

Philips M3535A, M3536A User Manual
English
HeartStart MRx
M3535A/M3536A
Instructions For Use


Notice
About This Edition
Publication number: 989803160421
Edition 1 Printed in the USA
To determine the product level version to which these
Instructions for Use are applicable, refer to the version
level appearing on the back cover of this book or on the
label of the User Documentation CD-ROM that
accompanied this device. This information is subject to
change without notice.
Edition Print Date
1 April 2009
NOTE: To obtain Instructions for Use for previous
versions of the HeartStart MRx, visit the Philips
Documentation and Downloads web site at
http://www.philips.com/ProductDocs and search for
resuscitation.
Philips shall not be liable for errors contained herein or
for incidental or consequential damages in connection
with the furnishing, performance, or use of this material.
Copyright
Copyright © 2009 Koninklijke Philips Electronics N.V.
RelyOn and Virkon are registered trademarks or
trademarks of E.I. du Pont de Nemours and Company or
its affiliates. Other trademarks and trade names are those
of their respective owners.
Use of supplies or accessories other than those
recommended by Philips may compromise product
performance.
THIS PRODUCT IS NOT INTENDED FOR HOME
USE. U.S. FEDERAL LAW RESTRICTS THIS
DEVICE TO SALE ON OR BY THE ORDER OF A
PHYSICIAN.
Medical Device Directive
The HeartStart MRx complies with the requirements of
the Medical Device Directive 93/42/EEC and carries the
mark accordingly.
0123
Manufacturer
Philips Medical Systems
3000 Minuteman Road
Andover, MA 01810 USA
All rights are reserved. Permission is granted to copy and
distribute this document for your organization’s internal
educational use. Reproduction and/or distribution
outside your organization in whole or in part is
prohibited without the prior written consent of the
copyright holder.
SMART Biphasic is a registered trademark of Philips.
Rosetta-Lt
trademarks of General Devices. Microstream
FilterLine
™
, Rosetta-Rx™ and CAREpoint™ are
®
are registered trademarks of Oridion Medical
®
and
Ltd. Smart CapnoLine™ is a trademark of Oridion
Medical Ltd. Q-CPR
®
is a registered trademark of
Laerdal Medical AS. The HeartStart MRx contains an
Ezurio PC Card with Bluetooth
®
wireless technology.
The Bluetooth wordmark and logos are owned by the
Bluetooth SIG, Inc. and any use of such marks by Ezurio
is under license. Coverage Plus
®
NPD
are registered trademarks of Steris Corp.
CidexPlus
®
is a registered trademark of Advanced
Sterilization Products. Nellcor
of Nellcor Puritan Bennett, Inc. TransPac
registered trademark of ICU Medical, Inc. TruWave
®
and Coverage Plus
®
is a registered trademark
®
IV is a
®
is
a registered trademark of Edwards Lifescience Corp.
DTX Plus
™
is a trademark of Becton, Dickinson & Co.
Authorized EU-representative
Philips Medizin Systeme Böblingen GmbH
Hewlett Packard Str. 2
71034 Böblingen
Germany
Canada EMC:ICES-001
U.S. FCC and Industry Canada Radio Compliance:
Contains FCC ID: PQC-WMTS-MODULE
When using the IntelliVue networking option, operation
of this equipment requires the prior coordination with a
frequency coordinator designated by the FCC for the
Wireless Medical Telemetry Service. This device
complies with Part 15 of the FCC rules and RSS-210 of
Industry Canada. Operation is subject to the following
conditions:
• This device may not cause harmful interference.
• This device must accept any interference received,
including interference that may cause undesired
operation.
i

Notice
Any changes or modifications to this equipment not
expressly approved by Philips Medical Systems may cause
harmful radio frequency interference and void your
authority to operate this equipment.
China:
After Sales Service: Beijing MEHECO-PHILIPS Medical
Equipment Service Center.
After Sales Service Address: No. 208, 2nd District, Wang
Jing Li Ze Zhong Yuan, Chao Yang District, Beijing.
Postal code: 100102.
Telephone: 8008100038.
Registration number: SFDA(I)20083211481.
Product Standard number: YZB/USA 1863-2008.
For the Declaration of Conformity Statement, please see
the Philips Medical web site at http://
incenter.medical.philips.com/PMSPublic. Scroll over the
Quality and Regulatory Tab located in the upper left
corner of the window. Click to select Regulatory by
Modality. Then click to select Defibrillators and select
the entry for Declaration of Conformity (DoC)
Warning
Radio frequency (RF) interference coming from devices
other than the HeartStart MRx may degrade the performance of the MRx. Electromagnetic compatibility with
surrounding devices should be assessed prior to using the
monitor/defibrillator.
.
ii

These Instructions for Use contain the following conventions:
WARNING Warning statements describe conditions or actions that can result in personal injury or loss of life.
CAUTION Caution statements describe conditions or actions that can result in damage to the equipment or loss of
data.
NOTE Notes contain additional information on usage.
"Voice" represents voice prompt messages
Text represents messages that appear on the display
[Soft key] represents soft key labels that appear on the display above the
button to which they correspond.
Images of the HeartStart MRx display and menus appearing in this document are for illustration
purposes only. Menu choices on your device are driven by the options you have purchased and
selections you make in Configuration Mode.
iii


1Table of Contents
1 Introduction 1
Overview 1
Intended Use 2
Indications for Use 3
AED Therapy 3
Manual Defibrillation 3
Noninvasive External Pacing Therapy 3
Pulse Oximetry 3
Noninvasive Blood Pressure Monitoring 3
End-tidal CO
12-Lead ECG 3
Q-CPR 4
Invasive Pressures 4
Te m p e r a t u r e 4
ACI-TIPI 4
TPI 4
Safety Considerations 5
Documentation and Training 5
2
3
2 Getting Acquainted 7
Basic Orientation 8
Front Panel 8
Side Panels 9
Top Pan el 10
Back Panel 11
M3538A Lithium Ion Battery 12
Battery Capacity 12
Battery Life 12
Operating Modes 12
Password Security 13
Display Views 13
General Status 14
Wave Sec to rs 15
Parameter Blocks 16
Turning Parameters On/Off 16
Soft Key Labels 16
Menus 17
Message Windows 18
High Contrast Display 18
v

Controls 19
Therapy Knob 19
General Function Buttons 20
Defibrillation Controls 21
Soft Keys 21
Indicators 22
Audio Recording 23
Reviewing Recorded Audio 23
Alarms 24
Responding to Alarms 24
Printing on Alarms 26
Identifying Your Device 26
Entering Patient Information 27
Continued Use 27
Printing Waveforms 28
Return to Owner 29
3 Setting Up 31
Attaching the Carrying Case and Accessory Pouches 31
Storing Accessories 33
Connecting the ECG Cable 35
Connecting the SpO2 Cable 36
Connecting the NBP Interconnect Tubing 37
Connecting the Invasive Pressures Cable 38
Connecting the Temperature Cable 39
Connecting the CO2 FilterLine 40
Connecting the Therapy or Pads/CPR cables 41
Installing Paper 42
50 mm paper 42
75mm Printer (optional) 43
Installing Batteries 44
Charging Batteries 44
Battery Safety 44
Installing the AC Power Module 45
Installing the Data Card 46
46
4 ECG and Arrhythmia Monitoring 47
Overview 47
Monitoring View 48
Preparing to Monitor ECG 49
Electrode Placement 51
Lead Selection 53
Lead Choices 53
Selecting the Lead 54
Arrhythmia Monitoring 54
vi

Aberrantly-Conducted Beats 55
Intermittent Bundle Branch Block 55
Heart Rate and Arrhythmia Alarms 56
Arrhythmia Alarm Latching 56
INOP Messages 58
Setting Alarms 59
Changing Heart Rate or VTACH Alarm Limits 59
Enabling/Disabling Heart Rate and Arrhythmia Alarms 59
Responding to HR and Arrhythmia Alarms 59
Displaying an Annotated ECG 60
Arrhythmia Learning/Relearning 61
Troubleshooting 61
5 AED Mode 63
Precautions for AED Therapy 63
AED View 64
Preparation 65
Using AED Mode 66
Step 1 - Turn the Therapy Knob to AED 67
Step 2 - Follow Screen and Voice Prompts 67
Step 3 - Press Shock Button, if Prompted 69
Using Q-CPR in AED Mode 69
Troubleshooting 69
6 Manual Defibrillation and Cardioversion 71
Overview 71
Precautions for Manual Defibrillation Therapy 72
Synchronized Cardioversion Therapy 72
Code View 73
Preparing for Defibrillation 74
Using Multifunction Electrode Pads 74
Using External Paddles 75
Using Pediatric Paddles 76
Using Internal Paddles 76
Defibrillating (asynchronously) 77
Performing Synchronized Cardioversion 79
Preparing for Synchronized Cardioversion 79
Delivering a Synchronized Shock 80
Delivering Additional Synchronized Shocks 81
Disabling the Sync Function 81
Using Q-CPR in Manual Mode 81
Troubleshooting 81
7 Noninvasive Pacing 83
Overview 83
Alarms 84
vii

Pacing View 85
Demand Mode Versus Fixed Mode 86
Preparing for Pacing 87
Demand Mode Pacing 88
Fixed Mode Pacing 89
Defibrillating During Pacing 91
Troubleshooting 91
8 Pulse Oximetry 93
Overview 93
Understanding Pulse Oximetry 94
Selecting a Sensor 95
Applying the Sensor 96
Monitoring SpO
Pleth Wave 98
2
SpO2 Alarms 99
Changing the SpO2 Alarm Limits 99
SpO2 Desat Alarm 100
Enabling/Disabling the SpO2 Alarms 100
Pulse Rate Alarms 100
Enabling/Disabling the Pulse Rate Alarms 101
Changing the Pulse Rate Alarm Limits 101
Disabling the SpO2 Monitoring Function 101
Caring for Sensors 102
Troubleshooting 102
97
9 Noninvasive Blood Pressure 103
Overview 103
Preparing to Measure NBP 104
Measuring NBP 106
Changing the NBP Schedule 106
Alarms 107
Changing NBP Alarms 107
Enabling/Disabling NBP Alarms 108
Troubleshooting 108
10 Monitoring Carbon Dioxide 109
Overview 109
Preparing to Measure EtCO
Selecting the Accessories 110
2
Setting Up Microstream EtCO2 Measurements 111
Using the Nasal FilterLine 111
Using the FilterLine and Airway Adapter 111
Measuring EtCO
2
EtCO2 and AwRR Alarms 112
Changing the EtCO2 Alarm Limits 113
110
112
viii

Enabling/Disabling the EtCO2 Alarms 113
Changing the AwRR Alarm Limits 113
Changing the Apnea Time Alarm Limit 114
Enabling/Disabling AwRR Alarms 114
Disabling the EtCO2 Monitoring Function 114
Troubleshooting 114
11 Invasive Pressures 115
Overview 115
Setting up for a Pressure Measurement 115
Selecting a Pressure to Monitor 117
Pressure Waves 118
Zeroing the Pressure Transducer 119
Zeroing Using the Menu Select Button 119
Zeroing Using a Soft Key in Monitor Mode 119
Calibration 121
Known Calibration Factor 121
Calibrating Reusable Transducer CPJ840J6 122
Calibration Confirmation 123
Last Zero/Calibration 124
Non-Physiological Artifact Suppression 124
Alarms 125
Enabling/Disabling alarms 126
Viewing/Changing/Setting Source for Alarms 126
CPP Alarms 127
Wedge 127
Pulse 128
Pulse Sources 128
Changing Pulse Source 129
Setting Pulse Alarms 129
Enabling/Disabling Pulse Alarms 129
Pulse Alarm Limits 130
Changing Default Pulse Source and Alarm Limits 130
Caring For Your Transducers and Probes 130
Troubleshooting 130
12 Temperature 131
Overview 131
Selecting a Temperature Label 131
Monitoring Temperature 132
Alarms 132
Setting Temperature Alarms 132
Changing Temperature Alarm Limits 133
Enabling/Disabling Temperature Alarms 133
Changing Degree Units 133
Disabling the Temperature Function 134
ix

Caring For Your Temperature Cables and Probes 134
Troubleshooting 134
13 12-Lead ECG 135
Overview 135
Preparation 136
Preview Screen 137
Acquiring a 12-Lead ECG 138
Acquiring a 12-lead ECG with ACI-TIPI and/or TPI Analysis 139
Critical Values 143
Culprit Artery 145
12-Lead Report 146
Accessing Stored Reports 148
Improving Signal Quality 149
Adjusting Wave Size 149
12-Lead Filters 150
Troubleshooting 150
14 Vital Signs Trending 151
Overview 151
Reviewing Trending Data 151
About The Data Displayed 152
Vital Signs Trending Report Parameter List Order 153
Scrolling in the Vital Signs Trending Report 153
Vital Signs Trending Report Intervals 153
Adjusting Vital Signs Trending Report Interval 153
Printing the Vital Signs Trending Report 154
Exiting Vital Signs Trending Report 155
Troubleshooting 155
15 Q-CPR and Data Capture 157
Overview 157
Preparing to Use Q-CPR 159
Connecting the Pads/CPR Cable 159
Connecting the CPR Meter to the Pads/CPR Cable 160
Applying Multifunction Electrode Pads 160
CPR Meter 161
Attaching the CPR Meter Adhesive Pad 162
Placing the CPR Meter on the Patient 163
Starting CPR with the CPR Meter 164
CPR Meter Display 165
Q-CPR Feedback on the HeartStart MRx 167
Advanced View 167
Basic View 170
Using Q-CPR in Manual Defib Mode 171
Using Q-CPR in AED Mode 171
x

Feedback Prompts 172
Adjusting CPR Feedback Volume 173
After Each Use 174
Q-CPR Data Capture 174
Q-CPR Feedback Setting 174
Data and Events Recorded 175
Research Storage Setting 175
Reviewing Q-CPR Data 175
Troubleshooting 175
16 Networking 177
IntelliVue Networking Display 178
Connecting to the Network 179
Physical Connections 179
Wired Connection 180
Wireless Connection 180
Combined Connection 181
Configuring to Work on the Network 181
Using the Device Location Option 182
Network Settings 183
Admit, Discharge, Transfer of Patients 184
Admit 184
Discharge 185
Transfer 187
Transfer Mode 188
Sharing Information on the Network 190
Patient Information 190
Conflict Handling 192
Viewing Patient Incident Data 193
Alarms 193
Printing 193
Tu rn in g a Ne t wo rk e d D ev ic e Of f 193
Leaving a Clinical Mode 194
Events Logged 195
INOPs, Alarms and Messages at the Information Center 195
Troubleshooting 197
17 Configuration 199
Overview 199
Accessing the Configuration Menu 199
Setting the Date and Time 200
Modifying Settings 200
Saving Configuration Settings to a Data Card 201
Loading Configuration Settings from a Data Card 201
Restoring the Default Settings 201
Printing Configuration Settings 201
xi

Configurable Parameters 202
18 Working with Data 225
Overview 225
Initiating an Event Summary 226
Entering Data Management Mode 226
Copying from Internal Memory 227
Viewing and Erasing the External Data Card 228
Printing During a Patient Event 229
Event Summaries 229
Vital Signs Trending Reports 229
12-Lead ECG Reports 229
Printing Individual Events 230
Printing from Data Management Mode 231
Events Stored in Event Summary 232
Marking Events 237
19 Data Transmission 239
Overview 239
Transmitting During a Critical Care Event 240
Preparing for Transmission 241
Modifying Reference IDs 241
Setting up Bluetooth Transmissions 242
Setting up Rosetta Transmissions 245
Connecting Rosetta-Lt 246
Setting Up for RS-232 Transmissions 247
Transmitting in 12-Lead Mode 248
Transmitting to a Manually Entered Fax Number 249
Transmitting to a Personal Computer 249
Periodic Clinical Data Transmission 250
Transmitting Clinical Values 250
PCDT Contents 250
Starting a Periodic Clinical Data Transmission 252
Ending a Periodic Clinical Values Transmission 253
Transmitting Event Summaries Post Event 254
Transmitting in Data Management Mode 255
Tracking Data Transmission 257
Transmission Errors 257
Cancelling a Transmission 257
Queuing Transmissions 258
Finding Transmission Results 258
Batch LAN Data Transfer 259
Setting Up for Batch LAN Data Transfer 259
Transferring Files with BLDT 260
Troubleshooting 261
xii

20 Maintenance 263
Overview 263
Automated Tests 264
Automated Test Summary 265
Ready For Use Indicator 266
Shift Checklist 267
Weekly Sh ock Tes t 267
HeartStart MRx Shift Checklist 268
Operational Check 270
Performing the Operational Check 271
Operational Check Report 277
Operational Check Summary 282
Battery Maintenance 283
Battery Life 283
Charging Batteries 284
Battery Calibration 284
Storing Batteries 286
Discarding Batteries 286
Cleaning Instructions 287
Monitor/Defibrillator 287
Printer Printhead 287
Paddles, Therapy Cable 288
ECG Cable 288
Carrying Case 289
NBP Cuff 289
SpO2 Sensor and Cable 289
Invasive Pressures Transducer and Cable 289
Temperature Probe and Cable 289
CPR meter 289
HeartStart MRx Disposal 290
Empty Calibration Gas Cylinders Disposal 290
CPR Meter and Adhesive Pads Disposal 290
21 Supplies & Accessories 291
Overview 291
22 Troubleshooting 297
Symptoms 298
Audio Tones and Alarm Indications 318
Calling for Service 319
23 Specifications and Safety 321
Specifications 321
General 321
Defibrillator 321
xiii

ECG and Arrhythmia Monitoring 324
Display 326
Battery 326
Thermal Array Printer 327
Noninvasive Pacing 327
SpO2 Pulse Oximetry 328
NBP 329
Invasive Pressures 330
Te m pe r at u r e 331
EtCO2 331
AwRR 332
Calibration Gas for CO2 Measurement System 332
CPR Meter 333
Patient Adhesive Pads 333
12-Lead ECG 333
Networking 333
Patient Data Storage 334
Environmental (M3535A) 334
Environmental (M3536A) 335
Bluetooth 336
Symbol Definitions 337
Units and Abbreviations 340
Clinical Performance Summary - Defibrillation 341
Methods 341
Results 341
Conclusion 341
Clinical Performance Summary - Cardioversion 342
Methods 342
Results 342
Conclusion 343
Clinical Performance Summary - Internal Defibrillation 344
Overview 344
Methods 344
Results 344
Conclusion 344
Safety Considerations 345
General 345
Defibrillation 348
Battery 349
Supplies and Accessories 350
Electromagnetic Compatibility 350
Reducing Electromagnetic Interference 350
Restrictions for Use 351
Emissions and Immunity 351
Guidance and Manufacturer’s Declaration 351
xiv

Index 359
xv


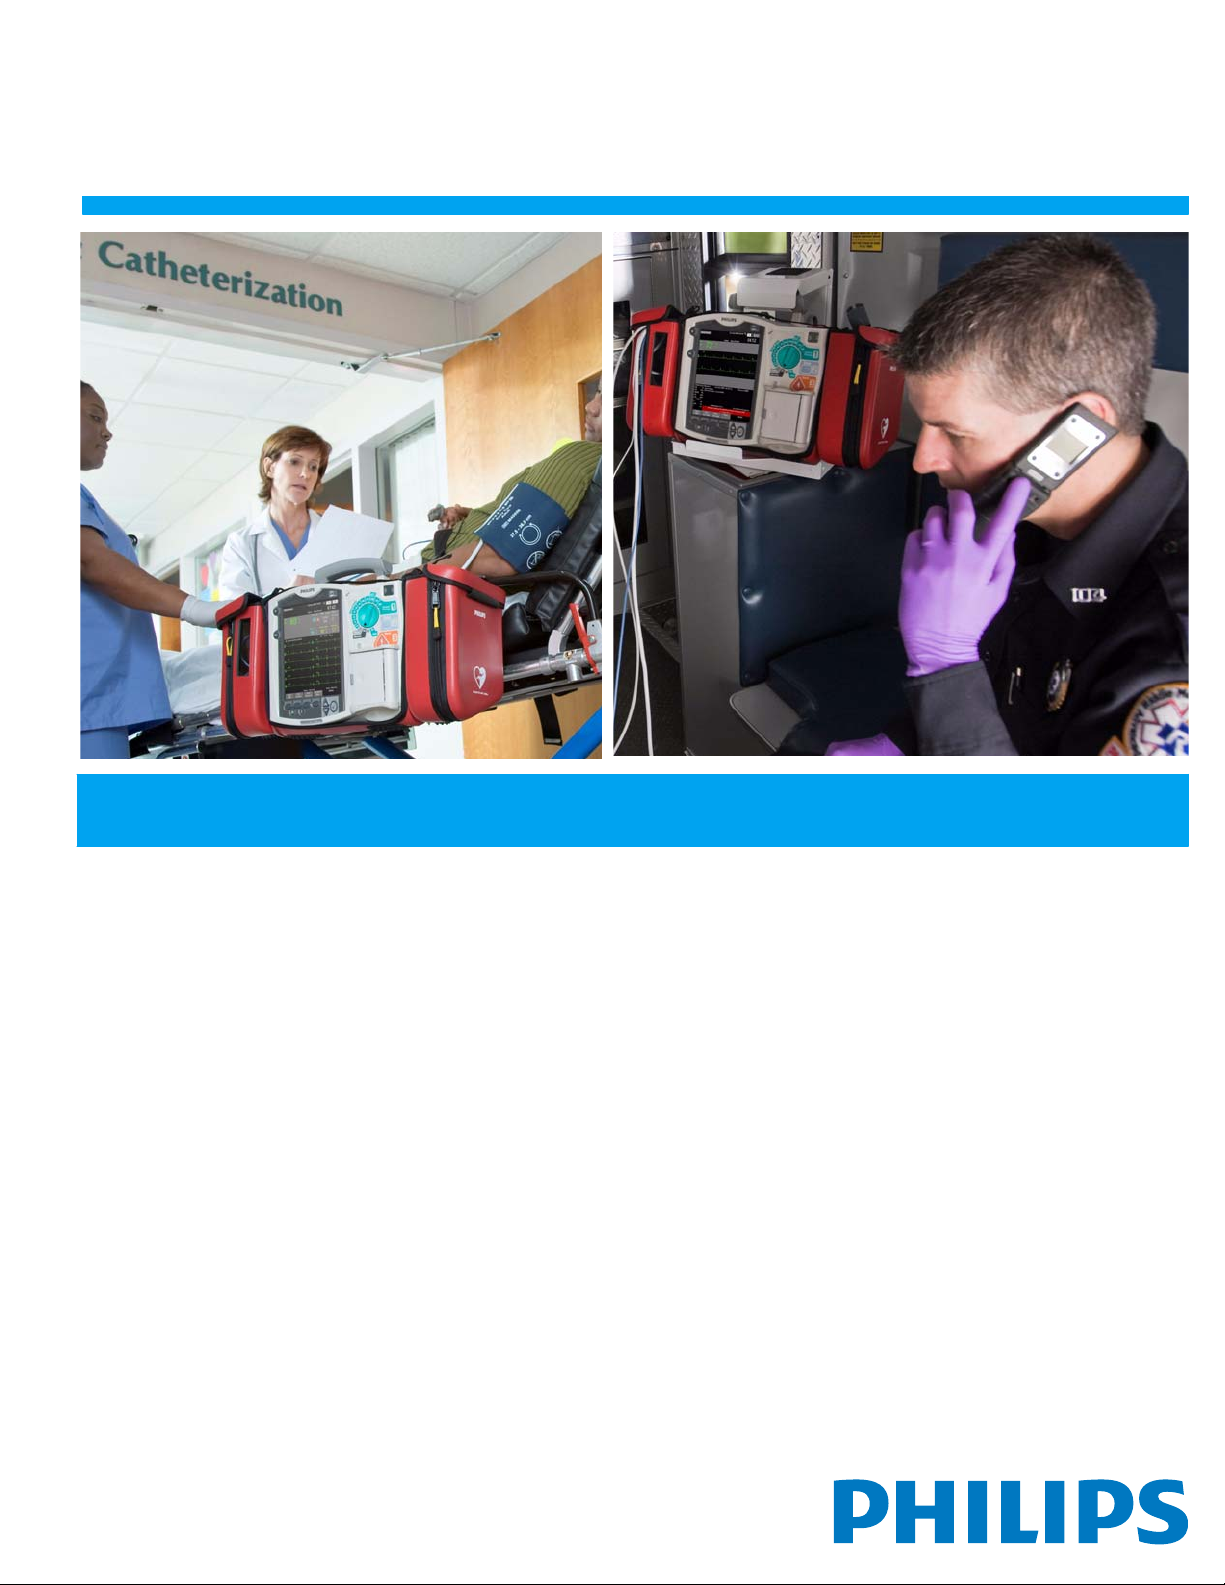
Thank you for choosing the HeartStart MRx monitor/defibrillator. Philips Healthcare welcomes you
to its family of resuscitation devices.
The HeartStart MRx is designed to meet your monitoring and resuscitation needs by providing
advanced, multi-parameter monitoring functions, a full range of defibrillation therapies, industryleading algorithms and a suite of data transmission options. This guide provides instructions for the
safe and proper operation of the device, as well as set-up, configuration, and maintenance information.
Be sure to familiarize yourself with the features and operation of your HeartStart MRx prior to its use.
Overview
The HeartStart MRx is a lightweight, portable, monitor/defibrillator. It provides four modes of
operation: Monitor, Manual Defib, AED, and Pacer (optional).
1
1Introduction
In Monitor Mode you can monitor up to four ECG waveforms, acquired through a 3-, 5-, or 10-lead
ECG set. Optional monitoring of pulse oximetry (SpO
dioxide (EtCO
parameters are presented on the display. Alarms are available to alert you to changes in the patient’s
condition. You can also display a Vital Signs Trending Report to view all key parameters and their
measurements at a glance.
Monitor Mode also provides an optional 12-Lead ECG function, enabling you to preview, acquire,
store, and print 12-lead ECG reports, with or without analysis/interpretation. In addition, there are
several STEMI decision support tools, including STEMI Culprit Artery, Critical Values and the Acute
Cardiac Ischemia Time-Insensitive Predictive Instrument (ACI-TIPI) and Thrombolytic Predictive
Instrument (TPI) algorithms. You can also transmit 12-Lead reports and Event Summaries via the 12Lead ECG Transmission and Event Summary Data Transfer options. Other transmission options are
available. See “Data Transmission” on page 239.
Manual Defib Mode offers simple, 3-step defibrillation. You analyze the patient’s ECG and, if
appropriate: 1) select an energy setting, 2) charge, and 3) deliver the shock. Defibrillation may be
performed using paddles or multifunction electrode pads. Manual Defib Mode also allows you to
perform synchronized cardioversion and internal defibrillation. If desired, use of Manual Defib Mode
may be password protected.
In AED Mode, the HeartStart MRx analyzes the patient’s ECG and determines whether a shock is
advised. Voice prompts guide you through the 3-step defibrillation process, providing easy-to-follow
instructions and patient information. Voice prompts are reinforced by messages on the display.
), temperature, and invasive pressures are also available. Measurements from these
2
), noninvasive blood pressure (NBP), carbon
2
1

1 Introduction Intended Use
The Manual Defib and AED modes incorporate Philips’ low energy SMART Biphasic waveform for
defibrillation. Both modes also offer the Q-CPR
corrective feedback on the rate, depth/complete release of compressions (and lack of CPR activity) and
ventilation rate. The HeartStart MRx displays a CPR Timer and compression counter to assist with
protocol management.
The HeartStart MRx also has an optional Audio function which allows you to record audio during a
patient event.
Optional Pacer Mode offers noninvasive transcutaneous pacing therapy. Pace pulses are delivered
through multifunction electrode pads, using a monophasic waveform. If desired, use of Pacer Mode
may be password protected.
The HeartStart MRx is powered by rechargeable lithium ion batteries. Available battery power is easily
determined by viewing the convenient battery power indicators located on the device display or by
checking the gauge on the battery itself. Additionally, an external AC or DC Power Module may be
applied as a secondary power source and for continual battery charging.
The HeartStart MRx performs Automated Tests on a regular basis. The results of these tests are
reported to the Ready For Use (RFU) indicator. The prominently displayed RFU indicator
communicates the status of your device, letting you know it is operating correctly, needs attention, or is
unable to deliver therapy. In addition, performing the specified Operational Check ensures that the
HeartStart MRx is functioning properly.
The HeartStart MRx automatically stores critical event data, such as Event Summaries, 12-Lead
Reports and Vital Signs Trending, in its internal memory. The HeartStart MRx also enables you to
store data and event information on an optional data card for downloading to Philips’ data
management solution, HeartStart Event Review Pro, or you can send the data electronically via several
methods to your destination point.
®
option. Q-CPR offers real-time measurement and
The HeartStart MRx is highly configurable to better meet the needs of diverse users. Be sure to
familiarize yourself with your device’s configuration before using the HeartStart MRx. See Chapter 17
“Configuration” for more details.
Intended Use
The HeartStart MRx is intended for use in hospital and pre-hospital settings by qualified medical
personnel trained in the operation of the device and qualified by training in basic life support,
advanced cardiac life support or defibrillation.
When operating as a semi-automatic external defibrillator in AED Mode, the HeartStart MRx is
suitable for use by medical personnel trained in basic life support that includes the use of an AED.
When operating in Monitor, Manual Defib or Pacer Mode, the HeartStart MRx is suitable for use by
healthcare professionals trained in advanced cardiac life support.
The SMART Biphasic waveform utilized in the HeartStart MRx has previously undergone clinical
testing in adults. These trials support the waveform’s effectiveness for defibrillation of ventricular
tachyarrhythmias at 150J.
2

Indications for Use 1 Introduction
Indications for Use
The HeartStart MRx is for use for the termination of ventricular tachycardia and ventricular
fibrillation.
The device is for use by qualified medical personnel trained in the operation of the device and qualified
by training in basic life support, advanced cardiac support, or defibrillation. It must be used by or on
the order of a physician.
AED Therapy
To be used in the presence of a suspected cardiac arrest on patients of at least 8 years of age that are
unresponsive, not breathing and pulseless.
Manual Defibrillation
Asynchronous defibrillation is the initial treatment for ventricular fibrillation and ventricular
tachycardia in patients that are pulseless and unresponsive. Synchronous defibrillation is indicated for
termination of atrial fibrillation.
Noninvasive External Pacing Therapy
The pacing option is intended for treating patients with symptomatic bradycardia. It can also be
helpful in patients with asystole, if performed early.
Pulse Oximetry
The SpO2 option is intended for use when it is beneficial to assess a patient’s oxygen saturation level.
Noninvasive Blood Pressure Monitoring
The NBP option is intended for noninvasive measurement of a patient’s arterial blood pressure.
End-tidal CO
2
The EtCO2 option is intended for noninvasive monitoring of a patient’s exhaled carbon dioxide and to
provide a respiration rate.
12-Lead ECG
The 12-Lead ECG function is to provide a conventional diagnostic 12-Lead ECG report, which may
include measurements and interpretative statements.
3

1 Introduction Indications for Use
Q-CPR
The Q-CPR option provides feedback designed to encourage rescuers to perform resuscitation in
accordance with AHA/ERC guidelines for chest compression rate, depth, and duty cycle and
ventilation rate, volume and flow rate (inflation time).
The Q-CPR option is contraindicated as follows:
• The Q-CPR option is contraindicated for use on neonatal and pediatric patients (under 8 years of
age or weighing less that 25 kg).
• The Q-CPR option is not for use when CPR is contraindicated.
Invasive Pressures
The Invasive Pressures option is indicated for measuring arterial, venous, intracranial and other
physiological pressures on patients.
Temperature
The Temperature option is indicated for measuring temperature in patients.
ACI-TIPI
This device is intended to be an aid to clinicians by focusing their attention on indicators of Acute
Cardiac Ischemia.
TPI
Indications for Use: Physiological purpose: To aid the clinician deciding whether to administer
thrombolytic therapy or to provide another avenue of treatment; Condition: Patient is a potential
candidate for thrombolytic therapy; Patient Population: adult (35 to 75 years) patients diagnosed as
having symptoms of Acute Myocardial Infarction; Body or type of tissue interacted with: No body or
tissue contact. Prescription versus over-the-counter: TPI is a prescription device.
Contraindications: NOTE: The Thrombolytic Predictive Instrument (TPI) is contraindicated for
patients with conditions which mimic acute myocardial infarction. Some of these conditions are:
Prinzmetal variant angina, acute pericarditis, acute myocarditis, cardiomyopathy, and primary and
secondary cardiac neoplasms.
The Thrombolytic Predictive Instrument (TPI) is also contraindicated for patients with conditions
whom the administration of thrombolytics is contraindicated. Some of these conditions are: aortic
dissection, acute myocardial infarction due to bacterial endocarditis, vasculitis, intracardiac thrombi,
and acute nonsuppurative and suppurative pericarditis mimicking acute myocardial infarction.
These situations, as well as Posterior Acute Myocardial Infarction, were not considered or covered in
the development of the predictive instrument calculations.
NOTE See note on page 140 for additional details on contraindications for TPI therapy.
4

Safety Considerations 1 Introduction
Safety Considerations
General warnings and cautions that apply to use of the HeartStart MRx are provided in “Specifications
and Safety” on page 321. Additional warnings and cautions specific to a particular feature are provided
in the appropriate section of this guide.
WARNING Electric shock hazards exist internally. Do not attempt to open the device. Refer servicing to qualified
personnel.
WARNING Use only supplies and accessories approved for use with your HeartStart MRx. Use of non-approved
supplies and accessories could affect performance and results.
WARNING Use single-use supplies and accessories only once.
Documentation and Training
Available documentation and training for the HeartStart MRx includes:
• HeartStart MRx Instructions for Use
• HeartStart MRx Quick Reference Cards
• HeartStart MRx Battery Application Note
• HeartStart MRx Improving ECG Quality Application Note
• HeartStart MRx Web-based User Training (Located at:
www.medical.philips.com/goto/mrxtraining. Enter training access password: meetMRx.)
• HeartStart MRx User Training Videotape and DVD
• To purchase additional copies of the Instructions for Use or Quick Cards, visit the Philips
Healthcare eStore at: www.philips.com/healthcarestore.
• Other Application Notes can be found on the Philips website at: www.medical.philips.com/goto/
productdocumentation.
5


2Getting Acquainted
The HeartStart MRx is designed with your needs in mind. Controls, indicators, and menus are
carefully organized to facilitate easy use. Display information is tailored to the current task.
This chapter acquaints you with the HeartStart MRx operational modes, display views, controls, and
indicators. It also provides general information on device use.
NOTE If your HeartStart MRx does not have some of the optional functionality listed in this chapter,
disregard these controls and the related information described throughout this manual.
2
7
2 Getting Acquainted Basic Orientation
Basic Orientation
HeartStart MRx controls, indicators, and connections are carefully organized.
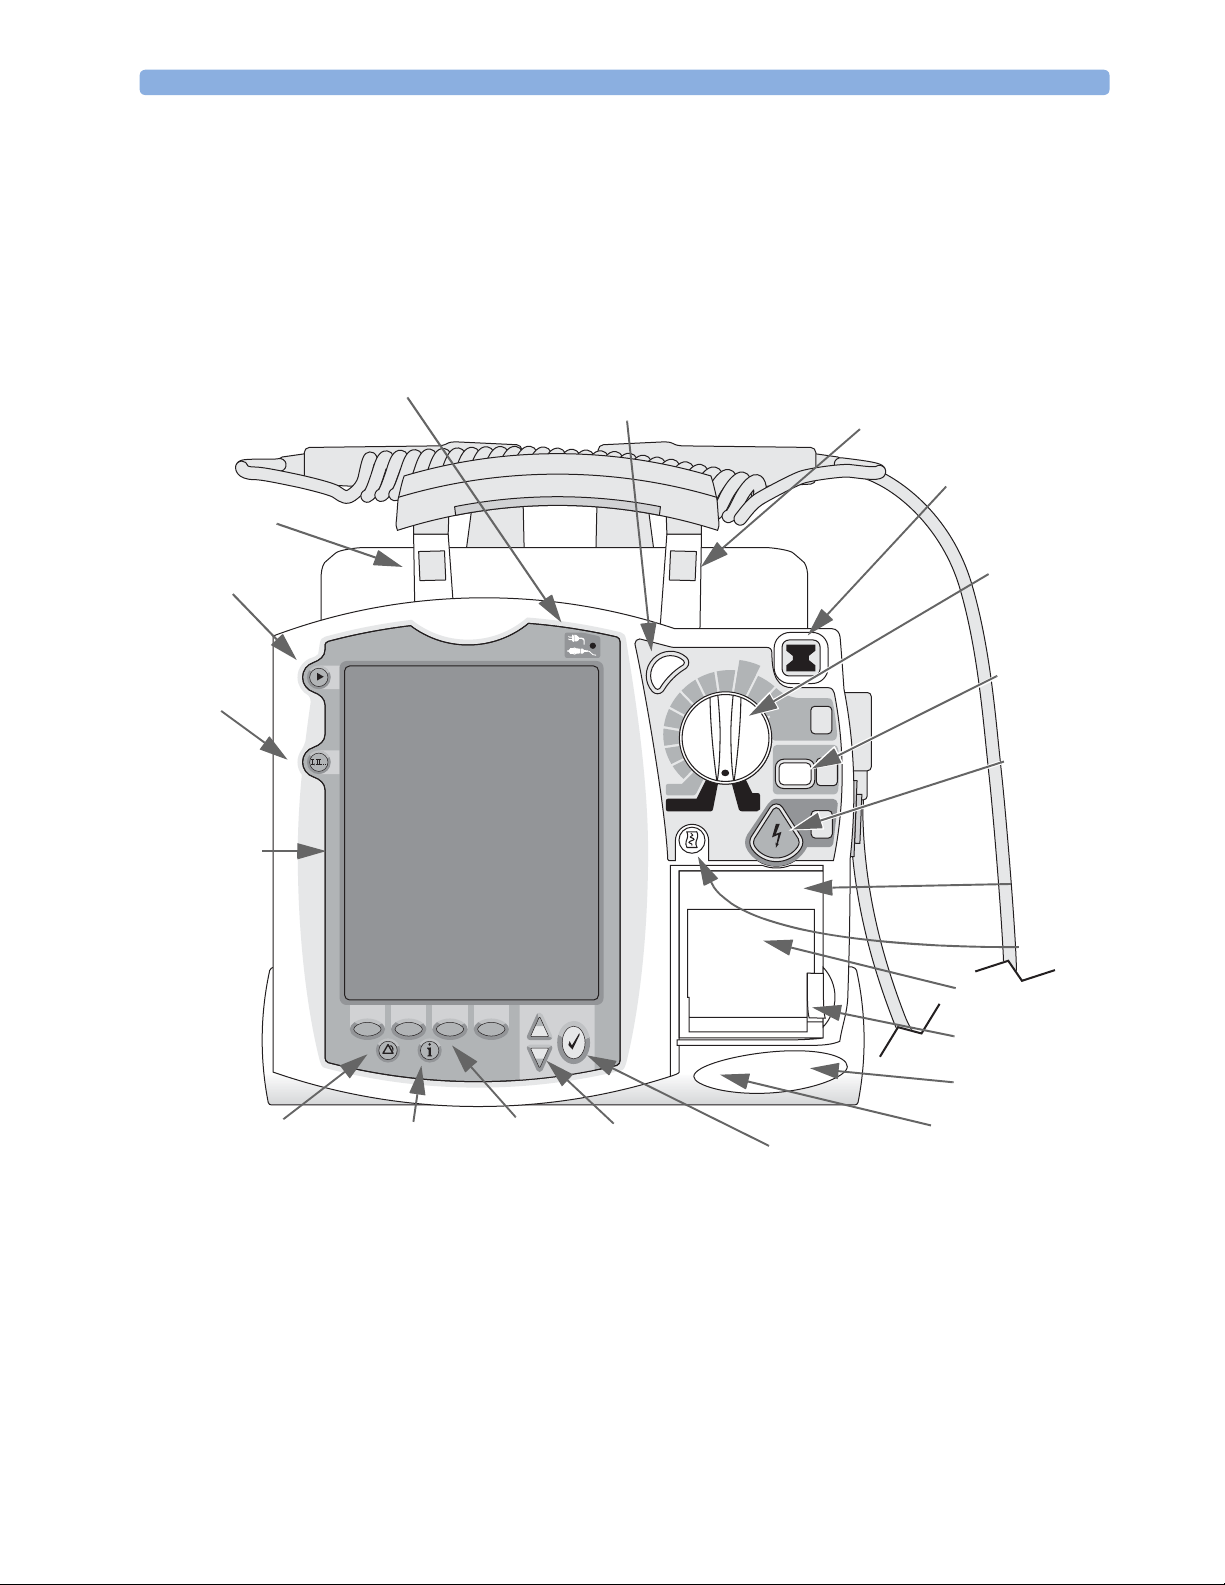
Front Panel
The front panel contains operational controls and indicators, as shown below.
Figure 1 Basic Orientation (Front)
Label Recess
Mark Event
button
Lead Select
button
Display
External Power Indicator
Synchronized
Cardioversion (Sync)
Sync
b
b
i
i
f
f
e
e
D
D
l
l
a
a
50
u
u
n
n
a
a
30
M
M
20
15
1-10
Pacer
Monitor
Adult
Dose
120
150
100
70
On
On
Off
AED
Location of Networking icon
(if device is network enabled)
Ready For Use
(RFU) Indicator
Therapy Knob
Charge
170
200
Select
Energy
1
Charge
2
Shock
button
Shock
button
3
Printer
(50 mm)
Print
Button
Printer Door
Printer Door
Latch
Speaker
Alarm Pause button
Summary
button
Soft keys
(4 total)
Navigation
buttons
Menu Select button
Microphone
Additional controls and indicators are on the paddles (if used) and batteries.
NOTE A palette of colored decals is included with your HeartStart MRx. These colored decals may be applied
to the label recesses located on the device handle to aid in identification. Use an indelible marker to
print identification information on the decal.
8
Basic Orientation 2 Getting Acquainted
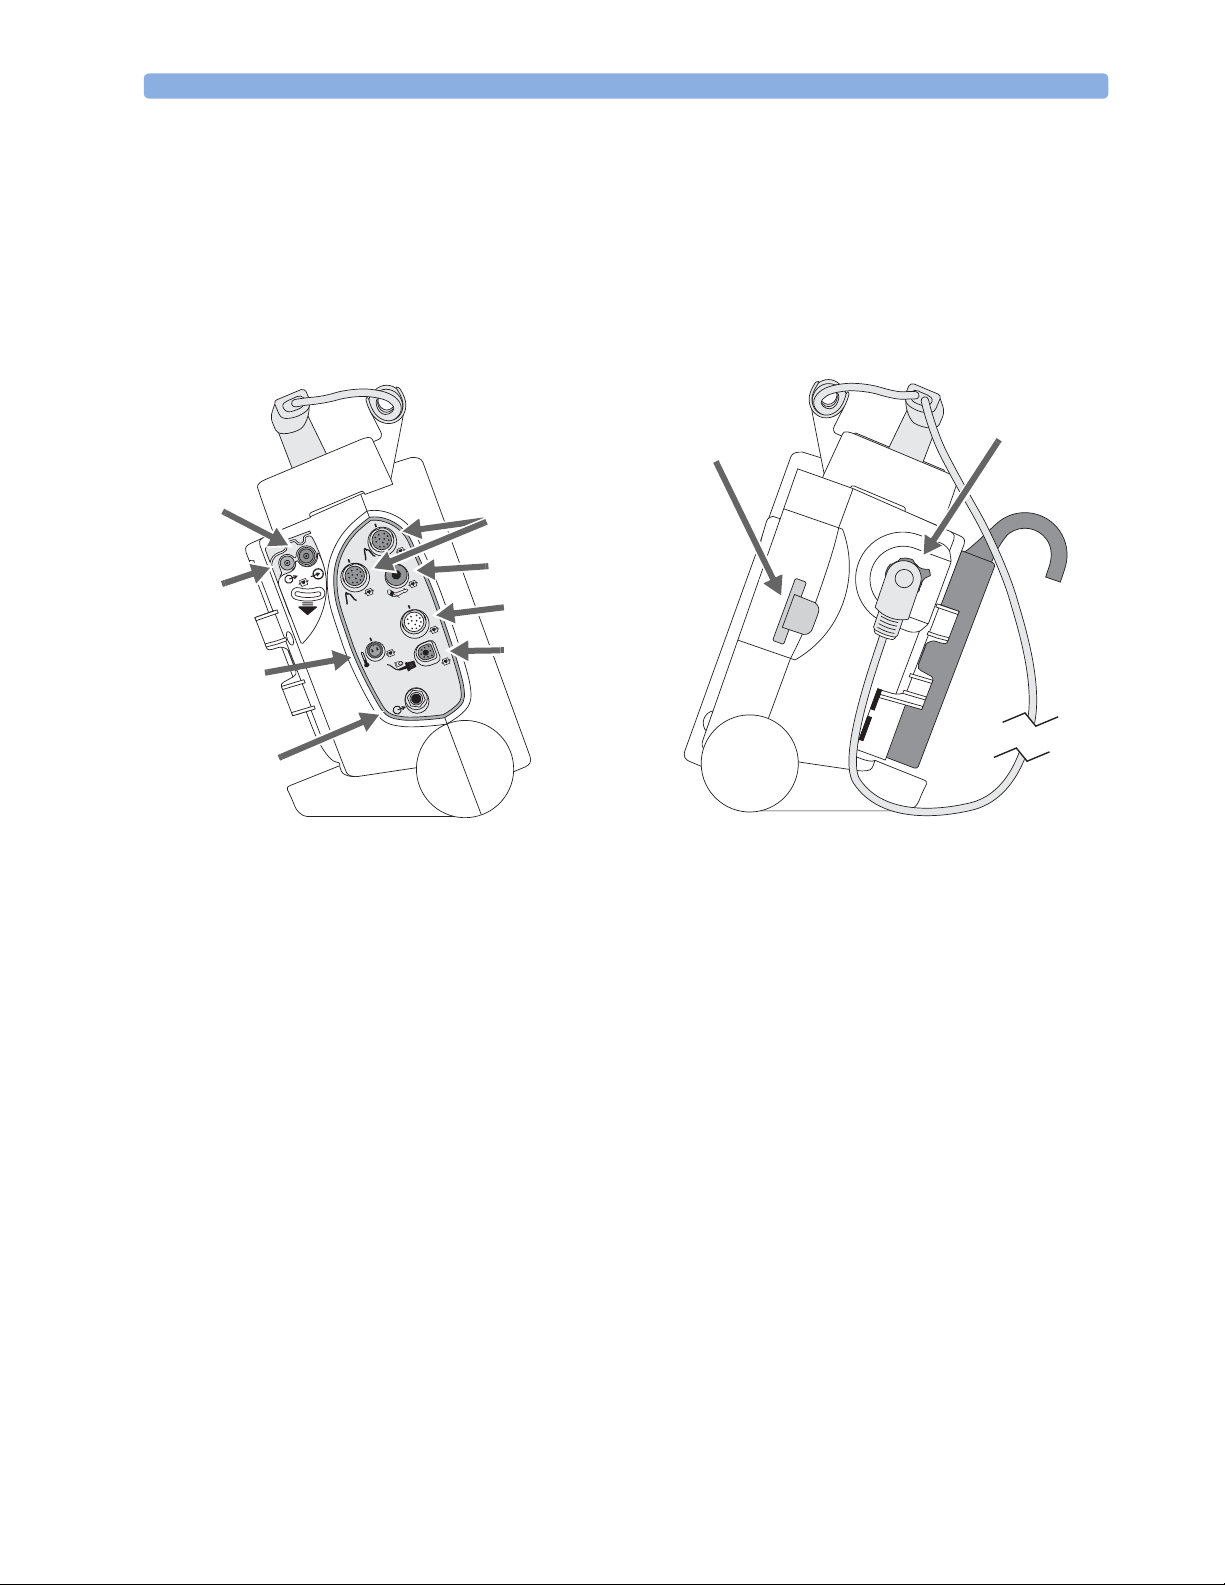
Side Panels
The left side of the HeartStart MRx has ports for monitoring cables, including ECG, pulse oximetry
), noninvasive blood pressure (NBP), invasive pressure (2), temperature and carbon dioxide
(SpO
2
(CO
). The ECG port may be used to connect a 3-, 5-, or 10-lead patient cable. The ECG Out jack
2
may be used to connect to an external monitor.
The right side of the HeartStart MRx has a therapy port for paddles (external or internal), or therapy
cable and multifunction electrode pads. It also has a slot for a data card to transfer patient information.
Figure 2 Basic Orientation (Right/Left Sides)
Therapy
Connector
Data Card slot
Inlet
CO
2
Port
CO
2
Outlet Port
Temperature
Port
2
CO
c
i
M
1
2
™
m
a
e
r
t
s
o
r
ECG
ECG
Invasive Pressure
ports
NBP Port
ECG Port
Port
SpO
2
ECG Out
(Sync) Jack
9
2 Getting Acquainted Basic Orientation
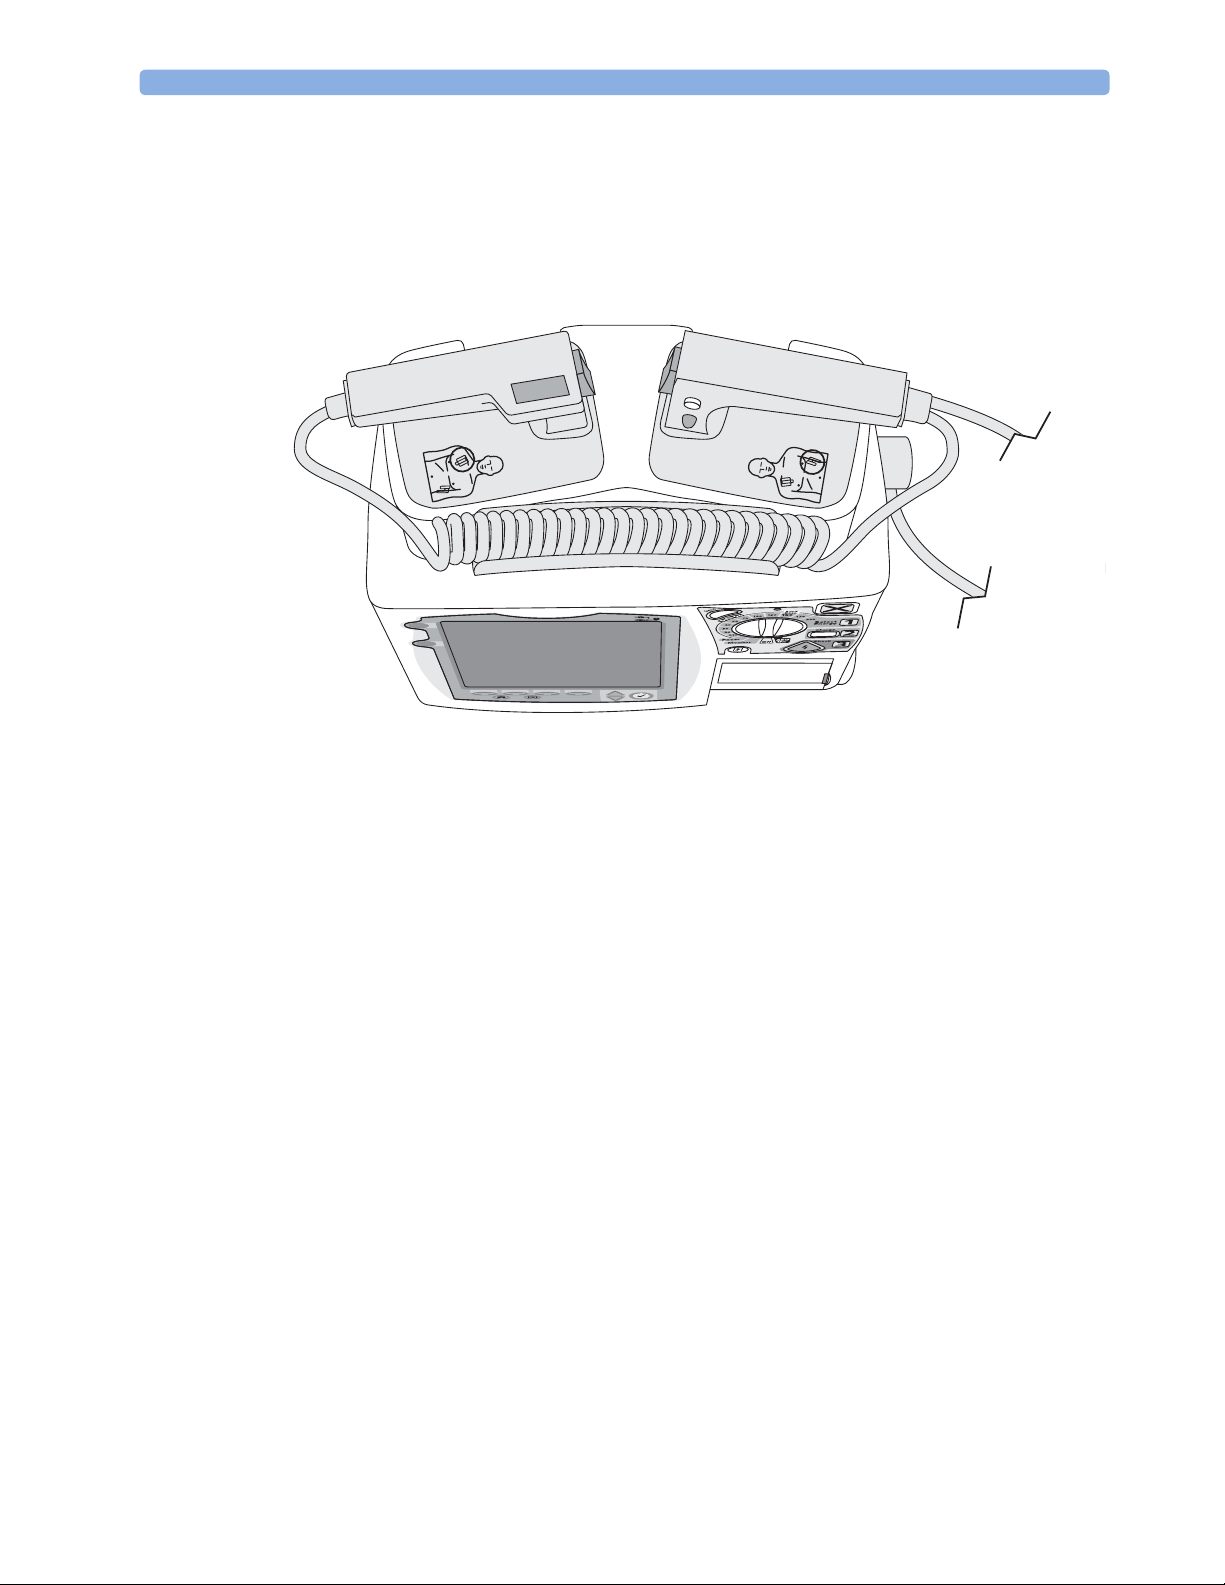
Top Panel
The top of the HeartStart MRx has a handle and basic operating instructions. If optional external
paddles are present, they reside on the top panel as shown.
Figure 3 Basic Orientation (Top - with Optional Paddles)
10
Basic Orientation 2 Getting Acquainted
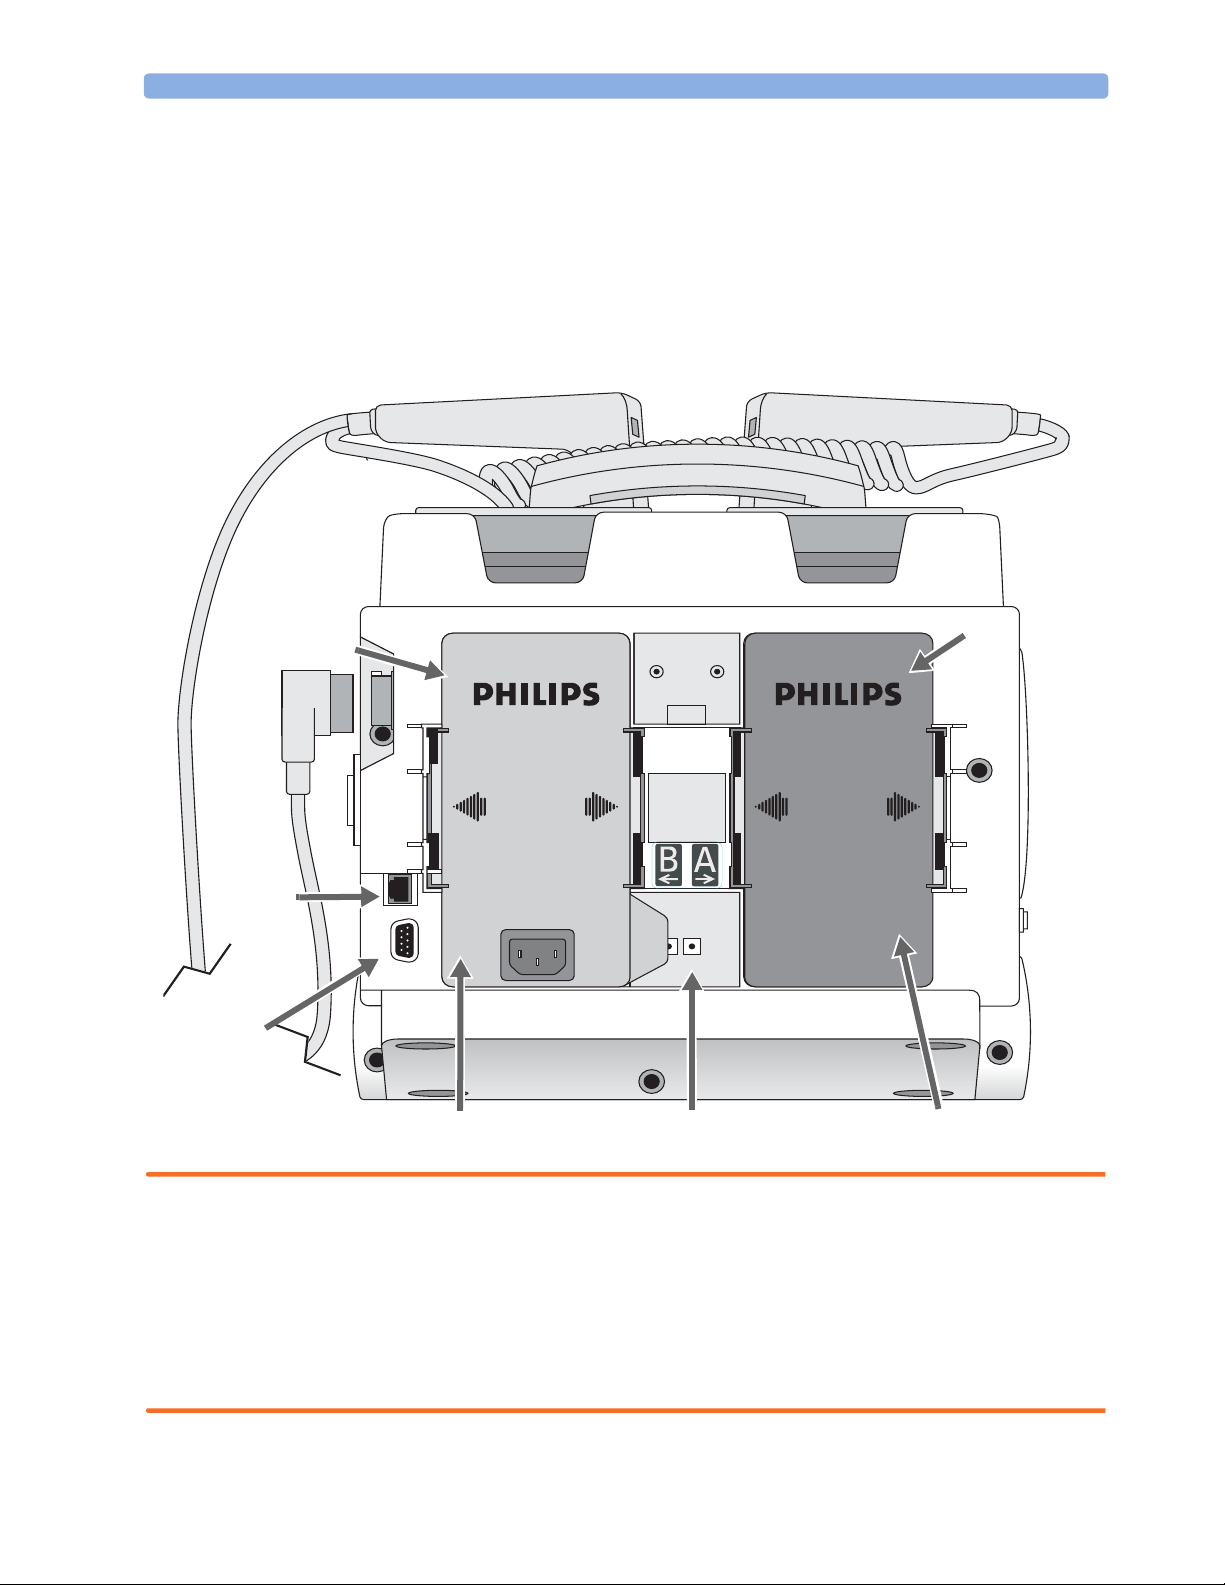
Back Panel
The back panel of the HeartStart MRx has two compartments for lithium ion batteries. Compartment
B may also be used to connect an AC power module. Between the battery compartments is a DC
Power Input port.
The back panel also has an RS-232 serial port for 12-lead ECG transmission or setting up a wireless
connection to the IntelliVue Network. The LAN port is for a wired connection to the IntelliVue
Network or for Batch LAN Data Transfer.
Figure 4 Basic Orientation (Back)
Battery
Battery/AC
Compartment B
Compartment A
LAN Port
RS-232
Serial Port
AC Power Module
WARNING The HeartStart MRx LAN port is intended for connection to the IntelliVue Clinical Network or for
DC Power Input
Battery
Batch LAN Data Transfer. It should only be used for connection to devices that comply with IEC
60950-1 and IEC 60601-1. During real-time patient monitoring, the HeartStart MRx wired LAN
connector should only be connected to the IntelliVue Network. For post-event Batch LAN Data
Transfer, the HeartStart MRx should only be connected to the facility network.
The RS-232 Serial Port is intended for connection to the IntelliVue wireless backpack. It is also for
connecting with the Rosetta-Lt and cellphones for data transmission. Improper system operation may
result if any other device is connected to this port.
11

2 Getting Acquainted M3538A Lithium Ion Battery
M3538A Lithium Ion Battery
The HeartStart MRx uses the M3538A Lithium Ion Battery. The battery has a fuel gauge with 5 LED
indicators, each representing a charge of at least 20% of capacity. Press the fuel gauge button to
illuminate the fuel gauge.
CAUTION A battery should be used as the primary power source. AC/DC should be used as a secondary source, if
desired. If an AC/DC power module is used as the only power source, the HeartStart MRx takes longer
to charge to the desired energy level and, in the event of power loss, all settings reset to the default
settings and a new incident is created when power is returned. All stored data remains intact and can be
found by retrieving the previous incident. Keep your unit charged.
Battery Capacity
A new, fully-charged M3538A battery, operating at room temperature 25oC (77oF), provides at least 5
hours of monitoring, with ECG, SpO
continuously, NBP measured every 15 minutes, and 20 200J discharges. A fully charged new battery
provides approximately 3.5 hours of monitoring, with ECG, SpO
pressures monitored continuously, NBP measured every 15 minutes, and pacing at 180ppm at 160mA.
, CO2, temperature, two invasive pressures monitored
2
, CO2, temperature, two invasive
2
Battery Life
Battery life depends on the frequency and duration of use. When properly cared for, the M3538A
Lithium Ion battery has a useful life of approximately 2 years. To optimize performance, a fully (or
nearly fully) discharged battery should be charged as soon as possible.
Operating Modes
The HeartStart MRx has four clinical modes of operation, each with a customized display view. The
modes are as follows:
Table 1 Operating Modes and Views
Mode of Operation Display View Description
Monitor Mode Monitoring View, or
12-Lead View
AED Mode AED View Used to analyze ECG and if necessary, perform semi-automatic external
Manual Defib Mode Code View Used to perform asynchronous and synchronous defibrillation
Pacer Mode Pacing View Used to perform demand or fixed mode pacing.
NOTE Upon returning to a clinical mode from a non-clinical mode such as Configuration or Data
Management, all settings reset to the default settings.
Used to monitor ECG, take an optional 12-lead ECG, and monitor
optional parameters such as SpO
Temperature and for viewing Vital Signs Trending data.
defibrillation. Q-CPR available.
(cardioversion). Q-CPR available.
, EtCO2, NBP, Invasive Pressures,
2
12
 Loading...