

Page 1

DVD VIDEO DIGITAL SURROUND SYSTEM
LX-
3500D
LX-
3000D
DVD HOME
DVD HOME
CINEMA
CINEMA
SYSTEM
SYSTEM
pg 01-26/LX3xxx/21-Eng 4/16/02, 11:20 AM1
1
Page 2

Important Note
4
3
México
Es necesario que lea cuidadosamente su instructivo de manejo.
PRECAUCIÓN - ADVERTENCIA
No abrir, riesgo de choque eléctrico
Verifique que el voltaje de alimentación
Para evitar el riesgo de choque eléctrico, no quite la tapa.
En caso de requerir servicio, dirijase al personal calificado.
Descripción: Sistema receptor/reproductor de DVD
Modelo : LX-3000D/21L, LX-3500D/21R
Alimentación: 110–127V~; 50 Hz
Consumo: 160 W
Importador: Philips Mexicana, S.A. de C.V.
Domicilio: Norte 45, # 669,
Col. Industrial Vallejo
Localidad y Tel: C.P. 02300 México D.F.,
Tel. 5728-4200
Exportador: Philips Electronics HK, Ltd.
País de Origen: China
Nº de Serie: ______________________________
ATENCIÓN
sea el requerido para su aparato
LEA CUIDADOSAMENTE ESTE INSTRUCTIVO
ANTES DE USAR SU APARATO.
Manufactured under license from Dolby Laboratories.
“Dolby” and the double-D symbol are trademarks of Dolby
Laboratories. Confidential Unpublished Works. ©19921997 Dolby Laboratories, Inc. All rights reserved.
Manufactured under license from Digital Theater Systems,
inc. US Pat. No. 5,451,942 and other worldwide patents
issued and pending. “DTS” and “DTS Digital Surround” are
trademarks of Digital Theater Systems, Inc. 1996 Digital
Theater Systems, Inc. All rights reserved.
This product incorporates copyright protection technology
that is protected by method claims of certain U.S. patents
and other intellectual property rights owned by Macrovision
Corporation and other rights owners. Use of this copyright
protection technology must be authorized by Macrovision
Corporation, and is intended for home and other limited
viewing uses only unless otherwise authorized by
Macrovision Corporation. Reverse engineering or
disassembly is prohibited.
CAUTION
Use of controls or adjustments or performance
of procedures other than herein may result in
hazardous radiation exposure or other unsafe
operation.
Laser
Type Semiconductor laser GaAIAs
Wave length 650nm
Output Power 7mW
Beam divergence 60 degree
The region code for this DVD player
(versions /21R and /21H) is 3.
The region code for this DVD player
(versions /21S, /21L and /30S) is 4.
2
IMPORTANT NOTE
pg 01-26/LX3xxx/21-Eng 4/16/02, 11:20 AM2
Page 3

Index
English -------------------------------------------------------- 8
Français ------------------------------------------------------ 27
Español ------------------------------------------------------ 46
----------------------------------------------- 65
English
Français
Español
pg 01-26/LX3xxx/21-Eng 4/16/02, 11:20 AM3
INDEX
3
Page 4

Australia - Philips product warranty for Australia only
Warranty conditions valid for Colour Television, Video
Cassette Recorders, CD Recordable, DVD Players, Audio
Systems, and Portable Audio.
The benefits given to the purchaser by this warranty are in
addition to all other rights and remedies which the
purchaser has in respect of the product under the Trade
Practices Act or other Commonwealth or State Law.
Philips Consumer Electronics warrants its products to the
purchaser as follows and subject to the stated conditions.
12 months free service
Conditions of warranty
1. All claims for warranty service should be made to your
nearest Philips Authorised Service Centre. Reasonable
evidence of date of purchase must be provided.
2. This warranty extends only to defects occurring under
normal use of the product when operated in accordance
with the instructions.
3. Home service within the normal service area of one of our
Authorised Service Centres will be provided for television
receivers with screen size 48cm and above. All other
products are to be brought or sent to your nearest
Authorised Service Centre.
4. This warranty does not cover:
a) Mileage or traveling time, pickup or delivery, cost of
insurance.
b) Service costs arising from failure to correctly adjust the
controls of the product or to observe the instructions,
or inspections that reveal that the product is in normal
working order.
c) Product failures caused by misuse, neglect, normal wear
and tear, accidental breakage, transit damage, inexpert
repairs or modification by unauthorised persons,
lightning strikes, vermin infestation or liquid spillage.
d) Cleaning of video or audio heads.
e) Inadequate receiving antenna.
f) Replacement of worn or used batteries, styli or other
consumables.
The conditions contained in this warranty replace and
override the provision of the World-Wide Guarantee for
products sold in Australia.
Philips Authorised Service Centres
To contact your nearest Philips Authorised Service Centre
call 1300-36-13-92 from anywhere in Australia.
Sydney
Canberra
Adelaide
Newcastle
Melbourne
Hobart
Per th
Brisbane
Wollongong
Service is provided through 350 accredited service dealers
throughout Australia. To find out about your nearest centre,
call 1300 36 13 92.
Please record the following information for your records
and keep in a safe place.
Model No:....................................................
Serial No:....................................................
Please retain your purchase receipt which is required to
claim service under warranty.
Philips Consumer Electronics Australia Limited
ACN 008 445 743, 3 Figtree Drive
Homebush NSW 2140
Version 4, 03/99, FPCP-030
4
pg 01-26/LX3xxx/21-Eng 4/16/02, 11:20 AM4
Page 5

New Zealand - Guarantee and Service for New Zealand
Thank-you for purchasing this quality Philips product.
Philips New Zealand Ltd guarantees this product against
defective components and faulty workmanship for a
period of 12 months. Any defect in materials or
workmanship occurring within 12 months from the date
of purchase subject to the following conditions will be
rectified free of charge by the retailer from whom this
product was purchased.
Conditions
1. The product must have been purchased in New Zealand.
As proof of purchase, retain the original sales docket
indicating the date of purchase.
2. The guarantee applies only to faults caused by defective
components, or faulty workmanship on the par t of the
manufacturer.
3. The guarantee does not cover failures caused by misuse,
neglect, normal wear and tear, accidental breakage, use on
the incorrect voltage, use contrary to operating
instructions, or unauthorised modification to the product
or repair by an unauthorised technician.
4. Reasonable evidence (in the form of a sales docket) must
be supplied to indicate that the product was purchased
no more than 12 months prior to the date of your claim.
5. In the event of a failure, Philips shall be under no liability
for any injury, or any loss or damage caused to property
or products other than the product under guarantee.
This guarantee does not prejudice your rights under
common law and statute, and is in addition to the normal
responsibilities of the retailer and Philips.
How to claim
Should your Philips product fail within the guarantee period,
please return it to the retailer from whom it was purchased.
In most cases the retailer will be able to satisfactorily repair
or replace the product.
However, should the retailer not be able to conclude the
matter satisfactorily, or if you have other diffi-culties claiming
under this guarantee, please contact
The Guarantee Controller
Philips New Zealand Ltd.
4 P.O. Box 41.021
Auckland
3 (09) 84 94 160
fax 3 (09) 84 97 858
pg 01-26/LX3xxx/21-Eng 4/16/02, 11:20 AM5
5
Page 6

POLIZA DE GARANTÍA
ESTA POLIZA ES GRATUITA
Este aparato ha sido cuidadosamente diseñado y se ha fabricado con los mejores materiales bajo un estricto
control de calidad, garantizando su buen funcionamiento por los periodos establecidos según el aparato (ver lista
en la parte inferior) a partir de la entrega del aparato al consumidor. Esta póliza incluye la reparación o
reposición gratuita de cualquier parte o componente que eventualmente fallase y la mano de obra
necesaria para su reparación, misma que se hará efectiva en cualquiera de nuestros centros de servicio
autorizados en el país.
Si su aparato llegase a requerir de nuestro servicio de garantía, acuda al centro de servicio más cercano a su
domicilio, de tener alguna duda por favor llame a nuestra CENTRAL DE SERVICIO al tel.: 57 28 42 52, y en el
interior del país LADA sin costo al 01 800 506 92 00 en donde con gusto le indicaremos el cetro de servicio
autorizado más cercano a su domicilio.
PHILIPS MEXICANA S.A. de C.V. a través de sus centros de servicio autorizados reparará y devolverá a usted
su aparato en un plazo no mayor a 20 días hábiles, contados a partir de la fecha de ingreso, impresa en la
orden de servicio de cualquiera de nuestros centros de servicio autorizados.
La garantía de esta póliza cubre cualquier desperfecto o daño eventualmente ocasionado por los
trabajos de reparación y/o traslado del aparato en el interior de nuestros centros de servicio
autorizados.
Esta póliza sólo tendrá validez, si está debidamente requisitada, sellada y firmada por la casa
vendedora, en caso de extravío de esta póliza, podrá hacer efectiva su garantía con la presentación de su
factura de compra.
ESTA POLIZA NO SE HARÁ EFECTIVA EN LOS SIGUIENTES CASOS:
• Cuando el aparato sea utilizado en condiciones anormales y los daños o desperfectos que manifestase sean
causados por mal trato, descuido o mal uso.
• Cuando el aparato no haya sido operado de acuerdo a su instructivo de uso, en donde se señalan las
condiciones normales de operación, los valores nominales y las tolerancias de las tensiones (voltaje),
frecuencia (ciclaje) de alimentación eléctrica y las características que deben reunir las instalaciones auxiliares.
• Cuando la causa de la falla o mal funcionamiento sea consecuencia de una reparación inadecuada o
alteración producida por personas no autorizadas por PHILIPS MEXICANA S.A. de C.V.
• Cuando los datos de esta póliza hayan sido alterados o modificados.
• Por fenómenos naturales no imputables a la empresa tales como: temblores, inundaciones, incendios,
descargas eléctricas, rayos, etc.
36 MESES. – Monitores para computadora.
12 MESES. – Televisores, videocassetteras,video reproductores DVD, grabador reproductor de disco compacto,
video proyectores (excepto la lámpara), cámaras de video, decodificadores de señal (IRD),
televisor para hotel, sistemas de observación, televisores de proyección, teléfonos celulares,
pagers, equipos modulares, sintoamplificadores, facsimil, LNB, antena de recepción de satélite,
DVD ROM, CDR ROM y CDRW ROM para computadora.
6 MESES. – Radiograbadoras con y sin reproductor de disco compacto, reproductor de cassette portátil,
reproductor de disco compacto portátil, radio relojes, radios A.M./F.M., auto estéros y teléfonos
inalámbricos.
3 MESES. – Accesorios, controles remotos, bocinas, cinta para fax y para cámara de videoconferencia.
MC-719-ARCO
6
pg 01-26/LX3xxx/21-Eng 4/16/02, 11:20 AM6
PERIODOS DE GARANTÍA
Page 7

Philips Mexicana, S.A. de C.V.
Producto importado por:
Philips Mexicana, S.A. de C.V.
Norte 45 No. 669 Col. Ind. Vallejo,
Del. Atzcapotzalco C.P. 02300
Tels. 5728 4200 y 57 2948 00
MODELO ___________________________________ Nº DE SERIE _____________________________
LX-3000D, LX-3500D
Centro de Información al Consumidor:
Norte 45 No. 669 Col. Ind. Vallejo
Del. Atzcapotzalco C.P. 02300
Tel. 5368 7788 Lada 01 800504 6200
La presente garantía contará a partir de: DIA _____________ MES_____________ AÑO_____________
En caso que en su producto se produzca alguna falla, acuda al centro de servicio más cercano a su domicilio (según listado de talleres), de tener
alguna duda, por favor llame a nuestra CENTRAL DE SERVICIO, en donde con gusto le atenderemos.
Asi mismo, cuando requiera refacciones y partes originales para su producto, acuda a los centros de servicio. Para hacer efectiva la garantía de su
producto, es necesario que presente usted esta póliza debidamente requisitada o de lo contrario presentar su factura de compra.
CENTROS DE SERVICIO
Ciudad EDO Calle y Nº Colonia C. P. Nombre Comercial Lada Telefono Fax
Acapulco GRO Av. Revolucion Nº 28 M. Aleman 39300 Servicio Electronico Profesional 74 83 32 96 – S
Cd. Juarez CHIH. Rancho el Becerro 3011 Pradera Dorada 32610 Teleservicio Dominguez 16 18 21 28 18 21 28 S
Cd. Reynosa TAMPS Tiburcio Garza Nº 401 Rodriguez 88630 Teleservicio Pepe 89 22 59 86 – S
Chihuahua CHIH. Trasviña y Retes Nº 3503-A San Felipe 31240 Zener Electronica 14 14 01 16 26 50 41 S
Colima COL Francisco I. Madero Nº 426 Centro 28000 TV Antenas de Colima 331 403 01 403 01 S
Culiacan SIN. Venustiano Carranza Nº 140-A Nte. Centro 80090 Estereo Voz 67 16 15 10 – S
Guadalajara JAL Av. Vallarta Nº 2250 Ladron de Guevara 44600 Leecom S.A. de C.V. 3
Leon GTO Hernandez Alvarez Nº 726 San Juan de Dios 37480 Tecnicos Especializados 47 70 26 99 15 58 64 S
Merida YUC Calle 70 Nº 443 X 49 Depto. 8 Centro 97000 Servicentro 99 28 54 28 23 39 97
Mexicali B.C.N. Calz. Cuauhtemoc Nº 866-2 Cuauhtemoc Nte. 21200 Baja Electronic’s 619 67 49 16 67 49 16
Mexico D.F. Calz. Vallejo Nº 1045-03 Esq Poniente 124
Mexico D.F. Calz. Vallejo Nº 904 Loc. 5 Industrial Vallejo 2300 Tecnologia y Servicio S.A. de C. V. 5 587 57 99 587 57 99
Mexico D.F. Pilares Nº 519 Local C-3 Del Valle 03100 Cocesionario Pilares 5
Monterrey N.L. Juan Mendez Nº 825 Nte. Centro 64000 Monterrey Centro Electronico S.A. 8 375 16 17 374 85 42
Morelia MICH. Lago de Patzcuaro Nº 500-A Ventura Puente 58020 Multiserv. Prof. de Zamora 43 12 03 17 –
Oaxaca OAX Huzares Nº 207 Centro 68000 El Francistor S. de R.L. de C.V. 951 647 37 –
Pachuca HGO Pza. de las Americas Lote 28 Nucleo D Valle de Sn Javier 42086 Frazare Electronica 77 14 15 81 –
Puebla PUE Av. 10 Poniente Nº 2902-B San Alejandro 72090 Selcom 22 48 77 64 48 77 64
Queretaro QRO Bolivia 32 Lomas de Queretaro 76190 Electronica Zener 421 610 09 –
San Luis Potosi S.L.P. Fuente De La Glorieta Nº 147 Balcones del Valle 78320 Servicios Electronicos 481 534 07 –
Tampico TAMPS Laredo Nº 105 Mainero 89060 Concesionario Philips Tampico 12 12 36 04 –
Tijuana B.C.N. Calle 1a. Nº 1540-3 Centro 22000
Toluca
Torreon COAH Mariano Lopez Ortiz Nº 1126 Nte. Centro 27000 Electronica Jomar 17 22 00 05 –
Tuxtla Gutierrez CHIS 10 Nte. Ote 153-A Centro 29000 KC-Video 96 18 19 08 –
Veracruz VER Guerrero Nº 1877 Entre Cortes y Canal Centro 91700 Antza Comunicaciones 29
Villahermosa TA B Sanchez Marmol Nº 206 Centro 86000 Tecnicentro 93 14 31 36 –
EDO MEX
Calle Toluca Nº 505 Sanchez 50040 Concesionario Philips Toluca 72 14 83 09 17 03 21
Industrial Nueva Vallejo
NOTA: Los Centros que tengan (S) solo proporcionan Servicio y los que tengan (SR) venden refacciones y proporcionan Servicio.
88699
2300 Chyr S.A. de C.V. 5
Sistemas Inalambricos de
Comunicacion
616 18 88
615 72 62 SR
616 01 26
567 22 56
567 96 32
567 96 32
605 42 15
605 43 46
605 42 76
66 85 95 58 85 95 58
32 78 23
32 78 23
32 44 44
S
S
SR
S
SR
SR
S
S
S
SR
S
S
SR
S
S
S
S
S
S
pg 01-26/LX3xxx/21-Eng 4/16/02, 11:20 AM7
7
Page 8

Contents
English
Introduction and General
Information
Features ............................................................................... 9
Discs for playback ............................................................. 9
Player zone
Supplied accessories ......................................................... 9
Environmental information.............................................. 9
Installation ........................................................................... 9
Maintenance........................................................................ 9
Functional Overview
Front and Rear panels .................................................... 10
Remote Control .............................................................. 11
Connections
Connecting antennas ...................................................... 12
MW Indoor Loop Antenna
FM Indoor Antenna
FM Outdoor Antenna
Connecting the speakers ............................................... 13
Connecting a TV and additional components ........... 13
Operations
Discs information ............................................................ 19
Basic playback............................................................ 19–20
Skipping to another track/chapter
Fast Search
Continue playback from the last stop point
Repeat play
Repeat A-B
Programme favourite tracks
Special DVD/VCD features ..................................... 20-22
Changing subtitle language
Changing sound track language
Playing in slow motion mode
Searching for a particular passage
Display the disc information during playback
Moving to another title/chapter
Playback from a selected point
Zooming in
Viewing from another angle
Advancing by frames
Checking the contents of DVD
Special VCD/SVCD features ......................................... 22
Playback Control (PBC)
Special MP3-CD features............................................... 23
MP3-CD menu
Preparations
Inserting batteries into the remote control.............. 14
Switching on the system ................................................ 14
Setting up the surround sound system ............... 14–15
Placing the speakers
Changing the volume level
Setting up the subwoofer ..............................................15
Activating progressive scan mode
(for model LX3500D only) ...........................................15
System Setup (DVD) ............................................... 15–17
General operation
Setting the picture
Setting the sound
Setting the language
Setting the features
Basic Functions
Selecting the surround sound mode ........................... 18
Selecting the digital sound effect ................................. 18
Volume control ................................................................ 18
Dimming the display screen .......................................... 18
Other Functions
Tuning to radio stations ................................................. 24
Presetting radio stations ................................................ 24
Listening to preset radio stations ................................ 24
Sleep timer setting ..........................................................24
Specifications ............................................. 25
Troubleshooting ......................................26
8
CONTENTS
pg 01-26/LX3xxx/21-Eng 4/16/02, 11:20 AM8
Page 9

Introduction and General Information
Features
Your complete 7-piece 200-Watt DVD Digital Home
Cinema System creates the same dynamic sound qualities
that you find in full-fledged cinemas and incorporates some
of the best features in home theatre technology.
Other features include:
R
Built-in DTS and Dolby
supporting Dolby
Lets you use the Home Cinema Audio System for a movietheatre surround sound experience.
Additional Component Connections
Lets you connect other audio and audio/visual components
to the DVD system so you can use the system’s surround
sound speakers.
Night Mode
Lets you compress the dynamic range, reducing the
difference in loudness between different sounds in Dolby
Digital mode.
Parental Control (Rating Level)
Lets you set a ratings level so that your children cannot
watch a DVD that has a rating higher than you set.
Sleep Timer
Enables the system to switch to standby mode
automatically at a preset time.
Progressive Scan (for LX3500D model only)
Provides a flicker free image with the highest effect on film
based sources. It can double the vertical resolution of the
picture to 525 lines every time the picture is refreshed. To
enjoy the full quality potential offered by
progressive scan feature, a progressive scan TV is
required.
Digital decoder,
R
ProLogic and virtual surround
Discs for playback
Your DVD player is able to play :
– All pre-recorded audio CDs
– All finalised audio CDR and audio CDRW discs
– All VCDs, Super VCDs and DVDs
– MP3-CDs (CD-ROMs with MP3 tracks)
Player zone
DVD discs and players are designed with regional
restrictions. Before playing a disc, make sure the disc is the
same zone as your player (refer to page 2).
Supplied accessories
– a remote control with two AA batteries
– an MW loop antenna and an FM wire antenna
– an audio and Pr/Cr Pb/Cb Y video cable for connection
with the TV
– five satellite speakers, including five speaker cables
– an active subwoofer, including a connection cable
and a power cable
– a power cable for connection with the main unit (for
versions /21S and /21H)
– this instruction booklet
If any item is damaged or missing, contact your retailer or
Philips.
Environmental information
All unnecessary packaging has been omitted. We have tried
to make the packaging easy to separate into three materials:
cardboard (box), polystyrene foam (buffer) and
polyethylene (bags, protective foam sheet).
Your system consists of materials which can be recycled
and reused if disassembled by a specialised company. Please
observe the local regulations regarding the disposal of
packaging materials, exhausted batteries and old equipment.
Installation
● Place the player on a flat, hard, and stable surface.
● There must be sufficient room in front of the player for the
drawer to open.
● In a cabinet, allows about 10cm (4 inches) of free space all
around the player for adequate ventilation.
● Do not expose your player to extreme temperatures or
humidity.
Maintenance
● When a disc becomes dir ty, clean it with a
cleaning cloth. Wipe the disc from the
centre out, in a straight line.
● Do not expose the player, batteries or
discs to humidity, rain, sand or excessive
heat (caused by heating equipment or
direct sunlight). Always keep the disc tray closed to avoid
dust on the lens.
● Do not use solvents such as benzene, thinner, commercially
available cleaners, or anti-static spray intended for colour
discs.
● The lens may cloud over when the player is suddenly
moved from cold to warm surroundings, making it
impossible to play a disc. Leave the player in the warm
environment until the moisture evaporates.
English
pg 01-26/LX3xxx/21-Eng 4/16/02, 11:20 AM9
INTRODUCTION AND GENERAL INFORMATION
9
Page 10
Functional Overview
VIDEO
OUT
S-VIDEO
OUT
ANTENNA
MW/FM
COMPONENT
VIDEOOUT
CENTER
LINE OUT
LINE OUT
WOOFER
AUDIO OUT
AUDIO IN
AUX
COAXIAL
OPTICAL
DIGITALOUT
SPEAKERS
MANUFACTUREDUNDERLICENSE FORMDOLBY
LABORATORIES,
DOLBY
LABORATORIES,
INC.
ALLRIGHTSRESERVED.
LABORATORIES.CONFIDENTIALUNPUBLISHED
WORKS.
1992-1997
DOLBY
AND
THE
DOUBLE-DSYMBOLARE TRADEMARKSOF DOLBY
CAUTION
P-SCAN
OFF ON
English
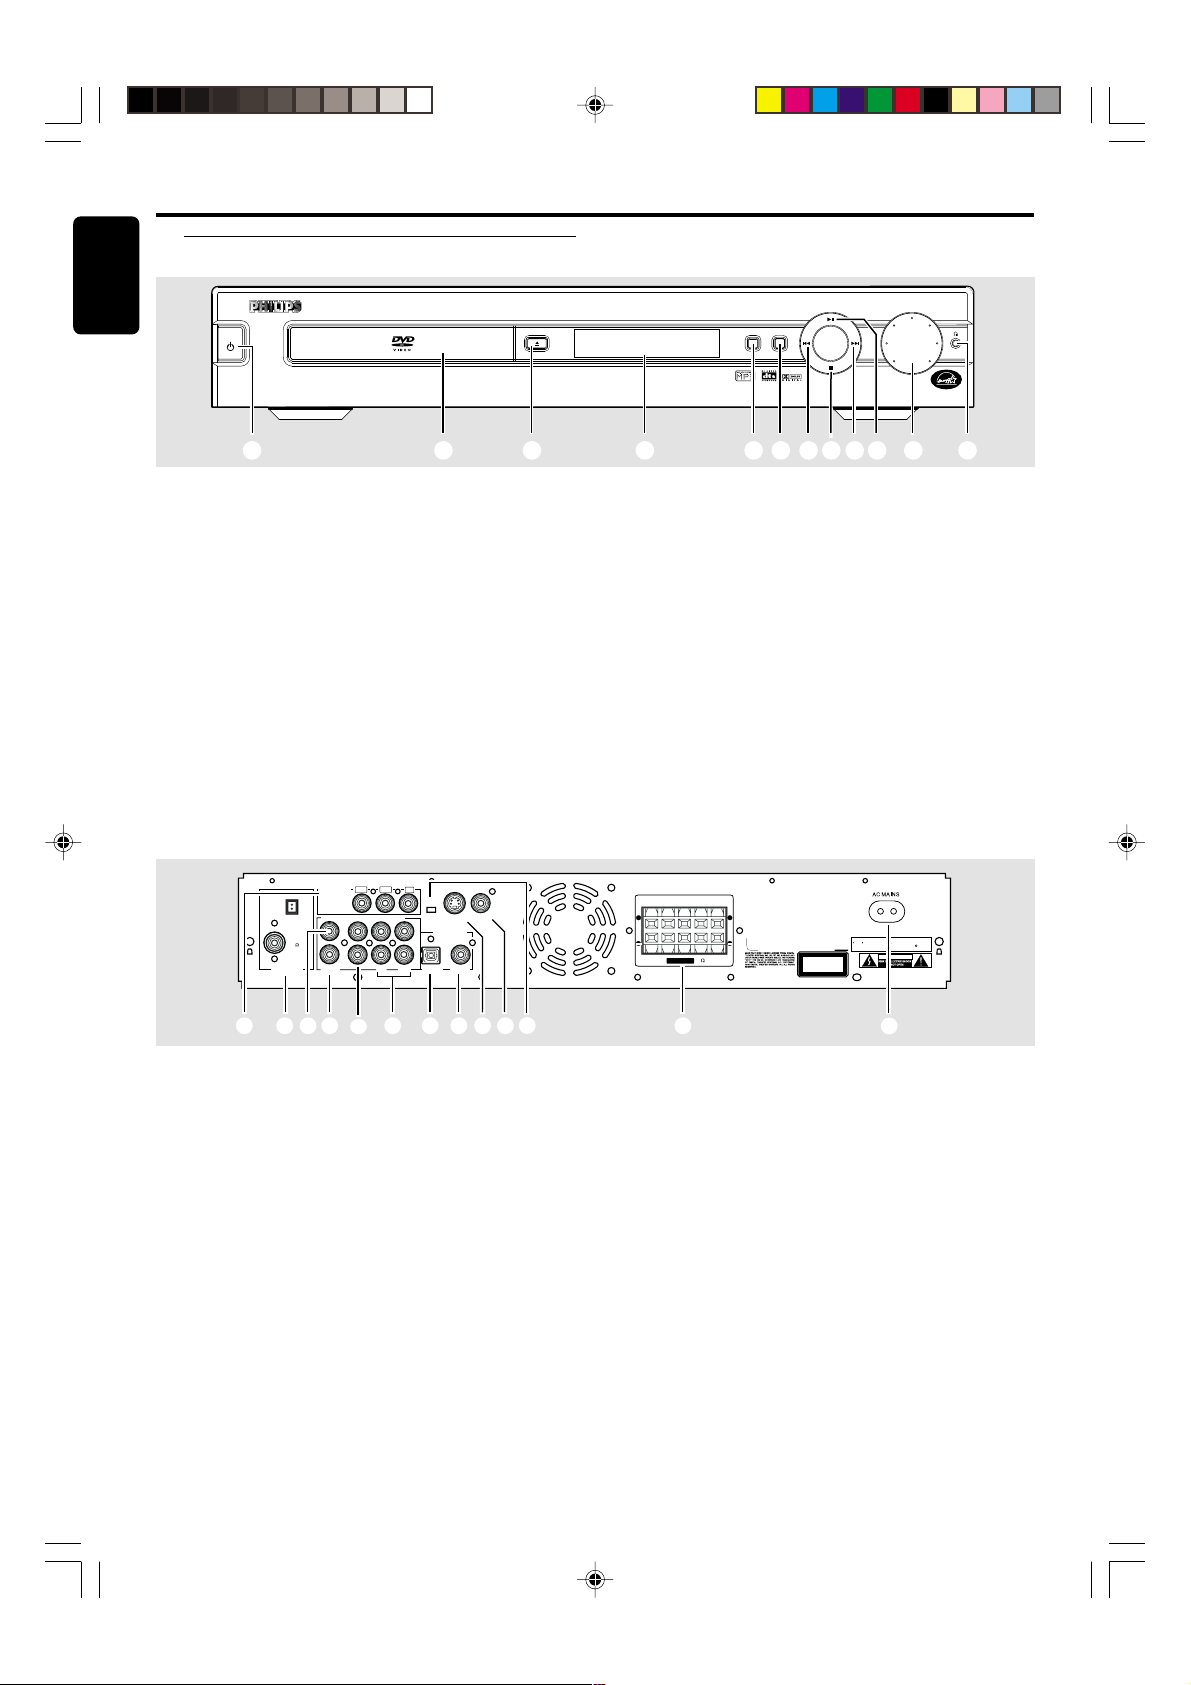
Front and Rear panels
DVD VIDEO DIGITAL SURROUND SYSTEM
STANDBY
ON
PROGRESSIVE SCAN
1 2 3 4 5 6 7 87 9 0 !
1 STANDBY ON y
– to switch between power on and standby modes.
2 Disc Tray
3 OPEN/CLOSE 0 (in Disc mode only)
– to open or close the disc tray.
4 Display screen
– to display details for user’s information.
5 SOURCE
– to select the desired source or external input source
(TV/AV, DISC, TUNER or AUX).
6 PROGRAM
– in Disc mode, to programme disc tracks.
– in Tuner mode, to programme preset radio stations.
OPEN/CLOSE
VOLUME
A
P
/
U
Y
S
SOURCE PROGRAM
A
E
L
P
N
E
V
X
E
R
T
P
S
P
T
O
7 PREV S / NEXT T
– in Disc mode, press to skip to the previous/next
chapter/track.
– in Disc mode, hold down to fast reverse/forward the
disc.
– in Tuner mode, to tune to a lower or higher radio
frequency.
8 STOP Ç (in Disc mode only)
– to stop playing the disc.
9 PLAY/PAUSEÉÅ (in Disc mode only)
– to star t or interrupt disc playback.
0 VOLUME
– to adjust the master volume.
! n
– to connect headphones.
COMPONENT
MW
FM
(75 )
MW/FM
ANTENNA
1 2 3 4
VIDEOOUT
CENTER
LINE OUT
WOOFER
LINE OUT
Pb/Cb
Pr/Cr
Y
Y
AUDIO OUT
5
P-SCAN
AUDIO IN
OFF ON
VIDEO
S-VIDEO
OUT
OUT
DIGITALOUT
L
R
TVTVAUX
6 8 9 0 @
OPTICAL
7
COAXIAL
!
1 Pr/Cr Pb/Cb Y (COMPONENT VIDEO OUT)
– connect to TV with Pr/Cr Pb/Cb Y inputs.
2 MW/FM ANTENNA
– connect to the MW loop antenna or FM antenna.
3 CENTER LINE OUT
– connect to an additional centre speaker.
4 WOOFER LINE OUT
– connect to an active subwoofer.
5 AUDIO OUT
– connect to the analogue audio inputs of an external
recording device or amplifier.
6 AUDIO IN (TV / AUX)
– connect to the analogue audio outputs of a TV or
VCR.
7 DIGITAL OUT-OPTICAL
– connect to audio equipment with digital-optical audio
input.
FL CFR SLSR
SPEAKERS
++
MANUFACTUREDUNDERLICENSE FORMDOLBY
DOLBY
AND
LABORATORIES.CONFIDENTIALUNPUBLISHED
(4 )
CLAS S 1
LASER PRODUCT
DOLBY
AVIS:RISQUEDECHOCELECTRIQUE-NEPASOUVRIR
THE
DOUBLE-DSYMBOLARE TRADEMARKSOF DOLBY
WORKS.
LABORATORIES,
INC.
ALLRIGHTSRESERVED.
CAUTION
LABORATORIES,
1
1992-1997
#
8 DIGITAL OUT-COAXIAL
– connect to audio equipment with digital-coaxial audio
input.
9 S-VIDEO OUT
– connect to a TV with S-video input.
0 VIDEO OUT
– connect to a TV with video input.
! P-SCAN ON/OFF (for model LX3500D only)
– switch on or off progressive scan feature.
@ SPEAKERS
– connect to the front, centre and surround speakers.
# AC Power Cord
– connect to a standard AC outlet.
Caution: Do not touch the inner pins of the jacks
on the rear panel. Electrostatic discharge may
cause permanent damage to the unit.
10
pg 01-26/LX3xxx/21-Eng 4/16/02, 11:20 AM10
FUNCTIONAL OVERVIEW
Page 11

Remote Control
(¡
1
()
2
3
4
5
6
7
8
9
0
!
Notes for remote control:
– First, select the source you wish to control by
pressing one of the source select keys on the remote
control (DISC or TUNER, for example).
– Then select the desired function (
for example).
1 SOURCE
– to select the desired source (TV/AV, DISC, TUNER or
AUX).
2 DISC MENU (disc mode only)
– to enter or exit the disc contents menu.
3 SYSTEM MENU (disc mode only)
– to enter or exit the system menu bar.
4 3 4 1 2
– in Tuner mode, to select a preset radio station
number (1 or 2).
– to select movement direction in disc contents menu /
system menu bar.
É
, S ,
((
*
4
(5
(&
(^
(%
($
#
@
T
5 S / T
– in disc mode, press to skip to the previous/next
chapter/track.
– in disc mode, hold down to fast reverse/forward the
disc.
– in Tuner mode, to tune to a lower or higher radio
frequency.
6 ÉÅ
– to star t or interrupt disc playback.
7 Ç
– to stop playing the disc.
8 SURROUND
– to select multichannel surround (Dolby Digital, DTS
or Dolby ProLogic) or stereo sound effect.
9 SOUND
– to select the various sound effects : CONCERT,
DRAMA, ACTION, SCI-FI, CLASSIC , JAZZ, ROCK or
DIGITAL.
0 REPEAT
– to repeat chapter, track or disc.
! REPEAT A-B
– to repeat a specific section on a disc.
@ SUBW +/-
– to adjust the subwoofer’s level.
REAR +/-
– to adjust the rear (surround) speakers’ level.
CENTER +/-
– to adjust the centre speaker’s level.
TV VOL +/-
– to adjust Philips television’s volume level.
# SLEEP
– to set the sleep (auto-off) timer function.
$ DIM
– to select different brightness for the display screen.
% NIGHT (DVD mode only)
– to optimise the dynamics of the sound output.
^ MUTE
– to interrupt or resume sound reproduction.
& RESUME
– to continue disc playback after an interruption.
* OK
– to exit or confirm the selection.
( VOL +/ -
– to adjust the volume level.
) Numeric Keypad (0-9)
– to enter a track/title number of the disc.
– to enter a number of preset radio stations.
¡ y
– to switch to standby mode.
English
pg 01-26/LX3xxx/21-Eng 4/16/02, 11:20 AM11
FUNCTIONAL OVERVIEW
11
Page 12
AM
FM
(75 Ω)
Connections
VIDEO
OUT
S-VIDEO
OUT
ANTENNA
MW/FM
COMPONENT
VIDEO OUT
CENTER
LINE OUT
LINE OUT
WOOFER
AUDIO OUT
AUDIO IN
AUX
COAXIAL
OPTICAL
DIGITALOUT
SPEAKERS
MANUFACTUREDUNDERLICENSE FORMDOLBY
LABORATORIES,
DOLBY
LABORATORIES,
INC.
ALLRIGHTS RESERVED.
LABORATORIES.CONFIDENTIALUNPUBLISHED
WORKS.
1992-1997
DOLBY
AND
THE
DOUBLE-DSYMBOLARE TRADEMARKSOF DOLBY
CAUTION
OFF ON
English
MW/FM
ANTENNA
COMPONENT
VIDEO OUT
MW
CENTER
LINE OUT
FM
(75 )
WOOFER
LINE OUT
Pr/Cr
AUDIO OUT
Pb/Cb
AUDIO IN
TV AUX
Y
Y
P-SCAN
OFF ON
L
R
OPTICAL
S-VIDEO
DIGITALOUT
OUT
COAXIAL
VIDEO
OUT
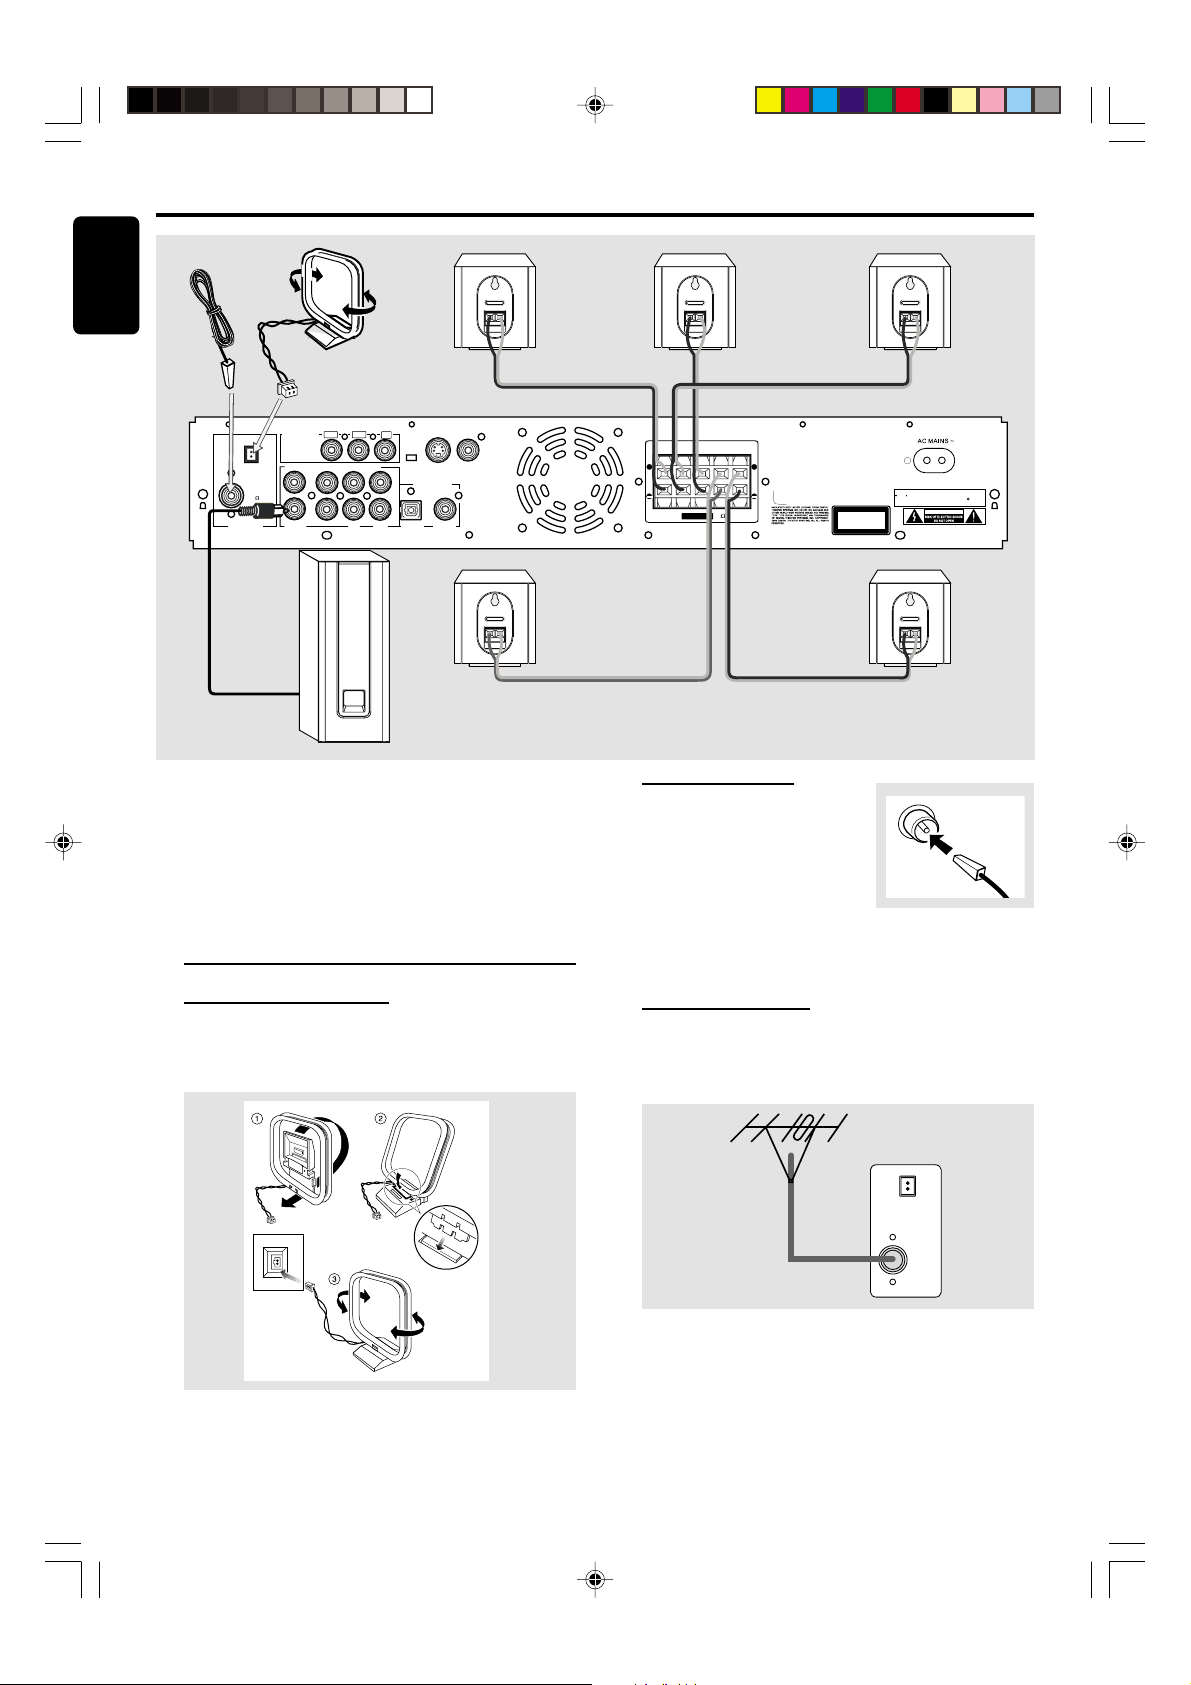
IMPORTANT!
– Before connecting the AC power cord to the
wall outlet, ensure that all other connections have
been made.
– Never make or change any connections with
the power switched on.
– The type plate is located at the rear or bottom
of the system.
Connecting antennas
MW Indoor Loop Antenna
Connect the supplied MW loop antenna to the MW
jack. Position the loop antenna to receive the clearest
sound.
FL CFR SLSR
SPEAKERS
++
MANUFACTUREDUNDERLICENSE FORMDOLBY
DOLBY
AND
THE
LABORATORIES.CONFIDENTIALUNPUBLISHED
LABORATORIES,
(4 )
LASER PRODUCT
CLAS S1
DOLBY
AVIS:RISQUEDECHOCELECTRIQUE-NEPASOUVRIR
LABORATORIES,
DOUBLE-DSYMBOLARE TRADEMARKSOF DOLBY
WORKS.
INC.
ALLRIGHTSRESERVED.
CAUTION
3
1992-1997
FM Indoor Antenna
Connect the supplied FM
antenna to the FM jack. Move
the antenna in various directions
until the clearest signal is
received.
Note:
– Keep the antenna as far away as possible from the TV, VCR
or any radiation source to prevent unwanted noise.
FM Outdoor Antenna
For better FM reception, use a 75 ohm coaxial cable (not
supplied) to connect the system to an outdoor FM antenna
as shown.
MW
pg 01-26/LX3xxx/21-Eng 4/16/02, 11:21 AM12
12
CONNECTIONS
Fix the claw
to the slot
Page 13

Connecting the speakers
VIDEO
OUT
S-VIDEO
OUT
ANTENNA
MW/FM
COMPONENT
VIDEOOUT
CENTER
LINE OUT
LINE OUT
WOOFER
AUDIO OUT
AUDIO IN
AUX
COAXIAL
OPTICAL
DIGITALOUT
++
SPEAKERS
MANUFACTUREDUNDERLICENSE FORMDOLBY
LABORATORIES,
DOLBY
LABORATORIES,
INC.ALLRIGHTS RESERVED.
LABORATORIES.CONFIDENTIALUNPUBLISHEDWORKS. 1992-1997
DOLBY ANDTHE DOUBLE-DSYMBOL ARETRADEMARKS OFDOLBY
CAUTION
P-SCAN
OFF ON
Connect the supplied speaker systems using the supplied
speaker cables by matching the colours of the jacks and
speaker cables.
1 Press up (or down) the speaker’s jack and fully insert the
stripped portion of the speaker cable into the jack, then
release.
12 mm
abc
2 Connect the subwoofer’s audio input to the WOOFER
LINE OUT jack and the speakers as follows :
● Use the supplied audio cables to connect AUDIO IN jacks
to the corresponding AUDIO OUT jacks on the TV, VCR or
other audio/visual components.
● Use the supplied Pr/Cr Pb/Cb Y cables to connect
Pr/Cr Pb/Cb Y jacks to the corresponding video input
jacks on a TV.
If your TV is not equipped with Pr/Cr Pb/Cb Y video input
jacks, you can select one of the following alternative
connections :
Option 1
Connect the S-VIDEO OUT jack to the S-Video input
jack on the TV using a S-Video cable (not supplied) .
Option 2
Connect the VIDEO OUT jack to the video input jack on
the TV using a video cable (not supplied).
English
Speakers
- +
Front Left (FL) black white
Front Right (FR) black red
Centre (C) black green
Surround Left (SL) black blue
Surround Right (SR) black grey
Notes:
– Ensure that the speaker cables are correctly connected.
Improper connections may damage the system due to shortcircuit.
– For optimal sound performance, use the supplied speakers.
– Do not connect more than one speaker to any one pair of
+/- speaker jacks.
– Do not connect speakers with an impedance lower than
the speakers supplied. Please refer to the SPECIFICATIONS
section of this manual.
Connecting a TV and
additional components
You must connect a TV to the DVD system in order to use
the DVD player. You can connect other audio and audio/
visual components to the DVD system in order to use the
Home Cinema Audio System’s surround sound capabilities.
IMPORTANT!
– There are various ways to connect the system
to a TV (as shown in the illustration). You only
need to make one of the best connections,
depending on the capabilities of your TV system.
– Always refer to the instruction manual of the
connected equipment to make an optimal
connection.
– Some DVD discs have anti-copying devices, so
you will not able to record the disc through a VCR.
Use the AUDIO OUT jacks
– for connecting to an amplifier, audio system or TV with
analogue audio inputs.
– for connecting to a CD or Tape recorder to make an
analogue recording.
Use the OPTICAL or COAXIAL jacks
– for connecting to an amplifier with DTS, Dolby Digital
decoder or CD recorder.
You will need to set the DVD system’s digital output to
“ALL” (refer to “Preparations - System setup (DVD)”).
Notes:
– MP3 audio is not available on the digital output.
– Digital recording is only possible on a CD or VCD.
P-SCAN
OFF ON
OPTICAL
DIGITALOUT
or
VIDEO
S-VIDEO
OUT
OUT
COAXIAL
C
O
A
or
O
X
P
IA
T
L
IC
IN
A
L
IN
MW/FM
ANTENNA
or
COMPONENT
Pb/Cb
Pr/Cr
Y
AUDIO OUT
AUDIO IN
TVTVAUX
Y
L
R
VIDEOOUT
MW
CENTER
LINE OUT
FM
(75 )
WOOFER
LINE OUT
CONNECTIONS
13
pg 01-26/LX3xxx/21-Eng 4/16/02, 11:21 AM13
Page 14
Preparations
English
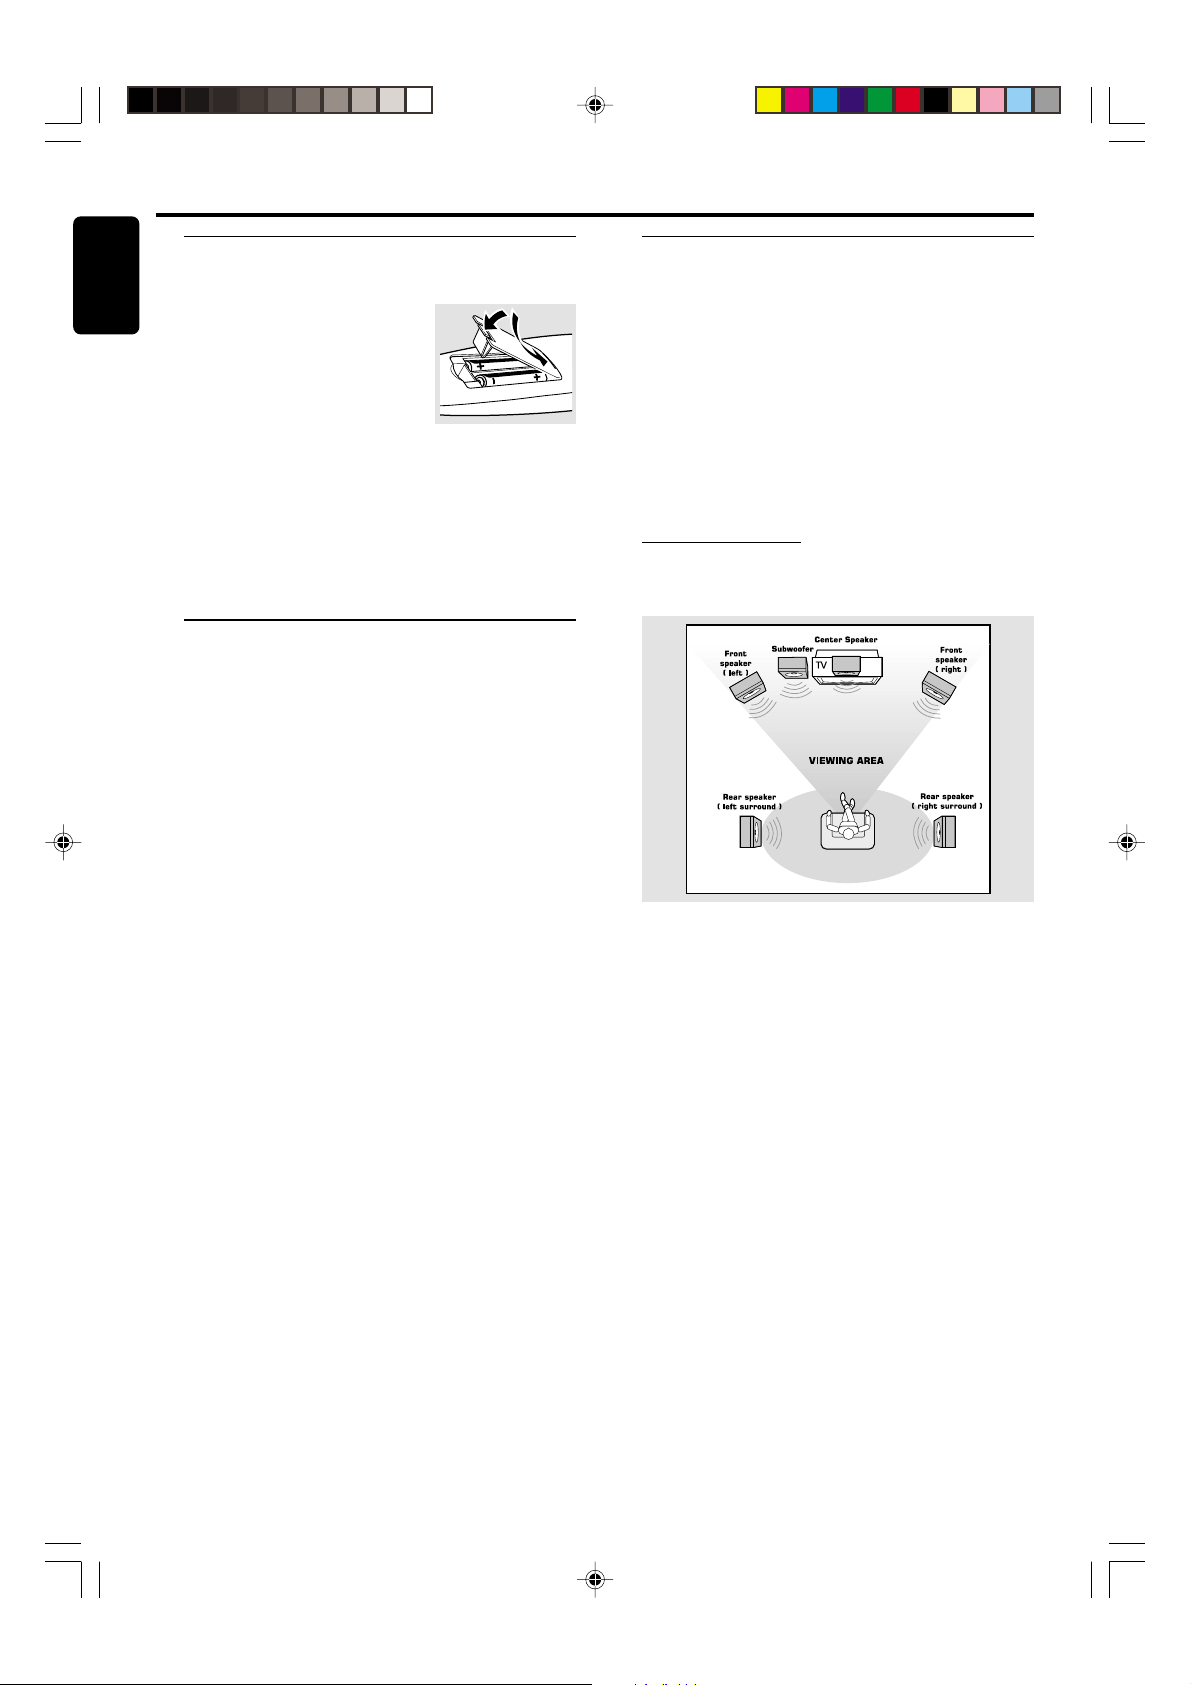
Inserting batteries into the
remote control
1 Open the battery compartment.
2 Place the batteries in the
compartment with the correct
polarity as indicated by “+“ and “-“
symbols.
3 Close the cover.
CAUTION!
– Remove batteries if they are exhausted or will
not be used for a long time.
– Do not use old and new or different types of
batteries in combination.
– Batteries contain chemical substances, so they
should be disposed off properly.
Switching on the system
1 After completing all the connections, connect the AC
power cord of the player and subwoofer to the power
outlet.
2 Press STANDBY ON to switch on the last selected
source.
3 Adjust the SOURCE button (or press TV/AV, DISC,
TUNER or AUX) to select the input source.
➜ The selected source will be displayed.
● For viewing a DVD or VCD disc, a TV set needs to be
connected (refer to “Connections - Connecting a TV and
additional components”).
Switch on the TV and set to the correct video in channel
(for example, EXT1, EXT2, AV1, AV2). Refer to your TV
instruction manual for details.
➜ The default screen appear s on the TV.
● You can connect other external components to the DVD
system in order to use the Home Theatre Audio System’s
surround sound capabilities. For example, connect to a TV
and select TV/AV as the input source or connect to a VCR
and select AUX as the input source.
Setting up the surround sound
system
You must connect all the speakers and set up the system
properly in order to enjoy the Digital Cinema experience at
home (refer to “Connections - Connecting the speakers”).
You will have the feeling of being in the middle of the action
because sound is coming from everywhere around you.
The subwoofer can enhance the bass performance of your
system dramatically.
IMPORTANT!
Please sit at your usual listening position in order
to set up the speaker balance correctly.
Placing the speakers
To obtain the best surround effect, place the speakers as
follows.
1 Place the front left and right speakers at equal distances
from the TV and at an angle of approximately 45 degrees
from the listening position.
2 Place the centre speaker above or below the TV so the
centre channel’s sound is localised.
3 Place the surround speakers at normal listening ear level
facing each other or mounted on the wall.
4 Place the subwoofer on the floor near the TV.
14
PREPARATIONS
pg 01-26/LX3xxx/21-Eng 4/16/02, 11:21 AM14
Notes:
– To avoid magnetic interference, do not position the front
speakers too close to your TV.
– If the rear surround speakers are installed farther away
from the listening position than the front and centre speakers,
it will weaken the surround effect.
– All speakers should be securely installed to prevent
accidents and improve sound quality.
Page 15

Changing the volume level
You can change the speakers’ sound distribution to suit
your surround sound needs.
● Press CENTER +/- to adjust the level of the centre
speaker.
➜ “CNT +XX DB” is displayed.
● Press REAR +/- to adjust the level of the rear
surround speakers.
➜ “RE +XX DB” is displayed.
System Setup (DVD)
The system setup is carried out via the TV, it enabling you
to customise the DVD system to suit your particular
requirement. If the preferred options selected are not
available on a disc, then the disc’s own preference will be
used.
IMPORTANT !
To access the System Setup menu, playback must
be stopped.
English
Note:
–“XX” denotes the volume level between -15db to 10db.
Setting up the subwoofer
1 Use the supplied subwoofer cable to connect the
subwoofer’s audio input jack to the WOOFER LINE
OUT of the DVD system.
2 Connect the subwoofer’s AC power cable to the wall
socket and switch on the power.
➜ It will automatically switch on when receiving an audio
signal input. If there is no audio signal input, it will switch off
automatically.
3 Select the phase polarity at the rear of the subwoofer at
o
either 0
or 180o to determine better bass reproduction
effect in certain listening environment.
4 Press SUBW +/- to adjust the volume level of the
subwoofer (-15dB to 10dB).
➜ “SUB +XX DB” is displayed.
Activating progressive scan
mode
The progressive-scan display presents 60 complete frames
per second, rather than the 30 frames per second of
interlaced scanning (ordinary normal TV system). With
nearly double the numbers of line, progressive scan offers
higher picture resolution and eliminates bothersome
motion artifacts those jagged edges on moving objects.
To enjoy the full quality potential offered by
progressive scan feature, a progressive scan TV is
required.
1 Press STANDBY ON to switch the system off.
2 Slip the P-SCAN switch (located at back panel) to “ON”
position.
3 Press STANDBY ON again to switch the system on.
Note:
– You need to switch the system off before changing the
progressive scan mode.
(for model LX3500D only)
General operation
1 Press SYSTEM MENU.
➜
icon will be highlighted in the menu bar on the TV
screen.
2 Press 4 to activate the System Setup menu.
3 Use 1 2 34 keys to toggle through the functions and
select your preferred option.
4 Press OK to confirm a highlighted selection.
5 To exit the System Setup menu, press SYSTEM MENU
or OK.
The following items are available :
Setting the picture
– TV Shape
Select the aspect ratio of the TV to be connected.
4:3 PS (default setting)
– If you have a conventional TV set and your DVD is not
formatted for widescreen viewing, use this setting. A wide
picture is displayed on the whole TV screen with a por tion
automatically cut off.
4:3 LB
– If you have a conventional TV set and your DVD is
formatted for widescreen viewing, use this setting. Wide
bands will be displayed on the upper and lower portions of
the TV screen.
16:9
– If you have a widescreen TV set, use this setting (you
must also set your widescreen TV to “full size”).
pg 01-26/LX3xxx/21-Eng 4/16/02, 11:21 AM15
PREPARATIONS
15
Page 16

English
Setting the sound
16:9
(Wide screen)
4:3 LB
(Letter Box)
4:3 PS
(Pan Scan)
Note:
– If your DVD is not encoded to allow you to change the
aspect ratio, TV shape cannot be changed.
– TV System
Allows you to select the colour system matching the
connected TV set.
AUTO (default setting)
– If the connected TV is multi system, select this mode.
The output format will be in accordance with the video
signal of the disc.
NTSC
– If the connected TV is NTSC system, select this mode.
It will change the video signal of a PAL disc and output in
NTSC format.
PAL
– If the connected TV is PAL system, select this mode.
It will change the video signal of a NTSC disc and output in
PAL format.
– Video Out
Video out selection enables you to choose the type of
video output suitable for your receiver.
¶ Select PR PB Y (default setting), if you have connected the
video output to your TV using the Component Video Out
(Pr/Cr Pb/Cb Y) jacks.
¶ SCART (this feature is not available for this model)
¶ Select S-VIDEO if you have connected the video output
to your TV using S-Video jack.
– Screen Saver
If set to ON, when you leave the system in stop or pause
mode for more than one minute, the screen saver will be
activated. The default setting is OFF.
– Digital Output
Digital output selection enables you to specify the type of
digital output suitable for your amplifier or receiver.
¶ Select ALL (default setting), if you have connected the
digital output (COAXIAL or OPTICAL) to a multichannel
decoder receiver.
¶ Select PCM 96K if the external component is capable of
processing digital signal input with sampling rates of 96 kHz.
¶ Select PCM 48K if the external component is incapable of
processing 96 kHz digital signal input, then convert to
standard signal with sampling rates of 48 kHz.
¶ Select OFF to deactivate the digital output (COAXIAL or
OPTICAL).
– Night Mode
Set night mode to on to level out the volume. For
example, the disc will play at the same sound level
throughout the movie. The default setting is OFF.
Night function can also be accessed via the
remote control.
– Center Delay
If the listening position is closer to the centre speaker than
the front speakers, you can set the centre delay time to
improve the surround sound effect.
Options : 5ms, 3ms, 2ms, 1ms or OFF (default setting).
– Rear Delay
If the listening position is closer to the rear surround
speakers than the front speakers, you can set the rear delay
time to improve the surround sound effect.
Options : 15ms, 12ms, 9ms, 6ms (default setting), 3ms or
OFF.
– Test Tone (disc mode only)
If set to ON, the system will test the speaker settings. The
test signal is generated through the left, centre, right, and
surround speakers. The default setting is OFF.
16
PREPARATIONS
pg 01-26/LX3xxx/21-Eng 4/16/02, 11:21 AM16
Page 17

Setting the language
2 Use 34 keys to select a rating level.
English
– Audio
– Subtitle
– Disc Menu
● This is to select the audio language, subtitle language and
the language used on TV screen menus or DVD menus that
will always be used for every disc to be played back. The
default setting is English.
● If the language selected is not available on the disc, the
original language designated by each disc will be selected.
Setting the features
– Parental
Enables setting of playback limitation level. Some DVDs may
have a parental level assigned to the complete disc or to
certain scenes on the disc. The rating levels are from 1 to 8
and are country dependent. You can prohibit the playing of
certain discs that are not suitable for your children or have
certain discs played with alternative scenes.
1 Enter the 4-digit code. If necessary, enter the code a second
time.
3 Press OK to confirm.
Rating - NO PARENT
If parental control is not activated, it will play all discs.
Rating - 1 to 8
If the player’s parental level is set below 8, only discs with a
lower or equal level will play. For example, if the player is
set to 5, only discs with ratings of 5, 4, 3, 2 and 1 will be
played. Higher rated scenes will not be played unless an
alternative that has the same rating or lower is available on
the disc. For example, consider a disc that generally is
suitable for most audiences, and it is rated at level 2 for the
most part. However, in the middle, there are also scenes
rated at 5 (not suitable for children).
To play a higher rated disc or scene than the level
set
● Enter the 4-digit cord before resetting the rating level to a
higher number (go to “Password”).
If you forget the 4-digit code
1 Press Ç four times when prompted for the password
and the system will change back to the default password.
2 Go to “Password” and enter your new code.
Note:
– Some DVDs are not encoded with a rating though the
movie rating is printed on the disc jacket. The rating level
feature does not work for such discs.
– Password
To set a new password for the parental control or to
change the password. The password supplied as default is
1234.
pg 01-26/LX3xxx/21-Eng 4/16/02, 11:21 AM17
– Menu Language
Select the language for on-screen display.
– Defaults
If RESET is selected, all the items in the setup menu will be
reset to default setting.
PREPARATIONS
17
Page 18

Basic Functions
English
Selecting the surround sound
mode
IMPORTANT!
– For proper surround sound, make sure you have
followed the “Connections” and “Preparations”
procedures fully.
– The centre and surround speakers only operate
when the system is set to surround sound mode
and the source material being played is recorded
or broadcast in Dolby Digital, DTS or Dolby Pro
Logic surround sound.
– Stereo broadcasts or recordings will produce
some surround channel effects when played in a
surround mode. However, mono sources will not
produce any sound from the surround speakers.
● Press SURROUND to select surround or stereo mode.
➜ The availability of the various surround sound modes
depend on the number of speakers used and the incoming
sound information available on the disc. The available output
modes are shown below.
Dolby Digital Surround
Dolby Digital (also known as AC-3 or Dolby 5.1) and
MPEG Multichannel delivers a realistic and dynamic sound
similar to theatre and cinema. It requires connection of all
five speakers (front left/right, centre, surround left/right) and
subwoofer for correct Dolby Digital Surround sound
reproduction. Each channel plays its own unique role in
providing the right sound. Front left, centre and right join
two surround speakers to reproduce high, mid and bass
frequencies in five full-range channels of surround. Bass
rumble, explosions and low frequency effects you feel are
delivered through the subwoofer. A large number of DVD
discs have been recorded in Dolby Digital Surround.
DTS Surround
The DTS Surround is a cinema surround sound format that
offers superior digital audio performance. DTS offers more
clarity and definition especially for higher tones. The better
sound quality is a result of the limited sound compression
(3:1 instead of 11:1 for Dolby Digital) and the 20-bit
resolution.
Dolby Pro Logic Surround
The Dolby Pro Logic Surround system is a specially
encoded two-channel analogue format that will produce
sound through four speaker channels (front left, centre,
front right, mono surround) when a Dolby Pro Logic
Decoder is used. It is also compatible with stereo systems
but the user will only have two-channel (front left & right)
of sound.
Matrix
A new surround playback system that delivers amazingly
rich and convincing five-channel surround outputs (front
left/right, centre, surround left/right).
VSS (Virtual Surround Sound)
The ProLogic MPEG or Dolby Digital surround channel is
processed by a ‘virtualiser’ DSP to add surround effect from
just the two front speakers.
Stereo
All sound is reproduced and played through the front left
and right speakers. This enables standard stereo
reproduction.
Selecting the digital sound
effect
The digital sound effects allow you to select from various
pre-set modes that control the frequency bands of sound
to optimise certain musical styles. It greatly enhances the
excitement and enjoyment of your favourite music.
● Press SOUND repeatedly to select the available sound
effect.
When playing a DVD/VCD, select :
– CONCERT, DRAMA, ACTION or SCI-FI
When playing a CD or in Tuner or Aux mode,
select :
– CLASSIC, JAZZ, ROCK or DIGITAL
Volume control
Adjust VOLUME button (or press VOL +/-) to
increase or decrease the volume level.
➜ “VOL XX” is displayed. “XX”denotes the volume level.
For Philips TVs only
● Press TV VOL +/- on the remote control to adjust the
TV’s volume level.
To listen through the headphones
● Connect the headphones plug to the n socket at the
front of the player.
➜ The speakers will be muted.
To switch off the volume temporarily
● Press MUTE.
➜ Playback will continue without sound and "MUTE" is
displayed.
● To restore the volume, press MUTE again.
Dimming the display screen
● Press DIM repeatedly to select different levels of
brightness for the display screen : HIGH, MID or LOW.
18
BASIC FUNCTIONS
pg 01-26/LX3xxx/21-Eng 4/16/02, 11:21 AM18
Page 19

Operations
Discs information
DVD-VIDEO DISC
TITLE 1 TITLE 2
CHAPTER 1 CHAPTER 2 CHAPTER 1 CHAPTER 2 CHAPTER 3
● DVD video discs may have one or more Titles, and each
Title may have one or more Chapters.
● Playback stops at the end of each Title.
VIDEO CD
TRACK 1 TRACK 2
INDEX 1 INDEX 2 INDEX 1 INDEX 2 INDEX 3
● Video CDs may have one or more Tracks, and each Track
may have one or more Indexes.
● To make easy and convenient access, you can move
between Tracks and Indexes.
● Some Video CDs have Play Back Control (PBC), which is a
predefined playback sequence stored on the disc (refer to
“Special VCD/SVCD features”).
AUDIO CD
2 3 5 6 7 8 9 10 11 12 ...41
TRACKS
● Audio CDs contain only Tracks.
Basic playback
CAUTION!
– Do not move the disc player during playback, as
doing so may damage the DVD system.
– Do not push on the disc tray or put any objects
other than disc on the disc tray. Doing so may
cause the disc player malfunction.
1 Press STANDBY ON y or
POWER y to switch the system
on.
2 Press OPEN/CLOSE 0 to open
the disc tray.
3 Load a disc with the label side
facing up.
4 Press OPEN/CLOSE 0 again to
close the tray.
➜ There will be a shor t delay while the player identifies
the disc and reads the menu from the disc.
● Some discs will start playing automatically, and others will
display the Disc Contents Menu on the TV screen. If the
menu is presented, use 341 2 keys to highlight your
selection and press OK to confirm. To select a play option,
press numeric keypad (0-9).
5 PressÉÅ to start playback.
POWER ON/OFF
Notes:
– Your player will not play discs that have a region code
different from the region code of your player.
– If the inhibit icon appears on the TV screen when a
button is pressed, it means the function is not available
on the disc you are playing.
To interrupt playback
● PressÉÅ.
➜ The picture freezes and the sound will be muted.
● To resume playback, pressÉÅ again.
To stop playback
● Press Ç.
Skipping to another track/chapter
● Press S or T repeatedly during playback to skip
backward or forward. Each press will take the disc to the
beginning of the previous or next track/chapter.
Note:
S
– If the REPEAT function has been set, pressing
T
will replay the same track/chapter.
or
To skip to the beginning of the current track/
chapter during playback
● Press S once.
To go directly to any track/chapter
● Use the numeric keypad (0-9) to enter the number of
the desired track/chapter.
Fast Search
1 Hold down S or T about two seconds to fast
reverse or forward the disc.
2 To resume normal play, pressÉÅ .
Continue playback from the last stop point
● In stop mode and when a disc has not been ejected, press
RESUME to resume playback from the point at which it
stopped.
To cancel the resume mode
● Press Ç again.
Notes:
– When the player is disconnected from the power supply or
the disc tray is opened, the resume option will be cancelled
automatically.
– The resume option may not be available on some discs.
English
pg 01-26/LX3xxx/21-Eng 4/16/02, 11:21 AM19
OPERATIONS
19
Page 20

English
Repeat play
You can only select the repeat play mode during playback.
For DVD - Repeat chapter/title/disc
● Press REPEAT repeatedly to select the following :
➜ “R-1” – repeat chapter.
➜ “R-A” – repeat title/disc.
Special DVD/VCD features
A number of operations can be carried out directly via
the multiple menu bars on the TV screen without
interrupting disc playback.
For VCD/CD/MP3-CD - Repeat track/disc
● Press REPEAT repeatedly to select the following :
➜ “R-1” – repeat the current track.
➜ “R-A” – repeat the entire disc.
Notes:
– Repeat play might not work correctly with some DVDs.
– For VCD, repeat play is not possible during PBC playback.
Repeat A-B
You can play a specific section in a chapter/track repeatedly.
1 Press REPEAT A-B at your chosen starting point.
2 Press REPEAT A-B again at your chosen end point.
➜ The passage will now repeat continuously.
3 To resume normal play, press REPEAT A-B again.
Note:
– The section A and B can be set only within the same
chapter/track.
Programme favourite tracks
You can play the contents of the disc in the order you want
by programming the order of the tracks to be played. Up to
99 tracks can be stored.
1 While playback is stopped, select or press PROGRAM to
enter programme mode.
➜ “P 00:00” is displayed.
2 Use the numeric keypad (0-9) to input the track
number in the order you want.
➜ If you attempt to programme more than 99 tracks,
"FULL" is displayed.
3 Press OK to store the track.
● Repeat steps 2-3 to store other tracks.
4 To start programme play, pressÉÅ .
5 To stop playback, press Ç once.
6 To cancel the programme, press Ç again.
From the left,
SETUP MENU ™ SUBTITLE ™ LANGUAGE ™ SLOW
™ FAST REVERSE ™ FAST FORWARD ™ STATUS
From the left,
TITLE SEARCH ™ CHAPTER SEARCH ™ TIME
SEARCH ™ ZOOM ™ ANGLE ™ STEP ™ PBC ON/
OFF
From the left,
PROGRAM
IMPORTANT!
Some operations may be different or restricted,
depending on the disc format. Refer to the jacket
or case of the disc you are playing.
1 Press SYSTEM MENU.
➜ The menu bar will be displayed across the top of the
TV screen.
2 Press 1 or 2 to move through the menu bar.
3 Press 4 to select the highlighted icon and use 34 keys
to select your preferred option.
4 Press OK to confirm a highlighted selection.
5 To exit, press SYSTEM MENU or OK.
Changing subtitle language
This operation works only on DVDs with multiple subtitle
languages.
● Select
the desired language.
from the menu bar and press 4 key to select
Programme function can also be accessed via the
menu bar
1 Press SYSTEM MENU and select from the menu
bar.
2 Repeat steps 2-6 listed above to programme your
favourite tracks.
20
OPERATIONS
pg 01-26/LX3xxx/21-Eng 4/16/02, 11:21 AM20
Page 21

Changing sound track language
DVD
VCD (PBC ON)
This operation works only on DVDs with multiple
soundtrack language.
● Select
the desired language.
For VCD :
● Press 4 to select the desired audio channels for sound :
Note:
– When the desired language is not selected even after
pressing the button several times, it means the language is not
available on the disc.
Playing in slow motion mode
from the menu bar and press 4 key to select
LEFT VOCAL ™ RIGHT VOCAL ™ MONO LEFT
™ MONO RIGHT ™ STEREO ™ LEFT VOCAL
3 To resume normal play, pressÉÅ.
Note:
– The sound will be muted during fast reverse or forward
search.
Display the disc information during playback
● Select
the following display informations :
from the menu bar and press 4 key to select
English
1 Select from the menu bar and press 4 key to select
the required slow motion speed :
SF x2 ™ SF x4 ™ SF x8 ™ SR x2 ™ SR x4 ™ SR x8 ™
SLOW OFF
(SF) = slow forward
(SR) = slow reverse
For VCD :
1 Press 4 key to select the required slow motion speed :
(forward) : SF x1 ™ SF x2 ™ SF x3 ™ OFF
2 To resume normal play, pressÉÅ.
Note:
– The sound will be muted during slow-motion play.
Searching for a particular passage
1 Select or from the menu bar to select fast reverse
search or fast foward search respectively.
2 Press 4 key to select the required search speed :
(reverse) : FR x2 ™ FR x4 ™ FR x6 ™ FR x8 ™ OFF
(forward) : FF x2 ™ FF x4 ™ FF x6 ™ FF x8 ™ OFF
Moving to another title/chapter
Some discs may contain more than one title or chapter. If
the disc has a title or chapter menu recorded on it, you can
start playback from the selected item.
1 Select (title) or (chapter) from the menu bar.
2 Use numeric keypad (0-9) to select a desired title/
chapter number and press OK to start playback.
Note:
– Selecting a title or chapter might not be possible on certain
discs.
Playback from a selected point
This function allows you to start playing at any chosen time
on the disc.
1 Select from the menu bar.
2 Enter hours, minutes and seconds from left to right in the
time edit box using the numeric keypad (0-9).
➜ Each time an item has been entered, the next item will
be highlighted.
3 PressÉÅ to start playback.
For VCD :
2 Press 4 key to select the required search speed :
(reverse) : FR x1 ™ FR x2 ™ FR x3 ™ FR x4 ™ OFF
(forward) : FF x1 ™ FF x2 ™ FF x3 ™ FF x4 ™ OFF
pg 01-26/LX3xxx/21-Eng 4/16/02, 11:21 AM21
OPERATIONS
21
Page 22

English
Zooming in
This function allows you to enlarge the picture on the TV
screen and to pan through the enlarged image.
1 Select from the menu bar and press 4 key repeatedly
to select a zoom factor : x1.5 ™ x2.0 ™ x4.0 ™ OFF.
2 To pan through the enlarged image, press OK to confirm
the zoom selection and use 1 2 34 keys to move the
zoomed picture left, right, up and down.
3 To exit ZOOM mode, select zoom factor to
“ZOOM OFF” from the menu bar.
Viewing from another angle
If the disc contains sequences recorded from different
camera angles, this allows you to view the picture from
different angles. The selections of angle are depending on
the disc format.
Checking the contents of DVD
1 Press DISC MENU on the remote control.
➜ If the current title has a menu, the menu will appear on
the screen. Otherwise, the disc menu will be displayed.
2 Use 1 2 34 keys to select the desired title or chapter,
followed byÉÅ or OK.
➜ The selected title or chapter star ts playing.
Notes:
– The details of operation might differ depending on the DVD
disc.
– Selecting a title or disc might not be possible on certain
DVD discs.
Special VCD/SVCD features
Playback Control (PBC)
PBC playback allows you to play Video CDs interactively,
following the menu on the display.
● Select in the menu bar and press 4 key to select
PBC ON or PBC OFF.
● Select from the menu bar and press 34 keys to select
the desired angle : 1/4, 2/4, 3/4 or 4/4.
➜ Playback changes to the selected angle.
Advancing by frames
1 Select from the menu bar and press 4 key to play the
disc step by step (one frame each step).
2 To resume normal play, press ÉÅ.
When playing a disc with PBC function
● If “PBC OFF”, the system will star t playback automatically.
● If “PBC ON”, the PBC menu (if available) will appear on the
TV screen for selection. Use the numeric keypad (0-9)
to enter your choice.
Note:
– If PBC mode is switched on, TIME SEARCH and REPEAT
functions are not available.
22
OPERATIONS
pg 01-26/LX3xxx/21-Eng 4/16/02, 11:21 AM22
Page 23

Special MP3-CD features
– JPEG format
– Max. 12 characters
– Max. nested directory is 7 levels
– The max. album number is 32
– Suppor ted VBR bit-rate
– Suppor ted sampling frequencies for MP3 disc are :
32 kHz, 44.1 kHz, 48 kHz
– Suppor ted Bit-rates of MP3 disc are: 32, 64, 96, 128,
192, 256 (kbps)
– The disc reading time may exceed 30 seconds due to
the large number of songs compiled onto one disc.
MP3-CD menu
1 Press DISC MENU to switch on the MP3-CD menu.
➜ The album menu appears on the TV screen.
2 To select a desired album, press 341 2 and followed by
OK orÉÅ to confirm.
➜ The title menu appears on the TV screen.
3 To select a desired title, press 341 2 and followed by OK
orÉÅ to star t playback.
● You can also use the numeric keypad (0-9) to enter
your choice.
If the MP3-CD menu is switched off
● You can only play the existing selected title by pressing
ÉÅ button. While in playback mode, press S / T to
select the previous/next title.
➜ The title number will be displayed.
English
Only the following functions are possible for MP3 disc.
– STOP / PLAY / PAUSE / OK
– REPEAT (TITLE/ALBUM/DISC)
OPERATIONS
23
pg 01-26/LX3xxx/21-Eng 4/16/02, 11:21 AM23
Page 24

Other Functions
English
Tuning to radio stations
1 Press STANDBY ON to switch on the last selected
source.
2 Adjust SOURCE (or press TUNER) to select TUNER
mode.
3 Press TUNER again to select the desired band : FM or
MW.
4 Press and hold S or T until the frequency indication
starts to change, then release.
➜ The system automatically tunes to the next strong radio
station.
● To tune to a weak station, press S or T briefly and
repeatedly until an optimal reception is found.
5 Repeat step 4 if necessary until you find the desired radio
station.
Presetting radio stations
You can preset up to 40 stations regardless of the
reception.
1 Tune to your desired radio station (refer to “Tuning to radio
stations”).
2 Press PROGRAM.
➜ “Program” icon appears.
Program
3 Use the numeric keypad (0-9) to select the desired
preset number.
Program
Listening to preset radio
stations
● In tuner mode, press 1 or 2 or use the numeric keypad
(0-9) to select the desired preset number.
➜ The preset number, radio frequency, and waveband are
displayed.
Sleep timer setting
The sleep timer enables the system to switch to standby
mode automatically at a preset time.
1 Press SLEEP repeatedly to select a preset time.
➜ The selections are as follows (time in minutes):
15 ™ 30 ™ 45 ™ 60 ™ 90 ™ 120™ OFF ™ 15...
2 When you reach the desired length of time, stop pressing
the SLEEP button.
➜ “Sleep” icon appears.
To check the remaining length of time after sleep
timer is activated
● Press SLEEP once.
To change the preset sleep timer
● Press SLEEP again while the remaining sleep timer is
shown.
➜ The display will show the next sleep timer options.
To deactivate the sleep timer
● Press SLEEP repeatedly until "OFF" is displayed, or press
the STANDBY ON button.
Note:
– If “Program” icon goes off before you select the desired
preset number, press PROGRAM again.
4 Press PROGRAM again to store the radio station.
● Repeat steps 1–4 to store other radio stations.
Notes:
– If you attempt to programme more than 40 preset radio
stations, "FULL" is displayed.
– During programming, if no key is pressed within five
seconds, the system will exit the programme mode
automatically.
24
OTHER FUNCTIONS
pg 01-26/LX3xxx/21-Eng 4/16/02, 11:21 AM24
Page 25

Specifications
AMPLIFIER SECTION
Output power
- Stereo mode (DIN) ....................................................................................2 x 25 W
- Surround mode (1 kHz) ..................................................... 15 W RMS/channel
Total Harmonic Distortion ............................... 10% at rated power (1 kHz)
Frequency Response ..................................................180 Hz – 14 kHz / ±1 dB
Signal-to-Noise Ratio ......................................................................> 65 dB (CCIR)
Input Sensitivity..................................................................................................... 400 mV
TUNER SECTION
Tuning Range .......................................... FM 87.5 – 108 MHz (50 kHz steps)
.......................................................................... MW 531 – 1602 kHz (9 kHz steps)
....................................................................... MW 530 – 1700 kHz (10 kHz steps)
26 dB Quieting Sensitivity ......................................................................... FM 20 dB
26 dB Quieting Sensitivity .......................................................... MW 3162 µV/m
Image Rejection Radio ................................................................................. FM 25 dB
................................................................................................................................ MW 28 dB
IF Rejection Ratio ............................................................................................ FM 60 dB
................................................................................................................................ MW 24 dB
Signal-to-Noise Ratio .................................................................................... FM 60 dB
................................................................................................................................ MW 40 dB
AM Suppression Ratio ................................................................................. FM 30 dB
Harmonic Distortion ............................................................................FM Mono 3%
......................................................................................................................... FM Stereo 3%
...................................................................................................................................... MW 5%
Frequency Response ......................................... FM 180 Hz – 10 kHz / ±6 dB
Stereo Separation .........................................................................FM 26 dB (1 kHz)
Stereo Threshold ......................................................................................... FM 23.5 dB
DVD SECTION
Laser Type ................................................................................................ Semiconductor
Disc Diameter .............................................................................................. 12cm / 8cm
Video Decoding .................................................................................................. MPEG-2
Video DAC................................................................................................................ 10 Bits
Signal System ............................................................................................... PAL / NTSC
Video Format ..................................................................................................... 4:3 / 16:9
Video S/N ........................................................................................... 56 dB (minimum)
Composite Video Output ................................................................ 1.0 Vp-p, 75
S-Video Output ............................................................................. Y - 1.0 Vp-p, 75 Ω
........................................................................................................... C - 0.286 Vp-p, 75 Ω
Audio DAC .......................................................................................... 24 Bits / 96 kHz
Frequency Response ................................................. 4 Hz – 20 kHz (44.1 kHz)
................................................................................................... 4 Hz – 22 kHz (48 kHz)
................................................................................................... 4 Hz – 44 kHz (96 kHz)
Digital Output .................................................................. SPDIF Coaxial & Optical
SPEAKERS
Front speakers / Centre speaker
System ........................................................................................................1-way shielded
Impedance ........................................................................................................................ 4 Ω
Speaker drivers ............................................................................................ 3” full range
Dimensions (w x h x d) ........................................ 90 mm x 90 mm x 90 mm
Weight............................................................................................................. 0.45 kg/each
Rear (surround) speaker
System ........................................................................................................1-way shielded
Impedance ........................................................................................................................ 4 Ω
Speaker drivers ............................................................................................ 3” full range
Dimensions (w x h x d) ........................................ 90 mm x 90 mm x 90 mm
Weight............................................................................................................. 0.45 kg/each
SUBWOOFER
Subwoofer (not magnetically shielded design)............................................ 6.5”
Output power .................................................................................. 75 W (4 Ω, DIN)
THD .............................................................................................................. 10% at 80 Hz
Reproduction frequency response .......................................... 30 Hz – 180 Hz
Phase switch ............................................................................................................ 0
Input sensitivity (Subwoofer In) .......................................................... 200 mVrms
AC power
SW3000/06S, SW3500/06S ...................................... 110 – 127 / 60 Hz
SW3000/00S, SW3500/02S ........................... 220 – 240 / 50 – 60 Hz
Power Consumption............................................... 53 W (at 1/8 Rated Power)
Dimensions (w x h x d) ................................135 mm x 338 mm x 375 mm
Weight............................................................................................................................... 7 kg
Specifications subject to change without prior notice
Ω
O
, 180
English
O
MISCELLANEOUS
Power Supply Rating
LX3000D/21L, LX3500D/21R ................................. 110 – 127 / 60 Hz
LX3000D/21S /30S, LX3500D/21H.......... 220 – 240 / 50 – 60 Hz
Power Consumption........................................................................................... 160 W
Dimensions (w x h x d) ...................................435 mm x 78 mm x 360 mm
Weight............................................................................................................................7.1 kg
IR REMOTE CONTROL
Effective Range................................................................................................. > 8 Meter
Number of Keys .............................................................................................................. 45
Battery (1.5V) ........................................................................................................ AA x 2
pg 01-26/LX3xxx/21-Eng 4/16/02, 11:21 AM25
SPECIFICATIONS
25
Page 26

Troubleshooting
English
WARNING!
Under no circumstances should you try to repair the system yourself, as this will invalidate the warranty. Do
not open the system as there is a risk of electric shock.
If a fault occurs, first check the points listed below before taking the system for repair. If you are unable to
solve a problem by following these hints, consult your dealer or service centre.
Problem Solution
No power. – Check if the AC power cord is properly connected.
No picture. – Select the appropriate video input mode on the TV.
Distorted or poor picture. – Sometimes a small amount of picture distortion may appear. This is not a malfunction.
The aspect ratio of the screen – The aspect ratio is fixed on the DVD disc.
cannot be changed even though – Depending on the TV, it may not allow you to change the aspect ratio.
you have set the TV shape.
No sound or distorted sound. – Adjust the volume.
No sound is heard from the – Use the CENTER +/- or REAR+/- to adjust the volume level.
centre or rear speakers. – Check that the centre or rear surround speakers are connected correctly.
The DVD player does not – Inser t a readable disc with the playback side facing down.
start playback. – Check the disc type, color system and regional code. Check for any scratches or smudges on
The DVD system does not respond – Disconnect the power plug from the outlet and insert again.
when the buttons are pressed.
The language for the sound or – Multi-language sound or subtitle is not recorded on the DVD.
subtitle cannot be changed when – Changing the language for the sound or subtitle is prohibited on the DVD.
playing a DVD.
No image is output when a – Make sure the component is connected correctly.
function is selected. – Press the correct function button for the input source.
Considerable noise in radio – Tune in the correct frequency.
broadcasts. – Connect the antenna.
The remote control does not – Point the remote control at the remote sensor of the unit.
function. – Reduce the distance to the player.
The display is dark. – Press DIM again.
Low hum or buzz sound. – Place the DVD system as far away as possible from electric devices with interference.
Low bass response. – Check all speakers for correct polarity.
The disc tray cannot open and – Press and hold SOURCE and STOP buttons for more than two seconds.
“TRAY LOCKED” is displayed.
– Check if the TV is switched on.
– Check the video connection.
– Clean the disc.
– Connect the system to TV’s S-video input.
– Check that the speakers are connected correctly.
– Replace the speaker cables.
– Check the speaker settings.
– The system is in pause, slow motion or fast forward/reverse mode, press PLAY to resume
normal play mode.
– Use surround mode.
the disc.
– Press SYSTEM MENU to turn off the setup menu screen.
– Cancel the parental control rating function or change the rating level.
– Moisture has condensed inside the system. Remove the disc and leave the system turned on
for about an hour.
– Route RF (AC-3) and digital cables away from the antenna terminals and wires.
– Fully extend the FM wire antenna. Position for best reception and secure to a wall.
– Connect an outdoor FM or MW antenna.
– Adjust the direction and position for best reception.
– Turn off the equipment causing the noise or move it away from the DVD system.
– Place the antenna far ther away from the equipment causing the noise.
– Remove any possible obstacles.
– Replace the batteries with new ones.
– Check that the batteries are loaded correctly.
26
TROUBLESHOOTING
pg 01-26/LX3xxx/21-Eng 4/16/02, 11:21 AM26
 Loading...