

Philips HTS3300 61 User Manual
DVD HOME THEATER SYSTEM
User Manual 4
46
88
Bahasa Melayu 130
Thank you for choosing Philips.
Need help fast?
Read your Quick-Use Guide and/or User Manual first for quick
tips that make using your Philips product more enjoyable.
If you have read your instructions and still need assistance,
you may access our online help at www.philips.com/support
HTS3300
3139 115 2xxx1
1
LASER
Type Semiconductor laser
GaAlAs
Wave length 650~660 nm (DVD)
784~796 nm (CD)
Output Power 7 mW (DVD)
10 mW (VCD/CD)
Beam divergence 60 degree
CAUTION
Use of controls or adjustments or
performance of procedures other than
herein may result in hazardous
radiation exposure or other unsafe
operation.
Manufactured under license from
Dolby Laboratories. “Dolby”, “Pro
Logic” and the double-D symbol are
trademarks of Dolby Laboratories.
Manufactured under license from
Digital Theater Systems, Inc. U.S. Pat.
Noís. 5,451,942; 5,956,674; 5,974,380;
5,978,762; 6,226,616; 6,487,535 and
other U.S. and world-wide patents
issued and pending. “DTS” and “DTS
Digital Surround” are registered
trademarks of Digital Theater Systems,
Inc. Copyright 1996, 2003 Digital Inc.
All Rights Reserved.
DivX®, DivX Certified, and
associated logos are
trademarks of
DivXNetworks, Inc and are
used under license.
Microsoft, Windows Media, and the
Windows logo are trademarks, or
registered trademarks of Microsoft
Corporation in the United States
and/or other countries
As an ENERGY STAR® partner;
Philips has determined that this
product meets the ENERGY STAR
guidelines for energy efficiency.
®
For Customer Use:
Read carefully the information located at
the bottom of your DVD system and
enter below the Serial No. Retain this
information for future reference.
Model No. DVD VIDEO HTS3300
Serial No. _______________
2
‘CONSUMERS SHOULD NOTE THAT NOT ALL HIGH
DEFINITION TELEVISION SETS ARE FULLY
COMPATIBLE WITH THIS PRODUCT AND MAY C AUSE
ARTIFACTS TO BE DISPLAYED IN THE PICTURE. IN
CASE OF 525 OR 625 PROGRESSIVE SCAN PICTURE
PROBLEMS, IT IS RECOMMENDED THAT THE USER
SWITCH THE CONNECTION TO THE ‘STANDARD
DEFINITION’ OUTPUT. IF THERE ARE QUESTIONS
REGARDING OUR TV SET COMPATIBILITY WITH THIS
MODEL 525p AND 625p DVD PLAYER, PLEASE
CONTACT OUR CUSTOMER SERVICE CENTRE’.
3139 115 2xxx1

Index
English ----------------------------------------- 4
-------------------------------------------------------- 46
-------------------------------------------------------- 88
Bahasa Melayu---------------------------- 130
English
Bahasa Melayu
3139 115 23271
3

Contents
English
General Information
Supplied accessories ................................... 6
Cleaning discs............................................... 6
Setup .............................................................. 6
Basic Connections
Step 1: Placing the speakers and
subwoofer ..................................................... 7
Step 2: Connecting the speakers and
subwoofer ..................................................... 8
Step 3: Connecting to TV .......................... 9
Option 1: Using Composite Video
socket (CVBS)......................................... 9
Option 2: Using Y Pb Pr sockets ......... 9
Step 4: Connecting FM/MW antennas ... 10
Step 5: Connecting the power cord ..... 10
Connection to External Devices
Connecting an audio/video device ........ 11
Remote Control......................... 12–13
Main Unit ............................................... 14
Getting Started
Step 1: Inserting batteries into the
remote control .......................................... 15
Using the remote control to
operate the system .............................. 15
Step 2: Switching on the DVD system .. 15
Switching to Eco Power standby
mode .......................................................15
Step 3: Setting the TV ............................... 15
Setting up Progressive Scan feature
(for Progressive Scan TV only) .......... 16
Selecting the matching colour
system ..................................................... 17
Setting the TV Display ......................... 17
Step 4: Setting language preferences ..... 18
On-Screen Display (OSD) language. 18
Audio, Subtitle and Disc menu
languages ................................................ 18
Disc Operations
Playable discs .............................................. 19
Playing discs ................................................ 19
Auto Eco Power standby mode........ 20
Basic playback controls ............................ 20
Selecting various repeat/shuffle
functions ...................................................... 20
Other operations for video playback
(DVD/ VCD/ SVCD) ................................. 21
Using the Disc Menu (for DVD only) 21
Viewing playback information............ 21
Advancing by frame ............................. 22
Resuming playback from the last
stopped point ........................................ 22
Zooming in ............................................ 22
Changing sound track language ......... 22
Changing subtitle language
(DVD only) ............................................ 22
Preview Function (VCD only) ........... 23
Playing MP3/Windows Media™ Audio/
JPEG/MPEG-4 disc ..................................... 24
Playing MP3 music and JPEG
picture simultaneously ........................ 24
Playing a picture disc (slide show)......... 25
Preview Function.................................. 25
Zoom picture ........................................ 25
Rotating/Flipping the picture ............. 25
Supported JPEG picture formats ......25
Playing a DivX disc.................................... 26
Playing a Karaoke disc .............................. 27
Microphone Setting ............................. 27
DVD Setup Menu Options
Accessing General Setup Page ............... 28
Locking/ Unlocking the disc
for viewing ............................................. 28
Dimming system’s display panel ........ 28
Programming disc tracks (not
for Picture CD/ MP3) .......................... 29
OSD language ....................................... 29
Screen Saver – turning on /off ...........30
DivX(R) VOD registration code ....... 30
Accessing Audio Setup Page ................... 31
Speakers Volume/Speakers Delay ...... 31
Night mode – turning on/off ............ 31
CD Upsampling .................................... 31
4

Accessing Video Setup Page .................... 32
TV Type ................................................... 32
TV Display ............................................. 32
Progressive function-turning on/off . 32
Picture Setting....................................... 33
Accessing Preference Setup Page .......... 34
Audio, Subtitle, Disc Menu ................. 34
Restricting playback by Parental
Control ............................................ 34–35
PBC (Playback Control)...................... 35
MP3/JPEG menu– turning on / off ..... 35
Changing the Password....................... 36
Setting the DivX Subtitle font ........... 36
Restoring to original settings ............ 36
Other Functions
Setting the Sleep timer ............................ 37
Tuner Operations
Tuning to radio stations ........................... 38
Presetting radio stations .......................... 38
Using the Plug and Play ....................... 38
Automatic presetting .......................... 39
Manual presetting ................................. 39
Selecting a preset radio station ............. 39
Deleting a preset radio station .............. 39
Changing tuning grid ................................. 39
Contents
English
Sound and Volume Controls
Individual speakers volume adjustment 40
Selecting surround sound........................ 41
Selecting digital sound effects ................. 41
Volume Control ......................................... 41
Troubleshooting ......................... 42–43
Specifications ......................................44
Glossary .................................................... 45
Language Code ....................... 173
5

General Information
English
Supplied accessories
Composite Video
cable (Yellow)
Audio Cable
FM wire antenna
MW loop antenna
Remote control
and two batteries
(12nc: 3139 258 70101)
Setup
Finding a suitable location
– Place the set on a flat, hard and stable
surface. Do not place the set on a carpet.
– Do not position the set on top of
other equipment that might heat it up
(e.g., receiver or amplifier).
– Do not put anything under the set
(e.g., CDs, magazines).
Space for ventilation
– Place the apparatus in a location with
adequate ventilation to prevent internal
heat build up. Allow at least 10 cm (4.5”)
clearance from the rear and the top of
the set and 5cm (2.3”) from the left and
right to prevent overheating.
5cm (2.3")
10cm (4.5")
5cm (2.3")
10cm (4.5")
Cleaning discs
To clean a disc, use a micro fibre cleaning
cloth and wipe the disc from the center
to the edge in a straight line.
CAUTION!
Do not use solvents such as benzene,
thinner, commercially available cleaners,
or anti-static sprays intended for discs.
Since the optical unit (laser) of the DVD
system operates at a higher power than
regular DVD or CD players, cleaning CDs
intended for DVD or CD players may
damage the optical unit (laser). Therefore,
refrain from using a cleaning CD.
6
Avoid high temperatures, moisture,
water and dust
– Apparatus shall not be exposed to
dripping or splashing.
– Do not place any sources of danger on
the apparatus (e.g., liquid filled objects,
lighted candles).
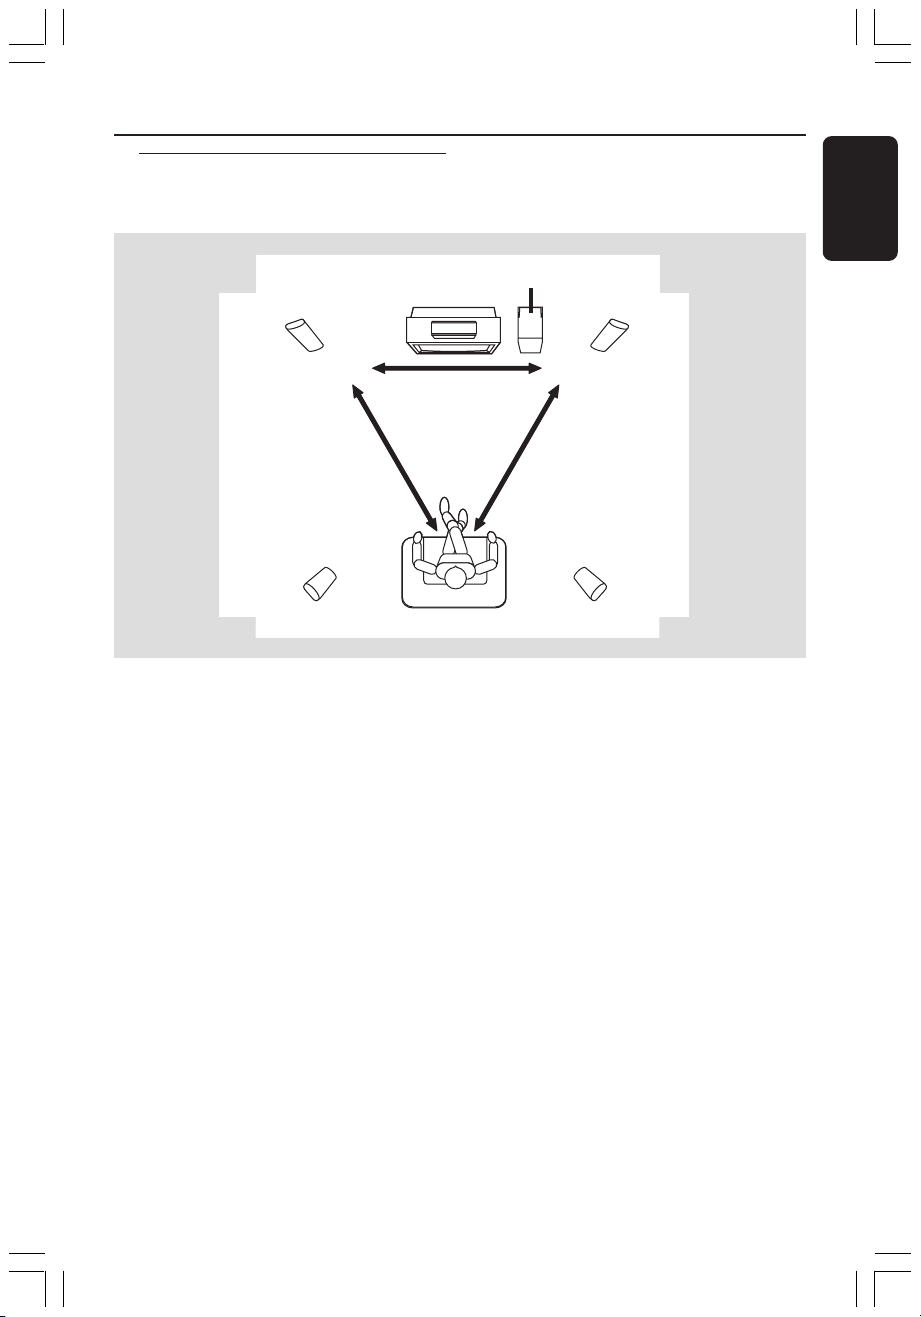
Step 1: Placing the speakers
and subwoofer
SUBWOOFER
2
Basic Connections
English
1
CENTER
33
For best possible surround sound, all the
speakers (except subwoofer) should be
placed at the same distance from the
listening position.
1 Place the front left and right speakers at
equal distances from the TV and at an
angle of approximately 45 degrees from
the listening position.
2 Place the centre speaker above the TV or
the DVD system so that the centre
channel’s sound is localised.
3 Place the rear speakers at normal
listening ear level facing each other or
hang on the wall.
4 Place the subwoofer on the floor near
the TV.
4
1
FRONT RFRONT L
REAR RREAR L
Helpful Hints:
– To avoid magnetic interference, do not
position the front speakers too close to your
TV.
– Allow adequate ventilation around the
DVD system.
7
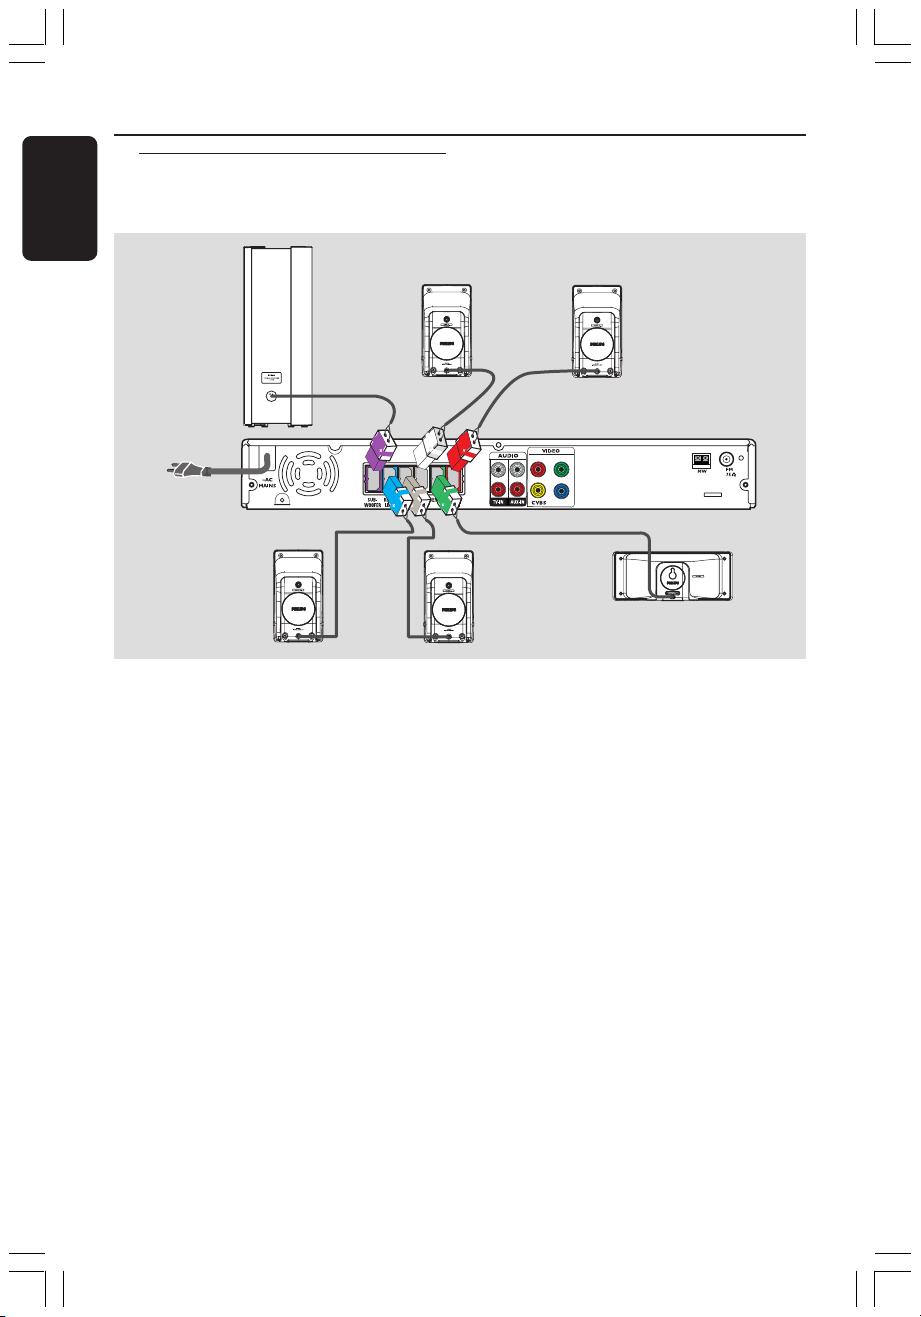
Basic Connections (continued)
English
Step 2: Connecting the
speakers and
subwoofer
Front Left
Subwoofer
Rear Left
Speaker
Connect the supplied speakers system
using the fixed speaker cables by
matching the colours of the sockets and
speaker cables.
Speaker
REAR RREAR L
L
R
Rear Right
Speaker
Front Right
Speaker
Y
Pr
1
Pb
FRONT RFRONT L
DVD System
CENTER
Centre Speaker
Helpful Hints:
– Ensure that the speaker cables are
correctly connected. Improper connections
may damage the system due to a shortcircuit.
– To prevent unwanted noise, do not place
the subwoofer too close to the DVD system,
AC power adaptor, TV or any other radiation
sources.
8

Step 3: Connecting to TV
Basic Connections (continued)
English
OR
IMPORTANT!
– You only need to make
connection from the following
options, depending on the
capabilities of your TV.
– Connect the DVD system directly
to the TV.
– Proceed to page 15 for setting up
the TV once you have completed
the connections.
Helpful Hint:
– To hear the TV channels through this DVD
system, use the audio cables (white/red - not
supplied) to connect AUDIO-TV IN sockets to
the corresponding AUDIO OUT sockets on
the TV.
Option 1: Using Composite Video
socket (CVBS)
● Use the supplied composite video cable
(yellow) to connect the DVD system’s
CVBS socket to the video input socket
(or labelled as A/V In, Video In, Composite
or Baseband) on the TV.
one video
Option 2: Using Y Pb Pr sockets
IMPORTANT!
The progressive scan video quality is
only possible when using Y Pb Pr and
a progressive scan TV is required.
1 Use the component video cables (red/
blue/green - not supplied) to connect the
DVD system’s Y Pb Pr sockets to the
corresponding component video input
sockets (or labelled as Y Pb/Cb Pr/Cr or
YUV) on the TV.
2 Proceed to page 16 for detailed
Progressive Scan set up.
9
Basic Connections (continued)
TV
Pb
Pr
Y
L
R
VOLTAGE SELECTOR
2
1
English
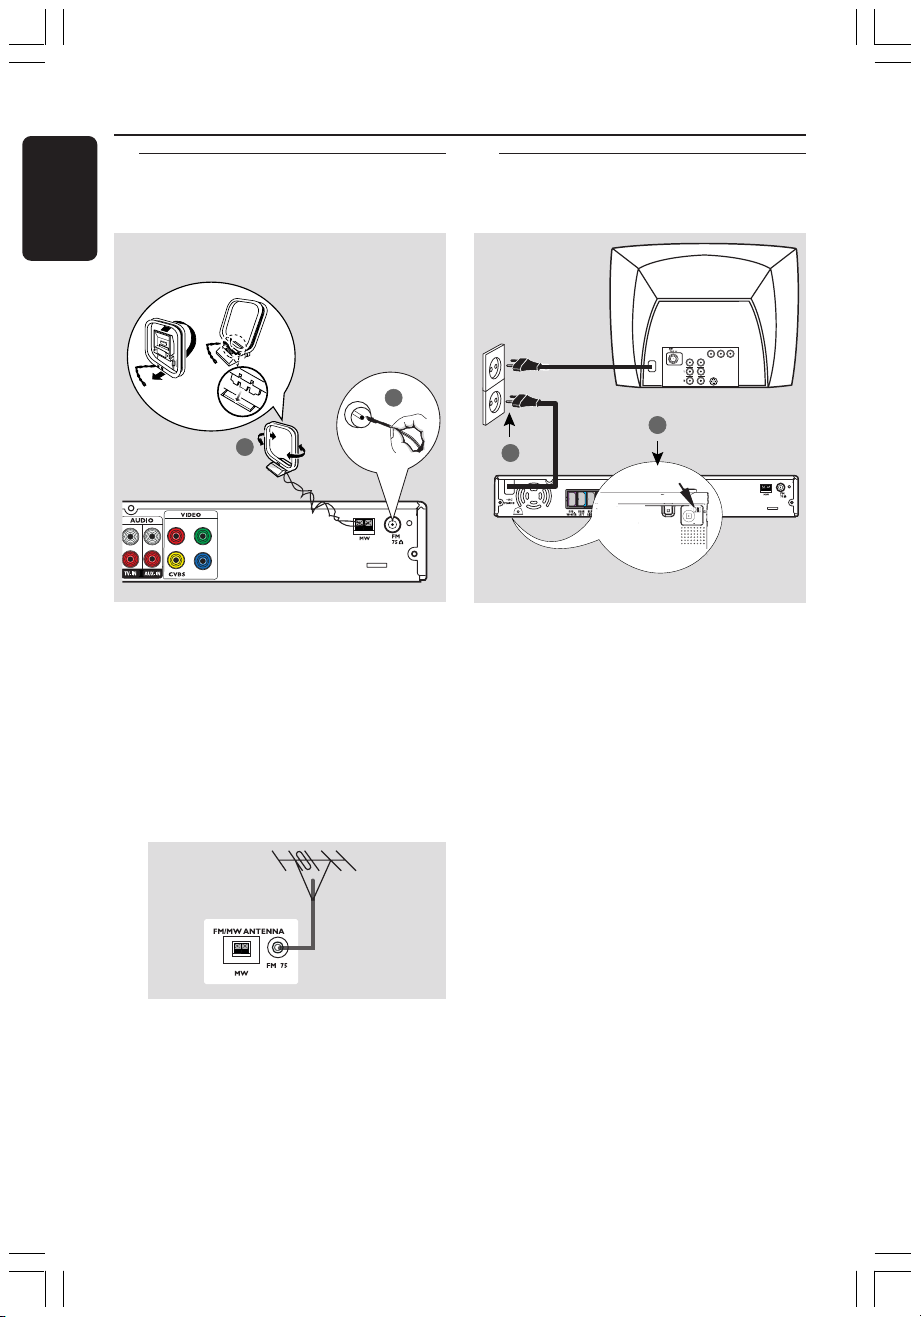
Step 4: Connecting FM/MW
antennas
fix the claw
into the slot
➠
1
MW
antenna
Y
Pr
Pb
1 Connect the supplied MW loop antenna
to the MW socket. Place the MW loop
antenna on a shelf, or attach it to a stand
or wall.
2 Connect the supplied FM antenna to the
FM socket. Extend the FM antenna and
fix its ends to the wall.
For better FM stereo reception, connect
an external FM antenna (not supplied).
FM
antenna
2
Step 5: Connecting the
power cord
DVD system
at the bottom of
the DVD system
After everything is connected
properly,
1 Set the VOLTAGE SELECTOR to the
local power line voltage.
2 Plug in the AC power cord to the power
outlet.
The red Eco Power LED on the DVD
system will light up. Never make or
change any connections with the power
switched on.
Helpful Hint:
– Refer to the type plate on the rear or
bottom of the system for identification and
supply ratings.
Helpful Hints:
– Adjust the position of the antennas for
optimal reception.
– Position the antennas as far as possible
from your TV, VCR or other radiation source
to prevent unwanted interference.
10
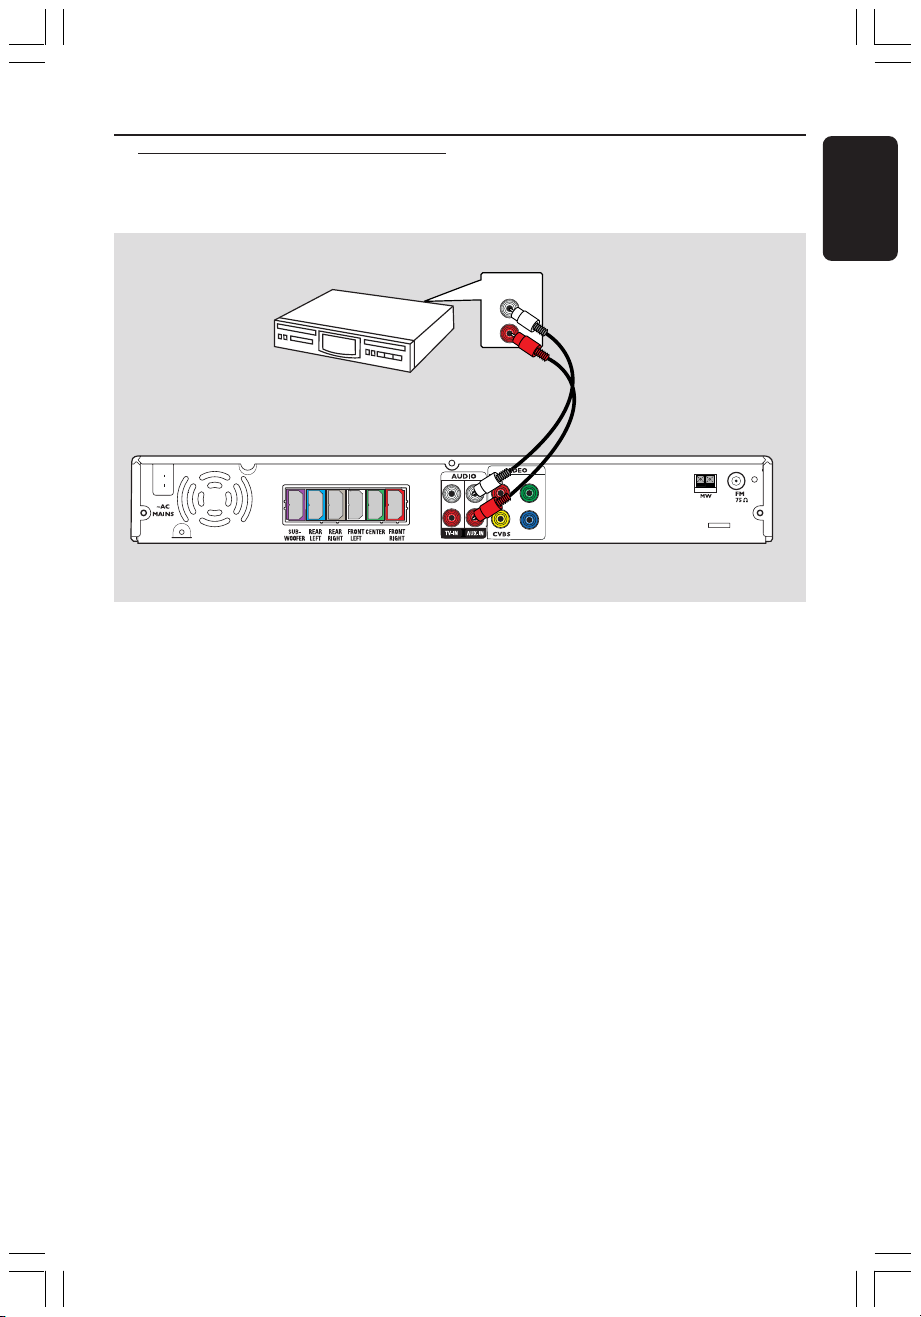
Connection to External Devices
Connecting a audio/video
device
English
Audio/Video
Device
You can connect other audio/video device
to the DVD system in order to use the
Home Theatre Audio System’s surround
sound capabilities.
● Use an audio cable (red/white, not
supplied) to connect the DVD system’s
AUX IN (R/L) sockets to the AUDIO
OUT sockets on the audio/video device.
To listen to the sound, press AUX/DI to
select “AUX” as the source to play.
AUDIO OUT
Y
L
R
Pr
Pb
DVD System
Helpful Hint:
– Always refer to the user manual of the
other devices for complete connection and
use details.
11

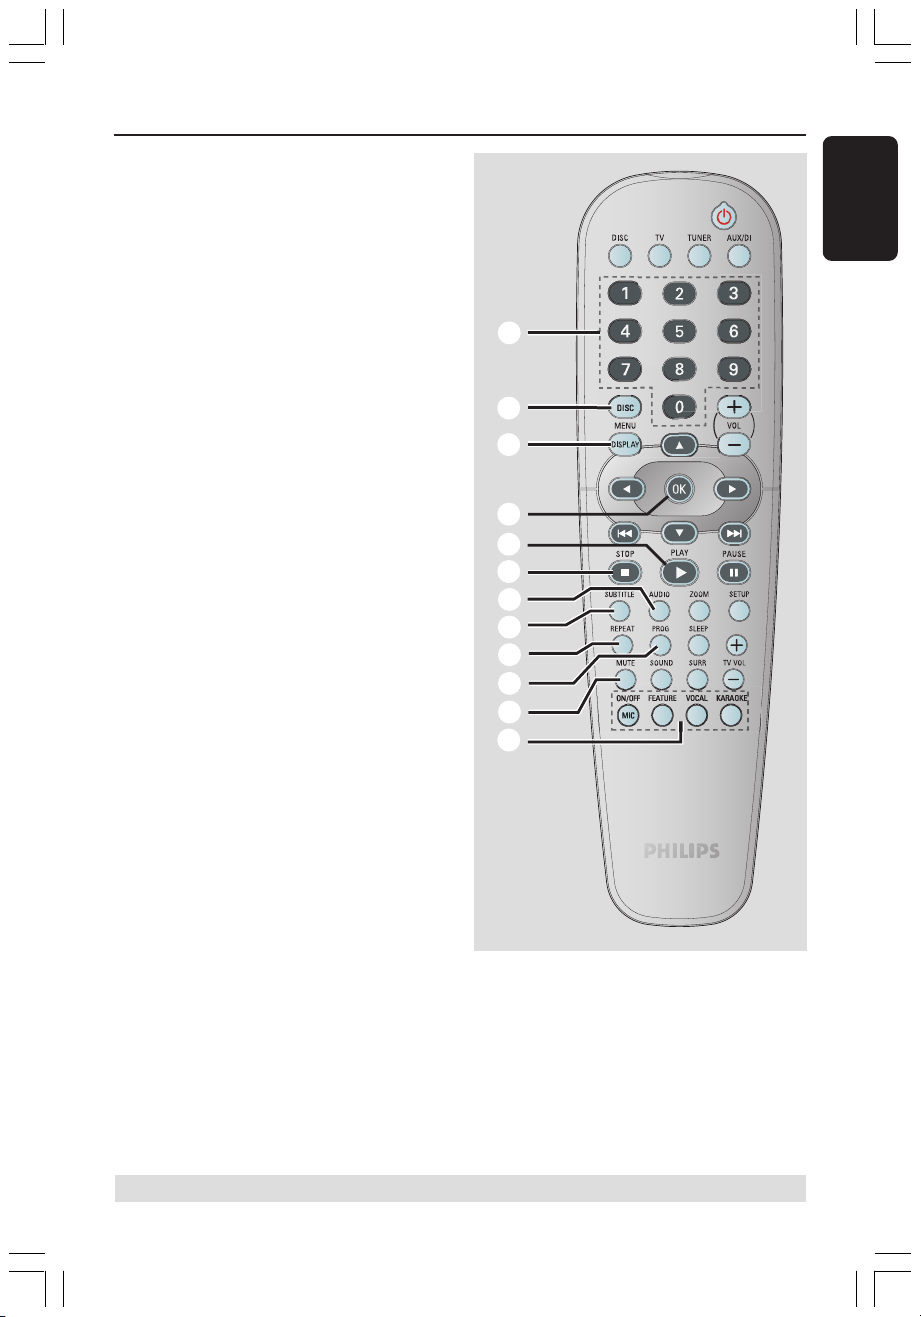
Remote Control
English
1
2
3
4
5
6
7
8
9
0
!
@
1 B
– Switches to Eco Power standby mode, or
turns on the system.
2 Source buttons
DISC : switches to DISC source mode.
TV: switches to TV source mode.
The sound from TV will come out
through the DVD system.
TUNER: toggles between FM and MW
band.
AUX/DI: switches to external mode.
3 VOL +-
– Adjusts the volume level.
4 1 2 3 4
– DISC: selects movement direction in the
menu.
– TUNER: use 3 4 to start auto searching,
use 1 2 to tune the radio frequency up/
down.
5 S / T
– DISC: *searches backward/forward or
selects a track.
– TUNER: selects a preset radio station.
6 PAUSE Å
– DISC: pauses playback.
7 SETUP
– DISC: enters or exits system setup menu.
8 ZOOM
– DISC: enlarges a picture on the TV screen.
9 SLEEP
– Sets the sleep timer function.
0 TV VOL +-
– Adjusts TV volume (Philips TV only).
! SURR
– Selects multichannel surround or stereo
mode.
@ SOUND
– Selects a predefined sound effect.
12
* = Press and hold the button for more than two seconds.
$
%
# Numeric Keypad (0-9)
– DISC: enters a track/title number.
– TUNER: enters the preset radio station
number.
$ DISC MENU
– DISC: enters or exits disc contents menu.
For VCD, selects various preview
function.
% DISPLAY
– DISC: displays the current status or disc
information.
^ OK
– Confirms a selection.
& PLAYÉ
– DISC: starts playback.
* STOPÇ
– Exits an operation.
– DISC: stops playback.
– DISC: holding down the button will open
or close the disc tray.
– TUNER: *erases a preset radio station.
( AUDIO
– DISC: selects an audio language (DVD/
VCD) or an audio channel (CD).
) SUBTITLE
– DISC: selects a subtitle language.
¡ REPEAT
– DISC: selects various repeat modes;
switches repeat mode off.
™ PROG
– DISC: starts programming.
– TUNER: starts *automatic/ manual preset
programming.
£ MUTE
– Mutes or restores the volume.
Remote Control (continued)
English
#
^
&
*
(
)
¡
™
£
≤
≤ Karaoke buttons
MIC ON/OFF: turns on/off the
microphone.
FEATURE: enters karaoke menu.
VOCAL: toggles between various audio
mode options.
KARAOKE: enters microphone setup
menu.
* = Press and hold the button for more than two seconds.
13

Main Unit
English
0
!
@
#
1
2
3
1 STANDBY ON (B)
– Switches to Eco Power standby mode, or
turns on the system.
2 Disc tray
3 OPEN CLOSE 0
– Opens/Closes the disc tray.
4 ECO POWER indicator
– Lights up when in Eco Power standby
mode.
5 iR
– Point the remote control towards this
sensor.
6 System display panel
7 VOLUME
– Adjusts the volume level.
8 MIC LEVEL
– Activates microphone level mode and use
the VOLUME control to set the
microphone volume level.
4
6
58
7
9
9 MIC
– For connecting the microphone socket.
0 SOURCE
– Selects the relevant active source mode:
DISC, TUNER (FM/MW), TV or AUX.
! ÉÅ PLAY/PAUSE
– DISC: starts/pauses playback.
– TUNER: starts preset radio station
installation in Plug & Play mode.
@ S PREV / NEXT T
– DISC: *searches backward/forward or
selects a track.
– TUNER: selects a preset radio station.
# Ç STOP
– Exits an operation.
– DISC: stops playback.
– TUNER: hold down this button to erase
the current preset radio station.
14
* = Press and hold the button for more than two seconds.
 Loading...