

Philips HR8893/06 User Manual [nl]
Vision Plus

2
English Page 4
• Keep pages 3 and 18 open when reading these
operating instructions.
Français Page 7
• Pour le mode d'emploi: dépliez les pages
3 et 18.
Deutsch Seite 10
• Schlagen Sie beim Lesen der Gebrauchsanweisung Seiten 3 und 18 auf.
Nederlands Pagina 13
• Sla bij het lezen van de gebruiksaanwijzing de
pagina's 3 en 18 op.
3
6
5
1b
1
2
1a
4
7
10
8
9
2
6
1
2
12
17
18
11
MIN
MAX
13
15
16
19
3
14

4
English
• To enable recycling, the plastics of the
product have been coded.
• The cardboard packaging has been
made of recycled material and is
entirely suitable for recycling.
Important
• Before using for the first time, check if
the dustbag is placed correctly.
• Never suck up water (or any other
liquid). Never pick up ashes until they
are cold.
• When picking up fine dust, the pores of
the dustbag may become clogged.
This will obstruct the air passage.
Subsequently, the dustbag needs
replacement, although the bag might be
far from full.
• Only use this vacuum cleaner with the
original Philips dustbags types Oslo+or
Oslo+Hygiene (closeable).
• Never use the vacuum cleaner without
the motor protection filter.
f
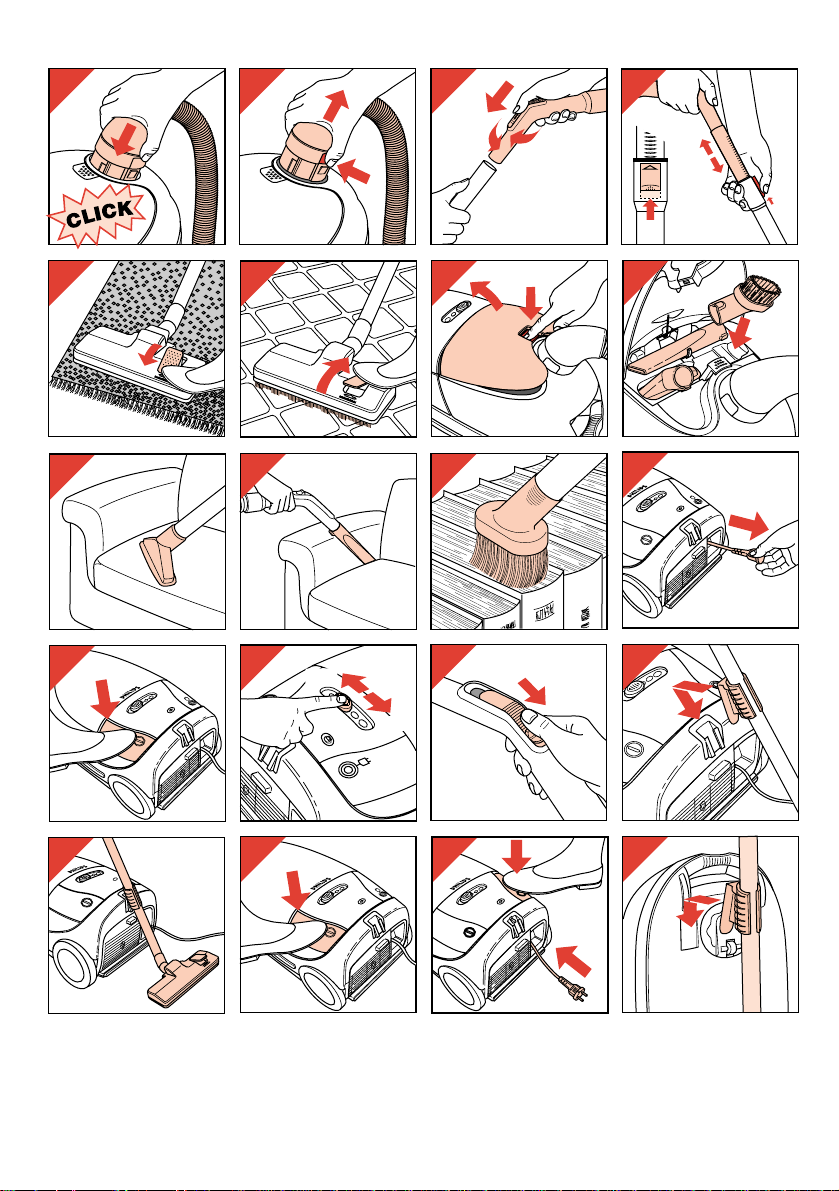
Getting the vacuum cleaner ready for use:
• Connecting the hose: press firmly ("Click!")
(fig. 1a).
- To disconnect: press the knob and pull the
hose out of the vacuum cleaner (fig. 1b).
• Connecting the nozzle, the telescopic tube
and the handle: insert the narrowed section
into the wider section while rotating a little
(fig. 2).
- To disconnect: pull while rotating.
• To adjust the telescopic tube to the required
length, pull the locking knob in the direction of
the arrow (fig. 3) while sliding the top section of
the telescopic tube in or out the lower section.
Then release the knob
• Nozzles:
- Combi nozzle. This nozzle is convertible for
use on either carpets (without brush, fig. 4) or
hard floors (with brush, fig. 5);
- Small nozzle, brush nozzle and crevice
nozzle. These can be found in the special
storage compartment (fig. 6-10);
• Pull the mains plug out of the vacuum cleaner
(fig. 11) and insert into the wall socket.
• Press the on/off switch (I) (fig. 12).
• The electronic suction power control on the
vacuum cleaner enables smooth suction
power adjustment (fig. 13).
MAX = maximum suction power.
MIN = minimum suction power.
- Move the slide towards MAX until the desired
suction power is obtained.
Medium suction power is advisable for
general use. (See also the section on the
Philips “Turbomax” motor.)
Minimum suction power is advisable for
dusting using the brush nozzle and for cleaning
curtains, cloths, etc.
Maximum suction power is advisable for
cleaning very dirty carpets and hard floors.
• The suction power control at the hand grip
enables you to reduce suction power (fig. 14).
This extra facility is advisable if you wish to
apply lower suction power for a short period.
Insufficient suction power?
Please check:
- if the slide on the vacuum cleaner is in the
required position;
- if the control at the hand grip is in "open"
position;
- if the dustbag is full;
- if the nozzle, tube or hose is blocked up.
To remove the obstruction, disconnect the
blocked-up item and connect it (as far as
possible) in adverse position. Then the air will
stream through the item in opposite direction.
Park & Stop
If you wish to interrupt vacuum cleaning, you can
place the tube clip into the rest (fig. 15).
You can slide the clip along the tube to change
the height.
In one movement the tube is parked in a
Philips “Turbomax” motor
Your vacuum cleaner is equipped with the
very powerful Philips “Turbomax” motor.
As long as the dustbag is more or less
empty, medium suction power will be quite
enough for general use. This saves
energy and makes vacuuming easy.
As the dustbag becomes more and more
full, you can select higher suction power.
This ensures that the dustbag will be filled
entirely.

5
convenient position (fig. 16) and the motor is
switched off.
When you lift the tube from the rest the motor will
start again automatically.
Storage
- Switch the vacuum cleaner off (fig. 17).
- Remove the mains plug from the wall socket.
- Rewind the mains cord by pressing the
cordwinder pedal (i) (fig. 18).
- Hitch the lower tube onto the vacuum cleaner
(fig. 19-20). You can slide the clip along the
tube to change the height.
Replacing the dustbag
• Only use this vacuum cleaner with the original
Philips dustbags types Oslo+ (type nº.
HR 6938 or service nº. 4822 015 70049) or
Oslo+Hygiene (closeable) (type nº.
HR 6938-OSH or service nº. 4822 015 70057)
(fig. 21). Damage due to using other dustbags
is not covered by guarantee.
• The "dustbag full indicator" will indicate when
the dustbag is full (fig. 22).
- Switch the vacuum cleaner off (fig. 17).
- Remove the hose (fig. 1b).
- Open the cover (fig. 23).
- Remove the cassette with the full dustbag
(fig. 24).
- Remove the full dustbag from the cassette by
pulling the cardboard tag (fig. 25).
This automatically closes the dustbag (type
Oslo+Hygiene).
- Discard the full dustbag.
- Slide the cardboard front plate of the new
dustbag into the two slots of the cassette as far
as possible (fig. 26-27).
- Position the cassette and the new dustbag in
the vacuum cleaner (fig. 28).
- Bend the rear part of the dustbag downwards.
- Close the cover ("Click!") (fig. 29).
Note: If no dustbag has been placed into the
cassette, the cover cannot be closed.
Replacing the motor protection filter
After having removed the full dustbag, you can
see the removable holder with the motor
protection filter.
Replace the motor protection filter when placing
the first of a new set of dustbags.
You can take the holder to the dustbin and shake
the filter out there. Hygienic: you need not touch
the filter.
Position the new filter with the white side towards
the dustbag (fig. 30-32).
Press the holder with the new filter firmly into
place to ensure that it fits in correctly at the
bottom.
S-Class filter
This revolutionary S-Class filter was especially
designed for Philips Vision vacuum cleaners.
The S-Class filter is capable of removing from the
outlet air at least 99.97% of all the particles
measuring 0.0003 mm and more.
This includes not only normal domestic dust, but
also harmful microscopic vermin such as
glycyphagii and their excrements.
These are known as causes of bronchial
allergies.
• To guarantee optimum air filtering, the S-Class
filter needs replacement at least once a year.
• For replacement, single S-Class filters are
available from your dealer under type
n°. HR 6992 or service n°. 4822 480 10084.
How to replace the S-Class filter
- Open the filter holder (fig. 33).
- Remove the old filter (fig. 34).
- Place the new filter as indicated in fig. 35-37.
Replacing the mains cord
If the mains cord of this appliance is damaged, it
must only be replaced by Philips or their service
representative, as special tools and/or parts are
required.
Extra accessories
To enable you have even better profit from your
Philips Vision vacuum cleaner, some extra
accessories are available from your dealer:
Turbo nozzle HR 6988 (fig. 38)
This turbo nozzle has been especially designed
for enhanced cleaning of rugs and carpets.
The rotating brush effortlessly picks up small
threads, hairs, fluff and more difficult to vacuum
particles.
Good in-depth cleaning is guaranteed with the
turbo nozzle.
Hard floor nozzle HR 6943 (fig. 39)
This nozzle is especially advisable for large
surfaces of parquet, tiles, etc.

6
Ordering dustbags and accessories
One new motor protection filter is supplied with
each set of original Philips dustbags Oslo+or
Oslo+Hygiene (closeable).
In case you have any difficulties obtaining
dustbags, filters or other accessories for this
vacuum cleaner, please contact the consumer
relations desk in your country.
For phone numbers please refer to the guarantee
card.
 Loading...