

Philips HR7756/01 User Manual [sv]

Essence HR7756
Recipes & Directions for use
Oppskrifter og bruksanvisning
Recept & Bruksanvisning
Käyttöohje & ruokaohjeita
Opskrifter & Brugsanvisning

2
3
M
L
K
J
I
H
G
F
E
D
C
B
A
R
Q
P
O
N
S
T
U
V
W
X
Y

4

ENGLISH 6
NORSK 26
SVENSKA 46
SUOMI 66
DANSK 85
HR7756
5

ENGLISH6
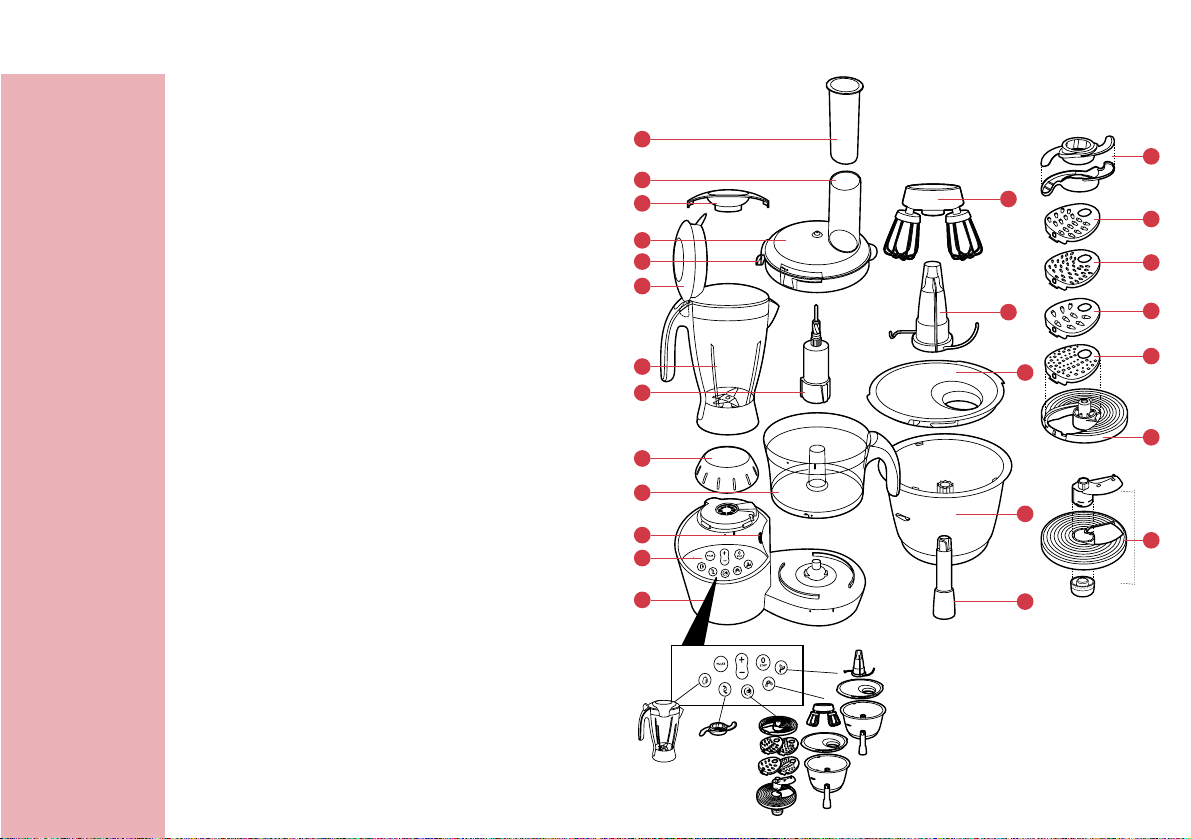
Parts and accessories
A Motor unit
B Smart Process Control panel
C Built-in safety lock
D Food processing bowl
E Screw cap (must be placed to use bowl
functions)
F Tool holder
G)Blender jar
H)Blender jar lid
I Peg of lid (activates and deactivates the safety
switch)
J Lid of food processing bowl
K Stopper
L Feed tube
M Pusher
N Driving shaft
O Mixing bowl
P Mixing bowl lid
Q Kneading accessory
R Mixing accessory
S Metal blade + protective cover
T Shredding insert medium
U Shredding insert fine
V Shredding insert coarse
W Granulating insert
X Insert holder
Y Adjustable slicing disc (slicing insert, carrier
and adjusting knob)
Introduction
This appliance is equipped with an automatic
thermal cut-out system.This system will
automatically cut off the power supply to the
appliance in case of overheating.
If your appliance suddenly stops
running:
1 Pull the mains plug out of the socket.
2 Let the appliance cool down for
60 minutes.
3 Put the mains plug in the socket.
4 Switch the appliance on again.
Please contact your Philips dealer or an
authorised Philips service centre if the automatic
thermal cut-out system is activated too often.
CAUTION: In order to avoid a hazardous
situation, this appliance must never be connected
to a timer switch.
Important
◗ Read these instructions for use carefully and
look at the illustrations before using the
appliance.
◗ Keep these instructions for use for future
reference.

ENGLISH 7
◗ Check if the voltage indicated on the
appliance corresponds to the local mains
voltage before you connect the appliance.
◗ Never use any accessories or parts from
other manufacturers or that have not been
specifically advised by Philips.Your guarantee
will become invalid if such accessories or
parts have been used.
◗ Do not use the appliance if the mains cord,
the plug or other parts are damaged.
◗ If the mains cord is damaged, it must be
replaced by Philips, a service centre
authorised by Philips or similarly qualified
persons in order to avoid a hazard.
◗ Thoroughly clean the parts that will come
into contact with food before you use the
appliance for the first time.
◗ Do not exceed the quantities and preparation
times indicated in the table.
◗ Do not exceed the maximum content
indicated on the bowl, i.e. do not fill beyond
the top graduation.
◗ Unplug the appliance immediately after use.
◗ Never use your fingers or an object (e.g. a
spatula) to push ingredients down the feed
tube while the appliance is running. Only the
pusher is to be used for this purpose.
◗ Always unplug the appliance before reaching
into the blender jar with your fingers or an
object (e.g. a spatula).
◗ Keep the appliance out of the reach of
children.
◗ Never let the appliance run unattended.
◗ Place the lid on the bowl in the right position.
The build-in safety lock will now be deblocked
and you will be able to turn the appliance on.
Both the motor unit and the screw cap have
been provided with marks.The appliance will
only function if the dot on the motor unit is
placed opposite the dot on the screw cap.
◗ Switch the appliance off before detaching any
accessory.
◗ Always switch the appliance off by pressing
the STOP button.
◗ Wait until moving parts have stopped running
before you remove the lid of the appliance.
◗ The screw cap can only be removed if the lid
is not on the bowl or if the bowl has been
removed altogether.
◗ Never immerse the motor unit in water or
any other fluid, nor rinse it under the tap. Use
only a moist cloth to clean the motor unit.
◗ Remove the protective cover from the blade
before use.
◗ Let hot ingredients cool down before
processing them (max. temperature
80cC/175cF).
◗ If you are processing a liquid that is hot or
tends to foam, do not put more than 1 litre
into the blender jar to avoid spillage.
◗ Unplug the appliance immediately after use.
◗ For application times, see the table further on
in these instructions for use.
Note that it is not possible to use the
bowlfunctions when the blender is attached.
ENGLISH8
Using the appliance
Smart Process Control
This appliance is equipped with a Smart Process
Control to ensure an optimal process and a
perfect end result. Each process button is linked
to a pre-programmed speed profile representing
the optimal process for a specific accessory.
The speed can be increased or decreased 3 times
by pressing + or - button.
If you press the pulse button, the appliance will
run at the highest speed.When you release the
button, the appliance will stop or return to the
previously selected working speed.
The process can always be stopped by pressing
the Stop-button.
If you press the same process button again within
40 seconds, the process star ts where it has been
stopped.
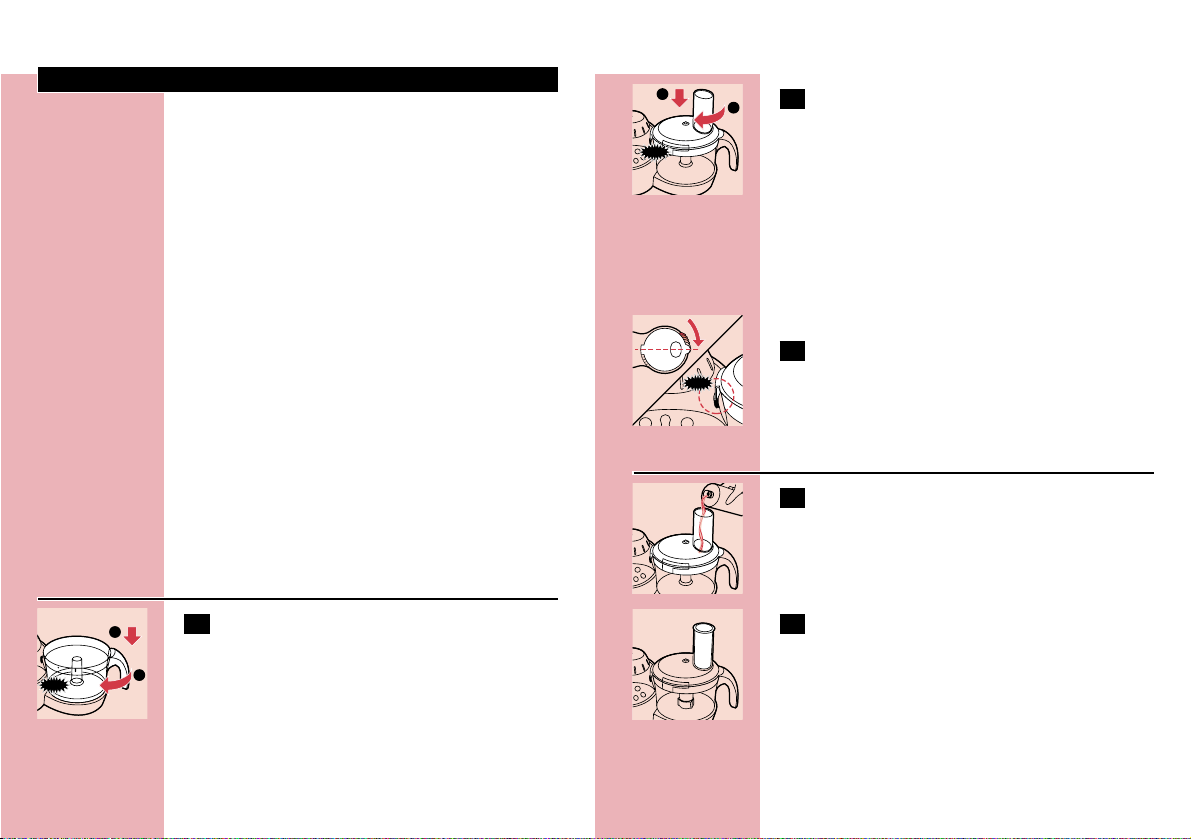
Food processing bowl
C
1 Mount the bowl with the handle on the
food processor by turning the handle in
the direction of the arrow until you hear a
click.
C
2 Put the lid on the bowl.Turn the lid in the
direction of the arrow until you hear a
click (this requires some force).
Built-in safety lock
B
The motor unit, the bowl and the lid have been
provided with marks. The appliance will only
function if the mark on the motor unit is directly
opposite the mark on the screw cap.
C
1 Make sure that the dot on the lid and the
dot on the bowl are directly opposite each
other.The projection of the lid will
complete the shape of the handgrip.
Feed tube and pusher
C
1 Use the feed tube to add liquid and/or
solid ingredients. Use the pusher to push
solid ingredients through the feed tube.
C
2 You can also use the pusher to close the
feed tube in order to prevent ingredients
from escaping through the feed tube.
CLICK
CLICK
1
2
CLICK
1
2

ENGLISH 9
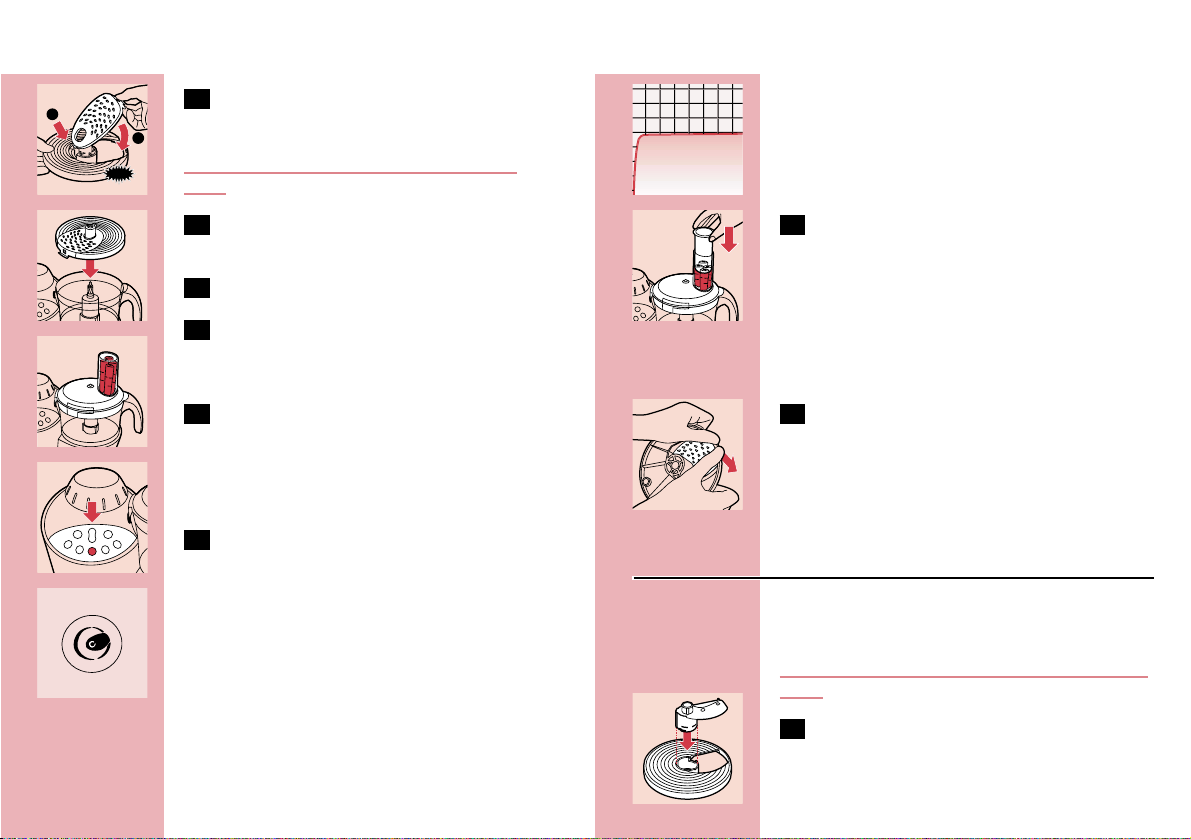
Metal blade
◗ The metal blade can be used for chopping,
mixing, blending and pureeing.
C
1 Remove the protective cover from the
blade.
The cutting edges of the blade are very sharp
Avoid touching them!
C
2 Put the tool holder in the bowl and the
blade on the tool holder.
3 Put the ingredients in the bowl. Pre-cut
large pieces of food into pieces of approx.
3 x 3 x 3 cm. Put the lid on the bowl.
4 Put the pusher in the feed tube.
C
5 Press the chopping process button on the
control panel.
- The process will start with 4 pulses to ensure
that the ingredients (i.e. onions or nuts) are
chopped regularly.
- Next the process will increase to max. speed
and continue until the STOP button is pressed.
◗ Press the - button to decrease the speed.
◗ The process can be stopped any time during
the pulses by pressing the STOP button.
Tips
◗ If you chop onions, stop the appliance after
the four pulses to prevent them from
becoming too finely chopped.
◗ Do not let the appliance run too long when
you are chopping (hard) cheese.The cheese
will become too hot, will start to melt and
will turn lumpy.
◗ Do not use the blade to chop very hard
ingredients like coffee beans,turmeric, nutmeg
and ice cubes, as this may cause the blade to
get blunt.
If food sticks to the blade or to the inside of the
bowl:
1 Turn the appliance off.
2 Remove the lid from the bowl.
3 Remove the ingredients from the blade or
from the wall of the bowl with a spatula.
Inserts
Never process hard ingredients like ice cubes
with the inserts.
ENGLISH10
C
1 Put the selected insert in the insert holder
before you place it onto the toolholder.
Cutting edges are very sharp.Avoid touching
them!
C
2 Place the insert holder onto the tool
holder that stands in the bowl.
3 Put the lid on the bowl.
4 Put the ingredients in the feed tube. Pre-
cut large chunks to make them fit into the
feed tube.
C
5 Fill the feed tube evenly for the best
results.
When you have to cut large amounts of food,
process only small batches at a time and empty
the bowl regularly between the batches.
C
6 Select the 'shredding & slicing process' on
the control panel.
◗ The speed can be increased or decreased
3 times by pressing the + or - button.
C
7 Press the pusher lightly onto the
ingredients in the feed tube.
◗ If you are shredding soft vegetables or fruits,
you can decrease the speed up to three steps
by pressing the - button to prevent the
shredded vegetables and fruits from turning
into puree.
C
8 To remove the insert from the insert
holder, take the insert holder in your
hands with its back pointing towards you.
Push the edges of the insert with your
thumbs to make the insert fall out of the
holder.
Adjustable slicing disc
The adjustable slicing disc allows you to cut
ingredients to any thickness you like.
Be careful: the cutting edges of the blade are very
sharp.
C
1 Insert the blade into the top of the carrier.
CLICK
2
1

ENGLISH 11
C
2 Connect the knob from the bottom side
of the disc and turn it to position dot to
lock it.
C
3 Turn the adjusting knob to adjust the
thickness you prefer.
C
4 Place the adjustable slicing disc on the tool
holder.
5 Close the lid and put the ingredients in the
feed tube.
C
6 Select the 'shredding & slicing process' on
the control panel.
◗ The process increases immediately to the
defined processing speed to guarantee the
optimal endresult.
7 Press the ingredients slowly down with the
pusher, if necessary.
Kneading accessory & mixing bowl
The kneading accessory can be used for kneading
yeast dough for bread and pizzas.
C
1 Push the driving shaft of the mixing bowl
into the opening of the mixing bowl from
below.You will hear a 'click' when it snaps
into place.
C
2 Place the mixing bowl on the motor unit
and turn it into the direction of the arrow
until you hear a 'click'.
C
3 Fit the kneading accessory onto the
driving shaft.
4 Put the ingredients in the bowl.
C
5 Put the lid on the bowl and turn it to the
left until you hear a click.
1
2
1
CLICK
1
2
2

ENGLISH12
C
6 Press the kneading process button on the
Smart Process Control.
The appliance will gradually increase the kneading
speed within 10 seconds to avoid splashing.This
speed will be maintained for about 50 seconds to
mix the ingredients properly.Then the speed will
decrease to a speed that is optimal for kneading.
The appliance will continue to run at this speed
until the stop button is pressed.The speed can be
decreased up to 3 times by pressing the - button.
Tip
◗ If the kneading hook does not rotate although
you have pressed the kneading process
button, check whether you have pushed the
driving shaft into the mixing bowl until it
locked into position (click).
Mixing accessory & mixing bowl
You can use the mixing accessory to whisk eggs,
egg whites, instant puddings, cream, the
ingredients for cake mixtures and other soft
ingredients.
C
1 Push the driving shaft of the mixing bowl
into the opening of the mixing bowl from
below.You will hear a click when it snaps
into place.
C
2 Put the mixing bowl on the motor unit and
turn it to the left until you hear a 'click'.
C
3 Insert the gearwheel into the housing of
the mixing accessory.
C
4 Snap the two balloon beaters onto the
metal pins on the housing of the mixing
accessory.
C
5 Fit the mixing accessory onto the tool
holder.
6 Put the ingredients into the bowl, put the
lid on the bowl and turn it to the right
until you hear a click.
CLICK
1
2

13ENGLISH
C
7 Press the whisking process button on the
control panel.
The appliance will increase the speed to working
speed in 7 seconds.This speed is maintained for
approx. 30 seconds.Then the speed increases
again and the appliance will continue to run at
this speed until the stop button is pressed.The
speed can be increased or decreased in three
steps by pressing the + button or - button
respectively.
Tip
◗ If the mixing accessory does not rotate
although you have pressed the whisking
process button, check whether you have
pushed the driving shaft into the mixing bowl
until it locked into position (click) and the
gearwheel is correctly inserted into the
mixing accessory housing.
Blender
The blender is intended for:
- Blending fluids, e.g. dairy products, sauces, fruit
juices, soups, mixed drinks, sweat teas, shakes.
- Mixing soft ingredients, e.g. pancake batter or
mayonnaise.
- Pureeing cooked ingredients, e.g. for making
baby food.
◗ The appliance can be used with or without
the blender attached to the motor unit. If you
use the appliance without the blender, the
appliance will not function if the screw cap
has not been screwed properly onto the
motor unit.
C
1 To attach the blender jar, remove the
screw cap above the panel.
C
2 Mount the blender jar on top of the
motor unit by turning it in the direction of
the arrow until it is firmly fixed.The handle
must be facing to the left!
Do not exert too much pressure on the handle
of the blender jar.
3 Put the ingredients in the blender jar.
C
4 Close the lid.
5 Always connect the safety cover onto the
blender lid before you start processing.
C
6 Press the blending process button on the
control panel.The blender will start to
operate.The speed increases to maximum
speed.The appliance will continue to run
1
2
1
2

ENGLISH14
at this speed until the STOP button is
pressed. During the blending process the
speed can be decreased up to three times
by pressing the - button.
Tips
C
◗ Pour the liquid ingredients into the blender
jar through the hole in the lid.
◗ The longer you let the appliance run, the finer
the blending result will be.
◗ Pre-cut solid ingredients into smaller pieces
before putting them in the blender. If you
want to prepare a large quantity, process small
batches of ingredients instead of trying to
process a large quantity at once.
◗ Hard ingredients e.g. soy beans for soy bean
milk, must be soaked in water before they are
processed.
C
◗ Crush ice cubes by placing the ice cubes in
the jar, close the lid and use the pulse
function.
If ingredients stick to the wall of the blender jar:
1 Switch the appliance off and unplug it.
2 Open the lid.
Never open the lid while the appliance is still
running.
3 Use a spatula to remove the ingredients
from the wall of the jar.
Keep the spatula at a safe distance from the
blades (approx. 2 cm).
◗ If you are not satisfied with the results, let the
appliance run briefly a number of times by
pressing the pulse button.You can also try to
get a better result by stirring the ingredients
with a spatula (not while the blender is
running), or by pouring some of the contents
out in order to process a smaller amount.
◗ In some cases the ingredients are easier to
blend if you add some liquid e.g. lemon juice
when blending fruits.
Cleaning
Always unplug the appliance before you start
cleaning the motor unit.
1 Clean the motor unit with a damp cloth.
Do not immerse the motor unit in water
and do not rinse it either.
2 Always clean the parts that have come into
contact with food in hot water with
washing-up liquid immediately after use.

ENGLISH 15
◗ The bowls, the lids of the bowl, the pusher
and the accessories (except for the blender
jar) can also be cleaned in a dishwasher.
These parts have been tested for dishwasher
resistance based on DIN EN 12875.
The blender jar is not dishwasherproof!
C
◗ To remove the lid, open it and then pull it
upwards.
Only remove the lid for cleaning purposes.
Clean the metal blade, the blade unit of the
blender and the inserts very carefully.Their cutting
edges are very sharp!
Make sure that the cutting edges of the blades
and the inserts do not come into contact with
hard objects.This could cause them to become
blunt.
Certain ingredients may cause discolourations on
the surface of the accessories.This does not have
a negative effect on the accessories.The
discolourations usually disappear after some time.
C
◗ Wind the (excess) mains cord around the reel
on the back of the appliance.
Blender quick-clean operation
C
1 Pour lukewarm water (not more than
0.5 litres) and some washing-up liquid into
the blender jar.
2 Close the lid.
C
3 Let the appliance run for a few moments
by pressing the pulse button. (The
appliance stops running when you release
the button).
4 Detach the blender jar and rinse it with
clean water.
To clean the mixing accessory/balloon
beaters thoroughly:
C
1 Detach the gearwheels and the balloon
beaters so that they can be cleaned more
easily.
The gearwheels and the balloon beaters are
dishwasherproof.
To clean the adjustable slicing disc
thoroughly:
C
1 Turn the adjusting knob to the right to pull
the blade out of the disc.
The disc, the blade and the adjusting knob can be
cleaned in warm soapy water or in the dishwasher.
1
2

ENGLISH16
Storage
MicroStore
C
◗ Put the accessories (blade, insert holder) on
the tool holder and store them in the bowl.
Always end up with the insert holder.
Guarantee & service
If you need information or if you have a
problem, please visit the Philips Web site at
www.philips.com or contact the Philips Customer
Care Centre in your country (you will find its
phone number in the worldwide guarantee
leaflet). If there is no Customer Care Centre in
your country, turn to your local Philips dealer or
contact the Service Department of Philips
Domestic Appliances and Personal Care BV.
Application
times
10 - 60 sec.
10 - 60 sec.
10 - 60 sec.
60 - 240 sec.
60 - 120 sec.
10 - 60 sec.
Application
Chopping, pureeing,mixing
Shredding, grating
Slicing
Kneading
Whsiking, whipping,emulsifying,
mixing
Blending, pureeing
Accessory
P
hjkh
¬
∂
ß
D
Function
¥
^
^
π
ø
†
Functions, accessories and applications
Solution
Turn the bowl/or lid clockwise until you hear a click.
Make sure that the points on the bowl and on the lid
are placed directly opposite each other.
The automatic thermal cut-out system has probably cut
off the power supply to the appliance because it has
overheated. 1) Unplug the appliance. 2) Let the
appliance cool down for 60 minutes. 3) Put the mains
plug in the socket. 4) Switch the appliance on again.
Press the button for the process you want.
This appliance is equipped with a memory-function. If
you restart the appliance within 40 seconds, the process
will start where it was interrupted. If you want the
process to start right from the beginning: 1) Briefly press
another process (e.g. the pulse button) 2) Then press
the STOP button. 3) Press the appropriate process
button to make the process start all over again.
1) Make sure you have snapped the driving shaft into
the mixing bowl. 2) Make sure you have inserted the
gearwheel properly into the housing of the mixing
accessory. 3) Check if you have really turned the mixing
bowl clockwise as far as the point where you hear a
click.
If both the blender and the food processing bowl or
mixing bowl have been mounted correctly, only the
blender will function. If you want to use the food
processing bowl or the mixing bowl, detach the blender
and close the fixing hole with the screw cap.
The motor is already at its physical limit, i.e. at kneading
or when the speed is at the defined level where it can
not be decreased any further.
Problem
The appliance doesn't
switch on.
The appliance has
suddenly stopped
running.
You have pressed the
wrong process button.
The process doesn't
start at the beginning
after a restart of the
process
The kneading or
mixing accessory
doesn't turn.
Both the blender jar
and the food
processing bowl or the
mixing bowl are
attached, but only the
blender works.
The +/- button does
not react at certain
applications.
Troubleshooting guide

ENGLISH 17
Applications
Salads, raw
vegetables
Salads, raw
vegetables
Pancakes,
waffles
Breadcrumbed
dishes, au
gratin dishes
Deserts,
toppings
Procedure
Cut the vegetables into pieces
that fit into the tube. Fill the
tube with the pieces and shred
them while pressing the pusher
lightly.
Cut the vegetables into pieces
that fit into the tube. Fill the
tube with the pieces and slice
them while pressing the pusher
lightly.
First pour the milk into the
blender and then add the dry
ingredients. Mix the ingredients
for approx. 1 minute. If
necessary, repeat this
procedure 2 times.Then stop
for a few minutes to allow the
appliance to cool down to
ambient temperature.
Use dry, crispy bread.
Use soft butter for a light
result.
Proce
ss
butto
n/acce
ssory
^ / j
^ / ¬
† / D
¥ / P
ø /
ß
Max.
quanti
ty
500g
500g
750ml
milk
100g
300g
Ingredients &
results
Apples,
carrots,
celeriac shredding
Apples,
carrots,
celeriac slicing
Batter
(pancake) whisking
Bread crumbs
- chopping
Butter cream
(creme au
beurre) whisking
Quantities and preparation times
Applications
Garnishing,
soups, sauces,
au gratin
dishes
Sauces, pizzas,
au gratin
dishes, fondues
Garnishing,
sauces, pastry,
puddings,
mousses
Purees, soups
Baby and
infant food
Salads,
garnishing
Bread
Procedure
Use a piece of rindless
Parmesan and cut it into pieces
of approx. 3 x 3 cm.
Cut the cheese into pieces that
fit into the tube. Press carefully
with the pusher.
Use hard, plain chocolate. Break
it into pieces of 2 cm.
Use cooked peas or beans. If
necessary, add some liquid to
improve the consistency of the
mixture.
For a coarse puree, add only a
little liquid. For a fine puree,
keep adding liquid until the
mixture is smooth.
Put the cucumber in the tube
and press it down carefully.
Mix warm water with yeast and
sugar. Add flour, oil and salt and
knead the dough for approx. 90
seconds. Leave to rise for 30
minutes.
Proce
ss
butto
n/acce
ssory
¥ / P
^ / k
^ / k
^ / k
¥ / P
^ / ¬
π /
∂
Max.
quanti
ty
200g
200g
200g
250g
500g
2
cucum
bers
1000g
flour
Ingredients &
results
Cheese
(Parmesan) chopping
Cheese
(Gouda) shredding
Chocolate chopping
Cooked peas,
beans pureeing
Cooked
vegetables and
meats pureeing
Cucumbers slicing
Dough (for
bread) kneading

ENGLISH18
Applications
Pizza
Apple pies,
sweet biscuits,
open fruit flans
Luxury bread
Procedure
Follow the same procedure as
for bread dough. Knead the
dough for 1 minute.
Use cold margarine, cut the
margarine into 2cm cubes. Put
the flour in the bowl and add
the margarine. Mix until the
dough has become crumbly.
Then add cold water while
mixing. Stop as soon as the
dough starts to turn into a ball.
Allow the dough to cool
before further processing.
First mix yeast, warm water
and some sugar in a separate
bowl. Put all ingredients in the
mixing bowl and knead the
dough until it is smooth and
does not stick to the bowl
(takes approx. 1 minute). Leave
it to rise for 30 minutes.
Proce
ss
butto
n/acce
ssory
π /
∂
π /
∂
π /
∂
Max.
quanti
ty
1500g
flour
500g
flour
1000g
flour
Ingredients &
results
Dough (for
pizzas) kneading
Dough
(shortcrust
pastry) kneading
Dough (yeast)
- kneading
Applications
Puddings,
soufflees,
meringues
Sauces, jams,
puddings, baby
food
Sauces, jams,
puddings, baby
food
Garnishing,
dips
Sauces, soups,
garnishing,
herb butter
Fruit juices
Procedure
Use egg whites at room
temperature. Note: use at least
2 egg whites.
Tip: add a little lemon juice to
prevent the fruit from
discolouring. Add some liquid
to obtain a smooth puree.
Tip: add a little lemon juice to
prevent the fruit from
discolouring
Peel the garlic. Press the pulse
button several times to avoid
chopping the garlic too fine.
Use at least 150g.
Wash and dry the herbs before
chopping.
Add water or another liquid
(optional) to obtain a smooth
juice.
Proce
ss
butto
n/acce
ssory
ø /
ß
† / D
¥ / P
¥ / P
¥ / P
‘ / ©
Max.
quanti
ty
6 egg
whites
500g
500g
300g
Min.
50g
500g
(total
amou
nt)
Ingredients &
results
Egg whites whisking
Fruit (e.g.
apples,
bananas, water
chestnut) blending
Fruit (e.g.
apples,
bananas) chopping
Garlic chopping
Herbs (e.g.
parsley) chopping
Juices (e.g.
made of
papaya, water
melon, pear,
guava) blending

1919ENGLISH
Applications
Salads,
garnishing and
barbecue
sauces
Steaks tartar,
hamburgers,
meat balls
Steaks tartar,
hamburgers,
meat balls
Milkshakes
Various cakes.
Procedure
All the ingredients must be at
room temperature. Note: use
at least one large egg, two small
eggs or two egg yolks. Put the
egg and a little vinegar in the
bowl and add the oil drop by
drop.
First remove any sinews or
bones. Cut the meat into cubes
of 3cm. Press the pulse button
to get a coarser chopping
result.
First remove any sinews or
bones. Cut the meat into cubes
of 3cm. Press the pulse button
to get a coarser chopping
result.
Puree the fruit (e.g. bananas,
strawberries) with sugar, milk
and some ice cream and mix
well.
The ingredients must be at
room temperature. Mix the
softened butter and the sugar
until the mixture is smooth and
creamy.Then add milk, eggs and
flour.
Proce
ss
butto
n/acce
ssory
ø /
ß
¥ / P
¥ / P
† / D
ø /
ß
Max.
quanti
ty
3 eggs
500g
400g
500ml
milk
6 eggs
Ingredients &
results
Mayonnaise emulsifying
Meats (lean) mincing
Meats, fish,
poultry
(streaky) mincing
Milkshakes blending
Mixture (cake)
- mixing
Applications
Salads,
puddings, nut
bread, almond
paste
Salad, cooked
food, stir-fries,
garnishing
Salad, cooked
food, stir-fries,
garnishing
Minced meat
Soups, sauces
Garnishing,
cream, icecream
mixtures
Procedure
Use the pulse button for
coarse chopping. Stop the
process if you want a coarse
result.
Peel the onions and cut them
into 4 pieces. Stop the process
after 2 pulses to check the
result.
Peel the onions and cut them
into pieces that fit into the
tube. Note: use at least 100g.
First remove any sinews or
bones. Cut the meat into cubes
of 3cm. Use the pulse button
for a coarser chopping result.
Use cooked vegetables.
Use cream that comes straight
from the refrigerator. Note: use
at least 125ml cream.The
whipped cream is ready after
approx. 2 minutes..
Proce
ss
butto
n/acce
ssory
¥ / P
¥ / P
^ / g
¥ / P
† / D
ø /
ß
Max.
quanti
ty
250g
500g
300g
200g
500ml
500ml
Ingredients &
results
Nuts chopping
Onions chopping
Onions slicing
Poultry mincing
Soups blending
Whipping
cream whipping

ENGLISH20
Recipes
Courgette Sandwich Spread
Ingredients:
- 2 courgettes
- 3 cooked eggs
- 1 small onion
- 1 tbs. vegetable oil
- parsley
- 2-3 tbs. sour cream
- lemon juice,Tabasco sauce, salt, pepper, currypowder, paprika
B
Wash and dry the courgettes and shred them
with the fine shredding insert in the foodprocessing bowl.Transfer the shredded courgette
to a dish, sprinkle salt on it and leave for about
15 minutes so that the salt extracts the liquid
from the shredded courgette. Cut the onion in
4 pieces and chop them fine together with the
garlic clove. Remove parsley leaves from the stalks
and chop them.
B
Then put the shredded courgette on a clean towel
and press the liquid out. Pour some oil into a pan
and fry the chopped onions and garlic lightly, add
the shredded courgettes. All liquids should
evaporate from the ingredients.Allow the fried
ingredients to cool down for a while. Peel the eggs
and chop them in the food-processing bowl for a
few seconds.Add the other ingredients to the food
processing bowl, season them and mix them with
the blade. Ser ve on toasted white bread.
Fruit cake
Ingredients:
- 180 g dates
- 270 g prunes
- 60 g almonds
- 60 g walnuts
- 60 g raisins
- 60 g sultanas
- 240 g rye full grain flour
- 120 g wheat flour
- 120 g brown sugar
- 360 g butter milk
- pinch of salt
- 1 sachet of backing powder
B
Place the metal blade into the bowl. Put all the
ingredients in the bowl, press the chopping process
button and mix the ingredients for 30 seconds.
If the dough sticks to the lid of the bowl, remove
it by means of the spatula. Bake the cake in a
30 cm. long baking tin for 40 minutes at 170cC.
Leek Quiche
Ingredients for the dough:
- 250 g wheat flour (or wholemeal wheat flour)
- pinch of salt
- 1 tbs honey
- 20 g fresh yeast or 1/2 sachet of dry yeast
- 100 g butter
- 6 tbs lukewarm water
Ingredients for the filling:
- 500 g leeks
- vegetable oil

21ENGLISH
- 4 eggs
- 500 g sour cream
- salt, pepper, 1-2 tbs. of flour if needed
B
Put all the ingredients in the bowl and knead into
a consistent dough. Let the dough rise for about
30 min.
B
Slice the leeks with the adjustable slicing disc (e.g.
setting 3). Put some oil in a pan and fr y the sliced
leeks for a few minutes. Put the rest of the
ingredients in the blender jar and let the blender
run until you have reached a creamy consistency.
Add 1-2 tbsp. of flour to thicken the mixture.
B
Grease a baking tin with a diameter of 24 cm
and cover the bottom and sides evenly with
dough. Spread the leek mixture onto the dough
and pour the rest of the ingredients over it. Bake
in a preheated oven for about 40min at 180cC.
Can be served warm or cold.
Hungarian-style goulash
Ingredients:
- 1 tbsp oil
- 1 medium onion
- 1 tsp paprika
- 400 g beef or pork
- 1 green pepper
- 1 tomato
-salt
- 200 g carrots
- 300 g potatoes
- caraway seeds
B
Wash the meat and cut it into 2 cm cubes. Peel
the onion and chop it in the food processing bowl
using the metal blade. Core the green pepper and
slice it into rings using the adjustable slicing disc.
Peel the tomato, remove the pips and cut it into
thin strips. Fry the chopped onion in the oil until
soft. Remove from the heat and sprinkle the
paprika over the onion, add the meat and fry over
a high heat for a few minutes while stirring
constantly.Add the green pepper, the tomato and
salt to taste, cover the pan and braise in its own
juice over a moderate heat until almost tender.
B
Meanwhile, peel and slice the carrots using the
adjustable slicing disc and peel and dice the
potatoes. Add them to the meat and pour enough
cold water for the amount of soup you want to
make (approx. 1,2 litres).Season with a pinch of
caraway seeds and simmer until everything is soft
as butter, adding more salt if necessary.
B
Serve hot.You could add a garnish of green
pepper rings and serve sharp cherry paprika on a
separate plate.
Strawberry tart
Ingredients:
- 100 g margarine
- 100 g sugar
- 3 egg yolks
- 240 g flour
- 100 g coconut
Filling:
- 80 g sugar
- 2 tsp. lemon juice

ENGLISH22
- 400 g cream cheese
- 500 g strawberries
Glaze:
- 500 g strawberries
- 250 ml water
- 120 g sugar
- 60 g cornstarch
Garnishing:
- 250 g cream
B
Heat oven to 180cC. Cream margarine and sugar
in the bowl with the mixing accessory.
B
Blend in egg yolk, then stir in flour and flaked
coconut. Put the dough on the baking plate, flute
the edge and prick with a fork. Bake for 15 - 20
minutes until light brown. Let the tart cool on a
rack. Mix sugar, lemon juice and cream cheese in
the bowl until fluffy using the mixing accessory.
Spread on the cooled tart shell. Arrange a part of
the strawberries (stem side down) on the tart.
Put in the refrigerator.
B
Prepare the glaze. Blend the remaining
strawberries with the water and the sugar in the
blender jar. Dissolve the cornstarch in 125 ml of
the strawberry mixture. Bring the strawberr y
mixture to boil.When it is boiling stir in the
dissolved cornstarch. Spoon the hot glaze over the
strawberries and chill for 2 hours.Top with cream
whipped to stiff peaks.
Fresh fruit milkshake
Ingredients:
- 100 g bananas or strawberries
- 200 ml fresh milk
- 50 g vanilla ice cream
- granulated sugar to taste
B
Peel the bananas or rinse the strawberries. Cut
fruit into smaller pieces. Put all the ingredients in
the blender jar. Blend until smooth.
B
You can use fruit of your choice to make your
favourite fresh fruit milkshake.
Hazelnut Bread Ring
Ingredients dough:
- 500 g sieved flour
- 75 g sugar
- 1 tsp. salt
- 1 egg
- 250 ml milk (at 35cC)
- 100 g butter, softened
- 30 g fresh yeast (for dry yeast, read the
instructions on the package)
Filling:
- 250 g chopped hazelnuts
- 100 g sugar
- 2 sachets of vanilla sugar
- 125 ml cream
B
Heat oven to 200cC. Mix milk, yeast and sugar in
the bowl for 15 seconds using the kneading tool.
Add flour, salt, butter and egg. Knead the dough
mixture for 2 minutes. Put the dough into a

23ENGLISH
separate bowl and cover it with a damp cloth and
allow the dough to rise in a lukewarm place for
20 minutes.
B
Chop the hazelnuts using the metal blade. Mix
ingredients for the filling. Roll the dough out into a
rectangular shape. Spread it with the hazelnut
mixture, then roll it up into a ring. Put the ring in a
buttered spring-release tin. Let the ring rise for
20 minutes. Brush some whipped egg yolk onto
the top and place the tin on a rack in the centre
of the oven. Bake for 25 - 30 minutes at 200cC.
Chocolate cake
Ingredients:
- 140 g butter, softened
- 110 g icing sugar
- 140 g chocolate
- 6 egg whites
- 6 egg yolks
- 110 g granulated sugar
- 140 g wheat flour
Filling:
- 200 g apricot jam
Glaze:
- 125 ml water
- 300 g sugar
- 250 g grated chocolate
- whipped cream, if desired
B
Heat oven to 160cC. Cream butter with icing
sugar using the mixing accessory. Melt the
chocolate and mix in. Add egg yolks one by one to
the mixture and mix until creamy.Whip the egg
white with the granulated sugar until stiff and
foamy using the mixing accessory. Add the egg
white foam to the mixture and stir in gently.Then
fold in flour with a spatula. Put the cake mixture
into the greased baking tin. Bake for one hour at
160cC. The first 15 minutes the oven door should
be kept slightly ajar.
B
Allow the cake to cool for a while in the baking tin
(24 cm), then turn it onto a wire rack to cool
further. Cut the cake horizontally in half, spread
one half with apricot jam and put the two halves
together again. Heat the rest of the jam until
syrupy and spread it over the top of the cake.
Prepare the icing. Boil water, add sugar and
chocolate and cook over low heat. Stir continuously
until it has a smooth and of spreadable
consistency. Put the icing on the cake and allow it
to cool. Ser ve the cake with some whipped cream.
Broccoli soup (for 4 persons)
Ingredients:
- 50 g mature Gouda cheese
- 300 g cooked broccoli (stalks and florets)
- cooking liquid of the broccoli
- 2 boiled potatoes in pieces
- 2 stock cubes
- 2 tbsp whipping cream
-curry
-salt
- pepper
-nutmeg

ENGLISH24
B
Shred the cheese. Puree the broccoli with the
boiled potatoes and some of the cooking liquid of
the broccoli. Put the broccoli puree and the
remaining liquid and stock cubes into a measuring
beaker and fill it up to 750ml.Transfer the soup to
a pan and bring it to the boil while stirring. Stir in
the cheese and season with curry, salt, pepper and
nutmeg and add the cream.
Pizza
Ingredients for the dough:
- 400 g flour
- 1/2 tsp salt
- 20 g fresh yeast or 1.5 sachets dried yeast
- 2 tbsp oil
- approx. 240ml water (35cC)
For the topping:
- 300 ml sieved tomatoes (tinned)
- 1 tsp mixed Italian herbs (dried or fresh)
- 1 onion
- 2 cloves garlic
- salt and pepper
- sugar
Ingredients to be spread on the sauce:
- olives, salami, artichokes, mushrooms, anchovies,
Mozzarella cheese, peppers, grated mature
cheese and olive oil according to taste.
B
Place the kneading hooks in the mixing bowl. Put
all the ingredients in the mixing bowl and select
the kneading process. Knead the dough for
approx. 1 minute until a smooth ball has formed.
Put the dough in a separate bowl, cover it with a
damp cloth and leave it to rise for about
30 minutes.
B
Chop the onions and garlic with the metal blade
in the food processing bowl and fry them in a pan
until they are transparent.Add the sieved
tomatoes and the herbs and simmer for about
10 minutes. Season to taste with salt, pepper and
sugar.Allow the sauce to cool down.
B
Heat the oven to 250cC.
B
Roll the dough out on a floured worktop and
make two round shapes. Place the dough shapes
on a greased baking tray. Spread the topping on
the pizza, leaving the edges free. Spread with the
desired ingredients, scatter some grated cheese
over the pizza and drip some olive oil over it.
B
Bake the pizzas for 12 to 15 minutes.
Vegetable and potato fry
Ingredients:
- 1 egg
- 50 cc milk
- 1 tbsp flour
- 1 tsp coriander
- salt and pepper
- 2 large potatoes (about 300 g)
- 100 g winter carrots
- 150 g celery
- 50 g sunflower seeds or 2 tbsp corn from the
cob
- oil to fry

25ENGLISH
B
Using the metal blade, mix the egg, milk, flour,
coriander, salt and pepper.
B
Shred the peeled potatoes, the scraped carrots
and the cleaned celery with the coarse shredding
insert and add to the egg mixture. Stir the
vegetables, the egg mixture and the sunflower
seeds or corn from the cob together in a bowl.
B
Heat the oil in a frying pan and fry 8 flat patties
on both sides until they are golden brown.Allow to
drain on kitchen paper.
B
Cooking time: 3-4 minutes.
Bread (white)
Ingredients:
- 500 g bread flour
- 15 g soft butter or margarine
- 25 g fresh yeast or 20 g dried yeast
- 260 ml water
- 10 g salt
- 10 g sugar
B
Assemble the kneading hooks in the mixing bowl.
Put flour, salt and margarine or butter in the bowl.
Add the fresh or dried yeast and the water. Put
the lid on the bowl and turn it into the direction of
the arrow until you hear a click. Press the
kneading process button and mix the dough (for
the maximum kneading time see the chapter
Quantities and preparation times).
B
Remove the dough from the bowl, put it in a large
bowl, cover with a damp tea towel and allow to
rise in a warm place for 20 minutes. After rising,
flatten the dough again, and shape into a ball.
B
Return the dough to the bowl, cover with the
damp cloth and leave it to rise for another
20 minutes. Flatten it again, and roll it up.
B
Place the dough in a greased baking tin, and leave
it to rise for another 45 minutes. Bake the bread
in the lower part of a pre-heated oven.
B
Bake the bread at about 225cC in the lower part
of a pre-heated oven in about 35 minutes.

NORSK26
Deler og tilbehør
A Motorenhet
B Kontrollpanel med Smart-styring
C Innebygd sikkerhetslås
D Foodprocessor-bolle
E Skrudeksel (må være montert for å bruke
bollens funksjoner)
F Tilbehørholder
G Hurtigmikserkanne
H Lokk til hurtigmikserkanne
I Låsehake (aktiverer og deaktiverer
sikkerhetsbryteren)
J Lokk til foodprocessor-bolle
K Propp
L Materør
M Stapper
N Drivaksel
O Miksebolle
P Lokk til miksebolle
Q Deigelter
R Miksetilbehør
S Kniv + beskyttelsesdeksel
T Medium raspeskive
U Fin raspeskive
V Grov raspeskive
W Maleskive
X Skiveholder
Y Justerbar kutteskive (kutteskive,
monteringsplate og justeringsknapp)
Innledning
Dette apparatet er utstyrt med en automatisk
overopphetingsbryter.Ved overoppheting kobles
strømforsyningen automatisk fra.
Dersom apparatet plutselig stopper:
1 Dra nettledningsstøpselet ut av
stikkontakten.
2 La apparatet avkjøles i 60 minutter.
3 Sett støpselet inn i stikkontakten.
4 Slå apparatet på igjen.
Ta kontakt med Deres Philips-forhandler eller et
serviceverksted som er autorisert av Philips
dersom den automatiske overopphetingsbryteren
aktiveres for ofte.
ADVARSEL: For å unngå at farlige situasjoner
oppstår, må dette apparatet ikke kobles til en
tidsbryter.
Viktig
◗ Les denne bruksanvisningen nøye og se på
illustrasjonene før De tar i bruk apparatet.
◗ Ta vare på denne bruksanvisningen.
◗ Kontroller at spenningen som er angitt på
apparatet, samsvarer med spenningen i det
lokale nettet før De kobler til apparatet.

27NORSK
◗ Bruk aldri tilbehør/deler fra andre
produsenter eller tilbehør/deler som ikke er
spesielt anbefalt av Philips. Garantien gjelder
ikke hvis slike deler eller slikt tilbehør brukes.
◗ Apparatet må ikke brukes hvis det er skade på
nettledningen, støpselet eller andre deler.
◗ Dersom nettledningen er ødelagt, må den
skiftes ut av Philips, et servicesenter
autorisert av Philips eller liknende kvalifisert
personell slik at man unngår farlige
situasjoner.
◗ Før De bruker apparatet for første gang, må
alle deler som kommer i kontakt med mat,
rengjøres grundig.
◗ Ikke overskrid mengdene og
tilberedningstidene som er angitt i tabellen.
◗ Ikke overskrid maksimumsgrensen for innhold
som er avmerket på bollen,dvs. ikke fyll over
den øverste streken.
◗ Ta støpselet ut av stikkontakten umiddelbart
etter bruk.
◗ Bruk aldri fingrene eller en gjenstand (f.eks. en
slikkepott) til å skyve ingredienser ned i
materøret mens apparatet er i gang. Bare
stapperen skal brukes til dette.
◗ Trekk alltid støpselet ut av stikkontakten før
De stikker fingrene eller en gjenstand (f.eks.
en slikkepott) ned i hurtigmikserkannen.
◗ Oppbevar apparatet utilgjengelig for barn.
◗ La aldri apparatet gå uten tilsyn.
◗ Plasser lokket på bollen i riktig posisjon.
Blokkeringen av den innebygde
sikkerhetslåsen vil nå oppheves,og De kan slå
på apparatet. Både motorenheten og
skrudekselet har egne merker.Apparatet
virker bare hvis punktet på motorenheten
plasseres midt imot punktet på skrudekselet.
◗ Slå apparatet av før De demonterer tilbehør.
◗ Slå alltid av apparatet ved å trykke på STOPP-
knappen.
◗ Vent til deler i bevegelse har stoppet før De
tar lokket av bollen.
◗ Skrudekselet kan bare tas av når lokket ikke
er montert på bollen, eller når selve bollen
ikke er festet til apparatet.
◗ Motorenheten må aldri senkes ned i vann
eller annen væske, eller skylles under
springen. Bruk kun en fuktig klut til rengjøring
av motorenheten.
◗ Fjern beskyttelsesdekslet fra kniven før bruk.
◗ Varme ingredienser må avkjøles før de
behandles i maskinen (maks. temperatur:
80cC).
◗ For å unngå søl når De tilbereder væske som
er varm eller som vanligvis danner skum, må
De ikke fylle på mer enn 1 liter i
hurtigmikserkannen.
◗ Ta støpselet ut av stikkontakten umiddelbart
etter bruk.
◗ For tilberedningstid, se tabellen senere i denne
bruksanvisningen.
Legg merke til at bollens funksjoner ikke kan
aktiveres når hurtigmikseren er påmonter t.

NORSK28
Bruk av apparatet
Kontrollpanel med Smart-styring
Dette apparatet er utstyrt med et kontrollpanel
med Smart-styring, noe som sikrer en optimal
tilberedning og et perfekt sluttresultat.
Hver aktiveringsknapp er koblet til en
forhåndsprogrammert hastighetsprofil som
representerer den optimale arbeidsprosessen
for et bestemt tilbehør.
Hastigheten kan økes eller reduseres inntil
3 ganger ved å trykke på knappene som er
merket med pluss- eller minustegn.
Hvis De trykker på Puls-knappen,kjører apparatet
på høyeste hastighet. Når De slipper knappen,
stopper apparatet eller hastigheten settes tilbake
til den tidligere valgte verdien.
Tilberedningsprosessen kan alltid avbrytes ved å
trykke på Stopp-knappen.
Hvis De velger den samme aktiveringsknappen på
nytt innen 40 sekunder, startes tilberedningen fra
der den ble stanset.
Foodprocessor-bolle
C
1 Monter bollen ved hjelp av håndtaket på
kjøkkenmaskinen ved å dreie håndtaket i
samme retning som pilen inntil De hører
et klikk.
C
2 Sett lokket på bollen. Drei lokket i pilens
retning inntil De hører et klikk (dette
krever at De bruker litt kraft).
Innebygd sikkerhetslås
B
Motorenheten, bollen og lokket er utstyrt med
merker.Apparatet virker kun dersom merket på
motoren er plassert midt imot merket på
skrudekselet.
C
1 Kontroller at punktet på lokket og punktet
på bollen er plassert midt imot hverandre.
Plasseringen av lokket vil fullføre formen
på håndtaket.
Materør og stapper
C
1 Bruk materøret ved tilsetning av væske
og/eller faste ingredienser. Bruk stapperen
til å dytte de faste ingrediensene ned
gjennom materøret.
C
2 Stapperen kan også brukes til å sperre
materøret slik at ingredienser ikke slipper
ut gjennom røret.
CLICK
1
2
CLICK
1
2
CLICK

29NORSK
Kniv
◗ Kniven kan brukes til hakking, miksing,
blanding og maling.
C
1 Ta beskyttelsesdekslet av kniven.
Bladene er skarpe og må ikke berøres!
C
2 Sett inn tilbehørholderen i bollen og
monter kniven på holderen.
3 Tilsett ingrediensene i bollen. Store biter
kuttes på forhånd opp i mindre,
ca. 3 x 3 x 3 cm. Sett lokket på bollen.
4 Sett stapperen i materøret.
C
5 Trykk på knappen for hakking på
kontrollpanelet.
- Tilberedningsprosessen starter med
4 pulsomdreininger slik at ingrediensene
(f.eks. løk eller nøtter) kuttes opp jevnt.
- Deretter øker prosessen til maksimal hastighet
inntil Stopp-knappen trykkes inn.
◗ Trykk på knappen med minustegnet dersom
De vil redusere hastigheten.
◗ Tilberedningen kan når som helst stoppes ved
å trykke på Stopp-knappen.
Tips
◗ Dersom De hakker løk, kan De forhindre at
disse blir for finhakket hvis De stopper
apparatet etter de innledende fire
pulsomdreiningene.
◗ La ikke apparatet gå for lenge ved hakking av
hard ost. Osten vil da bli for varm, smelter og
blir klumpet.
◗ Ikke bruk kniven til å hakke ingredienser som
er veldig harde, f.eks. kaffebønner, gurkemeie,
muskatnøtt og isbiter, da dette kan gjøre
kniven sløv.
Dersom ingrediensene sitter fast på kniven eller
på innsiden av bollen:
1 Slå av apparatet.
2 Ta lokket av bollen.
3 Fjern ingrediensene fra kniven eller
innsiden av bollen med en slikkepott.
Skiver
Ikke bruk skivene ved tilbereding av harde
ingredienser som f.eks. isbiter.
C
1 Plasser den valgte skiven i skiveholderen
før De monterer denne på
tilbehørholderen.
Skjæreflatene er veldig skarpe. Unngå å ta på dem!
CLICK
2
1

NORSK30
C
2 Sett skiveholderen på tilbehørholderen
som står i bollen.
3 Sett lokket på bollen.
4 Ha ingrediensene i materøret.Store
stykker deles opp slik at de passer i røret.
C
5 Fyll materøret jevnt for beste resultat.
Hvis De har store mengder mat som skal
behandles, er det best å ta det i flere omganger
og tømme bollen mellom hver gang.
C
6 Velg alternativet for rasping og kutting på
kontrollpanelet.
◗ Hastigheten kan økes eller reduseres inntil
3 ganger ved å trykke på knappene med plusseller minustegn.
C
7 Press ingrediensene forsiktig gjennom
materøret ved hjelp av stapperen.
◗ Dersom De rasper myke grønnsaker eller
frukt, kan De redusere hastigheten inntil tre
ganger ved å trykke på knappen med
minustegnet. De unngår dermed at
grønnsakene og frukten ender opp som puré.
C
8 Når De skal fjerne skiven fra
skiveholderen,tar De skiveholderen i
hånden med baksiden pekende mot Dem.
Ved å presse endene på skiven fremover
med tomlene, faller skiven ut av holderen.
Justerbar kutteskive
Ved hjelp av den justerbare kutteskiven kan De
kutte ingrediensene i den tykkelsen De ønsker.
Vær forsiktig: knivbladene er veldig skarpe.
C
1 Sett i kniven på toppen av
monteringsplaten.
C
2 Fest justeringsknappen fra undersiden av
platen og skru til De treffer plasseringen av
merket, slik at den låses.
1
2
 Loading...