

Philips HR 7725 User Manual

2
English Page 3
Français Page 15
Deutsch Seite 27
Nederlands Pagina 39
Italiano Pagina 51
Ελληνικά Σελίδα 63

3
Q
L
M
G
J
H
I
V
D
C
B
K
O
F
E
R
S
T
U
P
A
N
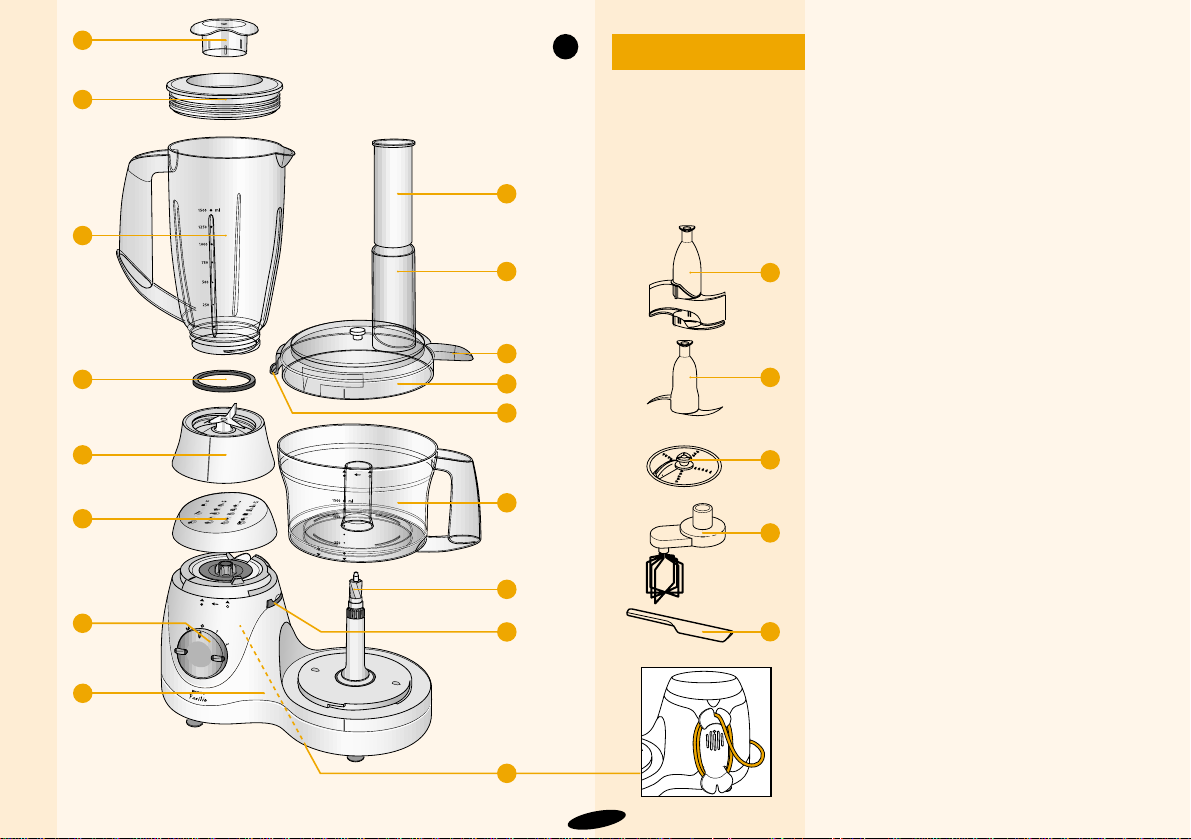
General description (fig. 1)
A Motor unit
B Bowl
C Lid of bowl
D Peg of lid (activates and deactivates the
safety lock)
E Projection (covers the opening in the
handle)
F Built-in safety lock
G Blade £
H Slicing/grating disc (medium fine,
double-sided) ≠
I Beater ß
J Kneading accessory ©
K Driving shaft
L Chute
M Pusher
N Speed control
O = Off
1 - 2 = variable speed control
(1 = lowest speed; 2 = highest
speed)
M = Moment/Pulse button
(appliance runs as long as button is
pressed)
O Cord clip (for fixing the cord when
wrapped)
P Screw cap (for closing the attaching
hole for the blender jar when it is not
used)
Blender accessories ®
Q Stopper
R Lid
S Blender jar
T Rubber sealing ring
U Knife unit
V Spatula
1
English

Automatic cut-out
Read these instructions carefully before you start using the
appliance
To prevent damage due to overheating, your appliance has been
equipped with an automatic cut-out system. In case of overheating, this
system will automatically cut off the power supply to the appliance.
If you follow the instructions below, you can switch on the appliance
again after you have let it cool down for 15 minutes.
If your appliance suddenly stops running:
- Pull the mains plug out of the socket
- Set the switch to position O
- Let the appliance cool down for 15 minutes
- Put the mains plug back in the socket
- Switch on the appliance again.
Please contact your Philips dealer or an authorised Philips service centre
if the automatic cut-out system is activated time and again.
Symbols on the appliance
To the left of the symbols on the appliance representing the various
applications you will find an icon of the accessory to be used. Above
this icon, the most appropriate speed for that particular application has
been indicated: M (= pulse setting) or speeds 1 to 2 (see table on pages
8-10).
Important
• Read the directions for use and look at the illustrations before you
start using the appliance.
• Remove the protective cover from the blade each time you use it.
• Be very careful when you pick up the blade, the knife of the
blender and the slicing/grating disc. They are very sharp!
• Thoroughly clean the parts that will come into contact with food
before you use the appliance for the first time.
• Place the lid on the bowl in the right position. The built-in safety
lock will now be deblocked and you will be able to turn on the
appliance.
• Note that if both the blender and the bowl have been correctly
mounted, only the blender will function.
• Never let the appliance run unattended.
• Never let children run the appliance.
• When you are mixing or blending liquids, do not exceed the
maximum content indicated on the bowl or the blender (top line of
the graduation).
• Do not exceed the maximum amounts and processing times
indicated in the table.
• Wait until moving parts have stopped running before you remove
the lid of the appliance.
• Never put your fingers or objects (e.g. a spatula) in the chute while
the appliance is running. Only the pusher is to be used for this
purpose.
• Never put your fingers or objects (e.g. a spatula) in the blender
unless you have unplugged the appliance first.
• Never immerse the motor unit in water or any other liquid. Do not
rinse it either.
• Unplug the appliance after use.
• If the mains cord of this appliance is damaged, it must only be
replaced by Philips or their service representative, as special tools
and/or parts are required.
• Keep these directions for use for future reference.
4

1
2
3
CLICK
4
CLICK
5
CLICK
6
7
8
9
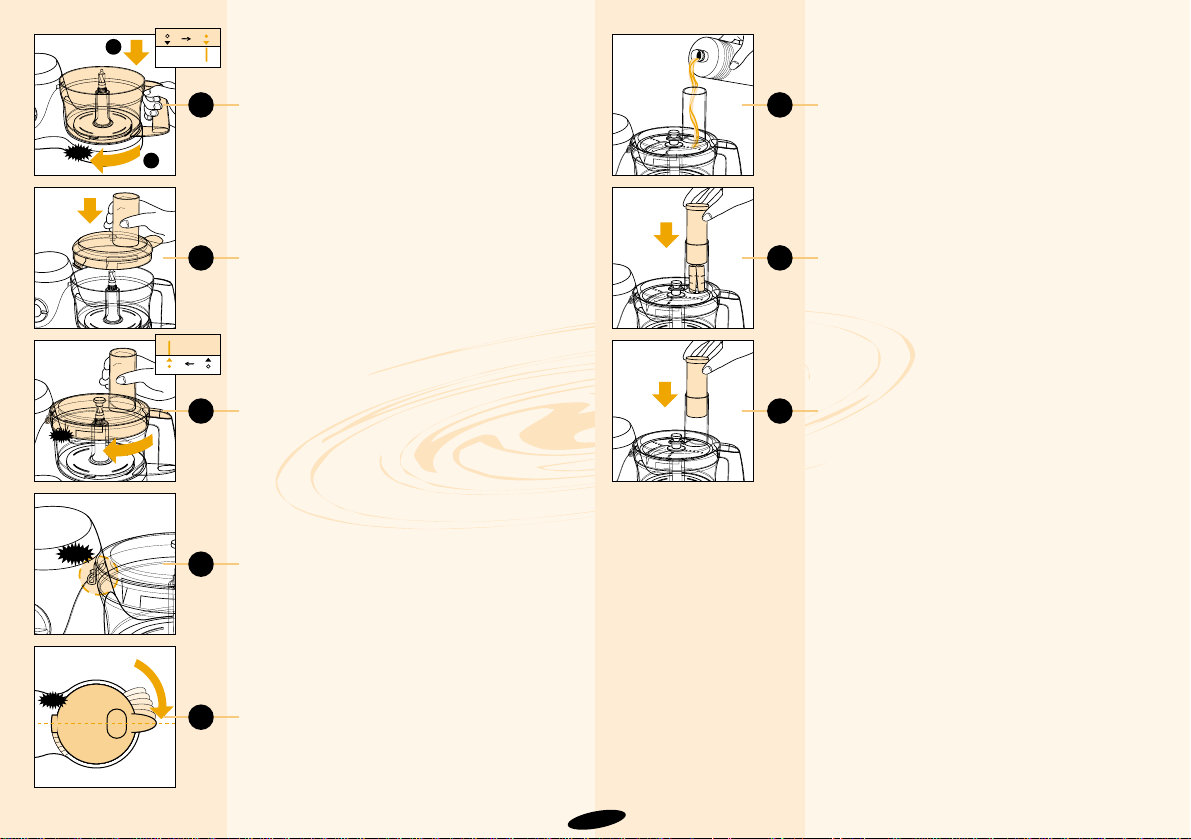
Placing the bowl (B) (fig. 2)
- Put the bowl on the food processor as
shown (1)
- Turn the handle in the direction of the
arrow until the bowl cannot be moved any
further and you hear a ‘click’ (2).
Placing the lid (C)
- Put the lid on the bowl as shown in fig. 3.
- Turn the lid with some force in the direction
of the arrow until the lid will not move any
further and you hear a ‘click’ (fig. 4-5).
- Make sure that the mark on the lid and the
arrow on the bowl are directly opposite
each other. The projection of the lid will
now cover the opening in the handle of the
bowl (fig. 6).
Chute (L) and pusher (M)
• The chute can be used to add liquid and
solid ingredients (fig. 7).
• Use the pusher to push ingredients through
the chute (fig. 8).
• You can also use the pusher to close the
chute while the appliance is running to
prevent dust or drops of liquid from
escaping through the chute (fig. 9).
Built-in safety lock (F)
The motor unit as well as the lid (C) have
been provided with marks. The appliance will
only function if the arrow on the motor unit is
placed directly opposite the mark on the lid. In
this position, the projection (E) of the lid will
cover the opening in the handle of the bowl.
How to use the appliance
Note: The appliance will only function if
• The screw cap (P) or the blender (Q-U)
have been properly mounted onto the
motor unit (A) and
• The bowl (B) and the lid (C) have been
placed on the motor unit in accordance
with the instructions in this booklet.
• If both the blender and the bowl have been
mounted correctly onto the motor unit, only
the blender will function.
Set the speed control (N) to the position
indicated in the table on pages 8-10 and
switch the appliance on. When you have
doubts about the right speed, always select
the highest speed (setting 2).
5
CLICK
2
10
11
12
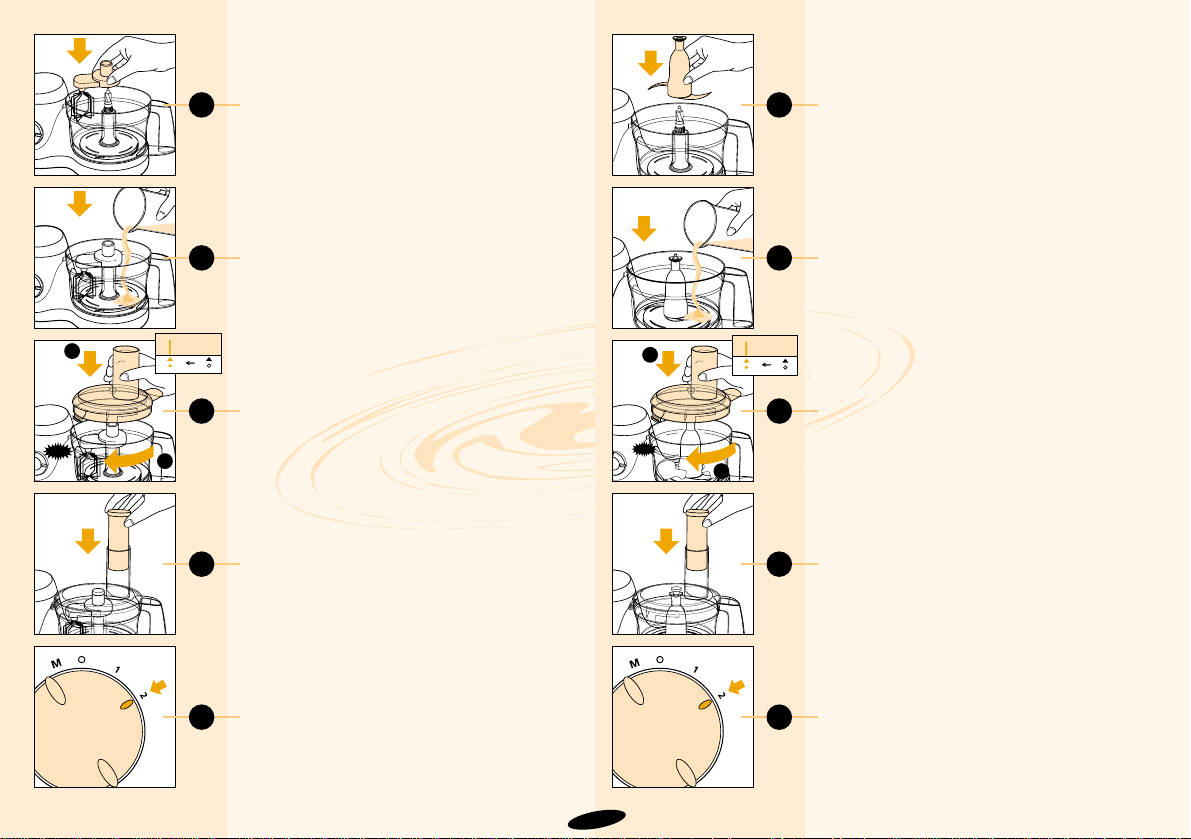
Blade (G) £
Be careful: the cutting edges of the blade
are very sharp!
• The blade can be used for chopping,
mixing, blending, pureeing and preparing
puff pastry, crumble and shortcrust pastry.
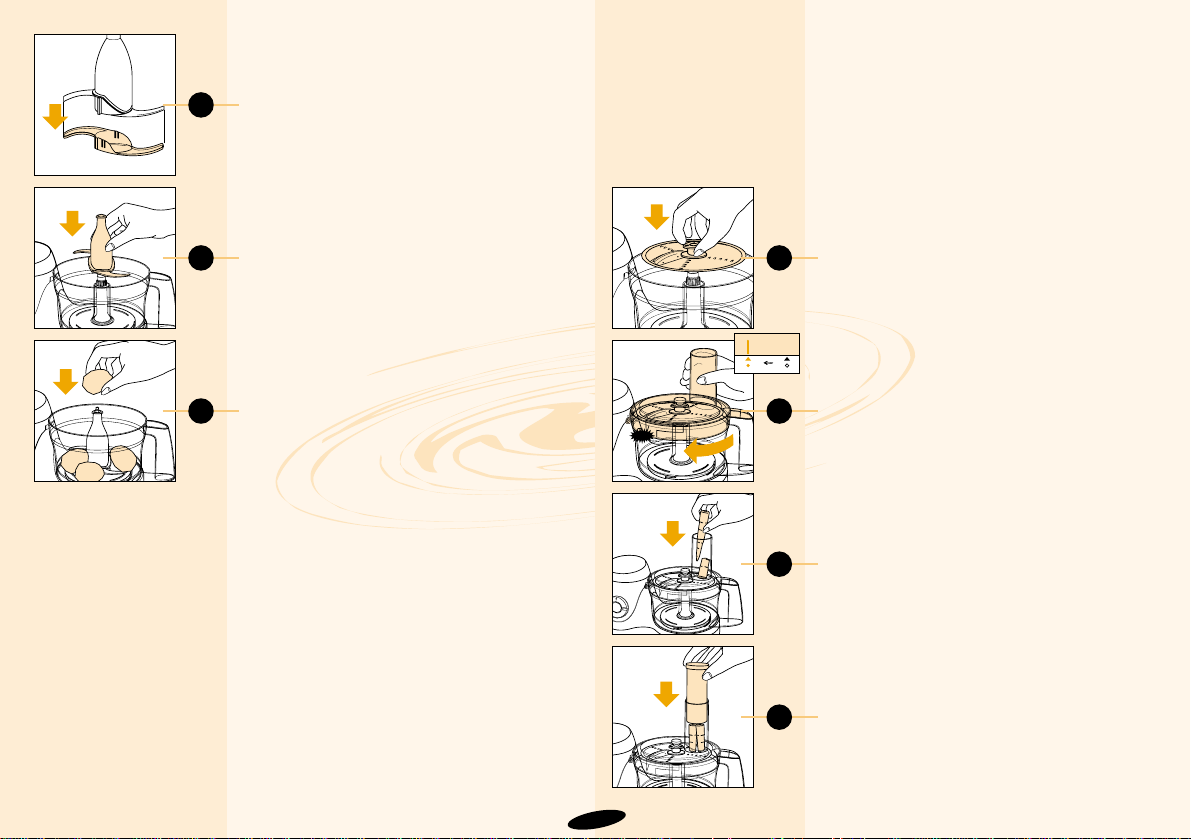
- Remove the protective cover from the
blade (fig. 10).
- Put the bowl on the motor unit (fig. 2) and
fit the blade onto the driving shaft (fig. 11).
- Put the ingredients in the bowl (fig. 12).
- Fasten the lid onto the bowl and put the
pusher in the chute.
- Set the speed control (N) to the position
indicated in the table and switch the
appliance on. If you have doubts about the
correct speed, always select the highest
speed (position 2).
• Applications/recipes, mentioned in the
table, will be ready after 10-60 seconds.
Tips:
• It is better not to chop large chunks with
the blade; pre-cut them into pieces of
approximately 3 cm before putting them in
the food processor.
• The appliance chops very quickly; let it run
for short periods at a time, also when you
are using the pulse setting (M), to prevent
the food from becoming too finely chopped.
• Do not let the appliance run for too long
when you are chopping (hard) cheese; the
cheese will get too hot and will start to melt
and become lumpy.
• If food sticks to the blade or to the inside of
the bowl:
- turn the appliance off;
- remove the lid from the bowl;
- remove the ingredients from the blade or
the inside of the bowl with a spatula.
• Do not chop very hard ingredients like
coffee beans, nutmeg and ice cubes. They
could cause the blade to get blunt.
Check the table for the appropriate speed
and setting.
Slicing/grating disc (H) ≠
Be careful: the cutting edges of the disc
are very sharp!
Only grasp the plastic part in the middle of
the disc.
- Put the bowl on the motor unit (fig. 2).
- Put the slicing/grating disc in place
(fig. 13).
- Put the lid on the bowl (fig. 14).
- Put the ingredients in the chute (fig. 15).
- Press the pusher lightly onto the
ingredients in the chute.
- For grating and slicing: set the speed
control to position 2 (maximum speed).
- If you want to cut soft vegetables or fruits,
you can also select a lower speed setting
(see table).
- Press the ingredients slowly and steadily
down with the pusher (fig. 16).
Tips:
• Pre-cut large chunks to make them fit into
the chute.
• Fill the chute evenly for the best results.
• When you have to cut large amounts of
food, process only small batches at a time
and empty the bowl regularly between
batches.
6
13
CLICK
14
15
16

17
18
1
2
CLICK
19
20
21
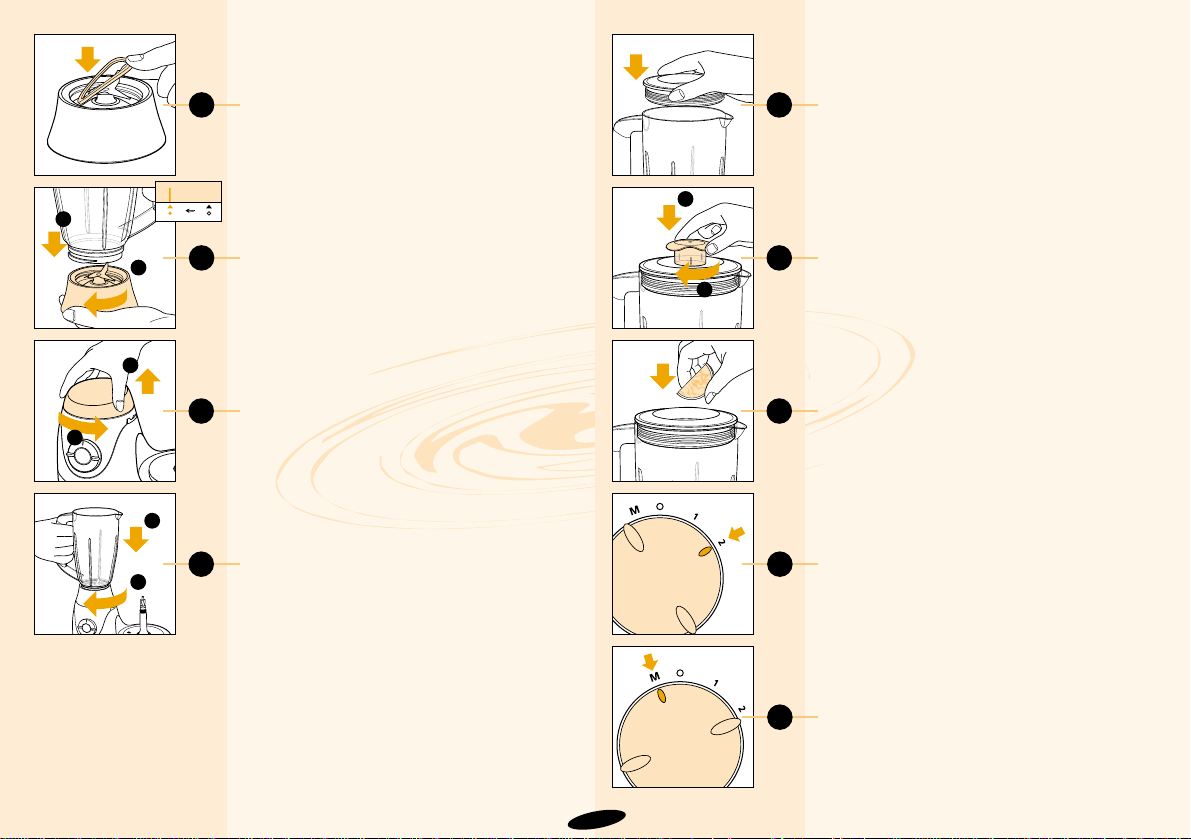
Beater (I)
ß
• You can use the beater to beat eggs, egg
whites, toppings for desserts, instant
pudding and whipping cream.
Do not use the beater for making batter or
cake mixture!
- Put the bowl on the motor unit (fig. 2) and
attach the beater to the driving shaft
(fig. 17).
- Put the ingredients in the bowl (fig. 18) and
fasten the lid onto the bowl (fig. 19).
- Put the pusher in the chute to close it
(fig. 20).
- Set the speed control (N) to the position
indicated in the table and switch the
appliance on. If you have doubts about the
correct speed, always select the highest
speed (position 2) (fig. 21).
• Applications/recipes, mentioned in the
table, will be ready after 2-5 minutes.
Kneading accessory (J) ©
• The kneading accessory can be used for
kneading bread dough and for mixing
batters and cake mixtures.
- Put the bowl on the motor unit (fig. 2) and
fit the kneading accessory onto the driving
shaft (fig. 22).
- Put the ingredients in the bowl (fig. 23) and
fasten the lid onto the bowl (fig. 24).
- Put the pusher in the chute to close it
(fig. 25).
- Set the speed control (N) to position 2
(= maximum speed) (fig. 26). The dough,
batter or cake mixture will be ready after
1 - 3 minutes.
7
22
23
CLICK
1
2
24
25
26
Blender (Q-U) ®
Important:
• The appliance can be used with or
without the blender attached to the
motor unit. If you use the appliance
without the blender, the appliance will
not function if the screw cap (P) has
not been screwed onto the attaching
hole for the blender.
• Before use: do not put the mains plug
in the socket until you have attached
the blender jar (S), the lid (R) and the
knife unit (U) to the motor unit in the
correct way.
• After use: unplug the appliance before
you remove the blender jar from the
motor unit.
• The blender can be used for pureeing
very finely and for blending. It can be
used for e.g. soups, sauces,
milkshakes, baby food, vegetables,
fruit, thin batter, puree, etc. If
necessary, cut solid ingredients into
smaller pieces before you put them in
the blender.
• Do not fill the blender jar with
ingredients that are hotter than 80 °C.
• To prevent spilling, do not put more
than 1.5 litres of liquid in the blender
jar.
• Never remove the lid while the blender
is running.
Assembly and disassembly
- Put the rubber sealing ring (T) around the
edge of the knife unit (U) (fig. 27).
- Turn the knife unit to the left to attach it to
the blender jar (fig. 28). Make sure it is
firmly fixed!
- Remove the screw cap (P) (fig. 29).
- Mount the blender jar onto the attaching
hole and turn it in the direction of the arrow
until it is firmly fixed (fig. 30).
Warning: do not exert too much pressure on
the handle of the blender jar.
- Press the lid into place (fig. 31).
- Attach the stopper by pressing it down and
turning it in the direction of the arrows until
it is firmly attached (fig. 32).
• To detach the blender, follow these steps
in reverse order and opposite direction.
• Applications/recipes, mentioned in the
table, will be ready after 10 seconds - 2
minutes.
How to use the blender
- Put the ingredients in the blender jar
(fig. 33).
- Switch on the appliance by setting the
speed control to the recommended speed
(fig. 34) or by pressing the pulse button (M)
(fig. 35). If you have any doubt about the
correct speed, always select the highest
speed (position 2). Check the table for the
appropriate speed and setting.
8
27
1
2
28
2
1
29
1
2
30
31
1
2
32
33
34
35
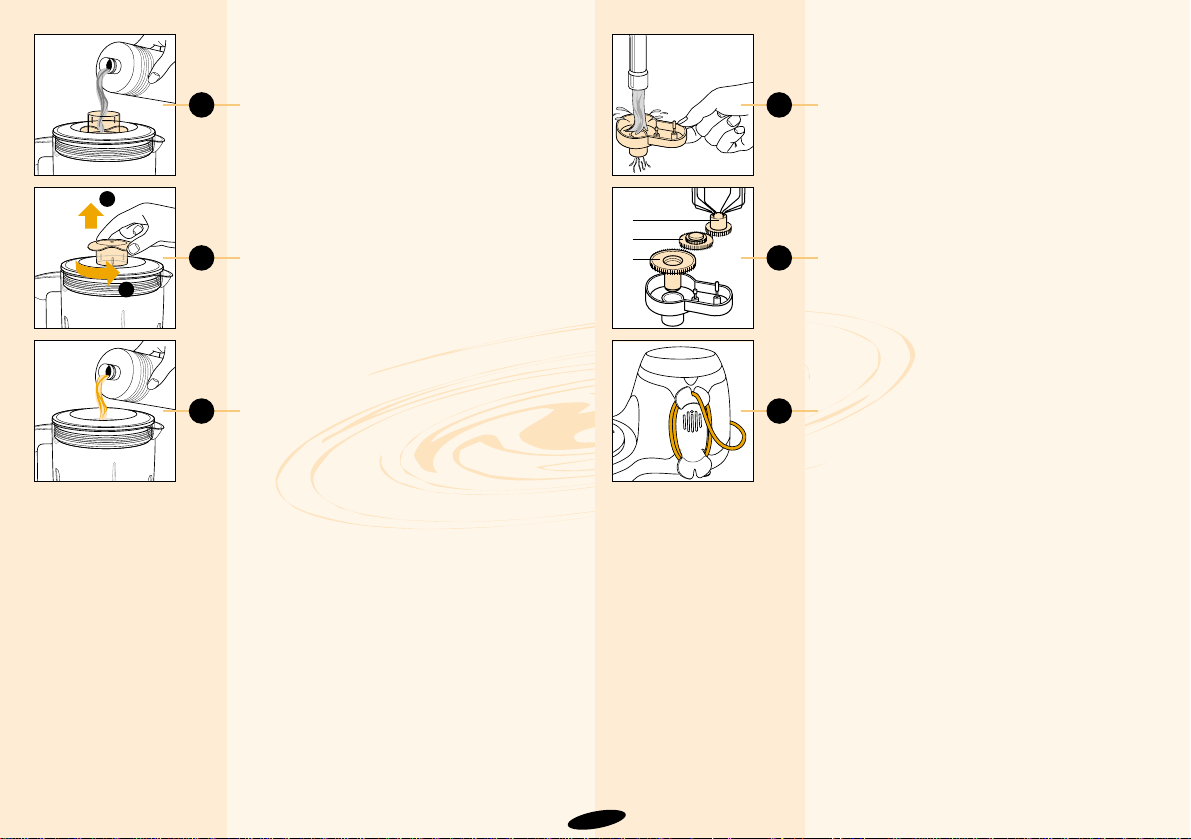
Tips:
• Liquid ingredients (for example oil for
making mayonnaise) can be poured into
the blender jar through the hole in the
stopper which has been put in the lid
upside down (fig. 36).
• The opening in the lid can be used to add
ingredients while the appliance is running.
To do so, unscrew the stopper and remove
it from the lid (fig. 37-38).
• The longer you let the appliance run, the
finer the blending result will usually be.
• It may be necessary to switch off the
appliance from time to time to remove
pieces of food sticking to the inside of the
blender jar.
- Switch off the appliance and unplug it;
- Remove the stopper and the lid;
- Remove pieces sticking to the inside of the
blender jar with a soft spatula. Keep the
spatula at a safe distance from the knives
(approximately 2 cm).
Cleaning
• Always unplug the appliance before you
start cleaning the motor unit.
• You can clean the motor unit with a damp
cloth. Do not immerse the motor unit in
water and do not rinse it either.
• Always clean the parts that have come into
contact with food in hot water with
washing-up liquid immediately after use.
• Clean the blade, the knife unit of the
blender and the slicing disc very carefully.
The cutting edges are very sharp!
• Make sure that the cutting edges of the
blade and the slicing disc do not come into
contact with hard objects: this could cause
them to become blunt.
• The gearwheels of the beater can be
detached and cleaned very easily
(fig. 39-40).
• Certain ingredients may cause
discolorations on the surface of the
accessories. This does not have a negative
effect; the discolorations usually disappear
after some time.
• Wrap the (excess) mains cord around the
reel on the back of the appliance (fig. 41).
9
36
2
1
37
38
39
2
1
3
40
41

10
Apples, carrots,
celeriac
- grating/slicing
Batter (pancake)
- whisking
Breadcrumbs
- chopping
Butter cream (crème au beurre)
Cheese (Parmesan)
- grating
Cheese (Gouda)
- grating
Chocolate
- chopping
Dough (tarts, pies, dumplings)
- kneading
Dough (bread)
- kneading
Dough (pizza)
- kneading
500 g
500 ml
milk
100 g
300 g
200 g
200 g
200 g
300 g
flour
700 g
flour
700 g
flour
2 / M
2
2
2
2
1
1 / M
2
2
2
Cut the fruit/vegetables into pieces that fit into the chute. Fill the chute with
the pieces and grate them while pressing the pusher lightly.
First pour the milk into the blender and then add the dry ingredients. Mix
the ingredients approx. 1 minute. If necessary, repeat this procedure max.
2 times. Then stop for a few minutes to allow the appliance to cool down to
ambient temperature.
Use dry, crisp bread
Use soft butter for a light result
Use a piece of rindless Parmesan and cut it into pieces that fit into the
chute
Cut the cheese into pieces that fit into the chute. Press carefully with the
pusher.
Use hard, plain chocolate. Break into pieces of 2 cm. Use the pulse setting
(M) during the first few seconds and then switch to max. speed to chop
very finely.
Use cold margarine and cold water. Put flour in the bowl and add the
margarine cut into pieces of 2 cm. Mix at max. speed until the dough has
become crumbly, then add cold water while mixing. Stop as soon the
dough starts to turn into a ball. Allow the dough to cool before further
processing.
Mix warm water with yeast and sugar. Add flour, butter and salt and knead
the dough for approx. 90 seconds. Leave to rise for 30 minutes.
Same procedure as for bread dough. Knead the dough for approx. 1
minute.
Salads, raw
vegetables
Pancakes,
waffles, crLpes
Breadcrumbed
dishes, au gratin
dishes
Desserts, pastry,
toppings
Garnishing,
soups, sauces,
au gratin dishes
Sauces, pizzas,
au gratin dishes,
fondue
Garnishing, sauces,
pastry,
puddings, mousses
Fruit tarts, apple
dumplings, pies,
quiches.
Bread
Pizzas, tarts
≠
®
£
£
≠
≠
£
£
©
£ / ©
Ingredients Max. Speed Accessory Procedure Applications
quantity setting

11
Dough (yeast)
- kneading
Dough (shortcrust)
- kneading
Egg whites
- whisking
Fruit (e.g. apples, peaches, bananas)
- chopping
- pureeing
Herbs (e.g. parsley)
- chopping
Leeks, cucumbers, carrots
- slicing
Mayonnaise
- emulsifying
Meats, fish, poultry
- lean meat
- streaky meat
Milkshakes
- blending
Mixture (sponge)
- whisking
Mixture (cake)
- mixing
500 g
flour
500 g
flour
4 egg
whites
500 g
700 g
min.
75 g
min.
1 piece
3 eggs
500 g
400 g
250 ml
milk
3 eggs
4 eggs
2
2
2
M
2
2 / M
2 / M
1 - 2
2 / M
2 / M
2
2 / 1
2
First mix yeast, warm milk and some sugar. Add flour, sugar, salt, eggs
and soft margarine. Knead the dough until it stops sticking to the bowl.
(Takes approx. 1 minute). Leave it to rise for 30 minutes.
Use cold margarine, cut into pieces of 2 cm. Put all the ingredients in the
bowl and knead until the dough has turned into a ball. Allow the dough to
cool before further processing.
Use the eggs at room temperature.
Note: Use at least two egg whites
Tip: Add a little lemon juice to prevent the fruit from discolouring
Add some liquid to obtain a smooth puree.
Wash and dry the herb(s) before chopping
Fill the chute with leeks, pieces of cucumber or carrots and press carefully
with the pusher.
Use all ingredients at room temperature. Note: use at least one big egg,
two smal eggs or two big egg yolks.
First remove sinews and (fish) bones. Cut the meat/fish into cubes of 3
cm. Use the pulse setting for a coarser chopping result.
Puree the fruit (e.g. bananas, strawberries) with sugar and lemon juice.
Add milk and some ice cream and mix well.
Ingredients at room temperature. Whisk the mixture of eggs and sugar at
max. speed until stiff. Then add the sifted flour. Continue whisking
carefully at speed 1.
Ingredients at room temperature. Mix the softened butter and the sugar
until the mixture is smooth and creamy. Then add milk, eggs and flour
respectively.
Luxury bread
Apple pies, sweet
biscuits, open fruit
flans
Puddings, soufflés,
meringues
Salads
Sauces, jams,
puddings, baby food
Sauces, soups,
garnishing, herb
butter
Soups, salads,
quiches.
French fries, salads,
fondue, garnishing
and barbecue sauces.
Steaks tartare,
hamburgers
Minced meat
Sponge cakes, Swiss
rolls, pastry
Various cakes
©
£
ß
£
®
£
≠
£
£
£
®
ß / ©
£
Ingredients Max. Speed Accessory Procedure Applications
quantity setting

Nuts
- chopping
Onions
- chopping
- slicing
Peas, beans
(cooked)
- pureeing
Potatoes, cooked
- pureeing
Soups
- blending
Vegetables
- chopping
Vegetables and meats (cooked)
- pureeing
Whipping cream
- whipping
Salads, bread,
almond paste,
puddings
Salads, cooked food
Purees, soups
Oven dishes,
puree
Soups, sauces
Soups, raw
vegetables, salads
Baby and infant food
Garnishing, cream,
pastry,
ice cream mixtures
12
250 g
500 g
500 g
500 g
750 g
potatoes
500 ml
500 g
500 g
400 ml
2 / M
2 / M
2 / M
2
1 - 2
2
2
2
1 - 2
Use the pulse setting (M) for coarse chopping or max. speed for fine
chopping.
Peel the onions and cut them into 4 pieces. Note: use at least 100 g.
Peel the onions and cut them into pieces that fit into the chute. Note: use
at least 100 g
Use cooked beans or peas. If necessary, add some liquid to improve the
consistency of the mixture.
Do not overcook the potatoes. The amount of milk necessary depends on
the kind of potato used. Use warm milk (max. 80°C). Add the milk slowly
while the metal blade is rotating.
Use cooked vegetables
Pre-cut into cubes of 3 cm and chop them with the blade.
For coarse puree, add only a little liquid. For fine puree, keep adding liquid
until the mixture is smooth enough.
Use cream that has been cooled in the refrigerator.
Note: use at least 125 ml cream.
£
£
≠
®
£
®
£
®
ß
Ingredients Max. Speed Accessory Procedure Applications
quantity setting
13
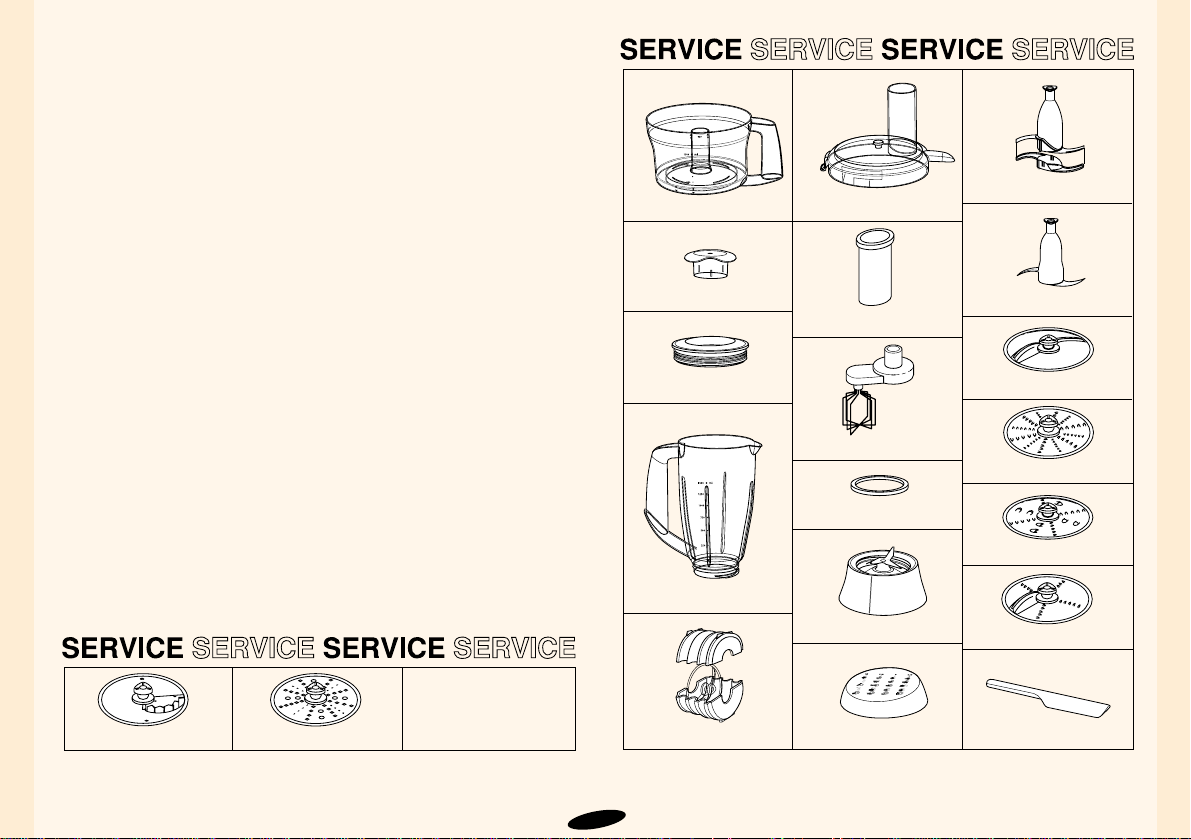
Parts
The following items are standard accessories:
- Bowl (B)
- Lid (C)
- Blade (G) £
- Slicing/grating disc (H) ≠
- Beater (I) ß
- Kneading accessory (J) ©
- Pusher (M)
- Blender (Q-U)
- Spatula (V)
The following additional accessories are available:
- double-sided slicing disc for thick and thin slicing
(n° 4822 690 40181) §
- double-sided grating disc for coarse and medium fine grating
(n° 4822 690 40182) •
- double-sided grating disc for fine and extra fine grating
(n° 4822 690 40183) ¶
- Potato grating disc (n° 4822 690 10139)
- single-sided slicing disc for French fries and e.g. Swedish turnip
HR 2912 (n° 4822 690 10141).
- Storage box for discs HR 2922 (n° 4822 690 40267).
Ask your supplier if these accessories are also available in your country.
If you want to order additional parts or replacements, please mention the
relevant service and/or type numbers.
4822 418 10343
4822 418 10342
4203 065 61850
4822 462 11055
4203 065 61990
4822 422 01336
4203 065 61880
4203 065 62000
4203 065 61890
4203 065 61900
4203 065 61910
4203 065 61980
4203 065 61960
4203 065 61970
4203 065 61930
4203 065 61940
4203 065 61950
4203 065 61860
4203 065 61830
4203 065 61840

14
You are not satisfied with the way the appliance functions?
If the appliance does not function the way you expect it to, consult the following table and read the relevant sections in the directions for use!
Possible solution:
Turn bowl and/or lid in the direction indicated as far as possible (until you hear a ‘click’).
Make sure that the arrows on the bowl and on the appliance as well as on the bowl and on the lid are
placed directly opposite each other (see fig. 2 and 6).
Make sure that the blender jar or the screw cap have been properly placed and turn them in the
direction indicated as far as possible.
This is probably the automatic cut-out system that has cut off the power supply to the appliance
because it has overheated.
- Unplug the appliance
- Set the switch to position O
- Let the appliance cool down for 15 minutes
- Put the mains plug back in the socket
- Switch on the appliance again.
If the automatic cut-out system is activated repeatedly, contact your Philips dealer or the Philips
Service Centre in your country.
Select the correct speed. Look at the indications on the appliance and in the directions for use.
You can try adding some lemon juice or salt. Make sure the beater and the bowl are grease-free and
select the right speed.
Use the beater. Use cooled whipping cream (approximately 6 °C).
Only use the beater to whip cream, eggs/egg whites and liquids. Do not use it to prepare batter, cake
mixture or dough!
Follow the instructions given in the directions for use carefully. Never add too much water.
Always use the accessory indicated in the table.
Do not exceed the maximum kneading time indicated.
Problem:
The switch does not function
The appliance has suddenly
stopped running
The chopping, slicing or grating
result is not optimal
The result when whisking eggs is
not optimal
The result when whipping cream
is not optimal
The beater slips or bends
The dough is swung around in
the bowl
15
Q
L
M
G
J
H
I
V
D
C
B
K
O
F
E
R
S
T
U
P
A
N
Description générale (fig.1)
A Bloc moteur
B Bol
C Couvercle du bol
D Doigt de sécurité du bol (active et
désactive l'interrupteur de sécurité)
E Ergot du bol (couvre l'orifice de la
poignée)
F Interrupteur de sécurité incorporé
G Couteau £
H Disque à émincer / râper ≠
(moyennement fin, deux faces)
I Batteur ß
J Accessoire de pétrissage ©
K Axe d'entraînement
L Cheminée de remplissage
M Poussoir
N Sélecteur de vitesse
O = Arrêt
1 - 2 = réglage variable des vitesses
1 = vitesse minimum,
2 = vitesse maximum)
M = Touche Eclair (impulsions)
(l'appareil est en marche tant que
vous appuyez sur le bouton)
O Enrouleur de cordon avec serre câble
(pour maintenir le câble enroulé)
P Capuchon fileté (pour couvrir l'ouverture
ou se fixe le bol mélangeur lorsqu'on ne
l'utilise pas)
Accessoires du bol mélangeur ®
Q Bouchon
R Couvercle
S Bol mélangeur
T Joint en caoutchouc
U Couteaux
V Spatule
1
Français

Interrupteur automatique de sécurité
Lisez ces instructions attentivement avant d'utiliser l'appareil.
L'appareil est équipé d'un interrupteur automatique afin d'éviter qu'il
s'abîme en cas de surchauffe. En cas de surchauffe, ce dispositif coupe
automatiquement l'alimentation électrique de l'appareil. Vous pouvez
remettre l'appareil en marche après l'avoir laissé refroidir pendant 15
minutes, en suivant les instructions ci-dessous :
Si votre appareil s'arrête brusquement :
• Débranchez l'appareil
• Mettez l'interrupteur sur la position O
• Laissez refroidir l'appareil 15 minutes
• Branchez à nouveau l'appareil
• Remettez l'appareil en marche
Consultez votre revendeur ou un Centre Service Agréé Philips si
l'interrupteur de sécurité se déclenche trop fréquemment.
Symboles
A gauche des symboles qui figurent sur l'appareil et qui indiquent les
différentes utilisations, se trouve une icône de l'accessoire à utiliser. Audessus de cette icône est indiquée la vitesse la plus appropriée pour
cette utilisation : M (= impulsions) ou les vitesses 1 ou 2 (voir le tableau,
pages 22-24).
Important
• Lisez ces recommandations ainsi que les illustrations avant
d'utiliser votre appareil.
• Enlevez la gaine de protection du couteau avant chaque
utilisation.
• Faites très attention en prenant le couteau et les disques à
émincer/râper car ils sont très aiguisés et tranchants.
• Avant la première utilisation, nettoyez toutes les pièces en contact
avec les aliments.
• Placez correctement le couvercle du bol pour qu'il déverrouille
l'interrupteur de sécurité, permettant ainsi la marche du moteur.
• Notez que si le mélangeur et le bol ont été montés correctement,
seul le mélangeur fonctionnera.
• Ne laissez pas fonctionner l'appareil sans surveillance.
• Ne laissez jamais les enfants utiliser l'appareil.
• Quand vous mixez ou mélangez des liquides, ne dépassez pas le
repère de remplissage maximum du bol ou du mélangeur (trait
supérieur de graduation).
• Ne dépassez pas les quantités maximums et les temps
d'utilisation indiqués dans le tableau.
• Attendez l'arrêt complet des parties en rotation avant de retirer le
couvercle.
• Ne mettez jamais vos doigts ou tout autre objet, par ex. la spatule,
dans la cheminée de remplissage ni dans le bol mélangeur sans
avoir au préalable débranché l'appareil.
• N'immergez jamais l'ensemble moteur dans l'eau ni dans aucun
autre liquide. Ne le rincez pas non plus.
• Débranchez l'appareil après son utilisation.
• Si le cordon d’alimentation de l’appareil est endommagé, il doit
être remplacé par un cordon équivalent. Adressez-vous à votre
revendeur ou à un Centre Service Agréé Philips qui seuls
possédent la compétence et les pièces nécessaires à la
réparation.
• Conservez ce mode d'emploi pour usage ultérieur.
16
2
3
CLICK
4
CLICK
5
CLICK
6
7
8
9
Pour mettre en place le bol (B) (fig. 2)
- Placez le bol sur le bloc moteur (1).
- Tournez à fond la poignée dans le sens de
la flèche jusqu'à ce que vous entendiez un
"clic" (2).
Pour mettre le couvercle en place (C)
- Mettez le couvercle sur le bol (fig. 3)
- Tournez fermement le couvercle à fond
dans le sens de la flèche jusqu'à ce que
vous entendiez un "clic" (fig. 4-5).
- Assurez-vous de faire coïncider le repère
du couvercle et la flèche du bol. L'ergot du
couvercle recouvre alors l'ouverture de la
poignée du bol (fig. 6).
La cheminée de remplissage (L) et le
poussoir (M)
• La cheminée de remplissage peut être
utilisée pour ajouter du liquide et des
ingrédients solides (fig. 7).
• Utilisez le poussoir pour pousser les
ingrédients dans la cheminée (fig. 8).
• Le poussoir peut également servir à fermer
la cheminée pendant que l'appareil est en
marche, pour empêcher toute projection
(fig. 9).
Verrouillage de sûreté incorporé (F)
Le bloc moteur et le couvercle (C )
comportent des repères. L'appareil ne peut
fonctionner que si la flèche du bloc moteur
coïncide exactement avec le repère du
couvercle. Dans cette position, l'ergot (E) du
couvercle couvre l'ouverture de la poignée
du bol.
Utilisation de l'appareil
Remarque: l'appareil ne peut fonctionner
que si :
• le capuchon fileté (P) ou le bol mélangeur
(Q - U) ont été montés correctement sur le
bloc moteur (A) et si le bol (B) et le couvercle (C) ont été positionnés sur le bloc
moteur selon les instructions de ce livret.
• Si le mélangeur et le bol ont été montés
correctement sur le bloc moteur, le
mélangeur seul fonctionnera.
Positionnez le sélecteur de vitesse (N) sur la
position indiquée dans le tableau (pages 22-
24) et mettez l'appareil en marche. Si vous
hésitez sur la vitesse à utiliser, choisissez
toujours la vitesse la plus élevée (position 2).
17
CLICK
1
2

10
11
12
Le couteau £ (G)
Attention : les lames du couteau sont
très aiguisées et tranchantes !
• Le couteau peut être utilisé pour hacher,
mélanger, mixer, réduire en purée et pour
préparer les pâtes feuilletées, brisées et
sablées.
- Enlevez la gaine de protection du couteau
(fig. 10).
- Placez le bol sur le bloc moteur (fig. 2) et
positionnez le couteau sur l'axe
d'entraînement (fig. 11).
- Mettez les ingrédients dans le bol (fig. 12).
- Fixez le couvercle sur le bol et introduisez
le poussoir dans la cheminée
d'alimentation.
- Tournez le sélecteur de vitesse (N) sur la
position indiquée dans le tableau et mettez
l'appareil en marche. Si vous hésitez sur le
choix de la vitesse, choisissez toujours la
vitesse la plus élevée (position 2).
• Les préparations indiquées dans les
recettes sont généralement prêtes en 10 à
60 secondes.
Conseils :
• Il est préférable de ne pas hacher de gros
morceaux avec le couteau. Coupez-les en
dés d'environ 3 cm de côté avant de les
mettre dans le bol mélangeur.
• L'appareil hache très rapidement. Ne le
faites pas tourner trop longtemps : les
aliments seraient hachés trop fins. De
même lorsque vous utilisez la touche Eclair
(M).
• Ne laissez pas tourner l'appareil trop
longtemps lorsque vous hachez du
fromage (à pâte dure) : le fromage
chaufferait trop, commencerait à fondre et
à devenir pâteux.
• Si des aliments s'enroulent autour du
couteau ou collent à la paroi du bol :
- débranchez d'abord l'appareil
- retirez le couvercle du bol
- enlevez ensuite les aliments avec la
spatule.
- Ne hachez pas des ingrédients trop durs
tels que des grains de café, des noix de
muscade ou des glaçons : cela pourrait
émousser les lames du couteau.
Reportez-vous au tableau pour la vitesse et
le réglage appropriés.
Disque à émincer et à râper ≠ (H)
Attention : les lames du disque sont très
aiguisées !
Saisissez toujours le disque par la partie en
plastique au centre du disque.
- Placez le bol sur le bloc moteur (fig. 2).
- Positionnez le disque à émincer ou à râper
(fig. 13).
- Placez le couvercle sur le bol (fig. 14).
- Mettez les ingrédients dans la cheminée
d'alimentation (fig. 15).
- Appuyez légèrement sur les ingrédients
avec le poussoir.
- Pour émincer et râper : réglez le sélecteur
de vitesse sur la position 2 (vitesse
maximum).
- Si vous désirez trancher des légumes
tendres ou des fruits, vous pouvez
également choisir une vitesse inférieure
(voir le tableau).
18
13
CLICK
14
15
16
17
18
1
2
CLICK
19
20
21
- Poussez les ingrédients lentement et
régulièrement avec le poussoir (fig.16).
Conseils :
• Coupez les aliments grossièrement pour
les introduire dans la cheminée.
• Remplissez la cheminée de façon régulière
pour obtenir les meilleurs résultats.
• Si vous devez traiter d'importantes
quantités d'aliments, ne traitez que des
petites portions à la fois et videz le bol
fréquemment.
Le fouet
ß (I)
• Vous pouvez vous servir du fouet pour
battre des œufs, des blancs d'œufs, des
garnitures de desserts, des flans et de la
crème fouettée.
Ne vous servez pas du fouet pour faire
une pâte ou des mélanges pour gâteaux !
• Placez le bol sur le bloc moteur (fig. 2) et
fixez le fouet sur l'axe d'entraînement
(fig. 17).
• Mettez les aliments dans le bol (fig. 18) et
fixez le couvercle sur le bol (fig. 19).
• Mettez le poussoir dans la cheminée
(fig. 20).
• Tournez le sélecteur de vitesse (N) sur la
position indiquée dans le tableau et mettez
l'appareil en marche. Si vous hésitez sur le
choix de la vitesse, choisissez toujours la
vitesse la plus élevée (position 2) (fig. 21).
• Les préparations indiquées dans les
recettes sont généralement prêtes en 2 à 5
minutes.
Accessoire de pétrissage © (J)
• L'accessoire de pétrissage sert à pétrir de
la pâte à pain, à mixer de la pâte à frire ou
les ingrédients pour un gâteau.
- Placez le bol sur le bloc moteur (fig. 2) et
fixez l'accessoire de pétrissage sur l'axe
d'entraînement (fig. 22).
- Mettez les ingrédients dans le bol (fig. 23)
et fixez le couvercle sur le bol (fig. 24).
- Mettez le poussoir dans la cheminée
(fig. 25).
- Tournez le sélecteur de vitesse (N) sur la
position 2 (= vitesse maximum) (fig. 26). La
pâte ou le mélange sont prêts en une à
trois minutes.
19
22
23
CLICK
1
2
24
25
26

Le bol mélangeur ® (Q-U)
Important :
• L'appareil ne peut fonctionner que si
le bol mélangeur est fixé sur le bloc
moteur ou si le capuchon fileté (P)
est bien fixé sur l'ouverture de
raccordement du bol mélangeur.
• Avant toute utilisation : ne branchez
pas l'appareil avant d'avoir installé
correctement sur le bloc moteur, le
bol mélangeur (S) , le couvercle (R) et
l’ensemble couteaux (U).
• Après utilisation : débranchez
l'appareil avant de retirer le bol
mélangeur du bloc moteur.
• Le bol mélangeur peut être utilisé
pour réduire en purée ou pour
mélanger. Il peut servir par exemple
pour les soupes, les sauces, les milkshakes, les aliments de bébés, les
légumes, les fruits, les pâtes fluides,
la purée etc. Si nécessaire, coupez les
ingrédients solides en morceaux plus
petits avant de les mettre dans le bol
mélangeur.
• Ne mettez pas dans le bol mélangeur
des ingrédients à une température
supérieure à 80˚ C.
• Pour éviter tout débordement, ne
mettez pas plus de 1,5 litres de liquide
dans le bol .
• Ne retirez jamais le couvercle du bol
mélangeur pendant son
fonctionnement.
Montage et démontage
- Disposez le joint (T) autour du rebord du
bloc moteur (fig. 27).
- Faites tourner le couteaux vers la gauche
pour le fixer sur le bol mélangeur (fig. 28).
Assurez-vous qu'il est correctement
enclenché !
• Retirez le capuchon fileté (P) (fig. 29).
• Montez le bol mélangeur sur l'ouverture de
raccordement et tournez-le dans le sens de
la flèche jusqu'à son enclenchement
(fig. 30).
Attention : n'exercez pas une pression trop
importante sur la poignée du bol mélangeur.
• Positionnez le couvercle en appuyant
dessus (fig. 31).
• Fixez le bouchon en le tournant dans le
sens des flèches jusqu'à blocage (fig. 32).
• Pour retirer le bol mélangeur, procédez
dans l'ordre et dans le sens inverses.
• Les préparations indiquées dans les
recettes sont généralement prêtes suivant
le cas entre 10 secondes et 2 minutes.
Utilisation du bol mélangeur
• Mettez les ingrédients dans le bol
mélangeur (fig. 33).
• Mettez l'appareil en marche en réglant le
sélecteur de vitesses sur la vitesse
recommandée (fig. 34) ou en appuyant sur
la touche Eclair (M) (fig. 35). Si vous
hésitez sur le choix de la vitesse,
choisissez toujours la vitesse maximum
(position 2). Consultez le tableau pour la
vitesse et le réglage appropriés.
20
27
1
2
28
2
1
29
1
2
30
31
1
2
32
33
34
35

Conseils :
• Les ingrédients liquides (par exemple pour
une mayonnaise) peuvent être versés dans
le bol mixer par l’ouverture du bouchon mis
à l’envers (fig. 36).
• L'ouverture du couvercle peut servir à
ajouter des ingrédients pendant le
fonctionnement de l'appareil. Pour cela,
dévissez le bouchon et retirez-le du
couvercle (fig. 37 - 38).
• Plus vous laissez l'appareil tourner
longtemps, plus le mélange que vous
obtenez est fin.
• Il peut s'avérer nécessaire d'arrêter
l'appareil de temps à autre pour retirer les
aliments collés le long des parois du verre
du mélangeur.
• Arrêtez l'appareil et débranchez-le.
• Retirez le bouchon et le couvercle.
• Avec une spatule douce, retirez les
morceaux collés sur les parois du verre du
mélangeur. Tenez la spatule éloignée des
couteaux (environ 2 cm).
Nettoyage
• Débranchez toujours l'appareil avant de
nettoyer le bloc moteur.
• Le bloc moteur peut être nettoyé avec un
chiffon humide. N'immergez jamais le bloc
moteur dans l'eau. Ne le placez pas sous
l'eau.
• Lavez immédiatement après utilisation les
accessoires en contact avec les aliments, à
l'eau chaude savonneuse.
Ne les lavez pas dans le lave-vaisselle.
• Faites attention en nettoyant le couteau et
le disque à émincer/râper. Leurs lames
sont très aiguisées !
• Evitez de cogner les lames contre des
objets durs car cela les émousserait.
• Les roues d'entraînement du fouet peuvent
être retirées et lavées très facilement
(fig. 39-40).
• Certains aliments peuvent provoquer une
décoloration sur la surface des
accessoires. Cela est sans importance.
Les décolorations disparaissent
habituellement en peu de temps.
• Enroulez le cordon d'alimentation (en
excédant) autour de l'enrouleur au dos de
l'appareil (fig. 41).
21
36
2
1
37
38
39
2
1
3
40
41

22
Pommes, carottes, céleri
- émincer, râper
Pâte (à crêpes)
- fouet
Chapelure
- hacher
Crème au beurre
Fromage (parmesan)
- râper
Fromage (gouda)
- râper
Chocolat
- hacher
Pâte (tartes, pâtés en croûte,
beignets)
- pétrir
Pâte (pain)
- pétrir
Pâte (pizza)
- pétrir
Pâte (au levain)
- pétrir
500 g
500 ml
lait
100 g
300 g
200 g
200 g
200 g
300 g
farine
700 g
farine
700 g
farine
500 g
farine
2 / M
2
2
2
2
1
1 / M
2
2
2
2
Coupez les fruits ou les légumes grossièrement pour les introduire dans la
cheminée. Remplissez la cheminée et râpez-les en appuyant doucement
sur le poussoir.
Versez d’abord le lait dans le mixer pendant 1 min. environ, puis ajoutez
les ingrédients secs. Répétez cette opération 2 fois maxi. puis laissez
refroidir l’appareil pendant quelques minutes.
Utilisez du pain sec, croustillant
Prenez du beurre mou pour obtenir une crème légère.
Utilisez un morceau de parmesan sans croûte et coupez-le en morceaux
pour les introduire dans la cheminée.
Coupez le fromage en morceaux pour les introduire dans la cheminée.
Appuyez doucement sur le poussoir.
Utilisez du chocolat noir, dur. Cassez en morceaux de 2 cm. Utilisez la
touche Eclair pendant quelques secondes et passez ensuite à la vitesse
maximum pour hacher très fin.
Utilisez de la margarine et de l’eau froide. Versez la farine dans le bol et
ajoutez la margarine coupée en morceaux de 2 cm. Mélangez à la vitesse
maximum jusqu’à ce que la pâte devienne friable, puis ajoutez de l’eau
froide tout en mélangeant. Arrêtez dès que la pâte commence à former
une boule. Laissez la pâte refroidir avant de vous en servir.
Mélangez la levure et le sucre avec de l’eau tiéde. Ajoutez la farine, le
beurre et le sel et pétrissez la pâte pendant 1
1
⁄2 min. Laissez lever 30
minutes.
Même opération que pour la pâte à pain. Laissez lever 1 minute.
Mélangez d'abord la levure, du lait chaud et un peu de sucre. Ajoutez la
farine, le sucre, le sel, les œufs et de la margarine molle. Pétrissez la pâte
jusqu'à ce qu'elle ne colle plus au bol. Laissez lever 30 minutes.
Salades, légumes
crus
Crêpes,
gaufres
Plats panés, gratins
Desserts, pâtisserie,
garnitures.
Garnitures, soupes,
sauces, gratins.
Sauces, pizzas,
gratins, fondue.
Garnitures, sauces,
pâtisseries, flans,
mousses
Tartes aux fruits,
beignets aux
pommes, pâtés,
quiches
Pain
Pizzas, tartes
Pain brioché
≠
®
£
£
≠
≠
£
£
©
£ / ©
©
Ingredients Qtité RéglageAcces- Utilisation Usages
maximum et soires
vitesse

23
Pâte (brisée)
- pétrir
Blancs d'œufs
- fouetter
Fruits (par ex. pommes,
pêches, bananes)
- hacher
- purée
Herbes (par ex. persil)
- hacher
Poireaux, concombres,
carottes
- émincer
Mayonnaise
- émulsionner
Viandes, poisson, volaille
- viande maigre
- viande persillée
Milkshakes
- mélanger
Mélange (babas)
- fouetter
Mélange (gâteaux)
- mixer
500 g
farine
4 blancs
d'œufs
500 g
700 g
min. 75 g
min.
1 pièce
3 œufs
500 g
400 g
250 ml
lait
3 œufs
4 œufs
2
2
M
2
2 / M
2 / M
1 - 2
2 / M
2 / M
2
2 / 1
2
2 / M
Mélangez d’abord la levure, du lait chaud et un peu de sucre. Ajoutez la
farine, le sucre, le sel, les œufs et de la margarine molle. Pétrissez la pâte
jusqu’à ce qu’elle ne colle plus au bol (1 min. environ). Laissez lever 30
minutes.
Utilisez les œufs à température ambiante.
Remarque : utilisez au moins deux blancs d'œufs.
Conseil : ajoutez un peu de jus de citron pour empêcher la décoloration
des fruits.
Ajoutez du liquide pour une purée plus onctueuse.
Lavez et séchez les herbes avant de les hacher.
Remplissez la cheminée de poireaux, de dés de concombre ou de
carottes et appuyez doucement avec le poussoir.
Tous les ingrédients doivent être à température ambiante. Remarque :
utilisez au minimum un gros œuf, deux petits œufs ou deux gros jaunes
d'œufs.
Retirez d'abord les nerfs, les os, les arêtes. Coupez la viande/le poisson
en dés de 3 cm. Utilisez la touche Eclair pour un hachage plus grossier.
Réduisez en purée le fruit (par ex. bananes, fraises) avec du sucre et du
jus de citron. Ajoutez du lait et de la crème glacée et mélangez bien.
Utilisez des ingrédients à température ambiante. Faites monter les œufs
et le sucre en neige à vitesse maximum. Ajoutez alors la farine tamisée et
continuez à fouetter avec précaution à la vitesse 1.
Utilisez des ingrédients à température ambiante. Mélangez le beurre
ramolli et le sucre jusqu'à ce que le mélange soit onctueux et crémeux.
Ajoutez ensuite, dans l'ordre, le lait, les œufs et la farine.
Tourte aux pommes,
biscuits, tartes aux
fruits
Entremets, soufflés,
meringues
Salades
Sauces, confitures,
flans, aliments pour
bébés
Sauces, soupes,
garnitures, beurre
aux herbes.
Soupes, salades,
quiches
Pommes frites,
salades, fondue,
garnitures et sauces
de barbecue.
Steaks tartare,
hamburgers, viande
hachée.
Babas, génoise
roulée, pâtisserie
Divers gâteaux
£
ß
£
®
£
≠
£
£
£
®
ß / ©
£
Ingredients Qtité RéglageAcces- Utilisation Usages
maximum et soires
vitesse

Noix
- hacher
Oignons
- hacher
- émincer
Petits pois,
haricots (cuits)
- purée
Pommes de terre bouillies
- purée
Soupe
- mixer
Légumes
- hacher
Légumes et viandes (cuits)
- purée
Crème fouettée
- fouetter
Salades, pain,
frangipane,
entremets
Salades, plats
cuisinés
Purées, soupes
Plats au four, purée
Soupes, sauces
Soupes, légumes
crus, salades
Aliments pour bébés
Garnitures, crèmes,
pâtisserie, mélanges
de crèmes glacées
24
250 g
500 g
500 g
500 g
750 g de
pommes de
terre
500 ml
500 g
500 g
400 ml
2 / M
2 / M
2
1 - 2
2
2
2
1
Utilisez la touche Eclair (M) pour un hachage grossier et la vitesse
maximum pour un hachage fin.
Pelez les oignons et coupez-les en quatre. Remarque : utilisez au moins
100 g. Pelez les oignons et coupez-les en morceaux pour les introduire
dans la cheminée. Remarque : utilisez au moins 100 g.
Utilisez les légumes cuits. Si nécessaire, ajoutez du liquide pour améliorer
la consistance du mélange.
Ne cuisez pas trop les pommes de terre. La quantité de lait nécessaire
dépend de la qualité des pommes de terre utilisées. Utilisez du lait chaud
(80˚ C max.) Ajoutez le lait lentement tout en faisant tourner le couteau.
Utilisez des légumes cuits
Découpez en cubes de 3 cm et hachez avec le couteau.
Pour obtenir une purée épaisse, ajoutez peu de liquide. Pour une purée
fine, ajoutez du liquide jusqu'à ce que le mélange soit suffisamment
onctueux.
Utilisez de la crème préalablement refroidie dans le réfrigérateur.
Remarque : utilisez au moins 125 ml de crème liquide
£
£
≠
®
£
®
£
®
ß
Ingredients Qtité RéglageAcces- Utilisation Usages
maximum et soires
vitesse
 Loading...