

Page 1
Cucina HR7639
Recipes & Directions for use
Recettes & Mode d'emploi
Recetas & Instrucciones de Uso
Receitas & Modo de Emprego
ΩGóîà°SE’G π«dO
Page 2

2
Page 3

3
A
B
C
D
E
F
G
H
J
K
I
L
M
N
O
P
Q
R
S
T
U
V
W
X
Page 4

4
Page 5

ENGLISH 6
FRANÇAIS 23
ESPAÑOL 41
PORTUGUÊS 60
91
108
HR7639
5
áá««HHôô©©ddGG
Page 6

ENGLISH6
Food processor: parts and accessories
A) Speed control
B) Motor unit
C) Built-in safety lock
D) Bowl
E) Screw cap (for closing the blender fixing hole
when the blender is not in use)
F) Tool holder
G) Blender jar
H) Peg of lid (activates and deactivates the safety
switch)
I) Filter
J) Lid of bowl
K) Feed tube
L) Pusher
M) Lid of blender jar
N) Cover with closable insert storage space
O) Mill beaker
P) Mill blade unit
Q) Slicing insert medium
R) Slicing insert fine
S) Shredding insert medium
T) Insert holder
U) Blade (with protective cover)
V) Kneading accessory
W)Emulsifying disc
X) Spatula
Introduction
This appliance has been equipped with an
automatic thermal cut-off system. This system will
automatically cut off the power supply to the
appliance in case of overheating.
If your appliance suddenly stops
running:
1 Pull the mains plug out of the wall socket.
2 Press the 'PULSE / 0' button to switch the
appliance off.
3 Let the appliance cool down for 60
minutes.
4 Put the mains plug in the wall socket.
5 Switch the appliance on again.
Please contact your Philips dealer or authorised
Philips service centre if the automatic thermal cutout system is activated too often.
CAUTION: In order to avoid a hazardous
situation, this appliance must never be connected
to a timer switch.
Important
◗ Read the instructions for use carefully and
look at the illustrations before using the
appliance.
◗ Keep these instructions for use for future
reference.
◗ Check if the voltage indicated on the
appliance corresponds to the local mains
voltage (110-127V or 220-240V) before you
connect the appliance.
Page 7

ENGLISH 7
◗ Never use any accessories or parts from
other manufacturers or that have not been
specifically advised by Philips. Your guarantee
will become invalid if such accessories or
parts have been used.
◗ Do not use the appliance if the mains cord,
the plug or other parts are damaged.
◗ If the mains cord of this appliance is damaged,
it must always be replaced by Philips or a
service centre authorised by Philips, in order
to avoid hazardous situations.
◗ Thoroughly clean the parts that will come
into contact with food before you use the
appliance for the first time.
◗ Do not exceed the quantities and preparation
times indicated in the tables and recipes.
◗ Do not exceed the maximum content
indicated on the bowl or the blender jar, i.e.
do not fill beyond the top graduation.
◗ Unplug the appliance immediately after use.
◗ Never use your fingers or an object (e.g. a
spatula) to push ingredients down the feed
tube while the appliance is running. Only the
pusher is to be used for this purpose.
◗ Always unplug the appliance before reaching
into the blender jar with your fingers or an
object (e.g. a spatula).
◗ Keep the appliance out of the reach of
children.
◗ Never let the appliance run unattended.
◗ Never switch the appliance off by turning the
lid. Always switch the appliance off by
pressing the PULSE / 0 button.
◗ Switch the appliance off before detaching any
accessory.
◗ Never immerse the motor unit in water or
any other fluid, nor rinse it under the tap. Use
only a moist cloth to clean the motor unit.
◗ When you mount the blender jar, the bowl
and the screw cap in the proper way, you will
hear a click.
◗ The emulsifying disc, the blade and the
kneading accessory have to be placed on the
toolholder that stands in the bowl.
◗ Remove the protective cover from the blade
before use.
◗ Avoid touching the SHARP cutting edges of
the blades and inserts, especially when the
appliance is plugged in.
◗ If one of the blades get stuck, unplug the
appliance before removing the ingredients
that are blocking the blades.
◗ Let hot ingredients cool down before
processing them (max. temperature
80cC/175cF).
◗ If you are processing a liquid that tends to
foam, do not put more than 1 litre into the
blender jar to avoid spillage.
Note that if both the blender and the bowl have
been correctly mounted, only the blender will
function.
Page 8

ENGLISH8
Using the appliance
Bowl
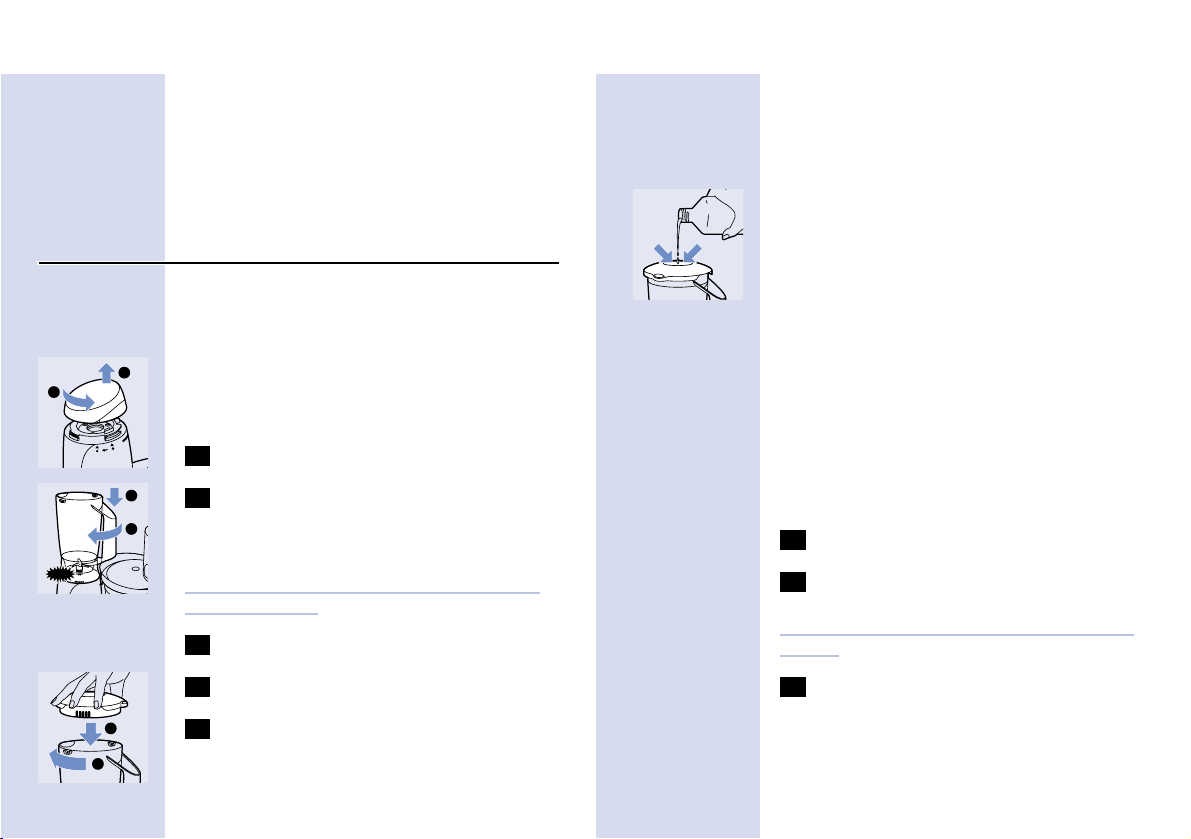
◗ If you want to use the bowl, remove the
blender jar and close the fixing hole with the
screw cap. All functions that require the use
of the bowl will only work if the blender jar
has been removed.
C
1 Mount the bowl on the food processor by
turning the handle in the direction of the
arrow until you hear a click.
C
2 Put the lid on the bowl. Turn the lid in the
direction of the arrow until you hear a
click (this requires some force).
Built-in safety lock
B
The motor unit as well as the lid have been
provided with marks. The appliance will only
function if the arrow on the motor unit is placed
directly opposite the mark on the lid.
C
1 Make sure that the mark on the lid and
the arrow on the bowl are directly
opposite each other. The projection of the
lid will now cover the opening of the
handle.
CLICK
Feed tube and pusher
C
1 Use the feed tube to add liquid and/or
solid ingredients. Use the pusher to push
solid ingredients through the feed tube.
C
2 You can also use the pusher to close the
feed tube in order to prevent ingredients
from escaping through the feed tube.
Blade
◗ The blade can be used for chopping, mixing,
blending, pureeing and preparing cake
mixtures.
C
1 Put the bowl on the motor unit.
C
2 Remove the protective cover from the
blade.
The cutting edges of the blade are very sharp
Avoid touching them!
C
3 Put the blade on the tool holder.
CLICK
1
2
1
2
CLICK
CLICK
1
2
Page 9

ENGLISH 9
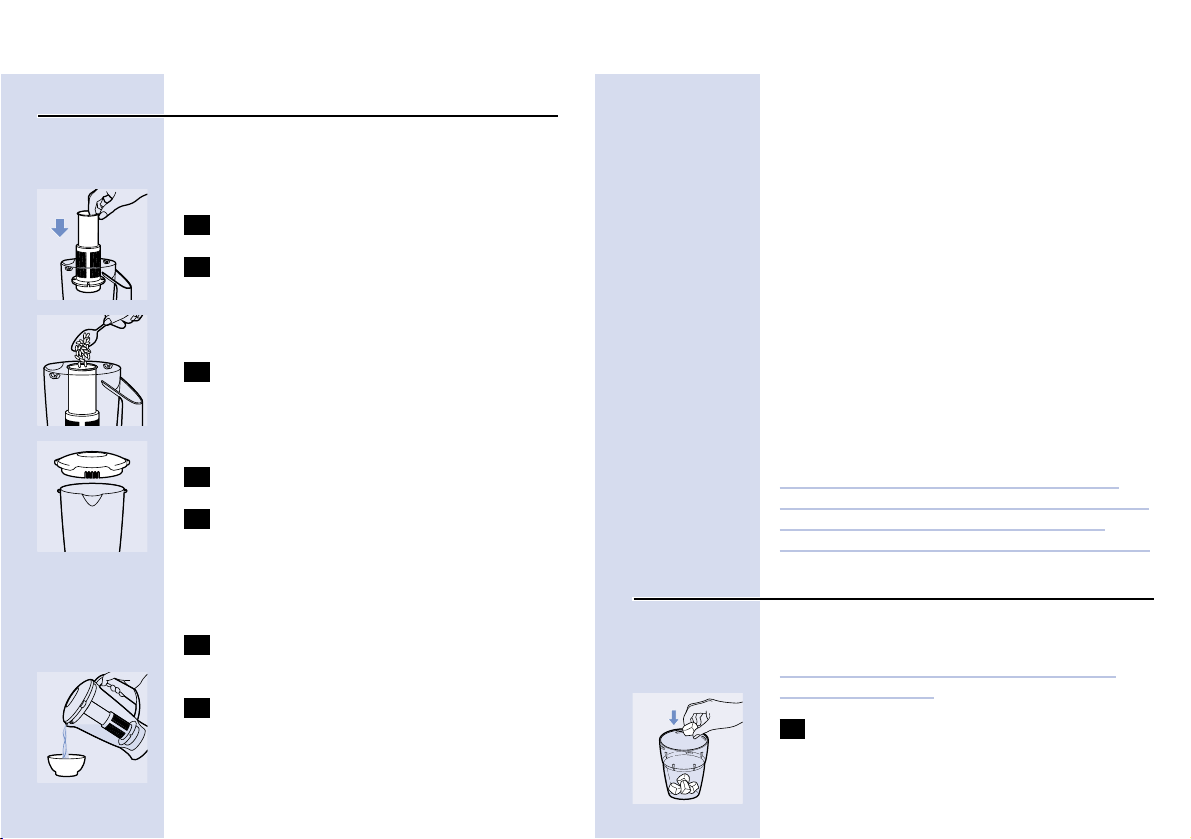
C
4 Put the tool holder in the bowl.
5 Put the ingredients in the bowl. Pre-cut
large pieces of food into pieces of approx.
3 x 3 cm. Put the lid on the bowl.
C
6 The buttons allow you to adjust the speed
of the appliance to obtain optimal results.
B
'PULSE / 0' button: for pulse operation and for
turning the appliance off. If the PULSE / 0 button
is pressed the appliance runs at the highest
speed. The appliance stops running when the
button is released.
B
button 1: for normal speed.
B
button 2: for high speed.
See the table for the recommended speeds.
Processing takes 10 - 60 seconds.
Tips
◗ The appliance chops very quickly. Use the
pulse function for short periods at a time to
prevent the food from becoming too finely
chopped.
◗ Do not let the appliance run too long when
you are chopping (hard) cheese. The cheese
will become too hot, will start to melt and
will turn lumpy.
◗ Do not use the blade to chop very hard
ingredients like coffee beans, nutmeg and ice
cubes. The blade might get blunt.
If food sticks to the blade or to the inside of the
bowl:
1 Switch the appliance off.
2 Remove the lid from the bowl.
3 Remove the ingredients with the spatula.
Inserts
The cutting edges of the inserts are very sharp
Do not touch them!
Do not process hard ingredients, such as ice
cubes, with the inserts!
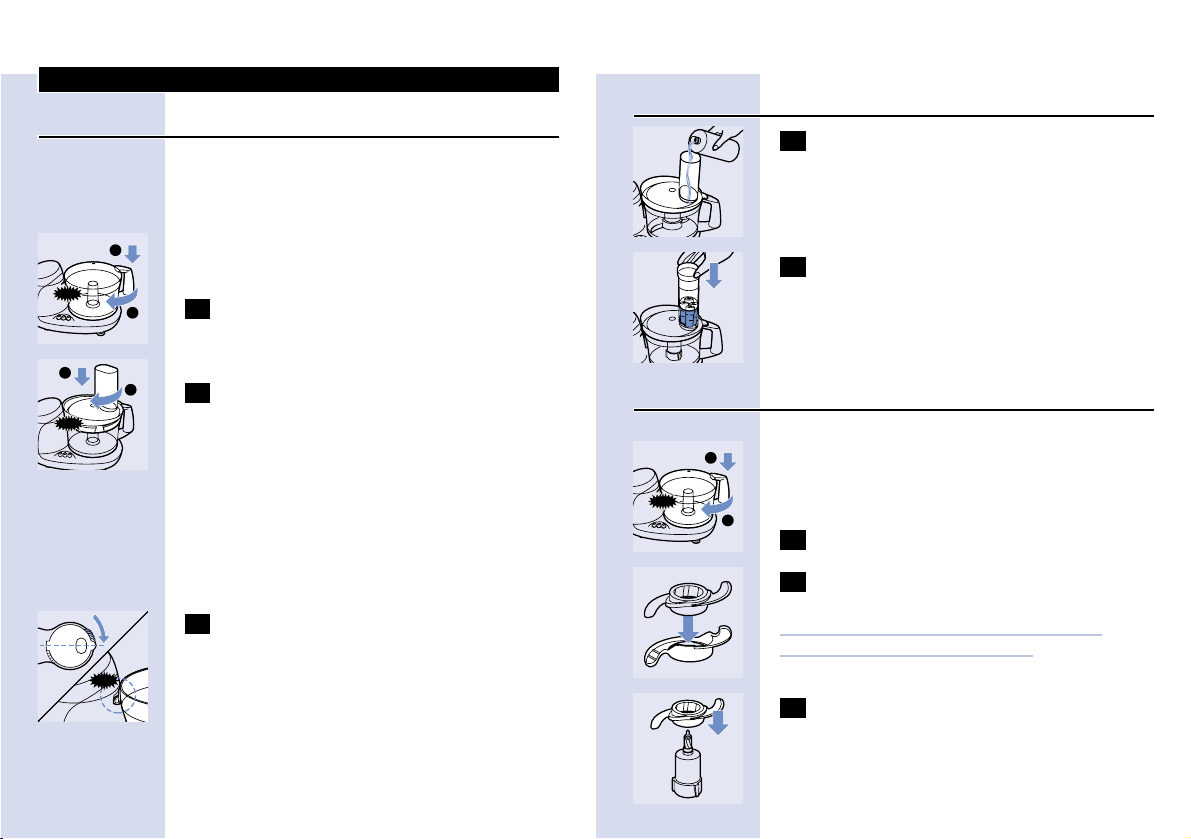
C
1 Put the selected insert in the insert holder.
C
2 Place the insert holder onto the tool
holder that stands in the bowl.
3 Put the lid on the bowl.
C
4 Put the ingredients in the feed tube. Pre-
cut large chunks to make them fit into the
feed tube.
5 Fill the feed tube evenly for the best
results.
When you have to cut large amounts of food,
process only small batches at a time and empty
the bowl regularly between the batches.
1
CLICK
2
Page 10

ENGLISH10
6 Select the appropriate speed to obtain
optimal results. See the table for the
recommended speed.
Processing takes 10-60 seconds.
C
7 Press the ingredients slowly and steadily
down the feed tube with the pusher.
C
8 To remove the insert from the insert
holder, take the insert holder in your
hands with its bottom pointing towards
you. Push the edges of the insert with
your thumbs to make the insert fall out of
the holder.
Kneading accessory
The kneading accessory can be used for kneading
dough for bread and dumplings and for mixing
batters and cake mixtures.
C
1 Fit the kneading accessory onto the tool
holder.
2 Put the ingredients in the bowl.
C
3 Close the bowl with the lid.
C
4 Close the feed tube by placing the pusher
in it.
C
5 Select the appropriate speed to obtain
optimal results. See the table for the
recommended speed.
Emulsifying disc
You can use the emulsifying disc to prepare
mayonnaise, to whip cream and to whisk egg
whites.
C
1 Put the emulsifying disc onto the tool
holder that stands in the bowl.
2 Put the ingredients in the bowl and put the
lid on the bowl.
3 Select the appropriate speed to obtain
optimal results. See the table for the
recommended speed.
Tips
◗ When you want to whisk egg whites, make
sure the eggs are at room temperature.
Take the eggs out of the refrigerator at least half
an hour before you are going to use them.
◗ All the ingredients for making mayonnaise
must be at room temperature.
Oil can be added through the small hole in the
bottom of the pusher.
CLICK
1
2
Page 11
ENGLISH 11
◗ If you are going to whip cream, the cream
must be taken straight from the refrigerator.
Please observe the preparation time in the
table. Cream should not be whipped too long.
Use the pulse function to have more control over
the process.
Blender
The blender is intended for:
- Blending fluids, e.g. dairy products, sauces, fruit
juices, soups, mixed drinks, shakes.
- Mixing soft ingredients, e.g. pancake batter or
mayonnaise.
- Pureeing cooked ingredients, e.g. for making
baby food.
C
4 Remove the screw cap.
C
5 Mount the blender jar in the fixing hole by
turning it in the direction of the arrow
until it is firmly fixed.
Do not exert too much pressure on the handle
of the blender jar.
6 Put the ingredients in the blender jar.
C
7 Screw the lid onto the blender jar.
8 Switch the appliance on and blend the
ingredients. The buttons allow you to
adjust the speed of the appliance to obtain
optimal results. See the table for the
recommended speed.
Tips
C
◗ Pour liquid ingredients into the blender jar
through the hole in the lid.
◗ The longer you let the appliance run, the finer
the blending result will be.
◗ Hard ingredients may require soaking in
water prior to processing.
◗ Pre-cut solid ingredients into smaller pieces
before putting them into the blender. If you
want to prepare a large quantity, process
small batches of ingredients instead of trying
to process a large quantity at once.
◗ If you have doubts about the right speed,
always choose the highest speed (button 2).
If ingredients stick to the wall of the blender jar:
1 Switch the appliance off and unplug it.
2 Remove the lid.
Never remove the lid while the appliance is still
running.
3 Use a spatula to remove the ingredients
from the wall of the jar.
Keep the spatula at a safe distance from the
cutting edges of the blade unit (approx. 2 cm).
1
CLICK
2
1
2
1
2
Page 12
ENGLISH12
Filter
With this filter you will make delicious fresh fruit
juices, cocktails or soy milk in next to no time. All
pips and skins will remain behind in the filter.
1 Assemble the blender jar.
C
2 Put the filter in the assembled blender jar.
Make sure that the grooves of the filter fit
exactly onto the ribs inside the blender
jar.
C
3 Put the ingredients in the filter.
Pour water or another liquid (e.g. for cocktails)
into the blender jar.
C
4 Place the lid in the sieve position.
5 Switch the appliance on. See the table for
the right speed setting.
If you have doubts about the right speed, select
the highest speed setting.
6 Switch the appliance off and remove the
blender jar from the motor unit.
C
7 Pour out the drink through the spout of
the blender jar. Do not remove the lid!
For optimal results, put the jar with the remaining
ingredients back onto the appliance and let it run
for a few more seconds.
Pour out the rest of the drink.
Tips
◗ Particularly when you are processing large
quantities, we advise you not to put all the
ingredients in the filter at the same time. Start
processing a small quantity, let the appliance
run for a moment, switch it off and then add
another small quantity. Always place the lid!
Repeat this procedure until you have
processed all the ingredients.
◗ For fruit juices and cocktails:
For the best results, add approximately 200 ml
water (or other liquid for cocktails, etc.) to 100 g
fruit.
◗ For making soy milk:
Soak soy beans for 4 hours before processing
them. You can process upto the max. level of 2/3
the metal sieve of the filter with soaked soy
beans. Add 500 ml water and blend until smooth.
Mill
Preparing the mill for use.
Never use the mill for more than 30 seconds
without interruption.
C
1 Put the ingredients in the inverted beaker.
Process only dry ingredients. Do not fill the
beaker beyond the "MAX" indication.
Page 13

1313ENGLISH
C
2 Pick up the blade unit by the safety ring.
Place the blade unit in the beaker. Take care that
all grooves fit the ribs inside the beaker.
C
3 Press and turn clockwise until the blade
unit is properly fixed.
C
4 Turn the assembled mill upside down and
screw it onto the motor unit.
After processing, unscrew the mill from the
motor housing:
C
5 Pull the safety ring out and turn it anti-
clockwise. Than remove the blade unit.
The mill is suitable for grinding e.g. ingredients as
mentioned in the table. Do not exceed the
quantities!
Quantities
5-25 g
10-50 g
25-75 g
25-75 g
25-75 g
25-50 g
50-100 g
20-40 g
10-30 g
50-100 g
20-50 g
Ingredients
peppercorns
sesame seed
rice, wheat
soy beans
dried peas
coconut
hard (e.g. Parmesan) cheese
bread crumbs
sugar cubes
nuts (shelled)
coffee beans
Cleaning
Always unplug the appliance before you start
cleaning the motor unit.
1 Clean the motor unit with a damp cloth.
Do not immerse the motor unit in water
and do not rinse it either.
2 Always clean the parts that have come
into contact with food in hot water with
washing-up liquid immediately after use.
◗ The bowl, the lid of the bowl, the pusher and
the accessories can also be washed in a
dishwasher.
Page 14
14
These parts have been tested for dishwasher
resistance according to DIN EN 12875.
The cover with insert storage space and the
blender jar are not dishwasher proof!
Clean the blade, the blade unit of the blender and
the inserts very carefully. Their cutting edges are
very sharp!
Make sure that the cutting edges of the blade, the
blade unit of the blender and the inserts do not
come into contact with hard objects. This could
cause them to become blunt.
Certain ingredients may cause discolourations on
the surface of the accessories. This does not have
a negative effect on the accessories. The
discolourations usually disappear after some time.
Cleaning of filter
◗ Hold the filter over a waste bin immediately
after use and gently shake out its contents
and rinse it under the tap.
Cleaning of mill
◗ Unplug the appliance.
◗ Detach the mill from the motor unit.
◗ Clean the beaker and the blade unit under a
running tap with lukewarm water and some
washing-up liquid.
◗ Be careful with the sharp edges of the blade
unit!
◗ After washing up the parts, rinse them with
clean water and dry them thoroughly.
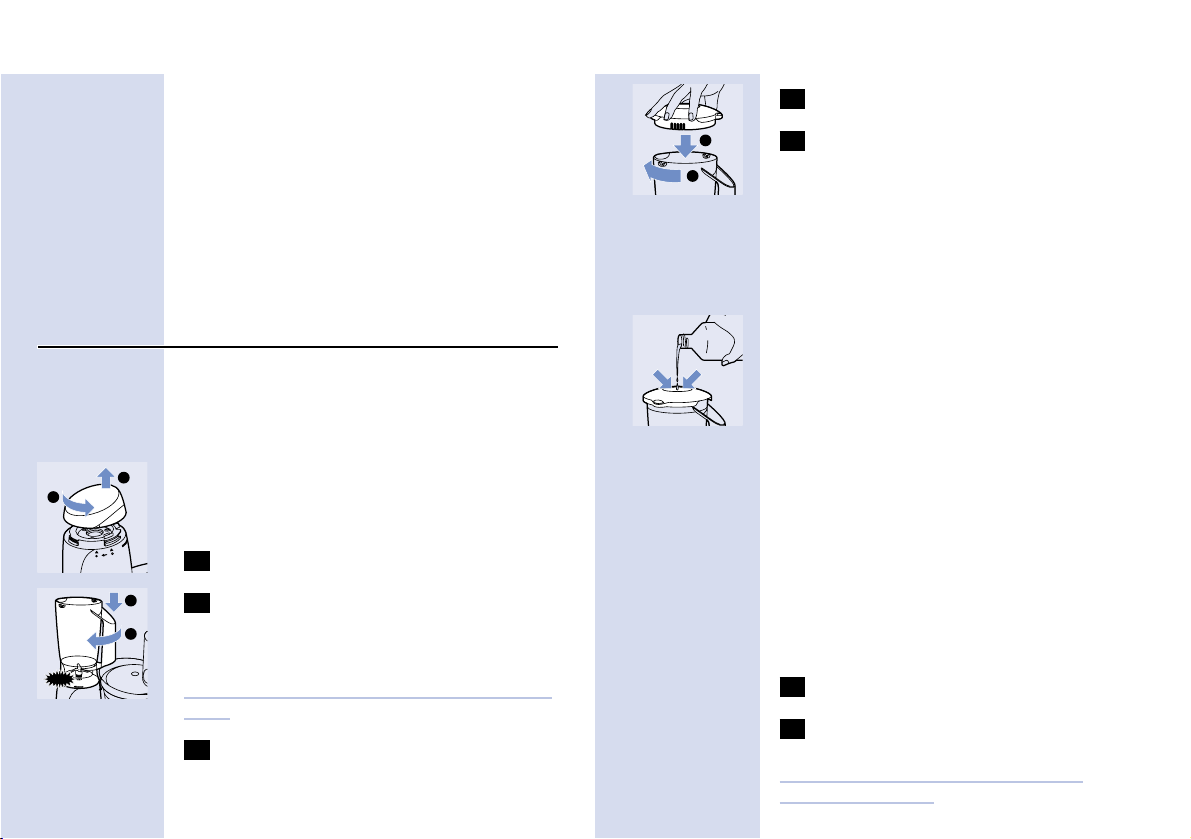
Blender quick-cleaning operation
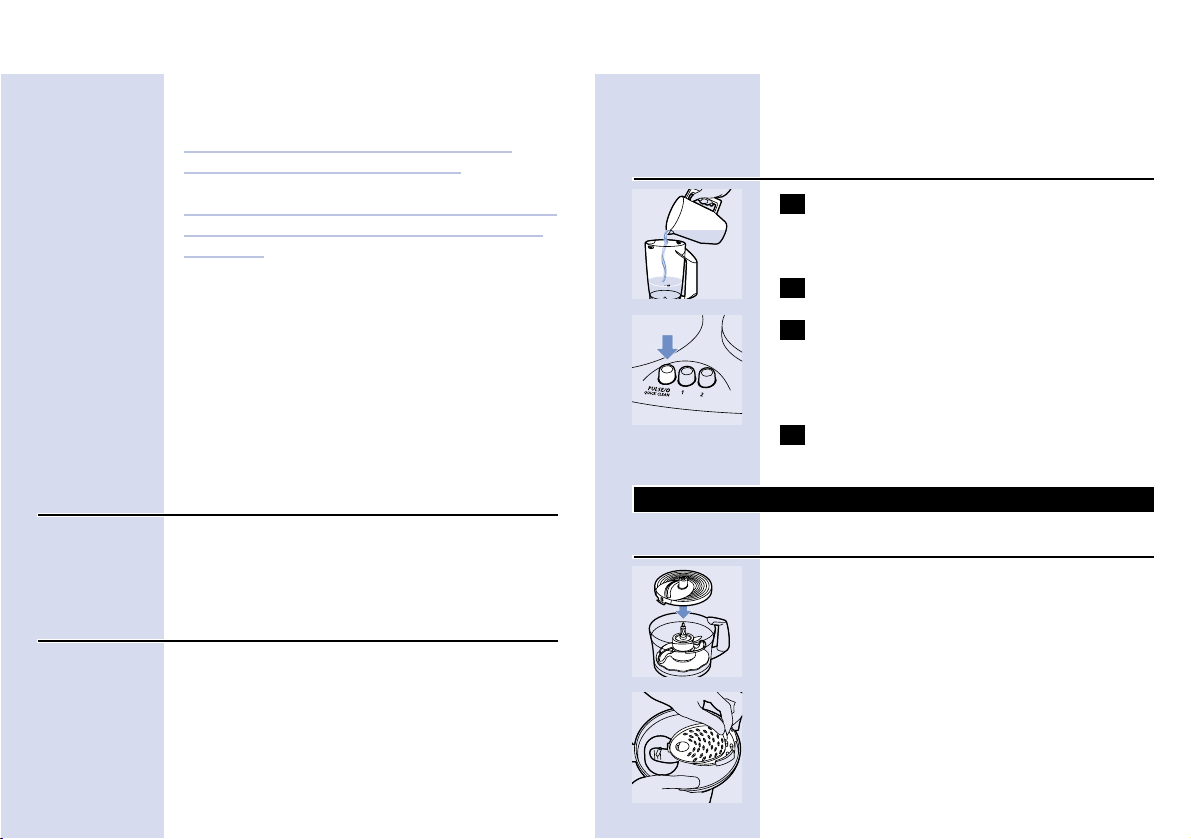
C
1 Pour lukewarm water (not more than 0.5
litres) and some washing-up liquid into the
blender jar.
2 Assemble the lid and the stopper.
C
3 Let the appliance run for a few moments
by pressing the Pulse button. (the
appliance stops running when you release
the button).
4 Detach the blender jar and rinse it with
clean water.
Storage
MicroStore
C
◗ Put the accessories (emulsifying disc, blade,
kneading accessory, insert holder) on the tool
holder and store them in the bowl. Always
end up with the insert holder.
C
◗ Two inserts can be stored in the storage
space in the cover that covers the lid of the
bowl, as indicated on the inside of the cover.
The inserts have to be slid into the cover, not
pressed.
Page 15

15
C
◗ Place the cover with insert storage space on
the transparent lid of the bowl.
◗ Wrap the mains cord around the reel on the
back of the appliance.
Information & service
If you need information or if you have a problem,
please visit the Philips Web site at
www.philips.com or contact the Philips Customer
Care Centre in your country (you will find its
phone number in the worldwide guarantee
leaflet). If there is no Customer Care Centre in
your country, turn to your local Philips dealer or
contact the Service Department of Philips
Domestic Appliances and Personal Care BV.
Quantities and preparation times
Applications
Pancakes,
waffles
Breadcrumbed
dishes, au
gratin dishes
Desserts,
toppings
Garnishing,
raw
vegetables,
turnip dishes
or cakes, dips
Salads
Garnishing,
soup, sauces,
au gratin
dishes
Sauces, pizzas,
au gratin
dishes, fondue
Procedure
First pour the milk into the
blender and then add the dry
ingredients. Mix the ingredients
approx. 1 minute. If necessary,
repeat this procedure 2 times.
Use dry, crispy bread.
Use soft butter for a light
result.
Cut the vegetables into pieces
that fit into the tube. Fill the
feed tube with the pieces and
shred them while pressing the
pusher down lightly.
Fill the feed tube with pieces of
vegetables and press them
carefully down with the pusher.
Use a piece of rindless
Parmesan and cut it into pieces
of approx. 3 x 3 cm.
Cut the cheese into pieces that
fit into the tube. Press the
pieces carefully down with the
pusher.
Speed
/acces
sory
2 / P
2 / P
2 / P
2 / j
k
2 / P /
g
2 / P
2 / j
k
Max.
quanti
ty
250
ml
milk
100g
300g
350g
350g
200g
200g
Ingredients &
results
Batter
(pancake) whisking
Breadcrumbs chopping
Butter cream
(creme au
beurre) whisking
Vegetables
(carrots,
turnips, white
radishes) shredding
Vegetables
(carrots, leeks,
celery) - slicing
Cheese
(Parmesan) chopping
Cheese
(Gouda) shredding
Page 16

ENGLISH16
Applications
Garnishing,
sauces, pastry,
puddings,
mousses
Purees, soups
Baby and
infant food
Salad,
garnishing
Bread
Pizza
Apple pies,
sweet biscuits,
open fruit flans
Procedure
Use hard, plain chocolate.
Break it into pieces of 2 cm.
Use cooked peas or beans. If
necessary, add some liquid to
improve the consistency of the
mixture.
For coarse puree, add only a
little liquid. For fine puree, keep
adding liquid until the mixture
is smooth enough.
Put the cucumber in the tube
and press it carefully down
with the pusher.
Mix warm water with yeast and
sugar. Add flour, oil and salt
and knead the dough for
approx. 90 seconds. Leave to
rise for 30 minutes.
Follow the same procedure as
for bread dough. Knead the
dough for approx. 1 minute.
First put in the flour and then
the other ingredients.
Use cold margarine, cut into
pieces of 2 cm. Put all the
ingredients in the bowl and
knead until the dough has
turned into a ball. Allow the
dough to cool before further
processing.
Speed
/acces
sory
2 / P
2 / P
D
2 / P
1 / g
2 / {
2 / {
2 / P
Max.
quanti
ty
200g
250g
300g
1
cucum
ber
350g
flour
400g
flour
200g
flour
Ingredients &
results
Chocolate chopping
Cooked peas,
beans pureeing
Cooked
vegetables and
meats pureeing
Cucumbers slicing
Dough (for
bread) kneading
Dough (for
pizzas) kneading
Dough (for
shortcrust
pastry) kneading
Applications
Fruit tarts, pies,
quiches
Luxury bread
Pudding,
soufflees,
meringues
Puddings, baby
food
Garnishing,
dips
Procedure
Use cold margarine and cold
water. Put flour in the bowl
and add the margarine cut into
pieces of 2cm. Mix at the
highest speed until the dough
has become crumbly, then add
cold water while mixing. Stop
as soon as the dough starts to
turn into a ball. Allow the
dough to cool before further
processing.
First mix yeast, warm milk and
some sugar in a separate bowl.
Put all the ingredients in the
food processor bowl and
knead the dough until it is
smooth and no longer sticks to
the wall of the bowl (takes
approx. 1 minute). Leave it to
rise for 30 minutes.
Use egg whites at room
temperature. Note: use at least
2 egg whites.
Tip: add a little lemon juice to
prevent the fruit from
discolouring. Add some liquid
to obtain a smooth puree.
Peel the garlic. Always press
the pulse button several times
to prevent the garlic from
being chopped too fine. Use at
least 150g.
Speed
/acces
sory
2 / P
2 / {
2 / S
P / P
P / P
Max.
quanti
ty
200g
flour
300g
flour
4 egg
whites
500g
300g
Ingredients &
results
Dough (for
tarts, pies) kneading
Dough (yeast)
- kneading
Egg whites emulsifying
Fruit (e.g.
apples,
bananas) chopping/pure
eing
Garlic chopping
Page 17

ENGLISH 17
Applications
Sauces, soups,
garnishing,
herb butter
Fruit juices
Salads,
garnishing and
barbecue
sauces
Steaks tartare,
hamburgers,
meat balls
Milkshakes
Various cakes.
Salads, bread,
almond paste,
puddings
Procedure
Wash and dry the herbs before
chopping
Add water or another liquid
(optional) to obtain a smooth
juice.
All the ingredients must be at
room temperature. Note: use
at least one large egg, two
small eggs or two egg yolks.
Put the egg and a little vinegar
in the bowl and add the oil
drop by drop.
First remove any sinews or
bones. Cut the meat into cubes
of 3 cm. Use the pulse function
for a coarser chopping result.
Puree the fruit (e.g. bananas,
strawberries) with sugar, milk
and some ice cream and mix
well.
The ingredients must be at
room temperature. Mix the
softened butter and the sugar
until the mixture is smooth and
creamy. Then add milk, eggs
and flour.
Use the pulse button for
coarse chopping or speed 2 for
fine chopping.
Speed
/acces
sory
2/P / P
2 / D
1-2 /
S
2/ P /
P
2 / D
2 / P
2/ P /
P
Max.
quanti
ty
Min.
75g
500g
(total
amou
nt)
3 eggs
300g
250ml
milk
3 eggs
250g
Ingredients &
results
Herbs (e.g.
parsley) chopping
Juices (e.g.
papaya, water
melon, pear) blending
Mayonnaise emulsifying
Meat (lean) mincing
Milkshakes blending
Cake mixture
- mixing
Nuts chopping
Applications
Stir-fries,
garnishing
Stir-fries,
garnishing
Minced meat
Soups, sauces
Garnishing,
cream, icecream
mixtures
Procedure
Peel the onions and cut them
into 4 pieces. Note: use at least
100g. Always press the pulse
button several times to prevent
the onions from being chopped
too fine.
Peel the onions and cut them
into pieces that fit into the
tube. Note: use at least 100g.
First remove any sinews or
bones. Cut the meat into cubes
of 3 cm. Use the pulse button
for a coarser chopping result.
Use cooked vegetables
Use cream that comes straight
from the refrigerator. Note:
use at least 125ml cream. The
whipped cream is ready after
approx. 20 seconds.
Speed
/acces
sory
P / P
1 / g
2/ P /
P
2 / D
P / S
Max.
quanti
ty
400g
300g
200g
500ml
350ml
Ingredients &
results
Onions chopping
Onions slicing
Poultry mincing
Soups blending
Whipping
cream whipping
Page 18

ENGLISH18
Recipes
Broccoli soup (for 4 persons)
h or D
- 50g mature Gouda cheese
- 300g cooked broccoli (stalks and florets)
- cooking liquid of the broccoli
- 2 boiled potatoes in pieces
- 2 stock cubes
- 2 tbsp whipping cream
- curry
-salt
- pepper
- nutmeg
B
Shred the cheese. Puree the broccoli with the
boiled potatoes and some of the cooking liquid of
the broccoli. Put the broccoli puree and the
remaining liquid and stock cubes into a measuring
beaker and fill it up to 750ml. Transfer the soup
to a pan and bring it to the boil while stirring. Stir
in the cheese and season with curry, salt, pepper
and nutmeg and add the cream.
Five spice powder
Mill
- 2g cinnamon
- 2g star anise
- 2g clove
- 2g liquorice slices
- 2g aniseed
B
Cut the cinnamon and liquorice slices into smaller
pieces before using.
B
Put all the ingredients into the mill and grind at
high speed for 30 seconds. NEVER GRIND FOR
MORE THAN 30 SEC.
Fruit cake
P
- 450 g dry pitted dates, halved
- 200 g dry plums, halved
- 650 g pecan nuts
- 160 g shredded coconut
- 300 g glazed pineapple
- 1 tin (400 g) sweetened condensed milk
- 1 tsp vanilla essence
B
Grease two 20cm-long baking tins and preheat
the oven to 135c C.
B
Put the halved dates and plums in the food
processor bowl and chop at maximum speed for
30 seconds. Then empty the bowl.
B
Put the pecan nuts in the food processor bowl and
roughly chop the nuts, using the pulse function.
Then empty the bowl.
B
Put the glazed pineapple in the food processor
bowl and chop into pieces, using the pulse
function. Then empty the bowl.
B
Mix the dates, plums, pecan nuts, pineapple and
shredded coconut in a large mixing bowl and mix
them.
B
Add milk and vanilla to the ingredients and mix.
B
Put the fruit mixture in the baking tins and bake
the cakes at 135c C for 90 minutes.
B
Do not process this recipe more than once without
interruption. if you need to more quantities, let the
appliance cool down first and then continue the
process.
Page 19

ENGLISH 19
Milkshake
D
- 175ml milk
- 10g sugar
- 1/2 banana or approx. 65g other fresh fruit
- 50g vanilla ice cream
B
Mix all the ingredients until the mixture is frothy.
Pizza
{
- 400g flour
- 40 ml oil
- 1/2 tsp salt
- 20g fresh yeast or 1.5 sachets dried yeast
- approx. 240ml water (35cC)
For the topping:
- 300ml sieved tomatoes (tinned)
- 1 tsp mixed Italian herbs (dried or fresh)
- 1 onion
- 2 cloves garlic
- salt and pepper
- sugar
- Ingredients to be spread on the sauce: olives,
salami, artichokes, mushrooms, anchovies,
Mozzarella cheese, peppers, grated mature
cheese and olive oil according to taste.
B
Place the kneading accessory in the bowl. Put all
the ingredients in the bowl and select speed 2.
Knead the dough for approx. 1 minute until a
smooth ball has formed. Hold the appliance down
Mashed potatoes
P
- 750g cooked potatoes
- approx. 250ml hot milk (90cC)
- 1 tbsp of butter
-salt
B
First mash the potatoes, then add milk, salt and
butter. Use speed 1 and process for only approx.
30 seconds to prevent the puree from becoming
sticky.
Mayonnaise
S
- 2 egg yolks or 1 large egg
- 1 tsp mustard
- 1 tsp vinegar
- 200ml oil
B
The ingredients must be at room temperature. Put
the emulsifying disc in the bowl. Put the egg yolks
or egg, mustard and vinegar in the bowl. Use
speed 1 or 2. Pour the oil gradually through the
feed tube onto the rotating disc. You can use the
hole in the pusher to add the oil.
B
Tip for tartare sauce: add parsley, gherkins and
hard-boiled eggs.
B
Tip for cocktail sauce: add 50ml creme fraiche, a
dash of whisky, 3 tsp tomato puree and a dash of
ginger syrup to 100ml mayonnaise.
Page 20

ENGLISH20
B
Peel and wash the potatoes.
B
Put the slicing insert in the insert holder and place
the insert holder in the bowl. Slice the potatoes
and the courgette at speed 1.
B
Cook the potato slices in boiling water with a
pinch of salt until they are almost done.
B
Put the slices in a colander and drain them
properly.
B
Put 20g butter and crushed garlic in a frying pan,
fry half of the courgette slices for 3 minutes while
turning them frequently. Sprinkle the slices with 1
tsp of Italian or Provencal herbs. Fry the other half
of the courgette slices in the same way. Sprinkle
them with the rest of the herbs.
B
Drain the fried courgette slices on kitchen paper.
B
Grease a low-sided oven dish and put the
courgette and potato slices in the dish, alternating
them and arranging them in such way that they
partly overlap like roof tiles.
B
Whisk the egg with the cream and the milk with
the blade at speed 2. Add salt and pepper
according to taste and pour the mixture over the
potato and courgette slices in the dish.
B
Replace the slicing insert with the shredding insert,
shred the cheese at speed 2 and sprinkle it over
the dish.
B
Put the dish in the centre of a hot oven (200cC)
and brown it in about 15 minutes.
with one hand to prevent it from moving around
on the worktop. Put the dough in a separate bowl,
cover it with a damp cloth and leave it to rise for
about 30 minutes.
B
Use the blade to chop the onion and the garlic.
Fry the chopped onion and garlic until transparent.
B
Add the sieved tomatoes and the herbs and
simmer the sauce for about 10 minutes.
B
Season to taste with salt, pepper and sugar. Allow
the sauce to cool down.
B
Heat the oven to 250cC.
B
Roll the dough out on a floured worktop and
make two round shapes. Place the dough shapes
on a greased baking tray. Spread the topping on
the pizza, leaving the edges free. Spread with the
desired ingredients, scatter some grated cheese
over the pizza and drip some olive oil over it.
B
Bake the pizzas for 12 to 15 minutes.
Potato-courgette gratin
Pgk
- 375g potatoes
- pinch salt
- 1 courgette (approx. 250g)
- 1 clove of garlic, crushed
- approx. 40g butter + butter to grease the oven
dish
- 2 tsp Italian or Provencal herbs
- 1 large egg
- 75ml whipping cream
- 75ml milk
- pepper
- 70g semi-matured cheese
Page 21

21ENGLISH
Sandwich spread
P
- 2 small carrots in pieces
- 2-3 gherkins in pieces
- 75g cauliflower in pieces
- 75g celeriac in pieces
- green herbs (parsley, dill, tarragon, celery stalks
in pieces)
- 100g mayonnaise
- 100g quark
-salt
- pepper
B
Chop the carrots, gherkins, cauliflower, green
herbs, celery stalks and celeriac fine. Mix in the
mayonnaise and quark carefully and season to
taste with pepper and salt.
Spanish cabbage salad
P
- 1 small red cabbage
- 2 red onions
- 1 fennel
- 1 apple
- juice of one orange and 2 tbsp red wine
vinegar
- 1 tbsp mustard
B
Mix the juice, mustard and vinegar. Slice the
cabbage, onions, fennel and apple at speed 1.
B
Combine the ingredients in a salad bowl.
Salmon mousse
PS
- 1 tin of salmon (220g)
- 2 sheets of gelatine
- a few stems of chives
- pinch salt
- pinch cayenne pepper
- half tbsp lemon juice
- 125ml whipping cream
- 1 small onion
- watercress for garnishing
B
Soak the gelatine in plenty of water.
B
Chop the chives and onions in the food processor
using the pulse function.
B
Remove the bones and the skin from the salmon.
B
Add salt, cayenne pepper, lemon juice, salmon
and the liquid from the tin to the chopped chives
and onion and puree the ingredients at speed 2.
B
Put the puree in a bowl.
B
Boil a small quantity of water and dissolve the
gelatine in it.
B
Stir the gelatine solution through the salmon
puree.
B
Put the emulsifying disc in the bowl and whip the
cream by pressing the pulse button for about 15
seconds.
B
Fold the whipped cream into the salmon puree
with a wooden spoon.
B
Turn the mousse out onto a dish, cover it and chill
it in the refrigerator for a few hours.
B
Garnish the mousse with some watercress.
Page 22

ENGLISH22
B
Peel the cucumber and shred it at speed 1. Put
the shredded cucumber in a colander and let it
drain properly.
B
Mix the other ingredients, except for the mint
leaves, through the cucumber. Chill the salad by
putting it in a covered bowl in the refrigerator for
one hour. Sprinkle mint leaves on top before
serving.
Sponge cake
P
- 4 eggs
- 30ml of water (35cC)
- 1 pinch of salt
- 150g sugar
- 1 sachet vanilla sugar
- 150g sieved flour
- 3g baking powder
B
Beat the eggs and the water for approx. 2 minutes.
Gradually add the sugar, the vanilla sugar and the
salt and mix for approx. 1 minute. The mixture
should leave a trail when you lift some of it from
the bowl with a spoon. Fold in the flour and
baking powder with a spatula. Bake it in the oven
at approx. 170cC for approx. 30-35 minutes.
B
Tip: You can fill the sponge cake with different
kinds of butter cream or simply with whipped
cream and fresh fruit.
Tzatziki
k
- 1 cucumber
- 200ml yoghurt
- 1 tbsp olive oil
- 2 cloves garlic
- pinch salt
- 1 tsp finely chopped dill
- a few mint leaves
Page 23

FRANÇAIS 23
Robot de cuisine: composants et accessoires
A) Sélecteur de vitesse
B) Bloc moteur
C) Verrouillage de sûreté incorporé
D) Bol
E) Capuchon de sécurité (pour couvrir
l'ouverture lorsqu'on n'utilise pas le bol
mixer)
F) Axe d'entraînement
G) Bol mixer
H) Doigt de sécurité du bol (active et désactive
l'interrupteur de sécurité)
I) Filtre
J) Couvercle du bol
K) Cheminée de remplissage
L) Poussoir
M) Couvercle du bol mixer
N) Couvercle avec espace de rangement pour les
inserts
O) Verre du moulin
P) Ensemble couteaux du moulin
Q) Insert à trancher moyen
R) Insert à trancher fin
S) Insert à râper moyen
T) Axe support
U) Couteaux (avec gaine de protection)
V) Accessoire de pétrissage
W)Disque à émulsionner
X) Spatule
Introduction
L'appareil est équipé d'un interrupteur
automatique thermique. En cas de surchauffe, ce
dispositif coupe automatiquement l'alimentation
électrique de l'appareil.
Si votre appareil s'arrête
brusquement:
1 Débranchez l'appareil.
2 Appuyez sur le bouton "PULSE / 0".
3 Laissez refroidir l'appareil 60 minutes.
4 Branchez à nouveau l'appareil.
5 Remettez l'appareil en marche.
Consultez votre revendeur ou un Centre Service
Agréé Philips si l'interrupteur de sécurité se
déclenche trop fréquemment.
Avertissement: Afin d'éviter tout accident causé
par la remise en marche de l'interrupteur de
sécurité thermique, l'appareil ne doit pas être
connecté à un minuteur.
Important
◗ Lisez attentivement les instructions ainsi que
les illustrations avant d'utiliser votre appareil.
◗ Conservez ce mode d'emploi pour un usage
ultérieur.
Page 24

FRANÇAIS24
◗ Avant de brancher l'appareil, vérifiez que la
tension indiquée sur l'appareil correspond à la
tension du secteur de votre logement (110127V ou 220-240V).
◗ N'utilisez jamais des accessoires ou des
composants des autres que ceux d'origine et
recommandés par Philips. Philips décline toute
résponsabilité envers la garantie si ce n'était
pas le cas.
◗ N'utilisez pas l'appareil si le cordon
d'alimentation, la fiche ou les autres pièces
sont détériorés.
◗ Si le cordon d'alimentation est endommagé, il
doit être remplacé par Philips ou à un Centre
Service Agréé Philips, afin d'éviter tout
accident.
◗ Avant la première utilisation, nettoyez toutes
les pièces en contact avec les aliments.
◗ Ne dépassez pas les quantités et le temps de
préparation indiqués dans les tableau et les
recettes.
◗ Ne dépassez pas le repère du bol ou du
mélangeur, par ex. ne dépassez pas le trait
supérieur de graduation.
◗ Débranchez l'appareil immédiatement après
utilisation.
◗ Débranchez l'appareil immédiatement après
utilisation.
◗ Débranchez toujours l'appareil avant mettre
vos doigts ou tout autre objet dans le bol
mixer (par ex. la spatule).
◗ Tenez l'appareil hors de portée des enfants.
◗ Ne laissez jamais l'appareil fonctionner sans
surveillance.
◗ N'arrêtez jamais l'appareil en tournant le
couvercle. Arrêtez l'appareil seulement en
appuyant sur le bouton PULSE / 0.
◗ Arrêtez toujours l'appareil avant de détacher
un accessoire.
◗ N'immergez jamais le bloc moteur dans l'eau
ni dans aucun autre liquide. Ne le rincez pas
non plus. Nettoyez-le avec un chiffon humide.
◗ Quand vous montez le bol mixer, le bol et le
capuchon fileté correctement, vous devez
entendre un clic.
◗ Le disque à émulsionner, les couteaux et
l'accessoire de pétrissage doivent être placés
sur l'axe d'entraînement qui se trouve dans le
bol.
◗ Enlevez la gaine de protection du couteau
avant utilisation.
◗ Evitez de toucher aux lames COUPANTES,
surtout lorsque l'appareil est sous tension.
◗ Si les lames se bloquent, DEBRANCHEZ
L'APPAREIL avant de retirer les ingrédients.
◗ Laissez les aliments cuits refroidir avant de les
hacher (température maximale 80cC/ 175cF).
◗ Si vous préparez un liquide qui peut mousser,
n'ajoutez pas plus d'un litre dans le bol mixer
pour éviter tout débordement.
Notez que si le mixer et le bol sont montés
ensembles, seul le mixer fonctionne.
Page 25
FRANÇAIS 25
Utilisation de l'appareil
Bol
◗ Si vous voulez utiliser le bol, retirez le bol
mixer et fermez l'ouverture où se fixe le bol
avec le capuchon fileté. Toutes les fonctions
qui nécessitent l'utilisation du bol
fonctionneront seulement si le bol mixer a
été enlevé.
C
1 Montez le bol sur le robot en tournant la
poignée dans le sens de la flèche jusqu'à ce
que vous entendiez un clic.
C
2 Mettez le couvercle sur le bol. Tournez
fermement le couvercle dans le sens de la
flèche jusqu'à ce que vous entendiez un
clic.
Verrouillage de sûreté incorporé
B
Le bloc moteur et le couvercle comportent des
repères. L'appareil ne peut fonctionner que si la
flèche du bloc moteur coïncide exactement avec
le repère du couvercle.
C
1 Assurez-vous que la flèche du bloc moteur
coïncide exactement avec le repère du
couvercle. L'ergot du couvercle couvre
l'ouverture de la poignée du bol.
CLICK
La cheminée de remplissage et le poussoir
C
1 Utilisez la cheminée de remplissage pour
ajouter du liquide et/ou des ingrédients
solides. Utilisez le poussoir pour pousser
les ingrédients dans la cheminée.
C
2 Le poussoir peut également servir à
fermer la cheminée pendant que l'appareil
est en marche, pour empêcher toute
projection.
Couteau
◗ Le couteau peut être utilisé pour hacher,
mélanger, mixer, réduire en purée et pour
préparer les pâtes feuilletées, brisées et
sablées.
C
1 Placez le bol sur le bloc moteur.
C
2 Enlevez la gaine de protection du couteau.
Les lames du couteau sont très aiguisées et
tranchantes. Evitez de les toucher!
C
3 Positionnez le couteau sur l'axe
d'entraînement.
CLICK
1
2
1
2
CLICK
1
2
CLICK
Page 26

FRANÇAIS26
C
4 Placez l'axe d'entraînement dans le bol.
5 Mettez les ingrédients dans le bol.
Découpez les ingrédients en dés d'environ
3 cm de côté. Mettez le couvercle sur le
bol.
C
6 Les réglages de vitesse vous permettent de
régler la vitesse de l'appareil pour obtenir
des résultats optimaux.
B
La fonction "PULSE / 0": pour une opération
impulse et pour arrêter l'appareil. Si vous
maintenez appuyé la touche "PULSE / 0"
l'appareil fonctionne à vitesse maximum.
L'appareil s'arrête après avoir relâché la touche.
B
réglage 1: pour une vitesse normale
B
réglage 2: pour une vitesse rapide
Consultez le tableau pour les réglages de vitesse
recommandés. La préparation des aliments dure
10 à 60 secondes.
Suggestions
◗ L'appareil hache très rapidement. N'utilisez
pas la touche éclair trop longtemps car les
aliments seraient hachés trop fins.
◗ Ne laissez pas tourner l'appareil trop
longtemps lorsque vous hachez du fromage (à
pâte dure) : le fromage chaufferait trop,
commencerait à fondre et à devenir pâteux.
◗ Ne hachez pas des ingrédients trop durs tels
que des grains de café, des noix de muscade
ou des glaçons. Cela pourrait émousser les
lames du couteau.
Si des aliments s'enroulent autour du couteau ou
collent à la paroi du bol :
1 Débranchez d'abord l'appareil.
2 Retirez le couvercle du bol.
3 Enlevez ensuite les aliments avec la spatule
Inserts
Les lames des inserts sont très aiguisées. Evitez de
les toucher!
Ne hachez pas des ingrédients durs tels que les
glaçons avec les inserts.
C
1 Placez l'insert sélectionné sur l'axe des
inserts.
C
2 Placez l'axe des inserts sur l'axe
d'entraînement qui se trouve dans le bol.
3 Mettez le couvercle sur le bol.
C
4 Mettez les ingrédients dans la cheminée.
Coupez les gros morceaux pour pouvoir
les introduire dans la cheminée.
5 Pour les meilleurs résultats remplissez la
cheminée de façon régulière.
Si vous devez traiter d'importantes quantités
d'aliments, ne traitez que des petites portions à la
fois et videz le bol fréquemment.
1
CLICK
2
Page 27

FRANÇAIS 27
6 Sélectionnez le réglage de vitesse
approprié pour obtenir des résultats
optimaux. Consultez le tableau pour les
réglages de vitesse recommandés.
La préparation des aliments dure 10 - 60
secondes.
C
7 Appuyez légèrement sur les ingrédients
avec le poussoir.
C
8 Pour retirer un insert du support, prenez
le support dans la main. Poussez les ergots
pour faire sortir l'insert désiré.
Accessoire de pétrissage
L'accessoire de pétrissage sert à pétrir la pâte à
pain, à mixer la pâte à frire ou les ingrédients
pour un gâteau.
C
1 Fixez l'accessoire de pétrissage sur l'axe
d'entraînement.
2 Mettez les ingrédients dans le bol.
C
3 Placez le couvercle sur le bol.
C
4 Fermez la cheminée de remplissage à l'aide
du poussoir.
C
5 Sélectionnez le réglage de vitesse
approprié pour obtenir des résultats
optimaux. Consultez le tableau pour les
réglages de vitesse recommandés.
Disque à émulsionner
Vous pouvez utiliser le disque à émulsionner pour
préparer de la mayonnaise, pour battre des blancs
d'œufs et de la crème fouettée.
C
1 Placez le disque à émulsionner sur l'axe
d'entraînement qui se trouve dans le bol.
2 Mettez les ingrédients dans le bol et placez
le couvercle sur le bol.
3 Sélectionnez le réglage de vitesse
approprié pour obtenir des résultats
optimaux. Consultez le tableau pour les
réglages de vitesse recommandés.
Suggestions
◗ Quand vous voulez fouetter des blancs
d'oeufs, ils doivent être à température
ambiante.
Otez les oeufs du réfrigérateur au moins une
demi-heure avant de les utiliser.
◗ Tous les ingrédients pour la préparation de la
mayonnaise doivent être à température
ambiante.
1
CLICK
2
Page 28
FRANÇAIS28
Vous pouvez verser de l'huile par l'ouverture qui
se trouve au dos du poussoir.
◗ Si vous voulez fouetter de la crème, utilisez
de la crème préalablement refroidie dans le
réfrigérateur. Respectez les temps de
préparation dans le tableau. La crème ne doit
pas être battue trop longtemps.
Utilisez la touche Eclair pour mieux contrôler
l'opération.
Mixer
Le mixer est destiné à:
- Mélanger des ingrédients liquides, tels que les
produits laitiers, les sauces, les jus de fruits, les
soupes, les cocktails, et milk-shakes.
- Mixer des ingrédients mous comme des pâtes à
crêpes ou de la mayonnaise.
- Réduire en purée des aliments cuits, pour les
nourrissons par exemple.
C
1 Retirer le capuchon fileté.
C
2 Fixez le mixer sur l'ouverture de
raccordement en tournant dans le sens de
la flèche jusqu'à son enclenchement.
N'exercez trop de pression sur la poignée du bol
mixer.
3 Mettez les ingrédients dans le bol.
C
4 Vissez le couvercle sur le bol mixer.
5 Mettez l'appareil en marche, et mélangez
les ingrédients. Les réglages de vitesse
vous permettent de régler la vitesse de
l'appareil pour obtenir des résultats
optimaux. Consultez le tableau pour les
réglages de vitesse recommandés.
Suggestions
C
◗ Les ingrédients liquides peuvent être versés
dans le bol par l'ouverture du bouchon qui se
trouve sur le couvercle.
◗ Plus vous laissez l'appareil tourner longtemps,
plus le mélange que vous obtenez est fin.
◗ Il peut être nécessaire de faire tremper les
ingrédients solides avant de les préparer.
◗ Coupez les aliments en morceaux fins pour
les introduire dans la cheminée. Si vous devez
traiter d'importantes quantités d'aliments, ne
traitez que des petites portions à la fois.
◗ Si vous hésitez sur la vitesse à utiliser,
choisissez toujours la vitesse la plus élevée
(position 2).
Si des aliments collent à la paroi du bol mixer:
1 Arrêtez l'appareil et débranchez-le.
2 Retirez le couvercle.
Ne retirez jamais le couvercle tandis que
l'appareil fonctionne.
1
CLICK
1
2
2
1
2
Page 29

FRANÇAIS 29
3 Enlevez les aliments avec une spatule.
Tenez la spatule éloignée des couteaux (environ
2 cm).
Filtre
Avec ce filtre vous pouvez obtenir des jus frais de
fruits, faire des cocktails ou lait de soja en
quelques secondes. Tous les pépins et peaux
resteront dans le filtre.
1 Assemblez le bol mixer.
C
2 Mettez le filtre dans le bol mixer. Assurez-
vous que les rainures du filtre se fixent
parfaitement sur les côtes à l'intérieur du
bol mixer.
C
3 Introduisez les ingrédients dans le filtre.
Ajoutez de l'eau ou un autre liquide (par ex. pour
cocktails) dans le bol mixer.
C
4 Placez le couvercle.
5 Mettez l'appareil en marche. Consultez le
tableau pour les réglages de vitesse
recommandés.
Si vous ne savez pas la vitesse correcte,
sélectionnez la vitesse la plus haute.
6 Arrêtez l'appareil et retirez le bol mixer.
C
7 Versez la boisson par le bec verseur du
bol mixer. Ne retirez pas le couvercle!
Pour obtenir les meilleurs résultats, replacez le bol
mixer avec les ingrédients restants sur l'appareil et
laissez-le fonctionner encore quelques secondes.
Versez le reste de la boisson.
Suggestions
◗ Surtout si vous traitez d'importantes
quantités d'ingrédients, il n'est pas
recommandé de mettre tous les ingrédients à
la fois. Commencez à préparer une petite
portion, laissez l'appareil fonctionner pendant
quelques instants, arrêtez-le et ajoutez une
autre portion. Placez toujours le couvercle!
Répétez la procédure jusqu'à ce que vous
ayez terminer tous les ingrédients.
◗ Pour faire des jus de fruits et cocktails:
Pour les meilleurs résultats, ajoutez environ 200
ml d'eau (ou tout autre liquide si vous faites des
cocktails, etc.) à 100 g de fruits.
◗ Pour préparer du lait de soja:
Faites tremper les germes de soja pendant 4
heures avant de les préparer. Vous pouvez
préparer jusqu'au max. 2/3 du tamis métallique
de germes de soja trempés. Ajoutez-y 500 ml
d'eau et mélangez la composition.
Page 30

FRANÇAIS30
Moulin
Préparation du moulin à l'emploi.
N'utilisez jamais le moulin pendant plus de 30
secondes sans interruption.
C
1 Mettez les ingrédients dans le verre.
Traitez seulement des ingrédients solides. Ne
remplissez pas le verre au-delà de 'MAX'.
C
2 Tenez l'ensemble couteaux par l'anneau de
sécurité.
Placez l'ensemble couteaux dans le verre.
Assurez-vous qu'il soit bien fixé à l'intérieur du
verre.
C
3 Appuyez et tournez-le dans le sens des
aiguilles d'une montre jusqu'à ce qu'il soit
correctement fixé.
C
4 Renversez le moulin et vissez-le sur le bloc
moteur.
Après avoir fini, dévissez le moulin du bloc
moteur:
C
5 Tournez l'anneau de sécurité dans le sens
inverse des aiguilles d'une montre pour
retirer l'ensemble couteaux.
Le moulin est approprié pour moudre des
ingrédients tels que ceux mentionnés dans le
tableau. Ne dépassez pas les quantités!
Quantités
5-25 g
10-50 g
25-75 g
25-75 g
25-75 g
25-50 g
50-100 g
20-40 g
10-30 g
50-100 g
20-50 g
Ingrédients
grains de poivre
graines de sésame
riz, blé
soja
pois secs
noix de coco
fromage dur (par ex. parmesan)
chapelure
morceaux de sucre
noix (décortiquées)
grains de café
Page 31

FRANÇAIS 31
Nettoyage
Débranchez toujours l'appareil avant de nettoyer
le bloc moteur.
1 Le bloc moteur peut être nettoyé avec un
chiffon humide. N'immergez jamais le bloc
moteur dans l'eau et ne le rincez pas sous
l'eau non plus.
2 Lavez immédiatement après utilisation les
accessoires en contact avec les aliments, à
l'eau chaude savonneuse.
◗ Le bol, le couvercle du bol, le poussoir et les
accessoires peuvent être lavés dans le lavevaisselle.
Ces composants ont été testés pour la resistance
au lave-vaisselle conformément au DIN EN
12875.
Le couvercle avec espace de rangement pour les
inserts et le bol mixer ne sont pas résistants au
lave-vaisselle!
Faites attention en nettoyant le couteau
l'ensemble couteaux et les inserts. Leurs lames
sont très aiguisées !
Evitez de cogner les lames du couteau, et les
inserts contre des objets durs car cela pourrait les
émousser.
Certains aliments peuvent provoquer une
décoloration de la surface des accessoires. Cela
est sans importance sur le bon fonctionnement
de l'appareil. Les décolorations peuvent
disparaitre après quelque de temps.
Nettoyage du filtre
◗ Secouez le filtre au dessus d'une poubelle et
rincez-le à l'eau du robinet.
Nettoyage du moulin
◗ Débranchez l'appareil.
◗ Détachez le moulin du bloc moteur.
◗ Nettoyez le verre et l'ensemble couteaux
avec de l'eau tiède et un peu de produit
vaisselle.
◗ Faites attention aux lames des couteaux!
◗ A la fin, rincez les composants détachables à
l'eau claire et séchez-les bien.
Nettoyage rapide du mixer
C
1 Versez de l'eau tiède (pas plus de 0,5
litres) et un peu de produit lave-vaisselle
dans le bol mixer.
2 Placez le couvercle et le bouchon.
C
3 Laissez l'appareil fonctionner quelques
instants en appuyant sur la touche Eclair.
(l'appareil ne fonctionne plus lorsque vous
relâchez le bouton.)
4 Détachez le bol mixer et rincez-le avec de
l'eau claire.
Page 32

FRANÇAIS32
Rangement
MicroRangement
C
◗ Mettez les accessoires (disque à émilsionner,
couteau, accessoire à pétrir, axe des inserts)
sur l'axe d'entraînement et placez-les dans le
bol. Rangez toujours l'axe d'entrainement en
dernier.
C
◗ Deux inserts peuvent être rangés dans
l'espace de rangement pour les inserts du
couvercle qui couvre le bol, comme indiqué à
l'intérieur du couvercle. Les inserts doivent
entrer légèrement dans le couvercle, ils ne
doit pas être pressés.
C
◗ Placez le couvercle avec l'espace de
rangement pour les inserts sur le couvercle
transparent du bol.
◗ Enroulez le cordon autour de l'enrouleur au
dos de l'appareil.
Garantie et service
Pour toute réparation/information, ou en cas de
problème, visitez notre website: www.philips.com.
Ou veuillez contacter le Service Consommateurs
Philips de votre pays (vous trouverez le numéro
de téléphone dans le dépliant sur la garantie
internationale). S'il n'y a aucun Service
Consommateurs Philips dans votre pays,
contactez votre distributeur ou le Service
Department of Philips Domestic Appliances and
Personal Care BV.
Quantité et temps de préparation
Applications
Crêpes,
gaufres
Plats panés,
gratins
Desserts,
garnitures
Garnitures,
légumes crues,
plats au navet,
fondues
Salades
Garnitures,
soupes, sauces,
gratins
Sauces, pizzas,
gratins, fondue
Procédure
Versez d'abord le lait dans le
mixer, puis ajoutez les
ingrédients secs. Mélangez
pendant 1 minute environ. Si
nécessaire, répétez l'opération
2 fois.
Utilisez du pain sec, croustillant
Prenez du beurre mou pour
obtenir une crème légère.
Coupez les légumes
grossièrement pour les
introduire dans la cheminée.
Remplissez la cheminée et
râpez-les en appuyant
doucement sur
Remplissez la cheminée et
tranchez les légumes en
appuyant doucement sur le
poussoir.
Utilisez un morceau de
parmesan sans croûte et
coupez-le en morceaux
d'environ 3 x 3 cm.
Coupez le fromage en
morceaux pour les introduire
dans la cheminée. Appuyez
doucement sur le poussoir.
Réglag
e de
vitess
e /
Acces
soire
2 / P
2 / P
2 / P
2 / j
k
2 / P /
g
2 / P
2 / j
k
Quant
ité
maxi
male
250
ml lait
100g
300g
350g
350g
200g
200g
Ingrédients et
résultats
Pâtes à crêpes
(crêpes) fouetter
Chapelure
Crème au
beurre - battre
Légumes
(carottes,
navets, céleris)
- trancher
Légumes
(carottes,
poireaux,
céléris) tancher
Fromage
(parmesan)râper
Fromage
Page 33

FRANÇAIS 33
Applications
Garnitures,
sauces,
pâtisseries,
flans, mousses
Purées, soupes
Aliments pour
bébés
Salades,
garnitures
Pain
Pizza
Procédure
Utilisez du chocolat noir, dur.
Cassez en morceaux de 2 cm.
Utilisez les légumes cuits. Si
nécessaire, ajoutez du liquide
pour améliorer la consistance
du mélange.
Pour obtenir une purée
épaisse, ajoutez peu de liquide.
Pour une purée fine, ajoutez du
liquide jusqu'à ce que le
mélange soit suffisamment
onctueux.
Mettez le concombre dans la
cheminée et appuyez
doucement.
Mélangez la levure et le sucre
avec de l'eau chaude. Ajoutez
la farine, l'huile et le sel et
mélangez pendant 90 sec.
environ. Laissez lever 30 min.
Même opération que pour la
pâte à pain. Mélangez pendant
1 min. environ. Ajoutez tout
d'abord la farine et ensuite les
autres ingrédients.
Réglag
e de
vitess
e /
Acces
soire
2 / P
2 / P
D
2 / P
1 / g
2 / {
2 / {
Quant
ité
maxi
male
200g
250g
300g
1
conco
mbre
350g
farine
400g
farine
Ingrédients et
résultats
Chocolat
Petits pois,
haricots cuits purée
Légumes et
viandes cuits purée
Concombre trancher
Pâte
Pâte
Applications
Tourtes aux
pommes,
biscuits, tartes
aux fruits
Tartes aux
fruits, pâtés,
quiches
Pain brioché
Procédure
Utilisez de la margarine froide
et coupez-la en morceaux de 2
cm. Mettez tous les ingrédients
dans le bol et pétrissez jusqu'à
ce que la pâte devienne une
boule. Laissez la pâte refroidir
avant de vous en servir.
Utilisez de la margarine et de
l'eau froide. Versez la farine
dans le bol et ajoutez la
margarine coupée en
morceaux de 2 cm. Mélangez à
la vitesse maximum jusqu'à ce
que la pâte devienne friable,
puis ajoutez de l'eau froide
tout en mélangeant. Arrêtez
dès que la pâte commence à
former une boule. Laissez la
pâte refroidir avant de vous en
servir.
Mélangez d'abord la levure, du
lait chaud et un peu de sucre
dans un bol séparé. Ajoutez les
ingrédients dans le bol et
pétrissez la pâte jusqu'à ce
qu'elle ne colle plus au bol
(environ 1minute). Laissez lever
30 minutes.
Réglag
e de
vitess
e /
Acces
soire
2 / P
2 / P
2 / {
Quant
ité
maxi
male
200g
farine
200g
farine
300g
farine
Ingrédients et
résultats
Pâte
Pâte
Pâte
Page 34

FRANÇAIS34
Applications
Entremets,
soufflés,
meringues
Entremets,
soufflés,
meringues
Garnitures,
fondues
Sauces,
soupes,
garnitures,
beurre aux
herbes
Jus de fruits
Salades,
garnitures et
sauces de
barbecue
Procédure
Utilisez les œufs à température
ambiante. Remarque : utilisez
au moins deux blancs d'œufs.
Suggestion: ajoutez un peu de
jus de citron pour empêcher la
décoloration des fruits. Ajoutez
du liquide pour une purée plus
onctueuse.
Pelez l'ail. Utilisez la touche
Eclair quelques fois pour éviter
un hachage trop fin. Utilisez au
moins 150g d'ail.
Lavez et séchez les herbes
avant de les hacher
Ajoutez de l'eau ou tout autre
liquide (optionnel) pour un jus
plus onctueux.
Tous les ingrédients doivent
être à température ambiante.
Remarque : utilisez au
minimum un gros œuf, deux
petits œufs ou deux gros
jaunes d'œufs. Mettez l'œuf et
un peu de moutarde et un peu
de vinaigre dans le bol et
ajoutez l'huile goutte à goutte.
Réglag
e de
vitess
e /
Acces
soire
2 / S
P / P
P / P
2/P / P
2 / D
1-2 /
S
Quant
ité
maxi
male
4
blancs
d'œufs
500g
300g
Min.
75g
500g
(quant
ité
totale)
3
œufs
Ingrédients et
résultats
Blancs d'œufs
- fouetter
Fruits
Ail - hacher
Herbes
Jus (par ex.
papaye, melon
d'eau, poire) mélanger
Mayonnaise
Applications
Steaks tartare,
hamburgers,
boulette de
viande.
Milkshakes
Divers gâteaux
Salades, pain,
frangipane,
entremets
Sautés,
garnitures
Sautés,
garnitures
Procédure
Retirez d'abord les nerfs ou les
os. Coupez la viande en dés de
3 cm. Utilisez la touche Eclair
pour un hachage grossier.
Réduisez en purée le fruit (par
ex. bananes, fraises) avec du
sucre du lait et de la crème
glacée et mélangez bien.
Utilisez des ingrédients à
température ambiante.
Mélangez le beurre ramolli et le
sucre jusqu'à ce que le
mélange soit onctueux et
crémeux. Ajoutez ensuite le
lait, les œufs et la farine.
Utilisez la touche Eclair (P)
pour un hachage grossier et la
vitesse maximale pour un
hachage fin.
Pelez les oignons et coupez-les
en quatre. Remarque : utilisez
au moins 100 g. Utilisez la
touche Eclair éviter un hachage
trop fin.
Pelez les oignons et coupez-les
en morceaux pour les
introduire dans la cheminée.
Remarque: utilisez au moins
100 g.
Réglag
e de
vitess
e /
Acces
soire
2/ P /
P
2 / D
2 / P
2/ P /
P
P / P
1 / g
Quant
ité
maxi
male
300g
250ml
lait
3
œufs
250g
400g
300g
Ingrédients et
résultats
Viande hacher
Milkshakes mélanger
Mélange
Noix - hacher
Oignons hacher
Oignons émincer
Page 35

FRANÇAIS 35
Applications
Viande hachée
Soupes, sauces
Garnitures,
crèmes,
mélanges de
crèmes glacées
Procédure
Retirez d'abord les nerfs ou les
os. Coupez la viande en dés de
3 cm. Utilisez la touche Eclair
pour un hachage plus grossier.
Utilisez des légumes cuits
Utilisez de la crème
préalablement refroidie dans le
réfrigérateur. Remarque: utilisez
au moins 125 ml de crème
liquide. La crème fouettée est
prête en 20 sec.
Réglag
e de
vitess
e /
Acces
soire
2/ P /
P
2 / D
P / S
Quant
ité
maxi
male
200g
500ml
350ml
Ingrédients et
résultats
Volaille hacher
Soupe - mixer
Crème
fouettée fouetter
Recettes
Soupe de brocolis (pour 4 personnes)
h or D
- 50g fromage gouda
- 300g de brocolis cuits
- l'eau où les brocolis ont été préalablement
cuits
- 2 pommes de terre bouillies coupés en
morceaux
- 2 bouillon-cubes
- 2 c. à c. crème
- curry
- sel
- poivre
- muscade
B
Râper le fromage. Réduisez en purée les broccolis
et les pommes de terre cuites ; ajoutez y un peu
d'eau de cuisson. Mettez la purée de broccolis, le
liquide restant et le bouillon-cubes dans un verre
gradué et remplissez-le jusqu'à 750ml. Versez le
tout dans une casserole et faites bouillir en
remuant. Ajoutez le fromage en tournant et
assaisonnez de curry, sel, poivre et muscade et
crème.
Poudre à cinq épices
Moulin
- 2g cannelle
- 2g anis étoilé
- 2g clou de girofle
- 2g réglisse
- 2g graines d'anis
Page 36

FRANÇAIS36
B
Découpez la canelle et les tranches de réglisse en
petits morceaux avant de les utiliser.
B
Mettez tous les ingrédients dans le moulin et
moulez à haute vitesse pendant 30 secondes. NE
MOULEZ JAMAIS PLUS DE 30 SECONDES.
Tarte aux fruits
P
- 450 g dattes sèches dénoyautées, en moitiés
- 200 g prunes sèches, en moitiés
- 650 g noix de pecan
- 160 g noix de coco râpée
- 300 g ananas givré
- 1 boîte (400 g) de lait concentré sucré
- 1 c. à c. extrait de vanille
B
Graissez deux moules de 20 cm et préchauffez le
four à 135c C.
B
Mettez les moitiés de dattes et de prunes dans le
bol et hachez-les à la vitesse maximale pendant
30 secondes. Ensuite videz le bol.
B
Mettez les noix de pecan dans le bol et hachezles grossièrement à l'aide de la fonction impulse.
Ensuite videz le bol.
B
Mettez l'ananas givré dans le bol et hachez-le à
l'aide de la fonction impulse. Ensuite videz le bol.
B
Mélangez les dattes, les prunes, les noix de
pecan, l'ananas et la noix de coco râpée dans un
grand bol.
B
Ajoutez du lait et de l'extrait de vanille aux
ingrédients et mixez.
B
Versez la composition dans les moules et faites
cuire les tartes à 135c pendant 90 minutes.
B
Ne préparez pas les ingrédients de cette recette
plusieurs fois sans interruption. Si vous voulez
préparer plusieurs quantités, d'abord laissez
l'appareil refroidir et ensuite continuez la
préparation.
Purée de pommes de terre
P
- 750g pommes de terre bouillies
- +/- 250ml lait chaud (90cC)
- 1 c. à s. de beurre
-sel
B
Tout d'abord réduisez les pommes de terre cuites
en purée, ensuite ajoutez le sel et le beurre.
Utilisez la vitesse 1 et mélangez pendant 30
secondes environ.
Mayonnaise
S
- 2 jaunes d'œufs ou un gros œuf
- 1c. à c. de moutarde
- 1c. à c. de vinaigre
- 200ml huile
B
Tous les ingrédients doivent être à température
ambiante. Placez le disque à émulsionner dans le
bol. Mettez les jaunes d'œufs ou le gros œuf, du
vinaigre et du moutarde dans le bol. Utilisez la
vitesse 1 ou 2. Versez l'huile graduellement par la
cheminée de remplissage sur le disque rotatif.
Vous pouvez utiliser l'orifice du poussoir pour
ajouter de l'huile.
B
Suggestion pour le sauce tartare: ajoutez du persil,
des cornichons et des œufs durs.
Page 37

FRANÇAIS 37
mozzarella, poivrons, fromage fait râpé et huile
d'olive suivant votre goût.
B
Placez l'accessoire à pétrissage dans le bol.
Mettez tous les ingrédients dans le bol et
sélectionnez la vitesse 2. Pétrissez la pâte
pendant 1 minute jusqu'à ce qu'elle commence à
former une boule. Tenez l'appareil avec la main.
Mettez la pâte dans un autre bol et laissez lever
30 min.
B
Utilisez le couteau pour hacher l'oignon et l'ail.
Faite revenir l'oignon et l'ail hachés jusqu'à ce
qu'ils deviennent transparents.
B
Ajoutez les tomates et les herbes et faites cuire
la sauce à feu doux pendant 10 minutes.
B
Assaisonnez suivant votre goût avec sel, poivre et
sucre. Laissez refroidir la sauce.
B
Chauffez le four à 250cC.
B
Mélangez la pâte. Puis faite deux abaisses rondes
de la grandeur du plateau de cuisson. Placez-les
sur le plateau de cuisson légèrement graissé au
pléalable. Etalez bien les abaisses en relevant les
bords avec les doigts. Etalez les ingrédients désirés
à l'intérieur et saupoudrez de fromage râpé,
ajoutez y un peu d'huile d'olive.
B
Faites cuire les pizzas au four pendant 12 à 15
minutes.
Pommes de terre et courgette au
gratin
Pgk
- 375g pommes de terre
- une pinçée de sel
- 1 courgette (approx. 250g)
B
Suggestion pour la sauce cocktail: ajoutez 50ml
crème fraîche, une goutte de whisky, 3 cuilleres à
café de purée de tomates et une goutte de sirop
de gingembre à 100ml mayonnaise.
Milkshake
D
- 175ml lait
- 10g sucre
- 1/2 banane ou approx. 65g d'autres fruits frais
- 50g glace à la vanille
B
Mélangez les ingrédients jusqu'à ce qu'ils
deviennent mousseux.
Pizza
{
- 400g farine
- 40 ml huile
- 1/2 c. à c. de sel
- 20g levure fraîche ou 1,5 paquet levure
déshydratée
- approx. 240cm˛ eau (35cC)
Pour la garniture:
- 300ml tomates passées (en conserve)
- 1 c. à c. d'herbes mixtes (sèches ou fraiches)
- 1 oignon
- 2 gousse d'ail
- sel et poivre
- sucre
- Ingrédients à ajouter sur la sauce: olives, salami,
artichauts, champignons, anchois, fromage
Page 38

FRANÇAIS38
râpez le fromage à vitesse 2 pour assaisonner le
plat.
B
Mettez le plat au centre d'un four chaud (200cC)
et faites-le dorer pendant 15 minutes.
Mousse au saumon
PS
- 1 boîte de saumon
- 2 feuilles de gélatine
- quelques branches de ciboulettes
- une pinçée de sel
- une pinçée de poivre de cayenne
- 1/2 c. à c. jus de citron
- 125ml crème fouettée
- 1 petit oignon
- cresson pour garnissage
B
Faites tremper la gélatine dans beaucoup d'eau.
B
Hachez les ciboulettes et les oignons dans le robot
en utilisant la touche éclair.
B
Enlevez les arêtes et la peau du saumon.
B
Ajoutez le sel, poivre de cayenne, jus de citron,
saumon et le liquide de la boîte au ciboulettes et
oignons hachés et réduisez tous les ingrédients en
purée en utilisant la vitesse 2.
B
Mettez la purée dans le bol.
B
Amenez à ébullition un peu d'eau et faites fondre
la gélatine dans l'eau.
B
Incorporez la gélatine fondue à la purée de
saumon.
B
Placez le disque à émulsionner dans le bol et
fouettez la crème en appuyant sur la touche éclair
pendant 15 secondes.
- 1 gousse d'ail, pressé
- approx. 40g beurre + un peu de beurre pour
graisser le plateau du four
- 2 c. à c. herbes
- 1 gros œuf
- 75ml crème fouettée
- 75ml lait
- poivre
- 70g fromage semi-fait
B
Epluchez et lavez les pommes de terre.
B
Mettez l'insert à trancher sur le support et
placezl'ensemble sur l'axe d'entrainement dans le
bol. Tranchez les pommes de terre et la courgette
en utilisant la vitesse 1.
B
Faite cuire les tranches à l'eau bouillante avec une
pinçée de sel.
B
Mettez les tranches dans une passoire et
égouttez-les.
B
Mettez 20g beurre dans une poêle, faites frire
une demie courgette en tranches pendant
3 minutes tout en tournant. Assaisonnez les
tranches avec 1 c. à c. d'herbes.
B
Egouttez les rondelles frites sur un papier essuietout.
B
Graissez un plat et mettez les courgettes et les
pommes de terre sur le plat, en les alternant
comme des tuiles.
B
Fouettez les œufs avec la crème et le lait en
utilisant le couteau à vitesse 2. Ajoutez du sel et
du poivre au goût et versez le mélange sur les
rondelles de pommes de terre et courgette.
B
Remplacez l'insert à trancher avec l'insert à râper,
Page 39

FRANÇAIS 39
B
Mélangez le jus, la moutarde et le vinaigre.
Tranchez le chou, les oignons, le fenouil et la
pomme en utilisant la vitesse 1.
B
Combinez les ingrédients dans un saladier.
Biscuit de Savoie
P
- 4 œufs
- 300ml eau (35cC)
- une pinçée de sel
- 150g sucre
- 1 sachet sucre vanillé
- 150g farine tamisée
- 3g de levure
B
Fouettez les œufs et l'eau pendant environ
2 minutes. Ajoutez en tournant le sucre, vanille et
sel peu à peu et mélangez pendant 1 minute. Le
mélange doit être homogène. Incorporez la farine
et la levure avec une spatule. Faites cuire au four
pendant environ 170cC pendant 30-35 minutes.
B
Suggestion: Vous pouvez fourrer le biscuit de
Savoie de divers crèmes ou de crème fouettée et
fruits frais.
Tzatziki
k
- 1 concombre
- 200ml yaourt
- 1 c.à s. huile d'olives
- 2 gousse d'ail
- une pinçée de sel
- 1 c.à c. d'aneth haché menu
- quelques feuilles de menthe
B
Incorporez la crème fouettée au purée de saumon
à l'aide d'une cuillère de bois.
B
Démoulez la mousse sur un plateau, couvrez-la et
laissez-la refroidir dans le réfrigérateur pendant
quelques heures.
B
Garnissez la mousse de cresson.
Pâte à tartiner
P
- 2 petites carottes en morceaux
- 2-3 cornichons en morceaux
- 75g chou-fleur en morceaux
- 75g céleri en morceaux
- herbes vertes (percil, aneth, estragon, pieds de
céleris tranchés)
- 100g mayonnaise
- 100g fromage blanc
- sel
- poivre
B
Hachez menu les carottes, cornichons, chou-flour,
herbes vertes, pieds de céleri et céleri-rave.
Incorporez la mayonnaise et assaisonnez à votre
goût avec poivre et sel.
Salade de chou espagnole
P
- 1 petit chou rouge
- 2 oignons rouges
- 1 fenouil
- 1 pomme
- jus d'une orange et 2 c.à s. vinaigre de vin
rouge
- 1 c.à s. moutarde
Page 40

FRANÇAIS40
B
Epluchez le concombre et râpez-le en utilisant la
vitesse 1. Mettez le concombre râpé dans une
passoire et laissez-le s'égoutter.
B
Mélangez les autres ingrédients, sauf les feuilles
de menthe au concombre. Versez la salade dans
un bol couvert et mettez-la dans le réfrigérateur
pendant une heure. Assaisonnez avec des feuilles
de menthe avant de servir.
Page 41

ESPAÑOL 41
Robot de cocina : Piezas y accesorios
A) Control de la velocidad
B) Unidad motora
C) Incorporado cierre de seguridad
D) Recipiente
E) Tapa enroscable (Para cerrar el agujero de
fijación de la batidora cuando la jarra batidora
no esté en uso)
F) Soporte de la herramienta
G) Jarra batidora
H) Espiga de la tapa (Activa y desactiva el
interruptor de seguridad)
I) Filtro
J) Tapa del recipiente
K) Tubo de llenado
L) Empujador
M) Tapa de la jarra batidora
N) Cubierta con lugar cerrable para guardar el
inserto
O) Vaso del molinillo
P) Unidad de cuchillas del molinillo
Q) Inserto de rebanado medio
R) Inserto de rebanado fino
S) Inserto de troceado medio
T) Soporte del inserto
U) Cuchilla (Con cubierta protectora)
V) Accesorio amasador
W)Disco emulsionador
X) Espátula
Introducción
Este aparato ha sido provisto de un sistema
térmico de desconexión automática. Este sistema
desconectará automáticamente la corriente del
aparato en caso de sobrecalentamiento.
Si su aparato se para de repente:
1 Desenchúfenlo de la red.
2 Presionen el botón "TURBO / 0"
(PULSE / 0).
3 Dejen que el aparato se enfríe durante
60 minutos.
4 Enchúfenlo a la red.
5 Vuelvan a ponerlo en marcha.
Contacten con su vendedor Philips o con un
Servicio de Asistencia Técnica de Philips si el
sistema térmico de desconexión automática se
activa muy a menudo.
PRECAUCION : A fin de evitar situaciones de
peligro, este aparato nunca debe conectarse a un
temporizador.
Importante
◗ Antes de usar el aparato, lean
cuidadosamente las instrucciones de uso y
miren las ilustraciones.
Page 42

ESPAÑOL42
◗ Guarden estas instrucciones de uso para
futuras consultas.
◗ Antes de enchufar el aparato a la red,
comprueben si el voltaje indicado en el
aparato se corresponde con el de la red local
(110 - 127 V ó 220 - 240 V).
◗ No usen nunca ningún accesorio o piezas de
otros fabricantes o que no hayan sido
específicamente aconsejados por Philips. Su
garantía quedará invalidada si han usado tales
accesorios o piezas.
◗ No usen el aparato si el cable de red, la clavija
u otras piezas están deteriorados.
◗ A fin de evitar situaciones peligrosas, si el
cable de red del aparato se deteriora, siempre
debe ser sustituido por Philips o por un
Servicio de Asistencia Técnica de Philips
◗ Antes de usar el aparato por vez primera,
limpien cuidadosamente las piezas que vayan a
entrar en contacto con los alimentos.
◗ No excedan las cantidades y tiempos de
preparación indicados en las tablas y en las
recetas.
◗ No excedan el contenido máximo indicado en
el recipiente o en la jarra batidora, por
ejemplo, no llenen por encima de la
graduación máxima.
◗ Desenchufen el aparato de la red
inmediatamente después del uso.
◗ No usen nunca sus dedos o un objeto (Por
ejemplo, una espátula) para presionar los
ingredientes dentro del tubo de llenado
mientras el aparato esté en marcha. Para ese
propósito solo debe usarse el empujador.
◗ Desenchufen siempre el aparato de la red
antes de introducir sus dedos o un objeto
(Por ejemplo, una espátula) en la jarra
batidora.
◗ Mantengan el aparato fuera del alcance de los
niños.
◗ No dejen nunca que el aparato funcione sin
vigilancia.
◗ No paren nunca el aparato haciendo girar la
tapa. Paren siempre el aparato presionando el
botón "TURBO / 0"(PULSE / 0).
◗ Paren el aparato antes de desmontar
cualquier accesorio.
◗ No sumerjan nunca la unidad motora en agua
o en cualquier otro fluído ni la enjuaguen bajo
el agua del grifo. Para limpiar la unidad
motora usen solo un paño húmedo.
◗ Cuando monten la jarra batidora, el
recipiente y enrosquen la tapa de forma
adecuada, oirán un "click".
◗ El disco emulsionador, la cuchilla y el
accesorio amasador deben ser colocados
sobre el soporte de la herramienta que se
coloca derecho dentro del recipiente.
◗ Quiten la cubierta protectora de la cuchilla
antes de usarla.
◗ Eviten tocar las cuchillas AFILADAS,
especialmente cuando el aparato esté
enchufado a la red.
◗ Si las cuchillas se agarrotan, desenchufen el
aparato de la red antes de quitar los
ingredientes que estén bloqueando las
cuchillas.
Page 43

ESPAÑOL 43
◗ Dejen que los ingredientes calientes se
enfríen antes de procesarlos (Temperatura
máxima 80cC/175cF).
◗ Para evitar derrames si están procesando un
líquido que tiene tendencia a formar espuma,
no pongan más de 1 litro en la jarra batidora.
Tengan en cuenta que la batidora solo funcionará
si tanto la batidora y como el recipiente han sido
montados correctamente.
Cómo usar el aparato
Recipiente
◗ Si desean usar el recipiente, quiten la jarra
batidora y cierren el agujero de fijación con la
tapa roscada. Todas las funciones que
requieren el uso del recipiente solo
funcionarán si se ha quitado la jarra batidora.
C
1 Monten el recipiente en el Robot de
Cocina haciendo girar la empuñadura en la
dirección de la flecha hasta que oigan un
"click".
C
2 Pongan la tapa en el recipiente. Giren la
tapa en la dirección de la flecha hasta que
oigan un "click" (Ello requerirá un poco de
fuerza).
Cierre de seguridad incorporado
B
Tanto la unidad motora como la tapa están
provistas de marcas. El aparato solo funcionará si
la flecha de la unidad motora está directamente
opuesta a la marca de la tapa.
C
1 Asegúrense de que la marca de la tapa y la
flecha del recipiente estén directamente
opuestas la una con la otra. Entonces, la
proyección de la tapa cubrirá la abertura
de la empuñadura.
Tubo de llenado y empujador
C
1 Para añadir líquidos y/o ingredientes
sólidos, usen el tubo de llenado. Usen el
empujador para para presionar los
ingredientes sólidos a través del tubo de
llenado.
C
2 También pueden usar el empujador para
cerrar el tubo de llenado y evitar que los
ingredientes se escapen a través de él.
Cuchilla
◗ La cuchilla puede usarse para picar, mezclar,
batir, hacer puré y preparar mezclas para
pasteles.
C
1 Pongan el recipiente sobre la unidad
motora
CLICK
CLICK
CLICK
1
2
1
2
CLICK
1
2
Page 44

ESPAÑOL44
C
2 Quiten la tapa protectora de la cuchilla.
Los filos cortantes están muy afilados ¡ Eviten
tocarlos !
C
3 Pongan la cuchilla en el soporte de la
herramienta.
C
4 Pongan el soporte de la herramienta en el
recipiente.
5 Pongan los ingredientes en el recipiente.
Corten antes los trozos grandes de
alimentos en trozos de unos 3 x 3 cm.
Pongan la tapa sobre el recipiente.
C
6 Las posiciones de la velocidad les permiten
ajustar la velocidad del aparato para
obtener unos resultados óptimos.
B
Posición "TURBO / 0" (PULSE / 0) : Para
operaciones pulsantes y para parar el aparato. Si
el botón "TURBO / 0" (PULSE / 0) se presiona, el
aparato funciona a la máxima velocidad . Al soltar
el botón, el aparato se para.
B
Posición 1 : Para velocidad normal
B
Posición 2 : Para velocidad alta
Consulten la tabla para las recomendadas
posiciones de velocidad. El proceso tarda entre 1
y 60 segundos.
Consejos
◗ El aparato pica muy deprisa. Usen la función
"TURBO" (PULSE) durante cortos períodos
cada vez para evitar que la comida quede
picada demasiado finamente.
◗ No dejen que el aparato funcione demasiado
tiempo cuando estén picando queso (Duro).
El queso puede calentarse demasiado,
empezar a fundirse y formar masa.
◗ No usen la cuchilla para picar ingredientes
muy duros, tales como café, granos, nuez
moscada y cubitos de hielo. La cuchilla podría
mellarse
Si la comida se pega a la cuchilla o al interior del
recipiente :
1 Paren el aparato
2 Quiten la tapa del recipiente.
3 Quiten los ingredientes con una espátula.
Insertos
Los filos de los insertos están muy afilados ¡ No
los toquen !
¡ Con los insertos, no procesen ingredientes
duros tales como cubitos de hielo !
C
1 Pongan el inserto seleccionado en el
soporte de los insertos.
1
CLICK
2
Page 45

ESPAÑOL 45
C
2 Coloquen el soporte del inserto sobre el
soporte de la herramienta que queda
derecho en el recipiente.
3 Pongan la tapa sobre el recipiente.
C
4 Pongan los ingredientes en el tubo de
llenado. Antes corten los trozos grandes
para que puedan pasar por el tubo de
llenado.
5 Para unos mejores resultados, llenen
uniformemente el tubo de llenado.
Cuando necesiten cortar grandes cantidades de
alimentos, procesen solo una pequeña cantidad
cada vez y vacíen regularmente el recipiente entre
cantidades.
6 Seleccionen la posición de velocidad
adecuada para obtener resultados
óptimos. Consulten la tabla para las
posiciones de velocidad recomendadas.
El proceso tarda entre 10 y 60 segundos.
C
7 Presionen los ingredientes, lenta y
constantemente, con el empujador hacia
dentro del tubo de llenado.
C
8 Para quitar el accesorio de su soporte,
cojan el soporte del accesorio con sus
manos y con la parte trasera del inserto
hacia Udes. Presionen los hilos del
accesorio con sus pulgares para hacer que
el inserto se separe del soporte.
Accesorio amasador
El accesorio amasador puede usarse para amasar
pasta para pan y para pudings y para mezclar
pastas culinarias y mezclas para pasteles.
C
1 Fijen el accesorio amasador sobre el
soporte de la herramienta.
2 Pongan los ingredientes en el recipiente.
C
3 Cierren el recipiente con la tapa.
C
4 Cierren el tubo de llenado colocando el
empujador en él.
C
5 Seleccionen la posición de velocidad
adecuada para obtener resultados
óptimos. Consulten la tabla para las
posiciones de velocidad recomendadas.
Disco emulsionador
Pueden usar el disco emulsionador para preparar
mayonesa, montar nata o batir claras de huevo.
C
1 Pongan el disco emulsionador sobre el
soporte de la herramienta que queda
derecho dentro del recipiente.
1
CLICK
2
Page 46

ESPAÑOL46
2 Pongan los ingredientes en el recipiente y
pongan la tapa sobre el recipiente.
3 Seleccionen la posición de velocidad
adecuada para obtener resultados
óptimos. Consulten la tabla para las
posiciones de velocidad recomendadas.
Consejos
◗ Cuando deseen batir claras de huevo,
asegúrense de que las claras de huevo estén a
temperatura ambiente.
Saquen los huevos del frigorífico al menos hora y
media antes de usarlos.
◗ Todos los ingredientes para hacer mayonesa
deben estar a temperatura ambiente.
El aceite puede ser añadido a través del pequeño
agujero del fondo del empujador.
◗ Si desean montar nata, la nata debe haber
sido sacada directamente del frigorífico.
Consulten el tiempo de preparación en la
tabla. La nata no debe ser montada durante
demasiado tiempo.
Usen la función "TURBO" (PULSE) para tener
más control sobre el proceso.
Batidora
La batidora está pensada para :
- Batir líquidos, por ejemplo, productos de
lechería, salsas, jugos de fruta, sopas, mezclar
bebidas, batidos.
- Mezclar ingredientes blandos, por ejemplo,
pasta para tartas o mayonesa
- Hacer puré de ingredientes cocidos, por
ejemplo, para preparar comida de bebes.
C
4 Quiten la tapa
C
5 Monten la jarra batidora en el agujero de
fijación, girándola en la dirección de la
flecha hasta que esté firmemente fijada.
No ejerzan demasiada presión sobre la
empuñadura de la jarra batidora.
6 Pongan los ingredientes en la jarra
batidora.
C
7 Enrosquen la tapa en la jarra batidora.
8 Pongan en marcha el aparato y batan los
ingredientes. Las posiciones de la
velocidad les permiten ajustar la velocidad
del aparato para obtener resultados
óptimos. Consulten la tabla para las
posiciones de velocidad recomendadas.
Consejos
C
◗ Viertan los ingredientes líquidos en la jarra
batidora a través del agujero de la tapa.
◗ Cuanto más tiempo dejen funcionar el
aparato más fino será el resultado del batido.
1
CLICK
2
1
2
1
2
Page 47

ESPAÑOL 47
◗ Los ingredientes duros pueden requerir
ponerlos en remojo con agua antes de
procesarlos.
◗ Corten los ingredientes sólidos en pedazos
más pequeños antes de ponerlos en la
batidora. Si desean preparar una gran
cantidad, procesen pequeñas cantidades de
ingredientes en lugar de tratar de procesar
una gran cantidad de una vez.
◗ Si tienen dudas acerca de la correcta
velocidad, seleccionen siempre la velocidad
más alta (Posición 2).
Si los ingredientes se pegan a la pared de la jarra
batidora :
1 Paren el aparato y desenchúfenlo de la
red.
2 Quiten la tapa
No quiten nunca la tapa mientras el aparato
todavía esté funcionando.
3 Usen una espátula para quitar los
ingredientes de la pared de la jarra.
Mantengan la espátula a una distancia segura de
los hilos de la unidad de cuchillas (Unos 2 cm).
Filtro
Con este filtro podrán hacer deliciosos zumos de
frutas frescas, cócteles o leche de soja casi sin
emplear ningún tiempo. Todas las pepitas y las
pieles se quedarám en el filtro.
1 Monten la jarra batidora
C
2 Pongan el filtro en la jarra batidora ya
montada. Asegúrense de que las ranuras
del filtro ajusten exactamente sobre los
rebordes del interior de la jarra batidora.
C
3 Pongan los ingredientes en el filtro.
Viertan agua u otro líquido (Por ejemplo, cócteles
) en la jarra batidora.
C
4 Coloquen la tapa en la posición de cedazo
5 Pongan en marcha el aparato. Consulten la
tabla para la correcta posición de
velocidad.
Si tienen dudas sobre la velocidad correcta,
seleccionen la posición de más alta velocidad.
6 Paren el aparato y quiten la jarra batidora
de la unidad motora.
C
7 Viertan la bebida a través del vertedero de
la jarra batidora ¡ No quiten la tapa !
Para lograr unos resultados óptimos, vuelvan a
poner la jarra batidora en el aparato y dejen que
este funcione durante unos pocos segundos más.
Viertan el resto de la bebida.
Page 48

ESPAÑOL48
Consejos
◗ Especialmente cuando estén procesando
grandes cantidades, les aconsejamos que no
pongan, a la vez, todos los ingredientes en el
filtro. Empiecen procesando una pequeña
cantidad, dejen que el aparato funcione un
momento, párenlo y, después, añadan otra
pequeña cantidad. ¡ Coloquen siempre la tapa
! Repitan este procedimiento hasta que hayan
procesado todos los ingredientes.
◗ Para zumos de fruta y cócteles
Para obtener los mejores resultados, añadan unos
200 ml de agua (O bien otro líquido para
cócteles, etc.) a 100 g de fruta.
◗ Para hacer leche de soja
Antes de procesarlos, pongan en remojo los
granos de soja durante 4 horas. Pueden procesar
granos de soja remojados hasta el nivel máximo
de 2/3 del cedazo metálico del filtro. Añadan 500
ml de agua y batan hasta que quede suave.
Molinillo
Cómo preparar el molinillo para el uso
No usen nunca el molinillo durante más de 30
segundos sin interrupción.
C
1 Pongan los ingredientes en el vaso
invertido.
Solo procesen ingredientes secos. No llenen el
vaso por encima de la indicación "MAX".
C
2 Cojan la unidad de cuchillas por la
arandela de seguridad.
Coloquen la unidad de cuchillas en el vaso.
Tengan cuidado de que todas las ranuras se
ajusten a los nervios del interior del vaso.
C
3 Presionen y giren en sentido horario hasta
que la unidad de cuchillas quede
adecuadamente fijada.
C
4 Denle la vuelta al molinillo ya montado y
(Girándolo) pónganlo sobre la unidad
motora.
Después del procesado, quiten (Girándolo) el
molinillo de la unidad motora.
C
5 Estiren hacia afuera de la arandela de
seguridad y háganla girar en sentido
antihorario. Después quiten la unidad de
cuchillas.
El molinillo es adecuado para moler, por ejemplo,
los ingredientes que se menciona en la tabla ¡ No
superen las cantidades !
Page 49

ESPAÑOL 49
Limpieza
Antes de empezar a limpiar la unidad motora
desenchufen siempre el aparato de la red.
1 Limpien la unidad motora con un paño
húmedo. No sumerjan la unidad motora
en agua ni la enjuaguen bajo el grifo.
2 Limpien, siempre e inmediatamente
después del uso, las piezas que hayan
estado en contacto con los alimentos con
agua caliente con un líquido limpiador.
Cantidades
5 - 25 g
10 - 50 g
25 - 75 g
25 - 75 g
25 - 75 g
25 - 50 g
50 - 100 g
20 - 40 g
10 - 30 g
50 - 100 g
20 - 50 g
Ingredientes
Granos de pimienta
Semillas de sésamo
Arroz, trigo
Granos de soja
Guisantes secos
Coco
Queso duro (Por ejemplo, Parmesano)
Migas de pan
Terrones de azúcar
Frutos secos ( Sin cáscaras)
Granos de café
◗ El recipiente, la tapa del recipiente, el
empujador y los accesorios pueden lavarse en
un lavavajillas.
Esas piezas han sido probadas, desde el punto de
vista de su resistencia al lavavajillas, de acuerdo a
la norma DIN EN 12875.
¡ La cubierta con espacio para guardar el
accesorio y la jarra batidora no están a prueba de
lavavajillas !
Limpien la cuchilla, la unidad de cuchillas de la
batidora y los accesorios con mucho cuidado
Sus hilos cortantes están muy afilados !
Asegúrense de que los hilos cortantes de la
cuchilla, la unidad de cuchillas de la batidora y los
accesorios no entren en contacto con objetos
duros ya que ello podría causarles mellas.
Ciertos ingredientes pueden causar
decoloraciones de la superficie de los accesorios.
Ello no tiene efectos negativos sobre los
accesorios. Estas decoloraciones desaparecen,
normalmente, después de algún tiempo.
Cómo limpiar el filtro
◗ Inmediatamente después del uso, sostengan el
filtro sobre un cubo de basura y, agitando
suavemente, hagan salir su contenido y
enjuáguenlo bajo el grifo.
Page 50

ESPAÑOL50
Cómo limpiar el molinillo
◗ Desenchufen el aparato
◗ Desmonten el molinillo de la unidad motora
◗ Limpien el vaso y la unidad de las cuchillas
bajo el grifo con agua tibia y un poco de
líquido limpiador.
◗ ¡ Tengan cuidado con los filos cortantes de la
unidad de cuchillas !
◗ Después de lavar las piezas, enjuáguenlas con
agua limpia y séquenlas cuidadosamented.
Rápida operación de limpieza de la batidora
C
1 Pongan agua tibia (No más de 0'5 litros) y
un poco de líquido limpiador en la jarra
batidora.
2 Monten la tapa y el obturador
C
3 Presionando el botón "Turbo" (Pulse),
hagan que el aparato funcione unos pocos
momentos (El aparato se parará cuando
suelten el botón).
4 Desmonten la jarra batidora y enjuágenla
con agua limpia.
Almacenamiento
MicroAlmacenamiento
C
◗ Pongan los accesorios (Disco emulsionador,
cuchilla, accesorio amasador, soporte del
inserto) en el soporte de la herramienta y
guárdenlos en el recipiente. Acaben siempre
poniendo el soporte del inserto.
C
◗ Dos accesorios pueden guardarse en el
espacio para guardar de la cubierta que cubre
la tapa del recipiente, tal como se indica en el
interior de la cubierta. Los accesorios deben
deslizarse (No presionarse) en la cubierta.
C
◗ Coloquen la cubierta con el espacio para
guardar accesorios sobre la tapa transparente
del recipiente.
◗ Enrollen el cable de red alrededor del carrete
de la parte posterior del aparato.
Información y Servicio
Si necesitan información o si tienen algún
problema, visiten la página Web de Philips en
www.philips.com o contacten con el Servicio
Philips de Atención al Cliente de su país (Hallarán
su número de teléfono en el folleto de la
Garantía Mundial). Si en su país no hay Servicio
Philips de Atención al Cliente, contacten con su
distribuidor local Philips o con el Service
Department of Philips Domestic Appliances and
Personal Care BV.
Page 51

ESPAÑOL 51
Cantidades y tiempos de preparación
Aplicaciones
Tartas,
barquillos.
Platos
rebozados,
platos
gratinados.
Postres,
acabados
superficiales
Garnishing,
raw
vegetables,
turnip dishes
or cakes, dips
Ensaladas.
Procedimiento
Viertan primero la leche en la
batidora y, entonces, añadan
los ingredientes secos. Mezclen
los ingredientes durante,
aproximadamente, 1 minuto. Si
es necesario, repitan 2 veces
este procedimiento.
Usen pan seco y crujiente
Para un resultado ligero, usen
mantequilla blanda
Corten los vegetales a trozos
que pasen por el tubo. Llenen
el tubo con los trozos y
rállenlos mientras los presionan
ligeramente hacia abajo con el
empujador.
Llenen el tubo con trozos de
vegetales y presiónenlos
cuidadosamente hacia abajo
con el empujador.
Posici
ón de
veloci
dad /
Acces
orio
2 / P
2 / P
2 / P
2 / j
k
2 / P /
g
Canti
dad
máxi
ma
250
ml de
leche
100 g
300 g
350 g
350 g
Ingredientes y
resultados
Pasta culinaria
(Tartas) Agitado
Migas de pan Picado
Crema de
mantequilla
(Creme au
beurre) Agitado
Vegetales
(Zanahorias,
nabos, rábanos
blancos) Rebanado
Vegetales
(Zanahorias,
puerros, apio)
- Rebanado
Aplicaciones
Guarniciones,
sopas, salsas,
platos
gratinados.
Salsas, pizzas,
platos
gratinados,
fondues.
Guarniciones,
salsas,
pastelería,
pudings,
mousses.
Purés, sopas.
Comida de
niños y bebés.
Ensaladas,
guarniciones.
Procedimiento
Usen un pedazo de Parmesano
sin corteza y cortado a trozos
de unos 3 x 3 cm.
Corten el queso a trozos que
pasen por el tubo. Presionen
cuidadosamente con el
empujador.
Usen chocolate duro y plano.
Rómpanlo a trozos de 2 cm.
Usen guisantes o judias
cocidos. Si es necesario, añadan
un poco de líquido para
mejorar la consistencia de la
mezcla.
Para un puré grueso, añadan
solo un poco de líquido. Para
un puré fino, vayan añadiendo
líquido hasta que la mezcla esté
suave.
Pongan el pepino en el tubo y
presiónenlo cuidadosamente.
Posici
ón de
veloci
dad /
Acces
orio
2 / P
2 / j
k
2 / P
2 / P
D
2 / P
1 / g
Canti
dad
máxi
ma
200 g
200 g
200 g
250 g
300 g
1
pepin
o
Ingredientes y
resultados
Queso
(Parmesano) Picado
Queso
(Gouda) Rallado
Chocolate Picado
Guisantes o
judias cocidos
- Hacer puré
Carnes y
vegetales
cocidos Hacer puré
Pepinos Rebanado
Page 52

ESPAÑOL52
Aplicaciones
Pan
Pizza
Empanadas de
manzana,
bizcochos
dulces, flanes
con trozos de
fruta.
Procedimiento
Mezclen agua caliente con
levadura y azúcar. Añadan
harina y amasen la pasta
durante unos 90 segundos.
Dejen que suba durante 30
minutos.
Sigan el mismo procedimiento
que para la pasta para pan.
Amasen la pasta durante 1
minuto aproximadamente.
Pongan primero la harina y
después los demás
ingredientes.
Usen margarina fría y cortada a
trozos de 2 cm. Pongan todos
los ingredientes en el recipiente
y amásenlos hasta que la pasta
se haya tornado una bola.
Dejen que la pasta se enfríe
antes de las siguientes
operaciones.
Posici
ón de
veloci
dad /
Acces
orio
2 / {
2 / {
2 / P
Canti
dad
máxi
ma
350 g
de
harina
400 g
de
harina
200 g
de
harina
Ingredientes y
resultados
Pasta (Para
pan) Amasado
Pasta (Para
pizzas) Amasado
Pasta (Para
pastelería de
pasta
quebradiza) Amasado
Aplicaciones
Tartas de
frutas,
empanadas,
quiches.
Delicioso pan.
Pudings,
soufflés,
merengues.
Procedimiento
Usen margarina y agua frías.
Pongan la harina en el
recipiente y añadan la
margarina cortada a trozos de
2 cm. Mezclen a la velocidad
más alta hasta que la pasta se
torne desmenuzable. Añadan,
entonces, agua fría mientras
mezclan. Paren tan pronto
como la pasta empiece a
transformarse en un bola.
Dejen que la pasta se enfríe
antes de las siguientes
operaciones.
Mezclen primero la levadura, la
leche caliente y un poco de
azúcar en un recipiente
separado. Pongan todos los
ingredientes en el recipiente
del Robot de Cocina y amasen
la pasta hasta que esté suave y
no se pegue la pared del
recipiente (Tardará
aproximadamente 1 minuto).
Dejen que suba durante 30
minutos.
Usen claras de huevo a
temperatura ambiente. Nota :
Usen, al menos, 2 claras de
huevo.
Posici
ón de
veloci
dad /
Acces
orio
2 / P
2 / {
2 / S
Canti
dad
máxi
ma
200 g
de
harina
300 g
de
harina
4
claras
de
huevo
Ingredientes y
resultados
Pasta (Para
tartas,
empanadas) Amasado
Pasta (Con
levadura) Amasado
Claras de
huevo Emulsionado
Page 53

ESPAÑOL 53
Aplicaciones
Pudings,
comida de
bebés.
Guarniciones,
marinados.
Salsas, sopas,
guarniciones,
mantequilla de
hierbas.
Zumos de
frutas
Ensaladas,
guarniciones y
salsas para
barbacoa.
Procedimiento
Consejo : Añadan un poco de
zumo de limón para evitar que
la fruta se descoloree. Añadan
un poco de líquido para
obtener un suave puré.
Pelen el ajo. Presionen siempre
el botón "Turbo" (Pulse)
algunas veces para evitar que el
ajo se pique demasiado
finamente. Usen, al menos, 150
g.
Laven y sequen las hierbas
antes de picarlas.
Añadan agua u otro líquido
(Opcionalmente) para obtener
un zumo suave.
Todos los ingredientes debe
estar a temperatura ambiente.
Nota : Usen, al menos, un
huevo grande, dos huevos
pequeños o dos yemas de
huevo. Pongan el huevo y un
poco de vinagre en el
recipiente y añadan el aceite
gota a gota.
Posici
ón de
veloci
dad /
Acces
orio
P / P
P / P
Min.
75 g
2 / D
1-2 /
S
Canti
dad
máxi
ma
500 g
300 g
Mínim
o 75 g
500 g
(Canti
dad
total)
3
huevo
s
Ingredientes y
resultados
Fruta ( Por
ejemplo,
manzanas,
plátanos) Picado / Hacer
puré
Ajo - Picado
Hierbas (Por
ejemplo,
perejil) Picado
Zumos (Por
ejemplo, de
papaya, sandía,
pera) - Batido
Mayonesa Emulsionado
Aplicaciones
Bistecs
tártaros,
hamburguesas,
albóndigas.
Batidos de
leche
Diversos
pasteles.
Ensaladas, pan,
pasta de
almendras,
pudings.
Sofritos,
guarniciones.
Procedimiento
Primero quiten todos nervios o
huesos. Corten la carne a
trozos de 3 cm. Usen la
función "Turbo" (Pulse) para
obtener un picado grueso.
Hagan puré con la fruta (Por
ejemplo, plátanos, fresas) con
azúcar, leche y un poco de
helado y mezclen bien.
Los ingredientes deben estar a
temperatura ambiente.
Mezclen la suavizada
mantequilla y el azúcar hasta
que la mezcla quede suave y
cremosa y, entonces, añadan la
leche, los huevos y la harina.
Usen el botón "Turbo" (Pulse)
para un picado grueso o la
posición de velocidad 2 para
un picado fino.
Pelen las cebollas y córtenlas
en 4 trozos. Nota : Usen, al
menos, 100 g. Presionen
siempre el botón "Turbo"
(Pulse) varias veces para evitar
que las cebollas se piquen
demasiado finamente.
Posici
ón de
veloci
dad /
Acces
orio
2/ P /
P
2 / D
2 / P
2/ P /
P
P / P
Canti
dad
máxi
ma
300 g
250
ml de
leche
3
huevo
s
250 g
400 g
Ingredientes y
resultados
Carne (Magra)
- Picado
Batidos de
lecha - Batido
Mezcla (Pastel)
- Mezclado
Frutos secos Picado
Cebollas Picado
Page 54

ESPAÑOL54
Aplicaciones
Sofritos,
guarniciones.
Carne picada.
Sopas, salsas.
Guarniciones,
nata, mezclas
para helado.
Procedimiento
Pelen las cebollas y córtenlas a
trozos que pasen por el tubo.
Nota : Usen, al menos, 100 g.
Primero quiten cualquier nervio
o hueso. Corten la carne a
trozos de 3 cm. Usen el botón
"Turbo" (Pulse) para obtener
un picado más grueso.
Usen vegetales cocidos.
Usen nata directamente sacada
del frigorífico. Nota : Usen, al
menos, 125 ml de nata. La nata
montada estará lista después
de unos 20 segundos.
Posici
ón de
veloci
dad /
Acces
orio
1 / g
2/ P /
P
2 / D
P / S
Canti
dad
máxi
ma
300 g
200 g
500
ml
350
ml
Ingredientes y
resultados
Cebollas Rebanado
Carne de aves
de corral Picado
Sopas - Batido
Nata montada
- Agitado
Recetas
Sopa de brecol (Para 4 personas)
h o D
- 50 g de queso Bouda seco.
- 300 g de brecol cocido (Tallos y flores)
- El agua de hervir el brecol
- 2 patatas hervidas y a trozos
- 2 cubitos de caldo
- 2 cucharadas soperas de nata sin montar
- Curry
- Sal
- Pimienta
- Nuez moscada
B
Rallen el queso. Hagan puré con el brecol, las
patatas hervidas y un poco de agua de hervir el
brecol. Pongan el puré de brecol, el resto de
líquido y los cubitos de caldo en un recipiente
medidor y llénenlo hasta 750 ml. Llévenlo a una
cazuela y háganlo hervir mientras remueven.
Revuélvanlo con el queso y sazónenlo con curry,
sal, pimienta y nuez moscada y añadan la nata.
Polvo de cinco especias
Molinillo
- 2 g de canela
- 2 g de anís estrellado
- 2 g de clavo
- 2 g de rebanadas de regaliz
- 2 g de granos de anís
B
Antes de usarlas, corten las rebanadas de canela
y de regaliz a trozos más pequeños
Page 55

ESPAÑOL 55
B
Pongan todos los ingredientes en el molinillo y
muelan a velocidad alta durante 30 segundos.
NO MUELAN NUNCA DURANTE MÁS DE 30
SEGUNDOS.
Tarta de fruta
P
- 450 g de dátiles secos deshuesados , partidos
por la mitad
- 200 g de ciruelas pasas, partidas por la mitad
- 650 g de nueces pacanas
- 160 g de coco rallado
- 300 g de piña escarchada
- 1 lata (400 g) de leche condensada
- 1 cucharada pequeña de esencia de vainilla
B
Engrase 2 moldes para horno de 20 cm de largo
y precaliente el horno a 135c C.
B
Coloque los dátiles y las ciruelas partidas por la
mitad en el recipiente para procesar alimentos y
píquelos a la velocidad máxima durante 30
segundos. Después vacíe el recipiente.
B
Eche las nueces pacanas en el recipiente para
procesar alimentos y píquelas usando la función
de impulsos. Después vacíe el recipiente.
B
Eche la piña escarchada en el recipiente para
procesar alimentos y píquela, utilizando la función
de impulsos. Después vacíe el recipiente.
B
Mezcle los dátiles, las ciruelas,las nueces pacanas,
la piña y el coco rallado en un recipiente grande.
B
Añada leche y vainilla a los ingredientes y bátalo.
B
Eche la mezcla de frutas en los moldes y ponga
las tartas en el horno a 135c C durante 90
minutos.
B
No prepare esta receta más de una vez sin
interrupción.Si necesita preparar más
cantidad,deje que el aparato se enfríe antes de
seguir con el proceso.
Puré de patatas
P
- 750 g de patatas cocidas
- Unos 250 ml de leche caliente (90cC).
- 1 cucharada sopera de mantequilla
- Sal
B
Primero amasen las patatas y, después, añadan
la leche, la sal y la mantequilla. Usen la velocidad
1 y procesen solo durante unos 30 segundos para
evitar que el puré se torne pegajoso.
Mayonesa
S
- 2 yemas de huevo o 1 huevo grande.
- 1 cucharadita de café de mostaza
- 1 cucharadita de café de vinagre
- 200 ml de aceite
B
Los ingredientes deben estar a temperatura
ambiente. Pongan el disco emulsionador en el
recipiente. Pongan las yemas de huevo o el huevo,
la mostaza y el vinagre en el recipiente. Usen la
velocidad 1 ó 2. Viertan gradualmente el aceite a
través del tubo de llenado sobre el disco giratorio.
Para añadir el aceite, pueden usar el agujero del
empujador.
B
Consejo para la salsa tártara : Añadan perejil,
pepinillos y huevos duros.
Page 56

ESPAÑOL56
Mozzarella, pimientos, queso duro rallado y
aceite de oliva al gusto.
B
Coloquen el accesorio amasador en el recipiente.
Pongan todos los ingredientes en el recipiente y
seleccionen la velocidad 2. Amasen la pasta
durante, aproximadamente, 1 minuto hasta que
se forme una bola suave. Con una mano, sujeten
el aparato contra la superficie de trabajo para
evitar que se mueva sobre ella. Pongan la pasta
en un recipiente separado, tápenla con un paño
húmedo y dejen que suba durante unos 30
minutos.
B
Usen la cuchilla para picar la
cebolla y el ajo. Frían la cebolla y el ajo picados
hasta que se tornen transparentes.
B
Añadan el tomate tamizado y las hierbas e
hiervan la salsa a fuego lento durante unos 10
minutos.
B
Sazonen al gusto con sal, pimienta y azúcar.
Dejen que la salsa se enfríe.
B
Calienten el horno a 250cC.
B
Desenrollen la pasta sobre la enharinada
superficie de trabajo y hagan dos piezas
redondas. Pongan las dos redondas de pasta en
una engrasada bandeja para hornear. Diseminen
sobre la pizza los ingredientes para la parte
superior, dejando libres los bordes. Unten con los
ingredientes deseados, esparzan un poco de
queso rallado sobre la pizza y viertan un poco de
aceite de oliva sobre ella.
B
Horneen las pizzas durante un período de 12 a
15 minutos.
B
Consejo para la salsa de cóctel : Añadan 50 ml
de nata fresca, un poquito de whisky, 3
cucharaditas de café de pasta de tomate y un
poquito de almibar de jengibre.
Batido de leche
D
- 175 ml de leche
- 10 g de azúcar
- Medio plátano o unos 65 g de otra fruta fresca
- 50 g de helado de vainilla
B
Mezclen todos los ingredientes hasta que la
mezcla quede espumosa
Pizza
{
- 400 g de harina
- 40 ml de aceite
- Media cucharadita de café de sal
- 20 g de levadura fresca o 1'5 paquetes de
levadura seca
- Unos 240 cc de agua (35cC).
Para los ingredientes de la parte superior
- 300 ml de tomado tamizado (De lata)
- 1 cucharadita de café de hierbas italianas (Secas
o frescas)
- 1 cebolla
- 2 dientes de ajo
- Sal y pimienta
- Azúcar
- Ingredientes a esparcir sobre la salsa : Olivas,
salami, alcachofas, setas, anchoas, queso
Page 57

ESPAÑOL 57
hornear y pongan las rebanadas de calabaza y de
patata, alternándolas y disponiéndolas de forma
tal que se solapen parcialmente como las tejas de
un tejado.
B
Con la cuchilla a la velocidad 2, batan el huevo
con la nata y la leche. Añadan sal y pimienta al
gusto y viertan la mezcla sobre las rebanadas de
calabaza y de patata del plato.
B
Sustituyan el inserto rebanador por el inserto
rallador, rallen el queso a la velocidad 2 y
espolvoréenlo sobre el plato.
B
Pongan el plato en el centro de un horno caliente
(200cC) y hornéenlo durante unos 15 minutos.
Mousse de salmón
PS
- 1 lata de salmón
- 2 hojas de gelatina
- Unos pocos tallos de cebollino
- Una pizca de sal
- Una pizca de pimienta de Cayena
- Media cucharada sopera de zumo de limón
- 125 ml de nata montada
- 1 cebolla pequeña
- Berro para la guarnición
B
Remojen la gelatina en abundante agua
B
Piquen los cebollinos y la cebolla en el Robot de
Cocina usando la función "Turbo" (Pulse).
B
Quiten las espinas y la piel del salmón.
B
Añadan la sal, la pimienta de Cayena, el zumo de
limón, el salmón y el líquido de la lata a los
cebollinos y cebolla picados y hagan puré con los
ingredientes a la velocidad 2.
Gratinado de patatas y calabaza
Pgk
- 375 g de patatas
- Una pizca de sal
- 1 calabaza (De unos 250 g)
- 1 diente de ajo triturado
- Unos 40 g de mantequilla + más la necesaria
para engrasar el plato para el horno
- 2 cucharaditas de café de hierbas italianas o
provenzales
- 1 huevo grande
- 75 ml de nata montada
- 75 ml de leche
- Pimienta
- 70 g de queso semiseco
B
Pelen y laven las patatas.
B
Coloquen el inserto rebanador en el soporte de
insertos y coloquen el soporte de insertos en el
recipiente. Rebanen las patatas y la calabaza a la
velocidad 1.
B
Cuezcan las rebanadas de patata en agua
hirviendo con una pizca de sal hasta que casi
estén hechas.
B
Pongan las rebanadas en un colador y dejen que
se escurran adecuadamente.
B
Pongan 20 g de mantequilla en una sartén, frían
la mitad de las rebanadas de calabaza durante 3
minutos mientras las giran frecuentemente.
Espolvoréen las rebanadas con una cucharadita
de café de hierbas italianas o provenzales.
B
Escurran las fritas rebanadas de calabaza sobre
un papel de cocina.
B
Engrasen la parte inferior de un plato para
Page 58

ESPAÑOL58
Ensalada de col española
P
- 1 pequeña col roja
- 2 cebollas rojas
- 1 hinojo
- 1 manzana
- El zumo de una naranja y 2 cucharadas soperas
de vinagre de vino tinto.
- 1 cucharada sopera de mostaza
B
Mezclen el zumo, la mostaza y el vinagre.
Rebanen la col, las cebollas, el hinojo y la
manzana a la velocidad 1.
B
Combinen los ingredientes en una ensaladera.
Bizcochuelo
P
- 4 huevos
- 30 ml de agua (35cC).
- Una pizca de sal
- 150 g de azúcar
- 1 bolsita de azúcar de vainilla
- 150 g de harina tamizada
- 3 g de levadura en polvo
B
Batan los huevos y el agua durante unos 2 minutos.
Añadan el azúcar, la vainilla y la sal poco a poco
y mezclen durante 1 minuto aproximadamente.
La mezcla deberá caerse de la cuchara como una
tira espesa. Utilizando una espátula, inclúyanla en
la harina y la levadura en polvo. Hornéenlo en un
horno a unos (35cC) durante un período entre
30 y 35 minutos.
B
Pongan el puré en el recipiente.
B
Hiervan una pequeña cantidad de agua y
disuelvan la gelatina en ella.
B
Mezclen la solución de gelatina con el puré de
salmón
B
Coloquen el disco emulsionador en el recipiente y
monten la nata presionando el botón "Turbo"
(Pulse) durante unos 15 segundos.
B
Utilizando una cuchara de madera, incluyan la
nata montada en el puré de salmón.
B
Echen la mousse en un plato, tápenla y enfríenla
en el frigorífico durante unas pocas horas
B
Guarnezcan la mousse con un poco de berro.
Pasta para bocadillos
P
- 2 zanahorias pequeñas y a trozos
- 2 - 2 pepinillos a trozos
- 75 g de coliflor a trozos
- 75 g de arracacha a trozos
- Hierbas verdes (Perejil, eneldo, estragón, tallos
de apio a trozos)
- 100 g de mayonesa
- 100 g de requesón
- Sal
- Pimienta
B
Piquen finamente las zanahorias, los pepinillos, la
coliflor, las hirbas verdes, los tallos de apio y las
arracachas. Mezclenlo cuidadosamente con la
mayonesa y el requesón y sazonen al gusto con
pimienta y sal.
Page 59

ESPAÑOL 59
B
Consejo : Pueden rellenar el bizcochuelo con
diferentes tipos de crema o, simplemente, con
nata montada con fruta fresca.
Tzatziki (Ensalada de pepino)
k
- 1 pepino
- 200 ml de yogurt
- 1 cucharada sopera de aceite de oliva
- 2 dientes de ajo
- Una pizca de sal
- 1 cucharadita de café de eneldo finamente
picado
- Unas pocas hojas de menta
B
Pelen el pepino y rállenlo a la velocidad 1. Pongan
el pepino rallado en un colador y dejen que se
escurra adecuadamente.
B
Excepto las hojas de menta, mezclen los demás
ingredientes con el pepino. Enfríen la ensalada
poniéndola en un recipiente tapado en el
frigorífico durante una hora. Antes de servirla,
espolvoreen las hojas de menta en la parte
superior.
Page 60

PORTUGÛES60
Robot de cozinha: peças e acessórios
A) Controlo da velocidade
B) Unidade do motor
C) Fecho de segurança integrado
D) Taça
E) Tampa de enroscar (para fechar o orifício de
fixação da liquidificadora quando esta não
está em uso)
F) Suporte
G) Copo misturador
H) Pega da tampa (activa e desactiva o
interruptor de segurança)
I) Filtro
J) Tampa da taça
K) Tubo dos alimentos
L) Pressor
M) Tampa da liquidificadora
N) Tampa com compartimento de arrumação
O) Moinho
P) Lâmina do moinho
Q) Disco de cortar médio
R) Disco de cortar fino
S) Disco de ralar médio
T) Suporte dos discos
U) Lâmina (com tampa protectora)
V) Acessório para amassar
W)Disco emulsionante
X) Espátula
Introdução
Este aparelho está equipado com um sistema de
corte automático. No caso de sobreaquecimento,
este sistema corta automaticamente a corrente e
o aparelho desliga-se.
Se o aparelho deixar repentinamente
de trabalhar:
1 Retire a ficha da tomada eléctrica.
2 Prima o botão 'PULSE/0' para desligar a
máquina.
3 Deixe o aparelho arrefecer durante 60
minutos.
4 Introduza a ficha na tomada eléctrica.
5 Volte a ligar a máquina.
Se o sistema térmico de corte automático for
activado muitas vezes, deverá contactar o seu
agente Philips ou um concessionário Philips
autorizado.
ATENÇÃO: Para evitar situações gravosas, este
aparelho nunca deve ser ligado a um
temporizador.
Importante
◗ Leia as instruções com atenção e observe as
ilustrações antes de começar a usar o
aparelho.
◗ Guarde este modo de emprego para uma
eventual consulta futura.
Page 61

PORTUGÛES 61
◗ Verifique se a voltagem indicada no aparelho
corresponde à tensão eléctrica local (110127V ou 220-240V) antes de ligar o aparelho
à corrente.
◗ Nunca use qualquer acessório ou peça
doutros fabricantes ou que não tenham sido
especificamente aconselhados pela Philips. A
sua garantia será considerada nula se forem
usados acessórios ou peças doutras origens.
◗ Não se sirva da máquina se o fio, a ficha ou
outro componente se apresentar danificado.
◗ Se o fio estiver danificado, deverá sempre ser
substituído pela Philips ou por um centro de
assistência autorizado pela Philips, para evitar
situações gravosas para o utilizador.
◗ Antes de se servir do aparelho pela primeira
vez, lave muito bem todas as peças que vão
estar em contacto com os alimentos.
◗ Não exceda as quantidades e os tempos de
preparação indicados nas tabelas e nas
receitas.
◗ Não exceda a quantidade máxima indicada na
taça ou no copo misturador, isto é, não encha
acima da graduação superior.
◗ Desligue a máquina imediatamente após a sua
utilização.
◗ Nunca se sirva dos dedos ou de um objecto
(por ex. uma espátula) para empurrar os
ingredientes dentro do tubo dos alimentos
com a máquina em funcionamento. Apenas o
pressor deve ser utilizado para essa finalidade.
◗ Nunca coloque os dedos ou qualquer objecto
(por ex. uma espátula) dentro do copo
misturador sem desligar primeiro a máquina.
◗ Mantenha fora do alcance das crianças.
◗ Nunca deixe a máquina a trabalhar sem
vigilância.
◗ Nunca desligue a máquina através da rotação
da tampa. Deve ser desligada premindo o
botão PULSE/0.
◗ Antes de retirar os acessórios, deve desligar a
máquina.
◗ Nunca mergulhe a unidade do motor dentro
de água ou de qualquer outro líquido, nem
enxague à torneira. Use apenas um pano
húmido para limpar a unidade do motor.
◗ Quando a liquidificadora, a taça e a tampa de
enroscar estão bem colocadas, ouve-se um
'clique'.
◗ O disco para emulsionar, a lâmina e o
amassador devem ser colocados no suporte
respectivo no interior da taça.
◗ Retire a protecção da lâmina sempre que se
servir dela.
◗ Evite tocar no rebordo AFIADO das lâminas,
principalmente se a máquina estiver ligada à
corrente.
◗ Se as lâminas ficarem presas, desligue da
corrente antes de retirar os ingredientes que
as estiverem a obstruir.
◗ Deixe os ingredientes quentes arrefecerem
antes de os processar (temperatura máx.
80cC/175cF).
◗ Se estiver a processar um líquido que tenha
tendência a formar espuma, não deite mais do
que 1 litro no copo misturador para evitar
salpicos e derrames.
Page 62

PORTUGÛES62
Tenha em atenção que, se a liquidificadora e a
taça estiverem correctamente colocadas, somente
a liquidificadora funcionará.
Utilização
Taça
◗ Se quiser usar a taça, retire o copo
misturador e feche o orifício de fixação com a
tampa de enroscar. Todas as funções que
requeiram a utilização da taça só funcionarão
se a liquidificadora tiver sido retirada.
C
1 Coloque a taça no robot de cozinha,
rodando a pega na direcção da seta até
ouvir um clique.
C
2 Coloque a tampa na taça. Rode a tampa na
direcção da seta até ouvir um clique (é
preciso fazer alguma força).
Fecho de segurança integrado
B
Quer a unidade do motor quer a tampa
apresentam algumas marcas. O aparelho só
funciona se a seta da unidade do motor estiver
colocada directamente na posição oposta à
marca da tampa.
C
1 Verifique se a marca da tampa e a seta da
taça estão colocadas frente a frente. A
projecção da tampa fica a cobrir a
abertura da pega.
Tubo dos alimentos e pressor
C
1 Use o tubo dos alimentos para juntar
líquidos e/ou ingredientes sólidos. Sirva-se
do pressor para empurrar os ingredientes
sólidos para dentro do tubo.
C
2 O pressor também pode servir de tampa
para fechar o tubo e evitar que os
ingredientes saiam para fora.
Lâmina
◗ A lâmina pode ser usada para cortar,
misturar, bater, reduzir a puré e preparar
massas finas para bolos.
C
1 Coloque a taça sobre a unidade do motor.
C
2 Retire a protecção da lâmina.
O rebordo das lâminas é muito afiado. Evite
tocar-lhes!
C
3 Coloque a lâmina no suporte dos
acessórios.
CLICK
CLICK
1
2
1
2
1
CLICK
2
CLICK
Page 63

PORTUGÛES 63
C
4 Coloque o suporte dos acessórios dentro
da taça.
5 Coloque os ingredientes dentro da taça.
Corte previamente os alimentos em
pedaços com cerca de 3 x 3 cm. Coloque
a tampa na taça.
C
6 Os botões permitem ajustar a velocidade
para obter sempre os melhores
resultados.
B
posição 'PULSE/0': para batimentos e para
desligar a máquina. Se premir o botão PULSE/0, a
máquina trabalha na velocidade máxima. Ao
soltar o botão, a máquina pára.
B
posição1: velocidade normal.
B
posição 2: velocidade máxima.
Consulte a tabela para verificar quais as
velocidades recomendadas. O processamento
demora entre 1 a 60 segundos.
Sugestões
◗ A máquina trabalha com muita rapidez. Use a
função 'pulse' em períodos curtos de cada vez
para evitar que os alimentos fiquem
demasiado finos.
◗ Não deixe a máquina trabalhar durante muito
tempo quando estiver a ralar queijo (duro). O
queijo pode aquecer demasiado e começar a
derreter, ganhando grumos.
◗ Não processe ingredientes muito duros,
como grãos de café, frutos secos e cubos de
gelo. A lâmina pode ficar romba.
Se os alimentos se agarrarem à lâmina ou às
paredes da taça:
1 Desligue a máquina.
2 Retire a tampa da taça.
3 Retire os alimentos com uma espátula.
Discos
O rebordo dos discos é muito afiado. Evite tocar
lhes!
Não se sirva dos discos para processar
ingredientes duros, como cubos de gelo!
C
1 Coloque o disco seleccionado no suporte
respectivo.
C
2 Coloque o disco no suporte respectivo
dentro da taça.
3 Coloque a tampa na taça.
C
4 Coloque os ingredientes dentro do tubo
dos alimentos. Corte previamente para
caberem dentro do tubo.
5 Encha o tubo até acima para obter
melhores resultados.
Quando tiver que processar grandes quantidades
de alimentos, faça-o por fases, em pequenas
1
CLICK
2
Page 64

PORTUGÛES64
quantidades de cada vez, esvaziando a taça entre
cada processamento.
6 Seleccione a velocidade correcta para
obter sempre bons resultados. Consulte a
tabela para verificar quais as velocidades
recomendadas.
O processamento demora entre 10 a 60
segundos
C
7 Empurre os ingredientes lentamente e
com firmeza dentro do tubo com o auxílio
do pressor.
C
8 Para retirar o disco do respectivo suporte,
segure no disco com a parte de trás virada
na sua direcção. Empurre os rebordos do
disco com os polegares para o encaixar no
suporte.
Amassador
O amassador pode ser usado para bater massa
de pão e bolinhos e para bater polmes e
preparados para bolos.
C
1 Encaixe o amassador no suporte dos
acessórios.
2 Coloque os ingredientes na taça.
C
3 Feche a taça com a tampa.
C
4 Feche o tubo dos alimentos colocando-lhe
o pressor.
C
5 Seleccione a velocidade correcta para
obter sempre bons resultados. Consulte a
tabela para verificar quais as velocidades
recomendadas.
Disco para emulsionar
Pode usar o disco de emulsionar para preparar
maionese, bater natas e claras.
C
1 Coloque o disco de emulsionar no
suporte no interior da taça.
2 Coloque os ingredientes na taça e ponha a
tampa na taça.
3 Seleccione a velocidade correcta para
obter sempre bons resultados. Consulte a
tabela para verificar quais as velocidades
recomendadas.
Sugestões
◗ Quando quiser bater claras, os ovos devem
estar à temperatura ambiente.
Retire os ovos do frigorífico pelo menos meia
hora antes de os usar.
CLICK
1
2
Page 65

PORTUGÛES 65
◗ Todos os ingredientes para preparar a
maionese devem estar à temperatura
ambiente.
O óleo pode ser adicionado através do pequeno
orifício no fundo do pressor.
◗ Quando preparar natas, as natas devem ser
retiradas do frigorífico apenas no momento
em que as for usar. Consulte a tabela para
saber qual o tempo de preparação. As natas
não devem ser batidas durante muito tempo.
Use a função 'pulse' para controlar melhor o
batimento das natas.
Liquidificadora
A liquidificadora pode ser usada para:
- Bater líquidos, como lacticínios, molhos, sumos
de fruta, sopas, bebidas, batidos.
- Misturar ingredientes macios, como massa para
panquecas ou maionese.
- Reduzir ingredientes cozidos a puré, para
preparar comida para bébés, por exemplo.
C
1 Retire a tampa de enroscar.
C
2 Coloque a liquidificadora no orifício de
fixação, rodando na direcção da seta até
ficar firme.
Não faça demasiada pressão sobre a pega do
copo misturador.
3 Coloque os ingredientes dentro do copo
misturador.
C
4 Enrosque a tampa no copo misturador.
5 Ligue a máquina e bata os ingredientes. Os
botões permitem seleccionar a velocidade
ideal para obter bons resultados. Consulte
a tabela para saber quais as velocidades
recomendadas.
Sugestões
C
◗ Deite os ingredientes líquidos no copo
misturador através do orifício da tampa.
◗ Quanto mais tempo a máquina trabalhar, mais
finos ficarão os alimentos.
◗ Os ingredientes duros podem necessitar de
ser demolhados antes de os processar.
◗ Corte previamente os ingredientes sólidos
em pedaços pequenos antes de os processar
na liquidificadora. Se quiser preparar uma
quantidade grande, processe pequenas
quantidades de cada vez e não tente fazer
tudo de seguida.
◗ Se tiver dúvidas sobre a velocidade adequada,
seleccione sempre a velocidade máxima
(posição 2).
Se os ingredientes se pegarem às paredes do
copo misturador:
1 Páre a máquina e desligue-a da corrente.
1
CLICK
1
2
2
1
2
Page 66

PORTUGÛES66
2 Retire a tampa.
Nunca retire a tampa com a máquina em
funcionamento.
3 Use uma espátula para soltar os
ingredientes das paredes do copo.
Mantenha a espátula a uma distância segura do
rebordo da lâmina (aprox. 2 cm).
Filtro
Com este filtro poderá preparar deliciosos sumos
de fruta fresca, cocktails ou leite de soja num
piscar de olhos. Todas as sementes e peles ficarão
retidas no filtro.
1 Monte a liquidificadora.
C
2 Coloque o filtro na liquidificadora. As
saliências do filtro devem encaixar
exactamente nas ranhuras do copo
misturador.
C
3 Deite os ingredientes no filtro.
Junte água ou outro líquido (por ex. para os
cocktails).
C
4 Coloque a tampa na posição de filtro.
5 Ligue a máquina. Consulte a tabela para
saber a velocidade correcta.
Se tiver dúvidas sobre a velocidade certa,
seleccione sempre a velocidade máxima.
6 Desligue a máquina e retire o copo
misturador da unidade do motor.
C
7 Deite a bebida através do bico do copo
misturador. Não tire a tampa!
Para obter óptimos resultados, coloque
novamente o copo com os ingredientes restantes
na máquina e deixe trabalhar durante mais alguns
segundos.
Sirva o resto da bebida.
Sugestões
◗ Sobretudo quando estiver a processar
grandes quantidades, é aconselhável não
colocar todos os ingredientes no filtro duma
só vez. Comece por processar uma
quantidade pequena, ligue a máquina durante
uns momentos, desligue-a e junte mais um
pouco. Nunca se esqueça de pôr a tampa!
Repita este procedimento até processar
todos os ingredientes.
◗ Para fazer sumos de fruta e cocktails:
Obterá melhores resultados se juntar cerca de 2
dl de água (ou outro líquido para cocktails, por
ex.) por cada 100 gr de fruta.
◗ Para preparar leite de soja:
Page 67

PORTUGÛES 67
Ponha os grãos de soja de molho durante 4 horas
antes de os processar. Pode colocar os grãos de
soja demolhados até 2/3 do nível máximo da
rede metálica do filtro. JUnte 5 dl de água e bata
até ficar macio.
Moinho
Preparação do moinho.
Nunca use o moinho durante mais de 30
segundos seguidos.
C
1 Coloque os ingredientes no copo
invertido.
Trabalhe apenas ingredientes secos. Não encha o
copo para além da indicação "MAX".
C
2 Segure a lâmina pelo anel de segurança.
Coloque a lâmina no copo. Verifique se todas as
saliências encaixam perfeitamente nas ranhuras
do copo.
C
3 Faça pressão e rode para a direita até fixar
a lâmina.
C
4 Vire o moinho já montado de cabeça para
baixo e enrosque-o na unidade do motor.
Depois de terminar, desaperte o moinho e retireo do motor.
C
5 Puxe o anel de segurança e rode-o para a
esquerda. Em seguida, retire a unidade do
motor.
O moinho é próprio para moer os ingredientes
mencionados na tabela. Não deve exceder as
quantidades indicadas!
Quantidades
5-25 gr
10-50 gr
25-75 gr
25-75 gr
25-75 gr
25-50 gr
50-100 gr
20-40 gr
10-30 gr
50-100 gr
20-50 gr
Ingredientes
pimenta em grão
sementes de sésamo
arroz, trigo
grãos de soja
ervilhas secas
côco
queijo curado (Parmesão)
pão duro
cubos de açúcar
frrutos secos (com casca)
café em grão
Page 68

PORTUGÛES68
Limpeza
Antes de proceder à limpeza da unidade do
motor desligue sempre a máquina da corrente.
1 Limpe a unidade do motor com um pano
húmido. Não mergulhe a unidade do
motor dentro de água nem enxague à
torneira.
2 Lave sempre as peças que entram em
contacto com os alimentos com água
quente e detergente logo após a sua
utilização.
◗ A taça, a tampa da taça, o pressor e os
acessórios também podem ser lavados na
máquina da loiça.
A resistência destas peças à máquina da loiça foi
testada segundo a norma DIN EN 12875.
A cobertura com o compartimento para
arrumação dos discos e o copo misturador não
são laváveis na máquina!
Lave a lâmina, a unidade de corte da
liquidificadora e os discos com muito cuidado. Os
rebordos são muito afiados!
Certifique-se que os rebordos afiados da lâmina,
da unidade de corte da liquidificadora e dos
discos não entram em contacto com objectos
rijos para não ficarem rombos.
Certos ingredientes podem causar a descoloração
da superfície dos acessórios. Isso não tem
qualquer efeito negativo, até porque a
descoloração normalmente desaparece passado
algum tempo.
LImpeza do filtro
◗ Assim que terminar, segure o filtro sobre o
caixote do lixo e sacuda cuidadosamente o
seu conteúdo. Passe por água à torneira.
Limpeza do moinho
◗ Desligue a máquina.
◗ Retire o moinho da unidade do motor.
◗ Lave o copo e a lâmina à torneira com água
morna e um pouco de detergente.
◗ Tenha cuidado com os rebordos afiados da
lâmina!
◗ Depois de lavar as peças, passe-as por água
limpa e seque-as bem.
Limpeza rápida da liquidificadora
C
1 Deite água tépida (não mais de 0.5 litros) e
um pouco de detergente líquido dentro do
copo misturador.
2 Coloque a tampa e o pressor.
Page 69

PORTUGÛES 69
C
3 Deixe a máquina trabalhar durante alguns
momentos, premindo o botão 'Pulse'. (A
máquina pára logo que se solta o botão).
4 Retire o copo misturador e enxague com
água limpa.
Arrumação
Arrumação compacta
C
◗ Coloque os acessórios (disco de emulsionar,
lâmina, amassador, suporte para os discos) no
suporte e arrume dentro da taça. Termine
sempre pelo suporte para os discos.
C
◗ O espaço de arrumação da cobertura que
tapa a tampa da taça tem lugar para dois
discos, conforme indicado no interior da
cobertura. Os discos são encaixados, não
empurrados.
C
◗ Coloque a cobertura com o espaço para
arrumação dos discos na tampa transparente
da taça.
◗ Enrole o cabo de alimentação no encaixe
existente na parte de trás do aparelho.
Informações e assistência
Se necessitar de informações ou se tiver algum
problema, por favor visite a página Philips na
Internet em www.philips.com ou contacte o
Centro de Informação ao Consumidor Philips do
seu país (os números de telefone encontram-se
no folheto da garantia mundial). Se não existir um
Centro de Informação ao Consumidor Philips no
seu país, dirija-se a um agente Philips ou contacte
o Departamento de Service da Philips Domestic
Appliances and Personal Care BV.
Page 70

PORTUGÛES70
Quantidades e tempos de preparação
Aplicações
Panquecas,
waffles
Pratos
panados e
pratos
gratinados
Sobremesas,
coberturas
Guarnições,
legumes crus
Saladas
Guarnições,
sopas, molhos,
pratos
gratinados
Procedimento
Comece por deitar o leite na
liquidificadora e junte depois os
ingredientes sólidos. Misture
tudo durante cerca de 1
minuto. Se for necessário,
repita por mais 2 vezes.
Use pão duro, estaladiço.
Use manteiga amolecida para
obter melhores resultados.
Corte os legumes em pedaços
que caibam dentro do tubo.
Encha o tubo e empurre
ligeiramente os ingredientes
com o pressor.
Encha o tubo com os legumes
cortados e empurre
cuidadosamente com o
pressor.
Use um pedaço de Parmesão
sem casca e corte-o em
pedaços com cerca de 3 x 3
cm.
Veloci
dade /
Acess
ório
2 / P
2 / P
2 / P
2 / j
k
2 / P /
g
2 / P
Quant
idade
máx.
2.5 dl
de
leite
100 gr
300 gr
350 gr
350 gr
200 gr
Ingredientes e
resultados
Massa
(panquecas) bater
Restos de pão
duro - ralar
Massa de
manteiga
(creme de
manteiga) bater
Legumes
(cenouras,
nabos,
rabanetes) cortar
Legumes
(cenouras,
alho pôrro,
aipo) - cortar
Queijo
(Parmesão) ralar
Aplicações
Molhos, pizzas,
pratos
gratinados,
fondue
Guarnições,
molhos,
pastelaria,
pudins,
mousses
Purés, sopas
Comida para
bébés e
crianças
Saladas,
guarnições
Pão
Procedimento
Corte o queijo em pedaços
que caibam no tubo dos
alimentos. Comprima
ligeiramente com o pressor.
Use chocolate simples e duro.
Parta-o em pedaços de 2 cm
Use ervilhas ou feijão cozidos.
Se necessário, junte um pouco
de líquido para melhorar a
consistência da mistura.
Para um puré mais grosseiro,
junte apenas um pouco de
líquido. Para um puré mais fino,
continue a juntar líquido até
obter a consistência desejada.
Coloque o pepino dentro do
tubo e empurre com cuidado.
Misture água quente com
fermento e açúcar. Junte
farinha, óleo e sal e bata a
massa durante cerca de 90
segundos. Deixe levedar
durante 30 minutos.
Veloci
dade /
Acess
ório
2 / j
k
2 / P
2 / P
D
2 / P
1 / g
2 / {
Quant
idade
máx.
200 gr
200 gr
250 gr
300 gr
1
pepin
o
350 gr
de
farinha
Ingredientes e
resultados
Queijo
(Gouda) ralar
Chocolate ralar
Ervilhas, feijão
cozidos reduzir a puré
Legumes e
carne cozidos
- reduzir a
puré
Pepinos cortar
Massa (para
pão) - bater
Page 71

PORTUGÛES 71
Aplicações
Pizza
Tarte de maçã,
biscoitos, flãs
de frutas
Tartes de
fruta, tartes,
quiches
Pão fino
Procedimento
Siga o mesmo procedimento
descrito para a massa de pão.
Bata durante cerca de 1
minuto. Comece por deitar a
farinha e depois os outros
ingredientes.
Use margarina fria e corte-a
em pedaços de 2 cm. Coloque
todos os ingredientes na taça e
amasse até que a massa forme
uma bola. Deixe a massa
arrefecer antes de continuar.
Use margarina fria e água fria.
Coloque farinha na taça e junte
a margarina cortada em
pedaços com 2 cm. Bata tudo
na velocidade máxima até que
a massa fique grumosa, junte
água fria e continue a bater.
Páre logo que a massa forme
uma bola. Deixe a massa
arrefecer antes de continuar.
Comece por misturar o
fermento, leite quente e um
pouco de açúcar numa tigela
separada. Coloque todos os
ingredientes na taça do robot e
bata a massa até ficar macia e
se desprender das paredes da
taça (demora cerca de 1
minuto). Deixe a levedar
durante 30 minutos.
Veloci
dade /
Acess
ório
2 / {
2 / P
2 / P
2 / {
Quant
idade
máx.
400 gr
de
farinha
200 gr
de
farinha
200 gr
de
farinha
300 gr
de
farinha
Ingredientes e
resultados
Massa (para
pizzas) - bater
Massa (tipo
massa de
bolacha) amassar
Massa (para
tartes, tortas) amassar
Massa (lêveda)
- amassar
Aplicações
Pudins, suflés,
merengues
Pudins, comida
para bébé
Guarnições,
recheios
Molhos, sopas,
guarnições,
manteiga de
ervas
Sumos de
fruta
Saladas,
guarnições e
molhos para
grelhados
Procedimento
Use as claras à temperatura
ambiente. Nota: use pelo
menos 2 claras.
Sugestão: junte um pouco de
sumo de limão para evitar que
a fruta oxide. Junte algum
líquido para obter um puré
macio.
Descasque o alho. Prima
sempre o botão 'pulse' várias
vezes para evitar que o alho
fique demasiado fino. Use pelo
menos 150 gr.
Lave e seque as ervas antes de
as processar
Junte água ou outro líquido
(opcional) para obter um sumo
macio.
Todos os ingredientes devem
estar à temperatura ambiente.
Nota: use pelo menos um ovo
grande, dois ovos pequenos ou
duas gemas de ovo. Deite o
ovo e um pouco de vinagre
dentro da taça e vá juntando o
óleo aos poucos.
Veloci
dade /
Acess
ório
2 / S
P / P
P / P
2/P / P
2 / D
1-2 /
S
Quant
idade
máx.
4
claras
de
ovo
500 gr
300 gr
Mín.
75 gr
500 gr
(quant
idade
total)
3 ovos
Ingredientes e
resultados
Claras de ovo
- emulsionar
Fruta (por ex.
maçãs,
bananas) cortar/reduzir
a puré
Alho - picar
Ervas
aromáticas
(por ex. salsa)
- picar
Sumos (por
ex. papaia,
melancia,
pêra) - bater
Maionese emulsionar
Page 72

PORTUGÛES72
Aplicações
Bifes tártaro,
hamburgers,
almôndegas
Batidos
Vários bolos
Saladas, pão,
pasta de
amêndoa,
pudins
Refogados,
guarnições
Refogados,
guarnições
Procedimento
Comece por limpar os nervos
e ossos. Corte a carne em
cubos com 3 cm. Use a função
'pulse' para um picado mais
grosseiro.
Reduza a fruta a puré (por ex.
bananas, morangos) com
açúcar, leite e um pouco de
gelado e misture bem.
Os ingredientes devem estar à
temperatura ambiente. Bata a
manteiga amolecida com o
açúcar até obter uma mistura
macia e cremosa. Junte o leite,
os ovos e a farinha.
Use o botão 'pulse' para picar
grosseiramente ou a velocidade
2 para picar finamente.
Descasque as cebolas e corteas em 4 pedaços. Nota: use
pelo menos 100 gr. Prima
sempre o botão 'pulse' várias
vezes para evitar que as
cebolas fiquem demasiado
finas.
Descasque as cebolas e corteas em pedaços que caibam no
tubo. Nota: use pelo menos
100 gr.
Veloci
dade /
Acess
ório
2/ P /
P
2 / D
2 / P
2/ P /
P
P / P
1 / g
Quant
idade
máx.
300 gr
2.5 dl
de
leite
3 ovos
250 gr
400 gr
300 gr
Ingredientes e
resultados
Carne (limpa)
- picar
Batidos - bater
Preparado
(para bolos) bater
Frutos secos picar
Cebola - picar
Cebolas cortar
Aplicações
Carne picada
Sopas, molhos
Guarnições,
natas, mistura
para gelados
Procedimento
Comece por retirar nervos e
ossos. Corte a carne em cubos
com 3 cm. Use o botão 'pulse'
para picar grosseiramente.
Use legumes cozidos
Use natas acabadas de retirar
do frigorífico. Nota: use pelo
menos 1.25 dl de natas. As
natas ficam prontas em cerca
de 20 segundos.
Veloci
dade /
Acess
ório
2/ P /
P
2 / D
P / S
Quant
idade
máx.
200 gr
5 dl
3.5 dl
Ingredientes e
resultados
Aves - picar
Sopas - bater
Natas batidas -
bater
Page 73

PORTUGÛES 73
Receitas
Sopa de bróculos (para 4 pessoas)
h or D
- 50 gr de queijo Gouda ralado
- 300 gr de bróculos cozidos (pés e flor)
- água de cozer os bróculos
- 2 batatas cozidas cortadas
- 2 cubos de caldo
- 2 colheres de sopa de natas batidas
- caril
- sal
- pimenta
- noz moscada
B
Rale o queijo. Reduza os bróculos a puré com as
batatas cozidas e alguma água da cozedura dos
bróculos. Deite o puré de bróculos, o líquido
restante e os cubos numa medida e meça até 7.5
dl. Passe para uma panela e mexa até ferver.
Misture o queijo e tempere com o caril, o sal, a
pimenta e a noz moscada. Junte as natas.
Mistura de cinco especiarias
Moinho
- 2 gr de canela
- 2 gr de anis estrelado
- 2gr de alho
- 2gr de alcaçuz
- 2 gr de anis
B
Corte a canela e o alcaçuz em pedaços
pequenos.
B
Deite todos os ingredientes no moinho e moa na
velocidade máxima durante 30 segundos.
NUNCA ULTRAPASSE OS 30 SEG.!
Bolo de fruta
P
- 450 gr de tâmaras secas cortadas ao meio
- 200 g de ameixas secas, cortadas ao meio
- 650 g de frutos secos
- 160 g de côco ralado
- 300 g de ananás cristalizado
- 1 lata (400 g) de leite condensado doce
- 1 colher de chá de essência de baunilha
B
Unte duasformas de 20 cm de comprimento e
aqueça previamente o forno a 135c C.
B
Coloque as tâmaras e as ameixas cortadas ao
meio na taça do robot de cozinha e pique tudo
na velocidade máxima durante 30 segundos. Em
seguida, esvazie a taça.
B
Coloque os frutos secos no robot e pique-os
grosseiramente usando a função 'pulse'
(batimento). Em seguida, esvazie a taça.
B
Coloque o ananás cristalizado na taça do robot de
cozinha e corte em pedaços usando a função
'pulse' (batimento). Em seguida, esvazie a taça.
B
Misture as tâmaras, as ameixas, as castanhas de
caju, o ananás e o côco ralado numa taça grande.
B
Junte leite e baunilha aos ingredientes e mexa.
B
Deite o preparado nas formas e leve os bolos a
cozer no forno à temperatura de 135c C durante
90 minutos.
Page 74

PORTUGÛES74
B
Sugestão para molho cocktail: junte 0.5 dl de
natas frescas, uma gota de whisky, 3 colheres de
chá de polpa de tomate ou ketchup e uma gota
de xarope de gengibre por cada decilitro de
maionese.
Batidos
D
- 1.75 dl de leite
- 10 gr de açúcar
- 1/2 banana ou cerca de 65 gr de qualquer fruta
fresca
- 50 gr de gelado de baunilha
B
Misture todos os ingredientes até obter a
consistência ideal.
Pizza
{
- 400 gr de farinha
- 4 dl de óleo
- 1/2 colher de chá de sal
- 20 gr de fermento de padeiro fresco ou 1.5
pacote de fermento em pó
- cerca de 2.4 dl de água (35cC)
Para a cobertura:
- 3 dl de tomate sem sementes (de lata)
- 1 colher de chá de mistura Italiana de ervas
aromáticas (secas ou frescas)
- 1 cebola
- 2 dentes de alho
- sal e pimenta
- açúcar
B
Não processe esta receita mais do que uma vez
sem interrupção. Se precisar de bater mais
quantidades, deixe o aparelho arrefecer primeiro
antes de continuar.
Puré de batata
P
- 750 gr de batatas cozidas
- aprox. 2.5 dl de leite quente (90cC)
- 1 colher de sopa de manteiga
- sal
B
Comece por reduzir as batatas a puré, junte o
leite, o sal e a manteiga. Use a velocidade 1 e
processe tudo durante 30 segundos apenas para
evitar que o puré fique grudento.
Maionese
S
- 2 gemas ou 1 ovo grande
- 1 colher de chá de mostarda
- 1 colher de chá de vinagre
- 2 dl de óleo
B
Os ingredientes devem estar à temperatura
ambiente. Coloque o disco de emulsionar na taça.
Deite as gemas ou o ovo, a mostarda e o vinagre
para dentro da taça. Use a velocidade 1 ou 2. Vá
deitando o óleo gradualmente através do tubo dos
alimentos e sobre o disco em movimento.
Também pode deitar o óleo pelo orifício do
pressor.
B
Sugestão para molho tártaro: junte salsa, pepinos
de conserva e ovos cozidos.
Page 75

PORTUGÛES 75
- 1 courgette (cerca de 250 gr)
- 1 dente de alho, esmagado
- cerca de 40 gr de manteiga + manteiga para
untar o prato de ir ao forno
- 2 colheres de chá de mistura de ervas Italiana
ou Provençal
- 1 ovo grande
- 0.75 dl de natas
- 0.75 dl de leite
- pimenta
- 70 gr de queijo meia cura
B
Descasque e lave as batatas.
B
Coloque o disco no suporte (disco de cortar) da
taça e corte as batatas e a courgette na
velocidade 1.
B
Deite as rodelas de batata em água a ferver com
uma pitada de sal até ficarem quase cozidas.
B
Coloque as batatas num passador e deixe
escorrer bem.
B
Deite 20 gr de manteiga numa frigideira e frite
metade das rodelas de courgette durante
3 minutos, virando-as frequentemente. Salpique as
fatias com 1 colher de chá da mistura de ervas
Italiana ou Provençal.
B
Coloque as rodelas de courgette fritas a escorrer
sobre papel de cozinha.
B
Unte um prato baixo de ir ao forno e coloque as
rodelas de courgette e de batata no prato,
alternando e dispondo-as de forma a ficarem
ligeiramente sobrepostas como as telhas de um
telhado.
B
Bata o ovo com as natas e o leite com a lâmina
de metal na velocidade 2. Junte sal e pimenta a
- Ingredientes para colocar sobre o molho:
azeitonas, salame, alcachofras, cogumelos,
anchovas, queijo Mozzarella, pimento, queijo
ralado e azeite a gosto.
B
Coloque o amassador na taça. Deite todos os
ingredientes na taça e seleccione a velocidade 2.
Bata a massa durante cerca de 1 minuto até se
formar uma bola macia. Segure a máquina com a
mão livre para evitar que ela se desloque sobre a
mesa de trabalho. Coloque a massa numa tigela
separada, cubra-a com um pano húmido e deixea crescer durante cerca de 30 minutos.
B
Use a lâmina para picar a cebola e o alho. Refogue
a cebola e o alho até ficarem transparentes.
B
Junte o tomate pelado e as ervas aromáticas e
deixe ferver o molho durante 10 minutos.
B
Tempere a gosto com sal, pimenta e açúcar.
Deixe o molho arrefecer.
B
Aqueça o forno a 250cC.
B
Estenda a massa sobre a mesa de trabalho
polvilhada com farinha e faça duas bases
redondas. Coloque as bases da pizza num
tabuleiro untado. Espalhe a cobertura sobre as
pizzas, deixando os rebordos livres. Enfeite com os
ingredientes desejados, espalhe um pouco de
queijo ralado sobre as pizzas e deite uma gota de
azeite por cima.
B
Leve ao forno a cozer durante 12 a 15 minutos.
Gratinado de batata e courgettes
Pgk
- 375 gr de batatas
- uma pitada de sal
Page 76

PORTUGÛES76
B
Misture as natas batidas ao puré de salmão com
cuidado e usando uma colher de pau.
B
Deite a mousse num prato, cubra e leve ao
frigorífico durante algumas horas.
B
Guarneça a mousse com umas folhas de agrião.
Pasta para sandes
P
- 2 cenouras pequenas em pedaços
- 2-3 pepinos de conserva em pedaços
- 75 gr de couve-flor em pedaços
- 75 gr de aipo em pedaços
- ervas aromáticas (salsa, endro, estragão, aipo)
- 100 gr de maionese
- 100 gr de coalho
- sal
- pimenta
B
Pique finamente as cenouras, os pepinos, as ervas
aromáticas e o aipo. Misture a maionese e o
coalho cuidadosamente e tempere a gosto com
pimenta e sal.
Salada de couve roxa
P
- 1 couve roxa pequena
- 2 cebolas roxas
- 1 funcho
- 1 maçã
- sumo de 1 laranja e 2 colheres de sopa de
vinagre de vinho tinto
- 1 colher de sopa de mostarda
gosto e deite a mistura sobre as camadas de
courgette e batata dentro do prato.
B
Substitua o disco de cortar pelo disco de ralar. Rale
o queijo na velocidade 2 e espalhe-o sobre o prato.
B
Coloque o prato no centro do forno quente
(200cC) e deixe dourar durante 15 minutos.
Mousse de salmão
PS
- 1 lata de salmão (220 gr)
- 2 folhas de gelatina
- alguns pés de cebolinho
- uma pitada de sal
- uma pitada de pimenta de caiena
- meia colher de sopa de sumo de limão
- 1.25 dl de natas batidas
- 1 cebola pequena
- agrião para guarnecer
B
Ponha a gelatina de molho em bastante água.
B
Pique o cebolinho e a cebola na máquina usando
a posição 'pulse'.
B
Retire a pele e as espinhas do salmão.
B
Junte sal, pimenta, sumo de limão, o salmão e o
líquido da lata ao cebolinho e à cebola picados e
reduza os ingredientes a puré na velocidade 2.
B
Coloque o puré dentro da taça.
B
Ferva uma pequena quantidade de água e
dissolva a gelatina.
B
Deite a gelatina sobre o puré de salmão e misture
bem.
B
Coloque o disco de emulsionar na taça e bata as
natas premindo o botão 'pulse' durante cerca de
15 segundos.
Page 77

PORTUGÛES 77
1 colher de chá de endro finamente picado
- algumas folhas de hortelã
B
Descasque o pepino e corte-o na velocidade 1.
Coloque o pepino cortado num passador para
escorrer bem.
B
Misture os outros ingredientes, excepto as folhas
de hortelã, ao pepino. Deite a salada numa tigela,
tape e leve ao frigorífico a arrefecer durante uma
hora. Antes de servir, enfeite com folhas de
hortelã.
B
Misture o sumo, a mostarda e o vinagre. Corte a
couve, as cebolas, o funcho e a maçã na
velocidade 1.
B
Junte os ingredientes numa saladeira.
Bolo esponjoso
P
- 4 ovos
- 0.3 dl de água (35cC)
- 1 pitada de sal
- 150 gr de açúcar
- 1 pacote de açúcar baunilhado
- 150 gr de farinha peneirada
- 3 gr de fermento em pó
B
Bata os ovos e a água durante cerca de 2
minutos. Junte o açúcar, a baunilha e o sal, pouco
a pouco, e bata durante cerca de 1 minuto. A
mistura deve pingar da colher com uma
consistência espessa. Junte a farinha e o fermento
com uma espátula. Leve a cozer no forno a
170cC durante cerca de 30 a 35 minutos.
B
Sugestão: Este tipo de bolo pode ser recheado
com uma grande variedade de cremes ou,
simplesmente, com natas batidas e frutos frescos.
Tzaziki
k
- 1 pepino
- 2 dl de iogurte
- 1 colher de sopa de azeite
- 2 dentes de alho
- uma pitada de sal
Page 78

78
((»»µµjjõõJJGGõõJJ)) ÍÍ∏∏ddÉÉHH QQÉÉ««ÿÿGG áᣣ∏∏°°SS
k
IóMGh IQÉ«N -
Íd π∏e 200 -
¿ƒàjQ âjR IÒ¨°U á≤©∏e -
ΩƒK ¿ÉàÑM -
í∏e -
GóL GÒ¨°U á©£≤e πHGƒàdG øe á∏≤H -
´Éæ©ædG ¥GQhG ™°†H -
¬«côJGh IÉØ°üe ‘ ¬«©°V .1 áYô°S ≈∏Y ¬«eôaGh QÉ«ÿG …ô°ûb
™e ´Éæ©ædG ¥GQhG ’G äÉjƒàÙG »bÉH »£∏NG .∞é«d âbƒdG ¢†©Ñd
IóŸ áLÓãdG ‘ ≥«ªY øë°U ‘ ¬©°VƒH OÈj §«∏ÿG »YO .QÉ«ÿG
.Újõà∏d ´Éæ©ædG ¥GQhG »°TQ .áYÉ°S
áá°°ùùªªÿÿGG ääGGQQÉÉ¡¡ÑÑddGG IIQQOOƒƒHH
áæë£e
áaôb ΩGôZ 2 -
¿ƒ°ùfÉj ΩGôZ 2 -
πØfôb ΩGôZ 2 -
¢Sƒ°S íFGô°T ΩGôZ 2 -
¿ƒ°ùfÉj ܃ÑM ΩGôZ 2 -
.∫ɪ©à°S’G πÑb IÒ¨°U ™£b ¤G ¢Sƒ°ùdGh áaô≤dG »©£b -
áYô°S ≈∏Y º¡æë£H »eƒbh áæ룟G ‘ äÉjƒàÙG ™«ªL »©°V -
!á«fÉK 30 øY ójõJ IóŸ GóHG »æë£J ’ .á«fÉK 30 IóŸ á«dÉY
Page 79

79
¢†eÉ◊G Ò°üY øe IÒ¨°U á≤©∏e ∞°üf -
ábƒØfl áÁôc πe 125 -
IÒ¨°U á∏°üH -
Újõà∏d á∏≤ÑdG áÑ°ûY -
ᣰSGƒH •ÓÿG ‘ π°üÑdGh ΩƒãdG »©£b .AÉŸG ‘ ÚJÓ«÷G »©≤fG
í∏ŸG »Ø«°VG .¿ƒŸÉ°ùdG øY ó∏÷Gh Ωɶ©dG »∏jRG .¢†ÑædG ™°Vh
áÑ∏Y ‘ πFÉ°ùdG ¤G áaÉ°V’ÉH ¿ƒŸÉ°ùdGh ¢†eÉ◊Gh πØ∏ØdGh
. 2áYô°S ≈∏Y É©«ªL º¡«°SôgGh π°üÑdGh ™£≤ŸG ΩƒãdG ¤G ¿ƒŸÉ°ùdG
¬«a »HhPh AÉŸG øe Ó«∏b »∏ZG .≥«ªY øë°U ‘ ¢ùjô¡dG »©°V
.Éjƒ°S É¡«£∏NGh ¢ùjô¡dG ‘ ÚJÓ«÷G §«∏N »©°V .ÚJÓ«÷G
øe áÁôµdG »≤ØNGh ≥«ª©dG øë°üdG ‘ ÜÓëà°S’G ¢Uôb »©°V
áÁôµdG »©°V .ÉÑjô≤J á«fÉK 15 IóŸ ¢†ÑædG QR ≈∏Y §¨°†dG ∫ÓN
.á«Ñ°ûN á≤©∏e ΩGóîà°SÉH ¿ƒŸÉ°ùdG ¢ùjôg ≈∏Y
.äÉYÉ°S ™°†Ñd áLÓãdG ‘ ¬«©°Vh ¬«£Zh øë°U ‘ §«∏ÿG …ôjOG
.á∏≤ÑdG áÑ°ûY ¢†©ÑH øë°üdG »æjR
ääÉÉ°°ûûjjhhóóææ°°ùùddGG øøggOO §§««∏∏NN
P
¿Éà©£≤e ¿ÉJQõL -
á©£≤e π∏fl »à©£b -
á©£≤e §«Ñfô≤dG IôgR ΩGôZ 75 -
™£≤e ¢ùaôc ΩGôZ 75 -
(¢ùaôµdG ,¢ùfhó≤H) AGô°†N ÜÉ°ûYCG -
õ«fƒjÉe ΩGôZ 100 -
∑QGƒc ΩGôZ 100 -
í∏e -
πØ∏a -
õ«fƒjÉŸG »£∏NG .¢ùaôµdGh ÜÉ°ûYC’Gh IôgõdGh π∏ıGh Qõ÷G »©£b
.¥hòdG Ö°ùM πØ∏ØdGh í∏ŸG »Ø«°VG ºK ∑QGƒµdGh
áá««ffÉÉÑÑ°°SSEE’’GG ±±ƒƒØØ∏∏ŸŸGG áᣣ∏∏°°SS
P
IÒ¨°U AGôªM áaƒØ∏e -
ôªMG π°üH ¿ÉàÑM -
Qɪ°T áÑM -
áMÉØJ -
ôªMG πN ¿Éà≤©∏eh ∫É≤JôH Ò°üY -
∫OôN IÒ¨°U á≤©∏e -
Qɪ°ûdGh π°üÑdGh ±ƒØ∏ŸG »©£b .πÿGh ∫OôÿGh Ò°ü©dG »£∏NG
‘ äÉjƒàÙG »LôNG .2 áYô°S ≈∏Y ìÉØàdGh
.≥«ªY øë°U
áá««ééææØØ°°SSGG ááµµ©©cc
P
äÉ°†«H 4
AÉe π∏e 30 -
í∏e -
ôµ°S ΩGôZ 150 -
Ó«fÉØdG ôµ°S øe óMGh ±ôX -
≥«bódG øe ΩGôZ 150QOhÉH èæ«cÉH ΩGôZ 3 -
Ó«fÉØdGh ôµ°ùdG »Ø«°VG .Úà≤«bO ‹Gƒ◊ AÉŸGh ¢†«ÑdG »£∏NG
≥«bódG »Ø«°VG ºK IóMGh á≤«bO IóŸ º¡«£∏NGh É«éjQóJ í∏ŸGh
ájƒÄe áLQO 170 IQGôM ≈∏Y ¿ôØdÉH É¡jõÑNG .QOhÉH èæµjÉÑdGh
‘ áØ∏àfl AÉ«°TG »©°†J ¿G ∂æµÁ :áë«°üf .á≤«bO 35-30 IóŸ
.áLRÉ£dG ¬cGƒØdG hCG áÁôµdG πãe ÉgõÑN ó©H ᵩµdG §°Sh
Page 80

80
-…òdG øë°üdG ´Éb ≈∏Y É¡ægód IóHõdG øe π«∏b + IóHR ΩGôZ 40
¿ôØdG ‘ ™°Vƒ«°S
ájhô≤dG hCG á«dÉ£jE’G ÜÉ°ûYC’G øe ¿ÉJÒ¨°U ¿Éà≤©∏e -
IÒÑc IóMGh á°†«H -
ábƒØfl áÁôc πe 75 -
Ö«∏M πe 75 -
πØ∏a -
áé°VÉf ∞°üf áæÑL ΩGôZ 70 -
»©°V ºK á∏eÉ◊G IGOC’G ‘ á©WÉ≤dG »©°V .ÉWÉ£ÑdG »∏°ùZGh …ô°ûb
.1 áYô°S ≈∏Y É¡H É°SƒµdGh ÉWÉ£ÑdG »©£b .≥«ªY øë°U ‘ á∏eÉ◊G
¿G ¤G í∏ŸG øe π«∏b ™e »∏¨e AÉe ‘ ÉWÉ£ÑdG ™£b »îÑWG
øe ΩGôZ 20 »©°V .Gó«L É¡«Ø°Uh IÉØ°üe ‘ ™£≤dG »©°V .…ƒà°ùJ
™e ≥FÉbO 3 IóŸ É°SƒµdG ™£b ᫪c ∞°üf »∏bGh IÓ≤e ‘ IóHõdG
øe IÒ¨°U á≤©∏e ᫪c º¡«∏Y »°TQ .âbƒdG Gòg ∫ÓN º¡µjô–
¥Qh ≈∏Y á«∏≤ŸG É°SƒµdG »©°V .ájhô≤dG hCG á«dÉ£jE’G ÜÉ°ûYC’G
¬«a ÉWÉ£ÑdGh É°SƒµdG »©°Vh IóHõdG ¢†©ÑH øë°U »ægOG .ïÑ£ŸG
iôN’G ƒ∏J IóMGh
áÁôµdG ™e ¢†«ÑdG »£∏NG .(ÉWÉ£H á©£b É¡«∏J É°Sƒc á©£b)
¥hò∏d É≤ah πØ∏ØdGh í∏ŸG »Ø«°VG .2 áYô°S ≈∏Y •ÓÿG ‘ Ö«∏◊Gh
á©WÉ≤dG ‹óHG .øë°üdG ‘ É°SƒµdGh ÉWÉ£ÑdG ≈∏Y §«∏ÿG »Ñµ°SG ºK
≈∏Y É¡«°TQh 2 áYô°S ≈∏Y Í÷G »eôaGh ádB’G ‘ áeQÉØdÉH
(ájƒÄe áLQO 200) ¿ôØdG §°Sh ‘ øë°üdG »©°V .øë°üdG
.≈∏YC’G øe ¿ƒ∏dG á«æH íÑ°üJ ≈àM á≤«bO 15 IóŸ É¡«côJGh
¿¿ƒƒŸŸÉÉ°°ùùddGG ¢¢SSƒƒee
PS
ΩGôZ 220 ¿ƒŸÉ°S áÑ∏Y -
ÚJÓ«÷G øe ¿ÉaôW -
ΩƒK í∏e -
πØ∏a -
Gõà«ÑdG äÉjƒàfi
Iô°û≤e ºWɪW π∏e 300 -
áØØ› hCG áLRÉW á«dÉ£jG ÜÉ°ûYCG á≤©∏e -
äGQÉ¡H h í∏e -
ôµ°S -
-»°VQG ,»eÓ°ùdG ,¿ƒàjõdG :á°ü∏°üdG ¤G ±É°†J »àdG äÉjƒàÙG
ÍL ,äGQÉ¡H ,ÓjQGõJƒŸG áæÑL ,±ƒ°ûfC’G ∂ª°S ,ô£a ,ácƒ°T
.áÑZôdG Ö°ùM ¿ƒàjR âjR h Qƒ°ûÑe
-AÉYƒdG ‘ äÉjƒàÙG ™«ªL ™°V .AÉYƒdG πNGO øé©dG IGOCG ™°V
§«∏ÿG πµ°ûj ≈àM IóMGh á≤«bO IÎØd 2 áYô°S ≈∏Y §¨°VGh
™°V .ádhÉ£dG ≈∏Y ¬µjô– ÖæŒ h IóMGh ó«H RÉ¡÷G ∂°ùeG .IôFGO
h á∏∏Ñe ¢Tɪb á©£≤H ¬à«£¨àH ºb h π°üØæe AÉYh ‘ Úé©dG
.á≤«bO 30 IóŸ ÉÑfÉL É¡YO
-.ΩƒãdG h π°üÑdG ™«£≤àd IôØ°ûdG πª©à°SG .´ÉØJQ’ÉH CGóÑJ ¿CG ¤G
∞°VCG .ÉaÉØ°T ¬fƒd íÑ°üj ¿CG ¤G ™£≤ŸG ΩƒãdG h π°üÑdG »∏bG
áÄaGO QÉf ≈∏Y á°ü∏°üdG »¡WG h ÜÉ°ûYC’G h Iô°û≤ŸG ºWɪ£dG
á°ü∏°üdG ´O .ôµ°ùdG h QÉ¡ÑdG h í∏ŸG ∞°VCG .≥FÉbO Iô°ûY IóŸ
…OôaG .ájƒÄe 250 IQGôM áLQO ≈∏Y ¿ôØdG π©°TCG .Ó«∏b OÈJ
.É¡H ÚJôFGO πqµ°T h í£°ùe í£°S ≈∏Y Úé©dG
-äÉjƒàÙG ∞°VCG .âjõdÉH áMƒ°ù‡ õÑN á«æ«°U ≈∏Y Úé©dG ™°V
áÑZôdG Ö°ùM äÉjƒàÙG ∞°VCG .á«dÉN ±GôWC’G ÉcQÉJ Gõà«ÑdG ¥ƒa
âjR øe π«∏≤dG Öµ°SG h Gõà«ÑdG ¥ƒa Qƒ°ûÑŸG Í÷G ¢†©H ´Rh h
.á≤«bO 15 hCG 12 IóŸ Gõà«ÑdG õÑNG .É¡bƒa ¿ƒàjõdG
ÉÉ°°SSƒƒµµddGGhh ÉÉWWÉÉ££ÑÑddGG ¿¿ÉÉJJGGôôLL
Pgk
ÉWÉ£H ΩGôZ 375 -
í∏e á°TQ -
(ΩGôZ 250 ÉÑjô≤J) IóMGh É°Sƒc -
á°Shô¡e ΩƒK áÑM -
Page 81

81
¬¬ccGGƒƒØØddGG ááµµ©©cc
P
±É°üfCG ¤G ™ q£≤e ,ôq≤æŸG ôªàdG øe ΩGôZ 380 -
±É°üfCG ¤G ™ q£≤e ,∞qØÛG ñƒÿG øe ΩGôZ 200 -
¿É≤ÑdG RƒL øe ΩGôZ 650 -
É«dƒW ™ q£≤e óæ¡dG RƒL øe ΩGôZ 150 -
™qª∏ŸG ¢SÉfÉfC’G øe ΩGôZ 300 -
≈q∏ÙG h õqcôŸG Ö«∏◊G øe (ΩGôZ 400) IóMGh IƒÑY -
Ó«fÉØdG ¢ü∏îà°ùe øe IÒ¨°U á≤©∏e -
-20 É¡æe πc ∫ƒW á«YhCG áKÓK ≈∏Y IóHõdG hCG âjõdG øgóH »eƒb
.ájƒÄe 135 IQGôM áLQO ¤G É≤Ñ°ùe ¿ôØdG Úî°ùàH »eƒb h º°S
-»eƒbh •ÓÿG AÉYh ‘ ñƒÿGh ±É°üfCG ¤G ™q£≤ŸG ôªàdG »©°V
∂dP ó©H »ZôaCG .á«fÉK 30 IóŸ áYô°S ≈°übCG ᣰSGƒH º¡©«£≤àH
.AÉYƒdG
-Ó«∏b Rƒ÷G ™«£≤àH »eƒb h •ÓÿG AÉYh ‘ ¿É≤ÑdG RƒL »©°V
.∂dP ó©H AÉYƒdG »ZôaCG .¢†ÑædG QÉ«N ΩGóîà°SÉH
-¤G ¬©«£≤àH »eƒb h •ÓÿG AÉYh ‘ ™qª∏ŸG ¢SÉfÉfC’G »©°V
.∂dP ó©H AÉYƒdG »ZôaCG .¢†ÑædG QÉ«N ΩGóîà°SÉH IÒ¨°U ™£b
-h ñƒÿG h ôªàdG »©°V .•ÓÿG AÉYh ‘ á«fó©ŸG IôØ°ûdG »©°V
.º¡«£∏NG h AÉYh ‘ Qƒ°ûÑŸG óæ¡dG RƒL h ¢SÉfÉfC’Gh ¿É≤ÑdG RƒL
.º¡£∏îH »eƒb h äÉjƒàÙG ¤G Ó«fÉØdG h Ö«∏◊G »Ø«°VCG -
-≈∏Y äɵ©µdG …õÑNG h õÑÿG á«YhCG ‘ ¬cGƒØdG §«∏N »©°V
.á≤«bO 90 IóŸ ájƒÄe 135 IQGôM áLQO
áá°°SShhôô¡¡ŸŸGG ÉÉWWÉÉ££ÑÑddGG
P
áNƒÑ£e ÉWÉ£H ΩGôZ 750-
(ájƒÄe áLQO 90 IQGôëH) øNÉ°S Ö«∏M π∏e 250-
IóHR á≤©∏e -
í∏e -
- Ωóîà°SG .IóHõdG h í∏ŸG h Ö«∏◊G ∞°VCG ºK ’hCG ÉWÉ£ÑdG ¢SôgG
.¢ùjô¡dG ¿É≤°üd Öæéàd á«fÉK 30 IóŸ §∏NG h 1 áYô°ùdG
õõ««ffƒƒjjÉÉŸŸGG
S
IÒÑc á∏eÉc á°†«H hCG Úà°†«H QÉØ°U -
∫OôÿG øe ΩÉ©W á≤©∏e -
πÿG øe ΩÉ©W á≤©∏e -
âjR π∏e 200 -
¢Uôb ™°V .áaô¨dG IQGôM áLQóH äÉjƒàÙG ¿ƒµJ ¿CG Öéj
‘ πÿG h ∫OôÿG h Úà°†«ÑdG QÉØ°U ™°V .AÉYƒdG ‘ ÜÓëà°S’G
܃ÑfCG ∫ÓN øe ÊCÉàH âjõdG Öµ°SG .2 hCG 1 áYô°S πª©à°SG .AÉYƒdG
§ZÉ°†dG ‘ ΩôÿG ΩGóîà°SG ∂æµÁ .…ôFGódG ¢Uô≤dG ≈∏Y ä’ƒcCÉŸG
.âjõdG áaÉ°V’
¢†«ÑdG h QÉ«ÿG h ¢ùfhó≤ÑdG ∞°VCG :QÉJQÉàdG á°ü∏°üd áë«°üf
.¥ƒ∏°ùŸG
çÓK h êRÉW Ëôc π∏e Ú°ùªN ∞°VCG :π«àcƒµdG á°ü∏°üd áë«°üf
πFÉ°ùdG π«Ñ‚õdG ºc ™°†H h IÒ¨°U ºWɪW ¿ƒé©e ≥dÉ©e
.õ«fƒjÉŸG øe π∏e 100 ≈∏Y ∫ƒ°üë∏d
∂∂««°°TT ∂∂∏∏««ee
D
Ö«∏M π∏e 175-
ôµ°S ΩGôZ 10-
iôNCG áLRÉW á¡cÉa ΩGôZ 65 hCG IRƒe ∞°üf-
Ëôc ¢ùjBG Ó«fÉa ΩGôZ 50-
.IƒZQ èjõŸG íÑ°üj ¿CG ¤G äÉjƒàÙG ™«ªL §∏NG -
GGõõàà««ÑÑddGG
§{
ÚëW ΩGôZ 400 -
.âjõdG øe πe 40 -
í∏e á≤©∏e ∞°üf -
áaÉ÷G IÒªÿG øe ∞°üf h áÑ∏Y hCG áLRÉW IÒªN ΩGôZ 20 -
AÉŸG øe π∏e 240 -
Page 82

82
èèFFÉÉààffhh ääÉÉjjƒƒààfifi
iiƒƒ°°üübb áá««ªªcc
ΩGôZ 300
ΩGôZ 200
π∏e 500
π∏e 350
//ááYYôô°°SS
//ááLLQQOO
≥≥ëë∏∏ee
gI/
P2/P/
D2/
SP/
ÒÒ°°††ëëààddGG áá««∏∏ªªYYääÉÉ≤≤««ÑÑ££JJ
- π°üH
íFGô°T ™«£≤J
.܃ÑfC’G ‘ ™°ùàJ ™£b ¤G É¡©£bh π°üÑdG ô°ûb
πbC’G ≈∏Y ΩGôZ 100 πª©à°SG :á¶MÓe
ÚjõJ ,äÉ«∏≤e
™«£≤J - Ωƒ◊
πª©à°SG .º°S 3 äÉÑ©µe ¤G ºë∏dG ™£b .Ωɶ©dG ´õfEG
.ø°ûN ™«£≤J èFÉàæd ¢†ÑædG ™°Vh
ΩhôØe º◊
§∏N - AÉ°ùMáNƒÑ£e äGhô°†N πª©à°SGäÉ°ü∏°U ,AÉ°ùM
- ¥ƒØfl Ëôc
≥ØN
πe 125 πª©à°SG :á¶MÓe .áLÓãdG øe Ëôc πª©à°SG
á«fÉK 20 ó©H ¥ƒØıG ËôµdG õ¡éj .πbC’G ≈∏Y Ëôc
.ÉÑjô≤J
,Ëôc ,ÚjõJ
Ëôc ¢ùjBG §«∏N
((¢¢UUÉÉîî°°TTCCGG áá©©HHQQCC’’)) ‹‹ƒƒcchhÈÈddGG AAÉÉ°°ùùMM
D h
IOƒZ áæÑL øe ΩGôZ Ú°ùªN -
(Qhò÷G h IôgõdG) ñƒÑ£e ‹ƒchôH ΩGôZ 300 -
¬«a ‹ƒchÈdG »¡W ” …òdG AÉŸG -
á©£≤e ábƒ∏°ùe ÉWÉ£H ¿ÉàÑM -
ábôŸG äÉÑ©µe 2 -
¥ƒØfl ÒZ Ëôc ÚJÒ¨°U Úà≤©∏e -
…QɵdG äGQÉ¡H -
í∏e -
äGQÉ¡H -
Ö«£dG IRƒL -
¢†©H h ábƒ∏°ùŸG ÉWÉ£ÑdG ™e ‹ƒchÈdG ¢Sôg h Í÷G ô°ûÑH ºb
πFÉ°ùdG h ‹ƒchÈdG ¢ùjôg ™°V .¬«a ‹ƒchÈdG »¡W ” …òdG AÉŸG
óM ¤G √CÓeGh »°SÉ«≤e ∫É«µe πNGO ábôŸG äÉÑ©µe h ¬æe »≤ÑàŸG
∫ÓN É¡«∏ZG h »¡£dG AÉYh ¤G äÉjƒàÙG π≤fG .π∏e 750
√ÓYCG IQƒcòŸG äGQÉ¡ÑdG ∞°VCG h §«∏ÿG ¤G áæÑ÷G Öµ°SG .É¡µjô–
.ËôµdG ∞°VCG ºK øe h í∏ŸG h
áá°°ùùªªÿÿGG ääGGQQÉÉ¡¡ÑÑddGG IIQQOOƒƒHH
áæë£e
áaôb ΩGôZ 2 -
¿ƒ°ùfÉj ΩGôZ 2 -
πØfôb ΩGôZ 2 -
¢Sƒ°S íFGô°T ΩGôZ 2 -
¿ƒ°ùfÉj ܃ÑM ΩGôZ 2 -
.∫ɪ©à°S’G πÑb IÒ¨°U ™£b ¤G ¢Sƒ°ùdGh áaô≤dG »©£b -
-áYô°S ≈∏Y º¡æë£H »eƒbh áæ룟G ‘ äÉjƒàÙG ™«ªL »©°V
!á«fÉK 30 øY ójõJ IóŸ GóHG »æë£J ’ .á«fÉK 30 IóŸ á«dÉY
ääÉÉØØ°°UUhh
Page 83

83
èèFFÉÉààffhh ääÉÉjjƒƒààfifi
iiƒƒ°°üübb áá««ªªcc
Ö«∏M πe 250
ΩGôZ 100
ΩGôZ 300
ΩGôZ 350
ΩGôZ 350
ΩGôZ 200
ΩGôZ 200
ΩGôZ 200
ΩGôZ 250
ΩGôZ 300
IóMGh IQÉ«N
ΩGôZ 200
ÚëW
ΩGôZ 400
ÚëW
ΩGôZ 200
ÚëW
//ááYYôô°°SS
//ááLLQQOO
≥≥ëë∏∏ee
P2/
P2/
P2/
j k2/
g /P2/
P2/
j k2/
P2 /
P D2 /
P2/
gI/
{2 /
{2 /
P2 /
ÒÒ°°††ëëààddGG áá««∏∏ªªYYääÉÉ≤≤««ÑÑ££JJ
- ∂«µfÉÑdG ôFÉ£a
≥ØN
.áaÉ÷G äÉjƒàÙG ∞°VCG ºK •ÓÿG ‘ Ö«∏◊G Öµ°SG
ƒd ÚJôe á«∏ª©dG Qôc .IóMGh á≤«bód èjõŸG §∏NEG
,∂«µfÉH ôFÉ£a
πaGh
- õÑÿG äÉàa
™«£≤J
¢üªfih ±ÉL õÑN πª©à°SGäÉàØH ¥ÉÑWCG
¿ÉJGôL ,õÑÿG
- IóHõdG áÁôc
≥ØN
áØ«ØN áé«àæd áªYÉf IóHR πª©à°SGÚjõJ ,äÉjƒ∏M
- äGhô°†N
ô°ûH
܃ÑfC’G CÓeEG .܃ÑfC’G ‘ ™°ùàJ ™£≤d äGhô°†ÿG ™£b
≈∏Y ∞«ØÿG §¨°†dG AÉæKCG ºgô°ûÑH ºbh ™£≤dÉH
.§ZÉ°†dG
äɵ©c ,ÚjõJ
äGhô°†N ,iƒ∏M
- äGhô°†N
™«£≤J
√ÉÑàfÉH º¡£¨°VGh äGhô°†ÿG ™£≤H ܃ÑfC’G CÓeEG
.§ZÉ°†dG ᣰSGƒH
äÉ£∏°S
- ¿Gõ«eQÉH áæÑL
™«£≤J
™£b ¤G É¡©£bh ¿Gõ«eQÉH ÍL á©£b πª©à°SG
3 ¢SÉ≤ª
x.º°S 3
,AÉ°ùM ,ÚjõJ
¿ÉJGôL ,äÉ°ü∏°U
- GOƒL áæÑL
™«£≤J
√ÉÑàfÉH º¡£¨°VGh ܃ÑfC’G ‘ ™°ùàJ ™£≤d Í÷G ™£b
.§ZÉ°†dG ᣰSGƒH
,Gõà«H ,äÉ°ü∏°U
¿ÉJGôL ,…ófƒa
- áJ’ƒcƒ°T
™«£≤J
™£b ¤G É¡©£bh á«°SÉb áJ’ƒcƒ°T πª©à°SG
.º°S 2 ¢SÉ≤ª
á°ü∏°U
áJ’ƒcƒ°ûdG
- ñƒÑ£e ∫ƒah ÓjRÉH
¢Sôg
ƒd ∞°VCG .áNƒÑ£e ÓjRÉH hCG ∫ƒa ܃ÑM πª©à°SG
.èjõŸG Ú°ùëàd πFÉ°ùdG ¢†©H âÑZQ
,¢Shô¡e ΩÉ©W
AÉ°ùM
- ñƒÑ£e º◊h QÉ°†N
¢Sôg
.ø°ûN ¢ùjôg ≈∏Y ∫ƒ°üë∏d πFÉ°ùdG øe π«∏b ∞°VCG
.ºYÉf ¢ùjôg ≈∏Y ∫ƒ°üë∏d πFÉ°ùdG øe ÒãµdG ∞°VCG
∫ÉØWCG ΩÉ©W
- ™«£≤J - QÉ«N
.√ÉÑàfÉH É¡£¨°VGh ܃ÑfC’G ‘ IQÉ«ÿG ™°VÚjõJ ,á£∏°S
- (õÑî∏d) áæ«éY
øéY
âjRh ÚëW ∞°VCG .ôµ°Sh IÒªN ™e øNÉ°S AÉe êõeG
™ØJôJ É¡YO .á«fÉK 90 IóŸ áæ«é©dG øéYGh í∏eh
á≤«bO 30 IóŸ
õÑN
- (äÉæé©ŸG Ò°†ëàd) áæ«éY
øéY
™°V .º°S 2 ™£b ¤G É¡©£bh IOQÉH øjôZQÉe πª©à°SG
áæ«é©dG ∫ƒëàJ ≈àM øéYGh AÉYƒdG ‘ äÉjƒàÙG πc
á«∏ªY á∏°UGƒe πÑb OÈJ áæ«é©dG ´O .Iôc ¤G
,ìÉØàdG ôFÉ£a
iƒ∏M ,âjƒµ°ùH
á¡cÉØdG
- (Gõà«Ñ∏d) áæ«éY
øéY
áæ«é©dG øéYG .õÑÿG áæ«éY Ò°†– äɪ«∏©J ™ÑJG
»bÉH ºK Úë£dÉH ’hCG É¡©¨°V .IóMGh á≤«bód
Gõà«H
èèFFÉÉààffhh ääÉÉjjƒƒààfifi
ÒÒ°°††ëëààddGG áá««∏∏ªªYYääÉÉ≤≤««ÑÑ££JJ
- ôFÉ£Ø∏d áæ«éY
≥ØN
AÉYh ‘ Úë£dG ™°V .OQÉH AÉeh øjôLQÉe πª©à°SG
≈∏Y §∏NG .º°S 2 ™£b ¤G ™£≤ŸG øjôLQÉŸG ∞°VGh
∞bƒJ .§∏ÿG AÉæKG OQÉÑdG AÉŸG ∞°VG ºK .áYô°S ≈∏YG
áæ«é©dG ´O .Iôc πµ°T ≈∏Y áæ«é©dG íÑ°üJ ÉeóæY
.Ò°†ëàdG á«∏ªY á∏°UGƒe πÑb OÈJ
,¬cGƒa ôFÉ£a
¢û«c
iiƒƒ°°üübb áá««ªªcc
ÚëW ΩGôZ 200
ΩGôZ 100
ΩGôZ 300
ÚëW ΩGôZ 300
äÉ°†«H 4 ¢VÉ«H
ΩGôZ 500
ΩGôZ 300
≈∏Y ΩGôZ 75
πbC’G
ΩGôZ 500
‹ÉªLEG
äÉ°†«H 3
ΩGôZ 300
Ö«∏M πe 250
äÉ°†«H 3
ΩGôZ 250
ΩGôZ 400
//ááYYôô°°SS
//ááLLQQOO
≥≥ëë∏∏ee
P2/
{2/
S2/
PP/
PP/
P2 /P/
D2/
S1-2/
P2 /P/
D2 /
P2 /
P2 /P/
PP/
- IÒªî∏d áæ«éY
≥ØN
ábƒØfl ∂«µfÉH ôFÉ£°T‘ ôµ°ùdG ¢†©Hh ó«aGO Ö«∏M ™e IÒªN §∏NG ’hG
á©fÉ°U AÉYh ‘ äÉjƒàÙG πc ™°V .π°üØæe AÉYh
≥°ü∏j ’h ºYÉf íÑ°üj ≈àM Úé©dG øéYGh ΩÉ©£dG
IóŸ ™ØJôJ É¡YO .(á≤«bO ‹GƒM ¥ô¨à°ùJ) AÉYƒdG ‘
õÑN
ÜÓëà°SG - ¢†«ÑdG ¢VÉ«H
:á¶MÓe .áaô¨dG IQGôM áLQóH ¢†«ÑdG ¢VÉ«H πª©à°SG
.πbC’G ≈∏Y Úà°†«H
¬«∏aƒ°S ,„OƒH
- (Rƒe ,ìÉØJ) ¬cGƒa
¢Sôg / ™«£≤J
á¡cÉØdG Öæéàd ¢†eÉ◊G Ò°üY ¢†©H ∞°VG :áë«°üf
≈∏Y ∫ƒ°üë∏d πFÉ°ùdG ¢†©H ∞°VG .É¡fƒd Ò¨J øe
.ºYÉf ¢ùjôg
∫ÉØWCG ΩÉ©W
- ΩƒK
™«£≤J
äGôe IóY ¢†ÑædG ™°Vh ≈∏Y ÉehO §¨°VG .ΩƒãdG ô°ûb
.πbC’G ≈∏Y ΩGôZ 150 πª©à°SG .GÒãc ΩƒãdG Ωôa Öæéàd
ÚjõJ
- (¢ùfhó≤H) ÜÉ°ûYCG
™«£≤J
.É¡©«£≤J πÑb ÜÉ°ûYC’G ∞ØLh π°ùZG,AÉ°ùM ,äÉ°ü∏°U
ÚjõJ
(¢UÉLEG ,ÉjÉHÉH ,ï«£H) Ò°üY
-
.¢ù∏°S Ò°üY ≈∏Y ∫ƒ°üë∏d ôNBG πFÉ°S hCG AÉŸG ∞°VG¬cGƒa Ò°üY
- õ«fƒjÉe
ÜÓëà°SG
.áaô¨dG IQGôM áLQóH ¿ƒµJ ¿G Öéj äÉjƒàÙG ™«ªL
¢†©Hh á°†«ÑdG ™°V .IÒÑc á°†«H πª©à°SG :á¶MÓe
.á£≤f á£≤f âjõdG ∞°VGh AÉYh ‘ πÿG
,ÚjõJ ,äÉ£∏°S
ƒ«µ«HQÉH á°ü∏°Uh
(áæ«d) Ωƒ◊
™«£≤J
.º°S 3 äÉÑ©µe ¤G ºë∏dG ™£b .Ωɶ©dG ’hG ´õfG
.∂«ª°S ™«£≤J ≈∏Y ∫ƒ°üë∏d ¢†ÑædG ™°Vh πª©à°SG
,º◊ äGôc
∂«à°S ,ôZQƒÑeÉg
- äɵ©µdG èjõe
êõe
.áaô¨dG IQGôM áLQóH ¿ƒµJ ¿G Öéj äÉjƒàÙG ™«ªL
ºK .ºYÉf §«∏ÿG íÑ°üj ≈àM ôµ°ùdGh IóHõdG §∏NG
.Úë£dGh ¢†«ÑdGh Ö«∏◊G ∞°VG
IOó©àe äɵ©c
- äGQhõH
™«£≤J
2 áYô°S hG ∂«ª°ùdG ™«£≤à∏d ¢†ÑædG ™°Vh πª©à°SG
.ºYÉædG ™«£≤à∏d
õÑN ,äÉ£∏°S
- π°üH
™«£≤J
ΩGôZ 100 :á¶MÓe .™£b 4 ¤G º¡©£bh π°üÑdG ô°ûb
äGôe IóY ¢†ÑædG ™°Vh ≈∏Y §¨°VG ÉehO .πbC’G ≈∏Y
.GóL áªYÉf ™£b ‹G π°üÑdG ™«£≤J Öæéàd
,»∏≤e π°üH
- ∂«°T ∂∏«e
§∏N
Ö«∏◊Gh ôµ°ùdG ™e (ádhGôØdG hG RƒŸG) á¡cÉØdG ¢SôgG
.kGó«L º¡£∏NGh è∏ãdG ¢†©Hh
∂«°T ∂∏«e
Page 84

84
øøjjõõîîààddGG
ááææë룣ŸŸGG ∞∞««¶¶ææJJ
◗
..RRÉÉ¡¡÷÷GG øøee AAÉÉHHôô¡¡µµddGG ¢¢ùùÑÑ≤≤ee ´´õõffGG
◗
..∑∑ôôÙÙGG IIóóMMhh øøee ááææë룣ŸŸGG ´´õõffGG
◗
AAÉÉÃà AAÉÉŸŸGG QQƒƒÑÑææ°°UU ââ–– IIôôØØ°°ûûddGG IIóóMMhhhh ∫∫ÉÉ««µµŸŸGG ∞∞««¶¶ææààHH ººbb
..¿¿ƒƒHHÉÉ°°üüddGG ππFFÉÉ°°SS ¢¢††©©HHhh AA≈≈aaGGOO
◗
!!ááææææ°°ùùŸŸGG IIôôØØ°°ûûddGG IIóóMMhh ±±GGôôWWCCGG øøee ¬¬ÑÑààffGG
◗
..kkGGóó««LL ºº¡¡ØØ««ØØééààHH ººbbhh AAÉÉŸŸÉÉHH ºº¡¡ØØ££°°TTGG ,,™™££≤≤ddGG ∞∞««¶¶ææJJ óó©©HH
áá©©jjôô°°ùùddGG ••ÓÓÿÿGG ∞∞««¶¶ææJJ áá««∏∏ªªYY
ππFFÉÉ°°SS ¢¢††©©HH hh ((ÎΫ«dd ∞∞°°üüff øøYY óójjõõjj ’’)) ááÄÄaaGGOO AAÉÉee ÖÖµµ°°SSGG
..••ÓÓÿÿGG AAÉÉYYhh ππNNGGOO ¿¿ƒƒHHÉÉ°°üüddGG
..AAÉÉ££¨¨ddGG ÖÖqqccQQ
≈≈∏∏YY §§¨¨°°††ddGG áᣣ°°SSGGƒƒHH ääÉɶ¶◊◊ ™™°°††ÑÑdd π𪪩©jj RRÉÉ¡¡÷÷GG ´´OO
ááddGGRRGG óóææYY π𪪩©ddGG øøYY ∞∞bbƒƒààjj RRÉÉ¡¡÷÷GG)) ..¢¢††ÑÑææddGG ììÉÉààØØee
((ììÉÉààØØŸŸGG øøYY ∂∂©©ÑÑ°°UUCCGG
..ááØØ««¶¶ff AAÉÉÃà ¬¬ØØ££°°TTGG hh ••ÓÓÿÿGG AAÉÉYYhh ∂∂ØØHH ººbb
èèeeóóŸŸGG »»JJGGòòddGG øøjjõõîîààddGG
◗,äGôØ°ûdG IóMh ,ÜÓëà°S’G ¢Uôb) äÉ≤ë∏ŸG πc ™°V
h äGhOC’G πeÉM ≈∏Y (∫ÉNO’G äGhOCG πeÉM h ≥ØÿG ≥ë∏e
πeÉëH á«∏ª©dG »¡fCG ɪFGO .AÉYƒdG πNGO º¡æjõîàH ºb
.∫ÉNO’G äGhOCG
1
2
B
4
3
B
B
B
◗
……òòddGG AAÉÉ££¨¨ddGG ‘‘ øøjjõõîîààddGG ááMMÉÉ°°ùùee ‘‘ ÚÚJJGGOOBBGG øøjjõõîîJJ øøµµÁÁ
..AAÉÉ££¨¨ddGG ππNNGGOO ‘‘ ¬¬««ddGG ôô°°TTDDƒƒee ƒƒgg Éɪªcc AAÉÉYYƒƒddGG AAÉÉ££ZZ »»££¨¨jj
¢¢ùù««ddhh AAÉÉ££¨¨ddGG ¤¤GG áá««ÑÑffÉÉLL áá≤≤jjôô££HH ääGGhhOOCC’’GG ∫∫ÉÉNNOOGG ÖÖééjj
..§§¨¨°°††ddGG áá≤≤jjôô££HH
◗
±±ÉÉØØ°°ûûddGG AAÉÉ££¨¨ddGG ¥¥ƒƒaa øøjjõõîîààddGG ááMMÉÉ°°ùùee ™™ee AAÉÉ££¨¨ddGG ™™°°VV
..AAÉÉYYƒƒ∏∏dd
◗
..RRÉÉ¡¡÷÷GG øøee »»ØØ∏∏ÿÿGG ºº°°ùù≤≤ddGG ∫∫ƒƒMM »»FFÉÉHHôô¡¡µµddGG ∂∂∏∏°°ùùddGG ∞∞∏∏HH ººbb
∂æe ƒLôf á∏µ°ûe ájCG »à¡LGh hCG áeóN ájCG ¤G »àéàMG GPG
¿GƒæY â– âfÎf’G ≈∏Y ¢ùÑ«∏«a áëØ°U IQÉjR
www.philips.comáeóÿ ¢ùÑ«∏«a õcôà ∫É°üJ’G hCG
øe ∞JÉ¡dG ºbQ ≈∏Y ∫ƒ°ü◊G ∂æµÁ ) ∑ó∏H ‘ øFÉHõdG
áeóN õcôe ∑Éæg øµj ⁄ GPG .(»ŸÉ©dG ¿Éª°†dG ≥ë∏e
дЙйажe π«cƒH »∏°ьJEG ,¬«a Ъж£≤J …тdG у∏СdG ‘ шFЙHхdG
á«dõæŸG äGhOCÓd ¢ùÑ«∏«a áeóN õcôà »∏°üJEG hCG ¢ùÑ«∏«a
.á«°üî°ûdG ájÉæ©dGh
ááeeóóÿÿGGhh ääÉÉeeƒƒ∏∏©©ŸŸGG
B
Page 85

85
∞«¶æàH AóÑdG πÑb §FÉ◊G øe RÉ¡÷G ¢†Ñ≤e ´õfG ɪFGO
.∑ôÙG IóMh
ôôªª¨¨JJ ’’ ..áá∏∏∏∏ÑÑee ¢¢TTÉɪªbb áá©©££≤≤HH ∑∑ôôÙÙGG IIóóMMhh ∞∞««¶¶ææààjj ººbb
..AAÉÉŸŸÉÉHH ¬¬ØØ££°°ûûJJ ’’ hh AAÉÉŸŸGG ππNNGGOO ∑∑ôôÙÙGG IIóóMMhh
AAÉÉee ää’’ƒƒccCCÉÉŸŸGG ââ°°ùùee’’ »»ààddGG ™™££≤≤ddGG ∞∞««¶¶ææààjj ººbb ÉɪªFFGGOO
..ΩΩGGóóîîàà°°SS’’GG óó©©HH IIôô°°TTÉÉÑÑee ¿¿ƒƒHHÉÉ°°UU hh øøNNÉÉ°°SS
◗
ääÉÉ≤≤ëë∏∏ŸŸGG hh §§ZZÉÉ°°††ddGG hh AAÉÉYYƒƒddGG AAÉÉ££ZZ hh AAÉÉYYƒƒddGG ππ°°ùùZZ øøµµÁÁ
..¿¿ƒƒëë°°üüddGG ááddÉÉ°°ùùZZ ‘‘
.¿ƒë°üdG ádÉ°ùZ áehÉ≤Ÿ ™£≤dG √òg áªFÓe ¢üëa ”
‘ º¡∏°ùZ øµÁ ’ •ÓÿG AÉYh h øjõîàdG áMÉ°ùe AÉ£Z
.¿ƒë°üdG ádÉ°ùZ
¬ÑàfG .Gó«L á«∏NGódG AGõLC’G h äGôØ°ûdG IóMh h IôØ°ûdG ∞ q¶f
.GóL IOÉM º¡aGôWCG ¿C’
IóMh h IôØ°û∏d IOÉ◊G ±GôWC’G á°ùeÓe ΩóY øe ócCÉJ
ºgó≤Øj ∂dP .á«°SÉb ΩÉ°ùLCÉH á«∏NGódG äGhOC’G h äGôØ°ûdG
.º¡JóM
.äÉ≤ë∏ŸG í£°S ¿ƒ∏d GÒ«¨J ÖÑ°ùJ ¿CG øµÁ äÉjƒàÙG ¢†©H
»Øàîj IOÉY ¿ƒ∏dG Ò«¨àa ,äÉ≤ë∏ŸG ≈∏Y É«Ñ∏°S ôKDƒj ’ ∂dP
.Ò°üb âbh ó©H
ÎÎ∏∏ØØddGG ∞∞««¶¶ææJJ
◗
∫∫Éɪª©©àà°°SS’’GG óó©©HH IIôô°°TTÉÉÑÑee ááeeÉɪª≤≤ddGG ¥¥hhóóææ°°UU ¥¥ƒƒaa ÎÎ∏∏ØØddGG ππªªMMGG
..AAÉÉŸŸGG QQƒƒÑÑææ°°UU ââ–– ¬¬ØØ££°°TTGG ººKK ¬¬JJÉÉjjƒƒààfifi ∞∞££∏∏HH qqêêQQhh
∞∞««¶¶ææààddGG
ääÉÉjjƒƒààÙÙGG
πØ∏ØdG RGƒcCG
º°ùª°ùdG ܃ÑM
íªb ,RQCG
Éjƒ°üdG ܃ÑM
áaÉL AÓjRÉH
óæ¡dG RƒL
(¿Gõ«eQÉH) »°SÉb ÍL
õÑÿG äÉàa
ôµ°ùdG äÉÑ©µe
äGô°ùµe
Iƒ¡≤dG ܃ÑM
ääÉÉ««ªªµµddGG
ΩGôZ 25-5
ΩGôZ 50-10
ΩGôZ 75-25
ΩGôZ 75-25
ΩGôZ 75-25
ΩGôZ 50-25
ΩGôZ 100-50
ΩGôZ 40-20
ΩGôZ 30-10
ΩGôZ 100-50
ΩGôZ 50-20
IIóóMMhh ííÑÑ°°üüJJ ¿¿GG ¤¤GG ááYYÉÉ°°ùùddGG ÜÜQQÉÉ≤≤YY √√ÉÉŒŒÉÉHH ÉÉ¡¡ØØ∏∏HH ººbbhh §§¨¨°°VVEEGG
..ΩΩÉɵµMMEEÉÉHH ááÑÑccôôee IIôôØØ°°ûûddGG
≈≈∏∏YY ÉÉ¡¡ÑÑ««ccÎÎHH ººbbhh ÖÖ≤≤ZZ ≈≈∏∏YY kkÉÉ°°SSCCGGQQ ááÑÑccôôŸŸGG ááææë룣ŸŸGG ππªªMMEEGG
..∑∑ôôÙÙGG IIóóMMhh
.∑ôÙG IóMh øe áæ룟G ∂ØH ºb ,øë£dG á«∏ªY ó©H
..ááYYÉÉ°°ùùddGG ÜÜQQÉÉ≤≤YY √√ÉÉŒŒGG ¢¢ùùµµ©©HH ÉÉ¡¡ØØ∏∏HH ººbbhh ¿¿ÉÉeeCC’’GG áá≤≤∏∏MM ÖÖëë°°SSEEGG
..IIôôØØ°°ûûddGG IIóóMMhh ´´õõffGG ººKK
.áëFÓdG ‘ IQƒcòe äÉjƒàfi øë£d áÑ°SÉæe áæ룟G
!äÉ«ªµdG øe ̵J ’
4
3
5
B
B
B
1
2
Page 86

86
ííFFÉÉ°°üüff
◗
ääÉÉjjƒƒààÙÙGG ™™««ªªLL ™™°°VVhh ΩΩóó©©HH ∂∂ëë°°üüææff ,,IIÒÒÑÑcc ääÉÉ««ªªcc ôô°°üüYY óóææYY
´´OO ººKK ,,IIÒÒ¨¨°°UU ääÉÉ««ªªcc ôô°°üü©©HH CCGGóóHHEEGG ..óóMMGGhh mm¿¿BBGG ‘‘ ÎÎ∏∏ØØddGG ππNNGGOO
ääÉÉ««ªªcc ∞∞°°VVCCGG ººKK ∑∑ôôÙÙGG ∞∞bbCCGG ººKK ,,ââbbƒƒddGG ¢¢††©©ÑÑdd ÓÓ¨¨°°ûûee RRÉÉ¡¡÷÷GG
ccAAÉÉ££¨¨ddGG ÖÖqqccQQ ÉɪªFFGGOO ..GGOOóó›› IIÒÒ¨¨°°UU áá««aaÉÉ°°VVEEGG
..ÉÉ¡¡∏∏cc ääÉÉ««ªªµµddGG ääòòØØff ¿¿ƒƒµµJJ ¿¿GG ¤¤GG áá««∏∏ªª©©ddGG √√òògg QQqqQQ
◗
::ππ««ààccƒƒµµddGGhh ÒÒ°°üü©©∏∏dd
hCG) AÉŸG øe πe 200 ÉÑjô≤J ∞°VCG ,èFÉàædG π°†aCG ≈∏Y ∫ƒ°üë∏d
.á¡cÉØdG øe ΩGôZ 100 πµd (.ïdG ,π«àcƒµ∏d ôNBG πFÉ°S …CG
◗
::ÉÉjjƒƒ°°üüddGG ÖÖ««∏∏MM ÒÒ°°††ëëààdd
ô°üY ∂æµÁ .ºgô°üY πÑb äÉYÉ°S 4 IóŸ Éjƒ°üdG ܃ÑM ™≤æH ºb
Úã∏K Aπe hCG áØØÛG Éjƒ°üdG ܃ÑM øe ΩGôZ 50 ≈°übC’G ≈∏Y
øe πe 500 ∞°VCG .áaÉ÷G Éjƒ°üdG ܃ÑëH Î∏Ø∏d Êó©ŸG πîæŸG
.ÚªYÉf GƒëÑ°üj ¿G ¤G ºgô°üYGh AÉŸG
ááææë룣ŸŸGG
.∫ɪ©à°SEÓd áæ룟G Ò°†–
.∞bƒJ ¿hóH á«fÉK 30 øe ÌcC’ áæ룟G GóHG Ωóîà°ùJ ’
..∫∫ÉÉ««µµŸŸGG ‘‘ ääÉÉjjƒƒààÙÙGG ™™°°VV
áeÓY øe ÌcCG ∫É«µŸG CÓ“ ’ .áaÉL äÉjƒàfi øë£H §≤a ºb
MAX.Iô°TDƒŸG
..¿¿ÉÉeeCC’’GG áá≤≤∏∏MM øøee IIôôØØ°°ûûddGG IIóóMMhh ππªªMMEEGG
.ΩɵMEÉH É¡Ñ«cÎH ºbh ∫É«µŸG πNGO IôØ°ûdG IóMh ™°V
ÎÎ∏∏ØØddGG
Ö«∏Mh áLRÉ£dG á¡cÉØdG Ò°üY Ò°†– ∂æµÁ Î∏ØdG Gòg ᣰSGƒH
á¡cÉØdG Qƒ°ûbh QhòH ™«ªL Î∏ØdG ™qªéjh .≥FÉbO ¿ƒ°†¨H Éjƒ°üdG
.¬∏NGóH
..••ÓÓÿÿGG ≥≥jjôôHHGG ÖÖqqccQQ
ΩΩÉɵµMMEEÉÉHH ÖÖccôôee ¬¬ffCCGG øøee óóccCCÉÉJJhh ••ÓÓÿÿGG ≥≥jjôôHHEEGG ππNNGGOO ÎÎ∏∏ØØddGG ™™°°VV
..¬¬∏∏NNGGóóHH
..ÎÎ∏∏ØØddGG ππNNGGOO ääÉÉjjƒƒààÙÙGG ™™°°VV
.•ÓÿG ≥jôHG πNGO (π«àcƒµdG kÓãe) ôNBG πFÉ°S …CG hCG AÉŸG Öµ°SG
..íí««ëë°°üüddGG ¬¬©©°°VVƒƒHH AAÉÉ££¨¨ddGG ÖÖccQQ
ááYYôô°°ùùddGG ™™°°VVhh ááaaôô©©ŸŸ ááëëFFÓÓddGG ¤¤GG ôô¶¶ffGG ..RRÉÉ¡¡÷÷GG π𫫨¨°°ûûààHH ººbb
..Ü܃ƒ∏∏££ŸŸGG
.áYô°S áLQO ≈∏YCG ÎNG ,áYô°ùdG ™°Vh øY ∂°T ∂jód ¿Éc GPG
..∑∑ôôÙÙGG IIóóMMhh øøee ••ÓÓÿÿGG ≥≥jjôôHHGG ´´õõffGGhh RRÉÉ¡¡÷÷GG π𫫨¨°°ûûJJ ∞∞bbhhCCGG
!!AAÉÉ££¨¨ddGG ÆÆõõææJJ ’’ ..••ÓÓÿÿGG ≥≥jjôôHHGG ááëëààaa ∫∫ÓÓNN øøee ÜÜGGôô°°ûûddGG ÖÖµµ°°SSGG
á«≤ÑàŸG äÉjƒàÙÉH ≥jôH’G ÖqcQ ,èFÉàædG π°†aCG ≈∏Y ∫ƒ°üë∏d
.ÊGƒK á©°†Ñd Ó¨°ûe ¬YOh RÉ¡÷G ≈∏Y
.ÜGô°ûdG á«≤H Öµ°SG
1
2
6
7
B
B
1
B
2
B
4
3
5
B
B
Page 87

87
AAÉÉYYƒƒddGG ¥¥ƒƒaa AAÉÉ££¨¨ddGG ™™°°VV ººKK AAÉÉYYƒƒddGG »»ØØJJÉÉjjƒƒààÙÙGG ™™°°VV
IIôôggÉÉHH èèFFÉÉààff ≈≈∏∏YY ∫∫ƒƒ°°üüëë∏∏dd ÖÖ°°SSÉÉæ柟GG ááYYôô°°ùùddGG ™™°°VVhh ÎÎNNGG
ÉÉ¡¡HH íí°°üüææjj »»ààddGG ááYYôô°°ùùddGG ´´ÉÉ°°VVhhCCGG ááëëFF’’ ¤¤GG ôô¶¶ffGG
ííFFÉÉ°°üüff
◗
ááLLQQOO ââ–– ¢¢††««ÑÑddGG ¿¿CCGG óóccCCÉÉJJ ,,¢¢††««ÑÑddGG ¢¢VVÉÉ««HH ≥≥ØØNN óójjôôJJ ÉÉeeóóææYY
..ááaaôô¨¨ddGG IIQQGGôôMM
AóÑdG πÑb πbC’G ≈∏Y áYÉ°S ∞°üf πÑb áLÓãdG øe ¢†«ÑdG êôNCG
.¬eGóîà°SÉj
◗
IIQQGGôôMM ááLLQQóóHH õõ««ffƒƒjjÉÉŸŸGG ÒÒ°°††ëëààdd ääÉÉjjƒƒààÙÙGG ™™««ªªLL ¿¿ƒƒµµJJ ¿¿CCGG ÖÖééjj
..ááaaôô¨¨ddGG
.§ZÉ°†dG πØ°SCG ‘ Ò¨°üdG ΩôÿG ∫ÓN øe âjõdG áaÉ°VG øµÁ
◗
..ááLLÓÓããddGG øøee kkIIôô°°TTÉÉÑÑee ËËôôµµddGG êêôôîîjj ¿¿CCGG ÖÖééjj ,,ËËôôµµddGG ≥≥ØØNN óóææYY
≥≥ØØNN ΩΩóóYY ÖÖééjj ááëëFFÓÓddGG ‘‘ Ü܃ƒ∏∏££ŸŸGG ââbbƒƒddGG áᶶMMÓÓee AAÉÉLLôôddGG
..áá∏∏jjƒƒWW IIóóŸŸ ËËôôµµddGG
.á«∏ª©dG √òg ‘ ÈcCG ºµ– ≈∏Y ∫ƒ°üë∏d ¢†ÑædG ™°Vh Ωóîà°SG
••ÓÓÿÿGG
:»JBÓd Ö°SÉæe •ÓÿG
-,AЙ°щ◊G ,Т°ь©dG ,дЙ°ь∏°ьdG ,Ц«∏◊G дЙйажe :kУгe ,πFGƒ°щdG §∏N
.∂«°T ∂∏«ŸGh áLhõªŸG äÉHhô°ûŸG
.õ«fƒjÉŸGh IóHõdG äɵ©c :kÓãe ,ájôW äÉjƒàfi êõe -
.∫ÉØWC’G ä’ƒcCÉe :kÓãe ,áNƒÑ£e äÉjƒàfi ¢Sôg -
AAÉÉ££¨¨ddGG ´´õõffGG
2
3
1
B
√√ÉÉŒŒÉÉHH ÉÉ¡¡ØØdd áᣣ°°SSGGƒƒHH ááÑÑ°°SSÉÉæ柟GG ááëëààØØddGG ‘‘ §§∏∏ÿÿGG AAÉÉYYhh ÖÖccQQ
..ΩΩÉɵµMMÉÉHH ÉÉ¡¡ÑÑ««ccôôJJ ººààjj ¿¿CCGG ¤¤GG ºº¡¡°°ùùddGG
.•ÓÿG AÉYh áµ°ùe ≈∏Y IÒÑc Iƒ≤H §¨°†J ’
••ÓÓÿÿGG AAÉÉYYhh ‘‘ ääÉÉjjƒƒààÙÙGG ™™°°VV
••ÓÓÿÿGG AAÉÉYYhh ≈≈∏∏YY AAÉÉ££¨¨ddGG ∞∞∏∏HH ººbb
ááYYôô°°ùùddGG ´´ÉÉ°°VVhhCCGG ∂∂ddƒƒîîJJ ..ääÉÉjjƒƒààÙÙGG §§∏∏NNhh RRÉÉ¡¡÷÷GG π𫫨¨°°ûûààHH ººbb
¤¤GG ôô¶¶ffCCGG .. èèFFÉÉààææddGG ππ°°††aaCCGG ≈≈∏∏YY ∫∫ƒƒ°°üüëë∏∏dd ááÑÑ°°SSÉÉæ柟GG ááYYôô°°ùùddGG §§ÑÑ°°VV
..ÉÉ¡¡HH íí°°üüææjj »»ààddGG ááYYôô°°ùùddGG ´´ÉÉ°°VVhhCCGG ááëëFF’’
ííFFÉÉ°°üüff
◗
‘‘ ΩΩôôÿÿGG ∫∫ÓÓNN øøee ••ÓÓÿÿGG AAÉÉYYhh ‘‘ ππFFGGƒƒ°°ùùddGG ääÉÉjjƒƒààfifi ÖÖµµ°°SSGG
..AAÉÉ££¨¨ddGG
◗
§§∏∏NN ááéé««ààff ≈≈∏∏YY ââ∏∏°°üüMM Éɪª∏∏cc ,,∫∫ƒƒWWCCGG IIóóŸŸ π𪪩©jj RRÉÉ¡¡÷÷GG ââccôôJJ Éɪª∏∏cc
..ÈÈccCCGG
◗
‘‘ ºº¡¡©©°°VVhh ππÑÑbb IIÒÒ¨¨°°UU ™™££bb ¤¤GG IIóóeeÉÉ÷÷GG ääÉÉjjƒƒààÙÙGG ™™««££≤≤ààHH ººbb
IIÒÒ¨¨°°UU ääÉÉ««ªªcc ™™°°VVƒƒHH ººbb ,,IIÒÒÑÑcc ääÉÉ««ªªcc ÒÒ°°††–– ääOOQQCCGG GGPPGG ..••ÓÓÿÿGG
..ππMMGGôôee IIóóYY ≈≈∏∏YY
◗
ááYYôô°°ùùddGG ÎÎNNGG kkÉÉeehhOO ,,ááÑÑ°°SSÉÉæ柟GG ááYYôô°°ùùddGG øøYY ∂∂°°TT ∂∂jjóódd ¿¿ÉÉcc GGPPGG
((22 ™™°°VVhh)) iiƒƒ°°üü≤≤ddGG
:πNGódG øe •ÓÿG AÉYh §FÉM ≈∏Y ä’ƒcCÉŸG â≤°üd GPG
..¢¢ùùÑÑ≤≤ŸŸGG ´´õõffGGhh RRÉÉ¡¡÷÷GG π𫫨¨°°ûûJJ ∞∞bbhhCCGG
AAÉÉ££¨¨ddGG ´´õõffGG
.RÉ¡÷G 𫨰ûJ AÉæKCG AÉ£¨dG ´õæJ ’
..AAÉÉYYƒƒddGG §§FFÉÉMM ≈≈∏∏YY á᪪ccGGÎΟŸGG ääÉÉjjƒƒààÙÙGG ááddGGRR’’ ááaaôô¨¨ee π𪪩©àà°°SSGG
º°S 2) á©WÉ≤dG IôØ°ûdG ±GôWCG øe áæeBG áaÉ°ùe ≈∏Y áaô¨ŸG »≤HG
.(kÉÑjô≤J
2
B
4
3
5
B
1
2
3
CLICK
1
2
1
2
1
2
Page 88

88
∫∫ÉÉNNOO’’GG ääGGhhOOCCGG
!É¡°ùª∏J ’ .kGóL áææ°ùe ∫ÉNO’G äGhOC’ á©WÉ≤dG ÖfGƒ÷G
äGhOCG ᣰSGƒH á«é∏K äÉÑ©µªc á«°SÉb äÉjƒàfi øëW ∫hÉ– ’
!∫ÉNOE’G
..∫∫ÉÉNNOO’’GG ääGGhhOOGG ππeeÉÉMM ‘‘ ∫∫ÉÉNNOO’’GG IIGGOOCCGG ™™°°VV
∞∞≤≤jj ……òòddGG ääGGhhOO’’GG ππeeÉÉMM ≈≈∏∏YY ∫∫ÉÉNNOO’’GG ääGGhhOOCCGG ππeeÉÉMM ™™°°VV
..AAÉÉYYƒƒddGG ππNNGGOO
..AAÉÉYYƒƒddGG ≈≈∏∏YY AAÉÉ££¨¨ddGG ™™°°VV
IIÒÒÑѵµddGG ™™££≤≤ddGG ™™££bbGG ..ää’’ƒƒccCCÉÉŸŸGG Ü܃ƒÑÑffCCGG ππNNGGOO ääÉÉjjƒƒààÙÙGG ™™°°VV
..Ü܃ƒÑÑffCC’’GG ‘‘ ºº¡¡©©°°VVhh ≈≈ææ°°ùùàà««dd
..èèFFÉÉààææddGG ππ°°††aaCCGG ≈≈∏∏YY ∫∫ƒƒ°°üüëë∏∏dd ……hhÉÉ°°ùùààHH Ü܃ƒÑÑffCC’’GG CCÓÓeeGG
IÒ¨°U äÉ«ªc ™°V ,ä’ƒcCÉŸG øe IÒÑc äÉ«ªc ™«£≤J ójôJ ÉeóæY
.á«∏ªY πc ÚH ΩɶàfÉH AÉYƒdG ÆôaGh RÉ¡÷G πNGO §≤a
èèFFÉÉààææddGG ππ°°††aaCCGG ≈≈∏∏YY ∫∫ƒƒ°°üüëë∏∏dd ááÑÑ°°SSÉÉæ柟GG ááYYôô°°ùùddGG ÎÎNNGG
..ÉÉ¡¡HH íí°°üüææjj »»ààddGG ááYYôô°°ùùddGG ´´ÉÉ°°VVhhCCGG ááëëFF’’ ¤¤GG ôô¶¶ffGG
.á«fÉK 60 - 10 øe ¥ô¨à°ùJ ™«£≤àdG á«∏ªY
áᣣ°°SSGGƒƒHH ää’’ƒƒccCCÉÉŸŸGG Ü܃ƒÑÑffCCGG ∫∫õõffGGhh AA§§ÑÑHH ääÉÉjjƒƒààÙÙGG §§¨¨°°VVGG
..§§ZZÉÉ°°††ddGG
ππeeÉÉMM ∂∂°°ùùeeGG ,,∫∫ÉÉNNOO’’GG ääGGhhOOCCGG ππeeÉÉMM øøee ∫∫ÉÉNNOO’’GG IIGGOOCCGG êêGGôôNN’’
ÉÉ¡¡ææee »»ØØ∏∏ÿÿGG ºº°°ùù≤≤ddGG ¿¿ƒƒµµjj åå««MM ∑∑óó««HH ∫∫ÉÉNNOO’’GG ääGGhhOOCCGG
êêGGôôNN’’ ∂∂eeÉÉ¡¡HHGG áᣣ°°SSGGƒƒHH ∫∫ÉÉNNOO’’GG IIGGOOCCGG ±±GGôôWWCCGG §§¨¨°°VVGG ..∂∂ggÉÉŒŒÉÉHH
..ππeeÉÉ◊◊GG øøee ∫∫ÉÉNNOO’’GG IIGGOOCCGG
4
1
2
3
5
6
7
8
B
B
B
B
B
øøéé©©ddGG IIGGOOCCGG
äɵ©µdG èjõe §∏ÿh õÑÿG øé©d øé©dG ≥ë∏e ΩGóîà°SG øµÁ
ääGGhhOOCC’’GG ππeeÉÉMM ≈≈∏∏YY øøéé©©ddGG ≥≥ëë∏∏ee ÖÖccQQ
AAÉÉYYƒƒddGG ‘‘ ääÉÉjjƒƒààÙÙGG ™™°°VV
AAÉÉ££¨¨ddGG áᣣ°°SSGGƒƒHH AAÉÉYYƒƒddGG ≥≥∏∏ZZGG
..ÉÉ¡¡∏∏NNGGóóHH §§ZZÉÉ°°††ddGG ™™°°VVhh ∫∫ÓÓNN øøee ää’’ƒƒccCCÉÉŸŸGG Ü܃ƒÑÑffCCGG ≥≥∏∏ZZGG
¤¤GG ôô¶¶ffGG ..èèFFÉÉààææddGG ππ°°††aaCCGG ≈≈∏∏YY ∫∫ƒƒ°°üüëë∏∏dd ááÑÑ°°SSÉÉæ柟GG ááYYôô°°ùùddGG ÎÎNNGG
..ÉÉ¡¡HH íí°°üüææjj »»ààddGG ááYYôô°°ùùddGG ´´ÉÉ°°VVhhCCGG ááëëFF’’
ÜÜÓÓëëàà°°SS’’GG ¢¢UUôôbb
ËôµdG ≥Øÿh õ«fƒjÉŸG Ò°†ëàd ÜÓëà°S’G ¢Uôb ∫ɪ©à°SG ∂æµÁ
.¢†«ÑdG ¢VÉ«Hh
ππNNGGOO ∞∞≤≤jj ……òòddGG ääGGhhOOCC’’GG ππeeÉÉMM ≈≈∏∏YY ÜÜÓÓëëàà°°SS’’GG ¢¢UUôôbb ™™°°VV
..AAÉÉYYƒƒddGG
4
1
2
3
5
B
B
B
B
1
B
1
CLICK
2
1
2
CLICK
Page 89

89
§§ZZÉÉ°°††ddGGhh ää’’ƒƒccCCÉÉŸŸGG Ü܃ƒÑÑffCCGG
.IóeÉL hCG á∏FÉ°S äÉjƒàfi áaÉ°VC’ ä’ƒcCÉŸG ܃ÑfCG πª©à°SG
.܃ÑfC’G πNGO IóeÉ÷G äÉjƒàÙG §¨°†d §ZÉ°†dG πª©à°SG
∂dPh ä’ƒcCÉŸG ܃ÑfCG ¥ÓZ’ §ZÉ°†dG ΩGóîà°SG kÉ°†jCG ∂æµÁ
.ä’ƒcCÉŸG ܃ÑfCG πNGO äÉjƒàÙG Ühôg Öæéàd
IIôôØØ°°ûûddGG
◗
èèjjõõee ÒÒ°°††ëëààddhh êêõõŸŸGGhh §§∏∏ÿÿGGhh ™™««££≤≤àà∏∏dd IIôôØØ°°ûûddGG ∫∫Éɪª©©àà°°SSGG øøµµÁÁ
..ääÉɵµ©©µµddGG
..∑∑ôôÙÙGG IIóóMMhh ≈≈∏∏YY AAÉÉYYƒƒddGG ™™°°VV
..IIôôØØ°°ûûddGG ≈≈∏∏YY øøee »»eeÉÉ◊◊GG AAÉÉ££¨¨ddGG ´´õõffGG
.É¡°ùŸ ÖæŒ . kGóL áææ°ùe IôØ°ûdG
..ääGGhhOOCC’’GG ππeeÉÉMM ≈≈∏∏YY IIôôØØ°°ûûddGG ™™°°VV
1
2
1
2
3
B
B
B
B
B
..AAÉÉYYƒƒddGG ππNNGGOO ääGGhhOOCC’’GG ππeeÉÉMM ™™°°VV
™™££bb ¤¤GG IIÒÒÑѵµddGG ™™££≤≤ddGG ™™««££≤≤ààHH ººbb ..AAÉÉYYƒƒddGG ‘‘ ääÉÉjjƒƒààÙÙGG ™™°°VV
..AAÉÉYYƒƒddGG ≈≈∏∏YY AAÉÉ££¨¨ddGG ™™°°VV ..ºº°°SS 3333 ººééMM ääGGPP IIÒÒ¨¨°°UU
∫∫ƒƒ°°üüëë∏∏dd RRÉÉ¡¡÷÷GG ááYYôô°°SS §§ÑÑ°°VV ∂∂ddƒƒîîJJ ááYYôô°°ùùddÉÉHH ººµµëëààddGG ääÉÉLLQQOO
..èèFFÉÉààææddGG ππ°°††aaCCGG ≈≈∏∏YY
™°Vh
PULSE/0
óæY .RÉ¡÷G 𫨰ûJ ±É≤j’h ¢†ÑædG á«∏ª©d :
ìÉàØeh §¨°V
PULSE/0
∞bƒàj .áYô°S ≈∏YCG ≈∏Y RÉ¡÷G πª©j
.ìÉàØŸG π°üa óæY πª©dG øY RÉ¡÷G
ájOÉ©dG áYô°ù∏d :1 ™°Vh
á«dÉ©dG áYô°ù∏d :2 ™°Vh
Ωôa á«∏ªY .É¡H í°üæj »àdG áYô°ùdG ´É°VhCG áaô©Ÿ áëFÓdG ¤G ô¶fG
.á«fÉK 60-1 øe ¥ô¨à°ùJ äÉjƒàÙG
ííFFÉÉ°°üüff
◗
ääGGÎÎØØdd ääGGôôee IIóóYY ¢¢††ÑÑææddGG ™™°°VVhh π𪪩©àà°°SSGG ..ááYYôô°°ùùHH ™™££≤≤jj RRÉÉ¡¡÷÷GG
..kkGGóóLL IIÒÒ¨¨°°UU ™™££bb ¤¤GG ää’’ƒƒccCCÉÉŸŸGG ππjjƒƒ–– ÖÖææééààdd IIÒÒ°°üübb
◗
ííÑÑ°°üü««°°SS ..»»°°SSÉÉbb ÍÍLL ™™««££≤≤JJ AAÉÉææKKCCGG áá∏∏jjƒƒWW IIóóŸŸ π𪪩©jj RRÉÉ¡¡÷÷GG ´´óóJJ ’’
..ÜÜhhòò««°°SShh kkGGóóLL øøNNÉÉ°°SS ÍÍ÷÷GG
◗
IIƒƒ¡¡≤≤ddGG Ü܃ƒÑÑMM ππããee kkGGóóLL áá««°°SSÉÉbb ääÉÉjjƒƒààfifi ™™««££≤≤ààdd IIôôØØ°°ûûddÓÓªª©©àà°°ùùJJ ’’
..∞∞∏∏ààJJ ¿¿CCGG IIôôØØ°°ûû∏∏dd øøµµÁÁ ..èè∏∏ããddGG ääÉÉÑÑ©©µµeehh ÖÖ««££ddGG IIRRƒƒLLhh
:AÉYƒdG πNGOh IôØ°ûdG ≈∏Y ä’ƒcCÉŸG â≤∏Y GPG
π𪪩©ddGG øøYY RRÉÉ¡¡÷÷GG ∞∞bbhhCCGG
AAÉÉYYƒƒddGG øøee AAÉÉ££¨¨ddGG ´´õõffGG
ááaaôô¨¨ee áᣣ°°SSGGƒƒHH ääÉÉjjƒƒààÙÙGG ´´õõffGG
4
1
2
3
5
6
B
B
1
CLICK
2
Page 90

90
◗±ƒ°S .¢ùÑ«∏«a øe ádƒfl ÒZ iôNCG äÉ≤ë∏e hCG ™£b Ωóîà°ùJ ’
.iôNCG äÉ≤ë∏e hCG ™£b ΩGóîà°SG ” GPG RÉ¡÷G Gòg ¿Éª°V ≈¨∏j
◗iôNCG ™£b …CG hCG »FÉHô¡µdG ∂∏°ùdG ∞∏J ” GPG RÉ¡÷G Ωóîà°ùJ ’
◗õcôe iód ¬ë«∏°üJ hCG ¬dGóÑà°SG Öéj ,»FÉHô¡µdG ∂∏°ùdG ∞∏J ” GPG
.çOGƒM ´ƒbh Öæéàd ¢ùÑ«∏«a áeóN
◗RÉ¡÷G ΩGóîà°SG πÑb ä’ƒcCÉŸG ¢ùeÓJ »àdG kGó«L ™£≤dG ∞¶f
.Iôe ∫hC’
◗áªFÓdG ‘ É¡æY ô°TDƒŸGh áHƒ∏£ŸG äÉbhC’Gh äÉ«ªµdG ió©àJ ’
◗•ÓÿGh AÉYƒ∏d É¡H í°üæj »àdG äÉ«ªµdG ió©àJ ’
◗RÉ¡÷G ∫ɪ©à°SG øe AÉ¡àf’G ó©H áYô°ùH »FÉHô¡µdG ∂∏°ùdG ´õfG
◗∫ÓN ܃ÑfC’G ‘ ä’ƒcCÉŸG §¨°†d áaô¨e hCG ∂©Ñ°UCG Ωóîà°ùJ ’
§ZÉ°†dG Ωóîà°SG §≤a .RÉ¡÷G ∫ɪ©à°SG
◗πÑb »FÉHô¡µdG QÉ«àdG ¬æY ™£bGh RÉ¡÷G 𫨰ûJ ∞bhCG kÉehO
.áaô¨e hCG ∂©HÉ°UCG ᣰSGƒH •ÓÿG AÉYh ¤G ∫ƒ°UƒdG ádhÉfi
◗∫ÉØWC’G ∫hÉæàe øY RÉ¡÷G Gòg ó©HCG
◗¬ÑfÉéH ∑OƒLh ¿hO πª©j RÉ¡÷G ´óJ ’
◗¬JÉ≤ë∏e hCG ¬©£b ióMG ´õf hCG áaÉ°VG πÑb RÉ¡÷G 𫨰ûJ ∞bh CG
◗¬Ø£°ûJ ’h ôNBG πFÉ°S …CG hCG AÉŸÉH ∑ôÙG IóMh kGóHCG ôª¨J ’
.∑ôÙG IóMh ∞«¶æàd á∏∏Ñe ¢Tɪb á©£b §≤a Ωóîà°SG .AÉŸÉH
◗kGó«L •ÓÿG AÉ£Zh RÉ¡÷G AÉYhh •ÓÿG AÉYh Ö«côJ óæY
.''∂«∏c'' ô°TDƒe 䃰U ™ª°ùà°S
◗πeÉM ≈∏Y º¡©°Vh Öéj øé©dG IGOCGh IôØ°ûdGh ÜÓëà°S’G ¢Uôb
.AÉYƒdG πØ°SC’ ¢ùeÓŸG äGhOC’G
◗.∫ɪ©à°S’G πÑb IôØ°ûdG øe »eÉ◊G AÉ£¨dG ´õfG
◗.RÉ¡÷G 𫨰ûJ AÉæKCG ká°UÉN áææ°ùŸG IôØ°ûdG ¢ùŸ ÖæŒ
◗πÑb RÉ¡÷G øY »FÉHô¡µdG QÉ«àdG ™£bG ,IôØ°ûdG ácôM âØbƒJ GPG
.ä’ƒcCÉŸG øe IôØ°ûdG ábÉYG ¢ü«∏îJ ádhÉfi
◗IQGô◊G áLQO) RÉ¡÷G ΩGóîà°SG πÑb OÈJ áæNÉ°ùdG äÉjƒàÙG ´O
( ± 175 - ájƒÄe 80 iƒ°ü≤dG
◗øe ÌcCG ™°†J ’ ,IƒZQ ¤G ∫ƒëàj ºK πFÉ°S ΩGóîà°SG ádÉM ‘
.πFÉ°ùdG ôjÉ£J Öæéàd •ÓÿG πNGO óMGh Ϋd
‘ RÉ¡÷G AÉYhh •ÓÿG AÉYh Ö«côJ ádÉM ‘ ¬fCG ôcòJ :á¶MÓe
.πª©dÉH Ωƒ≤«°S •ÓÿG AÉYh §≤a ,óMGh ¿BG
AAÉÉYYƒƒddGG
◗AÉ£¨H áëàØdG ≥∏ZGh •ÓÿG AÉYh ´õfG ,AÉYƒdG ∫ɪ©à°SG äOQG GPG
.•ÓÿG ´õf ” GPG §≤a πª©à°S AÉYƒdG ∞FÉXh ™«ªL .•ÓÿG
¿¿CCGG ¤¤GG ºº¡¡°°ùùddGG √√ÉÉŒŒÉÉHH ¢¢††ÑÑ≤≤ŸŸGG ∫∫ÓÓNN øøee RRÉÉ¡¡÷÷GG ≈≈∏∏YY AAÉÉYYƒƒddGG ÖÖccQQ
..''''∂∂««∏∏cc'''' ä䃃°°UU ™™ªª°°ùùJJ
¿¿CCGG ¤¤GG ºº¡¡°°ùùddGG √√ÉÉŒŒÉÉHH AAÉÉ££¨¨ddGG QQOOCCGG ..AAÉÉYYƒƒddGG ≈≈∏∏YY AAÉÉ££¨¨ddGG ™™°°VV
((IIƒƒ≤≤ddGG ¢¢††©©ÑÑdd êêÉÉààëëjj ∂∂ddPP)) ..''''∂∂««∏∏cc'''' ä䃃°°UU ™™ªª°°ùùJJ
OOhhõõŸŸGG ¿¿ÉÉeeCC’’GG ììÉÉààØØee
-§≤a RÉ¡÷G 𪩫°S .AÉ£¨dGh ∑ôÙG IóMh ≈∏Y äÉeÓY ™°Vh ”
áeÓ©dG πHÉ≤e ∑ôÙG IóMh ≈∏Y OƒLƒŸG º¡°ùdG ™°Vh ” GPG
.AÉ£¨dG ≈∏Y IOƒLƒŸG
»»££¨¨««°°SS ..AAÉÉYYƒƒddGG ≈≈∏∏YY OOƒƒLLƒƒŸŸGG ºº¡¡°°ùù∏∏dd AAÉÉ££¨¨ddGG ááeeÓÓYY áá≤≤HHÉÉ££ee øøee óóccCCÉÉJJ
..¢¢††ÑÑ≤≤ŸŸGG ááëëààaa AAÉÉ££¨¨ddGG ´´ÉÉØØJJQQGG ∂∂ddòòHH
RRÉÉ¡¡÷÷GG ΩΩGGóóîîàà°°SSGG
1
2
1
B
B
B
1
CLICK
2
1
CLICK
2
CLICK
Page 91

91
::kkIICCÉÉééaa π𪪩©ddGG øøYY RRÉÉ¡¡÷÷GG ∞∞bbƒƒJJ GGPPGG
§FÉ◊G øe AÉHô¡µdG ¢ùÑ≤e Öë°SG
ìÉàØe ≈∏Y §¨°VGPULSE/0
á≤«bO 60 IóŸ OÈj RÉ¡÷G ´O
§FÉ◊G ‘ AÉHô¡µdG ¢ùÑ≤e π°UhCG
ójóL øe RÉ¡÷G 𫨰ûàH ºb
äQôµJ GPG áeóî∏d ¢ùÑ«∏«a õcôe hCG ¢ùÑ«∏«a π«cƒH ∫É°üJ’G AÉLôdG
.RÉ¡÷G øY »FÉHô¡µdG QÉ«àdG ´É£≤fG á«∏ªY
Öéj ,»FÉHô¡µdG QÉ«àdG ´É£≤fG á«∏ªY øe ô£ÿG Öæéàd :ôjò–
.вbDƒe мЙаШГ RЙ¡чG Gтg π«°UƒJ ΩуY
◗RÉ¡÷G ∫ɪ©à°SG πÑb äÉeƒ°SôdG ¤G ô¶fGh kGó«L äɪ«∏©àdG CGôbG
◗πÑ≤à°ùŸG ‘ É¡eGóîà°S’ äɪ«∏©àdG √ò¡H ßØàMG
◗¬∏«°UƒJ πÑb RÉ¡÷G Gò¡d »FÉHô¡µdG QÉ«àdG áªFÓe øe ócCÉJ
( 240-220 hCG 127-110)
kkGGóóLL ºº¡¡ee
áYô°ùdÉH ºµëàdG
∑ôÙG IóMh
Ohõe »∏NGO ¿ÉeCG ìÉàØe
AÉYƒdG
(¬eGóîà°SG ΩóY óæY •ÓÿG á«£¨àd) •ÓÿG AÉ£Z
äGhOC’G πeÉM
•Óî∏d AÉYh
(¿Ée’G ìÉàØe ∞bƒjh π¨°ûj) AÉ£¨dG ìÉàØe
Î∏a
AÉYƒdG AÉ£Z
ä’ƒcCÉŸG ܃ÑfCG
§ZÉ°†dG
•Óî∏d AÉ£Z
¥ÓZÓd á∏HÉb øjõîJ áMÉ°ùe ™e AÉ£Z
áæ룪∏d ∫É«µe
áæ룪∏d Úµ°S IóMh
ᣰSƒàe íjô°ûJ IGOCG
á≤«bO íjô°ûJ IGOCG
ᣰSƒàe ™«£≤J IGOCG
∫ÉNO’G äGhOCG πeÉM
(»eÉM AÉ£Z ™e) IôØ°ûdG
øéY ≥ë∏e
ÜÓëà°S’G ¢Uôb
áaô¨e
…òdG AÉHô¡µdG QÉ«J ™£≤d »µ«JÉeƒJhCG ΩɶæH RÉ¡÷G Gòg º«ª°üJ ”
.¬«∏Y IQGô◊G áLQO OÉjORG ádÉM ‘ ∑ôÙG ájɪ◊ πª©j
ääÉÉ≤≤ëë∏∏eehh ™™££bb ::ΩΩÉÉ©©WW áá©©ffÉÉ°°UU
ááeeóó≤≤ee
(A
(B
(C
(D
(E
(F
(G
(H
(I
(J
(K
(L
(M
(N
(O
(P
(Q
(R
(S
(T
(U
(V
(w
(X
2
3
4
5
1
Page 92

92
h
Page 93

93
P
P
P
Page 94

94
Pgj
PS
Page 95

95
{ S
D
Page 96

96
k
P
P
P
S
Page 97

97
P
D
S
P
D
P
P
P
g
P
D
S
Page 98

98
P
P
D
P
g
{
{
P
P
{
S
P
P
Page 99

99
P
P
P
jk
g
P
jk
B
B
Page 100

100100
B
B
B
 Loading...