

Page 1

HR7638
Recipes & Directions for use
Рецепты и Инструкции по эксплуатации
Рецепти та інструкції з використання приладу
Recepty & Návod k použití
Recepti in navodila za uporabo
Recepty & Návod k použití
Receptek & Használati utasítások
Recepty a návod na použitie
Reţete şi Instrucţiuni de utilizare
Page 2

2
Page 3

3
A
B
C
D
E
F
G
H
I
J
K
L
M
N
O
P
Q
R
S
T
U
Page 4

4
Page 5

ENGLISH 6
ROMÂNĂ 21
РУССКИЙ 36
ČESKY 54
MAGYAR 68
УКРАЇНСЬКІЙ 83
HRVATSKI 99
SLOVENŠČINA 112
SLOVENSKY 127
HR7638
5
Page 6

ENGLISH6
Food processor: parts and accessories
A) Speed control
B) Motor unit
C) Built-in saftely lock
D) Bowl
E) Screw cap (for closing the blender fixing hole
when the blender is not in use)
F) Tool holder
G) Blender jar
H) Peg of lid (activates and deactivates the
safety switch)
I) Lif of bowl
J) Feed tube
K) Pusher
L) Lid of blender jar
M) Cover with closable insert storage space
N) Slicing insert medium
O) Slicing insert fime
P) Shredding insert medium
Q) Insert holder
R) Blade (with protective cover)
S) Kneading accessory
T) Emulsifying disc
U) Spatula
Introduction
This appliance has been equipped with an
automatic thermal cut-off system. This system will
automatically cut off the power supply to the
appliance in case of overheating.
If your appliance suddenly stops
running:
1 Pull the mains plug out of the wall socket.
2 Press the 'PULSE / 0' button to switch the
appliance off.
3 Let the appliance cool down for
60 minutes.
4 Put the mains plug in the wall socket.
5 Switch the appliance on again.
Please contact your Philips dealer or authorised
Philips service centre if the automatic thermal cutout system is activated too often.
CAUTION: In order to avoid a hazardous
situation, this appliance must never be connected
to a timer switch.
Important
◗ Read the instructions for use carefully and
look at the illustrations before using the
appliance.
◗ Keep these instructions for use for future
reference.
◗ Check if the voltage indicated on the
appliance corresponds to the local mains
voltage (110-127V or 220-240V) before you
connect the appliance.
Page 7

ENGLISH 7
◗ Never use any accessories or parts from
other manufacturers or that have not been
specifically advised by Philips. Your guarantee
will become invalid if such accessories or
parts have been used.
◗ Do not use the appliance if the mains cord,
the plug or other parts are damaged.
◗ If the mains cord is damaged, it must be
replaced by Philips, a service centre
authorised by Philips or similarly qualified
persons in order to avoid a hazard.
◗ Thoroughly clean the parts that will come
into contact with food before you use the
appliance for the first time.
◗ Do not exceed the quantities and preparation
times indicated in the tables and recipes.
◗ Do not exceed the maximum content
indicated on the bowl or the blender jar, i.e.
do not fill beyond the top graduation.
◗ Unplug the appliance immediately after use.
◗ Never use your fingers or an object (e.g. a
spatula) to push ingredients down the feed
tube while the appliance is running. Only the
pusher is to be used for this purpose.
◗ Always unplug the appliance before reaching
into the blender jar with your fingers or an
object (e.g. a spatula).
◗ Keep the appliance out of the reach of
children.
◗ Never let the appliance run unattended.
◗ Never switch the appliance off by turning the
lid. Always switch the appliance off by
pressing the PULSE / 0 button.
◗ Switch the appliance off before detaching any
accessory.
◗ Never immerse the motor unit in water or
any other fluid, nor rinse it under the tap. Use
only a moist cloth to clean the motor unit.
◗ When you mount the blender jar, the bowl
and the screw cap in the proper way, you will
hear a click.
◗ The emulsifying disc, the blade and the
kneading accessory have to be placed on the
toolholder that stands in the bowl.
◗ Remove the protective cover from the blade
before use.
◗ Avoid touching the SHARP cutting edges of
the blades and inserts, especially when the
appliance is plugged in.
◗ If one of the blades get stuck, unplug the
appliance before removing the ingredients
that are blocking the blades.
◗ Let hot ingredients cool down before
processing them (max. temperature
80cC/175cF).
◗ If you are processing a liquid that tends to
foam, do not put more than 1 litre into the
blender jar to avoid spillage.
Note that if both the blender and the bowl have
been correctly mounted, only the blender will
function.
Page 8
ENGLISH8
Using the appliance
Bowl
◗ If you want to use the bowl, remove the
blender jar and close the fixing hole with the
screw cap. All functions that require the use
of the bowl will only work if the blender jar
has been removed.
C
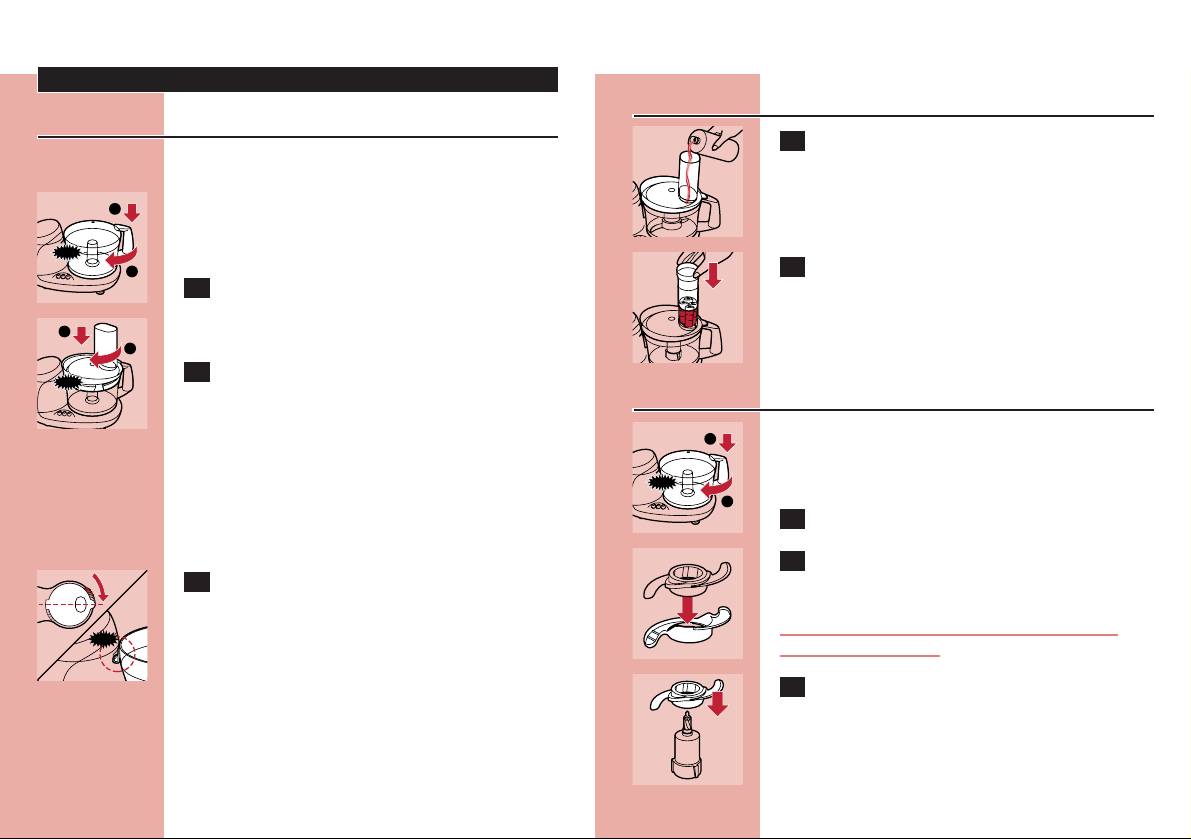
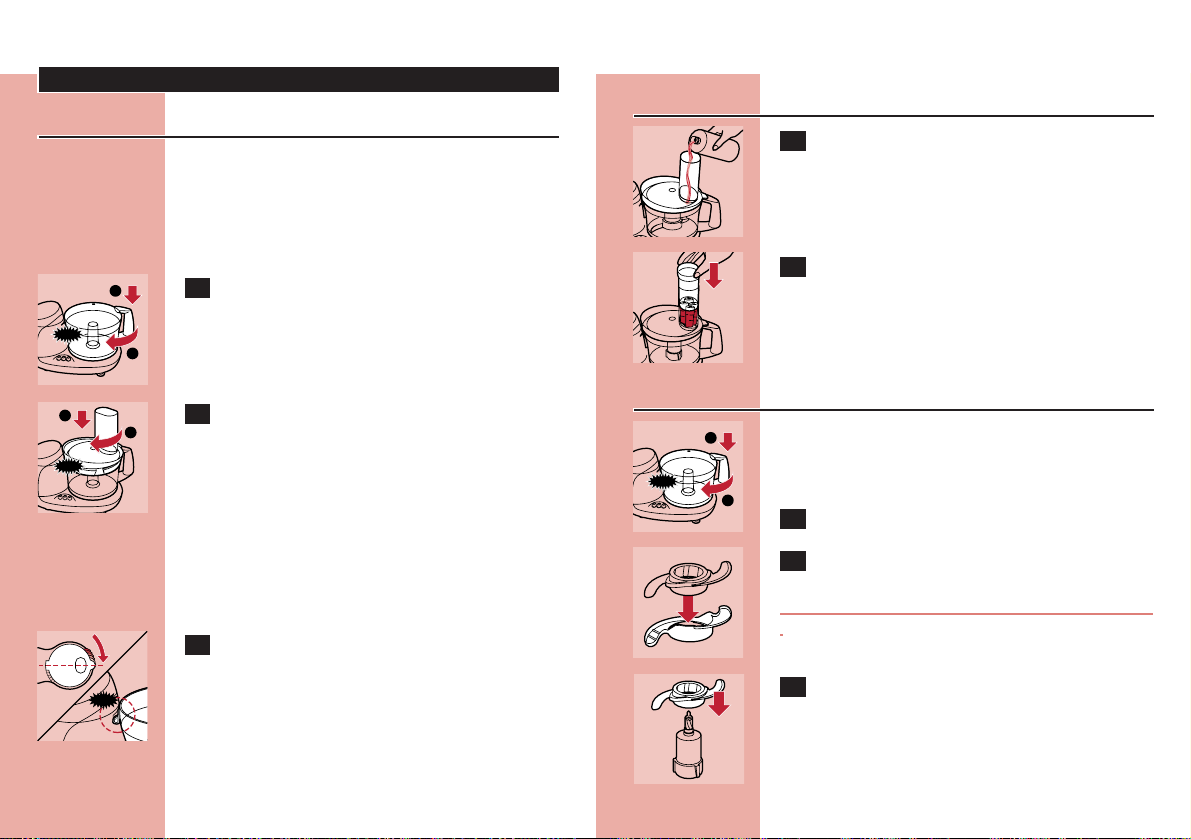
1 Mount the bowl on the food processor by
turning the handle in the direction of the
arrow until you hear a click.
C
2 Put the lid on the bowl. Turn the lid in the
direction of the arrow until you hear a
click (this requires some force).
Built-in safety lock
B
The motor unit as well as the lid have been
provided with marks. The appliance will only
function if the arrow on the motor unit is placed
directly opposite the mark on the lid.
C
1 Make sure that the mark on the lid and
the arrow on the bowl are directly
opposite each other. The projection of the
lid will now cover the opening of the
handle.
CLICK
Feed tube and pusher
C
1 Use the feed tube to add liquid and/or
solid ingredients. Use the pusher to push
solid ingredients down the feed tube.
C
2 You can also use the pusher to close the
feed tube in order to prevent ingredients
from escaping down the feed tube.
Blade
◗ The blade can be used for chopping, mixing,
blending, pureeing and preparing cake
mixtures.
C
1 Put the bowl on the motor unit.
C
2 Remove the protective cover from the
blade.
The cutting edges of the blade are very sharp
Avoid touching them!
C
3 Put the blade on the tool holder.
CLICK
1
2
1
2
CLICK
CLICK
1
2
Page 9

ENGLISH 9
C
4 Put the tool holder in the bowl.
5 Put the ingredients in the bowl. Pre-cut
large pieces of food into pieces of approx.
3 x 3 cm. Put the lid on the bowl.
C
6 The buttons allow you to adjust the speed
of the appliance to obtain optimal results.
B
'PULSE / 0' button: for pulse operation and for
turning the appliance off. If the PULSE / 0 button
is pressed the appliance runs at the highest
speed. The appliance stops running when the
button is released.
B
button 1: for normal speed.
B
button 2: for high speed.
See the table for the recommended speeds.
Processing takes 10 - 60 seconds.
Tips
◗ The appliance chops very quickly. Use the
pulse function for short periods at a time to
prevent the food from becoming too finely
chopped.
◗ Do not let the appliance run too long when
you are chopping (hard) cheese. The cheese
will become too hot, will start to melt and
will turn lumpy.
◗ Do not use the blade to chop very hard
ingredients like coffee beans, nutmeg and ice
cubes. The blade might get blunt.
If food sticks to the blade or to the inside of the
bowl:
1 Switch the appliance off.
2 Remove the lid from the bowl.
3 Remove the ingredients with the spatula.
Inserts
The cutting edges of the inserts are very sharp
Do not touch them!
Do not process hard ingredients, such as ice
cubes, with the inserts!
C
1 Put the selected insert in the insert holder.
C
2 Place the insert holder onto the tool
holder that stands in the bowl.
3 Put the lid on the bowl.
C
4 Put the ingredients in the feed tube. Pre-
cut large chunks to make them fit into the
feed tube.
5 Fill the feed tube evenly for the best
results.
When you have to cut large amounts of food,
process only small batches at a time and empty
the bowl regularly between the batches.
1
CLICK
2
Page 10
ENGLISH10
3 Select the appropriate speed to obtain
optimal results. See the table for the
recommended speed.
Processing takes 10-60 seconds.
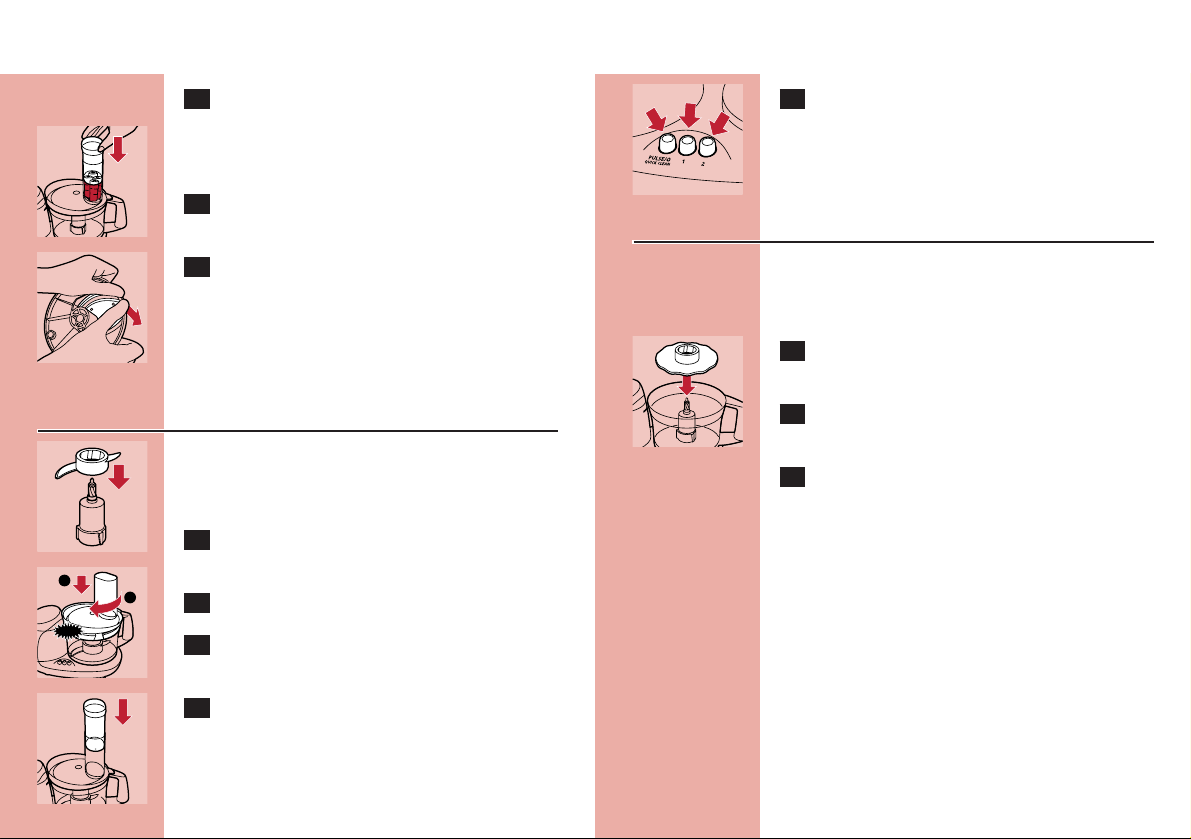
C
4 Press the ingredients slowly and steadily
down the feed tube with the pusher.
C
5 To remove the insert from the insert
holder, take the insert holder in your
hands with its bottom pointing towards
you. Push the edges of the insert with
your thumbs to make the insert fall out of
the holder.
Kneading accessory
The kneading accessory can be used for kneading
dough for bread and dumplings and for mixing
batters and cake mixtures.
C
6 Fit the kneading accessory onto the tool
holder.
7 Put the ingredients in the bowl.
C
8 Close the bowl with the lid.
C
9 Close the feed tube by placing the pusher
in it.
C
10 Select the appropriate speed to obtain
optimal results. See the table for the
recommended speed.
Emulsifying disc
You can use the emulsifying disc to prepare
mayonnaise, to whip cream and to whisk egg
whites.
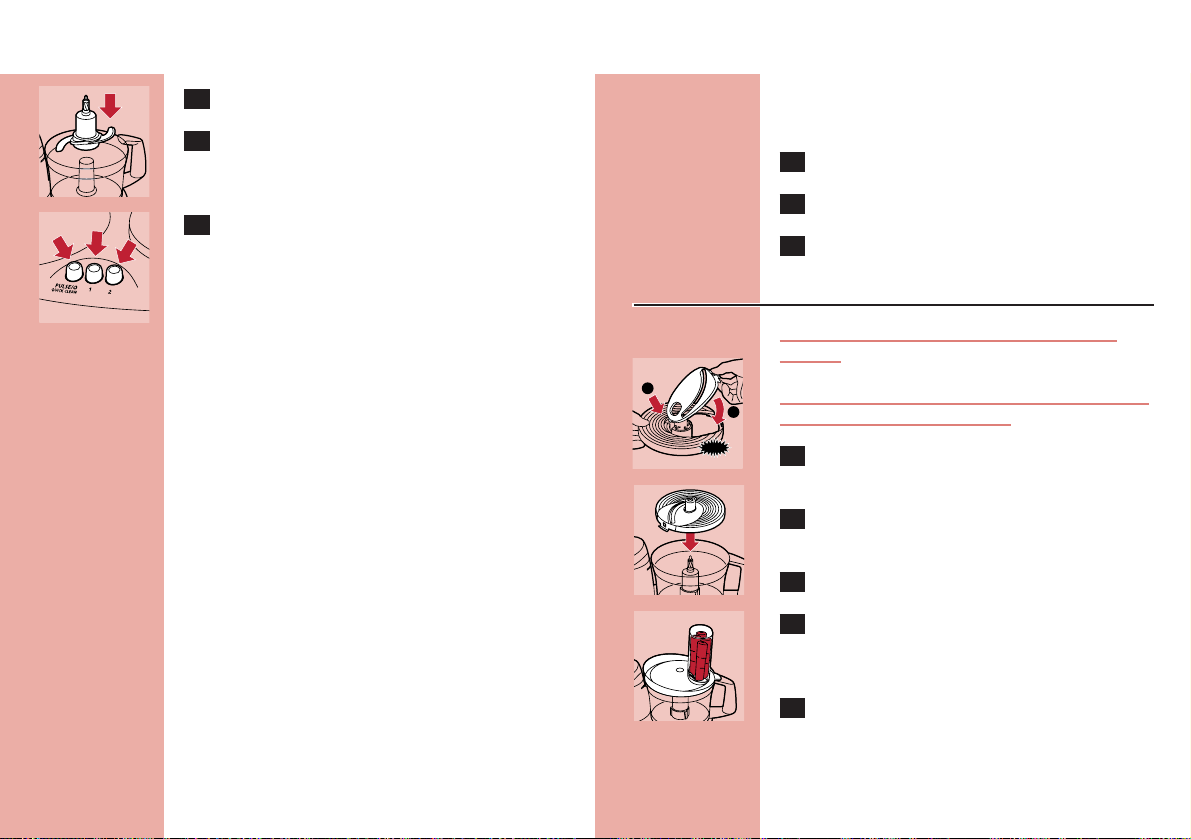
C
11 Put the emulsifying disc onto the tool
holder that stands in the bowl.
12 Put the ingredients in the bowl and put the
lid on the bowl.
13 Select the appropriate speed to obtain
optimal results. See the table for the
recommended speed.
Tips
◗ When you want to whisk egg whites, make
sure the eggs are at room temperature.
Take the eggs out of the refrigerator at least half
an hour before you are going to use them.
◗ All the ingredients for making mayonnaise
must be at room temperature.
Oil can be added through the small hole in the
bottom of the pusher.
CLICK
1
2
Page 11
ENGLISH 11
◗ If you are going to whip cream, the cream
must be taken straight from the refrigerator.
Please observe the preparation time in the
table. Cream should not be whipped too long.
Use the pulse function to have more control over
the process.
Blender
The blender is intended for:
- Blending fluids, e.g. dairy products, sauces, fruit
juices, soups, mixed drinks, shakes.
- Mixing soft ingredients, e.g. pancake batter or
mayonnaise.
- Pureeing cooked ingredients, e.g. for making
baby food.
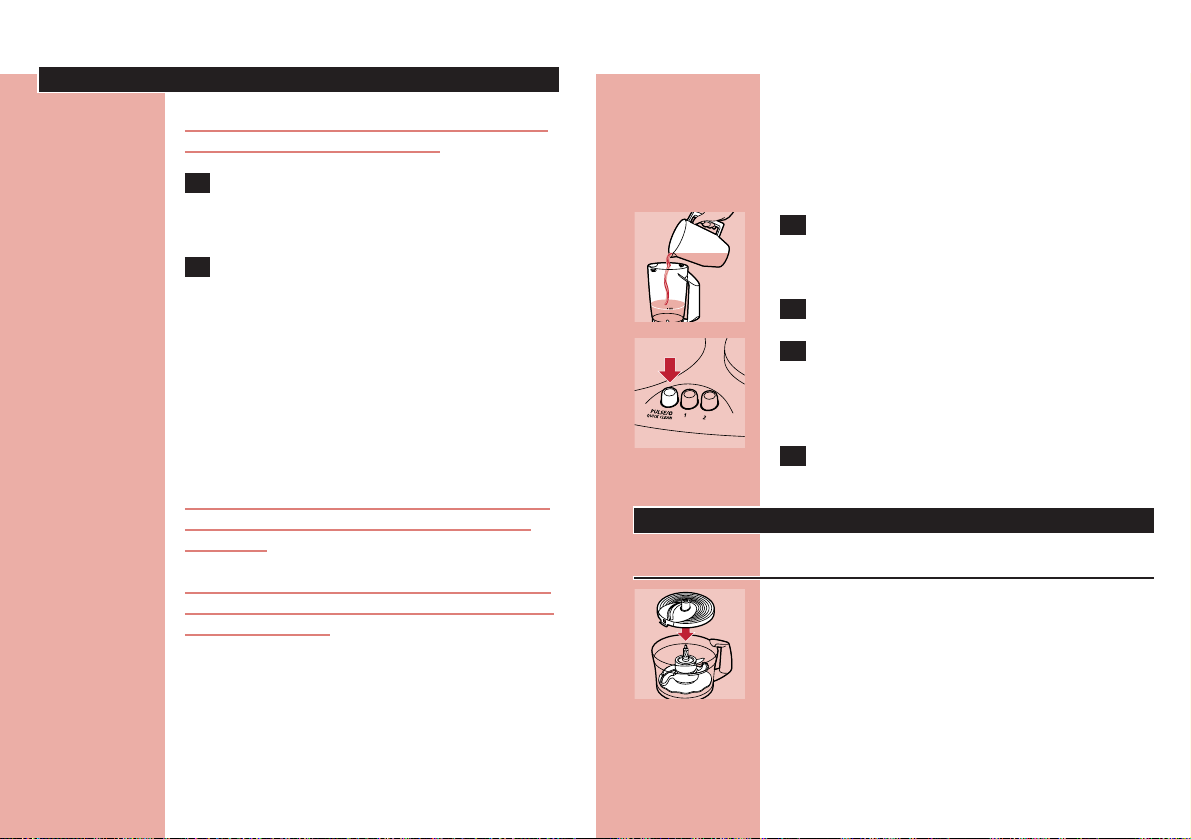
C
14 Remove the screw cap.
C
15 Mount the blender jar in the fixing hole by
turning it in the direction of the arrow
until it is firmly fixed.
Do not exert too much pressure on the handle
of the blender jar.
C
16 Put the ingredients in the blender jar.
17 Screw the lid onto the blender jar.
18 Switch the appliance on and blend the
ingredients. The buttons allow you to
adjust the speed of the appliance to obtain
optimal results. See the table for the
recommended speed.
Tips
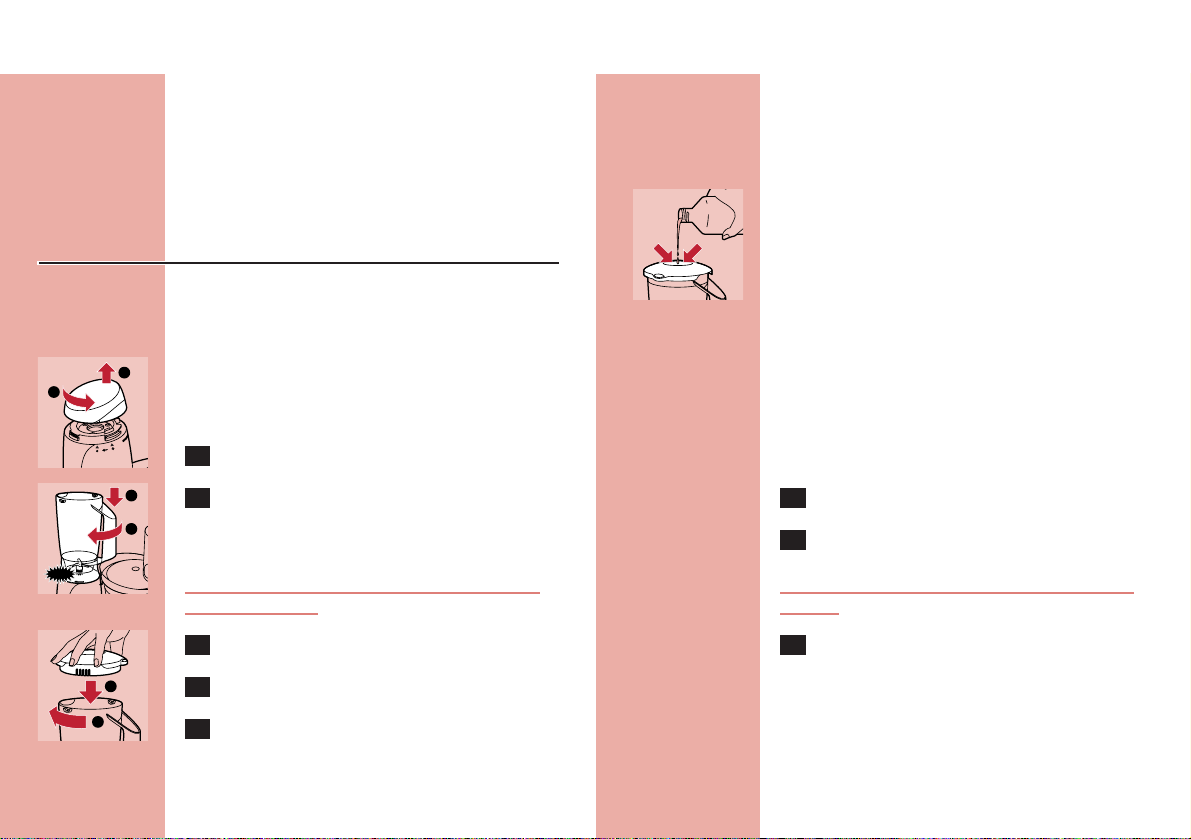
C
◗ Pour liquid ingredients into the blender jar
through the hole in the lid.
◗ The longer you let the appliance run, the finer
the blending result will be.
◗ Pre-cut solid ingredients into smaller pieces
before putting them into the blender. If you
want to prepare a large quantity, process
small batches of ingredients instead of trying
to process a large quantity at once.
◗ If you have doubts about the right speed,
always choose the highest speed (button 2).
If ingredients stick to the wall of the blender jar:
1 Switch the appliance off and unplug it.
2 Remove the lid.
Never remove the lid while the appliance is still
running.
3 Use a spatula to remove the ingredients
from the wall of the jar.
Keep the spatula at a safe distance from the
cutting edges of the blade unit (approx. 2 cm).
1
CLICK
2
1
2
1
2
Page 12
ENGLISH12
Cleaning
Always unplug the appliance before you start
cleaning the motor unit.
1 Clean the motor unit with a damp cloth.
Do not immerse the motor unit in water
and do not rinse it either.
2 Always clean the parts that have come
into contact with food in hot water with
washing-up liquid immediately after use.
◗ The bowl, the lid of the bowl, the pusher and
the accessories can also be washed in a
dishwasher.
These parts have been tested for dishwasher
resistance according to DIN EN 12875.
The cover with insert storage space and the
blender jar are not dishwasher proof!
Clean the blade, the blade unit of the blender and
the inserts very carefully. Their cutting edges are
very sharp!
Make sure that the cutting edges of the blade, the
blade unit of the blender and the inserts do not
come into contact with hard objects. This could
cause them to become blunt.
Certain ingredients may cause discolourations on
the surface of the accessories. This does not have
a negative effect on the accessories. The
discolourations usually disappear after some time.
Blender quick-cleaning operation
C
1 Pour lukewarm water (not more than
0.5 litres) and some washing-up liquid into
the blender jar.
2 Assemble the lid.
C
3 Let the appliance run for a few moments
by pressing the Pulse button. (The
appliance stops running when you release
the button.)
4 Detach the blender jar and rinse it with
clean water.
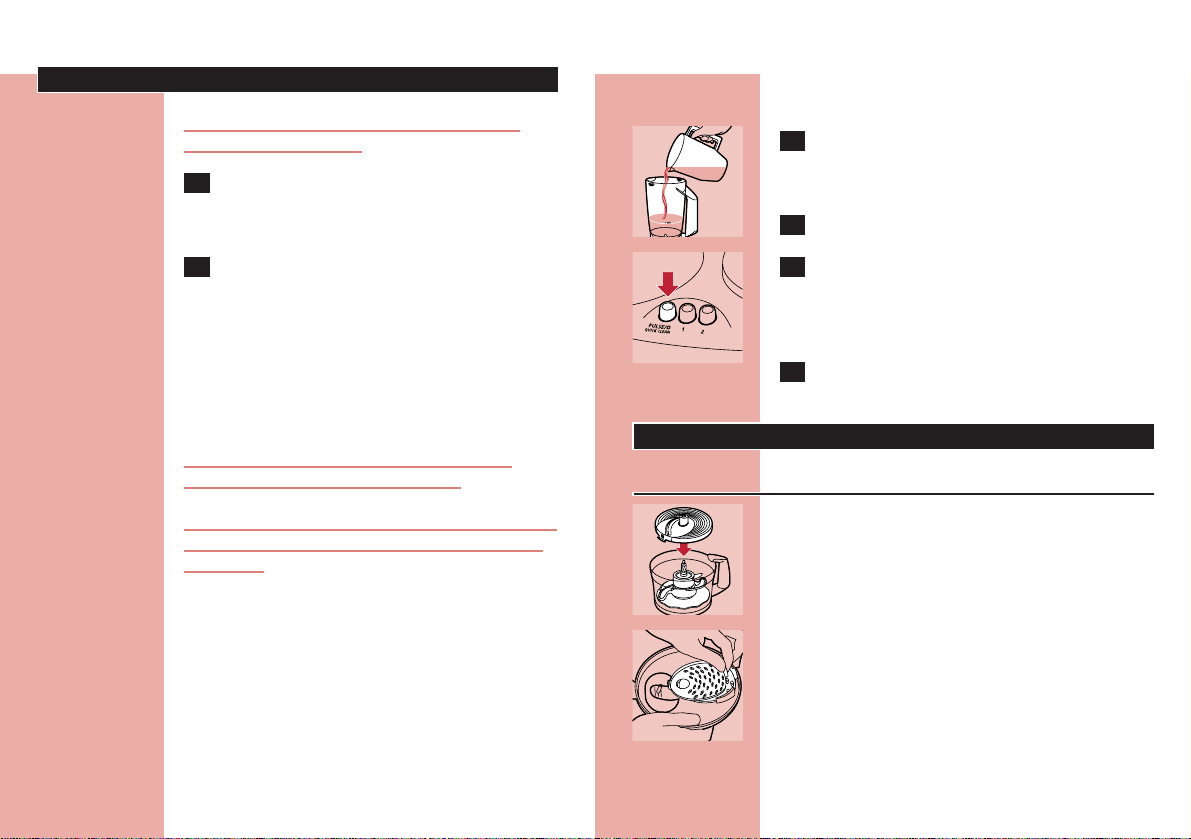
Storage
MicroStore
C
◗ Put the accessories (emulsifying disc, blade,
kneading accessory, insert holder) on the tool
holder and store them in the bowl. Always
end up with the insert holder.
C
◗ Two inserts can be stored in the storage
space in the cover that covers the lid of the
bowl, as indicated on the inside of the cover.
The inserts have to be slid into the cover, not
pressed.
Page 13

13ENGLISH
C
◗ Place the cover with insert storage space on
the transparent lid of the bowl.
◗ Wrap the mains cord around the reel on the
back of the appliance.
Information & service
If you need information or if you have a problem,
please visit the Philips Web site at
www.philips.com or contact the Philips
Customer Care Centre in your country (you will
find its phone number in the worldwide
guarantee leaflet).
If there is no Customer Care Centre in your
country, turn to your local Philips dealer or
contact the Service Department of Philips
Domestic Appliances and Personal Care BV.
Quantities and preparation times
Applications
Pancakes,
waffles
Breadcrumbed
dishes, au
gratin dishes
Desserts,
toppings
Garnishing,
raw
vegetables,
turnip dishes,
cakes, dips
Salads
Garnishing,
soup, sauces,
au gratin
dishes
Sauces, pizzas,
au gratin
dishes, fondue
Procedure
First pour the milk into the
blender and then add the dry
ingredients. Mix the ingredients
approx. 1 minute. If necessary,
repeat this procedure 2 times.
Use dry, crispy bread.
Use soft butter for a light
result.
Cut the vegetables into pieces
that fit into the tube. Fill the
feed tube with the pieces and
shred them while pressing the
pusher down lightly.
Fill the feed tube with pieces of
vegetables and press them
carefully down with the pusher.
Use a piece of rindless
Parmesan and cut it into pieces
of approx. 3 x 3 cm.
Cut the cheese into pieces that
fit into the tube. Press the
pieces carefully down with the
pusher.
Speed
/acces
sory
2 / P
2 / P
2 / P
2 / j
k
2 / P /
g
2 / P
2 / j
k
Max.
quanti
ty
250
ml
milk
100g
300g
350g
350g
200g
200g
Ingredients &
results
Batter
(pancake) whisking
Breadcrumbs chopping
Butter cream
(creme au
beurre) whisking
Vegetables
(carrots,
turnips, white
radishes) shredding
Vegetables
(carrots, leaks,
celery) - slicing
Cheese
(Parmesan) chopping
Cheese
(Gouda) shredding
Page 14

ENGLISH14
Applications
Garnishing,
sauces, pastry,
puddings,
mousses
Purees, soups
Baby and
infant food
Salad,
garnishing
Bread
Pizza
Apple pies,
sweet biscuits,
open fruit flans
Procedure
Use hard, plain chocolate.
Break it into pieces of 2 cm.
Use cooked peas or beans. If
necessary, add some liquid to
improve the consistency of the
mixture.
For coarse puree, add only a
little liquid. For fine puree, keep
adding liquid until the mixture
is smooth enough.
Put the cucumber in the tube
and press it carefully down
with the pusher.
Mix warm water with yeast and
sugar. Add flour, oil and salt
and knead the dough for
approx. 90 seconds. Leave to
rise for 30 minutes.
Follow the same procedure as
for bread dough. Knead the
dough for approx. 1 minute.
First put in the flour and then
the other ingredients.
Use cold margarine, cut into
pieces of 2 cm. Put all the
ingredients in the bowl and
knead until the dough has
turned into a ball. Allow the
dough to cool before further
processing.
Speed
/acces
sory
2 / P
2 / P
D
2 / P
1 / g
2 / {
2 / {
2 / P
Max.
quanti
ty
200g
250g
300g
1
cucum
ber
350g
flour
400g
flour
200g
flour
Ingredients &
results
Chocolate chopping
Cooked peas,
beans pureeing
Cooked
vegetables and
meats pureeing
Cucumbers slicing
Dough (for
bread) kneading
Dough (for
pizzas) kneading
Dough (for
shortcrust
pastry) kneading
Applications
Fruit tarts, pies,
quiches
Luxury bread
Pudding,
soufflees,
meringues
Puddings, baby
food
Garnishing,
dips
Procedure
Use cold margarine and cold
water. Put flour in the bowl
and add the margarine cut into
pieces of 2cm. Mix at the
highest speed until the dough
has become crumbly, then add
cold water while mixing. Stop
as soon as the dough starts to
turn into a ball. Allow the
dough to cool before further
processing.
First mix yeast, warm milk and
some sugar in a separate bowl.
Put all the ingredients in the
food processor bowl and
knead the dough until it is
smooth and no longer sticks to
the wall of the bowl (takes
approx. 1 minute). Leave it to
rise for 30 minutes.
Use egg whites at room
temperature. Note: use at least
2 egg whites.
Tip: add a little lemon juice to
prevent the fruit from
discolouring. Add some liquid
to obtain a smooth puree.
Peel the garlic. Always press
the pulse button several times
to prevent the garlic from
being chopped too fine. Use at
least 150g.
Speed
/acces
sory
2 / P
2 / {
2 / S
P / P
P / P
Max.
quanti
ty
200g
flour
300g
flour
4 egg
whites
500g
300g
Ingredients &
results
Dough (for
tarts, pies) kneading
Dough (yeast)
- kneading
Egg whites emulsifying
Fruit (e.g.
apples,
bananas) chopping/pure
eing
Garlic chopping
Page 15

ENGLISH 15
Applications
Sauces, soups,
garnishing,
herb butter
Fruit juices
Salads,
garnishing and
barbecue
sauces
Steaks tartare,
hamburgers,
meat balls
Milkshakes
Various cakes.
Salads, bread,
almond paste,
puddings
Procedure
Wash and dry the herbs before
chopping
Add water or another liquid
(optional) to obtain a smooth
juice.
All the ingredients must be at
room temperature. Note: use
at least one large egg, two
small eggs or two egg yolks.
Put the egg and a little vinegar
in the bowl and add the oil
drop by drop.
First remove any sinews or
bones. Cut the meat into cubes
of 3 cm. Use the pulse function
for a coarser chopping result.
Puree the fruit (e.g. bananas,
strawberries) with sugar, milk
and some ice cream and mix
well.
The ingredients must be at
room temperature. Mix the
softened butter and the sugar
until the mixture is smooth and
creamy. Then add milk, eggs
and flour.
Use the pulse button for
coarse chopping or speed 2 for
fine chopping.
Speed
/acces
sory
2/P / P
2 / D
1-2 /
S
2/ P /
P
2 / D
2 / P
2/ P /
P
Max.
quanti
ty
Min.
75g
500g
(total
amou
nt)
3 eggs
300g
250ml
milk
3 eggs
250g
Ingredients &
results
Herbs (e.g.
parsley) chopping
Juices (e.g.
papaya, water
melon, pear) blending
Mayonnaise emulsifying
Meat (lean) mincing
Milkshakes blending
Cake mixture
- mixing
Nuts chopping
Applications
Stir-fries,
garnishing
Stir-fries,
garnishing
Minced meat
Soups, sauces
Garnishing,
cream, icecream
mixtures
Procedure
Peel the onions and cut them
into 4 pieces. Note: use at least
100g. Always press the pulse
button several times to prevent
the onions from being chopped
too fine.
Peel the onions and cut them
into pieces that fit into the
tube. Note: use at least 100g.
First remove any sinews or
bones. Cut the meat into cubes
of 3 cm. Use the pulse button
for a coarser chopping result.
Use cooked vegetables
Use cream that comes straight
from the refrigerator. Note:
use at least 125ml cream. The
whipped cream is ready after
approx. 20 seconds.
Speed
/acces
sory
P / P
1 / g
2/ P /
P
2 / D
P / S
Max.
quanti
ty
400g
300g
200g
500ml
350ml
Ingredients &
results
Onions chopping
Onions slicing
Poultry mincing
Soups blending
Whipping
cream whipping
Page 16

ENGLISH16
Recipes
Broccoli soup (for 4 persons)
h or D
- 50g mature Gouda cheese
- 300g cooked broccoli (stalks and florets)
- cooking liquid of the broccoli
- 2 boiled potatoes in pieces
- 2 stock cubes
- 2 tbsp whipping cream
- curry
- salt
- pepper
- nutmeg
B
Shred the cheese. Puree the broccoli with the
boiled potatoes and some of the cooking liquid of
the broccoli. Put the broccoli puree and the
remaining liquid and stock cubes into a measuring
beaker and fill it up to 750ml. Transfer the soup
to a pan and bring it to the boil while stirring. Stir
in the cheese and season with curry, salt, pepper
and nutmeg and add the cream.
Fruit cake
P
- 450 g dry pitted dates, halved
- 200 g dry plums, halved
- 650 g pecan nuts
- 160 g shredded coconut
- 300 g glazed pineapple
- 1 tin (400 g) sweetened condensed milk
- 1 tsp vanilla essence
B
Grease two 20cm-long baking tins and preheat
the oven to 135c C.
B
Put the halved dates and plums in the food
processor bowl and chop at maximum speed for
30 seconds. Then empty the bowl.
B
Put the pecan nuts in the food processor bowl
and roughly chop the nuts, using the pulse
function. Then empty the bowl.
B
Put the glazed pineapple in the food processor
bowl and chop into pieces, using the pulse
function. Then empty the bowl.
B
Mix the dates, plums, pecan nuts, pineapple and
shredded coconut in a large mixing bowl and mix
them.
B
Add milk and vanilla to the ingredients and mix.
B
Put the fruit mixture in the baking tins and bake
the cakes at 135c C for 90 minutes.
B
Do not process this recipe more than once
without interruption. if you need to more
quantities, let the appliance cool down first and
then continue the process.
Mashed potatoes
P
- 750g cooked potatoes
- approx. 250ml hot milk (90cC)
- 1 tbsp of butter
- salt
B
First mash the potatoes, then add milk, salt and
butter. Use speed 1 and process for only approx.
30 seconds to prevent the puree from becoming
sticky.
Page 17

ENGLISH 17
- 20g fresh yeast or 1.5 sachets dried yeast
- approx. 240ml water (35cC)
For the topping:
- 300ml sieved tomatoes (tinned)
- 1 tsp mixed Italian herbs (dried or fresh)
- 1 onion
- 2 cloves garlic
- salt and pepper
- sugar
- Ingredients to be spread on the sauce: olives,
salami, artichokes, mushrooms, anchovies,
Mozzarella cheese, peppers, grated mature
cheese and olive oil according to taste.
B
Place the kneading accessory in the bowl. Put all
the ingredients in the bowl and select speed
2. Knead the dough for approx. 1 minute until a
smooth ball has formed. Hold the appliance down
with one hand to prevent it from moving around
on the worktop. Put the dough in a separate bowl,
cover it with a damp cloth and leave it to rise for
about 30 minutes.
B
Use the blade to chop the onion and the garlic.
Fry the chopped onion and garlic until transparent.
B
Add the sieved tomatoes and the herbs and
simmer the sauce for about 10 minutes.
B
Season to taste with salt, pepper and sugar. Allow
the sauce to cool down.
B
Heat the oven to 250cC.
B
Roll the dough out on a floured worktop and
make two round shapes. Place the dough shapes
on a greased baking tray. Spread the topping on
Mayonnaise
S
- 2 egg yolks or 1 large egg
- 1 tsp mustard
- 1 tsp vinegar
- 200ml oil
B
The ingredients must be at room temperature. Put
the emulsifying disc in the bowl. Put the egg yolks
or egg, mustard and vinegar in the bowl. Use
speed 1 or 2. Pour the oil gradually through the
feed tube onto the rotating disc. You can use the
hole in the pusher to add the oil.
B
Tip for tartare sauce: add parsley, gherkins and
hard-boiled eggs.
B
Tip for cocktail sauce: add 50ml creme fraiche, a
dash of whisky, 3 tsp tomato puree and a dash of
ginger syrup to 100ml mayonnaise.
Milkshake
D
- 175ml milk
- 10g sugar
- 1/2 banana or approx.
- 65g other fresh fruit
- 50g vanilla ice cream
B
Mix all the ingredients until the mixture is frothy.
Pizza
{
- 400g flour
- 40 ml oil
- 1/2 tsp salt
Page 18

ENGLISH18
B
Drain the fried courgette slices on kitchen paper.
B
Grease a low-sided oven dish and put the
courgette and potato slices in the dish, alternating
them and arranging them in such way that they
partly overlap like roof tiles.
B
Whisk the egg with the cream and the milk with
the blade at speed 2. Add salt and pepper
according to taste and pour the mixture over the
potato and courgette slices in the dish.
B
Replace the slicing insert with the shredding insert,
shred the cheese at speed 2 and sprinkle it over
the dish.
B
Put the dish in the centre of a hot oven (200cC)
and brown it in about 15 minutes.
Salmon mousse
PS
- 1 tin of salmon (220g)
- 2 sheets of gelatine
- a few stems of chives
- pinch salt
- pinch cayenne pepper
- half tbsp lemon juice
- 125ml whipping cream
- 1 small onion
- watercress for garnishing
B
Soak the gelatine in plenty of water.
B
Chop the chives and onions in the food processor
using the pulse function.
B
Remove the bones and the skin from the salmon.
B
Add salt, cayenne pepper, lemon juice, salmon
and the liquid from the tin to the chopped chives
and onion and puree the ingredients at speed 2.
the pizza, leaving the edges free. Spread with the
desired ingredients, scatter some grated cheese
over the pizza and drip some olive oil over it.
B
Bake the pizzas for 12 to 15 minutes.
Potato-courgette gratin
Pgk
- 375g potatoes
- pinch salt
- 1 courgette (approx. 250g)
- 1 clove of garlic, crushed
- approx. 40g butter + butter to grease the oven
dish
- 2 tsp Italian or Provencal herbs
- 1 large egg
- 75ml whipping cream
- 75ml milk
- pepper
- 70g semi-matured cheese
B
Peel and wash the potatoes.
B
Put the slicing insert in the insert holder and place
the insert holder in the bowl. Slice the potatoes
and the courgette at speed 1.
B
Cook the potato slices in boiling water with a
pinch of salt until they are almost done.
B
Put the slices in a colander and drain them
properly.
B
Put 20g butter and crushed garlic in a frying pan,
fry half of the courgette slices for 3 minutes while
turning them frequently. Sprinkle the slices with
1 tsp of Italian or Provencal herbs. Fry the other
half of the courgette slices in the same way.
Sprinkle them with the rest of the herbs.
Page 19

19
Spanish cabbage salad
P
- 1 small red cabbage
- 2 red onions
- 1 fennel
- 1 apple
- juice of one orange and 2 tbsp red wine
vinegar
- 1 tbsp mustard
B
Mix the juice, mustard and vinegar. Slice the
cabbage, onions, fennel and apple at speed 1.
B
Combine the ingredients in a salad bowl.
Sponge cake
P
- 4 eggs
- 30ml of water (35cC)
- 1 pinch of salt
- 150g sugar
- 1 sachet vanilla sugar
- 150g sieved flour
- 3g baking powder
B
Beat the eggs and the water for approx.
2 minutes. Gradually add the sugar, the vanilla
sugar and the salt and mix for approx. 1 minute.
The mixture should leave a trail when you lift
some of it from the bowl with a spoon. Fold in the
flour and baking powder with a spatula. Bake it in
30-35 minutes.
B
Tip: You can fill the sponge cake with different
kinds of butter cream or simply with whipped
cream and fresh fruit.
ENGLISH
B
Put the puree in a bowl.
B
Boil a small quantity of water and dissolve the
gelatine in it.
B
Stir the gelatine solution through the salmon
puree.
B
Put the emulsifying disc in the bowl and whip the
cream by pressing the pulse button for about
15 seconds.
B
Fold the whipped cream into the salmon puree
with a wooden spoon.
B
Turn the mousse out onto a dish, cover it and chill
it in the refrigerator for a few hours.
B
Garnish the mousse with some watercress.
Sandwich spread
P
- 2 small carrots in pieces
- 2-3 gherkins in pieces
- 75g cauliflower in pieces
- 75g celeriac in pieces
- green herbs (parsley, dill, tarragon, celery stalks
in pieces)
- 100g mayonnaise
- 100g quark
- salt
- pepper
B
Chop the carrots, gherkins, cauliflower, green
herbs, celery stalks and celeriac fine. Mix in the
mayonnaise and quark carefully and season to
taste with pepper and salt.
Page 20

ENGLISH20
Tzatziki
k
- 1 cucumber
- 200ml yoghurt
- 1 tbsp olive oil
- 2 cloves garlic
- pinch salt
- 1 tsp finely chopped dill
- a few mint leaves
B
Peel the cucumber and shred it at speed 1. Put
the shredded cucumber in a colander and let it
drain properly.
B
Mix the other ingredients, except for the mint
leaves, through the cucumber. Chill the salad by
putting it in a covered bowl in the refrigerator for
one hour. Sprinkle mint leaves on top before
serving.
Page 21

ROMÂNĂ 21
Robot de bucătărie: componente şi accesorii
A) Reglaj viteză
B) Bloc motor
C) Dispozitiv de siguranţă încorporat
D) Bol
E) Dop filetat (pentru închiderea orificiului
pentru fixarea blenderului când acesta nu
este folosit)
F) Ax ustensile
G) Vas blender
H) Ştift capac (cuplează şi decuplează butonul de
siguranţă)
I) Capac bol
J) Tub de alimentare
K) Dispozitiv de împingere
L) Capac pentru vas blender
M) Capac cu spaţiu de depozitare discuri
N) Disc feliere medie
O) Disc radere fină
P) Disc radere medie
Q) Ax discuri
R) Cuţit (cu înveliş protector)
S) Accesoriu de frământare
T) Disc de emulsionare
U) Spatulă
Introducere
Acest aparat a fost echipat cu o siguranţă termică
automată. Acest sistem va opri automat
alimentarea cu curent a aparatului în cazul
supraîncălzirii.
Dacă aparatul se opreşte brusc:
1 Scoateţi ştecherul din priză.
2 Apăsaţi butonul 'PULSE / 0'.
3 Lăsaţi aparatul să se răcească 60 de
minute.
4 Introduceţi ştecherul în priză.
5 Porniţi din nou aparatul.
Vă rugăm să contactaţi furnizorul Philips sau un
centru Philips autorizat dacă siguranţa termică
automată se declanşează prea des.
Atenţie: pentru a evita situaţiile nedorite datorate
resetării greşite a siguranţei termice, nu conectaţi
aparatul la un întrerupător comandat de un ceas
electronic.
Important
◗ Citiţi instrucţiunile de folosire cu atenţie şi
consultaţi ilustraţiile înainte de utilizarea
aparatului.
◗ Păstraţi instrucţiunile pentru consultări
ulterioare.
◗ Verificaţi dacă tesiunea indicată pe aparat
corespunde tensiunii locale (110-127V sau
220-240V) înainte de a conecta aparatul.
Page 22

ROMÂNĂ22
◗ Nu folosiţi nici un accesoriu sau component
de la alţi producători sau dacă acestea nu au
fost recomandate de firma Philips. Garanţia nu
va mai fi valabilă în cazul utilizării unor astfel
de accesorii.
◗ Nu folosiţi aparatul dacă ştecherul, cablul de
alimentare sau alte componente sunt
deteriorate.
◗ În cazul în care cablul de alimentare este
deteriorat, trebuie înlocuit doar de Philips, la
un centru service autorizat Philips sau de
persoane calificate pentru a evita orice
accident.
◗ Curăţaţi foarte bine componentele care vin în
contact cu alimentele înainte de a utiliza
aparatul pentru prima oară.
◗ Nu depăşiţi cantităţile şi durata de preparare
indicate în tabel.
◗ Nu depăşiţi conţinutul maxim indicat pe bol
sau pe vasul blenderului, adică nu umpleţi
vasul peste gradaţia maximă.
◗ Scoateţi aparatul din priză imediat după
utilizare.
◗ Nu împingeţi ingredientele cu degetele sau cu
alt obiect (cum ar fi o spatulă) în timp ce
aparatul funcţionează. Pentru acest scop aveţi
dispozitivul special de împingere.
◗ Deconectaţi întotdeauna aparatul înainte de a
introduce degetele sau vreun alt obiect (de
ex. o spatulă) în vasul blenderului.
◗ Nu lăsaţi aparatul la îndemâna copiilor.
◗ Nu lăsaţi aparatul să funcţioneze
nesupravegheat.
◗ Nu opriţi niciodată aparatul prin răsucirea
capacului. Opriţi aparatul doar prin apăsarea
butonului PULSE / 0.
◗ Opriţi aparatul înainte de a demonta vreun
accesoriu.
◗ Nu introduceţi niciodată blocul motor în apă
sau în alt lichid, şi nici nu-l clătiţi sub jet de
apă. Utilizaţi doar o cârpă umedă pentru a-l
curăţa.
◗ După ce montaţi corect vasul blenderului,
bolul şi dopul filetat, veţi auzi un clic.
◗ Discul de emulsionare, cuţitul şi accesoriul de
frământare trebuie aşezate pe axul pentru
ustensile din bol.
◗ Îndepărtaţi învelişul protector de pe cuţit
înainte de utilizare.
◗ Evitaţi să atingeţi lamele ASCUŢITE, mai ales
când aparatul este introdus în priză.
◗ Dacă lamele se înţepenesc, deconectaţi
aparatul înainte de a îndepărta ingredientele
care blochează cuţitele.
◗ Lăsaţi ingredientele fierbinţi să se răcească
înainte de a le procesa (temperatura max.
80cC/175cF).
◗ Dacă preparaţi un ingredient lichid care, brin
batere, devine spumă, nu adăugaţi mai mult de
1 litru în paharul blenderului pentru a nu da
pe-afară.
Nu uitaţi că, dacă aţi montat corect blenderul şi
bolul, doar blenderul va funcţiona.
Page 23
ROMÂNĂ 23
Utilizarea aparatului
Bol
◗ Dacă doriţi să folosiţi bolul, scoateţi vasul
blenderului şi închideţi orificiul de fixare cu
dopul filetat. Toate funcţiile care necesită
utilizarea bolului vor funcţiona numai după
îndepărtarea vasului blenderului.
C
1 Montaţi bolul pe robot răsucind de mâner
în direcţia săgeţii până auziţi clic.
C
2 Puneţi capacul deasupra bolului. Răsuciţi
capacul în direcţia săgeţii până ce auziţi clic
(acest lucru necesită puţin efort).
Dispozitiv de siguranţă încorporat
B
Blocul motor şi capacul au inscripţionate nişte
semne. Aparatul va funcţiona doar dacă săgeata
de pe blocul motor este aşezată exact în sensul
opus semnului de pe capac.
C
1 Asiguraţi-vă că semnul de pe capac şi
săgeata de pe vas sunt în sens invers unul
faţă de celălalt. Marginea capacului va
acoperi deschiderea din mâner.
CLICK
Tub de alimentare şi dipozitiv de împingere
C
1 Folosiţi dispozitivul de alimentare pentru a
adăuga lichide şi/sau alte ingrediente
solide. Folosiţi dispozitivul de împingere
pentru a împinge ingredientele solide pe
tubul de alimentare.
C
2 Puteţi, de asemenea, folosi tubul de
alimentare pentru a preveni ca
ingredientele să dea pe-afară.
Cuţit
◗ Cuţitul poate fi folosit pentru tocare, mixare,
amestecare, omogenizare sau prepararea
aluaturilor.
C
1 Aşezaţi bolul pe blocul motor.
C
2 Îndepărtaţi învelişul protector de pe cuţit.
Lamele cuţitului sunt foarte ascuţite. Nu le atingeţi
!
C
3 Aşezaţi cuţitul pe axul pentru ustensile.
1
2
1
CLICK
CLICK
2
CLICK
1
2
Page 24
ROMÂNĂ24
C
4 Aşezaţi axul în bol.
5 Introduceţi ingredientele în bol. Tăiaţi
ingredientele în bucăţi de aprox. 3 x 3 cm.
Acoperiţi bolul cu capacul.
C
6 Reglajele de viteză vă permit să reglaţi
viteza aparatului pentru a obţine rezultate
optime.
B
reglaj: 'PULSE / 0' : pentru operaţii impuls şi
pentru oprirea aparatului. Dacă butonul PULSE /
0 este apăsat aparatul va funcţiona la viteză
maximă. După ce decuplaţi butonul, aparatul se
opreşte.
B
reglaj 1 : pentru viteză normală.
B
reglaj 2 : pentru viteză mare.
A se vedea tabelul pentru reglajele de viteză
corespunzătoare. Procesarea durează între 1 -60
secunde.
Sugestii
◗ Aparatul taie foarte repede. Folosiţi funcţia
impuls pentru perioade foarte scurte de timp
pentru a evita tocarea prea măruntă a
ingredientelor.
◗ Nu lăsaţi aparatul să funcţioneze prea mult
timp dacă radeţi brânză (sau caşcaval). Brânza
se va încinge, va începe să se topească şi va
face cocoloaşe.
◗ Nu folosiţi cuţitul pentru a măcina ingrediente
foarte dure cum ar fi boabele de cafea, miejii
de nucă sau cuburile de gheaţă. Aţi putea toci
cuţitul.
Dacă ingredientele se lipesc de cuţit sau de
interiorul vasului:
1 Opriţi aparatul.
2 Scoateţi capacul de pe bol.
3 Scoateţi ingredientele cu o spatulă.
Discuri
Marginile discurilor sunt foarte ascuţite. Nu le
atingeţi !
Nu procesaţi niciodată ingrediente dure, cum ar fi
cuburile de gheaţă, cu discurile.
C
1 Poziţionaţi discul ales pe axul pentru
discuri.
C
2 Aşezaţi axul pentru discuri peste axul
pentru ustensile din bol.
3 Puneţi capacul peste bol.
C
4 Puneţi ingredientele în tubul de alimentare.
Tăiaţi alimentele mari în bucăţi mai mici
care să intre în tubul de alimentare.
5 Pentru cele mai bune rezultate, umpleţi
complet tubul de alimentare.
Când trebuie să procesaţi cantităţi mari de
alimente, procesaţi pe rând cantităţi mici şi goliţi
regulat bolul.
1
CLICK
2
Page 25

25ROMÂNĂ
3 Selecţionaţi viteza corespunzătoare pentru
a obţine rezultate optime. A se vedea
tabelul pentru reglajele de viteză
recomandate.
Procesarea durează între 10-60 de secunde.
C
4 Împingeţi uşor ingredientele pe tubul de
alimentare cu ajutorul dispozitivului de
împingere.
C
5 Pentru a scoate discul de pe axul pentru
discuri, apucaţi axul pentru discuri cu
mâinile şi împingeţi cu buricele degetelor
discul, până ce acesta iese de pe ax.
Accesoriu de frământare
Accesoriul de frământare poate fi folosit pentru a
frământa cocă de pâine, aluat de gogoşi sau aluat
de plăcinte sau torturi.
C
6 Fixaţi accesoriul de frământare pe axul
pentru ustensile.
7 Puneţi ingredientele în bol.
C
8 Închideţi bolul cu capacul.
C
9 Închideţi tubul de alimentare punând
deasupra acestuia dispozitivul de
împingere.
C
10 Selecţionaţi viteza corespunzătoare pentru
a obţine rezultate optime. A se vedea
tabelul pentru reglajele de viteză
recomandate.
Disc de emulsionare
Puteţi folosi discul de emulsionare pentru a
prepara maioneză, pentru a bate frişcă sau a bate
albuşuri de ouă.
C
11 Puneţi discul de emulsionare pe axul
pentru ustensile din bol.
12 Puneţi ingredientele în bol şi închideţi
capacul.
13 Selecţionaţi viteza corespunzătoare pentru
a obţine rezultate optime. A se vedea
tabelul pentru reglajele de viteză
recomandate.
Sugestii
◗ Când doriţi să bateţi albuşuri, aveţi grijă ca
acestea să fie la temperatura camerei.
Scoateţi ouăle din frigider cu cel puţin o jumătate
de oră înainte de a le folosi.
◗ Toate ingredientele folosite pentru
prepararea maionezei trebuie folosite la
temperatura camerei.
Uleiul poate fi turnat prin orificiul de pe fundul
dispozitivului de împingere.
CLICK
1
2
Page 26

ROMÂNĂ26
◗ Dacă intenţionaţi să faceţi frişcă bătută, luaţi
smântâna direct din frigider. Vă rugăm să
consultaţi tabelul pentru perioada de
preparare. Frişca nu trebuie bătută prea mult
timp.
Folosiţi funcţia impuls pentru a avea mai mult
control asupra procesului de preparare.
Blender
Blenderul se foloseşte la:
- Mixarea lichidelor, de ex. lactate, sosuri, sucuri
de fructe, supe, cocktail-uri, shake-uri.
- Mixarea ingredientelor moi, cum ar fi aluatul de
clătite sau maioneza.
- Pasarea ingredientelor gătite, de ex. pentru
prepararea mâncării pentru bebeluşi.
C
14 Scoateţi dopul filetat.
C
15 Montaţi vasul blenderului în orificiul de
fixare răsucindu-l în direcţia săgeţii până ce
se fixează corect.
Nu apăsaţi prea tare pe mânerul blenderului.
C
16 Puneţi ingredientele în vasul blenderului.
17 Înşurubaţi capacul pe vas.
18 Porniţi aparatul şi mixaţi ingredientele.
Reglajele de viteză vă permit să reglaţi
viteza aparatului pentru a obţine cele mai
bune rezultate. A se vedea tabelul pentru
reglajele de viteză corespunzătoare.
Sugestii
C
◗ Turnaţi ingredientele lichide în blender prin
orificiul din capac.
◗ Cu cât aparatul va funcţiona mai mult, cu atât
compoziţia rezultată va fi mai fină.
◗ Tăiaţi în bucăţele ingredientele solide înainte
de a le pune în blender. Dacă doriţi să
preparaţi o cantitate mai mare, procesaţi pe
rând cantităţi mici, nu încercaţi să procesaţi o
cantitate mare o dată.
◗ Dacă aveţi nelămuriri în privinţa vitezei
corespunzătoare, selecţionaţi întotdeauna
viteza cea mai mare (poziţia 2).
Dacă se lipesc ingredientele de vasul blenderului:
1 Opriţi aparatul şi scoateţi-l din priză.
2 Scoateţi capacul.
Nu scoateţi niciodată capacul când aparatul
funcţionează.
3 Folosiţi o spatulă pentru a îndepărta
ingredientele de pe pereţii vasului.
Ţineţi spatula la o distanţă sigură de lamele
ascuţite ale cuţitului (aprox. 2 cm).
1
CLICK
2
1
2
1
2
Page 27
ROMÂNĂ 27
Curăţare
Scoateţi întotdeauna aparatul din priză înainte de
a începe curăţarea blocului motor.
1 Curăţaţi blocul motor cu o cârpă umedă.
Nu introduceţi blocul motor în apă şi nici
nu-l clătiţi.
2 Curăţaţi întotdeauna componentele care
au venit în contact cu alimentele cu apă
caldă şi detergent de vase, imediat după
folosire.
◗ Bolul, capacul bolului, dispozitivul de
împingere şi accesoriile pot fi, de asemenea,
spălate în maşina de spălat vase.
Aceste componente au fost testate pentru a
rezista la spălatul în maşina de spălat vase
conform DIN EN 12875.
Capacul cu spaţiul de depozitare pentru discuri şi
vasul blenderului nu pot fi spălate în maşina de
spălat vase.
Curăţaţi cuţitul, unitatea de tăiere a blenderului şi
accesoriile cu foarte mare grijă. Marginile acestora
sunt foarte ascuţite!
Aveţi grijă ca marginile ascuţite ale cuţitului,
unităţii de tăiere şi accesoriilor să nu vină în
contact cu obiecte dure. Acestea s-ar putea toci.
Anumite ingrediente pot cauza decolorarea
suprafaţei accesoriilor. Acest lucru nu afectează
accesoriile. Decolorarea dispare de obicei după
un anumit timp.
Operaţie de curăţare rapidă a
blenderului
C
1 Turnaţi apă călduţă (nu mai mult de 0,5
litri) şi puţin detergent lichid în vasul
blenderului.
2 Puneţi capacul.
C
3 Lăsaţi aparatul să funcţioneze câteva
momente apăsând butonul impuls.
(Aparatul nu mai funcţionează cînd
decuplaţi butonul.)
4 Scoateţi vasul blenderului şi clătiţi-l cu apă
curată.
Depozitare
MicroDepozitare
C
◗ Puneţi accesoriile (disc de emulsionare, cuţit,
accesoriu de frământare, ax discuri) pe axul
pentru ustensile şi depozitaţi-le în bol. Puneţi
întotdeauna la sfârşit axul pentru discuri.
Page 28

Cantităţi şi perioade de preparare
ROMÂNĂ28
C
◗ Două discuri pot fi depozitate în spaţiul de
depozitare din capacul protector care
acoperă capacul bolului, aşa cum este descris
în interiorul capacului protector. Discurile
trebuie introduse cu grijă în capacul
protector, nu trebuie să intre forţat.
C
◗ Aşezaţi capacul protector cu spaţiul de
depozitare al discurilor pe capacul transparent
al bolului.
◗ Înfăşuraţi cablul de alimentare în jurul
mosorului din spatele aparatului.
Garanţie şi service
Dacă aveţi nevoie de informaţii sau aveţi alte
nelămuriri, vizitaţi-ne pe site-ul web Philips la
www.philips.com sau contactaţi Departamentul
Clienţi Philips din ţara dumneavoastră (veţi găsi
numărul de telefon în pliatul de garanţie
internaţională). Dacă nu există un astfel de centru
în ţara dumneavoastră, apelaţi la furnizorul Philips
sau contactaţi Departamentul Servicii Philips
pentru Aparatelor Electrocasnice şi de Îngrijire
Personală BV.
Aplicaţii
Clătite, gaufre
Preparate
pané, gratinate
Deserturi,
topinguri
Garnituri,
legume crude,
mâncare de
napi, prăjituri,
preparate
gratinate
Salate
Garnituri,
supe, sosuri,
mâncăruri
gratinate
Sosuri, pizza,
mâncăruri
gratinate
Procedură
Mai întâi turnaţi laptele în
blender şi apoi adăugaţi
ingredientele solide. Mixaţi
ingredientele aprox. 1 minut.
Repetaţi această procedură de
2 ori, dacă este necesar.
Folosiţi pâine uscată, crocantă.
Folosiţi unt slab pentru o
cremă uşoară
Tăiaţi legumele în bucăţele
astfel încât să încapă în tubul de
alimentare. Umpleţi tubul şi
feliaţi bucăţelele în timp ce le
împingeţi uşor cu dispozitivul
de împingere.
Umpleţi tubul cu legume tăiate
bucăţele şi împingeţi-le cu
atenţie cu dispozitivul de
împingere.
Folosiţi o bucată de Parmezan
decojit şi tăiaţi-o în bucăţele de
aprox. 3 x 3 cm.
Tăiaţi brânza în bucăţele ce pot
intra în tubul de alimentare.
Apăsaţi cu grijă dispozitivul de
împingere.
Reglaj
viteză
/
Acces
oriu
2 / P
2 / P
2 / P
2 / P
k
2 / P /
g
2 / P
2 / P
k
Cantit
ate
max.
250
ml
lapte
100g
300g
350g
350g
200g
200g
Ingrediente şi
rezultate
Aluat (clătite) batere
Pesmet mărunţire
Cremă cu unt
- batere
Legume
(morcovi, napi,
ridichi albe) feliere
Legume
(morcovi, praz,
ţelină) - feliere
Caşcaval
(Parmezan) radere
Brânză
(Gouda) radere
Page 29

ROMÂNĂ 29
Aplicaţii
Ornamentări,
siropuri,
produse de
patiserie,
budinci, spume
Piureuri, supe
Mâncare de
bebeluşi şi
copii
Salată,
garnitură
Pâine
Pizza
Procedură
Folosiţi ciocolată menajeră tare.
Rupeţi-o în bucăţi de 2 cm.
Folosiţi mazăre şi fasole gătită.
Dacă este necesar, adăugaţi
puţin lichid pentru a da o
anumită consistenţă pastei.
Pentru o compoziţie mai
consistentă, nu adăugaţi mult
lichid. Pentru un piure moale,
adăugaţi lichid până ce acesta
capătă consistenţa dorită.
Puneţi castravetele în tubul de
alimentare şi apăsaţi-l uşor.
Amestecaţi apă caldă cu
drojdie şi zahăr. Adăugaţi făină,
ulei şi sare şi frământaţi coca
timp de aprox. 90 secunde.
Lăsaţi coca să crească timp de
30 de minute.
Urmaţi aceeaşi procedură ca
pentru coca de pâine.
Frământaţi aluatul timp de
aprox. 1 minut. Puneţi mai întâi
făina şi apoi celelalte
ingrediente.
Reglaj
viteză
/
Acces
oriu
2 / P
2 / P
D
2 / P
1 / g
2 / {
2 / {
Cantit
ate
max.
200g
250g
300g
1
castra
vete
350g
făină
400g
făină
Ingrediente şi
rezultate
Ciocolată radere
Mazăre sau
fasole fierte pasare
Carne şi
legume gătite pasare
Castraveţi feliere
Cocă (pentru
pâine) frământare
Aluat (de
pizza) frământare
Aplicaţii
Plăcinte de
mere, biscuiţi
dulci, tarte cu
fructe
Tarte cu
fructe, plăcinte,
quiches
Pâine specială
Procedură
Folosiţi margarină rece, tăiată în
bucăţele de 2 cm. Puneţi toate
ingredientele în bol şi
frământaţi până ce coca devine
o minge. Lăsaţi aluatul să se
răcească înainte de a continua
prepararea.
Folosiţi margarină rece şi apă
rece. Puneţi făina în bol şi
adăugaţi margarina tăiată în
bucăţele de 2 cm. Mixaţi la
viteza cea mai înaltă până ce
aluatul devine fărâmicios, apoi
adăugaţi apă rece în timp ce
mixaţi. Opriţi mixarea imediat
ce aluatul începe să capete
forma unei mingi. Lăsaţi coca să
se răcească înainte de a
continua prepararea.
Mixaţi mai întâi drojdia, laptele
cald şi puţin zahăr într-un vas
separat. Puneţi toate
ingredientele în bolul robotului
şi frământaţi coca până ce se
omogenizează şi nu mai
rămâne lipită pe pereţii vasului
(durează aprox. 1 minut). Lăsaţi
coca să crească timp de 30 de
minute.
Reglaj
viteză
/
Acces
oriu
2 / P
2 / P
2 / {
Cantit
ate
max.
200g
făină
200g
făină
300g
făină
Ingrediente şi
rezultate
Aluat (pentru
produse cu
aluat fraged) frământare
Aluat (pentru
tarte, plăcinte)
- frământare
Cocă (drojdie)
- frământare
Page 30

ROMÂNĂ30
Aplicaţii
Budincă,
sufleuri,
meringues
Budinci,
mâncare
pentru
bebeluşi
Garnituri,
sosuri
Sosuri, supe,
garnituri, unt
cu verdeaţă
Sucuri de
fructe
Salate, sosuri
pentru
garnituri şi
friptură
Procedură
Folosiţi albuşuri păstrate la
temperatura camerei. Notă:
folosiţi cel puţin 2 albuşuri.
Sugestie: adăugaţi puţin suc de
lămâie pentru ca sucul să nu se
oxideze. Adăugaţi puţin lichid
pentru a obţin un piure fin.
Curăţaţi usturoiul. Apăsaţi de
câteva ori butonul impuls
pentru a preveni ca usturoiul să
fie tocat prea mărunt. Folosiţi
cel puţin 150g.
Spălaţi şi uscaţi verdeaţa înainte
de a o toca
Adăugaţi apă sau un alt lichid
(opţional) pentru a obţine un
suc omogen.
Toate ingredientele trebuie să
fie la temperatura camerei.
Notă: folosiţi cel puţin un ou
mare, două ouă mici sau două
gălbenuşuri de ou. Puneţi oul şi
puţin oţet în vas şi adăugaţi ulei
câte puţin.
Reglaj
viteză
/
Acces
oriu
2 / S
P / P
P / P
2/P / P
2 / D
1-2 /
S
Cantit
ate
max.
4
albuşu
ri
500g
300g
Min.
75g
500g
(cantit
ate
totală)
3 ouă
Ingrediente şi
rezultate
Albuşuri batere
Fructe (de ex.
mere, banane)
radere/omoge
nizare
Usturoi pisare
Verdeaţă
(pătrunjel) tocare
Sucuri (de ex.
papaia,
pepene, pere)
- amestecare
Maioneză -
emulsionare
Aplicaţii
Biftec tartar,
hamburger,
chifteluţe
Milkshake-uri
Diverse
prăjituri.
Salate, pâine,
pastă de
migdale,
budinci
Soté, garnituri
Soté, garnituri
Procedură
Mai întâi îndepărtaţi zgârciurile
sau oasele. Tăiaţi carnea în
cubuleţe de 3 cm. Folosiţi
funcţia impuls pentru o carne
tocată mai mare.
Omogenizaţi fructele (cum ar fi
banane, căpşuni) cu zahăr, lapte
şi puţină îngheţată şi mixaţi-le
bine.
Ingredientele trebuie să fie la
temperatura camerei. Mixaţi
untul moale cu zahărul până ce
compoziţia devine onctuoasă.
Apoi adăugaţi laptele, ouăle şi
făina.
Folosiţi butonul impuls pentru
o tocare în bucăţi mari sau
viteza 2 pentru o tocare
măruntă.
Curăţaţi cepele şi tăiaţi-le în
patru. Notă: folosiţi cel puţin
100g. Apăsaţi întotdeauna
butonul impuls de câteva ori
pentru a nu toca ceapa prea
fin.
Curăţaţi cepele şi tăiaţi-le în
bucăţi care să încapă pe tubul
de alimentare. Notă: folosiţi cel
puţin 100g.
Reglaj
viteză
/
Acces
oriu
2 /P /
P
2 / D
2 / P
2 /P /
P
P / P
1 / g
Cantit
ate
max.
300g
250ml
lapte
3 ouă
250g
400g
300g
Ingrediente şi
rezultate
Carne (slabă) tocare
Milkshake amestecare
Aluaturi
(prăjituri) mixare
Nuci - tocare
Cepe - tocare
Cepe -feliere
Page 31

ROMÂNĂ 31
Aplicaţii
Carne tocată
Supe, sosuri
Garnituri,
frişcă,
preparate pe
bază de
îngheţată
Procedură
Scoateţi oasele şi zgârciurile.
Tăiaţi carnea în cubuleţe de 3
cm. Folosiţi butonul impuls
pentru o tocare mare.
Folosiţi legume gătite
Folosiţi frişcă proaspăt scoasă
din frigider. Notă: folosiţi cel
puţin 125ml de smântână.
Frişca bătută este gata după
aprox. 20 de secunde.
Reglaj
viteză
/
Acces
oriu
2 /P /
P
2 / D
P / S
Cantit
ate
max.
200g
500ml
350ml
Ingrediente şi
rezultate
Carne de
pasăre - tocare
Supe - pasare
Frişcă bătută -
batere
Reţete
Supă de brocoli
h sau D
- 50g brânză Gouda
- 300g broccoli fiert (tulpină şi frunze)
- apa în care a fost fiert broccoli
- 2 cartofi fierţi cubuleţe
- condimente pentru ciorbă tip vegeta
- 2 linguri smântână
- curry
- sare
- piper
- miez de nucă
B
Radeţi brânza. Faceţi un piure din broccoli, cartofi
fierţi şi o parte din apa în care a fiert broccoli.
Puneţi piureul obţinut, apa rămasă şi
condimentele într-un pahar de măsurat şi umpleţi
paharul până la 750ml. Răsturnaţi compoziţia
într-o cratiţă şi lăsaţi-o să dea în clocot
amestecând continuu. Încorporaţi brânza şi
condimentaţi cu curry, sare, piper, miez de nucă şi
apoi adăugaţi smântâna.
Prăjitură cu fructe
P
- 450 gr curmale uscate fără sâmburi, înjumătăţite
- 200 gr prune uscate, înjumătăţite
- 650 gr arahide
- 160 gr nucă de cocos rasă
- 300ananas glasat
- 1 cutie (400 gr) lapte condensat
- 1 linguriţă esenţă de vanilie
Page 32

ROMÂNĂ32
Maioneză
S
- 2 gălbenuşuri sau 1 ou mare
- 1 linguriţă muştar
- 1 linguriţă oţet
- 200ml ulei
B
Ingredientele trebuie să fie la temperatura
camerei. Puneţi discul de emulsionare în bol.
Adăugaţi cele două gălbenuşuri sau oul întreg,
muştarul şi oţetul. Turnaţi uleiul treptat prin tubul
de alimentare pe discul rotativ. Puteţi folosi
orificiuldin dispozitivul de împingere pentru a
adăuga uleiul.
B
Sugestie pentru sosul tartar: adăugaţi pătrunjel,
castraveciori şi ouă fierte tare.
B
Sugestie pentru coctail: adăugaţi 50ml frişcă
proaspătă, puţin whisky, 3 linguriţe pastă de
tomate şi puţin sirop de ghimber la 100ml de
maioneză.
Milkshake
D
- 175ml lapte
- 10g zahăr
- 1/2 banană sau aprox. 65g din alte fructe
proaspete
- 50g îngheţată de vanilie
B
Amestecaţi toate ingredientele până ce
compoziţia devine spumoasă.
B
Ungeţi douătăvi de 20 cm şi preîncălziţi cuptorul
la 135c C.
B
Puneţi jumătăţile de curmale şi de prune în bolul
robotului de bucătărie şi tocaţi-le la viteza
maximă timp de 30 de secunde. Apoi goliţi bolul.
B
Puneţi arahidele în bolul robotului de bucătărie şi
tocaţi-le folosind funcţia impuls. Apoi goliţi bolul.
B
Puneţi ananasul glasat în bolul robotului de
bucătărie şi tăiaţi-l în bucăţi mari, cu ajutorul
funcţiei impuls. Apoi goliţi bolul.
B
Amestecaţi curmalele, prunele, arahidele,
ananasul şi nuca de cocos rasă într-un bol mare.
B
Adăugaţi lapte şi esenţă de vanilie şi mixaţi.
B Puneţi compoziţia în tăvile de copt şi coaceţi la
135c C timp de 90 de minute.
B
Nu pregătiţi ingredientele pentru această reţetă
de mai multe ori fără întrerupere. Dacă doriţi să
preparaţi mai multe cantităţi, lăsaţi mai întâi
aparatul să se răcească şi apoi continuaţi
prepararea.
Piure de cartofi
P
- 750g cartofi fierţi
- aprox. 250ml lapte fierbinte (90cC)
- 1 lingură unt
- sare
B
Pisaţi mai întâi cartofii, apoi adăugaţi laptele,
sarea şi untul. Folosiţi viteza 1 şi mixaţi aprox.
30 secunde pentru ca piureul să nu devină
lipicios.
Page 33

33ROMÂNĂ
B
Condimentaţi după gust cu sare, piper şi zahăr.
Lăsaţi sosul să se răcească.
B
Încălziţi cuptorul la 250cC.
B
Întindeţi coca pe masa de lucru pe care aţi
presărat făină şi întindeţi coca în două foi rotunde.
Puneţi cele două foi de cocă pe tava unsă. Turnaţi
toppingurile pe blatul de pizza şi adăugaţi câteva
picături de ulei de măsline.
B
Coaceţi pizza 12-15 minute.
Mâncare de cartofi şi dovlecei
gratinaţi
Pgk
- 375g cartofi
- un vârf de cuţit de sare
- 1 dovlecel
- 1 căţel de usturoi, pisat
- aprox. 40g unt + puţin unt pentru a unge tava
- 2 linguriţe verdeaţă
- 1 ou mare
- 75ml smântână
- 75ml lapte
- piper
- 70g brânză semi-tare
B
Curăţaţi şi spălaţi cartofii.
B
Puneţi discul de feliere pe axul pentru discuri şi
aşezaţi-l în vas. Feliaţi cartofii şi dovlecelul la
viteza 1.
B
Fierbeţi feliile de cartofi în apă clocotită cu puţină
sare.
B
Puneţi cartofii într-o strecurătoare şi lăsaţi-i să se
scurgă.
Pizza
{
- 400g făină
- 40ml ulei
- 1/2 linguriţă sare
- 20g drojdie proaspătă sau 1,5 pachet de drojdie
uscată
- aprox. 240cc apă (35cC)
Pentru toping:
- 300ml pastă de tomate (la conservă)
- 1 linguriţă verdeaţă amestecată (uscată şi
proaspătă)
- 1 ceapă
- 2 căţei de usturoi
- sare şi piper
- zahăr
- Ingredientele ce se vor presăra peste sos:
măsline, salam, anghinare, ciuperci, anşoa,
brânză Mozzarella, ardei iute, brânză tare rasă şi
ulei de măsline după gust.
B
Puneţi în bol accesoriul de frământare. Puneţi
toate ingredientele în bol şi selectaţi viteza
2. Frământaţi coca aprox. 1 minut până capătă
forma unei mingi. Ţineţi aparatul apăsat cu o
mână pentru a nu se ridica şi a se roti în gol.
Puneţi coca într-un vas separat, acoperiţi-o cu un
şervet umed, şi lăsaţi-o să crească 30 de minute.
B
Folosiţi cuţitul pentru a toca ceapa şi usturoiul.
Căliţi ceapa tocată şi usturoiul până ce devin
transparente.
B
Adăugaţi pasta de tomate şi verdeaţa şi lăsaţi să
fiarbă la foc mic aproximativ 10 minute.
Page 34

ROMÂNĂ34
B
Scoateţi oasele şi îndepărtaţi pielea de pe peşte.
B
Adăugaţi sare, ardei iute roşu, suc de lămâie,
peştele şi sos din conservă peste arpagicul şi
ceapa tocată şi omogenizaţi compoziţia folosind
viteza 2.
B
Puneţi pasta obţinută într-un vas.
B
Fierbeţi puţină apă şi dizolvaţi gelatina.
B
Turnaţi gelatina în compoziţia de somon şi
amestecaţi.
B
Poziţionaţi discul de emulsionare în bol şi bateţi
frişca apăsând butonul impuls timp de
15 secunde.
B
Încorporaţi smântâna bătută în pasta de somon
cu o lingură de lemn.
B
Răsturnaţi spuma obţinută pe un platou,
acoperiţi-o şi introduceţi-o în frigider.
B
Garnisiţi cu puţin creson.
Paste de sanvişuri
P
- 2 morcovi mici, tăiaţi bucăţi
- 2-3 castraveciori, tăiaţi bucăţi
- 75g conopidă, tăiată bucăţi
- 75g ţelină tăiată bucăţi
- verdeaţă (pătrunjel, mărar, tarhon, tulpină de
ţelină tăiată bucăţele)
- 100g maioneză
- 100g brânză de vaci
- sare
- piper
B
Tocaţi morcovii, castraveciorii, conopida, verdeaţa
şi ţelina mărunt. Adăugaţi maioneza şi asezonaţi
după gust cu sare şi piper.
B
Puneţi 20g unt într-o tigaie, prăjiţi jumătate din
feliile de dovlecel timp de 3 minute întorcându-le
pe o parte şi pe cealaltă. Presăraţi pe felii 1
linguriţă de verdeaţă.
B
Aşezaţi feliile de dovlecel prăjite pe o bucată de
hârtie de bucătărie pentru a absorbi surplusul de
grăsime.
B
Ungeţi tava de la aragaz şi puneţi feliile de
dovlecel şi de cartofi în tavă, alternându-le şi
aranjându-le ca ţiglele de pe un acoperiş.
B
Bateţi oul cu smântâna şi laptele folosind cuţitul
robotului şi utilizând viteza 2. Adăugaţi sare şi
piper după gust şi turnaţi compoziţia peste feliile
de cartofi şi dovlecel din tavă.
B
Înlocuiţi discul de feliere cu cel de radere, radeţi
brânza la viteza 2 şi presăraţi-o peste mâncare.
B
Puneţi tava în centrul cuptorului aragazului
(200cC) şi lăsaţi mâncarea să se rumenească
timp de 15 minute.
Pastă de somon
PS
- 1 conservă somon (220g)
- 2 folii gelatină
- câteva bucăţi de arpagic
- un vârf de cuţit de sare
- puţin ardei roşu iute
- jumătate lingură suc de lămâie
- 125ml smântână bătută
- 1 ceapă mică
- creson pentru garnisire
B
Înmuiaţi gelatina în multă apă.
B
Tocaţi arpagicul şi ceapa în robotul de bucătărie
folosind funcţia impuls.
Page 35

ROMÂNĂ 35
Tzatziki
k
- 1 castravete
- 200ml iaurt
- 1 lingură ulei măsline
- 2 căţei de usturoi
- un vârf de cuţit de sare
- 1 lingură de mărar tocat mărunt
- câteva frunze de mentă
B
Curăţaţi castravetele şi tocaţi-l folosind viteza 1.
Puneţi castravetele tocat într-o strecurătoare şi
lăsaţi-l să se scurgă bine.
B
Mixaţi celelalte ingrediente, cu excepţia mentei,
cu castravetele. Puneţi salata într-un vas acoperit
şi introduceţi-o în frigider timp de o oră. Presăraţi
frunze de mentă înainte de a o servi.
Salată de varză spaniolă
P
- 1 varză mică roşie
- 2 cepe roşii
- 1 anason
- 1 măr
- sucul de la o portocală şi 2 linguri de oţet de
vin roşu
- 1 lingură muştar
B
Mixaţi sucul, muştarul şi oţetul. Tăiaţi felii varza,
ceapa, anasonul şi mărul la viteza 1.
B
Amestecaţi ingredientele într-un castron de salată.
Biscuit de Savoie
P
- 4 ouă
- 300ml de apă (35cC)
- 1 vârf de cuţit de sare
- 150g zahăr
- 1 plic de zahăr vanilat
- 150g făină cernută
- 3g praf de copt
B
Bateţi ouăle şi apa aprox. 2 minute. Adăugaţi
zahăr, vanilie şi sare puţin câte puţin şi
amestecaţi timp de 1 minut. Compoziţia ar
trebuie să fie ca o smântână groasă. Încorporaţi
făina şi praful de copt cu ajutorul unei spatule.
Introduceţi compoziţia în cuptor şi lăsaţi-o să se
coacă la aprox. 170cC timp de 30-35 minute.
B
Sugestie: Puteţi umple prăjitura cu diverse creme
sau cu frişcă şi fructe proaspete.
Page 36

РУССКИЙ36
Пищевой процессор: детали и
вспомогательные принадлежности.
A) Регулятор скорости
B) Блок электродвигателя
C) Встроенная блокировка
D) Чаша
E) Навинчивающийся колпачок (закрывающий
отверстие для крепления блендера, когда
блендер не используется)
F) Держатель для насадок
G) Кувшин блендера
H) Выступ крышки (включает и отключает
аварийный выключатель)
I) Крышка чаши
J) Загрузочный бункер
K) Толкатель
L) Крышка блендера
M) Крышка с закрывающимся отсеком для
хранения ножей-вставок
N) Нож-вставка для нарезания ломтиков
среднего размера
O) Нож-вставка для тонкого измельчения
P) Нож-вставка для среднего измельчения
Q) Рамка для ножей-вставок
R) Нож (с защитным колпачком)
S) Насадка для замешивания теста
T) Диск для перемешивания жидкостей
U) Лопатка
Введение
Данный электроприбор оснащен аварийным
термовыключателем, который отключает
подачу электроэнергии в случае перегревания
прибора.
При неожиданной остановке
электродвигателя:
1 Выньте вилку сетевого шнура из
электророзетки.
2 Нажмите на кнопку «PULSE/0».
3 Дайте электроприбору остыть в течение
60 минут.
4 Вставьте вилку сетевого шнура в
электророзетку.
5 Включите электроприбор повторно.
В случае слишком частого срабатывания
аварийного выключателя обращайтесь в
торговую организацию или уполномоченный
сервисный центр компании «Филипс».
БУДЬТЕ ОСТОРОЖНЫ: Для того, что
избежать опасности, связанной с
непреднамеренной перенастройкой систем
теплового отключения, не соединяйте
электроприбор с реле времени.
Внимание
◗ Прежде чем начать пользоваться
электроприбором, внимательно прочитайте
настоящее руководство и ознакомьтесь с
иллюстрациями.
Page 37

РУССКИЙ 37
◗ Сохраните настоящее руководство по
эксплуатации в качестве справочного
материала.
◗ Прежде чем подключить прибор к
электросети, убедитесь в том, что
напряжение, указанное на приборе,
соответствует напряжению электросети в
вашем доме (110-127 В или 220-240 В).
◗ случа поврждния ствого шнура го
нобходимо замнить только в торговой
организации или в уполномочнном
срвисном цнтр компании «Филипс», или в
срвисном цнтр с прсоналом аналогичной
квалификации, чтобы обспчить бзопасную
эксплуатацию прибора.
◗ Не пользуйтесь прибором при
повреждении сетевого шнура,
штепсельной вилки или других деталей.
◗ В случае повреждения сетевого шнура его
следует заменить в торговой организации
или в уполномоченном сервисном центре
компании «Филипс», чтобы избежать
опасности при эксплуатации прибора.
◗ Перед первым применением прибора
тщательно промойте все детали, которые
будут контактировать с пищевыми
продуктами.
◗ Не превышайте количества загружаемых
продуктов и время их обработки,
указанные в таблице.
◗ Не заполняйте чашу или кувшин блендера
выше отметки максимального уровня.
◗ Сразу же после окончания работы
вынимайте вилку сетевого шнура из
розетки электросети.
◗ Во время работы электроприбора
запрещается проталкивать продукты в
загрузочный бункер пальцами или какимилибо предметами (например, лопаткой).
Для этой цели пользуйтесь только
толкателем.
◗ Если вам все же необходимо
воспользоваться рукой или каким-либо
предметом (например, лопаткой), выньте
вилку сетевого шнура из розетки
электросети.
◗ Храните электроприбор в недоступном для
детей месте.
◗ Запрещается оставлять включенный прибор
без присмотра.
◗ Запрещается выключать электроприбор
поворотом крышки. Отключать прибор
следует только нажатием на кнопку
PULSE/0.
◗ Выключите электроприбор, прежде чем
снять с него какую-либо насадку.
◗ Запрещается погружать блок
электродвигателя в воду или другие
жидкости, а также промывать этот блок
под струей водопроводной воды. Для
очистки блока электродвигателя
пользуйтесь влажной тканью.
◗ При установке кувшина блендера, чаши и
навинчивающегося колпачка в правильное
положение вы услышите щелчок.
◗ Диск для перемешивания жидкостей, нож
и насадку для замешивания теста следует
установить на держатель для насадок,
имеющийся в чаше.
Page 38

РУССКИЙ38
◗ Прежде чем пользоваться ножом, снимите
с него защитный колпачок.
◗ Не прикасайтесь к ОСТРЫМ лезвиям
ножей, особенно, если электроприбор
подключен к электросети.
◗ Если лезвия ножей застряли, сначала
отключите прибор от электросети, а затем
удалите ингредиенты, создавшие
препятствие для ножей.
◗ Прежде чем обрабатывать горячие
продукты, дайте им остыть (максимальная
температура - 80.
◗ При переработке жидкости, образующей
пену, не наливайте в кувшин блендера
более 1~л, чтобы не разлить содержимое.
Обратите внимание на то, что, если н
электроприбор правильно установит
одновременно и чашу, и блендер, работат
будет только блендер.
Как пользоваться электроприбором
Чаша
◗ Если вы хотите использовать чашу, снимите
кувшин блендера и закройте отверстие для
крепления блендера навинчивающимся
колпачком. Все узлы электроприбора,
необходимые для использования чаши,
будут функционировать только в
отсутствии кувшина блендера.
C
1 Для того, чтобы установить чашу на
пищевой процессор, поверните ручку
до щелчка в направлении, указанном
стрелкой.
C
2 Накройте чашу крышкой. Поверните
крышку в направлении, указанном
стрелкой, пока не услышите щелчок
(для этого потребуется приложить
некоторое усилие).
Встроенная блокировка
B
На блок электродвигателя и на крышку чаши
нанесены отметки. Электроприбор будет
работать только в том случае, когда
стрелка на блоке электродвигателя
находится точно напротив отметки на
крышке чаши.
C
1 Убедитесь в том, что отметка на
крышке и стрелка на чаше находятся
точно напротив друг друга. Теперь
выступ крышки закрывает отверстие в
ручке.
Загрузочный бункер и толкатель
C
1 Для добавления жидких и/или твердых
ингредиентов используйте загрузочный
бункер. Для продвижения твердых
ингредиентов вниз по загрузочному
бункеру пользуйтесь толкателем.
CLICK
CLICK
1
2
1
2
CLICK
Page 39

РУССКИЙ 39
C
2 Вы можете также воспользоваться
толкателем для того, чтобы закрыть
загрузочный бункер, предотвращая
разбрызгивание продуктов.
Нож
◗ Ножи предназначены для нарезки,
перемешивания, смешивания,
приготовления пюре и жидкого теста.
C
1 Установите чашу на блок.
C
2 Снимите с ножа защитный колпачок.
Режущие кромки ножа очень острые. Не
прикасайтесь к ним!
C
3 Установите нож на держатель для
насадок.
C
4 Установите держатель для насадок в
чашу.
5 Поместите в чашу ингредиенты.
Предварительно нарежьте крупные
куски продуктов кубиками размером
около 3 х 3 см. Накройте чашу
крышкой.
C
6 Установки скорости позволят вам
отрегулировать скорость
электроприбора для получения
оптимальных результатов.
B
Установка «PULSE/0»: для работы в
импульсном режиме и для выключения
прибора. При нажатой кнопке «PULSE/0»
скорость работы электроприбора
максимальна. Если отпустить эту кнопку,
прибор перестанет работать.
B
установка 1: нормальная скорость.
B
установка 2: высокая скорость.
Ознакомьтесь с указанными в таблице
рекомендуемыми установками скорости.
Обработка продуктов занимает от 1 до 60
секунд.
Полезные советы
◗ Электроприбор измельчает продукты
очень быстро. Чтобы избежать
чрезмерного измельчения ингредиентов,
работайте в импульсном режиме, включая
прибор ненадолго.
◗ При измельчении твердых сортов сыра не
включайте электродвигатель надолго. Сыр
может нагреться, начнет плавиться и
слипаться в комки.
◗ Не пользуйтесь ножом для измельчения
очень твердых ингредиентов, таких как
кофейные зерна, мускатный орех и кубики
льда. Нож может затупиться.
CLICK
1
2
Page 40

РУССКИЙ40
В случае налипания продуктов на нож или
внутреннюю поверхность чаши:
1 Выключите прибор.
2 Снимите с чаши крышку.
3 Очистите прилипшие продукты с
помощью лопатки.
Ножи-вставки
Режущие кромки ножей-вставок очень острые
Не прикасайтесь к ним!
Запрещается пользоваться ножами-вставками
для обработки твердых ингредиенто
например, кубиков льда.
C
1 Установите нужный нож-вставку в
рамку для ножей-вставок.
C
2 Установите рамку для ножей-вставок на
держатель для насадок, имеющийся в
чаше.
3 Закройте чашу крышкой.
C
4 Поместите ингредиенты в загрузочный
бункер, предварительно нарезав
крупные куски так, чтобы они
проходили в загрузочный бункер.
5 Для получения наилучших результатов
заполняйте загрузочный бункер
равномерно.
Если вам необходимо измельчить большое
количество продуктов, разделите их на
небольшие порции и регулярно освобождайте
чашу после обработки каждой порции.
3 Для получения оптимальных
результатов подберите подходящую
установку скорости. Ознакомьтесь с
указанными в таблице рекомендуемыми
установками скорости.
Обработка продуктов занимает от 10 до 60
секунд.
C
4 Проталкивайте ингредиенты вниз по
загрузочному бункеру с помощью
толкателя. Давление должно быть
постоянным и умеренным.
C
5 Для того, чтобы извлечь нож-вставку из
рамки, возьмите рамку для ножейвставок в руки так, чтобы ее заднее
ребро было направлено в вашу сторону.
Нажмите на края ножа-вставки
большими пальцами, и он выпадет из
рамки.
Насадка для замешивания теста
Насадка для замешивания теста предназначена
для замешивания теста для хлеба и клецок, а
также для перемешивания жидкого теста.
1
CLICK
2
Page 41

РУССКИЙ 41
C
6 Установите насадку для замешивания
теста на держатель для насадок.
7 Поместите в чашу ингредиенты.
C
8 Закройте чашу крышкой.
C
9 Закройте загрузочный бункер, поместив
в него толкатель.
C
10 Для получения оптимальных
результатов подберите подходящую
установку скорости. Ознакомьтесь с
указанными в таблице рекомендуемыми
установками скорости.
Диск для перемешивания жидкостей
Диск для перемешивания жидкостей
предназначен для приготовления майонеза,
взбивания сливок и сбивания яичных белков.
C
11 Установите диск для перемешивания
жидкостей на держатель для насадок,
имеющийся в чаше.
12 Поместите в чашу ингредиенты и
закройте ее крышкой.
13 Для получения оптимальных
результатов подберите подходящую
скорость. Ознакомьтесь с указанными в
таблице рекомендуемыми установками
скорости.
Полезные советы
◗ Перед тем, как взбивать яичные белки,
убедитесь, что белки имеют комнатную
температуру.
Вынимайте яйца из холодильника не менее
чем за полчаса до их использования.
◗ Все ингредиенты, предназначенные для
приготовления майонеза, должны иметь
комнатную температуру.
Вы можете добавлять растительное масло
через небольшое отверстие в нижней части
толкателя.
◗ Если вы хотите взбить сливки, то имейте в
виду, что сливки следует доставать из
холодильника непосредственно перед
обработкой. Соблюдайте указанное в
таблице время обработки. Сливки не
следует взбивать слишком долго.
Для того, чтобы более точно контролировать
процесс взбивания, работайте в импульсном
режиме
CLICK
1
2
Page 42

РУССКИЙ42
Блендер
Блендер предназначен для:
- Перемешивания жидкостей, таких как
молочные продукты, соусы, фруктовые соки,
супы, напитки, коктейли.
- Смешивания мягких ингредиентов, например,
предназначенных для приготовления жидкого
теста для блинов или майонеза.
- Приготовления пюре из отварных
продуктов, например, для детского питания.
C
14 Снимите навинчивающийся колпачок.
C
15 Установите кувшин блендера в
отверстие для крепления блендера,
поворачивая его в направлении,
указанном стрелкой, до упора.
Не нажимайте слишком сильно на ручку
кувшина блендера.
C
16 Поместите ингредиенты в кувшин
блендера.
17 Закрутите крышку кувшина блендера.
18 Включите прибор и перемешайте
ингредиенты. Для получения
оптимальных результатов установите
подходящую скорость с помощью
регулятора. Ознакомьтесь с указанными
в таблице рекомендуемыми установками
скорости.
Полезные советы
C
◗ Наливайте жидкие ингредиенты в кувшин
блендера через отверстие в крышке.
◗ Чем дольше будет включен
электродвигатель, тем более однородной
будет полученная смесь.
◗ Перед загрузкой в блендер твердых
ингредиентов нарезайте их на более
мелкие кусочки. Если вам требуется
переработать большой объем продуктов,
разделите его на небольшие порции, а не
старайтесь переработать все в один прием.
◗ Если вы не уверены в правильности выбора
скорости, всегда устанавливайте
максимальную скорость (положение 2).
Если ингредиенты прилипают к стенкам
кувшина блендера:
1 Выключите электроприбор и выньте
вилку сетевого шнура из розетки
электросети.
2 Снимите крышку.
Запрещается снимать крышку с работающего
блендера.
3 Очищайте налипшие продукты со
стенок кувшина с помощью
лопатки.Держите лопатку на безопасном
расстоянии от режущих кромок
ножевого узла (приблизительно 2 см).
1
CLICK
2
1
2
1
2
Page 43

43РУССКИЙ
Очистка
Перед очисткой блока электродвигател
всегда вынимайте вилку сетевого шнура из
розетки электросети.
1 Очищайте блок электродвигателя
влажной тканью. Запрещается
погружать блок электродвигателя в воду
или промывать его под струей воды.
2 Каждый раз сразу же после работы
промывайте горячей водой с моющим
средством детали, контактирующие с
пищей.
◗ Чашу, крышку чаши, толкатель и
вспомогательные принадлежности также
можно мыть в посудомоечной машине.
Эти детали прошли испытание на
устойчивость к мытью в посудомоечной
машине в соответствии с DIN EN 12875.
Крышку с закрывающимся отсеком дл
хранения ножей-вставок и кувшин бленде
нельзя мыть в посудомоечной машине!
Будьте очень осторожны при очистке нож
ножевого узла блендера и ножей-вставок
Режущие кромки этих деталей очень острые!
Убедитесь, что лезвия ножа, ножевого узла
блендера и ножей-вставок не вступают в
контакт с твердыми предметами, которые
могут их затупить.
Под воздействием определенных продуктов
цвет поверхности деталей может измениться.
Эксплуатационные качества деталей при этом
не ухудшаются. Через некоторое время цвет
деталей, как правило, восстанавливается.
Быстрая очистка блендера
C
1 Налейте в кувшин блендера теплую воду
(не более 0,5 л) и немного моющего
средства.
2 Установите крышку.
C
3 Нажав на кнопку Pulse, включите
электроприбор на несколько секунд.
(Прибор выключается, когда вы
отпускаете кнопку).
4 Снимите кувшин блендера с прибора и
промойте его чистой водой.
Хранение
Хранение мелких принадлежностей
C
◗ Установите насадки (диск для
перемешивания жидкостей, нож, насадку
для замешивания теста и рамку для ножейвставок) на держатель для насадок и
храните их в чаше. Последней всегда
устанавливайте рамку для ножей-вставок.
Page 44

РУССКИЙ44
C
◗ Два ножа-вставки могут храниться в отсеке
крышки, расположенной поверх крышки
чаши, в соответствии с обозначениями на
ее внутренней поверхности. Ножи-вставки
следует задвигать в отсек плавно, не
оказывая на них давления.
C
◗ Установите крышку с отсеком для ножей-
вставок поверх прозрачной крышки чаши.
◗ Намотайте сетевой шнур вокруг барабана,
расположенного на задней панели
электроприбора.
Гарантия и обслуживание
По поводу дополнительной информации или в
случае возникновения каких-либо проблем
обращайтесь на Web-сайт компании «Филипс»
по адресу: www.philips.com или в центр
компании «Филипс» по обслуживанию
потребителей в вашей стране (вы найдете его
номер телефона на международном
гарантийном талоне). Если подобный центр в
вашей стране отсутствует, обратитесь в вашу
местную торговую организацию компании
«Филипс» или в сервисное отделение
компании Philips Domestic Appliances and
Personal Care BV.
Объемы продуктов и время обработки
Применение
готового
продукта
Блины, вафли
Панированны
е блюда,
блюда,
обжаренные в
сухарях
Десерты,
украшение
кондитерских
изделий
Гарниры,
блюда из
сырых
овощей,
блюда из
репы,
лепешки,
соусы
Салаты
Описание процедуры
Сначала залейте в блендер
молоко, затем добавляйте
сухие ингредиенты.
Перемешивайте ингредиенты
в течение приблизительно 1
мин. При необходимости
повторите процедуру.
Используйте сухой,
хрустящий хлеб
Для получения воздушного
продукта используйте
размягченное масло.
Предварительно нарежьте
овощи на кусочки,
проходящие в загрузочный
бункер. Заполните кусочками
бункер и во время
измельчения осторожно
проталкивайте их вниз
толкателем.
Заполните кусочками овощей
загрузочный бункер и
осторожно проталкивайте их
вниз толкателем.
Устан
овка
скоро
сти/на
садка
2 / P
2 / P
2 / P
2 / j
k
2 / Р /
g
Макси
мальн
ое
колич
ество
250
мл
молок
а
100 г
300 г
350 г
350 г
Ингредиенты
и результат
обработки
Жидкое
тесто (для
блинов) взбивание
Панировочны
е сухари измельчение
Сливочные
кремы взбивание
Овощи
(морковь,
репа, редис) нарезка
ломтиками,
шинкование
Овощи
(морковь, лукпорей,
сельдерей)) нарезка
ломтиками,
шинкование
Page 45

РУССКИЙ 45
Применение
готового
продукта
Гарниры,
приготовлени
е блюд,
обжаренных в
сухарях и
сыре,
приправы,
супы
Приправы,
пицца,
приготовлени
е блюд,
обжаренных в
сухарях и
сыре, фондю
Гарниры,
кремы,
кондитерские
изделия,
муссы
Пюре, супы
Описание процедуры
Используйте сыр Пармезан
без корки, нарезав его
кубиками размером 3 х 3 см.
Предварительно нарежьте
сыр на кусочки, проходящие
в загрузочный бункер.
Осторожно проталкивайте
их вниз толкателем.
Используйте твердый
шоколад без добавок.
Предварительно поломайте
его на кусочки размером 2
см.
Используйте вареные фасоль
или горох. При
необходимости для
улучшения консистенции
добавьте немного жидкости.
Устан
овка
скоро
сти/на
садка
2 / P
2 / j
k
2 / P
2 / P 2
/ D
Макси
мальн
ое
колич
ество
200 г
200 г
200 г
250 г
Ингредиенты
и результат
обработки
Сыр
(Пармезан) измельчение
Сыр (Гауда) тонкое
измельчение
Шоколад измельчение
Вареные
горох, фасоль
приготовлени
е пюре
Применение
готового
продукта
Блюда для
детского
питания
Салаты,
гарниры
Хлеб
Пицца
Описание процедуры
Для приготовления
грубоизмельченного пюре
добавляйте небольшое
количество жидкости. Для
приготовления жидкого
пюре продолжайте
добавлять жидкость до тех
пор, пока смесь не станет
однородной.
Поместите в загрузочный
бункер огурец и осторожно
проталкивайте его вниз.
Смешайте теплую воду с
дрожжами и сахаром.
Добавьте муку, растительное
масло, соль и замешивайте
тесто в течение
приблизительно 90 сек.
Дайте тесту подняться в
течение 30 минут.
Последовательность
действий такая же, как при
приготовлении теста для
хлеба. Перемешивайте тесто
в течение приблизительно 1
мин. Сначала всыпьте муку, а
затем добавьте другие
ингредиенты.
Устан
овка
скоро
сти/на
садка
2 / P
1 / g
2 / {
2 / {
Макси
мальн
ое
колич
ество
300 г
1
огуре
ц
350 г
муки
400 г
муки
Ингредиенты
и результат
обработки
Вареные
овощи и мясо
приготовлени
е пюре
Огурцы нарезка
ломтиками
Тесто (для
выпечки
хлеба) замешивание
Тесто (для
пиццы) замешивание
Page 46

РУССКИЙ46
Применение
готового
продукта
Пирог с
яблоками,
печенье,
открытые
пироги с
фруктами
Пироги и
торты с
начинкой из
фруктов,
пироги с
заварным
кремом и
различной
начинкой
Описание процедуры
Используйте холодный
маргарин, нарезанный
кусочками размером 2 см.
Поместите все ингредиенты
в чашу и замешивайте тесто
до тех пор, пока оно не
примет форму шара. Перед
дальнейшей обработкой
теста охладите его.
Используйте холодный
маргарин и холодную воду.
Всыпьте в чашу муку и
добавьте маргарин,
нарезанный кусочками
размером 2 см. Замешивайте
при максимальной скорости
до тех пор, пока тесто не
станет рассыпчатым, затем,
продолжая перемешивать,
добавьте холодную воду.
Прекратите перемешивать,
как только тесто начнет
принимать форму шара.
Прежде чем обрабатывать
тесто дальше, охладите его.
Устан
овка
скоро
сти/на
садка
2 / P
2 / P
Макси
мальн
ое
колич
ество
200 г
муки
200 г
муки
Ингредиенты
и результат
обработки
Тесто
(песочное) замешивание
Тесто (для
тортов и
пирожных) замешивание
Применение
готового
продукта
Хлеб высшего
качества
Пудинги,
суфле,
меренги
Пудинги,
блюда для
детского
питания
Описание процедуры
Сначала смешайте в
отдельной емкости теплое
молоко, дрожжи и
небольшое количество
сахара. Поместите все
ингредиенты в чашу
пищевого процессора и
замешивайте тесто до тех
пор, пока оно не станет
однородным и не перестанет
налипать на стенки чаши
(приблизительно 1 мин.).
Дайте тесту подняться в
течение 30 минут.
Используйте яичные белки,
имеющие комнатную
температуру. Примечание:
используйте не менее 2
яичных белков.
Полезный совет: для того,
чтобы цвет фруктов не
изменился, добавьте немного
лимонного сока. Для
получения жидкого пюре
добавьте немного жидкости.
Устан
овка
скоро
сти/на
садка
2 / {
2 / S
Р / P
Макси
мальн
ое
колич
ество
300 г
муки
4
яичны
х
белка
500 г
Ингредиенты
и результат
обработки
Дрожжевое
тесто замешивание
Яичные белки
- сбивание
Фрукты
(например,
яблоки,
бананы) измельчение,
приготовлени
е пюре
Page 47

РУССКИЙ 47
Применение
готового
продукта
Гарниры,
подливы
Соусы, супы,
гарниры,
ароматизиров
анное масло
Фруктовые
соки
Салаты,
гарниры и
соус для
барбекю
Описание процедуры
Очистите чеснок. Нажимайте
на кнопку импульсного
режима несколько раз, чтобы
не допустить чрезмерного
измельчения чеснока. Объем
порции чеснока должен
составлять не менее 150 г.
Перед измельчением
вымойте и высушите зелень
По желанию можно
добавить воду или другую
жидкость для получения
менее густого сока.
Все ингредиенты должны
иметь комнатную
температуру. Примечание:
используйте не менее 1
крупного яйца, или 2 мелких
яиц, или 2 яичных желтков.
Разбейте в чашу яйцо, влейте
немного уксуса и добавляйте
по каплям растительное
масло.
Устан
овка
скоро
сти/на
садка
Р / P
2/Р / P
2/ D
1-2/
S
Макси
мальн
ое
колич
ество
300 г
Не
менее
75 г
500 г
(обще
е
колич
ество
)
3
яйца
Ингредиенты
и результат
обработки
Чеснок измельчение
Зелень
(например,
петрушка) измельчение
Соки
(например, из
папайи,
арбуза,
груши) купажировани
е
Майонез взбивание
Применение
готового
продукта
Бифштексы,
гамбургеры,
фрикадельки
Молочные
коктейли
Различные
виды выпечки
Салаты, хлеб,
миндальная
масса,
пудинги
Описание процедуры
Сначала удалите сухожилия и
кости. Нарежьте мясо
кубиками размером 3 см. Для
получения более
грубоизмельченного фарша
работайте в импульсном
режиме.
Приготовьте фруктовое
пюре (из бананов, клубники и
т.д.) с добавлением сахара,
молока и мороженого и
тщательно перемешайте.
Ингредиенты должны иметь
комнатную температуру.
Перемешивайте
размягченное масло и сахар
до тех пор, пока смесь не
станет однородной и
пышной. Затем добавьте
молоко, яйца и муку.
Для грубого измельчения
пользуйтесь кнопкой
импульсного режима, для
тонкого измельчения установите регулятор
скорости в положение 2.
Устан
овка
скоро
сти/на
садка
2/ Р/ P
2/ D
2 / P
2/ Р/ P
Макси
мальн
ое
колич
ество
300 г
250
мл
молок
а
3
яйца
250 г
Ингредиенты
и результат
обработки
Постное
мясо измельчение
Молочные
коктейли смешивание
Смеси для
приготовлени
я пирожных смешивание
Орехи измельчение
Page 48

РУССКИЙ48
Применение
готового
продукта
Жареный лук,
гарниры
Жареный лук,
гарниры
Рубленое
мясо птицы
Супы, соусы
Украшение
блюд, кремы,
мороженое
Описание процедуры
Очистите лук и разрежьте
каждую луковицу на 4 части.
Примечание: одна порция
должна составлять не менее
100 г. Нажимайте на кнопку
импульсного режима
несколько раз, чтобы не
допустить чрезмерного
измельчения.
Очистите лук и нарежьте его
на кусочки, проходящие в
загрузочный бункер.
Примечание: одна порция
должна составлять не менее
100 г.
Сначала удалите сухожилия и
кости. Нарежьте мясо
кубиками размером 3 см. Для
получения более
грубоизмельченного фарша
работайте в импульсном
режиме.
Используйте вареные овощи
Доставайте сливки из
холодильника
непосредственно перед
взбиванием. Примечание:
порция сливок должна
составлять не менее 125 мл.
Для приготовления
требуется около 20 секунд.
Устан
овка
скоро
сти/на
садка
Р / P
1 / g
2/ Р/ P
2/ D
Макси
мальн
ое
колич
ество
400 г
300 г
200 г
500
мл
350
мл
Ингредиенты
и результат
обработки
Репчатый лук
- шинкование
Репчатый лук
- нарезка
кусочками
Птица приготовлени
е фарша из
мяса птицы
Супы перемешиван
ие
Взбитые
сливки взбивание
Рецепты
Суп из брокколи (на 4 персоны)
h или D
- 50 г зрелого сыра Гауда
- 300 г вареной брокколи (стебли и соцветия)
- вода, в которой варилась брокколи
- 2 нарезанных кусочками клубня отварного
картофеля
- 2 бульонных кубика
- 2 столовые ложки невзбитых сливок
- карри
- соль
- перец
- мускатный орех
B
Натрите сыр. Приготовьте пюре из
брокколи, отварного картофеля и
некоторого количества отвара брокколи.
Поместите приготовленное пюре и
оставшийся отвар вместе с бульонными
кубиками в мерную емкость и доведите
объем до 750 мл. Перелейте смесь в
кастрюлю и, помешивая, доведите ее до
кипения. Примешайте сыр, добавьте карри,
соль, перец, мускатный орех и сливки.
Фруктовый пирог
P
- 450г фиников без косточек, разрезанных
пополам
- 200г сушеных слив, разрезанных пополам
- 650г плодов ореха-пекана
- 160 г кокосовой стружки
- 300 г глессированных ананасов
Page 49

РУССКИЙ 49
Картофельное пюре
P
- 750 г отварного картофеля
- Приблизительно 250 мл горячего молока
(90cС)
- 1 столовая ложка сливочного масла
- соль
B
Сначала приготовьте картофельное пюре,
затем добавьте молоко, соль и масло.
Установите регулятор скорости в
положение 1 и перемешивайте не дольше
30 секунд, иначе пюре станет клейким.
Майонез
S
- 2 яичных желтка или 1 крупное яйцо
- 1 столовая ложка горчицы
- 1 столовая ложка уксуса
- 200 мл растительного масла
B
Ингредиенты должны иметь комнатную
температуру. Установите в чаше диск для
перемешивания жидкостей. Поместите в
чашу яичные желтки или яйцо, горчицу и
уксус. Установите 1-ую или 2-ую скорость. Во
время перемешивания постепенно заливайте
через загрузочный бункер на вращающийся
диск растительное масло. Вы можете
также добавлять масло через отверстие в
толкателе.
B
Совет по приготовлению соуса тартар:
добавьте петрушку, корнишоны и сваренные
вкрутую яйца.
- 1 банка (400 г) сладкого сгущенного молока
- 1 чайная ложка ванильной эссенции
B
Смажьте жиром три 20-см формы и
нагрейте духовку до 135c C.
B
Поместите разрезанные пополам финики и
сливы в чашу кухонного комбайна и
измельчайте их при максимальной скорости
в течение 30 секунд. После этого выньте их
из чаши.
B
Поместите плоды ореха-пекана в чашу
кухонного комбайна и крупно размелите
орехи, используя импульсный режим. После
этого выньте их из чаши.
B
Поместите глессированный ананас в чашу
кухонного комбайна и измельчите, до
получения небольших кусочков, используя
импульсный режим. После этого выньте их
из чаши.
B
При помощи миксера смешайте финики без
косточек, груши, орехи, ананасы и кокосовую
стружку в большой чаше.
B
Добавьте к ингредиентам молоко и ваниль и
перемешайте.
B
Поместите фруктовую смесь в формы, и
выпекайте пироги при 135c C в течение
90 минут.
B
Не производите повторное смешивание, не
сделав перерыва. Если вам нужно
переработать большее количество
продуктов, дайте прибору остыть и затем
продолжайте переработку.
Page 50

РУССКИЙ50
- Ингредиенты, раскладываемые поверх соуса
и добавляемые по вкусу: оливки, салями,
артишоки, грибы, анчоусы, сыр Моцарелла,
перец, тертый твердый сыр и оливковое
масло.
B
Установите в чаше насадку для замешивания
теста. Поместите в чашу все ингредиенты
и установите регулятор скорости в
положение 2. Замешивайте тесто в течение
приблизительно 1 минуты до образования
гладко вымешанного шара. Для того, чтобы
электроприбор не перемещался во время
замешивания по поверхности стола,
придерживайте его сверху рукой.
Перенесите тесто в другую емкость,
накройте ее влажной тканью и дайте
подняться в течение приблизительно
30 минут.
B
С помощью ножа измельчите лук и чеснок.
Обжаривайте измельченный лук и чеснок в
масле до тех пор, пока они не станут
прозрачными.
B
Добавьте протертые томаты и зелень и
варите соус на медленном огне, не доводя до
кипения, в течение приблизительно
10 минут.
B
Приправьте по вкусу солью, перцем и
сахаром. Дайте соусу остыть.
B
Нагрейте духовку до температуры 250cС.
B
Раскатайте тесто на посыпанной мукой
поверхности и, разделив его на 2 части,
придайте им форму круга. Поместите эти
B
Совет по приготовлению соуса для закуски из
крабов или устриц: к 100 мл майонеза
добавьте 50 мл сметаны, несколько капель
виски, 3 столовых ложки томатной пасты и
несколько капель сахарного сиропа с
имбирем.
Молочный коктейль
D
- 175 мл молока
- 10 г сахара
- 1/2 банана или приблизительно 65 г других
свежих фруктов
- 50 г ванильного мороженого
B
Перемешивайте все ингредиенты до
образования пенящейся смеси.
Пицца
{
- 400 г муки
- 40 мл растительного масла
- 1/2 столовой ложки соли
- 20 г свежих дрожжей или 1,5 упаковки сухих
дрожжей
- около 240 мл воды (35cС)
Для начинки пиццы:
- 300 мл консервированных протертых томатов
- 1 столовая ложка смеси итальянских трав
(сухих или свежих)
- 1 луковица
- 2 зубка чеснока
- соль и перец
- сахар
Page 51

51РУССКИЙ
B
Перенесите ломтики в дуршлаг и дайте воде
стечь.
B
Положите в сковороду 20 г сливочного масла
и обжаривайте половину ломтиков кабачка в
течение 3 минут, часто их переворачивая.
Посыпьте ломтики итальянской или
провансальской смесью трав (1 столовая
ложка).
B
Обсушите обжаренные ломтики кабачка на
кулинарной бумаге.
B
Смажьте жиром форму для выпечки с
низкими стенками и перенесите в нее
ломтики кабачка и картофеля, чередуя их и
укладывая таким образом, чтобы они
частично перекрывались наподобие
кровельной черепицы.
B
Установив регулятор скорости в положение
2, взбейте ножом яйца вместе со сливками и
молоком. Добавьте по вкусу соль и перец и
вылейте эту смесь на находящиеся в форме
ломтики картофеля и кабачка.
B
Замените нож-вставку для нарезания
ломтиков на нож-вставку для тонкого
измельчения, установите регулятор
скорости в положение 2, натрите сыр и
посыпьте им блюдо.
B
Поместите форму в центр горячей духовки
(200cС) и подрумянивайте блюдо в течение
приблизительно 15 минут.
круги в смазанные жиром формы для выпечки.
Поместите на поверхность пиццы начинку,
оставляя края свободными. Разложите
поверх желаемые ингредиенты, посыпьте
пиццу тертым сыром и сбрызните
оливковым маслом.
B
Выпекайте пиццу в течение 12-15 минут.
Картофель и кабачки, обжаренные
в тертом сыре.
Pgk
- 375 г картофеля
- щепотка соли
- 1 кабачок (приблизительно 250 г)
- 1 зубок чеснока, растолочь
- около 40 г сливочного масла + масло для
смазывания формы для выпечки
- 2 столовые ложки итальянской или
провансальской смеси трав
- 1 крупное яйцо
- 75 мл взбитых сливок
- 75 мл молока
- перец
- 70 г полутвердого сыра
B
Очистите и вымойте картофель.
B
Установите нож-вставку для нарезания
ломтиков в рамку для ножей-вставок и
поместите рамку в чашу. Установив
скорость 1, нарежьте картофель и кабачок
ломтиками.
B
Сварите ломтики картофеля в кипящей воде
с щепоткой соли почти до готовности.
Page 52

РУССКИЙ52
B
Выложите мусс на блюдо, накройте, и
охладите в течение нескольких часов в
холодильнике.
B
Украсьте мусс веточками водяного кресса.
Паста для сандвичей
P
- 2 небольшие, нарезанные ломтиками
моркови
- 2-3 нарезанных ломтиками корнишона
- 75 г нарезанной ломтиками цветной капусты
- 75 г нарезанного ломтиками корневого
сельдерея
- зелень (петрушка, укроп, эстрагон,
нарезанные стебли сельдерея)
- 100 г майонеза
- 100 г обезжиренного творога
- соль
- перец
B
Тонко измельчите морковь, корнишоны,
цветную капусту, зелень, стебли и корень
сельдерея. Тщательно перемешайте вместе
с майонезом и творогом и добавьте соль и
перец по вкусу.
Испанский салат из капусты
P
- 1 небольшой кочан краснокочанной капусты
- 2 луковицы красного лука
- 1 веточка фенхеля
- 1 яблоко
- сок 1 апельсина и 2 столовые ложки
красного виноградного уксуса
- 1 столовая ложка горчицы
Мусс из лосося
PS
- 1 банка консервированного лосося (220 г)
- 2 листика желатина
- несколько стеблей лука-резанца
- щепотка соли
- щепотка кайенского перца
- половина столовой ложки лимонного сока
- 125 мл взбитых сливок
- 1 небольшая луковица
- водяной кресс для украшения блюда
B
Замочите желатин в большом количестве
воды.
B
Работая в импульсном режиме, измельчите в
пищевом процессоре репчатый лук и лукрезанец.
B
Очистите лосося от кожи и костей.
B
Добавьте соль, кайенский перец, лимонный
сок, лосося и жидкость из банки к
измельченному репчатому луку и лукурезанцу, установите регулятор скорости в
положение 2 и приготовьте пюре.
B
Поместите пюре в чашу.
B
Вскипятите небольшое количество воды и
растворите в ней желатин.
B
Перемешивая пюре из лосося, влейте в него
раствор желатина.
B
Установите в чаше диск для перемешивания
и взбейте сливки, удерживая кнопку
импульсного режима нажатой в течение
приблизительно 15 секунд.
B
Деревянной ложкой осторожно введите
взбитые сливки в пюре из лосося.
Page 53

РУССКИЙ 53
Цацики
k
- 1 огурец
- 200 мл йогурта
- 1 столовая ложка оливкового масла
- 2 зубка чеснока
- щепотка соли
- 1 столовая ложка мелко нарезанного укропа
- несколько листиков мяты
B
Очистите огурец и нашинкуйте его на
скорости 1. Перенесите нашинкованный
огурец в дуршлаг и дайте ему как следует
стечь.
B
Перемешайте вместе с огурцом остальные
ингредиенты, за исключением листиков
мяты. Охладите салат, поместив его на 1
час в закрытой емкости в холодильник.
Перед подачей на стол украсьте листиками
мяты.
B
Смешайте сок, горчицу и уксус. Установив
регулятор скорости в положение 1,
нарежьте ломтиками капусту, лук, фенхель
и яблоко.
B
Смешайте все ингредиенты в емкости для
салата.
Бисквит
P
- 4 яйца
- 30 мл воды (35cС;)
- 1 щепотка соли
- 150 г сахара
- Поместите пюре в чашу.
- 150 г просеянной муки
- 3 г пекарского порошка
B
Взбивайте яйца с водой в течение
приблизительно 2 минут. Добавьте сахар,
ванильный сахар и соль и перемешивайте в
течение 1 минуты. Смесь должна стекать с
ложки наподобие тяжелой ленты. С помощью
лопатки осторожно добавьте муку и
пекарский порошок. Выпекайте бисквит в
духовке при температуре около 170cС в
течение приблизительно 30-35 минут.
B
Совет: вы можете прослоить бисквит
различными видами крема или просто
взбитыми сливками со свежими фруктами.
Page 54

ČESKY54
Kuchyňský robot: díly a příslušenství
A) Volič rychlost
B) Motorová jednotka
C) Bezpečnostní zajištění
D) Hnětací nádoba
E) Šroubovací uzávěr (pro uzavření náhonu
mixéru pokud mixér není použit)
F) Držák nástrojů
G) Sklenice mixéru
H) Výčnělek víka (aktivuje a deaktivuje
bezpečnostní spínač)
I) Víko nádoby
J) Plnicí tubus
K) Pěchovač
L) Víko sklenice mixéru
M) Kryt s uzavíratelným prostorem pro vložky
N) Krájecí kotouč střední
O) Strouhací kotouč jemný
P) Strouhací kotouč střední
Q) Držák vložek
R) Nože (s ochranným krytem)
S) Hnětací příslušenství
T) Emulgační kotouč
U) Stěrka
Úvod
Tento přístroj je vybaven automatickou tepelnou
ochranou. V případě přehřátí motoru je přívod
proudu automaticky vypnut.
Když přístroj náhle přestane
pracovat:
1 Vytáhněte jeho síťovovu zástrčku ze
zásuvky.
2 Stiskněte tlačítko 'PULSE / 0'.
3 Nechte přístroj 60 minut vychladnout.
4 Zasuňte jeho síťovou zástrčku do zásuvky.
5 Znovu zapněte přístroj.
Kdyby automatický vypínač vypínal přístroj častěji,
kontaktujte autorizovanou opravnu firmy Philips.
VÝSTRAHA: abyste zabránili nebezpečné situaci
způsobené náhodným resetováním tepelné
ochrany, nesmí být přístroj připojen k časovému
spínači.
Důležité
◗ Před použitím přístroje přečtěte pozorně
následující instrukce a sledujte přitom
příslušná vyobrazení.
◗ Návod uschovejte pro případná pozdější
nahlédnutí.
◗ Nejprve zkontrolujte, zda napětí, uvedené na
typovém štítku přístroje, souhlasí s napětím
ve vaší světelné síti (110 až 127 V nebo 220 až
240 V).
Page 55

ČESKY 55
◗ S přístrojem nikdy nepoužívejte cizí doplňky,
pokud nebyly výslovně doporučeny firmou
Philips. Kromě případné poruchy by to
způsobilo i ztrátu záručních nároků.
◗ Pokud byste zjistili závadu na přívodním
kabelu, na jeho zástrčce nebo na jiném dílu,
nepoužívejte přístroj a ihned zajistěte opravu.
◗ Pokud by byl poškozen síťový přívod, musí
být jeho výměna svěřena organizaci,
autorizované firmou Philips nebo shodně
kvalifikovaným pracovníkům, abyste předešli
možnému nebezpečí.
◗ Než přístroj poprvé použijete, umyjte pečlivě
všechny jeho díly, které přicházejí do přímého
styku s potravinami.
◗ Nikdy nepřekračujte množství zpracovávaných
potravin, která jsou uvedena v tabulce.
◗ Nepřekračujte též maximální obsah náplně
indikované na nádobě nebo na sklenici mixéru
a neplňte je nad příslušnou značku.
◗ Po použití vždy přístroj vypněte.
◗ Nikdy nestrkejte prsty (ani stěrku) do nádoby
plnicím tubusem pokud je přístroj v chodu.
Smíte použít výhradně pěchovač.
◗ Vždy vypněte přístroj dříve, než strčíte prsty
(nebo stěrku) do nádoby mixéru.
◗ Dbejte na to, aby přístroj nebyl v přímém
dosahu dětí.
◗ Nikdy nenechávejte přístroj pracovat bez
dozoru.
◗ Nikdy přístroj nevypínejte otočením víka.
Vždy použijte výhradně tlačítko PULSE / 0.
◗ Před vyjmutím příslušenství musí být přístroj
rovněž ve vypnutém stavu.
◗ Nikdy nesmíte ponořit motorovou jednotku
do vody nebo do jiné kapaliny, ani ji mýt pod
tekoucí vodou. Čistit ji můžete pouze
navlhčeným hadříkem.
◗ Když nasazujete mixérovou nádobu otočte
nádobou i jejím víkem až uslyšíte zřetelné
klapnutí.
◗ Emulgační kotouč, nože a hnětací příslušenství
mohou být umístěny v držáku nástrojů v
hnětací nádobě.
◗ Před použitím nožů nejprve sejměte jejich
ochranný obal.
◗ Nožů se nedotýkejte, obzvláště je-li přístroj
připojen do sítě.
◗ Když se nože v potravině zablokují, vždy
přístroj vypněte dříve, než potraviny, blokující
nože, vyjmete.
◗ Horké potraviny před zpracováním ochlaďte.
Jejich nejvyšší teplota smí být 80cC.
◗ Zpracováváte-li tekutiny, které mají sklon k
pěnění, nenaplňujte jich do mixérové sklenice
větší množství než 1 litr.
Vždy zkontrolujte, že nádoba i sklenice mixéru
jsou správně vloženy. V opačném případě by
mixér nepracoval.
Použití přístroje
Hnětací nádoba
◗ Pokud chcete použít hnětací nádobu,
odejměte sklenici mixéru a otvor náhonu
Page 56

ČESKY56
zakryjte šroubovacím uzávěrem. Všechny
požadované práce s hnětací nádobou lze
realizovat pouze v případě, že byla mixérová
sklenice odejmuta.
C
1 Umístěte hnětací nádobu na přístroj a
zajistěte ji otočením ve směru šipky až
slyšitelně zaklapne.
C
2 Na nádobu nasaďte víko. To rovněž
otočte ve směru šipky až slyšitelně
zaklapne (to vyžaduje určitou sílu).
Vestavěný bezpečnostní vypínač
B
Motorová jednotka i víko jsou opatřeny značkami.
Přístroj pracuje jen tehdy, když je šipka na
motorové jednotce přesně proti šipce na víku.
C
1 Přesvědčte se, že značka na hnětací
nádobě a značka na víku jsou přesně proti
sobě. Výstupek na víku se nyní kryje s
otvorem v rukojeti.
Plnicí tubus a pěchovač
C
1 Plnicím tubusem přístroj plňte tekutými i
tuhými přísadami. Při tuhých přísadách
použijte pěchovač.
C
2 Pěchovač je vhodný též pro utěsnění
plnicího tubusu v případě, že by tekuté
přísady měly snahu plnicím tubusem
vystřikovat.
Nože
◗ Nože používejte pro sekání, mixování,
míchání, nebo přípravu koláčových směsí.
C
1 Nasaďte nádobu na motorovou jednotku.
C
2 Sejměte z nožů ochranný kryt.
Nože jsou velmi ostré. Dbejte náležité opatrnosti!
C
3 Vložte nože do držáku nástrojů.
C
4 Držák nástrojů vložte do nádoby.
5 Nádobu naplňte potravinami. Větší kusy
nakrájejte na menší kousky o velikosti
nejvýše 3 x 3 cm. Na nádobu nasaďte víko.
CLICK
CLICK
1
2
1
2
1
CLICK
2
CLICK
Page 57

ČESKY 57
C
6 Zvolte takovou rychlost, která poskytne
nejlepší výsledky.
B
Nastavení 'PULSE / 0' :je vhodné pro mžikové
zpracovávání. Pokud držíte tlačítko 'PULSE / 0'
stisknuté, běží motor největší rychlostí, pokud toto
tlačítko uvolníte, motor se zastaví.
B
Nastavení 1: standardní rychlost.
B
Nastavení 2: velká rychlost.
Viz tabulku doporučených rychlostí. Zpracování
trvá 1 až 60 sekund.
Praktické rady
◗ Přístroj pracuje velmi rychle. Mžikovým
provozem pracujte jen v krátkých intervalech
abyste zabránili přílišnému rozsekání potravin.
◗ Při zpracování tvrdých sýrů nenechte přístroj
přiliš dlouho v chodu. Sýr by se nadměrně
ohřál, začal by se roztékat a stal by se
hrudkovitým.
◗ Nože nepoužívejte na rozsekání velmi tvrdých
ingrediencí jako jsou například kávová zrnka,
muškátové ořechy nebo kostky ledu. Nože by
se zakrátko otupily.
Pokud by potraviny ulpěly na nožích:
1 Vypněte přístroj.
2 Sejměte víko z nádoby.
3 Odstraňte přilepené potraviny stěrkou.
Vložky
Řezací hrany vložek jsou velmi ostré. Pozor při
doteku!
Vložky nikdy nepoužívejte pro zpracování tvrdých
potravin jako jsou například kostky ledu.
C
1 Vložte vybranou vložku do jejího držáku.
C
2 Držák vložek vložte do držáku nástrojů.
3 Na nádobu nasaďte víko.
C
4 Potraviny vkládejte plnicím tubusem. Větší
části potravin předem rozřežte.
5 Potraviny vkládejte postupně a
rovnoměrně.
Zpracováváte-li větší množství potravin, vkládejte
je postupně a v malých dávkách. Nezapomeňte
včas nádobu vyprazdňovat.
3 Zvolte přiměřenou rychlost tak, aby byl
výsledek optimální. Řiďte se doporučením
v tabulce.
Nechte přístroj v chodu asi 10 až 60 sekund.
C
4 Potraviny vkládejte do plnicího tubusu
plynule a přitlačujte je pěchovadlem.
1
CLICK
2
Page 58

EESTI58
C
5 Přejete-li si vyjmout vložku z držáku
vezměte držák vložek do rukou tak, že
jeho zadní část směřuje k vám. Zatlačte
hrany vložky prsty tak aby z držáku
vypadla.
Hnětací příslušenství
Hnětací příslušenství je vhodné pro zpracování
chlebového těsta nebo knedlíků a pro lité těsto
nebo koláčové směsi.
C
6 Nasaďte hnětací příslušenství na držák
nástrojů.
7 Vložte potraviny do nádoby.
C
8 Nádobu uzavřete víkem.
C
9 Plnicí tubus rovněž uzavřete vložením
pěchovače.
C
10 Zvolte vhodnou rychlost tak, aby byl
výsledek optimální. Řiďte se doporučením
v tabulce.
Emulgační kotouč
Emulgační kotouč můžete použít pro přípravu
majonézy, šlehání krémů nebo vaječných bílků.
C
11 Nasaďte emulgační kotouč na držák
nástrojů.
12 Vložte potraviny do nádoby a nádobu
uzavřete víkem.
13 Zvolte vhodnou rychlost tak, aby byl
výsledek optimální. Řiďte se doporučením
v tabulce.
Praktické rady
◗ Přejete-li si šlehat vaječné bílky, dbejte na to,
aby vejce měly pokojovou teplotu.
Proto vejce vyjměte z chladničky alespoň půl
hodiny před jejich zpracováním.
◗ Všechny přísady pro výrobu majonézy mají
mít též pokojovou teplotu.
Olej můžete přidávat malým otvorem ve dnu
pěchovače.
◗ Pokud si přejete šlehat krém, zpracovávejte
ho ihned po vyjmutí z chladničky. Doba
zpracování je uvedena v tabulce. Krém nemá
být šlehán nadměrně dlouho.
Přejete-li si mít lepší kontrolu nad pracovním
postupem, využívejte mžikovou spínací funkci.
CLICK
1
2
Page 59

ČESKY 59
Mixér
Mixér je vhodný pro:
- Mixování tekutin, například mléčných produktů,
omáček, ovocných šťáv nebo nápojů.
- Mixování měkkých potravin, například
lívancového těsta nebo majonézy.
- Rozšlehání vařených ingrediencí, například
výroba dětské výživy.
C
14 Odšroubujte kryt náhonu mixéru.
C
15 Nasaďte sklenici mixéru a zajistěte ji
otočením ve směru šipky až bude
dostatečně upevněna.
Na držadlo sklenice netlačte nadměrnou silou.
C
16 Do sklenice mikéru vložte potraviny.
17 Na sklenici našroubujte uzávěr.
18 Zapněte přístroj a mixujte potraviny.
Zvolte takovou rychlost, aby byl výsledek
mixování optimální. Viz tabulku
doporučených rychlostí.
Praktické rady
C
◗ Tekuté přísady můžete do mixéru přidávat
otvorem ve víku.
◗ Čím déle necháte přístroj v chodu, tím
jemnější bude výsledek mixování.
◗ Tuhé přísady před vložením do mixéru
rozřežte na malé kousky. Pokud potřebujete
zpracovat větší množství potravin,
zpracovávejte postupně menší množství.
Nevkládejte větší množtví najednou.
◗ Máte-li pochybnosti o správné rychlosti,
zvolte vždy raději větší rychlost (poloha 2).
Pokud by se potraviny přilepily na stěny sklenice:
1 Vypněte přístroj a vytáhněte jeho zástrčku
ze zásuvky.
2 Sejměte víko.
Víko nikdy nesnímejte dříve, než se mixér zcela
zastaví.
3 Nalepené potraviny odstraňte ze stěn
sklenice stěrkou.
Dbejte na to, aby stěrka byla v bezpečné
vzdálenosti od nožů mixéru (přibližně 2 cm).
Čištění přístroje
Před čištěním motorové jednotky vždy předem
odpojte přístroj od sítě.
1 Motorovou jednotku čistěte pouze
navlhčeným hadříkem. Nesmíte ji nikdy
ponořit do vody ani ji vodou oplachovat.
2 Všechny díly, které přicházejí do styku s
potravinami, myjte v horké vodě s
1
CLICK
2
1
2
1
2
Page 60

ČESKY60
přídáním vhodného mycího prostředku a
to po každém použití.
◗ Hnětací nádobu, její víko, pěchovač a
příslušenství lze mýt též v myčce nádobí.
Testy pro odolnost mytí v myčce nádobí
odpovídají DIN EN 12875.
Kryt úložného prostoru a sklenici mixéru nelze
mýt v myčce nádobí.
Nože, nožovou jednotku mixéru a vložky čistěte
velmi opatrně. Jejich hrany jsou velmi ostré!
Dbejte na to, aby ostré hrany nožů nebo nožové
jednotky mixéru a vložek nepřišly do styku s
tvrdými předměty, které by je mohly otupit.
Některé druhy potravin mohou způsobit
zabarvení povrchu příslušenství. To nemá na
funkci příslušenství žádný negativní vliv. Po určitém
čase toto zabarvení obvykle zmizí.
Rychlé čištění mixéru
C
1 Do mixérové sklenice nalijte vlažnou vodu
(nejvýše půl litru) s přísadou vhodného
mycího prostředku.
2 Sklenici mixéru uzavřete víkem.
C
3 Mixér ponechte malou chvíli v chodu
stisknutím mžikového tlačítka.
4 Mixér rozeberte, vodu vylijte a mixér
vypláchněte čistou vodou.
Uchovávání přístroje
Rychlé uložení
C
◗ Příslušenství (emulgační kotouč, nože, hnětací
příslušenství, držák vložek) vložte do držáku
nástrojů a uložte do nádoby. Držák vložek
vkládejte až nakonec.
C
◗ Dvě vložky můžete uchovávat v úschovném
prostoru v krytu, který kryje víko nádoby, jak
je naznačeno na vnitřní straně krytu. Vložky
mají být do krytu pouze zasunuty, nikoli silou
zatlačeny.
C
◗ Kryt s úložným prostorem umístěte na
průhledné víko nádoby.
◗ Naviňte síťový přívod okolo kotouče na zadní
straně přístroje.
Záruka a servis
Pokud byste potřebovali jakoukoli informaci nebo
měli nějaký problém, podívejte se na internetovou
stránku www.philips.com, případně kontaktujte
Informační středisko firmy Philips, jehož telefonní
číslo naleznete na letáčku s celosvětovou zárukou.
Page 61

ČESKY 61
Množství a doba zpracování
Použití
Lívance, vafle
Příměs do jídel
Dezerty,
polevy
Zdobení,
syrová
zelenina,
tuřínové plátky
Saláty
Zdobení,
polévky,
omáčky
Omáčky, pizzy,
fondy
Zdobení,
omáčky,
cukrovinky,
pudinky
Postup
Nejprve nalejte mléko do
mixéru a pak přidejte pevné
substance. Mixujte asi 1 minutu.
Pokud je to nutné opakujte
tento postup dvakrát.
Použijte suché a křehké pečivo.
Použijte měkké máslo.
Zeleninu rozřežte na kousky a
vkládejte je do plnicího otvoru.
Přitom je lehce přitlačujte
pěchovačem.
Jednotlivé kousky vkládejte do
plnicího otvoru a lehce je
přitlačujte pěchovačem.
Parmezán bez kůry rozřežte na
kousky o hraně asi 3 cm a ty
pak vkládejte do plnicího
otvoru.
Sýr rozřezaný na kousky
vkládejte do plnicího otvoru.
Opatrně přitlačujte
pěchovačem.
Použijte tvrdou a hladkou
čokoládu. Rozlamte ji na
kousky asi 2 cm.
Nasta
vení
rychlo
sti /
Přísluš
enství
2 / P
2 / P
2 / P
2 / j
k
2 / P /
g
2 / P
2 / j
k
2 / P
Nejvě
tší
množs
tví
250
ml
mléka
100 g
300 g
350 g
350 g
200 g
200 g
200 g
Přísady a
výsledek
Těsto
lívancové šlehání
Strouhanka rozsekání
Máslový krém
- šlehání
Zelenina
(mrkev, tuřín,
bílé ředkvičky)
- krájení
Zelenina
(mrkev, pórek,
celer) - krájení
Sýr
(parmezán) rozsekání
Sýr (gouda) strouhání
Čokoláda rozsekání
Použití
Pyré, polévky
Dětská a
kojenecká
výživa
Saláty, zdobení
Chléb
Pizza
Jablkový závin,
sladké piškoty,
dorty
Postup
Použijte vařený hrách nebo
fazole. Pokud je to třeba,
můžete do směsi přidat trochu
tekutiny.
Pro hrubší pyré nepřidávejte
příliš mnoho tekutiny. Pro
jemné pyré přidejte jen tolik
tekutiny až je směs hladká.
Vložte okurku do plnicího
otvoru a opatrně ji přitlačujte.
Smíchejte horkou vodu s
kvasniceni a cukrem. Přidejte
mouku a zpracovávejte
výsledné těsto asi 90 sekund.
Nechte ho kynout asi 30 minut.
Pracujte shodně jako v
předešlém případě.
Zpracovávejte těsto asi 1
minutu. Nejprve přidejte
mouku a pak další přísady.
Použijte chladný margarin, který
rozřežte na kousky asi 2 cm.
Vložte všechny přísady do
nádoby a zpracovávejte tak
dlouho, až se vytvoří těstová
koule. Před dalším zpracováním
nechte těsto vychladnout.
Nasta
vení
rychlo
sti /
Přísluš
enství
2 / P
D
2 / P
1 / g
2 / {
2 / {
2 / P
Nejvě
tší
množs
tví
250 g
300 g
1
okurka
350 g
mouky
400 g
mouky
200 g
mouky
Přísady a
výsledek
Vařený hrách,
fazole - výroba
pyré
Vařená
zelenina nebo
maso - výroba
pyré
Okurky krájení
Těsto (pro
chléb) hnětení
Těsto (pro
pizzu) hnětení
Těsto (pro
cukrářské
pečivo) hnětení
Page 62

ČESKY62
Použití
Ovocné
koláče
Luxusní pečívo
Pudinky, suflé,
sněhové
pusinky
Pudinky,
dětská výživa
Postup
Použijte chladný margarin a
studenou vodu. Nasypte
mouku do nádoby a přidejte
margarin, který rozřežte na
kousky asi 2 cm. Zpracovávejte
největší rychlostí až těsto začne
být hrudkovité. Pak, za stálého
míchání, přidejte studenou
vodu. Ukončete míchání až
těsto začne mít vzhled koule.
Před dalším zpracováním ho
nechte vychladnout.
Nejprve promíchejte kvasnice,
teplé mléko a trochu cukru ve
zvláštní nádobě. Směs pak
přelijte do hnětací nádoby a
zpracovávejte tak dlouho, až je
těsto hladké a nelepí se na
stěny nádoby. To trvá obvykle
asi 1 minutu. Pak nechte těsto
kynout asi 30 minut.
Bílky by měly mít pokojovou
teplotu. Poznámka: použijte
nejméně 2 bílky.
Rada: abyste předešli zabarvení
šťávy, přidejte trochu
citronové šťávy. Pro zjemnění
pyré můžete přidat trochu
tekutiny.
Nasta
vení
rychlo
sti /
Přísluš
enství
2 / P
2 / {
2 / S
P / P
Nejvě
tší
množs
tví
200 g
mouky
300 g
mouky
4
vaječn
é bílky
500 g
Přísady a
výsledek
Těsto (pro
zákusky,
koláče) hnětení
Těsto (kynuté)
- hnětení
Vaječné bílky šlehání
Ovoce (např.
jablka, banány)
rozsekání/výro
ba pyré)
Použití
Zdobení
Omáčky,
polévky,
zdobení,
bylinkové
máslo
Ovocné džusy
Saláty,
zdobení,
omáčky
barbecue
Tatarské
steaky,
hamburgry,
masové koule
Mléčné nápoje
Postup
Česnek oloupejte. Použijte
mžikový spínač, abyste předešli
příliš jemnému rozsekání.
Vložte nejméně 150 g česneku.
Bylinky nejprve omyjte a
usušte.
Přidejte vodu nebo jinou
tekutinu abyste získali jemnou
šťávu.
Všechny přísady mají mít
pokojovou teplotu. Poznámka:
použijte nejméně 1 vejce, dvě
malá vejce nebo dva vaječné
žloutky. Do nádoby vložte
vejce, přidejte trochu octa a
přikapávejte olej.
Nejprve odstraňte šlachy a
kosti. Maso nakrájejte na kostky
asi 3 cm. Pro nejlepší výsledek
použijte mžikový spínač.
Z banánů nebo jahod vyrobte
pyré. Smíchejte ho s cukrem,
mlékem a trochou
zmrzlinového krému a mixujte.
Nasta
vení
rychlo
sti /
Přísluš
enství
P / P
2/P / P
2 / D
1-2 /
S
2/ P /
P
2 / D
Nejvě
tší
množs
tví
300 g
min.
75 g
500 g
(celko
vě)
3
vejce
300 g
250
ml
mléka
Přísady a
výsledek
Česnek rozsekání
Bylinky (např.
petržel) rozsekání
Džusy (např.
melounový,
papayový,
hruškový) mixování
Majónéza emulgování
Maso (libové)
- drcení
Mléčné nápoje
- mixování
Page 63

ČESKY 63
Použití
Různé pečivo
Saláty, pečivo,
mandlové
těsto, pudinky
Různé
Různé
Drcené maso
Polévky,
omáčky
Zdobení,
různé použití
krémů
Postup
Přísady mají mít pokojovou
teplotu. Mixujte měkké máslo s
cukrem tak dlouho až vznikne
jemná krémová směs. Pak
přidejte mléko, vejce a mouku.
Pro hrubé rozsekání použijte
mžikové tlačítko nebo pro
jemné rozsekání rychlost 2.
Z cibule odstraňte slupku a
cibuli rozdělte na 4 díly.
Poznámka: použijte mžikový
spínač krátkými stisky, abyste
předešli příliš jemnému
rozsekání.
Z cibule odstraňte slupku a
rozřežte ji tak, aby prošla
plnicím otvorem. Poznámka:
použijte nejméně 100 g.
Nejprve odstraňte šlachy a
kosti. Maso nakrájejte na kostky
asi 3 cm. Pro nejlepší výsledek
použijte mžikový spínač.
Použijte vařenou zeleninu.
Použijte krém vyjmutý přímo z
chladničky. Poznámka: použijte
nejméně 125 ml krému. Krém
je ušlehán přibližně za 20
sekund.
Nasta
vení
rychlo
sti /
Přísluš
enství
2 / P
2/ P /
P
P / P
1 / g
2/ P /
P
2 / D
P / S
Nejvě
tší
množs
tví
3
vejce
250 g
400 g
300 g
200 g
500
ml
350
ml
Přísady a
výsledek
Směsi
(dortové) mixování
Ořechy rozsekání
Cibule rozsekání
Cibule krájení
Drůbež drcení
Polévky mixování
Šlehaný krém šlehání
Recepty
Polévka z brokolice (pro 4 osoby)
h nebo D
- 50 g zralého sýru Gouda
- 300 g vařené brokolice (stonky a květy)
- voda, v níž se brokolice vařila
- 2 vařené brambory v kouscích
- 2 nakrájené stonky
- 2 lžíce nešlehaného krému
- curry
- sůl
- pepř
- muškátový ořech
B
Nastrouhejte sýr.Vyrobte pyré z brokolice s
vařenými bramborami a s vodou, v níž se brokolice
vařila. Pyré z brokolice a zbylou vodu nalijte do
odměrné nádoby a doplňte do 750 ml. Přeneste
tuto směs na pánev a přiveďte ji za stálého
míchání do varu. Vmíchejte sýr a ochuťte solí,
curry, pepřem a muškátovým ořechem a přidejte
krém.
Ovocný koláč
P
- 450 gsuchýchodpeckovaných a půlených datlí
- 200g suché švestky, půlené
- 650 g pekanové ořechy
- 160 g nastrouhaný kokos
- 300 g ananas
- 1 plechovka (400 g) slazeného
kondenzovaného mléka
- 1 lžička vanilkové esence
Page 64

ČESKY64
Majonéza
S
- 2 vejce nebo 1 velké vejce
- 1 lžička hořčice
- 1 lžička octa
- 200 ml oleje
B
Přísady by měly mít pokojovou teplotu. Vložte
emulgační kotouč do nádoby. Do nádoby vložte
vaječné žloutky nebo vejce, hořčici a ocet. Použijte
rychlost 1 nebo 2. Olej přikapávejte otvorem v
pěchovači.
B
Doporučení pro tatarskou omáčku: přidejte
pertržel, kyselou okurku a natvrdo uvařená vejce.
B
Doporučení pro koktejlovou omáčku: přidejte
50 ml krému fraiche, kapku whisky, lžičku
rajského protlaku a trochu zázvorového syrupu na
100 l majonézy.
Mléčný koktejl
D
- 175 ml mléka
- 10g cukru
- 1/2 banánu nebo asi 65 g jiného čerstvého
ovoce
- 50 g vanilkového mraženého krému
B
Smíchejte všechny přísady až je hotová směs
pěnivá.
B
Vymažte dvapečicí plechy (20 cm dlouhé) a
předehřejte troubu na 135c C.
B
Vložte půlené datle a švestky do nádoby
kuchyňského strojku a rozsekejte je asi po dobu
30 sekund. Pak nádobu vyprázdněte.
B
Vložte pekanové ořechy do nádoby kuchyňského
strojku a hrubě je rozsekejte, nejlépe impulsní
funkcí. Pak nádobu vyprázdněte.
B
Vložte ananas do nádoby kuchyňského strojku a
rozsekejte ho na kousky, nejlépe impulsní funkcí.
Pak nádobu vyprázdněte.
B
Mixujte datle, švestky, pekanové ořechy a drcené
kokosové ořechy ve velké mixovací nádobě.
B
Přidejte mléko a vanilku a obsah promixujte.
B
Ovocnou směs nalijte na pečicí plech a vše pečte
při teplotě 135c C asi 90 minut.
B
Nerealizujte tento postup vícekrát než jednou bez
přerušení. Pokud potřebujete zpracovat větší
množství, nechte přístroj vychladnout a teprve
pak pokračujte v práci.
Šťouchané brambory
P
- 750 g vařených brambor
- asi 250 ml horkého mléka (90cC)
- 1 lžíce másla
- sůl
B
Nejprve rozmačkejte brambory, pak přidejte
mléko, sůl a máslo. Použijte rychlost 1 a míchejte
jen asi 30 sekund aby výsledek nebyl lepkavý.
Page 65

ČESKY 65
B
Ohřejte troubu na 250cC.
B
Uválcujte těsto na pomoučené podložce nebo
utvořte dva kruhové tvary. Těsto pak položte na
vymaštěný plech. Pizzu rozestřete a kraje
ponechte volné. Pizzu doplňte všemi přísadami,
posypte sýrem a polijte trochou oleje.
B
Pizzu pečte 12 až 15 minut.
Bramborové courgetty
Pgk
- 375 g brambor
- špetka soli
- 1 courgette (asi 250 g)
- 1 stroužek česneku (rozdrcený)
- asi 40 g másla + máslo k potření plechu
- 2 lžičky provencalských bylinek
- 1 velké vejce
- 75 ml šlehaného krému
- 75 ml mléka
- pepř
- 70 g polozralého sýra
B
Brambory oloupejte a omyjte.
B
Vložte řezací vložku do držáku vložek a držák
vložek vložte do nádoby. Rozkrájejte brambory a
courgette rychlostí 1.
B
Bramborové plátky uvařte v horké vodě s trochou
soli.
B
Pak vložte bramborové plátky na cedník a pečlivě
je usušte.
B
Dejte 20g másla na pánev, a pečte polovinu
courgettových plátků 3 minuty za stálého
obracení. Posypte je 1 lžičkou italských nebo
provencálských bylinek.
Pizza
{
- 400 g mouky
- 40 ml oleje
- 1/2 lžičky soli
- 20 g čerstvého droždí nebo 1,5 balíčku
sušeného droždí
- asi 240 ml vody (35cC)
Pro výbornou pizzu:
- 300 ml rajského protlaku
- 1 lžička italských bylinek (sušené nebo čerstvé)
- 1 cibule
- 2 stroužky česneku
- sůl a pepř
- cukr
- Přísady k posypání omáčky: olivy, salám,
artyčoky, houby, ančovičky, sýr mozarella, pepř
a další.
B
Do nádoby vložte hnětací příslušenství spolu se
všemi nutnými přísadami a zvolte rychlost 2.
Zpracovávejte asi 1 minutu až těsto získá tvar
koule. Pak těsto vyklopte z hnětací nádoby do
druhé nádoby, přikryjte je vlhkým hadříkem a
nechte ho asi 30 minut kynout.
B
Pomocí nožů rozkrájejte cibuli a česnek. Osmažte
rozsekanou cibuli s česnekem až se výsledek
stane transparentní.
B
Přidejte procezená rajčata s bylinkami a povařte
je asi 10 minut.
B
Ochuťte solí, pepřem a cukrem. Nechte omáčku
vychladnout.
Page 66

ČESKY66
B
Uveďte do varu malé množství vody a přidejte do
něho želatinu.
B
Želatinový roztok rozmíchejte do lososového pyré.
B
Do nádoby vložte emulgační kotouč a šlehejte
krém za použití mžikového spínače asi 15 sekund.
B
Vmíchejte ušlehaný krém do lososového pyré
dřevěnou lžící.
B
Vyjměte mousse, přikryjte ho a ochlaďte několik
hodin v chladničce.
B
Ozdobte trochou řeřichy.
Sendvičová pomazánka
P
- 2 malé mrkve nakrájené
- 2 až 3 okurky nakrájené
- 75 g květáku nakrájeného
- 75 g celeru nakrájeného
- bylinky (petržel, kopr, stonky nakrájeného
celeru)
- 100 g majonézy
- 100 g tvarohu
- sůl
- pepř
B
Jemně rozsekejte mrkev, okurky, květák a celer.
Smíchejte vše s majonézou a tvarohem a
ochuťte pepřem a solí.
Španělský zelný salát
P
- 1 malé červené zelí
- 2 červené cibule
- 1 fenykl
- 1 jablko
B
Opečené courgettové plátky usušte na
kuchyňském papíru.
B
Vymažte pečicí plát tukem a vložte na něj
bramborové a courgettové plátky.
B
Rozšlehejte vejce s krémem a mlékem noži
rychlostí 2. Přidejte sůl a pepř podle chuti a
potřete touto směsí brambory a courgette na
plechu.
B
Zaměňte krájecí vložku za krouhací vložku a
rozdrťte sýr při rychlosti 2. Sýrem pak posypte
pečicí plech.
B
Plech vložte do středu pečicí trouby a při teplotě
200cC pečte vše asi 15 minut.
Lososová mousse
PS
- 1 plechovka s lososem (220 g)
- 2 plátky želatiny
- několik stonků pažitky
- špetka soli
- špetka cayannského pepře
- půl lžíce citronové šťávy
- 125 ml šlehaného krému
- 1 malá cibule
- řeřicha k ozdobení
B
Rozmočte želatinu v dostatku vody.
B
Rozsekejte pažitku a cibuli a použijte při tom
funkci mžikového spínače.
B
Odstraňte kosti a kůži z lososa.
B
Přidejte sůl, cayanský pepř, citronovou šťávu a
tekutinu z plechovky se sekanou pažitkou a cibulí
a vyrobte ze všeho pyré při rychlosti 2.
B
Nalijte pyré do hnětací nádoby.
Page 67

ČESKY 67
- 1 lžička drceného kopru
- několik lístků máty
B
Oloupejte okurku a rozsekejte ji při rychlosti 1.
Rozsekanou okurku vložte de cedníku a nechte ji
dostatečně uschnout.
B
Přimíchejte ostatní přísady, kromě mátových listů,
k okurce. Salát ochlaďte vložením do chladničky
alespoň na hodinu. Můžete ho před podáváním
posypat mátovým listím.
- šťáva z jednoho pomeranče a 2 lžíce octa
- 1 lžíce hořčice
B
Smíchejte šťávu, hořčici a ocet. Rozkrájejte zelí,
cibuli, fenykl a jablka při rychlosti 1.
B
Vše smíchejte v salátové nádobě.
Piškotový koláč
P
- 4 vejce
- 30 ml vody (35cC)
- špetka soli
- 150 g cukru
- vanilkový cukr
- 150 g přesáté mouky
- 3 g prášku do pečiva
B
Ušlehejte vejce s vodou po dobu asi 2 minut.
Přidejte cukr, vanilku a trochu soli a mixujte asi
1 minutu. Výsledná směs by měla ze lžičky kapat
v hustém proudu. Přidejte mouku a prášek na
pečení. Pečte v troubě při teplotě 170cC asi
30 až 35 minut.
B
Doporučení: tento piškotový koláč můžete naplnit
růzými druhy krémů, například šlehaným krémem
z čerstvého ovoce.
Tzatziki
k
- 1 okurka
- 200 ml jogurtu
- 1 lžíce olivového oleje
- 2 stroužky česneku
- špetka soli
Page 68

MAGYAR68
Konyhai robotgép: részek és tartozékok
A) Sebességszabályozó
B) Motoregység
C) Beépített biztonsági kapcsoló
D) A munkatál fedele
E) Menetes fedél (a turmixgép rögzítőnyílásának
lefedéséhez, ha a turmixgépet nem használja)
F) Eszköztartó
G) Turmix kancsó
H) A fedő zárócsapja (a biztonsági kapcsoló be-
és kikapcsolásához)
I) A munkatál fedele
J) Ételadagoló nyílás
K) Nyomórúd
L) Turmix kancsó fedő
M) Fedő zárható betéttárolóval
N) Közepes szeletelő betét
O) Finom aprító betét
P) Közepes aprító betét
Q) Betéttartó
R) Vágóegység (védősapkával)
S) Dagasztó tartozék
T) Habverő tárcsa
U) Kenőlapát
Bevezetés
A készülék automatikus hőkapcsoló rendszerrel
rendelkezik. A rendszer automatikusan kikapcsolja
a készüléket, ha a készülék túlmelegedik.
Ha a készülék hirtelen megáll:
1 Húzza ki a hálózati csatlakozó dugót a fali
konnektorból.
2 Nyomja meg a "PULSE/0" gombot.
3 Hagyja a készüléket 60 percig hűlni.
4 Dugja a hálózati csatlakozó dugót a fali
konnektorba.
5 Kapcsolja be ismét a készüléket.
Lépjen érintkezésbe a Philips szaküzlettel, vagy a
Philips Szerviz Központtal, ha az automatikus
hőkapcsoló rendszer túl gyakran működésbe lép.
FIGYELEM: A működésbe lépett hőkapcsoló
véletlen nullázásából eredő veszélyes helyzet
elkerülése érdekében a készüléket tilos
időkapcsolóhoz csatlakoztatni.
Fontos
◗ A készülék használata előtt figyelmesen
olvassa el a használati útmutatót és nézze meg
az ábrákat.
◗ Tartsa meg a használati útmutatót a későbbi
használathoz.
◗ A készülék csatlakoztatása előtt ellenőrizze,
hogy a készüléken jelzett hálózati
tápfeszültség megegyezik-e a helyi
tápfeszültséggel (110-127 V vagy 220-240 V).
Page 69

MAGYAR 69
◗ Soha ne használjon más gyártó által gyártott
tartozékokat vagy alkatrészeket, illetve
olyanokat, amelyeket a Philips kifejezetten
nem tanácsol. Ha ilyen tartozékokat vagy
részeket használ, a garancia érvénytelenné
válik.
◗ Ne használja a készüléket, ha a hálózati
csatlakozó vezeték, a csatlakozó dugó vagy
egyéb alkatrészek sérültek.
◗ Ha a csatlakozó vezeték meghibásodott, a
kockázatok elkerülése érdekében a javítást
csak Philips szakszerviz vagy Philips
felhatalmazással rendelkező szakember
végezheti el.
◗ A készülék első használata előtt alaposan
tisztítsa meg azokat a részeket, amelyek az
étellel érintkezni fognak.
◗ Ne lépje túl a táblázatban megadott
mennyiséget és elkészítési időt.
◗ Ne lépje túl a munkatálon vagy a keverőtálon
jelzett maximális mennyiséget, pl. ne töltsön
folyadékot a felső jelzés fölé.
◗ Használat után rögtön húzza ki a hálózati
csatlakozó dugót a fali konnektorból.
◗ Soha ne használja az ujjait vagy más tárgyat
(pl. kenőlapátot) a hozzávalók ételadagoló
nyílásba töltéséhez, a készülék működése
közben. E célra csak a nyomórudat használja.
◗ Mindig húzza ki a hálózati csatlakozó dugót a
fali konnektorból, mielőtt az ujjaival vagy más
tárggyal (pl. kenőlapáttal) a keverőtálba
nyúlna.
◗ Tartsa távol a készüléket gyermekektől.
◗ Soha ne működtesse a készüléket felügyelet
nélkül.
◗ A készüléket soha ne a fedő elfordításával
kapcsolja ki. A készüléket a PULSE/0 gomb
megnyomásával kapcsolja ki.
◗ Bármelyik tartozék levétele előtt kapcsolja ki
a készüléket.
◗ Soha ne merítse a motoregységet vízbe vagy
más folyadékba, és ne öblítse le csapvíz alatt
sem. A motoregység tisztításához nedves
ruhát használjon.
◗ Ha a keverőtálat, a munkatálat és a menetes
fedelet megfelelően szereli fel, kattanást hall.
◗ A habverő tárcsát, a vágóegységet és a
dagasztó tartozékot a munkatálban álló
eszköztartóban helyezze el.
◗ Használat előtt vegye le a védősapkát a
vágóegységről.
◗ Ne érintse meg az az ÉLES vágókéseket,
különösen ha a készülék a hálózathoz
csatlakozik.
◗ Ha a vágókések megakadtak, húzza ki a
hálózati csatlakozó dugót a fali konnektorból,
mielőtt a vágókések mozgását akadályozó
hozzávalókat kivenné a készülékből.
◗ Feldolgozás előtt hagyja lehűlni a forró
hozzávalókat (max. hőmérséklet 80cC/175cF).
◗ Ha olyan folyadékot dolgoz fel, ami habzásra
hajlamos, ne öntsön 1 liternél több folyadékot
a keverőtálba, a kifröccsenés megakadályozása
érdekében.
Abban az esetben, ha a munkatálat és a
turmixgépet is megfelelően szereli fel, csak a
turmixgép fog működni.
Page 70

MAGYAR70
A készülék használata
Munkatál
◗ Ha a munkatálat akarja használni, vegye le a
keverőtálat és zárja le a rögzítőnyílást a
menetes fedéllel. A munkatál használatához
szükséges összes funkció csak akkor működik,
ha a keverőtálat levette.
C
1 Tegye a munkatálat a konyhai robotgépre.
A fogantyút a nyíllal jelzett irányba addig
fordítsa, amíg kattanást hall.
C
2 Tegye a fedőt a munkatálra. Forgassa a
fedőt a nyíllal jelzett irányba, míg kattanást
hall (ehhez szükséges némi erőkifejtés).
Beépített biztonsági kapcsoló
B
A motoregységet és a fedőt jelzéssel látták el. A
készülék csak akkor működik, ha a motoregységen
lévő nyíl közvetlenül szemben van a fedőn lévő
nyíllal.
C
1 Győződjön meg róla, hogy a fedőn lévő
jelzés és a munkatálon lévő nyíl pontosan
szemben vannak-e egymással. A fedő
kiszögellése most lefedi a fogantyú nyílását.
CLICK
Ételadagoló nyílás és nyomórúd
C
1 Az ételadagoló nyílást folyadékok és/vagy
szilárd hozzávalók adagolásához használja.
A nyomórúddal szilárd hozzávalókat
nyomjon le az ételadagoló nyíláson
keresztül.
C
2 A nyomórudat használhatja az ételadagoló
nyílás lezárására is, hogy megakadályozza a
hozzávalók leszivárgását az ételadagoló
nyílásban.
Vágóegység
◗ A vágóegység szeletelésre, mixelésre,
keverésre, pürésítésre és süteménykeverékek
készítésére szolgál.
C
1 Tegye a munkatálat a motoregységre.
C
2 Vegye le a védősapkát a vágóegységről.
A vágóegység vágóélei nagyon élesek. Ne érjen
hozzájuk!
C
3 Tegye a vágóegységet az eszköztartóra.
1
2
CLICK
1
2
CLICK
CLICK
1
2
Page 71

MAGYAR 71
C
4 Tegye az eszköztartót a munkatálba.
5 Tegye a hozzávalókat a munkatálba. A
nagyobb részeket vágja fel kb. 3x3 cm-es
darabokra. Tegye a fedőt a munkatálra.
C
6 A sebességszabályozó segítségével
szabályozza a vágó tárcsa sebességét a
legjobb eredmény elérése érdekében.
B
"PULSE/0" fokozat: a szakaszos működéshez és a
készülék kikapcsolásához. Ha megnyomja a
PULSE/0 gombot, a készülék a legnagyobb
sebességgel működik. A gomb elengedése után a
készülék megáll.
B
1. fokozat: normál sebesség
B
2. fokozat: nagy sebesség
Nézze meg a táblázatban a javasolt
sebességfokozatokat. Az ételfeldolgozás 10-60
másodpercet vesz igénybe.
Tanácsok
◗ A készülék nagyon gyorsan szeletel. Rövid
ideig a szakaszos üzemmódot használja, hogy
megelőzze az étel túl finomra vágását.
◗ Ne hagyja a készüléket túl sokáig működni,
amikor (kemény) sajtot szeletel. A sajt
átmelegedhet, megolvadhat és csomóssá
válhat.
◗ Ne használja a vágóegységet túl kemény
hozzávalók, pl. babkávé, szerecsendió és
jégkockák aprításához. A vágóegység élei
kicsorbulhatnak.
Ha az étel a vágóegységhez, vagy a munkatál
belsejébe ragad:
1 Kapcsolja ki a készüléket.
2 Vegye le a fedőt a tálról.
3 Vegye ki a hozzávalókat a kenőlapáttal.
Betétek
A betétek vágóélei nagyon élesek. Ne érjen
hozzájuk!
Soha ne dolgozzon fel kemény hozzávalókat (pl
jégkockát) a betétekkel.
C
1 Tegye a választott betétet a betéttartóba.
C
2 Helyezze a betéttartót a munkatálban álló
eszköztartóra.
3 Tegye a fedőt a munkatálra.
C
4 Tegye a hozzávalókat az ételadagoló
nyílásba. A felaprított nagyobb darabokat
tegye az ételadagoló nyílásba.
5 Egyenletesen töltse meg az ételadagoló
nyílást a jobb eredmény érdekében.
Ha nagyobb mennyiségű ételt kíván felvágni,
először csak egy kisebb adagot dolgozzon fel,
1
CLICK
2
Page 72

MAGYAR72
ürítse ki a munkatálat, majd jöhet a következő
adag.
3 A legjobb eredmény elérése érdekében
megfelelő sebességfokozatot válasszon.
Lásd a táblázatban a javasolt
sebességfokozatokat.
A feldolgozási eljárás 10-60 másodpercet vesz
igénybe.
C
4 A hozzávalókat lassan és egyenletesen
nyomja le az ételadagoló nyílásba a
nyomórúddal.
C
5 Vegye ki a betétet a betéttartóból, a
betéttartót úgy fogja, hogy a háta Ön felé
mutasson. Nyomja meg a betét széleit az
ujjaival, hogy a betét kiessen a tartóból.
Dagasztó tartozék
A dagasztó tartozékot kenyértészta, gombóc,
kevert tészták és süteménykeverékek készítéséhez
használhatja.
C
6 Rögzítse a dagasztó tartozékot az
eszköztartóra.
7 Tegye a hozzávalókat a munkatálba.
C
8 Zárja le a munkatálat a fedővel.
C
9 Zárja le az ételadagoló nyílást úgy, hogy
belehelyezi a nyomórudat.
C
10 A legjobb eredmény elérése érdekében
megfelelő sebességfokozatot válasszon.
Lásd a táblázatban a javasolt
sebességfokozatokat.
Habverő tárcsa
A habverő tárcsát majonéz, tejszínhab és
tojásfehérje felveréséhez használhatja.
C
11 Tegye a habverő tárcsát a munkatálban
álló eszköztartóra.
12 Tegye a hozzávalókat a munkatálba, és
tegye a fedőt a munkatálra.
13 A legjobb eredmény elérése érdekében
megfelelő sebességfokozatot válasszon.
Lásd a táblázatban a javasolt
sebességfokozatokat.
Tanácsok
◗ Ha tojásfehérjét akar felverni, vigyázzon, hogy
a tojás szobahőmérsékletű legyen.
Használat előtt legalább félórával vegye ki a
tojásokat a hűtőből.
CLICK
1
2
Page 73

MAGYAR 73
◗ A majonézkészítéshez szükséges minden
hozzávaló szobahőmérsékletű legyen.
Olajat is adagolhat hozzá a nyomórúd alján lévő
kis nyíláson keresztül.
◗ Tejszínhab készítésekor a tejszínt a hűtőből
való kivétel után rögtön felverheti. Nézze meg
az elkészítési időt a táblázatban. Ne verje a
tejszínt túl sokáig.
Használja a szakaszos üzemmódot, hogy a
folyamatot megfelelően ellenőrizhesse.
Turmixgép
A turmixgépet a következőkre használhatja:
- Folyadékok, pl. tejtermékek, mártások,
gyümölcslevek, levesek, italkeverékek, koktélok
keverésére.
- Szilárd hozzávalók, pl. palacsintatészta vagy
majonéz keveréséhez.
- Főtt hozzávalók, pl. bébiétel pürésítéséhez.
C
14 Vegye le a menetes fedelet.
C
15 Szerelje a keverőtálat a rögzítőnyílásba a
nyíl irányában történő elforgatással, míg
szilárdan rögzül.
Ne nyomja túl erősen a keverőtál fogantyúját.
C
16 Tegye a hozzávalókat a keverőtálba.
17 Csavarja a fedőt a keverő tálra.
18 Kapcsolja be a készüléket, és keverje össze
a hozzávalókat. A legjobb eredmény
elérése érdekében a sebességfokozatoknak
köszönhetően szabályozhatja a sebességet.
Lásd a táblázatban a javasolt
sebességfokozatokat.
Tanácsok
C
◗ A fedőn lévő nyíláson keresztül a keverőtálba
folyékony hozzávalók önthetők.
◗ Ha hosszabb ideig hagyja a készüléket
működni, a keverék hígabb lesz.
◗ A szilárd hozzávalókat vágja fel kisebb
darabokra, mielőtt a turmixgépbe teszi őket.
Ha nagyobb mennyiséget akar feldolgozni,
először csak egy kisebb adagot tegyen bele
ahelyett, hogy egyszerre próbálna nagyobb
mennyiséget feldolgozni.
◗ Ha kétsége van a megfelelő sebességet
illetően, mindig a legnagyobb (2.) fokozatot
válassza.
Ha a hozzávalók a keverőtál falára ragadnak:
1 Kapcsolja ki a készüléket és húzza ki a
hálózati csatlakozó dugót a fali
konnektorból.
2 Vegye le a fedőt.
1
CLICK
1
2
2
1
2
Page 74

MAGYAR74
Soha ne vegye le a fedőt, ha a készülék működik.
3 A keverőtál oldaláról a hozzávalókat a
kenőlapát használatával távolítsa el.
Biztonságos távolságra tartsa a kenőlapátot a
vágóegység vágóéleitől (kb. 2 cm).
Tisztítás
A motoregység tisztítása előtt mindig húzza ki a
hálózati csatlakozó dugót a fali konnektorból.
1 Nedves ruhával tisztítsa a motoregységet.
Ne merítse a motoregységet vízbe, és ne
öblítse le csapvíz alatt sem.
2 Használat után rögtön tisztítsa meg az
étellel érintkezésre került részeket forró,
mosogatószeres vízben.
◗ A munkatálat, a munkatál fedelét, a
nyomórudat és a tartozékokat
mosogatógépben is tisztíthatja.
Ezek a részek a mosogatógépben való tisztításnak
a DIN EN 12875 szabványban leírtak szerint
ellenállnak.
A fedő a betéttároló résszel és a keverőtál nem
tisztítható mosogatógépben!
A vágóegységet, a turmixgép vágóegységét és a
betéteket nagyon óvatosan tisztítsa. A vágóéleik
nagyon élesek!
Vigyázzon, hogy a vágóegység vágóélei, a
turmixgép vágóegysége és a betétek ne
kerüljenek kemény tárggyal érintkezésbe. Az éleik
kicsorbulhatnak.
Egyes hozzávalók a tartozékok felületén
elszíneződést okozhatnak. Ez nem befolyásolja a
tartozékok használhatóságát. Az elszíneződés kis
idő múlva rendszerint megszűnik.
A turmixgép gyorstisztító működése
C
1 Öntsön kézmeleg (0,5 liternél kevesebb)
mosogatószeres vizet a keverőtálba.
2 Tegye fel a fedőt.
C
3 Hagyja a készüléket néhány pillanatig
működni a Pulse gomb megnyomásával.
(A készülék addig működik, míg el nem
engedi a gombot.)
4 Vegye le a keverőtálat és öblítse ki
hidegvízzel.
Page 75

75MAGYAR
Mennyiségek és elkészítési időkTárolás
Mikrotárolás
C
◗ Tegye a tartozékokat (habverő tárcsa,
vágóegység, dagasztó tartozék, betéttartó) az
eszköztartóra és tárolja őket a munkatálban.
Mindig a betéttartót tegye felülre.
C
◗ Két betétet tárolhat a tárolótartó fedélben,
ami takarja a munkatál fedelét, mint ahogy az
a burkolat belsejében jelzett. A betéteket ne
nyomja, hanem csúsztassa a fedőbe.
C
◗ Tegye a fedelet a betéttárolóval együtt a
munkatál átlátszó fedelére.
◗ Csévélje a hálózati csatlakozó vezetéket a
készülék hátulján lévő tengely köré.
Garancia és szerviz
Ha információra van szüksége, esetleg probléma
merül fel, keresse fel a Philips www.philips.com
Web-lapját, vagy lépjen érintkezésre a lakóhelyén
lévő Philips Vevőszolgálattal (a telefonszámot
megtalálja az egész világra kiterjedő
garancialevélen). Ha nincs Vevőszolgálat a
lakóhelyén, forduljon a Philips készülékeket árusító
szaküzlethez, vagy lépjen érintkezésbe a Philips
Háztartási Készülékek és Testápolás BV Szerviz
Osztályával.
Alkalmazások
Palacsinták,
ostyák
Pirított
zsemlemorzsa,
csőben sültek
Desszertek,
feltétek
Köretek, nyers
zöldségek,
zöldséges
fogások,
sütemények,
mártások
Saláták
Köretek, leves,
szószok,
csőben sültek
Eljárás
Először öntse a tejet a
turmixgépbe, majd adja hozzá a
száraz hozzávalókat. Keverje a
hozzávalókat kb. 1 percig. Ha
szükséges, ismételje meg
kétszer ezt az eljárást.
Száraz, ropogós kenyeret
használjon.
A laza krémhez lágy vajat
használjon.
Vágja fel a zöldségeket, majd
tegye őket az ételadagoló
nyílásba. Töltse meg a nyílást a
zöldségdarabokkal és reszelje le
őket, miközben a nyomórúddal
óvatosan lenyomja őket.
Tegye a nyílásba a
zöldségdarabokat és nyomja le
őket óvatosan a nyomórúddal.
Használjon kéregnélküli
parmezán sajtot és vágja fel
3x3 cm-es darabokra.
Sebes
ségfok
ozat /
tartoz
ék
2 / P
2 / P
2 / P
2 / j
k
2 / P /
g
2 / P
Maxi
mális
menn
yiség
250
ml tej
100g
300g
350g
350g
200g
Hozzávalók és
eredmények
Tészta
(palacsinta) felverés
Zsemlemorzsa
- aprítás
Vajkrém
(creme au
beurre) felverés
Zöldségek
(sárgarépa,
fehérrépa,
fehér retek) szeletelés
Zöldségek
(sárgarépa,
fehérrépa,
fehér retek) szeletelés
Sajt
(parmezán) aprítás
Page 76

MAGYAR76
Alkalmazások
Mártások,
pizzák, csőben
sültek, fondü
Köretek,
mártások,
cukrászsütemé
nyek,
pudingok,
habok
Pürék, levesek
Bébi- és
csecsemőétele
k
Saláta, köret
Kenyér
Eljárás
Vágja fel a sajtot darabokra,
majd töltse az ételadagoló
nyílásba. Óvatosan nyomja a
nyomórúddal.
Kemény, keserű csokoládét
használjon. Törje 2 cm-es
darabokra.
Használjon főtt borsót vagy
babot. Ha szükséges, adjon
hozzá némi folyadékot a
keverék sűrűségének
javításához.
A sűrű püréhez csak kis
folyadékot adjon. Ha lágyabb
pürét akar, annyi folyadékot
adjon hozzá, míg a keverék híg
lesz.
Tegye az uborkát az
ételadagoló nyílásba és
óvatosan nyomja lefelé.
Keverjen össze meleg vizet
élesztővel és cukorral. Adja
hozzá a lisztet, az olajat és a
sót, majd kb. 90 másodpercig
dagassza a tésztát. Hagyja kelni
30 percig.
Sebes
ségfok
ozat /
tartoz
ék
2 / j
k
2 / P
2 / P
D
2 / P
1 / g
2 / {
Maxi
mális
menn
yiség
200g
200g
250g
300g
1
ubork
a
350 g
liszt
Hozzávalók és
eredmények
Sajt (Gouda) aprítás
Csokoládé aprítás
Főtt borsó,
bab - pürésítés
Főtt zöldségek
és húsok pürésítés
Uborka szeletelés
Tészta
(kenyér) dagasztás
Alkalmazások
Pizza
Almás piték,
édes kekszek,
gyümölccsel
töltött
sütemények
Gyümölcstortá
k, piték,
lepények
Eljárás
Kövesse a kenyértészta
készítésénél leírtakat. Kb. 1
percig dagassza a tésztát.
Először a lisztet tegye bele,
majd a többi hozzávalót.
Használjon 2 cm-es darabokra
vágott hideg margarint. Tegye
az összes hozzávalót a
munkatálba és addig dagassza,
amíg a tészta labdaformájúvá áll
össze. További feldolgozás előtt
hagyja kihűlni a tésztát.
Hideg margarint és hideg vizet
használjon. Öntse a lisztet a
munkatálba és adja hozzá a 2
cm-es darabokra vágott
margarint. Keverje a
legnagyobb sebességfokozaton,
míg a tészta morzsás nem lesz,
majd keverés közben adjon
hozzá hideg vizet. Ne
dagasszon tovább, ha a tészta
labdaformájúvá válik. További
feldolgozás előtt hagyja a
tésztát kihűlni.
Sebes
ségfok
ozat /
tartoz
ék
2 / {
2 / P
2 / P
Maxi
mális
menn
yiség
400 g
liszt
200 g
liszt
200 g
liszt
Hozzávalók és
eredmények
Tészta (pizza)
- dagasztás
Tészta
(vékonyhéjú
sütemények) dagasztás
Tészta
(tortákhoz,
pitékhez) dagasztás
Page 77

MAGYAR 77
Alkalmazások
Luxury kenyér
Pudingok,
szufflék, habos
sütemények
Pudingok,
bébiételek
Köretek,
mártások
Szószok,
levesek,
köretek,
fűszeres vaj
Eljárás
Először keverje össze az
élesztőt, a meleg vizet és némi
cukrot egy különálló tálban.
Tegye az összes hozzávalót a
konyhai robotgép munkatáljába
és addig dagassza a tésztát,
amíg lágy nem lesz, de csak
annyira, hogy ne ragadjon a
tészta a munkatál falára (kb. 1
percig). Hagyja 30 percig kelni a
tésztát.
Szobahőmérsékletű tojásokat
használjon. Megjegyzés: legalább
2 tojásfehérjét használjon.
Tanács: adjon hozzá egy kis
citromlevet, hogy megelőzze a
gyümölcs elszíneződését. A
hígabb püré érdekében adjon
hozzá némi folyadékot.
Hámozza meg a fokhagymát.
Időközönként nyomja meg a
Pulse gombot, nehogy túl
finomra vágja a fokhagymát.
Legalább 150 g foghagymát
aprítson fel.
Aprítás előtt mossa meg és
szárítsa meg a fűszereket.
Sebes
ségfok
ozat /
tartoz
ék
2 / {
2 / S
P / P
P / P
2/P / P
Maxi
mális
menn
yiség
300 g
liszt
4
tojásfe
hérje
500g
300g
Min.
75g
Hozzávalók és
eredmények
Tészta (kelt) dagasztás
Tojásfehérje felverés
Gyömölcs (pl.
alma, banán) aprítás/pürésít
és
Fokhagyma aprítás
Fűszerek (pl.
petrezselyem)
- aprítás
Alkalmazások
Gyümölcslevek
Saláták,
köretek és
barbecue
szószok
Sültek (steaks
tartare),
hamburger,
fasírt
Tejturmixok
Különböző
sütemények
Eljárás
A hígabb eredmény érdekében
adjon hozzá vizet vagy más
folyadékot (ízlés szerint).
Minden hozzávaló
szobahőmérsékletű legyen.
Megjegyzés: legalább egy
nagyobb tojást, két kisebb
tojást vagy két tojássárgáját
használjon. Tegye a tojást a
kiecetezett munkatálba és adja
hozzá cseppenként az olajat.
Először tisztítsa meg a húst az
inaktól és a csontoktól. Vágja
fel a húst 3 cm-es darabokra. A
durvább aprítási eredmény
érdekében használja a
szakaszos üzemmódot.
Pürésítse a gyümölcsöt (pl.
banánt, földiepret) egy kis
cukorral, tejjel, némi fagylalttal
és jól keverje össze.
A hozzávalók
szobahőmérsékletűek legyenek.
Keverje össze az olvasztott
vajat és a cukrot, amíg lágy és
krémes keveréket kap. Azután
adja hozzá a tejet, a tojásokat
és a lisztet.
Sebes
ségfok
ozat /
tartoz
ék
2 / D
1-2 /
S
2/ P /
P
2 / D
2 / P
Maxi
mális
menn
yiség
500 g
(teljes
menny
iség)
3 tojás
300g
250
ml tej
3 tojás
Hozzávalók és
eredmények
Gyümölcslevek
(pl. papaja,
görögdinnye,
körte) keverés
Majonéz felverés
Húsok
(sovány) darálás
Tejturmixok keverés
Keverék
(sütemény) keverés
Page 78

MAGYAR78
Alkalmazások
Saláták,
kenyér,
mandulástészt
a, pudingok
Felvertek,
köretek
Felvertek,
köretek
Darálthús
Levesek,
szószok
Köretek, krém,
fagylalt
keverékek
Eljárás
A durvább eredmény
érdekében használja a
szakaszos üzemmódot, a
finomabb eredmény érdekében
a 2. sebességfokozatot.
Hámozza meg a hagymákat és
vágja négyfelé őket.
Megjegyzés: legalább 100 g
hagymát aprítson fel. Időnként
kapcsoljon szakaszos
üzemmódba, hogy elkerülje a
hagyma túl finomra aprítását.
Hámozza meg a hagymákat és
vágja akkora darabokra, hogy
beleférjenek az ételadagoló
nyílásba. Megjegyzés: legalább
100 g hagymát szeleteljen fel.
Először tisztítsa meg a húst az
inaktól és csontoktól. Vágja a
húst 3 cm-es kockákra. A
durvább eredmény érdekében
használja a szakaszos
üzemmódot.
Használjon főtt zöldségeket.
A hűtőgépből kivett tejszínt
rögtön felhasználhatja.
Megjegyzést: legalább 125 ml
tejszínt verjen fel. A tejszínhab
kb. 20 másodperc múlva kész.
Sebes
ségfok
ozat /
tartoz
ék
2/ P /
P
P / P
1 / g
2/ P /
P
2 / D
P / S
Maxi
mális
menn
yiség
250g
400g
300g
200g
500ml
350ml
Hozzávalók és
eredmények
Szerecsendió aprítás
Hagyma aprítás
Hagyma szeletelés
Szárnyashús darálás
Levesek keverés
Tejszínhab felverés
Receptek
Brokkoli leves (4 személy részére)
h or D
- 50 g érett Gouda sajt
- 300 g főtt brokkoli (szár és virág)
- víz, amiben a brokkolit megfőzte
- 2 darabokra vágott főtt krumpli
- 2 húsleves kocka
- 2 evőkanál felveretlen tejszín
- curry
-só
- bors
- szerecsendió
B
Darabolja fel a sajtot. Pürésítse a brokkolit a főtt
krumplival és némi vízzel, amiben a brokkolit
főzte. Tegye a brokkolipürét, a maradék
folyadékot és a húsleves kockákat egy
mérőpohárba és töltse fel 750 ml-ig. Öntse át egy
fazékba és keverés közben forralja fel. Keverjen
bele sajtot és ízlés szerint curryt, sót, borsot,
szerecsendiót, majd adjon hozzá tejszínt.
Gyümölcstorta
P
- 450 g szárított, felezett datolya
- 200 g felezett aszalt szilva
- 650 g hikoridió
- 160 g reszelt kókusz
- 300 g kandírozott ananász
- 1 doboz (400 g) cukrozott sűrített tej (tejszín)
- 1 teáskanálnyi vaníliaaroma
Page 79

MAGYAR 79
Majonéz
S
- 2 tojássárgája vagy 1 nagyobb tojás
- 1 evőkanál mustár
- 1 evőkanál mustár
- 200 ml olaj
B
A hozzávalók szobahőmérsékletűek legyenek.
Tegye a habverő tárcsát a munkatálba. Tegye a
tojássárgákat vagy a tojást, a mustárt és az
ecetet a munkatálba. Kapcsoljon 1. vagy 2.
sebességfokozatra. Öntse az olajat fokozatosan
az ételadagoló nyíláson keresztül a forgó tárcsára.
Az olajadagoláshoz használhatja a nyomórudon
lévő lyukat is.
B
Tanács tartásmártás készítéséhez: adjon hozzá
petrezselymet, apró uborkát és félig főtt tojásokat.
B
Tanács koktélmártás készítéséhez: adjon hozzá
50 ml creme fraiche-t, egy csepp whiskyt,
3 evőkanál paradicsommártást és egy csepp
gyömbérszirupot 100 ml majonézhez.
Tejturmix
D
- 175 ml tej
- 10 g cukor
- 1/2 banán vagy kb. 65 g más friss gyümölcs
- 50 g vanília fagylalt
B
Keverje össze az összes hozzávalót, míg a keverék
habossá válik.
B
2 db 20 cm hosszú, kilisztezett sūtőformát
135cfokos sūtőben melegítsen elő.
B
Helyezze a felezett datolyát és szilvát a robotgép
tartályába, és aprítsa 30 másodpercig a
legmagasabb sebességfokozaton. Ha elkészūlt,
ūrítse ki a tartályt.
B
Helyezze a hikoridiót a robotgép tartályába, és
aprítsa durvára a pulzáló funkció használatával.
Ha készen van, ūrítse ki a tartályt.
B
Helyezze a kandírozott ananászt a robotgép
tartályába, és szeletelje fel a pulzáló funkciót
használva. Ürítse ki a tartályt.
B
Keverje össze a datolyát, a szilvát, a hikori diót, az
ananászt és a kókuszreszeléket egy nagy
keverőtálban.
B
Adja hozzá a sűrített tejet és a vaníliát, s az
egészet turmixolja össze.
B
Öntse a gyūmölcselegyet a sūtőformákba, és
sūsse a tortákat 135cC-on 90 percig.
B
Dupla adag készítésekor a két adag kikeverése
között tartson szūnetet a készūlék esetleges
túlmelegedésének elkerūlése érdekében. Néhány
perc elteltével a műveletsor folytatható.
Krumplipüré
P
- 750 g főtt krumpli
- kb. 250 ml forró tej (90°C)
- 1 evőkanál vaj
-só
B
Először törje át a krumplit, majd adja hozzá a
tejet, sót és a vajat. Kapcsoljon 1. sebességfokozatra
kb. 30 másodpercig, hogy megelőzze a püré
csomóssá válását.
Page 80

MAGYAR80
B
Adja hozzá az átszűrt paradicsomot és a
fűszereket, és lassú tűzön főzze a mártást kb.
10 percig.
B
Tegyen a mártásba sót, borsot és cukrot. Hagyja
kihűlni.
B
Fűtse fel a sütőt 250cC-ra.
B
Nyújtsa ki a tésztát a lisztezett munkafelületen és
csináljon belőle 2 köralakú formát. Helyezze a
tésztaformákat kizsírozott sütőtálcára. Szórja meg
a pizza tetejét, de a széleit hagyja szabadon.
Tegye rá a kívánt hozzávalókat, hintse meg reszelt
sajttal a pizza tetejét és cseppentsen rá
olivaolajat.
B
Süsse a pizzát 12-15 percig.
Krumpli-tök csőben sütve
Pgk
- 375 g krumpli
- csipet só
- 1 tök (kb. 250 g)
- 1 gerezd zúzott fokhagyma
- kb. 40 g vaj + vaj a sütőtál kikenéséhez
- 2 evőkanál olasz vagy provánszi fűszer
- 1 nagyobb tojás
- 75 ml tejszínhab
- 75 ml tej
- bors
- 70 g félérett sajt
B
Hámozza meg és mossa le a krumplit.
B
Tegye a szeletelő betétet a betéttartóba és
helyezze a betéttartót a munkatálba. Szeletelje fel
a burgonyákat és a tököt 1. sebességfokozaton.
Pizza
{
- 400 g liszt
- 40 ml olaj
- 1/2 evőkanál só
- 20 g friss élesztő vagy 1,5 csomag szárított
élesztő
- kb. 240 ml víz (35cC)
A feltéthez:
- 300 ml átszűrt paradicsom (konzerv)
- 1 evőkanál olasz fűszerkeverék (szárított vagy
friss)
- 1 hagyma
- 2 gerezd fokhagyma
- só és bors
- cukor
- A hozzávalókat terítse szét a mártáson:
olajbogyó, szalámi, articsóka, gomba, szardella,
mozzarella sajt, bors, reszelt érett sajt és
olivaolaj ízlés szerint.
B
Tegye a dagasztó tartozékot a munkatálba. Tegye
az összes hozzávalót a munkatálba és válassza a
2. sebességfokozatot. Dagassza a tésztát kb.
1 percig, míg a tészta labdaformájúvá válik. Egyik
kezével fogja le a készüléket, nehogy elmozduljon
a munkafelületen. Tegye a tésztát egy másik
tálba, fedje le nedves ruhával és hagyja kb.
30 percig kelni.
B
Használja a vágóegységet a hagyma és a
fokhagyma felaprításához. Pirítsa üvegesre a
felvágott hagymát és fokhagymát.
Page 81

81MAGYAR
- 1 kis hagyma
- vízitorma a díszítéshez
B
Áztassa a zselatint bő vízben.
B
Vágja fel a snidlinget és a hagymát a konyhai
robotgépben a szakaszos üzemmódot használva.
B
Vegye ki a csontokat és húzza le a bőrt a lazacról.
B
Adja hozzá a sót, a cayenne borsot, a citromlét, a
lazacot és a konzerv folyadékot a felvágott
snidlinghez és hagymához, majd pürésítse a
hozzávalókat 2. sebességfokozaton.
B
Tegye a pürét a munkatálba.
B
Forraljon fel kis mennyiségű vizet és oldja fel
benne a zselatint.
B
Keverje el teljesen a zselatin keveréket a
lazacpürében.
B
Tegye a habverő tárcsát a munkatálba és verje fel
a tejszínt a Pulse gomb megnyomásával kb.
15 másodpercig.
B
Keverje a tejszínhabot a lazacpürébe egy fakanál
segítségével.
B
Borítsa ki a habot egy tálba, fedje le és tegye be a
hűtőbe néhány órára.
B
Szórja meg a habot kevés vízitormával.
Szendvicskrém
P
- 2 kicsi sárgarépa szeletekben
- 2-3 szelet apró uborka
- 75 g karfiol szeletekben
- 75 g zeller szeletekben
- zöld fűszerek (petrezselyem, kapor, tárkony,
zeller szeletek)
B
Főzze a krumpliszeleteket majdnem készre
forrásban lévő vízben egy csipet sóval.
B
Tegye a szeleteket egy szűrőedénybe és teljesen
csurgassa le őket.
B
Tegyen 20 g vajat a sütőtálba, süsse a félbevágott
tökszeleteket 3 percig, gyakran forgatva. Szórja
meg a krumpliszeleteket 1 evőkanál olasz vagy
provánszi fűszerrel.
B
Szárítsa meg a sült tökszeleteket konyhai papíron.
B
Zsírozzon ki egy alacsony oldalú sütőtepsit és
tegye bele váltakozva a tök és krumpli szeleteket,
rendezze el őket úgy, hogy majdnem elérjék a
sütőtepsi tetejét.
B
Verjen fel egy tojást tejszínnel és tejjel a
vágóegység segítségével 2. sebességfokozaton.
Adjon hozzá sót és borsot ízlés szerint, majd öntse
a keveréket a sütőtepsiben lévő krumpli és tök
szeletekre.
B
Cserélje ki a szeletelő betétet az aprító tárcsára,
és aprítsa fel vele a sajtot 2. sebességfokozaton,
majd szórja a sajtot az ételre.
B
Tegye a tepsit a forró sütő közepére (200°C) és
barnítsa kb. 15 percig.
Lazac hab
PS
- 1 lazackonzerv (220 g)
- 2 lap zselatin
- néhány szál snidling
- csipet só
- csipet cayenne bors
- fél evőkanál citromlé
- 125 ml tejszínhab
Page 82

MAGYAR82
B
Verje fel a tojásokat és a vizet kb. 2 percig. Adja
hozzá apránként a cukrot, vaníliát és sót, és
keverje kb. 1 percig. A keverékből csináljon egy
vastag szalagformát. Tegye a lisztbe és a
sütőporba a kenőlapát segítségével. Süsse a
sütőben kb. 170°C-on kb. 30-35 percig.
B
Tanács: Megtöltheti a piskótatésztát különböző
krémekkel, vagy egyszerűen tejszínhabbal és friss
gyümölccsel.
Tzatziki
k
- 1 uborka
- 200 ml joghurt
- 1 evőkanál olivaolaj
- 2 gerezd fokhagyma
- csipet só
- 1 evőkanál finomra vágott kapor
- néhány mentalevél
B
Hámozza meg az uborkát és aprítsa fel 1.
sebességfokozaton. Tegye a felaprított uborkát
szűrőedénybe és teljesen csurgassa le.
B
Keverje a többi hozzávalót az uborkához a
mentalevél kivételével. Tegye egy tálba a salátát,
fedje le és tegye a hűtőbe egy órára. Tálalás előtt
szórja meg a mentalevelekkel a tetejét.
- 100 g majonéz
- 100 g aludttej
-só
- bors
B
Vágja fel a sárgarépát, uborkát, karfiolt, zöld
fűszereket és a zellert finomra. Keverje a
majonézbe és az aludttejbe óvatosan és ízlés
szerint borsozza és sózza.
Spanyol káposzta saláta
P
- 1 kis vöröskáposzta
- 2 vöröshagyma
- 1 édeskömény
- 1 alma
- egy narancs leve és 2 evőkanál vörösbor ecet
- 1 evőkanál mustár
B
Keverje össze a gyümölcslevet, a mustárt és az
ecetet. Szeletelje fel a káposztát, hagymát,
édesköményt és az almát 1. sebességfokozaton.
B
Öntse össze a hozzávalókat a salátástálba.
Piskótatészta
P
- 4 tojás
- 30 ml víz (35cC)
- 1 csipet só
- 150 g cukor
- 1 zacskó vaníliacukor
- 150 g átszitált liszt
- 3 g sütőpor
Page 83

83УКРАЇНСЬКІЙ
Кухонний комбайн: частини та приладдя
A) Регулювання швидкості
B) Вузол двигуна
C) Вбудований запобіжний замок
D) Посудина
E) Гвинтовий ковпачок (для закривання
фіксуючого отвору міксера, коли міксер не
працює)
F) Tool holder
G) Посудина міксера
H) Гачок кришки (активує та дезактивує
запобіжний перемикач)
I) Ковпак циліндра
J) Приймальна труба
K) Штовхач
L) Кришка міксера
M) Ковпак з місцем для зберігання вставок,
що зачиняється.
N) Нарізальна вставка - середнє нарізання
O) Здрібнювальна вставка - тонке нарізання
P) Здрібнювальна вставка - тонке нарізання
Q) Insert holder
R) Ніж (з захисним футляром)
S) Замішувач
T) Дисковий емульгатор
U) Лопатка
Вступ
Цей пристрій оснащено системою
автоматичного розмикання. У разі перегріву
система автоматично розриває ланцюг
живлення пристрою.
Якщо ваш пристрій несподівано
зупиняється:
1 Витягніть шнур з розетки.
2 Натисніть кнопку 'PULSE/0'.
3 Дайте пристрою охолонути протягом
60 хвилин.
4 Вставте штепсель у розетку.
5 Увімкніть пристрій.
Будь-ласка, зв'язуйтесь з вашим ділером Philips
або авторизованим сервісним центром Philips,
якщо система розмикання спрацьовує занадто
часто.
ПОПЕРЕДЖЕННЯ: Для того, щоб запобігти
небезпечним ситуаціям внаслідок
автоматичного перезапуску при відключенн
внаслідок перевищення температури, цей
пристрій не можна вмикати через таймер.
Увага
◗ Уважно прочитайте цю інструкцію та
продивіться на ілюстрації перед тим, як
використовувати пристрій.
◗ Зберігайте цю інструкцію для використання
в майбутньому.
◗ Перевірте, чи відповідає напруга, вказана на
Page 84

УКРАЇНСЬКІЙ84
пристрої, напрузі у вашій електромережі
(110-127 В чи 220-240 В) перед тим, як
вмикати пристрій.
◗ Ніколи не використовуйте будь-яке
приладдя чи частини від інших виробників
або такі, що не були спеціально
рекомендовані фірмою Philips. Якщо ви
використовуватимете таке приладдя і такі
частини, ваша гарантія втратить чинність.
◗ Не використовуйте пристрій при
пошкодженні штепселю, шнуру чи інших
частин.
◗ Якщо шнур для з`єднування з лктромржю
пошкоджний, його можна замінити в
срвісному цнтрі Philips або кваліфікованою
людиною для запобігання виникнння
пожжі.
◗ Ретельно почистіть частини, що
контактують з їжею, перед тим, як
використовувати пристрій уперше.
◗ Не перевищуйте кількість та час
приготування, вказані в таблиці.
◗ Не перевищуйте максимальну кількість їжі,
вказану на посудині пристрою або посудині
міксера, тобто не наливайте вище
верхнього ділення шкали.
◗ Від'єднуйте шнур від електромережі
негайно після закінчення роботи.
◗ Ніколи не встромляйте пальці або сторонні
предмети (наприклад, лопатку) у
приймальну трубу, коли пристрій працює.
Для цього має використовуватися штовхач.
◗ Завжди від'єднуйте пристрій від мережі
перед тим, як встромляти у посудину
міксера пальці або якийсь предмет
(наприклад, лопатку).
◗ Зберігайте пристрій подалі від дітей.
◗ Не залишайте пристрій працювати без
нагляду.
◗ Ніколи не вимикайте пристрій повертанням
кришки. Завжди вимикайте пристрій
натисканням кнопки PULSE/0.
◗ Вимикайте пристрій перед тим, як знімати
приладдя.
◗ Ніколи не занурюйте вузол двигуна у воду
чи іншу рідину, не мийте його під краном.
Застосовуйте вологу ганчірку для очищення
вузлу двигуна.
◗ При встановленні посудини міксера,
посудини пристрою та гвинтового
ковпачка ви маєте почути клацання.
◗ Дисковий емульгатор, ніж та замішувач
треба встановлювати у тримач інструментів,
що знаходиться у посудині.
◗ Кожного разу, коли Ви використовуєте ніж,
знімайте чохол.
◗ Не торкайтеся ГОСТРИХ ножів, особливо
коли пристрій під'єднано до мережі.
◗ Якщо ніж заїдає, витягніть штепсель із
розетки перед тим, як зняти продукти з
ножа.
◗ Перед тим, як обробляти гарячі
інгредієнти, Ви маєте остудити їх (макс.
температура 80cC/175cF.
◗ Якщо Ви обробляєте рідину, що піниться,
не наливайте у склянку міксера більше 1 л,
щоб запобігти витіканню.
Page 85

УКРАЇНСЬКІЙ
Зважте на те, що якщо посудина і склянка
міксера встановлено правильно, працюватиме
тільки міксер.
Експлуатація приладу
Посудина
◗ Якщо Ви бажаєте використовувати
посудину, зніміть склянку міксера та
закрийте фіксуючий отвір гвинтовим
ковпачком. Усі функції, що потребують
використання посудини, працюють лише
тоді, коли знято склянку міксера.
C
1 Встановіть посудину на комбайні,
повертаючи ручку у напрямку стрілки,
поки не почуєте клацання.
C
2 Накрийте посудину кришкою.
Повертайте кришку в напрямку стрілки,
поки не почуєте клацання (для цього
знадобиться деяке зусилля).
Вбудований запобіжний замок
B
Позначки є на вузлі двигуну та на кришці.
Пристрій працюватиме лише тоді, коли
стрілки на вузлі двигуна та на кришці будуть
знаходитися одна проти одної.
C
1 Пересвідчіться, що позначка на кришці
збігається зі стрілкою на посудині.
Виступ на кришці тепер закриватиме
отвір на ручці.
85
Приймальна труба та штовхач
C
1 Використовуйте подавальну трубу для
додавання рідини та твердих
інгредієнтів. Застосовуйте штовхач для
проштовхування твердих інгредієнтів у
приймальну трубу.
C
2 Ви також можете застосовувати
штовхач для закриття приймальної
труби, щоб інгредієнти не викидувалися
назовні.
Ніж
◗ Ніж можна використовувати для нарізки,
перемішування, змішування, приготування
пюре або тіста для пирогів.
C
1 Надіньте посудину на вузол двигуна.
C
2 Зніміть захисний чохол з ножа.
Ріжучі краї ножа дуже гострі. Не торкайтесь
до них!
C
3 Вставте ніж у тримач.
CLICK
CLICK
1
2
1
2
1
CLICK
2
CLICK
Page 86

УКРАЇНСЬКІЙ86
C
4 Вставте тримач у посудину.
5 Покладіть інгредієнти до посудини.
Наріжте попередньо великі шматки їжі
на шматки прибл. 3 x 3 см. Накрийте
посудину кришкою.
C
6 Установки швидкості дозволяють Вам
регулювати швидкість пристрою для
оптимального результату.
B
Установка 'PULSE/0': імпульсний режим або
вимкнення пристрою. Коли кнопку 'PULSE/0'
натиснуто, пристрій працює на максимальній
швидкості. Пристрій зупиняється, коли
кнопка відпускається.
B
установка 1: нормальна швидкість.
B
установка 2: для високої швидкості.
Див. таблицю рекомендованих швидкостей.
Обробка займе 1 - 60 секунд.
Поради
◗ Пристрій нарізає дуже швидко. Для того,
щоб їжа не здрібнювалась занадто сильно,
давайте пристрою працювати протягом
коротких періодів часу.
◗ Пристрій нарізає дуже швидко. Для того,
щоб їжа не здрібнювалась занадто сильно,
давайте пристрою працювати протягом
коротких періодів часу.
◗ Не застосовуйте ніж для нарізання дуже
твердих інгредієнтів - зерен кофе,
мускатних горіхів, кубиків льоду. Ніж
затупляється.
Якщо їжа нанизується на ніж або проникає до
внутрішньої частини посудини.
1 Вимкніть пристрій.
2 Зніміть кришку з посудини.
3 Видаліть інгредієнти лопаткою.
Вставки
Ріжучі краї ножів дуже гострі. Не торкайтесь
до них!
Ніколи не обробляйте вставками такі тве
речовини, як кубики льоду.
C
1 Встановіть вибрану вставку у тримачі
вставок.
C
2 Зафіксуйте тримач вставок у тримачі
інструментів у посудині.
3 Надіньте кришку на посудину.
C
4 Покладіть інгредієнти у приймальну
трубу. Попередньо розріжте великі
шматки, щоб вони підходили до труби.
5 Заповнюйте приймальну трубу
рівномірно для кращого результату.
Коли Ви розрізаєте велику кількість їжі,
обробляйте її маленькими "партіями" та
1
CLICK
2
Page 87

регулярно спорожнюйте кожух між
нарізаннями.
3 Для оптимального результату робіть
відповідні установки швидкості. Див.
таблицю рекомендованих швидкостей.
Обробка займе 10 - 60 секунд.
C
4 Повільно та рівномірно притискайте
інгредієнти штовхачем.
C
5 Щоб зняти вставку з тримача вставок,
візьміть тримач у руки і поверніть до
себе зворотною стороною. Натисніть
великими пальцями на краї вставки, щоб
вона випала з тримача.
Замішувач
Замішувач можна використовувати для
замішування тіста для хліба чи галушок,
збитого тіста та сумішей для тортів.
C
6 Вставте замішувач у тримач інструментів.
7 Покладіть інгредієнти до посудини.
C
8 Закрийте посудину кришкою.
87УКРАЇНСЬКІЙ
C
9 Вставте штовхач у приймальну трубу,
щоб перекрити її.
C
10 Для оптимального результату робіть
відповідні установки швидкості. Див.
таблицю рекомендованих швидкостей.
Дисковий емульгатор
Ви можете використовувати дисковий
емульгатор для приготування майонезу, крему,
збитого яєчного білку.
C
11 Вставте дисковий емульгатор у тримач
інструментів у посудині.
12 Покладіть інгредієнти у посудину та
накрийте її кришкою.
13 Для оптимального результату робіть
відповідні установки швидкості. Див.
таблицю рекомендованих швидкостей.
Поради
◗ Поради: щоб приготувати збитий яєчний
білок, пересвідчіться, що температура білку
дорівнює кімнатній.
Дістаньте яйця з холодильнику за півгодини
до початку приготування.
1
CLICK
2
Page 88

УКРАЇНСЬКІЙ88
◗ Для майонезу всі інгредієнти повинні мати
кімнатну температуру.
Олію потрібно добавляти через маленький
отвір на дні штовхача.
◗ Крем при приготуванні повинен бути
холодним (температура холодильника).
Зверніть увагу на час обробки (див.
таблицю). Не треба збивати його надто
довго.
Щоб краще контролювати процес,
використовуйте кнопку "pulse".
Міксер
Призначення міксера:
- Змішування рідин, наприклад
молокопродуктів, соусів, фруктових соків,
супів, змішаних напоїв, молочних коктейлів.
- Змішування м'яких інгредієнтів, наприклад,
суміші для торта або майонезу.
- Доведення приготовлених інгредієнтів до
однорідного стану, наприклад, для
приготування дитячого харчування.
C
14 Зніміть гвинтовий ковпачок.
C
15 Вставте склянку міксера у фіксуючий
отвір, повертаючи її в напрямку стрілки,
поки її не буде надійно зафіксовано.
Не прикладайте занадто сили до ручки
склянки міксера.
C
16 Покладіть інгредієнти до склянки.
17 Накрийте кришку на склянку і поверніть
її.
18 Для оптимального результату робіть
відповідні установки швидкості. Див.
таблицю рекомендованих швидкостей.
Поради
C
◗ Наливайте рідкі інгредієнти через отвір у
кришці склянки міксера.
◗ Чим довше працюватиме пристрій, тим
тоншим буде змішування.
◗ Перед тим, як класти у міксер, розріжте
тверді інгредієнти на менші шматки. Коли
Ви розрізаєте велику кількість їжі, краще
обробляти інгредієнти маленькими
"партіями".
◗ Якщо Ви вагаєтесь, як вибрати потрібну
швидкість, завжди вибирайте вищу
швидкість (положення 2).
Якщо інгредієнти липнуть до склянки:
1 Вимкніть пристрій та витягніть штепсель
з розетки.
2 Зніміть кришку.
Ніколи не знімайте кришку підчас роботи
пристрою.
1
CLICK
1
2
2
1
2
Page 89

3 Зніміть інгредієнти лопаткою зі стінок
склянки.
Тримайте лопатку на безпечній відстані від
ріжучих країв ножа (прибл. 2 см).
Чистка приладу
Перед тим, як чистити вузол двигуна, завжди
виймайте штепсель з розетки.
1 Чистіть вузол двигуну вологою
ганчіркою. Не занурюйте вузол двигуну
у воду та не мийте під краном.
2 Завжди чистіть частини, що
контактують з їжею, у гарячій воді
миючою рідиною безпосередньо після
використання.
◗ Посудину, кришку посудини, штовхач та
приладдя можна мити миючим засобом.
Непроникність для миючого засобу для цих
частин перевірено за стандартом DIN EN
12875.
Ковпак з місцем для вставок та склянка не
непроникними для миючого засобу!
Чистіть ніж, блок ножів міксера та вставки
дужеобережно. Ріжучі краї дуже гострі!
Пересвідчіться, що ріжучі краї ножа, блоку
ножів міксера та вставок не торкаються
твердих поверхонь Вони можуть затупитися.
УКРАЇНСЬКІЙ 89
Певні інгредієнти можуть викликати
знебарвлення поверхонь приладдя. Це не є
поганим для приладдя. Знебарвлення зникає
через деякий час.
Швидке чищення міксера
C
1 Налийте не дуже теплої води (не більш
ніж 0,5 л) та трохи миючої рідини у
склянку.
2 Встановіть кришку.
C
3 Дайте пристрою попрацювати декілька
секунд, натиснувши кнопку Pulse.
(Пристрій зупиняється. коли Ви
відпускаєте кнопку).
4 Від'єднайте склянку та промийте у
чистій воді.
Зберігання
MicroStore
C
◗ Вставте все приладдя (дисковий
емульгатор, ніж, замішувач, тримач вставок)
у тримач інструментів та зберігайте їх у
посудині. Кладіть тримач вставок завжди в
останню чергу.
Page 90

УКРАЇНСЬКІЙ
Кількість та час приготування
C
◗ Дві вставки можна зберігати у місті для
зберігання у ковпаку, що накриває кришку
посудини, як позначено на внутрішній
стороні ковпака. Вставки в'їжджають у
ковпак без зусилля.
C
◗ Покладіть ковпак з місцем для вставок на
прозору кришку циліндру.
◗ Накрутіть шнур на котушку ззаду
пристрою.
Гарантія та обслуговування
Якщо вам потрібна інформація або якщо у вас
виникли проблеми, зайдіть на сторінку Philips у
мережі Інтернет - www.philips.com, або
зв'яжіться з Центром підтримки клієнтів Philips
у вашій країні (телефон - на гарантійному
талоні). Якщо у вашій країні нема Центру
підтримки, зверніться до місцевого ділера
Philips або до Сервісного відділу компанії
Philips Domestic Appliences end Personel Cere BV.
90
Використанн
я
Млинці, вафлі
Посипані
сухарями
блюда,
посипання
при смаженні
(au gratin)
Десерти,
приправи
Гарніри, сирі
овочі, блюда з
репи, пироги
Салати
Процедура
Спочатку налийте молоко у
міксер, а потім додайте сухі
інгредієнти. Змішуйте
інгредієнти прибл. 1 хвилину.
Якщо необхідно, повторіть
процедуру 2 рази.
Візьміть сухарі
Для найкращого результату
використовуйте м'яке масло.
Розріжте овочі на шматки,
щоб вони проходили в трубу.
Насипайте овочі в трубу та
тріть їх, повільно натискаючи
штовхач.
Наповніть трубу шматками
овочів та повільно
притискайте їх штовхачем.
Устан
овка
швид
кості/
Прила
ддя
2 / P
2 / P
2 / P
2 / j
k
2 / P /
g
Макси
мальн
а
кількі
сть
250
мл
молок
а
100 г
300 г
350 г
350 г
Інгредієнти
та результати
Суміш для
торта збивання
Сухарі
кришіння
Масляний
крем (creme
au beurre) збивання
Овочі
(морква, ріпа,
редька) нарізання
Овочі
(морква,
цибуля,
селера) нарізання
Page 91

Використанн
я
Млинці, вафлі
Посипані
сухарями
блюда,
посипання
при смаженні
(au gratin)
Десерти,
приправи
Гарніри, сирі
овочі, блюда з
репи, пироги
Салати
Процедура
Спочатку налийте молоко у
міксер, а потім додайте сухі
інгредієнти. Змішуйте
інгредієнти прибл. 1 хвилину.
Якщо необхідно, повторіть
процедуру 2 рази.
Візьміть сухарі
Для найкращого результату
використовуйте м'яке масло.
Розріжте овочі на шматки,
щоб вони проходили в трубу.
Насипайте овочі в трубу та
тріть їх, повільно натискаючи
штовхач.
Наповніть трубу шматками
овочів та повільно
притискайте їх штовхачем.
Устан
овка
швид
кості/
Прила
ддя
2 / P
2 / P
2 / P
2 / j
k
2 / P /
g
Макси
мальн
а
кількі
сть
250
мл
молок
а
100 г
300 г
350 г
350 г
Інгредієнти
та результати
Суміш для
торта збивання
Сухарі
кришіння
Масляний
крем (creme
au beurre) збивання
Овочі
(морква, ріпа,
редька) нарізання
Овочі
(морква,
цибуля,
селера) нарізання
91УКРАЇНСЬКІЙ
Використанн
я
Гарніри, супи,
соуси,
обсмажені
блюда (au
gratin)
Соуси, піцци,
обсмажені
блюда (au
gretin),
плавлені сири
Гарніри, соуси,
кондитерські
вироби,
пудинги, муси
Пюре, супи
Дитяче
харчування
Салати,
гарніри
Процедура
Візьміть шматок сиру
пармезан без шкурки, наріжте
його шматками прибл. 3 х 3
см.
Наріжте сир шматками, щоб
вони входили у трубу.
Натискайте штовхач
обережно.
Візьміть плоский твердий
шоколад. Розламайте його на
шматки по 2 см.
Візьміть зварений горох або
боби. Якщо потрібно,
додайте трохи рідини для
кращої консистенції.
Для грубого пюре додайте
лише трохи рідини. Для
ніжного пюре, додавайте
рідину, поки суміш не стане
гладкою.
Покладіть огірок у трубу та
обережно натискайте.
Устан
овка
швид
кості/
Прила
ддя
2 / P
2 / j
k
2 / P
2 / P
D
2 / P
1 / g
Макси
мальн
а
кількі
сть
200 г
200 г
200 г
250 г
300 г
1
огірок
Інгредієнти
та результати
Сир
(пармезан) нарізання
Сир (гуда) здрібнення
Шоколад нарізання
Зварений
горох, боби приготування
пюре
Варені овочі
та м'ясо приготування
пюре
Огірки нарізання
Page 92

Використанн
я
Хліб
Піцца
Яблучні
пироги,
солодкі
бісквіти, м'ясо
з фруктами
Процедура
Змішати теплу воду з
дріжджами та цукром
Додати борошно та сіль і
замішувати тісто прибл. 90
секунд. Залишити тісто, щоб
воно піднялося, на 30 хвилин.
Та сама процедура, що і з
тістом для хліба. Замішуйте
тісто прибл. 1 хвилину.
Спочатку борошно, потім інші інгредієнти.
Візьміть холодний маргарин,
нарізаний шматками по 2 см.
Покладіть інгредієнти у
посудину та замішуйте, поки
тісто не перетвориться на
кулю. Дайте тісту охолонути
перед тим, як обробляти
його далі.
Устан
овка
швид
кості/
Прила
ддя
2 / {
2 / {
2 / P
Макси
мальн
а
кількі
сть
350 г
боро
шна
400 г
боро
шна
200 г
боро
шна
Інгредієнти
та результати
Замішування
тіста (хліб)
Замішування
тіста (піцца)
Замішування
тіста
(коржики)
УКРАЇНСЬКІЙ92
Використанн
я
Фруктові
пироги,
запечені в
тісті яблука,
торти
Хліб вищого
≠атунку
Пудинг,
суфле,
меренги
Процедура
Візьміть холодний маргарин і
холодну воду. Покладіть
борошно у посудину та
додайте маргарин,
розрізаний на шматки по 2
см. Змішуйте на максимальній
швидкості, поки тісто не
стане ламким, потім додайте
холодної води, продовжуючи
змішування. Зупиніться, коли
тісто перетвориться на кулю.
Дайте тісту охолонути перед
тим, як обробляти його далі.
Спочатку змішайте дріжджі,
тепле молоко, трохи цукру в
окремій мисці. Покладіть усі
інгредієнти до посудини
кухонного комбайна та
замішуйте тісто, поки воно
не перестане липнути до
стінок (прибл. 1 хвилина).
Залиште його, щоб воно
піднялося, на 30 хвилин.
Візьміть яєчні білки при
кімнатній температурі.
Зауваження: візьміть мінімум
2 яйця.
Устан
овка
швид
кості/
Прила
ддя
2 / P
2 / {
2 / S
Макси
мальн
а
кількі
сть
200 г
боро
шна
300 г
боро
шна
4
білка
Інгредієнти
та результати
Замішування
тіста (пироги,
торти)
Замішування
тіста
(дріжджове)
Емульгування
яєчних білків
Page 93

УКРАЇНСЬКІЙ 93
Використанн
я
Пудинги,
дитяче
харчування
Гарніри,
підливки
Соуси, супи,
гарніри, масло
на травах
Фруктові соки
Салати,
гарніри, соуси
для м'яса
Процедура
Порада: додайте трохи
лимонного соку, щоб
запобігти знебарвленню
фруктів. Додайте трохи
рідини, щоб приготувати
ніжне пюре.
Зніміть шкурку з часнику.
Натискайте кнопку "pulse"
декілька разів, щоб часник не
здрібнювався надто сильно.
Беріть щонайменше 150 г.
Помийте та висушіть трави
перед нарізанням
Додайте воду або іншу
рідину (за бажанням), щоб
отримати розбавлений сік.
Інгредієнти повинні мати
кімнатну температуру.
Зауваження: Візьміть
щонайменше одне велике
яйце, два маленьких яйця або
два жовтка. Покладіть яйце
та налийте трохи оцту в
циліндр, додайте трошки олії.
Устан
овка
швид
кості/
Прила
ддя
P / P
P / P
2/P / P
2 / D
1-2 /
S
Макси
мальн
а
кількі
сть
500 г
300 г
Мін.
75 г
500 г
(загал
ьна
кількіс
ть)
3
яйця
Інгредієнти
та результати
Фрукти
(яблука,
банани) нарізання,
приготування
пюре
Часник рубка
Трави
(наприклад,
петрушка) нарізання
Соки
(наприклад,
папайя, диня,
груша) змішування
Майонез приготування
емульсії
Використанн
я
Біфштекси,
гамбургери,
тюфтельки
Молочні
коктейлі
Різні торти.
Салати, хліб,
мигдальне
тісто, пудинги
Смажена
м'ясна суміш,
гарнір
Процедура
Спершу видаліть сухожилки
та кістки. Наріжте м'ясо
кубиками по 3 см.
Застосовуйте імпульсний
режим для грубої рубки.
Зробіть пюре з фруктів
(бананів чи полуниці) з
цукром, молоком, морозивом,
добре перемішайте.
Інгредієнти повинні мати
кімнатну температуру.
Змішуйте м'яке масло та
цукор, поки суміш не буде
гладкою та подібною до
крему. Додайте молока, яйця
та борошно.
Застосовуйте імпульсний
режим для грубого
перемелювання або
швидкість 2 для мілкого
перемелювання.
Зніміть шкірку з цибулини,
наріжте їх на 4 шматки.
Зауваження: беріть
щонайменше 100 г. Завжди
вмикайте та вимикайте
пристрій в імпульсному
режимі декілька разів, щоб
цибулини не нарізалися надто
мілко.
Устан
овка
швид
кості/
Прила
ддя
2/ P /
P
2 / D
2 / P
2/ P /
P
P / P
Макси
мальн
а
кількі
сть
300 г
250 г
молок
а
3
яйця
250 г
400 г
Інгредієнти
та результати
М'ясо(пісне) рубка
Молочні
коктейлі
змішування
Суміш (торт)
- змішування
Горіхи перемелюван
ня
Цибуля рубка
Page 94

УКРАЇНСЬКІЙ94
Використанн
я
Смажена
м'ясна суміш,
гарнір
М'ясна
начинка
Супи, соуси
Гарніри,
креми,
морозиво
Процедура
Зніміть шкурку з цибулин,
наріжте їх на шматки, щоб
вони входили у трубу.
Зауваження: беріть
щонайменше 100 г.
Видаліть сухожилки та кістки.
Наріжте м'ясо кубиками по 3
см. Застосовуйте кнопку
імпульсного режиму для
грубої рубки м'яса.
Візьміть зварені овочі
Крем потрібно спершу
остудити у холодильнику.
Зауваження: беріть
щонайменше 125 мл крему.
Крем готується прибл. 20
секунд.
Устан
овка
швид
кості/
Прила
ддя
1 / g
2/ P /
P
2 / D
P / S
Макси
мальн
а
кількі
сть
300 г
200 г
500
мл
350
мл
Інгредієнти
та результати
Цибулини нарізання
М'ясо птиці рубка
Супи змішування
Збитий крем збивання
Рецепти
Суп з брокколі (на 4 осіб)
h или D
- 50 г зрілого сиру "гуда"
- 300 г вареної брокколі (коріння та верхівки)
- 300 г вареної брокколі (коріння та верхівки)
- 2 варених томата, порізаних на шматки
- 2 бульйонних кубика
- 2 ст. ложки не збитого крему
- кері
- сіль
- перець
- мускатний горіх
B
Здрібніть сир. Зробіть пюре з брокколі,
варених томатів та невеликої кількості
води, у якій варилися брокколі. Помістить
пюре з брокколі та залишок рідини та
бульйонні кубики у вимірювальну посудину та
доведіть кількість до 750 мл. Перелийте у
каструлю та, помішуючи, доведіть до кипіння.
Вмішайте сир та приправте кері, сіллю,
перцем та мускатним горіхом, додайте
крем.
Фруктовий пиріг
P
- 450 г сухих фініків без кісточок, розділених
на половинки
- 200г сухих слив, розрізаних на половинки
- 650 г горіхів "пекан"
- 160 г дроблених кокосових горіхів
- 300 г глазурованих ананасів
Page 95

УКРАЇНСЬКІЙ 95
B
Спочатку розчавіть картоплю, потім
додайте молоко, сіль та масло.
Застосовуйте швидкість 1 та обробляйте
прибл. 30 секунд, щоб пюре не стало клейким.
Майонез
S
- 2 яєчних жовтка або 1 велике яйце
- 1 ст. ложка гірчиці
- 1 ст. ложка оцету
- 200 мл олії
B
Інгредієнти повинні мати кімнатну
температуру. Вставте у посудину дисковий
емульгатор. Покладіть яєчні жовтки або
яйце, гірчицю та оцет у циліндр.
Застосовуйте швидкість 1 або 2. Поступово
наливайте олію через жолоб для їжі на диск,
що обертається. Для наливання олії ви
можете застосовувати отвір у штовхачі.
B
Порада щодо татарського соусу: додайте
петрушки, корнішона та зварене круте яйце.
B
Порада для соусу-коктейль: додайте 50 мл
свіжого крему (creme fraiche), трохи віскі,
3 ст. ложки томатної пасти та трохи
імбирного сиропу на 100 г майонезу.
Молочний коктейль
D
- 175 мл молока
- 10 г цукру
- 1/2 банана або прибл. 65 г інших свіжих
фруктів
- 50 г ванільного морозива
- 1 банка (400 г) підсолодженого згущеного
молока
- 1 чайна ложка ванільної есенції
B
Змастіть два листи для запікання довжиною
20 см та прогрійте у духовці до135c C.
B
Покладіть половинки фініків та слив у чашу
кухонного комбайна та кришіть на
максимальній швидкості 30 секунд.
Спорожніть чашу.
B
Покладіть горіхи "пекан" у чашу кухонного
комбайна та наріжте грубо, застосовуючи
імпульсний режим. Спорожніть чашу.
B
Покладіть глазурований ананас у чашу
кухонного комбайна та наріжте на шматки,
застосовуючи імпульсний режим. Спорожніть
чашу.
B
Змішайте фініки, сливи, горіхи-пекан, ананас
та дроблений кокосовий горіх у великій посудині.
B
Додайте молока та ванілі та перемішайте.
B
Вилийте фруктову суміш на листі та
запікайте пиріг при температурі 135c C 90
хвилин.
B
Не обробляйте цю суміш більш ніж один раз
безперервно. Якщо вам потрібно обробити
більшу кількість, дайте пристрою охолонути
перед тим, як продовжувати обробку.
Товчена картопля
P
- 750 г зварених картоплин
- прибл. 250 мл гарячого молока (90cC)
- 1 ст. ложка масла
- сіль
Page 96

УКРАЇНСЬКІЙ96
B
Металевим ножем наріжте лук і часник, та
підсмажуйте їх, поки вони не стануть
прозорими.
B
Додайте просіяних томатів та трав і
кип'ятіть соус прибл. 10 хвилин.
B
Приправте сіллю, перцем та цукром за
смаком. Дайте соусу охолонути.
B
Нагрійте піч до
B
Розкачайте тісто на посипаному борошном
столі та зробіть з нього два кола. Покладіть
тісто на змащений піддон для смаження.
Посипте піццу начинкою та приправами,
залишаючи краї. Посипте бажаними
інгредієнтами за смаком, додайте трохи
сиру, капніть трохи оливкової олії.
B
Запікайте піццу 12-15 хвилин.
Смажена картопля з цукіні
Pgk
- 375 г картоплі
- щіпка солі
- 1 цукіні (прибл. 250 г)
- 1 зубчик часнику, роздавлений
- прибл. 40 г масла + масло для змащування
піддону печі
- 2 ст. ложки італійських чи провансальських
приправ
- 1 велике яйце
- 75 мл збитого крему
- 75 мл молока
- перець
- 70 г недозрілого сиру
B
Змішуйте всі інгредієнти, поки суміш не стане
пінитися.
Піцца
{
- 400 г борошна
- 1/2 ст. ложка солі
- 20 г свіжих дріжджів або 1,5 пакету сухих
дріжджів
- прибл. 240 куб. см води (35cC)
Для приправлення:
- 300 мл консервованих томатів
- 1 ст. ложка суміші італійських приправ (сухих
або свіжих)
- 1 цибулина
- 2 зубчики часнику
- сіль та перець
- цукор
- Інгредієнтами потрібно посипати соус:
маслини, салямі, артишоки, гриби, анчоуси,
моццарелла, сир, перець, тертий зрілий
твердий сир, маслинова олія за смаком.
B
Вставте замішувач у циліндр. Покладіть усі
інгредієнти у посудину та виберіть
швидкість 2. Замішуйте тісто прибл.
1 хвилину, поки не сформується гладенька
куля. Тримайте пристрій рукою, щоб
запобігти його пересуванню по поверхні
столу. Покладіть тісто в окрему посудину,
накрийте вологою ганчіркою і залиште на
30 хвилин, щоб воно піднялося.
Page 97

УКРАЇНСЬКІЙ 97
- щіпка солі
- щіпка каєнського перцю
- половина ст. ложки лимонного соку
- 125 г збитого крему
- 1 маленька цибулина
- Водяний крес для гарніру
B
Замочіть желатин у великій кількості води.
B
Наріжте часник та цибулю у комбайні,
застосовуючи імпульсний режим.
B
Видаліть кістки та шкіру з лососю.
B
Додайте солі, каєнського перцю, лимонного
соку, лосося та рідини з консервної банки до
нарізаного часнику та цибулі, робіть пюре
при швидкості 2.
B
Покладіть пюре у посудину.
B
Закип'ятіть невелику кількість води,
розведіть желатин у ній.
B
Вмішайте розчин желатину у лососеве пюре.
B
Вставте дисковий емульгатор у посудину та
збийте крем, натискаючи кнопку "pulse"
прибл. 15 секунд.
B
Вмішайте збитий крем у лососеве пюре
дерев'яною ложкою.
B
Вилийте мус на блюдо, накрийте, дайте
остигнути у холодильнику декілька годин.
B
Обкладіть мус деякою кількістю кресу.
Начинка для бутербродів
P
- 2 маленькі моркви, нарізані шматками
- 2-3 нарізаних корнішона
- 75 г нарізаної цвітної капусти
B
Зніміть шкуринку та помийте картоплини.
B
Вставте нарізальну вставку у тримач
вставок, а тримач - у посудину. Наріжте
картоплини та цукіні при швидкості 1.
B
Кип'ятіть картопляні скибки у солоній воді,
поки вони майже не зваряться.
B
Покладіть скибки у друшляк та старанно
промийте.
B
Покладіть 20 г маслу у сковороду, смажте
половину скибок цукіні протягом 3 хвилин,
часто перевертаючи. Обсипте скибки 1 ст.
ложкою приправ.
B
Дайте смаженим скибкам цукіні висохнути
на кухонному папері.
B
Змастить пічний піддон з низькими стінками,
покладіть на нього цукіні та картопляні
скибки, чергуючи їх та розміщуючи як
черепицю.
B
Збийте яйце з кремом та молоком
металевим ножем при швидкості 2. Додайте
солі та перцю за смаком, вилийте суміш на
скибки картоплі та цукіні, що лежать на
піддоні.
B
Замініть нарізальну вставку здрібнювальною,
покришіть твердий сир на швидкості
2, посипте ним блюдо.
B
Покладіть блюдо у центр гарячої печі
(200cC) та запікайте 15 хвилин.
Лососячий мус
PS
- 1 банка консервованого лосося (220 г)
- 2 листа желатину
- декілька пір'їв луку
Page 98

УКРАЇНСЬКІЙ98
- 1 пакетик ванільного цукру
- 150 г просіяного борошна
- 3 г пекарського порошку
B
Збивайте яйця з водою прибл. 2 хвилини.
Потроху додайте цукор, ваніль та сіль та
перемішуйте прибл. 1 хвилину. Суміш повинна
виливатися з ложки товстою смугою.
Вмішайте борошно та пекарський порошок
лопаткою. Запікайте при температурі
прибл. 170cC прибл. 30-35 хвилин у печі.
B
Порада: Ви можете наповнити торт
різними видами крему або просто збитим
кремом зі свіжими фруктами.
Цацикі
k
- 1 огірок
- 200 мл йогурту
- 1 ст. ложка маслинової олії
- 2 зубчики часнику
- щіпка солі
- 1 ст. ложка тонко нарубаного кропу
- декілька листиків м'яти
B
Очистіть огірки від шкурки та здрібніть на
швидкості 1. Покладіть порізані огірки у
друшляк та дайте стекти воді.
B
Змішайте інші інгредієнти, за виключенням
листиків м'яти, з огірком. Охолодіть салат,
поклавши його в закритій посудині у
холодильник на 1 годину. Перед тим, як
подавати, обсипте зверху м'ятою.
- 75 г нарізаного кореню селери
- зелені трави (нарізані петрушка, кроп, полин
естрагон, стеблини селери)
- 100 г майонезу
- 100 г сиру
- сіль
- перець
B
Мілко наріжте моркву, корнішон, цвітну
капусту, зелені трави та корінь селери.
Змішайте ретельно майонез із сиром та
приправте сіллю та перцем.
Іспанський салат з капусти
P
- 1 маленька червона капуста
- 2 червоні цибулини
- 1 фенхель
- 1 яблуко
- сік з одного помаранча та 2 ст. ложки оцту з
червоного вина
- 1 ст. ложка гірчиці
B
Змішайте сік, гірчицю та оцет. Наріжте
капусту (качанну), цибулю, фенхель та яблуко
при швидкості 1.
B
Змішайте інгредієнти в салатниці.
Губчастий торт
P
- 4 яйця
- 30 мл води (35cC)
- 1 щіпка солі
- 150 г цукру
Page 99

HRVATSKI 99
Kuhinjski stroj: dijelovi i pribor
A) Kontrola brzine
B) Motorna jedinica
C) Ugraūeni sigurnosni mehanizam
D) Posuda
E) Pokrov s navojima (za zatvaranje otvora kad
mješač nije u uporabi)
F) Držač pribora
G) Posuda mješača
H) Hvataljka pokrova (aktivira i deaktivira
sigurnosni mehanizam)
I) Pokrov posude
J) Cijev za dodavanje namirnica
K) Potiskivač
L) Pokrov posude mješača
M) Pokrov sa spremnikom
N) Srednji umetak za rezanje
O) Umetak za fino sjeckanje
P) Srednji umetak za sjeckanje
Q) Držač umetaka
R) Nož (sa zaštitnim pokrovom)
S) Nastavak za mijesenje
T) Disk za emulziju
U) Lopatica
Uvod
Ovaj aparat je opremljen sustavom automatskog
isključivanja. U slučaju pregrijavanja ovaj sustav
automatski prekida dovod napajanja u aparat.
Ako aparat iznenada prestane raditi:
1 Izvucite mrežni kabel iz utičnice.
2 Pritisnite tipku "PULSE / 0".
3 Ostavite aparat hladiti 60 minuta.
4 Utaknite mrežni kabel u utičnicu.
5 Ponovo uključite aparat.
Ako se sustav automatskog isključivanja prečesto
aktivira, molimo da se obratite prodavatelju ili
ovlaštenom servisu.
OPREZ: Kako bi izbjegli opasnost uslijed
prečestog aktiviranja sustava automatskog
isključivanja, ovaj se aparat ne smije napajati
putem timera.
Važno
◗ Prije uporabe pažljivo pročitajte ove upute i
pogledajte ilustracije.
◗ Zadržite ovaj priručnik za buduću uporabu.
◗ Prije priključenja na napajanje provjerite da li
napon Vaše mreže odgovara onome
naznačenom na pločici s podacima (110-127V
ili 220-240V).
◗ Nikada ne koristite pribor ili dijelove drugih
proizvoūača ili one koji nisu naznačeni od
proizvoūača, jer se na taj način poništava
jamstvo.
Page 100

HRVATSKI100
◗ Nemojte koristiti aparat ako su mrežni kabel,
utikač ili druge komponente oštećeni.
◗ Ako se mrežni kabel ošteti, mora se zamijeniti
u ovlaštenom Philips servisu kako bi izbjegli
potencijalno opasne situacije.
◗ Prije prve uporabe dobro operite dijelove koji
će dolaziti u kontakt s hranom.
◗ Ne prekoračujte količine i vrijeme pripreme
navedene u tablici.
◗ Ne prekoračujte oznaku maksimalne količine
na posudi. (Najviša linija).
◗ Isključite aparat iz napajanja odmah nakon
uporabe.
◗ Nikada ne stavljajte prste ili predmete
(primjerice, lopaticu) u cijev za dodavanje
sastojaka dok aparat radi. Za tu namjenu
koristite samo potiskivač.
◗ Prije uzimanja sastojaka iz posude prstima ili
primjerice, lopaticom, uvijek isključite aparat
iz napajanja.
◗ Držite aparat dalje od dohvata djece.
◗ Nikada ne ostavljajte aparat raditi bez
nadzora.
◗ Nikada ne isključujte aparat zakretanjem
pokrova. Uvijek ga isključujte pritiskom na
tipku PULSE / 0.
◗ Prije odvajanja bilo kojeg nastavka isključite
aparat.
◗ Nikada ne uranjajte motornu jedinicu u vodu
ili drugu tekućinu i ne ispirite je pod vodom.
Čistite je vlažnom krpom.
◗ Kad ispravno stavite posude i pokrov s
navojima, čuje se "klik".
◗ Disk za emulziju, nož i dodatak za mijesenje
potrebno je staviti na držač pribora u posudi.
◗ Prije svake uporabe skinite zaštitni pokrov s
noža.
◗ Ne dodirujte OŠTRE noževe, posebno kad je
aparat priključen na napajanje.
◗ Ako se noževi zaglave, isključite aparat iz
napajanja prije uklanjanja sastojaka koji
blokiraju noževe.
◗ Vruće sastojke prije obrade pustite da se
ohlade (maks. temperatura 80cC/175cF).
◗ Obraūujete li tekućine koje se pjene, u
posudu nemojte ulijevati više od 1 litre kako
bi izbjegli prolijevanje.
Ako su mješač i posuda ispravno stavljeni na
aparat, radit će samo mješač.
Uporaba aparata
Posuda
◗ Želite li koristiti posudu, skinite posudu
mješača i zatvorite otvor pokrovom s
navojem. Sve funkcije koje zahtijevaju uporabu
posude moguće su samo ako skinete posudu
mješača.
C
1 Stavite posudu na aparat zakretanjem
ručice u smjeri strelice dok ne začujete
"klik".
CLICK
1
2
 Loading...