

Page 1

HR7633
Recipes & Directions for use
Recettes & Mode d’emploi
Page 2

2
Page 3
3
H
G
D
J
I
K
L
F
E
Page 4

4
Page 5

ENGLISH 6
FRANÇAIS 19
HR7633
5
Page 6

ENGLISH6
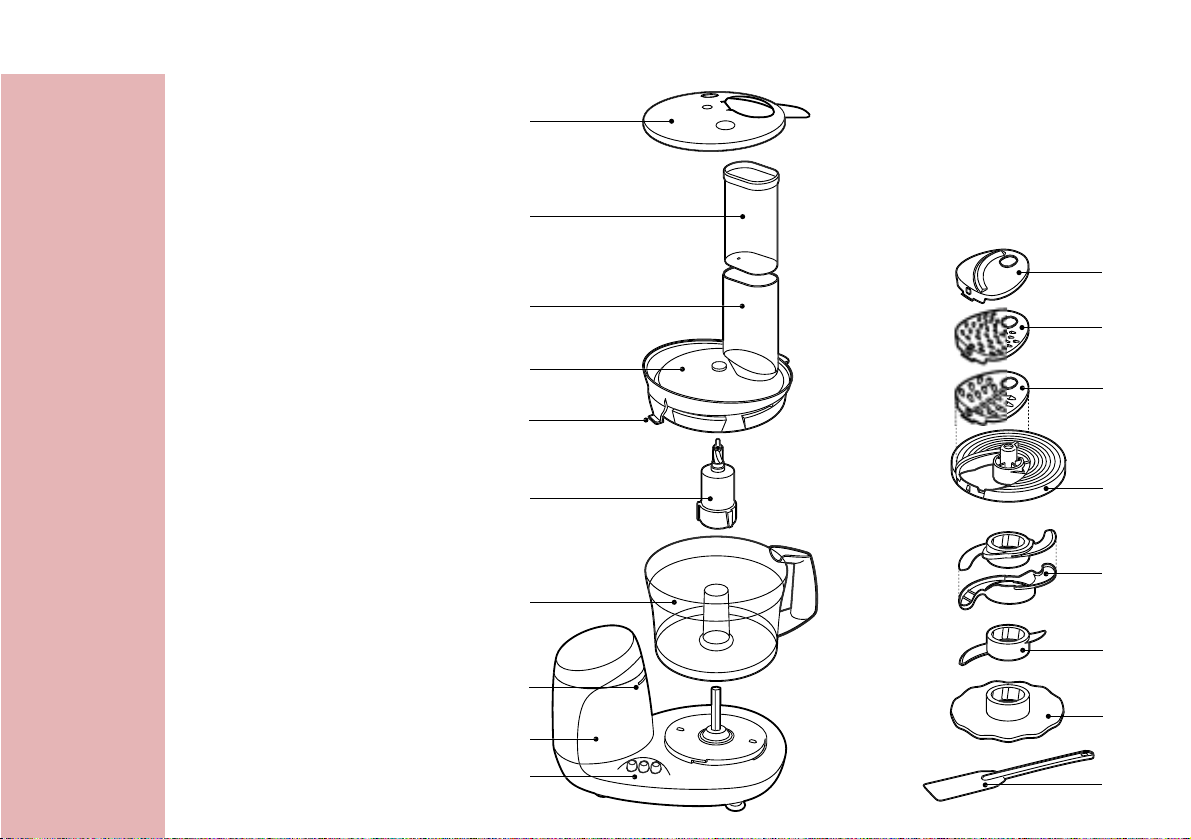
Foodprocessor: parts and accessories
A) Speed control
B) Motor unit
C) Built-in safety lock
D) Bowl
E) Tool holder
F) Peg of lid (activates and deactivates the
safety switch)
G) Lid of bowl
H) Feed tube
I) Pusher
J) Cover with closeable insert storage space
K) Slicing insert medium
L) Shredding insert fine
M) Shredding insert medium
N) Insert holder
O) Blade (+ protective cover)
P) Kneading accessory
Q) Emulsifying disc
R) Spatula
Introduction
This appliance is equipped with an automatic
thermal cut-out system. This system will
automatically cut off the power supply to the
appliance in case of overheating.
If your appliance suddenly stops
running
1 Pull the mains plug out of the wall socket.
2 Press the 'PULSE / 0' button to switch the
appliance off.
3 Let the appliance cool down for 60 minutes.
4 Put the mains plug in the wall socket.
5 Switch on the appliance again.
Please contact your Philips dealer or authorised
Philips service centre if the automatic thermal cutout system is activated too often.
CAUTION: In order to avoid a hazardous
situation, this appliance must never be connected
to a timer switch.
IMPORTANT
SAFEGUARDS
◗ Read the instructions for use carefully and look
at the illustrations before using the appliance.
◗ Keep these instructions for use for future
reference.
◗ Check if the voltage indicated on the
appliance corresponds to the local mains
voltage (110 - 127V or 220 - 240V) before
you connect the appliance.
◗ Never use any accessories or parts from
other manufacturers or that have not been
specifically advised by Philips. Your guarantee
will become invalid if such accessories or
parts have been used.
◗ If the mains cord is damaged, it must be
replaced by Philips, a service centre
authorised by Philips or similarly qualified
persons in order to avoid a hazard.
Page 7

ENGLISH 7
◗ This appliance has a polarized plug (one blade
is wider than the other). As a safety feature,
this plug will fit in a polarized outlet only one
way. if it still does not fit, contact a qualified
electrician. Do not attempt to defeat this
safety feature.
◗ Do not operate any appliance with a damaged
cord or plug, or after the appliance
malfunctions, or has been damaged in any
manner. Return the appliance to the nearest
authorized service facility for examination,
repair or adjustment (refer to the warranty
folder for the most convenient Philips Service
Centre location).
◗ Thoroughly clean the parts that will come
into contact with food before you use the
appliance for the first time.
◗ When you mount the bowl properly onto the
motor unit, you will hear a click.
◗ The emulsifying disc, the blade and the
kneading accessory have to be placed on the
tool holder that stands in the bowl.
◗ Do not exceed the quantities and preparation
times indicated in the tables and recipes.
◗ Do not exceed the maximum content
indicated on the bowl, i.e. do not fill beyond
the top graduation.
◗ Unplug the appliance immediately after use.
◗ Never use your fingers or an object (e.g. a
spatula) to push ingredients down the feed
tube while the appliance is running. Only the
pusher is to be used for this purpose.
◗ Keep the appliance out of the reach of children.
◗ Never let the appliance run unattended.
◗ Switch the appliance off before detaching any
accessory.
◗ Never immerse the motor unit in water or
any other fluid, nor rinse it under the tap. Use
only a moist cloth to clean the motor unit.
◗ Remove the protective cover from the blade
before use.
◗ Avoid touching the SHARP cutting edges of
the blade and the inserts, especially when the
appliance is plugged in.
◗ If the blade gets stuck, unplug the appliance
before removing the ingredients that are
blocking the blades.
◗ Let hot ingredients cool down before
processing them (max. temperature
80cC/175cF).
◗ Do not use this appliance for other than
intended use. This appliance is intended for
household use only.
SAVE THESE
INSTRUCTIONS
Using the appliance
Bowl
C
1 Mount the bowl on the food processor by
turning the handle in the direction of the
arrow until you hear a click.
CLICK
1
2
Page 8
ENGLISH8
C
2 Put the lid on the bowl. Turn the lid in the
direction of the arrow until you hear a
click (this requires some force).
Built-in safety lock
B
The motor unit as well as the lid have been
provided with marks. The appliance will only
function if the arrow on the motor unit is placed
directly opposite the mark on the lid.
C
1 Make sure that the mark on the lid and
the arrow on the bowl are directly
opposite each other. The projection of the
lid will now cover the opening of the
handle.
Feed tube and pusher
C
1 Use the feed tube to add liquid ingredients
and/or solid ingredients. Use the pusher to
push ingredients down the feed tube.
C
2 You can also use the pusher to close the
feed tube in order to prevent ingredients
from escaping through the feed tube.
Blade
◗ The blade can be used for chopping, mixing,
blending, pureeing and preparing cake
mixtures.
C
1 Put the bowl on the motor unit.
C
2 Remove the protective cover from the
blade.
The cutting edges of the blade are very sharp
Avoid touching them!
C
3 Put the blade on the tool holder.
C
4 Put the tool holder in the bowl.
5 Put the ingredients in the bowl. Pre-cut
large pieces of food into pieces of approx.
3 x 3 cm. Put the lid on the bowl.
C
6 The buttons allow you to adjust the speed
of the appliance to obtain optimal results.
B
'PULSE/0' button: for pulse operation and for
turning the appliance off. If the 'PULSE / 0' button
is pressed, the appliance runs at the highest
speed. The appliance stops running when the
button is released.
B
button 1: for normal speed.
1
CLICK
CLICK
2
CLICK
1
2
Page 9

ENGLISH 9
B
button 2: for high speed.
See the table for the recommended speeds.
Processing takes 10 - 60 seconds.
Tips
◗ The appliance chops very quickly. Use the
pulse function for short periods at a time, to
prevent the food from becoming too finely
chopped.
◗ Do not let the appliance run too long when
you are chopping (hard) cheese. The cheese
will get too hot and will start to melt and
become lumpy.
◗ Do not use the blade to chop very hard
ingredients like coffee beans, nutmeg and ice
cubes. The blade might get blunt.
If food sticks to the blade or to the inside of the
bowl:
1 Switch the appliance off.
2 Remove the lid from the bowl.
3 Remove the ingredients with the spatula.
Inserts
The cutting edges of the blades are very sharp
Do not touch them!
Do not process hard ingredient, such as ice cubes
with the inserts!
C
1 Put the selected insert into the insert
holder.
C
2 Place the insert holder onto the tool
holder that stands in the bowl.
3 Put the lid on the bowl.
C
4 Put the ingredients in the feed tube. Pre-
cut large chunks to make them fit into the
feed tube.
5 Fill the feed tube evenly for the best results.
When you have to cut large amounts of food,
process only small batches at a time and empty
the bowl regularly between the batches.
1 Select the appropriate speed to obtain
optimal results. See the table for the
recommended speed.
Processing takes 10 - 60 seconds.
C
2 Press the ingredients slowly and steadily
down the feed tube with the pusher.
C
3 To remove the insert from the insert
holder, take the insert holder in your hands
with its bottom pointing towards you. Push
the edges of the insert with your thumbs
to make the insert fall out of the holder.
CLICK
2
1
Page 10

ENGLISH10
Kneading accessory
The kneading accessory can be used for kneading
dough for bread and dumplings and for mixing
batters and cake mixtures.
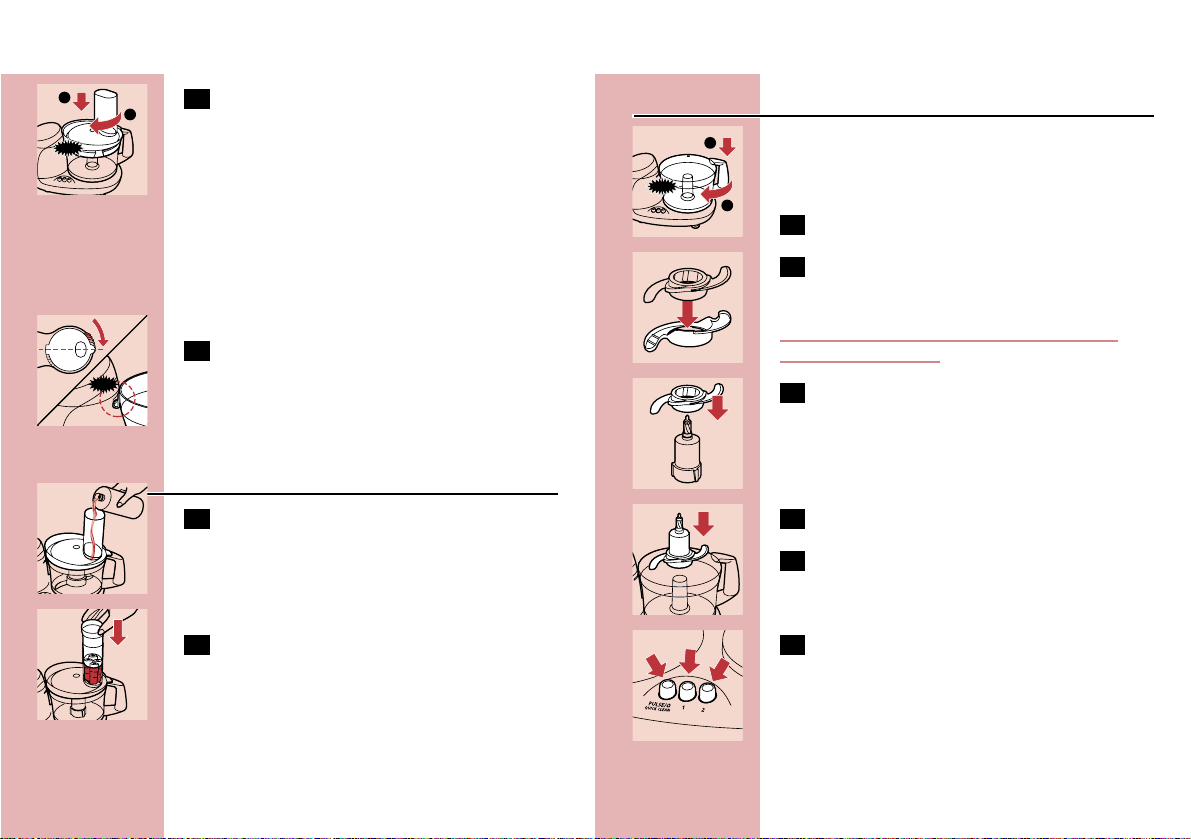
C
4 Fit the kneading accessory onto the tool
holder.
5 Put the ingredients in the bowl.
C
6 Close the bowl with the lid.
C
7 Close the feed tube by placing the pusher
in it.
C
8 Select the appropriate speed to obtain
optimal results. See the table for the
recommended speed.
Emulsifying disc
You can use the emulsifying disc to prepare
mayonnaise, to whip cream and to whisk egg
white.
C
9 Put the emulsifying disc onto the tool
holder that stands in the bowl.
10 Put the ingredients in the bowl and put the
lid on the bowl.
C
11 Select the appropriate speed to obtain
optimal results. See the table for the
recommended speed.
Tips
◗ When you want to whisk egg whites, make
sure the eggs are at room temperature.
Take the eggs out of the refrigerator at least half
an hour before you are going to use them.
◗ All the ingredients for making mayonnaise
must be at room temperature.
Oil can be added through the small hole in the
bottom of the pusher.
◗ If you are going to whip cream, the cream
must be taken straight from the refrigerator.
Please observe the preparation time in the
table. Cream should not be whipped too long.
Use the pulse function to have more control over
the process.
Cleaning
Always unplug the appliance before you start
cleaning the motor unit.
1
CLICK
2
Page 11

ENGLISH 11
1 Clean the motor unit with a damp cloth.
Do not immerse the motor unit in water
and do not rinse it either.
2 Always clean the parts that have come in
contact with food in hot water with
washing-up liquid immediately after use.
◗ The bowl, the lid of the bowl, the pusher and
the accessories can also be washed in a
dishwasher.
These parts have been tested for dishwasher
resistance according to DIN EN 12875.
The cover with insert storage space is not
dishwasher proof!
Clean the blade and the inserts very carefully. The
cutting edges are very sharp!
Make sure that the cutting edges of the blade and
the inserts do not come into contact with hard
objects. This could cause them to become blunt.
Certain ingredients may cause discolourations on
the surface of the accessories. This does not have
a negative effect on the accessories. The
discolourations usually disappear after some time.
Storage
MicroStore
C
◗ Put the accessories (emulsifying disc, blade
unit, kneading accessory, insert holder) on the
tool holder and store them in the bowl.
Always end up with the insert holder.
C
◗ Two inserts can be stored in the storage
space in the cover that covers the lid of the
bowl, as indicated on the inside of the cover.
The inserts have to be slid into the cover, not
pressed.
C
◗ Place the cover with insert storage space on
the transparent lid of the bowl.
◗ Wrap the mains cord around the reel on the
back of the appliance.
Information & service
If you need information or if you have a problem,
please visit the Philips Web site at
www.philips.com or contact the Philips
Customer Care Centre in your country (you will
find its phone number in the worldwide
guarantee leaflet). If there is no Customer Care
Centre in your country, turn to your local Philips
dealer or contact the Service Department of
Philips Domestic Appliances and Personal Care BV.
Page 12

ENGLISH12
Quantities and preparation times
Applications
Purees, soups
Baby and
infant food
Salad,
garnishing
Bread
Pizza
Apple pies,
sweet biscuits,
open fruit flans
Procedure
Use cooked peas or beans. If
necessary, add some liquid to
improve the consistency of the
mixture.
For coarse puree, add only a
little liquid. For fine puree, keep
adding liquid until the mixture
is smooth enough.
Put the cucumber in the tube
and press it carefully down
with the pusher.
Mix warm water with yeast and
sugar. Add flour, oil and salt
and knead the dough for
approx. 90 seconds. Leave to
rise for 30 minutes.
Follow the same procedure as
for bread dough. Knead the
dough for approx. 1 minute.
First put in the flour then the
other ingredients.
Use cold margarine, cut into
pieces of 2 cm. Put all the
ingredients in the bowl and
knead until the dough has
turned into a ball. Allow the
dough to cool before further
processing.
Speed
/acces
sory
2 / P
2 / P
1 / g
2 / {
2 / {
2 / P
Max.
quanti
ty
250g
300g
1
cucum
ber
350g
flour
400g
flour
200g
flour
Ingredients
Cooked peas,
beans pureeing
Cooked
vegetables and
meats pureeing
Cucumbers slicing
Dough (for
bread) kneading
Dough (for
pizzas) kneading
Dough (for
shortcrust
pastry) kneading
Applications
Salads, raw
vegetables
Pancakes,
waffles
Breadcrumbed
dishes, au
gratin dishes
Deserts,
toppings
Garnishing,
soup, sauces,
au gratin
dishes
Sauces, pizzas,
au gratin
dishes, fondue
Garnishing,
sauces, pastry,
puddings,
mousses
Procedure
Cut the fruit/vegetables into
pieces that fit into the tube. Fill
the tube with the pieces and
grate/slice them while pressing
the pusher lightly.
First pour the milk into the
bowl and then add the dry
ingredients. Mix the ingredients
approx. 1 minute. If necessary,
repeat this procedure max. 2
times.
Use dry, crispy bread.
Use soft butter for a light
result.
Use a piece of rindless
Parmesan and cut it into pieces
of approx. 3 x 3 cm.
Cut the cheese into pieces that
fit into the tube. Press the
pieces carefully down with the
pusher.
Use hard, plain chocolate.
Break it into pieces of 2 cm.
Speed
/acces
sory
2/P k
g
2 / P
2 / P
2 / P
2 / P
2 / k
2 / P
Max.
quanti
ty
350g
250
ml
milk
100g
300g
200g
200g
200g
Ingredients
Apples,
carrots,
celeriac grating/slicing
Batter
(pancake) whisking
Breadcrumbs chopping
Butter cream
(creme au
beurre) whisking
Cheese
(Parmesan) chopping
Cheese
(Gouda) shredding
Chocolate chopping
Page 13

13ENGLISH
Applications
Salads,
garnishing and
barbecue
sauces
Steaks tartare,
hamburgers,
fish balls,
minced meat
Various cakes.
Salads, breads,
almond paste,
puddings
Stir-fries,
garnishing
Stir-fries,
garnishing
Procedure
All the ingredients must be at
room temperature. Note: use
at least one large egg, two
small eggs or two egg yolks.
Put the egg and a little vinegar
in the bowl and add the oil
drop by drop.
First remove sinews and bones.
Cut the meat into cubes of 3
cm. Use the pulse function for
a coarser chopping result.
The ingredients must be at
room temperatures. Mix the
softened butter and the sugar
until the mixture is smooth and
creamy. Then add milk, eggs
and flour.
Use the pulse button for
coarse chopping or speed 2 for
fine chopping.
Peel the onions and cut them
into 4 pieces. Note: use at least
100g. Always press the pulse
button several times to prevent
the onions from being chopped
too fine.
Peel the onions and cut them
into pieces that fit into the feed
tube. Note: use at least 100g.
Speed
/acces
sory
1-2 /
S
2/P / P
2 / P
2/P / P
P / P
1 / g
Max.
quanti
ty
3 eggs
300g
3 eggs
250g
400g
300g
Ingredients
Mayonnaise emulsifying
Meat
(lean/streaky),
fish, poultry chopping
Cake mixture
- mixing
Nuts chopping
Onions chopping
Onions slicing
Applications
Fruit tarts,
apple
dumplings,
pies, quiches
Luxury bread
Pudding,
soufflees,
meringues
Sauces, jams,
puddings, baby
food
Sauces, soups,
garnishing,
herb butter
Procedure
Use cold margarine and cold
water. Put flour in the bowl
and add the margarine cut into
pieces of 2cm. Knead at the
highest speed until the dough
has become crumbly, then add
cold water while kneading.
Stop as soon the dough starts
to turn into a ball. Allow the
dough to cool before further
processing.
First mix yeast, warm milk and
some sugar in a separate bowl.
Put all the ingredients in the
food processor bowl and
knead the dough until it is
smooth and no longer sticks to
the wall of the bowl (takes
approx. 1 minute). Leave it to
rise for 30 minutes.
Use egg whites at room
temperature. Note: use at least
2 egg whites.
Tip: add a little lemon juice to
prevent the fruit from
discolouring. Add some liquid
to obtain a smooth puree.
Wash and dry the herbs before
chopping.
Speed
/acces
sory
2 / P
2 / {
2 / S
P / P
2/P / P
Max.
quanti
ty
200g
flour
300g
flour
4 egg
whites
500g
Min.
75g
Ingredients
Dough (for
tarts, pies,
dumplings) kneading
Dough (yeast)
- kneading
Egg whites emulsifying
Fruit (e.g.
apples,
bananas) chopping/pure
eing
Herbs (e.g.
parsley) chopping
Page 14

ENGLISH14
Recipes
Broccoli soup (for 4 persons)
kP
- 50g mature Gouda cheese
- 300g cooked broccoli (stalks and head)
- cooking liquid of the broccoli
- 2 boiled potatoes in pieces
- 2 stock cubes
- 2 tbsp whipping cream
- curry
-salt
- pepper
- nutmeg
B
Shred the cheese. Puree the broccoli with the
boiled potatoes and some of the cooking liquid of
the broccoli. Put the broccoli puree and the
remaining liquid and stock cubes into a measuring
beaker and fill it up to 750ml. Transfer the soup
to a pan and bring it to the boil while stirring. Stir
in the cheese and season with curry, salt, pepper
and nutmeg and add the cream.
Fruit cake
P
- 450 g dry pitted dates, halved
- 460 g dry plums, halved
- 840 g pecan nuts
- 210 g shredded coconut
- 420 g glazed pineapple
- 1 tin (400 g) sweetened condensed milk
- 1 tsp vanilla essence
Applications
Minced meat
Soups, raw
vegetables,
salads
Baby and
infant food
Garnishing,
cream, icecream
mixtures
Procedure
First remove sinews and bones.
Cut the meat into cubes of 3
cm. Use the pulse button for a
coarser chopping result.
Pre-cut into cubes of 3 cm and
chop them with the blade.
For coarse puree, add a little
liquid. For fine puree, keep
adding liquid until the mixture
is smooth.
Use cream that comes straight
from the refrigerator. Note:
use at least 125ml cream. The
whipped cream is ready after
approx. 20 seconds.
Speed
/acces
sory
2/P / P
2 / P
2 / P
P / S
Max.
quanti
ty
200g
250g
350g
350ml
Ingredients
Poultry chopping
Vegetables chopping
Vegetables
and meats
(cooked) pureeing
Whipping
cream whipping
Page 15

ENGLISH 15
Mayonnaise
S
- 2 egg yolks or 1 large egg
- 1 tsp mustard
- 1 tsp vinegar
- 200ml oil
B
The ingredients must be at room temperature. Put
the emulsifying disc in the bowl. Put the egg yolks
or egg, mustard and vinegar in the bowl. Use
speed 1 or 2. Pour the oil gradually through the
feed tube onto the rotating disc. You can use the
hole in the pusher to add the oil.
B
Tip for tartare sauce: add parsley, gherkins and
hard-boiled eggs.
B
Tip for cocktail sauce: add 50ml creme fraiche, a
dash of whisky, 3 tsp tomato puree and a dash of
ginger syrup to 100ml mayonnaise.
Milkshake
P
- 175ml milk
- 10g sugar
- 1/2 banana or approx. 65g other fresh fruit
- 50g vanilla ice cream
B
Mix all the ingredients until the mixture is frothy.
Pizza
{
- 400g flour
- 40 ml oil
- 1/2 tsp salt
- 20g fresh yeast or 1.5 sachets dried yeast
- approx. 240ml water (35cC)
B
Grease two 20cm-long baking tins and preheat
the oven to 135c C.
B
Put the halved dates and plums in the food
processor bowl and chop at maximum speed for
30 seconds. Then empty the bowl.
B
Put the pecan nuts in the food processor bowl and
roughly chop the nuts, using the pulse function.
Then empty the bowl.
B
Put the glazed pineapple in the food processor
bowl and chop into pieces, using the pulse
function. Then empty the bowl.
B
Mix the dates, plums, pecan nuts, pineapple and
shredded coconut in a large mixing bowl and mix
them.
B
Add milk and vanilla to the ingredients and mix.
B
Put the fruit mixture in the baking tins and bake
the cakes at 135c C for 90 minutes.
B
Do not process this recipe more than once
without interruption. if you need to more
quantities, let the appliance cool down first and
then continue the process.
Mashed Potatoes
P
- 750g cooked potatoes
- approx. 250ml hot milk (90cC)
- 1 tbsp of butter
-salt
B
First mash the potatoes, then add milk, salt and
butter. Use speed 1 and process for approx. 30
seconds to prevent the puree from becoming
sticky.
Page 16

ENGLISH16
Potato-courgette gratin
Pgk
- 375g potatoes
- pinch salt
- 1 courgette (approx. 250g)
- 1 clove of garlic, crushed
- approx. 40g butter + butter to grease the oven
dish
- 2 tsp Italian or Provincial herbs
- 1 large egg
- 75ml whipping cream
- 75ml milk
- pepper
- 70g semi-matured cheese
B
Peel and wash the potatoes.
B
Put the slicing insert in the insert holder disc and
place the insert holder in the bowl. Slice the
potatoes and the courgette at speed 1.
B
Boil the potato slices in boiling water with a pinch
of salt until they are almost done.
B
Put the slices in a colander and drain them
properly.
B
Put 20g butter and crushed garlic in a frying pan,
fry half of the courgette slices for 3 minutes while
turning them frequently. Sprinkle the slices with 1
tsp of Italian or Provincial herbs. Fry the other half
of the courgette slices in the same way. Sprinkle
them with the rest of the herbs.
B
Drain the fried courgette slices on kitchen paper.
B
Grease a low-sided oven dish and put the
courgette and potato slices in the dish, alternating
them and arranging them in such way that they
partly overlap like roof tiles.
B
For the topping:
- 300ml sieved tomatoes (tinned)
- 1 tsp. mixed Italian herbs (dried or fresh)
- salt and pepper
- sugar
- Ingredients to be spread on the sauce: olives,
salami, artichokes, mushrooms, anchovies,
Mozzarella cheese, peppers, grated mature
cheese and olive oil according to taste.
B
Place the kneading accessory in the bowl. Put all
the ingredients in the bowl and select speed 2.
Knead the dough for approx. 1 minute until a
smooth ball has formed. Hold the appliance down
with one hand to prevent it from moving around
on the worktop. Put the dough in a separate bowl,
covered it with a damp cloth and leave it to rise
for about 30 minutes.
B
Use the blade to chop the onion and garlic. Fry
the chopped onion and garlic until transparent.
B
Add the sieved tomatoes and the herbs and
simmer the sauce for about 10 minutes.
B
Season to taste with salt, pepper and sugar. Allow
the sauce to cool down.
B
Heat the oven to 250cC.
B
Roll the dough out on a floured worktop and
make two round shapes. Place the dough on a
grease baking tray. Spread the topping on the
pizza, leaving the edges free. Spread with the
desired ingredients, scatter some grated cheese
over the pizza and drip some olive oil over it.
B
Bake the pizzas for 12 to 15 minutes.
Page 17

ENGLISH 17
B
Put the emulsifying disc in the bowl and whip the
cream by pressing the pulse button for about
15 seconds.
B
Fold the whipped cream into the salmon puree
with a wooden spoon.
B
Turn the mousse out onto a dish, cover it and chill
it in the refrigerator for a few hours.
B
Garnish the mousse with some watercress.
Sandwich spread
P
- 2 small carrots in pieces
- 2-3 gherkins in pieces
- 75g cauliflower in pieces
- 75g celeriac in pieces
- green herbs (parsley, dill, tarragon, celery stalks
in pieces)
- 100g mayonnaise
- 100g quark
-salt
- pepper
B
Chop the carrots, gherkins, cauliflower, green herbs
and celeriac fine. Mix in the mayonnaise and
quark carefully and season to taste with pepper
and salt.
Spanish cabbage salad
P
- 1 small red cabbage
- 2 red onions
- 1 fennel
- 1 apple
B
Whisk the egg with the cream and the milk with
the blade at speed 2. Add salt and pepper
according to taste and pour the mixture over the
potato and courgette slices in the dish.
B
Replace the slicing insert with the shredding insert,
shred the cheese at speed 2 and sprinkle it over
the dish.
B
Put the dish in the centre of a hot oven (200cC)
and brown it in about 15 minutes.
Salmon mousse (serves 3-4 people)
PS
- 1 tin of salmon (220g)
- 2 sheets of gelatine
- a few stems of chives
- pinch salt
- pinch cayenne pepper
- half tbsp lemon juice
- 125ml whipping cream
- 1 small onion
- watercress for garnishing
B
Soak the gelatine in plenty of water.
B
Chop the chives and onions in the food processor
using the pulse setting.
B
Remove the bones and skin from the salmon.
B
Add salt, cayenne pepper, lemon juice, the salmon
and the liquid from the tin to the chopped chives
and onion and puree the ingredients at speed 2.
B
Put the puree in a bowl.
B
Boil a small quantity of water and dissolve the
gelatine in it.
B
Stir the gelatine solution through the salmon puree.
Page 18

ENGLISH18
Tzatziki
k
- 1 cucumber
- 200ml yoghurt
- 1 tbsp olive oil
- 2 cloves garlic
- pinch salt
- 1 tsp finely chopped dill
- a few mint leaves
B
Peel the cucumber and shred it at speed 1. Put
the shredded cucumber in a colander and let it
drain properly.
B
Mix the other ingredients, except for the mint
leaves, through the cucumber. Chill the salad by
putting it in a covered bowl in the refrigerator for
one hour. Sprinkle mint leaves on top before serving.
- juice of one orange and 2 tbsp red wine
vinegar
- 1 tbsp mustard
B
Mix the juice, mustard and vinegar. Slice the
cabbage, onions, fennel and apple at speed 1.
B
Combine the ingredients in a salad bowl.
Sponge cake
P
- 4 eggs
- 30ml of water (35cC)
- 1 pinch of salt
- 150g sugar
- 1 sachet vanilla sugar
- 150g sieved flour
- 3g baking powder
B
Beat the eggs and the water for approx. 2 minutes.
Gradually add the sugar, vanilla sugar and the salt
and mix for approx. 1 minute. The mixture should
leave a trail when some of it is lifted from the
bowl with a spoon. Fold in the flour and baking
powder with a spatula. Bake it in the oven at
approx. 170cC for approx. 30-35 minutes.
B
Tip: You can fill the sponge cake with different
kinds of butter cream or simply with whipped
cream and fresh fruit.
Page 19

FRANÇAIS 19
Robot de cuisine: composants et accessoires
A) Sélecteur de vitesse
B) Bloc moteur
C) Interrupteur de sécurité
D) Bol
E) Axe d'entraînement
F) Doigt de sécurité du bol (active et désactive
l'interrupteur de sécurité)
G) Couvercle du bol
H) Cheminée de remplissage
I) Poussoir
J) Couvercle avec espace de rangement
K) Insert à trancher moyen
L) Insert à râper fin
M) Insert à râper moyen
N) Axe support
O) Couteaux (+ gaine de protection)
P) Accessoire de pétrissage
Q) Disque à émulsionner
R) Spatule
Introduction
L'appareil est équipé d'un interrupteur
automatique thermique. En cas de surchauffe, ce
dispositif coupe automatiquement l'alimentation
électrique de l'appareil.
Si votre appareil s'arrête brusquement:
1 Débranchez l'appareil.
2 Appuyez sur le bouton "PULSE / 0".
3 Laissez refroidir l'appareil 60 minutes.
4 Branchez à nouveau l'appareil.
5 Remettez l'appareil en marche.
Consultez votre revendeur ou un Centre Service
Agréé Philips si l'interrupteur de sécurité se
déclenche trop fréquemment.
Avertissement: Afin d'éviter tout accident causé
par la remise en marche de l'interrupteur de
sécurité thermique, l'appareil ne doit pas être
connecté à un minuteur.
PRÉCAUTIONS
IMPORTANTES
◗ Lisez attentivement les instructions ainsi que
les illustrations avant d'utiliser votre appareil.
◗ Conservez ce mode d'emploi pour un usage
ultérieur.
◗ Avant de brancher l'appareil, vérifiez que la
tension indiquée sur l'appareil correspond à la
tension du secteur de votre logement (110127V ou 220-240V).
◗ N'utilisez jamais des accessoires ou des
composants des autres que ceux d'origine et
recommandés par Philips. Philips décline toute
résponsabilité envers la garantie si ce n'était
pas le cas.
◗ Si le cordon d'alimentation est endommagé, il
ne doit être remplacé que par Philips, par un
Centre Service Agréé Philips ou par des
personnes qualifiées pour éviter tout accident.
Page 20

FRANÇAIS20
◗ Cet appareil est doté d’une fiche polarisée
(l’une des lames est plus large que l’autre).
Pour réduire tout risque de choc électrique,
cette fiche ne peut être enfoncée que dans
une prise de courant polarisée. Si la fiche ne
peut être complètement enfoncée dans la
prise, tournez la fiche. Si vous ne pouvez
toujours pas l’enfoncer, contactez un
électricien qualifié. Ne modifiez pas le prise
de courant, en aucune façon.
◗ Ne pas utiliser un appareil si le cordon ou la
fiche est endommagé, s’il ne fonctionne pas
bien ou s’il a été endommagé de quelque
façon. Renvoyer l’appareil au centre de
service autorisé le plus près pour le faire
vérifier, réparer ou régler (se réfèrer à la
garantIe pour connaÎtre le centre de service
Philips le plus près.).
◗ Avant la première utilisation, nettoyez toutes
les pièces en contact avec les aliments.
◗ Quand vous montez le bol sur le bloc
moteur, vous devez entendre un clic.
◗ Le disque à émulsionner, les couteaux et
l'accessoire de pétrissage doivent être placés
sur l'axe d'entraînement qui se trouve dans le
bol.
◗ Ne dépassez pas les quantités et le temps de
préparation indiqués dans les tableau et les
recettes.
◗ Ne dépassez pas la quantité maximale
indiqués dans le tableau (gradation maximum).
◗ Débranchez l'appareil immédiatement après
utilisation.
◗ Débranchez l'appareil immédiatement après
utilisation.
◗ Tenez l'appareil hors de portée des enfants.
◗ Ne laissez jamais l'appareil fonctionner sans
surveillance.
◗ Arrêtez toujours l'appareil avant de détacher
un accessoire.
◗ N'immergez jamais le bloc moteur dans l'eau
ni dans aucun autre liquide. Ne le rincez pas
non plus. Nettoyez-le avec un chiffon humide.
◗ Enlevez la gaine de protection du couteau
avant utilisation.
◗ Evitez de toucher aux lames COUPANTES,
surtout lorsque l'appareil est sous tension.
◗ Si les lames se bloquent, DEBRANCHEZ
L'APPAREIL avant de retirer les ingrédients.
◗ Laissez les aliments cuits refroidir avant de les
hacher (température maximale 80cC/ 175cF).
◗ Ne pas utiliser cet appareil à des fins autres
que l’usage pour lequel il est prévu. Cet
appareil est destiné à un usage domestique
seulement.
VEUILLEZ
CONSERVER CES
CONSIGNES
Utilisation de l'appareil
Bol
C
1 Montez le bol sur le robot en tournant la
poignée dans le sens de la flèche jusqu'à ce
que vous entendiez un clic.
CLICK
1
2
Page 21

FRANÇAIS 21
C
2 Mettez le couvercle sur le bol. Tournez
fermement le couvercle dans le sens de la
flèche jusqu'à ce que vous entendiez un
clic.
Verrouillage de sûreté incorporé
B
Le bloc moteur et le couvercle comportent des
repères. L'appareil ne peut fonctionner que si la
flèche du bloc moteur coïncide exactement avec
le repère du couvercle.
C
1 Assurez-vous que la flèche du bloc moteur
coïncide exactement avec le repère du
couvercle. L'ergot du couvercle couvre
l'ouverture de la poignée du bol.
La cheminée de remplissage et le poussoir
C
1 Utilisez la cheminée de remplissage pour
ajouter du liquide et/ou des ingrédients
solides. Utilisez le poussoir pour pousser
les ingrédients dans la cheminée.
C
2 Le poussoir peut également servir à
fermer la cheminée pendant que l'appareil
est en marche, pour empêcher toute
projection.
Couteau
◗ Le couteau peut être utilisé pour hacher,
mélanger, mixer, réduire en purée et pour
préparer les pâtes feuilletées, brisées et
sablées.
C
1 Placez le bol sur le bloc moteur.
C
2 Enlevez la gaine de protection du couteau.
Les lames du couteau sont très aiguisées et
tranchantes. Evitez de les toucher!
C
3 Positionnez le couteau sur l'axe
d'entraînement.
C
4 Placez l'axe d'entraînement dans le bol.
5 Mettez les ingrédients dans le bol.
Découpez les ingrédients en dés d'environ
3 cm de côté. Mettez le couvercle sur le
bol.
C
6 Les réglages de vitesse vous permettent de
régler la vitesse de l'appareil pour obtenir
des résultats optimaux.
B
"PULSE / 0": pour une opération impulse et pour
arrêter l'appareil. Si vous maintenez appuyé la
1
CLICK
CLICK
2
CLICK
1
2
Page 22

FRANÇAIS22
touche "PULSE / 0" l'appareil fonctionne à vitesse
maximum. L'appareil s'arrête après avoir relâché
la touche.
B
réglage 1: pour une vitesse normale
B
réglage 2: pour une vitesse rapide
Consultez le tableau pour les réglages de vitesse
recommandés. La préparation des aliments dure
10 à 60 secondes.
Suggestions
◗ L'appareil hache très rapidement. N'utilisez
pas la touche éclair trop longtemps car les
aliments seraient hachés trop fins.
◗ Ne laissez pas tourner l'appareil trop
longtemps lorsque vous hachez du fromage (à
pâte dure) : le fromage chaufferait trop,
commencerait à fondre et à devenir pâteux.
◗ Ne hachez pas des ingrédients trop durs tels
que des grains de café, des noix de muscade
ou des glaçons. Cela pourrait émousser les
lames du couteau.
Si des aliments s'enroulent autour du couteau ou
collent à la paroi du bol :
1 Débranchez d'abord l'appareil.
2 Retirez le couvercle du bol.
3 Enlevez ensuite les aliments avec la
spatule.
Inserts
Les lames des inserts sont très aiguisées. Evitez de
les toucher!
Ne hachez pas des ingrédients durs tels que les
glacons avec les inserts.
C
1 Placez l'insert sélectionné sur l'axe des
inserts.
C
2 Placez l'axe des inserts sur l'axe
d'entraînement qui se trouve dans le bol.
3 Mettez le couvercle sur le bol.
C
4 Mettez les ingrédients dans la cheminée.
Coupez les gros morceaux pour pouvoir
les introduire dans la cheminée.
5 Pour les meilleurs résultats remplissez la
cheminée de façon régulière.
Si vous devez traiter d'importantes quantités
d'aliments, ne traitez que des petites portions à la
fois et videz le bol fréquemment.
1 Sélectionnez le réglage de vitesse
approprié pour obtenir des résultats
optimaux. Consultez le tableau pour les
réglages de vitesse recommandés.
Processing takes 10 - 60 seconds.
C
2 Appuyez légèrement sur les ingrédients
avec le poussoir.
1
CLICK
2
Page 23

FRANÇAIS 23
C
3 Pour retirer un insert du support, prenez
le support dans la main. Poussez les ergots
pour faire sortir l'insert désiré.
Accessoire de pétrissage
L'accessoire de pétrissage sert à pétrir la pâte à
pain, à mixer la pâte à frire ou les ingrédients
pour un gâteau.
C
4 Fixez l'accessoire de pétrissage sur l'axe
d'entraînement.
5 Mettez les ingrédients dans le bol.
C
6 Placez le couvercle sur le bol.
C
7 Fermez la cheminée de remplissage à l'aide
du poussoir.
C
8 Sélectionnez le réglage de vitesse
approprié pour obtenir des résultats
optimaux. Consultez le tableau pour les
réglages de vitesse recommendés.
Disque à émulsionner
Vous pouvez utiliser le disque à émulsionner pour
préparer de la mayonnaise, pour battre des blancs
d'œufs et de la crème fouettée.
C
9 Placez le disque à émulsionner sur l'axe
d'entraînement qui se trouve dans le bol.
10 Mettez les ingrédients dans le bol et placez
le couvercle sur le bol.
C
11 Sélectionnez le réglage de vitesse
approprié pour obtenir des résultats
optimaux. Consultez le tableau pour les
réglages de vitesse recommendés.
Suggestions
◗ Quand vous voulez fouetter des blancs
d'oeufs, ils doivent être à température
ambiante.
Otez les ingrédients du réfrigérateur au moins
une demi-heure avant de les utiliser.
◗ Tous les ingrédients pour la préparation de la
mayonnaise doivent être à température
ambiante.
Vous pouvez verser de l'huile par l'ouverture qui
se trouve au dos du poussoir.
◗ Si vous voulez fouetter de la crème, utilisez
de la crème préalablement refroidie dans le
réfrigérateur. Respectez les temps de
préparation dans le tableau. La crème ne doit
pas être battue trop longtemps.
1
CLICK
2
Page 24

FRANÇAIS24
Utilisez la touche Eclair pour mieux contrôler
l'opération.
Nettoyage
Débranchez toujours l'appareil avant de nettoyer
le bloc moteur.
1 Le bloc moteur peut être nettoyé avec un
chiffon humide. N'immergez jamais le bloc
moteur dans l'eau et ne le rincez pas sous
l'eau non plus.
2 Lavez immédiatement après utilisation les
accessoires en contact avec les aliments, à
l'eau chaude savonneuse.
◗ Le bol, le couvercle du bol, le poussoir et les
accessoires peuvent être lavés dans le lavevaisselle.
Ces composants ont été testés pour la resistance
au lave-vaisselle conformément au DIN EN 12875.
Le couvercle avec espace de rangement pour les
inserts n"est pas résistant au lave-vaisselle!
Faites attention en nettoyant le couteau et les
inserts. Leurs lames sont très aiguisées !
Evitez de cogner les lames du couteau et les
inserts contre des objets durs car cela pourrait les
émousser. Certains aliments peuvent provoquer
une décoloration de la surface des accessoires.
Cela est sans importance sur le bon
fonctionnement de l'appareil. Les décolorations
peuvent disparaitre après quelque de temps.
Rangement
MicroRangement
C
◗ Mettez les accessoires (disque à émilsionner,
couteau, accessoire à pétrir, axe des inserts)
sur l'axe d'entraînement et placez-les dans le
bol. Rangez toujours l'axe d'entrainement en
dernier.
C
◗ Deux inserts peuvent être rangés dans
l'espace de rangement pour les inserts du
couvercle qui couvre le bol, comme indiqué à
l'intérieur du couvercle. Les inserts doivent
entrer légèrement dans le couvercle, ils ne
doit pas être pressés.
C
◗ Placez le couvercle avec l'espace de
rangement pour les inserts sur le couvercle
transparent du bol.
◗ Enroulez le cordon autour de l'enrouleur au
dos de l'appareil.
Garantie et service
Pour toute réparation/information, ou en cas de
problème, visitez notre website: www.philips.com.
Ou veuillez contacter le Service Consommateurs
Philips de votre pays (vous trouverez le numéro
de téléphone dans le dépliant sur la garantie
internationale). S'il n'y a aucun Service
Consommateurs Philips dans votre pays,
contactez votre distributeur ou le Service
Department of Philips Domestic Appliances and
Personal Care BV.
Page 25

25FRANÇAIS
Quantité et temps de préparation
Applications
Salades,
légumes crues
Crêpes,
gaufres
Plats panés,
gratins
Desserts,
garnitures
Garnitures,
soupes, sauces,
gratins
Sauces, pizzas,
gratins, fondue
Garnitures,
sauces,
pâtisseries,
flans, mousses
Procédure
Coupez les fruits/légumes en
morceaux et introduisez-les
dans la cheminée. Remplissez la
cheminée et râpez les morceux
en appuyant sur doucement le
poussoir.
Versez d'abord le lait dans le
mixer, puis ajoutez les
ingrédients secs. Mélangez
pendant 1 minute environ. Si
nécessaire, répétez l'opération
2 fois.
Utilisez du pain sec, croustillant
Prenez du beurre mou pour
obtenir une crème légère.
Utilisez un morceau de
parmesan sans croûte et
coupez-le en morceaux
d'environ 3 x 3 cm.
Coupez le fromage en
morceaux pour les introduire
dans la cheminée. Appuyez
doucement sur le poussoir.
Utilisez du chocolat noir, dur.
Cassez en morceaux de 2 cm.
Réglage
de vitesse /
Acces
soire
2/P k
g
2 / P
2 / P
2 / P
2 / P
2 / k
2 / P
Quant
ité
maxi
male
350g
250
ml lait
100g
300g
200g
200g
200g
Ingrédients
Pommes,
carottes,
céleris râper/trancher
Pâtes à crêpes
(crêpes) fouetter
Chapelurehacher
Crème au
beurre - battre
Fromage
(parmesan)râper
Fromage(goud
a) - râper
Chocolathacher
Applications
Purées, soupes
Aliments pour
bébés
Salades,
garnitures
Pain
Pizza
Procédure
Utilisez les légumes cuits. Si
nécessaire, ajoutez du liquide
pour améliorer la consistance
du mélange.
Pour obtenir une purée
épaisse, ajoutez peu de liquide.
Pour une purée fine, ajoutez du
liquide jusqu'à ce que le
mélange soit suffisamment
onctueux.
Mettez le concombre dans la
cheminée et appuyez
doucement.
Mélangez la levure et le sucre
avec de l'eau chaude. Ajoutez
la farine, l'huile et le sel et
mélangez pendant 90 sec.
environ. Laissez lever 30 min.
Même opération que pour la
pâte à pain. Mélangez pendant
1 min. environ. Ajoutez tout
d'abord la farine et ensuite les
autres ingrédients.
Réglage
de vitesse /
Acces
soire
2 / P
2 / P
1 / g
2 / {
2 / {
Quant
ité
maxi
male
250g
300g
1
conco
mbre
350g
farine
400g
farine
Ingrédients
Petits pois,
haricots cuits purée
Légumes et
viandes cuits purée
Concombre trancher
Pâte(pain)pétrir
Pâte(pizza) pétrir
Page 26

FRANÇAIS26
Applications
Tourtes aux
pommes,
biscuits, tartes
aux fruits
Tartes aux
fruits, pâtés,
quiches
Pain brioché
Procédure
Utilisez de la margarine froide
et coupez-la en morceaux de 2
cm. Mettez tous les ingrédients
dans le bol et pétrissez jusqu'à
ce que la pâte devienne une
boule. Laissez la pâte refroidir
avant de vous en servir.
Utilisez de la margarine et de
l'eau froide. Versez la farine
dans le bol et ajoutez la
margarine coupée en
morceaux de 2 cm. Mélangez à
la vitesse maximum jusqu'à ce
que la pâte devienne friable,
puis ajoutez de l'eau froide
tout en mélangeant. Arrêtez
dès que la pâte commence à
former une boule. Laissez la
pâte refroidir avant de vous en
servir.
Mélangez d'abord la levure, du
lait chaud et un peu de sucre
dans un bol séparé. Ajoutez les
ingrédients dans le bol et
pétrissez la pâte jusqu'à ce
qu'elle ne colle plus au bol
(environ 1minute). Laissez lever
30 minutes.
Réglage
de vitesse /
Acces
soire
2 / P
2 / P
2 / {
Quant
ité
maxi
male
200g
farine
200g
farine
300g
farine
Ingrédients
Pâte(brisée) pétrir
Pâte(tartes,
pâtés en
croûte) - pétrir
Pâte(au levain)
- pétrir
Applications
Entremets,
soufflés,
meringues
Flans, aliments
pour bébés
Sauces,
soupes,
garnitures,
beurre aux
herbes
Salades,
garnitures et
sauces de
barbecue
Viande hachée
Procédure
Utilisez les œufs à température
ambiante. Remarque : utilisez
au moins deux blancs d'œufs.
Suggestion: ajoutez un peu de
jus de citron pour empêcher la
décoloration des fruits. Ajoutez
du liquide pour une purée plus
onctueuse.
Lavez et séchez les herbes
avant de les hacher
Tous les ingrédients doivent
être à température ambiante.
Remarque : utilisez au
minimum un gros œuf, deux
petits œufs ou deux gros
jaunes d'œufs. Mettez l'œuf et
un peu de moutarde et un peu
de vinaigre dans le bol et
ajoutez l'huile goutte à goutte.
Retirez d'abord les nerfs ou les
os. Coupez la viande en dés de
3 cm. Utilisez la touche Eclair
pour un hachage plus grossier.
Réglage
de vitesse /
Acces
soire
2 / S
P / P
2/P / P
1-2 /
S
2/P / P
Quant
ité
maxi
male
4
blancs
d'œufs
500g
Min.
75g
3
œufs
300g
Ingrédients
Blancs d'œufs
- fouetter
Fruits(par ex.
pommes,
bananes) hacher/purée
Herbes(par ex.
persil) - hacher
Mayonnaiseémulsionner
Viande,
poisson,
volaille (viande
maigre/pas
trop maigre) hacher
Page 27

FRANÇAIS 27
Applications
Divers gâteaux
Salades, pain,
frangipane,
entremets
Sautés,
garnitures
Sautés,
garnitures
Viande hachée
Soupes,
légumes crues,
salades
Procédure
Utilisez des ingrédients à
température ambiante.
Mélangez le beurre ramolli et le
sucre jusqu'à ce que le
mélange soit onctueux et
crémeux. Ajoutez ensuite le
lait, les œufs et la farine.
Utilisez la touche Eclair (P)
pour un hachage grossier et la
vitesse maximale pour un
hachage fin.
Pelez les oignons et coupez-les
en quatre. Remarque : utilisez
au moins 100 g. Utilisez la
touche Eclair éviter un hachage
trop fin.
Pelez les oignons et coupez-les
en morceaux pour les
introduire dans la cheminée.
Remarque: utilisez au moins
100 g.
Retirez d'abord les nerfs ou les
os. Coupez la viande en dés de
3 cm. Utilisez la touche Eclair
pour un hachage plus grossier.
Coupez-les en dès de 3 cm et
hachez-les avec le couteau.
Réglage
de vitesse /
Acces
soire
2 / P
2/P / P
P / P
1 / g
2/P / P
2 / P
Quant
ité
maxi
male
3
œufs
250g
400g
300g
200g
250g
Ingrédients
Mélange(gâtea
u) - mixer
Noix - hacher
Oignons hacher
Oignons émincer
Volaille hacher
Légumes hacher
Applications
Aliments pour
bébés
Garnitures,
crèmes,
mélanges de
crèmes glacées
Procédure
Pour obtenir une purée
épaisse, ajoutez peu de liquide.
Pour une purée fine, ajoutez du
liquide jusqu'à ce que le
mélange soit suffisamment
onctueux.
Utilisez de la crème
préalablement refroidie dans le
réfrigérateur. Remarque: utilisez
au moins 125 ml de crème
liquide. La crème fouettée est
prête en 20 sec.
Réglage
de vitesse /
Acces
soire
2 / P
P / S
Quant
ité
maxi
male
350g
350ml
Ingrédients
Légumes et
viandes cuits purée
Crème
fouettée fouetter
Page 28

FRANÇAIS28
Recettes
Soupe de brocolis (pour 4 personnes)
Accessoire: kP
- 50g fromage gouda
- 300g de brocolis cuits
- l'eau où les brocolis ont été préalablement
cuits
- 2 pommes de terre bouillies coupés en
morceaux
- 2 bouillon-cubes
- 2 c. à c. crème
- curry
- sel
- poivre
- muscade
B
Râper le fromage. Réduisez en purée les broccolis
et les pommes de terre cuites ; ajoutez y un peu
d'eau de cuisson. Mettez la purée de broccolis, le
liquide restant et le bouillon-cubes dans un verre
gradué et remplissez-le jusqu'à 750ml. Versez le
tout dans une casserole et faites bouillir en
remuant. Ajoutez le fromage en tournant et
assaisonnez de curry, sel, poivre et muscade et
crème.
Tarte aux fruits
P
- 450 g dattes sèches dénoyautées, en moitiés
- 200 g prunes sèches, en moitiés
- 650 g noix de pecan
- 160 g noix de coco râpée
- 300 g ananas givré
- 1 boîte (400 g) de lait concentré sucré
- 1 c. à c. extrait de vanille
B
Graissez deux moules de 20 cm et préchauffez le
four à 135c C.
B
Mettez les moitiés de dattes et de prunes dans le
bol et hachez-les à la vitesse maximale pendant
30 secondes. Ensuite videz le bol.
B
Mettez les noix de pecan dans le bol et hachezles grossièrement à l'aide de la fonction impulse.
Ensuite videz le bol.
B
Mettez l'ananas givré dans le bol et hachez-le à
l'aide de la fonction impulse. Ensuite videz le bol.
B
Mélangez les dattes, les prunes, les noix de
pecan, l'ananas et la noix de coco râpée dans un
grand bol.
B
Ajoutez du lait et de l'extrait de vanille aux
ingrédients et mixez.
B
Versez la composition dans les moules et faites
cuire les tartes à 135c pendant 90 minutes.
B
Ne préparez pas les ingrédients de cette recette
plusieurs fois sans interruption. Si vous voulez
préparer plusieurs quantités, d'abord laissez
l'appareil refroidir et ensuite continuez la
préparation.
Purée de pommes de terre
P
- 750g pommes de terre bouillies
- +/- 250ml lait chaud (90cC)
- 1 c. à s. de beurre
-sel
B
Tout d'abord réduisez les pommes de terre cuites
en purée, ensuite ajoutez le sel et le beurre.
Utilisez la vitesse 1 et mélangez pendant
30 secondes environ.
Page 29

FRANÇAIS 29
Pâte pour pizza
{
- 400g farine
- 40 ml huile
- 40 ml de aceite
- 1/2 c. à c. de sel
- 20g levure fraîche ou 1,5 paquet levure
déshydratée
- +/- 240cm˛ eau (35cC)
B
Pour la garniture:
- 300ml tomates passées (en conserve)
- 1 c. à c. d'herbes mixtes (sèches ou fraiches)
- sel et poivre
- sucre
- Ingrédients à ajouter sur la sauce: olives, salami,
artichauts, champignons, anchois, fromage
mozzarella, poivrons, fromage fait râpé et huile
d'olive suivant votre goût.
B
Placez l'accessoire à pétrissage dans le bol.
Mettez tous les ingrédients dans le bol et
sélectionnez la vitesse 2. Pétrissez la pâte pendant
1 minute jusqu'à ce qu'elle commence à former
une boule. Tenez l'appareil avec la main. Mettez
la pâte dans un autre bol et laissez lever 30 min.
B
Utilisez le couteau pour hacher l'oignon et l'ail.
Faite revenir l'oignon et l'ail hachés jusqu'à ce
qu'ils deviennent transparents.
B
Ajoutez les tomates et les herbes et faites cuire
la sauce à feu doux pendant 10 minutes.
B
Assaisonnez suivant votre goût avec sel, poivre et
sucre. Laissez refroidir la sauce.
B
Chauffez le four à 250cC.
Mayonnaise
S
- 2 jaunes d'œufs ou un gros œuf
- 1c. à c. de moutarde
- 1c. à c. de vinaigre
- 200ml huile
B
Tous les ingrédients doivent être à température
ambiante. Placez le disque à émulsionner dans le
bol. Mettez les jaunes d'œufs ou le gros œuf, du
vinaigre et du moutarde dans le bol. Utilisez la
vitesse 1 ou 2. Versez l'huile graduellement par la
cheminée de remplissage sur le disque rotatif.
Vous pouvez utiliser l'orifice du poussoir pour
ajouter de l'huile.
B
Suggestion pour le sauce tartare: ajoutez du persil,
des cornichons et des œufs durs.
B
Suggestion pour la sauce cocktail: ajoutez 50ml
crème fraîche, une goutte de whisky, 3 cuilleres à
café de purée de tomates et une goutte de sirop
de gingembre à 100ml mayonnaise.
Milkshake
P
- 175ml lait
- 10g sucre
- 1/2 banane ou approx. 65g d'autres fruits frais
- 50g glace à la vanille
B
Mélangez les ingrédients jusqu'à ce qu'ils
deviennent mousseux.
Page 30

FRANÇAIS30
B
Mettez les tranches dans une passoire et
égouttez-les.
B
Mettez 20g beurre dans une poêle, faites frire
une demie courgette en tranches pendant
3 minutes tout en tournant. Assaisonnez les
tranches avec 1 c. à c. d'herbes.
B
Egouttez les rondelles frites sur un papier essuietout.
B
Graissez un plat et mettez les courgettes et les
pommes de terre sur le plat, en les alternant
comme des tuiles.
B
Fouettez les œufs avec la crème et le lait en
utilisant le couteau à vitesse 2. Ajoutez du sel et
du poivre au goût et versez le mélange sur les
rondelles de pommes de terre et courgette.
B
Remplacez l'insert à trancher avec l'insert à râper,
râpez le fromage à vitesse 2 pour assaisonner le
plat.
B
Mettez le plat au centre d'un four chaud (200cC)
et faites-le dorer pendant 15 minutes.
Mousse au saumon
PS
- 1 boîte de saumon
- 2 feuilles de gélatine
- quelques branches de ciboulettes
- une pinçée de sel
- une pinçée de poivre de cayenne
- 1/2 c. à c. jus de citron
- 125ml crème fouettée
- 1 petit oignon
- cresson pour garnissage
B
Mélangez la pâte. Puis faite deux abaisses rondes
de la grandeur du plateau de cuisson. Placez-les
sur le plateau de cuisson légèrement graissé au
pléalable. Etalez bien les abaisses en relevant les
bords avec les doigts. Etalez les ingrédients désirés
à l'intérieur et saupoudrez de fromage râpé,
ajoutez y un peu d'huile d'olive.
B
Faites cuire les pizzas au four pendant 12 à 15
minutes.
Pommes de terre et courgette au
gratin
Pgk
- 375g pommes de terre
- une pinçée de sel
- 1 courgette (approx. 250g)
- 1 gousse d'ail, pressé
- approx. 40g beurre + un peu de beurre pour
graisser le plateau du four
- 2 c. à c. herbes
- 1 gros œuf
- 75ml crème fouettée
- 75ml lait
- poivre
- 70g fromage semi-fait
B
Epluchez et lavez les pommes de terre.
B
Mettez l'insert à trancher sur le support et placez
l'ensemble sur l'axe d'entrainement dans le bol.
Tranchez les pommes de terre et la courgette en
utilisant la vitesse 1.
B
Faite cuire les tranches à l'eau bouillante avec une
pinçée de sel.
Page 31

B
Hachez menu les carottes, cornichons, chou-flour,
herbes vertes, pieds de céleri et céleri-rave.
Incorporez la mayonnaise et le fromage blanc et
assaisonnez à votre goût avec poivre et sel.
Salade de chou espagnole
P
- 1 petit chou rouge
- 2 oignons rouges
- 1 fenouil
- 1 pomme
- jus d'une orange et 2 c.à s. vinaigre de vin
rouge
- 1 c.à s. moutarde
B
Mélangez le jus, la moutarde et le vinaigre.
Tranchez le chou, les oignons, le fenouil et la
pomme en utilisant la vitesse 1.
B
Combinez les ingrédients dans un saladier.
Biscuit de Savoie
P
- 4 œufs
- 300ml eau (35cC)
- une pinçée de sel
- 150g sucre
- 1 sachet sucre vanillé
- 150g farine tamisée
- 3g de levure
B
Fouettez les œufs et l'eau pendant environ
2 minutes. Ajoutez en tournant le sucre, vanille et
sel peu à peu et mélangez pendant 1 minute. Le
mélange doit être homogène. Incorporez la farine
FRANÇAIS 31
B
Faites tremper la gélatine dans beaucoup d'eau.
B
Hachez les ciboulettes et les oignons dans le robot
en utilisant la touche éclair.
B
Enlevez les arêtes et la peau du saumon.
B
Ajoutez le sel, poivre de cayenne, jus de citron,
saumon et le liquide de la boîte au ciboulettes et
oignons hachés et réduisez tous les ingrédients en
purée en utilisant la vitesse 2.
B
Mettez la purée dans le bol.
B
Amenez à ébullition un peu d'eau et faites fondre
la gélatine dans l'eau.
B
Incorporez la gélatine fondue à la purée de saumon.
B
Placez le disque à émulsionner dans le bol et
fouettez la crème en appuyant sur la touche éclair
pendant 15 secondes.
B
Incorporez la crème fouettée au purée de saumon
à l'aide d'une cuillère de bois.
B
Démoulez la mousse sur un plateau, couvrez-la et
laissez-la refroidir dans le réfrigérateur pendant
quelques heures.
B
Garnissez la mousse de cresson.
Pâte à tartiner
P
- 2 petites carottes en morceaux
- 2-3 cornichons en morceaux
- 75g chou-fleur en morceaux
- 75g céleri en morceaux
- herbes vertes (percil, aneth, estragon, pieds de
céleris tranchés)
- 100g mayonnaise
- 100g fromage blanc
- sel
- poivre
Page 32

FRANÇAIS32
et la levure avec une spatule. Faites cuire au four
pendant environ 170cC pendant 30-35 minutes.
B
Suggestion: Vous pouvez fourrer le biscuit de
Savoie de divers crèmes ou de crème fouettée et
fruits frais.
Tzatziki
k
- 1 concombre
- 200ml yaourt
- 1 c.à s. huile d'olives
- 2 gousse d'ail
- une pinçée de sel
- 1 c.à c. d'aneth haché menu
- quelques feuilles de menthe
B
Epluchez le concombre et râpez-le en utilisant la
vitesse 1. Mettez le concombre râpé dans une
passoire et laissez-le s'égoutter.
B
Mélangez les autres ingrédients, sauf les feuilles
de menthe au concombre. Versez la salade dans
un bol couvert et mettez-la dans le réfrigérateur
pendant une heure. Assaisonnez avec des feuilles
de menthe avant de servir.
Page 33

33
Page 34

u
4222 002 25583
www.philips.com
 Loading...