

Page 1

HR1844, HR1842
Page 2

2
Page 3
3
K
P
O
N
M
Q
R
S
T
J
H
F
D
E
G
C
B
A
I
L
Page 4

4
Page 5

HR1844, HR1842
ENGLISH 6
22
42
Page 6

Introduction
The appliance has been equipped with a built-in safety lock that
prevents it from functioning if the accessories have been assembled
incorrectly or have not been assembled at all.
Never use the accessories to turn the appliance on and off!
Important
◗ Please read these instructions carefully and look at the illustrations
before using the appliance.
◗ Keep these instructions for further reference.
◗ This appliance is intended for household use only.
◗ Check if the voltage indicated on the appliance corresponds to the
local mains voltage (110 - 127V or 220 - 240V) before you connect
the appliance to the wall socket.
◗ Never use any accessories or parts from other manufactures or
which have not been specifically advised by Philips.Your guarantee
will become invalid if such accessories or parts have been used.
◗ If the mains cord is damaged, it must be replaced by Philips, a service
centre authorised by Philips or similarly qualified persons in order to
avoid a hazard.
◗ Do not use the appliance when the mains cord, the plug or other
components are damaged.
◗ Assemble the appliance properly before plugging it into the wall
socket.
◗ When the jar unit or other accessories are properly fixed on the
motor unit, you can hear the 'click' sound.
◗ Do not remove accessories from the motorunit when the
appliance is working.
◗ Do not exceed the quantities and preparation times indicated in
the diverse sections.
◗ Let hot ingredients cool down before chopping them or pouring
them into the blender jar (max. temperature 80cC/175cF).
◗ Keep the appliance out of the reach of children.
◗ Never let the appliance operate unattended.
◗ Avoid touching the SHARP blades, especially when the appliance is
plugged in.
◗ If the blades get stuck, UNPLUG THE APPLIANCE before
removing the ingredients that are blocking the blades by using a
spatula.
◗ Never reach into the jar or bowl with your fingers or an object
while the appliance is running.
◗ Never immerse the motor unit in water or any other fluid, nor
rinse it under the tap. Use only a moist cloth.
◗ Unplug the appliance immediately after use, e.g. before unscrewing
the jar.
◗ Please keep these instructions for use for further reference.
◗ This appliance is intended for household use only.
ENGLISH6
Page 7

General description
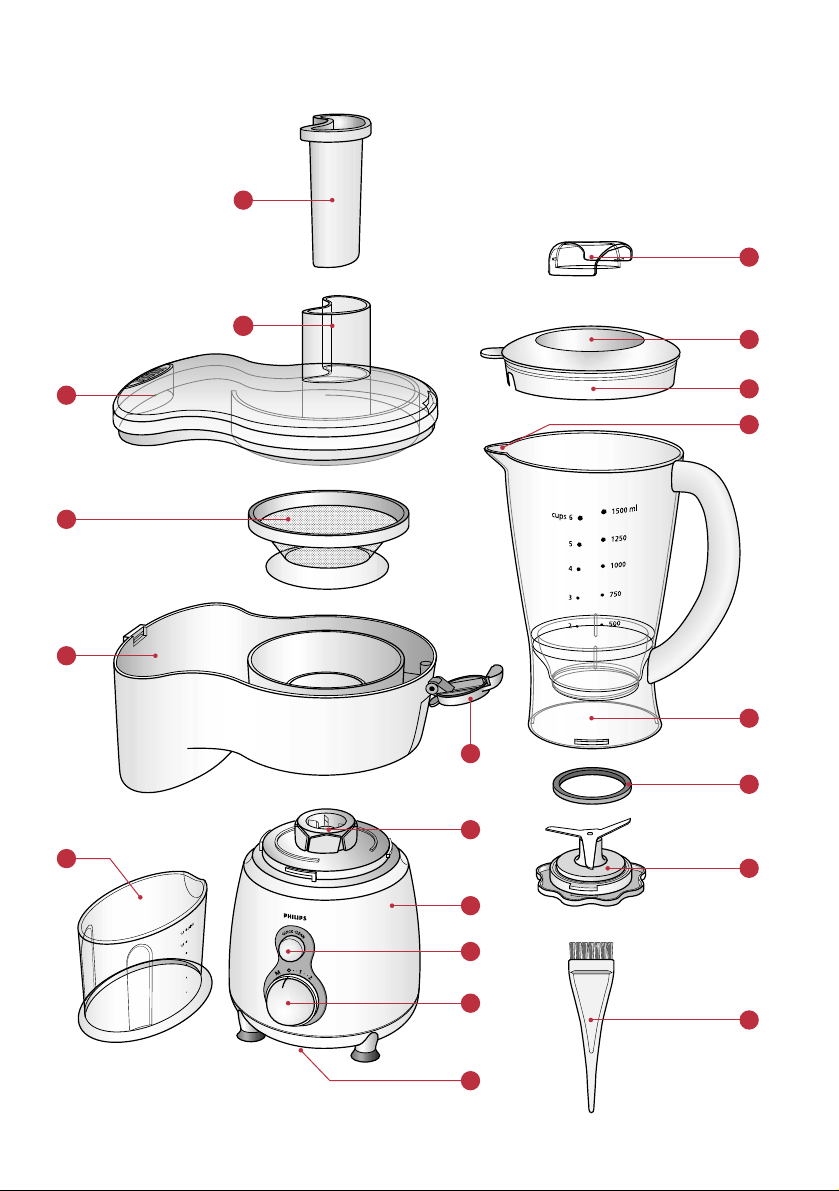
A Cord storage
B Speed selector with 2 speeds and pulse setting (M)
C Quick Clean button
D Motor unit
E Driving Shaft
F Juice cup
G Clamp for (un) fastening the lid
H Pulp container
i Sieve
J Lid of juice extractor
K Feeding Tube
L Pusher
M Stopper
N Opening for adding ingredients
O Lid of jar
P Spout
Q Blender jar
R Rubber sealing ring
T Knife unit
U Cleaning brush
V Lid of chopper
W Chopper blade
X Chopper gearing box
Y Driving axis
Z Bayonet coupling unit
a Fruit filter
b Mill beaker
c Rubber sealing ring
d Blade unit
Preparing the appliance for use
Wash all accessories and detachable parts (see section 'Cleaning').
◗ Wind excess mains cord around the base of the appliance.
Using the appliance
Blender
◗ The blender is intended for:
- Blending fluids, e.g. dairy products, sauces, fruit juices, soups, mixed
drinks, shakes.
- Mixing soft ingredients, e.g. pancake batter or mayonnaise.
- Pureeing cooked ingredients, e.g. for making baby food.
ENGLISH 7
Page 8
C
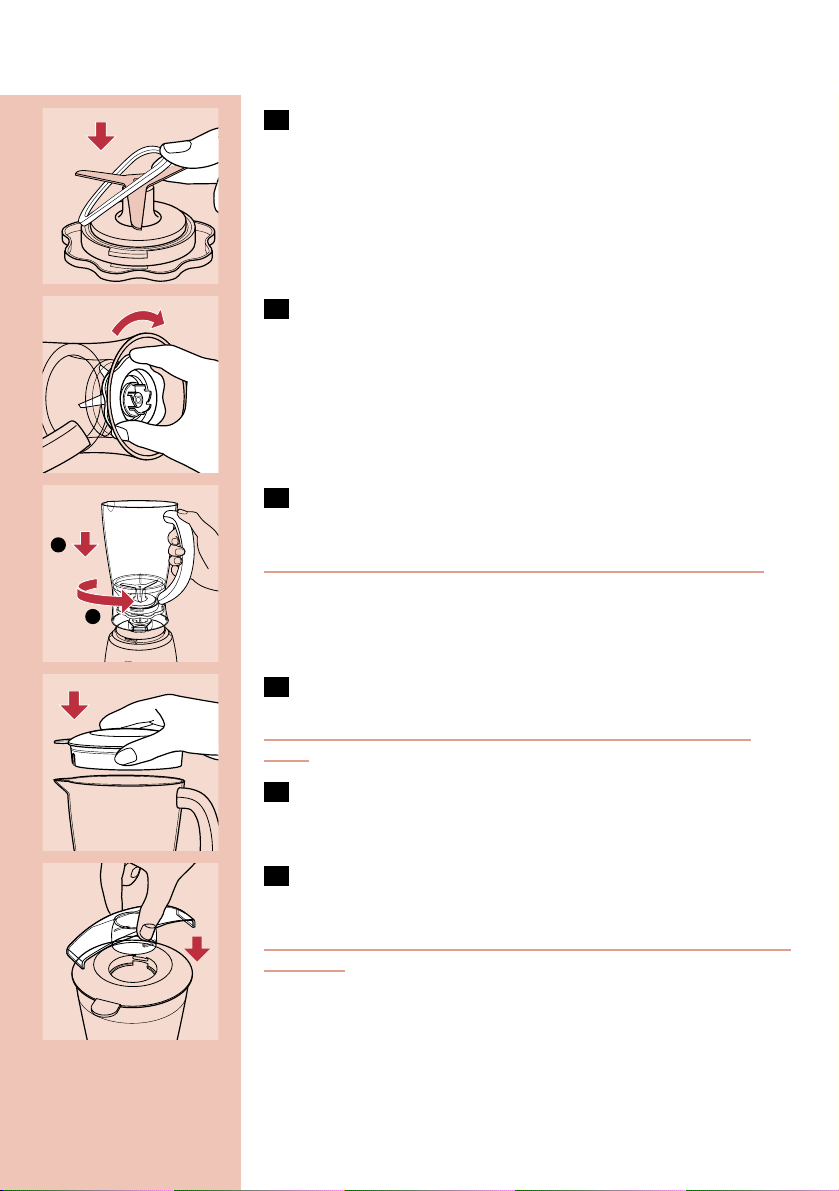
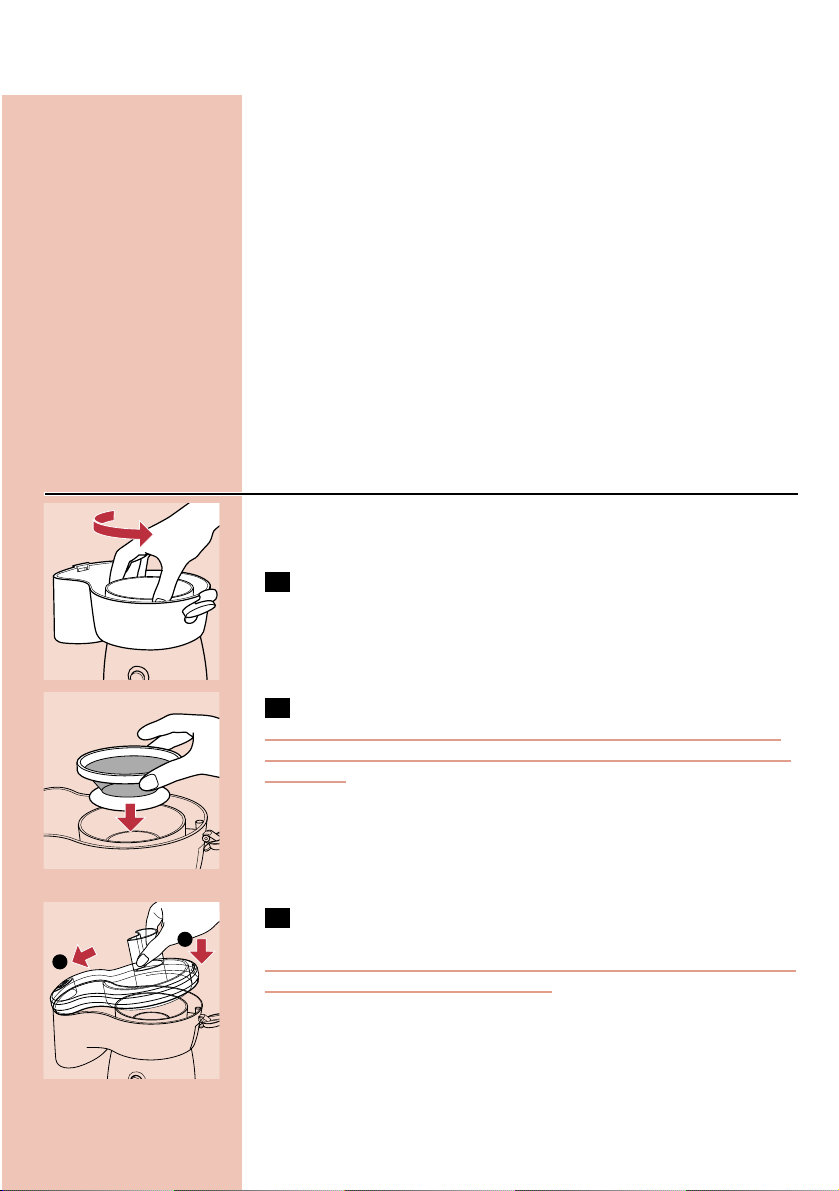
1 Put the rubber sealing ring around the edge of the knife unit.
C
2 Attach the knife unit to the blender jar by turning it in the
direction of the arrow.
C
3 Mount the jar unit onto the motor unit. Fix it by turning it in
the direction of the arrow.
Be careful not to exert too much pressure on the handle of the jar.
C
4 Put the ingredients in the jar.
Never fill the jar with ingredients that have a temperature of over
80cC.
5 Press the lid into place.
C
6 Place the stopper into the opening in the lid and turn it until it
is firmly fixed.
To avoid spillage, always inser t the stopper into the lid before you start
processing.
◗ The speed settings allow you to adjust the speed of the appliance
to obtain optimal results. See the table for the recommended
speed settings.
ENGLISH8
1
2
Page 9
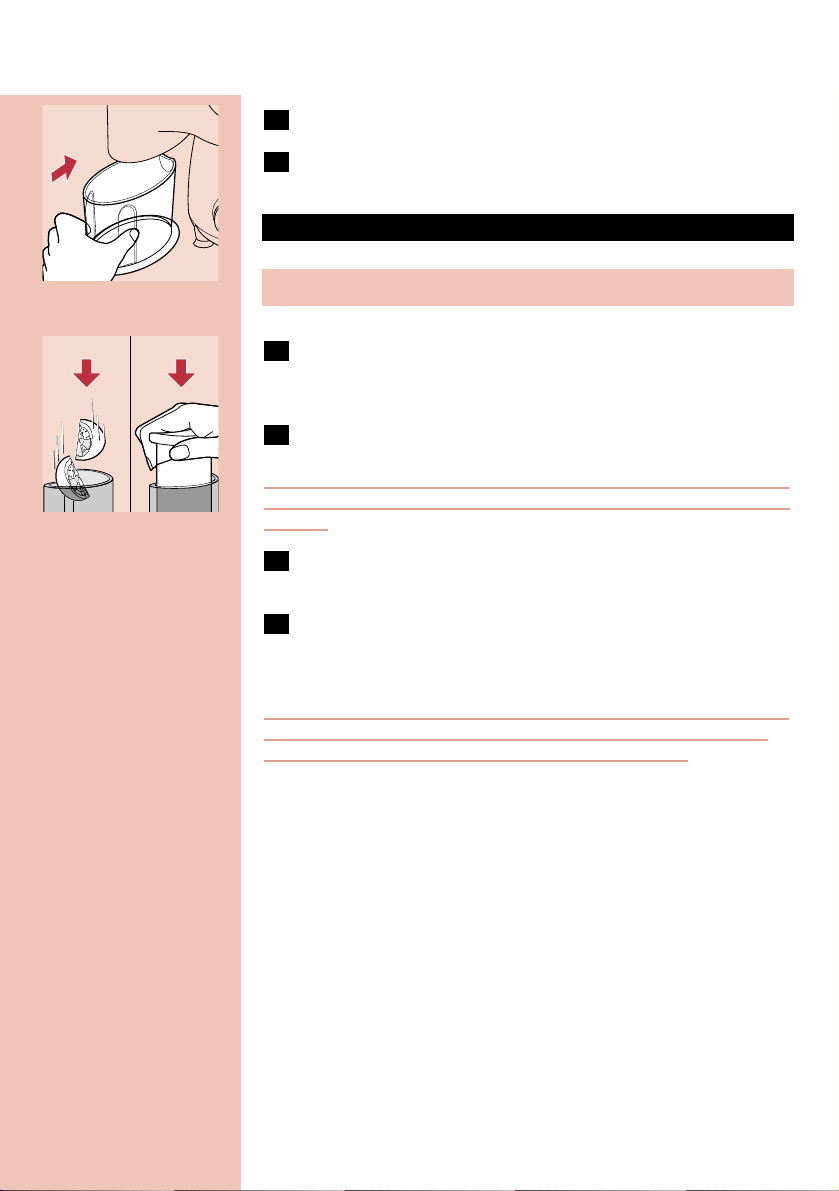
7 Put the mains plug in the wall socket.
C
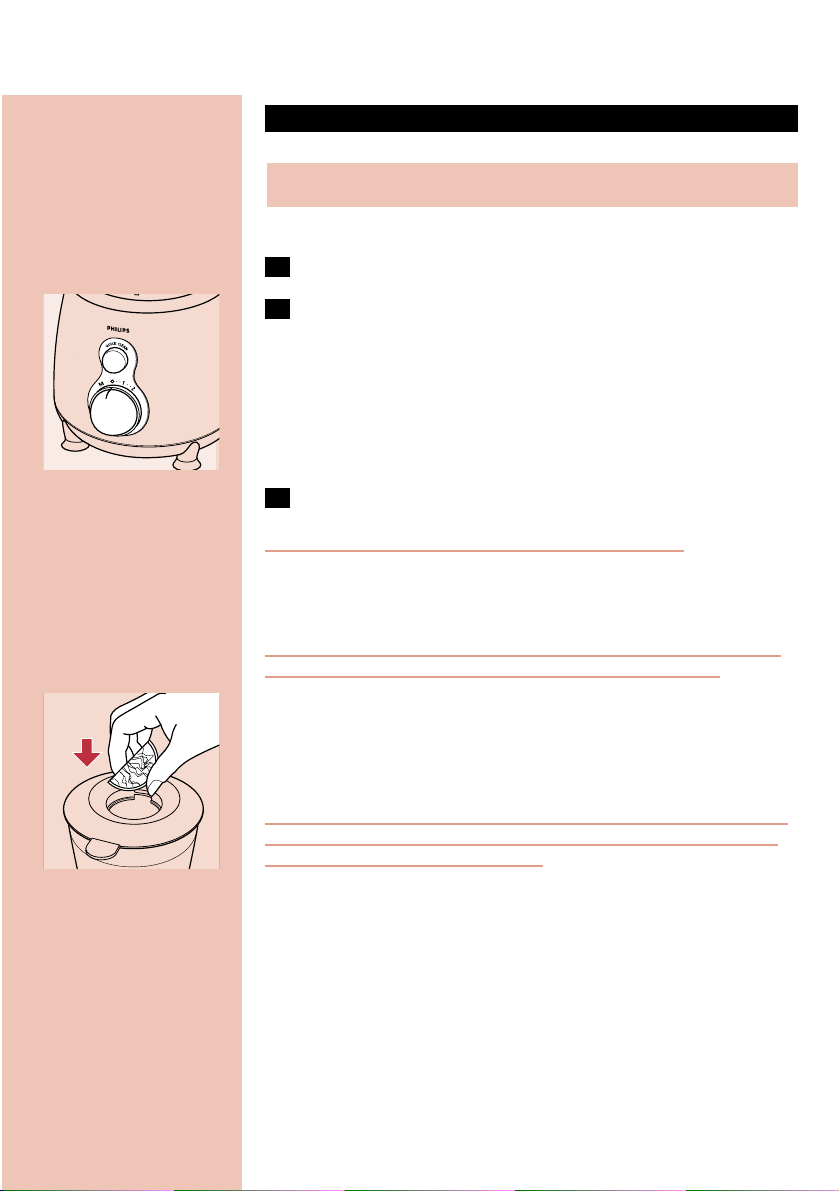
8 Select the desired speed setting and the appliance will switch
on.
If you are not sure which speed to select, you can always use the
highest speed (speed 2).
◗ To let the appliance run for only a few seconds at a time, set the
switch to position M (Momentum) and release it straight away.
Repeat this as often as necessary.
9 To switch the appliance off, switch to position 0.
Never switch the appliance on and off by turning the jar.
For recipes see further on in this booklet.
Tips
To avoid spillage, never fill the jar above the maximum level indication
(1,5 litres), par ticularly not when you are blending hot liquids.
C
◗ Liquid ingredients (e.g. oil) can be poured into the blender jar
while the appliance is running through the opening in the stopper.
◗ While the motor is running, ingredients can be added into the
blender through the opening in the lid.
Do not run the blender for more than 3 minutes at a time. If you have
not finished blending after 3 minutes, switch the appliance off for one
minute before you continue blending.
◗ Dry ingredients must not be processed for more than 1 minute.
◗ Pre-cut solid ingredients into smaller pieces before putting them
into the blender. Do not feed a large quantity at once into the
blender jar. Feed a series of small amounts.
◗ If you are not satisfied with the result at blending solid materials,
switch the blender off and let it run briefly a number of times by
means of the M position. Or stir the ingredients with a spatula (not
while the blender is running), or reduce the contents of the jar and
process smaller amounts.
ENGLISH 9
Speed
speed 1
speed 2
M
Ingredients to process
liquid ingredients (e.g. chocolate milk, milk with fruit, mayonnaise)
heavier ingredients e.g. a combination of liquid and solid
ingredients (e.g. tomato sauce or pate)
heavy, mainly solid ingredients (e.g. ice cubes, soups, beans, etc.)
Page 10
◗ To grind ice cubes, drop them into the rotating knives through the
opening in the lid.
◗ To make tomato juice, cut the tomatoes in four and drop the
pieces onto the rotating knives through the opening in the lid.
Never put your hand or any object in the jar while the blender is
running.
Filter (only types HR1844, HR1842)
◗ You can use the filter accessory to obtain extra finely blended
sauces, fresh fruit juices or soy milk.All pips and skins will remain
in the filter.
C
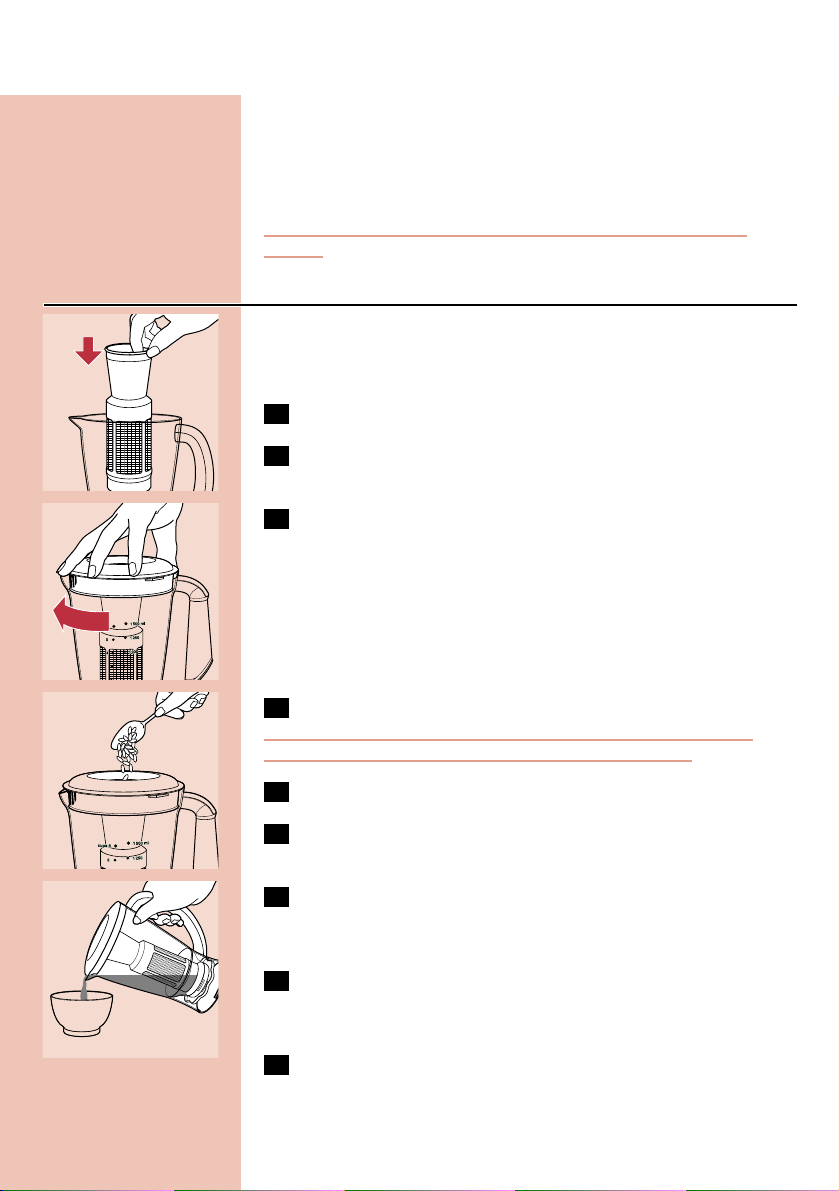
1 Put the filter in the blender jar.
2 Make sure the filter is properly fitted on the bottom of the jar.
C
3 Put the lid in place to fix the filter.
C
4 Put the ingredients in the filter.
The filter should never be filled beyond its maximum (MAX) level
indication. Do not use thefilter to process hot ingredients.
5 Add water or any other liquid.
6 Put the stopper in place and switch the appliance on. Select the
highest speed and let the appliance run for max. 40 seconds.
C
7 Switch the appliance off and remove the blender jar from the
motor unit. Pour out the drink through the spout of the
blender jar.
8 For optimal results, put the jar with the remaining ingredients
and some liquid (optional) back onto the appliance and let it
run for a few more seconds.
9 Pour out the rest of the drink.
ENGLISH10
Page 11
Tips
Particularly when you are processing large quantities, we advise you not
to put all the ingredients in the filter at the same time. Start processing
a small quantity, let the appliance run for a moment, switch it off and
then add another small quantity. Repeat this procedure until you have
processed all the ingredients.
For making soy milk:
Soak soy beans for at least 4 hours before processing them.
You can process max. 145 g. (a measuring cup full) of soaked soybeans
(this is equal with 65 g. dried soybeans) with max. 650 ml. (3 measuring
cups full) water at a time.
For making fruit juices and cocktails:
For the best results add approx. 300 ml. water (or other liquid for
cocktails, etc.) to 500 g. fruit at a time.
Juice extractor
◗ The juice extractor can be used for preparing fresh fruit juices.
Pulp, pips and skins will be separated.
C
1 Put the pulp container on the motor unit and turn it in the
direction of the arrow until it is firmly fixed.
C
2 Insert the sieve.
Always check the sieve before use. Do not use the sieve if you notice
any damage on it like cracks, fissures, opening on metal screen or loose
grater disc.
In case of a damaged sieve, contact the Philips Customer Care Centre
in your country (you will find its phone number in the worldwide
guarantee leaflet). If there is no Customer Care Centre in your country,
turn to your local Philips dealer or contact the Service Department of
Philips Domestic Appliances and Personal Care BV.
C
3 Put the lid in place and finally fasten the clamp by pushing it
down.
Make sure the clamp is on the right side of the motor unit. Check if the
lid is properly assembled and fastened.
ENGLISH 11
2
1
Page 12
C
4 Put the juice cup in place.
5 Select the right speed setting to switch the appliance on.
C
6 Put the ingredients in the feeding tube. Before processing, cut
large ingredients into pieces that fit into the feeding tube.
C
7 Push the ingredients gently down with the pusher.
Do not exert too much pressure on the pusher, since this would affect
the quality of the end result and it could even cause the sieve to come
to a halt.
8 If no more juice comes out, switch the appliance off and wait
until the sieve has stopped rotating before releasing the clamp.
9 Remove the juice cup.
B
For recipes see further on in this booklet.
Do not let the juice extractor run contnously for more than 2 minutes
If you have not finished extracting juice, switch the appliance off and
allow it to cool down for 2 minutes before you continue.
Tips
◗ If the pulp container is full during processing, switch the appliance
off and wait until the sieve has completely stopped rotating.
Unfasten the clamp and remove the lid. Remove the sieve. Detach
the pulp container from the motor unit by turning it to the right
and remove it. Empty the pulp container and clean the sieve.
Reassemble the juice extractor and switch it on again.
◗ If the juice cup is full during processing, switch the appliance off
and wait until the sieve has completely stopped rotating.Remove
the juice cup and empty it.The maximum content of the juice cup
is 700 ml.
◗ Before processing it is unnecessary to remove thin peels and skins.
Only thick peels (e.g. those of oranges, pineapples or uncooked
beetroots) need to be removed.
ENGLISH12
Speed
speed 1
speed 2
Ingredients to process
fruits (soft)
fresh coconut, beetroots (hard)
Page 13
◗ Firm fruits that contain a lot of starch, such as bananas, papayas,
avocados, figs and mangoes are not suitable for processing in the
juice extractor. Use the blender to process these fruits.
◗ Always use fresh fruits and vegetables.They contain more juice.
◗ Leafs and leaf stalks of for instance lettuce can also be processed
in the juice extractor.
◗ Apple juice turns brown very quickly.You can slow down this
process by adding a few drops of lemon juice.
◗ The pulp of carrots, beetroots, cabbage or spinach can be used as
the basis for soups, sauces, jam,desserts, ice cream etc. Boil the
pulp and add some herbs. Puree the pulp in the blender.You can
use tomato pulp to make tomato paste.
Mill (only type HR1844)
C
◗ The mill attachment can be used for grinding dry ingredients.
Always process cloves, star (Chinese) anise and aniseed in combination
with other ingredients. If processed solely, they may be aggressive to
the plastic materials.
The mill is not suitable for chopping very hard ingredients like nutmeg
and ice cubes.
C
1 Put the ingredients in the beaker.
Process only dry ingredients.
Do not fill the beaker beyond the 'MAX' indication.
See the table for the advised quantities.
ENGLISH 13
Quantities
35-75 g
25-75 g
50-100 g
75-125 g
25-75 g
25-75 g
25-75 g
25-75 g
25-75 g
25-75 g
one dried slice of bread
50 g
50-100 g
125-250 g
Ingredients
dried spices
pepper corns
sesame seed
rice, wheat
soy beans
white beans (haricots)
dried peas
coconut
coffee beans
cheese
bread crumbs
sugar cubes
nuts (shelled)
dry massala
Page 14
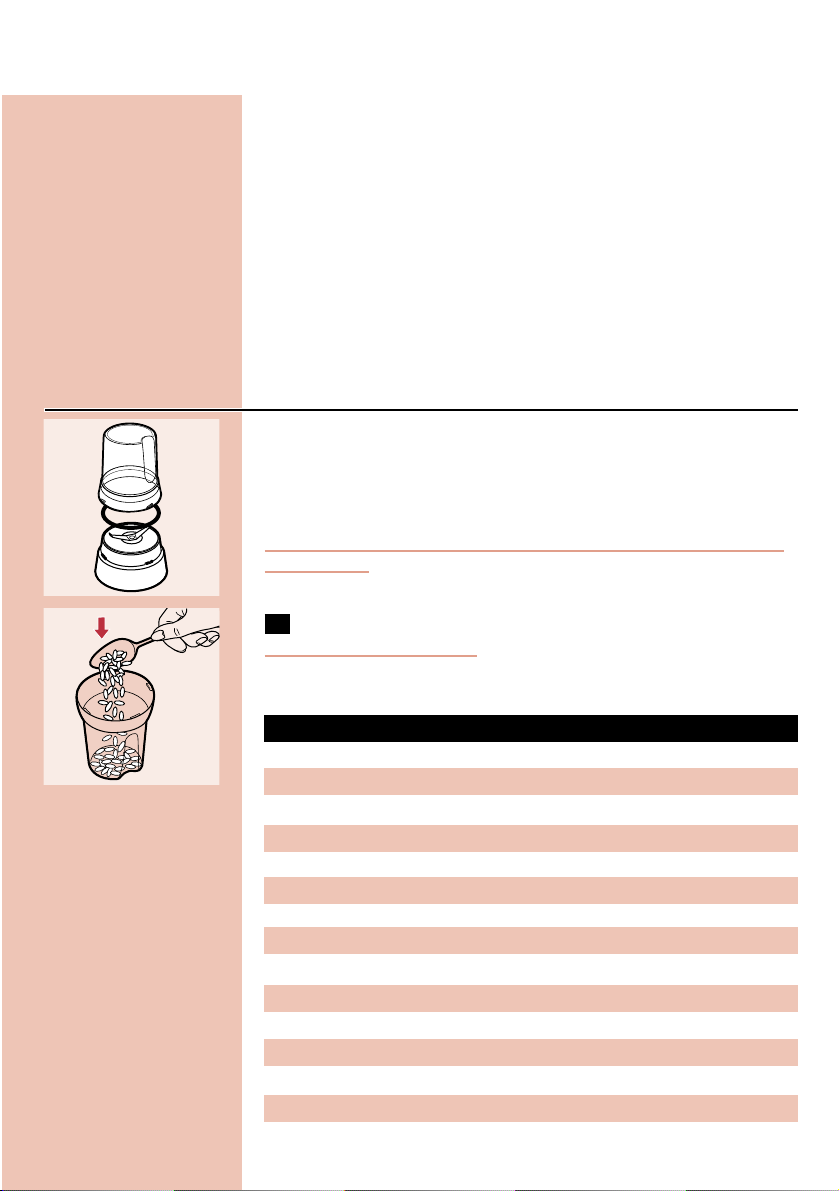
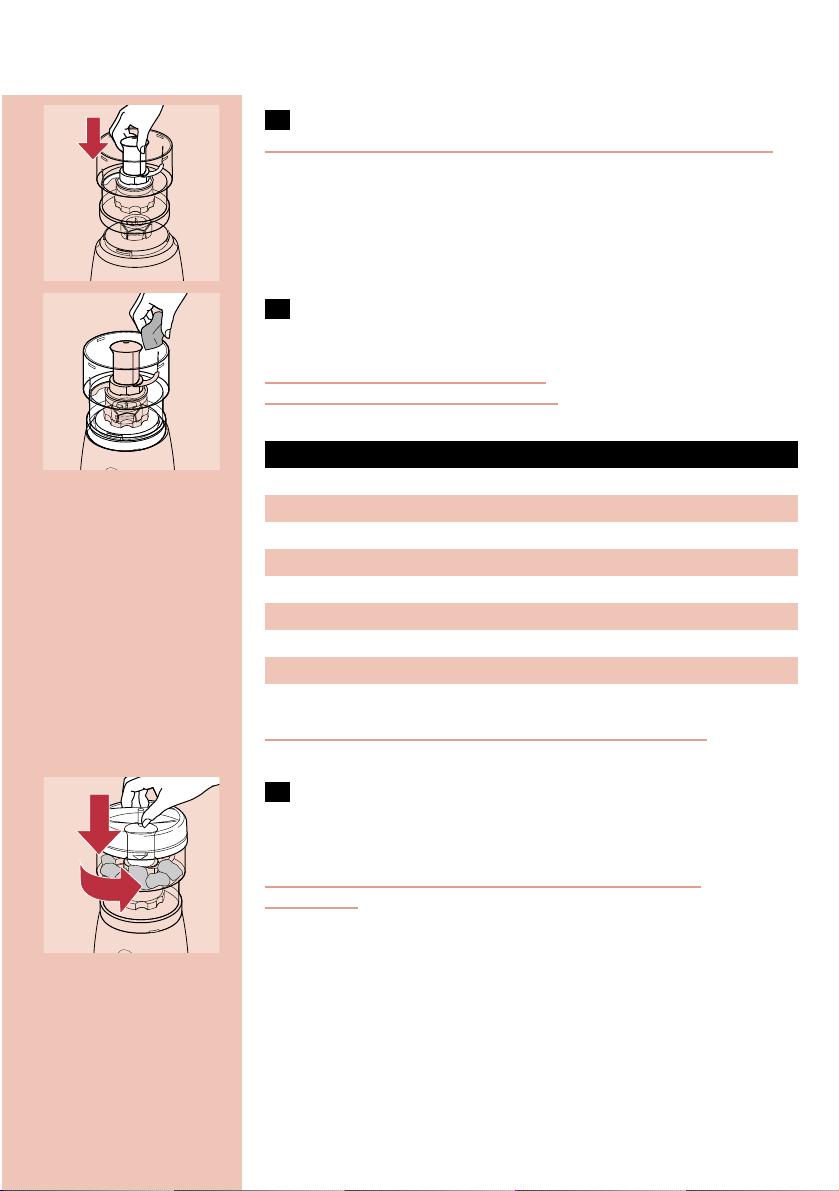
C
2 Ensure the rubber ring on the blade unit is properly placed.
C
3 Screw the blade unit onto the beaker.
If this requires some effort, moisten the rubber ring with a drop of
water.
C
4 Turn the assembled mill upside down, place it on the motor
unit and turn the mill in the direction of the arrow.
C
5 Preferably use the mill at M-speed.
Never use the mill for more than 30 seconds without interruption.
Chopper (only type HR1844)
◗ The chopper attachment can be used for chopping ingredients
such as nuts, meat, onions,hard cheese, dried fruits, chocolate,
garlic, herbs, dry bread etc.
The chopper is not suitable for chopping hard ingredients like coffee
beans, dr y beans, nutmeg and uncooked rice. Use the mill.
C
1 Place the bowl on the motor unit.Turn it in the direction of the
arrow.
ENGLISH14
2
1
Page 15
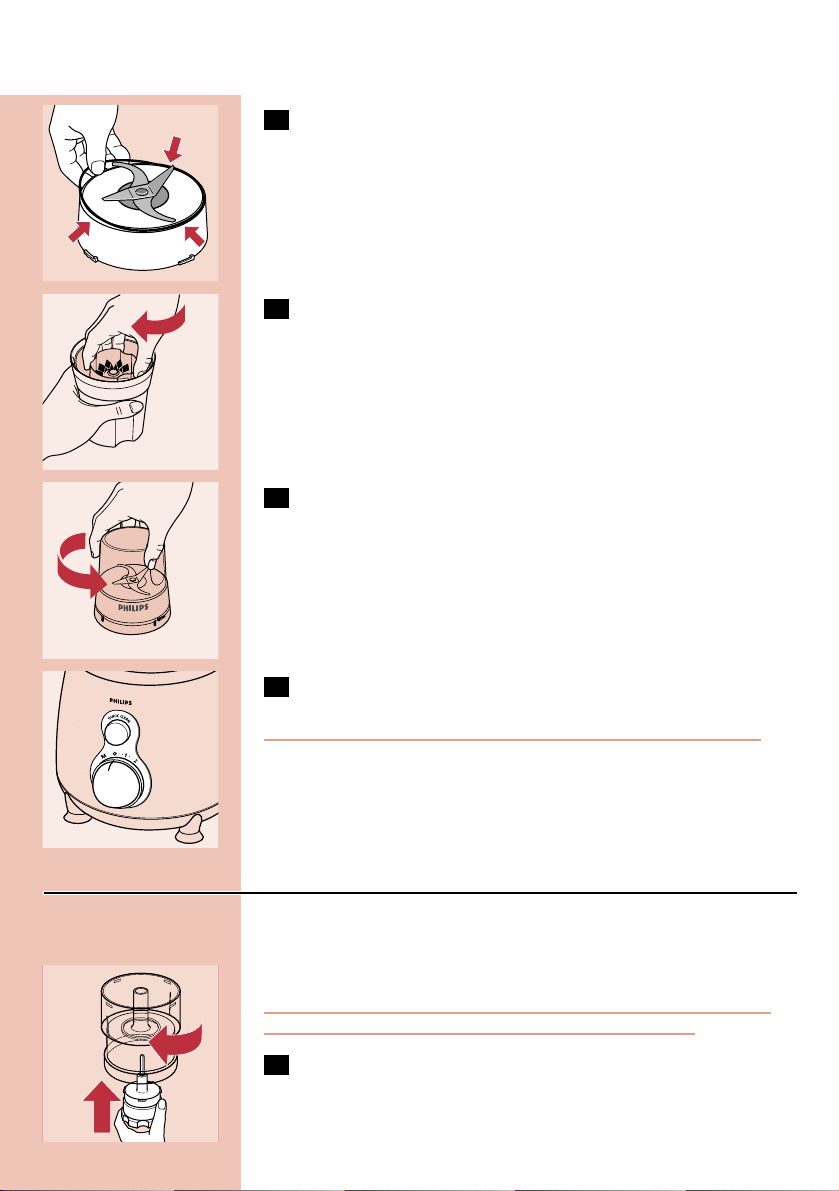
C
2 Put the blade unit in the bowl.
The cutting edges of the blades are very sharp: avoid touching them!
C
3 Put the ingredients in the bowl. Cut large ingredients into
pieces of approximately 1-2 cm/0.5-1 inch before processing.
Never exceed the maximum quantity.
See the table for the advised quantities.
Do not use the chopper for mixing liquids. Use the blender.
C
4 Put the lid on the bowl, push it down and turn it in the
direction of the arrow until it is entirely fixed. Make sure it is
properly fixed before you switch the chopper on.
Never use the chopper for more than 30 seconds without
interruption.
ENGLISH 15
Speed
speed 1
speed 2
speed 1
speed 1
speed 2
speed 2
speed 2
speed 1
Quantities
50-150 g
50-200 g
10-20 g
75-150 g
75-150 g
50-75 g
50-100 g
100-200 g
Ingredients
onions
meat (lean, uncooked)
parsley
fruits
vegetables/fruit (uncooked)
chocolate
cheese (firm, crust less)
baby food
1
2
Page 16
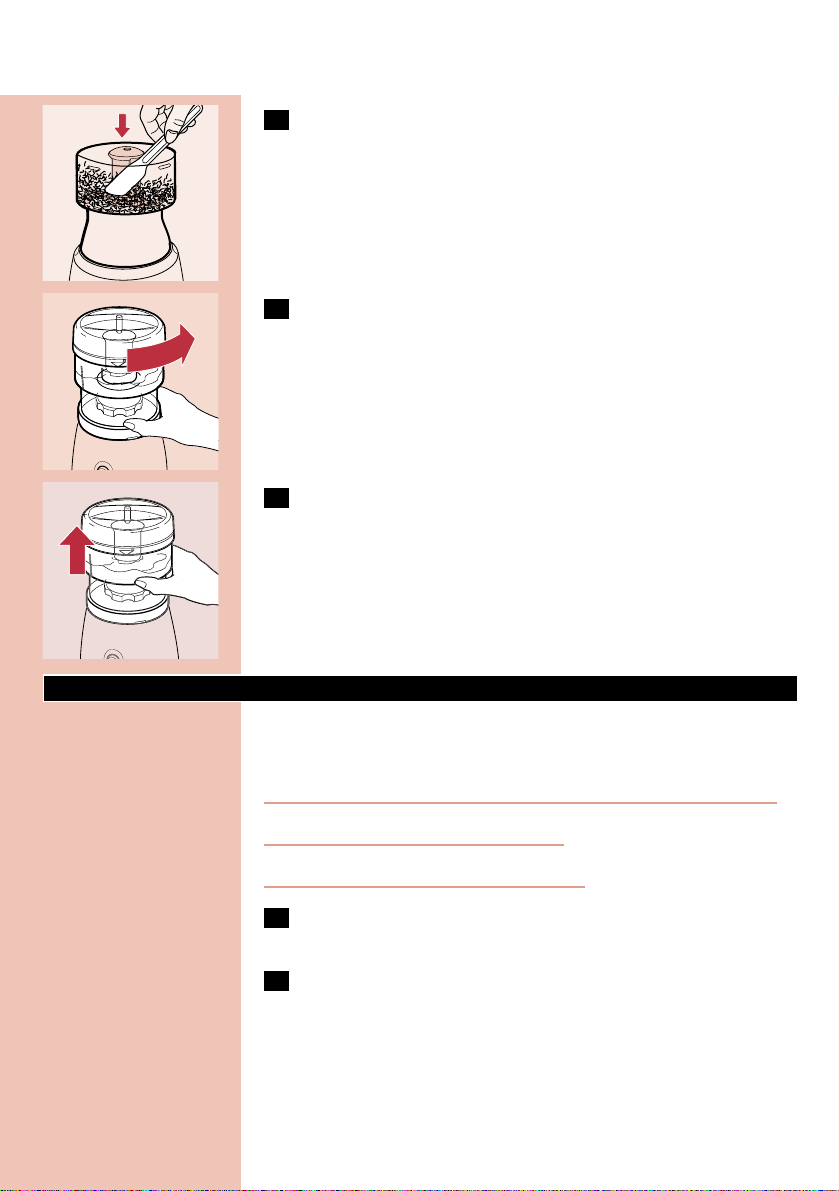
C
5 If the ingredients stick to the chopper beaker wall, stop the
appliance and loosen the ingredients by using a spatula.
◗ If the appliance shakes because the food is not evenly distributed,
turn the appliance off. Open the lid and distribute the ingredients
evenly on the surface of the chopper.Turn the appliance on again.
C
6 When you have finished chopping, switch the appliance off,
unplug it and detach the chopper by turning it in the direction
of the arrow.
C
7 Remove the chopper from the motor unit before you empty
the bowl.
Cleaning
Cleaning of the appliance, its parts and accessories is easiest
immediately after use.
Never clean the accessories or the appliance parts in the dishwasher.
Clean the motor unit with a moist cloth.
Do not use abrasives, scourers, alcohol, etc.
1 Unplug the appliance, detach the used accessories and parts
and clean them in lukewarm, soapy water.
2 Rinse all washed up accessories and parts under a tap.
ENGLISH16
Page 17
Blender, quick cleaning
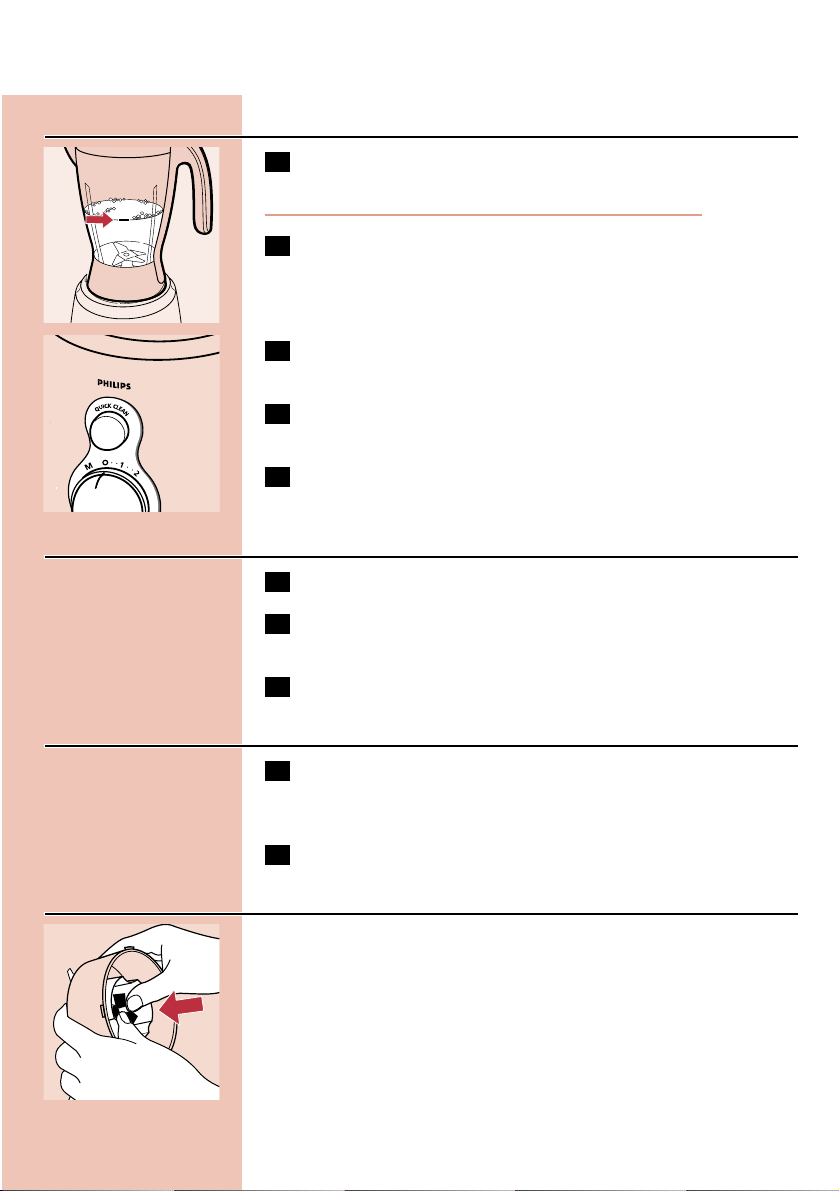
C
1 Pour lukewarm water and some washing-up liquid into the
blender jar.
Do not exceed the maximum quantity of the jar (1.5 litre).
2 Assemble the lid and the stopper.
C
3 Let the appliance run for a few seconds by pressing the Quick
Clean button.
4 Detach the blender jar, remove the lid and stopper and rinse
them with clean water.
5 For better cleaning, remove the knife unit from the blender jar.
Filter, better cleaning
1 Take the filter out of the blender jar.
2 Hold the filter over a waste bin and gently shake out its
contents.
3 Rinse the filter under the tap.
Juice extractor, better cleaning
1 Remove the lid, the pulp container (release the clamp before
removing the pulp containerfrom the motor unit) and the
sieve. Rinse them immediately after use.
2 You can use the supplied brush to clean the sieve.
Mill, better cleaning
C
◗ The blade unit is spring-loaded to enable better cleaning under
the knifes.
ENGLISH 17
Page 18

Chopper, better cleaning
C
1 Always detach the gear box before you clean the chopper.
2 You can clean the gear box with a moist cloth.
Do not immerse the gear box into water.
Guarantee & service
If you need information or if you have a problem, please visit the Philips
Web site at www.philips.com or contact the Philips Customer Care
Centre in your country (you will find its phone number in the
worldwide guarantee leaflet). If there is no Customer Care Centre in
your country, turn to your local Philips dealer or contact the Service
Department of Philips Domestic Appliances and Personal Care BV.
Recipes for the Juice Extractor and Blender
combination
With the Juice & Co you can experiment endlessly and try out all kind
of recipes.You can make delicious juices, shakes, soups and sauces in no
time at all.To give you an idea of the possibilities, we have included a
number of recipes which will certainly prove a success.
Savoury cakes
- 250gr vegetable pulp (particularly suitable are cabbage, celery or
celeriac, tomatoes, carrots, onions, peppers, leeks, spinach and fennel)
- 100 gr breadcrumbs
- 2 eggs
- 2 tbsp tomato ketchup
- 1 tbsp chopped green herbs (e.g. parsley/chives)
- 2 tsp sambal
- 50 gr grated mature cheese
- salt
- pepper
- 50 gr butter
B
Stir the tomato ketchup, chopped herbs, sambal and cheese through the
pulp. Put the pulp in a bowl and mix the breadcrumbs, the eggs and
some salt and pepper. Make 4 - 5 flat cakes of the mixture.
B
Heat the butter in a frying pan and fry the cakes over moderate heat for
approx. 5 minutes on each side until they are brown and cooked. Serve
hot.
ENGLISH18
Page 19

Apple pancakes
- 150 gr apple pulp
- 150 gr self-raising flour
- 2 eggs
- approx. 100 ml milk
- 50 gr raisins
- 50 gr dried apricots, cut into pieces
- butter
- sugar and cinnamon according to taste
B
Stir the self-raising flour and the eggs through the apple pulp.Add
enough milk to make a fairly firm mixture. Spoon the raisins and apricots
through the mixture.
B
Heat some butter in a frying pan. Put scoops of mixture into the frying
pan at a small distance from each other. Flatten the mixture into the
pancakes and fry them over a moderate heat on both sides until they
are golden and cooked. Ser ve the pancakes hot or cold and sprinkle
them with sugar and cinnamon according to taste.
Vitamin drink (three glasses)
- 1 mango
- 1 banana
- juice of 1 apple (washed), 1 kiwi fruit and 1 orange
- 2 tsp honey (or more, according to taste)
- 300 ml buttermilk
B
Peel the kiwi fruit and the orange. Process them in the juice extractor
together with the apple. Peel the mango and the banana and mix them
in the blender together with the fruit juice, the honey and the buttermilk
to create a delicious shake.
B
Tip: replace the buttermilk with quark or yoghurt to create a tasty and
healthy dessert.
Ice-cold shake for a tropical day (two glasses)
- 1/2 pineapple
- 2 apples
- 1 pink grapefruit
- ice cubes (approx. 2 full glasses)
B
Skin the pineapple and peel the grapefruit, rinse the apples and cut
everything into pieces. Process them in the juice extractor and collect the
juice.
B
Assemble the blender and put the ice cubes in the blender jar. Crunch
the ice at the highest setting and add the fruit juice.You will have a
delicious, ice-cold fresh fruit shake that will quench your thirst!
Vegetable shake (one large serving)
- 200 ml carrot juice
- 1/2 stalk of celery, cut into pieces
- 1 medium-sized tomato, peeled and cut into pieces
ENGLISH 19
Page 20

- 1/2 small green or red pepper, cut into pieces
- small handful of fresh spinach or several sprigs of parsley
- 2 or 3 ice cubes
- 1 long, thin stalk of celer y for garnishing
B
Process 6 to 8 carrots in the juice in the juice extractor.
B
Assemble the blender accessory. Put the carrot juice, the vegetables and
the spinach or the parsley in the blender and mix for 15-30 seconds at
maximum speed. Add the ice cubes and blend for a few more seconds.
Pour the shake into a tall glass and garnish with a long, stick of celer y.
Gazpacho blanco (4 servings)
- 500 gr seedless white grapes
- 2 cucumbers (approx. 750 gr)
- 1 shallot, cut into pieces
- 1 clove garlic, shopped
- 1/4 tsp salt
- 1/4 tsp white pepper
- 500 ml low-fat yoghurt
- 6 - 8 drops of Tabasco
B
Wash the grapes and remove the stalks. Process them in the juice
extractor and collect the juice.
B
Assemble the blender accessory. Put the grape juice in the blender. Peel
the cucumber, halve it lengthwise and remove the seeds. Cut the
cucumber into thick slices and add these slices to the grape juice in the
blender.Add the shallot, the garlic, the salt and the pepper and run the
machine briefly. Pour the mixture into a bowl and stir the yoghurt and
Tabasco through it.
B
Chill the soup by putting it in a covered bowl in the refrigerator for 30
minutes. Serve in large soup bowls and garnish with cucumber slices and
halved grapes.
ENGLISH20
Page 21

ENGLISH 21
Troubleshooting guide
Solution
The appliance is provided with a safety system. If accessories are not properly
connected with the motor unit, the appliance does not work. Check whether
the accessories have been connected in the right way (see the various sections).
Turn off the appliance first!
Turn off the appliance and process a smaller quantity.
This is normal for the first few applications. If the smelling continues, check the
quantity you are processing, the application time or used speed.
Turn off the appliance and unplug it. Contact Philips Customer Service Hotline,
Philips Offices or Philips Service Centre for assistance.
Turn off the appliance. Release the knife unit by turning it anti-clockwise. Check
whether the rubber ring is properly assembled on the knife unit (rest on flat
position).
Make sure the lid is attached properly.The stopper fits with a 'click'.
Turn off the appliance. Check if the sieve is properly connected.The ribs on the
bottom of the sieve should fit properly on the motor coupling opening.
Check if the sieve is not damaged. Cracks, fissures, loose grater disc or any other
irregularity may cause malfunction.
Check whether the knife is properly attached to the beaker.
Check whether the rubber ring is assembled in a correct way.
Make sure the rubber ring is assembled properly.The ring should rest around all
interface, in a flat position. Note: a small leakage is normal.
Make sure the chopper has been properly attached to the motor unit.The
bayonets of the bowl should fit in the slots of the motor housing and 'click'.
Make sure the lid fits properly on the bowl. Note: a small leakage of liquid is
normal.
Make sure that the filter accessory has been attached properly into the blender
jar.
Problem
The appliance does not work
The knife unit / motor unit is blocked.
The motor unit gives an unpleasant
smell during the first few times of use.
The appliance makes a lot of noise,
smells, feels hot to touch, smokes, etc.
The blender shows leakage
The lid and/or stopper of the blender
show leakage
The sieve of the juice extractor makes
contact with the feeding tube or
shows a high vibration during
processing.
The mill shows a high vibration,
produces a lot of noise or the knife
unit is out of alignment.
The mill leaks powder
The chopper shows a high vibration,
produces a lot of noise or the knife
unit is out of alignment.
The chopper leaks
Despite the filter accessory juices
show pulp of fruits or soybean.
* If problems persist or if other problems occur, please contact Philips Customer Service Hotline, Philips Offices or
Philips Service Centre for assistance.
Page 22

222324
Page 23

Page 24

Page 25

25
1
2
Page 26

26
Page 27

272829
2
Page 28

Page 29

2
1
Page 30

303132
Page 31

Page 32

Page 33

33
2
1
Page 34

34
1
2
Page 35

35363738394041
Page 36

Page 37

Page 38

Page 39

Page 40

Page 41

2005/07/25
Page 42

42
Page 43

43
A
B
C
D
E
F
G
H
I
J
K
L
M
N
O
P
Q
R
S
T
U
V
W
X
Y
A
a
b
c
d
Page 44

44
1
2
Page 45

454647
Page 46

Page 47

2
1
Page 48

484950
Page 49

Page 50

2
1
Page 51

51
1
2
Page 52

5253545556
Page 53

Page 54

Page 55

Page 56

Page 57

57
Page 58

58
U
V
W
Y
X
b
a
Page 59

59
Page 60

u
4222 002 62821
www.philips.com
 Loading...