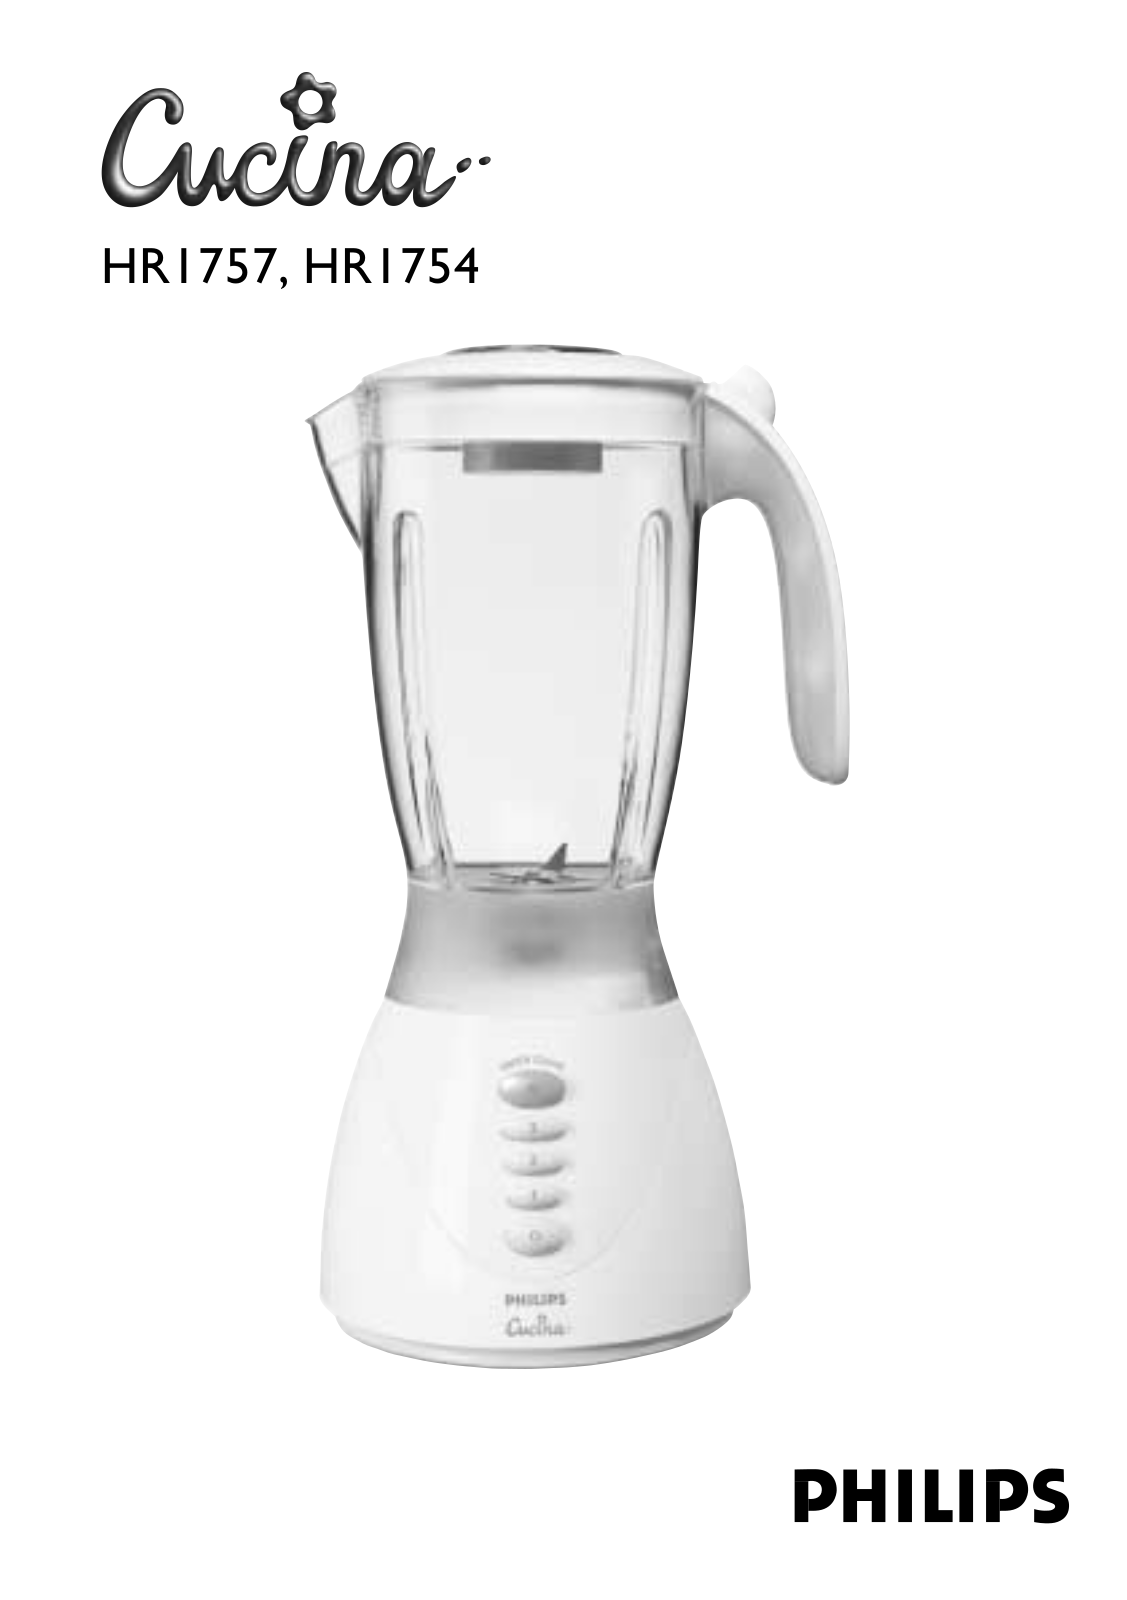
PHILIPS HR 1754 User Manual

HR1757, HR1754

2

ENGLISH 4

DEUTSCH 14

FRANÇAIS 24

NEDERLANDS 34

ESPAÑOL 44

ITALIANO 54

PORTUGUÊS 64

NORSK 74

SVENSKA 83

SUOMI 92

DANSK 101

111

TÜRKÇE 122

HR1757, HR1754

4 ENGLISH

Introduction

The appliance is equipped with built-in safety system:

-The appliance does not function if the accessories have been assembled incorrectly or have not been assembled at all.

-NEVER SWITCH THE APPLIANCE ON OR OFF BY TURNING THE JAR!

Important

Read these instructions for use carefully and look at the illustrations before using the appliance.

Keep these instructions for future reference.

Check if the voltage indicated on the appliance corresponds to the local mains voltage (110-127V or 220-240V) before you connect the appliance.

Never use any accessories or parts from other manufacturers or that have not been specifically advised by Philips.Your guarantee will become invalid if such accessories or parts have been used.

Do not exceed the maximum level indicated on the accessories.

Do not exceed the quantities and preparation times indicated in the table.

Never remove accessories or parts from the motor unit while the appliance is running.Always unplug the appliance first.

Never use the accessories to turn the appliance on and off!

Keep the appliance out of the reach of children.

Never let the appliance run unattended.

Do not use the appliance if the mains cord, the plug or other parts are damaged.

If the mains cord is damaged, it must be replaced by Philips, a service centre authorised by Philips or similarly qualified persons in order to avoid a hazard.

Let hot ingredients cool down before chopping them or pouring them into the jar (max. temperature 80cC/175cF).

To avoid spillage, never fill the jar beyond the maximum level indication (1.5 litres), particularly not if you are blending hot liquids (maximum 1.1 litres).

To avoid spillage, always insert the stopper into the lid before you start processing.

Never reach into the jar with your fingers or an object while the appliance is running.

If the ingredients stick to the wall of the blender, switch the appliance off, unplug the appliance and loosen the ingredients from the wall by adding liquid or using a spatula.

ENGLISH 5

Preparing the appliance for use

Wash all accessories and detachable parts (see 'Cleaning').

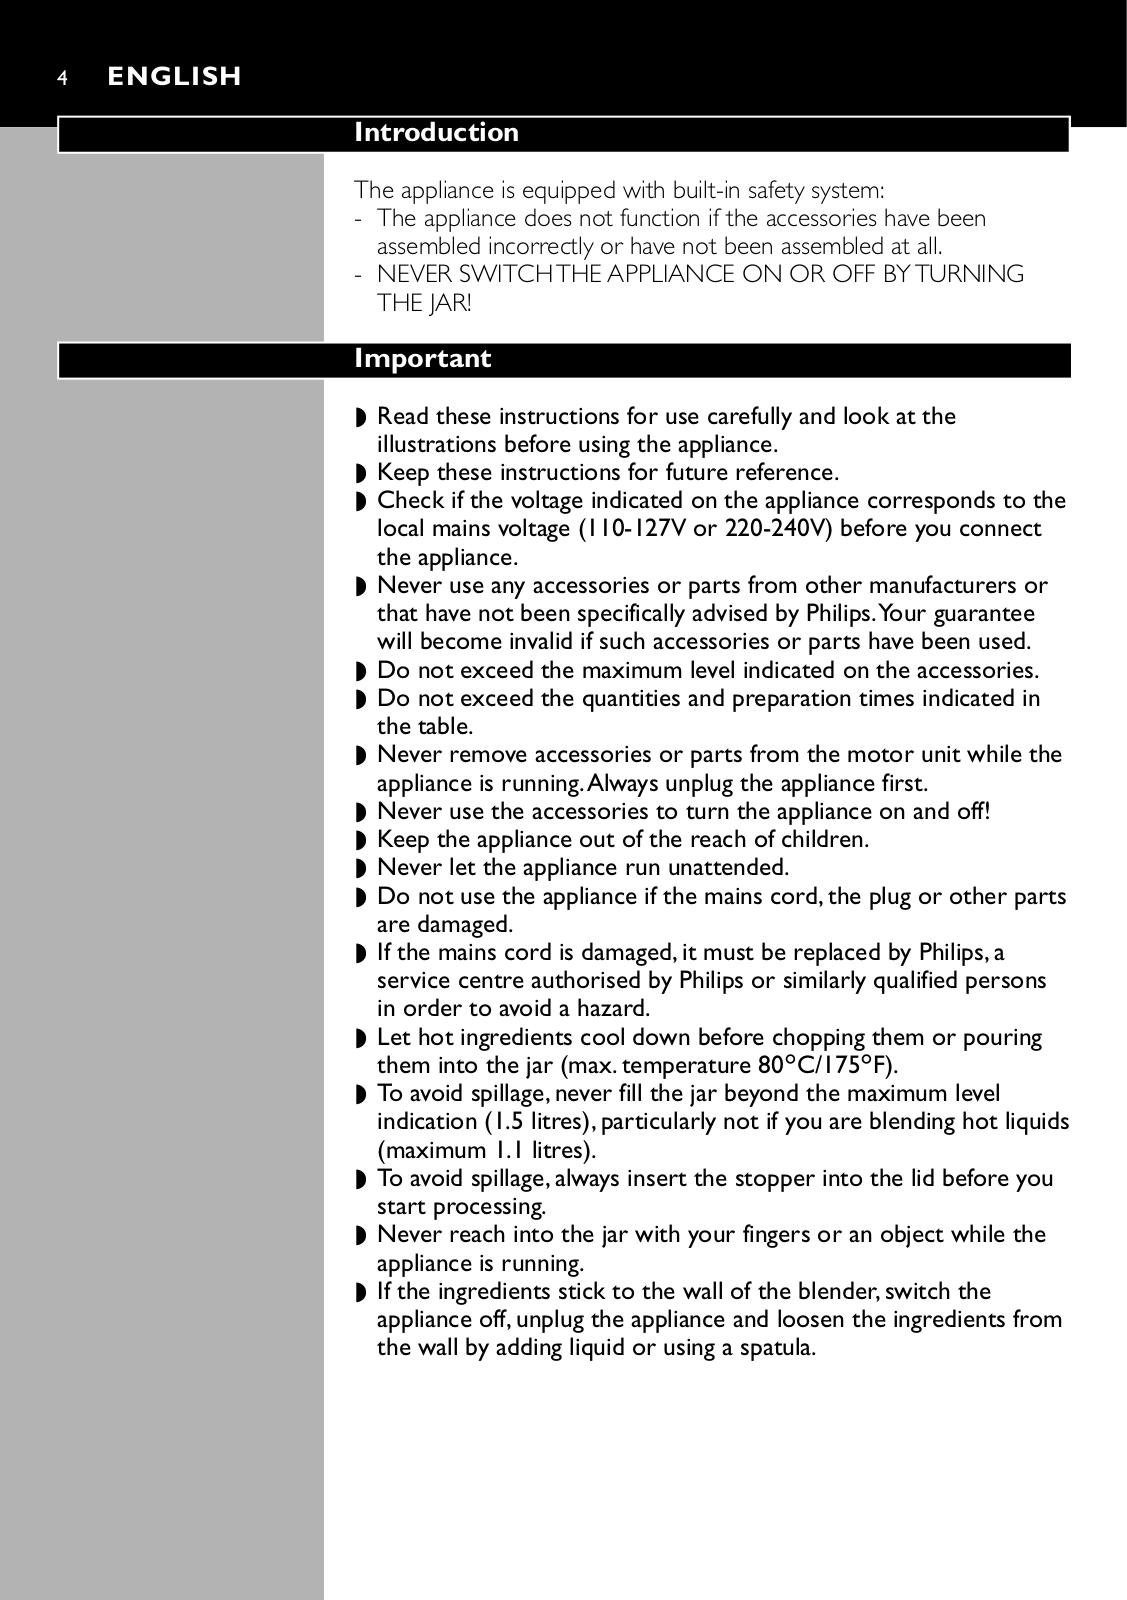
C Wind excess mains cord round the base of the appliance.

Using the appliance

Blender

The blender is intended for:

-Blending fluids, e.g. dairy products, sauces, fruit juices, soups, mixed drinks, shakes.

-Mixing soft ingredients, e.g. pancake batter or mayonnaise.

-Pureeing cooked ingredients, e.g. for making baby food.


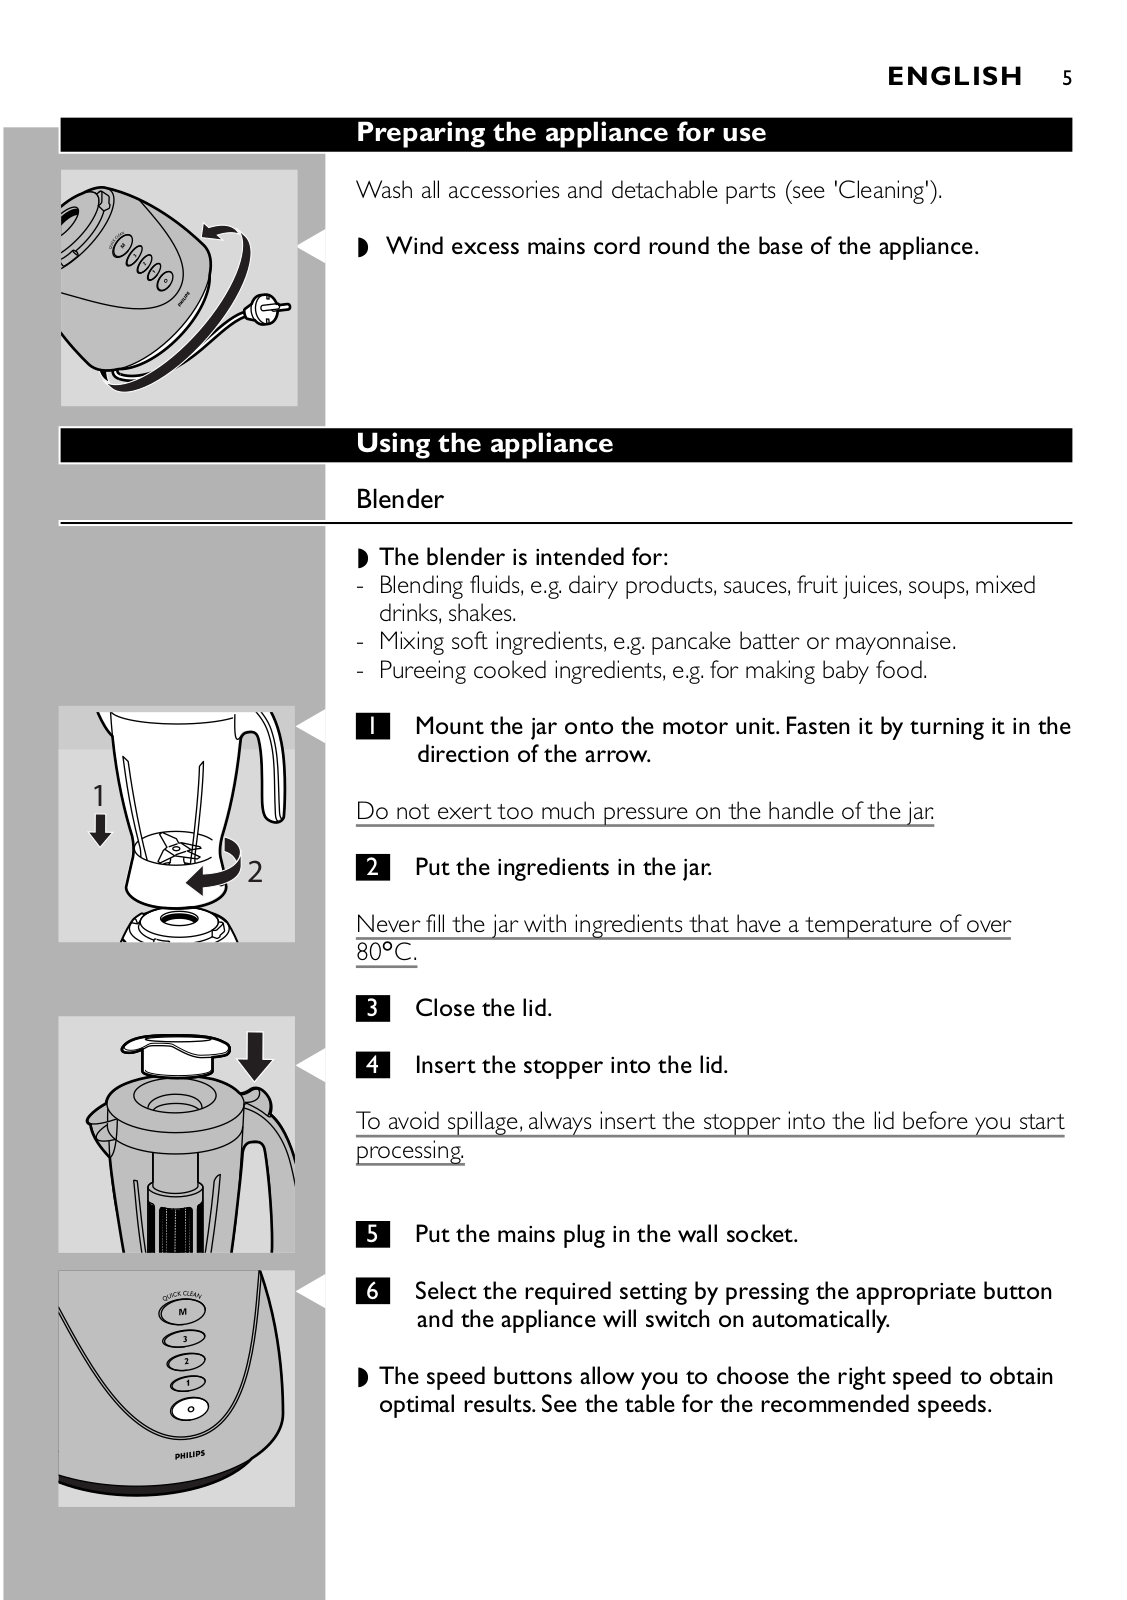
C 1

Mount the jar onto the motor unit. Fasten it by turning it in the


direction of the arrow.

1

Do not exert too much pressure on the handle of the jar.


2

2

Put the ingredients in the jar.


Never fill the jar with ingredients that have a temperature of over


80cC.


3

Close the lid.


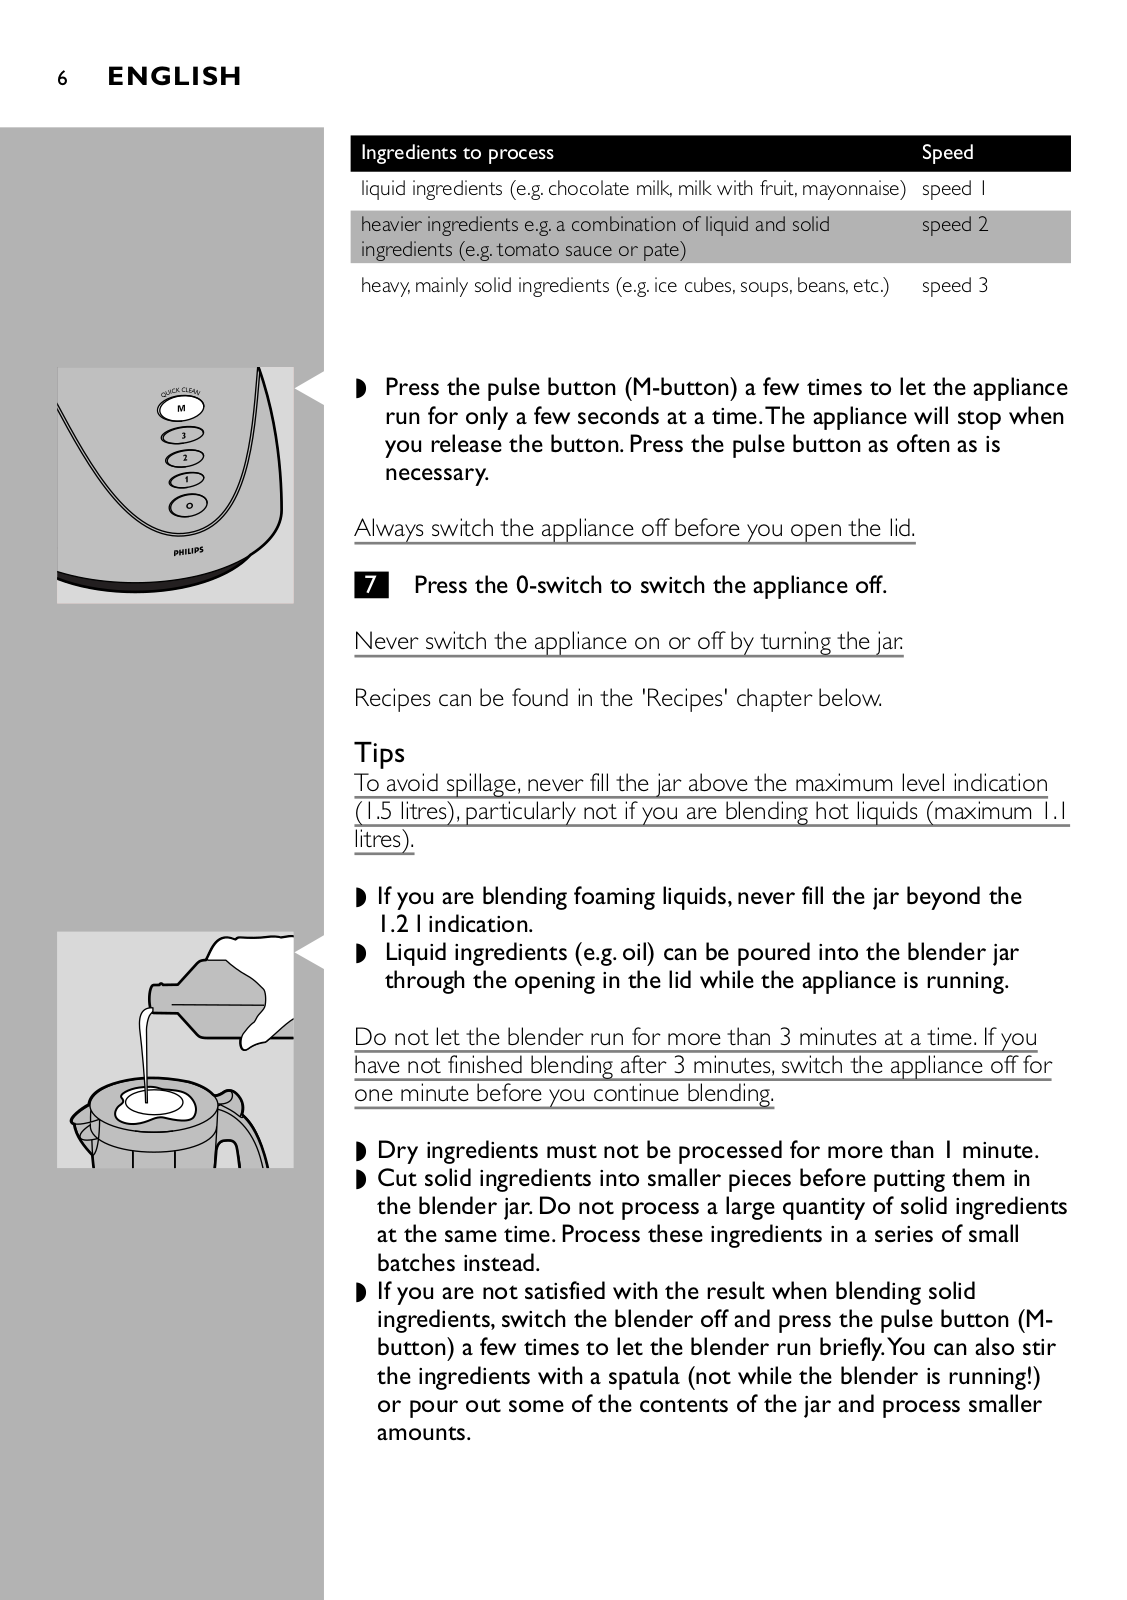
C 4

Insert the stopper into the lid.

To avoid spillage, always insert the stopper into the lid before you start

processing.

5

Put the mains plug in the wall socket.

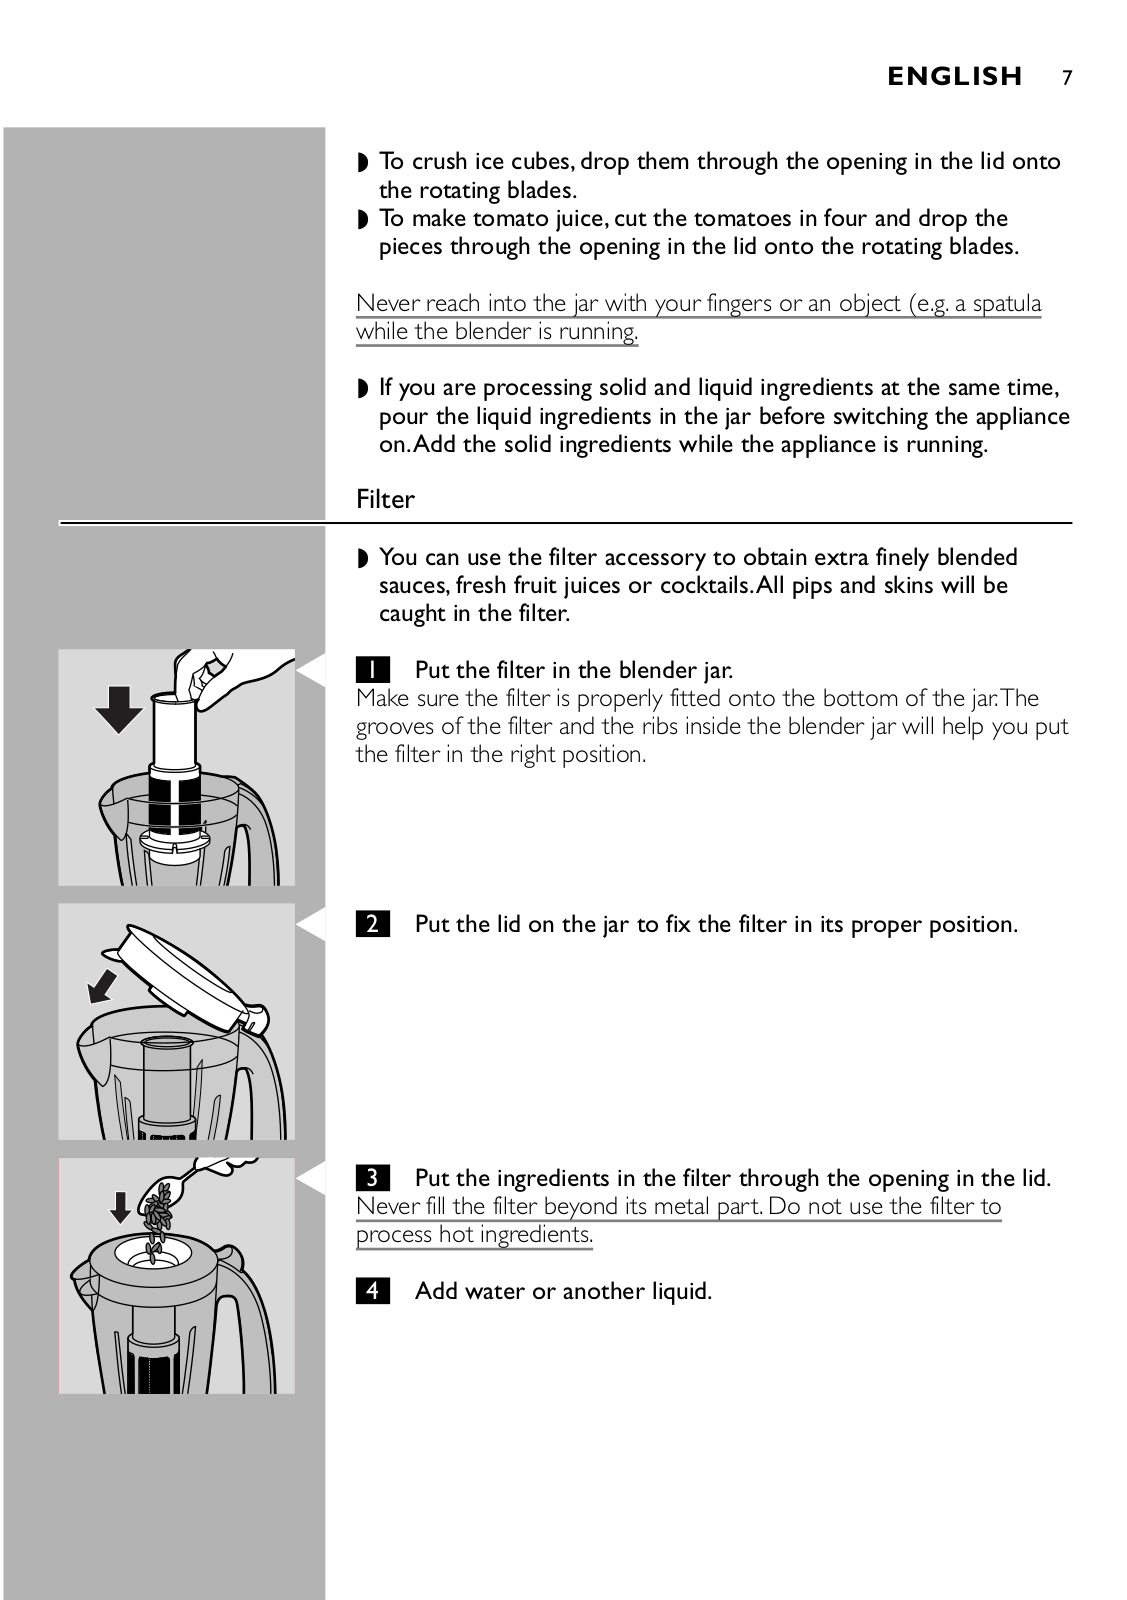
C 6

Select the required setting by pressing the appropriate button


and the appliance will switch on automatically.

The speed buttons allow you to choose the right speed to obtain optimal results. See the table for the recommended speeds.

6 ENGLISH

Ingredients to process

Speed

liquid ingredients (e.g. chocolate milk, milk with fruit, mayonnaise)

speed 1


heavier ingredients e.g. a combination of liquid and solid

speed 2

ingredients (e.g. tomato sauce or pate)


heavy, mainly solid ingredients (e.g. ice cubes, soups, beans, etc.)

speed 3

C Press the pulse button (M-button) a few times to let the appliance run for only a few seconds at a time.The appliance will stop when you release the button. Press the pulse button as often as is necessary.

Always switch the appliance off before you open the lid.

7 Press the 0-switch to switch the appliance off.

Never switch the appliance on or off by turning the jar.

Recipes can be found in the 'Recipes' chapter below.

Tips

To avoid spillage, never fill the jar above the maximum level indication (1.5 litres), particularly not if you are blending hot liquids (maximum 1.1 litres).

If you are blending foaming liquids, never fill the jar beyond the 1.2 l indication.

C Liquid ingredients (e.g. oil) can be poured into the blender jar through the opening in the lid while the appliance is running.

Do not let the blender run for more than 3 minutes at a time. If you have not finished blending after 3 minutes, switch the appliance off for one minute before you continue blending.

Dry ingredients must not be processed for more than 1 minute.

Cut solid ingredients into smaller pieces before putting them in the blender jar. Do not process a large quantity of solid ingredients at the same time. Process these ingredients in a series of small batches instead.

If you are not satisfied with the result when blending solid ingredients, switch the blender off and press the pulse button (M- button) a few times to let the blender run briefly.You can also stir the ingredients with a spatula (not while the blender is running!) or pour out some of the contents of the jar and process smaller amounts.

ENGLISH 7

To crush ice cubes, drop them through the opening in the lid onto the rotating blades.

To make tomato juice, cut the tomatoes in four and drop the pieces through the opening in the lid onto the rotating blades.

Never reach into the jar with your fingers or an object (e.g. a spatula

while the blender is running.

If you are processing solid and liquid ingredients at the same time, pour the liquid ingredients in the jar before switching the appliance on.Add the solid ingredients while the appliance is running.

Filter

You can use the filter accessory to obtain extra finely blended sauces, fresh fruit juices or cocktails.All pips and skins will be caught in the filter.

C 1 Put the filter in the blender jar.

Make sure the filter is properly fitted onto the bottom of the jar.The grooves of the filter and the ribs inside the blender jar will help you put the filter in the right position.

C 2

Put the lid on the jar to fix the filter in its proper position.

C 3

Put the ingredients in the filter through the opening in the lid.

Never fill the filter beyond its metal part. Do not use the filter to

process hot ingredients.

4

Add water or another liquid.

8 ENGLISH

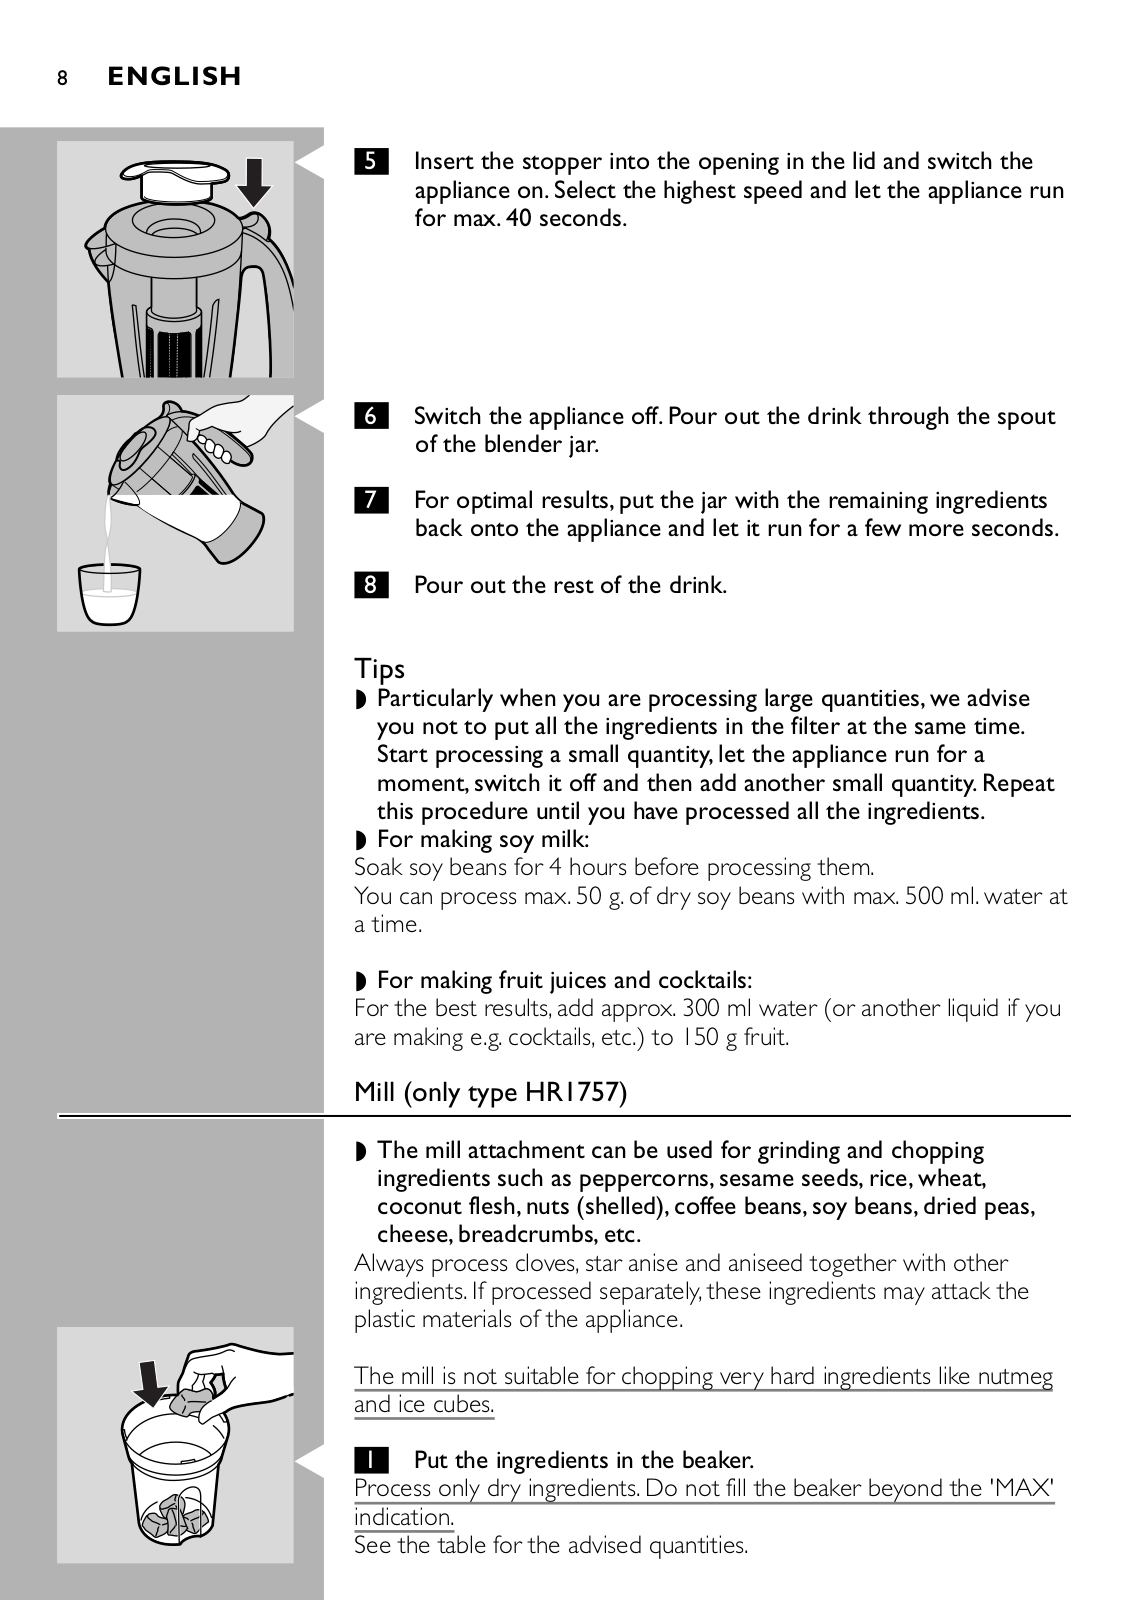
C 5 Insert the stopper into the opening in the lid and switch the appliance on. Select the highest speed and let the appliance run for max. 40 seconds.

C 6

Switch the appliance off. Pour out the drink through the spout


of the blender jar.

7

For optimal results, put the jar with the remaining ingredients


back onto the appliance and let it run for a few more seconds.

8

Pour out the rest of the drink.

Tips

Particularly when you are processing large quantities, we advise you not to put all the ingredients in the filter at the same time. Start processing a small quantity, let the appliance run for a moment, switch it off and then add another small quantity. Repeat this procedure until you have processed all the ingredients.

For making soy milk:

Soak soy beans for 4 hours before processing them.

You can process max. 50 g. of dry soy beans with max. 500 ml. water at a time.

For making fruit juices and cocktails:

For the best results, add approx. 300 ml water (or another liquid if you are making e.g. cocktails, etc.) to 150 g fruit.

Mill (only type HR1757)

The mill attachment can be used for grinding and chopping ingredients such as peppercorns, sesame seeds, rice, wheat, coconut flesh, nuts (shelled), coffee beans, soy beans, dried peas, cheese, breadcrumbs, etc.

Always process cloves, star anise and aniseed together with other ingredients. If processed separately, these ingredients may attack the plastic materials of the appliance.

The mill is not suitable for chopping very hard ingredients like nutmeg and ice cubes.

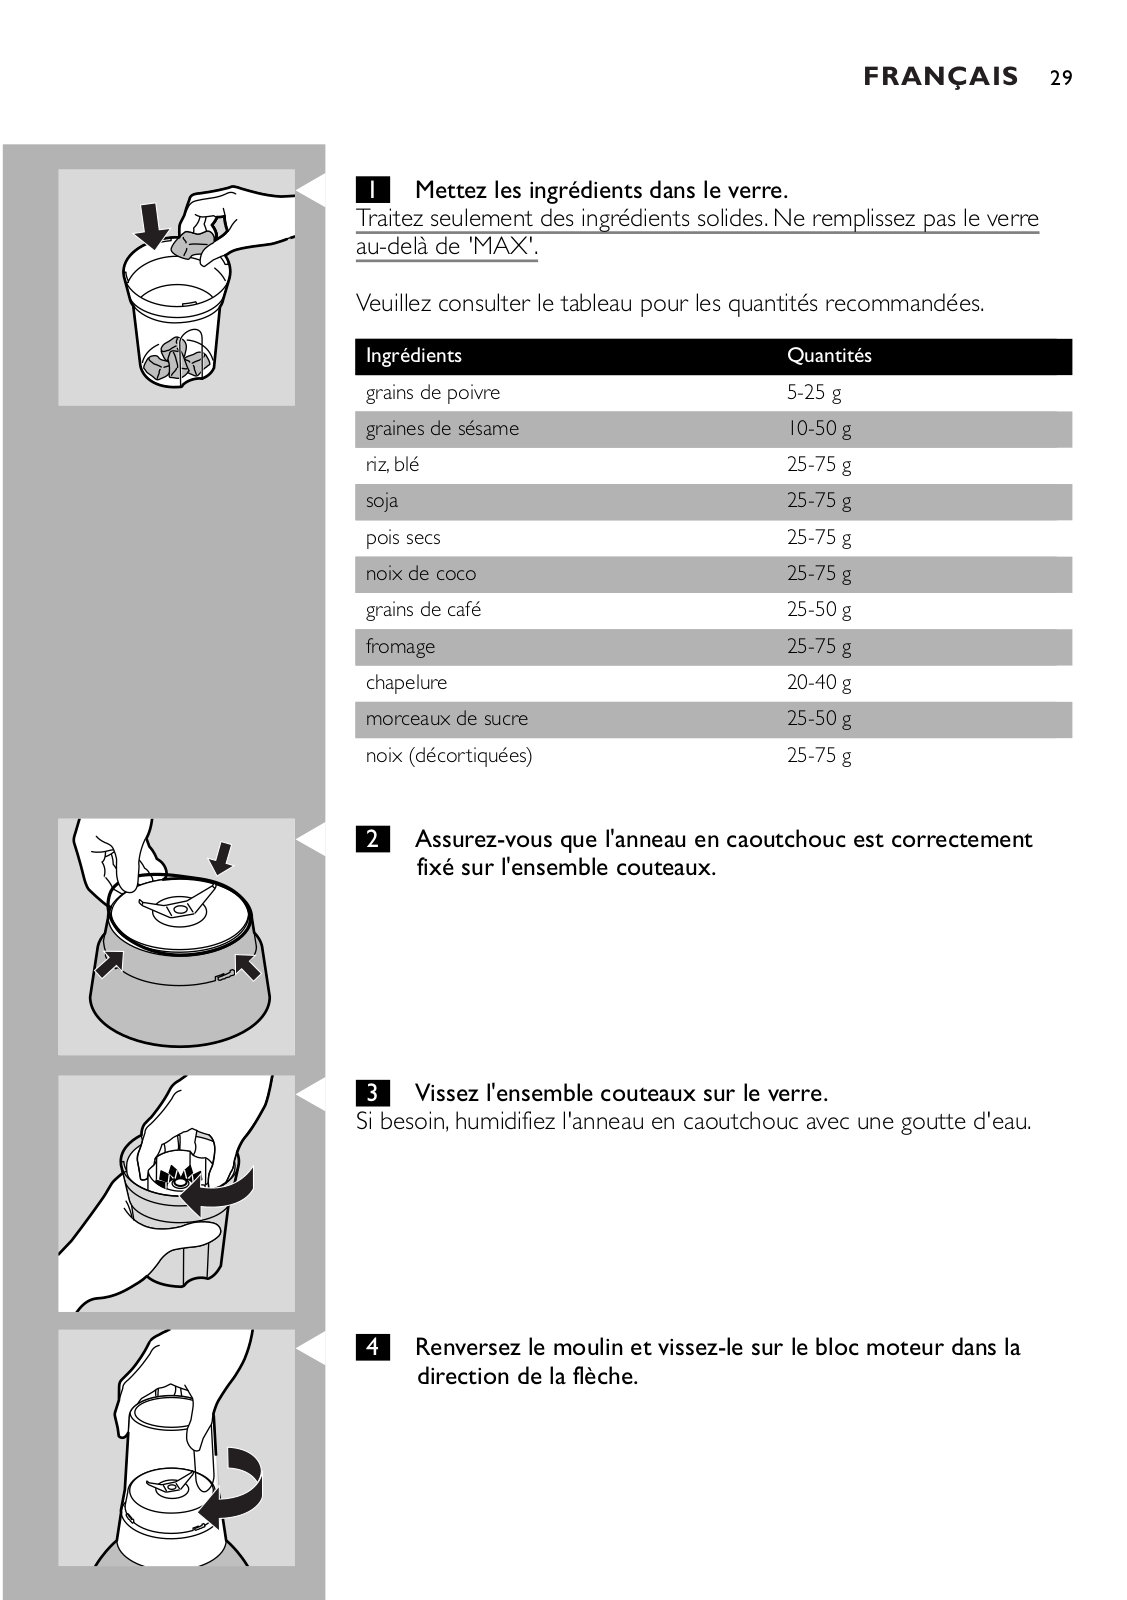
C 1 Put the ingredients in the beaker.

Process only dry ingredients. Do not fill the beaker beyond the 'MAX'

indication.

See the table for the advised quantities.


ENGLISH

9


Ingredients

Quantities


pepper corns

5-25 g


sesame seed

10-50 g


rice, wheat

25-75 g


soy beans

25-75 g


dried peas

25-75 g


coconut flesh

25-75 g


coffee beans

25-50 g


cheese

25-75 g


bread crumbs

20-40 g


sugar cubes

25-50 g


nuts (shelled)

25-75 g


C


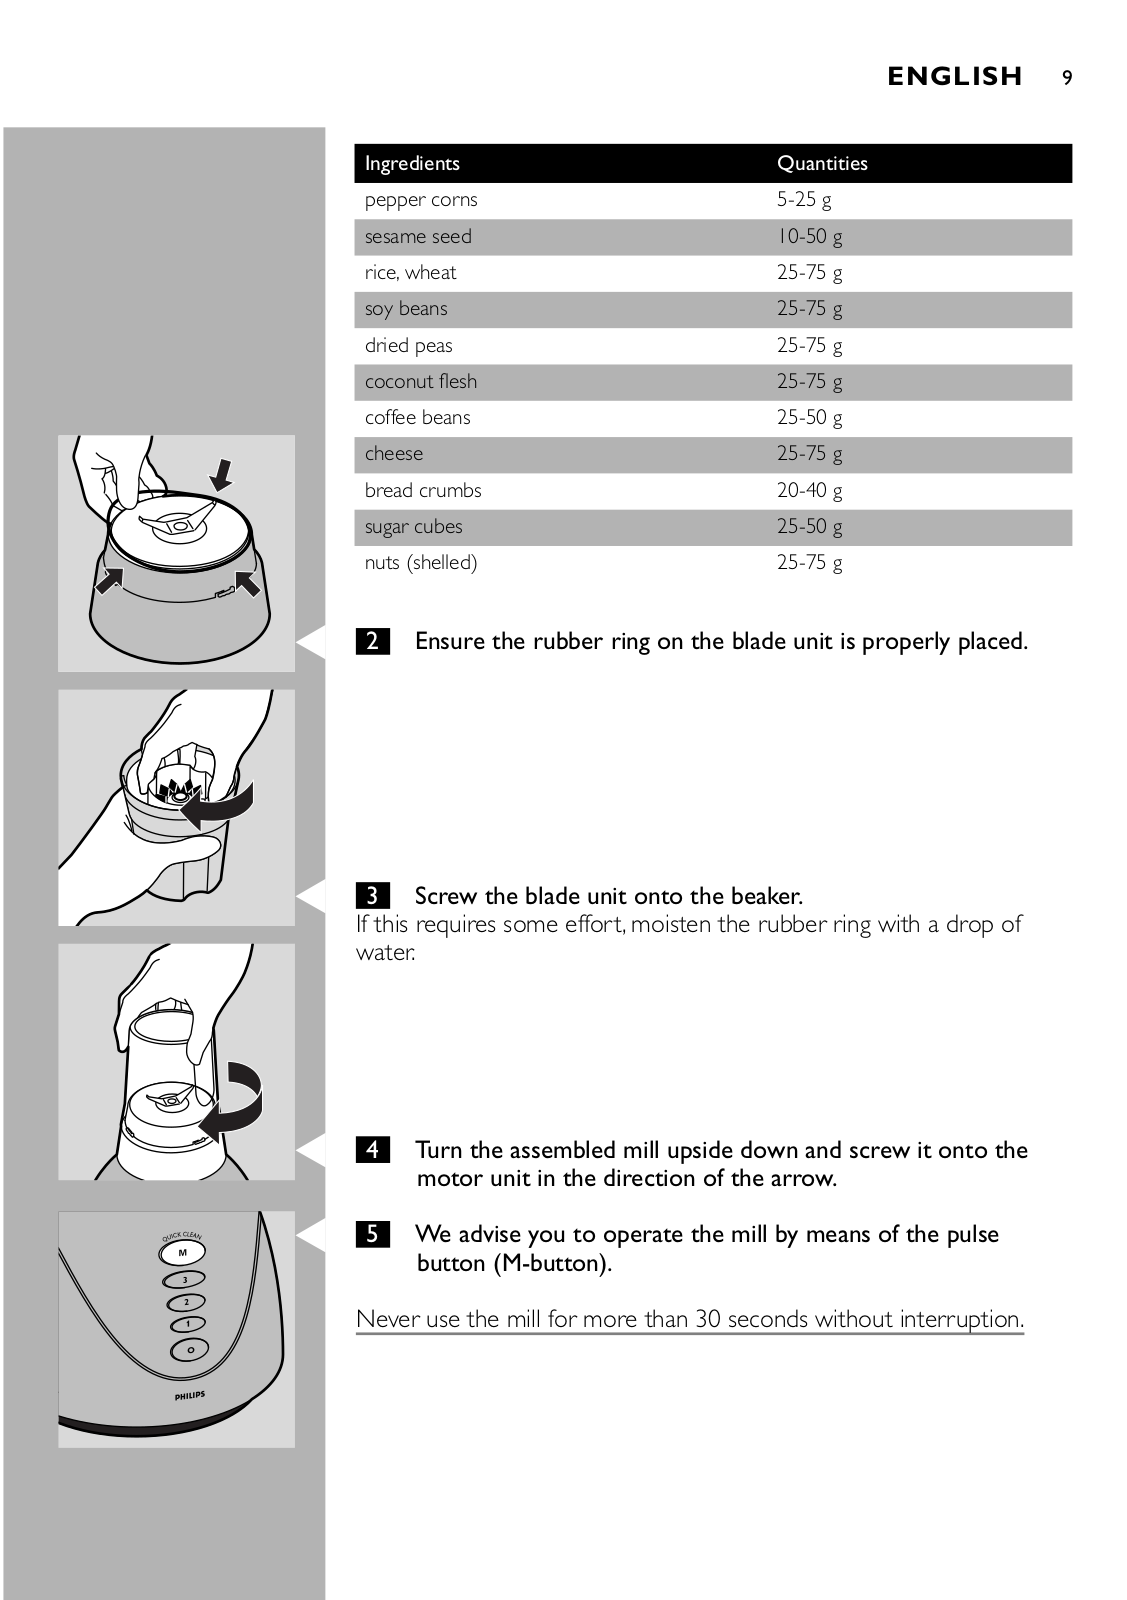
Ensure the rubber ring on the blade unit is properly placed.


2


C 3 Screw the blade unit onto the beaker.

If this requires some effort, moisten the rubber ring with a drop of water.

C

C

4Turn the assembled mill upside down and screw it onto the motor unit in the direction of the arrow.

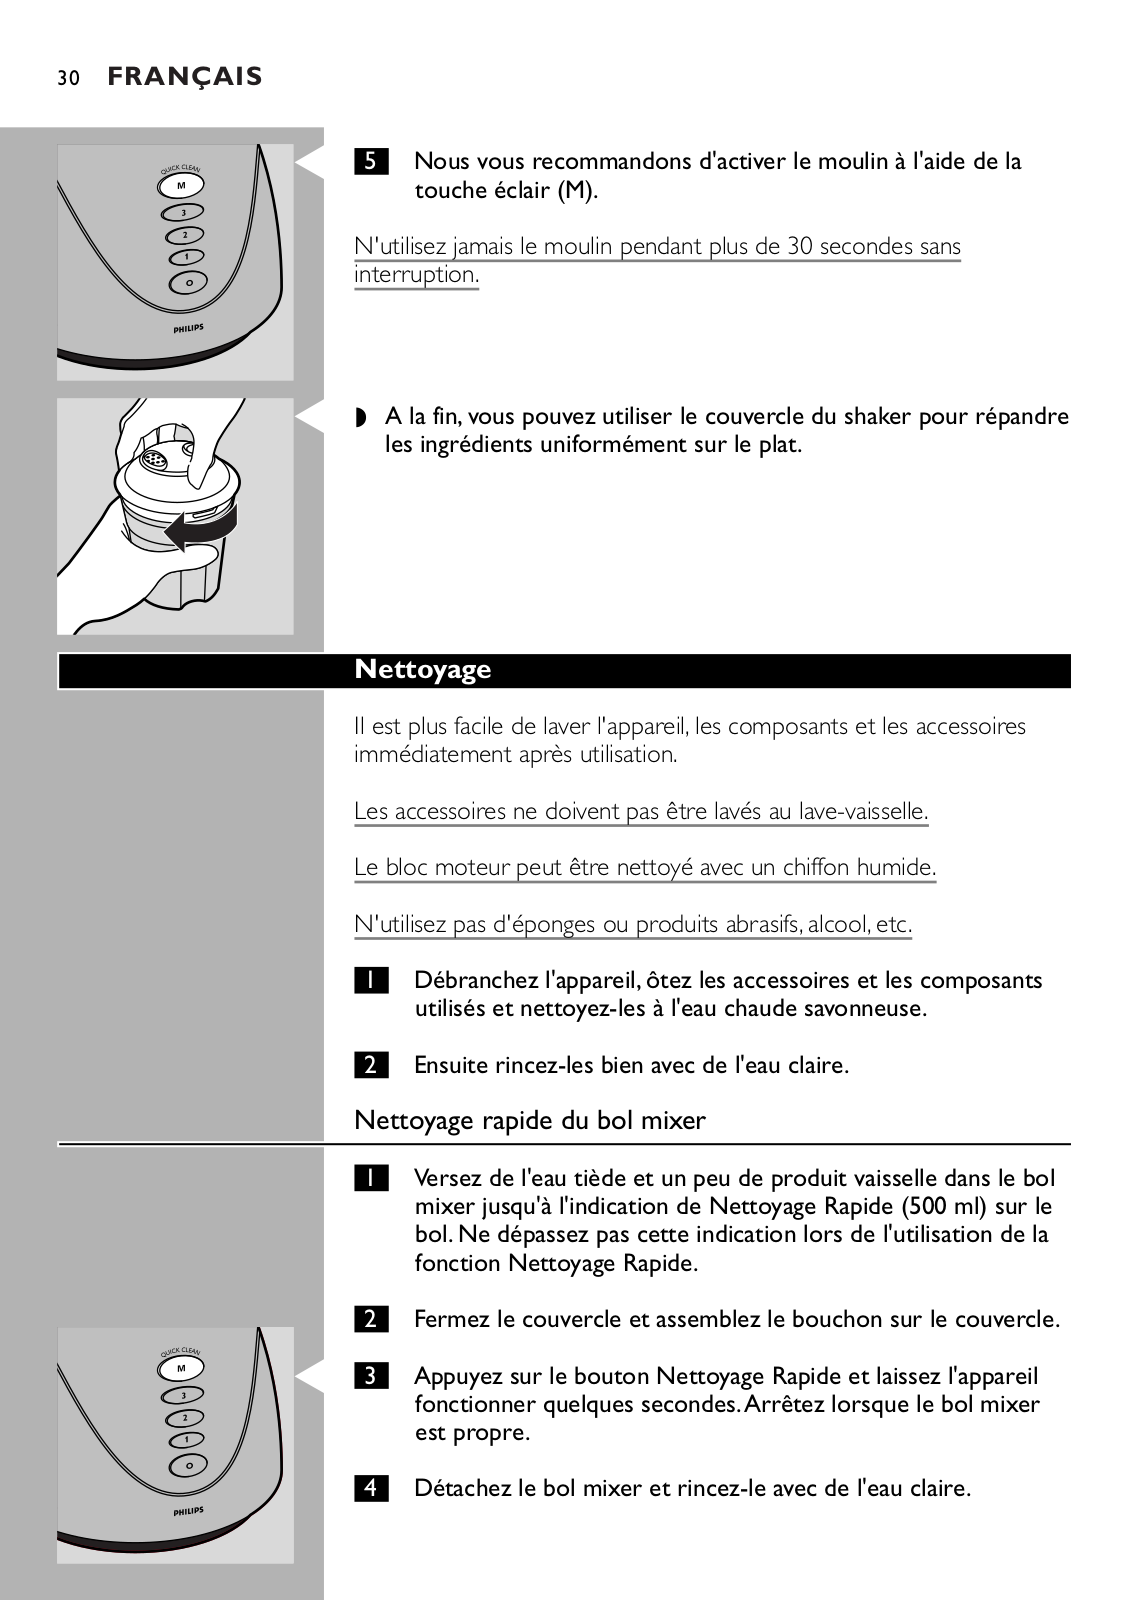
5We advise you to operate the mill by means of the pulse button (M-button).

Never use the mill for more than 30 seconds without interruption.

10 ENGLISH

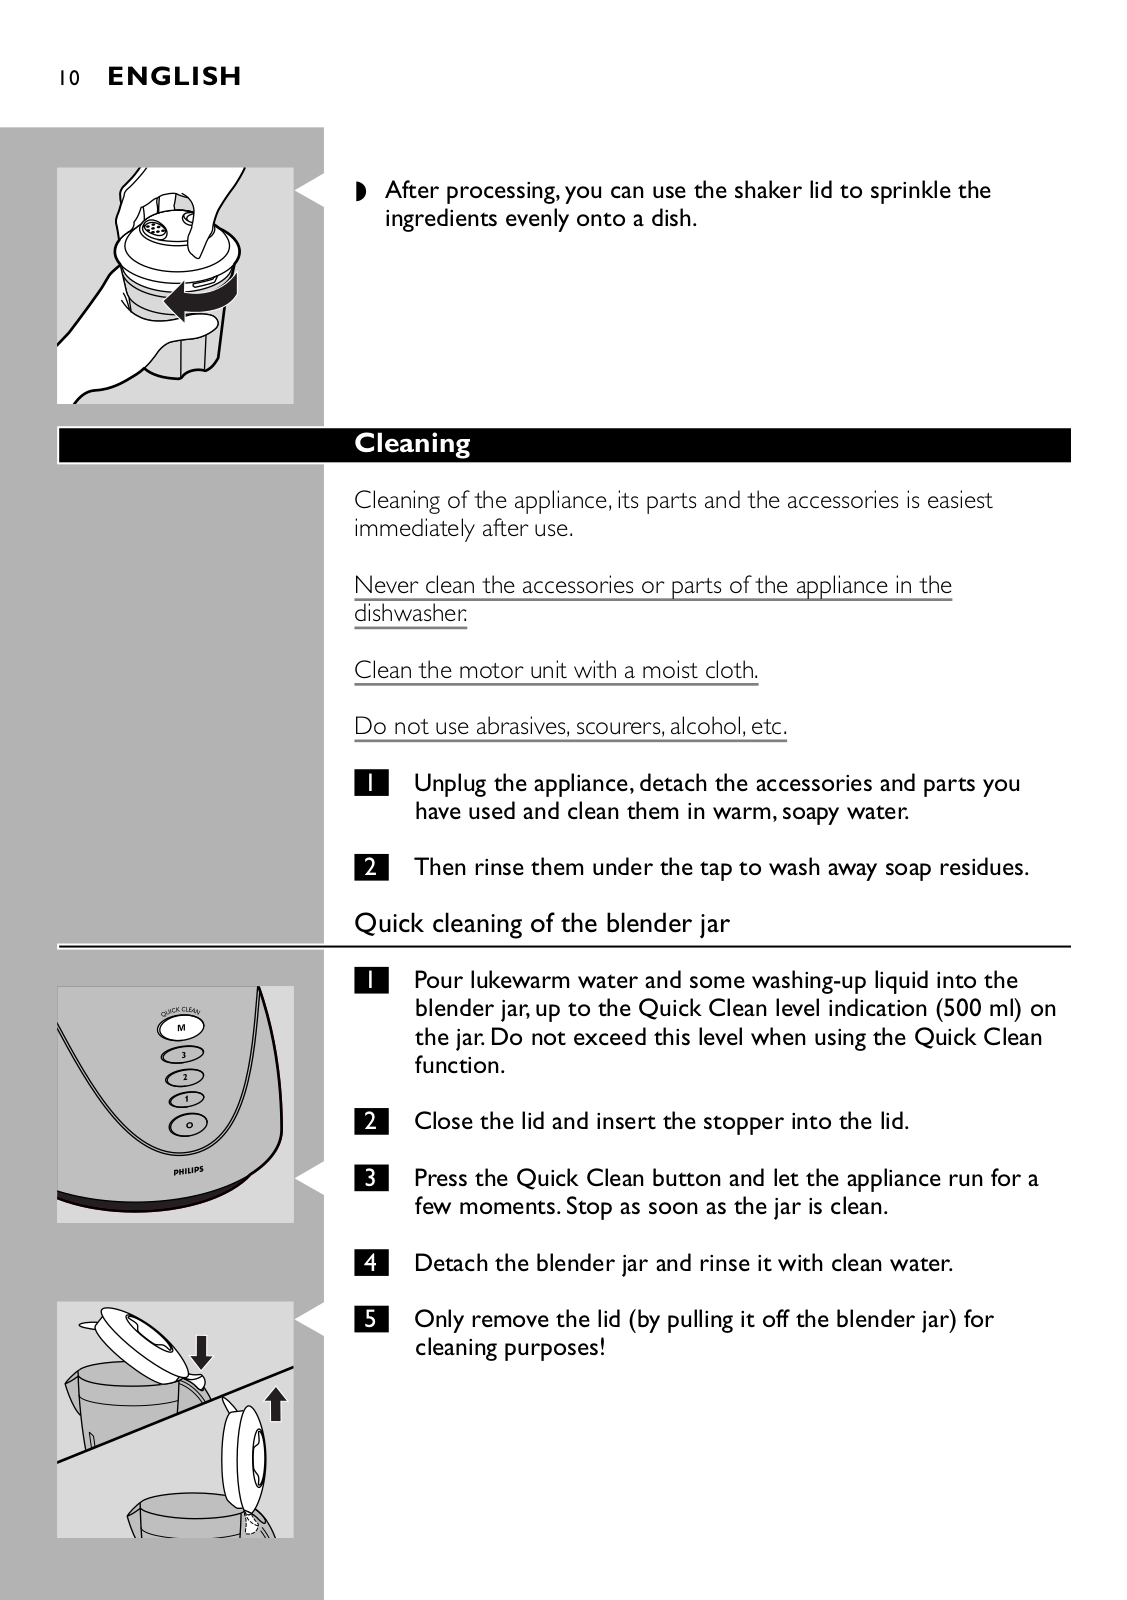
C After processing, you can use the shaker lid to sprinkle the ingredients evenly onto a dish.

Cleaning

Cleaning of the appliance, its parts and the accessories is easiest immediately after use.

Never clean the accessories or parts of the appliance in the

dishwasher.

Clean the motor unit with a moist cloth.

Do not use abrasives, scourers, alcohol, etc.

1Unplug the appliance, detach the accessories and parts you have used and clean them in warm, soapy water.

2Then rinse them under the tap to wash away soap residues.

Quick cleaning of the blender jar

C

C

1Pour lukewarm water and some washing-up liquid into the blender jar, up to the Quick Clean level indication (500 ml) on the jar. Do not exceed this level when using the Quick Clean function.

2Close the lid and insert the stopper into the lid.

3Press the Quick Clean button and let the appliance run for a few moments. Stop as soon as the jar is clean.

4Detach the blender jar and rinse it with clean water.

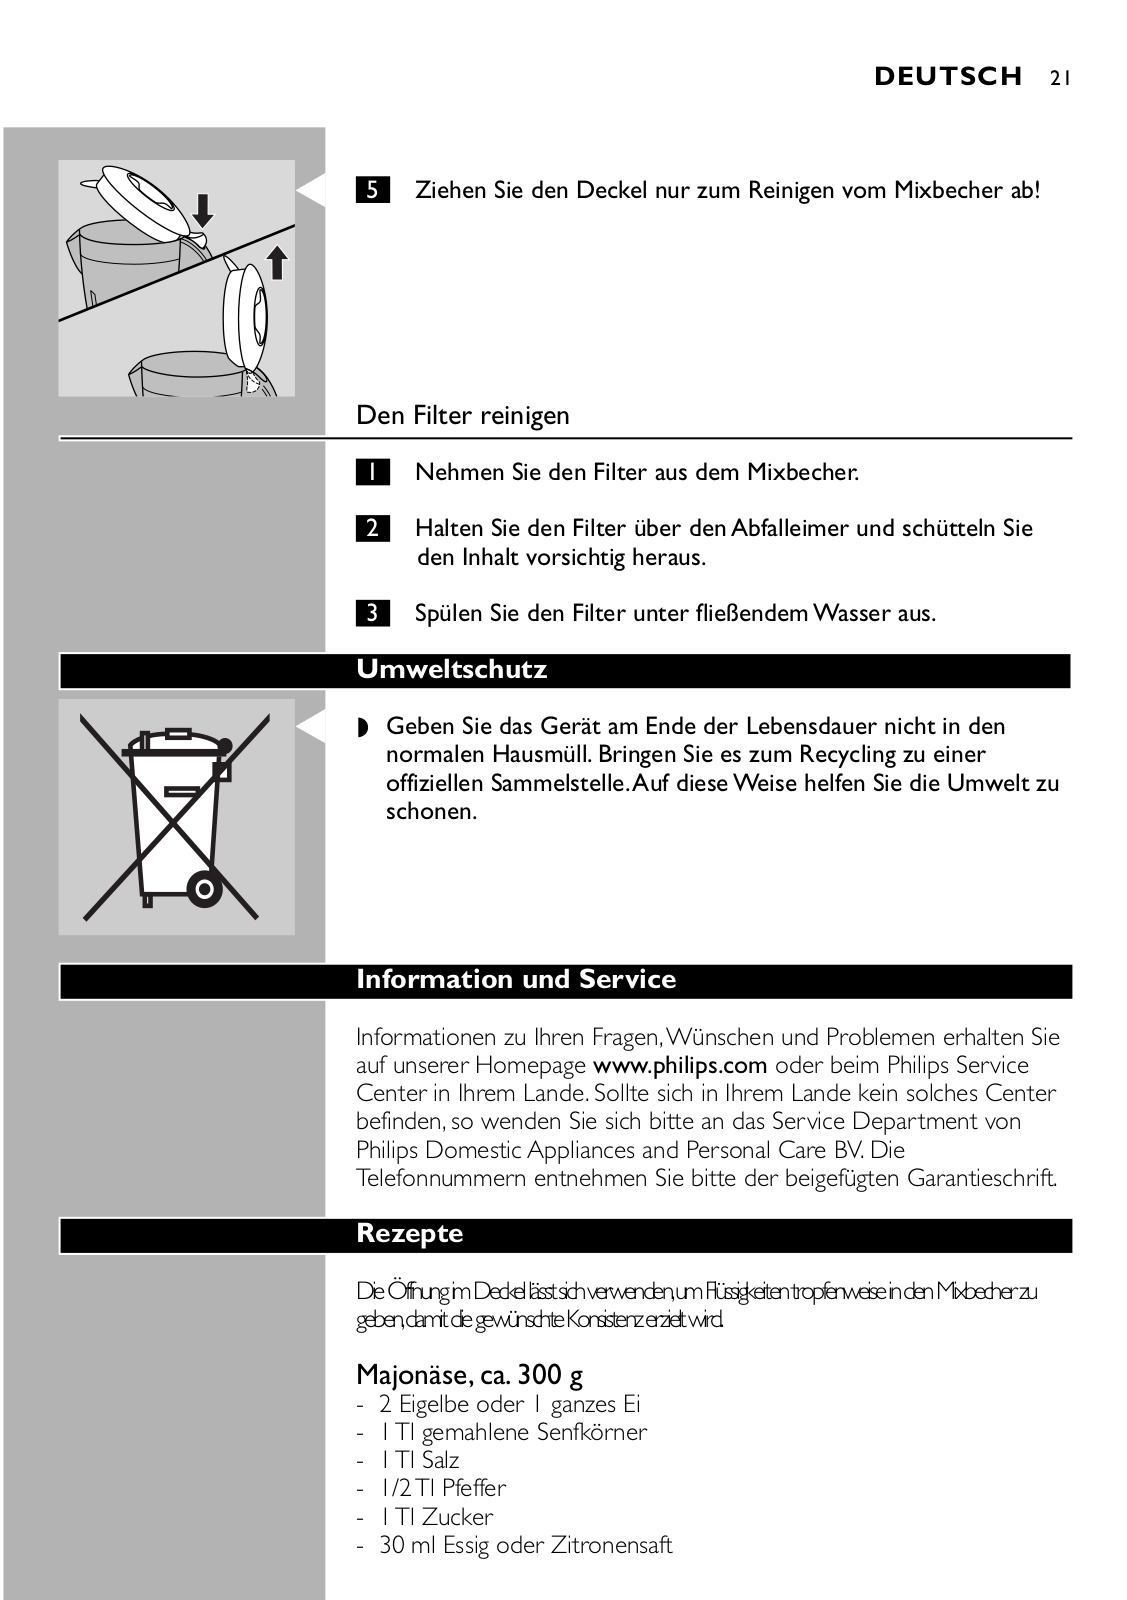
5Only remove the lid (by pulling it off the blender jar) for cleaning purposes!

ENGLISH 11

Cleaning the filter

1Take the filter out of the blender jar.

2Hold the filter over a waste bin and gently shake out its contents.

3Rinse the filter under the tap.

Environment

C Do not throw the appliance away with the normal household waste at the end of its life, but hand it in at an official collection point for recycling. By doing this you will help to preserve the environment.

Information & service

If you need information or if you have a problem, please visit the Philips Web site at www.philips.com or contact the Philips Customer Care Centre in your country (you will find its phone number in the worldwide guarantee leaflet). If there is no Customer Care Centre in your country, turn to your local Philips dealer or contact the Service Department of Philips Domestic Appliances and Personal Care BV.

Recipes

The hole in the lid can be used to add drops of liquid to the ingredients in the jar in order to obtain the required level of consistency.

Mayonnaise (about 300 ml)

-2 eggyolks or 1 whole egg

-1 tsp. mustard powder

-1 tsp. salt

-1/2 tsp. pepper

-1 tsp. sugar

-30ml vinegar or lemon juice

-300ml oil

B All the ingredients have to be at room temperature.

BPut the egg or egg yolks in the blender jar, add salt, pepper and mustard powder and half of the vinegar or lemon juice and blend at average speed. Pour oil through the hole in the lid until the mayonnaise becomes thick.Then add the remaining vinegar or lemon juice and season

according to taste.

B Store in the refrigerator.

12 ENGLISH

Carrot cake

-4 Eggs

-200 g sliced carrot

-200 ml milk

-100 g condensed milk

-300 g sugar

-300 g wheat flour

-150 g oil

-1 tsp. dried yeast

B Put the eggs, the sliced carrots, the milk, the condensed milk and the sugar in the blender jar and process it for approx. 15 seconds at max. speed.

BAdd the wheat flour spoon by spoon. When the mixture has become homogeneous, gradually add the oil through the small hole in the safety lock. Finally add the dried yeast and let the appliance run for another

5 seconds.

BPut the mixture in a baking tin and bake it at 180c for approx. 40 minutes.

Salad dressing

-1 part vinegar or lemon

-3 parts oil

-salt, pepper

BPour vinegar or lemon juice into the blender jar, add salt and pepper and switch the appliance on. Process until the salt and pepper have dissolved. Then add the oil through the hole in the lid until a homogeneous dressing

has formed.

BYou can also prepare a larger quantity of this basic dressing and store it in the refrigerator. Always shake before use to mix the ingredients.

Cheese cake

-4 eggs

-525 ml milk

-75g margarine

-90g Parmesan cheese cut into 1-cm cubes

-440g sugar

-290g corn flour

-250g wheat flour

-1 tsp baking powder

B Put the eggs, milk, margarine, Parmesan cheese and sugar in the jar. Let the appliance run at maximum speed for 10 seconds.

BAdd the corn flour spoon by spoon and let the appliance run for 20 seconds at maximum speed.Then add the wheat flour spoon by spoon and let the appliance run for another 30 seconds at maximum speed. Add the baking powder and let the appliance run for 10 more seconds. Then turn the appliance off. Put the mixture in a baking tin that has been greased with oil or margarine and then floured. Bake the cheese cake in the oven at 200 - 210cC for approximately 35-40 minutes.


ENGLISH 13


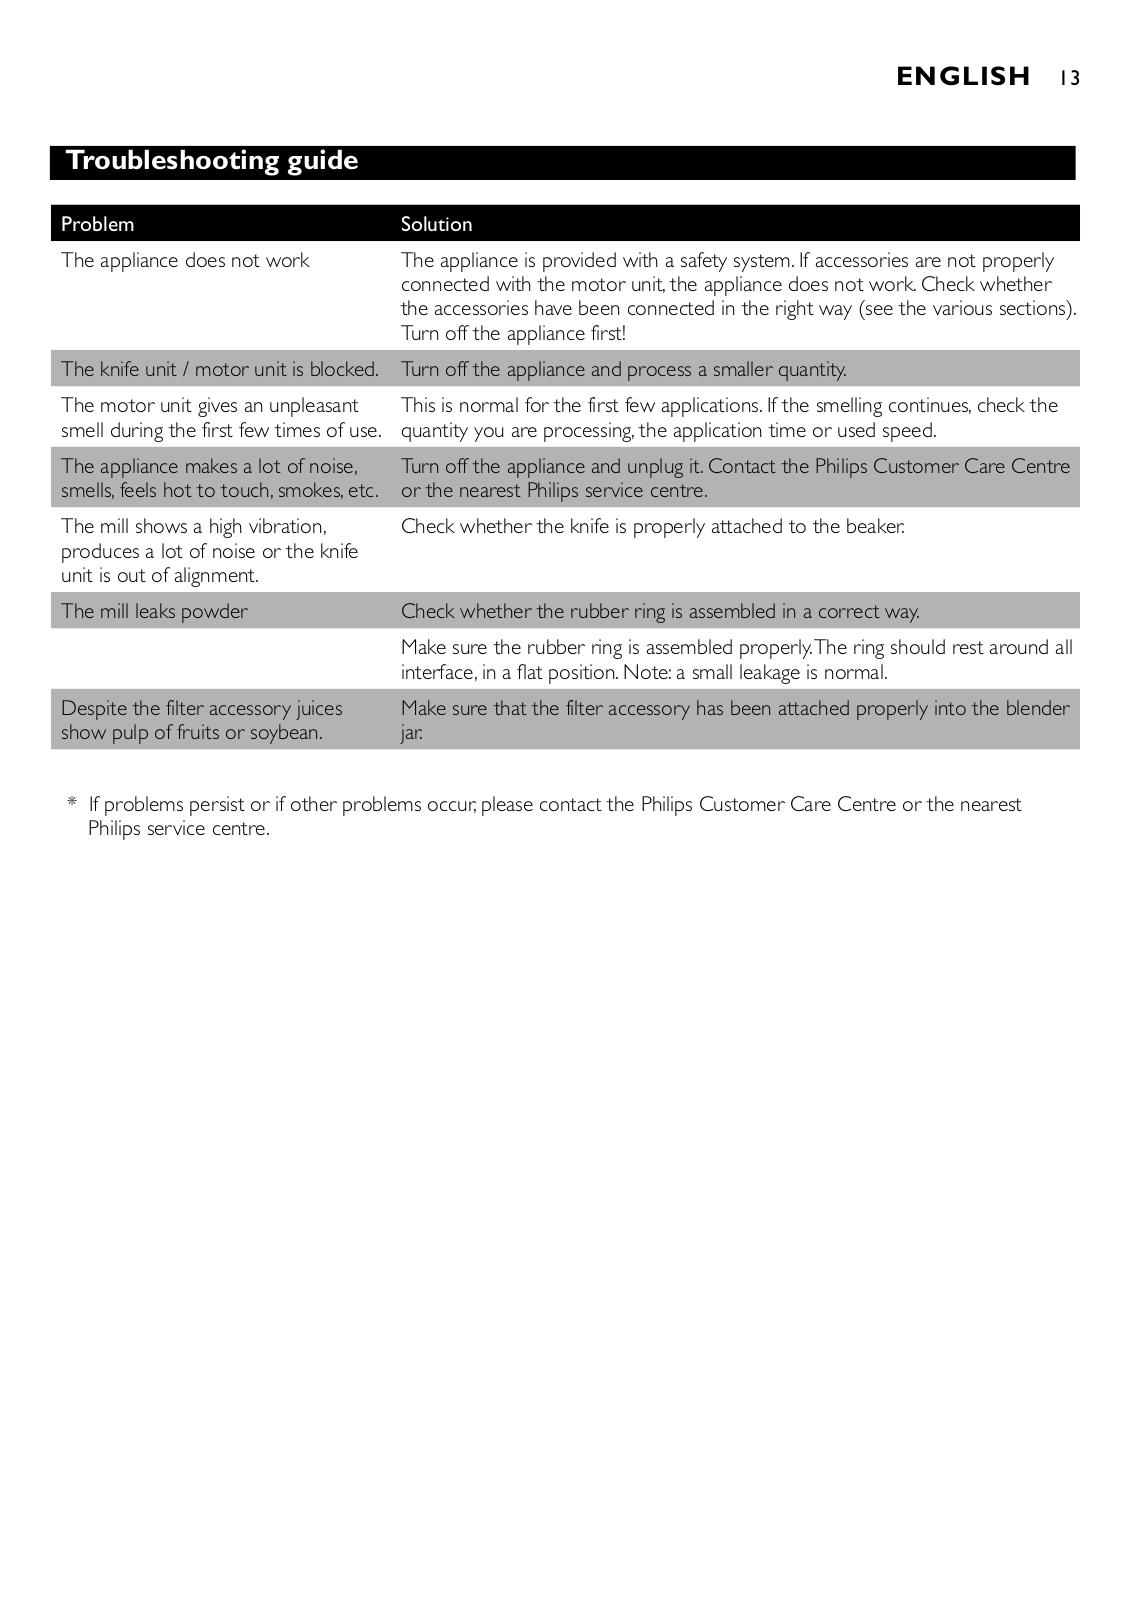
Troubleshooting guide


Problem

Solution

The appliance does not work

The appliance is provided with a safety system. If accessories are not properly


connected with the motor unit, the appliance does not work. Check whether


the accessories have been connected in the right way (see the various sections).


Turn off the appliance first!


The knife unit / motor unit is blocked.

Turn off the appliance and process a smaller quantity.

The motor unit gives an unpleasant

This is normal for the first few applications. If the smelling continues, check the

smell during the first few times of use.

quantity you are processing, the application time or used speed.


The appliance makes a lot of noise,

Turn off the appliance and unplug it. Contact the Philips Customer Care Centre

smells, feels hot to touch, smokes, etc.

or the nearest Philips service centre.

The mill shows a high vibration,

Check whether the knife is properly attached to the beaker.

produces a lot of noise or the knife


unit is out of alignment.


The mill leaks powder

Check whether the rubber ring is assembled in a correct way.


Make sure the rubber ring is assembled properly.The ring should rest around all


interface, in a flat position. Note: a small leakage is normal.


Despite the filter accessory juices

Make sure that the filter accessory has been attached properly into the blender

show pulp of fruits or soybean.

jar.


*If problems persist or if other problems occur, please contact the Philips Customer Care Centre or the nearest Philips service centre.

14 DEUTSCH

Einleitung

Dieses Gerät ist mit einem intergrierten Siecherheitssystem ausgerüstet.

-Das Gerät funktioniert nur, wenn einer der Aufsätze richtig installiert.

-SCHALTEN SIE DAS GERÄT NIEMALS AM MIXBECHER AN ODER AUS!

Wichtig

Lesen Sie diese Gebrauchsanweisung aufmerksam durch, und sehen Sie sich dabei die Abbildungen an, bevor Sie das Gerät zum ersten Mal verwenden.

Bewahren Sie diese Gebrauchsanweisung zur späteren Einsicht sorgfältig auf.

Prüfen Sie, ob die Spannungsangabe auf dem Gerät (110-127 V bzw. 220-240 V) mit der örtlichen Netzspannung übereinstimmt.

Verwenden Sie mit dieser Küchenmaschine keine Zusatzgeräte oder andere Teile, die von Philips nicht ausdrücklich empfohlen werden. Ist das trotzdem der Fall, führt dies zum Verlust der Garantie.

Überschreiten Sie nicht die an den Aufsätzen ersichtlichen Markierungen.

Überschreiten Sie nicht die in der Tabelle aufgeführten Höchstmengen und Zubereitungszeiten.

Versuchen Sie niemals, einen Aufsatz bei laufendem Gerät abzunehmen. Ziehen Sie zuvor stets den Netzstecker.

Versuchen Sie niemals, der Mixbecher an den Aufsätzen einoder auszuschalten.

Halten Sie Kinder von dem Gerät fern.

Lassen Sie das eingeschaltete Gerät niemals unbeaufsichtigt.

Verwenden Sie das Gerät nicht, wenn das Motorgehäuse, das Netzkabel oder der Stecker beschädigt ist.

Wenn das Netzkabel defekt oder beschädigt ist, darf es nur von einem Philips Service-Center oder einer von Philips autorisierten Werkstatt ausgetauscht werden, um Gefährdungen zu vermeiden.

Lassen Sie alle Zutaten vor der Verarbeitung im Gerät auf 80c C abkühlen.

Vermeiden Sie Spritzer. Füllen Sie den Mixbecher niemals höher als bis zur höächsten Markierung (1,5 Liter), und maximal 1,1 Liter, wenn Sie heiße Flüssigkeiten mischen.

Bringen Sie vor dem Gebrauch des Geräts immer den Einsatz auf dem Deckel an.

Stecken Sie bei laufendem Gerät niemals einen Gegenstand oder Ihre Finger in den Mixbecher.

Zutaten, die an der Innenwand des Mixbechers haften, entfernen Sie wie folgt: Schalten Sie das Gerät aus, und ziehen Sie den Netzstecker aus der Steckdose. Lösen Sie dann die Zutaten mit einem Spatel von der Wand des Mixbechers.

DEUTSCH 15

Vorbereitung zum Gebrauch

Reinigen Sie die Aufsätze und alle abnehmbaren Teile. - Vgl. den

Abschnitt "Reinigung"

C Wickeln Sie überschüssiges Netzkabel um die Gerätebasis.

Der Gebrauch des Geräts

Der Mixbecher:

Der Mixer ist geeignet zum ...

-Mischen von Flüssigkeiten, z. B. Milchprodukte, Soßen, Obstsäfte, Suppen, Mixgetränke, (Milch-)Shakes.

-Mischen weicher Zutaten, z. B. Pfannkuchenteig und Majonäse.

-Pürieren gegarter Zutaten, z. B. zur Zubereitung von Baby-Nahrung.

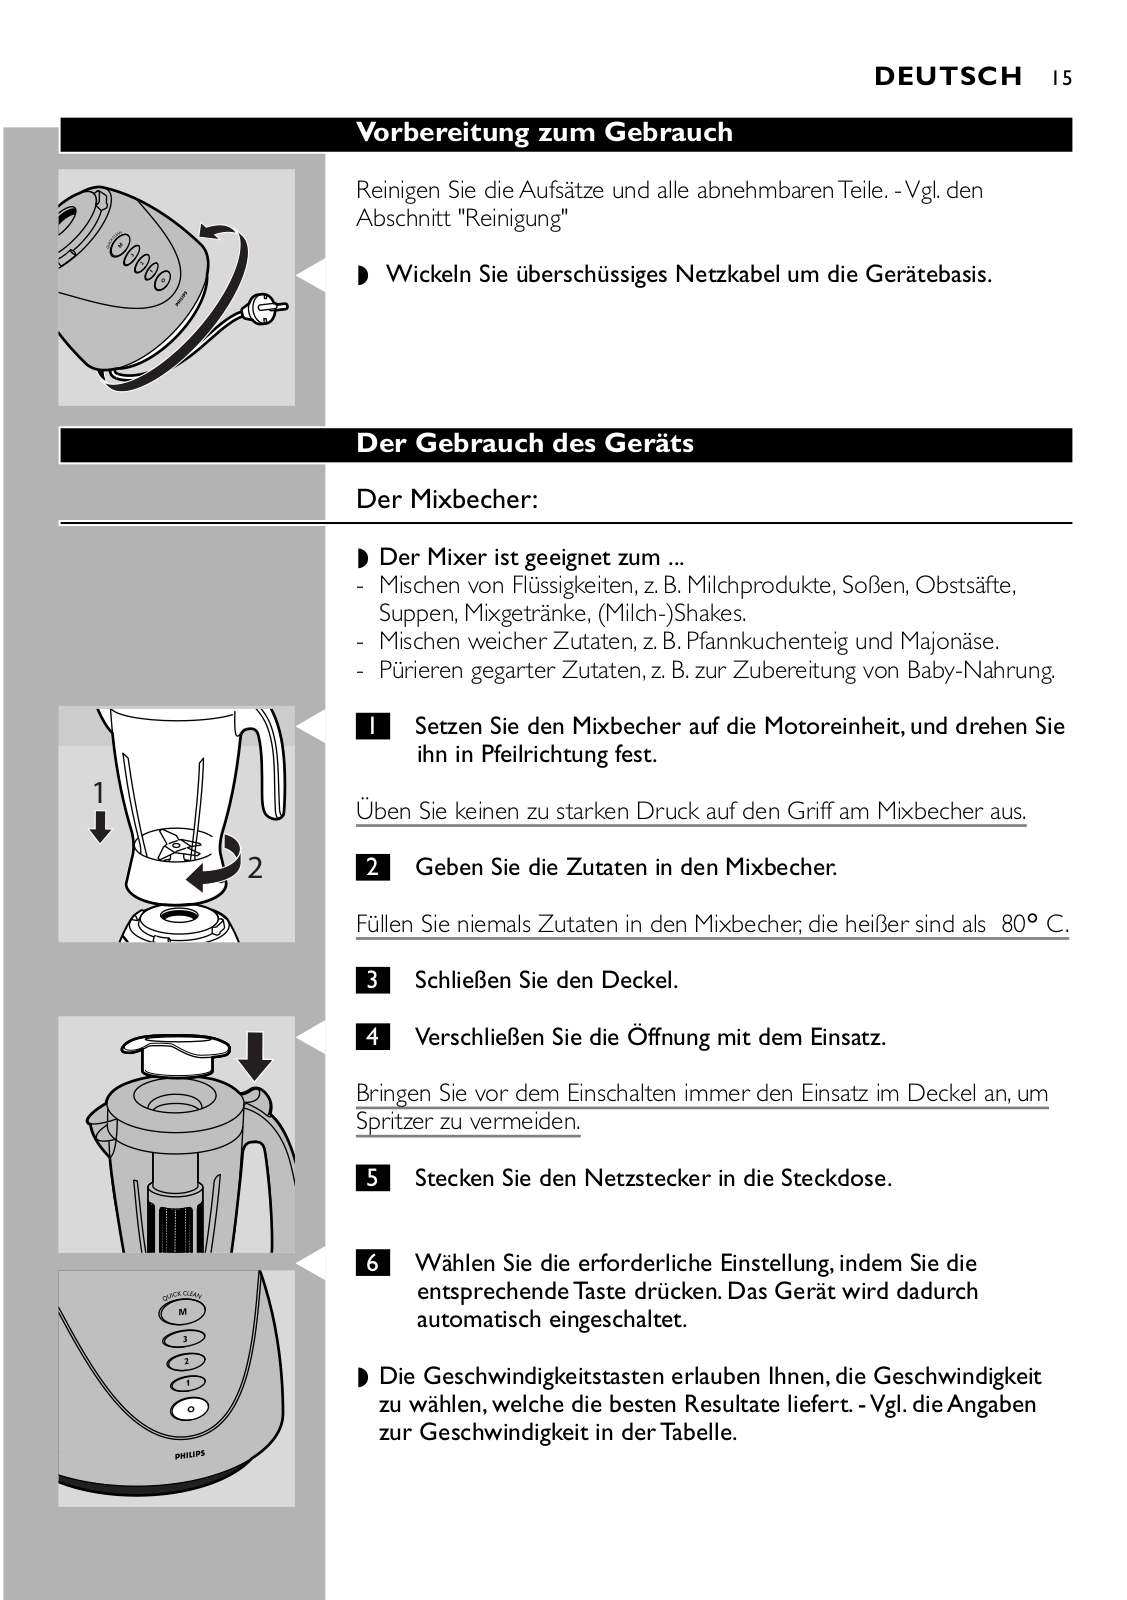
C 1 Setzen Sie den Mixbecher auf die Motoreinheit, und drehen Sie ihn in Pfeilrichtung fest.

1

Üben Sie keinen zu starken Druck auf den Griff am Mixbecher aus.

2

2 Geben Sie die Zutaten in den Mixbecher.

Füllen Sie niemals Zutaten in den Mixbecher, die heißer sind als 80c C.


3

Schließen Sie den Deckel.

C


Verschließen Sie die Öffnung mit dem Einsatz.

4


Bringen Sie vor dem Einschalten immer den Einsatz im Deckel an, um

Spritzer zu vermeiden.

5 Stecken Sie den Netzstecker in die Steckdose.

C 6 Wählen Sie die erforderliche Einstellung, indem Sie die entsprechende Taste drücken. Das Gerät wird dadurch automatisch eingeschaltet.

Die Geschwindigkeitstasten erlauben Ihnen, die Geschwindigkeit zu wählen, welche die besten Resultate liefert. - Vgl. die Angaben zur Geschwindigkeit in der Tabelle.

16 DEUTSCH

Zu verarbeitende Zutaten

Geschwindigkeit


Flüssige Zutaten, z. B. Kakaozubereitung, Milch mit Früchten,

Geschwindigkeit 1

Majonäse


Schwerere Zutaten, z. B. Kombinationen von flüssigen und

Geschwindigkeit 2

festen Zutaten wie Tomatensoße oder Pastete


Schwere und feste Zutaten, z. B. Eiswürfel, Suppen, Bohnen usw. Geschwindigkeit 3

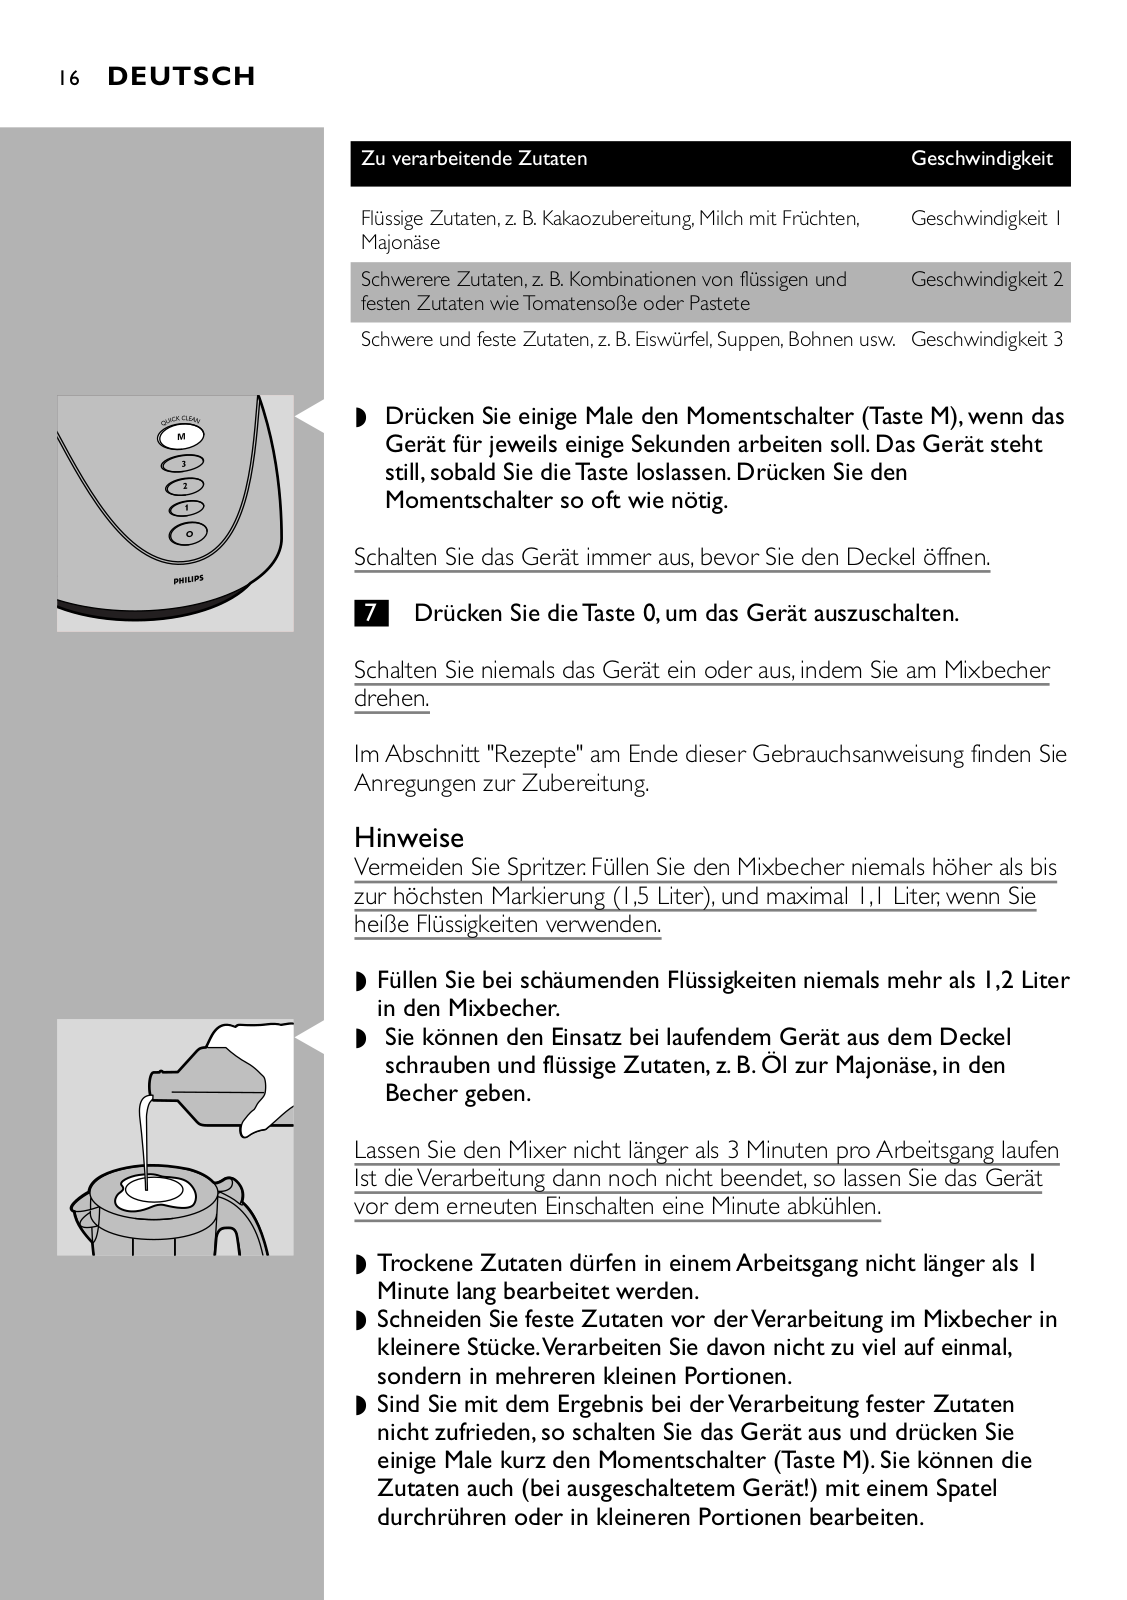
C Drücken Sie einige Male den Momentschalter (Taste M), wenn das Gerät für jeweils einige Sekunden arbeiten soll. Das Gerät steht still, sobald Sie die Taste loslassen. Drücken Sie den Momentschalter so oft wie nötig.

Schalten Sie das Gerät immer aus, bevor Sie den Deckel öffnen.

7 Drücken Sie die Taste 0, um das Gerät auszuschalten.

Schalten Sie niemals das Gerät ein oder aus, indem Sie am Mixbecher drehen.

Im Abschnitt "Rezepte" am Ende dieser Gebrauchsanweisung finden Sie

Anregungen zur Zubereitung.

Hinweise

Vermeiden Sie Spritzer. Füllen Sie den Mixbecher niemals höher als bis zur höchsten Markierung (1,5 Liter), und maximal 1,1 Liter, wenn Sie heiße Flüssigkeiten verwenden.

Füllen Sie bei schäumenden Flüssigkeiten niemals mehr als 1,2 Liter in den Mixbecher.

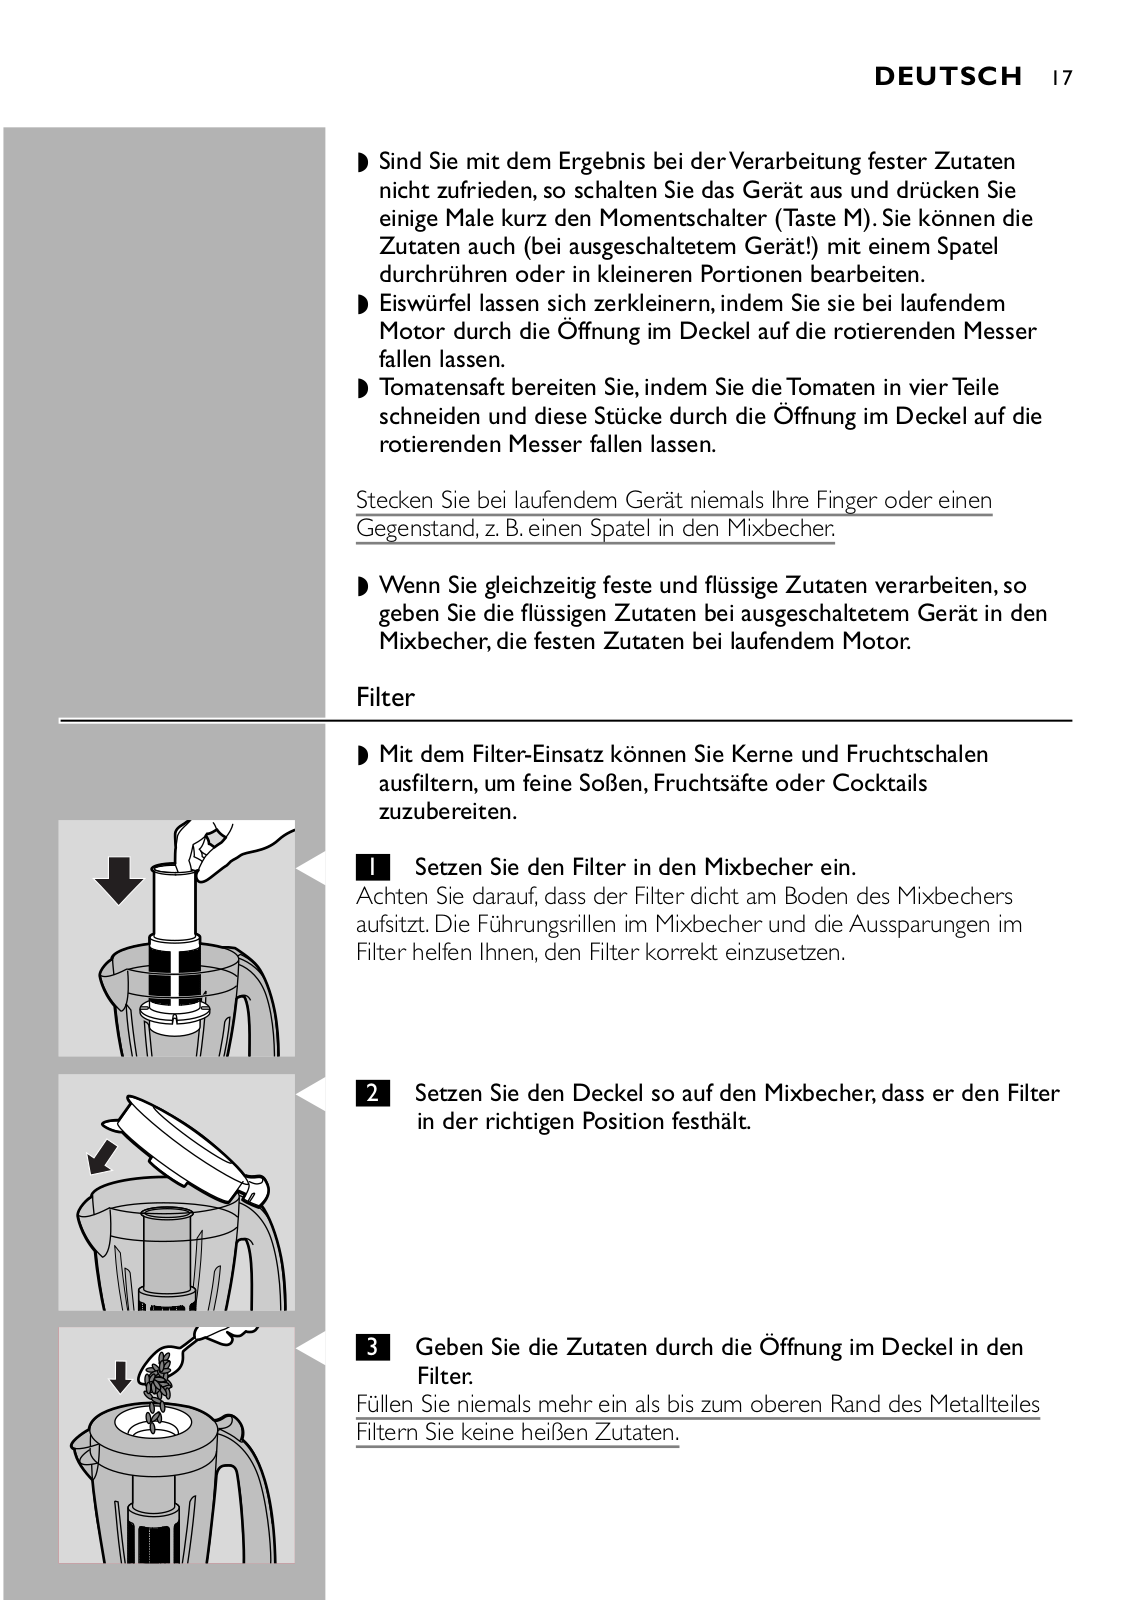
C Sie können den Einsatz bei laufendem Gerät aus dem Deckel schrauben und flüssige Zutaten, z. B. Öl zur Majonäse, in den Becher geben.

Lassen Sie den Mixer nicht länger als 3 Minuten pro Arbeitsgang laufen

Ist die Verarbeitung dann noch nicht beendet, so lassen Sie das Gerät vor dem erneuten Einschalten eine Minute abkühlen.

Trockene Zutaten dürfen in einem Arbeitsgang nicht länger als 1 Minute lang bearbeitet werden.

Schneiden Sie feste Zutaten vor der Verarbeitung im Mixbecher in kleinere Stücke.Verarbeiten Sie davon nicht zu viel auf einmal, sondern in mehreren kleinen Portionen.

Sind Sie mit dem Ergebnis bei der Verarbeitung fester Zutaten nicht zufrieden, so schalten Sie das Gerät aus und drücken Sie einige Male kurz den Momentschalter (Taste M). Sie können die Zutaten auch (bei ausgeschaltetem Gerät!) mit einem Spatel durchrühren oder in kleineren Portionen bearbeiten.

DEUTSCH 17

Sind Sie mit dem Ergebnis bei der Verarbeitung fester Zutaten nicht zufrieden, so schalten Sie das Gerät aus und drücken Sie einige Male kurz den Momentschalter (Taste M). Sie können die Zutaten auch (bei ausgeschaltetem Gerät!) mit einem Spatel durchrühren oder in kleineren Portionen bearbeiten.

Eiswürfel lassen sich zerkleinern, indem Sie sie bei laufendem Motor durch die Öffnung im Deckel auf die rotierenden Messer fallen lassen.

Tomatensaft bereiten Sie, indem Sie die Tomaten in vier Teile schneiden und diese Stücke durch die Öffnung im Deckel auf die rotierenden Messer fallen lassen.

Stecken Sie bei laufendem Gerät niemals Ihre Finger oder einen

Gegenstand, z. B. einen Spatel in den Mixbecher.

Wenn Sie gleichzeitig feste und flüssige Zutaten verarbeiten, so geben Sie die flüssigen Zutaten bei ausgeschaltetem Gerät in den Mixbecher, die festen Zutaten bei laufendem Motor.

Filter

Mit dem Filter-Einsatz können Sie Kerne und Fruchtschalen ausfiltern, um feine Soßen, Fruchtsäfte oder Cocktails zuzubereiten.

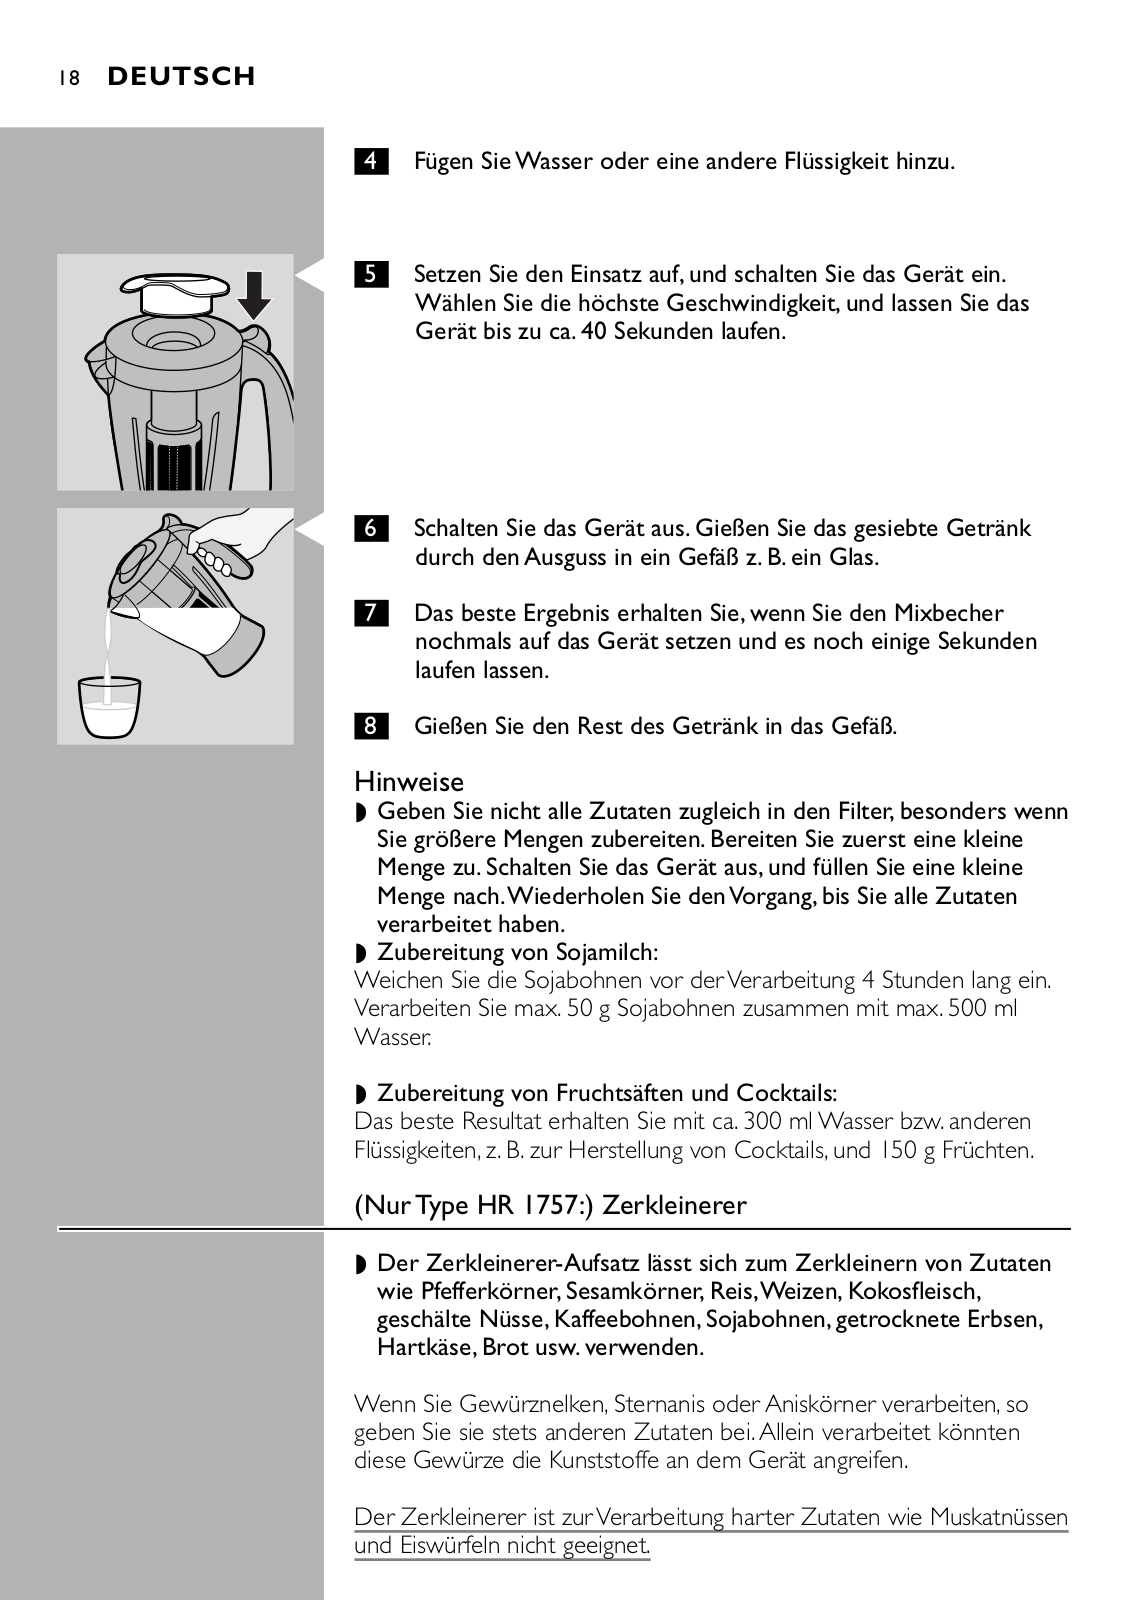
C 1 Setzen Sie den Filter in den Mixbecher ein.

Achten Sie darauf, dass der Filter dicht am Boden des Mixbechers aufsitzt. Die Führungsrillen im Mixbecher und die Aussparungen im Filter helfen Ihnen, den Filter korrekt einzusetzen.

C 2 Setzen Sie den Deckel so auf den Mixbecher, dass er den Filter in der richtigen Position festhält.

C 3 Geben Sie die Zutaten durch die Öffnung im Deckel in den Filter.

Füllen Sie niemals mehr ein als bis zum oberen Rand des Metallteiles Filtern Sie keine heißen Zutaten.

18 DEUTSCH

4 Fügen Sie Wasser oder eine andere Flüssigkeit hinzu.

C

C

5

6

7

Setzen Sie den Einsatz auf, und schalten Sie das Gerät ein. Wählen Sie die höchste Geschwindigkeit, und lassen Sie das Gerät bis zu ca. 40 Sekunden laufen.

Schalten Sie das Gerät aus. Gießen Sie das gesiebte Getränk durch den Ausguss in ein Gefäß z. B. ein Glas.

Das beste Ergebnis erhalten Sie, wenn Sie den Mixbecher nochmals auf das Gerät setzen und es noch einige Sekunden laufen lassen.

8 Gießen Sie den Rest des Getränk in das Gefäß.

Hinweise

Geben Sie nicht alle Zutaten zugleich in den Filter, besonders wenn Sie größere Mengen zubereiten. Bereiten Sie zuerst eine kleine Menge zu. Schalten Sie das Gerät aus, und füllen Sie eine kleine Menge nach.Wiederholen Sie den Vorgang, bis Sie alle Zutaten verarbeitet haben.

Zubereitung von Sojamilch:

Weichen Sie die Sojabohnen vor der Verarbeitung 4 Stunden lang ein. Verarbeiten Sie max. 50 g Sojabohnen zusammen mit max. 500 ml Wasser.

Zubereitung von Fruchtsäften und Cocktails:

Das beste Resultat erhalten Sie mit ca. 300 ml Wasser bzw. anderen Flüssigkeiten, z. B. zur Herstellung von Cocktails, und 150 g Früchten.

(Nur Type HR 1757:) Zerkleinerer

Der Zerkleinerer-Aufsatz lässt sich zum Zerkleinern von Zutaten wie Pfefferkörner, Sesamkörner, Reis,Weizen, Kokosfleisch, geschälte Nüsse, Kaffeebohnen, Sojabohnen, getrocknete Erbsen, Hartkäse, Brot usw. verwenden.

Wenn Sie Gewürznelken, Sternanis oder Aniskörner verarbeiten, so geben Sie sie stets anderen Zutaten bei. Allein verarbeitet könnten diese Gewürze die Kunststoffe an dem Gerät angreifen.

Der Zerkleinerer ist zur Verarbeitung harter Zutaten wie Muskatnüssen

und Eiswürfeln nicht geeignet.

DEUTSCH 19

C 1 Geben Sie die Zutaten in den Becher des Zerkleinerers.

Verarbeiten Sie ausschließlich trockene Zutaten. Füllen Sie den Becher nicht höher als bis zur Markierung "MAX".

Zu den empfohlenen Mengen vgl. die Tabelle.

Zutaten

Mengen

Pefferkörner

5 bis 25 g


Sesamkörner

10 bis 50 g

Reis,Weizenkörner

25 bis 75 g


Sojabohnen

25 bis 75 g

Getrocknete Erbsen

25 bis 75 g


Kokosfleisch

25 bis 75 g

Kaffeebohnen

25 bis 75 g


Hartkäse

25 bis 75 g

Paniermehl

20 bis 40 g Brot


Zuckerwürfel

25 bis 75 g

Nusskerne

25 bis 75 g

C


Achten Sie darauf, dass der Gummiring korrekt auf der

2


Messereinheit sitzt.

C


Schrauben Sie die Messereinheit auf den Mixbecher.

3


Wenn das etwas schwierig ist, so feuchten Sie den Gummiring mit einem Tropfen Wasser an.

C 4 Drehen Sie den zusammengesetzten Zerkleinerer um, und schrauben Sie ihn in Pfeilrichtung auf die Motoreinheit.

C 5 Wir raten Ihnen, den Zerkleinerer mit Hilfe des

Momentschalters (Taste M) zu betreiben.

Verwenden Sie den Zerkleinerer bei einem Arbeitsgang nicht länger als

30 Sekunden.

20 DEUTSCH

C Sie können anschließend den Deckel des Mixers zum Bestreuen des Gerichtes verwenden.

Reinigung

Die verwendeten Teile lassen sich unmittelbar nach Gebrauch am leichtesten reinigen.

Das Gerät, die Aufsätze und seine Zusatzteile sind für die Reinigung im

Geschirrspüler nicht geeignet.

Die Motoreinheit lässt sich mit einem feuchten Tuch reinigen, auf das

Sie bei Bedarf ein wenig Spülmittel aufgetragen haben.

Verwenden Sie keine scheuernden Mittel und keine Lösungsmittel wie

Alkohol, Azeton oder Benzin.

1Ziehen Sie den Netzstecker aus der Steckdose, nehmen Sie die Aufsätze ab und reinigen Sie die abnehmbaren Teile in warmem Wasser, dem Sie etwas Spülmittel zugefügt habern.

2Spülen Sie die gereinigten Teile gründlich mit klarem Wasser ab.

Schnellreinigung des Mixbechers

1Gießen Sie lauwarmes Waser mit einige Tropfen Spülmittel bis zur Markierung (500 ml) in den Mixbecher. Überschreiten Sie bei der Schnellreinigung niemals diese Menge.

2Schließen Sie den Deckel, und bringen Sie den Einsatzs an.

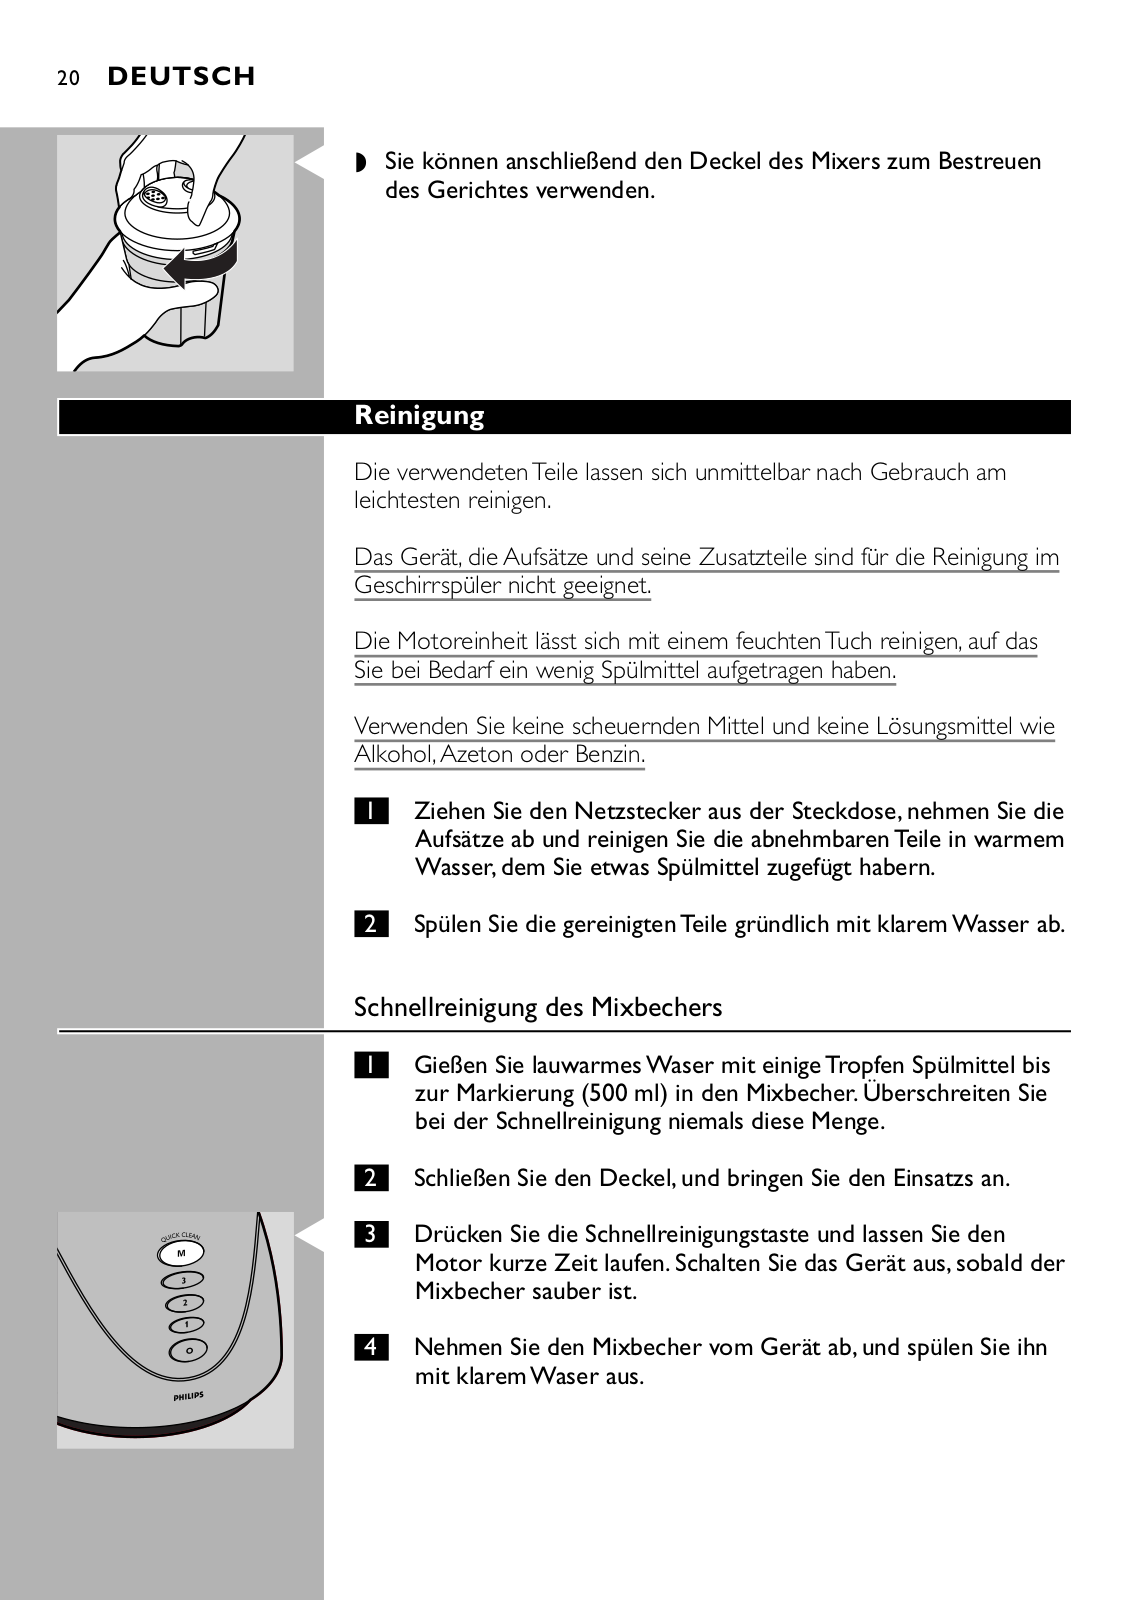
C 3 Drücken Sie die Schnellreinigungstaste und lassen Sie den Motor kurze Zeit laufen. Schalten Sie das Gerät aus, sobald der Mixbecher sauber ist.

4 Nehmen Sie den Mixbecher vom Gerät ab, und spülen Sie ihn mit klarem Waser aus.

DEUTSCH 21

C 5 Ziehen Sie den Deckel nur zum Reinigen vom Mixbecher ab!

Den Filter reinigen

1Nehmen Sie den Filter aus dem Mixbecher.

2Halten Sie den Filter über den Abfalleimer und schütteln Sie den Inhalt vorsichtig heraus.

3Spülen Sie den Filter unter fließendem Wasser aus.

Umweltschutz

C Geben Sie das Gerät am Ende der Lebensdauer nicht in den normalen Hausmüll. Bringen Sie es zum Recycling zu einer offiziellen Sammelstelle.Auf diese Weise helfen Sie die Umwelt zu schonen.

Information und Service

Informationen zu Ihren Fragen,Wünschen und Problemen erhalten Sie auf unserer Homepage www.philips.com oder beim Philips Service Center in Ihrem Lande. Sollte sich in Ihrem Lande kein solches Center befinden, so wenden Sie sich bitte an das Service Department von Philips Domestic Appliances and Personal Care BV. Die Telefonnummern entnehmen Sie bitte der beigefügten Garantieschrift.

Rezepte

DieÖffnungimDeckellässtsichverwenden,umFlüssigkeitentropfenweiseindenMixbecherzu geben,damitdiegewünschteKonsistenzerzieltwird.

Majonäse, ca. 300 g

-2 Eigelbe oder 1 ganzes Ei

-1 Tl gemahlene Senfkörner

-1 Tl Salz

-1/2 Tl Pfeffer

-1 Tl Zucker

-30 ml Essig oder Zitronensaft

22 DEUTSCH

- 300 ml Speiseöl

B Alle Zutaten mit Zimmertemperatur verwenden.

BGeben Sie die Eier bzw. die Eigelbe in den Mixbexher. Geben Sie Salz, Pfeffer und Senf hinzu, sowie die Hälfte des Essigs bzw. des Zitronensaftes. Mischen Sie alles bei mittlerer Geschwindigkeit. Gießen Sie das Öl durch die Öffnung im Deckel, bid die Majonäse steif zu werden beginnt. Geben Sie dann den rectlichen Essig bzw. Zitronensaft

hinzu, und würzen Sie die Majonäse nach Belieben. B Bewahren Sie die Majonäse im Kühlschrank auf.

Möhrenkuchen

-4 Eier

-200 g Möhren, in Scheiben

-200 ml Milch

-100 ml Kondensmilch

-300 g Zucker

-300 g Weizenmehl

-150 ml Speiseöl

-1 Tl Trockenhefe

BGeben Sie die Eier, die Möhrenscheiben, die Milch, die Kondensmilch und den Zucker in den Mixbecher. Betreiben Sie das Gerät ca. 15 Sekunden

mit der höchsten Geschwindigkeit.

BGeben Sie das Weizenmehl löffelweise hinzu. Wenn die Mischung glatt und homogen geworden ist, geben Sie nach und nach das Öl durch die Öffnung im Deckel hinzu. Fügen Sie zum Schluss die Trockenhefe hinzu,

und betreiben Sie das Gerät nochmals 5 Sekunden lang.

BFüllen Sie eine Backform mit dem angerührten Teig, und backen Sie ihn ca. 40 Minuten lang bei 180c.

Salat-Dressing

-1 Teil Essig oder Zitronensaft

-3 Teile Salatöl

-Salz und Pfeffer

BGießen Sie den Essig bzw. Zitronensaft in den Mixbecher. Geben Sie Salz und Peffer hinzu, und schalten Sie das Gerät ein.Verarbeiten Sie alles, bis sich das Salz gelöst und der Peffer gut verteilt hat. Geben Sie dann durch die Öffnung

im Deckel das Öl hinzu, bis sich ein homogenes Dressing gebildet hat.

BSie können auch eine größere Menge zubereiten und im Kühlschrank aufbewahren. Schütteln Sie jeweils vor Entnahme, damit sich alle Bestandteile gut mischen.

Käsekuchen

-4 Eier

-525 ml Milch

-75 g Margarine

-90 g Parmesan, in Würfeln von 1 cm Kantenlänge

-440 g Zucker

DEUTSCH 23

-290 g Maismehl

-250 g Weizenmehl

-1 EL Backpulver

B Eier, Milch, Margarine, Parmesan und Zucker in den Mixbecher geben.

Den Motor ca. 10 Sekunden bei Höchstgeschwindigkeit laufen lassen.

BDas Maismehl löffelweise zufügen, und den Motor 20 Sekunden bei Höchstgeschwindigkeit laufen lassen. Die Trockenhefe hinzufügen und weitere 10 Sekunden bearbeiten. Danach das Gerät ausschalten. Die Mischung auf ein mit Öl oder Margarine gefettetes und mit Mehl bestreutes Backblech streichen. Den Käsekuchen bei 200 bis 210°C ca. 35 bis 40 Minuten backen.

Hilfe bei Schwierigkeiten

Problem

Lösung

Das Gerät arbeitet nicht

Das Gerät ist mit einem Sicherheitssystem versehen.Wenn die Zusatzteile


und Aufsätze nicht korrekt auf der Motoreinheit angebracht sind, arbeitet das


Gerät nicht. Schalten Sie zuerst das Gerät aus, und prüfen Sie dann, ob Sie alle


Teile ordnungsgemäß angebracht haben.

Die Messereinheit/die Motoreinheit ist blockiert.

Die Motoreinheit gibt während der ersten Verwendungen einen unangenehmen Geruch ab.

Schalten Sie das Gerät aus, und verarbeiten Sie eine kleinere Menge.

Das ist für den Anfang normal.Tritt das später noch auf, so prüfen Sie, ob Sie die empfohlenen Mengen, die Zubereitungszeiten und/oder die Geschwindigkeit einhalten.

Das Gerät arbeitet laut, riecht, fühlt

Schalten Sie das Gerät aus. Ziehen Sie den Netzstecker aus der Steckdose.

sich heiß an, gibt Rauch ab usw.

Wenden Sie sich an Ihren Philips Händler oder an das Philips Service Center.

Der Zerkleinerer vibriert stark, ist sehr

Prüfen Sie, ob die Messereinheit korrekt am Zerkleinerer angebracht ist.

laut, oder das Messer läuft nicht rund.


Der Zerkleinerer staubt.

Prüfen Sie, ob der Gummiring korrekt angebracht ist.


Achten Sie darauf, dass der Gummiring korrekt angebracht ist. Der Ring muss


über die ganze Fläche glatt und flach aufliegen. Hinweis: Eine geringe


Undichtigkeit ist normal.

Trotz des eingesetzten Filters enthält der Saft Bestandteile des Fruchtfleischs bzw. der Sojabohnen.

Achten Sie darauf, dass der Filter ordnungsgemäß in den Mixbecher eingesetzt wird.

*Wenn das Problem weiterhin besteht oder andere Probleme auftreten,. so wenden Sie sich an Ihren Philips Händler oder das Philips Service Center in Ihrem Lande.

24 FRANÇAIS

Introduction

L’appareil est doté de systèmes de sécurité incorperés:

-L'appareil ne fonctionne pas si les accessoires n'ont pas été correctement fixés, ou si vous n'avez pas bien fermé le couvercle.

-N'ARRETEZ ET NE METTEZ JAMAIS L'APPAREIL EN MARCHE EN TOURNANT LE BOL OU EN OUVRANT OU FERMANT LE COUVERCLE!

Important

Lisez ces recommandations ainsi que les illustrations avant d'utiliser votre appareil.

Conservez ce mode d'emploi pour usage ultérieur.

Avant de brancher l'appareil, vérifiez que la tension indiquée sur l'appareil correspond à la tension du secteur de votre logement (110-127V ou 220-240V).

N'utilisez jamais des accessoires ou des composants autres que ceux d'origine et recommandés par Philips. Philips décline toute résponsabilité si ce n'était pas le cas et la garantie ne serait pas valable.

Ne dépassez pas le repère de remplissage maximum indiqué sur les accessoires.

Ne dépassez pas les quantités maximums et les temps d'utilisation indiqués dans le tableau.

N'ôtez jamais les accessoires ou les composants du bloc moteur pendant que l'appareil fonctionne. Débranchez toujours l'appareil.

N'utilisez jamais les accessoires pour mettre en marche ou pour arrêter l'appareil!

Tenez l'appareil hors de portée des enfants.

Ne laissez jamais l'appareil fonctionner sans surveillance.

N'utilisez pas l'appareil si le cordon d'alimentation, la fiche ou les autres pièces sont détériorés.

Si le cable d'alimentation est endommagé, il ne doit etre remplacé que par le fabricant (Philips), son service après vente ou une personnes de qualification similaire afin d'éviter un danger.

Laissez les aliments cuits refroidir avant de les hacher ou de les verser dans le bol (température maximale 80cC/175cF).

Pour éviter tout débordement, ne dépassez jamais le niveau maximum (1,5 l), surtout si vous préparez des ingrédients liquides chauds (dans ce cas le niveau max. est 1,2 l).

Pour éviter tout débordement, fixez toujours le bouchon sur le couvercle avant de commencer.

Ne mettez jamais vos doigts ou tout autre objet dans le bol mixer pendant le fonctionnement de l'appareil.

Si les ingrédients collent à la paroi du mixer, arrêtez l'appareil, débranchez-le et délier les ingrédients en ajoutant un peu d'eau ou à l'aide d'une spatule.

PHILIPS HR 1754 User Manual

FRANÇAIS 25

Préparation de l'appareil à l'emploi

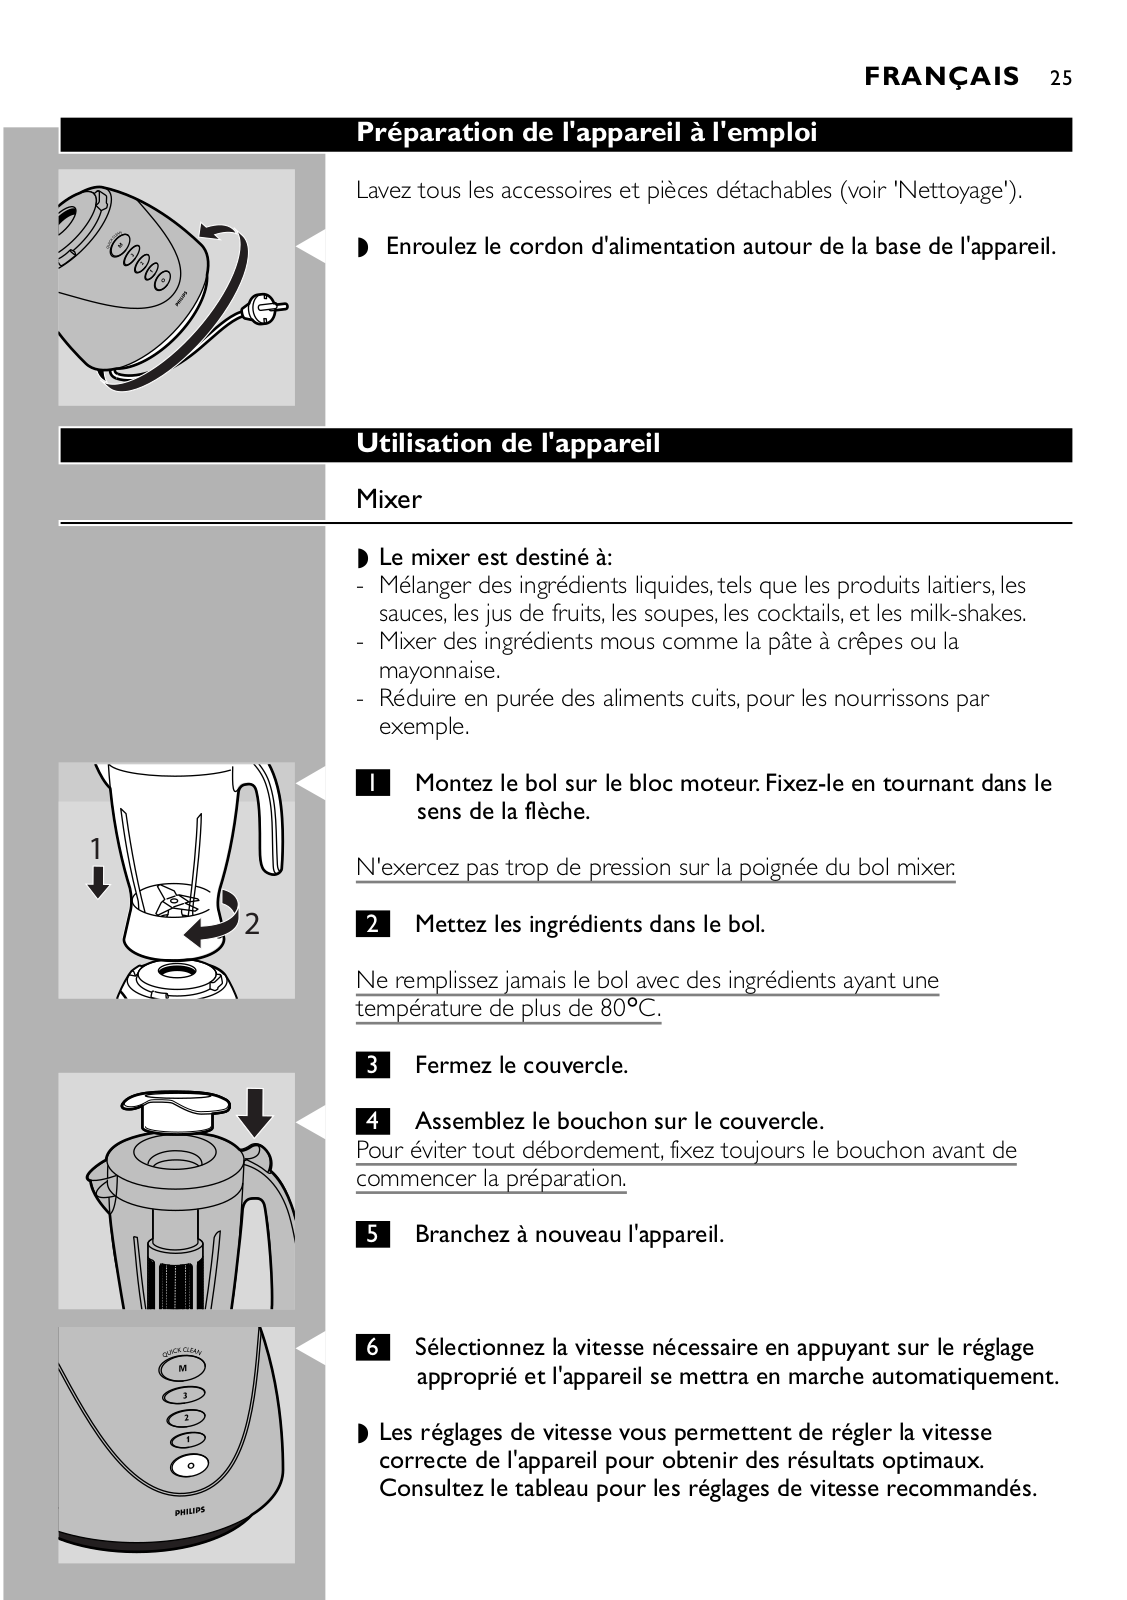
Lavez tous les accessoires et pièces détachables (voir 'Nettoyage').

C Enroulez le cordon d'alimentation autour de la base de l'appareil.

Utilisation de l'appareil

Mixer

Le mixer est destiné à:

-Mélanger des ingrédients liquides, tels que les produits laitiers, les sauces, les jus de fruits, les soupes, les cocktails, et les milk-shakes.

-Mixer des ingrédients mous comme la pâte à crêpes ou la mayonnaise.

-Réduire en purée des aliments cuits, pour les nourrissons par exemple.


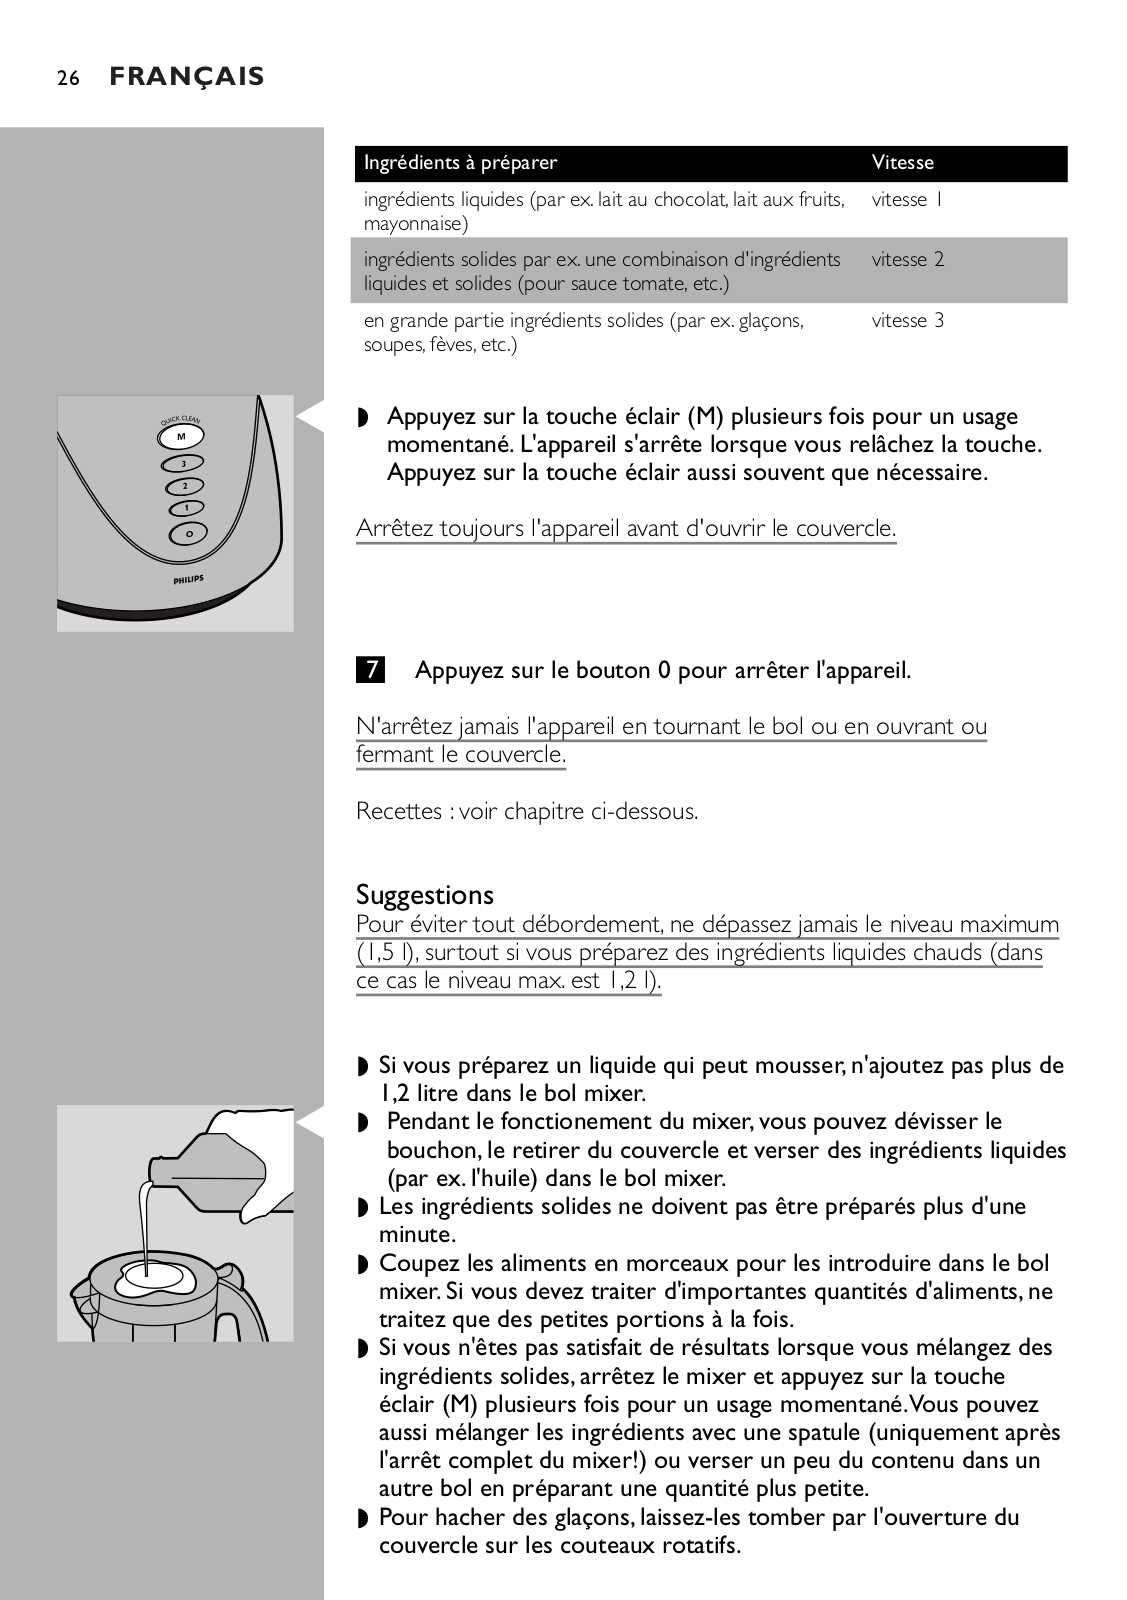
C 1

Montez le bol sur le bloc moteur. Fixez-le en tournant dans le


sens de la flèche.

1

N'exercez pas trop de pression sur la poignée du bol mixer.


2

2

Mettez les ingrédients dans le bol.


Ne remplissez jamais le bol avec des ingrédients ayant une


température de plus de 80cC.


3

Fermez le couvercle.


C 4

Assemblez le bouchon sur le couvercle.


Pour éviter tout débordement, fixez toujours le bouchon avant de


commencer la préparation.


5

Branchez à nouveau l'appareil.


C 6

Sélectionnez la vitesse nécessaire en appuyant sur le réglage


approprié et l'appareil se mettra en marche automatiquement.

Les réglages de vitesse vous permettent de régler la vitesse correcte de l'appareil pour obtenir des résultats optimaux. Consultez le tableau pour les réglages de vitesse recommandés.

26 FRANÇAIS


Ingrédients à préparer

Vitesse


ingrédients liquides (par ex. lait au chocolat, lait aux fruits,

vitesse 1


mayonnaise)


ingrédients solides par ex. une combinaison d'ingrédients

vitesse 2


liquides et solides (pour sauce tomate, etc.)


en grande partie ingrédients solides (par ex. glaçons,

vitesse 3


soupes, fèves, etc.)


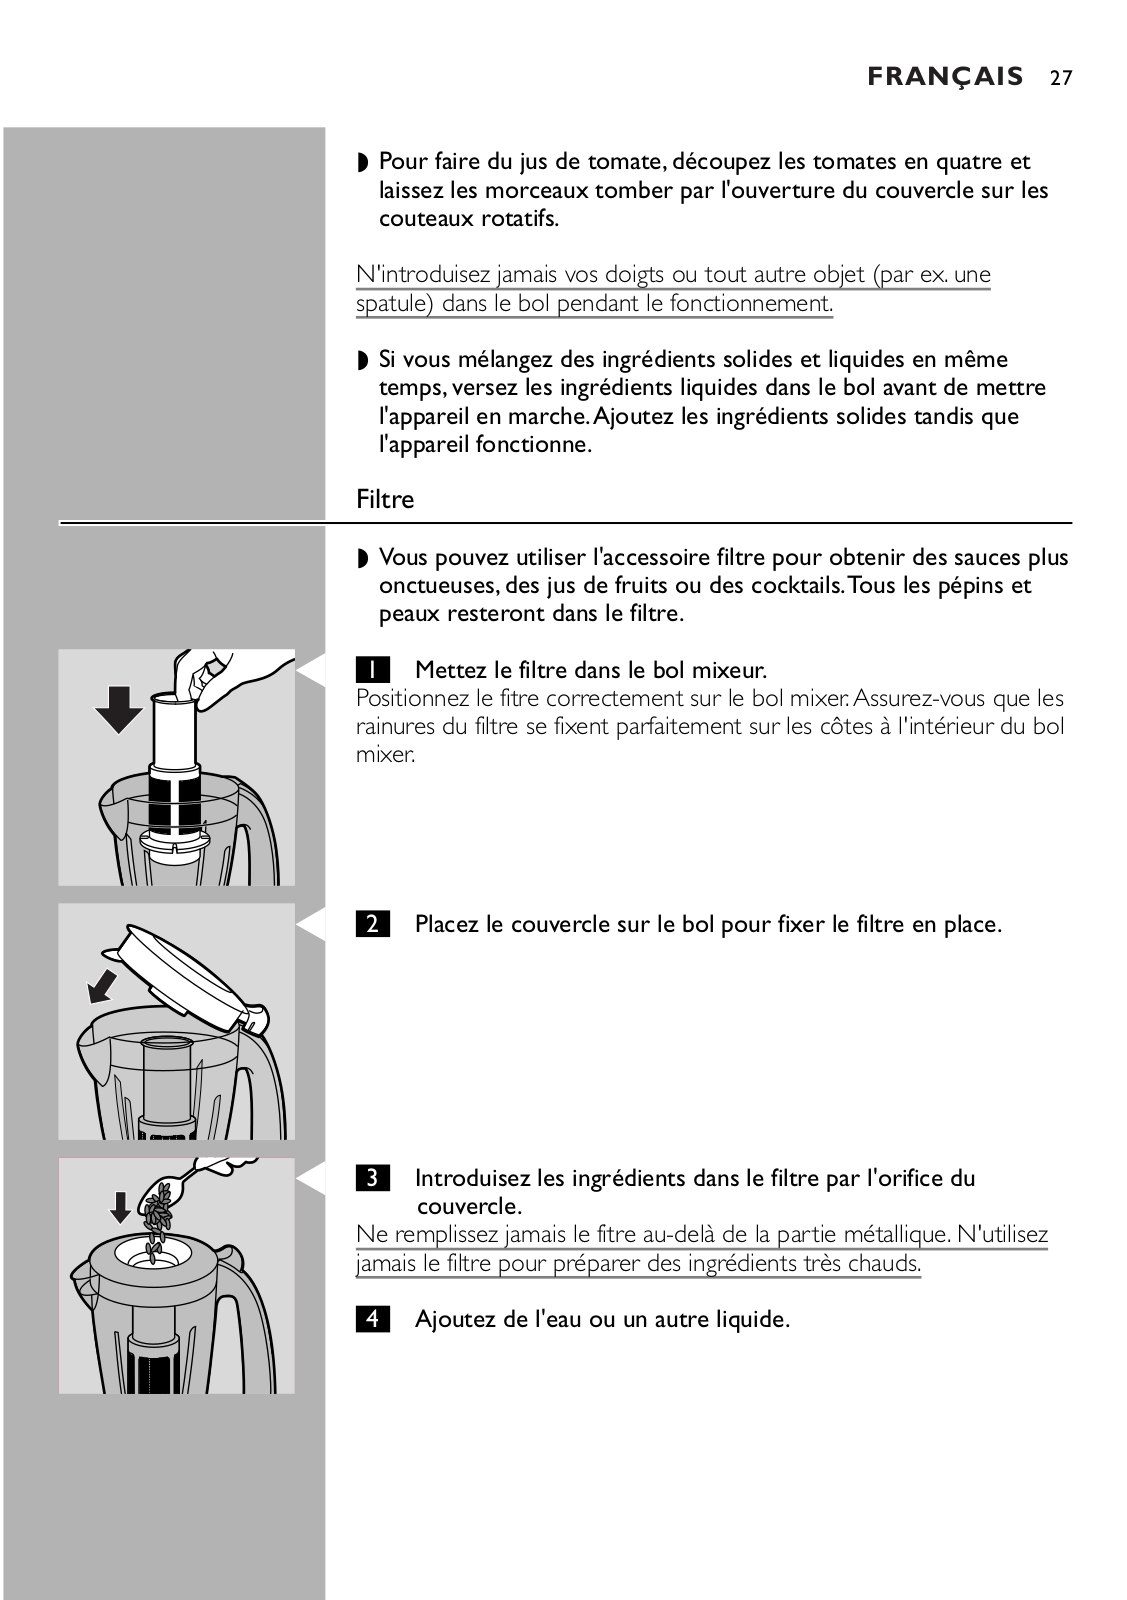
C Appuyez sur la touche éclair (M) plusieurs fois pour un usage momentané. L'appareil s'arrête lorsque vous relâchez la touche. Appuyez sur la touche éclair aussi souvent que nécessaire.

Arrêtez toujours l'appareil avant d'ouvrir le couvercle.

7 Appuyez sur le bouton 0 pour arrêter l'appareil.

N'arrêtez jamais l'appareil en tournant le bol ou en ouvrant ou

fermant le couvercle.

Recettes : voir chapitre ci-dessous.

Suggestions

Pour éviter tout débordement, ne dépassez jamais le niveau maximum

(1,5 l), surtout si vous préparez des ingrédients liquides chauds (dans

ce cas le niveau max. est 1,2 l).

Si vous préparez un liquide qui peut mousser, n'ajoutez pas plus de 1,2 litre dans le bol mixer.

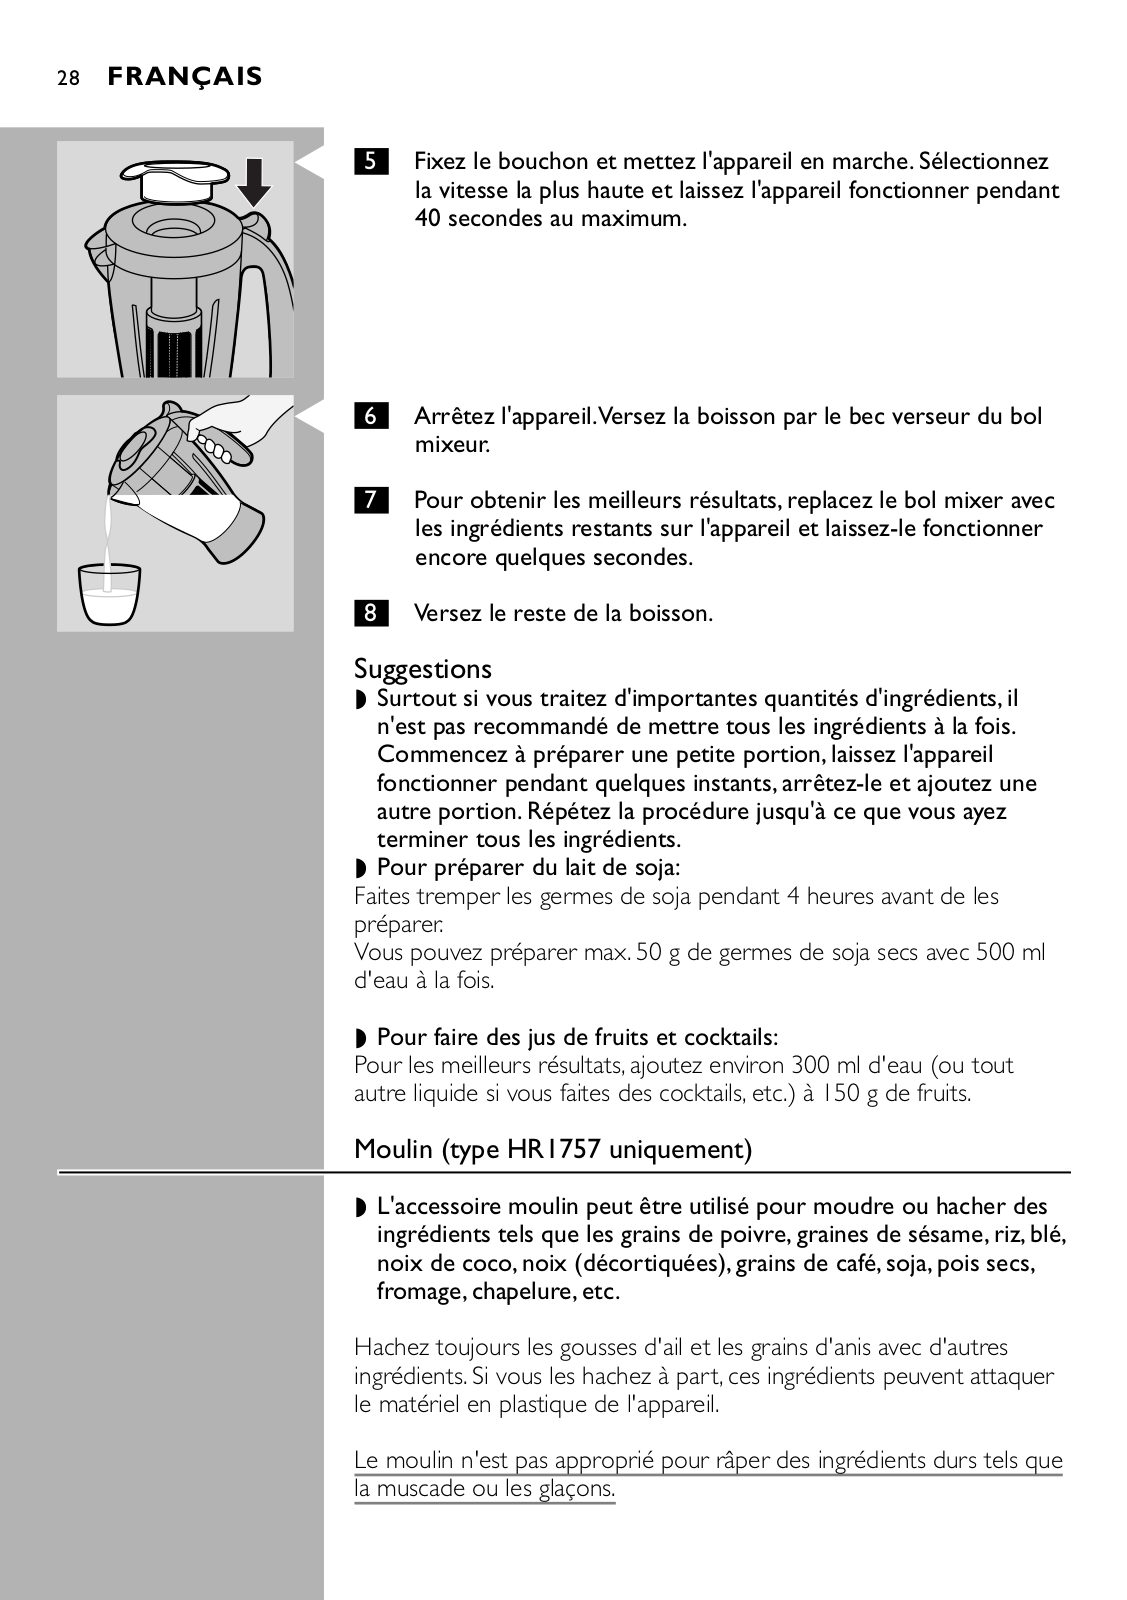
C Pendant le fonctionement du mixer, vous pouvez dévisser le bouchon, le retirer du couvercle et verser des ingrédients liquides (par ex. l'huile) dans le bol mixer.

Les ingrédients solides ne doivent pas être préparés plus d'une minute.

Coupez les aliments en morceaux pour les introduire dans le bol mixer. Si vous devez traiter d'importantes quantités d'aliments, ne traitez que des petites portions à la fois.

Si vous n'êtes pas satisfait de résultats lorsque vous mélangez des ingrédients solides, arrêtez le mixer et appuyez sur la touche éclair (M) plusieurs fois pour un usage momentané.Vous pouvez aussi mélanger les ingrédients avec une spatule (uniquement après l'arrêt complet du mixer!) ou verser un peu du contenu dans un autre bol en préparant une quantité plus petite.

Pour hacher des glaçons, laissez-les tomber par l'ouverture du couvercle sur les couteaux rotatifs.

FRANÇAIS 27

Pour faire du jus de tomate, découpez les tomates en quatre et laissez les morceaux tomber par l'ouverture du couvercle sur les couteaux rotatifs.

N'introduisez jamais vos doigts ou tout autre objet (par ex. une

spatule) dans le bol pendant le fonctionnement.

Si vous mélangez des ingrédients solides et liquides en même temps, versez les ingrédients liquides dans le bol avant de mettre l'appareil en marche.Ajoutez les ingrédients solides tandis que l'appareil fonctionne.

Filtre

Vous pouvez utiliser l'accessoire filtre pour obtenir des sauces plus onctueuses, des jus de fruits ou des cocktails.Tous les pépins et peaux resteront dans le filtre.

C 1 Mettez le filtre dans le bol mixeur.

Positionnez le fitre correctement sur le bol mixer. Assurez-vous que les rainures du filtre se fixent parfaitement sur les côtes à l'intérieur du bol mixer.

C 2 Placez le couvercle sur le bol pour fixer le filtre en place.

C 3

Introduisez les ingrédients dans le filtre par l'orifice du


couvercle.

Ne remplissez jamais le fitre au-delà de la partie métallique. N'utilisez

jamais le filtre pour préparer des ingrédients très chauds.

4

Ajoutez de l'eau ou un autre liquide.

28FRANÇAIS

C

C

5Fixez le bouchon et mettez l'appareil en marche. Sélectionnez la vitesse la plus haute et laissez l'appareil fonctionner pendant 40 secondes au maximum.

6Arrêtez l'appareil.Versez la boisson par le bec verseur du bol mixeur.

7Pour obtenir les meilleurs résultats, replacez le bol mixer avec les ingrédients restants sur l'appareil et laissez-le fonctionner encore quelques secondes.

8Versez le reste de la boisson.

Suggestions

Surtout si vous traitez d'importantes quantités d'ingrédients, il n'est pas recommandé de mettre tous les ingrédients à la fois. Commencez à préparer une petite portion, laissez l'appareil fonctionner pendant quelques instants, arrêtez-le et ajoutez une autre portion. Répétez la procédure jusqu'à ce que vous ayez terminer tous les ingrédients.

Pour préparer du lait de soja:

Faites tremper les germes de soja pendant 4 heures avant de les préparer.

Vous pouvez préparer max. 50 g de germes de soja secs avec 500 ml d'eau à la fois.

Pour faire des jus de fruits et cocktails:

Pour les meilleurs résultats, ajoutez environ 300 ml d'eau (ou tout autre liquide si vous faites des cocktails, etc.) à 150 g de fruits.

Moulin (type HR1757 uniquement)

L'accessoire moulin peut être utilisé pour moudre ou hacher des ingrédients tels que les grains de poivre, graines de sésame, riz, blé, noix de coco, noix (décortiquées), grains de café, soja, pois secs, fromage, chapelure, etc.

Hachez toujours les gousses d'ail et les grains d'anis avec d'autres ingrédients. Si vous les hachez à part, ces ingrédients peuvent attaquer le matériel en plastique de l'appareil.

Le moulin n'est pas approprié pour râper des ingrédients durs tels que

la muscade ou les glaçons.


FRANÇAIS 29

C 1

Mettez les ingrédients dans le verre.

Traitez seulement des ingrédients solides. Ne remplissez pas le verre

au-delà de 'MAX'.


Veuillez consulter le tableau pour les quantités recommandées.

Ingrédients

Quantités

grains de poivre

5-25 g

graines de sésame

10-50 g

riz, blé

25-75 g

soja


25-75 g

pois secs

25-75 g

noix de coco

25-75 g

grains de café

25-50 g

fromage

25-75 g

chapelure

20-40 g

morceaux de sucre

25-50 g

noix (décortiquées)

25-75 g

C 2

Assurez-vous que l'anneau en caoutchouc est correctement


fixé sur l'ensemble couteaux.


C 3 Vissez l'ensemble couteaux sur le verre.

Si besoin, humidifiez l'anneau en caoutchouc avec une goutte d'eau.

C 4 Renversez le moulin et vissez-le sur le bloc moteur dans la direction de la flèche.

30 FRANÇAIS

C 5 Nous vous recommandons d'activer le moulin à l'aide de la touche éclair (M).

N'utilisez jamais le moulin pendant plus de 30 secondes sans interruption.

C A la fin, vous pouvez utiliser le couvercle du shaker pour répandre les ingrédients uniformément sur le plat.

Nettoyage

Il est plus facile de laver l'appareil, les composants et les accessoires immédiatement après utilisation.

Les accessoires ne doivent pas être lavés au lave-vaisselle.

Le bloc moteur peut être nettoyé avec un chiffon humide.

N'utilisez pas d'éponges ou produits abrasifs, alcool, etc.

1Débranchez l'appareil, ôtez les accessoires et les composants utilisés et nettoyez-les à l'eau chaude savonneuse.

2Ensuite rincez-les bien avec de l'eau claire.

Nettoyage rapide du bol mixer

1Versez de l'eau tiède et un peu de produit vaisselle dans le bol mixer jusqu'à l'indication de Nettoyage Rapide (500 ml) sur le bol. Ne dépassez pas cette indication lors de l'utilisation de la fonction Nettoyage Rapide.

2Fermez le couvercle et assemblez le bouchon sur le couvercle.


C


Appuyez sur le bouton Nettoyage Rapide et laissez l'appareil

3


fonctionner quelques secondes.Arrêtez lorsque le bol mixer


est propre.


Détachez le bol mixer et rincez-le avec de l'eau claire.

4


Loading...
+ 102 hidden pages