


ENGLISH 4
FRANÇAIS 22
HQ7800

Important
Read these instructions for use carefully before
using the appliances and save them for future
reference.
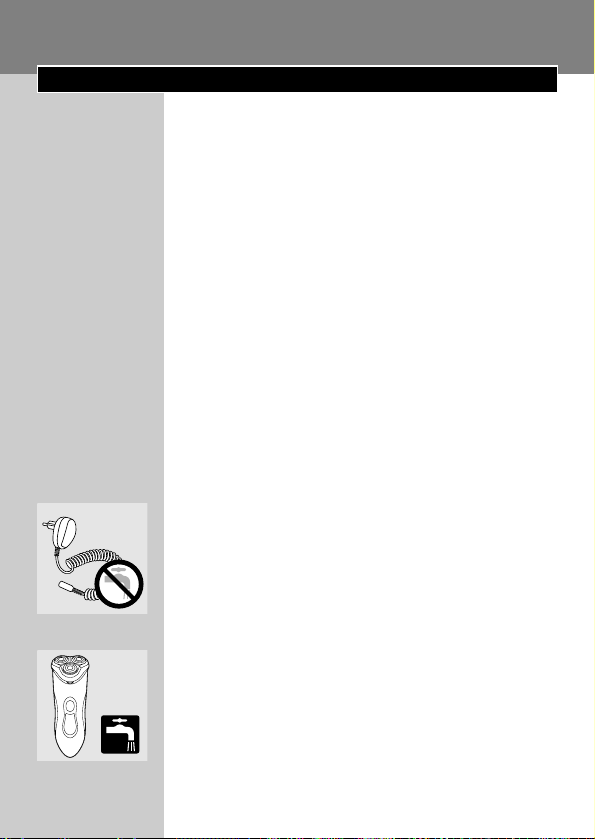
◗ Only use the powerplug supplied.
◗ The powerplug transforms 100-240 volts to a
safe low voltage of less than 24 volts.
◗ The powerplug contains a transformer. Do
not cut off the powerplug to replace it with
another plug, as this will cause a hazardous
situation.
◗ Do not use a damaged powerplug.
◗ If the powerplug is damaged, always have it
replaced by one of the original type in order
to avoid a hazard.
C
◗ Make sure the powerplug does not get wet.
◗ Charge and store the shaver at a temperature
between 5cC and 35cC.
◗ Do not recharge the shaver in a closed pouch.
◗ Always unplug the shaver before cleaning it
under the tap.
C
◗ The shaver complies with the internationally
approved IEC safety regulations and can be
safely cleaned under the tap.
Be careful with hot water. Always check if the
water is not too hot, to prevent your hands from
getting burnt.
◗ This washable shaver is not suitable for
shaving in the shower.
C
◗ Do not immerse the shaver in water.
ENGLISH4
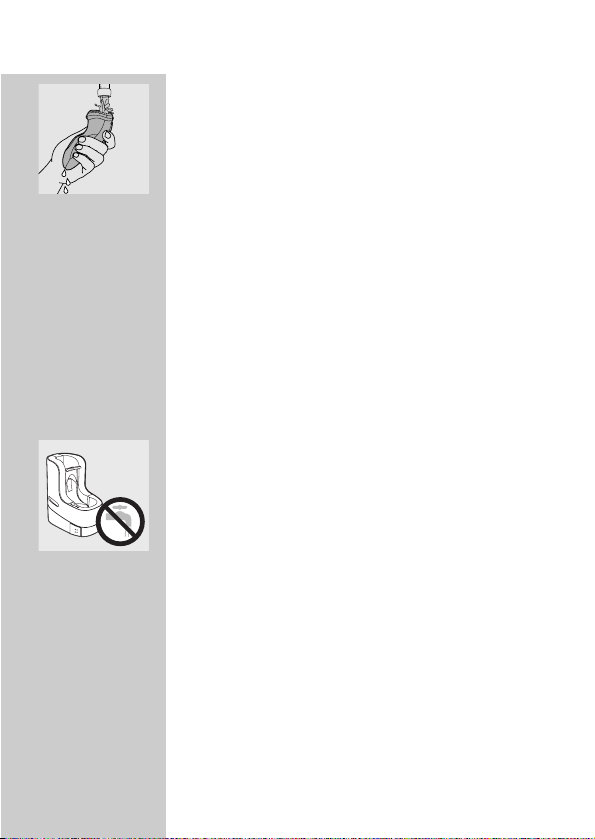
C
◗ Water may leak from the socket at the
bottom of the shaver when you rinse it.This is
normal and not dangerous because all
electronics are enclosed in a sealed shell
inside the shaver.
◗ Only use the washing machine with the
original HQ200 cleaning fluid.
◗ Empty the cleaning chamber and clean it
thoroughly by rinsing it with hot tap water
every 2 weeks.
◗ The washing machine thoroughly cleans but
does not disinfect your shaver,therefore do
not share the shaver with others.
C
◗ Never immerse the washing machine in water
nor rinse it under the tap.
◗ Keep the washing machine out of the reach of
children.
◗ Charge and store the washing machine at a
temperature between 5cC and 35cC.
◗ Always place the washing machine on a stable,
level and horizontal surface to prevent
leakage.
◗ When the washing machine is ready for use, it
must not be moved to prevent leakage of
cleaning fluid.
ENGLISH 5
Charging
You can also shave without charging by
connecting the shaver to the mains.
Charging takes approx. 8 hours.
Do not recharge the shaver in a closed pouch.
◗ Make sure the shaver is switched off before
you start charging it.
◗ Charge the shaver when the motor stops or
starts running slower.
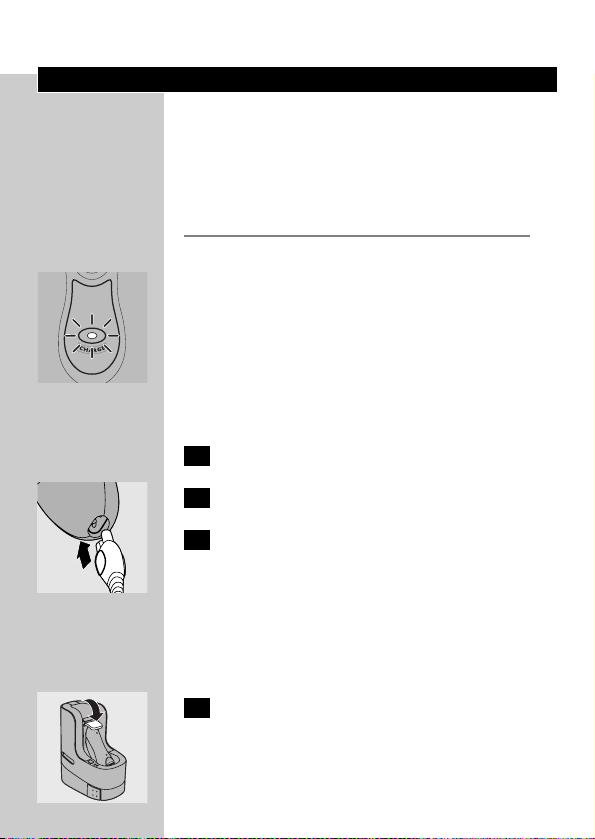
C
◗ When the shaver is being charged,the
charging light burns green.
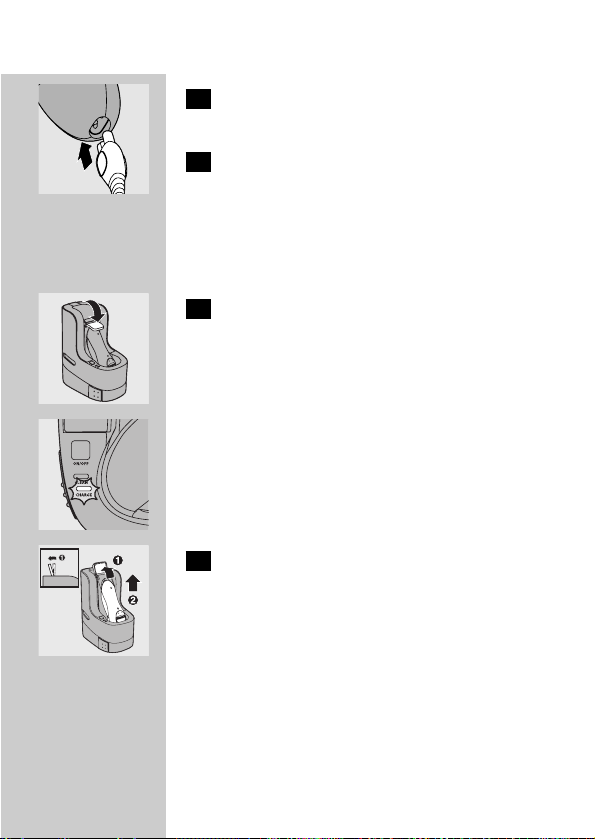
Charging by means of the powerplug
1 Put the appliance plug in the shaver.
C
2 Put the powerplug in the wall socket.
3 Remove the powerplug from the wall
socket and pull the appliance plug out of
the shaver when the battery has been fully
charged.
Charging by means of the washing
machine
C
1 Place the shaver in the holder and lock it
into place by pushing the lever down
completely.
The charging light starts blinking to indicate that
the shaver is being charged.
ENGLISH6
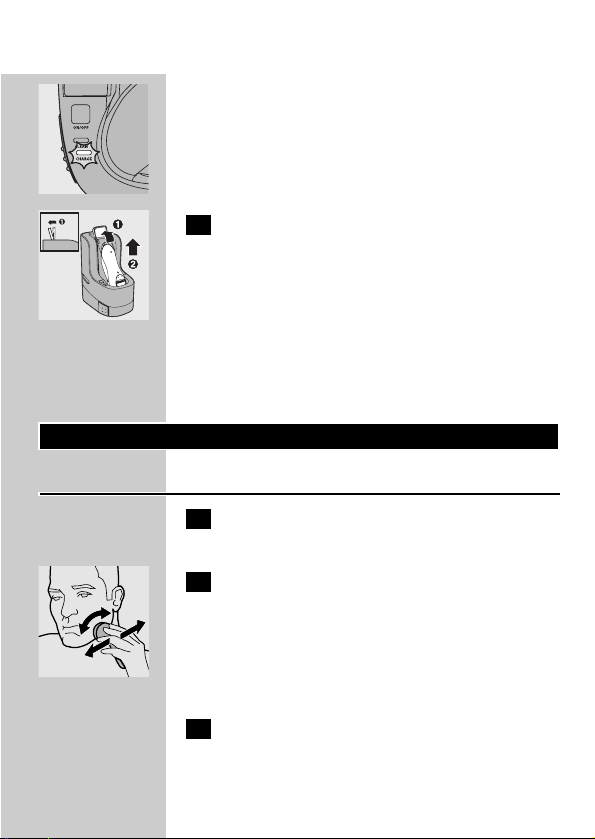
C
◗ When the charging light starts burning
continuously (after approx.8 hours), the
shaver is fully charged.
C
2 Move the lever upwards until it won't go
any further (1) and remove the shaver
from the washing machine (2).
The charging light goes out.
Cordless shaving time
A fully charged shaver has a cordless shaving time
of up to 30 minutes.
Using the appliance
Shaving
1 Switch the shaver on by pressing the on/off
button once.
C
2 Move the shaving heads quickly over your
skin, making both straight and circular
movements.
- Shaving on a dry face gives the best results.
- Your skin may need 2 or 3 weeks to get
accustomed to the Philips shaving system.
3 Switch the shaver off by pressing the on/off
button once.
ENGLISH 7
4 Clean the shaver (see chapter 'Cleaning
and maintenance').
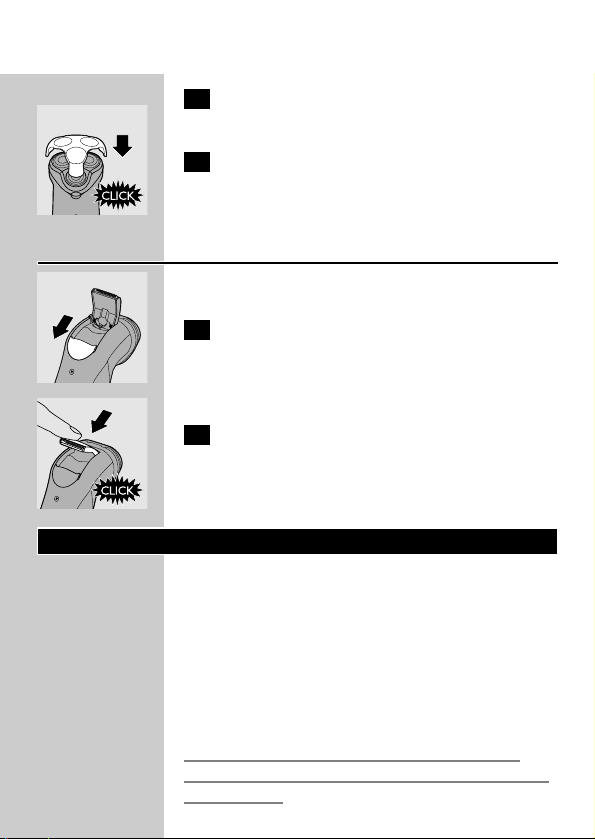
C
5 Put the protection cap on the shaver every
time you have used it, to prevent damage.
Trimming
For grooming sideburns and moustache.
C
1 Open the trimmer by pushing the slide
downwards.
The trimmer can be activated while the motor is
running.
C
2 Close the trimmer ('click').
Cleaning and maintenance
◗ The best and most hygienic way to clean the
shaver is in the washing machine, but you can
also clean the shaver by rinsing it under the
tap or with the brush supplied.
Regular cleaning guarantees better shaving
performance.
Be careful with hot water. Always check if the
water is not too hot, to prevent your hands from
getting burnt.
ENGLISH8
B
Water may leak from the socket at the bottom of
the shaver when you rinse it.This is normal and
not dangerous.
Cleaning the shaver in the washing machine
supplied
Preparing the washing machine for
use
Fill the transparent fluid container when using the
washing machine for the first time and when the
container is almost empty.The fluid level is visible
at the front and on both sides of the washing
machine.
If you use the washing machine to clean your
shaver every day, you should refill the fluid
container approx. once a month.
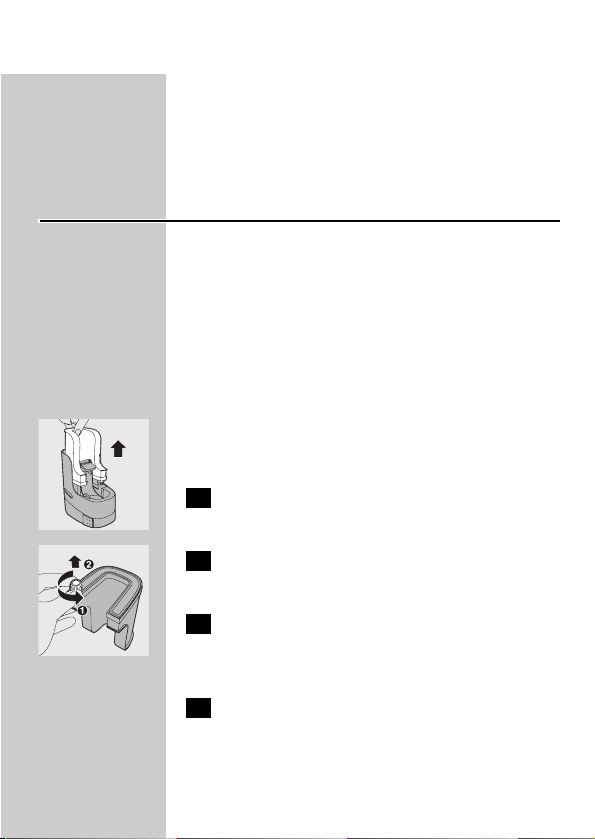
C
1 Remove the cleaning fluid container from
the washing machine.
C
2 Remove the dosing cap from the fluid
container.
3 Unscrew the cap from the bottle with
cleaning fluid, remove the airtight seal and
screw the cap back onto the bottle.
4 Fill the container with HQ200 cleaning
fluid and tightly screw the dosing cap back
onto the container.
ENGLISH 9
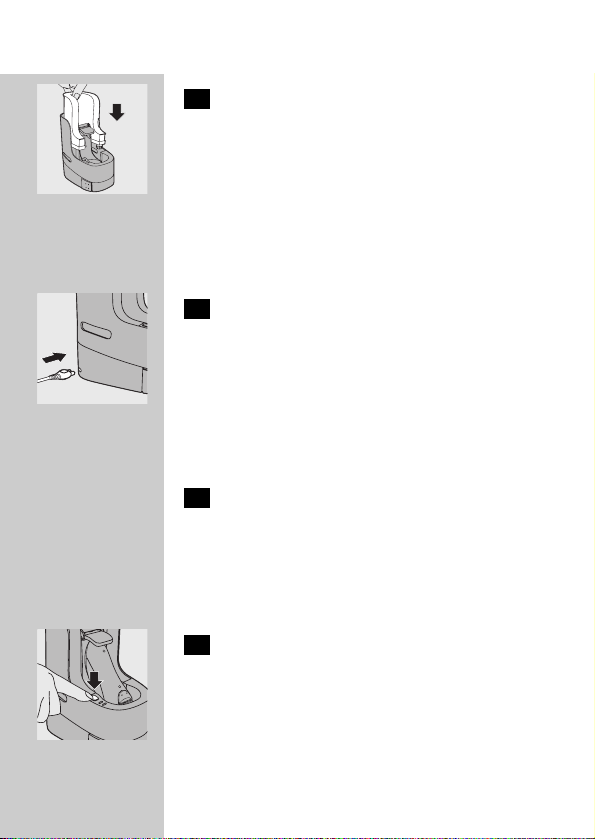
C
5 Place the cleaning fluid container back into
the washing machine in such a way that
the top and front of the container are
properly aligned with the housing of the
washing machine.
B
The cleaning fluid is automatically supplied to the
cleaning chamber through a special mechanism in
the dosing button.
C
6 Connect the powerplug to the washing
machine.
The holder automatically moves to the highest
position.
The washing machine is now ready for use.
Using the washing machine
1 Place the shaver in the holder and lock it
into place by pushing the lever down
completely.
The charging light on the washing machine starts
blinking to indicate that the shaver is being
charged.
C
2 Press the start button to start the cleaning
program.
The cleaning light starts blinking and the shaver is
automatically lowered into the cleaning fluid.
During the cleaning program, which takes approx.
1 hour, the cleaning light blinks continuously.
ENGLISH10

During the first phase of the cleaning program,
the shaver automatically switches on and off
several times and is put in different positions.
During the second phase of the cleaning program,
the shaver is placed in the drying position. It stays
in this position until the end of the program.The
cleaning light starts burning continuously.
After the cleaning program, the shaver
automatically returns to its starting position and
the charging program is started.The charging light
starts blinking.
B
If you press the start button or open the lever
during cleaning, the cleaning program is aborted
and reset. In this case, the cleaning light stops
blinking and the holder returns to its starting
position.
B
If the powerplug is removed from the wall socket
during the cleaning program, the holder will
remain in its current position. When the powerplug
is put back into the wall socket, the holder will
move to the highest position.
C
◗ When the cleaning light starts burning
continuously, the shaver is hygienically clean.
◗ If the shaver also needs to be charged,you
can simply leave it in the appliance after the
cleaning process.
ENGLISH 11
Cleaning the washing machine
◗ The cleaning fluid container and the cleaning
chamber are not dishwasher-proof.
◗ Clean the cleaning chamber every two weeks.
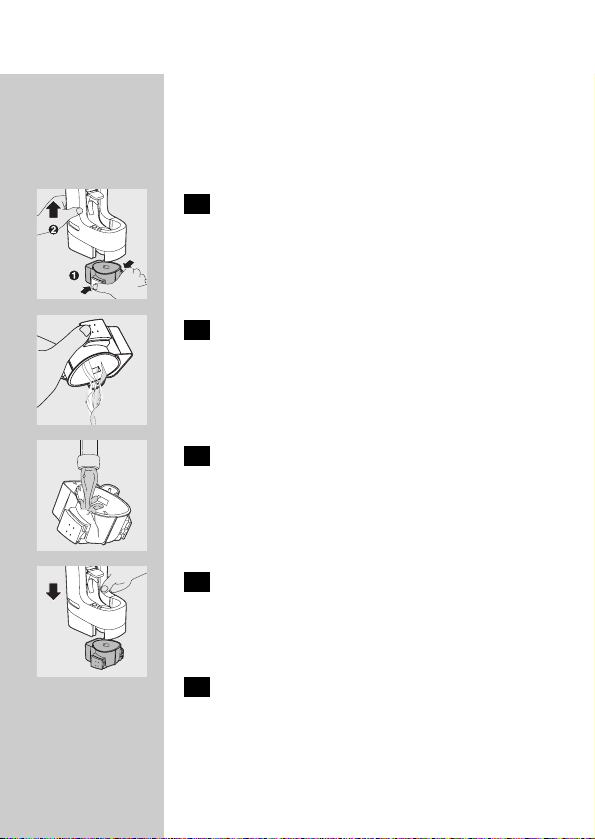
C
1 Simultaneously press the buttons on both
sides of the washing machine (1) and lift
the washing machine off the cleaning
chamber (2).
The cleaning chamber remains behind.
C
2 Pour any remaining cleaning fluid out of
the cleaning chamber.
The cleaning fluid can simply be poured down the
sink.
C
3 Clean the cleaning chamber by rinsing it
under the tap.
C
4 Carefully place the washing machine back
over the cleaning chamber.
Make sure the release buttons snap back into
place.
5 Clean the washing machine with a moist
cloth.
ENGLISH12

Cleaning the shaver under the tap
1 Switch the shaver off,remove the
powerplug from the wall socket and pull
the appliance plug out of the shaver.
C
2 Press the release button to open the
shaving unit.
C
3 Clean the shaving unit and the hair
chamber by rinsing them under a hot tap
for some time.
C
◗ Make sure you clean the inside as well as the
outside of the shaving unit.
4 Close the shaving unit and shake off excess
water.
Never dry the shaving unit with a towel or tissue
as this may damage the shaving heads.
C
5 Open the shaving unit again and leave it
open to let the appliance dry completely.
You can also clean the hair chamber without
water by using the brush supplied.
ENGLISH 13

Cleaning the shaver with the brush supplied
Shaving heads
C
1 Open the shaving unit, turn the lock
anticlockwise (1) and remove the retaining
frame (2).
C
2 Clean the cutters and guards with the
brush supplied.
Do not clean more than one cutter and guard at
a time, since they are all matching sets. If you
accidentally mix up the cutters and guards, it may
take several weeks before optimal shaving
performance is restored.
C
3 Put the shaving heads back into the shaving
unit. Put the retaining frame back into the
shaving unit and turn the lock clockwise.
4 Close the shaving unit.
Cleaning the trimmer
Clean the trimmer every time you have used it.
1 Switch the shaver off,remove the
powerplug from the wall socket and pull
the appliance plug out of the shaver.
C
2 Clean the trimmer with the brush
supplied.
ENGLISH14

C
3 Lubricate the trimmer teeth with a drop
of sewing machine oil every six months.
Storage
C
◗ Put the protection cap on the shaver to
prevent damage.
C
◗ Store the shaver in the pouch or place it in
the washing machine.
Replacement
Replace the shaving heads every two years for
optimal shaving results.
Replace damaged or worn shaving heads with
HQ9 Philips shaving heads only.
B
Do not mix up the cutters and the guards to
guarantee optimal shaving performance.
1 Switch the shaver off,remove the
powerplug from the wall socket and pull
the appliance plug out of the shaver.
ENGLISH 15

2 Press the release button to open the
shaving unit.
C
3 Turn the lock anticlockwise (1) and
remove the retaining frame (2).
C
4 Remove the shaving heads and place new
ones in the shaving unit. Put the retaining
frame back into the shaving unit and turn
the lock clockwise.
Make sure that the projections of the shaving
heads fit exactly into the recesses.
5 Close the shaving unit.
Accessories
The following accessories are available:
- HQ8000 powerplug.
- HQ9 Philips shaving heads.
- HQ110 Philips shaving head cleaner (shaving
head cleaning spray). Not available in Canada.
- HQ8010 car cord.
- HQ200 Philips cleaning fluid.
Environment
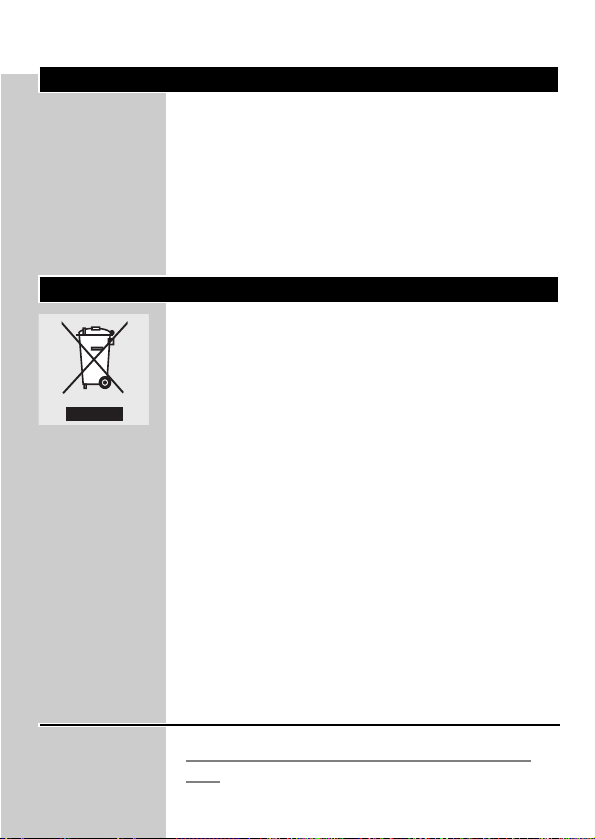
C
◗ Do not throw the appliances away with the
normal household waste at the end of their
life, but hand it in at an official collection point
for recycling. By doing this you will help to
preserve the environment.
ENGLISH16

Shaver
The built-in rechargeable battery contains
substances that may pollute the environment.
Remove the battery when you discard the
appliance. Do not throw the battery away with
the normal household waste, but hand it in at an
official collection point.You can also take the
appliance to a Philips service centre, which will
remove the battery for you and will dispose of it
in an environmentally safe way.
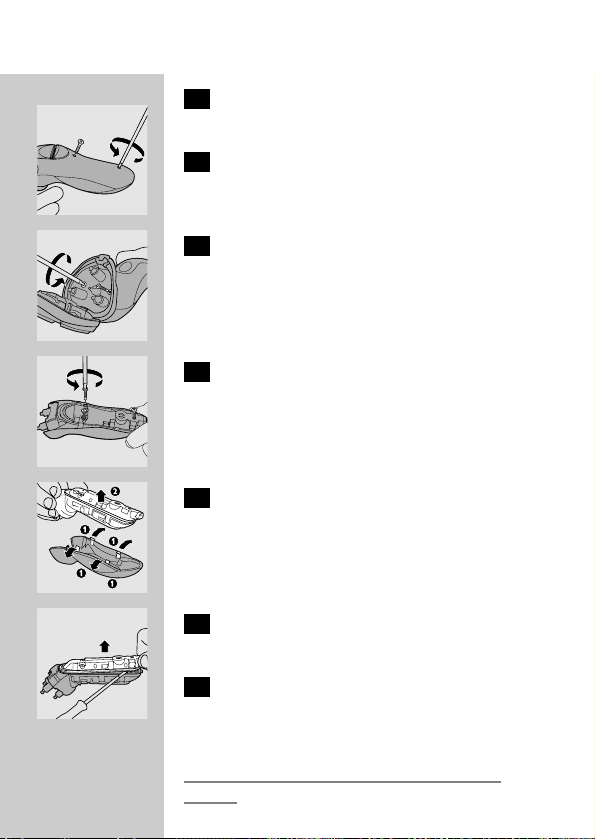
Disposal of the battery
Only remove the battery if it is completely empty.
1 Remove the powerplug from the wall
socket and pull the appliance plug out of
the shaver.
C
2 Let the shaver run until it stops and undo
the two screws at the back of the shaver.
C
3 Undo the two screws in the hair chamber.
C
4 Undo the three screws in the power unit.
ENGLISH 17

C
5 Bend the 4 hooks aside (1) to take out the
power unit (2).
Be careful, the hooks are very sharp.
C
6 Remove the power unit cover by means of
a screwdriver.
7 Remove the battery.
Be careful, the battery strips are very sharp.
Do not connect the shaver to the mains again
after the battery has been removed.
Guarantee & service
If you need information or if you have a
problem, please visit the Philips website at
www.philips.com or contact the Philips Customer
Care Centre in your country (you will find its
phone number in the worldwide guarantee
leaflet). If there is no Customer Care Centre in
your country, turn to your local Philips dealer or
contact the Service Depar tment of Philips
Domestic Appliances and Personal Care BV.
Troubleshooting
1 Reduced shaving performance.
B
Cause 1: the shaving heads are dirty.The shaver
has not been rinsed long enough or the water
used was not hot enough.
ENGLISH18

◗ Clean the shaver thoroughly before you
continue shaving.See chapter 'Cleaning and
maintenance'.
B
Cause 2: long hairs are obstructing the shaving
heads.
◗ Clean the cutters and guards with the brush
supplied. See chapter 'Cleaning and
maintenance', section 'Every six months:
shaving heads'.
B
Cause 3: the shaving heads are damaged or worn.
◗ Replace the shaving heads. See chapter
'Replacement'.
2 The shaver does not work when the on/off
button is pressed.
B
Cause 1: the battery is empty.
◗ Recharge the battery.See chapter 'Charging'.
B
Cause 2: the appliance is not connected to the
mains.
◗ Put the powerplug in the wall socket.
3 The shaving unit has come off the shaver.
B
The shaving unit has not been placed correctly.
ENGLISH 19

C
◗ If the shaving unit becomes detached from the
shaver, you can easily put it back by inserting
the hinge into the slot in the rim of the hair
chamber and pushing it home until it locks
into place ('click').
4 The shaver is not entirely clean after using
the washing machine.
B
Cause 1: the cleaning fluid in the cleaning
chamber may be soiled.
◗ Empty and rinse the cleaning chamber.
B
Cause 2: the cleaning fluid level may be too low.
C
◗ The cleaning fluid level is visible on both sides
of the washing machine. If the fluid level is
low,refill the cleaning fluid container (see
chapter 'Cleaning and maintenance').
5 The washing machine does not work when
the start button is pressed.
B
Cause 1: the washing machine may not be
connected to the mains.
◗ Put the powerplug in the wall socket.
B
Cause 2: there may not be an electrical
connection between the washing machine and the
shaver.
ENGLISH20

◗ Open the lever and close it again until the
charging light starts blinking.
6 There is heavy foaming in the cleaning
chamber of the washing machine.
B
Cause: the cleaning fluid level may be too low.
◗ The cleaning fluid level is visible on both sides
of the washing machine. If the fluid level is
low,refill the cleaning fluid container (see
chapter 'Cleaning and maintenance'.
ENGLISH 21
Important
Lire attentivement ces directives avant d'utiliser
l'appareil et les conserver pour consultation
ultérieure.
◗ N'utiliser que la prise d'alimentation fournie
avec l'appareil.
◗ La prise d'alimentation transforme la tension
de 100-240 volts en tension plus faible et plus
sécuritaire de 24 volts.
◗ La prise d'alimentation contient un
transformateur. Ne pas couper la prise
d'alimentation en vue de la remplacer par une
autre fiche afin d'éviter tout risque de
blessure.
◗ Ne pas utiliser une prise d'alimentation
endommagée.
◗ Lorsque la prise d'alimentation est
endommagée, la remplacer par une prise
d'origine, pour éviter tout accident.
C
◗ Garder la prise d'alimentation au sec.
◗ Recharger et ranger l'appareil dans un endroit
où la température se situe entre 5 et 35 cC.
◗ Ne pas laisser l'appareil dans son étui fermé
pour le recharger.
◗ Toujours débrancher le rasoir avant de le
nettoyer sous le robinet.
C
◗ Le rasoir respecte les normes de sécurité
internationales de la CEI et peut être nettoyé
à l'eau courante en toute sécurité.
Attention avec l'eau chaude. Il est important de
toujours vérifier que l'eau n'est pas trop chaude
pour ne pas vous brûler les mains.
FRANÇAIS22

◗ Ce rasoir lavable n'est pas adapté au rasage
sous la douche.
C
◗ Ne pas immerger le rasoir dans l'eau.
C
◗ Il est possible que de l'eau s'écoule de la prise
au bas du rasoir au cours du rinçage. C'est
normal et sans danger car tous les
composants électroniques sont regroupés
dans un boîtier hermétique à l'intérieur de
l'appareil.
◗ N'utiliser le dispositif de nettoyage qu'avec le
liquide nettoyant HQ200.
◗ Vider la cuve nettoyante et la rincer
complètement à l'eau chaude du robinet
toutes les deux semaines.
◗ Le dispositif de nettoyage permet de laver
complètement votre rasoir mais ne le
désinfecte pas; c'est pourquoi vous ne devez
pas prêter votre rasoir à d'autres personnes.
C
◗ Ne jamais immerger ni rincer à l'eau courante
le dispositif de nettoyage.
◗ Garder le dispositif de nettoyage hors de
portée des enfants.
◗ Recharger et ranger l'appareil dans un endroit
où la température se situe entre 5 et 35 cC.
FRANÇAIS 23

◗ Toujours ranger le dispositif de nettoyage sur
une surface stable, plane et horizontale pour
éviter les fuites.
◗ Quand le dispositif de nettoyage est prêt à
être utilisé, il ne faut pas le déplacer afin
d'éviter les fuites de liquide nettoyant.
Recharge
Vous pouvez également vous raser sans recharger
l'appareil en le branchant directement à une prise
de courant.
Le chargement dure environ 8 heures.
Ne pas laisser l'appareil dans son étui fermé pour
le recharger.
◗ Veiller à ce que le rasoir soit éteint avant de
commencer à le recharger.
◗ Quand le moteur commence à ralentir ou
s'arrête, cela signifie que le rasoir doit être
rechargé.
C
◗ Quand le rasoir est en cours de chargement,
le voyant de charge s'allume en vert.
Recharge au moyen de la prise
d'alimentation
1 Insérer la fiche de l'appareil dans le rasoir
FRANÇAIS24
C
2 Brancher la prise d'alimentation dans la
prise murale.
3 Retirer la prise d'alimentation de la prise
murale et la fiche du rasoir une fois la pile
complètement rechargée.
Recharge au moyen du dispositif de
nettoyage
C
1 Placer le rasoir sur le support et le fixer
en position en poussant le levier au
maximum vers le bas.
Le voyant de charge commence à clignoter pour
indiquer que le rasoir est en cours de charge.
C
◗ Quand le voyant de charge s'allume de façon
continue (après 8 heures environ), le rasoir
est complètement rechargé.
C
2 Pousser le levier au maximum vers le haut
(1) et retirer le rasoir du dispositif de
nettoyage (2).
Le voyant de charge s'éteint.
Temps de rasage sans fil
Un rasoir complètement chargé peut fonctionner
sans fil pendant 30 minutes.
FRANÇAIS 25

Utilisation de l'appareil
Rasage
1 Allumer le rasoir en appuyant une fois sur
le bouton On/off.
C
2 Faire glisser les têtes de rasage rapidement
sur votre peau, en alternant mouvements
circulaires et mouvement droits.
- Le rasage à sec donne les meilleurs résultats.
- Votre peau pourrait avoir besoin de 2 ou 3
semaines pour s'habituer au système de rasage
Philips.
3 Éteindre le rasoir en appuyant une fois sur
le bouton On/off.
4 Nettoyer le rasoir (voir section Nettoyage
et entretien).
C
5 Mettre le couvercle de protection sur le
rasoir chaque fois que vous l'avez utilisé
pour éviter les dégâts.
Taille
Pour l'entretien des favoris et de la moustache.
C
1 Ouvrir le taille-favoris en poussant la
glissière vers le bas.
Vous pouvez activer le taille-favoris pendant que
le moteur fonctionne.
FRANÇAIS26

C
2 Fermer le taille-favoris (vous devez
entendre un clic).
Nettoyage et entretien
◗ Le dispositif de nettoyage est le meilleur
moyen (et le plus hygiénique) de nettoyer le
rasoir, mais vous pouvez aussi rincer le rasoir
à l'eau courante ou le nettoyer à l'aide de la
brosse fournie.
Nettoyer le rasoir régulièrement assure un rasage
optimal.
Attention avec l'eau chaude. Il est important de
toujours vérifier que l'eau n'est pas trop chaude
pour ne pas vous brûler les mains.
B
Il est possible que de l'eau s'écoule de la prise au
bas du rasoir au cours du rinçage. C'est normal et
sans danger.
Nettoyer le rasoir en utilisant le dispositif
de nettoyage fourni.
Préparation du dispositif de nettoyage
Remplir le contenant à liquide nettoyant
transparent lors de la première utilisation du
dispositif de nettoyage ou quand le contenant est
presque vide. Le niveau de liquide est visible à
l'avant et sur les côtés du dispositif de nettoyage.
FRANÇAIS 27

Si vous utilisez le dispositif de nettoyage tous les
jours, vous devrez remplir le contenant de liquide
nettoyant environ une fois par mois.
C
1 Retirer le contenant à liquide nettoyant du
dispositif de nettoyage.
C
2 Retirer le bouchon doseur du contenant.
3 Dévisser le bouchon du flacon de liquide
nettoyant, retirer le sceau hermétique et
revisser le bouchon sur la bouteille.
4 Remplir le contenant de liquide nettoyant
HQ200 et bien revisser le bouchon du
contenant.
C
5 Placer le contenant à liquide nettoyant sur
le dispositif de nettoyage, de façon que le
haut et l'avant du contenant s'alignent avec
le boîtier du dispositif.
B
Le liquide nettoyant est distribué
automatiquement à la cuve nettoyante grâce à un
mécanisme spécial du bouton doseur.
C
6 Brancher la prise d'alimentation dans le
dispositif de nettoyage
Le support se place automatiquement en position
haute.
Le dispositif de nettoyage est maintenant prêt à
être utilisé.
FRANÇAIS28

Utiliser le dispositif de nettoyage
1 Placer le rasoir sur le support et le fixer
en position en poussant le levier au
maximum vers le bas.
Le voyant de charge du dispositif de nettoyage
commence à clignoter pour indiquer que le rasoir
est en charge.
C
2 Appuyer sur le bouton Start pour faire
démarrer le programme de nettoyage.
Le voyant de nettoyage commence à clignoter et
le rasoir est abaissé automatiquement dans le
liquide nettoyant.
Pendant le programme de nettoyage, qui dure
environ 1 heure, le voyant de nettoyage clignote
en continu.
Au cours de la première phase du programme de
nettoyage, le rasoir s'allume et s'éteint
automatiquement à plusieurs reprises, et change
de position plusieurs fois.
Au cours de la seconde phase du programme de
nettoyage, le rasoir est en position de séchage
jusqu'à la fin du programme. Le voyant de
nettoyage reste allumé en permanence.
À la fin du programme de nettoyage, le rasoir
revient à sa position initiale et le programme de
charge démarre. Le voyant de charge se met à
clignoter.
FRANÇAIS 29

B
Si vous appuyez sur le bouton « Start » ou si
vous soulevez le levier pendant le nettoyage, le
programme de nettoyage s'interrompra et sera
prêt à redémarrer. Dans ce cas, le voyant de
nettoyage cessera de clignoter et le support
reprendra sa position initiale.
B
Si la prise d'alimentation est retirée de la prise
murale pendant le programme de nettoyage, le
support restera dans sa position. Quand vous
rebrancherez l'appareil dans la prise murale, le
support se replacera en position haute.
C
◗ Quand le voyant de nettoyage s'allume de
façon continue, c'est que le rasoir est propre.
◗ Si le rasoir a aussi besoin d'être chargé, vous
pouvez tout simplement le laisser dans
l'appareil une fois le nettoyage terminé.
Lavage du dispositif de nettoyage
◗ Le contenant à liquide nettoyant et la cuve
nettoyante ne vont pas au lave-vaisselle.
◗ Laver le dispositif de nettoyage toutes les
deux semaines.
C
1 Appuyer en même temps sur les boutons
des deux côtés du dispositif de nettoyage
(1) et soulever le dispositif de nettoyage
de la cuve nettoyante (2).
La cuve nettoyante est ainsi séparée du dispositif
de nettoyage.
C
2 Vider la cuve nettoyante du liquide
nettoyant restant.
FRANÇAIS30

Vous pouvez tout simplement vider le liquide
nettoyant dans le lavabo.
C
3 Laver la cuve nettoyante en la passant sous
l'eau courante.
C
4 Placer avec soins le dispositif de nettoyage
sur la cuve nettoyante.
Veiller à ce que les boutons de dégagement
reprennent leur place.
5 Laver le dispositif de nettoyage avec un
linge humide.
Nettoyage du rasoir sous le robinet
1 Éteindre le rasoir et retirer la prise
d'alimentation de la prise murale et du
rasoir.
C
2 Appuyer sur le bouton de dégagement
pour ouvrir la tête du rasoir.
C
3 Nettoyer la tête du rasoir et le
compartiment de récupération des poils
en les rinçant à l'eau chaude.
C
◗ Bien nettoyer l'intérieur et l'extérieur de la
tête du rasoir.
4 Fermer la tête du rasoir et enlever l'excès
d'eau.
FRANÇAIS 31

Ne jamais sécher la tête du rasoir avec une
serviette ou un mouchoir en papier car cela
pourrait endommager les têtes de rasage.
C
5 Ouvrir de nouveau la tête du rasoir et la
laisser ouverte jusqu'à ce qu'elle sèche
complètement.
Vous pouvez également nettoyer le
compartiment de récupération des poils en
utilisant la brosse fournie.
Nettoyage du rasoir à l'aide de la brosse
fournie
Têtes de rasage
C
1 Ouvrir la tête du rasoir, tourner le verrou
dans le sens anti-horaire (1) et retirer la
bague de maintien (2).
C
2 Nettoyer les lames et les dresse-poils avec
la brosse fournie.
Ne pas nettoyer plus d'une lame et d'un dressepoils à la fois, car ils sont groupés par jeux. Si vous
mélangez accidentellement les lames et les
dresse-poils, il pourra vous falloir plusieurs
semaines avant d'obtenir de nouveau un rasage
optimal.
C
3 Remettre les têtes de rasage puis la bague
de maintien dans la tête du rasoir.Tourner
le verrou dans le sens horaire.
FRANÇAIS32

4 Fermer la tête du rasoir.
Nettoyage du taille-favoris
Nettoyer le taille-favoris après chaque utilisation
1 Éteindre le rasoir et retirer la prise
d'alimentation de la prise murale et du
rasoir.
C
2 Nettoyer le taille-favoris avec la brosse
fournie.
C
3 Lubrifier les lames du taille-favoris avec
une goutte d'huile pour machine à coudre
tous les six mois.
Rangement
C
◗ Mettre le couvercle de protection sur le
rasoir pour éviter les dégâts.
C
◗ Ranger le rasoir dans son étui ou le placer sur
le dispositif de nettoyage.
FRANÇAIS 33

Remplacement
Remplacer les têtes de rasage tous les deux ans
pour un résultat optimal.
Remplacez les têtes de rasage endommagées
ou usées uniquement par des têtes de rasage
Philips HQ9.
B
Ne pas mélanger les lames et les dresse-poils
pour un rasage optimal.
1 Éteindre le rasoir et retirer la prise
d'alimentation de la prise murale et du
rasoir.
2 Appuyer sur le bouton de dégagement
pour ouvrir la tête du rasoir.
C
3 Tourner le verrou dans le sens anti-horaire
(1) et retirer la bague de maintien (2).
C
4 Retirer les têtes de rasage et en placer de
nouvelles dans la tête du rasoir. Remettre
la bague de maintien dans la tête de rasoir
et tourner le verrou dans le sens horaire.
Veiller à ce que les saillies de la tête de rasage
s'imbriquent parfaitement dans les creux de la
tête du rasoir.
5 Fermer la tête du rasoir.
FRANÇAIS34
Accessoires
Les accessoires suivants sont offerts :
- Prise d'alimentation HQ8000
- Têtes de rasage Philips HQ9
- Nettoyant HQ110 pour têtes de rasage Philips
(en aérosol). N'est pas vendu au Canada.
- Adaptateur pour l'auto HQ8010
- Liquide de nettoyage Philips HQ200
Environnement
C
◗ Ne pas jeter les appareils avec les ordures
ménagères quand ils sont usés; il est
préférable de les déposer dans un point de
collecte officiel où ils seront recyclés.Vous
contribuerez ainsi à la protection de
l'environnement.
Rasoir
La pile rechargeable intégrée contient des
substances polluantes pour l'environnement.
Retirer la pile avant de jeter l'appareil. Ne pas
jeter la pile avec les ordures ménagères; il est
préférable de la déposer dans un point de
collecte officiel.Vous pouvez également rapporter
votre rasoir à un centre de service Philips où on
retirera la pile pour vous et où on se
débarrassera de l'appareil de façon écologique.
Élimination de la pile
Ne retirez la pile que si elle est complètement
vide.
FRANÇAIS 35
1 Retirer la prise d'alimentation de la prise
murale et du rasoir
C
2 Laisser le rasoir fonctionner jusqu'à ce
qu'il s'arrête automatiquement et défaire
les deux vis au dos de l'appareil.
C
3 Défaire les deux vis du compartiment de
récupération des poils.
C
4 Défaire les trois vis du bloc d'alimentation.
C
5 Plier les quatre crochets sur les côtés (1)
pour retirer le bloc d'alimentation (2).
Attention, les crochets sont très pointus.
C
6 Retirer le couvercle du bloc d'alimentation
au moyen d'un tournevis.
7 Retirer la pile.
Attention, les barrettes de connexion de la pile
sont très coupantes.
Ne pas rebrancher le rasoir une fois la pile
retirée.
FRANÇAIS36

Garantie et service
Si vous avez besoin de renseignements ou si vous
avez un problème, veuillez visiter le site Web de
Philips à l'adresse www.philips.com ou
communiquer avec le centre d'assistance à la
clientèle Philips (vous trouverez le numéro de
téléphone dans le feuillet sur la garantie à l'échelle
mondiale). S'il n'y a pas de centre d'assistance à la
clientèle dans votre pays, communiquez avec le
détaillant de produits Philips de votre région ou
avec le service d'entretien de Philips Domestic
Appliances and Personal Care.
Résolution de problèmes
1 Rasage moins efficace
B
Cause 1 : les têtes de rasages sont sales. Le
rasoir n'a pas été rincé assez longtemps ou bien
l'eau utilisée n'était pas assez chaude.
◗ Nettoyer le rasoir complètement avant de
continuer à vous raser.Voir la section
Nettoyage et entretien.
B
Cause 2 : de longs poils obstruent les têtes de
rasage.
◗ Nettoyer les lames et les dresse-poils à l'aide
de la brosse fournie.Voir la section Nettoyage
et entretien, rubrique tous les six mois : têtes
de rasage.
FRANÇAIS 37

B
Cause 3 : les têtes de rasage sont endommagées
ou usées.
◗ Remplacer les têtes de rasage.Voir section
Remplacement.
2 Le rasoir ne fonctionne pas lorsque
j'appuie sur le bouton On/off.
B
Cause 1 : la pile est à plat.
◗ Recharger la pile.Voir section Chargement.
B
Cause 2 : l'appareil n'est pas branché.
◗ Brancher la prise d'alimentation dans la prise
murale.
3 La tête de rasoir s'est détachée de
l'appareil.
B
La tête de rasoir n'a pas été placée correctement.
C
◗ Si la tête de rasoir se détache du rasoir, vous
pouvez facilement la remettre en place en
insérant la charnière dans la fente ménagée
dans la bordure du compartiment de
récupération des poils et la mettre en place
en poussant jusqu'à ce que vous entendiez un
clic.
4 Le rasoir n'est pas complètement propre
après utilisation du dispositif de nettoyage.
FRANÇAIS38

B
Cause 1 : le liquide nettoyant dans la cuve
nettoyante est peut-être sale.
◗ Vider et rincer la cuve nettoyante.
B
Cause 2 : le niveau du liquide nettoyant est peutêtre trop bas.
C
◗ Le niveau du liquide nettoyant est visible sur
les deux côtés du dispositif de nettoyage. Si le
niveau du liquide est trop bas,remplir le
contenant à liquide nettoyant. (Voir la section
Nettoyage et entretien.)
5 Le dispositif de nettoyage ne fonctionne
pas quand j'appuie sur le bouton Start.
B
Cause 1 : il est possible que le dispositif de
nettoyage ne soit pas branché.
◗ Brancher la prise d'alimentation dans la prise
murale.
B
Cause 2 : il pourrait ne pas y avoir de connexion
électrique entre le dispositif de nettoyage et le
rasoir.
◗ Soulever le levier et l'abaisser de nouveau
jusqu'à ce que le voyant de charge commence
à clignoter.
6 Une mousse importante se forme dans la
cuve nettoyante du dispositif de nettoyage.
FRANÇAIS 39

B
Cause : il se peut que le niveau du liquide
nettoyant soit trop bas.
◗ Le niveau du liquide nettoyant est visible des
deux côtés du dispositif de nettoyage. Si le
niveau du liquide est trop bas,remplir le
contenant à liquide nettoyant. (Voir la section
Nettoyage et entretien.)
FRANÇAIS40

41

42
4222 002 46543
 Loading...