


ENGLISH 4
FRANÇAIS 15
HQ7390, HQ7380, HQ7363, HQ7360

4
ENGLISH
Introduction
Congratulations on your purchase and welcome
to Philips! To fully benet from the support that
Philips offers, register your product at www.philips.
com/welcome.
Important
Read this user manual carefully before you use the
appliance and save it for future reference.
Danger
- Make sure the adapter does not get wet.
Warning
- The adapter contains a transformer. Do not cut
off the adapter to replace it with another plug, as
this causes a hazardous situation.
- This appliance is not intended for use by persons
(including children) with reduced physical, sensory
or mental capabilities, or lack of experience
and knowledge, unless they have been given
supervision or instruction concerning use of the
appliance by a person responsible for their safety.
- Children should be supervised to ensure that they
do not play with the appliance.
Caution
- Do not use the shaver or the adapter if it is
damaged.
- Only use the adapter supplied.
- If the adapter is damaged, always have it replaced
with one of the original type in order to avoid a
hazard.
- Charge, use and store the shaver at a temperature
between 5°C and 35°C.
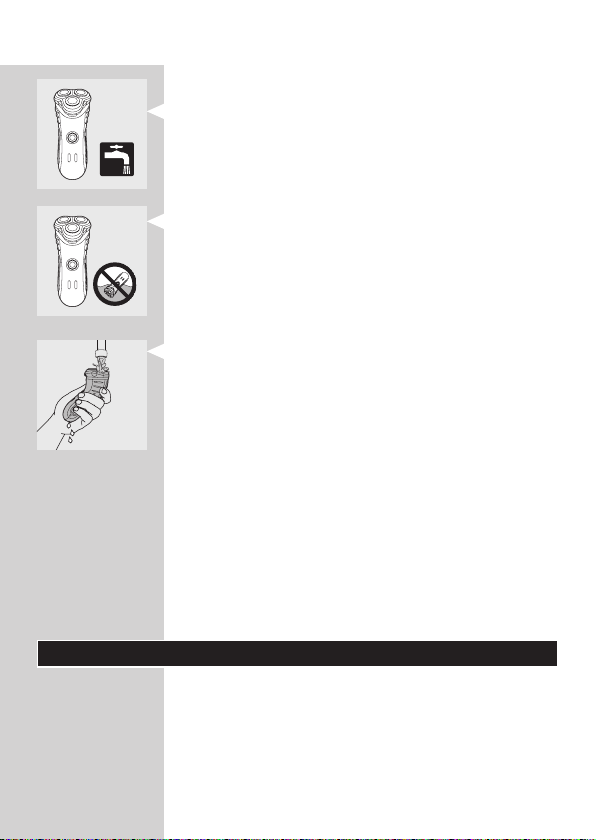
- Always unplug the shaver before you clean it
under the tap.
ENGLISH 5
- Be careful with hot water. Always check if the
water is not too hot, to avoid burning your hands.
- The appliance complies with the internationally
approved IEC safety regulations and can be safely
cleaned under the tap.
- This washable shaver is not suitable for shaving in
the shower.
- Do not immerse the shaver in water.
- Water may leak from the socket at the bottom
of the appliance when you rinse it. This is normal
and not dangerous because all electronics are
enclosed in a sealed power unit inside the shaver.
General
- The adapter transforms 100-240 volts to a safe
low voltage of less than 24 volts.
Electromagnetic elds (EMF)
This Philips appliance complies with all standards
regarding electromagnetic elds (EMF). If handled
properly and according to the instructions in this
user manual, the appliance is safe to use based on
scientic evidence available today.
Charging
Make sure the appliance is switched off before you
start to charge it.
When you charge the shaver for the rst time
or after a long period of disuse, let it charge
continuously for at least 12 hours, for instance
overnight.
ENGLISH6
Charging normally takes 1 hour.
You can also shave without charging by connecting
the shaver to the mains.
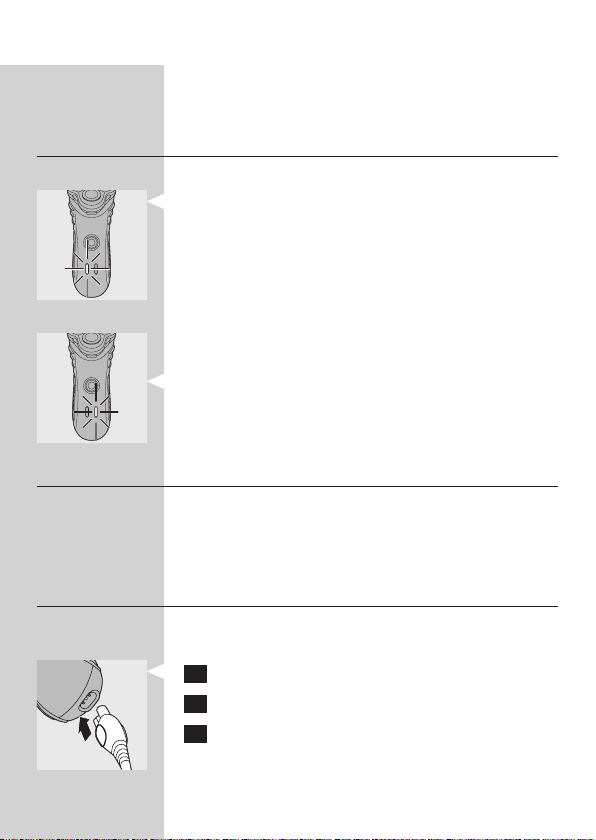
Charge indications
Charging
- When you start charging the empty shaver, the
charging light goes on.
Battery fully charged
- When the battery is fully charged, the charging
light starts ashing.
When you unplug the shaver, the charging light goes
out.
Battery running low
- When the battery is running low, the battery-low
light goes on.
When you switch off the shaver, this light ashes a
few times.
Cordless shaving time
After having been charged for 6 minutes, the battery
contains enough energy for one shave.
When the shaver is fully charged, it has a cordless
shaving time of up to 35 minutes.
Charging the appliance
Charge the shaver when the battery-low light goes
on.
1 Put the appliance plug in the shaver.
2 Put the adapter in the wall socket.
3 Remove the adapter from the wall socket and
pull the appliance plug out of the shaver when
the battery is fully charged.
ENGLISH 7
Using the appliance
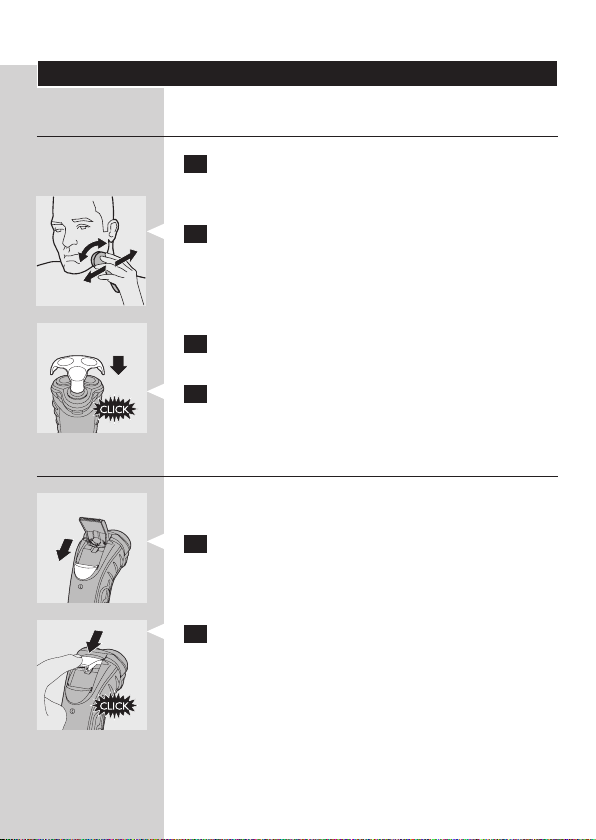
Shaving
1 Press the on/off button once to switch on the
shaver.
, The power-on lights go on.
2 Move the shaving heads quickly over your skin.
Make both straight and circular movements.
Shaving on a dry face gives the best results.
Your skin may need 2 or 3 weeks to get accustomed
to the Philips shaving system.
3 Clean the shaver (see chapter ‘Cleaning and
maintenance’).
4 Put the protection cap on the shaver every
time you have used it, to prevent damage to
the shaving heads.
Trimming
You can use the trimmer to groom your sideburns
and moustache.
1 Push the slide downwards to open the
trimmer.
The trimmer can be activated while the motor is
running.
2 Close the trimmer after trimming (‘click’).
ENGLISH8
Cleaning and maintenance
Regular cleaning guarantees better shaving
performance.
Be careful with hot water. Always check if the
water is not too hot, to avoid burning your hands.
Note: Water may leak from the socket at the bottom of
the appliance when you rinse it. This is normal and not
dangerous.
Every day: shaving unit and hair chamber
1 Switch off the shaver, remove the adapter from
the wall socket and pull the appliance plug out
of the shaver.
2 Press the release button to open the shaving
unit.
3 Rinse the hair chamber and the inside of the
shaving unit under a hot tap for some time.
4 Rinse the outside of the shaving unit.
5 Close the shaving unit and shake off excess
water.
Never dry the shaving unit with a towel or tissue,
as this may damage the shaving heads.
ENGLISH 9
6 Open the shaving unit again and leave it open
to let the appliance dry completely.
You can also clean the hair chamber without water
by using the brush supplied.
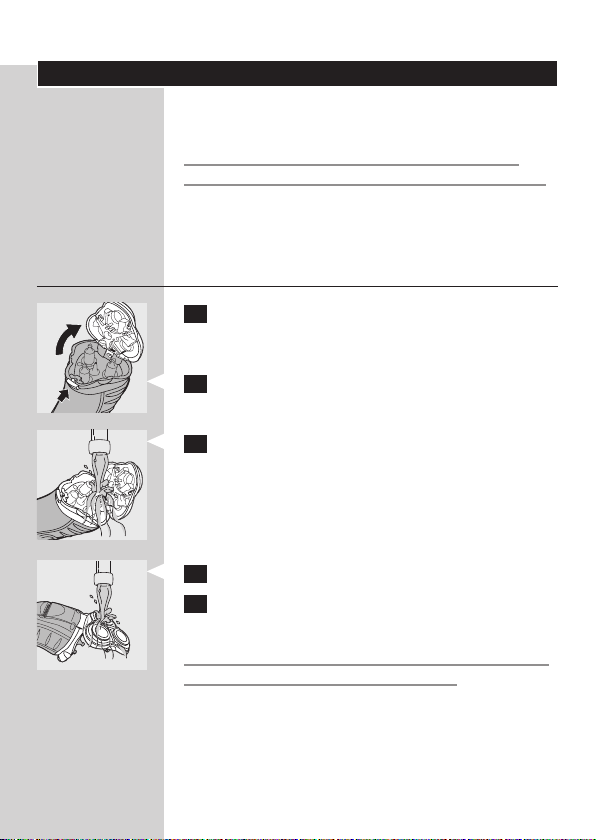
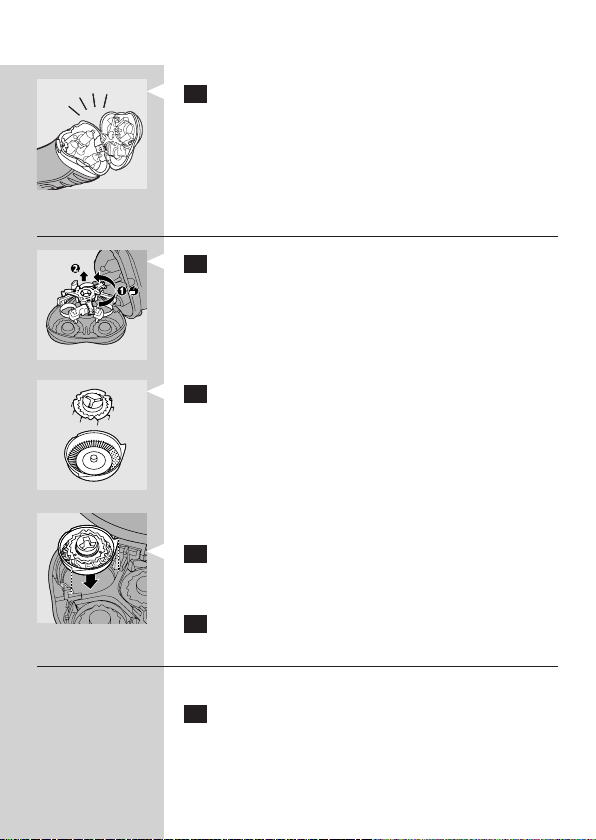
Every six months: shaving heads
1 Press the release button to open the shaving
unit, turn the lock anticlockwise (1) and
remove the retaining frame (2).
2 Clean the cutters and guards with the brush
supplied.
Note: Do not clean more than one cutter and guard
at a time, since they are all matching sets. If you
accidentally mix up the cutters and guards, it may take
several weeks before optimal shaving performance is
restored.
3 Put the shaving heads back into the shaving
unit. Put the retaining frame back into the
shaving unit and turn the lock clockwise.
4 Close the shaving unit.
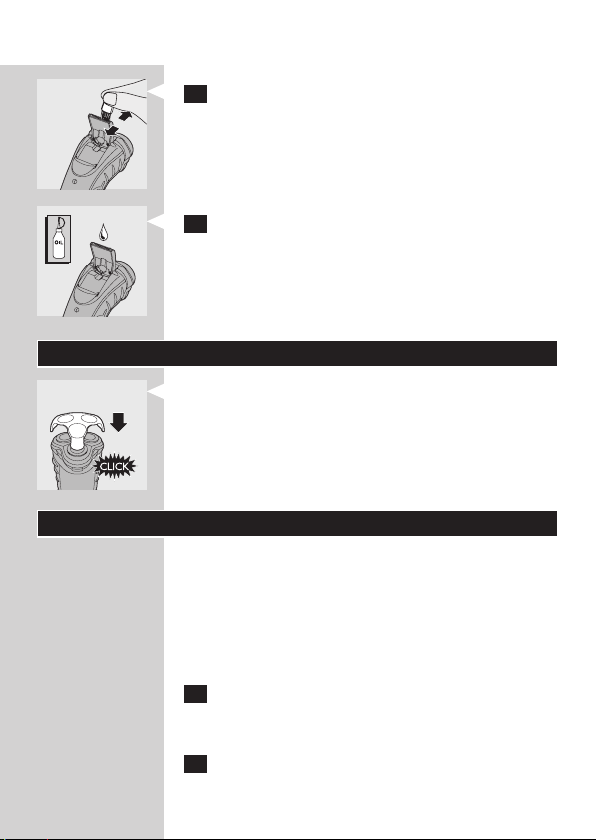
Trimmer
Clean the trimmer every time you have used it.
1 Switch off the shaver, remove the adapter from
the wall socket and pull the appliance plug out
of the shaver.
ENGLISH10
2 Clean the trimmer with the brush supplied.
3 Lubricate the trimmer teeth with a drop of
sewing machine oil every six months.
Storage
- Put the protection cap on the shaver to prevent
damage to the shaving heads.
Replacement
Replace the shaving heads every two years for
optimal shaving results.
Replace damaged or worn shaving heads with HQ8
Philips shaving heads only.
Note: Do not mix up the cutters and the guards to
guarantee optimal shaving performance.
1 Switch off the shaver, remove the adapter from
the wall socket and pull the appliance plug out
of the shaver.
2 Press the release button to open the shaving
unit.

ENGLISH 11
3 Turn the lock anticlockwise (1) and remove the
retaining frame (2).
4 Remove the shaving heads and place new ones
in the shaving unit. Put the retaining frame
back into the shaving unit and turn the lock
clockwise.
Make sure that the projections of the shaving
heads t exactly into the recesses.
5 Close the shaving unit.
Accessories
The following accessories are available:
- HQ8500/HQ8000 adapter.
- HQ8 Philips Shaving Heads.
- HQ110 Philips Shaving Head Cleaning Spray.
- HQ8010 car cord.
Note: Some accessories may not be available in all
countries. Contact the Consumer Care Centre in your
country about the availability of the accessories.
Environment
- Do not throw away the appliance with the normal
household waste at the end of its life, but hand
it in at an ofcial collection point for recycling. By
doing this, you help to preserve the environment.

ENGLISH12
- The built-in rechargeable lithium-ion (Li-ion)
battery contains substances that may pollute the
environment. Always remove the battery before
you discard and hand in the appliance at an ofcial
collection point. Dispose of the battery at an
ofcial collection point for batteries. If you have
trouble removing the battery, you can also take
the appliance to a Philips service centre. The staff
of this centre will remove the battery for you and
will dispose of it in an environmentally safe way.
Removing the rechargeable battery
Only remove the rechargeable battery if it is
completely empty.
1 Remove the adapter from the wall socket and
pull the appliance plug out of the shaver.
2 Let the shaver run until it stops, undo the two
screws in the hair chamber and remove it.
3 Undo the two screws at the back of the shaver
and remove the back panel of the housing.
4 Pull the side panels off the sealed power unit.

ENGLISH 13
5 Undo the three screws in the sealed power
unit.
6 Remove the back panel of the sealed with a
screwdriver.
7 Remove the rechargeable battery.
Be careful, the battery strips are very sharp.
Do not connect the shaver to the mains again after
you have removed the battery.
Guarantee & service
If you need service or information or if you
have a problem, please visit the Philips website at
www.philips.com or contact the Philips Consumer
Care Centre in your country (you nd its phone
number in the worldwide guarantee leaet). If there
is no Consumer Care Centre in your country, go to
your local Philips dealer.
Guarantee restrictions
The shaving heads (cutters and guards) are not
covered by the terms of the international guarantee
because they are subject to wear.
Troubleshooting
1 Reduced shaving performance.
Cause 1: the shaving heads are dirty. You have not
rinsed the shaver long enough or the water you
used was not hot enough.

ENGLISH14
- Clean the shaver thoroughly before you continue
shaving. See chapter ‘Cleaning and maintenance’.
Cause 2: long hairs obstruct the shaving heads.
- Clean the cutters and guards with the brush
supplied. See chapter ‘Cleaning and maintenance’,
section ‘Every six months: shaving heads’.
Cause 3: the shaving heads are damaged or worn.
- Replace the shaving heads. See chapter
‘Replacement’.
2 The shaver does not work when I press the
on/off button.
Cause 1: the rechargeable battery is empty.
- Recharge the appliance. See chapter ‘Charging’.
Cause 2: the appliance is not connected to the
mains.
- Put the adapter in the wall socket.
3 The shaving unit has come off the shaver.
The shaving unit has not been placed correctly.
- If the shaving unit becomes detached from the
shaver, you can easily put it back by inserting the
hinge into the slot in the rim of the hair chamber
and pushing it home until it locks into place
(‘click’).

FRANÇAIS
Introduction
Félicitations pour votre achat et bienvenue dans
l’univers Philips ! Pour proter pleinement de
l’assistance Philips, enregistrez votre produit sur le
site à l’adresse suivante : www.philips.com/welcome.
Important
Lisez attentivement ce mode d’emploi avant d’utiliser
l’appareil et conservez-le pour un usage ultérieur.
Danger
- Veillez à ce que l’adaptateur n’entre pas en
contact avec de l’eau.
Avertissement
- L’adaptateur contient un transformateur. An
d’éviter tout accident, n’essayez pas de remplacer
la che de l’adaptateur.
- Cet appareil n’est pas destiné à être utilisé par
des personnes (notamment des enfants) dont les
capacités physiques, sensorielles ou intellectuelles
sont réduites, ou par des personnes manquant
d’expérience ou de connaissances, à moins que
celles-ci ne soient sous surveillance ou qu’elles
n’aient reçu des instructions quant à l’utilisation de
l’appareil par une personne responsable de leur
sécurité.
- Veillez à ce que les enfants ne puissent pas jouer
avec l’appareil.
Attention
- N’utilisez pas le rasoir ou l’adaptateur s’il est
endommagé.
- Utilisez exclusivement l’adaptateur fourni.
- Si l’adaptateur est endommagé, remplacez-le
toujours par un adaptateur de même type pour
éviter tout accident.
15

FRANÇAIS16
- Utilisez, chargez et conser vez le rasoir à une
température comprise entre 5 °C et 35 °C.
- Débranchez toujours le rasoir avant de le
nettoyer sous le robinet.
- Veillez à ce que l’eau ne soit pas trop chaude pour
ne pas vous brûler.
- Ce rasoir est conforme aux normes
internationales IEC et peut être nettoyé à l’eau en
toute sécurité.
- N’utilisez pas le rasoir lavable sous la douche.
- Évitez de plonger le rasoir dans l’eau.
- Lorsque vous rincez l’appareil, de l’eau peut
s’écouler par la prise inférieure. Ce phénomène
est normal et ne présente pas de danger car
toutes les pièces électroniques à l’intérieur du
rasoir sont protégées.
Général
- L’adaptateur transforme la tension de 100-240 V
en une tension de sécurité de moins de 24 V.
Champs électromagnétiques (CEM)
Cet appareil Philips est conforme à toutes les
normes relatives aux champs électromagnétiques
(CEM). Il répond aux règles de sécurité établies sur
la base des connaissances scientiques actuelles s’il
est manipulé correctement et conformément aux
instructions de ce mode d’emploi.
Charge
Assurez-vous que l’appareil est éteint avant de le
mettre en charge.

FRANÇAIS 17
Lorsque vous chargez le rasoir pour la première fois
ou si l’appareil n’a pas été utilisé pendant une longue
période, chargez-le au moins pendant 12 heures, par
exemple la nuit.
Une charge normale dure 1 heure.
Vous pouvez également vous raser sans charger le
rasoir au préalable, en le branchant directement sur
le secteur.
Informations relatives à la charge
Charge
- Lorsque vous commencez à charger le rasoir, le
voyant de charge s’allume.
Batterie entièrement chargée
- Lorsque la batterie est complètement chargée, le
voyant de charge se met à clignoter.
Lorsque vous débranchez le rasoir, le voyant de
charge s’éteint.
Batterie faible
- Lorsque le niveau de charge de la batterie est
insufsant, le voyant de batterie faible s’allume.
Lorsque vous arrêtez le rasoir, ce voyant clignote
plusieurs fois.
Autonomie de rasage
Après une charge de 6 minutes, l’appareil est
sufsamment chargé pour une séance de rasage.
Après une charge complète, l’appareil a une
autonomie de rasage de 35 minutes environ.
Charge de l’appareil
Chargez l’appareil lorsque le voyant de batterie
faible s’allume.

FRANÇAIS18
1 Insérez la che dans le rasoir.
2 Branchez l’adaptateur sur la prise secteur.
3 Lorsque le rasoir est complètement chargé,
débranchez l’adaptateur de la prise secteur
avant de retirer la che du rasoir.
Utilisation de l’appareil
Rasoir
1 Mettez le rasoir en marche en appuyant sur le
bouton marche/arrêt.
, Le voyant d’alimentation s’allume.
2 Déplacez rapidement les têtes de rasage sur la
peau en effectuant des mouvements rectilignes
et circulaires.
Vous obtiendrez de meilleurs résultats de rasage sur
peau sèche.
Votre peau pourrait avoir besoin de 2 ou 3 semaines
pour s’habituer au système de rasage Philips.
3 Nettoyez le rasoir (voir le chapitre
« Nettoyage et entretien »).
4 Replacez le capot de protection sur le
rasoir après chaque utilisation pour éviter
d’endommager les têtes de rasoir.
Tondeuse
Vous pouvez utiliser la tondeuse pour tailler les
favoris et la moustache.

FRANÇAIS 19
1 Dégagez la tondeuse en faisant glisser le taquet
vers le bas.
La tondeuse peut être mise en marche pendant que
le moteur fonctionne.
2 Après utilisation, remettez la tondeuse en
place (clic).
Nettoyage et entretien
Nettoyez régulièrement l’appareil pour obtenir des
résultats de rasage optimaux.
Veillez à ce que l’eau ne soit pas trop chaude pour
ne pas vous brûler.
Remarque : Lorsque vous rincez l’appareil, de l’eau
peut s’écouler par la prise inférieure. Ce phénomène
est normal et ne présente aucun danger.
Nettoyage quotidien de l’unité de rasage et du compartiment à poils
1 Arrêtez le rasoir, débranchez l’adaptateur de la
prise secteur, puis retirez la che du rasoir.
2 Appuyez sur le bouton de déverrouillage pour
ouvrir l’unité de rasage.

FRANÇAIS20
3 Rincez le compartiment à poils et l’intérieur de
l’unité de rasage à l’eau chaude.
4 Rincez l’extérieur de l’unité de rasage.
5 Fermez l’unité de rasage et secouez le rasoir
pour en retirer l’eau.
Ne séchez jamais l’unité de rasage à l’aide d’une
serviette au risque d’endommager les têtes de
rasoir.
6 Ouvrez à nouveau l’unité de rasage et
laissez-la ouverte pour que le rasoir sèche
complètement.
Vous pouvez également nettoyer le compartiment à
poils à l’aide de la brosse fournie.
Nettoyage des têtes de rasoir tous les six mois
1 Appuyez sur le bouton de déverrouillage
pour ouvrir l’unité de rasage, faites tourner le
système de xation dans le sens inverse des
aiguilles d’une montre (1), puis retirez-le (2).
2 Nettoyez les lames et les grilles à l’aide de la
brosse fournie.
Remarque : Ne nettoyez qu’une lame et une grille à
la fois car elles sont assemblées par paires. Si vous
intervertissez les lames et les grilles, il pourrait falloir

FRANÇAIS 21
plusieurs semaines avant d’obtenir de nouveau un
rasage optimal.
3 Remontez les têtes de rasoir sur l’unité de
rasage, puis replacez-y le système de xation et
tournez dans le sens des aiguilles d’une montre.
4 Fermez l’unité de rasage.
Tondeuse
Nettoyez la tondeuse après chaque utilisation.
1 Arrêtez le rasoir, débranchez l’adaptateur de la
prise secteur, puis retirez la che du rasoir.
2 Nettoyez la tondeuse à l’aide de la brosse
fournie.
3 Tous les six mois, appliquez une goutte d’huile
pour machine à coudre sur la tondeuse.
Rangement
- Replacez le capot de protection sur le rasoir pour
éviter d’endommager les têtes de rasoir.
Remplacement
Pour obtenir un résultat de rasage optimal,
remplacez les têtes de rasoir tous les deux ans.

FRANÇAIS22
Remplacez les têtes de rasoir endommagées ou
usagées uniquement par des têtes de rasoir Philips
HQ8.
Remarque : Pour garantir des performances de rasage
optimales, n’intervertissez pas les lames et les grilles.
1 Arrêtez le rasoir, débranchez l’adaptateur de la
prise secteur, puis retirez la che du rasoir.
2 Appuyez sur le bouton de déverrouillage pour
ouvrir l’unité de rasage.
3 Faites tourner le système de xation dans le
sens inverse des aiguilles d’une montre (1), puis
retirez-le (2).
4 Retirez les têtes de rasoir usées et placez-en
de nouvelles dans l’unité de rasage. Remontez
le système de xation et faites-le tourner dans
le sens des aiguilles d’une montre.
Veillez à ce que les têtes de rasoir s’encastrent
parfaitement dans les encoches.
5 Fermez l’unité de rasage.
Accessoires
Les accessoires suivants sont disponibles :
- Adaptateur HQ8500/HQ8000
- Têtes de rasoir Philips HQ8
- Spray Philips de nettoyage des têtes de rasoir
HQ110
- Cordon pour voiture HQ8010
Remarque : Certains accessoires ne sont peut-être
pas disponibles dans tous les pays. Contactez le
Service Consommateurs de votre pays pour savoir si
ces accessoires sont disponibles.Environnement

FRANÇAIS 23
- Lorsqu’il ne fonctionnera plus, ne jetez pas
l’appareil avec les ordures ménagères, mais
déposez-le à un endroit assigné à cet effet, où il
pourra être recyclé. Vous contribuerez ainsi à la
protection de l’environnement.
- La batterie lithium-ion (Li-ion) rechargeable
intégrée contient des substances qui peuvent
nuire à l’environnement. Veillez à toujours retirer
la batterie avant de mettre l’appareil au rebut.
Déposez la batterie usagée à un endroit assigné
à cet effet. Si vous n’arrivez pas à retirer la
batterie, vous pouvez apporter l’appareil dans
un Centre Service Agréé Philips qui prendra
toute l’opération en charge pour préserver
l’environnement.
Retrait de la batterie rechargeable
Retirez la batterie rechargeable lorsqu’elle est
complètement déchargée.
1 Débranchez l’adaptateur de la prise secteur,
puis retirez la che du rasoir.
2 Laissez le rasoir fonctionner jusqu’à l’arrêt
complet du moteur, puis retirez les deux vis du
compartiment à poils.
3 Ôtez les deux vis à l’arrière de l’appareil et
retirez le panneau arrière du boîtier.
4 Retirez les panneaux latéraux du bloc
d’alimentation.

FRANÇAIS24
5 Retirez les trois vis du bloc d’alimentation.
6 Retirez le panneau arrière du bloc
d’alimentation à l’aide d’un tournevis.
7 Retirez la batterie rechargeable.
Soyez prudent car les languettes de la batterie sont
coupantes.
Ne branchez pas le rasoir sur le secteur après
avoir retiré la batterie.
Garantie et service
Si vous souhaitez obtenir des informations
supplémentaires ou faire réparer l’appareil, ou si
vous rencontrez un problème, rendez-vous sur le
site Web de Philips à l’adresse www.philips.com
ou contactez le Service Consommateurs Philips
de votre pays (vous trouverez le numéro de
téléphone correspondant sur le dépliant de
garantie internationale). S’il n’existe pas de
Service Consommateurs Philips dans votre pays,
renseignez-vous auprès de votre revendeur Philips
local.
Limites de la garantie
Étant susceptibles de s’user, les têtes de rasoir (lames
et grilles) ne sont pas couvertes par la garantie
internationale.

FRANÇAIS 25
Dépannage
1 Les résultats de rasage ne sont pas satisfaisants.
Cause 1 : les têtes de rasoir sont sales. Le rasoir n’a
pas été rincé sufsamment longtemps ou l’eau n’était
pas assez chaude.
- Nettoyez l’appareil à fond avant de continuer
à vous raser. Reportez-vous au chapitre
« Nettoyage et entretien ».
Cause 2 : des poils longs bloquent les têtes de rasoir.
- Nettoyez les lames et les grilles à l’aide de
la brosse fournie. Reportez-vous au chapitre
« Nettoyage et entretien », section « Nettoyage
des têtes de rasoir tous les six mois ».
Cause 3 : les têtes de rasoir sont endommagées ou
usées.
- Remplacez les têtes de rasoir. Reportez-vous au
chapitre « Remplacement ».
2 Le rasoir ne fonctionne pas lorsque j’appuie
sur le bouton marche/arrêt.
Cause 1 : la batterie rechargeable est vide.
- Rechargez l’appareil. Reportez-vous au chapitre
« Charge ».
Cause 2 : l’appareil n’est pas branché sur le secteur.
- Branchez l’adaptateur sur la prise secteur.
3 L’unité de rasage s’est détachée.
L’unité de rasage n’a pas été placée correctement.
- Si l’unité de rasage se détache du rasoir, vous
pouvez la remonter facilement : insérez la
charnière dans la fente située au bord du
compartiment à poils et appuyez jusqu’à ce qu’elle
s’enclenche (clic).

26
4222.002.5153.1
 Loading...