

Page 1
Get support at
http://www.philips.com/support/
http://philipshtv.supportsystem.com/
Installation Manual for StudioLine
xxHFL2869T
xxHFL2879T
(update of StudioLine Installation Manual for xxHFL2839/2849/2859)
Status: Final
Version: 1.0
Date: November 2017
Author: Gerrit Weiden
Page 2

1
Page 3

Contents
1. Requirements before starting the installation .......................................................................................................... 3
2. Find out the state of the TV ...................................................................................................................................... 6
3. Re-install TV .............................................................................................................................................................. 8
4. Installation wizard ................................................................................................................................................... 10
5. Picture ....................................................................................................................................................................................................... 14
6. Sound ......................................................................................................................................................................................................... 15
7. Settings ..................................................................................................................................................................................................... 17
8. Channel list .............................................................................................................................................................. 22
9. Media Browser ...................................................................................................................................................................................... 24
10. Professional Settings .......................................................................................................................................................................... 25
11. Welcome Logo ....................................................................................................................................................................................... 31
12. Clone........................................................................................................................................................................ 32
13. Feature settings .................................................................................................................................................................................... 36
14. CSM (Consumer Setup menu) .......................................................................................................................................................... 37
Appendix 1 ...................................................................................................................................................................... 38
Channel List Editor ....................................................................................................................................................................................... 38
Interface description and usage ............................................................................................................................................................. 39
Main window .................................................................................................................................................................. 39
Editing channel list ....................................................................................................................................................................................... 42
Limitations and constraints ...................................................................................................................................................................... 44
Import channel list to TV............................................................................................................................................................................ 44
2
Page 4
General remark:
For those new StudioLine products the UI (User Interface) is the same as for previous StudioLine products
(xxHFL2839 & xxHFL2849). Just the appearance is different. Following document shows the “old” appearance on
display whereas for the new products the selectable options in the different menus and the explanation stay the
same.
e.g.: appearance of the UI for xxHFL2839 & xxHFL2849
e.g.: appearance of the UI for xxHFL2859 & xxHFL2869 & xxHFL2879
3
Page 5
1. Requirements before starting the installation
Before starting the installation, make sure that you have everything you need at hand.
Master remote control 22AV8573 / 22AV9573A or Guest remote control 22AV1407A
and USB stick
To enter the Hotel TV menu using the guest remote (22AV1407A):
For all HFL2869/HFL2879 models you can use the guest remote and the key sequence 3,1,9,7,5,3,MUTE to access
the Hotel Mode. The key sequence will not work if High Security Mode is enabled.
To enter the Hotel TV menu using the master remote control (22AV8573/22AV9573A):
• Press the RC5 Setup key;
• Press the Home/Menu key;
Note:
The Home/Menu key on the master remote control (22AV8573/22AV9573A) will activate only the hotel menu,
navigation in this menu must be done with the guest remote (22AV1407A).
Note: Only 22AV9573A: for RC5 Guest and RC5 Setup Mode there are 2 submodes:
RC5 StudioLine mode
RC5 Philips mode
RC5 Guest and RC5 Setup mode are selected for StudioLine sets by default. The user can change RC5 submode by
pressing:
“1” + “A” at the same time for more than 4 seconds: RC5 StudioLine mode selected
“1” + “B” at the same time for more than 4 seconds: RC5 Philips mode selected
Exit Hotel TV Menu
Leaving the Hotel TV Menu after making the required settings, can be done using the master Remote Control
(22AV8573/22AV9573) or with the TV included standard Remote Control.
To exit the Hotel TV menu with master remote control:
• Press the RC5 Setup key;
• Press the Home/Menu key;
To exit the Hotel TV menu with standard RC:
4
Page 6

- Press the Menu key or
- Press the Return key
Note: On the bottom part of the screen the TV will display which buttons can help you to navigate and change the
options.
5
Page 7

Hotel TV menu is ON
Hotel TV menu is OFF
2. Find out the state of the TV
It is important to know if a TV is in ‘first time installation’ (out of the box) or installed before.
If you can see this screen below, you know that the TV is in ‘virgin mode’ and you can install the set. See chapter 4 of
this manual.
If you power on the set and then press the ‘Home’ button on the guest remote, you will see this screen appear, if the
TV already has been installed or the wizard was already skipped.
You can start the installation wizard again by reinstalling the TV as explained in chapter 3 of this manual. Please
disable the Hotel TV mode to be able to modify any settings on the TV.
6
Page 8
Disable the Hotel TV mode
To access the setup menu you should press the ‘RC5 SETUP’ key and then press the ‘Home/Menu’ button if you are
using the 22AV8573/22AV9573.
To access the Hotel TV menu using the guest remote you need to input the key sequence 3,1,9,7,5,3,MUTE .
You can use the guest remote to select with the up or down arrow buttons and change values with the left or right
arrow buttons. Set the Hotel TV Mode to OFF.
Press “MENU” or “Return” button to exit this menu.
Note: Setting Hotel mode to OFF will disable all features from the Menu.
7
Page 9
3. Re-install TV
If you want to start an installation from scratch you can always re-install the TV. First step is to set the Hotel Mode to
OFF and exit using the MENU or Return button on the guest remote.
Note: It is not required to use a save button, once you exit the menu, you will save the settings from the Hotel TV Menu
Press the MENU button on the guest remote to access the full menu of the TV. The following menu should be
displayed. Select the option “Install and Retune” (highlighted below)
Press “OK” to access the submenu.
Select the last option available “First time installation” and press “OK”. The TV asks for confirmation by showing the
following screen:
8
Page 10

If you are sure that you want to re-install the TV, select “Yes” and press OK.
TV will reboot itself and show the “virgin state” screens with a welcome message.
Note: All settings will be reset to default values except Hotel menu values. Those values will remain the same. To reset the Hotel
TV menu use the Reset to Default Values option present in that menu.
9
Page 11
1
2
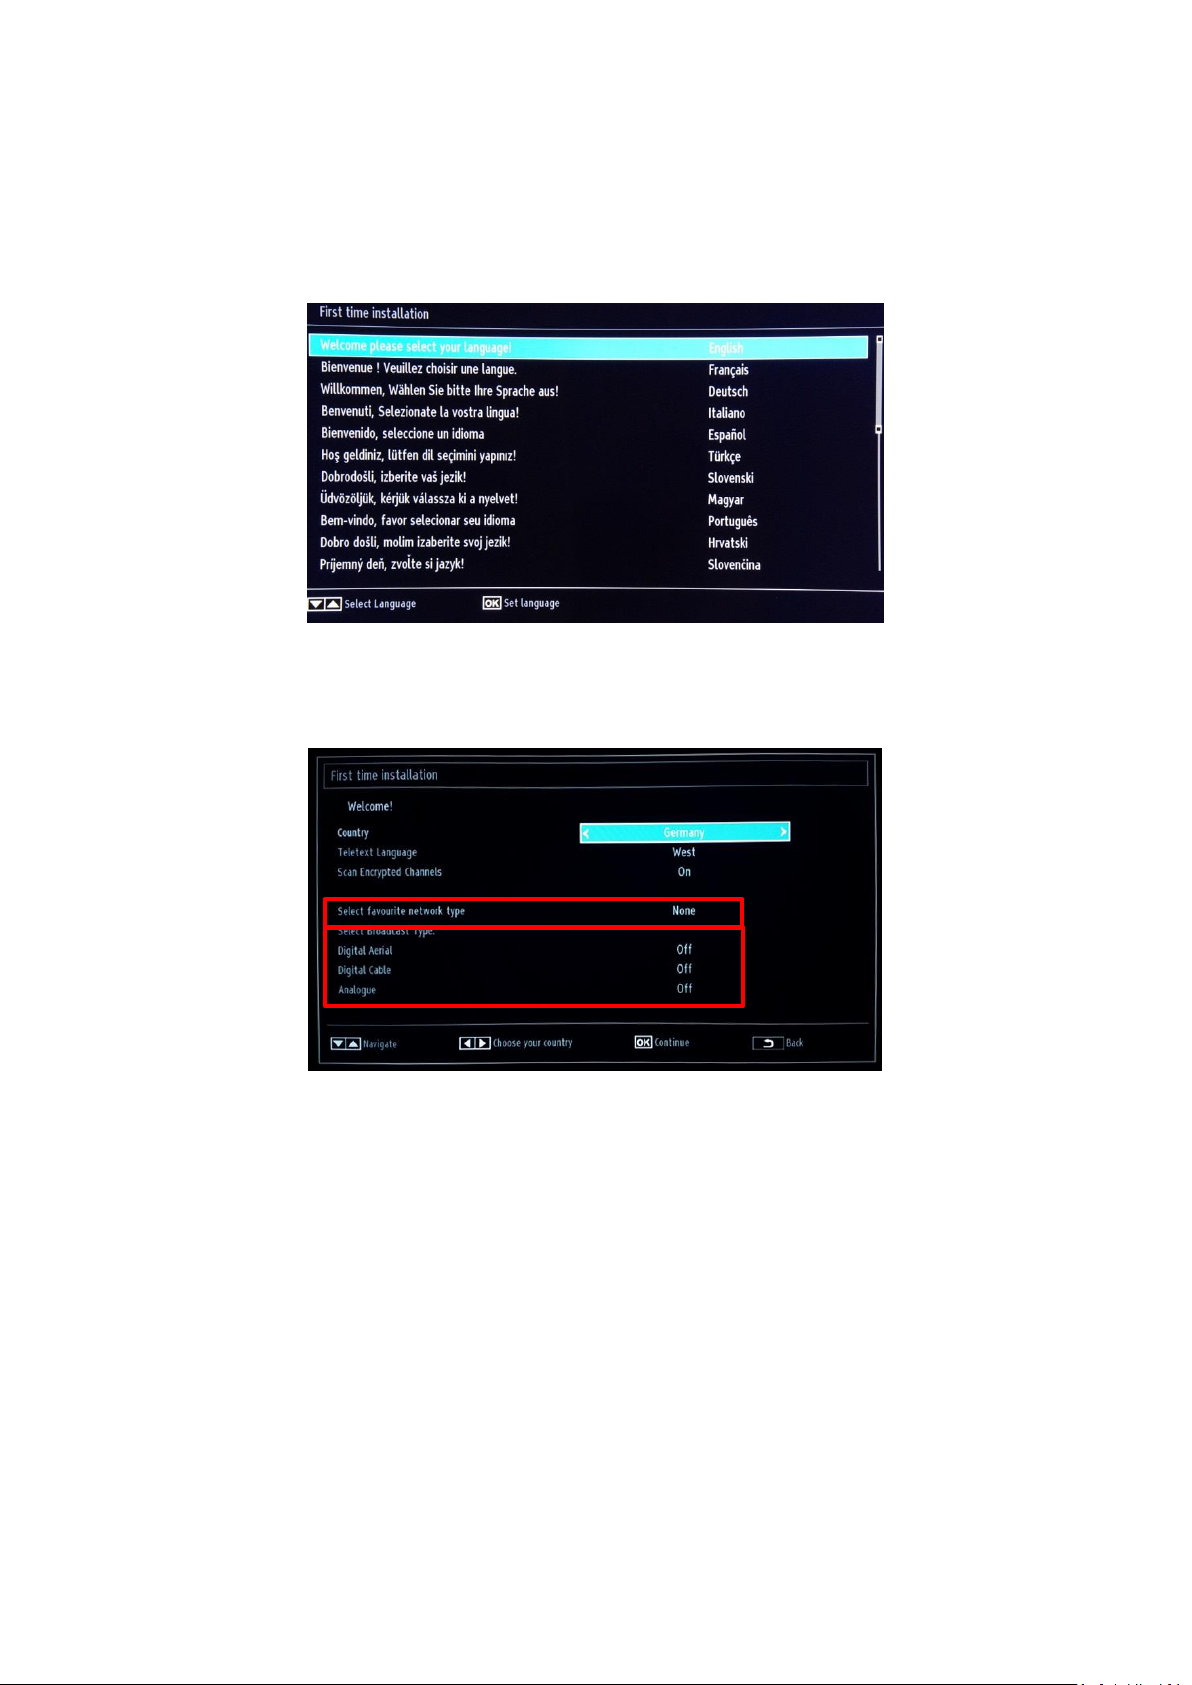
4. Installation wizard
When you turn on the TV for the first time, or you have reinstalled the TV, you should see the following screen. The
installation wizard, from whom this screen is a part, will guide you through all the menus for a basic TV installation.
Please select your language and press “OK” to start the installation of the TV set.
The first step is to select the country, which will enable country cable providers, time setting and channel list presets.
The next step is to select the “Teletext Language”, eg. west, east, cyrillic, etc.
“Scan Encrypted Channels” can be chosen between ON and OFF.
Further step is to select which kind of TV channel search you want to perform:
- Digital Cable: TV will search only for DVB-C channels
- Digital Aerial: TV will search only for DVB-T channels
- Analogue TV only: The TV will search only for analogue channels
Digital Aerial Installation
If you select the Digital AERIAL option in the Search Type screen, the TV set will search for digital terrestrial TV (DVB-
T) broadcasts.
NOTE: You can press the “MENU” button to cancel.
10
Page 12

After all the available stations are stored, the Channel List will be displayed on the screen. If you like to sort the
channels according to the LCN (*), please select “Yes” and then press OK.
Press the “MENU” button to quit the channel list and watch TV.
(*) LCN is the Logical Channel Number system that organizes available broadcasts in accordance with a recognizable channel sequence (if
available).
Digital Cable Installation
If you want to install DVB-C channels, select the “Digital CABLE” option and press the “OK” button on the remote
control to continue. To continue, please select “YES” and press “OK”. To cancel the operation, select “NO” and press
“OK”.
Analogue installation
Using this option TV will search for all available analogue TV channels and install them into a single list.
By using Part 1 “Select favorite network type” of the screen above it is possible to use a single search of network
types only, with : Digital Cable or Digital Aerial or Analogue.
By using Part 2 “Select Broadcast Type” of the screen above it is possible to use a combination of different channel
search: Digital Cable and / or Digital Aerial and / or Analogue.
Note: On the bottom part of the screen the TV will display which buttons can help you to navigate and change the
options.
Once you have set up the channel search, you can press “OK” to go to next step of the installation.
If you do not want to install any kind of channels, you can leave the settings to “OFF” / “NONE”
11
Page 13
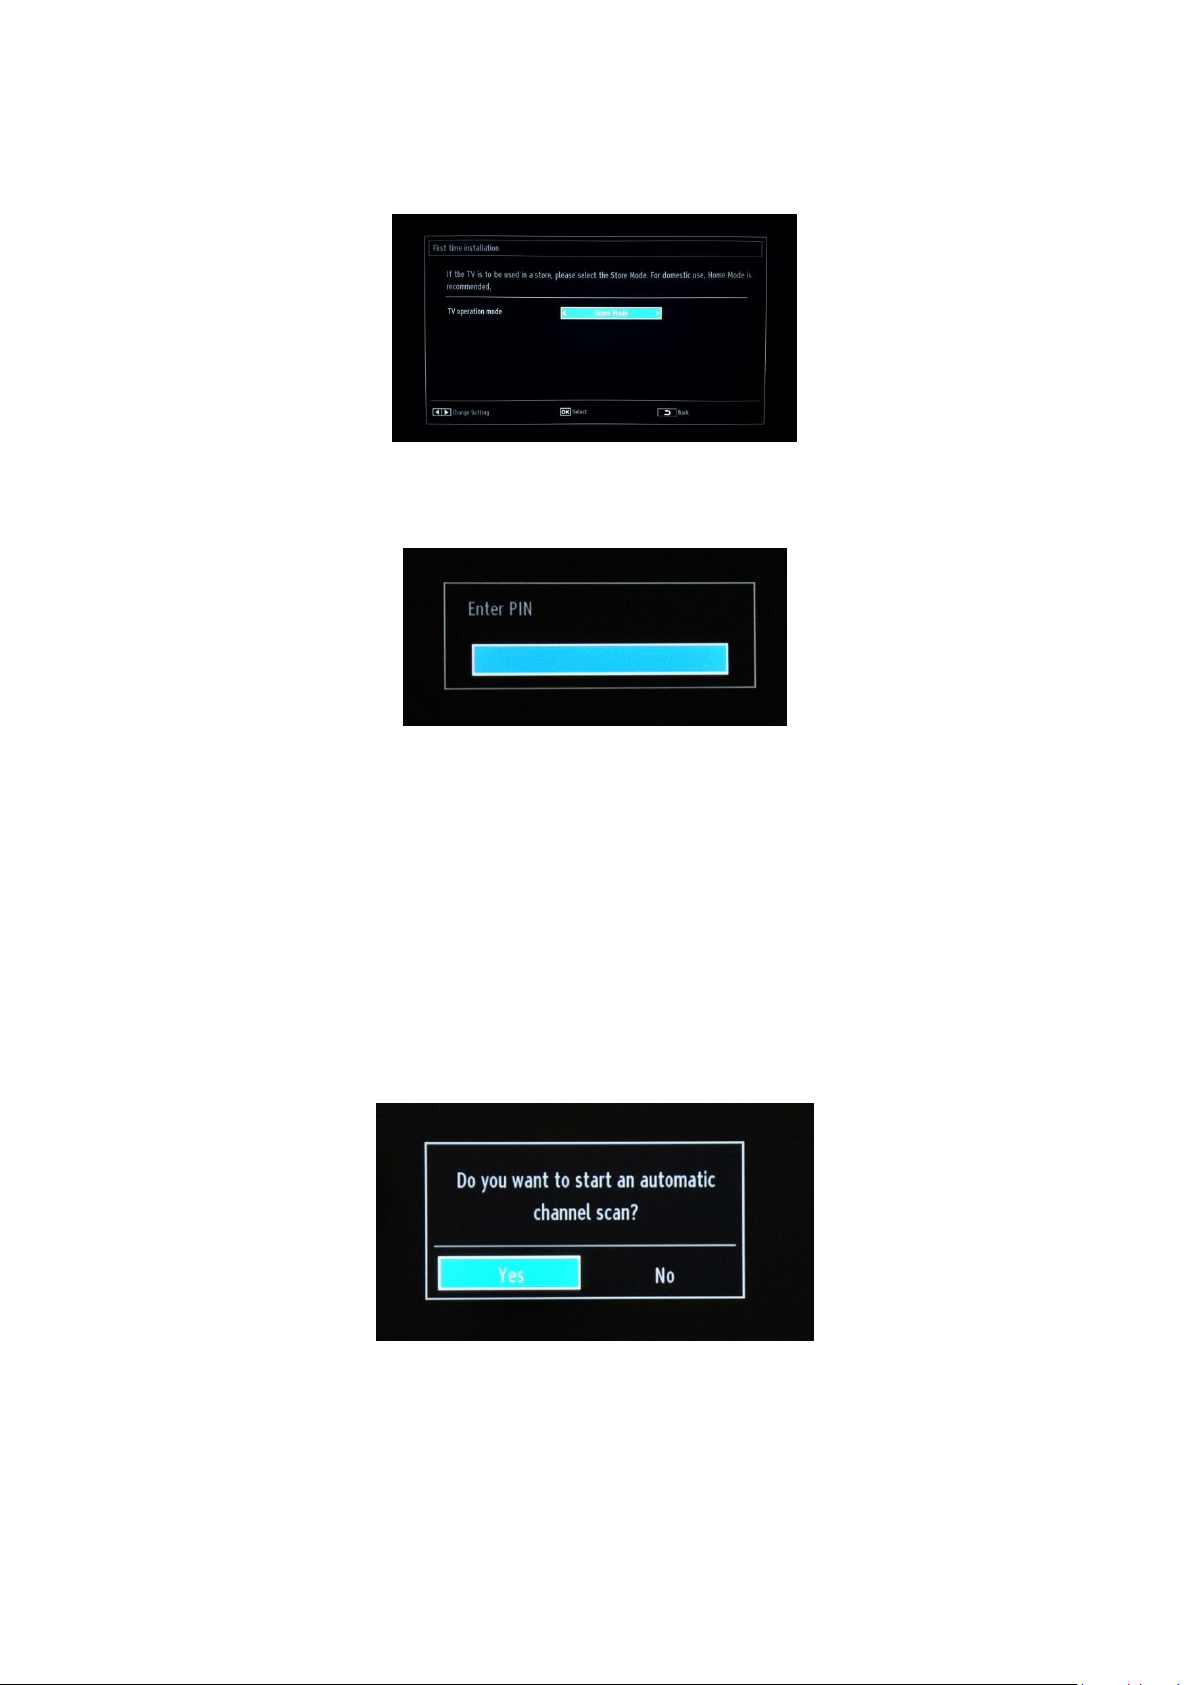
Always select the “Home Mode” and press OK to continue. “Store mode” will display banners with commercials
while running.
Depending on country you might need to follow an additional step, setting up a pin code. This pin code will be used
for blocking TV channels and settings.
In some cases due the country regulations, you have to provide a pin code formed from four digits. This pin code will
be required in case you want to modify the settings of the TV. Selected PIN code cannot be 0000. Enter a PIN code
and confirm it by entering it once more. Press the OK button to continue. If the two PIN codes match, your PIN code
will be set.
If later on you cannot remember your PIN code you can use Pin 4725.
WARNING:
When you are required to enter a PIN code for any menu operation, you should use the PIN that you have previously
defined during the first time installation.
Press “OK” to continue to the next screen, which will ask if you want to start an automatic channel scan.
Select “Yes” and press “OK” to continue. Select “No” if you do not want to install any channels.
12
Page 14

Only available while using selection of “First Time Installation”
You can select frequency ranges from this screen. For highlighting lines, use the “▼“or “▲” buttons. You can enter
the frequency range manually by using the numeric buttons on the remote control. Set the Start and Stop Frequency
as desired by using the numeric buttons on the remote control. After this operation, you can set the Search Step as
8000 KHz or 1000 KHz.
If you select 1000 KHz the search will take longer, since the TV needs to check more frequencies. Depending on your
Country selection in the first time installation, a 250 KHz search step option might be available on the Network
Channel Scan screen. Note that if you perform the search with 250 KHz option, the search process could take longer.
Press “OK” to start the installation process. During this progress the bar will fill and found channels will be added to
the list.
Note: If option Digital Aerial & Digital Cable option is selected (only during “First Time Installation”), when DVB-T
channel search is complete, you need to define the start frequency, end frequency and step for DVB-C channels. If you
don’t know those values, use the default ones and press “OK” to start the search.
When the automatic channel installation is complete, a similar summary like the below picture appears.
13
Page 15

Here you can move, edit or lock channels. The information bar displayed on the bottom part of the screen will guide
you through the options that you can use.
Now you can press “MENU” to exit the installation page or you can press the “OK” button to watch TV. Pressing the
MENU button will bring the MENU with all options active.
5. Picture
Note: this menu might not be available depending on the settings in the Hotel Mode menu.
Accessing the picture submenu will bring the following menu on the screen:
14
Page 16

The option which can be set:
- Mode: Can be set to one of these options: Cinema, Game, Sport, Dynamic and Natural.
- Contrast: Sets the difference between the brightest and darkest of the screen.
- Brightness: Sets the brightness value for the screen.
- Sharpness: Sets the sharpness value for the objects displayed on the screen.
- Color: Sets the color value, adjusting the colors.
- Energy Saving: Can be set to one of these options: Off, Custom, Auto, Maximum, Medium and Minimum.
- Backlight: This setting controls the backlight level and it can be set in a range of 0 to 100 (depending on the
setting of the MODE. Backlight function will be inactive if MODE is set to Cinema, Sport and Natural.
Backlight cannot be activated in VGA, Media Browser mode or while the picture mode is set to Eco.
- Advanced settings: Press “OK” and you will access the advanced options for the Picture menu.
- Reset: This option will reset all values for the picture setting to default.
Pressing the Return button will return you to the main menu. Pressing the MENU button will exit you from the
MENU.
6. Sound
Note: this menu might not be available depending on the settings in the Hotel Mode menu.
The sound options are available from the main menu:
15
Page 17

Select and press “OK” to access the submenu:
The options available are:
- Volume: Adjusts the volume level.
- Equalizer: In the equalizer menu, the preset can be changed to Music, Movie, Speech, Flat, Classic and User.
Press the “MENU” button to return to the previous menu. The equalizer menu settings can be changed
manually only when the Equalizer Mode is in “User” mode.
- Balance: This setting is used for emphasizing left or right speaker balance.
- Headphone: Sets headphone volume.
- Sound Mode: You can select Mono, Stereo, Dual I or Dual II mode, only if the selected channel supports that
mode.
- AVL: Automatic Volume Limiting (AVL) function sets the sound to obtain fixed output level between
programs (For instance, volume levels of advertisements tend to be louder than programs).
- Headphone/Lineout: Selects to have variable or constant level output on the headphone output. If Lineout
is selected then the headphone volume will not be controllable
- Dynamic Bass: Dynamic Bass: Press “◄“ or “►” button to set Dynamic Bass as on or off.
- Surround sound: Surround sound mode can be changed as On or Off.
- Digital Out: Sets digital out audio type.
Pressing the Return button you will return to the main menu. Pressing the MENU button you will exit from the
MENU.
16
Page 18

7. Settings
Note: this menu might not be available depending on the settings in the Hotel Mode menu.
The submenu can be access by pressing “OK” when this menu is highlighted.
The options available are:
- The Conditional Access: Controls conditional access modules when available.
- Language: Configures language settings (-may change depending on the country selected) Preferred and
current settings will be available.
- Parental: Configures parental settings including PIN code, Menu lock, Maturity Lock and Child Lock.
- Timers: Sets timers for selected programs. / Sets sleep timer to turn off the TV after a certain time. Sets also
the wakeup alarm
- Date/Time: Sets date and time.
Note:* The TV takes the time info via the broadcast. Correct time will be available on Date/Time Settings, if the time info is
provided in the broadcast. If the TV is in no channel mode, Date/Time settings can be changed. However, if there is a channel preset,
only “Time Settings Mode” can be changed and if this is set to Manual, Time Zone will be enabled.
* If the TV is switched to standby mode and switched on later and there is no broadcast available, time information will not
be updated. If there is a present broadcast; however, time information will be taken via the broadcast. In other words, time information
will be available according to these priorities: The TV first looks for the time info in the broadcast, then to the user preference, and
17
Page 19

Menu Timeout: The amount of time for displaying the
menu and can have different values OFF, 15 sec, 30 sec and
60 sec.
Software Upgrade: Press “OK” to access the menu where
you can disable or enable the Automatic scanning or trigger
a manual upgrade.
Note: If automatic scanning in Upgrade Options menu is
enabled, the TV wakes up at 03:00 and searches broadcast
channels for new software upgrade. If new software is found
and downloaded successfully, with the next power up the TV
starts with new software version. In a hotel the safe
approach will be to disable this option.
Application Version: Is the software version initially used
for certification.
Auto TV OFF: You can set the timeout value of auto off
feature. When the timeout value is reached and the TV is
not operated for selected time, the TV will go off.
Note: Auto switch OFF is an EU regulation for reducing the
power consumption.
Store mode: Banners with advertisements will be displayed
during normal operation of the TV. Feature only for shops.
Power Up Mode: Defines the behavior of the TV in case of
power cut.
Last state: When power is restored the TV will return to the
same state before power cut.
Standby: When power is restored the TV will go by default
to standby. This is recommended setting.
CEC: to Enable or Disable CEC control on HDMI
CEC Auto Power On: to Enable or Disable CEC control on
HDMI as Auto Power On
Speakers: to select sound reproduction via the TV or
Amplifier (via HDMI ARC)
Quick Standby: Enables or disables the quick standby mode.
Note: Quick Standby disabled is the default setting. This
setting will reduce the power consumption.
lastly to the teletext time information. In the Professional menu, one can also select a channel to synchronize the time for the Wakeup
time
- Sources: Enables or disables selected source options.
- Accessibility: Configures “Hard Of Hearing” and “Audio Description” (Refers to an additional narration track
for blind and visually impaired viewers of visual media, including television and movies.)
- More: (selecting “MORE” provides an extra menu:
18
Page 20

Digital Aerial: Searches and stores aerial DVB-T channels.
Digital Cable: Searches and stores cable DVB-C channels.
Analogue: Searches and stores analogue channels.
Install and Retune Menu Content all options related to channel installation.
Note: this menu is not visible when Hotel Mode is set to ON.
The menu contains options for automatic channel install, manual channel install, network scan, analog fine tune for
a better reception of the analog TV channels. The first time installation option will delete the TV channels and set all
settings to default values, except Hotel TV settings.
Automatic Channel Scan: Displays automatic tuning options available.
Note: Using any of this option will delete the current channel plan. If you are sure, select “Yes” and press “OK”
19
Page 21

Search Type: Type of the channel to install Digital Cable,
Digital Aerial or Analog
Frequency: Input for the frequency
Modulation: select the modulation type
Network channel scan: Enable or disable the network
scan
Signal quality & Signal Level:
These two options will show the quality and level of
signal received on the frequency defined above.
Manual Channel Scan: This feature can be used for direct broadcast
entry.
Network Channel Scan: Searches for the linked channels in the
broadcast system.
20
Page 22

Analogue Fine Tune: You can use this setting for fine tuning analogue
channels. This feature is not available if no analogue channels are
stored.
Export Channel List to USB: connect an USB device to the USB port of
the set. While pressing the OK button on the RC an XML File will be
copied to the USB. This XML file can be used for the CHANNEL EDITOR
program (see appendix 1)
Import Channel List from USB: import an (prepared) XML file from the
USB device
First Time Installation: Deletes all stored channels and settings, resets
the TV to factory settings and starts the first time installation. You can
follow the instructions in the Initial Installation section for more
information on this process.
21
Page 23

8. Channel list
Note: this menu is not visible when Hotel Mode is set to ON.
For channels options like: add/remove, edit name, lock/unlock or move you have to access the menu from the picture
below. Channel management can also be done with channel editor application available for PC. Check appendix 1 for
channel editor installation and usage.
Press “OK” for the submenu.
Note: If the following menu is not displayed in the menu, please go and disable the Hotel TV mode.
Edit channel list:
The channel list with all TV channels installed will be displayed.
With the up and down arrow buttons you can select the channel and with the left and right arrow buttons the
function which will be used for that channel.
To move a TV channel in the list you need to do something similar. Select the TV channel with the up or down arrow
buttons, and then press “OK”. The TV will display a new window in which you must select the next step.
22
Page 24

Watch: will display the current selected channel from
the channel list
Move: will open a new window to enter a new channel
number
Edit name: will open a new window to edit the name
of the channel
Lock/Unlock: will open a new window to lock or
unlock the current selected channel from the channel
list. The PIN is a 4-digit Code.
Add/Remove Favourites: will open a new window to
create 4 different kind of favorite lists.
23
Page 25

9. Media Browser
Note: this menu might not be available depending on the settings in the Hotel Mode menu.
You can play photo, music, and movie files stored on a USB disk by connecting it to your TV. Connect a USB drive to
the USB input located on the side of the TV. TV will read the content and provide an option to browse the USB drive.
In Media Browser setting the following items are available: Videos, Photos, Music, All and Settings.
Files which can be played by the TV will be displayed inside the category. If the file is not available in none of the
category it means that file is not supported by the TV.
You can set your Media Browser preferences by using the Settings Menu.
The “Settings Menu” of the Media Browser contains:
View style: select “Flat” or “Folder”
Setting “Flat”: Flat view style displays all files in removable device.
Setting “Folder”: Folder view style displays files in selected folder.
Slideshow Interval: select in steps of 5 sec. (max. 30 sec.) in which frequency a slideshow of pictures should progress
Show Subtitle: Enable or Disable the subtitle option
Auto Play: Enable or Disable the USB Auto Play
Subtitle language: Select the language for the subtitles
Subtitle position: Select the position of the subtitle between “Up” and “Down”
Subtitle Font Size: Choose the font size of the subtitle
IMPORTANT! Back up your files before making any connections to the TV. The manufacturer will not be responsible
for any file damage or data loss. Certain types of USB devices, for example, MP3 players or USB hard disk
drives/memory sticks may not be compatible with this TV.
24
Page 26

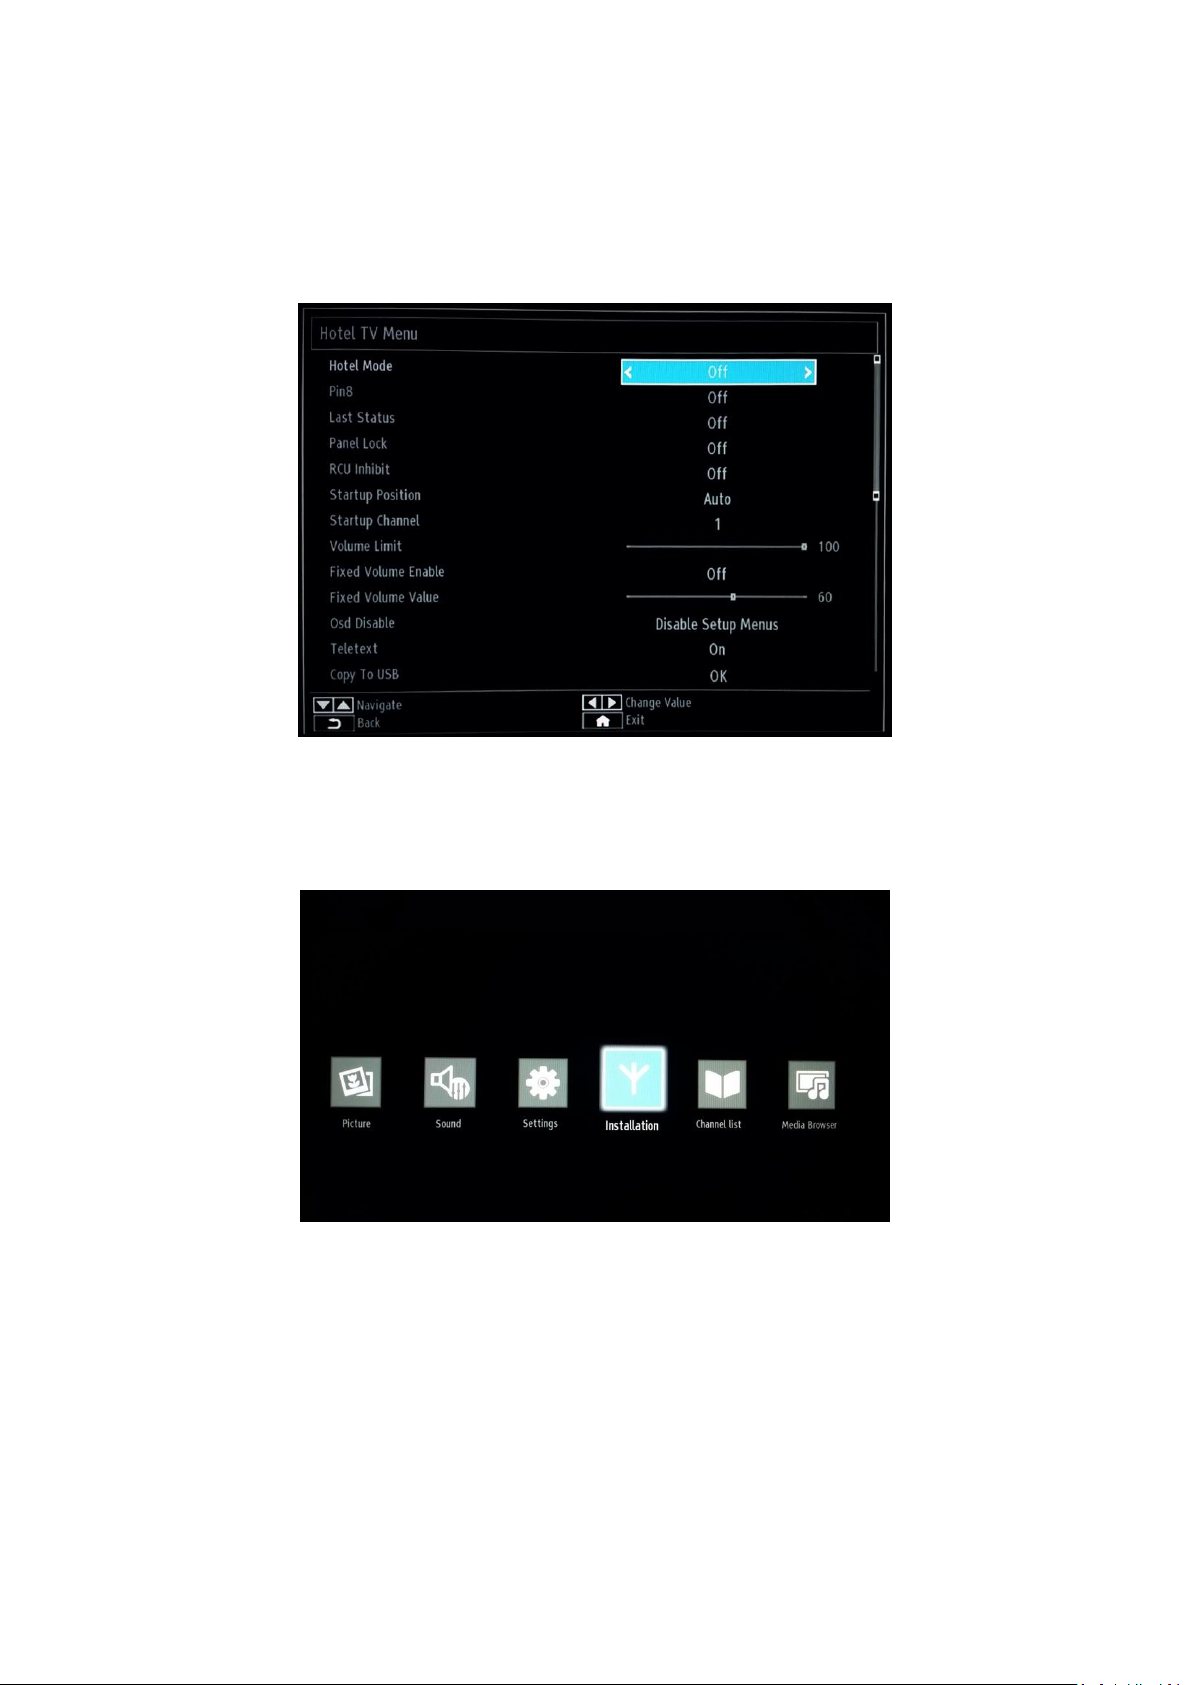
[Hotel Mode]
Feature to enable or disable the Hotel TV Menu features.
Note: When enabled, the TV will follow configured feature settings. If the Hotel
Mode is set to OFF, none of the settings from this menu will be active.
[Pin8]
Feature to enable or disable the auto SCART feature
Note: This feature allows a connected SCART device to turn the TV on or off.
[Last status]
This feature allows the TV to remember the last used configuration and restore
when startup again. Otherwise default settings are used.
[Panel Lock]
Feature to enable or disable the functionality of the side control TV button.
Select [On] to lock the side control TV button.
Select [Off] unlock the side control TV button
[RCU Inhibit]
Enable or disable the functionality of the Remote Control.
Select [On] to block all RC commands
Select [Off] and all RC commands are enabled.
Note: Yellow Service Remote “Home/Menu” key will still work to enter the Hotel
TV Menu.
10. Professional Settings
25
Page 27

[Startup Position]
Select startup program/source when TV is switched on via Power On key or Digit
keys.
• Auto TV wakes up in last used channel/source.
• TV: The TV set wakes up with the channel specified in Startup Channel field
• SCART / Side AV / HDMI1/ YPbPr / VGA_PC
[Startup Channel]
Feature to select the startup channel.
[Volume Limit] only xxHFL2839
Feature to set the maximum volume level.
Selectable values between 0-100.
[Volume Settings] only xxHFL2849 & 65HFL2859 & xxHFL2869 & xxHFL2879
Feature to set different volume levels for:
- Volume Limit - Volume Limit (Headphone)
- Startup Volume Enable
- Startup Volume Value - Startup Volume Value (Headphone)
- Fixed Volume Enable
- Fixed Volume Value
[Fixed Volume Enable] only xxHFL2839
Feature to set Volume to a set Fixed Volume
Volume is fixed to the level defined at the option: Fixed Volume Value
[Fixed Volume Value] only xxHFL2839
Feature to set the Fixed Volume value.
Selectable values between 0-100.
26
Page 28

[OSD Disable]
Feature to hide menu items when the Remote Control Menu key is pressed.
• Disable All Menus :all menu icons are hidden
• Disable Setup Menus: Picture, sound, settings and media browser menu icons
are displayed.
When [Hotel Mode] is set to Off, all TV menu items will be displayed (picture,
sound, settings install and retune, channel list, media browser).
If OSD Disable is set to Disable All Menus, the EPG will not be displayed.
[Teletext]
Feature to hide the Teletext display.
• On: to enable Teletext activation.
• Off: to hide Teletext.
[Copy To USB]
Feature to copy configuration and channel settings. Press “OK” to copy settings
to a USB device connected on the side USB connector.
Note: The settings will be captured in directory: VES16xHE_CLONE00001 (see
chapter 12)
[Copy From USB]
Feature to copy configuration and channel settings from a USB device. Select
“OK” to copy settings from a USB device
[Export Channel List]
Connect an USB device to the USB port of the set. While pressing the OK button
on the RC an XML File will be copied to the USB. This XML file can be used for the
CHANNEL EDITOR program (see appendix 1)
[Import Channel List]
Connect an USB device to the USB port of the set. While pressing the OK button
on the RC an XML File will be copied to the USB. This XML file can be used for the
CHANNEL EDITOR program (see appendix 1)
27
Page 29

[Wakeup Time Channel]
This feature helps to select the channel to extract the reference time to
synchronize with for setting the Wakeup Time.
• Use the digits button(s) on the remote to complete the entry field
All timers and events are not possible to set once all menus are hidden.
[Wakeup Time Volume]
Feature to set the wakeup time volume level.
Selectable values between 0-100.
[USB option]
Feature to detect if a USB device is connected.
- ON: to enable USB device detection.
- OFF: to disable USB device detection.
- 5V: Supplies only 5V for charging.
When [Off] the Media Browser icon will be displayed but cannot be activated.
[Fixed Pic. Mode]
Feature to hide the picture menu icon
• Off: picture icon is displayed amongst all menus.
• On: picture icon is hidden
[Boot Up Picture Mode]
The picture setting loaded at startup. Based on user preference this can be changed
between few presets: Off, Dynamic, Natural, Cinema, Game, Sports
[Digital Tuner]
• Off: only analog channels are available
• On: digital channels are available together with analogue channels.
28
Page 30

[Multiple RC support]
Feature to enable the Multi RC.
• Off: feature is disabled
• On: feature is enabled and shows which RC is set
Note: see chapter 13 for more information
[Welcome Screen]
Feature to show a welcome screen at startup
• On: a welcome screen is shown
• Off: a welcome screen is hidden
Note: see chapter 11 for more information
[NIT Update]
If this option is enabled LCN information’s will be updated automatically. This
option is available only for Nordic countries.
Recommended action is to disable NIT table.
[EPG Enabled/Disable]
Enabling this option will make EPG available when Hotel TV mode is active.
[High Security]
If you set this option as ON, the Hotel TV menu will be accessible only with Philips
master remote control.
29
Page 31

[CEC Enabled]
To control the behavior of the CEC break-in
Off: CEC is disabled
On - Auto switch: TV will automatically switch to the device sending the control
command
On – Manual switch: CEC is enabled, but TV will not switch automatically
[Reset to Default Values]
Highlight this option and press the OK button on the remote to return the TV to
default settings.
Note: Only Hotel TV options will be affected by this action. TV channels will not
be deleted
30
Page 32

11. Welcome Logo
Once this feature is configured and set, the welcome image will be displayed within 14 seconds after switch ON. This
page will remain until a key on the RC is pressed.
How to upload Welcome Logo
2 possibilities:
1.: Welcome Logo + Clone File
1. Create a graphics file: 960 x 540.png (1920 x 1080.png : only for 65HFL2859 / 1280 x 720.png: only for xxHFL2879)
with the logo. Follow the next guidelines:
Maximum size of the welcome logo should be less than 512 Kb. (for xxHFL2869)
Maximum size of the welcome logo should be less than 1024 Kb. (for xxHFL2839/2849/2859)
Maximum size of the welcome logo should be less than 2048 Kb. (for xxHFL2879)
Always use 16 bit color depth.
2. File name: hotel_wel.png (File name is case-sensitive)
3. Create/copy a folder named “VES161HE_CLONE00001\” on your USB key. (for xxHFL2839)
Create/copy a folder named “VES162HE_CLONE00001\” on your USB key. (for xxHFL2849)
Create/copy a folder named “VES163HE_CLONE00001\” on your USB key. (for xxHFL2859)
Create/copy a folder named “VES171HE_CLONE00001\” on your USB key. (for xxHFL2869)
Create/copy a folder named “VES172HE_CLONE00001\” on your USB key. (for xxHFL2879)
4. Save the image “hotel_wel.png” into the“VES161HE_CLONE00001\” folder on you USB key. (for xxHFL2839)
Save the image “hotel_wel.png” into the“VES162HE_CLONE00001\” folder on you USB key. (for xxHFL2849)
Save the image “hotel_wel.png” into the“VES163HE_CLONE00001\” folder on you USB key. (for xxHFL2859)
Save the image “hotel_wel.png” into the“VES171HE_CLONE00001\” folder on you USB key. (for xxHFL2869)
Save the image “hotel_wel.png” into the“VES172HE_CLONE00001\” folder on you USB key. (for xxHFL2879)
5. Insert the USB device into TV.
6. Enter the Hotel Mode.
8. Make sure that option Welcome screen is set to ON
7. Select the option: Copy from USB.
Select the folder “VES161HE_CLONExxxxx\” if you have multiple files on USB flash drive. (for xxHFL2839)
Select the folder “VES162HE_CLONExxxxx\” if you have multiple files on USB flash drive. (for xxHFL2849)
Select the folder “VES163HE_CLONExxxxx\” if you have multiple files on USB flash drive. (for xxHFL2859)
Select the folder “VES171HE_CLONExxxxx\” if you have multiple files on USB flash drive. (for xxHFL2869)
Select the folder “VES172HE_CLONExxxxx\” if you have multiple files on USB flash drive. (for xxHFL2879)
TV will copy the file and restart.
2.: only Welcome Logo
1. Create a graphics file: 960 x 540.png (1920 x 1080.png : only for 65HFL2859) with the logo. Follow the next
guidelines:
Maximum size of the welcome logo should be less than 1024 Kb.
Always use 16 bit color depth.
2. File name: hotel_wel.png (File name is case-sensitive)
3. Create a folder named “welcome_image” on your USB key.
4. Save the image “hotel_wel.png” into the “welcome_image” folder on you USB key.
5. Insert the USB device into TV.
6. Enter the Hotel Mode.
8. Make sure that option Welcome screen is set to ON
7. Select the option: Copy from USB. Select the folder “welcome_image”. TV will copy the file and restart.
31
Page 33

Note: For the welcome picture, there is a color lookup table used that is limiting the number of colors available to
display. This can result in certain display color artifacts and using a limited number of different color values can improve
this. Once this feature is configured and set the welcome image will be displayed within 14 seconds after switch on.
This page will remain until a key on the RC is pressed.
12. Clone
With cloning it is possible to copy to/from a USB device the configuration data and the channel list data from a TV.
Place a USB Memory stick in the USB side connector of the TV.
*The USB device should be formatted as FAT or FAT32.
Access the Hotel Mode Menu with the RC 8573 (yellow remote) or with the guest remote by entering the key sequence
3,1,9,7,5,3,MUTE and navigate with the TV remote to following items:
[Copy from USB]
1. Select [Copy from USB] and press OK.
2. The clone data will be loaded from the USB device into the TV.
There can be multiple clone files stored on one USB drive. They are identified by an increasing number added
to the directory name. If multiple clone files are available a file explorer will be shown to select the correct one.
3. Wait until the OSD message returns to its earlier state before removing the USB device.
4. Power down the TV and remove the USB device.
[Copy to USB]
1. Select [Copy to USB] and press OK.
2. The clone data will be loaded from the TV into USB device.
There can be multiple clone files stored on one USB drive. They are identified by an increasing number added to
the directory name. If multiple clone files are available a file explorer will be shown to select the correct one.
3. Wait until the OSD message returns to its earlier state before removing the USB device.
32
Page 34

VES161HE_CLONE00001
VES162HE_CLONE00001
VES163HE_CLONE00001
VES171HE_CLONE00001
VES172HE_CLONE00001
Content of the USB key:
for xxHFL2839: for xxHFL2849:
for 65HFL2859: for xxHFL2869:
for xxHFL2879:
Because the clone data is stored inside a folder, multiple clone data can be stored on the same USB key.
The cloning is compatible between all screen sizes.
33
Page 35

12.1 Software upgrade and Instant Initial Cloning
Software upgrade and cloning can be done without going through the installation wizard.
When the installation wizard is displayed, it is possible to directly upgrade the FW or install the TV with a clone file
taken from another similar TV. To be able to upgrade you have to have a USB stick plugged in with a valid FW and/or
clone file(s) before starting the TV.
For xxHFL2839:
A valid FW should have VES161HE_upgrade.bin as file name and placed in the root directory of the USB stick.
For xxHFL2849:
A valid FW should have VES162HE_upgrade.bin as file name and placed in the root directory of the USB stick.
For xxHFL2859:
A valid FW should have VES163HE_upgrade.bin as file name and placed in the root directory of the USB stick.
For xxHFL2869:
A valid FW should have VES171HE_upgrade.bin as file name and placed in the root directory of the USB stick.
For xxHFL2879:
A valid FW should have VES172HE_upgrade.bin as file name and placed in the root directory of the USB stick.
If a valid FW is found on the USB stick, you can upgrade the FW by pressing the RED button on the guest remote
control. After the FW is loaded successfully, the TV will go to standby mode, program the FW in the TV while flashing
the red LED on the TV and boot up again with the installation wizard.
Instant initial cloning allows you to copy all TV channels and settings without going through installation wizard. The
procedure requires to have a USB flash drive which contains the cloning data from master TV.
Steps for instant initial cloning are:
1. While the first step of the installation wizard is displayed (language selection) insert the USB flash drive in
side connector.
34
Page 36

2. Press the GREEN button on the remote and TV set will display the folder view of the USB flash drive.
3. Select the folder which contains the cloning data which needs to be applied. After selecting the folder press
OK to start the upgrade process.
4. TV will display the OSD message the cloning data was uploaded and TV will reset.
5. When the process is complete, the TV will restart and display the switch ON channel. USB flash drive can be
removed. TV set is configured.
Note: Software upgrade via an USB device can be done anytime by using the hidden key combination, “Menu-1-5-0-
5”. (for more explanation please see DFU)
35
Page 37

13. Feature settings
[Multi RC]
Enter the MultiRC Menu Feature to configure the remote control to work with one TV. To enter the MultiRC Menu on
TV press the key sequence: MENU, RETURN, 1,2,3,4. On the TV a menu will guide you to select the desired TV
configuration. Choose a number between 1 and 4 to assign to the TV. Afterwards configure the remote control for
the same number as TV by keeping pressed MENU (HOME) + Digit for 5 seconds.
The HFL2839/HFL2849/HFL2859/HFL2869/HFL2879 supports a maximum value of four remotes. The default value is
Remote 1.
Remote 1: Press MENU + 1 (for 5 seconds).
Remote 2: Press MENU + 2 (for 5 seconds).
Remote 3: Press MENU + 3 (for 5 seconds).
Remote 4: Press MENU + 4 (for 5 seconds).
Example: TV is configured for Multi RC 2.
Remote control: Press MENU + 2 (for 5 seconds).
!!Note: Before disabling the Hotel TV for any reason, reset the multi RC to default. The reset procedure is explained
below.
Enter the MultiRC Menu Feature to reset the MultiRC feature for the TV or for the remote control.
To enter the MultiRC Menu:
• Press key sequence: MENU, RETURN, 4,3,2,1
On the TV you will see a dialog, “Reset OK?” Press OK key to reset the system. After resetting, the system will return
to the factory default.
To reset the remote control to default value press MENU + 1 (for 5 seconds).
36
Page 38

14. CSM (Consumer Setup menu)
Enter Service Menu
It is only possible to enter the Service Menu if the Hotel Mode is disabled. Enter the Hotel Mode menu and set the
Hotel Mode to “Off”
To enter the Service Menu:
• Press the following key sequence: Menu, 1,2,3,6,5,4
No items can be selected in the Service Menu. The software version number will be shown as
VES161HE_x.y.z (for xxHFL2839) and
VES162HE_x.y.z (for xxHFL2849) and
VES163HE_x.y.z (for xxHFL2859) and
VES171HE_x.y.z (for xxHFL2869) and
VES172HE_x.y.z (for xxHFL2879)
37
Page 39

Appendix 1
Channel List Editor
Channel List Editor PC tool enables editing exported XML channel list files in a way that is more understandable and
user friendly.
Note: XML means Extensible Markup Language
Channel list should be exported from a TV set using the option available in the following menu (make sure that Hotel
mode is set to OFF):
1. Insert the USB key on side connector of the TV.
2. Enter in the MENU and navigate to Channel list.
3. Select the option “Export Channel list to USB”.
4. When the process is complete remove the USB key.
PC Tool can create a new empty channel without importing channels on TV, but we do not recommend this mode of
use due to the high level of possible errors that can be entered by user (wrong parameters or channel type).
When we export the channel list from TV, on USB drive there will be a file called “channelTable.xml” in the root folder.
You can open that list for editing from within PC tool using Open option. It will import all the channels and load them
according to the Network Type (DVB-S, DVB-T...). Channel can be moved inside its Network Type, added to favorites,
channel info can be edited, removed, new channel can be added.
For Channel List editor we recommend usage of a PC with Windows XP or Windows 7 and .Net framework 2.0 and
3.5 should be installed. Currently only English is supported for graphical user interface.
38
Page 40

Interface description and usage
1. Main window
Main menu consists of pretty much the same options as the toolbar below, with exception of “Save as” and “Exit”
option from File submenu.
File submenu consists of standard options as it can be seen on ion the Image 1-1 – File
Image 1-1 – File
Edit submenu consists of controls to Add, Edit and Delete the current selected channels in the list.
Image 1-2 – Edit
Tools submenu consists of Settings and Preferences (Image 1-2- Tools). Settings open Channel list settings dialog
where user can change Satellite configuration and Country (currently not used). Preferences open a dialog for
managing application settings (Satellite names, Countries, User band values).
Image 1-2- Tools
Help submenu provides basic help about how to use channel list editor tool.
39
Page 41

Toolbar provide shortcut icons for basic operations with channels and channel list.
First group from the left provides file operations next to it provides channel managing operations and the last group
provides list settings and help.
Image 1-3 – Toolbar
Clone – clones channel info except for Service name and service number for easy adding channel with similar values.
Under tool bar there is a list of channels from the loaded list sorted by network type in a tree view.
More than one channel can be selected by holding SHIFT or CTRL and right mouse click.
Image 1-4 - Channel list tree view
Channel or selection of channels can be moved using drag and drop. Move will cause renumbering of the channels in
the list. Move is possible only in the same subcategory, moving channel from DVB-S to Analogue will display message
(Image 1-5 - Info message):
Image 1-5 - Info message
40
Page 42

On the right part of the main windows currently selected channel details are loaded. It consists of one mandatory
group:
Image 1-6 - Common Service Params
And, depending on the Network Type of the currently selected channel, different additional groups can be displayed:
Image 1-7 - DVB Triplet
Values in DVB Triplet are only present when DVB channels are selected, for Analogue channels values in this group
are empty.
Image 1-9 - DVB-C
When the form is in add/edit state new buttons are added under “Tuner Configuration” group:
Image 0-8 - Edit state
41
Page 43

2. Editing channel list
Channel list editing can be performed easily with use of the toolbar buttons: Add, Favourite, Clone, Edit, Remove.
Image 2-1 - Add
Add – changes the state of the main form to add state and empty’s all the fields so the user can enter new values. Only
when in add state Network Type combo box is enabled. When correct values are entered user can save with pressing
“Enter” key or pressing “Add” button.
Image 2-2 – Clone
Clone - is much like Add just instead of leaving all the fields empty it leaves all the values from the previously selected
channel except for values that needs to be unique (Service Name, Channel Number...) for easy adding new channels
42
Page 44

on the same frequency. Depending on the Network type more or less parameters are copied. In case the user changes
the Network Type all fields will be cleared and drop back to regular Add mode. When correct values are entered user
can save with pressing “Enter” key or pressing “Add” button. Clone is disabled for analogue channels because all
analogue parameters need to be unique.
Image 2-3 – Edit
Edit – enables editing of the currently selected channel info. When correct values are entered user can save with
pressing “Enter” key or pressing “Save” button.
Channel or selection of channels can be moved using drag and drop. Move will cause renumbering of the channels in
the list.
Delete – removes the channel from the list. When single service channel is selected on delete message appears asking
the user to confirm deletion of the channel with the corresponding name. In case more than one channel is selected
it will only inform the user of the number of channels that will be deleted.
Image 2-4 - Delete
43
Page 45

Limitations and constraints
Service name length is not explicitly defined in DVB standard. Only limitation is the size (8bit) reserved for value in SDT
descriptor that defines the service name length, this compile to 255 char string.
Channel number or LCN can take values from 1 – 9999 as it is defined in code. These limitations are applied in the
editor.
Save – when the channel list is according with the requirements press “Save” button for saving the channel list. This
option will rewrite the open file and save it in the same location.
If you want to save the file in to another location please use the “Save As” option from File menu.
3. Import channel list to TV
Import the channel list back to TV requires the USB drive with the file channelTable.xml saved on root of the drive.
To import the channel list back to TV the following steps should be followed (make sure that Hotel mode is set to
OFF):
Note: Import of the channel table is also available in the HOTEL TV MENU.
1. Insert the USB key on side connector of the TV.
2. Enter in the MENU and navigate to Channel list.
3. Select the option “Import Channel list to USB”.
4. When the process is complete remove the USB key.
Do check the channel list before saving the cloning data.
44
Page 46

© 2017 Koninklijke Philips N.V.
All Rights reserved.
Specifications are subject to change without notice.
Trademarks are the property of Koninklijke Philips N.V. or their respective owners.
www.philips.com
 Loading...