

Philips HFC21/07, HFC21/05 User Manual

How this manual is set up for easy use
To make it as easy as possible to install, program and use your fax machine, we have divided the manual into
three main parts:
I ESSENTIALS
Here you find everything which is necessary to quickly install and use your fax machine. Y ou learn
about the proper location, the important settings and the basic functions which are available.
II FUNCTIONS
In this part you find the whole range of special functions your fax machine offers. These are several
functions of the fax and additional possibilities.
III APPENDIX
Here you find a table of errors and problems that may arise and how to solve them. Further there is
technical information, the address of the customer hotline, the index and a glossary , which explains
some technical terms.
Lightning protection: To protect your machine from possible damage, we recommend to
disconnect the machine from the mains and from the telephone line during thunder storms.
This equipment is not designed for making telephony calls when the power
fails. Alternative arrangements should be made for access to emergency
services.
– 1 –

I ESSENTIALS
1 Introduction 6
1.1 Preface .............................................................................................................................. 6
1.2 Conventions........................................................................................................................ 6
1.3 Description ......................................................................................................................... 6
2 Installation 9
2.1 The proper location............................................................................................................. 9
2.2 Connection ....................................................................................................................... 10
2.3 Connecting additional devices .......................................................................................... 14
2.4 Connecting to a home telephone system .......................................................................... 15
2.5 Connecting to a private branch exchange......................................................................... 15
2.6 Loading or removing the thermal paper............................................................................. 16
2.7 Important settings ............................................................................................................. 19
2.7.1 Available functions ................................................................................................... 19
2.7.2 Language of display and reports ............................................................................. 20
2.7.3 Entering date and time............................................................................................. 21
2.7.4 Entering your number.............................................................................................. 21
2.7.5 Entering your name ................................................................................................. 22
2.7.6 Correcting wrong entries ......................................................................................... 23
2.7.7 Mode of operation ................................................................................................... 23
3 The basic functions 24
3.1 Making a call .................................................................................................................... 24
3.2 Redial ............................................................................................................................... 24
3.3 Sending faxes................................................................................................................... 25
3.4 Receiving faxes - different reception modes ..................................................................... 28
3.4.1 Changing the mode ................................................................................................. 28
3.4.2 Manual reception ..................................................................................................... 28
3.4.3 Automatic reception................................................................................................. 29
3.5 Copying............................................................................................................................ 32
FAX
II FUNCTIONS
4 The fax 34
4.1 Improved picture quality.................................................................................................... 34
4.2 Sending a fax during a telephone call ............................................................................... 34
4.3 Speaking after fax transmission ........................................................................................ 35
4.4 Polling............................................................................................................................... 35
4.5 Faxing to sub-addresses................................................................................................... 36
4.6 Page header..................................................................................................................... 36
4.7 Half-speed transmission.................................................................................................... 37
5 Additional possibilities 38
5.1 Call restriction - baby-sitter setting ................................................................................... 38
5.2 Volume of the ring signal .................................................................................................. 40
5.3 Remote diagnostics .......................................................................................................... 40
5.4 Mercury............................................................................................................................ 40
5.4.1 Mercury Residential 132 .......................................................................................... 41
5.4.2 Mercury Pin Code service ....................................................................................... 41
5.4.3 Changing the Mercury Pin Code ............................................................................. 42
5.4.4 Deleting the Mercury Pin Code ............................................................................... 42
5.4.5 Using Cost Centre Codes ....................................................................................... 43
5.4.6 Initiating a conversation via MCL service ................................................................ 43
5.4.7 Switching the Mercury function off .......................................................................... 44
– 2 –

A
B
C
III APPENDIX
6 Troubleshooting 46
7 Interesting facts 49
7.1 Important information for safe operation ........................................................................... 49
7.2 Technical specification ..................................................................................................... 50
7.3 Customer information ....................................................................................................... 50
7.4 Glossary ........................................................................................................................... 51
7.5 Index ................................................................................................................................ 52
– 3 –

– 4 –

I
ESSENTIALS
– 5 –

1 Introduction
This chapter gives basic information about your fax machine - the fax technology in general, the
use of the user manual, the operating elements and the functions.
1.1 Preface
We are very glad that you have selected our fax machine. Congratulations on your decision. In your new
machine the most advanced technology has been applied to meet the highest quality levels. Furthermore, our
engineers have combined a wide range of functions with the easiest use possible.
Y our fax machine opens the door to the world of private telecommunications in an easy and fast way . At the same
time additional telecommunication appliances can be connected.
Enjoy your new fax machine!
1.2 Conventions
italic
bold Important information
bold and italic
CAPIT AL LETTERS Display texts and key names
italic
References, function names and announcements
Additional information
Decisive information regarding security and proper operation
1.3 Description
Check that the following items are included in the packaging:
Fax machine
T elephone handset with spiral cable
T elephone cable with plug
Thermal paper
Paper adjustment part (built-in)
User manual
Guarantee booklet
– 6 –
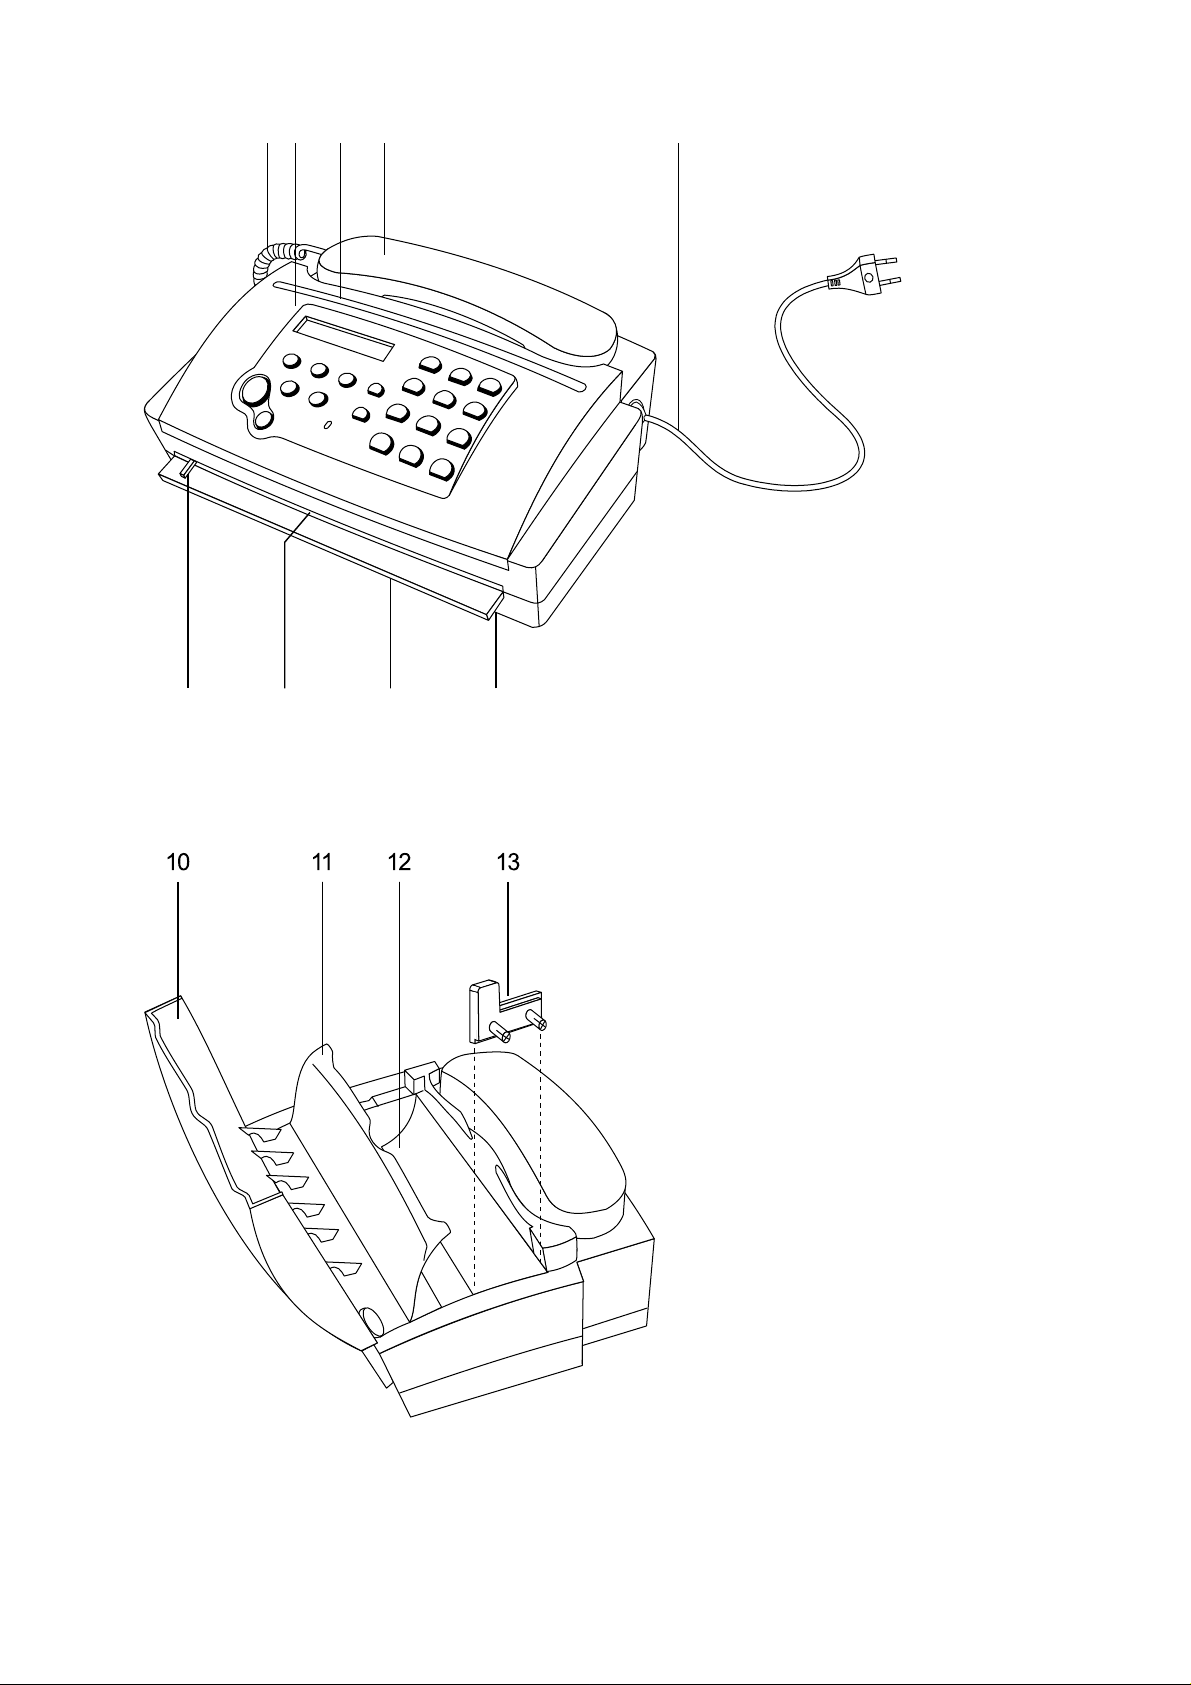
412 3 5
67 98
1 Spiral cable for the telephone handset
2 Operation panel
3 Document outlet
4 T elephone handset
5 Mains cable with power plug
6 Document guide
7 Document feed slot
8 Paper tear strip
9 Thermal paper outlet
10 Operation panel
1 1 Inner paper cover
12 Paper compartment
13 Paper adjustment part
(for 210 mm thermal paper rolls)
– 7 –

HFC 21
14 15
FINE PHOTO BUSY TEL TEL/FAX EXT.
START
COPY
20
16 18 19
OK
RESOLUTION
FUNCTION
STOP
21
17
1
2
3
ABC
DEF
4
5
JKL
MNO
8
TUV WXYZ
0
6
9
#
ERROR
RECALL/R
REDIAL/
GHI
7
PQRS
23 24 2522
14 CURSOR LEFT : to move the cursor , to select options, to adjust the volume and to delete entries
15 Display (Remove the protection foil before use.)
16 OK key: to confirm entries
17 CURSOR RIGHT : to move the cursor , to select options and to adjust the volume
18 R key: for the use with a private branch exchange (P ABX)
19 Dial pad for entering numbers and names
20 ST ART/COPY key: to start transmission or to copy
21 STOP key: interrupts procedures
22 RESOLUTION key: to send and copy with higher resolution
23 FUNCTION key: to call up functions
24 ERROR indicator lamp
25 MERCURY/REDIAL key: to start the MCL service and to repeat the last number you have dialled, or to make
a dialling pause
FINE PHOTO BUSY TEL TEL/FAX EXT .
The pointers on the display indicate different modes:
FINE/PHOTO indicate whether you send or copy with a higher resolution or with grey tones. If
none of the two is visible, the standard resolution is selected. T o change the resolution
use the RESOLUTION - key .
BUSY is visible if you are calling on an external phone on the same telephone line.
TEL, TEL/FAX, EXT. are three different modes to operate your fax machine. You can choose between
the modes with function 31. See details in chapter 3.4.
– 8 –
2 Installation
This chapter explains the correct installation of your fax machine.
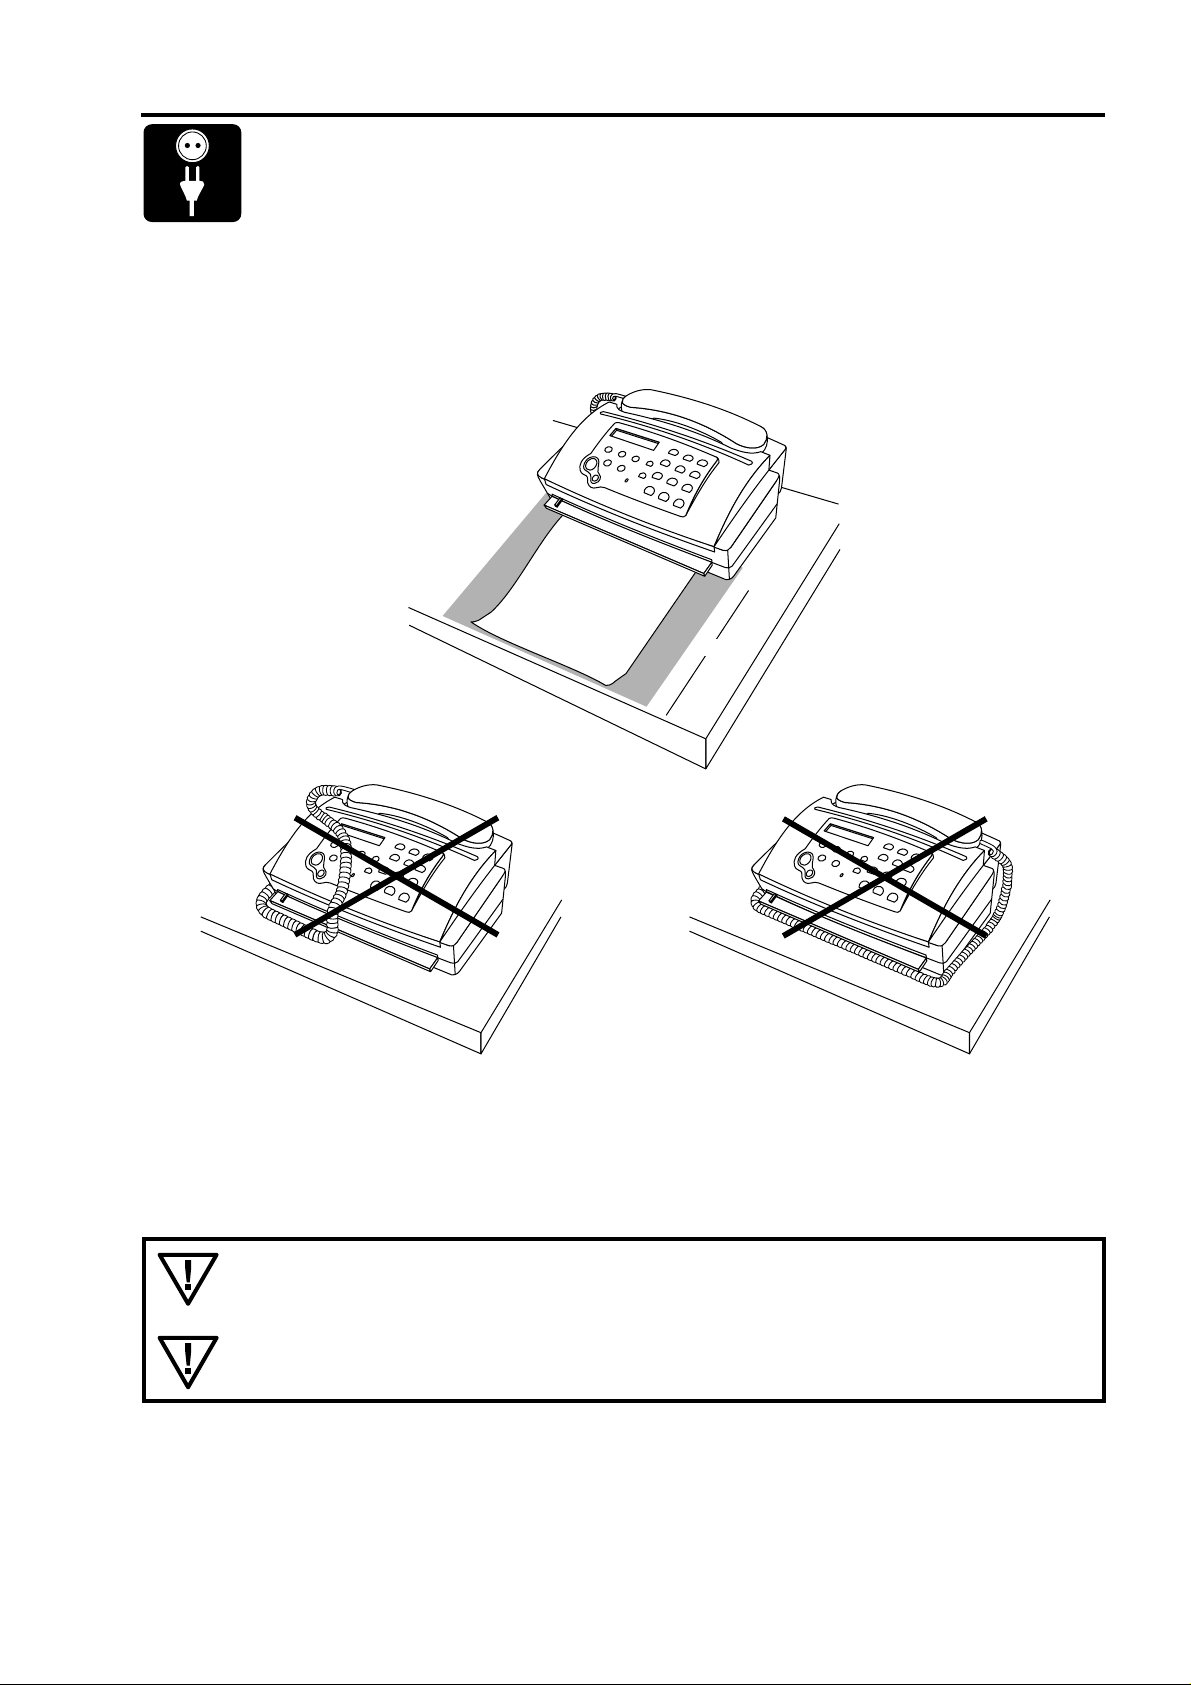
2.1 The proper location
30 cm
Your fax should be positioned near the telephone socket and near a mains socket. Make sure it is placed in a
safe and stable position on a flat and horizontal surface. Do not locate your fax in direct sunlight, near radiators
or air conditioning and do not expose it to dust, water or chemicals.
Since the paper outlet is at the front, do not place any objects in front of the machine. In order
to avoid a paper jam, make sure that the surface close to the paper outlet is smooth. Rubberlike surfaces are not suitable.
The fax machine heats up during operation. Avoid heat build-up by ensuring that the machine
is not covered. Place the fax in such a way as to ensure free circulation of air around it.
– 9 –

2.2 Connection
Connecting to the telephone socket
(without additional devices)
Turn the machine bottom up. Connect the telephone cable to the fax machine by
inserting it in the socket on the bottom of the machine identified with LINE.
Then insert the telephone plug into the telephone line socket.
Insert the cable in the groove provided.
Connecting the handset to the fax machine
Remove the handset and the spiral cable from its wrapping.
Insert the one end of the spiral cable into the socket identified with a handset
symbol on the bottom of the machine.
– 10 –

This appliance must be earthed (information for UK only).
How to change a fuse:
This apparatus is supplied with an approved moulded 13A plug. To change a fuse in this type of plug
proceed as follows:
1. Remove fuse cover and fuse.
2. Fit new fuse which should be a BS 1362 5A, A.S.T .A. or BSI approved type.
3. Refit the fuse cover.
If the fitted plug is not suitable for your socket outlets, it should be cut off
and an appropriate 3-pin plug fitted in its place.
If the mains plug contains a fuse, this should have a value of 5A. If a plug
without a fuse is used, the fuse at the distribution board should not be
greater than 5A.
The severed plug must be destroyed to avoid a possible shock hazard should it be inserted
into a 13A socket elsewhere.
How to connect a plug:
The wires in the mains lead are coloured in accordance with the following code:
BLUE - "NEUTRAL" ("N")
BROWN - "LIVE" ("L")
GREEN & YELLOW - "EARTH" ("E")
1. The GREEN & YELLOW wire must be connected to the terminal in the
plug which is marked with the letter "E" or by the Earth symbol or coloured
GREEN AND YELLOW.
2. The BLUE wire must be connected to the terminal which is marked with
the letter "N" or coloured BLACK.
3. The BROWN wire must be connected to the terminal which is marked
with the letter "L“ or coloured RED.
Before replacing plug cover, make certain that the cord grip is clamped over the sheath of the lead - not
simply over the three wires.
– 11 –
Connecting to the power supply
FINE PHOTO BUSY TEL TEL/FAX
EXT.
FINE PHOTO BUSY TEL TEL/FAX
EXT.
FINE PHOTO BUSY TEL TEL/FAX
EXT.
FINE PHOTO BUSY TEL TEL/FAX
EXT.
FINE PHOTO BUSY TEL TEL/FAX
EXT.
FINE PHOTO BUSY TEL TEL/FAX
EXT.
FINE PHOTO BUSY TEL TEL/FAX
EXT.
FINE PHOTO BUSY TEL TEL/FAX
EXT.
FINE PHOTO BUSY TEL TEL/FAX
EXT.
FINE PHOTO BUSY TEL TEL/FAX
EXT.
FINE PHOTO BUSY TEL TEL/FAX
EXT.
Plug the mains cable into the wall socket. The machine will carry out an internal test.
Afterwards you need to enter the current date and time (see below).
If there is no thermal paper in the machine, the display will read:
Insert a new paper roll (see chapter 2.6).
If you do not enter the time and date, after 40 seconds or after you
press the STOP key the display will read as follows:
1
2
3
4
5
6
Use the dial pad to enter the correct time
7
8
9
0
∗
OK
1
2
4
5
7
8
0
∗
OK
(e.g. 1 2 3 0 for 12:30).
#
Press the OK key .
3
6
Enter the correct year.
9
#
Press the OK key .
TIME: 0:00
OUT OF PAPER
DIAL/INSERT DOC.
TIME: 12:3¡
YEAR: ¢6
YEAR: 9
MONTH: ¡1
1
2
3
4
5
6
7
8
0
∗
OK
1
2
4
5
7
8
0
∗
OK
Enter the correct month.
9
#
Press the OK key .
3
6
Enter the correct day .
9
#
Press the OK key .
MONTH: 0¤
DAY: ¡1
DAY: 1¤
15-MAY-97 12:30
Y ou can correct your entries any time you want (see chapter 2.7.6).
If desired you can change the language on the display with function 15 (see page 19).
In the event of a power failure, you can no longer operate the telephone of fax facility. If
switched on again you have to re-enter the current time.
Keep the power plug free and easily accessible. The machine has no power on/off switch, so
the plug is used to switch off the power.
– 12 –

T one or pulse dialling
FUNCTION
1
4
7
2
5
8
0
3
6
9
#
∗
FINE PHOTO BUSY TEL TEL/FAX
EXT.
FINE PHOTO BUSY TEL TEL/FAX
EXT.
FINE PHOTO BUSY TEL TEL/FAX
EXT.
FINE PHOTO BUSY TEL TEL/FAX
EXT.
FINE PHOTO BUSY TEL TEL/FAX
EXT.
Your phone can dial in two different ways. Older telephone systems usually work with pulse dialling, whilst
modern, digital systems use tone dialling. You can change the dialling mode of your fax machine. If you do not
know which method your line uses, contact your telephone company .
Only for UK: Although this equipment can use either loop disconnect or DTMF signalling, only the
performance of the DTMF signalling is subject to regulatory requirements for correct operation. It
is therefore strongly recommended that the equipment is set to use DTMF signalling for access to
public or private emergency services. DTMF signalling also provides faster call set up.
Select function 14 (pressing the function key and then
14 DIAL MODE
the number 14).
OK
OK
OK
Press the OK key.
Press the CURSOR LEFT or CURSOR RIGHT key.
Press the OK key.
Press the OK key again if you are operating your fax machine on
a regular PTT line (connecting to a private branch exchange see
DIAL MODE: TONE
DIAL MODE: PULSE
PABX? NO
1 SET UP
chapter 2.5).
Sometimes it is necessary to send tone dial signals to make use of certain services. If your
telephone system works on pulse dialling, you can still do so by pressing the ∗ or # key. All
numbers are then transmitted in the tone dialling method. As soon as you replace the handset on
the fax machine, your fax machine will switch back to pulse dialling.
– 13 –
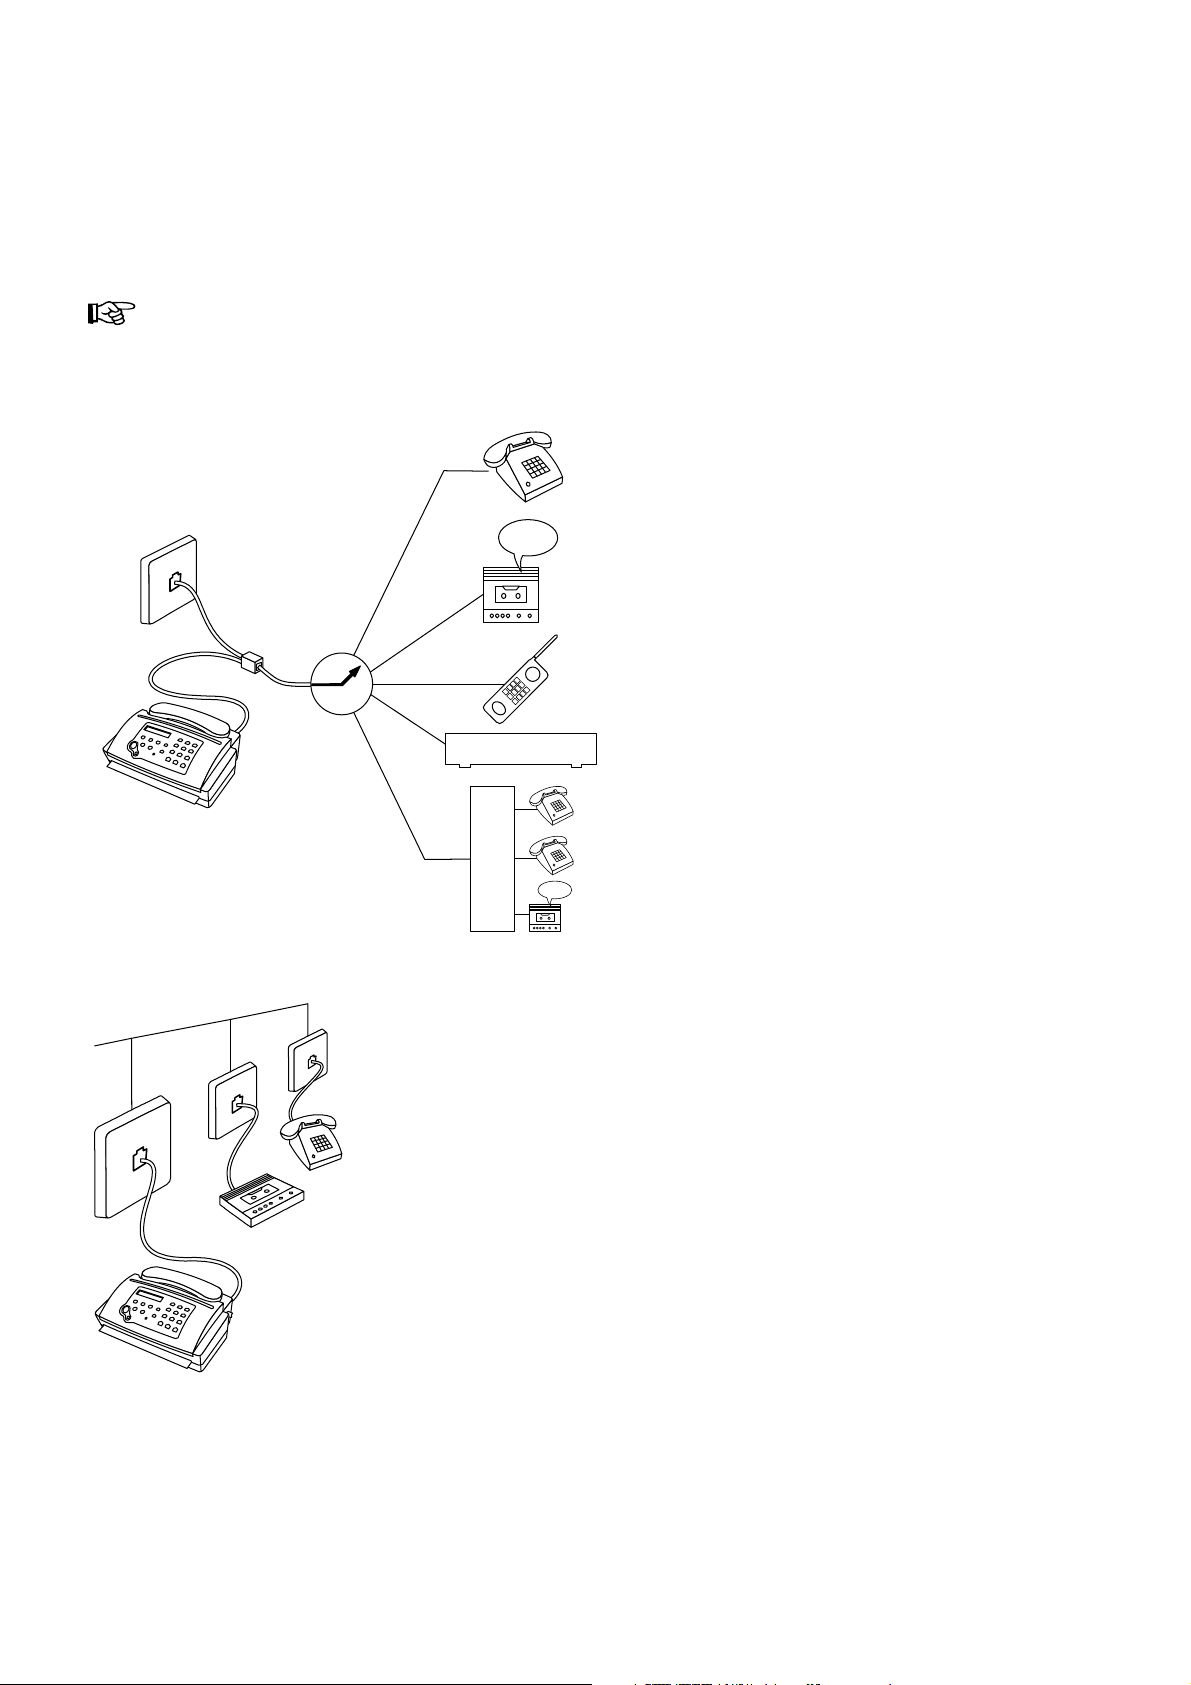
2.3 Connecting additional devices
In addition to your fax machine, you can also connect other devices, such as additional telephones, an answering
machine or a modem to a single telephone line (for UK: So long as the REN (Ringer Equivalence Number) value
on the line doesn’t exceed 4. The REN value on the fax is 1). The factory-setting of your fax machine allows the
connection and instant use of other such devices.
If you have connected an answering machine, make sure that the number of rings programmed on
the answering machine is less than the one on your fax.
T o the same socket
(not in all countries)
You can connect additional devices to the same
telephone plug.
T o separate sockets
(not in all countries)
MODEM
H
T
S
You can connect additional devices to separate sockets on the
same line even if they are located in different rooms. Make sure
that the fax machine is the first device connected to the line.
– 14 –
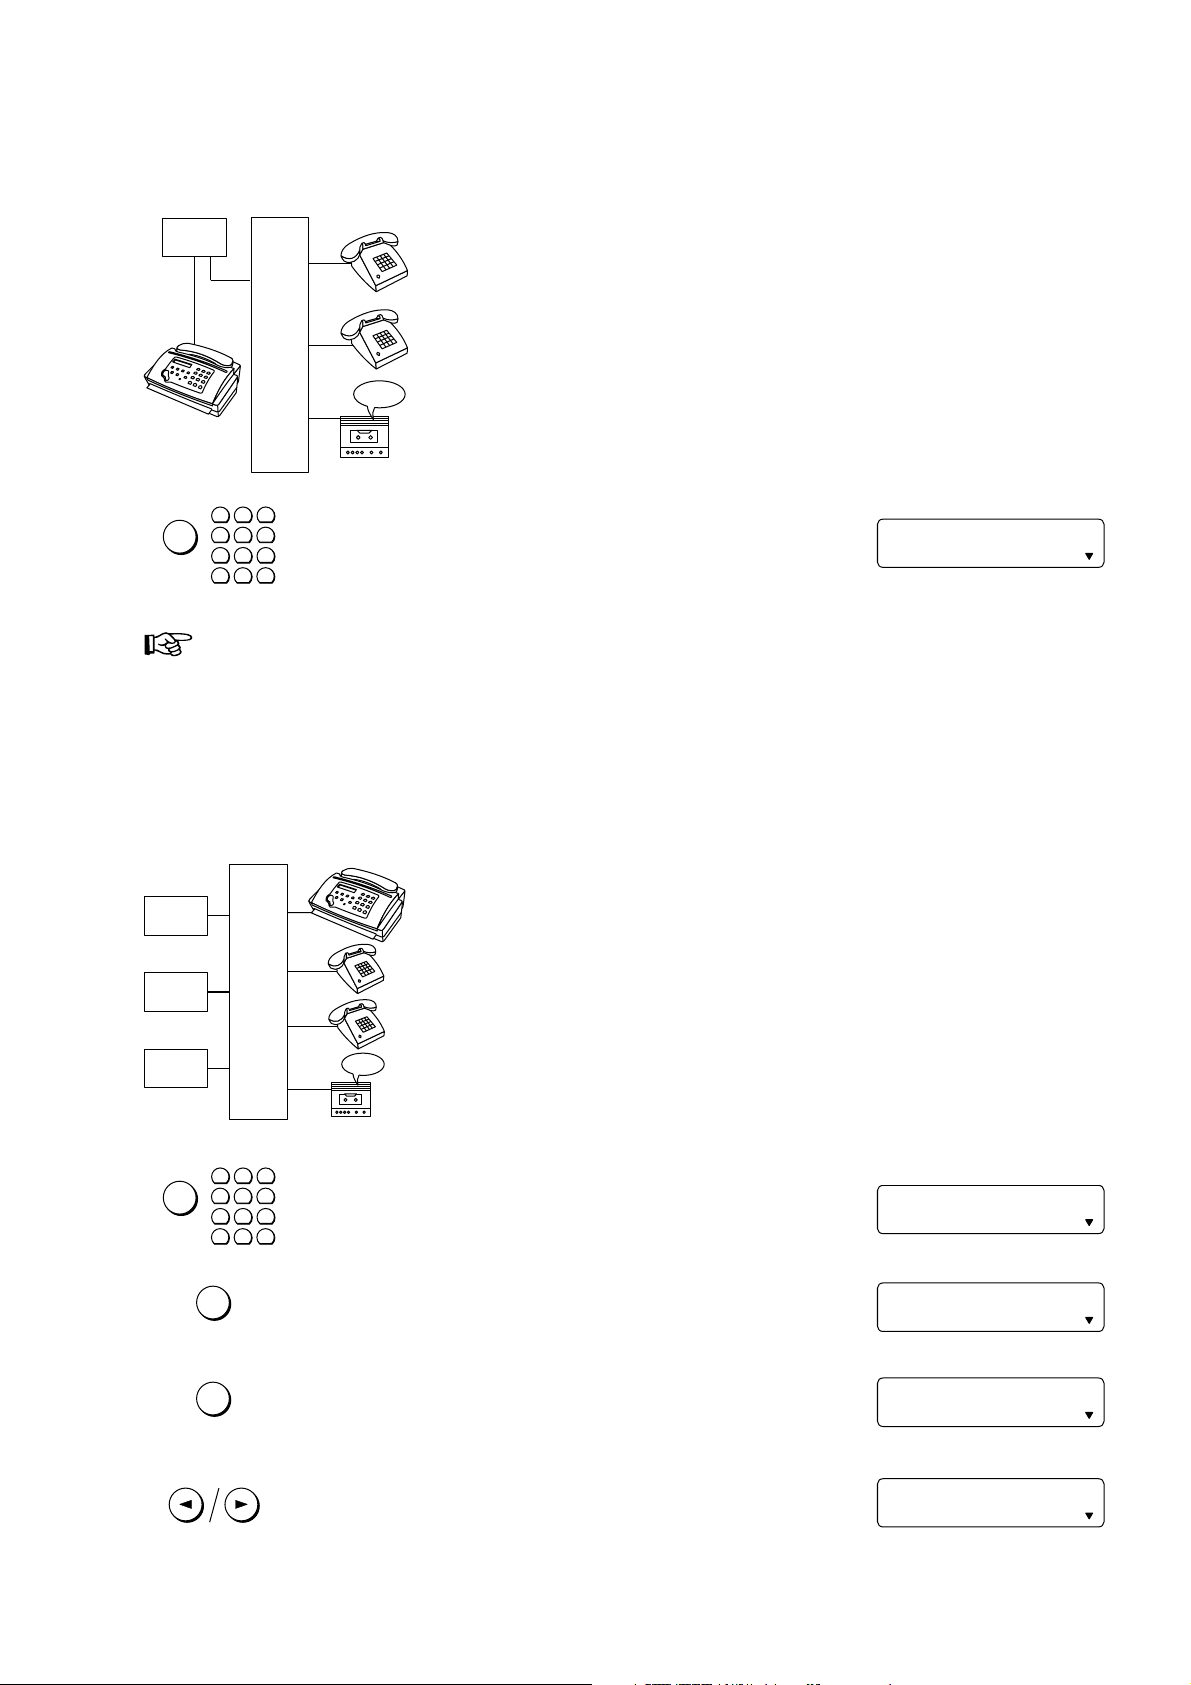
2.4 Connecting to a home telephone system
FINE PHOTO BUSY TEL TEL/FAX
EXT.
FINE PHOTO BUSY TEL TEL/FAX
EXT.
FINE PHOTO BUSY TEL TEL/FAX
EXT.
FINE PHOTO BUSY TEL TEL/FAX
EXT.
FINE PHOTO BUSY TEL TEL/FAX
EXT.
(one PTT line)
PTT
H
T
Connect the fax machine as the first device to the line and the home telephone
system (HTS) as the second.
S
1
2
3
4
FUNCTION
7
∗
2.5 Connecting to a private branch exchange
(several PTT lines)
In order to operate your fax machine on a home telephone system,
5
6
change to EXT . mode with function 31. The corresponding pointer
8
9
on the display will light up.
0
#
There are no regulations for home telephone systems. Therefore we cannot provide you with
generally valid operating rules. Refer to the operating instructions provided by the manufacturer.
15-MAY-97 12:30
PTT
PTT
PTT
FUNCTION
OK
OK
P
A
B
Connect the fax machine to an extension line of the private branch exchange
(PABX). In order to operate your fax machine on an extension, you need to
enter the appropriate settings in function 14.
X
1
2
3
4
5
6
7
∗
Select function 14 (pressing the function key and number 14).
8
9
0
#
Press the OK key.
Press the OK key.
Press the CURSOR LEFT or CURSOR RIGHT key in order to
switch to operation on a PABX extension.
14 DIAL MODE
DIAL MODE: TONE
PABX? NO
PABX? YES
– 15 –

FINE PHOTO BUSY TEL TEL/FAX
EXT.
RECALL/R
FINE PHOTO BUSY TEL TEL/FAX
EXT.
FINE PHOTO BUSY TEL TEL/FAX
EXT.
FINE PHOTO BUSY TEL TEL/FAX
EXT.
FINE PHOTO BUSY TEL TEL/FAX
EXT.
FINE PHOTO BUSY TEL TEL/FAX
EXT.
FINE PHOTO BUSY TEL TEL/FAX
EXT.
FINE PHOTO BUSY TEL TEL/FAX
EXT.
OK
Press the OK key .
1
2
3
4
7
∗
Now enter the key that has to be pressed to obtain an outside line
5
6
(outside line access code). This is either 0, the R key or another
8
9
number.
0
#
POSTLINE BY: 0
POSTLINE BY: R
OK
OK
Press OK.
Press OK. Your machine will then check that the outside line can
be obtained.
If the check is successful, the following message will appear briefly
in the display:
If the check is unsuccessful, the following message will appear
briefly in the display.
Y ou will be asked to repeat the entry . Change either the dial mode
or the key for obtaining an outside line.
2.6 Loading or removing the thermal paper
Loading the thermal paper
CHECK ? YES
CHECKING...
CHECK OK
CHECK NOT OK
DIAL MODE: TONE
Before you can receive or copy documents you must first load thermal paper into
your fax machine. For this, your fax machine needs to be connected to the power
supply.
If the paper is finished or no paper roll is in your fax machine, the display will read:
Y ou can remove the rest of the old paper roll and insert a new one.
Open the operation panel by gripping the edges on either side.
Then open the inner paper cover until it clicks into place.
OUT OF PAPER
– 16 –
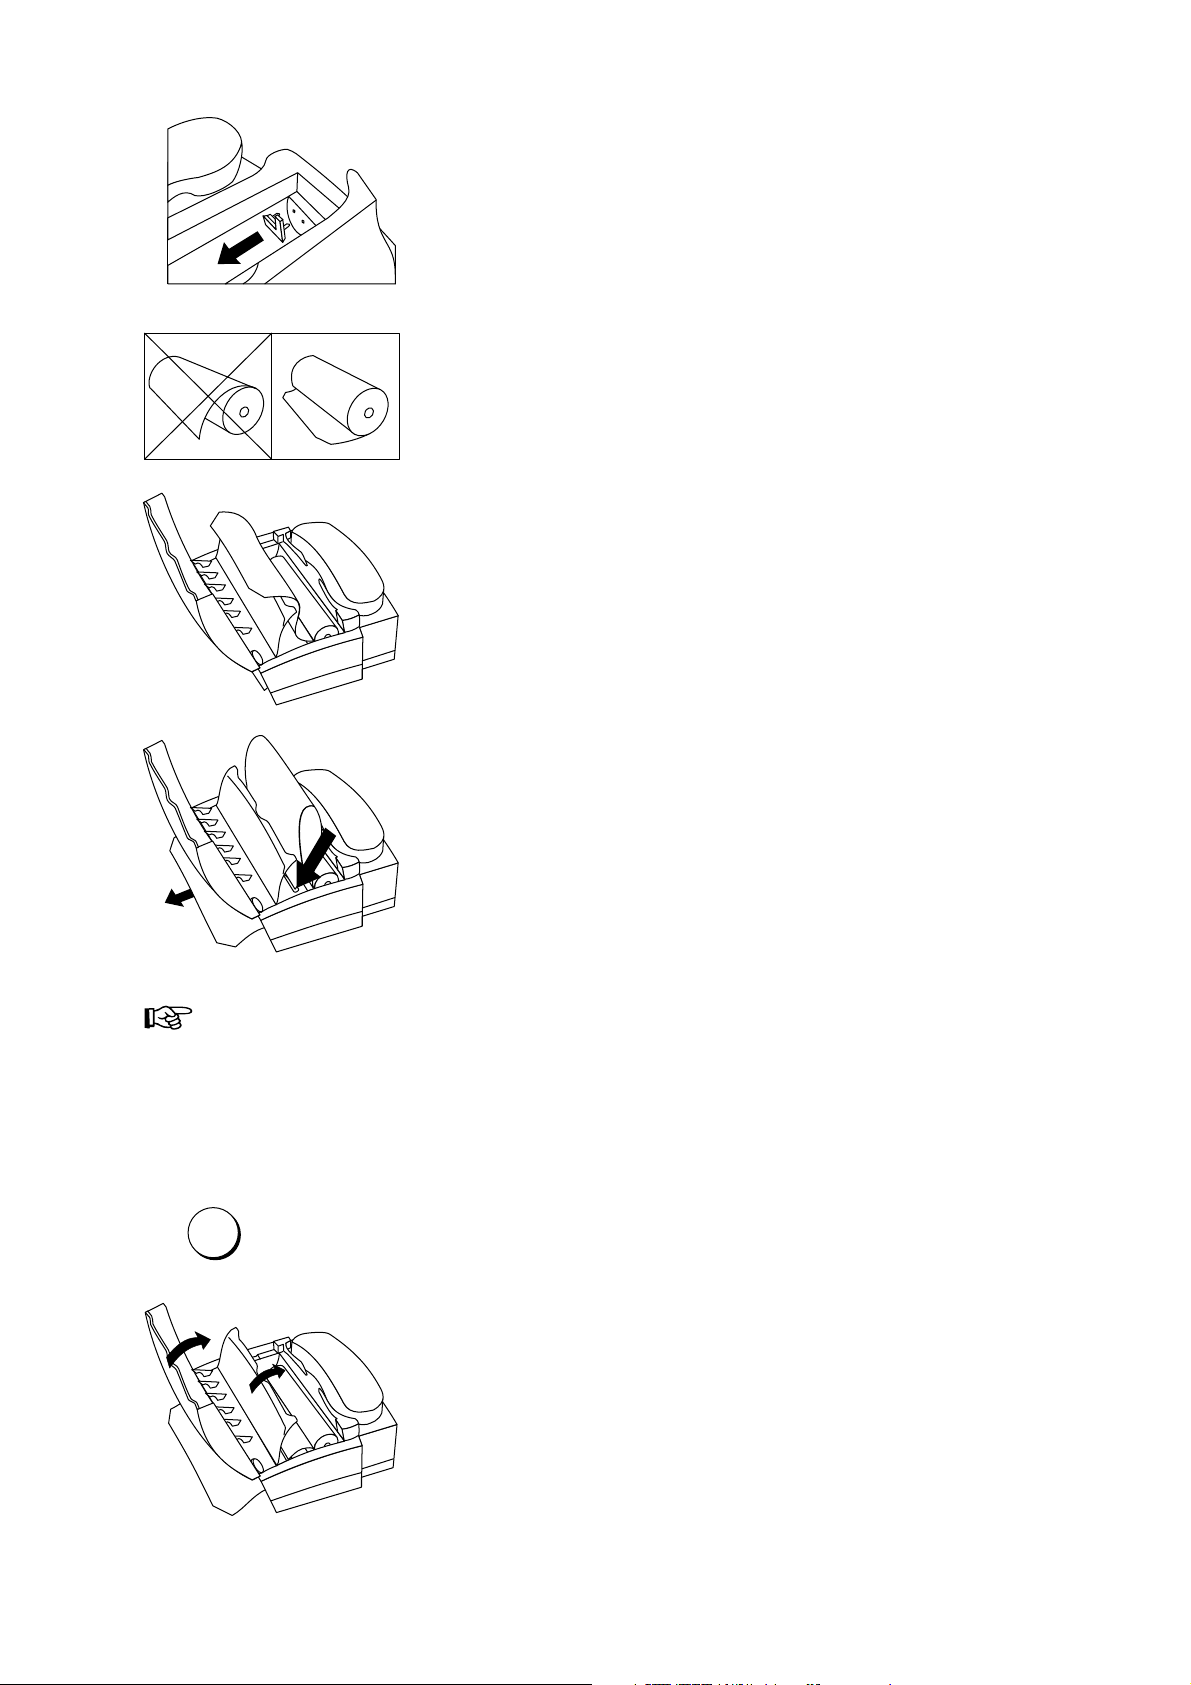
The paper compartment is set to a paper width of 210 mm. If you want to use
START
paper rolls with a width of 216 mm, remove the paper adjustment part.
Unwrap the new paper roll. Cut the leading edge of the thermal paper, so that
any sticker is totally removed. Cut it in a straight line and cut the edges as
indicated on the picture, this will make feeding the paper easier . Hold it so that
the paper unrolls in the direction away from you when you pull the paper upwards.
Place the paper roll in the compartment as illustrated. Pull out approximately 15
cm of paper.
Slide the leading edge of the paper into the paper feed slot until it protrudes from
the front of the machine.
If your local copy or received faxes are blank, the document or the thermal paper are inserted the
wrong way .
Help for feeding in the thermal paper:
If you have problems feeding in the paper (for example because there is not much fax paper left and it is curling):
COPY
Press the start key . The rubber roll inside the machine starts turning.
Now insert the paper as normally. The turning roll will help you
feed the paper through the machine. The roll will turn for about 30
seconds and will then stop automatically .
Close the inner paper cover and the operation panel.
– 17 –
 Loading...