

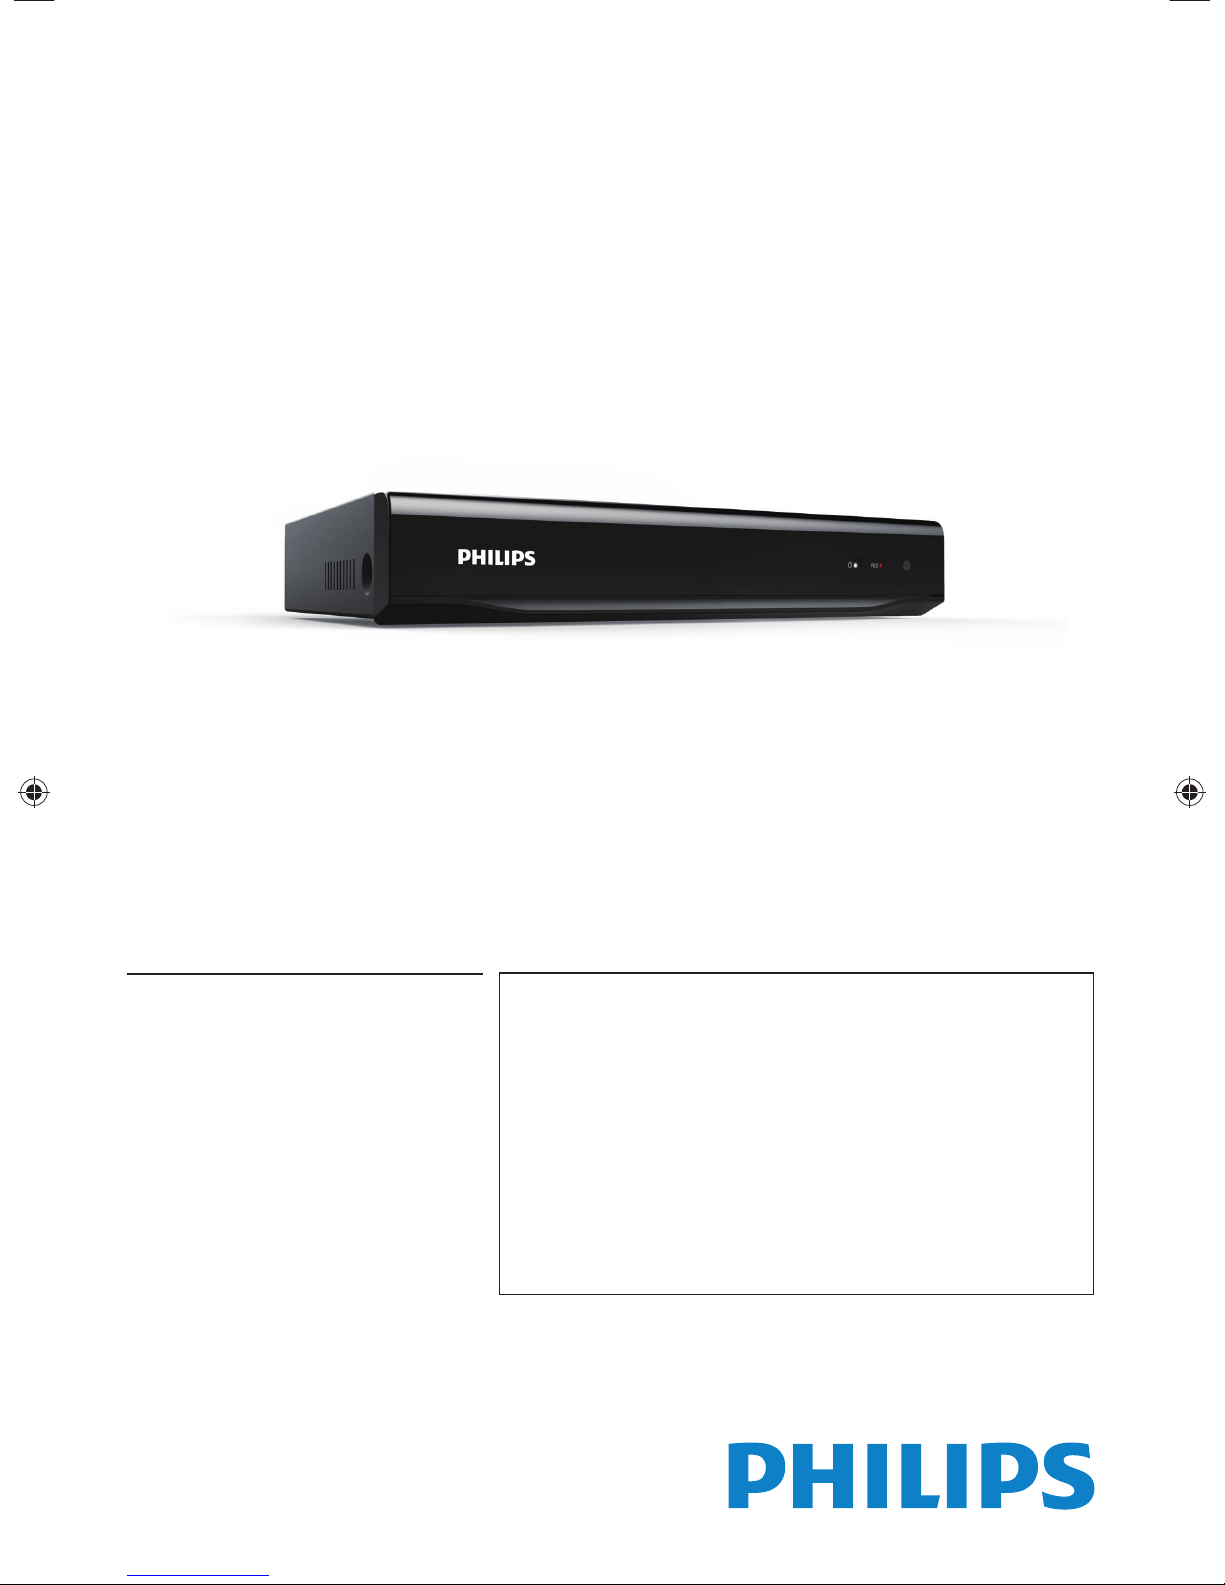
Philips HDR5750, HDR5710 User Manual
Register your product and get support at
www.philips.com/support
HDR5750
HDR5710
EN User Manual
ES Manual del Usuario
FR Manuel d’Utilisation
EN For further assistance, call the customer support service in your
country.
• To obtain assistance in the U.S.A., Canada, Puerto Rico, or the U.S.
Virgin Islands, contact Philips Customer Care Center at 1-866-310-
0744
ES Pour obtenir de l’aide supplémentaire, communiquez avec le centre
de service à la clientèle de votre pays.
• Pour obtenir de l’aide aux États-Unis, au Canada, à Puerto Rico ou aux
Îles Vierges américaines, communiquez avec le centre de service à la
clientèle Philips au: 1-866-310-0744
FR Para obtener más información, llame al servicio de soporte al cliente
de su país.
• Para obtener asistencia en los Estados Unidos, en Canadá, Puerto Rico
o en las Islas Vírgenes de los Estados Unidos, comuníquese con Centro
de atención al cliente de Philips a 1-866-310-0744
1. INTRODUCTION
Safety Information
Register online at www.productrecords.com/phl today to get the
very most from your purchase.
Registering your model with PHILIPS makes you eligible for all of the valuable benefits listed below, so
don’t miss out. Register online at www.productrecords.com/phl to ensure:
*
Product Safety Notification
By registering your product, you’ll receive
notification - directly from the manufacturer - in
the rare case of a product recall or safety defect.
Know these
* Additional Benefits
Registering your product guarantees that you’ll
receive all of the privileges to which you’re
entitled, including special money-saving offers.
safety
CAUTION
RISK OF ELECTRIC SHOCK
CAUTION:
TO REDUCE THE RISK OF ELECTRIC SHOCK, DO
NOT REMOVE COVER (OR BACK). NO USER
SERVICEABLE PARTS INSIDE. REFER SERVICING TO
QUALIFIED SERVICE PERSONNEL.
symbols
DO NOT OPEN
The lightning flash with arrowhead symbol,
within an equilateral triangle, is intended
to alert the user to the presence of
uninsulated “dangerous voltage” within
the product’s enclosure that may be of
sufficient magnitude to constitute a risk of
electric shock to persons.
The exclamation point within an equilateral
triangle is intended to alert the user to
the presence of important operating and
maintenance (servicing) instructions in the
literature accompanying the appliance.
WARNING:
TO REDUCE THE RISK OF FIRE OR ELECTRIC SHOCK, DO NOT EXPOSE THIS APPARATUS TO RAIN OR
MOISTURE. APPARATUS SHALL NOT BE EXPOSED TO DRIPPING OR SPLASHING AND NO OBJECTS
FILLED WITH LIQUIDS, SUCH AS VASES, SHALL BE PLACED ON THE APPARATUS.
CAUTION:
ATTENTION:
To prevent electric shock,match wide blade of plug to wide slot, fully insert.
Pour éviter les chocs électriques, introduire la lame la plus large de la fiche dans la borne correspondante de la
prise et pousser jusqu’au fond.
The symbol for CLASS ll (Double Insulation)
The important note and rating are located on the rear or bottom of the cabinet.
For Customer Use
Enter below the Serial No. which is located on the cabinet.
Retain this information for future reference.
Model No. ______________________________
Serial No. ______________________________
Visit our World Wide Web Site at http://www.philips.com/support
EN - 2
IMPORTANT SAFETY INSTRUCTIONS
1. Read these instructions.
2. Keep these instructions.
3. Heed all warnings.
4. Follow all instructions.
5. Do not use this apparatus near water.
6. Clean only with dry cloth.
7. Do not block any ventilation openings. Install in
accordance with the manufacturer’s instructions.
8. Do not install near any heat sources such as
radiators, heat registers, stoves, or other apparatus
(including amplifiers) that produce heat.
9. Do not defeat the safety purpose of the polarized
or grounding-type plug. A polarized plug has two
blades with one wider than the other. A grounding
type plug has two blades and a third grounding
prong. The wide blade or the third prong are
provided for your safety. If the provided plug does
not fit into your outlet, consult an electrician for
replacement of the obsolete outlet.
10. Protect the power cord from being walked on or
pinched particularly at plugs, convenience receptacles,
and the point where they exit from the apparatus.
11. Only use attachments/accessories specified by the
manufacturer.
12. Use only with the cart, stand, tripod, bracket, or table
specified by the manufacturer, or sold
with the apparatus. When a cart is
used, use caution when moving the
cart / apparatus combination to avoid
injury from tip-over.
13. Unplug this apparatus during lightning
storms or when unused for long periods of time.
14. Refer all servicing to qualified service personnel.
Servicing is required when the apparatus has been
damaged in any way, such as power-supply cord or
plug is damaged, liquid has been spilled or objects
have fallen into the apparatus, the apparatus has
been exposed to rain or moisture, does not operate
normally, or has been dropped.
To Avoid the Hazards of Electrical Shock and Fire
• Do Not handle the Power Cord with Wet Hands.
• Do Not Pull on the Power Cord when disconnecting it from an AC outlet. Grasp it by the Plug.
• Do Not put your Fingers or Objects into the Unit.
Location and Handling
• Do Not install the Unit in direct sunlight, near strong magnetic fields, or in a place subject to dust or strong vibration.
• Avoid a place with drastic temperature changes.
• Install the unit in a horizontal and stable position. Do not place anything directly on top or bottom of the unit.
Depending on your external devices, noise or disturbance of the picture and / or sound may be generated if the unit is
placed too close to them. In this case, please ensure enough space between the external devices and the unit.
• Depending on the environment, the Temperature of this Unit may increase slightly. This is not a malfunction.
• Be sure to Unplug the AC Power cord from the AC outlet before Removing the Unit.
Dew Condensation Warning
• Dew condensation may form inside the unit in the following conditions. If so, do not use this unit at least for a few hours
until its inside gets dry.
–The unit is moved from a cold place to a warm place.
–Under conditions of high humidity.
–After heating a cold room.
FCC WARNING
This equipment may generate or use radio frequency energy. Changes or modifications to this equipment may cause harmful
interference unless the modifications are expressly approved in the manual. The user could lose the authority to operate this
equipment if an unauthorized change or modification is made.
This transmitter must not be co-located or operated in conjunction with any other antenna or transmitter.
EN
RADIO-TV INTERFERENCE
This equipment has been tested and found to comply with the limits for a Class B digital device, pursuant to Part 15 of the FCC Rules.
These limits are designed to provide reasonable protection against harmful interference in a residential installation. This equipment
generates, uses, and can radiate radio frequency energy and, if not installed and used in accordance with the instructions, may cause
harmful interference to radio communications. However, there is no guarantee that interference will not occur in a particular installation.
If this equipment does cause harmful interference to radio or television reception, which can be determined by turning the equipment
off and on, the user is encouraged to try to correct the interference by one or more of the following measures:
1. Reorient or relocate the receiving antenna.
2. Increase the separation between the equipment and receiver.
3. Connect the equipment into an outlet on a circuit different from that to which the receiver is connected.
4. Consult the dealer or an experienced radio / TV technician for help.
This device complies with Industry Canada license-exempt RSS standard(s). Operation is subject to the following two conditions:
(1) this device may not cause interference, and (2) this device must accept any interference, including interference that may cause
undesired operation of the device.
Continued on next page.
EN - 3
This Class B digital apparatus complies with Canadian ICES-003. Cet appareil numérique de la classe (B) est
conforme à la norme NMB-003 du Canada.
Supplementary Television Receiving Apparatus – Appareil supplémentaire de réception de télévision, Canada
BETS-7 / NTMR-7.
Disconnect the AC plug to shut Off when trouble is found or not in use. The AC plug shall remain readily operable.
CAUTION:
WARNING:
IMPORTANT COPYRIGHT INFORMATION
Unauthorized copying, broadcasting, public performance and lending of discs are prohibited. This item incorporates copy
protection technology that is protected by U.S. patents and other intellectual property rights of Rovi Corporation. Reverse
engineering and disassembly are prohibited.
Do not place the unit on the furniture that is capable of being tilted by a child and an adult leaning, pulling, standing or climbing on
it. A falling unit can cause serious injury or even death.
This apparatus should not be placed in a built-in installation such as a bookcase or rack unless proper ventilation is provided. Make
sure to leave a space of 3.9 inches (10cm) or more around this apparatus.
Never use a gas duster on this unit. The gas trapped inside of this unit may cause ignition and explosion.
Do Not Connect your PC directly to the LAN terminal of the Unit.
Danger of explosion if battery is incorrectly replaced. Replace only with the same or equivalent type.
Batteries (Battery pack or battery installed) shall not be exposed to excessive heat such as sunshine, fire or the like.
Maintenance
Servicing
■
• Please refer to relevant topics on ‘Troubleshooting’ on pages 72-75 when trouble is found.
• If this unit becomes inoperative, do not try to correct the problem on your own. There are no user-serviceable parts
inside. Disconnect the USB-HDD or USB Memory Stick (if connected to the unit), place the unit into Standby mode,
unplug the AC power plug, and please contact: 1-866-310-0744 or visit :
www.philips.com/support
Cleaning the cabinet
■
• Wipe the front panel and other exterior surfaces of the unit with a soft cloth.
• Never use a solvent, thinner, benzene or alcohol to clean the unit. Do not spray insecticide liquid near the unit. Such
chemicals may discolor the surface or damage the unit.
HDD (Hard Disk Drive) handling
■
• HDD is a precision apparatus that is susceptible to vibration, strong impact or dirt. Depending on the installation
environment or handling, the unit may become partially damaged or in the worst case, recording or replaying may not be
available. Especially while the HDD is in motion, do not subject it to vibration or strong impact or pull out the power plug.
And if a power failure occurs, the content of the recording / replaying program may be lost.
• HDD rotates at high speed when in operation. Be sure that rotation has stopped and then move the unit without
subjecting it to strong impact or vibration.
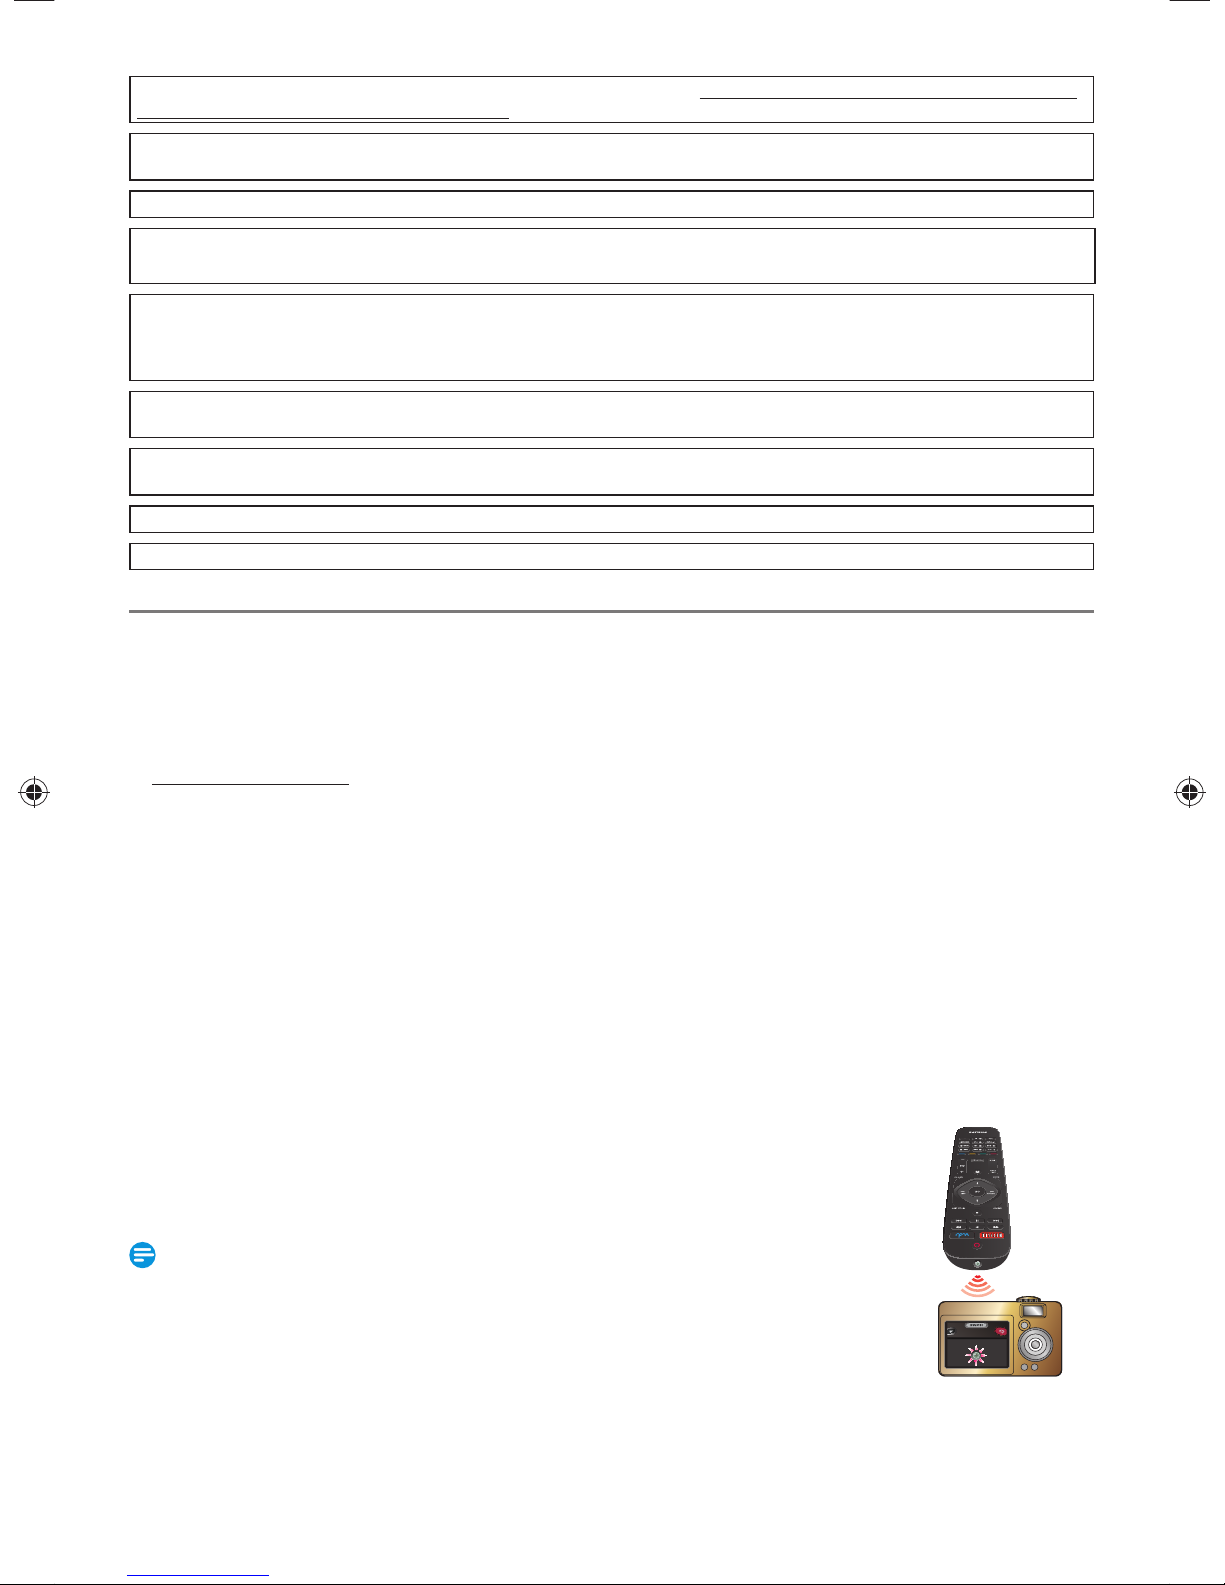
IR signal check
■
• If the Remote Control does Not work properly, you can test IR signal using a Digital Camera or Cell Phone Camera to see
if the Remote Control sends out the infrared signal.
1. Turn On the Digital or Cell Phone Camera.
2. Point the Digital or Cell Phone Camera towards the front of the Remote Control.
3. Press any Arrow key on the Remote Control and look at the Camera Display.
• If a pulsating light appears on the Display the Remote Control is sending out an IR signal.
Note(s)
• Some Cameras have an IR Filter and will not display the IR signal.
• Remote-control operation on any other remote control, such as a universal remote control, is not
guaranteed.
EN - 4
Continued on next page.
Notice
Specifications are subject to change without notice. Trademarks are the property of Koninklijke Philips N.V. or their respective
owners. P&F USA reserves the right to change products at any time without being obliged to adjust earlier supplies accordingly.
The material in this manual is believed adequate for the intended use of the system. If the product, or its individual modules or
procedures, are used for purposes other than those specified herein, confirmation of their validity and suitability must be obtained.
P&F USA warrants that the material itself does not infringe any United States patents. No further warranty is expressed or implied.
P&F USA cannot be held responsible neither for any errors in the content of this document nor for any problems as a result of the
content in this document. Errors reported to P&F USA will be adapted and published on the P&F USA support website as soon as
possible.
Warranty
No components are user serviceable. Do not open or remove covers to the inside of the product. Repairs may only be done
by Service Centers and official repair shops. Failure to do so shall void any warranty, stated or implied. Any operation expressly
prohibited in this manual, any adjustments, or assembly procedures not recommended or authorized in this manual shall void the
warranty.
Important
Registering your model with Philips makes you eligible for all of the valuable benefits listed below, so don’t miss out. Register online
at www.productrecords.com/phl to ensure:
Product Safety Notification
By registering your product you receive notification - directly from the manufacturer - in the rare case of a product recall or safety
defect.
Additional Benefits of Product Ownership
Registering your product guarantees that you receive all of the privileges to which you’re entitled, including special money-saving
offers.
For further assistance
For further assistance, call the customer support service in your country.
• To obtain assistance in the U.S.A., Canada, Puerto Rico, or the U.S. Virgin Islands, contact Philips Customer Care Center at
1-866-310-0744
EN
Environmental care
The packaging of this product is intended to be recycled.
Contact your local authorities for information about how to recycle the packaging.
For product recycling information, please visit - www.recycle.philips.com
End of life directives
Philips pays a lot of attention to produce environment-friendly products in green focal areas. Your new Digital Video Recorder
contains materials which can be recycled and reused. At the end of its life, specialized companies can dismantle the discarded Digital
Video Recorder to concentrate the reusable materials and to minimize the amount of materials to be disposed of. Please ensure
you dispose of your old Digital Video Recorder according to local regulations.
Disposal of used batteries
The batteries supplied do not contain the heavy metals mercury and cadmium. Nevertheless, in many areas batteries may not be
disposed of with your household waste. Please ensure you dispose of batteries according to local regulations.
EN - 5
LICENSE
This product includes some open source software that is
subject to the GNU General Public License (GPL), GNU
Lesser General Public License (LGPL) and/or copyright licenses,
disclaims and notices. You can confirm further information
about these by pressing [
“Software”
“License”. If you are interested in obtaining GPL
(home) ], then select “Setup”
source code used in this product, please contact P &F USA, Inc.,
PO Box 430 Daleville, IN 47334-0430 U.S.A.
Supplied Accessories
Tra de ma rk Inf ormat io n
The terms HDMI and HDMI High-Definition Multimedia
Interface, and the HDMI Logo are trademarks or registered
trademarks of HDMI Licensing LLC in the United States and
other countries.
Remote Control
with AAA (1.5 V) battery x2
6+6.'.+56/'07
4'2.#; 5-+2
$#%-
0'668
&+5
2.#;
%*
%*
+0(1
;1767$'
4'%
RF coaxial cable
RCA audio/video cables User Manual
Quick Start Guide
Manufactured under license from Dolby Laboratories.
Dolby and the double-D symbol are trademarks of Dolby
Laboratories.
VUDUTM is a trademark of VUDU, Inc.
Netflix and the Netflix logo are trademarks or registered
trademarks of Netflix, Inc.
CinemaNow and the CinemaNow logo are trademarks of
BestBuy Stores L.P. and BestBuy Canada LTD.
YouTube and the YouTube logo are trademarks of Google Inc.
EN - 6
The Wi-Fi CERTIFIED Logo is a certification mark of the Wi-Fi
Alliance.
ENERGY STAR® is a joint program of the U.S. Environmental
Protection Agency and the U.S. Depar tment of Energy helping
us all save money and protect the environment through energy
efficient products and practices.

Table of Contents
1. INTRODUCTION
Safety Information ................................. 2
Maintenance.....................................................................................4
Noti ce ...................................................................................................5
Warr a nt y ............................................................................................ 5
Imp ortant ........................................................................................... 5
Environmental care ....................................................................5
Disposal of used batteries ....................................................5
LIC ENS E .............................................................................................6
Supplied Accessories ................................................................6
Trademark Information ..........................................................6
Table of Contents ................................... 7
Feat ures .................................................... 9
Functional Overview ........................... 10
Front Panel .....................................................................................10
Rear Panel .......................................................................................10
Remote Control ........................................................................11
2. CONNECTIONS
Connection ............................................ 13
Antenna Connection (Required) ................................13
Connecting to a TV
Using Audio / Video cables ..............................................14
Connecting to a TV Using an HDMI cable..........15
Connecting to a Cable / Satellite Box......................16
Connecting to a USB-HDD ............................................17
Digital Audio Connection .................................................18
Connection to the Network ..........................................19
3. INITIAL SETUP
Before You Start ................................... 21
Finding the Viewing Channel on your TV .............21
Initial Setup ............................................ 21
4. VIEWING TV
While Viewing TV ................................ 24
Channel Selection ....................................................................24
Channel List ..................................................................................24
Detailed Information on the Program.....................24
Audio Languages .......................................................................24
Closed Caption .........................................................................25
Noise Reduction ......................................................................25
Switching between HDD Mode / USB-HDD
Mod e ................................................................................................. 25
5. INSTALLATION
Guide to the Home Menu ................................................26
Channel Installation ............................. 26
Autoprogram (Auto Channel Scan) .........................26
Weak Channel Installation ................................................27
Installation Mode ......................................................................27
Skipping Channels ....................................................................27
Clock Setup............................................ 28
Clock Setting (Manual) ........................................................28
Clock Setting (Auto) ..............................................................28
Time Zone .....................................................................................28
Daylight Saving Time ..............................................................28
Audio Setup ........................................... 29
Digital Audio Language ........................................................29
Alternate Audio .........................................................................29
Mono / Stereo .............................................................................29
Child Lock .............................................. 29
Channel Lock ...............................................................................29
Setting TV and Movie Ratings ........................................30
Canadian English / Canadian French Ratings ......31
Changing PIN Code ............................. 31
EN
Continued on next page.
EN - 7

6. RECORDING
9. SOFTWARE
Information on Recording .................. 32
Guide to Display ........................................................................32
Before Recording .................................. 33
Setting for Auto Chapter ...................................................33
Basic Recording &
One-Touch Timer Recording............. 33
Timer Recording .................................. 35
Hints for Timer Recording ................................................37
Dubbing .................................................. 38
Information on Dubbing .....................................................38
Selected Title Dubbing ........................................................39
7. PLAYBACK
Information on Playback..................... 41
Guide to a Title List ................................................................41
Hint for HDD / USB-HDD Playback .......................41
Resume Point ...............................................................................41
Basic Playback ....................................... 42
Direct Playback ...........................................................................42
Playback from the Title List ..............................................42
Paus e ................................................................................................... 42
Special Playback ................................... 42
Fast Forward / Fast Reverse Playback......................42
Variable Skip / Variable Replay.......................................42
Chasing Playback during Recording and
Simultaneous Playback and Recording ....................42
Chapter Skip .................................................................................42
Selecting Audio/Video Format .........43
Switching Audio Languages ..............................................43
Switching Closed Caption .................................................43
Reducing Block Noise ...........................................................43
Software ................................................. 47
Software Information ............................................................47
Software Update ......................................................................47
Automatically Check for Latest Software ............48
10. NETWORK
Network Settings ................................. 49
USB-HDD Connection.......................................................55
Net TV .................................................... 58
Before Using Network Services ...................................58
Information on Network Services ..............................58
Deactivation of Network Services .............................58
11.
FUNCTION SETUP
List of Settings ....................................... 59
Setups ...................................................... 65
Video / Audio ..............................................................................66
Dis play ...............................................................................................67
HDM I .................................................................................................70
Playback / Recording ..............................................................70
Other ................................................................................................. 71
12. OTHERS
Trou bl es ho ot ing .................................... 72
Error Message .............................................................................75
Glos sar y .................................................. 76
Specifications......................................... 77
ONE (1) YEAR LIMITED
WARRANTY ........................................ 78
8. EDITING
Deleting a Title .......................................................................... 44
Deleting Multiple Titles ....................................................... 44
Renaming a Title ........................................................................45
Protecting a Title .......................................................................45
Media Management ............................. 46
Deleting All Recording Data
on the HDD / USB-HDD .................................................46
Renaming USB-HDD ............................................................46
Protecting a USB-HDD ......................................................46
EN - 8

Features
Recording
This unit lets you record Digital broadcast programs to the
internal HDD (Hard Disk Drive) or USB-HDD (USB external
HDD hooked up to this unit).
Program Recording
■
You can program up to 100 programs. Also, Daily / Weekly
program mode is available.
One-Touch Timer Recording (OTR)
■
You can easily set a recording time. Every time [ REC ]
is pressed during recording, the recording time will be
increased by 15 minutes up to 4 hours. The recording will
automatically stop when the recording reaches the time you
set or the HDD / USB-HDD is full.
Auto-Chapter Function
■
Chapter marks will be inserted based on the interval you set
before recording.
High Definition broadcast can be recorded in
■
High Definition picture quality.
This Unit Cannot Record Analog Broadcasting.
■
(Analog Broadcasting via Cable Box is also not
available.)
Playback
Variable Skip / Replay
■
You can Skip Forward or Backward a certain time, which is
specified in the “Playback / Recording” Menu in advance, by
simply pressing the SKIP (
Playback.
Chasing Playback during Recording and
■
simultaneous Playback / Recording
You can Play back the already Recorded part of the Current
Recording or another Title during Recording.
VOD service (NETFLIX / Vudu)
■
This Unit allows you to Play back the Files Purchased or
Rented from VOD (Video-On-Demand) services. Use the
Remote Control to browse each one of the VOD service
pages. The Files are available on the Internet. When you
Purchase or Rent VOD Files on the Internet, you will be
asked to enter a Registration code and a Deactivation code.
This Menu provides you with both Codes.
YouTube
■
This Unit lets you enjoy Video-sharing services provided on
YouTube. Use the Remote Control to browse YouTube. You
can Play contents uploaded by individuals and much more, all
on your TV screen.
) or REPLAY ( ) buttons during
Editing
EN
USB-HDD (External)
■
You can connect an external USB-HDD device to this unit.
Connect a USB-HDD with 32GB to 4TB capacity. (The unit
will return an error when a USB-HDD with less than 32GB
or more than 4TB is connected.)
This unit supports Bus-powered USB-HDD’s.
HDR5710: MAX. 500GB formatted capacity HDD
■
(Internal)
This unit is equipped with a 500GB HDD which allows
you to Record programs for up to a total of 50 HD hours.
You can record a single program for up to
time in Timer Recording or 4 hours using One-Touch Timer
Recording.
HDR5750: MAX. 1TB formatted capacity HDD
■
(Internal)
This unit is equipped with a 1TB HDD which allows you to
Record programs for up to a total of 100 HD hours. You can
record a single program for up to
Recording or 4 hours using One-Touch Timer Recording.
Dubbing
You can Dub Titles bi-directionally between an HDD and
a USB-HDD, and also select Copy or Move.
Multiple Title Dubbing
■
You can Dub up to 36 Titles at once.
Simultaneous Operation
■
You can also enjoy the Playback, the Recording and/or the
Net TV simultaneously during Dubbing.
8 hours at a time in Timer
8 hours at a
Deleting a Title
■
You may Delete a Recorded Title.
Rename a Title
■
You can put your Favorite name(s) on Titles.
Others
HDMI (High-Definition Multimedia Interface)
■
You can enjoy clearer Audio/Video Output by connecting
this Unit to a Display device with an HDMI Input port.
LAN Terminal / Internal Wireless LAN adapter
■
Connects the LAN Terminal or Wireless LAN adapter to
access the Internet.
Closed Caption decoder
■
Built-in Closed Caption decoder displays text for Closed
Caption supported programs.
Child Lock
■
This feature allows you to Block children's access to
inappropriate programs.
Auto Power Off
■
If there is No Operation for 3 hours, the Unit will go into
Standby mode automatically.
Choices for On-screen Language
■
Select your On-screen Language: English, Spanish or French.
Continued on next page.
EN - 9
Functional Overview
Front Panel
1 2
3
1. (Power-ON) Indicator
2. REC Indicator
Status Indicator
Power-On
Indicator (White)
REC Indicator
(Red)
Solid and No Light Power ON
Blinking and No Light Starting Up
Solid and Solid Recording
Solid and Blinking Recording Paused
No Light and No Light Standby
Blinking and Blinking
Rear Panel
AC plug
Indicates...
Unmatched Remote
Control Code (at
Power ON)
3. Infrared Sensor Window
Receives IR Signal from your Remote Control so that you
can Control the Unit from a distance.
Note(s)
• The REC Indicator will blink in Standby mode if the Clock
Setting is Not Completed, the Unit is acquiring Auto Clock
Data, from 2 minutes before the Programmed Star ting
Time, or if the Unit and the Remote Control’s Remote
Control Code does Not match. This is Not a malfunction.
31
AUDIO
4
OUT
VIDEO OUT
L
USB
LAN
(
)
HDD
8765
2
ANTENNA
HDMI OUT
R
IN
OUT
1. AC Power Cord
• Connect to a standard AC outlet to supply power to
this Unit.
• Unplug this cord from the AC outlet to completely
shut down the Unit.
2. ANTENNA IN jack
Use to connect an Antenna / Cable Box / Satellite
Receiver for TV pass through only.
3. AUDIO OUT jacks
Use to connect a TV monitor, AV Receiver or other
devices with a set of RCA audio cable.
4. VIDEO OUT jack
Use to connect a TV monitor, AV receiver or other
device with an RCA video cable.
5. ANTENNA OUT jack
Use to connect an RF Coaxial cable to pass the Signal to
the ANTENNA IN on your TV.
6. HDMI OUT jack
Use to connect this unit and the Display with an HDMI
cable.
EN - 10
7. LAN terminal
Use a shielded LAN cable to connect to a Network
device (Hub, Broadband Router, Modem, etc.)
8. USB input
Use to connect a USB-HDD or USB Memory Stick with
a Software Update File.
Note(s)
• Do Not Touch the Inner Pins of the Jacks on the Rear
Panel. Electrostatic discharge may cause permanent
damage to the Unit.
• This Unit does not have an RF Modulator.
• Do Not Connect any Devices other than the USB-HDD
or the USB Memory Stick into the USB Input.
• USB Memory Stick can be used Only for a Software Update.
(USB card reader, MP3 player, Digital camera, PC, keyboard,
mouse, etc. cannot be used.)
• When connecting a USB-HDD or USB Memory Stick,
connect it directly to the USB Input. Do not use a USB
Extension cable.
• Make sure to Power-Off this Unit and the USB-HDD before
Disconnecting the USB-HDD.
Continued on next page.
Remote Control
Installing the Batteries in the Remote Control
Install 2 AAA (1.5V) batteries matching the polarity indicated
inside battery compar tment of the remote control.
Note(s)
Incorrect use of batteries can result in hazards such as leakage
and bursting. Please observe the following:
• Lithium or ni-cad and ni-mh rechargeable batteries are
not recommended to use for Remote Control.
• Do not mix different types of batteries such as alkaline
and standard (carbon-zinc).
• Do not mix new and old batteries together.
• Do not use different kinds of batteries together.
Although they may look similar, different batteries may have
different voltages.
• Make sure that the + and - ends of each battery match
the indications in the battery compartment.
• Remove batteries from battery compartment that is not
going to be used for a month or more.
• When disposing of used batteries, please comply with
Governmental regulations or Environmental Public
Instruction’s rules that apply in your country or area.
• Do Not recharge, short-circuit, heat, burn or disassemble
batteries.
Using the Remote Control
Keep in mind the following when using the Remote Control
• Make sure that there are No Obstacles between the
Remote Control and the Infrared Sensor Window on the
unit.
• You need to set both the Unit and the Remote Control
to the Same Code. (The Default setting for the Remote
Control is “Code1”) Refer to page 71 for more information
on Remote Control Code.
• Remote operation may become unreliable if Strong
Sunlight or Fluorescent light is shining on the Infrared
Sensor Window on the unit.
• Remote Controls for different Devices can interfere with
each other. Avoid using Remote Controls from other
Devices which are located close to the unit.
• Replace the Batteries when you notice a fall off in the
operating range of the Remote Control.
• The Maximum Operable ranges from the Unit are as
follows.
–Line of sight: approx. 23 feet (7m)
–Either side of the center:
approx. 16 feet (5m) within 30°
–Above: approx. 16 feet (5m) within 15°
–Below: approx. 10 feet (3m) within 30°
30˚30˚
16 feet (5m)
23 feet (7m)
16 feet (5m)
EN
Continued on next page.
EN - 11

1
*
2
3
4
5
6
7
8
9
10
11
*
12
13
14
1. (Power-ON) button
• Press to Turn On the unit or to Turn the unit into
Standby mode. (To completely shut down the unit, you
must unplug the AC power cord)
2. NETFLIX button
• Press to Start up NETFLIX.
E
3.
4.
5.
6. MENU button
7. / / / (Cursor) buttons
(Rewind) button
• During Playback press to Fast Reverse the playback.
H
(Previous) button
• During Playback, press H to Return to the Beginning
of the Current Chapter and then Press H as needed
to go back to Previous Chapter(s).
C
(Stop) button
• Press to stop Playback or Recording.
• Press to display the Sub Menu.
• Press to select Items or Settings.
REPLAY
SKIP
• During Playback, press to Skip or Rewind for a certain
amount of time as long as they are pressed.
( ) button
(
) button
*
15
16
17
18
19
20
21
22
23
24
8. BACK button
• Press to Return to the previously displayed Menu or
Screen.
*
*
• Press to Exit from the various Screen or Window.
9.
10. DISPLAY button
11 INFO button
12. YOUTUBE button
13. Number buttons
(Dot) button
14. REC button
15. VUDU button
16. B (Play) button
17.
18.
19. F (Pause) button
20. TITLE LIST button
21. OK button
22. NET TV button
23. CH +/− buttons
24. red/green/yellow/blue button
* Net Service will be activated by pressing this button.
• If using a universal Remote, please check for any additional
• Cannot guarantee about third par ty’s Remote Controls.
(
home) button
• Press to Display the Home Menu.
• Press to Turn the Display Menu On or Off.
• Press to display Information about the current program
or the title currently playing.
*
• Press to Start up YouTube.
• Press to select Channel numbers.
• Press the Dot and Minor Number buttons to select
the Minor part of the Digital Channel Selection using
Number and Dot buttons [e.g. 6 → . → 1 = Ch 6.1].
• Press Once to Start Recording.
• Press Repeatedly to Start the OTR (One-Touch Timer
Recording) and set the Recording Time.
*
• Press to Start up VUDU.
• Press to Start Playback or Resume Playback.
D
(Fast Forward) button
• During Playback, press to Fast Forward the Playback.
G
(Next) button
• During Playback, press to Skip to the next Chapter.
• Press to Pause Playback or Recording.
• Press to display the Title List
• Press to Confirm or Determine the selected Item in
the Menu. If Tuner Signal is Received, the Channel List
will be Displayed.
*
• Press to Display Net TV.
• Press to Change the Channel Up or Down.
• Press to Move page Up or Down.
• Functionally useful for Net service.
Note(s)
Remote Code or contact the Manufacturer for additional
assistances.
Please contact the Remote manufacturer if you have any
problem with it.
EN - 12
2. CONNECTIONS
Connection
Read this First:
■
1. Disconnect the AC Power cords of this unit , TV and other devices from the AC outlet.
2. Make the Connections as illustrated below.
3. After making All the Connections, connect the AC power cords of the devices.
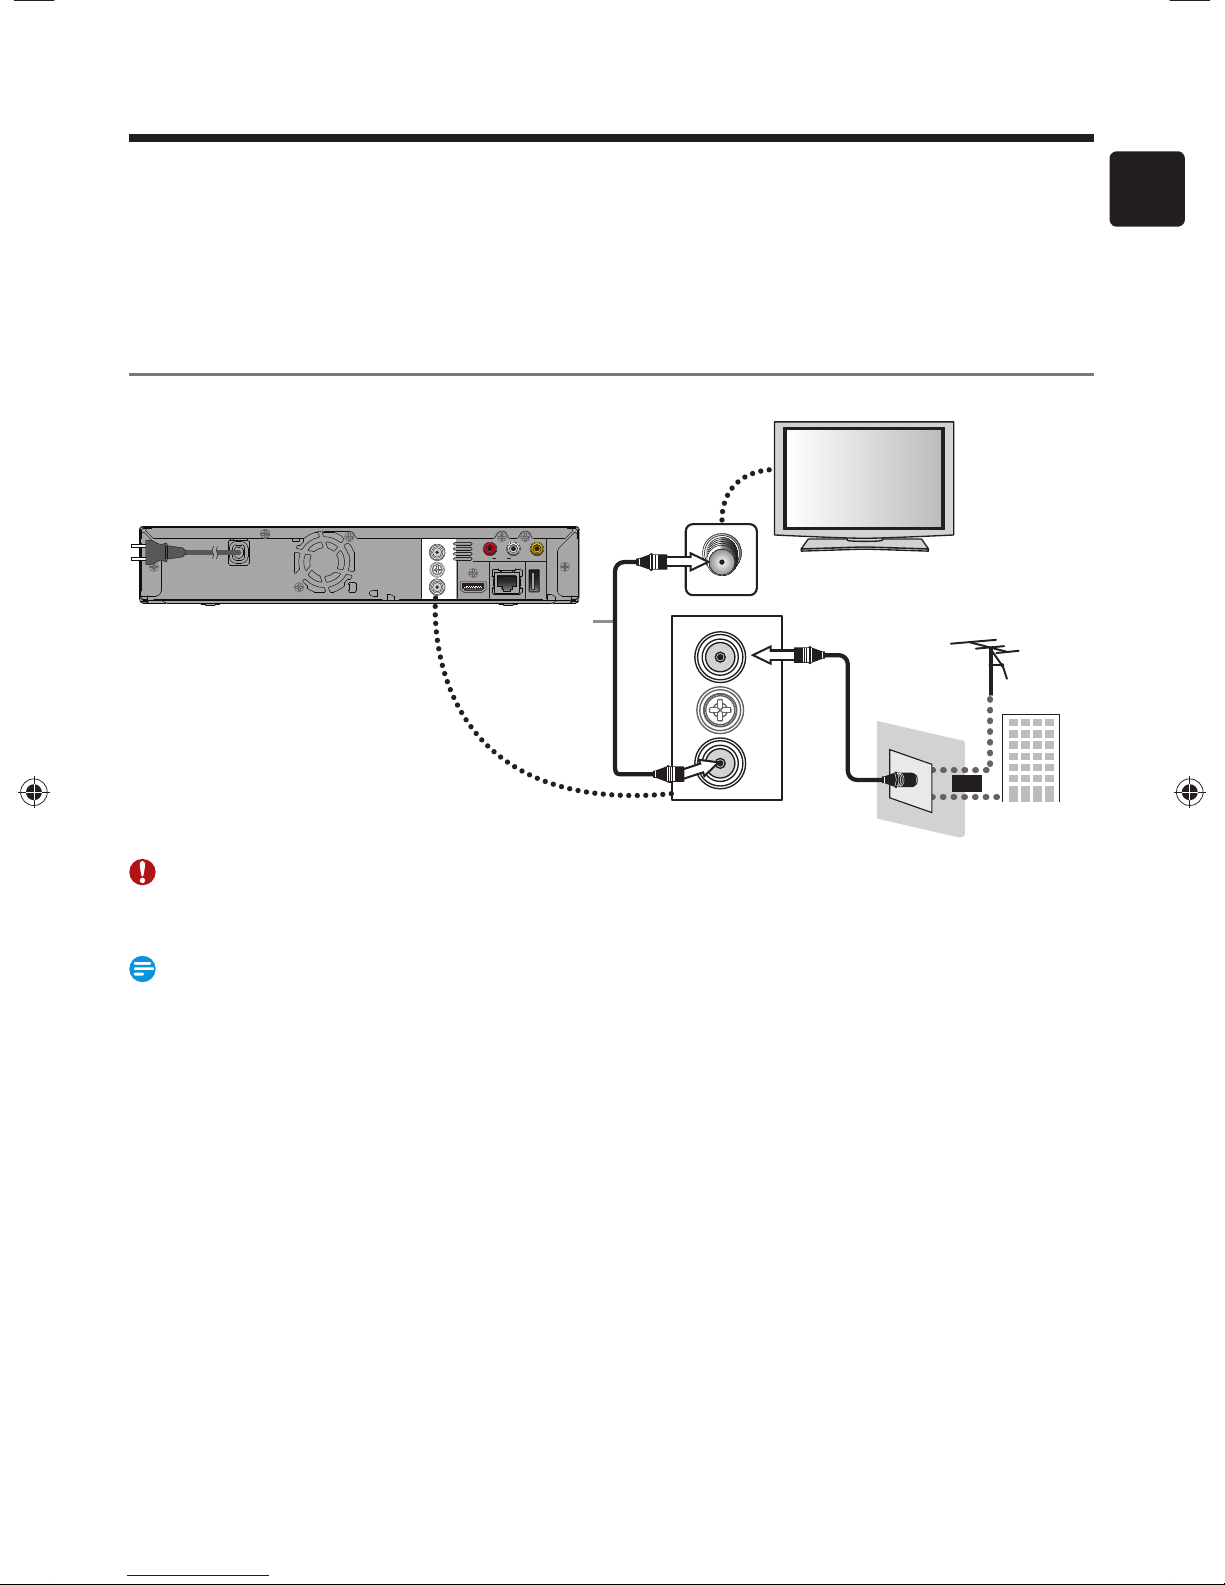
Antenna Connection (Required)
Rear of this Unit
ANTENNA
ANTENNA
AUDIO
OUT
IN
IN
HDMI OUT
OUT
OUT
This Connection is
for TV Pass
Through Only
VIDEO OUT
LR
USB
LAN
(
HDD
)
RF Coaxial
cable
ANT. IN
ANTENNA
IN
VHF / UHF
antenna
EN
OUT
RF Coaxial
cable
or
Cable TV
Caution
• Do Not use a Tightening Tool when connecting a F-type Coaxial cable connector to this Unit.
If the Coaxial cable is connected too tightly using a Tightening Tool, the Antenna Input Jack may be damaged.
Note(s)
• For your Safety and to avoid damage to the Device, please unplug the RF Coaxial cable from the ANTENNA IN / OUT jack
before moving the unit.
• If you use an Antenna to receive Analog TV, it should also work for DTV reception. Outdoor or Attic antennas will be
more effective than Set-top Indoor versions.
• ANTENNA OUT jack is for TV pass through only. HDD / USB-HDD playback through the RF is not supported.
Supplied Cables used in this Connection are as follows:
■
• RF Coaxial cable x 1
Please purchase the rest of the necessary Cables at your local store.
Continued on next page.
EN - 13
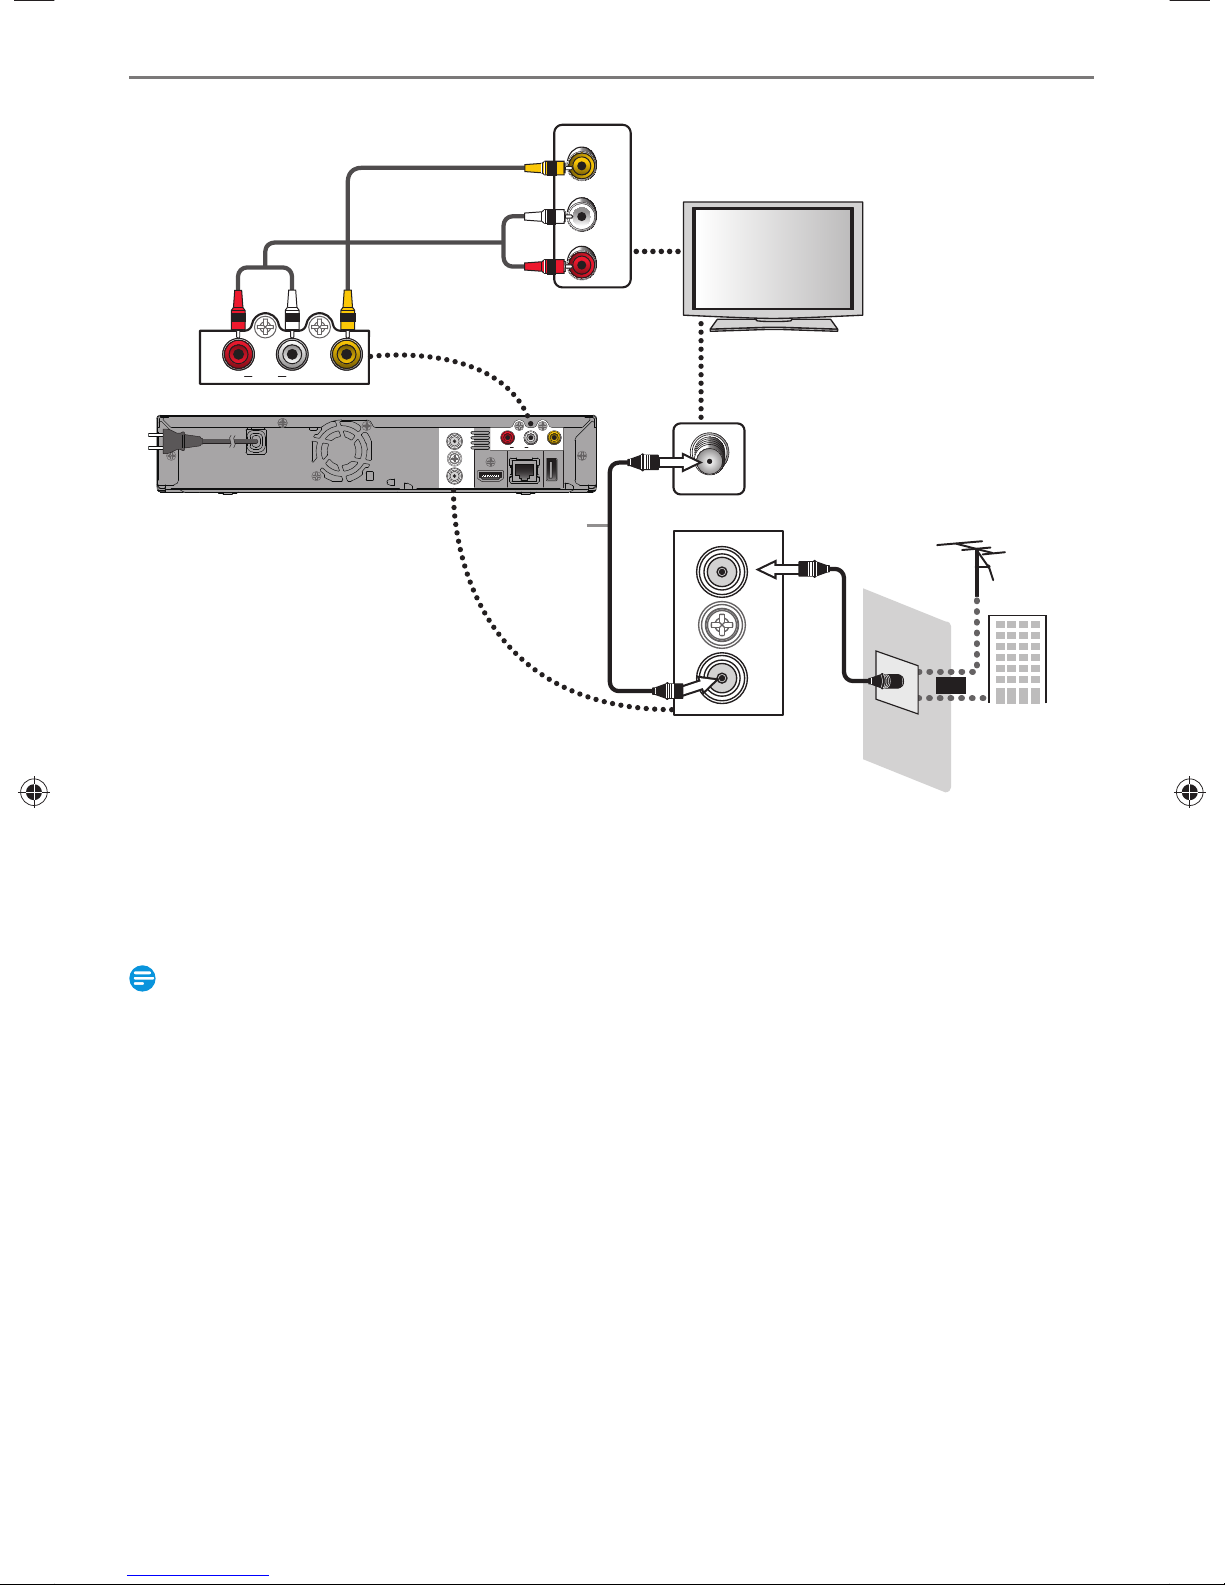
Connecting to a TV Using Audio / Video cables
VIDEO IN
Rear of this Unit
RCA Video cable
RCA Audio cable
AUDI O
OUT
R
VIDEO OUT
L
ANTENNA
ANTENNA
IN
IN
HDMI OUT
OUT
OUT
This Connection
is for TV Pass
Through Only
AUDIO
AUDIO
OUT
OUT
LR
LR
LAN
RF Coaxial
VIDEO OUT
VIDEO OUT
USB
(
HDD
)
AUDIO IN
cable
L
R
ANT. IN
ANTENNA
VHF / UHF
IN
OUT
RF Coaxial
cable
antenna
or
Cable TV
Supplied cables used in this connection are as follows:
■
• RF Coaxial cable x 1
• RCA Audio (L/R) cable x 1
• RCA Video cable x 1
Please purchase the rest of the necessary Cables at your local store.
Note(s)
• Connect this unit directly to the TV. If the audio / video cables are connected to a VCR then the pictures may be distor ted
due to the copyright protection system.
• When the HDMI Video Resolution is set to “Auto” or “1080p”, Video signals are not output from the Video Out jack
depending on your TV. (Refer to page 70.)
EN - 14
Continued on next page.
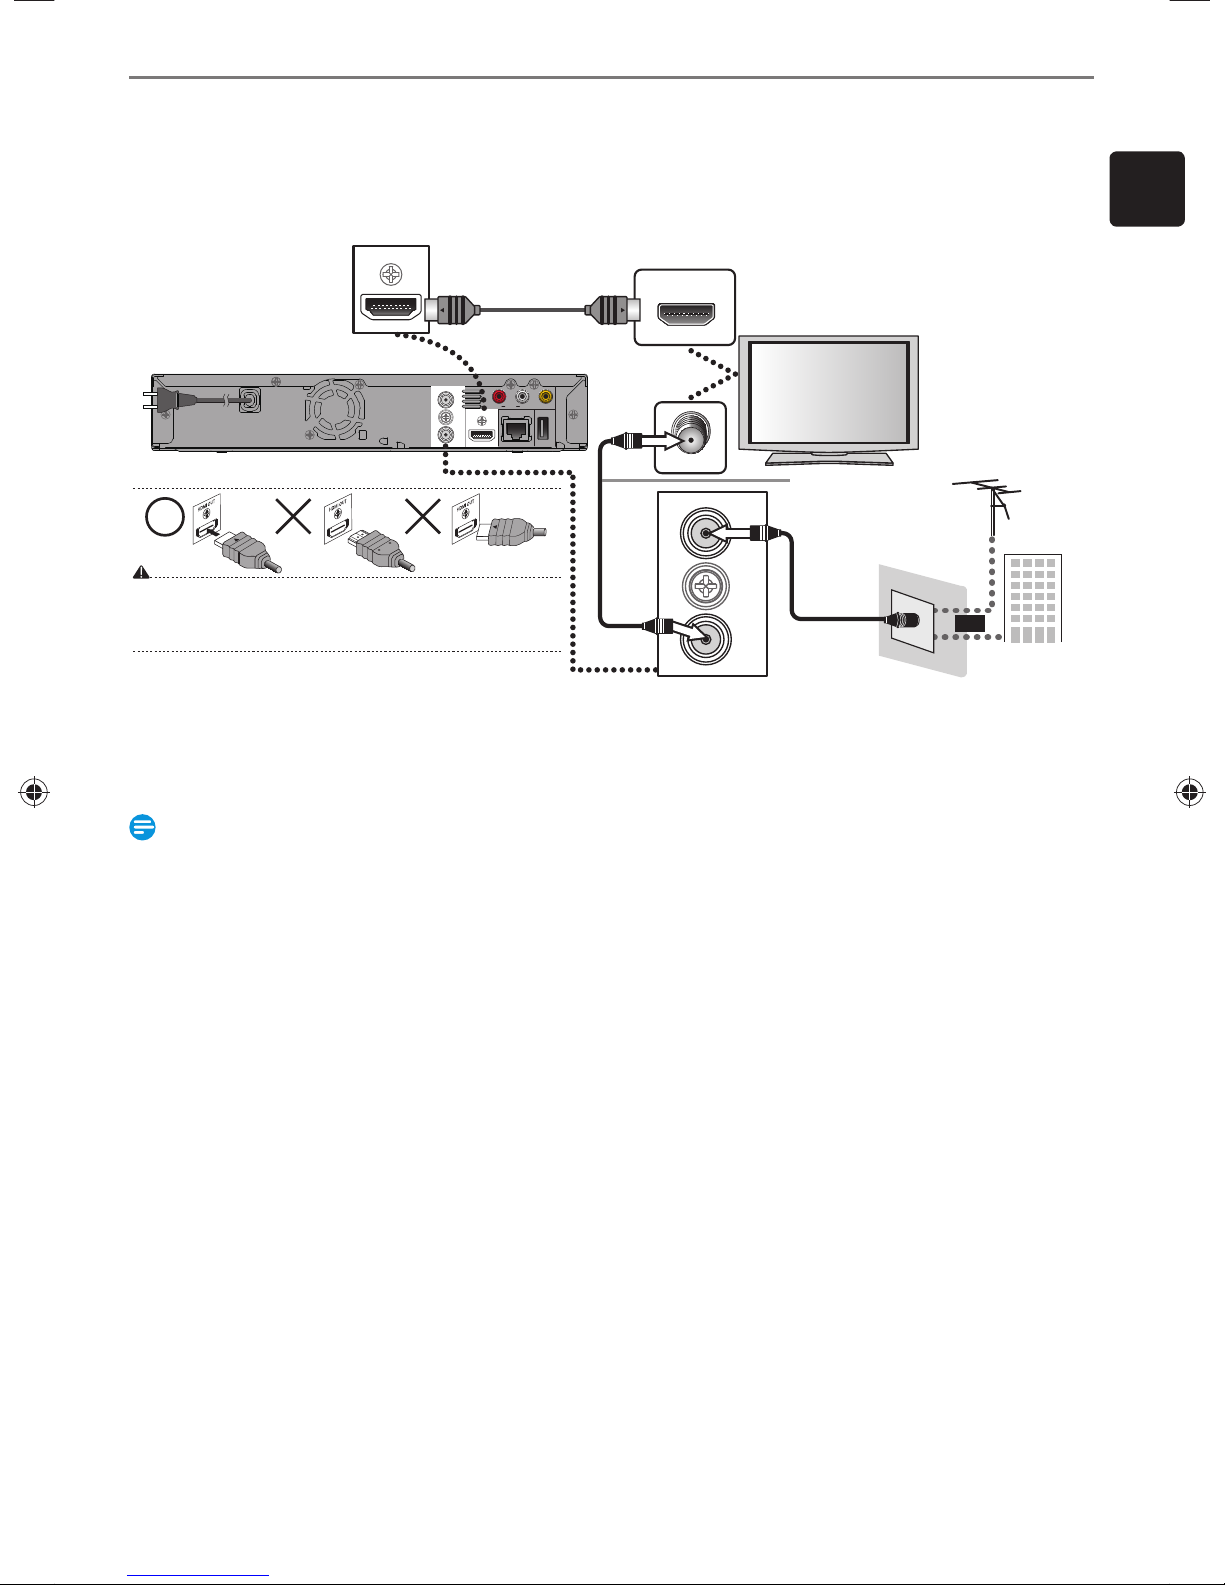
Connecting to a TV Using an HDMI cable
• HDMI outputs the Video / Audio signals without converting to Analog signals.
• No Audio connection is required.
• High Speed HDMI cable (also known as HDMI Category 2 cable) is recommended for Better Compatibility.
• Use an HDMI cable with the HDMI logo (a certified HDMI cable) for this connection.
EN
HDMI OUT
HDMI cable
(not supplied)
HDMI IN
Rear of this Unit
ANTENNA
ANTENNA
Do Not Tilt the Connector when inserting it into the HDMI jack
and make sure the Shapes of the Jack and the Connector are
matched.
Supplied cables used in this connection are as follows:
■
AUDIO
VIDEO OUT
OUT
HDMI OUT
HDMI OUT
LR
USB
LAN
(
)
HDD
RF Coaxial
cable
ANT. IN
ANTENNA
IN
OUT
This Connection
is for TV Pass
Through Only
RF Coaxial
cable
or
VHF / UHF
antenna
Cable TV
IN
IN
OUT
OUT
• RF Coaxial cable x 1
Please purchase the rest of the necessary Cables at your local store.
Note(s)
• Some Devices with an HDMI input may not operate properly with this unit.
• When using an HDCP-incompatible Display Device, the Image will not be viewed properly.
• The Audio signals (including the sampling frequency, the number of channels and bit length) from the HDMI connector may
be limited by the Device that is connected.
• When this unit’s HDMI connector is connected to a DVI-D compatible monitor (HDCP compatible) with an HDMI-DVI
converter cable, the signals are output in digital RGB.
• When a Power Failure occurs or when you Unplug the Unit, some problems with the HDMI setting might occur. Please
Check and Set the HDMI Setting again.
Continued on next page.
EN - 15
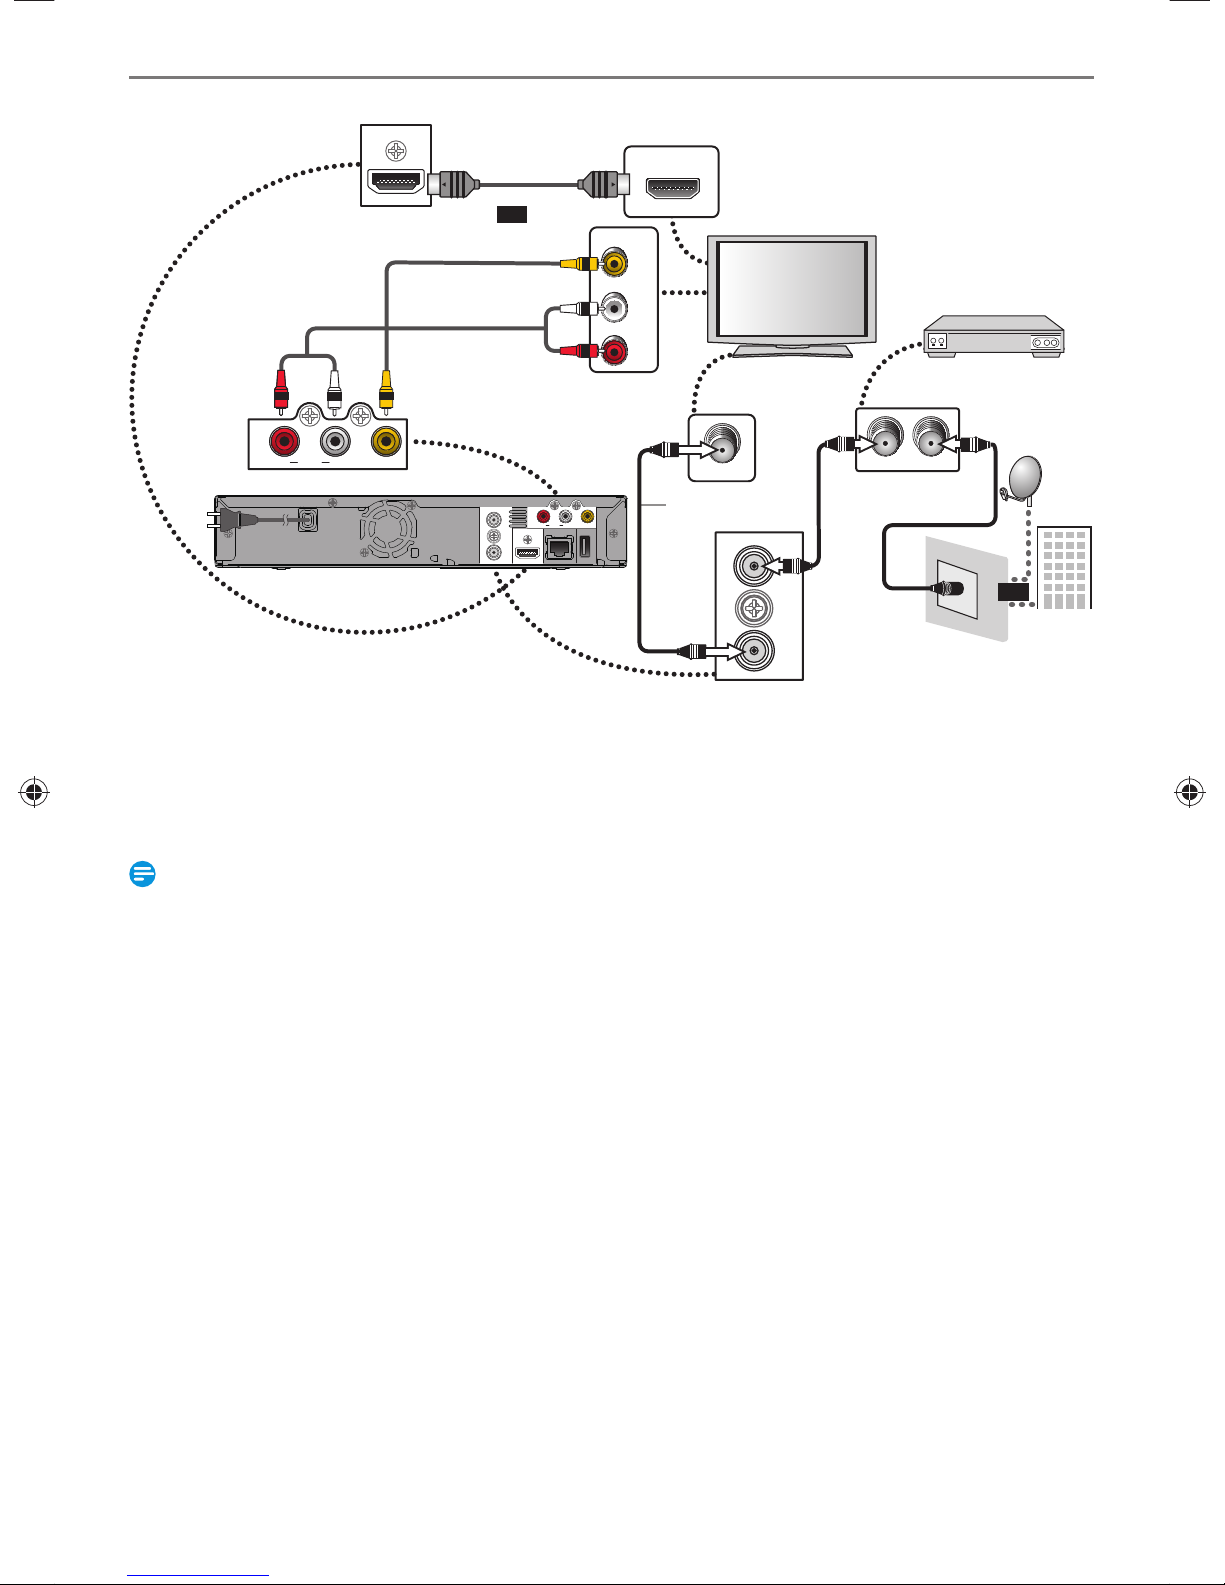
Connecting to a Cable / Satellite Box
HDMI OUT
HDMI cable
(not supplied)
or
RCA Video cable
RCA Audio cable
HDMI IN
VIDEO IN
AUDIO IN
L
R
AUDIO
OUT
RL
Rear of this Unit
Supplied Cables used in this Connection are as follows:
■
VIDEO OUT
ANTENNA
ANTENNA
ANT. IN
This Connection is
AUDIO
AUDIO
VIDEO OUT
OUT
OUT
VIDEO OUT
R
L
HDMI OUT
HDMI OUT
LR
USB
LAN
(
)
HDD
RF Coaxial
cable
IN
IN
OUT
OUT
for TV Pass Through
Only
ANTENNA
IN
OUT
• RF Coaxial cable x 1
• RCA Audio (L/R) cable x 1
• RCA Video cable x 1
Please purchase the rest of the necessary Cables at your local store.
Note(s)
• Required Cables and Connecting methods differ depending on the Cable / Satellite box.
For more information, please contact your Cable / Satellite Provider.
• You cannot Record One Channel while Watching another Channel.
RF Coaxial
cable
Cab le / Sat elli te Box
ANT. INANT.OUT
RF Coaxial cable
or
Satellite
Dish
Cable TV
EN - 16
Continued on next page.
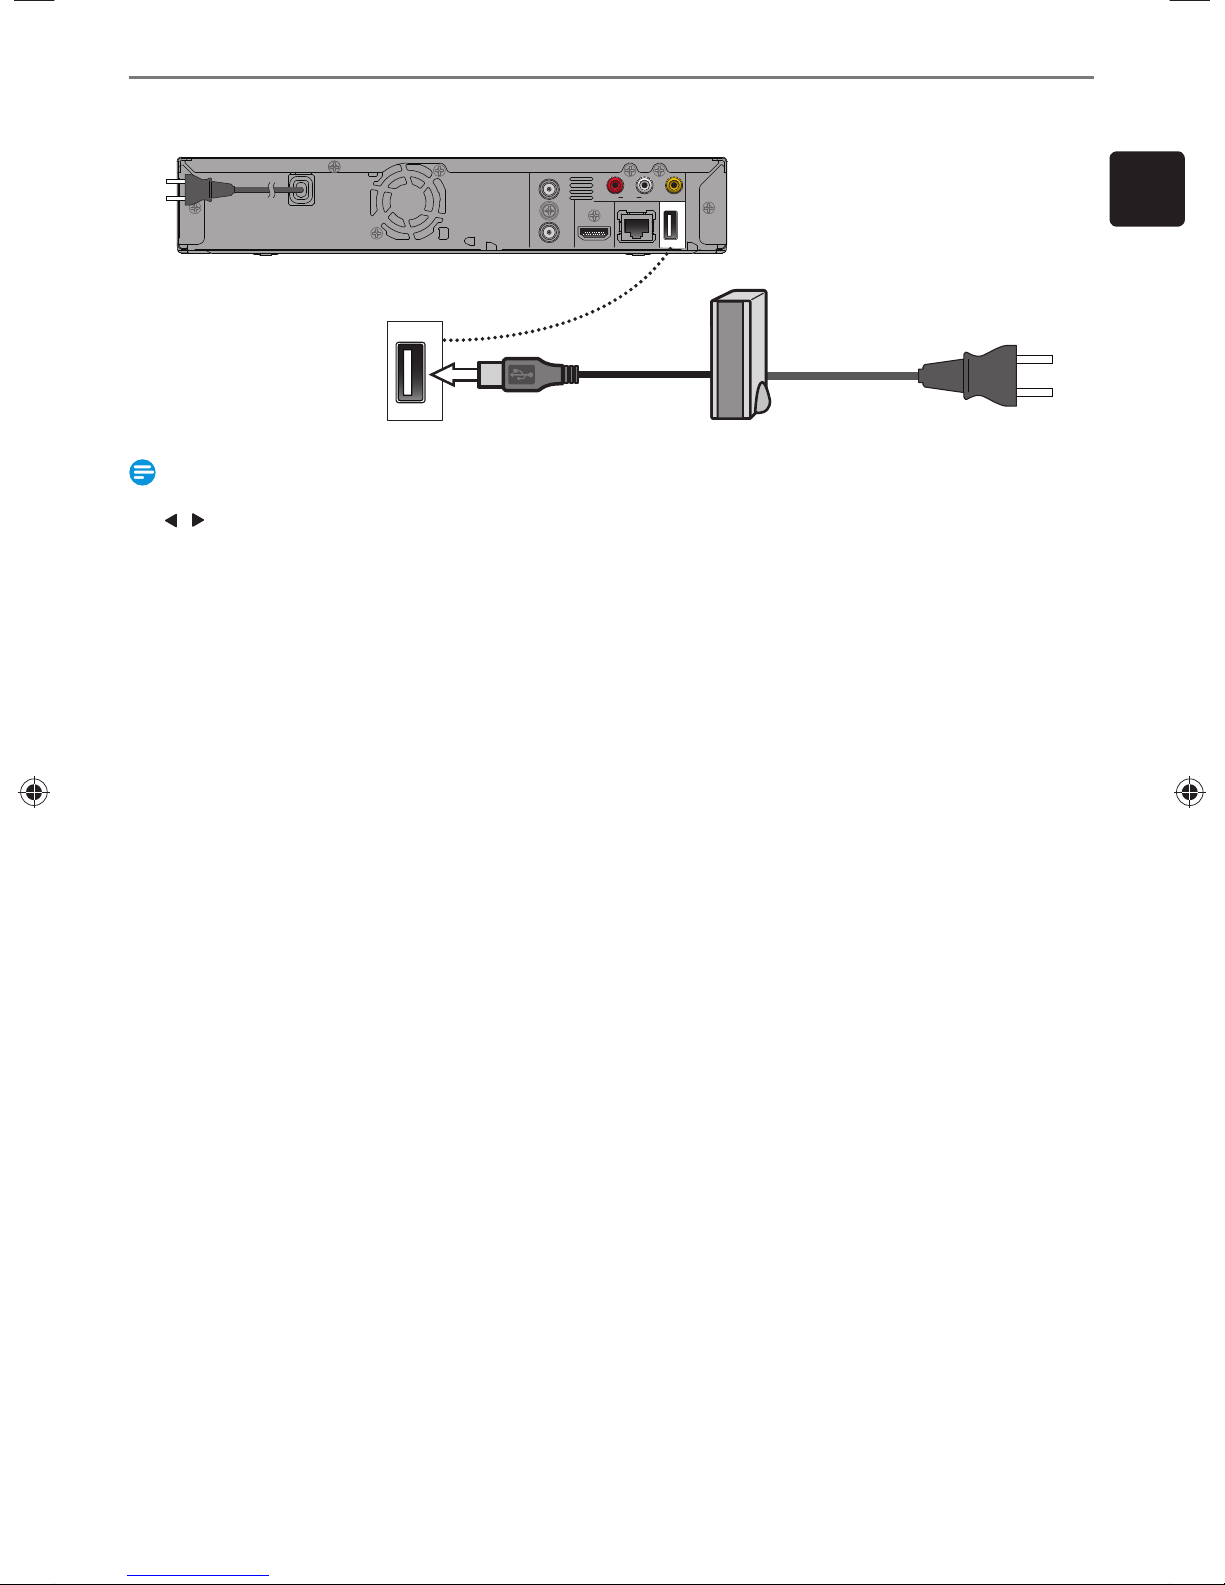
Connecting to a USB-HDD
USB
(
HDD
ANTENNA
IN
OUT
)
AUDIO
OUT
HDMI OUT
LAN
USB cable
(not supplied)
VIDEO OUT
LR
USB
USB
(
)
(
)
HDD
HDD
AC plug
(Self-powerd
USB-HDD only)
Note(s)
• USB-HDD Registration Screen will appear if you connect Unregistered USB-HDD to this Unit. Please select “Yes” using
/ ] , then press [ OK ] . Move on to Step 2 in ‘Registering a USB-HDD’ on page 56.
[
• Do Not Turn Off the Unit or Unplug any Cable while the USB-HDD is Operating. Doing so Causes a Malfunction of the
USB-HDD.
• For a Self-powered USB-HDD, make sure to Turn Off the USB-HDD when Connecting it to the Unit or Disconnecting it
from the Unit.
After Turning Off the Unit, make sure All the LED Indicators on the Front Panel of the Unit are Off.
–Turning Off the unit or Disconnecting the USB-HDD while operating Causes Data Loss and Malfunction.
EN
Continued on next page.
EN - 17
Digital Audio Connection
HDMI Audio Connection
AV Receiver / Amplifier with an HDMI Input jack
Rear of this Unit
HDMI IN
HDMI cable
(NOT SUPPLIED)
HDMI OUT
ANTENNA
AUDIO
OUT
VIDEO OUT
HDMI OUT
HDMI OUT
LR
USB
LAN
(
HDD
IN
OUT
Refer to page 70 to set up “HDMI Audio Out”.
Audio format
Dolby Digital/Dolby Digital Plus
LPCM
Dolby Digital
Setting on this Unit
PCM 2 channel PCM
Bitstream Dolby Digital
PCM
Bitstream
2 channel PCM
HDMI
Actual Output
Cables Not Supplied.
■
Please purchase the necessary Cables at your local store.
Note(s)
• The Audio source in a Dolby Digital multi channel Surround Format cannot be recorded as Digital Sound by an MD or
DAT deck.
• By Connecting this Unit to a Dolby Digital Decoder, you can enjoy High-quality Dolby Digital multi channel Surround
Sound as in Movie Theaters.
• Playing back a Recorded Title using incorrect Digital Audio Settings may generate Noise Distortion and also damage
Speakers.
)
2 Channel Analog Audio Connection
Stereo System
Analog Audio
Input jacks
AUDIO IN
L R
RCA Audio cable
Supplied Cables used in these Connections are as follows:
■
• RCA Audio (L/R) cable x 1
EN - 18
AUDI O
OUT
R
VIDEO OUT
L
Rear of this Unit
ANTENNA
AUDIO
AUDIO
OUT
OUT
VIDEO OUT
L
R
HDMI OUT
LR
USB
LAN
(
)
HDD
IN
OUT
Continued on next page.
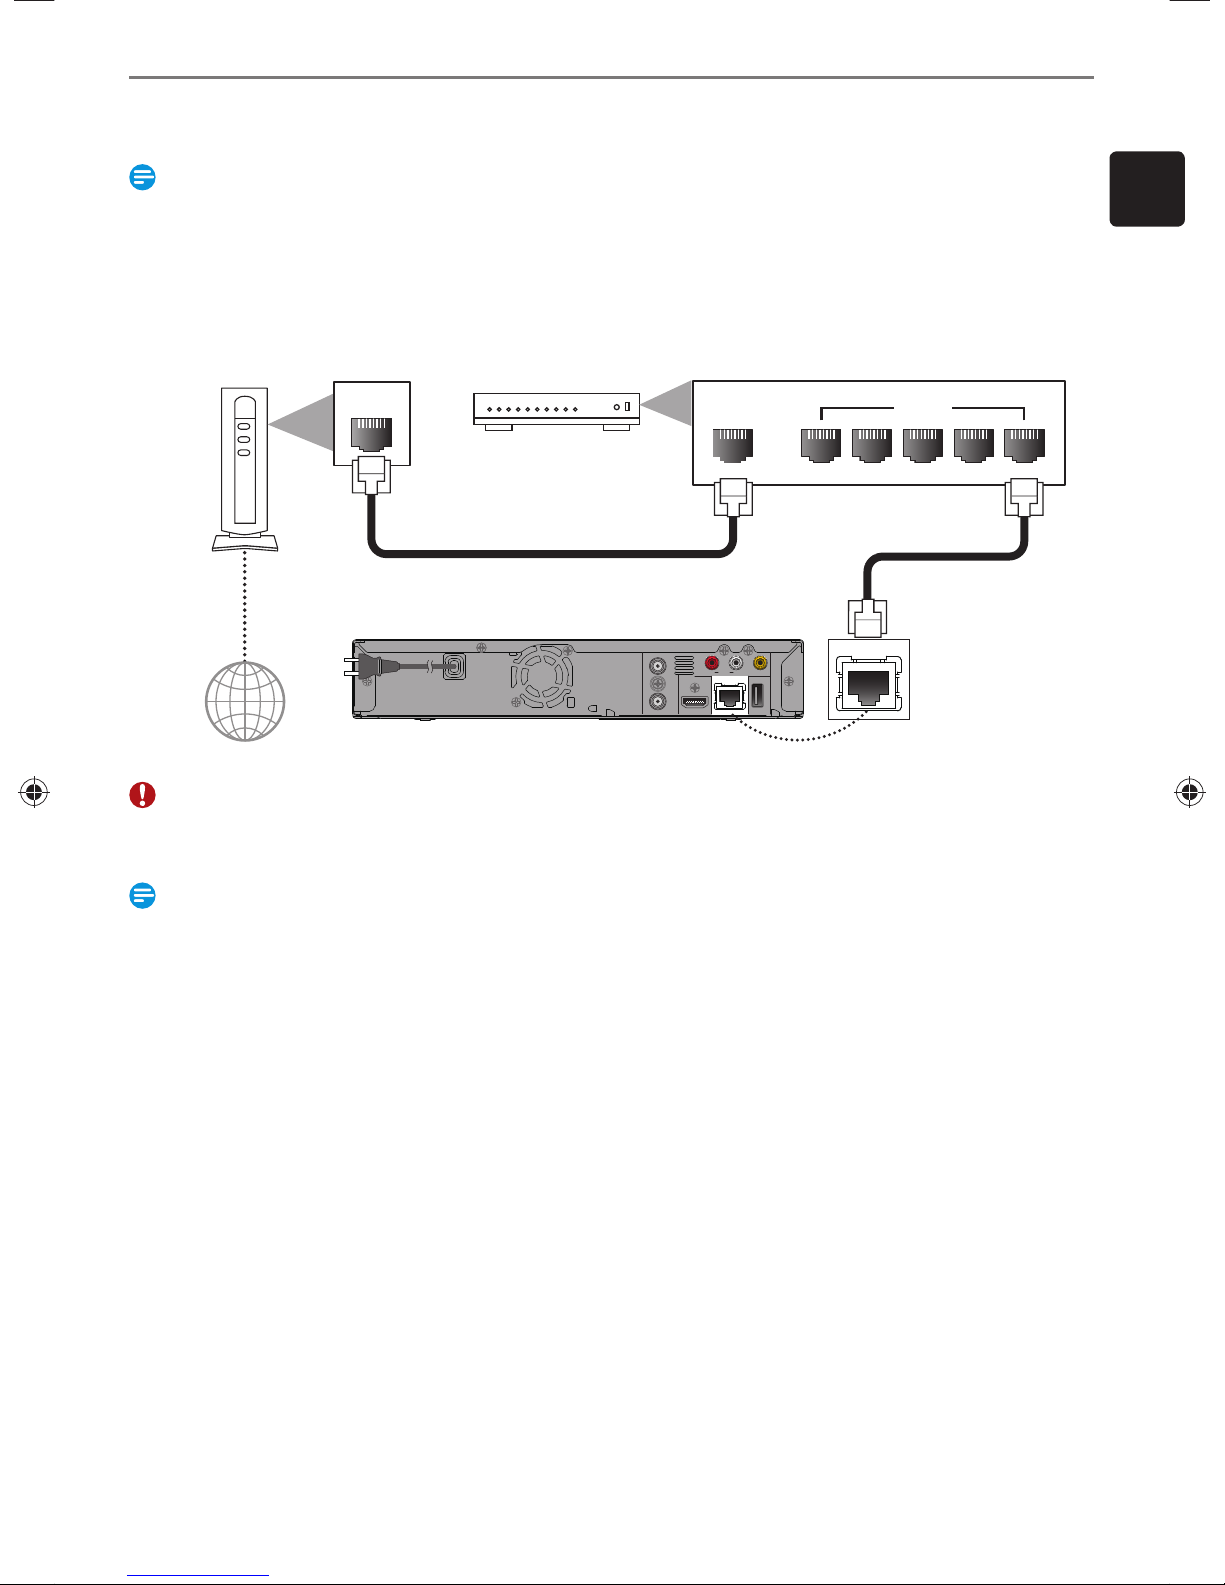
Connection to the Network
By connecting this unit to the Internet, you can update the Software via the Internet and access network services.
Note(s)
• For a stable Connection, Wired Connection is recommended when using following Features.
(Using following Features with Wi-Fi Connection can be affected by other devices using Radio frequencies.)
–Video Streaming services
–Network Update
Wired Connection
■
Networking Equipment
(Modem, etc.)
LAN
Internet
Broadband Router or Hub
LAN cable
(not supplied)
ANTENNA
IN
HDMI OUT
OUT
WAN
Rear of this Unit
AUDIO
OUT
VIDEO OUT
LR
LAN
USB
LAN
(
)
HDD
LAN
LAN
LAN cable
(not supplied)
EN
54321
Caution
• Do Not Inser t any Cable other than a LAN cable to the LAN terminal to avoid damaging the Unit.
• Do Not Connect your PC directly to the LAN terminal of this Unit.
Note(s)
• After you made a Wired Connection, set up necessary Network Settings.
(For Network Setting of Wired Connection, refer to ‘Network Settings’ on page 49.)
• If your Modem does Not have Router Functions, connect a Wired Router.
• If your Modem has Router Functions but there is No Vacant port, add a Hub.
• For a Wired Router, use a Router which supports 10BASE-T / 100BASE-TX ETHERNET standard.
• Please purchase Shielded LAN cables at your local store and use them when you Connect to Network equipment.
Continued on next page.
EN - 19
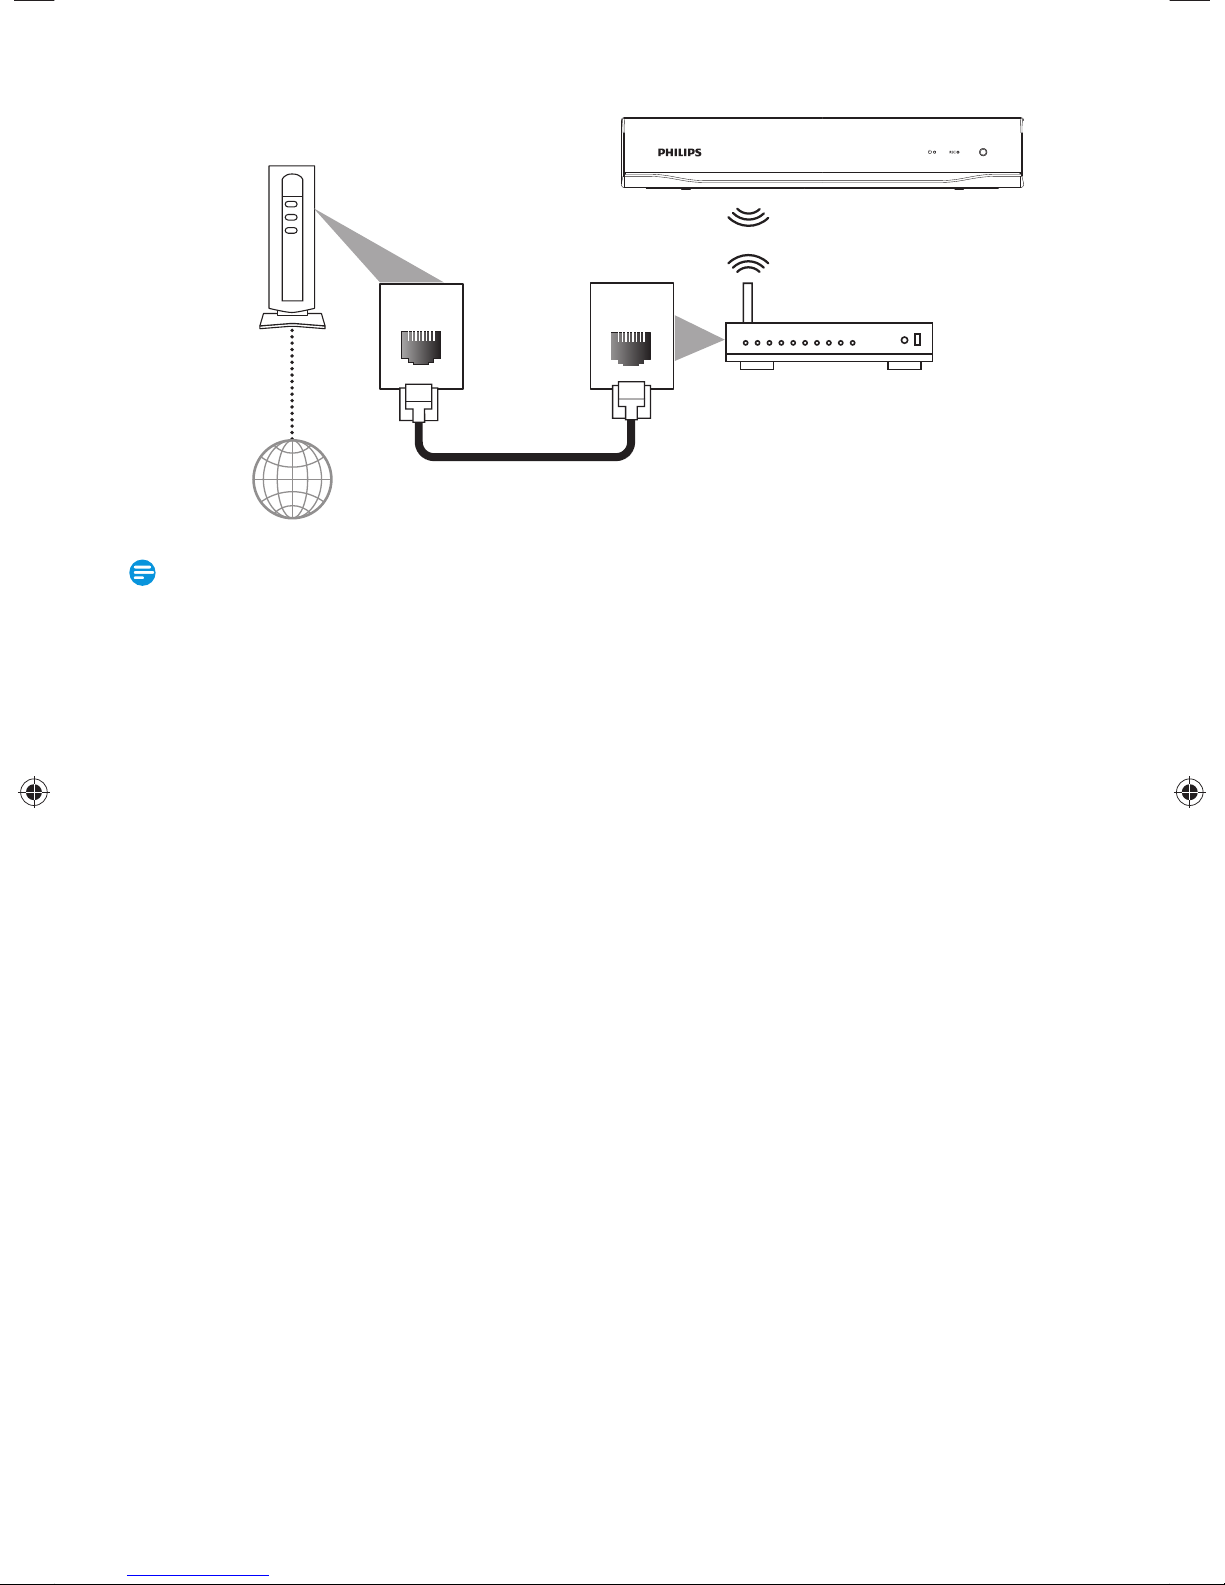
Wi-Fi Router Connection
■
Networking Equipment
(Modem, etc.)
WAN
Wi-Fi Router
Internet
LAN
LAN cable
(not supplied)
Note(s)
• After you made the Wi-Fi Router Connection, set up necessary Network Settings.
(For the Network Setting of Wi-Fi Router Connection, refer to ‘Network Settings’ on page 49.)
• For a Wi-Fi Router, use a Router which supports IEEE 802.11 b/g/n.
(“n” type is recommended for stable operation of the Wi-Fi network.)
• Set the Wi-Fi Router to Infrastructure mode. This unit does Not support Ad-hoc mode.
• Other Radio devices or Obstacles may cause Interference to the Wi-Fi Network Connection.
EN - 20
3. INITIAL SETUP
Initial Setup
Before You Start
Finding the Viewing Channel on your
TV
After you have completed All of the Connections to your TV,
review the Steps below.
1.
Press [ (Power-ON) ] to Turn On the
unit.
2.
Turn On your TV.
3.
Find the Button on the TV’s Remote
Control that accesses the External Source
Input. (The button may be labeled ‘Source’,
‘Select’ or ‘Input’. Refer to your TV’s user
manual.)
Press that Button Repeatedly until you see
the Welcome Screen on the TV screen.
• If you see the Welcome Screen, that is the correct
viewing Source Input associated with this unit’s output.
Make sure to always select this Source Input on your
TV when using this unit.
• If the TV is connected using an HDMI cable, it may
take a few moments until the Welcome Screen
appears.
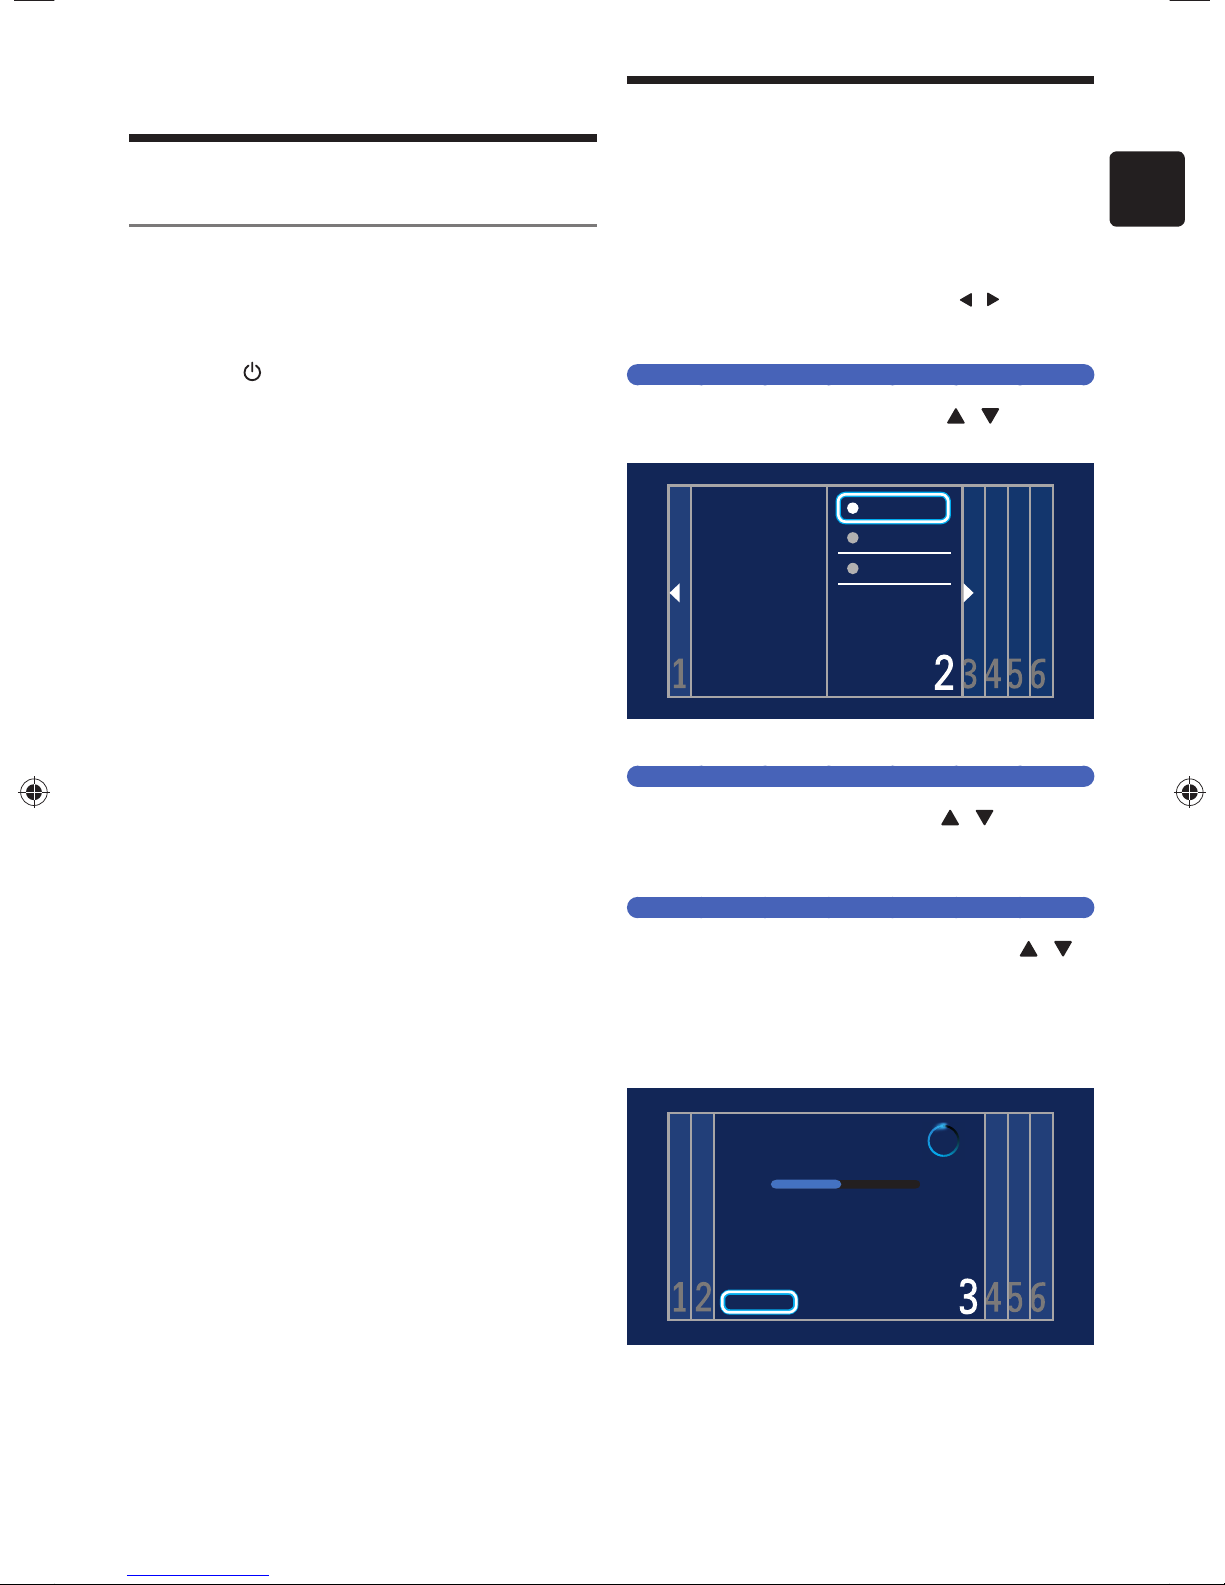
Please follow the instructions below to complete the Initial Setup.
1.
While the Welcome Screen is displayed,
press [ OK ].
• ‘Language Setting’ screen will appear.
• In Initial Setup, pressing [ BACK ] lets you go back to
the previous screen. Also, pressing [
go back to the previous screen or go forward to the
next screen when it is available.
Language Setting
2.
Select your Language using [ / ] , then
/ ] lets you
press [ OK ].
Select your menu
language with the
Up/Down buttons
on your remote
control, press the
OK button to
proceed.
• ‘Country Setting’ screen will appear.
Country Setting
3.
Select your Country using [ / ] , then
English
Français
Español
press [ OK ].
• ‘Antenna / Cable Signal Setting’ screen will appear.
Antenna / Cable Signal Setting
EN
4.
Select “Antenna” or “Cable” using [ / ] ,
then press [ OK ].
• Select “Antenna” for Terrestrial Broadcasting.
Select “Cable” for Cable Television. Then, Channel Scan
will begin.
• Select “Skip” if you wish to Skip this Setting.
System searching. Please wait...
Digital Channels found: 0
Analog Channels found: 0
Auto Channel Programming may take more than 20 Minutes to
complete. Digital will take longer than Analog Channels to find
and program the Channels. Please wait until you see the Auto
Programming Complete Message.
Stop
• If you wish to Skip Scanning, select “Stop” by pressing
[ OK ].
5.
Press [ OK ] on Finish.
• ‘Time Zone’ screen will appear.
Continued on next page.
EN - 21
Time Zone
For “Wired” Connection
A
6.
Select your Time Zone using [ / ] , then
press [ OK ].
Time adjustment for each Time Zone
Atlantic GMT (Greenwich Mean Time ) - 4 hours
Eastern GMT (Greenwich Mean Time ) - 5 hours
Central GMT (Greenwich Mean Time ) - 6 hours
Mountain GMT (Greenwich Mean Time ) - 7 hours
Pacific GMT (Greenwich Mean Time ) - 8 hours
Alaska GMT (Greenwich Mean Time ) - 9 hours
Hawaii GMT (Greenwich Mean Time ) - 10 hours
• ‘Clock Setting’ screen will appear.
Clock Setting
7.
Enter Year / Month / Day / Hour / Minute
and select AM or PM using [
/ / / ] ,
then press [ OK ].
• You can also use [ the Number buttons ] to Enter
a Number.
• You can Move between the Input Fields using [
• If you wish to automatically set Daylight Saving Time,
leave DST ON.
• The highlight will move to “Next” upon pressing [ OK ]
at an Input field.
8.
Press [ OK ] on “Next”.
• ‘Network Setting’ screen will appear.
Network Setting
If you wish to proceed with the Network Setting, perform this
setting. If you wish to skip this setting, select “Skip” using [
then press [ OK ]. Move on to ‘Auto Update Setting’ on page 23.
9.
Select “Next” using [ / ] ,then press
/ ] .
/ ] ,
[ OK ].
• ‘Network Selection’ screen will appear.
10.
Select “Wired” or “Wireless” using [ / ] ,
then press [ OK ].
If you Connect this Unit to the
Wired
Wireless
Network using an Ethernet cable,
select “Wired” to Connect to the
Internet.
If you have a Wireless Router, select
“Wireless” to Connect to the Internet.
A
B
Connection Test will start automatically. Refer to ‘Connection
Test’ on page 55.
1. After Connection Test, the Test result will be
displayed. Press [ OK ] on “Info” for detailed Network
Information, then press [ OK ] on “Next” to complete
the Network Setup.
• Please move on to ‘Auto Update Setting’ on page 23.
For “Wireless” Connection
B
Select “Easy Connect” or “Scan” using [
[ OK ].
Select this setting if your Wireless
Easy
Connect
(WPS)
Scan
“Easy Connect (WPS)” Method
1. Press the WPS button on your Wireless Router.
2. Return to this Unit within 2 minutes, select “Connect”
using [
• Connection Test will start automatically.
3. After Connection Test, the Test result will be
displayed. Press [ OK ] on “Info” for detailed Network
Information, then press [ OK ] on “Next” to complete
the Network Setup.
• Please move on to ‘Auto Update Setting’ on page 23.
“Scan (Access Point Scan)” Method
• AP (Access Point) list will appear.
1. Select an AP to which you wish to Connect this Unit
using [
• If you select an AP which does Not Support WPA,
2. A: “WPS code”
1 Select “WPS code” using [
2 Log on to your Wireless Router and enter the 8-digit
3 Return to this Unit, select “Connect” using [
2. B: “Easy Connect”
1 Select “Easy Connect” using [
Router has a WPS button
easiest way to Set up a Wireless
Connection. If it fails, try “Easy Connect”
*2
again.
This Setting automatically Searches for
Wireless Networks.
*1 WPS (Wi-Fi Protected Setup) button may be called
PBC (Push Button Configuration) button on your
Wireless Router.
*2 If it Continuously fails, then refer to the Router’s
Manual for more details.
/ ] , then press [ O K ].
If the AP is compatible with WPS
/ ] , then press [ OK ] .
WEP / WPA / WPA2 key entry Screen will appear.
Please refer to
• An 8-digit PIN Code will be shown on screen.
PIN Code in it.
then press [ O K ].
• Step 2 and 3 need to be performed within 2 minutes.
• Connection Test will Start automatically.
• Refer to
2. C: on the next page.
“Easy Connect (WPS)” Method above.
/ ] , then press
*1
. It is the
/ ] , then press [ OK ].
/ ] ,
/ ] , then press [ OK ].
EN - 22
Continued on next page.

2. C: “Manual”
1 Select “Manual” using [
• WEP / WPA Key entry screen will appear.
• If your wireless router is not protected by WEP /
WPA / WPA2, Connection Test will start automatically.
2 Enter the WEP / WPA / WPA2 key using the On screen
Keyboard on screen.
• Follow the On-screen Instructions.
• For Details on how to use the On screen Keyboard,
refer to ‘Guide to the On Screen Keyboard’ on page 45.
• Confirmation Message will appear. Select “Yes” and
Connection Test will automatically Start.
3. After Connection Test, the test result will be displayed.
Press [ OK ] on “Info” for detailed Network
Information, then press [ OK ] on “Next” to complete
the Network Setup.
• Please move on to ‘Auto Update Setting’ below.
If the AP is NOT compatible with WPS
1. Select an AP to which you wish to connect this unit
using [
2. After Connection Test, the Test result will be displayed.
Press [ OK ] on “Info” for detailed Network
Information, then press [ OK ] on “Next” to complete
the Network Setup.
• Please move on to ‘Auto Update Setting’ below.
/ ] , then press [ OK ] .
/ ] , then press [ OK ].
EN
Note(s)
• “Easy Connect (WPS)” Method is only available when
your Wireless Router suppor ts it. For details, please refer
to the User Manual of your Wireless Router.
• If more than 64 AP’s are found, a confirmation message
will appear, then the Screen goes back to the AP list.
• Connection Test will automatically Start when you select
an AP that does not have an Authentication Method.
Auto Update Setting
If you wish to Set the unit to automatically perform Network
Update for the latest Software, Activate this Function.
11.
Select “On” using [ / ] , then press
[ OK ].
12.
Select “Next” using [ / ] , then press
[ OK ].
• If the Connection Test result earlier was Pass, the unit
will perform Network Update immediately. Please
follow the On-screen Instructions.
• If you skipped Network Setting, the unit will switch to
the TV viewing mode.
If you wish to set the Network Settings later, you can
refer to ‘Network Settings’ on page 49.
EN - 23
4. VIEWING TV
11.1
KABC
A Day of Memories
Sound Mode
Stereo
Audio Language
English (2/2)
CC Presence
[CC]
Rating
TV-14/MPAA-R
While Viewing TV
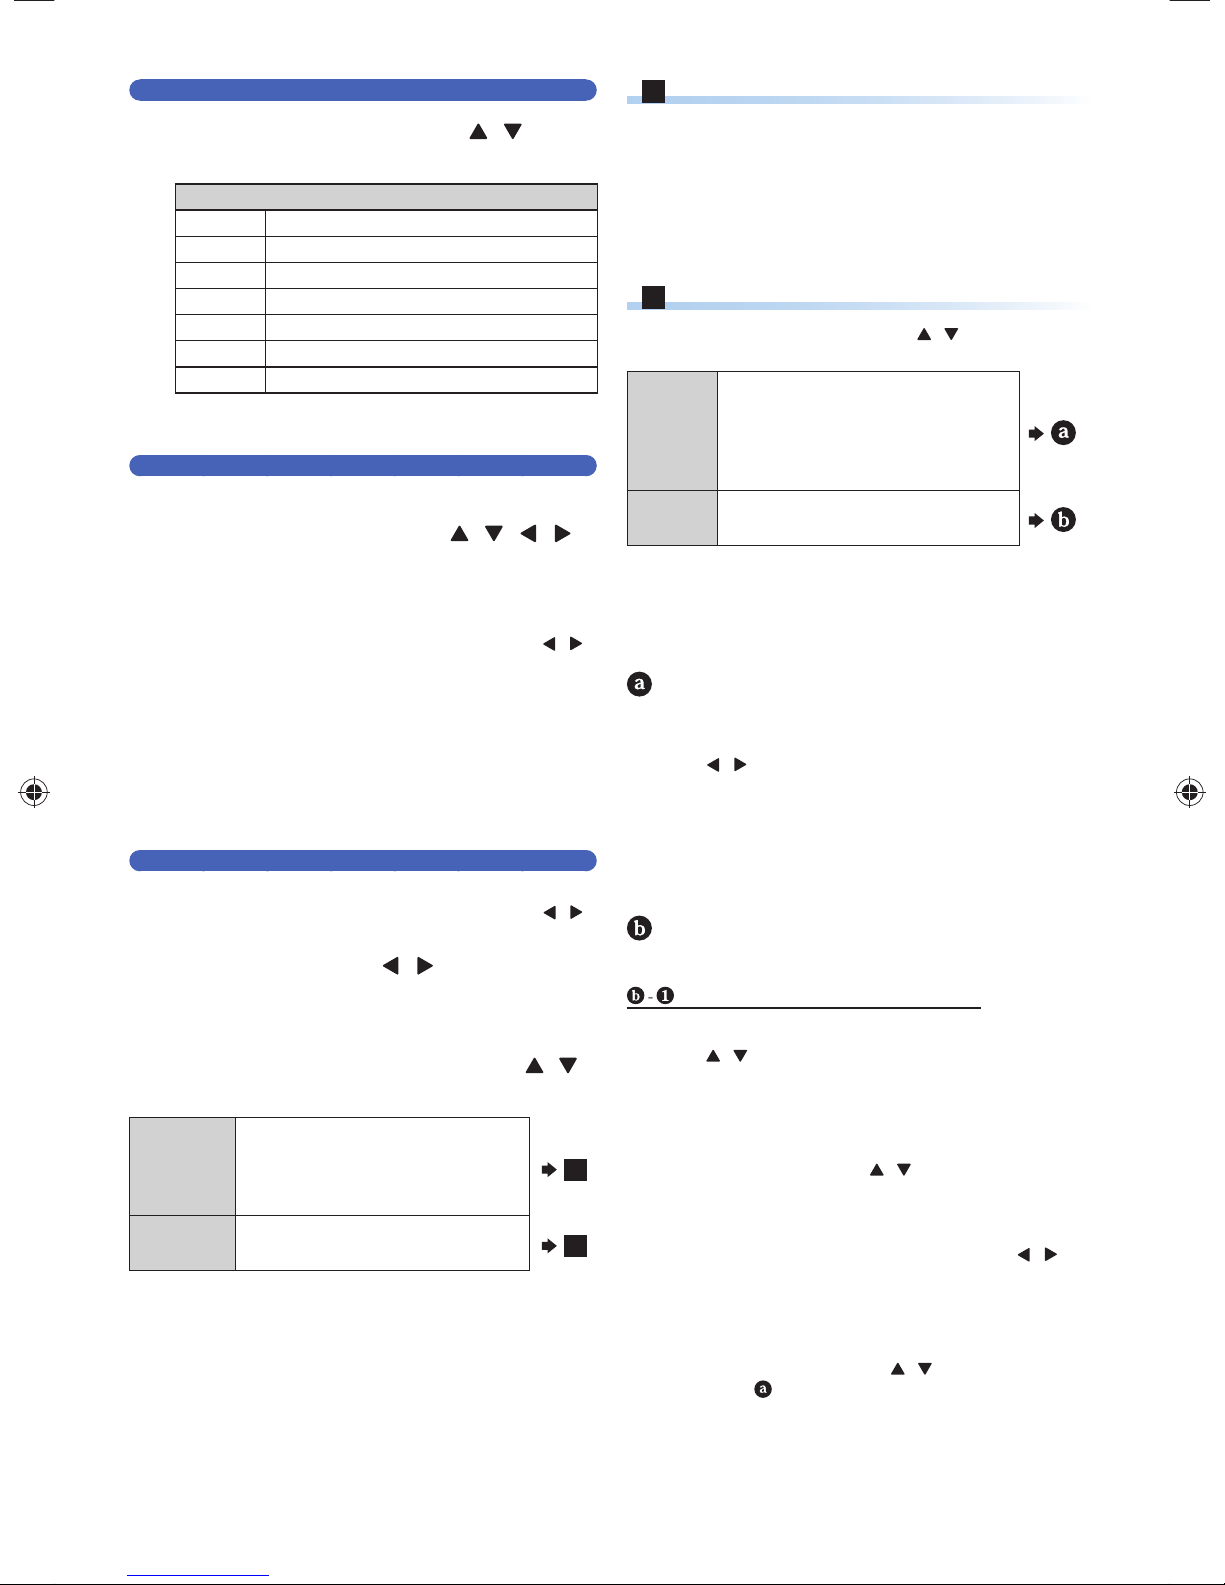
Detailed Information on the Program
You can check the information on the TV program that is
currently on-air.
1.
Press [ INFO ] while viewing a TV program.
Channel Selection
Select a channel using [ CH +/− ] or [ the Number
buttons ] on the Remote Control.
Using [ CH +/− ]
Press [ CH + ] and [ CH − ] to switch up and down through
the memorized channels.
Using [ the Number buttons ]
Press [ 0 ] - [ 9 ] and [ ] to directly switch to the channel.
Digital TV Channels
Enter the Major and Minor Channel Numbers using [ the
Number buttons ] to select a Channel.
For 1-digit Major Channel number
e.g.) 2.1 ch: [ 2 ] + [ . ] + [ 1 ]
For 2-digit Major Channel number
e.g.) 35.1 ch: [ 3 ] + [ 5 ]+ [ . ] + [ 1 ]
Analog TV Channels
For 1-digit number
e.g.) 2 ch: [ 0 ] + [ 2 ] or
[ 2 ] + [ . ] or
[ 2 ] + leave it for 3 seconds
For 2-digit number
e.g.) 12 ch: [ 1 ] + [ 2 ]
Note(s)
• It may take a moment to switch the Digital TV channels.
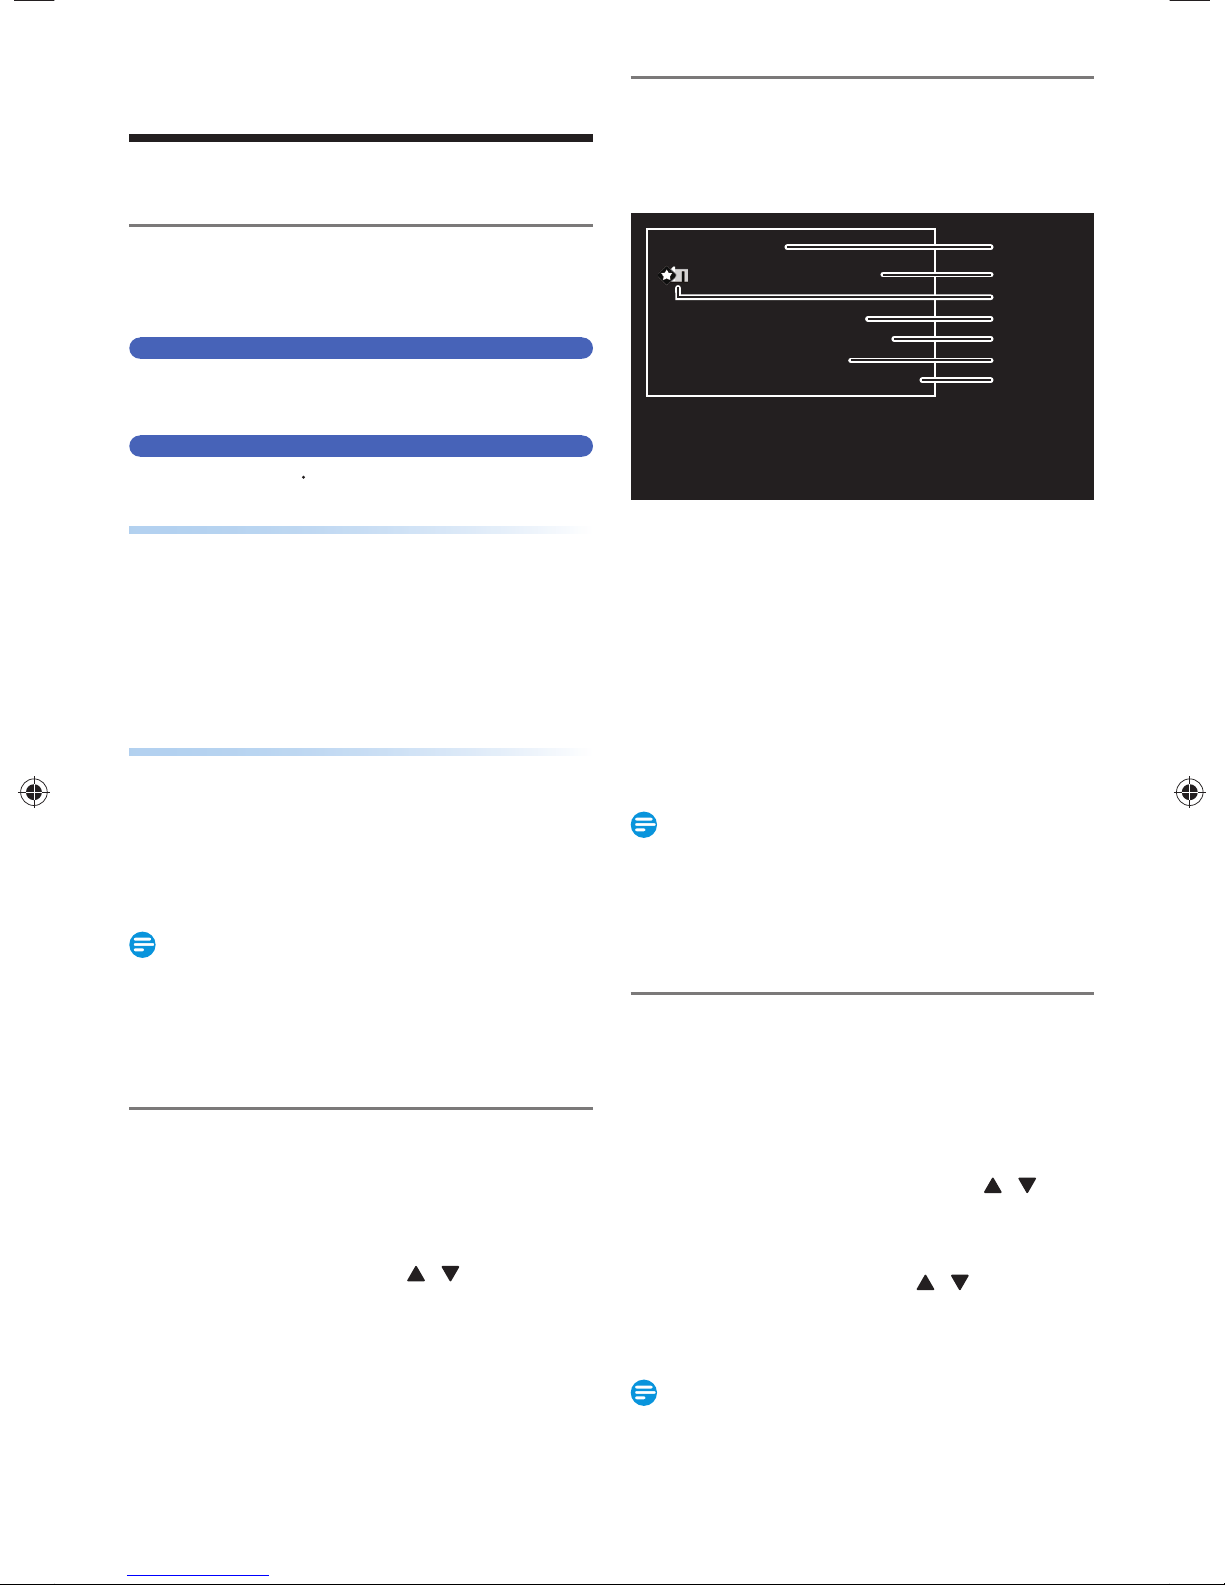
11.1
KABC
A Day of Memories
1
2
3
Sound Mode
Audio Language
CC Presence
Rating
1. Channel number / Broadcast station
2. Program Title
3. Favorite Channel Group
The Favorite Channel Group Icon will be displayed if you
Registered the Favorite Channel on your List.
4. Audio Mode
5. Audio Language
(Indicates the Language currently selected.)
6. Closed Caption
(Indicates the Program being broadcast has Closed
Captioning available.)
7. Program Rating
Stereo
English (2/2)
[CC]
TV-14/MPAA-R
4
5
6
7
Note(s)
• In some cases, DTV Closed Caption Function on the
Unit may not work even when the Closed Caption Icon is
displayed. In such case, check the Closed Caption Setting
on your TV (Only if the Unit is connected to a TV with
the RCA Video Cable).
• The Display will automatically disappear in 5 Seconds.
About Digital TV Broadcasting
■
With its High-Definition Broadcast, Digital Broadcasting far
surpasses Analog Broadcasting in both Picture and Sound
Quality.
Channel List
You can switch the Channel quickly using Channel List.
1.
Press [ OK ] while viewing a TV program.
• Channel List window will appear.
2.
Select a Channel using [ / ] , then press
[ OK ].
EN - 24
Audio Languages
You can switch Audio Language while viewing a Digital TV program.
1.
Press [ MENU ] while viewing a TV
program.
• Sub Menu window will appear.
2.
Select “Audio Language” using [ / ] ,
then press [ OK ].
• Available Languages will be displayed.
3.
Select a Language using [ / ] , then press
[ OK ].
• Available Languages will vary depending on the TV
program.
Note(s)
• If there is Only one Audio Language Available for the
Digital TV you are Viewing, “Audio Language” Setting will
Not be Displayed.
Continued on next page.
 Loading...