

Page 1
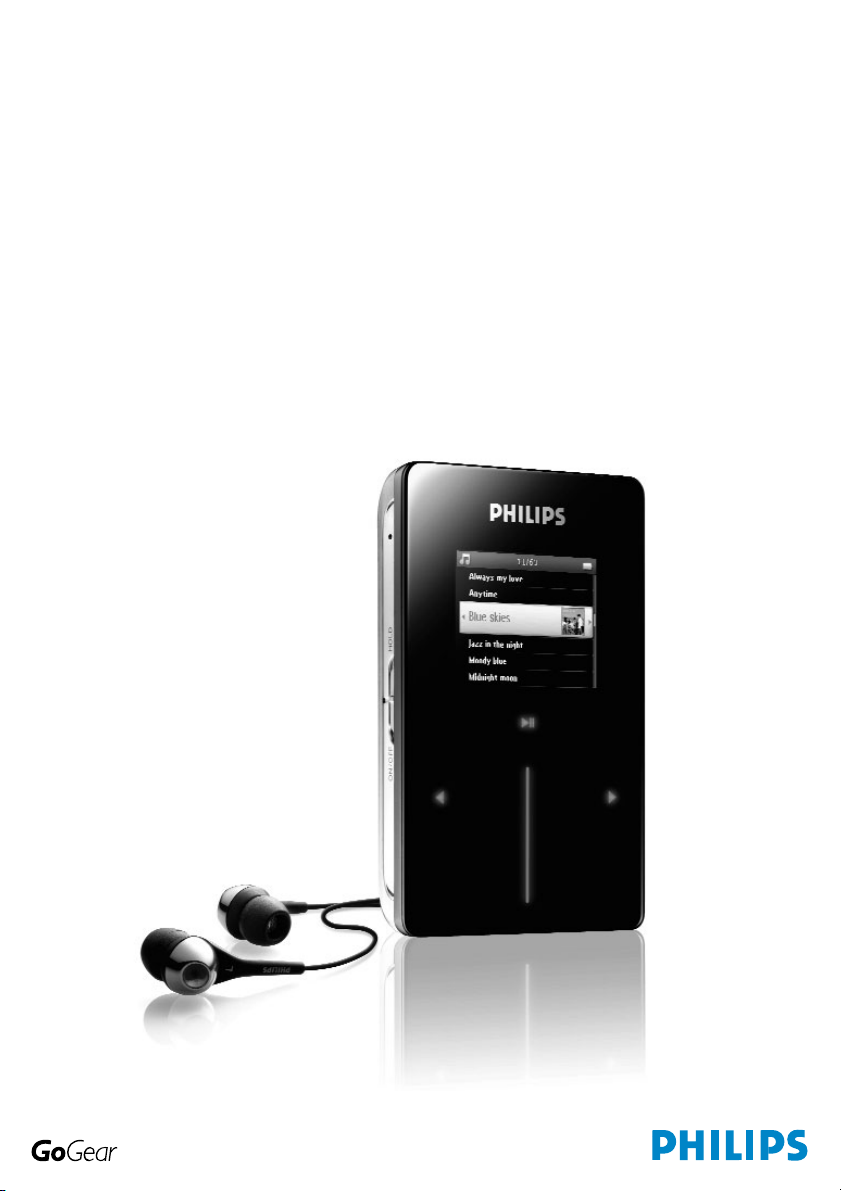
User manual
Manuel d’utilisation | Benutzerhandbuch | Manual del usuario
Gebruikershandleiding | Manuale per l'utente | Manual do usuário
Användar-handbok
Jukebox HDD6320
HDD6330
HDD6335
Page 2

Contents EN
Welcome ......................................................... 1
About your new player ..........................................................................................1
Accessories ....................................................................................................................1
Optional accessories ................................................................................................2
Register your product .............................................................................................3
More information .......................................................................................................3
Connect and Charge ...................................... 4
Battery level indication ............................................................................................4
Install ................................................................ 4
Transfer ........................................................... 5
Enjoy ................................................................. 5
Powering on and off .................................................................................................5
Reset .................................................................................................................................5
Using your GoGear player ............................. 6
Overview of controls and connections .........................................................6
Main menu .....................................................................................................................7
Navigation ......................................................................................................................7
Organise and synchronise pictures and music
with Windows Media Player .......................... 9
Music .................................................................................................................................9
Pictures .........................................................................................................................17
Detailed operation ........................................ 23
Music mode ................................................................................................................23
Pictures .........................................................................................................................29
Radio* ...........................................................................................................................32
Recordings ..................................................................................................................35
Settings ..........................................................................................................................37
Using your player to store and carry data files ......................................39
Updating your player .................................... 40
Manually check whether your firmware is up to date .......................40
Troubleshooting ............................................ 42
My player skips tracks ...........................................................................................42
My Player is not recognised by Windows ................................................42
My player cannot power ON ..........................................................................42
There is no Music on my player after transfer .......................................44
There are no pictures on my player after transfer ..............................44
My GoGear player hangs ...................................................................................45
My player is full and I have less songs on my player than I expected ...45
Poor radio reception* ..........................................................................................45
i
Page 3

Safety and Maintenance ............................... 46
Notice for the USA ....................................... 48
Notice for Canada ........................................ 48
Notice for the European Union ................... 48
Technical data ............................................... 49
Cameras supported ...................................... 50
ii
Page 4
Welcome
About your new player
With your newly purchased product, you can enjoy the following:
- MP3 and WMA playback
- Picture viewing
-FM radio*
- Recording: Voice, FM*, line-in
For more information on any of the above features, see "Detailed operation" on page 23 of this manual.
Accessories
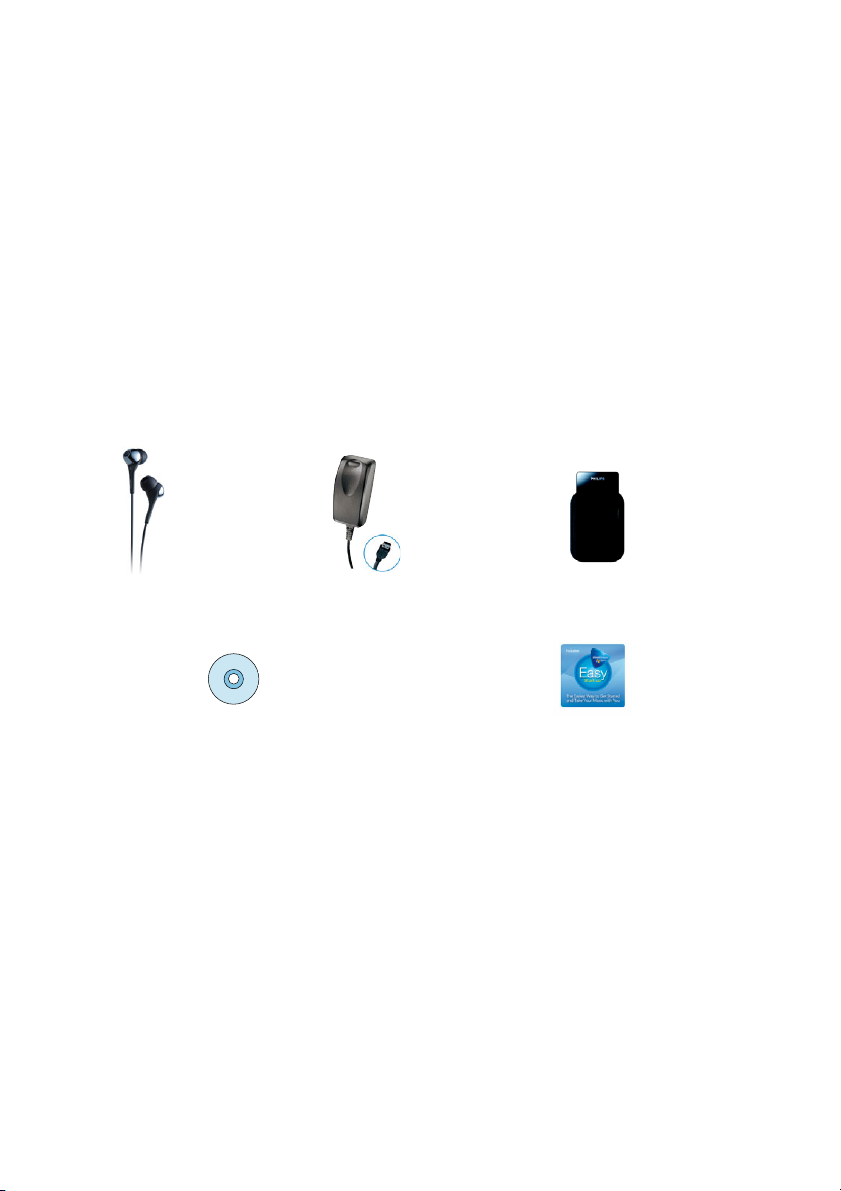
The following accessories are included with your player:
Headphones Combined charger/
For Europe and other regions:
CD-ROM with Windows Media Player,
Philips Device Manager, Philips Device Plugin, User Manual, Tutorials and Frequently
Asked Questions
*
FM radio is only available for certain regions. It is not available for Europe.
USB cable
For US:
Easy start CD 1 and 2 with Windows Media
Player, Philips Device Manager, Philips
Device Plug-in, User Manual, Tutorials and
Frequently Asked Questions
Protective pouch
1
Page 5
Optional accessories
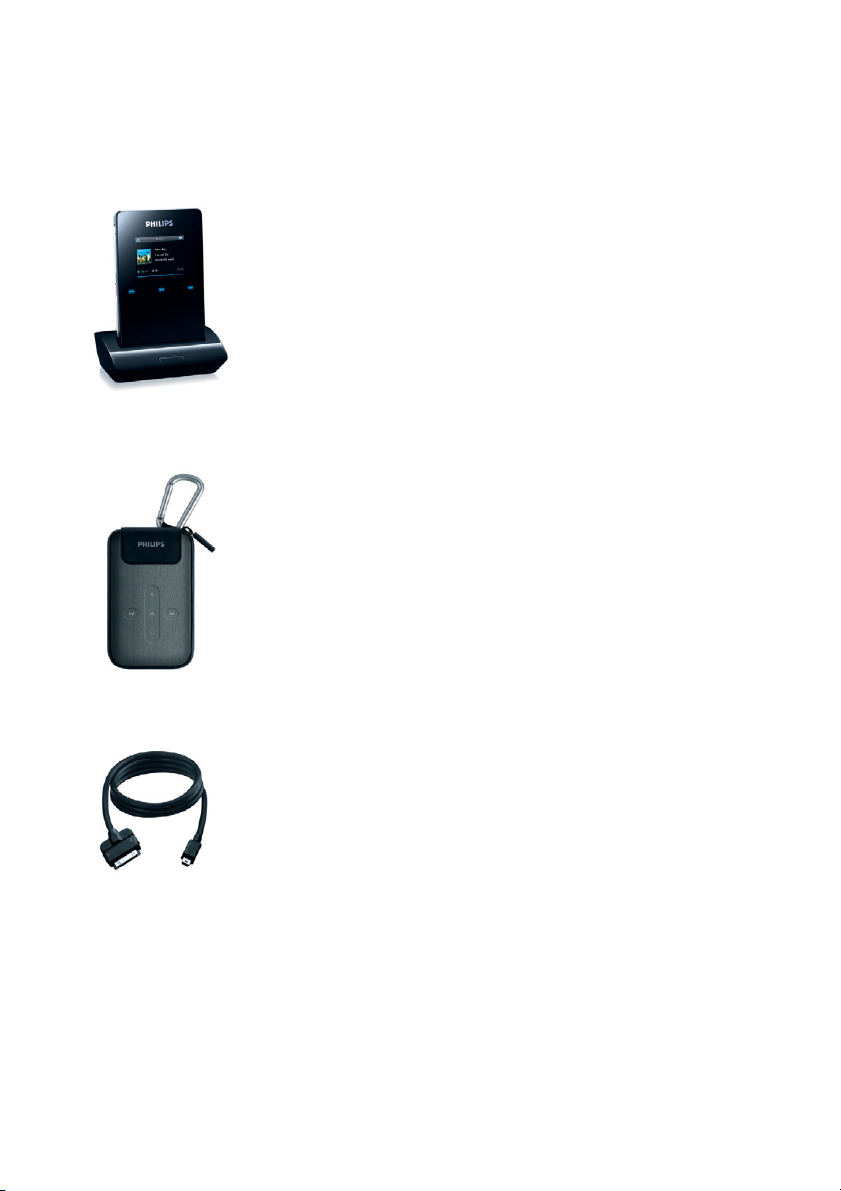
The following accessories are not included with your player, but can be bought separately. You can find them
at www.philips.com/GoGearshop (Europe) or www.store.philips.com (US).
Docking cradle
Dock and connect the player to your stereo system or TV for music sharing or viewing of slideshows
GoGear control case
Protect your player and control your music
Digicam connection cable
Transfer your digicam pictures to the player and free up memory space of your digital camera.
*See page 50 for a list of supported cameras.
*
2
Page 6

Register your product
We strongly recommend that you register your product in order to gain access to free upgrades. To register
your product, please log on to www.philips.com/register so that we can inform you as soon as new updates
become available.
More information
Please visit www.philips.com/support or www.usasupport.philips.com (for U.S. residents)
Enter your product model number to view:
- FAQ, Frequently Asked Questions
- Latest User Manuals
- Tutorials
- Latest PC software downloads
- Firmware upgrade files
The model and production numbers can be found on the label at the back of your product.
3
Page 7
Connect and Charge
1. Connect the supplied multi-voltage adaptor/charger to your player by plugging it into the DC-In connector
at the bottom of the player and then plug the other end into a standard AC outlet.
2. The battery will be fully charged in 4 hours when charging it for the first time and 70% charged in 1 hour
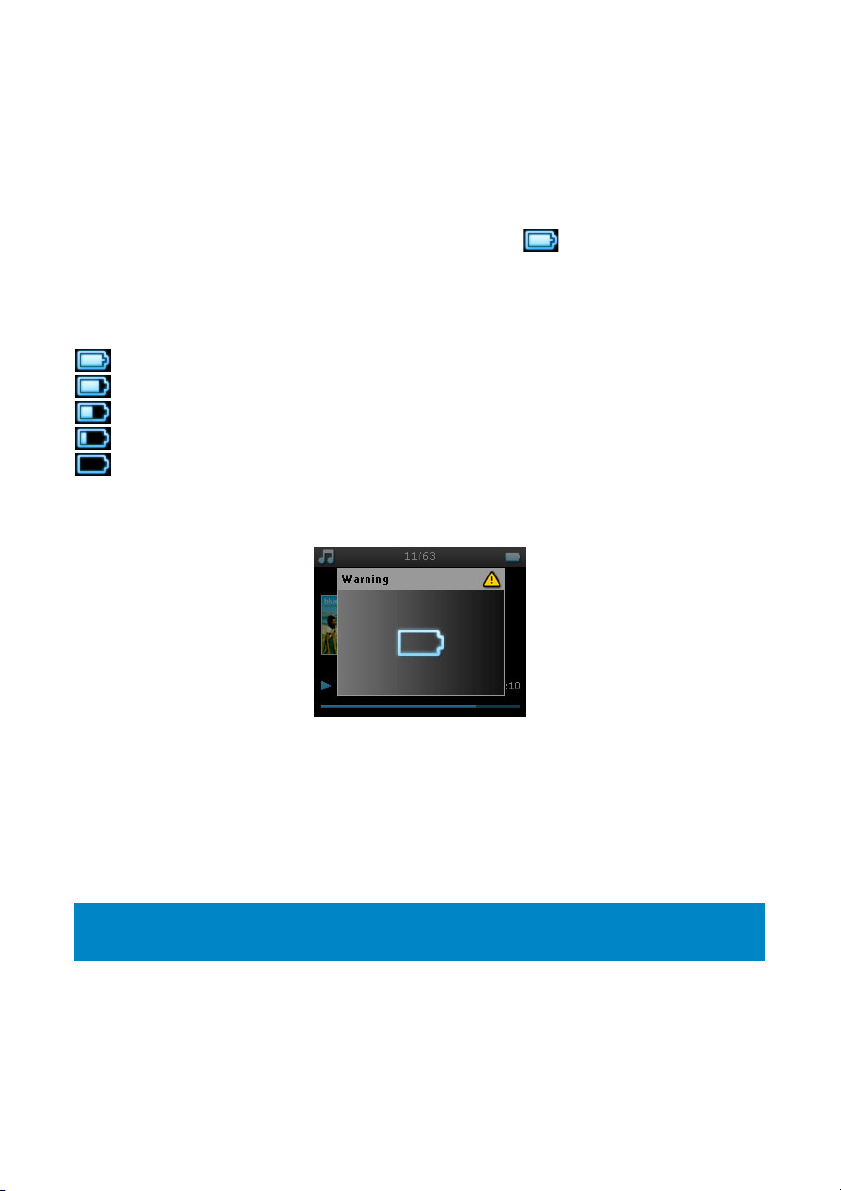
for quick charge.
3. The player is fully charged when the charging animation stops and is displayed.
Battery level indication
The approximate power levels of your battery are indicated as follows:
Battery is full
Battery is two-thirds full
Battery is half full
Battery is low
Battery is empty
When the battery is nearly empty, the following power low warning screen will blink and emit a beep tone.
When you hear a double beep, your player will power down in less than 60 seconds. All settings and unfinished recordings will be saved before the player shuts down.
Install
1. Insert the CD supplied with your product into the CD ROM drive of your PC.
2. Follow the onscreen instructions to complete the installation of
necessary plug-ins) and
IMPORTANT!
For US: There are two CDs and both are required for installation.
3. You may need to restart your PC after software installation.
4. If the installation program does not start automatically, browse the CD contents via
and run the program by double clicking on the file ending with
Philips Device Manager
.
Windows Media Player
.exe
.
(including
Windows Explorer
4
Page 8

5. System requirements:
- Windows® XP (SP2 or above)
- Pentium Class 300 MHz processor or higher
-128 MB RAM
- 500 MB hard disk space
- Internet connection
- Microsoft Internet Explorer 6.0 or higher
-USB port
Lost your CD? Don’t worry, you can download the CD contents from www.philips.com/support or
www.usasupport.philips.com (for U.S. residents).
Transfer
You can transfer music and pictures to your player using
synchronise pictures and music with Windows Media Player" on page 9 for more details.
Windows Media Player
. See "Organise and
Enjoy
Powering on and off
To power on, push and hold down
powers on.
To power off, push and hold down
powers off.
NOTE!
Your player automatically powers off if there is no operation nor music played for 10 minutes. The last
playback status and screen will be resumed the next time it is powered on unless the player has been
powered off for a long period of time or the battery level was low when the player was powered off.
ON/OFF HOLD
ON/OFF HOLD
Reset
In the unlikely event that your player hangs, do not panic. Simply push and hold down
ON/OFF
position and press
TIP
The existing contents on your player will not be erased when you reset your player.
VOLUME
+
at the same time. Hold until the player shuts down.
slider to
slider to
ON/OFF
position for 3 seconds until the player
ON/OFF
position for 3 seconds until the player
ON/OFF HOLD
slider to
5
Page 9
Using your GoGear player
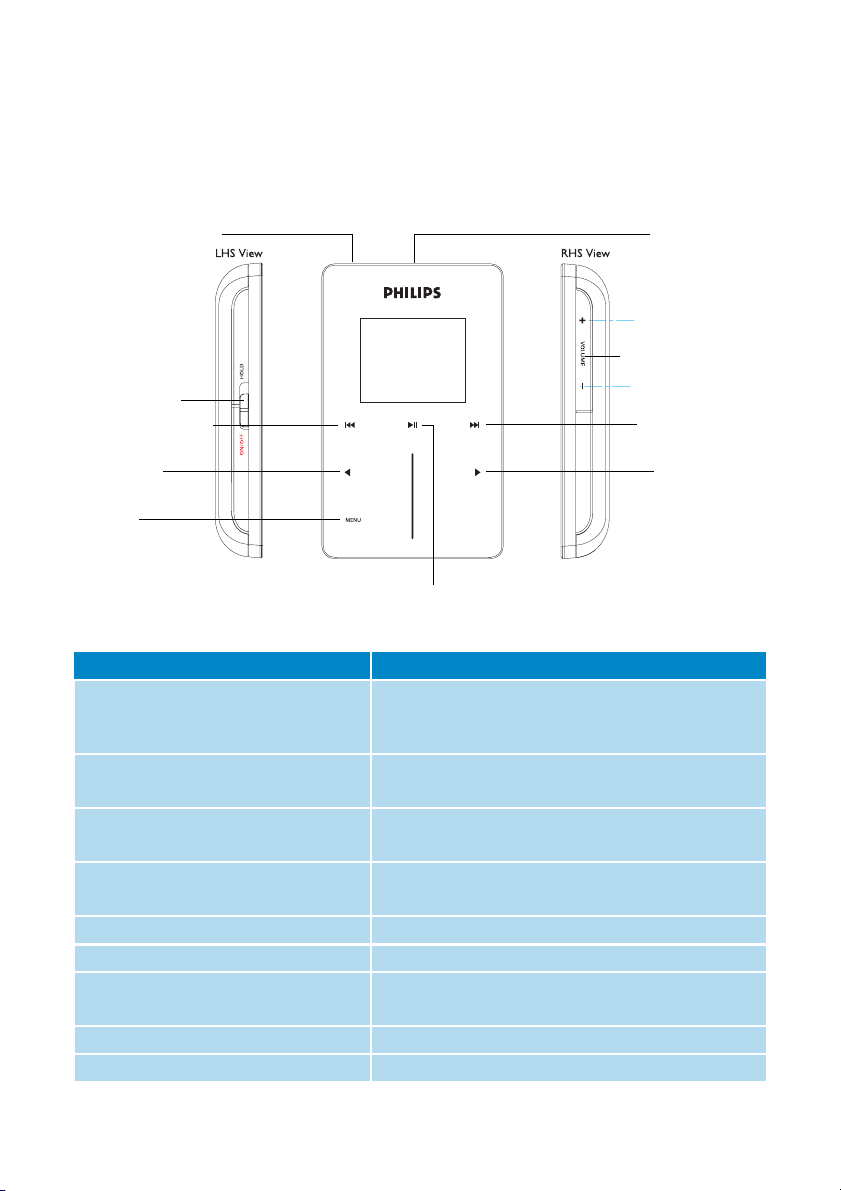
Overview of controls and connections
Recording Microphone
On/Off/Hold
(key lock) slider
Rewind/Previous key
Left/Back key
Menu key
Play/Pause key
Press To
ON/OFF HOLD
about 3 seconds)
ON/OFF HOLD
2; Play/Pause songs
J( Move back to previous song
§ Jump to next song
VOLUME
+
1 Return to previous menu/option
2 Select option
VERTICAL TOUCH STRIP
MENU
(slide down and hold for
(slide up)
-
Power on/off
Lock all touch control keys
Stop radio playback
Fast rewind
Fast forward
Control volume
Go to next option
Scroll through lists
Access list of menu options
Headphone plug
Volume up/down bar
Forward/Next key
Right/Select key
6
Page 10
Main menu
The following are available from the main menu of your player:
Menu To
USIC
M
ICTURES
P
ADIO
R
*
ECORDINGS
R
ETTINGS
S
OW PLAYING
N
TIP
Press and hold 1 to return to main menu.
Play your digital music tracks
View pictures
Listen to radio
Create or listen to recordings
Customise the settings of your player
Go to the play screen
Navigation
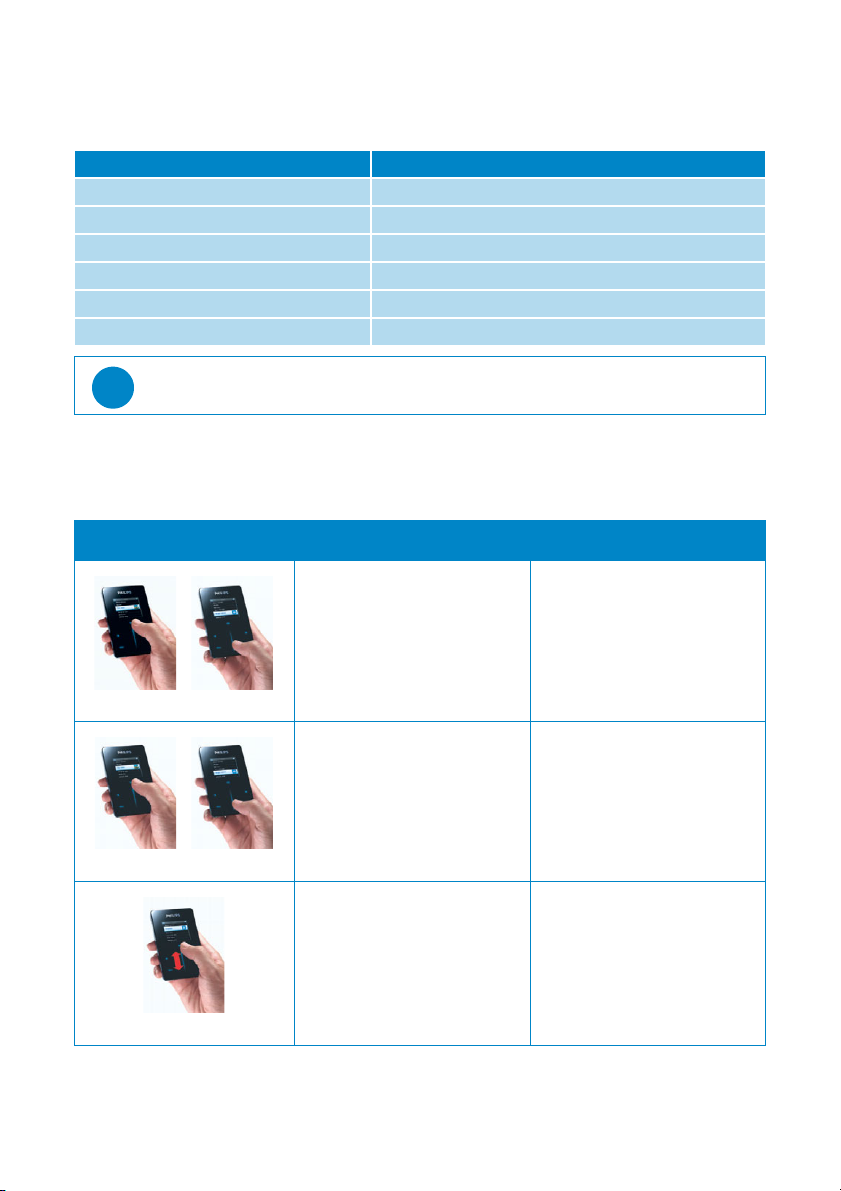
Your player has touch sensitive controls that respond to the touch of your fingers. The
(see picture) is used to scroll through lists. It responds to the following finger movements:
Action Description Function
VERTICAL TOUCH STRIP
Lightly touch the top or bottom
end of the touch strip
Tap
Press and hold finger on the top
or bottom end of the touchstrip
Hold
Move finger from top to bottom
or bottom to top
Stroke
*
FM radio is only available for certain regions. It is not available for Europe.
Move up or down step by step
Scroll through a list at increasing
speed (SuperScroll)
Scroll through list
7
Page 11
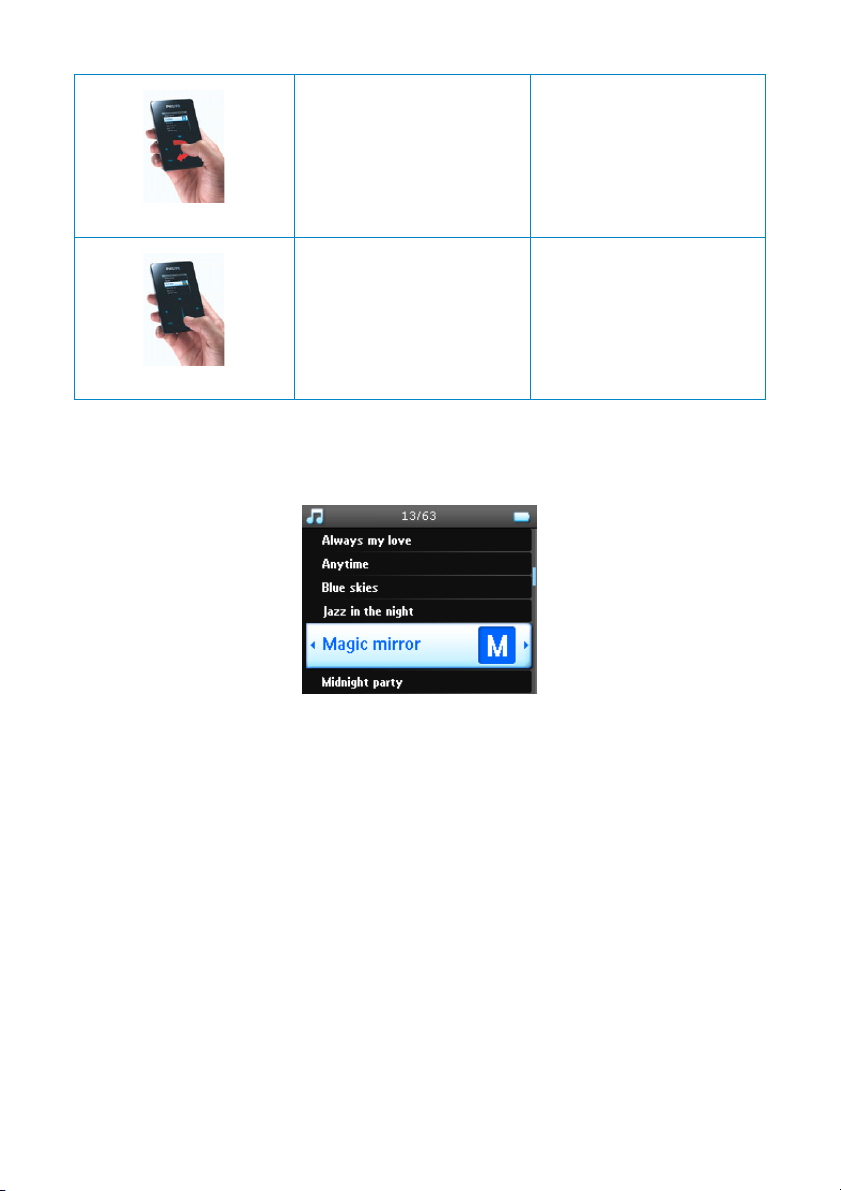
Fast swipe up or down List will scroll quickly like a wheel
(Fly wheel) and then slow down
gradually
Swipe
Tap in the middle To stop list from spinning
Tap
SuperScroll
Superscroll enables you to find your favorite songs quickly. When scrolling quickly through a list of songs,
artists, albums or genres, a Superscroll letter (the first alphabet of the song, artist, album or genre) will be
displayed in highlight to give you information about where you are in the list.
8
Page 12

Organise and synchronise
pictures and music with Windows
Media Player
This chapter describes the basic operations and steps that you need to follow to successfully transfer music and
pictures to your player. For more information, please refer to
Music
Add songs to Windows Media Player Library
Songs that are already on your computer
1. Start
Windows Media Player
by clicking the following icon on your desktop.
Windows Media Player Help
on your computer.
2. Select
Library
tab to access media library.
9
Page 13
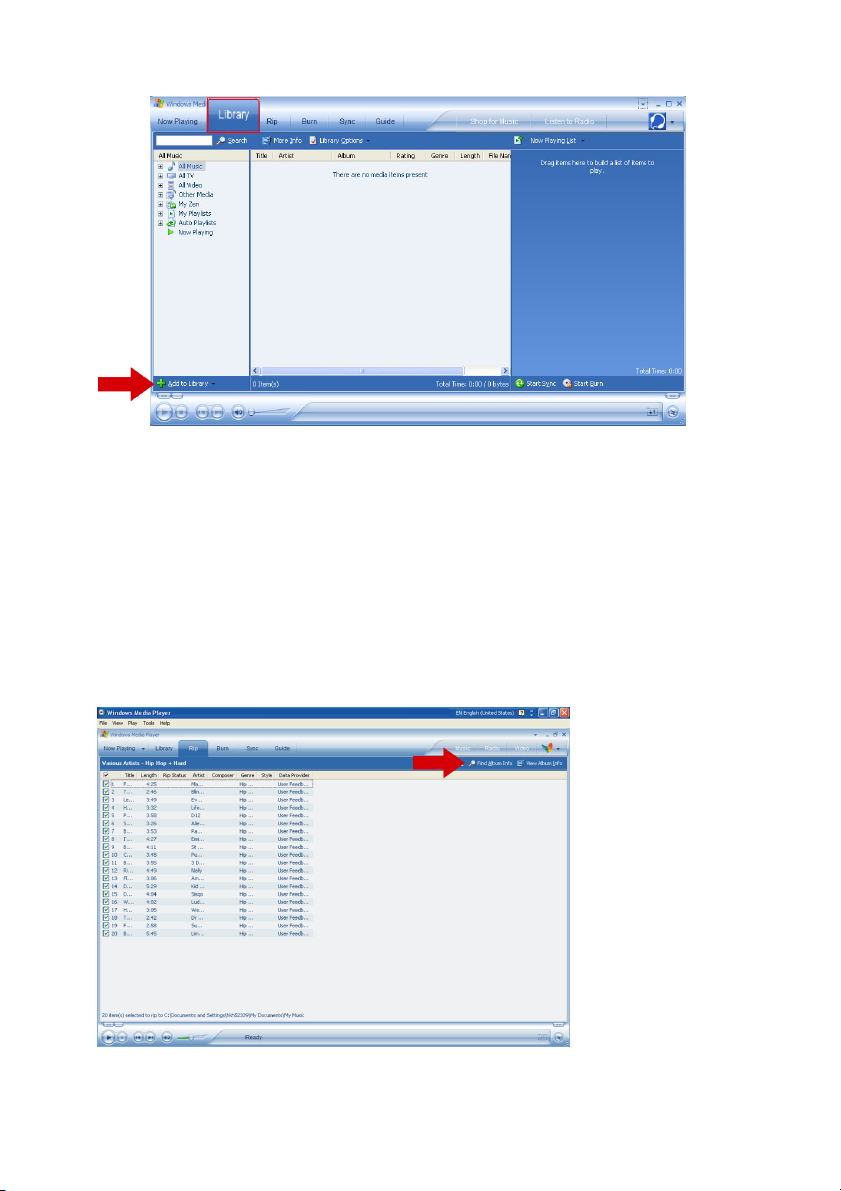
3. Click
4. You can choose to add files from folder, URL, by searching your computer, etc.
Add to Library
on the bottom left of the screen.
Ripping songs from a CD
If you want to transfer music from a CD to your player, you need to create a digital copy of the music on your
PC first. This is called ripping.
1. Start
2. Insert the Audio CD.
3. Select
4. If your computer is connected to the Internet, the album information will be automatically obtained so
5. If this does not happen, check that you are connected to the Internet and click
Windows Media Player
Rip
tab to display a list of music tracks on your CD.
that you don’t have to enter the song titles and other information manually.
.
Find Album Info
.
10
Page 14
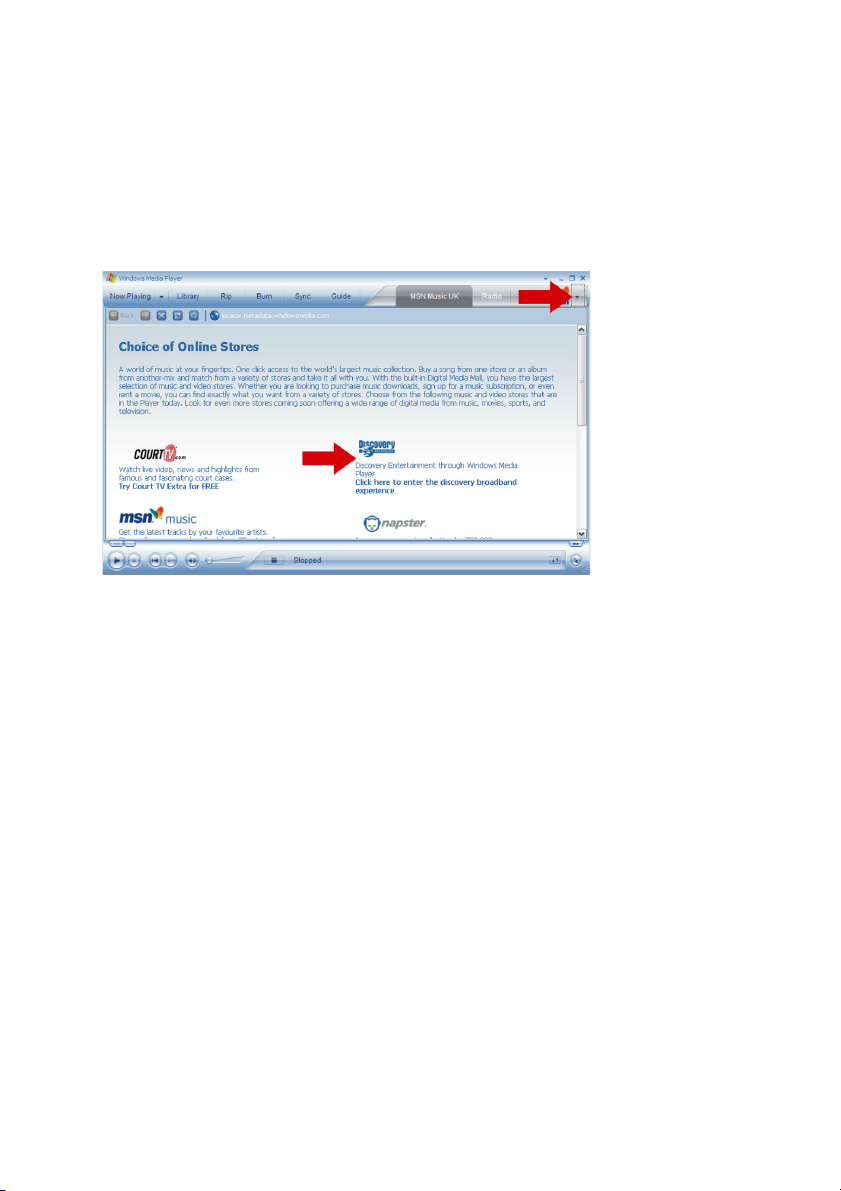
6. Select the music tracks you would like to rip and click
7. The music tracks will be converted into digital copies and added to
Rip Music
on the top menu bar.
Windows Media Player
library.
Buying songs online
If you want to buy music online, you need to select a music store.
1. Click the little triangle on the top right of the screen and select
2. Choose a store and follow the onscreen instructions.
3. After you have bought a song or an album, it will appear in
Browse all Online Stores
Windows Media Player
.
library.
Synchronising Windows Media Library contents with
your player
When you connect the player to your computer for the first time,
Setup Wizard
or manually.
Automatic synchronisation
When you start
player will be updated automatically according to the sync settings you have specified.
Manual synchronisation
When you start
not start until you have selected the contents and specified the order in which they will be synchronised.
. You can choose to synchronise your player with
Windows Media Player
Windows Media Player
and connect your player to the computer, the contents on your
and connect your player to the computer, updating of contents will
Windows Media Player
Windows Media Player
will start
library automatically
Device
11
Page 15
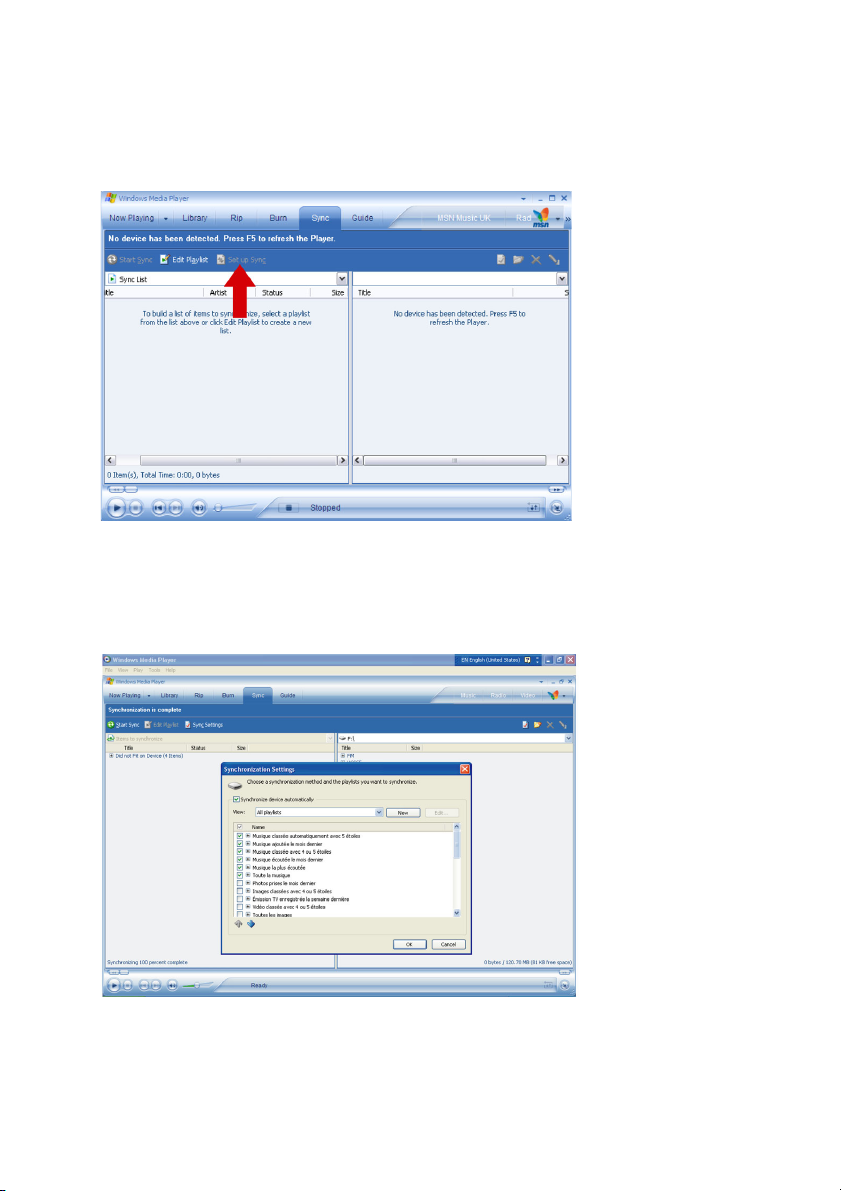
Setting up automatic synchronisation
1. Start
2. Connect the player to your computer using the supplied USB cable.
3. Select
4.
5. Select
6. Select the check boxes that correspond to the playlists you want to synchronise.
7. Click OK.
Windows Media Player
Sync
tab and click
Synchronisation settings
Synchronise device automatically
Sync settingsorSet up Sync
.
.
dialog box will be displayed.
check box.
12
Page 16
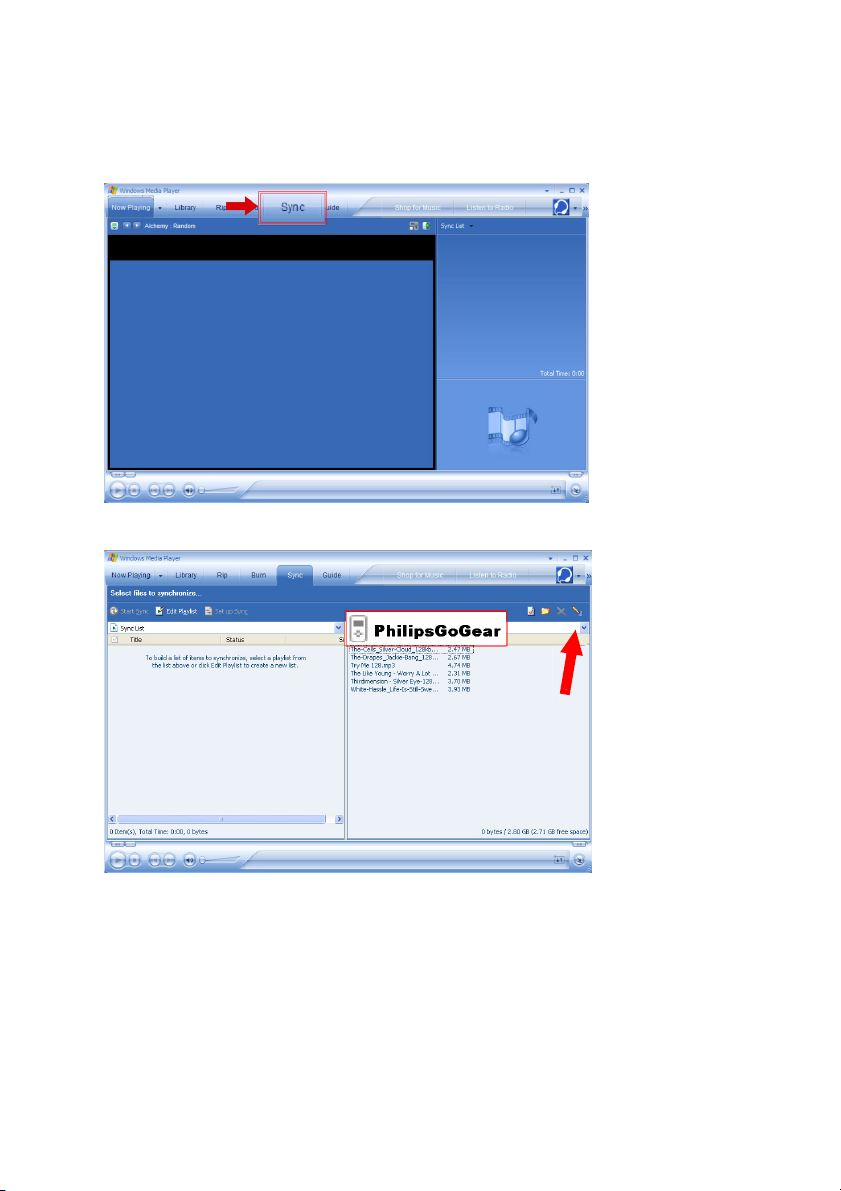
Setting up manual synchronisation
1. Start
2. Connect the player to your computer using the supplied USB cable.
3. Select
Windows Media Player
Sync
tab.
.
4. In the pull-down menu on the right pane, select
5. If they are not in the list, click F5 to refresh and try again.
Philips
Philips GoGear
or
as the destination.
13
Page 17
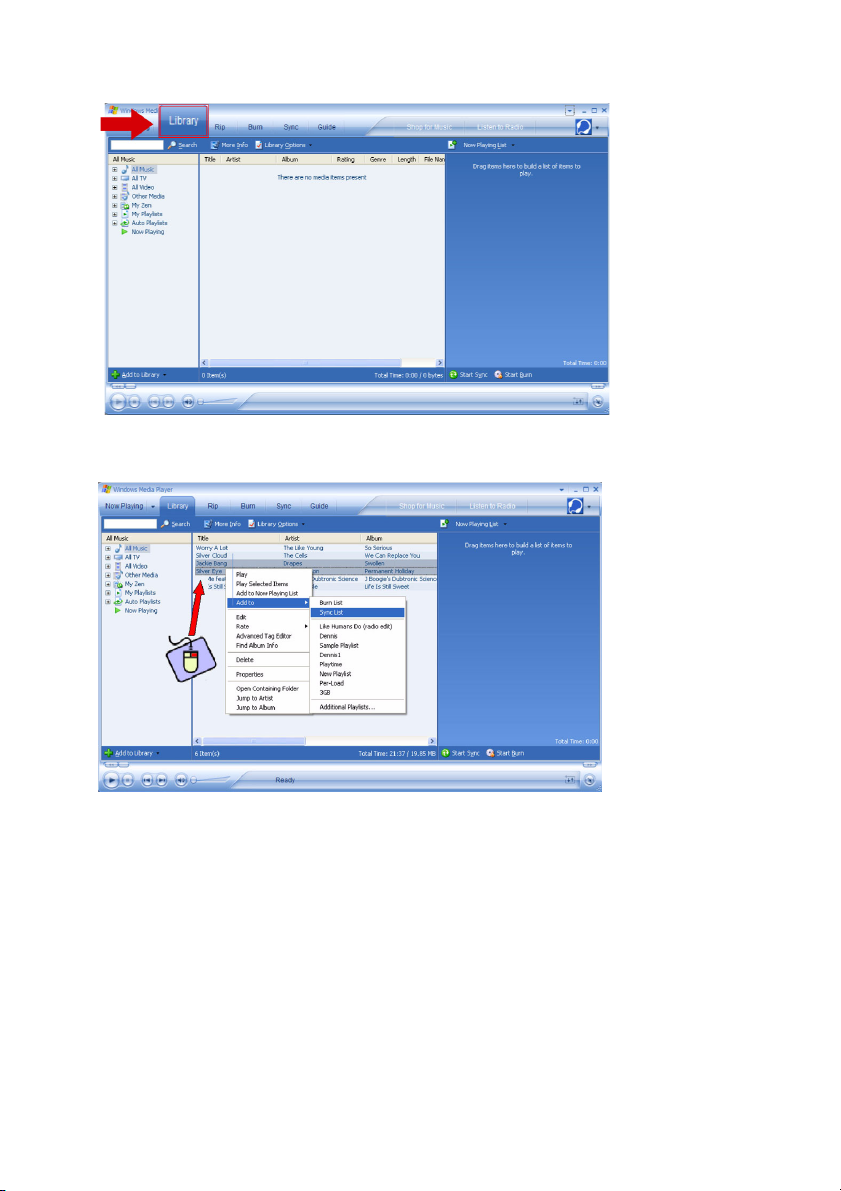
6. Select
7. Click to highlight the song you want to copy.
8. Right click on the song and select
Library
tab to access media library.
Add to
>
Sync List
.
14
Page 18
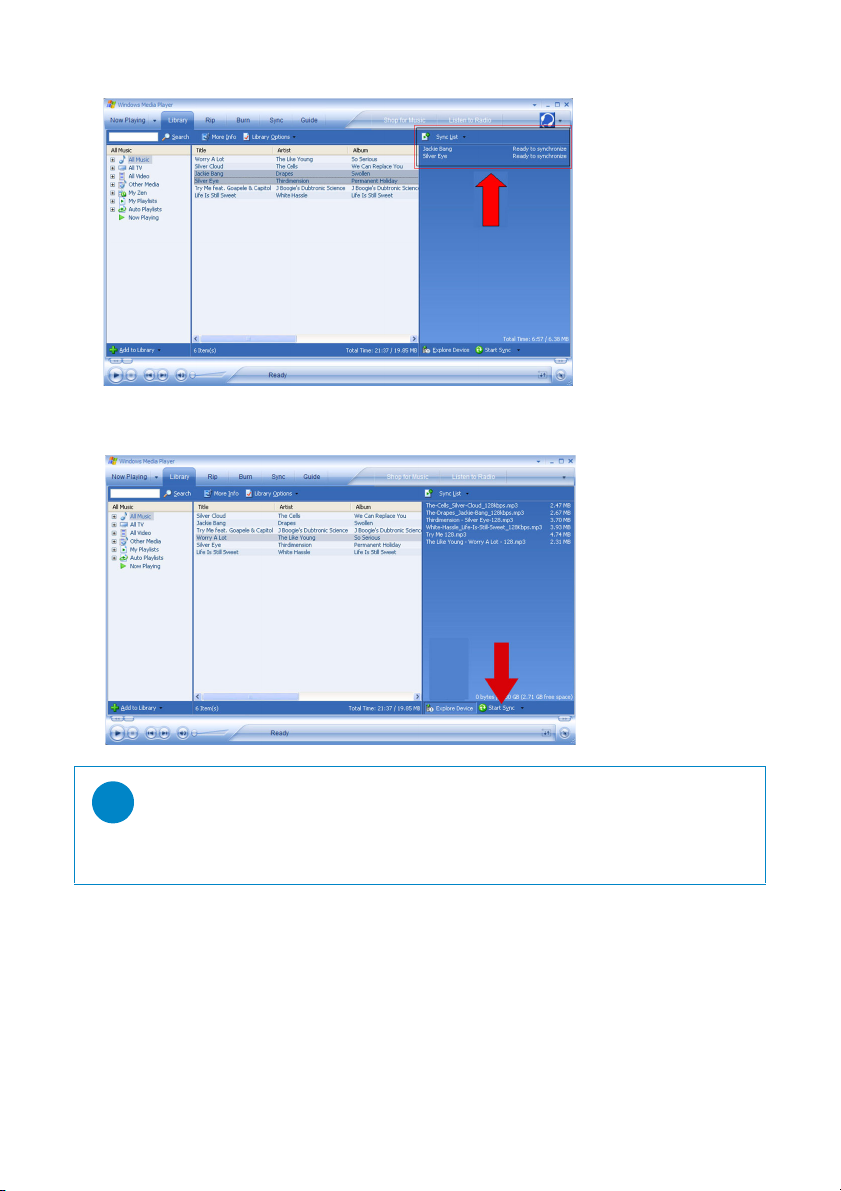
9. Or drag and drop the song into the
Sync List
on the right pane.
10. Click
Start Sync
displayed just above the
TIP
We recommend that you always use
player. However, if you prefer to use
music into the Media/ Music folder, otherwise the songs will neither show nor play on your
player.
button at the bottom of the screen to start synchronisation. The progress will be
Start Sync
button.
Windows Media Player
Windows Explorer
, always make sure to copy your
to transfer music to your
15
Page 19
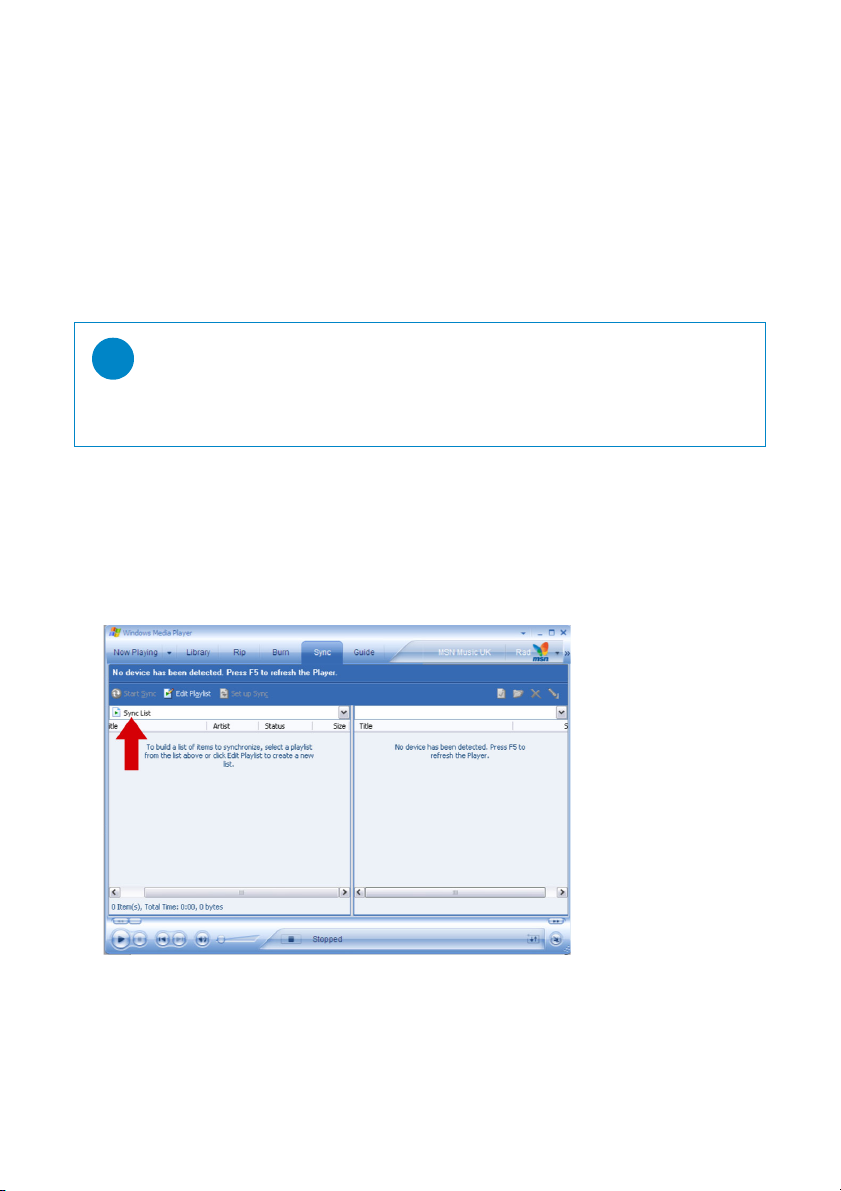
Windows Media Player Playlist
Creating a Playlist
1. Start
2. Select
3. Click to highlight a track.
4. Right click on the track and select
5. In the
6. The track you have selected will be added to the playlist.
Transfer playlists
You can transfer playlists to your player via the automatic synchronisation option of
(See "Setting up automatic synchronisation" on page 12 for step by step instructions)
1. Select
2. Click
Windows Media Player
Library
tab to access media library.
Add to Playlist
TIP
playlists to be synchronised with the player.
To select more than one track, press and hold the
to select any number of tracks.
To select consecutive tracks in a list, click the first track, then press and hold the
of your keyboard and click the last track in the list you want to select.
Sync
tab.
Sync settings
or
.
Add to
dialog box, select an existing playlist or click
Setup Sync
, select
Additional Playlist...
>
Synchronise device automatically
New
<Ctrl>
key of your keyboard, then click
to add a new playlist.
check box and select the
<Shift>
key
Windows Media Player
.
16
Page 20

Managing your tracks and playlists in Windows Media Player
Delete Tracks from Windows Media Player library
1. Click to highlight an item.
2. Right click and select
!
Delete
to delete the item.
TIP
It is not possible to delete playlists that are on your
Player
. You can only delete the playlist via the device itself.
GoGear
player via
Windows Media
Edit Track Information via Windows Media Player
1. Select
2. Highlight the track you want to edit, right click and select
3. Edit on the text box directly.
Library
tab.
Edit
.
Search for Tracks via Windows Media Player
1. Select
2. Type a search string in the search field.
3. Click
4. A list of tracks containing the search string will be displayed.
5. You can play, transfer, delete, add to sync list, etc.
Library
tab.
Search
to start searching.
Pictures
IMPORTANT!
Make sure
image support on your player. It is automatically installed from the supplied CD when you click
Install software
To check whether this Plug-in has been installed, go to
check if
Philips Device Plug-in
dialog box.
Philips Device Plug-in
has been installed on your computer. This Plug-in is crucial to enable
Control Panel > Add or Remove Programs
is listed.
Enable picture support
1. Start
2. Go to
3. Make sure
Windows Media Player
Tools
Options
>
Enable picture support for devices
>
.
Player
.
check box is selected.
Install
in the
and
17
Page 21
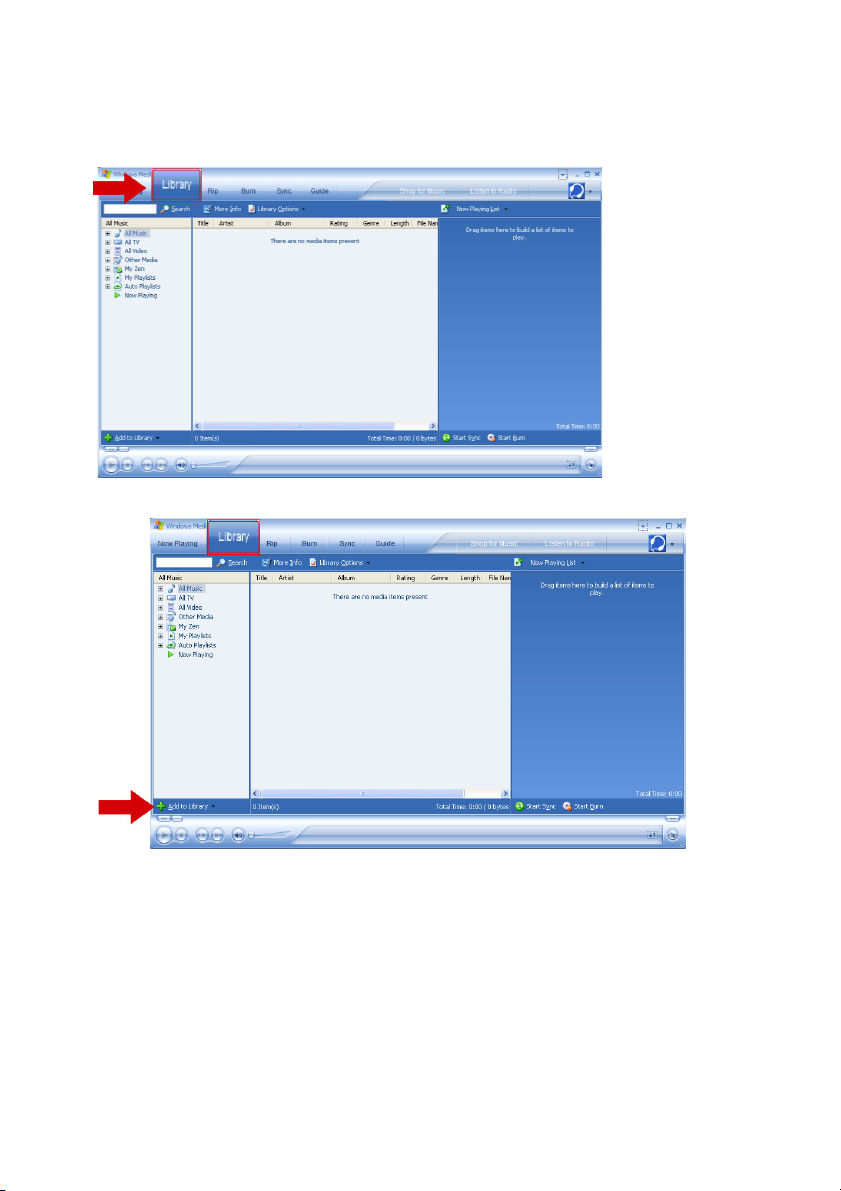
Add pictures to Windows Media Player Library
1. Start
2. Select
Windows Media Player
Library
tab to access media library.
.
3. Click
4. Choose
5. Select the folder in which you have kept your pictures and press OK.
Add to Library
Add Folder...
on the bottom left corner of the screen.
.
18
Page 22
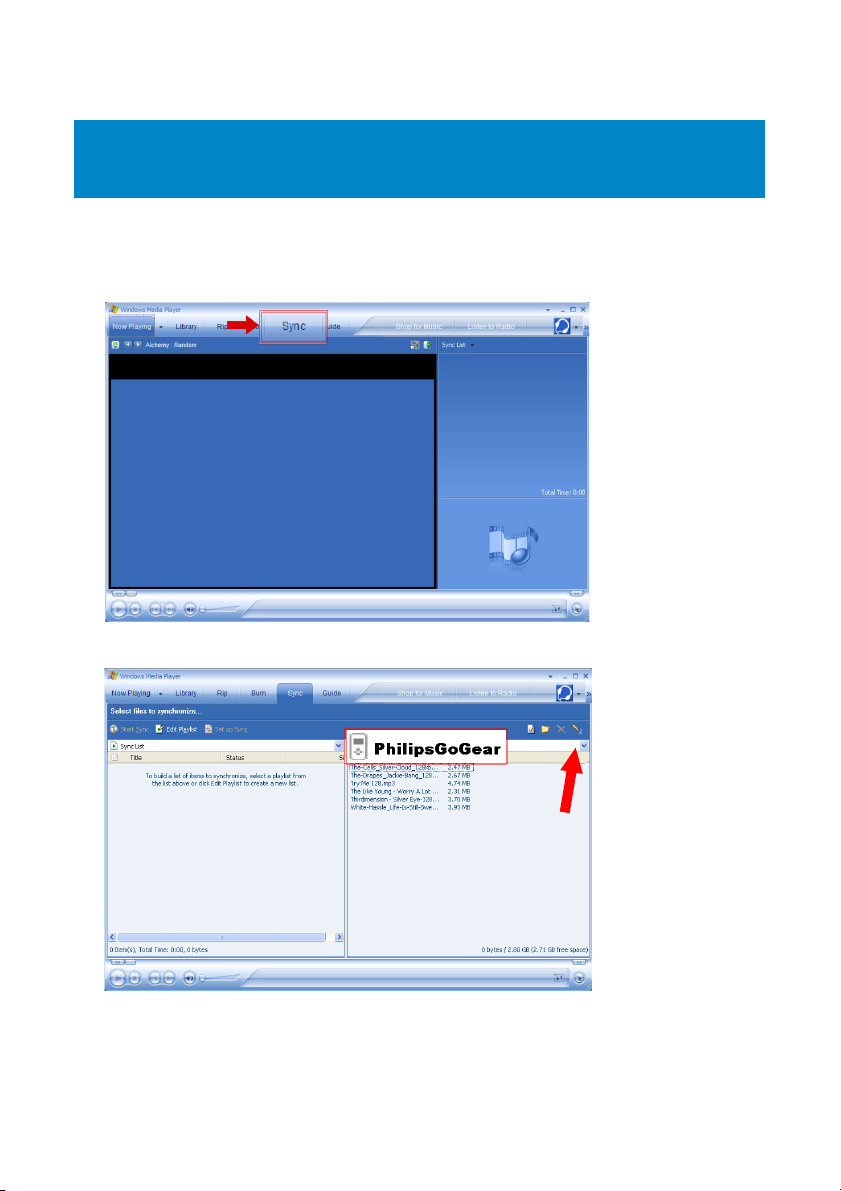
Transfer pictures to your player
IMPORTANT!
Pictures can only be transferred using
Windows Explorer
1. Connect the player to your computer.
2. Start
3. Select
Windows Media Player
Sync
, they will not show on your device.
tab.
Windows Media Player
.
. If they were dragged and dropped using
4. In the pull-down menu on the right pane, select
5. If they are not in the list, click F5 to refresh and try again.
Philips
Philips GoGear
or
as the destination.
19
Page 23
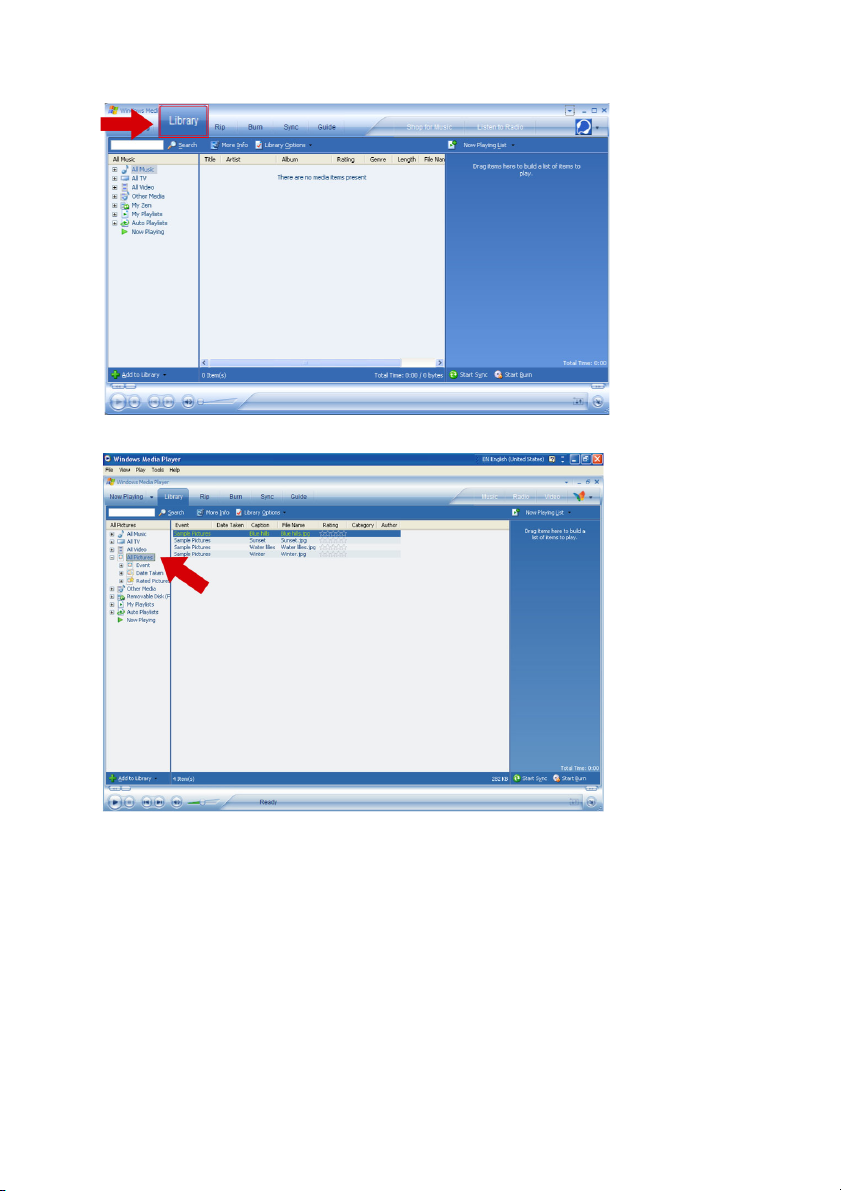
6. Select
Library
tab to access media library.
7. Click
8. Click to highlight a picture you want to copy to your player.
All Pictures
on the left pane to display the list of pictures.
20
Page 24
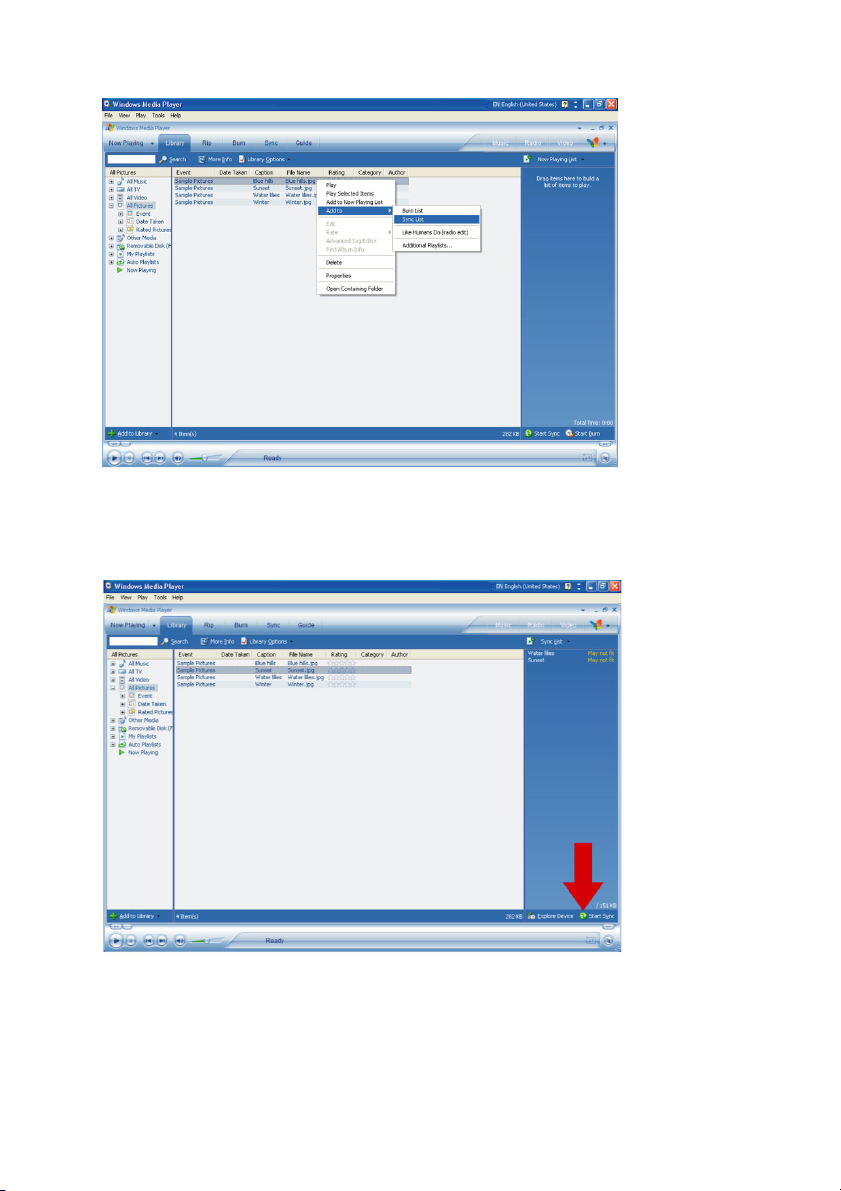
9. Right click on the picture and select
Add to
Sync List
>
.
10. Or drag and drop the picture into the
11. Click
Start Sync
displayed just above the
button at the bottom of the screen to start synchronisation. The progress will be
Start Sync
button.
Sync List
on the right pane.
21
Page 25
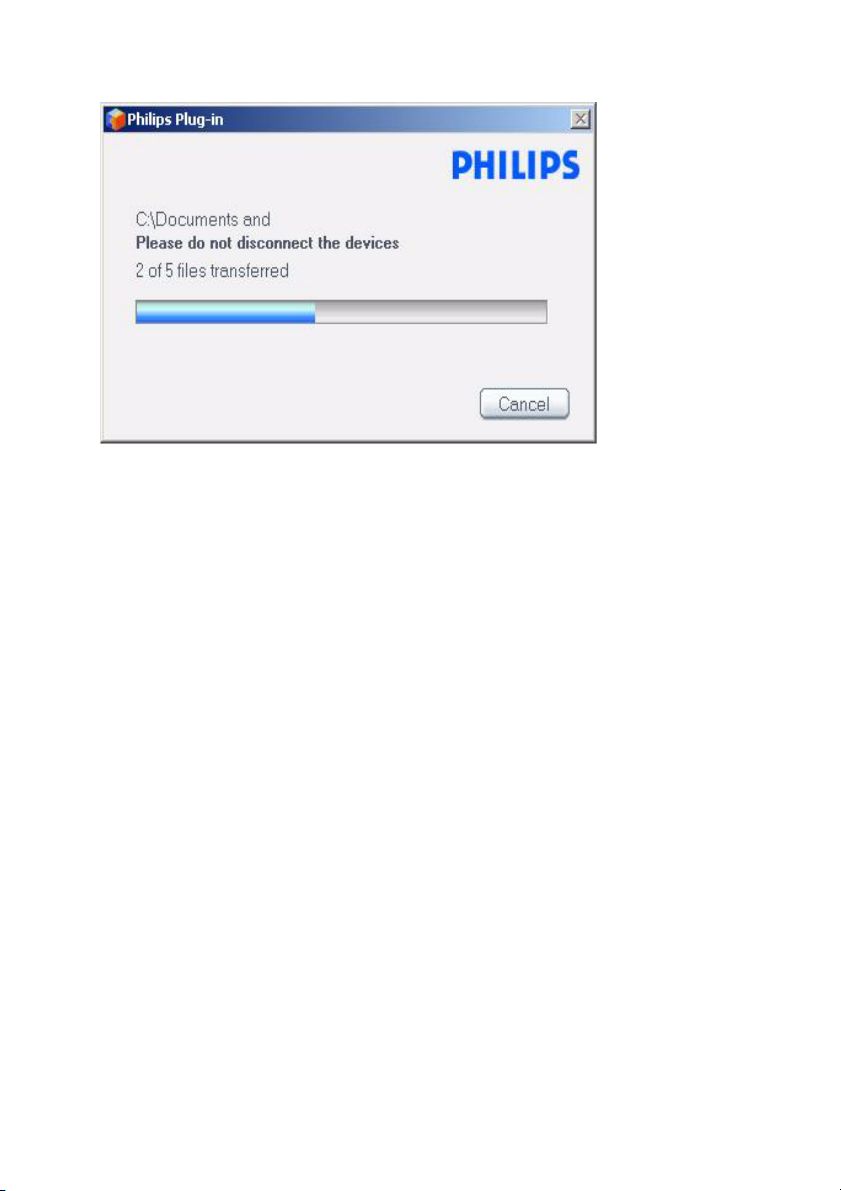
12. A pop-up message will be displayed, notifying you of the synchronisation progress.
13. When the pop-up disappears, the transfer is completed and you can disconnect your player.
22
Page 26
Detailed operation
Music mode
Your player is preloaded with some music tracks. You can transfer your digital music and picture collection
from your computer to your player using
found on page 9.
Finding your music
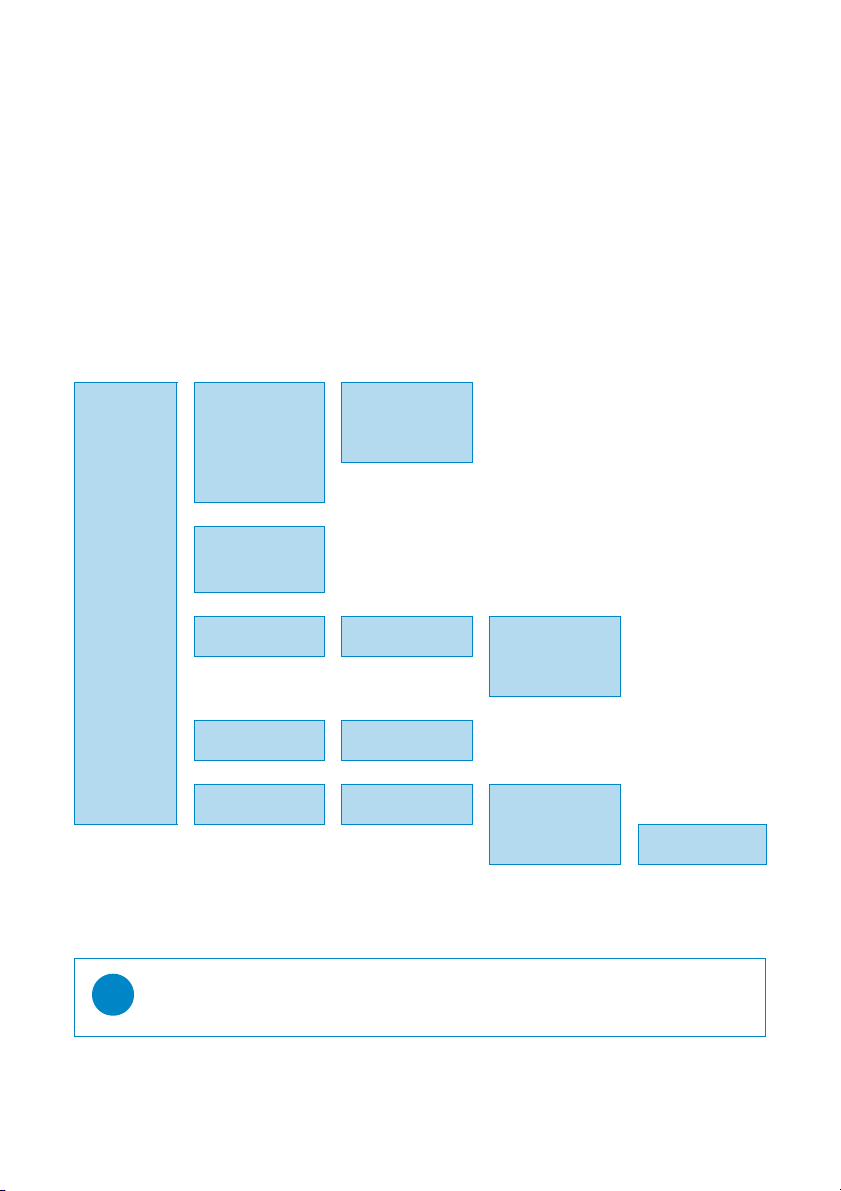
1. From the main menu, select
options:
Music
Playlists
Playlist on the go
2
Most played Tracks listed in most
Playlists in
alphabetical order
Windows Media Player
MUSIC
to enter music mode. You can search from the following music
Tracks listed in play
2
order
played order
. More information on music transfer can be
All tracks
Artists
Albums
Genres
2. Use the
3. Press 2 to select or press 1 to return to previous level.
4. Press 2; to play your selection.
Shuffle All
2
Alphabetically listed
tracks
Alphabetically listed
2
artists
Alphabetically listed
2
albums
Alphabetically listed
2
genres
VERTICAL TOUCH STRIP
TIP
Superplay™
pressing 2; on the selection.
to scroll up or down the options.
allows you to playback the selected music or album immediately at any point by
All tracks
2
Tracks listed in album
2
order
Alphabetically listed
2
artists
Tracks in album order
2
Albums in
alphabetical order
All tracks
2
Artists’ albums in
alphabetical order
Tracks in album
2
order
23
Page 27
Controls
During music playback, you can do the following:
To Do this
Play / Pause music Press
Go to next track Press
Go to previous track Press
Forward search Press and hold
Backward search Press and hold
Access options menu Press
Return to browsing Press
2;
§
J(
§
J(
MENU
1
Play mode
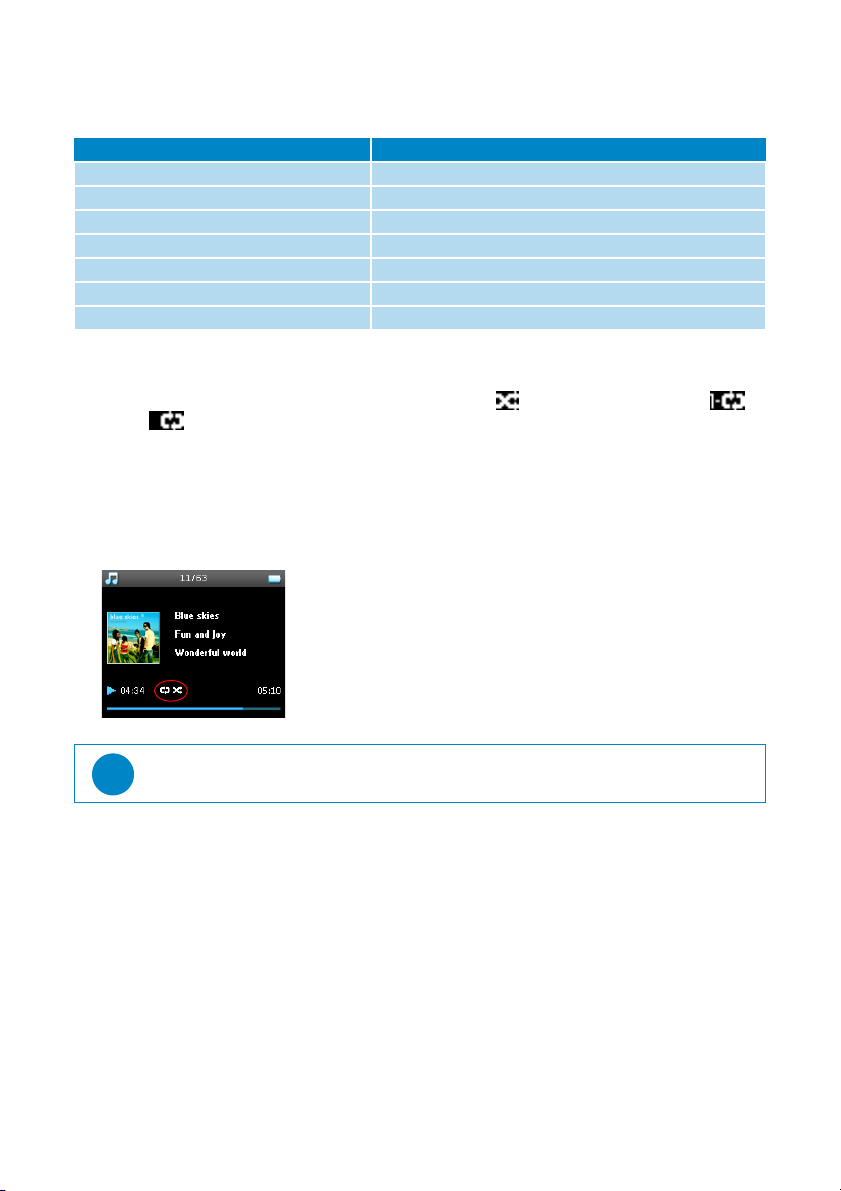
You can set your player to play music tracks randomly (
Repeat All
1. From the main menu, select
2. Use the
3. Press 2 to select an option.
4. Press 2 again to deselect an option.
While you are playing music you can see the following active play mode screen.
).
Settings
VERTICAL TOUCH STRIP
Play mode
>
to scroll up or down the options.
Shuffle All
.
)
or repeatedly (
Repeat One
or
TIP
You can also access the above play mode while you are playing music by pressing
MENU
.
24
Page 28
Sound settings
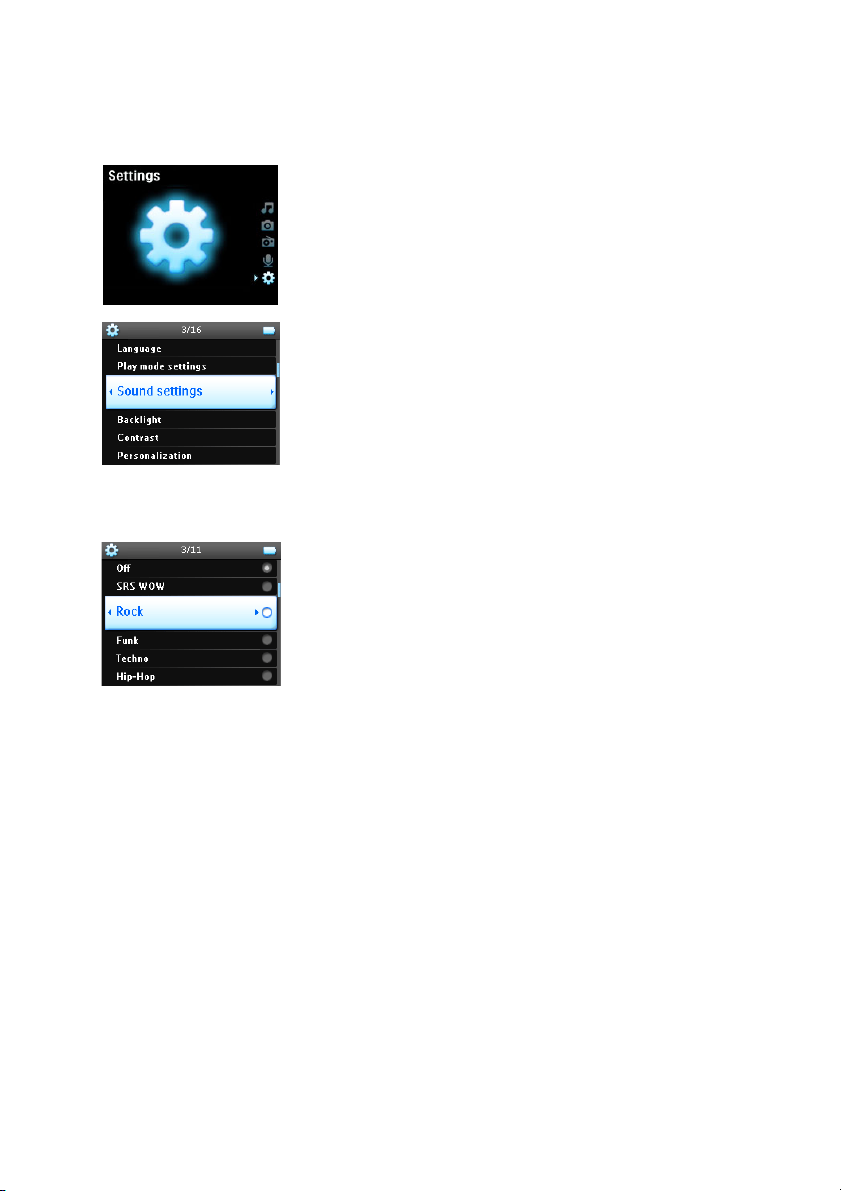
You can set your player to play music tracks with different EQ (equalizers) settings.
1. From the main menu, select
Settings
Sound Settings
>
.
2. Use the
3. Press 2to select.
4.
VERTICAL TOUCH STRIP
HipHop, Classical, Jazz, Spoken Word, Custom
Custom
settings allow you specify your desired equalizer setting by adjusting the individual settings for
bass (B), low (L), mid (M), high (H) and treble (T).
to scroll through the list of options:
, or
Off
.
SRS WOW, Rock, Funk, Techno
Playlist on the go
Playlist on the go
All songs will be displayed and listed in play order in the playlist. New songs are automatically added to the end
of the playlist.
Adding songs to playlist on the go
You can add your favorite songs, albums, artists and genres to
1. Press
2. Select
3. A message
is a playlist that can be created on the player while on the move.
Playlist on the go
MENU
.
Add to Playlist on the go
[item name] added to playlist on the go
.
will be displayed.
during music playback.
,
25
Page 29
Alternatively, you can add songs, albums, artists and genres to
1. Press
2. A message
MENU
and select
[item name] added to playlist on the go
Add to Playlist on the go
.
will be displayed.
Playback of playlist on the go
1. Select
2. Select your playlist and press 2;.
Music> Playlists
Playlist on the go
>
.
Clear Playlist on the go
You can clear all the songs in
1. Select
2. Press
Music> Playlists
MENU
and select
TIP
This will empty
Playlist on the go
Playlist on the go
>
Clear Playlist on the go
Playlist on the go
.
,
.
but will not delete those tracks from your player.
Save Playlist on the go
You can save
1. During music playback, press
2. Select
3. A message
4. Select
5. A message
Playlist on the go
Save playlist on the go
Save playlist on the go?
Save
to confirm.
Playlist-on-the-go saved as: Playlist-on-the-go
. It will be saved under a different name and
MENU
.
.
will be displayed.
Delete songs from Playlist on the go
You can delete specific songs from
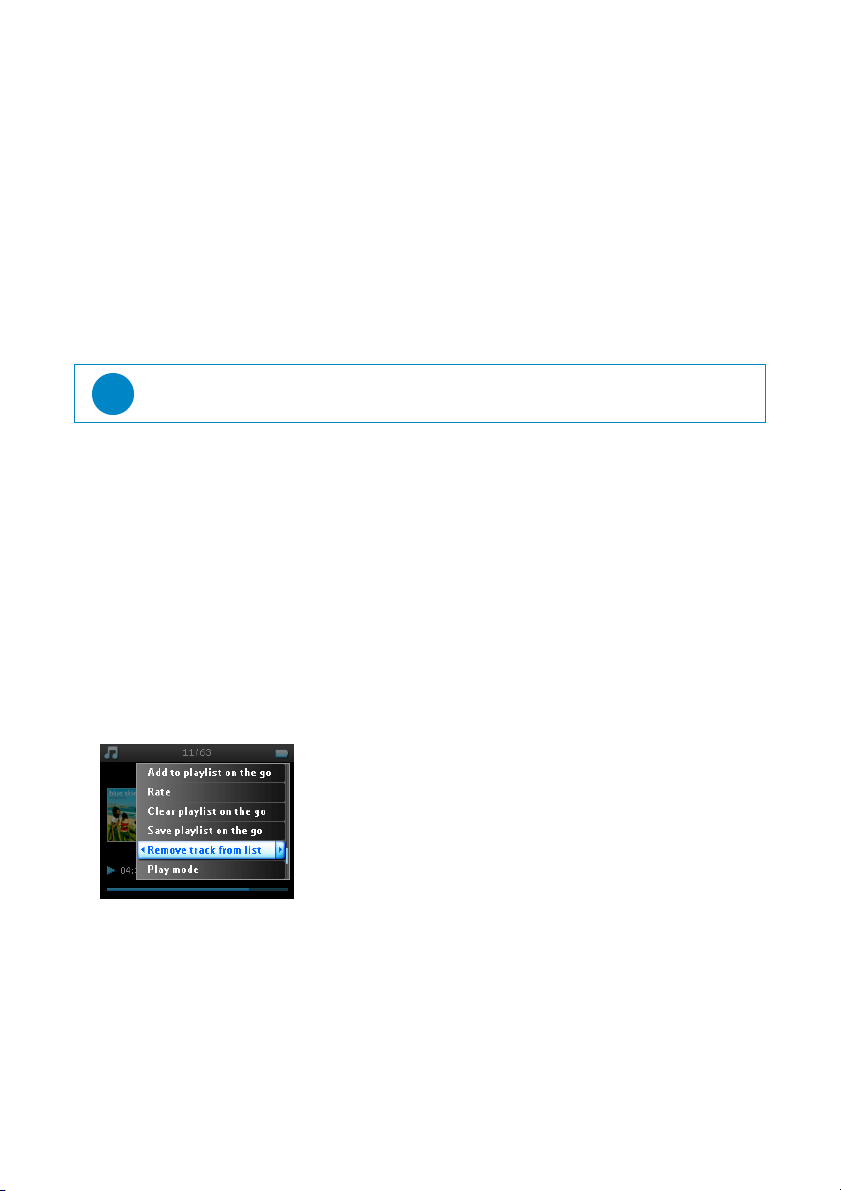
1. Select the song from
MENU
2. Press
and select
Playlist on the go
Music
Playlists
>
Remove track from list
>
.
Playlist on the go
.
Playlist on the go
Playlist on the go
YYYY-MM-DD-XX
.
from the music library.
will be emptied.
will be displayed.
3. A message
Remove [song name] from playlist?
will be displayed.
26
Page 30
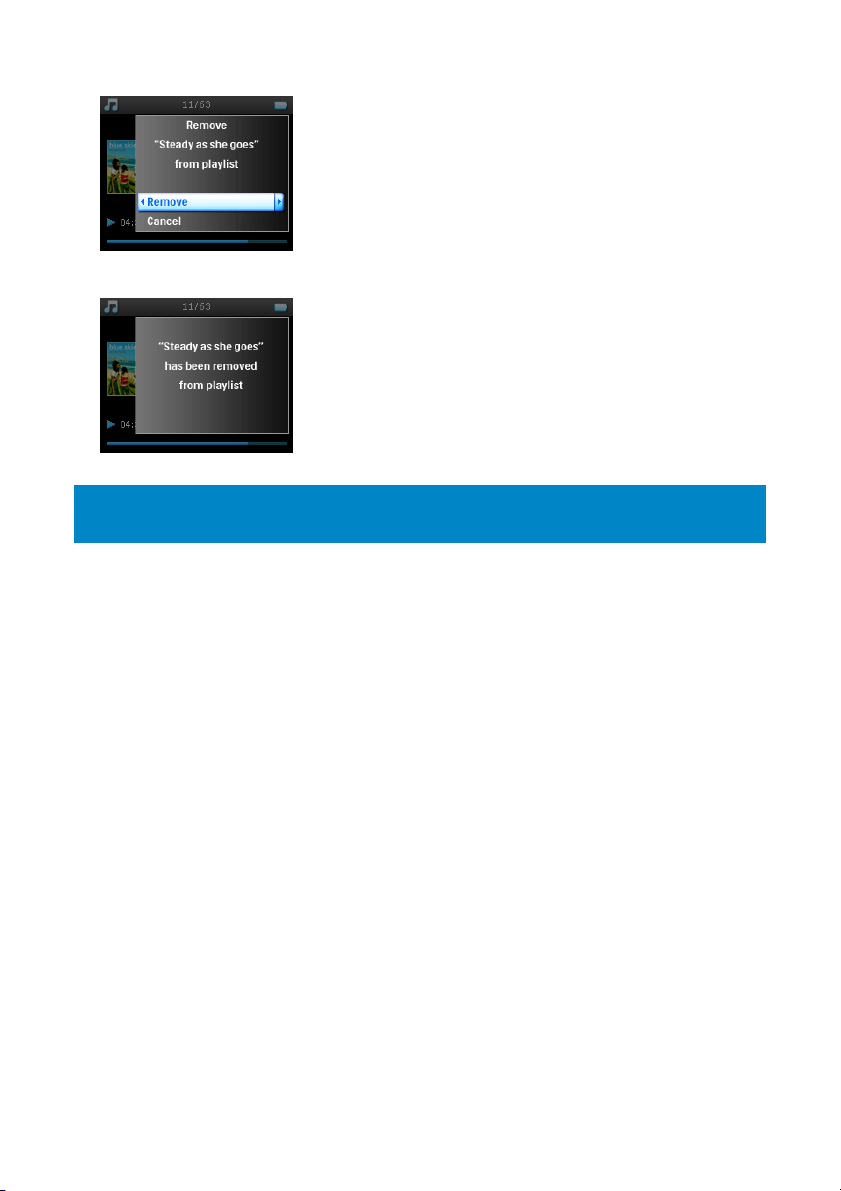
4. Select
Remove
to delete the song from
Playlist on the go
.
5. A message
NOTE!
The song is removed from the playlist only, it will not be deleted from the player.
Most played
You can playback your top 100 most played songs by selecting this playlist.
1. From the main menu, select
2. The list shows the 100 most played songs on your player. The first song in the list is the most played song.
3. You can reset the play count to 0 via
Other playlists
You can transfer playlists to the player using
16 for details.
[song name] has been removed from playlist
Music> Playlists
Settings
Most played
>
Music library settings
>
Windows Media Player
will be displayed.
.
Reset play count
>
. Please refer to "Transfer playlists" on page
.
Delete playlist from your player
You cannot delete the playlist on your player via
the player itself.
1. Play the playlist you want to delete.
MENU
2. Press
3. Select
4. A message
5. Select
6. A message
.
Delete playlist
Delete [playlist name]?
Delete
[playlist name] deleted!
.
.
will be displayed.
will be displayed.
Windows Media Player
. We recommend that you do it via
27
Page 31
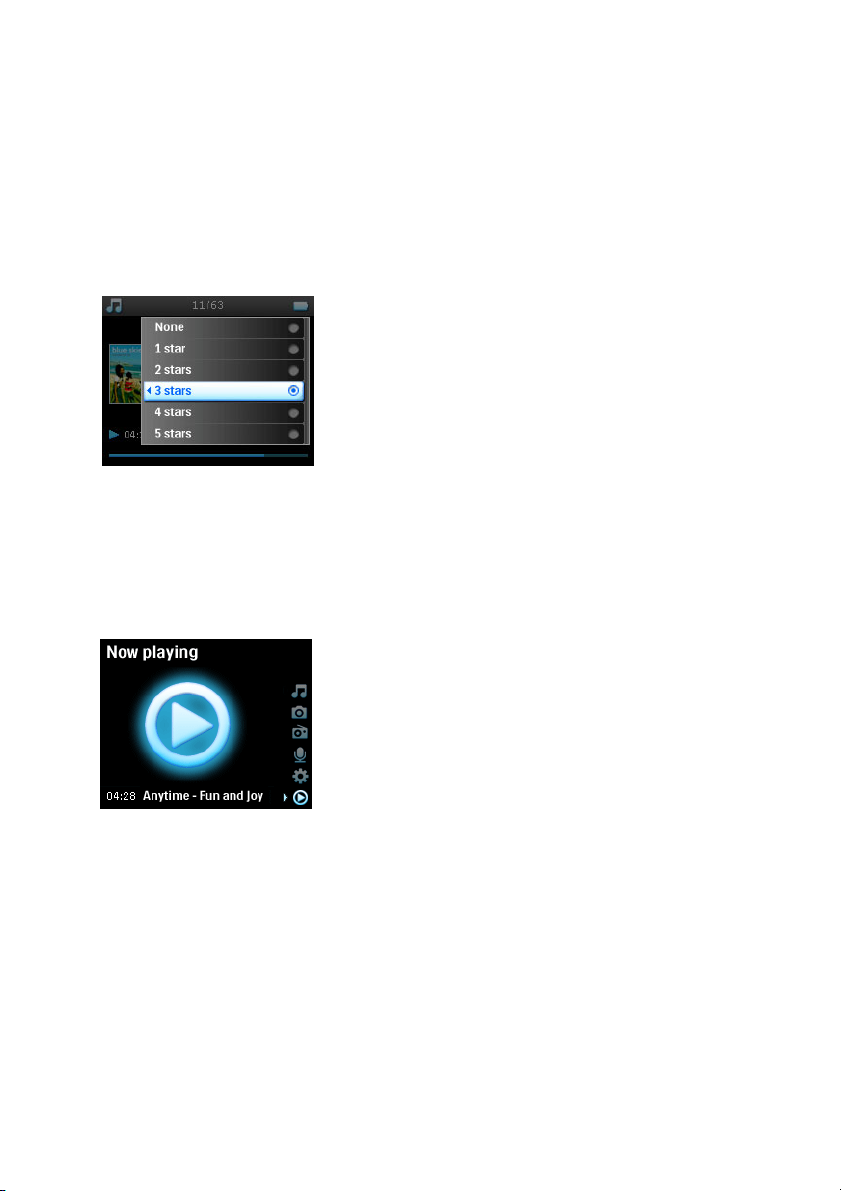
Rating your tracks
You can rate a track with 1 to 5 stars.
If you want to rate the track currently playing, press
stars.
You can also rate a song that is not currently playing.
1. Select the song from the music library.
MENU
2. Press
3. You can then rate the track from 1 star to 5 stars.
and select
Rate
.
MENU
and select
Rate
. Then rate the track from 1 star to 5
4. The next time that you connect your player to your computer and start
rating of your songs in
Windows Media Player
will be updated with the information from your player.
Windows Media Player
Now Playing
You can browse your music library or pictures while you are listening to music.
To go back to the play screen, press 1 to navigate back to the main menu and select
Now Playing
, the
.
28
Page 32
Pictures
You can view your favorite pictures on your player. While you are browsing your pictures, you can listen to
music or radio at the same time.
Transferring pictures to your player
From PC
You can transfer pictures from your PC to your player using
synchronise pictures and music with Windows Media Player" on page 9 for details.
From Camera
Your player can serve as an image storage device. You can connect it to your digital camera* and transfer your
pictures from your camera to your player.
1. Connect your camera to your player with the digicam connection cable. (this is an optional accessory
which is not supplied with your player. See "Optional accessories" on page 2 for details)
2. Connect the smaller end of the cable to the camera and the bigger end to your player.
3. Power on both the camera and your player.
4. When the camera is recognised, the player will stop its current activities and switch to camera connected
mode.
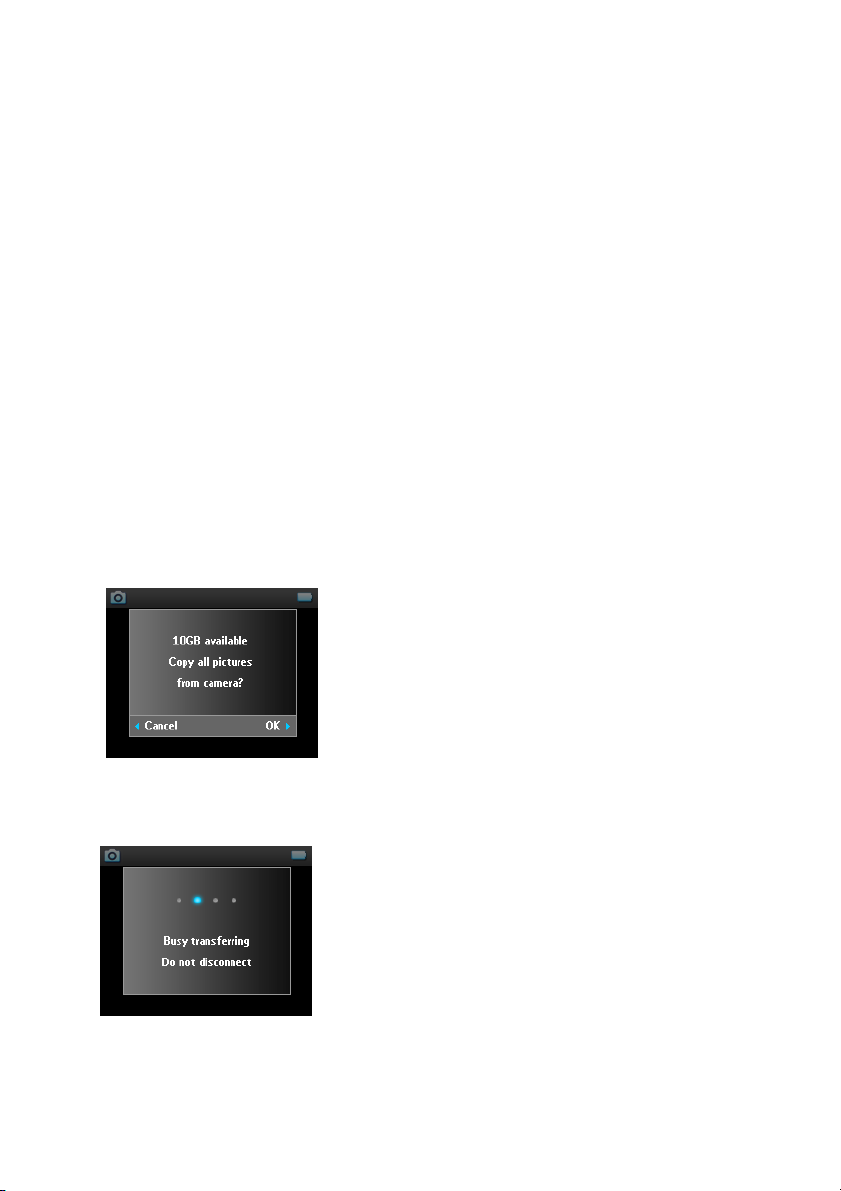
5. A message [
XX]GB available. Copy all pictures from camera?
Windows Media Player
is displayed.
. See "Organise and
6. Press 2 to confirm.
7. A message
*See page 50 for a list of supported cameras.
Busy transferring. Do not disconnect
is displayed.
29
Page 33
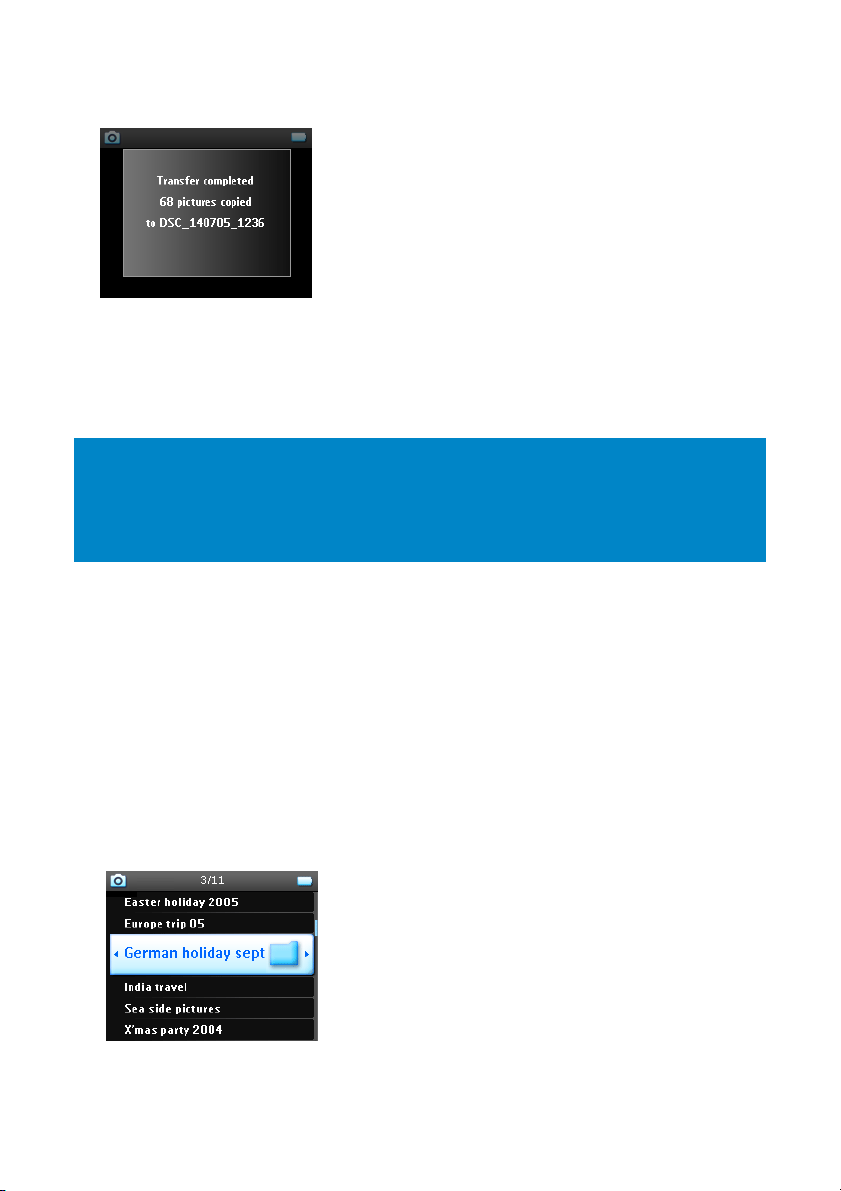
8. This will be followed by a pop-up message:
Transfer completed. [number] pictures copied to <new folder name>.
9. Safely disconnect your camera from the player. The player will return to
10. A new picture album will be created each time pictures are transferred from your camera to the player.
To find this album, select
11. Select
From camera
NOTE!
When images from the camera are displayed as a TV slideshow on TV, the minimum time interval
between slides is 10 seconds.
The full view images for pictures transferred from the camera are slightly smaller than those transferred
from PC.
Pictures
from the main menu.
album to view the pictures which you have transferred from your camera.
Pictures
menu.
Uploading pictures from the player to your PC
1. Connect the player to your computer.
2. Your player will be identified as Philips or Philips GoGear in
Media
3. Go to
4. Drag and drop your pictures to any desired location on your PC.
>
Pictures
From camera
>
.
Windows Explorer
.
Finding pictures on your player
Pictures on your player are organised in albums which are similar to the way they are organised in
Media Player
1. When you select
.
Pictures
from the main menu you will see a list of all picture albums.
Windows
30
Page 34

2. Select the picture album you wish to view. You will see a thumbnail view of all pictures in that album.
3. Use the
4. You can also browse through your pictures in full view mode by tapping on the top or bottom of the
VERTICAL TOUCH STRIP
VERTICAL TOUCH STRIP
to scroll and select a picture to see its full view.
to go to the next or previous picture.
Slideshow
A slideshow will display all pictures inside an album in full view. It will automatically go to the next picture at a
specified interval. Background music can be played from a specified playlist during a slideshow.
Start a slideshow
1. From the main menu, select
2. Select the picture album you wish to view.
3. You can start slideshow in album list, thumbnail view or full picture view.
MENU
4. Press
5. You can stop the slideshow by pressing 1.
and select
Slideshow music
You can play background music during a slideshow by assigning a playlist in
choose to play any playlist during a slideshow.
1. From the main menu, select
MENU
2. Press
and select
Pictures
.
Start slide show
Pictures
Slide show settings
.
.
Slideshow music
>
Slide show settings
and choose one of the playlists.
. You can
NOTE!
During a slideshow you cannot pause, skip or fast forward / rewind your music.
31
Page 35
Customising slideshow settings
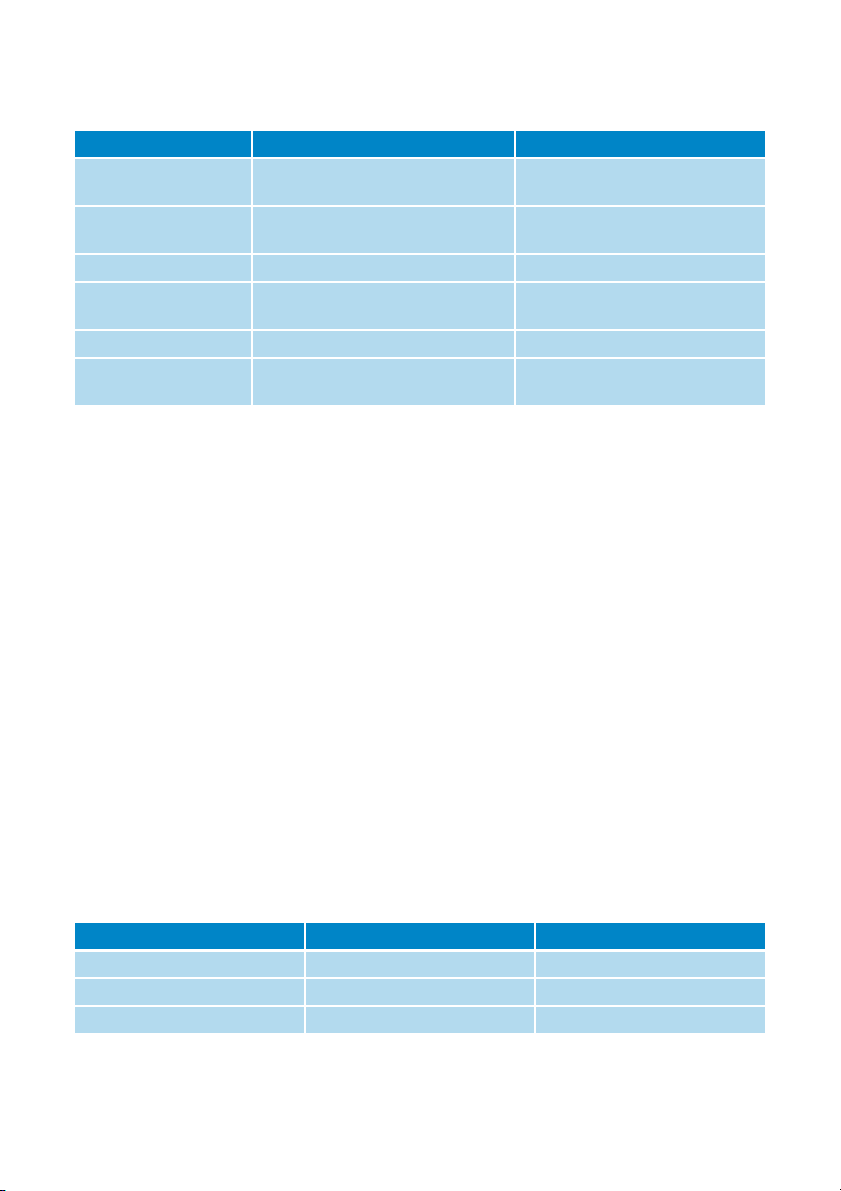
You can customise slideshow settings using
Settings Options Descriptions
Slideshow music Alphabetical playlists / None Choose which playlist to play in the
Transitions Off / Vertical Wipe / Fade Choose the transition effect
Time per slide 4 Sec / 6 Sec / 8 Sec / 10 Sec / 20 Sec Choose to set time between slides
Shuffle slideshow On / Off Choose to show slides at random
Repeat slideshow On / Off Choose to repeat slides
TV settings NTSC (USA) / PAL (Europe) Choose the TV setting that works
Slide show settings
menu.
background while playing slide show
between slides
or in album order
with your TV
TV slideshow
Your player supports TV slideshow.
1. Connect your player to the TV via the docking cradle. (this is an optional accessory which is not supplied
with your player)
2. Select the A/V channel on your TV.
3. On your player, select
4. Select the album you want to view.
MENU
5. Press
which your TV supports. TVs in Europe generally support PAL and TVs in US generally support NTSC.
6. Select
7. The images will be displayed on your TV screen.
, select
Start slide show
Pictures
from the main menu.
Slide show settings > TV settings
.
and choose between
NTSC
or
PAL
depending on
Radio*
Connect the headphone
The headphone serves as a radio antenna. Make sure it is properly connected to ensure optimal reception.
Select your FM region
From the main menu, select
Region Frequency range Tuning steps
Europe 87.5 – 108 MHz 0.05 MHz
Americas 87.5 – 108 MHz 0.1 MHz
Asia (same as Europe) 87.5 – 108 MHz 0.05 MHz
*
FM radio is only available for certain regions. It is not available for Europe.
Settings > Radio settings
.
32
Page 36
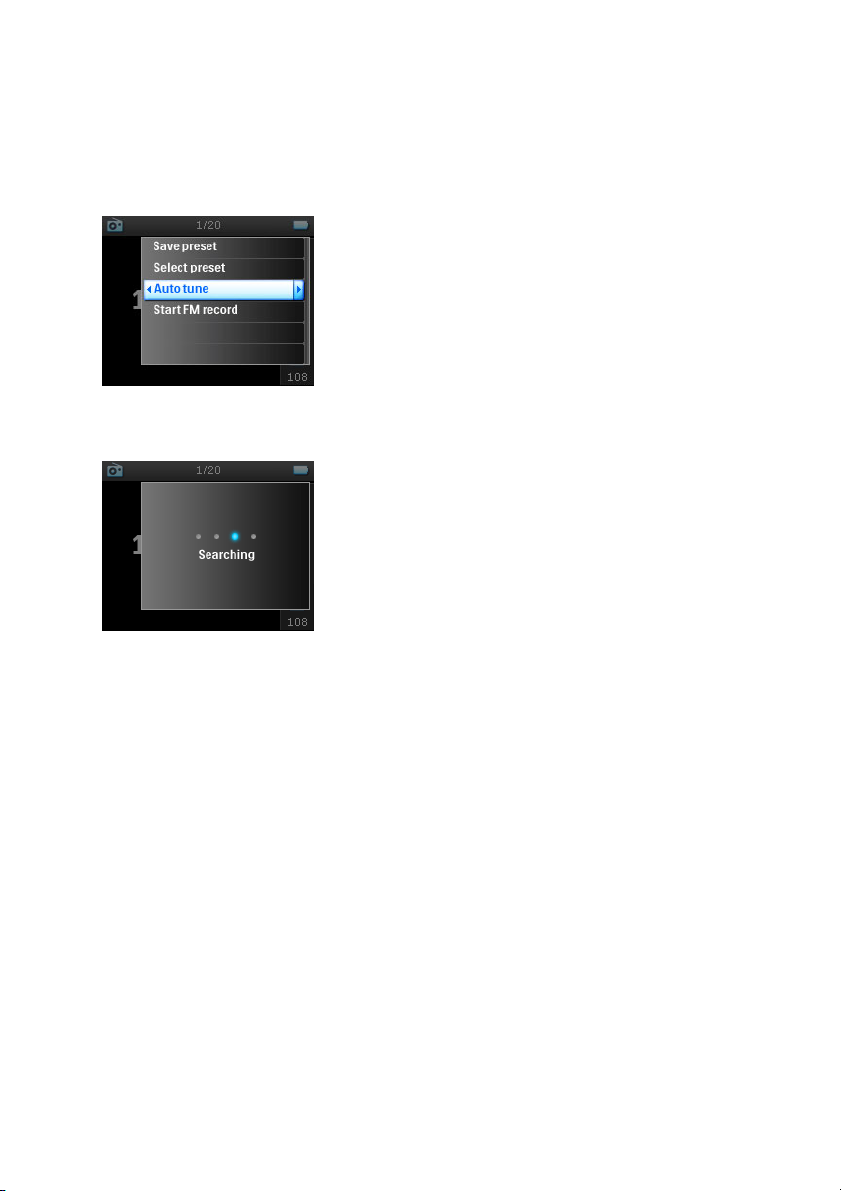
Auto tune
From the main menu, select
The radio will start playing from the last played station.
1. To find the radio stations with the strongest signals available in your area, press
tune
.
2. The player will search for the stations with the strongest signals and save them as presets. You can preset
a maximum of 20 radio stations.
Radio
to enter radio mode.
MENU
and select
Auto
Playing a preset radio station
1. From the main menu, select
2. Press
For quick access to a certain preset station, press
from the list.
J(
or § to browse your preset stations.
Radio
to enter radio mode.
MENU
, select
Select preset
and select your desired station
33
Page 37
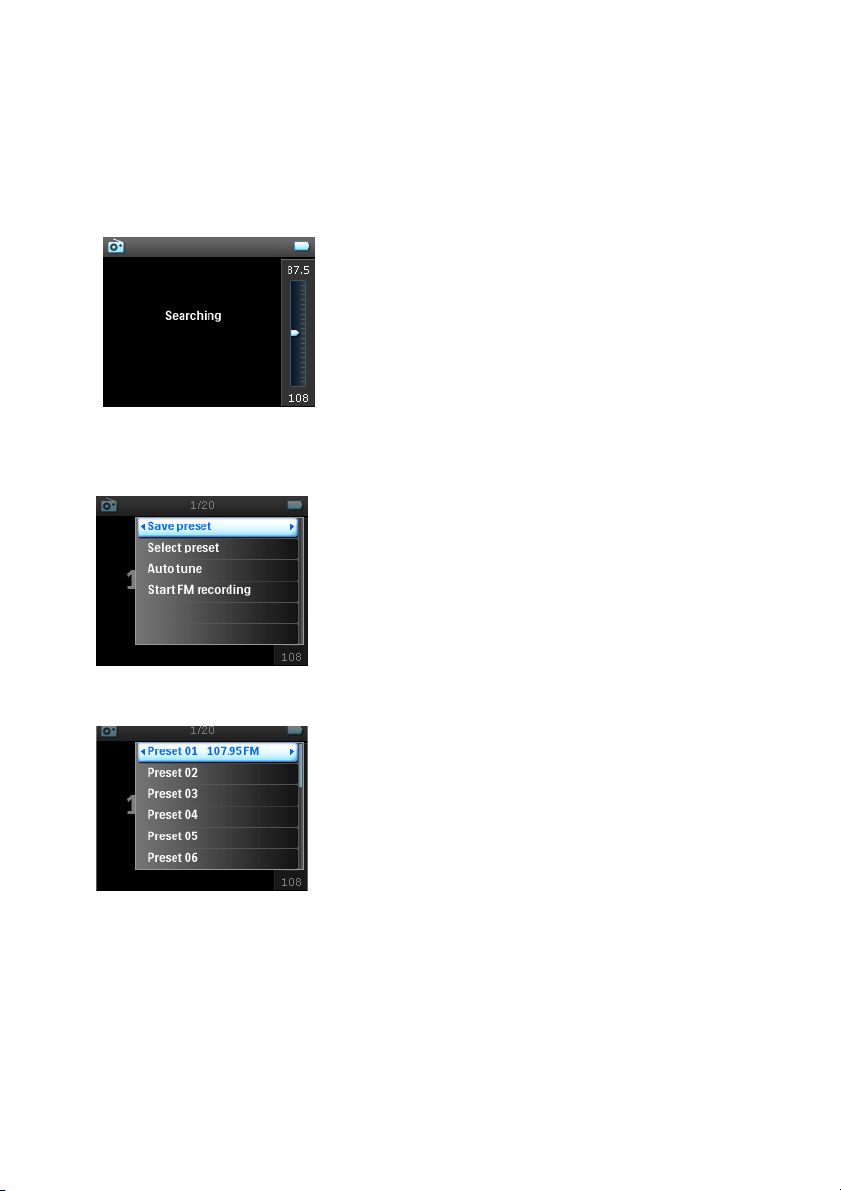
Manual tuning
1. Tap on the bottom or top of the
2. The frequency bar indicates the change in frequency.
3. Press and hold the top/ bottom end of the
available station.
4. A message
Searching
will be displayed and stops when a station with strong signal is found.
VERTICAL TOUCH STRIP
VERTICAL TOUCH STRIP
Saving a station as preset
1. In radio mode, press
MENU
and select
Save preset
.
to tune step by step.
to search for the previous/ next
2. Select the preset number at which you want to save the station.
3. Press 2 to save the station.
34
Page 38
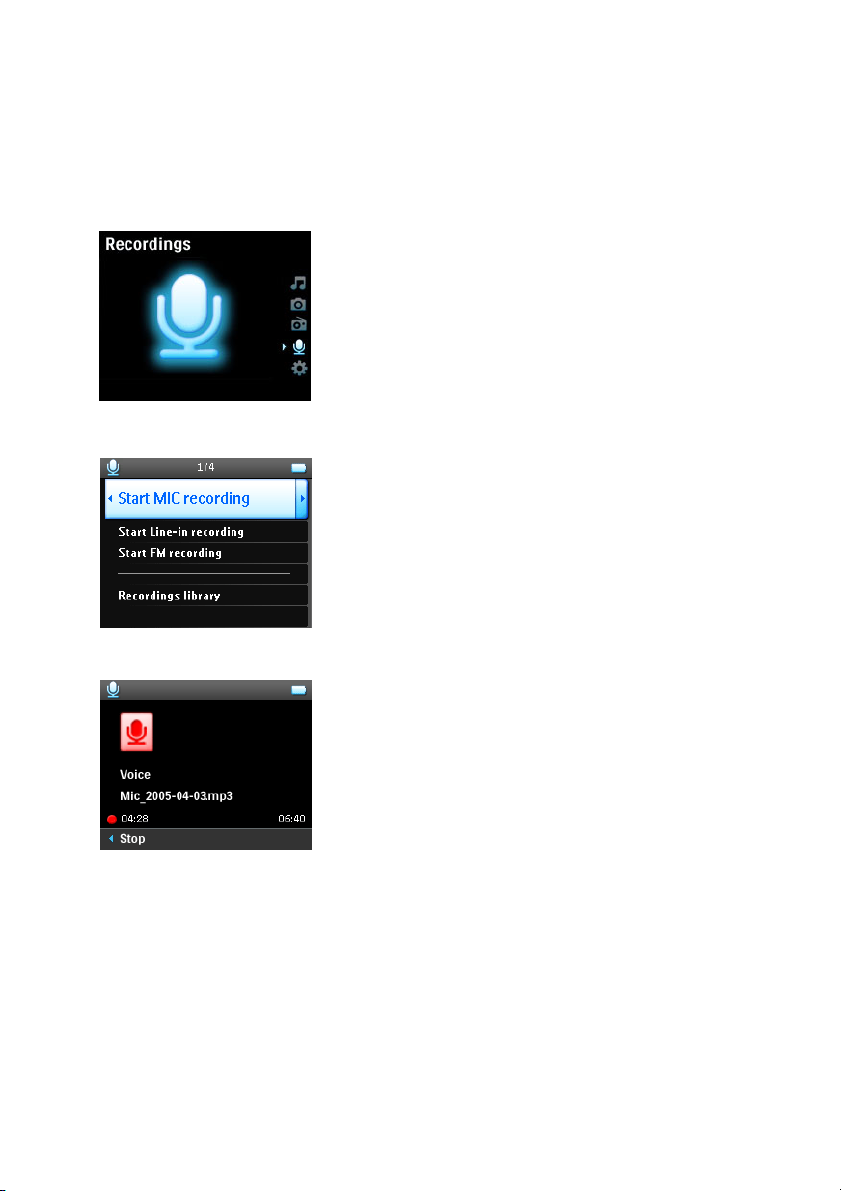
Recordings
You can make voice, radio* or line-in recordings using your player.
Making MIC recordings
1. From the main menu, select
Recordings
.
2. Select
3. Your player will display the following recording screen.
4. Press 1 to stop and save the voice recording.
5. The player will display the saving progress.
6. Your voice recording will be saved on your player as a PCM file (.wav extension). You can find this file
Start MIC recording
Recordings > Recordings Library > MIC recordings
under
to start a voice recording.
.
*
FM radio is only available for certain regions. It is not available for Europe.
35
Page 39
MENU
*
.
.
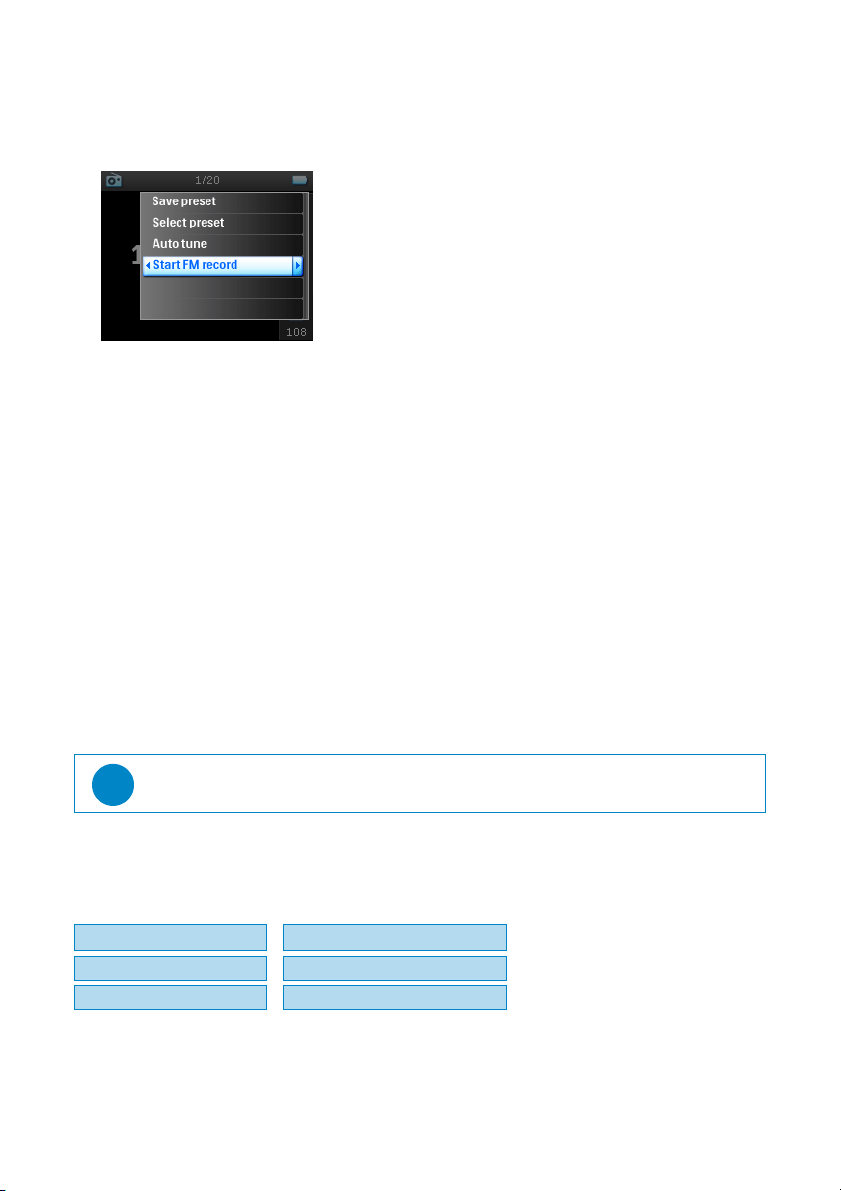
Making FM recordings
1. While listening to the radio, press
2. Choose
3. Press 1 to stop and save the FM recording.
4. Your FM recording will be saved on your player as a PCM file (.wav extension). You can find this file under
Start FM recording
Recordings > Recordings library > FM recordings
.
Making LINE-IN recordings
Line-in recordings are used to record music tracks in digital format directly from an external player.
1. Connect an external player (like a portable CD player or a stereo system) to your player via the docking
cradle. (this is an optional accessory which is not supplied with your player)
2. Insert one end of the audio cable to the line-out connection on the cradle and the other end to the device
you want to record from.
3. Go to the main menu of your player and select
4. A message
5. Press 2 to start line-in recording, at the same time, start the playback on the device you want to record from.
6. Press 1 to stop recording.
7. Your line-in recording will be saved on your player as a PCM file (.wav extension). You can find this file
under
Connect line-in
Recordings
will be displayed.
Recordings library
>
Recordings
Line-in recordings
>
Start LINE-IN recording
>
.
.
TIP
You can listen to the recording with your headphone while the recording is being made.
Play your recording
From the main menu, select
Recordings
Recordings
MIC recordings
Line-in recordings
FM recordings*
1. Select the recording you want to hear.
2. Press 2; to play the recording of your choice.
*
FM radio is only available for certain regions. It is not available for Europe.
2
2
2
Recordings library
>
Recordings listed in TIME order
Recordings listed in TIME order
Recordings listed in TIME order
. The following options are available:
36
Page 40
Delete your recording
1. While playing back a recording, press
2. Select
3. A message
4. Press 2 to confirm.
5. A message
Delete recording
Delete [recording name]?
Recording [recording name] deleted
.
MENU
.
will be displayed.
will be displayed.
Upload your recordings to the computer
1. Connect the player to your computer.
2. Your player will be identified as
3. Go to
4. Drag and drop your files to any desired location on your computer.
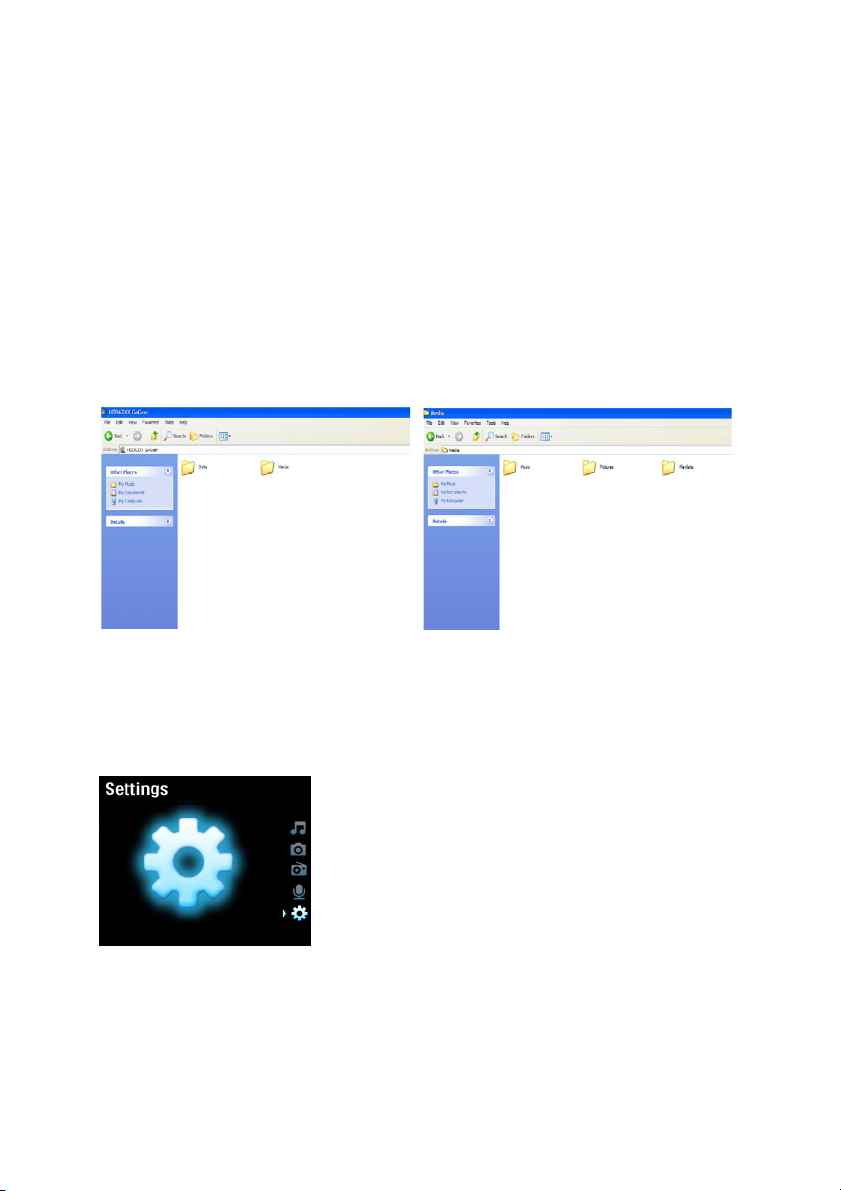
Media
folders.
Recordings
>
Philips GoGear
. You will find
Windows Explorer
in
FM recordings, Line-in recordings
.
Voice recordings
and
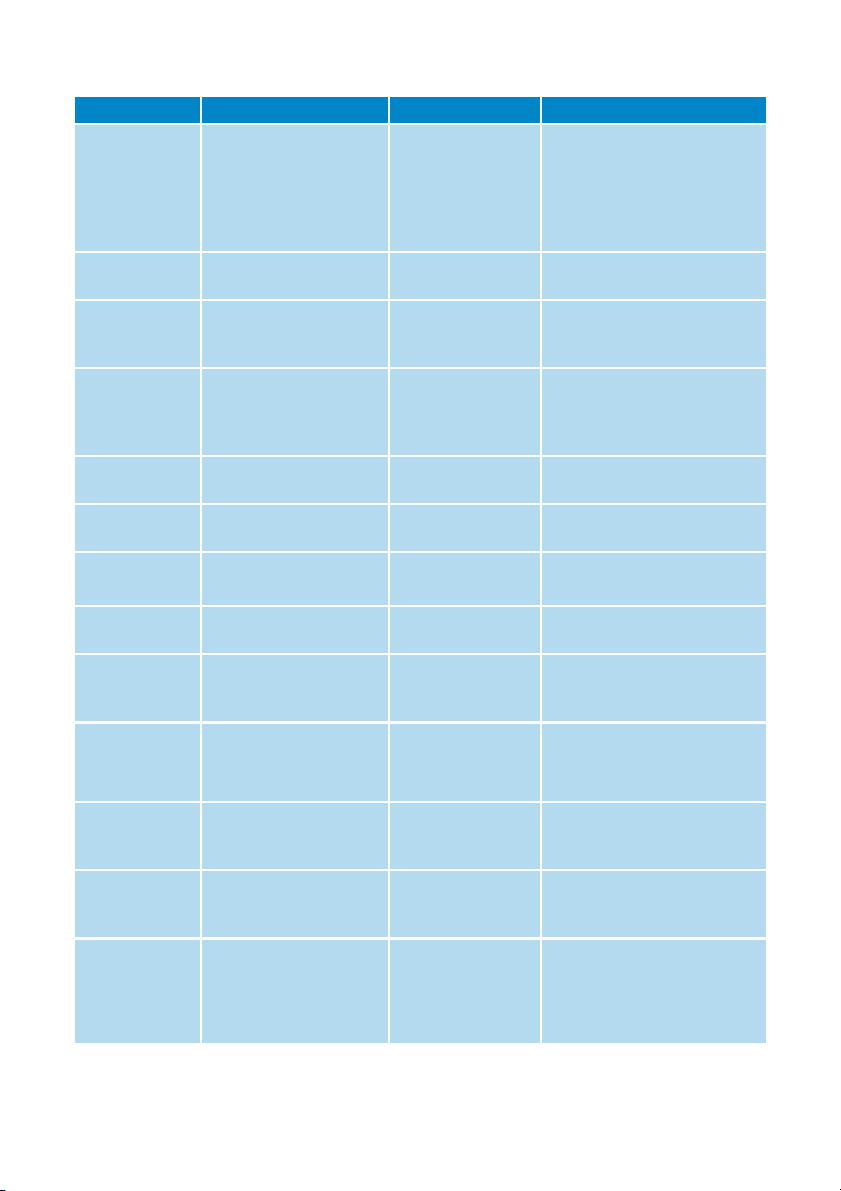
Settings
Settings
Settings
.
to select an option.
menu.
1. From the main menu, select
2. Use the
3. Press 2 to go to the next level or 1 to return to previous level.
4. Press 2 to confirm your selection.
5. Press 1 to exit the
VERTICAL TOUCH STRIP
37
Page 41
The following options are available:
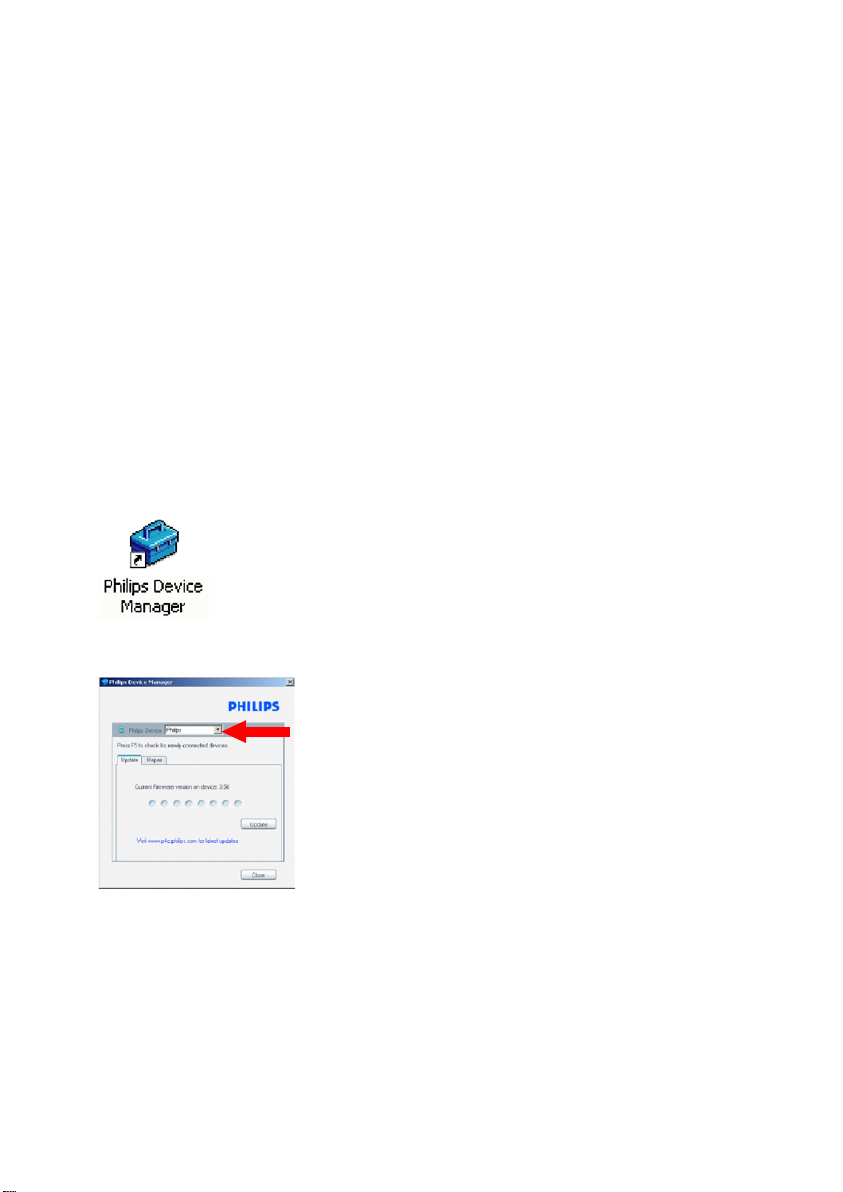
Settings Options Description
Language English, French, Italian,
German, Spanish, Dutch,
Swedish, Portuguese,
Simplified Chinese,
Traditional Chinese,
Korean, Japanese
Play mode Shuffle All On / Off Choose shuffle On to play
Repeat No Repeat / Repeat
Sound Settings SRS WOW, Rock, Funk,
Techno, HipHop,
Classical, Jazz, Spoken
Word, Custom, Off
Backlight Timer 10 Sec / 30 Sec / 45 Sec /
60 Sec
Contrast Levels 1 – 6 Choose contrast level to adjust
Skins Skin one
Skin two
Album Art On / Off Select ON to display album art
Sleep timer 15 Min / 30 Min / 60 Min /
90 Min/ 120 Min / Off
Time and date Set time
Set date
Show time in header
Clicker sound Device On / Off Choose to hear a clicker sound
Headphones On / Off Choose to hear a clicker sound
Information Information summary
Call center number
One / Repeat All
AM / PM
On / Off
Capacity /
Available space /
Firmware version /
Support site
Choose the language for display
on screen
selected tracks at random
Choose Repeat One or Repeat
All to keep looping selected
tracks
Choose the equalizer for best
music experience
Choose the time for backlight
display
brightness.
Personalise your player with
your favorite skin
for the song that you are playing
Choose sleep timer to turn off
your player automatically after
15, 30, 60, 90, or 120 minutes
Set your player’s date and time
and choose whether to display
it
from the player when you touch
the touchpad or buttons
via the headphones when you
touch the touchpad or buttons
Displays information about your
player
38
Page 42

Music library
settings
Recording
settings
Radio settings Europe / Americas / Asia Choose the region in which you
Demo mode Start Start demo mode (press power
Factory settings Restore Factory settings Restore to default factory
Reset play count Reset play count for “My most
played” playlist to zero
Silence detection On/ Off Silence detection during Line-in
recording will split the recording
into various separate tracks
operate the FM
for 4 seconds to exit this mode)
settings
Using your player to store and carry data files
You can use your player to store and carry data files by copying data files into the
Windows Explorer
.
Data
folder of your player via
39
Page 43
Updating your player
;QWT RNC[GT KU EQPVTQNNGF D[ CP KPVGTPCN RTQITCO ECNNGF HKTOYCTG 0GY XGTUKQPU QH VJG HKTOYCTG OC[ DG
TGNGCUGFCHVGT[QWJCXGRWTEJCUGF[QWTRNC[GT
#UQHVYCTGRTQITCOECNNGF2JKNKRU&GXKEG/CPCIGTYKNNOQPKVQTVJGHKTOYCTGUVCVWUQH[QWTRNC[GTCPFPQVKH[
[QWKHCPGYHKTOYCTGKUCXCKNCDNG;QWPGGFCPKPVGTPGVEQPPGEVKQPHQTVJKU
+PUVCNN2JKNKRU&GXKEG /CPCIGT HTQOVJGUWRRNKGF%&QT FQYPNQCF VJG NCVGUVXGTUKQPHTQOYYYRJKNKRUEQO
UWRRQTVQTYYYWUCUWRRQTVRJKNKRUEQOHQT75TGUKFGPVU
'XGT[VKOG[QWEQPPGEV[QWTRNC[GTVQ[QWTEQORWVGT
VJG+PVGTPGVCPFEJGEMHQTWRFCVGU
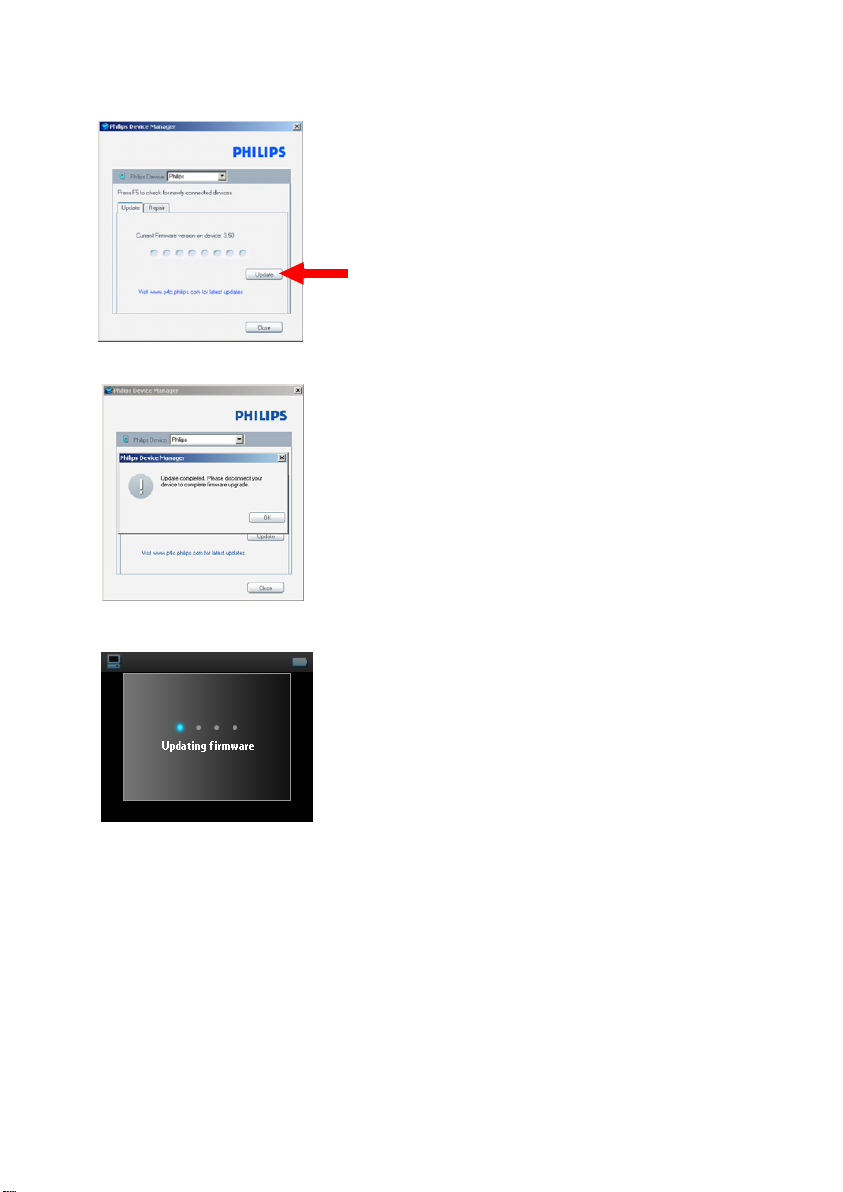
Manually check whether your firmware is
up to date
2QYGT[QWTRNC[GTYKVJVJGUWRRNKGF#%&%CFCRVGT
%QPPGEV[QWTRNC[GTVQVJGEQORWVGT
.CWPEJ
5GNGEV[QWTFGXKEG
Philips Device Manager
HTQO
Start
Philips Device Manager
Programs Philips Device Manager
YKNNCWVQOCVKECNN[EQPPGEVVQ
%NKEM
Update
40
Page 44
Philips Device Manager
[QWTRNC[GT
YKNN EJGEM YJGVJGTCPGYHKTOYCTG KU CXCKNCDNGQPVJGKPVGTPGVCPF KPUVCNN KVQP
9JGP
#OGUUCIG
;QWTRNC[GTKUTGCF[HQTWUGCICKPCHVGTTGUVCTV
Update completed
Updating firmware
CRRGCTUQPVJGUETGGPENKEMOKCPFFKUEQPPGEVVJGRNC[GT
YKNNDGFKURNC[GF
41
Page 45
Troubleshooting
My player skips tracks
6JGUMKRRGFVTCEMOC[ DG RTQVGEVGF ;QW OC[ PQV JCXG UWHHKEKGPV TKIJVU VQRNC[ VJG UMKRRGF VTCEM QP [QWT
RNC[GT%JGEMVJGOWUKETKIJVUYKVJVJGUQPIRTQXKFGT
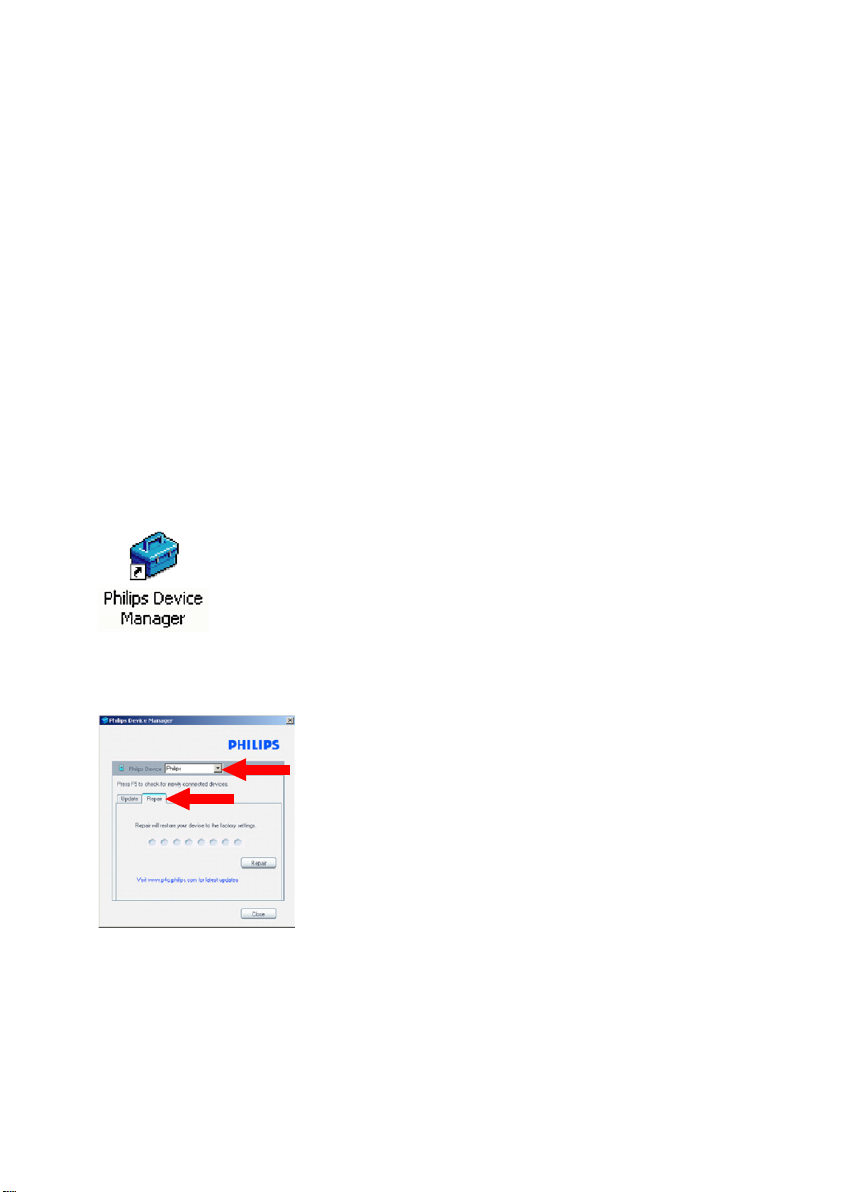
My Player is not recognised by Windows
/CMGUWTG[QWT2%KUTWPPKPI9KPFQYU:2
My player cannot power ON
;QWTFGXKEGDCVVGT[OC[DGQWVQHRQYGTFWGVQNQPIRGTKQFQHPQPWUCIG
%JCTIG[QWTRNC[GT
+PECUGQHFGXKEGGTTQTEQPPGEV[QWTRNC[GTVQVJGEQORWVGTCPFWUG
RNC[GT
.CWPEJ
5GNGEV[QWTFGXKEG
5GNGEV
Philips Device Manager
Repair
VCD
Start Programs Philips Device Manager
HTQO
Philips Device Manager
VQTGUVQTG[QWT
42
Page 46
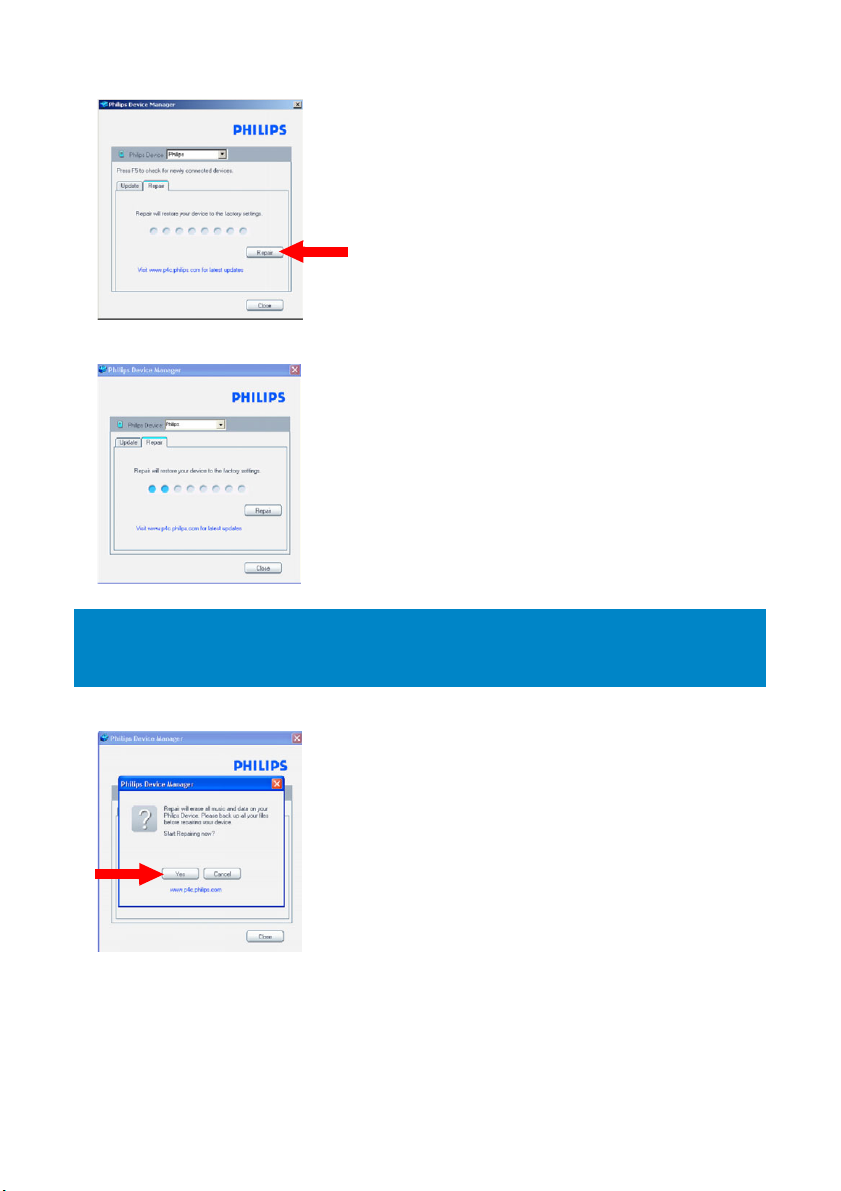
4. Click
5. The repair process will start.
Repair
.
IMPORTANT!
All your contents will be erased from your player. Therefore, please back up your files before repairing.
After repair, simply synchronise your player again to transfer music to your player.
6. Click
Yes
to proceed.
43
Page 47
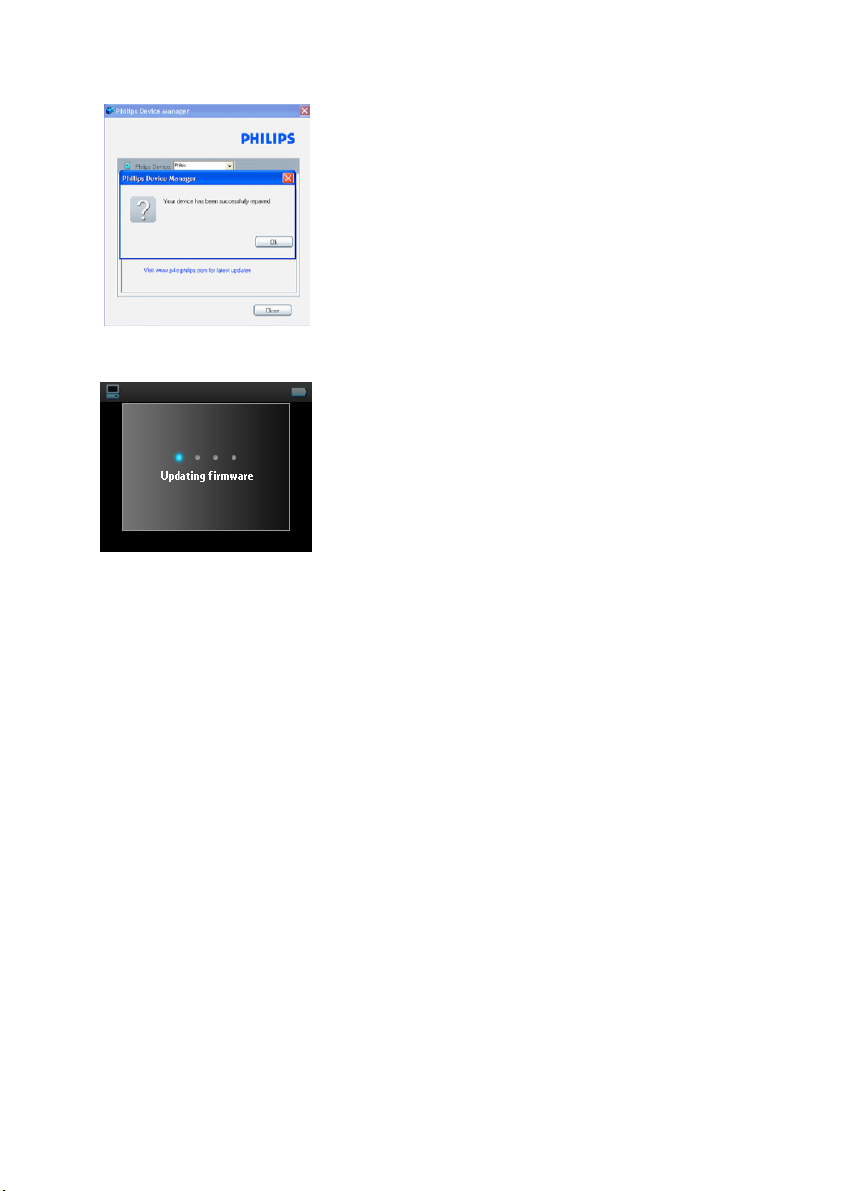
7. After the repair process is completed, click OK and disconnect your player.
8. A message
9. Your player is ready for use again after restart.
Updating firmware
will be displayed.
There is no Music on my player after transfer
If you cannot find the songs that you have transferred to your player, check the following:
1. Did you transfer using
data files. They will neither appear in the music library of your player nor can the songs be played.
2. Are your songs in MP3 or WMA format? Other formats will not playback on the player.
Windows Media Player
? Files transferred via other means will only be recognised as
There are no pictures on my player after
transfer
If you cannot find the pictures that you have transferred to your player, check the following:
1. Did you transfer your pictures using
appear on your device.
2. Is the
Philips Device Plug-in
pictures in
Plug-in is probably missing. To check whether this Plug-in is available on your computer, go to
Panel
software from the supplied CD.
Windows Media Player
Add or Remove Programs
>
Windows Media Player
installed on your computer? Immediately after you have transferred your
, you should see a Philips screen pop-up. If it does not appear, then the
and check if
Philips Device Plug-in
? Files transferred via other means will not
Control
is listed. If not, re-install the
44
Page 48

3. You may have disconnected your device too soon after the picture transfer in
was finished. Always wait for the Philips pop-up message to show and disappear before you disconnect
your device.
4. Are your pictures in JPEG format? Pictures in other formats cannot be transferred to your player.
Windows Media Player
My GoGear player hangs
1. In the unlikely event that your player hangs, do not panic. Simply push and hold down
ON/OFF
to
2. The existing contents on your player will not be erased.
3. If nothing happens, recharge the battery for at least 4 hours and try to power on or reset again. If this does
not work, you might have to repair your player with
position and press
VOLUME
+
at the same time. Hold until the player shuts down.
Philips Device Manager
ON/OFF HOLD
. (see page 42)
slider
My player is full and I have less songs on
my player than I expected
Your player has a hard disk memory to store songs. Check your model number to see the actual hard disk size.
You will be able to store more songs on your player if you use WMA formatted songs in 64 kbs with variable
bitrate.
Poor radio reception
If you cannot achieve a good reception from your
1. Make sure you have plugged the original headphone into your
2. The radio signal might be poor when you are indoors. We suggest that you use your player outdoors.
*
GoGear
radio, check the following:
GoGear
player correctly.
*
FM radio is only available for certain regions. It is not available for Europe.
45
Page 49

Safety and Maintenance
General maintenance
To avoid damage or malfunction:
- Handle your hard disk Digital Audio Player with care. Please use the protective pouch for optimal shock
protection.
- Do not expose the player to excessive heat caused by heating equipment or direct sunlight.
- Do not drop your player or allow objects to fall on your player.
- Do not allow your player to be submersed in water. Do not expose headphone socket or battery
compartment to water, as water entering the set may cause major damage.
- Do not use any cleaning agents containing alcohol, ammonia, benzene, or abrasives as these may harm the set.
- Active mobile phones in the vicinity may cause interference.
- Backup your files. Please ensure that you retain the original files you have downloaded to your device. Philips
is not responsible for any loss of data if the product becomes damaged or not readable / legible.
- Manage (transfer, delete, etc.) your music files only with the supplied music software to avoid problems!
About operating and storage temperatures
- Operate in a place where temperature is always between 0 and 35º C (32 to 95º F).
- Store in a place where temperature is always between -20 and 45º C (-4 to 113º F).
- Battery life may be shortened in low temperature conditions.
Hearing safety
Listen at a moderate volume. Using the headphone at high volume can impair your hearing. We recommend
headphone no. SHE9500 for this product.
Important (for models supplied with headphones):
Philips guarantees that its audio players comply with the maximum sound power as determined by the relevant
regulatory bodies only when used with the original headphones supplied with this product. In case the
headphone needs to be replaced, we recommend that you contact your retailer to order a model identical to
that of the original headphone provided by Philips.
Traffic safety
Do not use the headphone while driving or cycling as you may cause an accident.
Copyright information
- All other brands and product names are trademarks of their respective companies or organizations.
- Unauthorised duplication of any recordings whether downloaded from the internet or made from
audio CDs is a violation of copyright laws and international treaties.
- The making of unauthorised copies of copy-protected material, including computer programmes, files,
broadcasts and sound recordings, may be an infringement of copyrights and constitute a criminal
offence. This equipment should not be used for such purposes.
46
Page 50
Data logging
Philips is committed to improving the quality of your product and enhancing the Philips user experience. To
understand the usage profile of this device, this device logs some info/data to the non-volatile memory region
of the device. These data are used to identify and detect any failures or problems you as a user may
experience while using the device. The data stored, for example, will be the duration of playback in music
mode, duration of playback in tuner mode, how many times battery low was encountered, etc. The data
stored do not reveal the content or media used on the device or the source of downloads. The data stored on
the device are retrieved and used ONLY if the user returns the device to the Philips service centre and ONLY
to simplify error detection and prevention.The data stored shall be made available to user on user's first
request.
Disposal of your old product
Your product is designed and manufactured with high quality materials and components, which can be recycled
and reused.
When this crossed-out wheeled bin symbol is attached to a product, it means the
product is covered by the European Directive 2002/96/EC.
Please be informed about the local separate collection system for electrical and
electronic products.
Please act according to your local rules and do not dispose of your old products with
your normal household waste. The correct disposal of your old product will help
prevent potential negative consequences to the environment and human health.
Modifications
Modifications not authorised by the manufacturer may void user authority to operate this device.
47
Page 51
Notice for the USA
Philips
HDD6320
HDD082
HDD6330
HDD084
HDD6335
HDD085
Note:
This equipment has been tested and found to comply with the limits for a Class B digital device, pursuant to
part 15 of the FCC Rules.These limits are designed to provide reasonable protection against harmful
interference in a residential installation.This equipment generates, uses, and can radiate radio frequency energy
and, if not installed and used in accordance with the instruction manual, may cause harmful interference to radio
communications.
However, there is no guarantee that interference will not occur in a particular installation.
If this equipment does cause harmful interference to radio or television reception, which can be
determined by turning the equipment off and on, the user is encouraged to try to correct the interference by
one or more of the following measures:
- Relocate the receiving antenna.
- Increase the separation between the equipment and receiver.
- Connect the equipment into an outlet on a circuit different from that to which the receiver
is connected.
- Consult the dealer or an experienced radio/ TV technician for help.
Notice for Canada
This Class B digital apparaatus complies with Canadian ICES-003.
The set complies with the FCC-Rules, Par t 15 and with 21 CFR 1040.10.
Operation is subject to the following two conditions:
1.This device may not cause harmful interference, and
2.This device must accept any interference received, including interference that may cause undesired
operation.
Notice for the European Union
This product complies with the radio interference requirements of the European Union.
48
Page 52

Technical data
Power supply 830 mAh Li-ion internal rechargeable battery
Multi-voltage charger / adaptor: 4 hours full charge; 1 hour fast charge
Dimensions 64 x 104 x 16.8 mm
Weight 180 g
Picture / Display White backlight LCD, 220 x 176 pixels, 65K colours
Sound Channel separation
Equalizer settings
Frequency response
Signal to noise ratio
Output Power (RMS)
Audio Playback
Play time 15 hours*
Compression format MP3 (8-320 kbps and VBR )
WAV
WMA (32-192 kbps; Sample rates: 8, 11.025, 16, 22.050, 24, 32, 44.1, 48 kHz)
ID3-tag support Album title, Genre title, Track title and artist name
Audio Capturing Built-in microphone Mono
Storage Media
Built-in memory capacity 30GB** micro hdd
Tuner / Reception / Transmission Tuner band: FM***
Connectivity Headphone 3.5 mm, USB 2.0, Philips dock connector, 5V DC
Music and picture transfer via Windows Media Player 10
Data transfer via Windows Explorer
System Requirements Windows® XP (SP2 or above)
Pentium II or better
64 MB RAM
100 MB hard disk space
Internet connection
Microsoft Internet Explorer 5.5 or later
Video display card
Soundcard
USB port
50 dB
Rock, Pop, Jazz, Classical, Dance,
Electronica, Lounge, RnB, Hip Hop,
Spoken Word
20 - 16 000 Hz
> 82 dB
2 x 5 mW
* Battery life varies according to usage.
30
** Note that some operating systems display capacity in units of “GB” where 1.0 GB = 2
= 1,073,741,824 bytes.
The resulting “GB” capacity displayed by the OS will be smaller because of using this base-2 defiinition for “Gigabyte”.
*** FM radio is only available for certain regions. It is not available for Europe.
PHILIPS reserves the right to make design and specification changes for product improvement without prior
notice.
49
Page 53

Cameras supported
- Aiptek Pocket DV-4500
- Canon DIGITAL IXUS II
-Canon DIGITAL IXUS 400
-Canon IXY DIGITAL 500
-Canon PowerShot G3
-Canon PowerShot G5
-Canon PowerShot G6
-Canon PowerShot SD500
- Casio Exilim EX-Z55
- DigiLife 660
- FujiFilm FinePix 420
- FujiFilm FinePix A340
- FujiFilm FinePix F610
- FujiFilm FinePix F700
- FujiFilm FinePix S5000
- Gateway DC-M42
- Gateway DC T-50
- Hewlett-Packard Photosmart M407
- Hewlett-Packard Photosmart R507
- Hewlett-Packard Photosmart R707
- Hewlett-Packard Photosmart 945
- Kodak EasyShare DX4530
- Kodak EasyShare DX7590
- Kodak EasyShare DX7630
- Konica/Minolta DiMAGE F100
- Konica/Minolta DiMAGE Xt
- Konica/Minolta DiMAGE Z1
- Nikon Coolpix 2200
- Nikon Coolpix 3100
- Nikon Coolpix 4300
- Nikon Coolpix E2500
- Olympus CAMEDIA AZ-1
- Olympus C-7000 Zoom
- Olympus Stylus 300 Digital
- Olympus µ-mini Digital
- ORite VC2110
- Panasonic Lumix DMC-FZ10K
- Pentax Optio S40
- Samsung Digimax 360
- Samsung Digimax 370
- Sony Cyber-shotÆ DSC-P10
- Sony Cyber-shot DSC-P93
- Sony Cyber-shot DSC-T1
- Sony Cyber-shot DSC-T1
- Sony Cyber-shot DSC-V1
- Sony Cyber-shot U DSC-U10
- Vivitar Vivicam 3345
50
Page 54

This product is protected by certain intellectual property rights of Microsoft
Corporation. Use or distribution of such technology outside of this product is prohibited
without a license from Microsoft or an authorized Microsoft subsidiary.
Content providers are using the digital rights management technology for Windows
Media contained in this device (“WM-DRM”) to protect the integrity of their content
(“Secure Content”) so that their intellectual property, including copyright, in such
content is not misappropriated. This device uses WM-DRM software to play Secure
Content (“WM-DRM Software”). If the security of the WM-DRM Software in this device
has been compromised, owners of Secure Content (“Secure Content Owners”) may
request that Microsoft revoke the WM-DRM Software’s right to acquire new licenses to
copy, display and/or play Secure Content. Revocation does not alter the WM-DRM
Software’s ability to play unprotected content. A list of revoked WM-DRM Software is
sent to your device whenever you download a license for Secure Content from the
Internet or from a PC. Microsoft may, in conjunction with such license, also download
revocation lists onto your device on behalf of Secure Content Owners.
Page 55
Specifications are subject to change without notice.
Trademarks are the property of Koninklijke Philips Electronics N.V.
or their respective owners
2005 © Koninklijke Philips Electronics N.V. All rights reserved.
www.philips.com
Printed in China
 Loading...