

Page 1
ENGLISH
한국의
Type HD8927
Register your product and get support at
www.saeco.com/welcome
4219.460.3434.1 HD8927 FRONT-BACK COVER_EN-KO.indd 1 07/03/16 11:39
Page 2

Page 3
ESPRESSO
ESPRESSO
LUNGO
CAFFE’
CREMA
CAPPUCCINO
LATTE
MACCHIATO
AROMA
STRENGTH
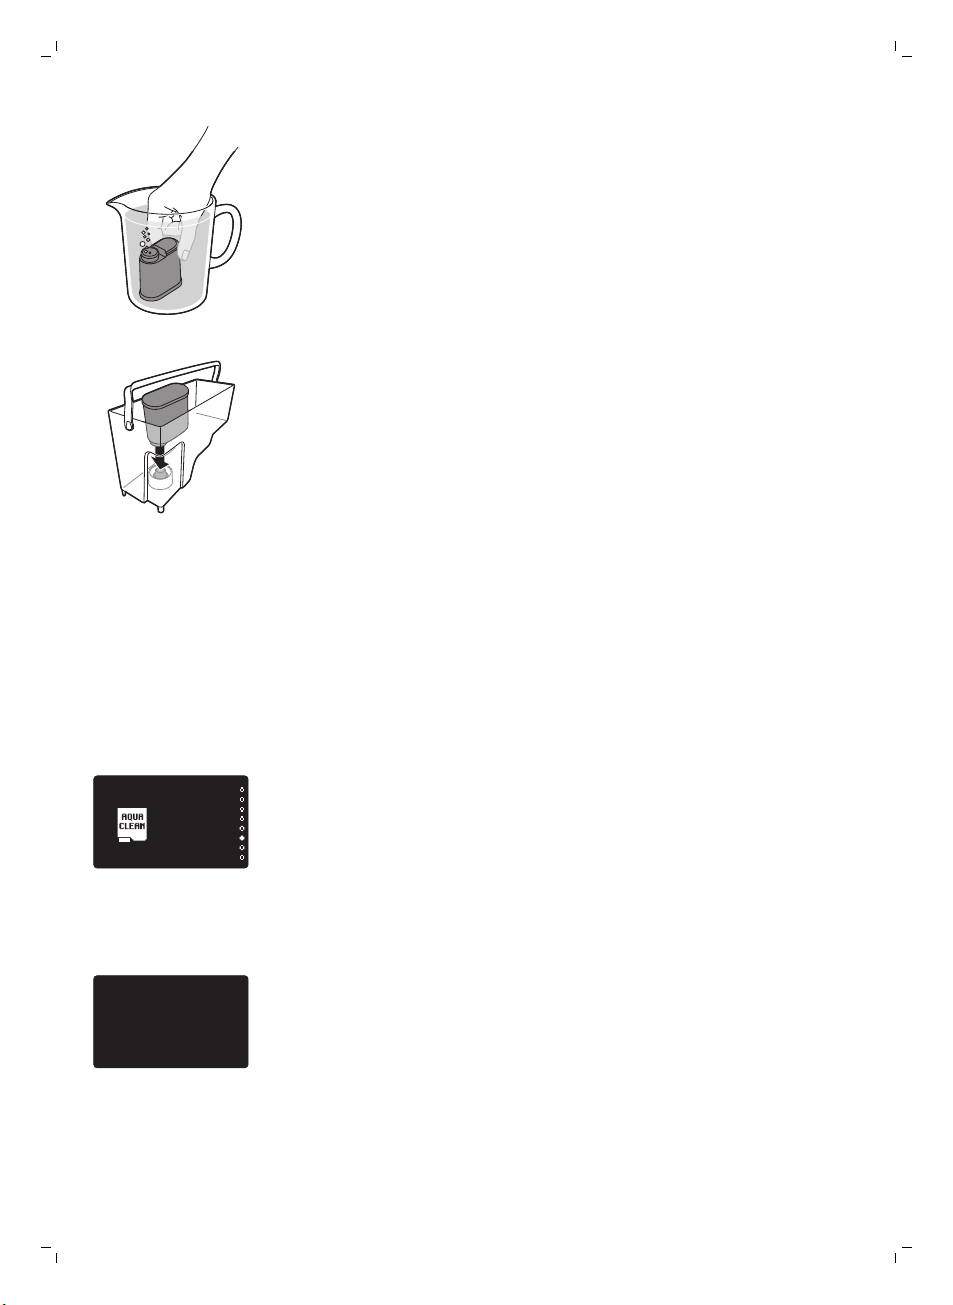
MENU /
SPECIAL DRINKS
25
26
16
15
2
1
3
4
38
36
22
31
32
33
34
43
44
40
18
19
17
23
39
37
28
7
86 10
5 119
4241
24
21 20
12
13
14
27
35
29 30
Page 4

Page 5

English 6
한국의 45
Page 6

6
English
Contents
Introduction 7
Important 7
Warning 7
Caution 8
Machine overview 8
The user interface 9
First installation 9
Manual rinsing cycle 14
Coffee brewing circuit rinsing 14
Hot water circuit rinsing 14
AquaClean filter 14
Preparing and installing the AquaClean filter 15
Activating the AquaClean filter 15
Replacing the AquaClean filter 17
Measuring the water hardness 19
Beverage types and lengths 20
Brewing coffee 21
Brewing coffee with beans 21
Brewing coffee with pre-ground coffee 22
Brewing milk-based beverages 22
How to use the milk carafe 22
Brewing milk-based coffee beverages and milk froth 23
Special drinks 24
How to select special drinks 24
Dispensing hot water 24
Adjusting quantity and taste 25
Saeco Adapting System 25
Adjusting coffee and milk length 25
Adjusting coffee strength 26
Adjusting the grinder settings 26
Maintenance and care 27
Cleaning the brew group 28
Monthly lubrication of the brew group 30
Cleaning the milk carafe 31
Descaling procedure 34
What to do if the descaling procedure is interrupted 36
Warning icons and error codes 36
Meaning of error codes 38
Troubleshooting 39
Demo mode function 42
Ordering accessories Saeco 43
Technical specifications 43
Recycling 44
Guarantee and support 44
English
Page 7

Introduction
Important
Warning
English
Dear customer, we thank you for buying the Saeco PicoBaristo fullautomatic espresso machine! Now you can prepare all your favorite coffee
specialties from espresso to latte macchiato at the touch of a button, and of
course from fresh beans!
In this user manual you find all the information you need to install, use,
maintain and get the best out of your machine. To fully benefit from the
support that Saeco offers, please register your product at
www.philips.com/welcome.
-
Connect the machine to a wall socket with a voltage matching the
technical specifications of the machine.
-
Connect the machine to an earthed wall socket.
-
Do not let the power cord hang over the edge of a table or counter, or
touch hot surfaces.
-
Never immerse the machine, mains plug or power cord in water (danger
of electrical shock).
-
Do not pour liquids on the power cord connector.
-
Never direct the hot water jet towards body parts: danger of burns.
-
Do not touch hot surfaces. Use handles and knobs.
-
Switch off the machine with the main switch located on the back and
remove the mains plug from the socket:
-
If a malfunction occurs.
-
If the machine will not be used for a long time.
-
Before cleaning the machine.
-
Pull on the plug, not on the power cord.
-
Do not touch the mains plug with wet hands.
-
Do not use the machine if the mains plug, the power cord or the machine
itself is damaged.
-
Do not make any modifications to the machine or its power cord.
-
Only have repairs carried out by a service center authorized by Philips to
avoid a hazard.
-
The machine should not be used by children younger than 8 years old.
-
This machine can be used by children aged from 8 years and above and
by persons with reduced physical, sensory or mental capabilities or lack
of experience and knowledge if they have been given supervision or
instruction concerning use of the machine in a safe way and if they
understand the hazards involved.
-
Cleaning and user maintenance shall not be made by children unless
they are older than 8 and supervised.
-
Keep the machine and its cord out of the reach of children aged less than
8 years.
-
Children should be supervised to ensure that they do not play with the
machine.
7
Page 8

8
English
Caution
-
Never insert fingers or other objects in the coffee grinder.
-
This machine is intended for normal household use only. It is not
intended for use in environments such as staff kitchens of shops, offices,
farms or other work environments.
-
Always put the machine on a flat and stable surface. Keep it in upright
position, also during transport.
-
Do not place the machine on a hotplate or directly next to a hot oven,
heater or similar source of heat.
-
Only put roasted coffee beans in the bean hopper. If ground coffee,
instant coffee, raw coffee beans or any other substance is put in the
coffee bean hopper, it may cause damage to the machine.
-
Let the machine cool down before inserting or removing any parts. The
heating surfaces may retain residual heat after use.
-
Never fill the water tank with warm, hot or sparkling water, as this may
cause damage to the water tank and the machine.
-
Never use souring pads, abrasive cleaning agents or aggressive liquids
such as petrol or acetone to clean the machine. Simply use a soft cloth
dampened with water.
-
Descale your machine regularly. The machine indicates when descaling is
needed. Not doing this will make your appliance stop working properly.
In this case repair is not covered under your guarantee.
-
Do not keep the machine at temperatures below 0°C.Water left in the
heating system may freeze and cause damage.
-
Do not leave water in the water tank when the machine is not used over
a long period of time. The water can be contaminated. Use fresh water
every time you use the machine.
Machine overview
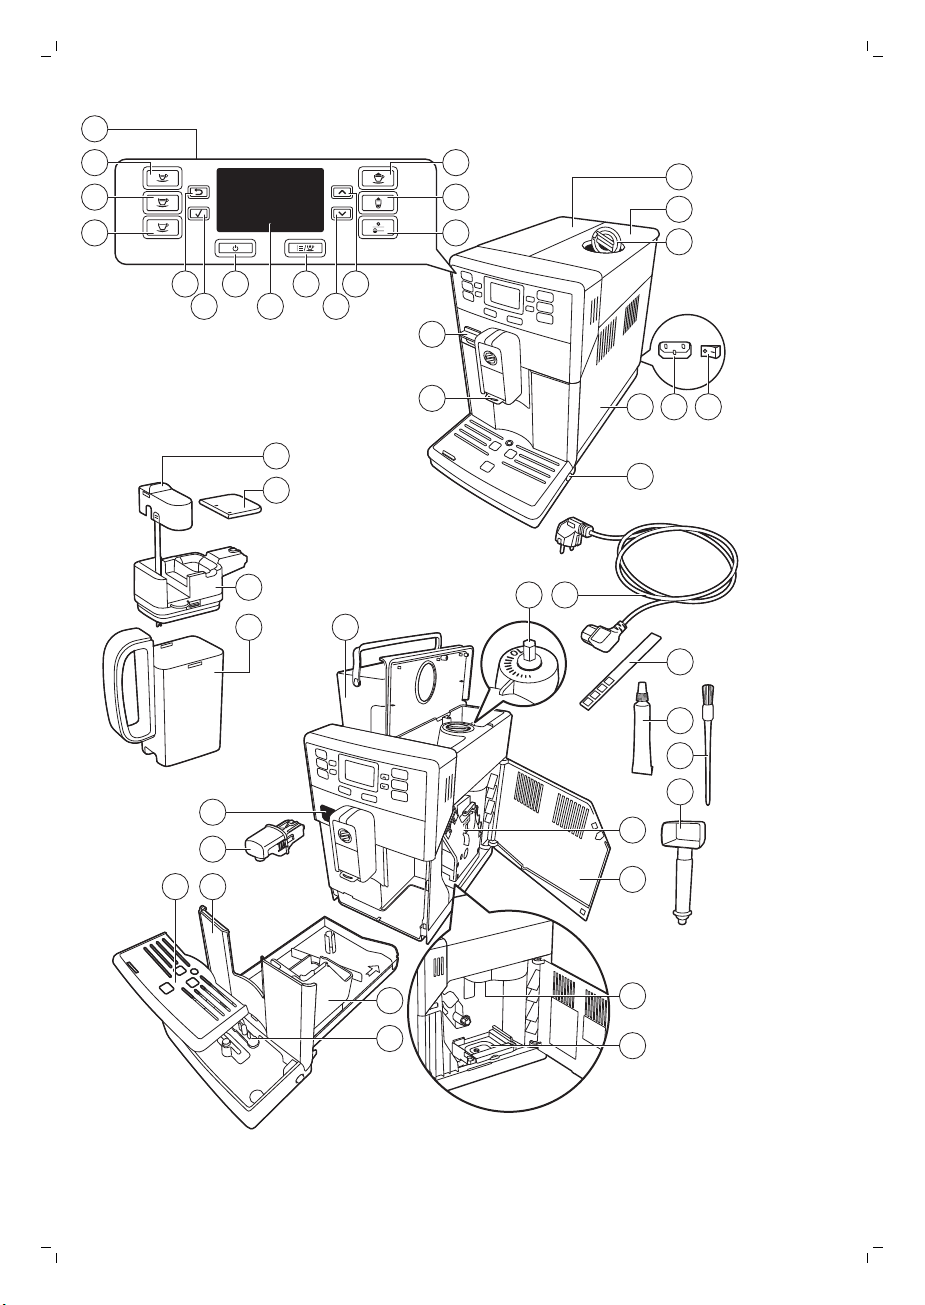
1 User interface
2 ESPRESSO button
3 ESPRESSO LUNGO button
4 CAFFÈ CREMA button
5 ESC button
6 OK button
7 Standby button
8 Display
9 MENU/SPECIAL DRINKS button
10 DOWN button
11 UP button
12 CAPPUCCINO button
13 LATTE MACCHIATO button
14 AROMA STRENGTH button
15 Protection cover
16 Adjustable removable coffee dispensing spout
17 Lid of the water tank
18 Lid of the bean hopper
19 Lid of the pre-ground coffee compartment
20 Main switch
Page 9
21 Socket for cord
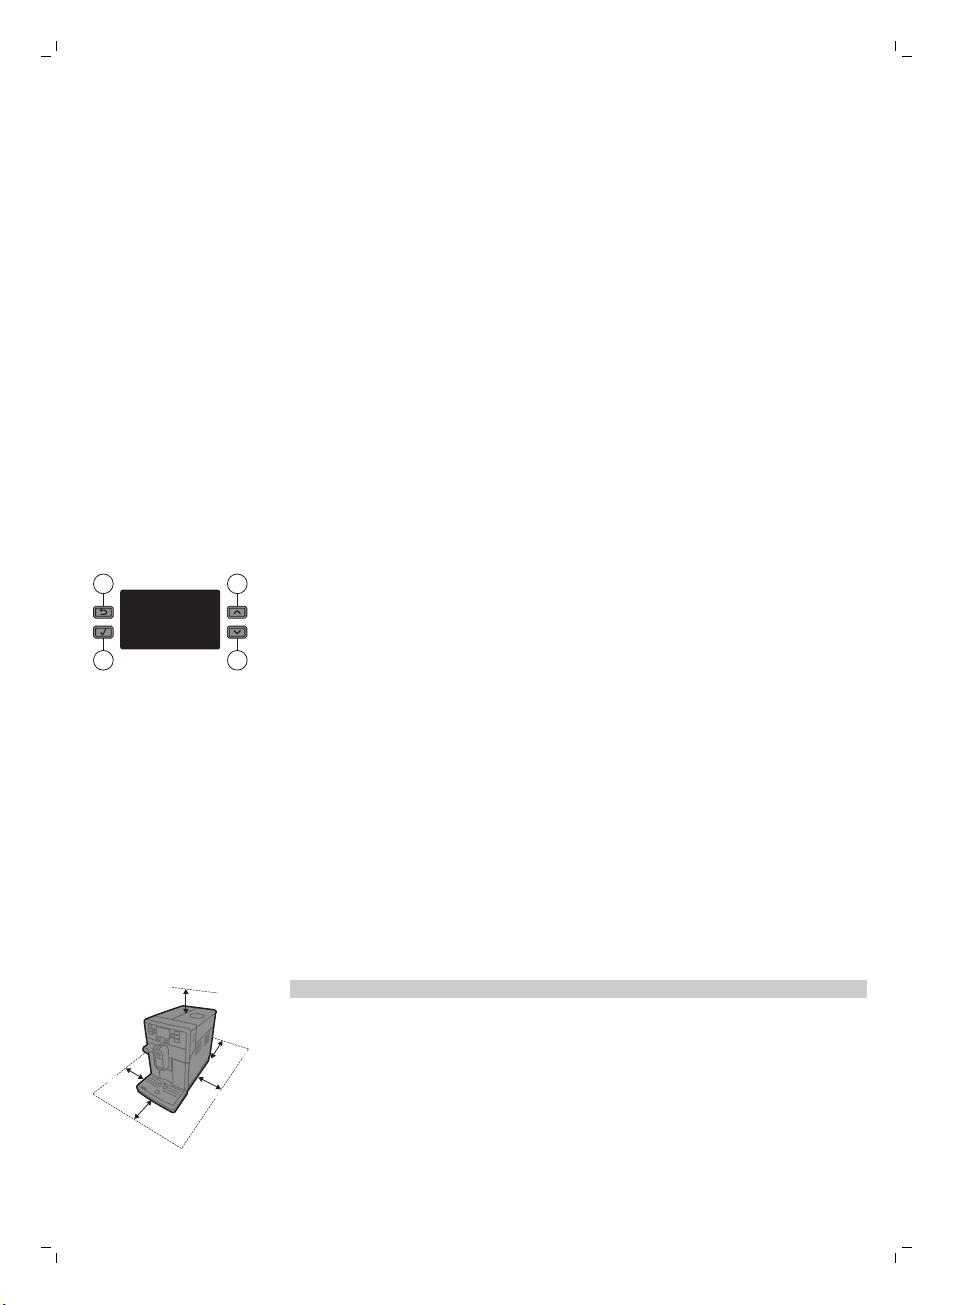
1
2
3
4
22 Service door
23 Drip tray release button
24 Milk froth dispensing spout
25 Lid of the milk carafe
26 Top of the milk carafe
27 Milk carafe
28 Water tank
29 Grinder adjustment knob
30 Cord
31 Water hardness tester
32 Grease
33 Cleaning brush
34 Multifunctional tool
(measuring scoop, grinder adjustment key and coffee duct cleaning tool)
35 Brew group
36 Service door
37 Coffee exit duct
38 Coffee residues drawer
39 Drip tray full indicator
40 Coffee grounds container
41 Drip tray cover
42 Drip tray
43 Hot water dispensing spout
44 Opening for hot water dispensing spout
The user interface
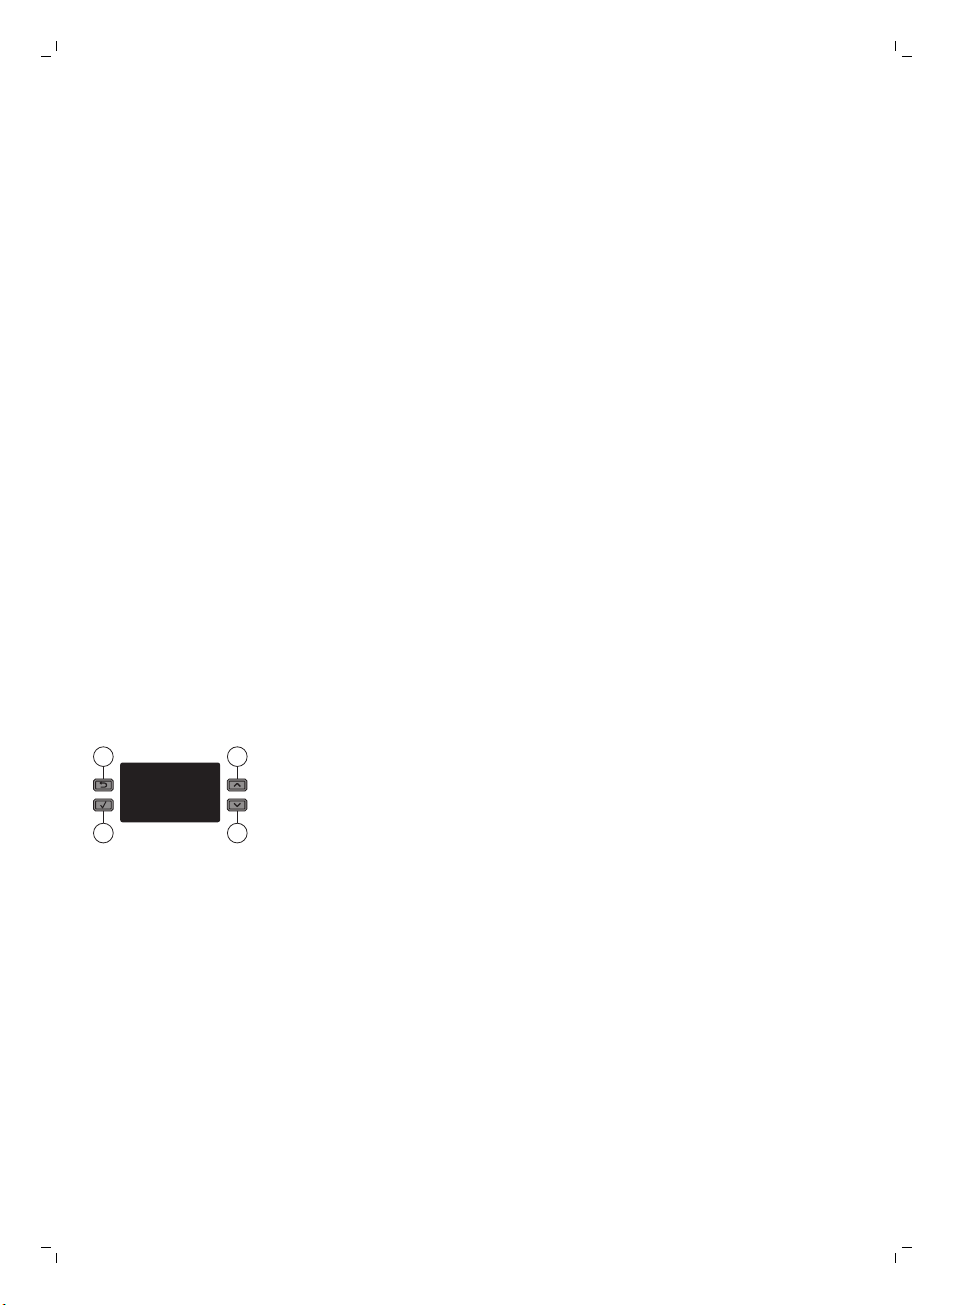
Use these buttons to navigate through the menus:
1 ESC button: press this button to return to the main menu.
2 OK button: press this button to select, confirm or stop a function.
3 UP button: press this button to scroll up through the display menu.
4 DOWN button: press this button to scroll down through the display menu.
The buttons are backlighted to guide you. To confirm a beverage selection
or to stop the function, you have to press on the OK button. The ESC button
is backlighted to go back and to pause a function when the pause symbol is
shown on the display.
English
9
First installation
This machine has been tested with coffee. Although it has been carefully
cleaned, there may be some coffee residues left. We guarantee, however,
that the machine is absolutely new.
Like with most full-automatic machines, you first need to brew some coffees
to enable the machine to complete its self-adjustment and get the best
tasting coffee.
1 Remove all packaging material from the machine.
2 Place the machine on a table or worktop away from the tap, the sink and
heat sources.
Page 10
15 cm
15 cm
15 cm
15 cm
15 cm
15 cm
15 cm
15 cm
M
AX
CALC
CLEAN
MAX
2
1
10
English
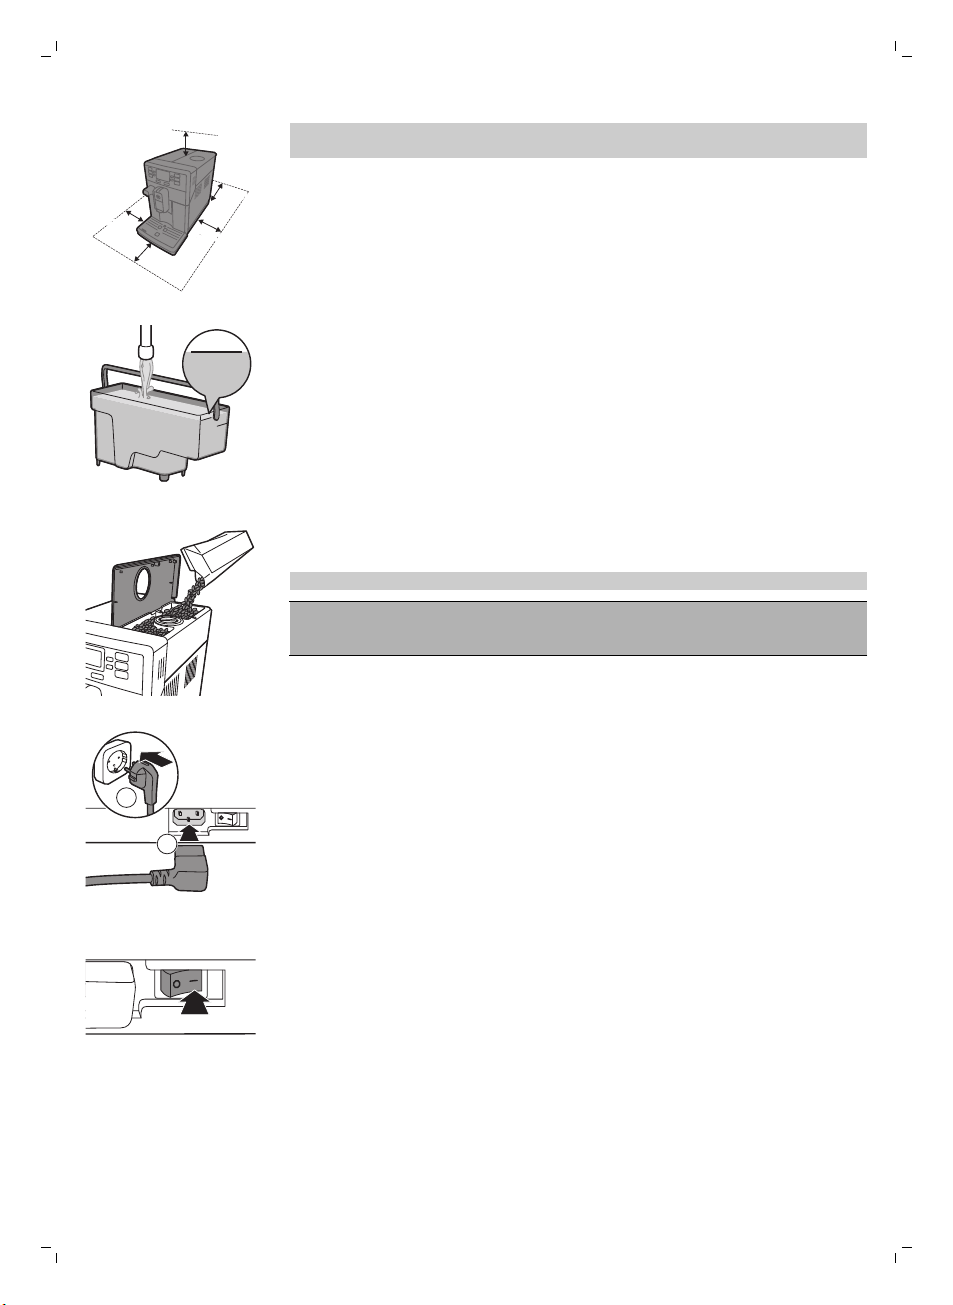
Note: Leave at least 15 cm of free space above, behind and on both sides
of the machine.
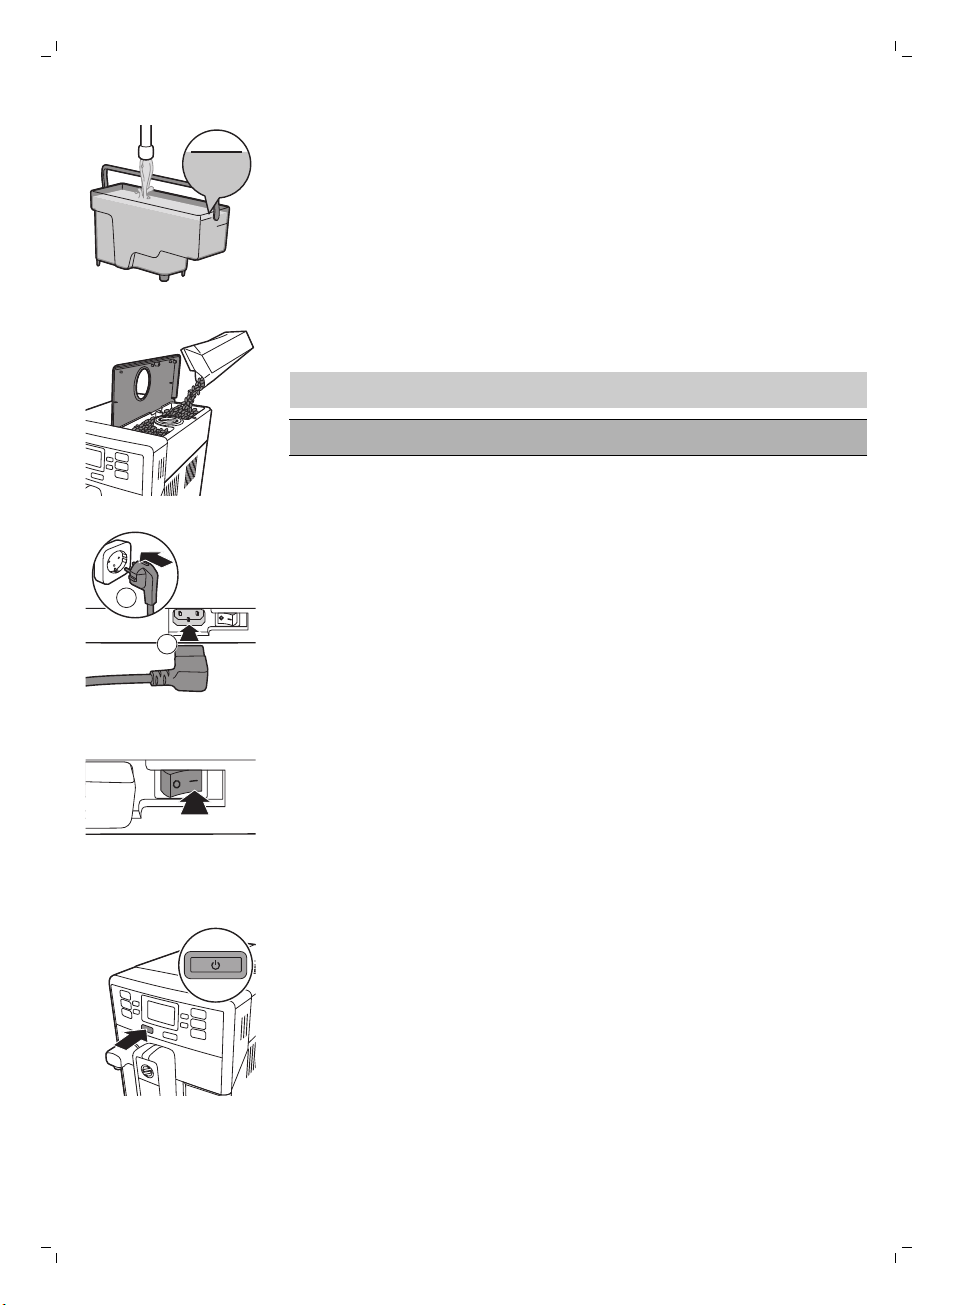
3 Fill the water tank with fresh water up to the MAX level indication and
place it back into the machine. Press the OK button to confirm.
4 Open the lid of the bean hopper. Fill the bean hopper with coffee beans
and close the lid.
Note: Do not overfill the bean hopper to avoid damage to the grinder.
Caution: Only use espresso beans. Never use ground coffee, unroasted
coffee beans or caramelized coffee beans, as this may cause damage
to the machine.
5 Insert mains plug into a wall socket (1) and insert the small plug into the
socket located on the back of the machine (2).
6 Set the main switch to the ON position to switch on the machine.
-
The standby button flashes.
Page 11
SELECT LANGUAGE
English
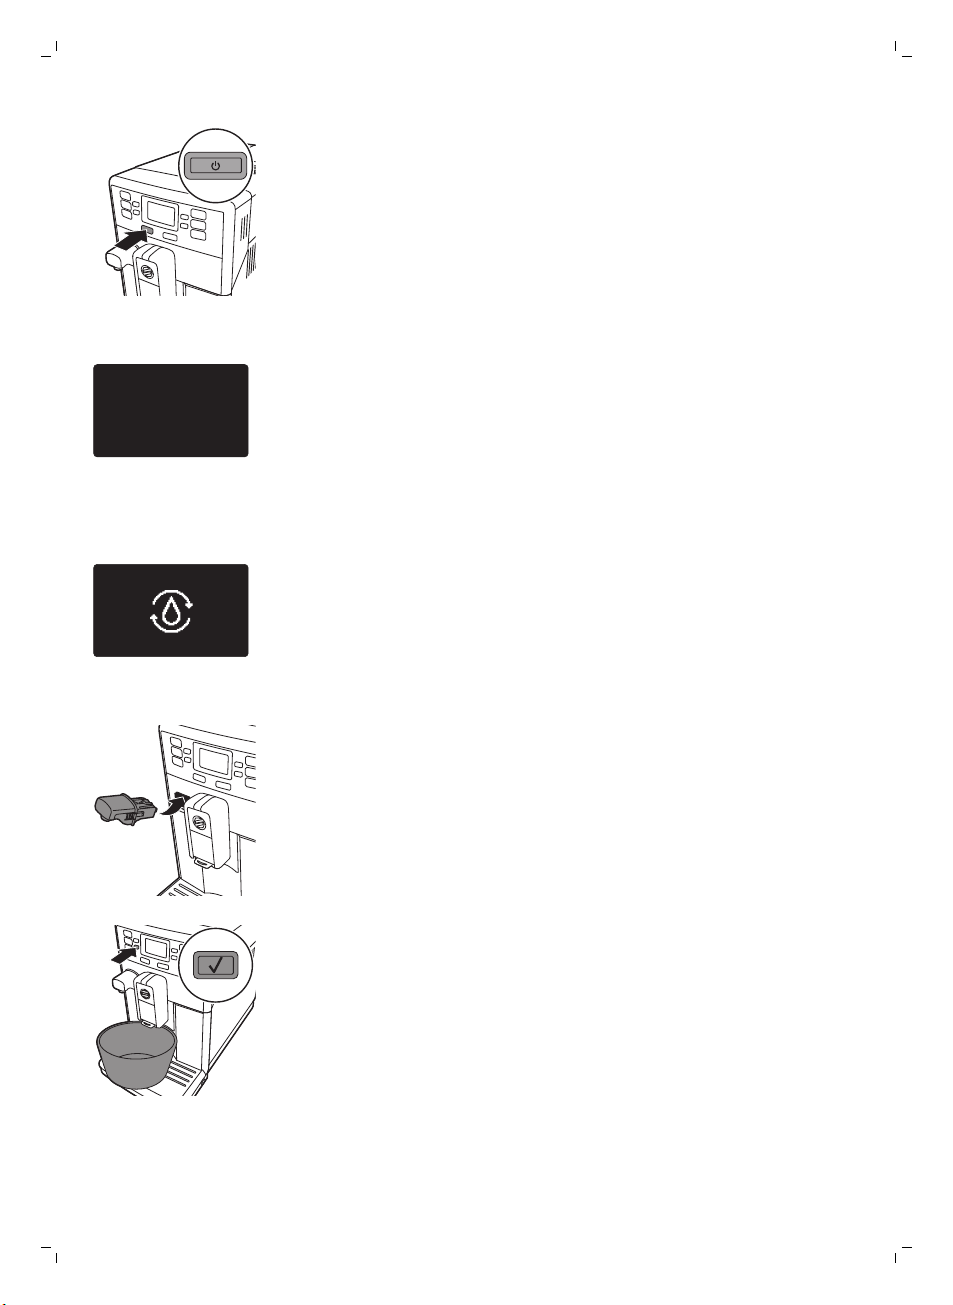
7 Press the standby button to switch on the machine.
8 The display asks you to select your language. Press the OK button.
9 Scroll down the list of languages and confirm the chosen language by
pressing the OK button.
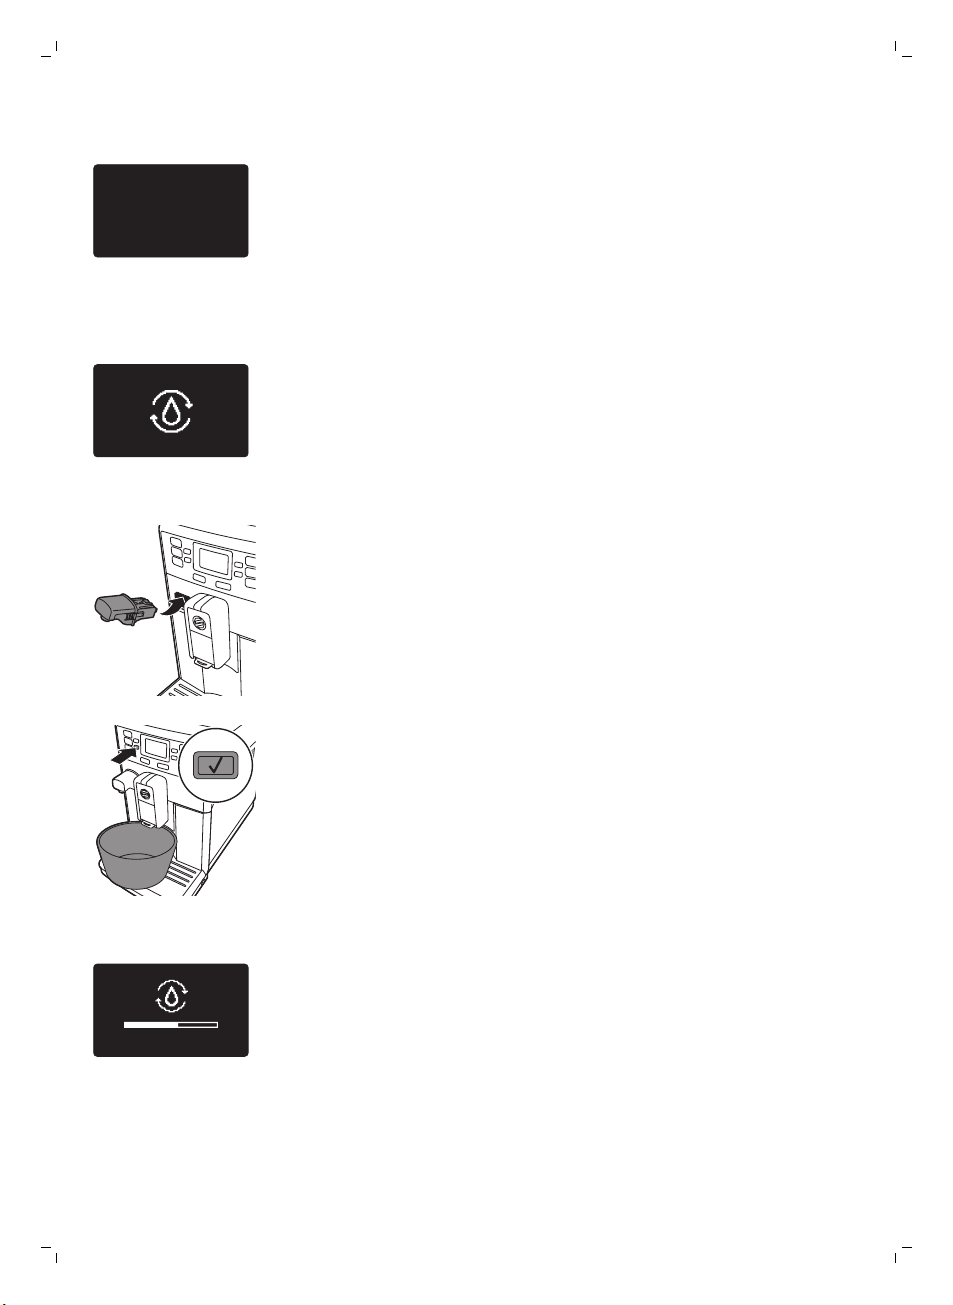
10 The display shows the circuit priming icon to indicate that you have to
prime the circuit.
11
11 Insert the hot water dispensing spout.
12 Place a container under the hot water dispensing spout. Press the OK
button to start the water circuit priming cycle. The machine starts
dispensing hot water.
Page 12
PRIMING
HEATING UP
RINSING
ACTIVATE
AQUACLEAN FILTER?
2 MIN
INSERT FILTER
FILL WATER TANK
12
English
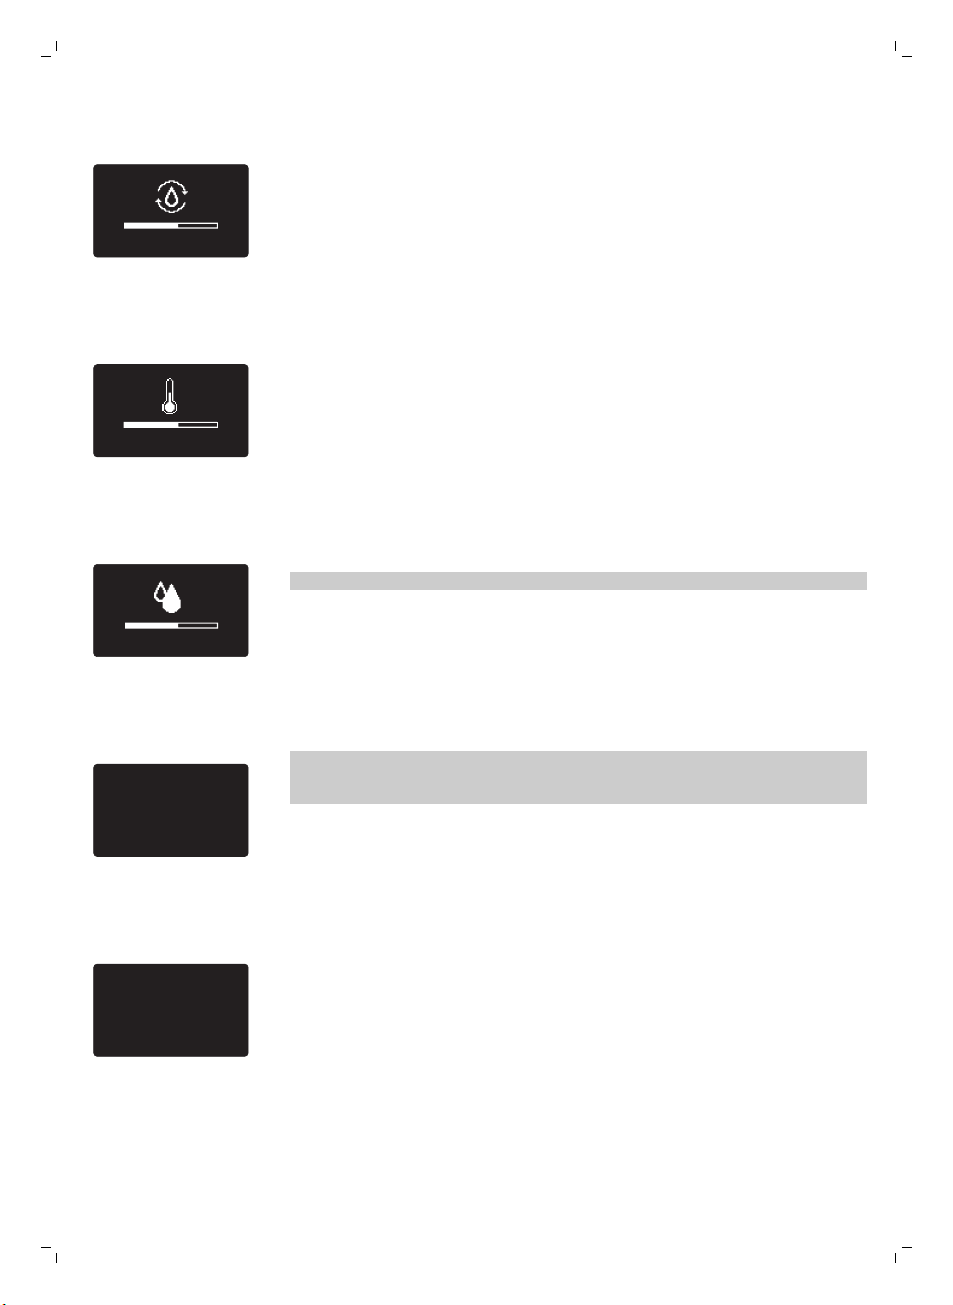
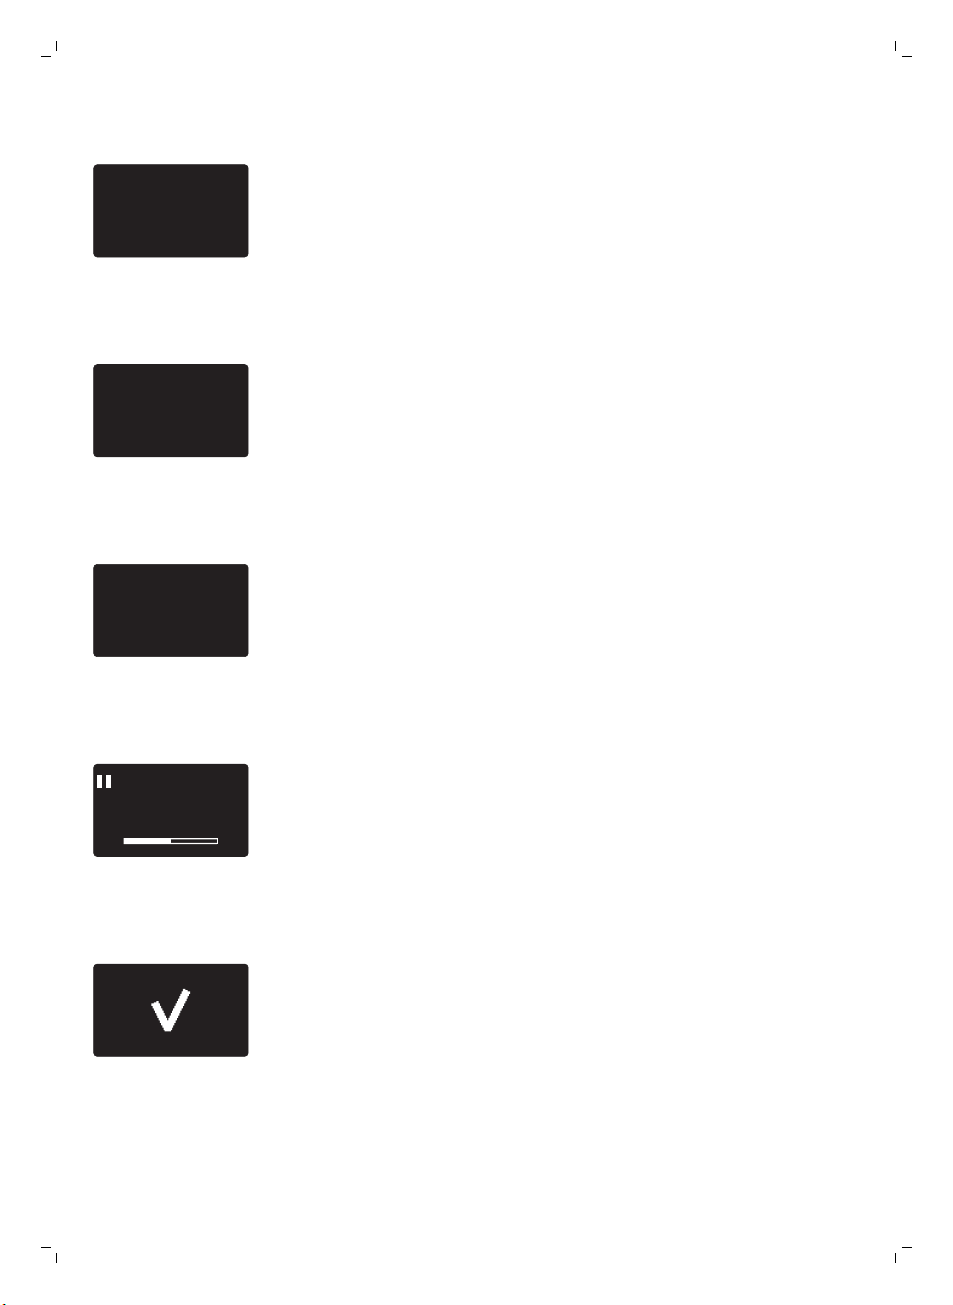
13 The display shows the priming icon. The progress bar shows the progress
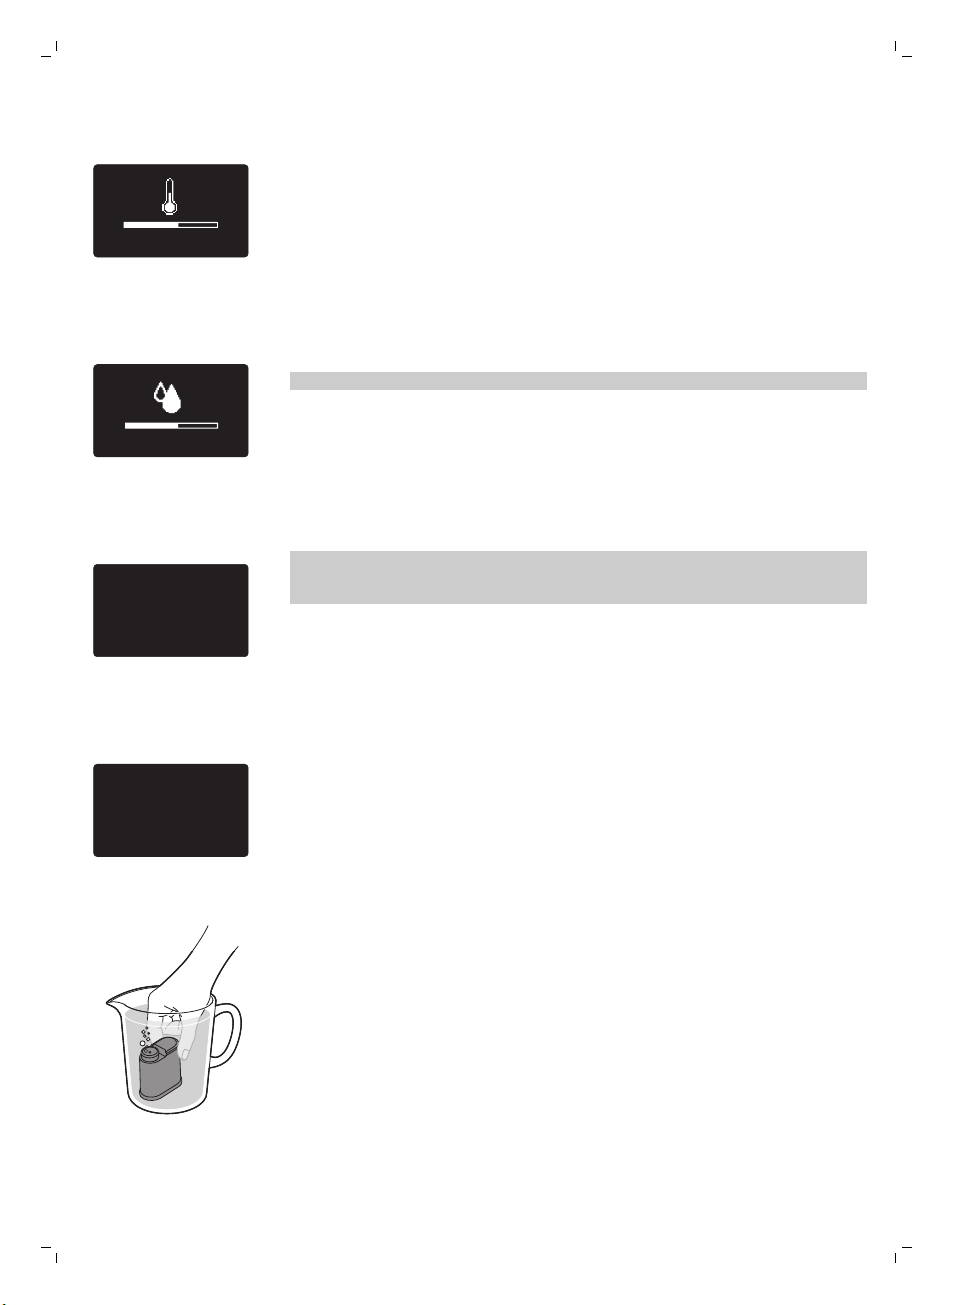
of the priming cycle.
14 The machine heats up and the display shows the temperature icon.
15 Empty the container and place it under the coffee dispensing spout.
16 The machine starts rinsing water through the coffee dispensing spout.
The display shows the rinsing icon and a progress bar.
Note: Do not interrupt the rinsing cycle.
17 The display asks: Activate AquaClean filter?
Note: If you want to install the AquaClean filter later, press the ESC
button and continue with the manual rinsing cycle. For installation at a
later time, see chapter ‘AquaClean filter’.
18 If you want to install the AquaClean filter, press the OK button. Activation
will take 2 minutes. The display reminds you: Insert filter, fill water tank.
19 Remove the AquaClean filter from its packaging. Shake the filter for about
5 seconds.
Page 13
PLACE A
CONTAINER
UNDER THE
WATER SPOUT
ACTIVATING
FILTER
English
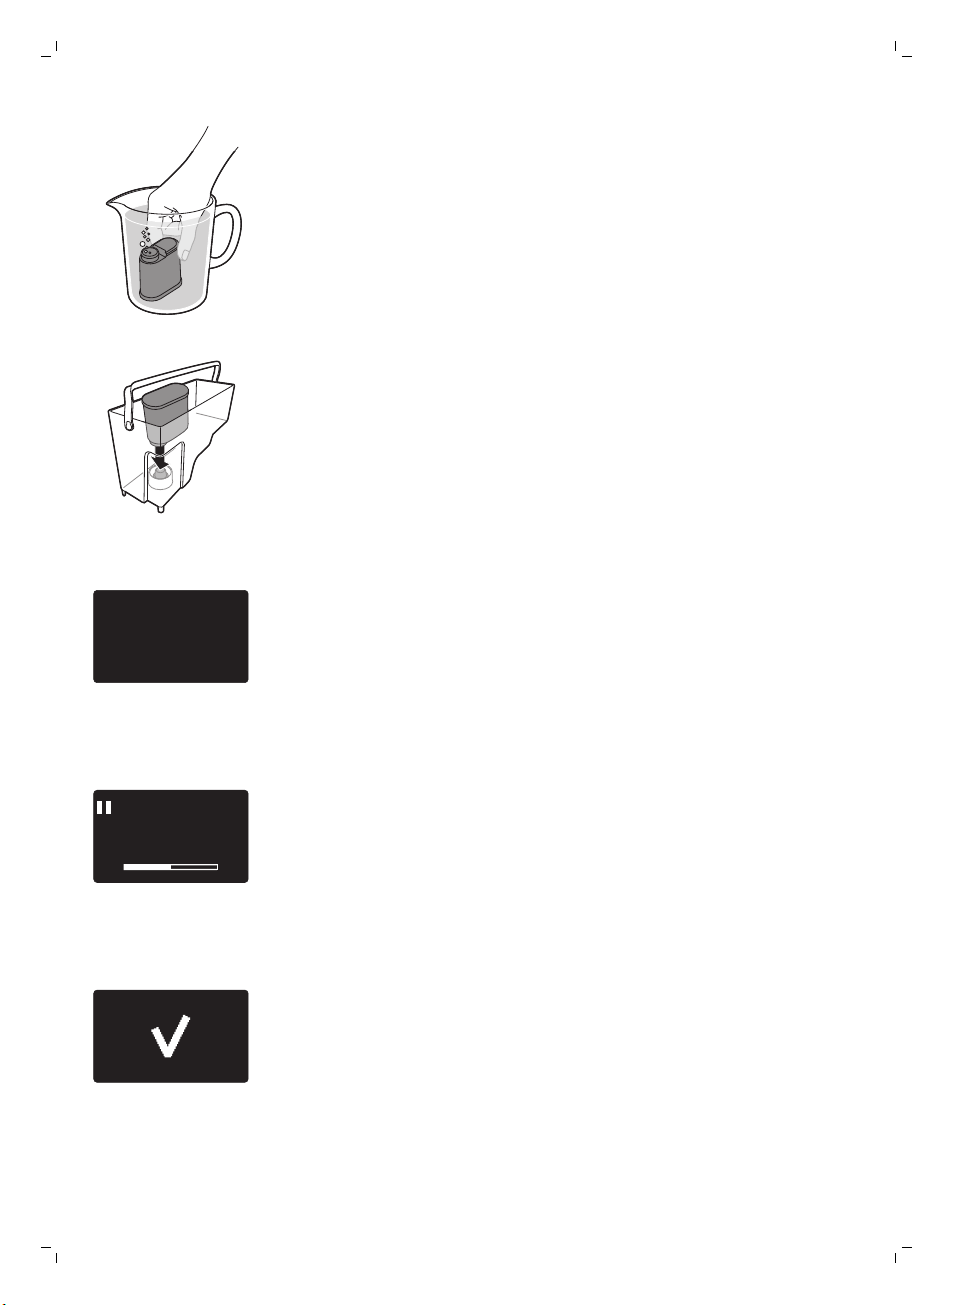
20 Immerse the AquaClean filter upside down in a jug with cold water and
wait until no more air bubbles come out.
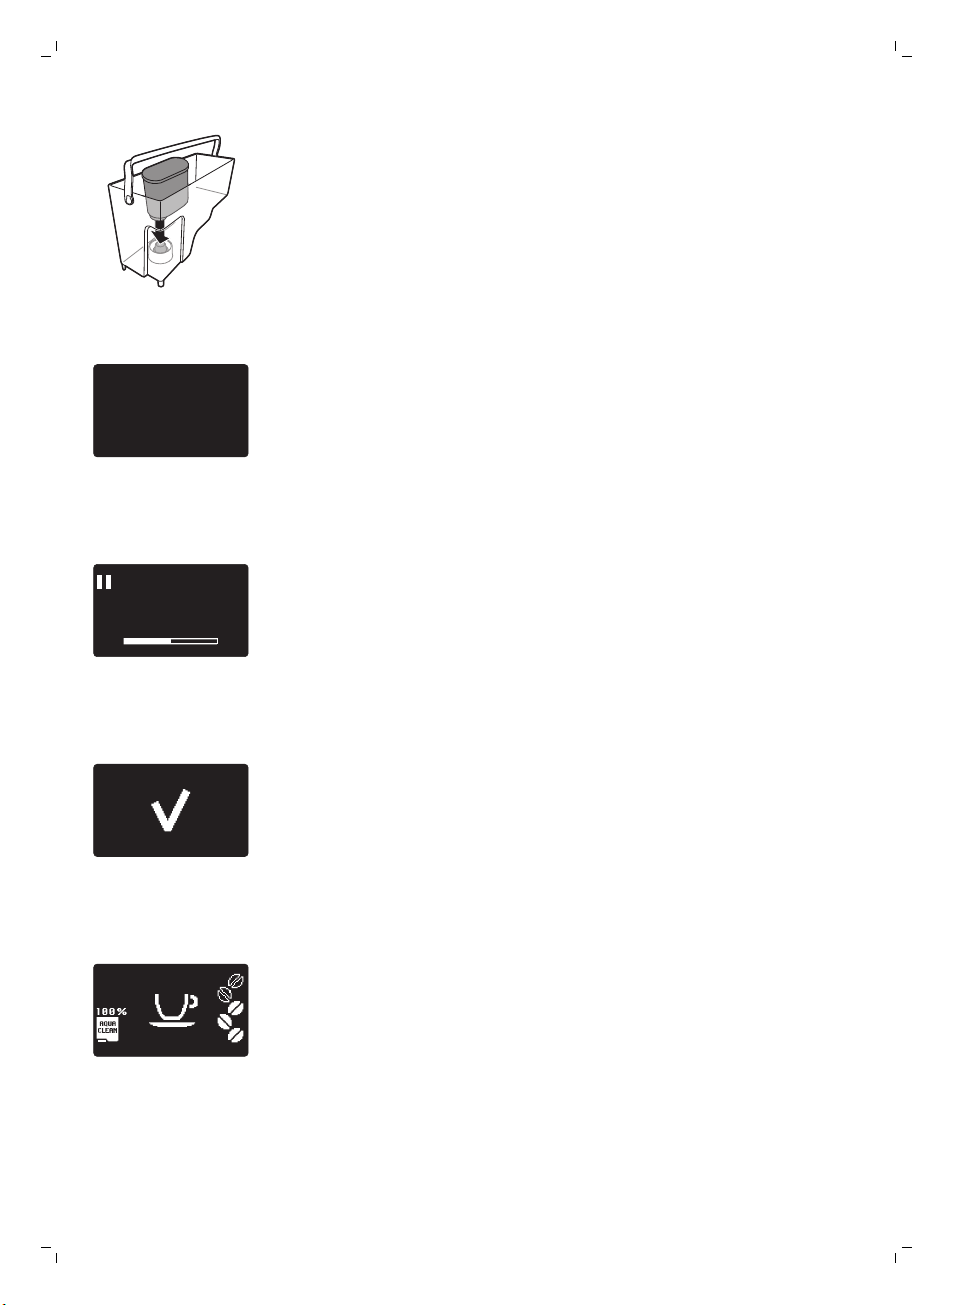
21 Remove the water tank from the machine and empty it.
22 Insert the AquaClean filter vertically onto the filter connection. Push the
AquaClean filter to the lowest possible point. Make sure that the filter fits
tightly and the seal is in the right position, to guarantee the best
performance.
23 Fill the water tank with fresh water up to the MAX level indication and
place it back into the machine. Press the OK button to confirm.
24 The display reminds you to place a container under the hot water
dispensing spout. Press the OK button to confirm. The machine starts
dispensing water.
13
25 The filter activation screen appears with a progress bar showing the
progress of the filter activation.
26 When activation is finished, the display shows a tick to confirm activation.
Page 14
GROUND COFFEE
HOT WATER
14
English
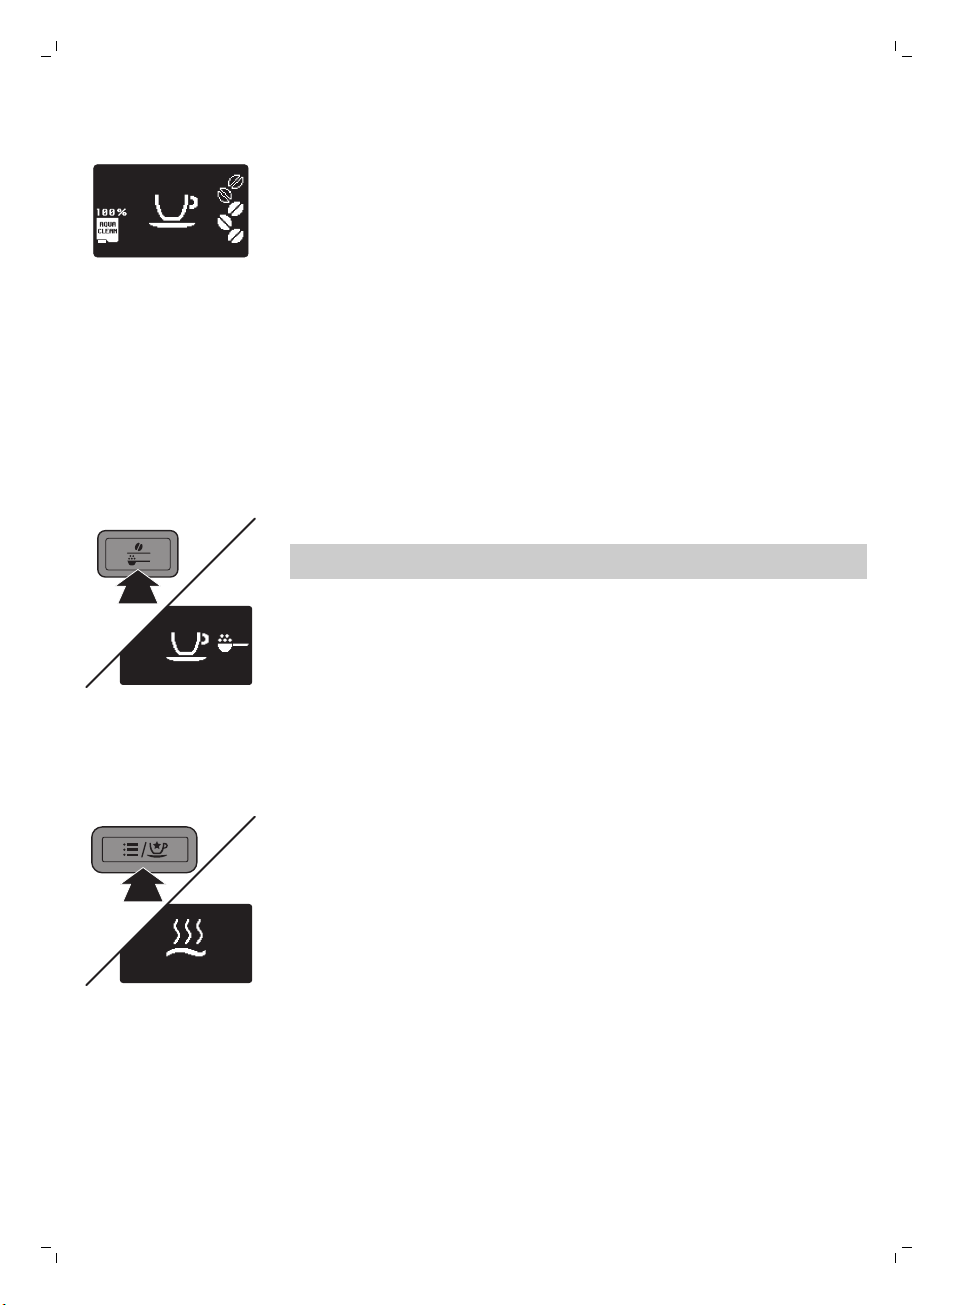
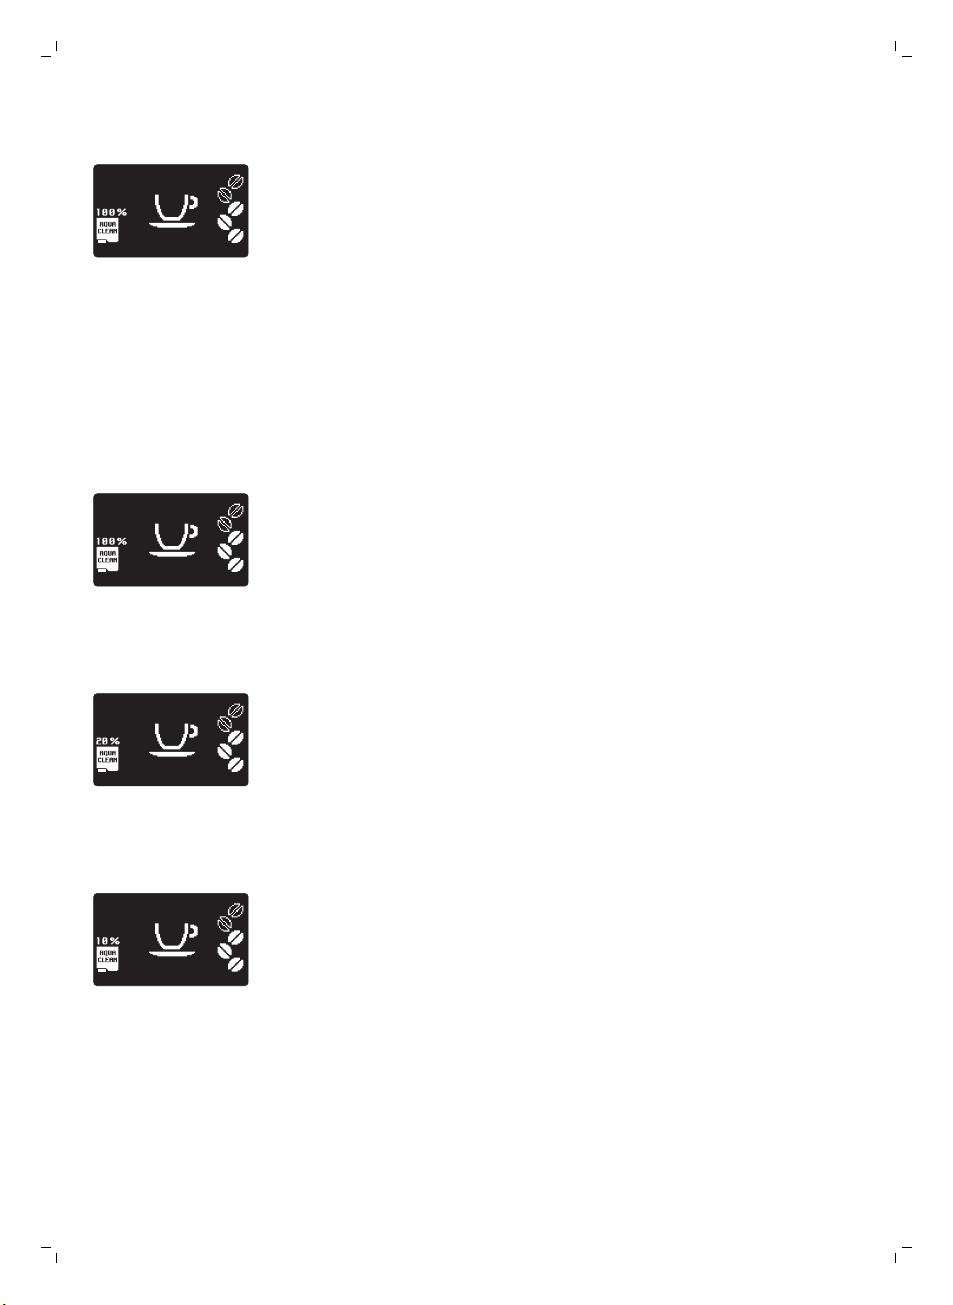
27 Then the machine ready screen appears with the AquaClean 100% icon
to indicate that the filter has been activated.
Manual rinsing cycle
During the manual rinsing cycle, fresh water flows through the water and
coffee brewing circuit. This takes a few minutes.
Coffee brewing circuit rinsing
1 Place a container under the coffee dispensing spout.
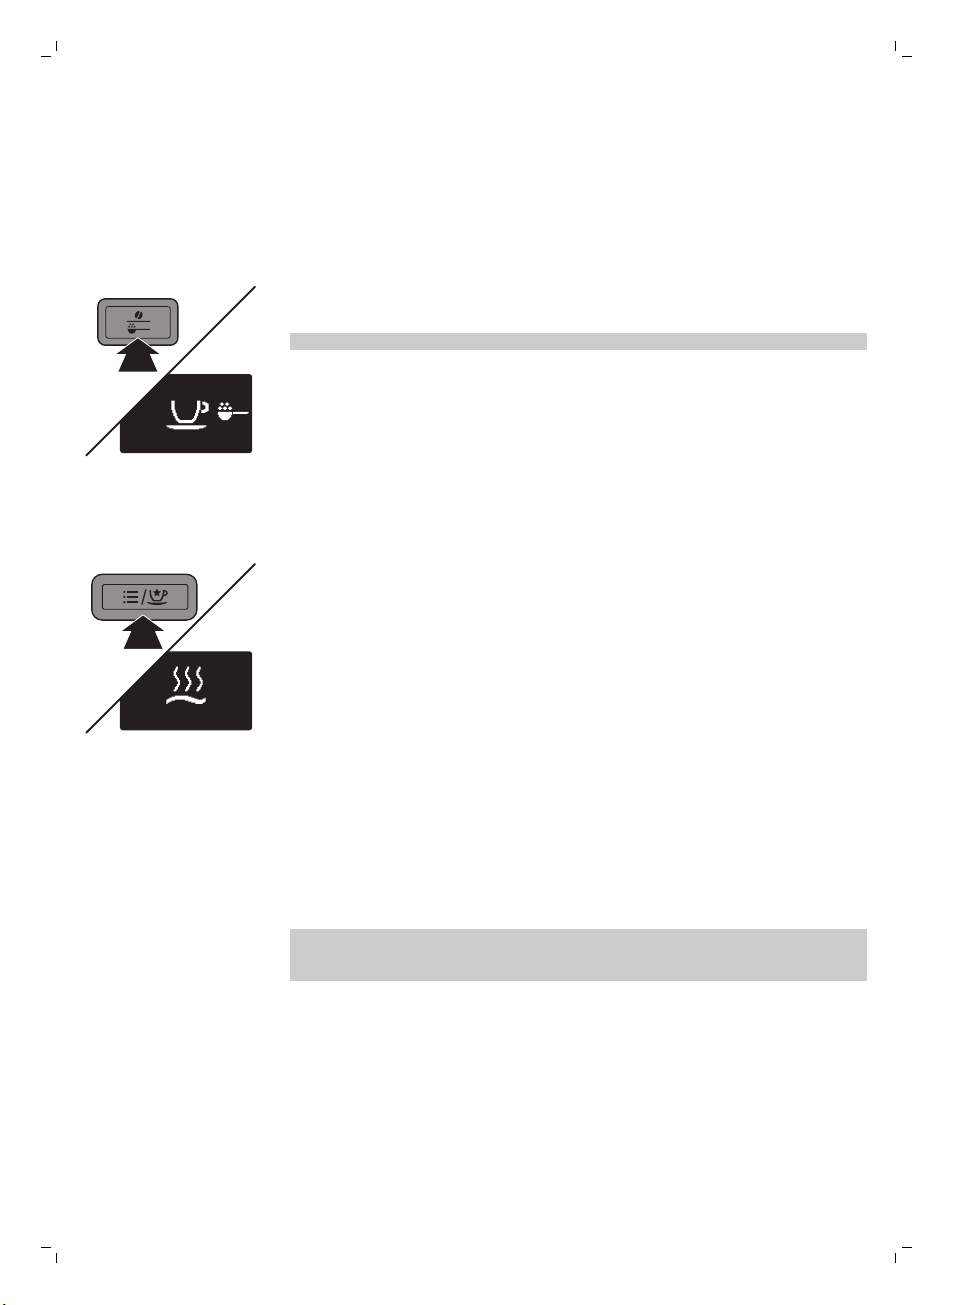
2 Press the AROMA STRENGTH button and select GROUND COFFEE.
Note: Do not add pre-ground coffee in the pre-ground coffee
compartment.
3 Press the CAFFÈ CREMA button. The machine starts dispensing water
from the coffee dispensing spout.
4 Wait until the machine stops dispensing water and empty the container.
5 Repeat steps 1 to 4 twice.
Hot water circuit rinsing
1 Insert the hot water dispensing spout and place a container under the
2 Press the MENU/SPECIAL DRINKS button. Select the SPECIAL DRINKS
3 When the machine stops dispensing, repeat steps 1 to 3 twice.
4 When the machine has returned to the main menu, empty the container.
AquaClean filter
The AquaClean filter is designed to reduce limescale deposits in your coffee
machine and provide filtered water to preserve the aroma and flavor of each
cup of coffee. If you use a series of 8 Aquaclean filters as indicated in this
user manual, you don't have to descale your machine for 5000 cups (with a
capacity of 100 ml).
hot water dispensing spout.
function and scroll the menu to select the HOT WATER function. Press
the OK button to confirm.
The machine starts dispensing hot water.
The machine is ready for use.
Page 15
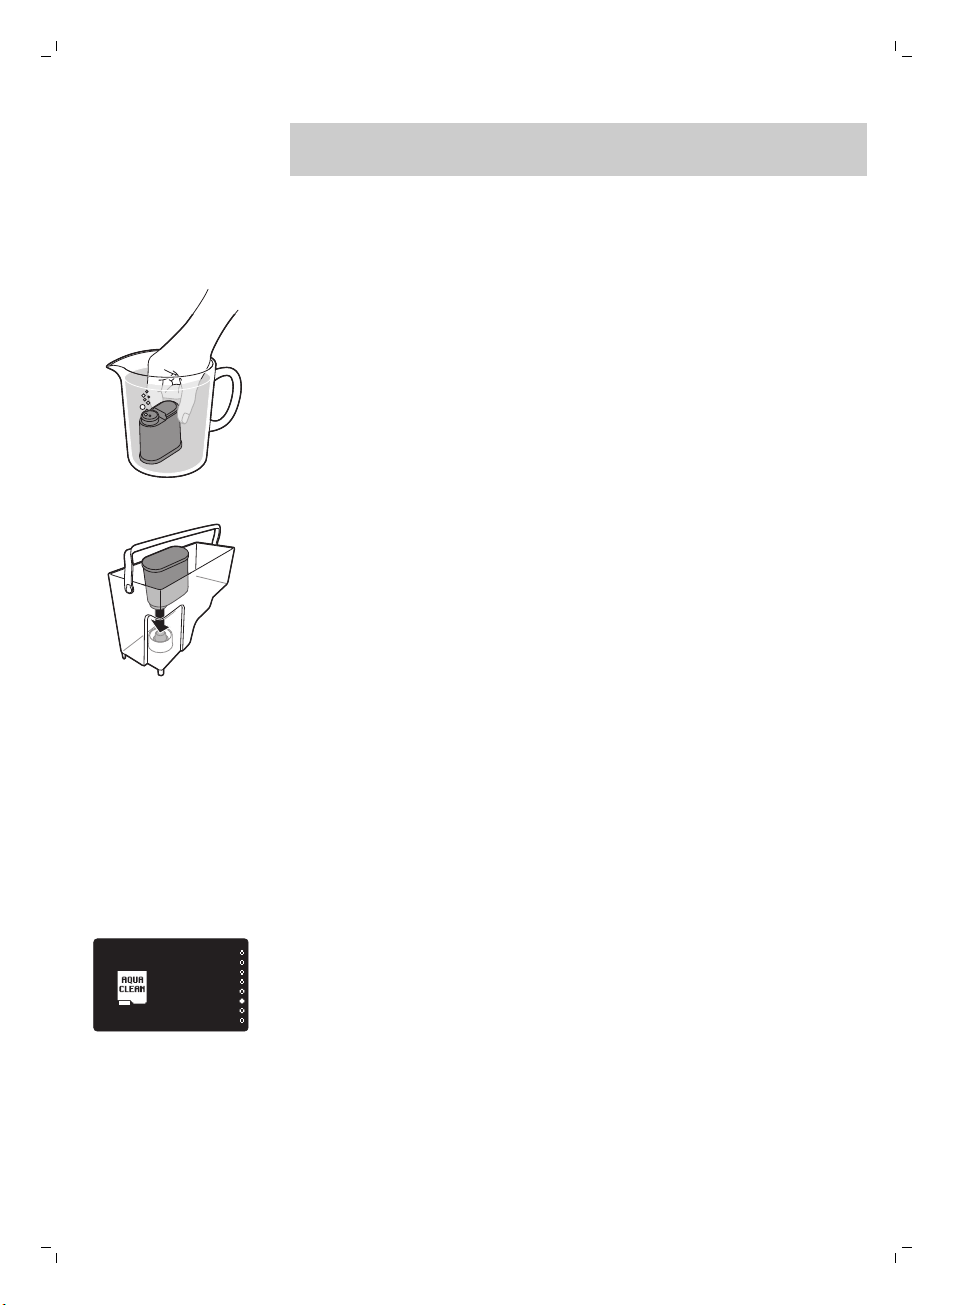
Note: Replace the AquaClean filter when the filter icon starts flashing on the
AQUACLEAN
FILTER
0 / 8
display. Replace the AquaClean filter at least every 3 months, even if the
machine has not yet indicated that replacement is required.
Preparing and installing the AquaClean filter
1 Remove the AquaClean filter from its packaging. Shake the filter for about
5 seconds.
2 Immerse the AquaClean filter upside down in a jug with cold water and
wait until no more air bubbles come out.
3 Insert the AquaClean filter vertically onto the filter connection. Push the
AquaClean filter to the lowest possible point. Make sure that the filter fits
tightly and the seal is in the right position, to guarantee the best
performance.
English
15
Activating the AquaClean filter
You can install the AquaClean filter at first installation as part of the
installation procedure. If you skipped installation of the AquaClean filter at
first use, you can install it by entering the menu as described below.
1 Press the MENU/SPECIAL DRINKS button, select MENU and press the OK
button to confirm. Scroll to select 'AquaClean' filter. Press the OK button
to confirm.
-
The display shows the number of AquaClean filters that have been
installed previously from 0 to 8 filters.
Page 16
ACTIVATE
AQUACLEAN FILTER?
2 MIN
INSERT FILTER
FILL WATER TANK
INSERT
WATER SPOUT
PLACE A
CONTAINER
UNDER THE
WATER SPOUT
ACTIVATING
FILTER
16
English
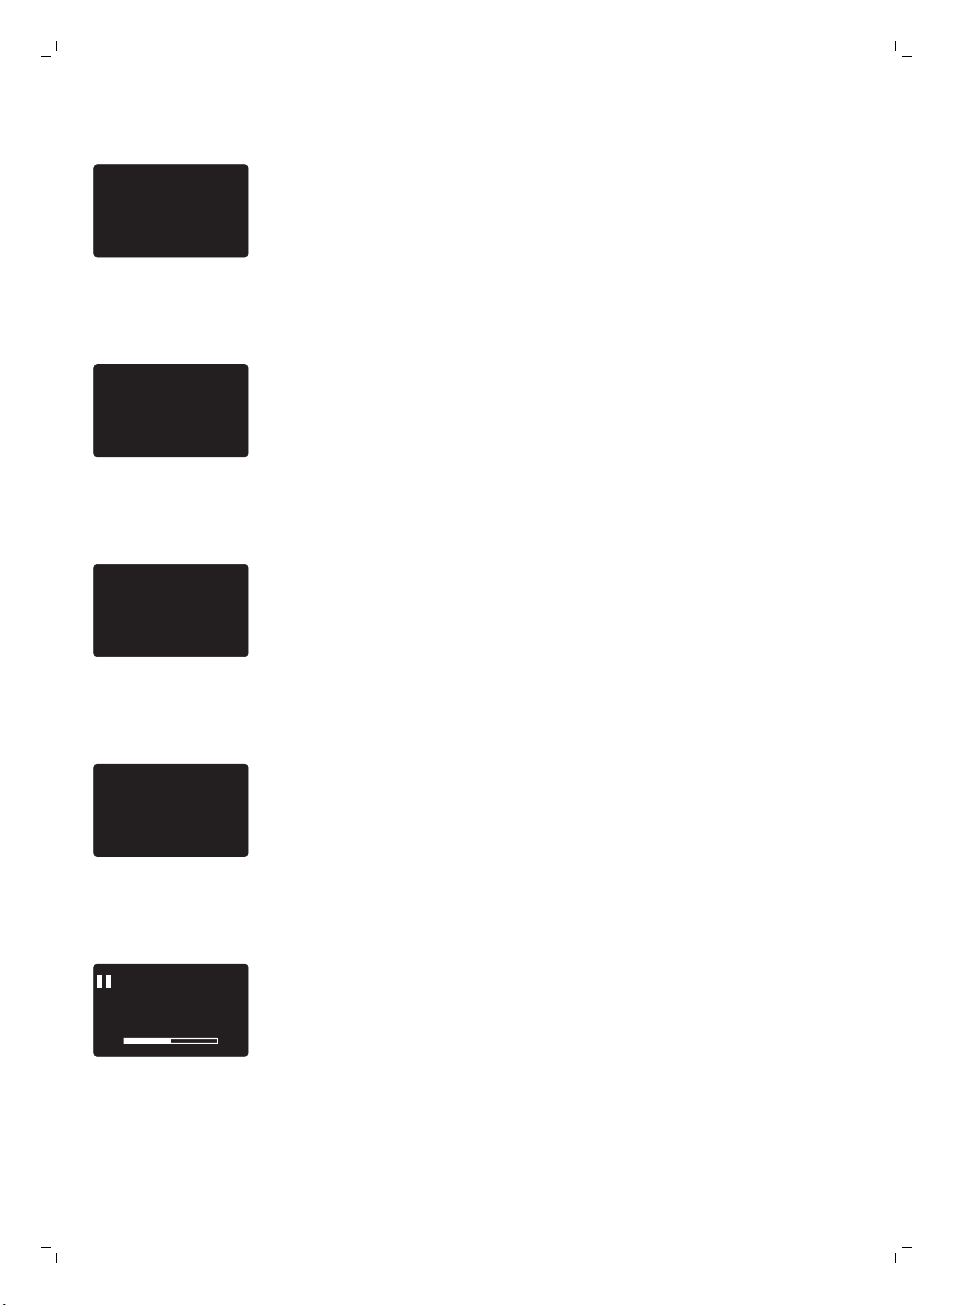
2 The display asks if you want to activate the filter. Press the OK button to
activate the filter.
3 The display asks you to insert the filter and fill the water tank. Prepare the
AquaClean filter and install it in the water tank (see 'Preparing and
installing the AquaClean filter'). Fill the water tank up to the MAX level
indication.
4 The display reminds you to insert the hot water spout into the machine.
Press the OK button to confirm.
5 The display reminds you to place a container under the hot water spout.
Press the OK button to confirm. The machine starts dispensing water.
-
The filter activation screen appears with a progress bar showing the
progress of the filter activation.
Page 17
-
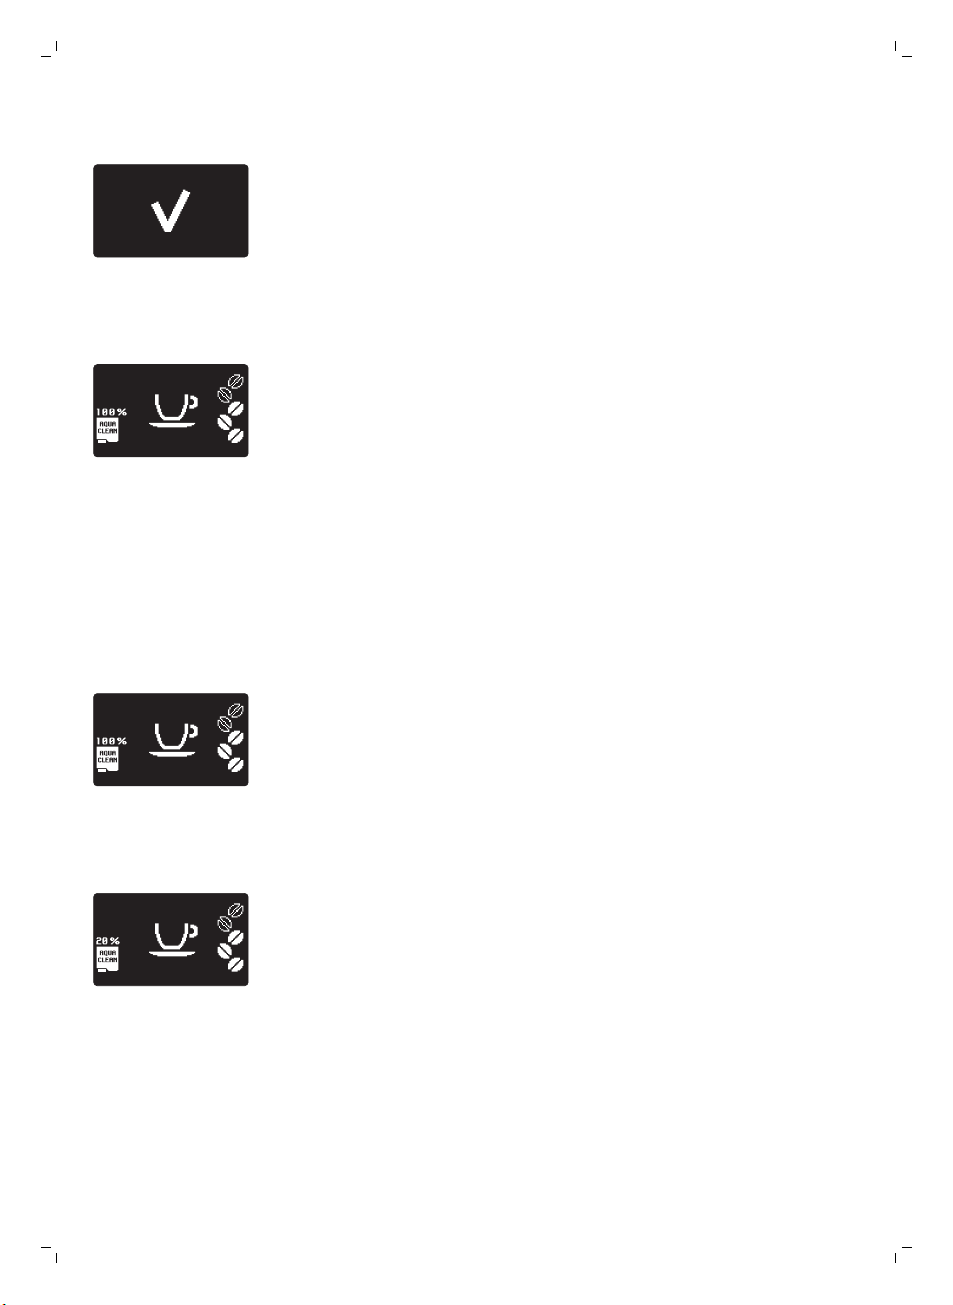
When activation is finished, the display shows a tick to confirm
activation.
-
Then the machine ready screen appears with the AquaClean 100%
icon to indicate that the filter has been activated.
Replacing the AquaClean filter
Replace the AquaClean filter when the filter icon starts flashing on the
display.
Filter capacity indications
-
When you install a new filter, the status indication above the filter icon is
100%.
English
17
-
This percentage gradually drops from 100% to 20% as you use the
machine.
Page 18
AQUACLEAN
FILTER
2 / 8
18
English
-
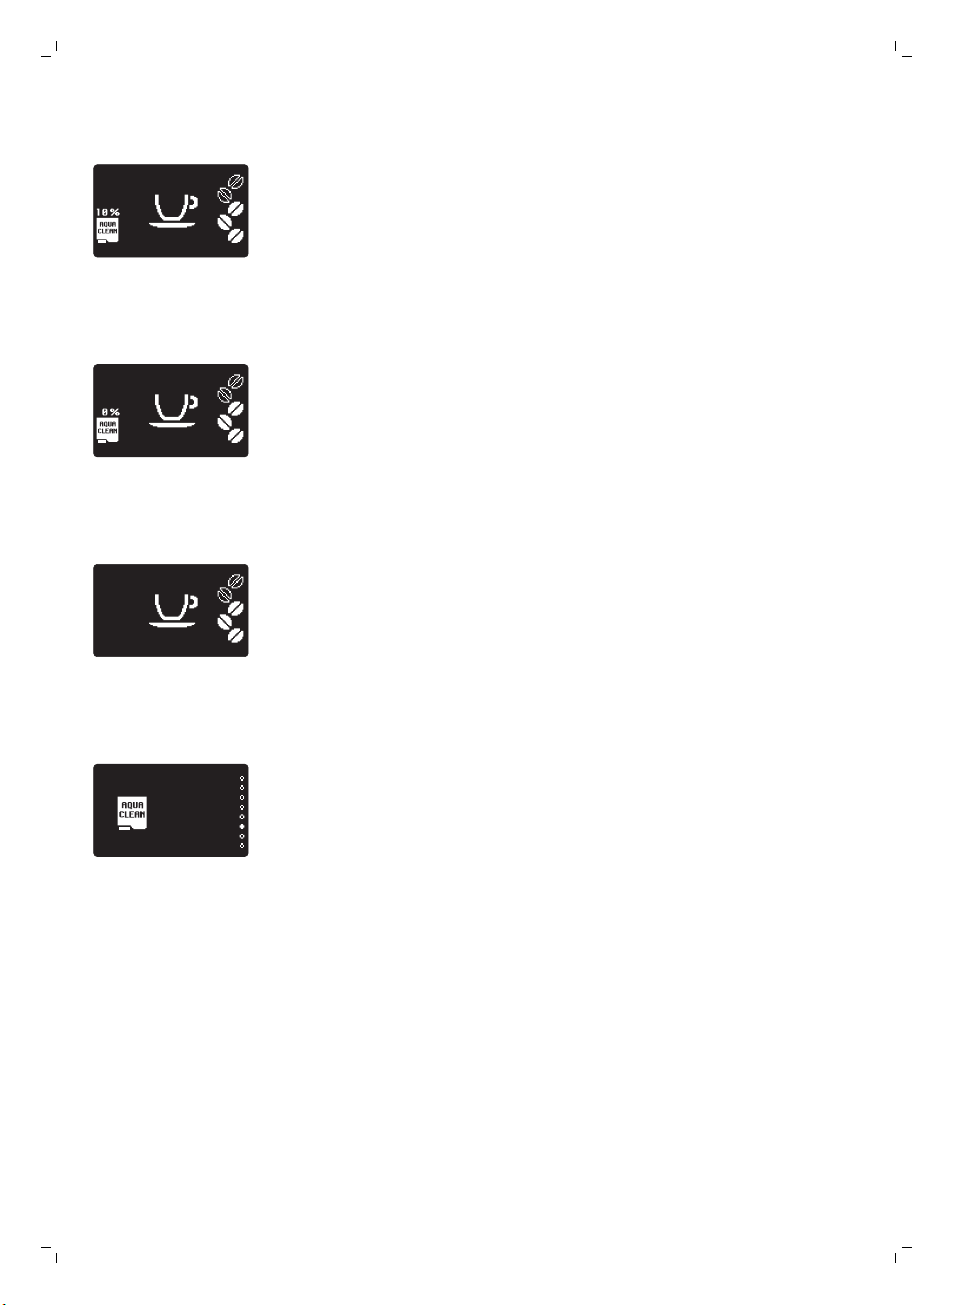
The filter icon starts flashing 2 seconds on and 2 seconds off when the
filter capacity has dropped to 10%. This is the indication that the filter
performance has decreased so much that you should remove the filter
and install a new one.
-
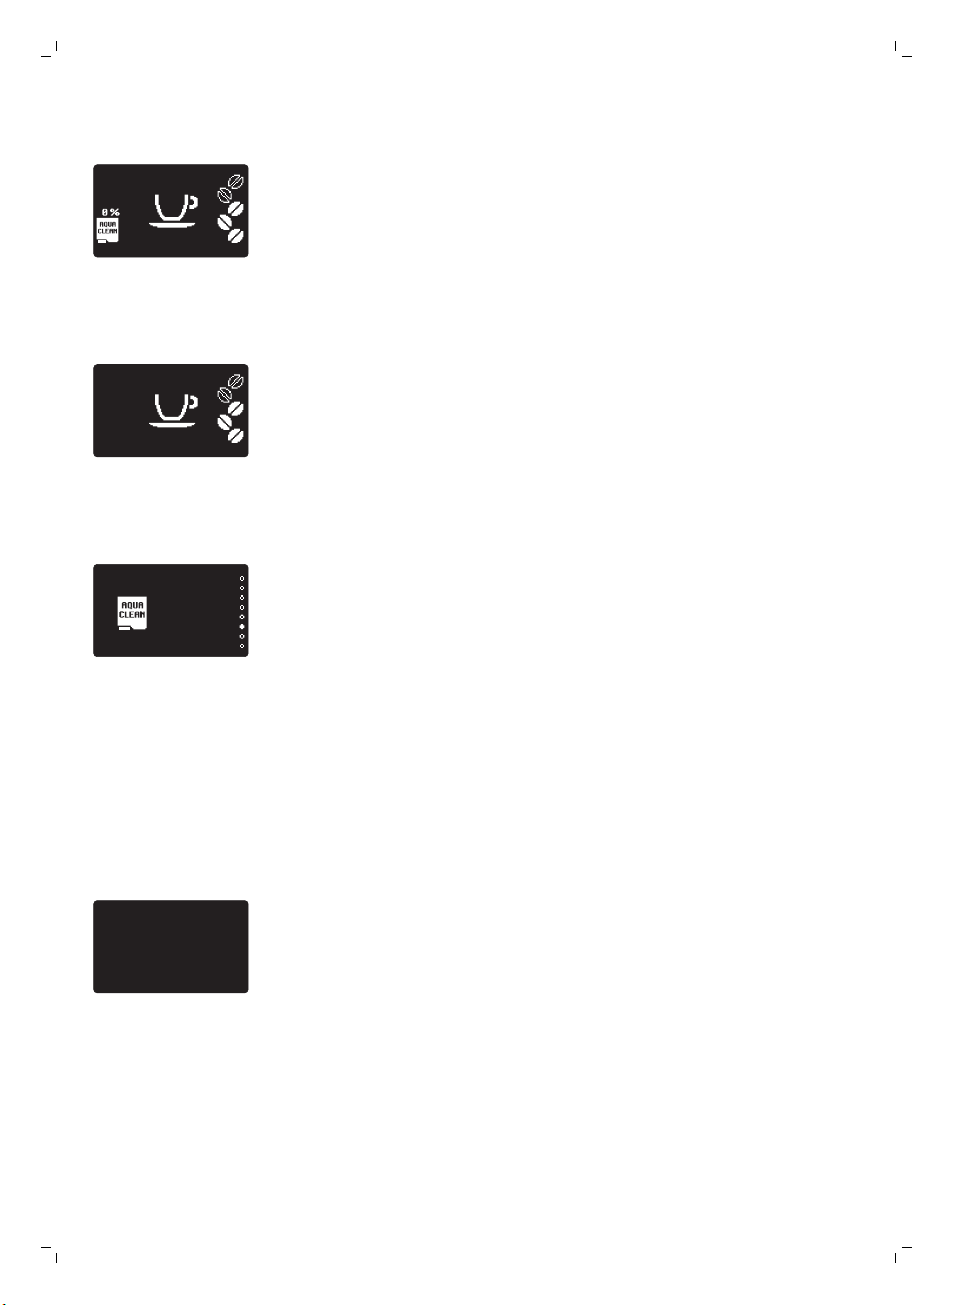
If you do not replace the filter, the filter icon starts flashing 1 second on
and 1 second off when the capacity has dropped to 0%. If you ignore this
indication, the filter icon will disappear from the display.
-
When the filter icon has disappeared from the display, you have to
descale the machine before installing a new filter.
How to replace the filter
1 Press the MENU/SPECIAL DRINKS button, select MENU and press the OK
button to confirm. Scroll to select 'AquaClean' filter. Press the OK button
to confirm.
-
The display shows the number of AquaClean filters that have been
installed previously from 0 to 8 filters.
2 The display asks if you want to activate a new filter. Press the OK button
to confirm.
3 Follow the instructions on the screen to install the new filter, to fill the
water tank, to insert the hot water dispensing spout. Press the OK button
to confirm each step.
-
The filter activation screen appears with a progress bar showing the
progress of the filter activation.
-
When activation is finished, the display shows a tick to confirm
activation.
-
Then the machine ready screen appears with the AquaClean 100%
icon to indicate that the filter has been activated.
Replacing the filter after 8 filters were used
1 When the filter icon starts flashing on the display, press the
MENU/SPECIAL DRINKS button, select MENU and press the OK button
to confirm. Scroll to select the AquaClean filter. Press the OK button to
enter the filter menu.
Page 19
DESCALE BEFORE
ACTIVATING FILTER
-
1
2
3
4
The display tells you that you need to descale the machine before
activating the new filter.
2 Press the OK button to start the descaling procedure.
-
Press the ESC button several times to leave the filter menu if you do
not want to descale right away.
3 At the end of the descaling procedure, the display asks you if you want
to install the AquaClean filter.
-
Follow the steps in 'Replacing the AquaClean filter'.
Measuring the water hardness
To be able to adjust the machine settings to the water in your region, please
measure the water hardness with the water hardness strip supplied.
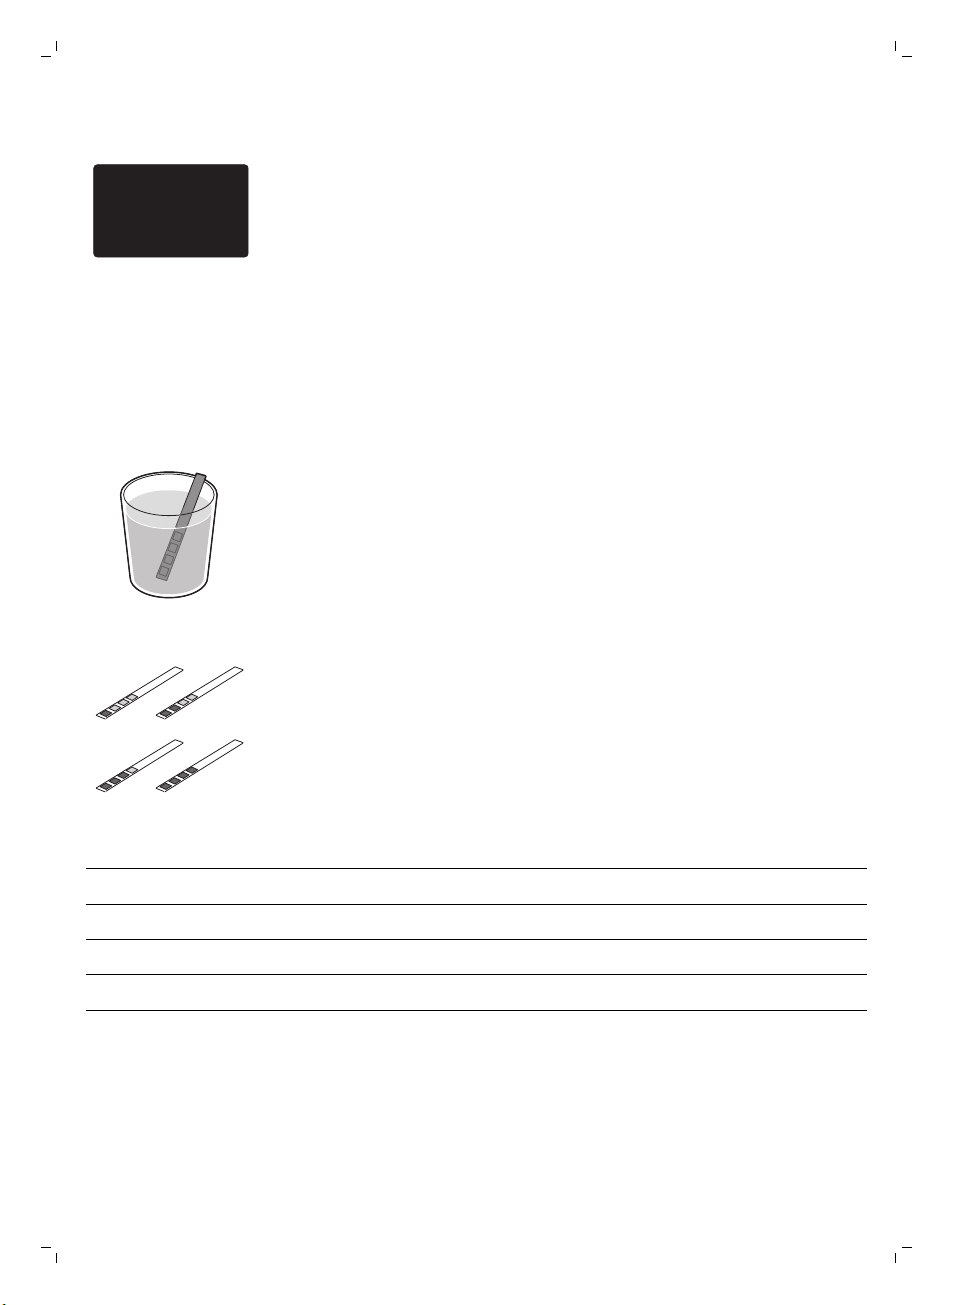
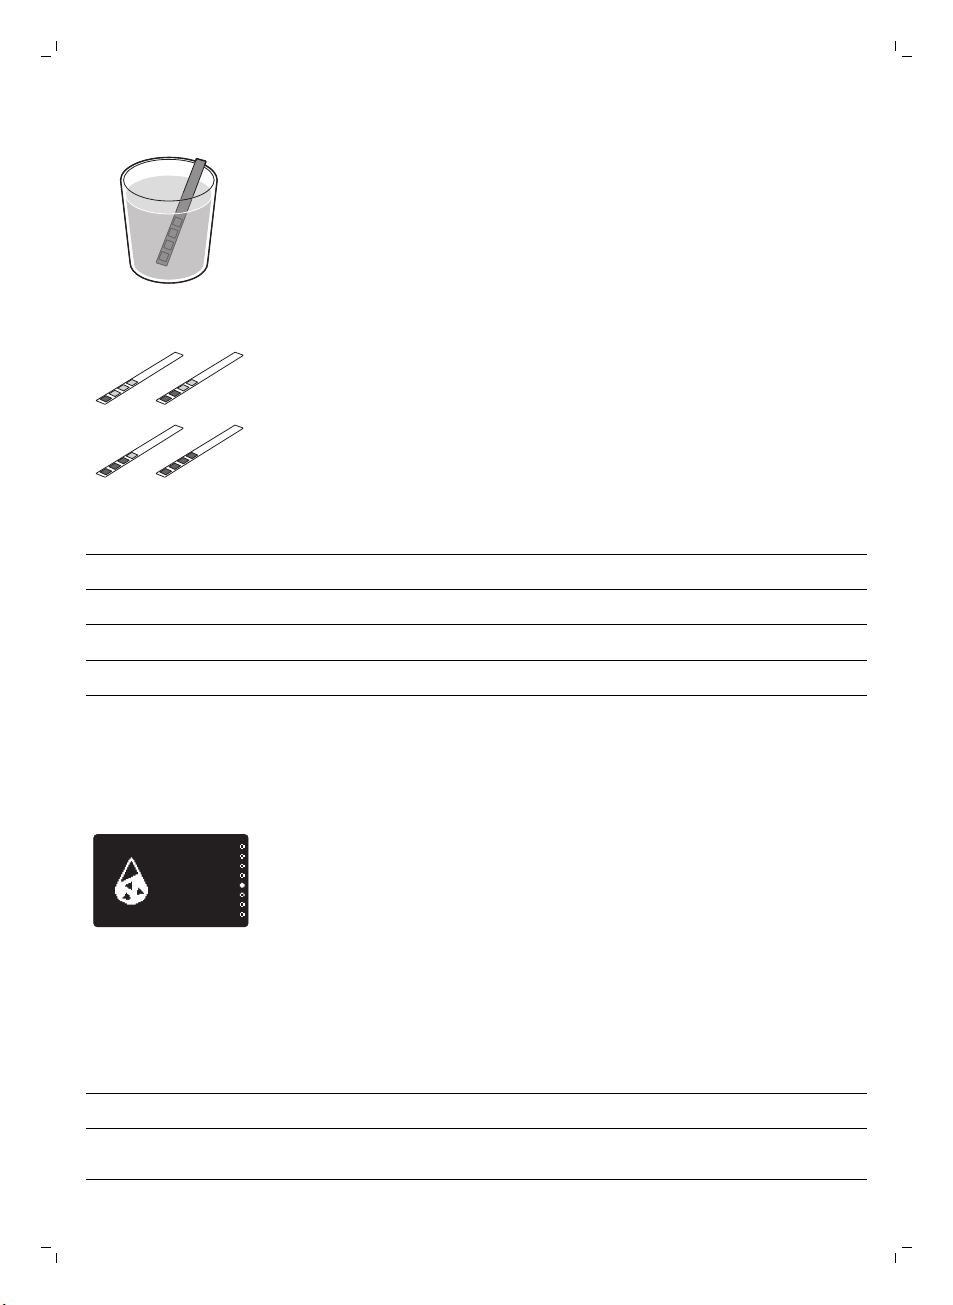
1 Immerse the water hardness test strip (supplied with the machine) in tap
water for 1 second.
2 Remove the water hardness strip and and wait for 1 minute.
3 Check how many squares have changed into the red colour and check
the water hardness in below table.
English
19
numbers of red squares
1 1 very soft water
2 2 soft water
3 3 hard water
4 4 very hard water
value to be set water hardness
Setting the water hardness
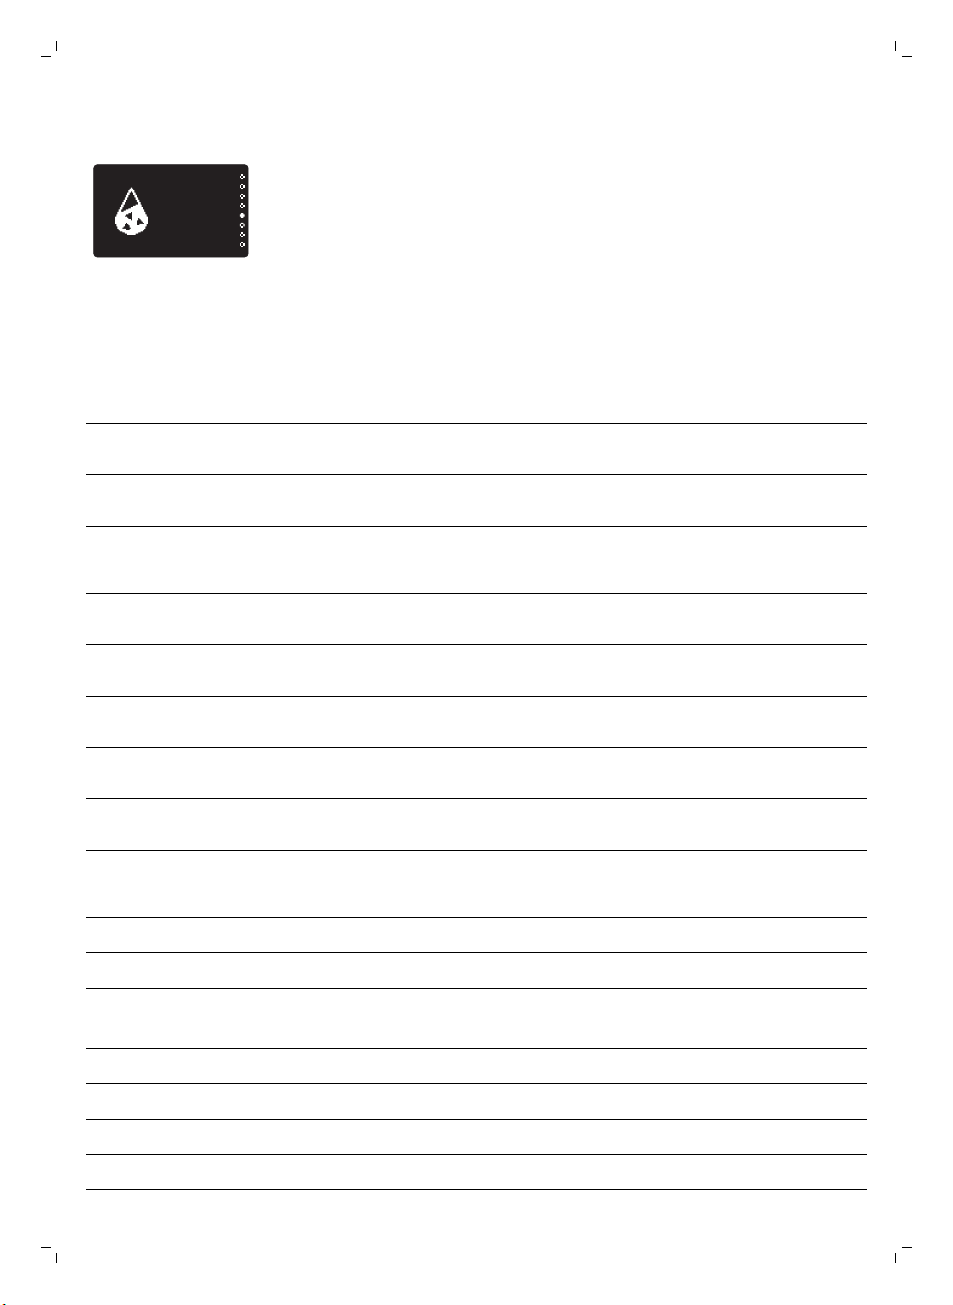
1 To set the water hardness, press the MENU/SPECIAL DRINKS button,
select menu and scroll to select water hardness.
Page 20
WATER
HARDNESS
20
English
2 Press the OK button and select the water hardness in your area.
3 Press the OK button to confirm.
Beverage types and lengths
Beverage name
Espresso Coffee with thick crema served in
Description How to select
a small cup
Programmable button on
control panel
Ristretto Shorter espresso with a thick
crema served in a small cup
Espresso Lungo A longer espresso with thick
crema served in a medium-sized
cup
Caffè Crema Long espresso with a light crema
served in a large cup
Espresso Double Double espresso with thick crema
served in a small cup
Cappuccino 1/3 espresso, 1/3 hot milk and 1/3
milk foam served in a large cup
Baby Cappuccino Smaller cappuccino served in a
medium-sized cup
Flat White Coffee with hot milk topped with
a thin foam served in a tall glass
Latte Macchiato Long shot of hot milk with foam
stained with a shot of espresso
and served in a tall glass
Milk froth Hot milk with foam Special Drinks menu
Hot Water Special Drinks Menu
Special Drinks menu
Programmable button on
control panel
Programmable button on
control panell
Special Drinks menu
Programmable button on
control panel
Special Drinks menu
Special Drinks menu
Programmable button on
control panell
Beverage name
Espresso 40 ml 20 - 230 ml
Standard length Length range
Ristretto 30 ml 20 - 230 ml
Espresso Lungo 80 ml 20 - 230 ml
Caffè Crema 125 ml 20 - 230 ml
Page 21
Espresso Double 60 ml (double grinding) 40- 230 ml
ESPRESSO LUNGO
Hot water 300 ml 50 - 450 ml
Note: The lengths stated above are approximate values.
Brewing coffee
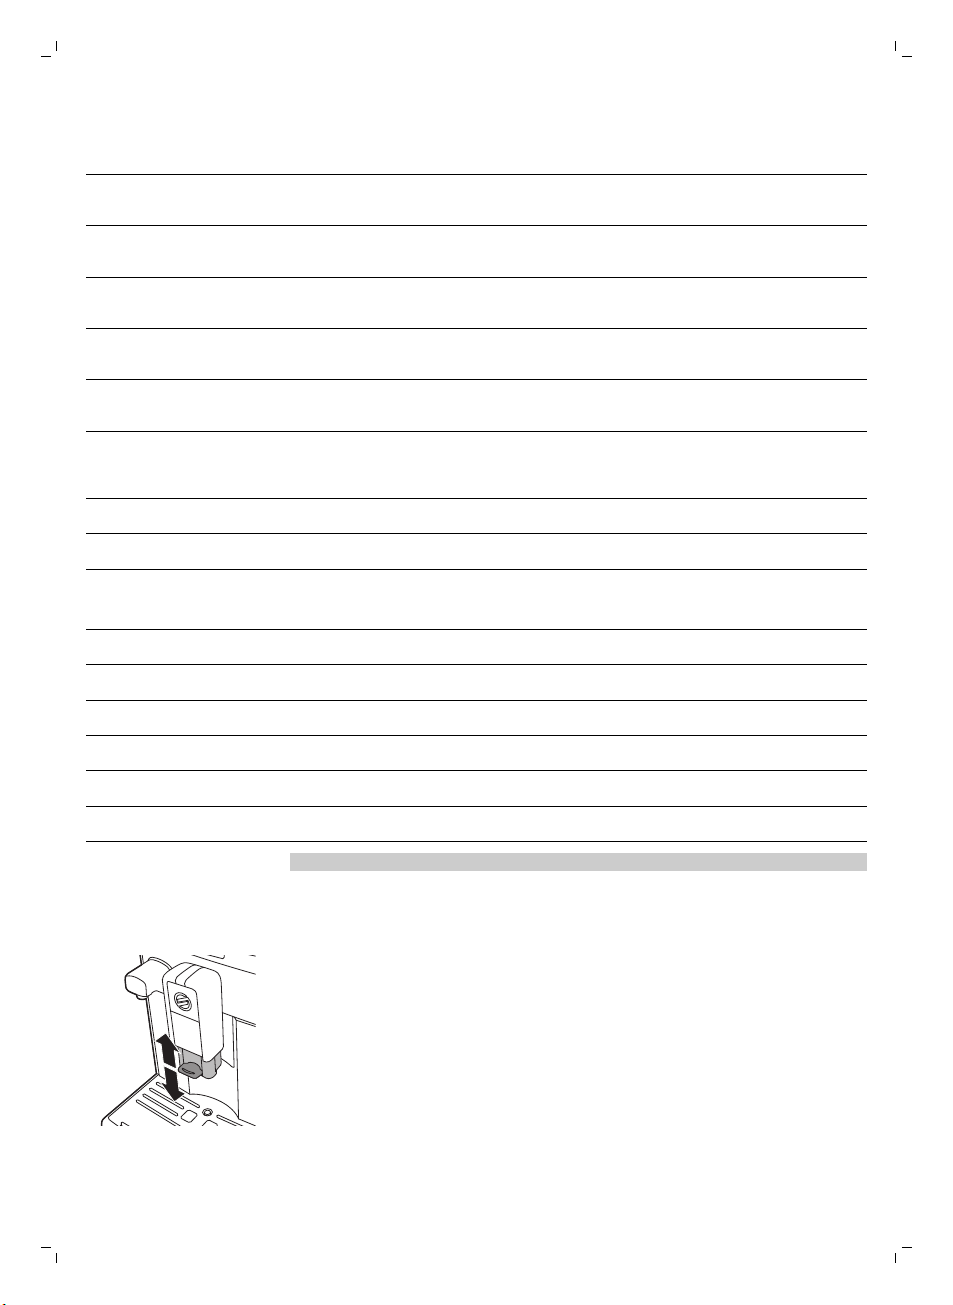
The machine can be used to dispense different coffee types in cups or
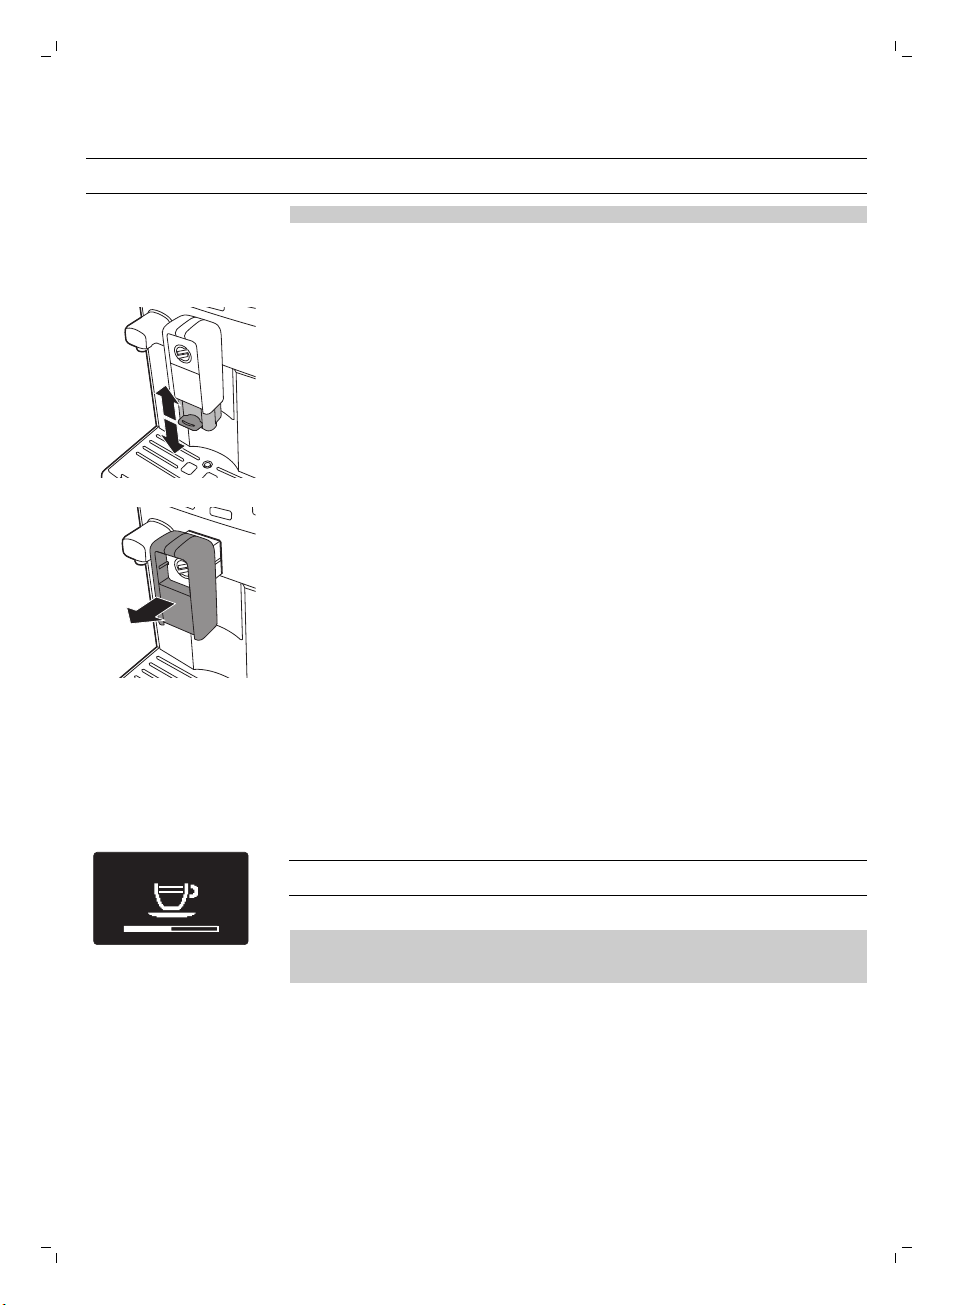
glasses of different sizes. To adjust the height of the coffee dispensing spout
to the size of the cup or glass, slide the spout up or down.
If you want to brew a latte macchiato, remove the coffee dispensing spout
to fit the latte macchiato glass under the coffee outlet.
English
21
Brewing coffee with beans
Brewing 1 cup of coffee
1 Place a cup under the coffee dispensing spout.
2 Press the ESPRESSO, ESPRESSO LUNGO or CAFFÈ CREMA button to
brew the selected coffee.
Tip: Ristretto and Espresso Double can be selected in the SPECIAL
DRINKS menu.
-
Coffee starts pouring from the coffee dispensing spout.
Note: If you want to stop the brewing process before the machine has
finished dispensing the preset coffee volume, press the OK button or the
previously selected beverage button.
Brewing 2 cups of coffee
1 Place two cups under the coffee dispensing spout.
Page 22
ESPRESSO LUNGO 2x
GROUND COFFEE
22
English
2 You can brew two cups of espresso, espresso lungo or caffè crema
simultaneously. Press the button of the desired beverage twice. The
machine automatically carries out two grinding cycles in sequence.
Brewing coffee with pre-ground coffee
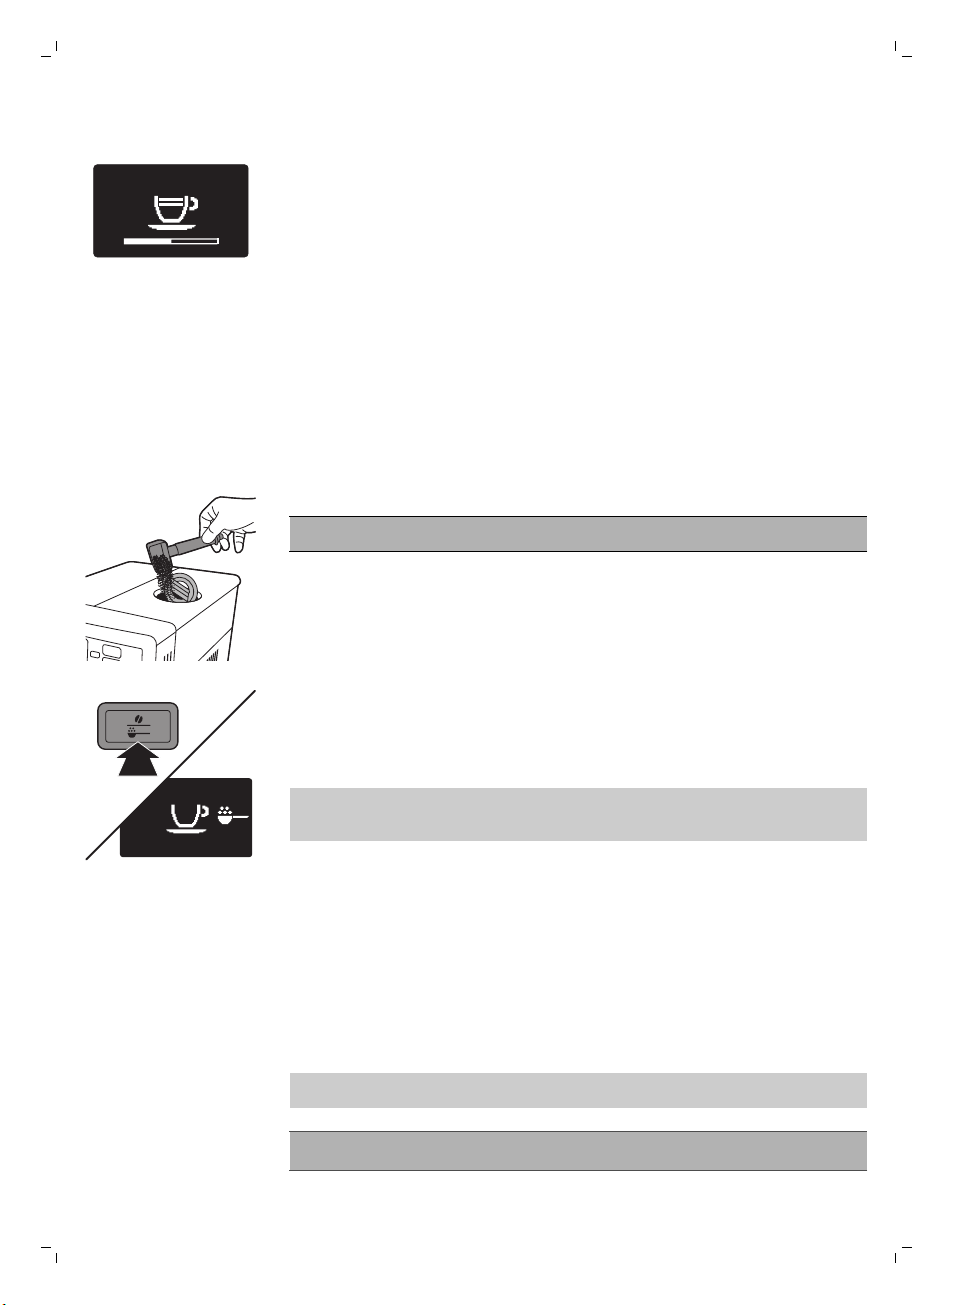
When you brew coffee with pre-ground coffee, use the measuring scoop in
the multifunctional tool supplied to put the correct dose in the pre-ground
coffee compartment. If you add more pre-ground coffee, the excess coffee
will end up in the coffee grounds drawer.
1 Open the lid of the pre-ground coffee compartment.
2 Pour one measuring scoop of pre-ground coffee into the compartment.
Caution: Do not put any other substance than pre-ground coffee in the
pre-ground coffee compartment, as this may damage the machine.
3 Place the lid back on the pre-ground coffee compartment.
4 Place a cup under the coffee dispensing spout.
Brewing milk-based beverages
How to use the milk carafe
5 Press the AROMA STRENGTH button a few times to select GROUND
COFFEE.
6 Press the button of the beverage you want to brew.
-
The machine automatically starts brewing the selected beverage.
Note: You can only brew one coffee beverage at a time with pre-ground
coffee. You cannot brew beverages that require two grindings, such as
espresso double, with pre-ground coffee.
The milk carafe is used to froth milk and brew milk-based coffee beverages.
Note: Before first use, rinse the milk carafe as described in chapter
'Maintenance and care', section 'Cleaning the milk carafe'.
Caution: Steam and hot milk may spray out of the milk froth dispensing
spout at the start of the brewing cycle.
Page 23
1
1
2
English
Caution: Make sure that the milk carafe is installed and the milk froth
dispensing spout is open before you select a milk-based coffee beverage
or milk froth.
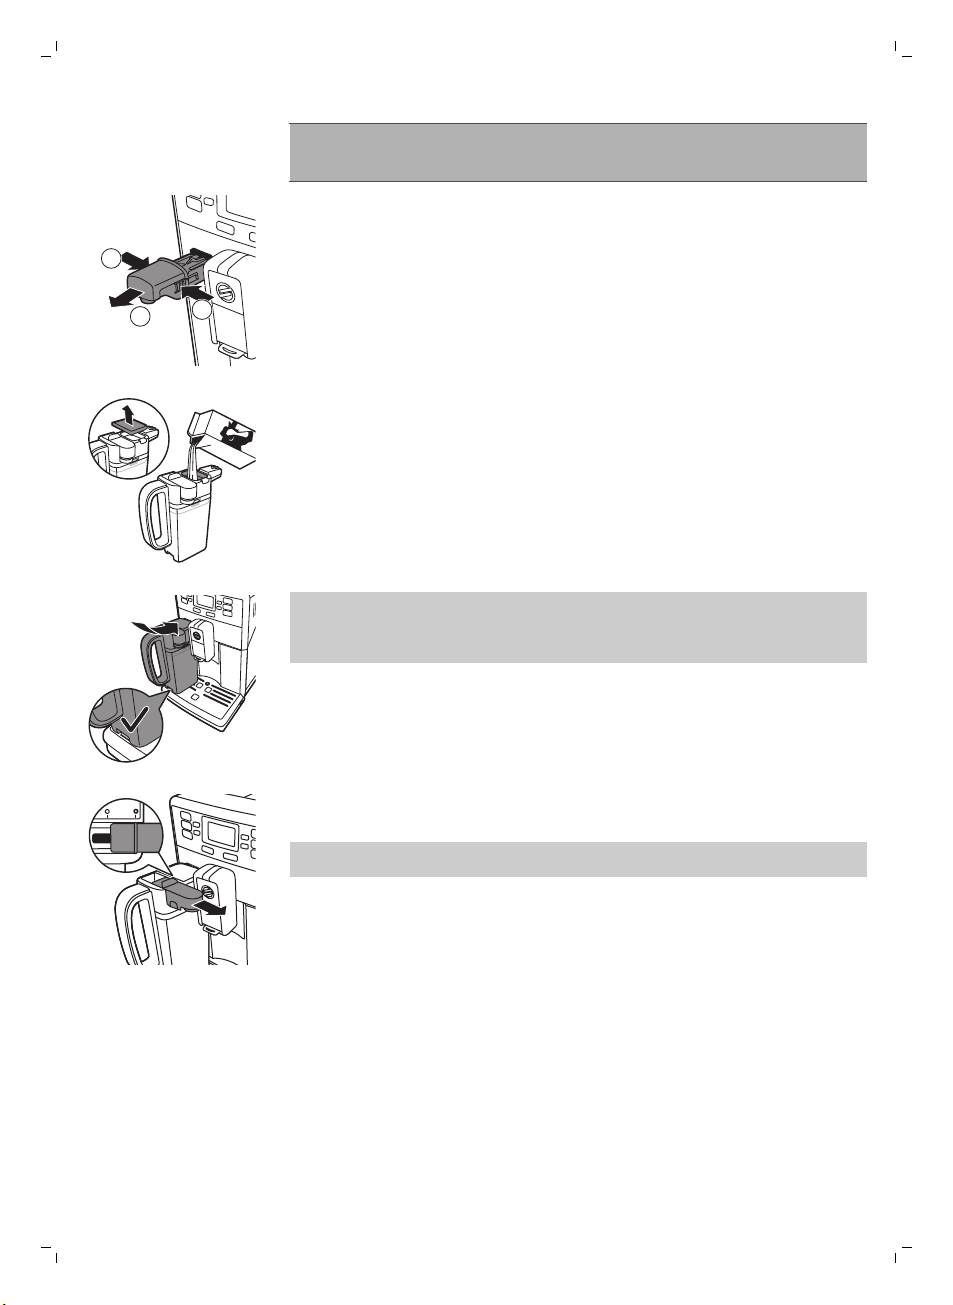
1 If the hot water dispensing spout is installed, press the release buttons on
both sides of the hot water dispensing spout (1) and remove it (2).
2 Remove the milk carafe lid.
3 Fill the milk carafe with milk between the MIN and MAX level indications.
Note: Use cold milk (at a temperature of approximately 5°C/41°F) with a
protein content of at least 3% to ensure an optimal frothing result. You
can use whole milk or semi-skimmed milk. It is also possible to use
skimmed milk, soy milk and lactose-free milk.
4 Slightly tilt the milk carafe and insert it into the guides of the machine.
Then push the bottom of the carafe towards the machine until it locks
onto the drip tray.
23
5 Pull out the milk froth dispensing spout completely to the right to froth
dispensing position.
Note: If the milk froth dispensing spout is not pulled out fully, the milk
carafe does not froth milk properly.
Brewing milk-based coffee beverages and milk froth
1 Place a cup under the open milk froth dispensing spout.
2 Choose your milk-based beverage.
-
Press the CAPPUCCINO button to brew a cappuccino.
-
Press the LATTE MACCHIATO button to brew a latte macchiato.
Page 24
24
English
-
Press the MENU/SPECIAL DRINKS button, choose 'Drinks' and scroll
through the drinks to select one of the special milk-based beverages.
You can choose flat white, baby cappuccino and milk froth. You can
find more details in chapter 'Special drinks'.
3 The machine first dispenses a preset quantity of frothed milk into the cup
or glass and then dispenses a preset quantity of coffee.
-
To stop dispensing milk or coffee, press the OK button or the button
of the selected beverage.
4 After brewing milk-based coffee beverages, the display asks you if you
want to perform a quick clean of the milk carafe spout. You can perform
the quick clean while leaving the milk inside the milk carafe. Remove the
cup with the beverage and place a container under the milk froth
dispensing spout. Press the OK button to confirm that you want to quick
clean, or press the ESC button to perform the quick clean later. It is
recommended to perform quick clean at least once a day, see chapter
'Cleaning the milk carafe'.
Special drinks
In the special drinks menu, you can select ristretto, espresso double, flat
white, baby cappuccino, milk froth and hot water.
How to select special drinks
1 Press the MENU/SPECIAL DRINKS button and select 'Drinks'.
2 Press the OK button to confirm.
3 Scroll the menu and select the desired beverage.
Dispensing hot water
Inserting and removing the hot water dispensing spout
To insert the hot water dispensing spout:
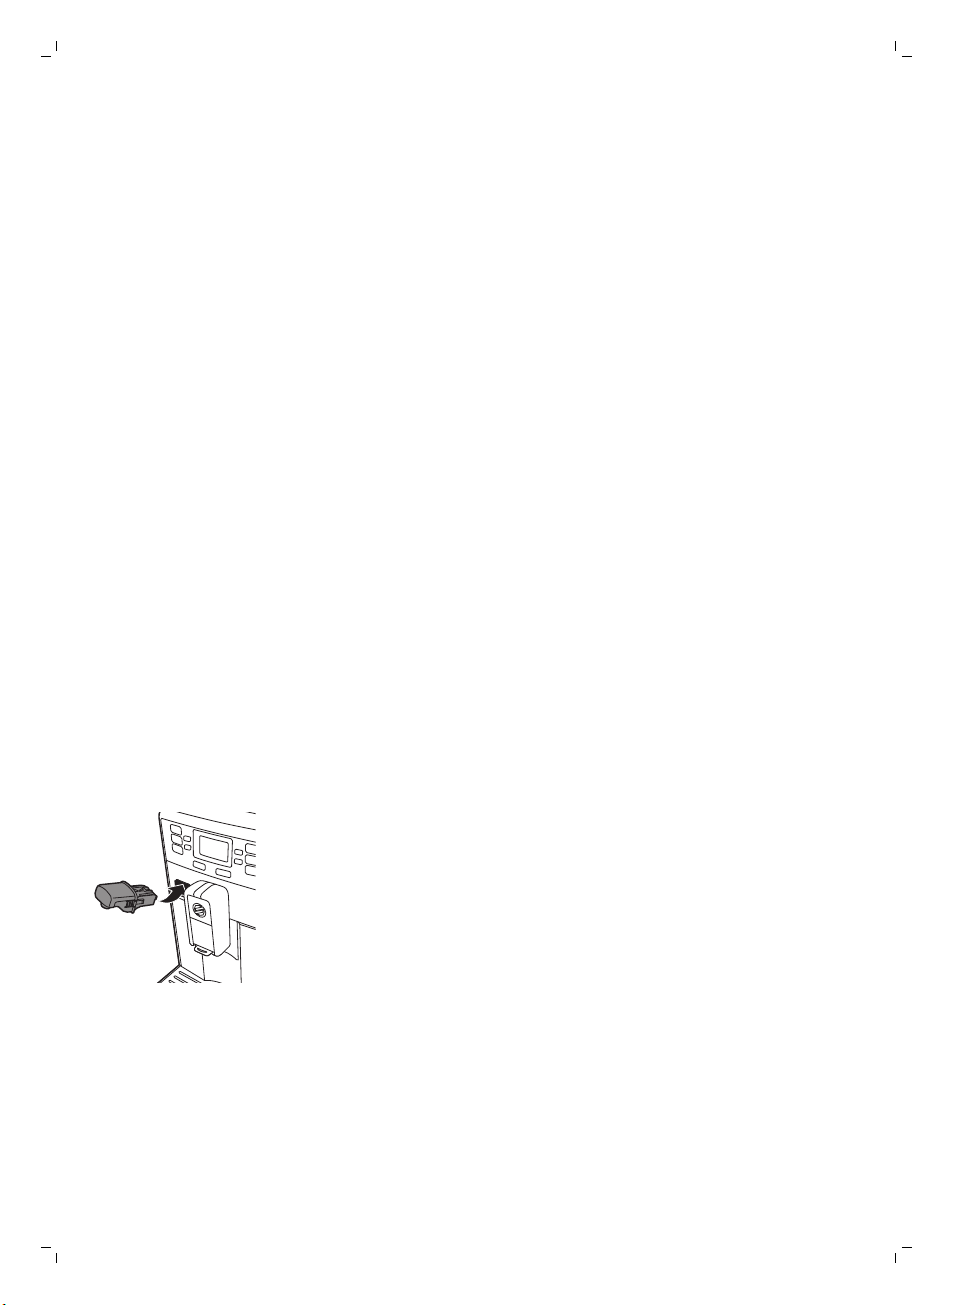
1 Tilt the hot water dispensing spout slightly and insert it into the machine.
2 Press and turn the hot water dispensing spout downwards to lock it in the
machine.
To remove the hot water spout:
Page 25
1
1
2
1 Press the release buttons on the sides of the hot water dispensing spout
HOT WATER
ESPRESSO
to unlock it.
2 Lift the hot water dispensing spout slightly and pull it out of the machine.
Dispensing hot water
Caution: Steam and hot water may spray out of the hot water dispensing
spout when brewing starts. Wait until the cycle has ended before
removing the hot water dispensing spout.
1 Press the MENU/SPECIAL DRINKS button. Select ' Drinks' and scroll the
menu to select ' Hot water'.
Caution: Only select 'Hot water' in the menu when the hot water
dispensing spout is installed.
2 Press the OK button to confirm. The machine starts dispensing a preset
quantity of hot water.
-
To stop dispensing hot water, press the OK button or the hot water
button.
Note: If you don't stop the dispensing, the product stops automatically
when it reaches the default quantity or the memorized quantity.
Adjusting quantity and taste
Saeco Adapting System
Coffee is a natural product and its characteristics may vary according to
origin, blend and roasting. The machine is equipped with a self-adjustment
system that allows it to get the best taste out of your favorite coffee beans.
It regulates itself after brewing some coffees.
English
25
Adjusting coffee and milk length
You can adjust the quantity of beverage brewed according to your taste and
to the size of the cups.
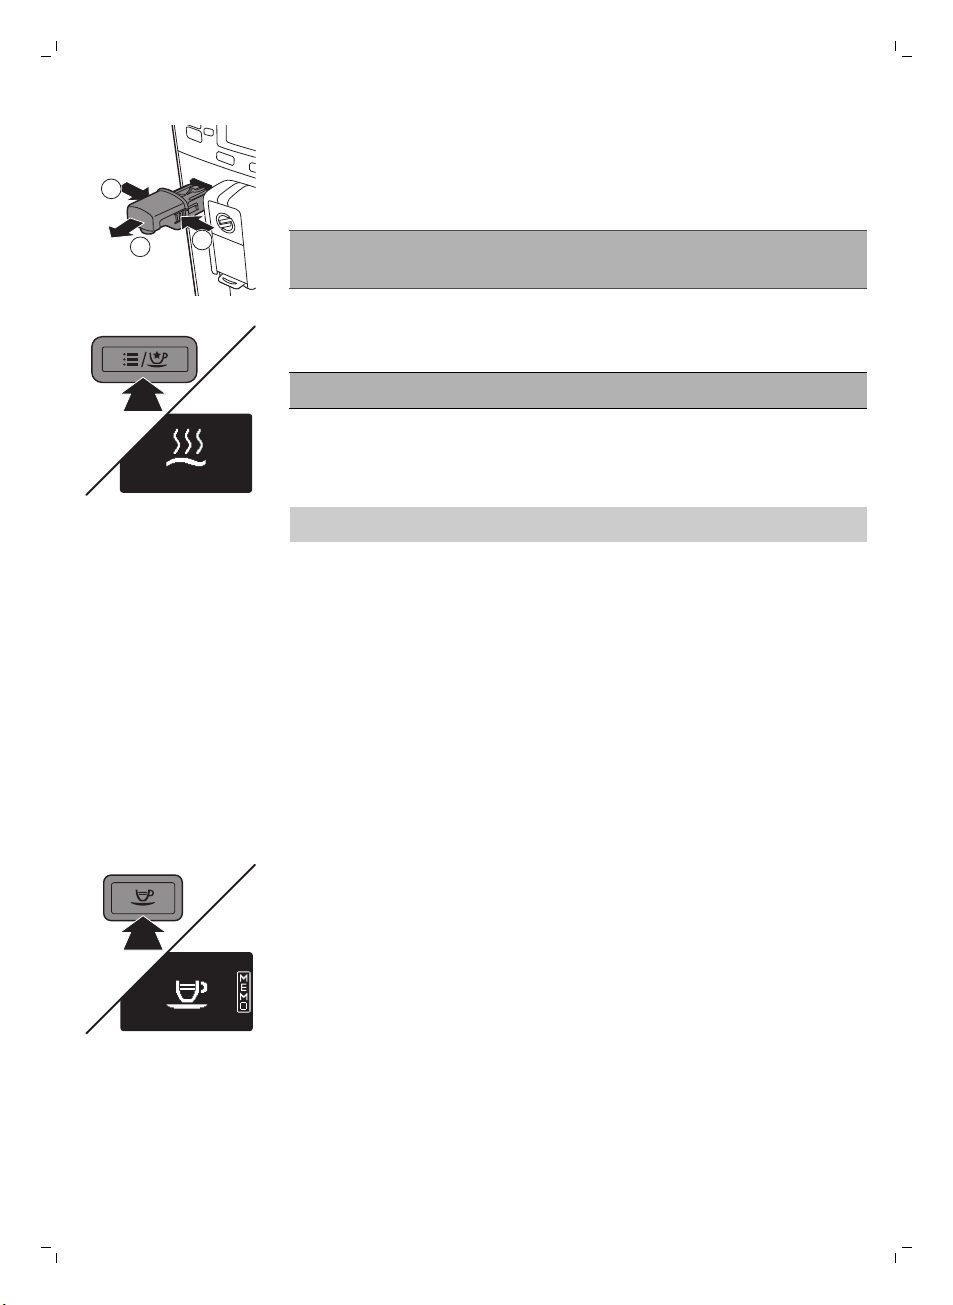
1 To adjust the length of espresso, press and hold the ESPRESSO button
until the display shows the MEMO icon.
-
The machine enters the programming phase and starts to brew the
selected beverage.
Page 26
1
2
3
4
5
26
English
2 Press the OK button when the cup contains the desired amount of
espresso.
-
The tick on the display shows that the button is programmed: every
time it is pressed, the machine will brew espresso in the amount set.
-
To set the length of espresso lungo, caffè crema, cappuccino and latte
macchiato, follow the same procedure: press and hold the button of
the beverage and press the OK button when the desired amount is in
the cup. To adjust the length of milk-based coffee beverages, insert
the milk carafe and save the milk volume first and then save the
coffee volume.
Length adjustment of special drinks
1 Press the MENU/SPECIAL DRINKS button and select 'Drinks'.
2 Scroll the menu and select a special drink (ristretto, espresso double, flat
white, baby cappuccino or milk froth) or hot water.
3 Keep the OK button pressed until the display shows the MEMO icon.
4 When the desired amount is in the cup, press the OK button again. To
adjust the length of milk-based coffee beverages, insert the milk carafe
and save the milk volume first and then save the coffee volume. The
amount has now been programmed.
Note: You can only save the set length for espresso double after the
second grinding cycle has started and the OK button is backlighted.
Adjusting coffee strength
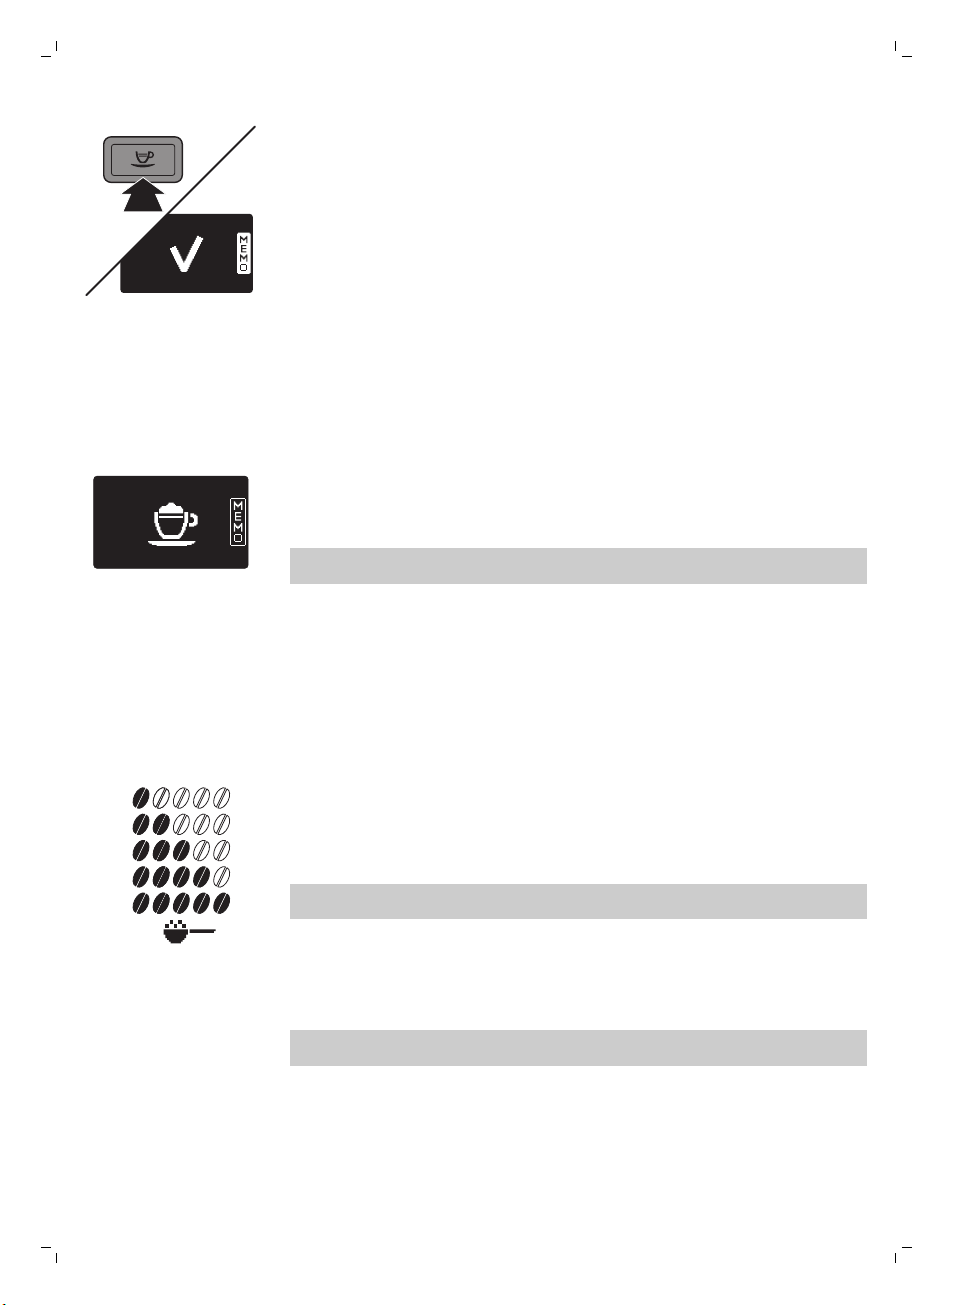
To change the coffee strength, press the AROMA STRENGTH button. Each
time you press the AROMA STRENGTH button, the aroma strength changes
by one degree. The display shows the chosen strength, which will only be
saved when brewing a coffee.
1 Very mild
2 Mild
3 Regular
4 Strong
5 Very strong
Note: The machine will automatically dispense the correct quantity of coffee
for each coffee strength.
GROUND COFFEE is the last option in the coffee strength menu. Select this
option to brew coffee with ground coffee. Use the measuring scoop
integrated in the multifunctional tool supplied to dose the correct quantity
of ground coffee.
Note: The machine returns to the main screen and saves the chosen aroma
strength when you brew a coffee.
Adjusting the grinder settings
You can adjust the grinder settings with the grinder adjustment key
integrated into the handle of the multifunctional tool. At each setting
Page 27
selected, the ceramic coffee grinder guarantees a perfectly even grind for
1
2
every cup of coffee you brew. It preserves the full coffee aroma and delivers
the perfect taste to every cup.
Note: You can only adjust the grinder settings when the machine is grinding
coffee beans.
1 Place a cup under the coffee dispensing spout.
2 Open the lid of the bean hopper.
3 Press the ESPRESSO button.
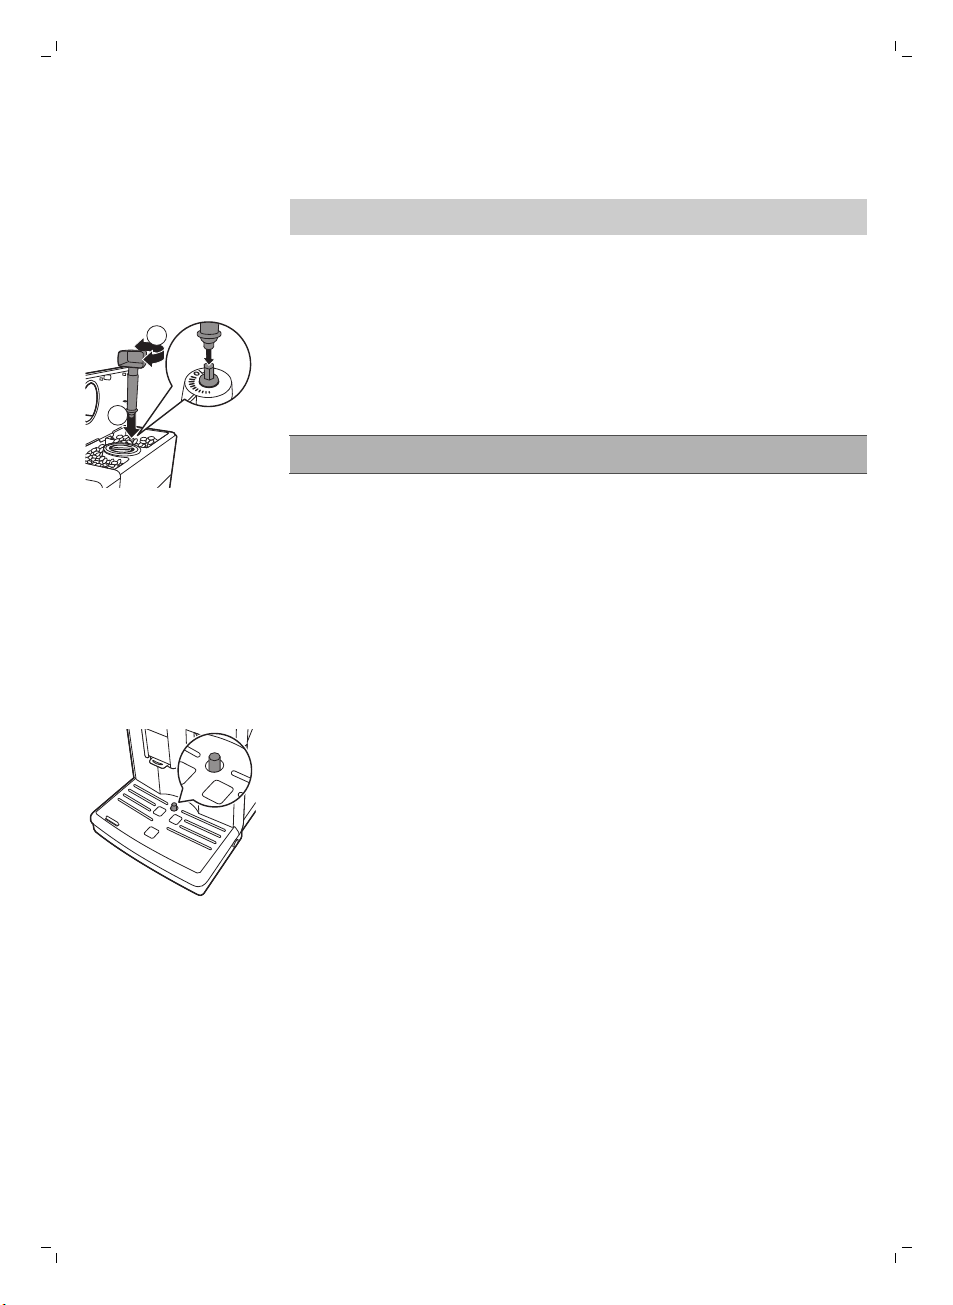
4 When the grinder starts grinding, place the grinder adjustment key on the
grinder adjustment knob (1). Push and turn to the left or to the right (2).
-
There are 10 different grinder settings you can choose from. The
shorter the line, the stronger the coffee. The difference becomes
noticeable after you have brewed 2 or 3 coffees at the new setting.
Caution: Do not turn the grinder adjustment knob more than one notch at
a time to prevent damage to the grinder.
Maintenance and care
Maintenance of your machine is important to prolong the life of your
machine and to ensure optimum quality and taste of your coffee.
Cleaning the drip tray and the coffee grounds container
Perform the following actions while the machine is switched on:
-
When the display shows the 'empty coffee grounds container' icon,
empty the coffee grounds container.
-
The drip tray is full when the drip tray full indicator pops up through the
drip tray. Empty and clean the drip tray every day.
English
27
Page 28
1
1
2
2
1
28
English
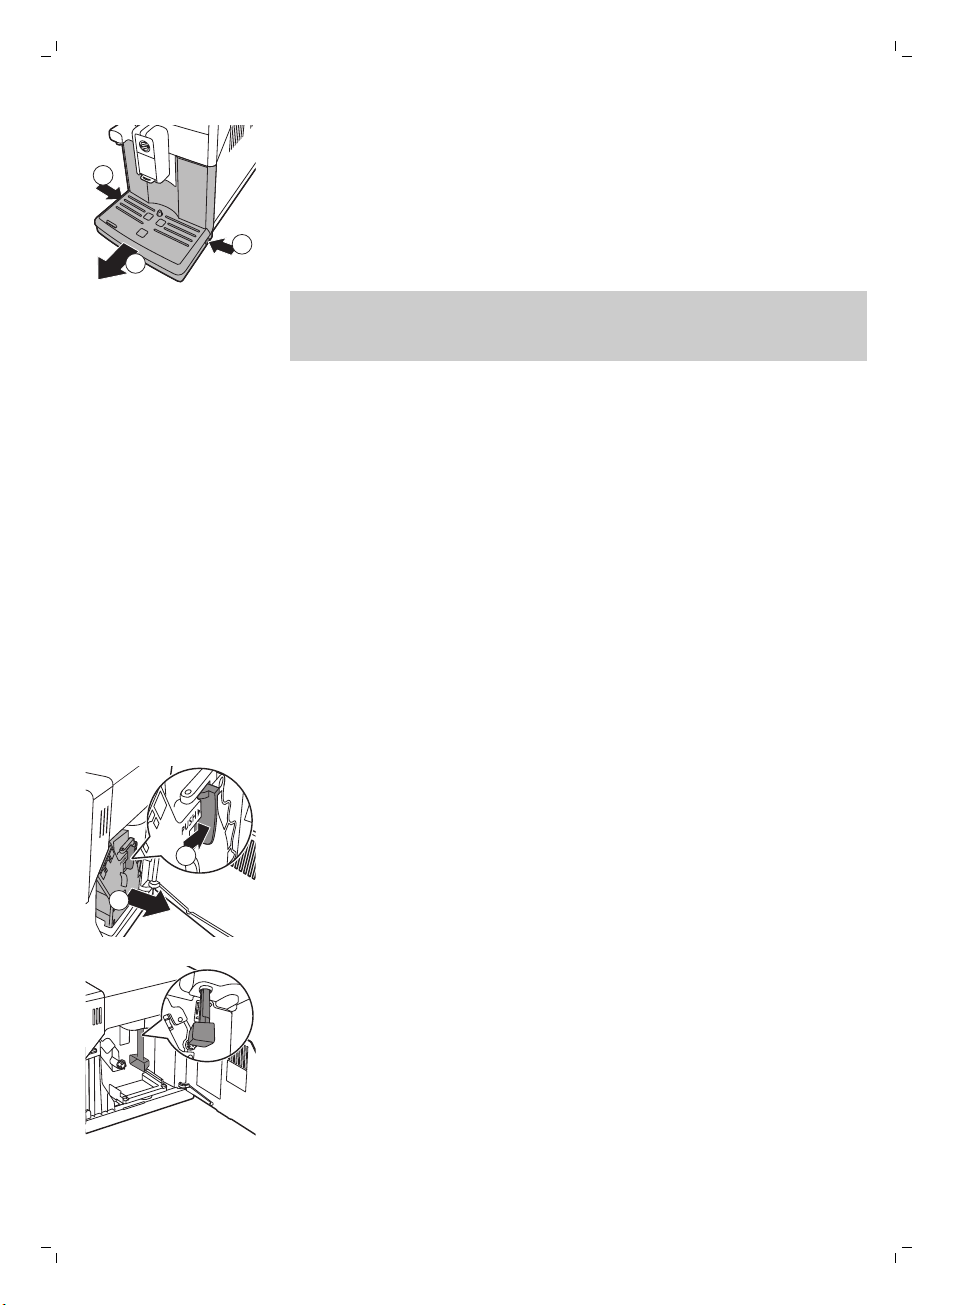
1 Press the release buttons on both sides of the drip tray (1) and pull the
drip tray out of the machine (2).
2 Remove and empty the coffee grounds container.
3 Empty and rinse the drip tray under the tap.
4 Place the coffee grounds container back in the drip tray.
5 Slide the drip tray back into the machine until it locks into position with a
click.
Note: Make sure that the machine is still switched on when you remove the
drip tray. If you switch off the machine before you remove the drip tray, the
'empty coffee grounds container' icon will be visible on the display when
you switch on the machine again, even though the drip tray is empty.
Cleaning the water tank
1 Remove the water tank from the machine and rinse it with fresh water
periodically.
2 Fill the water tank with fresh water up to the MAX level indication and
place it back in the machine.
Cleaning the coffee compartments
-
Clean the bean hopper with a dry cloth once a month.
-
If necessary, clean the pre-ground coffee compartment with a dry cloth.
Cleaning the brew group
Weekly cleaning of the brew group
1 Switch off the machine and unplug it.
2 Remove the drip tray with the coffee grounds container.
3 Empty the drip tray and rinse it under the tap.
4 Empty the coffee grounds container and rinse it under a lukewarm tap.
5 Open the service door.
6 Press the PUSH button (1) and pull at the grip of the brew group to
remove it from the machine (2).
7 Clean the coffee exit duct thoroughly with a spoon handle or with the
multifunctional tool provided with the machine. Insert it as indicated in
the figure.
Page 29
English
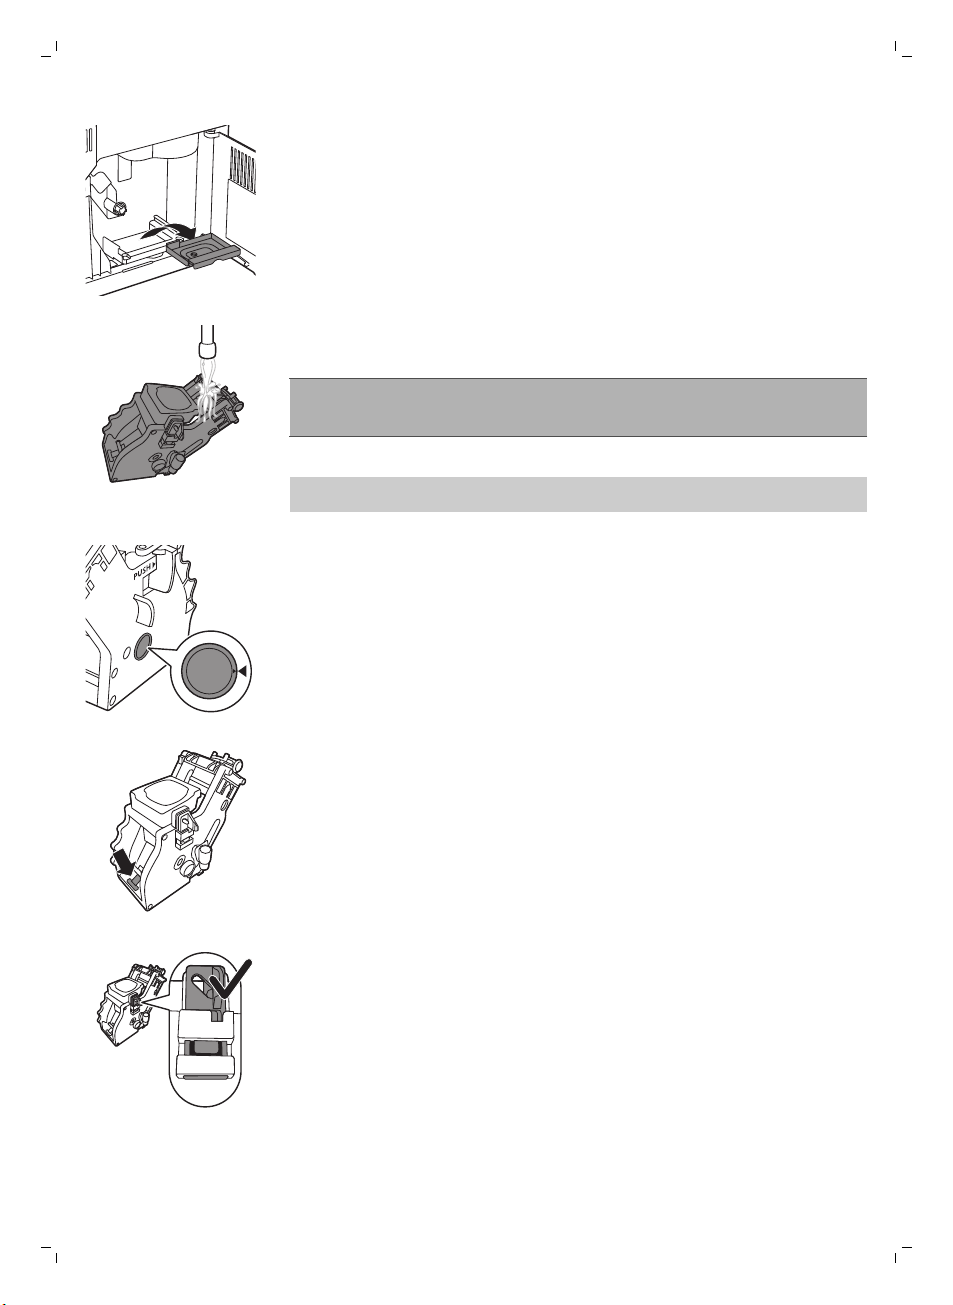
8 Remove the coffee residues container, empty it and rinse it under a
lukewarm tap. Let it dry and then reinsert it.
9 Rinse the brew group thoroughly with lukewarm water. Clean the upper
filter carefully.
Caution: Do not clean the brew group in the dishwasher and do not use
washing-up liquid or a cleaning agent to clean it. This may cause the brew
group to malfunction and may have a negative effect on the coffee taste.
10 Let the brew group air-dry thoroughly.
Note: Do not dry the brew group with a cloth to prevent fibers from
collecting inside the brew group.
11 Clean the inside of the machine with a soft damp cloth.
12 Before you slide the brew group back into the machine, make sure the
two reference signs on the side match. If they do not match, perform the
following step:
29
-
Make sure the lever is in contact with the base of the brew group.
13 Make sure that the locking hook of the brew group is in the correct
position.
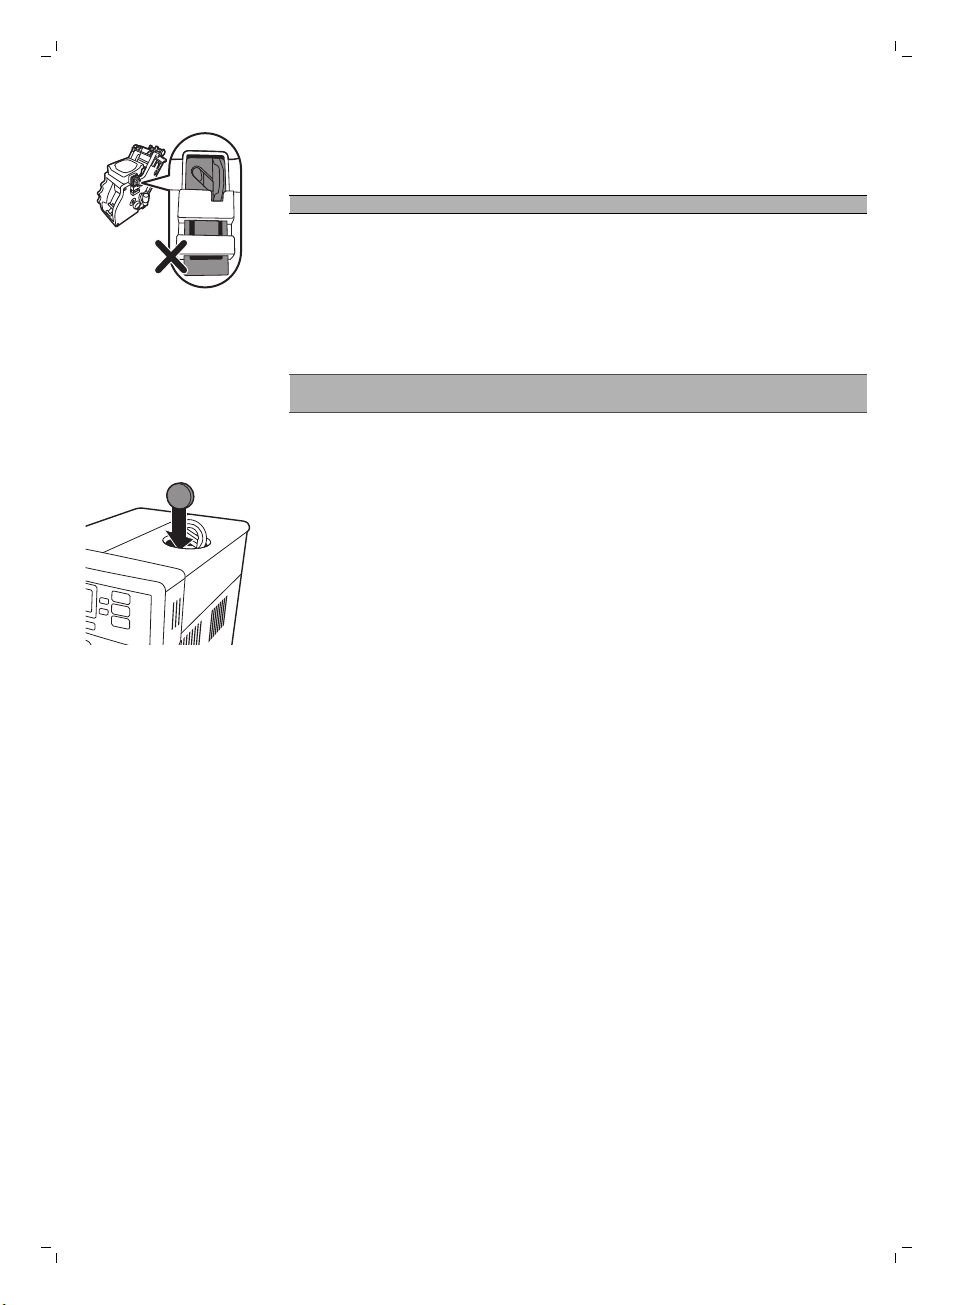
-
To position the hook correctly, push it upwards until it is in uppermost
position.
Page 30
30
English
-
The hook is not correctly positioned if it is still in bottommost position.
14 Slide the brew group back into the machine along the guiding rails on the
sides until it locks into position with a click.
Caution: Do not press the PUSH button.
15 Close the service door.
Monthly cleaning of the brew group with the degreasing tablet
-
Perform this cleaning cycle after the machine has brewed 500 cups of
coffee or once a month.
-
Use a degreasing tablet for this cleaning cycle.
Caution: Only use degreasing tablets for cleaning. They do not have a
descaling function.
1 Place a container under the coffee dispensing spout.
2 Press the AROMA STRENGTH button and select GROUND COFFEE.
3 Put a degreasing tablet in the pre-ground coffee compartment.
4 Press the CAFFÈ CREMA button. The machine dispenses water from the
coffee dispensing spout.
5 When the progress bar has reached the middle, set the main switch on
the back of the machine to OFF.
6 Let the degreasing solution work for approximately 15 minutes.
7 Set the main switch to ON.
8 Press the standby button.
9 Wait until the machine performs an automatic rinsing cycle.
10 Perform the 'Weekly cleaning of the brew group' procedure.
11 Remove the drip tray with the coffee grounds container. Empty the drip
tray and the coffee grounds container and place them back in the
machine.
12 Press the AROMA STRENGTH button and select GROUND COFFEE..
13 Press the CAFFÈ CREMA button. The machine dispenses water from the
coffee dispensing spout.
14 Repeat steps 12 and 13 twice. Discard the dispensed water.
15 To clean the drip tray, put a degreasing tablet in the drip tray and fill the
drip tray up to two-thirds of its capacity with hot water. Let the
degreasing tablet take effect for about 30 minutes. Then empty the drip
tray and rinse it thoroughly.
Monthly lubrication of the brew group
Lubricate the brew group after the machine has brewed 500 cups of coffee
or once a month.
1 Switch off the machine and unplug it.
2 Remove the brew group and rinse it under a lukewarm tap as described
in section 'Weekly cleaning of the brew group'.
Page 31
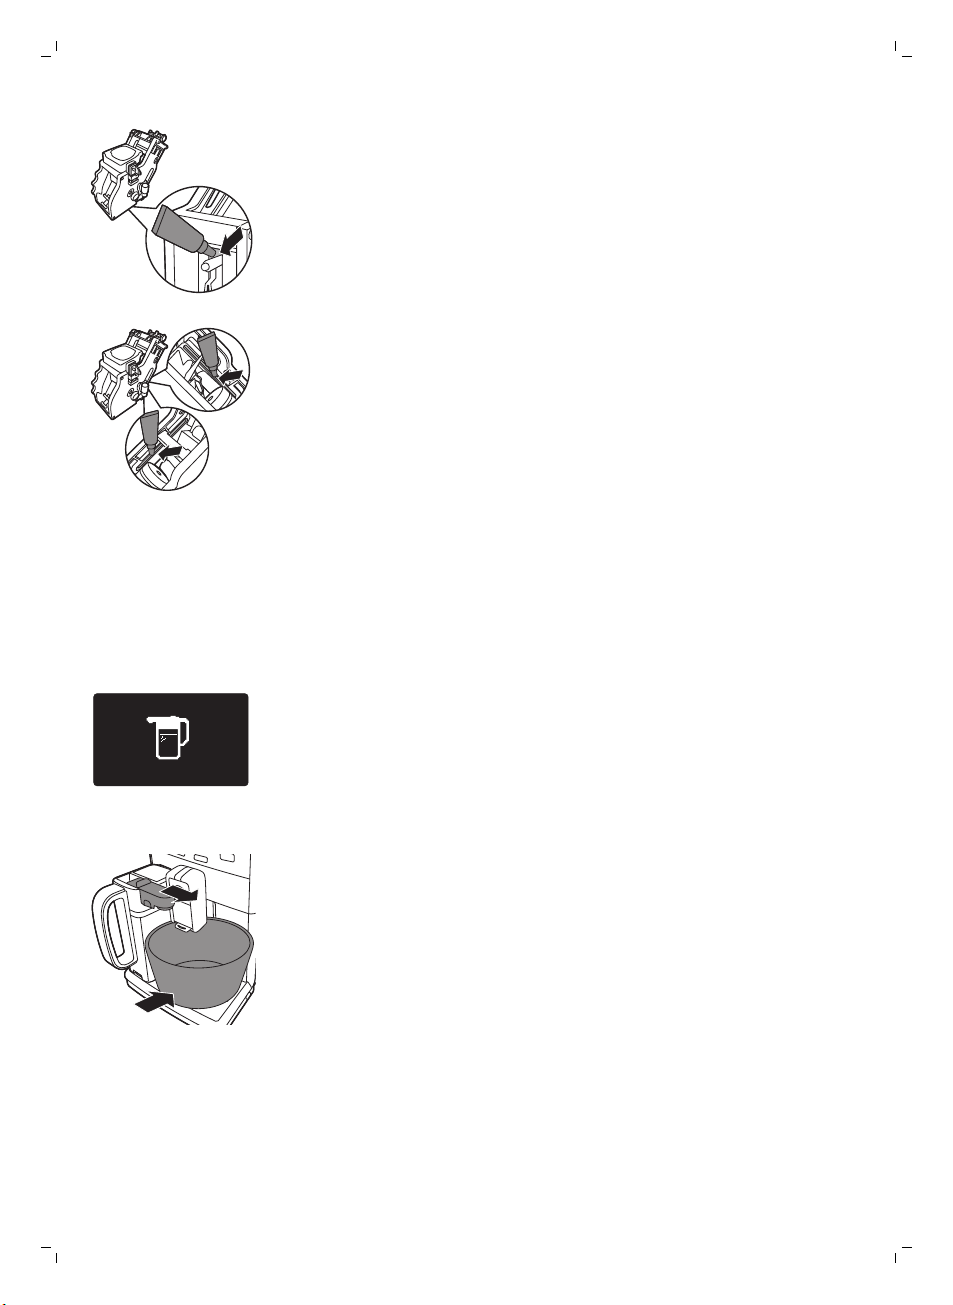
3 Apply some grease around the shaft in the bottom of the brew group.
QUICK CLEAN
4 Apply some grease to the rails on both sides (see figure).
5 Insert the brew group as described in section 'Weekly cleaning of the
brew group'.
Cleaning the milk carafe
Daily cleaning of the milk carafe: Quick Clean
After preparing a milk-based beverage, the carafe cleaning icon appears on
the display.
1 When the carafe cleaning icon appears on the display, press the OK
button if you want to perform a cleaning cycle.
English
31
2 Place a container under the milk froth dispensing spout and pull out the
milk froth dispensing spout.
3 Press the OK button to start dispensing hot water.
To clean the milk carafe thoroughly, you have to do the
following regularly:
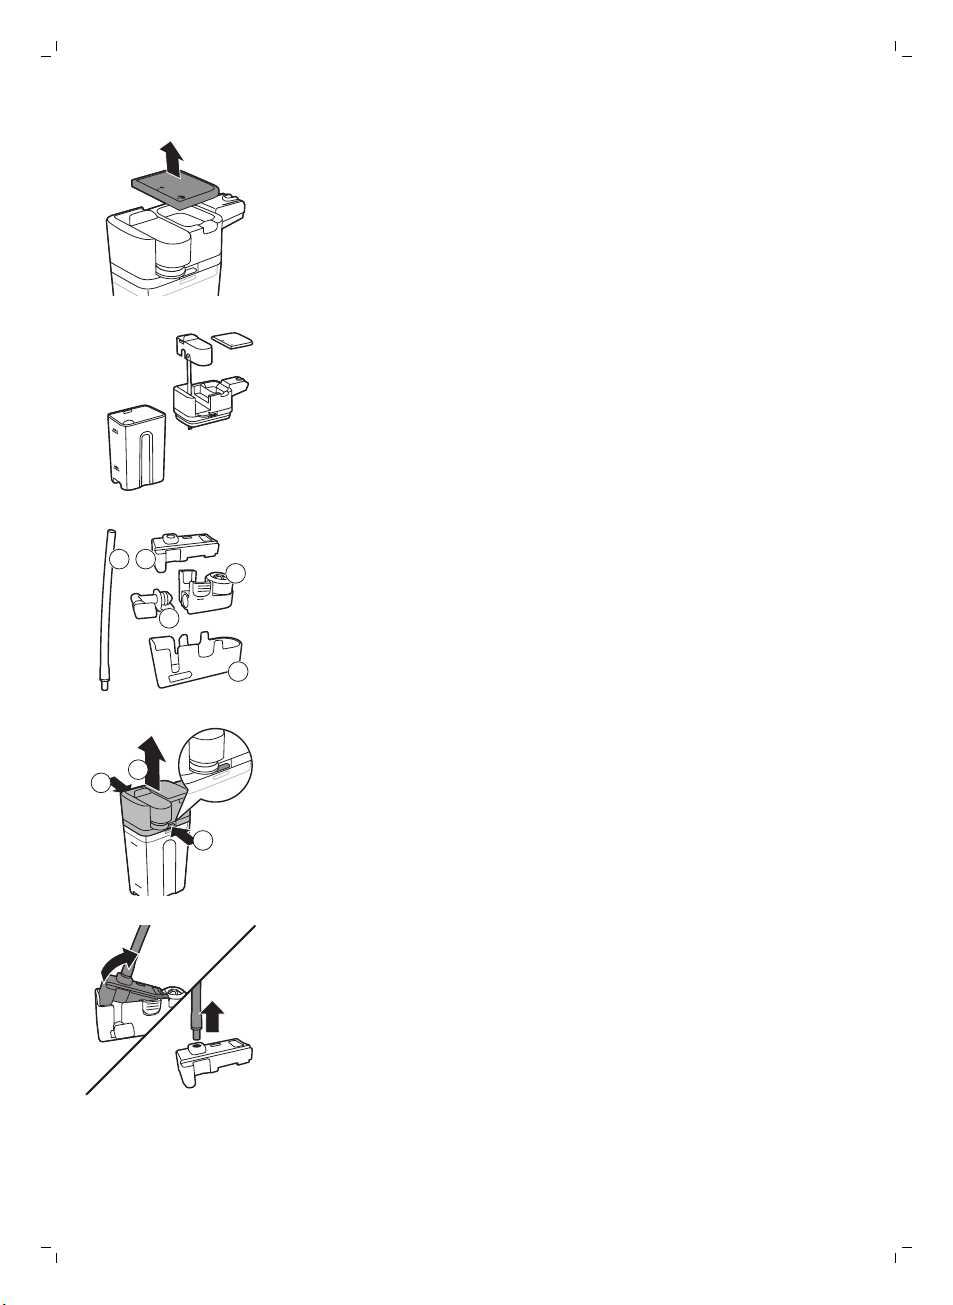
1 Disassemble the top of the milk carafe.
Page 32
1 2
5
3
4
1
2
1
32
English
2 Remove the lid of the milk carafe.
3 Lift the milk froth dispensing spout out of the top of the carafe.
4 Remove the suction tube from the milk froth dispensing spout.
5 Rinse the suction tube with lukewarm tap water thoroughly.
Weekly cleaning of the milk carafe
The milk froth dispensing spout consists of 5 components. Disassamble all
components once a week to clean them.
1 Suction tube
2 Rubber support
3 Milk frother
4 Milk frother connection
5 Dispensing spout lid
Disassembling the milk carafe
1 Press the release buttons on both sides of the top of the milk carafe (1)
and lift the top off the milk carafe (2).
2 Turn the dispensing spout lid upside down and hold it firmly in your
hand. Pull the suction tube off the rubber support.
Page 33
2
1
English
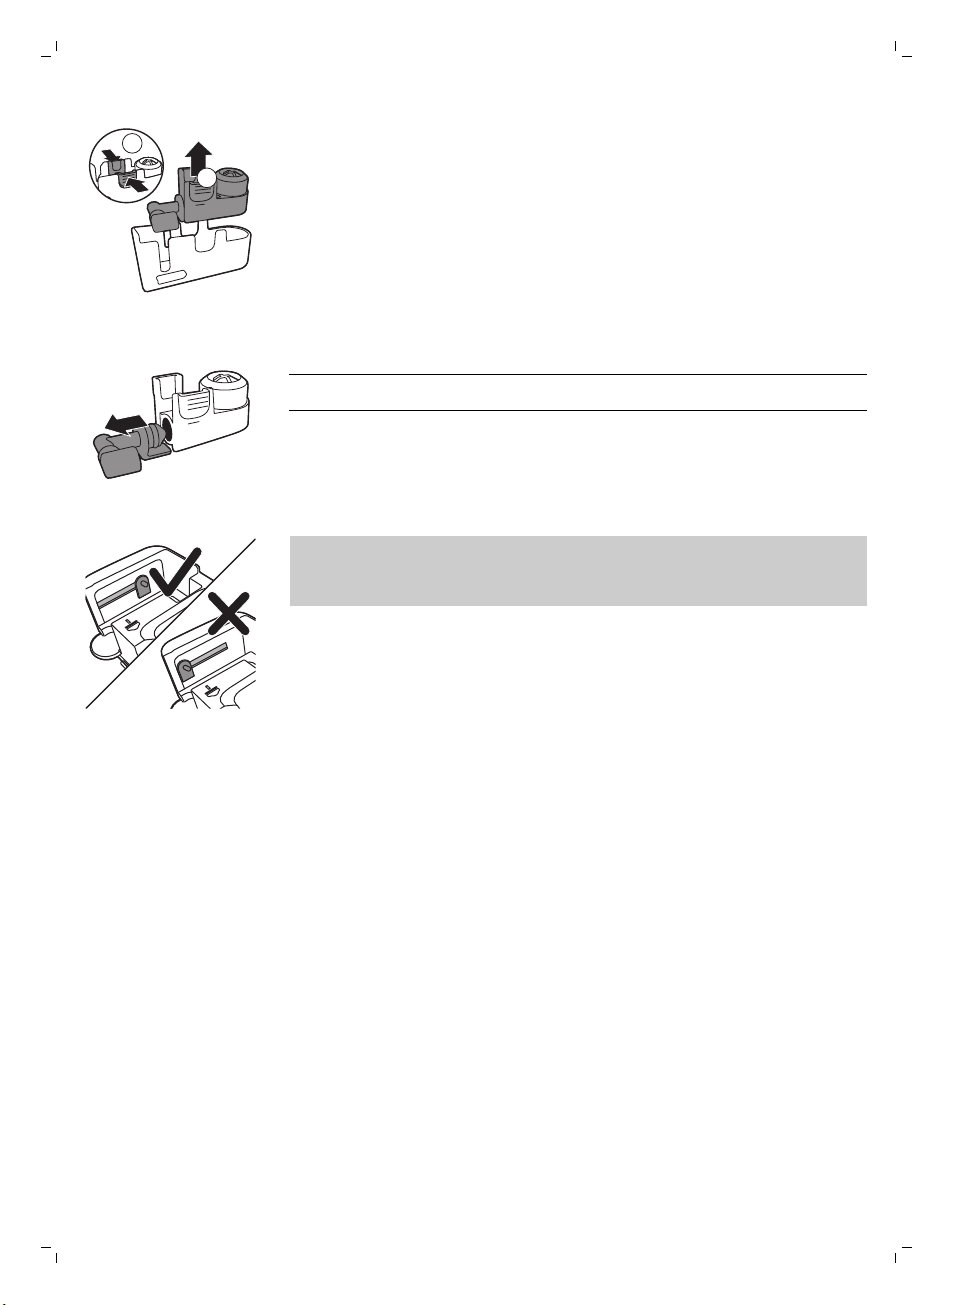
3 Press the release buttons on the milk froth dispensing spout and remove
the milk frother from the the rubber support.
4 Pull the milk frother connection out of the milk frother.
5 Rinse all components under a lukewarm tap.
Tip: All detachable parts, except the carafe, can be cleaned in the
dishwasher.
33
Reassembling the milk carafe
1 To reassemble the milk froth dispensing spout, follow steps 2 to 4 of
'Disassembling the milk froth dispensing spout' in reverse order.
2 Place the milk froth dispensing spout back in the top of the milk carafe.
3 Place the top of the milk carafe back on the milk carafe.
Note: Before you place the milk froth dispensing spout back in the top of
the milk carafe, move the pin inside the top to the correct position. If this
pin is not in the correct position, you cannot place the milk froth
dispensing spout back in the top of the milk carafe.
Monthly cleaning of the milk carafe
Only use SAECO milk circuit cleaner CA6705 for this cleaning cycle.
Page 34
MI
N
MAX
2
MAX
1
34
English
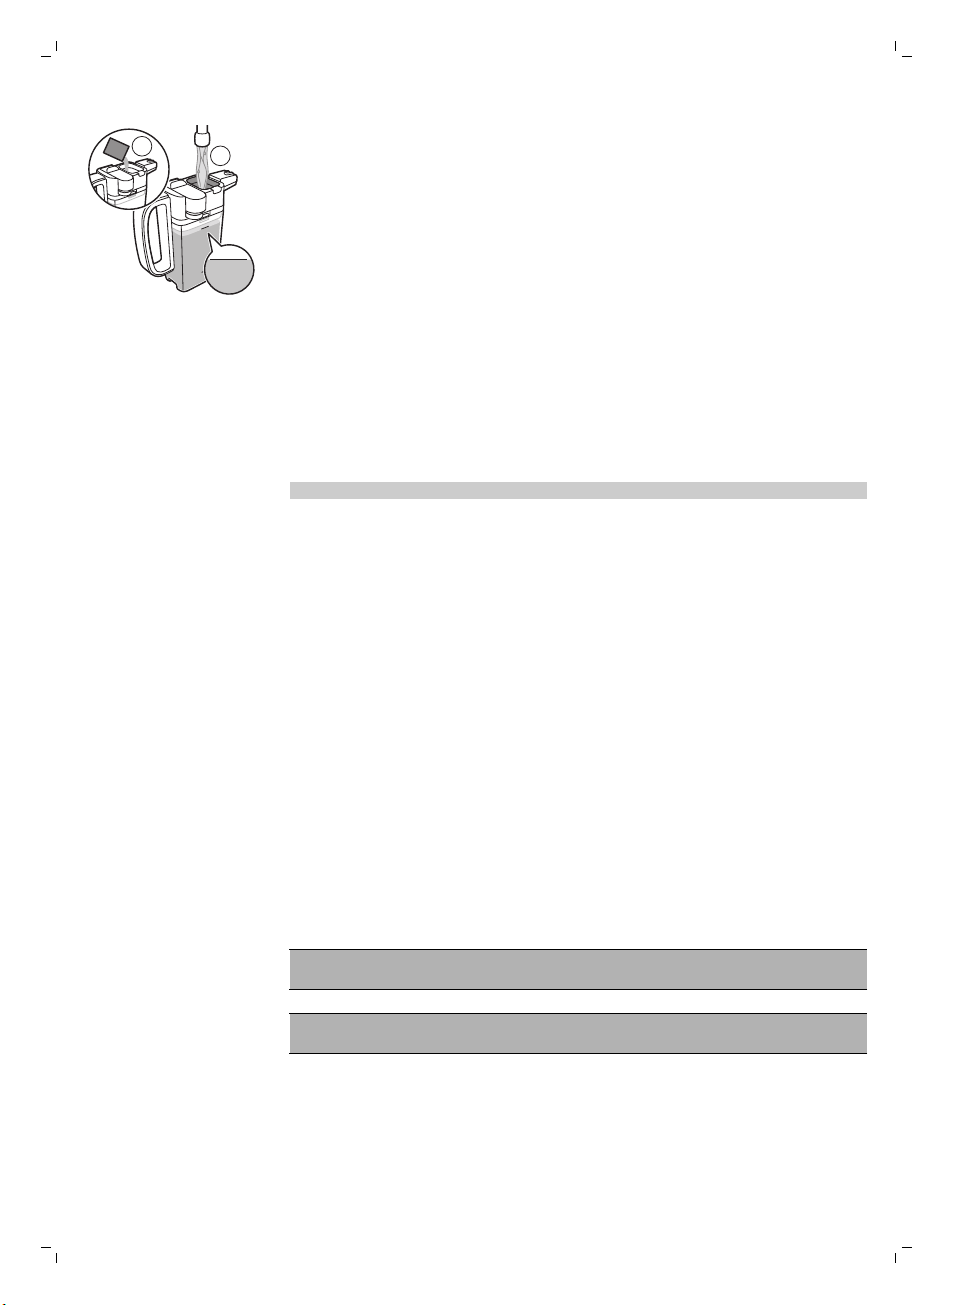
1 Pour the contents of the milk circuit cleaner sachet in the milk carafe (1).
Then fill the milk carafe with water up to the MAX level indication (2).
2 Insert the milk carafe into the machine and place a container under the
milk froth dispensing spout.
3 Press the MENU/SPECIAL DRINKS button, select ' Drinks' and scroll to
milk froth. Press the OK button to start dispensing the cleaning solution.
4 Repeat step 3 until the milk carafe is empty.
5 When the carafe is empty, remove the container and the milk carafe from
the machine.
6 Rinse the milk carafe thoroughly and fill it with fresh water up to the MAX
level indication.
7 Insert the milk carafe into the machine.
8 Place the container under the milk froth dispensing spout.
9 Press the MENU/SPECIAL DRINKS button and select 'milk froth' in the
special drinks menu to start the carafe rinsing cycle.
10 Repeat step 9 until the milk carafe is empty.
Note: never drink the solution dispensed during this step
11 Repeat step 6-10.
12 When the machine stops dispensing water, the cycle is finished.
13 Disassemble all the components and rinse them under a lukewarm tap.
The machine is ready for use.
Descaling procedure
When the display asks 'Start descaling?', you need to descale the machine.
If you do not descale the machine when this question appears on the
display, the machine may stop working properly. In that case, repairs are not
covered by the guarantee.
Only use Saeco descaling solution to descale the machine. Saeco descaling
solution is designed to ensure optimal performance of the machine. The use
of other products may damage the machine and leave residues in the water.
You can buy Saeco descaling solution in the online shop at
www.shop.philips.com/service.
The descaling procedure lasts 23 minutes and consists of a descaling cycle
(20 minutes) and a rinsing cycle (3 minutes). You can pause the descaling or
rinsing cycle by pressing the ESC button. To continue the descaling or
rinsing cycle, press the OK button.
Note: Do not remove the brew group during the descaling
procedure.
Warning: Do not drink the descaling solution or the water
dispensed during the descaling procedure.
Page 35
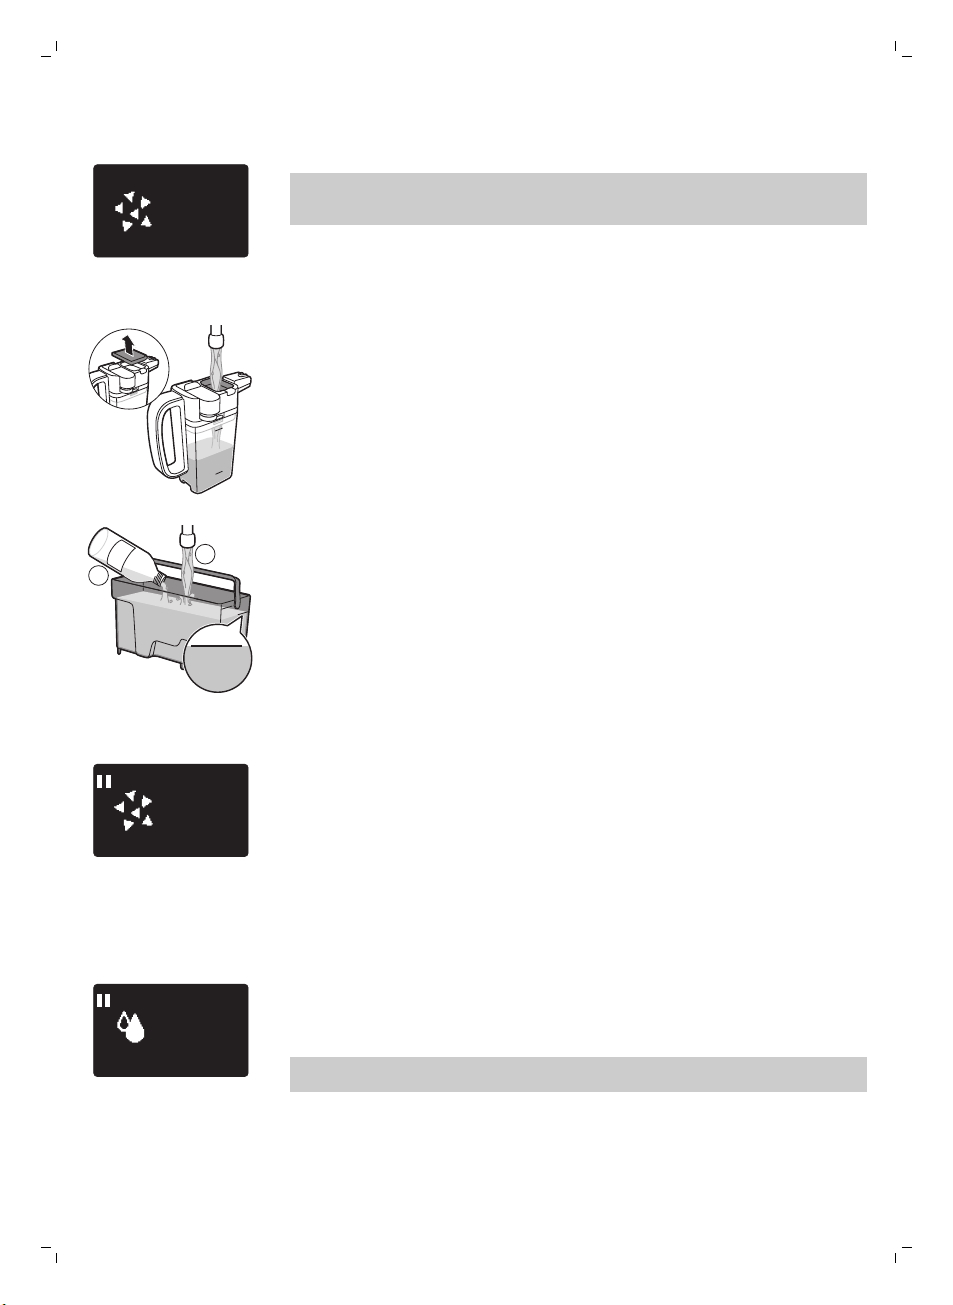
START
DESCALING?
23 MIN
MI
N
MAX
MAX
CALC
CLEAN
CALC
CLEAN
1
2
DESCALING
PHASE 1/2
20 MIN
DESCALING
PHASE 2/2
3 MIN
English
35
1 When the display asks 'Start descaling?', press the OK button to start the
descaling procedure.
Note: You can press ESC to skip descaling. If you want to start the
descaling procedure later, press the MENU/SPECIAL DRINKS button,
choose 'Menu', and scroll to select 'Descaling'. Press OK to confirm.
2 The display tells you to remove the AquaClean filter from the water tank
(if present). Remove the filter and press the OK button to confirm.
3 The display tells you to empty the drip tray. Empty the drip tray and
press the OK button to confirm.
4 The display tells you to insert the milk carafe. Fill the milk carafe with
water halfway, insert the carafe and open the milk dispensing spout.
Press the OK button to confirm.
5 Place a large container (1.5 l) under the coffee dispensing spout and
press the OK button to confirm.
6 Pour the descaling solution in the water tank. Fill the water tank with
fresh water up to the CALC CLEAN level indication. Place the water tank
back in the machine. Press the OK button to confirm.
-
The first phase of the descaling cycle starts. The machine starts
dispensing the descaling solution at intervals.
-
The display shows the descaling icon, the phase indication and the
duration. This first phase takes 20 minutes.
7 Let the machine dispense the descaling solution until the water tank is
empty.
8 Remove the water tank and rinse it.
9 Fill the water tank with fresh water up to the CALC CLEAN level
indication. Place the water tank back in the machine and press OK.
10 Remove and rinse the milk carafe. Fill the milk carafe with water up to the
MIN level indication. Insert the milk carafe into the machine and open the
milk froth dispensing spout.
11 Remove and empty the container and place it back under the coffee
dispensing spout. Press OK to confirm.
12 The second phase of descaling starts, which is a rinsing cycle. This phase
takes 3 minutes. The display shows the rinsing icon and the duration of
the phase.
Note: If the water tank is not filled up to the CALC CLEAN level, the
machine may require another rinsing cycle.
Page 36
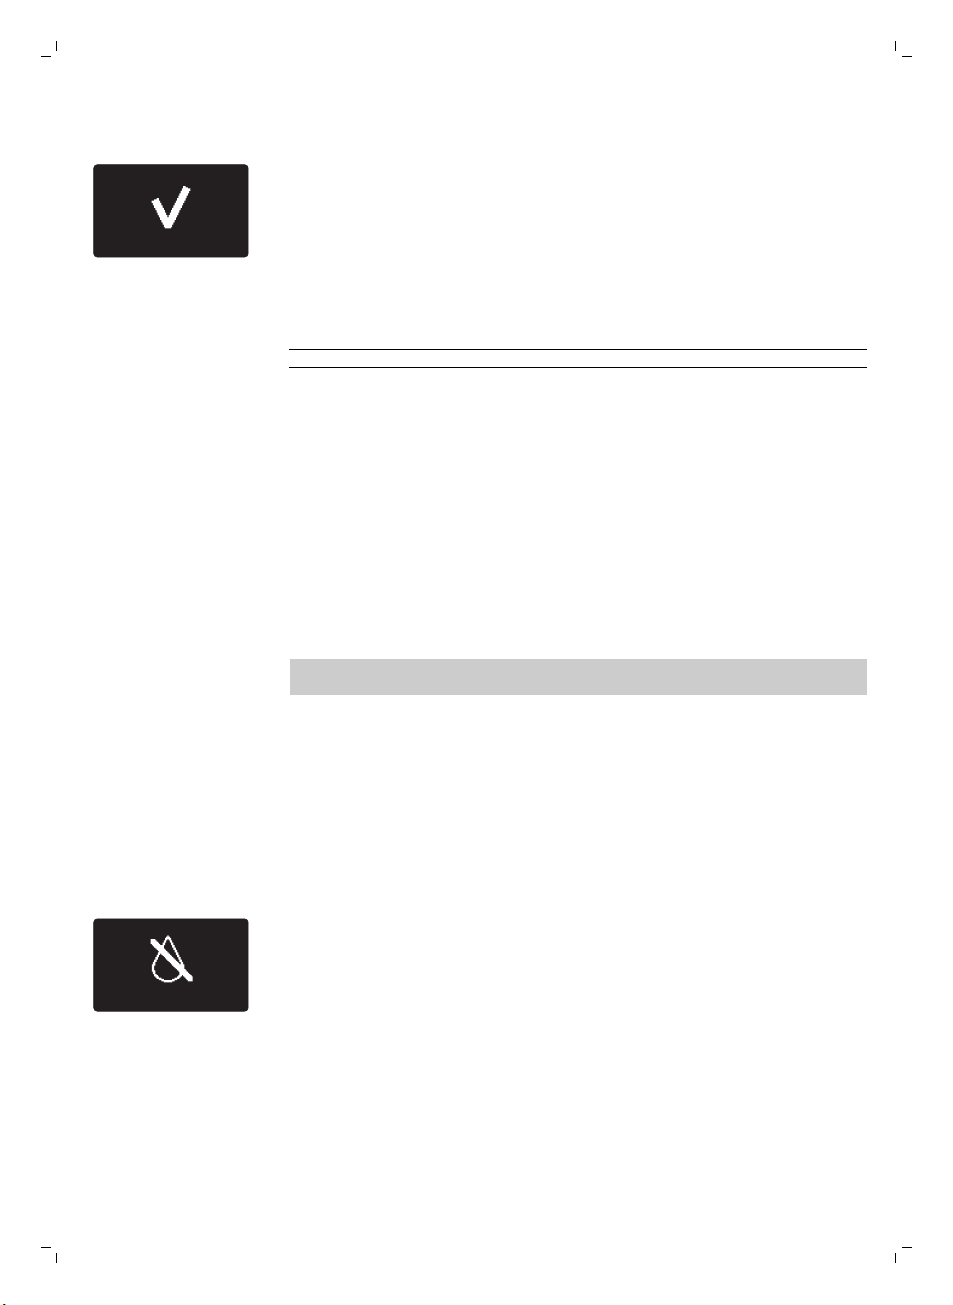
DESCALING COMPLETED
ADD WATER
36
English
13 Wait until the machine stops dispensing water. The descaling procedure
is finished when the tick appears on the display.
14 Press the OK button to exit the descaling cycle. The machine starts
heating up and performs the automatic rinsing cycle.
15 Remove and empty the container.
16 Perform the 'Weekly cleaning of the milk carafe' procedure to clean the
milk carafe after descaling.
17 Clean the brew group by performing the 'Weekly brew group cleaning'
cycle.
18 Install a new AquaClean filter in the water tank.
Tip: Using the AquaClean filter reduces the need for descaling!
What to do if the descaling procedure is interrupted
Once the descaling procedure has started, you must complete it till the very
end without switching off the machine. If the machine gets stuck during the
cycle, you can exit the descaling procedure by pressing the standby button.
If this occurs, or in case of a power failure or accidental disconnection of the
cord, do the following:
1 Empty and rinse the water tank thoroughly.
2 Fill the water tank up to the CALC CLEAN level indication and switch the
machine back on. The machine will heat up and perform an automatic
rinsing cycle.
3 Before brewing any beverages, perform a manual rinsing cycle, see
section 'Manual rinsing cycle'.
Note: If the descaling procedure was not completed, the machine will
require another descaling procedure as soon as possible.
Warning icons and error codes
Meaning of the warning icons
Warning signals are displayed in red. Below you find a list of the
warnings that may appear on the display and their meaning.
-
Fill the water tank with fresh water to the MAX level indication.
Page 37
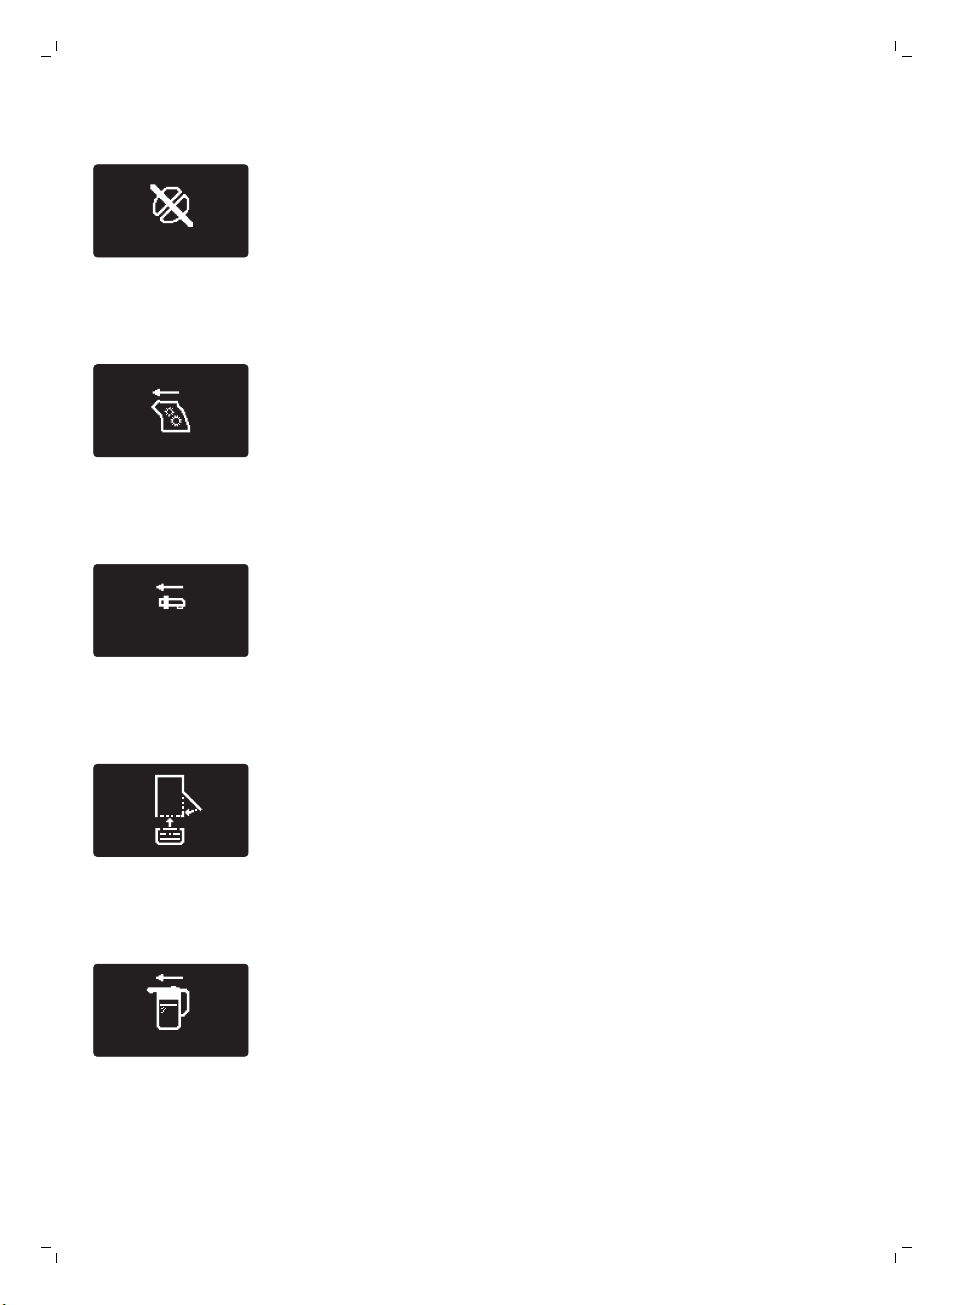
ADD COFFEE
INSERT
WATER SPOUT
INSERT CARAFE
English
-
The bean hopper is empty. Put new coffee beans in the bean hopper.
-
The brew group is not in the machine. Insert the group.
-
The hot water dispensing spout is not installed. Insert the hot water
dispensing spout.
37
-
Insert the drip tray and close the service door.
-
The milk carafe is not installed. Insert the milk carafe into the machine.
Page 38
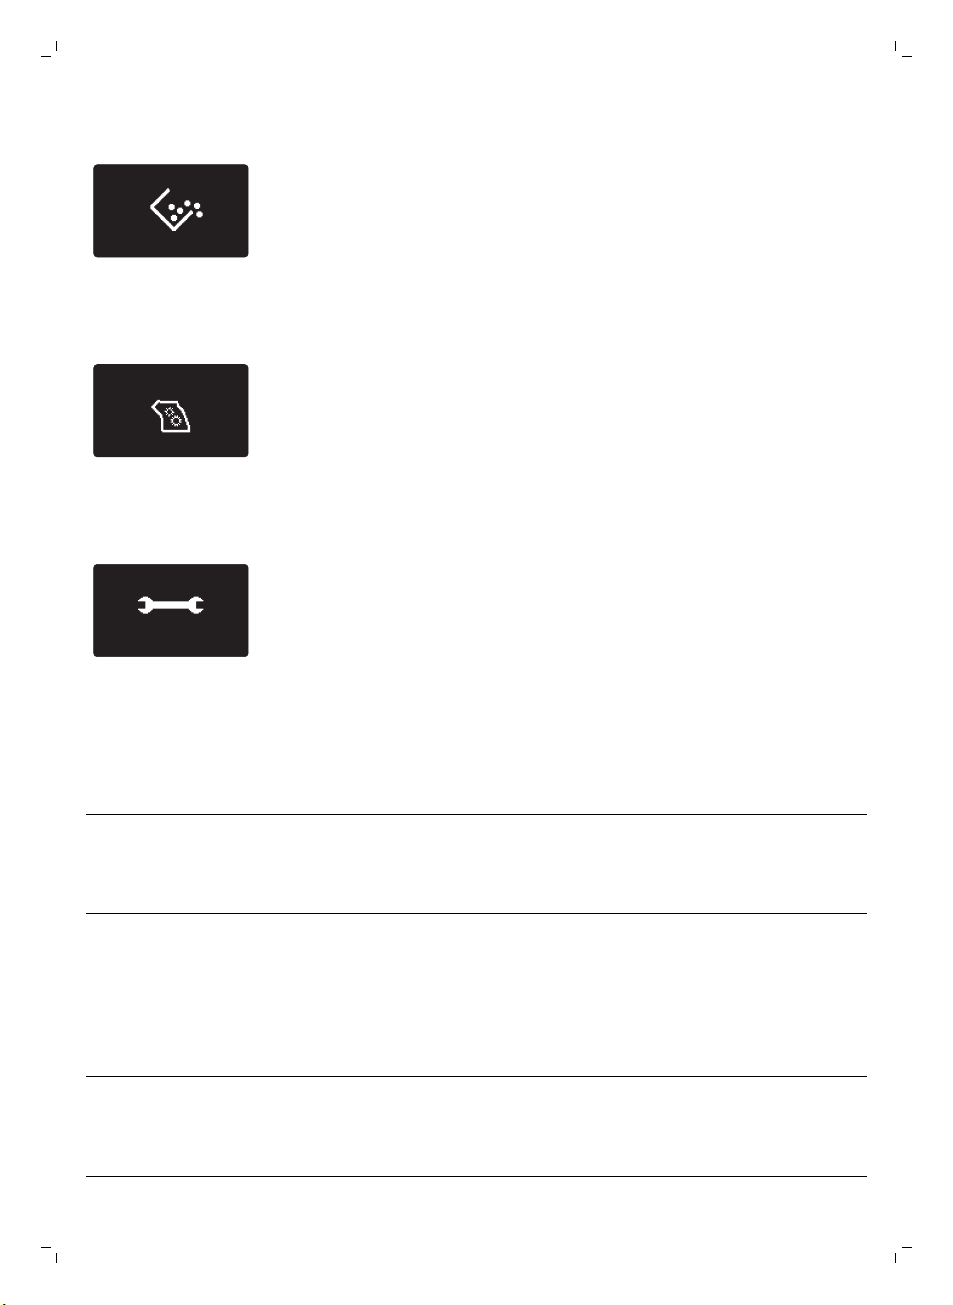
10
SUPPORT REQUIRED
38
English
-
Remove the coffee grounds container and empty it.
-
There is too much powder in the brew group. Clean the brew group.
-
If an error code is triggered, check the section 'Meaning of error codes' to
see what the code on the display means and what you can do. The
machine cannot be used when this icon is on the display.
Meaning of error codes
Error code
1 Coffee grinder blocked Coffee exit duct
3 - 4 The brew group cannot
5 Water circuit problem There is air in the water
Problem Cause Possible solution
clogged
be removed.
The brew group is
blocked by dirt or is not
positioned correctly.
circuit.
Clean the coffee exit
duct thoroughly with
the handle of the
multifunctional tool or a
spoon handle.
Close the service door.
Switch the machine off
and back on again. Wait
for the ‘machine ready’
icon on the display and
then remove the brew
group.Clean the brew
group and make sure it
is well greased.
Remove the AquaClean
filter and switch the
machine off and on
again. If the machine
works, replace the filter.
Page 39
English
Error code Problem Cause Possible solution
Perform a manual
rinsing cycle.
Remove the water tank
from the machine.
Check the water tank
compartment to check if
there are any coffee
beans on the bottom.
Remove them. Switch
the machine on and off.
39
Other error codes Switch the machine off
If the above solutions do not help to remove the error code icon from the
display and bring the machine back to normal working order, contact the
Philips Saeco hotline. Contact details can be found in the warranty booklet
or on www.saeco.com/support.
and switch it back on
again after 30 seconds.
Try this 2 or 3 times.
Troubleshooting
Problem
The machine does not
switch on.
The machine is in DEMO
mode.
The drip tray is quickly
filled.
Cause Solution
The machine is disconnected or the
main switch is in the OFF position.
The standby button has been
pressed for more than 8 seconds.
This is normal. The machine uses
water to rinse the internal circuit and
brew group. Some water flows
through the internal system directly
into the drip tray.
Check if the mains cord is inserted
correctly.
Make sure that the main switch is
set in ON position.
Switch the machine off and then
on again using the main switch on
the back of the machine.
Empty the drip tray when the 'drip
tray full' full indicator pops up
through the drip tray cover.
Place a cup under the dispensing
spout to collect rinsing water.
The coffee grounds
container full icon remains
displayed.
The coffee grounds container was
emptied while the machine was
switched off.
Always empty the coffee grounds
container while the machine is ON.
If the coffee grounds container is
emptied while the machine is
switched off, the coffee cycle
counter is not reset. In that case,
the 'empty coffee grounds
container' message will stay on the
display even though the container
is not full.
Page 40
40
English
The brew group cannot be
removed.
The brew group cannot be
inserted.
The coffee grounds container was
placed back too fast.
The brew group is not positioned
correctly.
The coffee grounds container is not
removed.
The machine is still in the descaling
process.
The brew group is not in the correct
position.
Do not place back the coffee
grounds container until the screen
message prompts you to put it
back.
Close the service door. Switch the
machine off and back on again.
Wait for the machine ready screen
to appear and then remove the
brew group.
Remove the coffee grounds
container before removing the
brew group.
You cannot remove the brew
group when the descaling process
is active. First complete the
descaling process and then
remove the brew group.
The brew group was not put in rest
position before it was placed back.
Make sure that the lever is in
contact with the base of the brew
group and that the hook of the
brew group is in the correct
position.
Reset the machine by switching it
on and off. Place the drip tray and
the coffee grounds container back.
Leave the brew group out. Close
the service door and switch the
machine on and off. Then try to
reinsert the brew group.
The coffee has too little
cream or is watery.
The coffee is not hot
enough.
The grinder is set to a coarse setting. Adjust the grinder to a finer setting.
The brew group is dirty. Clean the brew group. For
The coffee exit duct is dirty. Clean the coffee exit duct
The coffee blend is not the correct
one.
The cups you use are cold. Preheat the cups by rinsing them
The temperature is set too low.
Check the menu settings.
You added milk. Whether the milk you add is warm
thorough cleaning, follow the
monthly cleaning procedure with
the degreasing tablet.
thoroughly with the handle of the
multifunctional tool or a spoon
handle.
Try another coffee blend.
with hot water.
Set the temperature to high in the
menu.
or cold, it will always decrease the
temperature of the coffee to some
extent.
Page 41
English
41
The machine grinds the
coffee beans, but coffee
does not come out.
The coffee comes out
slowly.
The milk does not froth. The milk carafe is dirty or not
The grind is set too fine. Adjust the grinder to a coarser
The brew group is dirty. Clean the brew group.
The coffee dispensing spout is dirty. Clean the coffee dispensing spout
The coffee exit duct is blocked. Clean the coffee exit duct with the
The grind is ground too finely. Adjust the grinder to a coarser
The brew group is dirty. Clean the brew group.
The coffee exit duct is blocked. Clean the coffee exit duct with the
The machine circuit is blocked by
limescale.
inserted correctly.
The milk froth dispensing spout has
not been opened fully.
The milk carafe is incompletely
assembled.
setting.
and its holes with a pipe cleaner.
handle of the multifunctional tool
or a spoon handle.
setting.
handle of the multifunctional tool
or a spoon handle.
Descale the machine.
Clean the carafe and make sure
that you position and insert it
correctly.
Check that the milk froth
dispensing spout has been set in
the correct position.
Check that all the components
have been assembled correctly.
The AquaClean filter
cannot be activated as the
tick does not appear on
the display.
The filter cannot be
activated and the
machine asks for
descaling.
The type of milk used is not suitable
for frothing.
A filter has just been activated. You have to dispense at least 10
You have already replaced 8
AquaClean filters. After 8 filter
replacements you need to descale
the machine.
The filter has not been replaced in
time after the AquaClean water filter
signal started flashing.
Different types of milk result in
different amounts of froth and
different froth qualities. We have
tested the following milk types
which proved to deliver a good
milk froth result: semi-skimmed or
full-fac cow's milk, soy milk and
lactose-free milk. Other types of
milk have not been tested and
may result in a small amount of
milk froth.
cups (of 100ml each before you
can activate a new filter. Be careful
as you activate a new filter, the
filter counter will increase
automatically.
Descale your machine first and
install the filter.
Descale your machine first and
install the filter.
Page 42
42
English
The filter has not been installed
during first installation but after
having brewed approx. 50 coffees
(based on 100ml cups). The machine
has to be completely limescale-free
before installing the AquaClean filter.
The AquaClean filter was not
activated in the menu at first
installation.
The AquaClean filter is
installed, but the
descaling message
appears.
The descaling message
appears before 8 filters
were replaced.
The filter does not fit. You need to remove air from the
After 8 filter replacements, you need
to descale the machine
You did not activate the AquaClean
filter correctly during first installation.
You placed the AquaClean filter after
having used the machine for a while.
You did not activate the replacement
filter in the machine menu.
You did not replace the filter when
the filter symbol started flashing.
filter.
First descale the machine and
then install a new AquaClean filter.
After descaling, the filter counter is
reset to 0/8. Always confirm filter
activation in the machine menu,
also after filter replacement
Descale your machine first and
install a new filter.
First descale the machine and
then install a new AquaClean filter.
This will reset the filter counter to
0/8. Always confirm filter
activation in the machine menu,
also after filter replacement.
First descale the machine and
then install a new AquaClean filter.
Always activate the filter in the
machine menu.
Let air bubbles come out of the
filter.
There is still water in the water tank. Empty the water tank before you
You try to install another filter than
the AquaClean filter.
There is water under the
machine.
The machine is not placed on a
The drip tray is too full and
overflowed.
horizontal surface.
Note: If you are unable to solve the problem with the information in this
table, contact the Philips Saeco hotline.
Demo mode function
The machine is provided with a demo mode function.
install the filter.
Only the AquaClean filter will fit.
Empty the drip tray when the drip
tray full indicator pops up through
the drip tray. Always empty the
drip tray before you start descaling
the machine.
Place the machine on a horizontal
surface so that the drop iray full
indicator works properly.
Page 43
1 Press and hold the STANDBY button for more than 8 seconds to enter
the demo mode function.
2 To exit the demo mode, switch the machine OFF and ON using the main
switch at the back of the machine.
Ordering accessories Saeco
To clean and descale the machine, only use the Saeco maintenance
products. These products can be purchased in the Philips online shop (if
available in your country) at www.shop.philips.com/service, from your local
reseller or from the authorized service centers.
Ordering maintenance products:
Typenumber
CA6700 Descaling solution
CA6903 AquaClean filter
HD5061 Brew group grease
CA6704 Degreasing tablets
CA6705 Milk circuit cleaner
Product
English
43
Technical specifications
The manufacturer reserves the right to improve the technical specifications
of the product. All the preset quantities are approximate.
Description
Housing material Thermoplastic
Size (w x h x d) 221 x 335 x 430 mm
Weight 8.9 kg
Power cord length 800 - 1200 mm
Control panel Front
Cup size up to 152 mm
Water tank 1.8 litres, removable
Coffee bean hopper capacity 250 g
Coffee grounds drawer capacity 15 pucks
Milk carafe capacity 500 ml
Pump pressure 15 bar
Boiler stainless steel boiler
Value
Page 44
44
English
Safety devices thermal fuse
Energy saving mode < 1 Wh
Nominal voltage - Power rating - Power supply See data on inside of service door
Recycling
-
This symbol means that this product shall not be disposed of with normal
household waste (2012/19/EU).
-
Follow your country's rules for the separate collection of electrical and
electronic products. Correct disposal helps prevent negative
consequences for the environment and human health.
Guarantee and support
If you need information or support, please visit www.saeco.com/support or
read the separate guarantee leaflet.
If you need information or support, please contact the Philips Saeco hotline
in your country. Contacts are included in the warranty booklet supplied
separately or visit www.saeco.com/support.
Page 45

한국의
45
목차
소개 46
중요 사항 46
경고 46
주의 46
커피 머신 개요 47
사용자 인터페이스 48
최초 설치 48
수동 헹굼 과정 53
커피 추출 배출구 헹굼 53
온수 배출구 헹굼 53
AquaClean 필터 53
AquaClean 필터 준비 및 설치 53
AquaClean 필터 활성화 54
AquaClean 필터 교체 56
물 경도 측정 57
음료 종류 및 양 58
커피 추출 59
원두로 커피 추출 60
분쇄 커피로 커피 추출 60
우유 함유 음료 추출 61
밀크 카라페 사용법 61
우유 함유 커피 음료와 우유 거품 추출 62
스페셜 드링크 63
스페셜 드링크 선택법 63
온수 배출 63
용량 및 풍미 조절 64
Saeco 조절 시스템 64
커피 및 우유 양 조절 64
커피 강도 조정 64
분쇄기 설정 조절 65
유지관리 65
추출기 세척 66
추출기에 월 1회 윤활유 도포 68
밀크 카라페 세척 69
석회질 제거 절차 72
석회질 제거 절차가 도중에 중단된 경우의 대처 방법 74
경고 아이콘 및 오류 코드 74
오류 코드의 의미 76
문제 해결 77
데모 모드 기능 80
액세서리 Saeco 주문 80
기술 사양 81
재활용 81
보증 및 지원 82
한국의
Page 46

46
한국의
소개
중요 사항
경고
Saeco PicoBaristo 전자동 에스프레소 머신을 구입해 주셔서 감사합니다! 이제
버튼을 누르기만 하면 에스프레소에서 라테 마키아토까지 원하는 모든 특별한
커피를 신선한 원두로 만들 수 있습니다.
이 사용 설명서는 커피 머신을 설치 및 사용하고 유지관리하며 최대한 활용하는 데
필요한 정보를 제공합니다. Saeco가 드리는 지원 혜택을 받으실 수 있도록
www.philips.com/welcome에서 제품을 등록하해 주십시오.
-
커피 머신의 기술 사양과 전압이 일치하는 벽면 콘센트에 커피 머신을
연결하십시오.
-
커피 머신을 접지된 벽면 콘센트에 연결하십시오.
-
전원 코드가 식탁이나 조리대의 가장자리로 흘러내리거나 뜨거운 표면에 닿지
않도록 하십시오.
-
커피 머신, 전원 플러그, 전원 코드를 물에 담그지 마십시오(감전 위험).
-
전원 코드 커넥터에 액체를 붓지 마십시오.
-
분사되는 뜨거운 물이 몸 쪽을 향하지 않도록 하십시오. 화상을 입을 위험이
있습니다.
-
뜨거운 표면에 손을 대지 마십시오. 손잡이와 조절기를 사용하십시오.
-
다음과 같은 경우 뒷면에 있는 전원 스위치를 끈 다음 콘센트에서 전원
플러그를 뽑으십시오.
-
오작동이 발생할 경우
-
커피 머신을 장시간 사용하지 않을 경우
-
커피 머신을 청소하기 전
-
전원 코드를 잡지 말고 플러그를 잡고 당기십시오.
-
젖은 손으로 전원 플러그를 만지지 마십시오.
-
만약 전원 플러그나 전원 코드 또는 본체가 손상되었을 때는 머신을 사용하지
마십시오..
-
커피 머신이나 전원 코드를 개조하지 마십시오.
-
수리가 필요할 경우 안전을 위해 필립스 지정 서비스 센터만 이용하십시오. .
-
이 커피 머신은 8세 미만의 어린이가 사용할 수 없습니다.
-
8세 이상의 어린이 및 신체적인 감각 및 정신적인 능력이 떨어지거나 경험과
지식이 풍부하지 않은 성인이 이 머신을 사용하려면 머신 사용과 관련하여
안전하게 사용할 수 있도록 지시사항을 충분히 숙지한 사람의 도움을 받아야
합니다.
-
8세 이상 어린이가 어른의 지도를 받으면서 하지 않는 한, 어린이가 제품 청소
및 관리를 하도록 두어서는 안됩니다.
-
커피 머신과 코드를 8세 이하 어린이의 손에 닿지 않는 장소에 보관하십시오.
-
어린이가 커피 머신을 가지고 놀지 못하도록 지도하십시오.
-
손가락이나 다른 물체를 커피 분쇄기에 넣지 마십시오.
주의
-
이 커피 머신은 가정용입니다. 본 제품은 매장의 직원 휴게실, 사무실, 농장 또는
기타 작업 환경 등에서 사용하기 위한 것이 아닙니다.
Page 47

커피 머신 개요
한국의
-
커피 머신을 평평하고 안정적인 곳에 두십시오. 이동 시에도 항상 똑바로 세워
옮기십시오..
-
커피 머신을 열판 위, 뜨거운 오븐 바로 옆, 히터 또는 화기 근처에 놓지
마십시오.
-
원두 투입구에는 볶은 커피 원두만 넣으십시오. 커피 원두 투입구에 분쇄 커피,
인스턴트 커피, 커피 생두 또는 다른 물질을 넣으면 커피 머신이 손상될 수
있습니다.
-
부품을 끼우거나 빼낼 때는 커피 머신이 충분히 식은 후에 하십시오. 사용 후
가열 표면에 잔열이 남아 있을 수 있습니다.
-
물탱크에 따뜻하거나 뜨거운 물 또는 탄산수를 채우지 마십시오. 물탱크와 커피
머신이 손상될 수 있습니다.
-
커피 머신을 세척할 때 수세미, 연마성 세제나 휘발유, 아세톤과 같은 강력
세제를 사용하지 마십시오. 물에 적신 부드러운 천을 사용하여 닦으십시오.
-
커피 머신의 석회질을 정기적으로 제거하십시오. 석회질을 제거해야 할 경우
커피 머신에 메시지가 표시됩니다. 석회질을 제거하지 않으면 기기가 제대로
작동되지 않습니다. 이런 경우에는 보증 수리를 받을 수 없습니다.
-
0°C 이하의 온도에서 커피 머신을 보관하지 마십시오. 가열 시스템에 남아 있는
물이 얼어 손상될 수 있습니다.
-
커피 머신을 장기간 사용하지 않을 경우 물탱크에 물을 남아 있지 않도록
하십시오. 물이 오염될 수 있습니다. 커피 머신을 사용할 때는 항상 깨끗한 물을
사용하십시오.
1 사용자 인터페이스
2 에스프레소 버튼
3 에스프레소 룽고 버튼
4 카페 크레마 버튼
5 ESC 버튼
6 OK 버튼
7 대기 버튼
8 디스플레이
9 메뉴/스페셜 드링크 버튼
10 아래 화살표 버튼
11 위 화살표 버튼
12 카푸치노 버튼
13 라테 마키아토 버튼
14 아로마 강도 버튼
15 보호 캡
16 조절 및 탈착 가능한 커피 배출구
17 물탱크 뚜껑
18 원두 투입구 뚜껑
19 분쇄 커피함 뚜껑
20 전원 스위치
21 코드 소켓
22 서비스 도어
23 물받이 열림 버튼
24 우유 거품 배출구
25 밀크 카라페 뚜껑
26 밀크 카라페 상단
27 밀크 카라페
28 물탱크
29 분쇄기 조절 스위치
47
Page 48
1
2
3
4
15 cm
15 cm
15 cm
15 cm
15 cm
15 cm
15 cm
15 cm
48
한국의
30 코드
31 물 경도 테스터
32 윤활유
33 청소용 브러시
34 다기능 도구
(계량 스푼, 분쇄기 조절키, 커피 배출관 세척 도구)
35 추출기
36 서비스 도어
37 커피 배출관
38 커피 찌꺼기 통
39 물받이 가득 참 표시등
40 커피 가루 용기
41 물받이 덮개
42 물받이
43 온수 배출구
44 온수 배출구용 구멍
사용자 인터페이스
다음 버튼을 사용하여 메뉴를 탐색합니다.
1 ESC 버튼: 이 버튼을 누르면 주 메뉴로 돌아갑니다.
2 OK 버튼: 기능을 선택하여 확인하거나 중단하려면 이 버튼을 누릅니다.
3 위 화살표 버튼: 디스플레이 메뉴에서 위로 스크롤하려면 이 버튼을 누릅니다.
4 아래 화살표 버튼: 디스플레이 메뉴에서 아래로 스크롤하려면 이 버튼을
누릅니다.
다음 동작을 안내하기 위해 버튼에 불이 들어옵니다. 음료 선택을 확인하거나
기능을 중단하려면 OK 버튼을 눌러야 합니다. 디스플레이에 일시 중지 기호가
표시되면 뒤로 돌아가 기능을 일시 중지할 수 있도록 ESC 버튼이 켜집니다.
최초 설치
이 커피 머신은 커피를 사용하여 테스트를 거쳤습니다. 꼼꼼히 세척하였으나 일부
커피 찌꺼기가 남아 있을 수 있습니다. 그러나 이 커피 머신은 완벽한 새 제품임을
보장합니다.
대부분의 전자동 커피 머신과 마찬가지로 처음에 몇 번 커피를 추출한 후에야 커피
머신이 자율 조절 기능을 통해 최상의 커피 맛을 낼 수 있습니다.
1 커피 머신에서 모든 포장재를 제거합니다.
2 커피 머신을 수도꼭지, 싱크대 및 열원에서 떨어진 테이블이나 작업대에
놓습니다.
참고: 위쪽, 뒤쪽 및 양쪽 측면에 최소한 15cm 정도의 여유 공간을 두십시오.
Page 49
M
AX
CALC
CLEAN
MAX
2
1
한국의
49
3 물탱크에 MAX 표시선까지 깨끗한 물을 채운 후 커피 머신에 다시 장착합니다.
OK 버튼을 눌러 확인합니다.
4 원두 투입구의 뚜껑을 엽니다. 원두 투입구에 커피 원두를 채우고 뚜껑을
닫습니다.
참고: 분쇄기가 손상될 수 있으니 원두 투입구에 원두를 너무 많이 채우지
마십시오.
주의: 에스프레소 원두만 사용하십시오. 커피 머신이 손상될 수 있으므로 분쇄
커피, 볶지 않은 커피 생두 또는 카라멜화된 커피 원두는 사용하지 마십시오.
5 전원 플러그를 벽면 콘센트에 꽂고(1), 소형 플러그를 커피 머신 뒷면에 있는
소켓에 꽂습니다(2).
6 전원 스위치를 켜짐 위치로 설정하여 커피 머신의 전원을 켭니다.
-
대기 버튼이 깜박입니다.
7 대기 버튼을 눌러 커피 머신의 전원을 켭니다.
8 언어를 선택하라는 메시지가 디스플레이에 표시됩니다. OK 버튼을 누릅니다.
Page 50
SELECT LANGUAGE
PRIMING
50
한국의
9 언어 목록을 아래로 스크롤하고 OK 버튼을 눌러 선택한 언어를 확인합니다.
10 디스플레이에 배출구 프라이밍 아이콘이 나타나 배출구 프라이밍이
필요하다고 알려줍니다.
11 온수 배출구를 끼웁니다.
12 온수 배출구 아래에 용기를 놓습니다. OK 버튼을 눌러 물 배출구 프라이밍
과정을 시작합니다. 온수가 배출되기 시작합니다.
13 프라이밍 아이콘이 디스플레이에 표시됩니다. 진행 표시바는 프라이밍 과정의
진행 상황을 보여줍니다.
Page 51
HEATING UP
RINSING
ACTIVATE
AQUACLEAN FILTER?
2 MIN
INSERT FILTER
FILL WATER TANK
한국의
14 커피 머신이 가열되면 온도 아이콘이 디스플레이에 표시됩니다.
15 용기를 비운 다음 커피 배출구 아래에 놓습니다.
16 커피 머신의 커피 배출구에서 헹굼 물이 배출되기 시작합니다. 헹굼 아이콘과
진행 표시바가 디스플레이에 표시됩니다.
참고: 헹굼 과정 도중에 중단하지 마십시오.
17 디스플레이에 AquaClean 필터를 사용할 것인지 묻는 메시지가 표시됩니다.
참고: AquaClean 필터를 나중에 설치하려면 ESC 버튼을 누르고 수동 헹굼
과정을 계속하십시오. 나중에 설치하는 방법은 'AquaClean 필터' 단원을
참조하십시오.
51
18 AquaClean 필터를 설치하려면 OK 버튼을 누릅니다. 활성화하는 데 2분
걸립니다. 필터를 끼우고 물탱크를 채우라는 메시지가 디스플레이에
표시됩니다.
19 AquaClean 필터의 포장을 벗깁니다. 필터를 약 5초 동안 흔들어 줍니다.
20 찬물을 넣은 용기에 AquaClean 필터를 거꾸로 담근 후 공기 거품이 올라오지
않을 때까지 기다립니다.
21 커피 머신에서 물탱크를 빼내 비웁니다.
Page 52
PLACE A
CONTAINER
UNDER THE
WATER SPOUT
ACTIVATING
FILTER
52
한국의
22 AquaClean 필터를 필터 연결부에 수직 방향으로 끼웁니다. AquaClean
필터를 최대한 아래까지 밀어 넣습니다. 최상의 성능을 보장할 수 있도록 하기
위해 필터가 단단히 고정되어 있고 씰의 위치가 올바른지 확인합니다.
23 물탱크에 MAX 표시선까지 깨끗한 물을 채운 후 커피 머신에 다시 장착합니다.
OK 버튼을 눌러 확인합니다.
24 온수 배출구 아래에 용기를 놓으라는 메시지가 디스플레이에 표시됩니다. OK
버튼을 눌러 확인합니다. 물이 배출되기 시작합니다.
25 필터 활성화 화면에 필터 활성화 진행 상황을 보여주는 진행 표시바가
나타납니다.
26 활성화가 끝나면 활성화를 확인하는 체크 표시가 디스플레이에 나타납니다.
27 그런 다음 AquaClean 100% 아이콘과 함께 머신이 준비되었음을 알려주는
화면이 나타나 필터가 활성화되었음을 보여줍니다.
Page 53
수동 헹굼 과정
GROUND COFFEE
HOT WATER
수동 헹굼 과정에서 깨끗한 물이 물과 커피 추출 배출구를 통해 흐릅니다. 이
과정은 몇 분 정도 걸립니다.
커피 추출 배출구 헹굼
1 커피 배출구 아래에 용기를 놓습니다.
2 AROMA STRENGTH(아로마 강도) 버튼을 누르고 GROUND COFFEE(분쇄
커피)를 선택합니다.
참고: 분쇄 커피함에 분쇄 커피를 추가하지 마십시오.
3 CAFFÈ CREMA(카페 크레마) 버튼을 누릅니다. 커피 머신의 커피 배출구에서
물이 배출되기 시작합니다.
4 물 배출이 멈출 때까지 기다렸다가 용기를 비우십시오.
5 1-4단계를 두 번 반복합니다.
온수 배출구 헹굼
1 온수 배출구를 끼우고 용기를 온수 배출구 아래에 놓습니다.
2 MENU/SPECIAL DRINKS(메뉴/스페셜 드링크) 버튼을 누릅니다. SPECIAL
DRINKS(스페셜 드링크) 기능을 선택한 다음 메뉴를 스크롤하여 HOT
WATER(온수) 기능을 선택합니다. OK 버튼을 눌러 확인합니다.
온수가 배출되기 시작합니다.
3 배출이 멈추면 1-3단계를 두 번 반복합니다.
4 주 메뉴로 돌아가면 용기를 비웁니다. 이제 커피 머신을 사용하기 위한 준비가
되었습니다.
한국의
53
AquaClean 필터
AquaClean 필터는 커피 머신에 물때가 끼는 것을 줄이고 커피의 향과 풍미를
항상 유지하기 위해 여과된 물을 공급하도록 고안된 것입니다. 이 사용 설명서에
제시된 바와 같이 AquaClean 필터 8개를 사용할 경우 5000잔(100ml
용량)까지는 석회질을 제거할 필요가 없습니다.
참고: 디스플레이에서 필터 아이콘이 깜박거리기 시작하면 AquaClean 필터를
교체하십시오. 교체가 필요하다는 메시지가 나타나지 않더라도 적어도 3개월에 한
번은 AquaClean 필터를 교체하십시오.
AquaClean 필터 준비 및 설치
1 AquaClean 필터의 포장을 벗깁니다. 필터를 약 5초 동안 흔들어 줍니다.
Page 54
AQUACLEAN
FILTER
0 / 8
ACTIVATE
AQUACLEAN FILTER?
2 MIN
54
한국의
2 찬물을 넣은 용기에 AquaClean 필터를 거꾸로 담근 후 공기 거품이 올라오지
않을 때까지 기다립니다.
3 AquaClean 필터를 필터 연결부에 수직 방향으로 끼웁니다. AquaClean
필터를 최대한 아래까지 밀어 넣습니다. 최상의 성능을 보장할 수 있도록 하기
위해 필터가 단단히 고정되어 있고 씰의 위치가 올바른지 확인합니다.
AquaClean 필터 활성화
처음 설치할 때 설치 과정에서 AquaClean 필터를 설치할 수 있습니다. 처음에
AquaClean 필터를 설치하지 않은 경우 아래 설명에 따라 메뉴를 선택하여 설치할
수 있습니다.
1 MENU/SPECIAL DRINKS(메뉴/스페셜 드링크) 버튼을 누르고 MENU(메뉴)를
선택한 후 OK 버튼을 누릅니다. 스크롤하여 'AquaClean' 필터를 선택합니다.
OK 버튼을 눌러 확인합니다.
-
이전에 설치한 AquaClean 필터 수(0-8개)가 디스플레이에 표시됩니다.
2 필터를 사용할 것인지 묻는 메시지가 디스플레이에 표시됩니다. 필터를
사용하려면 OK 버튼을 누릅니다.
Page 55
INSERT FILTER
FILL WATER TANK
INSERT
WATER SPOUT
PLACE A
CONTAINER
UNDER THE
WATER SPOUT
ACTIVATING
FILTER
한국의
3 필터를 끼우고 물탱크를 채우라는 메시지가 디스플레이에 표시됩니다.
AquaClean 필터를 준비하여 물탱크에 끼웁니다('AquaClean 필터 준비 및
설치' 참조). 물 탱크를 MAX 표시선까지 채웁니다.
4 온수 배출구를 커피 머신에 끼우라는 메시지가 디스플레이에 표시됩니다. OK
버튼을 눌러 확인합니다.
5 온수 배출구 아래에 용기를 놓으라는 메시지가 디스플레이에 표시됩니다. OK
버튼을 눌러 확인합니다. 물이 배출되기 시작합니다.
55
-
필터 활성화 화면에 필터 활성화 진행 상황을 보여주는 진행 표시바가
나타납니다.
-
활성화가 끝나면 활성화를 확인하는 체크 표시가 디스플레이에 나타납니다.
Page 56
56
한국의
-
AquaClean 필터 교체
디스플레이에서 필터 아이콘이 깜박이기 시작하면 AquaClean 필터를
교체하십시오.
필터 용량 표시등
-
새 필터를 설치하면 필터 아이콘 위의 상태 표시등이 100%로 나타납니다.
-
커피 머신을 사용하면 이 비율이 100%에서 20%까지 서서히 떨어집니다.
그런 다음 AquaClean 100% 아이콘과 함께 머신이 준비되었음을 알려주는
화면이 나타나 필터가 활성화되었음을 보여줍니다.
-
필터 용량이 10%로 떨어지면 필터 아이콘이 2초 간격으로 켜졌다 꺼졌다를
반복하며 깜박입니다. 이것은 필터 성능이 저하되었으므로 필터를 빼내고 새
것을 끼워야 한다는 의미입니다.
Page 57
AQUACLEAN
FILTER
2 / 8
DESCALE BEFORE
ACTIVATING FILTER
한국의
-
필터를 교체하지 않아 필터 용량이 0%로 떨어지면 필터 아이콘이 1초 간격으로
켜졌다 꺼졌다를 반복하며 깜박입니다. 이 표시등을 무시하면 필터 아이콘이
디스플레이에서 사라집니다.
-
필터 아이콘이 디스플레이에서 사라지면 새 필터를 설치하기 전에 커피 머신의
석회질을 제거해야 합니다.
57
필터 교체 방법
1 MENU/SPECIAL DRINKS(메뉴/스페셜 드링크) 버튼을 누르고 MENU(메뉴)를
선택한 후 OK 버튼을 누릅니다. 스크롤하여 'AquaClean' 필터를 선택합니다.
OK 버튼을 눌러 확인합니다.
-
이전에 설치한 AquaClean 필터 수(0-8개)가 디스플레이에 표시됩니다.
2 새 필터를 사용할 것인지 묻는 메시지가 디스플레이에 표시됩니다. OK 버튼을
눌러 확인합니다.
3 화면의 지시에 따라 새 필터를 끼우고 물탱크를 채운 다음 온수 배출구를
끼웁니다. OK 버튼을 눌러 각 단계를 확인합니다.
-
필터 활성화 화면에 필터 활성화 진행 상황을 보여주는 진행 표시바가
나타납니다.
-
활성화가 끝나면 활성화를 확인하는 체크 표시가 디스플레이에 나타납니다.
-
그런 다음 AquaClean 100% 아이콘과 함께 머신이 준비되었음을 알려주는
화면이 나타나 필터가 활성화되었음을 보여줍니다.
필터 8개 사용 후 필터 교체
1 디스플레이에 필터 아이콘이 깜박이기 시작하면 MENU/SPECIAL
DRINKS(메뉴/스페셜 드링크) 버튼을 누르고 MENU(메뉴)를 선택한 다음 OK
버튼을 눌러 확인합니다. 스크롤하여 AquaClean 필터를 선택합니다. OK
버튼을 눌러 필터 메뉴로 갑니다.
-
새 필터를 사용하기 전에 커피 머신의 석회질을 제거해야 한다는 메시지가
디스플레이에 표시됩니다.
2 OK 버튼을 눌러 석회질 제거 절차를 시작합니다.
-
석회질 제거 절차를 나중에 수행하려면 ESC 버튼을 여러 번 눌러 필터
메뉴에서 나갑니다.
3 석회질 제거 과정이 끝나면 AquaClean 필터를 설치할 것인지 묻는 메시지가
디스플레이에 표시됩니다.
-
'AquaClean 필터 교체'의 단계를 따릅니다.
물 경도 측정
해당 지역의 수질에 맞게 커피 머신 설정을 조절하려면 제공된 물 경도 검사지로
물 경도를 측정하십시오.
Page 58
1
2
3
4
WATER
HARDNESS
58
한국의
1 물경도 검사지(커피 머신과 함께 제공됨)를 수돗물에 1초 동안 담급니다.
2 물 경도 검사지를 물에서 꺼낸 다음 1분간 기다립니다.
3 검사지에서 빨간색으로 변한 사각형 수를 확인하고 아래 표에 제시된 물 경도와
비교합니다.
사각형 수
1 1 심한 연수
2 2 연수
3 3 경수
4 4 심한 경수
설정할 값 물 경도
물 경도 설정
1 물 경도를 설정하려면 메뉴/스페셜 드링크 버튼을 누르고 메뉴를 선택한 후
스크롤하여 물 경도를 선택합니다.
2 OK 버튼을 누르고 해당 지역의 물 경도를 선택합니다.
3 OK 버튼을 눌러 확인합니다.
음료 종류 및 양
음료 이름
Espresso(에스프레소) 크레마가 진한 커피, 작은 잔 제어판의 프로그래밍 버튼
설명 선택 방법
Ristretto(리스트레토) 크레마가 진한 적은 양의
에스프레소, 작은 잔
스페셜 드링크 메뉴
Page 59
한국의
59
Espresso Lungo(에스프레소 룽고) 크레마가 진한 중간 양의
Caffè Crema(카페 크레마) 크레마가 연한 많은 양의
Espresso Double(에스프레소
더블)
Cappuccino(카푸치노) 1/3 에스프레소, 1/3 뜨거운 우유,
Baby Cappuccino(베이비
카푸치노)
Flat White(플랫 화이트) 뜨거운 우유를 넣고 거품을 얇게
Latte Macchiato(라테 마키아토) 거품을 낸 뜨거운 우유 롱 샷에
Milk froth(우유 거품) 거품을 낸 뜨거운 우유 스페셜 드링크 메뉴
Hot Water(온수) 스페셜 드링크 메뉴
에스프레소, 중간 잔
에스프레소, 큰 잔
크레마가 진한 더블 에스프레소,
작은 잔
1/3 우유 거품, 큰 잔
적은 양의 카푸치노, 중간 잔 스페셜 드링크 메뉴
얹은 커피, 높은 유리잔
에스프레소 샷을 더한 커피, 높은
유리잔
제어판의 프로그래밍 버튼
제어판의 프로그래밍 버튼
스페셜 드링크 메뉴
제어판의 프로그래밍 버튼
스페셜 드링크 메뉴
제어판의 프로그래밍 버튼
음료 이름
에스프레소 40ml 20 - 230ml
리스트레토 30ml 20 - 230ml
에스프레소 룽고 80ml 20 - 230ml
표준 양 양 범위
카페 크레마 125ml 20 - 230ml
에스프레소 더블 60ml(2회 분쇄) 40- 230ml
온수 300ml 50 - 450ml
참고: 위에 표시된 양은 대략적 수치입니다.
커피 추출
이 커피 머신에는 다양한 크기의 컵이나 유리잔과 여러 종류의 커피를 사용할 수
있습니다. 커피 배출구 높이를 컵이나 유리잔 크기에 맞춰 조절하려면 배출구를
위나 아래로 밀어 조정합니다.
Page 60
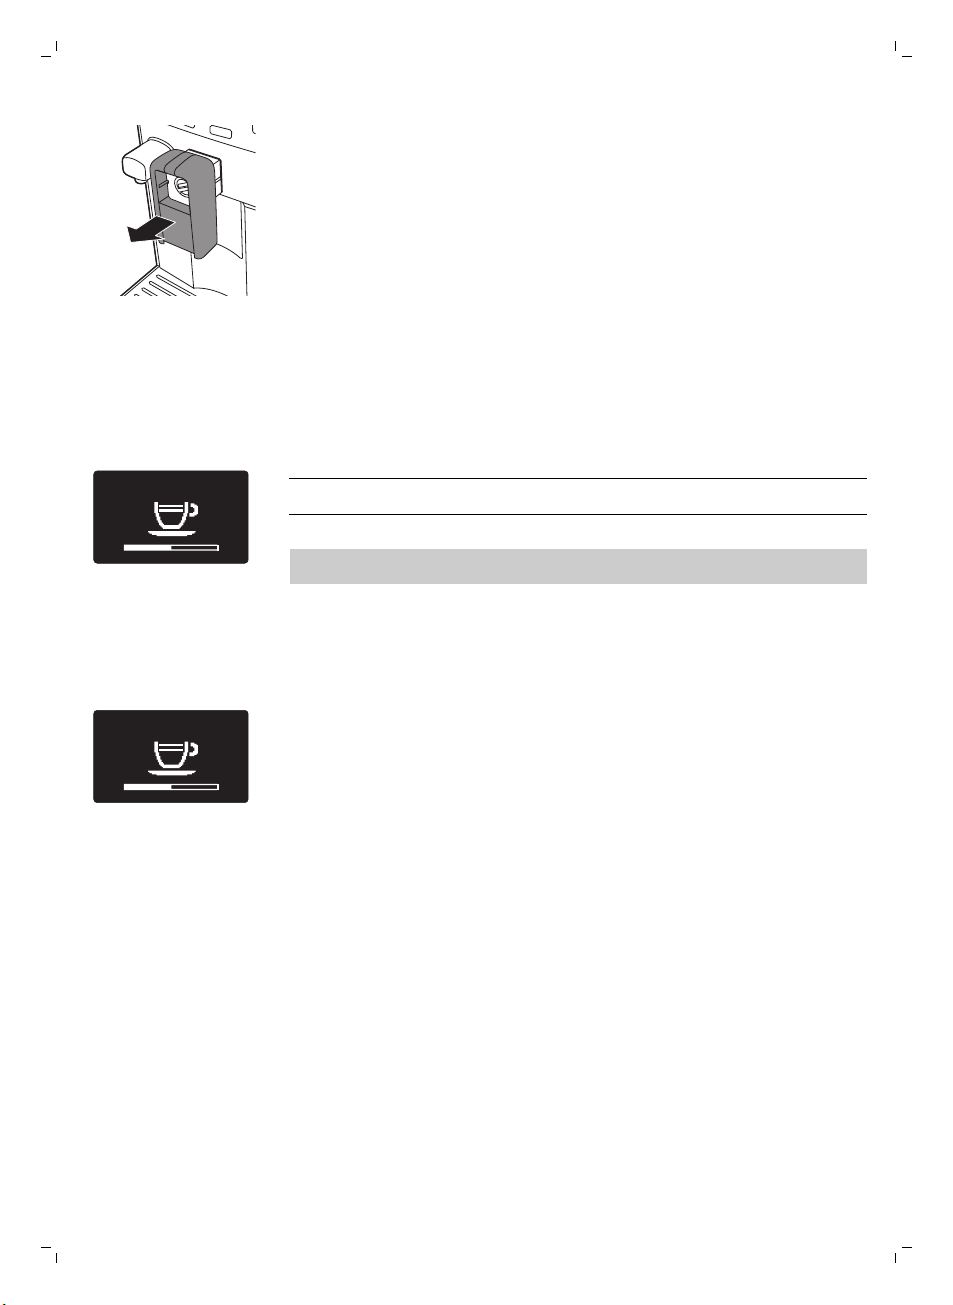
ESPRESSO LUNGO
ESPRESSO LUNGO 2x
60
한국의
원두로 커피 추출
라테 마키아토를 추출하려면 커피 배출구를 빼내고 커피 배출구 아래에 라테
마키아토 잔을 넣으십시오.
커피 1잔 추출
1 커피 배출구 아래에 잔을 놓습니다.
2 ESPRESSO(에스프레소), ESPRESSO LUNGO(에스프레소 룽고) 또는 CAFFÈ
CREMA(카페 크레마) 버튼을 눌러 선택한 커피를 추출합니다.
도움말: 스페셜 드링크 메뉴에서 리스트레토와 에스프레소 더블을 선택할 수
있습니다.
-
커피 배출구에서 커피가 내려오기 시작합니다.
참고: 커피 머신에서 커피를 모두 배출하기 전에 추출 과정을 중지하려면 OK
버튼이나 이전에 선택한 음료 버튼을 누르십시오.
커피 2잔 추출
1 커피 배출구 아래에 잔을 두 개 놓습니다.
2 에스프레소, 에스프레소 룽고 또는 카페 크레마 2잔을 동시에 추출할 수
있습니다. 원하는 음료 버튼을 두 번 누릅니다. 커피 머신이 자동으로 분쇄
과정을 연속으로 두 번 수행합니다.
분쇄 커피로 커피 추출
분쇄 커피로 커피를 추출할 때는 제공된 다기능 도구의 계량 스푼을 사용하여 적정
용량을 분쇄 커피함에 넣으십시오. 적정량을 초과하여 분쇄 커피를 넣을 경우
초과량이 커피 가루 용기로 들어갑니다.
1 분쇄 커피함 뚜껑을 엽니다.
Page 61
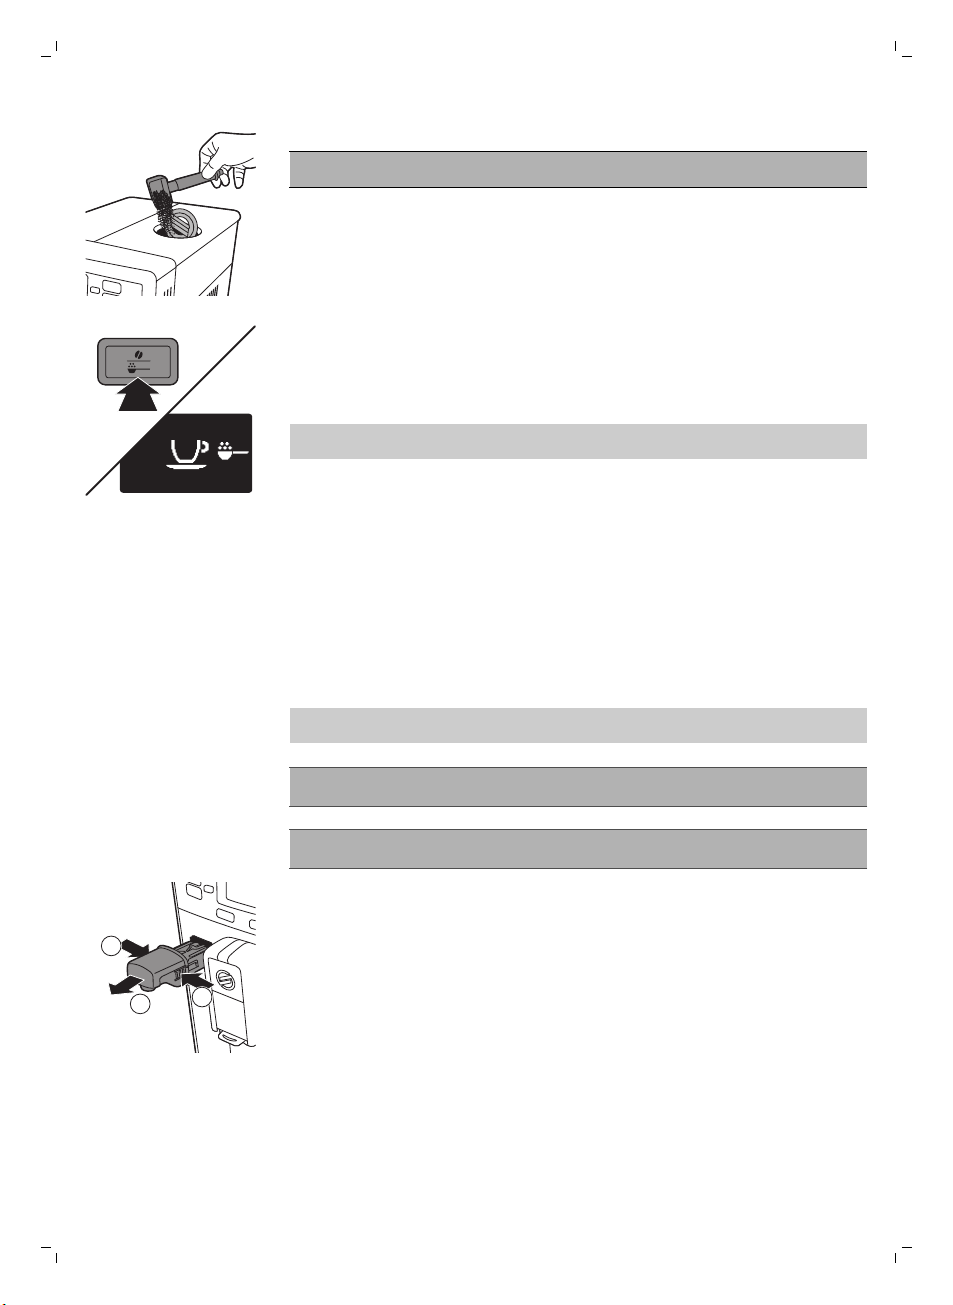
2 계량 스푼으로 분쇄 커피 한 스푼을 떠서 커피함에 넣습니다.
GROUND COFFEE
1
1
2
주의: 분쇄 커피함에 분쇄 커피 외에 다른 물질을 넣으면 커피 머신이 손상될 수
있습니다.
3 분쇄 커피함 뚜껑을 닫습니다.
4 커피 배출구 아래에 잔을 놓습니다.
5 AROMA STRENGTH(아로마 강도) 버튼을 몇 번 눌러 GROUND
COFFEE(분쇄 커피)를 선택합니다.
6 추출하려는 음료 버튼을 두 번 누릅니다.
-
선택한 음료가 자동으로 추출되기 시작합니다.
참고: 분쇄 커피로는 한 번에 커피 음료 한 잔만 추출할 수 있습니다. 분쇄 커피로는
에스프레소 더블과 같이 2회 분쇄가 필요한 음료는 추출할 수 없습니다.
우유 함유 음료 추출
밀크 카라페는 우유 거품을 내고 우유 함유 커피 음료를 추출할 때 사용합니다.
한국의
61
밀크 카라페 사용법
참고: 처음 사용할 때는 먼저 '유지관리' 장, '밀크 카라페 세척' 단원의 설명에 따라
밀크 카라페를 헹구십시오.
주의: 추출 과정이 시작될 때 우유 거품 배출구에서 증기와 뜨거운 우유가 배출될
수 있습니다.
주의: 우유 함유 커피 음료나 우유 거품을 선택할 때는 먼저 밀크 카라페가 끼워져
있고 우유 거품 배출구가 열려 있는지 확인하십시오.
1 온수 배출구가 끼워져 있는 경우 온수 배출구 양쪽에 있는 열림 버튼을 눌러(1)
빼냅니다(2).
Page 62
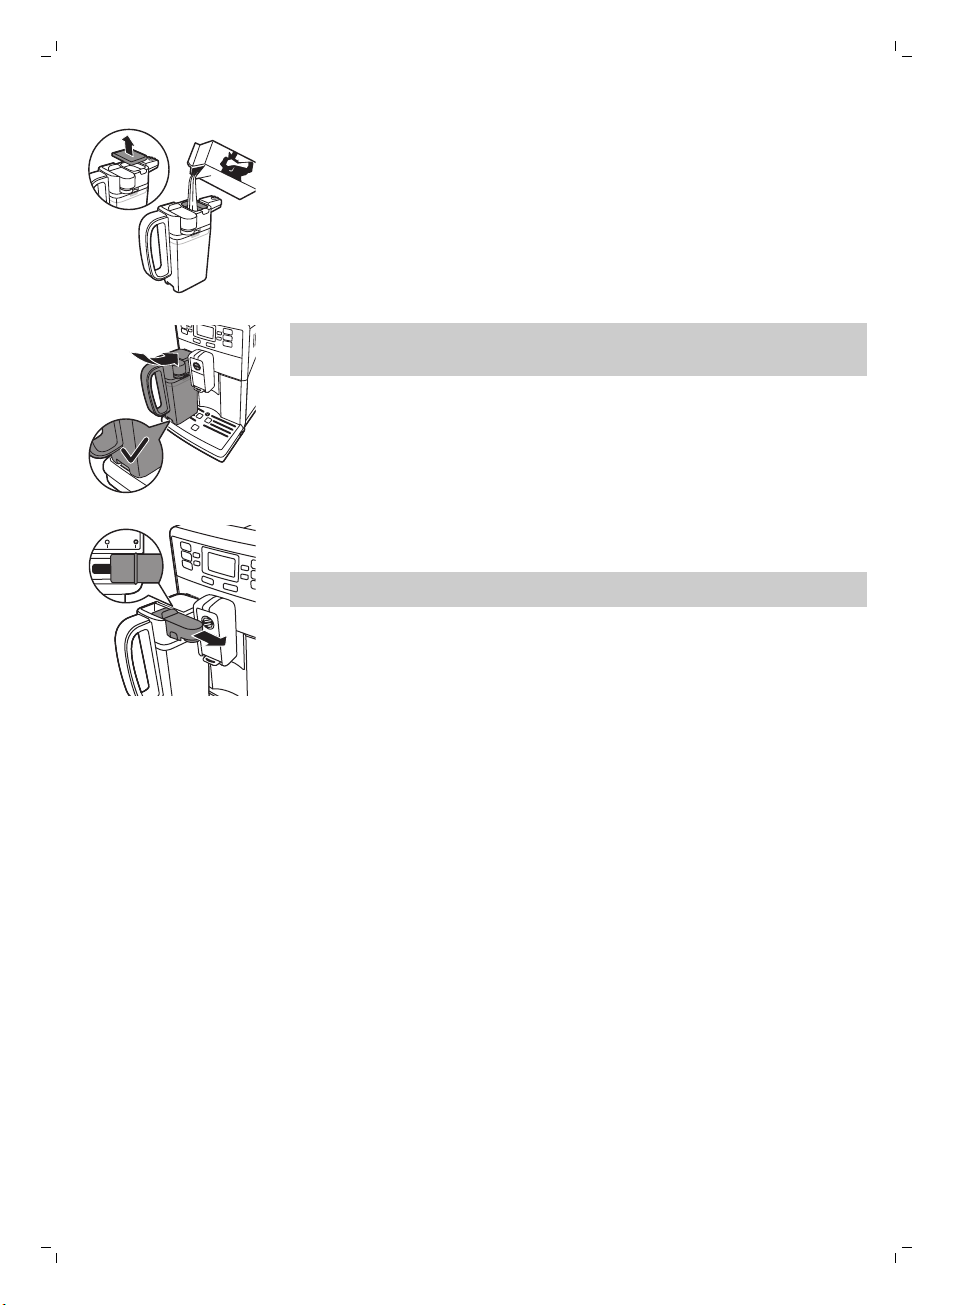
62
한국의
2 밀크 카라페 뚜껑을 빼냅니다.
3 밀크 카라페에 우유를 MIN과 MAX 표시선 사이까지 채웁니다.
참고: 우유 거품을 제대로 만들려면 단백질 함량이 3% 이상인 찬 우유(약
5°C/41°F)를 사용하십시오. 전유 또는 저지방 우유를 사용할 수 있습니다.
무지방 우유, 두유, 무유당 우유도 사용할 수 있습니다.
4 밀크 카라페를 살짝 기울여 커피 머신의 홈에 끼웁니다. 그런 다음 물받이 위에
꼭 맞게 끼워질 때까지 카라페 바닥을 커피 머신 쪽으로 밀어 넣습니다.
5 우유 거품 배출구를 거품이 배출될 위치에 오도록 오른쪽으로 완전히 당겨
빼냅니다.
참고: 우유 거품 배출구를 완전히 당겨 빼내지 않으면 밀크 카라페에서 우유
거품이 제대로 나오지 않습니다.
우유 함유 커피 음료와 우유 거품 추출
1 우유 거품 배출구 아래에 잔을 놓습니다.
2 우유 함유 음료를 선택합니다.
-
CAPPUCCINO(카푸치노) 버튼을 눌러 카푸치노를 추출합니다.
-
LATTE MACCHIATO(라테 마키아토) 버튼을 눌러 라테 마키아토를
추출합니다.
-
MENU/SPECIAL DRINKS(메뉴/스페셜 드링크) 버튼을 누르고
'Drinks(음료)'를 선택한 다음 스크롤하여 우유 함유 음료 중 하나를
선택합니다. 플랫 화이트, 베이비 카푸치노, 우유 거품을 선택할 수
있습니다. 자세한 내용은 '스페셜 드링크' 단원을 참조하십시오.
3 정해진 양의 거품 우유가 먼저 잔이나 유리컵에 배출된 다음 정해진 양의
커피가 배출됩니다.
-
우유나 커피 배출을 중단하려면 OK 버튼이나 선택한 음료 버튼을 누릅니다.
4 우유 함유 커피 음료가 추출되면 밀크 카라페 배출구의 빠른 세척을 실행할지
묻는 메시지가 디스플레이에 표시됩니다. 밀크 카라페 안에 우유가 남아 있는
상태에서 빠른 세척을 실행할 수 있습니다. 음료가 든 잔을 꺼내고 용기를 우유
거품 배출구 아래에 놓으십시오. OK 버튼을 눌러 빠른 세척을 바로 수행하거나,
ESC 버튼을 눌러 나중에 빠른 세척을 수행하십시오. 적어도 하루 한 번 빠른
세척을 하는 것이 좋습니다('밀크 카라페 세척' 단원 참조).
Page 63
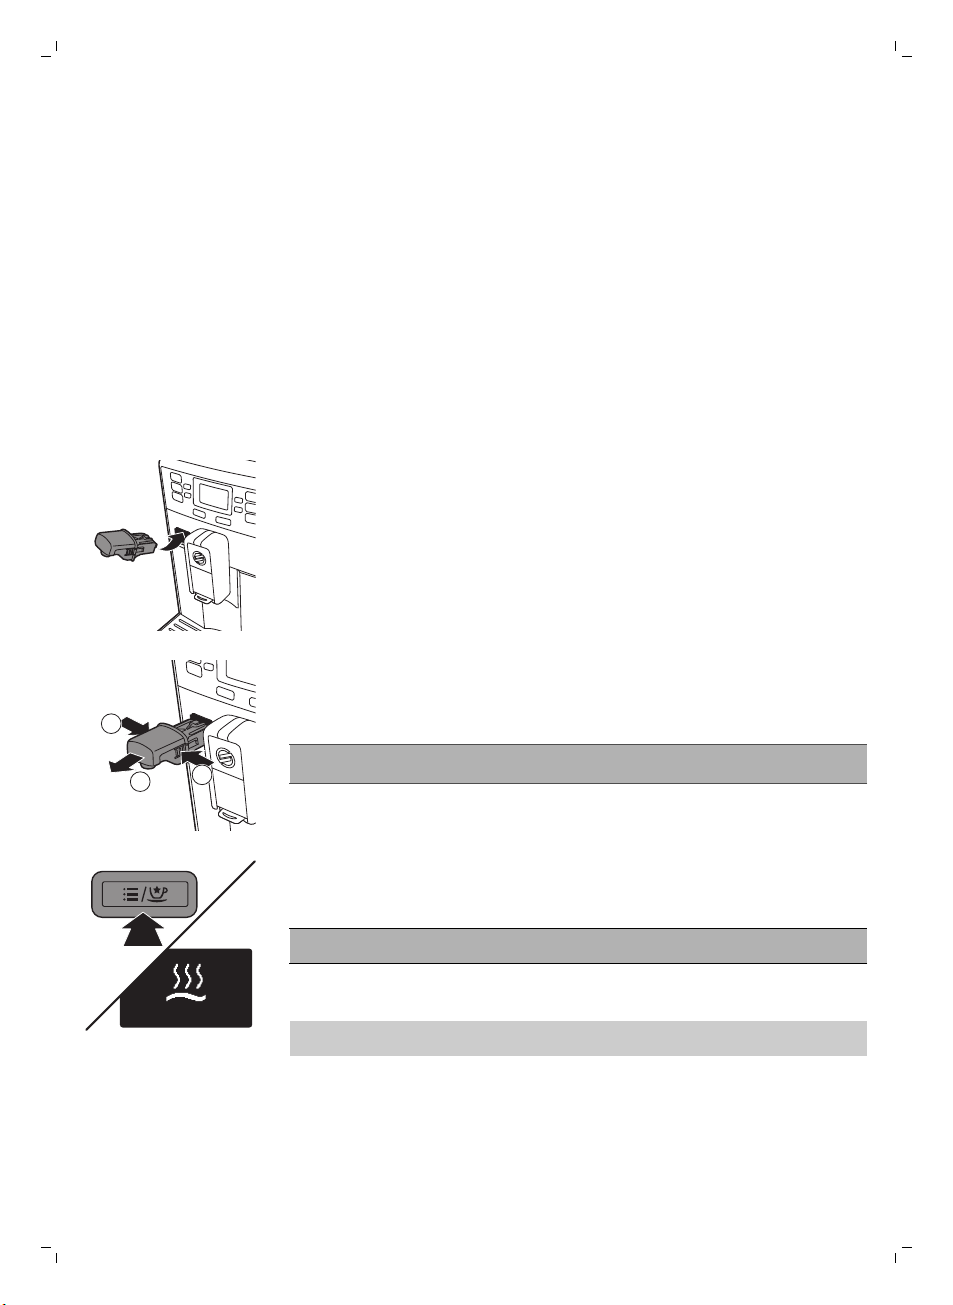
스페셜 드링크
1
1
2
HOT WATER
스페셜 드링크 메뉴에서는 리스트레토, 에스프레소 더블, 플랫 화이트, 베이비
카푸치노, 우유 거품, 온수 중에서 선택할 수 있습니다.
스페셜 드링크 선택법
1 MENU/SPECIAL DRINKS(메뉴/스페셜 드링크) 버튼을 누르고
'Drinks(음료)'를 선택합니다.
2 OK 버튼을 눌러 확인합니다.
3 메뉴를 스크롤하여 원하는 음료를 선택합니다.
온수 배출
온수 배출구 삽입 및 분리
온수 배출구를 끼우려면 다음과 같이 합니다.
1 온수 배출구를 살짝 기울여 커피 머신에 끼웁니다.
2 온수 배출구를 누르고 아래로 돌려 커피 머신에 고정합니다.
온수 배출구를 빼내려면 다음과 같이 합니다.
한국의
63
1 온수 배출구 양쪽에 있는 열림 버튼을 눌러 고정 해제합니다.
2 온수 배출구를 살짝 들어 올린 후 커피 머신에서 당겨 빼냅니다.
온수 배출
주의: 추출이 시작될 때 온수 배출구에서 증기와 온수가 배출될 수 있습니다.
과정이 완료된 후에 온수 배출구를 빼내십시오.
1 MENU/SPECIAL DRINKS(메뉴/스페셜 드링크) 버튼을 누릅니다.
'Drinks(음료)'를 선택한 다음 메뉴를 스크롤하여 'Hot water(온수)'를
선택합니다.
주의: 온수 배출구가 끼워져 있으면 메뉴에서 바로 '온수(Hot water)'를
선택하면 됩니다.
2 OK 버튼을 눌러 확인합니다. 정해진 양의 온수가 배출되기 시작합니다.
-
온수 배출을 중단하려면 OK 버튼이나 온수 버튼을 누릅니다.
참고: 도중에 배출을 중단하지 않을 경우 기본 양 또는 기억된 양에 도달하면
제품이 자동으로 중단됩니다.
Page 64
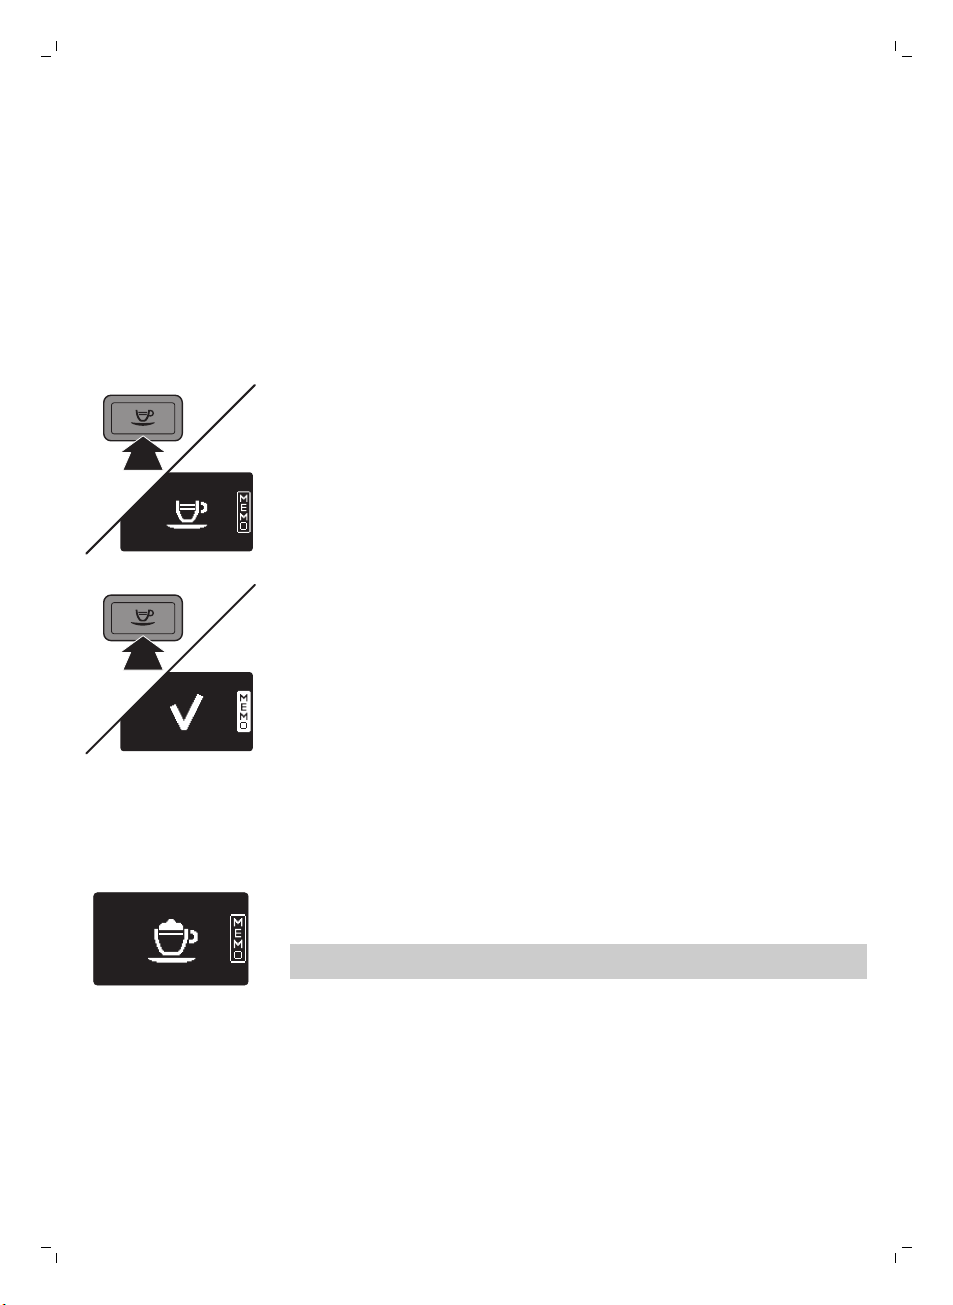
ESPRESSO
64
한국의
용량 및 풍미 조절
Saeco 조절 시스템
커피는 천연물이므로 원산지, 블렌드, 로스팅에 따라 특성이 다를 수 있습니다. 이
커피 머신에는 즐겨 먹는 커피 원두로부터 최상의 맛을 내도록 자율 조절되는
시스템이 갖춰져 있습니다. 커피를 몇 차례 추출하고 나면 자율 조절되는
방식입니다.
커피 및 우유 양 조절
취향과 잔 크기에 맞추어 음료 추출 양을 조절할 수 있습니다.
1 에스프레소의 양을 조절하려면 디스플레이에 MEMO 아이콘이 표시될 때까지
ESPRESSO(에스프레소) 버튼을 길게 누릅니다.
-
2 에스프레소가 원하는 양만큼 추출되면 OK 버튼을 누릅니다.
-
-
스페셜 드링크 양 조절
1 MENU/SPECIAL DRINKS(메뉴/스페셜 드링크) 버튼을 누르고
'Drinks(음료)'를 선택합니다.
2 메뉴를 스크롤하여 스페셜 드링크(리스트레토, 에스프레소 더블, 플랫 화이트,
베이비 카푸치노 또는 우유 거품) 또는 온수를 선택합니다.
3 디스플레이에 MEMO 아이콘이 표시될 때까지 OK 버튼을 길게 누릅니다.
4 원하는 양이 잔에 추출되면 OK 버튼을 누르십시오. 우유 함유 커피 음료의 양을
조절하려면 밀크 카라페를 끼우고 우유 양을 먼저 저장한 다음 커피 양을
저장합니다. 저장된 양이 이제 프로그래밍되었습니다.
참고: 에스프레소 더블의 양은 두 번째 분쇄 과정이 시작되고 OK 버튼에 불이
들어온 후에 저장할 수 있습니다.
커피 머신이 프로그래밍 단계로 설정되고 선택한 음료가 추출되기
시작합니다.
디스플레이에 체크 표시가 나타나 버튼이 프로그래밍되었음을 보여줍니다.
이 버튼을 누를 때마다 정해진 양만큼 에스프레소가 추출됩니다.
에스프레소 룽고, 카페 크레마, 카푸치노, 라테 마키아토의 양을 설정하려면
같은 절차를 따릅니다. 해당 음료 버튼을 길게 누르고 원하는 양이 컵에
추출되면 OK 버튼을 누릅니다. 우유 함유 커피 음료의 양을 조절하려면
밀크 카라페를 끼우고 우유 양을 먼저 저장한 다음 커피 양을 저장합니다.
커피 강도 조정
커피의 강도를 바꾸려면 AROMA STRENGTH(아로마 강도) 버튼을 누릅니다.
AROMA STRENGTH(아로마 강도) 버튼을 누를 때마다 아로마 강도가 1단계씩
변경됩니다. 디스플레이에 선택한 강도가 표시되며 이 강도는 커피를 추출할 때만
저장됩니다.
Page 65
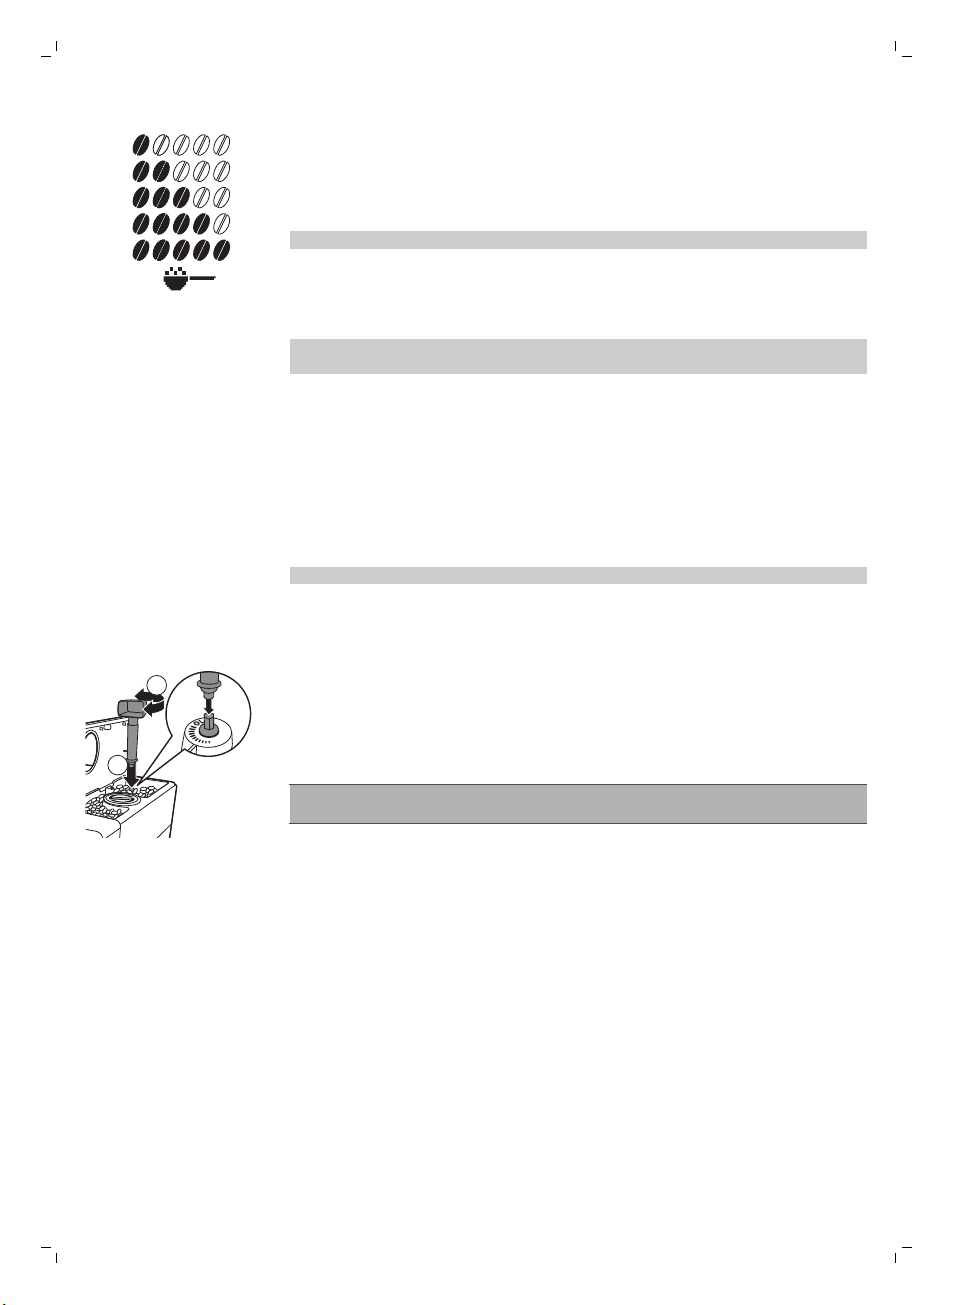
1
2
3
4
5
분쇄기 설정 조절
1
2
한국의
1 매우 연함
2 연함
3 일반 취사
4 진함
5 매우 진함
참고: 본 커피 머신은 각각의 커피 강도에 맞는 커피 양을 자동으로 배출합니다.
커피 강도 메뉴의 마지막 옵션은 GROUND COFFEE(분쇄 커피)입니다. 분쇄
커피로 커피를 추출하려면 이 옵션을 선택합니다. 제공된 다기능 도구의 계량
스푼을 사용하여 적정 용량의 분쇄 커피를 넣습니다.
참고: 커피를 추출하면 커피 머신이 주 화면으로 돌아가고 선택한 아로마 강도가
저장됩니다.
다기능 도구 손잡이에 내장된 분쇄기 조절키로 분쇄기 설정을 조절할 수 있습니다.
세라믹 커피 그라인더는 추출할 커피에 대해 선택된 분쇄도로 원두를 고르게
분쇄해 줍니다. 커피 향을 그대로 살려주므로 매 잔마다 완벽한 풍미를 즐길 수
있습니다.
참고: 분쇄기 설정은 커피 원두가 분쇄되는 동안에만 조절할 수 있습니다.
1 커피 배출구 아래에 잔을 놓습니다.
2 원두 투입구의 뚜껑을 엽니다.
3 ESPRESSO(에스프레소) 버튼을 누릅니다.
4 분쇄기가 분쇄를 시작하면 분쇄기 조절키를 분쇄기 조절 스위치 위에
놓습니다(1). 밀면서 오른쪽이나 왼쪽으로 돌립니다(2).
-
10가지 분쇄기 설정 중에서 선택할 수 있습니다. 라인이 짧을수록 커피가
진해집니다. 새로운 설정으로 2-3회 커피를 추출하고 나면 차이가
분명하게 느껴집니다.
주의: 분쇄기 조절 스위치를 한 번에 한 단계 이상 돌리지 마십시오. 그래야 분쇄기
손상을 예방할 수 있습니다.
65
유지관리
커피 머신의 수명을 연장하고 최적의 커피 맛과 품질을 보장하려면 커피 머신의
유지관리가 중요합니다.
물받이 및 커피 가루 용기 세척
커피 머신의 전원을 켠 상태에서 다음과 같이 합니다.
-
'커피 가루 용기를 비우기' 아이콘이 디스플레이에 표시되면 커피 가루 용기를
비웁니다.
Page 66
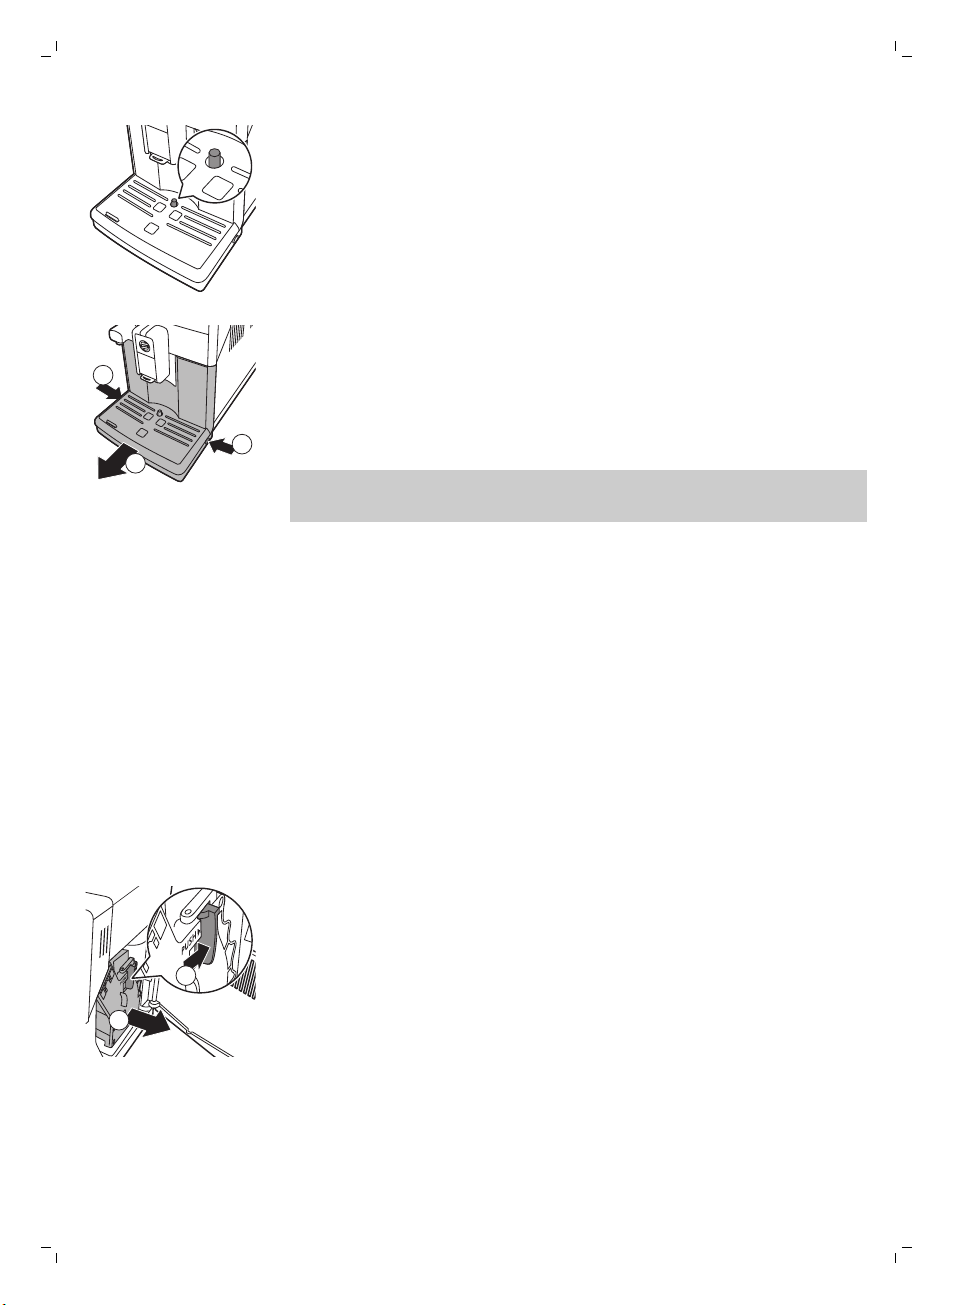
1
1
2
2
1
66
한국의
-
물받이에서 물받이 가득 참 표시등이 켜지면 물받이가 가득 찬 것입니다.
물받이를 비우고 매일 세척하십시오.
1 물받이 양쪽의 열림 버튼을 동시에 누르고(1) 커피 머신에서 물받이를 당겨
빼냅니다(2).
2 커피 가루 용기를 빼내서 비웁니다.
3 물받이를 비우고 흐르는 수돗물에 헹굽니다.
4 커피 가루 용기를 물받이 안에 다시 설치합니다.
5 물받이를 찰칵 소리가 날 때까지 커피 머신에 밀어 넣어서 끼웁니다.
참고: 물받이를 빼낼 때 커피 머신의 전원이 계속 켜 있어야 합니다. 물받이를
빼내기 전에 커피 머신의 전원을 끄면 커피 머신을 다시 켰을 때 물받이가 비어
있는데도 '커피 가루 용기 비우기'는 아이콘이 디스플레이에 표시됩니다.
물탱크 세척
1 정기적으로 커피 머신에서 물탱크를 빼내 깨끗한 물로 헹굽니다.
2 물탱크에 MAX 표시선까지 깨끗한 물을 채운 후 커피 머신에 다시 장착합니다.
커피함 세척
-
월 1회 마른 천으로 원두 투입구를 청소하십시오.
-
필요한 경우 마른 천을 사용하여 분쇄 커피함을 닦으십시오.
추출기 세척
추출기 주간 세척
1 커피 머신 전원을 끄고 전원 코드를 뽑습니다.
2 커피 가루 용기와 함께 물받이를 빼냅니다.
3 물받이를 비우고 흐르는 수돗물에 헹굽니다.
4 커피 가루 용기를 비우고 미지근한 수돗물로 헹굽니다.
5 서비스 도어를 엽니다.
6 PUSH(누름) 버튼을 누르고 (1) 추출기의 손잡이를 잡아당겨 커피 머신에서
빼냅니다(2).
Page 67
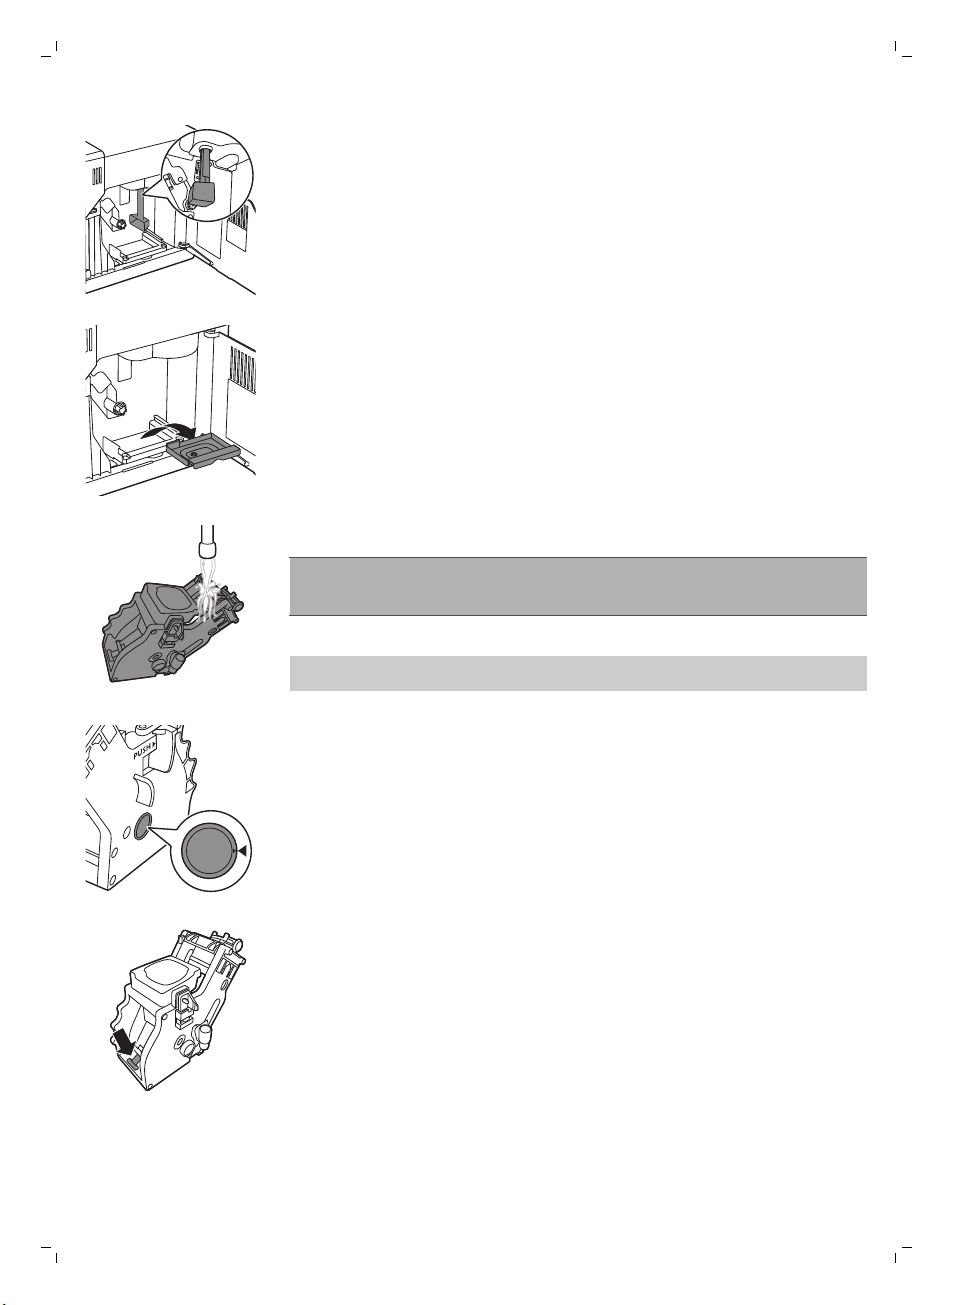
한국의
7 숟가락 손잡이 또는 커피 머신과 함께 제공된 다기능 도구로 커피 배출관을
깨끗하게 세척합니다. 그림과 같이 끼웁니다.
8 커피 가루 용기를 꺼내 비우고 미지근한 수돗물로 헹굽니다. 건조시킨 후 다시
끼웁니다.
9 미지근한 물로 추출기를 깨끗이 헹굽니다. 상단 필터를 주의하여 세척합니다.
주의: 추출기를 식기세척기로 세척하지 마시고 세척 시 주방용 액체 세제나
세정제를 사용하지 마십시오. 이렇게 할 경우 추출기가 고장 날 수 있으며 커피의
향과 맛을 떨어뜨릴 수 있습니다.
10 추출기를 상온에서 완전히 말립니다.
참고: 추출기 내부를 천으로 닦으면 보풀이 묻을 수 있으므로 천으로 닦지
마십시오.
11 커피 머신의 내부를 부드러운 젖은 헝겊으로 닦습니다.
12 추출기를 커피 머신에 다시 끼우기 전 측면의 두 참조 표시가 잘 맞는지
확인합니다. 잘 맞지 않는 경우 다음 절차를 수행합니다.
67
-
레버가 추출기의 바닥에 닿았는지 확인합니다.
13 추출기의 잠금 훅이 올바른 위치에 있는지 확인합니다.
Page 68
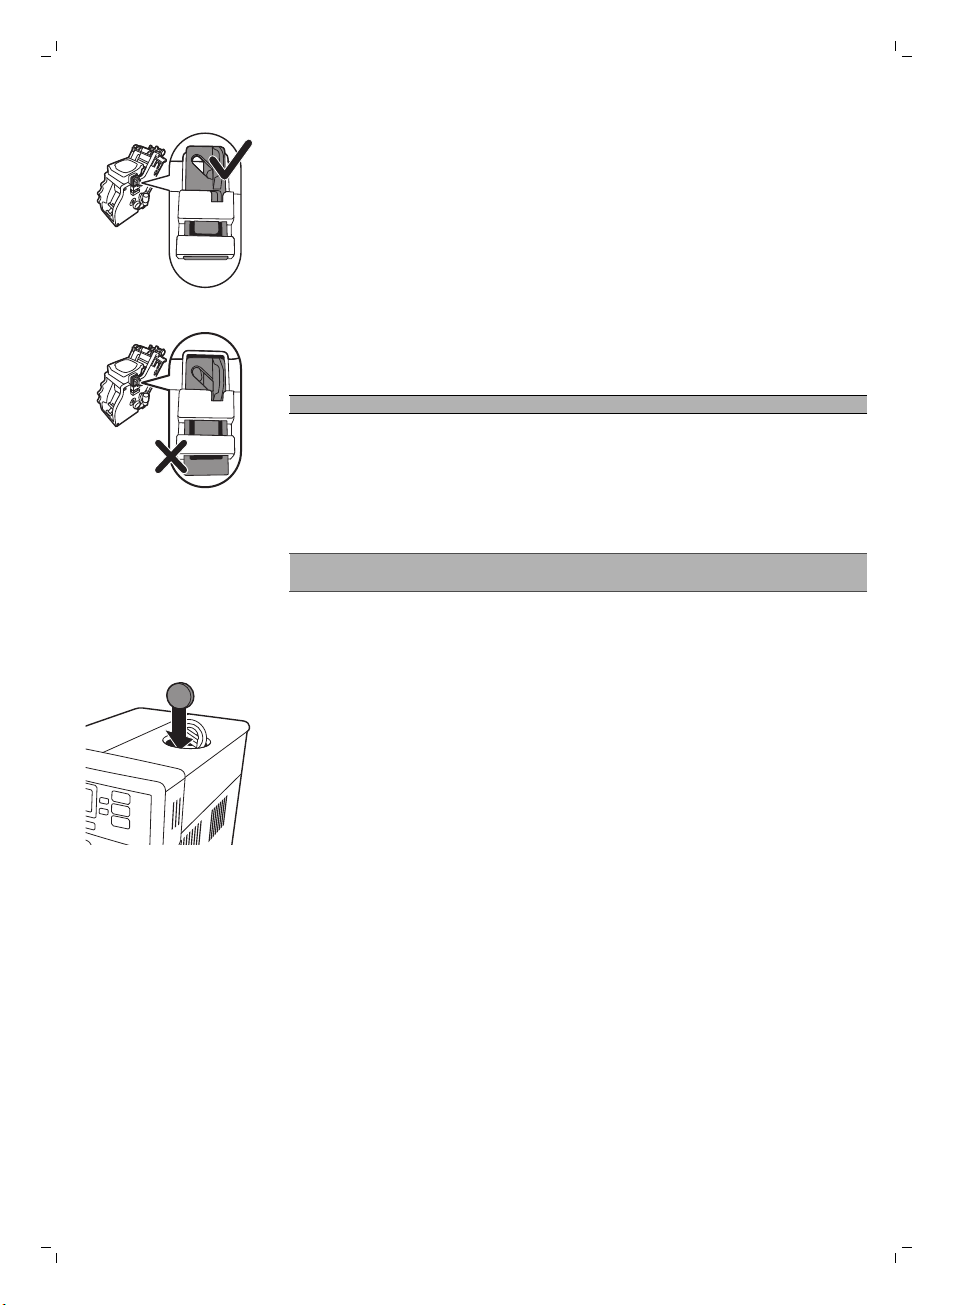
68
한국의
-
훅을 올바르게 배치하려면 맨 위쪽까지 밀어 올리십시오.
-
맨 아래쪽에 위치하는 경우 훅이 올바르게 배치되지 않은 것입니다.
14 딸깍 소리가 날 때까지 측면의 가이딩 레일을 따라 추출기를 커피 머신에 다시
끼워 넣습니다.
주의: PUSH(누름) 버튼을 누르지 마십시오.
15 서비스 도어를 닫습니다.
기름때 제거용 세정제로 월 1회 추출기 세척
-
이 세척 과정은 커피 500잔 추출 후 또는 월 1회 수행하십시오.
-
이 세척 과정에는 기름때 제거용 세정제를 사용하십시오..
주의: 기름때 제거용 세정제는 세척용으로만 사용해야 합니다. 세정제는 석회질
제거 효과가 없습니다.
1 커피 배출구 아래에 용기를 놓습니다.
2 AROMA STRENGTH(아로마 강도) 버튼을 누르고 GROUND COFFEE(분쇄
커피)를 선택합니다.
3 분쇄 커피함에 기름때 제거용 세정제를 넣습니다.
4 CAFFÈ CREMA(카페 크레마) 버튼을 누릅니다. 커피 머신의 커피 배출구에서
물이 배출됩니다.
5 진행 표시바가 중간에 오면 커피 머신 뒷면의 전원 스위치를 끕니다.
6 세정제 용액이 제 기능을 할 때까지 약 15분 동안 기다립니다.
7 전원 스위치를 켭니다.
8 대기 버튼을 누릅니다.
9 커피 머신이 자동 헹굼 단계를 수행할 때까지 기다립니다.
10 '추출기 주간 세척' 절차를 수행합니다.
11 커피 가루 용기와 함께 물받이를 빼냅니다. 물받이와 커피 가루 용기를 비운 후
커피 머신에 다시 장착합니다.
12 AROMA STRENGTH(아로마 강도) 버튼을 누르고 GROUND COFFEE(분쇄
커피)를 선택합니다..
13 CAFFÈ CREMA(카페 크레마) 버튼을 누릅니다. 커피 머신의 커피 배출구에서
물이 배출됩니다.
14 12단계와 13단계를 두 번 반복합니다. 배출된 물은 버립니다.
15 물받이를 세척하려면 기름때 제거용 세정제를 물받이 안에 넣고 뜨거운 물을
2/3 정도 찰 때까지 붓습니다. 세정제가 효과를 나타낼 때까지 약 30분 동안
기다립니다. 물받이를 비우고 깨끗하게 헹굽니다.
추출기에 월 1회 윤활유 도포
커피 500잔 추출 후 또는 월 1회 추출기에 윤활유를 도포하십시오.
1 커피 머신 전원을 끄고 전원 코드를 뽑습니다.
Page 69
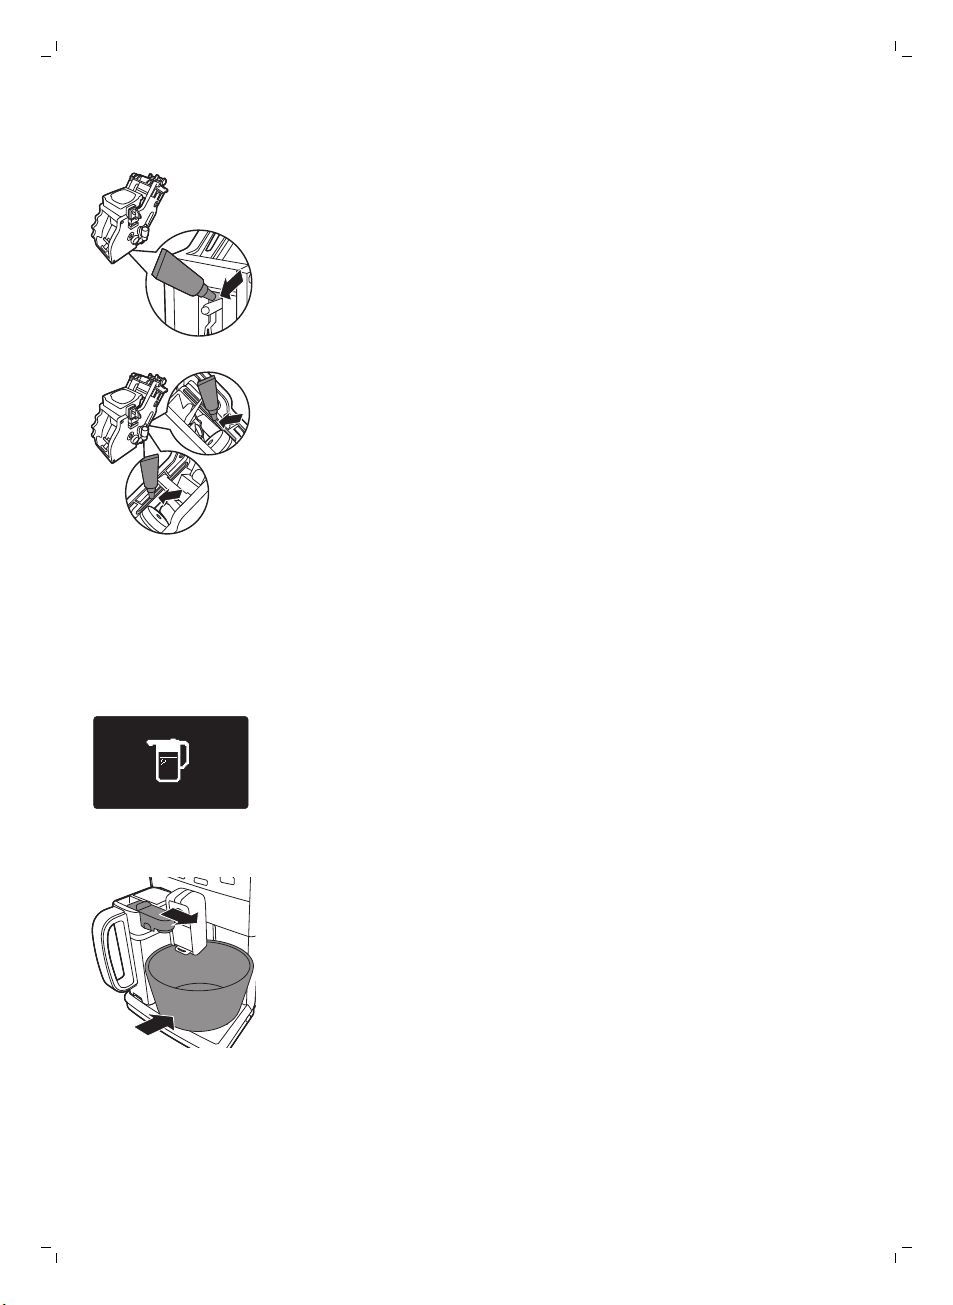
밀크 카라페 세척
QUICK CLEAN
한국의
2 '추출기 주간 세척' 항목의 설명과 같이 추출기를 빼내 미지근한 수돗물로
헹굽니다.
3 추출기 바닥의 축 주변에 윤활유를 바릅니다.
4 양쪽 레일에 윤활유를 바릅니다(그림 참조).
5 '추출기 주간 세척' 항목의 설명과 같이 추출기를 끼웁니다.
밀크 카라페 1일 1회 세척: 빠른 세척
우유 함유 음료를 만든 후에는 카라페 세척 아이콘이 디스플레이에 표시됩니다.
1 카라페 세척 아이콘이 디스플레이에 표시될 때 세척 과정을 수행하려면 OK
버튼을 누릅니다.
69
2 용기를 우유 거품 배출구 아래에 놓고 우유 거품 배출구를 빼냅니다.
3 OK 버튼을 누르면 온수가 배출되기 시작합니다.
밀크 카라페를 깨끗이 세척하려면 다음 절차를 정기적으로 수행해야
합니다.
1 밀크 카라페 상단을 분리합니다. .
Page 70
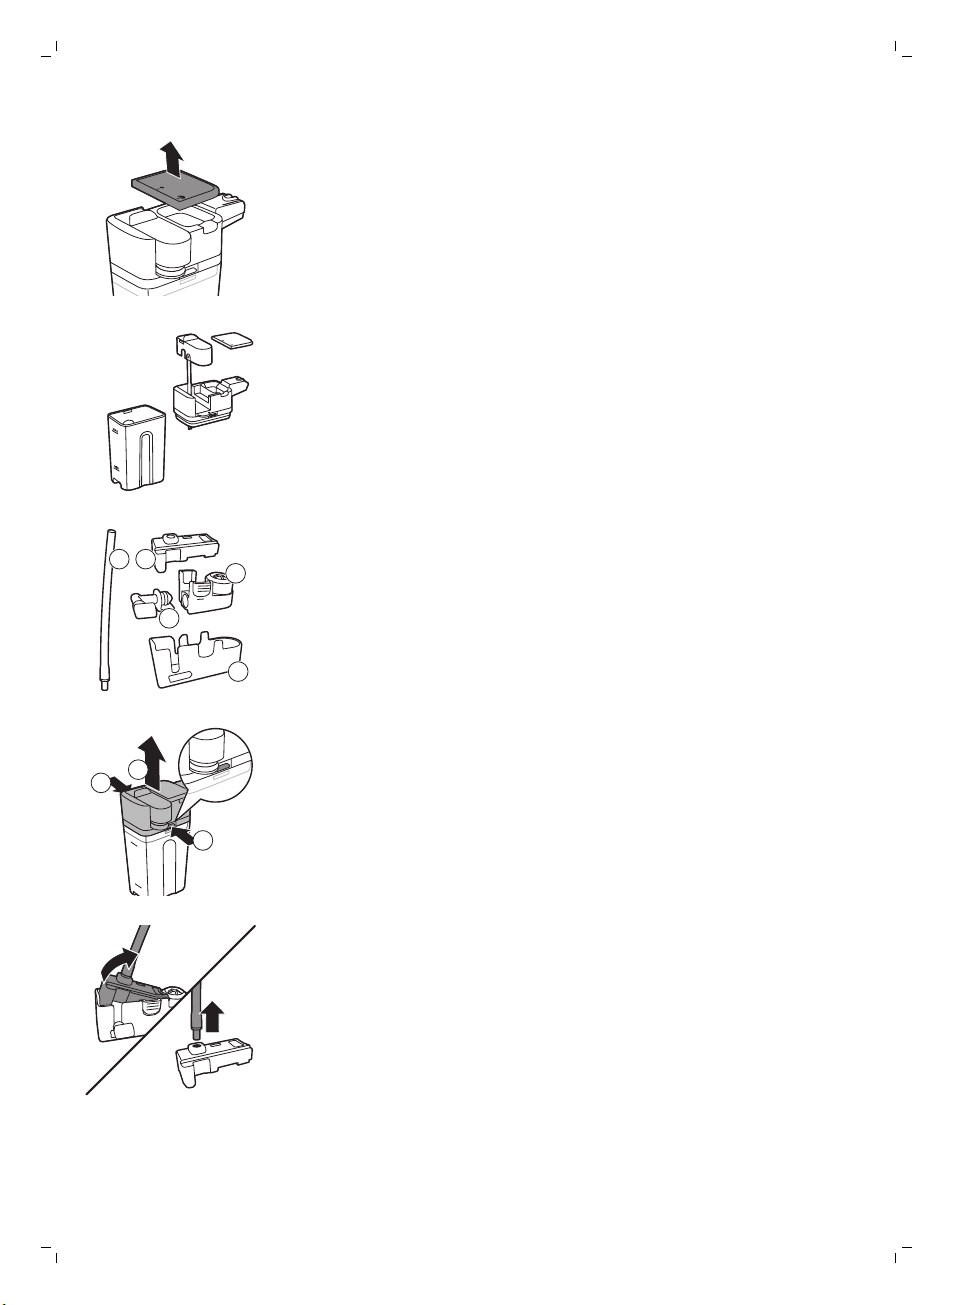
1 2
5
3
4
1
2
1
70
한국의
2 밀크 카라페 뚜껑을 빼냅니다.
3 카라페 상단에서 우유거품 배출구를 들어 올립니다.
4 우유거품 배출구에서 흡입 연장관을 빼냅니다.
5 미지근한 수돗물로 흡입 연장관을 깨끗이 헹굽니다.
밀크 카라페 주간 세척
우유 거품 배출구는 5개의 부품으로 구성됩니다. 매주 한 번씩 모든 부품을
분해하여 세척하십시오.
1 흡입 연장관
2 고무 지지대
3 우유 거품기
4 우유 거품기 연결부
5 배출구 뚜껑
밀크 카라페 분해
1 밀크 카라페 상단 양쪽의 열림 버튼을 동시에 누르고(1) 밀크 카라페에서
상단을 들어 올립니다(2).
2 배출구 뚜껑을 뒤집어서 꽉 잡습니다. 고무 지지대에서 흡입 연장관을 당겨
빼냅니다.
Page 71
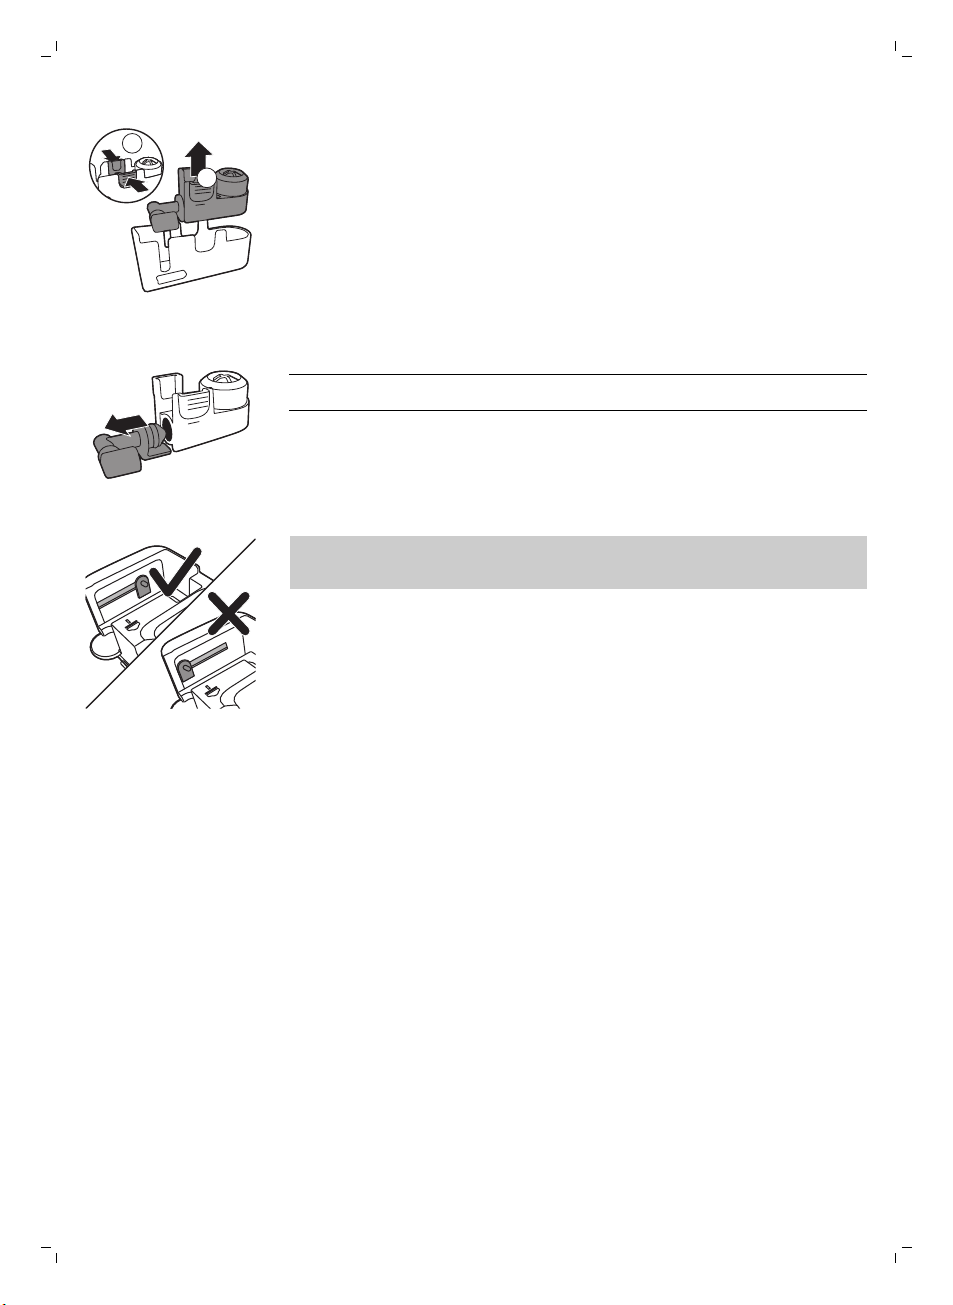
2
1
한국의
3 우유 거품 배출구의 열림 버튼을 누르고 고무 지지대에서 우유 거품기를
빼냅니다.
4 우유 거품기에서 우유 거품기 연결부를 당겨 빼냅니다.
5 미지근한 수돗물을 틀어 모든 부품을 헹굽니다.
도움말: 카라페를 제외하고 분리되는 모든 부품은 식기세척기를 사용하여
세척할 수 있습니다.
71
밀크 카라페 재조립
1 우유 거품기 배출구를 다시 조립하려면 '우유 거품기 배출구 분해'의 2-4단계를
역순으로 수행합니다.
2 우유거품 배출구를 밀크 카라페 상단에 다시 장착합니다.
3 밀크 카라페 상단을 밀크 카레페에 다시 올려 놓습니다.
참고: 우유 거품 배출구를 밀크 카라페 상단에 다시 끼워 넣기 전에 상단 안쪽의
핀을 올바른 위치에 놓으십시오. 이 핀의 위치가 바르지 않으면 우유 거품
배출구를 밀크 카라페 상단에 다시 끼워 넣을 수 없습니다.
밀크 카라페 월 1회 세척
이 세척 과정에는 SAECO 우유 배출구 세척제 CA6705만 사용하십시오.
Page 72
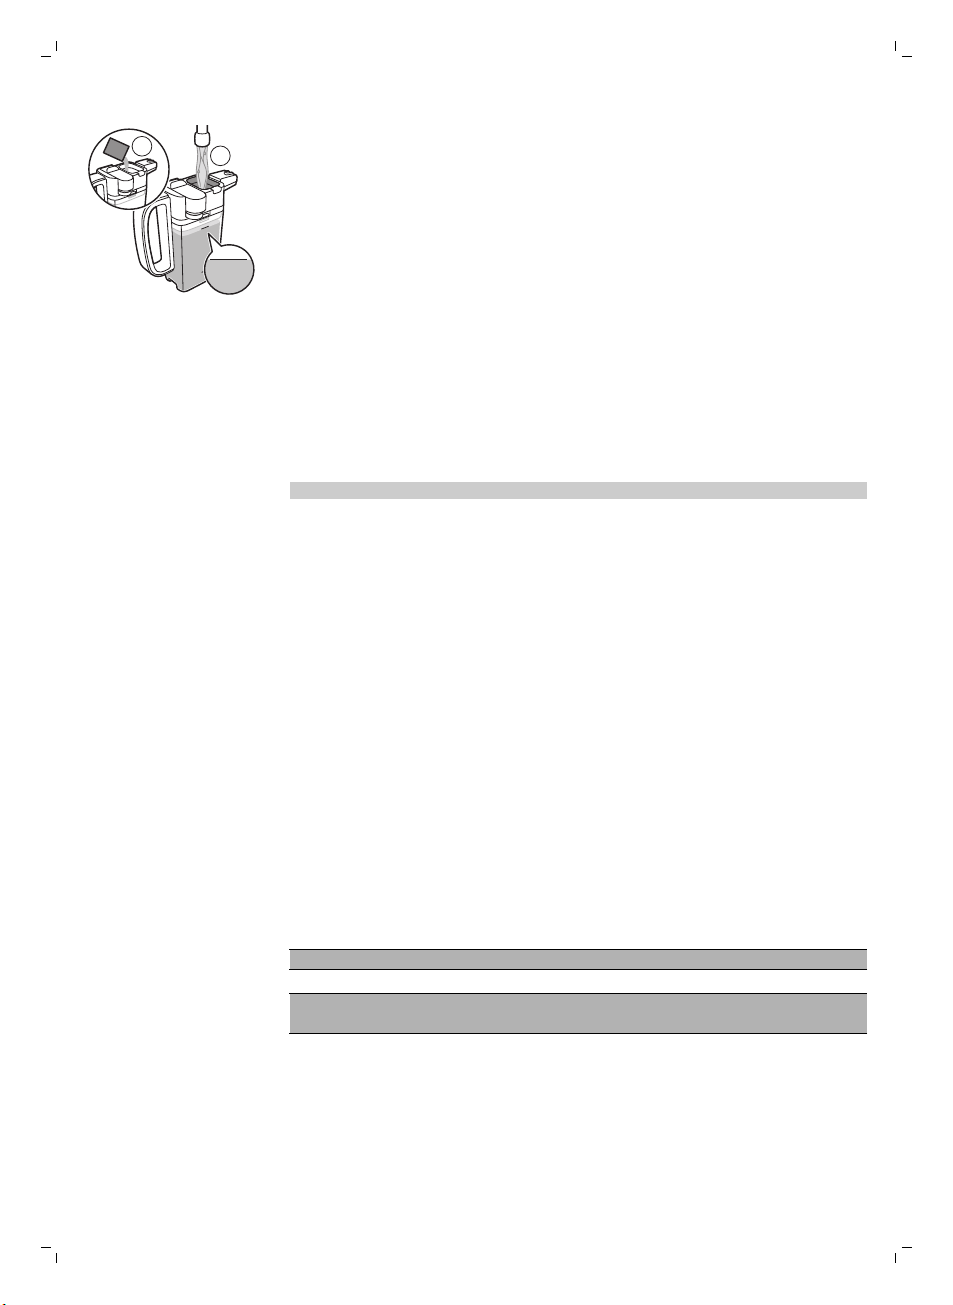
MI
N
MAX
2
MAX
1
72
한국의
석회질 제거 절차
1 우유 배출구 세척제 봉지의 내용물을 밀크 카라페에 붓습니다(1). 밀크
카라페에 MAX 표시선까지 오도록 물을 채웁니다(2).
2 밀크 카라페를 커피 머신에 끼운 다음 우유 거품 배출구 아래에 용기를
넣습니다.
3 MENU/SPECIAL DRINKS(메뉴/스페셜 드링크) 버튼을 누르고
'Drinks(음료)'를 선택한 후 스크롤하여 우유 거품을 선택합니다. OK 버튼을
누르면 세정액이 배출되기 시작합니다.
4 밀크 카라페가 비워질 때까지 3단계를 반복합니다.
5 카라페가 비워지면 커피 머신에서 용기와 밀크 카라페를 커피 머신에서
빼냅니다.
6 밀크 카라페를 깨끗이 헹군 후 MAX 표시선까지 오도록 깨끗한 물을 채웁니다.
7 밀크 카라페를 커피 머신에 끼우십시오.
8 우유 거품 배출구 아래에 용기를 놓습니다.
9 MENU/SPECIAL DRINKS(메뉴/스페셜 드링크) 버튼을 누르고 스페셜 드링크
메뉴에서 'milk froth(우유 거품)'을 선택하여 카라페 헹굼 과정을 시작합니다.
10 밀크 카라페가 비워질 때까지 9단계를 반복합니다.
참고: 이 단계에서 배출된 용액은 절대 마시지 마십시오.
11 6 - 10단계를 반복합니다.
12 물 배출이 멈추면 이 과정이 완료된 것입니다.
13 모든 부품을 분해한 후 미지근한 수돗물로 헹굽니다.
이제 커피 머신을 사용하기 위한 준비가 되었습니다.
석회질 제거를 시작할지 묻는 메시지가 디스플레이에 나타나면 커피 머신의
석회질을 제거해야 합니다. 이 메시지가 디스플레이에 표시될 때 석회질을
제거하지 않으면 커피 머신이 제대로 작동되지 않을 수 있습니다. 이 경우 보증
수리를 받을 수 없습니다.
커피 머신의 석회질을 제거할 때는 반드시 Saeco 석회질 제거 용액을
사용하십시오. Saeco 석회질 제거 용액은 커피 머신의 성능을 최대한 보장하도록
만들어졌습니다. 다른 용액을 사용하면 커피 머신이 손상될 수 있으며 물에
잔여물이 남게 됩니다. Saeco 석회질 제거 용액은 온라인 매장
www.shop.philips.com/service에서 구입할 수 있습니다.
석회질 제거 절차는 23분이 소요되며 석회질 제거 과정(20분)과 헹굼
과정(3분)으로 이루어집니다. ESC 버튼을 눌러 석회질 제거 또는 헹굼 과정을
정지할 수 있습니다. 석회질 제거 또는 헹굼 과정을 계속하려면 OK 버튼을
누릅니다.
참고: 석회질을 제거하는 동안 추출기를 빼내지 마십시오.
경고: 석회질 제거 용액이나 석회질 제거 과정에서 배출된 물을 마시지
마십시오.
Page 73
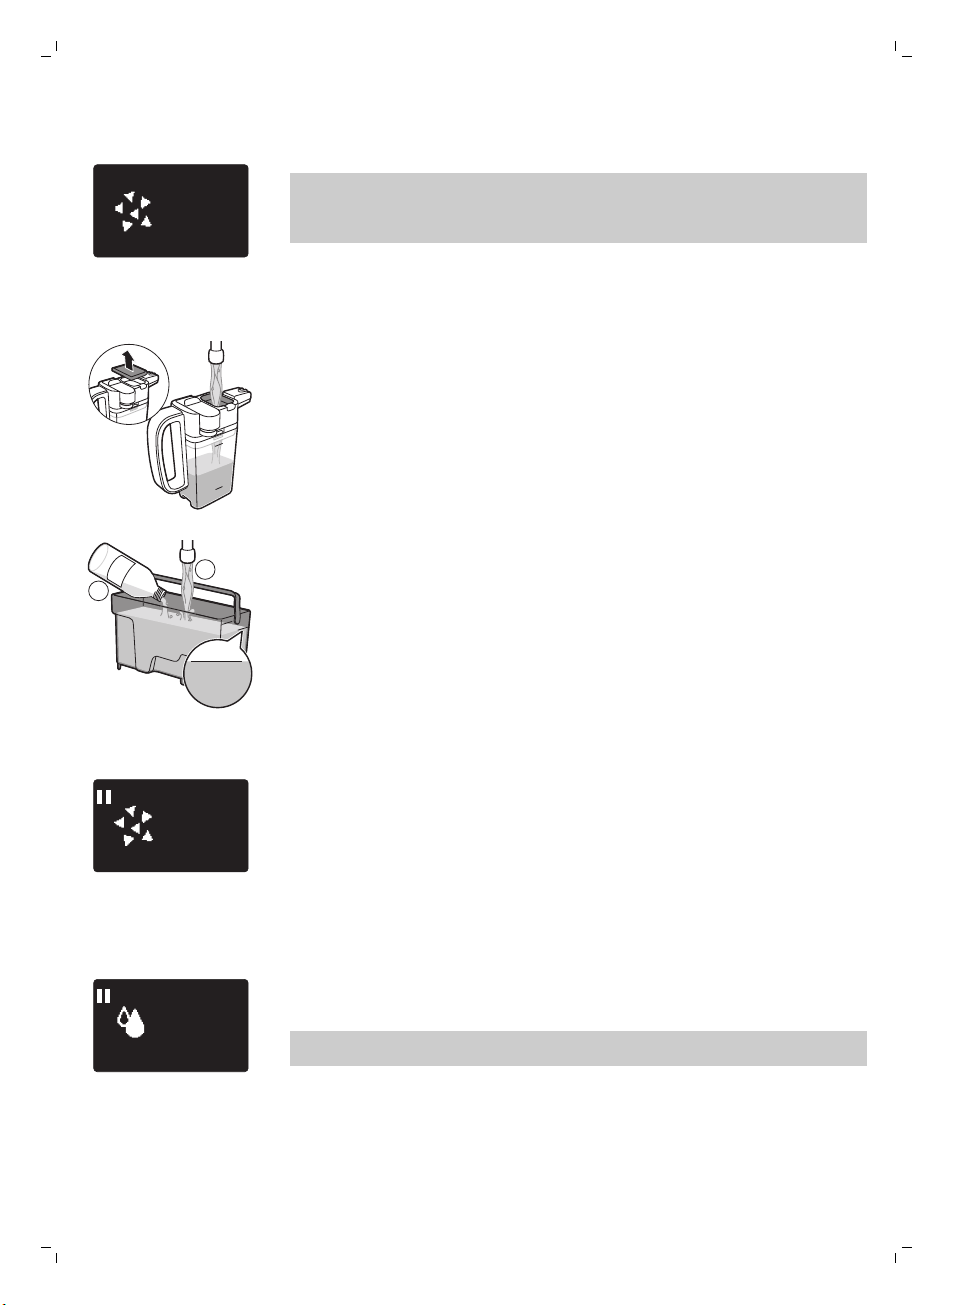
START
DESCALING?
23 MIN
MI
N
MAX
M
AX
CALC
CLEAN
CALC
CLEAN
1
2
DESCALING
PHASE 1/2
20 MIN
DESCALING
PHASE 2/2
3 MIN
한국의
1 석회질 제거를 시작할지 묻는 메시지가 디스플레이에 나타나면 OK 버튼을
눌러 석회질 제거 과정을 시작합니다.
참고: ESC를 눌러 석회질 제거 과정을 건너뛸 수 있습니다. 나중에 석회질 제거
과정을 시작하려면 MENU/SPECIAL DRINKS(메뉴/스페셜 드링크) 버튼을
누르고 'Menu(메뉴)'를 선택한 다음 스크롤하여 'Descaling(석회질 제거)'를
선택하십시오. OK를 눌러 확인합니다.
2 물탱크에서 AquaClean 필터를 빼내라는 메시지가 디스플레이에
표시됩니다(필터가 있는 경우). 필터를 빼내고 OK 버튼을 눌러 확인합니다.
3 물받이를 비우라는 메시지가 디스플레이에 표시됩니다. 물받이를 비우고 OK
버튼을 눌러 확인합니다.
4 밀크 카라페를 끼우라는 메시지가 디스플레이에 표시됩니다. 밀크 카라페에
물을 반만 채우고 카라페를 끼운 다음 우유 배출구를 엽니다. OK 버튼을 눌러
확인합니다.
5 큰 용기(1.5l)를 커피 배출구 아래에 놓고 OK 버튼을 눌러 확인합니다.
6 물 탱크에 석회질 제거 용액을 붓습니다. 물탱크의 CALC CLEAN 표시선까지
깨끗한 물을 채웁니다. 물탱크를 커피 머신에 다시 장착합니다. OK 버튼을 눌러
확인합니다.
-
석회질 제거 과정의 첫 단계가 시작됩니다. 커피 머신에서 일정 간격으로
석회질 제거 용액이 배출되기 시작합니다.
73
-
석회질 제거 아이콘과 진행 단계 및 지속 시간이 디스플레이에 표시됩니다.
이 첫 단계는 20분이 걸립니다.
7 물탱크가 비워질 때까지 석회질 제거 용액이 배출되도록 합니다.
8 물탱크를 빼내 헹굽니다.
9 물탱크의 CALC CLEAN 표시선까지 깨끗한 물을 채웁니다. 물탱크를 커피
머신에 다시 장착하고 OK를 누릅니다.
10 밀크 카라페를 빼내 헹굽니다. 밀크 카라페에 MIN 표시선까지 오도록 물을
채웁니다. 밀크 카라페를 커피 머신에 끼운 다음 우유 거품 배출구를 엽니다.
11 용기를 빼내 비운 다음 커피 배출구 아래에 다시 놓습니다. OK를 눌러
확인합니다.
12 석회질 제거 과정의 두 번째 단계인 헹굼 과정이 시작됩니다. 이 단계는 3분
걸립니다. 헹굼 아이콘과 이 단계의 지속 시간이 디스플레이에 표시됩니다.
참고: 물탱크가 CALC CLEAN 표시선까지 채워지지 않은 경우 헹굼 과정을 한
번 더 반복해야 할 수도 있습니다.
Page 74
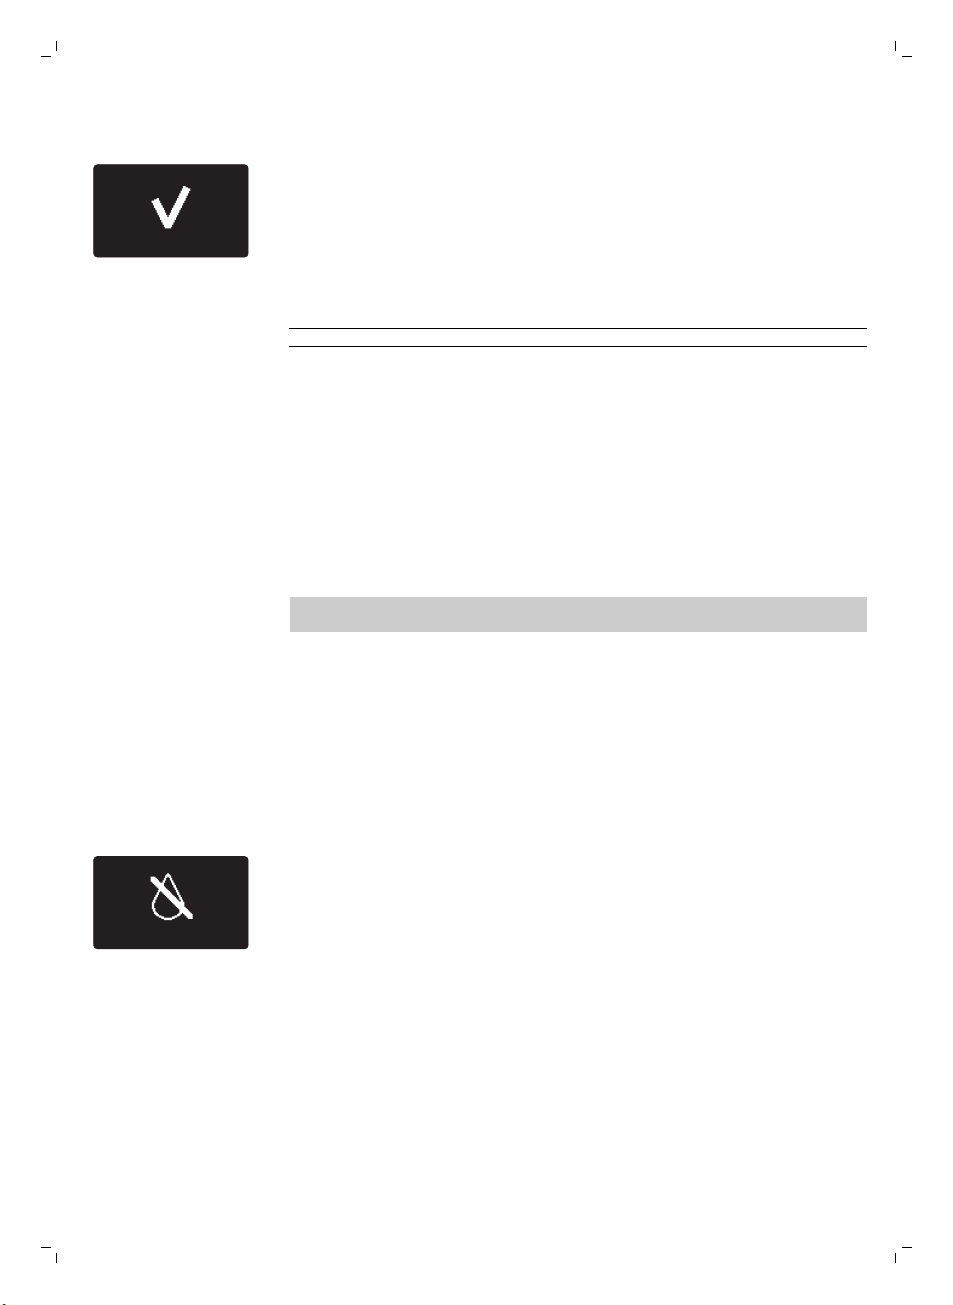
DESCALING COMPLETED
ADD WATER
74
한국의
13 물 배출이 멈출 때까지 기다립니다. 디스플레이에 체크 표시가 나타나면 석회질
제거 과정이 완료된 것입니다.
14 OK 버튼을 눌러 석회질 제거 과정을 끝냅니다. 커피 머신이 가열되기 시작하고
자동 헹굼 단계가 수행됩니다.
15 용기를 꺼내 비웁니다.
16 '밀크 카라페 주간 세척' 과정을 실행하여 석회질 제거 후 밀크 카라페를
세척합니다.
17 '추출기 주간 세척' 과정을 실행하여 추출기를 세척합니다.
18 물탱크에 새 AquaClean 필터를 끼웁니다.
도움말: AquaClean 필터를 사용하면 석회질을 자주 제거할 필요가 없습니다!
석회질 제거 절차가 도중에 중단된 경우의 대처 방법
석회질 제거 절차가 시작되면 중간에 커피 머신의 전원을 끄지 말고 전체 절차를
완료해야 합니다. 절차 도중에 커피 머신이 동작하지 않을 경우 대기 버튼을 눌러
석회질 제거 과정을 중단할 수 있습니다. 이러한 경우가 발생하거나 정전 또는
실수로 코드가 빠진 경우에는 다음과 같이 하십시오.
1 물탱크를 비우고 깨끗이 헹굽니다.
2 물탱크를 CALC CLEAN 표시선까지 채우고 커피 머신의 전원을 다시 켭니다.
커피 머신이 가열되고 자동 헹굼 단계가 수행됩니다.
3 음료를 추출하기 전에 수동 헹굼 과정을 수행합니다. '수동 헹굼 과정' 부분을
참조하십시오.
참고: 석회질 제거 과정이 완료되지 않은 경우 가능한 한 빨리 석회질 제거 과정을
다시 수행해야 합니다.
경고 아이콘 및 오류 코드
경고 아이콘의 의미
경고 신호는 빨간색으로 표시됩니다. 디스플레이에 표시될 수 있는 경고 목록과
해당 의미는 아래에 나와 있습니다.
-
물탱크의 MAX 표시선까지 깨끗한 물을 채우십시오.
Page 75
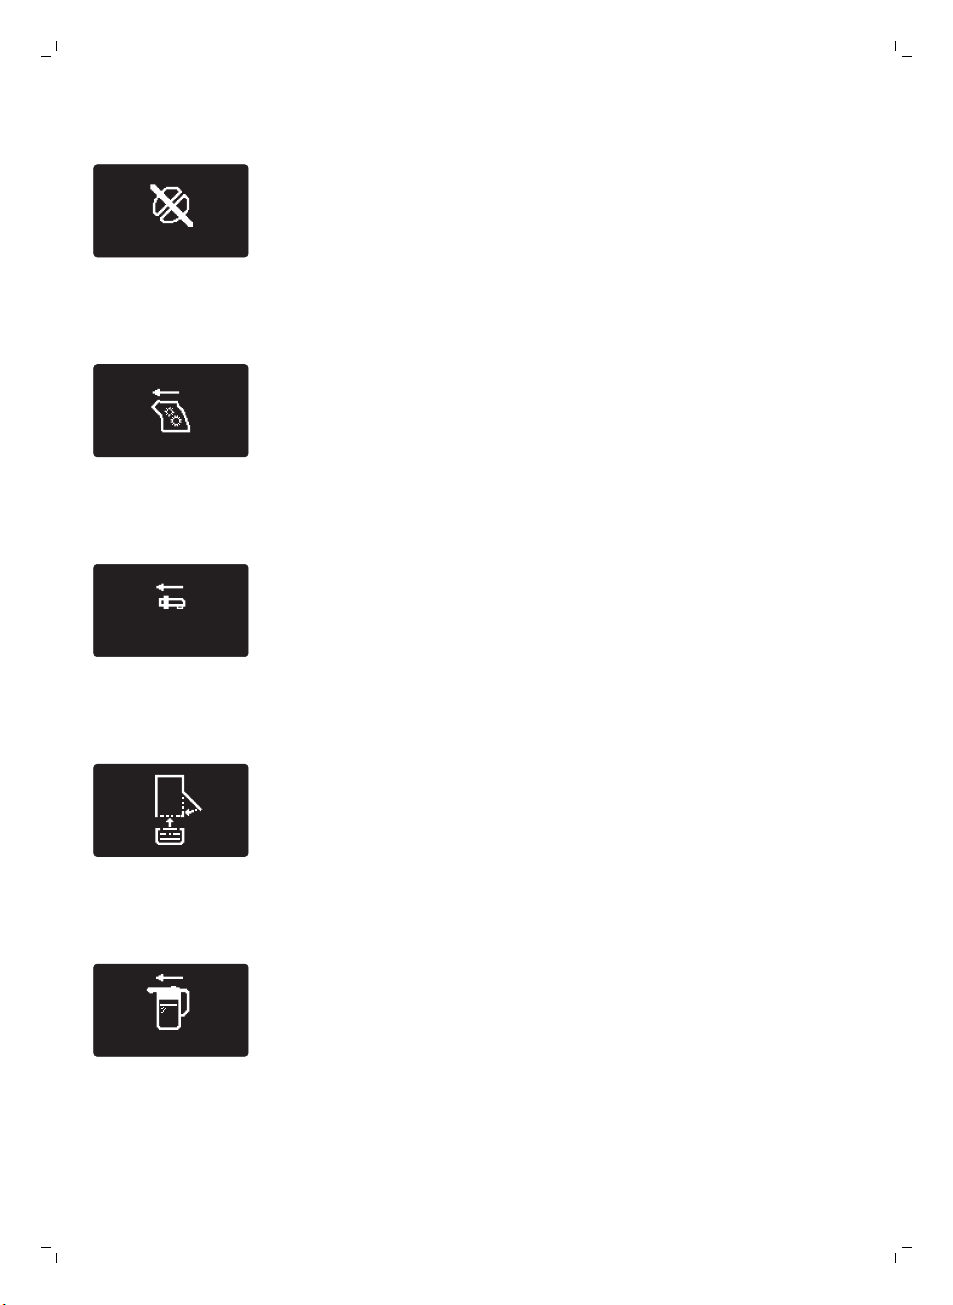
ADD COFFEE
-
INSERT
WATER SPOUT
INSERT CARAFE
원두 투입구가 비었습니다. 원두 투입구에 새 커피 원두를 넣으십시오.
-
커피 머신에 추출기가 없습니다. 추출기를 끼우십시오.
-
온수 배출구가 설치되지 않았습니다. 온수 배출구를 끼웁니다.
한국의
75
-
물받이를 끼우고 서비스 도어를 닫으십시오.
-
밀크 카라페가 끼워지지 않았습니다. 밀크 카라페를 커피 머신에 끼우십시오.
Page 76
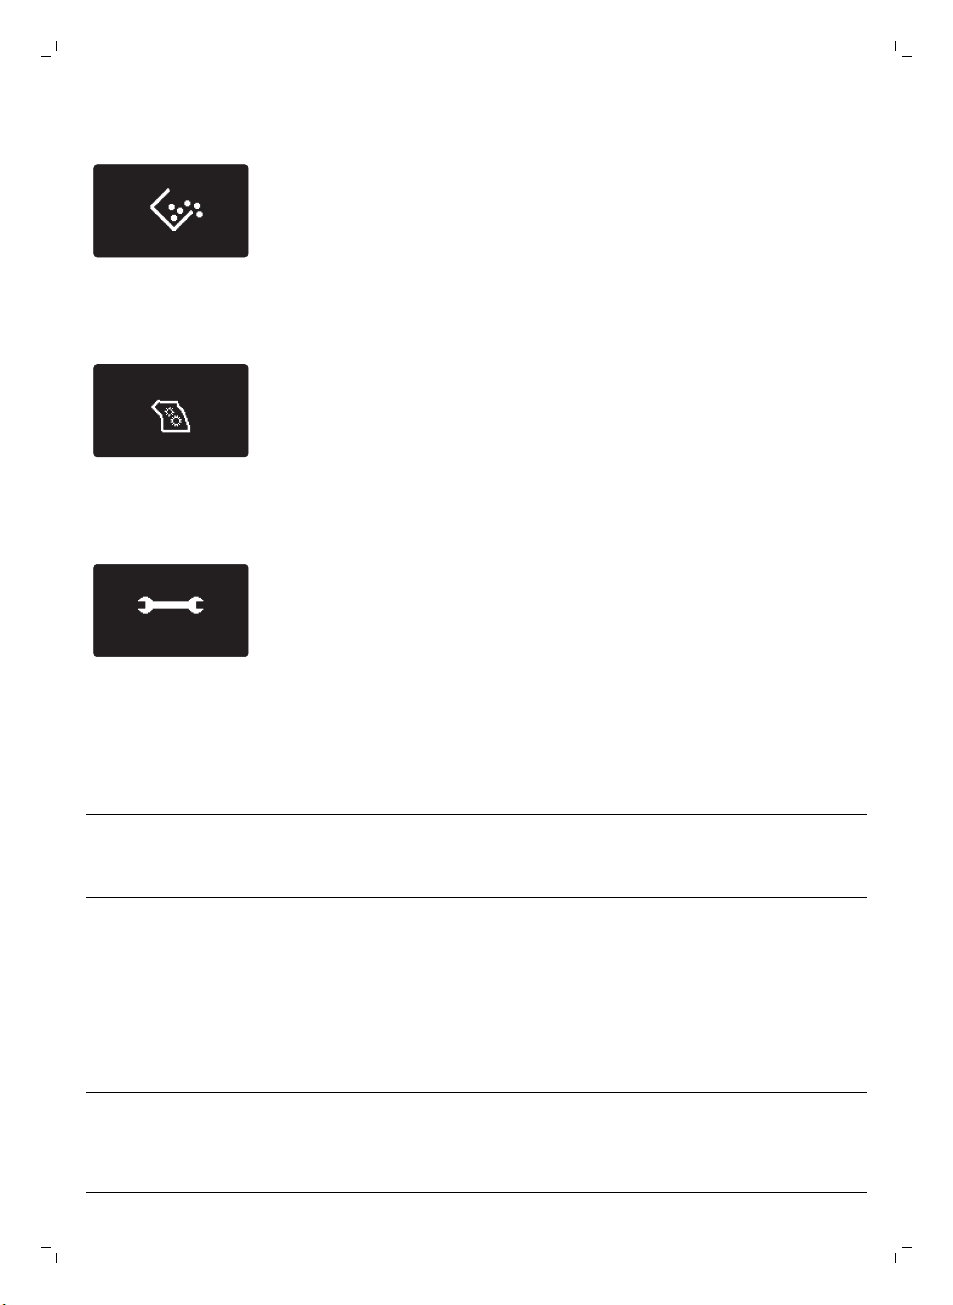
10
SUPPORT REQUIRED
76
한국의
-
커피 가루 용기를 빼내 비우십시오.
-
추출기에 분말이 너무 많이 끼었습니다. 추출기를 세척하십시오.
-
오류 코드가 표시되면 '오류 코드의 의미' 항목을 점검하여 디스플레이에
표시된 코드의 의미와 취해야 할 조치에 대해 알아보십시오. 이 아이콘이
디스플레이에 표시되면 커피 머신을 사용하지 말아야 합니다.
오류 코드의 의미
오류 코드
1 커피 분쇄기가
3 - 4 추출기를 빼낼 수
5 온수 배출 문제 물 배출구에 공기가 들어
문제점 원인 가능한 해결책
막혔습니다.
없습니다.
커피 배출관이
막혔습니다.
추출기가 이물질로 막혀
있거나 잘못 놓여져
있습니다.
있습니다.
숟가락 손잡이 또는
다기능 도구의 손잡이로
커피 배출관을 깨끗하게
세척하십시오.
서비스 도어를 닫습니다.
커피 머신을 껐다가 다시
켜십시오. '커피 머신 준비
완료' 아이콘이
디스플레이에 표시될
때까지 기다렸다가
추출기를 빼냅니다.
추출기를 세척하고
윤활유가 제대로
도포되었는지
확인하십시오.
AquaClean 필터를 빼낸
후 커피 머신 전원을
껐다가 다시 켜십시오.
커피 머신이 작동되면
필터를 다시 끼우십시오.
Page 77
한국의
오류 코드 문제점 원인 가능한 해결책
수동 헹굼 과정을
수행하십시오.
커피 머신에서 물탱크를
빼내십시오. 물탱크를
점검하여 바닥에 커피
원두가 있는지
확인합니다. 원두가
있으면 빼냅니다. 커피
머신을 켰다가 다시
끄십시오.
77
기타 오류 코드 커피 머신을 끈 다음 30초
위의 해결책으로 디스플레이에서 오류 코드 아이콘이 없어지고 커피 머신이 정상
작동 상태로 돌아가지 않으면 Philips Saeco 핫라인으로 문의하십시오. 연락처
정보는 보증서나 www.saeco.com/support에서 찾아볼 수 있습니다.
후에 다시 켜십시오. 이
과정을 2-3회
반복하십시오.
문제 해결
문제점
커피 머신이 켜지지
않습니다.
커피 머신이 DEMO(데모)
모드입니다.
물받이가 금방 찹니다. 이는 일반적인 현상입니다. 커피 머신의
커피 가루 용기가 가득
찼다는 아이콘이 계속
표시됩니다.
원인 해결책
커피 머신의 전원 플러그가 분리되어
있거나 전원 스위치가 꺼져 있습니다.
대기 버튼을 8초 이상 눌렀습니다. 커피 머신 뒷면의 전원 스위치로
내부 배출구와 추출기가 물로
헹궈집니다. 이때 약간의 물이 내부
시스템을 통해 물받이로 직접
떨어집니다.
커피 머신의 전원을 끈 상태로 커피 가루
용기를 비웠습니다.
전원 코드가 제대로 꽂혀 있는지
확인하십시오.
전원 스위치가 켜져 있는지
확인하십시오.
전원을 껐다가 다시 켜십시오.
물받이 커버에서 '물받이 가득 참'
표시등이 켜지면 물받이를
비우십시오.
헹굼 물을 받을 수 있도록 우유 거품
배출구 아래에 잔을 놓으십시오.
커피 가루 용기는 항상 커피 머신의
전원을 켠 상태에서 비우십시오. 커피
머신의 전원을 끈 상태에서 커피 가루
용기를 비우면 커피 사이클 카운터가
리셋되지 않습니다. 이 경우 용기가
가득 차 있지 않아도 ''커피 가루
용기를 비우라'는 메시지가
디스플레이에 계속 표시됩니다.
커피 가루 용기를 너무 빨리 끼웠습니다. 커피 가루 용기를 다시 끼우라는
메시지가 화면에 표시된 후에
끼우십시오.
Page 78
78
한국의
추출기를 빼낼 수 없습니다. 추출기 위치가 올바르지 않습니다. 서비스 도어를 닫습니다. 커피 머신을
커피 가루 용기를 빼내지 않았습니다. 추출기를 빼내기 전에 커피 가루
커피 머신에서 아직 석회질 제거 과정을
수행 중입니다.
추출기를 끼울 수 없습니다. 추출기 위치가 올바르지 않습니다. 추출기를 돌려 놓기 전에 정지 위치로
커피에 크림이 너무 적거나
묽습니다.
분쇄기가 굵게 설정되어 있습니다. 분쇄기를 미세 설정으로
추출기가 더럽습니다. 추출기를 세척하십시오. 깨끗하게
껐다가 다시 켜십시오. 커피 머신이
준비되었다는 메시지가 화면에
표시될 때까지 기다렸다가 추출기를
빼내십시오.
용기를 먼저 빼내십시오.
석회질 제거 과정이 진행되는
동안에는 추출기를 분리할 수
없습니다. 먼저 석회질 제거 과정을
완료한 다음 추출기를 빼내십시오.
되어 있지 않았습니다. 레버가
추출기의 바닥에 닿아 있고 추출기의
훅이 올바른 위치에 있는지
확인하십시오.
커피 머신의 전원을 켰다가 다시 꺼서
리셋하십시오. 물받이와 커피 가루
용기를 다시 넣으십시오. 추출기는
끼우지 말고 두십시오. 서비스 도어를
닫고 커피 머신 전원을 켰다가 다시
끄십시오. 이제 추출기를 다시
끼웁니다.
조절하십시오.
세척하려면 기름때 제거용 세정제를
이용한 월 1회 세척 과정을
따르십시오.
커피가 충분히 뜨겁지
않습니다.
커피 머신에서 커피 원두가
분쇄되기는 하는데 커피가
나오지 않습니다.
커피 배출관이 더럽습니다. 숟가락 손잡이 또는 다기능 도구의
커피 블렌드가 올바르지 않습니다. 다른 커피 블렌드를 시도하십시오.
사용한 잔이 차갑습니다. 뜨거운 물로 헹궈 잔을 예열하십시오.
설정 온도가 너무 낮습니다. 메뉴 설정을
확인하십시오.
나중에 우유를 넣었습니다. 따뜻한 우유든 찬 우유든, 우유를
너무 곱게 분쇄되도록 설정했습니다. 분쇄기를 좀더 굵은 설정으로
추출기가 더럽습니다. 추출기를 세척하십시오.
커피 배출구가 더럽습니다. 커피 배출구와 구멍을 파이프
손잡이로 커피 배출관을 깨끗하게
세척하십시오.
메뉴에서 온도를 높게 맞추십시오.
추가하게 되면 언제나 어느 정도는
커피 온도가 내려갑니다.
조절하십시오.
세척제로 세척하십시오.
Page 79
한국의
79
커피 배출관이 막혔습니다. 숟가락 손잡이 또는 다기능 도구의
커피가 천천히 나옵니다. 원두를 너무 곱게 분쇄했습니다. 분쇄기를 좀더 굵은 설정으로
추출기가 더럽습니다. 추출기를 세척하십시오.
커피 배출관이 막혔습니다. 숟가락 손잡이 또는 다기능 도구의
커피 머신 추출관이 물때로 막혔습니다. 커피 머신의 석회질을 제거하십시오.
우유에 거품이 생기지
않습니다.
AquaClean 필터를
활성화할 수 없고
디스플레이에 체크 표시도
나타나지 않습니다.
밀크 카라페가 더럽거나 잘못
끼워졌습니다.
우유 거품 배출구가 완전히 열리지
않았습니다.
밀크 카라페가 완전히 조립되지
않았습니다.
사용한 우유가 거품을 내기에 적합하지
않습니다.
필터가 방금 활성화되었습니다. 새 필터가 활성화되려면 적어도
손잡이로 커피 배출관을
세척하십시오.
조절하십시오.
손잡이로 커피 배출관을
세척하십시오.
카라페를 세척하고 올바른 위치로
끼워졌는지 확인하십시오.
우유 거품 배출구가 올바른 위치로
놓여졌는지 확인하십시오.
모든 부품이 제대로 조립되었는지
확인하십시오.
우유 종류에 따라 거품의 양과 질이
달라집니다. 테스트 결과 양질의 우유
거품을 내는 것으로 입증된 우유는
저지방 우유 또는 전유, 두유, 무유당
우유입니다. 다른 우유는 테스트하지
않았으며 우유 거품이 적게 만들어질
수 있습니다.
10잔(각 100ml) 이상 배출해야
합니다. 새 필터를 활성화할 때는
주의하십시오. 필터 카운터가
자동으로 늘어납니다.
필터를 활성화할 수 없고
석회질 제거가 필요하다는
메시지가 나타납니다.
이미 AquaClean 필터 8개를
교체했습니다. 필터 8개를 교체한
후에는 커피 머신의 석회질을 제거해야
합니다.
AquaClean 필터 아이콘이 깜박이기
시작한 후 상당 기간 필터를 교체하지
않았습니다.
최초 설치 시가 아니라 약 50잔(100ml
잔 기준)을 추출한 후에 필터를
끼웠습니다. AquaClean 필터를
끼우려면 커피 머신에 석회질이 전혀
없어야 합니다.
최초 설치 시 메뉴에서 AquaClean
필터를 활성화하지 않았습니다.
먼저 커피 머신의 석회질을 제거한
다음 필터를 끼우십시오.
먼저 커피 머신의 석회질을 제거한
다음 필터를 끼우십시오.
먼저 커피 머신의 석회질을 제거한
다음 새 AquaClean 필터를
끼우십시오. 석회질을 제거하면 필터
카운터가 0/8으로 리셋됩니다. 또한
필터 교체 후에는 항상 커피 머신
메뉴에서 필터 활성화를
확인하십시오.
먼저 커피 머신의 석회질을 제거한
다음 새 필터를 끼우십시오.
Page 80
80
한국의
AquaClean 필터를
끼웠으나 석회질 제거
메시지가 표시됩니다.
필터 8개를 교체하기
전인데도 석회질 교체
메시지가 표시됩니다.
필터가 잘 들어맞지
않습니다.
커피 머신 밑에 물이
있습니다.
필터 8개를 교체한 후에는 커피 머신의
석회질을 제거해야 합니다.
최초 설치 시 AquaClean 필터를 제대로
활성화하지 않았습니다.
커피 머신을 얼마 동안 사용한 후에
AquaClean 필터를 끼웠습니다.
교체한 필터를 커피 머신 메뉴에서
활성화하지 않았습니다.
필터 아이콘이 깜박거리기 시작할 때
필터를 교체하지 않았습니다.
필터에서 공기를 빼내야 합니다. 필터에서 공기 방울을 빼내십시오.
물 탱크에 물이 남아 있습니다. 필터를 끼우기 전에 물탱크를
AquaClean 필터가 아닌 다른 필터를
끼우려고 했습니다.
물받이가 가득 차 넘쳐 흘렀습니다.
먼저 커피 머신의 석회질을 제거한
다음 새 AquaClean 필터를
끼우십시오. 그러면 필터 카운터가
0/8으로 리셋됩니다. 또한 필터 교체
후에는 항상 커피 머신 메뉴에서 필터
활성화를 확인하십시오.
먼저 커피 머신의 석회질을 제거한
다음 새 AquaClean 필터를
끼우십시오. 항상 커피 머신 메뉴에서
필터를 활성화하십시오.
비우십시오.
꼭 맞는 필터는 AquaClean
필터뿐입니다.
물받이에서 물받이 가득 참 표시등이
켜지면 물받이를 비우십시오. 커피
머신의 석회질 제거 과정을 시작하기
전에 항상 물받이를 비우십시오.
커피 머신을 평평한 곳에 놓지
않았습니다.
참고: 이 표의 정보를 참조해도 문제를 해결할 수 없는 경우에는 Philips Saeco
핫라인으로 문의하십시오.
데모 모드 기능
이 커피 머신에는 데모 모드 기능이 제공됩니다.
1 데모 모드 기능을 사용하려면 STANDBY(대기) 버튼을 8초 이상 길게 누릅니다.
2 데모 모드를 종료하려면 커피 머신 뒷면의 전원 스위치를 사용하여 머신 전원을
껐다가 다시 켭니다.
액세서리 Saeco 주문
커피 머신을 청소하거나 석회질을 제거할 때는 반드시 Saeco 유지관리용 제품을
사용하십시오. 이러한 제품은 온라인 매장(이용 가능한 국가의 경우)
www.shop.philips.com/service, 현지 유통업체 또는 지정 서비스 센터에서
구입하실 수 있습니다.
물받이 가득 참 표시등이 제대로
작동하도록 커피 머신을 평평한 곳에
놓으십시오.
Page 81
관리 제품 주문:
숫자 입력
CA6700 석회질 제거 용액
CA6903 AquaClean 필터
HD5061 추출기 윤활유
CA6704 기름때 제거용 세정제
CA6705 우유 배출구 세척제
제품
기술 사양
제조업체는 제품의 기술 사양을 개선할 수 있습니다. 모든 사전 설정된 양은
대강의 수치입니다.
설명
외관 재질 열가소성 수지
크기(W x H x D) 221 x 335 x 430mm
중량 8.9kg
전원 코드 길이 800 - 1200mm
값
한국의
81
제어판 전면
잔 크기 최대 152 mm
물탱크 1.8리터, 분리형
커피 원두 투입구 용량 250g
커피 가루 용기 용량 15개
밀크 카라페 용량 500ml
펌프 압력 15바
보일러 스테인리스 보일러
안전 장치 온도 퓨즈
절전 모드 < 1Wh
공칭 전압 - 전력 등급 - 전원 공급 장치 서비스 도어 안쪽에 있는 데이터 참조
재활용
-
이 기호는 본 제품을 일반 가정용 쓰레기와 함께 폐기하면 안 됨을
의미합니다(2012/19/EU).
Page 82

82
한국의
보증 및 지원
-
전기 및 전자 제품의 분리 수거에 대한 해당 국가의 규정을 준수하십시오.
제품을 올바르게 폐기하면 환경과 인체 건강에 미치는 부정적인 영향을 예방할
수 있습니다.
보다 자세한 정보나 지원이 필요한 경우에는
웹사이트(www.saeco.com/support)를 방문하거나 별도의 제품 보증서를
참조하십시오.
자세한 정보 및 지원은 해당 국가의 Philips Saeco 핫라인에 문의하십시오. 연락처
정보는 별도 제공된 보증서를 참조하거나, www.saeco.com/support를
방문하십시오.
Page 83

empty page before backcover
Page 84
www.saeco.com/welcome
4219.460.3434.1 Rev. 00 - 04.03.2016
4219.460.3434.1 HD8927 FRONT-BACK COVER_EN-KO.indd 2 22-03-16 15:43
 Loading...