

Page 1
INCANTO
HD8918, HD8917
HD8916, HD8915
EN
USER MANUAL
简体中文 用户手册
한국어 사용자 설명서
4219.460.3913.1 HD8918,17,16,15 SAECO_INCANTO OTC_ROW_COVER_A5_FC.indd 1 02-03-17 17:38
Page 2

Page 3

1
2
3
4
ESPRESSO CAPPUCCINO
ESPRESSO LUNGO LATTE MACCHIATO
AROMA STRENGTH MENU
5
8
7
6
11
12
13
29
31
30
41
40
39
38
37
36
35
34
33
32
10
9
16
15 14
17
18
19
20
21
22
23
24
25
28
26
27
Page 4

Page 5

4
English
Contents
Machine overview_________________________________________________________________ 5
Introduction ______________________________________________________________________ 5
First installation___________________________________________________________________ 6
AquaClean filter __________________________________________________________________ 6
Activating the AquaClean filter_______________________________________________________ 6
Replacing the AquaClean filter_______________________________________________________ 7
Replacing the AquaClean filter after 8 filters were used__________________________________ 8
Measuring the water hardness_______________________________________________________ 8
Control panel and display___________________________________________________________ 9
One-touch beverage buttons________________________________________________________ 9
Navigation buttons________________________________________________________________ 9
MENU button ____________________________________________________________________ 9
AROMA STRENGTH button _________________________________________________________ 10
Brewing coffee____________________________________________________________________ 10
Brewing coffee with beans__________________________________________________________ 10
Brewing coffee with pre-ground coffee________________________________________________ 10
Special drinks and hot water_________________________________________________________ 10
Dispensing hot water_______________________________________________________________ 11
Brewing milk-based coffee beverages and milk froth____________________________________ 11
Beverage types and lengths_________________________________________________________ 12
Beverage types___________________________________________________________________ 12
Beverage lengths__________________________________________________________________ 12
Adjusting volume and taste_________________________________________________________ 12
Adjusting coffee and milk volume____________________________________________________ 12
Adjusting coffee strength___________________________________________________________ 13
Adjusting grinder settings___________________________________________________________ 13
Cleaning and maintenance__________________________________________________________ 14
Cleaning table ____________________________________________________________________ 14
Cleaning the brew group____________________________________________________________ 15
Cleaning the brew group under the tap________________________________________________ 15
Cleaning the brew group with coffee oil remover tablets__________________________________ 15
Reinserting the brew group__________________________________________________________ 16
Lubrication_______________________________________________________________________ 17
Cleaning the milk carafe ____________________________________________________________ 17
Carafe quick clean_________________________________________________________________ 17
Thorough cleaning of the milk carafe__________________________________________________ 18
Weekly cleaning of the milk carafe___________________________________________________ 18
Monthly cleaning of the milk carafe___________________________________________________ 19
Descaling procedure_______________________________________________________________ 20
What to do if the descaling procedure is interrupted_____________________________________ 22
Warning icons and error codes_______________________________________________________ 22
Meaning of the warning icons________________________________________________________ 22
Meaning of the error codes__________________________________________________________ 23
Troubleshooting___________________________________________________________________ 24
Page 6
English
Machine overview
User interface 22 Cover of bean hopper
1
2 ESPRESSO button 23 Bean hopper
3 ESPRESSO LUNGO button 24 Brew group
4 AROMA STRENGTH button 25 Inside of service door with cleaning instructions
5 Standby button 26 Coffee exit duct
6 MENU button 27 Coffee residues drawer
7 LATTE MACCHIATO button 28 Coffee grounds container
8 CAPPUCCINO button 29 Drip tray cover
9 Protection cover 30 Hot water dispensing spout
10 Adjustable coffee dispensing spout 31 Opening for hot water dispensing spout
11 Lid of water tank 32 Water tank
12 Lid of bean hopper 33 Milk container
13 Lid of pre-ground coffee compartment 34 Milk dispensing unit
14 Main switch 35 Lid of milk dispensing unit
15 Socket for cord 36 Milk dispensing spout
5
16 Service door 37 AquaClean filter
17 'Drip tray full' indicator 38 Water hardness test strip
18 Drip tray 39 Grease tube with application tip
19 Drip tray release button 40 Cleaning brush
20 Cord 41 Measuring scoop
21 Grind setting knob
Introduction
Congratulations on your purchase of a Saeco full-automatic coffee
machine! To fully benefit from the support that Saeco offers, please register
your product at www.saeco.com/care.
To help you get the best out of your coffee machine, Saeco offers full
support in 4 different ways:
-
The separate quick start guide for first installation and first use.
-
This user manual for more detailed information on how to use the
machine, how to keep it clean, how to descale it and how to solve
problems.
Page 7
6
English
-
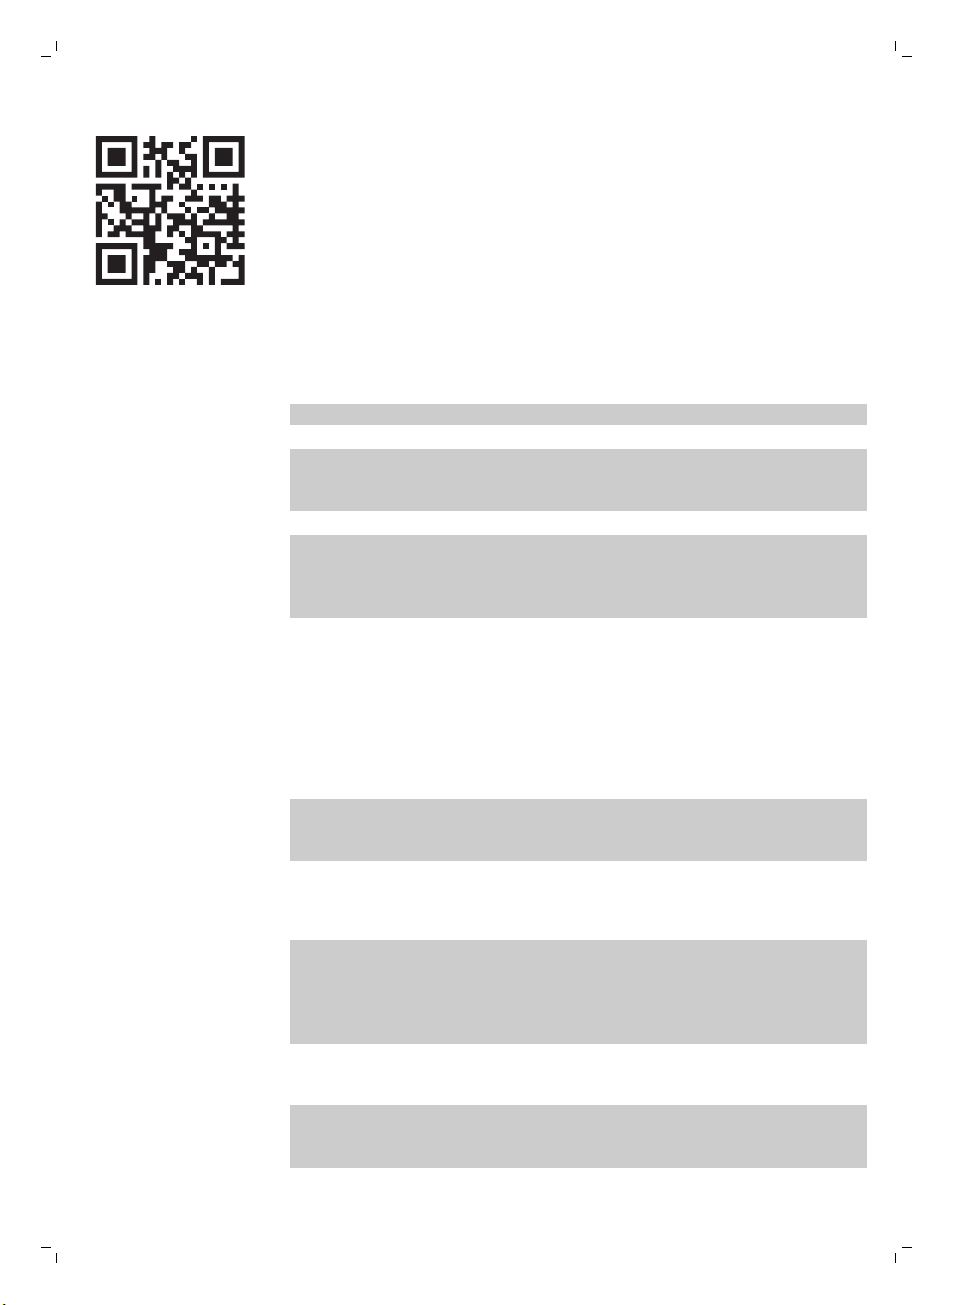
This is the QR code. Scan this code to access instruction videos on how
to brew the best coffees, how to clean the machine and for a list of
frequently asked questions. (www.saeco.com/care)
-
The separate booklet with important safety information.
First installation
For first installation, follow the instructions on the separate quick start guide.
Note: This machine has been tested with coffee. Although it has been
carefully cleaned, there may be some coffee residues left. We guarantee,
however, that the machine is absolutely new.
Note: You can install the AquaClean filter during the first installation
procedure (see separate quick start guide). If you skip installation of the
AquaClean filter at first use, you can install it later by entering the menu (see
'Activating the AquaClean filter').
AquaClean filter
The AquaClean filter is designed to reduce limescale deposits in your coffee
machine and provide filtered water to preserve the aroma and flavor of each
cup of coffee. If you use a series of 8 AquaClean filters as indicated in this
user manual, you don't have to descale your machine for up to 5000 cups.
Note: Your machine has to be completely limescale-free before you start to
use the AquaClean filter. If you did not activate the filter during first
installation, you need to descale the machine before you activate the filter.
Activating the AquaClean filter
Note: Always confirm activation of the AquaClean filter in the machine menu
as described below. You also need to do this after replacing the AquaClean
filter. By activating the AquaClean filter in the machine menu, the machine
monitors the number of filters used. When the filter has been replaced 8
times, the machine reminds you to descale it.
1 For instructions on how to place the AquaClean filter in the water tank,
see the separate quick start guide.
Note: Shake the AquaClean filter for about 5 seconds, immerse it upside
down in a jug with cold water and wait until no more air bubbles come
out.
Page 8
FILTER
0 / 8
AQUA CLEAN
0 / 8
ON
OFF
FILTER
1 / 8
AQUA CLEAN
FILTER
1 / 8
AQUA CLEAN
English
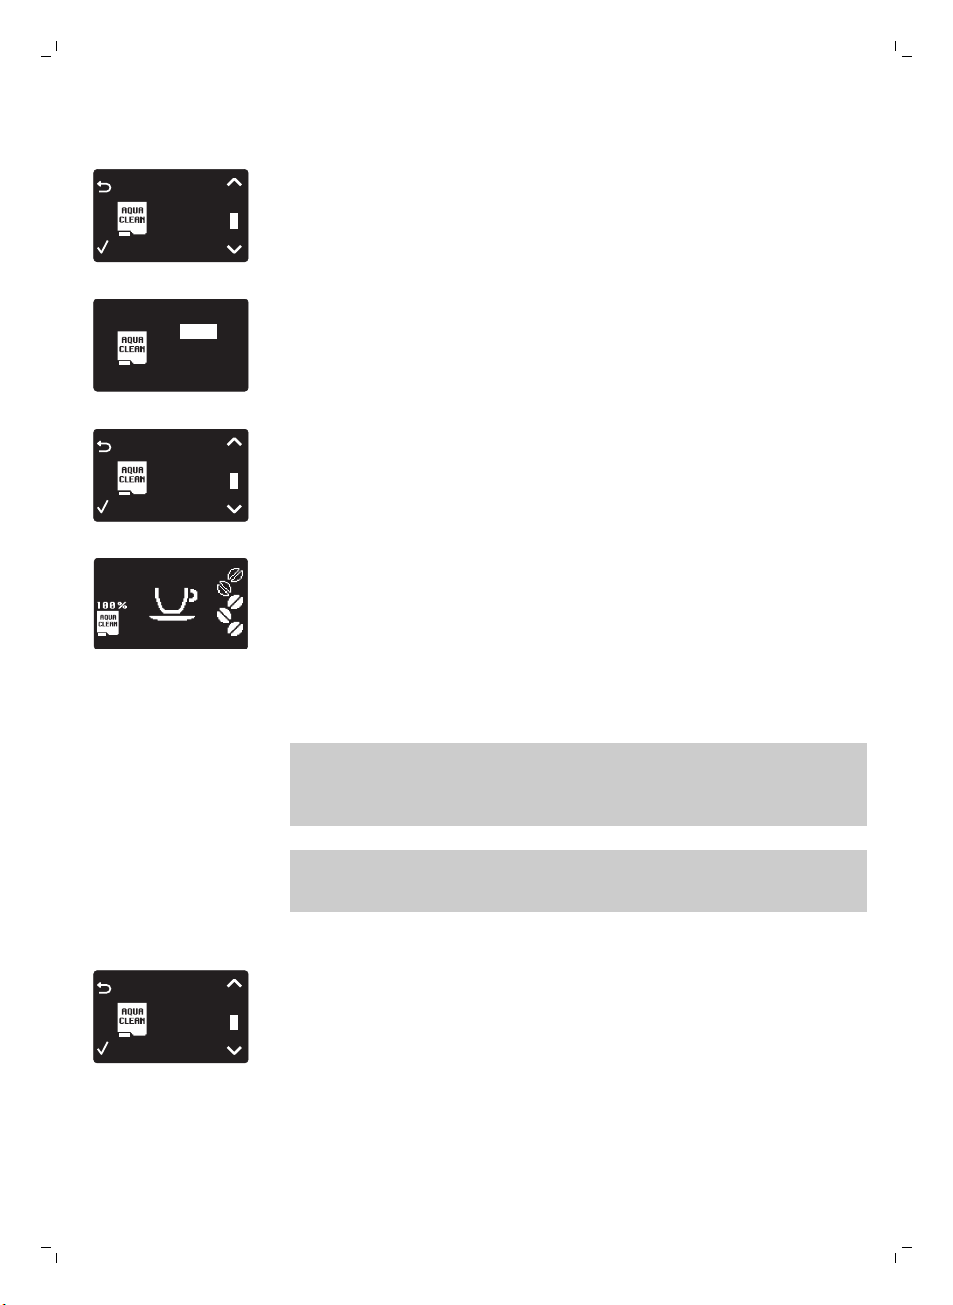
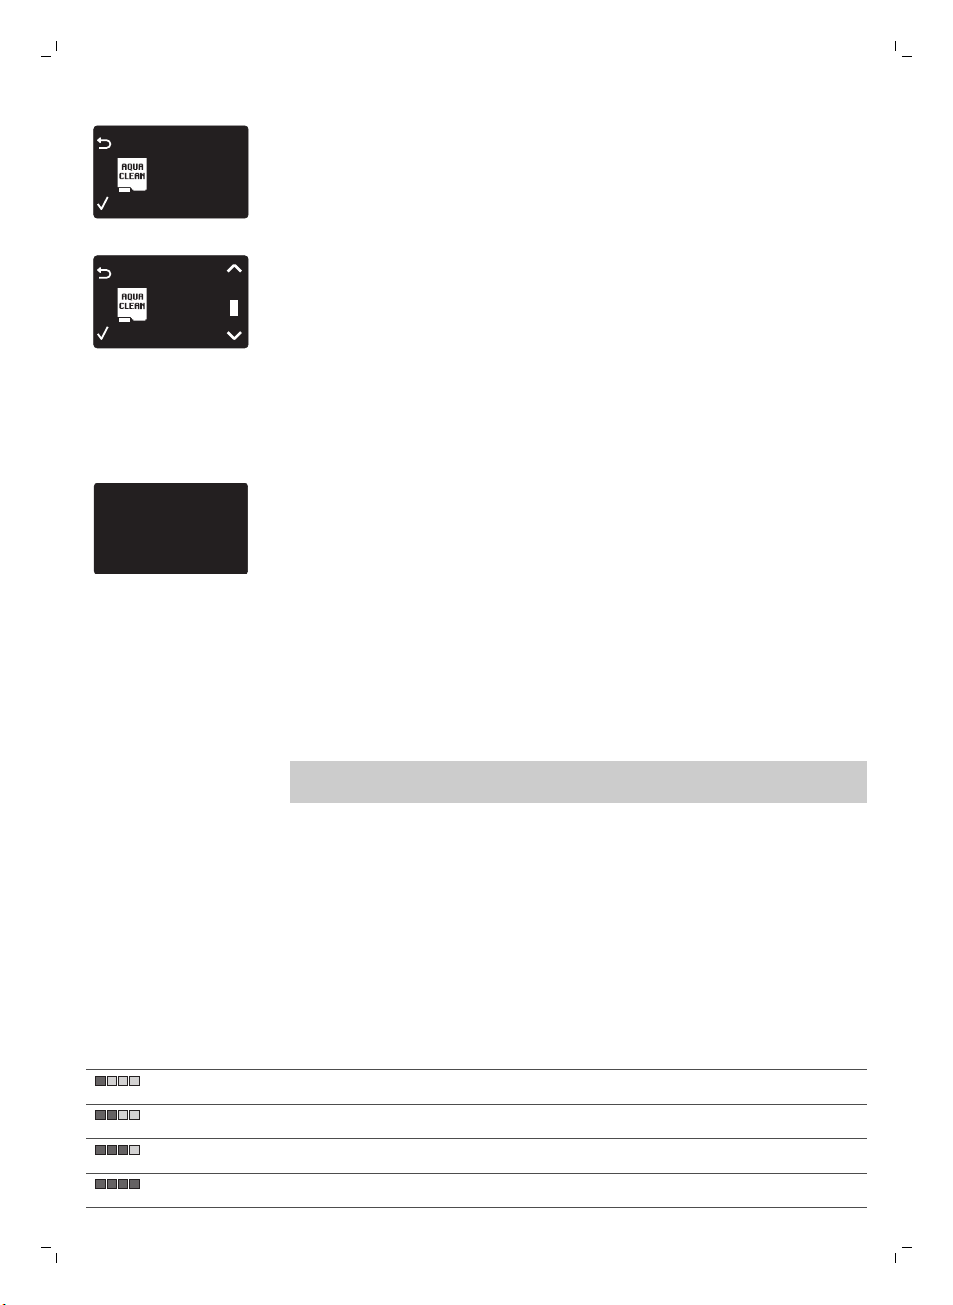
2 Press the MENU button, select MENU and press the OK button to
confirm. Scroll to AQUACLEAN FILTER. Press the OK button to confirm.
-
The display shows the number of AquaClean filters that have been
installed previously from 0 to 8 filters.
3 Select ON on the display, press the OK button to confirm.
4 The display automatically updates the number of filters used.
-
Then the 'machine ready' screen appears with the AquaClean 100%
icon to indicate that the filter has been installed.
5 Dispense 2 cups of hot water (0.5 l) to complete the activation. Discard
this water.
7
Replacing the AquaClean filter
Note: Replace the AquaClean filter as soon as the capacity has dropped to
0% and the filter icon flashes quickly. Replace the AquaClean filter at least
every 3 months, even if the machine has not yet indicated that replacement
is required.
Tip: We advise you to buy a new filter when the capacity has dropped to
10% and the filter icon starts flashing slowly. This ensures that you can
replace the filter when the capacity has dropped to 0%.
1 Take out the AquaClean filter and replace it by a new AquaClean filter
(also see the separate quick start guide).
2 Press the MENU button, scroll to AQUACLEAN FILTER and press the OK
button to confirm.
Page 9
FILTER
0%
NEW?
AQUA CLEAN
FILTER
2 / 8
AQUA CLEAN
DESCALE BEFORE
ACTIVATING FILTER
8
English
-
The display asks if you want to activate a new filter.
3 Press the OK button to confirm.
-
The display automatically updates the number of filters used.
4 Dispense 2 cups of hot water (0.5 l) to complete the activation. Discard
this water.
Replacing the AquaClean filter after 8 filters were used
1 When the filter icon starts flashing on the display, press the MENU
button, scroll to AQUACLEAN FILTER and press the OK button to confirm.
-
The display tells you that you need to descale the machine before
activating the new filter.
2 Press the OK button to start the descaling procedure (see 'Descaling
procedure').
-
Press the escape button several times to leave the filter menu if you
do not want to descale right away.
3 At the end of the descaling procedure, the display asks you if you want
to install the AquaClean filter.
-
Follow the steps in 'Replacing the AquaClean filter'.
Measuring the water hardness
Note: If you have installed the AquaClean filter, you do not need to set the
water hardness.
To be able to adjust the machine settings to the water in your region, please
measure the water hardness with the water hardness test strip supplied. The
default water hardness of the machine is set to the highest level (4). If the
measured water hardness is different, adjust the setting in the machine
menu.
1 Immerse the water hardness test strip (supplied with the machine) in tap
water for 1 second.
2 Remove the water hardness test strip and and wait for 1 minute.
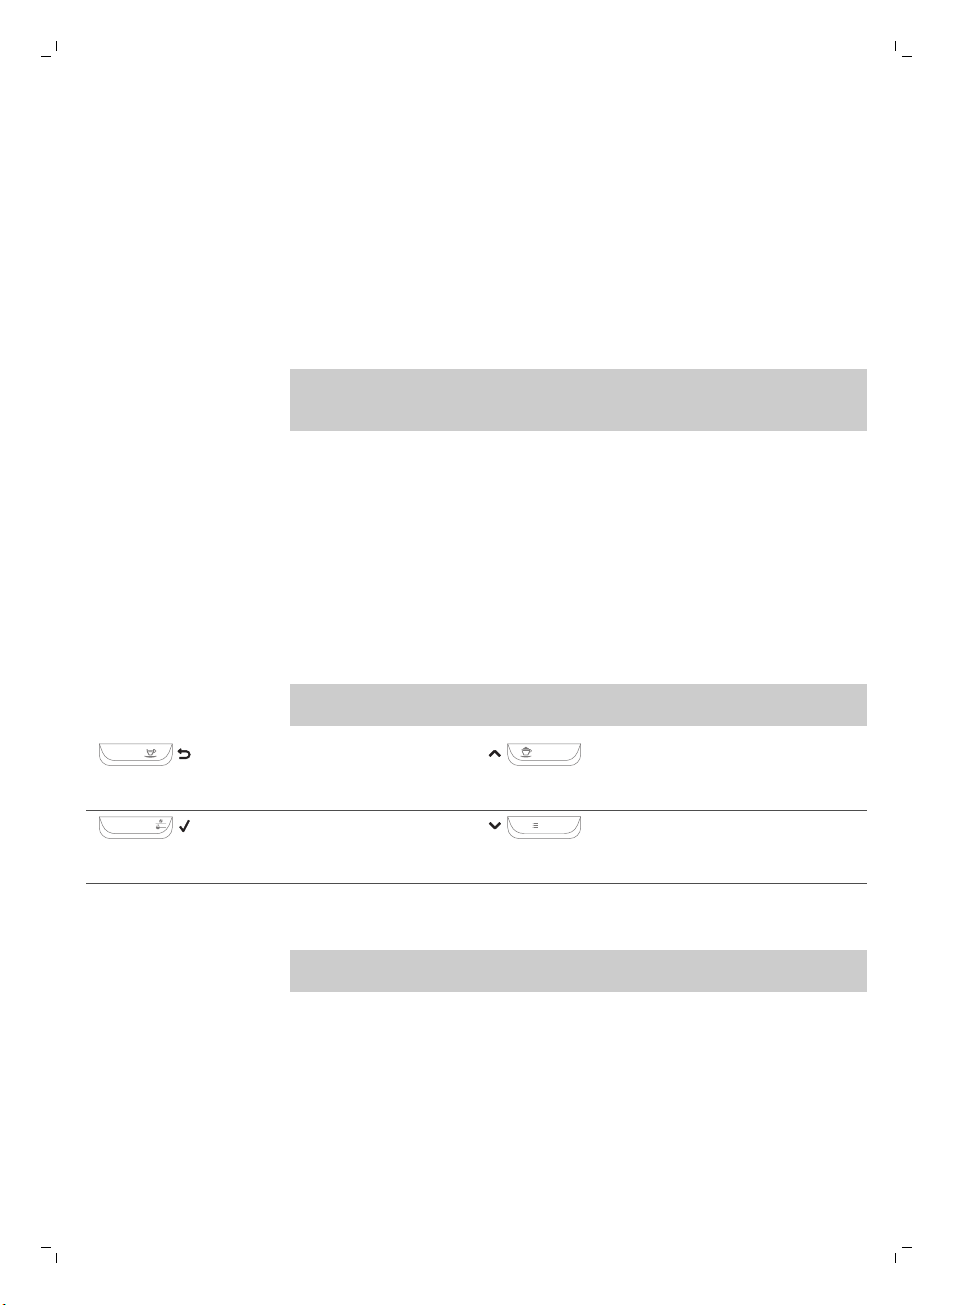
3 Check how many squares have turned red and check the water hardness
in the table below.
number of red squares
value to be set water hardness
1 very soft water
2 soft water
3 hard water
4 very hard water
Page 10
4 Press the MENU button, select menu and scroll to select water hardness.
ESPRESSO
CAPPUCCINO
AROMA STRENGTH
MENU
Select the preferred water hardness setting and press the OK button to
confirm.
Control panel and display
This espresso machine has a self-explaining display for easy use. Read the
sections below for a quick explanation of the buttons.
One-touch beverage buttons
Use the one-touch beverage buttons (ESPRESSO, ESPRESSO LUNGO,
CAPPUCCINO and LATTE MACCHIATO) to quickly prepare one of the preset
beverages.
-
Make sure that the milk carafe is in place and prepared for use when you
select cappuccino or latte macchiato (see the separate quick start guide).
-
If you want to stop the brewing process before the machine has finished
dispensing the preset coffee volume, press the OK button.
-
You can adjust the length of espresso or espresso lungo (see 'Adjusting
coffee and milk volume').
-
After preparing a milk-based beverage, the machine starts the QUICK
CARAFE CLEAN procedure.
Navigation buttons
English
9
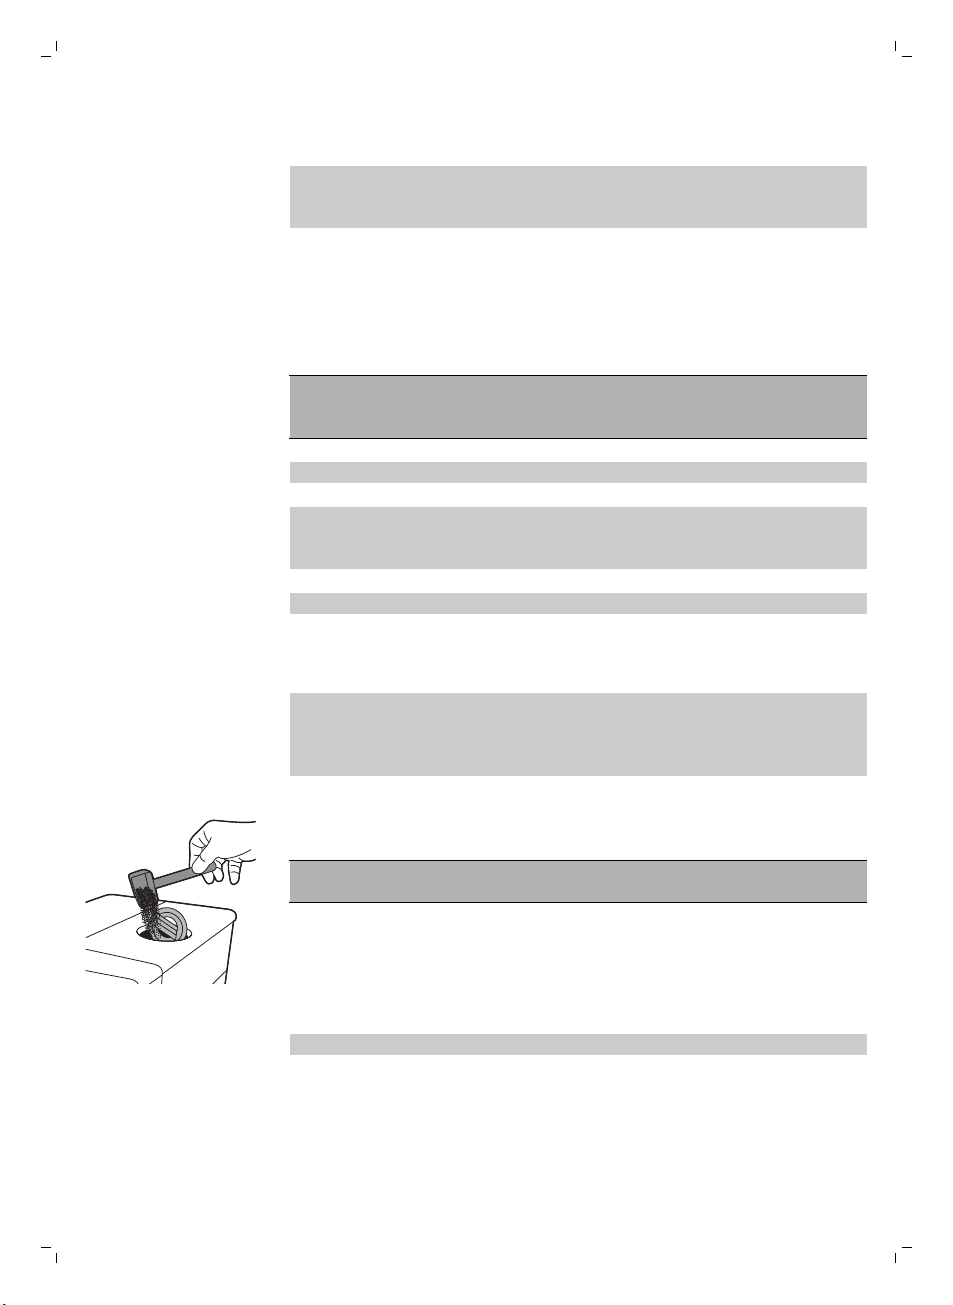
ESPRESSO button = Escape
button: press this button to return
to the main menu.
AROMA STRENGTH button = OK
button: press this button to select,
confirm or stop a function.
MENU button
Some of the one-touch beverage buttons have a double function; use these
buttons to navigate through the menu:
CAPPUCCINO button = Up button:
press this button to scroll up
through the display menu.
MENU button = Down button:
press this button to scroll down
through the display menu.
Use the MENU button to prepare other drinks, like hot water and frothed
milk. You can also use the MENU button to change the following settings:
-
Display contrast
-
Coffee temperature
-
Stand-by time: this is the time after which the machine goes into standby
mode.
-
Water hardness: to be able to adjust the machine settings to the water in
your region, please measure the water hardness.
-
To activate the AquaClean filter
-
To start descaling
Page 11
10
English
AROMA STRENGTH button
Use the AROMA STRENGTH button to adjust the coffee strength (see
'Adjusting coffee strength') or to brew pre-ground coffee (see 'Brewing
coffee with pre-ground coffee').
Brewing coffee
Brewing coffee with beans
Caution: Only use espresso beans. Never put ground coffee, unroasted
coffee beans or caramelized coffee beans in the bean hopper, as this may
cause damage to the machine.
To brew coffee, follow the instructions on the separate quick start guide.
To brew two cups of espresso or espresso lungo, press the button of the
desired beverage twice. The machine automatically carries out two grinding
cycles in sequence.
Note: Using the cover of the bean hopper helps to keep the beans fresh.
Brewing coffee with pre-ground coffee
When you brew coffee with pre-ground coffee, use the measuring scoop
supplied to put the correct dose in the pre-ground coffee compartment. Do
not add too much pre-ground coffee to avoid the coffee grounds drawer
from getting clogged.
1 Open the lid of the pre-ground coffee compartment.
2 Pour one measuring scoop of pre-ground coffee into the pre-ground
coffee compartment and close the lid.
Caution: Do not put any other substance than pre-ground coffee in the
pre-ground coffee compartment, as this may damage the machine.
3 Place a cup under the coffee dispensing spout.
4 Press the AROMA STRENGTH button and select the pre-ground coffee
brewing function.
5 Press the ESPRESSO button.
The machine automatically starts brewing the selected beverage.
Note: With pre-ground coffee you can only brew one coffee at a time.
Special drinks and hot water
1 Press the MENU button and select DRINKS.
2 Press the OK button to confirm.
3 Scroll through the menu and select the desired beverage.
Page 12
Dispensing hot water
Caution: Steam and hot water may spray out of the hot water dispensing
spout when brewing starts. Wait until brewing has ended before you
remove the hot water dispensing spout.
1 Insert the hot water dispensing spout.
2 Press the MENU button. Select DRINKS, confirm and scroll to select HOT
WATER.
Caution: Only select HOT WATER in the menu when the hot water
dispensing spout is installed.
3 Press the OK button to confirm. The display reminds you to install the hot
water dispensing spout; press the OK button to confirm. The machine
starts dispensing hot water.
4 To stop dispensing hot water, press the OK button.
Brewing milk-based coffee beverages and milk froth
Note: For more information on how to use the milk carafe, read the separate
quick start guide or scan the QR code (see 'Introduction ') to access the
dedicated website for instruction videos.
Caution: Make sure that the milk carafe is installed and the milk
froth dispensing spout is open before you select a milk-based
coffee beverage or milk froth. If the milk carafe is not installed
correctly, steam and hot milk may spray out of the milk froth
dispensing spout.
1 Place a cup under the open milk froth dispensing spout.
2 Choose your milk-based beverage.
-
Press the one-touch CAPPUCCINO or LATTE MACCHIATO button to
brew one of these milk-based beverages right away.
-
Press the MENU button, choose DRINKS and scroll down through the
drinks to select MILK FROTH.
-
The machine reminds you that you have to install the milk carafe and
open the milk froth dispensing spout.
3 The machine first dispenses a preset volume of frothed milk into the cup
or glass and then dispenses a preset volume of coffee.
-
To stop dispensing milk or coffee, press the OK button.
4 After brewing milk-based coffee beverages, the display asks you if you
want to perform the quick clean procedure for the milk carafe. You have
10 seconds to activate the quick clean procedure (see 'Carafe quick
clean'). You can perform the quick clean procedure while leaving the milk
inside the milk carafe. It is recommended to perform the quick clean
procedure at least once a day. Press the OK button to confirm that you
want to perform the quick clean procedure or press the escape button to
perform the quick clean procedure later.
English
11
Page 13
12
English
Beverage types and lengths
Beverage types
Beverage name
Espresso Coffee with thick crema served in a
Description How to select
small cup
One-touch beverage button on
control panel
Espresso Lungo A longer espresso with thick crema
served in a medium-sized cup
Cappuccino 1/3 espresso, 1/3 hot milk and 1/3
milk foam served in a large cup
Latte Macchiato Long shot of hot milk with foam and
a shot of espresso served in a tall
glass
Milk Froth Hot milk with foam MENU/DRINKS
Hot Water MENU/DRINKS
One-touch beverage button on
control panel
One-touch beverage button on
control panel
One-touch beverage button on
control panel
Beverage lengths
Beverage name
Espresso 40 ml 20 - 230 ml
Espresso Lungo 80 ml 20 - 230 ml
Hot water 300 ml 50 - 450 ml
Standard length Length range
Adjusting volume and taste
Adjusting coffee and milk volume
You can adjust the volume of the beverage brewed according to your taste
and to the size of the cups.
Caution: Do not use cups that have a diameter of more than 8cm, to avoid
damage to the front panel.
Note: We advise you to use glass cups or cups with a ceramic-coated rim.
1 To adjust the espresso volume, press and hold the ESPRESSO button
until the display shows the MEMO icon.
-
The machine enters the programming phase and starts to brew the
selected beverage.
2 Press the OK button when the cup contains the desired amount of
espresso.
-
The tick on the display shows that the button is programmed: every
time it is pressed, the machine brews the set espresso volume.
Page 14
Note: To set the volume of espresso lungo, cappuccino and latte macchiato,
1
2
3
4
5
1
2
follow the same procedure: press and hold the button of the beverage and
press the OK button when the cup contains the desired amount. To adjust
the volume of milk-based coffee beverages, first insert the milk carafe and
save the milk volume and then save the coffee volume.
Adjusting coffee strength
To change the coffee strength, press the AROMA STRENGTH button. Each
time you press the AROMA STRENGTH button, the aroma strength changes
by one degree. The display shows the chosen strength, which is only saved
if you brew a coffee.
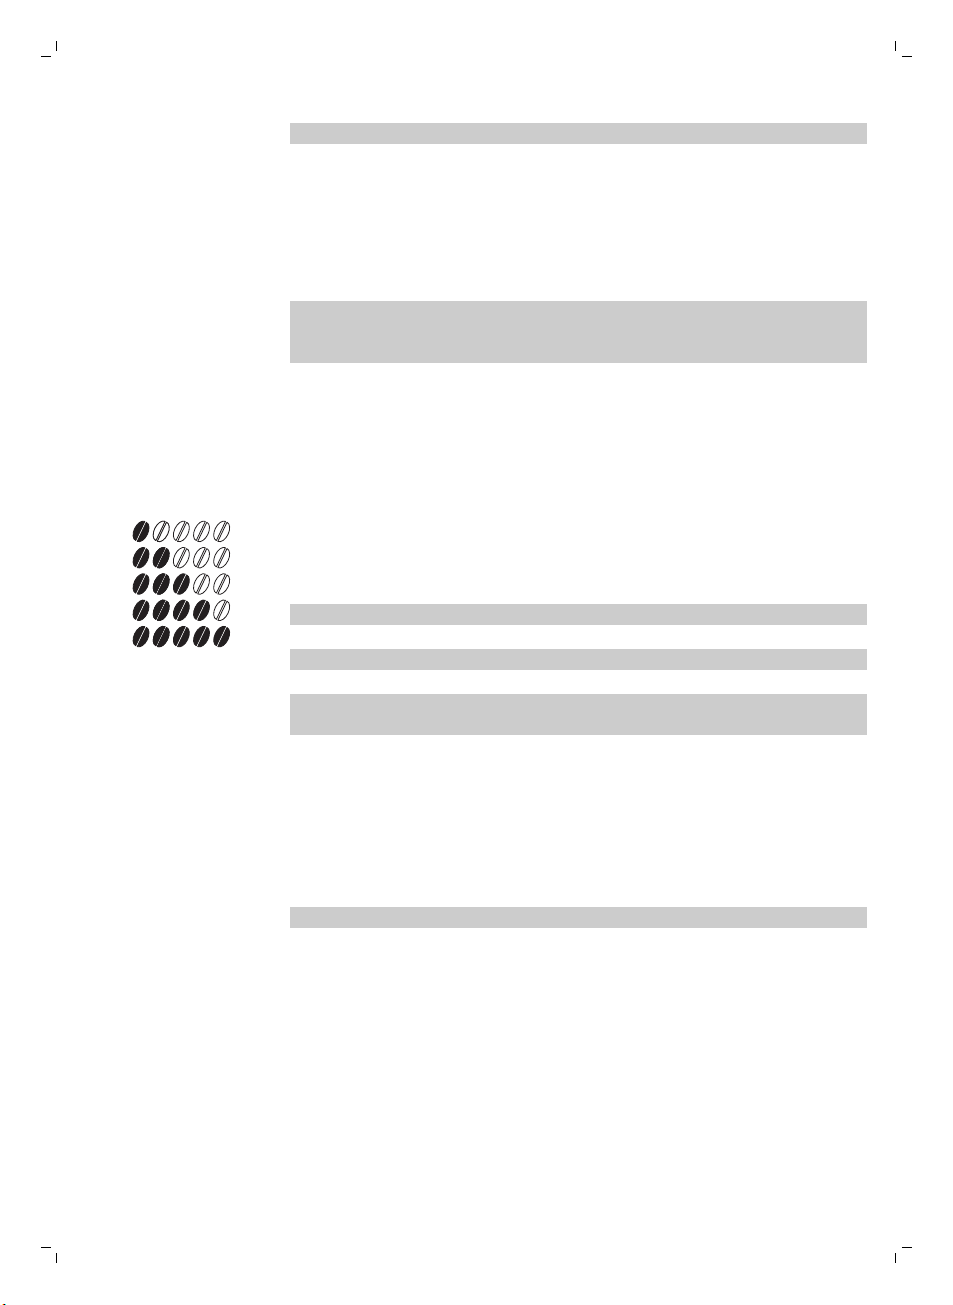
1 Very mild
2 Mild
3 Regular
4 Strong
5 Very strong
Note: The machine automatically dispenses the correct coffee volume for
each coffee strength.
Note: You can also use the AROMA STRENGTH button to brew coffee with
pre-ground coffee.
Note: After adjusting the coffee strength, the display shows the main menu
again and saves the chosen aroma strength when you brew a coffee.
English
13
Adjusting grinder settings
You can adjust the grinder settings by using the grind setting knob inside the
bean container.
Note: You can only adjust the grind settings when the machine is grinding
coffee beans.
Caution: Do not turn the grind setting knob more than one notch at a time to
prevent damage to the grinder.
1 Place a cup under the coffee dispensing spout.
2 Open the lid of the bean hopper.
3 Press the ESPRESSO button.
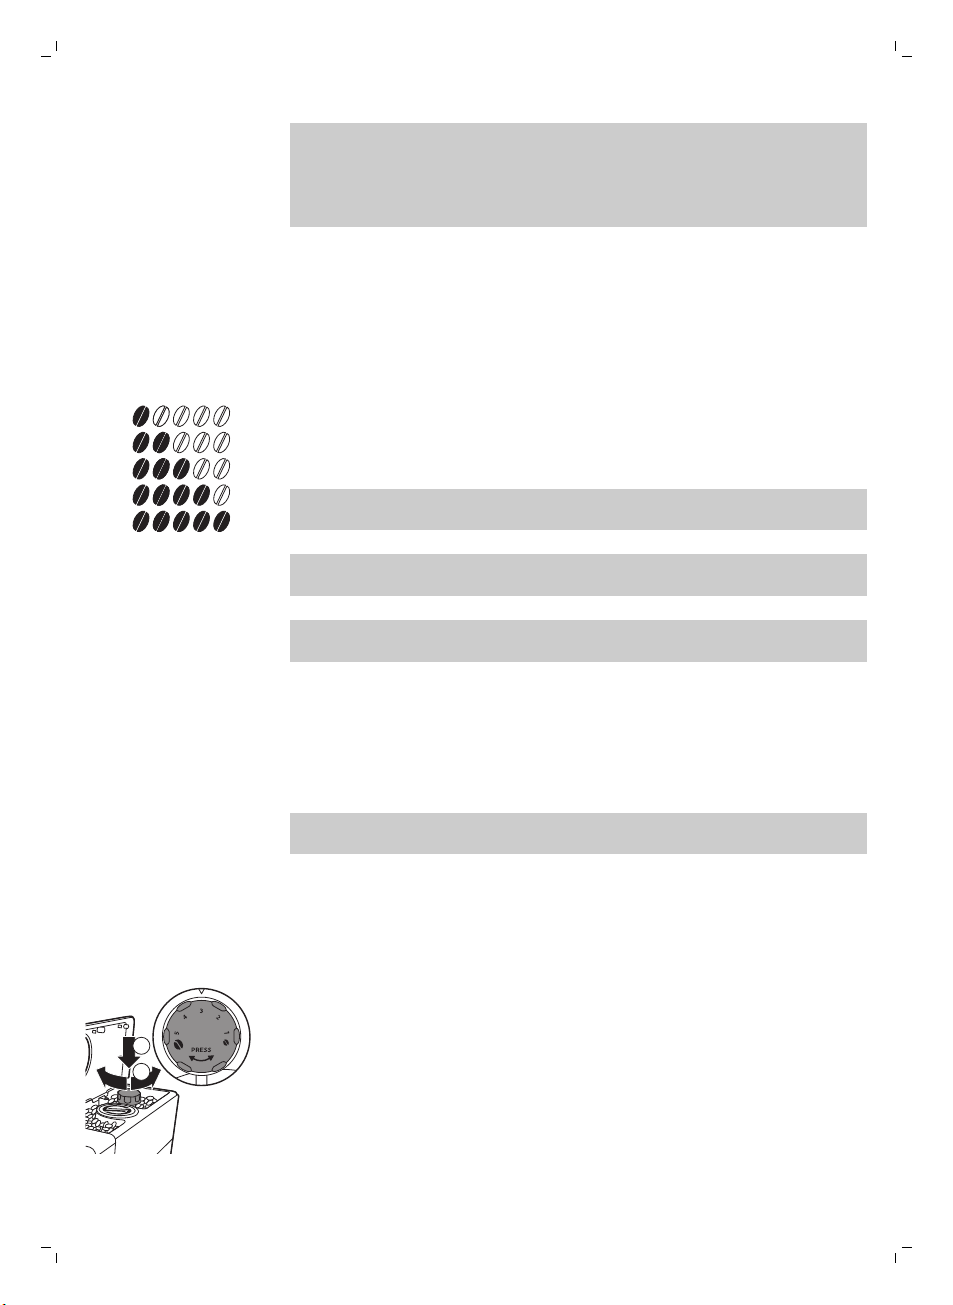
4 When the grinder starts grinding, press down the grind setting knob and
turn it to the left or right.
-
There are 5 different grind settings you can choose from. The lower the
setting, the stronger the coffee.
Page 15
14
English
Cleaning and maintenance
Note: Consult the table below for when and how to clean all detachable
parts of the machine. For more detailed information on how to clean the
brew group and how to descale the machine, read the corresponding
chapters below or go to the dedicated website www.saeco.com/care.
Cleaning table
Part description
Brew group Weekly Remove the brew group and clean it under the tap
When to clean How to clean
(see 'Cleaning the brew group under the tap').
Depending on the
type of usage
Monthly Clean the brew group with the coffee oil remover
Milk carafe After every use Perform the QUICK CARAFE CLEAN as indicated on
Daily Clean the milk carafe thoroughly (see 'Thorough
Weekly Disassemble the milk carafe and clean all parts under
Monthly Use Saeco milk circuit cleaner CA6705 for this
Drip tray As soon as the red
Coffee grounds
container
Water tank When it suits you Clean it under the tap.
'drip tray full' indicator
pops up through the
drip tray.
When it suits you Empty the coffee grounds container and clean it
Lubricate the brew group (see 'Lubrication').
tablets.
the machine after preparing a milk-based beverage
(see 'Carafe quick clean').
cleaning of the milk carafe').
the tap (see 'Weekly cleaning of the milk carafe').
cleaning cycle (see 'Monthly cleaning of the milk
carafe').
Empty the drip tray and clean it under the tap.
under the tap. Make sure the machine is switched on
while you empty and clean the coffee grounds
container.
Page 16
Part description When to clean How to clean
2
1
Pre-ground coffee
compartment/coffee
exit duct
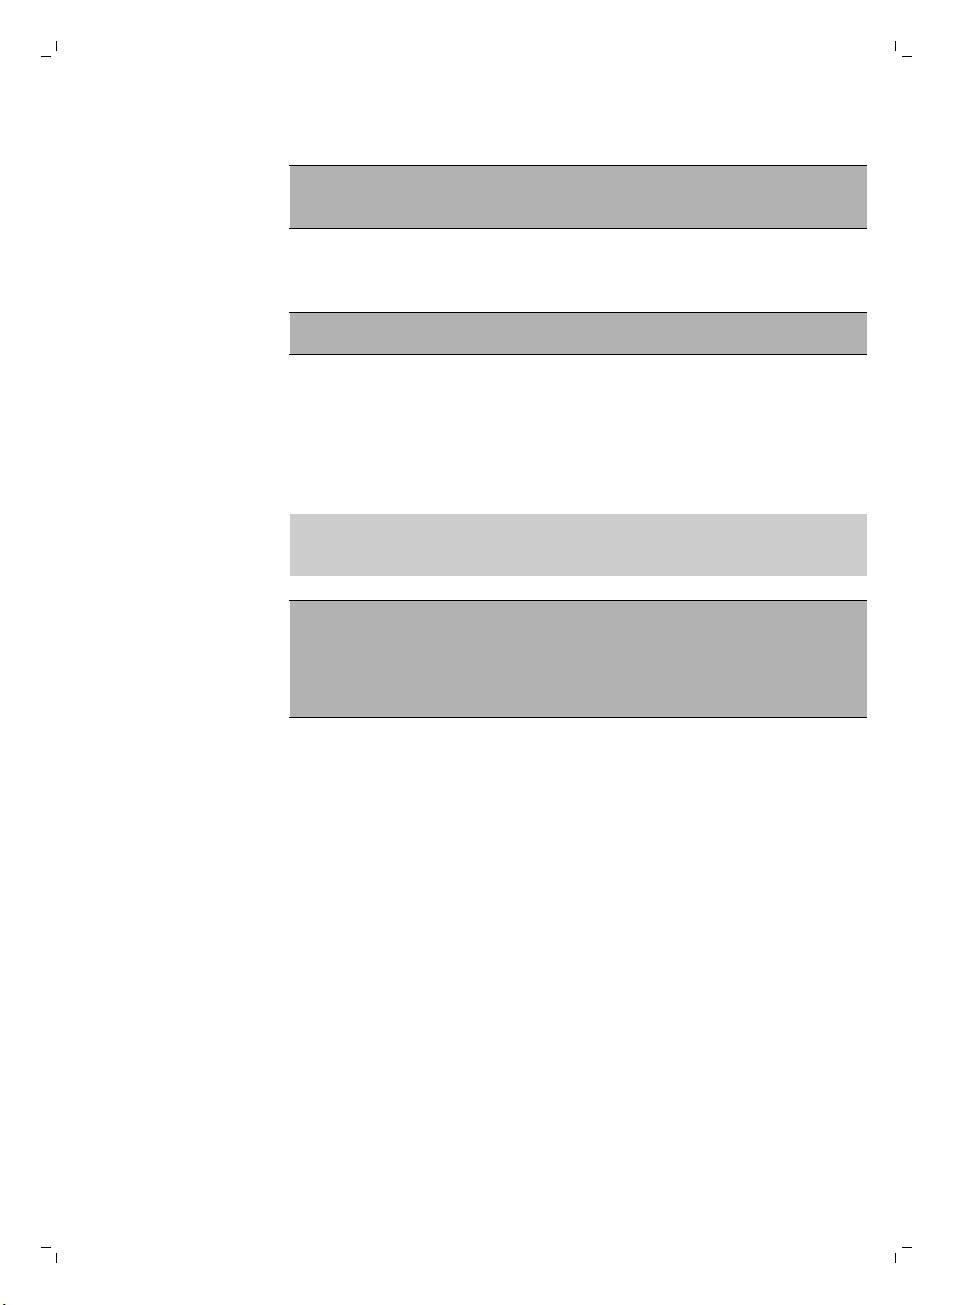
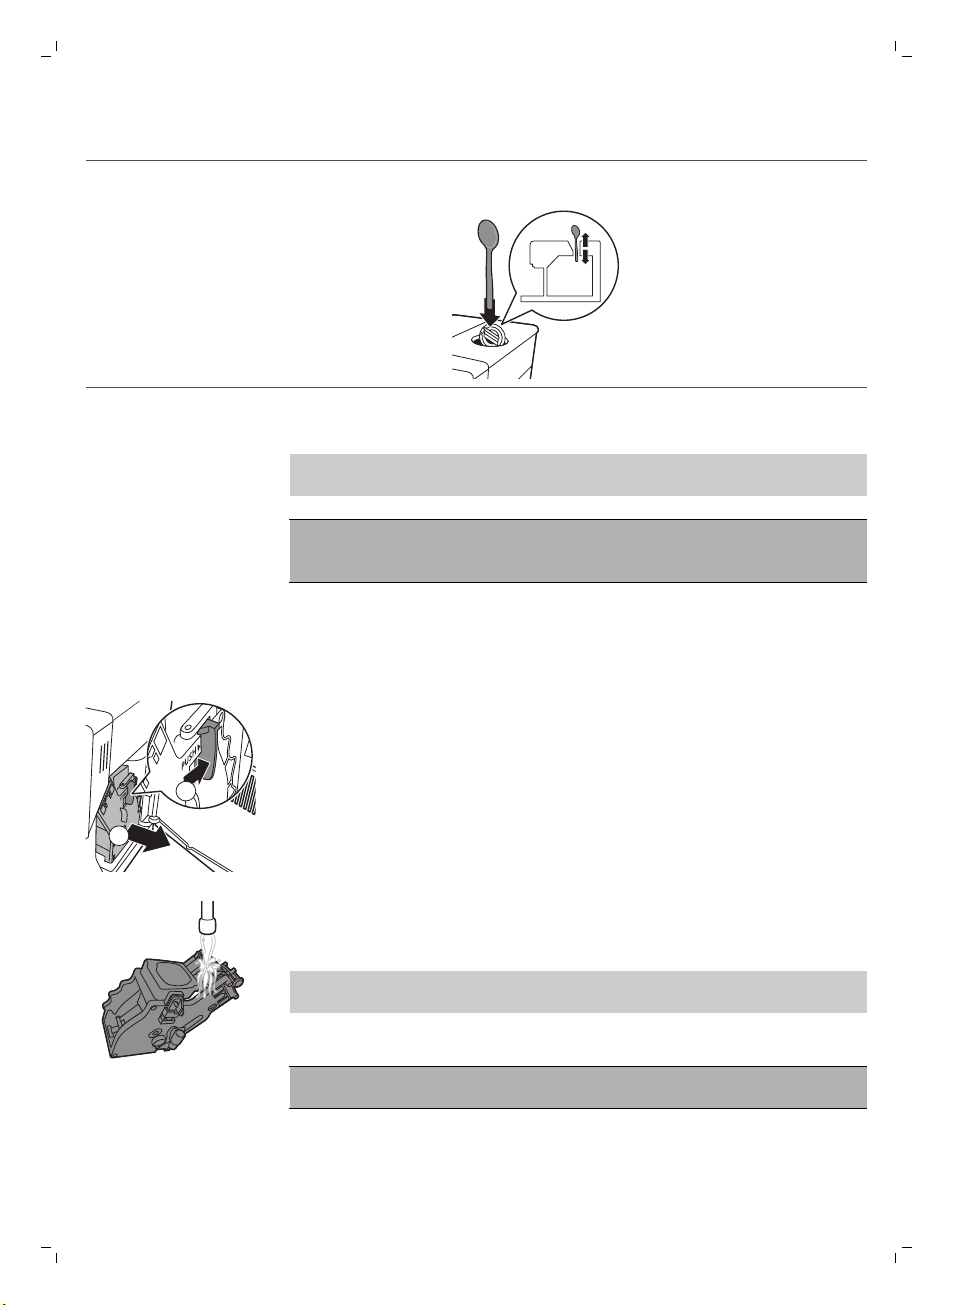
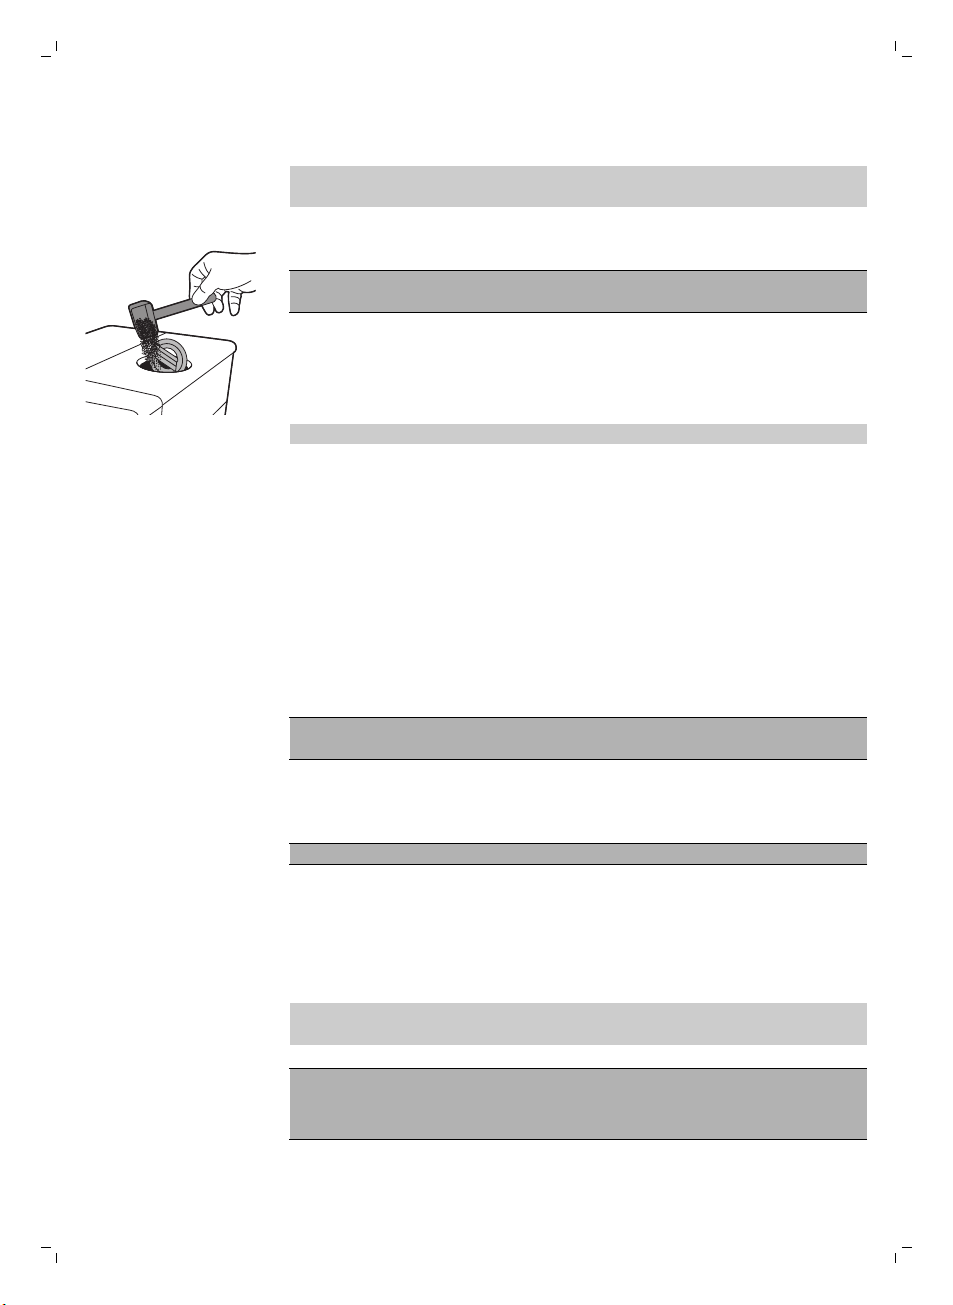
Weekly Clean the top part with a spoon handle as shown
below.
Cleaning the brew group
Note: Scan the QR code or go to www.saeco.com/care for detailed
instructions on how to disassemble and clean the brew group.
Caution: Do not clean the brew group in the dishwasher and do not use
washing-up liquid or a cleaning agent to clean it. This may cause the brew
group to malfunction and may have a negative effect on the coffee taste.
Cleaning the brew group under the tap
1 Switch off the machine and unplug it.
2 Remove the drip tray with the coffee grounds container.
3 Open the service door.
4 Press the PUSH button (1) and pull at the grip of the brew group to
remove it from the machine (2).
English
15
5 Rinse the brew group thoroughly with lukewarm water. Clean the upper
filter carefully.
6 Let the brew group air-dry.
Note: Do not dry the brew group with a cloth to prevent fibers from
collecting inside the brew group.
Cleaning the brew group with coffee oil remover tablets
Caution: Only use coffee oil remover tablets for cleaning. They do not
have a descaling function.
1 Place a container under the coffee dispensing spout.
2 Press the AROMA STRENGTH button and select pre-ground coffee.
Page 17
16
English
3 Put a coffee oil remover tablet in the pre-ground coffee compartment.
4 Press the ESPRESSO LUNGO button. The machine dispenses water from
the coffee dispensing spout.
5 When the progress bar has reached the middle, set the main switch on
the back of the machine to OFF.
6 Let the coffee oil remover solution act for approximately 15 minutes.
7 Set the main switch to ON. Press the standby button.
8 Wait until the machine performs an automatic rinsing cycle.
9 Perform the 'Weekly cleaning of the brew group' procedure.
10 Remove the drip tray with the coffee grounds container. Empty the drip
tray and the coffee grounds container and place them back in the
machine.
11 Press the AROMA STRENGTH button and select pre-ground coffee.
12 Press the ESPRESSO LUNGO button. The machine dispenses water from
the coffee dispensing spout.
13 Repeat steps 12 and 13 twice. Discard the dispensed water.
Reinserting the brew group
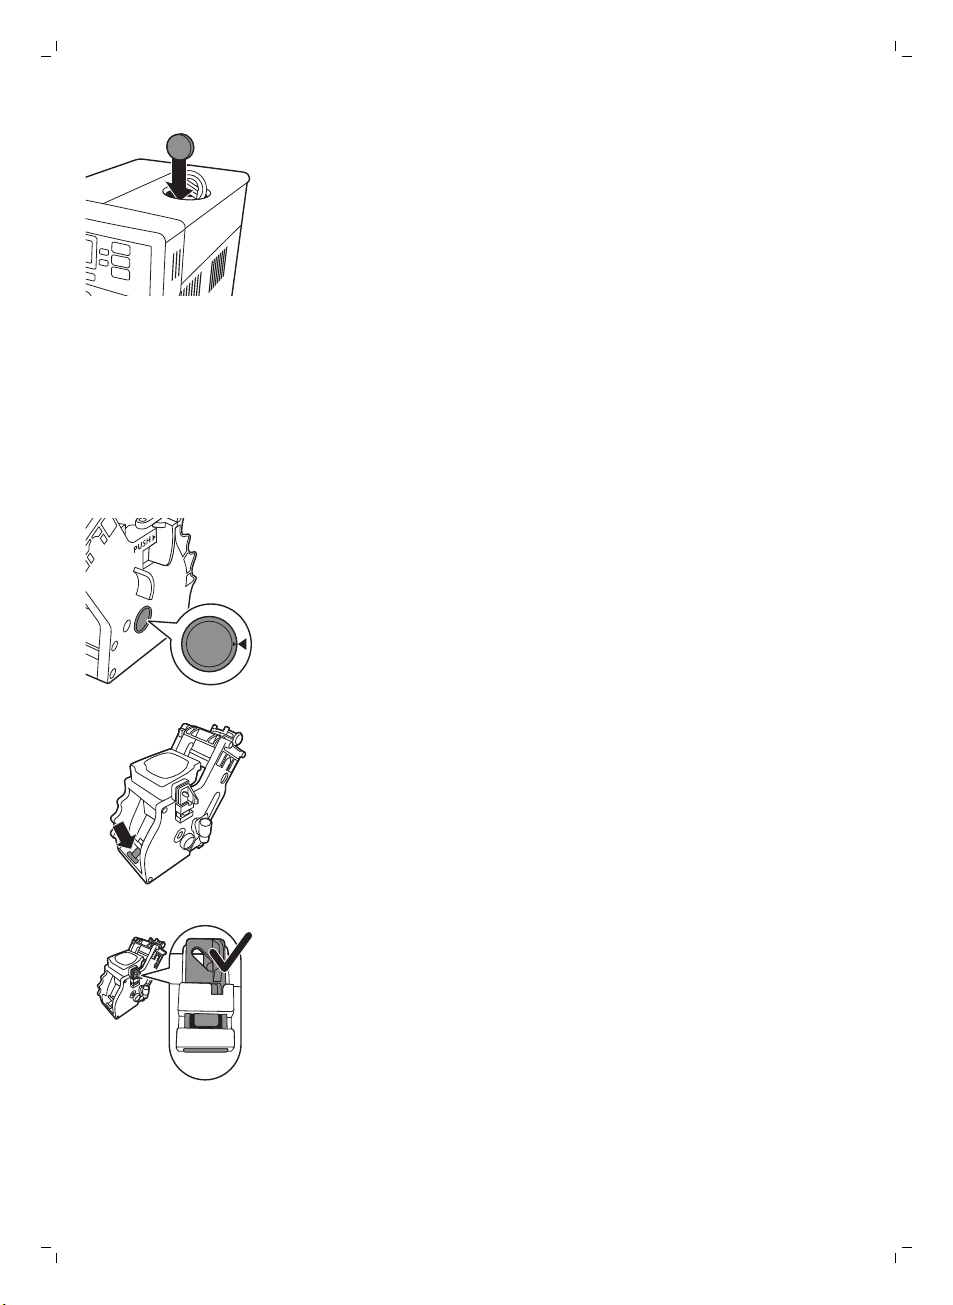
1 Before you slide the brew group back into the machine, make sure the
two yellow reference signs on the side match. If they do not match,
perform the following step:
-
Make sure the lever is in contact with the base of the brew group.
2 Make sure that the yellow locking hook of the brew group is in the correct
position.
-
To position the hook correctly, push it upwards until it is in uppermost
position.
Page 18
English
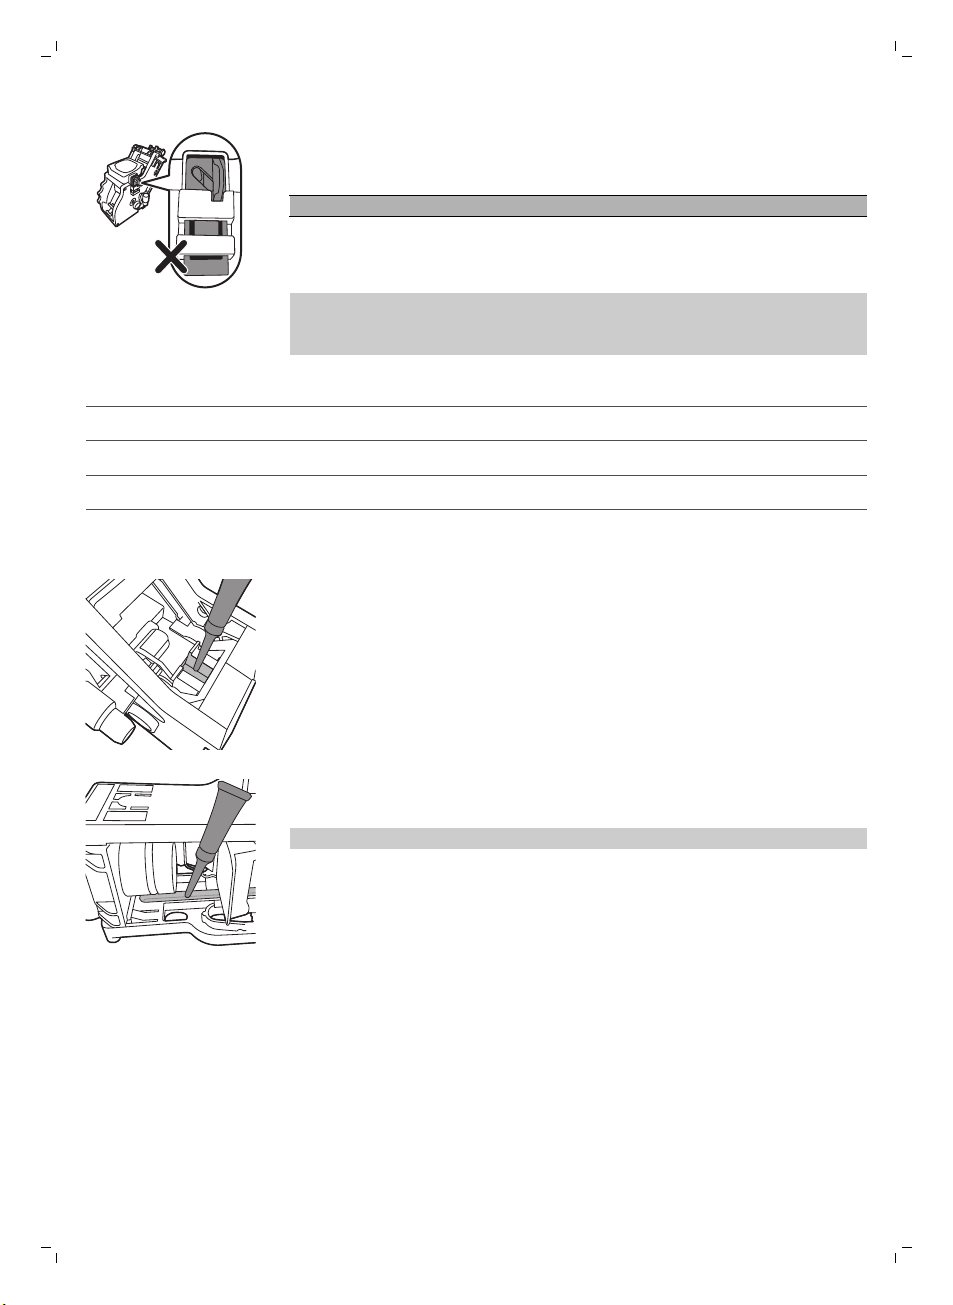
-
The hook is not positioned correctly if it is still in bottommost position.
3 Slide the brew group back into the machine along the guiding rails on the
sides until it locks into position with a click.
Caution: Do not press the PUSH button.
4 Close the service door.
17
Lubrication
For optimal performance of the machine, you have to lubricate the brew
group. See table below for the lubrication frequency. For support visit our
website: www.saeco.com/care.
Usage frequency
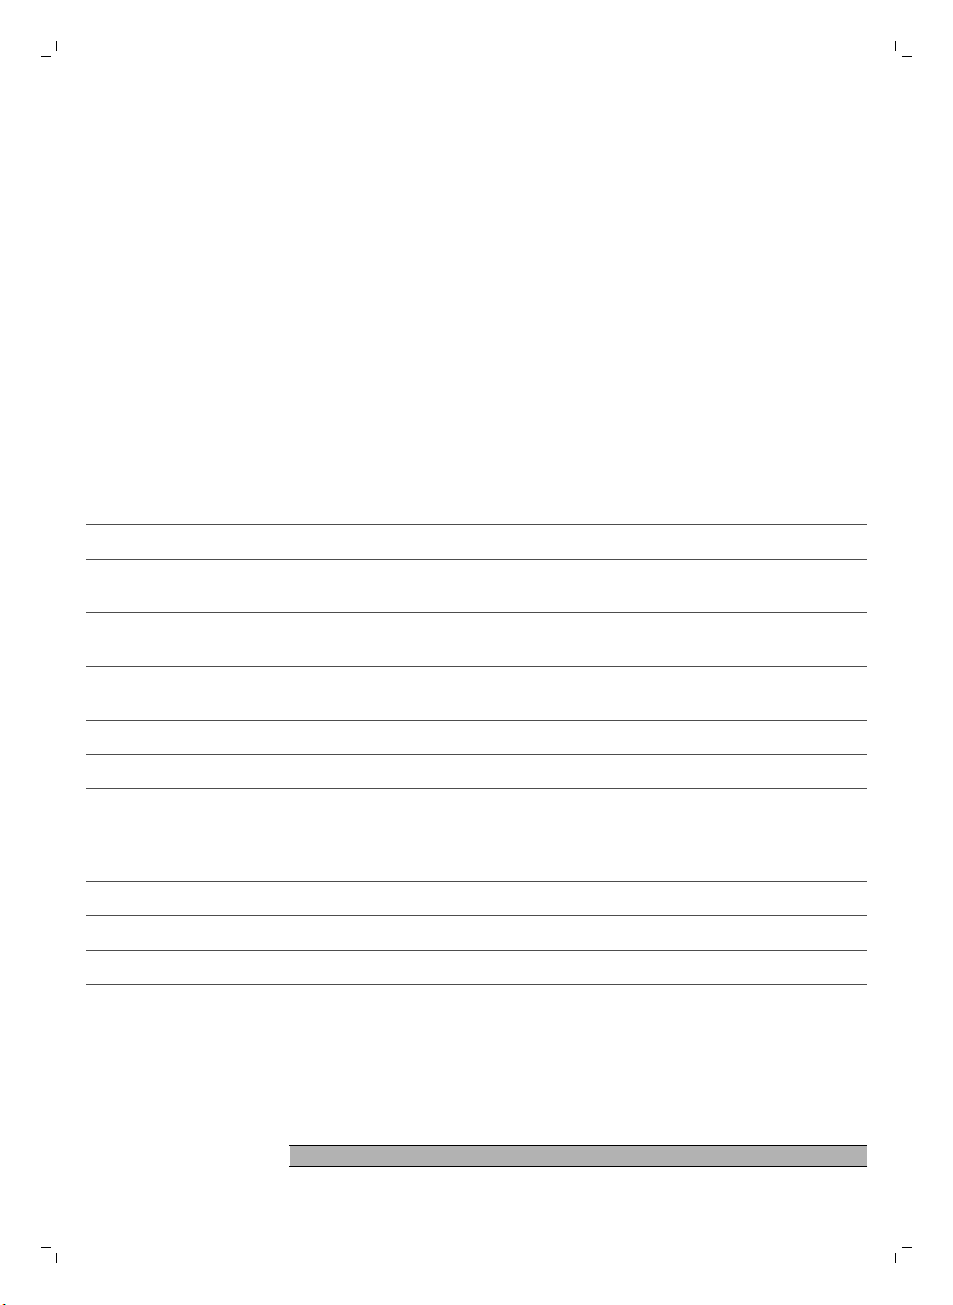
Low 1-5 Every 4 months
Normal 6-10 Every 2 months
Heavy >10 Every month
Nr of beverages brewed daily Lubrication frequency
1 Switch off the appliance and unplug it.
2 Remove the brew group and rinse it under a lukewarm tap (see 'Cleaning
the brew group under the tap').
3 Apply a thin layer of grease around the shaft in the bottom of the brew
group.
4 Apply a thin layer of grease to the rails on both sides (see figure).
5 Reinsert the brew group (see 'Reinserting the brew group').
You can use the grease tube multiple times.
Cleaning the milk carafe
Carafe quick clean
After preparing a milk-based beverage, the carafe cleaning icon appears on
the display.
1 When the carafe cleaning icon appears on the display, press the OK
button if you want to perform a cleaning cycle.
Page 19
1 2
5
3
4
1
2
1
18
English
2 Remove the cup with the beverage and place an empty cup under the
milk dispensing spout.
Note: Make sure the milk dispensing spout is pulled out.
3 Press the OK button to start dispensing hot water.
Thorough cleaning of the milk carafe
To clean the milk carafe thoroughly, you have to do the following regularly:
1 Remove the lid of the milk dispensing unit.
2 Lift the milk dispensing spout out of the milk dispensing unit.
3 Remove the milk tube from the milk dispensing spout.
4 Rinse the milk tube and milk dispensing spout with lukewarm water
thoroughly.
Weekly cleaning of the milk carafe
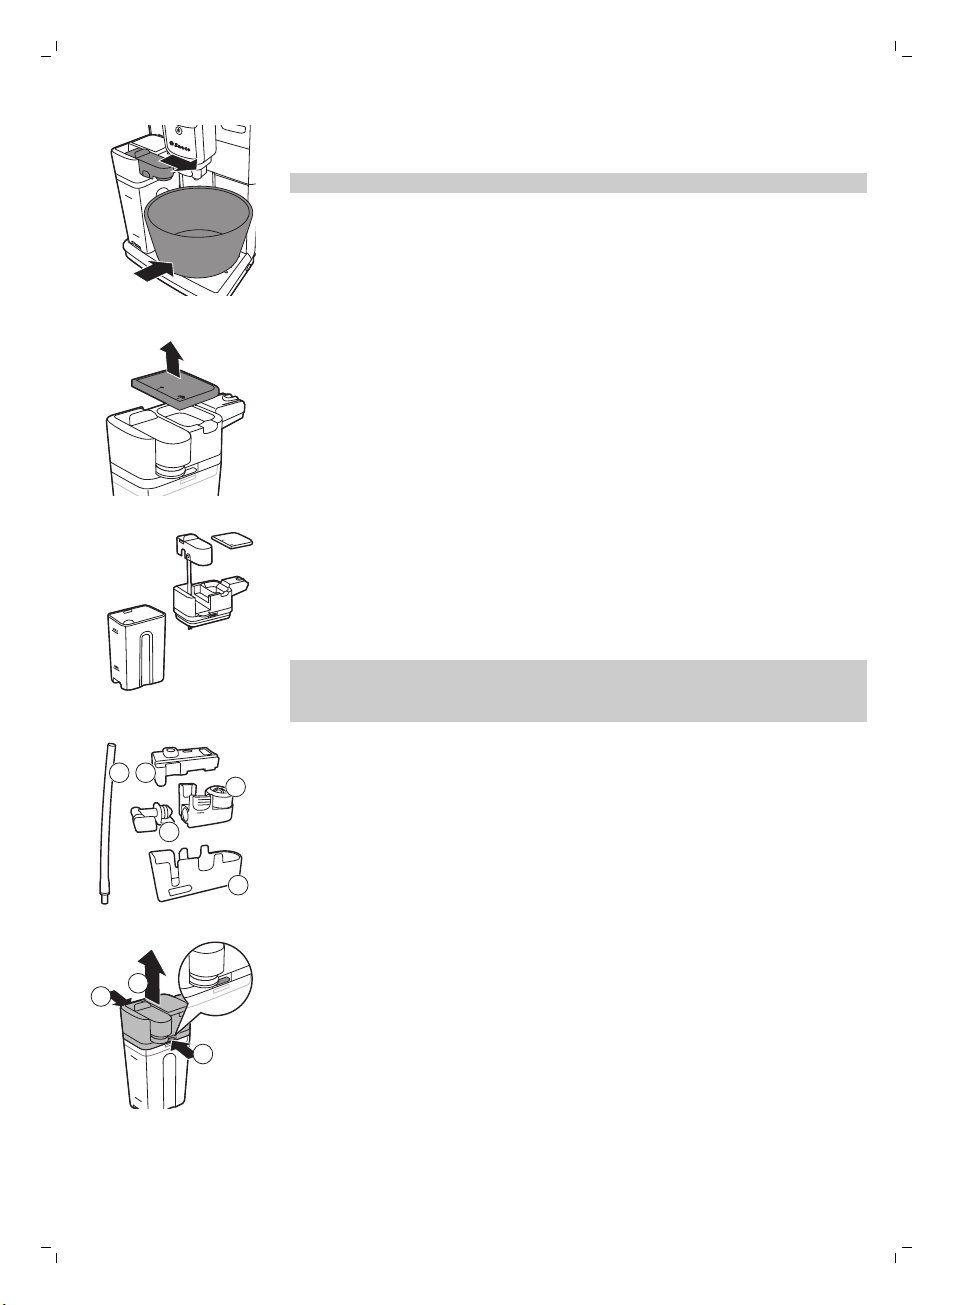
The milk dispensing spout consists of 5 components. Disassemble all
components once a week and clean them under the tap. You can also clean
all components, except for the milk container, in the dishwasher.
1 Milk tube
2 Rubber support
3 Milk frother
4 Milk frother connector
5 Housing of milk dispensing spout
Disassembling the milk dispensing spout
1 Press the release buttons on both sides of the top of the milk dispensing
unit (1) and lift the top off the milk container (2).
Page 20
2
1
English
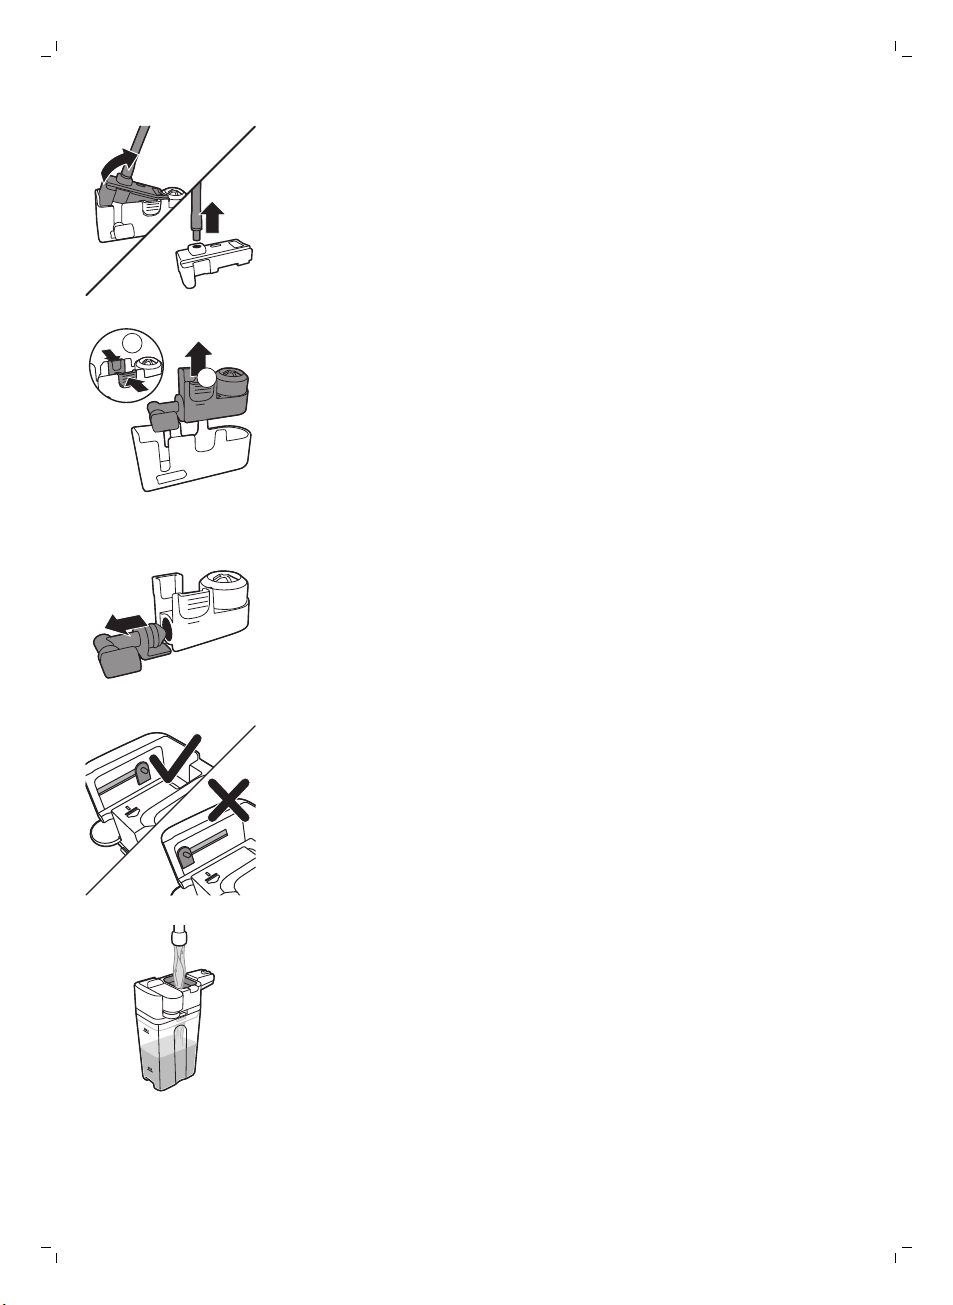
2 Turn the milk dispensing unit upside down and hold it firmly in your hand.
Pull the milk tube off the rubber support.
3 Press the release buttons on the milk frother and remove the milk frother
from the the rubber support.
4 Pull the milk frother connector out of the milk frother.
5 Rinse all components under a lukewarm tap.
19
Reassembling the milk carafe
1 To reassemble the milk froth dispensing spout, follow steps 2 to 4 of
'Disassembling the milk froth dispensing spout' in reverse order.
2 Place the milk froth dispensing spout back into the top of the milk carafe.
3 Place the top of the milk carafe back onto the milk carafe.
Note: Before you place the milk froth dispensing spout back into the top of
the milk carafe, move the pin inside the top to the correct position. If this pin
is not in the correct position, you cannot place the milk froth dispensing
spout back into the top of the milk carafe.
Monthly cleaning of the milk carafe
Only use SAECO milk circuit cleaner CA6705 for this cleaning cycle.
1 Pour the contents of the milk circuit cleaner sachet in the milk carafe.
Then fill the milk carafe with water up to the MAX level indication.
2 Insert the milk carafe into the machine and place a container under the
milk dispensing spout.
3 Press the MENU button, select DRINKS and scroll to MILK FROTH. Press
the OK button to start dispensing the cleaning solution.
4 Repeat step 3 until the milk carafe is empty.
5 When the carafe is empty, remove the container and the milk carafe from
the machine.
6 Rinse the milk carafe thoroughly and fill it with fresh water up to the MAX
level indication.
7 Insert the milk carafe into the machine.
8 Place the container under the milk dispensing spout.
Page 21
START
CALC
CLEAN
20
English
9 Press the MENU button and select MILK FROTH in the DRINKS menu to
start the carafe rinsing cycle.
10 Repeat step 9 until the milk carafe is empty.
Note: Never drink the solution dispensed during this step.
11 Repeat steps 6-10.
12 When the machine stops dispensing water, the cleaning cycle is finished.
13 Disassemble all the components and rinse them under a lukewarm tap.
The machine is ready for use.
Descaling procedure
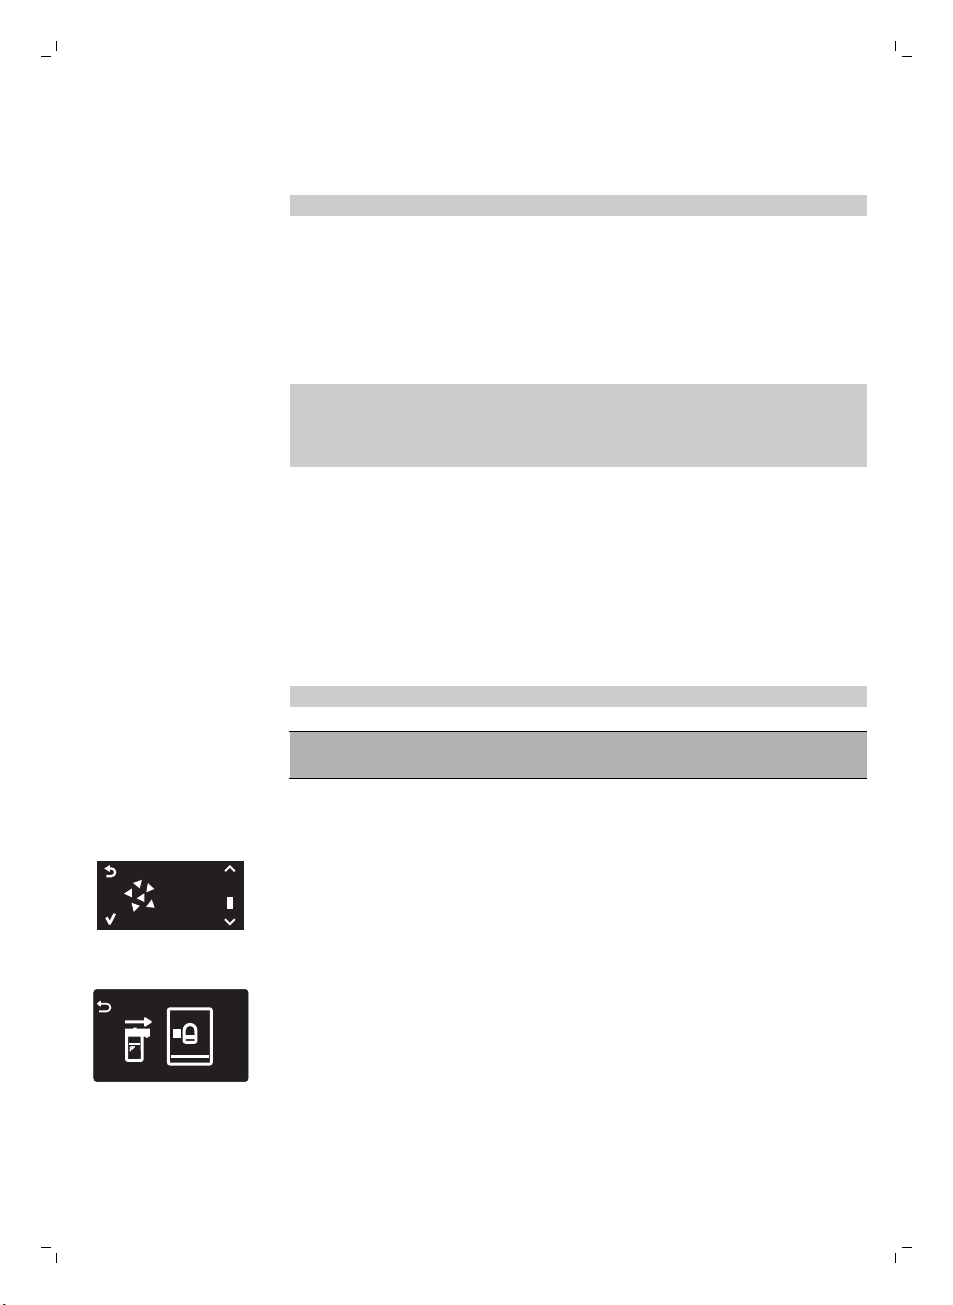
When the display shows START CALC CLEAN, you need to descale the
machine. If you do not descale the machine when this message appears on
the display, the machine will eventually stop working properly. In that case,
repairs are not covered by the warranty.
Only use Saeco descaling solution to descale the machine. Saeco descaling
solution is designed to ensure optimal performance of the machine. The use
of other products may damage the machine and leave residues in the water.
You can buy Saeco descaling solution in the online shop at
www.saeco.com/care.
The descaling procedure lasts 30 minutes and consists of a descaling cycle
and a rinsing cycle. You can pause the descaling or rinsing cycle by pressing
the escape button. To continue the descaling or rinsing cycle, press the OK
button.
Note: Do not remove the brew group during the descaling procedure.
Warning: Do not drink the descaling solution or the water
dispensed during the descaling procedure.
1 Remove the drip tray and the coffee grounds container, empty and clean
them and put them back into place.
2 Place a large container (1.5 l) under the coffee dispensing spout.
3 When the display shows START CALC CLEAN, press the OK button to
start the descaling procedure. Remove the hot water dispensing spout if
present.
-
The display reminds you that you have to insert the carafe.
Page 22
REMOVE
FILTER
MAX
CALC
CLEAN
CALC
CLEAN
1
2
English
-
The display reminds you that you have to open the milk dispensing
21
spout.
-
The display reminds you that you have to remove the AquaClean
filter.
Note: You can press the escape button to skip descaling. If you want to
start the descaling procedure later, press the MENU button, select MENU
and scroll to select DESCALING. Press OK to confirm.
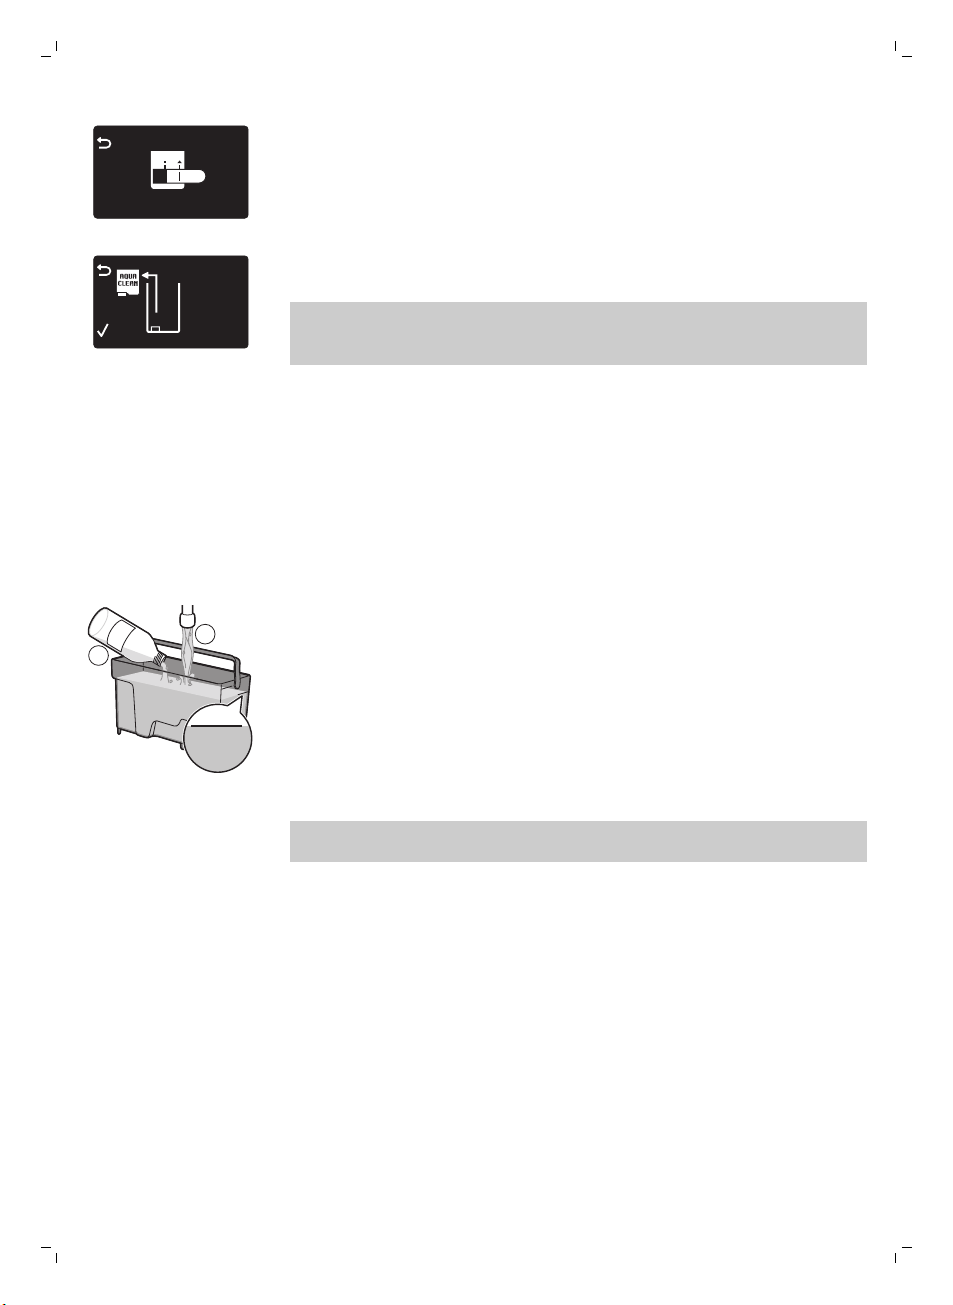
4 Pour the descaling solution into the water tank. Fill the water tank with
fresh water up to the CALC CLEAN level indication. Place the water tank
back into the machine. Press the OK button to confirm.
-
The first phase of the descaling procedure starts. The machine starts
dispensing the descaling solution at intervals.
-
The display shows the descaling icon, the phase indication and the
duration. This first phase takes 20 minutes.
5 Let the machine dispense the descaling solution until the water tank is
empty.
6 Remove the water tank and rinse it.
7 Fill the water tank with fresh water up to the CALC CLEAN level
indication. Place the water tank back into the machine and press OK.
8 Remove and rinse the milk carafe. Fill the milk carafe with water up to the
MIN level indication. Insert the milk carafe into the machine and open the
milk froth dispensing spout.
9 Remove and empty the container and place it back under the coffee
dispensing spout. Press OK to confirm.
10 The second phase of the descaling procedure starts, which is the rinsing
cycle. This phase takes 3 minutes. The display shows the rinsing icon and
the duration of the phase.
Note: If the water tank is not filled up to the CALC CLEAN level, the
machine may require another rinsing cycle.
11 Wait until the machine stops dispensing water. The descaling procedure
is finished when the tick appears on the display.
12 Press the OK button to exit the descaling cycle. The machine starts
heating up and performs the automatic rinsing cycle.
13 Remove and empty the container.
14 Perform the 'Weekly cleaning of the milk carafe' procedure to clean the
milk carafe after descaling.
Page 23
ADD WATER
INSERT CARAFE
ADD COFFEE
INSERT
WATER SPOUT
22
English
15 Clean the brew group by performing the 'Weekly brew group cleaning'
cycle.
16 Install a new AquaClean filter in the water tank.
Tip: Using the AquaClean filter reduces the need for descaling!
What to do if the descaling procedure is interrupted
Once the descaling procedure has started, you must let the machine
perform the entire procedure until the very end without switching off the
machine. If the machine gets stuck during descaling, you can exit the
descaling procedure by pressing the standby button. If this occurs, or in case
of a power failure or accidental disconnection of the cord, do the following:
1 Empty and rinse the water tank thoroughly.
2 Fill the water tank up to the CALC CLEAN level indication and switch the
machine back on. The machine will heat up and perform an automatic
rinsing cycle.
3 Before brewing any beverages, perform a manual rinsing cycle.
Note: If the descaling procedure was not completed, the machine will
require another descaling procedure as soon as possible.
Warning icons and error codes
Meaning of the warning icons
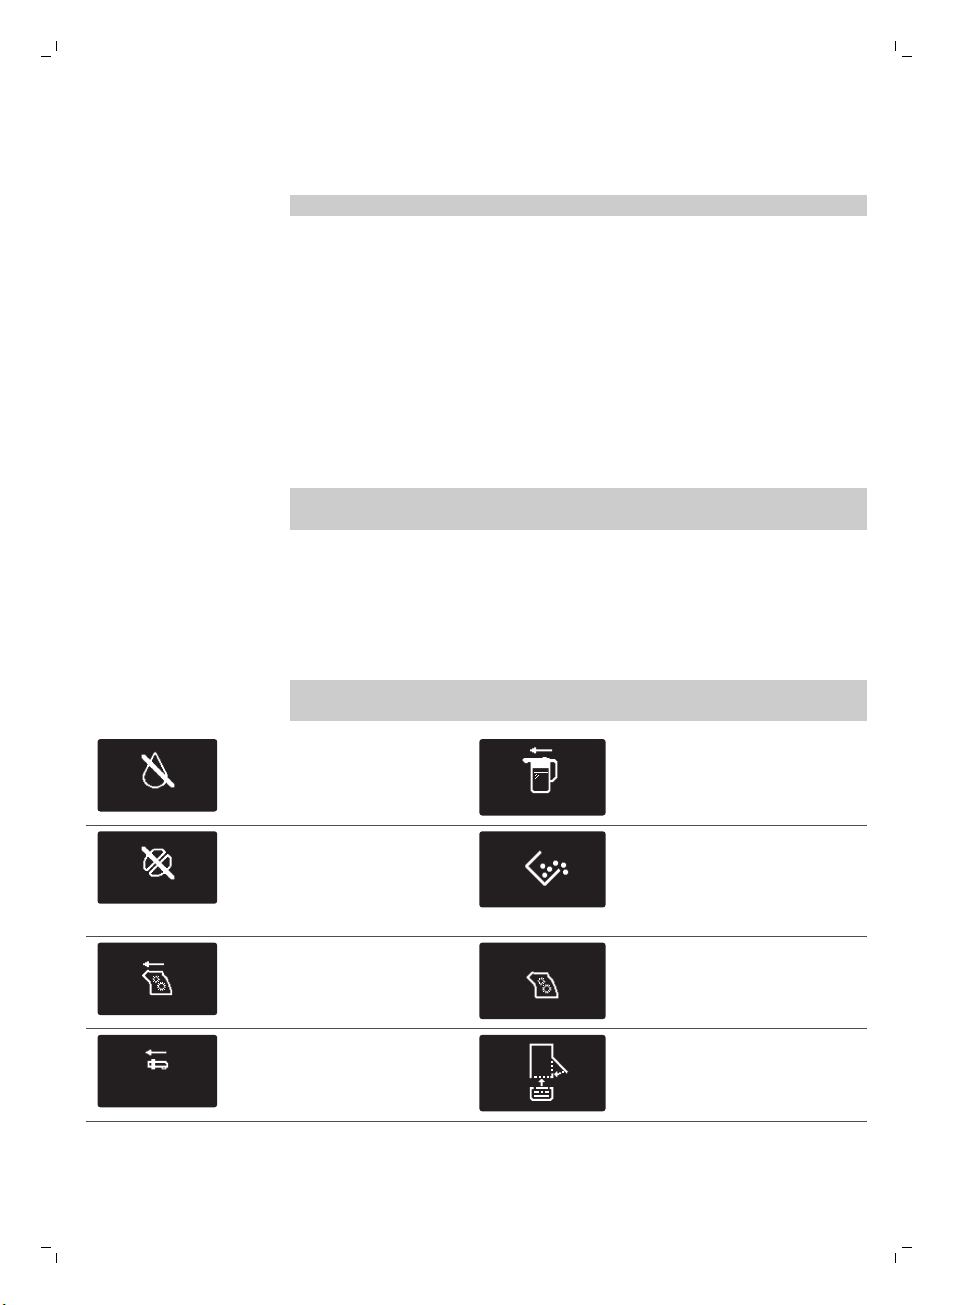
The warning icons are displayed in red. Below you find a list of the warning
icons that may appear on the display and their meaning.
Fill the water tank with fresh
water to the MAX level
indication.
The bean hopper is empty.
Put new coffee beans in the
bean hopper.
The brew group is not in the
machine or it is not inserted
correctly. Insert the brew
group.
The hot water dispensing
spout is not installed. Insert
the hot water dispensing
spout.
The milk carafe is not installed.
Insert the milk carafe into the
machine.
The coffee grounds container
is full. Make sure the machine
is switched on. Then remove
and empty the coffee grounds
container.
The brew group is blocked by
coffee powder. Clean the brew
group.
Insert the drip tray and close
the service door.
Page 24
10
xx
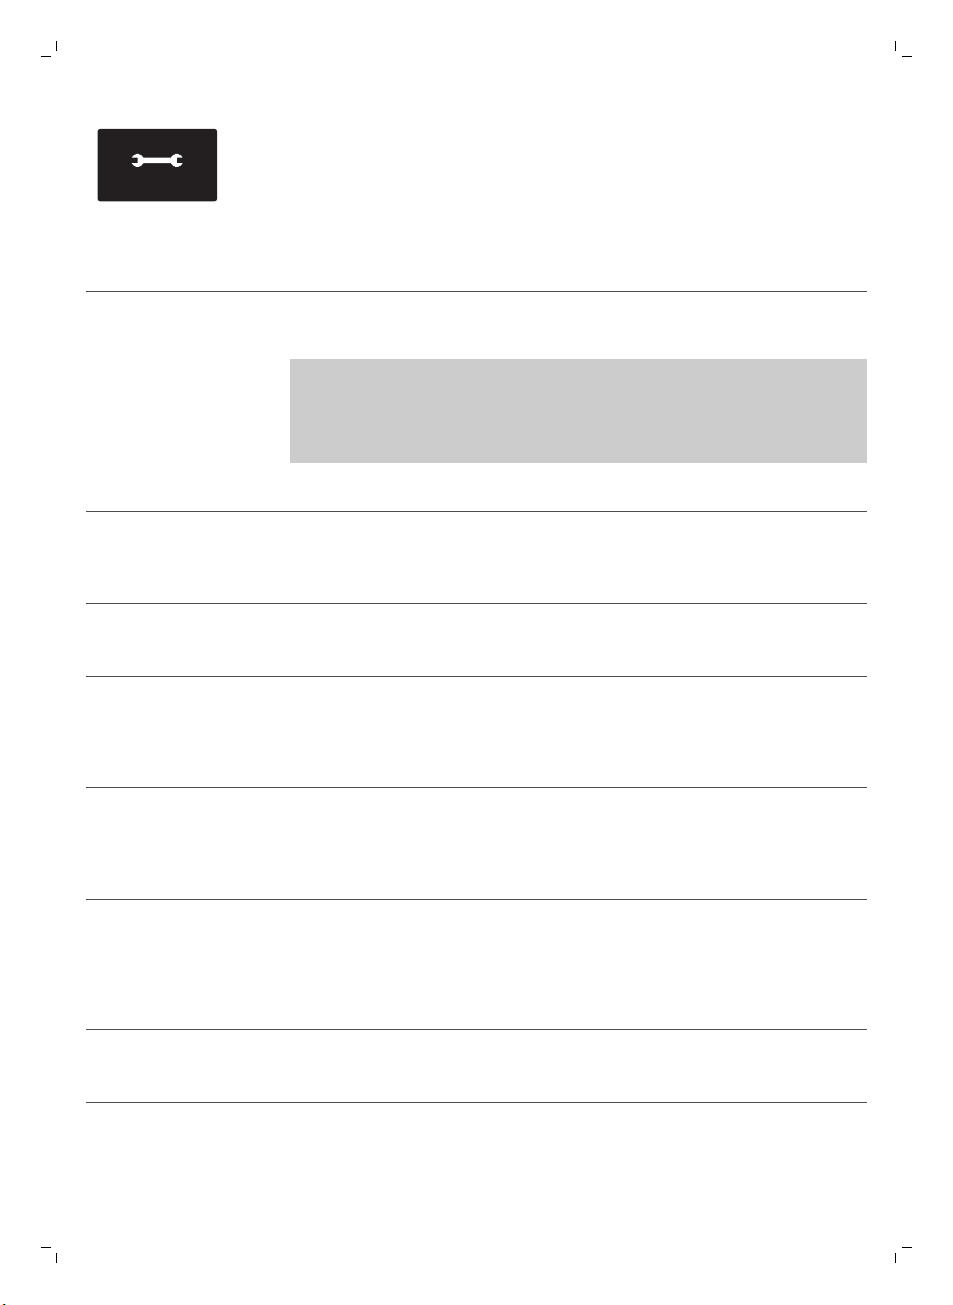
If the display shows an error
code, check section 'Meaning
of the error codes' to see
what the code on the display
means and what you can do.
The machine cannot be used
when this icon is on the
display.
Meaning of the error codes
Below you find a list of the error codes that may appear on the display, their
meaning and how to solve the problem. If these solutions do not help to
remove the error code from the display and bring the machine back to
normal working order, contact the Saeco hotline. Contact details can be
found in the warranty booklet or on www.saeco.com/care.
English
23
Error code
01 The coffee grinder is
03 - 04 There is a problem
05 There is a water
14 The machine is
Problem Cause Possible solution
blocked
with the brew group.
circuit problem.
overheated.
The coffee exit duct is
clogged.
The brew group is
dirty.
The brew group is not
positioned correctly.
There is air in the
water circuit.
This can have several
causes.
Clean the coffee exit duct thoroughly
with the handle of the measuring
spoon or a spoon handle. Switch the
appliance off and on again.
Remove the brew group and clean it
thoroughly (see 'Cleaning the brew
group').
Remove the brew group and reinsert
it. Make sure the two reference signs
on the side match before you slide
the brew group back into the
machine.
Remove and place back the water
tank a couple of times. Make sure
you insert it into the machine
properly. Check if the water tank
compartment is clean.
If you use an AquaClean filter:
remove the AquaClean filter from the
water tank and shake it to remove all
air from the filter. Then place the
AquaClean filter back into the water
tank.
Switch the machine off and switch it
back on again after 30 minutes. Try
this 2 or 3 times.
Page 25
24
English
Troubleshooting
This chapter summarizes the most common problems you could encounter
with the machine. If you are unable to solve the problem with the
information below, visit www.saeco.com/care for a list of frequently asked
questions or contact the Consumer Care Center in your country.
Problem
The machine does not
switch on.
Cause Solution
The machine is disconnected
or the main switch is in the 'off'
position (0).
Check if the mains cord is inserted
correctly.
Make sure the main switch is set to 'on'
position (I).
The machine is in DEMO
mode.
The drip tray fills up
quickly.
The 'coffee grounds
container full' icon
remains displayed.
I cannot remove the brew
group.
You pressed the standby
button for more than 8
seconds.
This is normal. The machine
uses water to rinse the internal
circuit and brew group. Some
water flows through the
internal system directly into the
drip tray.
You emptied the coffee
grounds container while the
machine was switched off.
You placed back the coffee
grounds container too fast.
The brew group is not in the
correct position.
Switch the machine off and then on
again with the main switch on the back
of the machine.
Empty the drip tray when the 'drip tray
full' indicator pops up through the drip
tray cover.
Place a cup under the dispensing spout
to collect rinsing water.
Always empty the coffee grounds
container while the machine is switched
on. If you empty the coffee grounds
container when the machine is switched
off, the coffee cycle counter is not reset.
In that case, the 'empty coffee grounds
container' message stays on the display
even though the container is not full.
Do not place back the coffee grounds
container until the display message
prompts you to put it back.
Close the service door. Switch the
machine off and back on again. Wait for
the 'machine ready' screen to appear
and then remove the brew group.
You have not removed the
I cannot insert the brew
group.
coffee grounds container.
The brew group is not in the
correct position.
Remove the coffee grounds container
before you remove the brew group.
You did not put the brew group in the
correct position before placing it back.
Make sure that the lever is in contact
with the base of the brew group and that
the hook of the brew group is in the
correct position.
Page 26
Problem Cause Solution
Reset the machine in the following way:
place the drip tray and the coffee
grounds container back. Leave the brew
group out. Close the service door and
switch the machine on and off. Then try
to reinsert the brew group.
English
25
The machine is still in the
descaling procedure.
The coffee has too little
crema or is watery.
The coffee blend is not the
The machine is performing its
The brew group is dirty. Clean the brew group.
Coffee is leaking from the
coffee dispensing spout.
The coffee is not hot
enough.
The temperature is set too low.
You added milk. Whether the milk you add is warm or
The machine grinds the
coffee beans, but coffee
does not come out.
The grinder is set to a too
coarse setting.
correct one.
self-adjustment procedure.
The coffee dispensing spout is
clogged.
The coffee exit duct is clogged. Clean the coffee exit duct.
The cups you use are cold. Preheat the cups by rinsing them with
Check the menu settings.
The coffee exit duct is blocked. Clean the coffee exit duct with the
You cannot remove the brew group
when the descaling procedure is active.
First complete the descaling process
and then remove the brew group.
Adjust the grinder to a finer setting.
Change the coffee blend.
Brew a few cups of coffee.
Clean the coffee dispensing spout and
its holes with a pipe cleaner.
hot water.
Set the temperature to 'high' in the
menu.
cold, it always decreases the
temperature of the coffee to some
extent.
handle of the measuring spoon or a
spoon handle. Switch the appliance off
and on again.
The grinder is set to a too fine
setting.
The brew group is dirty. Clean the brew group.
The coffee dispensing spout is
The coffee comes out
slowly.
The brew group is dirty. Clean the brew group.
dirty.
The grinder is set to a too fine
setting.
Adjust the grinder to a coarser setting.
Clean the coffee dispensing spout and
its holes with a pipe cleaner.
Use a different coffee blend or adjust
the grinder.
Page 27
26
English
Problem Cause Solution
The coffee exit duct is blocked. Clean the coffee exit duct with the
handle of the measuring spoon or a
spoon handle.
The machine circuit is blocked
The frothed milk is too
cold.
The milk does not froth. The milk carafe is dirty or not
The milk dispensing spout has
The milk carafe is incompletely
The type of milk used is not
I cannot activate the
AquaClean filter and the
machine asks for
descaling.
by limescale.
The cups are cold. Preheat the cups with hot water.
inserted correctly.
not been opened fully.
assembled.
suitable for frothing.
You have already replaced the
AquaClean filter 8 times. After
you have replaced the
AquaClean filter 8 times, you
need to descale the machine.
Descale the machine.
Clean the carafe and make sure that you
position and insert it correctly.
Make sure that the milk dispensing
spout is in the correct position.
Make sure that all the components
(especially the milk tube) have been
assembled correctly
Different types of milk result in different
amounts of froth and different froth
qualities. We have tested the following
milk types which proved to deliver a
good milk froth result: semi-skimmed or
full-fat cow's milk, soy milk and lactosefree milk. Other types of milk have not
been tested and may result in a small
amount of milk froth.
Descale your machine first and install
the AquaClean filter. Always activate the
AquaClean filter in the menu (see
'Activating the AquaClean filter'). Also do
this when you replace the filter.
The filter has not been
replaced in time after the
AquaClean filter icon flashed
and the capacity dropped to
0%.
You did not install the
AquaClean filter during first
installation, but after having
brewed approx. 50 coffees
(based on 100ml cups). The
machine has to be completely
limescale-free before you
install the AquaClean filter.
Descale your machine first and then
install the AquaClean filter.
First descale the machine and then
install a new AquaClean filter. After
descaling, the filter counter is reset to
0/8. Always confirm filter activation in
the machine menu. Also do this after
filter replacement.
Page 28
Problem Cause Solution
You did not activate the new or
replaced AquaClean filter in
the machine menu. Also after
replacing the filter, you need to
confirm activation in the
machine menu.
Descale your machine first. Then
activate the AquaClean filter in the menu
(see 'Activating the AquaClean filter').
Also do this when you replace the filter.
English
27
The AquaClean filter icon
does not appear on the
display after I replaced
the filter.
The AquaClean filter is
installed, but the
descaling message
appears.
The AquaClean filter does
not fit.
There is still water in the water
You are trying to install another
There is water under the
machine.
You did not confirm activation
in the machine menu.
You have not activated the
AquaClean filter in the machine
menu.
You need to remove air from
the filter.
tank.
filter than the AquaClean filter.
The rubber o-ring is not
attached to the AquaClean
filter.
The drip tray is too full and has
overflowed.
Confirm the activation of the filter in the
machine menu. (see 'Activating the
AquaClean filter') If the display shows
'START CALC CLEAN', you first need to
descale the machine. Remove the
AquaClean filter before descaling and
reinsert it afterwards.
First descale the machine and then
install a new AquaClean filter. This will
reset the filter counter to 0/8. Always
confirm filter activation in the machine
menu (see 'Activating the AquaClean
filter'), also after filter replacement.
Let air bubbles come out of the filter.
Empty the water tank before you install
the filter.
Only the AquaClean filter fits into the
machine.
Check the packaging for the o-ring and
attach it to the AquaClean filter.
Empty the drip tray when the 'drip tray
full' indicator pops up through the drip
tray. Always empty the drip tray before
you start descaling the machine.
The machine is not placed on a
horizontal surface.
Place the machine on a horizontal
surface so that the 'drip tray full'
indicator works properly.
Page 29

28
简体中文
目录
咖啡机概述________________________________________________________________________________ 29
介绍 ___________________________________________________________________________________ 29
首次安装__________________________________________________________________________________ 30
水清洁 (AquaClean) 过滤器 _________________________________________________________________ 30
激活 水清洁 (AquaClean) 过滤器_____________________________________________________________ 30
更换 AquaClean 过滤器_____________________________________________________________________ 31
使用 8 个过滤器后更换 水清洁 (AquaClean) 过滤器_____________________________________________ 32
测量水质硬度______________________________________________________________________________ 32
控制面板和显示屏__________________________________________________________________________ 32
一键式饮料按钮____________________________________________________________________________ 32
导航按钮__________________________________________________________________________________ 33
菜单 (Menu) 按钮___________________________________________________________________________ 33
香味浓度 (Aroma strength) 按钮______________________________________________________________ 33
冲煮咖啡__________________________________________________________________________________ 33
使用咖啡豆冲煮咖啡________________________________________________________________________ 33
使用预研磨咖啡冲煮咖啡____________________________________________________________________ 34
特色饮料和热水____________________________________________________________________________ 34
如何选择特色饮料__________________________________________________________________________ 34
倒出热水__________________________________________________________________________________ 34
冲煮牛奶咖啡饮料和制作奶泡________________________________________________________________ 34
饮料类型和长度____________________________________________________________________________ 35
饮料类型__________________________________________________________________________________ 35
饮料长度__________________________________________________________________________________ 35
调整份量和口味____________________________________________________________________________ 35
调整咖啡和牛奶的量________________________________________________________________________ 35
调整咖啡浓度______________________________________________________________________________ 36
调整研磨机设置____________________________________________________________________________ 36
清洁和保养________________________________________________________________________________ 37
清洁表格 __________________________________________________________________________________ 37
清洁冲煮组件______________________________________________________________________________ 38
在水龙头下清洁冲煮组件____________________________________________________________________ 38
重新插入冲煮组件__________________________________________________________________________ 38
润滑 ___________________________________________________________________________________ 39
清洁奶瓶 __________________________________________________________________________________ 40
奶瓶快速清洁______________________________________________________________________________ 40
彻底清洁奶瓶______________________________________________________________________________ 40
每周奶瓶清洁______________________________________________________________________________ 41
每周清洁奶瓶______________________________________________________________________________ 42
除垢程序__________________________________________________________________________________ 42
除垢程序中断时采取的操作__________________________________________________________________ 44
警告图标和错误代码________________________________________________________________________ 44
警告图标的含义____________________________________________________________________________ 44
错误代码含义______________________________________________________________________________ 45
故障处理方法______________________________________________________________________________ 45
Page 30
咖啡机概述
1 用户界面 22 咖啡豆加料斗盖
2 浓缩咖啡 按钮 23 咖啡豆加料斗
3 加长浓缩咖啡 按钮 24 冲煮组件
4 香味浓度 按钮 25 在维护舱门内,有清洁说明
5 待机按钮 26 咖啡出口管
6 菜单 (Menu) 按钮 27 咖啡残渣盒
7 拿铁玛琪朵 按钮 28 咖啡粉容器
8 卡布奇诺 按钮 29 水盘盖
9 保护盖 30 热水出水口
10 可调节咖啡出水口 31 热水出水口开口
11 水箱盖 32 水箱
12 咖啡豆加料斗盖 33 储奶容器
13 预研磨咖啡容器盖 34 出奶装置
14 电源开关 35 出奶装置盖
15 电源线插座 36 牛奶出水口
简体中文
29
16 维护舱门 37 水清洁 (AquaClean) 过滤器
17 “水盘已满”指示器 38 水质硬度测试条
18 水盘 39 带使用仪器头的润滑脂软管
19 水盘释放钮 40 清洁刷
20 电线 41 量勺
21 研磨设置旋钮
介绍
Saeco 全自动咖啡机,您值得购买! 为了让您能够充分享受 Saeco 提供的支持,
请在 www.saeco.com/care 上注册您的产品。
为帮助您发挥咖啡机最大功效,Saeco 以 4 种不同的方式提供全面支持:
-
单独的首次安装和首次使用快速入门指南。
-
此用户手册提供有关如何使用咖啡机、如何保持清洁、如何除垢以及如何解决
问题的更多详细信息。
Page 31
30
简体中文
-
这是 二维码 (QR Code)。 扫描此代码以访问有关如何冲煮最好的咖啡、如何
清洁咖啡机以及常见问题列表的说明视频。
-
单独的重要安全信息手册
首次安装
对于首次安装,请遵守单独快速入门指南的说明。
注意: 本咖啡机使用咖啡进行过测试。 虽然经过了认真清洗,仍可能会有咖啡残
渣。 不过我们保证,本咖啡机是全新的。
注意: 您可以在首次安装过程中安装 水清洁 (AquaClean) 过滤器(请参阅单独的
快速入门指南)。 如果您在首次使用时跳过了 水清洁 (AquaClean) 过滤器安装,
稍后可以通过进入菜单 (请参见 '激活 水清洁 (AquaClean) 过滤器')进行安装。
水清洁 (AquaClean) 过滤器
水清洁 (AquaClean) 过滤器可以减少咖啡机中的水垢残留物,提供的过滤水可以
保证每杯咖啡的香味和口感。 如果您按照本用户手册中的说明使用一系列 8 个 水
清洁 (AquaClean) 过滤器,则可以冲煮 5000 杯咖啡而无需除垢。
注意: 开始使用 水清洁 (AquaClean) 过滤器前必须确保咖啡机中完全没有水垢。
如果没有在首次安装时激活过滤器,需要对咖啡机除垢,然后才能激活过滤器。
激活 水清洁 (AquaClean) 过滤器
注意: 请始终在咖啡机菜单中确认激活 水清洁 (AquaClean) 过滤器,如下所述。
更换 水清洁 (AquaClean) 过滤器后也需要进行确认。 通过在咖啡机菜单中激活 水
清洁 (AquaClean) 过滤器,咖啡机监控所使用的过滤器数量。 当更换 8 次过滤器
后,咖啡机会提示您进行除垢。
1 有关如何将 水清洁 (AquaClean) 过滤器中放入水箱的说明,请参阅单独的快速
入门指南。
注意: 抖动 水清洁 (AquaClean) 过滤器大约 5 秒钟,将其头朝下浸入装有冷
水的壶中,等到不再有气泡冒出。
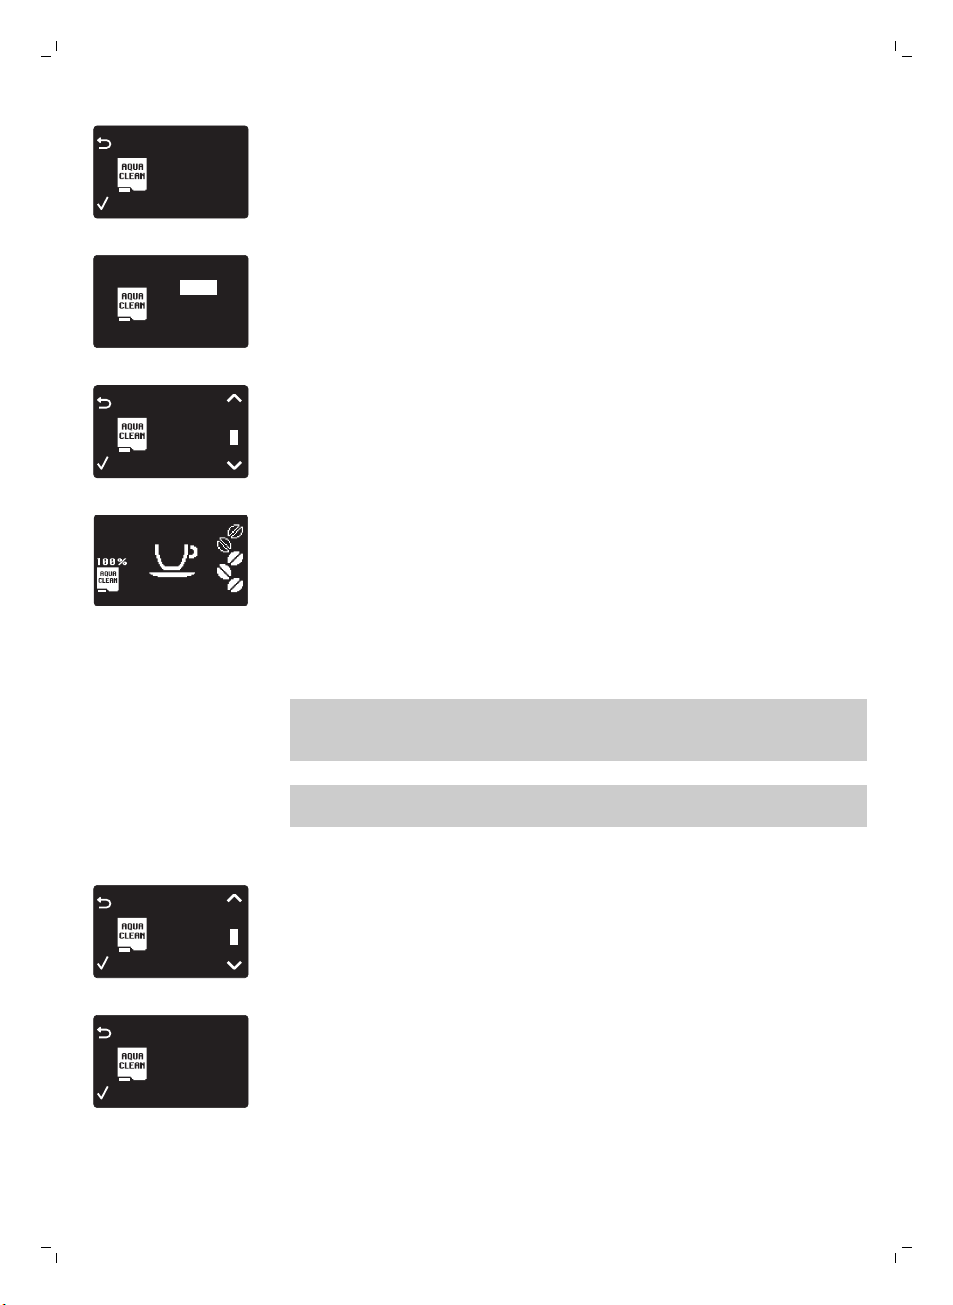
2 按 菜单 (Menu) 按钮,选择 菜单 (Menu) 并按 确定 (OK) 按钮确认。 滚动到 水
清洁 (AquaClean)。 按 确定 (OK) 按钮确认。
Page 32
0 / 8
80%
NEW?
0 / 8
ON
OFF
FILTER
1 / 8
AQUA CLEAN
FILTER
1 / 8
AQUA CLEAN
FILTER
0%
NEW?
AQUA CLEAN
简体中文
-
显示屏显示之前安装的 水清洁 (AquaClean) 过滤器数量,数量为从 0 到 8
个过滤器。
3 在显示屏上选择 开启 (On),按 确定 (OK) 按钮确认。
4 显示屏自动更新所使用的过滤器数量。
-
然后会显示“咖啡机就绪”屏幕,上面带有 水清洁 (AquaClean) 100% 图
标,指示已安装过滤器。
5 释放 2 杯热水 (0.5 l) 以完成激活。 弃用流出的水。
31
更换 AquaClean 过滤器
注意: 当容量降至 0% 并且过滤器图标快速闪烁时,请尽快更换 水清洁
(AquaClean) 过滤器。 即使咖啡机尚未指示需要更换,也请至少每 3 个月更换一
次 水清洁 (AquaClean) 过滤器。
提示: 当过滤器容量降至 10% 并且过滤器图标慢速闪烁时,建议您购买新的过滤
器。 这可以确保在容量降至 0% 时您可以更换过滤器。
1 取出 水清洁 (AquaClean) 过滤器并更换为新的 水清洁 (AquaClean) 过滤器
(另请参阅单独的快速入门指南)。
2 按 菜单 (Menu) 按钮,滚动到 水清洁 (AquaClean) 并按 确定 (OK) 按钮确认。
-
显示屏上会询问您是否要激活新的过滤器。
3 按 确定 按钮确认。
Page 33
FILTER
2 / 8
AQUA CLEAN
DESCALE BEFORE
ACTIVATING FILTER
32
简体中文
-
显示屏自动更新所使用的过滤器数量。
4 释放 2 杯热水 (0.5 l) 以完成激活。 弃用流出的水。
使用 8 个过滤器后更换 水清洁 (AquaClean) 过滤器
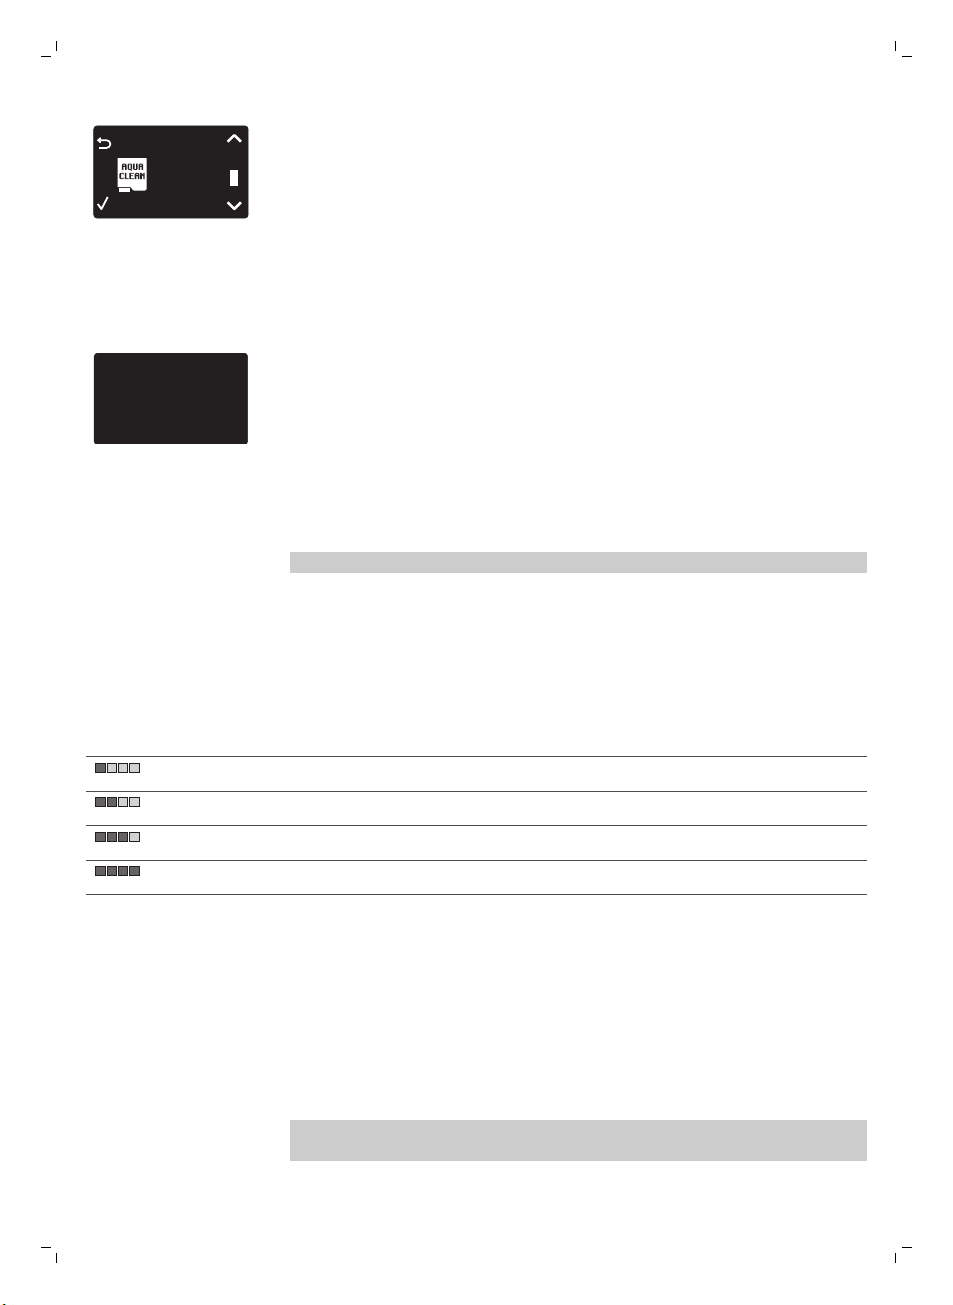
1 当显示屏上的过滤器图标开始闪烁时,按 菜单 (Menu) 按钮,滚动到 水清洁
(AquaClean) 并按 确定 (OK) 按钮进行确认。
-
显示器指示您在激活新过滤器前需要对咖啡机除垢。
2 按 OK 按钮启动除垢程序 (请参见 '除垢程序')。
-
如果您不想马上除垢,可按 按钮 (ESC) 按钮几次离开过滤器菜单。
3 在除垢程序结束时,显示屏会询问您是否要安装 水清洁 (AquaClean) 过滤器。
-
请按照“更换 水清洁 (AquaClean) 过滤器”中的步骤操作。
测量水质硬度
注意: 如果已安装 水清洁 (AquaClean) 过滤器,则不需要设置水质硬度。
要调整咖啡机设置以适合您当地的水质,请使用提供的水质硬度测试条测试水质硬
度。 咖啡机的默认水质硬度设置为最高级别 (4)。 如果测得的水质硬度不同,请在
咖啡机菜单中调整设置。
1 将水质硬度测试条(随咖啡机提供)浸入自来水中 1 秒钟。
2 取出水质硬度测试条并等待 1 分钟。
3 检查测试条上变为红色的方块数量,并在下表中查看水质硬度。
红色方块数量
设定值 水质硬度
控制面板和显示屏
一键式饮料按钮
1 水很软
2 软水
3 硬水
4 水很硬
4 按 菜单 (Menu) 按钮,选择菜单并滚动选择水质硬度。 选择所需水质硬度设置
并按 确定 (OK) 按钮确认。
此浓缩咖啡机具有自说明显示屏,便于使用。 阅读下面的章节了解按钮的快速说
明。
使用一键式饮料按钮(浓缩咖啡 (Espresso), 加长浓缩咖啡 (Espresso lungo), 卡
布奇诺 (Cappuccino) 和 拿铁玛琪朵 (Latte macchiato)快速准备一种预设饮料。
Page 34
导航按钮
ESPRESSO
CAPPUCCINO
AROMA STRENGTH
MENU
简体中文
-
确保在选择卡布奇诺或拿铁玛琪朵时奶瓶就位且已就绪(请参阅单独的快速入
门指南)。
-
如果要在咖啡机未出够预设咖啡量之前停止冲煮过程,请按 OK 按钮。
-
可以调整浓缩咖啡或加长 (请参见 '调整咖啡和牛奶的量')浓缩咖啡的时长。
-
准备牛奶饮料后,咖啡机启动 奶瓶快速清洁 (Quick carafe clean) 程序。
某些一键式饮料按钮具有双重功能;使用这些按钮浏览菜单:
33
ESPRESSO 按钮 = 按钮 (ESC) 按钮
: 按此按钮可返回到主菜单。
AROMA STRENGTH 按钮 = 确定
(OK) 按钮: 按此按钮可选择、确认
或停止某一功能。
菜单 (Menu) 按钮
使用 菜单 (Menu) 按钮准备其他饮料,如热水和奶泡。 还可使用 菜单 (Menu) 按
钮更改以下设置:
-
显示对比度
-
咖啡温度
-
待机时间: 这是咖啡机进入待机模式前的时间。
-
水质硬度: 要调整咖啡机设置以适合您当地的水质,请测试水质硬度。
-
激活 水清洁 (AquaClean) 过滤器
-
启动除垢
香味浓度 (Aroma strength) 按钮
使用 香味浓度 (Aroma strength) 按钮调整咖啡浓度 (请参见 '调整咖啡浓度')或冲煮
预研磨咖啡 (请参见 '使用预研磨咖啡冲煮咖啡')。
冲煮咖啡
CAPPUCCINO 按钮 = 向上按钮: 按
此按钮可向上滚动显示菜单。
MENU 按钮 = 向下按钮: 按此按钮
可向下滚动显示菜单。
使用咖啡豆冲煮咖啡
警告: 请仅使用浓缩咖啡豆。 切勿将研磨咖啡、未烘焙咖啡豆或焦糖咖啡豆放入
咖啡豆加料斗,否则可能会损坏咖啡机。
要冲煮咖啡,请按照单独快速入门指南中的说明操作。
要冲煮两杯浓缩咖啡或加长浓缩咖啡,按两次所需饮料的按钮。 咖啡机就会自动
按顺序执行两次研磨周期。
注意: 使用咖啡豆加料斗盖帮助保持咖啡豆的新鲜。
Page 35
34
简体中文
使用预研磨咖啡冲煮咖啡
使用预磨咖啡冲煮咖啡时,请使用提供的量勺将正确剂量的咖啡放入预研磨咖啡容
器中。 不要加入过多预研磨咖啡,避免咖啡粉盒堵塞。
1 打开预研磨咖啡容器盖。
将一量勺预研磨咖啡倒入预研磨咖啡容器并关闭盖子。
2
警告: 不要将预研磨咖啡以外的任何其他物质放入预研磨咖啡容器中,这可能
会损坏咖啡机。
3 将杯子放在咖啡出水口下方。
4 按 香味浓度 (Aroma strength) 按钮并选择预研磨咖啡冲煮功能。
5 按 浓缩咖啡 (Espresso) 按钮。
咖啡机会自动开始冲煮所选饮料。
注意: 使用预研磨咖啡一次只能冲煮一杯咖啡。
特色饮料和热水
如何选择特色饮料
1 按 菜单 (Menu) 按钮并选择 饮料 (Drinks).
2 按 确定 (OK) 按钮确认。
3 滚动浏览菜单并选择所需饮料。
倒出热水
警告: 在冲煮开始时,可能会有蒸汽和热水喷出热水出水口。 请等到冲煮结束再
取下热水出水口。
1 插入热水出水口。
2 按下 菜单 (Menu) 按钮。 选择 饮料 (Drinks),确认并滚动选择 热水 (Hot
Water)。
警告: 只有在安装了热水出水口时才能选择 热水 (Hot Water)。
3 按 确定 按钮确认。 显示屏上会提示您安装热水出水口;按 确定 (OK) 按钮确
认。 咖啡机开始放出热水。
4 要停止放出热水,请按 确定 (OK) 按钮。
冲煮牛奶咖啡饮料和制作奶泡
注意: 有关如何使用奶瓶的更多信息,请阅读单独的快速入门指南或扫描 二维码
(QR Code) (请参见 '介绍 ') 以访问包含说明视频的专门网站。
警告: 在选择带牛奶的咖啡饮料或奶泡前,请确保安装了奶瓶并且奶泡
出水口打开。 如果未正确安装奶瓶,可能会有蒸汽和热牛奶喷出奶泡出
水口。
1 将一个杯子放在打开的奶泡出水口下。
2 选择您的牛奶饮料。
Page 36
简体中文
-
按下一键式 卡布奇诺 (Cappuccino) 或 拿铁玛琪朵 (Latte macchiato) 按钮
可立即冲煮牛奶饮料。
-
按 菜单 (Menu) 按钮,选择 饮料 (Drinks) 并滚动浏览饮料以选择 奶泡 (Milk
Froth)。
-
咖啡机提示您必须安装奶瓶并打开奶泡出水口。
3 咖啡机先流到杯子里预设量的奶泡,然后流出预设量的咖啡。
-
要停止放出牛奶或咖啡,请按 确定 (OK) 按钮。
4 在冲煮牛奶咖啡饮料后,显示屏会询问您是否要执行奶瓶的快速清洁程序。 您
有 10 秒激活快速清洁程序 (请参见 '奶瓶快速清洁')。 奶瓶里有牛奶时可以执行
快速清洁程序。 建议每天至少执行一次快速清洁程序。 按 确定 (OK) 按钮确认
您要执行快速清洁程序,或按 (ESC) 按钮按钮稍后再执行快速清洁程序。
饮料类型和长度
饮料类型
饮料名称
浓缩咖啡 带有浓郁咖啡脂的咖啡,常用小杯 控制面板上的一键式饮料按钮
描述 如何选择
35
加长浓缩咖啡 萃取时间加长的浓缩咖啡,带有浓郁咖
啡脂,常用中等大小的杯子
卡布奇诺 1/3 浓缩咖啡、1/3 热牛奶加 1/3 奶泡,
常用大杯
拿铁玛琪朵 奶泡加入热牛奶再加入浓缩咖啡,用高
玻璃杯
奶泡 带泡沫的热牛奶 菜单 (Menu)/饮料 (Drinks)
热水 菜单 (Menu)/饮料 (Drinks)
控制面板上的一键式饮料按钮
控制面板上的一键式饮料按钮
控制面板上的一键式饮料按钮
饮料长度
饮料名称
浓缩咖啡 40 毫升 20-230 毫升
加长浓缩咖啡 80 毫升 20-230 毫升
热水 300 毫升 50-450 毫升
标准长度 长度范围
调整份量和口味
调整咖啡和牛奶的量
您可以根据自己的口味和杯量大小调整冲煮的饮料量。
警告: 不得使用直径超过 8 厘米的杯子,避免损坏前面板。
Page 37
1
2
3
4
5
36
简体中文
调整咖啡浓度
注意: 我们建议您使用玻璃杯或具有陶瓷涂层边缘的杯子。
1 要调整浓缩咖啡量,请按住 浓缩咖啡 (Espresso) 按钮直到显示屏显示 记忆
(Memo) 图标。
-
咖啡机进入编程阶段并开始冲煮所选饮料。
2 当杯中的浓缩咖啡达到所需量时,按 确定 按钮。
-
显示屏上的勾号显示该按钮已编程: 每次按下时,咖啡机都会冲煮设定的
浓缩量。
注意: 要设置加长浓缩咖啡、卡布奇诺和拿铁玛琪朵的量,请按照相同的程序操
作: 按住相应的饮料按钮,并在杯中饮料达到所需数量时按 OK 按钮。 要调整牛
奶咖啡饮料的量,请先插入奶瓶并保存奶量,然后保存咖啡量。
要更改咖啡浓度,请按 香味浓度 (Aroma strength) 按钮。 每按一次 香味浓度
(Aroma strength) 按钮,香味浓度就会变化一度。 显示屏显示所选浓度,该浓度
只会在冲煮咖啡时保存。
1 很淡
2 淡
3 普通
4 浓
5 很浓
注意: 对于每种咖啡浓度,咖啡机会自动放出正确份量的咖啡。
注意: 还可以使用 香味浓度 (Aroma strength) 按钮用预研磨咖啡冲煮咖啡。
注意: 调整咖啡浓度后,在冲煮咖啡时,显示屏会再次显示主菜单并保存所选香
味浓度。
调整研磨机设置
您可以使用咖啡豆容器中的研磨设置钮调整研磨设置。 不管选择哪种设置,陶瓷
咖啡研磨机均可确保实现十分均匀的研磨效果,完美冲煮每一杯咖啡。 它可以保
留每一缕芳香,让每一杯咖啡都具有真正好味道。
注意: 只有在咖啡机研磨咖啡豆时才能调整研磨设置。
警告: 为防止损坏研磨机,请勿将研磨设置钮一次转动多档。
1 将杯子放在咖啡出水口下方。
2 打开咖啡豆加料斗的盖子。
3 按下 浓缩咖啡 按钮。
Page 38
1
2
简体中文
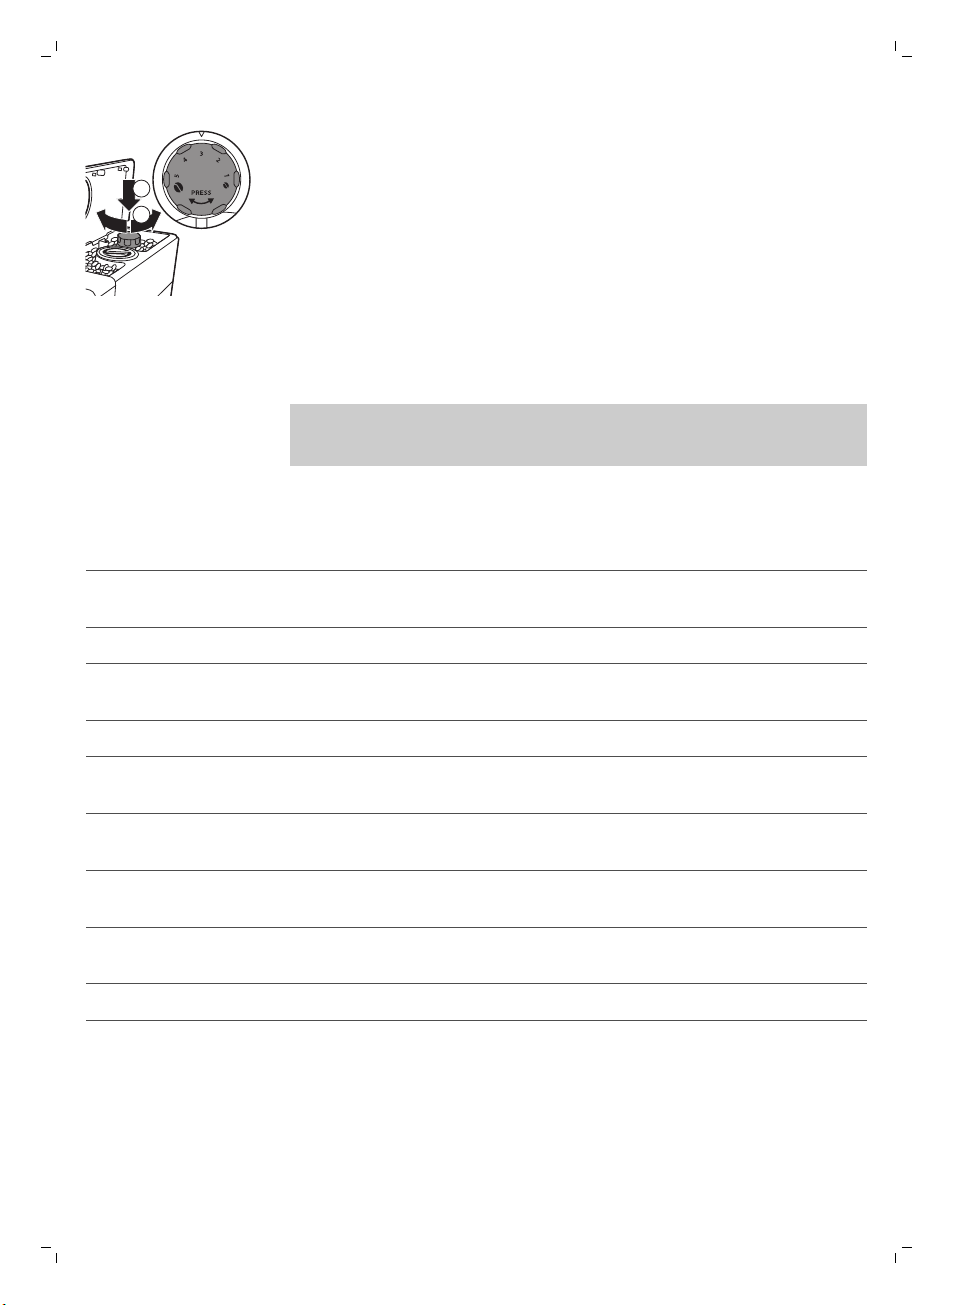
4 当研磨机开始研磨时,按下研磨设置钮并将其向左或向右旋转。
-
有 5 档不同的研磨设置可供选择。 设置的档位越低,咖啡就越浓。
清洁和保养
注意: 请参阅下表了解清洁咖啡机所有可拆卸部件的时间和方式。 有关如何清洁
冲煮组件以及如何为咖啡机除垢的更多详细信息,请阅读下面的相应章节或转到专
门的网站 www.saeco.com/care。
清洁表格
部件说明
冲煮组件 每周一次 取出冲煮组件,在水龙头 (请参见 '在水龙头下清洁冲煮组
清洁时间 清洁方式
件')下清洁。
具体取决于使用类型 润滑冲煮组件 (请参见 '润滑')。
37
奶瓶 每次使用后 准备牛奶饮料 (请参见 '奶瓶快速清洁')后,按咖啡机指示
执行 奶瓶快速清洁 (Quick carafe clean)。
每天一次 彻底 (请参见 '彻底清洁奶瓶')清洁奶瓶。
每周一次 拆卸奶瓶并在水龙头 (请参见 '每周奶瓶清洁')下清洁所有
部件。
每月一次 使用 Saeco 牛奶回路清洁剂 CA6705 执行此清洁周期 (请
参见 '每周清洁奶瓶')。
水盘 只要红色“水盘已
满”指示器弹出水盘。
咖啡粉容器 适合时 倒空咖啡粉容器并在水龙头下清洁。 确保在倒空并清洁咖
水箱 适合时 在水龙头下清洁。
倒空水盘并在水龙头下清洁。
啡粉容器时已打开咖啡机。
Page 39
2
1
38
简体中文
部件说明 清洁时间 清洁方式
预研磨咖啡容器/咖啡
出口管
清洁冲煮组件
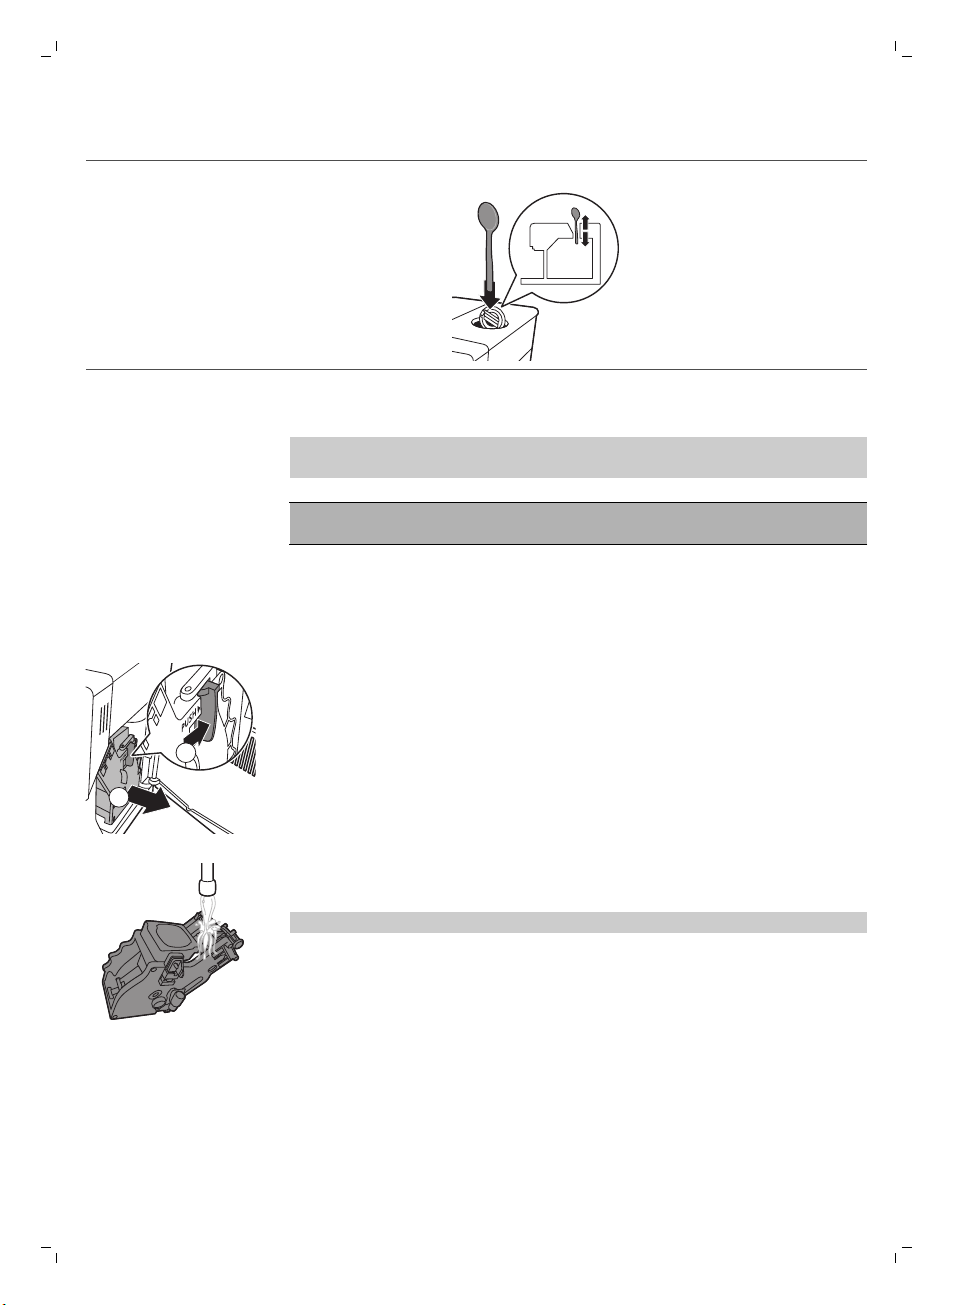
每周一次 用勺柄清洁顶部部件,如下所示。
注意: 扫描 二维码 (QR Code) 或转到 www.saeco.com/care 了解有关如何拆卸和
清洁冲煮组件的详细说明。
警告:请勿用洗碗机清洗冲煮组件,也不要用洗涤液或清洁剂进行清洁。 这可能
导致冲煮组件发生故障并对咖啡口感产生负面影响。
在水龙头下清洁冲煮组件
1 关闭咖啡机并拔下电源插头。
2 带咖啡粉容器取下水盘。
3 打开维护舱门。
4 按 推 (Push) 按钮 (1),然后拉动冲煮组件上的把手,将其从咖啡机上取下
(2)。
5 用微温水龙头彻底冲洗冲煮组件。 仔细清洁上层滤网。
6 让冲煮组件晾干。
注意: 不要用布擦干冲煮组件,以免纤维堆积在冲煮组件内。
重新插入冲煮组件
Page 40
简体中文
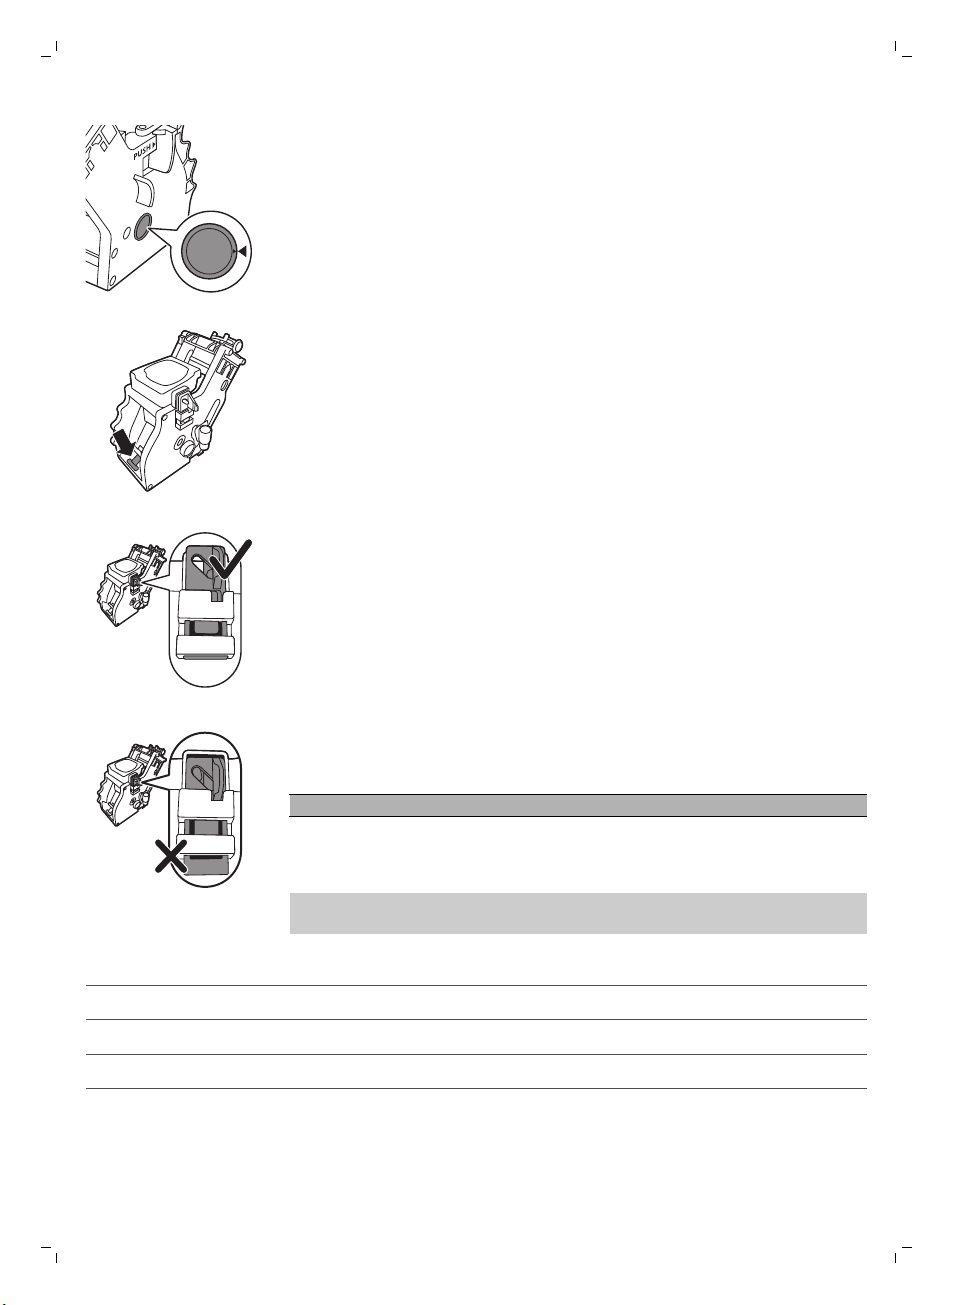
1 将冲煮组件推回咖啡机之前,确保侧面的两个黄色参考标记相匹配。 如果不匹
配,请执行以下步骤:
-
确保锁杠与冲煮组件的底座接触。
2 确保冲煮组件的黄色锁钩处于正确位置。
-
要使锁钩正确就位,请将其向上推至最高位置。
39
-
如果锁钩仍处于最低位置,则表明其未正确就位。
3 将冲煮组件沿着侧面的导槽推回咖啡机内,直至其卡入到位并发出“咔
哒”声。
警告: 请勿按 推 (Push) 按钮。
4 关闭维护舱门。
润滑
为了实现咖啡机的最佳性能,必须润滑冲煮组件。 请参阅下表中的润滑频率。 如
需支持,请访问我们的网站: www.saeco.com/care。
使用频率
低 1-5 每 4 个月
正常 6-10 每 2 个月
高 >10 每月
每日冲煮的饮料数量 润滑频率
1 关闭产品并拔下电源插头。
2 拆下冲煮组件,并在微温水龙头 (请参见 '在水龙头下清洁冲煮组件')下进行冲
洗。
Page 41
40
简体中文
清洁奶瓶
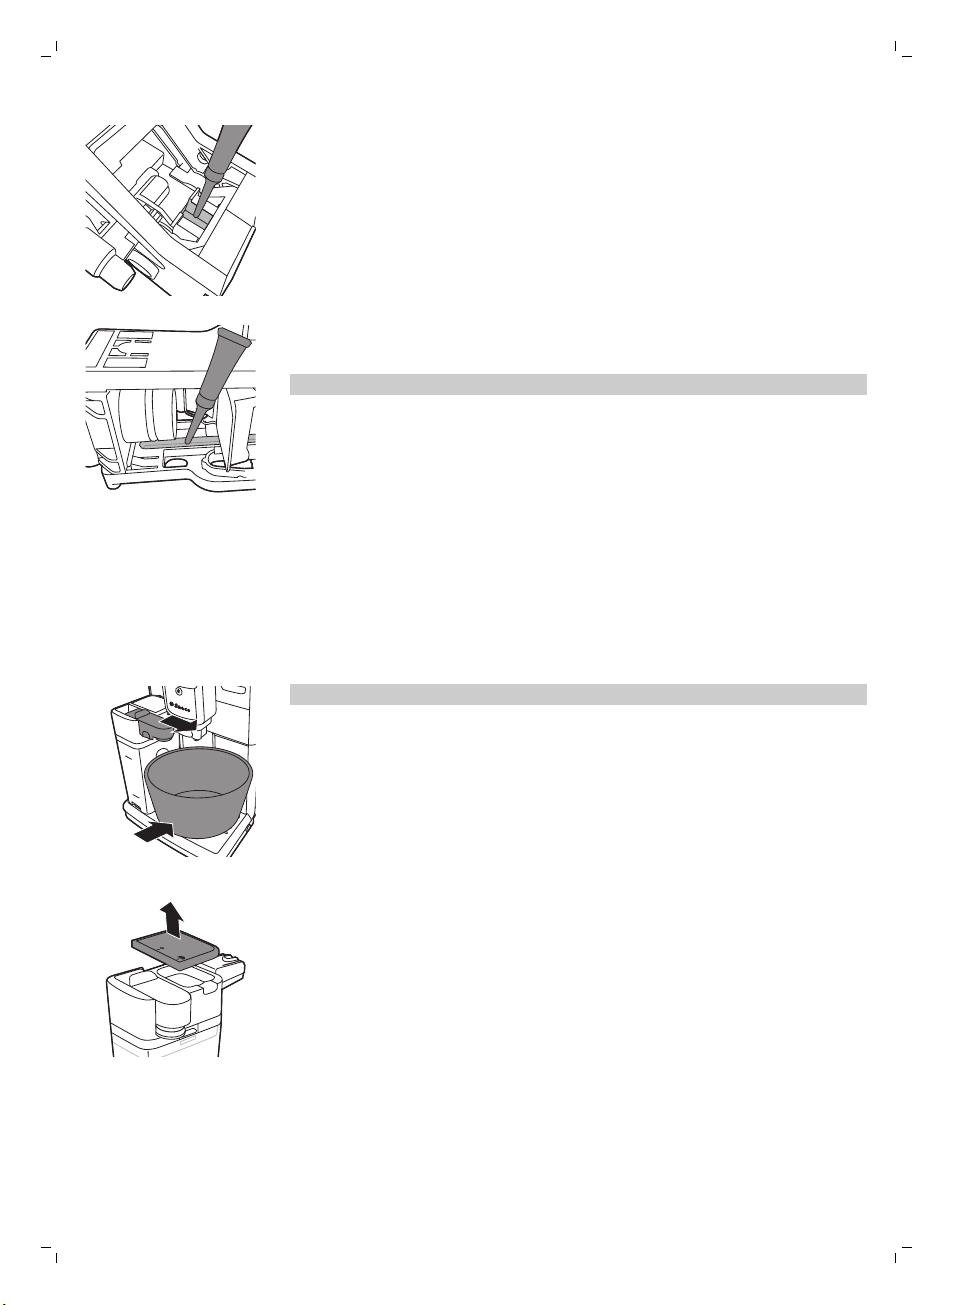
3 在冲煮组件底部的轴周围涂抹薄薄一层润滑脂。
4 在两侧的导轨上均涂抹薄薄一层润滑脂(见下图)。
5 重新插入冲煮组件 (请参见 '重新插入冲煮组件')。
您可以多次使用润滑脂软管。
奶瓶快速清洁
准备牛奶饮料后,显示屏上会显示奶瓶清洁图标。
1 当显示屏上显示奶瓶清洁图标时,如果要执行清洁周期,请按 OK 按钮。
2 取走装有饮料的杯子,并在牛奶出水口下方放置一个容器。
注意: 确保拉出牛奶出水口。
3 按 确定 按钮开始出热水。
彻底清洁奶瓶
要彻底清洁奶瓶,必须定期执行以下操作:
1 取下出奶装置的盖。
Page 42
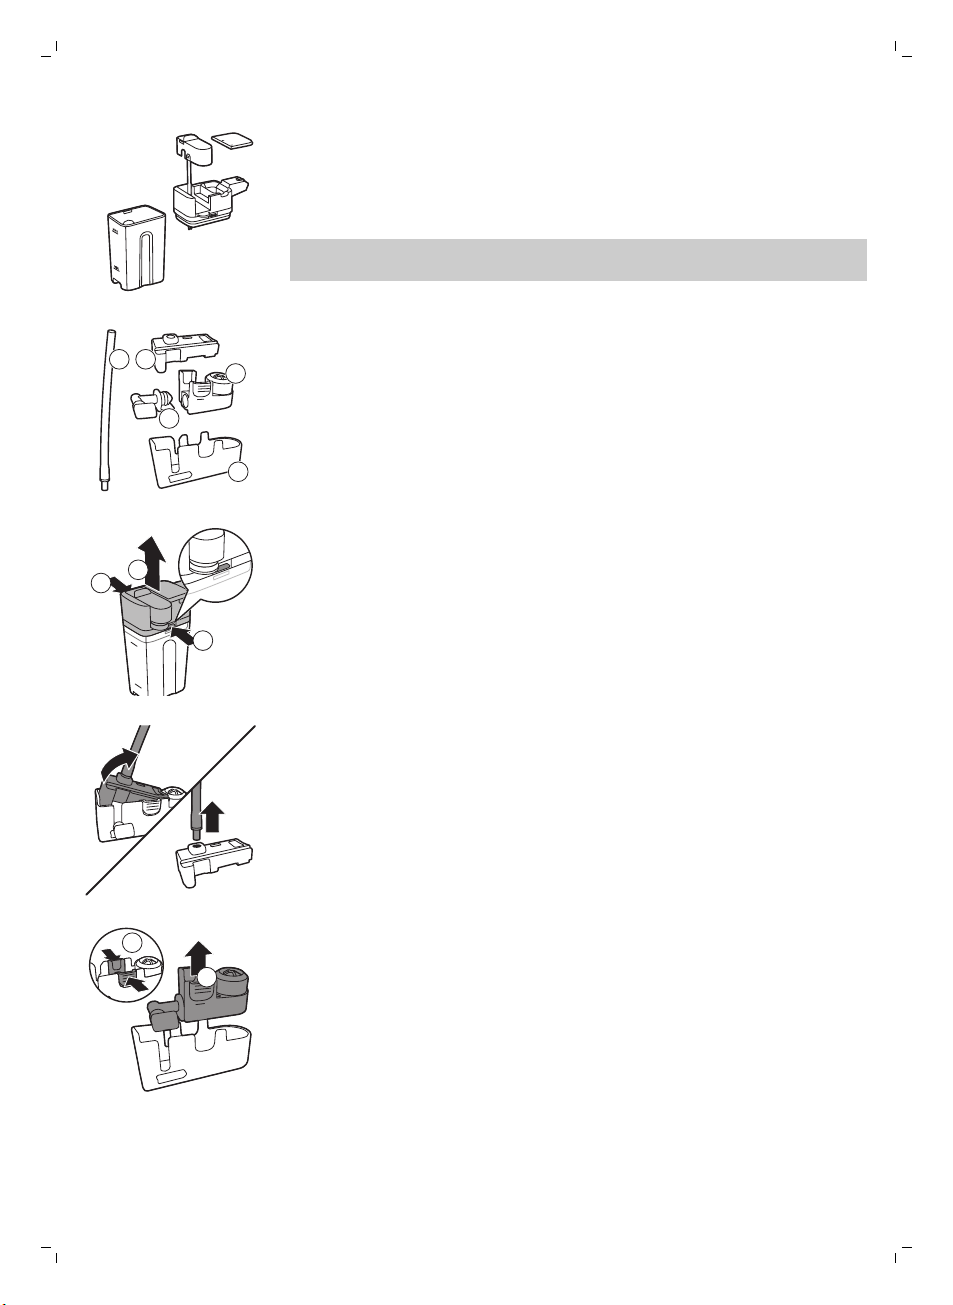
1 2
5
3
4
1
2
1
2
1
简体中文
2 将牛奶出水口抬高离开出奶装置。
3 从牛奶出水口上拆下吸奶管。
4 用温水彻底冲洗吸奶管和牛奶出水口。
41
每周奶瓶清洁
牛奶出水口包含 5 个组件。 每周拆卸一次所有组件并在水龙头下清洗。 还可以用
洗碗机清洁除储奶容器之外的所有组件。
1 吸奶管
2 橡胶支架
3 奶泡器
4 奶泡器接头
5 牛奶出水口外壳
拆卸牛奶出水口
1 按下出奶装置顶部两侧的释放按钮 (1) 并抬起储奶容器顶部 (2)。
2 将出奶装置转到朝下并用手握紧。 将吸奶管从橡胶支架上抽离。
3 按奶泡器上的释放按钮,将奶泡器从橡胶支架上取下。
Page 43

42
简体中文
4 将奶泡器接头从奶泡器上抽离。
5 在微温水龙头下冲洗所有组件。
重新组装奶瓶
1 要重新组装奶泡出水口,请按照相反顺序执行“拆卸奶泡出水口”的步骤 2 到
4。
2 将奶泡出水口放回奶瓶顶部中。
3 将奶瓶顶部放回奶瓶上。
注意: 在将奶泡出水口放回奶瓶顶部中前,请移动顶部中的轴以纠正位置。 如果
此轴不在正确位置,您将无法将奶泡出水口放回奶瓶顶部中。
每周清洁奶瓶
只能使用 SAECO牛奶回路清洁剂 CA6705 执行此清洁周期。
1 将一小袋牛奶回路清洁剂倒入奶瓶中。 然后向奶瓶注水,直至 最大 (Max) 水
位标示处。
2 将奶瓶插入咖啡机并在牛奶出水口下方放置一个容器。
3 按 菜单 (Menu) 按钮,选择 饮料 (Drinks) 并滚动到 奶泡 (Milk Froth)。 按 确定
(OK) 按钮开始放出清洁溶液。
4 重复步骤 3 直到奶瓶变空。
5 当奶瓶变空时,从咖啡机上取下容器和奶瓶。
6 充分冲洗奶瓶,并向其中注入清水,直至达到 最大 (Max) 水位标示处。
7 请将奶瓶插入咖啡机中。
8 将容器放在牛奶出水口下方。
9 按 饮料 (Drinks) 按钮并在 饮料 (Drinks) 菜单中选择 奶泡 (Milk Froth) 启动奶瓶
冲洗周期。
10 重复步骤 9 直到奶瓶变空。
注意: 切勿饮用此步骤中放出的溶液。
11 重复步骤 6 至 10。
12 当咖啡机停止出水时,这一清洁周期就完成了。
13 拆卸所有组件并在微温水龙头下冲洗。
咖啡机可以使用了。
除垢程序
当显示屏显示 开始除垢 (Start Calc Clean) 时,您需要给咖啡机除垢。 如果显示屏
上显示此消息后您并未给咖啡机除垢,咖啡机最终将无法正常工作。 由这种情况
造成的维修不包含在保修范围之内。
请仅使用 Saeco 除垢溶液为咖啡机除垢。 Saeco 除垢溶液旨在确保咖啡机发挥出
最佳性能。 使用其他产品可能会损坏咖啡机并在水中留下残留物。 您可以从在线
商店 (www.saeco.com/care) 购买 Saeco 除垢溶液。
Page 44
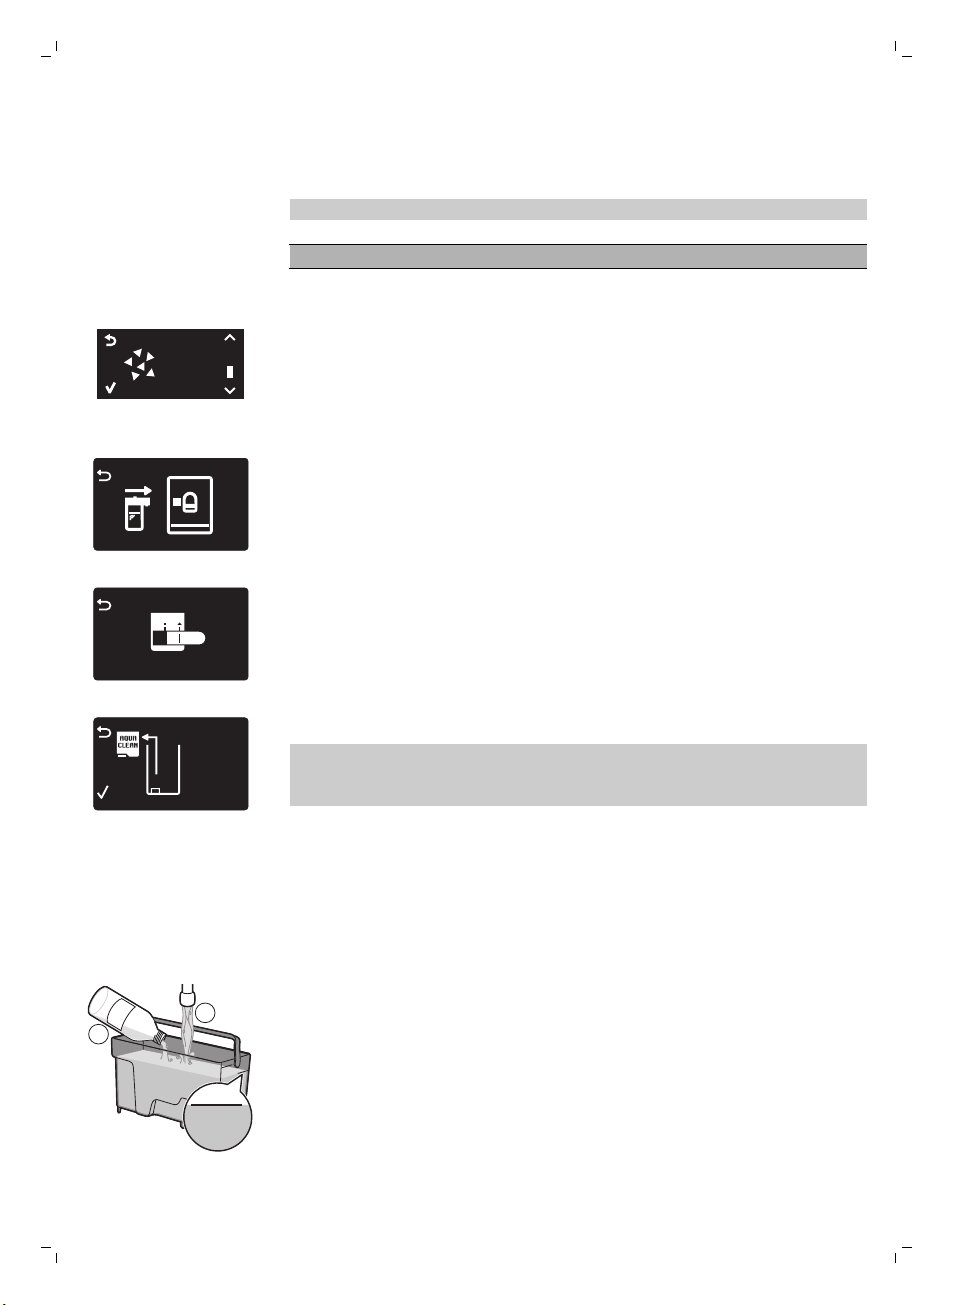
START
CALC
CLEAN
REMOVE
FILTER
MAX
CALC
CLEAN
CALC
CLEAN
1
2
简体中文
除垢程序持续 30 分钟,包括一个除垢周期和一个冲洗周期。 按 (ESC) 按钮 按钮
可以暂停除垢周期或冲洗周期。 要继续除垢周期或冲洗周期,请按 确定 (OK) 按
钮。
注意: 请勿在除垢程序中取出冲煮组件。
警告: 不要饮用除垢溶液或设备在除垢过程中排放出来的水。
1 取出水盘和咖啡粉容器,倒空并进行清洁,然后将其放回原位。
2 将一个大容器 (1.5 l) 放在咖啡出水口下方。
3 当显示屏上显示 开始除垢 (Start Calc Clean) 时,按 确定 (OK) 按钮启动除垢
程序。 卸下热水出水口(如有)。
-
显示屏上提示您必须插入奶瓶。
-
显示屏上提示您必须打开牛奶出水口。
43
-
显示屏上提示您必须取出 水清洁 (AquaClean) 过滤器。
注意: 您可以按 (ESC) 按钮 按钮 按钮跳过除垢。 如果稍后要启动除垢程序,
请按 菜单 (Menu) 按钮,选择 菜单 (Menu) 并滚动选择 除垢 (Descaling)。 按
确定 (OK) 确认。
4 将除垢溶液倒入水箱中。 向水箱中注入清水,直至 CALC CLEAN 水位标示
处。 将水箱放回咖啡机内。 按 确定 (OK) 按钮确认。
-
除垢程序的第一个阶段启动。 咖啡机开始陆续放出除垢溶液。
-
显示屏显示除垢图标、阶段指示和持续时间。 第一个阶段需要 20 分钟。
5 让咖啡机放出除垢溶液,直到水箱放空。
6 取出水箱并进行冲洗。
7 向水箱中注入清水,直至 CALC CLEAN 水位标示处。 将水箱放回咖啡机并按
确定 (OK)。
8 取下并冲洗奶瓶。 向奶瓶注水,直至达 最低 水位标示处。 将奶瓶插入咖啡机
并打开奶泡出水口。
9 取出容器并倒空,然后放回咖啡出水口的下方。 按 确定 确认。
10 除垢程序的第二个阶段冲洗周期启动。 这个阶段需要 3 分钟。 显示屏显示冲
洗图标和该阶段的持续时间。
Page 45
ADD WATER
INSERT CARAFE
ADD COFFEE
INSERT
WATER SPOUT
44
简体中文
注意: 如果水箱中注入的水没到 除垢 水位标示处,咖啡机可能需要另一个冲
洗周期。
11 等待直到咖啡机停止出水。 除垢程序完成,显示屏上显示勾号。
12 按 确定 按钮退出除垢周期。 咖啡机开始加热,并执行自动冲洗周期。
13 取出并倒空容器。
14 除垢后执行“每周奶瓶清洁”程序清洁奶瓶。
15 执行“每周冲煮组件清洁”周期清洁冲煮组件。
16 在水箱中安装一个新的 水清洁 (AquaClean) 过滤器。
提示: 使用 水清洁 (AquaClean) 过滤器可减少除垢需求!
除垢程序中断时采取的操作
除垢程序启动后,切勿关闭咖啡机,必须让咖啡机执行整个程序直至最后完成。
如果咖啡机在除垢期间卡住,您可以按待机按钮退出除垢程序。 如果发生这种情
况,或者发生电源故障或线缆意外断开连接,请执行以下操作:
1 倒空净水箱,并用水彻底冲洗。
2 将水注入水箱,直至达到 CALC CLEAN 水位标示,然后重新打开咖啡机。 咖
啡机会加热,并执行自动冲洗周期。
3 在冲煮任何饮料前,执行手动冲洗周期。
注意: 如果除垢程序未完成,需要尽快对咖啡机执行另一次除垢程序。
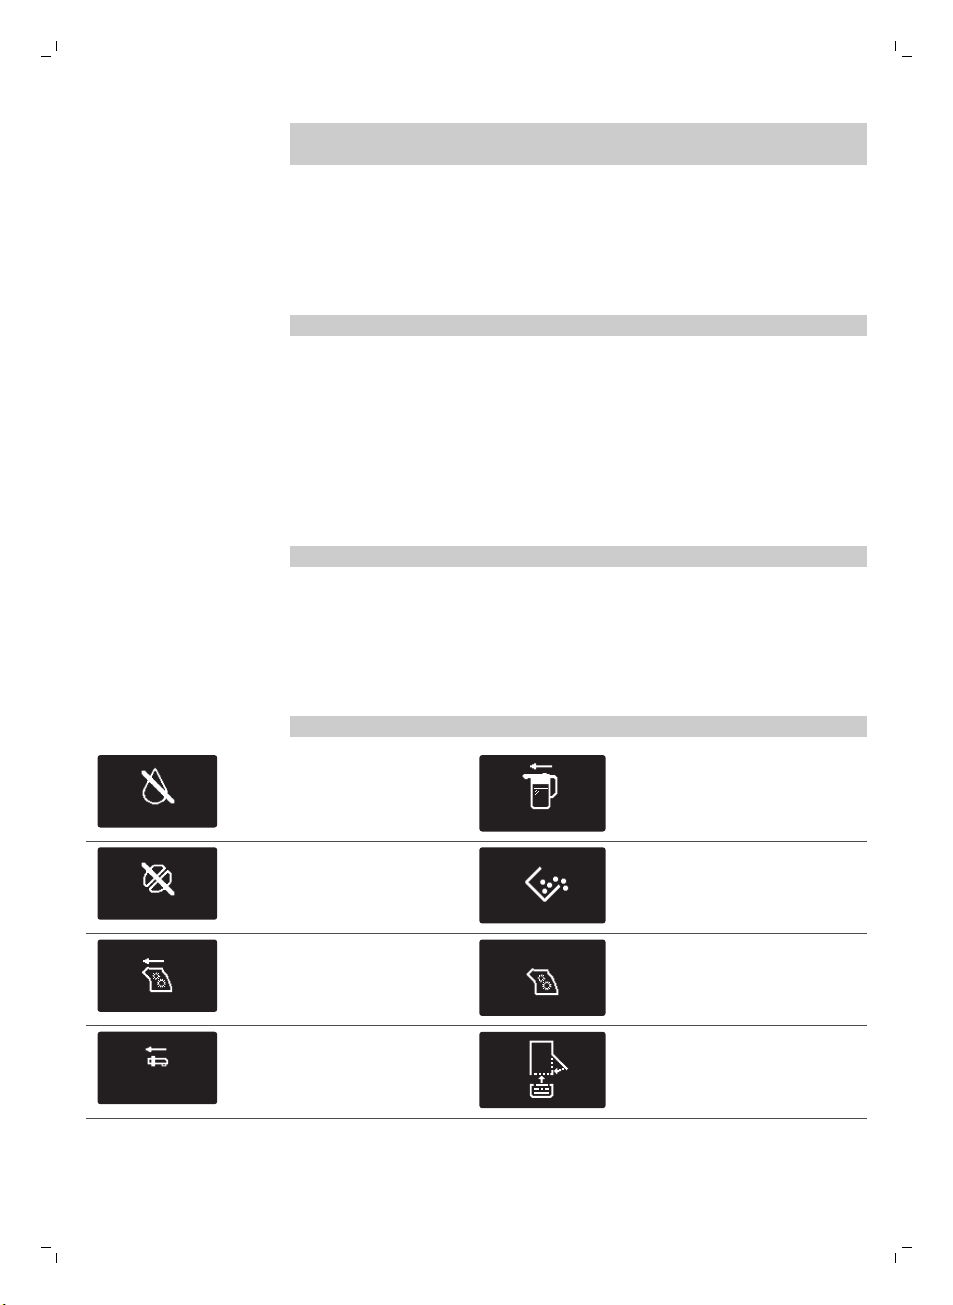
警告图标和错误代码
警告图标的含义
警告图标以红色显示。 下面有显示屏上可能出现的警告图标列表及其含义。
向水箱中注入清水,直至达 最
高 水位标示处。
咖啡豆加料斗已空。 请将新咖
啡豆放于咖啡豆加料斗中。
冲煮组件不在咖啡机中或未正确
插入。 插入冲煮组件。
热水出水口未安装。 插入热水
出水口。
奶瓶未安装。 请将奶瓶插入咖啡
机中。
表示咖啡粉容器已满。 确保咖啡
机已打开。 然后取下咖啡粉容器
并将其清空。
冲煮组件被咖啡粉末阻塞。 清洁
冲煮组件。
请插入水盘并关闭维护舱门。
Page 46
10
xx
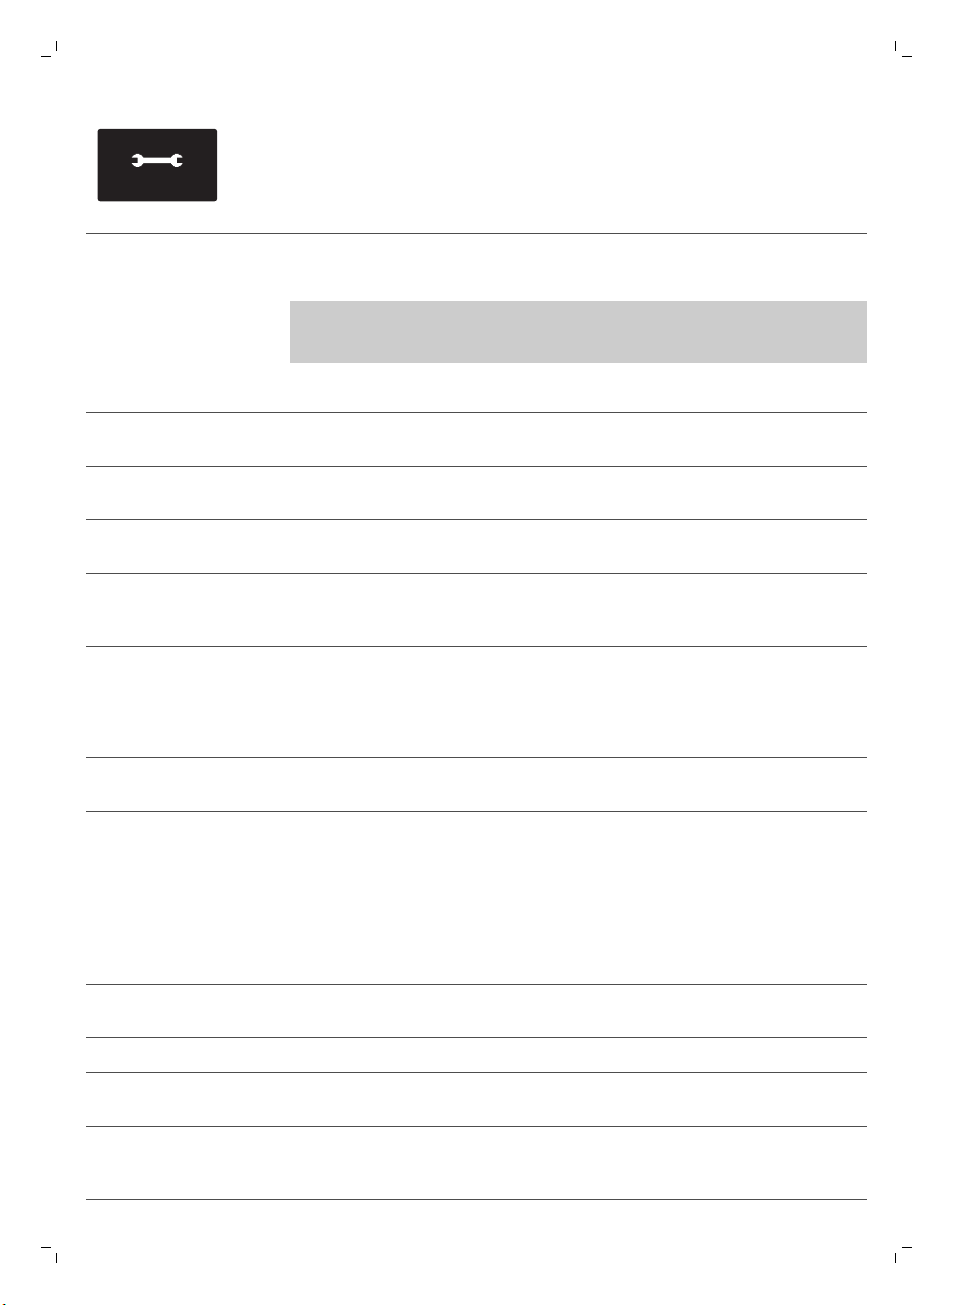
错误代码含义
如果显示屏上显示错误代码,请
查看“错误代码含义”章节,了
解显示屏上代码的含义及可采取
的措施。 当显示屏上显示此图
标时,咖啡机不能使用。
下面有显示屏上可能出现的错误代码列表、含义及如何解决问题。 如果这些解决
方案未能帮助清除显示屏上的错误代码并使咖啡机回到正常工作状态,请拨打飞利
浦 Saeco 热线。 保修卡中包含联系方式,也可访问 www.saeco.com/care。
简体中文
45
错误代码
01 咖啡研磨机堵塞 咖啡出口管堵塞。 用量匙的手柄或勺柄彻底清洁咖啡出口
03 - 04 冲煮组件出现问题。 冲煮组件脏了。 拆下冲煮组件,并彻底 (请参见 '清洁冲
05 水回路有问题。 水回路中有空气。 多次将水箱拆下并放回。 确保您将其正
14 表明咖啡机过热。 这可能有以下几个原因:关闭咖啡机并在 30 分钟后重新打开。
问题 原因 可能的解决方案
管。
煮组件')清洁。
冲煮组件的位置不正确。拆下冲煮组件,并确保侧面的两个参考
标记相匹配,然后再将其推回咖啡机。
确插入了咖啡机。 检查水箱仓是否清
洁。
如果使用 水清洁 (AquaClean) 过滤器:
从水箱中取出 水清洁 (AquaClean) 过滤
器并抖动,从过滤器中清除所有空气。
然后将 水清洁 (AquaClean) 过滤器放回
水箱。
尝试 2 或 3 次。
故障处理方法
本章归纳了使用本机器时最常遇到的问题。 如果您无法根据以下信息解决问题,
请访问 www.saeco.com/care 查阅常见问题列表,或联系您所在国家/地区的客户
服务中心。
问题
原因 解决方法
咖啡机无法启动。 咖啡机断开连接或电源开关位
于“关”位置 (0)。
咖啡机处于 DEMO 模式。 按下待机按钮超过 8 秒。 用咖啡机背面的电源开关关闭咖啡机并重新
水盘会迅速注满。 这是正常的。 咖啡机用水冲洗内
部回路和冲煮组件。 一部分水通
过内部系统直接流入水盘。
检查电源线是否正确插入。
确保电源开关设为“开”位置 (I)。
打开。
当“水盘已满”指示器弹出水盘盖时,请倒
空水盘。
Page 47
46
简体中文
问题 原因 解决方法
将杯子放在出水口下方接盛冲洗水。
“咖啡粉容器已满”图标继
续显示。
无法取出冲煮组件。 冲煮组件的位置不正确。 关闭维护舱门。 关闭咖啡机,然后再重新打
未拆下咖啡粉容器。 拆下冲煮组件前先取出咖啡粉容器。
无法插入冲煮组件。 冲煮组件的位置不正确。 在放回前未将冲煮组件放置至正确位置。 确
咖啡沫过少或咖啡太淡。 研磨机的研磨度设置为太粗。 将研磨机的研磨度设置调整为较细。
咖啡混合方式不合适。 更改咖啡混合。
咖啡机在执行自动调整程序。 冲煮几杯咖啡。
您在咖啡机关闭时清空了咖啡粉
容器。
放回咖啡粉容器的速度太快。 请在显示屏消息提示您放回咖啡粉容器时再
咖啡机仍处于除垢程序中。 如果已启用除垢程序,则无法拆下冲煮组
请始终在咖啡机打开时倒空咖啡粉容器。 如
果在咖啡机关闭时清空了咖啡粉容器,咖啡
周期计数器不会重置。 在这种情况下,即使
咖啡粉容器不满,显示屏上仍会显示“清空
咖啡粉容器”消息。
将其放回。
开。 等待“咖啡机就绪”屏幕出现,然后取
出冲煮组件。
保锁杠与冲煮组件的底座接触且冲煮组件的
锁钩处于正确位置。
按以下方式重置咖啡机: 放回水盘和咖啡粉
容器。 请勿安装冲煮组件。 关闭维护舱
门,并重新打开咖啡机,然后再关闭。 随后
尝试重新插入冲煮组件。
件。 请首先完成除垢程序,然后拆下冲煮组
件。
冲煮组件脏了。 清洁冲煮组件。
咖啡从咖啡出水口漏出。 咖啡出水口阻塞。 使用管道清洁剂清洁咖啡出水口及相应的
咖啡出口管堵塞。 清洁咖啡出口管。
咖啡不够热。 使用的杯子是冷的。 通过用热水冲洗来预热杯子。
设定的温度太低。 检查菜单设置。在菜单中将温度设定为“高”。
您添加了牛奶。 无论您加入了热牛奶还是冷牛奶,都始终会
咖啡机可以研磨咖啡豆,但
不出咖啡。
冲煮组件脏了。 清洁冲煮组件。
咖啡出口管堵塞。 用量匙的手柄或勺柄清洁咖啡出口管。
研磨机的研磨度设置为太细。 将研磨机的研磨度设置调整为较粗。
孔。
在一定程度上降低咖啡的温度。
Page 48
问题 原因 解决方法
简体中文
47
咖啡出水口脏了。 使用管道清洁剂清洁咖啡出水口及相应的
出咖啡速度太慢。 研磨机的研磨度设置为太细。 使用不同的咖啡混合或调整研磨器。
冲煮组件脏了。 清洁冲煮组件。
咖啡出口管堵塞。 用量匙的手柄或勺柄清洁咖啡出口管。
咖啡机回路被水垢堵塞。 为咖啡机除垢。
奶泡太冷了。 杯子是冷的。 用热水预热杯子。
牛奶不起泡。 奶瓶脏了或插入不正确。 清洁奶瓶并确保放置和插入正确。
牛奶出水口没有完全打开。 确保牛奶出水口位置正确。
奶瓶组装不完全。 确保所有组件(尤其是吸奶管)都组装正确
所用牛奶类型不适于制作奶泡。 起泡量和起泡质量因牛奶种类而异。 我们测
无法激活 水清洁
(AquaClean) 过滤器,咖啡
机需要除垢。
当 水清洁 (AquaClean) 过滤器图
您已经更换了 8 次 水清洁
(AquaClean) 过滤器。 更换 水清
洁 (AquaClean) 过滤器 8 次后,
需要为咖啡机除垢。
标闪烁并且容量降至 0% 时,未
及时更换过滤器。
孔。
试了以下种类的牛奶,证实这些牛奶可以达
到令人满意的奶泡效果: 半脱脂或全脂牛
奶、豆奶和无乳糖牛奶。 其他种类的牛奶未
进行测试,产生的奶泡量可能较少。
请先为咖啡机除垢,然后再安装 水清洁
(AquaClean) 过滤器。 请始终在咖啡机菜单
(请参见 '激活 水清洁 (AquaClean) 过滤器
')中激活 水清洁 (AquaClean) 过滤器。 在
更换过滤器时也是如此。
请先为咖啡机除垢,再安装 水清洁
(AquaClean) 过滤器。
首次安装时没有安装 水清洁
您未在咖啡机菜单中激活新的或
更换过滤器后,显示屏上不
会显示 水清洁 (AquaClean)
过滤器。
(AquaClean) 过滤器,而是在冲
煮了大约 50 杯(每杯 100 毫
升)咖啡后才进行安装。 安装 水
清洁 (AquaClean) 过滤器前必须
确保咖啡机中完全没有水垢。
更换的 水清洁 (AquaClean) 过滤
器。 而且在更换过滤器后,需要
在咖啡机菜单中确认激活。
没有在咖啡机菜单中确认激活过
滤器。
请先为咖啡机除垢,然后再安装一个新的 水
清洁 (AquaClean) 过滤器。 除垢后,过滤
器计数器会重置为 0/8。 请始终在咖啡机菜
单中确认激活过滤器。 更换过滤器后也是如
此。
首先为咖啡机除垢。 然后在咖啡机菜单 (请
参见 '激活 水清洁 (AquaClean) 过滤器')中
激活 水清洁 (AquaClean) 过滤器。 在更换
过滤器时也是如此。
在咖啡机的菜单 (请参见 '激活 水清洁
(AquaClean) 过滤器')中确认激活过滤器。
如果显示屏显示 开始除垢 (Start Calc
Clean),则首先需要为咖啡机除垢。 在除垢
前拆下 水清洁 (AquaClean) 过滤器,并在
除垢后重新插入。
Page 49
48
简体中文
问题 原因 解决方法
水清洁 (AquaClean) 过滤器
已安装,但除垢消息出现。
水清洁 (AquaClean) 过滤器
无法装入。
水箱中还有水。 安装过滤器前请倒空水箱。
您正尝试安装除 水清洁
咖啡机下面有水。 水盘太满导致溢出。 当“水盘已满”指示器弹出水盘时,请倒空
咖啡机没有放在水平表面上。 将咖啡机放在水平表面上,以便“水盘已
您未在咖啡机菜单中激活 水清洁
(AquaClean) 过滤器。
您需要将过滤器中的空气排出。 将气泡排出过滤器。
(AquaClean) 过滤器以外的其他
过滤器。
橡胶 O 环未安装到 水清洁
(AquaClean) 过滤器上。
请先为咖啡机除垢,然后再安装一个新的 水
清洁 (AquaClean) 过滤器。 这会将过滤器
计数器重置为 0/8。 请始终在咖啡机菜单
(请参见 '激活 水清洁 (AquaClean) 过滤器
')中确认激活过滤器,过滤器更换后也是如
此。
只有 水清洁 (AquaClean) 过滤器适合咖啡
机。
检查 O 环的包装并将其安装到 水清洁
(AquaClean) 过滤器上。
水盘。 开始给咖啡机除垢之前,请始终切记
倒空水盘。
满”指示器可以正常工作。
Page 50

한국어
49
목차
커피 머신 개요_____________________________________________________________________________ 50
소개 ___________________________________________________________________________________ 50
최초 설치_________________________________________________________________________________ 51
AquaClean 필터 __________________________________________________________________________ 51
AquaClean 필터 활성화____________________________________________________________________ 51
AquaClean 필터 교체______________________________________________________________________ 52
AquaClean 필터 8개 사용 후 필터 교체______________________________________________________ 53
물 경도 측정_______________________________________________________________________________ 53
제어판 및 디스플레이_______________________________________________________________________ 54
원터치 음료 버튼___________________________________________________________________________ 54
탐색 버튼_________________________________________________________________________________ 54
MENU(메뉴) 버튼 _________________________________________________________________________ 54
아로마 강도 버튼 __________________________________________________________________________ 55
커피 추출_________________________________________________________________________________ 55
원두로 커피 추출___________________________________________________________________________ 55
분쇄 커피로 커피 추출______________________________________________________________________ 55
스페셜 드링크 및 온수______________________________________________________________________ 55
스페셜 드링크 선택법_______________________________________________________________________ 55
온수 배출_________________________________________________________________________________ 56
우유 함유 커피 음료와 우유 거품 추출________________________________________________________ 56
음료 종류 및 양____________________________________________________________________________ 57
음료 유형_________________________________________________________________________________ 57
음료 양 ___________________________________________________________________________________ 57
용량 및 풍미 조절__________________________________________________________________________ 57
커피 및 우유 양 조절_______________________________________________________________________ 57
커피 강도 조정_____________________________________________________________________________ 58
분쇄기 설정 조절___________________________________________________________________________ 58
청소 및 유지관리___________________________________________________________________________ 59
청소 표 ___________________________________________________________________________________ 59
추출기 세척_______________________________________________________________________________ 60
수돗물로 추출기 세척_______________________________________________________________________ 60
추출기 다시 끼움___________________________________________________________________________ 60
윤활유 도포_______________________________________________________________________________ 61
밀크 카라페 세척 __________________________________________________________________________ 62
카라페 빠른 세척___________________________________________________________________________ 62
밀크 카라페 깨끗이 세척____________________________________________________________________ 62
밀크 카라페 주간 세척______________________________________________________________________ 62
밀크 카라페 월 1회 세척____________________________________________________________________ 63
석회질 제거 절차___________________________________________________________________________ 64
석회질 제거 절차가 도중에 중단된 경우의 대처 방법___________________________________________ 66
경고 아이콘 및 오류 코드___________________________________________________________________ 66
경고 아이콘의 의미_________________________________________________________________________ 66
오류 코드의 의미___________________________________________________________________________ 67
문제 해결_________________________________________________________________________________ 67
Page 51
50
한국어
커피 머신 개요
1 사용자 인터페이스 22 원두 투입구 덮개
2 에스프레소 버튼 23 원두 투입구
3 에스프레소 룽고 버튼 24 추출기
4 아로마 강도 버튼 25 세척 지침이 적혀 있는 서비스 도어의 내부
5 대기 버튼 26 커피 배출관
6 MENU(메뉴) 버튼 27 커피 찌꺼기 통
7 라테 마키아토 버튼 28 커피 가루 용기
8 카푸치노 버튼 29 물받이 덮개
9 보호 캡 30 온수 배출구
10 조절 가능한 커피 배출구 31 온수 배출구용 구멍
11 물탱크 뚜껑 32 물탱크
12 원두 투입구 뚜껑 33 우유통
13 분쇄 커피함 뚜껑 34 우유 배출 장치
14 전원 스위치 35 우유 배출 장치 뚜껑
15 코드 소켓 36 우유 배출구
16 서비스 도어 37 AquaClean 필터
17 '물받이 가득 참' 표시등 38 물 경도 검사지
18 물받이 39 사용 팁 포함 윤활유 튜브
19 물받이 열림 버튼 40 청소용 브러시
20 코드 41 계량 스푼
21 분쇄 설정 조절기
소개
Saeco 전자동 커피 머신을 구입해 주셔서 감사합니다! Saeco가 드리는 지원
혜택을 받으실 수 있도록 www.saeco.com/care에서 제품을 등록해 주십시오.
커피 머신을 최대한 활용할 수 있도록, Saeco는 다음 4가지 방법으로 모든
지원을 제공합니다.
-
별도로 제공되는 최초 설치 및 최초 사용에 대한 요약 설명서
-
이 사용 설명서에는 커피 머신 사용 방법, 청소 방법, 석회질 제거 방법, 문제
해결 방법에 대한 자세한 내용이 나와 있습니다.
Page 52
최초 설치
한국어
-
이것은 QR 코드입니다. 이 코드를 스캔하여 최상의 커피를 추출하는 방법,
커피 머신을 청소하는 방법 및 자주 묻는 질문(FAQ)에 대한 지침 비디오에
액세스할 수 있습니다.
-
별도로 제공되는 중요 안전 정보 책자
최초 설치는 별도로 제공되는 요약 설명서의 지침을 따르십시오.
참고: 이 커피 머신은 커피를 사용하여 테스트를 거쳤습니다. 꼼꼼히
세척하였으나 일부 커피 찌꺼기가 남아 있을 수 있습니다. 그러나 이 커피 머신은
완벽한 새 제품임을 보장합니다.
참고: 처음 설치할 때 설치 절차 중에 AquaClean 필터를 설치할 수
있습니다(별도로 제공되는 요약 설명서 참조). 처음에 AquaClean 필터를
설치하지 않은 경우 메뉴 (보기 'AquaClean 필터 활성화')를 선택하여 나중에
설치할 수 있습니다.
51
AquaClean 필터
AquaClean 필터는 커피 머신에 물때가 끼는 것을 줄이고 커피의 향과 풍미를
항상 유지하기 위해 여과된 물을 공급하도록 고안된 것입니다. 이 사용 설명서에
제시된 바와 같이 AquaClean 필터 8개를 사용할 경우 5000잔까지는 석회질을
제거할 필요가 없습니다.
참고: AquaClean 필터를 사용하기 시작하려면 커피 머신에 석회질이 전혀
없어야 합니다. 처음 설치할 때 필터를 사용하기 전에 커피 머신의 석회질을
제거해야 합니다.
AquaClean 필터 활성화
참고: 항상 커피 머신 메뉴에서 아래 설명과 같이 AquaClean 필터 활성화를
확인합니다. AquaClean 필터 교체 후에도 이 작업을 해야 합니다. 커피 머신
메뉴에서 AquaClean 필터를 활성화하면 커피 머신이 사용된 필터 수를
모니터링합니다. 필터를 8회 교체하면 커피 머신이 석회질을 제거하라는
메시지를 표시합니다.
1 물탱크의 AquaClean 필터를 끼우는 방법에 대한 지침은 별도로 제공되는
요약 설명서를 참조하십시오.
참고: 약 5초 동안 AquaClean 필터를 흔들어 찬물을 넣은 용기에 거꾸로
담근 후 공기 거품이 올라오지 않을 때까지 기다립니다.
Page 53
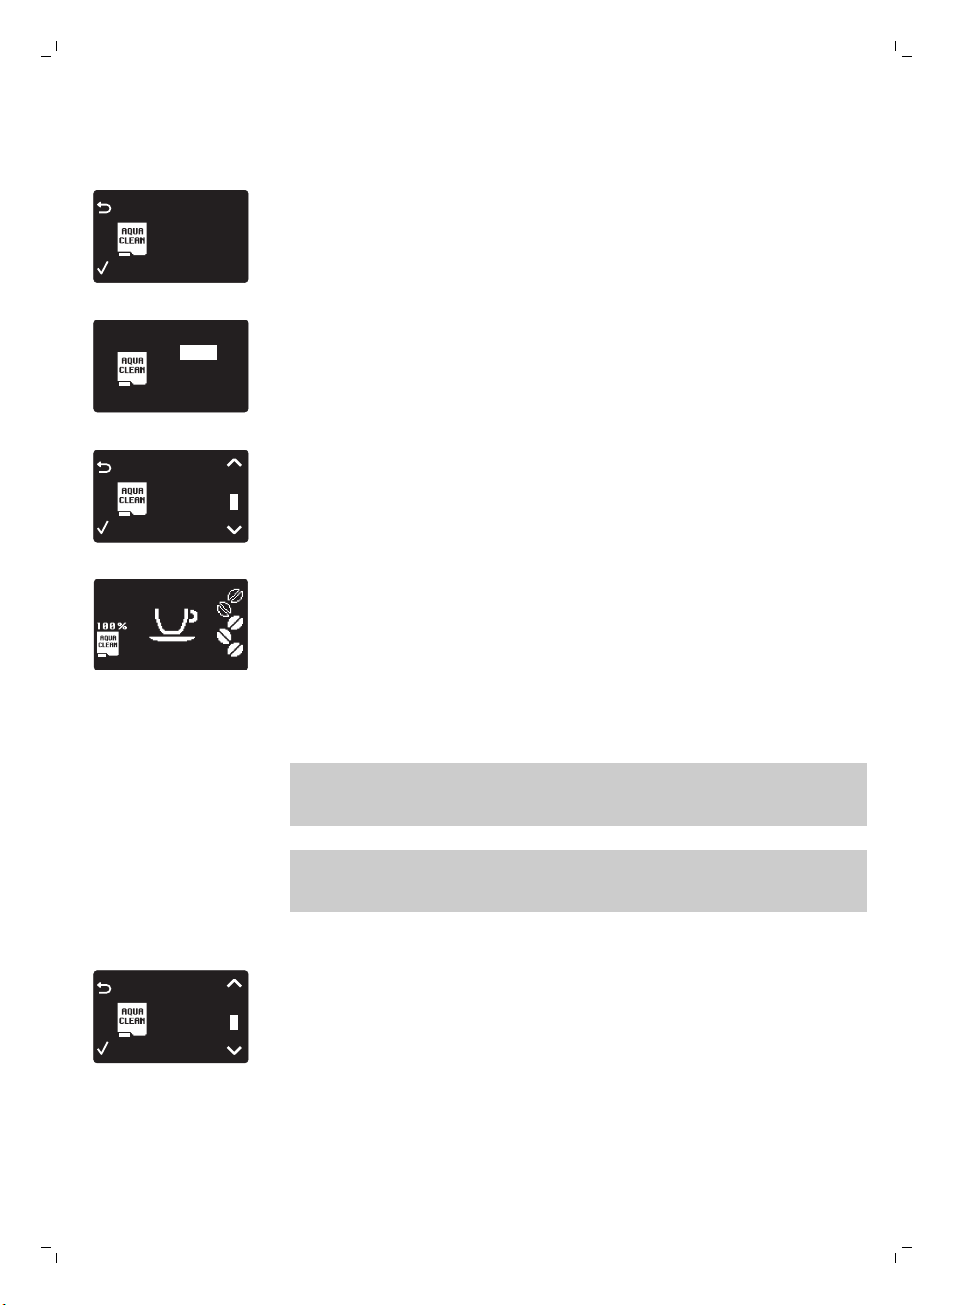
0 / 8
80%
NEW?
0 / 8
ON
OFF
FILTER
1 / 8
AQUA CLEAN
FILTER
1 / 8
AQUA CLEAN
52
한국어
2 MENU(메뉴) 버튼을 누르고 MENU(메뉴)를 선택한 후 OK 버튼을 누릅니다.
AQUACLEAN FILTER(AQUACLEAN 필터)로 스크롤합니다. OK 버튼을 눌러
확인합니다.
-
이전에 설치한 AquaClean 필터 수(0-8개)가 디스플레이에 표시됩니다.
3 디스플레이에서 ON을 선택하고 OK 버튼을 눌러 적용합니다.
4 디스플레이가 사용된 필터의 수를 자동으로 업데이트합니다.
-
그런 다음 AquaClean 100% 아이콘과 함께 '머신이 준비되었음'을
알려주는 화면이 나타나 필터가 설치되었음을 보여줍니다.
5 활성화를 완료하려면 뜨거운 물 2잔(0.5l)을 배출합니다. 물은 버립니다.
AquaClean 필터 교체
참고: 용량이 0%로 떨어지고 필터 아이콘이 빠르게 깜박이면 최대한 빨리
AquaClean 필터를 교체하십시오. 교체가 필요하다는 메시지가 나타나지
않더라도 적어도 3개월에 한 번은 AquaClean 필터를 교체하십시오.
도움말: 용량이 10%로 떨어지고 필터 아이콘이 천천히 깜박이기 시작하면 새
필터를 구매하는 것이 좋습니다. 이렇게 하면 용량이 0%로 떨어질 때 필터를
교체할 수 있습니다.
1 AquaClean 필터를 꺼내고 새 AquaClean 필터로 교체합니다(또한 별도로
제공되는 요약 설명서 참조).
2 MENU(메뉴) 버튼을 누르고 AQUACLEAN FILTER(AQUACLEAN 필터)로
스크롤한 후 OK 버튼을 누릅니다.
Page 54
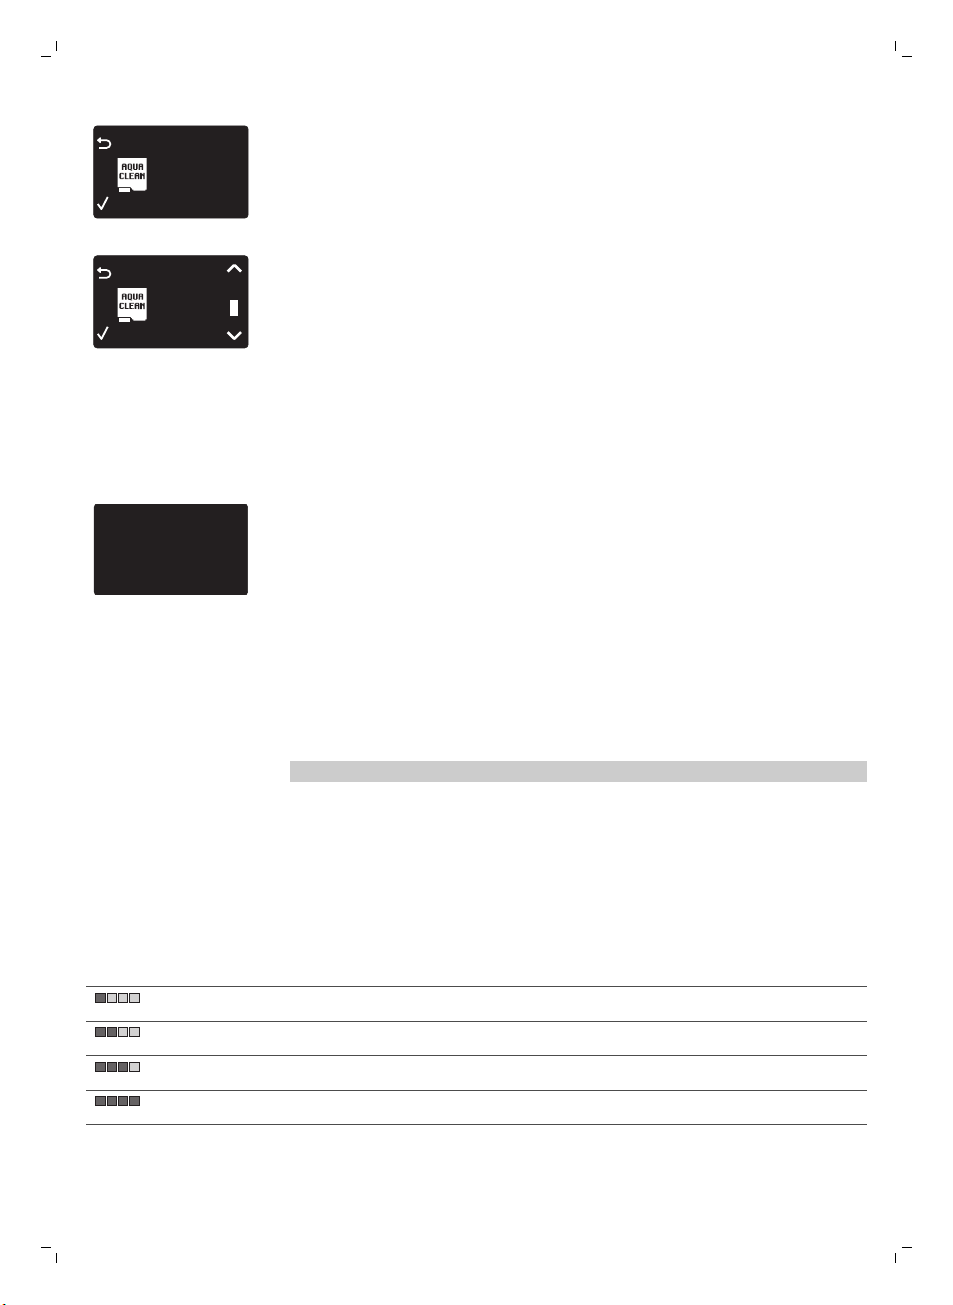
FILTER
0%
NEW?
AQUA CLEAN
-
FILTER
2 / 8
AQUA CLEAN
DESCALE BEFORE
ACTIVATING FILTER
디스플레이에 새 필터를 사용할 것인지 묻는 메시지가 표시됩니다.
3 OK 버튼을 눌러 확인합니다.
-
디스플레이가 사용된 필터의 수를 자동으로 업데이트합니다.
4 활성화를 완료하려면 뜨거운 물 2잔(0.5l)을 배출합니다. 물은 버립니다.
AquaClean 필터 8개 사용 후 필터 교체
1 디스플레이에 필터 아이콘이 깜박이기 시작하면 MENU(메뉴)를 선택하고
AQUACLEAN FILTER(AQUACLEAN 필터)로 스크롤한 다음 OK 버튼을 눌러
확인합니다.
-
새 필터를 사용하기 전에 커피 머신의 석회질을 제거해야 한다는 메시지가
디스플레이에 표시됩니다.
2 OK 버튼을 눌러 석회질 제거 절차 (보기 '석회질 제거 절차')를 시작합니다.
-
석회질 제거 절차를 나중에 수행하려면 ESC 버튼을 여러 번 눌러 필터
메뉴에서 나갑니다.
3 석회질 제거 과정이 끝나면 AquaClean 필터를 설치할 것인지 묻는 메시지가
디스플레이에 표시됩니다.
-
'AquaClean 필터 교체'의 단계를 따릅니다.
한국어
53
물 경도 측정
빨간 사각형 수 설정할 값 물 경도
참고: AquaClean 필터를 설치한 경우 물 경도를 설정할 필요가 없습니다.
해당 지역의 수질에 맞게 커피 머신 설정을 조절하려면 제공된 물 경도 검사지로
물 경도를 측정하십시오. 머신의 기본 물 경도는 가장 높은 수준(4)으로 설정되어
있습니다. 측정된 물 경도가 다른 경우 머신 메뉴에서 설정을 조절합니다.
1 물경도 검사지(커피 머신과 함께 제공됨)를 수돗물에 1초 동안 담급니다.
2 물 경도 검사지를 물에서 꺼낸 다음 1분간 기다립니다.
3 검사지에서 빨간색으로 변한 사각형 수를 확인하고 아래 표에 제시된 물
경도와 비교합니다.
1 심한 연수
2 연수
3 경수
4 심한 경수
4 MENU(메뉴) 버튼을 누르고 메뉴를 선택하고 스크롤하여 물 경도를
선택합니다. 원하는 물 경도 설정을 선택하고 OK 버튼을 눌러 적용합니다.
Page 55
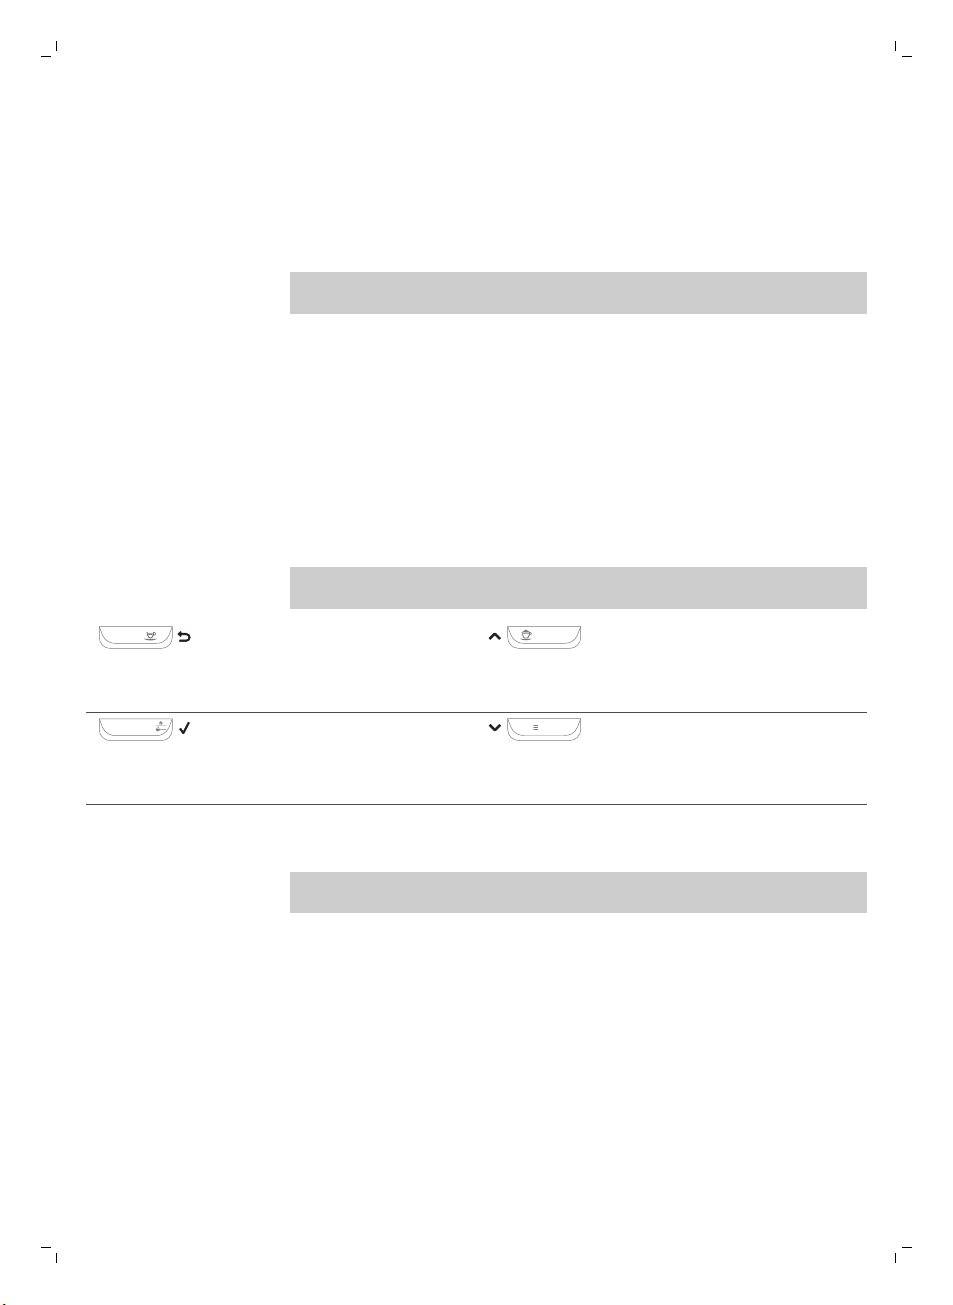
ESPRESSO
CAPPUCCINO
AROMA STRENGTH
MENU
54
한국어
제어판 및 디스플레이
이 에스프레소 머신은 디스플레이만 봐도 이해할 수 있어 쉽게 사용할 수
있습니다. 버튼에 대한 요약 설명은 아래 섹션을 읽어보십시오.
원터치 음료 버튼
사전 설정 음료 중 하나를 빠르게 만들려면 원터치 음료 버튼(ESPRESSO,
ESPRESSO LUNGO, CAPPUCCINO 및 LATTE MACCHIATO)을 사용하십시오.
-
카푸치노 또는 라테 마키아토를 선택한 경우 밀크 카라페를 제대로 장착되고
사용 준비가 되었는지 확인하십시오(별도로 제공되는 요약 설명서 참조).
-
커피 머신에서 커피를 모두 배출하기 전에 추출 과정을 중지하려면 OK
버튼을 누르십시오.
-
에스프레소또는 에스프레소 룽고 (보기 '커피 및 우유 양 조절')의 양을
조절할 수 있습니다.
-
우유 함유 음료를 만든 후에는 커피 머신이 QUICK CARAFE CLEAN(카라페
빠른 세척) 절차를 시작합니다.
탐색 버튼
원터치 음료 버튼 중 일부는 이중 기능이 있습니다. 이러한 버튼을 사용하여
메뉴를 탐색합니다.
ESPRESSO(에스프레소) 버튼 =
ESC 버튼: 이 버튼을 누르면 주
메뉴로 돌아갑니다.
AROMA STRENGTH(아로마 강도)
버튼 = OK 버튼: 기능을 선택하여
확인하거나 중단하려면 이 버튼을
누릅니다.
MENU(메뉴) 버튼
뜨거운 물 또는 우유 거품 등 다른 음료를 만들려면 MENU(메뉴) 버튼을
사용합니다. MENU(메뉴) 버튼을 사용하여 다음 설정을 변경할 수도 있습니다.
-
-
-
-
-
-
CAPPUCCINO(카푸치노) 버튼 = 위
화살표 버튼: 디스플레이 메뉴에서
위로 스크롤하려면 이 버튼을
누릅니다.
MENU(메뉴) 버튼 = 아래 화살표
버튼: 디스플레이 메뉴에서 아래로
스크롤하려면 이 버튼을 누릅니다.
디스플레이 대비
커피 온도
대기 시간: 커피 머신이 대기 모드가 된 후 경과 시간입니다.
물 경도: 해당 지역의 수질에 맞게 커피 머신 설정을 조절하려면 물 경도를
측정하십시오.
AquaClean 필터 활성화
석회질 제거 시작
Page 56
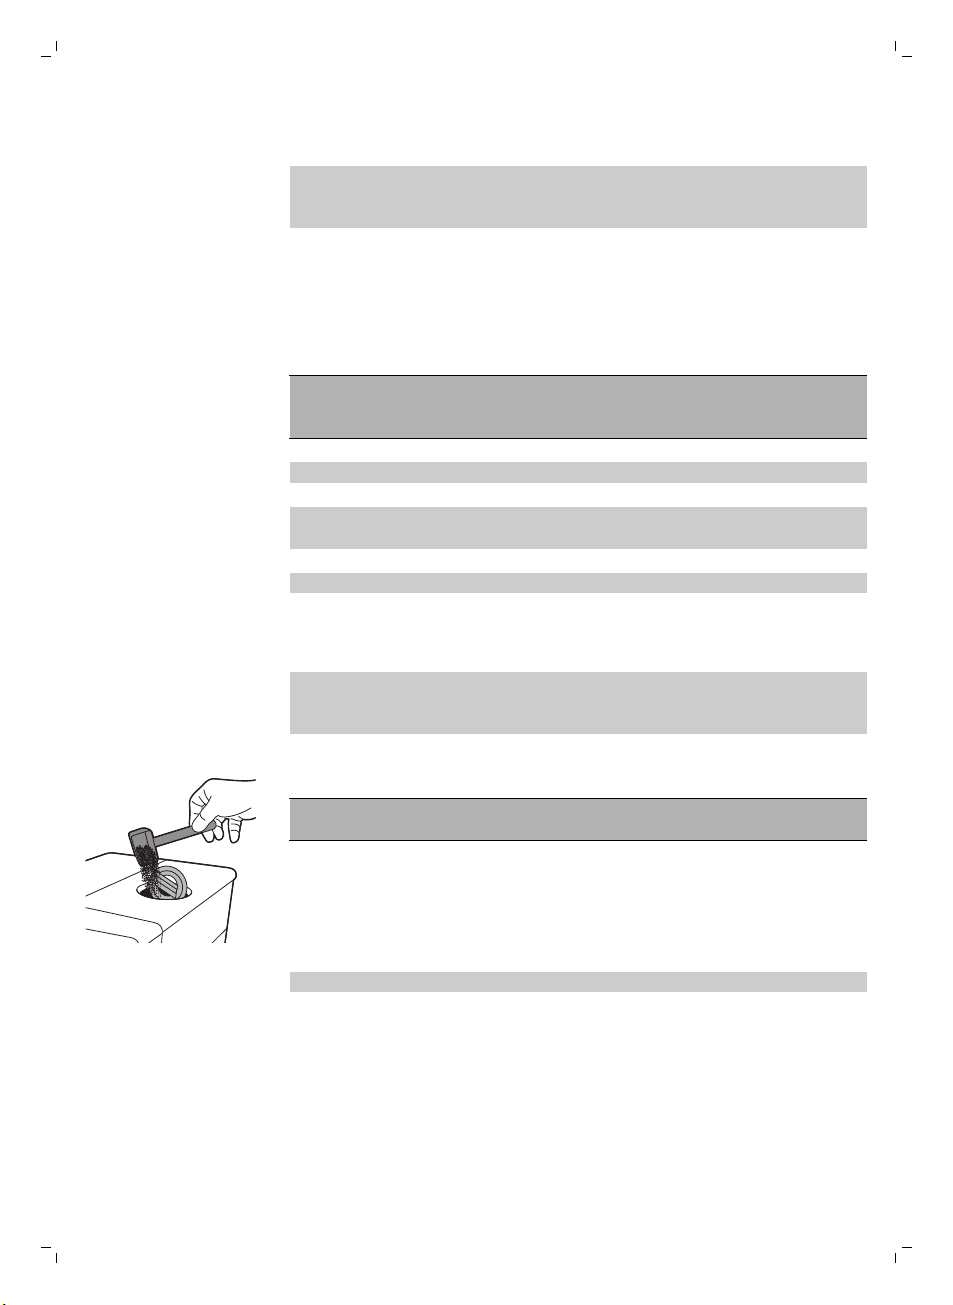
아로마 강도 버튼
커피 강도 (보기 '커피 강도 조정')를 조절하거나 분쇄 커피 (보기 '분쇄 커피로
커피 추출')를 추출하려면 AROMA STRENGTH(아로마 강도) 버튼을
사용합니다.
커피 추출
원두로 커피 추출
주의: 에스프레소 원두만 사용하십시오. 커피 머신이 손상될 수 있으므로 분쇄
커피, 볶지 않은 커피 생두 또는 카라멜화된 커피 원두는 원두 투입구에 넣지
마십시오.
커피를 추출하려면 별도로 제공되는 요약 설명서의 지침을 따르십시오.
에스프레소 또는 에스프레소 룽고를 2잔 추출하려면 원하는 음료 버튼을 두 번
누릅니다. 커피 머신이 자동으로 분쇄 과정을 연속으로 두 번 수행합니다.
참고: 원두 투입구 덮개를 사용하면 원두를 신선하게 보관할 수 있습니다.
분쇄 커피로 커피 추출
한국어
55
분쇄 커피로 커피를 추출할 때는 제공된 계량 스푼을 사용하여 적정 용량을 분쇄
커피함에 넣으십시오. 커피 가루 용기가 막히지 않도록 분쇄 커피를 너무 많이
넣지 마십시오.
1 분쇄 커피함 뚜껑을 엽니다.
2 분쇄 커피함에 분쇄 커피를 한 스푼 붓고 뚜껑을 닫습니다.
주의: 분쇄 커피함에 분쇄 커피 외에 다른 물질을 넣으면 커피 머신이 손상될
수 있습니다.
3 커피 배출구 아래에 잔을 놓습니다.
4 AROMA STRENGTH(아로마 강도) 버튼을 눌러 분쇄 커피 추출 기능을
선택합니다.
5 ESPRESSO(에스프레소) 버튼을 누릅니다.
선택한 음료가 자동으로 추출되기 시작합니다.
참고: 분쇄 커피로는 한 번에 커피 한 잔만 추출할 수 있습니다.
스페셜 드링크 및 온수
스페셜 드링크 선택법
1 MENU(메뉴) 버튼을 누르고 DRINKS(음료)를 선택합니다.
2 OK 버튼을 눌러 확인합니다.
3 메뉴를 스크롤하여 원하는 음료를 선택합니다.
Page 57
56
한국어
온수 배출
주의: 추출이 시작될 때 온수 배출구에서 증기와 온수가 배출될 수 있습니다.
추출이 완료된 후에 온수 배출구를 빼내십시오.
1 온수 배출구를 끼웁니다.
2 MENU(설정) 버튼를 누르십시오. DRINKS(음료)를 선택하고 확인한 다음
스크롤하여 HOT WATER(온수)를 선택합니다.
주의: 온수 배출구가 끼워져 있으면 메뉴에서 바로 HOT WATER(온수)를
선택하면 됩니다.
3 OK 버튼을 눌러 확인합니다. 디스플레이에 온수 배출구를 끼우라는 메시지가
표시되면 OK 버튼을 눌러 확인합니다. 온수가 배출되기 시작합니다.
4 온수 배출을 멈추려면 OK 버튼을 누릅니다.
우유 함유 커피 음료와 우유 거품 추출
참고: 밀크 카라페를 사용하는 방법에 대한 자세한 내용은 별도로 제공되는 요약
설명서를 읽어보거나 QR 코드 (보기 '소개 ')를 스캔하여 전용 웹 사이트의 지침
비디오에 액세스하십시오.
주의: 우유 함유 커피 음료나 우유 거품을 선택할 때는 먼저 밀크
카라페가 끼워져 있고 우유 거품 배출구가 열려 있는지 확인하십시오.
밀크 카라페가 제대로 끼워지지 않은 경우 증기와 뜨거운 우유가 우유
거품 배출구 밖으로 분사될 수 있습니다.
1 우유 거품 배출구 아래에 잔을 놓습니다.
2 우유 함유 음료를 선택합니다.
-
우유 함유 음료를 즉시 추출하려면 원터치 CAPPUCCINO(카푸치노) 또는
LATTE MACCHIATO(라테 마키아토) 버튼을 누르십시오.
-
MENU(메뉴) 버튼을 누르고 DRINKS(음료)를 선택하고 아래로 음료를
스크롤하여 MILK FROTH(우유 거품)를 선택합니다.
-
밀크 카라페를 끼우고 우유 거품 배출구를 열어야 한다는 메시지가 커피
머신에 표시됩니다.
3 정해진 양의 거품 우유가 먼저 잔이나 유리컵에 배출된 다음 정해진 양의
커피가 배출됩니다.
-
우유 또는 커피 배출을 멈추려면 OK 버튼을 누릅니다.
4 우유 함유 커피 음료가 추출되면 디스플레이에 밀크 카라페의 빠른 세척
절차를 실행할지 묻는 메시지가 표시됩니다. 10초 동안 빠른 세척 절차 (보기
'카라페 빠른 세척')를 활성화할 수 있습니다. 밀크 카라페 안에 우유가 남아
있는 상태에서 빠른 세척 절차를 실행할 수 있습니다. 적어도 하루 한 번 빠른
세척 절차를 수행하는 것이 좋습니다. OK 버튼을 눌러 빠른 세척 절차를 바로
수행하거나, ESC 버튼을 눌러 나중에 빠른 세척 절차를 수행하십시오.
Page 58
음료 종류 및 양
음료 유형
음료 이름 설명 선택 방법
에스프레소 크레마가 진한 커피, 작은 잔 제어판의 원터치 음료 버튼
한국어
57
에스프레소 룽고 크레마가 진한 중간 양의 에스프레소,
중간 잔
카푸치노 1/3 에스프레소, 1/3 뜨거운 우유, 1/3
우유 거품, 큰 잔
라테 마키아토 거품을 낸 뜨거운 우유 롱 샷과
에스프레소 샷을 더한 커피, 높은
유리잔
우유 거품 거품을 낸 뜨거운 우유 MENU/DRINKS(메뉴/음료)
온수 MENU/DRINKS(메뉴/음료)
제어판의 원터치 음료 버튼
제어판의 원터치 음료 버튼
제어판의 원터치 음료 버튼
음료 양
음료 이름 표준 양 양 범위
에스프레소 40ml 20~230ml
에스프레소 룽고 80ml 20~230ml
온수 300ml 50~450ml
용량 및 풍미 조절
커피 및 우유 양 조절
취향과 잔 크기에 맞추어 음료 추출 양을 조절할 수 있습니다.
주의: 앞쪽 패널의 손상을 방지하려면 직경이 8cm가 넘는 잔을 사용하지
마십시오.
참고: 유리잔 또는 테두리를 세라믹으로 코팅한 잔을 사용하는 것이 좋습니다.
1 에스프레소의 양을 조절하려면 디스플레이에 MEMO 아이콘이 표시될 때까지
ESPRESSO(에스프레소) 버튼을 길게 누릅니다.
-
커피 머신이 프로그래밍 단계로 설정되고 선택한 음료가 추출되기
시작합니다.
2 에스프레소가 원하는 양만큼 추출되면 OK 버튼을 누릅니다.
-
디스플레이에 체크 표시가 나타나 버튼이 프로그래밍되었음을
보여줍니다. 이 버튼을 누를 때마다 설정된 에스프레소 양이 추출됩니다.
참고: 에스프레소 룽고, 카푸치노, 라테 마키아토의 양을 설정하려면 같은 절차를
따릅니다. 해당 음료 버튼을 길게 누르고 원하는 양이 잔에 추출되면 OK 버튼을
Page 59
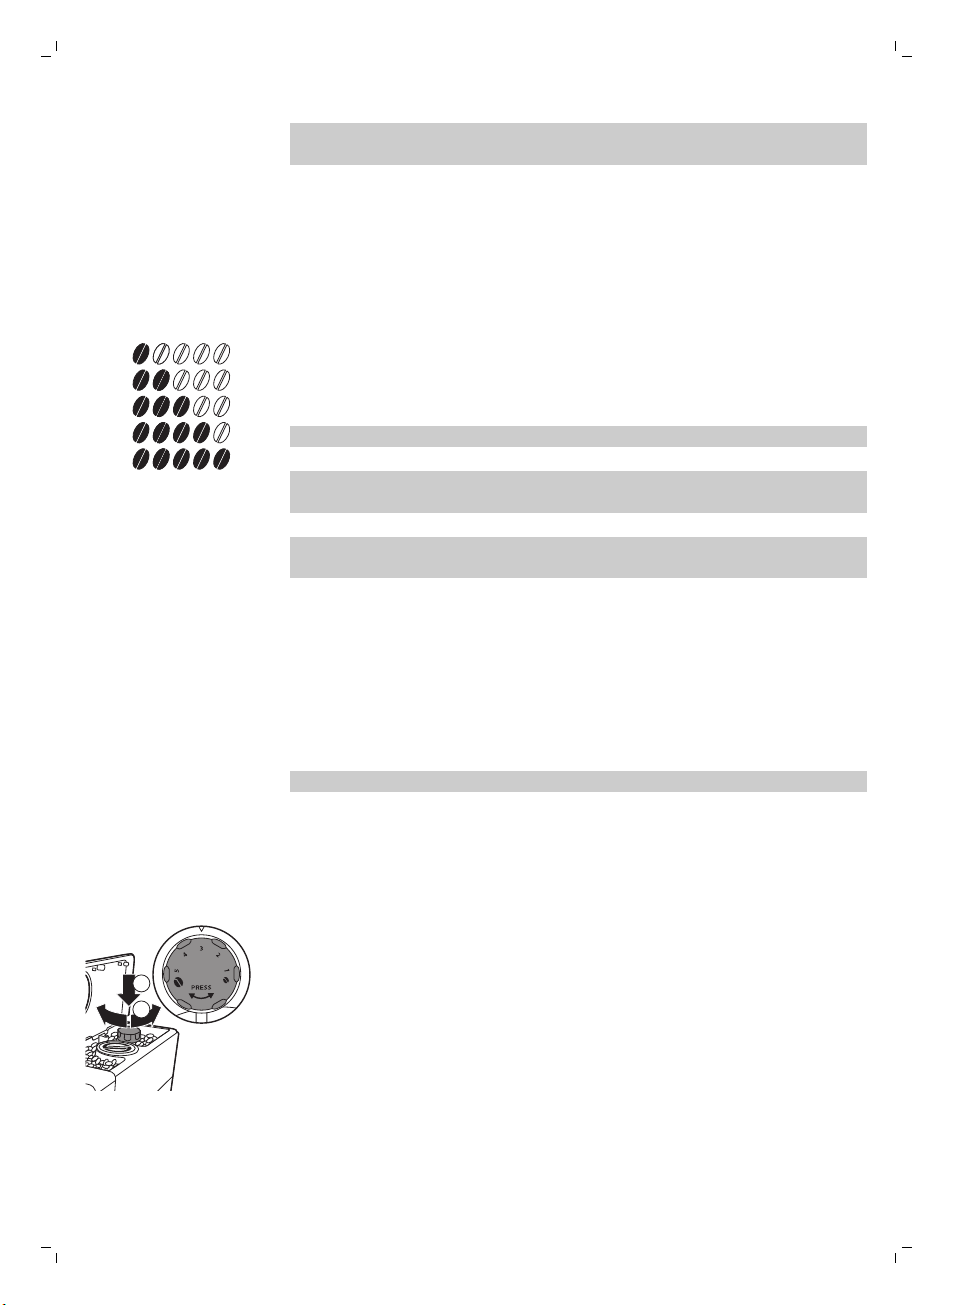
1
2
3
4
5
1
2
58
한국어
커피 강도 조정
분쇄기 설정 조절
누릅니다. 우유 함유 커피 음료의 양을 조절하려면 먼저 밀크 카라페를 끼우고
우유 양을 먼저 저장한 다음 커피 양을 저장합니다.
커피의 강도를 바꾸려면 AROMA STRENGTH(아로마 강도) 버튼을 누릅니다.
AROMA STRENGTH(아로마 강도) 버튼을 누를 때마다 아로마 강도가 1단계씩
변경됩니다. 디스플레이에 선택한 강도가 표시되며 이 강도는 커피를 추출하는
경우에만 저장됩니다.
1 매우 연함
2 연함
3 일반
4 진함
5 매우 진함
참고: 본 커피 머신은 각각의 커피 강도에 맞는 커피 양을 자동으로 배출합니다.
참고: AROMA STRENGTH(아로마 강도) 버튼을 사용하여 분쇄 커피로 커피를
추출할 수도 있습니다.
참고: 커피 강도를 조절한 후에는 디스플레이에 다시 주 메뉴가 표시되고 커피를
추출할 때 선택한 아로마 강도가 저장됩니다.
원두 용기 안에 있는 분쇄 설정 노브를 사용하여 분쇄 설정을 조절할 수
있습니다. 세라믹 커피 그라인더는 추출할 커피에 대해 선택된 분쇄도로 원두를
고르게 분쇄해 줍니다. 커피 향을 그대로 살려주므로 매 잔마다 완벽한 풍미를
즐길 수 있습니다.
참고: 분쇄 설정은 커피 원두가 분쇄되는 동안에만 조절할 수 있습니다.
주의: 그라인더 손상을 방지하려면 분쇄 설정 노브를 한 번에 한 단계 이상
돌리지 마십시오.
1 커피 배출구 아래에 잔을 놓습니다.
2 원두 투입구의 뚜껑을 엽니다.
3 ESPRESSO(에스프레소) 버튼을 누릅니다.
4 분쇄기가 분쇄를 시작하면 분쇄 설정 노브를 눌러 왼쪽이나 오른쪽으로
돌립니다.
-
5 가지 분쇄 설정 중에서 선택할 수 있습니다. 설정이 낮을수록 커피가
진해집니다.
Page 60
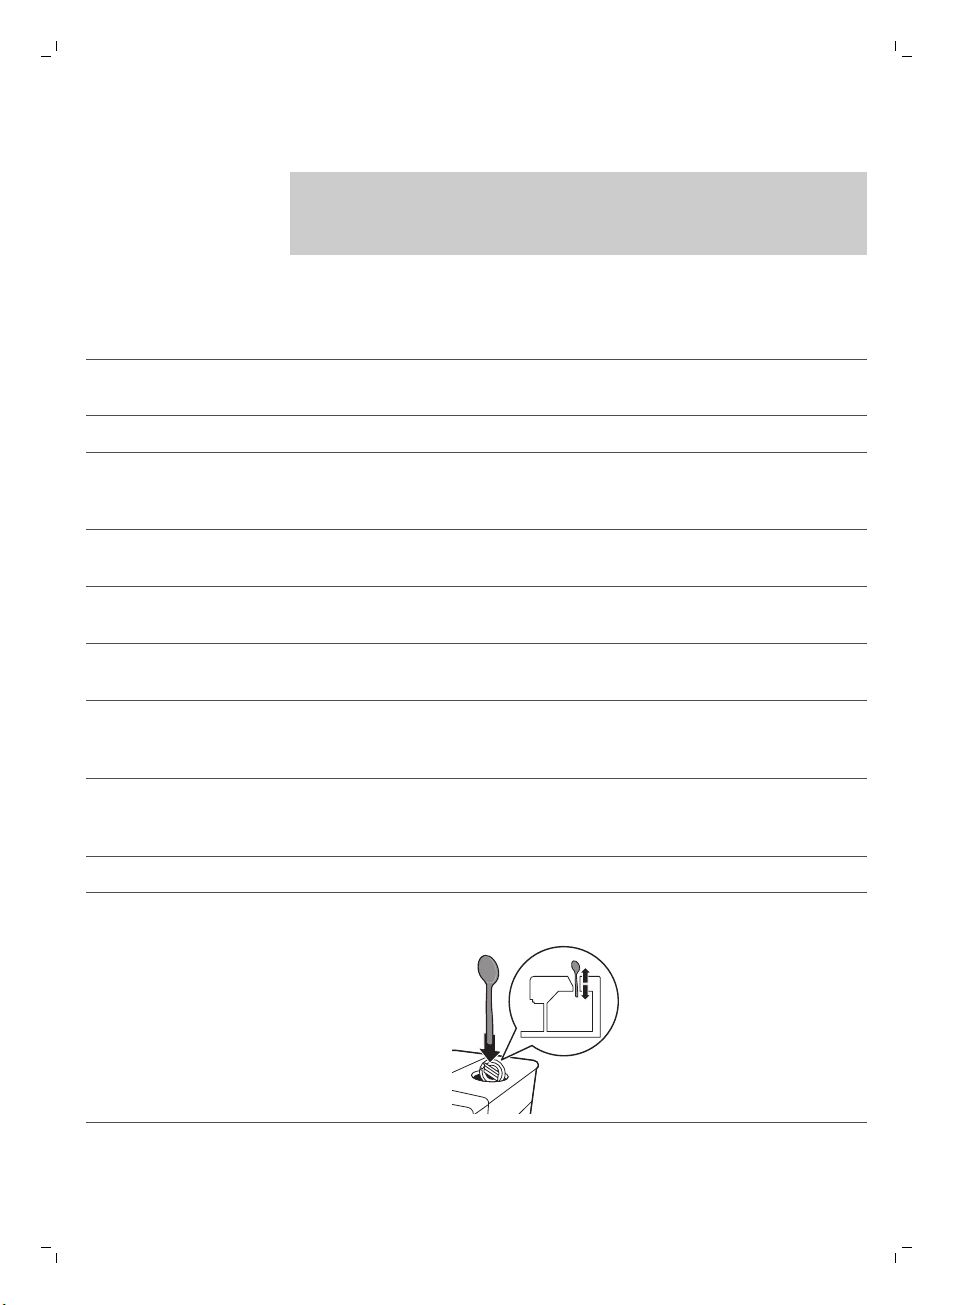
한국어
청소 및 유지관리
참고: 커피 머신의 모든 분리형 부품을 청소하는 시기와 방법에 대한 내용은 아래
표를 참조하십시오. 추출기를 청소하는 방법과 커피 머신에서 석회질을 제거하는
방법에 대한 자세한 내용은 아래의 해당 장을 읽어보거나 전용 웹 사이트
www.saeco.com/care를 참조하십시오.
청소 표
부품 설명 세척 시기 세척 방법
추출기 매주 세척기를 빼내 흐르는 수돗물 (보기 '수돗물로 추출기
세척')에 세척하십시오.
사용 종류에 따라 다름 추출기 (보기 '윤활유 도포')에 윤활유를 도포합니다.
밀크 카라페 매 회 사용 후 우유 함유 음료 (보기 '카라페 빠른 세척')를 만든 후 커피
머신에 표시된 대로 QUICK CARAFE CLEAN(카라페
빠른 세척)을 수행합니다.
매일 밀크 카라페를 깨끗이 (보기 '밀크 카라페 깨끗이 세척')
세척합니다.
매주 밀크 카라페를 분해하고 모든 부품을 수돗물 (보기 '밀크
카라페 주간 세척')로 세척합니다.
59
매월 이 세척 과정 (보기 '밀크 카라페 월 1회 세척')에 Saeco
우유 배출구 세척제 CA6705를 사용합니다.
물받이 물받이에서 '물받이
가득 참' 표시등이
켜지는 즉시
커피 가루 용기 적합한 시기 커피 가루 용기를 비우고 수돗물로 세척합니다. 커피
물탱크 적합한 시기 수돗물에 세척합니다.
분쇄 커피함/커피
배출관
매주 아래와 같이 숟가락 손잡이를 사용하여 상단 부분을
물받이를 비우고 흐르는 수돗물에 세척합니다.
가루 용기를 비우고 세척하는 동안 커피 머신이 켜져
있어야 합니다.
세척하십시오.
Page 61
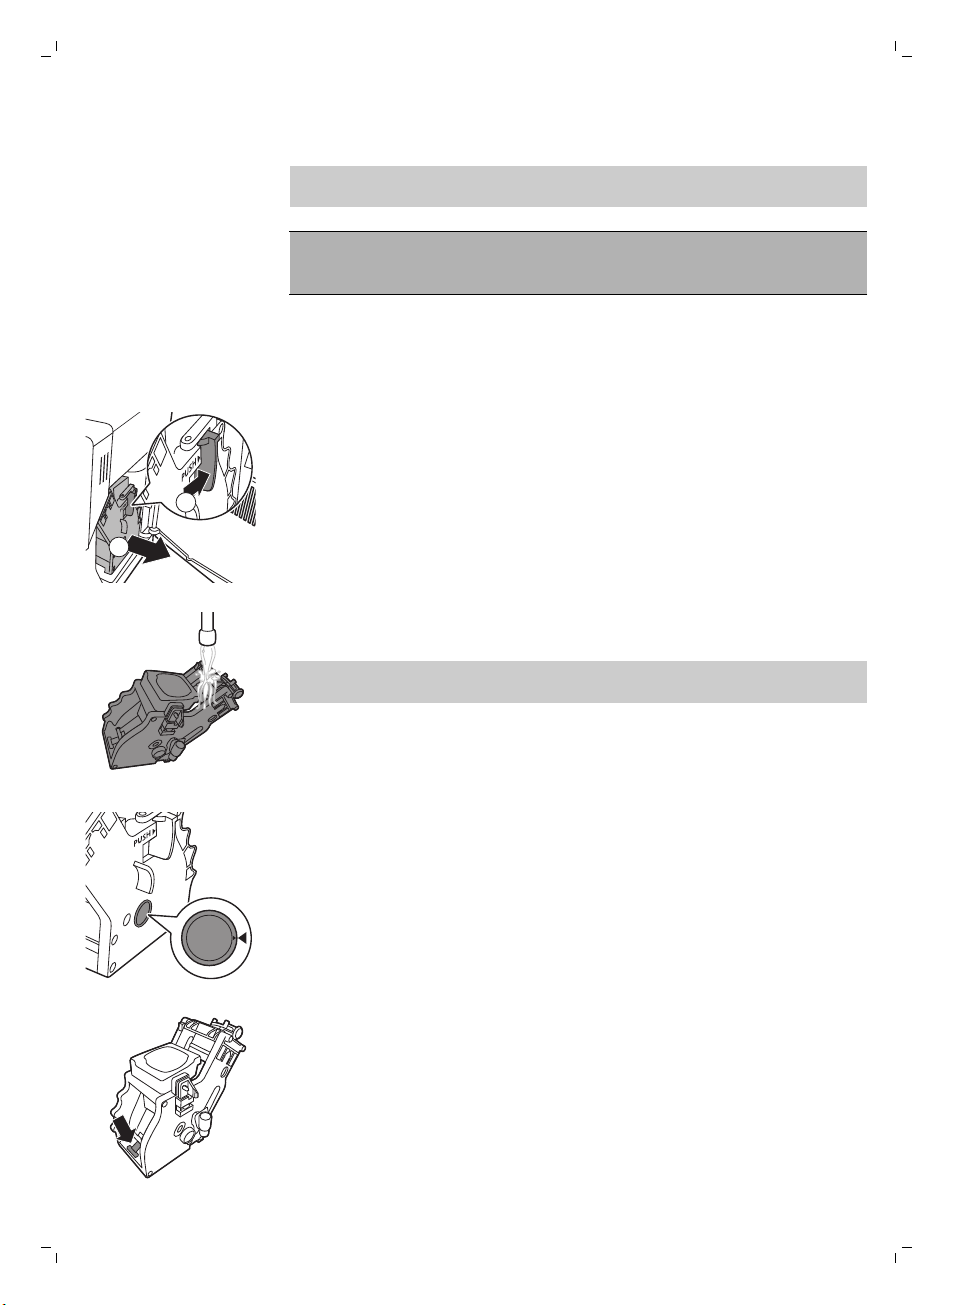
2
1
60
한국어
추출기 세척
참고: 추출기를 분해 및 청소하는 방법에 대한 자세한 지침은 QR 코드를
스캔하거나 www.saeco.com/care를 참조하십시오.
주의:추출기를 식기세척기로 세척하지 마시고 세척 시 주방용 액체 세제나
세정제를 사용하지 마십시오. 이렇게 할 경우 추출기가 고장 날 수 있으며 커피의
향과 맛을 떨어뜨릴 수 있습니다.
수돗물로 추출기 세척
1 커피 머신 전원을 끄고 전원 코드를 뽑습니다.
2 커피 가루 용기와 함께 물받이를 빼냅니다.
3 서비스 도어를 엽니다.
4 PUSH(누름) 버튼을 누르고 (1) 추출기의 손잡이를 잡아당겨 커피 머신에서
빼냅니다(2).
5 미지근한 물로 추출기를 깨끗이 헹굽니다. 상단 필터를 주의하여 세척합니다.
6 추출기를 상온에서 말립니다.
참고: 추출기 내부를 천으로 닦으면 보풀이 묻을 수 있으므로 천으로 닦지
마십시오.
추출기 다시 끼움
1 추출기를 커피 머신에 다시 끼우기 전 측면의 두 노란색 참조 표시가 잘
맞는지 확인합니다. 잘 맞지 않는 경우 다음 절차를 수행합니다.
-
레버가 추출기의 바닥에 닿았는지 확인합니다.
2 추출기의 노란색 잠금 훅이 올바른 위치에 있는지 확인합니다.
Page 62
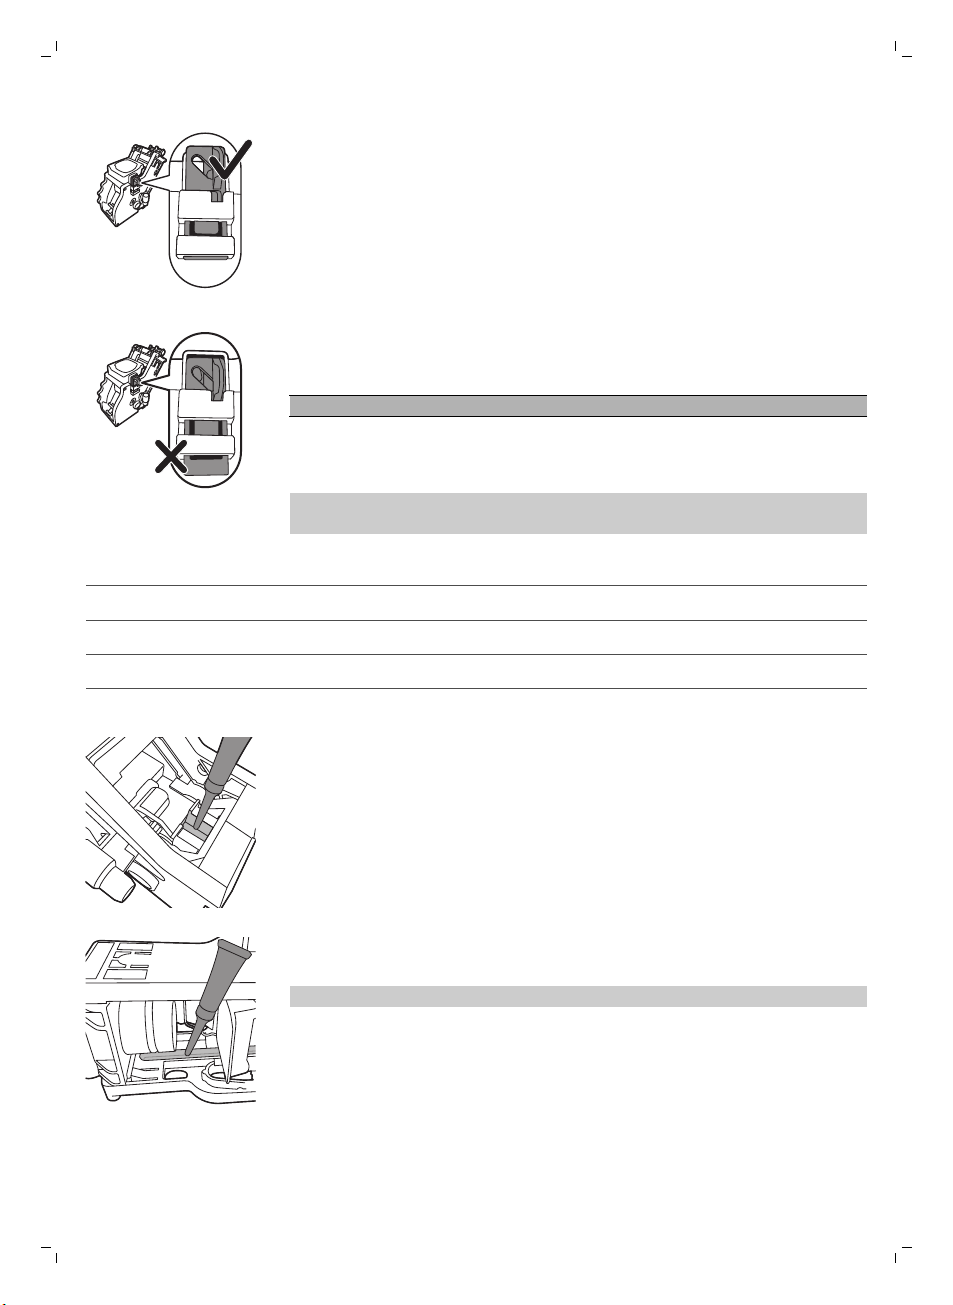
-
훅을 올바르게 배치하려면 맨 위쪽까지 밀어 올리십시오.
-
맨 아래쪽에 위치하는 경우 훅이 올바르게 배치되지 않은 것입니다.
3 딸깍 소리가 날 때까지 측면의 가이딩 레일을 따라 추출기를 커피 머신에
다시 끼워 넣습니다.
주의: PUSH(누름) 버튼을 누르지 마십시오.
4 서비스 도어를 닫습니다.
윤활유 도포
최적의 커피 머신 성능을 위해 추출기에 윤활유를 도포해야 합니다. 윤활 주기는
아래 표를 참조하십시오. 지원 문의는 www.saeco.com/care를 참조하십시오.
사용 빈도 매일 추출하는 음료의 수 윤활 주기
낮음 1-5 매 4개월
보통 6-10 매 2개월
한국어
61
무거움 >10 매월
1 제품 전원을 끄고 전원 코드를 뽑으십시오.
2 추출기를 꺼내 미지근한 수돗물 (보기 '수돗물로 추출기 세척')로 헹굽니다.
3 추출기 바닥의 축 주변에 윤활유를 얇게 바릅니다.
4 양쪽 레일에 윤활유를 얇게 바릅니다(그림 참조).
5 추출기 (보기 '추출기 다시 끼움')를 다시 끼웁니다.
윤활유 튜브를 여러 번 사용할 수 있습니다.
Page 63
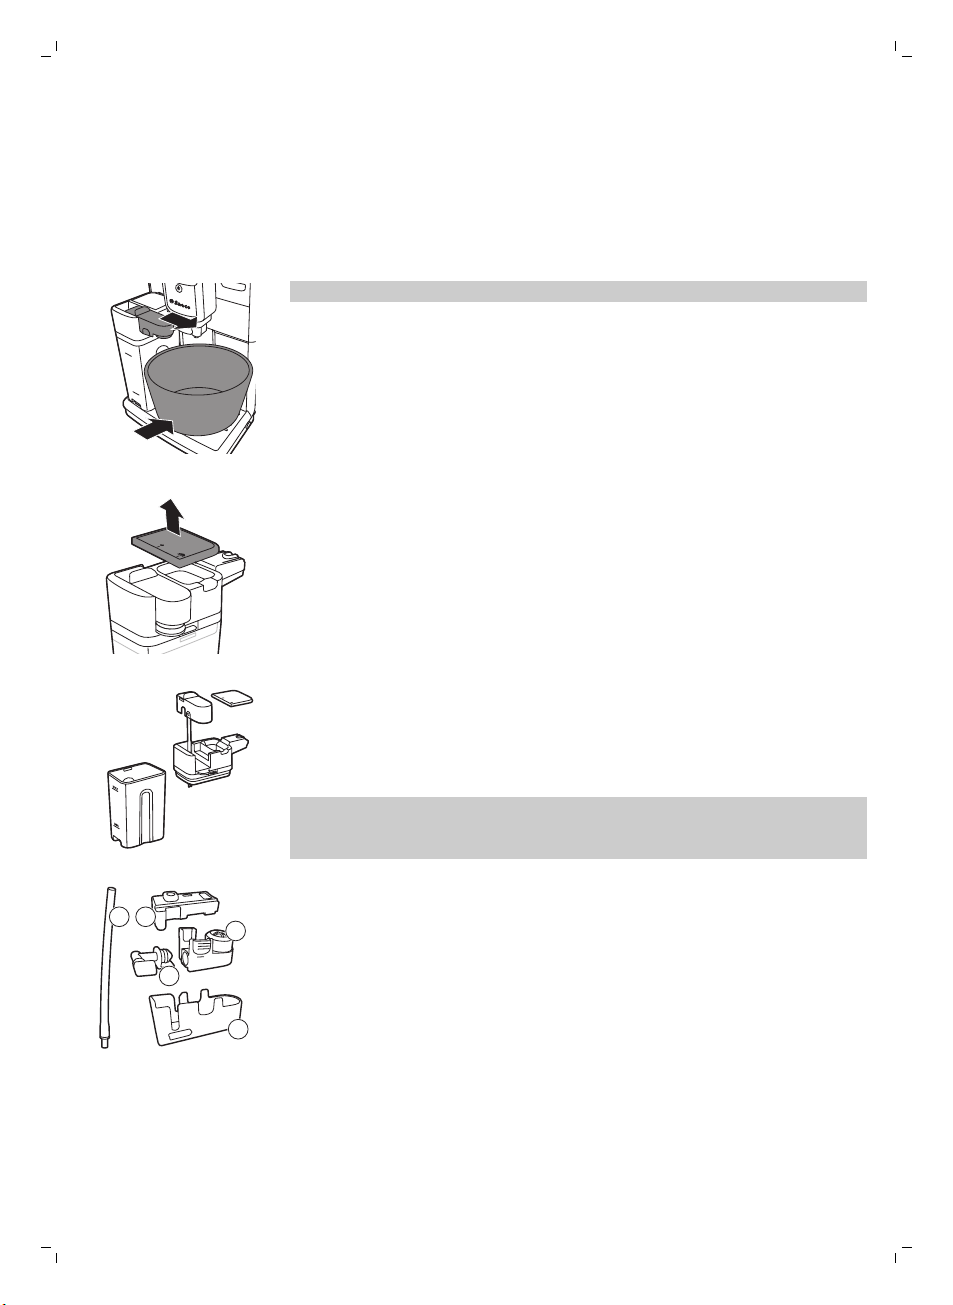
62
1 2
5
3
4
한국어
밀크 카라페 세척
카라페 빠른 세척
디스플레이에 우유 함유 음료를 만든 후에는 카라페 세척 아이콘이 표시됩니다.
1 디스플레이에 카라페 세척 아이콘이 표시될 때 세척 과정을 수행하려면 OK
버튼을 누릅니다.
2 음료가 든 잔을 꺼내고 용기를 우유 배출구 아래에 놓으십시오.
참고: 우유 배출구를 당겨 빼십시오.
3 OK 버튼을 누르면 온수가 배출되기 시작합니다.
밀크 카라페 깨끗이 세척
밀크 카라페를 깨끗이 세척하려면 다음 절차를 정기적으로 수행해야 합니다.
1 우유 배출 장치 뚜껑을 빼냅니다.
2 우유 배출 장치에서 우유거품 배출구를 들어 올립니다.
3 우유 배출구에서 우유 튜브를 빼냅니다.
4 미지근한 물로 우유 튜브와 우유 배출구를 깨끗이 헹굽니다.
밀크 카라페 주간 세척
우유 배출구는 5개의 부품으로 구성됩니다. 모든 부품을 일주일에 한 번
분해하고 수돗물로 세척합니다. 우유통을 제외한 모든 부품은 식기세척기를
이용해 세척하실 수 있습니다.
1 우유 튜브
2 고무 지지대
3 우유 거품기
4 우유 거품기 커넥터
5 우유 배출구 케이스
우유 배출구 분해
Page 64
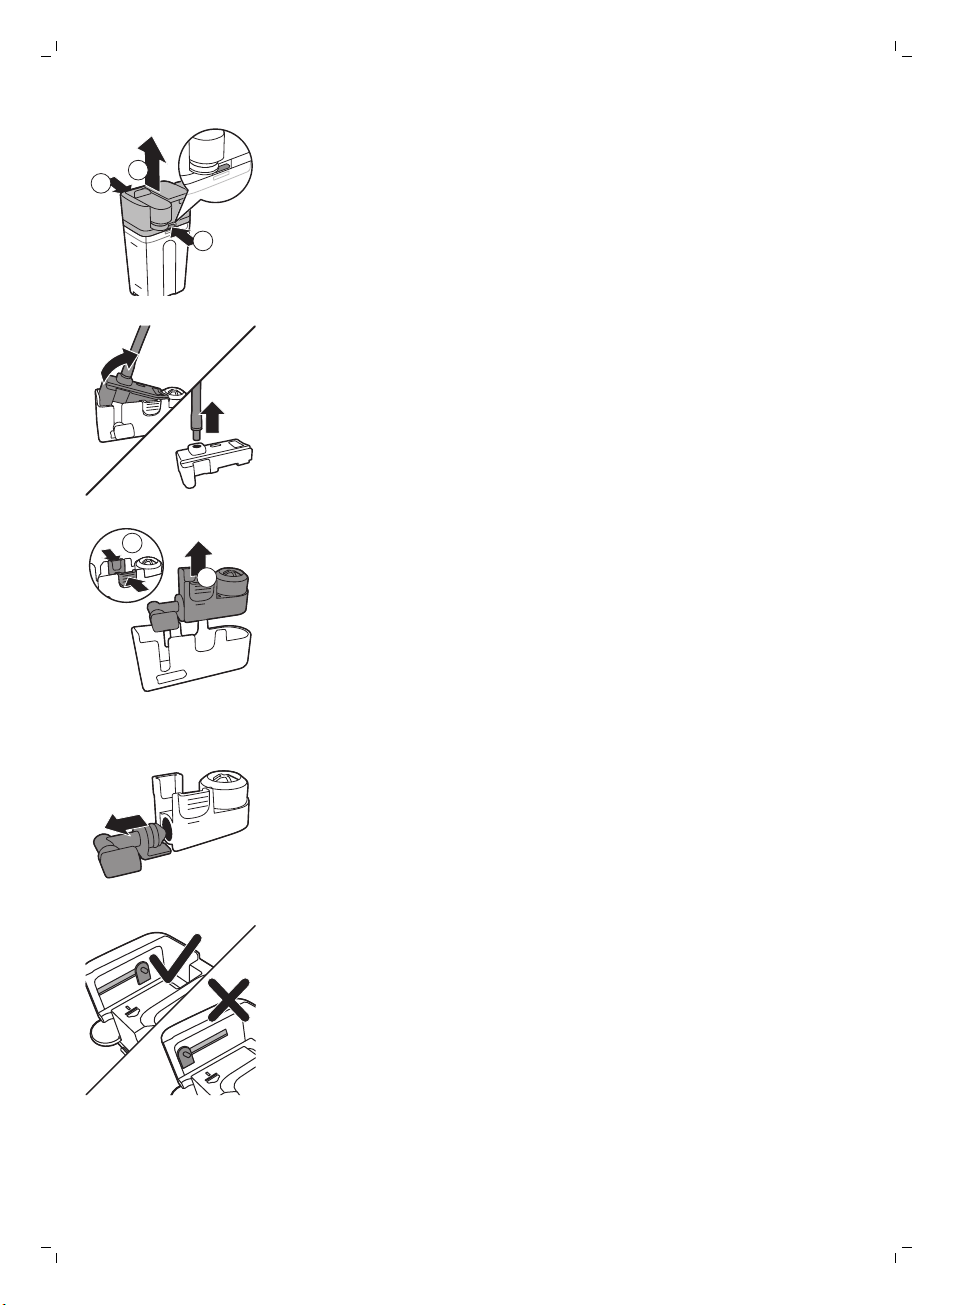
1
2
1
2
1
한국어
1 우유 배출구(1) 상단 양쪽의 열림 버튼을 동시에 누르고 우유통(2)에서
상단을 들어 올립니다.
2 우유 배출 장치를 뒤집어서 꽉 잡습니다. 고무 지지대에서 우유 튜브를 당겨
빼냅니다.
3 우유 거품기의 열림 버튼을 누르고 고무 지지대에서 우유 거품기를 빼냅니다.
63
4 우유 거품기에서 우유 거품기 커넥터를 당겨 빼냅니다.
5 미지근한 수돗물을 틀어 모든 부품을 헹굽니다.
밀크 카라페 재조립
1 우유 거품기 배출구를다시 조립하려면 '우유 거품기 배출구 분해'의
2-4단계를 역순으로 수행합니다.
2 우유거품 배출구를 밀크 카라페 상단에 다시 장착합니다.
3 밀크 카라페 상단을 밀크 카레페에 다시 올려 놓습니다.
참고: 우유 거품 배출구를 밀크 카라페 상단에 다시 끼워 넣기 전에 상단 안쪽의
핀을 올바른 위치에 놓으십시오. 이 핀의 위치가 바르지 않으면 우유 거품
배출구를 밀크 카라페 상단에 다시 끼워 넣을 수 없습니다.
밀크 카라페 월 1회 세척
이 세척 과정에는 SAECO 우유배출구 세척제 CA6705만 사용합니다.
Page 65
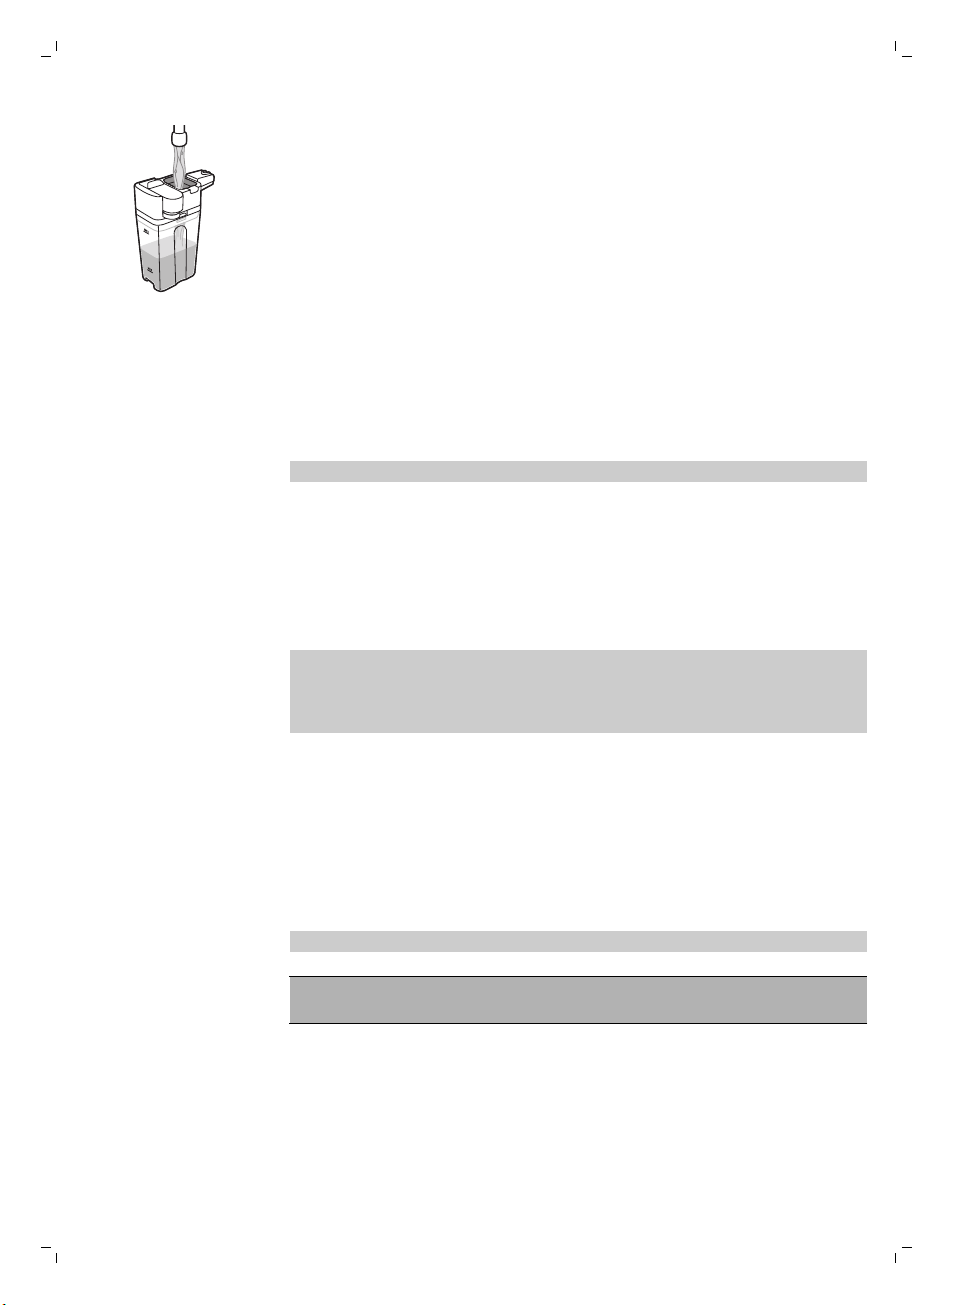
64
한국어
석회질 제거 절차
1 우유 배출구 세척제 봉지의 내용물을 밀크 카라페에 붓습니다. 밀크 카라페에
MAX 표시선까지 오도록 물을 채웁니다.
2 밀크 카라페를 커피 머신에 끼운 다음 우유 배출구 아래에 용기를 넣습니다.
3 MENU(메뉴) 버튼을 누르고 DRINKS(음료)를 선택하고 MILK FROTH(우유
거품)로 스크롤합니다. OK 버튼을 누르면 세정액이 배출되기 시작합니다.
4 밀크 카라페가 비워질 때까지 3단계를 반복합니다.
5 카라페가 비워지면 커피 머신에서 용기와 밀크 카라페를 커피 머신에서
빼냅니다.
6 밀크 카라페를 깨끗이 헹군 후 MAX 표시선까지 오도록 깨끗한 물을
채웁니다.
7 밀크 카라페를 커피 머신에 끼웁니다.
8 우유 배출구 아래에 용기를 놓습니다.
9 MENU(메뉴) 버튼을 누르고 DRINKS(음료) 메뉴에서 MILK FROTH(우유
거품)을 선택하여 카라페 헹굼 과정을 시작합니다.
10 밀크 카라페가 비워질 때까지 9단계를 반복합니다.
참고: 이 단계에서 배출된 용액은 절대 마시지 마십시오.
11 6~10단계를 반복합니다.
12 물 배출이 멈추면 세척 과정이 완료된 것입니다.
13 모든 부품을 분해한 후 미지근한 수돗물로 헹굽니다.
이제 커피 머신을 사용하기 위한 준비가 되었습니다.
디스플레이에 START CALC CLEAN(석회질 제거 시작) 메시지가 표시되면 커피
머신의 석회질을 제거해야 합니다. 이 메시지가 디스플레이에 표시될 때
석회질을 제거하지 않으면 커피 머신이 결국 제대로 작동하지 않게 됩니다.
이러한 경우의 수리는 보증되지 않습니다.
커피 머신의 석회질을 제거할 때는 반드시 Saeco 석회질 제거 용액을
사용하십시오. Saeco 석회질 제거 용액은 커피 머신의 성능을 최대한
보장하도록 만들어졌습니다. 다른 용액을 사용하면 커피 머신이 손상될 수
있으며 물에 잔여물이 남게 됩니다. Saeco 석회질 제거 용액은 온라인 매장
www.saeco.com/care에서 구입할 수 있습니다.
석회질 제거 절차에는 30분이 소요되며 석회질 제거 과정과 헹굼 과정으로
이루어져 있습니다. ESC 버튼을 눌러 석회질 제거 또는 헹굼 과정을 정지할 수
있습니다. 석회질 제거 또는 헹굼 과정을 계속하려면 OK 버튼을 누릅니다.
참고: 석회질을 제거하는 동안 추출기를 빼내지 마십시오.
경고: 석회질 제거 용액이나 석회질 제거 과정에서 배출된 물을 마시지
마십시오.
1 물받이와 커피 가루 용기를 빼내고 비워서 청소한 다음 제자리에 넣습니다.
2 커피 배출구 아래에 큰 용기(1.5l)를 놓습니다.
Page 66
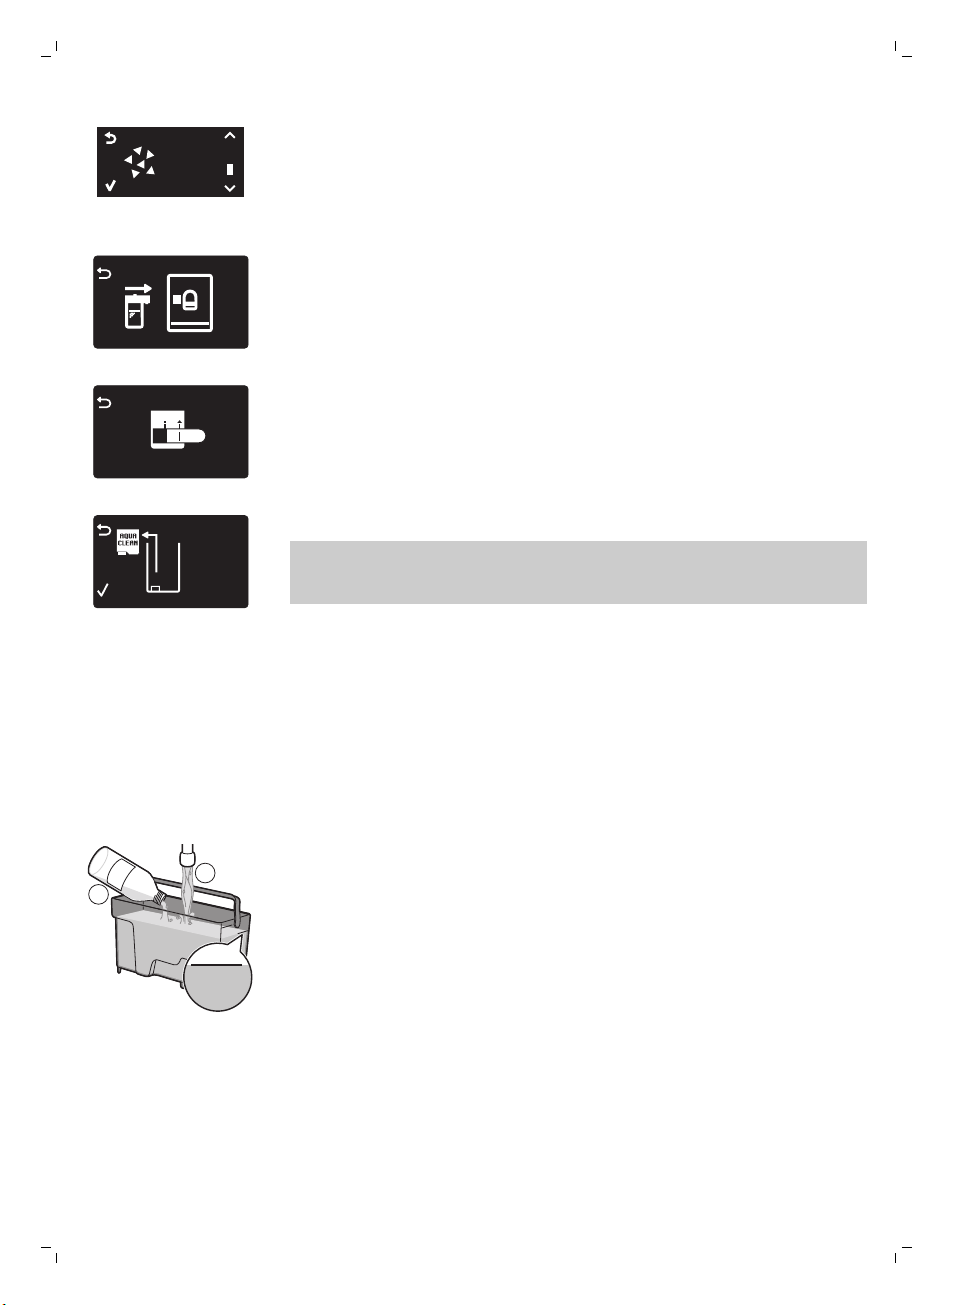
START
CALC
CLEAN
REMOVE
FILTER
MAX
CALC
CLEAN
CALC
CLEAN
1
2
한국어
65
3 디스플레이에 START CALC CLEAN(석회질 제거 시작) 메시지가 표시되면
OK 버튼을 눌러 석회질 제거 과정을 시작합니다. 온수 배출구가 있는 경우
빼냅니다.
-
디스플레이에 카라페를 끼우라는 메시지가 표시됩니다.
-
디스플레이에 우유 배출구를 열라는 메시지가 표시됩니다.
-
디스플레이에 AquaClean 필터를 빼내라는 메시지가 표시됩니다.
참고: 석회질 제거를 건너뛰려면 ESC 버튼을 누릅니다. 나중에 석회질 제거
과정을 시작하려면 MENU(메뉴) 버튼을 누르고 MENU(메뉴)를 선택한 다음
스크롤하여 DESCALING(석회질 제거)을 선택합니다. OK를 눌러 확인합니다.
4 물탱크에 석회질 제거 용액을 붓습니다. 물탱크의 CALC CLEAN 표시선까지
깨끗한 물을 채웁니다. 물탱크를 커피 머신에 다시 장착합니다. OK 버튼을
눌러 확인합니다.
-
석회질 제거 절차의 첫 단계가 시작됩니다. 커피 머신에서 일정 간격으로
석회질 제거 용액이 배출되기 시작합니다.
-
석회질 제거 아이콘과 진행 단계 및 지속 시간이 디스플레이에
표시됩니다. 이 첫 단계는 20분이 걸립니다.
5 물탱크가 비워질 때까지 석회질 제거 용액이 배출되도록 합니다.
6 물탱크를 빼내 헹굽니다.
7 물탱크의 CALC CLEAN 표시선까지 깨끗한 물을 채웁니다. 물탱크를 커피
머신에 다시 장착하고 OK를 누릅니다.
8 밀크 카라페를 빼내 헹굽니다. 밀크 카라페에 MIN 표시선까지 오도록 물을
채웁니다. 밀크 카라페를 커피 머신에 끼운 다음 우유 거품 배출구를 엽니다.
9 용기를 빼내 비운 다음 커피 배출구 아래에 다시 놓습니다. OK를 눌러
확인합니다.
10 석회질 제거 절차의 두 번째 단계인 헹굼 과정이 시작됩니다. 이 단계는 3분
걸립니다. 디스플레이에 헹굼 아이콘과 이 단계의 지속 시간이 표시됩니다.
Page 67
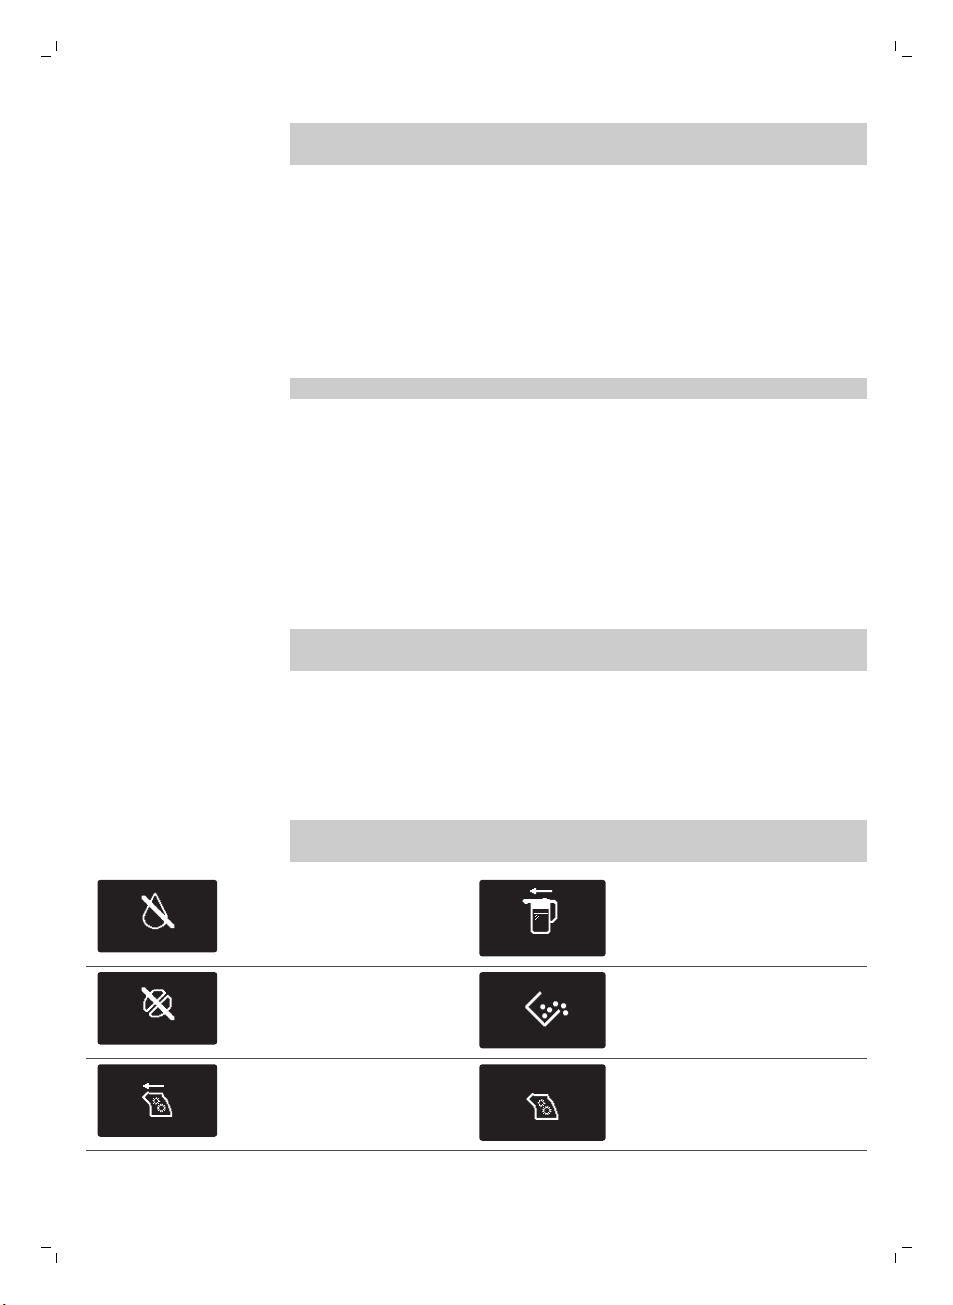
ADD WATER
INSERT CARAFE
ADD COFFEE
66
한국어
참고: 물탱크가 CALC CLEAN 표시선까지 채워지지 않은 경우 헹굼 과정을
한 번 더 반복해야 할 수도 있습니다.
11 물 배출이 멈출 때까지 기다립니다. 디스플레이에 체크 표시가 나타나면
석회질 제거 과정이 완료된 것입니다.
12 OK 버튼을 눌러 석회질 제거 과정을 끝냅니다. 커피 머신이 가열되기
시작하고 자동 헹굼 단계가 수행됩니다.
13 용기를 꺼내 비웁니다.
14 '밀크 카라페 주간 세척' 과정을 실행하여 석회질 제거 후 밀크 카라페를
세척합니다.
15 '추출기 주간 세척' 과정을 실행하여 추출기를 세척합니다.
16 물탱크에 새 AquaClean 필터를 끼웁니다.
도움말: AquaClean 필터를 사용하면 석회질을 자주 제거할 필요가 없습니다!
석회질 제거 절차가 도중에 중단된 경우의 대처 방법
석회질 제거 절차가 시작되면 커피 머신의 전원을 끄지 말고 머신이 전체 절차를
완료하도록 해야 합니다. 석회질 제거 도중에 커피 머신이 동작하지 않을 경우
대기 버튼을 눌러 석회질 제거 과정을 중단할 수 있습니다. 이러한 경우가
발생하거나정전 또는 실수로 코드가 빠진 경우에는 다음과 같이 하십시오.
1 물탱크를 비우고 깨끗이 헹굽니다.
2 물탱크를 CALC CLEAN(석회질 제거) 표시선까지 채우고 커피 머신의 전원을
다시 켭니다. 커피 머신이 가열되고 자동 헹굼 단계가 수행됩니다.
3 음료를 추출하기 전에 수동 헹굼 과정을 수행합니다.
참고: 석회질 제거 과정이 완료되지 않은 경우 가능한 한 빨리 석회질 제거
과정을 다시 수행해야 합니다.
경고 아이콘 및 오류 코드
경고 아이콘의 의미
경고 아이콘은 빨간색으로 표시됩니다. 디스플레이에 표시될 수 있는 경고
아이콘 목록과 해당 의미는 아래에 나와 있습니다.
물탱크의 MAX 표시선까지
깨끗한 물을 채우십시오.
원두 투입구가 비었습니다.
원두 투입구에 새 커피 원두를
넣으십시오.
추출기가 커피 머신에 없거나
올바로 끼워져 있지 않습니다.
추출기를 끼웁니다.
밀크 카라페가 끼워지지
않았습니다. 밀크 카라페를 커피
머신에 끼우십시오.
커피 가루 용기가 가득 찼습니다.
커피 머신이 켜져 있는지
확인하십시오. 그런 다음 커피
가루 용기를 빼내서 비웁니다.
추출기가 커피 가루로
막혔습니다. 추출기를
세척합니다.
Page 68
INSERT
WATER SPOUT
10
xx
한국어
67
온수 배출구가 설치되지
않았습니다. 온수 배출구를
끼웁니다.
오류 코드가 표시되면 '오류
코드의 의미' 항목을 확인하여
디스플레이에 표시된 코드의
의미와 취해야 할 조치에 대해
알아보십시오. 디스플레이에 이
아이콘이 표시되면 커피 머신을
사용하지 말아야 합니다.
물받이를 끼우고 서비스 도어를
닫습니다.
오류 코드의 의미
디스플레이에 표시될 수 있는 오류 목록과 해당 의미 및 문제 해결 방법은 아래에
나와 있습니다. 이러한 해결책으로 디스플레이에서 오류 코드가 없어지고 커피
머신이 정상 작동 상태로 돌아가지 않으면 Saeco 핫라인으로 문의하십시오.
연락처 정보는 보증서나 www.saeco.com/care에서 찾아볼 수 있습니다.
오류 코드 문제점 원인 가능한 해결책
01 커피 분쇄기가
막혔습니다.
03 - 04 추출기에 문제가
있습니다.
커피 배출관이
막혔습니다.
추출기가 더럽습니다. 추출기을 분리하여 깨끗이 (보기
추출기 위치가
올바르지 않습니다.
숟가락 손잡이 또는 계량 스푼의
손잡이로 커피 배출관을 깨끗하게
세척합니다.
'추출기 세척') 세척합니다.
추출기를 꺼내고 커피 머신에 다시
끼우기 전 측면의 두 참조 표시가 잘
맞는지 확인합니다.
05 물 배출구에 문제가
있습니다.
14 머신이 과열됩니다. 원인은 여러 가지가
물 배출구에 공기가
들어 있습니다.
있을 수 있습니다.
문제 해결
이 장에서는 기기를 사용하면서 접할 수 있는 가장 일반적인 문제를 다룹니다.
아래 정보를 통해 문제를 해결하지 못한 경우www.saeco.com/care를 방문하여
자주 묻는 질문(FAQ) 목록을 참조하거나 해당 국가의 필립스 고객 상담실로
문의하십시오.
물탱크를 두어 번 뺐다가 다시
끼웁니다. 커피 머신에 제대로 꽂았는지
확인합니다. 물탱크 함이 깨끗한지
확인합니다.
AquaClean 필터를 사용하는 경우
물탱크에서 AquaClean 필터를 빼내고
흔들어 필터에서 공기를 모두
제거합니다. 그런 다음 AquaClean
필터를 물탱크에 다시 끼웁니다.
커피 머신을 끈 다음 30분 후에 다시
켭니다. 이 과정을 2~3회 반복합니다.
Page 69
68
한국어
문제점 원인 해결책
커피 머신이 켜지지
않습니다.
커피 머신의 전원 플러그가
분리되어 있거나 전원 스위치가
'꺼짐' 위치(0)에 있습니다.
전원 코드가 제대로 꽂혀 있는지
확인하십시오.
전원 스위치가 '켜짐' 위치(I)에 있는지
확인하십시오.
커피 머신이 DEMO(데모)
모드입니다.
물받이가 금방 찹니다. 이는 일반적인 현상입니다. 커피
'커피 가루 용기가 가득 참'
아이콘이 계속 표시됩니다.
추출기를 빼낼 수 없습니다. 추출기 위치가 올바르지
추출기를 끼울 수 없습니다. 추출기 위치가 올바르지
대기 버튼을 8초 이상
눌렀습니다.
머신의 내부 배출구와 추출기가
물로 헹궈집니다. 이때 약간의
물이 내부 시스템을 통해
물받이로 직접 떨어집니다.
커피 머신의 전원을 끈 상태로
커피 가루 용기를 비웠습니다.
커피 가루 용기를 너무 빨리
끼웠습니다.
않습니다.
커피 가루 용기를 빼내지
않았습니다.
않습니다.
커피 머신 뒷면의 전원 스위치로 전원을
껐다가 다시 켜십시오.
물받이 커버에서 '물받이 가득 참'
표시등이 켜지면 물받이를 비웁니다.
헹굼 물을 받을 수 있도록 우유 거품
배출구 아래에 잔을 놓습니다.
커피 가루 용기는 항상 커피 머신의 전원을
켠 상태에서 비웁니다. 커피 머신의 전원을
끈 상태에서 커피 가루 용기를 비우면 커피
사이클 카운터가 리셋되지 않습니다. 이
경우 용기가 가득 차 있지 않아도 '커피
가루 용기 비우기' 메시지가 디스플레이에
계속 표시됩니다.
디스플레이에 커피 가루 용기를 다시
끼우라는 메시지가 표시된 후에 끼웁니다.
서비스 도어를 닫습니다. 커피 머신을
껐다가 다시 켭니다. '커피 머신 준비'
메시지가 화면에 표시될 때까지
기다렸다가 추출기를 빼냅니다.
추출기를 빼내기 전에 커피 가루 용기를
먼저 빼냅니다.
추출기를 올바른 위치에 놓고 다시 넣지
않았습니다. 레버가 추출기의 바닥에 닿아
있고 추출기의 훅이 올바른 위치에 있는지
확인합니다.
커피에 크레마가 너무
적거나
묽습니다.
커피 머신이 아직 석회질 제거
과정을 수행 중입니다.
분쇄기가 너무 굵게 설정되어
있습니다.
다음의 방법으로 머신을 리셋합니다.
물받이와 커피 가루 용기를 다시 넣습니다.
추출기는 끼우지 말고 둡니다. 서비스
도어를 닫고 커피 머신 전원을 켰다가 다시
끄십시오. 이제 추출기를 다시 끼웁니다.
석회질 제거 절차가 진행되는 동안에는
추출기를 분리할 수 없습니다. 먼저 석회질
제거 과정을 완료한 다음 추출기를
빼냅니다.
분쇄기를 미세 설정으로 조절합니다.
Page 70
문제점 원인 해결책
커피 블렌드가 올바르지
않습니다.
커피 블렌드를 바꿉니다.
한국어
69
커피 머신이 자율 조절 절차를
수행하고 있습니다.
추출기가 더럽습니다. 추출기를 세척합니다.
커피 배출구에서 커피가
샙니다.
커피가 충분히 뜨겁지
않습니다.
커피 머신에서 커피 원두가
분쇄되기는 하는데 커피가
나오지 않습니다.
커피가 천천히 나옵니다. 분쇄기가 너무 곱게 설정되어
커피 배출구가 막혔습니다. 커피 배출구와 구멍을 파이프 세척제로
커피 배출관이 막혔습니다. 커피 배출관을 청소합니다.
사용한 잔이 차갑습니다. 뜨거운 물로 헹궈 잔을 예열합니다.
설정 온도가 너무 낮습니다. 메뉴
설정을 확인합니다.
나중에 우유를 넣었습니다. 따뜻한 우유든 찬 우유든, 우유를 추가하게
커피 배출관이 막혔습니다. 숟가락 손잡이 또는 계량 스푼의 손잡이로
분쇄기가 너무 곱게 설정되어
있습니다.
추출기가 더럽습니다. 추출기를 세척합니다.
커피 배출구가 더럽습니다. 커피 배출구와 구멍을 파이프 세척제로
있습니다.
커피 몇 잔을 추출합니다.
세척합니다.
메뉴에서 온도를 '높음'으로 맞춥니다.
되면 언제나 어느 정도는 커피 온도가
내려갑니다.
커피 배출관을 청소합니다.
분쇄기를 좀더 굵은 설정으로 조절합니다.
세척합니다.
다른 커피 블렌드를 사용하거나 분쇄기를
조절합니다.
우유 거품이 너무
차갑습니다.
우유에 거품이 생기지
않습니다.
추출기가 더럽습니다. 추출기를 세척합니다.
커피 배출관이 막혔습니다. 숟가락 손잡이 또는 계량 스푼의 손잡이로
커피 머신 추출관이 물때로
막혔습니다.
잔이 차갑습니다. 잔을 뜨거운 물로 예열합니다.
밀크 카라페가 더럽거나 잘못
끼워졌습니다.
우유 배출구가 완전히 열리지
않았습니다.
밀크 카라페가 완전히 조립되지
않았습니다.
커피 배출관을 청소합니다.
커피 머신의 석회질을 제거합니다.
카라페를 세척하고 올바른 위치로
끼워졌는지 확인합니다.
우유 거품 배출구가 올바른 위치에 있는지
확인합니다.
모든 부품(특히 우유 튜브)이 제대로
조립되었는지
확인합니다.
Page 71
70
한국어
문제점 원인 해결책
사용한 우유가 거품을 내기에
적합하지 않습니다.
우유 종류에 따라 거품의 양과 질이
달라집니다. 테스트 결과 양질의 우유
거품을 내는 것으로 입증된 우유는 저지방
우유 또는 전유, 두유, 무유당 우유입니다.
다른 우유는 테스트하지 않았으며 우유
거품이 적게 만들어질 수 있습니다.
AquaClea 필터를 활성화할
수 없고 커피 머신에 석회질
제거가 필요하다는
메시지가 나타납니다.
필터를 교체한 후
디스플레이에 AquaClean
필터 아이콘이 나타나지
않습니다.
이미 AquaClean 필터를 8회
교체했습니다. AquaClean
필터를 8회 교체한 후에는 커피
머신에서 석회질을 제거해야
합니다.
AquaClean 필터 아이콘이
깜박이고 용량이 0%로 떨어진
후 상당 기간 필터를 교체하지
않았습니다.
최초 설치 시가 아니라 약
50잔(100ml 잔 기준)을 추출한
후에 AquaClean 필터를
끼웠습니다. AquaClean 필터를
끼우려면 커피 머신에 석회질이
전혀 없어야 합니다.
새 AquaClean 필터 또는 교체한
AquaClean 필터를 커피 머신
메뉴에서 활성화하지
않았습니다. 필터를 교체한
후에도 커피 머신 메뉴에서
활성화를 확인해야 합니다.
커피 머신 메뉴에서 필터
활성화를 확인하지 않았습니다.
먼저 커피 머신의 석회질을 제거한 다음
AquaClean 필터를 끼웁니다. 항상 메뉴
(보기 'AquaClean 필터 활성화')에서
AquaClean 필터를 활성화합니다. 필터를
교체할 때에도 그렇게 합니다.
먼저 커피 머신의 석회질을 제거한 다음
AquaClean 필터를 끼웁니다.
먼저 커피 머신의 석회질을 제거한 다음 새
AquaClean 필터를 끼웁니다. 석회질을
제거하면 필터 카운터가 0/8으로
리셋됩니다. 항상 커피 머신 메뉴에서 필터
활성화를 확인합니다. 필터를 교체한
후에도 그렇게 합니다.
커피 머신의 석회질을 먼저 제거하십시오.
그런 다음 메뉴 (보기 'AquaClean 필터
활성화')에서 AquaClean 필터를
활성화합니다. 필터를 교체할 때에도
그렇게 합니다.
커피 머신 메뉴 (보기 'AquaClean 필터
활성화')에서 필터 활성화를 확인합니다.
디스플레이에 'START CALC
CLEAN(석회질 제거 시작)' 메시지가
표시되면 먼저 커피 머신의 석회질을
제거해야 합니다. 석회질을 제거하기 전에
AquaClean 필터를 꺼내고 나중에 다시
끼웁니다.
AquaClean 필터를
끼웠으나 석회질 제거
메시지가 표시됩니다.
AquaClean 필터가 잘
들어맞지 않습니다.
AquaClean 필터를 커피 머신
메뉴에서 활성화하지
않았습니다.
필터에서 공기를 빼내야 합니다. 필터에서 공기 방울을 빼냅니다.
물탱크에 물이 남아 있습니다. 필터를 끼우기 전에 물탱크를 비웁니다.
AquaClean 필터가 아닌 다른
끼우려고 합니다.
필터를
먼저 커피 머신의 석회질을 제거한 다음 새
AquaClean 필터를 끼웁니다. 그러면 필터
카운터가 0/8으로 리셋됩니다. 또한 필터
교체 후에는 항상 커피 머신 메뉴 (보기
'AquaClean 필터 활성화')에서 필터
활성화를 확인합니다.
커피 머신에 꼭 맞는 필터는 AquaClean
필터뿐입니다.
Page 72
문제점 원인 해결책
고무 O링을 AquaClean 필터에
끼우지 않았습니다.
O링 포장을 확인하고 AquaClean 필터에
끼웁니다.
한국어
71
커피 머신 밑에 물이
있습니다.
물받이가 가득 차 넘쳐
흘렀습니다.
커피 머신을 평평한 곳에 놓지
않았습니다.
물받이에서 '물받이 가득 참' 표시등이
켜지면 물받이를 비웁니다. 커피 머신의
석회질 제거 과정을 시작하기 전에 항상
물받이를 비웁니다.
'물받이 가득 참' 표시등이 제대로
작동하도록 커피 머신을 평평한 곳에
놓습니다.
Page 73

Page 74

empty page before backcover
Page 75
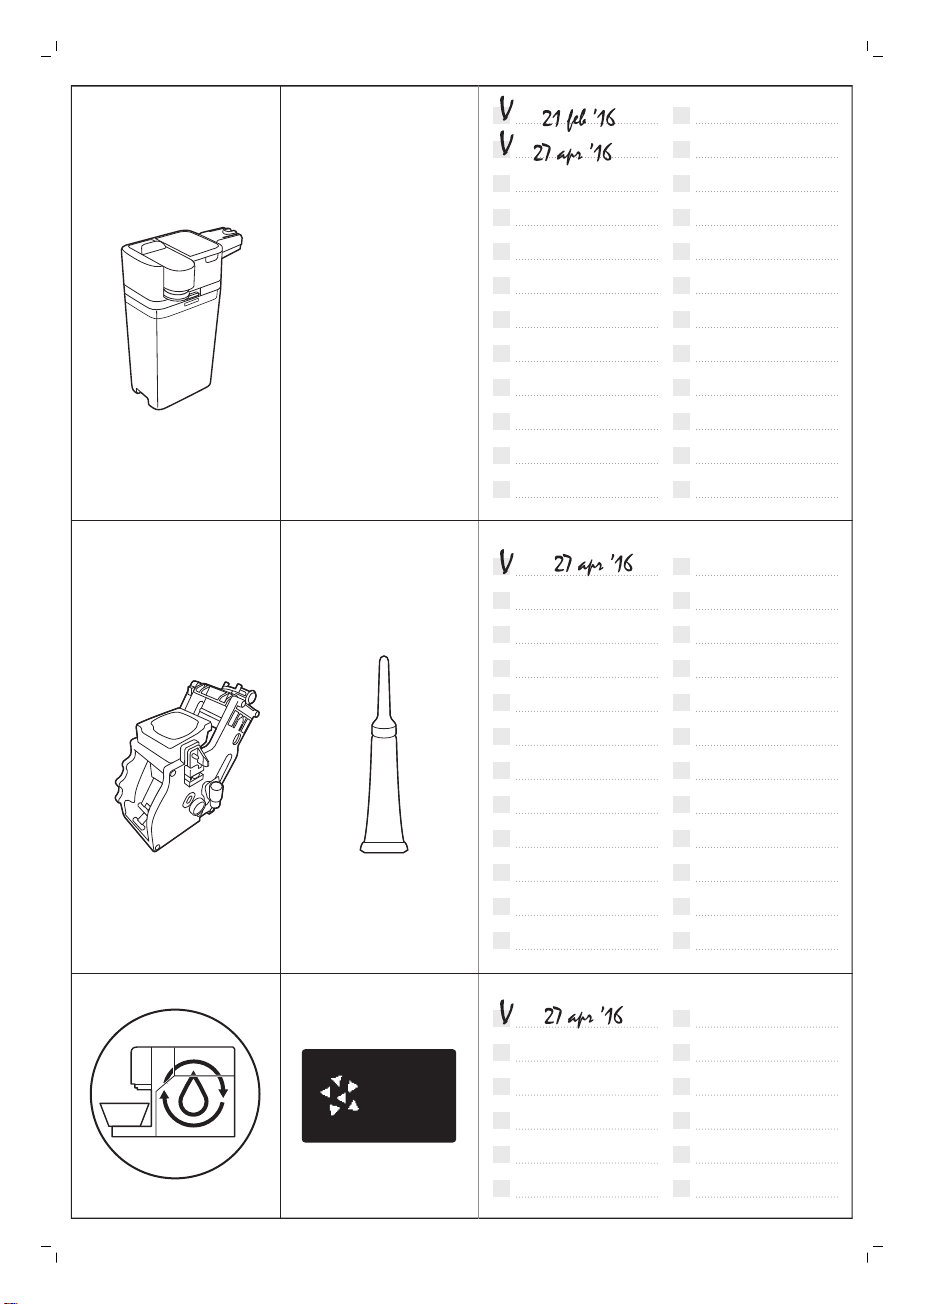
Milk
circuit
cleaner
START
DESCALING?
23 MIN
Appliance overview 2
Page 76
4219.460.3913.1 (4/2017)
www.saeco.com/care
>75% recycled paper
>75% papier recyclé
 Loading...