

Page 1

English
English
Français (Canada)
繁體中文
Register your product and get support at
www.saeco.com/care
Page 2

Page 3

ESPRESSO
ESPRESSO LUNGO
AROMA STRENGTH MENU
STEAM
HOT WATER
10
9
2
1
3
4
8
7
6
25
23
16
12
13
11
24
21
5
27
15 14
22
20
31
30
29
3233
28
18
17
19
26
Page 4

4
English
Contents
Introduction ___________________________________________________________________________________________ 5
Important ______________________________________________________________________________________________ 5
Electromagnetic fields (EMF)__________________________________________________________________________ 6
Machine overview______________________________________________________________________________________ 6
The user interface______________________________________________________________________________________ 7
First installation _______________________________________________________________________________________ 8
Manual rinsing cycle___________________________________________________________________________________ 10
Hot water circuit rinsing________________________________________________________________________________ 10
Coffee brewing circuit rinsing _________________________________________________________________________ 10
Intenza+ water filter___________________________________________________________________________________ 10
Installing the Intenza+ water filter_____________________________________________________________________ 10
Replacing the Intenza+ water filter___________________________________________________________________ 11
Measuring the water hardness________________________________________________________________________ 12
Setting the water hardness____________________________________________________________________________ 12
Beverage types and lengths___________________________________________________________________________ 13
Brewing coffee_________________________________________________________________________________________ 13
Adjusting the coffee dispensing spout _______________________________________________________________ 13
Brewing coffee with beans____________________________________________________________________________ 13
Brewing 1 cup of coffee________________________________________________________________________________ 13
Brewing 2 cups of coffee______________________________________________________________________________ 13
Brewing coffee with pre-ground coffee_______________________________________________________________ 14
Frothing milk___________________________________________________________________________________________ 14
Hot water ______________________________________________________________________________________________ 15
Adjusting quantity and taste__________________________________________________________________________ 15
Saeco Adapting System_______________________________________________________________________________ 15
Adjusting coffee length________________________________________________________________________________ 15
Adjusting coffee strength______________________________________________________________________________ 16
Adjusting the grinder settings_________________________________________________________________________ 16
Maintenance and care_________________________________________________________________________________ 17
Cleaning the drip tray and the coffee grounds container ____________________________________________ 17
Cleaning the water tank_______________________________________________________________________________ 17
Cleaning the bean hopper_____________________________________________________________________________ 17
Cleaning the brew group and the coffee exit duct____________________________________________________ 17
Weekly cleaning of the brew group___________________________________________________________________ 17
Monthly cleaning of the brew group__________________________________________________________________ 19
Lubrication of the brew group_________________________________________________________________________ 20
Cleaning the classic milk frother_______________________________________________________________________ 21
Daily cleaning of classic milk frother__________________________________________________________________ 21
Weekly cleaning of classic milk frother and steam wand ____________________________________________ 21
Descaling procedure___________________________________________________________________________________ 21
What to do if the descaling procedure is interrupted________________________________________________ 23
Warning icons and error codes _______________________________________________________________________ 23
Meaning of error codes________________________________________________________________________________ 24
Troubleshooting_______________________________________________________________________________________ 25
Demo mode function _________________________________________________________________________________ 29
Ordering accessories Saeco___________________________________________________________________________ 29
Page 5

English
Technical specifications_______________________________________________________________________________ 29
Disposal________________________________________________________________________________________________ 30
Warranty and support _________________________________________________________________________________ 30
Introduction
Dear customer, we thank you for buying the Saeco Incanto full-automatic
espresso machine!
Coffee is a natural product and its characteristics may vary according to
origin, blend and roasting. The machine is equipped with a self-adjustment
system that allows it to get the best taste out of your favorite coffee beans.
It regulates itself after brewing 10-20 coffees.
In this user manual you find all the information you need to install, use,
maintain and get the best out of your machine. To fully benefit from the
support that Saeco offers, please register your product at
www.saeco.com/welcome.
Important
This machine is equipped with safety features. Nevertheless, read and follow
the safety instructions carefully and only use the machine as described in
these instructions, to avoid accidental injury or damage due to improper use
of the machine. Keep this user manual for future reference.
-
Connect the machine to a wall socket with a voltage matching the
technical specifications of the machine.
-
Connect the machine to an earthed wall socket.
-
Do not let the power cord hang over the edge of a table or counter, or
touch hot surfaces.
-
Never immerse the machine, mains plug or power cord in water (danger
of electrical shock).
-
Do not pour liquids on the power cord connector.
-
Never direct the hot water jet towards body parts: danger of burns.
-
Do not touch hot surfaces. Use handles and knobs.
-
Switch off the machine with the main switch located on the back and
remove the mains plug from the socket:
-
If a malfunction occurs.
-
If the machine will not be used for a long time.
-
Before cleaning the machine.
-
Pull on the plug, not on the power cord.
-
Do not touch the mains plug with wet hands.
-
Do not use the machine if the mains plug, the power cord or the machine
itself is damaged.
-
Do not make any modifications to the machine or its power cord.
-
Only have repairs carried out by a service center authorized by Philips to
avoid ahazard
-
The machine should not be used by children younger than 8 years old.
5
Page 6

6
English
-
This machine can be used by children aged from 8 years and above and
by persons with reduced physical, sensory or mental capabilities or lack
of experience and knowledge if they have been given supervision or
instruction concerning use of the machine in a safe way and if they
understand the hazards involved.
-
Cleaning and user maintenance shall not be made by children unless
they are older than 8 and supervised.
-
Keep the machine, its accessories and its cord out of the reach of
children aged less than 8 years.
-
Children should be supervised to ensure that they do not play with the
machine.
-
Never insert fingers or other objects in the coffee grinder.
-
The machine shall not be placed in a cabinet when in use.
-
This machine is intended for normal household use only. It is not
intended for use in environments such as staff kitchens of shops, offices,
farms or other work environments.
-
Always put the machine on a flat and stable surface. Keep it in upright
position, also during transport.
-
Do not place the machine on a hotplate or directly next to a hot oven,
heater or similar source of heat.
-
Only put roasted coffee beans in the bean hopper. If ground coffee,
instant coffee, raw coffee beans or any other substance is put in the
coffee bean hopper, it may cause damage to the machine.
-
Let the machine cool down before inserting or removing any parts. The
heating surfaces may retain residual heat after use.
-
Never fill the water tank with warm, hot or sparkling water, as this may
cause damage to the water tank and the machine.
-
Never use souring pads, abrasive cleaning agents or aggressive liquids
such as petrol or acetone to clean the machine. Simply use a soft cloth
dampened with water.
-
Descale your machine regularly. The machine indicates when descaling is
needed. Not doing this will make your appliance stop working properly. In
this case repair is not covered under your guarantee.
-
Do not keep the machine at temperatures below 0°C.Water left in the
heating system may freeze and cause damage.
-
Do not leave water in the water tank when the machine is not used over
a long period of time. The water can be contaminated. Use fresh water
every time you use the machine.
Electromagnetic fields (EMF)
This Philips appliance complies with all applicable standards and
regulations regarding exposure to electromagnetic fields.
Machine overview
1 User interface
2 ESPRESSO button
3 ESPRESSO LUNGO button
4 AROMA STRENGTH button
Page 7

ESPRESSO
AROMA STRENGTH
STEAM
English
5 Standby button
6 MENU button
7 HOT WATER button
8 STEAM button
9 Classic milk frother
10 Adjustable coffee dispensing spout
11 Lid of the water tank
12 Lid of the bean hopper
13 Lid of the pre-ground coffee compartment
14 Main switch
15 Socket for cord
16 Service door
17 Drip tray
18 Drip tray release button
19 Drip tray full indicator
20 Grinder adjustment knob
21 Water tank
22 Brew group
23 Inside of service door with cleaning instructions
24 Coffee exit duct
25 Coffee residues drawer
26 Coffee grounds container
27 Drip tray cover
28 Cord
29 Cleaning brush
30 Grease
31 Water hardness tester
32 Multifunctional tool (measuring scoop, grinder adjustment key and coffee
duct cleaning tool)
33 AquaClean filter
7
The user interface
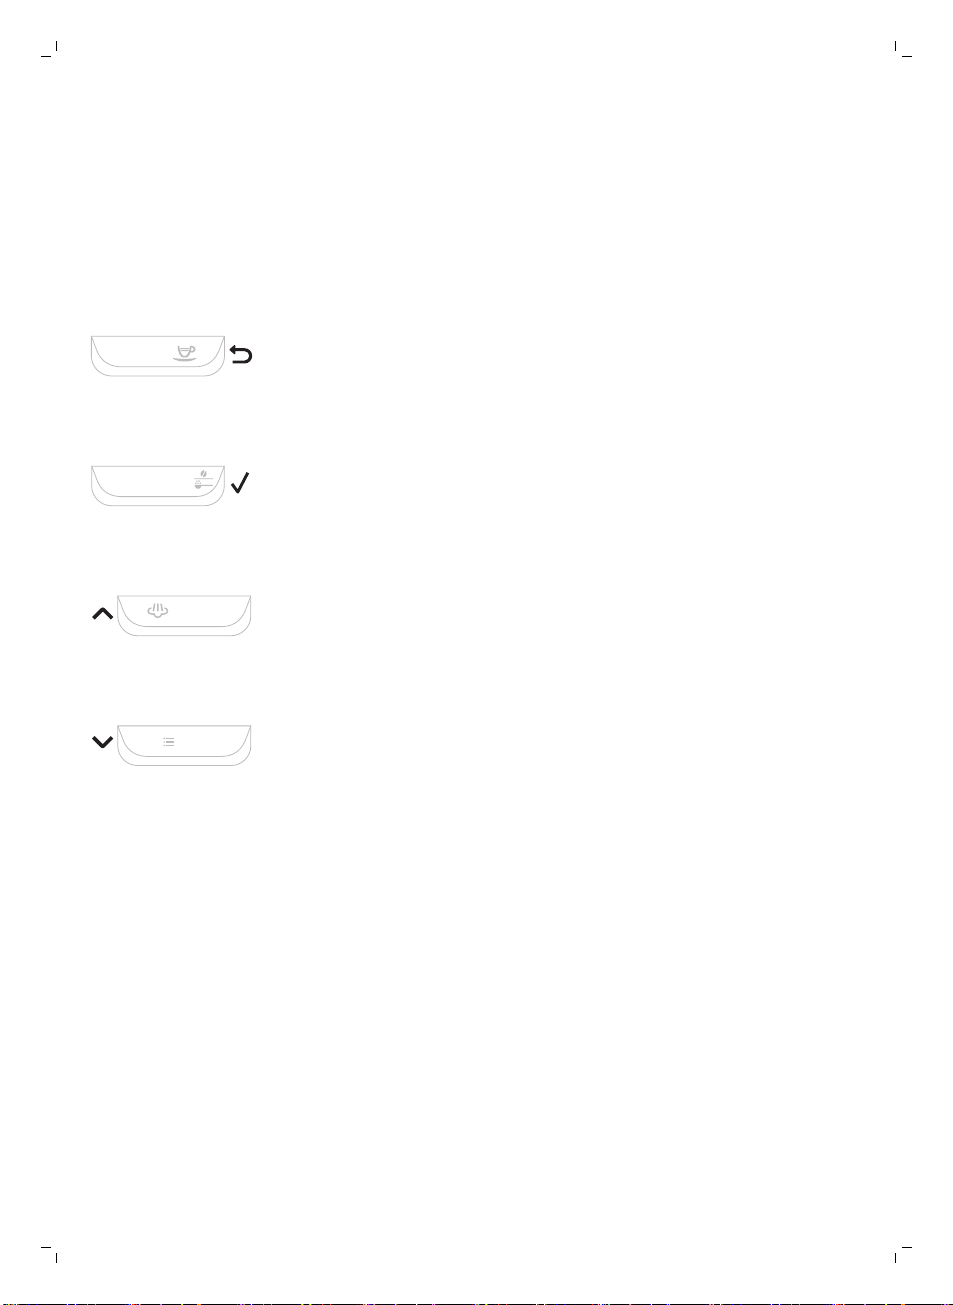
Use these buttons to navigate through the menus:
ESPRESSO button = ESC button: press this button to return to the main
menu.
AROMA STRENGTH button = OK button: press this button to select, confirm
or stop a function.
STEAM button = UP button: press this button to scroll up through the
display menu.
Page 8

MENU
15 cm
15 cm
15 cm
15 cm
15 cm
15 cm
15 cm
15 cm
M
AX
CALC
CLEAN
MAX
8
English
MENU button = DOWN button: press this button to scroll down through the
display menu.
First installation
This machine has been tested with coffee. Although it has been carefully
cleaned, there may be some coffee residues left. We guarantee, however,
that the machine is absolutely new. Like with most full-automatic machines,
you first need to brew some coffees to enable the machine to complete its
self-adjustment and get the best tasting coffee.
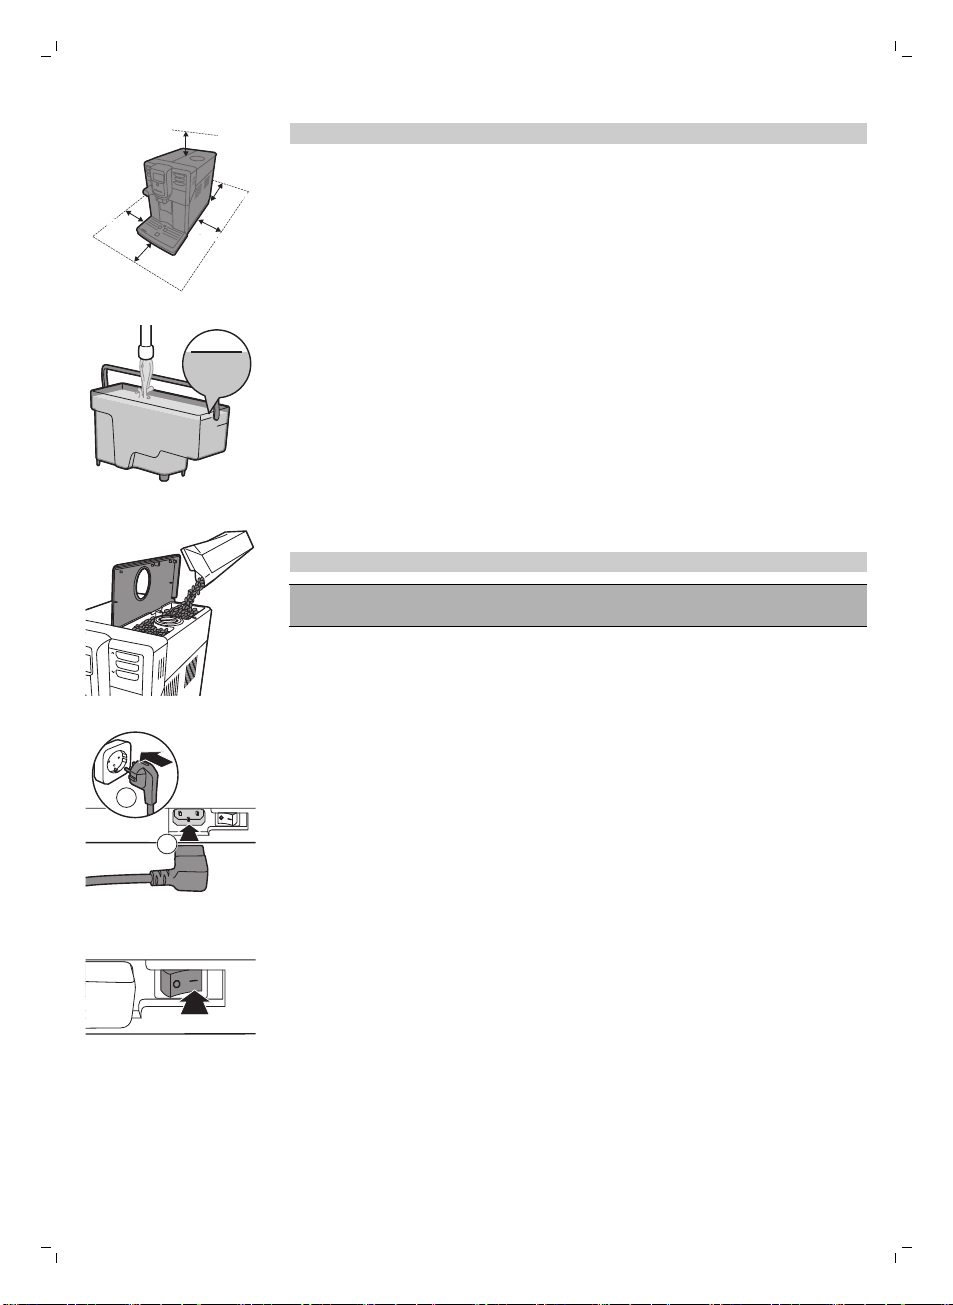
1 Remove all packaging material from the machine.
2 Place the machine on a table or counter away from the faucet, the sink
and heat sources.
Note: Leave at least 15 cm of free space above, behind and on both sides
of the machine.
3 Fill the water tank with fresh water to the MAX level indication.
4 Open the lid of the bean hopper. Fill the bean hopper with coffee beans
and close the lid.
Note:Do not overfill the bean hopper to avoid damage to the grinder.
Caution: Only use espresso beans. Never use ground coffee, unroasted
coffee beans or caramelized coffee beans, as this may cause damage to
the machine.
Page 9

2
1
STRENGTH
English
5 Insert the power plug into a wall outlet (1) and insert the small plug into
the socket located on the back of the machine (2).
6 Set the main switch to the ON position to turn on the machine.
The standby button flashes.
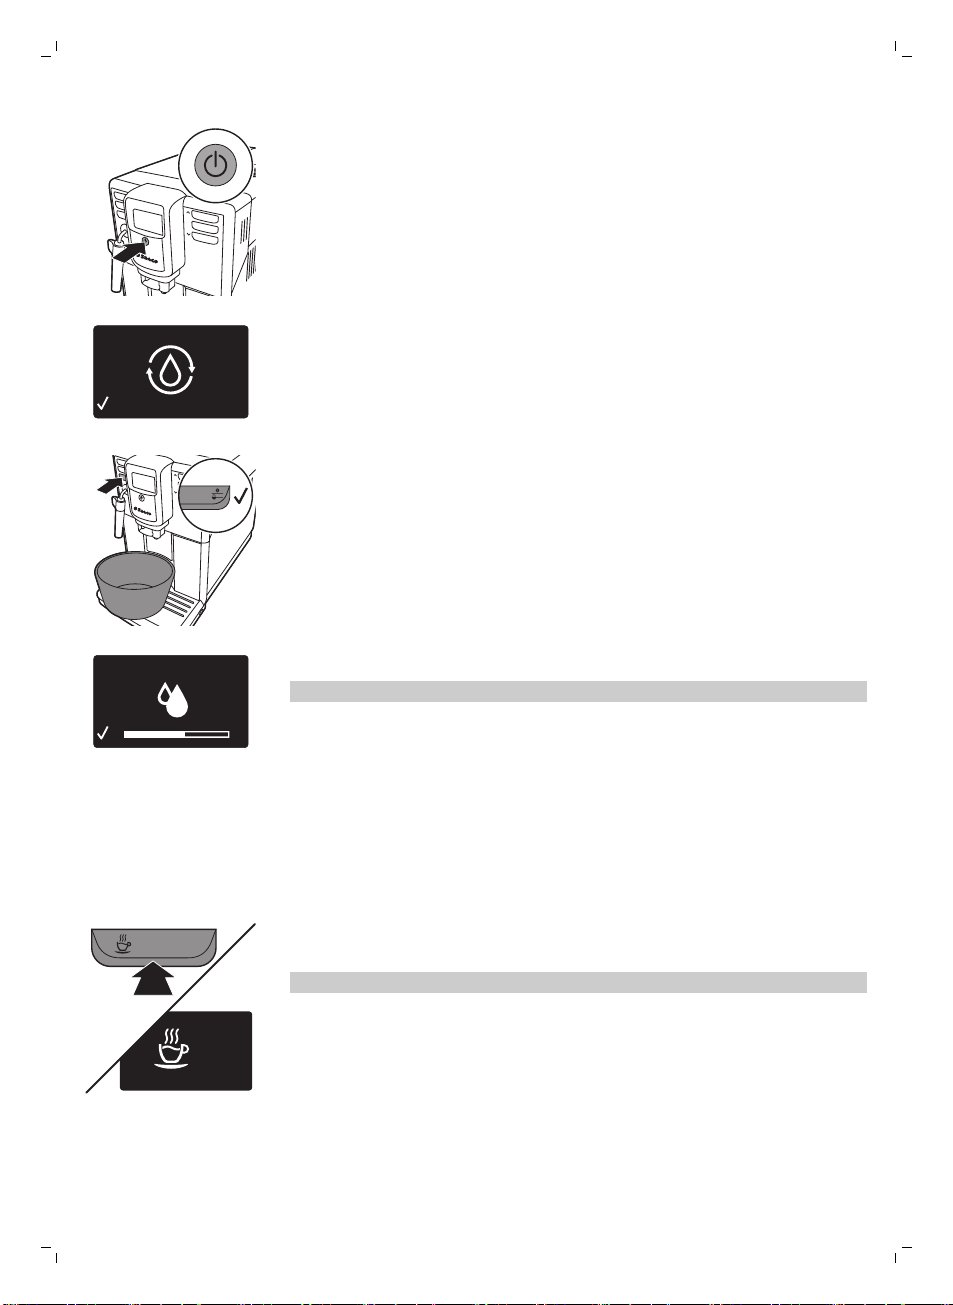
7 Press the standby button to turn on the machine.
9
-
The display shows the circuit priming icon to indicate that you have to
prime the circuit.
8 Place a container under the classic milk frother. Press the OK button to
start the water circuit priming cycle.
-
The machine starts dispensing hot water.
-
The display shows the priming icon. The progress bar shows the
progress of the priming cycle.
9 The machine heats up and the display shows the temperature icon.
10 Empty the container and place it under the coffee dispensing spout.
11 The machine starts rinsing water through the coffee dispensing spout.
The display shows the rinsing icon and a progress bar.
Note: Do not interrupt the rinsing cycle.
The machine is now ready for use.
Page 10

HOT WATER
HOT
WATER
AROMA STRENGTH
GROUND COFFEE
10
English
Manual rinsing cycle
During the manual rinsing cycle, fresh water flows through the water and
coffee brewing circuit. This takes a few minutes.
Hot water circuit rinsing
1 Place a container under the classic milk frother.
2 Press the HOT WATER button.
-
Note: To interrupt the rinsing cycle, press the OK button.
3 When the machine has dispensed 2 cups of hot water (0.5 l), press the
OK button to stop the hot water dispensing. Repeat steps 1 to 3 twice.
Coffee brewing circuit rinsing
1 Place a container under the coffee dispensing spout.
2 Press the AROMA STRENGTH button and select the pre-ground coffee
brewing function.
Note: Do not add pre-ground coffee in the pre-ground coffee
compartment.
3 Press the ESPRESSO LUNGO button.
-
4 Wait until the machine stops dispensing water and empty the container.
5 Repeat steps 1 to 4 twice.
6 When the machine has returned to the main menu, empty the container.
The machine is ready for use.
The machine starts dispensing hot water.
The machine starts dispensing water from the coffee dispensing
spout.
Intenza+ water filter
We advise you to install the Intenza+ water filter to reduce limescale
deposits in your coffee machine and to provide filtered water for preserving
the aroma and flavor of each cup of coffee.
Installing the Intenza+ water filter
Note: Always confirm activation of the Intenza+ water filter in the machine
menu as described below. By activating the Intenza+ water filter in the
machine menu, the machine indicates when you need to replace the filter.
1 Remove the small white filter from the water tank and store it in a dry
place.
Note: Please keep the small white filter for future use. You will need it for
the descaling process.
Page 11

ON
OFF
FILTER
FIL
TER
ON
OFF
RESET
FILTER
English
2 Remove the filter from its packaging and immerse it in cold water with
the opening pointing upwards. Press the sides of the filter gently to let
out the air bubbles.
3 Turn the knob of the filter to the setting that corresponds to the water
hardness of the area you live in.
a Very soft water/soft water
b Hard water (default)
c Very hard water
Note: You can test the water hardness with a water hardness test strip.
4 Place the filter in the empty water tank. Press it down until it cannot
move any further.
5 Fill the water tank with fresh water up to the MAX indication and slide it
into the machine.
6 Press the MENU button and scroll to INTENZA+ FILTER. Press the OK
button to confirm.
11
7 Select ON on the display, press the OK button to confirm activation.
8 Dispense 2 cups of hot water (0.5l) to complete the activation. Discard
this water.
Replacing the Intenza+ water filter
Note: Replace the Intenza+ water filter as soon as the filter icon appears on
the display.
1 Take out the water filter and replace it by a new Intenza+ water filter.
Follow the instructions (see 'Intenza+ water filter') on how to prepare the
water filter for use.
2 Press the MENU button and scroll to INTENZA+ FILTER. Press the OK
button to confirm.
3 Select RESET on the display, press the OK button to confirm reactivation.
4 Dispense 2 cups of hot water (0.5 l) to complete the activation of the new
filter. Discard this water.
Page 12

1
2
3
4
12
English
Measuring the water hardness
To be able to adjust the machine settings to the water in your region, please
measure the water hardness with the water hardness strip supplied.
1 Immerse the water hardness test strip (supplied with the machine) in tap
water for 1 second.
2 Remove the water hardness strip and and wait for 1 minute.
3 Check how many squares have changed into the red colour and check
the water hardness in below table.
numbers of red squares
1 1 very soft water
2 2 soft water
3 3 hard water
4 4 very hard water
value to be set water hardness
Setting the water hardness
Setting the water hardness
1 To set the water hardness, press the MENU button, select menu and
scroll to select WATER HARDNESS.
2 Press the OK button and select the water hardness in your area.
3 Press the OK button to confirm.
4 Press the ESC button to return to the main menu.
Page 13

Beverage types and lengths
English
13
Beverage name
Espresso Coffee with thick crema served in
Espresso Lungo A longer espresso with thick
Hot Water Button on control panel
Description How to select
Button on control panel
a small cup
Button on control panel
crema served in a medium-sized
cup
Beverage name
Espresso 40 ml 20 - 230 ml
Espresso Lungo 120 ml 20 - 230 ml
Standard length Length range
Brewing coffee
Adjusting the coffee dispensing spout
The machine can be used to dispense different coffee types in cups or
glasses of different sizes. To adjust the height of the coffee dispensing spout
to the size of the cup or glass, slide the spout up or down.
Brewing coffee with beans
Brewing 1 cup of coffee
1 Place a cup under the coffee dispensing spout.
2 Press the ESPRESSO or ESPRESSO LUNGO button to brew the selected
coffee.
-
Coffee starts pouring from the coffee dispensing spout.
Note: If you want to stop the brewing process before the machine has
finished dispensing the preset coffee volume, press the OK button.
Brewing 2 cups of coffee
1 Place two cups under the coffee dispensing spout.
2 You can brew two cups of espresso or espresso lungo simultaneously.
Press the button of the desired beverage twice. The machine
automatically carries out two grinding cycles in sequence.
Page 14

14
English
Frothing milk
Brewing coffee with pre-ground coffee
When you brew coffee with pre-ground coffee, use the measuring scoop in
the multifunctional tool supplied to put the correct dose in the pre-ground
coffee compartment. If you add more pre-ground coffee, the excess coffee
will end up in the coffee grounds drawer.
1 Open the lid of the pre-ground coffee compartment.
2 Pour one measuring scoop of pre-ground coffee into the compartment.
Caution: Do not put any other substance than pre-ground coffee in the
pre-ground coffee compartment, as this may damage the machine.
3 Close the lid of the pre-ground coffee compartment.
4 Place a cup under the coffee dispensing spout.
5 Press the AROMA STRENGTH button and select pre-ground coffee
-
The machine automatically starts brewing the selected beverage.
Note: You can only brew one coffee beverage at a time with pre-ground
coffee.
Warning: Danger of scalding! Dispensing may be preceded by
small jets of hot water. Use the appropriate protective handle
only.
Note: Use cold milk (at a temperature of approximately 5°C/41°F) with a
protein content of at least 3% to ensure an optimal frothing result. You can
use whole milk or semi-skimmed milk. It is also possible to use skimmed
milk, soy milk and lactose-free milk.
Note: We advise you to rinse the water circuit before use. Press the STEAM
button to dispense steam for a few seconds.
1 Fill 1/3 of a jug with cold milk.
2 Immerse the classic milk frother in milk. Press the STEAM button.
Page 15

3 Froth the milk by gently swirling the jug and moving it up and down.
ESPRESSO
4 Press the OK button to stop frothing.
Hot water
Warning: Danger of scalding! Dispensing may be preceded by
small jets of hot water. Use the appropriate protective handle
only.
1 Place a jug under the classic milk frother.
2 Press the HOT WATER button. Hot water dispensing starts automatically.
3 Press the OK button to stop hot water dispensing.
Adjusting quantity and taste
Saeco Adapting System
Coffee is a natural product and its characteristics may vary according to
origin, blend and roasting. The machine is equipped with a self-adjustment
system that allows it to get the best taste out of your favorite coffee beans.
It regulates itself after brewing some coffees.
English
15
Adjusting coffee length
You can adjust the quantity of beverage brewed according to your taste and
to the size of the cups.
1 To adjust the length of espresso, press and hold the ESPRESSO button
until the display shows the MEMO icon.
-
The machine enters the programming phase and starts to brew the
selected beverage.
Page 16

1
2
3
4
5
2
1
16
English
2 Press the OK button when the cup contains the desired amount of
espresso.
-
The tick on the display shows that the button is programmed: every
time it is pressed, the machine will brew espresso in the amount set.To
set the length of espresso lungo, follow the same procedure: press
and hold the button of the beverage and press the OK button when
the desired amount is in the cup.
Adjusting coffee strength
To change the coffee strength, press the AROMA STRENGTH button. Each
time you press the AROMA STRENGTH button, the aroma strength changes
by one degree. The display shows the chosen strength, which will only be
saved when brewing a coffee.
1 Very mild
2 Mild
3 Regular
4 Strong
5 Very strong
Note: The machine will automatically dispense the correct quantity of coffee
for each coffee strength.
GROUND COFFEE is the last option in the coffee strength menu. Select this
option to brew coffee with ground coffee. Use the measuring scoop
integrated in the multifunctional tool supplied to dose the correct quantity
of ground coffee.
Note: The machine returns to the main screen and saves the chosen aroma
strength when you brew a coffee.
Adjusting the grinder settings
You can adjust the grinder settings with the grinder adjustment key
integrated into the handle of the multifunctional tool. At each setting
selected, the ceramic coffee grinder guarantees a perfectly even grind for
every cup of coffee you brew. It preserves the full coffee aroma and delivers
the perfect taste to every cup.
1 Open the lid of the bean hopper.
2 Place the grinder adjustment key on the grinder adjustment knob (1).
Push and turn to the left or to the right (2) one notch at a time.
-
There are 5 different grinder settings you can choose from. The smaller
the dot the stronger the coffee.
Caution: Do not turn the grinder adjustment knob more than one notch at
a time to prevent damage to the grinder.
Note: The difference becomes noticeable after you have brewed 2-3 cups of
coffee at the new setting.
Page 17

1
2
1
English
Maintenance and care
Maintenance of your machine is important to prolong the life of your
machine and to ensure optimum quality and taste of your coffee.
Cleaning the drip tray and the coffee grounds container
Perform the following actions while the machine is turned on:
-
When the display shows the 'empty coffee grounds container' icon,
empty the coffee grounds container.
-
The drip tray is full when the drip tray full indicator pops up through the
drip tray. Empty and clean the drip tray every day.
1 Turn the classic milk frother to the left.
2 Press the release buttons on both sides of the drip tray (1) and pull the
drip tray out of the machine (2).
3 Remove and empty the coffee grounds container.
4 Empty and rinse the drip tray under the tap.
5 Place the coffee grounds container back in the drip tray.
6 Slide the drip tray back into the machine until it locks into position with a
click.
17
Note: Make sure that the machine is still switched on when you remove the
drip tray. If you switch off the machine before you remove the drip tray, the
'empty coffee grounds container' icon will be visible on the display when
you switch on the machine again, even though the drip tray is empty.
Cleaning the water tank
1 Remove the water tank from the machine and rinse it with fresh water
periodically.
2 Fill the water tank with fresh water up to the MAX level indication and
place it back in the machine.
Cleaning the bean hopper
Clean the bean hopper with a dry cloth once a month.
Cleaning the brew group and the coffee exit duct
Weekly cleaning of the brew group
1 Turn off the machine and unplug it.
2 Remove the drip tray with the coffee grounds container.
3 Empty the drip tray and rinse it under running water.
Page 18
2
1
18
English
4 Empty the coffee grounds container and rinse it under lukewarm running
water.
5 Open the service door.
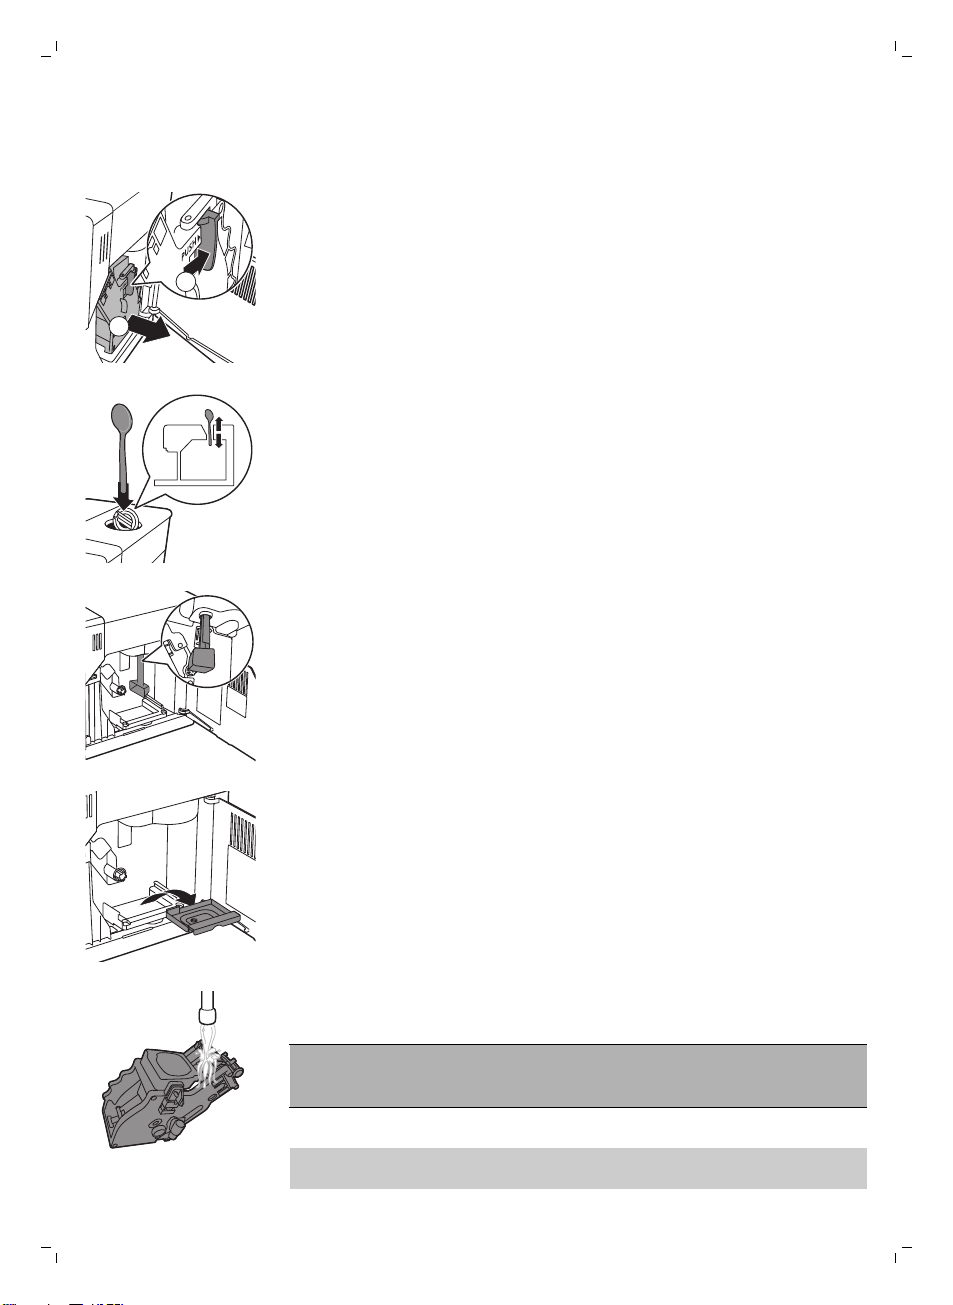
6 Press the PUSH button (1) and pull at the grip of the brew group to
remove it from the machine (2).
7 Clean the top part of the coffee exit duct thoroughly with a spoon
handle. Insert it as indicated in the figure.
8 Clean the bottom part of the coffee exit duct thoroughly with a spoon
handle or with the multifunctional tool provided with the machine. Insert
it as indicated in the figure.
9 Remove the coffee residues container, empty it and rinse it under
lukewarm running water. Let it dry and then reinsert it.
10 Rinse the brew group thoroughly under lukewarm running water. Clean
the upper filter carefully.
Caution: Do not clean the brew group in the dishwasher and do not use
dishwashing liquid or a cleaning agent to clean it. This may cause the brew
group to malfunction and may have a negative effect on the coffee taste.
11 Let the brew group air-dry thoroughly.
Note: Do not dry the brew group with a cloth to prevent fibers from
collecting inside the brew group.
Page 19
English
12 Clean the inside of the machine with a soft damp cloth.
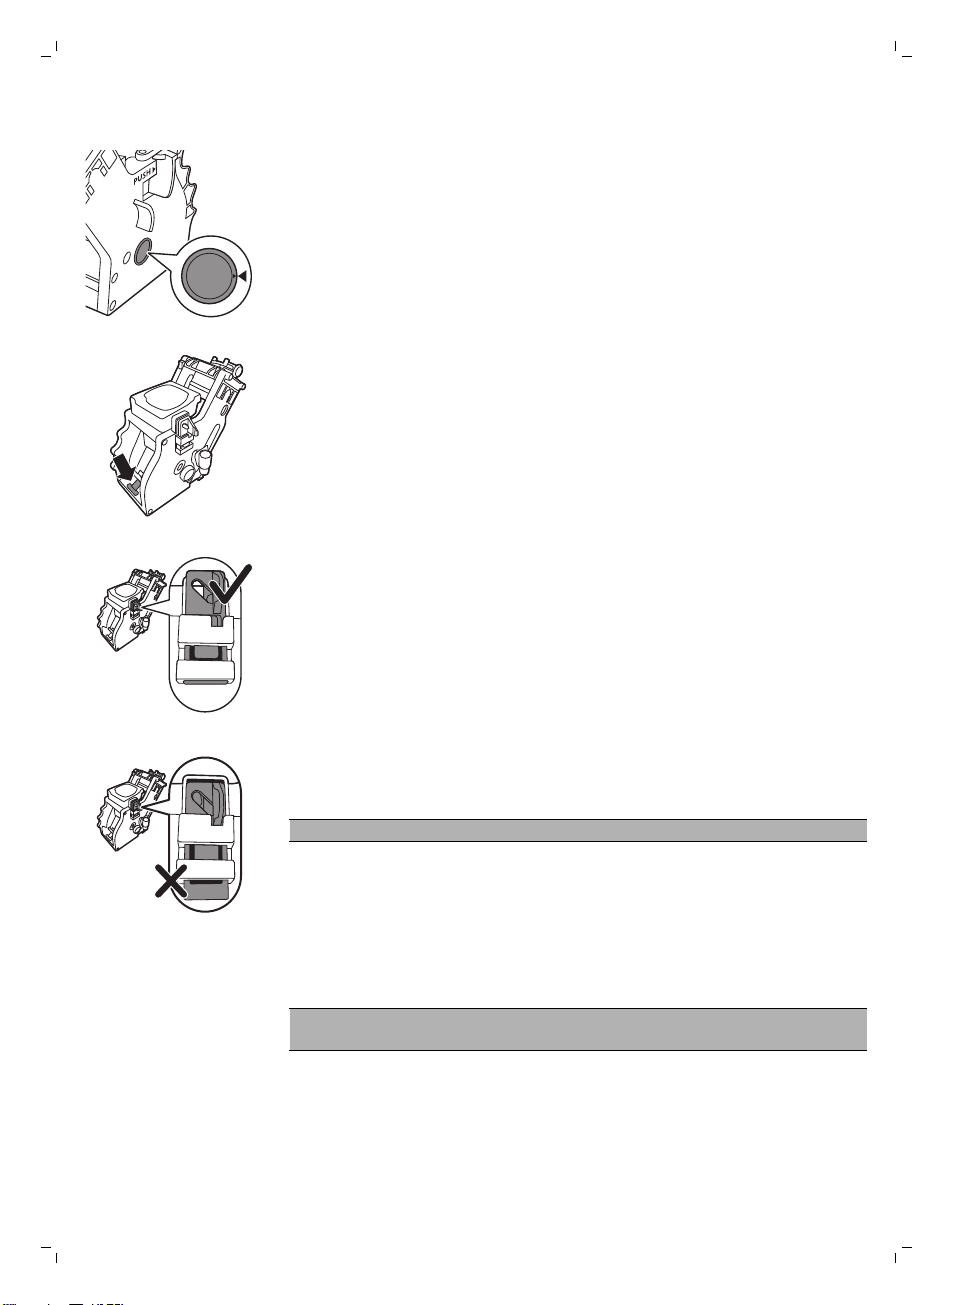
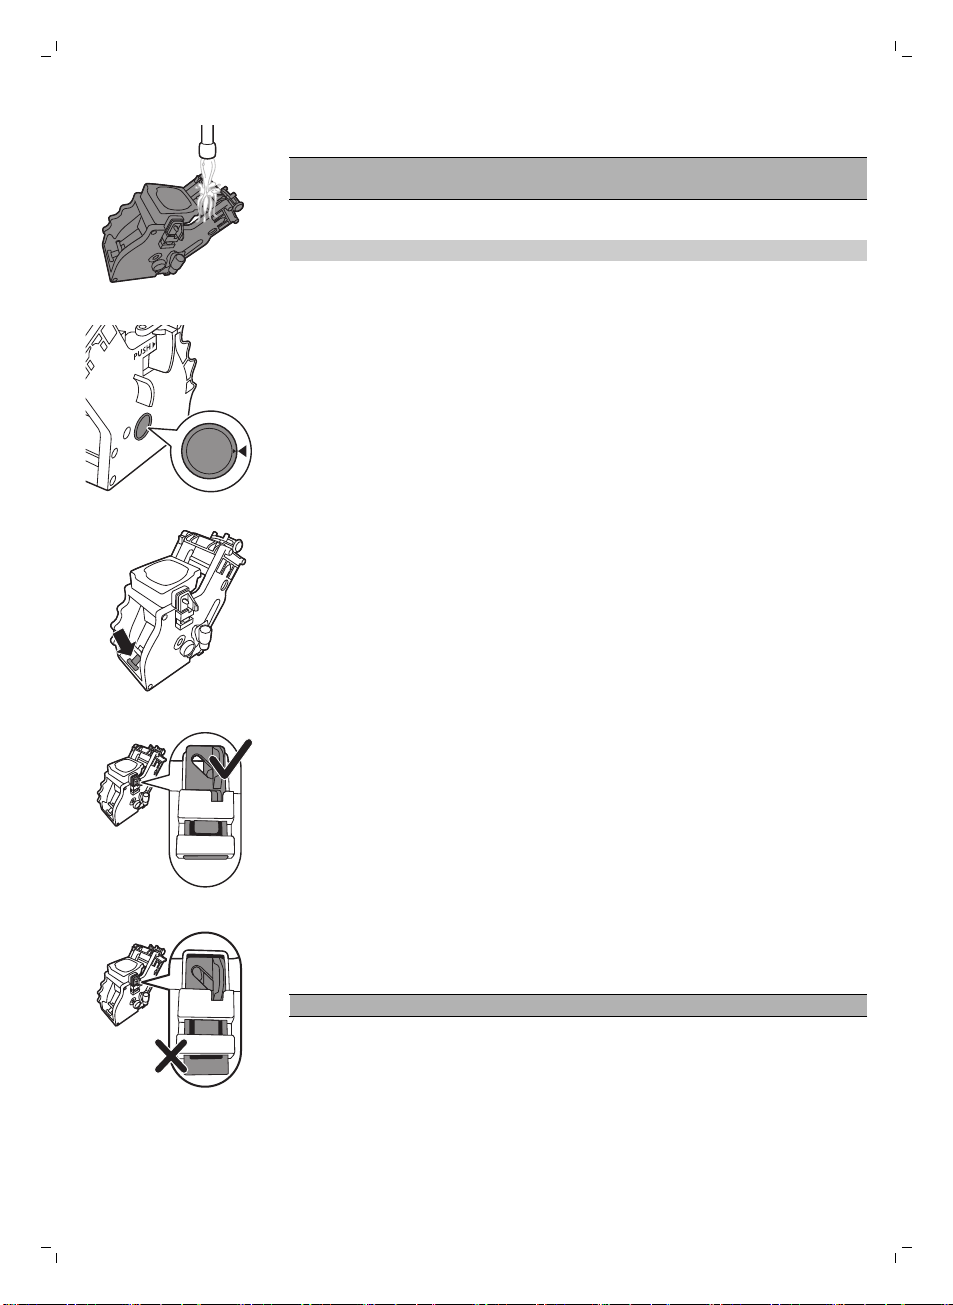
13 Before you slide the brew group back into the machine, make sure the
two reference signs on the side match. If they do not match, perform the
following step:
-
Make sure the lever is in contact with the base of the brew group.
14 Make sure that the locking hook of the brew group is in the correct
position.
-
To position the hook correctly, push it upwards until it is in uppermost
position.
19
-
The hook is not correctly positioned if it is still in bottommost position.
15 Slide the brew group back into the machine along the guiding rails on the
sides until it locks into position with a click.
Caution: Do not press the PUSH button.
16 Close the service door.
Monthly cleaning of the brew group
-
Perform this cleaning cycle after the machine has brewed 500 cups of
coffee or once a month.
-
Use a degreasing tablet for this cleaning cycle.
Caution: Only use degreasing tablets for cleaning. They do not have a
descaling function.
1 Place a container under the coffee dispensing spout.
2 Press the AROMA STRENGTH button and select pre-ground coffee.
Page 20
20
English
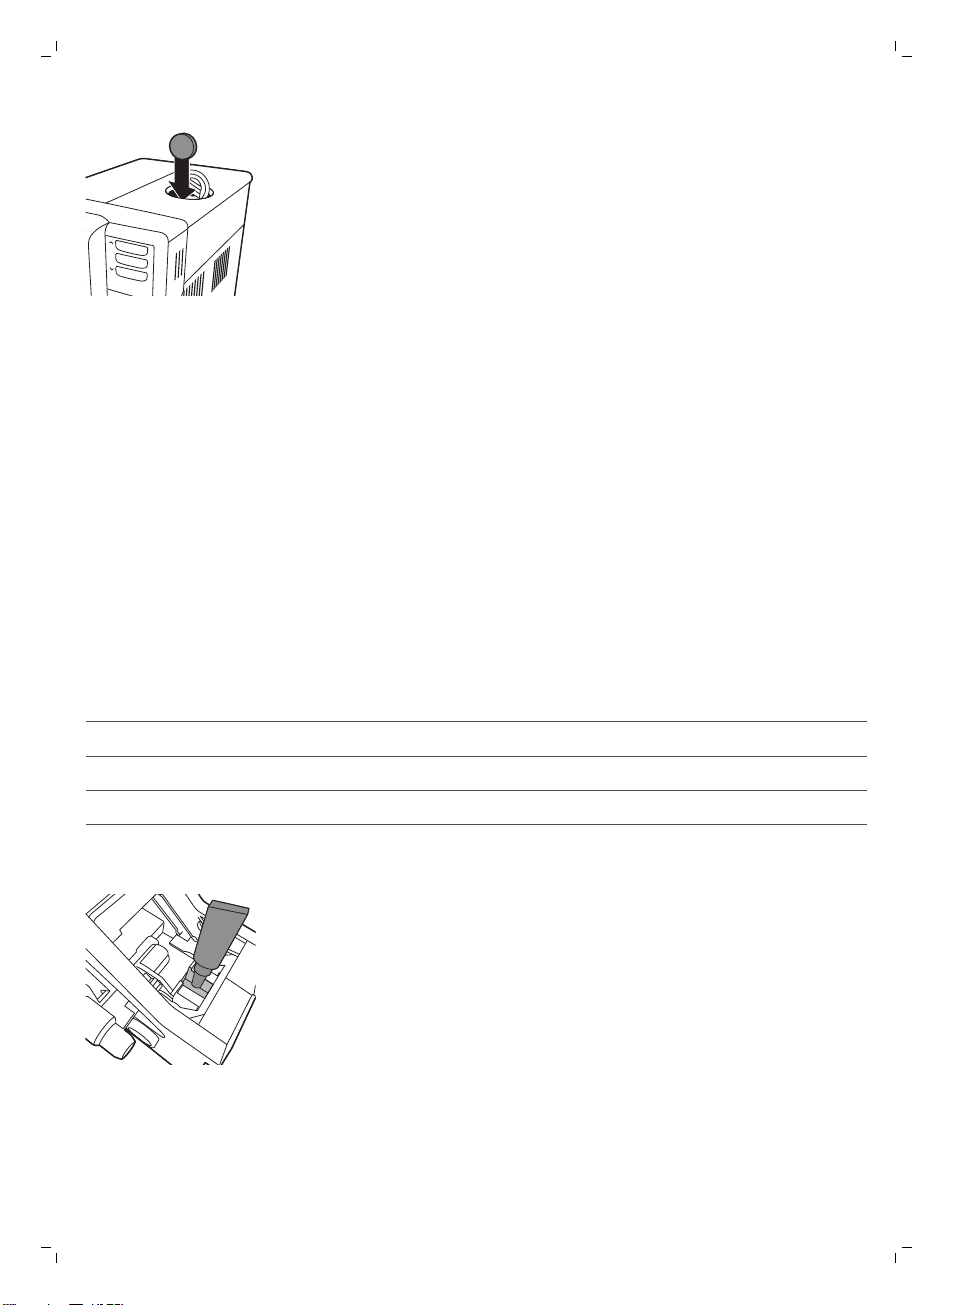
3 Put a coffee oil remover tablet in the pre-ground coffee compartment.
4 Press the ESPRESSO LUNGO button. The machine dispenses water from
the coffee dispensing spout.
5 When the progress bar has reached the middle, set the main switch on
the back of the machine to OFF.
6 Let the degreasing solution work for approximately 15 minutes.
7 Set the main switch to ON.
8 Press the standby button.
9 Wait until the machine performs an automatic rinsing cycle.
10 Perform the 'Weekly cleaning of the brew group'procedure.
11 Remove the drip tray with the coffee grounds container. Empty the drip
tray and the coffee grounds container and place them back into the
machine.
12 Press the AROMA STRENGTH button and select pre-ground coffee.
13 Press the ESPRESSO LUNGO button. The machine dispenses water from
the coffee dispensing spout.
14 Repeat steps 12 and 13 twice. Discard the dispensed water.
15 To clean the drip tray, put a degreasing tablet in the drip tray and fill the
drip tray up to two-thirds of its capacity with hot water. Let the
degreasing tablet take effect for about 30 minutes. Then empty the drip
tray and rinse it thoroughly.
Lubrication of the brew group
For optimal performance of the machine you have to lubricate the brew
group. See table below for the lubrication frequency. For support visit our
website: www.philips.com/support.
Type of usage
Low 1-5 Every 4 months
Nr of daily products Lubrication frequency
Normal 6-10 Every 2 months
Heavy >10 Monthly
1 Switch off the machine and unplug it.
2 Remove the brew group and rinse it under a lukewarm tap as described
in section 'Weekly cleaning of the brew group'.
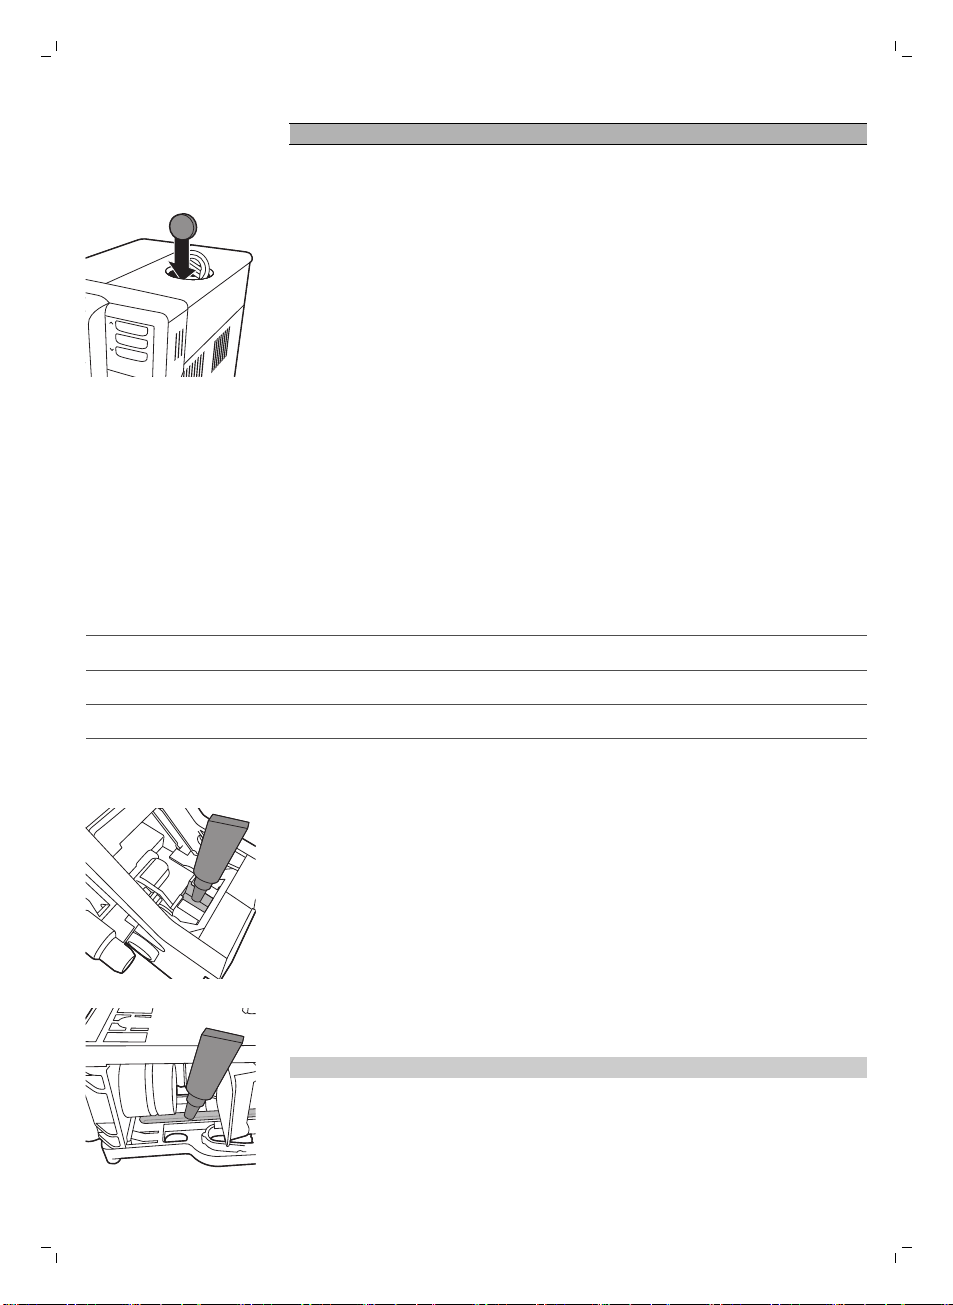
3 Apply a thin layer of grease around the shaft in the bottom of the brew
group.
Page 21
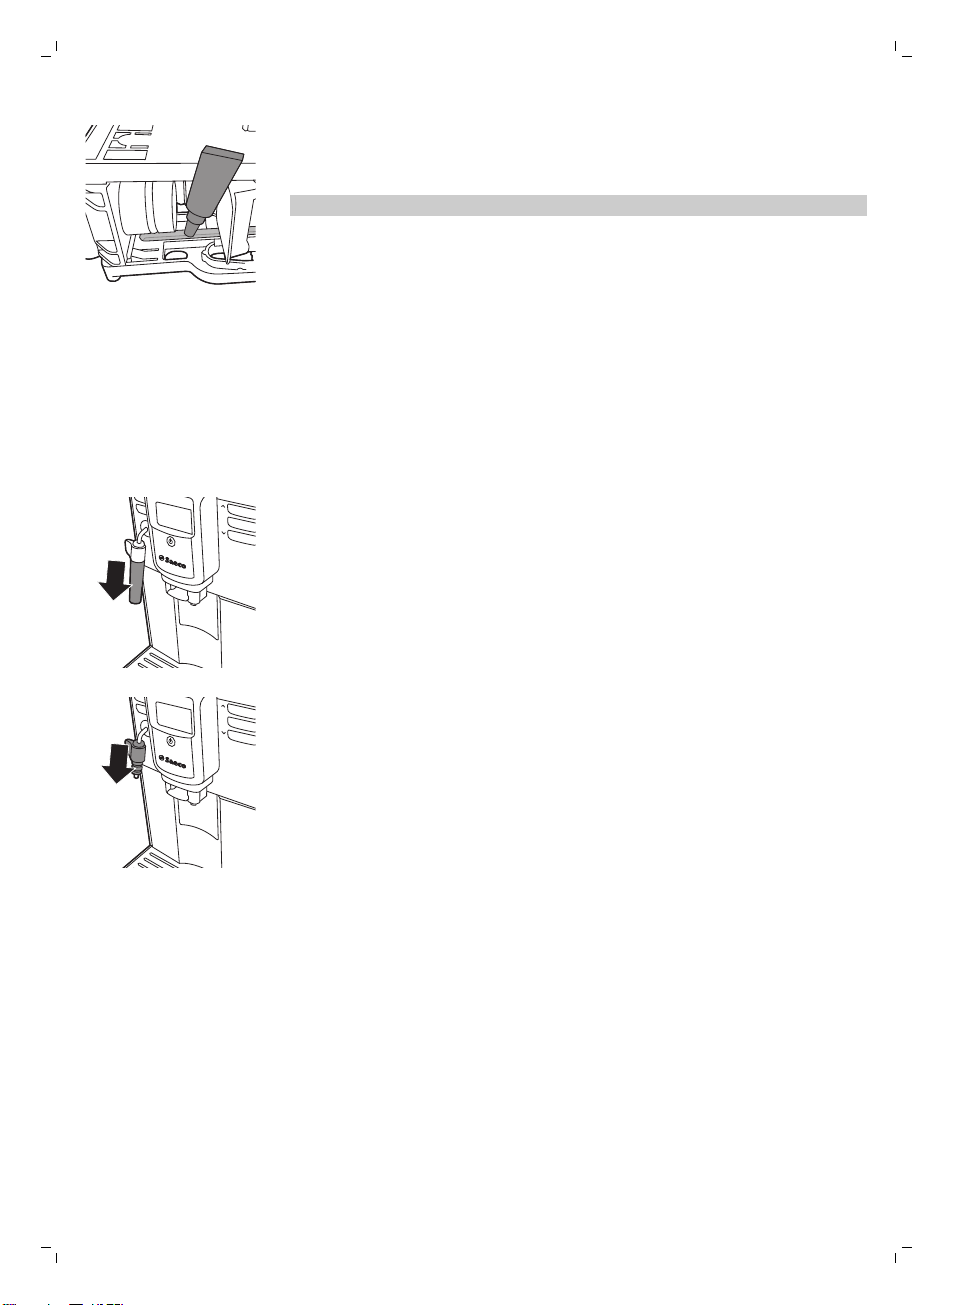
4 Apply a thin layer of grease to the rails on both sides (see figure).
5 Insert the brew group as described in section 'Weekly cleaning of the
brew group'.
You can use the grease tube multiple times.
Cleaning the classic milk frother
Daily cleaning of classic milk frother
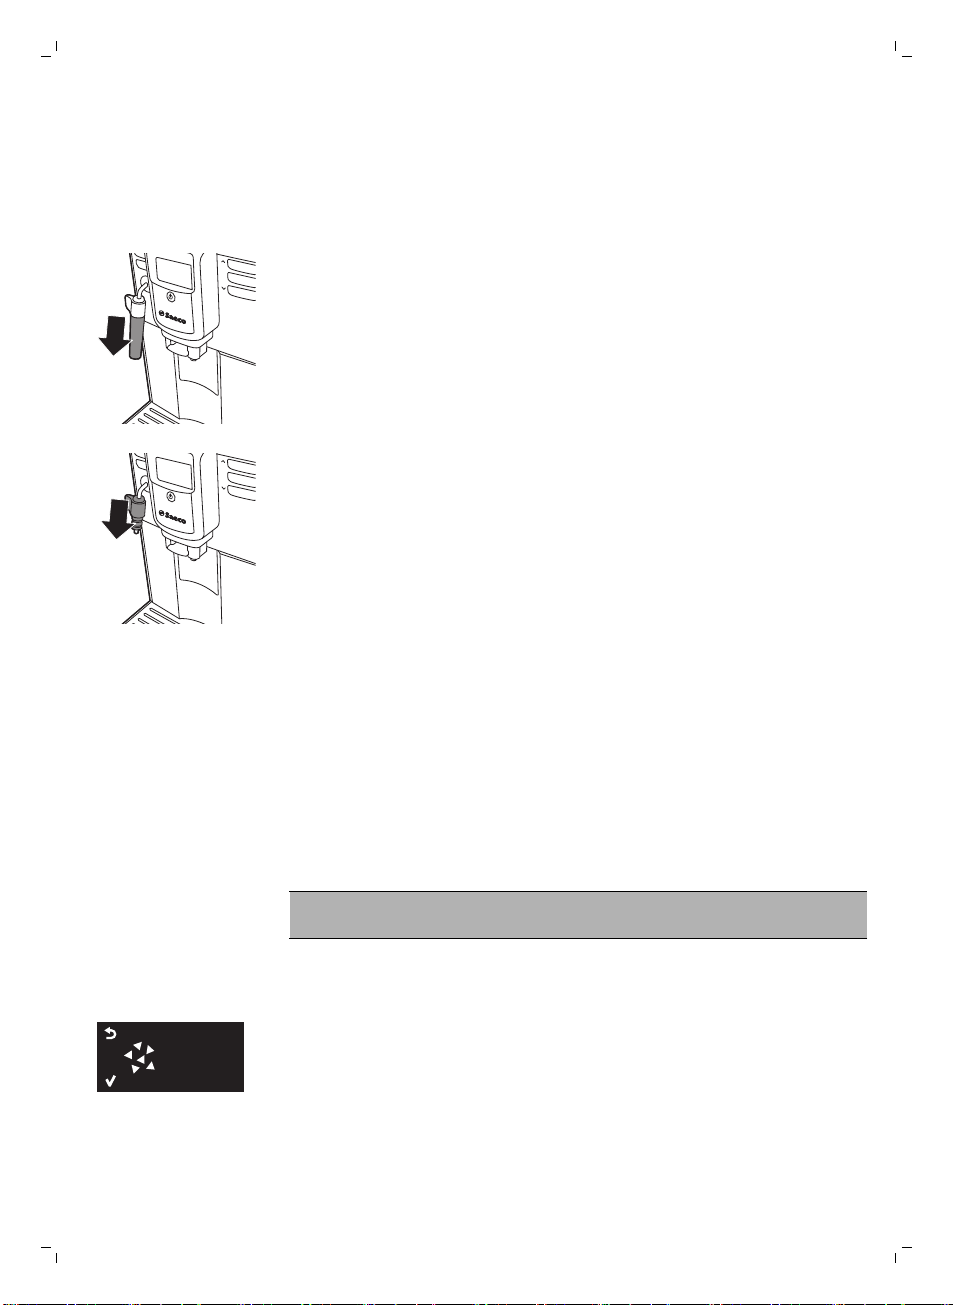
Remove the external part of the classic milk frother and rinse it with fresh
water.
Weekly cleaning of classic milk frother and steam wand
1 Remove the external part of the classic milk frother and rinse it with fresh
water.
English
21
2 Remove the upper part of the classic milk frother from the steam wand
and rinse it with fresh water.
3 Clean the steam wand with a wet cloth.
4 Reassamble all the classic milk frother parts.
Descaling procedure
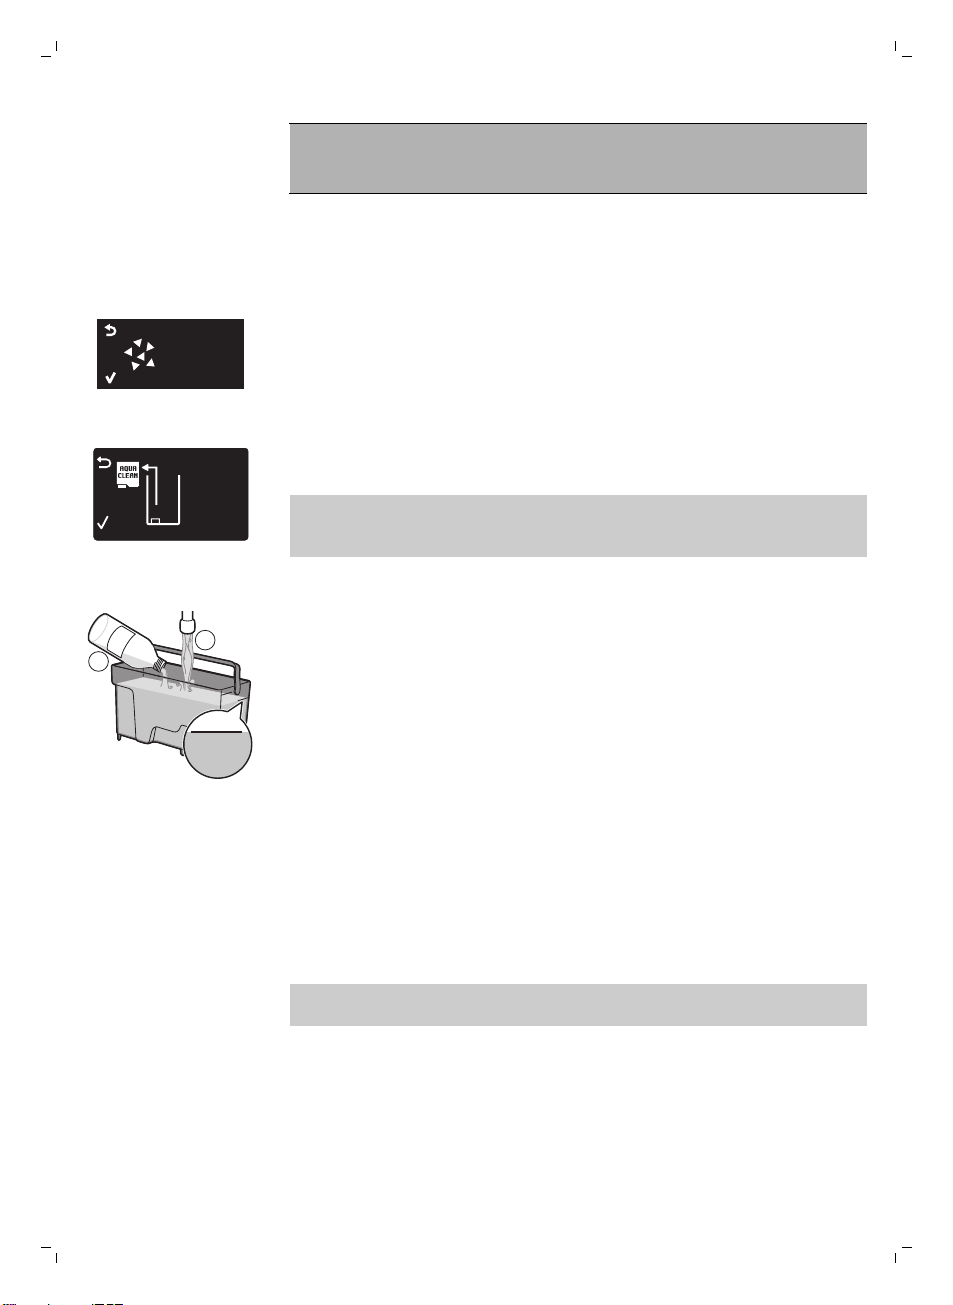
When the display shows 'START CALC CLEAN', you need to descale the
machine. If you do not descale the machine when this message appears on
the display, the machine stop working properly. In that case, repairs are not
covered by the warranty.
Only use Saeco descaling solution to descale the machine. Saeco descaling
solution is designed to ensure optimal performance of the machine. The use
of other products may damage the machine and leave residues in the water.
You can buy Saeco descaling solution in the online shop at
www.shop.philips.com/service. The descaling procedure lasts 30 minutes
and consists of a descaling cycle and a rinsing cycle. You can pause the
descaling or rinsing cycle by pressing the ESC button. To continue the
descaling or rinsing cycle, press the OK button.
Page 22
START
CALC
CLEAN
REMOVE
FILTER
M
AX
CALC
CLEAN
CALC
CLEAN
1
2
22
English
Note: Do not remove the brew group during the descaling
procedure. Warning: Do not drink the descaling solution or the
water dispensed during the descaling procedure.
1 Remove the drip tray and the coffee grounds container, empty and clean
them and put them back into place.
2 Remove the external part of the classic milk frother.
3 Place a large container (1.5 l) under the coffee dispensing spout and the
classic milk frother.
4 When the display shows 'START CALC CLEAN', press the OK button to
start the descaling procedure. Remove the hot water dispensing spout if
present.
-
The followingicon on the display reminds you to remove the Intenza+
water filter.
Note: You can press ESC to skip descaling. If you want to start the
descaling procedure later, press the MENU button, select MENU and
scroll to select DESCALING. Press OK to confirm.
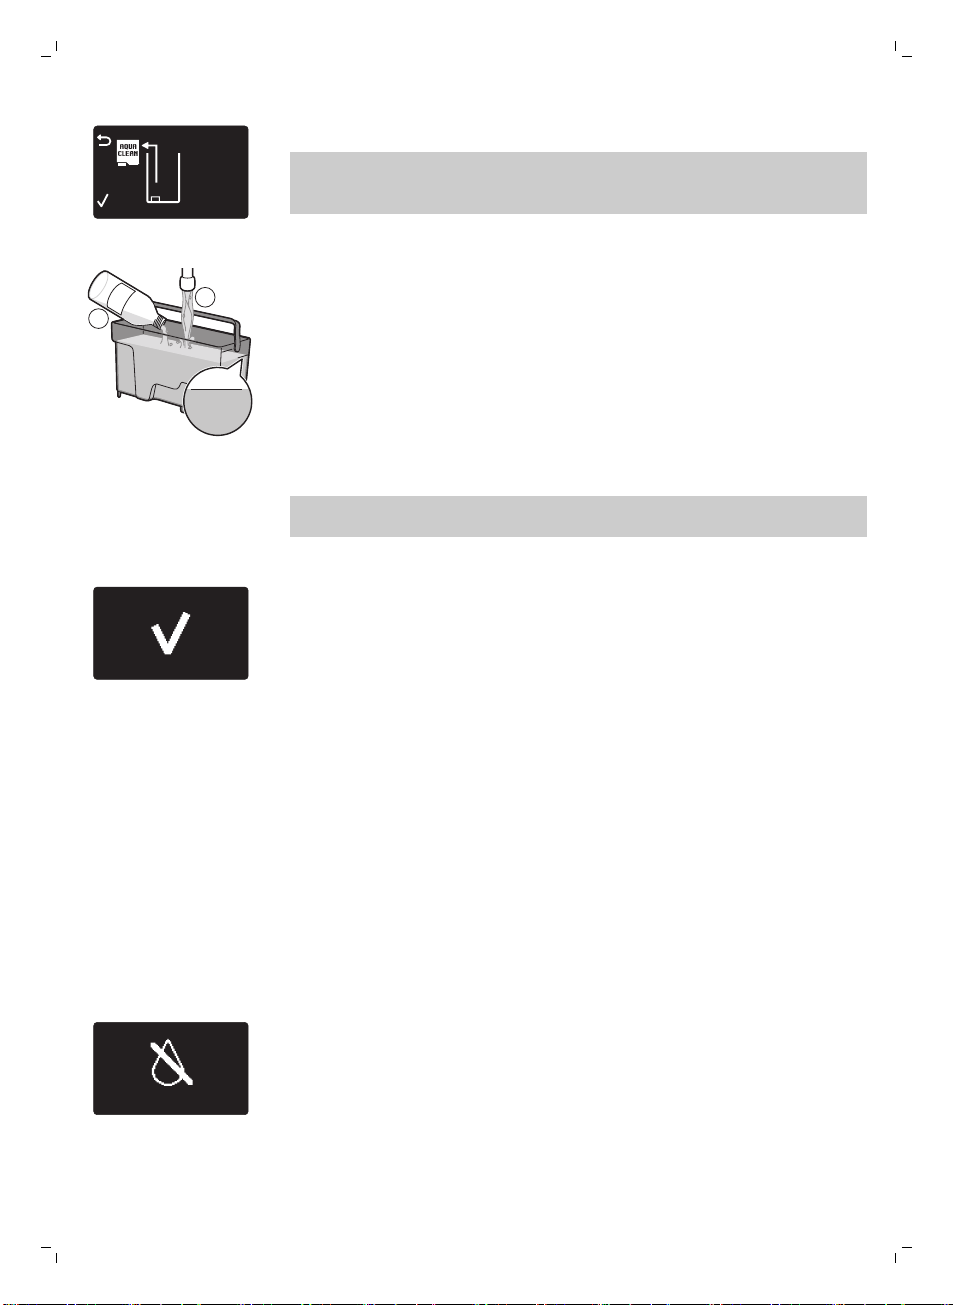
5 Remove the water tank. If present, remove the Intenza+ water filter from
the water tank and replace it with the original small white filter.
6 Pour the descaling solution in the water tank. Fill the water tank with
fresh water up to the CALC CLEAN level indication. Place the water tank
back in the machine. Press the OK button to confirm.
-
The first phase of the descaling procedure starts. The machine starts
dispensing the descaling solution at intervals.
-
The display shows the descaling icon, the phase indication and the
duration. This first phase takes 20 minutes.
7 Let the machine dispense the descaling solution until the water tank is
empty.
8 Remove the water tank and rinse it.
9 Fill the water tank with fresh water up to the CALC CLEAN level
indication. Place the water tank back in the machine and press OK.
10 Remove and empty the container and place it back under the coffee
dispensing spout. Press OK to confirm.
11 The second phase of the descaling procedure starts, which is the rinsing
cycle. This phase takes 3 minutes. The display shows the rinsing icon and
the duration of the phase.
Note: If the water tank is not filled up to the CALC CLEAN level, the
machine may require another rinsing cycle.
Page 23
English
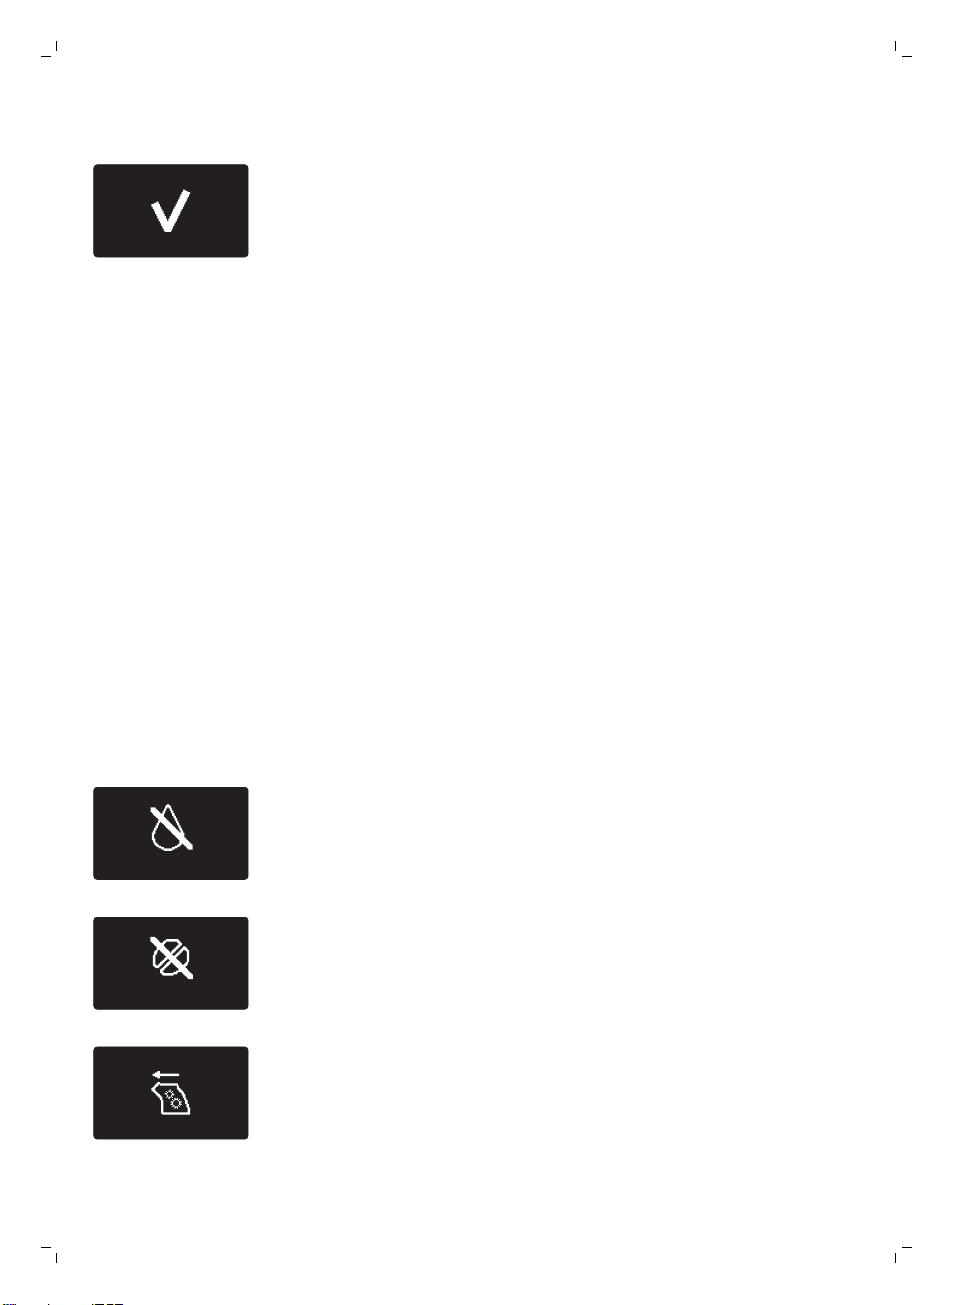
12 Wait until the machine stops dispensing water. The descaling procedure
is finished when the tick appears on the display.
13 Press the OK button to exit the descaling procedure. The machine starts
heating up and performs the automatic rinsing cycle.
14 Remove and empty the container.
15 Clean the classic milk frother after descaling.
16 Clean the brew group by performing the 'Weekly brew group cleaning'
cycle.
17 Reinstall the Intenza+ water filter.
23
What to do if the descaling procedure is interrupted
Once the descaling procedure has started, you must complete it till the very
end without switching off the machine. If the machine gets stuck during the
cycle, you can exit the descaling procedure by pressing the standby button.
If this occurs, or in case of a power failure or accidental disconnection of the
cord, do the following:
1 Turn off the machine.
2 Empty and rinse the water tank thoroughly.
3 Fill the water tank up to the CALC CLEAN level indication and turn the
machine back on.
-
The machine will heat up and perform an automatic rinsing cycle.
4 Before brewing any beverages, perform a manual rinsing cycle (see
'Manual rinsing cycle').
Note: If the descaling procedure was not completed, the machine will
require another descaling procedure as soon as possible.
Warning icons and error codes
The warning icons are displayed in red. Below you find a list of the warning
icons that may appear on the display and their meaning.
-
Fill the water tank with fresh water to the MAX level indication.
-
The bean hopper is empty. Put new coffee beans in the bean hopper.
-
The brew group is not in the machine or it is not inserted properly. Insert
the brew group.
Page 24
FIL
TER
10
xx
24
English
-
Insert the drip tray.
-
Close the service door.
-
Remove the coffee grounds container and empty it.
-
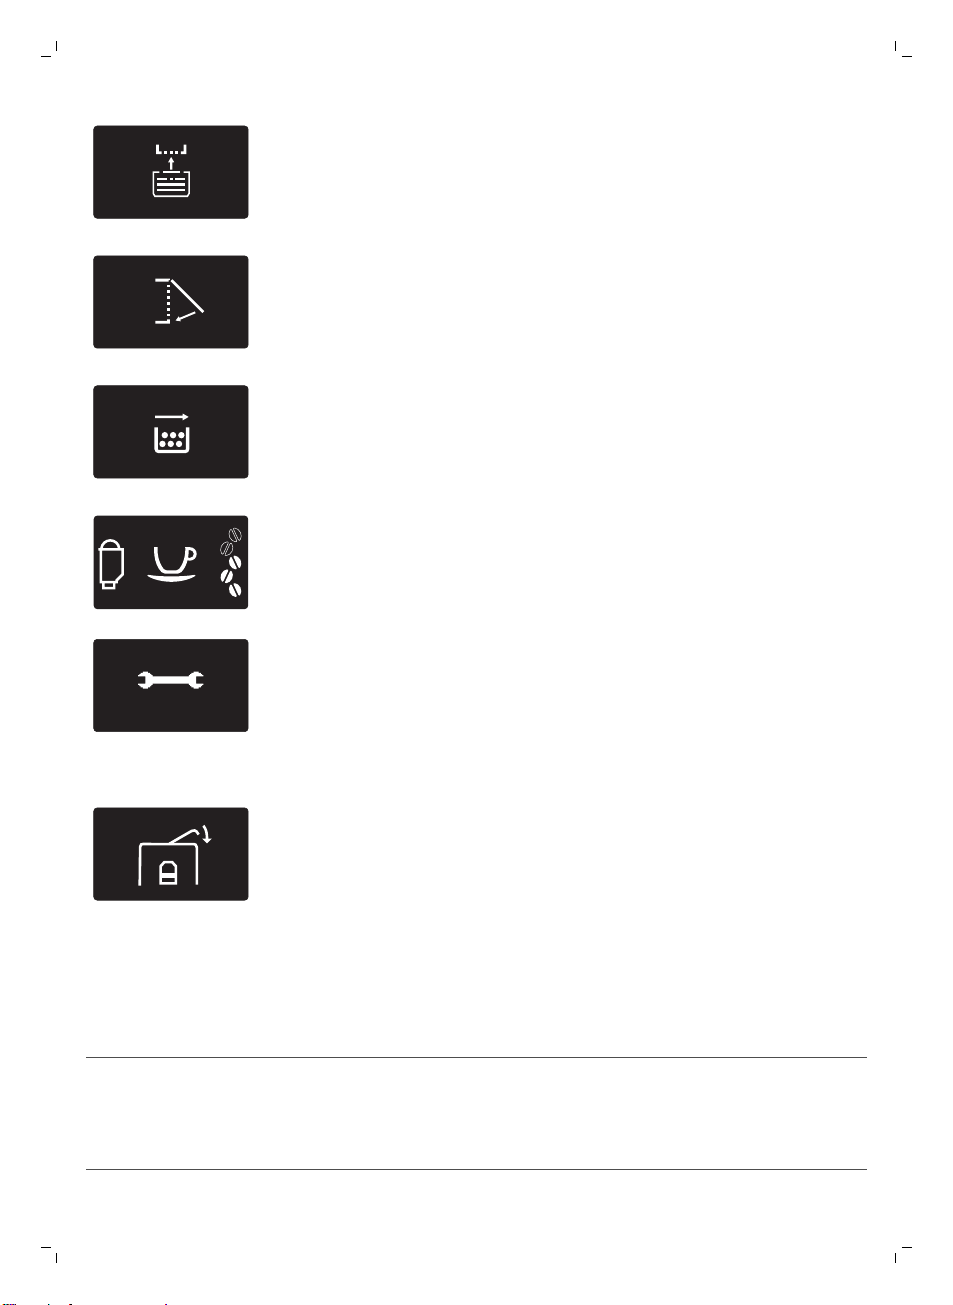
When the filter icon appears on the display, you need to replace the
Intenza+ water filter (see 'Replacing the Intenza+ water filter').
-
If the display shows an error code, check section 'Meaning of the error
codes' to see what the code on the display means and what you can do.
The machine cannot be used when this icon is on the display.
-
The lid of the bean hopper is open. Close the lid of the bean hopper.
Meaning of error codes
Error code
1 The coffee grinder is
Problem Cause Possible solution
blocked.
The coffee exit duct is
clogged.
Clean the coffee exit
duct thoroughly with
the handle of the
multifunctional tool or a
spoon handle.
Page 25
English
Error code Problem Cause Possible solution
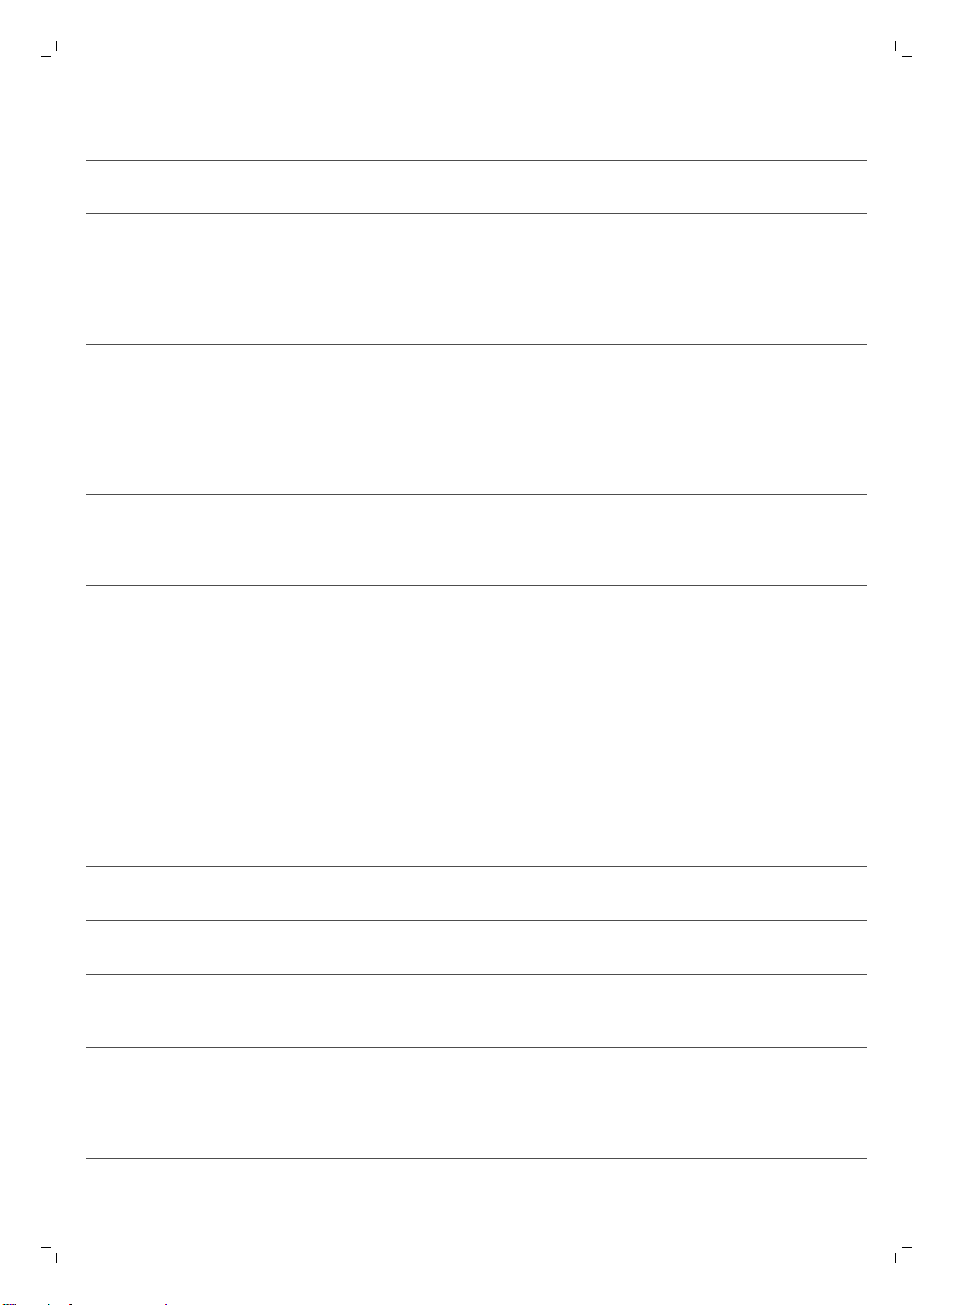
3 - 4 There is a problem with
the brew group.
The brew group is dirty. Remove the brew group
and thoroughly.
25
. The brew group is not
5 There is a water circuit
problem.
14 The machine is
overheated.
If the above solutions do not help to remove the error code icon from the
display and bring the machine back to normal working order, contact the
Philips Saeco hotline. Contact details can be found in the warranty booklet
or on www.saeco.com/support.
positioned correctly.
There is air in the water
circuit.
This can have several
causes.
Troubleshooting
This chapter summarizes the most common problems you could encounter
with the machine. If you are unable to solve the problem with the
information below, visit www.saeco.com/support for a list of frequently
asked questions or contact the Consumer Care Center in your country.
Problem
The machine does not
turn on.
Cause Solution
The machine is disconnected or the
main switch is in OFF position.
Check if the power cord is inserted
correctly.
Remove the brew group
and reinsert it. Before
you slide it back into
the machine, make sure
the two reference signs
on the side match.
Remove and place back
the water tank a couple
of times. Make sure you
insert it into the
machine properly.
Check if the water tank
compartment is clean.
Turn the machine off
and turn it back on
again after 30 minutes.
Try this 2 or 3 times.
Make sure the main switch is in ON
The machine is in DEMO
mode.
The drip tray fills up
quickly.
The standby button has been
pressed for more than 8 seconds.
This is normal. The machine uses
water to rinse the internal circuit and
brew group. Some water flows
through the internal system directly
into the drip tray.
position.
Turn the machine off and then on
again using the main switch on the
back of the machine.
Empty the drip tray when the 'drip
tray full' indicator pops up through
the drip tray cover.
Page 26
26
English
Problem Cause Solution
Place a cup under the dispensing
spout to collect rinsing water.
The 'coffee grounds
container full' icon
remains displayed.
You placed back the coffee grounds
I cannot remove the brew
group.
You have not removed the coffee
I cannot insert the brew
group.
You emptied the coffee grounds
container while the machine was
turned off.
container too fast.
The brew group is not in the correct
position.
grounds container.
The brew group is not in the correct
position.
Always empty the coffee grounds
container while the machine is ON.
If you empty the coffee grounds
container while the machine is
turned off, the coffee cycle counter
is not reset. In that case, the
'empty coffee grounds container'
icon willstay on the display even
though the container is not full.
Do not place back the coffee
grounds container until the display
prompts you to put it back
Close the service door. Turn the
machine off and back on again.
Wait for the machine ready screen
to appear and then remove the
brew group. Clean the brew group.
Remove the coffee grounds
container before you remove the
brew group
You did not put the brew group in
neutral position before placing it
back. Make sure that the lever is in
contact with the base of the brew
group and that the hook of the
brew group is in the correct
position.
Reset the machine by turning it on
The machine is still in the descaling
The coffee has too little
crema or is watery.
You are using an unsuitable coffee
procedure.
The grinder is set to a too coarse
setting.
blend.
and off. Place the drip tray and the
coffee grounds container back.
Leave the brew group out. Close
the maintenance door and turn
the machine on and off. Then try
to reinsert the brew group.
You cannot remove the brew
group when the descaling process
is active. First complete the
descaling process and then
remove the brew group.
Adjust the grinder to a finer
setting.
Start using a different coffee
blend.
Page 27
Problem Cause Solution
The machine is performing its self-
adjustment.
The brew group is dirty. Clean the brew group.
Brew a few cups of coffee.
English
27
Coffee is leaking from the
coffee dispensing spout.
The coffee is not hot
enough.
The temperature is set too low.
You added milk. Whether the milk you add is warm
The machine grinds the
coffee beans, but coffee
does not come out.
The brew group is dirty. Clean the brew group.
The coffee dispensing spout is dirty. Clean the coffee dispensing spout
The coffee comes out
slowly.
The brew group is dirty. Clean the brew group.
The coffee exit duct is blocked. Clean the coffee exit duct with the
The coffee dispensing spout is
clogged.
The cups you use are cold. Preheat the cups by rinsing them
Check the menu settings.
The coffee exit duct is blocked. Clean the coffee exit duct with the
The grind is set to a too fine setting. Adjust the grinder to a coarser
The coffee is grind too finely. Use a different coffee blend or
Clean the coffee dispensing spout
and its holes with a pipe cleaner.
with hot water.
Set the temperature to 'high' in the
menu.
or cold, it always decreases the
temperature of the coffee to some
extent.
handle of the multifunctional tool
or a spoon handle.
setting.
and its holes with a pipe cleaner.
adjust the grinder.
handle of the multifunctional tool
or a spoon handle.
The machine circuit is blocked by
The frothed milk is too
cold.
The milk does not froth. The classic milk frother is dirty or not
limescale.
The cups are cold. Preheat the cups by rinsing them
assembled correctly.
Descale the machine.
with hot water.
Clean the classic milk frother and
make sure it is correctly
assembled.
Page 28
28
English
Problem Cause Solution
The type of milk used is not suitable
for frothing.
Different types of milk result in
different amounts of froth and
different froth qualities. We have
tested the following milk types
which proved to deliver a good
milk froth result: semi-skimmed or
full-fat cow's milk, soy milk and
lactose-free milk. Other types of
milk have not been tested and
may result in a small amount of
milk froth.
There is water under the
machine.
The machine is not placed on a
I cannot activate the
AquaClean filter and the
machine asks for
descaling.
The filter has not been replaced in
You did not install the AquaClean
You did not activate the new or
The drip tray is too full and
overflowed.
horizontal surface.
You have already replaced the
AquaClean filter 8 times. After you
have replaced the AquaClean filter 8
times, you need to descale the
machine.
time after the AquaClean filter icon
flashed and the capacity dropped to
0%.
filter during first installation, but after
having brewed approx. 50 coffees
(based on 100ml cups). The machine
has to be completely limescale-free
before you install the AquaClean
filter.
replaced AquaClean filter in the
machine menu. Also after replacing
the filter, you need to confirm
activation in the machine menu.
Empty the drip tray when the 'drip
tray full' indicator pops up through
the drip tray. Always empty the
drip tray before you start descaling
the machine.
Place the machine on a horizontal
surface so that the 'drip tray full'
indicator works properly.
Descale your machine first and
install the AquaClean filter. Always
activate the AquaClean filter in the
menu. Also do this when you
replace the filter.
Descale your machine first and
then install the AquaClean filter.
First descale the machine and
then install a new AquaClean filter.
After descaling, the filter counter is
reset to 0/8. Always confirm filter
activation in the machine menu.
Also do this after filter
replacement.
Descale your machine first. Then
activate the AquaClean filter in the
menu. Also do this when you
replace the filter.
The AquaClean filter icon
does not appear on the
display after I replaced
the filter.
You did not confirm activation in the
machine menu.
Confirm the activation of the filter
in the machine menu. If the display
shows 'START CALC CLEAN', you
first need to descale the machine.
Remove the AquaClean filter
before descaling and reinsert it
afterwards.
Page 29
Problem Cause Solution
The AquaClean filter is
installed, but the
descaling message
appears.
You have not activated the
AquaClean filter in the machine
menu.
First descale the machine and
then install a new AquaClean filter.
This will reset the filter counter to
0/8. Always confirm filter
activation in the machine menu,
also after filter replacement.
English
29
The AquaClean filter does
not fit.
There is still water in the water tank. Empty the water tank before you
You are trying to install another filter
You need to remove air from the
filter.
than the AquaClean filter.
The rubber o-ring is not attached to
the AquaClean filter.
Let air bubbles come out of the
filter.
install the filter.
Only the AquaClean filter fits into
the machine.
Check the packaging for the o-ring
and attach it to the AquaClean
filter.
Demo mode function
The machine is equipped with a demo mode function.
1 Press and hold the standby button for more than 8 seconds to enter the
demo mode function.
2 To exit the demo mode, turn the machine OFF and ON using the main
switch at the back of the machine.
Ordering accessories Saeco
To clean and descale the machine, only use the Saeco maintenance
products. These products can be purchased in the Philips online shop (if
available in your country) at www.shop.philips.com/service, from your local
reseller or from the authorized service centers.
Ordering maintenance products:
Typenumber
CA6700 Descaling solution
Product
CA6903 AquaClean filter
HD5061 Brew group grease
CA6704 Degreasingtablets
Technical specifications
The manufacturer reserves the right to improve the technical specifications
of the product. All the preset quantities are approximate.
Page 30
30
English
Description Value
Housing material Thermoplastic
Size (w x h x d) 8.7 x 13.4 x 16.9 in.
Weight 265 oz
Power cord length 31.5 -47.2 in.
Control panel Front
Cup size up to 6 in.
Water tank 60 fl oz, removable
Coffee bean hopper capacity 8.8 oz
Coffee grounds drawer capacity 15 pucks
Pump pressure 15 bar
Boiler stainless steel boiler
Safety devices thermal fuse
Energy saving mode < 1 Wh
Nominal voltage - Power rating - Power supply See data on inside of maintenance door
Disposal
This product may contain lead and mercury. Disposal of these materials may
be regulated due to environmental considerations. For disposal or recycling
information, please contact your local authorities or visit
www.recycle.philips.com.
Warranty and support
If you need information or support, please visit www.saeco.com/support or
read the separate international warranty leaflet.
To buy spare parts, visit www.shop.philips.com/service or go to your Saeco
dealer or authorized service center. You can also contact the Philips/Saeco
hotline in your country.
Page 31

內容
_________________________________________________________________________________________________ 32
簡介
重要事項
警告
電磁波 (EMF)
咖啡機概觀
使用者介面
首次安裝
手動沖洗循環
沖洗熱水管路
沖洗咖啡沖煮管路
Intenza+ 濾網
安裝 Intenza+ 濾網
更換 Intenza+ 濾網
測試水質硬度
設定水質硬度
飲品類型與份量
沖煮咖啡
調整咖啡流出口
以咖啡豆沖煮咖啡
沖煮 1 杯咖啡
沖煮 2 杯咖啡
以預磨咖啡粉沖煮咖啡
製作奶泡
熱水
調整數量與口味
Saeco 調整系統
調整咖啡份量
調整咖啡濃度
調整研磨設定
維護與保養
清潔滴盤與咖啡粉槽
清潔水箱
清潔豆槽
清潔沖煮組件與咖啡出口輸送管
每週清潔沖煮組件
每月清潔沖煮組件
潤滑沖煮組件
清潔經典奶泡器
每天清潔經典奶泡器
每週清潔經典奶泡器和蒸氣棒
除垢程序
若除垢程序中斷該怎麼做
警示圖示與錯誤碼
錯誤碼的意義
疑難排解
示範模式功能
________________________________________________________________________________________________ 32
_________________________________________________________________________________________________ 33
____________________________________________________________________________________________ 33
______________________________________________________________________________________________ 33
______________________________________________________________________________________________ 34
________________________________________________________________________________________________ 34
___________________________________________________________________________________________ 36
___________________________________________________________________________________________ 36
______________________________________________________________________________________ 36
___________________________________________________________________________________________ 37
______________________________________________________________________________________ 37
______________________________________________________________________________________ 38
___________________________________________________________________________________________ 38
___________________________________________________________________________________________ 39
_________________________________________________________________________________________ 39
________________________________________________________________________________________________ 40
_________________________________________________________________________________________ 40
_______________________________________________________________________________________ 40
___________________________________________________________________________________________ 40
___________________________________________________________________________________________ 40
__________________________________________________________________________________ 40
________________________________________________________________________________________________ 40
_________________________________________________________________________________________________ 41
_________________________________________________________________________________________ 41
_________________________________________________________________________________________ 41
___________________________________________________________________________________________ 41
___________________________________________________________________________________________ 42
___________________________________________________________________________________________ 42
______________________________________________________________________________________________ 43
____________________________________________________________________________________ 43
________________________________________________________________________________________________ 43
________________________________________________________________________________________________ 43
_________________________________________________________________________ 44
_______________________________________________________________________________________ 44
_______________________________________________________________________________________ 45
___________________________________________________________________________________________ 46
_________________________________________________________________________________________ 47
____________________________________________________________________________________ 47
__________________________________________________________________________ 47
________________________________________________________________________________________________ 47
________________________________________________________________________________ 48
______________________________________________________________________________________ 48
___________________________________________________________________________________________ 50
________________________________________________________________________________________________ 50
___________________________________________________________________________________________ 53
繁體中文
31
Page 32

32
繁體中文
訂購 Saeco 配件
技術規格
處理方式
保固與支援
________________________________________________________________________________________ 53
________________________________________________________________________________________________ 54
________________________________________________________________________________________________ 54
_____________________________________________________________________________________________ 55
簡介
重要事項
親愛的顧客,感謝您購買 Saeco Incanto 全自動義式濃縮咖啡機!
咖啡是天然產品,其風味特色可能依據其產地、調豆與烘焙方式而有所不同。 本
咖啡機搭載了自行調整系統,能夠從您最喜愛的咖啡豆中萃取出最佳風味。 機器
會在沖煮 10-20 杯咖啡後進行自我調整。
您可以在本使用手冊中找到所需的資訊,並以最佳方式安裝、使用、維護並善用咖
啡機。 為充分享受
Saeco 為您提供的好處,請至下列位址註冊產品:www.saeco.com/welcome。
咖啡機備有多種安全功能, 但是您仍需仔細閱讀並遵照安全性指示,僅可根據相
關指示使用咖啡機,以避免不當使用咖啡機所造成的意外傷害或毀壞。 請保留本
使用手冊以供日後參考。
-
連接的牆上插座務必符合咖啡機技術規格的電壓。
-
將咖啡機連接到有接地的電源插座。
-
請勿讓電源線懸掛在餐桌或流理台邊緣,或是接觸高溫表面。
-
請勿將咖啡機、插頭或電源線浸入水中 (有觸電的危險)。
-
請勿讓液體淋濕電源線接頭。
-
請勿將熱水噴嘴朝向身體部位: 有燙傷的危險。
-
請勿接觸高溫表面, 務必使用握把和旋鈕。
-
使用咖啡機背後的主開關,關閉咖啡機電源,並將電源插頭從插座上拔除:
-
若發生故障。
-
若長時間不用咖啡機。
-
清潔咖啡機之前。
-
請拔插頭,切勿拉扯電源線。
-
接觸插頭時,請確保雙手乾燥。
-
當插頭、電源線或機器本身受損時,請停止使用。.
-
請勿擅自改裝咖啡機或電源線。
-
務必讓飛利浦授權的維修中心進行維修作業,以免發生危險。 .
-
八歲以下的兒童切勿使用咖啡機。
-
在有人從旁監督或適當指示如何安全使用咖啡機,以及瞭解潛在危險的狀況
下,咖啡機可供 8 歲以上兒童、身體官能或心智能力退化者,或是經驗與使用
知識缺乏者使用。
-
除非兒童年滿 8 歲以上且有人監督,否則請勿讓兒童進行清潔和使用者維護。
-
請將咖啡機和電源線放在 8 歲以下兒童無法取得之處。
-
請看管孩童,避免他們將咖啡機當成玩具。
-
請勿將手指或其他物品插入咖啡研磨機。
Page 33

警告
電磁波 (EMF)
咖啡機概觀
繁體中文
-
本咖啡機僅供一般家用, 並非用於商店的員工廚房、辦公室、農舍或其他工作
場所。
-
務必將產品置於穩固的平面上。 搬運時也請保持直立狀態。.
-
請勿將咖啡機放在加熱盤上,或直接放在高溫烤箱、加熱器或類似熱源旁邊。
-
豆槽只能放入烘焙的咖啡豆。 如果豆槽放入研磨咖啡粉、即溶咖啡、未烘焙的
咖啡豆或其他任何物質,可能會造成機器損壞。
-
安裝或拆除任何零件前,請務必先讓咖啡機冷卻。 加熱面在使用後可能會有餘
熱。
-
請勿在水箱中裝入溫水、熱水或氣泡礦泉水,否則可能會損害水箱和咖啡機。
-
絕對不可使用鋼絲絨、磨蝕性的清潔劑或侵蝕性的液體 (例如汽油或丙酮) 清潔
咖啡機。 使用軟布沾水擦拭即可。
-
定期為咖啡機除垢。 咖啡機會提示除垢的時間。 如果未定期除垢,咖啡機可能
會無法正常運作。 保固並未涵蓋此情況的修復作業。
-
請勿將咖啡機放在低於 0°C 的地方。加熱系統內殘留的水可能會凍結並造成
損壞。
-
若長時間不使用咖啡機,則請勿將水留在水箱內。 水可能會有汙染, 每次使用
咖啡機時均請使用乾淨的水。
本飛利浦產品符合所有電磁波暴露的相關適用標準和法規。
1 使用者介面
2 ESPRESSO 按鈕
3 ESPRESSO LUNGO 按鈕
4 AROMA STRENGTH 按鈕
5 待機按鈕
6 MENU 按鈕
7 熱水按鈕
8 STEAM 按鈕
9 經典奶泡器
10 可調式咖啡流出口
11 水箱蓋
12 豆槽蓋
13 預磨咖啡粉槽蓋
14 主開關
15 電線插座
16 維修門蓋
17 滴盤
18 滴盤釋放鈕
19 滴盤已滿指示燈
20 研磨調整旋鈕
21 水箱
22 沖煮組件
23 維修門內側標有清潔說明
24 咖啡出口輸送管
25 咖啡殘渣抽屜
26 咖啡粉槽
27 滴盤蓋
33
Page 34
ESPRESSO
AROMA STRENGTH
STEAM
MENU
34
繁體中文
使用者介面
28 電線
29 清潔刷
30 潤滑膏
31 水質硬度試紙
32 多功能工具 (measuring scoop, grinder adjustment key and coffee duct
cleaning tool)
使用這些按鈕瀏覽功能表:
ESPRESSO 按鈕 = ESC 按鈕: 按下此按鈕可回到主選單。
AROMA STRENGTH 按鈕 = OK 按鈕: 按下此按鈕可選擇、確認或停止功能。
STEAM 按鈕 = UP 按鈕: 按下此按鈕可向上捲動顯示功能表。
首次安裝
MENU 按鈕 = DOWN 按鈕: 按下此按鈕可向下捲動顯示功能表。
本機器經過咖啡沖泡測試。 雖然機器經過仔細清潔,機器內可能留有咖啡殘渣。
但是我們保證此咖啡機為全新機器。 就如同大部分的全自動機器,您必須先沖煮
若干杯咖啡後,讓機器完成自行調整,以便沖泡出最美味的咖啡。
1 移除咖啡機的所有包裝材料。
2 將咖啡機放置於餐桌或流理台,遠離水龍頭、水槽與熱源。
Page 35
15 cm
15 cm
15 cm
15 cm
15 cm
15 cm
15 cm
15 cm
M
AX
CALC
CLEAN
MAX
2
1
繁體中文
注意: 咖啡機的上方、背面及兩側必須至少保留 15 公分的間隔距離。
3 將清水注入水箱至 MAX 水位刻度。
4 打開豆槽蓋。 將咖啡豆倒入豆槽內,關上蓋子。
注意: 請勿在豆槽中加入過量的咖啡豆,以免研磨器受損。
警告: 僅能使用義式濃縮咖啡豆。 請勿使用研磨咖啡粉、未烘焙或焦糖化的咖
啡豆,否則可能造成機器損壞。
35
5 將電源插頭插入牆上插座 (1),然後將小插頭插入機器後方的插座 (2)。
6 將主開關設定到 ON 位置,啟動咖啡機。
待機按鈕會閃爍。
Page 36
STRENGTH
HOT WATER
HOT
WATER
36
繁體中文
7 按下待機按鈕,開啟咖啡機電源。
-
顯示螢幕顯示管路預備圖示,表示您需要預備管路。
8 將一個容器放置在經典奶泡機下方。 按下 OK 按鈕來啟動水流管路預備循環。
-
咖啡機開始流出熱水。
-
顯示螢幕顯示預備圖示。 進度列會顯示預備循環的進展。
9 咖啡機進行加熱,顯示螢幕顯示溫度圖示。
10 將容器清空,並將其放回咖啡流出口下方。
手動沖洗循環
11 咖啡機開始讓沖洗用水流過咖啡流出口。 顯示螢幕顯示沖洗圖示與進度列。
注意: 請勿打斷沖洗循環。
這時就可以開始使用機器。
在手動沖洗循環期間,清水會流過水流與咖啡沖煮管路。 這會持續數分鐘。
沖洗熱水管路
1 將一個容器放置在經典奶泡機下方。
2 按下 HOT WATER (熱水) 按鈕。
-
咖啡機開始流出熱水。
注意: 若要中斷沖洗循環,按下 OK 按鈕即可。
3 機器流出 2 杯熱水 (0.5 公升) 後,請按下 OK 按鈕以停止熱水出水。 重複步驟
1 至 3 兩次。
沖洗咖啡沖煮管路
1 將一個容器放在咖啡流出口下方。
Page 37
AROMA STRENGTH
GROUND COFFEE
Intenza+ 濾網
繁體中文
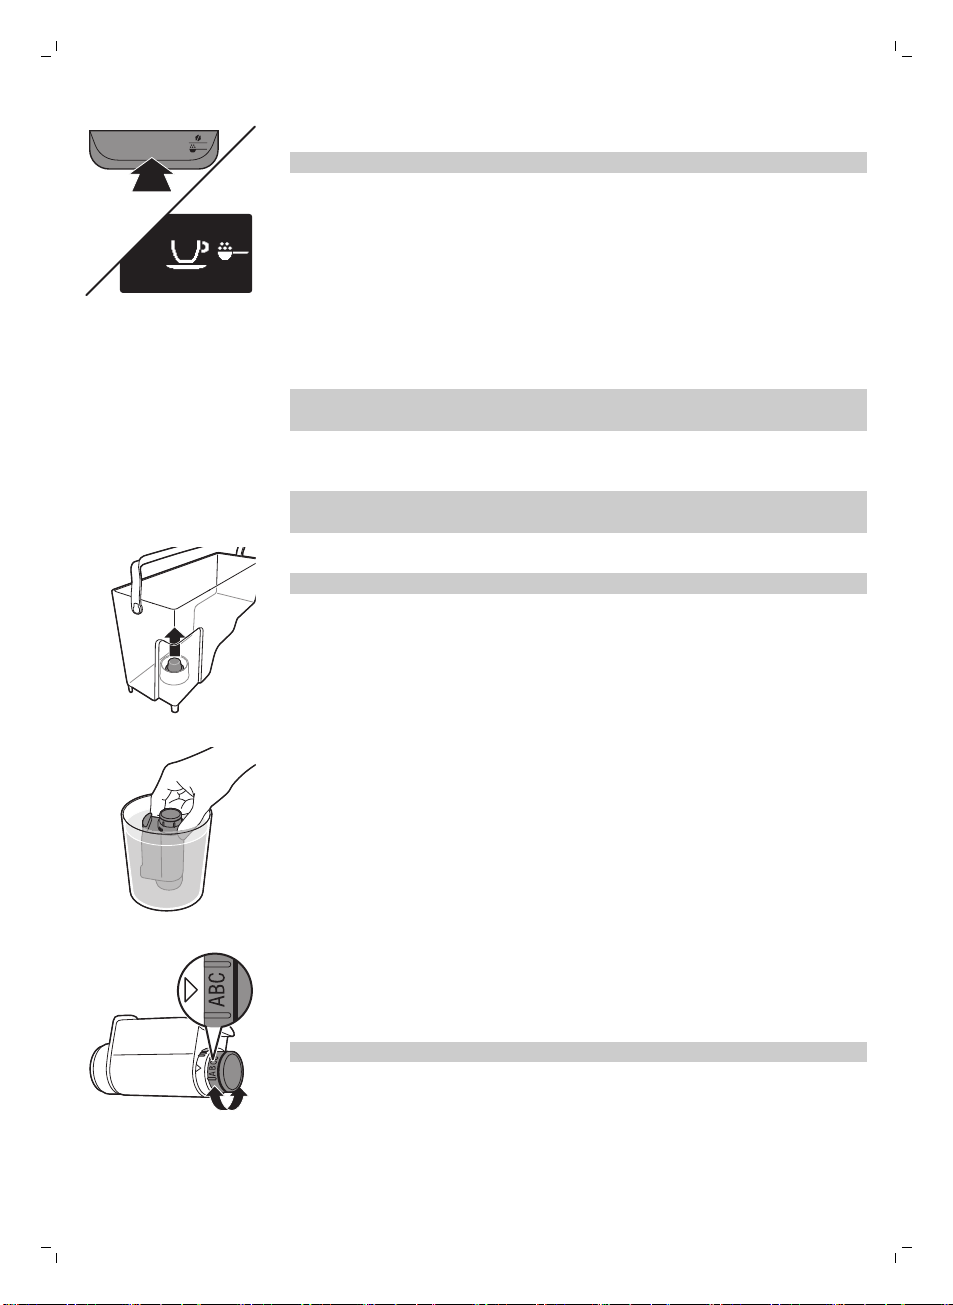
2 按下 AROMA STRENGTH 按鈕,選擇預磨咖啡粉沖煮功能。
注意: 請勿將預磨咖啡粉加至預磨咖啡粉槽中。
3 按下 ESPRESSO LUNGO 按鈕。
-
咖啡機會從咖啡流出口開始流出水。
4 靜候片刻,直到咖啡機停止流出水,再清空容器。
5 重複步驟 1 至 4 兩次。
6 咖啡機回到主選單後,清空容器。 您現在可以開始使用咖啡機。
建議安裝 Intenza+ 濾網來減少咖啡機中的水垢沈積物,並提供過濾水,以完整保
留每一杯咖啡的香氣與美味。
37
安裝 Intenza+ 濾網
注意: 請務必依照下述方法,在咖啡機功能表中確認 Intenza+ 濾網的啟動。 藉由
在咖啡機功能表中啟動 Intenza+ 濾網,咖啡機會顯示濾網何時該更換。
1 從水箱中取出小型白色濾網,並收納在乾燥的地方。
注意: 請留著小型白色濾網以供日後使用。 在進行除垢程序時會用到。
2 從包裝中取出濾網,並將開口朝上浸泡於冷水中。 輕按濾網兩側,將氣泡洩
出。
3 將濾網旋鈕旋轉至與您居住區域水質硬度相符的設定。
a 水質很軟/軟水
b 硬水 (預設)
c 水質硬度很高
注意: 您可以使用水質硬度試紙測試水質硬度。
Page 38
ON
OFF
FILTER
FIL
TER
ON
OFF
RESET
FILTER
1
2
3
4
38
繁體中文
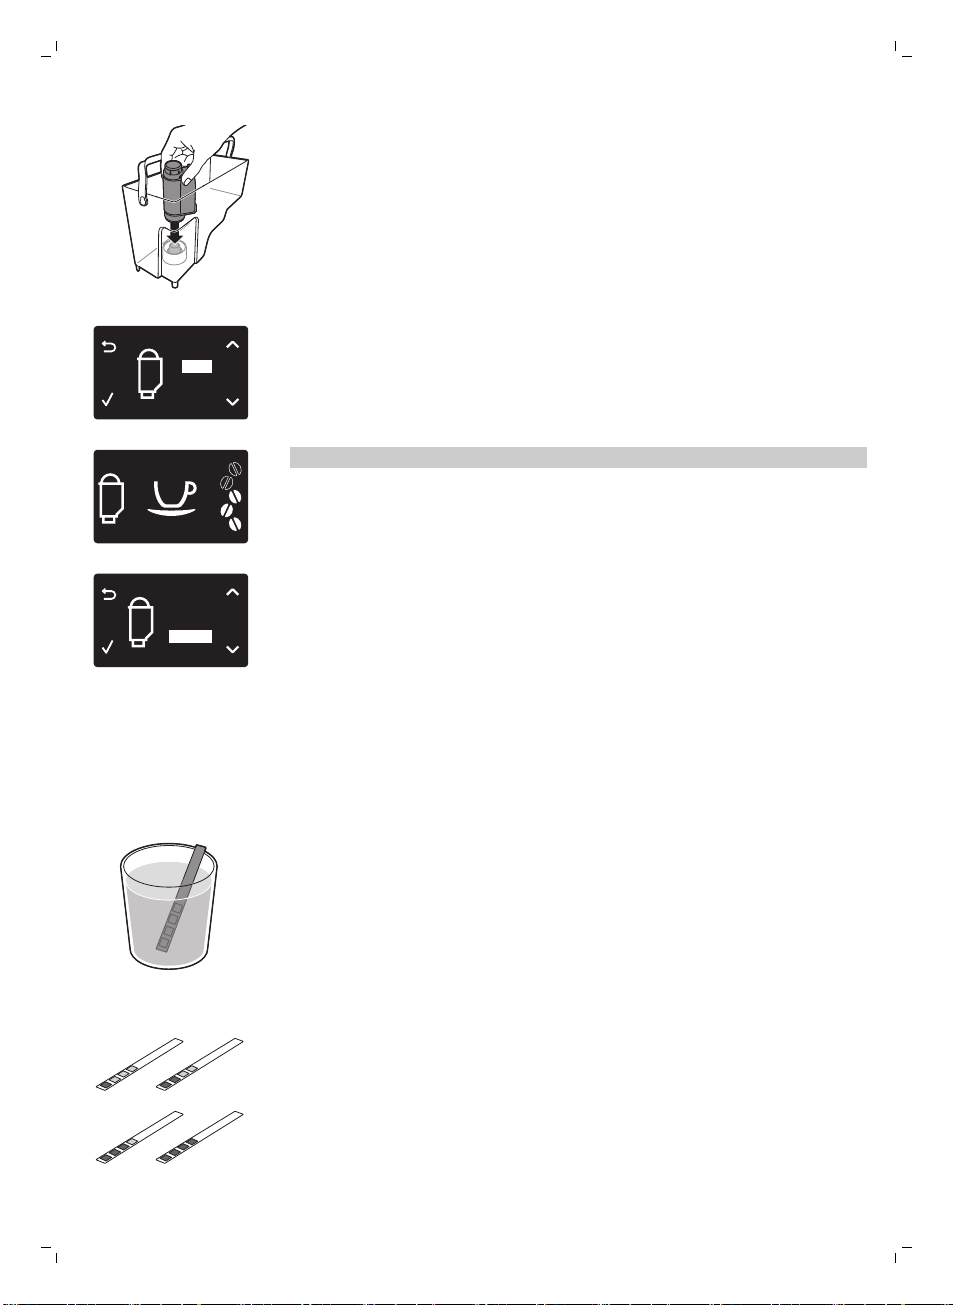
4 將濾網放入空的水箱中。 將濾網往下壓,直到無法再移動為止。
5 在水箱中裝入乾淨的水到 MAX 刻度,然後將水箱裝回機器上。
6 按下 MENU 按鈕,並捲動至 INTENZA+ FILTER (INTENZA+ FILTER 濾網)。
按下 OK 按鈕來確認。
7 選擇顯示幕上的 ON (開啟),按下 OK 按鈕確認啟動。
8 讓熱水流出 2 杯 (0.5 公升) 的量以完成啟動。 請將這些水倒掉。
更換 Intenza+ 濾網
注意: 當顯示幕上出現濾網圖示時,請盡快更換 Intenza+ 濾網。
1 取出濾網,更換為新的 Intenza+ 濾網。 請遵循濾網的使用準備說明 (見
'Intenza+ 濾網')。
2 按下 MENU 按鈕,並捲動至 INTENZA+ FILTER (INTENZA+ FILTER 濾網)。
按下 OK 按鈕來確認。
3 選擇顯示幕上的 RESET (重設),按下 OK 按鈕確認重新啟動。
4 讓熱水流出 2 杯 (0.5 公升) 的量以完成新濾網的啟動。 請將這些水倒掉。
測試水質硬度
為了讓咖啡機能依據您所在地區的水質調整,請使用隨附的水質硬度試紙測試水質
硬度。
1 將隨附的水質硬度試紙在自來水中浸泡 1 秒。
2 移開水質硬度試紙,等候 1 分鐘。
3 檢查有幾個方塊變成紅色,並對照下方的水質硬度表。
Page 39
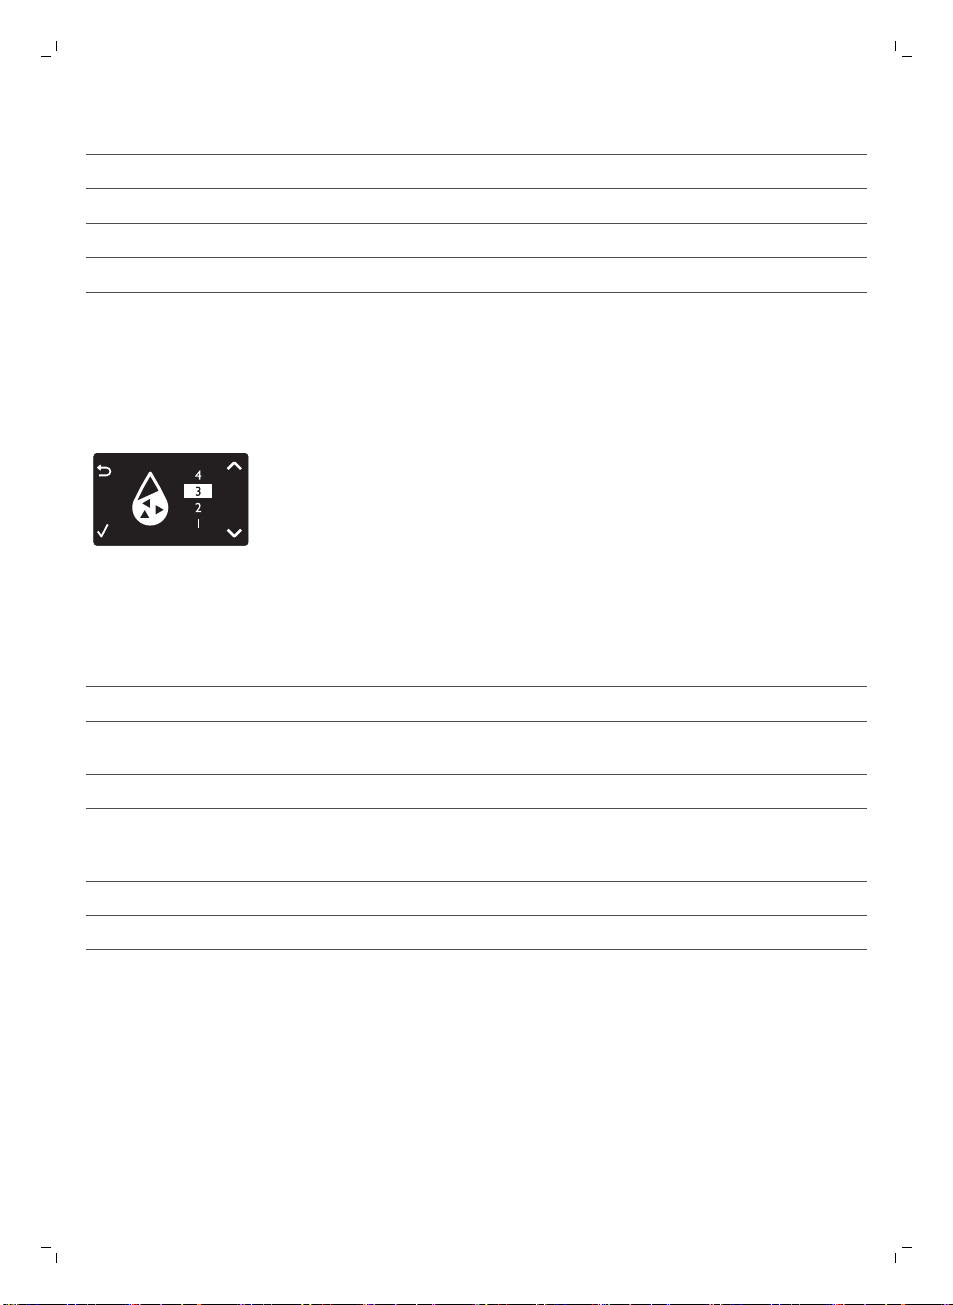
紅色方塊數 設定的值 水質硬度
1 1 水質很軟
2 2 軟水
3 3 硬水
4 4 水質硬度很高
設定水質硬度
設定水質硬度
1 若要設定水質硬度,請按下 MENU 按鈕,選擇功能表,捲動並選擇 WATER
HARDNESS。
2 按下 OK 按鈕,選擇在您當地的水質硬度。
3 按下 OK 按鈕來確認。
4 按下 ESC 按鈕可回到主選單。
飲品類型與份量
飲品名稱 說明 選擇方式
繁體中文
39
義式濃縮咖啡 泡沫層厚的小杯咖啡 控制面板上的按鈕
淡式義式濃縮咖啡 泡沫層厚的中杯大份量義式濃縮咖啡控制面板上的按鈕
熱水 控制面板上的按鈕
飲品名稱
義式濃縮咖啡 40 毫升 20 - 230 毫升
淡式義式濃縮咖啡 120 毫升 20 - 230 毫升
標準份量 份量範圍
Page 40
40
繁體中文
沖煮咖啡
調整咖啡流出口
以咖啡豆沖煮咖啡
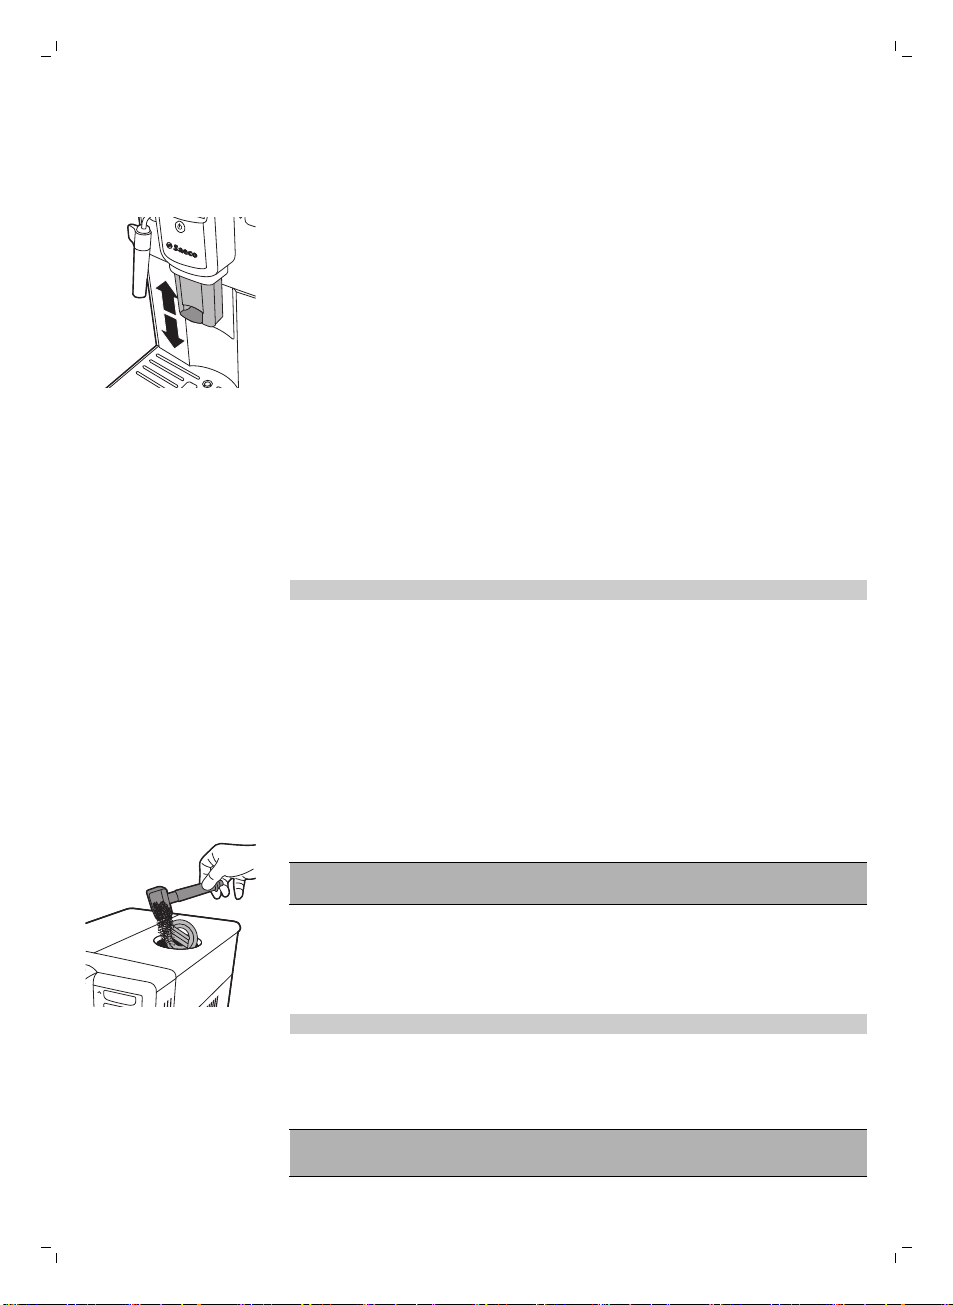
本咖啡機可用來沖煮不同種類的咖啡,容器可以是不同尺寸的杯子或玻璃杯。 若
要調整咖啡流出口的高度至杯子或玻璃杯尺寸適合的位置,請向上或向下滑動流出
口。
沖煮 1 杯咖啡
1 將一個咖啡杯放在咖啡流出口下方。
2 按下 ESPRESSO 或 ESPRESSO LUNGO 按鈕,沖煮所選的咖啡。
-
咖啡開始從咖啡流出口流出。
注意: 若您想在機器流出預設的咖啡量前停止沖煮流程,請按下 OK 按鈕。
沖煮 2 杯咖啡
1 將兩個咖啡杯放在咖啡流出口下方。
2 您可以同時沖煮兩杯義式濃縮咖啡或淡式義式濃縮咖啡。 按下您想要飲品的按
鈕兩次。 機器便會自動依序執行兩次研磨循環。
製作奶泡
以預磨咖啡粉沖煮咖啡
當您使用預磨咖啡粉沖煮咖啡時,請使用隨附多功能工具中的量匙,將正確的咖啡
粉量放入預磨咖啡粉槽中。 若您加入過多的預磨咖啡粉,多餘的咖啡粉將會跑到
咖啡粉抽屜中。
1 打開預磨咖啡粉槽蓋。
2 倒入一量匙的預磨咖啡粉至咖啡粉槽中。
警告: 請勿在預磨咖啡粉槽中放入預磨咖啡粉以外的其他任何物質,因為可能
會損壞機器。
3 關上預磨咖啡粉槽蓋。
4 將一個咖啡杯放在咖啡流出口下方。
5 按下 AROMA STRENGTH 按鈕,選擇預磨咖啡粉
-
咖啡機將開始自動沖煮所選的飲品。
注意: 使用預磨咖啡粉的話,一次只能沖煮一杯咖啡飲品。
警告: 小心燙傷! 咖啡流出之前可能會先稍微噴出熱水。 務必使用適當
的保護握把。
Page 41
繁體中文
注意: 使用蛋白質含量至少 3% 的冰牛奶 (溫度約 5°C/41°F),確保製作出最佳
奶泡。 您可以使用全脂或半脫脂牛奶。 也可以使用脫脂牛奶、豆漿或零乳糖牛
奶。
注意: 建議在使用前先沖洗水流管路。 按下 STEAM (蒸氣) 按鈕以提供蒸氣數秒
鐘。
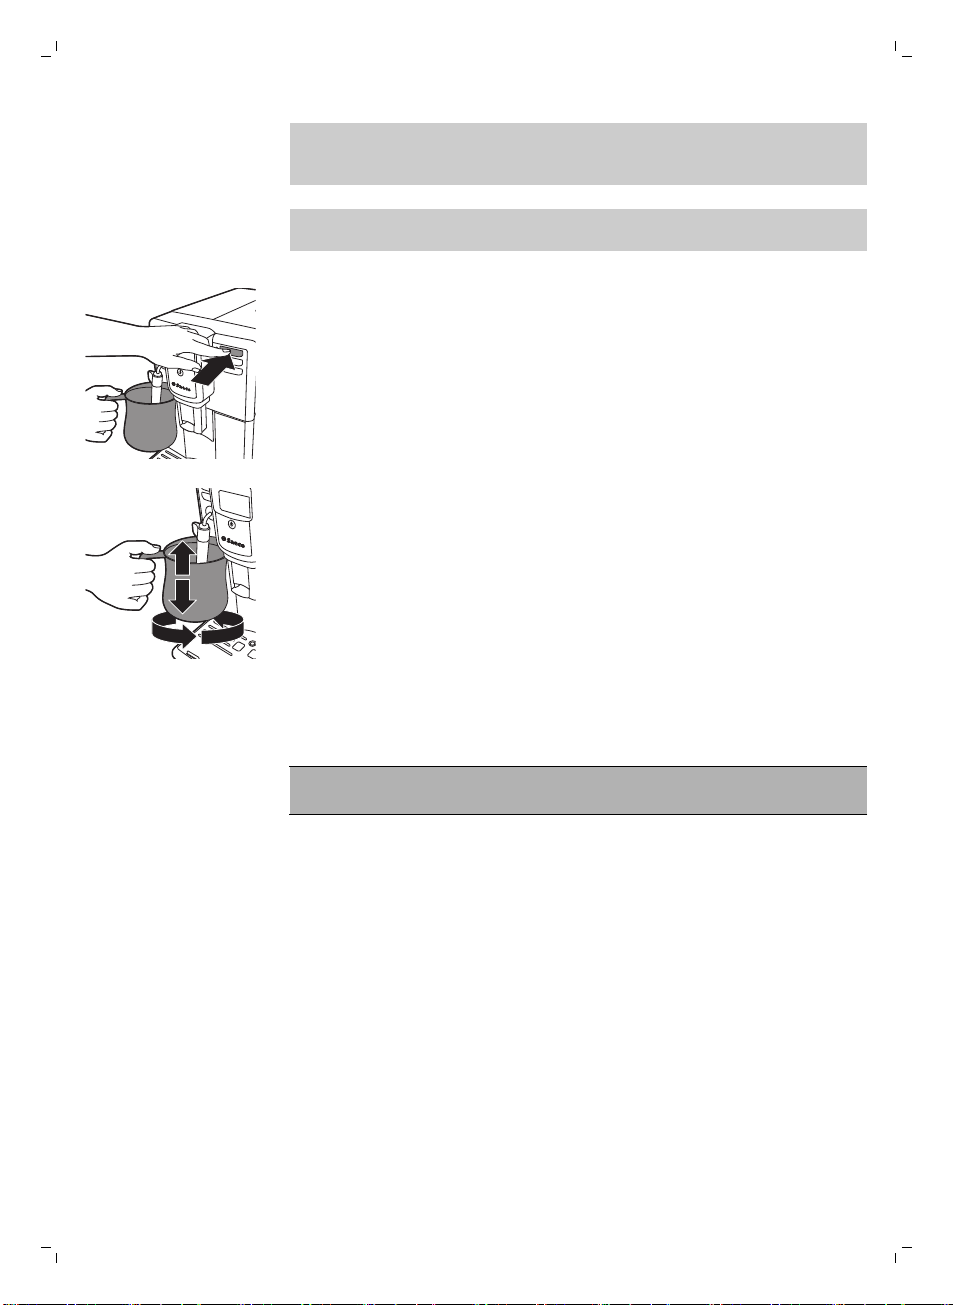
1 將冰牛奶裝入壺中 1/3 容量處。
2 將經典奶泡器浸入牛奶中。 按下 STEAM (蒸氣) 按鈕。
3 將壺輕輕旋轉並上下移動,即可將牛奶打成奶泡。
4 按下 OK 按鈕,即可停止製作奶泡。
41
熱水
警告: 小心燙傷! 咖啡流出之前可能會先稍微噴出熱水。 務必使用適當
的保護握把。
1 將咖啡壺放在經典奶泡器下方。
2 按下 HOT WATER (熱水) 按鈕。 開始自動流出熱水。
3 按下 OK 按鈕,即可停止熱水流出。
調整數量與口味
Saeco 調整系統
咖啡是天然產品,其風味特色可能依據其產地、調豆與烘焙方式而有所不同。 本
咖啡機搭載了自行調整系統,能夠從您最喜愛的咖啡豆中萃取出最佳風味。 機器
會在沖煮若干杯咖啡後進行自我調整。
調整咖啡份量
您可以依據您的口味和杯子的大小,調整沖煮的飲品份量。
Page 42
ESPRESSO
1
2
3
4
5
42
繁體中文
調整咖啡濃度
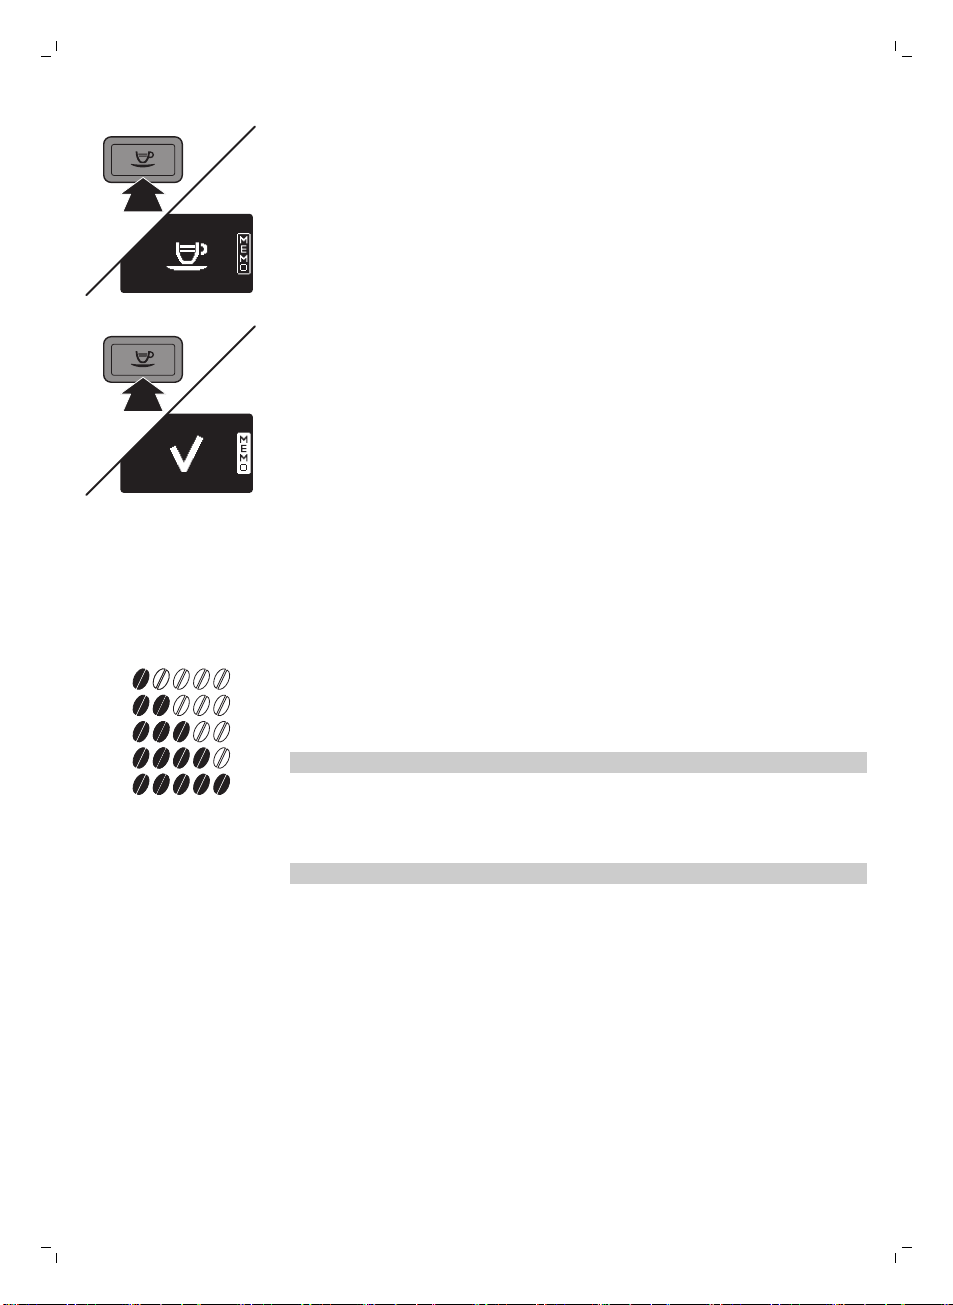
1 如欲調整義式濃縮咖啡的份量,按住 ESPRESSO 按鈕,直到顯示螢幕顯示
MEMO (記憶) 圖示。
-
咖啡機進入程序設定階段,開始沖煮所選的飲品。
2 當杯子裝滿需要的義式濃縮咖啡量時,按下 OK 按鈕。
-
顯示螢幕上的打勾圖示顯示該按鈕已經設定好: 每次按下該按鈕,咖啡機
將沖煮設定好的義式濃縮咖啡量。若要設定淡式義式濃縮咖啡的份量,請遵
循同樣的程序: 按住該飲品的按鈕,並在杯中已注入想要的咖啡量時按下
OK 按鈕。
若要變更咖啡份量,按下 AROMA STRENGTH 按鈕。 您每次按下 AROMA
STRENGTH 按鈕,香氣強度都會變更一度。 顯示螢幕顯示選擇的強度,並只會在
沖煮咖啡時儲存此設定。
1 非常溫和
2 溫和
3 一般
4 濃
5 非常濃
注意: 咖啡機會針對每種咖啡強度,自動注入正確的咖啡量。
GROUND COFFEE (研磨咖啡) 是咖啡強度功能表中的最後一個選項。 選擇此選項
就可用研磨咖啡粉沖煮咖啡。 使用隨附多功能工具中的量匙,量出正確的研磨咖
啡粉量。
注意: 咖啡機在沖煮咖啡時,將回到主畫面,並儲存選擇的香氣強度。
調整研磨設定
您可以使用多功能工具握把中的研磨器調整鑰匙,調整研磨器設定。 根據每次選
定的研磨設定,陶瓷咖啡研磨器可確保您沖煮的每杯咖啡都完美地經過均勻的研
磨。 如此可保留完整的咖啡香氣,並為每杯咖啡帶來完美口感。
1 打開豆槽蓋。
Page 43
2
1
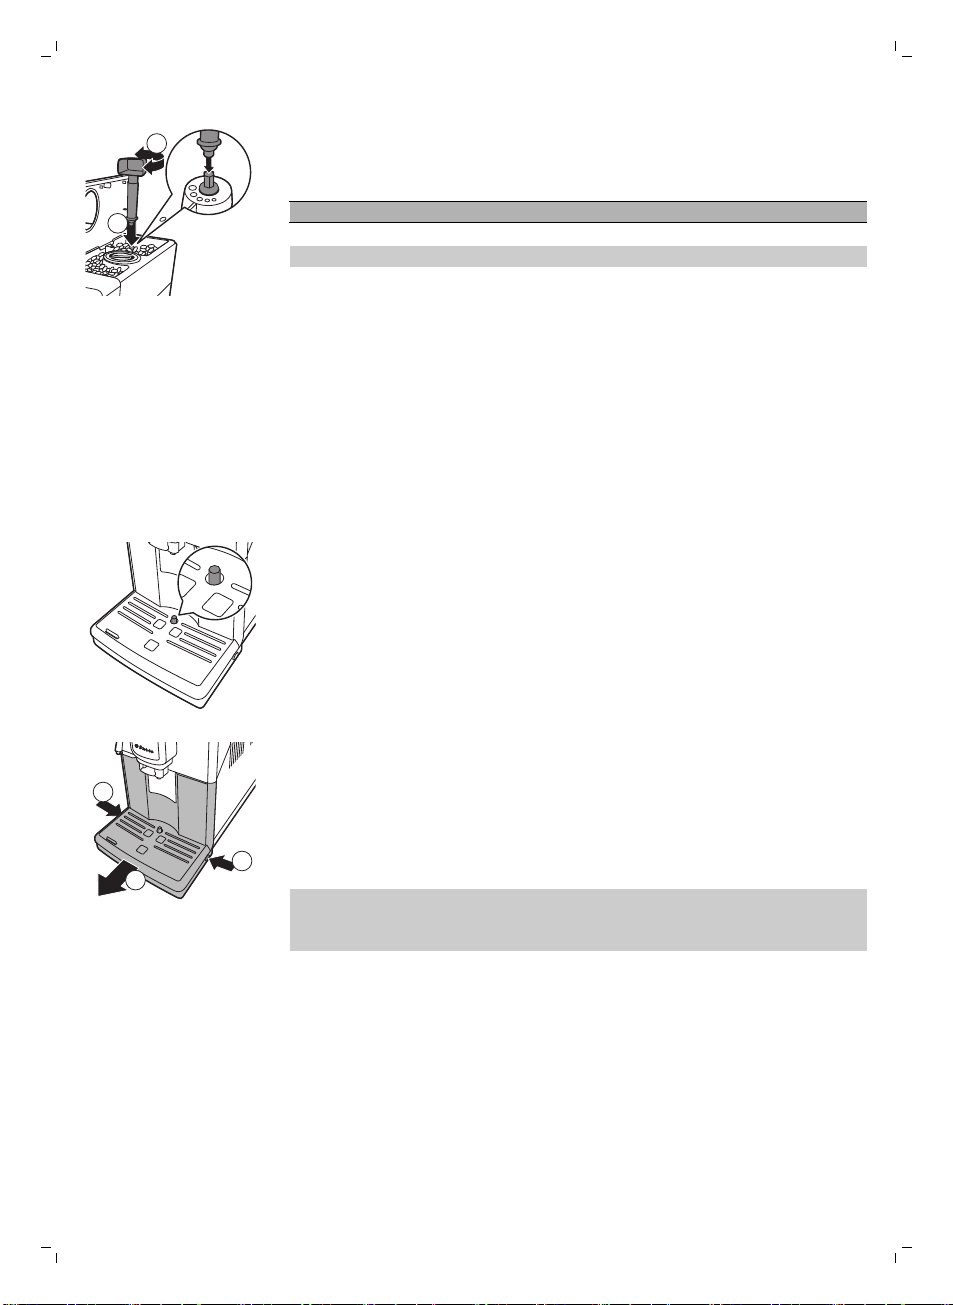
2 將研磨器調整鑰匙放在研磨調整旋鈕上 (1)。 往下推並往左或往右旋轉 (2),每
1
2
1
-
注意:轉動研磨調整旋鈕時,每次請勿超過一個溝槽,以免研磨器受損。
注意: 使用新設定時,沖煮 2-3 杯咖啡之後,差異會變得更明顯。
維護與保養
咖啡機的維護極為重要,如此才能延長咖啡機的使用壽命,並確保沖煮出最佳品質
與口感的咖啡。
清潔滴盤與咖啡粉槽
在咖啡機為開機狀態時執行下列動作:
-
-
繁體中文
次轉動一個溝槽。
您共有 5 種不同的研磨設定可以選擇。 點愈小,咖啡愈濃。
當顯示螢幕顯示「清空咖啡粉槽」圖示時,清空咖啡粉槽。
滴盤已滿指示燈透過滴盤亮起時,代表滴盤已滿。 每天清空並清潔滴盤。
43
1 向左轉動經典奶泡器。
2 按下滴盤兩側的釋放按鈕 (1),將滴盤拉出咖啡機 (2)。
3 移除並清空咖啡粉槽。
4 清空滴盤後,放在水龍頭下沖洗。
5 請重新將咖啡粉槽裝回滴盤。
6 將滴盤滑入咖啡機內,直到聽見「喀噠」一聲卡入定位為止。
注意: 當您移除滴盤時,請確定咖啡機仍維持在開機狀態。 若在移除滴盤前將咖
啡機關機,重新開啟咖啡機後,即便滴盤已空,「清空咖啡粉槽」圖示仍會出現在
顯示螢幕上。
清潔水箱
1 定期將水箱從咖啡機移除,並以清水沖洗。
2 將清水注入水箱至 MAX 刻度,然後將水箱裝回咖啡機上。
清潔豆槽
每個月用乾布清潔豆槽一次。
Page 44
2
1
44
繁體中文
清潔沖煮組件與咖啡出口輸送管
每週清潔沖煮組件
1 關閉咖啡機電源,並拔除插頭。
2 連同咖啡粉槽一起移除滴盤。
3 清空滴盤後,放在水龍頭下沖洗。
4 清空咖啡粉槽,並在水龍頭下以溫水沖洗。
5 打開維修門蓋。
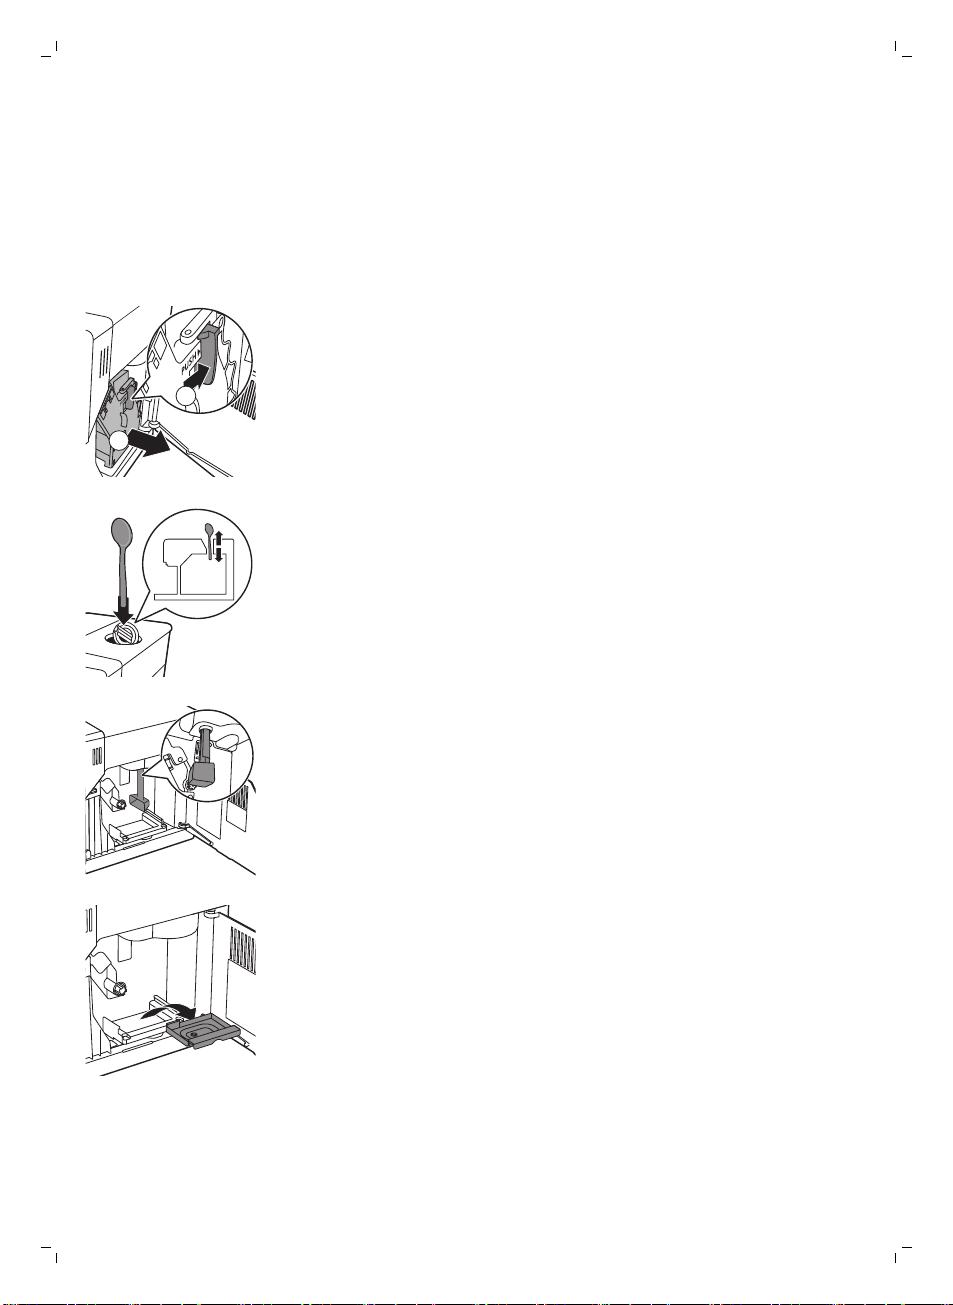
6 按下 PUSH 按鈕 (1) 並拉動沖煮組件上的握柄,將其從咖啡機取下 (2)。
7 以湯匙握把徹底清潔咖啡出口輸送管頂部。 如圖所示插入。
8 使用湯匙握把或隨附的多功能工具,徹底清潔咖啡出口輸送管底部。 如圖所示
插入。
9 移除並清空咖啡粉殘渣槽後,在水龍頭下以溫水沖洗。 晾乾後重新插入。
Page 45
繁體中文
10 在水龍頭下以溫水徹底沖洗沖煮組件。 請仔細清潔上方濾網。
注意事項:請勿將沖煮組件放入洗碗機清洗,同時也請勿使用洗碗精或清潔劑來
清潔。 這可能會造成沖煮組件故障,並影響咖啡的口感。
11 請徹底風乾沖煮組件。
注意: 請勿用布擦乾沖煮組件,以避免沖煮組件內累積纖維。
12 以沾濕的軟布清潔咖啡機內部。
13 將沖煮組件推回咖啡機之前,請確定兩側的參考記號相符。 如不相符,請執行
下列步驟:
-
確定拉桿接觸到沖煮組件底部。
14 請確定沖煮組件的鎖定鉤位於正確的位置。
45
-
要將鉤正確定位,請將它往上推到最上方的位置。
-
如果鉤還在最底部的位置,它就無法正確定位。
15 沿著兩側的導引軌道將沖煮組件推回咖啡機,直到聽見「喀噠」一聲卡入定位
為止。
警告: 請勿按下 PUSH 按鈕。
16 關閉維修門蓋。
每月清潔沖煮組件
-
請在咖啡機沖煮 500 杯咖啡後執行此清潔循環,或每個月執行一次此清潔循
環。
-
請使用去油汙錠執行此清潔循環。
Page 46
46
繁體中文
警告: 去油汙錠只可用於清潔。 去油汙錠並不具有除垢功能。
1 將一個容器放在咖啡流出口下方。
2 按下 AROMA STRENGTH 按鈕,選擇預磨咖啡粉.
3 將去油汙錠放入研磨咖啡粉槽中。
4 按下 ESPRESSO LUNGO 按鈕。咖啡機會從咖啡流出口流出水。
5 進度列達到中間時,將咖啡機背後的主開關切至 OFF。
6 靜置約 15 分鐘的時間,讓去油汙溶液產生作用。
7 將主開關設定至 ON。
8 按一下待機按鈕。
9 靜候片刻,直到咖啡機執行自動沖洗循環。
10 執行「每週清潔沖煮組件」 程序。
11 連同咖啡粉槽一起移除滴盤。 清空滴盤與咖啡粉槽後,再裝回咖啡機。
12 按下 AROMA STRENGTH 按鈕,選擇預磨咖啡粉.
13 按下 ESPRESSO LUNGO 按鈕。咖啡機會從咖啡流出口流出水。
14 重複步驟 12 與 13 兩次。 倒掉流出的水。
15 如欲清潔滴盤,請在滴盤中放入去油汙錠,並在滴盤中注入達三分之二容量的
熱水。 靜置約 30 分鐘,讓去油汙錠產生作用。 接著倒空滴盤並徹底沖洗。
潤滑沖煮組件
為發揮咖啡機的最大效能,請務必為沖煮組件進行潤滑。 請參考下表的潤滑頻
率。 如需支援,請造訪我們的網站: www.philips.com/support。
使用類型 每日產品用量 潤滑頻率
低度 1-5 每 4 個月
一般 6-10 每 2 個月
重度 >10 每月
1 關閉咖啡機電源,並拔除插頭。
2 拆卸沖煮組件,然後按照「每週清潔沖煮組件」一節中的指示,在水龍頭下以
溫水徹底沖洗。
3 在沖煮組件底部的軸周圍塗抹一層薄薄的潤滑劑。
4 在軌道兩側塗抹一層薄薄的潤滑劑 (見圖示)。
5 按照「每週清潔沖煮組件」一節的指示裝入沖煮組件。
潤滑劑管可重複使用。
Page 47
清潔經典奶泡器
START
CALC
CLEAN
每天清潔經典奶泡器
取下經典奶泡器外部零件,並以清水沖洗。
每週清潔經典奶泡器和蒸氣棒
1 取下經典奶泡器外部零件,並以清水沖洗。
2 從蒸氣棒取下經典奶泡器上部零件,並以清水沖洗。
3 請用濕布清潔蒸氣棒。
4 重新組裝所有的經典奶泡器零件。
繁體中文
47
除垢程序
當顯示幕顯示「START CALC CLEAN (開始除鈣清洗)」,就必須為機器除垢。 若
顯示幕出現此訊息時,沒有為機器除垢,咖啡機可能會無法正常運作。 若是這
樣,保固將不涵蓋此種維修。
僅能使用 Saeco 除垢溶液來為機器除垢。 Saeco 除垢溶液專為確保讓咖啡機發揮
最佳效能而設計。 使用其他除垢產品可能會損壞咖啡機,並在水中留下殘留物。
您可以前往 www.shop.philips.com/service,在線上商店購買 Saeco 除垢溶液。
除垢程序會持續 30 分鐘,其中包含除垢循環和沖洗循環。 您可以隨時按下 ESC
按鈕暫停除垢或沖洗循環。 若要繼續除垢或沖洗循環,按下 OK 按鈕即可。
注意: 請勿在除垢程序期間取下沖煮組件。 警告: 除垢程序進行時,請
勿飲用除垢溶液或流出的水。
1 取下滴盤與咖啡粉槽後,清空並清潔之後再裝回原位。
2 取下經典奶泡器外部零件。
3 在咖啡流出口和經典奶泡器下方放置大型容器 (1.5 公升)。
4 顯示幕顯示「START CALC CLEAN (開始除鈣清洗)」時,按下 OK 按鈕,開始
進行除垢程序。 如有安裝熱水流出口,請將它取下。
Page 48
REMOVE
FILTER
M
AX
CALC
CLEAN
CALC
CLEAN
1
2
48
繁體中文
-
顯示幕上的下列 圖示會提醒您取下 Intenza+ 濾網。
注意: 您可以按下 ESC 按鈕跳過除垢。 若您想要稍後開始除垢程序,請按下
MENU 按鈕,選擇 MENU (功能表),捲動並選擇 DESCALING (除垢)。 按下
OK 以確認。
5 取出水箱。 若有使用 Intenza+ 濾網的話,請將濾網從水箱取出,更換為最初
的白色小濾網。
6 將除垢溶液倒入水箱中。 將清水注入水箱至 CALC CLEAN 刻度。 將水箱推回
咖啡機中。 按下 OK 按鈕來確認。
-
除垢程序的第一階段開始。 咖啡機開始每隔一段時間注入除垢溶液。
-
顯示螢幕顯示除垢圖示、階段指示與持續時間。 第一階段需要 20 分鐘。
7 讓咖啡機流出除垢溶液直到水箱已空。
8 取出水箱,並沖洗乾淨。
9 將清水注入水箱至 CALC CLEAN 刻度。 將水箱推回咖啡機中,按下 OK。
10 移除並清空容器,再將其放回咖啡流出口下方。 按下 OK 以確認。
11 除垢程序的第二階段開始,第二階段是沖洗循環。 此階段需要 3 分鐘。 顯示
幕顯示沖洗圖示與此階段的持續時間。
注意: 若水箱水位未達到 CALC CLEAN 刻度,咖啡機可能需要進行另一次沖
洗循環。
12 等待咖啡機停止流出水。 當顯示螢幕上出現打勾圖示,就代表除垢程序完成。
13 按下 OK 按鈕,退出除垢程序。 咖啡機開始加熱,並執行自動沖洗循環。
14 移除並清空容器。
15 除垢後請清潔經典奶泡器。
16 執行「每週清潔沖煮組件」循環清潔沖煮組件。
17 重新安裝 Intenza+ 濾網。
若除垢程序中斷該怎麼做
一旦除垢程序開始後,您就必須讓機器完成程序,不得關閉機器電源。 若機器在
循環中遇到問題,您可以按下待機按鈕,退出除垢程序。 若發生此情形,或出現
電源中斷或電線不慎脫落的狀況,請執行下列步驟:
1 關閉咖啡機電源。
2 請倒光水箱內的水後,徹底洗淨水箱。
3 將水箱加水至 CALC CLEAN 刻度後,開啟咖啡機電源。
-
咖啡機將加熱,並執行自動沖洗循環。
4 沖煮任何咖啡飲品前,請執行手動沖洗循環 (見 '手動沖洗循環')。
注意: 若除垢程序尚未完成,需要儘快讓咖啡機執行另一次除垢程序。
警示圖示與錯誤碼
警示圖示以紅色顯示。 下列是可能出現在顯示幕上的警示圖示清單,及其意義。
-
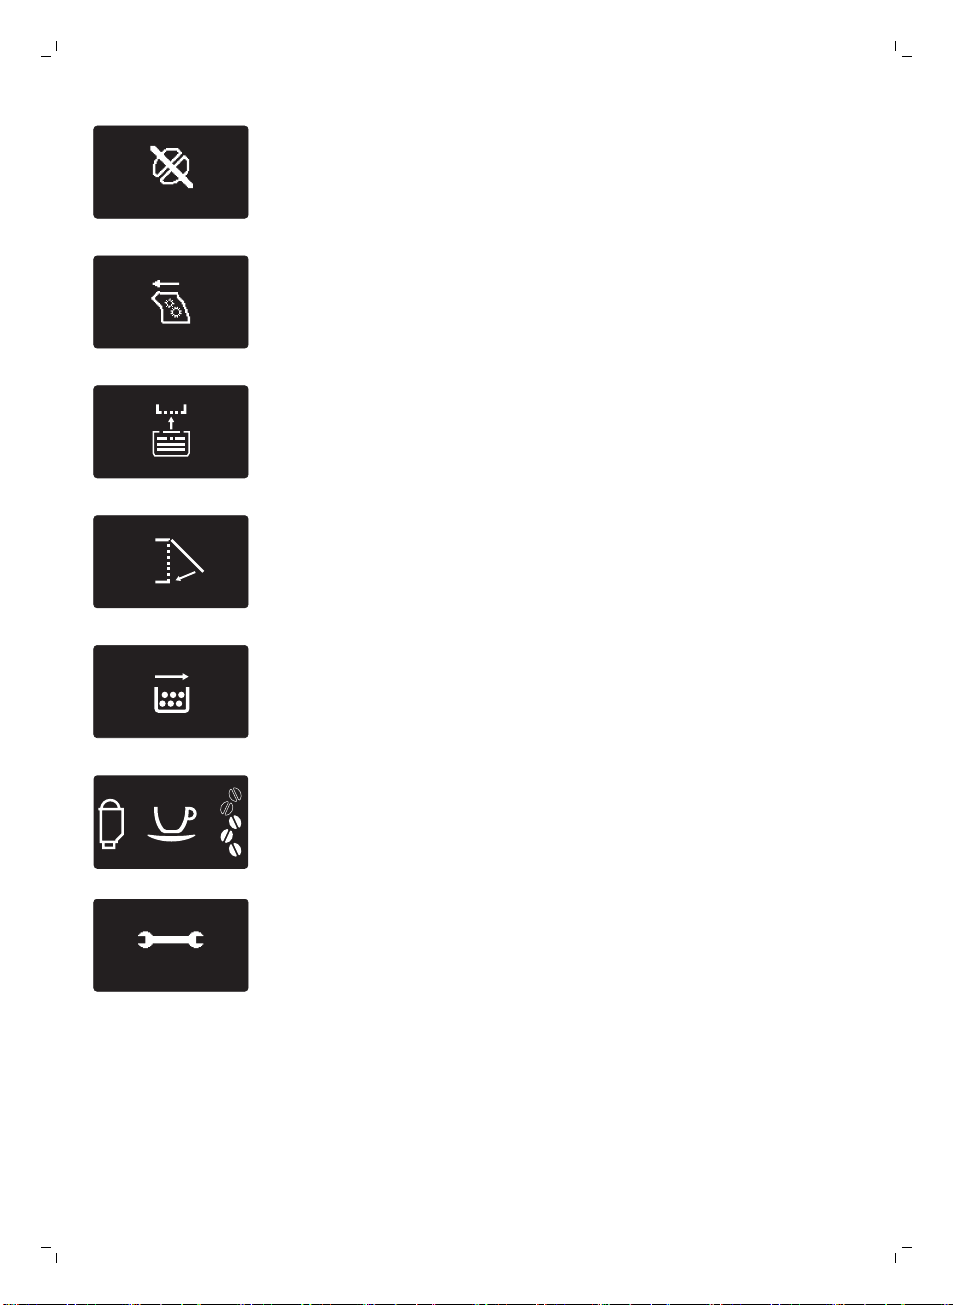
將清水注入水箱至 MAX 水位刻度。
Page 49
-
FIL
TER
10
xx
豆槽已空。 在豆槽內放入新的咖啡豆。
-
沖煮組件不在咖啡機中,或未正確插入。 插入沖煮組件。
-
插入滴盤。
-
關閉維修門蓋。
-
移除咖啡粉槽並清空。
繁體中文
49
-
當顯示幕上出現濾網圖示時,必須更換 Intenza+ 濾網 (見 '更換 Intenza+ 濾網
')。
-
若顯示幕顯示錯誤碼,請參閱「錯誤碼的意義」,了解顯示幕上錯誤碼的意義
以及您可以怎麼做。 顯示幕出現此圖示時無法使用咖啡機。
Page 50
50
繁體中文
錯誤碼的意義
錯誤碼
-
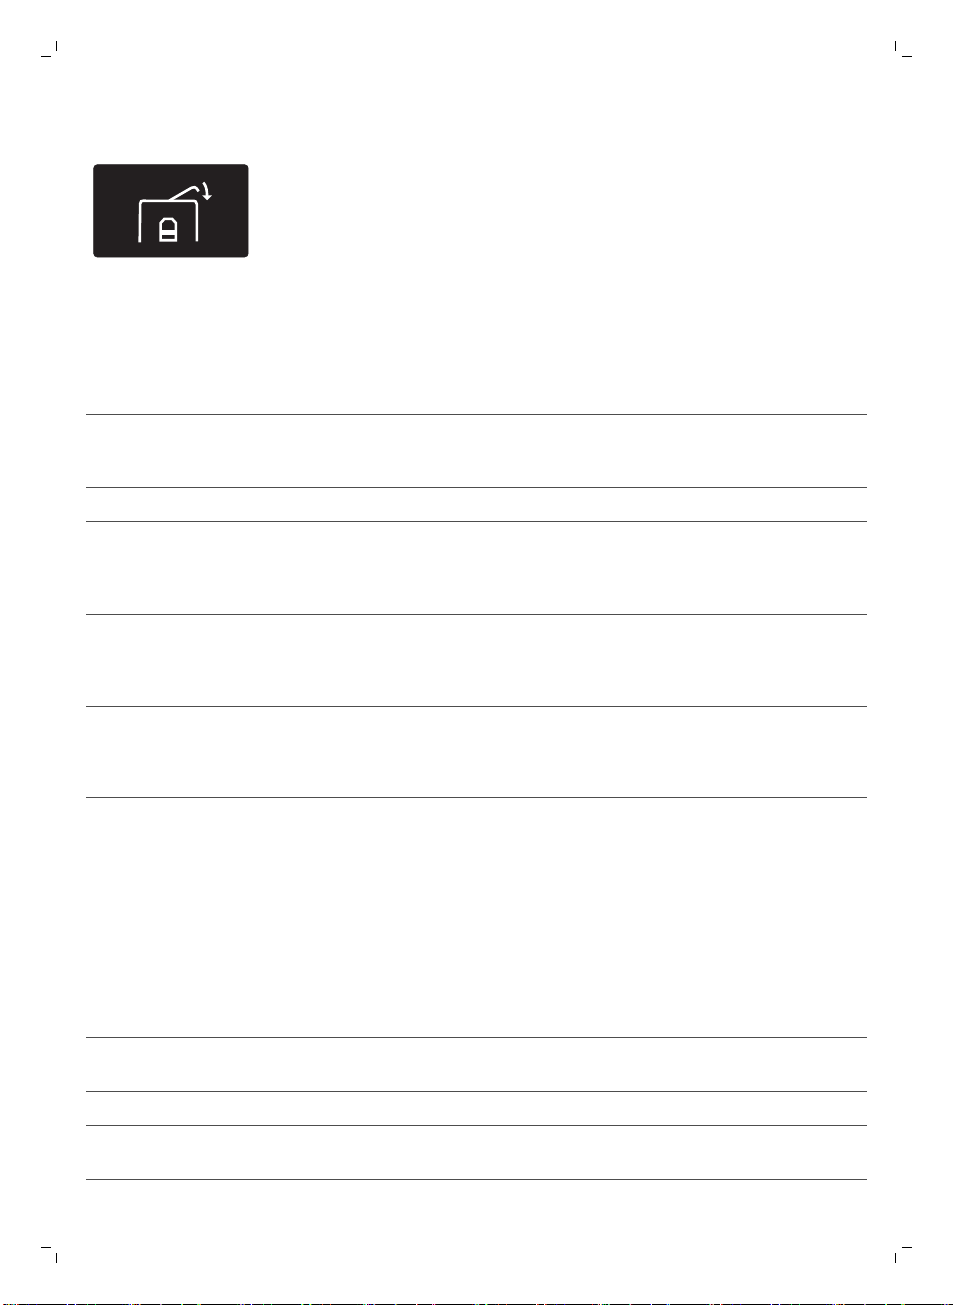
豆槽蓋為開啟狀態。 關閉豆槽蓋。
問題 原因 可能的解決方法
1 咖啡研磨器阻塞。 咖啡出口輸送管堵塞。 以多功能工具握把或湯匙
3 - 4 沖煮組件有問題。 沖煮組件有髒汙。 徹底拆下沖煮組件。
. 沖煮組件安裝不正確。 請取出沖煮組件並重新裝
5 水流管路有問題。 水流管路中有空氣。 將水箱拆下並裝回,並重
14 代表咖啡機已過熱。 這有幾種可能的原因。 關閉咖啡機電源,在 30
若上述的解決方案無法協助您將顯示螢幕上的錯誤碼圖示消除,並讓咖啡機恢復正
常運作,請聯絡飛利浦 Saeco 熱線。 保證書或 www.saeco.com/support 上可找
到詳細聯絡資料。
握把徹底清潔咖啡出口輸
送管。
入。 將沖煮組件推回咖啡
機之前,請確定兩側的參
考記號相符。
複數次。 請確認水箱是否
已正確插入咖啡機。 檢查
水箱槽是否乾淨。
分鐘後重新開啟咖啡機電
源。 嘗試此方法 2 或 3
次。
疑難排解
本單元概述了使用本機器最常遇到的問題。 如果無法利用以下資訊解決遇到的問
題,請造訪 www.saeco.com/support 瀏覽常見問題清單,或聯絡您所在國家/地區
的飛利浦客戶服務中心。
問題
原因 解決方法
咖啡機無法開啟。 咖啡機未連接電源,或主開關設置為
請確定主開關設置於 ON 位置。
咖啡機處於 DEMO (示範) 模
式。
OFF 位置。
按壓待機按鈕超過 8 秒。 使用咖啡機背後的主開關,關閉咖啡
檢查主電源線是否正確插入。
機電源後再重新開啟。
Page 51
問題 原因 解決方法
繁體中文
51
滴盤一下就滿了。 這是正常現象。 咖啡機會用水清洗內部
在流出口下方放一個杯子,來收集清
「咖啡粉槽已滿」圖示持續
顯示。
您太快裝回咖啡粉槽。 請在顯示幕提示您將咖啡粉槽裝回咖
我無法拆下沖煮組件。 沖煮組件的位置不正確。 關閉維修門蓋。 關閉咖啡機電源後再
您尚未拆除咖啡粉槽。 請先拆除咖啡粉槽後,再拆除沖煮組
我無法插入沖煮組件。 沖煮組件的位置不正確。 在裝回沖煮組件之前,您未將沖煮組
關閉咖啡機電源後再次開啟,藉此重
管路和沖煮組件。 部分的水會經由內部
系統直接流入滴盤。
您在咖啡機關閉時清空咖啡粉槽。 請一定要在咖啡機電源開啟時清空咖
「滴盤已滿」指示燈透過滴盤蓋亮起
時,請將滴盤清空。
洗後的水。
啡粉槽。 如果您在咖啡機關閉時清空
咖啡粉槽,表示咖啡循環計數器並未
重新設定。 若是這樣,即使咖啡粉槽
尚未裝滿,「清空咖啡粉槽」圖示 將
會持續出現在顯示螢幕上。
啡機之後,再將咖啡粉槽裝回去
開啟。 靜候咖啡機出現就緒畫面,然
後再拆除沖煮組件。 清潔沖煮組件。
件
件放置於原本的位置。 確定拉桿接觸
到沖煮組件的底部,同時也請確定沖
煮組件的鉤位於正確的位置。
新設定咖啡機。 請重新裝回滴盤和咖
啡粉槽, 但不要裝回沖煮組件。 關
閉保養門蓋,開啟咖啡機電源後再關
閉。 然後嘗試將沖煮組件裝回。
咖啡機仍在進行除垢程序。 除垢程序進行時,無法拆除沖煮組
咖啡奶泡太少或咖啡太淡。 研磨器設為過粗的顆粒設定。 將研磨器調為較細的設定。
使用不適合的咖啡調豆。 請開始使用不同的咖啡調豆。
咖啡機正在自行調整。 沖煮幾杯咖啡。
沖煮組件有髒汙。 清潔沖煮組件。
咖啡從咖啡流出口漏出。 咖啡流出口堵塞。 以管路清潔劑清潔咖啡流出口及其洞
咖啡不夠燙。 您使用的杯子過冷。 先以熱水清洗來預熱杯子。
溫度設定過低。 檢查功能表設定。 在功能表中將溫度設定為「高」。
您加了牛奶。 無論您加的牛奶是熱還是冷,多少都
件。 請先完成除垢程序,才能拆除沖
煮組件。
口。
會降低咖啡的溫度。
Page 52
52
繁體中文
問題 原因 解決方法
咖啡機會研磨咖啡豆,但是
沒有流出咖啡。
沖煮組件有髒汙。 清潔沖煮組件。
咖啡流出口有髒汙。 以管路清潔劑清潔咖啡流出口及其洞
咖啡流出的速度太慢。 研磨顆粒太細。 使用不同的咖啡調豆或調整研磨器。
沖煮組件有髒汙。 清潔沖煮組件。
咖啡出口輸送管堵塞。 以多功能工具握把或湯匙握把清潔咖
咖啡機管路被水垢阻塞。 為咖啡機除垢。
奶泡太冷。 杯子過冷。 先以熱水清洗來預熱杯子。
牛奶沒有奶泡。 經典奶泡器有髒汙,或組裝不正確。 清潔經典奶泡器,並確定已經正確組
所用的牛奶種類不適合製作奶泡。 牛奶種類會影響奶泡量和奶泡品質。
咖啡機下方有積水。 滴盤過滿而溢出。 「滴盤已滿」指示燈透過滴盤亮起
咖啡出口輸送管堵塞。 以多功能工具握把或湯匙握把清潔咖
啡出口輸送管。
研磨設定過細。 將研磨器調為較粗的設定。
口。
啡出口輸送管。
裝。
我們已測試下列的牛奶種類,結果證
明這些牛奶都能製作出優質奶泡: 半
脫脂牛奶或全脂牛奶、豆漿和零乳糖
牛奶。 其他種類的牛奶未經測試,奶
泡量可能會較少。
時,請將滴盤清空。 進行咖啡機除垢
之前,務必先清空滴盤。
咖啡機未放在水平表面上。 將咖啡機置於水平表面上,以便「滴
我無法啟動 AquaClean 濾
水器,咖啡機將要求進行除
垢程序。
在 AquaClean 濾水器圖示快速閃爍且容
您未在首次安裝時安裝 AquaClean 濾水
您已經更換 8 次 AquaClean 濾水器。
在您更換 8 次 AquaClean 濾水器之
後,您必須為咖啡機進行除垢。
量下降至 0% 之後,未及時更換濾水
器。
器,但已沖煮約 50 杯咖啡 (每杯 100 毫
升)。 在您安裝 AquaClean 濾水器前,
咖啡機必須完全沒有水垢。
盤已滿」指示燈能夠正常運作。
先為咖啡機除垢,再安裝 AquaClean
濾水器。 請一律在功能表中啟動
AquaClean 濾水器。 當您更換濾芯
時也必須這麼做。
先為咖啡機除垢,再安裝 AquaClean
濾水器。
首先為咖啡機除垢,接著安裝新的
AquaClean 濾水器。 除垢後,濾水
器計數器將重設為 0/8。 請一律在咖
啡機功能表中確認濾水器啟動。 當您
更換濾芯之後也必須這麼做。
Page 53
問題 原因 解決方法
繁體中文
53
您沒有在咖啡機功能表中啟動新的或替
我更換濾水器之後,顯示幕
上沒有出現 AquaClean 濾
水器圖示。
AquaClean 濾水器已安裝,
但出現除垢訊息。
AquaClean 濾水器不符。 您必須移除濾水器內的空氣。 讓氣泡從濾水器中排出。
水箱中仍有水。 在您安裝濾水器前,清空水箱。
您嘗試安裝 AquaClean 濾水器之外的濾
換用 AquaClean 濾水器。 在更換濾水
器後,您必須在咖啡機功能表中確認啟
動。
您沒有在咖啡機功能表中確認啟動。 請在咖啡機功能表中確認濾水器啟
您沒有在咖啡機功能表中啟動
AquaClean 濾水器。
水器。
橡膠 O 型環未安裝至 AquaClean 濾水器。檢查 O 型環的包裝,然後將它安裝至
請先為咖啡機除垢。 然後在功能表中
啟動 AquaClean 濾水器。 當您更換
濾芯時也必須這麼做。
動。 如果顯示幕顯示「START CALC
CLEAN (開始除鈣清洗)」,就必須先
為咖啡機除垢。 在進行除垢之前,請
拆下 AquaClean 濾水器,除垢之後
再將它重新插入。
首先為咖啡機除垢,接著安裝新的
AquaClean 濾水器。 這會將濾水器
計數器重設為 0/8。 請一律在咖啡機
功能表中確認濾水器啟動,同時也必
須在濾水器更換後進行確認。
只有 AquaClean 濾水器會符合咖啡
機需求。
AquaClean 濾水器。
示範模式功能
本咖啡機具備示範模式功能。
1 按住待機按鈕超過 8 秒,就能進入示範模式功能。
2 若要退出示範模式,使用咖啡機背後的主開關,關閉咖啡機電源後再開啟。
訂購 Saeco 配件
如欲清潔與除垢本機器,只能使用 Saeco 維護產品。 您可以在飛利浦線上商店
(若您所在的國家/地區有提供服務的話) www.shop.philips.com/service、本地經銷
商或授權服務中心購買這些產品。
訂購保養產品:
型號
CA6700 除垢溶液
CA6702 Intenza+
HD5061 沖煮組件潤滑劑
CA6704 去油汙 錠
產品
Page 54
54
繁體中文
技術規格
製造商保有更新此產品技術規格的權利。 所有預設的數量皆為約略值。
說明
外殼材質 熱塑性塑膠
尺寸 (寬 x 高 x 深) 8.7 x 13.4 x 16.9 英寸
體重 265 盎司
電線長度 31.5 - 47.2 英寸
控制面板 正面
杯子大小 最長 6 英寸
水箱 60 液體盎司,可拆除
咖啡豆槽容量 8.8 盎司
咖啡粉抽屜容量 15 包
幫浦水壓 15 巴
鍋爐 不鏽鋼鍋爐
安全裝置 防過熱保險絲
省電模式 < 1 瓦時
值
額定電壓 - 功率定額 - 電力供應 詳見保養門蓋內的資料
處理方式
此產品可能含有鉛與汞。 由於環境考量,這些材質的處理方式通常受到條例規
範。 如需處理方式或回收資訊,請洽當地相關單位或造訪
www.recycle.philips.com。
Page 55
ѴѦǩ뻭ϙ࿆5#'%1+0%#061ƽĢƘץКƮ뺭뺭Տ뻛ՏК뻜뻭*&
'SWKROGPVPCOG6[RGFGUKIPCVKQP6[RG
˲ʻ뼈PKV
ՄůˀΘӍȺƒ
4GUVTKEVGFUWDUVCPEGUCPFKVUEJGOKECNU[ODQNU
.GCF
(Pb)
᰽
/GTEWT[
(Hg)
⬮
%CFOKWO
(Cd)
ԣᲰ
*GZCXCNGPV
EJTQOKWO
(Cr (VI) )
Ġ⅑ԓ᧠
2QN[DTQ
OKPCVGF
DKRJGP[NU
(PBB)
Ġ⅑ȕ᧠⓭
2QN[DTQ
OKPCVGF
FKRJGP[N
GVJGTU
(PBDE)
ǖ۷Ϡز
- O O O O O
œԜǖƮᅰԞ
- O O O O O
ڿգ
- O O O O O
ߪݨǖɢذ
- O O O O O
ѦҨ뻂ɸŜYV뻃Ӎ뻂ɸŜYV뻃۱ϱՄůˀΘƥœȤߒʔɸŜœȤߒ
ʔӂҲ뺯
0QVG뻭q'ZEGGFKPIYVrCPFqGZEGGFKPIYVrKPFKECVGVJCVVJG
RGTEGPVCIGEQPVGPVQHVJGTGUVTKEVGFUWDUVCPEGGZEGGFUVJGTGHGTGPEG
RGTEGPVCIGXCNWGQHRTGUGPEGEQPFKVKQP
ѦҨ뻂O뻃۱ϱ˿ּՄůˀΘƥœȤߒʔλɸŜœȤߒʔӂҲ뺯
0QVG뻭qOrKPFKECVGUVJCVVJGRGTEGPVCIGEQPVGPVQHVJGTGUVTKEVGFUWDUVCPEG
FQGUPQVGZEGGFVJGRGTEGPVCIGQHTGHGTGPEGXCNWGQHRTGUGPEG
ѦҨ뻂뻠뻃۱ϱ˿ּՄůˀΘĦפּϝ뺯
0QVG뻭6JGq뽈rKPFKECVGUVJCVVJGTGUVTKEVGFUWDUVCPEGEQTTGURQPFUVQVJG
GZGORVKQP
保固與支援
繁體中文
55
如需資訊或支援,請造訪:www.saeco.com/support,或另行參閱全球保固說明
書。
若要購買備用零件,請造訪 www.shop.philips.com/service,或洽詢您的 Saeco 經
銷商或授權的服務中心。 您也可以聯絡您所在國家的飛利浦/Saeco 服務專線。
Page 56
4219.460.3747.2 (
10/2017) rev.00
www.saeco.com/care
>75% recycled paper
>75% papier recyclé
 Loading...