

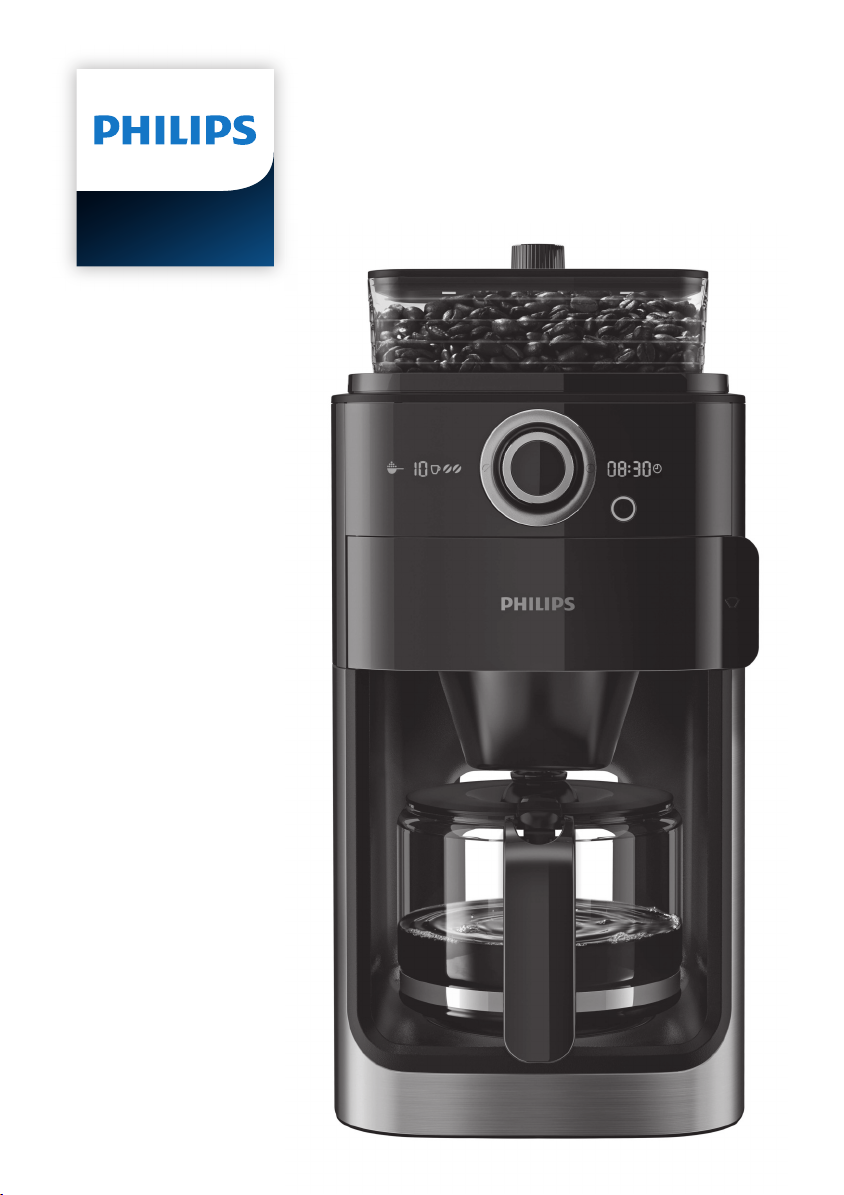
HD7768

1
2
3
5
6
4
8
9
10
11
12
22
23
24
25
7
1513
14 16 19 21
17 18 20
1


English 6
Türkçe 15

6
English
Introduction
Thank you for buying Philips. To register your new product, please go to www.philips.com/grindbrew.
On this website, you can also find handy videos, delicious recipes, frequently asked questions and get
support.
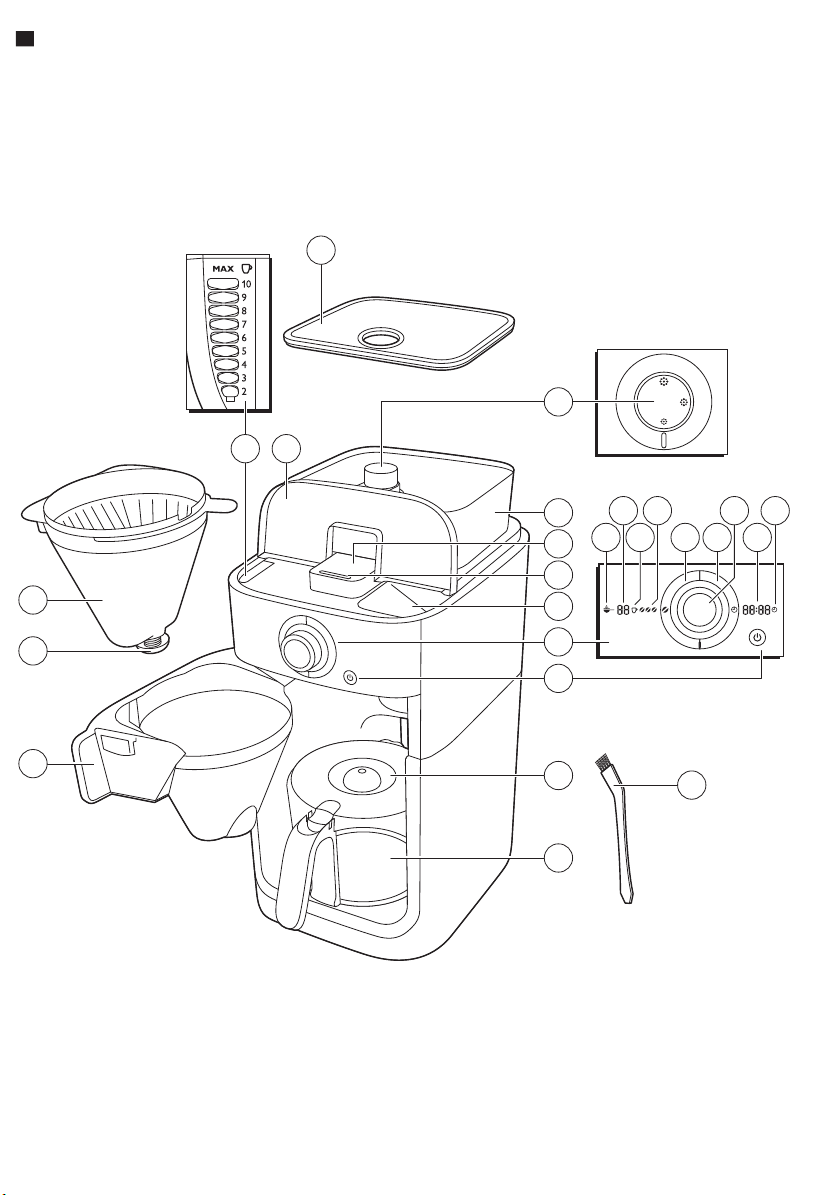
General description (Fig. 1)
1 Filter basket
2 Drip stop
3 Filter basket holder
4 Water level indicator
5 Water reservoir lid
6 Bean container lid
7 Coarseness knob
8 Coffee bean container
9 Grinder funnel lid
10 Lock of grinder funnel lid
11 Water filling hole
12 Display
13 Pre-ground coffee icon
14 Number of cups
15 Coffee cup icon
16 Strength select coffee bean icon
17 Strength select button
18 Timer button
19 Control knob
20 Time indication
21 Timer icon
22 On/off button
23 Glass jug lid
24 Glass jug
25 Bean chute cleaning brush
Important
Danger
-
Never immerse the appliance in water or any other liquid, nor
rinse it under the tap.
Warning
-
Check if the voltage indicated on the appliance corresponds to
the local mains voltage before you connect the appliance.
-
Do not use the appliance if the plug, the mains cord or the
appliance itself is damaged.

English
-
If the mains cord is damaged, you must have it replaced by
Philips, a service center authorized by Philips or similarly qualified
persons in order to avoid a hazard.
-
Connect the appliance to an earthed wall socket.
-
This appliance can be used by children aged from 8 years and
above and by persons with reduced physical, sensory or mental
capabilities or lack of experience and knowledge if they have
been given supervision or instruction concerning use of the
appliance in a safe way and if they understand the hazards
involved. Cleaning and user maintenance shall not be made by
children unless they are older than 8 and supervised. Keep the
appliance and its cord out of reach of children aged less than 8
years.
-
Children shall not play with the appliance.
-
Only use this appliance for its intended purpose to avoid
potential hazard or injury.
-
Do not let the mains cord hang over the edge of the table or
worktop on which the appliance stands.
-
Never pour water into the bean container, as this damages the
appliance.
-
Do not touch the grinding burrs of the of the appliance, especially
when the appliance is connected to a wall socket.
-
Do not touch the hot surfaces of the appliance when it operates.
-
Do not empty the water reservoir by tilting the appliance, as this
can damage the appliance. To empty the appliance, follow the
instructions for flushing the appliance (see 'Flushing the
appliance').
-
If a problem occurs that you cannot solve by means of this user
manual, contact the Consumer Care Center in your country. If the
problem cannot be solved, take the appliance to a service center
authorized by Philips for examination or repair. Do not attempt to
repair the appliance yourself, otherwise your warranty becomes
invalid.
7

8
English
Caution
-
Do not place the appliance on a hot surface and prevent the
mains cord from coming into contact with hot surfaces.
-
Do not place the appliance in a cabinet when in use.
-
Unplug the appliance if problems occur during grinding or
brewing and before you clean it.
-
Keep the plug and the wall socket dry.
-
Do not lift and move the appliance while it is operating.
-
The jug is hot during and after brewing. Always hold the jug by its
handle.
-
Never use the jug in a microwave oven.
-
Wait until the appliance has cooled down before you store it. The
hotplate and the coffee jug may be hot.
-
After you have unpacked the appliance, make sure it is complete
and undamaged. If in doubt, do not use the appliance but contact
the Consumer Care Center in your country.
-
This appliance is intended to be used in household and similar
applications such as farm houses, bed and breakfast type
environments, staff kitchen areas in shops, offices and other
working environments, and by clients in hotels, motels and other
residential type environments.
Electromagnetic fields (EMF)
This Philips appliance complies with all applicable standards and regulations regarding exposure to
electromagnetic fields.
Before first use
Setting the clock
1 Put the mains plug in the wall socket. The time indication flashes on the display to indicate that
you have to set the clock time.
2 Turn the control knob to set the hour. The hour indication flashes (Fig. 2).
3 Press the center of the control knob to confirm the hour (Fig. 3).
4 The minutes indication starts flashing to indicate that you have to set the minutes (Fig. 4).
5 Turn the control knob to set the minutes (Fig. 5).
6 Press the center of the control knob to confirm the minutes (Fig. 6).
7 The display shows the set clock time. The coffeemaker is now ready for use.

English
Setting the automatic switch-off time
You can choose how long you want your coffee to stay hot after brewing by adjusting the time after
which the appliance automatically switches off. The default automatic switch-off time is 30 minutes.
The maximum automatic switch-off time is 120 minutes. To adjust the automatic switch-off time,
follow the steps below.
1 Make sure that the appliance is switched off but the mains plug is in the wall socket.
2 Press the center of the control knob until the display starts flashing.
3 Turn the control knob to increase or decrease the time. 1 is 10 minutes, 2 is 20 minutes, 3 is 30
minutes and so on until 12 is 120 minutes.
4 Press the center of the control knob to confirm the automatic switch-off time.
Note: The appliance always saves the last setting.
Flushing the appliance
Always flush the coffeemaker once before first use by following the steps below.
Warning: Never pour water into the bean container, as this damages the coffeemaker.
1 Open the water reservoir lid. Fill the water reservoir with fresh cold water up to the 8-cup indication
(Fig. 7).
Caution: Do not put coffee beans or pre-ground coffee in the water reservoir.
2 Close the water reservoir lid.
3 Put the jug in the appliance (Fig. 8).
4 Press the on/off button (Fig. 9). The display lights up and the appliance beeps.
5 Press the strength select button (Fig. 10).
6 Turn the control knob to choose the pre-ground coffee setting (Fig. 11). The pre-ground coffee icon
starts flashing.
7 Press the center of the control knob twice to confirm (Fig. 12). The appliance starts the flushing
process.
8 Let the appliance operate until the flushing process is finished. It is finished when the appliance
stops beeping.
9 Empty the jug.
10 Press the on/off button to switch off the appliance (Fig. 23).
9
Using the appliance
Filling the water reservoir
There are indications for 2 to 10 cups (275ml to 1375ml) on the water-level window. You can use these
indications to determine how much water to put in the water reservoir. The reflection changes from
light to dark for each cup of water added.
1 Open the water reservoir lid and fill the water reservoir with the required amount of cold water (Fig.
7).
Note: Do not fill the water reservoir beyond the 10-cup indication.
Note: Make sure that the amount of water you pour into the water reservoir is consistent with the
number of cups you want to brew. The coffeemaker uses all the water in the water reservoir.
 Loading...