

Page 1
HD 7259/60
Page 2

English Page 3
Français Page 8
Deutsch Seite 13
Nederlands Pagina 18
Italiano Pagina 23
Español Página 28
Português Página 33
2
Page 3
• Before connecting the appliance, please
check if the voltage indicated on the
appliance corresponds with the mains
voltage in your home.
• Do not place the appliance on a hot surface.
• Remove the mains plug from the wall
socket:
- if problems occur during making coffee;
- before cleaning the appliance.
• Do not allow the mains cord to come into
contact with hot surfaces.
• Use the appliance out of children's reach.
Prevent them from pulling the mains cord.
• Never use the appliance if the mains plug,
the mains cord or the appliance itself is
damaged.
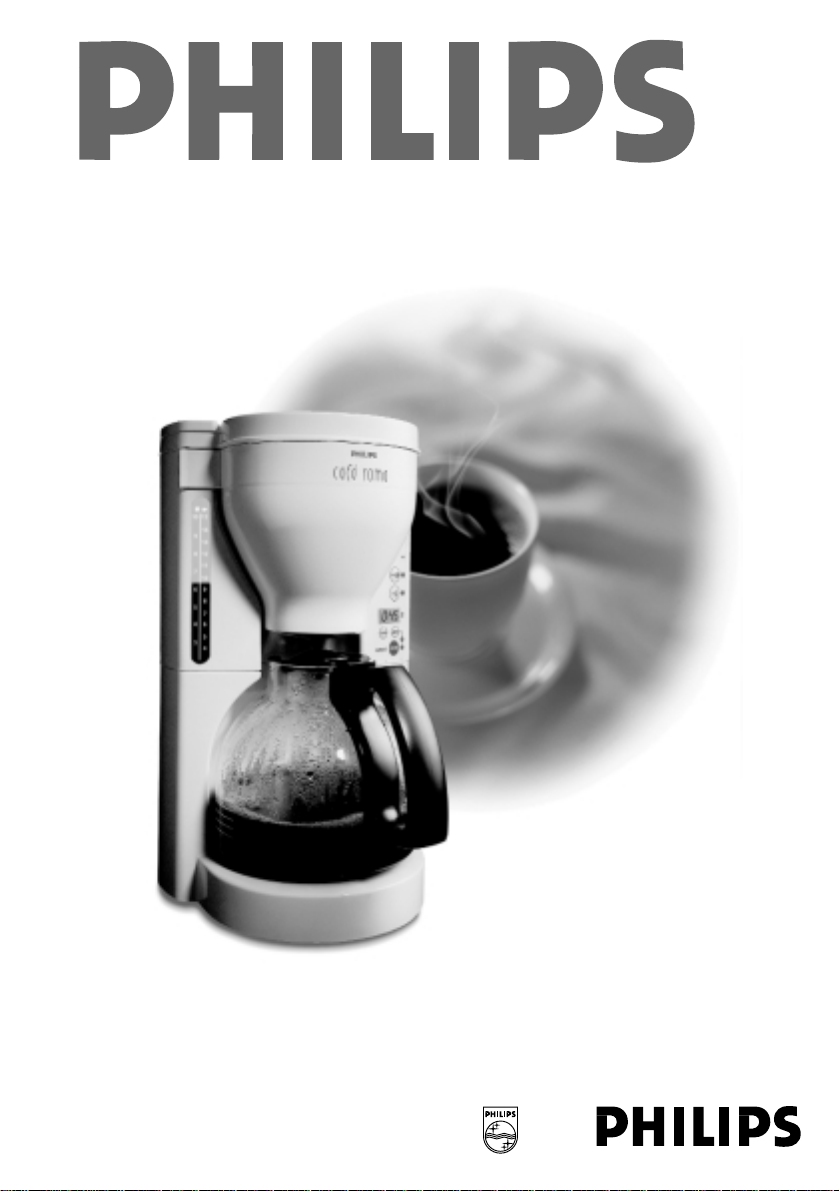
Mains cord storage
Excess mains cord can
be stored at the back of
the coffee maker (fig.1).
Setting the time of day
You can choose either a 24-hour scale or a
12-hour scale.
24-hour scale
- Insert the mains plug into a mains outlet. In the
display 12:00 will be blinking (fig. 2).
- Press button H/M to set the actual time (fig. 3).
The time indication will scroll rapidly.
- For fine setting/adjustment: depress button H/M
shortly a number of times.
12-hour scale
- Insert the mains plug into a mains outlet while
keeping button AUTO depressed.
In the display P12:00 will be blinking (fig. 4).
- Press button H/M to set the actual time (fig. 5).
The time indication will scroll rapidly.
- For fine setting/adjustment: depress button H/M
shortly a number of times.
Note: P (for "Post Meridiem") will only be
displayed between midday and midnight.
English
3
This coffee maker features automatic switchon at a preset time. To obtain this, the time of
day and the automatic switch-on time must
be set and the AUTO mode must be
selected. (The corresponding yellow pilot
light will illuminate.)
But it is also possible to start brewing rightaway by pressing the ON/OFF button. (The
corresponding red pilot light will illuminate.)
1
3
2
3
54
Page 4
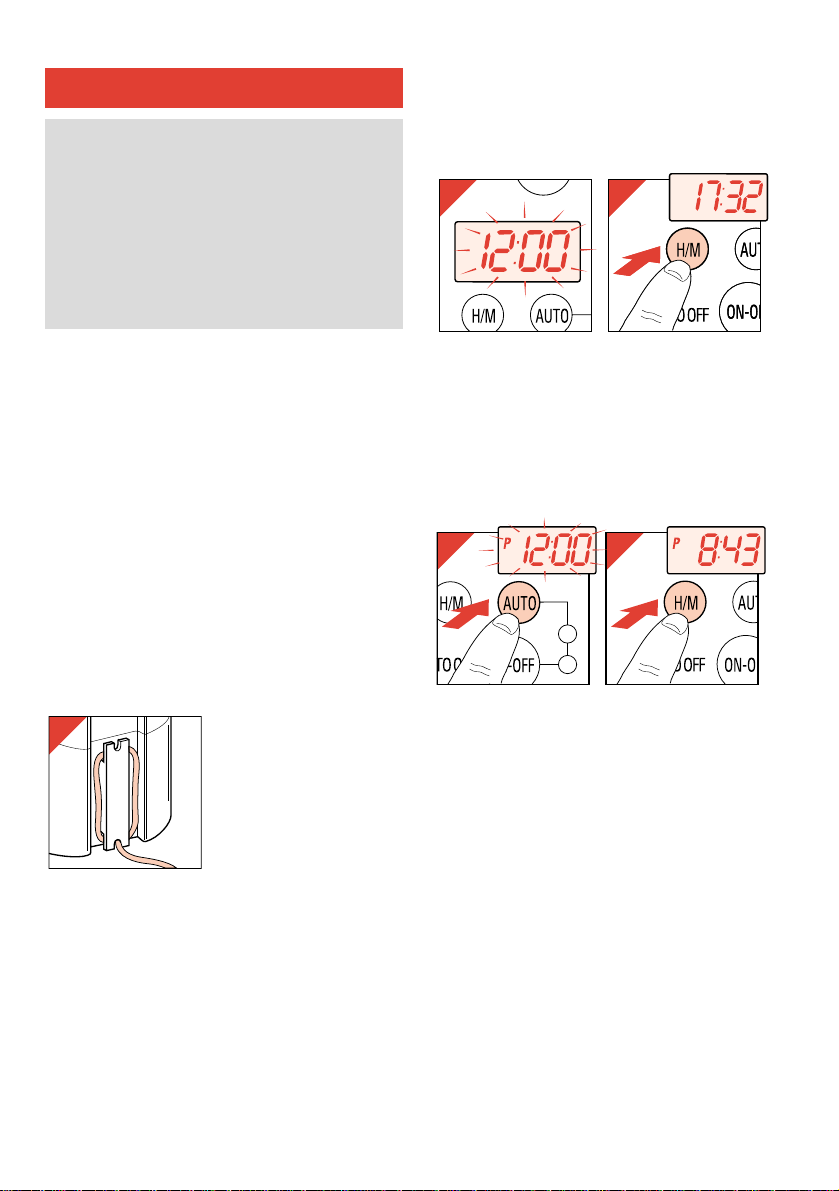
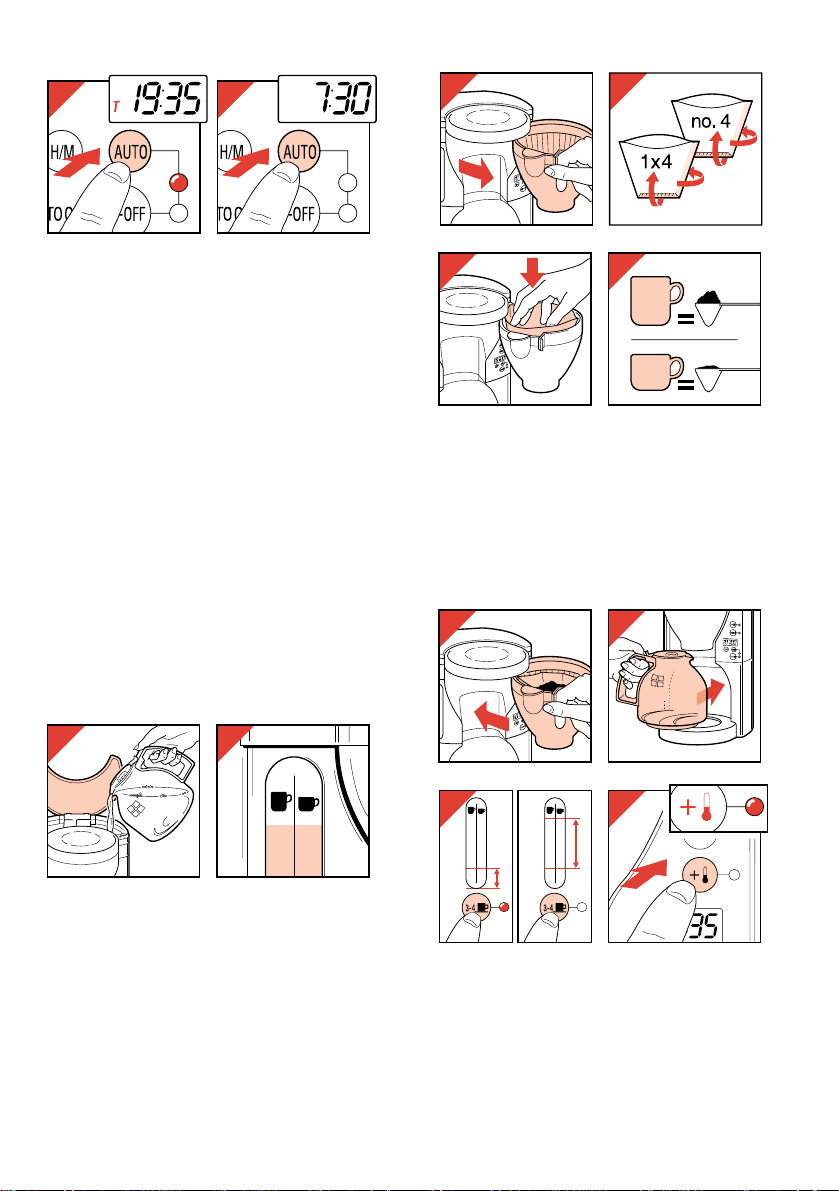
Setting the automatic switch-on time
- Press button AUTO (fig. 6).
In the display T 12.00 will be visible.
- Press button H/M to set the automatic switch-on
time (fig. 7). The time indication will scroll
rapidly.
- For fine setting/adjustment: depress button H/M
shortly a number of times.
- Release the H/M button when ready. The time
of day (without T) will become visible again
after 10 seconds.
• The colon (:) will not blink while the automatic
switch-on time is being displayed.
• If you wait too long (i.e.longer than about 10
seconds) before entering the automatic switchon time, the clock will automatically switch back
to the time of day reading.
• You can always check the automatic switch-on
time by pressing button AUTO (fig. 8). The
yellow pilot light comes on and T appears.
Unless you want the appliance to start operating
at the set time, do not forget to press button
AUTO again to leave the automatic switch-on
mode (fig. 9). (Yellow pilot light goes out.)
• You need not reset the automatic switch-on time
each time you wish to operate the coffee maker
automatically: the setting is stored until you
change it.
• Reset the time of day and the timer after an
electricity breakdown or when the appliance has
been unplugged.
Before first use
- Operate the appliance without adding ground
coffee to the filter. (See section “Making coffee”.)
- Next, clean the removable parts as described in
section “Cleaning”.
Making coffee (fig. 10 - 26)
- To fill the water tank use fresh cold water only
(fig 10).
The left hand side level indications correspond
to large cups (125 ml or 0.22 pint).
The right hand side level indications correspond
to smaller cups (85 ml or 0.15 pint) (fig 11).
- Use filter paper type “1x4 “ or “no. 4”. Do not
forget to fold the bottom and side seals (fig. 13).
With some models a permanent filter is supplied.
Paper filters are then not required.
- For large cups: take one full (heaped) measuring
spoonful of ground coffee (“fast filter” type) for
each cup.
For smaller cups: one level measuring spoonful
for each cup (fig 15).
4
6 7
8 9
10
11
15
10
14
9
13
8
12
12
13
14
15
Page 5
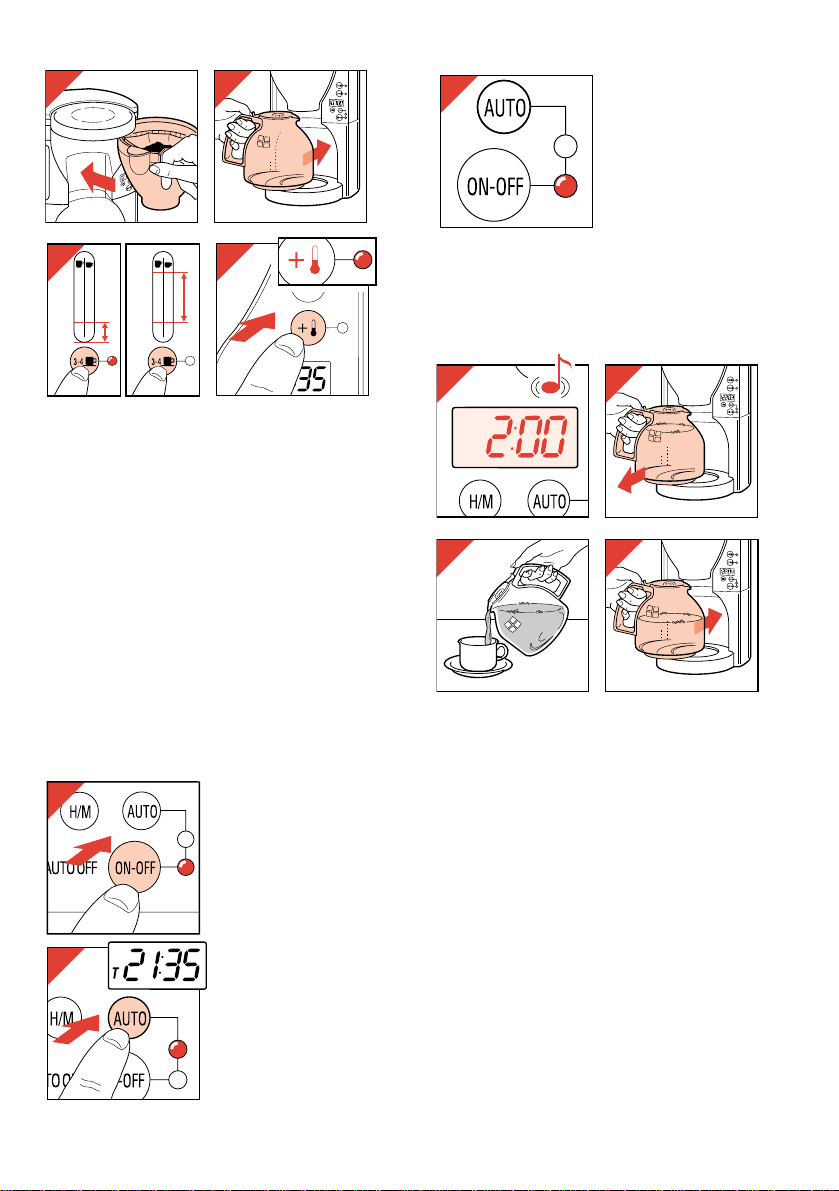
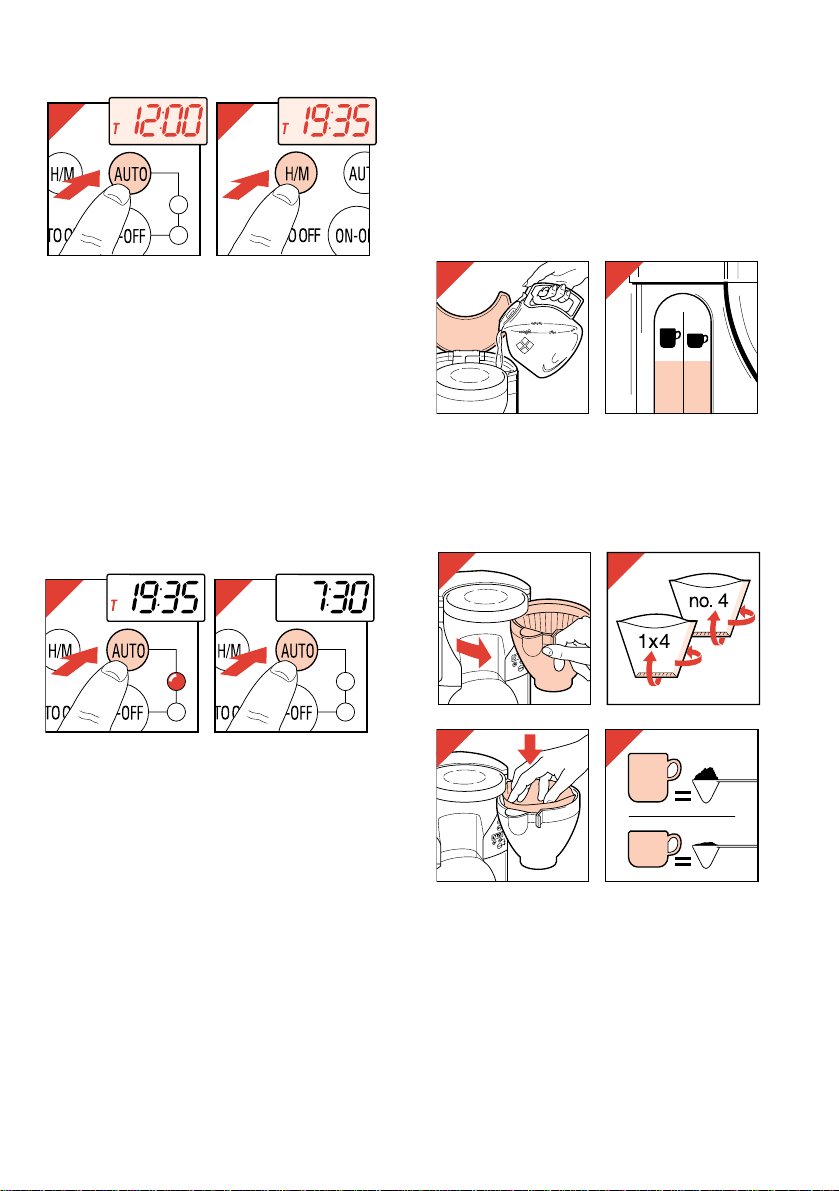
- Up to 4 large (or 6 small) cups of coffee: press
button 3-4 k to make the corresponding red
pilot light come on.
More than 4 large (or 6 small) cups of coffee:
press button 3-4 k to make the corresponding
red pilot light go out (fig. 18).
Note: After setting the appliance to brewing a
small quantity (red pilot light on), do not forget to
reset this button if you want to make a larger
quantity (red pilot light off). If this has been
forgotten, the appliance may incorrectly indicate
that it needs descaling. (See section "Descaling".)
- You may press button EXTRA $ to adjust the
hotplate temperature to your personal
preference (fig. 19). The hotplate temperature is
at maximum if the pilot light is on.
• Switching on
Press button ON/OFF if
you want the coffee
maker to start brewing
rightaway. (Thus without
using the timer) (fig.
20).The corresponding
red pilot light will come
on .
Press button AUTO if
you want the coffee
maker to switch on
automatically at the
set time (within 24 hrs)
(fig. 21). The
corresponding yellow
pilot light will come on.
When the appliance is
switched on automatically, the corresponding
red pilot light will come
on and the yellow light
will go out (fig. 22).
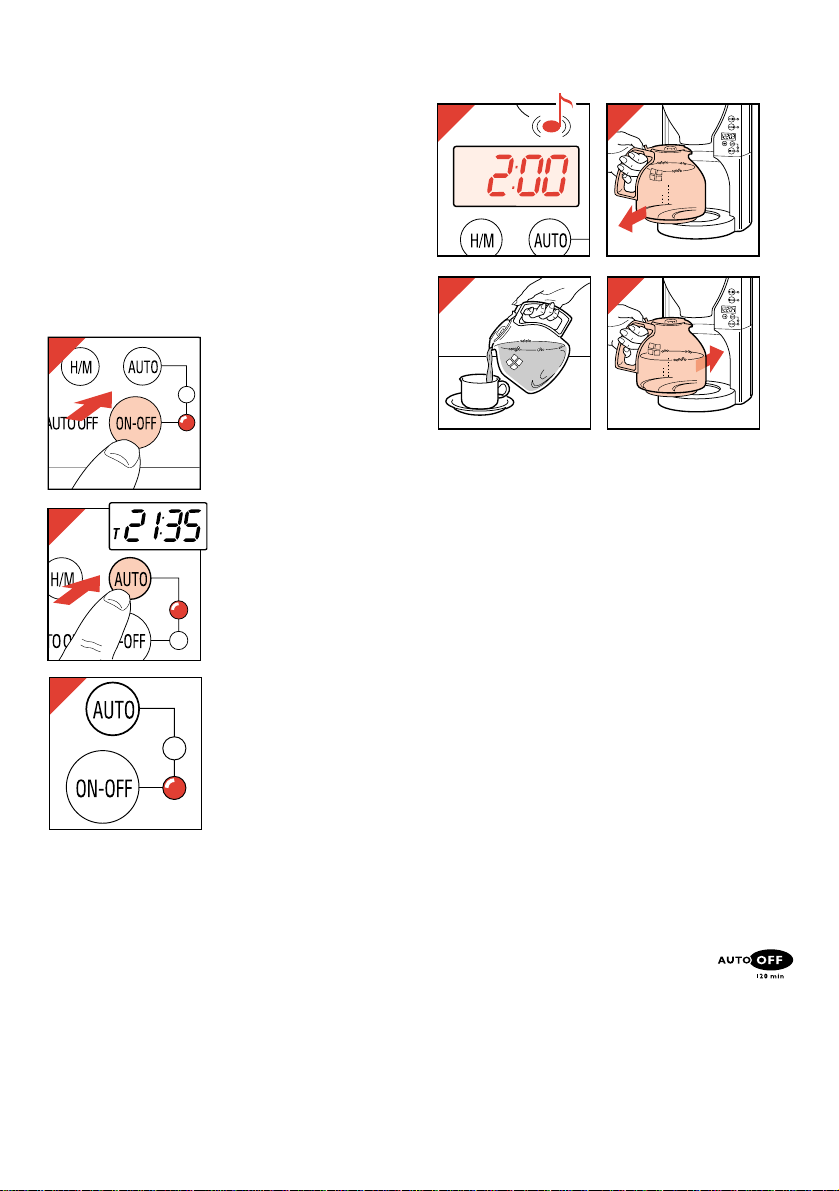
• Hotkeeping time
- As long as the appliance is plugged in, the
display will show the time of day reading (after
you have set this).
- However, when the coffee maker has finished
brewing the time of day reading will be
replaced by 2:00. You can then hear a sound
signal (fig. 23).
The hotkeeping time (max. 2 hours) is counted
down: so the display will inform you how fresh
your coffee is.
After 0:01 the coffee maker switches off
automatically and the normal time of day is
displayed again.
Special features
• “Pre-moistening”. After about a minute of
brewing the coffee maker will stop pumping hot
water. The first amount of hot water then is
allowed to act on the ground coffee (= “simmering”). The aromatic substances of the ground
coffee are then better released, which
considerably enhances the taste and flavour of
the coffee.
5
16
17
22
18
15
10
14
9
13
8
12
11
7
10
6
9
8
5
7
4
6
3
5
4
10
9
8
7
6
5
4
3
19
15
14
13
12
11
10
9
8
7
6
5
4
20
23
25
24
26
21
Page 6
• “Drip-stop”. The automatic stop-valve ensures
that no coffee will drip on to the hotplate if the
jug is removed from the appliance for a moment
during the brewing process or if the jug is
removed after making coffee.
Note: the drip-stop will only allow coffee to
flow into the jug if the jug lid has been placed.
• Automatic power shut-off.
For your convenience, and also for
extra safety: if you have not switched
off the coffee maker, it will switch off
automatically after 2 hours.
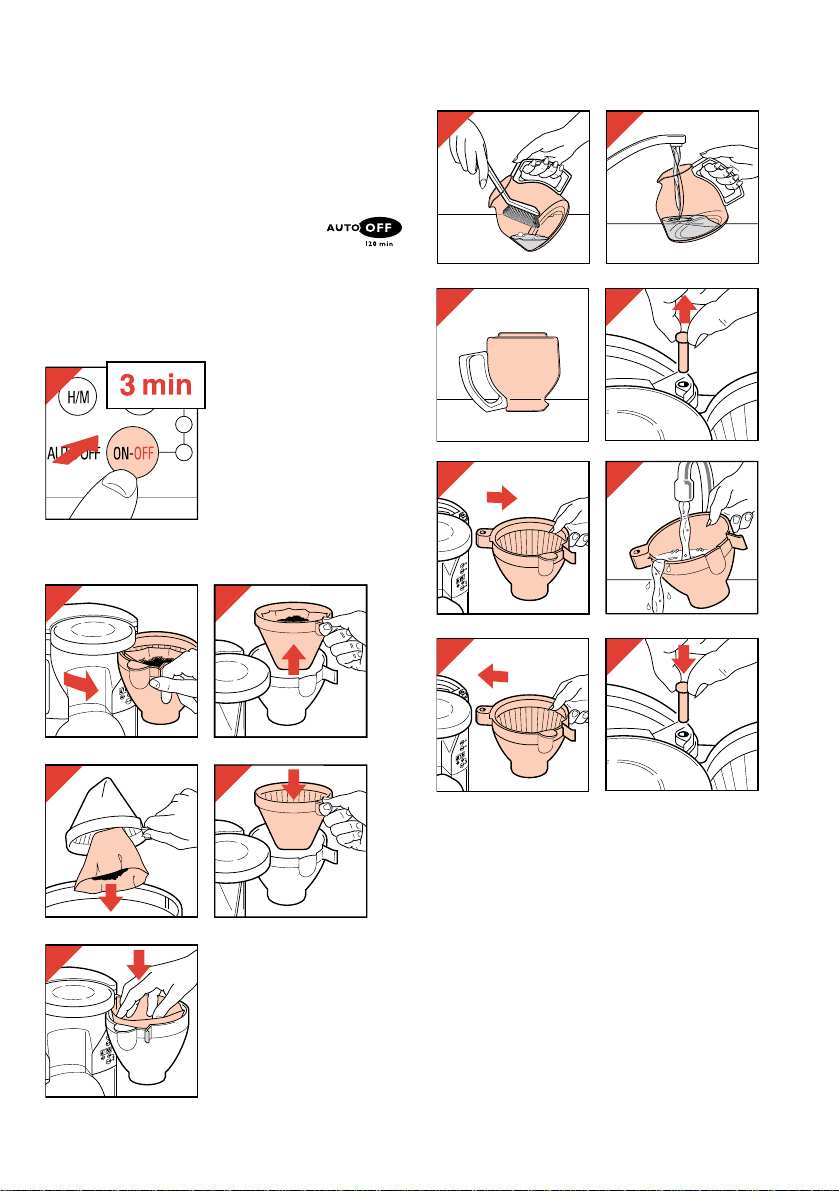
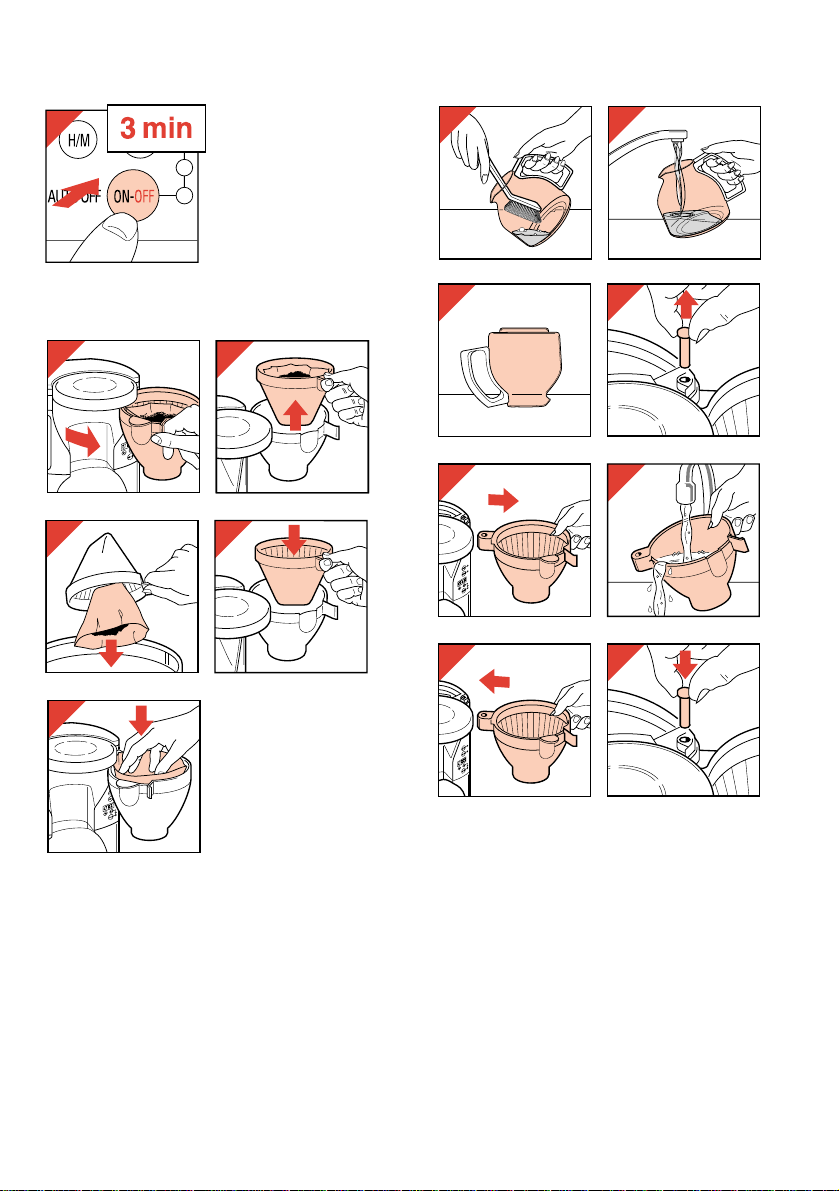
Making more coffee straight away?
If you have made one jug
of coffee and wish to
make some more
straight away, please
switch the coffee maker
off (fig. 27) and allow
about three minutes for it
to cool down. Then you
can refill the water tank.
After use
Cleaning (fig. 33 - 40)
- Always remove the mains plug from the wall
socket before cleaning the appliance.
• Never immerse the appliance in water. You
should clean it with a damp cloth.
• The removable items should be washed in hot
soapy water. Rinse with clean hot water and dry.
These items can also be cleaned in a
dishwasher.
To take out the outer filter holder first remove
the axis (fig. 36). Do not mislay the axis!
6
33
35
34
36
27
28
30
32
29
31
37
39
38
40
Page 7
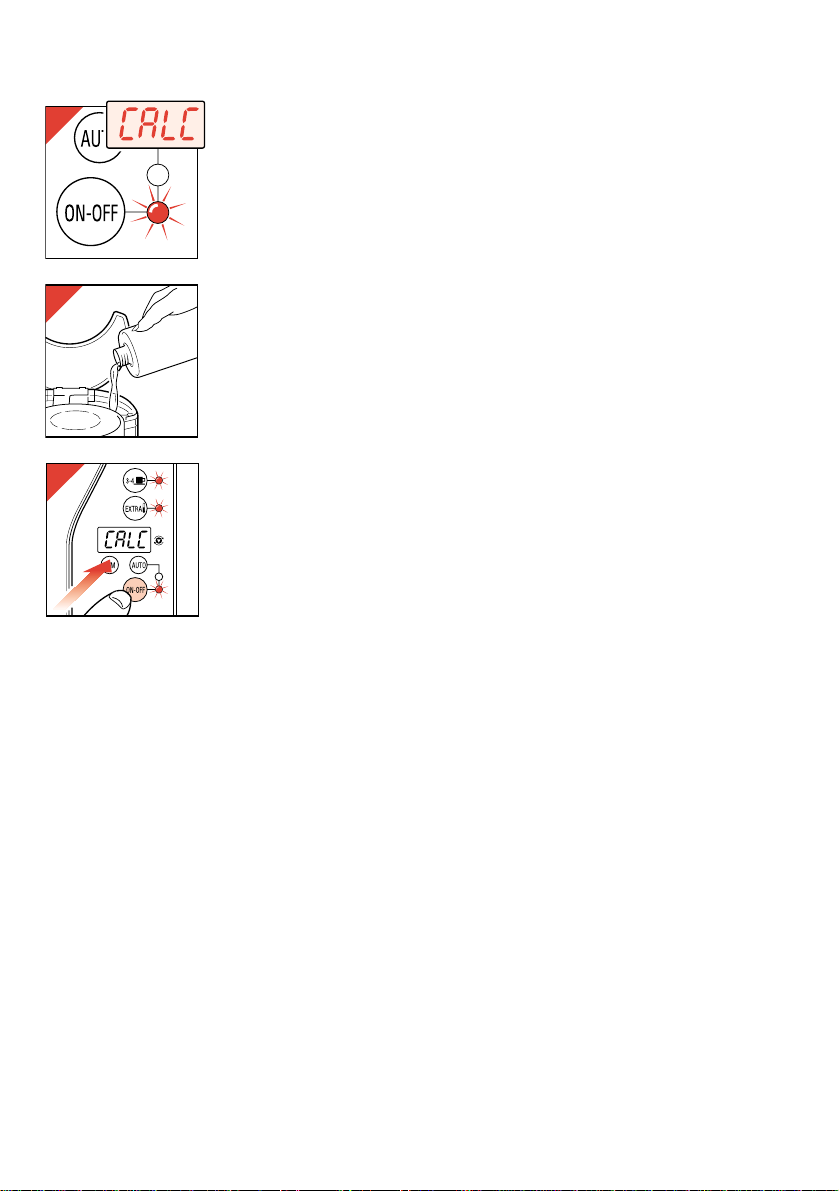
Descaling
If pilot light ON/OFF
starts blinking and the
word CALC alternates
with the actual time
reading (fig. 41), your
appliance needs
descaling.
Fill the water tank with
ordinary vinegar and do
not place a filter with
ground coffee (fig. 42).
Press and hold the on/off
switch for three seconds
when switching on. The
three red pilot lights will
start blinking (fig. 43).
Subsequently the descaling programme begins,
which spans approx. 20 minutes.
- After descaling, let the appliance work twice
more with only water to rinse away the vinegar
and scale remainders.
- Wash the coffee jug, lid and filter holder.
Jug broken? Extra jug wanted?
You can order a jug from your dealer or
Philips Service Centre under type nr. HD 7909.
Replacing the mains cord
If the mains cord of this appliance is damaged, it
must be replaced by the special cord.
Apply to your Philips dealer or to the Philips
organization in your country.
Guarantee: please refer to separate card.
■■■ Delicious coffee recipes
Irish coffee
Put one dinner spoonful of brown sugar into a
special Irish Coffee glass. Add one shot glass of
(Irish) whisky. Pour one cup of hot extra strong
coffee onto this. Top with whipped cream. If you
wish you can garnish this with a biscuit horn and
shredded chocolate.
Café Roma
Pour extra strong coffee into a coffee cup. Stir one
dinner spoonful of Cognac (French brandy)
through the coffee. Pour 5 dinner spoonfuls of
frothed (whisked) milk onto the mixture. Sprinkle
with some cocoa powder.
Granita
Make strong coffee using 850 ml (= 8 large or
10 small cups) of water and 70 g (=10 heaped
measuring spoonfuls) of ground coffee.
Pour the coffee into a shallow bowl and add 125 g
of castor sugar. Put a piece of lemon skin into the
mixture and let it cool down. Then place it into the
freezer and let it freeze. With intervals of approx.
half an hour stir the mixture well until it has
become syrupy. Serve in long drinking glasses; if
you wish with a topping of whipped cream.
7
41
42
43
3 sec
Page 8

• Assurez-vous avant de brancher l'appareil
que le voltage indiqué sur la plaque
signalétique du dessous de l'appareil
correspond au voltage du réseau de votre
habitation.
• Ne placez pas l'appareil sur une surface
chaude.
• Débranchez l'appareil:
- si un problème survient pendant la
préparation du café
- avant de le nettoyer
• Faites attention à ce que le cordon
d'alimentation ne vienne pas en contact
avec les surfaces chaudes.
• Utilisez l'appareil hors de portée des
enfants. Faites attention qu'ils ne tirent pas
sur le cordon d'alimentation.
• N'utilisez jamais l'appareil si la fiche, le
cordon d'alimentation ou l'appareil sont
endommagés.
Rangement du cordon
Vous pouvez ranger
l’excédent de cordon à
l’arrière de l’appareil
(fig. 1).
Réglage de l’heure
- Branchez l’appareil. Dans le cadran l’affichage
12:00 se met à clignoter (fig. 2).
- Appuyez sur le bouton H/M pour régler l’heure
actuelle (fig. 3). Les heures défilent rapidement.
- Pour un réglage précis: appuyez sur le bouton
H/M brièvement plusieurs fois.
Réglage de la mise en marche automatique
- Appuyez sur le bouton AUTO (fig. 4).
Dans le cadran s’affiche T 12.00.
- Appuyez sur le bouton H/M pour régler l’heure
de la mise en marche automatique (fig. 5). Les
heures défilent rapidement.
- Pour un réglage précis: appuyez sur le bouton
H/M brièvement plusieurs fois.
- Relâchez le bouton H/M. L’heure actuelle
(sans T) réapparaît au bout de 10 secondes.
• Les (:) ne clignotent pas tant que l’heure de
mise en marche automatique est affichée.
• Si vous attendez plus de 10 secondes pour
régler l’heure de mise en marche automatique,
l’horloge revient automatiquement à l’heure
actuelle du jour.
4 5
2
3
3
Français
8
Cette cafetière se met en marche à une
heure pré-sélectionnée. Pour ce faire, vous
devez régler auparavant l’heure ainsi que la
mise en marche automatique, et sélectionner
le mode AUTO. (Le voyant jaune s’allume.)
Il est cependant possible de faire du café en
appuyant simplement sur le bouton ON/OFF.
(Le voyant rouge s’allume.)
1
Page 9
• Vous pouvez toujours contrôler l’heure de mise
en marche automatique en appuyant sur le
bouton AUTO (fig. 6). Le voyant jaune s’allume
et T apparaît.
N’oubliez pas d’appuyer sur le bouton AUTO à
nouveau pour retirer le mode automatique
(fig. 7). (Le voyant jaune s’éteint.)
• Il n’est pas nécessaire de réajuster le dispositif
de mise en marche automatique chaque fois
que vous voulez faire fonctionner la cafetière
automatiquement: le réglage est conservé en
mémoire.
• Réglez l’heure et la mise en marche
automatique après une coupure d’électricité ou
après avoir débranché l’appareil.
Avant la première utilisation
- Faites fonctionner l’appareil deux fois sans
café. (Voir paragraphe “Préparation du café”.)
- Ensuite, nettoyez les parties amovibles comme
décrit dans le paragraphe “Nettoyage”.
Préparation du café (fig. 8 - 24)
- Remplissez d’eau fraîche uniquement le
réservoir d’eau (fig. 8).
Les indications de niveau sur le côté gauche
correspondent à de grandes tasses (125 ml).
Les indications de niveau sur le côté droit
correspondent à de petites tasses (85 ml)
(fig 9).
- Utilisez des filtres papier type “1x4” ou “n° 4”.
N'oubliez pas de replier les bords.
Suivant les modèles, un filtre permanent peut
être utilisé. Dans ce cas les filtres papier ne
sont pas nécessaires.
- Pour de grandes tasses, il est recommandé de
mettre une cuillère doseuse bien pleine par
tasse. Pour de petites tasses, il est
recommandé de mettre une cuillère doseuse
rase par tasse (fig. 13).
- Pour 3 grandes tasses (ou 4 petites) de café:
appuyez sur le bouton 3-4 k pour allumer le
voyant rouge.
Plus de 3 grandes tasses (ou 4 petites) de
café: appuyez sur le bouton 3-4 k pour
éteindre le voyant rouge (fig. 16).
Nota - Après avoir réglé l’appareil pour préparer
une petite quantité de café (témoin lumineux
17
16
14
13
12
11
10
9
8
7
6
5
4
15
3
4
5
6
7
8
9
10
14
13
12
11
10
9
8
7
6
5
4
15
3
4
5
6
7
8
9
10
14
15
10
9
6 7
11
8
9
15
10
14
9
13
8
12
12
13
Page 10
rouge) n’oubliez pas d’appuyer à nouveau sur
ce bouton si vous voulez préparer une quantité
de café supplémentaire (témoin éteint).
Si vous avez oublié de le faire, l’appareil peut
indiquer de manière erronée qu’il a besoin
d’être détartré. (Voir paragraphe “Détartrage”).
- Vous pouvez appuyer sur le bouton EXTRA $
pour ajuster la température de la plaque
chauffante (fig. 17). La température est à son
maximum quand le voyant est allumé.
• Mise en marche
Appuyez sur le bouton
ON/OFF si vous voulez
faire du café. (Sans
utilisation du programmateur.) (Fig. 18.)
Le voyant rouge
s’allume.
Appuyez sur le bouton
AUTO si vous désirez
que la mise en marche
de l’appareil se fasse
automatiquement à une
heure pré-sélectionnée
(dans les 24 heures)
(fig. 19).
Le voyant jaune
s’allume. Quand
l’appareil est mis en
marche automatiquement, le voyant rouge
s’allume et le jaune
s’éteint (fig. 20).
• Durée de maintien à température
- Tant que l’appareil est branché, le cadran
indique l’heure du jour (après l’avoir réglée).
- Cependant, lorsque le café est prêt, l’heure
normale est remplacée par l’indication 2:00.
Vous entendez alors un signal sonore (fig. 21).
Le temps de maintien à température (max.
2 heures) est affiché vous indiquant la fraîcheur
du café.
Après 0:01 la cafetière s’arrête
automatiquement et l’heure du jour est à
nouveau affichée.
Caractéristiques particulières
•“Pré-humidification”. Au bout d’une minute de
fonctionnement, l’écoulement de l’eau chaude
s’arrête. Le café ainsi humidifié dégage un
meilleur arôme et augmente le goût.
• Système “anti-goutte”. Il empêche le café de
couler sur la plaque chauffante, si vous enlevez
la verseuse le temps de vous servir ou en fin de
préparation.
Nota : le système “anti-goutte” ne fonctionne
correctement qu’avec le couvercle placé sur la
verseuse.
• Dispositif de coupure automatique.
Pour des raisons de sécurité,
l’appareil se coupe automatiquement au bout de 2 heures, si vous
avez oublié de l’arrêter.
10
21
22
20
23
24
18
19
Page 11
Refaire du café immédiatement ?
Si vous voulez refaire du
café, arrêtez l’appareil
(fig. 25) et laissez-le
refroidir environ 3
minutes. Vous pouvez à
nouveau remplir le
réservoir d’eau.
Après l'emploi
Nettoyage
• Débranchez toujours votre appareil avant de le
nettoyer.
• N’immergez jamais l’appareil dans l’eau. Vous
pouvez le nettoyer avec un chiffon humide.
• Les parties amovibles peuvent être nettoyées à
l’eau chaude savonneuse. Rincez à l’eau
chaude et séchez. Ces éléments peuvent
également être nettoyés dans un lave-vaisselle.
Pour retirer le porte-filtre, enlevez
préalablement l’axe (fig. 34). Ne perdez pas
l’axe.
11
31
32
37
38
35
36
34
33
25
29
28
26
27
30
Page 12

Détartrage
Votre appareil a besoin
d’être détartré lorsque le
voyant “ON/OFF” se
met à clignoter et que le
mot “CALC” alterne
avec l’heure (fig.39).
Remplissez le réservoir
avec du vinaigre blanc
sans mettre de café
dans le filtre (fig.40).
Maintenez appuyé le
bouton marche/arrêt
pendant 3 secondes.
Les 3 voyants rouges
clignotent (fig. 41).
Le programme détartrage commence et va durer
environ 20 minutes.
- Lorsque le détartrage est terminé, faites
fonctionner l’appareil deux fois avec de l’eau
fraîche afin d’éliminer les restes de vinaigre et
de tartre.
Lavez la verseuse, le couvercle et le porte-filtre.
Votre verseuse est cassée?
Vous pouvez la commander chez votre revendeur
ou un réparateur indépendant agréé Philips sous
la référence HD 7909.
Remplacement du cordon
Si le cordon d’alimentation de votre appareil est
endommagé, vous devez vous adresser à un
revendeur ou un réparateur indépendant agréé
Philips de votre région.
Délicieuses recettes
Irish coffee
Mettez une cuillère à soupe de sucre brun dans
un verre spécial pour Irish Coffee. Ajoutez un petit
verre de whisky. Versez dessus une tasse de café
chaud extra fort. Garnissez de crème fouettée.
Vous pouvez garnir avec un biscuit et du chocolat
en paillettes.
Café Roma
Versez du café fort dans une tasse. Ajoutez une
cuillère à soupe de Cognac et mélangez. Versez
5 cuillères à soupe de lait. Saupoudrez de poudre
de cacao.
Granita
Préparez du café fort avec 850 ml d’eau et 70 g
de café. Versez le café dans un bol et ajoutez
125 g de sucre brun. Mettez un zeste de citron
dans le mélange et laissez celui-ci refroidir.
Placez ensuite dans le freezer. Laissez environ
une demi-heure et mélangez jusqu’à ce qu’il
devienne sirupeux. Servez dans des verres hauts,
avec un peu de crème fouettée sur le dessus à
votre goût.
12
40
39
41
3 sec
Page 13

• Die Warmhalteplatte und die angrenzenden
Gehäuseteile werden heiß. Deshalb ist beim
Gebrauch des Gerätes Vorsicht geboten.
• Prüfen Sie vor Inbetriebnahme, ob die
Spannungsangabe auf dem Gerät mit der
örtlichen Netzspannung übereinstimmt.
• Stellen Sie das Gerät nicht auf eine heiße
Oberfläche.
• Ziehen Sie den Netzstecker aus der
Steckdose ...
- bei Störungen während der Zubereitung
des Kaffees,
- vor der Reinigung des Gerätes.
• Achten Sie darauf, daß das Netzkabel nicht
mit der heißen Heizplatte in Berührung
kommt.
• Achten Sie darauf, daß Kinder nicht den
Netzstecker aus der Steckdose ziehen oder
das Gerät herabziehen können.
• Verwenden Sie das Gerät auf keinen Fall,
wenn de Netzstecker, das Netzkabel oder
das Gerät selbst in irgendeiner Hinsicht
beschädigt ist.
Netzkabel unterbringen
Überschüssiges
Netzkabel können Sie
auf der Rückseite des
Geräts unterbringen
(Abb. 1).
Einstellen der aktuellen Uhrzeit
- Stecken Sie den Stecker in die Steckdose. Auf
der Anzeige blinkt 12:00 (Abb. 2).
- Drücken Sie den Schalter H/M, um die aktuelle
Uhrzeit einzugeben (Abb. 3). Die Anzeige läuft
schnell durch.
- Zur Feineinstellung drücken Sie den Schalter
H/M mehrmals kurz nacheinander.
Einstellen der automatischen Einschaltzeit
- Drücken Sie den Schalter AUTO (Abb. 4).
Auf der Anzeige erscheint T 12.00.
- Drücken Sie den Schalter H/M, um die
automatische Einschaltzeit einzugeben
(Abb. 6). Die Anzeige läuft schnell durch.
- Zur Feineinstellung drücken Sie den Schalter
H/M mehrmals kurz nacheinander.
- Lassen Sie den Schalter nach dem Einstellen
los. Die Tageszeit (ohne T) wird dann nach
ungefähr 10 Sekunden wieder sichtbar sein.
• Der Doppelpunkt (:) blinkt nicht, wenn die
automatische Einschaltzeit angezeigt wird.
• Wenn Sie länger als ca. 10 Sekunden mit der
Eingabe der automatischen Einschaltzeit
warten, schaltet die Anzeige auf die aktuelle
Uhrzeit zurück.
4 5
2
3
3
Deutsch
13
Diese Kaffeemaschine schaltet sich zu einer
eingestellten Zeit automatisch ein. Dazu muß
die aktuelle Uhrzeit eingestellt werden und
die Zeit, zu der sich die Maschine einschalten
soll. Dann muß noch die Betriebsart AUTO
gewählt werden. Die gelbe Kontrollampe
leuchtet auf.
Außerdem kann jederzeit sofort Kaffee zubereitet werden, indem der Ein-/Ausschalter
betätigt wird. Die rote Kontrollampe leuchtet
auf.
1
Page 14

• Sie können jederzeit die eingestellte
Einschaltzeit kontrollieren, indem Sie den
Schalter AUTO drücken (Abb. 6). Die gelbe
Kontrollampe leuchtet dann auf und T
erscheint. Wenn Sie zur eingestellten Zeit
keinen Kaffee zubereiten wollen, müssen Sie
den Schalter AUTO nochmals drücken (Abb. 7).
Die gelbe Kontrollampe erlischt dann.
• Sie brauchen die Einschaltzeit nicht jedesmal
erneut einzustellen; diese Zeit wird gespeichert,
bis Sie die Einstellung ändern.
• Nach einem Stromausfall oder nachdem der
Stecker aus der Steckdose gezogen war,
müssen Sie die aktuelle Uhrzeit und die
automatische Einschaltzeit neu einstellen.
Vor dem ersten Gebrauch
- Betreiben Sie das Gerät zweimal, wie im
Abschnitt "Kaffee zubereiten" beschrieben,
ohne Kaffee in den Filter zu geben.
- Reinigen Sie danach alle abnehmbaren Teile,
wie im Abschnitt "Reinigung" beschrieben.
Kaffee zubereiten (Abb. 8 bis 24)
- Füllen Sie den Waserbehälter nur mit frischem,
kaltem Wasser (Abb. 8).
Die linke Skala der Wasserstandsanzeige
entspricht großen Tassen (125 ml).
Die rechte Skala entspricht kleinen Tassen
(85 ml) (Abb. 9).
- Verwenden Sie Filtertüten Type "1 x 4" bzw.
"No. 4".
- Vergessen Sie nicht, die Kanten zu falzen
(Abb. 11).
Einige Modelle werden mit einem Permanentfilter geliefert. Hierfür sind keine Papierfilter
erforderlich.
- Für große Tassen: Nehmen Sie einen
gehäuften Meßlöffel voll gemahlenem Kaffee
pro Tasse.
Für kleinere Tassen nehmen Sie einen
gestrichenen Meßlöffel voll Kaffee pro Tasse
(Abb. 13).
- Bis zu 3 großen oder 4 kleine Tassen Kaffee:
Drücken Sie den Schalter 3-4 k; die rote
Kontrollampe leuchtet auf.
Mehr als 3 große bzw. 4 kleine Tassen
Kaffee: Drücken Sie den Schalter 3-4 k; die
rote Kontrollampe erlischt (Abb. 16).
17
16
14
13
12
11
10
9
8
7
6
5
4
15
3
4
5
6
7
8
9
10
14
13
12
11
10
9
8
7
6
5
4
15
3
4
5
6
7
8
9
10
14
15
10
14
6 7
11
8
9
12
13
10
9
8
15
14
13
12
Page 15

Hinweis: Wenn Sie das Gerät für die Zubereitung kleiner Mengen eingestellt haben (rote
Kontrollampe an) und Sie wollen größere
Mengen zubereiten, so vergessen Sie bitte
nicht, den Schalter für die Zubereitung größerer
Mengen umzustellen (rote Kontrollampe aus)!
Geschieht dies nicht, kann das Gerät
fälschlicherweise anzeigen, daß Entkalung
notwendig ist. Vgl. den Abschnitt “Entkalken”.
- Sie können den Schalter EXTRA $ drücken, um
die Temperatur der Heizplatte (Abb. 17) nach
Ihrem Belieben einzustellen. Wenn die
Kontrollampe aufleuchtet, ist die höchste
Temperatur eingestellt.
• Einschalten
Drücken Sie den
Ein-/Ausschalter, ohne
die automatische
Einschaltzeit zu
aktivieren, wenn Sie
sofort frischen Kaffee
zubereiten wollen
(Abb. 18).
Die rote Kontrollampe
leuchtet auf.
Drücken Sie den
Schalter AUTO, wenn
der Kaffee zur
eingestellten Zeit im
Laufe der nächsten
24 Stunden zubereitet
werden soll (Abb. 19).
Die gelbe Kontrollampe
leuchtet auf.
Sobald sich das Gerät
einschaltet, leuchtet die
rote Kontrollampe, und
die gelbe erlischt.
• Warmhaltedauer
- Nachdem Sie die aktuelle Uhrzeit eingestellt
haben, wird sie solange angezeigt, wie der
Stecker in der Steckdose steckt.
- Wenn dann der Kaffee fertig ist, wird 2:00
angezeigt, und ein akustisches Signal ertönt
(Abb. 21).
Die Warmhaltezeit von max. 2 Stunden wird
rückwärts gezählt; so können Sie sehen, wie
frisch Ihr Kaffee ist.
- Nach der Anzeige 0:01 schaltet das Gerät
automatisch auf die aktuelle Uhrzeit zurück.
Sonderausstattung
• Anfeuchtung. Nach ca. 1 Minute unterbricht
das Gerät die Zufuhr von heißem Wasser, und
das bis dahin geflossene Wasser feuchtet das
Kaffeemehl an.
Die Aromastoffe werden so aus dem Kaffee
besser freigesetzt, wodurch Geschmack und
Duft des Kaffees verbessert werden.
• Tropf-Stop. Ein automatisches Ventil
verhindert, daß Kaffee auf die Warmhalteplatte
tropft, wenn sich die Kanne nicht im Gerät
befindet.
Wichtig: Wegen des automatischen TropfStop kann nur bei aufgesetztem
Kannendeckel Kaffee in die Kanne fließen.
• Automatische Stromabschaltung.
Zu Ihrer Bequemlichkeit und Ihrer
Sicherheit wird das Gerät nach
Ablauf von 2 Stunden ausgeschaltet.
15
21
22
20
23
24
18
19
Page 16

Sofort frischen Kaffee zubereiten
Ist Ihr Kaffee fertig, und
Sie möchten sofort noch
eine Kanne zubereiten,
so schalten Sie das
Gerät aus (Abb. 25) und
lassen es ca. drei Minuten abkühlen. Danach
können Sie den Wasserbehälter neu füllen.
Nach dem Gebrauch
Reinigung
• Ziehen Sie vor jeder Reinigung den Stecker aus
der Steckdose.
• Tauchen Sie das Gerät niemals in Wasser. Sie
können es mit einem feuchten Tuch abwischen.
• Die abnehmbaren Teile können in warmem
Wasser gereinigt werden, dem Sie ein wenig
Spülmittel zugefügt haben. Spülen Sie mit
klarem, warmem Wasser nach, und trocknen
Sie ab.
Sie können diese Teile auch im Geschirrspüler
reinigen.
Nehmen Sie den Verriegelungsstift (Abb. 34)
heraus, bevor Sie den äußeren Filterhalter
abnehmen, und bewahren Sie ihn sorgfältig auf.
16
31
32
37
38
35
36
34
33
25
29
28
26
27
30
Page 17

Entkalken
Wenn die Kontrollampe
"ON/OFF" aufleuchtet
und das Wort "CALC"
erscheint (Abb. 39), muß
das Gerät entkalkt
werden.
Füllen Sie den
Wasserbehälter mit
Haushaltsessig, und
setzen Sie den Filter
nicht auf.
Halten Sie den
Ein-/Ausschalter beim
Einschalten drei
Sekunden lang gedrückt.
Die drei roten
Kontrollampen beginnen
zu blinken (Abb. 41).
Danach läuft das Entkalkungsprogramm ab, das
ca. 20 Minuten dauert.
- Betreiben Sie anschließend das Gerät zweimal
mit klarem Wasser, um Essig- und Kalkreste zu
entfernen.
- Waschen Sie die Kanne, den Deckel und den
Filterhalter ab.
Kanne zerbrochen? Extra-Kanne nötig?
Sie können bei Ihrem Händler oder beim PhilipsKundendienst eine Kanne unter der Type Nr.
HD 7909 bestellen.
Ersatz des Netzkabels
Wird das Netzkabel beschädigt, muß es durch ein
Spezialkabel ersetzt werden.
Wenden Sie sich in diesem Fall an Ihren Händler
oder die Philips-Organisation in Ihrem Lande.
Köstliche Kaffee-Rezepte
Irish Coffee
Geben Sie einen Eßlöffel braunen Zucker in ein
Irish-Coffee-Glas. Geben Sie ein Meßglas Irish
Whiskey hinzu. Gießen Sie eine Tasse besonders
heißen starken Kaffee darauf. Krönen Sie das
Glas mit einer Haube aus Schlagsahne und nach
Belieben einem Biskuit oder mit geriebener
Schokolade.
Café Roma
Gießen Sie einen Teelöffel Cognac in eine Tasse
besonders starken Kaffee. Geben Sie 5 Eßlöffel
Milchschaum oder Schlagsahne auf die Mischung.
Bestreuen Sie die Haube mit etwas Kakaopulver.
Granita
Bereiten Sie aus 850 ml (= 8 große oder 10 kleine
Tassen) Wasser und 70 g (= 10 gehäufte
Meßlöffel) gemahlenem Kaffee einen starken
Kaffee. Gießen Sie ihn in eine flache Schüssel auf
etwa 125 g Kristallzucker. Geben Sie ein Stück
Zitronenschale in die Mischung, und lassen Sie
sie abkühlen. Stellen Sie die Mischung in ein
Gefriergerät, und rühren Sie sie in ca.
halbstündigem Abstand gut durch, bis sie
sirupartig geworden ist. Servieren Sie das
Getränk in Longdrink-Gläsern, nach Belieben mit
einer Sahnehaube versehen.
17
40
39
41
3 sec
Page 18

• Controleer, vóórdat u het apparaat aansluit,
of de aanduiding van het voltage op het
apparaat overeenkomt met de netspanning
in uw woning.
• Zet het apparaat niet op een heet oppervlak.
• Neem de stekker uit het stopcontact:
- als er bij het koffiezetten problemen
optreden;
- voordat u het apparaat gaat schoonmaken.
• Zorg ervoor dat het snoer niet in aanraking
kan komen met hete oppervlakken.
• Gebruik het apparaat buiten bereik van
kinderen. Let erop dat zij niet aan het snoer
kunnen trekken.
• Gebruik het apparaat niet als de stekker, het
snoer of het apparaat zelf beschadigd is.
Snoer opbergen
Overtollig snoer kunt u
opbergen aan de
achterzijde van de
koffiezetter (fig. 1).
Instellen: normale kloktijd
- Steek de stekker in het stopcontact. In het
venster knippert 12:00 (fig. 2).
- Druk toets H/M om de normale kloktijd in te
stellen (fig. 3). De tijdsaanduiding verandert dan
doorlopend.
- Om de aanduiding precies juist te krijgen, kunt
u tenslotte toets H/M een paar keer kort
indrukken.
Instellen: tijdstip automatisch inschakelen
- Druk toets AUTO in (fig. 4).
In het venster ziet u T 12.00.
- Druk toets H/M om het tijdstip voor automatisch
inschakelen in te stellen (fig. 5).
- Om de aanduiding precies juist te krijgen, kunt
u tenslotte toets H/M een paar keer kort
indrukken.
- Als u klaar bent, laat u toets H/M los. De
normale kloktijd (zonder T) wordt na 10 seconden weer zichtbaar.
• De dubbele punt (:) knippert niet terwijl het
tijdstip voor automatisch inschakelen in het
venster zichtbaar is.
• Als u langer dan ongeveer 10 seconden wacht
voordat u het tijdstip voor automatisch
inschakelen intoetst, schakelt de klok
automatisch terug naar de normale kloktijd.
4 5
2
3
3
Nederlands
18
Deze koffiezetter kunt u automatisch laten
inschakelen op een vooraf ingestelde tijd.
Hiertoe moeten de normale kloktijd en het
tijdstip van automatisch inschakelen
ingesteld zijn. Tevens moet de functie AUTO
ingeschakeld zijn. (Het betreffende gele
controlelampje brandt.)
Maar het is ook mogelijk het apparaat
meteen te laten beginnen met koffiezetten,
door knop ON/OFF in te drukken. (Het
daarbij behorende rode controlelampje gaat
branden.)
1
Page 19

• U kunt altijd controleren of u het tijdstip voor
automatisch inschakelen juist hebt ingesteld
door toets AUTO in te drukken (fig. 6). Het gele
controlelampje gaat dan branden en de T
verschijnt.
Tenzij u wilt dat het apparaat inderdaad op het
ingestelde tijdstip wordt ingeschakeld, drukt u
nogmaals op knop AUTO om de functie
“automatisch inschakelen” te beëindigen. (Gele
controlelampje gaat uit.)
• U hoeft het tijdstip voor automatisch
inschakelen niet telkens opnieuw in te stellen:
het ingestelde tijdstip blijft bewaard todat u het
wijzigt.
• Na een stroomstoring, en ook als de stekker uit
het stopcontact is geweest, moeten de normale
kloktijd en het tijdstip voor automatisch
inschakelen opnieuw worden ingesteld.
Vóór het eerste gebruik
- Laat het apparaat vóór het eerste gebruik een
keer werken zonder koffie in het filter. (Zie
“Koffiezetten”.)
- Was daarna de losse onderdelen af. (Zie
“Schoonmaken”.)
Koffiezetten (fig. 8 - 24)
- Gebruik voor het vullen van het waterreservoir
alleen vers, koud water (fig. 8).
De linker niveauaanduidingen gelden voor grote
koppen (125 ml).
De rechter niveau-aanduidingen gelden voor
kleinere koppen (85 ml). (Fig. 9.)
- Gebruik papieren filterzakjes type “1x4 “ of
“n° 4”. Vergeet niet de plakranden om te
vouwen (fig. 11).
Bij sommige versies wordt een permanent filter
geleverd. U hoeft dan geen papieren filterzakjes
te gebruiken.
- Voor grote koppen: 1 volle maatlepel koffiemaalsel (snelfiltermaling) per kop.
Voor kleinere koppen: 1 afgestreken maatlepel
per kop (fig. 13).
- Voor maximaal 4 grote (of 6 kleine) koppen
koffie: druk toets 3-4 k om het betreffende
rode controlelampje te laten branden.
Voor méér dan 4 grote (of 6 kleine) koppen
koffie: druk toets 3-4 k om het betreffende
rode controlelampje te laten uitgaan (fig. 16).
14
15
10
19
6 7
17
16
14
13
12
11
10
9
8
7
6
5
4
15
3
4
5
6
7
8
9
10
14
13
12
11
10
9
8
7
6
5
4
15
3
4
5
6
7
8
9
10
11
8
9
12
13
10
9
8
15
14
13
12
Page 20

N.B.: Nadat u het apparaat hebt ingesteld op het
zetten van een kleine hoeveelheid koffie (rode
controlelampje brandt), moet u niet vergeten dit
knopje opnieuw in te drukken als u weer een grote
hoeveelheid wilt zetten (rode controlelampje uit).
Als dit wordt vergeten, kan het apparaat ten
onrechte melden dat het moet worden ontkalkt.
(Zie hoofdstuk "Ontkalken".)
- U kunt druktoets EXTRA $ indrukken om de
temperatuur van de warmhoudplaat aan te
passen bij uw persoonlijke voorkeur (fig. 17).
De temperatuur is het hoogst wanneer het
controlelampje brandt.
• Inschakelen
Druk op toets ON/OFF
als u wilt dat de
koffiezetter direct begint
te werken. (Dus zonder
de tijdschakelaar te
gebruiken.) (Fig. 18.)
Het betreffende rode
controlelampje gaat
branden.
Druk op toets AUTO als
u wilt dat de koffiezetter
zichzelf (binnen 24 uur)
automatisch inschakelt
op de door u ingestelde
tijd (fig. 19).
Het bijbehorende gele
controlelelampje “auto”
gaat branden.
Wanneer het apparaat
automatisch wordt
ingeschakeld, gaat het
betreffende rode
controlelampje branden.
Het gele lampje gaat
dan uit (fig. 20).
• Warmhoudtijd
- Zolang de koffiezetter is aangesloten, is in het
venster de normale kloktijd zichtbaar (nadat
deze door u is ingesteld).
- Wanneer het apparaat klaar is met koffiezetten,
maakt de normale tijdsaanduiding echter plaats
voor de aanduiding 2:00. U hoort dan een
geluidssignaal (fig. 21).
De warmhoudtijd (max. 2 uur) wordt afgeteld: u
kunt dus aan de klok zien hoe vers de koffie is.
Na de aanduiding 0:01 schakelt het apparaat
zichzelf uit en wordt de normale kloktijd weer
zichtbaar.
Bijzondere eigenschappen
• Vóórbevochtigen. Na ongeveer een minuut
stopt de koffiezetter even met het oppompen
van heet water. Het eerste hete water kan dan
goed op het koffiemaalsel inwerken (= “wellen”).
De smaakstoffen in de koffie komen hierdoor
beter vrij, wat het aroma en de geur van de
koffie zeer ten goede komt.
• “Drip-stop”. De ingebouwde “drip-stop”
(“druppelstopper”) zorgt ervoor dat er geen
koffie uit de filterhouder op de warmhoudplaat
druppelt, wanneer u tijdens het koffiezetten de
kan even uit het apparaat neemt, en wanneer u
ná het koffiezetten de kan verwijdert.
Let op: de “drip-stop” zal alleen koffie in de
kan laten stromen als het deksel op de kan
is geplaatst.
• Automatisch uitschakelen.
Voor het gemak, en ook voor extra
veiligheid: als u de koffiezetter niet hebt
uitgeschakeld, schakelt het apparaat zichzelf na
2 uur automatisch uit.
20
21
22
20
23
24
18
19
Page 21

Meteen opnieuw koffie zetten?
Als u meteen opnieuw
koffie wilt zetten, schakel
dan de koffiezetter uit
(fig. 25) en laat het
apparaat tenminste drie
minuten afkoelen.
Daarna kunt u het
waterreservoir opnieuw
vullen.
Na het gebruik
Schoonmaken
• Haal altijd de stekker uit het stopcontact
voordat u het apparaat gaat schoonmaken.
• Dompel het apparaat nooit in water. U kunt het
schoonmaken met een vochtige doek.
• De losse delen kunt u afwassen in heet sop.
Spoel ze na met heet water en droog ze af.
U kunt de losse delen ook schoonmaken in de
afwasmachine.
Voor het losnemen van de buitenste
filterhouder verwijdert u eerst het asje (fig. 34).
Zorg ervoor dat u het asje niet kwijtraakt!
21
31
32
37
38
35
36
34
33
29
28
30
26
27
25
Page 22

Ontkalken
Wanneer het controlelampje “ON/OFF” gaat
knipperen en het woord
“CALC” afwisselend
met de normale kloktijd
in het venster zichtbaar
wordt (fig. 39), moet uw
apparaat ontkalkt
worden.
Vul het waterreservoir
met gewone azijn in
plaats van water, en
plaats geen filterzakje
met gemalen koffie
(fig. 40).
Houd de aan/uit (On/Off)
schakelaar bij het
inschakelen drie
seconden ingedrukt.
De drie rode
controlelampjes gaan
dan knipperen (fig. 41).
Vervolgens begint het speciale ontkalkprogramma, dat ca. 20 minuten duurt.
- Laat na het ontkalken het apparaat nog twee
keer met alleen koud water werken om azijn en
kalkresten weg te spoelen.
- Was vervolgens de koffiekan, de filterhouder en
het deksel af.
Kan kapot? Of extra kan?
U kunt bij uw leverancier of Philips Service
Centrum een kan bestellen onder typenr.
HD 7909.
Snoer vervangen
Indien het snoer van dit apparaat is beschadigd,
dient het uitsluitend door het originele type te
worden vervangen. Wend u daartoe tot uw Philips
leverancier of tot de Philips organisatie in uw land.
Heerlijke koffierecepten
Irish coffee
Doe een eetlepel bruine suiker in een speciaal
Irish coffee glas.
Schenk er een borrelmaatje (Ierse) whisky bij.
Schenk daarop een kopje hete extra sterke koffie.
Doe hier geklopte slagroom op.
Eventueel garneren met een biscuithoorntje en
chocoladeschaafsel.
Café Roma
Schenk in een koffiekopje extra sterke koffie.
Roer er een eetlepel cognac doorheen. Schenk er
daarna 5 eetlepels opgeklopte melk op.
Bestrooi het geheel met wat cacoapoeder.
Granita
Zet sterke koffie met 850 ml (= 8 grote of 10 kleine
koppen) water en 70 gram (= 10 volle maatlepels)
koffiemaalsel.
Giet dit in een lage kom en voeg 125 g
basterdsuiker toe.
Leg er een stukje citroenschil in.
Laat het geheel afkoelen.
Zet de kom daarna in de diepvriezer en laat het
mengsel bevriezen. Roer elk half uur de vloeistof
even om totdat het mengsel stroperig is
geworden.
Serveren in longdrinkglazen, eventueel met
slagroom.
22
40
39
41
3 sec
Page 23

• Prima di collegare l’apparecchio, controllate
che la tensione indicata sull’apparecchio
corrisponda a quella della rete locale.
• Non appoggiate l’apparecchio su una
superficie calda.
• Togliete immediatamente la spina dalla
presa di alimentazione:
- nel caso si verificassero problemi durante
la preparazione del caffè
- prima di procedere alla pulizia
dell’apparecchio.
• Evitate che il cavo di alimentazione venga a
contatto con superfici calde.
• Durante l’uso, tenete l’apparecchio lontano
dalla portata dei bambini.
Fate in modo che non possano tirare il cavo
di alimentazione.
• Non utilizzate l’apparecchio nel caso in cui il
cavo di alimentazione, la spina o
l’apparecchio risultassero danneggiati.
Avvolgicavo
Il cavo di alimentazione
in eccesso può essere
riposto nella parte
posteriore della
macchina del caffè.
Regolazione dell’ora attuale
- Inserite la spina nella presa di alimentazione.
Nel display vedrete lampeggiare 12:00 (fig. 2).
- Premete il pulsante H/M (Minuti) per regolare
l’ora attuale (fig. 3). L’indicazione dell’ora
inizierà a scorrere rapidamente.
- Per regolare l’ora esatta: premete il pulsante
H/M brevemente.
Regolazione dell’orario di accensione
automatica
- Premete il pulsante AUTO (fig. 4).
Sul display apparirà T 12.00.
- Premete il pulsante H/M per regolare l’orario di
accensione automatica (fig. 5). L’indicazione
dell’ora scorrerà velocemente.
- Per regolare l’ora esatta: premete il pulsante
H/M brevemente.
- Rilasciate il pulsante H/M quando avrete
raggiunto l’ora desiderata. L’ora (senza T) sarà
di nuovo visibile dopo 10 secondi.
• I due puntini (:) non lampeggeranno quando
l’orario di accensione automatica sarà visibile
sul display.
• Se aspettate più di 10 secondi prima di fissare
l’orario di accensione automatica, sul display
apparirà nuovamente l’ora normale.
4 5
2
3
3
Italiano
23
La caratteristica principale di questa
macchina da caffè è costituita dall’accensione automatica all’orario pre-selezionato.
Per ottenere questo è sufficiente regolare
l’ora attuale e l’orario dell’accensione
automatica e selezionare la funzione AUTO.
La corrispondente spia luminosa si
accenderà.
Premendo il pulsante ON/OFF la macchina
del caffè erogherà subito il caffè. (La
corrispondente spia luminosa si accenderà.)
1
Page 24

- Potete sempre arrestare l’accensione
automatica premendo il pulsante AUTO (fig. 6).
(La spia luminosa gialla si accenderà e vedrete
apparire T.) Se non volete che l’apparecchio si
accenda all’ora stabilita, ricordatevi di premere
di nuovo il pulsante AUTO (la spia luminosa
gialla si spegnerà).
• Non occorre regolare l’orario di accensione
automatica ogni volta che fate funzionare
l’apparecchio automaticamente: la regolazione
rimane in memoria fino a quando non la
cambierete.
• Se venisse a mancare la luce, o se la spina
venisse tolta dalla presa di alimentazione, l’ora
esatta ed il timer dovranno essere regolati
nuovamente.
Quando usate la macchina del caffè per la
prima volta
- Fate funzionare la macchina del caffè per due
volte senza usare il caffè (ved. il cap.
“Preparazione del caffè”).
- Pulite le parti asportabili dell’apparecchio come
descritto nel cap. “Pulizia”.
Preparazione del caffè (fig. 8 - 24)
- Versate nel serbatoio solamente acqua fredda
(fig. 8).
I livelli posti a sinistra indicano la quantità per le
tazze grandi (125 ml).
I livelli posti a destra indicano la quantità per le
tazze piccole (85 ml) (fig. 9).
- Usate filtri di carta mod. 1x4 o nr. 4. Ricordatevi
di piegare i bordi.
Con alcuni modelli viene fornito un filtro
permanente. In questo caso i filtri di carta non
sono più necessari.
- Per ogni tazza grande, usate un misurino ben
colmo di caffè macinato (tipo Fast Filter).
Per ogni tazza piccola, usate un misurino raso
di caffè (fig. 13).
- Per preparare meno di tre tazze grandi di
caffè (o 4 piccole): premete il pulsante 3-4 k
per accendere la corrispondente spia luminosa
rossa.
- Per preparare più di tre tazze grandi di caffè
(o 4 piccole): premete il pulsante 3-4 k per
spegnere la corrispondente spia luminosa rossa
(fig. 16).
17
16
14
13
12
11
10
9
8
7
6
5
4
15
3
4
5
6
7
8
9
10
14
13
12
11
10
9
8
7
6
5
4
15
3
4
5
6
7
8
9
10
14
15
24
6 7
10
12
11
13
8
9
10
9
8
15
14
13
12
Page 25

Nota: dopo aver predistposto l’apparecchio per
preparare una piccola quantità di caffè (spia
rossa accesa), non dimenticate di premere
nuovamente il pulsante per preparare quantità
maggiori (spia rossa spenta).
In caso contrario, l’apparecchio potrebbe
erroneamente indicare la necessità di
un’operazione di disincrostazione (vedere la
sezione “La decalcificazione”).
- Potete premere il pulsante EXTRA per regolare
la temperatura della piastra secondo la vostra
preferenza (fig. 17). La temperatura della
piastra è al massimo quando la spia luminosa è
accesa.
• Accensione
Premete il pulsante
ON/OFF (Acceso/
Spento) se volete che la
macchina del caffè
prepari subito il caffè.
(Quindi senza usare il
timer) (fig. 18).
La corrispondente spia
luminosa rossa si
accenderà.
Premete il pulsante
AUTO se volete che la
macchina del caffè si
accenda automaticamente all’orario da voi
selezionato (entro
24 ore) (fig.19).
La corrispondente spia
luminosa gialla si
accenderà.
Quando l’apparecchio si
accende automaticamente, la corrispondente
spia luminosa rossa si
accenderà e quella gialla
si spegnerà.
Visualizzazione della durata del caffè caldo
- Fino a quando l’apparecchio è collegato alla
rete di alimentazione, sul display vedrete
apparire l’ora attuale (dopo che l’avrete
selezionata).
- Ma, quando la macchina del caffè ha finito
l’erogazione del caffè anziché veder apparire
l’ora vedrete 2:00.
Inoltre sentirete un segnale acustico (fig. 21).
Il caffè si manterrà caldo (max per 2 ore) e
l’apparecchio inizierà il conto alla rovescia: in
questo modo il display vi dà la possibilità di
sapere se il caffè è ancora caldo.
Dopo 0:01 la macchina del caffè si spegnerà
automaticamente e sul display vedrete
riapparire l’ora attuale.
Caratteristiche
- Pre-umidificazione del caffè macinato.
Un minuto dopo l’inizio dell’erogazione del caffè
l’apparecchio cesserà di pompare acqua calda.
La prima quantità di acqua calda può quindi
agire sul caffè macinato.
Così il caffè macinato emanerà meglio il suo
aroma aumentando considerevolmente il gusto
ed il sapore .
- Il “ferma gocce” (la valvola di fermo
automatica) evita che il caffè goccioli sulla
piastra di riscaldamento quando togliete il
bricco mentre l’apparecchio sta preparando il
caffè e quando togliete il bricco dalla piastra
dopo aver preparato il caffè.
Nota: il “ferma gocce” funziona solamente
se sul bricco è stato posto il coperchio.
25
21
22
20
23
24
18
19
Page 26

• Spegnimento automatico.
Per comodità, e per ragioni di
sicurezza: se non avete spento la macchina del
caffè, dopo 2 ore si spegnerà automaticamente.
Volete preparare dell’altro caffè subito dopo?
Se avete appena
preparato il caffè e
volete prepararne
dell’altro subito dopo,
spegnete la macchina
del caffè (fig. 25) e
lasciatela raffreddare per
tre minuti.
Poi procedete alla nuova
preparazione riempendo
il serbatoio.
Dopo l'uso
Pulizia
• Prima di pulire l’apparecchio togliete sempre la
spina dalla presa di alimentazione.
• Non immergete mai l’apparecchio nell’acqua,
pulitelo invece con un panno umido.
• Pulite le parti staccabili con acqua calda e
detersivo.
Risciacquatele con acqua calda ed asciugatele
poi con cura; si possono lavare anche in
lavastoviglie.
Per togliere la parte esterna del porta filtro
occorre per prima cosa togliere il perno
(fig. 34). Non perdete tale perno.
26
31
32
37
38
35
36
34
33
25
29
28
26
27
30
Page 27

La decalcificazione
Quando la spia
“ON/OFF” inizia a
lampeggiare e la parola
“Calc” si alterna
all’orario (fig. 39)
significa che occorre
decalcificare
l’apparecchio.
Riempite il serbatoio con
normale aceto bianco e
non mettete caffè nel
filtro (fig. 40).
Quando accendete
l’apparecchio premete e
mantenete premuto per
tre secondi il pulsante
On/Off (fig. 41).
Le tre spie luminose rosse inizieranno a
lampeggiare (fig. 27). Inizia il programma di
decalcificazione per il quale occorre circa
20 minuti.
- Ripetete ancora due volte l’operazione usando
solamente acqua per togliere i depositi calcarei
ed il sapore di aceto.
- Lavate il bricco, il coperchio ed il porta filtro.
Sostituzione del bricco
Per ordinare un bricco supplementare, rivolgetevi
al vostro rivenditore abituale o ad uno dei
numerosi Centri Assistenza Philips chiedendo il
tipo HD 7909.
Sostituzione del cavo di alimentazione
Se il cavo di alimentazione di questo apparecchio
si dovesse rovinare, occorrerà sostituirlo con un
cavo speciale: a questo scopo rivolgetevi al
rivenditore Philips o all’organizzazione Philips.
Alcune ricette veramente inedite
Caffè Irlandese
In un bicchiere versate un cucchiaio di zucchero e
una dose di whisky.
Aggiungete una tazza di caffè forte ben caldo.
Ricopritelo con panna montata.
Volendo, potete guarnirlo con un biscotto o con
delle scaglie di cioccolato.
Caffè Roma
Versate del caffè forte in una tazza.
Aggiungete un cucchiaio di cognac (o brandy) e
mescolate.
Versatevi 5 cucchiai di latte montato e spruzzatelo
con cacao in polvere.
Granita
Preparate 850 ml di caffè forte (= 8 tazze grandi o
10 tazze piccole di acqua) e 70 g di caffè
macinato (= 10 cucchiaini ben colmi di caffè).
Versate il caffè in una tazza poco profonda e
aggiungete 125 g di zucchero.
Aggiungete una scorza di limone e lasciate
raffreddare.
Ponete la tazza nel freezer.
Ad intervalli di circa mezz’ora mescolate il
composto fino a quando diventerà sciropposo.
Servite in bicchieri alti, e se lo desiderate,
aggiungete della panna montata.
27
40
39
41
3 sec
Page 28

• Antes de conectar el aparato, comprueben
si el voltaje indicado en el aparato se
corresponde con el de su hogar.
• No coloquen el aparato sobre una superficie
caliente.
• Quiten la clavija de la base de enchufe:
- si sucede algún problema durante la
preparación del café,
- antes de limpiar el aparato.
• No permitan que el cable de red entre en
contacto con superficies calientes.
• Usen el aparato lejos del alcance de los
niños y eviten que estiren del cable de red.
• No usen nunca el aparato si la clavija, el
cable de red o el aparato están deteriorados.
Almacenamiento del cable
El cable sobrante puede
ser guardado en la parte
posterior de la cafetera
(fig. 1).
Para poner el reloj en hora
- Enchufen la clavija en una toma de corriente.
En la pantalla aparecerá 12:00, parpadeando
(fig. 2).
- Aprieten el botón H/M para poner el reloj en la
hora real (fig. 3). El indicador de hora se
ajustará rápidamente.
- Para conseguir un ajuste fino, aprieten
brevemente el botón H/M, varias veces
repetidas, hasta llegar a la hora exacta.
Ajuste de la hora de encendido automático
- Aprieten el botón AUTO (fig. 4).
En la pantalla aparecerá T 12.00.
- Aprieten el botón H/M para ajustar la hora de
encendido automático (fig. 5). El indicador de
hora se ajustará rápidamente.
- Para conseguir un ajuste fino, aprieten
brevemente el botón H/M, varias veces
repetidas, hasta llegar a la hora exacta.
- Suelten el botón H/M cuando estén listos. La
hora real (sin T) será visible otra vez al cabo de
10 segundos.
• Los dos puntos (:) no parpadearán mientras
sea visible en la pantalla la hora de encendido
automático.
• Si esperan más de 10 segundos antes de
introducir la hora de encendido automático, el
reloj volverá por sí mismo a la hora real.
4 5
2
3
3
Español
28
Esta cafetera lleva incorporado un dispositivo
de encendido automático a la hora que se
haya fijado. Para conseguirlo hay que ajustar
la hora del día y aquella en que queramos
que se active, seleccionando a continuación
AUTO. (Con ello se ilumina el piloto amarillo
correspondiente.)
Pero también se puede poner en marcha la
cafetera apretando el botón del interruptor
(ON/OFF), con lo que se iluminará el piloto
amarillo respectivo.)
1
Page 29

• Siempre podrán comprobar la hora de
encendido automático sin más que apretar el
botón AUTO (fig. 6). El piloto amarillo se
iluminará y T aparece. A menos que quieran
que el aparato empiece a funcionar a la hora
prevista, no olviden apretar el botón AUTO otra
vez, para abandonar el modo automático (el
piloto amarillo se apaga).
• No hace falta que reajusten la hora de
encendido automático cada vez que quieran
poner en marcha la cafetera: el ajuste inicial se
mantiene en la memoria hasta que lo cambien
ustedes mismos.
• Reajusten la hora y el momento de puesta en
marcha de la cafetera cuando haya un corte de
luz o si se ha desenchufado el aparato.
Antes de usarlo por la primera vez
- Pongan el aparato en funcionamiento dos
veces seguidas, sin llenar el filtro con café.
(Véase la sección “Para hacer café”.)
- A continuación, limpien las partes amovibles tal
como se indica en la sección “Limpieza”.
Para hacer café (figs. 8 - 24)
- Utilicen sólo agua fresca para llenar de agua el
depósito del aparato (fig. 8).
Las indicaciones de nivel de la izquierda
corresponden a tazas grandes (125 ml), en
tanto que las de la derecha son para tazas
pequeñas (85 ml) (fig. 9).
- Usen papel de filtro del tipo “1x4” o “nº 4”. No
se olviden de doblar los bordes.
Con algunos modelos se suministra un filtro
permanente, en cuyo caso no son necesarios
los filtros de papel.
Para tazas grandes: echen una cucharada de
medida a rebosar de café molido (tipo “filtro
rápido”) por cada taza.
Para tazas pequeñas: una cucharada de
medida a ras por cada taza (fig. 13).
- Hasta tres tazas grandes (o cuatro pequeñas):
aprieten el botón 3-4 k para que el piloto rojo
correspondiente se ilumine.
Más de tres tazas grandes (o cuatro
pequeñas): aprieten el botón 3-4 k para que
el piloto rojo correspondiente se apague
(fig. 16).
Nota: Después de ajustar el aparato para
17
16
14
13
12
11
10
9
8
7
6
5
4
15
3
4
5
6
7
8
9
10
14
13
12
11
10
9
8
7
6
5
4
15
3
4
5
6
7
8
9
10
14
15
10
29
6 7
11
8
9
12
13
10
9
8
15
14
13
12
Page 30

preparar un cantidad pequeña (luz indicadora
roja encendida), no se olviden de reajustar este
botón si desean preparar un mayor cantidad
(luz indicadora roja apagada).
Si se olvidan de hacerlo, el aparato puede
indicar, incorrectamente, que es necesario
desincrustrar (ver la sección “Descalcificación”).
- Pueden apretar el botón EXTRA $ para ajustar
la temperatura de la placa térmica a su gusto
personal (fig. 17). La temperatura de dicha
placa se encuentra al máximo si el piloto está
encendido.
• Encendido
Aprieten el botón
ON/OFF si quieren que
la cafetera empiece a
hacer café en ese
mismo instante (es decir,
sin utilizar el
temporizador) (fig. 18).
El piloto rojo correspondiente se iluminará.
Aprieten el botón AUTO
si quieren que la
cafetera se active
automáticamente al
llegar la hora prefijada
(dentro de un plazo de
24 horas) (fig. 19).
El piloto amarillo
correspondiente se
iluminará.
Al activarse automáticamente la cafetera, se
iluminará el piloto rojo,
apagándose a la vez el
amarillo (fig. 20).
Tiempo de mantenimiento caliente
- Mientras esté enchufado el aparato, en la
pantalla se verá la hora real (si han puesto en
hora el reloj).
- Pero al terminar de hacerse el café, la hora real
queda sustituida por 2:00, a la vez que se oirá
una señal acústica.
El tiempo durante el cual se mantiene caliente
el café (2 horas como máximo) se va
descontando, por lo que la pantalla les indicará
en cada instante lo fresco que se encuentra el
café aún.
Después de 0:01 la cafetera se desconecta
automáticamente, volviendo a aparecer en la
pantalla la hora real.
Propiedades especiales
• “Prehumedecimiento”. Transcurrido un minuto
de infusión, la cafetera dejará de bombear agua
caliente. Esa primera cantidad de agua se deja
que actúe sobre el café molido (empapándolo).
De ese modo, las sustancias aromáticas del café
se extraen mejor, con lo que mejoran
notablemente el sabor y el aroma del café.
•“Antigoteo”. La válvula antigoteo se encarga
de que no caiga ninguna gota de café en la
placa térmica si se quita la jarra del aparato un
instante durante el proceso de la infusión o tras
haberse terminado ésta, para servirlo.
Nota: El antigoteo sólo deja pasar café a la
jarra si ésta tiene puesta la tapa.
30
21
22
20
23
24
18
19
Page 31

• Desconexión automática de la red.
Para su comodidad y a modo de
seguridad extra, si se olvidan de
apagar la cafetera, ésta se desconectará
automáticamente transcurridas dos horas.
¿Quieren hacer más café inmediatamente?
Si acaban de hacer una
jarra de café y quieren
hacer otra inmediatamente después,
apaguen primero la
cafetera (fig. 25) y dejen
que se enfríe durante
tres minutos. Después
ya pueden volver a
llenar de agua el
depósito y repetir el
proceso.
Después el uso
Limpieza
• Quiten siempre la clavija de la toma de
corriente antes de limpiar el aparato.
• No sumerjan nunca el aparato en agua. Podrán
limpiarlo con un paño húmedo.
• Los elementos amovibles pueden lavarse con
agua caliente jabonosa, aclarándolos después
con agua limpia y secándolos.
Estas piezas también pueden lavarse en el
lavavajillas.
Para sacar el portafiltro quiten antes el eje
(fig. 34). ¡No lo extravíen!
31
31
32
37
38
35
36
34
33
25
29
28
26
27
30
Page 32

Descalcificación
Si empieza a parpadear
el piloto “ON/OFF” y la
palabra “CALC” alterna
con la hora del reloj
(fig. 39), el aparato
necesita
descalcificación.
Llenen el depósito con
vinagre ordinario y no
pongan filtro para el café
(fig. 40).
Aprieten el interruptor
ON/OFF y manténganlo
así durante tres
segundos (fig. 41).
A continuación empieza el programa de
descalcificación, que dura unos 20 minutos.
- Tras haberse descalcificado, dejen que la
cafetera funcione dos veces seguidas con agua
sola, para hacer desaparecer las trazas que
hayan podido quedar de vinagre e
incrustaciones.
- Laven la cafetera, la tapa y el portafiltro.
¿Se les ha roto la jarra? ¿Necesitan otra
extra?
Podrán pedirla a cualquier distribuidor Philips o a
un Centro de Servicio Philips, con el número de
tipo HD 7909.
Sustitución del cordón de red
Si se estropea el cordón de red del aparato, hay
que sustituirlo por otro especial. Consulten a un
distribuidor Philips o a la organización Philips de
su país.
Recetas de cafés deliciosos
Café irlandés
Echen una cucharada sopera de azúcar moreno
en un vaso especial para café irlandés. Añadan
un chupito de whisky (irlandés). Echen una taza
de café caliente extrafuerte en lo anterior. Cubran
con un poco de nata montada. Si quieren
adornarlo, pueden hacerlo con un barquillo y
chocolate rallado.
Café Roma
Echen café extrafuerte en una taza. Viertan en él
una cucharada sopera de coñac francés y agiten
el todo. Añadan 5 cucharadas soperas de leche
espumosa y salpiquen con algo de polvo de
cacao.
Granita
Hagan un café fuerte usando 850 ml (8 tazas
grandes o 10 pequeñas) de agua y 70 g (10 cucharadas de medida a rebosar) de café molido.
Echen el café así hecho en un cuenco hondo y
añadan 125 g de azúcar en polvo. Pongan un
trozo de piel de limón en la mezcla y dejen que se
enfríe. Después colóquenlo en el congelador y,
con intervalos de media hora, agiten bien la
mezcla hasta que adquiera una consistencia de
jarabe. Sírvanlo en vasos largos. Si quieren,
pueden echarle por encima un poco de nata
montada.
32
40
39
41
3 sec
Page 33

• Antes de ligar a máquina, verifique por favor
se a voltagem indicada no aparelho
corresponde à tensïo da rede eléctrica em
sua casa.
• Nïo coloque a máquina numa superfície
quente.
• Retire a ficha da tomada da parede:
- se surgirem dificuldades ao fazer café;
- antes de limpar a máquina.
• Nïo deixe que o cabo de ligaçïo entre em
contacto com superfícies quentes.
• Utilize a máquina fora do alcance das
crianças.
Evite que elas possam puxar o cabo de
ligaçïo.
• Nunca use a máquina se a ficha, o cabo de
ligaçïo ou o aparelho estiverem danificados.
Arrumação do cabo de alimentação
O excesso de cabo de
alimentação pode ser
arrumado na parte
detrás da máquina de
café (fig. 1)
Marcar a hora do dia
- Introduza na tomada da parede a ficha do cabo
da alimentação, ao mesmo tempo que mantém
premida a tecla AUTO. No mostrador a
indicação 12:00 começa a cintilar (fig. 2).
- Carregue na tecla H/M para marcar a hora
correcta (fig. 3). A indicação da hora avança
rapidamente.
- Para uma marcação / ajuste mais exacto,
carregue várias vezes seguidas na tecla H/M.
.
Marcar a hora para se ligar automaticamente
- Carregue na tecla AUTO (fig. 4).
A indicação T 12.00 aparece.
- Carregue na tecla H/M para marcar a hora a
que a máquina se deve ligar automaticamente
(fig. 5). A indicação da hora avança
rapidamente.
- Para uma marcação / ajuste mais exacto,
carregue várias vezes seguidas na tecla H/M.
- Solte a tecla H/M quando estiver tudo pronto. A
hora correcta (sem o T) volta a aparecer após
10 segundos.
• Os dois pontos (:) não cintilam enquanto
estiver visível a indicação da hora a que a
máquina se vai ligar automaticamente.
• Se esperar mais de 10 segundos antes de
marcar a hora a que a máquina se deverá ligar
automaticamente, o relógio passará
automaticamente para a hora correcta do dia.
4 5
2
3
3
Português
33
Esta máquina de fazer café possui a
capacidade de se ligar automaticamente a
uma determinada hora. Para isto, é
necessário marcar a hora correcta do dia, a
hora em que se deve ligar automaticamente
e seleccionar o modo AUTO (a respectiva
lâmpada indicadora amarela fica iluminada).
Também é possível ligar logo a máquina,
bastando carregar na tecla ON/OFF (a
respectiva lâmpada indicadora encarnada
fica iluminada).
1
Page 34

• Para verificar a hora a que a máquina se vai
ligar automaticamente, basta carregar na tecla
AUTO (fig. 6). A respectiva lâmpada indicadora
amarela fica iluminada e a indicação T aparece.
A menos que queira que a máquina comece a
funcionar à hora marcada, não se esqueça de
premir novamente a tecla AUTO para
abandonar o modo de ligação automática (a
lâmpada indicadora amarela apaga-se).
• Não é necessário marcar a hora de ligação
automática de cada vez que quiser utilizar a
máquina de fazer café. O ajuste fica
memorizado até que o queira alterar.
• Se houver uma quebra na energia eléctrica ou
se a máquina for desligada, não se esqueça de
voltar a acertar a hora correcta e o
temporizador.
Antes de utilizar pela primera vez
- Faça a máquina funcionar duas vezes sem
encher o filtro com café moído (consulte a
secção “Fazer café”).
- Em seguida, limpe as partes removíveis
conforme está descrito na secção “Limpeza”.
Fazer café (fig. 8 - 24)
- Para encher o depósito da água utilize apenas
água fria (fig. 8).
As indicações de nível do lado esquerdo
correspondem a chávenas grandes (125 ml).
As indicações de nível do lado direito
correspondem a chávenas pequenas (85 ml)
(fig. 9).
- Utilize filtros de papel do tipo “1x4” ou “Nº 4”).
- Não esqueça dobrar os bordos do filtro de
papel.
Com alguns modelos é fornecido um filtro
permanente. Neste caso os filtros de papel
tornam-se desnecessários.
- Para chávenas grandes: utilize uma colher de
sopa completamente cheia com café moído
(tipo “filtro rápido”) para cada chávena.
Para chávenas pequenas: utilize uma colher
medida para cada chávena (fig. 13).
- Para até três chávenas grandes (ou quatro
chávenas pequenas) de café: carregue na
tecla 3-4 k de modo a que a lâmpada
indicadora encarnada correspondente fique
iluminada.
Para mais de três chávenas grandes (ou
quatro chávenas pequenas) de café:
10
34
6 7
17
16
14
13
12
11
10
9
8
7
6
5
4
15
3
4
5
6
7
8
9
10
14
13
12
11
10
9
8
7
6
5
4
15
3
4
5
6
7
8
9
10
14
15
11
8
9
12
13
10
9
8
15
14
13
12
Page 35

carregue na tecla 3-4 k de modo a que a
lâmpada indicadora encarnada correspondente
fique apagada (fig. 16).
Nota: Depois de regular a máquina para fazer
uma pequena quantidade (a lâmpada vermelha
acende-se), não se esqueça de desligar esta
tecla no caso de querer fazer uma quantidade
maior (a lâmpada vermelha apaga-se).
Se se esquecer, a máquina poderá indicar
incorrectamente que precisa de ser descalcificada. (Leia a secção “Descalcificar”).
- É possível ajustar a temperatura da placa de
aquecimento consoante a sua preferência
pessoal carregando na tecla EXTRA $ (fig. 17).
A temperatura da placa de aquecimento estará
no máximo se a lâmpada indicadora estiver
iluminada.
• Para ligar
Carregue na tecla
ON/OFF se quiser que a
máquina de fazer café
comece a funcionar
imediatamente (ou seja,
sem utilizar o
temporizador) (fig. 18).
A lâmpada indicadora
encarnada fica
iluminada.
Carregue na tecla AUTO
se quiser que a máquina
de fazer café fique automaticamente ligada à
hora marcada (no espaço de 24 horas) (fig. 19).
A lâmpada indicadora
amarela fica iluminada.
Quando a máquina de
fazer café for
automaticamente ligada,
a lâmpada indicadora
encarnada ficará
iluminada e a lâmpada
amarela apaga-se.
Tempo de conservação em quente
- Desde que a máquina esteja ligada, no
mostrador aparecerá a indicação da hora
correcta do dia (após tê-la marcado).
- No entanto, mal o café esteja feito a indicação
da hora correcta é substituída pela indicação
de 2:00 e ouve-se um sinal sonoro.
O tempo em que o café vai ser mantido quente
(máximo 2 horas) começa a ser contado de
forma decrescente, pelo que é possível verificar
através do mostrador há quanto tempo o café
foi feito.
Após a indicação 0:01 a máquina de fazer café
desliga-se automaticamente e é novamente
apresentada a hora correcta do dia.
Caracteristicas especiais
• “Pré-humedecimento” - Cerca de um minuto
após ter começado a funcionar, a máquina de
fazer café deixa de bombear água quente.
Assim, a primeira porção de água quente vai
actuar sobre o café moído o que irá fazer com
que as suas substâncias aromáticas sejam
mais facilmente libertadas. Isto vai melhorar
consideravelmente o aroma e o sabor do café.
• “Ausência de pingos” - Uma válvula
automática vai fazer com que não caiam pingos
de café sobre a placa de aquecimento quando
retirar o jarro da máquina durante o seu
funcionamento ou após o café estar pronto.
Nota: a válvula apenas permite que o café caia
no jarro se a respectiva tampa tiver sido
colocada.
35
21
22
20
23
24
18
19
Page 36

• Interrupção automática da
alimentação
Para uma maior conveniência e também para
uma maior segurança, a máquina de café se
não for desligada irá desligar-se
automaticamente após duas horas.
Para fazer imediatamente mais café
Se quiser fazer logo
mais café após ter feito
um jarro, desligue a
máquina (fig. 25) e
aguarde cerca de três
minutos para ela
arrefecer. Em seguida,
encha novamente o
depósito com água.
Depois da utilização
Limpeza
• Antes de limpar a máquina de fazer café
desligue sempre a ficha da tomada da parede.
• Nunca mergulhe a máquina dentro de água.
Ela deve ser limpa com um pano húmido.
• As peças removíveis devem ser lavadas com
água quente e detergente. Enxague com água
quente sem detergente e limpe todas as peças.
Estas peças também podem ser limpas dentro
da máquina de lavar.
Para remover o compartimento do filtro é
necessário remover primeiro o eixo (fig. 34).
Não perca o eixo!
36
31
32
37
38
35
36
34
33
25
29
28
26
27
30
Page 37

Descalcificar
Se a lâmpada indicadora
“ON/OFF” começar a
cintilar e a palavra
“CALC” alternar com a
indicação da hora
correcta (fig. 39), isto
significa que a máquina
necessita ser
descalcificada.
Encha o depósito da
água com vinagre
normal e não coloque
filtro.
Carregue e mantenha
premido o comutador de
ligar/desligar durante
três segundos enquanto
a máquina estiver a ser
ligada. As três lâmpadas
indicadoras começam a
cintilar (fig. 41).
Em seguida, o programa de descalcificação
começa, durando cerca de 20 minutos.
- Depois da descalcificação, deixe a máquina
funcionar mais duas vezes apenas com água
de modo a limpar todos os resíduos de vinagre
e de calcário que tenham ficado.
- Lave o jarro, a tampa e o compartimento do
filtro.
Para adquirir outro jarro
É possível adquirir outro jarro junto do seu
vendedor ou nas lojas Philips, com o número de
tipo HD 7909.
Substituir o cabo de alimentação
Se o cabo de alimentação da máquina estiver
danificado, deverá ser substituído. Contacte o seu
vendedor ou as lojas Philips.
Excelentes receitas de cafè
IRISH COFFEE
Coloque uma colher de sopa de acúçar louro num
copo especial para Irish Coffee. Junte um copo de
whisky (irlandês). Junte uma chávena de café
quente e muito forte. Cubra com natas batidas.
Se quiser pode decorar o copo com uma bolacha
de baunilha e chocolate raspado.
CAFÉ ROMA
Deite café muito forte numa chávena. Misture
uma colher de sopa cheia de Conhaque (brandy
francês) no café. Junte à mistura 5 colheres de
sopa de leite batido. Espalhe por cima um pouco
de cacau em pó.
GRANITA
Faça café forte utilizando 850 ml (= 8 chávenas
grandes ou 10 chávenas pequenas) de água e
70 g (= 10 colheres de medida cheias) de café
moído. Deite o café numa taça de paredes baixas
e junte 125 g de açúcar. Junte à mistura uma
casca de limão e deixe arrefecer. Em seguida
coloque a taça no frigorífico e deixe arrefecer
bastante. De meia em meia hora mexa bem a
mistura até ficar em xarope. Sirva em copos altos
e, se quiser, pode cobrir o topo com natas.
37
40
39
41
3 sec
Page 38

38
Page 39

39
Page 40

;
4222 001 71705
Printed in The Netherlands
Imprimé en Hollande
 Loading...