

Page 1
Comfort
HD6123, HD6121
Page 2

2
Page 3
3
F
E
D
C
B
A
H
G
I
J
Page 4

4
Page 5

ENGLISH 6
NORSK 15
SVENSKA 23
SUOMI 31
DANSK 39
HD6123, HD6121
Page 6

Introduction
Dear customer, congratulations on acquiring your new Philips Comfort Plus fr yer.Your new fryer
allows you to fry all kinds of food safely and easily.
General description
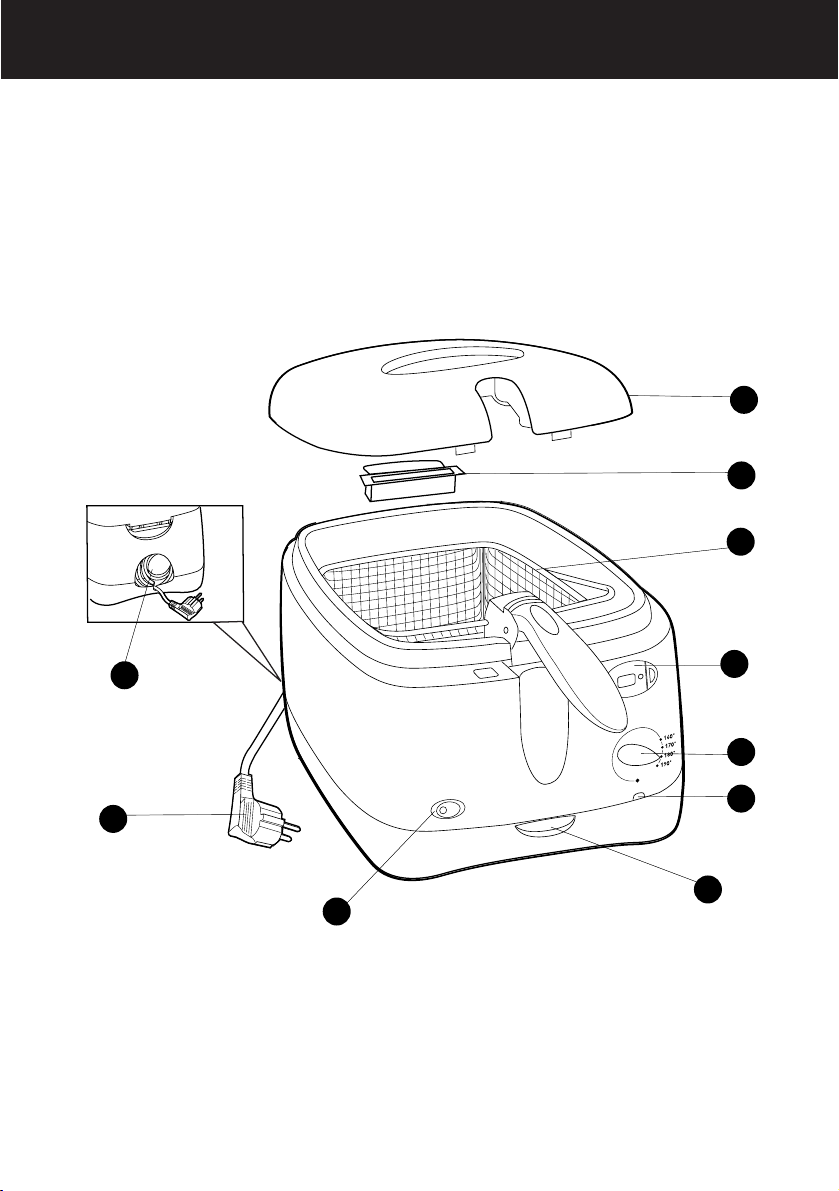
A Lid
B Condensed water tray
C Frying basket
D Temperature control
E Pilot light
F Lid release lever
G Cord
H Cord storage compartment
I Removable timer (HD6123 only)
J On/off switch (HD6123 only)
Important
Read these instructions for use carefully before using the appliance and save them for future
reference.
◗ Check if the voltage indicated on the appliance corresponds to the local mains voltage before
you connect the appliance.
◗ Only connect the appliance to an earthed wall socket.
◗ If the mains cord is damaged, it must be replaced by Philips, a service centre authorised by
Philips or similarly qualified persons in order to avoid a hazard.
◗ Always return the appliance to a service centre authorised by Philips for examination or
repair. Do not attempt to repair the appliance yourself,otherwise your guarantee will
become invalid.
◗ Clean the separate parts of the fryer thoroughly before using the appliance for the first time
(see chapter 'Cleaning'). Make sure all parts are completely dry before you fill the fryer with
oil or liquid fat.
◗ Never immerse the housing, which contains electrical components and the heating element,
in water nor rinse it under the tap.
◗ Always unplug the appliance after use.Do not move the fryer until it has cooled down
sufficiently.
◗ Do not switch the appliance on before you have filled it with oil or fat. Make sure the fryer is
always filled to a level between the two indication marks on the inside of the inner bowl.
◗ During frying, hot steam is released through the filter. Keep your hands and face at a safe
distance from the steam.You should also be careful of the hot steam when you open the lid.
◗ Keep the appliance out of the reach of children. Do not let the mains cord hang over the
edge of the table or worktop on which the appliance is standing.
◗ This appliance is intended for household use only. If the appliance is used improperly or for
(semi-)professional purposes or if it is used in a way that is not in accordance with the
instructions for use, the guarantee will become invalid and Philips will not accept liability for
any damage caused.
◗ Fry food golden-yellow instead of dark or brown and remove burnt remnants! Do not fry
starchy foods,especially potato and cereal products, at a temperature above 175cC (to
minimise the production of acrylamide).
ENGLISH6
Page 7

Safety cut-out
This appliance is equipped with a safety cut-out that switches the appliance off if it overheats.This
may happen if there is not enough oil or fat in the fryer or if blocks of solid fat are being melted in
the fryer, which will prevent the heating element from being able to give off its heat.
◗ If the fryer doesn't work anymore, let the oil or fat cool down and turn to your Philips
dealer or a service centre authorised by Philips.
Preparing for use
1 Place the appliance on a horizontal, even and stable surface out of the reach of children.
If you wish to place the fryer on top of the cooker,make sure the rings of the cooker have been
turned off and are cold.
2 Fill the dry fryer with oil, liquid fat or melted solid fat up to the top indication mark on the
inside of the inner bowl (see section 'Oil and fat', for instructions on how to use solid fat)
(fig. 1).
Oil and fat
Never mix different types of oil or fat.
We advise you to use frying oil or liquid fr ying fat, preferably vegetable oil or fat that is rich in
unsaturated fats (e.g. linoleic acid).
It is possible to use solid frying fat, but in that case extra precautions are necessary to prevent the
fat from spattering and the heating element from overheating or becoming damaged.
1 If you want to use new blocks of fat, first melt them slowly over a low heat in a normal pan.
2 Pour the melted fat carefully into the fryer.
3 Store the fryer with resolidified fat still in it at room temperature.
4 If the fat gets very cold, it may start spattering when melted. Punch some holes into the
resolidified fat with a fork to prevent this (fig. 2).
Be careful not to damage the inner bowl with the fork.
Using the appliance
Frying
Be careful: hot steam will escape from the filter in the lid during frying.
1 Take the entire cord from the cord storage compartment and put the plug in the wall socket
(fig. 3).
Make sure the mains cord does not come into contact with hot parts of the appliance.
2 HD6123 only - Switch the fryer on by means of the on/off switch (fig. 4).
The pilot light in the on/off switch goes on.
3 Set the temperature control to the required temperature (160-190cC) (fig. 5).
The temperature pilot light goes on.
ENGLISH 7
Solid fat
1700 g
2000 g
Oil/liquid fat
2 l
2.3 l
Min.
Max.
Page 8
- For information about which temperature to select, check the package of the food to be fried
or the table at the end of these instructions for use.
- The oil or fat will be heated to the selected temperature in 10 to 15 minutes.
- While the fryer is heating up, the pilot light goes out and on a number of times.When it stays
out for some time, the oil or fat has reached the preset temperature.
- After a batch has been fried, the pilot light also goes on.Wait until it stays out for some time
before frying the next batch.
B
You can leave the basket in the fryer while the fryer is heating up.
4 Open the lid by pressing the release lever.The lid will open automatically (fig. 6).
5 Lift the handle to raise the basket to its highest position (fig. 7).
6 Remove the basket from the fryer and put the food to be fried in the basket (fig. 8).
B
For the best frying results, we advise you not to exceed the maximum quantities mentioned below.
Do not fry Asian rice cakes (or similar types of food) in this appliance as this might cause heavy
spattering or violent bubbling of the oil or fat.
7 Carefully put the basket in the fryer without lowering it into the oil or fat (fig. 9).
8 Close the lid.
9 HD6123 only - Set the required frying time (see section 'Timer' in this chapter).
You can also use the fryer without setting the timer.
10 Press the release button of the basket handle and carefully lower the basket to its lowest
position (fig. 10).
B
For a good end result, stick to the preparation time indicated on the package of the food to be fried
or the preparation time mentioned in the table at the end of these instructions for use.
B
For a uniform golden frying result, lift the basket out of the oil or fat a few times during frying and
gently shake the contents.
Timer (HD6123 only)
Type HD6123 is equipped with a digital timer.
The timer indicates the end of the frying time, but does NOT switch the fryer off.
Setting the timer
1 Press the timer button to set the frying time in minutes.
The set time will become visible on the display.
2 Keep the button pressed to put the minutes forward quickly. Release the button once the
required frying time has been reached.
- The maximum time that can be set is 99 minutes.
- A few seconds after you have set the frying time, the timer will start counting down.
- While the timer is counting down, the remaining frying time blinks on the display.The last minute
is displayed in seconds.
3 If the preset time is not correct,you can erase it by pressing the timer button for 2 seconds
at the moment the timer starts counting downs (i.e. when the time starts to blink).Keep the
button pressed until '00' appears on the display.You can now set the correct frying time.
ENGLISH8
Frozen French fries
800 g
450 g
Home-made French fries
1000 g
600 g
Max. quantity
Recommended quantity for best
result
Page 9
4 When the preset time has elapsed, you will hear an audible signal.After 10 seconds the
audible signal will be repeated.You can stop the audible signal by pressing the timer button.
Removing the timer
The timer is removable, which allows you to take the timer with you to another room. In this way
you will be able to hear the audible signal which indicates that the fried food is ready wherever you
are.
◗ After you have set the required frying time, you can remove the timer from the fryer by
pulling the right side towards you (fig.11).
When the timer gives an audible signal to indicate that the fried food is ready, you can return to the
fryer and push the timer back into the fryer.
Water tray
During frying condensed water will appear on the inside of the lid.This water will be collected in the
water tray when you open the lid instead of dripping onto the worktop.
◗ Empty the water tray after use.
- Wait until the oil or fat has cooled down sufficiently.
- Remove the lid.
- Remove the water tray and empty it into the sink.
After frying
1 Lift the handle to raise the basket to its highest position, i.e. the draining position (fig.12).
2 Open the lid by pressing the lid release lever (fig. 13).
Beware of the hot steam and possible spattering of the oil.
3 Carefully remove the basket from the fryer.
If necessary, shake the basket over the fryer to remove excess oil or fat. Put the fried food in a bowl
or colander containing grease-absorbing paper, e.g. kitchen paper.
4 HD6123 only: Switch the fryer off by means of the on/off switch (fig. 14).
The pilot light in the on/off switch goes out.
5 Unplug the appliance after use.
Do not move the fryer until the oil or fat has cooled down sufficiently, which takes
approximately 60 minutes.
B
If you do not use the fryer regularly, we advise you to remove the oil or liquid fat and to store it in
well-closed containers, preferably in the refrigerator or in a cool place. Fill the containers by pouring
the oil or fat through a fine sieve to remove food particles. Remove the frying basket before emptying
the inner bowl.
B
If the fryer contains solid fat, let the fat solidify in the fryer and store the fryer with the fat still in it
(see chapter 'Preparing for use', section 'Oil and fat').
Cleaning
Wait until the oil or fat has cooled down sufficiently.
Do not use any abrasive (liquid) cleaning agents or materials (e.g scouring pads) to clean the
appliance.
1 Press the lid release lever to open the lid.
ENGLISH 9
Page 10

2 Then lift the lid off the appliance.
3 Remove the water tray.
4 Remove the frying basket from the fryer and pour out the oil or fat.
5 Clean the housing with a moist cloth (with some washing-up liquid) and/or kitchen paper.
6 Clean the inner bowl with hot water and some washing-up liquid.
Do not immerse the complete fryer housing in water.
7 Clean the lid, the water tray and the frying basket in hot water with some washing-up liquid
or in the dishwasher.
8 Rinse the parts with fresh water and dry them thoroughly.
Cleaning the permanent anti-grease filter
The lid with the permanent anti-grease filter can be cleaned thoroughly in the dishwasher or in hot
water with some washing-up liquid.
Dishwasher-proof parts
- Lid with permanent anti-grease filter
- Basket
- Water tray
Changing oil or fat
Because oil and fat lose their favourable properties rather quickly, you should change the oil or fat
regularly.To do so, follow the instructions below:
If you mainly use the fryer to prepare French fries and if you sieve the oil or fat after each use, you
can re-use the oil or fat 10 to 12 times before it needs to be changed. If you use the fryer to
prepare food that is rich in proteins (such as meat or fish), you should change the oil or fat more
often.
◗ Never use the same oil longer than 6 months and always follow the instructions on the
package.
◗ Never add fresh oil or fat to used oil or fat.
◗ Never mix different types of oil or fat.
◗ Always change the oil or fat if it starts foaming when it is heated,if it has a strong smell or
taste or if it turns dark and/or syrupy.
Disposing of used oil or fat
Pour used oil or liquid fat back into its original (resealable) plastic bottle.You can dispose of used fat
by letting it solidify in the fryer (without the basket in it) and subsequently scooping it out of the
fryer by means of a spatula and wrapping it in a newspaper. If applicable, you can put the bottle or
newspaper in the bin for non-compostable waste (not in the compostable waste bin) or dispose of
it in accordance with the regulations in your country.
Storage
1 Put all parts back onto/into the fryer and close the lid.
2 Roll up the cord, put it into the cord storage compartment and insert the plug in the plug
fixing facility.
3 Lift the fryer by its handles.
ENGLISH10
Page 11

Frying tips
For an overview of preparation times and frying temperatures, see the table at the end of these
instructions for use.
Home-made French fries
You will make the tastiest and crispiest French fries in the following way:
1 Use firm potatoes and cut them into sticks. Rinse the sticks with cold water.
This will prevent them from sticking to each other during frying.
B
Dry the sticks thoroughly.
2 Fry the French fries twice: the first time for 4-6 minutes at a temperature of 160cC, the
second time for 5-8 minutes at a temperature of 175cC.
3 Put the home-made French fries in a bowl and shake them.Let the fries cool down before
frying them for the second time.
Frozen food
Frozen fries have already been precooked, so you will only have to fry them once in accordance
with the instructions on the package.
Food from the freezer (-16 to -18cC) will cause the oil or fat to cool down considerably when the
food is immersed in it. Because the food does not sear right away, it may also absorb too much oil
or fat.
Take the following measures to prevent this:
- Preferably allow frozen food to defrost at room temperature before frying.
- Carefully shake off as much ice and water as possible and dab the food to be fried until it is
properly dry.
- Do not fry very large quantities at one time (consult the table with preparation times and frying
temperatures).
- Select the frying temperature indicated in the table in these instructions for use or on the
package of the food to be fried. If there are no instructions, select a temperature of 190cC.
- Lower the food into the oil or fat very gently, since frozen food may cause the hot oil or fat to
start bubbling violently.
Getting rid of unwanted flavours
Certain types of food,particularly fish,can give the oil or fat an unpleasant flavour.To neutralise the
taste of the oil or fat:
1 Heat the oil or fat to a temperature of 160cC.
2 Put two thin slices of bread or a few sprigs of parsley in the oil.
3 Wait until no more bubbles appear and then scoop the bread or the parsley out of the fryer
with a spatula.
The oil or fat will now have a neutral taste again.
ENGLISH 11
Page 12

Environment
◗ Do not throw the appliance away with the normal household waste at the end of its life, but
hand it in at an official collection point for recycling. By doing this you will help to preserve
the environment (fig.15).
Remove the battery of the timer (HD6123 only) before you discard the appliance.
1 Use a small flat-blade screwdriver to remove the back of the timer.
2 Remove the battery. Do not throw the battery away with the normal household waste, but
hand it in at an official collection point.
Guarantee & service
If you need information or if you have a problem, please visit the Philips website at www.philips.com
or contact the Philips Customer Care Centre in your country (you will find its phone number in the
worldwide guarantee leaflet). If there is no Customer Care Centre in your country,turn to your
local Philips dealer or contact the Service Depar tment of Philips Domestic Appliances and Personal
Care BV.
ENGLISH12
Page 13

Solution
Check on the package of the food or in the table in
these instructions for use whether the temperature
and/or preparation time you have selected is/are
correct. Set the temperature control to the correct
temperature.
Never fry more food at one time than the quantity
mentioned in the table.
The fuse of the temperature control may have blown,
causing the safety cut-out to switch the appliance off.
Turn to your Philips dealer or a service centre
authorised by Philips to have the fuse replaced.
Remove the lid and clean the lid and filter in hot water
with some washing-up liquid or in the dishwasher.
Change the oil or fat. Regularly sieve the oil or fat to
keep it fresh longer.
Use frying oil or liquid fr ying fat of good quality. Never
mix two different types of oil or fat.
Check whether the lid has been closed properly.
Remove the lid and clean the lid and filter in hot water
with some washing-up liquid or in the dishwasher.
If the ring is dirty, clean the lid in hot water with some
washing-up liquid or in the dishwasher. If the lid is
worn, turn to your Philips dealer or a service centre
authorised by Philips to have the sealing ring replaced.
Make sure the oil or fat in the fryer does not exceed
the maximum level.
Dry the food thoroughly before you start frying it and
fry the food in accordance with these instructions for
use.
Do not fry more food at one time than the quantity
mentioned in the table.
Dry the food thoroughly before frying it.
Use frying oil or liquid fr ying fat of good quality. Never
mix two different types of oil or fat.
Clean the inner bowl as described in these instructions
for use.
Possible cause
The selected temperature is too
low and/or the food has not
been fried long enough.
There is too much food in the
basket.
The oil or fat does not become
hot enough.
The permanent anti-grease filter
is saturated.
The oil or fat is no longer fresh.
The type of oil or fat used is not
suitable for deep-frying food.
The lid has not been closed
properly.
The permanent anti-grease filter
is saturated.
The sealing ring around the
metal inside of the lid is dirty or
worn.
There is too much oil or fat in
the fryer.
The food contains too much
moisture.
There is too much food in the
frying basket.
The food contains too much
moisture.
The type of oil or fat used is
unsuitable for deep-frying food.
The inner bowl has not been
cleaned properly.
Problem
The fried food does
not have a golden
brown colour and/or
is not crispy.
The fryer gives off a
strong unpleasant
smell.
Steam escapes from
other places than
the filter.
Oil or fat spills over
the edge of the fryer
during frying.
The oil or fat foams
strongly during
frying.
Troubleshooting
ENGLISH 13
Page 14

Preparation times and temperature settings
The table below indicates how much of a particular type of food you can prepare at one time
and which frying temperature and preparation time you should select.
If the instructions on the package of the food to be prepared differ from those in the table,
always follow the instructions on the package.
*) Also see 'Frying tips' for the preparation of home-made French fries.
ENGLISH
14
Frying time
(minutes) frozen
food
-
15-20
6-7
4-5
-
-
5-6
-
6-7
10-12
8-10
4-5
4-5
4-5
3-4
4-5
4-5
-
-
-
-
Frying time
(minutes) fresh
or (partly)
defrosted food
4-6 (go to 175cC in
this table for
instructions about
the 2nd cycle)
5-7
12-15
4-5
3-4
2-3
5-8
3-4
4-5
6-7
5-6
3-4
3-4
3-4
2-3
3-4
3-4
3-4
5-6
2-3
3-4
Recommended
quantity per
batch
600g
450g
3-5 pieces
5 pieces
4 pieces
8-10 pieces
600 g
450 g
600 g
4-5 pieces
2-3 pieces
5-6 pieces
8-10 pieces
8-10 pieces
8-10 pieces
12-15 pieces
8-10 pieces
5 pieces
600 g
3-4 pieces
2-4 pieces
2 pieces
Type of food
Home-made French
fries*) 1st frying
cycle
Fresh fish
Chicken (drumsticks)
Cheese croquettes
Mini potato
pancakes
Vegetable fritters
(mushrooms,
cauliflower)
Home-made French
fries*) 2nd frying
cycle
Frozen French fries
Crisps (very thin
potato slices)
Potato croquettes
Chinese spring rolls
Vietnamese spring
rolls
Chicken nuggets
Mini snacks
Meatballs (small)
Mussels
Prawns
Apple fritters
Aubergine (slices)
Doughnuts
Camembert
(breadcrumbed)
Wiener schnitzel
Temperature
160cC
170cC
175cC
180cC
190cC
Page 15

Innledning
Kjære kunde! Gratulerer med din nye Philips Comfort Plus-frityrgryte. Med denne frityrgryten kan
du fritere mange ulike typer matvarer sikkert og enkelt.
Generell beskrivelse
A Lokk
B Skuff for kondensvann
C Frityrkurv
D Temperaturbr yter
E Indikatorlampe
F Spak for utløsing av lokk
G Nettledning
H Oppbevaringsrom for nettledning
I Avtakbar tidtaker (bare HD6123)
J Strømbryter (bare HD6123)
Viktig
Les denne bruksanvisningen sammen med illustrasjonene nøye før apparatet tas i bruk.Ta vare på
bruksanvisningen for senere referanse.
◗ Kontroller at spenningen som er angitt på apparatet, stemmer overens med nettspenningen,
før du kobler til apparatet.
◗ Bruk bare et jordet nettuttak til dette apparatet.
◗ Hvis nettledningen blir skadet, må den skiftes av Philips, et autorisert Philips-verksted eller
andre kvalifiserte personer for å unngå fare.
◗ Lever alltid apparatet til et Philips-godkjent servicesenter for undersøkelse eller reparasjon.
Prøv ikke å reparere apparatet selv,ellers blir garantien ugyldig.
◗ Rengjør de enkelte delene av frityrgryten grundig før apparatet brukes for første gang (se
'Rengjøring'). Kontroller at alle delene er helt tørre før du fyller olje eller flytende fett på
frityrkokeren.
◗ Apparathuset, som inneholder de elektriske komponentene og varmeelementet, må aldri
senkes ned i vann eller skylles under springen.
◗ Ta alltid ut støpselet etter bruk. Flytt ikke på frityrkokeren før den er tilstrekkelig avkjølt.
◗ Apparatet skal ikke slås på før det er fylt med olje eller fett.Kontroller alltid at frityrgryten
er fylt til et nivå mellom de to merkene på innsiden av den indre bollen.
◗ Under steking vil varm damp komme ut av apparatet.Hold hender og ansikt godt unna denne
dampen.
◗ Hold alltid frityrgryten utenfor barns rekkevidde, spesielt under bruk. La ikke nettledningen
henge over kanten av bordet eller benken.
◗ Dette apparatet er bare beregnet til husholdningsbruk.Hvis apparatet brukes feil eller til
(halv)profesjonelle formål eller det brukes på en måte som ikke er i samsvar med
bruksanvisningen, blir garantien ugyldig, og Philips aksepterer da intet ansvar for påført skade.
◗ Stek maten gyldenbrun, ikke mørkebrun, og fjern brente rester! Stivelsesholdig mat, særlig
potet- og kornprodukter, bør ikke stekes ved temperaturer over 175cC (for å redusere
dannelsen av akrylamid).
Sikkerhetsbryter
Dette apparatet er utstyrt med en sikkerhetsbryter som slår av apparatet hvis det blir for varmt.
Dette kan skje hvis det ikke er nok olje eller fett i frityrgryten, eller hvis fettklumper smeltes i den,
noe som kan hindre varmeelementene i å avgi varmen.
NORSK 15
Page 16
◗ Hvis frityrgryten ikke fungerer lenger, la oljen eller fettet avkjøles og henvend deg til en
Philips-forhandler eller et godkjent Philips-verksted.
Klargjøring for bruk
1 Apparatet skal stå på et vannrett, jevnt og stabilt underlag, utilgjengelig for barn.
Hvis du vil sette frityrgryten på komfyren, må du passe på at platene på komfyren er slått av og
er kalde.
2 Fyll den tørre frityrgryten med olje, flytende fett eller smeltet fast fett til det øverste merket
på innsiden av den indre bollen (se avsnittet "Olje og fett" for instrukser om bruk av fast fett)
(fig. 1).
Olje og fett
Bland aldri ulike typer olje eller fett.
Det anbefales å bruke frityrolje eller flytende frityrfett, fortrinnsvis vegetabilsk olje eller fett som
inneholder mye umettet fett (f.eks. linolsyre).
Fett i fast form kan brukes, men man må være forsiktig for å unngå at fettet spruter og at
varmeelementet blir overopphetet eller skadet.
1 Hvis du ønsker å bruke nye blokker med fett,må du først smelte dem sakte på svak varme i
en vanlig kasserolle.
2 Hell det smeltede fettet forsiktig i frityrgryten.
3 Frityrgryten oppbevares ved romtemperatur med det stivnede fettet i.
4 Hvis fettet blir svært kaldt, kan det begynne å sprute når det smelter. Stikk noen hull i det
størknede fettet med en gaffel for å unngå dette (fig. 2).
Pass på at innerbollen ikke blir skadet av gaffelen.
Bruke apparatet
Fritering
Vær forsiktig: det kommer varm damp fra filteret i lokket under friteringen.
1 Ta hele ledningen ut av ledningsrommet og sett støpselet i stikkontakten (fig.3).
Pass på at nettledningen ikke kommer i berøring med de varme delene av apparatet.
2 Bare HD6123 - Slå frityrgryten på ved hjelp av strømbryteren (fig. 4).
Lampen i strømbryteren tennes.
3 Vri temperaturbryteren til ønsket temperatur (160-190cC) (fig. 5).
Temperaturlampen tennes
- Se matemballasjen eller tabellen på slutten av denne bruksanvisningen for temperaturvalg.
- Oljen eller fettet varmes til valgt temperatur i løpet av 10-15 minutter.
- Når frityrgryten varmes opp, slås indikatorlyset på og av flere ganger. Når det lyser kontinuerlig,
har oljen eller fettet nådd innstilt temperatur.
NORSK16
Fett i fast form
1700 g
2000 g
Olje/flytende fett
2 l
2,3 l
Min.
Maks.
Page 17

- Når en porsjon har blitt fritert, slås lyset også på.Vent til det har vær t av en stund før du friterer
neste porsjon.
B
Du kan la stekekurven være i frityrgryten mens den varmes opp.
4 Åpne lokket ved å trykke på utløserspaken. Lokket åpnes automatisk (fig. 6).
5 Løft på håndtaket for å sette kurven i øverste stilling (fig.7).
6 Ta kurven ut av frityrgryten og legg maten som skal stekes, i kurven (fig. 8).
B
For best mulig stekeresultat anbefaler vi at maksimalgrensene nedenfor ikke overskrides.
Ikke friter asiatiske riskaker (eller lignende mat) i dette apparatet, da det kan få oljen eller fettet
til å boble eller sprute kraftig.
7 Legg kurven forsiktig ned i frityrgryten uten å senke den ned i oljen eller fettet (fig. 9).
8 Lukk lokket.
9 Bare HD6123 - Still inn ønsket friteringstid (se avsnittet "Tidtaker" i dette kapitlet).
Du kan også bruke frityrgryten uten å stille inn tidtakeren.
10 Trykk på utløserknappen på kurvhåndtaket og senk forsiktig kurven til laveste stilling (fig. 10).
B
For å oppnå best mulig friteringsresultat, hold deg til steketidene som er angitt på pakningen, eller følg
steketidene som er satt opp i den aktuelle tabellen.
B
For å oppnå et jevnt, gyllent friteringsresultat løfter du stekekurven opp fra oljen eller fettet et par
ganger under fritering og rister forsiktig på innholdet.
Tidtaker (bare HD6123)
Type HD6123 er utstyrt med en digital tidtaker.
Tidtakeren angir når friteringstiden er gått,men slår IKKE av frityrgryten.
Stille inn tidtakeren
1 Trykk på tidtakerknappen når du skal stille inn friteringstiden i minutter.
Angitt tid vises i displayet.
2 Hold knappen nede for å øke minuttantallet raskt.Slipp knappen når ønsket friteringstid er
nådd.
- Maksimaltiden som kan stilles inn, er 99 minutter.
- Noen sekunder etter at friteringstiden er stilt inn, begynner tidtakeren å telle ned.
- Mens tidtakeren teller ned, vises gjenværende friteringstid på displayet. Det siste minuttet vises i
sekunder.
3 Hvis forhåndsinnstilt tid ikke er riktig,kan du slette den ved å trykke inn tidtakerknappen i
2 sekunder i det øyeblikk tidsbryteren begynner å telle ned (når tiden begynner å blinke).
Hold knappen inne til '00' vises i displayet.Du kan nå stille inn ønsket friteringstid.
4 Når den innstilte tiden er gått, høres et signal. Etter 10 sekunder gjentas lydsignalet.
Lydsignalet kan stoppes ved å trykke på tidsbryterknappen.
NORSK 17
Frosne pommes frites
800 g
450 g
Hjemmelagde pommes frites
1000 g
600 g
Maks. mengde
Anbefalt mengde for best resultat
Page 18

Ta av tidtakeren
Tidtakeren er avtakbar, slik at du kan ta den med deg til et annet rom om ønskelig. På denne måten
kan du høre lydsignalet som indikerer at maten er ferdigfritert, uansett hvor du befinner deg.
◗ Når du har angitt ønsket friteringstid, kan du ta tidtakeren av frityrgryten ved å dra høyre
side mot deg (fig. 11).
Når tidtakeren varsler ved hjelp av et lydsignal at maten er ferdigfritert, kan du gå tilbake til
frityrgryten og feste tidtakeren på frityrgryten igjen.
Vannskuff
Under friteringen vil det komme kondensvann på innsiden av lokket. Dette vannet samles opp i
vannskuffen når du åpner lokket, slik at du unngår at det drypper ned på arbeidsbenken.
◗ Tøm vannskuffen etter bruk.
- Vent til oljen eller fettet er tilstrekkelig avkjølt.
- Ta av lokket.
- Ta ut vannskuffen og tøm den i vasken.
Etter friteringen
1 Løft håndtaket for å heve stekekurven til høyeste posisjon, altså avrenningsposisjon (fig. 12).
2 Åpne lokket ved å trykke på utløserspaken (fig. 13).
Pass deg for varm damp og eventuell oljesprut.
3 Ta stekekurven forsiktig ut av frityrgryten.
Rist om nødvendig stekekurven over frityrgryten for å fjerne overflødig olje eller fett. Legg den
friterte maten i en skål eller et dørslag med fettabsorberende papir, f.eks. kjøkkenpapir.
4 Bare HD6123: Slå frityrgryten av ved hjelp av strømbryteren (fig. 14).
Indikatorlyset på strømbryteren slås av.
5 Koble fra apparatet etter bruk.
Ikke beveg frityrgryten før oljen eller fettet er skikkelig avkjølt. Dette tar ca.1 time.
B
Hvis frityrgryten ikke brukes regelmessig, anbefaler vi å fjerne oljen eller det flytende fettet og
oppbevare det i en tett beholder,fortrinnsvis i kjøleskap. Hell oljen eller fettet gjennom en sil for å
fjerne matpartikler.Ta ut stekekurven før innerbollen tømmes.
B
Hvis frityrgryten inneholder fett i fast form, la fettet størkne i frityrgryten og oppbevar frityrgryten med
fettet i (se kapitlet "Klargjøring for bruk", avsnittet "Olje og fett".
Rengjøring
Vent til oljen eller fettet er tilstrekkelig avkjølt.
Ikke bruk skuremidler eller skurende materialer (for eksempel skuresvamper) til å rengjøre
apparatet.
1 Trykk på utløserspaken for å åpne lokket.
2 Løft deretter lokket av apparatet.
3 Ta ut vannskuffen.
4 Ta stekekurven ut av frityrgryten, og hell ut oljen eller fettet.
5 Rengjør apparathuset med en fuktig klut (med litt oppvaskmiddel) og/eller kjøkkenpapir.
NORSK18
Page 19

6 Rengjør den indre bollen med varmt vann og litt oppvaskmiddel.
Senk ikke ytterbeholderen ned i vann.
7 Rengjør lokket, vannskuffen og stekekurven i varmt vann med litt oppvaskmiddel eller i
oppvaskmaskinen.
8 Skyll delene i vann, og tørk dem godt.
Rengjøring av det permanente fettfilteret
Lokket med det permanente fettfilteret kan rengjøres grundig i oppvaskmaskin eller i varmt vann
med litt oppvaskmiddel.
Maskinvaskbare deler
- Lokk med permanent antifettfilter
- Stekekurv
- Vannskuff
Skifte olje eller fett
Ettersom olje og fett ganske raskt taper sine gunstige egenskaper, bør du skifte ut oljen eller fettet
med jevne mellomrom. Slik gjør du det:
Hvis frityrgryten brukes hovedsakelig til pommes frites og oljen eller fettet siles etter hver bruk, kan
oljen eller fettet brukes 10-12 ganger før utskiftning.
◗ Bruk aldri den samme oljen lenger enn 6 måneder, og følg alltid anvisningene på pakningen.
◗ Bland aldri ny olje eller nytt fett i brukt olje eller brukt fett.
◗ Bland aldri ulike typer olje eller fett.
◗ Bytt alltid olje hvis den begynner å skumme ved oppvarming, lukter eller smaker sterkt eller
blir mørk og/eller sirupsaktig.
Deponering av brukt olje eller fett
Brukt olje eller flytende fett kan helles tilbake på originalflasken (plastflaske). Brukt fett kan
deponeres ved å la det stivne i frityrgryten (uten stekekurven i) og skrape det ut av frityrgryten med
en slikkepott og pakke det i avispapir. Flasken eller avisen kan deponeres som restavfall (ikke
våtorganisk avfall) eller i henhold til lokale bestemmelser.
Oppbevaring
1 Sett alle deler inn i eller på frityrgryten og lukk lokket.
2 Rull opp ledningen, legg den i ledningsrommet og sett støpselet i holderen.
3 Løft frityrgryten etter håndtakene.
Friteringstips
Hvis du trenger generell informasjon om tilberedningstider og friteringstemperaturer, kan du se
tabellen til slutt i denne bruksanvisningen.
Hjemmelagde pommes frites
Pommes frites blir best og sprøest på følgende måte:
1 Bruk faste poteter og skjær dem i avlange biter. Skyll bitene i kaldt vann.
Slik unngår man at bitene kleber seg til hverandre under friteringen.
B
Tørk bitene grundig.
NORSK 19
Page 20

2 Pommes frites friteres to ganger: første gang i 4-6 minutter ved en temperatur på 160cC,
andre gang i 5-8 minutter ved en temperatur på 175cC.
3 Legg den hjemmelagede pommes fritesen i en bolle og rist den. La pommes fritesen avkjøles
før du friterer den for andre gang.
Frossen mat
Frosne pommes frites er allerede forstekt, så de trenger bare å friteres én gang som angitt på
emballasjen.
Mat fra fryser (-16 til -18 cC) vil gjøre at oljen eller fettet kjøles sterkt ned når den has i. Ettersom
mat med slik lav temperatur ikke stekes umiddelbart, vil den også kunne trekke til seg for mye olje
eller fett.
Gjør følgende for å forhindre dette:
- Frossen mat bør tines ved romtemperatur før fritering.
- Rist av mest mulig is og vann og tørk av maten før fritering.
- Ikke friter svært store mengder om gangen (se tabellen med tilberedningstider og
friteringstemperaturer).
- Velg friteringstemperatur som angitt i tabellen i denne brukerveiledningen eller på emballasjen
for matvaren som skal friteres. Hvis du ikke finner noen passende anvisning, velger du 190 cC.
- Senk maten forsiktig ned i oljen eller fettet, siden frossen mat kan få den varme oljen eller fettet
til å boble kraftig.
Fjerne uønsket smak
Bestemte matvarer, særlig fisk, kan gi oljen eller fettet en ubehagelig smak. Slik nøytraliserer du
smaken på oljen eller fettet:
1 Varm opp oljen eller fettet til en temperatur på 160cC.
2 Legg to tynne brødskiver eller noen persilledusker i oljen.
3 Vent til det slutter å boble,og fjern deretter brødet eller persillen fra frityrgryten ved hjelp
av en spatel.
Oljen eller fettet vil nå ha en nøytral smak igjen.
Miljø
◗ Ikke kast apparatet sammen med vanlig husholdningaavfall når produktets levetid er over,
men lever det på et anvist oppsamlingssted for resirkulering.Ved å gjøre dette, vil du hjelpe til
å verne miljøet (fig. 15).
Fjern batteriet fra tidtakeren (bare HD6123) før apparatet kastes.
1 Bruk et lite, flatt skrujern til å fjerne baksiden av tidtakeren.
2 Ta ut batteriet. Ikke kast batteriet sammen med det vanlige husholdningsavfallet, men lever
det inn på en miljøstasjon for spesialavfall.
Garanti og service
Hvis du trenger informasjon eller har et problem, kan du besøke Philips' webområde på
www.philips.com eller kontakte Philips' kundesenter i ditt land (du finner telefonnummeret i det
globale garantiheftet). Hvis det ikke er noe kundesenter i ditt land,kan du henvende deg til din lokale
Philips-forhandler eller kontakte serviceavdelingen ved Philips Domestic Appliances and Personal
Care BV.
NORSK20
Page 21

21
Løsning
Se etter på emballasjen for den aktuelle matvaren eller
i tabellen i denne brukerveiledningen for å finne ut om
det er valgt riktig temperatur og/eller tilberedningstid.
Ikke friter mer om gangen enn den mengden som er
angitt i tabellen.
Sikringen i temperaturbryteren kan ha røket, slik at
sikkerhetsbryteren har slått apparatet av. Kontakt din
Philips-forhandler eller et Philips-autorisert
servicesenter for å få sikringen skiftet.
Ta av lokket, og rengjør det sammen med filteret i
varmt vann med litt oppvaskmiddel eller i
oppvaskmaskin.
Skift ut oljen eller fettet. Sil oljen eller fettet regelmessig
for å holde det friskt lengst mulig.
Bruk frityrolje eller flytende frityrfett av god kvalitet.
Bland aldri to forskjellige typer oljer eller fett.
Kontroller at lokket er ordentlig lukket.
Ta av lokket, og rengjør det sammen med filteret i
varmt vann med litt oppvaskmiddel eller i
oppvaskmaskin.
Hvis pakningen er skitten, rengjør du lokket i varmt
vann med litt oppvaskmiddel eller i oppvaskmaskinen.
Hvis pakningen er slitt, må du kontakte din Philipsforhandler eller et Philips-autorisert servicesenter for å
få skiftet gummipakningen.
Kontroller at oljen eller fettet i frityrgryten ikke går
over maksimalnivået.
Tørk maten grundig før friteringen, og følg denne
bruksanvisningen ved friteringen.
Ikke friter mer om gangen enn den mengden som er
angitt i tabellen.
Tørk maten grundig før fritering.
Bruk frityrolje eller flytende frityrfett av god kvalitet.
Bland aldri to forskjellige typer oljer eller fett.
Rengjør den indre bollen som beskrevet i denne
bruksanvisningen.
Mulig årsak
Den valgte temperaturen er for
lav,og/eller maten har ikke blitt
fritert lenge nok.
Det er for mye mat i kurven.
Oljen eller fettet får ikke en høy
nok temperatur.
Det permanente fettfilteret er
tett.
Oljen eller fettet er ikke lenger
friskt.
Olje- eller fettypen er ikke
egnet for fritering.
Lokket er ikke ordentlig lukket.
Det permanente fettfilteret er
tett.
Gummipakningen rundt metallet
på innsiden av lokket er skitten
eller slitt.
Det er for mye olje eller fett i
frityrgryten.
Maten inneholder for mye
fuktighet.
Det er for mye mat i
frityrkurven.
Maten inneholder for mye
fuktighet.
Olje- eller fettypen er ikke
egnet for fritering.
Den indre bollen er ikke
ordentlig rengjort.
Problem
Den friterte maten
blir ikke gyldenbrun
og/eller sprø.
Frityrgryten avgir en
sterk, sjenerende
lukt.
Damp kommer ut
fra andre steder enn
filteret.
Olje eller fett renner
over kanten på
frityrgryten under
fritering.
Oljen eller fettet
skummer kraftig
under friteringen.
Feilsøking
NORSK
Page 22

22
Tilberedningstider og temperaturinnstillinger
Tabellen nedenfor viser hvor mye av en bestemt type mat som kan tilberedes av gangen, og
hvilken temperatur og tilberedningstid som skal brukes.
Hvis instruksjonene på pakken som inneholder maten som skal tilberedes, er forskjellige fra de
i tabellen, følger du alltid instruksjonene på pakken.
*) Se også "Friteringstips" for tilberedning av hjemmelaget pommes frites.
NORSK
Friteringstid
(minutter),
frossen mat
-
15-20
6-7
4-5
-
-
5-6
-
6-7
10-12
8-10
4-5
4-5
4-5
3-4
4-5
4-5
-
-
-
-
Friteringstid
(minutter), fersk
eller (delvis) tint
mat
4-6 (gå til 175cC i
denne tabellen for
instruksjoner om
andre fritering)
5-7
12-15
4-5
3-4
2-3
5-8
-
3-4
4-5
6-7
5-6
3-4
3-4
3-4
2-3
3-4
3-4
3-4
5-6
2-3
3-4
Anbefalt mengde
per porsjon
600 g
450 g
3-5 stk.
5 stk.
4 stk.
8-10 stk.
600 g
450 g
600 g
4-5 stykker
2-3 stk.
5-6 stykker
8-10 stk.
8-10 stk.
8-10 stk.
12-15 stykker
8-10 stk.
5 stk.
600 g
3-4 stk.
2-4 stykker
2 stykker
Mattype
Hjemmelagde
pommes frites*)
første fritering
Fersk fisk
Kylling (lår)
Ostekroketter
Små potetkaker
Friterte grønnsaker
(sopp, blomkål)
Hjemmelagde
pommes frites*)
andre steking
Frosne pommes
frites
Potetgull (veldig
tynne potetskiver)
Potetkroketter
Kinesiske vårruller
Vietnamesiske
vårruller
Kyllingnuggets
Minisnacks
Kjøttboller (små)
Blåskjell
Reker
Stekte epler
Aubergine (skiver)
Smultringer
Camembert
(panert)
Wienerschnitzel
Temperatur
160cC
170cC
175cC
180cC
190cC
Page 23

Introduktion
Tack för att du valde fritösen Philips Comfor t Plus. Du kan fritera alla möjliga typer av mat både
enkelt och säkert med din nya fritös.
Allmän beskrivning
A Lock
B Tråg för kondenserat vatten
C Frityrkorg
D Temperaturkontroll
E Kontrollampa
F Öppningsspak till locket
G Nätsladd
H Sladdförvaring
I Löstagbar timer (endast HD6123)
J Start-/stoppknapp (endast HD6123)
Viktigt
Läs bruksanvisningen och titta på bilderna innan du använder fritösen.
◗ Kontrollera att den spänning som anges på bryggaren stämmer med den du har i ditt hem
innan du ansluter den till elnätet.
◗ Fritösen får endast anslutas till ett jordat vägguttag.
◗ Om nätsladden är skadad måste den bytas ut av Philips,en av Philips auktoriserad verkstad
eller liknande kvalificerade personer för att undvika faror.
◗ Lämna alltid in apparaten till ett av Philips auktoriserat servicecenter för undersökning eller
reparation. Försök inte reparera apparaten själv. Om du gör det upphör garantin att gälla.
◗ Diska noga fritösens olika delar innan du använder den första gången (se kapitel 'Rengöring').
Se till att alla delar är helt torra innan du fyller fritösen med olja eller flytande matfett.
◗ Sänk aldrig ned fritösen med de elektriska delarna och värmeslingorna i vatten, och skölj den
inte heller under rinnande vatten.
◗ Dra alltid ur kontakten efter användning.Flytta inte fritösen förrän den har svalnat tillräckligt.
◗ Sätt inte på fritösen innan du har fyllt den med olja/matfett. Se till att fritösen alltid är fylld så
att nivån ligger mellan de två indikeringsmärkena på insidan av innerskålen.
◗ Under friteringen strömmar det ut ånga. Se upp så att du inte bränner dig på händerna eller i
ansiktet.Tänk på att het ånga kan strömma ut när du öppnar locket.
◗ Håll apparaten utom räckhåll för barn. Låt inte nätsladden hänga ner över bordskanten eller
arbetsytan på vilken apparaten står.
◗ Fritösen är endast avsedd för användning i normalt hushåll.Om den används fel,i
professionella sammanhang eller om bruksanvisningen inte följs,upphör garantin att gälla och
Philips ansvarar inte för de skador som kan uppkomma.
◗ Fritera maten gyllengul istället för mörk eller brun och ta bort brända rester! Fritera inte
stärkelsehaltig mat, speciellt potatis och spannmålsprodukter, vid en temperatur över 175cC
(för att minska produktionen av akrylamid).
Säkerhetsfunktion
Den här apparaten är försedd med en säkerhetsfunktion som stänger av apparaten om den blir
överhettad. Detta kan inträffa om det inte finns tillräckligt med olja eller om hela bitar fast fett smälts
i fritösen, vilket hindrar fritösens värmeelement från att avge all sin värme.
◗ Om fritösen inte längre fungerar ska du låta oljan eller matfettet svalna och vända dig till din
Philips-återförsäljare eller ett av Philips auktoriserat servicecenter.
SVENSKA 23
Page 24

24
Före användning
1 Sätt fritösen på en horisontell, jämn och stabil yta utom räckhåll för barn.
Om du vill ställa fritösen ovanpå spisen ska du kontrollera att spisplattorna är avstängda och är
kalla.
2 Fyll den torra fritösen med olja, flytande matfett eller smält fast matfett upp till översta
indikeringen på insidan av innerskålen (se avsnittet 'Olja och matfett' för instruktioner om
hur du använder fast matfett) (fig. 1).
Olja och matfett
Blanda aldrig olika sorters olja eller fett.
Vi rekommenderar att du använder friteringsolja eller flytande friteringsmatfett,helst vegetabiliskt
som innehåller omättat fett (t.ex. linolsyra).
Det går att använda fast friteringsmatfett men var i så fall extra försiktig för att förhindra att
matfettet stänker och att värmeelementet överhettas eller skadas.
1 Om du vill använda nya bitar fett måste du först smälta dem vid låg värme i en vanlig panna.
2 Häll försiktigt ned matfettet i fritösen.
3 Förvara fritösen med fett som stelnat på nytt i rumstemperatur.
4 Om matfettet blir väldigt kallt kan det börja stänka när det smälter. Stick några hål i det
stelnade matfettet med en gaffel för att förhindra detta (fig. 2).
Var försiktig så att du inte skadar innerskålen med gaffeln.
Använda apparaten
Fritering
Var försiktig:det kommer het ånga genom filtret i locket under friteringen.
1 Ta ut hela sladden från sladdförvaringsfacket och sätt kontakten i vägguttaget (fig. 3).
Se till att sladden inte kommer i kontakt med heta delar på fritösen.
2 Endast HD6123 - Sätt igång fritösen med hjälp av start-/stoppknappen (fig. 4).
Signallampan i start-/stoppknappen tänds.
3 Ställ in temperaturkontrollen på den temperatur som krävs (160-190cC) (fig.5).
Temperaturindikatorlampan tänds.
- Läs på matförpackningen eller i tabellen som finns i slutet av denna bruksanvisning vilken
temperatur du ska välja.
- Oljan/matfettet värms upp till den valda temperaturen på 10 till 15 minuter.
- Medan fritösen värms upp kommer signallampan tändas och släckas ett par gånger. När den
förblir släckt ett slag betyder det att oljan eller fettet har uppnått den inställda temperaturen.
- När du har friterat en omgång tänds signallampan.Vänta tills den varit släckt ett slag innan du
friterar nästa omgång.
B
Korgen kan lämnas kvar i fritösen medan den värms upp.
SVENSKA
Fast matfett
1700 g
2000 g
Olja/flytande matfett
2 l
2,3 l
Minst
Högst
Page 25

25
4 Öppna locket genom att trycka ner låsknappen. Locket öppnas automatiskt (fig. 6).
5 Lyft i handtaget för att placera korgen i det högsta läget (fig.7).
6 Lyft ut korgen ur fritösen och lägg maten som ska friteras i korgen (fig. 8).
B
För bästa friteringsresultat bör du inte låta mängden mat överskrida de maxgränser som anges
nedan.
Fritera inte asiatiska riskakor (eller liknande typer av mat) i den här apparaten eftersom det kan
orsaka kraftiga stänk eller våldsamt bubblande olja eller fett.
7 Sätt försiktigt korgen i fritösen utan att sänka ned det i oljan eller fettet (fig.9).
8 Stäng locket.
9 Endast modell HD6123 - Ställ in önskad friteringstid (se avsnittet 'Timer' i det här kapitlet).
Du kan också använda fritösen utan att ställa in timern.
10 Tryck på frigöringsknappen på korgens handtag och sänk försiktigt ned korgen till det
understa läget (fig. 10).
B
För ett gott slutresultat skall du följa tillagningstiden som anges på matförpackningen eller i tabellen
som finns i slutet av den här bruksanvisningen.
B
För att uppnå en jämn gyllene fritering bör du lyfta korgen ur oljan eller fettet några gånger och
försiktigt skaka runt innehållet.
Timer (endast HD6123)
Typ HD6123 är utrustad med en digital timer.
Timern indikerar att friteringstiden har löpt ut, men fritösen stängs INTE av.
Ställa in timern
1 Tryck på timer-knappen för att ställa in friteringstiden i minuter.
Den inställda tiden visas på displayen.
2 Håll knappen intryckt för att snabbt stega fram minuterna. Släpp upp knappen när den
önskade friteringstiden har nåtts.
- Längsta tid som kan ställas in är 99 minuter.
- Ett par sekunder efter det att du har ställt in tiden börjar timern räkna ned.
- Samtidigt som timern räknar ned blinkar den återstående tiden i displayen. Den sista minuten
visas i sekunder.
3 Om den förinställda tiden är fel, kan du återställa den genom att trycka ned knappen i två
sekunder när nedräkningen börjar (det vill säga när tiden börjar att blinka). Håll ned knappen
tills siffrorna '00' visas på displayen. Nu kan du ange den rätta tiden.
4 När den inställda tiden har löpt ut hörs en ljudsignal. Efter 10 sekunder upprepas signalen.
Stäng av signalen genom att trycka på timerknappen.
Lossa timern
Timern är löstagbar vilket gör att du kan ta timern med dig till ett annat rum. På detta sätt kan du
höra ljudsignalen som indikerar att den friterade maten är klar var du än är.
SVENSKA
Fryst pommes frites
800 gram
450 gram
Hemgjord pommes frites
1000 g
600 gram
Maximal mängd
Rekommenderad mängd för att få
bäst resultat
Page 26

26
◗ När du har ställt in önskad friteringstid kan du ta loss timern från fritösen genom att dra den
högra sidan mot dig (fig. 11).
När timern avger en signal för att visa att den friterade maten är klar, kan du återvända till fritösen
och sätta fast timern igen.
Vattentråget
Vid friteringen kommer kondens att bildas på lockets insida. Kondensen samlas i vattenbehållaren
när du öppnar locket, i stället för att droppa ner på arbetsytan.
◗ Töm vattentråget efter användning.
- Vänta tills oljan/matfettet har svalnat ordentligt.
- Ta av locket.
- Lyft ur vattenbehållaren och töm den i vasken.
Efter fritering
1 Lyft handtaget för att lyfta korgen till dess högsta läge,det vill säga tömningsläget (fig. 12).
2 Öppna locket genom att trycka ned frigöringsspaken (fig. 13).
Se upp för den heta ångan och stänket som kan komma från oljan.
3 Lyft försiktigt korgen ur fritösen.
Skaka korgen försiktigt för att bli av med överflödigt fett om så behövs. Lägg den friterade maten i
en skål eller ett durkslag på något fettabsorberande material,till exempel hushållspapper.
4 Endast modell HD6123: Stäng av fritösen med hjälp av start-/stoppknappen (fig. 14).
Signallampan i start-/stoppknappen släcks.
5 Koppla ur apparaten när du är klar.
Flytta inte fritösen tills oljan eller fettet har svalnat tillräckligt, vilket tar ungefär 60 minuter.
B
Om du inte använder fritösen regelbundet bör du flytta oljan eller matfettet till en väl försluten
behållare, och helst förvara det i kylen eller på någon annat sval plats. Häll oljan eller matfettet i
behållaren genom en fin sil för att bli av med eventuella matrester.Ta ur friteringskorgen innan du
tömmer innerskålen.
B
Om fritösen innehåller fast matfett ska du låta matfettet stelna i fritösen och sedan förvara fritösen
med matfettet i (se kapitel 'Före användning', avsnitt 'Olja och matfett').
Rengöring
Vänta tills oljan/matfettet har svalnat ordentligt.
Använd inte några slipande (flytande) rengöringsmedel eller redskap (t.ex.skursvampar) för att
rengöra apparaten.
1 Tryck på öppningsspaken till locket för att öppna det.
2 Lyft sedan av locket från apparaten.
3 Lyft ur vattenbehållaren.
4 Lyft ur friteringskorgen och häll ut eventuell frityr.
5 Rengör höljet med en fuktad trasa (med en aning flytande diskmedel) och/eller
hushållspapper.
6 Rengör innerskålen med hjälp av hett vatten och lite diskmedel.
Sänk aldrig ned fritösens hölje i vatten.
SVENSKA
Page 27

27
7 Rengör locket, vattenbehållaren och friteringskorgen i diskmaskinen eller med hjälp av hett
vatten och lite rengöringsmedel.
8 Skölj delarna med rent vatten och torka dem noggrannt.
Rengöra det permanenta flottfiltret
Det permanenta flottfiltret i locket kan rengöras i diskmaskinen eller med hjälp av hett vatten med
lite rengöringsmedel.
Delar som kan diskas i diskmaskin
- Locket med det permanenta flottfiltret
- Korgen
- Vattentråget
Byta olja eller matfett
Eftersom kvaliteten på olja och matfett försämras ganska snabbt,bör du regelbundet byta ut frityren.
Så här går du till väga:
Om du huvudsakligen använder fritösen för att laga pommes frites och om du silar oljan/matfettet
efter varje gång kan du återanvända oljan/matfettet 10 till 12 gånger innan den/det måste bytas. Om
du använder fritösen för att laga proteinrik mat (såsom kött eller fisk) bör du byta oljan/matfettet
oftare.
◗ Använd aldrig samma frityr längre än sex månader och följ alltid instruktionerna på
förpackningen.
◗ Tillsätt aldrig ny olja eller matfett till använd olja/använt matfett.
◗ Blanda aldrig olika sorters olja eller fett.
◗ Byt alltid olja/matfett om det börjar skumma vid uppvärmning, om det luktar eller smakar
starkt eller om det mörknar och/eller blir simmigt.
Ta hand om använd frityr
Häll tillbaka använd olja eller flytande fett i dess ursprungliga (förslutningsbara) plastflaska. Du kan
göra dig av med använt fett genom att låta det stelna i fritösen (utan att korgen är inuti den) och
sedan skopa ut det ur fritösen med hjälp av en stekspade och svepa in det i tidningspapper. Om det
går kan du lägga flaskan eller tidningspapperet i soptunnan för ej komposterbart avfall (inte i
soptunnan för komposterbart avfall) eller slänga det i enlighet med föreskrifterna i ditt land.
Förvaring
1 Lägg tillbaka alla delar i fritösen och stäng locket.
2 Rulla ihop sladden, lägg den i sladdförvaringsfacket och stoppa in kontakten i kontakthållaren.
3 Lyft fritösen i handtagen.
Friteringstips
En översikt av friteringstider och temperaturer hittar du i tabellen i slutet av de här anvisningarna.
Hemgjord pommes frites
Godast och knaprigast pommes frites får du så här:
1 Ta fast potatis och skär dem i stavar. Skölj stavarna med kallt vatten.
Detta hindrar dem från att klibba ihop under friteringen.
B
Torka stavarna noga.
SVENSKA
Page 28

28
2 Fritera pommes frites två gånger: första gången i 4-6 minuter vid en temperatur på 160cC,
andra gången i 5-8 minuter vid en temperatur på 175cC.
3 Lägg dina hemgjorda pommes frites i en skål och skaka dem. Låt dina pommes frites svalna
innan du friterar dem den andra gången.
Djupfryst mat
Fryst pommes frites är förkokt och behöver bara friteras en gång enligt anvisningarna på
förpackningen.
Om du friterar mat direkt från frysen (-16 till -18cC) kommer frityren att kylas ned ansenligt.
Eftersom maten inte bryns direkt kan den dessutom hinna absorbera för mycket frityr.
Så här undviker du ovanstående problem:
- Helst ska du låta den frysta maten tina i rumstemperatur innan du friterar den.
- Skaka försiktigt bort så mycket is och vatten som möjligt och torka av maten tills den är
ordentligt torr.
- Fritera inte stora mängder på en gång (se tabellen nedan för friteringstider och temperaturer).
- Använd den friteringstemperatur som anges i tabellen i de här anvisningarna eller på
förpackningen till den mat du ska fritera.Om du inte hittar några lämpliga instruktioner använder
du temperaturen 190cC.
- Sänk ned maten i oljan/matfettet mycket försiktigt, eftersom fryst mat kan göra att
oljan/matfettet börjar bubbla våldsamt.
Om oljan/matfettet har fått bismak
En del matvaror, särskilt fisk, kan ge oljan/matfettet en obehaglig smak. Gör så här för att få bort
smaken:
1 Hetta upp frityren till 160cC.
2 Lägg ner två tunna skivor bröd eller några persiljekvistar i frityren.
3 Vänta tills du inte ser några bubblor längre och lyft sedan ut brödet eller persiljan ur fritösen
med en stekspade.
Nu har frityren en neutral smak igen.
Miljö
◗ När apparatens livslängd är slut ska du inte slänga den med de vanliga hushållssoporna utan
lämna in den på en offentlig återvinningsstation. Om du gör det hjälper du till att skydda
miljön (fig. 15).
Ta ut batteriet ur timern (endast HD6123) innan du kasserar apparaten.
1 Använd en liten spårskruvmejsel för att avlägsna timerns baksida.
2 Ta ut batteriet. Kasta inte batteriet i de vanliga hushållssoporna utan lämna in det på ett
offentligt insamlingsställe.
Garanti och service
Om du behöver information eller har något problem kan du söka upp Philips webbsida på adressen
www.philips.com eller kontakta Philips kundtjänst i ditt land (rätt telefonnummer finner du i
världsgarantibroschyren). Om det inte finns någon kundtjänst i ditt land ska du vända dig till din
lokala återförsäljare, eller kontakta serviceavdelningen på Philips Domestic Appliances and Personal
Care BV.
SVENSKA
Page 29

Lösning
Se efter att du valt rätt temperatur och tid för
friteringen i tabellen i de här anvisningarna eller på
förpackningen till den mat du friterar. Ställ in rätt
temperatur.
Fritera aldrig mer mat än vad som anges i tabellen.
Säkringen till temperaturreglaget kan ha löst ut vilket
gör att säkerhetsströmbrytaren stängt av apparaten.
Vänd dig till din Philips återförsäljare eller ett av Philips
auktoriserat serviceombud för att byta ut säkringen.
Ta av locket och rengör filtret i diskmaskinen eller i hett
vatten med lite rengöringsmedel.
Byt olja eller matfett. Sila regelbundet frityren för att
hålla den fräsch längre.
Använd olja eller matfett av hög kvalitet. Blanda aldrig
olika sorters olja eller matfett.
Kontrollera att locket är ordentligt stängt.
Ta av locket och rengör filtret i diskmaskinen eller i hett
vatten med lite rengöringsmedel.
Om packningen är smutsig ska du rengöra locket i
varmt vatten med lite diskmedel eller i diskmaskinen.
Om locket är slitet ska du vända dig till din Philipsåterförsäljare eller ett av Philips auktoriserat
serviceombud för att få packningen utbytt.
Se till att oljan/matfettet inte överskrider maximinivån.
Torka maten ordentligt innan du börjar fritera den, och
fritera enligt den här bruksanvisningen.
Fritera aldrig mer mat än vad som anges i tabellen.
Torka maten ordentligt innan du friterar den.
Använd olja eller matfett av hög kvalitet. Blanda aldrig
olika sorters olja eller matfett.
Diska innerskålen enligt beskrivningen i den här
bruksanvisningen.
Möjlig orsak
Friteringstemperaturen är för
låg och/eller maten har inte
friterats tillräckligt länge.
Det är för mycket mat i korgen.
Frityren blir inte tillräckligt het.
Det permanenta flottfiltret är
igentäppt.
Frityren är inte fräsch längre.
Oljan eller matfettet som
används som frityr är inte
lämplig för fritering.
Locket är inte ordentligt stängt.
Det permanenta flottfiltret är
igentäppt.
Lockets packning är smutsig
eller sliten.
Det är för mycket olja/matfett i
fritösen.
Maten har för hög fukthalt.
Det är för mycket mat i
friteringskorgen.
Maten har för hög fukthalt.
Oljan eller matfettet som
används som frityr är inte
lämplig för fritering.
Innerskålen är inte ordentligt
diskad.
Problem
Den friterade maten
får inte en
gyllenbrun färg
och/eller är inte
krispig.
Det luktar starkt och
otrevligt från
fritösen.
Det kommer ånga ur
andra ställen än
filtret.
Olja/matfett rinner
över kanten på
fritösen under
fritering.
Oljan/matfettet
skummar mycket
under friteringen.
Felsökning
SVENSKA 29
Page 30

Friteringstider och temperaturinställningar
Tabellen nedan visar hur stor mängd av en viss typ mat du kan fritera samtidigt samt hur länge
och vid vilken temperatur den ska friteras.
Följ alltid instruktionerna på förpackningen till den mat som ska friteras om de skiljer sig från
instruktionerna i tabellen.
*) Se även 'Friteringstips' för instruktioner om hur du gör egna pommes frites.
SVENSKA
30
Friteringstid (i
minuter) för
frusen mat
-
15-20
6-7
4-5
-
-
5-6
-
6-7
10-12
8-10
4-5
4-5
4-5
3-4
4-5
4-5
-
-
-
-
Friteringstid (i
minuter) för
färsk eller (i stort
sett) tinad mat
4-6 (se sedan 175cC
i denna tabell för
instruktioner för
andra omgången)
5-7
12-15
4-5
3-4
2-3
5-8
3-4
4-5
6-7
5-6
3-4
3-4
3-4
2-3
3-4
3-4
3-4
5-6
2-3
3-4
Rekommenderad
friteringsmängd
600 g
450 g
3-5 stycken
5 stycken
4 stycken
8-10 stycken
600 gram
450 gram
600 gram
4-5 stycken
2-3 stycken
5-6 stycken
8-10 stycken
8-10 stycken
8-10 stycken
12-15 stycken
8-10 stycken
5 stycken
600 gram
3-4 stycken
2-4 stycken
2 stycken
Maträtt
Hemgjord pommes
frites*) första
friteringen
Färsk fisk
Kyckling (lårklubba)
Ostkroketter
Små potatiskakor
Grönsaksbitar
(svamp, blomkål)
Hemgjord pommes
frites*) andra
omgången
Fryst pommes frites
Chips (väldigt tunna
potatisskivor)
Potatiskroketter
Kinesiska vårrullar
Vietnamesiska
vårrullar
Kycklingbitar
Minisnacks
Köttbullar (små)
Musslor
Räkor
Äppelbitar
Auberginer (skivor)
Munkar
Camembert
(panerad)
Wienerschnitzel
Temperatur
160cC
170cC
175cC
180cC
190cC
Page 31

Johdanto
Hyvä asiakkaamme! Onnittelemme uuden Philips Comfort Plus -friteerauskeittimen omistajaa.
Uudella friteerauskeittimellä voi kypsentää kaikenlaisia ruokia turvallisesti ja helposti.
Laitteen osat
A Kansi
B Tiivistyneen veden keräysastia
C Kori
D Lämpötilanvalitsin
E Merkkivalo
F Kannen vapautuskytkin
G Verkkojohto
H Verkkojohdon säilytystila
I Irrotettava aikakytkin (vain mallissa HD6123)
J Virtakytkin (vain mallissa HD6123)
Tärkeää
Lue tämä käyttöohje huolellisesti, ennen kuin alat käyttää laitetta. Säilytä ohje vastaisen varalle.
◗ Tarkasta, että laitteen jännitemerkintä vastaa paikallista verkkojännitettä, ennen kuin yhdistät
laitteen pistorasiaan.
◗ Yhdistä laite vain maadoitettuun pistorasiaan.
◗ Jos laitteen liitosjohto on vahingoittunut,se on turvallisinta vaihdattaa Philips Kodinkoneiden
valtuuttamassa huoltoliikkeessä tai muuten ammattitaitoisella korjaajalla.
◗ Palauta laite aina Philipsin valtuuttamaan huoltoliikkeeseen tutkimusta tai korjausta varten.
Älä yritä korjata laitetta itse, koska se mitätöi takuun.
◗ Puhdista irto-osat ennen friteerauskeittimen käyttöönottoa (katso kohtaa Puhdistus).
Varmista,että kaikki osat ovat täysin kuivat, ennen kuin panet friteerauskeittimeen öljyä tai
juoksevaa rasvaa.
◗ Älä upota sähköisiä osia ja lämmityselementin sisältävää runkoa veteen,älä myöskään
huuhtele sitä juoksevalla vedellä.
◗ Irrota pistotulppa pistorasiasta aina käytön jälkeen.Älä siirrä friteerauskeitintä,ennen kuin se
on jäähtynyt riittävästi.
◗ Älä käynnistä keitintä, ennen kuin siinä on öljyä tai sulatettua rasvaa.Tarkasta aina ennen
friteerauksen aloittamista, että keittimessä on jäljellä tarpeeksi öljyä tai rasvaa. Öljyn tai
rasvan pinnan tulee olla friteerausastian sisäpuolella olevan kahden merkkiviivan välissä.
◗ Varo laitteen kuumia pintoja ja laitteesta purkautuvaa kuumaa ilmaa tai höyryä. Kypsennyksen
aikana kannessa olevan suodattimen kautta tulee kuumaa höyryä. Suojaa kädet ja kasvot tältä
höyryltä.Varo kuumaa höyryä, kun avaat kannen.
◗ Älä jätä laitetta lasten ulottuville. Älä jätä liitosjohtoa roikkumaan pöydän tai tiskipöydän
reunan yli.
◗ Tämä laite on tarkoitettu vain kotikäyttöön.Jos laitetta on käytetty väärin tai (puoli-)
ammatillisessa tarkoituksessa tai jos sitä on käytetty käyttöohjeen vastaisesti, takuu lakkaa
olemasta voimassa eikä Philips vastaa mahdollisista vahingoista.
◗ Kypsennä ruoka kullankeltaiseksi, älä anna sen ruskistua. Poista palaneet tähteet. Älä kypsennä
tärkkelyspitoisia ruokia,erityisesti peruna- ja viljatuotteita, yli 175 cC:n lämpötilassa
(akrylamidin muodostumisen välttämiseksi).
Ylikuumenemissuoja
Tässä laitteessa on ylikuumenemissuoja, joka katkaisee laitteen toiminnan, jos laite kuumenee liikaa.
Näin voi tapahtua, jos öljyä tai rasvaa ei ole riittävästi tai jos yritetään sulattaa uutta rasvaa paloina
friteerauskeittimessä, jolloin lämpö ei pääse leviämään lämmityselementistä.
SUOMI 31
Page 32

◗ Jos friteerauskeitin ei enää toimi,anna öljyn tai rasvan jäähtyä ja ota yhteys Philipsin
jälleenmyyjään tai Philipsin valtuuttamaan huoltoliikkeeseen.
Käyttöönotto
1 Aseta laite vaakasuoralle, tasaiselle ja vakaalle alustalle pois lasten ulottuvilta.
Jos asetat friteerauskeittimen liedelle, varmista, että keittolevyistä on sammutettu virta ja ne ovat
kylmiä.
2 Täytä friteerauskeitin öljyllä, juoksevalla rasvalla tai sulatetulla kiinteällä rasvalla
friteerausastian sisäpinnan ylempään merkkiviivaan asti (tietoja kiinteän rasvan käytöstä on
kohdassa Öljy ja rasva) (kuva 1).
Öljy ja rasva
Älä sekoita keskenään erityyppisiä öljyjä tai rasvoja.
Suosittelemme käytettäväksi uppopaistamiseen tarkoitettua öljyä tai juoksevaa rasvaa, mieluiten
kasviöljyä tai -rasvaa, joka sisältää runsaasti tyydyttymättömiä rasvoja (esimerkiksi linoleenihappoa).
Myös kiinteää uppopaistorasvaa voidaan käyttää, mutta sen sulattamisessa on oltava erityisen
varovainen, ettei rasva ala roiskua ja lämmitysvastus kuumene liikaa tai vahingoitu.
1 Jos haluat käyttää kiinteää rasvaa, sulata paloiteltu uusi kiinteä rasva erillisessä astiassa
miedolla lämmöllä.
2 Kaada sulanut rasva varovasti keittimeen.
3 Säilytä jähmettynyttä rasvaa sisältävää friteerauskeitintä huoneenlämmössä.
4 Kylmässä säilytetty rasva saattaa roiskua sulatettaessa.Voit estää tämän pistelemällä haarukalla
reikiä jähmettyneeseen rasvaan (kuva 2).
Varo vahingoittamasta haarukalla friteerausastiaa.
Käyttö
Kypsentäminen rasvassa
Ole varovainen: kuumaa höyryä tulee kannen suodattimesta kypsentämisen aikana.
1 Vedä liitosjohto kokonaan esiin johtopesästä ja liitä pistotulppa pistorasiaan (kuva 3).
Pidä huoli, ettei liitosjohto kosketa laitteen kuumia osia.
2 Vain HD6123 - Käynnistä friteerauskeitin painamalla virtakytkintä (kuva 4).
Virtakytkimen merkkivalo syttyy.
3 Aseta lämpötilan säätimen avulla sopiva lämpötila (160 - 190 cC) (kuva 5).
Lämmityksen merkkivalo syttyy.
- Katso sopiva lämpötila ruuan pakkauksesta tai tämän käyttöohjeen lopussa olevasta taulukosta.
- Öljy tai rasva kuumenee halutun lämpöiseksi 10 - 15 minuutissa.
- Kuumennuksen aikana merkkivalo sammuu ja syttyy useita kertoja. Kun merkkivalo on pysynyt
sammuksissa jonkin aikaa, öljy tai rasva on kuumentunut haluttuun lämpötilaan.
- Kun annos on kypsennetty, merkkivalo syttyy taas. Odota, että merkkivalo on jonkin aikaa
sammuksissa, ennen kuin alat kypsentää seuraavaa annosta.
B
Korin voi antaa olla friteerauskeittimessä kuumennuksen aikana.
SUOMI32
Kiinteä rasva
1 700 g
2 000 g
Öljy / juokseva rasva
2 l
2,3 l
Vähintään
Enintään
Page 33

4 Avaa kansi painamalla vapautuskytkintä. Kansi avautuu automaattisesti (kuva 6).
5 Nosta kahvasta kori yläasentoon (kuva 7).
6 Poista kori friteerauskeittimestä ja pane kypsennettävä ruoka koriin (kuva 8).
B
Älä pane koriin kerralla enempää ruokaa kuin alla on neuvottu.
Älä kypsennä aasialaisia riisikakkuja (tai vastaavanlaista ruokaa) tässä laitteessa, sillä ne voivat
aiheuttaa öljyn tai rasvan voimakasta roiskumista tai kuplimista.
7 Aseta kori varovasti friteerauskeittimeen laskematta sitä öljyn tai rasvan joukkoon (kuva 9).
8 Sulje kansi.
9 Vain HD6123 - Aseta kypsennysaika (katso kohtaa Aikakytkin).
Voit käyttää friteerauskeitintä myös asettamatta aikakytkintä.
10 Paina kahvan vapautuspainiketta ja laske kori varovasti ala-asentoon (kuva 10).
B
Saadaksesi hyvän lopputuloksen noudata ruokapakkauksessa ilmoitettua kypsennysaikaa tai tämän
käyttöohjeen lopussa olevan taulukon kypsennysaikaa.
B
Tasainen ruskistus saadaan, kun kori nostetaan ylös ja sitä ravistellaan varovasti pari kertaa
kypsennyksen aikana.
Aikakytkin (vain mallissa HD6123)
Mallissa HD6123 on digitaalinen aikakytkin.
Aikakytkin ilmoittaa kypsennysajan kuluneen, mutta EI katkaise laitteesta virtaa.
Aikakytkimen asetus
1 Aseta kypsennysaika minuutteina painamalla aikakytkintä.
Asetettu aika tulee näkyviin näyttöön.
2 Minuutit vaihtuvat nopeammin, jos painat kytkintä jatkuvasti.Vapauta kytkin, kun haluttu
kypsennysaika on näkyvissä.
- Pisin asetettava kypsennysaika on 99 minuuttia.
- Asetettuasi kypsennysajan aikakytkin alkaa muutaman sekunnin kuluttua vähentää aikaa.
- Aikakytkimen vähentäessä aikaa jäljellä oleva aika vilkkuu näytössä.Viimeinen minuutti näytetään
sekunteina.
3 Jos asetettu aika ei ole oikea,voit poistaa sen painamalla aikakytkimen painiketta kaksi
sekuntia sillä hetkellä, kun aikakytkin alkaa vähentää aikaa (eli kun aika alkaa vilkkua). Paina
painiketta niin kauan, kunnes näytössä näkyy 00. Nyt voit asettaa oikean ajan.
4 Kun asetettu aika on kulunut,kuulet merkkiäänen. Merkkiääni toistuu kymmenen sekunnin
kuluttua.Voit katkaista merkkiäänen painamalla uudelleen aikakytkintä.
Aikakytkimen irrotus
Aikakytkin on irrotettava, joten voit ottaa sen mukaasi siirtyessäsi toiseen huoneeseen. Näin voit
kuulla ruoan valmistumisesta ilmoittavan äänimerkin missä tahansa.
◗ Kun olet asettanut kypsennysajan, voit irrottaa aikakytkimen friteerauskeittimestä vetämällä
sen oikeaa reunaa itseesi päin (kuva 11).
SUOMI 33
Pakastetut ranskanperunat
800 g
450 g
Kotitekoiset ranskanperunat
1 000 g
600 g
Enimmäismäärä
Suositusmäärä parasta lopputulosta
varten
Page 34

Kun aikakytkimen merkkiääni ilmoittaa ruoan olevan valmista, voit palata friteerauskeittimen luo ja
työntää aikakytkimen takaisin friteerauskeittimeen.
Vesiastia
Friteerauksen aikana kannen sisäpinnalle tiivistyy vettä.Tämä vesi kerääntyy kantta avattaessa
keräysastiaan sen sijaan, että se valuisi työpöydälle.
◗ Tyhjennä keräysastia käytön jälkeen.
- Odota, kunnes öljy tai rasva on jäähtynyt riittävästi.
- Poista kansi.
- Poista tiivistyneen veden keräysastia ja tyhjennä se pesualtaaseen.
Kypsentämisen jälkeen
1 Nosta kori kahvasta yläasentoon eli valumisasentoon (kuva 12).
2 Avaa kansi painamalla kannen vapautuskytkintä (kuva 13).
Varo kuumaa höyryä ja öljyn mahdollista roiskumista.
3 Nosta kori varovasti pois keittimestä.
Ravistele tarvittaessa keittimen päällä liika öljy tai rasva pois. Pane ruoka valumaan kulhoon tai
siivilään, jonka pohjalla on rasvaa imevää paperia, esimerkiksi talouspaperia.
4 Vain HD6123:Katkaise friteerauskeittimestä virta painamalla virtakytkintä (kuva 14).
Virtakytkimen merkkivalo sammuu.
5 Irrota pistotulppa pistorasiasta käytön jälkeen.
Älä siirrä friteerauskeitintä,ennen kuin öljy tai rasva on jäähtynyt riittävästi.Tähän kuluu noin
60 minuuttia.
B
Ellet käytä friteerauskeitintä säännöllisesti, säilytä öljy tai juokseva rasva hyvin suljetuissa pulloissa ja
mielellään jääkaapissa. Kaada öljy tai rasva pulloon tiheän siivilän läpi, niin ruuanpalat erottuvat pois.
Poista kori ennen friteerausastian tyhjentämistä.
B
Jos käytät kiinteää rasvaa, anna sen jähmettyä keittimessä ja säilytä keitin rasvoineen
huoneenlämmössä (katso kohdasta Käyttöönotto osa Öljy ja rasva).
Puhdistus
Odota, kunnes öljy tai rasva on jäähtynyt riittävästi.
Älä käytä naarmuttavia tai syövyttäviä puhdistusaineita tai -välineitä friteerauskeittimen
puhdistamiseen.
1 Avaa kansi painamalla kannen vapautuskytkintä.
2 Nosta kansi pois laitteesta.
3 Poista vesiallas.
4 Poista kori keittimestä ja kaada öljy tai rasva pois.
5 Pyyhi runko puhtaaksi kostealla liinalla (käytä tarvittaessa hieman astianpesuainetta) ja/tai
talouspaperilla.
6 Puhdista sisävaippa kuumalla vedellä ja astianpesuaineella.
Älä upota koko keitintä veteen.
7 Puhdista kansi, tiivistyneen veden keräysastia ja kori astianpesuaineella kuumassa vedessä tai
astianpesukoneessa.
SUOMI34
Page 35

8 Huuhtele osat ja kuivaa hyvin.
Rasvan- ja kärynsuodattimen puhdistus
Rasvan- ja kärynsuodattimella varustettu kansi voidaan pestä astianpesukoneessa tai kuumalla
pesuvedellä.
Konepesun kestävät osat
- Rasvansuodattimella varustettu kansi
- Kori
- Vesiastia
Öljyn tai rasvan vaihtaminen
Koska öljy ja rasva menettävät hyvät ominaisuutensa melko nopeasti, öljy tai rasva on vaihdettava
säännöllisesti. Noudata seuraavia ohjeita:
Jos friteerauskeitintä käytetään pääasiassa ranskanperunoiden valmistamiseen ja jos öljy tai rasva
siivilöidään aina käytön jälkeen, samaa öljyä tai rasvaa voi käyttää 10 - 12 kertaa, ennen kuin se on
vaihdettava. Jos friteerauskeittimessä kypsennetään runsasproteiinista ruokaa (kuten lihaa tai kalaa),
öljy tai rasva on vaihdettava useammin.
◗ Älä käytä samaa öljyä yli kuutta kuukautta ja noudata aina pakkauksen ohjeita.
◗ Älä lisää uutta öljyä tai rasvaa jo käytetyn joukkoon.
◗ Älä sekoita keskenään erityyppisiä öljyjä tai rasvoja.
◗ Vaihda öljy tai rasva,kun se alkaa kuohuta kuumennettaessa, kun siinä on voimakas haju tai
maku tai kun se on tummunut ja/tai muuttunut siirappimaiseksi.
Käytetyn öljyn tai rasvan hävittäminen
Kaada käytetty öljy tai juokseva rasva takaisin alkuperäiseen suljettavaan muovipulloon. Kiinteän
rasvan voi hävittää antamalla sen ensin jähmettyä keittimessä ilman koria, minkä jälkeen se voidaan
nostaa lastalla pois ja kääriä sanomalehteen.Voit heittää pullon tai sanomalehden talousjätteisiin, ei
kuitenkaan kompostoitavien jätteiden joukkoon, tai hävittää sen paikallisia ohjeita noudattaen.
Säilytys
1 Laita kaikki irto-osat takaisin friteerauskeittimeen ja sulje kansi.
2 Kierrä liitosjohto kasaan, työnnä se johtopesään ja kiinnitä pistotulppa pitimeen.
3 Nosta friteerauskeitin kahvoista.
Vinkkejä
Katso kypsennysajat ja lämpötila-asetukset tämän käyttöohjeen lopussa olevasta taulukosta.
Kotitekoiset ranskanperunat
Näin teet herkullisia ja rapeita ranskanperunoita:
1 Käytä kiinteitä perunoita ja leikkaa ne suikaleiksi. Huuhtele suikaleet siivilässä kylmällä vedellä.
Sen jälkeen suikaleet eivät tartu kiinni toisiinsa kypsennettäessä.
B
Kuivaa suikaleet esimerkiksi talouspaperilla.
2 Kypsennä ranskanperunat kahdesti: ensin 4 -6 minuuttia 160 cC:n lämpötilassa ja toisen
kerran 5 - 8 minuuttia 175 cC:n lämpötilassa.
SUOMI 35
Page 36

3 Pane kotitekoiset ranskanperunat kulhoon ja ravistele niitä.Anna ranskanperunoiden jäähtyä
ennen toista kypsennystä.
Pakasteruuat
Pakastetut ranskanperunat on esikypsennetty, ja niitä kypsennetään vain kerran pakkauksessa olevan
ohjeen mukaisesti.
Pakastimesta (-16...-18cC) otettu ruoka jäähdyttää öljyä tai rasvaa huomattavasti, kun se upotetaan
keittimeen. Koska ruoka ei ala paistua heti, se saattaa imeä liikaa öljyä tai rasvaa.
Tämä voidaan estää seuraavalla tavalla:
- Anna pakasteruoan mielellään sulaa huoneenlämmössä ennen kypsentämistä.
- Ravistele pois mahdollisimman paljon jäätä ja vettä ja taputtele kypsennettävä ruoka
talouspaperilla kuivaksi.
- Älä kypsennä kovin suuria annoksia kerralla (katso kypsennysajat ja lämpötila-asetukset
taulukosta).
- Valitse lämpötila tämän käyttöohjeen taulukon tai pakasteruuan pakkauksessa olevan ohjeen
mukaan. Ellei tällaista ohjetta ole, aseta valitsin korkeimpaan lämpötilaan (190cC).
- Laske ruoka varovasti öljyyn tai rasvaan, sillä pakasteruoka saattaa aiheuttaa kuuman öljyn tai
rasvan voimakasta kuplimista.
Vieraan maun poistaminen
Tietyistä ruoista, varsinkin kalasta, lähtee nestettä rasvassa kypsennettäessä, mikä saattaa antaa makua
öljyyn. Jos haluat estää maun tar ttumisen seuraavaan ruokaan:
1 Kuumenna öljy tai rasva 160cC.
2 Pane keittimeen kaksi ohutta leipäviipaletta.
3 Odota, kunnes kaikki ilmakuplat ovat hävinneet, ja nosta leivät pois keittimestä lastalla.
Nyt öljyssä tai rasvassa ei enää ole vierasta makua.
Ympäristöasiaa
◗ Älä hävitä loppuun käytettyä laitetta tavallisen kotitalousjätteen mukana, vaan toimita se
asianmukaiseen keräyspisteeseen.Näin autat suojelemaan ympäristöä (kuva 15).
Poista aikakytkimen paristo (vain HD6123) ennen laitteen hävittämistä.
1 Irrota aikakytkin pienen ruuvitaltan avulla.
2 Poista paristo.Älä hävitä paristoa tavallisen kotitalousjätteen mukana, vaan toimita se
asianmukaiseen keräyspisteeseen.
Takuu & huolto
Jos haluat lisätietoja tai jos laitteen suhteen tulee ongelmia, katso Philipsin www-sivuja osoitteesta
www.philips.com tai ota yhteys Philipsin asiakaspalveluun (puhelinnumero löytyy takuulehtisestä).
Voit myös kääntyä lähimmän Philips-kauppiaan puoleen tai ottaa suoraan yhteyden Hollantiin Philips
Domestic Appliances and Personal Care BV:n Service-osastoon.
SUOMI36
Page 37

37
Ratkaisu
Tarkista ruokapakkauksesta tai tämän käyttöohjeen
taulukosta, oliko lämpötila ja/tai kypsennysaika valittu
oikein.Valitse oikea lämpötila.
Älä kypsennä kerralla suurempia annoksia kuin mitä
taulukossa on neuvottu.
Termostaatin sulake on ehkä palanut, jolloin
ylikuumenemissuoja katkaisee laitteen toiminnan. Ota
yhteys Philips-jälleenmyyjään tai Philips Kodinkoneiden
valtuuttamaan huoltoliikkeeseen.
Poista kansi ja pese kansi ja suodatin kuumalla
astianpesuvedellä tai astianpesukoneessa.
Vaihda öljy tai rasva. Siivilöi öljy tai rasva säännöllisesti,
niin se pysyy pidempään hyvänä.
Käytä hyvälaatuista uppopaistamiseen tarkoitettua öljyä
tai juoksevaa rasvaa. Älä sekoita keskenään kahdenlaista
öljyä tai rasvaa.
Tarkista, onko kansi suljettu kunnolla.
Poista kansi ja pese kansi ja suodatin kuumalla
astianpesuvedellä tai astianpesukoneessa.
Jos rengas on likainen, puhdista kansi kuumalla vedellä
ja astianpesuaineella tai astianpesukoneessa. Jos kansi
on kulunut, ota yhteys Philipsin jälleenmyyjään tai
Philipsin valtuuttamaan huoltoliikkeeseen ja vaihdata
tiivisterengas.
Pidä huoli, että keittimessä olevan öljyn tai rasvan
määrä ei ylitä enimmäistasoa.
Kuivaa ruoka ennen valmistuksen aloittamista ja
kypsennä ruoka tämän käyttöohjeen neuvoja
noudattaen.
Älä kypsennä kerralla suurempaa annosta kuin mitä
taulukossa on neuvottu.
Kuivaa ruoka hyvin ennen kypsentämistä.
Käytä hyvälaatuista uppopaistamiseen tarkoitettua öljyä
tai juoksevaa rasvaa. Älä sekoita keskenään kahdenlaista
öljyä tai rasvaa.
Puhdista friteerausastia tässä käyttöohjeessa neuvotulla
tavalla.
Mahdollinen syy
On valittu liian matala lämpötila
ja/tai ruokaa ei ole kypsennetty
riittävän kauan.
Korissa on liikaa ruokaa.
Öljy tai rasva ei kuumene
riittävästi.
Käryn- ja rasvansuodatin on
likainen.
Öljy tai rasva ei ole enää hyvää.
Käytetty öljy tai rasva ei sovi
uppopaistamiseen.
Kantta ei ole suljettu kunnolla.
Käryn- ja rasvansuodatin on
likainen.
Kannen sisäpuolella metalliosan
päällä oleva tiivisterengas on
likainen tai kulunut.
Keittimessä on liikaa öljyä tai
rasvaa.
Ruoassa on liikaa kosteutta.
Korissa on liikaa ruokaa.
Ruoassa on liikaa kosteutta.
Käytetty öljy tai rasva ei sovi
uppopaistamiseen.
Friteerausastiaa ei ole
puhdistettu kunnolla.
Ongelma
Ruoka ei ole kauniin
kullanruskeaa eikä
rapeaa.
Friteerauskeittimestä
lähtee voimakas,
epämiellyttävä haju.
Höyryä tulee ulos
muualta kuin
suodattimesta.
Öljyä tai rasvaa
roiskuu valmistuksen
aikana
friteerauskeittimen
reunan yli.
Öljy tai rasva
vaahtoaa liikaa
valmistuksen aikana.
Tarkistusluettelo
SUOMI
Page 38

38
Kypsennysajat ja lämpötila-asetukset
Alla olevasta taulukosta näkyy, kuinka paljon tiettyä ruokaa voidaan valmistaa kerralla ja mikä
lämpötila ja kypsennysaika tulisi valita.
Jos ruoka-ainepakkuksen päällä on erilaiset ohjeet kuin taulukossa, noudata aina pakkauksen
ohjetta.
*) Katso myös kotitekoisten ranskanperunoiden valmistusohjetta.
SUOMI
Kypsennysaika
(minuuttia)
pakastettu ruoka
-
15 - 20
6 - 7
4 - 5
-
-
5 - 6
6 - 7
10 - 12
8 - 10
4 - 5
4 - 5
4 - 5
3 - 4
4 - 5
4 - 5
-
-
-
-
Kypsennysaika
(minuuttia) tuore
tai (osittain)
sulatettu ruoka
4 - 6 (katso toinen
kypsennysvaihe
kohdasta 175cC)
5 - 7
12 - 15
4 - 5
3 - 4
2 - 3
5 - 8
-
3 - 4
4 - 5
6 -7
5 - 6
3 - 4
3 - 4
3 - 4
2 - 3
3 - 4
3 - 4
3 - 4
5 - 6
2 - 3
3 - 4
Suositeltava
kerta-annos
600 g
450 g
3 - 5 kpl
5 kpl
4 kpl
8 - 10 kpl
600 g
450 g
600 g
4 - 5 kpl
2 - 3 kpl
5 - 6 kpl
8 - 10 kpl
8 - 10 kpl
8 - 10 kpl
12 - 15 kpl
8 - 10 kpl
5 kpl
600 g
3 - 4 kpl
2 - 4 kpl
2 kpl
Ruokalaji
Kotitekoiset
ranskanperunat *)
esikypsennysvaihe
Tuore kala
Broileri (koivet,
fileet)
Juustokuorukat
Pienet perunaletut
Friteeratut kasvikset
(herkkusienet,
kukkakaali)
Kotitekoiset
ranskanperunat *)
toinen kypsennys
Pakastetut
ranskanperunat
Perunalastut
Perunakuorukat
Kiinalaiset
kevätkääryleet
Vietnamilaiset
kevätkääryleet
Kananugetit
Pikku välipalat
Lihapyörykät
(pienet)
Simpukat
Katkaravut
Friteeratut omenat
Munakoiso
(viipaleet)
Donitsit/munkit
Camembert
(korppujauhotettu)
Wieninleike
Lämpötila
160cC
170cC
175cC
180cC
190cC
Page 39

Introduktion
Kære Kunde.Til lykke med anskaffelsen af din nye Philips Comfort Plus frituregryde. Frituregryden,
som gør det muligt for dig at friturestege næsten alle typer madvarer - nemt og sikkert.
Generel beskrivelse
A Låg
B Bakke til kondensvand
C Friturekurv
D Temperatur vælger
E Kontrollampe
F Udløserknap til låg
G Netledning
H Rum til ledningsopbevaring
I Aftagelig timer (kun HD6123)
J on/off-kontakt (kun HD6123)
Vigtigt
Læs brugsvejledningen grundigt igennem, inden apparatet tages i brug, og gem den til eventuelt
senere brug.
◗ Inden frituregryden tages i brug første gang, kontrolleres det, om den angivne
spændingsangivelse på apparatet svarer til den lokale netspænding.
◗ Apparatet må kun tilsluttes en stikkontakt med jordforbindelse.
◗ Hvis netledningen beskadiges, må den kun udskiftes af Philips, et autoriseret Philips-
serviceværksted eller en anden fagmand for at undgå enhver risiko ved efterfølgende brug.
◗ Reparation og eftersyn af apparatet skal altid foretages på et autoriseret Philips-
serviceværksted. Forsøg ikke selv at reparere apparatet,da garantien i så fald bortfalder.
◗ Rengør frituregrydens enkelte dele grundigt, før du anvender den første gang (se afsnittet
'Rengøring'). Sørg for,at alle dele er helt tørre,inden der kommes olie eller flydende fedt i
frituregryden.
◗ Selve kabinettet, som indeholder de elektriske komponenter og varmelegemet,må aldrig
kommes ned i vand eller skylles under vandhanen.
◗ Træk altid stikket ud af stikkontakten straks efter brug. Flyt ikke frituregryden, før den er
kølet tilstrækkeligt af.
◗ Tænd ikke frituregryden, før der er kommet olie eller fedt i. Sørg for, at frituregryden altid er
fyldt til et niveau mellem de to markeringer på indersiden af indergryden.
◗ Under friturestegningen kommer der meget varm damp ud gennem filteret i låget.Hold
ansigt og hænder i sikker afstand af dampen. Pas også på den varme damp, når låget åbnes.
◗ Hold frituregryden uden for børns rækkevidde, når den er i brug, og lad aldrig ledningen
hænge ud over kanten af det bord,den står på.
◗ Frituregryden er udelukkende beregnet til almindelig husholdningsbrug.Hvis den bruges
forkert eller til (semi)professionelle formål eller på en måde,der ikke er i overensstemmelse
med brugsvejledningen, bortfalder garantien, og Philips påtager sig intet ansvar for eventuelle
skader.
◗ Steg maden, indtil den er gyldenbrun og ikke mørk eller brun, og fjern altid brankede dele!
Undlad at stege fødevarer, som indeholder meget stivelse, specielt kartofler og
kornprodukter, ved temperaturer over 175cC (da der ellers kan dannes store mængder
akrylamid).
DANSK 39
Page 40

40
Sikkerhedsafbryder
Frituregryden er forsynet med en sikkerhedsafbryder, som slår gryden fra i tilfælde af
overophedning. Dette kan ske, hvis der ikke er tilstrækkeligt med olie eller fedt i gryden, eller hvis
der smeltes fedtblokke i gryden, som hindrer varmelegemet i at afgive dets varme.
◗ Hvis frituregryden herefter ikke virker, skal du lade olien eller fedtet køle af og kontakte din
Philips-forhandler.
Klargøring
1 Anbring frituregryden på et vandret, jævnt og fast underlag uden for børns rækkevidde.
Hvis du stiller frituregryden på komfuret,skal du først sikre dig, at komfuret er slukket,og at
kogepladerne er kolde.
2 Fyld den tørre frituregryde med olie, flydende eller smeltet fedt op til den øverste markering
på indersiden af indergryden (se afsnittet 'Olie og fedt' for yderligere oplysninger om
anvendelse af fast fedt).Mange tak og i lige måde (fig.1).
Olie og fedt
Bland aldrig forskellige olie- eller fedttyper.
Det anbefales at bruge fritureolie eller flydende friturefedt - helst vegetabilsk olie eller fedt med højt
indhold af umættede fedtsyrer (f.eks. linolensyre).
Det er dog muligt at anvende fast friturefedt, men i så fald skal du være ekstra opmærksom, så du
undgår, at fedtet begynder at sprøjte, og at varmelegemet bliver overophedet eller beskadiget.
1 Ønsker du at anvende faste fedtblokke,skal de først smeltes langsomt ved svag varme i en
almindelig gryde.
2 Hæld derefter forsigtigt det smeltede fedt over i frituregryden.
3 Opbevar frituregryden med det størknede fedt ved stuetemperatur.
4 Er fedtet meget koldt,kan det begynde at sprøjte, når det smeltes.Dette kan undgås ved at
prikke nogle huller i det størknede fedt med en gaffel (fig.2).
Pas på ikke at beskadige indergrydens belægning med gaflen.
Brug af frituregryden
Friturestegning
Vær opmærksom på, at der slipper varm damp ud af filteret i låget under friturestegningen.
1 Træk hele netledningen ud af rummet til ledningsopbevaring, og sæt stikket i en stikkontakt
(fig. 3).
Sørg for, at netledningen ikke kommer i kontakt med frituregrydens varme dele og flader.
2 Kun HD6123:Tænd for frituregryden på on/off-kontakten (fig. 4).
Kontrollampen i on/off-kontakten tændes.
3 Indstil temperaturvælgeren på den ønskede temperatur (160-190cC) (fig. 5).
DANSK
Fast fedt
1700 g
2000 g
Olie/flydende fedt
2 liter
2,3 liter
Min.
Max.
Page 41

41
Kontrollampen tænder.
- Oplysninger om, hvilken temperatur du skal vælge, finder du på emballagen til de madvarer, der
skal frituresteges, eller i tabellen sidst i denne brugsvejledning.
- Olien/fedtet opvarmes til den valgte temperatur i løbet af 10 til 15 minutter.
- Mens frituregryden opvarmes, tænder og slukker kontrollampen et par gange. Når den forbliver
slukket, har olien eller fedtet nået den indstillede temperatur.
- Når du har friturestegt den første por tion, tænder kontrollampen igen.Vent med at stege næste
portion, til den igen forbliver slukket.
B
Friturekurven kan blive siddende i gryden, medens apparatet varmer op.
4 Luk låget op ved at trykke på udløseren.Låget åbner automatisk (fig. 6).
5 Løft håndtaget op og sæt kurven i den øverste position (fig. 7).
6 Tag kurven op af frituregryden, og læg ingredienserne i (fig. 8).
B
Resultatet bliver bedst, hvis de maximale mængder angivet nedenfor ikke overskrides.
Undlad at friturestege asiatiske riskager (eller lignende produkter) i dette frituregryde, da de kan
få olien/fedtet til at sprøjte og/eller boble meget kraftigt.
7 Sæt forsigtigt kurven i frituregryden uden at sænke den ned i olien/fedtet (fig. 9).
8 Luk låget.
9 Kun HD6123 - Indstil den ønskede stegetid (se afsnittet 'Timer-funktion').
Frituregryden kan også bruges uden indstilling af timeren.
10 Tryk på udløserknappen på kurvens håndtag,og sænk forsigtigt kurven til laveste position
(fig. 10).
B
For at opnå det bedste resultat bør den angivne tilberedningstid på madvarens emballage - eller den
anbefalede tilberedningstid iflg. tabellen sidst i denne brugsvejledning - nøje overholdes.
B
For at opnå et ensartet, gyldent resultat løftes kurven op af olien/fedtet et par gange under
stegningen og rystes let.
Timer funktion (Kun HD6123)
Type HD6123 er udstyret med en digital timer.
Timeren indikerer, når den valgte stegetid er udløbet, men slukker IKKE for frituregryden.
Indstilling af timeren
1 Tryk på timer-tasten for indstilling stegetiden i minutter.
Det valgte minuttal ses i displayet.
2 Holdes tasten nede, går tidsindstillingen hurtigere. Slip tasten,så snart det ønskede minuttal
ses i displayet.
- Der kan maksimalt indstilles en stegetid på 99 minutter.
- Efter et par sekunder begynder timeren nedtællingen.
- Mens timeren tæller ned, vil den resterende stegetid blinke i displayet. Det sidste minut vises i
sekunder.
DANSK
Frosne pommes frites
800 g
450 g
Hjemmelavede pommes frites
1000 g
600 g
Max. mængde
Anbefalet kvantitet for det bedste
resultat
Page 42

42
3 Hvis du har indstillet en forkert tid, slettes den ved at holde timer-tasten nede i 2 sekunder,
idet nedtællingen starter (d.v.s.når timeren begynder at blinke). Hold tasten nede, indtil '00'
ses i displayet.Herefter kan du indstille et nyt minuttal.
4 Når den indstillede tid udløber, høres et lydsignal.Dette gentages efter 10 sekunder.
Lydsignalet stoppes ved tryk på timer-knappen.
Aftagning af timeren
Timeren er aftagelig, så du kan tage den med ind i et andet rum. Dette sikrer, at du kan høre
lydsignalet, der indikerer, at stegetiden er udløbet, selvom du opholder dig et andet sted i huset.
◗ Når stegetiden er indstillet, kan timeren tages af frituregryden ved at tage fat i dens højre
side og trække den ind mod dig selv (fig. 11).
Når timeren afgiver lydsignalet og indikerer, at maden er klar, kan du sætte timeren tilbage på plads.
Vandbakke
Under stegningen dannes kondensvand på lågets inderside. Kondensvandet opsamles i vandbakken,
når låget åbnes, istedet for at dryppe ned på bordet.
◗ Tøm vandbakken efter brug.
- Vent,indtil olien/fedtet er tilstrækkeligt afkølet.
- Tag låget af.
- Tag vandbakken ud og tøm den.
Efter friturestegningen
1 Løft op i håndtaget og sæt kurven til afdrypning i højeste position (fig. 12).
2 Luk låget op ved at trykke på udløseren (fig.13).
Pas på den varme damp og eventuelle oliesprøjt.
3 Løft forsigtigt kurven op af gryden.
Ryst om nødvendigt kurven over frituregryden for at fjerne overskydende olie eller fedt. Læg de
færdigstegte madvarer i en skål eller et dørslag med fedtsugende papir,f.eks. køkkenrulle.
4 Kun HD6123:Sluk for frituregryden på on/off-kontakten (fig.14).
Kontrollampen i on/off kontakten slukker.
5 Tag altid stikket ud af stikkontakten efter brug.
Flyt ikke frituregryden før olien/fedtet er tilstrækkligt kølet af.Dette tager ca. 60 minutter.
B
Hvis du ikke anvender frituregryden regelmæssigt, tilrådes det at fjerne olien eller det flydende fedt og
opbevare den/det i en tætsluttende beholder,helst i køleskab eller på et køligt sted. Fyld beholderen
ved at hælde olien eller fedtet igennem en fin si for at fjerne eventuelle madpartikler. Fjern
friturekurven, før du tømmer indergryden.
B
Hvis frituregryden indeholder fast fedt, kan du lade fedtet størkne i gr yden og opbevare den med
fedtet i (se afsnittet 'Olie og fedt' under 'Klargøring').
Rengøring
Vent, indtil olien/fedtet er tilstrækkeligt afkølet.
Brug ikke nogle former for skrappe (flydende) rengørings- eller skuremidler (f.eks.
ståluldssvampe) til rengøring af frituregryden.
1 Tryk på udløseren for at åbne låget.
2 Løft det herefter af.
DANSK
Page 43

43
3 Fjern vandbakken.
4 Tag friturekurven op og hæld olien/fedtet ud.
5 Rengør kabinettet med en fugtig klud (med lidt opvaskemiddel) og/eller køkkenrulle.
6 Vask indergryden med varmt vand tilsat lidt opvaskemiddel.
Selve kabinettet må aldrig kommes ned i vand.
7 Vask låget,vandbakken og friturekurven i varmt vand med lidt opvaskemiddel eller i
opvaskemaskinen.
8 Skyl delene og tør dem grundigt.
Rengøring af det permanente anti-fedtfilter
Låget med det permanente anti-fedtfilter kan gøres grundigt rent i opvaskemaskinen eller i varmt
vand tilsat opvaskemiddel.
Dele, som tåler opvaskemaskine
- Låg med permanent anti-fedtfilter
- Kurv
- Vandbakke
Udskiftning af olie/fedt
Da olie og fedt ret hurtigt bliver urent, skal det udskiftes regelmæssigt. Følg nedennævnte
anvisninger:
Hvis du fortrinsvis anvender frituregryden til tilberedning af pommes frites, og du sier olien/fedtet,
hver gang du har brugt frituregryden, kan olien/fedtet genbruges 10 til 12 gange, før den/det skal
skiftes. Anvendes frituregryden imidler tid til tilberedning af proteinrige madvarer, f.eks. kød eller fisk,
skal olien/fedtet udskiftes oftere.
◗ Brug dog aldrig samme portion olie eller fedt i mere end 6 måneder og følg altid
anvisningerne på emballagen.
◗ Bland aldrig frisk olie/fedt sammen med noget, der allerede har været brugt.
◗ Bland aldrig forskellige olie- eller fedttyper.
◗ Udskift altid olien/fedtet, hvis det begynder at skumme under opvarmningen, hvis det har fået
en harsk lugt eller smag, eller hvis det er blevet mørkt og/eller sirupsagtigt.
Sådan kasseres brugt olie/fedt:
Hæld brugt olie/fedt tilbage i den originale (lukbare) plastflaske. Du kan kassere brugt fedt ved at
lade det størkne i frituregryden (uden isat kurv) og derefter skrabe det ud med en spatel og pakke
det ind i avispapir. Smid flasken eller avispapiret ud sammen med ikke-kompostérbart affald (ikke
sammen med kompostérbart affald), eller kassér den/det i overensstemmelse med de lokale regler
for affald.
Opbevaring
1 Sæt alle dele tilbage i/på frituregryden, og luk låget.
2 Rul netledningen sammen, anbring den i rummet til ledningsopbevaring, og sæt stikket i
stikholderen.
3 Løft frituregryden i håndgrebene.
DANSK
Page 44

44
Gode råd
Oversigt over tilberedningstider og temperaturindstillinger findes i tabellen sidst i denne
brugsvejledning.
Hjemmelavede pommes frites
Sådan tilberedes de bedste og sprødeste pommes frites:
1 Brug faste kartofler, og skær dem i stave. Skyl stavene i koldt vand.
På den måde undgår du, at de klæber sammen under friturestegningen.
B
Tør kartoffelstavene omhyggeligt.
2 Steg pommes fritterne i to omgange: første gang i 4-6 minutter ved en temperatur på 160cC
og anden gang i 5-8 minutter ved en temperatur på 175cC.
3 Læg de hjemmelavede pommes frites en en skål og ryst dem let. Lad dem afkøle inden sidste
stegerunde.
Frosne madvarer
Dybfrosne pommes frites er altid forkogte,så de skal blot steges én gang i henhold til anvisningen på
emballagen.
Kommer du madvarer direkte fra fryseren (-16 til -18cC) op i varm olie eller fedt, vil olien/fedtet
blive kraftigt afkølet. Derfor brunes maden ikke med det samme, men absorberer istedet for meget
olie/fedt.
Dette kan du undgå på følgende måde:
- Det bedste vil være at lade frosne madvarer optø ved stuetemperatur.
- Ryst omhyggeligt så meget is og vand af som muligt, og dup ingredienserne, indtil de er helt
tørre.
- Frituresteg ikke for store portioner ad gangen (se anvisningerne i tabellen sidst i
brugsvejledningen).
- Indstil den anbefalede stegetemperatur i tabellen eller på emballagen til det pågældende
produkt. Hvis der ikke er nogen angivelse, vælges 190cC.
- Nedsænk maden i olien/fedtet meget forsigtigt, da frosne madvarer kan få olien/fedtet til at
boble/sprøjte voldsomt.
Sådan undgås uønsket bismag:
Visse typer madvarer, især fisk, kan give olien/fedtet en ubehagelig bismag.For at forhindre dette
gøres følgende:
1 Opvarm olien/fedtet i frituregryden til 160cC.
2 Kom derefter to tynde skiver franskbrød eller et par persillekviste op i olien/fedtet.
3 Vent, indtil der ikke kommer flere bobler, og tag så franskbrød/persille op af gryden med en
spatel.
Oliens/fedtets bismag er nu væk.
DANSK
Page 45

45
Miljøhensyn
◗ Smid ikke apparatet ud sammen med det almindelige husholdningsaffald,når det til sin tid
kasseres. Indlevér det istedet på det kommunale indsamlingssted for genbrugsmaterialer.
Derved er du med til at beskytte miljøet (fig. 15).
Tag batteriet ud af timeren (kun HD6123) inden frituregryden til sin tid kasseres.
1 Brug en lille skruetrækker til at løsne bagsiden af timeren.
2 Tag batteriet ud. Smid ikke batteriet ud sammen med det normale husholdningsaffald men
aflevér det istedet på et af myndighederne anvist sted.
Garanti og service
For alle yderligere oplysninger eller ved eventuelle problemer med apparatet henvises venligst til
Philips hjemmeside: www.philips.com eller det lokale Philips Kundecenter (telefonnumre findes i
vedlagte "World-Wide Guarantee"-folder). Hvis der ikke findes et kundecenter i dit land, bedes du
venligst kontakte din lokale Philips-forhandler eller serviceafdelingen i Philips Domestic Appliances
and Personal Care BV. - Dette apparat overholder de gældende EU-direktiver vedrørende sikkerhed
og radiostøj.
DANSK
Page 46

46
Løsning
Kontrollér, om den valgte temperatur og
tilberedningstid er korrekt i henhold til anvisningerne
på emballagen eller tabellen i brugsvejledningen. Indstil
den korrekte temperatur.
Frituresteg aldrig større mængder ad gangen end
angivet i tabellen.
Sikringen i temperaturkontrollen kan være sprunget, så
den automatiske sikkerhedsafbryder har afbrudt
apparatet. Kontakt Philips via din forhandler for at få
sikringen udskiftet.
Tag låget af, og vask låg og filter i varmt vand tilsat lidt
opvaskemiddel eller i opvaskemaskinen.
Udskift olien/fedtet. Si olien/fedtet regelmæssigt, så
den/det holder sig frisk(t) i længere tid.
Brug kun fritureolie/fedt af god kvalitet. Bland aldrig to
forskellige typer olie eller fedt.
Kontrollér, at låget er lukket korrekt.
Tag låget af, og vask låg og filter i varmt vand tilsat lidt
opvaskemiddel eller i opvaskemaskinen.
Hvis ringen er snavset, vaskes den i varmt vand tilsat
lidt opvaskemiddel eller i opvaskemaskinen. Er ringen
derimod slidt, bedes du kontakte din Philips-forhandler
for at få den udskiftet.
Sørg for,at olie-/fedtniveauet aldrig overstiger maxmarkeringen.
Tør ingredienserne omhyggeligt, inden de frituresteges,
og følg anvisningerne i brugsvejledningen.
Frituresteg ikke større mængder ad gangen end angivet
i tabellen.
Tør ingredienserne omhyggeligt, inden de kommes op i
frituregryden.
Brug kun fritureolie/fedt af god kvalitet. Bland aldrig to
forskellige typer olie eller fedt.
Rengør indergryden som beskrevet i
brugsvejledningen.
Mulig årsag
Den valgte temperatur har
været for lav, og/eller madvaren
er ikke stegt længe nok.
Der er for meget mad i kurven.
Olien/fedtet er ikke varmt nok.
Det permanente anti-fedtfilter
er mættet.
Olien/fedtet er ikke friskt
længere.
Den anvendte olie- eller
fedttype egner sig ikke til
dybfrosne madvarer.
Låget er ikke lukket ordentligt.
Det permanente anti-fedtfilter
er mættet.
Gummitætningsringen på lågets
metalinderside er snavset eller
slidt.
Der er for meget olie/fedt i
frituregryden.
Ingredienserne indeholder for
meget væde.
Der er for meget mad i
friturekurven.
Ingredienserne indeholder for
meget væde.
Den anvendte olie- eller
fedttype egner sig ikke til
dybfrosne madvarer.
Indergryden er ikke tilstrækkeligt
rengjort.
Problem
Den friturestegte
mad får ikke en
ensartet, gyldenbrun
farve og/eller er ikke
sprød.
Frituregryden afgiver
en kraftig og
ubehagelig lugt.
Der slipper damp ud
andre steder end
gennem filteret.
Der løber olie eller
fedt ud over kanten
af gryden under
friturestegningen.
Olien/fedtet
skummer voldsomt
under stegningen.
Fejlsøgning
DANSK
Page 47

47
Tilberedningstider og temperaturindstillinger
Tabellen nedenfor angiver, hvor store mængder af en bestemt type madvare, du kan tilberede
på én gang, samt anbefalede stegetemperaturer og tilberedningstider.
Hvis anvisningerne på emballage og tabel afviger fra hinanden, skal du holde dig til emballagens
anvisninger.
*) Se også "Stegetips" for tilberedning af hjemmelavede pommes frites.
DANSK
Stegetid
(minutter) for
frosne madvarer
-
15-20
6-7
4-5
-
-
5-6
-
6-7
10-12
8-10
4-5
4-5
4-5
3-4
4-5
4-5
-
-
-
-
Stegetid
(minutter) for
ferske eller
(delvist) optøede
madvarer
4-6 (se under
175cC i denne tabel
vedr. 2.stegerunde)
5-7
12-15
4-5
3-4
2-3
5-8
-
3-4
4-5
6-7
5-6
3-4
3-4
3-4
2-3
3-4
3-4
3-4
5-6
2-3
3-4
Anbefalet
mængde pr.
portion
600 g
450 g
3-5 stk.
5 stk.
4 stk.
8-10 stk.
600 g
450 g
600 g
4-5 stk.
2-3 stk.
5-6 stk.
8-10 stk.
8-10 stk.
8-10 stk.
12-15 stk.
8-10 stk.
5 stk.
600 g
3-4 stk.
2-4 stk.
2 stk.
Madvare
Hjemmelavede
pommes frites *) 1.
stegerunde
Frisk fisk
Kyllingelår
Ostekroketter
Mini
kartoffelpandekager
Grønsagsfritter
(champignons,
blomkål)
Hjemmelavede
pommes frites *) 2.
stegerunde
Frosne pommes
frites
Franske kartofler
(meget tynde
kartoffelskiver)
Kartoffelkroketter
Kinesiske forårsruller
Vietnamesiske
forårsruller
Kyllingenuggets
Mini snacks
Kødboller (små)
Muslinger
Kæmperejer
Æbleringe
Aubergine (i skiver)
Doughnuts
Camembert
(paneret)
Wienerschnitzel
Temperatur
160cC
170cC
175cC
180cC
190cC
Page 48

48
Page 49

49
Page 50

50
1 2 3 4
5 6 7 8
9 10 11 12
13 14 15
Page 51

51
Page 52

u
www.philips.com
4222 001 98642
 Loading...