

Page 1
HD 4285
Page 2

2
English Page 4
• Keep pages 3 and 26 open when reading
these operating instructions.
Français Page 8
• Pour le mode d'emploi: dépliez les
pages 3et 26.
Deutsch Seite 12
• Schlagen Sie beim Lesen der Gebrauchsanweisung Seiten 3 und 26 auf.
Nederlands Pagina 17
• Sla bij het lezen van de gebruiksaanwijzing
de pagina's 3 en 26 op.
Español Página 21
• Desplegar las páginas 3 y 26 al leer las
instrucciones de manejo.
Page 3
1
3
M
A
170¡
1
160¡
190¡
2
180¡
190¡
180¡
°
0
6
1
°
0
7
1
°
0
8
1
°
0
9
1
B
G
H
C
F
P
L
E
D
I
J
K
N
O
1a
¡
0
7
1
¡
0
6
1
1
¡
0
6
1
2
¡
0
¡
9
0
1
8
1
¡
0
8
1
¡
0
8
1
¡
0
9
1
¡
0
8
¡
0
7
1
°
0
6
1
°
0
7
1
°
0
8
1
¡
0
6
1
2
¡
0
8
1
¡
0
9
1
¡
0
8
1
1
°
0
9
1
¡
0
9
1
1
Page 4

4
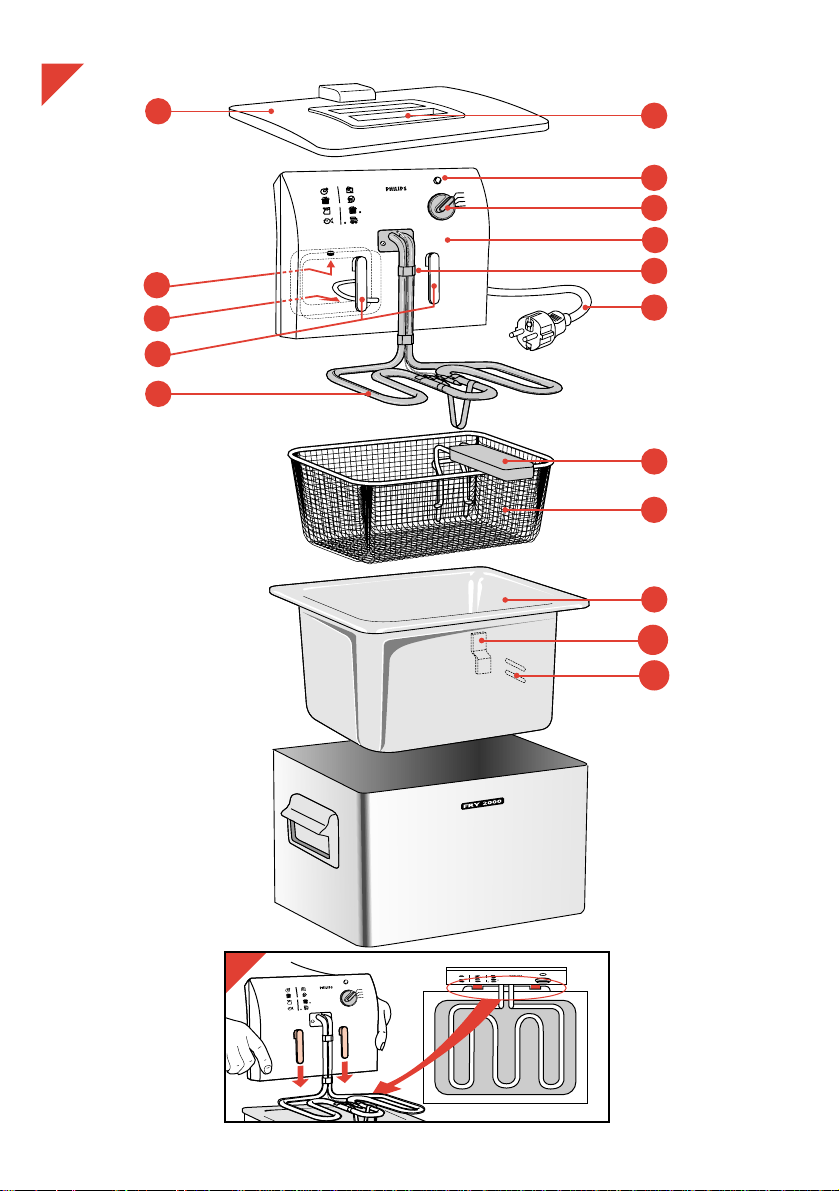
General description (fig. 1)
A Lid
B Lid handle
C Control unit
D Heating element
E Guiding profiles
F ”Reset” button
G Pilot light
H Temperature knob
I Hand grip of frying basket
J Frying basket
K Inner pan
L Mains cord
M Cord storage compartment
N Rest for frying basket
O Level indications (oil/fat)
P Automatic safety switch
English
Important
• Read these instructions in conjunction with the illustrations (pages 3 and 26) before using
the appliance.
• Before plugging the fryer in, check if the voltage indicated on the appliance is the same as
the mains voltage in your home.
• Only connect the appliance to an earthed wall socket.
• Never immerse the control panel, heating element or mains cord in water.
• Clean the various parts thoroughly before using the fryer for the first time. Ensure that they
are thoroughly dry before filling the frying pan with oil or melted fat.
• In general, we advise you to use liquid frying fat or frying oil in this appliance.
Solid frying fat can also be used. However, when using solid frying fat extra precautions
must be taken to prevent spatting fat when melting. (See section "Deep fat frying".)
• Do not switch on until you have filled the frying pan with oil or (melted) fat.
• When using new fat (lumps or blocks), melt the fat in a separate pan and then pour it into
the fryer before switching on.
• Only use oils and fats which are recommended for deep fat frying. This information can be
found on the packing of these oils/fats.
• Always fill with oil or fat to the level between the two measure indications.
Before you start frying, always check if there is still sufficient oil/fat in the fryer.
• Do not exceed the maximum quantities indicated in the table. Never fill the basket higher to
3/4 full.
If the basket is overfilled, hot fat/oil may flow over the fryer ridge.
• During the process of frying hot steam comes from the appliance. Keep your hands and
face away from this steam.
• The lid will keep the pan free from dust if not in use. Do not put the lid on the pan while
frying.
• Keep the deep fat fryer out of the reach of children at all times especially when in use.
• Do not let the mains cord hang over the edge of the table or sink.
• After use set the temperature knob to the lowest position (rotate anti-clockwise until it
stops). Remove the plug from the mains socket and let the oil or fat cool down. Do not
move the fryer until it has cooled sufficiently.
• If the mains cord of this appliance is damaged, it must only be replaced by Philips or their
service representative, as special tools and/or parts are required.
• Keep these instructions for future reference.
Extra safety
• The automatic safety switch (P) ensures that
the heating element can only be switched on if
the control panel is in position (fig. 1a).
• The safety thermostat switches the appliance
off when overheating occurs.
This may happen:
- if there is no (or too little) oil, melted fat, or
previously used (and resolidified) fat in the fryer
(fig. 2);
- if attempting to melt blocks or lumps of new fat
in the fryer (fig. 3).
The heat cannot be released quickly enough in
these cases.
Page 5

5
If the safety thermostat has switched the
appliance off:
- Allow the appliance to cool down.
- Press the “reset” button (F) (fig. 4) to make the
appliance ready for use again.
Prior to first use: clean thoroughly
• Ensure that the mains plug is not in the wall
socket.
• Never immerse the control unit with heating
element and mains cord in water. Never
rinse these items.
- Remove the lid (fig. 5), the frying basket (fig. 6)
and the control unit with the heating element
and mains cord (fig. 7).
Put the control unit with the heating element
and mains cord aside to a safe (dry) place.
- The stainless steel inner pan can be removed
(fig. 8) for quick and easy cleaning.
- Wash the frying basket, the lid and the hand
grip in hot soapy water (fig. 9). Rinse with clean
water and dry.
Deep fat frying
- Remove the lid (fig. 10).
- Put the hand grip into operational position
(fig. 11). Make sure that it clips securely to the
wire holder.
- Fill the deep fat frying pan with oil or melted fat
to the highest indication line (4 litres of oil or 3.5
kilogrammes of fat) (fig. 12).
When using new solid frying fat:
- Melt the piece(s) of new solid frying fat in a
separate pan on a low fire.
- Put out the fire below the pan as soon as the fat
has melted.
- Place the fryer in the sink basin.
- Very carefully pour the melted fat into the fryer.
- Carefully move the filled fryer to the place
where you want to use it. Then plug in and
switch on.
When melting used solid frying fat which has
curdled in the fryer:
- To prevent spatting, carefully pierce some holes
in the fat.
Avoid damaging the heating element when
doing so!
- Put the lid on the fryer.
- Switch on.
• Always leave the lid on the fryer while the fat is
melting to prevent spattering.
• Only use the described melting procedure!
Otherwise there is a risk of warm melted fat
suddenly spouting from below through the still
solid top layer of fat.
• Store the fryer containing solidified fat at room
temperature. If the fat is very cold there is a
greater risk of spattering.
• Never mix two different types of oil and/or fat.
- Unroll the mains cord completely (fig. 13).
• Ensure that the mains cord will not touch hot
surfaces and that it does not hang over the
worktop edge.
- Insert the plug into the mains socket.
- Set the temperature knob to the setting which is
most appropriate for the kind of food to be fried
(fig. 14). Refer to the table.
- After the pilot lamp has extinguished for the
second time (after 10-15 minutes) the oil/fat is
at the correct temperature.
- Carefully lift the frying basket out of the pan
(fig. 15).
- Put the food into the basket (fig. 16).
- Place the frying basket into the pan (fig. 17).
• For better overall browning, it is advised to lift
and shake the basket a couple of times during
frying (fig. 18).
- After frying, hook the frying basket in the high
position (i.e. “drain position”) (fig. 19). Allow the
fried food to drain for a while.
If required you can shake the basket over the
fryer to remove excess fat/oil (fig. 20).
- Remove the basket from the fryer and put the
fried food in a colander with fat absorbing paper
(e.g. tissue paper/kitchen roll) (fig. 21).
- After use, set the temperature knob to the lowest position (turn fully anti-clockwise) (fig. 22)
and remove the plug from the mains socket.
- Clean the fryer after the oil or fat has cooled
down sufficiently.
- You can tilt the hand grip backwards and store
it inside the frying basket. Store the fryer with
the lid on top. This will keep dust etc. from the
pan.
- You may wind the mains cord around the cord
storage facility at the back of the appliance.
“Cool Zone”
Loose food particles do not turn charred in this
fryer, so that the oil/fat will remain longer in good
condition. The loose particles will gather in the
“cool zone” below the heating element.
After the appliance has cooled down, you can
Page 6

6
remove the control unit with heating element and
mains cord, lift the inner pan out of the appliance
and pour the oil/fat through a fine sieve.
Table
In the table below is indicated what types of food
can be prepared with the fryer and what
temperature and preparation times should be
chosen. The table also indicates the maximum
quantity per preparation. You may deviate a little
from these instructions, depending on the
quantities to be prepared and on your personal
taste.
If you find different instructions (for the same
quantities!) on the packaging of the food, follow
these.
French fries
To obtain the nicest and most crispy French fries:
• Use not too new potatoes.
• Cut the potatoes first to thick slices and then to
sticks. Rinse the sticks in a colander under the
cold water tap: this will prevent the sticks from
adhering to one another while frying. Dry the
sticks using e.g. kitchen paper.
• French fries should be prepared in two steps:
- firstly at 160 °C (320 °F), during 8-10
minutes.
- secondly at 190 °C (374 °F), during 2-4
minutes.
During the second step shake the frying basket
at small intervals; then the French fries will get
a fine overall browning.
Deep frozen food
Food from your deep freezer or from the freezer
compartment of your fridge (-16 to -18 °C or -1 to
3 °F) will cool down the oil/fat vastly when lowered
into it, so that too much oil/fat may be absorbed.
• For that reason, do not put too big portions into
the fryer.
• Let the fryer regain optimum frying temperature
before you prepare a portion of deep frozen
food (approx. 15 minutes).
Set the temperature knob to the frying temperature indications on the packaging of the
deep frozen food. If these indications are not
given, set the knob to the highest temperature
(190 °C or 374 °F).
These instructions are also valid for certain
types of food which require careful preparation,
such as meat croquettes.
Temperature Type of food Max quantity per preparation Frying time *)
unfrozen frozen (minutes)
160 °C Chicken (fillet, 400 g 300 g 20-25
(320 °F) drumsticks)
170 °C Cheese croquettes 6 pcs. 4 pcs. 5
(338 °F) Shrimp fritters 6-8 pcs. 2-4
180 °C Apple fritters 6-8 pcs. 4-5
(356 °F) Cheese fritters 6-8 pcs. 2-4
Fish fingers/fillet 8-10 pcs. 8 pcs. 3-5
Meat balls 14-20 pcs. 4-5
Mussels 14-18 pcs. 21⁄2-3
190 °C Ball fritters 6 pcs. 2-4
(374 °F) Doughnuts 6 pcs. 4 pcs. 6-8
**) French fries 700 g 500 g 5
Cordon bleu 4 pcs. 3-4
Fish croquettes 6 pcs. 4 pcs. 5
Meat croquettes 6 pcs. 4 pcs. 5
Potato croquettes 6 pcs. 4 pcs. 5
Sliced potato 700 g 500 g 5
Wiener Schnitzel 4 pcs. 21⁄2
-3
*) For frozen food the preparation times may be longer than indicated.
**) For new French fries please refer to section "French fries".
Page 7

7
Deep frozen French fries are pre-fried and can
be fried in one step: max. 500 g at 190 °C /
374 °F, for about 5 minutes.
• Deep frozen food often contains too much ice.
Shake off as much of the ice as possible in the
sink. Then lower the food into the oil/fat
carefully, as deep frozen articles can make the
hot fat/oil bubble and splash excessively.
Tips
• Pure vegetable fat or oil containing polyunsaturated acids are often recommended by
health specialists.
Please note that these types of fat and oil must
be refreshed sooner than other types to
maintain their good qualities.
Also, a sticky and tenacious ridge of fat
deposits may set above the fat / oil level. We
advise you to clean the inside of the fryer
after each use with hot water and a washing-up
agent. (Please refer to section "Cleaning".)
• Use oils and/or fats which are recommended for
deep fat frying, i.e. vegetable fat or oil containing polyunsaturated acids.
• Regularly replace the oil or fat. Never add fresh
oil/fat to used oil/fat.
• In general the fat/oil will be tainted rather quickly when frying food containing a lot of protein
(such as meat and fish). When the oil/fat is
mainly used to deep fat fry potatoes and is
filtered after each use, the oil/fat can be used
10-12 times. However, do not use it for over six
months.
Oil (after cooling down) can be poured into a
bottle and curdled fat can be wrapped in an old
paper.
Curdled fat inside the pan can be easily
removed by heating it (at 160 °C/320 °F) until
just melted. (See the instructions in section
"Deep fat frying" on melting curdled fat in the
fryer.)
• Always replace all fat/oil as soon as it starts
seething when heated; when it has got a rancid
smell or taste; when its colour has become dark
and/or when it has turned syrupy.
• Make sure that the food to be fried is dry,
before lowering it into the hot fat/oil.
• Clean the fryer with paper tissue. Do not forget
the inside walls.
• If you do no not use the deep fat fryer frequently, you can best keep the oil in well-closed
(glass) bottles; preferably in the fridge. Store fat
in a well-closed (glass or stone) pot or bowl. It
is not advised to keep the fat/oil in the fryer for
a long time.
If the oil/fat has a taste...
Certain types of food (esp. fish) may lose some
fluid while being deep fat fried. This juice might
adversely affect the taste of food to be fried
later in the same oil/fat. To remove (or rather to
prevent) this taste heat the oil/fat to 160 °C /
320 °F. Then fry two thin slices of bread (5-6 mm,
or 0.25 "). Wait until all the air bubbles have
disappeared and the bread is brown all over. Then
take the bread out of the fryer and discard it. Now
the oil/fat has a neutral taste again.
Cleaning
• Outside and control unit: First remove the
mains plug from the wall socket. Wipe clean
with a damp cloth (if so required add some
detergent) and/or paper tissue.
• Inner pan, frying basket, hand grip, lid:
please refer to section “Before first use: clean
thoroughly”.
If you wish to clean the stainless steel inner pan
in a dish washer, it is advisable to remove any
sticky fat deposit first.
Use hot soapy water and a firm brush for this
purpose.
Page 8

8
Description générale (fig. 1)
A Couvercle
B Poignée de couvercle
C Boîtier de commande
D Elément chauffant
E Supports guides
F Bouton de réarmement
G Témoin lumineux
H Bouton de réglage température
I Poignée du panier
J Panier
Français
Important
• Lisez attentivement ce mode d’emploi en regardant les illustrations (pages 3 et 26) avant
d’utiliser l’appareil.
• Avant de brancher votre appareil, assurez-vous que la tension indiquée sur la plaque
signalétique placée sous l’appareil correspond bien à celle de votre logement.
• Ne plongez jamais le boîtier de commande, l’élément chauffant ou le cordon d’alimentation
dans l’eau.
• Nettoyez les différentes parties à l’aide d’un chiffon humide avant de l’utiliser. Assurezvous qu’elle soit bien sèche avant de la remplir avec de l’huile ou de la graisse.
• Ne branchez la friteuse qu’une fois qu’elle sera remplie d’huile ou graisse.
• En général, il est préférable d'utiliser dans cette friteuse de l'huile haute température ou
spéciale friture.
Vous pouvez toutefois utiliser de la graisse spéciale friture en respectant quelques règles
élémentaires de précaution afin d'éviter toute projection de graisse bouillante
(voir paragraphe “friture”).
• Quand vous utilisez des blocs de graisse neufs, faites-les fondre au préalable dans une
casserole et versez la graisse fondue dans le friteuse.
• Utilisez uniquement des huiles et graisses recommandées pour friture. Vous trouverez cette
information sur les emballages.
• Remplissez la cuve d’huile/ou graisse jusqu’à un niveau compris entre les deux repères
indiqués.
Vérifiez ce niveau avant chaque utilisation.
• Ne dépassez pas les quantités maximum indiquées sur le tableau.
Ne remplissez jamais le panier au-dessus des 3/4.
Si le panier est surchargé, l’huile peut déborder.
• Pendant la cuisson, de la vapeur chaude se dégage de la friteuse. Faites attention de ne pas
vous brûler les mains ou le visage.
• Placez le couvercle sur la cuve lorsque vous rangez la friteuse pour ne pas souiller le bain
de friture. Mais par contre retirez toujours le couvercle pendant l'utilisation de
la friteuse.
• Soyez prudent lorsque vous faites de la friture. Surtout prenez bien garde aux enfants.
• Ne laissez pas le cordon d’alimentation pendre de la table ou de l’évier.
• Après utilisation, replacez le bouton du thermostat sur la position la plus basse (tournez
dans le sens inverse des aiguilles d’une montre jusqu’à l’arrêt).
• Retirez la fiche de la prise de courant et laissez refroidir l’huile ou la graisse.
• Ne déplacez pas la friteuse tant qu’elle est chaude. Vous pourriez gravement vous brûler.
• Si le cordon d’alimentation est endommagé, faites-le remplacer par votre revendeur Philips
ou un Centre Service Agréé, car des outils spéciaux sont nécessaire.
• Conservez ce mode d’emploi.
K Cuve à friture
L Cordon d’alimentation
M Compartiment de rangement du cordon
N Support de panier
O Indications de niveau
P Sécurité thermique
Page 9

9
Sécurité
• La sécurité thermique (P) n’autorise la mise en
marche de l’élément chauffant que si le boîtier
de commande est en position de fonctionnement (fig. 1a).
• Le thermostat de sécurité coupe l’alimentation
dès qu’il y a surchauffe de l’élément chauffant.
Cela peut se produire dans les cas suivants :
- s’il n’y a pas (ou pas assez) d’huile ou si la
graisse s’est resolidifiée depuis la précédente
utilisation (fig. 2) ;
- si les blocs de graisse (neufs) ne sont pas
complètement fondus (fig. 3).
Dans ces 2 cas, la remise en marche peut être un
peu plus longue.
- Laissez l’appareil refroidir.
- Appuyez sur le bouton de réarmement (F)
(fig. 4) pour pouvoir utiliser de nouveau la
friteuse.
Avant la première utilisation
• Assurez-vous que la fiche n’est pas
connectée à la prise de courant.
• N’immergez jamais le boîtier de commande
ainsi que l’élément chauffant et le cordon
d’alimentation dans l’eau.
- Retirez le couvercle (fig. 5), le panier (fig. 6) et
le boîtier de commande avec l’élément
chauffant (fig. 7).
Posez l’élément chauffant et son cordon dans
un endroit sûr et sec.
- La cuve de la friteuse est amovible (fig. 8) pour
un nettoyage plus facile.
- Lavez le panier, le couvercle et la poignée à
l’eau chaude savonneuse (fig. 9). Rincez à
l’eau claire et séchez l’ensemble.
Friture
- Retirez le couvercle (fig. 10).
- Mettez la poignée dans la position d’utilisation
(fig. 11) . Assurez-vous qu’elle tient sûrement
sur la tige support.
- Fixez la poignée sur le panier (fig. 11).
- Remplissez la cuve de la friteuse avec de l’huile
(spéciale friture) ou de la graisse préalablement
fondue jusqu’au trait supérieur (4 litres d’huile
ou 3,5 kg de graisse) (fig. 12).
Lorsque vous utilisez des pains de graisse
neufs
- Faites fondre cette graisse au préalable dans
une casserole à feu doux.
- Placez la friteuse sur un plan de travail stable.
- Versez ensuite lentement la graisse fondue
dans la cuve.
- Attention de ne pas renverser la graisse chaude
sur vous.
- Branchez la fiche dans la prise de courant puis
mettez en marche.
Lorsque vous utilisez de la graisse solidifiée
dans la friteuse (mais déjà utilisée)
- Afin d'éviter les éclaboussures, percez
quelques trous dans la graisse.
Évitez endommager l’élément chauffant.
- Placez le couvercle sur la cuve.
Mettez en marche.
- Tenez toujours le couvercle sur la cuve afin
d'éviter toute projection durant la fonte de la
graisse.
- Utilisez la méthode décrite ci-dessus.
- Sinon il peut y avoir des risques importants de
projection de graisse fondue hors de la cuve.
- Ce risque est d'autant plus important que la
graisse figée est froide (réfrigérateur par
exemple ou pièce non chauffée).
- Stockez de préférence votre friteuse à
température ambiante de la pièce.
• Ne mélangez jamais huile et graisse.
- Déroulez complètement le cordon
d’alimentation (fig. 13).
• Assurez-vous qu’il ne touche pas des surfaces
chaudes et qu’il ne pende pas du plan de travail
où se trouve la friteuse.
- Branchez la fiche dans la prise de courant.
- Réglez le bouton de température sur la position
qui convient le mieux pour l’aliment que vous
voulez frire (fig. 14). Référez-vous au tableau
des températures.
- Après l’extinction du témoin lumineux pour la
deuxième fois (après 10 à 15 minutes), l’huile /
la graisse a atteint la bonne température.
- Sortez le panier de la friteuse (fig. 15).
- Déposez les aliments à frire dans le panier
(fig. 16).
- Replacez le panier dans la friteuse (fig. 17).
• Pour obtenir une friture uniformément dorée,
secouez le panier une ou deux fois durant la
cuisson (fig. 18).
- En fin de cuisson, relevez le panier et placez-le
en position haute (fig. 19). Laissez l’huile
s’égoutter.
Vous pouvez aussi secouer le panier pour
égoutter l’excédent d’huile plus vite (fig. 20).
- Enlevez le panier et versez son contenu dans
un récipient recouvert de papier absorbant
(fig. 21).
Page 10

10
- Après utilisation, réglez le bouton de
température sur arrêt (sens inverse des
aiguilles d’une montre) (fig. 22) et retirez la
fiche de la prise de courant.
- Vous pouvez plier la poignée vers le bas et la
ranger à l’intérieur du panier à frire. Laissez
l’huile refroidir avant de nettoyer la friteuse.
- Rangez la friteuse après avoir rabattu le
couvercle pour empêcher la poussière de
tomber dedans.
- Enroulez le cordon d’alimentation autour de la
base de la friteuse.
“Zone froide”
Grâce à la “zone froide” située sous l’élément
chauffant, les particules d’aliments ne peuvent se
carboniser au contact de celui-ci. L’huile peut
ainsi conserver toutes ses propriétés plus
longtemps.
Dès que l’appareil a refroidi, vous pouvez retirer le
couvercle, le boîtier de commande et l’élément
chauffant, sortir la cuve de la friteuse et filtrer
l’huile ou la graisse à l’aide d’un tamis.
Tableau des cuissons
Le tableau qui suit indique ce que vous pouvez
préparer avec la friteuse et quels sont les
températures ainsi que les temps de cuisson à
observer. Les valeurs sont les quantités
maximales par préparation. Vous pouvez bien
entendu adapter les quantités à votre goût
personnel.
Si vous trouvez des instructions différentes (pour
les mêmes quantitées!) sur l’emballage des
aliments, suivez les.
Pommes de terre frites
Vous réussirez de belles frites, bien croustillantes,
en les préparant comme suit :
• Employez de préférence des pommes de terre
qui ne soient pas trop “nouvelles”.
• Coupez-les en bâtonnets. Mettez-les dans une
passoire et rincez-les à l’eau froide. Ainsi, elles
ne colleront pas les unes aux autres lors de la
cuisson.
• Séchez-les avec du papier absorbant.
• La cuisson des frites se fait en 2 étapes :
- la 1ère à 160° C, durant 8 à 10 minutes ;
- la 2ème à 190° C, durant 2 à 4 minutes.
Température Type d'aliment Quantités maximales Temps de
non congelé congelé cuisson *) (en min.)
160 °C Poulet (filet, pilon) 400 g 300 g 20-25
170 °C Croquettes au fromage 6 pcs. 4 pcs. 5
Beignets aux crevettes 6-8 pcs. 2-4
180 °C Beignets aux pommes 6-8 pcs. 4-5
Beignets au fromage 6-8 pcs. 2-4
Poisson pané 8-10 pcs. 8 pcs. 3-5
Boulettes de viande 14-20 pcs. 4-5
Moules 14-18 pcs. 21⁄2-3
190 °C Beignets 6 pcs. 2-4
Doughnuts 6 pcs. 4 pcs. 6-8
Frites **) 700 g 500 g 5
Escalope farcie 4 pcs. 3-4
Croquettes de poisson 6 pcs. 4 pcs. 5
Croquettes de viande 6 pcs. 4 pcs. 5
Croquettes de
pommes de terre 6 pcs. 4 pcs. 5
Chips 700 g 500 g 5
Wiener Schnitzel 4 pcs. 21⁄2
-3
*) Pour les aliments congelés, le temps de cuisson peut être plus long.
**) Pour les frites fraîches, voir le chapitre “pommes de terre frites”.
Page 11

11
Secouez le panier régulièrement au cours de la
deuxième cuisson pour que les frites brunissent
uniformément.
Aliments surgelés
Les aliments qui sortent du congélateur ou du
compartiment conservateur de votre réfrigérateur
refroidissent fortement l’huile/la graisse dans
laquelle vous les plongez.
• Pour cette raison, ne mettez pas de trop
grosses portions à la fois dans la friture.
• Laissez la friteuse atteindre la température
optimum de cuisson avant d’y plonger les
surgelés (environ 15 à 20 minutes).
Placez le bouton de température sur la
position qui est indiquée sur l’emballage
des aliments surgelés. A défaut, choisissez la
plus haute température (190°C).
Ces recommandations sont aussi valables pour
certains mets qui doivent être préparés avec
précaution, tels que les croquettes de viande.
• Les frites surgelées peuvent être cuites en une
fois à 190°C pendant environ 5 minutes, car
elles sont déjà pré-cuites (500 g max.).
• Les aliments surgelés contiennent souvent
beaucoup de glace. Secouez-les pour enlever
le maximum de glace. Puis plongez-les
doucement dans la friteuse, car la glace peut
faire bouillonner l’huile excessivement, qui
risque alors de déborder.
Recommandations
• Employez de préférence de la graisse ou de
l'huile végétale contenant peu d'acides gras
non saturés.
Ces types d'huile/graisse doivent être
remplacées plus fréquemment que les autres
afin de maintenir une bonne qualité de cuisson.
Nous vous conseillons de nettoyer l'intérieur de
la friteuse après chaque utilisation avec de l'eau
chaude et un peu de liquide vaisselle.
(reportez-vous au paragraphe "Nettoyage".)
Renouvelez régulièrement la totalité de l’huile
ou de la graisse. Ne rajoutez jamais de l’huile
ou de la graisse fraîche dans de la friture déjà
usagée.
• En général l’huile ou la graisse se dégradent
plus vite lorsqu’on y fait frire des aliments riches
en protéines (tels que la viande ou le poisson).
Si vous utilisez principalement votre friture pour
frire des pommes de terre et si vous la filtrez
après chaque utilisation, elle pourra servir 10 à
12 fois. Cependant, ne la gardez pas plus de 6
mois. Ensuite vous devez la jeter.
La graisse figée dans la cuve peut facilement
être enlevée en chauffant quelques instants à
160° C quand la graisse se liquifiée sur les
parois. (Voir paragraphe “Friture”)
• Remplacez toute la totalité de la graisse ou de
l’huile lorsque celle-ci se met à grésiller en
chauffant, lorsqu’elle dégage une forte odeur,
lorsqu’elle prend un mauvais goût, lorsqu’elle
se fonce ou lorsqu’elle devient sirupeuse.
• Veillez à ce que les aliments soient aussi secs
que possible, lorsque vous les plongez dans la
friture.
• Essuyez la friteuse avec du papier absorbant.
N’oubliez pas l’intérieur de la cuve.
• Si vous n’utilisez pas régulièrement votre
friteuse, il est préférable de conserver l’huile
dans une bouteille de verre bien fermée que
vous placerez dans le réfrigérateur. Quant à la
graisse, mettez-la dans un pot ou un bocal
fermés (en verre ou en grès). Ne conservez pas
votre huile ou votre graisse trop longtemps
dans la friteuse.
Eliminer les mauvais goûts
Certains aliments, notamment les poissons,
peuvent perdre un peu de leur jus au cours de la
cuisson et dénaturer ainsi le goût des aliments qui
seront frits ultérieurement.
Pour pallier cet inconvénient, chauffez d’abord la
graisse ou l’huile à 160° C, puis mettez deux fines
tranches de pain (de 5 à 6 mm d’épaisseur) dans
la friteuse.
Attendez qu’il ne se produise plus de petites
bulles d’air et que le pain brunisse. Retirez-le
alors de la friteuse et jetez-le.
La graisse ou l’huile ont de nouveau un goût
neutre.
Nettoyage
Avant tout, débranchez l’appareil et laissez-le
refroidir.
• Extérieur et boîtier de commande : utilisez un
chiffon humide (avec éventuellement un peu de
détergent) et/ou du papier absorbant.
• Intérieur : référez-vous au paragraphe “Avant
la première utilisation”.
Si vous désirez nettoyer la cuve inox au lavevaisselle, il est toutefois préférable de retirer
l'excédent de dépôt graisseux fixé sur les
parois. Utilisez pour cela un peu d'eau chaude
savonneuse et une brosse à vaisselle.
Page 12

12
Allgemeine Beschreibung (Abb. 1)
A Deckel
B Griff des Deckels
C Bedienungseinheit
D Heizelement
E Führungsschienen
F Reset-Schalter
G Kontrollampe
Deutsch
Wichtig
• Lesen Sie diese Gebrauchsanweisung sorgfältig durch, und sehen Sie sich dabei die
Abbildungen (Seiten 3 und 26) an, bevor Sie das Gerät zum ersten Mal benutzen.
• Prüfen Sie vor Inbetriebnahme, ob die Spannungsangabe auf dem Gerät mit der örtlichen
Netzspannung übereinstimmt.
• Tauchen Sie die Bedienungseinheit, das Heizelement und das Netzkabel niemals in Wasser.
• Schließen Sie das Gerät nur an eine Schuko-Steckdose an. Das gilt auch, wenn Sie das
Gerät im Freien verwenden.
• Reinigen Sie die verschiedenen Teile vor Gebrauch mit einem feuchten Tuch. Lassen Sie
alles gut trocknen, bevor Sie die Friteuse mit Öl oder Fett füllen.
• Wir empfehlen Ihnen, in diesem Gerät nur Öl oder flüssiges Fritierfett zu verwenden.
Sie können aber auch festes Fett verwenden; wärmen Sie es jedoch langsam auf, damit das
schmelzende Fett nicht spritzt. Vgl. den Abschnitt "Fritieren".
• Schalten Sie das Gerät erst ein, nachdem es mit Öl oder geschmolzenem Fett gefüllt
worden ist.
• Bevor Sie Fett einfüllen: Schmelzen Sie das Fett in einem getrennen Gefäß und gießen Sie
es in die Friteuse, bevor Sie das Gerät einschalten.
Wenn Sie das Fett in der Friteuse wiederverwenden wollen, so stellen Sie den Temperaturregler auf 160° C. Erhöhen Sie die Temperatur erst, wenn alles Fett geschmolzen ist.
• Verwenden Sie nur Öle/Fette, die zum Fritieren geeignet sind. Eine entsprechende
Information ist auf den Verpackungen der Öle/Fette zu finden.
• Füllen Sie die Friteuse stets so, daß die Oberfläche des Öles bzw. des Fettes zwischen den
beiden Markierungen der Füllstandanzeige steht.
Achten Sie vor dem Fritieren immer darauf, daß noch genügend Öl/Fett in der Friteuse ist.
•Überschreiten Sie nie die Höchstmengen, die in der Tabelle aufgeführt sind. Füllen Sie den
Fritierkorb nicht mehr als auf Dreiviertel seiner Höhe. Geben Sie mehr hinein, kann das
Öl/Fett überlaufen.
• Während des Fritierens steigt heißer Dampf auf. Kommen Sie mit Gesicht oder Händen
nicht in seine Nähe!
• Der Deckel soll verhindern, daß die Friteuse verschmutzt. Setzen Sie ihn nicht beim
Fritieren auf.
• Halten Sie Kinder immer von dem Gerät fern, besonders, wenn es mit heißem Fett gefüllt ist.
• Lassen Sie das Kabel nicht über die Arbeitsfläche hinabhängen, damit das Gerät nicht
hinuntergezogen werden kann.
• Stellen Sie nach Gebrauch den Temperaturregler auf die niedrigste Einstellung, indem Sie
ihn entgegen dem Uhrzeigersinn bis zum Anschlag drehen. Ziehen Sie dann den Stecker
aus der Steckdose, und lassen Sie das Öl/Fett abkühlen. Bewegen Sie das Gerät nicht,
solange das Öl/Fett noch nicht abgekühlt ist!
• Wenn das Netzkabel defekt oder beschädigt ist, muß es von einer durch Philips
autorisierten Werkstatt ersetzt werden, da für die Reparatur Spezial-Werkzeug und/oder
spezielle Teile benötigt werden.
• Bewahren Sie die Gebrauchsanweisung auf.
H Temperaturregler
I Griff des Fritierkorbs
J Fritierkorb
K Fritierwanne, rostfreier Stahl
L Netzkabel
M Kabelaufwicklung
N Arretierung für den Fritierkorb
O Füllstandsanzeige für Öl/Fett
P Sicherheitsautomatik
Page 13

13
Sicherheitsvorrichtung
• Die Sicherheitsautomatik (P) verhindert, daß
das Heizelement eingeschaltet wird, solange
die Bedienungseinheit nicht richtig eingesetzt
ist (Abb. 1a).
• Der Sicherheitsthermostat schaltet das Gerät
bei Überhitzung aus. Das kann geschehen,
wenn ...
- sich kein oder zu wenig Öl/Fett in der Friteuse
befindet, bzw. wenn vorher verwendetes Fett
fest geworden ist (Abb. 2);
- Sie versuchen, neues Fett in der Friteuse zu
schmelzen (Abb. 3).
In diesen Fällen kann das Heizelement die
Hitze nicht schnell genug abgeben.
Wenn die Sicherheitsautomatik das Gerät
ausgeschaltet hat, ...
- lassen Sie das Gerät abkühlen;
- und drücken Sie dann den Reset-Schalter (F)
(Abb. 4).
Das Gerät ist danach wieder einsatzbereit.
Vor dem ersten Gebrauch gründlich reinigen
• Vergewissern Sie sich zuvor, daß der
Stecker nicht in der Steckdose steckt.
• Tauchen Sie die Bedienungseinheit mit dem
Heizelement und dem Netzkabel niemals in
Wasser. Spülen Sie diese Teile auch nicht
ab.
- Nehmen Sie den Deckel vom Gerät (Abb. 5),
sowie den Fritierkorb (Abb. 6) und das
Heizelement mit dem Netzkabel (Abb. 7).
Stellen Sie das Heizelement mit dem Netzkabel
an einer sicheren und trockenen Stelle ab.
- Die Fritierwanne kann zur schnellen und
bequemen Reinigung herausgenommen
werden (Abb. 8).
- Spülen Sie den Fritierkorb, den Deckel und den
Griff in heißem Wasser, dem Sie etwas
Spülmittel zugesetzt haben (Abb. 9). Spülen Sie
gründlich mit klarem Wasser nach und trocknen
Sie gut ab.
Fritieren
- Nehmen Sie den Deckel vom Gerät ab (Abb. 10).
- Bringen Sie den Griff am Fritierkorb an
(Abb. 11). Vergewissern Sie sich, daß er fest in
die Klammer einrastet (“Klick”).
- Füllen Sie die Fritierwanne bis zur obersten Markierung mit Öl oder geschmolzenem Fett (Abb.
12). Das entspricht 4 Liter Öl bzw. 3,5 kg Fett.
Festes Fett zum Fritieren verwenden:
- Schneiden Sie das Fett in Stücke, und
schmelzen Sie es langsam bei geringer Hitze.
- Unterbrechen Sie sofort die Wärmezufuhr,
wenn das Fett völlig geschmolzen ist.
- Stellen Sie die Friteuse in ein Spülbecken.
Ziehen Sie zuvor stets den Netzstecker aus der
Steckdose.
- Gießen Sie das geschmolzene Fett äußerst
vorsichtig in die Fritierwanne.
- Stellen Sie die Friteuse ebenso vorsichtig an
den Arbeitsplatz. Stecken Sie den Stecker in
die Steckdose, und schalten Sie das Gerät ein.
In der Friteuse erstarrtes Fett wiederverwenden:
- Stechen Sie vorsichtig einige Löcher in das
Fett, um Spritzer zu vermeiden.
Geben Sie acht, daß Sie dabei nicht das
Heizelement beschädigen.
- Setzen Sie den Deckel auf die Friteuse.
- Schalten Sie das Gerät ein.
• Lassen Sie während des Schmelzvorgangs
unbedingt den Deckel auf dem Gerät! Heißes
Fett kann spritzen.
• Gehen Sie stets nur wie hier beschrieben vor.
Anderenfalls könnte das schmelzende Fett die
feste Oberfläche durchbrechen und durch
Spritzer Schaden anrichten.
• Bewahren Sie eine mit Fett gefüllte Friteuse
immer bei Raumtemperatur auf. Je kälter das
Fett vor dem Schmelzen war, um so leichter
wird es beim Schmelzen spritzen.
• Mischen Sie niemals verschiedene Sorten Öl
und/oder Fett.
- Rollen Sie das Netzkabel ganz ab (Abb. 13).
• Stellen Sie sicher, daß das Netzkabel keine
heiße Stelle berühren kann und nicht über die
Arbeitsfläche hinabhängt.
- Stecken Sie erst jetzt den Stecker in die
Steckdose.
- Stellen Sie den Temperaturregler auf die
Position, die für die Zubereitung der jeweiligen
Speise empfohlen wird (Abb. 14). Beachten Sie
die Tabelle in dieser Gebrauchsanweisung.
- Nach ca. 10 bis 15 Minuten, wenn die
Kontrollampe nochmals erloschen ist, hat das
Öl/Fett die richtige Temperatur erreicht.
- Nehmen Sie den Fritierkorb vorsichtig aus dem
Gerät (Abb. 15).
- Füllen Sie den Fritierkorb (Abb. 16).
- Setzen Sie den Fritierkorb vorsichtig in die
Friteuse (Abb. 17).
• Sie erzielen eine gleichmäßige Bräunung, wenn
Sie den Fritierkorb hin und wieder anheben und
Page 14

14
das Fritiergut ein wenig schütteln (Abb. 18).
- Nach Ablauf der Fritierzeit haken Sie den
Fritierkorb in der oberen Position ein (Abb. 19)
und lassen das Fritiergut abtropfen.
Schütteln Sie bei Bedarf den Fritierkorb ein
wenig über der Fritierwanne, um
überschüssiges Öl/Fett zu entfernen (Abb. 20).
- Legen Sie ein Küchensieb mit
fettaufsaugendem Papier aus, nehmen Sie den
Fritierkorb vorsichtig aus dem Gerät, und
schütten Sie das Fritiergut in das vorbereitete
Küchensieb (Abb. 21).
- Stellen Sie nach dem Gebrauch des Geräts den
Temperaturregler auf die niedrigste
Temperatur, indem Sie ihn bis zum Anschlag
gegen den Uhrzeigersinn drehen (Abb. 22), und
ziehen Sie den Stecker aus der Steckdose.
- Reinigen Sie das Gerät, sobald das Öl/Fett
abgekühlt ist.
- Sie können den Griff zur Aufbewahrung in den
leeren Fritierkorb zurückklappen. Bewahren Sie
das Gerät mit aufgesetztem Deckel auf, damit
keine Verunreinigungen hineingeraten.
- Das Netzkabel können Sie an der Rückseite
des Geräts aufwickeln.
“Kühle Zone”
Bei dieser Friteuse können lose Partikel des
Fritierguts nicht verkohlen; sie sammeln sich in
der kühlen Zone über dem Heizelement an.
Dadurch bleibt das Öl/Fett länger brauchbar.
Nachdem das Gerät abgekühlt ist, können Sie das
Bedienungselement mit dem Netzkabel, danach
die Fritierwanne aus dem Gerät herausnehmen
und das Öl/Fett durch ein feines Sieb gießen.
Tabelle
Die Tabelle zeigt, welche Speisen mit der Friteuse
in einem Arbeitsgang zubereitet werden können,
bei welcher Temperatur und wie lange zu fritieren
ist. Außerdem wird die Höchstmenge angegeben.
Sie können, je nach der eingefüllten Menge und
dem persönlichen Geschmack, etwas von den
Angaben abweichen.
Wenn auf der Packung des Fritierguts (für die
gleiche Menge!) abweichende Zeitangaben
stehen, so befolgen Sie die Angaben auf der
Packung.
Temperatur Art der Speise Höchstmenge Fritierzeit *)
frisch gefroren (in Minuten)
160 °C Huhn, Hähnchen 400 g 300 g 20-25
(Filet, Keule)
170 °C Käse-Kroketten 6 Stk. 4 Stk. 5
Shrimp-Beignet 6-8 Stk. 2-4
180 °C Apfel-Beignet 6-8 Stk. 4-5
Käse-Beignet 6-8 Stk. 2-4
Fisch-Stäbchen 8-10 Stk. 8 Stk. 3-5
Fleischbällchen 14-20 Stk. 4-5
Muscheln 14-18 Stk. 21⁄2-3
190 °C Frikadellen 6 Stk. 2-4
Krapfen 6 Stk. 4 Stk. 6-8
Pommes frites **) 700 g 500 g 5
Cordon bleu 4 Stk. 3-4
Fisch-Kroketten 6 Stk. 4 Stk. 5
Fleisch-Kroketten 6 Stk. 4 Stk. 5
Kartoffel-Kroketten 6 Stk. 4 Stk. 5
Kartoffel-Chips 700 g 500 g 5
Wiener Schnitzel 4 Stk. 21⁄2-3
*
) Die Zubereitungszeit für tiefgefrorene Speisen kann höher sein, als in der Tabelle angegeben.
**
) Zu Pommes frites aus frischen Kartoffeln vgl. den folgenden Abschnitt “Pommes frites”.
Page 15

15
Pommes frites
So erhalten Sie die schönsten und knusprigsten
Pommes frites:
• Nehmen Sie keine neuen Kartoffeln.
• Schneiden Sie die Kartoffeln zuerst in dicke
Scheiben und dann in längliche Stäbchen.
Spülen Sie die Stäbchen in einem Sieb unter
kaltem Leitungswasser ab, damit sie beim
Fritieren nicht aneinanderkleben. Trocknen Sie
die Kartoffelstäbchen, z.B. mit Haushaltspapier.
• Pommes frites werden in zwei Stufen
zubereitet:
- zunächst 8 bis 10 Minuten bei 160° C,
- danach 2 bis 4 Minuten bei 190° C.
Schütteln Sie den Fritierkorb während der
zweiten Stufe in kurzen Abständen, dann
werden die Pommes frites rundherum
goldbraun.
Tiefkühlkost
Speisen aus einem Tiefkühlgerät oder
Tiefkühlfach (-16/-18° C) kühlen beim Eintauchen
das heiße Öl/Fett stark ab, so daß zu viel Öl/Fett
absorbiert werden kann.
• Geben Sie darum niemals größere Portionen in
die Friteuse.
• Heizen Sie die Friteuse ca. 15 Minuten auf die
erforderliche Temperatur auf, bevor Sie eine
Portion Tiefkühlkost fritieren.
Stellen Sie den Temperaturregler auf den
Wert, der auf der Packung angegeben ist.
Fehlt ein solcher Hinweis, so setzen Sie den
Temperaturregler auf die höchste Position
(190° C).
Diese Hinweise gelten auch für andere
Speisen, die eine präzise Zubereitung
verlangen, z.B. für Fleisch-Kroketten.
Tiefgekühlte Pommes frites sind vorfritiert und
max. 500 g können in 5 Minuten bei 190° C in
einem Arbeitsgang zubereitet werden.
• Tiefkühlkost enthält oft zu viel Eis. Lassen Sie
es vor dem Fritieren am besten eine halbe
Stunde abtauen, und gießen Sie das Wasser
ab. Senken Sie dann das Fritiergut langsam in
das Öl/Fett, damit sich keine Blasen und
Spritzer bilden.
Hinweise
• Verwenden Sie Fett/Öl, das zum Fritieren
geeignet ist, d.h. Pflanzenöl oder -fett mit einem
hohen Anteil an mehrfach ungesättigten
Fettsäuren.
Dieses Fett/Öl muß häufiger erneuert werden
als anderes Fett/Öl, wenn es seine Qualität
beibehalten soll.
Es kann sich oberhalb des Fett-/Ölspiegels ein
Rand von festen Rückständen absetzen. Es
empfiehlt sich deshalb, die Fritierwanne nach
jedem Gebrauch mit heißem Wasser
auszuspülen, dem Sie etwas Spülmittel
zugefügt haben. Vgl. den Abschnitt “Reinigung”.
• Verwenden Sie Öl/Fett, das zum Fritieren
geeignet ist, d.h. Pflanzenöl oder -fett mit einem
hohen Anteil an mehrfach ungesättigten
Fettsäuren.
• Tauschn Sie das Öl/Fett regelmäßig aus.
Setzen Sie niemals frisches Öl/Fett dem
gebrauchten zu.
• Im allgemeinen wird das Öl/Fett ziemlich
schnell unbrauchbar, wenn eiweißhaltige
Speisen (z.B. Fleisch oder Fisch) fritiert
werden. Wenn das Öl/Fett vorwiegend für die
Zubereitung von Pommes frites verwendet und
nach jedem Gebrauch gefiltert wird, kann es
10- bis 12mal verwendet werden. Tauschen Sie
es aber nach spätestens sechs Monaten aus.
Abgekühltes Öl können Sie in einer Flasche
aufbewahren, erstarrtes Fett in seiner alten
Verpackung oder in Zeitungspapier.
Erstarrtes Fett, das sich in der Friteuse
festgesetzt hat, ist leicht zu entfernen, wenn Sie
das Gerät auf 160° C aufheizen. Vgl. im Kapitel
"Fritieren" den Abschnitt "In der Friteuse
erstarrtes Fett wiederverwenden".
• Tauschen Sie das Öl bzw. Fett auf jeden Fall
aus, wenn es beim Aufheizen schäumt, wenn
es einen Stich angenommen hat, ranzig bzw.
dunkel und/oder dickflüssig geworden ist.
• Vergewissern Sie sich, daß die Speisen gut
trocken sind, bevor Sie sie in das heiße Öl bzw.
Fett geben.
• Reinigen Sie die Friteuse mit Haushaltspapier,
auch die Innenwände.
• Wenn Sie die Friteuse nur gelegentlich
verwenden, so verwahren Sie das Öl am
besten in einem (Glas-)Gefäß, möglichst im
Kühlschrank, und Fett in einem gut
verschlossenen Gefäß aus Glas oder Steingut.
Es ist nicht ratsam, Fett oder Öl längere Zeit in
der Friteuse stehen zu lassen.
Wenn das Öl/Fett einen Beigeschmack hat
Bestimmte Speisen (besonders Fisch) können
beim Fritieren etwas Flüssigkeit abgeben, was
sich nachteilig auf den Geschmack der Speisen
auswirkt, die später in dem selben Öl/Fett fritiert
werden.
Um diesen Beigeschmack zu beseitigen, erhitzen
Page 16

16
Sie das Öl/Fett auf 160° C und geben dann zwei
Scheiben Brot von ca. 5 bis 6 mm Dicke hinein.
Wenn keine Luftblasen mehr aufsteigen und das
Brot rundherum braun ist, nehmen Sie es aus der
Friteuse und werfen es fort.
Das Öl/Fett hat jetzt wieder einen neutralen
Geschmack.
Reinigung
Ziehen Sie vor jeder Reinigung den Stecker
aus der Steckdose!
• Außenwände und Bedienungseinheit:
Wischen Sie das Gerät mit einem feuchten
Tuch oder mit Haushaltspapier ab. Sie können
dem Wasser etwas Spülmittel zufügen.
• Innenwände, Fritierwanne, Griff und Deckel:
Entfernen Sie mit Haushaltspapier alle Öl- bzw.
Fettreste von den zu reinigenden Teilen.
Verfahren Sie dann, wie oben im Abschnitt “Vor
dem ersten Gebrauch gründlich reinigen”
geschildert.
Entfernen Sie vor der Reinigung der
Edelstahlwanne jeden Rest von Öl und Fett.
Verwenden Sie warmes Wasser, dem Sie
etwas Spülmittel zugefügt haben, und eine
Bürste mit kräftigen Borsten.
Page 17

17
Algemene beschrijving (fig. 1)
A Deksel
B Dekselhandgreep
C Regelunit
D Verwarmingselement
E Geleidingsprofielen
F ”Reset”knopje
G Controlelampje
H Temperatuurknop
I Handgreep van de frituurmand
J Frituurmand
K Binnenpan
Nederlands
Belangrijk
• Lees de gebruiksaanwijzing en bekijk de illustraties (pag. 3 en 26) voordat u het apparaat in
gebruik neemt.
• Controleer, voordat u de frituurpan aansluit, of de spanning die op het apparaat is
aangegeven overeenkomt met de netspanning in uw woning.
• Sluit het apparaat alleen aan op een geaard stopcontact.
• Dompel het regelpaneel, het verwarmingselement en het snoer nooit in water.
• Maak voor het eerste gebruik de verschillende onderdelen van de friteuse goed schoon.
Zorg dat ze goed droog zijn voordat u de frituurpan met olie of vet vult.
• In het algemeen raden wij u aan in dit apparaat vloeibaar frituurvet of frituurolie te
gebruiken.
Vast frituurvet kan ook worden gebruikt. Echter, wanneer u vast frituurvet gebruikt, moeten
extra maatregelen worden getroffen om spatten van vet tijdens het smelten te voorkomen.
(Zie gedeelte “Frituren”.)
• Schakel de friteuse pas in nadat u deze met olie of gesmolten vet hebt gevuld.
• Wanneer u nieuw vet (stukken of blokken) gebruikt, smelt u het vet dan in een aparte pan en
giet het over in de frituurpan voordat u deze inschakelt.
• Gebruik uitsluitend soorten olie en vet die geschikt zijn om in te frituren. Deze informatie
kunt u op de verpakking van die produkten vinden.
• Vul de pan met olie of vet altijd tot een niveau tussen de twee maatstrepen.
Controleer altijd of er nog voldoende olie/vet in de pan is, voordat u gaat frituren.
• Overschrijd niet de in de tabel aangegeven maximum hoeveelheden. Vul het mandje nooit
hoger dan tot 3/4.
Als u te veel voedsel in het mandje doet, kan heet vet/olie over de rand van de friteuse
komen.
• Tijdens het frituren komt er hete stoom vrij. Houd uw handen en gezicht op veilige afstand
van deze stoom.
• Het deksel is bedoeld om de pan stofvrij te houden als deze niet wordt gebruikt. Zet het
deksel niet op de pan als u bezig bent met frituren.
• Houd bij het gebruik de frituurpan buiten bereik van kinderen (heet vet!).
• Laat daarom het snoer niet over de rand van de tafel of het aanrecht hangen.
• Zet na gebruik de temperatuurregelaar in de laagste stand (geheel linksom draaien). Haal de
stekker uit het stopcontact en laat de olie of het vet afkoelen. Verplaats de friteuse pas als
deze voldoende is afgekoeld.
• Indien het snoer van dit apparaat is beschadigd, dient het uitsluitend te worden vervangen
door een door Philips daartoe aangewezen reparateur, omdat voor de reparatie speciale
gereedschappen en/of onderdelen vereist zijn.
• Bewaar deze gebruiksaanwijzing.
L Snoer
M Snoeropbergplaats
N Steuntje voor frituurmand
O Maatstrepen (niveau van olie/vet)
P Automatische beveiligingsschakelaar
Extra veiligheid
• De automatische beveiligingsschakelaar (P)
zorgt ervoor dat het verwarmingselement alleen
ingeschakeld kan worden wanneer het
bedieningspaneel op zijn plaats is (fig. 1a).
Page 18

18
• De thermostatische beveiliging schakelt het
apparaat uit bij oververhitting.
Dit kan gebeuren:
- wanneer er geen (of te weinig) olie, gesmolten
vet, of eerder gebruikt (en weer gestold) vet in
de frituurpan is (fig. 2);
- bij pogingen stukken of blokken nieuw vet in de
frituurpan te smelten (fig. 3).
De warmte-afgifte kan dan niet snel genoeg
plaatsvinden.
Als de thermostatische beveiliging het apparaat
heeft uitgeschakeld:
- Laat het apparaat afkoelen.
- Druk op het “Reset” knopje (F) (fig. 4).
Vervolgens is het apparaat weer klaar voor
gebruik.
Voor het eerste gebruik: goed schoonmaken
• Let erop dat de stekker niet in het
stopcontact is.
• Dompel nooit de regelunit met het
verwarmingselement en snoer in water.
Spoel deze delen ook niet af.
- Verwijder het deksel (fig. 5), de frituurmand
(fig. 6) en de regelunit met verwarmingselement
en snoer (fig. 7).
Leg de regelunit met verwarmingselement en
snoer op een veilige (droge) plaats weg.
- De roestvrijstalen binnenpan kan uit het
apparaat worden genomen (fig. 8). Zo kunt u
het apparaat goed en gemakkelijk
schoonmaken.
- Was de frituurmand, het deksel, de binnenpan
en de handgreep af in heet sop (fig. 9). Spoel
na met schoon water en droog ze af.
Frituren
- Verwijder het deksel (fig. 10).
- Zet de handgreep in de gebruiksstand (fig. 11).
Klem de handgreep goed vast aan het
draadprofiel.
- Vul de frituurpan met olie of gesmolten vet tot
de hoogste peilstreep (4 liter olie / 3,5 kg vet)
(fig. 12).
Wanneer u nieuw vast frituurvet gebruikt:
- Smelt het stuk / de stukken nieuw vast frituurvet
in een aparte pan op een laag vuur.
- Doe het vuur onder de pan uit zodra het vet
gesmolten is.
- Zet de frituurpan in de spoelbak van het
aanrecht.
- Giet heel voorzichtig het gesmolten vet in de
frituurpan.
- Breng de gevulde frituurpan voorzichtig naar de
plaats waar u hem wilt gebruiken. Steek daarna
de stekker in het stopcontact en schakel het
apparaat in.
Wanneer u eerder gebruikt, vast frituurvet wilt
smelten, dat in de frituurpan is gestold:
- Om spatten te voorkomen, prikt u voorzichtig
wat gaten in het vet. Pas op dat u daarbij niet
het verwarmingselement beschadigt!
- Doe het deksel op de frituurpan.
- Schakel de frituurpan in.
• Laat tijdens het smelten altijd het deksel op de
frituurpan om spatten te voorkomen.
• Gebruik alleen de beschreven procedure voor
het smelten van frituurvet! Anders bestaat er
een risico dat warm gesmolten vet plotseling
omhoog spuit vanonder de nog vaste
bovenlaag.
• Bewaar de friteuse, met daarin het gestolde vet,
bij kamertemperatuur. Te koud vet geeft bij het
smelten een grotere kans op spatten.
• Meng nooit twee verschillende soorten vet en/of
olie.
- Rol het snoer geheel af (fig. 13).
• Zorg ervoor dat het snoer niet in aanraking kan
komen met hete delen en dat het niet over de
rand van het werkblad hangt.
- Steek de stekker in het stopcontact.
- Zet de temperatuurknop in de stand die voor de
te bereiden etenswaren de meest geschikte is
(fig. 14). Zie hiervoor de tabel.
- Wanneer het controlelampje voor de tweede
keer is uitgegaan (na 10 - 15 minuten), is de
olie/het vet op de gewenste temperatuur.
- Neem de frituurmand voorzichtig uit de pan
(fig. 15).
- Doe de etenswaren in de frituurmand (fig. 16).
- Zet de frituurmand in de pan (fig. 17).
• Om een gelijkmatige bruining te bevorderen,
kunt u tijdens het frituren nu en dan de
frituurmand uit de vet/olie tillen en deze even
schudden (fig. 18).
- Wanneer het voedsel gebakken is, haakt u de
frituurmand vast in de hoge stand (d.i. de
“uitlekstand”) (fig. 19). Laat het gefrituurde
voedsel even uitlekken.
Schud zonodig het mandje boven de frituurpan
om overtollig vet te verwijderen (fig. 20).
- Til het mandje voorzichtig uit de pan en doe de
gefrituurde etenswaren in een vergiet met vetabsorberend papier (bijv. keukenpapier)
(fig. 21).
Page 19

19
- Zet na gebruik de temperatuurknop op de
laagste stand (geheel linksom draaien) (fig. 22)
en haal de stekker uit het stopcontact.
- Maak het apparaat schoon als de olie/het vet
voldoende is afgekoeld.
- U kunt de handgreep achterover kantelen en in
de frituurmand bewaren. Zet de pan met het
deksel erop weg. Zo houdt u stof e.d. buiten de
pan.
- U kunt het snoer opgerold bewaren in de
houder aan de achterzijde van het apparaat.
“Koele zone”
Bij deze frituurpan verkolen losgeraakte
voedseldeeltjes niet, zodat de olie/het vet langer
in goede conditie blijft. De losse deeltjes
verzamelen zich in de “koele zone” onder het
verwarmingselement.
Nadat het apparaat is afgekoeld, kunt u de
regelunit met verwarmingselement en snoer
verwijderen, de binnenpan uit het apparaat nemen
en de olie/het vet door een fijne zeef gieten.
Tabel
In de onderstaande tabel wordt aangegeven wat u
in één bakbeurt met de frituurpan zoal kunt
bereiden en welke temperatuur en bereidingstijd u
daarvoor kiest. U kunt enigszins van de gegeven
aanwijzingen afwijken, in verband met de te
bereiden hoeveelheid en uw smaak.
Als (voor dezelfde hoeveelheden!) afwijkende
aanwijzingen worden gegeven op de verpakking
van het voedsel, volgt u deze op.
Patates Frites
Op deze manier maakt u de lekkerste, mooiste en
meest krokante patates frites:
• Gebruik bij voorkeur niet al te nieuwe aardappelen.
• Snijd de aardappelen in dikke plakken. Snijd
deze in repen. Spoel deze in een vergiet af
onder de koude kraan: dan zullen ze tijdens het
bakken niet tegen elkaar plakken. Droog de
reepjes vervolgens af (bij voorbeeld met
keukenpapier).
• Bak de frites in twee bakbeurten:
- de eerste op 160 °C (8-10 minuten)
- de tweede op 190 °C (2-4 minuten).
Schud het mandje met kleine tussenpozen
gedurende de tweede bakbeurt; dan worden de
frites gelijkmatig bruin.
Temperatuur soort voedsel max. hoeveelheid per keer baktijd*)
niet bevroren diepvries (minuten)
160 °C Kip (filet, 400 g 300 g 20-25
drumsticks)
170 °C Kaaskroketten 6 st. 4 st. 5
Garnalenbeignets 6-8 st. 2-4
180 °C Appelbeignets 6-8 st. 4-5
Kaasbeignets 6-8 st. 2-4
Vissticks/-filet 8-10 st. 8 st. 3-5
Gehaktballetjes 14-20 st. 4-5
Mosselen 14-18 st. 21⁄2-3
190 °C Berliner bollen 6 st. 2-4
Doughnuts (Donuts) 6 st. 4 st. 6-8
Patates frites **) 700 g 500 g 5
Cordon bleu 4 st. 3-4
Viskroketten 6 st. 4 st. 5
Vleeskroketten 6 st. 4 st. 5
Aardappelkroketten 6 st. 4 st. 5
Aardappelschijfjes 700 g 500 g 5
Wiener Schnitzel 4 st. 21⁄2
-3
Bitterballen 14 st. 14 st. 5
*) Voor bevroren voedsel kunnen de bereidingstijden wat langer zijn.
**) Zie voor het frituren van verse frites het hoofdstuk “Patates Frites”.
Page 20

20
Diepvriesvoedsel
Etenswaren uit de diepvriezer of uit het vriesvak
van uw koelkast (-16 à -18 °C) koelen de olie/het
vet sterk af als u ze erin dompelt, zodat te veel
olie/vet wordt geabsorbeerd.
• Doe daarom niet te grote porties in de pan.
• Laat de frituurpan, voordat u het diepvriesvoedsel erin doet, ca. 15 minuten op temperatuur
komen. Stel daartoe de temperatuurknop in op
de stand die op de verpakking van het
diepvriesvoedsel wordt aangegeven. Als deze
aanwijzingen ontbreken, kies dan de hoogste
temperatuur (190 °C).
Deze aanwijzingen gelden ook voor sommige
gerechten die voorzichtig bereid moeten
worden, zoals vleeskroketten.
Diepvriesfrites zijn vóórgebakken en kunnen
dus in één beurt gebakken worden: max. 500 g
op 190 °C gedurende ca. 5 minuten.
• Voedsel uit de diepvries bevat vaak veel ijs.
Laat het bij voorkeur vóór het frituren een half
uur ontdooien. Schud boven de gootsteen
zoveel mogelijk ijs en water van de etenswaren
af. Laat het voedsel behoedzaam in de olie/het
vet zakken: bevroren voedsel kan het hete
vet/olie hevig doen opborrelen.
Tips
• Deskundigen op het gebied van gezond
voedsel adviseren vaak plantaardig vet of olie
die onverzadigde vetzuren bevat.
Houd er echter rekening mee dat deze soorten
olie en vet vaker moeten worden ververst om
hun goede eigenschappen te behouden.
Aan de binnenzijde van de friteuse kan zich
boven het niveau van het vet / de olie een taaie,
harde rand afzetten. Het is aan te raden
de binnenzijde van de friteuse na elk gebruik
met sop schoon te maken. (Zie
“Schoonmaken”.)
• Gebruik bij voorkeur plantaardig vet of olie die
onverzadigde vetzuren bevat.
• Ververs de olie of het vet regelmatig. Voeg
geen verse olie/vet toe aan gebruikte.
• In het algemeen bederft olie en vet snel
wanneer u eiwitrijk voedsel (zoals vlees en vis)
frituurt. Wanneer u de olie/het vet meestal
gebruikt om aardappels te frituren en het
telkens na gebruik filtreert, is de olie/het vet
zo’n tien tot twaalf keer te gebruiken. Gebruik
het echter niet langer dan ca. 6 maanden.
Olie (afgekoeld) doet u in een fles en vet
(gestold) in een krant.
Gestold vet verwijdert u heel eenvoudig uit de
pan door het te verwarmen (op 160 °C) totdat
het net is gesmolten. (Zie de aanwijzingen in
hoofdstuk “Frituren” voor het smelten van
gestold vet in de frituurpan.)
• Vervang in elk geval alle vet of olie wanneer de
olie of het vet gaat bruisen bij het verhitten,
sterk van reuk en/of smaak, donker van kleur
en/of stroperig is geworden.
• Zorg ervoor dat de etenswaren zoveel mogelijk
droog zijn, wanneer u ze in de hete olie/vet
dompelt.
• Veeg de frituurpan (ook aan de binnenzijde!)
schoon met keukenpapier.
• Als u de frituurpan niet regelmatig gebruikt, kunt
u de olie het best in goed afgesloten (glazen)
flessen bewaren; bij voorkeur in de koelkast.
Bewaar vet liefst in een afgesloten (glazen of
stenen) pot of kom. Bewaar de olie/het vet dus
bij voorkeur niet langdurig in de frituurpan.
Bijsmaakjes wegwerken
Bepaalde etenswaren (m.n. vis) kunnen tijdens
het bakken wat vocht verliezen en daardoor de
geur en smaak van later te bereiden gerechten
aantasten.
Om dit te verhelpen (of te voorkomen) kunt u de
olie/het vet verwarmen tot 160 °C . Dan doet u
twee dunne sneetjes brood (5 à 6 mm) in de
frituurpan.
Wacht totdat er geen luchtbelletjes meer te zien
zijn en het brood bruin gebakken is. Haal dan het
brood uit de pan en gooi het weg.
Het vet/de olie is dan weer neutraal van smaak.
Schoonmaken
• Buitenzijde en regelpaneel: afnemen met een
wat vochtige doek (eventueel met afwasmiddel)
en/of keukenpapier. Neem eerst de stekker uit
het stopcontact.
• Binnenpan, frituurmand, handgreep, deksel:
zie hoofdstuk “Voor het eerste gebruik: goed
schoonmaken”.
Wanneer u de roestvrijstalen binnenpan in een
vaatwasmachine wilt schoonmaken, is het aan
te raden eerst eventuele klevereige vetaanslag
te verwijderen. Gebruik hiervoor heet sop en
een stevige borstel.
Page 21

21
Descripción general (fig. 1)
A Tapa
B Asa de la tapa
C Unidad de control
D Elemento calefactor
E Perfiles de guía
F Botón de rearme
G Lámpara piloto
Español
Importante
• Lean estas instrucciones, junto con las ilustraciones (páginas 3 y 26) antes de usar el
aparato.
• Antes de conectar la freidora , comprueben que la tensión indicada en el aparato se
corresponde con la existente en su hogar.
• No sumerjan nunca en agua el panel de control, el elemento calefactor o el cable de red .
• Antes de usar la freidora, limpien las diferentes partes con un paño húmedo. Asegúrense
de que está completamente seca antes de llenarla con aceite o grasa.
• No pongan nunca en marcha la freidora sin haberla llenado de aceite o de grasa (fundida).
• Cuando usen grasa (trozos o bloques):
- La primera vez:
Fundan la grasa en una cazuela separada y, después de fundirla, viértanla en la freidora
antes de ponerla en marcha.
- Las veces siguientes:
Seleccionen primero la posición de 160 °C, y no una temperatura mayor, hasta que la grasa
no esté completamente fundida.
• En general, en este aparato les aconsejamos usar grasa líquida para freír o aceite para freír.
También pueden usar grasa sólida para freír. Sin embargo, cuando usen grasa sólida para
freír deben tomar precauciones adicionales para prevenir salpicaduras de grasa al fundirla
(Ver la sección "Freír con grasa").
• Usen solo aceites y grasas recomendados para freidoras. Esa información pueden
obtenerla del embalaje de esos aceites o grasas.
• Llenen siempre con aceite o grasa hasta un nivel entre las dos indicaciones de medida.
Antes de iniciar la fritura, comprueben siempre si todavía hay suficiente aceite o grasa en la
freidora.
• No excedan las cantidades máximas indicadas en la tabla. No llenen nunca el cestillo por
encima de las 3/4 partes de su capacidad.
Si el cestillo está sobrellenado, el aceite o la grasa caliente pueden derramarse por encima
del borde de la freidora.
• Durante el proceso de fritura, sale vapor caliente del aparato. Mantengan sus manos y el
rostro lejos de ese vapor.
• La tapa mantendrá la freidora libre de polvo cuando no esté en uso. No pongan la tapa
sobre la freidora durante la fritura.
• Mantengan la freidora fuera del alcance de los niños, especialmente durante su uso.
• No permitan que el cable de red cuelgue del canto de la mesa o del fregadero.
• Después del uso, lleven el botón de ajuste de la temperatura a su posición más baja
(girándolo a tope en sentido antihorario).
• Quiten la clavija de la base de enchufe y dejen que el aceite o la grasa se enfríen. No
muevan la freidora hasta que esté suficientemente fría.
• Si el cable de red de este aparato se deteriora, solo debe ser cambiado por Philips o por su
Servicio Oficial ya que se necesitan piezas y / o herramientas especiales.
• Conserven este modo de empleo para futuras consultas.
H Botón de ajuste de la temperatura
I Asa manual del cestillo para freír
J Cestillo para freír
K Cazuela interior
L Cable de red
M Compartimiento para almacenar el cable
de red
N Apoyo para el cestillo para freír
O Indicaciones de nivel (aceite/grasa)
P Interruptor automático de seguridad
Page 22

22
Seguridad extra
• El interruptor automático de seguridad (P),
asegura que el elemento calefactor solo pueda
ponerse en marcha si el panel de control está
en su posición correcta (fig. 1a).
• El termostato de seguridad desconecta el aparato cuando se produce un sobrecalentamiento.
Esto puede suceder:
- si en la freidora no hay (o hay demasiado
poco) aceite, grasa fundida o grasa
previamente usada (y solidificada de nuevo)
(fig. 2),
- si tratan de fundir bloques o trozos de grasa
nueva en la freidora (fig. 3).
En esos casos, el calor no puede ser liberado con
suficiente rapidez.
Si el termostato de seguridad ha desconectado el
aparato:
- Dejen que el aparato se enfríe.
- Presionen el botón de rearme (F) (fig. 4) para
poner, de nuevo, el aparato listo para su uso.
Antes del primer uso, laven el aparato a fondo
• Asegúrense de que el cable de red no está
conectado a la base de enchufe.
• No sumerjan nunca en agua la unidad de
control con el elemento calefactor y el cable
de red . No aclaren nunca estas piezas.
- Quiten la tapa (fig. 5), el cestillo para freír
(fig. 6) y la unidad de control con el elemento
calefactor y el cable de red (fig. 7).
Coloquen aparte la unidad de control con el
elemento calefactor y el cable de red en un
lugar seguro (seco).
- La cazuela interior de acero inoxidable puede
desmontarse (fig. 8) para una limpieza rápida y
fácil.
- Laven el cestillo para freír, la tapa y el asa
manual en agua caliente jabonosa (fig. 9).
Aclárenlos con agua limpia y séquenlos.
Como usar la freidora
- Quiten la tapa (fig. 10).
- Coloquen el asa manual en la posición de funcionamiento (fig. 11). Asegúrense de que haya
quedado bien fijada al soporte de alambre.
- Llenen la freidora con aceite o grasa fundida
hasta la más alta línea de indicación (4 litros o
3’5 kg de grasa) (fig. 12).
Cuando usen nueva grasa sólida para freír:
- Fundan la(s) pieza(s) de nueva grasa sólida para freír en una sartén separada y a fuego lento.
- Saquen la sartén del fuego tan pronto como la
grasa se haya fundido.
- Coloquen la sartén en la cubeta del fregadero.
- Con mucho cuidado, viertan la grasa fundida en
la freidora.
- Muevan cuidadosamente la llena freidora hasta
el lugar donde deseen usarla.
Enchúfenla a la red y pónganla en marcha.
Cuando, usando para freír grasa sólida
fundida, esta se ha solidificado en la freidora:
- Para evitar salpicaduras, hagan algunos
agujeros en la grasa. ¡ Al hacerlo, eviten
deteriorar el elemento calefactor !
- Pongan la tapa sobre la freidora.
- Pónganla en marcha.
• Para prevenir salpicaduras, dejen siempre la tapa sobre la freidora mientras la grasa se funda.
• ¡ Sigan solo el método de fusión descrito ! De
otro modo, existe el riesgo de que grasa
caliente fundida del fondo salpique
repentinamente a través la capa superior de
grasa todavía sólida.
• Guarden a temperatura ambiente la freidora
conteniendo grasa solidificada.
Si la grasa está muy fría, el riesgo de
salpicaduras es mayor.
• No mezclen nunca diferentes tipos de aceite y /
o grasa.
- Desenrollen totalmente el cable de red (fig. 13).
• Asegúrense de que el cable de red no toca
superficies calientes y de que no cuelga del
borde del lugar de uso.
- Inserten la clavija en la base de enchufe.
- Ajusten el botón de la temperatura en la
posición más adecuada para el tipo de
alimentos que deseen freír (fig. 14). Consulten
la tabla.
- Después de que la lámpara piloto se haya apagado de nuevo (al cabo de 10 - 15 minutos), el
aceite / grasa estará a la temperatura correcta.
- Saquen cuidadosamente el cestillo para freír de
la cazuela (fig. 15).
- Pongan los alimentos en el cestillo (fig. 16).
- Coloquen el cestillo para freír en la cazuela
(fig. 17).
• Para un mejor tostado uniforme, es aconsejable
sacar y agitar el cestillo un par de veces
durante la fritura (fig. 18).
- Después de la fritura, coloquen el cestillo para
freír en la posición alta (por ejemplo, posición
de escurrido) (fig. 19).
Dejen que los alimentos fritos se escurran
durante un rato.
Page 23

23
Si es necesario, pueden agitar el cestillo sobre
la freidora para eliminar el exceso de grasa /
aceite (fig. 20).
- Quiten el cestillo de la freidora y vacíen los
alimentos fritos en un colador con papel
absorbedor de grasa (por ejemplo , un papel de
celulosa / rollo de cocina) (fig. 21).
- Pueden inclinar la empunadura hacia atrás y
guardarla dentro del cetillo para la fritura.
Después del uso, ajusten el botón de la
temperatura en su posición más baja (girándolo
completamente en sentido antihorario) (fig. 22)
y quiten la clavija de la base de enchufe.
- Limpien la freidora después de que el aceite o
grasa se hayan enfriado suficientemente.
- Pueden inclinar la empuñadura hacia atrás y
guardarla dentro del cestillo para la fritura.
Guarden la freidora con la tapa puesta. De este
modo se impedirá que entre polvo, etc., en ella.
- Enrollen el cable de red alrededor del
dispositivo para almacenarlo situado en la parte
trasera del aparato.
“ Zona Fría “
Las partícula sueltas de los alimentos no se
carbonizan en esta freidora, con lo cual el aceite /
grasa permanecerán más tiempo en buenas
condiciones. Las partículas sueltas se acumulan
en la “ zona fría “ debajo del elemento calefactor.
Después que el aparato se haya enfriado, pueden
quitar la unidad de control con el elemento
calefactor y el cable de red, sacar la cazuela
interior del aparato y filtrar el aceite / grasa con un
cedazo fino.
Tabla
En la tabla se indican que tipos de alimentos
pueden ser preparados con la freidora y que
temperaturas y tiempos de preparación deben ser
elegidos.
La tabla indica también la máxima cantidad por
preparación.
Pueden desviarse un poco de esas instrucciones,
dependiendo de las cantidades a preparar y de su
gusto personal.
Si encuentrán instrucciones diferentes (!Para las
mismas cantidades!) en el embalaje del alimento
a freír, síganlas.
Temperatura Tipo de alimento Cantidad máxima por preparación Tiempo de fritura*)
Descongelada Congelada *) (minutos)
160 °C Pollo 400 g 300 g 20-25
170 °C Croquetas de queso 6 piezas 4 piezas 5
Camarones fritos 6-8 piezas 2-4
180 °C Fritos de manzana 6-8 piezas 4-5
Fritos de queso 6-8 piezas 2-4
Varitas/dedos de pescado 8-10 piezas 8 piezas 3-5
Albóndigas de carne 14-20 piezas 4-5
Mejillones 14-18 piezas 21⁄2-3
190 °C Fritos de albóndigas 6 piezas 2-4
Buñuelos 6 piezas 4 piezas 6-8
Patatas fritas
a la francesa**) 700 g 500 g 5
Cordón bleu 4 piezas 3-4
Croquetas de pescado 6 piezas 4 piezas 5
Croquetas de carne 6 piezas 4 piezas 5
Croquetas de patata 6 piezas 4 piezas 5
Patatas cortadas 700 g 500 g 5
Schnitzel vienés 4 piezas 21⁄2
-3
* ) Para alimentos congelados, los tiempos de preparación pueden ser más largos que los indicados.
** ) Para las nuevas patatas fritas a la francesa, consulten la sección “Patatas fritas a la francesa“
Page 24

24
Patatas fritas a la francesa
Para obtener unas más bonitas y crujientes
patatas fritas a la francesa:
• No usen patatas muy nuevas.
• Corten las patatas primero en rebanadas
gruesas y luego en palitos.
Pongan los palitos en una escurridora y
lávenlos con agua fría del grifo. Con ello
evitarán que se peguen entre sí al freírse.
Sequen los palitos con, por ejemplo, con un
papel de cocina.
• Las patatas fritas a la francesa deben
prepararse en dos etapas:
- Primera: A 160 °C durante 8 - 10 minutos.
- Segunda: A 190 °C durante 2 - 4 minutos.
Durante la segunda etapa y a pequeños
intervalos, agiten el cestillo para freír, con lo
cual lograrán dar un tostado uniforme a todas
las patatas fritas a la francesa.
Alimentos ultracongelados
Los alimentos sacados del congelador o del
compartimiento congelador de su nevera (entre
16 y 18 ° C bajo cero), enfriarán de modo notable
el aceite o la grasa al introducirlosen ellos, por lo
cual puede ser absorbido demasiado aceite /
grasa.
• Por ello, no deben echar porciones demasiado
grandes en la freidora.
• Dejen que la freidora recupere la temperatura
óptima para freír, antes de volver a echar otra
porción de alimento ultracongelado (unos 15
minutos).
Ajusten el mando de la temperatura de
acuerdo con las indicaciones dadas en el
embalaje del alimento ultracongelado. Si
esas indicaciones no vienen dadas, pongan el
mando en la temperatura más alta (190 °C).
Estas instrucciones son también válidas para
ciertos tipos de alimentos que exigen una
cuidadosa preparación, tales como las
croquetas de carne.
Las patatas fritas a la francesa congeladas
están prefitas y pueden terminar de freírse en
una etapa de, para 500 g, a 190 °C durante
unos 5 minutos.
• A menudo los alimentos ultracongelados
contienen demasiado hielo. Por ello conviene
sacudirlos y rasparlos en el fregadero. Después
échenlos lentamente en el aceite o grasa, ya
que los artículos ultracongelados pueden hacer
que el aceite o grasa caliente formen burbujas
y salpiquen excesivamente.
Consejos
• Los aceites o grasas vegetales puros que
contengan ácidos poliinsaturados son, a
menudo, recomendados por los especialistas
sanitarios.
Tengan en cuenta que, para mantener sus
buenas cualidades, esos tipos de grasa y de
aceite deben ser renovados más a menudo que
los de otros tipos.
Además, una pegajosa y firme costra de
depósitos de grasa puede asentarse sobre el
nivel de aceite / grasa. Les aconsejamos
limpiar el interior de la freidora después de
cada uso, con agua caliente y un agente
limpiador (Consulten la sección "Limpieza").
• Usen aceites y / o grasas recomendados para
freír en freidora, por ejemplo, aceite o grasa
vegetal que contengan ácidos poliinsaturados.
• Sustituyan regularmente el aceite o grasa. No
añadan nunca aceite o grasa frescos a los ya
usados.
• En general, el aceite o grasa se oscurecerán
con mayor rapidez cuando frían alimentos ricos
en proteínas (como carne o pescado).
Usándolos principalmente para freír patatas y
filtrándolos después de cada uso, el aceite o
grasa podrán utilizarse de 10 a 12 veces. De
todos modos, no los usen durante más de 6
meses.
El aceite (después de enfriado) puede vaciarse
en una botella y la grasa solidificada puede
envolverse en un papel viejo.
La grasa solidificada dentro de la freidora
puede ser fácilmente quitada después de
calentarla (A 160 ºC) hasta que empiece a
fundirse (Ver las instrucciones de la sección
"Freír con grasa" sobre la grasa fundida
solidificada en la freidora).
• Reemplacen siempre el aceite o grasa tan
pronto como empiecen a hervir al calentarlos, si
huelen o saben a rancio, si su color se ha
oscurecido y / o cuando se vuelvan como un
jarabe.
• Asegúrense de que el alimento que se va a
freír esté seco antes de echarlo en el aceite o
grasa caliente.
• Limpien la freidora con un papel de celulosa,
sin olvidar las paredes internas.
• Si no usan la freidora muy a menudo, lo mejor
es que guarden el aceite en botellas de vidrio
bien cerradas, preferiblemente en la nevera.
Conserven la grasa en un tarro o cuenco (de
vidrio o loza) bien cerrado. No es conveniente
dejar mucho tiempo el aceite o grasa en la
freidora.
Page 25

25
Si el aceite o grasa tienen un sabor…
Ciertas clases de alimentos (especialmente, el
pescado) pueden perder algún jugo mientras se
fríen. Ese jugo podría afectar, de modo negativo,
el sabor de los alimentos que se frían a
continuación en el mismo aceite o grasa.
Para suprimir (o, mejor dicho, impedir) ese sabor:
- Calienten el aceite hasta 160 °C.
- A continuación, frían 2 rebanadas de pan de 5
a 6 mm de grueso
- Esperen hasta que hayan desaparecido todas
las burbujas de aire y que el pan esté tostado
por igual.
- Saquen entonces el pan de la freidora y tírenlo.
- El aceite o grasa tendrán, de nuevo, un sabor
neutro.
Limpieza
• Exterior y unidad de control:
Primero quiten la clavija de la base de enchufe.
Para limpiarlos frótenlos con un paño húmedo
(añadiendo, si es necesario, un poco de
detergente) y / o un papel de celulosa.
• Cazuela interior, cestillo para freír, asa
manual, tapa:
Consulten la sección “ Antes del primer uso,
laven el aparato a fondo “.
Si desean limpiar la cazuela interior de acero
inoxidable, es aconsejable quitar primero
cualquier depósito de pegajosa grasa.
Para ello, usen agua caliente jabonosa y un
cepillo fuerte.
Page 26

2 3 4 5
26
1
7
0
¡
1
6
0
1
6
1
0
¡
1
8
1
8
0
¡
¡
1
7
0
¡
1
8
0
¡
1
9
0
¡
2
0
¡
1
9
0
¡
1
9
0
¡
MAX
MIN
1
7
0
¡
1
6
0
1
6
1
0
¡
1
8
0
1
8
0
¡
¡
1
7
0
¡
1
8
0
¡
1
9
0
¡
2
¡
1
9
0
¡
1
9
0
¡
¡
170
1
¡
160
¡
190
2
¡
180
190¡
¡
180
160¡
170¡
¡
180
¡
190
6 7 8
¡
10
14
18
170
1
160¡
¡
190
2
180¡
¡
190
180¡
¡
170
1
¡
160
¡
190
2
¡
180
¡
190
¡
180
¡
0
6
1
¡
0
7
1
¡
0
8
1
¡
0
9
1
160¡
¡
170
80¡
1
190¡
13
60¡
1
0¡
17
180¡
190¡
15
1
6
0
¡
1
7
0
¡
1
8
0
¡
1
9
0
¡
19
6
1
¡
0
7
1
1
¡
0
6
1
¡
0
9
1
2
¡
0
8
1
¡
0
9
1
¡
0
8
1
¡
0
7
1
1
¡
0
¡
0
9
1
2
¡
0
8
1
¡
0
9
1
¡
0
8
1
¡
0
6
1
¡
0
7
1
¡
0
8
1
¡
0
9
1
¡
0
6
1
¡
0
7
1
¡
0
8
1
¡
0
9
1
12
16
20
9
1
7
0
¡
1
6
0
1
6
0
¡
1
1
8
0
¡
¡
1
1
7
0
¡
1
8
0
¡
2
8
0
¡
1
9
0
¡
1
9
0
¡
1
9
0
¡
MIN
13
MAX
17
1
1
¡
0
6
1
2
¡
0
8
1
¡
0
9
1
¡
0
8
1
¡
0
7
1
¡
0
8
1
¡
0
9
1
¡
0
9
1
¡
0
6
1
¡
70
21
¡
0
6
1
¡
0
7
1
1
¡
0
6
1
2
¡
0
8
1
¡
0
9
1
¡
0
8
1
¡
0
7
1
¡
0
8
1
¡
0
9
1
¡
0
9
1
22
1
6
0
¡
1
7
0
¡
1
8
0
¡
1
9
0
¡
Page 27

27
Page 28

4222 001 74104
;
 Loading...