

Philips HD4269/00 User Manual [sv]

2
English Page 4
• Keep page 3 open when reading these
operating instructions.
Français Page 8
• Pour le mode d'emploi: dépliez la page 3.
Deutsch Seite 12
• Schlagen Sie beim Lesen der
Gebrauchsanweisung Seite 3 auf.
Nederlands Pagina 16
• Sla bij het lezen van de gebruiksaanwijzing
pagina 3 op.
Italiano Pagina 20
• Prima di usare l'apparecchio, aprite
la pagina 3 e leggete attentamente le
istruzioni per l'uso.
Español Página 24
• Desplegar la página 3 al leer las
instrucciones de manejo.
Português Página 28
• Durante a leitura do modo de emprêgo,
desdobre e verifique a pág. 3.
Dansk Side 32
• Hold side 3 opslået mens De læser
brugsanvisningen.
Norsk Side 36
• Slå opp på side 3 før De leser videre.
Svenska Sid 40
• Ha sidan 3 utvikt när ni läser bruksanvisningen.
Suomi Sivu 44
• Pidä sivu 3 auki samalla kun luet käyttöohjetta.
3
1
HD 4269 HD 4268
A
2
B
HD 4269
3
E
4
C
5
6
7
D
8
HD 4269
9
HD 4269
1
10
1
9123
6
11
12

4
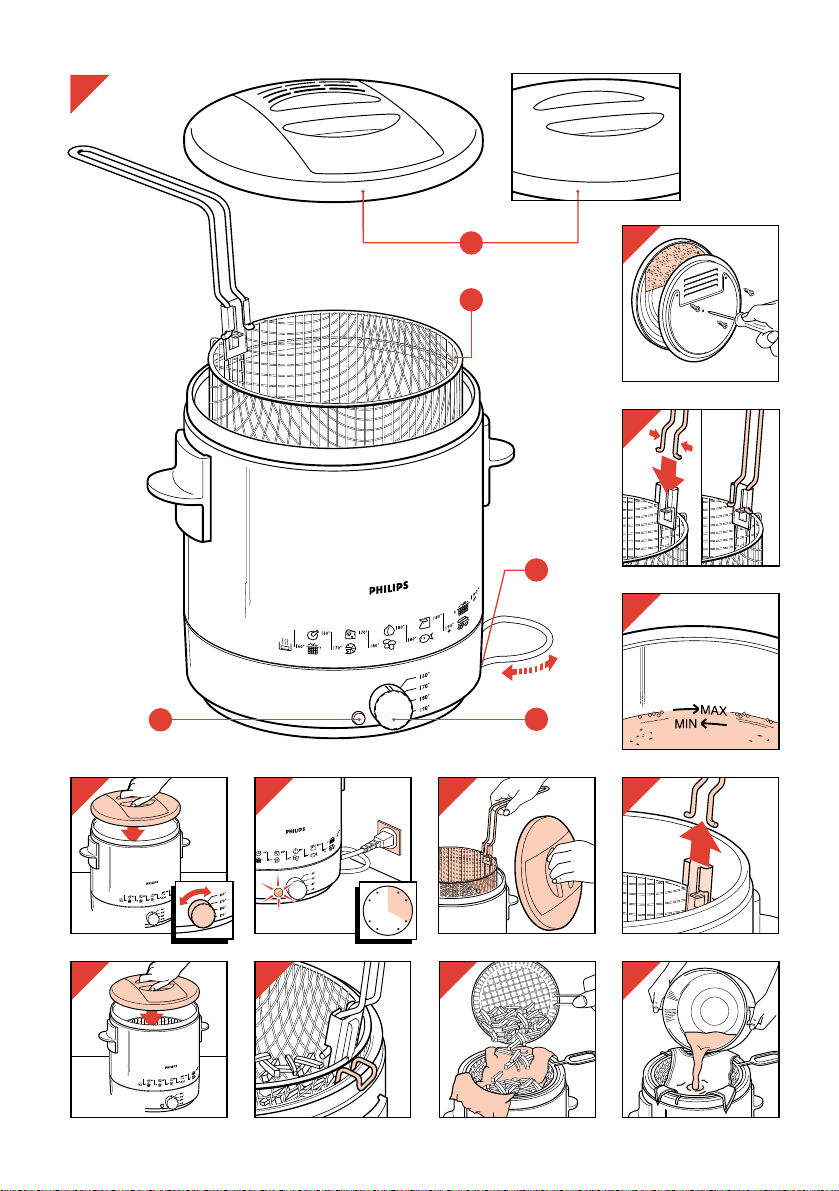
General description (fig. 1)
A Lid
For type HD 4269: with anti-smell filter. New
filters can be obtained from your dealer. Fig. 2
shows how to remove the filter from the lid.
B Frying basket with removable hand grip.
The hand grip can be fixed to the frying
basket following fig. 3; for removing proceed
in reverse way.
C Pilot lamp. This lamp is on as long as the
deep fat frying fat/oil is being heated.
D Temperature knob.
E Cord storage. The mains lead (1 m, or
approx. 4 ft.) can be pushed back into the
housing.
Prior to first use
- Wash the frying basket in hot soapy water.
- Pour some hot soapy water into the fryer and
wash the inner side thoroughly.
- Rinse the inside of the fryer well with clean
water (using e.g. a cup). Dry well.
Deep fat frying
Important - for type HD 4268 only:
Water vapour must be enabled to escape from the
deep fat fryer while frying. Therefore, do not put
the lid without an anti-smell filter on the fryer
while actually frying food.
Only use this lid in the following situations:
• When lowering the filled frying basket into the
hot oil/fat to catch any spatters (see fig. 7).
• After use as a dust cover.
- Fig. 4. Fill the (dry) deep fat frying pan with oil
or fat to the indication line MAX (2 litres of oil or
1800 grammes of fat).
Note: Never mix two different types of oil and/or
fat.
- Fig. 5. Type HD 4269: Place the lid (with antismell filter) on the deep fat frying pan.
- Set the temperature knob to the desired
position.
- Fig. 6. Place the plug into the wall socket. The
pilot lamp should now be lit.
- Heat up the deep fry oil/fat for 15-20 minutes.
During heating up, the pilot lamp will be on.
When the oil/fat has gained the set temperature
the light will go out.
While frying the pilot light will come on from
time to time to indicate that the oil/fat is being
heated up again to the set temperature.
- Fit the loose hand grip to the frying basket and
English
Important
• Read these instructions in conjunction
with the illustrations before using the
appliance.
• Before plugging the appliance in, check
if the voltage indicated at the bottom of
the appliance is the same as the mains
voltage in your home.
• Never immerse the deep fat fryer in water.
• Clean the various parts with a damp
cloth prior to use. Ensure that they are
thoroughly dry before filling the deep fat
fryer with oil or fat.
• Do not switch on the deep fat frying pan
until you have filled it with oil or fat.
When melting fat: initially select 160 °C /
320 °F and do not select a higher
temperature until the fat is completely
melted. Melt the pieces of fat on the
bottom of the fryer and not in the frying
basket.
• Only use oils and fats which are recommended for deep fat frying. This
information can be found on the packing
of these oils/fats.
• Always fill with oil or fat to the level
between the measure indications MIN
and MAX.
Before you start frying, always check if
there is still sufficiently oil/fat in the fryer.
• Do not exceed the maximum quantities
indicated in the table. Never fill the
basket higher than up to 3⁄4.
If the basket is overfilled, hot fat/oil may
flow over the fryer ridge.
• Type HD 4269: During the process hot
steam comes through the filter in the lid.
Keep your hands and face away from
this steam.
• Keep the deep fat fryer out of the reach
of children at all times especially when
in use.
• Do not let the mains cord hang over the
edge of the table or sink.
• Remove the plug from the mains socket
after use, so that the oil or fat can cool
down. Do not move the fryer until it has
cooled sufficiently.
• Keep these instructions for future
reference.

Temperature Type of food Max quantity per preparation Frying time
unfrozen frozen (minutes)
160 °C Chicken (fillet, 300 g 200 g 20-25
(320 °F) drumsticks)
170 °C Cheese croquettes 5 pcs. 4 pcs. 2-4
(338 °F) Shrimp fritters 3-4 pcs. 2-4
180 °C Apple fritters 3-4 pcs. 4-5
(356 °F) Cheese fritters 3-4 pcs. 2-4
Fish sticks/fingers 6 pcs. 5 pcs. 3-5
Meat balls 10-13 pcs. 4-5
Mussels 10-12 pcs. 21⁄2-3
190 °C Ball fritters 3-4 pcs. 2-4
(374 °F) Doughnuts 3-2 pcs.. 2 pcs 6-8
*) French fries 300 g 200 g 5
Cordon bleu 2 pcs. 3-4
Fish croquettes 5 pcs. 4 pcs. 3-4
Meat croquettes 5 pcs. 4 pcs. 3-4
Potato croquettes 5 pcs. 4 pcs. 3-4
Sliced potato 300 g 200 g 3-4
Wiener Schnitzel 2 pcs. 2
1
⁄2-3
5
fill the basket outside the pan. For the best
result use only the recommended quantities.
- Fig. 7. Lower the filled basket carefully into the
oil/fat. Use the lid to catch any oil splashes.
- Fig. 8. Remove the hand grip from the frying
basket.
- Fig. 9. Type HD 4269: Put the lid on the pan.
- Use the table for the correct frying times and
temperatures.
- After frying: remove the lid and fit the hand grip
to the frying basket again.
- Fig. 10. Lift the basket from the fat/oil and hook
it to the rim of the fryer to let the fried food
drain.
Now the oil/fat in the fryer has the opportunity to
gain the set temperature
(approx. 3 to 5 minutes).
- Fig. 11. Empty the fried food into a colander or
strainer with fat absorbing paper (e.g. kitchen
paper).
- Remove loose particles with a skimmer from
the oil/fat.
- Remove the plug from the socket after use.
- Fig. 12. Filter the oil/fat (if so desired) after
cooling down sufficiently. (Please refer to
“Tips”.)
- Store the pan with the lid in position. This keeps
dust etc. from the pan.
Table
In the table below is indicated what types of food
can be prepared with the fryer and what
temperature and preparation times should be
chosen. The table also indicates the maximum
quantity per preparation. You may deviate a little
from these instructions, depending on the
quantities to be prepared and on your personal
taste.
*) For new French fries please refer to section “French fries”

6
French fries
To obtain the nicest and most crispy French fries:
• Use not too new potatoes.
• Cut the potatoes first to thick slices and then to
sticks. Rinse the sticks in a colander under the
cold water tap: this will prevent the sticks to
adhere to one another while frying. Dry the
sticks using e.g. kitchen paper.
• French fries should be prepared in two steps:
- firstly at 160 °C (320 °F), during 8-10 minutes.
- secondly at 190 °C (374 °F), during
2-4 minutes.
During the second step shake the frying basket at
small intervals; then the French fries will get a fine
overall brown.
Deep frozen food
Food from your deep freezer or from the freezer
compartment of your fridge (-16 to -18° C or
-1 to 3 °F) will cool down the oil/fat vastly when
lowered into it.
• For that reason, do not put too big portions into
the fryer.
• Let the fryer regain optimum frying temperature
before you prepare a portion of deep frozen
food (15-20 minutes).
Set the temperature knob to the frying
temperature indications on the packaging of the
deep frozen food. If these indications are not
given, set the knob to the highest temperature
(190 °C or 374 °F).
These instructions are also valid for certain
types of food which require careful preparation,
such as meat croquettes.
Deep frozen French fries are pre-fried and can
be fried in one step at 190 °C or 374 °F, for
about 5 minutes.
• Deep frozen food often contains too much ice.
Shake off as much of the ice as possible in the
sink. Then lower the food into the oil/fat
carefully, as deep frozen articles can make the
hot fat/oil bubble and splash excessively.
Tips
• Use oils and/or fats which are recommended for
deep fat frying, i.e. vegetable fat or oil
containing polyunsaturated acids.
• Regularly replace the oil or fat. Never add fresh
oil/fat to used oil/fat.
• In general the fat/oil will be tainted rather
quickly when frying food containing a lot of
protein (such as meat and fish). When the oil/fat
is mainly used to deep fat fry potatoes and is
filtered after each use, the oil/fat can be used
10-12 times. However, do not use it for over
six months. Then it should be discarded
responsibly.
Oil (after cooling down) can be poured into a
bottle and curdled fat can be wrapped in an old
paper.
Curdled fat inside the pan can be easily
removed by heating it for about one minute
(at 160 °C/320 °F). It will melt along the edges
and no longer stick to the wall.
• Always replace all fat/oil as soon as it starts
seething when heated; when it has got a rancid
smell or taste; when its colour has become dark
and/or when it has turned syrupy.
• Make sure that the food to be fried is dry,
before lowering it into the hot fat/oil.
• Filter the fat/oil if required:
- Remove the plug from the mains socket after
you have finished frying. Allow the oil/fat to cool
down for some time.
- To remove minute particles, put a piece of
paper tissue or a thin cotton cloth in a fine metal
strainer or in a sieve, then pour the oil/fat
through this filter into a pan (fig. 12).
• Clean the fryer with paper tissue. Do not forget
the inside walls.
• If you do no not use the deep fat fryer
frequently, you can best keep the oil in wellclosed (glass) bottles; preferably in the fridge.
Store fat in a well-closed (glass or stone) pot or
bowl. It is not advised to keep the fat/oil in the
fryer for a long time.
If the oil/fat has a taste...
Certain types of food (esp. fish) may lose some
fluid while being deep fat fried. This juice might
adversely affect the taste of food to be fried later
in the same oil/fat. To remove (or rather to
prevent) this taste heat the oil/fat to
160 °C / 320 °F. Then fry two thin slices of bread
(5-6 mm, or 0.25 "). Wait until all the air bubbles
have disappeared and the bread is brown all over.
Then take the bread out of the fryer and discard it.
Now the oil/fat has a neutral taste again.
Cleaning
Outside: wipe it clean with a damp cloth (if so
required add some detergent) and/or paper tissue.
Inside: remove any particles of fat/oil which are
sticking to the walls by means of a ball of tissue
paper.
It is advised to clean the inside of the fryer
thoroughly (e.g. when replacing the oil/fat). Pour

7
some hot soapy water into the fryer and wash the
inside with a brush. Empty the fryer and rinse it
with clean water. (Do not rinse under the tap: use
e.g. a cup for this purpose.)
Always dry the inside and the outside of the fryer
thoroughly after cleaning.
Guarantee and service
This product is guaranteed by Philips for a period
of one year after the date of purchase against
defects due to faulty workmanship or materials.
The guarantee covers both piece parts and
labour.
Service under guarantee is provided only upon
presentation of reasonable evidence (e.g.
completed guarantee card or purchase receipt)
that the date of the claim is within the guarantee
period.
The guarantee is not valid if the defect is due to
accidental damage, misuse or neglect and in case
of alterations or repair carried out by unauthorised
persons.
Service (during and after guarantee) is available
in all countries where the product is officially
distributed by Philips.
In countries where Philips do not distribute the
product, the local Philips service organisation will
also arrange service although there may be a
delay if the required spare parts are not readily
available.
In the event of difficulty please contact:
Philips Domestic Appliances and Personal Care B.V.
Service Department,
P.O. Box 225,
9700 AE Groningen,
The Netherlands.
Fax: +31.50.138016.
For United Kingdom:
(The statement above does not affect a
consumer’s statutory rights.)
Should service be required please apply to the
dealer in the U.K. from whom the product was
purchased or to a Philips Authorised Service
Dealer. For the address of your nearest
Authorised Service Dealer simply contact our
Consumer Help Desk,
Telephone No. 081-689-2166 Ext. 8014.
This product is manufactured to comply with the
radio interference requirements of the council
directive 87/308/EEC.
Non-rewireable mains plug (for U.K. only)
This appliance is supplied with an earthed nonrewireable 13 Ampere fused plug. The plug must
never be used without the fuse cover being in place.
If a replacement fuse cover is required it must be of
the same type or colour as the coloured insert around
the fuse cover. Only fit a 13 Ampere BSI or
ASTA BS 1362 approved replacement fuse.
Always refit the fuse cover after changing the fuse.
Replacement fuse covers are available from
Electrical Retailers or direct from Philips,
tel. No. 081 - 689 - 2166 Ext. 8014.
Important safety information
If the supplied non-rewireable plug is not suitable for
the socket outlets in your home it can be removed
and an appropriate one fitted. (See below.)
Warning: The non-rewireable plug must be cut from
the mains cord, the fuse removed, and the plug safely
discarded to prevent further use. The removed plug
can be hazardous if inserted into a live mains socket.
Fitting a Plug
IMPORTANT
WARNING - THIS APPLIANCE MUST BE
EARTHED
The wires in this mains lead are coloured in
accordance with the following code:
GREEN AND YELLOW - EARTH
BLUE - NEUTRAL
BROWN - LIVE
As the colours of the wires in the mains lead of
this appliance may not correspond with the
coloured markings identifying the terminals in
your plug, proceed as follows:
The wire which is coloured GREEN AND
YELLOW must be connected to the terminal
which is marked with the letter “E” or by the
earth symbol E or coloured GREEN or
GREEN AND YELLOW.
The wire which is coloured BROWN must be
connected to the terminal which is marked with
the letter “L” or coloured RED.
The wire which is coloured BLUE must be
connected to the terminal which is marked with
a letter “N” or coloured BLACK.
Note: If the terminals of the plug are
unmarked or if you are in any doubt consult
a qualified electrician.
If a (BS 1363) 13 amp. plug is used this must be
fitted with a 13 amp. fuse.

8
Description générale (fig. 1)
A Couvercle
(Pour le type HD 4269: avec filtre anti-
odeurs). Vous pouvez obtenir de nouveaux
filtres chez votre revendeur.
La fig. 2 vous montre comment retirer le filtre
du couvercle.
B Panier de friture avec poignée amovible
(fig. 3). La poignée peut être fixée au panier
suivant fig. 3; pour la retirer, procédez en
sens inverse.
C Témoin lumineux. Ce témoin est allumé tant
que l’huile/ou la graisse chauffe.
D Bouton de réglage de la température.
E Rangement du cordon. Vous pouvez rentrer
le cordon (env. 1 m) à l’arrière de la friteuse.
Avant la première utilisation
- Lavez le panier à l'eau chaude savonneuse.
- Versez un peu d'eau chaude savonneuse dans
la cuve de la friteuse et lavez soigneusement
les parois intérieures.
- Rincez la cuve à l'eau claire (à l'aide d'une
tasse par exemple).
Friteuse
Important - pour le type HD 4268 uniquement:
Il est possible que de la vapeur puisse s'échapper
de la friteuse pendant la friture. De ce fait, ne
mettez pas le couvercle sans le filtre antiodeurs en place pendant que vous êtes en
train de faire frire des aliments.
Utilisez uniquement ce couvercle dans les
situations suivantes:
• quand vous abaissez le panier rempli dans
l'huile (ou la graisse) à frire chaude pour arrêter
les éclaboussures.
• Après usage comme couvercle à poussières.
- Fig. 4. Remplissez la friteuse (sèche) avec
l’huile/ou graisse jusqu’au repère MAX
(2 litres d’huile ou 1,8 kg de graisse).
Nota: Ne mélangez jamais 2 sortes d’huile et/ou
de graisse.
- Fig. 5. Type HD 4269: Placez le couvercle
(avec son filtre anti-odeurs) sur la friteuse.
- Réglez le bouton de température sur la position
désirée.
- Fig. 6. Branchez l’appareil. Le témoin lumineux
s’allume.
- Chauffez l’huile/la graisse pendant
15 à 20 minutes. Durant le préchauffage, le
témoin lumineux s’allume. Quand l’huile/graisse
Français
Important
• Lisez ces recommandations en même
temps que les illustrations avant
d’utiliser votre appareil.
• Avant de brancher votre appareil,
assurez-vous que la tension indiquée
sur la plaque signalétique placée sous
l’appareil correspond bien à celle de
votre logement.
• Ne plongez jamais la friteuse dans l’eau.
• Nettoyez les différentes parties avant de
l’utiliser. Assurez-vous qu’elle soit bien
sèche avant de la remplir avec de l’huile
ou de la graisse.
• Ne branchez la friteuse qu’une fois
qu’elle sera remplie d’huile ou graisse.
Quand la graisse fond: sélectionnez tout
d’abord la température à 160° C et
maintenez cette température tant que la
graisse n’a pas fondu complètement.
Placez les blocs de graisse au fond de la
friteuse et non dans le panier de friture.
• Utilisez uniquement des huiles et
graisses recommandées pour friture.
Vous trouverez cette information sur les
emballages.
• Remplissez la cuve d’huile/ou graisse
entre les niveaux MIN et MAX.
Avant de commencer une friture, vérifiez
toujours qu’il y a suffisamment d’huile
dans la friteuse.
• Ne dépassez pas les quantités
maximum indiquées sur le tableau.
Ne remplissez jamais le panier audessus des 3⁄4.
Si le panier est surchargé, l’huile peut
déborder.
• Type HD 4269: Pendant la cuisson, de la
vapeur chaude passe à travers le filtre
dans le couvercle. Tenez-vous éloigné.
• Mettez la friteuse hors de portée des
enfants, surtout lors de son
fonctionnement.
• Ne laissez pas le cordon d’alimentation
pendre sur un coin de table ou l’évier.
• Débranchez la friteuse après utilisation,
et laissez-la refroidir. Ne la déplacez pas
tant qu’elle est chaude.
• Conservez ce mode d’emploi.

Température Aliments Quantité max. par préparation Temps de cuisson
dégelé congelé (minutes)
160 °C Poulet (blancs, cuisses) 300 g 200 g 20-25
170 °C Beignets au fromage 5 pcs. 4 pcs. 2-4
Beignets de crevettes 3-4 pcs. 2-4
180 °C Beignets aux pommes 3-4 pcs. 4-5
Croquettes au fromage 3-4 pcs. 2-4
Bâtonnets de poisson 6 pcs. 5 pcs. 3-5
Boulettes de viande 10-13 pcs. 4-5
Moules 10-12 pcs. 21⁄2-3
190 °C Beignets 3-4 pcs. 2-4
Pets de nonne 3-2 pcs.. 2 pcs 6-8
Pommes frites *) 300 g 200 g 5
Cordon bleu 2 pcs. 3-4
Croquettes de poisson 5 pcs. 4 pcs. 3-4
Croquettes de viande 5 pcs. 4 pcs. 3-4
Croquettes de 5 pcs. 4 pcs. 3-4
pommes de terre
Chips 300 g 200 g 3-4
Escalope panée 2 pcs. 21⁄2-3
9
a atteint la bonne température, le témoin
lumineux s’éteint.
Pendant la friture, le témoin lumineux s’allume
et s’éteint, indiquant que l’huile/graisse chauffe
à la température désirée.
- Fixez la poignée au panier et remplissez le
panier hors de l’appareil. Pour de meilleurs
résultats, respectez les quantités
recommandées.
- Fig. 7. Abaissez le panier dans l’huile/graisse.
Utilisez le couvercle pour éviter toute
éclaboussure.
- Fig. 8. Retirez la poignée du panier.
- Fig. 9. Type HD 4269: Mettez le couvercle sur
la friteuse.
- Aidez-vous du tableau pour respecter les temps
et températures de friture.
- Après la friture: retirez le couvercle et fixez la
poignée sur le panier.
- Fig. 10. Retirez le panier de l’huile/graisse et
fixez-le sur le rebord de la friteuse pour
égoutter la friture. Maintenant l’huile/graisse
dans la friteuse a la possibilité de retourner à la
température selectionnée (env. 3 à 5 minutes).
- Fig. 11. Videz le panier dans une passoire avec
du papier absorbant.
- Retirez les particules d’aliments restées dans la
friteuse à l’aide d’une écumoire.
- Débranchez l’appareil après utilisation.
- Fig. 12. Filtrez l’huile/graisse après
refroidissement complet. (Se reporter aux
“Conseils”.)
- Rangez la friteuse avec son couvercle dessus
pour éviter que la poussière ne tombe dedans.
Tableau des cuissons
Voici quelques idées de ce que vous pouvez
préparer avec la friteuse et des températures et
temps de cuisson à observer. Vous pouvez bien
entendu adapter les quantités à votre goût
personnel.
Pommes de terre frites
Vous réussirez de belles frites, bien croustillantes,
en les préparant comme suit:
• Employez de préférence des pommes de terre
qui ne soient pas trop “nouvelles”.
• Coupez-les en bâtonnets. Mettez-les dans une
passoire et rincez-les à l’eau froide. Ainsi, elles
ne colleront pas les unes aux autres lors de la
*) Pour les frites, voir le chapitre “Pommes de terre frites”.

10
cuisson.
• Séchez-les avec du papier absorbant.
• La cuisson des frites se fait en 2 étapes:
- la 1ère à 160° C, durant 8 à 10 minutes;
- la 2ème à 190° C, durant 2 à 4 minutes.
Secouez le panier régulièrement au cours de la
deuxième cuisson pour que les frites brunissent
uniformément.
Aliments surgelés
Les aliments qui sortent du congélateur ou du
compartiment conservateur de votre réfrigérateur
refroidissent fortement l’huile/la graisse dans
laquelle vous les plongez.
• Pour cette raison, ne mettez pas de trop
grosses portions à la fois dans la friture.
• Laissez la friteuse atteindre sa température
optimum de cuisson avant d’y plonger les
surgelés (environ 15 à 20 minutes).
Placez le bouton de température sur la position
qui est indiquée sur l’emballage des aliments
surgelés. A défaut, choisissez la plus haute
température (190° C).
Ces recommandations sont aussi valables pour
certains mets qui doivent être préparés avec
précaution, tels que les croquettes de viande.
• Les frites surgelées peuvent être cuites en une
fois à 190° C pendant environ 5 minutes, car
elles sont déjà pré-cuites.
• Les aliments surgelés contiennent souvent
beaucoup de glace. Secouez-les pour enlever
le maximum de glace. Puis plongez-les
doucement dans la friteuse, car la glace peut
faire bouillonner l’huile excessivement, qui
risque alors de déborder.
Recommandations
• Employez de préférence de la graisse végétale
ou de l'huile végétale contenant des acides
gras insaturés.
• Renouvelez régulièrement la totalité de l’huile
ou de la graisse. Ne rajoutez jamais de l’huile
ou de la graisse fraîche dans de la friture déjà
usagée.
• En général l’huile ou la graisse se dégradent
plus vite lorsqu’on y fait frire des aliments riches
en protéines (tels que la viande ou le poisson).
Si vous utilisez principalement votre friture pour
frire des pommes de terre et si vous la filtrez
après chaque utilisation, elle pourra servir
10 à 12 fois. Cependant, ne la gardez pas plus
de 6 mois. Ensuite vous devez la jeter. (De
préférence dans un endroit approprié aux
déchets chimiques.)
Pour vous débarrasser de la graisse figée,
faites chauffer la friteuse pendant environ une
minute pour que la graisse fonde et n’adhère
plus sur les bords.
• Remplacez toute la totalité de la graisse ou de
l’huile lorsque celle-ci se met à grésiller en
chauffant, lorsqu’elle dégage une forte odeur,
lorsqu’elle prend un mauvais goût, lorsqu’elle
se fonce ou lorsqu’elle devient sirupeuse.
• Veillez à ce que les aliments soient aussi secs
que possible, lorsque vous les plongez dans la
friture.
• Filtrez la graisse ou l’huile si besoin:
- Débranchez l’appareil dès que la friture est
terminée. Laissez la graisse ou l’huile refroidir
suffisamment.
- Mettez du papier absorbant dans un fin tamis
métallique. Versez l’huile dans le tamis audessus d’une casserole (fig. 12).
• Essuyez la friteuse avec du papier absorbant.
N’oubliez pas l’intérieur de la cuve.
• Si vous n’utilisez pas régulièrement votre
friteuse, il est préférable de conserver l’huile
dans une bouteille de verre bien fermée que
vous placerez dans le réfrigérateur. Quant à la
graisse, mettez-la dans un pot ou un bocal
fermés (en verre ou en grès). Ne conservez pas
votre huile ou votre graisse trop longtemps
dans la friteuse.
Eliminer les mauvais goûts
Certains aliments, notamment les poissons,
peuvent perdre un peu de leur jus au cours de la
cuisson et dénaturer ainsi le goût des aliments qui
seront frits ultérieurement.
Pour pallier à cet inconvénient, chauffez d’abord
la graisse ou l’huile à 160° C, puis mettez deux
fines tranches de pain (de 5 à 6 mm d’épaisseur)
dans la friteuse.
Attendez qu’il ne se produise plus de petites
bulles d’air et que le pain brunisse. Retirez-le
alors de la friteuse et jetez-le.
La graisse ou l’huile ont de nouveau un goût
neutre.
Nettoyage
Extérieur: utilisez un chiffon humide (avec
éventuellement un peu de détergent) et/ou du
papier absorbant.
Intérieur: éliminez avec un tampon de papier
absorbant les particules de graisse ou d’huile qui
collent encore à la cuve.
Il est recommandé de nettoyer l’intérieur de la
friteuse régulièrement (par exemple quand vous

11
changez l’huile/la graisse). Versez un peu d’eau
chaude savonneuse et lavez les parois avec une
brosse. Videz la friteuse et rincez-la à l’eau claire.
(Ne rincez pas sous le robinet: utilisez par
exemple une tasse.)
Séchez toujours bien l’intérieur et l’extérieur de la
friteuse après le nettoyage.
Garantie et service
Philips Appareils Domestiques garantit le
fonctionnement de ses appareils conformément
aux prescriptions de leur mode d'emploi.
En cas de défaillance de l'appareil, Philips assure
gratuitement, à travers son réseau de réparateurs
agréés (liste dans le minitel 3615 Philips), sa
réparation pendant un an, à compter de la date
de vente. Le service est effectué sous garantie
uniquement sur présentation d'un justificatif (par
ex. carte de garantie dûment complétée ou
facture d'achat) et la date d'intervention doit se
situer dans la période de garantie.
La garantie ne couvre pas les défaillances dues à
une cause accidentelle, à un mauvais usage ou
une négligence et en cas de modifications ou
réparations effectuées par des personnes non
qualifiées. En aucun cas, cette garantie ne peut
donner droit à des dommages et intérêts.
Les frais de port retour des interventions
effectuées par le réseau de Réparateurs
Indépendants Agréés Philips A.D sont pris en
charge par Philips A.D sur présentation des
justificatifs correspondants.
Philips assure la garantie et le service aprèsvente dans tous les pays dans lesquels le produit
est officiellement vendu et distribué. Dans les
pays où Philips ne distribue pas le produit,
l'organisation locale pourra effectuer le service
bien qu'il y ait un délai si les pièces ne sont pas
immédiatement disponibles.
En cas de difficulté, contactez:
Philips Domestic Appliances and Personal Care B.V.
Service Department,
P.O. Box 225,
9700 AE Groningen,
The Netherlands.
Fax: +31.50.138016.
Le consommateur bénéficie en tout état de cause
des conditions des articles 1641 et suivants du
code civil relatifs à la garantie légale.
(Pour la France)
Pour tous renseignements complémentaires, nous
vous conseillons de vous adresser à:
SERVICE SA
Service CONSOMMATEURS PHILIPS
APPAREILS DOMESTIQUES
Rue des Vieilles Vignes - B.P 49
Croissy-Beaubourg
77423 Marne-la-Vallée Cedex 2
Tel. (1) 64.80.54.54
Ce produit répond aux exigences de la Directive
Communautaire antiparasitage 87/308/CEE.

12
Allgemeine Beschreibung (Abb. 1)
A Deckel mit Filter.
(Für Type HD 4269: mit Geruchsfilter.) Neue
Filter erhalten Sie bei Ihrem Händler.
Abb. 2 zeigt, wie der Filter vom Deckel
abgenommen werden kann.
B Fritierkorb mit abnehmbarem Griff. Abb. 3
zeigt, wie der Griff am Fritierkorb befestigt
werden kann; verfahren Sie umgekehrt, wenn
Sie ihn abnehmen wollen.
C Kontrollampe. Diese Lampe leuchtet,
solange das Fett/Öl erhitzt wird.
D Temperaturregler.
E Kabelfach. Das Netzkabel (ca. 1 m) kann in
das Kabelfach zurückgeschoben werden.
Vor dem Gebrauch
- Spülen Sie den Fritierkorb in Wasser, dem Sie
etwas Spülmittel zugegeben haben.
- Gießen Sie etwas von diesem Wasser in die
Friteuse und wischen Sie die Flächen gründlich
ab.
- Spülen Sie die Friteuse mit klarem Wasser
nach. Verwenden Sie hierfür eine Tasse oder
ein anderes Gefäß.
Fritieren
Wichtig! (Nur für Type HD 4269:)
Während des Fritierens muß Wasserdampf
entweichen können. Setzen Sie darum den
Deckel beim Fritieren niemals ohne den
Geruchsfilter auf.
Verwenden Sie diesen Deckel nur bei den
folgenden Gelegenheiten:
• Um Spritzer aufzufangen, wenn Sie den Fritierkorb in das heiße Fett / Öl senken (Abb. 7).
• Nach Gebrauch, um Staub aufzufangen.
• Abb. 4: Füllen Sie die trockene Friteuse mit Öl
oder Fett bis zur Markierung MAX. Das
entspricht 2 Liter Öl oder 1800 g Fett.
Wichtig: Mischen Sie niemals verschiedene
Sorten Fett und/oder Öl.
Deutsch
Wichtig
• Lesen Sie diese Gebrauchsanweisung
sorgfältig durch, und sehen Sie sich
dabei die Abbildungen an, bevor Sie das
Gerät zum ersten Mal benutzen.
• Prüfen Sie vor Inbetriebnahme, ob die
Spannungsangabe auf der Unterseite
des Geräts mit der örtlichen
Netzspannung übereinstimmt.
• Tauchen Sie das Gerät niemals in
Wasser.
• Schließen Sie das Gerät nur an eine
Schutzkontakt-Steckdose an. Das gilt
auch, wenn Sie das Gerät im Freien
verwenden.
• Reinigen Sie die verschiedenen Teile
vor Gebrauch mit einem feuchten Tuch.
Lassen Sie alles gut trocknen, bevor Sie
die Friteuse mit Öl oder Fett füllen.
• Schalten Sie das Gerät erst ein, wenn es
mit Öl oder Fett gefüllt ist.
Wenn Sie Fett einfüllen: Legen Sie das
Fett auf den Boden der Friteuse - nicht
in den Fritierkorb. Stellen Sie den
Temperaturschalter auf 160° C. Erhöhen
Sie die Temperatur erst, wenn alles Fett
geschmolzen ist.
• Verwenden Sie nur Öle und Fette, die
zum Fritieren geeignet sind. Eine
entsprechende Information ist auf den
Packungen der Öle und Fette zu finden.
• Füllen Sie die Friteuse so, daß die
Oberfläche des Öles bzw. des Fettes
zwischen den Markierungen MIN und
MAX steht.
Achten Sie vor dem Fritieren immer
darauf, daß noch genügend Fett/Öl in
der Friteuse ist.
•Überschreiten Sie nie die
Höchstmengen, die in der Tabelle
aufgeführt sind. Füllen Sie den
Fritierkorb nicht mehr als auf Dreiviertel
seiner Höhe. Geben Sie mehr hinein,
kann das Fett/Öl überlaufen.
• Type HD 4269: Während des Fritierens
kommt heißer Dampf durch den Filter.
Kommen Sie nicht mit Gesicht oder
Händen in seine Nähe!
• Halten Sie das Gerät mit heißem Fett
jederzeit von Kindern fern.
• Lassen Sie das Kabel nicht über die
Standfläche hängen, damit das Gerät
nicht hinabgezogen werden kann.
• Ziehen Sie nach Gebrauch den Stecker
aus der Steckdose, und lassen Sie das
Öl bzw. das Fett abkühlen. Bewegen Sie
das Gerät nicht, solange das Fett/Öl
noch heiß ist!
• Bewahren Sie die Gebrauchsanweisung
auf.

Temperatur Art der Speise Höchstmenge Fritierzeit
frisch gefroren (in Minuten)
160 °C Huhn, Hähnchen 300 g 200 g 20-25
(Filet, Keule)
170 °C Käse-Beignet 5 Stk. 4 Stk. 2-4
Shrimp-Beignet 3-4 Stk. 2-4
180 °C Apfel-Beignet 3-4 Stk. 4-5
Käse-Kroketten 3-4 Stk. 2-4
Fisch-Stäbchen 6 Stk. 5 Stk. 3-5
Fleischbällchen 10-13 Stk. 4-5
Muscheln 10-12 Stk. 21⁄2-3
190 °C Frikadellen 3-4 Stk. 2-4
Krapfen 3-2 Stk. 2 Stk 6-8
Pommes frites*) 300 g 200 g 5
Cordon bleu 2 Stk. 3-4
Fisch-Kroketten 5 Stk. 4 Stk. 3-4
Fleisch-Kroketten 5 Stk. 4 Stk. 3-4
Kartoffel-Kroketten 5 Stk. 4 Stk. 3-4
Kartoffel-Chips 300 g 200 g 3-4
Wiener Schnitzel 2 Stk. 21⁄2-3
13
- Abb. 5: (Nur für Type HD 4269) Setzen Sie den
Deckel mit dem Geruchsfilter auf die Friteuse.
- Stellen Sie den Temperaturregler (D) auf die
gewünschte Position.
- Abb. 6: Stecken Sie den Stecker in die
Steckdose. Die Kontrollampe (C) muß nun
aufleuchten.
- Erhitzen Sie nun das Öl bzw. Fett 15 bis
20 Minuten lang. Während des Aufheizens
leuchtet die Kontrollampe. Hat das Fett/Öl die
erforderliche Temperatur erreicht, erlischt die
Kontrollampe.
Während des Fritierens leuchtet die
Kontrollampe dann und wann, wenn das Fett/Öl
wieder auf die eingestellte Temperatur
aufgeheizt wird.
- Befestigen Sie den Griff am Fritierkorb, füllen
Sie ihn, und setzen Sie ihn in die Friteuse.
Nehmen Sie nur die angegebenen Mengen,
wenn Sie ein gutes Ergebnis erzielen wollen.
- Abb. 7: Senken Sie den Fritierkorb langsam in
das Fett/Öl. Benutzen Sie den Deckel, um
Ölspritzer aufzufangen.
- Abb. 8: Nehmen Sie den Griff vom Fritierkorb ab.
- Abb. 9: (Nur für Type HD 4269) Setzen Sie
den Deckel auf das Gerät.
- Entnehmen Sie die erforderliche Temperatur
und die Fritierzeit aus der Tabelle.
- Nach Ablauf der Fritierzeit: Nehmen Sie den
Deckel ab, und befestigen Sie den Griff wieder
am Fritierkorb.
- Abb. 10: Nehmen Sie den Fritierkorb aus dem
Fett/Öl, haken Sie ihn am Rand des Gerätes
ein, und lassen Sie das Fritiergut abtropfen.
- Jetzt hat das Fett / Öl 3 bis 5 Minuten Zeit,
wieder die eingestellte Temperatur zu
erreichen.
- Abb. 11: Leeren Sie den Fritierkorb in ein Sieb,
das Sie zuvor mit fettaufsaugendem Papier
ausgeschlagen haben.
- Schöpfen Sie Reste des Fritierguts mit einem
Schaumlöffel vom Fett/Öl ab.
- Ziehen Sie nach dem Fritieren den Stecker aus
der Steckdose.
- Abb. 12: Filtern Sie bei Bedarf das Fett/Öl,
nachdem es etwas abgekühlt ist.
- Bewahren Sie die Friteuse mit aufgesetztem
Deckel auf. Das hält Verunreinigungen fern.
Tabelle
Die Tabelle zeigt, welche Speisen mit der Friteuse
zubereitet werden können, bei welcher
Temperatur und wie lange. Außerdem wird die
Höchstmenge angegeben. Sie können, je nach
der eingefüllten Menge und dem persönlichen
Geschmack etwas davon abweichen.
*
) Zu Pommes frites aus frischen Kartoffeln vgl. den folgenden Abschnitt “Pommes frites”.

14
Pommes frites
So kommen Sie zu den schönsten und
knusprigsten Pommes frites:
• Nehmen Sie keine neuen Kartoffeln.
• Schneiden Sie die Kartoffeln zuerst in dicke
Scheiben und dann in längliche Stäbchen.
Spülen Sie die Stäbchen in einem Sieb unter
kaltem Leitungswasser ab, damit sie beim
Fritieren nicht aneinanderkleben. Trocknen Sie
die Kartoffelstücke, z.B. mit Haushaltspapier.
• Pommes frites werden in zwei Stufen
zubereitet:
- zunächst 8 bis 10 Minuten bei 160° C,
- danach 2 bis 4 Minuten bei 190° C.
Schütteln Sie den Fritierkorb während der
zweiten Stufe in kurzen Abständen, dann
werden die Pommes frites rundherum
goldbraun.
Tiefkühlkost
Speisen aus einem Tiefkühlgerät oder
Tiefkühlfach kühlen beim Eintauchen das heiße
Fett/Öl stark ab.
• Geben Sie darum niemals größere Portionen in
die Friteuse.
• Lassen Sie die Friteuse 15 bis 20 Minuten auf
die erforderliche Temperatur aufheizen, bevor
Sie eine Portion Tiefkühlkost fritieren.
Stellen Sie den Temperaturregler auf den Wert,
der auf der Packung angegeben ist. Fehlt ein
solcher Hinweis, so setzen Sie den
Temperaturregler auf die höchste Position
(190° C).
Diese Hinweise gelten auch für Speisen, die
eine sorgfältige Zubereitung verlangen, z.B. für
Fleisch-Kroketten.
• Tiefgekühlte Pommes frites sind vorfritiert und
können in 5 Minuten bei 190° C in einem
Arbeitsgang zubereitet werden.
• Tiefkühlkost enthält oft zu viel Eis. Entfernen
Sie so viel davon wie möglich über einem
Spülbecken. Senken Sie dann das Fritiergut
langsam in das Fett/Öl, damit sich keine Blasen
und Spritzer bilden.
Hinweise
• Verwenden Sie Fett/Öl, das zum Fritieren
geeignet ist, d.h. Pflanzenöl oder -fett mit einem
hohen Anteil an mehrfach ungesättigten
Fettsäuren.
• Wechseln Sie das Fett/Öl regelmäßig aus.
Setzen Sie niemals frisches Fett/Öl dem
gebrauchten zu.
• Im allgemeinen wird das Fett/Öl ziemlich
schnell unbrauchbar, wenn eiweißhaltige
Speisen (z.B. Fleisch oder Fisch) fritiert
werden. Wenn das Fett/Öl vorwiegend für die
Zubereitung von Pommes frites verwendet und
nach jedem Gebrauch gefiltert wird, kann es
10- bis 12mal verwendet werden. Wechseln Sie
es aber nach spätestens sechs Monaten aus.
Geben Sie Ihr gebrauchtes Fett/Öl nicht in den
normalen Hausmüll, sondern benutzen Sie die
offiziellen örtlichen Sammelstellen für
Problemstoffe.
Abgekühltes Öl können Sie in einer Flasche
aufbewahren, erstarrtes Fett in der alten
Umhüllung.
Erstarrtes Fett kann leicht aus dem Gerät
entfernt werden, wenn es für ca. eine Minute
bei 160° C erwärmt wird; es schmilzt dann an
den Rändern und klebt nicht mehr an den
Wänden.
• Wechseln Sie das Öl bzw. Fett auf jeden Fall
aus, wenn es beim Aufheizen schäumt, wenn
es ranzig geworden ist, einen Stich
angenommen hat, oder wenn es dunkel
und/oder dickflüssig geworden ist.
• Vergewissern Sie sich, daß die Speisen trocken
sind, bevor Sie sie in das heiße Öl bzw. Fett
geben.
• Filtern Sie das Fett/Öl bei Bedarf:
- Ziehen Sie nach dem Fritieren den Stecker aus
der Steckdose. Lassen Sie das Fett/Öl eine
Weile abkühlen.
- Um kleine Partikel zu entfernen, legen Sie
Filterpapier oder ein dünnes Baumwolltuch in
ein feines Metallsieb, und gießen Sie das
Fett/Öl in ein Gefäß (Abb. 12).
• Reinigen Sie die Friteuse mit Haushaltspapier,
auch die Innenwände.
• Wenn Sie die Friteuse nur gelegentlich
verwenden, so verwahren Sie das Öl am
besten in einem (Glas-)Gefäß, möglichst im
Kühlschrank, Fett in einem gut verschlossenen
Gefäß aus Glas oder Steingut. Es ist nicht
ratsam, Fett oder Öl längere Zeit in der Friteuse
stehen zu lassen.

15
Wenn das Fett/Öl einen Beigeschmack hat ...
Bestimmte Speisen (besonders Fisch) können
beim Fritieren etwas Flüssigkeit abgeben, die sich
nachteilig auf den Geschmack der Speisen
auswirkt, die später in dem selben Fett/Öl fritiert
werden.
Um diesen Beigeschmack zu beseitigen oder ihn
zu vermeiden, erhitzen Sie das Fett/Öl auf 160° C
und geben dann zwei Scheiben Brot von
ca. 5 bis 6 mm Dicke hinein.
Warten Sie, bis keine Luftblasen mehr aufsteigen
und das Brot rundherum braun ist. Nehmen Sie es
dann aus der Friteuse und werfen Sie es fort.
Das Fett/Öl hat jetzt wieder einen neutralen
Geschmack.
Reinigung
Außen: Wischen Sie das Gerät mit einem
feuchten Tuch oder mit Haushaltspapier ab. Sie
können dem Wasser etwas Spülmittel zufügen.
Innen: Entfernen Sie mit Haushaltspapier alle
Fett- bzw. Ölreste von den Innenwänden der
Friteuse.
Die Friteuse muß vor dem Austausch von Fett/Öl
besonders gründlich gereinigt werden. Gießen Sie
in die Friteuse ein wenig heißes Wasser, dem Sie
etwas Spülmittel zugesetzt haben, und reinigen
Sie sie mit einer Spülbürste. Leeren Sie die
Friteuse und spülen Sie mit klarem Wasser nach.
Halten Sie das Gerät nicht unter fließendes
Wasser, sondern verwenden Sie ein geeignetes
Gefäß.
Trocknen Sie die Innen- und Außenwände nach
der Reinigung sorgfältig ab.
Garantie
Philips übernimmt für dieses Gerät eine Garantie
für die Dauer eines Jahres ab Verkaufsdatum.
Diese Garantie gilt für Material- und
Fabrikationsfehler und schließt sowohl die
Ersatzteile wie die Arbeitsleistung ein.
Die Garantieleistung setzt voraus, daß ein
ausreichender Beleg, z.B. die ausgefüllte
Garantiekarte oder eine ordentliche Kaufquittung,
vorgelegt wird und der Garantieanspruch
innerhalb der Garantiefrist erhoben wird. Die
Garantie verfällt, wenn das Gerät beschädigt,
nicht sachgemäß benutzt oder gewartet wurde
oder unbefugte Eingriffe vorgenommen wurden.
Der Service während und nach der Garantiezeit
ist in allen Ländern verfügbar, in denen das
gekaufte Philips-Produkt offiziell vertrieben wird.
In den Ländern, in denen Philips dieses Produkt
nicht vertreibt, übernimmt die örtliche PhilipsOrganisation trotzdem den Service; jedoch ist
dann ein Zeitverzug möglich, wenn die
erforderlichen Ersatzteile nicht sofort verfügbar
sind.
In Zweifelsfällen wenden Sie sich bitte an:
(für Deutschland)
-ARRIVO-
Philips GmbH, Elektro-Hausgeräte-Service
Essener Straße 91, 22419 Hamburg
oder
-ARRIVO Berlin-
Philips GmbH, Elektro-Hausgeräte-Service
Allee der Kosmonauten 35,12681 Berlin-Marzahn
oder an
Philips Domestic Appliances and
Personal Care B.V.
Service Department
PO Box 225,
9700 AE Groningen
The Netherlands
Fax: +31.50.138016
Dieses Produkt entspricht den Funkentstörvorschriften der Richtlinie des Rates 87/308/EWG.

16
Algemene beschrijving (fig. l)
A Deksel
Bij type HD 4269: met reukfilter. Nieuwe
reukfilters zijn bij uw leverancier verkrijgbaar.
Fig. 2 geeft aan hoe u het reukfilter uit het
deksel haalt.
B Frituurmand met afneembare handgreep.
Maak de afneembare handgreep volgens
fig. 3 vast aan het mandje; losmaken gaat in
omgekeerde volgorde.
C Controlelampje. Dit brandt wanneer het fri-
tuurvet/de olie wordt opgewarmd.
D Temperatuurknop.
E Snoeropbergruimte. Het snoer (1 m) kunt u
in de snoeropbergruimte terugduwen.
Voor het eerste gebruik
- Was het mandje af in heet sop.
- Doe wat sop in de frituurpan en was de
binnenkant van de pan daarmee goed af.
- Spoel na met schoon water. (Gebruik hiervoor
bijvoorbeeld een kopje.) Droog goed af.
Frituren
Belangrijk - alleen voor type HD 4268:
Tijdens het frituren moet waterdamp uit het
voedsel kunnen ontsnappen.
Zet daarom het deksel zonder reukfilter niet op
de frituurpan terwijl u aan het frituren bent.
Gebruik dit deksel alleen in de volgende situaties:
• Wanneer u het gevulde frituurmandje in de hete
olie/vet laat zakken, om eventuele spatten op te
vangen (zie fig. 7);
• Na het gebruik, om te voorkomen dat er stof in
de frituurpan komt.
- Fig. 4. Vul de (droge) frituurpan met olie of vet
tot de indicatiestreep MAX. (2 liter olie of
1800 gram vet).
N.B.: Meng nooit twee verschillende soorten vet
en/of olie.
- Fig. 5. Type HD 4269: Zet het deksel (met
reukfilter) op de frituurpan.
- Stel de temperatuurknop op de gewenste
stand.
- Fig. 6. Steek de stekker in het stopcontact. Het
controlelampje moet nu gaan branden.
- Warm de olie/het vet 15 à 20 minuten op.
Tijdens het opwarmen brandt het
controlelampje. Als de olie/het vet op de
ingestelde temperatuur is gekomen, gaat het
lampje uit.
Tijdens het frituren zal het nu en dan gaan
Nederlands
Belangrijk
• Lees de gebruiksaanwijzing en bekijk de
illustraties voordat u het apparaat in
gebruik neemt.
• Controleer, voordat u het apparaat
aansluit, of de spanning die op de
onderzijde van het apparaat staat
aangegeven, dezelfde is als de
netspanning in uw woning.
• Dompel de frituurpan nooit in water.
• Maak voor het eerste gebruik de verschil-
lende onderdelen met een vochtige doek
schoon. Zorg dat ze goed droog zijn voordat u de frituurpan met olie of vet vult.
• Schakel de frituurpan pas in nadat u
hem met olie of vet hebt gevuld.
Als u vet smelt: schakel de friteuse in op
160 °C en kies pas een hogere temperatuur wanneer al het vet is gesmolten.
Smelt de stukken vet op de bodem van
de pan: niet in het frituurmandje.
• Gebruik uitsluitend soorten olie en vet
die geschikt zijn om in te frituren. Deze
informatie kunt u op de verpakking van
die produkten vinden.
• Vul de pan met olie of vet altijd tot een
niveau tussen de maataanduidingen MIN
en MAX.
Controleer altijd of er nog voldoende
olie/vet in de pan is, voordat u gaat
frituren.
• Overschrijd niet de in de tabel
aangegeven maximum hoeveelheden.
Vul het mandje nooit hoger dan tot 3⁄4.
Als u te veel voedsel in het mandje doet,
kan heet vet/olie over de rand van de
friteuse komen.
• Type HD 4269: Tijdens het frituren komt
er hete stoom door het filter. Houd uw
handen en gezicht op veilige afstand
van deze stoom.
• Houd bij het gebruik de frituurpan
buiten bereik van kinderen (heet vet!).
• Laat daarom het snoer niet over de rand
van de tafel of het aanrecht hangen.
• Trek na het gebruik de stekker uit het
stopcontact waardoor de olie of het vet
kan afkoelen. Verplaats de friteuse pas
als deze voldoende is afgekoeld.
• Bewaar deze gebruiksaanwijzing.
 Loading...