

Page 1
HD 3353
Page 2
2
English Page 4
• Keep page 3 open when reading these
operating instructions.
Français Page 6
• Dépliez la page 3 en lisant le mode d'emploi.
Deutsch Seite 9
• Schlagen Sie beim Lesen der
Gebrauchsanweisung Seite 3 auf.
Nederlands Pagina 12
• Sla bij het lezen van de gebruiksaanwijzing
pagina 3 op.
Italiano Pagina 15
• Prima di usare l'apparecchio, aprite la pagina 3
e leggete attentamente le istruzioni per l'uso.
Español Página 18
• Desplegar la página 3 al leer las instrucciones
de manejo.
Português Página 21
• Durante a leitura do modo de emprêgo,
desdobre e verifique a pág. 3.
Dansk Side 23
• Hold side 3 opslået mens De læser
brugsanvisningen.
Norsk Side 26
• Slå opp på side 3 før De leser videre.
Svenska Sid 28
• Ha sidan 3 utvikt när ni läser bruksanvisningen.
Suomi Sivu 31
• Pidä sivu 3 auki samalla kun luet käyttöohjetta.
Ελληνικά Σελίδα 33
• Για τισ οδηγίεσ χρήσεωσ, ανοίξτε τισ
σελίδεσ 3.
Page 3
3
1
E
C
O
A
F
B
D
C
E
E
C
O
A
IR
H
O
T
S
Y
S
T
E
M
This figure is for reference only.
Do not use in an upright position.
Page 4

4
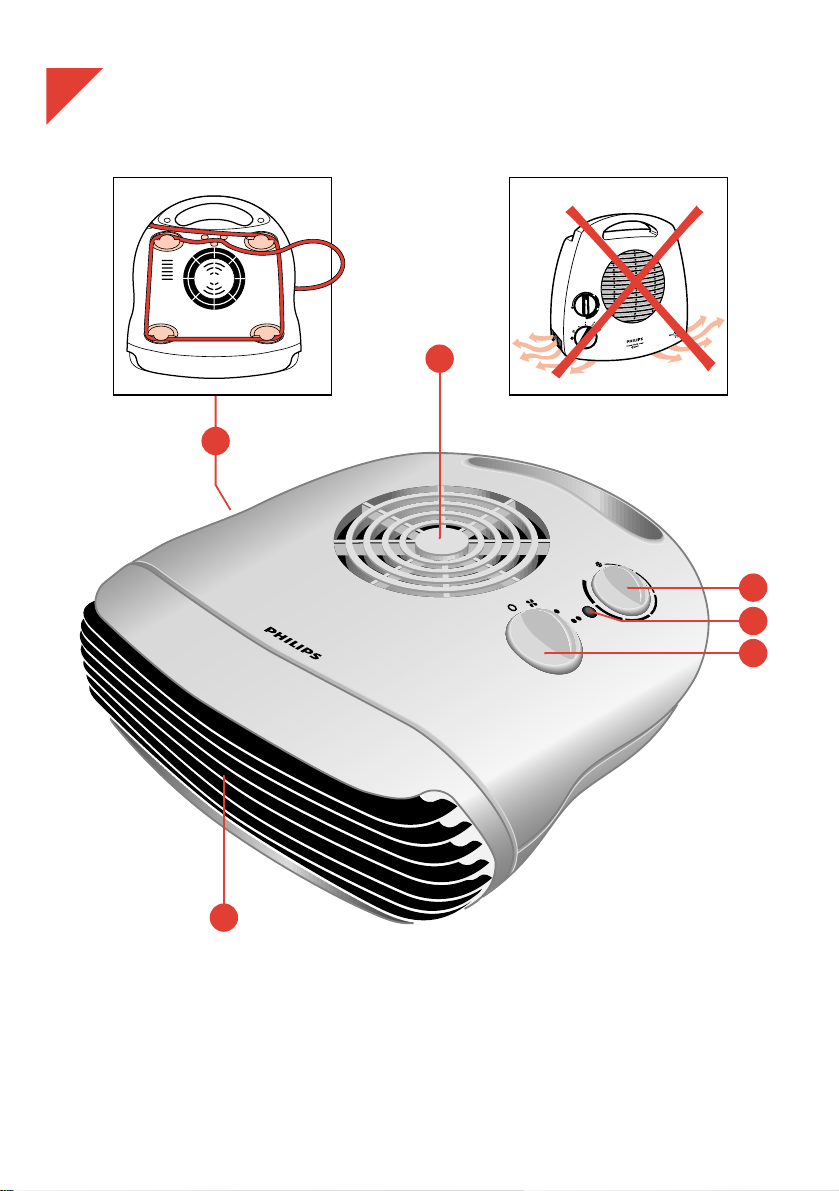
General description (fig. 1 on page 3)
A Air inlet grille
B Air outlet grille
C Selector switch
D Thermostat knob
E Pilot light
F Mains cord storage
Safe positioning
• The heater must not be located immediately
below a socket outlet.
• Only use the fan heater when it is standing in a
horizontal position, on the four feet (as
illustrated in fig. 1).
• For your own safety and that of others: water
and electricity are a dangerous combination!
Do not use this heater in a bathroom or near a
swimming pool.
Ensure that the appliance cannot fall into water
(bath, wash basin, shower cubicle, etc.).
• Do not use the heater in rooms with explosive
gas (e.g. petrol) or while using inflammable glue
or solvent (e.g. when glueing or varnishing
parquet floors, PVC etc.).
• Allow ample space around the heater.
A safe area to be left free is 50 cm / 20” at the
top and at the sides, and 120 cm / 47” at the
front.
• Prevent overheating of the appliance by
keeping the air inlet and outlet grilles free:
do not hang anything in front of it or above it otherwise there is a risk of fire.
Check the grilles from time to time for
accumulated dust.
If overheating should occur, the built-in
overheating safety device will switch off the
appliance.
• Keep the mains cord at a safe distance from the
air inlet and outlet grilles.
• Do not allow aerosols, inflammable substances
or materials sensitive to heat to be in the flow of
hot air.
• Do not use the heater on extremely
deep-pile carpets!
• Do not use the heater in an upright position
(see figure).
Important
• Before connecting the appliance check that the voltage indicated on the type plate
corresponds to the mains voltage in your home.
• Read these instructions carefully, in conjunction with the illustrations (page 3) before using
the appliance.
• The appliance is double insulated and need not be connected to an earthed mains outlet.
If you wish to use an extension cord, a 2-wire type is suitable. However, ensure that the
plugs and cord allow high power (16A-220V / 13A-240V AC).
If a reel type is employed, please unroll the cord completely to prevent overheating.
• It may happen, especially if the heater operates on position 2 and another electrical device
is switched on as well, that a fuse or circuit breaker cuts off the mains power. In such a case,
the fuse or circuit breaker may not allow this high electrical power.
You may connect one of the involved appliances to another circuit (employing another fuse
or circuit breaker) or have the electrical installation revised by an authorized electrician.
• The heater is not designed for use as the main form of heating. Use the appliance only for
the intended use, i.e. extra heating in the house.
• To avoid the risk of fire and electrical shock select a safe place for the heater. (See section
“Safe positioning”.)
• Do not insert any objects into the heater.
• Ensure that children cannot play with the appliance.
• Attention: the front grille gets hot during use.
• Only touch the heater with dry hands.
• If the mains cord of this appliance is damaged, it must only be replaced by Philips or their
service representative, as special tools and/or parts are required.
English
Page 5

Storing the mains cord
Excess mains cord can be stored by winding it
around the four feet, at the bottom of the
appliance. However, when the heater is being
used, unwind the cord completely.
How to use
The selector switch (C) and the thermostat knob
(D) enable you to select the following functions:
Selector switch (C)
O = "Off”. Both the fan and the two heating
elements are switched off.
> = “Cool air”. Only the fan is switched on.
1 = "Warm air" for gradual heating-up.
ECO positon (half power): the fan and one of
the two heating elements are switched on.
2 = "Hot air" for quick heating-up.
Full power: the fan and the two heating
elements are switched on.
Thermostat knob (D) With the thermostat knob
you can set a constant room temperature.
When the selector switch is set to position 1 or
position 2, the heater will automatically switch
on (using half power or full power respectively) as
soon as the room temperature falls below the set
temperature.
As soon as the set temperature is reached, the
heater will switch off.
Rotate the knob clockwise to obtain a higher
temperature setting or anti-clockwise for a lower
temperature setting.
You may adjust the thermostat during use.
To find the ideal thermostat setting:
- First set the knob to maximum position. (Rotate
clockwise until the knob stops.)
- As soon as the temperature is comfortable, turn
the knob anti-clockwise slowly until the heater
goes off.
y = "Frost-free" position. This position
corresponds with the minimum thermostat
setting (i.e. approx. +5 °C / +41 °F) and can
be used to keep the immediate vicinity of the
heater free from frost. E.g. to prevent pipes
from freezing, position the heater close to the
pipe and select this position.
Please note: When using the cool air setting >,
the thermostat knob should be in its highest
position.
Pilot light
- When the appliance is connected to the mains
and switched on by selecting >, 1 or 2 the
pilot light (E) will come on.
- The light will stay on until the appliance is
switched off by setting the selector switch (C) to
position O or by disconnecting from the mains.
- To indicate that the heater is still connected and
in "switched-on" position (>, 1 or 2), the pilot
light will remain on when the set temperature is
reached and the thermostat switches the
appliance off.
For the same reason the pilot light will remain
on when the overheating safety device switches
the appliance off.
Overheating safety device
To prevent damage and risks due to overheating,
the built-in overheating safety device cuts off the
power as soon as the heating elements become
too hot.
If this should happen:
- First ensure that it was not the thermostat which
has switched off the heater. Set the thermostat
to maximum position.
If the heater does not switch on, the safety device
has been activated.
- Remove the mains plug from the wall socket.
- Let the heater cool down for 30 minutes.
- Check if the heater had been placed correctly.
- Check if anything is obstructing the air flow.
If necessary, clean the grilles with a vacuum
cleaner.
- Replace the plug into the wall socket and switch
the heater on again.
If the safety device again switches off the heater:
- Remove the mains plug from the wall socket.
- Have the heater inspected by a Philips Service
Centre or by your dealer.
Cleaning
- Set the selector switch (C) to position O to
switch off.
- Remove the mains plug from the wall socket.
- Wait for the heater to cool down sufficiently.
- You may clean the outside of the heater with a
damp cloth. Do not allow water to come into the
appliance.
- Clean the air inlet and outlet grilles regularly
(with normal use at least twice a year) with a
vacuum cleaner, using the brush attachment.
5
Page 6

6
Description générale (fig. 1 page 3)
A Grille d'entrée d'air
B Grille de sortie d'air
C Commande de réglage
D Thermostat
E Témoin lumineux
F Rangement du cordon d'alimentation
Positionnement du chauffage
• Ne placez pas l’appareil sous la prise de
courant.
• Le chauffage à air pulsé doit être utilisé en
position horizontale, posé sur ses quatre pieds
(voir fig. 1).
• Pour votre propre sécurité et celle des autres,
n'oubliez pas qu'il est dangereux d'associer eau
et électricité. Cet appareil ne doit pas être placé
dans une salle de bain ou à proximité d'une
piscine. Prenez toutes les précautions
nécessaires pour éviter que l'appareil ne tombe
dans l'eau (baignoire, lavabo, douche, etc.).
• N'utilisez pas le chauffage dans des pièces
contenant des gaz explosifs (par exemple des
émanations d'essence) ou lorsque vous utilisez
de la colle ou un solvant inflammable (par
exemple lorsque vous collez ou vernissez un
parquet, du PVC etc.).
• Ménagez un espace libre suffisant autour du
chauffage : 50 cm sur le dessus et sur les côtés
et 120 cm sur le devant.
• Laissez les grilles libres pour éviter la
surchauffe de l'appareil : ne laissez rien pendre
devant ou au-dessus de l'appareil.
Débarrassez régulièrement les grilles de toute
accumulation de poussières.
L'appareil est équipé d'un système de sécurité
qui arrête l'appareil en cas de surchauffe.
• Maintenez le cordon d'alimentation éloigné de
la grille de sortie d'air.
• Ne laissez pas des aérosols, des substances
inflammables ou des produits sensibles à la
chaleur dans le flux d'air chaud.
• N'utilisez pas le chauffage sur un tapis à
poils longs.
• N’utilisez jamais le chauffage en position
verticale (voir figure).
Important
• Vérifiez que la tension indiquée sous l’appareil correspond bien à la tension de votre
secteur.
• Avant d'utiliser l'appareil, lisez soigneusement ces instructions en vous aidant des
illustrations (page 3).
• Cet appareil étant doublement isolé il n'est pas nécessaire de le brancher à une prise de
terre. Si vous désirez utiliser une rallonge, vous pouvez utiliser une prise à deux fils.
Assurez-vous cependant que le cordon et la prise peuvent supporter des courants de forte
intensité (16A-220V / 13 A-240 V). Si vous utilisez un cordon à enrouleur, déroulez-le
complètement pour éviter toute surchauffe.
• Il se peut en particulier si vous utilisez votre chauffage à pleine puissance 2 et qu'un autre
appareil électrique fonctionne en même temps, qu'un fusible ou le disjoncteur coupe
l'alimentation du secteur. Dans ce cas, le fusible ou le disjoncteur peuvent empêcher le
fonctionnement à pleine puissance.
Essayez alors de brancher l'un des appareils concernés sur un autre circuit (utilisant un
autre fusible ou un autre disjoncteur) ou bien faites réviser votre installation électrique par
un électricien agréé.
• Cet appareil n'a pas été conçu pour être utilisé comme un appareil de chauffage principal.
Utilisez l'appareil comme chauffage d'appoint uniquement.
• Pour éviter tout risque d'incendie et de choc électrique, choisissez un emplacement
approprié pour le chauffage (voir la section "Positionnement du chauffage").
• N'insérez aucun objet à l'intérieur du chauffage.
• Ne laissez pas les enfants jouer avec l'appareil.
• Attention : la grille devient très chaude en cours d'utilisation.
• Le chauffage ne doit être touché qu'avec des mains sèches.
• Si le cordon d'alimentation de l'appareil est endommagé, il doit être remplacé par un Centre
Service Agréé Philips car des pièces et/ou des outils spéciaux sont nécessaires.
Français
Page 7

Rangement du cordon d'alimentation
électrique
Le cordon d'alimentation électrique peut être
rangé en l'enroulant autour des quatre pieds, au
bas de l'appareil. Mais le cordon d'alimentation
électrique doit être entièrement déroulé lorsque
vous utilisez l'appareil.
Utilisation de l'appareil
Les commandes de réglage (C) et de thermostat
(D) vous permettent de sélectionner les fonctions
suivantes :
La commande de réglage (C)
O = "Arrêt". Le ventilateur et les deux éléments
chauffants sont éteints.
> = "Air frais". Seul le ventilateur fonctionne.
1 = "Air chaud" pour une augmentation
progressive de la température.
La position "ECO" (puissance moyenne) : le
ventilateur et un des deux éléments
chauffants fonctionnent.
2 = "Air très chaud" pour une augmentation
rapide de la température : le ventilateur et les
deux éléments chauffants fonctionnent.
La commande de thermostat (D).
La commande de thermostat vous permet
d'obtenir une température ambiante constante.
Lorsque la commande est réglée sur la position 1
ou 2, le chauffage se met en marche
automatiquement (respectivement à puissance
moyenne ou à pleine puissance) dès que la
température ambiante descend en dessous de la
température de réglage.
Dès que la température désirée est atteinte, le
chauffage s'éteint.
Tournez la commande dans le sens des aiguilles
d'une montre pour augmenter la température et
dans le sens inverse des aiguilles d'une montre
pour abaisser la température.
Vous pouvez tourner la commande du thermostat
pendant que l'appareil fonctionne.
Pour obtenir un réglage idéal du thermostat :
- Réglez la commande du thermostat au
maximum (dans le sens des aiguilles d'une
montre).
- Dès que la température désirée est atteinte,
tournez lentement la commande vers la gauche
jusqu'à ce que le chauffage s'éteigne.
y = Position "Hors gel".
Cette position correspond au réglage
minimum du thermostat (c'est à dire environ
+ 5° C) et peut être utilisée pour protéger du
gel les éléments à proximité du chauffage.
Par exemple, si vous voulez empêcher le gel
de vos conduites, placez le chauffage près
des conduites et sélectionnez le réglage "Hors
gel".
Remarque : lorsque vous sélectionnez le réglage
"Air frais" >, vous devez régler le thermostat sur
sa position maximum.
Le témoin lumineux
- Le témoin lumineux (E) s'éclaire lorsque vous
avez branché l'appareil et que vous l'avez réglé
sur >, 1 ou 2.
- Le témoin lumineux reste éclairé jusqu'à ce que
vous éteigniez l'appareil, en plaçant la
commande (C) sur la position O ou en
débranchant l'appareil.
- Afin d'indiquer que le chauffage est toujours
branché et en position de "Marche", (>, 1 ou
2) le témoin lumineux reste éclairé lorsque la
température de réglage est atteinte et que le
thermostat a éteint l'appareil.
Pour la même raison, le témoin lumineux reste
éclairé lorsque le dispositif de sécurité antisurchauffe a déjà éteint l'appareil.
Dispositif de sécurité anti-surchauffe
Afin d'éviter toute détérioration et tout danger en
cas de surchauffe, un dispositif de sécurité intégré
coupe le courant dès que les éléments chauffants
deviennent trop chauds.
Dans ce cas :
- Assurez-vous d'abord que ce n'est pas
simplement le thermostat qui a éteint le
chauffage. Réglez le thermostat au maximum.
Si le chauffage ne se remet pas en marche, c'est
que le dispositif de sécurité s'est déclenché.
- Débranchez l'appareil.
- Laissez le chauffage refroidir pendant 30
minutes.
- Vérifiez le bon positionnement du chauffage.
- Vérifiez que rien ne gêne la circulation de l'air.
- Le cas échéant, nettoyez les grilles à l'aide d'un
aspirateur.
- Branchez à nouveau la fiche à la prise de
courant et allumez le chauffage.
7
Page 8

8
Si le dispositif de sécurité éteint à nouveau le
chauffage :
- Débranchez la fiche de la prise de courant.
- Faites contrôler votre chauffage par un Centre
Service Agréé Philips.
Nettoyage
- Placez la commande de réglage (C) sur la
position O pour éteindre le chauffage.
- Laissez refroidir le chauffage suffisamment.
- Vous pouvez nettoyer les surfaces externes du
chauffage à l'aide d'un chiffon humide. Veillez à
ne pas faire pénétrer de l'eau à l'intérieur de
l'appareil.
- Nettoyez régulièrement les grilles d'entrée et de
sortie d'air (pour une utilisation normale, au
moins deux fois par an) à l'aide d'un aspirateur
muni de l'accessoire brosse.
Page 9

9
Allgemeine Beschreibung (Abb. 1 auf Seite 3)
A Lufteinlaß
B Luftauslaß
C Geräteschalter
D Temperaturregler
E Kontrollampe
F Kabelaufwicklung
Sichere Aufstellung
• Stellen Sie das Gerät nicht direkt unter einer
Steckdose auf.
• Verwenden Sie das Gerät nur, wenn es
horizontal auf seinen vier Gerätefüßen steht
(vgl. Abb. 1).
• Beachten Sie zu Ihrer eigenen und zu fremder
Personen Sicherheit, daß jede Kombination von
Wasser und Elektrizität gefährlich ist! Stellen
Sie das Gerät darum niemals in einem
Badezimmer oder in der Nähe eines
Schwimmbeckens auf.
Achten Sie darauf, daß das Gerät nicht ins
Wasser (Badewanne, Waschbecken usw.)
fallen kann.
• Lassen Sie keinerlei Sprays und keine
hitzeempfindlichen oder explosiven Gase in die
eingesaugte Luft gelangen.
• Verwenden Sie das Gerät nie in einem Raum,
in dem sich explosive Gase entwickeln
könnten - oder während des Gebrauchs von
Benzin, von Lösungsmitteln oder Klebern, etwa
beim Verlegen und Versiegeln von Fußböden.
• Lassen Sie rund um den Heizlüfter ausreichend
Platz: 50 cm über und neben dem Gerät, sowie
120 cm vor dem Gerät.
• Vermeiden Sie eine Überhitzung des Geräts.
Halten Sie die Lufteinlaß- und
Luftauslaßöffnungen frei, und hängen Sie nichts
davor bzw. darüber.
Entfernen Sie von Zeit zu Zeit den Staub, der
sich in den Öffnungen angesammelt hat.
Im Falle einer Überhitzung schaltet der
integrierte Überhitzungsschutz das Gerät
automatisch aus.
Wichtig
• Prüfen Sie, bevor Sie den Stecker in die Steckdose stecken, ob die Spannungsangabe auf
dem Typenschild mit der örtlichen Netzspannung übereinstimmt.
• Lesen Sie die Gebrauchsanweisung sorgfältig durch, und sehen Sie sich dabei die
Abbildungen auf Seite 3 an, bevor Sie das Gerät zum ersten Mal benutzen.
• Das Gerät ist doppelt isoliert und braucht deshalb nicht unbedingt an eine SchukoSteckdose angeschlossen zu werden.
Deshalb kann das Gerät auch über ein zweiadriges Verlängerungskabel angeschlossen
werden. Achten Sie aber darauf, daß dieses Kabel für höhere Stromstärken (16 A/230 V bzw.
13 A/240 V Wechselstrom) geeignet ist.
• Wenn Sie eine Kabeltrommel verwenden, so wickeln Sie das Kabel ganz ab, um eine
Überhitzung zu vermeiden!
• Es kann vorkommen, daß die Sicherung den Strom unterbricht; besonders wenn der
Heizlüfter auf Position 2 betrieben wird und ein weiteres Gerät an denselben Stromkreis
angeschlossen ist. Die Stromentnahme ist dann höher als zulässig.
Sie können in diesem Fall eines der Geräte ausschalten und über eine andere Sicherung an
einen anderen Stromkreis anschließen oder einen geprüften Elektriker beauftragen, die
Anlage entsprechend anzupassen.
• Das Gerät ist nicht als Hauptheizquelle geeignet. Verwenden Sie es ausschließlich als
Zusatz- oder Ersatzheizquelle.
• Wählen Sie für das Gerät einen sicheren Platz, um Brandgefahr zu vermeiden. Vgl. den
Abschnitt "Sichere Aufstellung".
• Stecken Sie niemals irgendwelche Gegenstände in das Gerät.
• Halten Sie Kinder von dem Gerät fern.
• Vorsicht: Die Abdeckung wird beim Betrieb heiß!
• Berühren Sie das Gerät nur mit völlig trockenen Händen.
• Wenn das Netzkabel defekt oder beschädigt ist, muß es von einer durch Philips autorisierten
Werkstatt ersetzt werden, da für die Reparatur Spezial-Werkzeug und/oder spezielle Teile
benötigt werden.
Deutsch
Page 10

Uhrzeigersinn; um die Temperatur herabzusetzen,
drehen Sie ihn entgegen dem Uhrzeigersinn.
Der Temperaturregler kann bei eingeschaltetem
Gerät bedient werden.
Um die gewünschte Temperatur einzustellen,
gehen Sie wie folgt vor:
- Schalten Sie das Gerät ein.
- Stellen Sie den Temperaturregler (D) bis zum
Anschlag auf die höchste Temperatur.
- Sobald die gewünschte Raumtemperatur
erreicht ist, drehen Sie den Regler langsam so
weit zurück, daß sich das Gerät ausschaltet.
- Das Gerät wird automatisch wieder
eingeschaltet, wenn die Raumtemperatur sinkt.
y Frostschutz-Einstellung
In dieser Position reagiert der Thermostat auf die
niedrigste Temperatur-Einstellung, nämlich +5° C.
Wollen Sie z.B. eine Wasserleitung vor dem
Einfrieren bewahren, dann stellen Sie das Gerät
in unmittelbarer Nachbarschaft der Leitung auf,
und wählen Sie diese Position.
Hinweis: Stellen Sie bei Position "Kaltluft" >
den Temperaturregler auf die höchste Position.
Die Kontrollampe (E)
- Wenn das Gerät an das Stromnetz
angeschlossen und eine der Positionen >, 1
oder 2 eingeschaltet ist, leuchtet die
Kontrollampe.
- Die Kontrollampe leuchtet, bis das Gerät am
Geräteschalter (C) ausgeschaltet oder der
Strom unterbrochen wird.
- Diese Kontrollampe zeigt an, daß das Gerät am
Netz angeschlossen und betriebsbereit ist; sie
leuchtet deshalb auch, wenn der Geräteschalter
auf >, 1 oder 2 steht, und der Thermostat
das Gerät ausgeschaltet hat.
Der Überhitzungsschutz
Um Risiken und Schäden zu vermeiden, die durch
zu starke Erhitzung entstehen, schaltet der
Überhitzungsschutz das Gerät aus, sobald die
Heizelemente sich zu stark erhitzen.
Sollte dies geschehen, so verfahren Sie wie folgt:
- Vergewissern Sie sich zunächst, daß nicht der
Thermostat das Gerät ausgeschaltet hat.
Stellen Sie dazu den Temperaturregler (D) auf
die höchste Position.
• Halten Sie das Netzkabel von Lufteinlaß- und
Luftauslaßöffnungen und von heißen
Oberflächen fern.
• Achten Sie darauf, daß keine Aerosole,
entzündbare oder hitzeempfindliche Stoffe in
den heißen Luftstrom geraten.
• Stellen Sie das Gerät nicht auf einen sehr
langflorigen Teppich.
• Das Gerät darf nur in vertikaler Position
(vgl. die Abbildung), niemals aufrecht
stehend zu verwendet werden.
Kabelaufwicklung
Das Kabel kann zur Aufbewahrung des Geräts an
der Unterseite über die Gerätefüße aufgewickelt
werden. Wickeln Sie das Kabel jedoch vor jedem
Gebrauch vollständig ab!
Der Gebrauch des Geräts
Der Geräteschalter (C) und der Temperaturregler
(D) ermöglichen verschiedene individuelle
Einstellungen:
Geräteschalter (C)
O = Aus. Der Ventilator und die beiden
Heizelemente sind ausgeschaltet.
> = "Kaltluft": Nur der Ventilator wird
eingeschaltet.
1 = "Warmluft" zum allmählichen Erwärmen.
ECO-Position: Der Ventilator und eines der
beiden Heizelemente werden eingeschaltet.
2 = "Heißluft" zum schnellen Aufheizen.
Vollbetrieb: Der Ventilator und beide
Heizelemente werden eingeschaltet.
Temperaturregler (D)
Der Temperaturregler hält automatisch eine
konstante Raumtemperatur aufrecht. Steht der
Geräteschalter auf 1 oder 2 wird das Gerät von
einem Thermostaten eingeschaltet, wenn die
eingestellte Temperatur unterschritten wird, und
ausgeschaltet (bzw. von 2 auf 1
herabgeschaltet), wenn die eingestellte
Temperatur erreicht ist.
Drehen Sie den Temperaturregler im
Uhrzeigersinn, um die Temperatur zu erhöhen,
und gegen den Uhrzeigersinn, um die Temperatur
herabzusetzen.
Um eine höhere Raumtemperatur zu erhalten,
drehen Sie den Temperaturregler im
10
Page 11

11
Wird das Gerät dann nicht eingeschaltet, so hat
tatsächlich der Überhitzungsschutz das Gerät
ausgeschaltet. Gehen Sie jetzt wie folgt vor:
- Ziehen Sie den Netzstecker aus der Steckdose.
- Lassen Sie das Gerät ca. 30 Minuten abkühlen.
- Prüfen Sie, ob der Heizlüfter vorschriftsmäßig
aufgestellt ist.
- Prüfen Sie dann, ob die Luft durch die
Lufteinlaß- und Luftauslaßöffnungen zirkulieren
kann. Reinigen Sie bei Bedarf die Lufteinlaßund -auslaßöffnungen mit einem Staubsauger.
- Stecken Sie den Netzstecker wieder in die
Steckdose und schalten Sie das Gerät wieder
ein.
Wird das Gerät daraufhin erneut ausgeschaltet,
so ...
- ziehen Sie den Netzstecker aus der Steckdose
und
- lassen Sie das Gerät von Ihrem Philips-Händler
oder vom Philips Service Center in Ihrem Lande
überprüfen.
Reinigung
- Stellen Sie den Geräteschalter (C) auf die
Position O, um das Gerät auszuschalten.
- Ziehen Sie den Netzstecker aus der Steckdose.
- Warten Sie, bis das Gerät ausreichend
abgekühlt ist.
- Sie können das Äußere des Gehäuses mit
einem feuchten Tuch abwischen. Achten Sie
darauf, daß kein Wasser in das Innere des
Geräts eindringt.
- Reinigen Sie regelmäßig (bei normalem
Gebrauch zweimal jährlich) die Lufteinlaßund -auslaßöffnungen mit einem Staubsauger,
unter Verwendung des Bürstenaufsatzes.
Page 12

12
Algemene beschrijving (fig. 1 op pag. 3)
A Luchtinlaatrooster
B Luchtuitstroomrooster
C Schakelaar
D Thermostaatknop
E Controlelampje
F Snoeropbergmogelijkheid
Veilig plaatsen
• De kachel mag niet direct onder een
stopcontact worden geplaatst.
• Gebruik de kachel alleen in een horizontale
positie, staand op de vier pootjes (zoals
afgebeeld in fig. 1).
• Voor uw eigen veiligheid en die van anderen:
water en elektriciteit vormen een gevaarlijke
combinatie!
Gebruik het apparaat niet in badkamer of bij
een zwembassin.
Zorg ervoor dat het apparaat nooit in water kan
vallen (bad, douchebak, wasbak, enz.).
• Gebruik de kachel niet in ruimten waarin
explosieve gassen (bijv. benzine) kunnen
voorkomen, of tijdens het verwerken van
brandgevaarlijke lijmen en oplosmiddelen
(zoals bij het lijmen of lakken van parket, PVC
e.d.).
• Laat voldoende ruimte open rondom de kachel.
(Een veilige vrije ruimte rondom de kachel is
50 cm aan de bovenkant en aan de zijkanten
en 120 cm aan de voorzijde.)
• Voorkom oververhitting van de kachel.
Houd daarom de luchtroosters vrij: hang er dus
niets voor of overheen - dit kan brandgevaar
opleveren.
Controleer de roosters van tijd tot tijd om na te
gaan of er zich geen stof heeft verzameld.
Bij eventuele oververhitting van de kachel
schakelt de ingebouwde beveiliging het
apparaat uit.
• Houd het snoer op veilige afstand van het
luchtinlaatrooster en het luchtuitstroomrooster.
• Houd spuitbussen, brandbare stoffen en
materialen die gevoelig zijn voor warmte uit de
warme luchtstroom.
• Zet de kachel niet op zeer hoogpolige
vloerbedekking!
• Plaats de kachel niet in een verticale positie
(zie illustratie).
Belangrijk
• Controleer, voordat u het apparaat aansluit, of het voltage dat op het typeplaatje is vermeld,
overeenkomt met de netspanning in uw woning.
• Lees de gebruiksaanwijzing goed door en bekijk de tekeningen (pag. 3) voordat u het
apparaat in gebruik neemt.
• Het apparaat is dubbel geïsoleerd, en hoeft dus niet op een geaard stopcontact te worden
aangesloten. Indien u een verlengsnoer wenst te gebruiken, kunt u een tweeaderig type
kiezen. Zorg er dan echter voor dat de stekker en contrastekker van het juiste type zijn, en
dat de belastbaarheid van het snoer voldoende is (16A-220V≈). Indien u een verlengsnoer op
kabelhaspel toepast, rol het snoer dan geheel uit om oververhitting te voorkomen.
• Het kan voorkomen, vooral wanneer het apparaat werkt op stand 2 en u nog een ander
elektrisch apparaat inschakelt, dat een zekering in de meterkast doorbrandt of uitschakelt.
De zekering is wellicht niet op grote stroomsterkte berekend. Sluit in zo'n geval één van
beide apparaten op een andere "groep" aan (via een andere zekering) of laat uw installatie
wijzigen door een erkend installateur.
• De kachel is niet ontworpen voor gebruik als hoofdverwarming. Gebruik het apparaat alleen
voor het doel waarvoor het werd ontworpen: als apparaat voor bijverwarming in huis.
• Vermijd brandgevaar en het risico van elektrische schok: zet het apparaat alleen op een
veilige plaats. (Zie het gedeelte “Veilig plaatsen”.)
• Steek geen voorwerpen in de kachel.
• Zorg ervoor dat kinderen niet met de kachel kunnen spelen.
• Let op: het rooster aan de voorzijde wordt heet tijdens het gebruik.
• Raak het apparaat alleen met droge handen aan.
• Indien het snoer van dit apparaat is beschadigd, dient het uitsluitend te worden vervangen
door een door Philips daartoe aangewezen reparateur, omdat voor de reparatie speciale
gereedschappen en/of onderdelen zijn vereist.
Nederlands
Page 13

Snoer opbergen
Overtollig snoer kunt u om de vier pootjes
wikkelen, aan de onderzijde van het apparaat.
Rol het snoer echter altijd helemaal uit, wanneer u
het apparaat gebruikt.
Gebruik
De keuzeschakelaar (C) en de thermostaatknop
(D) bieden u de volgend keuzemogelijkheden:
Keuzeschakelaar (C)
O = "Uit”. Zowel de ventilator als de beide
verwarmingselementen zijn uitgeschakeld.
> = “Koele lucht”. Alleen de ventilator is
ingeschakeld.
1 = "Warme lucht" voor geleidelijk opwarmen.
ECO-stand (half vermogen): de ventilator en
één van beide verwarmingselementen zijn
ingeschakeld.
2 = "Hete lucht" voor snel opwarmen.
Vol vermogen: de ventilator en beide
verwarmingselementen zijn ingeschakeld.
Thermostaatknop (D)
Met de thermostaatknop kunt u een vaste
kamertemperatuur instellen.
Als de keuzeschakelaar in stand 1 of 2 staat,
wordt de kachel automatisch ingeschakeld
(respectievelijk op half vermogen of op vol
vermogen) zodra de kamertemperatuur beneden
de ingestelde kamertemperatuur daalt.
Zodra de ingestelde kamertemperatuur is bereikt,
schakelt de kachel zichzelf uit.
Draai de knop rechtsom voor het instellen van een
hogere kamertemperatuur of linksom voor een
lagere kamertemperatuur.
U kunt de thermostaat tijdens het gebruik
bijregelen.
Om de meest geschikte stand van de thermostaat
te vinden:
- Zet eerst de thermostaatknop op de hoogste
stand. (rechtsom draaien tot de knop niet
verder kan.)
- Zodra u de temperatuur behaaglijk vindt, draait
u de knop langzaam linksom totdat de kachel
uitschakelt.
y = "Vorstvrij"-stand. Deze stand komt overeen
met de laagste thermostaatstand, d.i. ca. +5 °C.
Deze stand kan worden gebruikt om de directe
omgeving van de kachel vorstvrij te houden.
Om bijvoorbeeld een waterleiding vorstvrij te
houden, zet u de kachel dicht bij de leiding en
schakelt u de kachel in op deze stand.
Let op: Wanneer u de functie koele lucht > kiest,
dient de thermostaatknop in de hoogste stand
te staan.
Controlelampje
- Wanneer het apparaat is aangesloten en
ingeschakeld op stand >, 1 of 2, gaat het
controlelampje (E) branden.
- Het lampje blijft branden totdat het apparaat
wordt uitgeschakeld door de keuzeschakelaar
in stand O te zetten of de stekker uit het
stopcontact te nemen.
- Om aan te geven dat het apparaat nog steeds
is aangesloten en in stand “ingeschakeld”
(>, 1 of 2) staat, blijft het controlelampje
branden wanneer de ingestelde temperatuur is
bereikt en de thermostaat het apparaat
uitschakelt.
Om dezelfde reden blijft het lampje branden
wanneer de ingebouwde beveiliging tegen
oververhitting het apparaat uitschakelt.
Beveiliging tegen oververhitting
Om schade en risico als gevolg van oververhitting
te voorkomen, schakelt de ingebouwde
beveiliging de stroom uit zodra de
verwarmingselementen te heet worden.
Indien dit mocht gebeuren:
- Overtuig u er eerst van dat de kachel niet door
de thermostaat werd uitgeschakeld. Zet de
thermostaat in de hoogste stand.
Als de kachel niet gaat werken, was het inderdaad
de beveiliging die het apparaat heeft
uitgeschakeld.
- Neem de stekker uit het stopcontact.
- Laat de kachel 30 minuten afkoelen.
- Controleer of u het apparaat op de juiste manier
hebt geplaatst.
- Controleer of iets de doorstroming van lucht
belemmert. Maak zonodig de luchtroosters
schoon met behulp van een stofzuiger.
- Steek de stekker weer in het stopcontact en
schakel de kachel weer in.
Als de beveiliging de kachel opnieuw mocht
uitschakelen:
- Neem de stekker uit het stopcontact.
- Laat de kachel door uw leverancier of in een
Philips Service Centrum controleren.
13
Page 14

14
Schoonmaken
- Zet de keuzeschakelaar (C) in stand O om het
apparaat uit te schakelen.
- Neem de stekker uit het stopcontact.
- Wacht totdat de kachel voldoende is afgekoeld.
- U kunt de buitenkant van de kachel
schoonmaken met een vochtige doek. Zorg
ervoor dat er geen water in het apparaat komt.
- Met behulp van de stofzuiger (kleine zuigmond
met langharige borstel) kunt u het luchtinlaatrooster en het luchtuitstroomrooster
schoonmaken.
Wij raden u aan dit minstens twee keer per jaar
te doen.
Page 15

15
Descrizione generale (vedere fig. 1 a pag. 3)
A Griglia entrata aria
B Griglia uscita aria
C Selettore
D Termostato
E Spia
F Scomparto cavo
Come posizionare l’apparecchio in modo
sicuro
• Il termoventilatore non deve essere posizionato
immediatamente sopra una presa di corrente.
• Utilizzate il termoventilatore appoggiandolo
orizzontalmente sui quattro piedini (come
illustrato nella fig. 1).
• Per la vostra sicurezza e quella degli altri:
l’acqua e l’elettricità costituiscono una
combinazione pericolosa! Non usate il
termoventilatore in bagno o vicino ad una
piscina.
Assicuratevi che l’apparecchio non possa
cadere in acqua (vasca da bagno, lavandino,
doccia ecc.)
• Non usate il termoventilatore in camere con gas
esplosivi (es. benzina) o mentre vengono usate
colle o solventi infiammabili (ad esempio
mentre incollate o verniciate il parquet, oggetti
in PVC ecc.)
• Prevedete un ampio spazio attorno al
termoventilatore. Un’adeguata area di sicurezza
dovrebbe prevedere circa 50 cm. in alto, 20 cm.
ai lati e 120 cm. davanti all’apparecchio.
• Per evitare il surriscaldamento dell’apparecchio,
tenete libere le griglie di entrata e uscita aria.
Non appendete nulla davanti o sopra il
termoventilatore per evitare il rischio di
incendio.
IMPORTANTE
• Prima di collegare l’apparecchio, controllate che la tensione indicata sulla parte inferiore
corrisponda a quella della rete locale.
• Prima di usare l’apparecchio, leggete attentamente le istruzioni per l’uso guardando le
relative illustrazioni (pagina 3).
• L’apparecchio è provvisto di doppio isolamento e non deve necessariamente essere
collegato ad una presa provvista di messa a terra.
Se utilizzate una prolunga, vi consigliamo un modello a doppio cavo. Assicuratevi
comunque che le spine e il cavo siano in grado di sopportare alti voltaggi (16A-220V /
13A-240V AC).
Se usate la prolunga riavvolgibile ricordatevi di srotolata completamente per evitare il
surriscaldamento.
• Può verificarsi, soprattutto nel caso in cui l’apparecchio funzioni in posizione 2 oppure nel
caso siano accesi contemporaneamente più apparecchi elettrici, che un fusibile o il salvavita
interrompano l’erogazione della corrente elettrica. In questo caso il fusibile o il salvavita
potrebbero non essere in grado di sopportare un’erogazione di potenza elevata.
A questo punto potete collegare uno degli apparecchi ad un altra presa (che sia collegata a
un fusibile o un salvavita diverso) oppure far rivedere l’impianto elettrico da un elettricista
autorizzato.
• L’apparecchio non è adatto per essere utilizzato come principale forma di riscaldamento.
Utilizzatelo pertanto solo come fonte di calore supplementare.
• Per evitare il rischio di incendi o scariche elettriche, scegliete un posto sicuro per il
termoventilatore (Vedere “Come posizionare l’apparecchio in modo sicuro”).
• Non inserite nessun oggetto nell’apparecchio.
• Assicuratevi che l’apparecchio venga posizionato lontano dalla portata dei bambini.
• Attenzione: la griglia anteriore si riscalda durante l’uso!
• Toccate il termoventilatore con la mani perfettamente asciutte!
• Nel caso in cui il cavo di alimentazione fosse danneggiato, dovrà essere sostituito
esclusivamente presso un Centro di Assistenza Philips o un rivenditore autorizzato in
quanto possono essere necessari attrezzi e/o utensili speciali.
Italiano
Page 16

Controllate periodicamente le griglie per
eliminare l’eventuale polvere accumulata.
Nel caso di surriscaldamento, lo speciale
dispositivo di sicurezza spegnerà
automaticamente l’apparecchio.
• Tenete il cavo a distanza di sicurezza dalle
griglie dell’aria.
• Evitate che sostanze infiammabili o materiali
termosensibili si frappongano al getto d’aria.
• Non usate il termoventilatore su tappeti a
pelo lungo.
• Non usate il termoventilatore in posizione
verticale (vedere fig.).
Come riporre il cavo
Il cavo in eccesso può essere arrotolato attorno ai
quattro piedini posti nella parte posteriore del
termoventilatore. Ricordate comunque di srotolare
completamente il cavo durante l’uso.
Come usare l’apparecchio
Il selettore (C) e il termostato (D) vi permetteranno
di selezionare le funzioni seguenti:
Selettore (C)
O = “OFF” - Il ventilatore e le due resistenze
sono spenti.
> = “Aria fredda” - È acceso soltanto il
ventilatore.
1 = “Aria tiepida” per un riscaldamento
graduale. Posizione ECO (metà potenza):
sono accesi il ventilatore e una delle
resistenze.
2 = “Aria calda” per un riscaldamento rapido.
Piena potenza: sono accese le due resistenze
e il ventilatore.
Termostato (D)
Mediante il termostato è possibile impostare una
temperatura ambiente costante. Quando il
selettore è impostato in posizione 1 oppure 2, il
termoventilatore si accenderà automaticamente
(utilizzando rispettivamente la media o la piena
potenza) non appena la temperatura ambiente
scenderà al di sotto di quella impostata.
Non appena verrà raggiunta la temperatura
prevista, l’apparecchio si spegnerà
automaticamente.
Ruotate la manopola in senso orario per
impostare una temperatura superiore e in senso
antiorario per impostare una temperatura
inferiore.
E’ possibile regolare il termostato durante l’uso.
Per individuare l’impostazione ideale del
termostato:
- Per prima cosa, mettete la manopola nella
posizione massima (ruotate in senso orario fino
a quando si blocca la manopola).
- Non appena avrete raggiunto la temperatura
desiderata, ruotate la manopola in senso
antiorario fino a quando il termoventilatore non
si spegnerà.
y = posizione “Frost-free”. Questa posizione
corrisponde all’impostazione minima prevista
per il termostato (circa + 5∞C) e può essere
usata per non far gelare la zona posta nelle
immediate vicinanze dell’apparecchio. Es.:
per evitare che i tubi gelino, posizionate
l’apparecchio accanto a questi ultimi e
selezionate questa posizione.
Nota: Se utilizzate la posizione > “Aria fredda”,
ricordate di impostare il termostato nella posizione
massima.
Spia
- Quando l’apparecchio è collegato alla presa di
corrente e acceso in posizione >, 1 oppure 2,
si accenderà la spia (E).
- La spia rimarrà accesa fino a quando il
termoventilatore non verrà spento mettendo il
selettore (C) in posizione O oppure togliendo la
spina dalla presa.
- La spia rimarrà accesa anche quando verrà
raggiunta la temperatura impostata e il
termostato spegnerà l’apparecchio per indicare
che il termoventilatore è ancora collegato e in
posizione “acceso” (>, 1 oppure 2)
- Per lo stesso motivo, la spia rimarrà accesa
anche quando il dispositivo di sicurezza
interverrà spegnendo l’apparecchio.
Dispositivo di sicurezza contro il
surriscaldamento
Per evitare eventuali danni e rischi dovuti al
surriscaldamento, lo speciale dispositivo di
sicurezza interromperà l’erogazione di corrente
non appena le resistenze diventeranno troppo
calde.
In questo caso:
- controllate che non sia stato il termostato a
spegnere il termoventilatore. Impostate quindi il
termostato sulla posizione massima.
16
Page 17

17
Se il termoventilatore non si accende, significa
che è stato attivato il dispositivo di sicurezza.
- Togliete la spina dalla presa di corrente.
- Lasciate raffreddare il termoventilatore per circa
30 minuti.
- Controllate che il termoventilatore sia stato
posizionato in modo corretto.
- Controllate che il flusso d’aria non sia ostruito.
Se necessario, pulite le griglie con un
aspirapolvere.
- Rimettete la spina nella presa e riaccendete
l’apparecchio.
Nel caso il dispositivo di sicurezza spenga
nuovamente l’apparecchio:
- Togliete la spina dalla presa di corrente.
- Fate controllare il termoventilatore presso un
Centro d’Assistenza Philips o un rivenditore
autorizzato.
Pulizia
- Mettete il selettore (C) in posizione O per
spegnere l’apparecchio.
- Togliete la spina dalla presa di corrente.
- Lasciate raffreddare il termoventilatore.
- Per pulire l’esterno dell’apparecchio, potete
utilizzare un panno umido. Fate in modo che
non entri dell’acqua all’interno dell’apparecchio.
- Pulite regolarmente le griglie di entrata e uscita
aria (con un uso normale almeno due volte
all’anno) con un aspirapolvere, inserendo la
spazzola.
Page 18

18
Descripción general (fig. 1 de la página 3)
A Rejilla de entrada de aire
B Rejilla de salida de aire
C Interruptor selector
D Mando del termostato
E Lámpara piloto
F Almacenaje del cable de red.
Colocación segura
• El Termoventilador no debe ser colocado
inmediatamente debajo de un enchufe.
• Usen el Termoventilador solamente en posición
horizontal, apoyado sobre las cuatro patas (tal
como se muestra en la figura 1)
• Para su propia seguridad y la de los demás :
¡El agua y la electricidad forman una
combinación peligrosa!
No usen este Termoventilador en un cuarto de
baño o cerca de una piscina.
Asegúrense de que el aparato no pueda caer
en agua (bañera, lavabo, plato de la ducha ).
• No usen el calentador en habitaciones con
atmósfera inflamable (por ejemplo, gasolina) o
mientras estén aplicando colas o disolventes
inflamables (por ejemplo, cuando encolen o
barnicen suelos de parquet, PVC, etc.).
• Dejen un amplio espacio alrededor del
Termoventilador.
El área de seguridad que debe dejarse libre es
de 50 cm por encima y lateralmente, y 120 cm
de frente.
• Eviten el sobrecalentamiento del aparato,
manteniendo libres las rejillas de entrada y
salida del aire y no poniendo nada enfrente o
encima de ellas, ya que, de otra forma, hay
riesgo de incendio.
De vez en cuando, comprueben si hay polvo
acumulado en las rejillas.
Si ocurre un sobrecalentamiento, el dispositivo
de seguridad contra sobrecalentamientos
incorporado desconectará el aparato.
Importante
• Antes de conectar el aparato, comprueben que el voltaje indicado en la placa de
características se corresponde con el de su hogar.
• Lean cuidadosamente estas instrucciones, conjuntamente con las ilustraciones (página 3),
antes de usar el aparato.
• El aparato es de doble aislamiento y no necesita conectarse a un enchufe con toma de
tierra.
Si desean usar un cable prolongador, pueden hacerlo con uno de 2 conductores. No
obstante, asegúrense de que las clavijas y el cable son adecuados para una alta potencia
(16 A a 220 V / 13 A a 240 V AC).
Si emplean un cable enrollado, desenróllenlo completamente para evitar el
sobrecalentamiento.
• Puede suceder, especialmente si el Termoventilador funciona a la máxima potencia 2 y
además es conectado otro aparato eléctrico, que un fusible o un disyuntor corten la
corriente. En tal caso, el fusible o disyuntor no permiten esta alta potencia eléctrica.
Pueden conectar uno de los aparatos a otro circuito (que emplee otro fusible o disyuntor ) o
hacer revisar la instalación eléctrica por un electricista autorizado.
• El Termoventilador no ha sido diseñado para ser usado como sistema principal de
calefacción. Utilicen el aparato sólo para el uso para el cual ha sido proyectado, es decir,
como calefacción adicional en la casa.
• Para evitar riesgos de incendio y de choque eléctrico, elijan un lugar seguro para el
Termoventilador (ver la sección "Colocación segura").
• No introduzcan ningún objeto en el Termoventilador.
• Asegúrense de que los niños no puedan jugar con el aparato.
• Atención : La rejilla frontal se calienta durante el uso.
• Toquen el Termoventilador sólo con las manos secas.
• Si el cable de red de este aparato se deteriora, sólo puede ser sustituido por Philips o por
uno de sus Servicios Técnicos Oficiales, ya que se precisan herramientas y/o piezas
especiales.
Español
Page 19

• Mantengan el cable de red a una distancia
segura de las rejillas de entrada y de salida del
aire.
• No permitan que aerosoles, substancias
inflamables o materiales sensibles al calor
estén expuestos al flujo de aire caliente.
• ¡ No usen el Termoventilador sobre
alfombras de pelo muy largo ¡
• No usen el Termoventilador en posición
vertical (Vean el dibujo).
Almacenamiento del cable de red
El exceso de cable de red puede almacenarse
enrollándolo alrededor de las cuatro patas, en la
parte inferior del aparato.
Sin embargo, desenrollen completamente el cable
de red cuando el Termoventilador esté siendo
usado.
Cómo usar el aparato
El interruptor selector (C) y el mando del
termostato (D) les permiten seleccionar las
siguientes funciones :
Interruptor selector (C)
O = Parada (Off). Se desconectan tanto el
ventilador como los dos elementos
calefactores.
> = Aire frío (Cool air). Sólo se pone en
marcha el ventilador.
1 = Aire caliente (Warm air). Para un
calentamiento gradual
Posición ECO (potencia media = Half power) :
El ventilador y uno de los dos elementos
calefactores se ponen en marcha.
2 = Aire muy caliente (Hot air). Para un
calentamiento rápido. Potencia máxima (Full
power) : El ventilador y dos elementos
calefactores se ponen en marcha.
Mando del termostato (D)
Con el mando del termostato pueden fijar una
temperatura constante de la habitación.
Cuando el interruptor selector está colocado en la
posición 1 o en la posición 2, el Termoventilador
se pondrá automáticamente en marcha (usando,
respectivamente, la potencia media o máxima)
tan pronto como la temperatura de la habitación
caiga por debajo de la temperatura fijada.
Una vez se haya alcanzado la temperatura fijada,
el Termoventilador se desconectará.
Giren el mando en el sentido de las agujas del
reloj para ajustar a una temperatura más alta, o
en sentido contrario al de las agujas del reloj para
ajustar a una temperatura más baja.
Pueden ajustar el termostato durante su uso.
Para hallar el ajuste óptimo del termostato :
- Primero ajusten el mando a la posición máxima
(giren en el sentido de las agujas del reloj hasta
que el mando se pare).
- Tan pronto como la temperatura de la
habitación sea confortable, giren el mando
lentamente y en sentido contrario al de las
agujas del reloj, hasta que el Termoventilador
se desconecte.
y = Posición Anticongelación (Frost-free)
Esta posición se corresponde con el ajuste
mínimo del termostato (aproximadamente
5 ºC) y puede ser usada para mantener los
alrededores inmediatos del Termoventilador
libres de hielo.
Por ejemplo, para evitar la congelación de
tuberías, coloquen el Termoventilador cerca
de la tubería y seleccionen esta posición.
Nota : Cuando usen la posición de aire frío >, el
mando del termostato deberá estar en la posición
más alta.
Lámpara piloto
- Cuando el aparato esté enchufado a la red y
sea puesto en marcha al seleccionar >, 1 o
2, la lámpara piloto (E) se encenderá.
- La lámpara piloto permanecerá encendida
hasta que el aparato sea desconectado
colocando el interruptor selector (C) en posición
O, o desenchufándolo de la red.
- Para indicar que el calentador está todavía
enchufado y en la posición de " Marcha " (>, 1
o 2), la lámpara piloto permanecerá
encendida cuando se haya alcanzado la
temperatura seleccionada y el termostato
desconecte el aparato.
Por la misma razón, la lámpara piloto
permanecerá encendida cuando el dispositivo
de seguridad contra sobrecalentamientos
desconecte el aparato.
Dispositivo de seguridad contra
sobrecalentamientos
Para impedir deterioros y riesgos debidos al
sobrecalentamiento, el dispositivo de seguridad
contra sobrecalentamientos incorporado corta la
corriente tan pronto como los elementos
calefactores se calientan demasiado.
19
Page 20

20
Si esto sucediera :
- Primero, asegúrense de que no ha sido el
termostato lo que ha desconectado el
Termoventilador. Ajusten el termostato a la
posición máxima.
Si el Termoventilador no se pone en marcha,
significa que se ha activado el dispositivo de
seguridad.
- Desenchufen el aparato de la red.
- Dejen enfriar el Termoventilador durante
30 minutos.
- Comprueben que han colocado correctamente
el Termoventilador.
- Comprueben si algo está obstruyendo el flujo
de aire. Si es necesario, limpien las rejillas con
un aspirador.
- Vuelvan a enchufar el aparato a la red y
pónganlo en marcha de nuevo.
Si el dispositivo de seguridad desconecta otra vez
el Termoventilador :
- Desenchufen el aparato de la red.
- Hagan que el Termoventilador sea comprobado
por un Centro de Servicio Philips o por su
vendedor.
Limpieza
- Lleven el interruptor selector (C) a la posición O
para desconectarlo.
- Desenchufen el aparato de la red.
- Esperen que el Termoventilador se enfríe
suficientemente.
- Pueden limpiar el exterior del Termoventilador
con un paño húmedo. No permitan que el agua
penetre en el aparato.
- Limpien regularmente las rejillas de entrada y
de salida de aire (con un uso normal, al menos
dos veces al año) con un aspirador y usando el
cepillo accesorio.
Page 21

21
Descrição geral (fig. 1 na página 3)
A Grelha de entrada do ar
B Grelha de saída do ar
C Botão regulador
D Botão do termostato
E Lâmpada piloto
F Compartimento do fio
Condições de segurança
• O termoventilador não deve ser colocado mesmo
por debaixo de uma tomada eléctrica.
• O termoventilador só deverá ser utilizado na
horizontal, assente sobre os quatro pés (conforme
ilustrado na fig. 1).
• Para sua própria segurança e dos outros: a água e
a electricidade são uma combinação perigosa!
Não utilize na casa de banho ou perto duma
piscina.
Certifique-se que não existe o perigo do
termoventilador cair à água (banheira, bacia do
lavatório, cabina do duche, etc.).
• Não utilize em salas com gás explosivo (p.ex.:
petróleo) ou quando estiver a servir-se de cola ou
dissolventes inflamáveis (p.ex.: quando está a
colocar ou a envernizar soalhos, PVC, etc.).
• Deixe espaço livre à volta do termoventilador.
A área circundante deverá ter 50 cm para cima
e para os lados e 120 cm para a frente.
• Evite o sobreaquecimento do aparelho deixando
desimpedidas as grelhas de entrada e de saída
do ar: não pendure nada à frente ou sobre o
termoventilador - caso contrário, correrá o risco
de provocar um incêndio. De vez em quando,
verifique se as aberturas não acumularam pó.
Se houver sobreaquecimento, o dispositivo
incorporado de segurança desligará o aparelho.
• Mantenha o cabo de alimentação a uma distância
segura das grelhas de entrada e de saída do ar.
• Não utilize aerossóis nem substâncias ou
matérias inflamáveis sensíveis ao calor na
zona de circulação do ar quente.
• Não coloque o termoventilador sobre
alcatifas ou carpetes com pêlo muito alto.
• Não coloque o termoventilador na vertical
(ver figura).
Arrumação do cabo de alimentação
O fio pode ser enrolado à volta dos quatro pés do
termoventilador. Contudo, quando estiver a servir-se
do aparelho, o fio deverá estar completamente
desenrolado.
Importante
• Antes de ligar o aparelho, verifique primeiro se a voltagem nele indicada corresponde à
corrente local.
• Leia as instruções, acompanhando as ilustrações fornecidas (pág. 3), antes de se servir do
termoventilador pela primeira vez.
• O termoventilador é duplamente isolado, pelo que não se torna necessário ligá-lo a uma
tomada com terra. Se pretender utilizar uma extensão, poderá fazê-lo com um cabo de dois
fios. Contudo, deverá utilizar um cabo e uma tomada com suficiente potência (16A-220V / 13A240V AC). Se utilizar uma bobina, desenrole todo o fio para evitar o risco de
sobreaquecimento.
• Pode acontecer, principalmente se o aparelho estiver a funcionar na sua máxima potência 2 e
tiver outro aparelho eléctrico a trabalhar, que os fusíveis ou o quadro não suportem a carga.
Deverá, então, ligar os aparelhos em diferentes fases (ou noutro fusível). Se, mesmo assim,
tiver problemas, será melhor rever a instalação eléctrica por um técnico especializado.
• Este termoventilador não foi concebido para ser utilizado como a principal fonte de aquecimento
numa casa. Deverá, pois, servir-se dele apenas como uma fonte de calor adicional.
• Para evitar o risco de incêndio e de choques eléctricos, coloque em local seguro. (Consulte a
secção "Condições de segurança".)
• Não introduza quaisquer objectos dentro do aparelho.
• Nunca permita que as crianças brinquem com o termoventilador.
• Atenção: a grelha da frente aquece durante a utilização.
• Nunca toque no aparelho com as mãos molhadas ou húmidas.
• Se o fio se estragar, deverá ser substituído apenas pela Philips ou por um seu concessionário,
uma vez que a reparação requer ferramentas e/ou peças especiais.
Português
Page 22

Utilização
O comutador de selecção (C) e o botão do
termostato (D) permitem seleccionar as seguintes
funções:
Comutador de selecção (C)
O = "Off". A ventoinha e as duas resistências
estão desligados.
> = "Ar frio". Só trabalha a ventoinha.
1 = "Ar morno" para um aquecimento gradual.
Posição ECO (meia potência): a ventoinha e
uma das resistências estão ligados.
2 = "Ar quente" para um aquecimento rápido.
Potência total: a ventoinha e as duas
resistências estão ligados.
Botão do termostato (D)
Com o botão do termostato poderá conseguir uma
temperatura constante na sala.
Quando o comutador de selecção estiver na
posição 1 ou na posição 2, o aparelho liga-se
automaticamente (com potência média ou total,
respectivamente) logo que a temperatura da sala
baixar em relação à temperatura seleccionada.
Logo que a temperatura seleccionada for atingida,
o aparelho desliga-se.
Rode o botão para a direita para obter uma
temperatura mais elevada ou para a esquerda se
quiser baixar a temperatura.
Poderá regular a temperatura durante a utilização.
Para encontrar a programação ideal do termostato:
- Em primeiro lugar, coloque o botão do
termostato na posição máxima. (Rode para a
direita até parar.)
- Logo que a temperatura da sala estiver
confortável, rode o botão lentamente, para a
esquerda, até desligar.
y = Posição "anti-congelamento". Esta
posição corresponde à programação mínima
do termostato (isto é, aprox. +5ºC) e pode ser
utilizada para evitar que as proximidades
imediatas do termoventilador congelem, ou
seja, que os canos fiquem congelados.
Coloque o aparelho perto do cano e seleccione
esta posição.
Lâmpada piloto
- Quando o aparelho está ligado à corrente e se
põe a trabalhar, seleccionando >, 1 ou 2, a
lâmpada piloto (E) acende-se.
- A luz manter-se-á até se desligar o
termoventilador, colocando o selector (C) na
posição O ou desligando-o da corrente.
- Para indicar que o aparelho ainda está ligado e a
trabalhar nas posições >, 1 ou 2, a lâmpada
piloto mantém-se acesa quando atinge a
temperatura seleccionada e o termostato desliga
o termoventilador.
Pela mesma razão, a lâmpada piloto manter-seá acesa quando o dispositivo de segurança
contra sobreaquecimento desligar o aparelho.
Dispositivo de segurança contra
sobreaquecimento
Para evitar danos e riscos devidos a
sobreaquecimento, o dispositivo de segurança
incorporado corta automaticamente a energia logo
que as resistências ficam demasiado quentes.
Se isso acontecer:
- Verifique primeiro se não foi o termostato que
desligou o aparelho. Coloque o termostato na
posição máxima.
Se o aparelho não ligar, é sinal que o dispositivo
de segurança foi accionado.
- Retire a ficha da tomada de corrente.
- Deixe arrefecer durante 30 minutos.
- Certifique-se que o aparelho está correctamente
colocado.
- Verifique se nada está a obstruir o fluxo de ar.
Se necessário, limpe as grelhas com um aspirador.
- Volte a colocar a ficha na tomada e volte a ligar
o aparelho.
Se o dispositivo de segurança voltar a desligar o
termoventilador:
- Retire a ficha da tomada de corrente.
- Leve o aparelho a um Centro de Assistência
Philips ou ao seu distribuidor.
Limpeza
- Coloque o comutador de selecção (C) na
posição O para desligar o aparelho.
- Retire a ficha da tomada de corrente.
- Deixe o termoventilador arrefecer por completo.
- Poderá limpar o exterior do termoventilador com
um pano húmido. Não deixe entrar água para
dentro do aparelho.
- Limpe as grelhas de entrada e de saída do ar
com regularidade (numa utilização normal, pelo
menos duas vezes por ano) com um aspirador e
o bocal de escova.
22
Page 23

23
Generel beskrivelse (fig. 1 på side 3)
A Luftindtag
B Luftudblæsning
C Omskifterknap
D Termostatknap
E Kontrollampe
F Ledningsopbevaring
Sikker placering af varmeblæseren
• Varmeblæseren må ikke anbringes lige under
en stikkontakt.
• Apparatet må kun bruges, når det står vandret
og på alle fire støttefødder (som vist i fig. 1).
• Af hensyn til Deres egen og andres sikkerhed
skal De altid huske, at vand og elektricitet er en
farlig kombination! - Brug derfor aldrig
varmeblæseren i badeværelser eller nær en
swimmingpool.
Vær især sikker på, at den ikke kan falde ned i
vand (badekar, håndvaske, brusekabiner
o.s.v.).
• Brug aldrig varmeblæseren i rum med
antændelige dampe (f.eks. benzin) eller steder,
hvor der anvendes brandfarlig lim eller
opløsningsmidler (f.eks. i rum hvor der pålimes
eller renses parketgulve, PVC o.lign.).
• Sørg altid for, at der er rigeligt med plads
omkring apparatet. Der skal være 50 cm frit rum
ovenover og på siderne - og 120 cm foran
varmeblæseren.
• Undgå overophedning af varmeblæseren. Hold
åbningerne for luftindtag- og udblæsning fri.
Undlad således at hænge noget op foran eller
ovenover apparatet, da der ellers kan opstå
brandfare.
Kontrollér med jævne mellemrum, at
åbningerne er fri for støvansamlinger.
Hvis varmeblæseren bliver for varm, slukker
den indbyggede overophedningssikring
automatisk for apparatet.
• Hold ledningen i sikker afstand fra luftindtagsog udblæsningsåbningerne.
• Hold aerosolbeholdere, brandbare genstande
eller andre varmefølsomme ting væk fra den
varme luftstrøm.
• Stil ikke varmeblæseren på tæpper med
meget tyk luv.
• Varmeblæseren må aldrig anvendes
lodretstående (se fig.).
Vigtigt
• Før der sluttes strøm til apparatet, kontrolleres det, at spændingsangivelsen på typeskiltet
svarer til den lokale netspænding.
• Læs brugsanvisningen grundigt igennem og kig på illustrationerne (side 3), før apparatet
tages i brug.
• Apparatet er dobbeltisoleret og behøver derfor ingen ekstrabeskyttelse (jordforbindelse).
Hvis De er nødt til at bruge en forlængerledning, er en toleder-ledning tilstrækkelig, men
kontrollér, at både stik og ledning er beregnet til højt strømforbrug (16A).
Hvis De anvender en oprullelig forlængerledning, skal den rulles helt ud for at undgå, at
ledningen overophedes.
• Hvis varmeblæseren står i stilling 2, og der samtidig er andre elektriske apparater i brug,
kan det forekomme, at der går en sikring, og strømmen afbrydes. Dette skyldes, at sikringen
er overbelastet. Man kan prøve at slutte et af apparaterne til en anden stikkontakt (der er
sikret af en anden sikring). Kontakt eventuelt Deres el-installatør.
• Varmeblæseren er ikke beregnet til at blive anvendt som hovedvarmekilde. Den bør derfor
kun bruges som ekstra varmekilde i boligen.
• For at undgå brandfare og fare for elektrisk stød skal varmeblæseren anbringes et sikkert
sted (se afsnittet “Sikker placering af varmeblæseren”).
• Stik aldrig genstande af nogen art ind i varmeblæseren.
• Sørg for at børn ikke kan komme til at lege med apparatet.
• Pas på: Gitteret i udblæsningsåbningen bliver varmt under brugen.
• Rør altid kun ved apparatet, når Deres hænder er helt tørre.
• Hvis apparatets netledning beskadiges, må den kun udskiftes af Philips, da der kræves
specialværktøj og/eller specielle dele til udskiftningen.
Dansk
Page 24

24
Opbevaring af ledningen
Ledningen kan opbevares ved at rulle den op
omkring de fire fødder i bunden af
varmeblæseren. Rul dog aldrig ledning op
omkring fødderne når apparatet er i brug.
Sådan bruges apparatet
Ved hjælp af omskifterknappen (C) og termostatknappen (D) kan følgende funktioner vælges:
Omskifterknap (C):
O = Slukket. Både ventilatoren og de to
varmelegemer er slukkede.
> = Kold luft. Kun ventilatoren er tændt.
1 = Varm luft til langsom rumopvarmning.
Økonomi-stilling (halv kraft): Ventilatoren og
det ene varmelegeme er tændt.
2 = Meget varm luft til hurtig opvarmning.
Fuld kraft: Ventilatoren og begge
varmelegemer er tændt.
Termostatknap (D):
Ved hjælp af termostatknappen kan De indstille til
en konstant rumtemperatur.
Når omskifteren sættes i stilling 1 eller 2,
tænder varmeblæseren automatisk (halv eller fuld
kraft), når rumtemperaturen kommer ned under
den indstillede temperatur.
Så snart rumtemperaturen igen er oppe på det
ønskede, slukker apparatet. Man opnår højere
temperatur ved at dreje termostatknappen højre om
og lavere temperatur ved at dreje den venstre om.
De må gerne ændre termostatindstillingen,
medens apparatet er i brug.
Sådan findes den ideelle termostatindstilling:
- Sæt først termostatknappen i maksimum stilling
(drej den højre om til den ikke kan komme
længere).
- Når den ønskede rumtemperatur er nået, drejes
termostatknappen langsomt venstre om til det
punkt, hvor varmeblæseren slår fra.
y = Frostfri stilling. Denne stilling svarer til, at
termostatknappen er sat i minimum-stilling
(ca. +5° C) og kan bruges til at holde området
i umiddelbar nærhed af apparatet frostfrit,
f.eks. hvis man vil forhindre, at et vandrør
fryser til. Anbring varmeblæseren tæt på
vandrøret og vælg den frostfri stilling.
Bemærk: Hvis der vælges kold luft-stilling > , skal
termostatknappen være drejet til maksimum
stilling (helt højre om).
Kontrollampe
- Når der er sat strøm på varmeblæseren og
tændt for en af knapperne >, 1 eller 2, lyser
kontrollampen (E).
- Lampen bliver ved med at lyse, indtil der
slukkes for apparatet ved at sætte
omskifterknappen (C) i stilling O eller ved, at
der slukkes for strømmen til apparatet.
- For at indikere at der stadig er strøm på
varmeblæseren og tændt for den (>, 1 eller
2), lyser kontrollampen stadig, selvom den
ønskede temperatur er nået, og termostaten
har slukket for apparatet.
Af samme grund lyser kontrollampen også
fortsat, selvom sikkerhedsanordningen mod
overophedning har slukket for varmeblæseren.
Overophedningssikring
For at undgå beskadigelse og risiko i forbindelse
med overophedning afbryder den indbyggede
overophedningssikring for strømmen til
varmeblæseren i samme øjeblik, varmelegemerne
bliver for varme.
Hvis dette indtræffer, gøres følgende:
- Kontrollér først, at det ikke er termostaten, der
har afbrudt strømmen til apparatet. Drej
termostatknappen til maksimum stilling.
Hvis varmeblæseren ikke går i gang, er det
overophedningssikringen, der har afbrudt
apparatet.
- Tag stikket ud af stikkontakten.
- Lad varmeblæseren køle af i 30 minutter.
- Kontrollér, at De har placeret apparatet korrekt.
- Kontrollér, om der er noget, der blokerer for
luftstrømmen. Om nødvendigt renses
luftindtags- og udblæsningsgitrene med en
støvsuger.
- Sæt igen stikket i stikkontakten og tænd for
varmeblæseren.
Hvis overophedningssikringen igen afbryder for
varmeblæseren:
- Tag stikket ud af stikkontakten.
- Aflevér apparatet til eftersyn, enten via Deres
forhandler eller direkte til Philips.
Page 25

25
Rengøring.
- Sluk for apparatet ved at sætte
omskifterknappen (C) i stilling O.
- Tag stikket ud af stikkontakten.
- Vent derefter til varmeblæseren er kølet
tilstrækkeligt af.
- Udvendigt kan apparatet rengøres med en
fugtig klud. Sørg for at der aldrig kommer vand
ind i apparatet.
- Åbningerne til luftindtag og udblæsning
rengøres regelmæssigt (mindst 2 gange om
året ved normal brug af apparatet) ved hjælp af
en støvsuger med børstemundstykke.
Page 26

Generell beskrivelse (fig. 1 på side 3)
A Luftinntak
B Luftutløp
C Velgerbryter
D Termostatbryter
E Lampe som lyser når apparatet er på
F Rom for strømledning
Sikker plassering
• Varmeovnen må må ikke plaseres rett under
stikkontakten.
• Vifteovnen må bare brukes når den står
horisontalt på alle fire føttene (se fig. 1).
• For din egen og andres sikkerhet: vann og
elektrisitet er en farlig kombinasjon! Ikke bruk
ovnen i baderom eller i nærheten av
svømmebasseng.
Forsikre deg om at apparatet ikke kan falle i
vann (badekar, vask, dusjkabinett osv.).
• Ovnen må ikke brukes i rom med eksplosive
gasser (f.eks. bensin) eller i nærheten av
brennbart lim eller løsningsmiddel (f.eks. ved
liming eller lakkering av parkettgulv, PVC osv.).
• La det være god klaring rundt ovnen. Det må
være minst 50 cm klaring over ovnen og på
sidene, og 120 cm foran ovnen.
• Pass på at luftinntaket og -utløpet ikke
blokkeres, slik at apparatet ikke blir
overopphetet. Ikke heng noe foran eller over
ovnen, da dette medfører brannfare.
Fjern eventuelle støvansamlinger på grillene.
Hvis ovnen blir overopphetet, vil den innebygde
overopphetingsbryteren automatisk slå av ovnen.
• Hold strømledningen på trygg avstand fra
luftinntaket og -utløpet.
• Pass på at ikke aerosoler, brannfarlige stoffer
eller stoffer som er følsomme for varme,
befinner seg i den varme luftstrømmen.
• Ovnen må ikke brukes på langhårede
tepper.
• Varmeovnen må ikke brukes i vertikal
posisjon.
Lagre overflødig ledning
Ledning som blir til overs, kan legges rundt de fire
bena på undersiden av ovnen. Når ovnen er i
bruk, må imidlertid ledningen strekkes helt ut.
Viktig
• Kontroller at spenningen som er angitt på ovnen, er den samme som på strømnettet før du
setter i støpslet.
• Les denne bruksanvisningen nøye, og se på tegningene (side 3) før du bruker ovnen for
første gang.
• Apparatet er dobbeltisolert, og det er ikke nødvendig å koble det til en jordet stikkontakt.
Hvis du vil bruke skjøteledning, kan du bruke en totrådet ledning. Støpslet og ledningen må
tåle høye strømstyrker (16 A – 220 V / 13 A – 240 V vekselstrøm). Hvis du bruker
ledningssnelle, må du rulle ledningen helt ut for å unngå overoppheting.
• Det kan hende, særlig hvis ovnen står på 2 og et annet elektrisk apparat også står på, at en
sikring eller strømbryter kobler ut strømforsyningen. Dette kan skyldes at sikringen eller
strømbryteren ikke tillater en så stor strømstyrke. Du kan koble ett av apparatene til en
annen krets (som har en egen sikring eller strømbryter) eller få en elektriker til å se på det
elektriske opplegget.
• Ovnen er ikke beregnet til å være hovedvarmekilde i et hus. Bruk apparatet bare til formålet
det er beregnet for, som en ekstra varmekilde.
• Sett ovnen på et trygt sted, for å unngå fare for brann og elektrisk støt. (Se avsnittet "Sikker
plassering").
• Stikk ikke gjenstander inn i ovnen.
• Pass på at barn ikke kan leke med apparatet.
• Obs! Frontgrillen blir varm når ovnen er på.
• Vær tørr på hendene når du tar i ovnen.
• Hvis strømledningen til apparatet blir skadet, må den bare byttes av Philips eller en
serviceagent, da det kreves spesielle verktøy og/eller deler.
Norsk
26
Page 27

Slik bruker du ovnen
Med velgerbryteren (C) og termostatbryteren (D)
kan du velge følgende funksjoner:
Velgerbryter (C)
O = "Av". Både viften og de to
varmeelementene er slått av.
> = "Kald luft". Bare viften er på.
1 = "Svak varme" for gradvis oppvarming.
Økonomistilling (halv effekt): viften og det ene
av de to varmeelementene er på.
2 = "Sterk varme" for rask oppvarming. Full
effekt: viften og de to varmeelementene er på.
Termostatbryter (D)
Med termostatbryteren kan du stille inn en
konstant romtemperatur. Når velgerbryteren står
på 1 eller 2, slår ovnen seg automatisk på (med
henholdsvis halv og full effekt) så snart
romtemperaturen faller til under den innstilte
temperaturen. Så snart den innstilte temperaturen
er nådd, slår ovnen seg av. Vri bryteren med
klokken hvis du vil stille inn høyere temperatur,
eller mot klokken hvis du vil stille inn lavere
temperatur. Du kan endre termostatinnstillingen
mens ovnen er på.
Slik kan du finne en passende termostatinnstilling:
- Still først inn på høyeste temperatur (vri
bryteren med klokken så langt det går).
- Så snart temperaturen er behagelig, vrir du
bryteren sakte mot klokken til ovnen slår seg
av.
y = "Frostfri". Denne innstillingen svarer til den
laveste termostatinnstillingen (ca. + 5 °C) og
kan brukes til å holde området umiddelbart
rundt ovnen fritt for frost. Hvis du f.eks. skal
forhindre at et vannrør fryser, kan du sette
ovnen ved røret og velge denne innstillingen.
Merk: Når du bruker innstillingen for kald luft >,
må termostatbryteren være i høyeste stilling.
Lampe
Når apparatet er koblet til strømnettet og slått på
med innstillingen >, 1 eller 2, lyser lampen (E).
Lampen lyser til apparatet slås av ved at
velgerbryteren (C) settes på O eller støpslet tas
ut.
For å vise at ovnen er tilkoblet og slått på (står på
>, 1 eller 2), lyser lampen også når innstilt
temperatur er nådd og termostaten slår av
apparatet. Av samme grunn lyser lampen også
når overopphetingsbryteren slår av apparatet.
Overopphetingsbryter
For å hindre skader og fare på grunn av
overoppheting er apparatet utstyrt med en
innebygd overopphetingsbryter som kobler fra
strømmen hvis varmeelementene blir for varme.
Hvis dette skjer:
- Kontroller først at det ikke var termostaten som
koblet ut varmeovnen. Sett termostaten på
høyeste stilling.
Hvis ovnen ikke slår seg på, er
overopphetingsbryteren aktivert.
- Ta ut støpslet.
- La ovnen kjøles ned i 30 minutter.
- Kontroller at ovnen er riktig plassert.
- Kontroller at luftstrømmen ikke er blokkert.
Rengjør om nødvendig grillene med støvsuger.
- Sett i støpslet og slå ovnen på igjen.
Hvis overopphetingsbryteren slår av ovnen på
nytt:
- Ta ut støpslet
- Få ovnen kontrollert hos et Philipsservicesenter eller hos forhandleren.
Rengjøring
- Sett velgerbryteren (C) på O slik at ovnen slås
av.
- Ta ut støpslet.
- Vent til ovnen blir tilstrekkelig kald.
- Ovnen kan rengjøres utvendig med en fuktig
klut. Pass på at det ikke renner vann inn i
ovnen.
- Rengjør grillene ved luftinntak og -utløp
regelmessig (minst to ganger i året ved normal
bruk) med støvsuger. Bruk børstemunnstykke.
27
Page 28

28
Värmefläktens delar, fig 1 på sid 3
A Luftintag
B Luftutsläpp
C Funktionsväljare
D Termostatratt
E Kontrollampa
F Förvaringsutrymme för sladden
Säker placering
• Värmefläkten får inte placeras omedelbart
under ett vägguttag.
• Värmefläkten får endast användas horisontellt
stående på sina fyra fötter, fig 1.
• För din egen och andras säkerhet: vatten och
elektricitet är en farlig kombination.
Värmefläkten får endast användas i
bostadsrum. Den får inte användas i fuktiga
rum såsom i badrum, duschrum, bastu eller i
närheten av en pool och inte heller som
kupévärmare i fordon. Under inga
omständigheter får värmefläkten placeras så att
den kan falla i t ex badkar, tvättfat, duschkabin
eller likande.
• Använd inte värmefläkten i rum där det kan
finnas brännbara eller explosiva gaser t ex
bensin, fernissa och klister för lackerings- eller
limningsarbeten.
• Lämna 50 cm fritt utrymme ovanför och på
sidorna samt 1,20 m fritt utrymme framför
värmefläktens utblåsningsöppning.
• Värmefläkten blir överhettad om inte
insugnings- och/eller utblåsningsöppningen är
helt fri. Häng ingenting framför eller ovanför
värmefläkten. Kontrollera också nu och då att
insugnings- och utblåsningsöppningarna är fria
från damm.
Blir värmefläkten överhettad löser ett inbyggt
överhettningsskydd ut och stänger av den.
• Placera värmefläkten så att inte sladden
befinner sig i närheten av insug och
utblåsningsöppningen.
• Låt inte sprayburkar, brännbara ämnen eller
andra värmekänsliga föremål stå i den varma
luftströmmen.
Viktigt
• Före användning, kontrollera att uppgiften om spänning (V = Volt) på typskylten
överensstämmer med den aktuella nätspänning. Om det inte står rätt spänning på
typskylten, vänd dig då till inköpsstället.
• Läs denna bruksanvisning noggrant och studera samtidigt bilderna på sidan 3 innan du
börjar använda apparaten.
• Värmefläkten är dubbelisolerad och behöver inte anslutas till ett jordat vägguttag. Om
förlängningssladd behövs måste denna tåla en strömstyrka av (16A-220V / 13A-240V).
Om förlängningssladd med sladdvinda används skall den vara utrullad, följ bruksanvisning
som medföljer sladdvindan.
• Om säkringen löser ut - "proppen går" - kan detta bero på att även någon annan elektrisk
apparat är kopplad till samma propp och strömförbrukningen blir för stor. Anslut i så fall den
andra apparaten till ett vägguttag, som tillhör en annan propp. Om säkringen trots detta
löser bör du kontakta en behörig elektriker.
• Värmefläkten är inte avsedd att användas som huvudvärmekälla utan i första hand som extra
värmekälla för att värma och sprida varm luft i bostadsrum. Använd värmefläkten endast för
detta ändamål.
• För att undvika brandrisk och elektriska stötar välj en säker plats för värmefläkten. Se
avsnitt "Säker placering".
• Stick inte in föremål i värmefläkten, framför allt inte metallföremål som t ex verktyg.
• Se till att inte barn leker med värmefläkten.
• Observera: Skyddsgallret på fronten blir hett när värmen är påslagen.
• Vidrör värmefläkten endast med torra händer.
• Värmefläkten får inte täckas över. Då kan brandfara uppstå.
• Om nätsladden skadas måste du vända dig till någon av Philips auktoriserade verkstäder
eftersom speciella delar och verktyg krävs.
Svenska
Läs först hela bruksanvisningen! Spara den! Spara köpbevis och kvitto!
Page 29

y = Antifrostläge. Det här läget motsvarar
termostatens minimiläge (ungefär +5°C / 41°F)
och kan användas för att hålla temperaturen i
värmefläktens omedelbara närhet frostfri. Ställ
värmefläkten nära den plats där temperaturen
måste hållas över fryspunkten till exempel
nära ett rör som kan frysa.
Observera att termostatratten skall stå i sitt högsta
läge när du valt kalluftläget >.
Kontrollampan
- Kontrollampan (E) lyser när värmefläkten är
ansluten till ett eluttag och
funktionsomkopplaren står i >, 1 eller 2.
- Kontrollampan lyser tills värmefläkten stängs av
genom att funktionsväljaren (C) ställs i läge O
eller om stickproppen dras ut ur vägguttaget.
- Kontrollampan lyser så länge värmefläkten är
ansluten till ett eluttag och
funktionsomkopplaren står i >, 1 eller 2 även
om den inställda temperaturen har uppnåtts och
termostaten stängt av värmefläkten.
Av samma skäl kommer kontrollampan att lysa
även om överhettningsskyddet löst ut och
värmefläkten stannat.
Överhettningsskydd
Värmefläkten är skyddad mot överhettning med
ett inbyggt överhettningsskydd som löser ut och
stänger av om värmeslingorna skulle bli för
varma.
Gör så här om det händer:
- Kontrollera först att det inte var termostaten
som stoppade värmefläkten. Vrid
termostatratten till max läget.
Om inte värmefläkten startar har
överhettningsskyddet löst ut.
- Dra ut stickproppen ur vägguttaget.
- Låt värmefläkten stå och kallna i 30 minuter.
- Kontrollera att värmefläkten är placerad på rätt
sätt.
- Kontrollera om damm eller något annat hindrar
luftströmmen. Om nödvändigt rengör
skyddsgallren med dammsugare, se avsnittet
"Rengöring"
- Sätt stickproppen i vägguttaget och starta
värmefläkten igen.
• Ställ inte värmefläkten på matta med lång
lugg.
• Använd inte värmefläkten stående upprätt
på luftutsläppet (se bild).
Förvaringsutrymme för nätsladden
Överskjutande del av nätsladden kan lindas upp
runt de fyra fötterna under värmefläkten.
Observera att nätsladden ska vara upplindad helt
när värmefläkten används.
Användning
Med funktionsväljaren (C), termostatratten (D) kan
följande inställningar göras:
Funktionsväljaren (C)
O = Avstängd. Både fläkten och de två
värmeelementen är avstängda.
> = Kalluft. Endast fläkten går, värmen är
avstängd.
1 = Varmluft. För gradvis uppvärmning.
ECO läge (halv effekt): Fläkten och en
värmeslinga är inkopplade.
2 = Het luft. För snabb uppvärmning.
Full effekt: Fläkten och två värmeslingor är
inkopplade.
Termostatratten (D)
Med termostatratten kan man välja
rumstemperatur, som sedan hålls konstant med
små variationer.
Med funktionsväljaren i läge 1 eller 2 startar
fläkten automatiskt så snart temperaturen i
rummet blir lägre än vad som motsvaras av
termostatrattens läge och blåser varmluft med
halv eller full effekt.
Så snart rumstemperaturen motsvarar inställt läge
stannar fläkten och värmen stängs av.
Vrid termostatratten medurs för högre
temperaturinställning eller moturs för lägre
temperaturinställning.
Termostatratten kan ställas om medan fläkten är
igång.
Gör så här för att finna den idealiska
termostatinställningen:
- Vrid termostatratten till maximalt läge. Vrid
medurs så långt det går.
- Så snart du uppnått lämplig rumstemperatur
vrid termostatratten långsamt moturs tills
värmefläkten stannar.
29
Page 30

30
Om överhettningsskyddet löser ut igen:
- Drag ut stickproppen ur vägguttaget.
- Lämna värmefläkten till av Philips
rekommenderad serviceverkstad eller
återförsäljare för kontroll.
Rengöring
- Ställ funktionsväljaren (C) i läge O avstängd.
- Dra ut stickproppen ur vägguttaget.
- Låt värmefläkten kallna.
- Värmefläktens utsida kan torkas av med en väl
urvriden fuktig trasa. Se till att inget vatten
kommer in i värmefläkten.
- Rengör skyddsgallren vid insugnings- och
utblåsningsöppningarna med en dammsugare.
Använd dammsugarens dammborste.
Skyddsgallren skall vid normal användning
rengöras minst två gånger om året.
Page 31

31
Laitteen osat (kuva 1, sivu 3)
A Ilmanottoaukko
B Puhallusaukko
C Toimintatavan valitsin
D Lämpötilanvalitsin
E Merkkivalo
F Liitosjohdon säilytystila
Turvallinen asennuspaikka
• Lämpötuuletinta ei saa sijoittaa aivan
pistorasian alle.
• Käytä lämpötuuletinta vain vaaka-asennossa,
niin että se seisoo neljän jalkansa varassa
(kuten kuvassa 1).
• Muista, että sähkölaitteet ja vesi ovat vaarallinen
yhdistelmä! Noudata tarkoin ohjeita! Älä käytä
lämpötuuletinta kosteassa tilassa (kylpy- tai
suihkuhuoneessa). Pidä erityisesti huoli, ettei
laite pääse putoamaan veteen (kylpyamme,
pesuallas, suihkuallas).
• Älä käytä lämpötuuletinta tiloissa, joissa on
räjähtäviä kaasuja (esim. bensiiniä) tai joissa
käytetään helposti syttyviä liimoja tai liuottimia
(esim. lattiapäällysteitä liimattaessa tai parkettia
lakattaessa jne.).
• Jätä lämpötuulettimen ympärille riittävästi vapaata
tilaa. (Yläpuolelle ja sivuille noin 50 cm ja eteen
120 cm.)
• Estääksesi ylikuumenemisen pidä laitteen
ilmanotto- ja puhallusaukot vapaina: älä ripusta
mitään laitteen eteen tai yläpuolelle. Varmista,
ettei laitteen päälle pääse putoamaan mitään.
Puhdista aukot ajoittain pölystä. Jos laite
ylikuumenee, sisäänrakennettu lämpötilanrajoitin
katkaisee laitteen toiminnan.
• Aseta liitosjohto riittävän kauas puhallusaukoista.
• Pidä huoli, että aerosolipulloja tai kuumalle arkoja
materiaaleja ei ole kuuman ilmavirran tiellä.
• Älä käytä lämpötuuletinta pitkänukkaisten
mattojen päällä.
• Lämpötuuletinta ei saa käyttää
pystyasennossa (ks. kuva).
Suomi
Tärkeää
• Tarkista ennen kuin yhdistät laitteen sähköverkkoon, että laitteen arvokilvessä mainittu
käyttöjännite vastaa paikallista verkkojännitettä.
• Lue käyttöohje ja katsele kuvat (sivu 3), ennen kuin otat laitteen käyttöön.
• Laite on suojaeristetty eikä sitä tarvitse kytkeä maadoitettuun pistorasiaan.
Jatkojohdoksi riittää 2-johtiminen johto. Pistokkeiden ja johdon tulee kuitenkin kestää
riittävästi tehoa (16 A/220 V). Käytettäessä johtokelaa on johto kierrettävä kokonaan auki
ylikuumenemisen välttämiseksi.
• On mahdollista, erityisesti jos laite käy maksimiteholla 2 ja käytetään samaan aikaan jotain
toista sähkölaitetta, että sulake palaa. Tämä merkitsee sitä, että sulake tai sähköjohdot eivät
kestä näin suurta kuormitusta. Tällöin toinen laitteista on kytkettävä toiseen pistorasiaan
(toisen sulakkeen piiriin) tai sähköasentajan on muutettava asennusta.
• Lämpötuuletin on tarkoitettu huonetilojen lisälämmittimeksi, sitä ei saa käyttää muuhun
tarkoitukseen.
• Valitse sähkö- ja paloturvallisuuden kannalta sopiva paikka. (Katso kohtaa Turvallinen
asennuspaikka.)
•Älä työnnä mitään vieraita esineitä lämpötuulettimeen.
•Älä anna lasten leikkiä laitteella.
• Huom. Eturitilä kuumenee käytössä!
• Koske lämpötuulettimeen vain kuivin käsin.
• Tarkista liitosjohdon kunto säännöllisesti. Jos tämän laitteen verkkoliitosjohto vaurioituu, se
on korvattava erikoisjohdolla. Ota yhteys Philips-myyjään tai Philipsin Kodinkoneiden
valtuuttamaan huoltoon.
• Pidä huoli, etteivät terävät kulmat, kuumuus tai kemikaalit pääse vahingoittamaan
liitosjohtoa.
•Älä taivuta liitosjohtoa tiukalle mutkalle.
•Älä käytä roiskesuojaamatonta laitetta kosteissa tiloissa.
• Irrota pistotulppa pistorasiasta, aina kun laitetta ei käytetä.
• Irrota pistotulppa pistorasiasta aina ennen hoito- ja puhdistustoimenpiteitä.
• Varo laitteen kuumaa pintaa, laitteesta purkautuvaa kuumaa ilmaa.
Page 32

Liitosjohdon säilytys
Johto voidaan kiertää säilytyksen ajaksi neljän
jalan ympärille. Kun laitetta käytetään, johto on
kierrettävä kokonaan auki.
Käyttö
Toimintatavan valitsimella (C) ja
lämpötilanvalitsimella (D) voidaan valita seuraavat
toiminnot:
Toimintatavan valitsin (C)
O = "Katkaistu". Sekä tuuletin että molemmat
kaksi lämmitysvastusta on kytketty pois
toiminnasta.
> = "Kylmää ilmaa". Vain tuuletin toimii.
1 = "Lämmintä ilmaa" vähittäiseen
lämmittämiseen. Säästöasento (puoliteho):
Tuuletin ja vain yksi lämmitysvastus toimivat.
1 = "Kuumaa ilmaa" nopeaan lämmittämiseen.
Täysteho: Tuuletin ja molemmat kaksi
lämmitysvastusta toimivat.
Lämpötilanvalitsin (D)
Termostaatti pitää huoneen lämpötilan tasaisena.
Kun toimintatavan valitsin asetetaan asentoon 1 tai
asentoon 2, lämpötuuletin käynnistyy (vastaavasti
joko puoliteholle tai täysteholle) heti kun huoneen
lämpötila laskee asetetun lämpötilan alle.
Kun asetettu lämpötila on saavutettu,
lämpötuulettimen toiminta katkeaa.
Asetettu lämpötila nousee käännettäessä
lämpötilanvalitsinta myötäpäivään ja laskee
käännettäessä vastapäivään.
Lämpötilanvalitsinta voidaan kääntää laitteen
käydessä.
Sopivan lämpötila-asetuksen löytäminen:
- Käännä lämpötilanvalitsin ensin suurimpaan
asentoon. (Käännä myötäpäivään niin pitkälle
kuin valitsin menee.)
- Kun huoneen lämpötila on sopiva, käännä
lämpötilanvalitsinta hitaasti vastapäivään,
kunnes lämpötuulettimen toiminta katkeaa.
y = Peruslämpöasento
Tämä asento vastaa lämpötilanvalitsimen
minimiasetusta (eli noin +5°C) ja sitä voidaan
käyttää pitämään lämpötuulettimen lähiympäristö
jäätymättä, esim. estää vesiputken jäätyminen.
Laita lämpötuuletin lähelle sitä kohtaa, joka ei saa
jäätyä.
Huomaa: Kun käytetään kylmäilma-asentoa >,
lämpötilanvalitsimen tulee olla suurimmassa
asennossa.
Merkkivalo
- Kun laite on liitetty sähköverkkoon ja
käynnistetty valitsemalla asento >, 1 tai 2,
merkkivalo (E) syttyy.
- Merkkivalo palaa niin kauan, kunnes laitteen
toiminta katkaistaan asettamalla toimintatavan
valitsin (C) asentoon O tai pistotulppa irrotetaan
pistorasiasta.
- Osoituksena siitä, että lämpötuuletin on liitetty
sähköverkkoon ja kytketty toimintaan (>, 1 tai
2), merkkivalo jää palamaan, vaikka asetettu
lämpötila on saavutettu ja termostaatti
katkaisee laitteen toiminnan.
Samasta syystä merkkivalo jää palamaan, kun
lämpötilanrajoitin katkaisee laitteen toiminnan.
Lämpötilanrajoitin
Estääkseen ylikuumenemisesta aiheutuvia
vaaroja ja vahinkoja laitteen sisäänrakennettu
lämpötilanrajoitin katkaisee virran heti kun
lämmitysvastukset kuumenevat liikaa.
Jos näin tapahtuu:
- Varmista ensin, ettei termostaatti ole katkaissut
laitteen toimintaan. Aseta lämpötilanvalitsin
maksimiasentoon.
Jos lämpötuuletin ei käynnisty, lämpötilanrajoitin
on toiminut.
- Irrota pistotulppa pistorasiasta.
- Anna lämpötuulettimen jäähtyä 30 minuuttia.
- Tarkista, että lämpötuulettimen paikka on sopiva.
- Tarkista estääkö jokin ilman kiertoa.
Puhdista tarvittaessa ritilät pölynimurilla.
- Yhdistä pistotulppa takaisin pistorasiaan ja
käynnistä lämpötuuletin uudelleen.
Jos lämpötilanrajoitin katkaisee toiminnan
uudelleen:
- Irrota pistotulppa pistorasiasta.
- Toimita laite myyjälle tai Philips Kodinkoneiden
valtuuttamaan huoltoon tarkistettavaksi.
Puhdistus
- Katkaise toiminta asettamalla toimintatavan
valitsin (C) asentoon O.
- Irrota pistotulppa pistorasiasta.
- Anna lämpötuulettimen ensin jäähtyä riittävästi.
- Voit pyyhkiä lämpötuulettimen ulkovaipan kostealla liinalla. Laitteen sisään ei saa päästä vettä.
- Puhdista ilmanotto- ja puhallusaukot
säännöllisesti (yleensä vähintään kaksi kertaa
vuodessa) pölynimurilla.
Oikeus muutoksiin varataan.
32
Page 33

Γενική περιγραφή (εικ. 1, σελ. 3)
A Γρίλιεσ εισδου του αέρα
B Γρίλιεσ εξδου του αέρα
C ∆ιακπτησ επιλογήσ
D Θερµοστάτησ
E Eνδεικτικ φωτάκι
F Aποθήκευση καλωδίου τάσεωσ
Aσφαλήσ τοποθέτηση τησ συσκευήσ
• Μην τοποθετείτε το αερθερµο κάτω απ
πρίζα παροχήσ ρεύµατοσ.
• Xρησιµοποιείτε τη συσκευή µνο ταν είναι
τοποθετηµένη σε ασφαλή οριζντια
θέση,στα τέσσερα τησ πδια (εικ. 1).
• Για τη δική σασ ασφάλεια και των άλλων,
µην ξεχνάτε τι, το νερ και ο ηλεκτρισµσ
είναι επικίνδυνοσ συνδυασµσ. Γι’ αυτ µη
χρησιµοποιείτε τη συσκευή στο λουτρ σασ
ή κοντά σε πισίνα.
Προσέξτε η συσκευή να µην πέσει µέσα σε
νερ (µπανιέρα, νιπτήρα, νεροχύτη κ.λπ.).
33
Eλληνικά
Σηµαντικ
• Πριν συνδέσετε τη συσκευή στην τάση βεβαιωθείτε τι η τάση που αναφέρεται στην
πινακίδα µε τον τύπο τησ συσκευήσ είναι ίδια µε την τάση του σπιτιού σασ.
• ∆ιαβάστε τισ οδηγίεσ χρήσεωσ προσεκτικά, βλέποντασ και τισ αντίστοιχεσ εικνεσ πριν
χρησιµοποιήσετε τη συσκευή.
• H συσκευή έχει διπλή µνωση, γι’ αυτ δεν χρειάζεται να την συνδέσετε σε γειωµένη πρίζα.
Aν θέλετε να χρησιµοποιήσετε επέκταση καλωδίου, χρησιµοποιείστε καλώδιο που έχει δύο
εσωτερικά καλώδια. µωσ βεβαιωθείτε τι τα βύσµατα και το καλώδιο είναι κατάλληλα για
υψηλή ισχύ (16A - 220V/13A-240V AC).
Aν χρησιµοποιήσετε καλώδιο τύπου πηνίου, παρακαλούµε ξετυλίξτε το τελείωσ για να µην
υπερθερµανθεί.
• Mπορεί να συµβεί κυρίωσ ταν η συσκευή λειτουργεί στη θέση 2 και λειτουργήσετε
συγχρνωσ και άλλη ηλεκτρική συσκευή, η ασφάλεια ή το ρελέ θα διακψει την παροχή
τάσεωσ, διτι δεν επιτρέπουν την παροχή υψηλήσ τάσεωσ.
Mπορείτε να συνδέσετε µία απ τισ συσκευέσ σε άλλο κύκλωµα (που χρησιµοποιεί άλλη
ασφάλεια ή ρελέ) ή να καλέσετε ηλεκτρολγο να ελέγξει την εγκατάσταση του σπιτιού σασ.
• H συσκευή αυτή δεν είναι κατάλληλη για να χρησιµοποιείτε σαν κύρια πηγή θέρµανσησ.
Xρησιµοποιείστε την µνον για το σκοπ που προορίζεται δηλ. για να έχετε επιπρσθετη
θέρµανση στο δωµάτιο σασ.
• Για να αποφύγετε τον κίνδυνο φωτιάσ ή ηλεκτροπληξίασ τοποθετείστε τη συσκευή σε
ασφαλέσ µέροσ (βλέπε παρακάτω «Aσφαλή θέση τησ συσκευήσ»).
• Mη βάζετε αντικείµενα µέσα στη συσκευή
• Mην αφήνετε τα παιδιά να παίζουν µε τη συσκευή.
• Προσοχή: Oι εµπρσθιεσ γρίλιεσ ζεσταίνονται κατά τη χρήση.
• Mην αγγίζετε τη συσκευή µε βρεγµένα χέρια.
• Aν το καλώδιο τάσεωσ τησ συσκευήσ υποστεί βλάβη, πρέπει να αντικατασταθεί απ την
Philips ή εξουσιοδοτηµένο αντιπρσωπ τησ, διτι χρειάζονται εργαλεία και/ή
ανταλλακτικά.
• Mη χρησιµοποιείτε τη συσκευή σε χώρουσ,
που υπάρχουν υλικά που µπορεί να
εκραγούν (π.χ. πετρέλαιο) ή ταν
χρησιµοποιείτε εύφλεκτη κλλα ή διαλυτικά
(π.χ. ταν κολλάτε ή βερνικώνετε παρκέ
δαπέδων, PVC κ.λπ.).
• Aφήστε αρκετ ελεύθερο χώρο γύρω απ
τη συσκευή. Για την ασφάλεια σασ αφήστε
τουλάχιστον 50 εκ./20” στο επάνω µέροσ και
στα πλάγια και 120 εκ. / 47” εµπρσ.
• Για να µην υπερθερµανθεί η συσκευή, οι
γρίλιεσ εισδου και εξδου του αέρα,
πρέπει να είναι ελεύθερεσ. Γι’ αυτ µην
κρεµάτε τίποτα µπροστά ή επάνω απ τη
συσκευή, γιατί µπορεί να προκληθεί φωτιά.
Eλέγχετε τισ γρίλιεσ κατά διαστήµατα
µήπωσ έχει µαζευτεί σκνη.
• Aν η συσκευή υπερθερµανθεί η εσωτερική
ασφάλεια θα τη θέσει εκτσ λειτουργίασ.
• ∆ιατηρείτε το καλώδιο τάσεωσ σε ασφαλή
απσταση απ τισ γρίλιεσ εισδου και
εξδου του αέρα.
Page 34

34
• Mην αφήνετε αεροζλ, εύφλεκτα υλικά ή
ύλικά που είναι ευαίσθητα στη θερµτητα
να είναι στη ροή του ζεστού αέρα.
• Mη χρησιµοποιείτε τη συσκευή επάνω σε
χαλιά που έχουν πάρα πολύ µεγάλο χνούδι.
• Μη χρησιµοποιείτε το αερθερµο σε ρθια
θέση. (βλέπε εικνα).
Aποθήκευση του καλωδίου τάσεωσ
Mπορείτε να αποθηκεύσετε το καλώδιο που
περισσεύει τυλίγοντασ το γύρω απ τα
τέσσερα πδια στο κάτω µέροσ τησ συσκευήσ.
µωσ, ταν χρησιµοποιείτε τη συσκευή,
ξετυλίξτε το καλώδιο τελείωσ.
Πώσ θα χρησιµοποιήσετε τη συσκευή
Mε τον διακπτη C και τον θερµοστάτη D
µπορείτε να επιλέξετε τισ παρακάτω
λειτουργίεσ:
∆ιακπτη επιλογήσ C
O = «OFF» O ανεµιστήρασ και τα δύο
θερµαντικά στοιχεία είναι εκτσ
λειτουργίασ
> = «Cool air» (Kρύοσ αέρασ). Mνο ο
ανεµιστήρασ είναι σε λειτουργία.
1 = «Warm air» (θερµσ αέρασ) για βαθµιαίο
ζέσταµα. Θέση E (µισή ισχύσ): ο
ανεµιστήρασ και ένα απ τα θερµαντικά
στοιχεία είναι σε λειτουργία.
2 = «Hot air» (ζεστσ αέρασ), για γρήγορο
ζέσταµα. Πλήρησ ισχύσ: ο ανεµιστήρασ και
τα δύο θερµαντικά στοιχεία είναι σε
λειτουργία.
Θερµοστάτησ (D). Mε τον θερµοστάτη
µπορείτε να ρυθµίσετε σταθερή θερµοκρασία
δωµατίου.
ταν βάλετε τον θερµοστάτη στη θέση 1 ή
2, η συσκευή αρχίζει να λειτουργεί
αυτοµάτωσ (µε τη µισή ή την πλήρη ισχύ
αντίστοιχα) µλισ η θερµοκρασία του
δωµατίου πέσει κάτω απ την ρυθµιζµενη
θερµοκρασία.
Mλισ η συσκευή φθάσει την ρυθµισµένη
θερµοκρασία θα σβήσει (OFF).
Γυρίστε τον θερµοστάτη προσ τα δεξιά για
µεγαλύτερη θερµοκρασία ή προσ τα αριστερά
για µικρτερη.
Mπορείτε να ρυθµίζετε τον θερµοστάτη κατά
τη χρήση τησ συσκευήσ.
Για να βρείτε την ιδανική ρύθµιση του
θερµοστάτη
- Πρώτα γυρίστε τον θερµοστάτη στην
µέγιστη θέση (γυρίστε τον προσ τα δεξιά
µέχρι να σταµατήσει).
- Mλισ η θερµοκρασία γίνει άνετη, γυρίστε
τον θερµοστάτη προσ τα αριστερά αργά
µέχρι η συσκευή να σβήσει (OFF).
y = Θέση «Frost-free» (χωρίσ παγωνιά). H
θέση αυτή αντιστοιχεί στην ελάχιστη
ρύθµιση του θερµοστάτη (δηλ. περίπου +
5°C /+41°F) και µπορείτε να την
χρησιµοποιείτε για να διατηρείται την
περιοχή κοντά στον θερµοστάτη χωρίσ
παγωνιά π.χ. για να µην παγώνουν οι
σωλήνεσ, τοποθετήστε τη συσκευή κοντά
και διαλέξτε τη ρύθµιση αυτή.
Παρακαλούµε σηµειώστε τι ταν
χρησιµοποιείτε την ρύθµιση «cool air» >
θερµοστάτησ πρέπει να είναι γυρισµένοσ στη
µέγιστη θέση.
Eνδεικτικ φωτάκι
- ταν συνδέσετε τη συσκευή στην τάση και
την ανάψετε (ON) διαλέγοντασ >, 1 ή 2 το
ενδεικτικ φωτάκι θα ανάψει.
- Tο φωτάκι θα παραµείνει αναµένο µέχρι να
σβήσει η συσκευή βάζοντασ τον διακπτη C
στη θέση O ή αποσυνδέοντασ τη συσκευή
απ την πρίζα του τοίχου.
- Για να φαίνεται τι η συσκευή είναι ακµη
συνδεδεµένη στην τάση και σε λειτουργία
(ON), θέση (>, 1 ή 2) το ενδεικτικ φωτάκι
θα παραµείνει αναµµένο ταν φθάσει στη
ρυθµισµένη θερµοκρασία και ο
θερµοστάτησ θα σβήσει τη συσκευή (OFF).
Για τον ίδιο λγο το ενδεικτικ φωτάκι θα
παραµείνει αναµένο ταν η ασφάλεια
προστασίασ τησ συσκευήσ απο
υπερθέρµανση θα την θέσει εκτσ
λειτουργίασ (OFF).
Aσφάλεια προστασίασ τησ συσκευήσ απ
υπερθέρµανση
Για την αποφυγή βλάβησ και κινδύνων απ
υπερθέρµανση, η εσωτερική ασφάλεια τησ
συσκευήσ διακπτει την τροφοδοσία τησ µε
τάση µλισ τα θερµαντικά στοιχεία
υπερθερµανθούν.
Page 35

35
Σε περίπτωση υπερθέρµανσησ
- Bεβαιωθείτε πρώτα τι δεν ήταν ο
θερµοστάτησ, ο οποίοσ έθεσε τη συσκευή
εκτσ λειτουργίασ. Γυρίστε τον θερµοστάτη
στη µέγιστη θέση.
Aν η συσκευή δεν ανάψει (ON), η ασφάλεια
προστασίασ απ υπερθέρµανση έχει
ενεργοποιηθεί.
- Aποσυνδέστε τη συσκευή απ την πρίζα του
τοίχου.
- Aφήστε τη συσκευή να κρυώσει για 30
λεπτά.
- Eλέγξτε αν η συσκευή έχει τοποθετηθεί
σωστά.
- Eλέγξτε µήπωσ κάτι παρεµποδίζει τη ροή
του αέρα. Aν χρειάζεται καθαρίστε τισ
γρίλιεσ µε την ηλεκτρική σκούπα.
- Συνδέστε τη συσκευή πάλι στην πρίζα του
τοίχου και ανάψτε την (ON)
Aν η ασφάλεια προστασίασ τησ συσκευήσ
την σβήσει πάλι (OFF).
- Aποσυνδέστε την απ την πρίζα του τοίχου.
- Πηγαίνετε τη συσκευή για έλεγχο στο
SERVICE τησ Philips ή στον προµηθευτή
σασ.
Kαθαρισµσ
- Bάλτε τον διακπτη επιλογήσ C στη θέση O
για να σβήσει η συσκευή.
- Aποσυνδέστε την απ την πρίζα του τοίχου.
- Aφήστε τη συσκευή να κρυώσει αρκετά.
- Kαθαρίστε το εξωτερικ τησ συσκευήσ µε
ένα υγρ πανί. ∆εν πρέπει να µπει νερ
µέσα στη συσκευή.
- Kαθαρίζετε τισ γρίλιεσ εισδου και εξδου
του αέρα τακτικά (µε κανονική χρήση
τουλάχιστον δύο φορέσ τον χρνο)
χρησιµοποιώντασ το εξάρτηµα βούρτσασ
τησ ηλεκτρικήσ σκούπασ.
Page 36

4222 000 92732
u
 Loading...