

Page 1
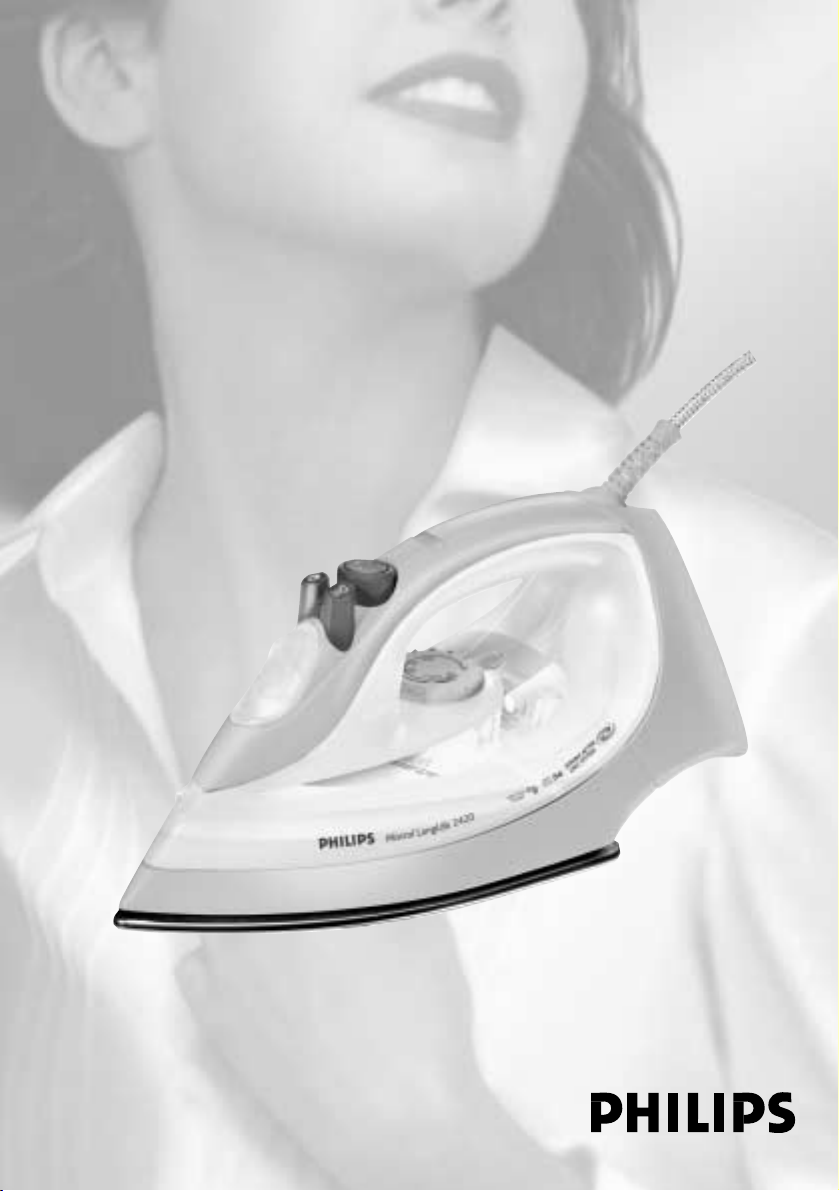
Mistral
GC2425, GC2420, GC2415, GC2330, GC2326, GC2325,
GC2320, GC2315, GC2310, GC2305
Page 2
2
Page 3
3
L
M
J
A D F GECB I
H
K
Page 4

4
Page 5

ENGLISH 6
DEUTSCH 14
FRANÇAIS 23
ITALIANO 32
GC2425, GC2420, GC2415, GC2330, GC2326,
GC2325, GC2320, GC2315, GC2310, GC2305
Page 6
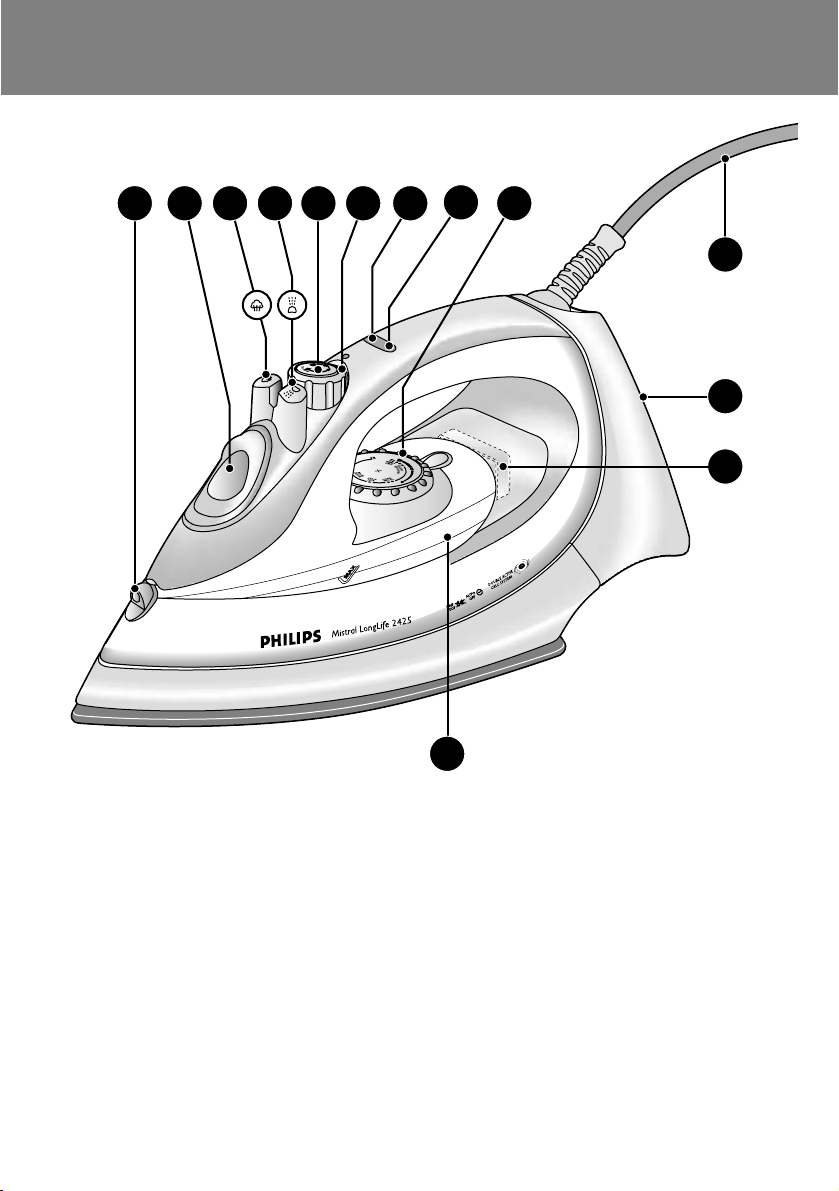
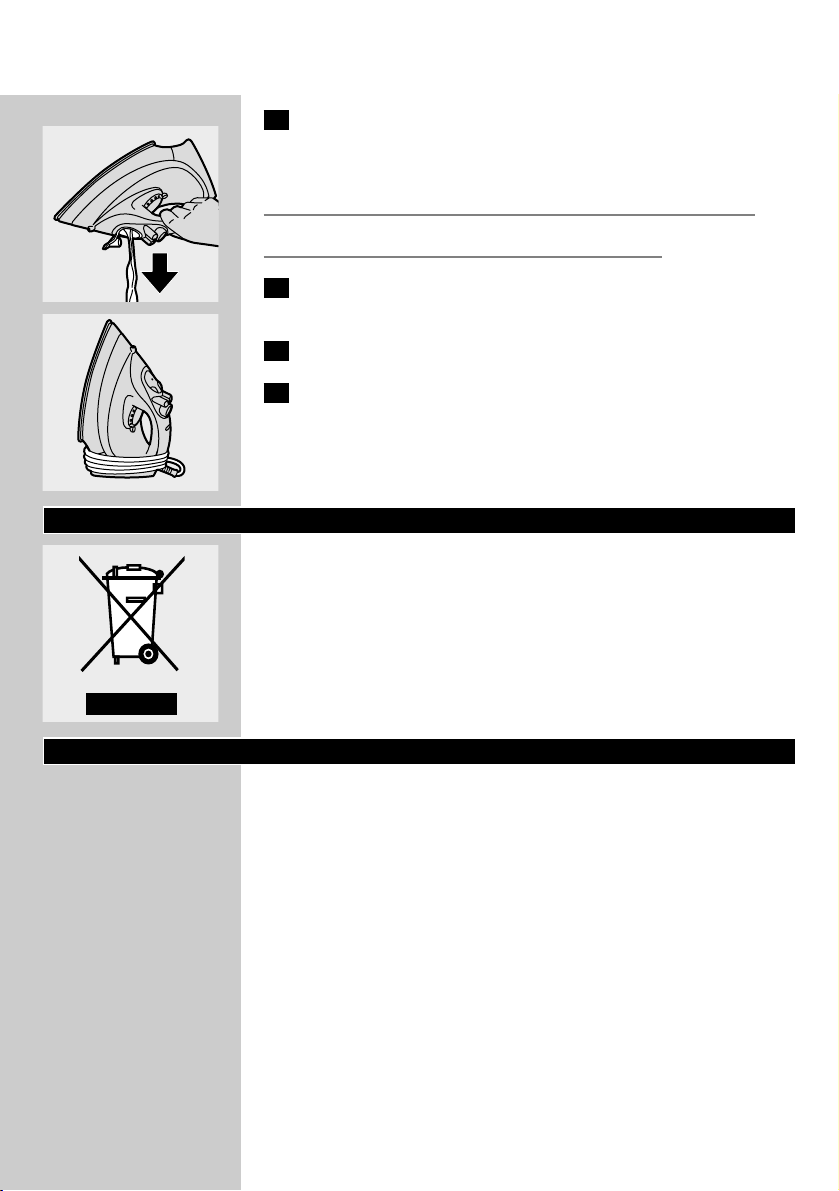
General description
A Spray nozzle
B Filling cap (GC2425/2420/2415/GC2330/2326/2325/2320 only)
C Shot-of-steam button (GC2425/2420/2415/
GC2330/2326/2325/2320/2315/2310 only)
D Spray button T
E Steam control
- O = no steam
- Á = minimum steam
- q = moderate steam
(GC2425/2420/2415/GC2330/2326/2325/2320 only)
- w = maximum steam
- 1 = Calc-Clean function
F Extra-steam function (GC2305 only)
G Temperature light
H Automatic shut-off light (GC2425/GC2330 only)
I Temperature dial
J Mains cord
K Type plate
L Anti-calc tablet
M Water tank
Important
Read these instructions for use carefully before using the appliance and
save them for future reference.
◗ Check if the voltage indicated on the type plate corresponds to
the local mains voltage before you connect the appliance.
◗ Only connect the appliance to an earthed wall socket.
◗ Do not use the appliance if the plug, the cord or the appliance
itself shows visible damage, or if the appliance has been dropped
or is leaking.
◗ Check the cord regularly for possible damage.
◗ If the mains cord is damaged, it must be replaced by Philips, a
service centre authorised by Philips or similarly qualified persons
in order to avoid a hazard.
◗ Never leave the iron unattended when it is connected to the mains.
◗ Never immerse the iron in water.
◗ Keep the appliance out of the reach of children.
◗ The soleplate of the iron can become extremely hot and may
cause burns if touched. Do not allow the cord to come into
contact with the soleplate when it is hot.
◗ Do not put perfume, vinegar, starch,descaling agents, ironing aids
or other chemicals in the water tank.
◗ When you have finished ironing, when you clean the appliance,
when you fill or empty the water tank and also when you leave
the iron even for a short while:set the steam control to position
O,put the iron on its heel and remove the mains plug from the
wall socket.
ENGLISH6
Page 7
◗ Place and use the iron on a stable ironing board or table.
◗ If a stand is provided with the appliance, ensure that the stand is
placed on a stable surface.
◗ This appliance is intended for household use only.
Preparing for use
Filling the water tank
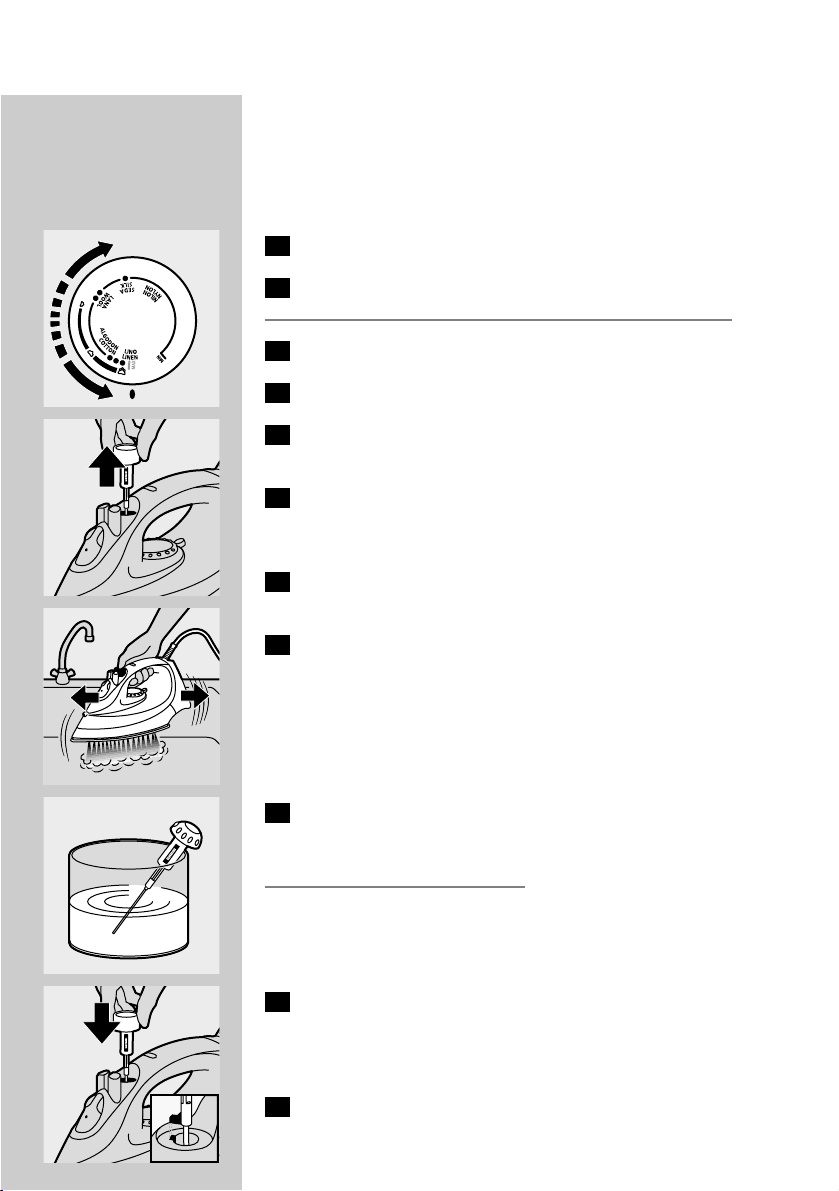
1 Remove the mains plug from the wall socket.
C
2 Set the steam control to position O (= no steam).
3 Open the filling cap (specific types only).
C
4 Tilt the iron and fill the water tank up to maximum level.
Do not fill the water tank beyond the MAX indication.
5 Close the filling cap (click!) (specific types only).
If the tap water in your area is very hard, we advise you to use distilled
water. Do not use vinegar, starch or chemically descaled water.
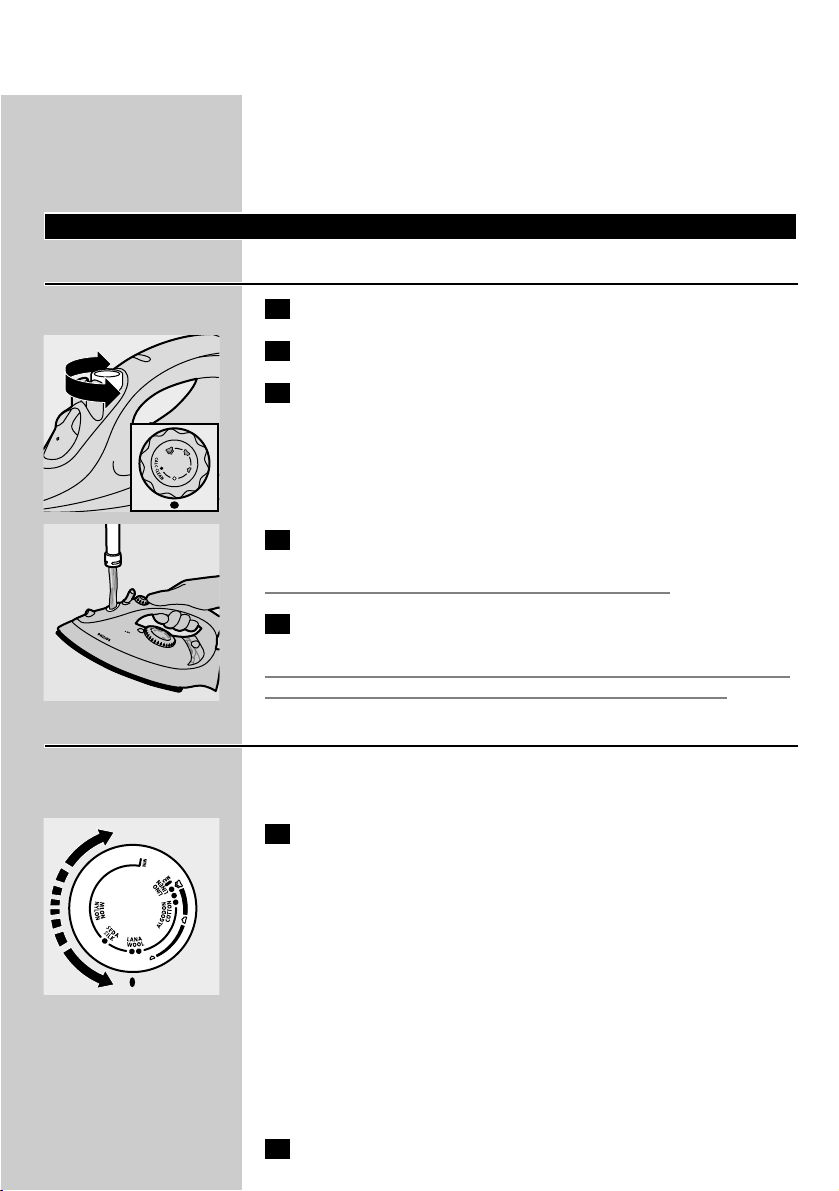
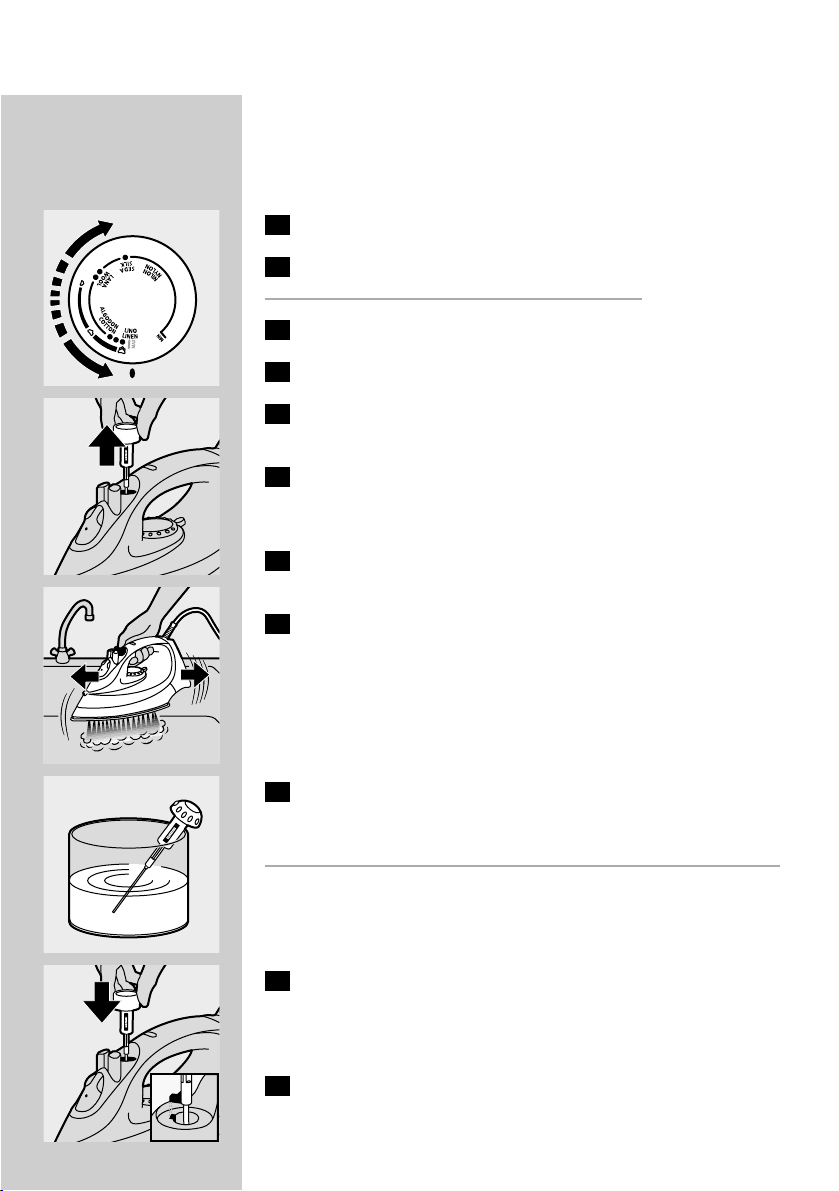
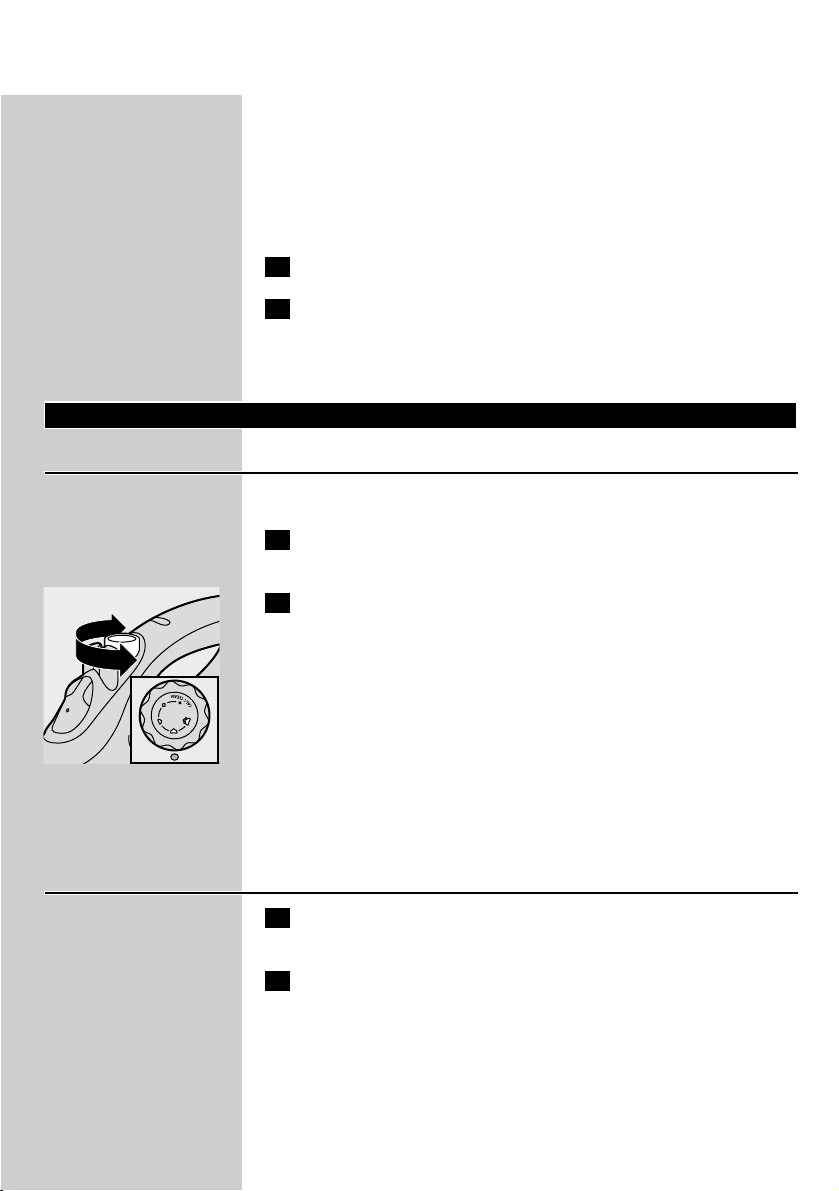
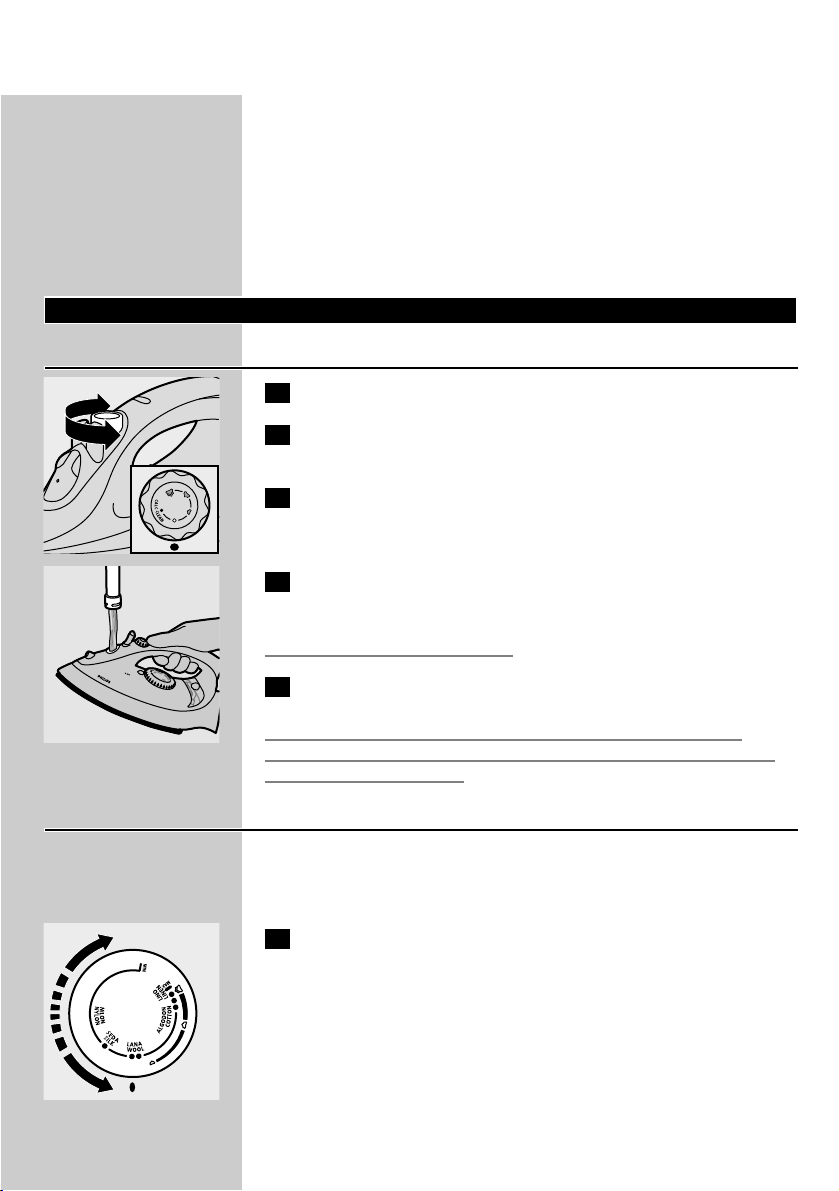
Setting the temperature
◗ The iron may give off some smoke when you use it for the first
time.This will cease after a short while.
C
1 Put the iron on its heel and set the temperature dial to the
required ironing temperature by turning it to the appropriate
position.
- Check the garment label for the required ironing temperature.
- 1 Synthetic fabrics (e.g. acrylic, viscose, polyamide, polyester)
- 1 Silk
- 2 Wool
- 3 Cotton, linen
- If you do not know what kind or kinds of fabric an article is made of,
determine the right ironing temperature by ironing a part that will
not be visible when you wear or use the article.
- Silk, woollen and synthetic materials: iron the reverse side of the
fabric to prevent shiny patches. Avoid using the spray function to
prevent stains.
2 Put the mains plug in an earthed wall socket.
ENGLISH 7
Page 8
3 When the temperature light has gone out, wait a while before
you start ironing.
B
The temperature light will go on from time to time during ironing.
Using the appliance
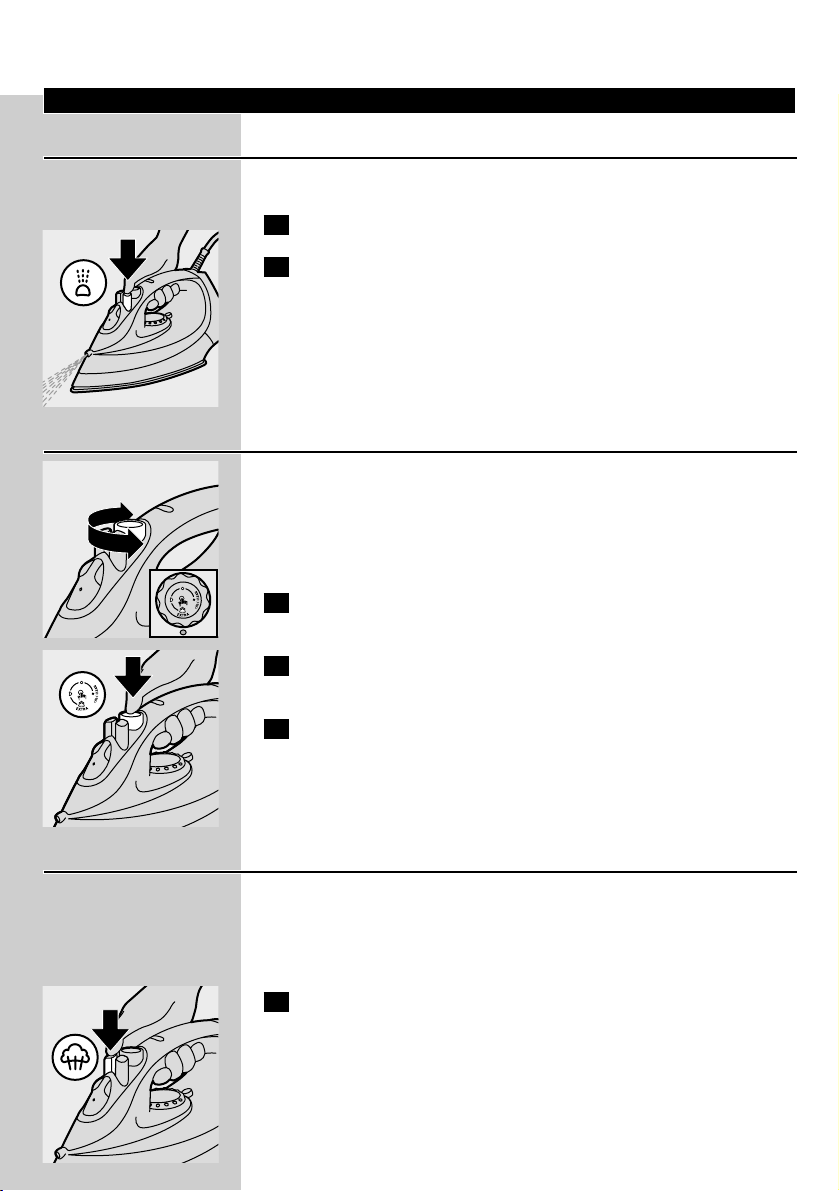
Steam ironing
Make sure that there is enough water in the water tank.
1 Set the temperature dial to the recommended position.
See 'Setting the temperature'.
C
2 Set the steam control to the appropriate steam position.
- Á for minimum steam (temperature settings 2 and 3).
- Ë for moderate steam (temperature settings 3 to MAX)
(specific types only).
- È for maximum steam (temperature settings 3 to MAX).
B
Steaming will start as soon as the set temperature has been reached.
GC2415/2320/2315/2310/2305 only:
Water may leak from the soleplate if the set temperature is too low
(MIN to 2).
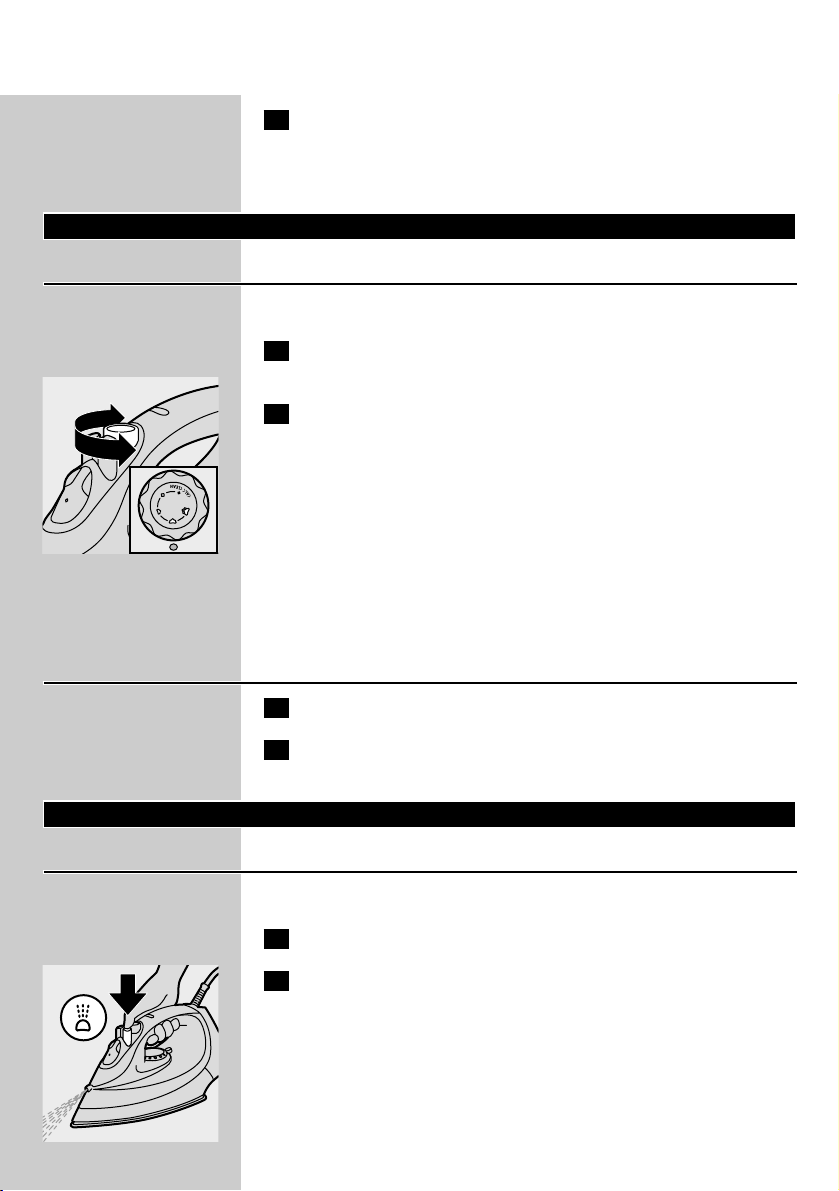
Ironing without steam
1 Set the steam control to position O (= no steam).
2 Set the temperature dial to the recommended position.
See 'Setting the temperature'.
Features
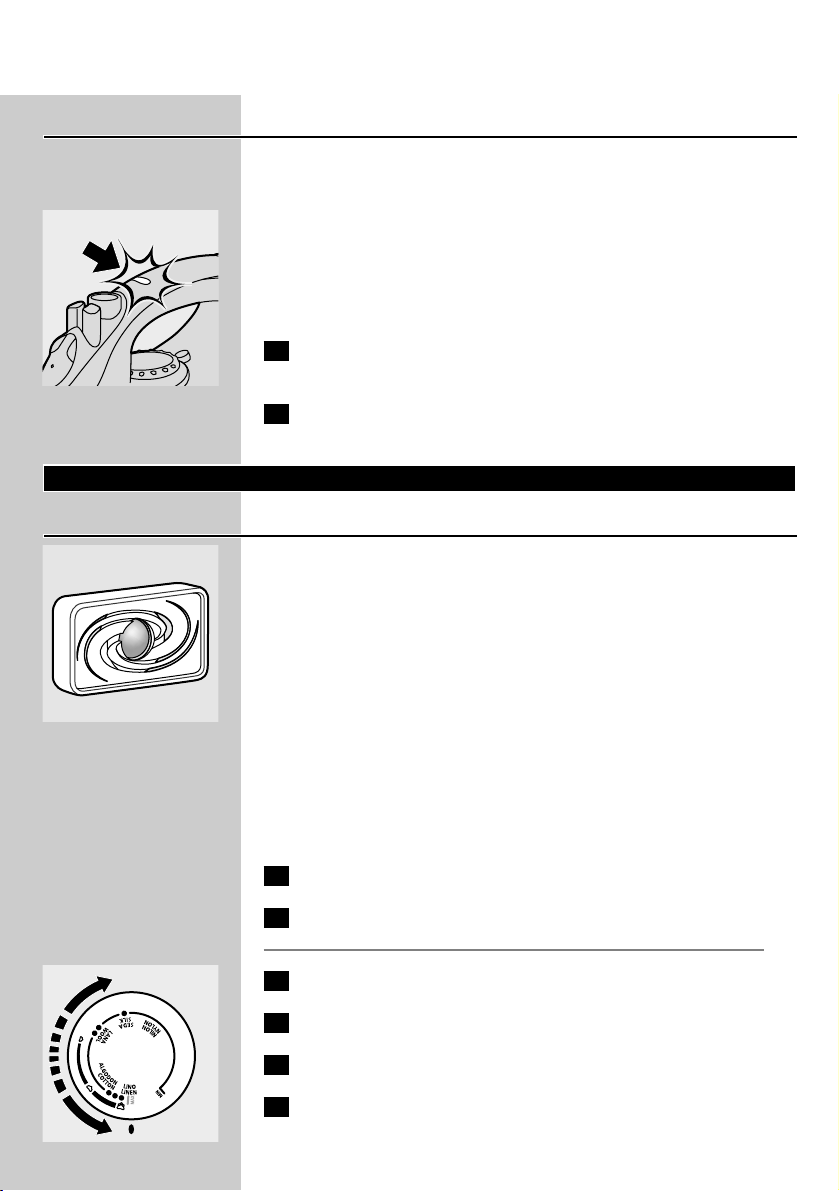
Spraying
To remove stubborn creases at any temperature
1 Make sure that there is enough water in the water tank.
C
2 Press the spray button several times to moisten the garment to
be ironed.
ENGLISH8
Page 9

Extra Steam (GC2305 only)
This function provides extra steam to remove really stubborn creases.
The Extra Steam function only works at temperature settings between
3 and MAX.
C
1 Set the steam control to maximum position È.
C
2 Press and hold the Steam Control button down for
max. 5 seconds.
3 Wait at least 1 minute before using Extra Steam again to
prevent water from dripping out of the soleplate.
Shot of Steam (specific types only)
A powerful shot of steam helps to remove ver y stubborn creases.
The Shot-of-Steam function only works at temperature settings
between 2 and MAX.
C
1 Press and release the Shot-of-Steam button.
Vertical Shot of Steam (specific types only)
C
1 The Shot-of-Steam function can also be used when you are
holding the iron in vertical position.This is useful for removing
creases from hanging clothes,curtains, etc.
Never direct the steam towards people.
Drip stop (GC2425/2420/GC2330/2326/2325 only)
This iron is equipped with a drip stop function: the iron automatically
stops steaming when the temperature is too low to prevent water
from dripping out of the soleplate. When this happens you will hear a
click.
ENGLISH 9
Page 10
Automatic shut-off (GC2425/GC2330 only)
An electronic safety device will automatically switch the heating
element off if the iron has not been moved for a while.
C
◗ To indicate that the heating element has been switched off, the
automatic shut-off light will start blinking.
To heat up the iron again: pick it up or move it slightly.The automatic
shut-off light will go out.
1 If the temperature light goes on, wait for it to go out before
you start ironing.
2 If the temperature light does not go on, the iron is ready for
use.
Cleaning and maintenance
Double-Active Calc System
C
◗ The anti-calc tablet prevents scale from clogging the steam vents.
The tablet is constantly active and does not need to be replaced.
◗ The Calc-Clean function removes the scale particles.
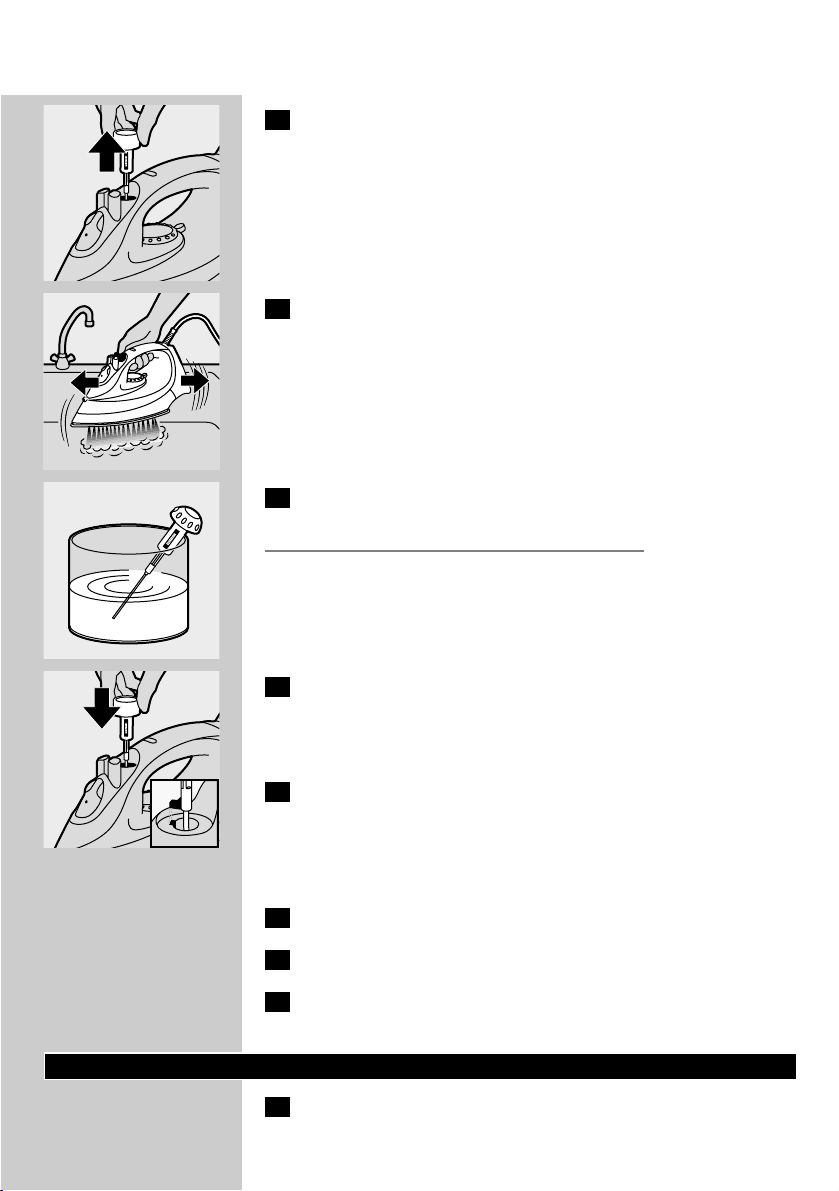
Calc-Clean function
Use the Calc-Clean function once every two weeks. If the water in
your area is very hard (i.e. when flakes come out of the soleplate
during ironing), the Calc-Clean function should be used more
frequently.
1 Set the steam control to position O.
2 Fill the water tank to the maximum level.
Do not pour vinegar or other descaling agents into the water tank..
C
3 Set the temperature dial to MAX.
4 Put the plug in the wall socket.
5 Unplug the iron when the temperature light has gone out.
6 Hold the iron over the sink and set the steam control to
position 1 (Calc-Clean).The steam control knob will spring up
slightly.
ENGLISH10
Page 11
C
7 Pull the steam control knob upwards to remove the steam
control needle.
C
8 Hold the iron over the sink and move it to and fro.
B
Steam and boiling water will come out of the soleplate. Impurities and
scale (if any) will be flushed out.
C
9 Use vinegar to remove scale, if any, from the needle.
Do not bend or damage the steam control needle.
C
10 Put the steam control needle back by inserting the point of the
needle exactly in the centre of the hole and by fitting the small
projection on the side of the needle into the slot. Set the
steam control knob to position O.
11 Repeat the Calc-Clean process if the iron still contains a lot of
impurities.
After the Calc-Clean process
1 Plug the iron in to let the soleplate dry up.
2 Unplug the iron when the temperature light has gone out.
3 Move the iron gently over a piece of used cloth to remove any
water stains that may have formed on the soleplate.
Storage
1 Remove the mains plug from the wall socket, let the iron cool
down and set the steam control to position O.
ENGLISH 11
Page 12
2 Clean the appliance and wipe scale and any other deposits off
the soleplate with a damp cloth and a non-abrasive (liquid)
cleaner.
Keep the soleplate smooth: avoid hard contact with metal objects.
Never use a scouring pad, vinegar or other chemicals.
C
3 Regurarly rinse the water tank with water and empty it after
cleaning.
C
4 Wind the mains cord round the cord storage facility.
5 Always store the iron standing on its heel in a safe and dry
place.
Environment
C
◗ Do not throw the appliance away with the normal household
waste at the end of its life, but hand it in at an official collection
point for recycling. By doing this you will help to preserve the
environment.
Guarantee & service
If you need information or if you have a problem, please visit the Philips
website at www.philips.com or contact the Philips Customer Care
Centre in your country (you will find its phone number in the
worldwide guarantee leaflet). If there is no Customer Care Centre in
your country, turn to your local Philips dealer or contact the Service
Department of Philips Domestic Appliances and Personal Care BV.
ENGLISH12
Page 13

Solution
Check the mains cord, the plug and
the wall socket.
Set the temperature dial to the
required position.
Fill the water tank (see 'Preparing for
use'; section 'Filling the watertank'.)
Set the steam position to Á, Ë or È
(see 'Using the appliance', section
'Steam ironing').
Set the temperature dial to a position
in the steam area (2 to MAX). Put
the iron on its heel and wait until the
temperature light has gone out before
you start ironing.
Put the iron in horizontal position and
wait a while before using the (Vertical)
Shot of Steam function again.
Set the temperature dial to a position
in the steam area (2 to MAX). Put
the iron on its heel and wait until the
temperature light has gone out before
you start ironing.
Use the Calc-Clean function a few
times (see 'Cleaning and maintenance',
section 'Calc-Clean').
Pick the iron up or move it slightly to
deactivate the automatic shut-off
function: the red light will stop blinking.
Press the filling cap until you hear a
click.
Set the temperature dial to a position
in the steam area (2 to MAX). Put
the iron on its heel and wait until the
temperature light has gone out before
you start ironing.
Empty the water tank and set the
steam control to position O after use.
Store the iron on its heel.
Possible cause(s)
Connection problem
Temperature dial set at MIN
Not enough water in the water tank.
The steam control has been set to
position O.
The soleplate is not hot enough
and/or the drip stop function (specific
types only) has been activated.
The (Vertical) Shot of Steam function
has been used too often within a very
short period.
The soleplate is not hot enough.
Hard water forms flakes inside the
soleplate.
The automatic shut-off function has
been activated (see 'Other features',
section 'Automatic shut-off').
The filling cap has not been closed
properly.
The temperature has been set too
low.
The iron has been put in horizontal
position while there was still water in
the water tank.
Problem
The iron is plugged in but the soleplate
is cold.
No steam
No shot of steam or no Vertical Shot
of Steam (specific types only).
Flakes and impurities come out of the
soleplate during ironing.
Red light is blinking (GC2425 and
GC2330 only).
Water droplets on fabric
(GC2425/2420/2415/GC2330/2326/2
325/2320 only)
Water droplets on fabric
(GC2415/2320/2315/2310/2305 only)
Water drips from the soleplate after
the iron has cooled down or has been
stored.
Troubleshooting
This chapter summarises the most common problems you could encounter with your iron. Please
read the different sections for more details. If you are unable to solve the problem, please contact the
Philips Customer Care Centre in your country.
ENGLISH 13
Page 14

Allgemeine Beschreibung
A Sprühdüse
B Verschlusskappe für Wasserbehälter (nur GC2425/2420/2415/
GC2330/2326/2325/2320)
C Dampfstoß-Taste (nur GC2425/2420/2415/
GC2330/2326/2325/2320/2315/2310)
D Sprühtaste T
E Dampfregler
- O = kein Dampf
- Á = wenig Dampf
- q = mäßiger Dampf (nur
GC2425/2420/2415/GC2330/2326/2325/2320)
- w = starker Dampf
- 1 = Calc-Clean Funktion
F Extra-Dampf Funktion (nur GC2305)
G Temperatur-Kontrolllampe
H Kontrolllampe: Abschaltautomatik (nur GC2425/GC2330)
I Temperaturregler
J Netzkabel
K Typenschild
L Anti-Kalk-Tablette
M Wasserbehälter
Wichtig
Lesen Sie diese Bedienungsanleitung vor dem ersten Gebrauch des
Geräts sorgfältig durch und bewahren Sie sie zur späteren
Einsichtnahme auf.
◗ Überprüfen Sie, ob die auf dem Typenschild angegebene
Betriebsspannung mit der örtlichen Netzspannung übereinstimmt,
bevor Sie das Gerät anschließen.
◗ Verwenden Sie das Gerät ausschließlich an einer
Schukosteckdose.
◗ Benutzen Sie das Gerät nicht, wenn Schäden am Stecker, am Kabel
oder am Gerät selbst erkennbar sind, oder wenn das Gerät
herunter gefallen oder undicht ist.
◗ Überprüfen Sie das Netzkabel regelmäßig auf Unversehrtheit.
◗ Wenn das Netzkabel defekt oder beschädigt ist, darf es nur von
einem Philips Service-Center oder einer von Philips autorisierten
Werkstatt durch ein Original-Ersatzkabel ausgetauscht werden,
um Gefährdungen zu vermeiden.
◗ Lassen Sie das eingeschaltete Gerät niemals unbeaufsichtigt.
◗ Tauchen Sie das Bügeleisen niemals in Wasser.
◗ Halten Sie das Gerät außer Reichweite von Kindern.
◗ Die Bügelsohle wird sehr heiß und kann bei Berührung zu
Verbrennungen führen. Lassen Sie das Netzkabel nicht in Kontakt
mit der heißen Bügelsohle kommen.
◗ Geben Sie niemals Parfüm, Essig, Stärke, Entkalker,Bügelhilfen oder
andere Chemikalien in den Wasserbehälter.
DEUTSCH14
Page 15

◗ Wenn Sie das Bügeln beenden, das Gerät reinigen, den
Wasserbehälter füllen oder leeren oder den Raum nur kurz
verlassen, stellen Sie stets den Dampfregler auf Position 0, stellen
Sie das Bügeleisen aufrecht und ziehen Sie den Netzstecker aus
der Steckdose.
◗ Zum Bügeln und Abstellen des Bügeleisens ist ein stabiles
Bügelbrett oder ein Tisch erforderlich.
◗ Sofern eine Abstellfläche für das Bügeleisen im Lieferumfang
enthalten ist, muss diese auf eine stabile Unterlage gelegt werden.
◗ Dieses Gerät ist nur für den Gebrauch im Haushalt bestimmt.
Vorbereitung zum Gebrauch
Den Wasserbehälter füllen
1 Ziehen Sie den Netzstecker aus der Steckdose.
C
2 Stellen Sie den Dampfregler auf Position 0 (= kein Dampf).
3 Nur bestimmte Gerätetypen: Öffnen Sie die Verschlusskappe
des Wasserbehälters.
C
4 Neigen Sie das Bügeleisen leicht nach hinten und füllen Sie den
Wasserbehälter bis zur Maximum-Markierung.
Füllen Sie den Wasserbehälter nicht über die Markierung MAX hinaus.
5 Nur bestimmte Gerätetypen: Schließen Sie die Verschlusskappe
(Sie hören ein Klicken!)
Wenn das Leitungswasser an Ihrem Wohnort sehr hart ist, empfehlen
wir die Verwendung von destilliertem Wasser.Verwenden Sie keinen
Essig, keine Stärke und kein chemisch entkalktes Wasser.
Einstellen der Bügeltemperatur
◗ Einige Teile des Bügeleisens sind leicht eingefettet und können
beim ersten Gebrauch etwas Rauch entwickeln. Dies geht nach
kurzer Zeit vorüber.
C
1 Stellen Sie das Bügeleisen aufrecht und drehen den
Temperaturregler auf die geeignete Bügeltemperatur.
- Prüfen Sie die Bügelvorschrift auf dem Etikett des Wäschestücks.
- 1 Sythetics, z. B. Akryl,Viskose, Polyamid, Polyester
- 1 Seide
- 2 Wolle
- 3 Baumwolle, Leinen
DEUTSCH 15
Page 16

- Wenn Sie nicht wissen, um welche Art von Gewebe es sich handelt,
ermitteln Sie die richtige Temperatur durch Bügeln einer Stelle, die
beim Tragen bzw. Benutzen des Kleidungs-/Wäschestücks
normalerweise nicht sichtbar ist.
- Seide, Wolle und Kunstfasern: Bügeln Sie das Gewebe von links, um
glänzende Stellen zu vermeiden.Verwenden Sie die Sprühfunktion
nicht; es könnten Wasserflecken zurückbleiben.
2 Stecken Sie den Netzstecker in eine Schuko-Steckdose.
3 Nachdem die Temperaturkontrolllampe erloschen ist, empfiehlt
es sich, noch eine kurze Zeit mit dem Bügeln zu warten.
B
Die Temperaturkontrolllampe leuchtet während des Bügels gelegentlich
auf.
Der Gebrauch des Geräts
Dampfbügeln
Achten Sie darauf, dass genügend Wasser im Wasserbehälter ist.
1 Drehen Sie den Temperaturregler auf die erforderliche
Position.
Siehe "Die Temperatur einstellen".
C
2 Stellen Sie dann den Dampfregler auf die erforderliche Position.
- Á für wenig Dampf (Temperatureinstellungen 2 und 3).
- Ë für mäßigen Dampf (Temperatureinstellungen 3 bis MAX -
nur bestimmte Gerätetypen)
- È für starken Dampf (Temperatureinstellungen 3 bis MAX).
B
Sobald die eingestellte Temperatur erreicht ist, können Sie mit dem
Dampfbügeln beginnen.
Nur Gerätetypen GC2415/2320/2315/2310/2305:
Wenn die eingestellte Temperatur zu niedrig ist, kann Wasser aus der
Bügelsohle tropfen (MIN bis 2).
Trockenbügeln
1 Stellen Sie den Dampfregler auf O = kein Dampf
2 Drehen Sie den Temperaturregler auf die erforderliche
Position.
Siehe "Die Temperatur einstellen".
DEUTSCH16
Page 17

Funktionen
Bügelgut einsprühen
Hartnäckige Falten bei beliebiger Temperatur ausbügeln
1 Achten Sie darauf, dass genügend Wasser im Wasserbehälter
ist.
C
2 Drücken Sie mehrmals auf die Sprühtaste, um das Bügelgut zu
befeuchten.
Extra Dampf (nur GC2305)
Mit dieser Funktion wird zusätzlicher Dampf gebildet, um hartnäckige
Falten zu beseitigen.
Die Funktion Turbo-Dampf wirkt nur bei Temperaturen zwischen 3
und MAX.
C
1 Drehen Sie den Dampfregler auf die Maximalposition È.
C
2 Drücken Sie auf den Dampfregler, und halten Sie ihn maximal
5 Sekunden lang gedrückt.
3 Warten Sie mindestens eine Minute lang,bis Sie die
Extradampf-Funktion erneut einsetzen. So verhindern Sie, dass
Wasser aus der Bügelsohle tropft.
Dampfstoß (nur bestimmte Gerätetypen)
Ein kräftiger Dampfstoß hilft bei der Entfernung äußerst har tnäckiger
Falten.
Die Dampfstoß-Funktion wirkt nur bei Temperaturen zwischen 2 und
MAX.
C
1 Drücken Sie die Dampfstoßtaste, und lassen Sie sie wieder los.
DEUTSCH 17
Page 18

Vertikaler Dampfstoß (nur bestimmte Gerätetypen)
C
1 Die Dampfstoßfunktion kann auch bei senkrecht gehaltenem
Bügeleisen eingesetzt werden. Dadurch können Sie Falten in
aufgehängten Kleidungsstücken,Vorhängen usw.entfernen.
Richten Sie den Dampstoß niemals auf Personen!
Tropf-Stop (nur Gerätetypen
GC2425/2420/GC2330/2326/2325)
Dieses Bügeleisen ist mit einer Tropfschutzfunktion versehen: Bei zu
niedrigen Temperaturen wird die Dampfproduktion automatisch
gestoppt, damit kein Wasser aus der Bügelsohle tropft. Sie hören ein
Klicken, wenn diese Funktion aktiviert wird.
Abschaltautomatik (nur Gerätetypen GC2425/GC2330)
Wenn das Bügeleisen einige Zeit nicht bewegt wurde, wird das
Heizelement durch eine elektronische Sicherheitseinrichtung
automatisch ausgeschaltet.
C
◗ Die blinkende Kontrolllampe signalisiert, dass sich das
Heizelement ausgeschaltet hat.
Damit sich das Bügeleisen wieder aufheizt, heben Sie es an und
bewegen es etwas. Die Kontrolllampe erlischt.
1 Wenn die Temperaturkontrolllampe leuchtet, warten Sie mit
dem Bügeln, bis sie erlischt.
2 Leuchtet die Temperaturkontrolllampe nicht, ist das Bügeleisen
betriebsbereit.
Reinigung und Wartung
Double-Active Kalksystem
C
◗ Die Anti-Kalk-Tablette verhindert, dass Kalkablagerungen die
Dampfaustrittsdüsen verstopfen. Die Tablette ist dauerhaft aktiv
und braucht nicht ausgewechselt werden.
◗ Mit der Calc-Clean Funktion entfernen Sie die Kalkpartikel.
DEUTSCH18
Page 19
Calc-Clean Funtion
Benutzen Sie Calc-Clean einmal alle 14 Tage. Ist das Wasser in Ihrer
Gegend besonders har t - wenn während des Bügelns Kalkpartikel aus
der Bügelsohle austreten -, sollten Sie Calc-Clean häufiger einsetzen.
1 Stellen Sie den Dampfregler in Position O.
2 Füllen Sie den Wasserbehälter bis zur Markierung MAX.
Verwenden Sie keinen Essig oder andere Entkalker.
C
3 Stellen Sie den Temperaturregler auf Position MAX.
4 Stecken Sie den Netzstecker in die Steckdose.
5 Ziehen Sie den Netzstecker aus der Steckdose, sobald die
Temperaturkontrolllampe erlischt.
6 Halten Sie das Bügeleisen über ein Waschbecken und stellen Sie
den Dampfregler auf die Position 1 (Calc-Clean). Der
Dampfreglerknopf springt ein kleines Stück heraus.
C
7 Ziehen Sie den Dampfreglerknopf nach oben, damit Sie die
Dampfkontrollnadel entfernen können.
C
8 Halten Sie das Bügeleisen über ein Spülbecken und schwenken
Sie es hin und her.
B
Dabei treten Dampf und kochendes Wasser aus der Bügelsohle aus.
Verunreinigungen und Kalkpartikel werden - sofern vorhanden herausgespült.
C
9 Falls sich an der Nadel Kalk festgesetzt hat, entfernen Sie ihn
mit Essig.
Achten Sie darauf, die Nadel nicht zu verbiegen oder zu beschädigen.
C
10 Setzen Sie die Dampfkontrollnadel wieder ein.Führen Sie die
Spitze genau in die Mitte des Loches ein. Die kleine seitliche
Ausbuchtung an der Nadel muss in die Aussparung eingepasst
werden. Stellen Sie den Dampfregler auf Position 0.
11 Wiederholen Sie den Vorgang bei Bedarf.
DEUTSCH 19
Page 20

Nach der Reingung mit Calc-Clean
1 Stecken Sie den Netzstecker in die Steckdose, damit die
Bügelsohle trocknet.
2 Ziehen Sie den Netzstecker aus der Steckdose, sobald die
Temperaturkontrolllampe erlischt.
3 Führen Sie die Bügelsohle leicht über ein altes Tuch, um sie von
möglichen Wasserflecken zu reinigen.
Aufbewahrung
1 Ziehen Sie den Netzstecker aus der Steckdose, lassen Sie das
Bügeleisen abkühlen und stellen Sie den Dampfregler auf O.
2 Reinigen Sie das Gerät und wischen Sie Kalkrückstände und
andere Ablagerungen mit einem feuchten Tuch und einem
milden Flüssigreiniger von der Bügelsohle.
Achten Sie darauf, daß die Bügelsohle unbeschädigt bleibt.Vermeiden
Sie, daß sie mit Metallgegenständen in Berührung kommt.
Verwenden Sie nie einen Scheuerschwamm, Essig oder Chemikalien.
C
3 Spülen Sie den Wasserbehälter regelmäßig aus und leeren Sie
ihn nach dem Reinigen.
C
4 Wickeln Sie das Netzkabel um die Kabelaufwicklung.
5 Bewahren Sie das Gerät in aufrechter Position an einem
sicheren und trockenen Ort auf.
Umweltschutz
C
◗ Geben Sie das Gerät am Ende der Lebensdauer nicht in den
normalen Hausmüll. Bringen Sie es zum Recycling zu einer
offiziellen Sammelstelle.Auf diese Weise helfen Sie die Umwelt zu
schonen.
DEUTSCH20
Page 21

Garantie und Kundendienst
Benötigen Sie weitere Informationen oder treten Probleme auf,
wenden Sie sich bitte an Ihren Philips-Händler oder setzen Sie sich mit
einem Philips Service-Center in Ihrem Land in Verbindung (Tel. Nr.
0180/5356767). Besuchen Sie auch die Philips Website
(www.philips.com).
DEUTSCH 21
Fehlerbehebung
In diesem Abschnitt sind die am häufigsten auftretenden Probleme zusammengestellt. Lesen Sie bei
Bedarf die ausführlichen Hinweise in den Abschnitten, auf die hier verwiesen wird. Sollte sich ein
Problem nicht lösen lassen, wenden Sie sich bitte an das Philips Service Center in Ihrem Land.
Lösung
Prüfen Sie das Netzkabel, den
Netzstecker und die Steckdose.
Stellen Sie den Temperaturregler auf
die gewünschte Position.
Füllen Sie den Wasserbehälter (siehe
"Vorbereitung für den Gebrauch",
Abschnitt "Den Wasserbehälter
füllen").
Stellen Sie den Dampfregler auf
Position Á, Ë oder È (siehe "Der
Gebrauch des Geräts", Abschnitt
"Dampfbügeln").
Stellen Sie den Temperaturregler auf
eine zum Dampfbügeln geeignete
Temperatur (2 bis MAX). Stellen Sie
das Bügeleisen senkrecht und warten
Sie, bis die Temperaturkontrolllampe
erlischt, bevor Sie mit dem Bügeln
beginnen.
Bringen Sie das Bügeleisen in eine
waagerechte Position und warten Sie
einen Moment, bevor Sie die Funktion
für den (vertikalen) Dampfstoß
wieder aktivieren.
Stellen Sie den Temperaturregler auf
eine zum Dampfbügeln geeignete
Temperatur (2 bis MAX). Stellen Sie
das Bügeleisen senkrecht und warten
Sie, bis die Temperaturkontrolllampe
erlischt, bevor Sie mit dem Bügeln
beginnen.
Führen Sie mehrfach die Funktion
Calc-Clean durch (siehe "Reinigung
und Wartung", Abschnitt "CalcClean").
Vermutliche Ursache(n)
Es gibt ein Problem mit der
Stromversorgung.
Der Temperaturregler wurde auf MIN
gestellt.
Es ist nicht genügend Wasser im Tank.
Der Dampfregler wurde auf O
gestellt.
Die Bügelsohle ist nicht heiß genug
bzw. die Tropf-Stop-Funktion (nur
bestimmte Gerätetypen) wurde
aktiviert.
Der (vertikale) Dampfstoß ist
innerhalb kurzer Zeit zu oft
angewandt worden.
Die Bügelsohle ist nicht heiß genug.
Durch hartes Wasser bilden sich in
der Bügelsohle Kalkpartikel.
Problem
Der Netzstecker steckt in der
Steckdose, aber die Bügelsohle bleibt
kalt.
Kein Dampf
Kein Dampfstoß bzw. kein vertikaler
Dampfstoß (nur bestimmte
Gerätetypen).
Kalkpartikel und Verunreinigungen
treten beim Bügeln aus der Bügelsohle
aus.
Page 22

Lösung
Heben Sie das Bügeleisen an und
bewegen Sie es leicht, um die
Abschaltautomatik zu deaktivieren: Die
rote Lampe hört auf zu blinken.
Drücken Sie auf die Verschlusskappe,
bis sie hörbar einrastet.
Stellen Sie den Temperaturregler auf
eine zum Dampfbügeln geeignete
Temperatur (2 bis MAX). Stellen Sie
das Bügeleisen senkrecht und warten
Sie, bis die Temperaturkontrolllampe
erlischt, bevor Sie mit dem Bügeln
beginnen.
Leeren Sie den Wasserbehälter und
stellen Sie nach dem Bügeln den
Dampfregler auf O. Bewahren Sie das
Bügeleisen in senkrechter Position auf.
Vermutliche Ursache(n)
EDie Abschaltautomatik wurde
aktiviert (siehe "Funktionen", Abschnitt
"Abschaltautomatik").
Die Verschlusskappe des
Wasserbehälters ist nicht richtig
geschlossen.
Die Temperatur wurde zu niedrig
eingestellt.
Das Bügeleisen wurde waagerecht
abgestellt, obwohl sich noch Wasser im
Wasserbehälter befand.
Problem
Die rote Lampe blinkt (nur
Gerätetypen GC2425 und GC2330).
Wasser tropft auf das Gewebe (nur
Gerätetypen
GC2425/2420/2415/GC2330/2326/23
25/2320)
Wassertropfen auf dem Gewebe (nur
Gerätetypen
GC2415/2320/2315/2310/2305)
Wasser tropft aus der Bügelsohle,
nachdem das Bügeleisen abgekühlt ist
bzw. weggestellt wurde.
DEUTSCH22
Page 23
Description générale
A Pulvérisateur
B Couvercle de l'orifice de remplissage (GC2425/2420/2415/
GC2330/2326/2325/2320 uniquement)
C Bouton jet de vapeur (GC2425/2420/2415/
GC2330/2326/2325/2320/2315/2310 uniquement)
D Bouton spray T
E Commande vapeur
- O = pas de vapeur
- Á = vapeur minimum
- q = vapeur modérée (GC2425/2420/2415/
GC2330/2326/2325/2320 uniquement)
- w = vapeur maximale
- 1 = fonction auto-nettoyage
F Fonction extra vapeur (GC2305 uniquement)
G Témoin de température
H Témoin arrêt automatique (GC2425/GC2330 uniquement)
I Thermostat
J Cordon d'alimentation
K Plaque signalétique
L Tablette anti-calcaire
M Réservoir d'eau
Important
Lisez ces instructions attentivement avant d'utiliser votre fer et
conservez-les pour une consultation ultérieure.
◗ Vérifiez que la tension indiquée sur votre fer correspondbien à la
tension de votre secteur avant de brancher l'appareil.
◗ Si l'appareil est fourni avec une fiche avec terre, il doit être
connecté impérativement à une prise munie d'une mise à la terre.
◗ N'utilisez pas le fer à repasser si la fiche, le cordon ou l'appareil
lui-même est endommagé, ou si le fer est tombé et/ou si de l'eau
s'écoule par l'appareil.
◗ Vérifiez le cordon d'alimentation régulièrement.
◗ Si le cordon d'alimentation est endommagé, il ne doit être
remplacé que par un Centre Service Agréé Philips ou par une
personne autorisée pour éviter tout accident.
◗ Ne laissez jamais le fer à repasser sans surveillance pendant qu'il
est branché.
◗ Ne plongez jamais le fer dans l'eau.
◗ Tenez l'appareil hors de portée des enfants.
◗ La semelle du fer à repasser peut devenir très chaude et donc
peut causer des brûlures si vous la touchez. Evitez le contact du
cordon d'alimentation avec la semelle lorsqu'elle est chaude.
◗ Ne mettez pas de parfum, de vinaigre, d'amidon, de détartrants ou
d'autres agents chimiques dans le réservoir d'eau.
FRANÇAIS 23
Page 24
24
◗ Lorsque vous avez fini de repasser,pendant que vous nettoyez,
remplissez ou videz le réservoir d'eau, et même si vous laissez le
fer pour un bref instant, réglez la commande de vapeur sur la
position O,placez le fer à repasser sur le talon et débranchez
l'appareil.
◗ Placez et utilisez le fer sur une surface stable (planche à repasser
ou table).
◗ Si l'appareil est doté d'un support, placez-le sur une surface stable.
◗ N'utilisez jamais le fer à repasser s'il est endommagé.
◗ Cet appareil est destiné à usage domestique uniquement.
Préparation à l'emploi
Remplissage du réservoir
1 Débranchez la fiche de la prise de courant.
C
2 Réglez la commande de vapeur sur la position O (pas de
vapeur).
3 Ouvrez le couvercle de l'orifice de remplissage (certains
modèles uniquement).
C
4 Inclinez le fer en arrière et remplissez le réservoir d'eau
jusqu'au niveau maximum.
Ne remplissez pas le réservoir au-delà de l'indication MAX.
5 Fermez le couvercle de l'orifice de remplissage ("clic"!)
(certains modèles uniquement).
Si l'eau du robinet de votre région est très calcaire, il est conseillé
d'utiliser de l'eau déminéralisée. N'utilisez pas de vinaigre, d'amidon ou
d'eau détartrée chimiquement.
Réglage de la température
◗ Le fer peut fumer légèrement quand on le branche pour la
première fois.Cela cessera après un bref instant.
C
1 Posez le fer à repasser sur son talon et mettez le thermostat
sur la position souhaitée en tournant.
- Vérifiez l'étiquette d'instructions de repassage pour vérifier la
température nécessaire de repassage.
- 1 Tissus synthétiques (par ex. acrylique, viscose, polyamide,
polyester).
- 1 Soie
- 2 Laine
- 3 Coton, lin.
FRANÇAIS
Page 25
25
- Si vous ne connaissez pas la composition des tissus, repassez en
commençant par la température la plus basse sur une partie interne
du vêtement et invisible de l'extérieur.
- La soie, la laine et autres fibres synthétiques: Repassez sur l'envers
pour éviter les taches. N'utilisez pas la fonction spray pour éviter de
lustrer les tissus.
2 Branchez la fiche dans la prise de courant.
3 Attendez que le témoin lumineux s'éteigne avant de
commencer à repasser.
B
Le témoin lumineux s'allume de temps en temps pendant le repassage.
Utilisation de l'appareil
Repassage à la vapeur
Assurez-vous qu'il y a suffisamment d'eau dans le réservoir.
1 Mettez le thermostat sur la position conseillée.
Voir le chapitre "Réglage de la température".
C
2 Réglez la commande de vapeur sur la position appropriée.
- Á vapeur minumum (réglages température 2 et 3).
- Ë vapeur modérée (réglages température: 3 à MAX) (cer tains
modèles uniquement).
- È vapeur maximum (réglage stempérature: 3 à MAX).
B
La vapeur commence à se dégager une fois que la température réglée a
été atteinte.
GC2415/2320/2315/2310/2305 uniquement:
Attention : de l'eau peut sortir par la semelle si la température réglée
est trop basse (MIN à 2).
Repassage sans vapeur
1 Réglez la commande de vapeur sur la position O (= pas de
vapeur).
2 Mettez le thermostat sur la position conseillée.
Voir le chapitre "Réglage de la température".
FRANÇAIS
Page 26
Caractéristiques
Le spray
Pour enlever les faux plis difficiles à éliminer.
1 Assurez-vous qu'il y a suffisamment d'eau dans le réservoir.
C
2 Appuyez sur le bouton spray plusieurs fois pour humidifier
l'article à repasser.
Extra Vapeur (GC2305 uniquement)
Cette fonction dégage plus de vapeur pour enlever les faux plis très
difficiles à éliminer.
La fonction Extra Vapeur ne peut être utilisée qu'à des températures
comprises entre 3 et MAX.
C
1 Réglez la commande de vapeur sur la position È.
C
2 Appuyez et maintenez appuyée la commande de vapeur
pendant 5 secondes au maximum.
3 Attendez au moins 1 minute avant d'utiliser à nouveau cette
fonction pour éviter que l'eau s'écoule par la semelle.
Jet de vapeur (certain modèles uniquement)
Un puissant jet de vapeur permet d'enlever les faux plis résistants.
Le jet de vapeur ne peut être utilisé qu'à des températures comprises
entre 2 et MAX.
C
1 Appuyez et relâchez le bouton jet de vapeur.
26 FRANÇAIS
Page 27

27
Défroissage vertical (certain modèles uniquement)
C
1 Le jet de vapeur peut être également utilisé en tenant le fer en
position verticale. Il est utile pour enlever les faux plis des
vêtements en position verticale, rideaux, etc.
Ne dirigez jamais le jet de vapeur vers des personnes.
Anti-goutte (GC2425/2420/GC2330/2326/2325 uniquement)
Ce fer à repasser est doté d'un système anti-goutte : lorsque la
température de la semelle est trop basse, la production de vapeur est
interrompue afin d'empêcher que la semelle ne goutte trop.Vous
entendrez un clic si cela se produit.
Arrêt automatique (GC2425/GC2330 uniquement)
Une sécurité électronique arrêtera automatiquement le fer s'il reste
inutilisé pendant un certain temps.
C
◗ Pour indiquer que le fer est arrêté,le témoin lumineux arrêt
automatique se met à clignoter.
Pour faire chauffer le fer à nouveau: prenez le fer en main ou bougez-le
légèrement. Le témoin lumineux arrêt automatique s'éteint.
1 Si le témoin de la température s'allume, attendez que celui-ci
s'éteigne avant de commencer à repasser.
2 Si le témoin reste éteint vous pouvez commencer le repassage.
Nettoyage et entretien
Système Anti-calcaire Double Active
C
◗ La tablette anti-calcaire évite que les particules de calcaire se
déposent sur les orifices de vapeur. La tablette ne doit pas être
changée.
◗ La fonction auto-nettoyage enlève les particules de calcaire.
Fonction auto-nettoyage
Utilisez la fonction auto-nettoyage toutes les deux semaines. Si l'eau de
votre région est très calcaire (par ex: lorsque des particules de calcaire
sortent par la semelle) vous devez utiliser cette fonction plus souvent.
1 Réglez la commande de vapeur sur la position O.
FRANÇAIS
Page 28

28
2 Remplissez le réservoir d'eau jusqu'au niveau maximum.
Ne versez pas de vinaigre ou d'autres agents détartrants dans le
réservoir d'eau.
C
3 Mettez le bouton de réglage de la température sur MAX.
4 Branchez l'appareil.
5 Débranchez le fer quand le témoin lumineux s'éteint.
6 Tenez le fer au-dessus de l'évier et réglez la commande de
vapeur sur la position 1 (auto-nettoyage). Le bouton se lèvera
un peu.
C
7 Pour enlever la tige de la commande de vapeur, tirez le bouton
de vapeur en haut.
C
8 Tenez le fer au-dessus de l'évier et secouez-le.
B
De l'eau bouillante et de la vapeur s'échappent alors de l'orifice de la
semelle. Les impuretés et le tartre (s'il y en a) seront éliminés du fer à
repasser.
C
9 Utilisez un peu de vinaigre pour enlever les particules de
calcaire de la tige, si nécessaire.
Ne courbez ou n'endommagez pas la tige de la commande de vapeur.
C
10 Réinsérez la pointe de la tige exactement dans le centre de
l'orifice et fixez-la dans sa fente. Réglez la commande de vapeur
sur la position O.
11 Répétez cette opération aussi souvent que nécessaire.
Après l'auto-nettoyage
1 Insérez la fiche dans la prise murale et laissez le fer réchauffer
pour sécher la semelle.
2 Débranchez le fer quand le témoin lumineux s'éteint.
FRANÇAIS
Page 29
29
3 Repassez un vieux morceau de tissu pour vous assurer que la
semelle est bien sèche.
Rangement
1 Débranchez l'appareil, laissez-le refroidir et réglez la
commande de vapeur sur la position O..
2 Nettoyez le fer et essuyez les particules de calcaire et autres
salissures de la semelle avec un chiffon humide ou un détergent
(liquide) non-abrasif.
Maintenez la semelle lisse : évitez le contact avec des objets
métalliques.
N'utilisez jamais de tampons à récurer, du vinaigre ou d'autres produits
chimiques.
C
3 Rincez régulièrement le réservoir d'eau et videz-le après
nettoyage.
C
4 Enroulez le cordon d'alimentation autour du support de
rangement.
5 Rangez toujours le fer sur son talon et placez-le sur une
surface stable et sèche.
Environnement
C
◗ Ne jetez pas l'appareil en fin de vie avec les ordures ménagères,
mais déposez-le à un endroit prévu à cet effet par les pouvoirs
publics pour son recyclage.Vous aiderez, ainsi,à protéger
l'environnement.
Garantie et service
Pour plus d'informations, visitez notre site Internet : www.philips.com
ou veuillez contacter le Service Consommateurs Philips de votre pays
(vous trouverez le numéro de téléphone dans le dépliant sur la
garantie internationale). S'il n'y a aucun Service Consommateurs Philips
dans votre pays, contactez votre distributeur ou le Service Department
of Philips Domestic Appliances and Personal Care BV.
FRANÇAIS
Page 30

30
Solution
Vérifiez le cordon d'alimentation, la
fiche et la prise de courant.
Réglez le thermostat sur la position
nécessaire.
Remplissez le réservoir d'eau (voir
"Préparation à l'emploi", section
"Remplissage du réservoir d'eau").
Réglez la commande de vapeur sur Á,
Ë ou È (voir "Utilisation de l'appareil",
section "Repassage à la vapeur").
Sélectionnez une température de
repassage appropriée pour le
repassage à la vapeur (2 au MAX).
Placez le fer sur son talon et attendez
jusqu'à ce que le témoin s'éteigne
avant de continuer le repassage.
Mettez le fer en position horizontale
et attendez quelque temps avant
d'utiliser la fonction jet de vapeur
(vertical) à nouveau.
Sélectionnez une température de
repassage appropriée pour le
repassage à la vapeur (2 au MAX).
Placez le fer sur son talon et attendez
jusqu'à ce que le témoin s'éteigne
avant de continuer le repassage.
Utilisez la fonction auto-nettoyage
quelques fois (voir "Nettoyage et
entretien", section "Auto-nettoyage").
Soulevez et remuez le fer doucement
pour désactiver la fonction arrêt
automatique: le témoin rouge ne
clignotera plus.
Appuyez-le jusqu'à ce que vous
entendiez un clic.
Sélectionnez une température de
repassage appropriée pour le
repassage à la vapeur (2 au MAX).
Placez le fer sur son talon et attendez
jusqu'à ce que le témoin s'éteigne
avant de continuer le repassage.
Cause(s) possible (s)
Problème de connexion
Thermostat réglé sur MIN
Il n'y a pas assez d'eau dans le
réservoir.
La commande de vapeur a été réglée
sur la position O.
La semelle n'est pas suffisamment
chaude et/ou la fonction anti-goutte
(certains modèles uniquement) a été
activée.
Le jet de vapeur a été utilisé trop
souvent et la semelle n'a pas eu le
temps de reprendre la température
initiale.
La semelle n'est pas suffisament
chaude.
L'eau est trop dure et entartre
l'intérieur de la semelle.
L'arrêt automatique est activé (voir
"Autres caractéristiques", section
"Arrêt automatique").
Le couvercle de l'orifice de
remplissage n'a pas été correctement
fermé.
La commande de vapeur a été réglée
sur une position inférieure.
Problème
Le fer à repasser est branché mais la
semelle est froide.
Pas de vapeur
Pas de jet de vapeur ou pas de jet de
vapeur vertical (cer tains modèles
uniquement).
Des particules de calcaire et des
impuretés sortent par la semelle
pendant le repassage.
Le témoin lumineux rouge clignote
(modèles GC2425 et GC2330
uniquement).
Des gouttes d'eau tombent sur le tissu
(GC2425/2420/2415/GC2330/2326/2
325/2320 uniquement)
Des gouttes d'eau tombent sur le tissu
(GC2415/2320/2315/2310/2305
uniquement)
Dépannage
Ce chapitre résume les problèmes les plus courants susceptibles d'être rencontrés. Lisez les sections
suivantes pour plus de détails. Si vous ne pouvez pas résoudre le problème, contactez votre
revendeur ou un Centre Service Agréé Philips.
FRANÇAIS
Page 31

31
Solution
Videz le réservoir d'eau et réglez la
commande de vapeur sur la position
O après utilisation. Rangez le fer sur le
talon.
Cause(s) possible (s)
Le fer a été mis en position
horizontale tandis que le réservoir
d'eau n'était pas vide.
Problème
Des gouttes d'eau sortent par la
semelle après avoir refroidi ou rangé le
fer à repasser.
FRANÇAIS
Page 32

Descrizione generale
A Bocchetta spray
B Tappo di riempimento (solo GC2425/2429/2415/
GC2330/2326/2325/2320)
C Pulsante getto di vapore (solo GC2425/2429/2415/
GC2330/2326/2325/2320)
D Pulsante spray T
E Regolatore vapore
- O = vapore escluso
- Á = vapore minimo
- q = vapore moderato (solo GC2425/2429/2415/
GC2330/2326/2325/2320)
- w = vapore massimo
- 1 = funzione Calc-Clean
F Funzione vapore extra (solo GC2305)
G Spia temperatura
H Spia spegnimento automatico (solo GC2425/GC2330)
I Termostato
J Cavo di alimentazione
K Piastra modello
L Pastiglia anti-calcare
M Serbatoio acqua
Importante
Per maggior sicurezza, leggere attentamente le istruzioni e osservare le
illustrazioni prima di usare l'apparecchio.
◗ Prima di collegare l'apparecchio, controllate che la tensione
indicata sulla placchetta corrisponda a quella della rete locale.
◗ Collegate sempre l'apparecchio ad una presa provvista di messa a
terra.
◗ Non usate l'apparecchio nel caso in cui la spina, il cavo o
l'apparecchio mostrino danni visibili, o nel caso in cui l'apparecchio
sia caduto o stia perdendo.
◗ Controllate periodicamente il cavo per evidenziare eventuali
danni.
◗ Nel caso in cui il cavo di alimentazione fosse danneggiato, dovrà
essere sostituito presso i centri autorizzati Philips, i rivenditori
specializzati oppure da personale opportunamente qualificato, per
evitare situazioni pericolose.
◗ Non lasciate mai il ferro incustodito mentre è collegato alla presa
di corrente.
◗ Non immergete mai il ferro nell'acqua.
◗ Tenete l'apparecchio fuori dalla portata dei bambini.
◗ La piastra del ferro diventa bollente durante l'uso e può causare
gravi ustioni se toccata. Fate in modo che il cavo non tocchi la
piastra bollente.
◗ Non mettete profumo,aceto, amido,sostanze disincrostanti o altri
prodotti chimici nel serbatoio dell'acqua.
ITALIANO32
Page 33
33
◗ Quando avete finito di stirare, mentre pulite, riempite o svuotate
il ferro o quando dovete allontanarvi anche solo per un attimo,
mettete il regolatore di vapore in posizione 0 e il ferro in
posizione verticale, quindi togliete la spina dalla presa.
◗ Appoggiate il ferro su un asse da stiro o un tavolo stabile.
◗ Nel caso l'apparecchio sia provvisto di supporto, controllate che
sia posizionato su una superficie stabile.
◗ Questo apparecchio è destinato esclusivamente all'uso domestico.
Come preparare l'apparecchio per l'uso
Come riempire il serbatoio
1 Togliete la spina dalla presa di corrente.
C
2 Mettete il regolatore di vapore sulla posizione O (=Vapore
escluso).
3 Aprite il tappo di riempimento (solo alcuni modelli)
C
4 Inclinate il ferro e riempite il serbatoio dell'acqua fino al livello
massimo.
Non superate l'indicazione MAX.
5 Chiudete il tappo di riempimento (click!) (solo alcuni modelli).
Nel caso l'acqua nella vostra zona fosse particolarmente dura, vi
consigliamo di usare acqua distillata. Non usate aceto, amido o acqua
decalcificata chimicamente.
Come impostare la temperatura
◗ Il ferro potrebbe emettere un po' di fumo quando viene acceso
per la prima volta. Il fenomeno è del tutto normale e scomparirà
nel giro di poco tempo.
C
1 Appoggiate il ferro in posizione verticale e impostate il
termostato sulla temperatura di stiratura desiderata,
ruotandolo nella posizione corretta.
- Controllate le istruzioni ripor tate sull'etichetta del capo da stirare
per individuare la temperatura consigliata.
- 1 fibre sintetiche (es. acrilico, viscosa, poliammide, poliestere).
- 1 seta
- 2 lana
- 3 cotone, lino
ITALIANO
Page 34

34
- Se non conoscete la composizione di un tessuto, fate una prova su
un angolo del capo che non sia visibile quando viene indossato, in
modo da stabilire la giusta temperatura di stiratura.
- Seta, lana e materiali sintetici: stirate il capo al rovescio per evitare
tracce di lucido. Evitate anche l'uso dello spray per non macchiare i
tessuti.
2 Inserite la spina in una presa dotata di messa a terra.
3 Dopo che la spia della temperatura si sarà spenta, aspettate un
po' prima di iniziare a stirare.
B
Durante la stiratura, la spia della temperatura si accenderà di quando in
quando.
Come usare l'apparecchio
Stiratura a vapore
Controllate che ci sia una quantità d'acqua sufficiente nel serbatoio.
1 Mettete il termostato nella posizione desiderata.
Vedere la sezione "Come impostare la temperatura".
C
2 Mettete il regolatore di vapore nella posizione prescelta.
- Á per un vapore ridotto (temperatura da 2 a 3).
- Ë per un vapore moderato (temperatura da a MAX) (solo alcuni
modelli)
- È per un vapore massimo (temperatura da 3 a MAX).
B
Il vapore inizierà a fuoriuscire non appena verrà raggiunta la
temperatura impostata.
Solo GC2415/2320/2315/2310/2305
L'acqua potrebbe fuoriuscire dalla piastra nel caso la temperatura fosse
troppo bassa (da MIN a 2).
Stiratura senza vapore.
1 Mettete il regolatore di vapore in posizione O (= assenza di
vapore)
2 Mettete il termostato nella posizione desiderata.
Vedere la sezione "Come impostare la temperatura".
ITALIANO
Page 35

Caratteristiche
Spray
Per eliminare le pieghe più ostinate
1 Controllate che ci sia una quantità d'acqua sufficiente nel
serbatoio.
C
2 Premete più volte il pulsante spray per inumidire il capo che
volete stirare.
Vapore extra (solo GC2305)
Questa funzione eroga del vapore extra per eliminare le pieghe più
ostinate
Il Colpo di Vapore può essere utilizzato soltanto con temperature
comprese fra 3 e MAX.
C
1 Mettete il regolatore di vapore sulla posizione MAX È.
C
2 Tenete premuto il pulsante del regolatore di vapore per
massimo 5 secondi.
3 Aspettate almeno 1 minuto prima di usare nuovamente la
funzione Vapore Extra per evitare la fuoriuscita di acqua dalla
piastra.
Colpo di vapore (solo alcuni modelli)
Il potente colpo di vapore è utilissimo per eliminare le pieghe più
ostinate.
Il getto di vapore può essere utilizzato solo con temperature comprese
fra 2 e MAX.
C
1 Premete e rilasciate il pulsante Colpo di Vapore.
35ITALIANO
Page 36

36
Getto di vapore verticale (solo alcuni modelli)
C
1 La funzione getto di vapore può essere usata anche tenendo il
ferro in posizione verticale ed è particolarmente utile per
eliminare le pieghe da capi appesi, tende ecc.
Non puntate mai il getto di vapore verso le persone.
Dispositivo antisgocciolamento
Il ferro è provvisto di uno speciale dispositivo antisgocciolamento che
blocca automaticamente il vapore nel caso vengano utilizzate
temperature troppo basse, per evitare che l'acqua fuoriesca dalla
piastra. In questa caso, sentirete un click.
Spegnimento automatico (solo GC2425/GC2330)
Uno speciale dispositivo elettronico spegne automaticamente il ferro
nel caso venga lasciato immobile per un po'.
C
◗ La spia del dispositivo di spegnimento automatico inizia a
lampeggiare per indicare che la serpentina è stata spenta.
Per riscaldare nuovamente il ferro: sollevatelo o muovetelo
leggermente. La spia del dispositivo di spegnimento automatico si
spegnerà.
1 Se si accende la spia della temperatura, aspettate prima di
iniziare a stirare.
2 Se non si accende la spia della temperatura, il ferro è pronto
per l'uso.
Pulizia e manutenzione
Sistema Anticalcare Double-Active
C
◗ La pastiglia anticalcare impedisce che il calcare ostruisca i fori del
vapore. La pastiglia è costantemente attiva e non deve essere
sostituita.
◗ La funzione Calc-Clean elimina le particelle di calcare.
ITALIANO
Page 37
37
Funzione Calc-Clean
Usate la funzione "Eliminazione calcare " una volta ogni quindici giorni.
Nel caso di acqua particolarmente dura (durante la stiratura
fuoriescono pezzetti di calcare dalla piastra), la funzione "Eliminazione
calcare" dovrà essere attivata con maggior frequenza.
1 Mettete il controllo vapore in posizione O.
2 Riempite il serbatoio fino al livello MAX.
Non mettete aceto o altri prodotti disincrostanti nel serbatoio.
C
3 Mettete il termostato in posizione MAX
4 Inserite la spina nella presa di corrente.
5 Togliete la spina dalla presa di corrente quando la spia si
spegne.
6 Tenendo il ferro sul lavandino,mettete il regolatore di vapore in
posizione 1 ("Eliminazione calcare"). La manopola del
regolatore di vapore si solleverà leggermente.
C
7 Tirate verso l'alto la manopola del regolatore di vapore per
togliere l'astina.
C
8 Muovete il ferro avanti e indietro, tenendolo sul lavandino.
B
Il vapore e l'acqua bollente inizieranno a fuoriuscire dalla piastra,
portando con sè l'eventuale calcare e le altre impurità.
C
9 Usate un po' di aceto per eliminare l'eventuale calcare presente
sull'astina.
Non piegate o danneggiate l'astina.
C
10 Rimettete a posto l'astina inserendo la punta esattamente al
centro del foro e agganciando nella cavità la piccola sporgenza
posta sul lato dell'astina. Mettete la manopola del regolatore di
vapore in posizione O.
11 Ripetete l'operazione nel caso in cui il ferro contenga una
grande quantità di impurità.
ITALIANO
Page 38

38
Dopo l'operazione di eliminazione del calcare
1 Inserite la spina nella presa per riscaldare il ferro.
2 Togliete la spina dalla presa di corrente quando la spia si
spegne.
3 Passate il ferro sopra uno straccio per eliminare eventuali
macchie che si fossero formate sulla piastra.
Come riporre il ferro
1 Togliete la spina dalla presa di corrente, lasciate raffreddare il
ferro e mettete il regolatore del vapore in posizione O
2 Pulite l'apparecchio e togliete eventuali depositi di calcare o
altro dalla piastra utilizzando un panno umido e un detergente
(liquido) non abrasivo.
La piastra deve essere perfettamente liscia: evitate il contatto con
oggetti metallici.
Non usate spugnette abrasive, aceto o altre sostanze chimiche.
C
3 Risciacquate periodicamente il serbatoio con acqua pulita e
svuotatelo dopo averlo pulito.
C
4 Avvolgete il cavo attorno all'apposito supporto.
5 Riponete sempre il ferro in posizione verticale, in un posto
sicuro e asciutto.
Ambiente
C
◗ A fine vita non gettare questo apparecchio nella normale raccolta
dei rifiuti, ma portalo presso uno dei punti di raccolta autorizzati.
In questo modo contribuirai a preservare l'ambiente.
ITALIANO
Page 39

39
Soluzione
Controllate il cavo, la presa e la spina
a muro.
Impostate il termostato sulla
posizione richiesta.
Riempite il serbatoio dell'acqua
(vedere "Prima dell'uso"; sezione
"Come riempire il serbatoio
dell'acqua").
Mettete il regolatore di vapore in
posizione Á, Ë o È (vedere "Come
usare l'apparecchio", sezione "Stiratura
a vapore").
Impostate il termostato in una
posizione compresa nell'area vapore
(da 2 a MAX). Mettete il ferro in
posizione verticale e aspettate che si
spenga la spia della temperatura
prima di inziare a stirare.
Mettete il ferro in posizione
orizzontale e aspettate un po' prima
di usare nuovamente il Getto di
vapore (verticale).
Impostate il termostato in una
posizione compresa nell'area vapore
(da 2 a MAX). Mettete il ferro in
posizione verticale e aspettate che si
spenga la spia della temperatura
prima di inziare a stirare.
Usate alcune volte la funzione
"Eliminazione Calcare" (Vedere "Pulizia
e manutenzione", sezione
"Eliminazione Calcare").
Sollevate il ferro o muovetelo
leggermente per disattivare la
funzione di spegnimento automatico:
la spia rossa smetterà di lampeggiare.
Possibile causa
Problemi di connessione
Termostato impostato su MIN.
Quantità d'acqua insufficiente nel
serbatoio
Il regolatore del vapore è stato messo
in posizione O
La piastra non è sufficientemente
calda e/o è stata attivata la funzione
antisgocciolamento (solo alcuni
modelli).
Il Getto di Vapore (Ver ticale) è stato
usato troppe volte in un periodo di
tempo limitato.
La piastra non è sufficientemente
calda.
L'acqua troppo dura ha formato del
calcare all'interno della piastra.
E' stata attivata la funzione di
spegnimento automatico (vedere
"Altre Caratteristiche", sezione
"Spegnimento automatico").
Problema
Il ferro è collegato alla presa di
corrente ma la piastra è fredda.
Mancanza di vapore
Il Colpo di Vapore o il Getto di
Vapore Verticale (solo alcuni modelli)
non funzionano.
Dalla piastra fuoriescono impurità e
residui di calcare durante la stiratura.
La spia rossa lampeggia (solo GC2425
e GC2330)
Localizzazione guasti
In questo capitolo vengono riportati i problemi più ricorrenti legati all'uso del ferro. Per ulteriori
dettagli, vi preghiamo di leggere le diverse sezioni. Nel caso non riusciste a risolvere un problema, vi
preghiamo di contattare il Centro Assistenza Philips più-vicino oppure un rivenditore autorizzato.
Garanzia e assistenza
Se avete bisogno di assistenza o in caso di problemi, vi preghiamo di
visitare il nostro sito web: www.philips.com oppure di contattare il
Centro Assistenza Clienti Philips del vostro Paese (per conoscere il
numero di telefono, vedere l'opuscolo della garanzia). Qualora nel
vostro Paese non ci fosse un Centro Assistenza Clienti, rivolgetevi al
rivenditore autorizzato Philips oppure contattate il Service
Departmente of Philips Domestic Appliances and Personal Care BV.
ITALIANO
Page 40

40
Soluzione
Premete il tappo fino a quando
sentirete un click.
Impostate il termostato in una
posizione compresa nell'area vapore
(da 2 a MAX). Mettete il ferro in
posizione verticale e aspettate che si
spenga la spia della temperatura
prima di inziare a stirare.
Svuotate il serbatoio dell'acqua e
mettete il regolatore vapore in
posizione O dopo l'uso. Riponete il
ferro in posizione verticale.
Possibile causa
Il tappo dell'apertura di riempimento
non è stato chiuso bene.
La temperatura impostata è troppo
bassa.
Il ferro è stato messo in posizione
orizzontale mentre c'era ancora
dell'acqua nel serbatoio.
Problema
Gocce d'acqua sui tessuti (solo
GC2425/2420/2415/GC2330/2326/2
325/2320 )
Gocce d'acqua sul tessuto (solo
GC2425/2429/2415/GC2330/2326/2
325/2320)
L'acqua sgocciola dalla piastra dopo
aver lasciato raffreddare o dopo aver
riposto il ferro.
ITALIANO
Page 41

414243
Page 42

Page 43

Page 44

u
4239 000 60252
www.philips.com
 Loading...