

Page 1
Mistral
GC2425, GC2420, GC2415, GC2330, GC2326, GC2325,
GC2320, GC2315, GC2310, GC2305
Page 2

2
Page 3

3
L
M
J
A D F GECB I
H
K
Page 4

4
Page 5

ENGLISH 6
POLSKI 14
ROMÂNĂ 23
РУССКИЙ 31
ČESKY 41
MAGYAR 49
SLOVENSKY 57
УКРАЇНСЬКА 66
HRVATSKI 76
EESTI 84
LATVISKI 92
LIETUVIŠKAI 102
SLOVENŠČINA 110
БЪЛГАРСКИ 118
SRPSKI 128
GC2425, GC2420, GC2415, GC2330, GC2326,
GC2325, GC2320, GC2315, GC2310, GC2305
Page 6

General description
A Spray nozzle
B Filling cap
(GC2425/2420/2415/GC2330/2326/2325/2320 only)
C Shot-of-steam button
(GC2425/2420/2415/GC2330/2326/2325/2320/2315/2310 only)
D Spray button T
E Steam control
- O = no steam
- Á = minimum steam
- q = moderate steam
(GC2425/2420/2415/GC2330/2326/2325/2320 only)
- w = maximum steam
- 1 = Calc-Clean function
F Extra-steam function (GC2305 only)
G Temperature light
H Automatic shut-off light (GC2425/GC2330 only)
I Temperature dial
J Mains cord
K Type plate
L Anti-calc tablet
M Water tank
Important
Read these instructions for use carefully before using the appliance and
save them for future reference.
◗ Check if the voltage indicated on the type plate corresponds to
the local mains voltage before you connect the appliance.
◗ Only connect the appliance to an earthed wall socket.
◗ Do not use the appliance if the plug, the cord or the appliance
itself shows visible damage, or if the appliance has been dropped
or is leaking.
◗ Check the cord regularly for possible damage.
◗ If the mains cord is damaged, it must be replaced by Philips, a
service centre authorised by Philips or similarly qualified persons
in order to avoid a hazard.
◗ Never leave the iron unattended when it is connected to the
mains.
◗ Never immerse the iron in water.
◗ Keep the appliance out of the reach of children.
◗ The soleplate of the iron can become extremely hot and may
cause burns if touched.
◗ Do not allow the cord to come into contact with the soleplate
when it is hot.
◗ Do not put perfume, vinegar, starch, descaling agents, ironing aids
or other chemicals in the water tank.
◗ When you have finished ironing, when you clean the appliance,
when you fill or empty the water tank and also when you leave
ENGLISH6
Page 7

the iron even for a short while: set the steam control to position
O, put the iron on its heel and remove the mains plug from the
wall socket.
◗ Place and use the iron on a stable ironing board or table.
◗ If a stand is provided with the appliance, ensure that the stand is
placed on a stable surface.
◗ This appliance is intended for household use only.
Preparing for use
Filling the water tank
1 Remove the mains plug from the wall socket.
C
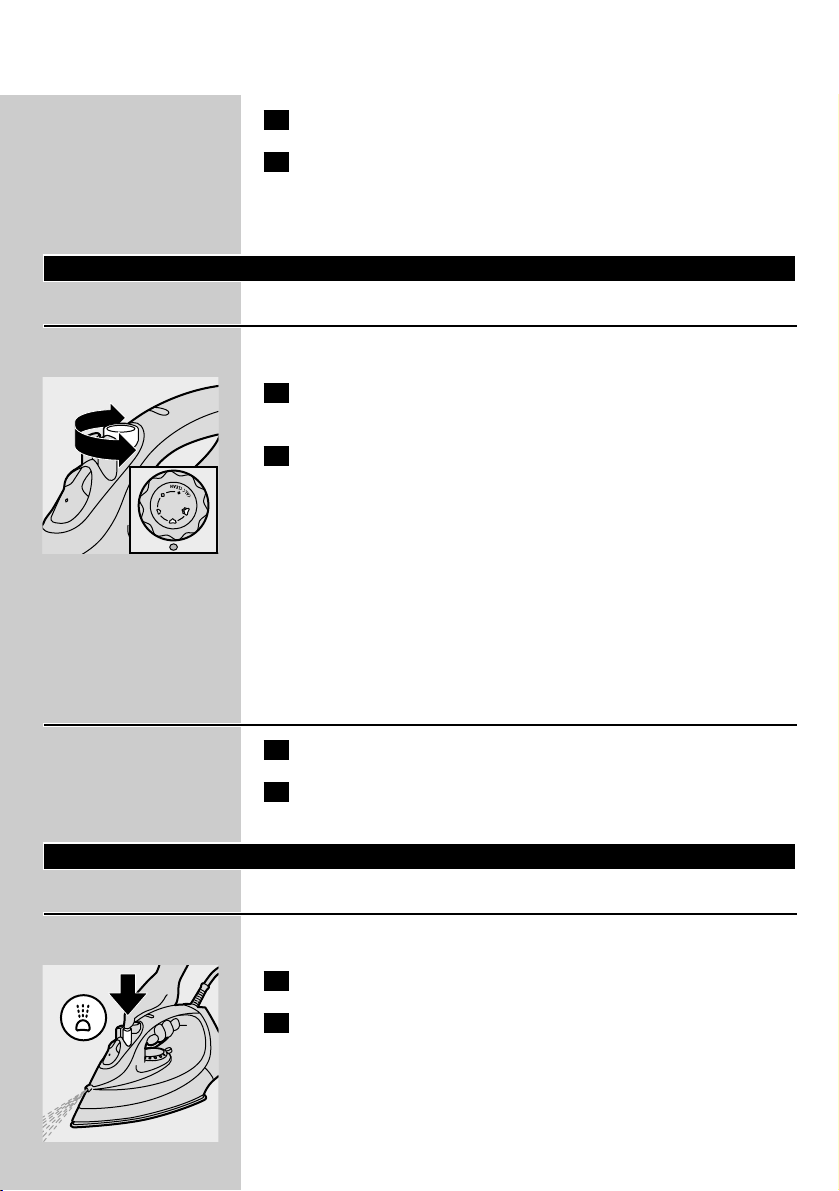
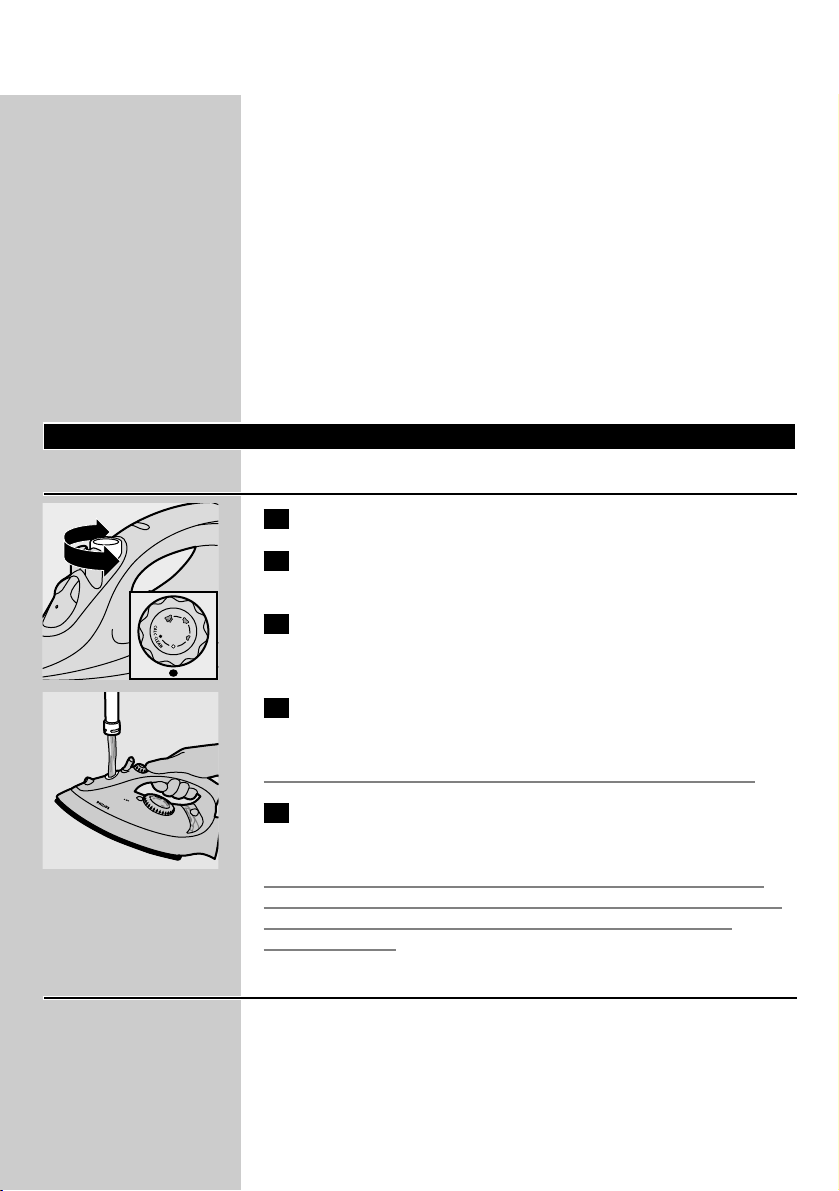
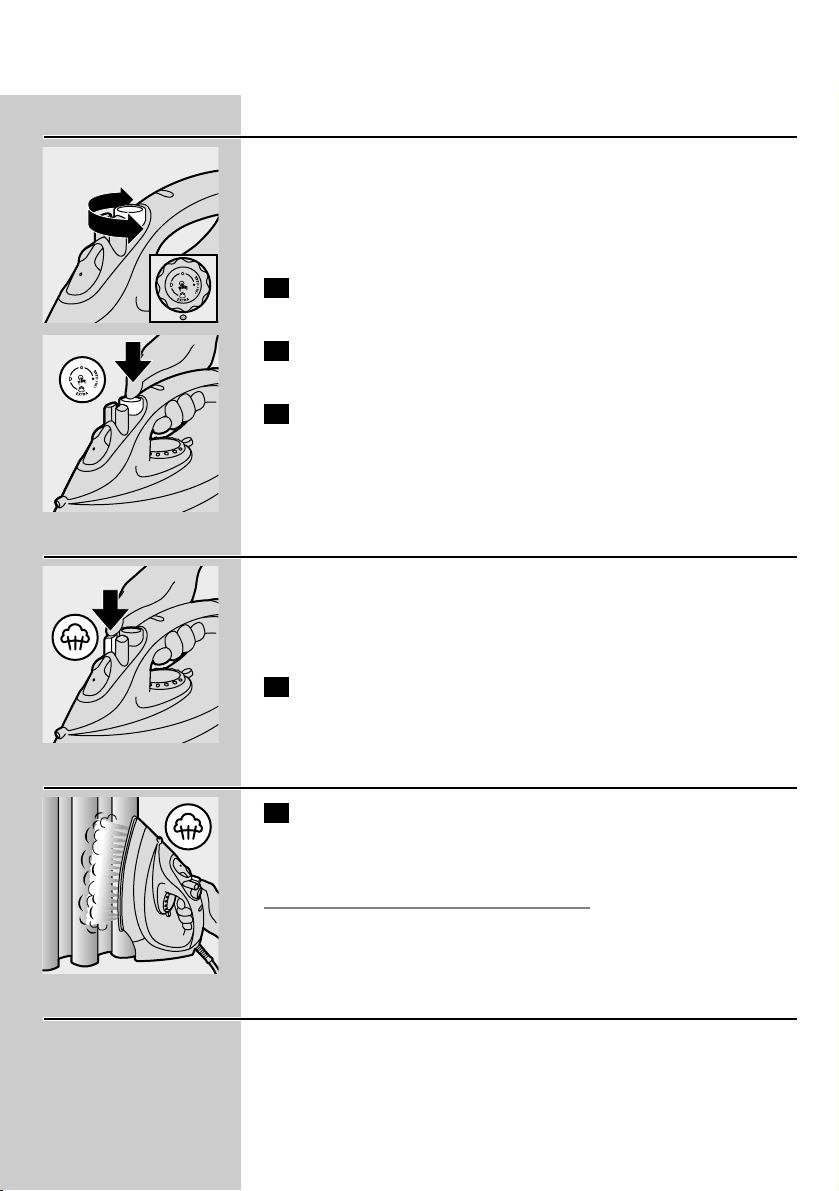
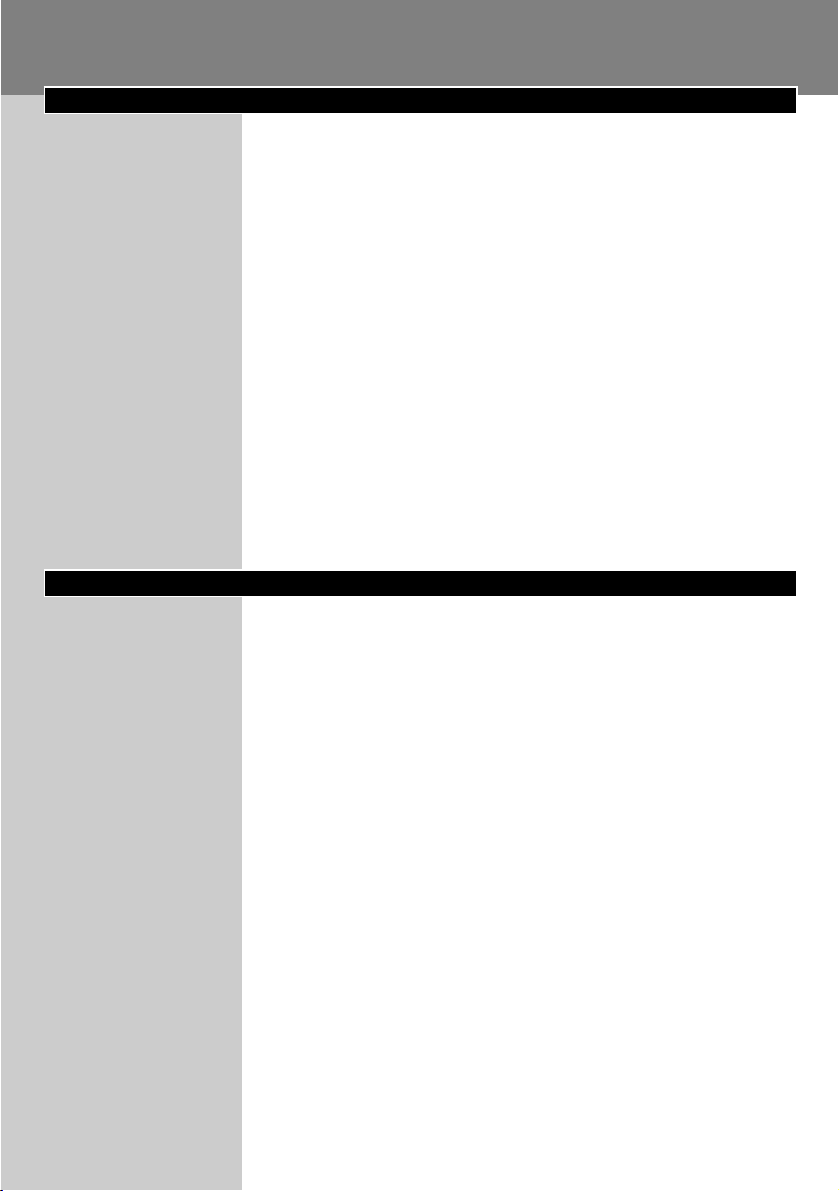
2 Set the steam control to position O (= no steam).
3 Open the filling cap (specific types only).
C
4 Tilt the iron and fill the water tank up to maximum level.
Do not fill the water tank beyond the MAX indication.
5 Close the filling cap (click!) (specific types only).
If the tap water in your area is very hard, we advise you to use distilled
water. Do not use vinegar, starch or chemically descaled water.
Setting the temperature
◗ The iron may give off some smoke when you use it for the first
time.This will cease after a short while.
C
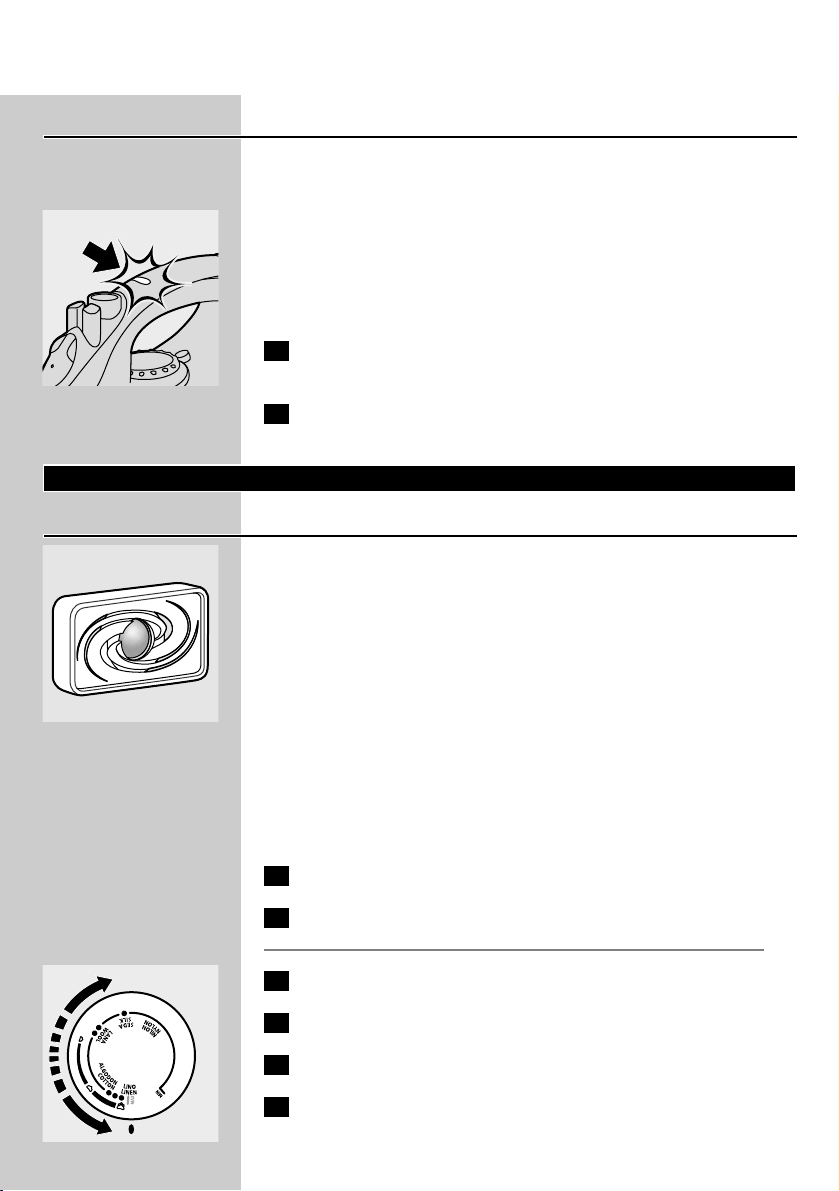
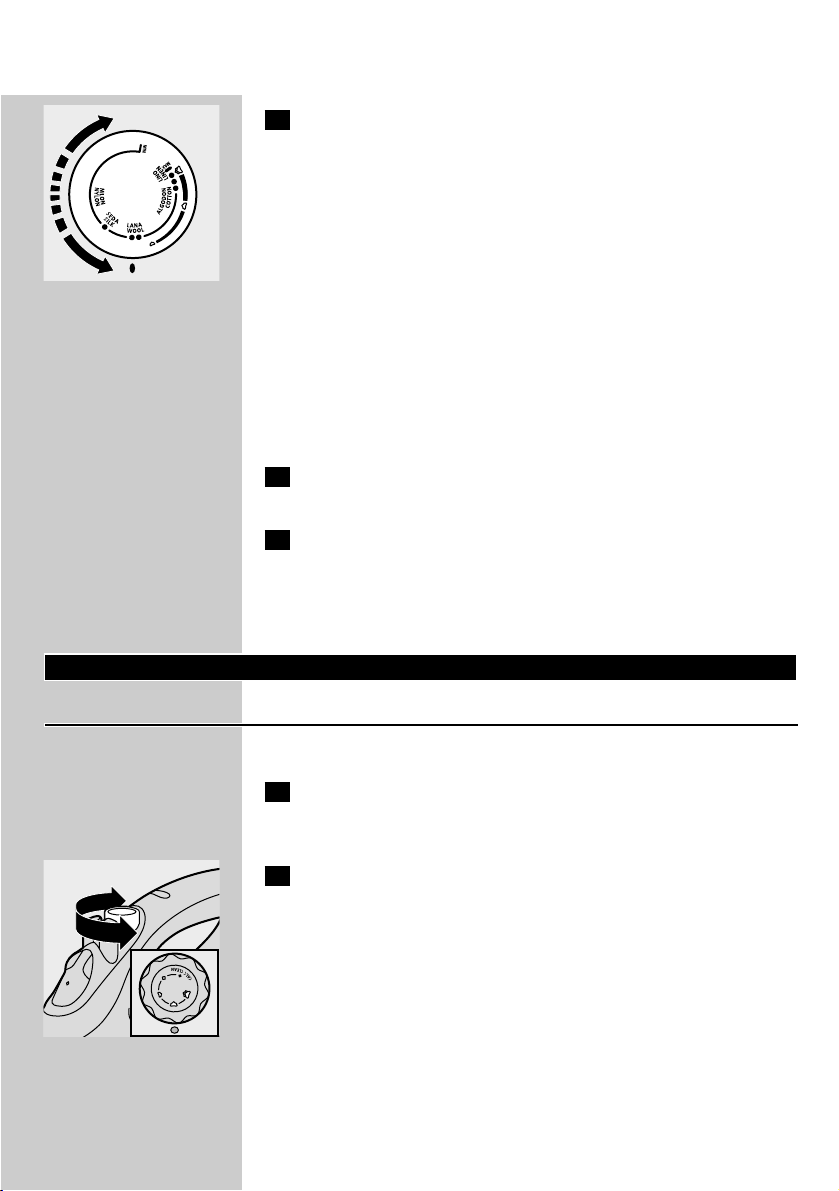
1 Put the iron on its heel and set the temperature dial to the
required ironing temperature by turning it to the appropriate
position.
- Check the garment label for the required ironing temperature.
- 1 Synthetic fabrics (e.g. acrylic, viscose, polyamide, polyester)
- 1 Silk
- 2 Wool
- 3 Cotton, linen
- If you do not know what kind or kinds of fabric an article is made of,
determine the right ironing temperature by ironing a part that will
not be visible when you wear or use the article.
- Silk, woollen and synthetic materials: iron the reverse side of the
fabric to prevent shiny patches. Avoid using the spray function to
prevent stains.
ENGLISH 7
Page 8
2 Put the mains plug in an earthed wall socket.
3 When the temperature light has gone out, wait a while before
you start ironing.
B
The temperature light will go on from time to time during ironing.
Using the appliance
Steam ironing
Make sure that there is enough water in the water tank.
1 Set the temperature dial to the recommended position.
See 'Setting the temperature'.
C
2 Set the steam control to the appropriate steam position.
- Á for minimum steam (temperature settings 2 and 3).
- Ë for moderate steam (temperature settings 3 to MAX)
(specific types only).
- È for maximum steam (temperature settings 3 to MAX).
B
Steaming will start as soon as the set temperature has been reached.
GC2415/2320/2315/2310/2305 only:
Water may leak from the soleplate if the set temperature is too low
(MIN to 2).
Ironing without steam
1 Set the steam control to position O (= no steam).
2 Set the temperature dial to the recommended position.
See 'Setting the temperature'.
Features
Spraying
To remove stubborn creases at any temperature
1 Make sure that there is enough water in the water tank.
C
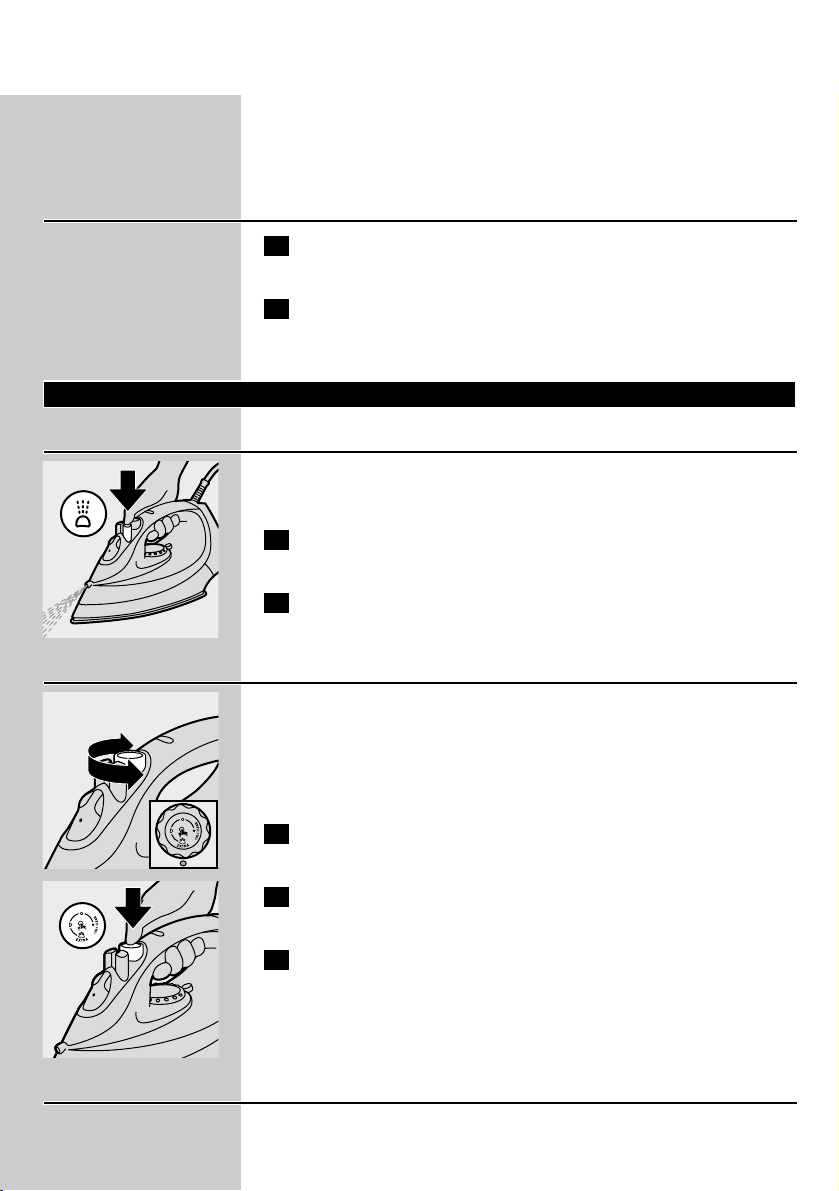
2 Press the spray button several times to moisten the garment to
be ironed.
ENGLISH8
Page 9

Extra Steam (GC2305 only)
This function provides extra steam to remove really stubborn creases.
The Extra Steam function only works at temperature settings between
3 and MAX.
C
1 Set the steam control to maximum position È.
C
2 Press and hold the Steam Control button down for max.5
seconds.
3 Wait at least 1 minute before using Extra Steam again to
prevent water from dripping out of the soleplate.
Shot of Steam (specific types only)
A powerful shot of steam helps to remove very stubborn creases.
The Shot-of-Steam function only works at temperature settings
between 2 and MAX.
C
1 Press and release the Shot-of-Steam button.
Vertical Shot of Steam (specific types only)
C
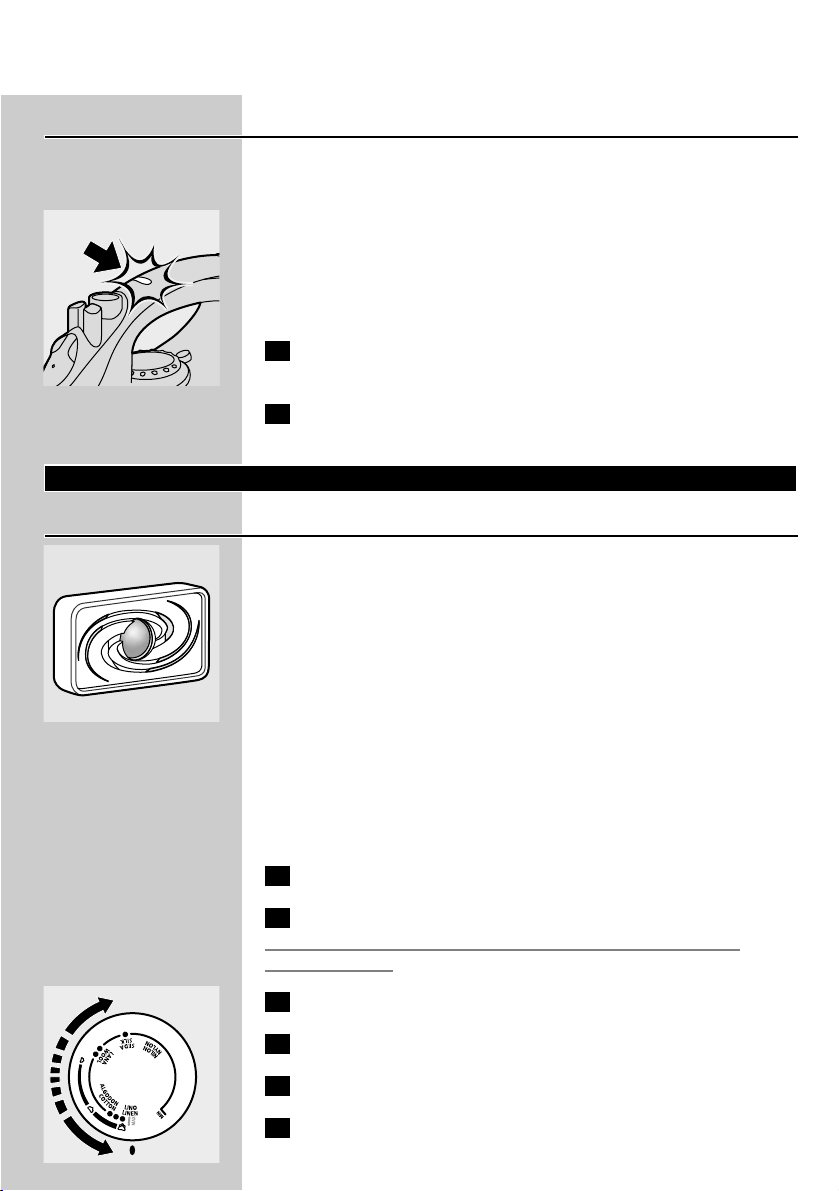
1 The Shot-of-Steam function can also be used when you are
holding the iron in vertical position.This is useful for removing
creases from hanging clothes, curtains, etc.
Never direct the steam towards people.
Drip stop (GC2425/2420/GC2330/2326/2325 only)
This iron is equipped with a drip stop function: the iron automatically
stops steaming when the temperature is too low to prevent water
from dripping out of the soleplate. When this happens you will hear a
click.
ENGLISH 9
Page 10
Automatic shut-off (GC2425/GC2330 only)
An electronic safety device will automatically switch the heating
element off if the iron has not been moved for a while.
C
◗ To indicate that the heating element has been switched off, the
automatic shut-off light will start blinking.
To heat up the iron again: pick it up or move it slightly.The automatic
shut-off light will go out.
1 If the temperature light goes on, wait for it to go out before
you start ironing.
2 If the temperature light does not go on, the iron is ready for
use.
Cleaning and maintenance
Double-Active Calc System
C
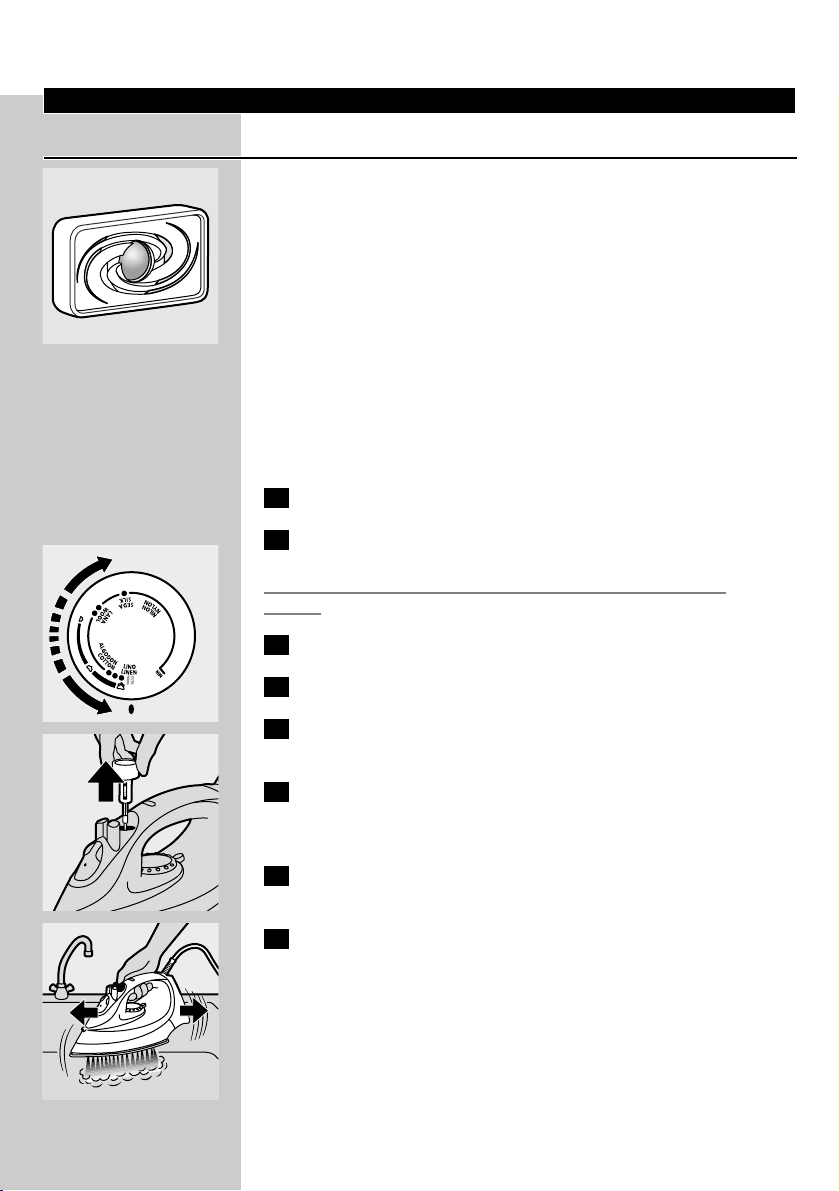
◗ The anti-calc tablet prevents scale from clogging the steam vents.
The tablet is constantly active and does not need to be replaced.
◗ The Calc-Clean function removes the scale particles.
Calc-Clean function
Use the Calc-Clean function once every two weeks. If the water in
your area is very hard (i.e. when flakes come out of the soleplate
during ironing), the Calc-Clean function should be used more
frequently.
1 Set the steam control to position O.
2 Fill the water tank to the maximum level.
Do not pour vinegar or other descaling agents into the water tank..
C
3 Set the temperature dial to MAX.
4 Put the plug in the wall socket.
5 Unplug the iron when the temperature light has gone out.
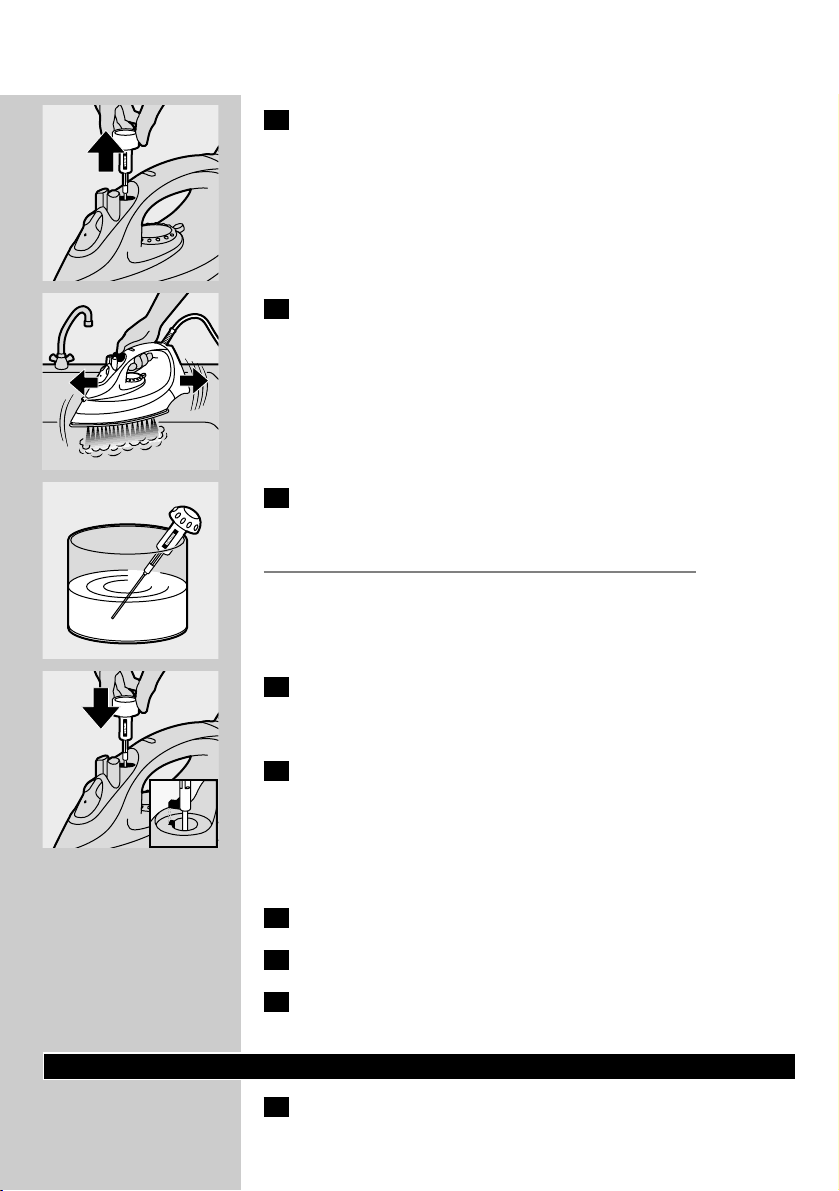
6 Hold the iron over the sink and set the steam control to
position 1 (Calc-Clean).The steam control knob will spring up
slightly.
ENGLISH10
Page 11

C
7 Pull the steam control knob upwards to remove the steam
control needle.
C
8 Hold the iron over the sink and move it to and fro.
B
Steam and boiling water will come out of the soleplate. Impurities and
scale (if any) will be flushed out.
C
9 Use vinegar to remove scale, if any, from the needle.
Do not bend or damage the steam control needle.
C
10 Put the steam control needle back by inserting the point of the
needle exactly in the centre of the hole and by fitting the small
projection on the side of the needle into the slot. Set the
steam control knob to position O.
11 Repeat the Calc-Clean process if the iron still contains a lot of
impurities.
After the Calc-Clean process
1 Plug the iron in to let the soleplate dry up.
2 Unplug the iron when the temperature light has gone out.
3 Move the iron gently over a piece of used cloth to remove any
water stains that may have formed on the soleplate.
Storage
1 Remove the mains plug from the wall socket, let the iron cool
down and set the steam control to position O.
ENGLISH 11
Page 12
2 Clean the appliance and wipe scale and any other deposits off
the soleplate with a damp cloth and a non-abrasive (liquid)
cleaner.
Keep the soleplate smooth: avoid hard contact with metal objects.
Never use a scouring pad, vinegar or other chemicals.
C
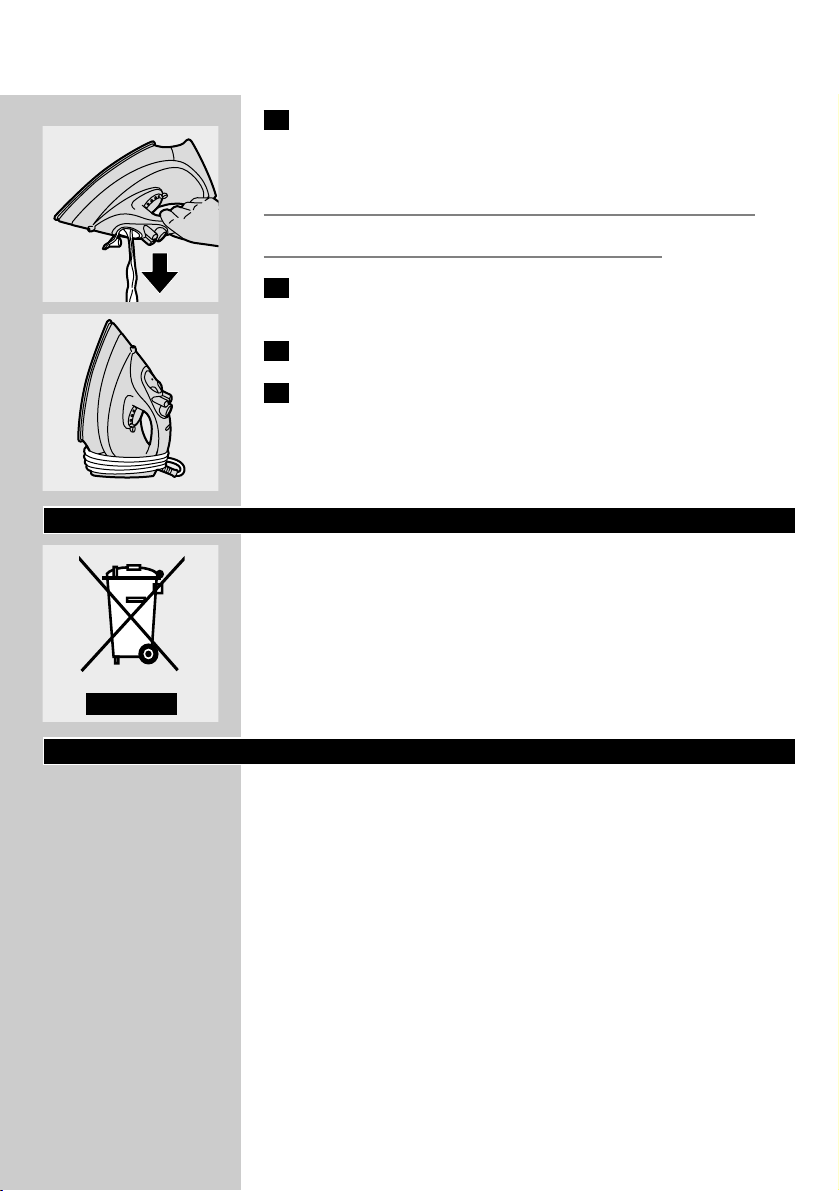
3 Regurarly rinse the water tank with water and empty it after
cleaning.
C
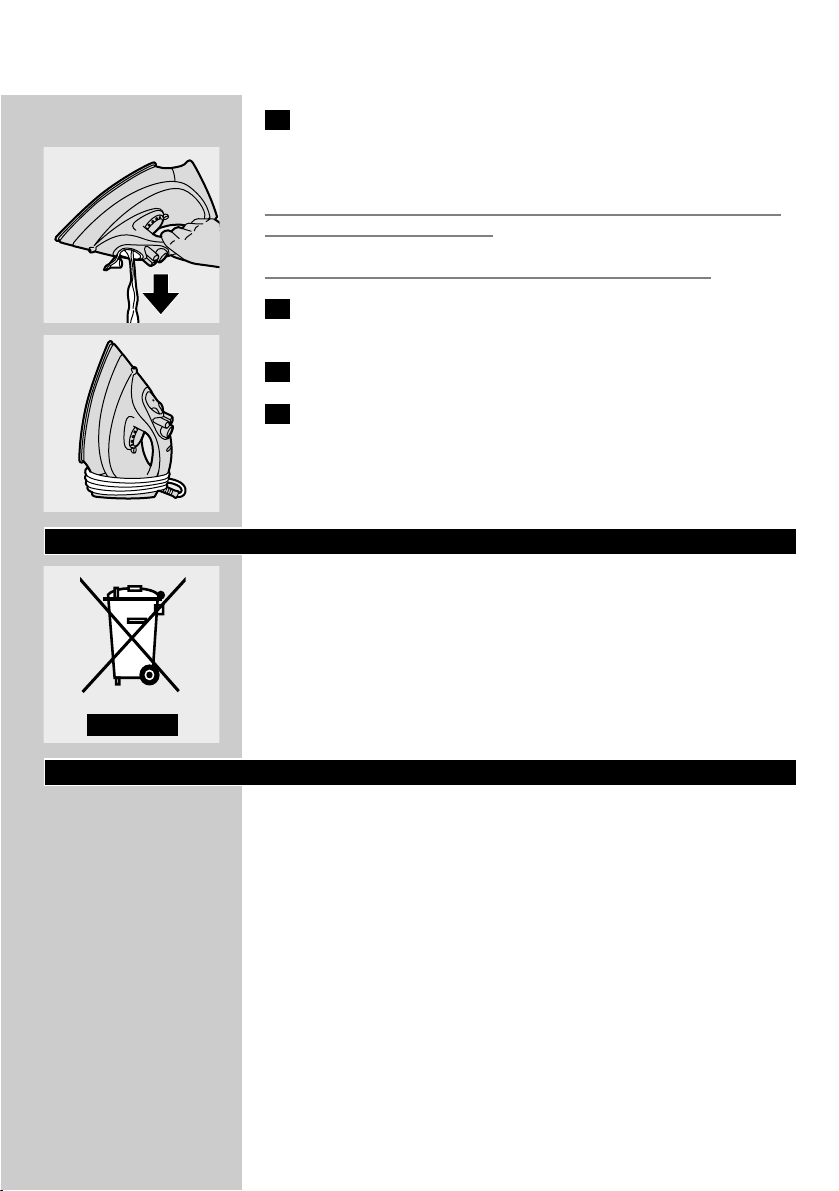
4 Wind the mains cord round the cord storage facility.
5 Always store the iron standing on its heel in a safe and dry
place.
Environment
C
◗ Do not throw the appliance away with the normal household
waste at the end of its life, but hand it in at an official collection
point for recycling. By doing this you will help to preserve the
environment.
Guarantee & service
If you need information or if you have a problem, please visit the Philips
website at www.philips.com or contact the Philips Customer Care
Centre in your country (you will find its phone number in the
worldwide guarantee leaflet). If there is no Customer Care Centre in
your country, turn to your local Philips dealer or contact the Service
Department of Philips Domestic Appliances and Personal Care BV.
ENGLISH12
Page 13

Solution
Check the mains cord, the plug and
the wall socket.
Set the temperature dial to the
required position.
Fill the water tank (see 'Preparing for
use'; section 'Filling the watertank'.)
Set the steam position to Á, Ë or È
(see 'Using the appliance', section
'Steam ironing').
Set the temperature dial to a position
in the steam area (2 to MAX). Put
the iron on its heel and wait until the
temperature light has gone out before
you start ironing.
Put the iron in horizontal position and
wait a while before using the (Vertical)
Shot of Steam function again.
Set the temperature dial to a position
in the steam area (2 to MAX). Put
the iron on its heel and wait until the
temperature light has gone out before
you start ironing.
Use the Calc-Clean function a few
times (see 'Cleaning and maintenance',
section 'Calc-Clean').
Pick the iron up or move it slightly to
deactivate the automatic shut-off
function: the red light will stop blinking.
Press the filling cap until you hear a
click.
Set the temperature dial to a position
in the steam area (2 to MAX). Put
the iron on its heel and wait until the
temperature light has gone out before
you start ironing.
Empty the water tank and set the
steam control to position O after use.
Store the iron on its heel.
Possible cause(s)
Connection problem
Temperature dial set at MIN
Not enough water in the water tank.
The steam control has been set to
position O.
The soleplate is not hot enough
and/or the drip stop function (specific
types only) has been activated.
The (Vertical) Shot of Steam function
has been used too often within a very
short period.
The soleplate is not hot enough.
Hard water forms flakes inside the
soleplate.
The automatic shut-off function has
been activated (see 'Other features',
section 'Automatic shut-off').
The filling cap has not been closed
properly.
The temperature has been set too
low.
The iron has been put in horizontal
position while there was still water in
the water tank.
Problem
The iron is plugged in but the soleplate
is cold.
No steam
No shot of steam or no Vertical Shot
of Steam (specific types only).
Flakes and impurities come out of the
soleplate during ironing.
Red light is blinking (GC2425 and
GC2330 only).
Water droplets on fabric
(GC2425/2420/2415/GC2330/2326/2
325/2320 only)
Water droplets on fabric
(GC2415/2320/2315/2310/2305 only)
Water drips from the soleplate after
the iron has cooled down or has been
stored.
Troubleshooting
This chapter summarises the most common problems you could encounter with your iron. Please
read the different sections for more details. If you are unable to solve the problem, please contact the
Philips Customer Care Centre in your country.
ENGLISH 13
Page 14

Opis urządzenia
A Dysza zraszająca
B Kapturek otworu do napełniania
(tylko dla modeli GC2425/2420/2415/GC2330/2326/2325/2320)
C Przycisk uderzenia pary (tylko dla modeli
GC2425/2420/2415/GC2330/2326/2325/2320/2315/2310)
D Przycisk zraszania T
E Regulator pary
- O = brak pary
- Á = minimalna ilość pary
- q = umiarkowana ilość pary
(tylko dla modeli GC2425/2420/2415/GC2330/2326/2325/2320)
- w = maksymalna ilość pary
- 1 = funkcja Calc-Clean - usuwania kamienia wapiennego
F Funkcja dodatkowej pary (tylko w modelu GC2305)
G Lampka sygnalizacyjna temperatury
H Lampka sygnalizacyjna automatycznego wyłączania
(tylko w modelach GC2425/GC2330)
I Pokrętło temperatury
J Przewód zasilający
K Tabliczka znamionowa
L Pastylka do systemu anti-calc
M Zbiornik na wodę
Ważne
Przed pierwszym użyciem urządzenia zapoznaj się dokładnie z
instrukcją jego obsługi i zachowaj ją na przyszłość, do ewentualnej
konsultacji.
◗ Przed podłączeniem urządzenia upewnij się, czy napięcie podane
na tabliczce znamionowej jest zgodne z napięciem w sieci
elektrycznej.
◗ Podłączaj urządzenie wyłącznie do gniazdka z uziemieniem.
◗ Nie używaj urządzenia jeśli wtyczka, przewód sieciowy lub żelazko
są uszkodzone albo jeśli żelazko spadło z wysokości lub przecieka
◗ Regularnie sprawdzaj, czy nie jest uszkodzony przewód zasilający.
◗ Jeśli przewód zasilający ulegnie uszkodzeniu,musi zostać
wymieniony w autoryzowanym punkcie serwisowym firmy Philips
lub przez osobę o podobnych kwalifikacjach, co pozwoli uniknąć
ewentualnego niebezpieczeństwa.
◗ Nigdy nie zostawiaj żelazka podłączonego do sieci bez nadzoru.
◗ Nigdy nie zanurzaj żelazka w wodzie.
◗ Przechowuj urządzenie w miejscu niedostępnym dla małych dzieci.
◗ Stopa żelazka może być bardzo rozgrzana i dotknięcie jej może
spowodować poparzenia.
◗ Nie pozwalaj, aby przewód stykał się z rozgrzaną stopą żelazka.
◗ Do zbiornika na wodę nie wlewaj perfum, octu, krochmalu,
środków odwapniających, środków ułatwiających prasowanie ani
żadnych innych środków chemicznych.
POLSKI14
Page 15

◗ Po skończeniu prasowania,podczas mycia żelazka, podczas
napełniania lub opróżniania zbiornika na wodę, a także gdy
zostawiasz żelazko choćby na krótką chwilę: ustaw regulator pary
na pozycję O,ustaw żelazko w pozycji pionowej i wyjmij wtyczkę
z gniazdka ściennego.
◗ Trzymaj i używaj żelazko na stabilnej desce do prasowania lub na
stole
◗ Jeśli na wyposażeniu żelazka jest podstawka,pamietak aby stawiać
ją na stabilnej powierzchni.
◗ Urządzenie to przeznaczone jest wyłącznie do użytku domowego.
Przygotowanie do użycia
Napełnianie zbiornika na wodę
1 Wyjmij wtyczkę z gniazdka ściennego.
C
2 Ustaw regulator pary na pozycję 0 (= brak pary).
3 Zdejmij kapturek z otworu do napełniania (tylko w niektórych
modelach).
C
4 Przechyl żelazko i napełnij zbiornik na wodę do maksymalnego
poziomu.
Nie napełniaj zbiornika powyżej oznaczenia MAX.
5 Zamknij kapturkiem otwór do napełniania (usłyszysz
charakterystyczne "kliknięcie") (tylko w niektórych modelach).
Jeśli w twojej okolicy woda z kranu jest bardzo twarda, radzimy używa
wody destylowanej. Nie stosuj octu, krochmalu, ani wody chemicznie
odwapnionej.
Ustawianie temperatury
◗ Podczas pierwszego użycia, z żelazka może wydostawać się dym.
Zjawisko to ustanie po krótkiej chwili.
C
1 Ustaw żelazko na jego pięcie i nastaw pokrętło regulatora
temperatury na żądaną temperaturę prasowania, obracając nim
do odpowiedniej pozycji.
- Sprawdź informacje na temat prasowania na metce ubrania.
- 1 Tkaniny syntetyczne (np. akryl, wiskoza, poliamid, poliester)
- 1 Jedwab
- 2 Wełna
- 3 Bawełna, len
POLSKI 15
Page 16

- Jeśli nie znasz rodzaju (lub rodzajów) materiału, z którego wykonana
jest prasowana sztuka, ustal właściwą temperaturę prasowania,
prasując taką jej część, która będzie niewidoczna podczas noszenia
czy używania.
- Jedwab, mieszanki wełniane i materiały syntetyczne: aby nie dopuścić
do powstawania błyszczących plam, prasuj tkaniny na lewej stronie.
Unikaj używania funkcji zraszania, żeby podczas prasowania nie
powstawały plamy.
2 Włącz wtyczkę do uziemionego gniazdka.
3 Gdy zgaśnie lampka kontrolna temperatury, zaczekaj jeszcze
chwilę, zanim zaczniesz prasować.
B
Podczas prasowania lampka kontrolna temperatury będzie się od czasu
do czasu zapalała.
Korzystanie z urządzenia
Prasowanie parowe
Upewnij się, czy w zbiorniku jest wystarczająca ilość wody.
1 Ustaw termostat na zalecaną pozycję.
Patrz rozdział "Ustawianie temperatury".
C
2 Ustaw regulator pary na odpowiednią pozycję.
- Á dla minimalnej ilości pary (ustawienia temperatury: 2 oraz 3)
- Ë dla umiarkowanej ilości pary (ustawienia temperatury: od 3
do MAX) (tylko w niektórych modelach).
- È dla maksymalnej ilości pary (ustawienia temperatury: 3 do
wartości MAX)
B
Para zacznie się wydobywać, gdy tylko zostanie osiągnięta wybrana
temperatura.
Tylko w modelach GC2415/2320/2315/2310/2305:
Jeśli nastawiona temperatura jest zbyt niska (pomiędzy MIN a 2),
wówczas ze stopy prasującej może wyciekać woda.
Prasowanie bez pary
1 Ustaw regulator pary w położeniu O (= bez pary).
2 Ustaw termostat na zalecaną pozycję.
Patrz rozdział "Ustawianie temperatury".
POLSKI16
Page 17

Cechy
Spryskiwanie
Usuwa uporczywe zagniecenia przy każdej temperaturze prasowania.
1 Upewnij się, czy w zbiorniku jest wystarczająca ilość wody.
C
2 Aby zwilżyć prasowaną sztukę odzieży, kilkakrotnie wciśnij
przycisk zraszania.
Dodatkowa ilość pary (tylko w modelu GC2305)
Funkcja ta zapewnia dostarczenie dodatkowej pary w celu usunięcia
wyraźnie uporczywych zgnieceń.
Funkcja dodatkowej pary działa tylko przy ustawieniach temperatury
od 3 do maksymalnej.
C
1 Ustaw pokrętło regulatora temperatury w maksymalnym
położeniu È.
C
2 Wciśnij i przytrzymaj pokrętło regulacji pary nie dłużej niż
przez 5 sekund.
3 Odczekaj co najmniej 1 minutę przed ponownym użyciem
funkcji dodatkowej pary (Extra Steam), aby ze stopy prasującej
nie skapywała woda.
Uderzenie pary (tylko w niektórych modelach).
Energiczne uderzenie pary pozwala usunąć najbardziej uporczywe
zgniecenia.
Funkcja ta działa tylko przy ustawieniach temperatury od 2 do
maksymalnej.
C
1 Wciśnij i zwolnij przycisk "uderzenie parowe".
POLSKI 17
Page 18

Pionowe uderzenie pary (tylko w niektórych modelach)
C
1 Funkcji uderzenia pary można używać również wtedy,gdy
żelazko znajduje się w pozycji pionowej.Jest to praktyczne w
przypadku usuwania zgnieceń na wiszących ubraniach,
zasłonach, itd.
Nigdy nie kieruj pary w stronę ludzi.
Zapobieganie skapywaniu wody
(tylko w modelach GC245/2420/GC2330/ 2326/2325)
Modele te zostały wyposażone w funkcje zapobiegającą kapaniu:
żelazko automatycznie zatrzymuje wytwarzanie pary, jeśli temperatura
jest za niska. Dzięki temu woda nie kapie spod stopy żelazka.W chwili
uaktywnienia tej funkcji usłyszysz kliknięcie.
Automatyczne wyłączanie
(tylko w modeluach GC2425/GC2330)
Elektoniczne zabezpieczenie automatycznie wyłącza żelazko, gdy nie jest
ono w ruchu przez jakiś czas.
C
◗ Aby zasygnalizować wyłączenie grzałki, zacznie migotać lampka
kontrolna automatycznego wyłączania.
Aby ponownie podgrzać żelazko,podnieś je lub lekko nim przesuń.
Zgaśnie lampka kontrolna automatycznego wyłączania.
1 Jeśli zaświeci się lampka kontrolna temperatury,wówczas
zaczekaj, aż zgaśnie, i dopiero wtedy zacznij prasować.
2 Jeśli lampka temperatury nie zaświeci się, będzie to oznaczać,
że żelazko jest gotowe do prasowania.
Mycie i konserwacja
Podwójny system zapobiegania tworzeniu się osadów
wapiennych
C
◗ Pastylka do systemu anti-calc zapobiega zatykaniu przez kamień
kotłowy otworów wylotu pary. Pastylka jest wciąż aktywna i nie
trzeba jej wymieniać.
◗ Funkcja Calc-Clean usuwa cząstki kamienia wapiennego.
Funkcja antywapienna Calc-Clean
Korzystaj z tej funkcji raz na dwa tygodnie. Jeśli woda w Twoim rejonie
jest bardzo twarda (tzn. jeśli podczas prasowania spod stopy żelazka
wydostają się osady), używaj tej funkcji częściej.
POLSKI18
Page 19

1 Ustaw pokrętło regulatora pary w położeniu O.
2 Napełnij zbiornik na wodę do poziomu MAX.
Nie wlewaj do zbiornika na wodę octu ani innych substancji
odkamieniających.
C
3 Ustaw termostat na pozycję MAX.
4 Włącz wtyczkę do gniazdka ściennego.
5 Odłącz żelazko od sieci z chwilą, gdy zgaśnie lampka kontrolna
temperatury.
6 Przenieś żelazko nad zlew i ustaw regulator pary w położeniu
1 (Calc-Clean). Pokrętło regulacji pary nieznacznie sprężyście
uniesie się.
C
7 Pociągnij ku górze pokrętło regulacji pary, aby wyjąć igłę
regulacji pary.
C
8 Trzymaj żelazko nad zlewem i poruszaj nim ruchem
wahadłowym.
B
Para i wrzątek będą wydobywać się ze stopy żelazka.W ten sposób
resztki kamienia lub innych zanieczyszczeń zostaną wypłukane.
C
9 Do usunięcia z igły ewentualnego kamienia wapiennego użyj
octu.
Nie zginaj ani nie uszkodź igły pokrętła pary.
C
10 Włóż igłę z powrotem, umieszczając ją dokładnie pośrodku
otworu i wpasowując mały występ w boku igły w zagłębienie.
Ustaw pokrętło pary na pozycję O.
11 Jeśli żelazko nadal jest zanieczyszczone kamieniem,powtórz
całą procedurę.
Po usunięciu kamienia
1 Aby wysuszyć stopę prasującą żelazka, podłącz je do sieci.
POLSKI 19
Page 20

2 Odłącz żelazko od sieci z chwilą, gdy zgaśnie lampka kontrolna
temperatury.
3 Przesuwaj żelazko delikatnie po kawałku zużytego materiału,
by usunąć pozostałości wody, które mogłyby poplamić inne
tkaniny.
Przechowywanie
1 Wyjmij wtyczkę z gniazdka sieciowego, odczekaj,aż żelazko się
ostudzi i ustaw regulator pary w pozycji O.
2 Używając wilgotnej szmatki i niezawierającego elementów
ściernych (płynnego) środka czyszczącego, oczyść żelazko i
zetrzyj z jego stopy kamień oraz wszelkie pozostałe osady.
Dbaj, by stopa żelazka była gładka: unikaj kontaktu z ostrymi
przedmiotami.
Nigdy nie używaj szorujących zmywaków, octu ani innych chemikaliów.
C
3 Regularnie płucz zbiornik wodą i opróżniaj go po oczyszczeniu.
C
4 Owiń przewód zasilający wokół specjalnych wsporników.
5 Przechowuj żelazko w pozycji pionowej,w suchym i
bezpiecznym miejscu.
Ochrona środowiska
C
◗ Nie wyrzucaj zużytego urządzenia wraz ze zwykłymi
odpadkami/śmieciami. Zanieś je do specjalnego punktu
zbierającego odpadki do utylizacji w celu ich utylizacji.W ten
sposób pomożesz chronić środowisko naturalne.
Gwarancja i serwis
Jeśli chcesz skorzystać z serwisu lub potrzebujesz informacji, bądź jeśli
masz jakiś problem, odwiedź naszą stronę w Internecie: www.philips.pl
lub skontaktuj się z Działem Obsługi Klienta firmy Philips
(numer telefonu znajdziesz w ulotce gwarancyjnej).
POLSKI20
Page 21

Rozwiązanie problemu
Sprawdź przewód zasilający, wtyczkę
oraz gniazdo ścienne
Ustaw pokrętło regulatora
temperatury na żądanej wartości.
Napełnij zbiornik wodą (patrz:
"Przygotowanie do użycia"; punkt:
"Napełnianie zbiornika wodą".)
Ustaw pokrętło regulacji pary w
położeniu Á lub Ë, albo È patrz:
"Korzystanie z urządzenia", punkt:
"Prasowanie z użyciem pary").
Ustaw pokrętło regulatora
temperatury w zaznaczonym obszarze
prasowania z użyciem pary (dla
temperatur od 2 do MAX). Ustaw
żelazko na jego pięcie (pionowo) i
przed rozpoczęciem prasowania
poczekaj, aż zgaśnie lampka kontrolna
temperatury.
Ustaw żelazko w pozycji poziomej i
odczekaj chwilę, po czym ponownie
użyj funkcji (pionowego) uderzenia
pary.
Ustaw pokrętło regulatora
temperatury w zaznaczonym obszarze
prasowania z użyciem pary (dla
temperatur od 2 do MAX). Ustaw
żelazko na jego pięcie (pionowo) i
przed rozpoczęciem prasowania
poczekaj, aż zgaśnie lampka kontrolna
temperatury.
Kilkakrotnie użyj funkcji Calc-Clean
(patrz: "Czyszczenie i konserwacja",
punkt: "Calc-Clean").
Aby wyłączyć funkcję automatycznego
wyłączania, podnieś żelazko lub lekko
nim porusz: przestanie migotać
czerwona lampka sygnalizacyjna.
Wciśnij kapturek zamykający otwór do
napełniania, aby usłyszeć
charakterystyczne kliknięcie.
Ewentualna przyczyna (y)
Nie ma połączenia
Pokrętło regulacji temperatury
ustawione jest na MIN.
W zbiorniku nie ma wystarczającej
ilości wody.
Regulator pary został ustawiony w
pozycji O.
Stopa prasująca nie jest wystarczająco
rozgrzana i/lub została uruchomiona
funkcja zapobienia skapywaniu (tylko
dla niektórych modeli).
Funkcja (Pionowego) Uderzenia Pary
była zbyt często używana w bardzo
krótkim okresie czasu.
Stopa żelazka nie jest wystarczająco
nagrzana.
Twarda woda powoduje tworzenie się
osadów wewnątrz stopy żelazka.
Została uruchomiona funkcja
automatycznego wyłączania (patrz:
"Inne funkcje", punkt "Automatyczne
wyłączanie").
Otwór do napełniania nie jest szczelnie
zamknięty kapturkiem.
Problem
Żelazko jest podłączone do sieci, ale
stopa jest zimna.
TABLE HERE (now at the end of the
document)
Brak pary
TABLE HERE (now at the end of the
document)
TABLE HERE (now at the end of the
document)
Nie ma efektu uderzenia pary lub
pionowego uderzenia pary (tylko dla
niektórych modeli).
TABLE HERE (now at the end of the
document)
Podczas prasowania ze stopy żelazka
wydostają się zanieczyszczenia.
Migocze czerwona lampka
sygnalizacyjna (tylko dla modeli
GC2425 i GC2330).
Krople wody na tkaninie
Rozwiązywanie problemów
W niniejszym rozdziale opisane są problemy, na które użytkownik żelazka może natrafić najczęściej.
Przeczytaj, proszę, z należytą uwagą poszczególne punkty tego rozdziału. Jeśli nie potrafisz
samodzielnie rozwiązać problemu, skontaktuj się, proszę,z Centrum Obsługi Klienta w twoim kraju.
POLSKI 21
Page 22

Rozwiązanie problemu
Ustaw pokrętło regulatora
temperatury w pozycji znajdującej się
w obszarze prasowania z użyciem pary
(dla temperatur od 2 do MAX).
Ustaw żelazko na jego pięcie
(pionowo) i przed rozpoczęciem
prasowania poczekaj, aż zgaśnie lampka
kontrolna temperatury.
Po użyciu żelazka opróżnij zbiornik z
wody i ustaw pokrętło regulacji pary w
położeniu O. Przechowuj żelazko
ustawione na jego pięcie.
Ewentualna przyczyna (y)
Ustawiona została za niska
temperatura.
Żelazko zostało ustawione w pozycji
poziomej z wypełnionym wodą
zbiornikiem.
Problem
Krople wody na materiale ( tylko dla
modeliGC2415/2320/2315/2310/2305
)
Podczas schładzania się żelazka lub po
jego odstawieniu ze stopy prasującej
wycieka woda.
POLSKI22
Page 23

Descriere generală
A Pulverizator
B Capac al orificiului de umplere
( doar GC2425/2420/2415/GC2330/2326/2325/2320)
C Buton jet de abur
(doar GC2425/2420/2415/GC2330/2326/2325/2320/2315/2310)
D Buton spray
E Comutator pentru abur
- O = fără abur
- Á = abur minim
- q = abur moderat
(doar GC2425/2420/2415/GC2330/2326/2325/2320)
- w = abur maxim
- 1 = funcţie anticalcar
F Funcţie abur suplimentar (doar GC2305)
G Led temperatură
H Led oprire automată (GC2425/GC2330 doar)
I Termostat
J Cablu de alimentare
K Plăcuţă de înregistrare
L Tabletă anticalcar
M Rezervor de apă
Important
Citiţi aceste instrucţiuni de utilizare cu atenţie înainte de a utiliza
aparatul şi păstraţi-le pentru consultări ulterioare.
◗ Verificaţi dacă tensiunea indicată pe plăcuţa de înregistrare
corespunde tensiunii locale înainte de a conecta aparatul.
◗ Conectaţi aparatul doar la o priză cu legătură la pământ.
◗ Nu folosiţi aparatul dacă ştecherul, cablul de alimentare sau fierul
prezintă deteriorări, dacă aţi scăpat aparatul pe jos sau dacă
prezintă scurgeri.
◗ Verificaţi cablul regulat, pentru a vă asigura că nu e deteriorat.
◗ În cazul în care cablul de alimentare este deteriorat, acesta trebuie
înlocuit la firma Philips sau la un centru service autorizat pentru a
evita eventualele accidente.
◗ Aparatul nu trebuie lăsat nesupravegheat atâta timp cât este
conectat la priză.
◗ Nu introduceţi niciodată fierul de călcat în apă.
◗ Nu lăsaţi aparatul la îndemâna copiilor.
◗ Talpa fierului de călcat se încinge foarte tare şi poate cauza arsuri
la atingere.
◗ Feriţi cablul de alimentare de contactul cu talpa încinsă.
◗ Nu turnaţi parfum, oţet, amidon,agenţi de îndepărtare a calcarului,
produse de călcare sau alte substanţe chimice în generatorul de
abur.
◗ După ce aţi terminat de călcat, când curăţaţi aparatul, în timp ce
umpleţi sau goliţi rezervorul de apă sau chiar când faceţi o scurtă
ROMÂNĂ 23
Page 24

pauză: poziţionaţi butonul pentru reglarea jetului de abur pe poziţia
O,puneţi fierul în poziţie verticală şi scoateţi aparatul din priză.
◗ Aşezaţi şi folosiţi fierul pe o masă de călcat sau pe o masă
obişnuită stabilă.
◗ Dacă aparatul este furnizat cu un suport, aveţi grijă ca acesta să fie
poziţionat pe o suprafaţă stabilă.
◗ Acest aparat este destinat exclusiv uzului casnic.
Pregătire pentru utilizare
Umplerea rezervorului de apă
1 Scoateţi ştecherul din priză.
C
2 Poziţionaţi butonul de reglare a aburului pe poziţia O
( = fără abur).
3 Deschideţi capacul rezervorului (doar anumite modele).
C
4 Înclinaţi fierul şi umpleţi rezervorul de apă până la nivelul
maxim.
Nu umpleţi rezervorul peste gradaţia MAX.
5 Închideţi capacul (clic!) (doar anumite modele).
Dacă apa din zona în care locuiţi este foarte dură, vă sfătuim să folosiţi
apă distilată. Nu folosiţi oţet, amidon sau apă detartrată chimic.
Reglarea temperaturii
◗ Din fierul de călcat poate ieşi fum când este folosit pentru prima
oară.Acest lucru va înceta după puţin timp.
C
1 Aşezaţi fierul de călcat în poziţie verticală şi reglaţi termostatul
pe temperatura necesară răsucindu-l pe poziţia
corespunzătoare.
- Verificaţi eticheta pentru a regla temperatura necesară de călcare.
- 1 Materiale sintetice
(de ex. fibre acrilice, vâscoză,poliamide, poliester)
- 1 Mătase
- 2 Lână
- 3 Bumbac, in
- Dacă nu cunoaşteţi tipul sau tipurile de material din care e
confecţionat articolul, încercaţi să călcaţi o porţiune de material ce nu
se vede când purtaţi ar ticolul respectiv, pentru a determina
temperatura corectă de călcare.
ROMÂNĂ24
Page 25

- Ţesături sintetice, de mătase şi de lână:călcaţi ţesătura pe dos pentru
a nu lăsa pete strălucitoare. Evitaţi folosirea funcţiei spray.
2 Introduceţi ştecherul în priza cu legătură la pământ.
3 După ce indicatorul de temperatură se stinge, aşteptaţi puţin
înainte de a începe să călcaţi.
B
Ledul de temperatură se va aprinde periodic în timpul călcatului.
Utilizarea aparatului
Călcarea cu abur
Asiguraţi-vă că este suficientă apă în rezervor.
1 Reglaţi termostatul pe poziţia recomandată.
Consultaţi capitolul "Reglarea temperaturii".
C
2 Poziţionaţi butonul de reglare a jetului de abur pe poziţia
potrivită.
- Á pentru abur minim (reglaje de temperatură 2 până la 3).
- Ë pentru abur moderat (reglaje de temperatură 3 până la MAX)
(doar anumite modele).
- È pentru abur maxim (reglaje de temperatură 3 până la MAX)
B
Jetul de abur va porni imediat ce temperatura selectată va fi atinsă.
Doar GC2415/2320/2315/2310/2305:
Apa se poate scurge prin talpa aparatului dacă temperatura este prea
joasă (MIN până la 2).
Călcarea fără abur
1 Poziţionaţi comutatorul pentru abur pe poziţia O ( = fără
abur).
2 Reglaţi termostatul pe poziţia recomandată.
Consultaţi capitolul "Reglarea temperaturii".
Caracteristici
Pulverizare
Pentru a netezi cutele mai dure la orice temperatură.
1 Asiguraţi-vă că este suficientă apă în rezervor.
ROMÂNĂ 25
Page 26

C
2 Apăsaţi butonul spray de câteva ori pentru a umezi articolul pe
care doriţi să-l călcaţi.
Abur suplimentar (doar GC2305)
Această funcţie degajă abur suplimentar pentru călcarea cutelor
rezistente.
Funcţia abur suplimentar nu poate fi folosită decât la temperaturi între
&@4,051 şi MAX.
C
1 Reglaţi comutatorul pentru abur pe poziţia È.
C
2 Apăsaţi şi ţineţi apăsat butonul pentru abur timp de maxim
5 secunde.
3 Aşteptaţi cel puţin 1 minut înainte de a utiliza această funcţie
din nou pentru a evita scurgerea apei prin talpă.
Jet de abur (doar anumite modele)
Jetul puternic de abur vă ajută să îndepărtaţi cutele foarte rezistente.
Funcţia Jet de Abur poate fi folosită doar la temperaturi între 2 şi
MAX.
C
1 Apăsaţi scurt butonul Jet de Abur.
Jet de abur vertical (doar anumite modele)
C
1 Funcţia jet de abur poate fi folosită şi când ţineţi fierul de călcat
în poziţie verticală.Astfel, puteţi netezi cutele perdelelor,
hainelor în poziţie verticală, etc.
Nu îndreptaţi niciodată aburul spre oameni.
ROMÂNĂ26
Page 27

Anti-picurare (doar GC2425/2420/GC2330/2326/2325)
Acest fier de călcat este echipat cu un sistem de blocare automată a
aburului: fierul de călcat opreşte automat aburul la temperaturi scăzute
pentru a preveni scurgerea apei prin talpă. Când se întâmplă acest
lucru veţi auzi un semnal acustic.
Oprire automată (doar GC2425/GC2330)
Un dispozitiv electronic de siguranţă va opri automat fierul de călcat
dacă acesta nu a fost mişcat o perioadă de timp.
C
◗ Pentru a vă indica faptul că elementul de încălzire a fost oprit,
ledul corespunzător opririi automate va începe să clipească
intermitent.
Pentru repornirea fierului: ridicaţi fierul de călcat sau mişcaţi-l uşor.
Ledul de oprire automată se va stinge.
1 Dacă ledul de temperatură se aprinde, aşteptaţi până se stinge
înainte de a continua călcatul.
2 Dacă ledul de temperatură nu se aprinde, fierul este gata de
utilizare.
Curăţare şi întreţinere
Sistem anticalcar dublu activ
C
◗ Tableta anticalcar previne înfundarea orificiilor cu depuneri de
calcare.Tableta acţionează permanent şi nu trebuie înlocuită.
◗ Funcţia anticalcar îndepărtează depunerile de calcar.
Funcţie Auto-Curăţare
Folosiţi funcţia de auto-curăţare o dată la două săptămâni. Dacă apa din
zona dumneavoastră este foarte dură (când ies mici particule de calcar
prin talpa fierului în timpul călcatului), funcţia auto-curăţare trebuie
folosită mai des.
1 Reglaţi comutatorul pentru abur pe poziţia O.
2 Umpleţi rezervorul până la nivelul maxim.
Nu turnaţi oţet sau alţi agenţi pentru îndepăr tarea calcarului în
rezervor.
ROMÂNĂ 27
Page 28

C
3 Poziţionaţi termostatul pe poziţia MAX.
4 Introduceţi ştecherul în priză.
5 Scoateţi ştecherul din priză când ledul de temperatură s-a stins.
6 Ţineţi fierul deasupra chiuvetei şi poziţionaţi comutatorul
pentru abur pe poziţia 1 (auto-curăţare). Comutatorul pentru
abur se va desprinde uşor.
C
7 Trageţi comutatorul pentru abur pentru a scoate tija acestuia.
C
8 Ţineţi fierul de călcat deasupra chiuvetei şi agitaţi-l bine.
B
Aburul şi apa ajunsă la punctul de fierbere se vor scurge prin talpa
fierului de călcat. Impurităţile şi calcarul (dacă există) se vor elimina.
C
9 Îndepărtaţi depunerile de calcar de pe tijă cu puţin oţet, dacă
este cazul.
Nu îndoiţi sau deterioraţi tija comutatorului pentru abur.
C
10 Reintroduceţi vârful tijei comutatorului pentru abur exact în
centrul orificiului şi fixaţi protuberanţa de pe tijă exact în nişă.
Reglaţi comutatorul pe poziţia O.
11 Repetaţi procedura de auto-curăţare dacă mai sunt impurităţi
în aparat.
După procedura de auto-curăţare
1 Introduceţi fierul în priză pentru a lăsa talpa să se usuce.
2 Scoateţi ştecherul din priză când ledul de temperatură s-a stins.
ROMÂNĂ28
Page 29

3 Mişcaţi uşor fierul încins peste o bucată de material uzat
pentru a îndepărta petele de apă care ar fi putut să se formeze
pe talpă.
Depozitare
1 Scoateţi cablul din priză, lăsaţi aparatul să se răcească şi
poziţionaţi comutatorul pentru abur pe poziţia O.
2 Curăţaţi aparatul şi ştergeţi depunerile de calcar sau orice alte
murdării de pe talpă cu o cârpă umedă şi un detergent (lichid)
neabraziv.
Pentru a păstra talpa netedă: evitaţi contactul dur cu obiecte metalice.
Nu folosiţi bureţi abrazivi, oţet sau alte produse chimice.
C
3 Clătiţi regulat rezervorul de apă şi goliţi-l după clătire.
C
4 Înfăşuraţi cablul în jurul suportului special.
5 Depozitaţi întotdeauna fierul sprijinit în poziţie verticală într-un
loc sigur.
Mediu
C
◗ Nu aruncaţi aparatul în gunoiul menajer la sfârşitul duratei de
funcţionare, ci duceţi-l la un punct de colectare autorizat pentru
reciclare. În acest fel, veţi ajuta la protejarea mediului înconjurător.
Garanţie şi service
Pentru informaţii suplimentare sau în cazul altor probleme, vă rugăm să
vizitaţi site-ul Philips www.philips.com sau să contactaţi Departamentul
Clienţi din ţara dumneavoastră (veţi găsi numărul de telefon în garanţia
internaţională). Dacă în ţara dumneavoastră nu există un astfel de
departament, contactaţi furnizorul dumneavoastră Philips sau
Departamentul Service pentru Aparate Electrocasnice şi Produse de
Îngrijire Personală Philips.
ROMÂNĂ 29
Page 30

Soluţie
Verificaţi cablul,ştecherul şi priza.
Reglaţi termostatul pe poziţia necesară.
Umpleţi rezervorul cu apă (a se vedea
"Pregătire de utilizare", secţiunea
"Umplerea rezervorului de apă").
Reglaţi aburul pe poziţiile Á, Ë sau È
(a se vedea "Utilizarea aparatului",
secţiunea "Călcare cu abur").
Reglaţi termostatul pe o temperatură
corespunzătoare călcatului cu abur (de
la 2 până la MAX). Puneţi fierul
vertical şi aşteptaţi până ce ledul se
stinge înainte de a începe călcarea.
Puneţi fierul în poziţie orizontală şi
aşteptaţi puţin înainte de a folosi
funcţia jet de abur (vertical) din nou.
Reglaţi termostatul pe o temperatură
corespunzătoare călcatului cu abur (de
la 2 până la MAX). Puneţi fierul
vertical şi aşteptaţi până ce ledul se
stinge înainte de a începe călcarea.
Folosiţi funcţia auto-curăţare de câteva
ori (a se vedea "Curăţare şi
întreţinere", secţiunea "Auto-curăţare").
Ridicaţi fierul şi mişcaţi-l uşor pentru a
dezactiva funcţia de oprire automată:
ledul roşu nu va mai clipi.
Apăsaţi capacul până auziţi clic.
Reglaţi termostatul pe o temperatură
corespunzătoare călcării cu abur (de la
2 până la MAX). Puneţi fierul vertical
şi aşteptaţi până ce ledul se stinge
înainte de a începe călcarea.
Goliţi rezervorul de apă şi reglaţi
comutatorul pentru abur pe poziţia O
după utilizare. Depozitaţi fierul vertical.
Cauză posibilă
Problemă de conexiune
Termostat reglat pe poziţia MIN
Nu este suficientă apă în rezervor.
Comutatorul pentru abur a fost setat
pe poziţia O.
Talpa nu este suficient de caldă şi/sau
funcţia anti-picurare (doar anumite
modele) a fost activată.
Funcţia Jet de Abur (Vertical) a fost
folosită prea des într-o perioadă foarte
scurtă de timp.
Talpa fierului de călcat nu este suficient
de încinsă.
Apa dură formează depuneri de calcar
în interiorul tălpii.
Funcţia oprire automată a fost activată
(a se vedea capitolul "Caracteristici",
secţiunea "Oprire automată").
Nu aţi închis corect capacul.
Temperatura este prea scăzută.
Aţi pus fierul în poziţie orizontală când
mai era apă în rezervor.
Problemă
Fierul este conectat la priză, dar talpa
este rece.
Din fierul de călcat nu iese abur
Nu funcţionează jetul de abur sau Jetul
de abur vertical (doar anumite
modele)
Ies impurităţi din talpă în timpul
călcării.
Ledul roşu clipeşte (doar GC2425 şi
GC2330).
Picături de apă pe articol (doar
GC2425/2420/2415/GC2330/2326/23
25/2320)
Picături de apă pe articol (doar
GC2415/2320/2315/2310/2305)
Apa continuă să picure din talpă şi
după răcirea sau depozitarea fierului.
Depanare
Acest capitol include cele mai frecvente probleme ce pot apărea cu fierul dumneavoastră de călcat.
Pentru mai multe detalii, vă rugăm să citiţi diferitele capitole. Dacă nu reuşiţi să rezolvaţi problema, vă
rugăm să contactaţi Centrul Consumatori Philips din ţara dumneavoastră.
ROMÂNĂ30
Page 31

Общее описание
A Сопло опрыскивания ткани
B Колпачок наливного отверстия (только для моделей
GC2425/2420/2415/GC2330/2326/2325/2320)
C Кнопка выброса пара (только для моделей
GC2425/2420/2415/GC2330/2326/2325/2320/2315/2310)
D Кнопка разбрызгивателя T
E Парорегулятор
- O = нет пара
- Á = слабое отпаривание
- q = умеренное отпаривание(только для моделей
GC2425/2420/2415/GC2330/2326/2325/2320)
- w = максимальный выброс пара
- 1 = Функция очистки от накипи
F Функция усиленного отпаривания (только для модели GC2305)
G Температурный индикатор
H Светодиод автоматического выключения утюга
(только для модели GC2425/GC2330)
I Диск терморегулятора
J Сетевой шнур
K Заводская бирка
L Таблетка очистки от накипи
M Водонаборный контейнер
Внимание
Внимательно прочитайте настоящую инструкцию перед началом
эксплуатации прибора и сохраните ее в качестве справочного
материала.
◗ Прежде чем подключить утюг к электросети, убедитесь в том,
что напряжение,указанное на заводской табличке,
соответствует напряжению электросети у вас дома.
◗ Подключайте электроприбор только к заземленной розетке
электросети.
◗ Не пользуйтесь утюгом с видимыми повреждениями сетевой
вилки, сетевого шнура или самого прибора, а также после
падения или при протекании утюга.
◗ Регулярно проверяйте сетевой шнур на наличие возможных
повреждений.
◗ В случае повреждения сетевого шнура, необходимо
произвести его замену только в торговой организации или в
уполномоченном сервисном центре компании.
◗ Не оставляйте включенный в сеть утюг без присмотра.
◗ Запрещается погружать утюг в воду.
◗ Храните утюг в недоступном для детей месте.
◗ Прикосновение к сильно нагретой подошве утюга может
привести к ожогам.
◗ Следите за тем чтобы сетевой шнур не касался горячей
подошвы.
РУССКИЙ 31
Page 32
◗ Не добавляйте в контейнер-парогенератор духи, уксус,
крахмал, химические средства для удаления накипи, добавки
для глажения или другие химические средства.
◗ По окончании глажения, при очистке электроприбора, во
время заполнения или опорожнения водонаборного
контейнера и даже если вы отходите от утюга на короткое
время, устанавливайте парорегулятор в положение О, ставьте
утюг вертикально на задний торец корпуса и вынимайте вилку
шнура питания из розетки электросети.
◗ Ставьте утюг и пользуйтесь им на устойчивой гладильной
доске или столе.
◗ Если в комплект поставки утюга входит подставка, убедитесь
что она стоит на устойчивой рабочей поверхности.
◗ Электроприбор предназначен только для бытовых целей.
Подготовка к использованию
Заполнение водонаборного контейнера.
1 Выньте вилку шнура питания из розетки электросети.
C
2 Установите парорегулятор в положение О (= отсутствие
пара).
3 Откройте колпачок наливного отверстия (только для
определенных моделей).
C
4 Наклоните утюг и заполните водонаборный контейнер до
максимального уровня.
Не заполняйте водонаборный контейнер выше отметки МАХ.
5 Закройте колпачок наливного отверстия (до щелчка)
(только для определенных моделей).
В случае если водопроводная вода в вашей местности слишком
жесткая, рекомендуется использовать дистиллированную воду. Не
добавляйте в воду уксус, крахмал и химические средства дл
удаления накипи.
Установка температуры.
◗ При первом включении утюга в сеть возможно выделение
дыма, которое вскоре прекратится.
РУССКИЙ32
Page 33
C
1 Поставьте утюг на пяту и установите регулятором
необходимую температуру, повернув его в надлежащее
положение.
- Проверьте необходимую температуру глажения на ярлыке
текстильного изделия.
- 1 синтетические ткани
(например, акрил, вискоза, полиамид, полиэфир).
- 1 шелк
- 2 Шерсть
- 3 хлопок, лен
- Если вы не знаете из какой ткани сшито изделие, попробуйте
сначала прогладить его на участке, незаметном при носке.
- Изделия, изготовленные из шелка, шерстяных и синтетических
материалов, следует гладить с изнанки, чтобы не допустить
появления лоснящихся пятен. Во избежание появления пятен на
изделиях не используйте функцию разбрызгивания.
2 Вставьте вилку шнура питания в заземленную розетку
электросети.
3 Начинать глажение следует через минуту после того, как
погаснет температурный индикатор.
B
Во время глажения будет периодически загораться
температурный индикатор.
Использование утюга
Глажение с отпариванием.
Убедитесь, что в водонаборном контейнере достаточно воды.
1 Установите диск терморегулятора на требуемую
температуру глажения.
См. раздел «Установка температуры».
C
2 Установите парорегулятор в соответствующее положение.
- Á для минимального отпаривания (при положениях
терморегулятора 2 и 3).
- Ë для умеренного отпаривания (при положении
терморегулятора 3 до MAX) (только для определенных
моделей).
- È для усиленного отпаривания (при положениях
терморегулятора в области от 3 до MAX).
B
Отпаривание начнется, как только температура подошвы
утюга достигнет установленного значения.
РУССКИЙ 33
Page 34
Только для моделей GC2415/2320/2315/2310/2305:
Если установлена недостаточно высокая температура
(от MIN до 2), из подошвы утюга может вытекать вода.
Сухое глажение.
1 Установите парорегулятор в положение O (= без
отпаривания).
2 Установите диск терморегулятора на требуемую
температуру глажения.
См. раздел «Установка температуры».
Возможности
Разбрызгивание.
Для разглаживания неподатливых складок при любой температуре
глажения.
1 Убедитесь, что в водонаборном контейнере достаточно
воды.
C
2 Для увлажнения изделий, подлежащих глажению, несколько
раз нажмите кнопку разбрызгивателя.
Усиленное отпаривание (только для модели GC2305)
При данном режиме осуществляется дополнительный выброс пара
для разглаживания особо неподатливых складок.
Функция усиленного отпаривания может быть использована
только при установке температуры в диапазоне от 3 до МАХ.
C
1 Установите парорегулятор на максимальное положение È.
C
2 Нажмите на кнопку парорегулятора и удерживайте ее в
течение максимум 5 секунд.
3 Подождите не менее 1 минуты перед повторным
использованием усиленного отпаривания, чтобы избежать
появления капель из отверстий подошвы утюга.
Выброс пара (только для определенных моделей)
Мощный выброс пара для разглаживания особо неподатливых
складок.
РУССКИЙ34
Page 35

Функция «Выброс пара» может быть использована только при
установке температуры в диапазоне от 2 до МАХ.
C
1 Нажмите, а затем отпустите кнопку «Выброс пара».
Вертикальный выброс пара (только для определенных
моделей)
C
1 Режим отпаривания можно также использовать, когда вы
гладите, удерживая утюг в вертикальном положении. Это
особенно удобно при разглаживании неподатливых складок
на висящей одежде, занавесках и т.д.
Запрещается направлять струю пара на людей.
Противокапельная система (только для моделей
GC2425/2420/GC2330/2326/2325)
Утюг снабжен каплеотсекателем "Drip Stop": при слишком низкой
температуре подошвы отпаривание автоматически отключается,
что предотвращает появление капель из отверстий подошвы.
Когда это происходит, раздается щелчок.
Автоматическое выключение утюга
(только для моделей GC2425/GC2330)
Электронное защитное устройство автоматически отключает утюг,
если его не перемещать в течение некоторого времени.
C
◗ Для сигнализации о выключении нагревательного элемента,
начинает мигать индикатор автоматического выключения.
Для того чтобы утюг опять начал нагреваться, приподнимите утюг
или немного сдвиньте его. Индикатор автоматического
выключения погаснет.
1 Если включился температурный индикатор, дождитесь пока
он погаснет, прежде чем начать гладить.
2 Если температурный индикатор не включился, значит утюг
готов к использованию.
РУССКИЙ 35
Page 36
Очистка и уход.
Система очистки Double-Active Calc
C
◗ Таблетка очистки от накипи предотвращает забивание
накипью отверстий выхода пара. Таблетка постоянно
функционирует и не требуется ее замены.
◗ Функция очистки от накипи предназначена для удаления
частиц накипи.
Функция очистки от известкового налета
Используйте функцию очистки от известкового налета один раз в
две недели. Если вода в вашей местности очень жесткая (в этом
случае при глажении из подошвы утюга выпадают хлопья), функцию
очистки от известкового налета необходимо использовать чаще.
1 Установите парорегулятор в положение O.
2 Заполните водонаборный контейнер до отметки
максимального уровня.
Не добавляйте в воду уксус и другие средства для удалени
накипи.
C
3 Установите диск терморегулятора в положение МАХ.
4 Вставьте вилку шнура питания в розетку электросети.
5 Отключите утюг от электросети, когда температурный
индикатор погаснет.
6 Удерживая утюг над раковиной,установите парорегулятор
в положение 1 (Очистка от известкового налета). Кнопка
парорегулятора немного приподнимется.
C
7 Оттяните вверх кнопку парорегулятора, чтобы извлечь иглу
парорегулятора.
C
8 Держа утюг над раковиной,слегка покачайте утюг взад-
вперед.
B
Из подошвы утюга начнут выходить пар и кипящая вода.
Примеси и накипь (если они имеются) будут вымываться наружу.
РУССКИЙ36
Page 37

C
9 Если игла покрыта накипью, удалите накипь с помощью
уксуса.
Не изгибайте иглу парорегулятора и не наносите ей други
повреждений.
C
10 Поместите иглу парорегулятора на место, вставив ее кончик
точно в центр отверстия и установив небольшой выступ
иглы напротив соответствующей канавки. Установите
парорегулятор в положение О.
11 Если в утюге еще осталось значительное загрязнение,
процедуру очистки от известкового налета следует
повторить.
После очистки от известкового налета
1 Включите утюг в сеть для того, чтобы высушить подошву.
2 Отключите утюг от электросети, когда температурный
индикатор погаснет.
3 Мягко проведите нагретым утюгом по куску ненужной
ткани, для того чтобы удалить остатки скопившейся на
подошве воды.
Хранение
1 Выньте сетевую вилку из розетки электросети, дайте утюгу
остытьи установите парорегулятор в положение O.
2 Очистите утюг и удалите накипь и другие загрязнения с
подошвы утюга с помощью кусочка ткани, смоченного
неабразивным (жидким) чистящим средством.
Следите за тем, чтобы поверхность подошвы утюга оставалас
гладкой: не допускайте ее резких соприкосновений с
металлическими поверхностями.
Запрещается использовать металлические мочалки, уксус или
другие химикаты.
C
3 Регулярно промывайте водонаборный контейнер водой и
сливайте воду после промывки.
РУССКИЙ 37
Page 38

C
4 Сверните шнур питания вокруг приспособления для
хранения шнура.
5 Всегда храните утюг в вертикальном положении, установив
его на задний торец корпуса в сухом и безопасном месте.
Защита окружающей среды
C
◗ По окончании срока службы не выбрасывайте прибор вместе
с обычными бытовыми отходами, а сдавайте в специальные
пункты приема. Поступая так вы способствуете делу
сохранения окружающей среды.
Гарантийное и сервисное обслуживание
По поводу обслуживания, получения дополнительной информации,
или в случае возникновения каких-либо проблем, обращайтесь на
веб-сайт компании Филипс по адресу www.philips.ru или в центр
компании «Филипс» по обслуживанию потребителей в вашей
стране (вы найдете его номер телефона на международном
гарантийном талоне). Если подобный центр в вашей стране
отсутствует, обратитесь в вашу местную торговую организацию
компании «Филипс» или сервисное отделение компании Philips
Domestic Appliances and Personal Care BV.
РУССКИЙ38
Page 39

Способ устранения
Проверьте исправность шнура
питания, вилки и розетки
электросети.
Установите диск терморегулятора
на требуемое значение
температуры.
Заполните контейнерпарогенератор водой (см. главу
«Подготовка к использованию»,
раздел «Заполнение контейнерапарогенератора»).
Установите терморегулятор в
положение Á, Ë или È (см. главу
«Использование утюга», раздел
«Глажение с отпариванием»).
Установите диск терморегулятора в
положение глажения с
отпариванием (от 2 до MAX).
Установите утюг на пятку и, перед
началом глажения, дождитесь, пока
погаснет температурный индикатор.
Придайте утюгу горизонтальное
положение и подождите некоторое
время перед повторным
использованием функции
(вертикального) выброса пара.
Установите диск терморегулятора в
положение глажения с
отпариванием (от 2 до MAX).
Установите утюг на пятку и, перед
началом глажения, дождитесь, пока
погаснет температурный индикатор.
Воспользуйтесь несколько раз
функцией очистки от известкового
налета (см. главу «Очистка и уход»,
раздел «Удаление известкового
налета»).
Приподнимите утюг и слегка
переместите утюг для отключения
функции автоматического
выключения: красный светодиод
перестанет мигать.
Возможная(ые) причина(ы)
Проблема с подключением.
Диск терморегулятора установлен
на MIN
Недостаточное количество воды в
водонаборном контейнере.
Парорегулятор установлен в
положение O.
Подошва утюга недостаточно
нагрета и/или включена
противокапельная функция (только
для определенных моделей).
Функцию (вертикального) выброса
пара использовали слишком часто в
течение короткого периода
времени.
Утюг недостаточно нагрет.
Из-за использования жесткой воды
внутри подошвы утюга образуются
хлопья.
Включился режим автоматического
выключения утюга (см. пункт
«Автоматическое выключение
утюга» раздела «Другие функции»).
Неполадка
Утюг включен в сеть, но подошва
холодная.
Отсутствие пара
Не происходит выброса пара или
вертикального выброса пара (только
для определенных моделей).
Во время глажения из отверстий
подошвы выпадают хлопья и
загрязнения.
Мигает красный светодиод (только
для модели GC2425 и GC2330).
Обнаружение и устранение неисправностей
В данном разделе перечислены наиболее распространенные проблемы, с которым вы можете
столкнуться при использовании утюга. Для более подробной информации просьба прочитать
другие разделы руководства. Если вы не можете устранить неполадки самостоятельно,
обращайтесь в ближайший сервисный центр компании «Филипс».
РУССКИЙ 39
Page 40

Способ устранения
Надавите на колпачок
водоналивного отверстия до
щелчка.
Установите диск терморегулятора в
положение глажения с
отпариванием (от 2 до MAX).
Установите утюг на пятку и, перед
началом глажения, дождитесь, пока
погаснет температурный индикатор.
После пользования утюгом
опорожните его водонаборный
контейнер и установите
парорегулятор в положение O.
Храните утюг в вертикальном
положении, поставив его на пятку.
Возможная(ые) причина(ы)
Плохо закрыт колпачок
водоналивного отверстия.
Терморегулятор установлен на
слишком низкую температуру.
Утюг был установлен в
горизонтальное положение, когда в
водонаборном контейнере
оставалась вода.
Неполадка
Капли воды на ткани (только для
моделей
GC2425/2420/2415/GC2330/2326/23
25/2320)
На ткани остаются капли воды
(только для моделей
GC2415/2320/2315/2310/2305)
После того как утюг остыл или был
убран, на подошве появляются капли
воды.
РУССКИЙ40
Page 41

Všeobecný popis
A Tryska rozprašovače
B Plnicí krytka (pouze GC2425/2420/2415/GC2330/2326/2325/2320)
C Tlačítko parního impulsu
(pouze GC2425/2420/2415/GC2330/2326/2325/2320/2315/2310)
D Tlačítko rozprašovače T
E Regulace páry
- O = bez páry
- Á = minimum páry
- q = střední množství páry
(pouze GC2425/2420/2415/GC2330/2326/2325/2320)
- w = maximum páry
- 1 = funkce Calc-Clean
F Funkce extra páry (pouze GC2305)
G Kontrolka teploty
H Kontrolka automatického vypnutí (pouze GC2425/GC2330)
I Regulátor teploty
J Síťový kabel
K Typový štítek
L Odvápňovací tableta Anti-calc
M Vodní nádržka
Důležité
Před použitím přístroje přečtěte podrobně tento návod a uschovejte
ho pro případné pozdější nahlédnutí.
◗ Před prvním použitím zkontrolujte, zda údaj o napětí na typovém
štítku žehličky odpovídá napětí ve vaší světelné síti.
◗ Používejte vždy zásuvku s nulovým kolíkem.
◗ Přístroj přestaňte používat, pokud je viditelně poškozená síťová
zástrčka, přívodní kabel či samotný přístroj nebo došlo-li k jeho
pádu na zem či vytéká-li z něj voda.
◗ Pravidelně kontrolujte síťový přívod zda není poškozen.
◗ Poškozený síťový přívod musí být vyměněn v servisu firmy Philips
nebo v servisu, který byl firmou Philips autorizován, či obdobně
kvalifikovaným pracovníkem, aby se zabránilo případné pozdější
hazardní situaci.
◗ Nikdy nenechávejte žehličku bez dozoru, pokud je zapnutá.
◗ Žehličku nesmíte nikdy ponořit do vody.
◗ Dbejte na to, aby k přístroji neměly přístup děti.
◗ Nedotýkejte se dna žehličky, je velmi horké a mohli byste se spálit.
◗ Dbejte na to, aby se síťový kabel nedostal do kontaktu s horkým
dnem žehličky.
◗ Do zásobníku vody nikdy nenalévejte parfémy, ocet, škrob nebo
prostředky k odstranění vodního kamene ani jiné chemikálie.
◗ Když žehlení ukončíte, když žehličku čistíte, když její zásobník
plníte vodou a také když od ní třeba jen na malou chvíli odcházíte:
vždy předem nastavte regulátor páry do polohy O, postavte
žehličku na zadní stěnu a vytáhněte její zástrčku ze zásuvky.
ČESKY 41
Page 42

◗ Žehličku odkládejte a používejte pouze na stabilním žehlicím
prkně nebo na stole.
◗ Je-li spolu s přístrojem dodáván podstavec, dbejte na to, aby byl
umístěn na stabilním podkladu.
◗ Žehlička je určena výhradně k domácímu použití.
Příprava k použití
Plnění zásobníku vodou
1 Vytáhněte síťovou zástrčku ze zásuvky.
C
2 Regulátor páry nastavte do polohy O (=bez páry).
3 Otevřete plnicí krytku (pouze u některých modelů).
C
4 Nakloňte žehličku a naplňte vodní zásobník až na maximum.
Zásobník vody nikdy neplňte nad značku MAX.
5 Zavřete plnicí krytku ("click!") (pouze u některých modelů).
Pokud je voda ve vaší oblasti nadměrně tvrdá, doporučujeme vám
používat destilovanou vodu. Nepoužívejte ocet, škrob nebo chemicky
upravovanou vodu.
Nastavení teploty
◗ Žehlička může při prvním zapnutí trochu kouřit.Tento jev však za
okamžik zmizí.
C
1 Položte žehličku na její zadní stranu a otočením regulátoru
teploty nastavte požadovanou teplotu pro žehlení.
- Řiďte se údajem na nášivce tkaniny určené k žehlení.
- 1 Syntetické materiály (akryl, viskóza,polyamid, polyestér)
- 1 Hedvábí.
- 2 Vlna
- 3 Bavlna, plátno.
- Jestliže neznáte druh žehlené textilie, zvolte správnou teplotu tak,že
zkušebně přežehlíte tu část textilie, která není běžně viditelná.
- Hedvábné, vlněné nebo syntetické materiály: žehlete je po rubové
straně abyste nevytvářeli lesklé plochy.Vyhněte se používání postřiku
vodou abyste zabránili vzniku skvrn.
2 Zasuňte zástrčku do síťové zásuvky.
ČESKY42
Page 43

3 Jakmile zhasne kontrolka teploty, ještě chvíli počkejte a pak již
můžete začít žehlit.
B
Kontrolka teploty se během žehlení může čas od času rozsvítit.
Používání žehličky
Žehlení s párou
Zkontrolujte, zda je v zásobníku dostatek vody.
1 Nastavte regulátor teploty do odpovídající polohy.
Viz odstavec "Nastavení teploty".
C
2 Regulátor páry nastavte do vhodné polohy.
- Á pro minimum páry (nastavení teploty 2 a 3).
- Ë pro střední množství páry (nastavení teploty 3 až MAX)
(pouze některé modely).
- È pro maximum páry (nastavení teploty 3 až MAX).
B
Pára začne být produkována, jakmile je nastavená teplota dosažena.
Pouze GC2415/2320/2315/2310/2305:
Ze dna žehličky může odkapávat voda, pokud je nastavena příliš nízká
teplota (MIN až 2).
Žehlení bez páry
1 Regulátor páry nastavte do polohy O (= bez páry).
2 Nastavte regulátor teploty do odpovídající polohy.
Viz odstavec "Nastavení teploty".
Další funkce
Postřik vodou
K odstranění nadměrného zmačkání při libovolné teplotě.
1 Zkontrolujte, zda je v zásobníku dostatek vody.
C
2 Tlačítko postřiku vodou stiskněte vícekrát abyste zvlhčili
žehlenou textilii.
ČESKY 43
Page 44
Extra pára (pouze GC2305)
Tento parní impuls poskytuje mimořádně velké množství páry pro
vyrovnání velmi zmačkaných textilií.
Tuto funkci však lze realizovat pouze při nastavené teplotě v rozmezí
3 a MAX.
C
1 Nastavte regulátor páry na maximum È.
C
2 Stiskněte tlačítko regulátoru páry a držte ho stisknuté nejvýše
5 sekund.
3 Než budete realizovat další mimořádný parní impuls, vyčkejte
asi 1 minutu, aby ze dna žehličky neodkapávala voda.
Parní impuls (pouze některé modely)
Parní impuls použijte pro vyrovnání velmi zmačkaných textilií.
Parní impuls lze realizovat pouze při teplotě nastavené mezi 2 a
MAX.
C
1 Stiskněte a uvolněte tlačítko impulsu páry.
Vertikální parní impuls (pouze některé modely)
C
1 Parní impuls lze realizovat též pokud je žehlička ve svislé
poloze.To lze výhodně použít například pro odstranění
zmačkaných míst na zavěšených záclonách nebo šatech.
Impulsem páry nikdy nemiřte proti osobám.
Funkce Drip stop (pouze GC2425/2420/GC2330/2326/2325)
Funkce Drip Stop zabraňuje výstupu páry v případě, že byla nastavena
nedostačující teplota žehličky. Pokud k uzavření výstupu páry dojde,
uslyšíte zřetelné klapnutí.
ČESKY44
Page 45
Automatické vypínání (pouze GC2425/GC2330)
Elektronický obvod žehličku automaticky vypne, jestliže s ní po určitou
dobu není pohnuto.
C
◗ Vypnutí topného elementu je indikováno blikáním kontrolky
automatického vypnutí.
Chcete-li znovu zahřát žehličku: zdvihněte ji nebo s ní mírně pohněte.
Kontrolka automatického vypnutí zhasne.
1 Pokud se rozsvítí kontrolka teploty, počkejte, až zhasne a
teprve pak pokračujte v žehlení.
2 Pokud se kontrolka teploty nerozsvítila, je žehlička připravena k
použití.
Čištění a údržba
Odvápňovací systém Double-Active
C
◗ Odvápňovací tableta zabraňuje v ucpání parních otvorů
usazeninami.Tableta je neustále aktivní a není nutné ji vyměňovat.
◗ Funkce Calc-Clean odstraňuje částečky vodního kamene.
Funkce Calc-Clean (odstranění vodního kamene)
Tuto funkci používejte vždy po dvou týdnech. Pokud by byla voda ve
vaší oblasti nadměrně tvrdá (ze dna žehličky by se během žehlení
odlupovaly částice vodního kamene), používejte funkci Calc-Clean
častěji.
1 Nastavte regulátor páry do polohy O.
2 Zásobník vody naplňte až po označení maximální hladiny.
Nenalévejte do zásobníku ocet nebo jiné přípravky k odstranění
vodního kamene.
C
3 Regulátor teploty nastavte do polohy MAX.
4 Zasuňte síťovou zástrčku do zásuvky.
5 Po zhasnutí kontrolky teploty odpojte žehličku ze zásuvky.
6 Podržte žehličku nad dřezem a regulátor páry nastavte do
polohy 1 (Calc-Clean). Regulátor páry se mírně vysune.
ČESKY 45
Page 46
C
7 Vysuňte regulátor páry směrem nahoru a vyjměte jeho jehlu.
C
8 Držte žehličku nad dřezem a pohybujte s ní sem a tam.
B
Ze dna žehličky začne vystupovat pára s horkou vodou a je vyplavován
vodní kámen (pokud je) i další nečistoty.
C
9 Pokud jsou na jehle částice vodního kamene, odstraňte je z
jehly octem.
Dbejte na to, abyste jehlu neohnuli nebo jinak nepoškodili.
C
10 Jehlu regulátoru páry vraťte zpět tak, že její hrot opatrně
vložíte do malého otvoru ve středu dutiny a pak ji zvolna do
otvoru zasunete. Regulátor páry nastavte do polohy O.
11 Pokud by nebyly odstraněny všechny nečistoty, celý postup
opakujte.
Po ukončení funkce Calc-Clean
1 Zapněte žehličku, aby se její dno usušilo.
2 Po zhasnutí kontrolky teploty odpojte žehličku ze zásuvky.
3 Přežehlete žehličkou kus staré textilie abyste odstranili
případné vodní skvrny, které by zůstaly na dně žehličky.
Uchovávání žehličky
1 Odpojte síťový kabel ze zásuvky, nechejte žehličku vychladnout
a nastavte regulátor páry do polohy O.
ČESKY46
Page 47
2 Pomocí navlhčené utěrky s trochou tekutého čisticího
prostředku otřete žehličku a z žehlicí plochy odstraňte
případné zbytky vodního kamene.
Dno žehličky udržujte čisté: zabraňte jeho styku s kovovými předměty
které by mohly dno poškrábat.
Nikdy nepoužívejte abrasívní přípravky nebo jiné chemikálie.
C
3 Pravidelně vyplachujte vodní zásobník vodou a nakonec jej
vyprázdněte.
C
4 Přívodní kabel můžete navinout kolem zadní části žehličky.
5 Žehličku vždy uchovávejte postavenou ve svislé poloze na zadní
stěně.
Ochrana životního prostředí
C
◗ Až přístroj doslouží, nevyhazujte jej do běžného domovního
odpadu, ale odevzdejte jej na oficiálním sběrném místě za účelem
recyklace. Přispějete tím k ochraně životního prostředí.
Záruka & servis
Pokud byste potřebovali jakoukoli informaci nebo měli nějaký problém,
podívejte se na internetovou stránku www.philips.com, případně
kontaktujte Informační středisko firmy Philips, jehož telefonní číslo
naleznete na letáčku s celosvětovou zárukou. Pokud není Informační
středisko ve vaší blízkosti, můžete kontaktovat místního dodavatele
výrobků Philips nebo Service Depar tment of Philips Domestic
Appliances and Personal Care BV.
ČESKY 47
Page 48

Řešení
Zkontrolujte zástrčku, přívodní kabel i
síťovou zásuvku.
Nastavte regulátor na požadovanou
teplotu.
Naplňte zásobník vodou (viz odstavec
"Příprava k použití" a "Plnění zásobníku
vodou").
Regulátor páry nastavte do polohy Á,
Ë nebo È (viz odstavec "Použití
žehličky" a "Žehlení s parou").
Nastavte regulátor teploty do polohy,
která je vhodná pro žehlení s párou
(2 až MAX). Položte žehličku na její
zadní stranu a počkejte, až zhasne
kontrolka teploty, předtím než začnete
žehlit.
Postavte žehličku do svislé polohy a
vyčkejte chvíli, než použijete další parní
impuls nebo vertikální parní impuls.
Nastavte regulátor teploty do polohy,
která je vhodná pro žehlení s párou
(2 až MAX). Položte žehličku na její
zadní stranu a počkejte, až zhasne
kontrolka teploty, předtím než začnete
žehlit.
Realizujte několikrát funkci Calc-Clean
(viz odstavec "Čištění a údržba", úsek
"Funkce Calc-Clean").
Zdvihněte žehličku nebo s ní mírně
pohněte, aby došlo k deaktivaci funkce
automatického vypínání: červená
kontrolka přestane blikat.
Stiskněte víčko, dokud neuslyšíte
zaklapnutí.
Nastavte regulátor teploty do polohy,
která je vhodná pro žehlení s párou
(2 až MAX). Položte žehličku na její
zadní stranu a počkejte, až zhasne
kontrolka teploty, předtím než začnete
žehlit.
Po použití vyprázdněte vodní zásobník
a regulátor páry nastavte do polohy
O. Žehličku ukládejte ve svislé poloze
(na zadní stranu).
Možná příčina (příčiny)
Problémy s připojením.
Regulátor teploty je nastaven na MIN.
Nedostatek vody v zásobníku.
Regulátor páry byl nastaven do polohy
O.
Žehlicí plocha není dostatečně teplá
a/nebo došlo k aktivaci funkce Drip
Stop (pouze u některých modelů).
Funkce parního impulsu (vertikálního
parního impulsu) byla použita příliš
často v krátkém časovém intervalu.
Dno žehličky není dostatečně horké.
Byla použita nadměrně tvrdá voda.
Byla aktivována funkce automatického
vypínání (viz "Další funkce", odstavec
"Automatické vypínání").
Víčko zásobníku vody nebylo řádně
uzavřeno.
Je nastavena příliš nízká teplota.
Žehlička byla uložena ve vodorovné
poloze a v zásobníku zůstala voda.
Problém
Žehlička je zapnuta ale dno je stále
studené.
Není produkována pára
Nefunguje parní impuls nebo vertikální
parní impuls (pouze u některých
modelů).
Ze dna žehličky se při žehlení odlupují
šupinky a jiné nečistoty.
Bliká červená kontrolka (pouze
GC2425 a GC2330).
Na oděv odkapává voda (pouze
GC2425/2420/2415/GC2330/2326/23
25/2320).
Na oděv odkapává voda (pouze
GC2415/2320/2315/2310/2305).
Po vychladnutí a uložení žehličky
odkapává voda ze žehlicí plochy.
Řešení případných problémů
V tomto odstavci jsou popsány nejběžnější problémy, které mohou při používání žehličky nastat.Tyto
řádky pečlivě pročtěte. Pokud by se vám daný problém nepodařilo vyřešit, kontaktujte Informační
středisko firmy Philips.
ČESKY48
Page 49
Általános ismertetés
A Vízpermetező
B Töltő pohár (csak GC2425/2420/2415/GC2330/2326/2325/2320)
C Gőzlövet gomb
(csak GC2425/2420/2415/GC2330/2326/2325/2320/2315/2310)
D Vízpermetező gomb T
E Gőzszabályozó
- O = nincs gőz
- Á = minimális gőz
- q = közepes erősségű gőz
(csak GC2425/2420/2415/GC2330/2326/2325/2320)
- w = teljes erősségű gőz
- 1 = Calc-Clean vízkőmentesítő funkció
F Extra-gőz funkció (csak GC2305)
G Hőmérséklet jelző lámpa
H Automatikus kikapcsolást jelző lámpa (csak GC2425/GC2330)
I Hőmérséklet szabályozó tárcsa
J Hálózati vezeték
K Hátsó lap
L Anti-calc tabletta
M Víztartály
Fontos
A készülék használatba vétele előtt olvassa el a használati útmutatót.
Őrizze meg az útmutatót későbbi használatra.
◗ A készülék csatlakoztatása előtt ellenőrizze, megfelel-e az
adattáblán feltüntetett feszültség a helyi hálózati feszültségnek.
◗ A készüléket csak földelt fali konnektorhoz csatlakoztassa.
◗ Ne használja a készüléket ha a csatlakozó dugó,vezeték vagy a
készülék láthatóan sérült vagy ha a készülék leesett vagy folyik.
◗ Rendszeresen ellenőrizze a hálózati csatlakozó kábelt
meghibásodás szempontjából.
◗ Ha a hálózati csatlakozó kábel megsérült, a kockázatok elkerülése
érdekében a javítást csak Philips szakszerviz vagy Philips
felhatalmazással rendelkező szakember végezheti el.
◗ Ha a vasalót csatlakoztatta a hálózathoz, soha ne hagyja felügyelet
nélkül.
◗ Soha ne merítse a vasalót vízbe.
◗ Tartsa a készüléket gyerekektől távol.
◗ A vasaló talpa különösen forróvá válhat, ha hozzáér, megégetheti
magát.
◗ A forró vasalótalphoz ne érinse hozzá a hálózati kábelt.
◗ Ne tegyen a víztartályba illatszert, ecetet, keményítőt, vízkőtlenítő
szert, vasalást segítő szert vagy más vegyszert.
◗ Ha befejezte a vasalást, ha tisztítja a készüléket, ha vizet tesz a
tartályba vagy kiüríti azt és akkor is, ha rövid ideig eltávozik a
vasalótól: állítsa a gőzszabályzót 0 pozícióra, állítsa a vasalót a
végére és húzza ki a hálózati csatlakozó dugót a fali konnektorból.
MAGYAR 49
Page 50
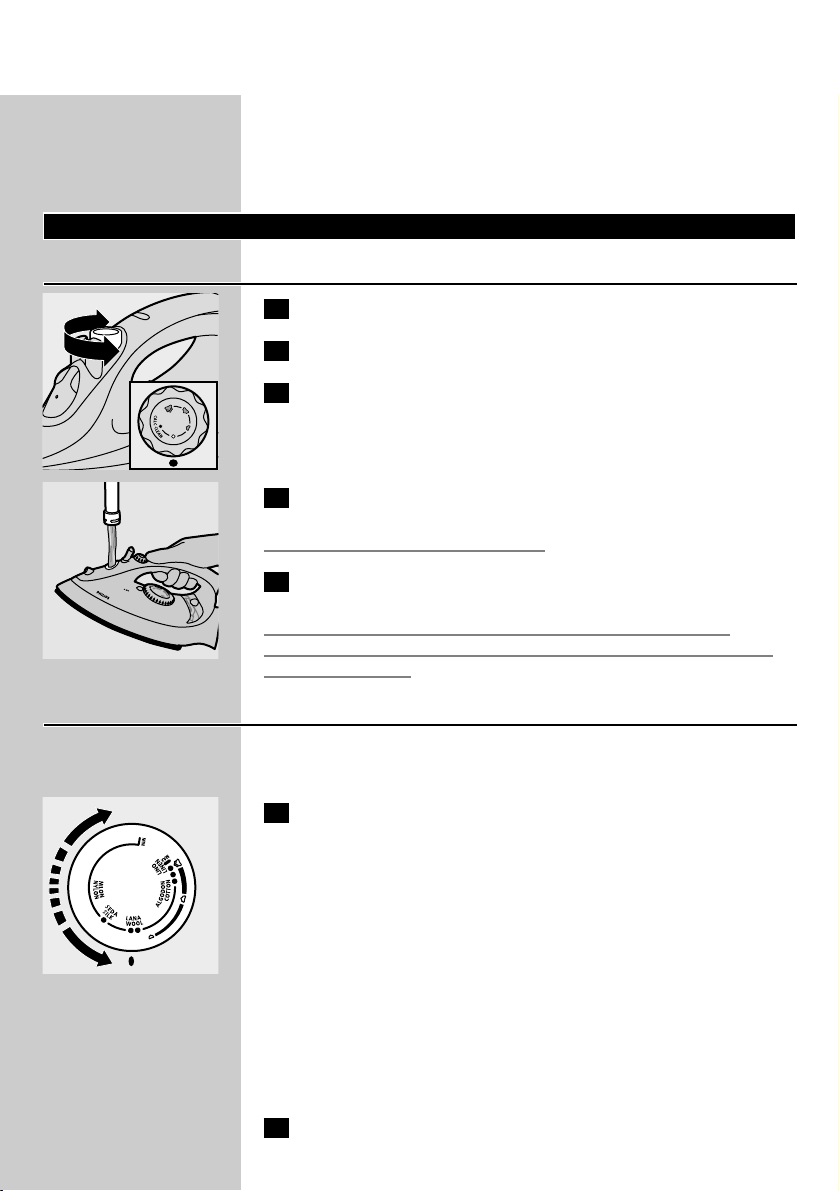
◗ A készüléket stabil vasaló állványon vagy asztalon használja.
◗ Ha az állványra felszerelte a készüléket, gondoskodjon róla, hogy
az állványt stabil felületre tegye.
◗ A termék kizárólag háztartási alkalmazásra készült.
Előkészítés használatra
A víztartály feltöltése
1 Húzza ki a hálózati csatlakozó dugót a fali konnektorból.
C
2 Állítsa a gőzszabályzó gombot O (= nincs gőz) pozícióba.
3 Nyissa ki a tartály kupaját (csak bizonyos típusoknál).
C
4 Döntse meg a vasalót és töltse meg vizzel a maximum jelzésig.
Ne töltse a tartályt a MAX jelzés fölé.
5 Csukja be a tartály kupakját (klikk!) (csak bizonyos típusoknál).
Amennyiben lakóhelyén a csapvíz nagyon kemény, desztillált víz
használatát javasoljuk. Ne használjon ecetet, keményítőt vagy vegyileg
mésztelenített vizet.
Hőmérséklet szabályozás
◗ Amikor a vasalót először használja, kissé füstölhet. Ez rövid idő
múlva megszűnik.
C
1 Helyezze a vasalót függőleges helyzetbe és állítsa be a
hőmérséklet szabályozó tárcsát a kivánt vasalási hőmérsékletre
úgy hogy eltekeri a tárcsát a kívánt pozicióba.
- Ellenőrizze a megfelelő vasalási hőmérsékletet a ruha címkéjén.
- 1 Szintetikus anyagok (pl. akril, viszkóz, poliamid, poliészter)
- 1 Selyem
- 2 Gyapjú
- 3 pamut, vászon
- Ha nem tudja, milyen anyag(ok)ból készült az adott darab, akkor egy
olyan rész próbavasalásával állapítsa meg a megfelelő hőfokot mely
viseléskor vagy használatkor nem látszik.
- Selyem, gyapjú és műszálas anyagok: Kifordítva vasalja az anyagot,
hogy ne keletkezzenek rajta fényes foltok.Az anyagra permetezett víz
is hasonló problémákat okozhat.
2 A vasaló hálózati csatlakozó dugóját földelt fali konnektorba
csatlakoztassa.
MAGYAR50
Page 51

3 Amikor a hőmérséklet jelző lámpa elkezd világítani várjon egy
keveset mielőtt elkezd újra vasalni.
B
A hőméréklet jelző lámpa időről időre világítani fog vasalás közben.
A készülék használata
Vasalás gőzzel
Győződjön meg róla, hogy elég víz van-e a tartályban.
1 Állítsa a hőmérsékletszabályzó gombot az előírt helyzetbe.
Lásd a "Hőmérséklet szabályozás" c. részt.
C
2 Állítsa a gőzszabályzó gombot a megfelelő gőzpozícióba.
- Á minimális gőz (2 és 3 hőfok mellett)
- Ë közepes erősségű gőz (3 és MAX hőfok közott) (csak
bizonyos típusoknál)
- È teljes erősségű gőz (3 MAX hőfok mellett)
B
Amint a készülék eléri a beállított hőmérsékletet, elkezdheti a gőzölős
vasalást.
Csak GC2415/2320/2315/2310/2305:
Ha a beállított hőfok túl alacsony (MIN 2), víz szivároghat a
vasalótalpból.
Vasalás gőz nélkül
1 Állítsa a hőmérsékletszabályozó gombot a O (=nincs gőz)
2 Állítsa a hőmérsékletszabályzó gombot az előírt helyzetbe.
Lásd a "Hőmérséklet szabályozás" c. részt.
Funkciók
Vízpermet
Makacs ráncok eltávolítása bármilyen hőmérsékleten
1 Győződjön meg róla, hogy elég víz van-e a tartályban.
C
2 A vízpermetező gombot néhányszor megnyomva nedvesítse be
a vasalandó ruhát.
MAGYAR 51
Page 52

Extra Gőz (csak GC2305)
Ez a funkció extra gőzt szolgáltat a legmakacsabb gyűrődések
kisimításához.
Az Extra gőz funkció csak ooo és MAX közötti hőmérséklet
beállításoknál működik.
C
1 Fordítsa a gőzszabályozót maximális (È) állásba.
C
2 Nyomja le a gőzszabályozó gombot legfeljebb 5 másodpercre.
3 Az extra gőz legközelebbi használatáig várjon legalább 1 percet,
különben vízcseppek hagyhatnák el a vasalótalpat.
Gőzlövet (csak bizonyos típusoknál)
Az erőteljes gőzlövet segít a nagyon makacs gyűrődések eltávolításában.
A gőzlöket funkció csak oo és MAX hőmérséklet beállítások között
működik.
C
1 Nyomja meg és engedje el a gőzlövet gombot.
Függőleges gőzlövet (csak bizonyos típusoknál)
C
1 A gőzlövet funkció függőleges helyzetű vasalóval is használható.
Így felakasztott ruhák, függönyök stb. gyűrődéseinek
elsimítására alkalmas.
Ne irányítsa a gőzt emberek felé.
Csepegésgátló (csak GC2425/2420/GC2330/2326/2325)
Ennek a vasalónak van csepegés gátló funkciója: a vasaló automatikusan
leállítja a gőzölést, ha a hőmérséklet túl alacsony, hogy elkerülje a
vízcsepegést a vasalótalpból. Ilyenkor kattanó hang hallható.
MAGYAR52
Page 53

Automatikus kikapcsolás (csak GC2425/GC2330)
Egy elektronikus biztonsági szerkezet automatikusan kikapcsolja a
fűtőelemet, ha a vasalót egy ideig nem mozdítja meg.
C
◗ Az automatikus kikapcsoló fénye villogni kezd, amikor a
fűtőelemet kikapcsolja.
A vasaló újramelegítéséhez: fogja meg a vasalót és kicsit mozgassa meg.
Az automatikus kikapcsoló fénye elalszik.
1 Ha a hőmérséklet jelző lámpa világítani kezd, várjon míg elalszik
és csak utána kezdjen el vasalni.
2 Ha a hőmérsékelt jelző lámpa nem világít, a vasaló készen áll a
használatra.
Tisztítás és karbantartás
Dupla vízkőmentesítő rendszer
C
◗ Az anti-calc megakadályozza hogy a vízkő eltömje a vasaló
gőznyílásait.Az anti-calc tabletta folyamatosan működik és nem
szükséges cserélni.
◗ A Calc-Clean funkció eltávolítja a vízkőrészecskéket.
Vízkőmentesítés
Használja a vízkő tisztító funkciót minden két hétben egyszer. Ha a víz
körzetében túl kemény (tehát ha vasalás közben pikkelyek jönnek ki a
talpból), a vízkő tisztító funkciót gyakrabban kell használnia.
1 Fordítsa a gőzszabályozót O állásba.
2 Töltse fel a víztartályt a maximális szintig.
Ne tegyen a tartályba ecetet vagy más vízkőtlenítő anyagot.
C
3 Állítsa a hőmérsékletet MAX-ra.
4 Dugja a hálózati csatlakozó dugót a fali konnektorba.
5 Húzza ki a hálózati csatlakozó dugót ha elérte a hőfokot.
6 Tartsa a vasalót a mosogató fölé, s fordítsa a gőzszabályozót 1
állásba (vízkőmentesítés).A gőzszabályozó gomb kissé
megemelkedik.
MAGYAR 53
Page 54

C
7 Húzza fel a gőzszabályozó gombot,majd távolítsa el a
gőzszabályozó tűt.
C
8 Tartsa a vasalót a mosagató fölé és mozgassa föl le.
B
A gőz és forró víz eltávozik a vasalótalpból. A szennyeződéseket és az
esetleges vízkövet kimossa.
C
9 Ecet segítségével távolítsa el a tűről az esetleges
vízkőlerakódást.
Ne hajlítsa meg vagy ne sértse meg a gőzszabályzó tűt.
C
10 Tegye vissza a gőzszabályzó tűt úgy,hogy a tű hegyét pontosan
a lyuk közepébe dugja és illessze a tű oldalán lévő kis kiálló
részt a résbe. Állítsa a gőzszabályzót gombot O pozícióba.
11 Ha a vasalóban még mindig van szennyeződés,ismételje meg a
vízkő tisztítási eljárást.
Vízkő tisztítási eljárás után
1 Dugja a hálózati csatlakozó dugót a fali konnektorba és hagyja
megszáradni a vasalótalpat.
2 Húzza ki a hálózati csatlakozó dugót ha elérte a hőfokot.
3 Mozgassa könnyedén a vasalót egy használt ruhadarabon, hogy
eltávolítson minden vízfoltot, ami a vasalótalpon keletkezhetett.
Tárolás
1 Húzza ki a csatlakozó dugót a fali konnektorból,hagyja a
vasalót lehülni és helyezze a gőz szabályozót a O pozicióba.
MAGYAR54
Page 55

2 Tisztitsa meg a készüléket és törölje le a vízkövet és minden
egyéb szennyeződést egy nedves ruhával és nem karcsoló
folyékony tisztítóval.
Védje a vasalótalpat: kerülje fémtárggyal való érintkezését.
Soha ne használjon súrolószivacsot, ecetet vagy vegyszereket.
C
3 Rendszeresen öblítse ki a víztartályt vízzel és ürítse ki tisztítás
után.
C
4 Csévélje a csatlakozóvezetéket a vezetéktárolóra.
5 A vasalót mindig a sarkára állítva tárolja biztos és száraz helyen.
Környezetvédelem
C
◗ Kérjük, hogy a használhatatlanná vált készüléket ne dobja a
háztartási hulladékgyűjtőbe, hanem hivatalos
hulladékújrahasznosítási gyűjtőhelyeken adja le. Ezzel Ön
hozzájárul a környezetünk megóvásához.
Jótállás és szerviz
Ha információra van szüksége, vagy valamilyen probléma merült fel,
akkor látogasson el a Philips honlapjára (www.philips.com), vagy
forduljon országa Philips vevőszolgálatához (a telefonszámot megtalálja
a világ minden részére vonatkozó garancialevélen). Ha országában nem
működik ilyen vevőszolgálat,forduljon a Philips helyi szaküzletéhez vagy
a Philips háztartási kisgépek és szépségápolási termékek üzletágának
vevőszolgálatához.
MAGYAR 55
Page 56

Elhárítás
Ellenőrizze a csatlakozó vezetéket, a
dugót és a fali konnektort.
Állítsa a hőmérséklet szabályozó
gombot a megfelelő állásba.
Töltse fel a víztartályt (ld. az
'Előkészítés a használatra' fejezet 'A
víztartály feltöltése' című részét).
Állítsa a gőzszabályozót Á, Ë vagy È
állásba (lásd 'A készülék használata'
fejezet 'Vasalás gőzzel' című részét).
Tekerje a hőmérséklet beállító tárcsát
abba a pozicióba ahol már gőzt termel
(2 és MAX között). Helyezze a
vasalót függőleges helyzetbe és mielptt
elkezdene vasalni várjon amig a
hőmérséklet jelző lámpa ki nem alszik.
Állítsa a vasalót vízszintes helyzetbe, s a
(függőleges) gőzlöket újbóli
alkalmazása előtt várjon egy kis ideig.
Tekerje a hőmérséklet beállító tárcsát
abba a pozicióba ahol már gőzt termel
(2 és MAX között). Helyezze a
vasalót függőleges helyzetbe és mielptt
elkezdene vasalni várjon amig a
hőmérséklet jelző lámpa ki nem alszik.
Vízkőmentesítse a készüléket
néhányszor egymás után (ld. a 'Tisztítás
és karbantartás' fejezet 'Vízkőtisztítás'
című részét).
Vegye kézbe a vasalót és enyhén
mozgassa hogy a vasaló újra
bekapcsoljon: a piros fény nem fog
többet villogni.
Nyomja lefelé a töltősapkát, míg
kattanást nem hall.
Tekerje a hőmérséklet beállító tárcsát
abba a pozicióba ahol már gőzt termel
(2 és MAX között). Helyezze a
vasalót függőleges helyzetbe és mielptt
elkezdene vasalni várjon amig a
hőmérséklet jelző lámpa ki nem alszik.
Ürítse ki a víztartályt és állítsa be a
gőzszabályozót a O poziciób használat
után. Függőleges helyzetben tárolja a
vasalót.
Lehetséges ok(ok)
Csatlakoztatási hiba
A hőfokszabályozó tárcsa MIN állásban
van.
Nincs elég víz a víztartályban.
A gőzszabályozó a O pozicióba van
állítva.
A vasalótalp nem eléggé meleg és/vagy
a csepegésgátló funkció (csak bizonyos
típusoknál) működésbe lépett.
A (függőleges) gőzlöketet túl gyorsan
használta rövid időn belül.
A vasalótalp nem elég forró.
A kemény víz pikkelyeket képez a
vasalótalp belsejében.
Az automatikus kikapcsoló funkció
működésbe lépett (lásd 'Egyéb
funkciók' és 'Automatikus kikapcsolás'
c. fejezeteket)
A töltősapka nincs rendesen lezárva.
A hőmérsékletet túl alacsonyra
állította.
Vízszintes helyzetben tette le a vasalót,
melynek még maradt víz a tartályában.
Hiba
A vasaló hálózati csatlakozó dugóját a
fali konnektorba csatlakoztatta, a
vasalótalp mégis hideg.
Nincs gőz
Nincs gőzlövet vagy nincs függőleges
gőzlövet (csak bizonyos típusoknál)
Vasalás közben pikkelyek és
szennyeződések jönnek ki a
vasalótalpból.
Piros lámpa villog (csak GC2425 és
GC2330)
Vízcseppek kerültek az anyagra (csak a
GC2425/2420/2415/GC2330/2326/23
25/2320 típusoknál)
Vízcseppek kerülnek az anyagra (csak
GC2415/2320/2315/2310/2305)
Vízcseppek jönnek ki a vasalótalpból
miután a vasaló lehült, vagy tárolás
közben.
Hibaelhárítás
Ez a fejezet részletesen foglalkozik a vasalóval kapcsolatban leggyakrabban felmerülő problémákkal. Ha
nem sikerül megoldania a problémát, forduljon az országában működő Philips vevőszolgálathoz.
MAGYAR56
Page 57

Opis zariadenia
A Rozprašovač
B Plniaci otvor
(len modely GC2425/2420/2415/GC2330/2326/2325/2320)
C Tlačidlo impulz pary Shot-of-steam (len modely
(GC2425/2420/2415/GC2330/2326/2325/2320/2315/2310)
D Tlačidlo rozprašovania vody T
E Ovládanie naparovania
- O = žiadna para
- Á = minimálne množstvo pary
- q = mierny prúd pary
(len modely GC2425/2420/2415/GC2330/2326/2325/2320)
- w = maximálny prúd pary
- 1 = funkcia Calc-Clean na odstránenie vodného kameňa
F Funkcia prídavného prúdu pary Extra-steam (len model GC2305)
G Kontrolné svetlo nastavenia teploty
H Kontrolné svetlo automatického vypnutia
(len modely GC2425/GC2330)
I Nastavenie teploty
J Kábel
K Štítok s označením modelu
L Tabletka na odstraňovanie vodného kameňa
M Zásobník na vodu
Dôležité upozornenie
Pred použitím zariadenia si pozorne prečítajte tento návod a odložte si
ho na neskoršie použitie.
◗ Pred tým ako zariadenie pripojíte do siete skontrolujte, či napätie
uvedené na štítku s označením modelu zariadenia súhlasí s
napätím v sieti.
◗ Zariadenie pripojte jedine do uzemnenej zásuvky.
◗ Ak je poškodená zástrčka alebo kábel, prípadne ak sú na zariadení
viditeľné známky poškodenia, ak Vám zariadenie spadlo, alebo z
neho uniká voda, nesmiete ho používať.
◗ Pravidelne kontrolujte stav kábla.
◗ Aby ste sa vyhli nebezpečným situáciám, poškodený napájací kábel
zariadenia smie výmeniť jedine personál spoločnosti Philips,
servisného centra autorizovaného spoločnosťou Philips prípadne
iná oprávnená osoba.
◗ Pokým je žehlička pripojená do siete nesmiete ju nikdy nechať bez
dozoru.
◗ Žehličku nikdy neponárajte do vody.
◗ Zariadenie musí byť mimo dosahu detí.
◗ Žehliaca platňa žehličky môže byť veľmi horúca a pri dotyku
spôsobiť popáleniny.
◗ Kým je žehliaca plocha horúca, kábel sa jej nesmie dotýkať.
57SLOVENSKY
Page 58

58
◗ Do zásobníka na vodu nepridávajte žiaden parfém, ocot, škrob,
prostriedky na odstránenie vodného kameňa,prípravky na
žehlenie, ani iné chemikálie.
◗ Keď skončíte žehlenie, keď čistíte zariadenie, keď plníte, alebo
vyprázdňujete zásobník na vodu a tiež keď necháte žehličku čo len
na krátku chviľu stáť: ovládač naparovania nastavtedo polohy 0,
postavte žehličku do zvislej polohy a odpojte ju zo siete.
◗ Žehličku položte a používajte na stabilnej doske na žehlenie, alebo
na stole.
◗ Ak je súčasťou žehličky podstavec, postarajte sa, aby stál na
stabilnej podložke.
◗ Toto zariadenie je určené len na použitie v domácnosti.
Príprava na použitie
Plnenie zásobníka na vodu
1 Zariadenie odpojte zo siete.
C
2 Ovládanie naparovania nastavte do polohy O (= bez pary).
3 Otvorte plniaci uzáver (len určité modely).
C
4 Nakloňte žehličku a naplňte zásobník na vodu po značku maxima.
Hladina vody v zásobníku nesmie prekročiť označenú maximálnu
úroveň.
5 Zatvorte plniaci uzáver, budete počuť kliknutie (len určité
modely).
Ak je voda, ktorú používate príliš tvrdá, odporúčame Vám používať
destilovanú vodu. Nepoužívajte ocot, škrob ani chemicky zmäkčenú
vodu.
Nastavenie teploty
◗ Pri prvom použití žehličky sa môže objaviť aj trochu dymu.Dym
sa však čoskoro stratí.
C
1 Žehličku postavte do zvislej polohy a otočením krúžka do
príslušnej polohy nastavte požadovanú teplotu pri žehlení.
- Skontrolujte odporúčanú teplotu žehlenia uvedenú na štítku odevu.
- 1 Syntetické vlákna (napr. akryl, viskóza, polyamid, polyester)
- 1 Hodváb
- 2 Vlna
- 3 Bavlna, ľan
SLOVENSKY
Page 59

59
- Ak neviete z akého materiálu je oblečenie zhotovené, správnu
teplotu žehlenia určíte tak, že ožehlíte časť oblečenia, ktorú pri nosení
alebo používaní nebude vidieť.
- Hodvábne, vlnené a syntetické materiály: žehlite opačnú stranu
oblečenia, aby na ňom nevznikli lesklé plochy. Pri žehlení takéhoto
oblečenia nepoužívajte kropenie, aby na oblečení nevznikli škvrny.
2 Zariadenie pripojte do uzemnenej zásuvky.
3 Keď zhasne kontrolné svetlo nastavenia teploty, chvíľu počkajte
a potom začnite so žehlením.
B
Kontrolné svetlo nastavenia teploty sa počas žehlenia občas rozsvieti.
Použitie zariadenia
Naparovanie
Presvedčte sa, či je v zásobníku vody dostatok vody.
1 Krúžok ovládania teploty nastavte do požadovanej polohy.
Pozrite "Nastavenie teploty".
C
2 Ovládanie naparovania nastavte do zodpovedajúcej polohy.
- Á minimálny prúd pary (nastavenie teploty 2 a 3).
- Ë mierny prúd pary (nastavenie teploty 3 až MAX) (len určité
modely).
- È maximálny prúd pary (nastavenie teploty @4,051; až MAX).
B
Naparovanie začne ihneď po dosiahnutí nastavenej teploty.
Len modely GC2415/2320/2315/2310/2305:
Ak nastavíte príliš nízku teplotu (MIN až 2), z otvorov v žehliacej
ploche môže unikať voda.
Žehlenie bez naparovania
1 Ovládanie naparovania nastavte do polohy O (= bez pary).
2 Krúžok ovládania teploty nastavte do požadovanej polohy.
Pozrite "Nastavenie teploty".
*alšie vlastnosti
Kropenie
Vyhladenie pokrčených miest pri ľubovoľnej teplote.
1 Presvedčte sa,či je v zásobníku vody dostatok vody.
SLOVENSKY
Page 60
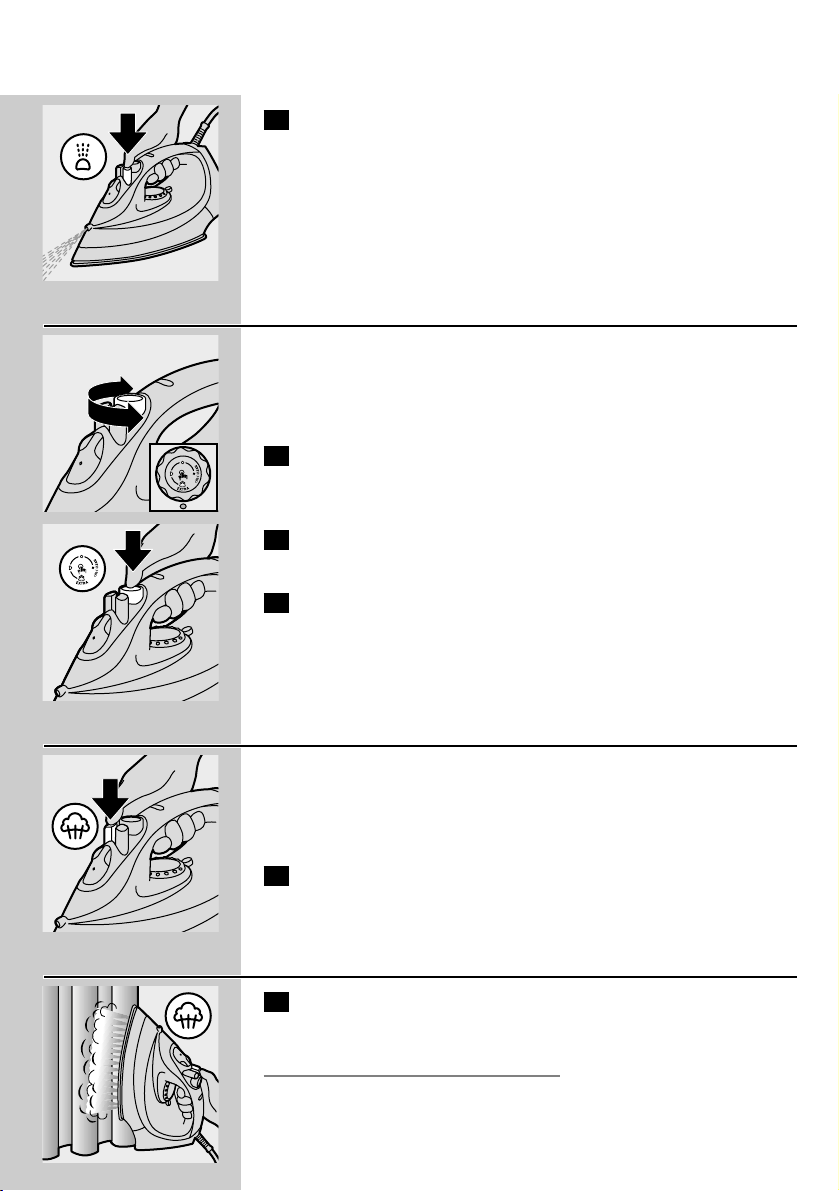
60
C
2 Opakovane stlačte tlačidlo kropenia,aby ste navhčili žehlenú
látku.
Prídavný prúd pary (len model GC2305)
Prídavný prúd pary sa používa na vyhladenie veľmi pokrčenej látky.
Prídavný prúd pary môžete použiť len pri nastavení teploty medzi
3 a MAX.
C
1 Ovládanie naparovania nastavte do polohy maxima È.
C
2 Stlačte a maximálne 5 sekúnd podržte stlačené tlačidlo na
ovládanie naparovania.
3 Aby ste predišli kvapkaniu vody z otvorov v žehliacej ploche,
počkajte aspoň 1 minútu, kým opäť použijete prídavný prúd
pary.
Impulz pary (len určité modely)
Silný prúd pary sa používa na vyhladenie veľmi pokrčenej látky.
Funkciu Impulz pary môžete použiť len pri nastavení teploty medzi 2
a MAX.
C
1 Stlačte a uvoľnite impulz pary.
Impulz pary vo zvislej polohe (len určité modely)
C
1 Impulz pary môžete použiť aj vo zvislej polohe. Používa sa na
vyhladenie pokrčených miest zaveseného oblečenia,záclon atď.
Paru nikdy neotáčajte smerom k ľuďom.
SLOVENSKY
Page 61
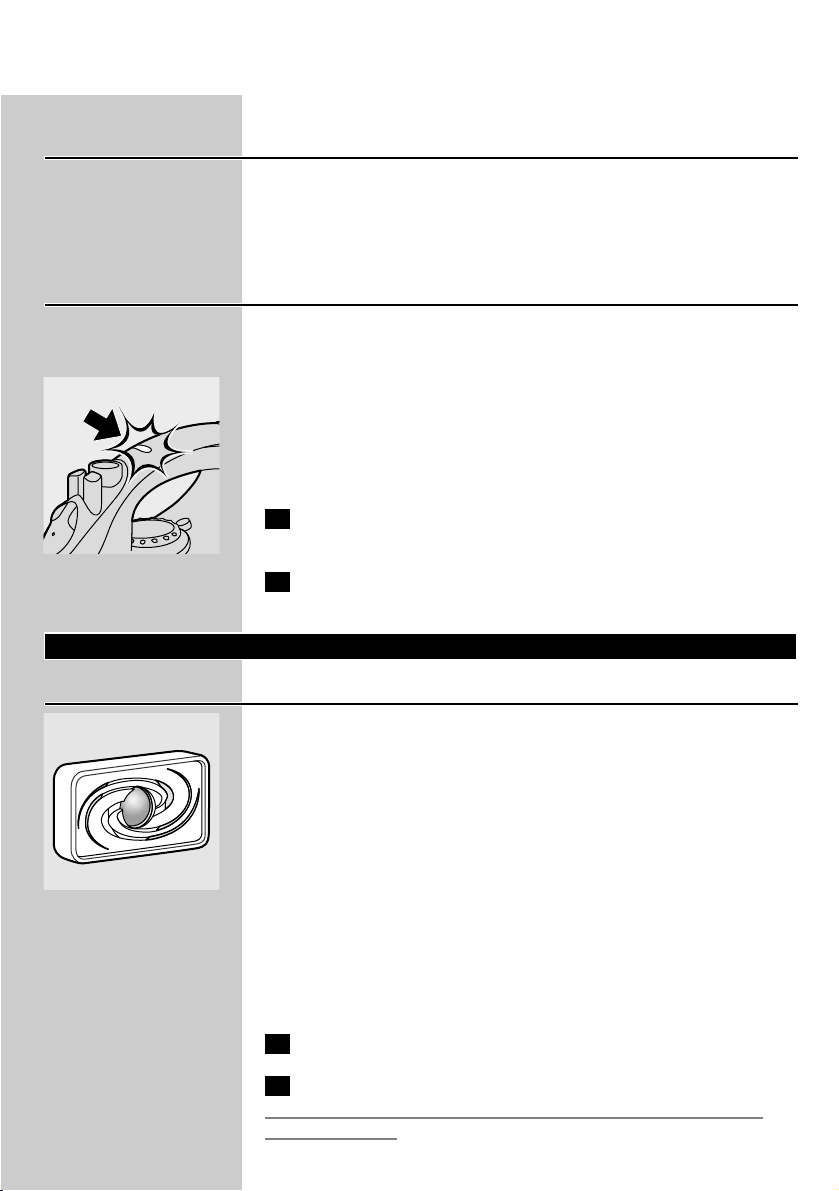
61
Funkcia Drip Stop (len modely
GC2425/2420/GC2330/2326/2325)
Žehlička umožňujúca použitie funkcie Zastavenie odkvapkávania:
žehlička automaticky zablokuje naparovanie, ak je teplota príliš nízka na
úplné odparenie vody pretekajúcej cez otvory v žehliacej platni. Ak sa
tak stane, budete počuť kliknutie.
Automatické vypnutie (len modely GC2425/GC2330)
Ak ste žehličkou určitý čas nepohli, elektronický bezpečnostný senzor
automaticky vypne ohrevné teleso.
C
◗ Automatické vypnutie ohrevného telesa indikuje blikajúce
kontrolné svetlo.
Opätovné zohriatie žehličky: zodvihnite žehličku, alebo ňou jemne
pohýbte. Kontrolné svetlo automatického vypnutia zhasne.
1 Ak sa rozsvieti kontrolné svetlo nastavenia teploty, počkajte
kým nezhasne, a až potom začnite so žehlením.
2 Ak sa kontrolné svelo nastavenia teploty nerozsvieti, žehlička je
pripravená na použitie.
Čistenie a údržba
Dvojitý systém ochrany proti vodnému kameňu
C
◗ Tabletka na odstránenie vodného kameňa zabraňuje upchatiu
otvorov na paru.Tabletka je stále účinná a nepotrebuje výmenu.
◗ Funkcia Calc-Clean odstráni usadený vodný kameň.
Funkcia Odstránenie vodného kameňa
Vodný kameň odstraňujte každé dva týždne.Ak je voda, ktorú
používate príliš tvrdá (napr. ak z otvorov v žehliacej platni vychádzajú
počas žehlenia šupiny usadenín), vodný kameň budete potrebovať
odstrániť častejšie.
1 Krúžok ovládania naparovania nastavte do polohy O.
2 Zásobník vody naplňte na maximálnu úroveň.
Do zásobníka nepridávajte ocot, ani iný prostriedok na odstránenie
vodného kameňa.
SLOVENSKY
Page 62

62
C
3 Teplotu nastavte na MAX.
4 Zariadenie pripojte do siete.
5 Keď zhasne kontrolné svetlo nastavenia teploty, žehličku
odpojte zo siete.
6 Žehličku podržte nad umývadlom a ovládanie naparovania
nastavte do polohy na odstraňovanie vodného kameňa 1.
Gombík ovládania naparovania sa trochu vysunie.
C
7 Vytiahnite gombík ovládania naparovania,aby ste vybrali ihlu na
ovládanie naparovania.
C
8 Žehličku podržte nad umývadlom a pohybujte ňou vpred a
vzad.
B
Cez otvory v žehliacej ploche vytečie horúca voda s parou a spolu s ňou
aj nečistoty a usadený vodný kameň.
C
9 Ak je na ihle usadený vodný kameň, rozpustite ho v octe.
Neohnite, ani inak nepoškoďte ihlu na ovládanie naparovania.
C
10 Vráťte ihlu ovládania naparovania späť tak,že jej špičku
zasuniete presne do stredu otvoru a výstupok na ihle do
drážky. Nastavte gombík ovládača naparovania do polohy O.
11 Ak je v žehličke stále veľa nečistôt,zopakujte postup
odstraňovania vodného kameňa.
Po odstránení vodného kameňa
1 Žehličku zapojte do siete a nechajte vysušiť žehliacu plochu.
2 Keď zhasne kontrolné svetlo nastavenia teploty, žehličku
odpojte zo siete.
SLOVENSKY
Page 63

63
3 Jemne prejdite žehličkou po kúsku použitej tkaniny, aby ste
odstránili škvrny, ktoré sa pri odparovaní vody mohli vytvoriť
na povrchu žehliacej platne.
Odkladanie
1 Odpojte zariadenie zo siete, nechajte žehličku ochladnúť a
ovládanie naparovania nastavte do polohy O.
2 Očistite žehličku a tkaninou navlhčenou neabrazívnym čistiacim
prostriedkom zotrite vodný kameň a ostatné usadeniny z
povrchu žehliacej plochy
Žehliacu platňu udržujte hladkú: vyvarujte sa dotyku kovovými
predmetmi.
Na jej čistenie nepoužívajte abrazívne prostriedky, ocot ani iné
chemikálie.
C
3 Zásobník na vodu pravidelne vyplachujte a po čistení
vyprázdnite.
C
4 Kábel natočte okolo výstupku na jeho odkladanie.
5 Žehličku odkladajte vždy vo zvislej polohe na bezpečnom a
suchom mieste.
Životné prostredie
C
◗ Keď sa skončí životnosť zariadenia, neodhadzujte ho spolu s
bežným odpadom, ale zaneste ho na miesto oficiálneho zberu
kvôli recyklovaniu. Pomôžete tak zachovať životné prostredie.
Záruka a servis
Ak potrebujete informácie, alebo máte problém,prosíme Vás, aby ste
navštívili www stránku spoločnosti Philips - www.philips.com, alebo sa
obrátili na Centrum služieb zákazníkom spoločnosti Philips vo Vašej krajine
(telefónne číslo Centra nájdete v priloženom celosvetovo platnom
záručnom liste). Ak sa vo Vašej krajine toto Centrum nenachádza, obráťte
sa na miestneho predajcu výrobkov Philips, alebo kontaktujte Oddelenie
služieb Philips - divízia domáce spotrebiče a osobná starostlivosť.
SLOVENSKY
Page 64

Riešenie
Skontrolujte sieťový kábel, zástrčku a
sieťovú zásuvku.
Krúžok na nastavenie teploty otočte
do požadovanej polohy.
Zásobník naplňte vodou (viď "Príprava
na použitie", časť "Plnenie zásobníka na
vodu").
Naparovania nastavte do polohy Á,Ë
alebo È (viď "Príprava na použitie",
časť "Naparovanie").
Krúžok na nastavenie teploty otočte
do polohy vhodnej na naparovanie
(2 až MAX). Žehličku postavte na
pätu a počkajte kým zhasne kontrolné
svetlo nastavenia teploty. Potom
môžete začať žehliť.
Žehličku postavte na žehliacu plochu a
pred ďalším použitím (vertikálneho)
impulzu pary chvíľu počkajte.
Krúžok na nastavenie teploty otočte
do polohy vhodnej na naparovanie
(2 až MAX). Žehličku postavte na
pätu a počkajte kým zhasne kontrolné
svetlo nastavenia teploty. Potom
môžete začať žehliť.
Opakovane použite funkciu
odstránenia vodného kameňa (viď
"Čistenie a údržba" časť "Odstránenie
vodného kameňa").
Zodvihnite, alebo jemne pohnite
žehličkou, aby ste deaktivovali funkciu
automatického vypnutia: červené
kontrolné svetlo prestane blikať.
Zatlačte plniaci uzáver, aby ste začuli
kliknutie.
Krúžok na nastavenie teploty otočte
do polohy vhodnej na naparovanie
(2 až MAX). Žehličku postavte na
pätu a počkajte kým zhasne kontrolné
svetlo nastavenia teploty. Potom
môžete začať žehliť.
Možná príčina (y)
Pravdepodobne je prerušený kontakt.
Krúžok na nastavenie teploty je v
polohe MIN.
V zásobníku nie je dosť vody.
Ovládanie naparovania bol nastavené
do polohy O.
Žehliaca plocha nie je dostatočne teplá
a/alebo bola aktivovaná funkcia Drip
stop (len určité modely).
Funkciu (vertikálneho) impulzu pary
ste v krátkom časovom intervale
použili príliš často.
Žehliaca platňa nie je dostatočne
zohriata.
Tvrdosť používanej vody spôsobuje
vznik usadenín.
Bola aktivovaná funkcia automatického
vypnutia (viď kapitolu "*alšie vlastnosti",
časť "Automatické vypnutie").
Plniaci uzáver nie je riadne uzavretý.
Nastavili ste príliš nízku teplotu.
Problém
Žehlička je pripojená do siete, ale
žehliaca platňa je studená.
Nie je para
Nefunguje funkcia impulz pary alebo
impulz pary vo zvislej polohe (len
určité modely).
Počas žehlenia z otvorov v žehliacej
platni vychádzajú usadeniny a nečistoty.
Bliká červené kontrolné svetlo (len
modely GC2425 a GC2330).
Kvapky vody na žehlenej látke (len
modely
GC2425/2420/2415/GC2330/2326/23
25/2320)
Kvapky vody na žehlenej látke (len
modely
GC2415/2320/2315/2310/2305)
Riešenie problémov
V tejto kapitole sú uvedené najbežnejšie problémy, s ktorými sa môžete stretnúť pri žehlení. *alšie
informácie získate v jednotlivých častiach návodu.V prípade, že nedokážete odstrániť vzniknutý
problém, kontaktujte Centrum starostlivosti o zákazníka spoločnosti Philips vo Vašej krajine.
SLOVENSKY64
Page 65

Riešenie
Po použití vyprázdnite zásobník na
vodu a ovládanie naparovania nastavte
do polohy O. Žehličku odkladajte vo
zvislej polohe.
Možná príčina (y)
Žehlička je vo vodorovnej polohe, hoci
v zásobníku zostala voda.
Problém
Počas chladenia, alebo po odložení
žehličky, z otvorov v žehliacej ploche
uniká voda.
SLOVENSKY 65
Page 66

Загальний опис
A Розпилювач
B Ковпачок для наповнення
(лише GC2425/2420/2415/GC2330/2326/2325/2320)
C Кнопка струменю пари
(лише GC2425/2420/2415/GC2330/2326/2325/2320/2315/2310)
D Кнопка розпилювання
E Регулятор пари
- O = нема пари
- Á = мінімальний вихід пари
- q = помірній пари
(лише GC2425/2420/2415/GC2330/2326/2325/2320)
- w = найбільша пара
- 1 = Функція "Calc-Clean"
F Функція додаткової пари (лише GC2305)
G Індикатор температури
H Індикатор автоматичного вимкнення (лише GC2425/GC2330)
I Дисковий регулятор температури
J Шнур живлення
K Табличка даних
L Антинакипова таблетка
M Водяний бачок
Увага!
Прочитайте цю інструкцію уважно перед використанням пристрою
та зберігайте для подальшого використання.
◗ Перевірте, чи збігається напруга, вказана на табличці
характеристик, із напругою у мережі вашого будинку перед
тим, як приєднувати пристрій до мережі.
◗ Під'єднуйте пристрій лише до заземлених розеток.
◗ Не використовуйте пристрій,якщо штепсель, шнур або сам
пристрій мають видимі пошкодження, або якщо з пристрою
крапає або тече вода.
◗ Перевіряйте шнур регулярно на можливе пошкодження.
◗ Якщо шнур пошкоджено,для запобігання небезпеці його
треба замінити у фірмі "Philips", у сервісному центрі,
уповноваженому фірмою "Philips", або його має замінити
кваліфікований спеціаліст.
◗ Ніколи не залишайте підключений до електромережі пристрій
без нагляду.
◗ Ніколи не занурюйте пристрій у воду.
◗ Тримайте пристрій подалі від дітей.
◗ Температура нагрівального елементу може бути дуже високою,
тому торкання до нагрівального елементу може спричинити
опік.
◗ Не допускайте, щоб шнур торкався підошви, коли вона гаряча.
66 УКРАЇНСЬКА
Page 67
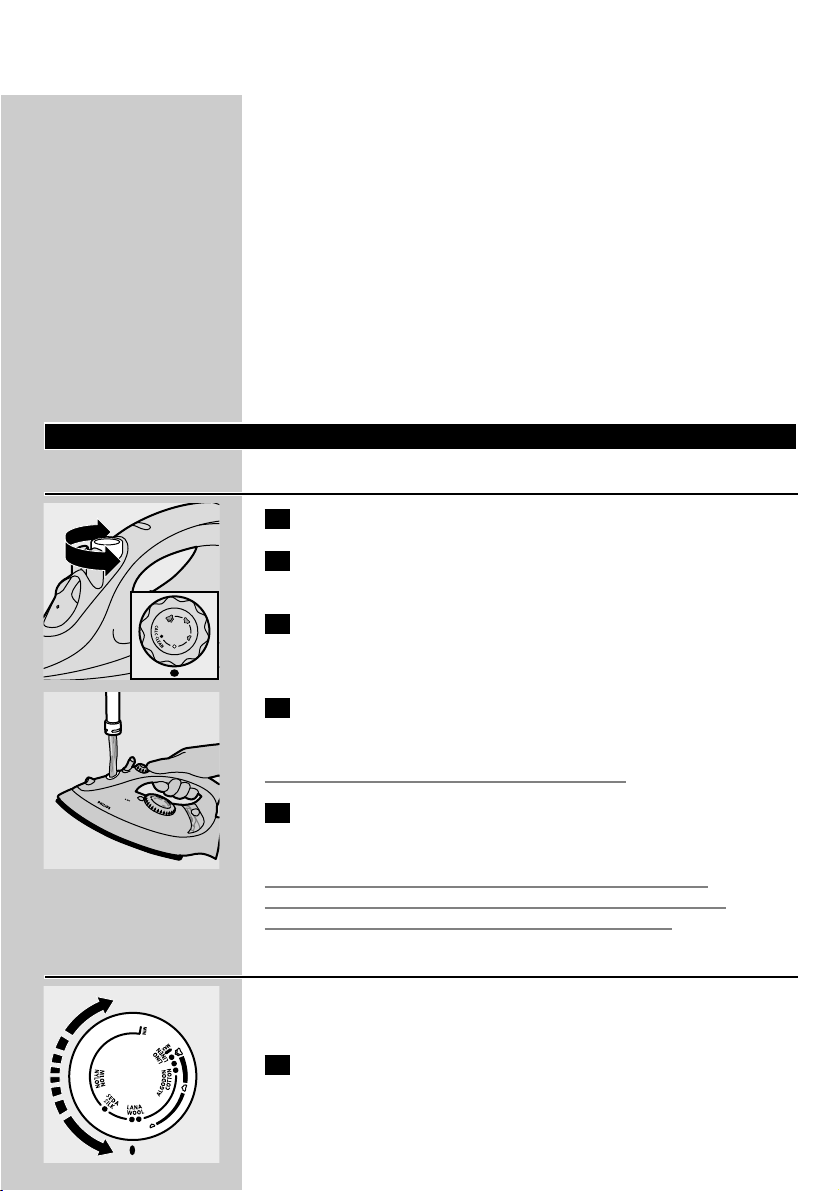
67
◗ Не заливайте парфуми, оцет, крохмаль, речовини для
видалення накипу, засоби для покращання прасування чи інші
хімічні речовини у водяний резервуар.
◗ Коли після закінчення прасування Ви чистите пристрій,коли
Ви заповнюєте або спустошуєте водяний резервуар,а також
якщо Ви залишаєте праску навіть на короткий час, ставте
регулятор інтенсивності пари у положення 0, встановлюйте
праску на п'яту та витягайте штепсель з розетки.
◗ Ставте та використовуйте праску на стійкій пральній дошці
або ж на столі.
◗ Якщо із пристроєм додається стійка, переконайтеся, що стійку
поставлено на стійку поверхню.
◗ Цей пристрій призначений виключено для домашнього
використання.
Підготовка до використання
Заливка води у резервуар праски
1 Вимкніть вилку праски з розетки.
C
2 Поставте регулятор подачі пару в положення O (= пар не
подається).
3 Відкрийте ковпачок для наповнювання (лише окремі
моделі).
C
4 Нахиліть праску та залийте воду в бачок до максимального
рівня.
Не наливайте воду вище максимального рівня.
5 Закрийте ковпачок для наповнювання (з клацанням!) (лише
окремі моделі).
Якщо вода в вашій місцевості надто жорстка, ми радимо
використовувати дистильовану воду. Не застосовуйте оцту
крохмалю та воду після хімічного видалення накипу.
Установлення температури
◗ На початку використання праска може давати невеличкий дим.
Це незабаром припиниться.
C
1 Поставте праску на п'яту та встановіть дисковий регулятор
температури на потрібну температуру прасування,
повертаючи його в потрібне положення.
- Температура прасування наведена на бирках речах, які ви
збираєтесь прасувати.
УКРАЇНСЬКА
Page 68

68
- 1 Синтетичні тканини
(наприклад, поліамід, віскоза, акрил, поліестер).
- 1 Шовк
- 2 Вовна
- 3 Бавовна, лен.
- Якщо ви не знаєте тип тканини, визначте правильну температуру
прасування, прасуючи частину одежі, що зазвичай залишається
невидимою.
- Шовк, вовняні та синтетичні матеріали: щоб тканина не лиснілася,
прасуйте зворотну сторону тканини. Уникайте застосування
функції розбризкування, щоб запобігти виникненню плям.
2 Ввімкніть вилку у заземлену розетку.
3 Коли індикатор температури згасне, зачекайте трохи перед
тим, як починати прасування.
B
Індикатор температури спалахує час від часу під час прасування.
Використання пристрою
Прасування з паром
Перевірте, щоб у прасці було досить води.
1 Встановіть регулятор температури на рекомендоване
значення.
Дивіться розділ "Встановлення температури".
C
2 Поставте регулятор подачі пару у відповідне положення.
- Á для мінімальної пари (установка температури 2 та 3).
- Ë для помірної пари (установка температури 3 до MAX)
(тільки в окремих моделях)
- È для максимальної пари (установки температури від 3 до
MAX).
B
Пар почне створюватися відразу ж після того, як буде досягнута
задана температура.
Лише GC2415/2320/2315/2310/2305:
Вода може виливатися з підошви, якщо встановлено надто низьку
температуру (від MIN до 2).
Прасування без пару
1 Встановіть регулятор пари у положення O (= без пари).
2 Встановіть регулятор температури на рекомендоване
значення.
Дивіться розділ "Встановлення температури".
УКРАЇНСЬКА
Page 69

Функції
Обприскування
Для видалення важких зморшок при будь-якій температурі.
1 Перевірте, щоб у прасці було досить води.
C
2 Натисніть кнопку розбризкування декілька разів, щоб
зволожити тканину, що прасується.
Додаткова пара (лише GC2305)
Ця функція забезпечує додаткову пару для усування важких
зморшок.
Функція "Extra Steam" працює лише при установках температури
від 3 до MAX.
C
1 Встановіть регулятор пари у максимальне положення È.
C
2 Натисніть та тримайте кнопку регулятора температури
максимум 5 секунд.
3 Почекайте щонайменше 1 хвилину перед тим, як знову
застосовувати функцію "Extra Steam", щоб вода не капала з
підошви.
Струмінь пари (лише окремі моделі)
Потужний струмінь пари допоможе усунути важкі зморшки.
Функція "Shot of Steam" працює при температурних установках від
2 до MAX.
C
1 Натисніть і відпустіть кнопку "Shot-of-Steam".
69УКРАЇНСЬКА
Page 70

70
Вертикальний струмінь пари (лише окремі моделі)
C
1 Функція "Shot-of-Steam" може також застосовуватися,коли
ви тримаєте праску у вертикальному положенні. Це корисно
для прасування зморшок підвішеного одягу, занавісок тощо.
Ні в якому разі не направляйте струмінь пару на людей.
"Дріп-стоп" (протикрапельний пристрій, лише
GC2425/2420/GC2330/2326/2325)
В цій прасці передбачена функція припинення капання: праска
автоматично перестає виділяти пар якщо температура стає
занизькою, щоб вода не почала сочитися через "підошву". У цьому
випадку ви почуєте звуковий сигнал.
Автоматичне вимикання (лише GC2425/GC2330)
Пристрій електронної безпеки автоматично відключає нагрівальний
елемент, якщо праску деякий час не рухали з місця.
C
◗ Щоб показати, що нагрівальний елемент вимкнено, індикатор
автоматичного вимкнення починає мигати.
Для повторного підігрівання праски візьміть її в руки або трохи
посуньте. Індикатор автоматичного вимкнення згасне.
1 Якщо індикатор температури загорається, зачекайте, поки
він згасне, перед тим, як починати прасування.
2 Якщо індикатор температури не горить, праска готова до
використання.
Чистка і догляд за праскою
Протинакипова система подвійної дії
C
◗ Протинакипова таблетка запобігає забиванню парових отворів
накипов. Таблетка діє постійно й не потребує заміни.
◗ Функція "Кальк-клін" усуває частинки накипу.
Функція "Calc-Clean"
Використовуйте функцію видалення вапна кожні два тижні. Якщо
вода у вашій місцевості дуже жорстка (тобто коли пластівці
з'являються на "підошві" в процесі прасування), цю функцію
необхідно використовувати частіше.
УКРАЇНСЬКА
Page 71

71
1 Встановіть регулятор пари у положення O..
2 Залийте воду у праску до максимального рівня.
Не заливайте в праску оцет та інші речовини для видалення накипу.
C
3 Встановіть регулятор температури на MAX.
4 Вставте штепсель у розетку.
5 Витягніть штепсель із розетки, коли індикатор температури
згасне.
6 Тримаючи праску над раковиною, встановіть регулятор пари
у положення 1 ("Calc-Clean" - функція усунення накипу).
Ручка регулятора пари трохи піднімається.
C
7 Витягніть ручку регулятора пари догори та зніміть стрілку
регулятора пари.
C
8 Тримайте праску над умивальником та рухайте її туди-сюди.
B
Через нагрівальний елемент буде виходити пар і кріп. При цьому
будуть також вилітати частинки забруднення і накипу (якщо
такі є).
C
9 Застосовуйте оцет для видалення накипу зі стрілки, якщо
він є.
Не зігніть та не пошкодьте стержень регулятора пари.
C
10 Поставте стержень на місце, точно по центру отвору і
попадаючи маленьким виступом на боці стержня в паз.
Поставте регулятор пари в позицію О.
11 Якщо в прасці лишилася деяка кількість домішок, повторіть
процедуру чищення.
УКРАЇНСЬКА
Page 72
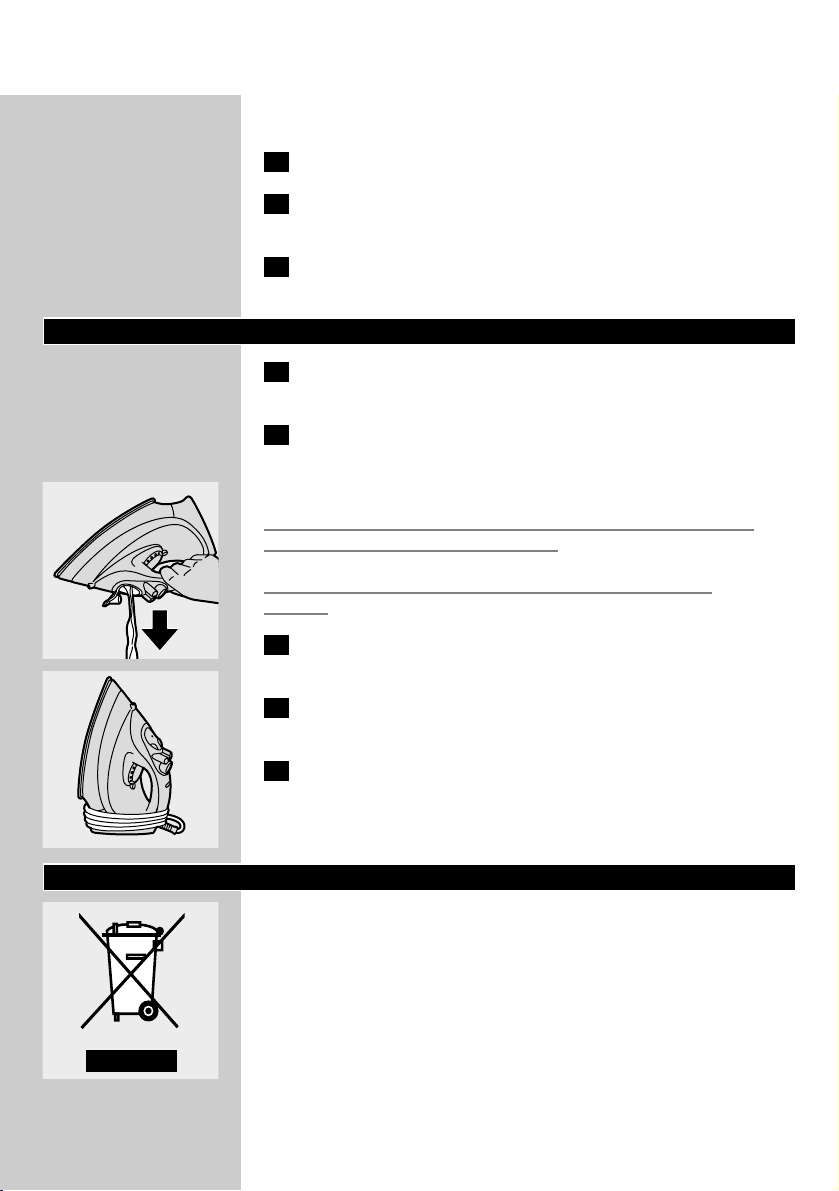
72
Після процесу видалення вапна.
1 Ввімкніть праску, щоб нагрівальний елемент висох.
2 Витягніть штепсель із розетки, коли індикатор температури
згасне.
3 Порухайте обережно праску по непотрібній ганчірці для
того, щоб видалити залишки води з "підошви".
Зберігання
1 Витягніть штепсель із розетки, дайте прасці охолонути і
встановіть регулятор пари у положення O.
2 Почистіть пристрій, зітріть накип та інші залишки з підошви
вологою ганчіркою та неабразивним (рідким) засобом для
чищення.
Оберігайте нагрівальний елемент від подряпин: уникайте його
контактів з металічними предметами.
Ніколи не застосовуйте подушки для чищення, оцет чи ін
хімікати.
C
3 Регулярно промивайте водяний бачок водою та
спорожнюйте після чищення.
C
4 Намотайте шнур живлення навколо пристрою для
зберігання шнура.
5 Завжди зберігайте праску у вертикальному положенні "на
п'яті" у надійному та сухому місці.
Довкілля
C
◗ Не викидайте пристрій зі звичайним побутовим сміттям,
доставляйте його після того, як сплине термін використання,
до офіційного приймального пункту для переробки. Цим ви
допоможете зберегти довкілля.
УКРАЇНСЬКА
Page 73

73
Гарантія і обслуговування
Якщо Вам необхідна інформація або у Вас виникли проблеми,
зверніться до веб-сторінки компанії "Philips" - www.philips.com, або
зверніться до Центру обслуговування клієнтів компанії "Philips" у
Вашій країні (телефон Ви можете знайти на гарантійному
талоні).Якщо у Вашій країні немає Центру обслуговування клієнтів,
зверніться до місцевого ділера або зв'яжіться з Сервісним відділом
"Philips Domestic Appliаnces аnd Personаl Cаre BV".
УКРАЇНСЬКА
Page 74

спосіб усунення
Перевірте стан шнуру живлення,
вилки і розетки.
Встановіть регулятор температури у
потрібне положення.
Наповніть водяний резервуар (див.
"Підготовка до використання", розділ
"Наповнення водяного резервуара").
Встановіть регулятор температури
на Á, Ë або È (див. "Використання
пристрою", розділ "Прасування з
парою").
Встановіть регулятор температури у
положення у проміжку прасування з
парою (від 2 до MAX). Поставте
праску на п'яту та зачекайте, доки
індикатор температури не згасне,
перед тим, як починати прасування.
Поставте праску горизонтально та
зачекайте трохи перед повторним
застосуванням (вертикального)
струменю пари.
Встановіть регулятор температури у
положення у проміжку прасування з
парою (від 2 до MAX). Поставте
праску на п'яту та зачекайте, доки
індикатор температури не згасне,
перед тим, як починати прасування.
Увімкніть функцію "Calc-Clean" усунення накипу - на декілька хвилин
(див. "Чищення та догляд", розділ
"Усунення накипу").
Візміть праску в руки або трохи
посуньте, щоб деактивувати функцію
автоматичного вимикання: червоний
індикатор має припинити мигати.
Натисніть ковпачок, поки не почуєте
клацання.
Встановіть регулятор температури в
положення у проміжку прасування з
парою (від 2 до MAX). Поставте
праску на п'яту та зачекайте, доки
індикатор температури не згасне,
перед тим, як починати прасування.
Можлива причина (причини)
Проблема з підключенням
Регулятор температури встановлено
на MIN
Не достатньо води у резервуарі
праски для води.
Регулятор пари встановлено в
положення O.
Підошва недостатньо гаряча, і
функцію "дріп-стоп" активовано
(лише в окремих моделях).
Протягом короткого часу функція
(вертикального) викиду пару
використовувалася занадто часто.
"Підошва" недостатньо гаряча.
Жорстка вода формує пластівці на
"підошві".
Функцію автоматичного вимикання
активовано (див. "Інші функції", розділ
"Автоматичне вимикання").
Ковпачок заливного отвору закрито
не щільно.
Виставлено занадто низьку
температуру.
Несправність
Праска ввімкнута в розетку, але
нагрівальний елемент холодний
Немає пару
Немає струменю пари чи
вертикального струменю пари (лише
в окремих моделях).
Пластівці та інші забруднення
виділяються з праски під час
прасування.
Червоний індикатор мигає (лише
GC2425 та GC2330).
Вода крапає на тканину (тільки
GC2425/2420/2415/GC2330/2326/23
25/2320)
Краплі води на тканині (лише
GC2415/2320/2315/2310/2305).
Можливі несправності.
У цій главі зведено основні труднощі, яки можуть виникнути при використанні праски. Будьласка, за подробицями звертайтеся до окремих розділів. Якщо у вас виникають складнощі, будьласка, зв'язуйтесь з центром обслуговування клієнтів "Philips Customer Cere" у вашій країні.
УКРАЇНСЬКА74
Page 75

спосіб усунення
Спорожніть водяний бачок,
поставте регулятор пари в
положення O після використання.
Для зберігання ставте праску на
п'яту.
Можлива причина (причини)
Праску поставлено у горизонтальне
положення, коли у резервуарі все ще
лишається вода.
Несправність
Вода капає з підошви після того, як
праска охолонула або після
зберігання.
УКРАЇНСЬКА 75
Page 76
Opći opis
A Sapnica
B Kapa otvora za punjenje
(GC2425/2420/2415/GC2330/2326/2325/2320)
C Dugme za mlaz pare
(GC2425/2420/2415/GC2330/2326/2325/2320/2315/2310)
D Dugme za 'sprej' funkciju
E Kontrola pare
- O = bez pare
- Á = minimum pare
- q = srednja količina pare
(GC2425/2420/2415/GC2330/2326/2325/2320 )
- w = maksimalna para
- 1 = Calc-Clean funkcija
F Funkcija 'Extra-para' (samo GC2305)
G Kontrolno svjetlo temperature.
H Kontrolno svjetlo automatskog isključivanja
(GC2425 i GC2330)
I Selektor temperature
J Mrežni kabel
K Pločica s podacima
L Tableta Anti-calc
M Spremište za vodu
Važno
Prije uporabe aparata pažljivo pročitajte ove upute i sačuvajte ih za
kasniju uporabu.
◗ Prije nego što uključite aparat, provjerite da li napon na pločici
modela odgovara mrežnom naponu.
◗ Aparat spojite isključivo na uzemljenu zidnu utičnicu.
◗ Nikadane koristiteaparat ako su utikač, mrežni kabel ili sam aparat
oštećeni, ako aparat procurjeva ili ako vam je ispao na pod.
◗ Redovito provjeravajte stanje mrežnog kabela, zbog oštećenja.
◗ Ako se mrežni kabel ošteti,mora se zamijeniti novim u
ovlaštenom Philips servisu ili od strane slične ovlaštene osobe.
◗ Nikada ne ostavljajte glačalo bez nadzora kad je priključeno na
napajanje.
◗ Nikada ne uranjajte glačalo u vodu.
◗ Držite aparat izvan dohvata djece.
◗ Donja ploča glačala se može jako zagrijati i uzrokovati opekotine
ako se dodiruje.
◗ Pazite da mrežni kabel ne dodje u kontakt s grijaćom pločom kada
je ova vruća.
◗ Nikada ne dodajte nikakve parfeme, osvježivače, kiseline ili bilo
kakve druge kamikalije u spremnik s vodom.
◗ Po završetku glačanja,tijekom čišćenja, punjenja ili pražnjenja
spremnika za vodu i kad nakratko ostavite glačalo: postavite
kontrolu pare na položaj O,postavite glačalo u uspravni položaj i
izvucite mrežni kabel iz zidne utičnice.
76 HRVATSKI
Page 77

77
◗ Glačalo postavite i koristite na ravnoj i stabilnoj plohi.
◗ Ako je uz glačalo isporučen i stalak, postavite ga na ravnu i stabilnu
plohu.
◗ Aparat je namijenjen isključivo za kućnu uporabu.
Priprema za uporabu
Punjenje spremnika za vodu
1 Izvucite mrežni kabel iz utičnice.
C
2 Postavite kontrolu pare na položaj O (= bez pare).
3 Otvorite kapu otvora za punjenje (samo neki tipovi)
C
4 Napunite spremište do oznake MAX.
Ne punite spremnik iznad oznake MAX.
5 Zatvorite kapu otvora za punjenje ('klik') (samo neki tipovi)
Ako je voda u Vašem području vrlo tvrda, savjetujemo Vam da rabite
destiliranu vodu. Nemojte rabiti ocat, štirku ili vodu koja je kemijski
očišćena od kamenca.
Podešavanje temperature
◗ Kod prve uporabe možda ćete primijetiti malo dima.Ta pojava
nakon kraćeg vremena nestaje.
C
1 Stavite glačalo na postolje te postavite temperaturu na
odgovarajuću.
- Potrebnu temperaturu glačanja provjerite na etiketi odjeće.
- 1 Sintetika (akril, viskoza,poliamid, poliester)
- 1 Svila
- 2 Vuna
- 3 Pamuk, lan
- Ako ne znate kojom temperaturom glačati odjeću jer ne znate sastav
tkanine, isprobajte razne temperature glačanja na djelu odjeće koji
nije vidljiv tijekom nošenja.
- Svila, vuneni i sintetički materijali: glačajte s naličja tkanine da biste
izbjegli sjajne mrlje. Izbjegavajte korištenje funkcije prskanja vodom da
biste izbjegli stvaranje mrlja.
2 Utaknite mrežni kabel u uzemljenu zidnu utičnicu.
HRVATSKI
Page 78

78
3 Kada se kontrolno svjetlo temperature ugasi, pričekajte neko
vrijeme prije početka glačanja.
B
Kontrolno svjetlo temperature će se povremeno paliti i gasiti tijekom
glačanja.
Uporaba aparata
Parno glačanje
Provjerite ima li u spremniku dovoljno vode.
1 Postavite kontrolu pare na odgovarajuću oznaku.
Pogledajte odjeljak "Podešavanje temperature".
C
2 Postavite kontrolu pare u odgovarajući položaj.
- Á za minimalnu paru (postave temperature 2 i 3).
- Ë za srednju količinu para (postava temperature 3 do MAX)
(samo neki tipovi).
- È za maksimalnu paru (postave temperature 3 do MAX).
B
Para počinje izlaziti čim je dosegnuta podešena temperatura.
GC2415/2320/2315/2310/2305:
Ako je postavljena temperatura preniska (MIN do 2), voda može
curiti iz grijaće ploče.
Glačanje bez pare
1 Postavite kontrolu temperature na poziciju O (=bez pare)
2 Postavite kontrolu pare na odgovarajuću oznaku.
Pogledajte odjeljak "Podešavanje temperature".
Funkcije
Prskanje vodom
Za glačanje tvrdih nabora pri bilo kojoj temperaturi.
1 Provjerite ima li u spremniku dovoljno vode.
C
2 Nekiliko puta pritisnite gumb za prskanje vodom da biste
navlažili predmet koji želite glačati.
HRVATSKI
Page 79

79
Ekstra para
Ova funkcija daje dodatnu paru koja olakšava glačanje upornih nabora.
Extra Steam funkcija radi samo pri temperaturama između 3 i
MAX.
C
1 Postavite regulator pare u maksimalni položaj È.
C
2 Pritisnite i držite gumb za kontrolu pare pritisnutim najviše 5
sekundi.
3 Pričekajte najmanje 1 minutu prije ponovnog korištenja funkcije
dodatne pare da Vam voda ne bi počela kapati iz grijaće ploče.
Mlaz pare (samo neki tipovi)
Snažan mlaz pare pomaže u glačanju vrlo upornih nabora.
Shot of Steam funkcija radi samo pri temperaturama između 2 i
MAX.
C
1 Pritisnite i otpustite tipku za mlaz pare.
Vertikalni mlaz pare (samo neki tipovi)
C
1 Funkcija mlaza pare može se koristiti i kad glačalo držite u
okomitom položaju.To je korisno za uklanjanje nabora na
izvješenoj odjeći, zavjesama, itd.
Nikada ne usmjerujte paru prema ljudima.
Drip stop (GC2425/2420/GC2330/2326/2325)
Ovo glačalo je opremljeno funkcijom sprječavanja kapanja: para se
automatski zaustavlja kad je temperatura preniska kako bi se spriječilo
kapanje vode iz grijaće ploče. Kad se to desi, začuje se "klik":
HRVATSKI
Page 80

80
Automatsko isključivanje (GC2425/GC2330)
Elektronički sigurnosni sklop automatski isključuje grijaći element ako
neko vrijeme niste pomaknuli glačalo.
C
◗ Kao indikacija da je grijaći element isključen, kontrolno svjetlo
automatskog isključivanja će započeti treptati.
Kako bi ponovno zagrijali glačalo: podignite ga ili ga lagano pomaknite.
Kontrolno svjetlo automatskog isključivanja će se isključiti.
1 Ako se kontrolno svjetlo temperature upali, pričekajte neko
vrijeme prije nego započnete s glačanjem.
2 Ako se kontrolno svjetlo temperature ne upali. glačalo je
spremno za rad.
Čišćenje i održavanje
Dvostruko-aktivni Calc sistem
C
◗ Anti calc tableta sprječava taloženja kamenca na otvorima za
izlaženje pare.Tableta je stalno aktivna i nije ju potrebno mijenjati.
◗ Funkcija Calc-Clean uklanja komadiće kamenca.
Funkcija čišćenja od kamenca
Koristite je jednom u dva tjedna. Ako je voda u Vašem području vrlo
tvrda (odnosno, kad tijekom glačanja iz grijaće ploče izlaze djelići
kamenca), ovu je funkciju potrebno koristiti češće.
1 Postavite regulator pare u položaj O.
2 Napunite spremnik za vodu do najviše razine.
U spremnik za vodu ne ulijevajte ocat ili druga sredstva za uklanjanje
kamenca.
C
3 Postavite kontrolu temperature na MAX.
4 Utaknite mrežni kabel u zidnu utičnicu.
5 Izvucite mrežni kabel iz utičnice kada se kontrolno svjetlo
temperature ugasi.
HRVATSKI
Page 81

81
6 Držite glačalo iznad sudopera i postavite regulator pare u
položaj 1 (čišćenje od kamenca). Polugica za kontrolu pare će
se malo podići.
C
7 Povucite polugicu za kontrolu pare prema gore i izvadite iglu za
kontrolu pare.
C
8 Držite glačalo iznad umivaonika lagano ga okrećite.
B
Para i proključala voda izlaze iz donje ploče. Nečistoća i kamenac (ako
ga ima) se na taj način ispiru.
C
9 Octom očistite kamenac s igle, ako ga ima.
Nemojte savijati ili oštetiti iglu kontrole pare.
C
10 Vratite iglu kontrole pare tako da njen vrh umetnete točno u
središte otvora,a malu izbočinu s bočne strane igle u utor.
Postavite kontrolu pare na položaj O.
11 Ako u glačalu još ima nečistoće, ponovite Calc-Clean postupak.
Nakon Calc-Clean postupka
1 Uključite glačalo u napajanje kako bi se donja ploča osušila.
2 Izvucite mrežni kabel iz utičnice kada se kontrolno svjetlo
temperature ugasi.
3 Lagano prijeđite glačalom preko stare krpe kako bi uklonili
eventualne mrlje od vode s grijaće ploče.
HRVATSKI
Page 82

Pohranjivanje
1 Izvucite mrežni kabel iz utičnice, ostavite glačalo da se ohladi i
postavite kontrolu temperature na poziciju O.
2 Očistite glačalo i obrišite kamenac ili bilo koje druge nečistoće
s grijaće ploče mekom tkaninom i nekim neabrazivnin
sredstvom za čišćenje.
Izbjegavajte kontakt donje ploče s metalnim predmetima.
Nikada nemojte rabiti spužvicu za ribanje, ocat ili druge kemikalije.
C
3 Regularno ispirite spremište za vodu vodom te ga ispraznite
nakon čišćenja.
C
4 Omotajte mrežni kabel oko utora za spremanje kabela.
5 Uvijek spremite glačalo u uspravnom položaju na sigurno i suho
mjesto.
Zaštita okoliša
C
◗ Aparat ne odbacujte zajedno s ostalim kućnim smećem, već ga
odložite na za to predviđena prikupljališta. Na taj način
pridonosite zaštiti okoliša.
Jamstvo i servis
Trebate li informaciju ili imate problem, molimo Vas posjetite nas na
našoj web stranici www.philips.com ili nazovite Philips predstavništvo u
Vašoj zemlji,Vašeg prodavača ili se javite u najbliži ovlašteni servis.
82 HRVATSKI
Page 83

Rješenje
Provjerite mrežni kabel, utikač i zidnu
utičnicu.
Postavite regulator temperature u
odgovarajući položaj.
Napunite spremnik za vodu
(pogledajte "Priprema za uporabu", dio
"Punjenje spremnika za vodu").
Postavite regulator pare u položaj Á,Ë
ili È (pogledajte "Uporaba aparata",
dio "Glačanje s parom").
Postavite temperaturu na postavku
O.do MAX). Postavite glačalo na
postolje i pričekajte da se kontrolno
svjetlo temperature ugasi prije nego
započnete ss glačanjem.
Stavite glačalo u vodoravan položaj i
malo pričekajte prije nego što ponovo
uporabite funkciju (okomitog) mlaza
pare.
Postavite temperaturu na postavku
O.do MAX). Postavite glačalo na
postolje i pričekajte da se kontrolno
svjetlo temperature ugasi prije nego
započnete ss glačanjem.
Nekoliko puta uporabite funkciju
čišćenja od kamenca (pogledajte
"Čišćenje i održavanje", dio "Čišćenje
od kamenca").
Podignite glačalo ili ga lagano
pomaknite kako bi deaktivirali funkciju
automatskog isključivanja. Crveno
svjetlo će prestati treptati.
Pritisnite poklopac spremnika za
punjenje dok ne začujete "klik".
Postavite temperaturu na postavku
O.do MAX). Postavite glačalo na
postolje i pričekajte da se kontrolno
svjetlo temperature ugasi prije nego
započnete ss glačanjem.
Ispraznite spremište za vodu i
postavite kontrolu temperature na
poziciju O nakon uporabe. Pospremite
glačalo na njegovom postolju.
Mogući uzrok (uzroci)
Problem u spoju sa strujom
Regulator temperature je postavljen na
MIN
Nema dovoljno vode u spremniku.
KOntrola pare je postavljena na
poziciju O.
Grijaća ploča nije dovoljno vruća ili je
drip stop funkcija aktivirana (samo neki
tipovi)
Funkcija (okomitog) mlaza pare je
prečesto korištena u vrlo kratkom
razdoblju.
Grijaća ploča nije dovoljno vruća.
Tvrda voda stvara kamenac u grijaćoj
ploči.
Funkcija automatskog isključivanje se
aktivirala (vidi ' Značajke', sekcija
'Automatsko isključivanje')
Poklopac spremnika za punjenje nije
dobro zatvoren.
Temperatura je preniska.
Glačalo je stavljeno u vodoravan
položaj dok je u spremniku još bilo
vode.
Problem
Glačalo je priključeno u napajanje ali
donja ploča je hladna.
Nema pare
Funkcija mlaza pare ili vertikalnog
mlaza pare ne radi (samo neki tipovi)
Tijekom glačanja iz grijaće ploče izlaze
komadići nečistoće i kamenca.
Crveno svjetlo trepti. (GC2425 I GC
2230)
Kapi vode kapaju na tkaninu
(GC2425/2420/2415/GC2330/2326/2
325/2320)
Voda kapa na tkaninu
(GC2425/2420/2415/GC2330/2326/2
326/2325/2320)
Voda kapa iz grijaće ploče nakon što
se glačalo ohladilo.
U slučaju problema
Ovo poglavlje pokriva najčešće probleme s kojima biste se mogli susresti kod uporabe aparata.
Pročitajte i ostala odgovarajuća poglavlja za detaljnije upute. Ako ne možete riješiti problem, obratite
se Philipsovom korisničkom centru u zemlji.
HRVATSKI 83
Page 84
Kirjeldus
A Piserdusotsik
B Täitenõu (ainult GC2425/2420/2415/GC2330/2326/2325/2320)
C Aurupahvaku nupp
(ainult GC2425/2420/2415/GC2330/2326/2325/2320/2315/2310)
D Piserdusnupp T
E Aurukontroll
- O = kuivtriikimine
- Á = minimaalne aur
- q = keskmine aur
- w = maksimaalne aurupahvak
- 1 = katlakivieemaldusfunktsioon
F Lisaauru funktsioon (ainult GC2305)
G Temperatuuri märgutuli
H Automaatne väljalülitusmärgutuli (ainult GC2425/GC2330)
I Temperatuuriregulaator
J Toitejuhe
K Andmeplaat
L Katlakivieemaldamistablett
M Veepaak
Pange tähele!
Lugege see kasutusjuhend hoolikalt läbi ja hoidke alles edaspidiseks.
◗ Enne seadme sisselülitamist kontrollige, kas seadme andmeplaadile
märgitud voolutugevus vastab kohalikule voolutugevusele.
◗ Ühendage seade ainult maandatud seinapistikusse.
◗ Ärge kasutage seadet, kui pistik, juhe või seade ise on vigastatud
või tilgub või lekib.
◗ Kontrollige juhet korrapäraselt,et avastada võimalikke vigastusi.
◗ Kui seadme toitejuhe on vigastatud,vahetage see ohtlike
olukordade vältimiseks alati Philipsi või Philipsi volitatud
teeninduskeskuses või kvalifitseeritud spetsialisti poolt.
◗ Ärge jätke vooluvõrku ühendatud triikrauda järelvalveta.
◗ Ärge pange triikrauda vette.
◗ Hoidke seade laste käeulatusest eemal.
◗ Triikraua tald võib minna väga kuumaks ja puudutamise korral
põhjustada põletusi.
◗ Ärge laske juhtmel olla vastu tulist triikrauatalda.
◗ Ärge pange lõhnaõli, äädikat, tärklist,katlakivivastaseid, triikimis-
või muid keemilisi aineid veepaaki.
◗ Kui lõpetate triikimise või puhastate seadet,kui täidate või
tühjendate veenõud või lahkute triikraua juurest kas või hetkeks,
siis: keerake aururegulaator O-asendisse, pange triikraud toele
seisma ja eemaldage pistik pistikupesast.
◗ Pange triikraud ja kasutage seadet kindlal triikimislaual või laual.
◗ Kui seadmega on kaasas alus,veenduge, et see oleks paigaldatud
kindlale pinnale.
◗ Seade on ettenähtud kasutamiseks ainult koduses majapidamises.
84 EESTI
Page 85

Ettevalmistamine kasutamiseks
Veepaagi täitmine
1 Võtke võrgupistik seinakontaktist välja.
C
2 Keerake aururegulaator asendisse O (= kuivtriikimine).
3 Avage veenõu kaas (ainult erimudelid).
C
4 Kallutage triikrauda veidi ja täitke veenõu maksimaalse
tasemeni.
Ärge kunagi täitke veepaaki üle MAX-tähise.
5 Sulgege kaas (klõpsatus) (ainult erimudelid).
Kui piirkonnas, kus te elate, on väga kare vesi, soovitame kasutada ainult
destilleeritud vett. Ärge kasutage äädikat, tärklist ega katlakivist
keemilisel teel puhastatud vett.
Temperatuuri valik
◗ Esmakasutusel võib triikraud veidi suitseda. See nähtus kaob
kiiresti.
C
1 Asetage triikraud jalasele ning valige temperatuuriregulaatoriga
sobiv triikimistemperatuur.
- Kontrollige triikimistemperatuuri valikut materjali alusel.
- 1 Tehiskiud (nt. atsetaat, akrüül, polüamiid, polüester)
- 1 Siid
- 2 Vill
- 3 Puuvill, lina
- Kui te ei tea, millis(t)est materjali(de)st ese on valmistatud, tehke
triikimisproov kohas, mida eseme kandmisel ei ole näha või
proovilapil.
- Siid, villane ja sünteetilised materjalid: triikige riiet pahemalt poolt, et
vältida läikimist.Vältige piserdusfunktsiooni kasutamist, et riie ei
muutuks plekiliseks.
2 Ühendage pistik maandatud pistikupessa.
3 Kui temperatuuri märgutuli kustub,oodake pisut enne triikima
hakkamist.
B
Temperatuuri märgutuli sütib triikimise ajal aegajalt.
85EESTI
Page 86

Seadme kasutamine
Aurtriikimine
Jälgige, kas veepaagis on piisavalt vett.
1 Seadke temperatuuri regulaator soovitavasse asendisse.
Vt lõiku „Temperatuuri valik".
C
2 Seadke aururegulaator vajalikku asendisse.
- Á minimaalne aur (temperatuuri seadistus 2 ja 3).
- Ë keskmine aur (temperatuuri seadistus 3 kuni MAX) (ainult
erimudelid)
- È maksimaalne aur (temperatuuri seadistus 3 kuni MAX).
B
Auru hakkab eralduma kohe, kui vajalik temperatuur on saavutatud.
Ainult GC2415/2320/2315/2310/2305:
Vett tilgub triikraua tallast, kui temperatuur on liiga madalaks seatud
(MIN kuni 2).
Kuivtriikimine
1 Seadke temperatuuriregulaator asendisse O (= auruta).
2 Seadke temperatuuri regulaator soovitavasse asendisse.
Vt lõiku „Temperatuuri valik".
Lisafunktsioonid
Niisutamine
Raskesti eemaldatavate kortsude kõrvaldamine igal temperatuuril.
1 Jälgige, kas veepaagis on piisavalt vett.
C
2 Vajutage pihustinuppu mitu korda, et riiet triikides niisutada.
Lisaaur (ainult GC2305)
Selle funktsiooni abil saab kõrvaldada raskesti eemaldatavaid kortse.
Lisaauru on võimalik kasutada ainult 3 ja MAX temperatuuride
seadete vahel.
C
1 Pange aurukontroll maksimumasendisse È.
86 EESTI
Page 87

87
C
2 Vajutage ja hoidke aururegulaatorit maksimaalselt 5 sekundit.
3 Oodake vähemalt 1 minut,enne kui kasutate
lisaaurufunktsiooni uuesti, et vältida vee tilkumist tallast.
Aurupahvak (ainult erimudelid)
Tugeva aurupahvaku abil saate kõrvaldada raskesti eemaldatavad
kortsud.
Auru saab piserdada vaid 2 ja MAX temperatuuride vahel.
C
1 Vajutage aurupahvakunuppu ja seejärel vabastage.
Vertikaalne aurupahvak (ainult erimudelid)
C
1 Aurupahvaku funktsiooni saate kasutada ka püstiasendis
triikrauaga. Nii on võimalik triikida riidepuul olevaid rõivaid,
kardinaid jms.
Ärge kunagi suunake auru inimeste poole.
Tilgalukusti (ainult GC2425/2420/GC2330/2326/2325)
Sellel triikraual on funktsioon, mis väldib tilkumist: madalamal
temperatuuril katkeb auru teke triikraual automaatselt, et vältida vee
tilkumist triikraua tallast. Funktsiooni käivitudes kuulete klõpsatust.
Automaatne aurupahvak (ainult GC2425/GC233)
Kui triikraud on olnud paigal (liigutamata) mõne aja, lülitub
soojenduselement automaatselt välja.
C
◗ Kui soojuselement on väljalülitunud,hakkab automaatne
väljalülitusmärgutuli vilkuma.
Triikraud hakkab jälle soojenema, kui seda tõsta või liigutada pisut.
Automaatne väljalülitusmärgutuli kustub.
1 Kui temperatuuri märgutuli on süttinud,oodake, kuni see
kustub ning seejärel jäkake triikimist.
EESTI
Page 88

88
2 Kui temperatuuri märgutuli ei süti,on triikraud triikimiseks
valmis.
Puhastamine ja hooldus
Double-Active katlakivi eemaldamissüsteem
C
◗ Katlakivivastane tablett väldib auru väljumisavade ummistumist.
Tablett on kestvalt aktiivne ning ei vaja vahetamist.
◗ Katlakivi eemaldamisfunktsioon eemaldab katlakivi osakesed.
Katlakivi eemaldamisfunktsioon
Kasutage katlakivi eemaldamisfunktsiooni kord kahe nädala jooksul. Kui
vesi on väga kare (nt. kui triikraua tallast väljuvad triikimise ajal helbed),
eemaldage katlakivi sagedamini.
1 Seadke aururegulaator asendisse O.
2 Valage veepaak vett täis (kuni MAX-tähiseni).
Ärge valage veepaaki kunagi äädikat ega katlakivikõrvaldeid.
C
3 Keerake temperatuuriregulaator MAX asendisse.
4 Ühendage pistik pistikupessa.
5 Kui temperatuurimärgutuli kustub,eemaldage pistik
pistikupesast.
6 Hoidke triikrauda valamu kohal ja seadke aururegulaator
katlakivi eemaldamise asendisse 1 (katlakivi eemaldamine).
Aururegulaatori nupp tõuseb aeglaselt üles.
C
7 Tõmmake aururegulaatori nuppu üles,et aururegulaatori nõela
eemaldada.
C
8 Hoidke triikraud kraanikausi kohal ning liigutage edasi- tagasi.
B
Talla auruavadest hakkab tulema kuuma vett ja auru, mis uhub välja
triikrauda kogunenud mustuse ja katlakivi (kui seda on).
EESTI
Page 89
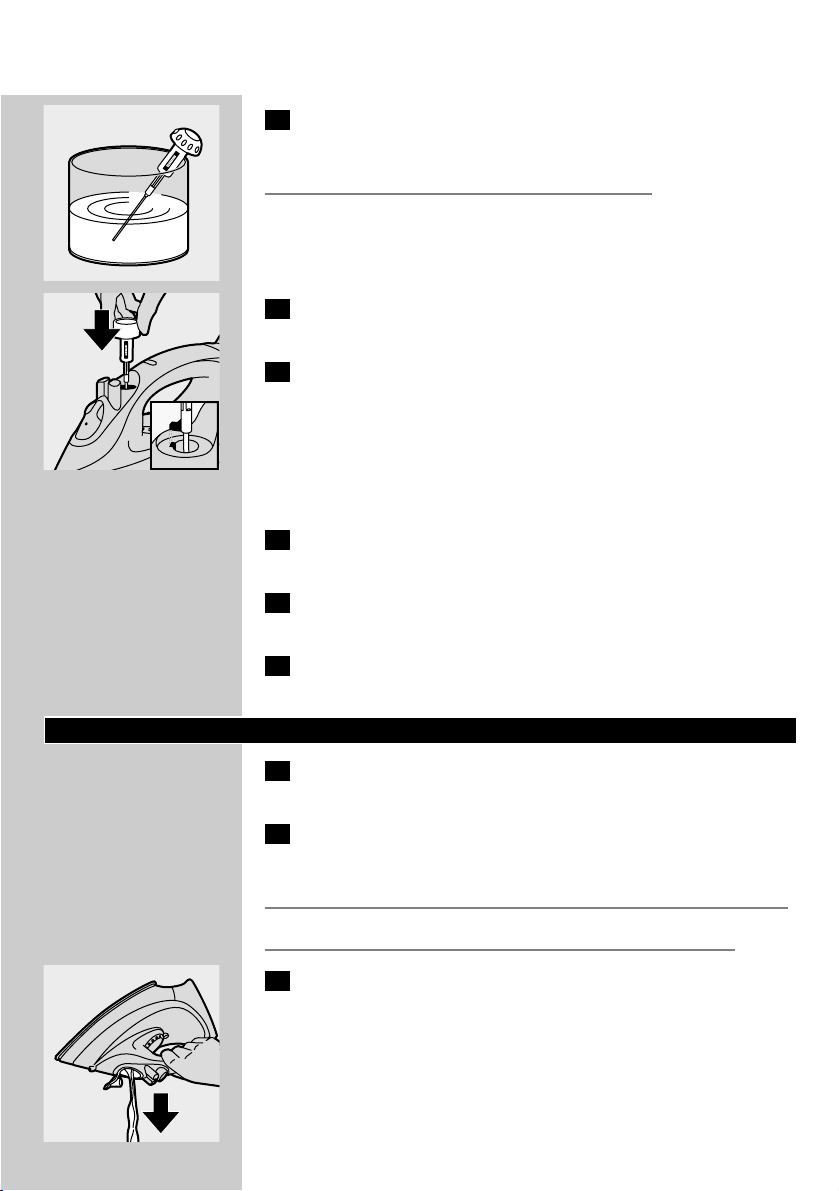
89
C
9 Kasutage äädikat nõelalt katlakivi eemaldamiseks, kui seal seda
on.
Ärge painutage ega vigastage aurureguleerimisnõela.
C
10 Pange aurureguleerimisnõel tagasi nii, et nõela terav ots oleks
täpselt augu keskel.Seadke aururegulaator asendisse O.
11 Korrake katlakivi kõrvaldamist kui triikrauda on jäänud veel
sadet.
Peale katlakivi eemaldamist
1 Ühendage pistik pistikupessa ja laske triikraual soojeneda, kuni
tald on kuiv.
2 Kui temperatuurimärgutuli kustub,eemaldage pistik
pistikupesast.
3 Triikige mõnd vanemat riideeset, et eemaldada,kui on, vett
triikraua tallast.
Hoidmine
1 Võtke pistik pistikupesast välja, laske triikraual jahtuda ning
pange aurukontroll asendisse O.
2 Puhastage seadet ning talda katlakivist ja mustusest niiske lapi
ning mitteabrasiivse puhastusvahendiga.
Hoiduge talda kriimustamast: talda ei tohi metallesemetega puudutada.
Ärge kunagi kasutage küürimiskäsnu, äädikat ega teisi kemikaale.
C
3 Loputage korrapäraselt veepaaki ning tühjendage pärast iga
pesemiskorda.
EESTI
Page 90

90
C
4 Kerige toitejuhe ümber juhtme hoidiku.
5 Hoidke triikrauda alati selle alusel kindlas ja kuivas kohas.
Keskkonnakaitse
C
◗ Ärge visake kasutusest kõrvaldatud seadet tavalise olmeprügi
hulka, vaid viige see vastavasse kogumispunkti. Olge
keskkonnasõbralik.
Garantii ja teenindus
Kui Te vajate informatsiooni või on Teil probleemid tekkinud, külastage
Philips Web lehekülge www.philips.com või võtke ühendus teie maa
Philipsi hoolduskeskusega (lisainfot ja telefoninumbrid leiate
garantiitalongilt). Kui Teie maal ei ole Philipsi hoolduskeskust, pöörduge
Philipsi toodete müüja poole või võtke ühendus Philipsi
koduhooldusseadmete ja isikliku hoolduse BV teenindusosakonnaga.
EESTI
Page 91

Lahendus
Kontrollige toitejuhet, pistikut ja
pistikupesa.
Seadke temperatuuri regulaator
nõutud asendisse.
Täitke veepaak (vt `Ettevalmistus
kasutamiseksÍ, lõik `Veepaagi täitmineÍ).
Seadke aururegulaator asendisse Á, Ë
või È (vt pt `Seadme kasutamineÍ lõik
ÍAurtriikimineÍ).
Pange temperatuuriregulaator auruga
triikimise (2 kuni MAX) asendisse.
Pange seade jalasele seisma ning
oodake enne triikima hakkamist, kuni
temperatuuri märgutuli kustub.
Pange triikraud horisontaalsesse
asendisse ja oodake, enne kui kasutate
(vertikaalne) aurupahvaku funktsiooni
uuesti.
Pange temperatuuriregulaator auruga
triikimise (2 kuni MAX) asendisse.
Pange seade jalasele seisma ning
oodake enne triikima hakkamist, kuni
temperatuuri märgutuli kustub.
Kasutage katlakivi eemaldamise
funktsiooni mitu korda (vt
ÍPuhastamine ja hooldusÍ, lõik ÍKatlakivi
eemaldamineÍ).
Võtke triikraud või liigutage aeglaselt,
et deaktiveerida automaatset
väljalülitusfunktsiooni: punane tuli
lõpetab vilkumise.
Vajutage kaant, kuni kostab klõpsatus.
Pange temperatuuriregulaator auruga
triikimise (2 kuni MAX) asendisse.
Pange seade jalasele seisma ning
oodake enne triikima hakkamist, kuni
temperatuuri märgutuli kustub.
Tühjendage veepaak ja seadke
aurukontroll pärast kasutamist
asendisse O. Pange triikraud jalasele
seisma.
Võimalik(ud) põhjus(ed)
Ühenduse viga.
Temperatuuri regulaator on seatud
MIN asendisse.
Paagis ei ole piisavalt vett.
Aururegulaator on asendis O.
Triikraua tald ei ole piisavalt tuline
ja/või tilgalukustifunktsioon (ainult
erimudelid) on aktiveeritud.
(Vertikaalne) asendi aurupihusti
funktsiooni on kasutatud liiga tihti ja
liiga lühikeste vaheaegadega.
Triikraua tald ei ole piisavalt tuline
Kare vesi tekitab katlakivi helbeid
triikraua tallas.
Automaatne väljalülitusfunktsioon on
kativeeritud (vt `Lisafunktsioonid` lõik
`Automaatne väljalülitus`).
Kaas ei ole korralikult suletud.
Temperatuur on liiga madal.
Triikraud on olnud horisontaalses
asendis ja veepaaki on veel vett jäänud.
Probleem
Triikraud on vooluvõrku ühendatud,
aga tald on külm.
Auru ei tule
Ei ole aurupahvakut või vertikaalset
aurupahvakut (ainult erimudelid).
Katlakivi helbed ja mustus väljuvad
triikimise ajal tallast.
Punane märgutuli vilgub (ainult
GC2425 ja GC2330)
Riideesemele tilgub vett (ainult
GC2425/2420/2415/GC2330/2326/23
25/2320)
Vesi tilgub riietele (ainult
GC2415/GC2320/2315/2310/2305)
Tallast tilgub vett pärast seda, kui
triikraud on maha jahtunud või hoiule
pandud.
Rikete kõrvaldamine
Selles peatükis on tehtud kokkuvõte enam esinevatest riketest, mis võivad tekkida. Lugege palun
põhjalikuma teabe saamiseks erinevaid lõike. Kui teil ei õnnestu riket omal jõul kõrvaldada, pöörduge
Philips hoolduskeskuse poole oma riigis.
EESTI 91
Page 92

Vispārīgs apraksts
A Smidzināšanas sprausla
B Uzpildes atveres vāciņš
(tikai modeļiem GC2425/2420/2415/GC2330/2326/2325/2320)
C Pastiprinātas tvaika padeves taustiņš (tikai modeļiem
GC2425/2420/2415/GC2330/2326/2325/2320/2315/2310)
D Smidzināšanas taustiņš T
E Tvaika padeves regulators
- O = bez tvaika
- Á = minimāls tvaiks
- q = vidēji stiprs tvaiks
(tikai modeļiem GC2425/2420/2415/GC2330/2326/2325/2320)
- w = maksimāli stiprs tvaiks
- 1 = katlakmens notīrīšanas funkcija
F Papildu tvaika padeves funkcija (tikai modelim GC2305)
G Temperatūras signāllampiņa
H Automātiskās izslēgšanās signāllampiņa
(tikai modeļiem GC2425/GC2330)
I Temperatūras regulators
J Elektrovads
K Modeļa plāksne
L Katlakmens notīrīšanas plāksne
M Ūdens tvertne
Svarīgi!
Pirms ierīces lietošanas rūpīgi izlasiet šīs pamācības un saglabājiet tās
turpmākām uzziņām.
◗ Pirms ierīces pievienošanas elektrotīklam pārbaudiet,vai uz
modeļa plāksnes norādītais spriegums atbilst elektrotīkla
spriegumam jūsu mājā.
◗ Pievienojiet ierīci tikai iezemētai elektrotīkla sienas
kontaktrozetei.
◗ Nelietojiet ierīci, ja redzami elektrovada vai ierīces bojājumi, no
ierīces tek ūdens vai arī tā ir nomesta vai nokritusi.
◗ Regulāri pārbaudiet, vai elektrovads nav bojāts.
◗ Lai izvairītos no bīstamām situācijām, bojāts elektrovads ir
jānomaina Philips pilnvarotā apkopes centrā vai nomaiņa jāuztic
līdzīgi kvalificētiem speciālistiem.
◗ Nekad neatstājiet elektrotīklam pievienotu gludekli bez
uzraudzības.
◗ Nekad neiegremdējiet gludekli ūdenī.
◗ Glabājiet ierīci bērniem nepieejamā vietā.
◗ Gludekļa klātne darbības laikā stipri sakarst, un, pieskaroties tai,
var izraisīt apdegumus.
◗ Raugieties, lai elektrovads nesaskaras ar gludekļa klātni, kamēr tā ir
karsta.
◗ Nelejiet ūdens tvertnē smaržas, etiķi, cieti,līdzekļus katlakmens
notīrīšanai, gludināšanas palīglīdzekļus un citas ķīmiskas vielas.
92 LATVISKI
Page 93

93
◗ Pēc gludināšanas, tīrot ierīci, piepildot vai iztukšojot ūdens tvertni
un arī atstājot gludekli bez uzraudzības kaut uz pavisam īsu brīdi,
pagrieziet tvaika padeves regulatoru O stāvoklī, novietojiet
gludekli vertikāli un izvelciet elektrovada kontaktspraudni no
elektrotīkla sienas kontaktrozetes.
◗ Novietojiet un lietojiet gludekli uz stabila gludināmā dēļa vai galda.
◗ Ja ierīces komplektā ir statīvs, pārliecinieties, ka tas novietots uz
stabilas virsmas.
◗ Ierīce paredzēta lietošanai tikai mājturībā.
Sagatavošana lietošanai
Ūdens tvertnes piepildīšana
1 Atvienojiet gludekli no elektrotīkla.
C
2 Pagrieziet tvaika padeves regulatoru O stāvoklī (= gludināšana
bez tvaika).
3 Atveriet uzpildes atveres vāciņu (tikai dažiem modeļiem).
C
4 Sasveriet gludekli un piepildiet ūdens tvertni līdz maksimālā
līmeņa iezīmei.
Nepārsniedziet maksimālā līmeņa iezīmi MAX.
5 Aizveriet uzpildes atveres vāciņu (atskan klikšķis) (tikai dažiem
modeļiem).
Ja vietā, kur dzīvojat, ūdens ir ļoti ciets, ieteicams izmantot destilētu
ūdeni. Neizmantojiet etiķi, cieti vai ķīmiski attīrītu ūdeni.
Gludināšanas temperatūras regulēšana
◗ Pirmajā lietošanas reizē gludeklis var nedaudz kūpēt. Pēc neilga
laika tvaiki izzudīs.
C
1 Novietojiet gludekli vertikāli un izvēlieties vajadzīgo
temperatūru, pagriežot temperatūras regulatoru atbilstošajā
stāvoklī.
- Pārbaudiet, vai apģērbam, ko vēlaties gludināt, ir etiķete ar
gludināšanas norādījumiem.
- 1 sintētiskie audumi
(piemēram, akrila audums, viskoze, poliamīds, poliesteris)
- 1 zīds
- 2 vilna
- 3 kokvilnas, linu audums
LATVISKI
Page 94

94
- Ja nezināt, no kādām šķiedrām apģērbs izgatavots, noskaidrojiet
nepieciešamo gludināšanas temperatūru, pagludinot apģērbu vietā,
kas valkājot nav redzama.
- Lai nerastos spīdīgi plankumi, zīda, vilnas un sintētisko materiālu
apģērbiem gludiniet otru pusi. Lai nerastos traipi, neizmantojiet
smidzināšanas funkciju.
2 Iespraudiet elektrovada kontaktspraudni iezemētā elektrotīkla
sienas kontaktrozetē.
3 Kad temperatūras signāllampiņa ir nodzisusi, pagaidiet brīdi,
pirms sākat gludināšanu.
B
Gludināšanas laikā temperatūras signāllampiņa periodiski iedegas.
Ierīces lietošana
Gludināšana ar tvaiku
Pārliecinieties, vai tvertnē ir pietiekami daudz ūdens.
1 Pagrieziet temperatūras regulatoru stāvoklī,kas atbilst
gludināmā auduma veidam.
Sk. nodaļu "Temperatūras regulēšana".
C
2 Pagrieziet tvaika padeves regulatoru nepieciešamajā stāvoklī.
- Á minimālam tvaikam (temperatūras režīms 2 un 3).
- Ë vidēji stipram tvaikam (temperatūras režīms no 3 līdz MAX)
(tikai dažiem modeļiem).
- È maksimāla stipruma tvaikam (temperatūras režīms no 3 līdz
MAX).
B
Tvaika padeve būs iespējama tad, kad tiks sasniegta izvēlētā
temperatūra.
Tikai modeļiem GC2415/2320/2315/2310/2305:
ja izvēlētā temperatūra ir pārāk zema, no gludekļa klātnes var sūkties
ūdens (no MIN līdz 2).
Gludināšana bez tvaika
1 Pagrieziet tvaika padeves regulatoru O stāvoklī (= bez tvaika).
2 Pagrieziet temperatūras regulatoru stāvoklī,kas atbilst
gludināmā auduma veidam.
Sk. nodaļu "Temperatūras regulēšana".
LATVISKI
Page 95
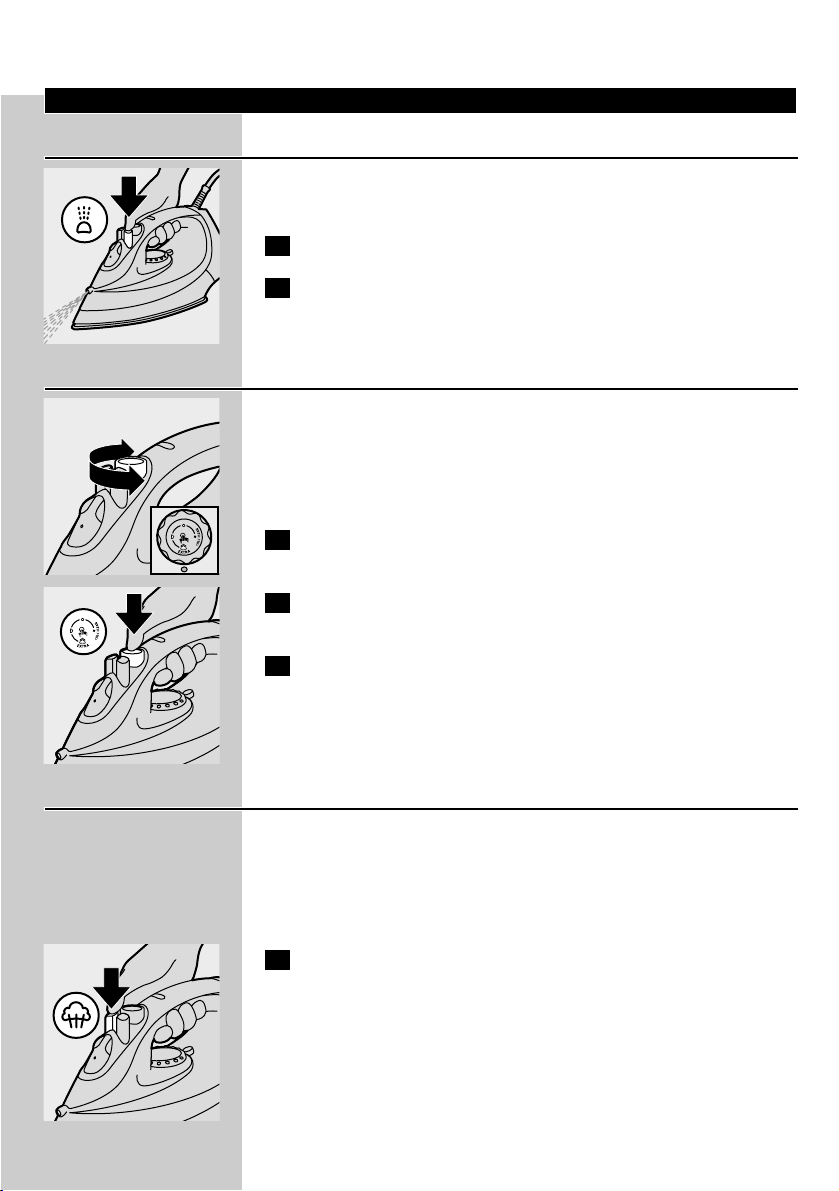
Papildu funkcijas
Smidzināšana
Šo funkciju var izmantot, gludinot jebkurā temperatūrā, lai izlīdzinātu
grūti izgludināmas krokas.
1 Pārliecinieties, vai tvertnē ir pietiekami daudz ūdens.
C
2 Vairākas reizes piespiediet smidzināšanas taustiņu, lai
samitrinātu gludināmo apģērbu.
Papildu tvaika padeve (tikai modelim GC2305)
Šī funkcija nodrošina papildu tvaika padevi, lai izgludinātu grūti
izgludināmas krokas.
Papildu tvaika padeve ir iespējama, ja temperatūras regulators ir
pagriezts stāvoklī no &@4,051 līdz MAX.
C
1 Pagrieziet tvaika padeves regulatoru maksimālajā È stāvoklī.
C
2 Piespiediet un turiet piespiestu tvaika padeves taustiņu ne ilgāk
kā piecas sekundes.
3 Lai novērstu ūdens pilēšanu no gludekļa klātnes, pagaidiet
vismaz vienu minūti, pirms atkārtoti izmantojat papildu tvaika
padeves funkciju.
Pastiprināta tvaika padeve (tikai dažiem modeļiem)
Spēcīga, pastiprināta tvaika padeve palīdz atbrīvoties no grūti
izgludināmām krokām.
Pastiprināta tvaika padeve ir iespējama, ja temperatūras regulators ir
pagriezts stāvoklī no 2 līdz MAX.
C
1 Īslaicīgi piespiediet pastiprinātas tvaika padeves taustiņu.
95LATVISKI
Page 96
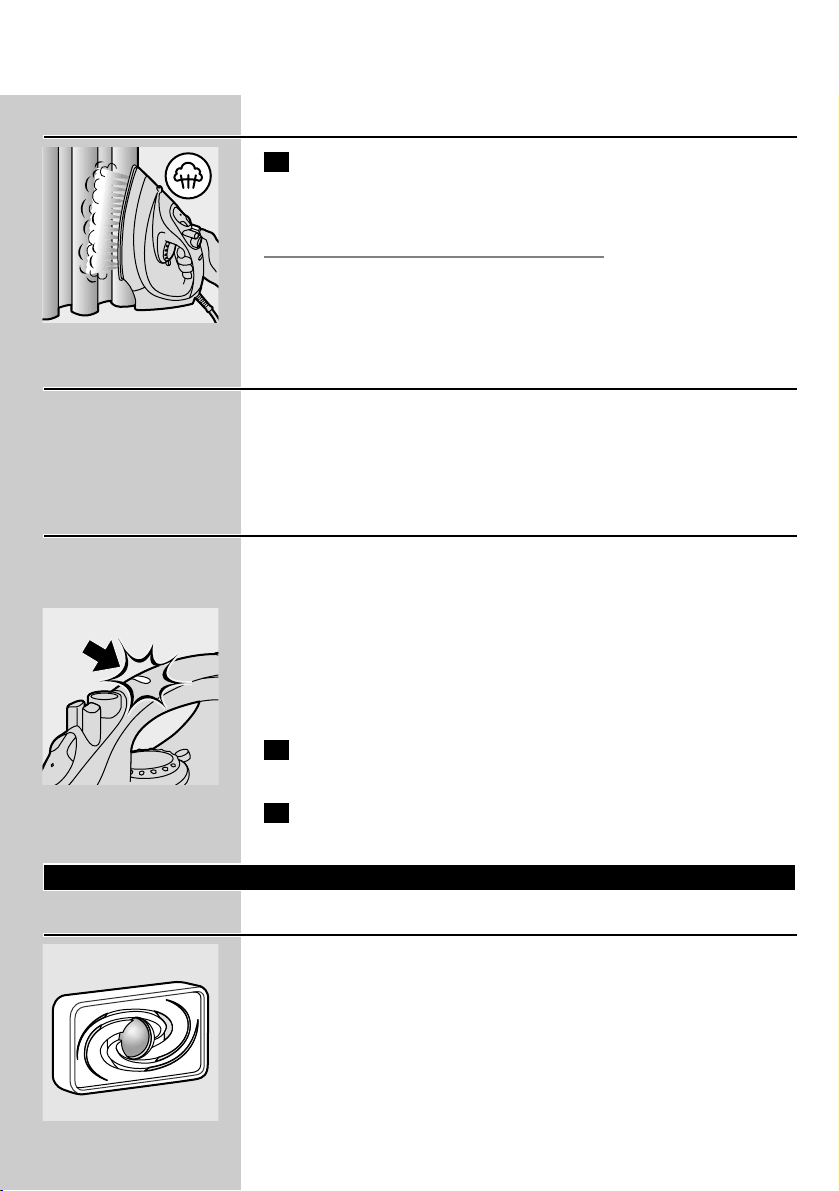
96
Vertikāla pastiprināta tvaika padeve (tikai dažiem modeļiem)
C
1 Pastiprinātu tvaika padevi iespējams izmantot arī turot gludekli
vertikāli.Tas palīdz izgludināt pakarinātu apģērbu, aizkaru u. tml.
krokas.
Nekad nevērsiet tvaika plūsmu pret cilvēkiem.
Pilienapture (tikai modeļiem
GC2425/2420/GC2330/2326/2325)
Šī ierīce ir aprīkota ar pilienaptures funkciju: gludeklis automātiski atslēdz
tvaika padevi, ja noregulētā gludināšanas temperatūra ir pārāk zema,
tādējādi novēršot ūdens pilēšanu no gludekļa klātnes. Iedarbojoties
pilienaptures funkcijai, atskanēs klikšķis.
Automātiskā izslēgšanās (tikai modeļiem GC2425/GC2330)
Ja gludeklis kādu laiku netiek kustināts, iebūvētais elektroniskais sensors
automātiski izslēdz sildelementu.
C
◗ Lai norādītu, ka sildelements ir izslēgts, automātiskās izslēgšanās
signāllampiņa sāks mirgot.
Lai gludeklis vēlreiz uzkarstu, paceliet to vai nedaudz pakustiniet.
Automātiskās izslēgšanās signāllampiņa nodzisīs.
1 Ja iedegas temperatūras signāllampiņa, pagaidiet, līdz tā nodziest,
pirms sākat gludināšanu.
2 Ja temperatūras signāllampiņa neiedegas, gludeklis ir gatavs
lietošanai.
Tīrīšana un kopšana
Katlakmens notīrīšanas divkāršā sistēma
C
◗ Katlakmens notīrīšanas plāksne neļauj katlakmenim aizsprostot
tvaika atveres.Plāksne ir pastāvīgi aktīva un nav jāmaina.
◗ Katlakmens notīrīšanas funkcija likvidē katlakmens daļiņas.
Katlakmens notīrīšanas funkcija
Izmantojiet šo funkciju vienu reizi divās nedēļās. Ja apvidū, kur dzīvojat, ir
ļoti ciets ūdens (t. i., ja gludināšanas laikā no gludekļa klātnes izplūst
nolobījušās daļiņas), attīrīšana no katlakmens nogulsnēm jāveic biežāk.
LATVISKI
Page 97
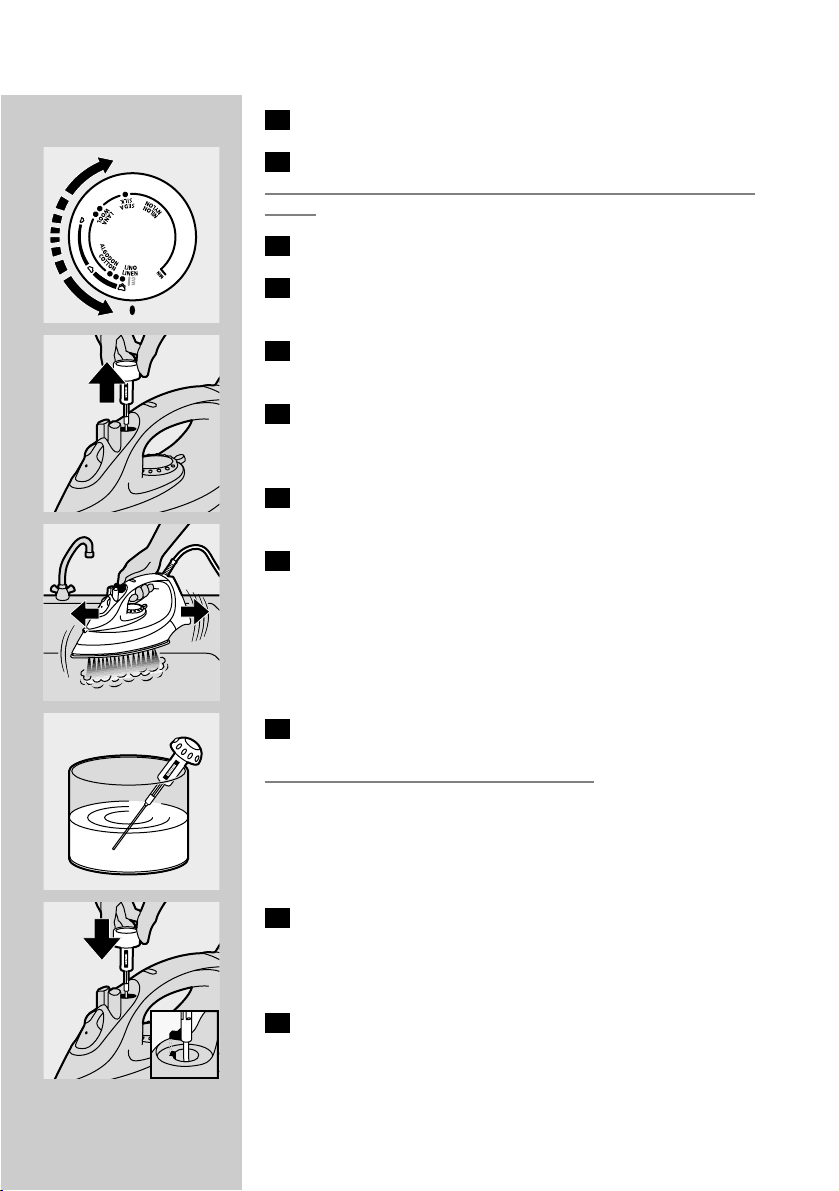
97
1 Pagrieziet tvaika padeves regulatoru O stāvoklī.
2 Piepildiet ūdens tvertni līdz maksimālā līmeņa iezīmei MAX.
Nelejiet ūdens tvertnē etiķi vai citu katlakmens notīrīšanas ķīmisko
līdzekli.
C
3 Pagrieziet temperatūras regulatoru MAX stāvoklī.
4 Iespraudiet elektrovada kontaktspraudni elektrotīkla
kontaktrozetē.
5 Kad temperatūras signāllampiņa nodzisusi, atvienojiet gludekli
no elektrotīkla.
6 Turiet gludekli virs izlietnes un pagrieziet tvaika padeves
regulatoru 1 stāvoklī (katlakmens notīrīšana).Tvaika padeves
regulators tiks nedaudz izvirzīts.
C
7 Pavelciet tvaika padeves regulatoru uz augšu, lai izņemtu tvaika
padeves adatu.
C
8 Pakustiniet gludekli uz priekšu un atpakaļ, turot to virs izlietnes.
B
Pa atverēm klātnē izplūdīs tvaiks un verdošs ūdens, līdzi aizskalojot
netīrumus un katlakmens nogulsnes (ja tādas ir).
C
9 Ja uz adatas arī ir katlakmens nogulsnes, notīriet tās ar etiķi.
Nelieciet un nebojājiet tvaika padeves adatu.
C
10 Ielieciet tvaika padeves adatu atpakaļ, ievietojot adatas galu tieši
atveres centrā,un iestipriniet spraugā mazo izvirzījumu, kas
atrodas adatas sānā. Pagrieziet tvaika padeves regulatoru O
stāvoklī.
11 Ja gludeklī ir vēl daudz netīrumu, atkārtojiet attīrīšanu no
katlakmens.
LATVISKI
Page 98

98
Pēc attīrīšanas no katlakmens
1 Iespraudiet elektrovada kontaktspraudni elektrotīkla
kontaktrozetē un ļaujiet klātnei nožūt.
2 Kad temperatūras signāllampiņa nodzisusi, atvienojiet gludekli
no elektrotīkla.
3 Uzmanīgi pagludiniet nevajadzīgu audumu, lai atbrīvotos no
ūdens nogulšņu traipiem, kas varētu būt izveidojušies uz
gludekļa klātnes.
Glabāšana
1 Izvelciet elektrovada kontaktspraudni no sienas kontaktrozetes,
ļaujiet gludeklim atdzist un pagrieziet tvaika padeves regulatoru
O stāvoklī.
2 Ar mitru drānu un neskrāpējošu (šķidru) tīrīšanas līdzekli
notīriet ierīci un noslaukiet katlakmeni un citas iespējamās
nogulsnes no klātnes.
Klātni nedrīkst bojāt! Raugieties, lai tā nesaskaras ar metāla
priekšmetiem.
Tīrīšanai nekad neizmantojiet skrāpi, etiķi vai citas ķīmiskas vielas.
C
3 Regulāri izskalojiet ūdens tvertni ar ūdeni un pēc tīrīšanas
iztukšojiet to.
C
4 Aptiniet elektrovadu ap izvirzījumu vada uzglabāšanai gludekļa
apakšdaļā.
5 Gludeklis vienmēr jāuzglabā vertikāli drošā un sausā vietā.
Vides aizsardzība
C
◗ Neizmetiet ierīci kopā ar parastajiem mājturības atkritumiem, bet
nododiet oficiālā atkārtotai pārstrādei paredzēto lietu savākšanas
vietā, tādējādi saudzējot apkārtējo vidi.
LATVISKI
Page 99

99
Garantija un apkope
Ja nepieciešama palīdzība vai informācija, lūdzu,izmantojiet Philips
tīmekļa vietni www.philips.com vai sazinieties ar Philips Pakalpojumu
centru savā valstī (tā tālruņa numurs atrodams pasaules garantijas
brošūrā). Ja jūsu valstī nav Philips Pakalpojumu centra, lūdziet palīdzību
Philips preču izplatītājiem vai Philips Mājturības un personīgās higiēnas
ierīču nodaļas pakalpojumu dienestam.
LATVISKI
Page 100

Risinājums
Pārbaudiet elektrovadu,
kontaktspraudni un sienas
kontaktrozeti.
Pagrieziet temperatūras regulatoru
vajadzīgajā stāvoklī.
Piepildiet ūdens tvertni (sk. nodaļas
"Sagatavošana lietošanai" apakšnodaļu
"Ūdens tvertnes piepildīšana").
Noregulējiet tvaika padevi Á, Ë vai È
stāvoklī (sk. nodaļas "Ierīces lietošana"
apakšnodaļu "Gludināšana ar tvaiku").
Pagrieziet temperatūras regulatoru
stāvoklī (no 2 līdz MAX), lai
gludinātu ar tvaiku. Novietojiet gludekli
vertikāli un pagaidiet, līdz nodziest
temperatūras signāllampiņa, pirms
sākat gludināšanu.
Novietojiet gludekli horizontāli un
mazliet pagaidiet, pirms vēlreiz lietojat
(vertikālo) pastiprināto tvaika padevi.
Pagrieziet temperatūras regulatoru
stāvoklī (no 2 līdz MAX), lai
gludinātu ar tvaiku. Novietojiet gludekli
vertikāli un pagaidiet, līdz nodziest
temperatūras signāllampiņa, pirms
sākat gludināšanu.
Vairākas reizes veiciet katlakmens
notīrīšanas darbības (sk. nodaļas
"Tīrīšana un kopšana" apakšnodaļu
"Katlakmens notīrīšana").
Paceliet gludekli vai nedaudz
pakustiniet, lai atceltu automātiskās
izslēgšanās funkciju: sarkanā
signāllampiņa pārstās mirgot.
Piespiediet tvertnes vāciņu, līdz atskan
klikšķis.
Pagrieziet temperatūras regulatoru
stāvoklī (no 2 līdz MAX), lai
gludinātu ar tvaiku. Novietojiet gludekli
vertikāli un pagaidiet, līdz nodziest
temperatūras signāllampiņa, pirms
sākat gludināšanu.
Iespējamais cēlonis
Pievienošanas problēma
Temperatūras regulators pagriezts pret
MIN iezīmi.
Tvertnē nav pietiekami daudz ūdens.
Tvaika padeves regulators pagriezts O
stāvoklī.
Klātne nav pietiekami karsta un/vai ir
aktivizēta pilienaptures funkcija (tikai
dažiem modeļiem).
(Vertikālā) pastiprinātā tvaika padeve ir
lietota pārāk bieži īsā laika posmā.
Gludekļa klātne nav pietiekami
sakarsusi.
Gludekļa klātnes iekšpusē ir ciets
ūdens, tāpēc veidojas plēksnes.
Ir aktivizēta automātiskās izslēgšanās
funkcija (sk. nodaļas "Papildu funkcijas"
sadaļu "Automātiskā izslēgšanās").
Tvertnes vāciņš nav cieši aizvērts.
Izvēlētā temperatūra ir pārāk zema.
Kļūme
Gludeklis ir pievienots elektrotīklam,
taču klātne ir auksta.
Nedarbojas tvaika padeves funkcija
Nav pastiprinātas tvaika padeves vai
vertikālās pastiprinātās tvaika padeves
(tikai dažiem modeļiem).
Gludināšanas laikā no gludekļa klātnes
izdalās netīrumi un nolobījušās daļiņas.
Mirgo sarkanā signāllampiņa (tikai
modeļiem GC2425 un GC2330).
Uz auduma pil ūdens (tikai modeļiem
GC2425/2420/2415/GC2330/2326/23
25/2320)
Uz auduma pil ūdens (tikai modeļiem
GC2415/2320/2315/2310/2305)
Kļūmju novēršana
Šajā nodaļā īsi aprakstītas visbiežāk sastopamās kļūmes, kas varētu rasties, rīkojoties ar gludekli. Sīkākai
informācijai lūdzam izlasīt atsevišķas nodaļas. Ja nespējat novērst kļūmi, lūdzu, sazinieties ar Philips
Pakalpojumu centru savā valstī.
LATVISKI100
 Loading...