

Page 1
English
Introduction
Congratulations on your purchase and welcome to Philips! To fully
benet from the support that Philips oers, register your product at
www.philips.com/welcome.
Read this user manual and the important information leaet carefully
before you use the appliance. Save them for future reference.
Important
Read this important information carefully before you use the appliance
and save it for future reference.
This appliance has been designed for domestic use only. Any commercial
use, inappropriate use or failure to comply with the instructions, the
manufacturer accepts no responsibility and the guarantee will not apply.
Danger
- Never immerse the appliance in water.
Warning
- Check if the voltage indicated on the
appliance corresponds to the local mains
voltage before you connect the appliance.
- Do not use the appliance if the plug, the
mains cord or the appliance itself shows
visible damage, or if the appliance functions
abnormally in any way, or if the appliance
has been dropped or leaks.
- Do not immerse the iron or (for cordless
iron) base in water.
- If the mains cord is damaged, you must
have it replaced by Philips, or a service
centre, authorised by Philips or similarly
qualied persons in order to avoid a hazard.
- Never leave the appliance unattended
when it is connected to the mains.
- Always unplug the appliance from the
socket outlet before you ll the water
reservoir. For cordless, the iron must be
removed from the base before you ll the
water reservoir.
- Cordless iron must only be used with the
base provided.
- This appliance can be used by children
aged from 8 years and above and by
persons with reduced physical, sensory or
mental capabilities or lack of experience
and knowledge if they have been given
supervision or instruction concerning use
of the appliance in a safe way and if they
understand the hazards involved.
- Do not allow children to play with the
appliance.
- Older children aged 8 or over are only
allowed to clean the appliance and
perform the Calc-Clean procedure under
supervision.
- Keep the iron and its mains cord out of
the reach of children less than 8 years of
age when the appliance is switched on or
cooling down.
- Always place the base (for cordless iron)
and use the iron on a stable, level and
horizontal surface.
- The appliance must be used and placed on
a at, stable, heat-resistant surface. When
you place the iron on its heel or its stand,
make sure that the surface on which you
place it is stable.
- Do not let the mains cord come into contact
with the hot soleplate of the iron.
- (For cordless iron) Do not do ironing with
the base attached to the iron. Otherwise,
the supply cord will easily get damaged. The
steam iron is designed for cordless ironing
only.
- The soleplate of the iron can become
extremely hot and may cause burns if
touched.
- Descale the iron regularly according to
the instructions in chapter ‘Cleaning and
maintenance’ in the user manual.
- When you have nished ironing when you
clean the appliance, when you ll or empty
the water tank and also when you leave the
iron even for a short while: set the steam
control to the ‘dry ironing’ position, put the
iron on its heel and remove the mains plug
from the wall socket.
- Do not put perfume, vinegar, starch,
descaling agents, ironing aids or other
chemicals in the water tank.
Electromagnetic elds (EMF)
- This Philips appliance complies with all applicable standards and
regulations regarding exposure to electromagnetic elds.
Recycling
- Do not throw away the product with the normal household waste
at the end of its life, but hand it in at an ocial collection point
for recycling. By doing this, you help to preserve the environment.
Guarantee and support
If you need information or support, please visit www.philips.com/
support or read the separate worldwide guarantee leaet.
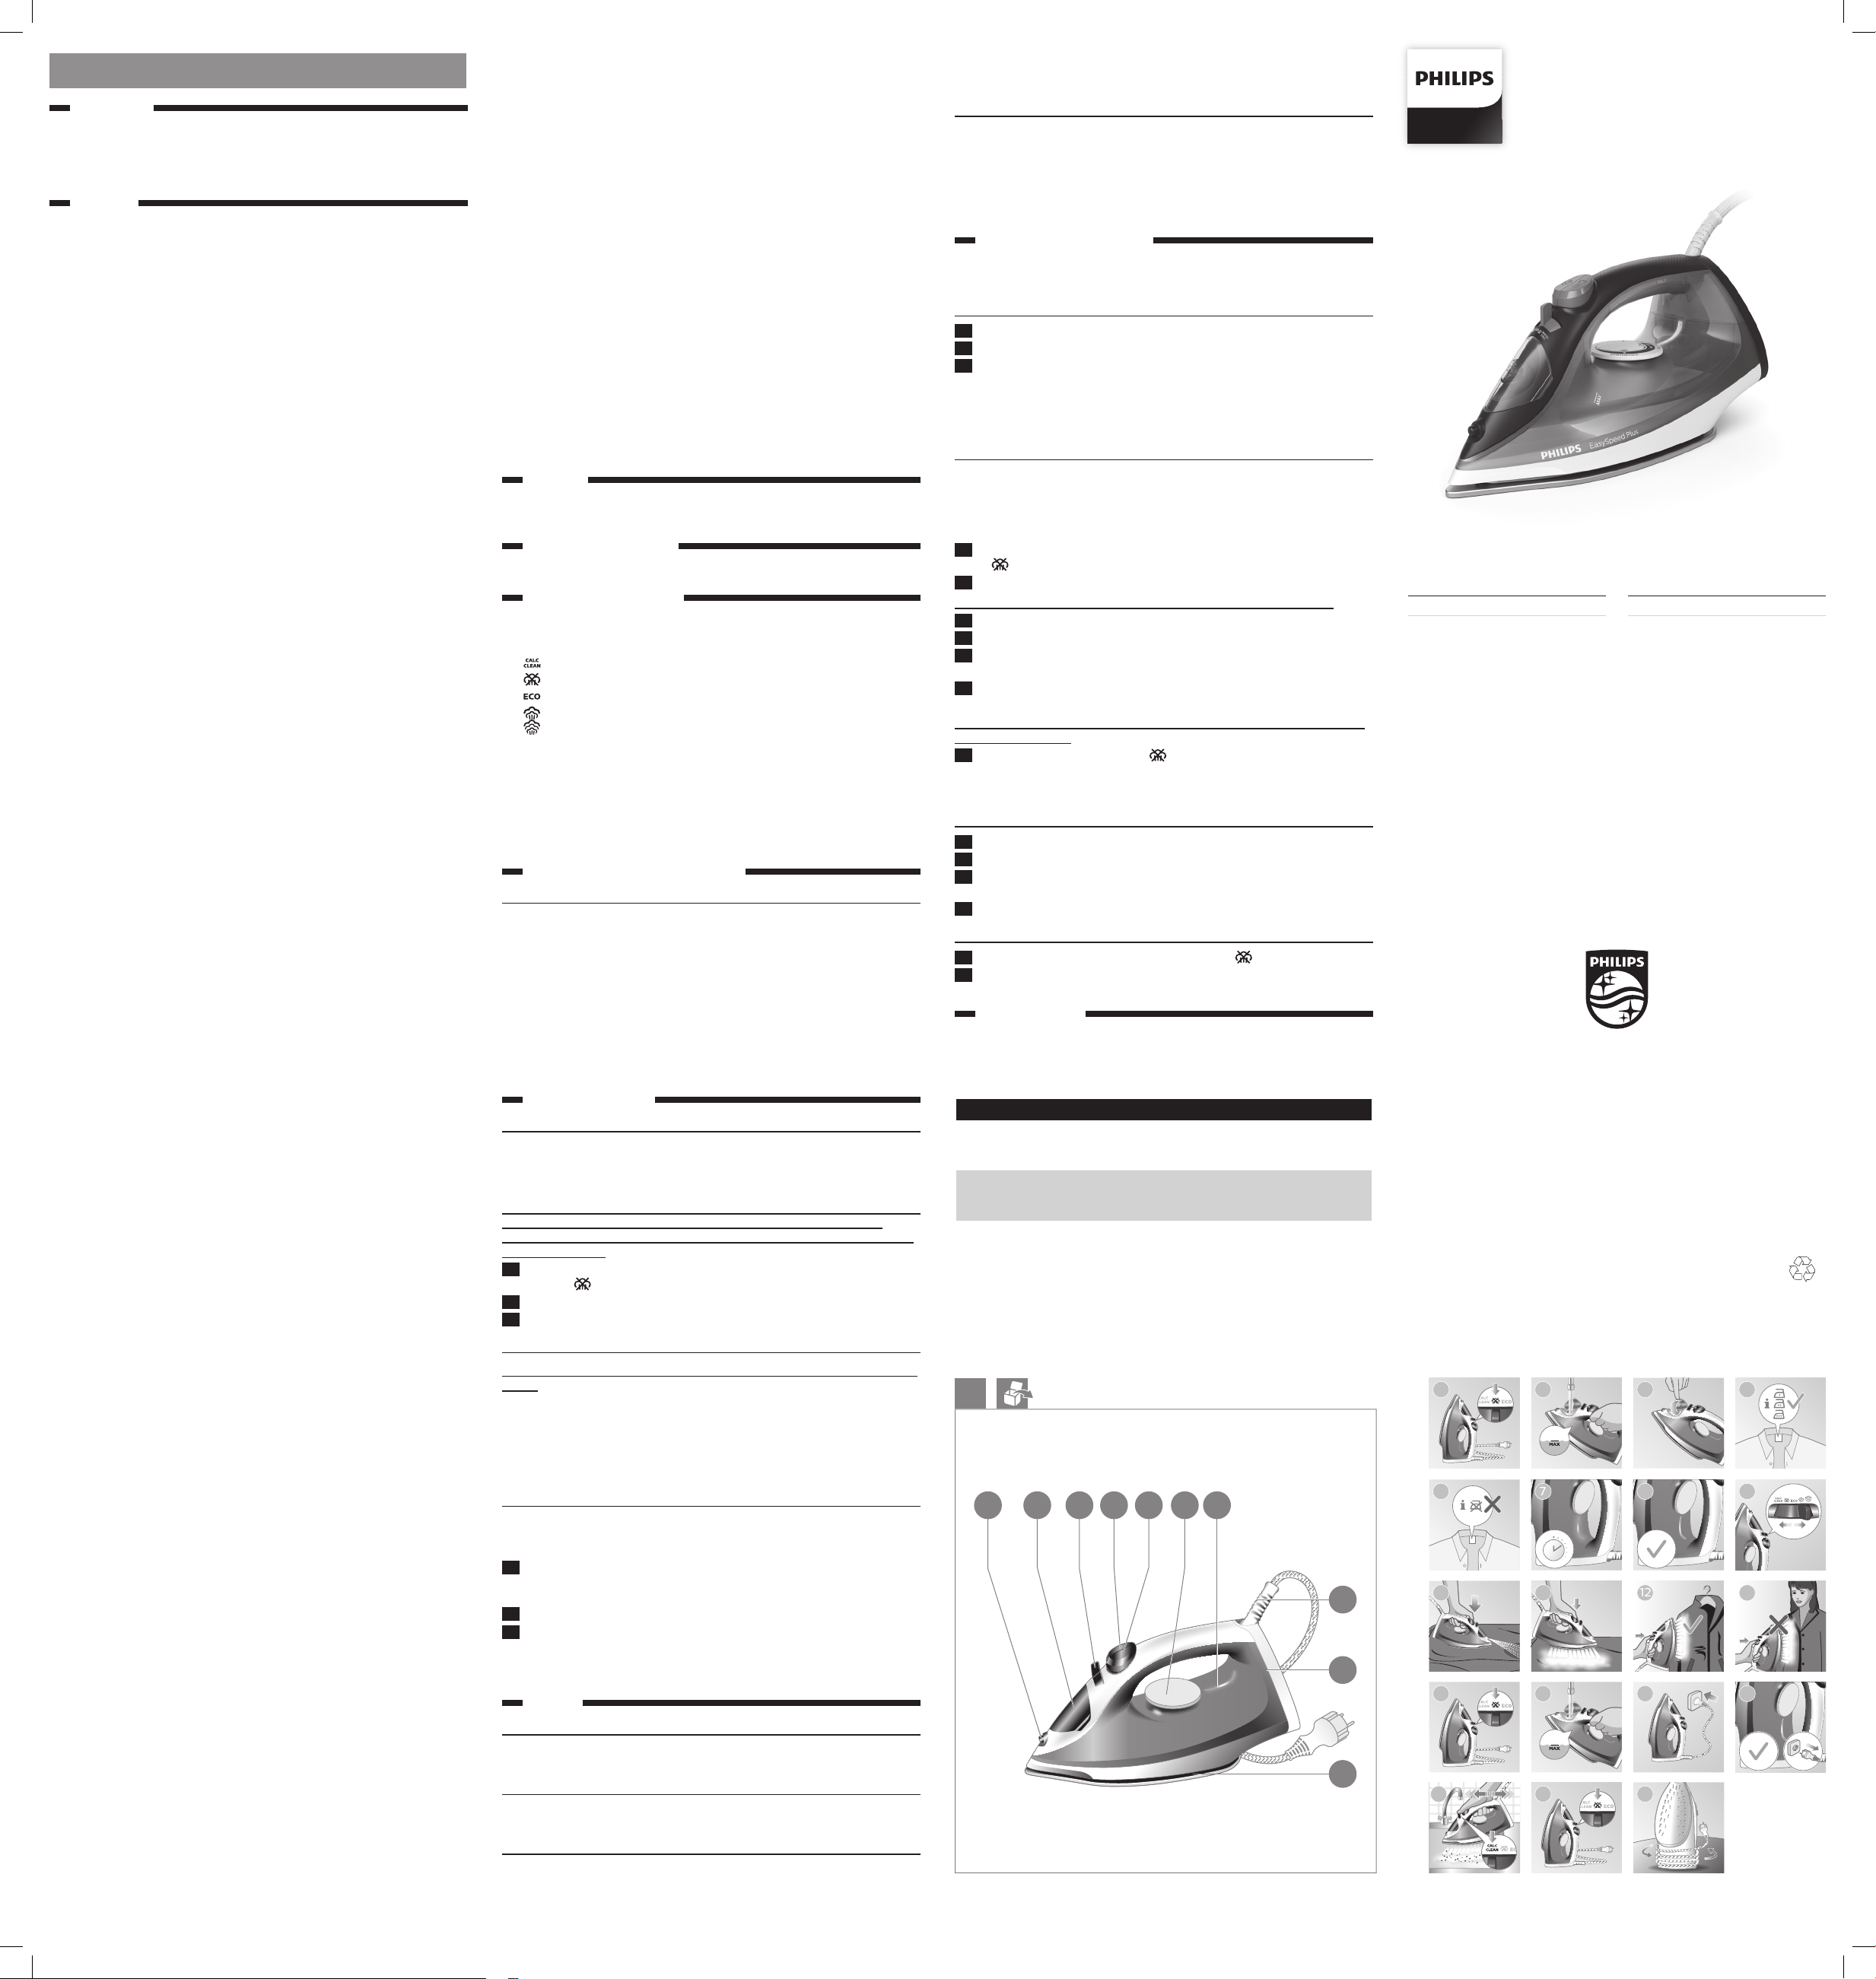
Product overview (Fig. 1)
1 Spray nozzle
2 Water tank lid
3 Steam slider with Calc-Clean function
Calc clean function
Steam o
ECO steam
Maximum steam
Turbo steam
4 Steam boost button
5 Spray button
6 Temperature dial
7 ‘Iron ready’ light
8 Mains cord with plug
9 Cord winding area
10 Soleplate
Exclusive technology from Philips
OptimalTEMP technology
The OptimalTEMP technology enables you to iron all types of ironable
fabrics, in any order, without adjusting the iron temperature and without
sorting your garments.
It is safe to just rest the hot soleplate directly on the ironing board
without putting back to the iron platform. This will help reduce the stress
on your wrist.
This appliance has been approved by The Woolmark Company Pty Ltd
for the ironing of wool-only products, provided that the garments are
ironed according to the instructions on the garment label and those
issued by the manufacturer of this appliance. R0000. In the United
Kingdom, Eire, Hong Kong and India, the Woolmark trademark is a
certication trademark.
Using the appliance
Filling the water tank
This appliance has been designed to be used with tap water. However,
if you live in an area with hard water, fast scale build-up may occur.
Therefore, it is recommended to use distilled or demineralized water to
prolong the lifetime of the appliance.
Do not use perfumed water, water from the tumble dryer, vinegar, starch,
descaling agents, ironing aids, chemically descaled water or other
chemicals, as they may cause water spitting, brown staining or damage
to your appliance.
1 Make sure the appliance is unplugged and set the steam slider to
position (Fig. 2).
2 Fill the water tank up to the MAX indication (Fig. 3).
3 Close the cap of the lling opening (‘click’) (Fig. 4).
Ironable fabrics
Do not iron non-ironable fabrics. Prints on the garment are not ironable
either.
- Fabrics with these symbols (Fig. 5) are ironable, for example linen,
cotton, polyester, silk, wool, viscose and rayon.
- Fabrics with this symbol (Fig. 6) are not ironable. These fabrics
include synthetic fabrics such as Spandex or elastane, Spandexmixed fabrics and polyolens (e.g. polypropylene). Prints on garments
are not ironable eit.her.
Ironing
Note: The iron may give o some smoke when you use it for the rst
time. This stops after a short while.
1 Put the iron on its heel and plug it in. The ‘iron ready’ light starts
to ash to indicate that the iron is heating up. This takes about
2 minutes (Fig. 7).
2 When the ‘iron ready’ light turns steady, the iron is ready (Fig. 8).
3 Select the steam setting to be used (Fig. 9).
Warning: Hot steam comes out of the iron. Do not remove wrinkles from
a garment while you are wearing it or somebody else is wearing it. To
prevent burns, do not direct the steam at people (Fig. 13).
Auto shut-o
The auto shut-o function automatically switches o the appliance
if it has not been used for 2 minutes resting on its soleplate or on its
backplate. The ‘iron ready’ light breathes to indicate the appliance is at
auto-o status.
To let the appliance heat up again, pick up the appliance or move it
slightly. The ‘iron ready’ light turns to ashing and the appliance starts to
heat up.
Cleaning and maintenance
For more information on how to performance clean and maintenance on
the iron, refer to the videos in this link: http://www.philips.com/descalingiron.
Cleaning the soleplate
1 Unplug the appliance and let it cool down.
2 Pour any remaining water out of the water tank.
3 Wipe akes and any other deposit o the soleplate with a damp
cloth and a non-abrasive (liquid) cleaning agent.
Note: To keep the soleplate smooth, avoid hard contact with metal
objects. Never use a scouring pad, vinegar or other chemicals to clean
the soleplate.
Calc-Clean function
IMPORTANT: To prolong the lifetime of your appliance and to maintain
good steaming performance, use the Calc-Clean function once every
1 month. If the water in your area is very hard (i.e. when akes come
out of the soleplate during ironing), use the Calc-Clean function more
frequently.
1 Make sure the appliance is unplugged and the steam control is set
to (Fig. 14).
2 Fill the water tank to the MAX indication (Fig. 15).
Do not pour vinegar or other descaling agents into the water tank.
3 Plug in the iron (Fig. 16).
4 Unplug the iron when the ‘iron ready’ light turns steady on (Fig. 17).
5 Hold the iron over the sink. Push the steam slider to the Calc-Clean
position and hold it (Fig. 18).
6 Gently shake the iron until all water in the water tank has been used
up.
Caution: While scale is ushed out, steam and boiling water also come
out of the soleplate.
7 Set the steam control back to .
Note: Repeat steps Calc-Clean process if the water that comes out of
the iron still contains scale particles.
After the Calc-Clean process
1 Plug in the iron. Let the iron heat up to let the soleplate dry.
2 Unplug the iron when the ‘iron ready’ light turns steady on.
3 Move the iron gently over a piece of cloth to remove any water stains
on the soleplate.
4 Let the iron cool down before you store it.
Storage
1 Unplug the iron and set the steam control to (Fig. 19).
2 Wind the mains cord round the cord storage facility and store the
iron on its heel (Fig. 20).
Troubleshooting
This chapter summarises the most common problems you could
encounter with the appliance. If you are unable to solve the problem
with the information below, visit www.philips.com/support for a list of
frequently asked questions or contact the Consumer Care Centre in your
country.
Problem Possible cause Solution
The iron cannot
remove wrinkles
from the garment.
The iron does not
produce any steam.
There is no
steam during
ironing.
There is not
enough water in
the tank.
The steam slider
is set to “steam
o”.
Fill the water tank and set
the steam slider to a position
with steam on.
Fill the water tank.
Fill the water tank and set
the steam slider to a position
with steam on.
1
1 2 3 4 5 6 7
8
GC2140 series
EN User manual ID Buku Petunjuk Pengguna
©2019 Koninklijke Philips N.V.
All rights reserved.
4239 001 16072
5
10
2
6
3
11
4
87 9
12 13
CAUTION: Hot surface (Fig. 1)
- Surfaces are liable to get hot during use
(for irons with ‘hot’ symbol marked on the
appliance).
Caution
- Only connect the appliance to an earthed
wall socket.
- Check the mains cord regularly for possible
damage.
- Fully unwind the mains cord before you
plug it in the wall socket.
Note: To use turbo steam, keep the steam slider pressed to the turbo
steam position continuously.
Features
Spray function
- Press the spray button to moisten the article to be ironed. This helps
to remove stubborn creases (Fig. 10).
Steam boost function
- Press and release the steam boost button for a powerful boost of
steam to remove stubborn creases (Fig. 11).
Vertical steam
- You can use the steam boost function when you hold the iron in
vertical position for removing creases form hanging clothes, curtains
etc (Fig. 12).
9
10
14
18 20
15
19
16
17
Page 2

Problem Possible cause Solution
Water droplets drips
onto the garment
during ironing.
The iron does not
produce a steam
boost
Dirty water and
impurities come
out of the soleplate
during ironing.
Water drips from
the soleplate after
the iron has been
unplugged.
The iron leaves a
shine or an imprint
on the garment.
When I push the
steam control to
the turbo steam
position, the steam
control jumps
back.
The iron is not
hot enough
yet to product
steam.
You have used
the steam boost
function too
often within a
short period.
You have not
closed the water
tank lid properly.
You have put a
chemical into
the water tank.
You have used
the steam boost
function too
often within a
short period.
The iron is not
hot enough for
ironing yet.
Hard water with
impurities or
chemicals has
formed akes
inside the
soleplate.
The steam slider
is set to “steam
on icon”
You have put the
iron in horizontal
position with
water still left in
the water tank
The surface
to be ironed
was uneven,
for instance
because you
ironed over a
seam or a fold in
the garment.
You did not
keep the steam
control in the
turbo steam
position.
Wait until the ‘iron ready’
light has stopped ashing
and lights up steadily.
Continue ironing in horizontal
position and wait a while
before you use the steam
boost function again.
Press the lid until you hear
a ‘click’.
Rinse the water tank and
do not put any perfume or
chemicals into the water tank.
Continue ironing in horizontal
position and wait a while
before you use the steam
boost function again.
Wait until the ‘iron ready’
light has stopped ashing
and lights up steadily.
Perform Calc-Clean function.
See chapter “Cleaning and
maintenance”.
Set the steam slider to “dry
icon”.
Empty the water tank after
use, or store the iron in
vertical position.
The iron is safe to use on all
ironable garments. The shine
or imprint is not permanent
and disappears when you
wash the garment. Avoid
ironing over seams or folds.
You can also place a cotton
cloth over the area to be
ironed to avoid imprints.
If you want to use turbo
steam, you have to keep the
steam control in the turbo
steam position continuously.
For other steam settings, this
is not necessary.
Indonesia
Pendahuluan
Selamat atas pembelian Anda dan selamat datang di Philips! Untuk
memanfaatkan sepenuhnya dukungan yang ditawarkan Philips,
daftarkan produk Anda di www.philips.com/welcome.
Baca petunjuk pengguna ini dan pamet informasi penting secara
saksama sebelum menggunakan alat. Simpanlah sebagai referensi di
kemudian hari.
Penting
Baca informasi penting ini dengan saksama sebelum menggunakan alat
dan simpanlah untuk referensi nanti.
Alat ini dirancang hanya untuk pemakaian rumah tangga. Pemakaian
komersial, pemakaian yang tidak tepat, atau gagal mematuhi petunjuk
pemakaian, maka produsen tidak bertanggung jawab dan garansi akan
tidak berlaku.
Bahaya
- Jangan sekali-kali merendam alat di dalam
air.
Peringatan
- Periksalah apakah voltase pada alat sesuai
dengan voltase listrik di rumah Anda,
sebelum menghubungkan alat.
- Jangan menggunakan alat jika steker, kabel
listrik atau alat itu sendiri menunjukkan
kerusakan, atau jika alat tidak berfungsi
secara normal, atau jika alat pernah terjatuh
atau bocor.
- Jangan merendam setrika atau tapaknya
(untuk setrika nirkabel) di dalam air.
- Jika kabel listrik rusak, maka harus diganti
oleh Philips, pusat layanan resmi Philips,
atau orang yang mempunyai keahlian
sejenis agar terhindar dari bahaya.
- Jangan sekali-kali meninggalkan alat tanpa
pengawasan saat masih tersambung ke
arus listrik.
- Selalu cabut steker alat dari stopkontak
listrik sebelum Anda mengisi tangki air.
Untuk alat nirkabel, setrika harus dilepaskan
dari tapaknya sebelum Anda mengisi tangki
air.
- Setrika nirkabel hanya boleh digunakan
dengan tapak yang disertakan.
- Alat ini dapat digunakan oleh anak-anak
minimal berusia 8 tahun ke atas dan
orang dengan cacat sik, indera atau
kecakapan mental yang kurang atau kurang
pengalaman dan pengetahuan jika mereka
diberi pengawasan atau petunjuk mengenai
cara penggunaan alat yang aman dan
mengerti bahayanya.
- Jangan biarkan anak-anak memainkan alat
ini.
- Anak-anak yang lebih dewasa berusia 8
tahun atau lebih hanya dibolehkan untuk
membersihkan alat ini dan melakukan
prosedur Calc-Clean di bawah pengawasan
orang dewasa.
- Jauhkan setrika dan kabelnya dari
jangkauan anak berusia kurang dari 8 tahun
jika sedang menyala atau didinginkan.
- Selalu letakkan tapak (untuk setrika
nirkabel) dan gunakan setrika di permukaan
yang stabil, rata, dan horizontal.
- Alat harus digunakan dan diletakkan di
permukaan yang rata, stabil, dan tahan
panas. Bila Anda meletakkan setrika pada
tumit atau dudukannya, pastikan setrika
diletakkan di atas permukaan yang stabil.
- Jangan sampai kabel listrik mengenai tapak
setrika saat sedang panas.
- (Untuk setrika nirkabel) Jangan menyetrika
dengan tapak terpasang. Jika tidak, kabel
suplai akan mudah rusak. Setrika uap
dirancang hanya untuk penyetrikaan tanpa
kabel.
PERHATIAN: Permukaan panas (Gbr. 1)
- Permukaan bisa menjadi panas selama
pemakaian (untuk setrika dengan simbol
‘hot’ pada alat).
Perhatian
- Alat hanya boleh dihubungkan ke
stopkontak dinding yang telah dibumikan.
- Cek kabel listriknya secara teratur kalaukalau ada kerusakan.
- Ulurkan sepenuhnya kabel listrik sebelum
Anda memasang steker ke stopkontak
dinding.
- Tapak setrika dapat menjadi sangat panas
dan menyebabkan luka bakar jika tersentuh.
- Bersihkan kerak secara rutin sesuai
petunjuk dalam bab ‘Membersihkan dan
pemeliharaan’ di petunjuk pengguna.
- Apabila Anda sudah selesai menyetrika,
ketika membersihkan alat, mengisi atau
mengosongkan tangki airnya dan juga saat
Anda meninggalkan setrika meskipun hanya
sebentar: setel kontrol uap ke posisi ‘dry
ironing’, letakkan setrika pada tumitnya dan
cabut steker listrik dari stopkontak dinding.
- Jangan memasukkan parfum, cuka, kanji,
zat pembersih kerak, bahan pelembut
penyetrikaan atau bahan kimia lainnya ke
dalam tangki air.
Medan elektromagnet (EMF)
- Alat Philips ini mematuhi semua standar dan peraturan yang
berlaku terkait paparan terhadap medan elektromagnet.
Mendaur ulang
- Jangan membuang alat bersama limbah rumah tangga biasa
jika alat sudah tidak bisa dipakai lagi, tetapi serahkan ke titik
pengumpulan atau daur ulang resmi. Dengan melakukan hal ini,
Anda ikut membantu melestarikan lingkungan.
Garansi dan dukungan
Jika Anda membutuhkan informasi atau dukungan, harap
kunjungi www.philips.com/support atau bacalah pamet garansi
internasional.
Tinjauan umum produk (Gbr. 1)
1 Pipa semprotan
2 Tutup tangki air
3 Kontrol uap dengan fungsi Calc-Clean
Fungsi Calc clean
Uap mati
Uap ECO
Uap maksimum
Uap turbo
4 Tombol semburan uap
5 Tombol semprotan
6 Putaran suhu
7 Lampu ‘Iron ready’
8 Kabel listrik dengan steker
9 Area penggulung kabel
10 Tapak setrika
Teknologi eksklusif dari Philips
Teknologi OptimalTEMP
Teknologi OptimalTEMP memungkinkan Anda menyetrika semua jenis
kain yang dapat disetrika, dalam urutan apa pun, tanpa menyesuaikan
suhu setrika dan tanpa harus menyortir pakaian Anda.
Aman untuk meletakkan tapak setrika secara langsung di papan Setrika
tanpa mengembalikannya ke dudukan setrika. Ini akan mengurangi
ketegangan pada pergelangan Anda.
Alat ini telah disetujui oleh The Woolmark Company Pty Ltd untuk
menyetrika produk yang berbahan wol saja, asalkan pakaian disetrika
sesuai dengan petunjuk pada label pakaian dan petunjuk yang diberikan
oleh produsen alat ini. R0000. Di Inggris, Eire, Hong Kong, dan India,
merek dagang Woolmark merupakan merek dagang sertikasi.
Menggunakan alat
Mengisi tangki air.
Alat ini dirancang untuk menggunakan air keran. Namun, jika Anda
tinggal di daerah dengan tingkat kesadahan air tinggi, kerak akan cepat
terbentuk. Oleh karena itu, disarankan untuk menggunakan air suling
atau tanpa kandungan mineral untuk memperpanjang masa pakai alat.
Jangan gunakan air parfum, air dari pengering pakaian, cuka, kanji, zat
pembersih kerak, pelicin pakaian, air bebas kerak dengan proses kimia,
atau bahan kimia lain, karena dapat menyebabkan semburan air, noda
karat, atau kerusakan pada alat.
1 Pastikan alat sudah dicabut dari listrik dan setel kontrol uap ke
posisi (Gbr. 2).
2 Isi tangki air hingga mencapai tanda MAX (Gbr. 3).
3 Pasang tutup lubang pengisian (bunyi ‘klik’) (Gbr. 4).
Kain yang dapat disetrika
Jangan menyetrika kain yang tidak dapat disetrika. Cetakan pada
pakaian juga tidak dapat disetrika.
- Kain dengan simbol ini (Gbr. 5) dapat disetrika, misalnya linen, katun,
poliester, sutera, wol, viskose, dan rayon.
- Kain dengan simbol ini (Gbr. 6) tidak dapat disetrika. Kain ini meliputi
kain sintetis seperti Spandex atau elastan, kain bercampur Spandex,
dan poliolen (mis. polipropilena). Cetakan pada pakaian juga tidak
dapat disetrika.
Menyetrika
Perhatian: Setrika mungkin saja mengeluarkan asap saat Anda
menggunakannya untuk pertama kali. Ini akan berhenti setelah
beberapa saat.
1 Simpan setrika pada posisi berdiri dan colokkan stekernya. Lampu
‘setrika siap’ mulai berkedip untuk menandakan bahwa setrika
sedang dipanaskan. Ini membutuhkan waktu sekitar 2 menit (Gbr. 7).
2 Bila lampu ‘setrika siap’ menyala terus-menerus, maka setrika siap
digunakan (Gbr. 8).
3 Pilih setelan uap yang ingin digunakan (Gbr. 9).
Catatan: Untuk menggunakan uap turbo, tekan terus kontrol uap pada
posisi uap turbo.
Fitur
Fungsi semprot
- Tekan tombol semprot untuk melembabkan pakaian yang akan
disetrika. Ini membantu menghilangkan kusut yang membandel
(Gbr. 10).
Fungsi semburan uap
- Tekan dan lepas tombol semburan uap untuk semburan uap yang
kuat untuk menghilangkan kusut yang membandel (Gbr. 11).
Uap vertikal
- Anda juga dapat menggunakan fungsi semburan uap saat Anda
memegang setrika pada posisi vertikal untuk menghilangkan kusut
dari baju yang digantung, tirai, dll (Gbr. 12).
Peringatan: Uap panas akan keluar dari setrika. Jangan menghilangkan
kusut dari pakaian yang sedang dipakai oleh Anda atau orang lain.
Untuk mencegah luka bakar, jangan arahkan uap langsung ke orang
(Gbr. 13).
Mati otomatis
Fungsi mati otomatis akan mematikan setrika secara otomatis apabila
tidak digunakan selama 2 menit dengan posisi tapak menyentuh
meja setrika atau berdiri pada pelat belakangnya. Lampu ‘setrika siap’
berkedip untuk menandakan alat berada pada status mati otomatis.
Untuk membuat alat memanas lagi, angkat alat atau gerakkan sedikit.
Lampu ‘setrika siap’ mulai berkedip dan alat mulai memanas.
Membersihkan dan pemeliharaan
Untuk informasi selengkapnya tentang cara membersihkan dan
memelihara setrika, lihat video di tautan berikut: http://www.philips.com/
descaling-iron.
Membersihkan tapak setrika
1 Cabut steker alat dan biarkan mendingin.
2 Tuang sisa air dari dalam tangki air.
3 Seka kerak air dan endapan lain dari tapak setrika dengan kain
lembap dan bahan pembersih (cair) non-abrasif.
Perhatian: Agar tapak setrika tetap licin, hindari kontak dengan benda
logam. Jangan sekali-kali menggunakan sabut gosok, cuka atau bahan
kimia lain untuk membersihkan tapak setrika.
Fungsi Calc-Clean
PENTING: Untuk memperpanjang masa pakai alat dan
mempertahankan kinerja penguapan yang baik, gunakan fungsi
Calc-Clean sekali tiap 1 bulan. Jika kesadahan air di area Anda sangat
tinggi (mis. jika serpihan keluar dari tapak setrika saat menyetrika),
gunakan fungsi Calc-Clean lebih sering.
1 Pastikan alat sudah dicabut dari aliran listrik dan kontrol uap disetel
ke (Gbr. 14).
2 Isi tangki air hingga mencapai tanda MAX (Gbr. 15).
Jangan menuangkan cuka atau zat pembersih kerak lainnya ke dalam
tangki air.
3 Colokkan steker setrika (Gbr. 16).
4 Cabut steker setrika saat lampu ‘setrika siap’ menyala
terus-menerus (Gbr. 17).
5 Pegang setrika di atas bak cuci. Tekan kontrol uap ke posisi
Calc-Clean dan tahan (Gbr. 18).
6 Goyangkan setrika perlahan hingga semua air di tangki habis
Perhatikan: Saat kerak dibilas, uap dan air mendidih juga keluar dari
tapak setrika.
7 Setel kontrol uap kembali ke posisi .
Catatan: Ulangi langkah proses Calc-Clean jika air yang keluar dari
setrika masih mengandung partikel kerak.
Setelah proses ‘Calc-Clean’
1 Colokkan steker setrika. Biarkan setrika memanas agar tapak setrika
kering.
2 Cabut steker setrika saat lampu ‘setrika siap’ menyala terus-
menerus.
3 Gunakan setrika dengan menggerakkannya perlahan di atas
selembar kain, untuk menghilangkan noda air pada tapak setrika.
4 Dinginkan dulu setrika sebelum Anda menyimpannya.
Penyimpanan
1 Cabut steker setrika dan setel kontrol uap ke (Gbr. 19).
2 Gulung kabel listrik pada tempat penyimpanan kabel dan simpan
setrika dengan meletakkannya pada posisi berdiri (Gbr. 20).
Mengatasi masalah
Bab ini merangkum masalah-masalah paling umum yang mungkin Anda
temui pada alat. Jika Anda tidak dapat mengatasi masalah dengan
informasi di bawah ini, kunjungi www.philips.com/support untuk melihat
daftar pertanyaan yang sering diajukan atau hubungi Pusat Layanan
Konsumen di negara Anda.
Masalah
Setrika tidak dapat
menghilangkan
kerutan pada
pakaian.
Setrika tidak
mengeluarkan uap
sama sekali.
Air menetes ke atas
pakaian selama
menyetrika.
Setrika tidak
menghasilkan
semburan uap
Air kotor dan
kotoran keluar
dari tapak setrika
selama menyetrika.
Air menetes dari
tapak setrika
setelah steker
setrika dicabut.
Setrika
meninggalkan
bekas mengkilap
atau bekas cetak
pada pakaian.
Saat saya menekan
kontrol uap ke
posisi uap turbo,
kontrol uap
kembali ke posisi
semula.
Kemungkinan
penyebab: Solusi
Tidak ada uap
selama menyetrika.
Air dalam tangki
tidak mencukupi.
Kontrol uap disetel
ke “uap mati”.
Setrika belum
cukup panas untuk
menghasilkan uap.
Anda terlalu sering
menggunakan
fungsi semburan
uap dalam waktu
singkat.
Anda belum
menutup penutup
tangki air dengan
benar.
Anda memasukkan
bahan kimia ke
dalam tangki air.
Anda terlalu sering
menggunakan
fungsi semburan
uap dalam waktu
singkat.
Setrika belum
cukup panas untuk
menyetrika.
Air sadah dengan
kotoran atau
bahan kimia
telah membentuk
serpihan di dalam
tapak setrika.
Kontrol uap disetel
ke “ikon uap hidup”
Setrika diletakkan
dengan posisi
rebah ketika masih
ada sisa air di
dalam tangki airnya
Permukaan yang
akan disetrika
tidak rata, misalnya
karena Anda
menyetrika di
atas keliman atau
lipatan pakaian.
Anda tidak
menahan kontrol
uap di posisi uap
turbo.
Isi tangki air dan setel
kontrol uap ke posisi uap
hidup.
Isilah tangki air.
Isi tangki air dan setel
kontrol uap ke posisi uap
hidup.
Tunggu hingga lampu
‘setrika siap’ berhenti
berkedip dan menyala
terus-menerus.
Teruskan menyetrika pada
posisi rebah dan tunggu
sebentar sebelum Anda
menggunakan kembali
fungsi semburan uap .
Tekan tutup sampai
terdengar bunyi ‘klik’.
Bilas tangki air dan jangan
masukkan parfum atau
bahan kimia apa pun ke
dalam tangki air.
Teruskan menyetrika pada
posisi rebah dan tunggu
sebentar sebelum Anda
menggunakan kembali
fungsi semburan uap .
Tunggu hingga lampu
‘setrika siap’ berhenti
berkedip dan menyala
terus-menerus.
Menjalankan fungsi
Calc Clean. Lihat bab
“Pembersihan dan
pemeliharaan”.
Setel pengatur uap ke “ikon
kering”.
Kosongkan tangki air
setelah penggunaan, atau
simpan setrika dalam
posisi vertikal.
Setrika aman digunakan
pada semua pakaian yang
dapat disetrika. Bekas
mengilap atau bekas cetak
tidak permanen dan akan
hilang bila Anda mencuci
pakaian tersebut. Hindari
menyetrika di atas keliman
atau lipatan. Anda juga
bisa meletakkan kain
katun di atas area yang
akan disetrika agar tidak
berbekas.
Jika ingin menggunakan
uap turbo, Anda harus
menahan kontrol uap
pada posisi uap turbo
terus-menerus. Untuk
setelan uap lainnya, ini
tidak diperlukan.
PHILIPS
SETRIKA UAP
GC2145
220-240 V, 50-60 Hz, 1200-1400 W
Negara Pembuat: Cina
Diimpor oleh: PT Philips Indonesia Commercial
Gedung Cibis Nine Lantai 10 Jl.
T.B. Simatupang No. 2 RT. 001
RW. 005, Kel. Cilandak Timur,
Kec. Pasar Minggu Jakarta
Selatan 12560, Indonesia
Reg. No: I.38.PIC1.00760.0219
 Loading...