

Page 1
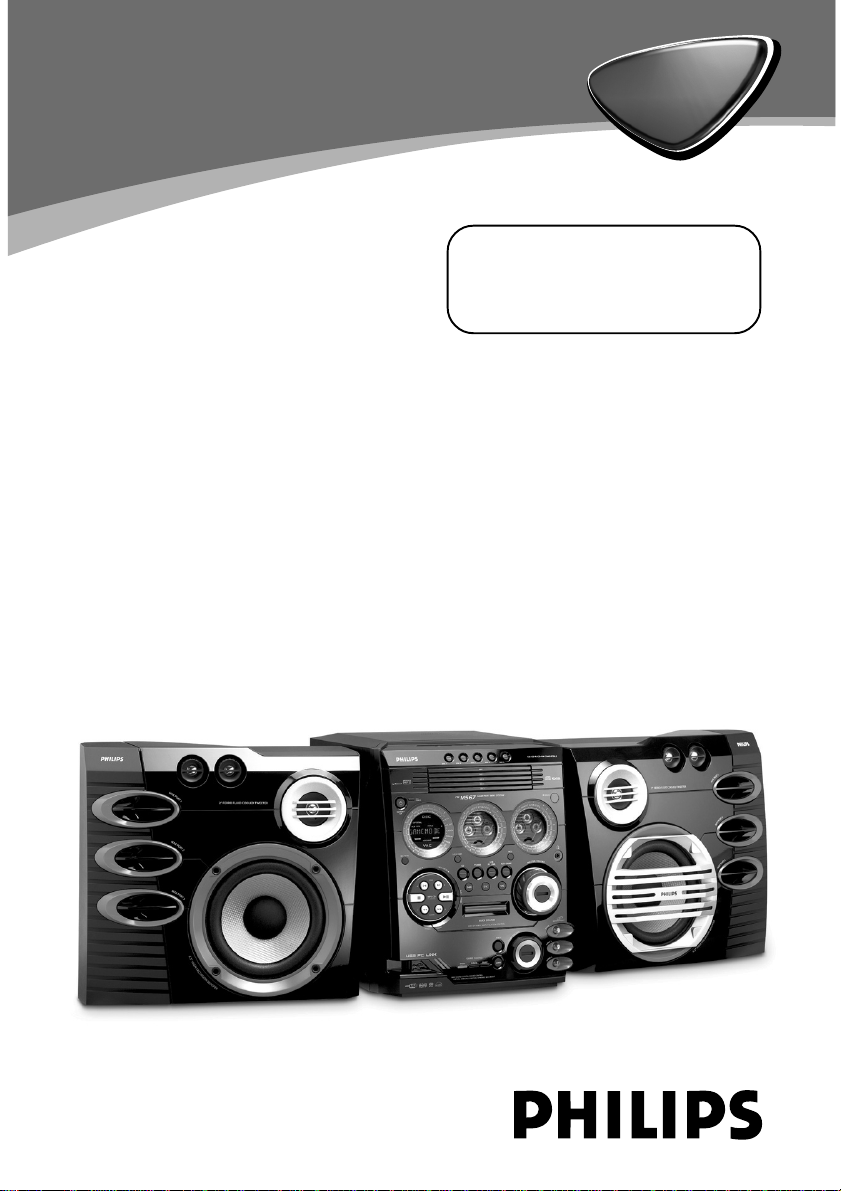
Mini Hi-Fi System
FW-
M567
FW-
M567
visit our website
www.audio.philips.com
to download latest UPDATES of USB PC Link Driver
MusicMatch Jukebox softwares and FAQs.
1
Page 2
Important notes for users in the
U.K.
Mains plug
This apparatus is fitted with an approved 13
Amp plug. To change a fuse in this type of plug
proceed as follows:
1 Remove fuse cover and fuse.
2 Fix new fuse which should be a BS1362 5 Amp,
A.S.T.A. or BSI approved type.
3 Refit the fuse cover.
If the fitted plug is not suitable for your socket
outlets, it should be cut off and an appropriate
plug fitted in its place.
If the mains plug contains a fuse, this should
have a value of 5 Amp. If a plug without a fuse
is used, the fuse at the distribution board
should not be greater than 5 Amp.
Note: The severed plug must be disposed of to
avoid a possible shock hazard should it be
inserted into a 13 Amp socket elsewhere.
How to connect a plug
The wires in the mains lead are coloured with
the following code: blue = neutral (N),
brown = live (L).
¶ As these colours may not correspond with the
colour markings identifying the terminals in
your plug, proceed as follows:
– Connect the blue wire to the terminal
marked N or coloured black.
– Connect the brown wire to the terminal
marked L or coloured red.
– Do not connect either wire to the earth
terminal in the plug, marked E (or e) or
coloured green (or green and yellow).
Before replacing the plug cover, make certain
that the cord grip is clamped over the sheath
of the lead - not simply over the two wires.
Copyright in the U.K.
Recording and playback of material may
require consent. See Copyright Act 1956 and
The Performer’s Protection Acts 1958 to 1972.
Italia
DICHIARAZIONE DI CONFORMITA’
Si dichiara che l’apparecchio FW-M567, Philips
risponde alle prescrizioni dell’ar t. 2 comma 1 del
D.M. 28 Agosto 1995 n. 548.
Fatto a Eindhoven
Philips Consumer Electronics
Philips, Glaslaan 2
5616 JB Eindhoven, The Nether lands
Norge
Typeskilt finnes på apparatens underside.
Observer: Nettbryteren er sekundert
innkoplet. Den innebygde netdelen er
derfor ikke frakoplet nettet så lenge
apparatet er tilsluttet nettkontakten.
For å redusere faren for brann eller elektrisk
støt, skal apparatet ikke utsettes for regn eller
fuktighet.
CAUTION
Use of controls or adjustments or
performance of procedures other than
herein may result in hazardous
radiation exposure or other unsafe
operation.
VAROITUS
Muiden kuin tässä esitettyjen
toimintojen säädön tai asetusten
muutto saattaa altistaa vaaralliselle
säteilylle tai muille vaarallisille
toiminnoille.
2
Page 3
D
ISC 5
DISC 1
DISC 2
DISC 3
DISC 4
DISC
DISC
DISC
D
ISC
DISC
CD
CD-R
CD-R
W
OMP
TIBLE
IR
DSC
DBB
TUNER
GAME
UX
USB
PC LINK
MODE
GAMESOUND
MA
X
SOUND
DSC
P1
D
ISC
1
D
ISC
2
D
I
SC
3
D
ISC
4
D
ISC
D
ISC
D
ISC
D
ISC
D
ISC
C
D
C
D
-R
C
D
-R
W
C
O
M
P
TI
B
L
E
D
ISC 1
CD TUNER
USB PC LINK
CD1 CD2 CD3
CD4 CD5
VOL
TITLE
ALBUM
REPEAT PROGRAM SHUFFLE DISPLAY
DIM SLEEP CLK/TIMER TIMER
DSC MUTEVAC
GAME
GAME
MIX-ITSOUND
P3
AUX/GAME
➠
ON/OFF
MAX ON/OFF
☞
P4
P2
2
C
D
/
C
D
-
R
/C
D
-
R
W
C
O
M
P
AT
I
B
L
D
I
S
C
1
D
I
S
C
2
D
I
S
C
3
D
I
S
C
4 D
I
S
C
5
D
I
S
C
1
D
I
S
C
2
D
I
S
C
3
D
D
I
I
S
S
C
C
4
1
C
D
/C
D
-
/C
R
D
-
W
R
CO
M
AT
P
I
B
L
E
D
I
S
1
C
D
I
S
C
2
D
I
S
3
C
D
I
S
4
C
D
I
S
5
C
D
I
S
C
1
D
I
S
C
2
D
I
S
C
3
D
I
S
C
4
D
I
S
C
5
G
A
M
E
P
O
R
T
M
I
N
I
S
Y
S
T
E
M
I
R
S
E
N
S
O
R
E
C
O
P
O
W
E
R
L
L
E
E
N
N
N
N
A
S
T
A
N
A
D
B
Y
H
H
C
C
T
T
H
O
N
F
G
E
I
L
R
D
D
R
R
R
R
I
I
V
V
E
E
E
E
V
V
O
O
D
S
C
1
D
C
L
A
M
I
T
P
O
Z
Z
A
J
K
C
O
R
P
O
P
M
I
D
S
W
E
N
P
E
E
L
S
2
D
B
L
A
X
I
M
M
F
W
M
E
L
T
I
T
M
A
M
P
C
C
D
3
F
U
H
S
C
G
O
R
P
P
E
R
K
R
T
C
S
I
D
L
L
A
D
4
C
C
.
.
T
T
T
T
R
R
S
I
E
E
R
E
B
Y
C
L
L
A
H
O
O
O
O
U
U
U
U
U
U
S
S
I
I
B
B
B
B
R
R
R
R
T
R
E
C
N
O
C
E
D
A
C
R
A
A
M
E
N
I
C
C
D
5
VAC
D
I
M
C
L
O
C
K
•
T
I
M
E
R
P
R
O
G
U
S
B
E
M
U
L
CD
T
U
N
E
R
P
C
L
I
N
K
G
A
M
•
E
AU
X
O
V
N
R
E
X
E
T
T
•
T
E
P
S
S
R
E
E
A
R
S
P
E
•
M
T
V
E
R
P
P
O
T
D
B
B
D
S
C
VAC
S
P
L
O
A
Y
M
E
•
D
P
•
A
P
U
S
O
E
T
S
M
A
X
S
O
U
N
D
S
G
E
N
A
I
R
N
C
U
T
H
•
O
E
D
I
V
E
M
U
L
M
I
X
-
I
T
O
V
E
M
A
G
L
E
F
O
T
I
D
U
A
GAME
SOUND
R
S
P
E
E
D
I
P
U
N
C
H
B
L
A
S
T
G
H
T
O
I
M
O
D
E
D
U
A
M
A
S
X
O
U
D
N
D
G
I
L
A
S
U
O
T
I
•
O
D
N
C
T
N
O
R
L
V
R
I
T
A
A
L
U
M
I
B
E
N
C
C
O
E
T
N
R
L
O
•
D
Y
A
N
M
I
C
A
B
S
B
S
O
O
T
S
1 3
,
E
3
3
Page 4
DK
Advarsel: Usynlig laserstråling ved åbning
når sikkerhedsafbrydere er ude af funktion.
Undgå utsættelse for stråling.
Bemærk: Netafbryderen er sekundært
indkoblet og ofbryder ikke strømmen fra
nettet. Den indbyggede netdel er derfor
tilsluttet til lysnettet så længe netstikket
sidder i stikkontakten.
S
Klass 1 laseraparat
Varning! Om apparaten används på annat
sätt än i denna bruksanvisning specificerats,
kan användaren utsättas för osynlig
laserstrålning, som överskrider gränsen för
laserklass 1.
Observera! Stömbrytaren är sekundärt
kopplad och bryter inte strömmen från
nätet. Den inbyggda nätdelen är därför
ansluten till elnätet så länge stickproppen
sitter i vägguttaget.
SF
Luokan 1 laserlaite
Varoitus! Laitteen käyttäminen
muulla kuin tässä käyttöohjeessa mainitulla
tavalla saattaa altistaa käyttäjän
turvallisuusluokan 1 ylittävälle
näkymättömälle lasersäteilylle.
Oikeus muutoksiin varataan. Laite ei
saa olla alttiina tippu-ja roiskevedelle.
Huom. Toiminnanvalitsin on kytketty
toisiopuolelle, eikä se kytke laitetta irti
sähköverkosta. Sisäänrakennettu verkkoosa on kytkettynä sähköverkkoon aina
silloin, kun pistoke on pistorasiassa.
Energy Star
As an ENERGY STAR
Partner, Philips has determined
that this product meets the
ENERGY STARR guidelines for energy efficiency.
R
4
Page 5
Index
English ------------------------------------------------ 6
Français -------------------------------------------- 28
Español --------------------------------------------- 50
Deutsch--------------------------------------------- 72
Nederlands ---------------------------------------- 94
Italiano-------------------------------------------- 116
Svenska ------------------------------------------- 138
English
Français
EspañolDeutschNederlandsItalianoSvenskaDanskSuomi
Dansk --------------------------------------------- 160
Suomi --------------------------------------------- 182
Português ---------------------------------------- 204
----------------------------------------- 226
Português
∂ППЛУИО¿Polski
5
Page 6
Contents
English
General Information
Supplied accessories ............................................ 7
Environmental information ................................ 7
Care and safety information .............................. 7
Functional Overview
Main unit and remote control....................... 8–9
Connections
Step 1: Connecting FM/AM antennas............. 11
Step 2: Connecting the speakers .................... 11
Step 3: Connecting to PC................................. 11
Step 4: Connecting to game console ............. 11
Step 5: Connecting the AC power cord........ 11
Step 6: Inserting batteries into the remote
control .................................................................. 12
Gameport Operations
About Gameport ............................................... 13
Preparation before use ..................................... 13
Start operating .................................................... 13
USB PC Link
Quick Setup Guide ............................................ 14
Connecting USB PC Link ................................. 15
Control buttons available on the
remote only......................................................... 9
Using the remote control to operate
the system ......................................................... 12
PC system requirement.................................. 14
Install MusicMatch software .......................... 14
Enable digital CD audio output .................... 15
Disc Operations
Playable discs....................................................... 18
Loading discs ....................................................... 18
Basic playback controls..................................... 18
Playing an MP3 disc............................................ 19
Repeat and Shuffle.............................................. 19
Repeat play........................................................ 19
Random play...................................................... 19
Programming the disc tracks........................... 20
Checking the programme .............................. 20
Clearing the programme................................ 20
Tuner Operations
Tuning to radio stations .................................... 21
Presetting radio stations................................... 21
Using the Plug and Play................................... 21
Automatic presetting ...................................... 21
Manual presetting............................................. 21
Selecting a preset radio station....................... 22
Deleting a preset radio station..................... 22
RDS ....................................................................... 22
Scrolling through RDS information.............. 22
Setting the RDS clock ..................................... 22
NEWS ................................................................... 23
Switching on NEWS function ....................... 23
Timer Operations
Timer setting ....................................................... 24
Activating/Deactivating the timer ................ 24
Sleep timer setting ............................................. 25
Other Connection
Listening to an external source ...................... 25
Basic Operations
Switching on/off .................................................. 16
Switching to active mode............................... 16
Switching to Eco Power standby mode...... 16
Switching to standby mode (view clock).... 16
Demonstration mode........................................ 16
Setting the clock................................................. 16
Dimming system’s display screen.................... 17
Volume control ................................................... 17
Sound control ..................................................... 17
MAX sound ....................................................... 17
Digital Sound Control..................................... 17
Virtual Ambience Control ............................. 17
Dynamic Bass Boost........................................ 17
6
Specifications ........................................... 26
Troubleshooting .................................... 27
Page 7

General Information
This product complies with the radio
interference requirements of the
European Community.
Refer to the type plate on the rear or
bottom of the system for identification
and supply ratings.
For users in the U.K.: please follow the
instructions on page 2.
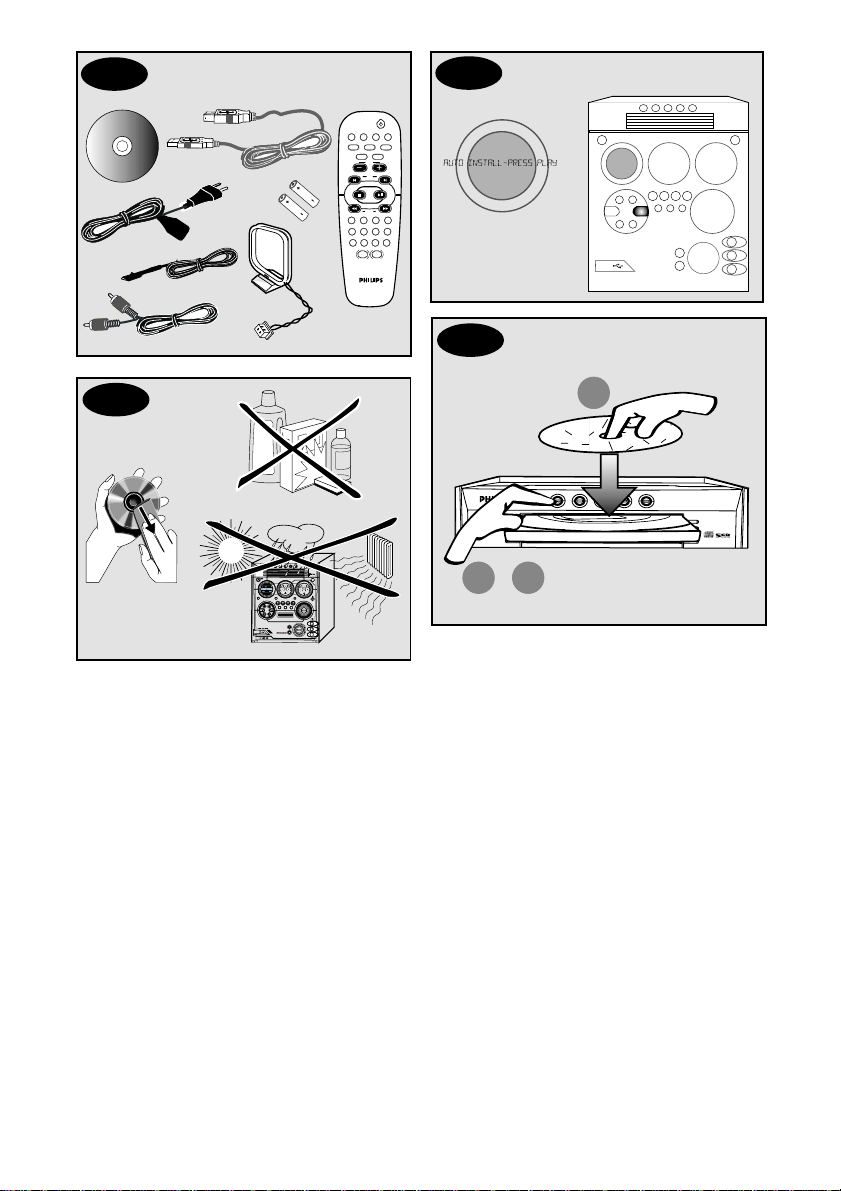
Supplied accessories (page 3 - P1)
– USB PC LINK software installer CD-ROM
– USB cable
– Remote control and two AA batteries.
– AM loop antenna
– FM wire antenna
– Video cinch cable (yellow)
– AC power cord
Environmental information
All unnecessary packaging has been omitted. We
have tried to make the packaging easy to
separate into three materials: cardboard (box),
polystyrene foam (buffer) and polyethylene (bags,
protective foam sheet).
Your system consists of materials which can be
recycled and reused if disassembled by a
specialised company. Please observe the local
regulations regarding the disposal of packaging
materials, exhausted batteries and old
equipment.
Care and safety information
(page 3 - P2)
Avoid high temperatures, moisture,
water and dust
– Do not expose the system, batteries or discs
to humidity, rain, sand or excessive heat (caused
by heating equipment or direct sunlight). Always
keep the disc tray closed to avoid dust on the
lens.
Avoid condensation problem
– The lens may cloud over when the system is
suddenly moved from cold to warm
surroundings, making it impossible to play a disc.
Leave the system in the warm environment until
the moisture evaporates.
Do not block the vents
– In a cabinet, allows about 10cm (4 inches) of
free space all around the system for adequate
ventilation.
Care of disc
– To clean a CD, wipe it in a straight line from
the centre towards the edge using a soft, lint-free
cloth. A cleaning agent may damage the disc!
– Write only on the printed side of a CDR(W)
and only with a soft felt-tipped pen.
– Handle the disc by its edge, do not touch the
surface.
Care of the cabinet
– Use a soft cloth slightly moistened with a mild
detergent solution. Do not use a solution
containing alcohol, spirits, ammonia or abrasives.
Finding a suitable location
– Place the system on a flat, hard, and stable
surface.
Built-in safety circuit
– Under extreme conditions, this system may
switch to standby mode automatically. If this
happens, let the system cool down before
reusing it.
Power saving
– This system is designed to use less than 1W
of electricity when switches to Eco Power
standby. Disconnect the AC power cord from
the power outlet when not in use.
English
7
Page 8
CD
CD-R
CD-RW
COMP
TIBLE
IR
MOD
E
GAM E SOUN D
MAX
SOUND
DSC
AC
#
$
∞
Functional Overview
English
≤
D
/C
D
-
R
/
M
P
AT
I
B
L
E
£
™
¡
)
(
*
&
6
CD TUNER
*
7
USB PC LINK
CD1 CD2 CD3
CD4 CD5
VOL
TITLE
AUX/GAME
8
0
9
§
(
≥
•
&
#
ALBUM
REPEAT PROGRAM SHUFFLE DISPLAY
DIM SLEEP CLK/TIMER TIMER
MAX ON/OFF
DSC MUTEVAC
GAME
GAME
MIX-ITSOUND
‹
¤
⁄
ON/OFF
º
4
!
ª
@
^
1
2
3
4
5
6
7
8
9
0
!
@
STANDBY
RD
C
C
D
-
R
W
D
ISC
1
D
IS
C
2
D
ISC
3
D
IS
C
4
D
IS
C
5
D
IS
C
1
D
IS
C
2
D
I
S
C
3
D
IS
C
4
D
I
S
C
ECO
POW
ER
O
N
DSC
CD1
O
PT
I
M
A
LJAZ
Z
ROCK P
O
P
DI
M
NE
W
S
S
L
E
E
P
A
L
BMIX
F
MMW
T
I
T
L
E
A
MP
M
CD2
CD3
SHUF
CD4
ROG
R
E
P
TRKP
D
I
SC A
L
L
.
.
I
S
CYB
E
R
HA
L
L
CONCERT
A
R
CADE CI
NEM
A
CD5
VAC
S
•
NE
W
S
P
•
V
E
R
P
P
O
T
S
O
M
E
D
•
P
O
T
S
C
L
OCK•
N
E
T
X
E
T
S
•
E
P
R
R
E
S
E
T
G
S
E
N
I
A
N
R
U
C
T
H
•
MAX
SOU
V
IRTUAL
5
GAMEPORT
MINI SYSTEM
L
E
N
N
A
H
C
T
F
E
L
D
R
R
I
E
V
V
E
O
C
T
T
R
E
U
U
U
S
I
R
R
T
IME
R
U
SB
CD
TUNE
R
P
C
LINK
P
DB
B
D
S
C
L
A
Y
•
P
A
U
S
E
MAX
SOUND
MIX-IT
GAME SO U
N
D
PUNCH
BL
SPEED
AS
T
N
D •
D
IG
I
AL
T
SOU
N
D
C
ON
T
R
OL
AMB
I
N
E
C
E C
ON
TROL•
D
Y
N
AMIC B
AS
S
B
O
O
ST
G
I
R
C
R
O
O
B
B
P
R
OG
A
UX
•GAME
M
VAC
E
M
U
L
O
V
E
M
A
G
MODE
CO
IR
S
E
N
S
O
R
L
E
N
N
A
H
C
T
H
D
R
R
I
E
V
V
E
O
T
T
E
O
O
U
U
U
S
I
B
B
R
R
V
O
R
L
E
U
T
S
M
A
E
O
E
D
I
V
.
L
O
I
D
U
A
.
R
O
I
D
U
A
%
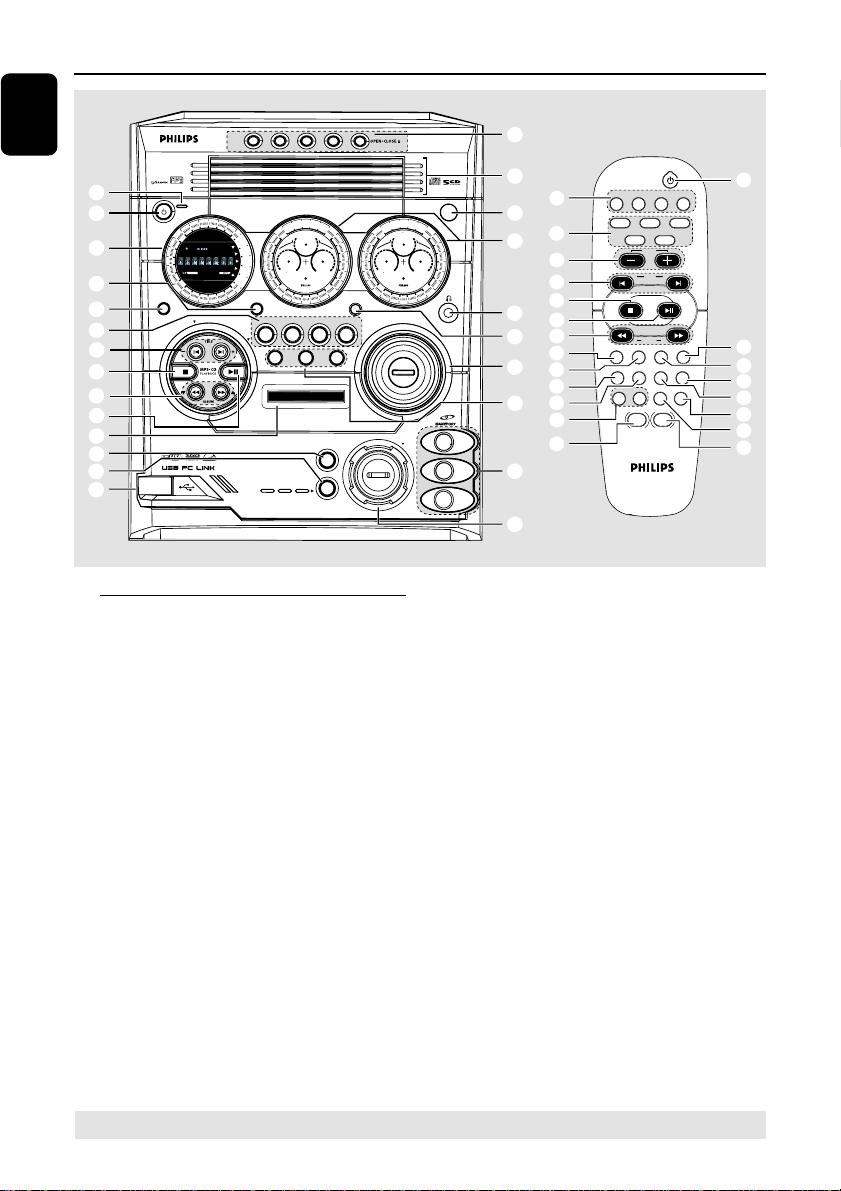
Main unit and remote control
6 CD / TUNER / USB PC LINK /
AUX•GAME
1 ECO POWER indicator
– Lights up when the system is in Eco Power
standby mode.
2 STANDBY ON B
– Switches to Eco Power standby mode or turns
on the system.
– *Switches to standby mode.
3 Display screen
4 CLOCK•TIMER (CLK/TIMER)
– *Enters clock or timer setting mode.
5 RDS•NEWS
– In tuner mode, selects RDS information.
– In other modes, turns on/off news.
– Selects the relevant active mode.
– CD: toggles between DISC 1~5.
– TUNER: toggles between FM and MW band.
– AUX•GAME: toggles between AUX and
GAMEPORT mode.
7 PREV•PRESET 4 (TITLE -) (í)
NEXT•PRESET3 (TITLE +) (ë)
– CD: selects a track or selects a title from MP3
disc.
– TUNER: selects a preset radio station.
– CLOCK: sets the minutes.
– USB PC LINK: selects a track from the playlist.
8 STOP•DEMO STOP Ç
– Exits an operation.
– CD: stops playback or clears a programme.
– TUNER: *erases a preset radio station.
– USB PC LINK: stops playback.
(only on the main unit)
– *Turns on/off the demonstration mode.
* = Press and hold the button for more than two seconds.
8
Page 9

Functional Overview
9 SEARCH•TUNING (ALBUM 34)(à á)
– CD: *searches backward/forward or selects an
album from MP3 disc.
– TUNER: tunes the radio frequency up/down.
– CLOCK: sets the hours.
– USB PC LINK: *searches backward/forward.
0 PLAY•PAUSE ÉÅ
– CD: starts/pauses playback.
– USB PC LINK: starts/pauses playback.
(only on the main unit)
TUNER: *enters Plug & Play mode and/or starts
preset radio station installation.
! MAX SOUND (MAX ON/OFF)
– Turns on/off the optimal mix of various sound
features.
@ MIX IT (GAME MIX IT)
– Mixes the game sound with your favourite music
from one of these music source (CD, TUNER,
USB PC LINK or AUX).
# MODE (GAME SOUND)
– Selects different type of equaliser setting for
Gameport (SPEED, PUNCH or BLAST).
$ Connect the USB cable between the system and
PC’s USB port.
% GAME VOLUME
– Adjusts the game’s output volume level.
^ VIDEO
– Use a video cable to connect to your game
console’s video output.
AUDIO L. / AUDIO R.
– Use a audio cable to connect to your game
console’s left/right audio output.
& DBB
– Selects different type of bass boost level settings
(DBB 1, DBB 2, DBB 3 or DBB OFF).
DSC
– Selects different type of preset sound equaliser
settings (OPTIMAL, JAZZ, ROCK or POP).
VAC
– Selects different type of environment ambience-
based equaliser settings (HALL, CINEMA,
CONCERT, CYBER or ARCADE).
* MASTER VOLUME (VOL +-)
– Adjusts the volume level.
( PROG (PROGRAM)
– CD: starts or confirms tracks programming.
– TUNER: starts *automatic/manual preset
programming.
– CLOCK: selects 12- or 24-hour clock display.
) n
– Plug in the headphones jack. The speakers
output will be cancelled.
¡ VU meters
– Indicates signal strength of left/right channel.
™ iR SENSOR
– Point the remote control towards this sensor.
£ Disc trays (1~5)
≤ OPEN•CLOSE 0 (DISC 1~5)
– Opens/closes the individual disc tray.
Control buttons available on the
remote only
∞ CD 1~5
– Selects a disc tray to playback.
§ REPEAT
– Repeats a track/disc/all programmed tracks.
≥ DIM
– Turns on/off the dim mode.
• SLEEP
– Sets the sleep timer function.
ª MUTE
– Mutes or restores the volume.
º TIMER ON/OFF
– Turns on/off the timer function.
⁄ SHUFFLE
– Turns on/off the random play mode.
¤ DISPLAY
– Displays the album and title name for MP3 disc.
‹ B
– Switches to Eco Power standby mode.
– *Switches to standby mode.
English
* = Press and hold the button for more than two seconds.
9
Page 10
Connections
English
10
Game console
Page 11

Connections
WARNING!
– Use only the supplied speakers. The
combination of the main unit and
speakers provide the best sound. Using
other speakers can damage the unit and
sound quality will be negatively affected.
– Never make or change connections
with the power switched on.
– Connect the AC power cord to the
power outlet only after you have finished
hooking up everything.
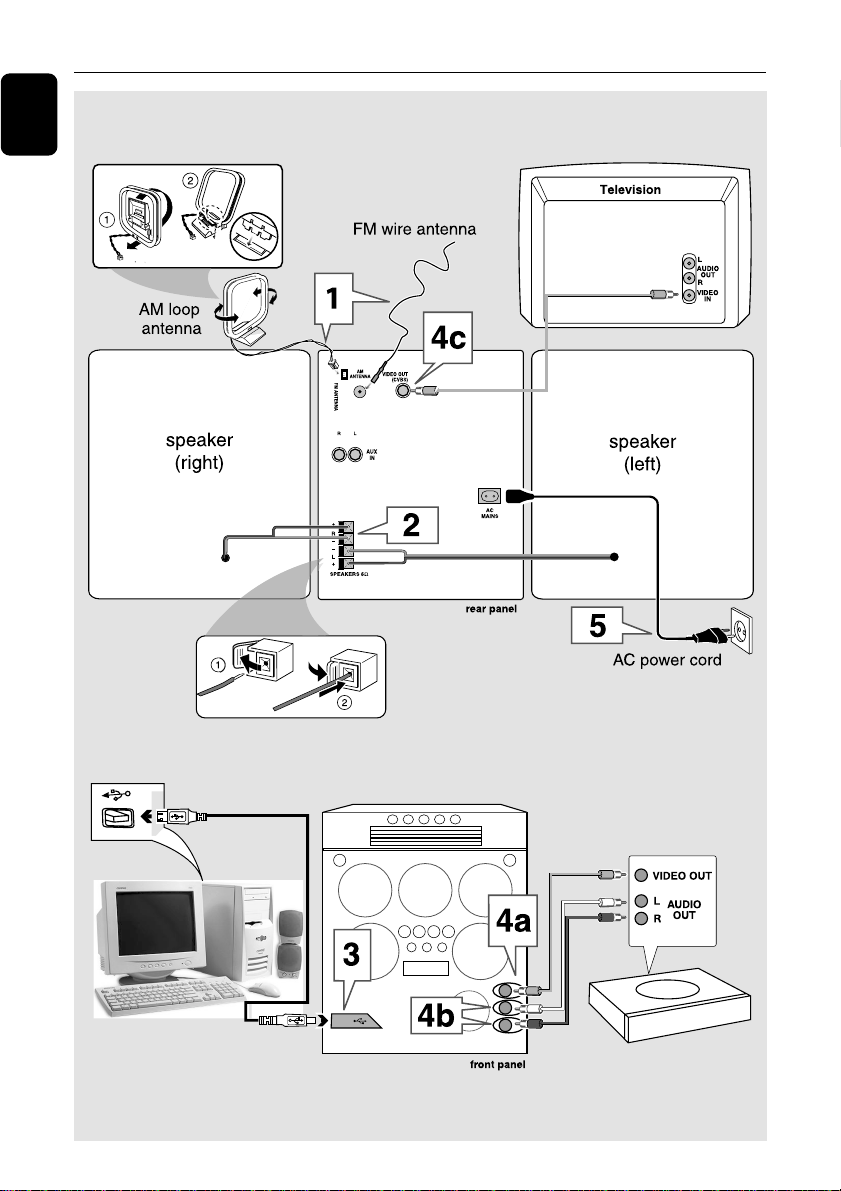
Step 1: Connecting FM/AM
antennas
– Place the AM loop antenna on a shelf or
attach it to a stand or wall.
– Extend the FM antenna and fix its ends to the
wall.
– Adjust the position of the antennas for
optimal reception.
– Position the antennas as far as possible from a
TV, VCR or other radiation source to prevent
unwanted noise.
– For better FM stereo reception, connect
external FM antenna.
Step 2: Connecting the
speakers
Connect the speaker wires to the SPEAKERS
terminals, right speaker to "R" and left speaker to
"L", coloured (marked) wire to "+" and black
(unmarked) wire to "-". Fully insert the
stripped portion of the speaker wire into the
terminal as shown.
Notes:
– Ensure that the speaker cables are correctly
connected. Improper connections may damage the
system due to short-circuit.
– Do not connect more than one speaker to any
one pair of +/- speaker terminals.
Step 3: Connecting to PC
Use the supplied USB cable to connect the
system to your personal computer’s USB port.
After installed the USB PC LINK application
software onto your PC, you are able to playback
your music collection via the system (refer to
“USB PC Link”).
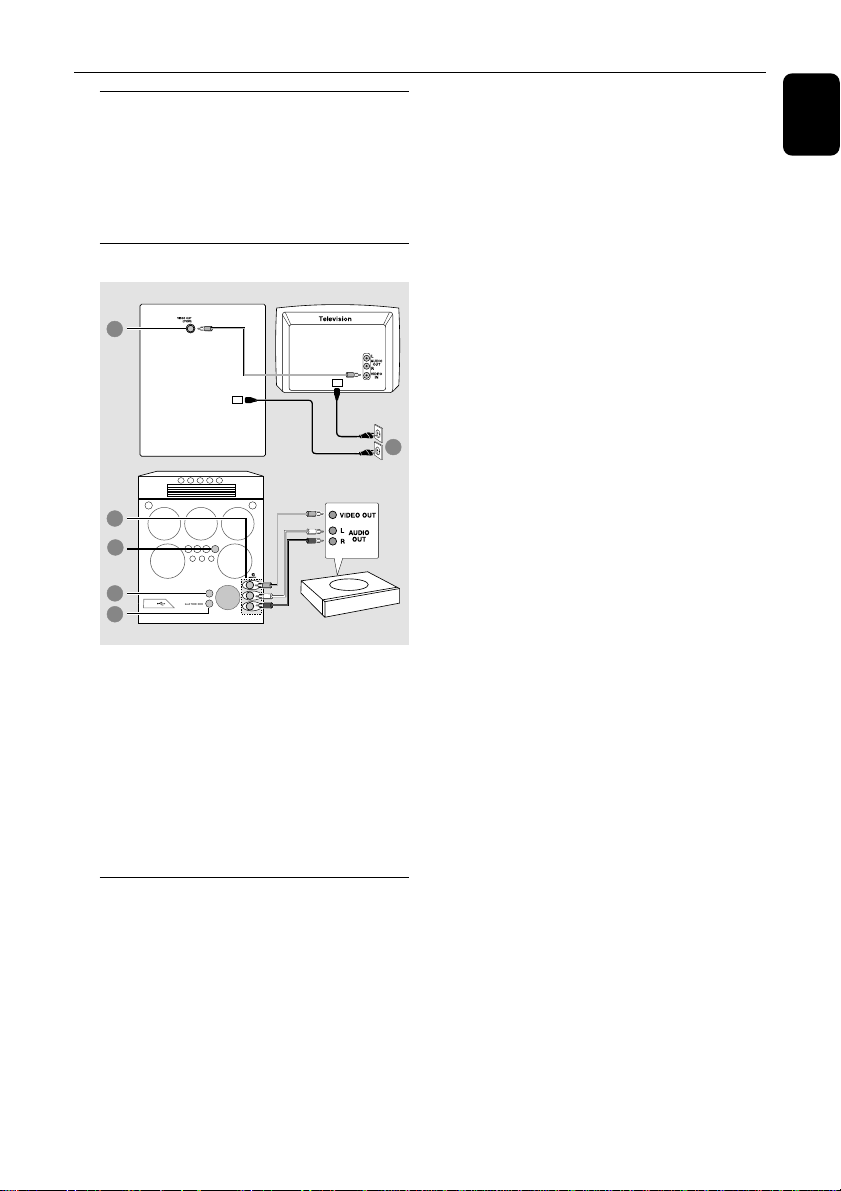
Step 4: Connecting to game
console
IMPORTANT!
Gameport inputs are solely for game
console only.
a. Use the game console’s video cable (not
supplied) to connect its video output to the
GAMEPORT-VIDEO terminal.
b. Use the game console’s audio cables (not
supplied) to connect its audio outputs to the
GAMEPORT-AUDIO L. / AUDIO R.
terminals.
c. Use the video cable (yellow) to connect the
VIDEO OUT terminal to the video input on
the TV for viewing.
Notes:
– On the TV, the Video Input jack is usually yellow
and might be labeled A/V In, CVBS, Composite or
Baseband.
– To avoid magnetic interference, do not position
the front speakers too close to your TV.
Step 5: Connecting the AC
power cord
"AUTO INSTALL - PRESS PLAY" may appear
on the display panel when the AC power cord is
plugged into the power outlet for the first time.
Press ÉÅ on the main unit to store all available
radio stations (page 3 - P3) or press Ç to exit
(refer to “Tuner Operations”).
English
11
Page 12
Connections
English
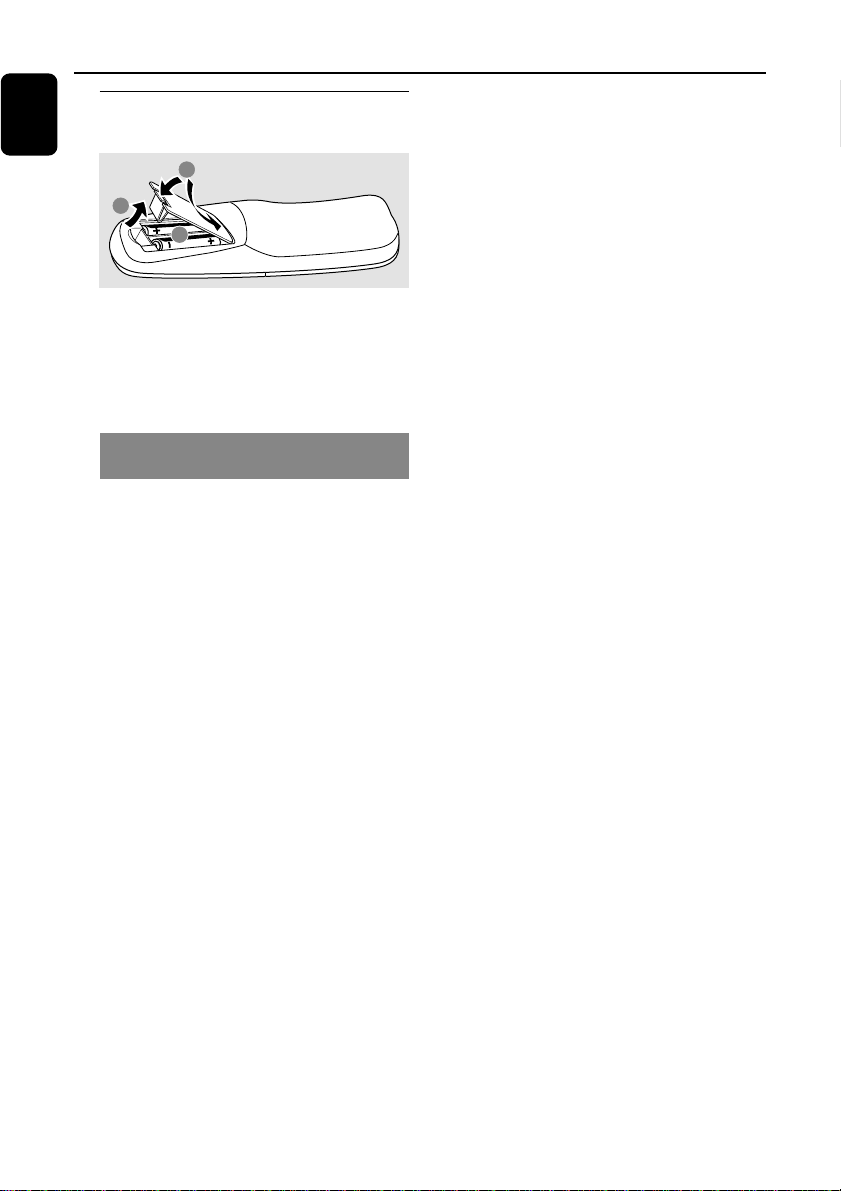
Step 6: Inserting batteries into
the remote control
3
1
2
1 Open the battery compartment cover.
2 Inser t two batteries type R06 or AA, following
the indications (+-) inside the
compartment.
3 Close the cover.
Using the remote control to operate
the system
1 Aim the remote control directly at the
remote sensor (iR) on the main unit.
2 Select the source you wish to control by
pressing one of the source select keys on the
remote control (for example CD, TUNER).
3 Then select the desired function (for example
ÉÅ,
í,
ë).
CAUTION!
– Remove batteries if they are exhausted
or will not be used for a long time.
– Do not use old and new or different
types of batteries in combination.
– Batteries contain chemical substances,
so they should be disposed of properly.
12
Page 13
Gameport Operations
MO
DE
G
AM
E
SOUN
D
GAM
E
A
U
X
About Gameport
Gameport allows you to connect your game
console to this mini system which enables you to
enjoy a total game immersion experience by
having powerful sound output.
Preparation before use
rear panel
2
3
1
G
AME
•A
U
5
7
6
X
O
E
D
I
V
E
M
U
L
O
V
E
M
A
.
L
G
O
I
D
U
A
M
IX
-I
T
GA
ME SOUND
.
R
S
P
E
E
D
P
U
N
O
C
H
B
L
A
ST
I
D
U
M
O
D
E
A
front panel
Game console
1 Connect your game console’s video and audio
output to the GAMEPORT video and audio
inputs respectively (refer to “Connections -
Connecting to game console).
2 Connect your TV’s video input to the VIDEO
OUT (CVBS) on the rear panel.
3 Connect all the AC power cord to the power
outlet.
Start operating
4 Turn on the TV and set to the correct
video-in channel.
The TV’s video input channel may be called
AUX(iliary) IN, AUDIO/VIDEO (A/V) IN, EXT 1,
etc. These channels are often near channel 00
on your TV. Or, your TV remote control may
have a button or switch that chooses different
video modes. See your TV manual for details.
5 Press AUX•GAME until “GAMEPORT” is
displayed.
6 Press MODE (or GAME SOUND on
remote) to select the type of sound setting
that best suit the game : SPEED, PUNCH,
BLAST or OFF.
7 If you like to mix your game sound to your
favourite music, press MIX-IT to select the
desired music source : CD, TUNER,
USB PC LINK, AUX or OFF.
CD ™ “MIX-CD"
TUNER ™ “MIX-TU"
USB PC LINK ™ “MIX-USB"
AUX ™ “MIX-AUX"
OFF ™ “ MIX-OFF"
8 If necessar y, star t playback your chosen mixer
source.
9 Star t playing your favourite game.
To adjust the game console’s volume
level
● Adjust GAME VOLUME.
To change the mixer source
● Press MIX-IT.
To control the current active mixer
source
● Press the respective source button (for
example, CD, TUNER) on the remote control,
then select the desired function (for example
í,
ë).
É,
For example, if CD is the mixer source and to
change the disc tray, you have to press CD, then
press CD 1~5 to select the desired disc tray.
Notes:
– You can only activate GAME VOLUME and
MIX-IT while in game source mode.
– If your game console is switched on, the video
image will always appear on the TV even though
you are not in the gameport mode.
English
13
Page 14
USB PC Link
English
Quick Setup Guide
PC system requirement
– Windows 98/ ME/ 2000/ XP
– Intel Pentium MMXX200 or higher
– CD-ROM drive
– USB port
– Free hard disk space : 15 MB for the
software
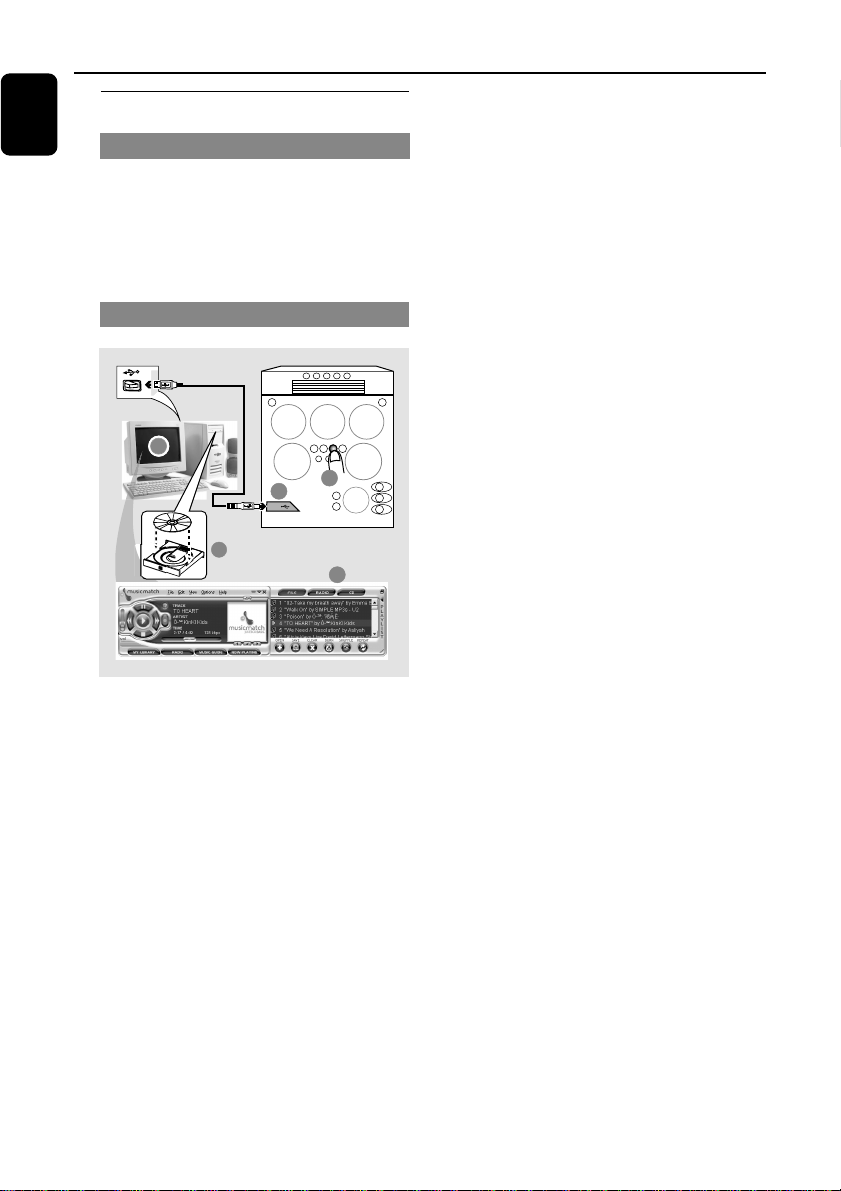
Install MusicMatch software
1
P
O
W
E
R
O
N
/
O
F
F
3
1 Use the supplied USB cable to connect the
audio system to your personal computer’s
USB port.
2 Press USB PC LINK.
3 Turn on the PC and insert the USB PC LINK
installer disc (which comes with this product)
onto the PC’s CD-ROM drive.
This application software can also be downloaded
from “http://www.audio.philips.com”.
IMPORTANT!
Please use this customised MusicMatch
software for your USB PC Link
application. Remember to un-install all
other MusicMatch jukebox software first
from your PC system (if available).
4 The installation guide will appear automatically. If
it does not, go to the CD-ROM drive in
Windows Explorer and double click on the
“USBPCLINK.exe”. Then perform the following
steps:
– First, select your desired language from the
list.
– Then, select “installer driver” and follow by
“installer MusicMatch jukebox”.
– Select other options (Tutorial, Free goodies,
FAQ).
Note:
– You are advised to read the MusicMatch tutorial
before using it for the first time. Make sure the
mute function on the PC is deactivated in order to
ensure sound output from the Audio System. For
optimum performance, the equaliser function in
MusicMatch should be set to a low level.
2
5
5 Launch the “MUSICMATCH JUKEBOX” and
choose to do one of the followings :
To create a “Playlist”
Select “Open” button on the MusicMatch
Jukebox and simply drag/drop the music tracks
from anywhere on your PC into the “Playlist”
window. Remember to save this “Playlist” for
future use.
To create a music library
A music library of all stored music files available
on your PC can be setup by simply select “add”
function on the MusicMatch Jukebox. Once
created, you may then choose to drag/drop any
music tracks from this library to a “Playlist” for
music playback.
Note:
– It is not possible to create a playlist from the
system’s 5 CD changer. If you encounter problem
using USB PC LINK, please refer to the FAQ
(Frequently Asked Questions) stored in your USB PC
LINK installer disc or visit “www.audio.philips.com”
for latest update on FAQ.
14
Page 15
USB PC Link
REPEAT SHUFFLE
DIM SLEEP CLK/TIMER TIMER
VOL
ALBUM
TITLE
USB PC LINK
ON/OFF
2
3
4
5
1
Enable digital CD audio output
Before playing the CD through your PC’s
CD-ROM drive, it is necessary to configure your
PC’s hardware as follows:
For Windows ME/ 2000/ XP
1 Enter the system control panel menu and
select :
“SYSTEM ™ HARDWARE ™
DEVICE MANAGER ™ CD-ROM DRIVES ™
ACTION–PROPERTIES ™ PROPERTIES”.
OR
For Windows 98
Enter the system control panel menu and
select “MULTIMEDIA” and “CD MUSIC”.
2 Check the ‘Enable digital CD audio for this
CD-ROM device’ setting option is selected
(enabled).
Note:
– You may need to refer to your PC’s manual for
correct configuration.
Connecting to USB PC LINK
USB PC LINK allows you to playback your music
collection from the PC via the powerful amplifier
and speakers of this system.
IMPORTANT!
Make sure the MusicMatch software has
been installed. Refer to “Quick Setup
Guide” for USB PC Link.
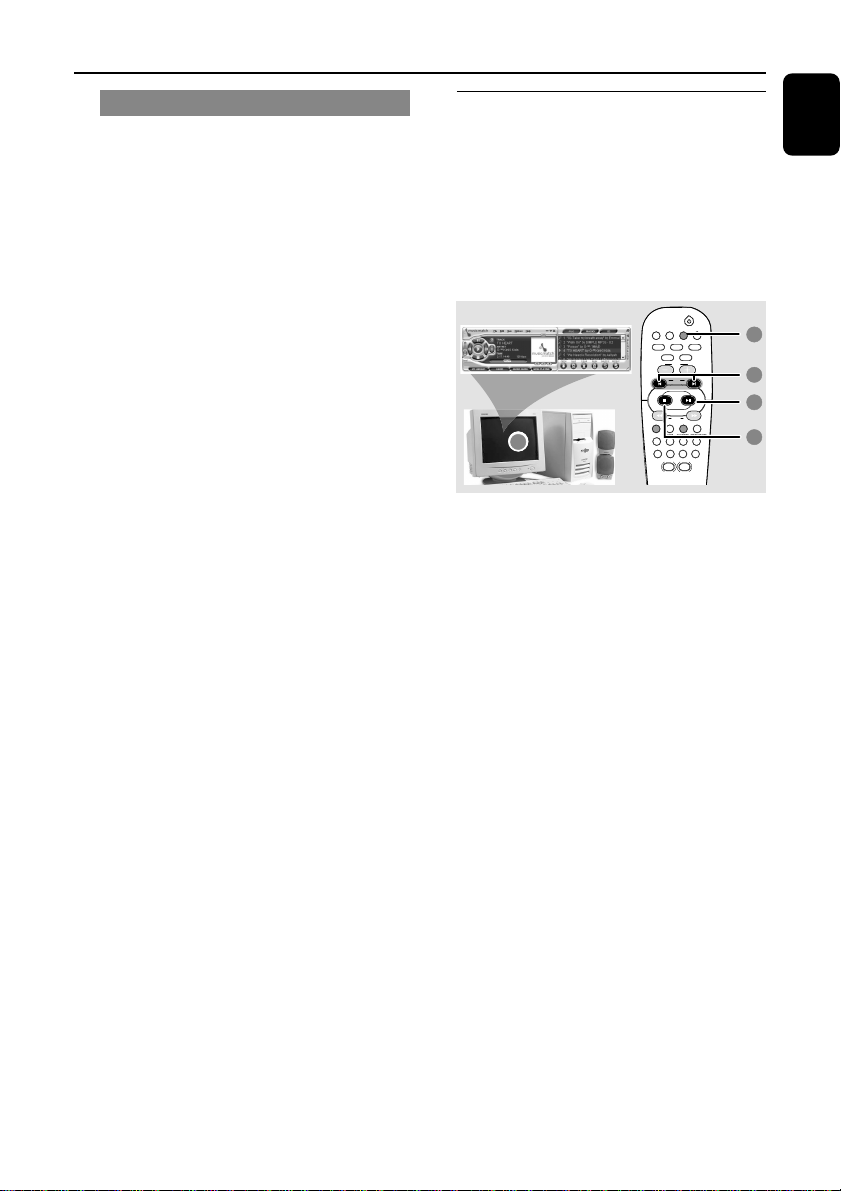
1 Turn on your computer and launch the
“MUSICMATCH JUKEBOX”.
➜ The volume level of PC should not be put
into mute.
2 Press USB PC LINK.
➜ If the audio streaming is detected,
“CONNECTING” is displayed and the USB
indicator will be flashing.
➜ If “NO CONNECTION” is displayed, check the
connection between your PC and mini system.
3 Press í or ë until the desired track in the
playlist is highlighted.
4 Press ÉÅ to start playback.
➜ The track information will appear on the
display. The display only supports English
characters.
During playback,
– Press SHUFFLE to play all available tracks in
the playlist in random order.
– Press REPEAT to repeat playback of all the
tracks in the playlist.
5 To exit, select another active mode or
press Ç.
English
15
Page 16
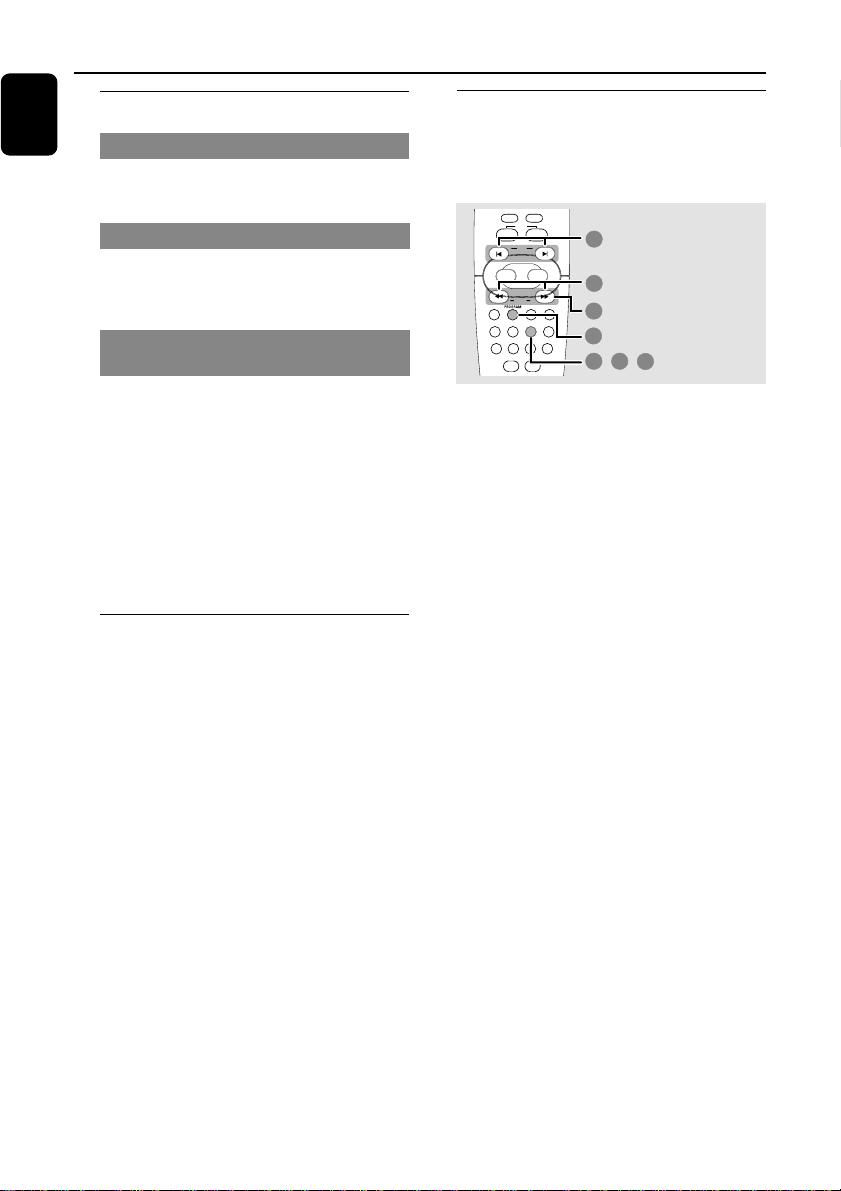
Basic Operations
CLK/TIMER
(00:00 î 12:00AM)
(
00
:00 / 12:00AM)
(00:
00
/ 12:00AM)
5
4
3
1 2
,
6
,
2
English
Switching on/off
Switching to active mode
● Press CD, TUNER, USB PC LINK or
AUX•GAME.
Switching to Eco Power standby mode
● Press B.
➜ ECO POWER button lights up.
➜ The display screen will go blank.
Switching to standby mode (view
clock)
● Press and hold B.
➜ The clock is displayed.
➜ While in standby mode, pressing
CLOCK•TIMER button will switch the system to
Eco Power standby mode.
Note:
– Before switching the system to Eco Power
standby or standby mode, make sure the
demonstration mode has been deactivated.
Demonstration mode
If the demonstration mode is active, whenever
you switch the system to Eco Power standby or
standby mode, it will begin showing the various
features offered by the system.
To activate the demonstration
● In Eco Power standby/standby mode,
press and hold Ç on the main unit until
"DEMO ON" is displayed.
To deactivate the demonstration
● Press and hold Ç on the main unit until
"DEMO OFF" is displayed.
Setting the clock
The clock can be set in either 12-hour or
24-hour mode ("11:59 PM" or "23:59" for
example).
1 Press and hold CLK/TIMER (or
CLOCK•TIMER on main unit) until
"SELECT CLOCK OR TIMER" is displayed.
2 Press ë to change the display to "CLOCK"
and press CLK/TIMER (CLOCK•TIMER)
again to confirm.
3 Press PROGRAM (PROG) repeatedly to
change between 12-hour and 24-hour clock
mode.
4 Press à or á repeatedly to set the hour.
5 Press í or ë repeatedly to set the minute.
6 Press CLK/TIMER (CLOCK•TIMER) to
store the setting.
➜ The clock will star t working.
To view the clock time in any active
mode
● Press CLK/TIMER (CLOCK•TIMER)
once.
➜ The clock is displayed for a few seconds.
Notes:
– The clock setting will be erased when the system
is disconnected from the power supply.
– The system will exit clock setting mode if no
button is pressed within 90 seconds.
– To set the clock automatically through the time
information in the RDS signal, refer to "Tuner
Operations - Setting the RDS clock".
16
Page 17
Basic Operations
Dimming system’s display screen
You can select the desired brightness for the
display panel.
● In any active mode, press DIM on remote
repeatedly to turn on/off dim mode.
➜ DIM is shown, except for DIM OFF mode.
Volume control
● Adjust MASTER VOLUME (or press
VOL +/- on remote) to increase or
decrease the sound level.
➜ "VOL MIN" is the minimum volume level and
"VOL MAX" is the maximum volume level.
To switch off the volume temporarily
● Press MUTE on the remote.
➜ Playback will continue without sound and
"MUTE" is displayed.
➜ To restore the volume, press MUTE again or
increase the volume level.
Sound control
MAX sound, DSC and VAC sound features
cannot be activated on the same time.
While in game mode, all the sound control
features are not available for selection, except
DBB and Game Sound control.
MAX sound
MAX sound provides the best mixture of
various sound features (DSC, VAC for example).
● Press MAX SOUND (or MAX ON/OFF
on remote).
➜ If activated, the MAX SOUND button lights
up. All other sound effects (DSC, VAC or DBB)
will be switched off automatically
Digital Sound Control
DSC provides a different type of preset sound
equaliser setting.
● Press DSC repeatedly to select : OPTIMAL,
JAZZ, ROCK or POP.
Virtual Ambience Control
VAC provides a different type of environmentbased equaliser setting.
● Press VAC repeatedly to select : HALL,
CINEMA, CONCERT, CYBER or ARCADE.
English
Dynamic Bass Boost
DBB enhances the bass response.
● Press DBB repeatedly to select : DBB 1,
DBB 2, DBB 3 or DBB OFF.
➜ Some discs might be recorded in high
modulation, which causes a distortion at high
volume. If this occurs, switch off DBB or reduce
the volume.
Automatic DSC-DBB and VAC-DBB
selection
The best DBB setting is generated automatically
for each DSC, VAC or Game Sound selection.
You can manually select the DBB setting that
best suits your listening environment.
17
Page 18
Disc Operations
English
IMPORTANT!
– This system is designed for regular
discs. Therefore, do not use any
accessories such as disc stabiliser rings or
disc treatment sheets, etc., as offered on
the market, because they may jam the
changer mechanism.
– Do not load more than one disc onto
each tray.
Playable discs
This system is able to play :
– All pre-recorded audio CDs
– All finalised audio CDR and audio CDRW
discs
– MP3-CDs (CD-ROMs with MP3 tracks)
Basic playback controls
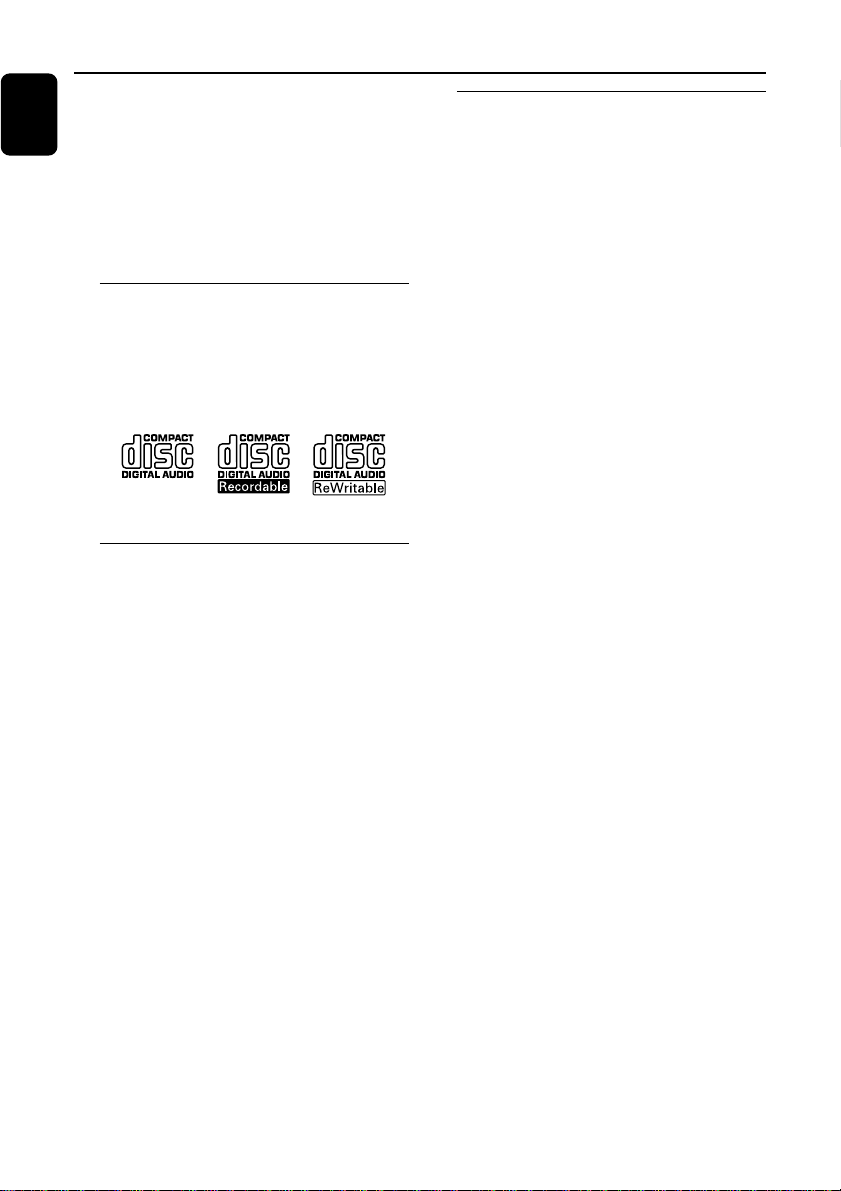
Load discs (page 3 - P4).
To play all discs on the disc trays
● Press ÉÅ.
OR
In stop mode, press CD to select a disc tray
to begin, then press ÉÅ.
➜ All the available discs will play once, then stop.
To play the selected disc only
● Press one of the CD 1~5 buttons on
remote.
➜ The selected disc will play once, then stop.
To select a desired track
● Press í or ë repeatedly until the desired
track is displayed.
➜ During random play (shuffle mode), pressing
í will not affect the current playback.
Loading discs (page 3 - P4)
1 Press OPEN•CLOSE 0 DISC 1 button on
top of the main unit to open disc tray 1.
2 Load a disc with the label side facing up. For
double-sided discs, load the side you want to
play facing up.
3 Press OPEN•CLOSE 0 DISC 1 button
again to close the disc tray.
➜ “READING“ is displayed. The selected disc
tray, total number of tracks and the playing time
will appear on the display.
4 Repeat steps 1~3 for loading discs onto the
disc trays 2~5.
Notes:
– To ensure good system performance, wait until
the disc trays completely read the disc(s) before
proceeding.
– Only one tray can be opened at each time. If
you open the second tray before closing the first
tray, the first tray will automatically close before the
second tray opens.
To search for a particular passage
during playback
● Press and hold à or á and release it when
the desired passage is located.
➜ During searching, the volume will be reduced.
For MP3 disc, the volume will be muted.
To replace discs without interrupting
playback
● Press OPEN•CLOSE 0 buttons of the
inactive disc trays (refer to “Loading discs”).
For example, if currently disc tray 1 is playing,
you can replace the discs on disc tray 2~5.
To interrupt playback
● Press ÉÅ.
➜ To resume normal playback, repeat the
above.
To stop playback
● Press Ç.
➜ If the system remains in stop mode for 30
minutes, it will switch to Eco Power standby
mode.
18
Page 19
D
I
SC
1
D
I
SC
2
D
ISC
3
D
I
SC
4
D
ISC
D
ISC
D
ISC
D
I
S
C
D
ISC
C
D
C
D
-R
C
D
-R
W
C
O
M
P
TI
BL
E
D
ISC 1
Disc Operations
Playing an MP3 disc
TITLE
A02 T008
1
3
4
C
D
/
C
D
-
R
/
C
D
-
R
W
C
O
M
P
AT
I
B
L
D
I
S
C
1
D
I
S
C
2
D
I
S
C
3
D
I
S
C
D
I
S
C
D
I
S
C
D
D
IS
I
S
C
C
E
D
I
S
C
4
D
I
S
C
5
1
2
3
4
1
2
ALB
A02 T001
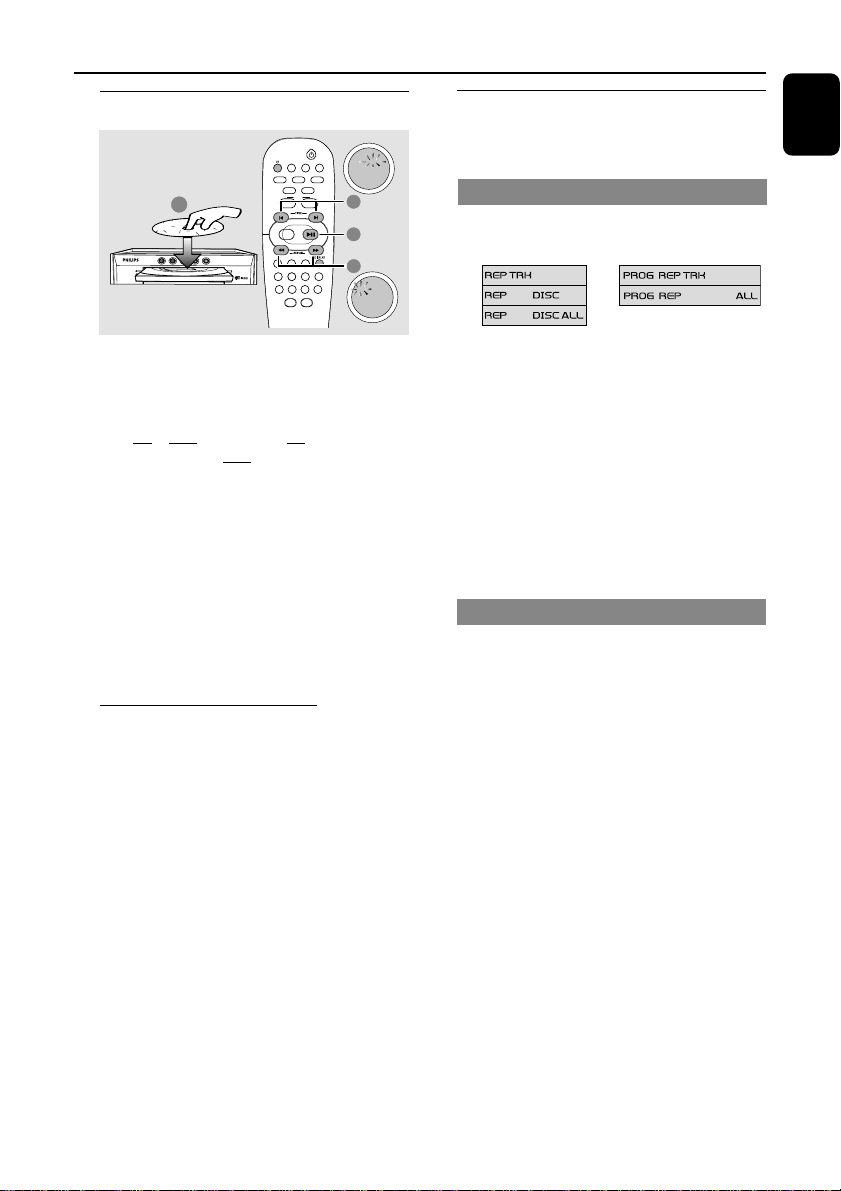
1 Load an MP3 disc.
➜ The disc reading time may exceed 10
seconds due to the large number of songs
compiled into one disc.
➜ "AXX TYYY" is displayed. XX is the current
album number and YYY is the current title
number.
2 Press à / á (ALBUM 43) to select a
desired album.
3 Press í / ë (TITLE -+) to select a
desired title.
4 Press ÉÅ to start playback.
● During playback, press DISPLAY to show
the album and title name.
Supported MP3 disc formats:
– ISO9660, Joliet, UDF 1.5
– Maximum title number : 999 (depending on
filename length)
– Maximum album number : 99
– Supported sampling frequencies : 32 kHz,
44.1 kHz, 48 kHz
– Supported Bit-rates : 32~256 (kbps), variable
bitrates
– ID3 tags : V1.1, V2.2, V2.3, V2.4
Repeat and Shuffle
You can select and change the various play
modes before or during playback.
Repeat play
1 Press REPEAT on the remote repeatedly to
select :
D
E
A
B
C
A – to repeat playback of the current track.
B – to repeat playback of the current disc.
C – to repeat playback of all available discs
(not available for this model).
D – to repeat playback of the current
programmed track (only if the programme
mode is active)
E – to repeat playback of all the programmed
tracks (only if the programme mode is
active)
2 To resume normal playback, press REPEAT
until "OFF" is displayed.
Random play
● Press SHUFFLE on the remote to turn
on/off the shuffling mode.
➜ If activated, SHUF is shown and the repeat
mode (if any) will be cancelled.
➜ The random play will star t from the current
disc tray. Only after all the tracks in the active
disc tray has been shuffled, then it will change to
the next available disc tray.
➜ If programme mode is active, only the
programmed tracks will be played in random
order.
Note:
– Pressing the OPEN•CLOSE button will cancel all
repeat and shuffling modes.
English
19
Page 20
D
ISC
1
D
I
SC
2
D
ISC
3
D
I
SC
4
D
ISC
D
ISC
D
IS
C
D
ISC
D
ISC
C
D
C
D
-R
C
D
-R
W
CO
M
P
T
I
BL
E
D
IS
C
1
Disc Operations
English
Programming the disc tracks
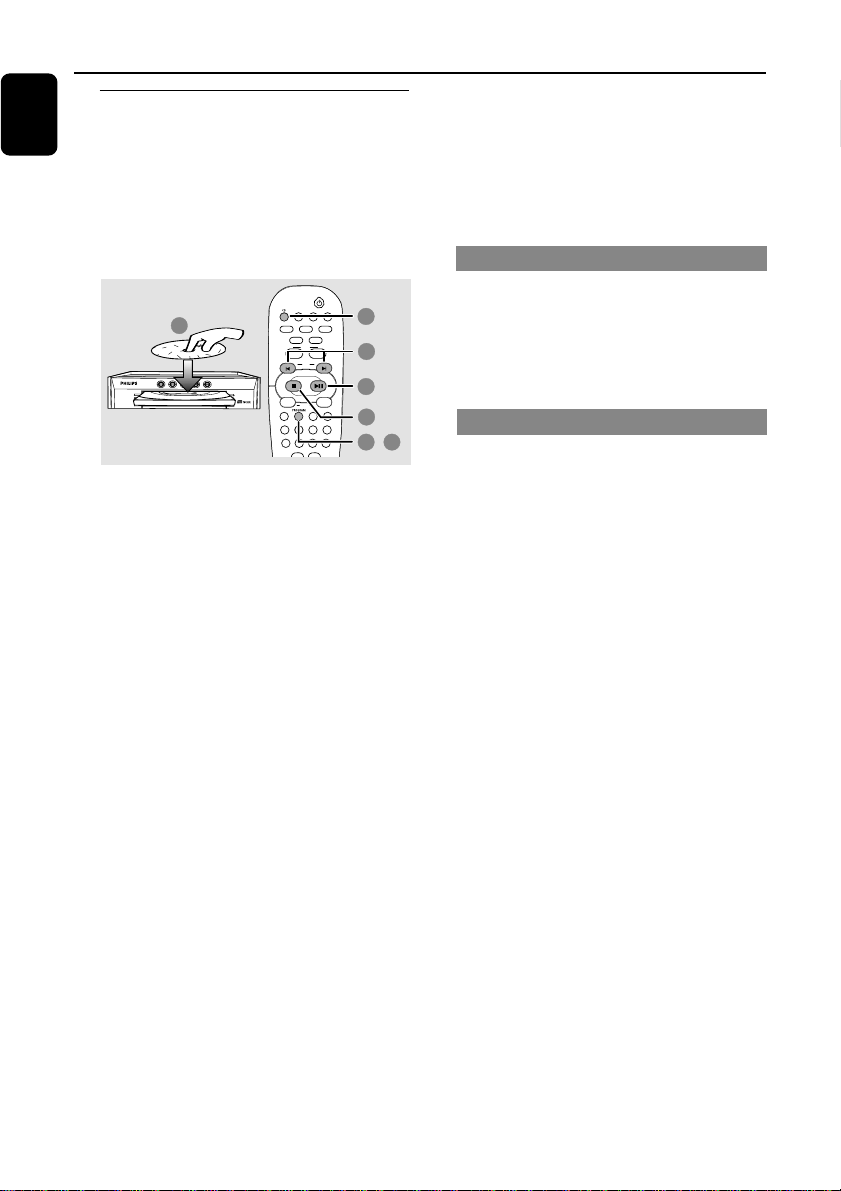
Programming tracks is possible when playback is
stopped. Up to 99 tracks can be stored in the
memory in any order.
IMPORTANT!
It is only possible to programme from
the current selected disc tray.
1
C
D
/
C
D
-
R
/
C
D
-
R
W
CO
M
P
A
T
I
B
L
D
I
S
C
1
D
I
S
C
2
D
I
S
C
3
D
I
S
D
I
S
D
I
S
D
D
IS
I
S
1 Load the desired discs on the disc trays (refer
to “Loading discs”).
2 Press CD or one of the CD 1~5 buttons to
select a disc.
3 Press PROGRAM (PROG) to start
programming.
➜ PROG starts flashing.
4 Press í or ë repeatedly to select the
desired track.
● For MP3 disc, press à / á (ALBUM 43) and
í / ë (TITLE -+) to select the desired
album and title for programming.
5 Press PROGRAM (PROG) to store.
● Repeat steps 4–5 to select other tracks.
➜ If you attempt to programme more than 99
tracks, "PROGRAM FULL" is displayed.
6 To start programme play, press ÉÅ.
7 To stop playback or to end the programming,
press Ç once.
➜ PROG stays and the programme mode
remains active.
E
D
I
S
C
4
D
I
S
C
5
C
1
C
2
C
3
C
C
4
1
2
4
6
7
3 5
,
Notes:
– If the total playing time reached 100 minutes or
if one of the programmed tracks has a number
greater than 30, then "--:--" is displayed instead
of the total playing time.
– The system will exit programming mode if no
button is pressed within 20 seconds.
Checking the programme
1 Stop playback and press í or ë repeatedly.
2 Press Ç to exit.
OR
Press ÉÅ to star t playback from the current
programmed track
Clearing the programme
● Stop playback, then press Ç to clear the
program.
OR
Press the OPEN•CLOSE 0 button of the
disc tray.
➜ PROG disappears and "PROGRAM CLEARED"
is displayed.
Note:
– The programme will be erased if the system is
disconnected from the power supply or you switch
to other source mode.
20
Page 21
Tuner Operations
IMPORTANT!
Make sure the FM and MW antennas are
connected.
Tuning to radio stations
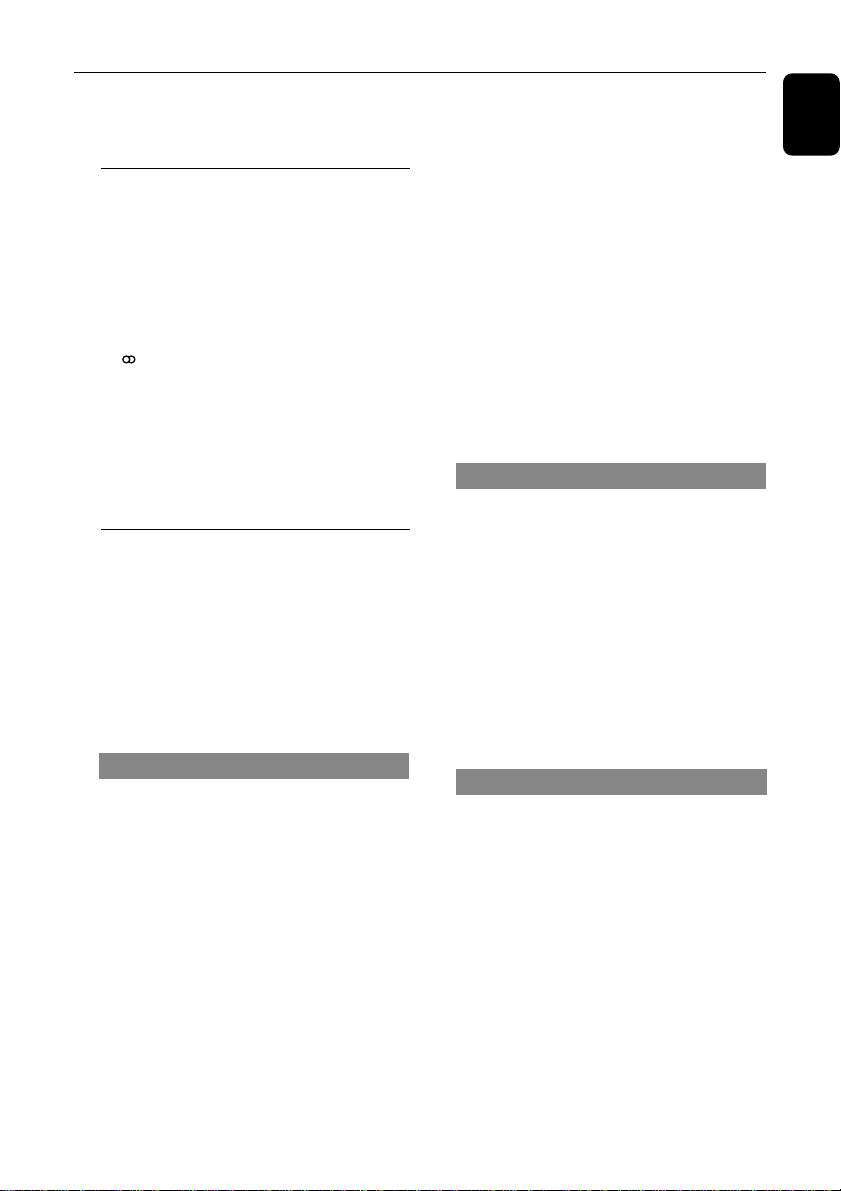
1 Press TUNER to enter tuner mode. To
select another waveband (FM or MW), press
TUNER again.
2 Press and hold à or á until the frequency
indication starts to change, then release.
➜ The system automatically tunes to the next
strong signal radio reception.
➜ lights up for FM stereo reception.
➜ RDS lights up for RDS station (in FM band
only).
For tuning to a weak signal station,
● Press à or á briefly and repeatedly until an
optimal reception is found.
Presetting radio stations
You can store up to 40 preset radio stations in
the memory, starting from FM and followed by
MW bands.
Notes:
– The system will exit presetting mode if no button
is pressed within 20 seconds.
– If no stereo frequency is detected during Plug
and Play, "CHECK ANTENNA" is displayed.
Using the Plug and Play (page 3 - P3)
Plug and Play allows you to store all available
radio stations automatically.
1 Connect the system to the power supply,
"AUTO INSTALL - PRESS PLAY" is
displayed.
OR
In Eco Power standby/standby mode,
press and hold ÉÅ on the main unit until
"AUTO INSTALL - PRESS PLAY" is
displayed.
2 Press ÉÅ on the main unit to start
installation.
➜ "INSTALL TUNER" is displayed.
➜ All previously stored radio stations will be
replaced.
➜ Once completed, the last tuned radio station
will be played.
➜ Once completed, the last tuned radio station
(or the first available RDS station) will be played.
3 If the first preset is a RDS station, it will
proceed to set the RDS clock.
➜ "INSTALL" is displayed, followed by "TIME"
and "SEARCH RDS TIME".
➜ When RDS time is read, "RDS TIME" is
displayed and the current time will be stored.
➜ If RDS station does not transmit RDS time
within 90 seconds, “NO RDS TIME” is displayed
and the programme will exit automatically.
Automatic presetting
You can start the automatic presetting from a
selected preset number.
1 In tuner mode, press í or ë to select a
preset number.
2 Press and hold PROGRAM (PROG) until
"AUTO" is displayed.
➜ If a radio station has been stored in one of
the presets, it will not be stored again under
another preset number.
➜ If no preset number is selected, automatic
preset will begin from preset (1) and all your
former presets will be overridden.
Manual presetting
You can choose to store only the favourite radio
stations.
1 Tune to your desired radio station (refer to
“Tuning to radio stations”).
2 Press PROGRAM (PROG).
➜ The preset number starts flashing. If you want
to store the radio station in another preset
number, press í or ë.
3 Press PROGRAM (PROG) again to store.
● Repeat steps 1–3 to store other radio
stations.
English
21
Page 22
Tuner Operations
English
Selecting a preset radio station
● In tuner mode, press í or ë.
➜ The preset number, radio frequency, and
waveband are displayed.
Deleting a preset radio station
● Press and hold Ç until “PRESET
DELETED” is displayed.
➜ The current preset radio station will be
deleted.
➜ All other preset radio stations with higher
numbers are decreased by one.
RDS
RDS (Radio Data System) is a service that
allows FM stations to show additional
information. If you are receiving a RDS station,
RDS and the station name are displayed.
Scrolling through RDS information
● Tuned to a RDS radio station from FM band,
then press RDS•NEWS repeatedly to select
the following information (if available):
– Station name
– Programme type (for example: News, Affairs,
Sport, etc.)
– Radio text messages
– Frequency
Setting the RDS clock
Some RDS radio station may be transmitting a
real clock time at an interval of ever y minute. It
is possible to set the clock by using a time signal
which is broadcast together with the RDS signal.
1 Tuned to a RDS station from FM band (refer
to “Tuning to radio stations”).
2 Press and hold CLK/TIMER (or
CLOCK•TIMER on main unit) until
"SELECT CLOCK OR TIMER" is displayed.
3 Press ë to change the display to "CLOCK"
and press CLK/TIMER (CLOCK•TIMER)
again to confirm.
4 Press RDS•NEWS.
➜ "SEARCH RDS TIME" is displayed.
➜ When RDS time is read, the current time will
be stored.
➜ If the RDS station does not transmit RDS
time within 90 seconds, "NO RDS TIME" is
displayed.
22
Note:
– Some RDS radio station may be transmitting a
real time clock at a minute interval. The accuracy
of the transmitted time depends on the transmitting
RDS radio station.
Page 23

NEWS
You may set up the tuner in such a way that
listening to CD or external source is interrupted
by the NEWS of a RDS station. This only works
if the RDS station broadcasts a NEWS signal
while sending the news.
IMPORTANT!
You can activate NEWS function from
any source mode except TUNER.
Switching on NEWS function
1 In any active mode, press RDS•NEWS until
"NEWS" is displayed.
➜ NEWS is shown.
➜ The system will scan the radio stations stored
in the first five (5) preset and wait for the News
Programme Type data to be available in any of
these RDS stations.
➜ While searching NEWS in progress, the
current active mode remains uninterrupted.
2 When NEWS transmission is detected, the
system will switch to Tuner mode.
➜ NEWS starts flashing.
● If no RDS station is detected in the first five
presets, the system will exit NEWS function.
➜ "NO RDS NEWS" is displayed.
Tuner Operations
English
Notes:
– You have to exit Tuner mode before selecting
NEWS function.
– Before you activate the NEWS feature, ensure
that the first five presets have RDS stations.
– The NEWS works only once for each activation.
To cancel NEWS function
● Press RDS•NEWS again or switch the
system to tuner mode.
OR
During news bulletin, press any other available
source keys to execute the relevant source
mode.
23
Page 24
Timer Operations
English
Timer setting
The system can switch on to CD, TUNER or
USB PC LINK mode automatically at a preset
time, serving as an alarm to wake you up.
IMPORTANT!
– Before setting the timer, ensure that
the clock is set correctly.
– The volume of the timer will increase
gradually to the last tuned volume level.
If the last tuned volume level is too low,
the set will then increase to a
predetermined minimum audible level.
3
4
4
CLK/TIMER TIMERON/OFF
2
1 2
(CD / TUNER / USB PC LINK)
(00:
00 / 12:00AM)
(00:00 / 12:00AM)
5
,
,
● At the preset time, the selected sound
source will be played for 30 minutes
before it switches to Eco Power standby
mode (if no button is being pressed within the
time frame).
➜ CD – playing the first track of the last
selected disc. If the last selected disc tray is
empty, it will switch to the next available disc. If
all the disc trays are not available, it will switch to
Tuner mode.
➜ TUNER – playing the last tuned radio station.
➜ USB PC LINK – playing the last selected
playlist. If the connection fails, it will switch to
Tuner mode. Refer to “USB PC Link” for proper
connection and setup before use.
Activating/Deactivating the timer
● Press TIMER ON/OFF on the remote to
turn off the timer or turn on to the last
setting again.
➜ If activated, the timer information will display
for a few seconds, then the system resumes to
the last active source or stays in standby mode.
➜ If deactivated, “OFF” is displayed.
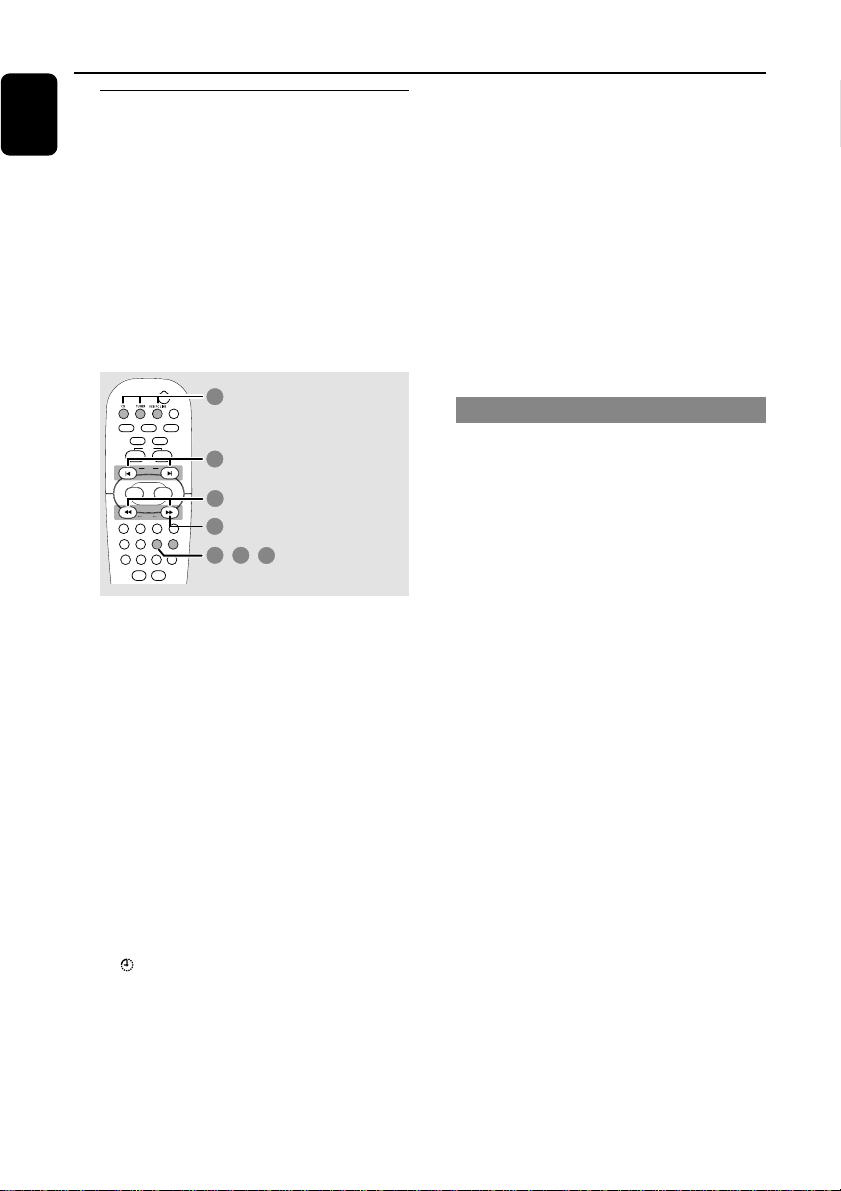
1 Press and hold CLK/TIMER (or
CLOCK•TIMER on main unit) until
"SELECT CLOCK OR TIMER" is displayed.
2 Press ë to change the display to "TIMER"
and press CLK/TIMER again to confirm.
3 Press CD or TUNER or USB PC LINK to
select the wake-up source.
CD ™ “CD XX:XX"
TUNER ™ “TU XX:XX”
USB PC LINK ™ “ USB XX:XX”
4 Press à or á (for hours) and í or ë
(for minutes) repeatedly to set the wake up
time.
5 Press CLK/TIMER to store the setting.
➜ The timer will always be switched on after it
has been set.
➜ icon remains on the display. It indicates the
timer is activated.
24
Note:
– The system will exit timer setting mode if no
button is pressed within 90 seconds.
Page 25
Timer Operations Other Connection
L
R
AUDIO OUT
LR
AUX
IN
PLAY
VOL
ALBUM
TITLE
USB PC LINK
CD TUNER
AUX/GAME
CD1 CD2 CD3
CD4 CD5
AUX/GAME
AUX
➠
1
3
2
Sleep timer setting
The sleep timer enables the system to switch to
Eco Power standby mode automatically at a
preset time.
1 Press SLEEP repeatedly until it reaches the
desired preset turn-off time.
➜ The selections are as follows (time in
minutes):
15 ™ 30 ™ 45 ™ 60 ™ 90 ™ 120 ™
OFF ™ 15 …
➜ SLEEP is shown, except for "OFF" mode.
➜ To view or change the setting, repeat the
above.
2 Before the system switches to Eco Power
standby mode, a countdown of 10 seconds is
displayed.
"SLEEP 10" ™ "SLEEP 9".... ™ "SLEEP 1"
™ "SLEEP"
To cancel the sleep timer function
● Press SLEEP repeatedly until "OFF" is
displayed, or press the STANDBY ON B
button.
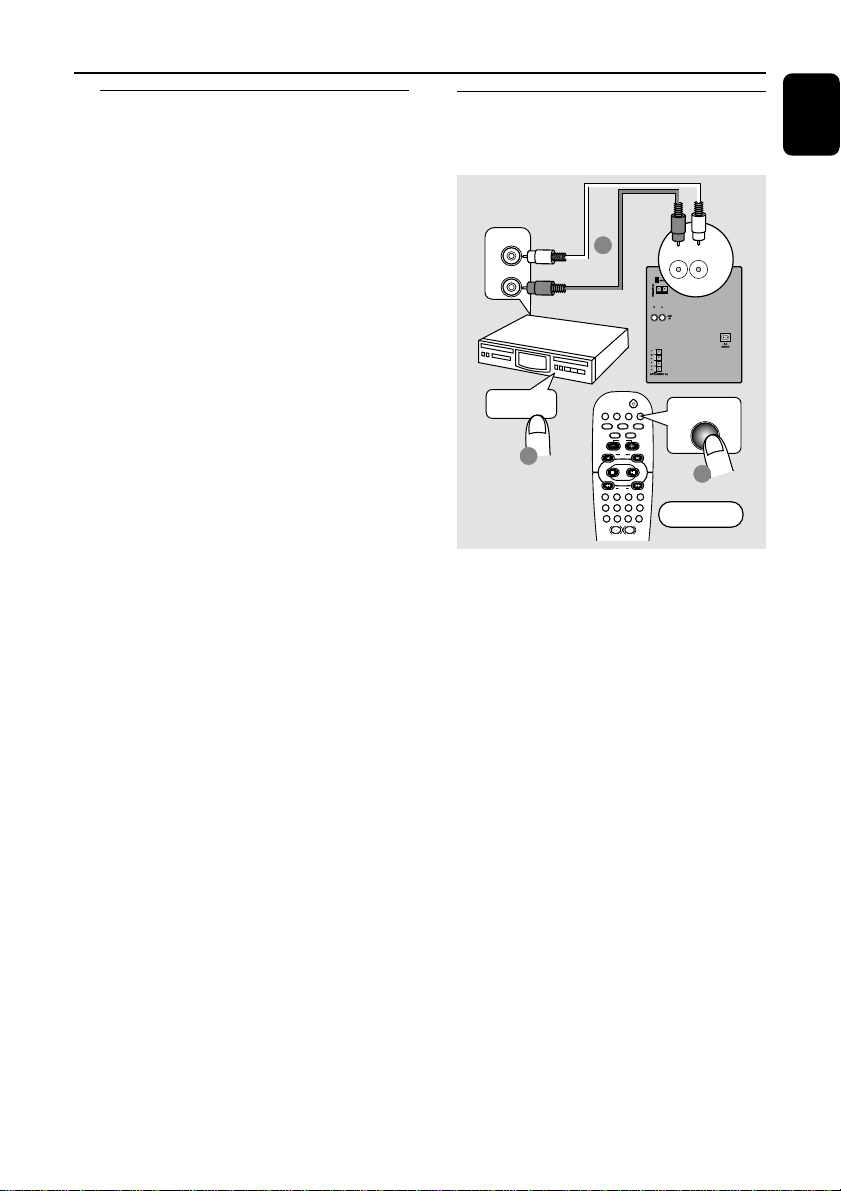
Listening to an external source
You can listen to the sound of the connected
external device through your system’s speakers.
1 Use the red/white audio cables to connect
the system’s AUX IN (R/L) terminals to the
AUDIO OUT terminals on the other
audio/visual device (such as a TV, VCR, Laser
Disc player, DVD player or CD recorder)
➜ If the connecting device has only a a single
audio out terminal, connect it to the AUX IN left
terminal. Alternatively, you can use a “single to
double” cinch cable, but the output sounds still
remain mono.
2 Press AUX/GAME until “AUX” is displayed.
3 Press PLAY on the connected device to start
playback.
English
Notes:
– All the sound control features (DSC, VAC for
example) are available for selection.
– Always refer to the owner’s manual of the other
equipment for complete connection and use details.
25
Page 26

Specifications
English
AMPLIFIER
Output power 2 x 280 W MPO
Signal-to-noise ratio ≥ 75 dBA (IEC)
Frequency response 50 – 18000 Hz, –3 dB
Input sensitivity
AUX In 640 m V
Gameport 310 mV
Output
Speakers ≥ 6 Ω
Headphones 32 Ω – 1000 Ω
(1) (6 Ω, 1 kHz, 10% THD)
DISC PLAYER
Programmable tracks 99
Frequency response 20 – 20000 Hz, –3 dB
Signal-to-noise ratio ≥ 76 dBA
Channel separation ≥ 60 dB (1 kHz)
MPEG 1 Layer 3 (MP3-CD) MPEG AUDIO
MP3-CD bit rate 32-256 kbps
Sampling frequencies 32, 44.1, 48 kHz
USB
Frequency response 20 – 20000 Hz, –3 dB
Signal-to-noise ratio ≥ 75 dBA
Channel separation ≥ 40 dB (1 kHz)
Total harmonic distortion < 0.3% (1 kHz)
TUNER
FM wave range 87.5 – 108 MHz
MW wave range 531 – 1602 kHz
Number of presets 40
Antenna
FM 75 Ω wire
AM Loop antenna
2 x 140 W RMS
(128 kbps advised)
SPEAKERS
(1)
System 3 way, Bass reflex
Impedance 6 Ω
Woofer 1 x 6.5"
Tweeter 1 x 2" Ferrofluid cooled
Dimensions (w x h x d) 348 x 322 x 245 (mm)
Weight 8.7 kg each
GENERAL
Material/finish Polystyrene/Metal
AC Power 220 – 230 V / 50 Hz
Power Consumption
Active 175 W
Standby < 25 W
Eco Power Standby < 1 W
Dimensions (w x h x d) 265 x 322 x 390 (mm)
Weight (without speakers) 8.6 kg
Specifications and external appearance are subject
to change without notice.
26
Page 27

Troubleshooting
WARNING
Under no circumstances should you try to repair the system yourself, as this will invalidate the
warranty. Do not open the system as there is a risk of electric shock.
If a fault occurs, first check the points listed below before taking the system for repair. If you
are unable to remedy a problem by following these hints, consult your dealer or Philips for
help.
Problem
Solution
English
When in USB PC LINK mode, “NO
CONNECTION” is displayed.
Radio reception is poor.
“NO DISC” is displayed or the disc cannot
be played.
The system does not react when buttons are
pressed.
Sound cannot be heard or is of poor quality.
The remote control does not function
properly.
✔ Check the connection between your PC and the
system and the inital setup required, see “Connections”
and “USB PC Link”.
✔ Make sure the connected PC is turned on.
✔ If the signal is too weak, adjust the antenna or connect
an external antenna for better reception.
✔ Increase the distance between the system and your TV
or VCR.
✔ Insert a disc .
✔ Load in the disc with label facing right.
✔ Replace or clean the disc, see “Care and safety
information”.
✔ Use a finalised CD-R(W) or a correct format disc.
✔ Remove and reconnect the AC power cord and switch
on the system again.
✔ Adjust the volume.
✔ Disconnect the headphones.
✔ Check that the speakers are connected correctly.
✔ Check that the AC power cord is connected properly.
✔ When in USB PC LINK mode, check that the PC’s
volume is not put into mute.
✔ When playing CD from PC’s CD drive, refer to “USB
PC Link - Enable digital CD audio output“.
✔ Select the source (CD or TUNER, for example) before
pressing the function button (ÉÅ, S ,
✔ Reduce the distance between the remote control and
the system.
✔ Replace the battery.
✔ Point the remote control directly toward the IR sensor.
T).
The timer is not working.
The system displays features automatically and
buttons start flashing.
Refer to the FAQ (Frequently Asked Questions) on the supplied CD-ROM or visit our website
“www.audio.philips.com” for latest update on FAQ.
✔ Set the clock correctly.
✔ Press TIMER ON/OFF to switch on the timer.
✔ Press and hold DEMO STOP on the main unit to switch
off the demonstration mode.
27
 Loading...