

Page 1
MAGNAVOX
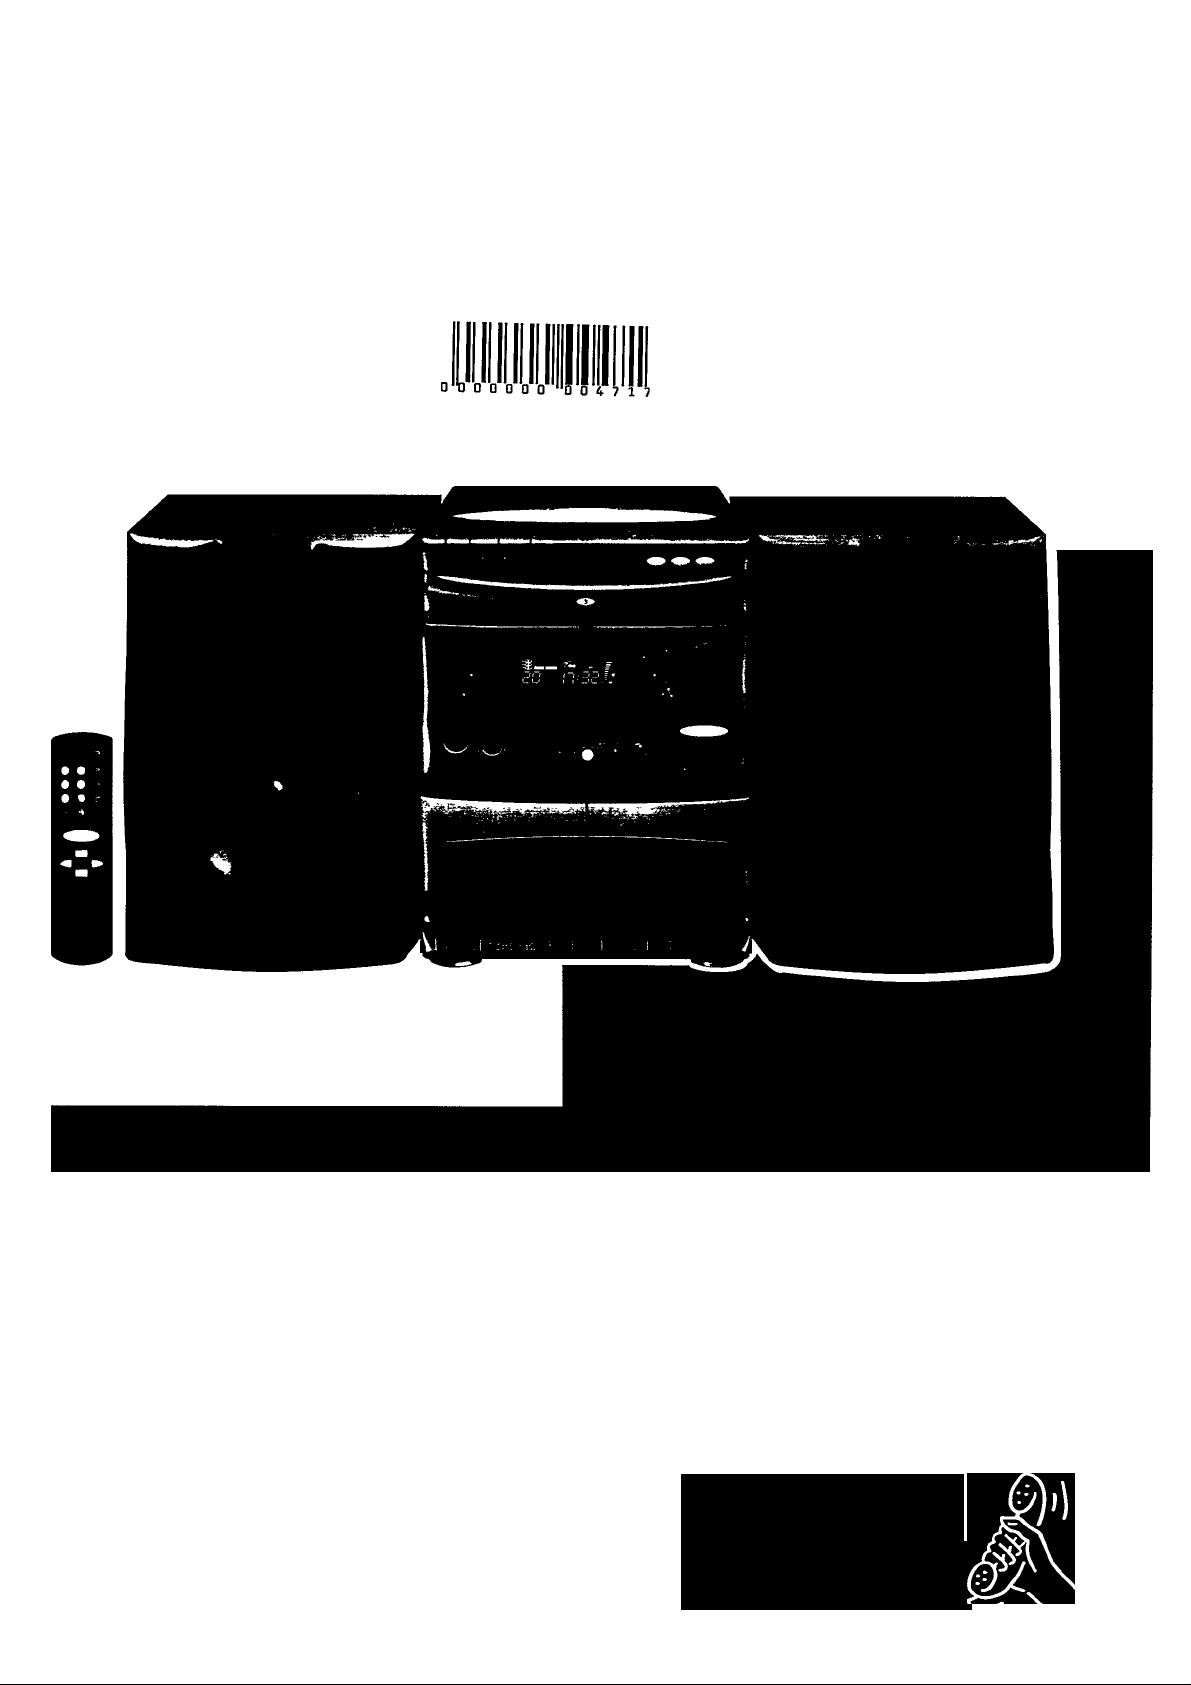
FW39IC I 392C Mini Hifi System
______________________________I
-----------------------------
Toll Free Help Line
Ligne d'assistance en service libre
Linea de ayuda telefònica sin cargo
800-53I-0039
Page 2

MAGNAVœC
Smart.Veiy smart;
WARRANTY
REGISTRATION
CARD
Return your Warranty Registration Card today to
ensure you receive all the benefits you’re entitled.
Once your MAGNAVOX purchase is registered, you’re eligible to receive all the privileges of owning a MAGNAVOX
product. So complete and return the Warranty Registration Card enclosed with your purchase at once. And take
advantage of these important benefits.
■ Warranty
Verification
Registering your product within 10
days confirms your right to maximum
protection under the terms and
conditions of your MAGNAVOX
warranty.
■ Owner
Confirmation
Your completed Warranty Registra
tion Card serves as verification of
ownership in the event of product
theft or loss.
MAGNAVOX
Smart.Very smart:
Congratulations on your purchase
and welcome to the “family!”
Dear MAGNAVOX product owner:
Thank you for your confidence in MAGNAVOX. You’ve selected one of the
best-built, best-backed products available today. And we’ll do everything in
our power to keep you happy with your purchase for many years to come.
As a member of the MAGNAVOX “family.” you’re entitled to protection by
one of the most comprehensive warranties and outstanding service
networks in the industry.
What’s more, your purchase guarantees you’ll receive all the information
and special offers for which you qualify, plus easy access to accessories
from our convenient home shopping network.
And most importantly you can count on our uncompromising commitment
to your total satisfaction.
All of this is our way of saying welcome-and thanks for investing in a
MAGNAVOX product.
Sincerely,
■ Model
Registration
Returning your Warranty Registration
Card right away guarantees you'll
receive all the information and special
offers which you qualify for as the
owner of your model.
KNOW THESE SAFETY
SYMBOLS.
CAUTION
A
A This “bolt of lightning" indicates
uninsulated material within your unit may
cause an electrical shock. For the safety
of everyone in your household, please do
not remove product covering.
A The “exclamation point" calls attention
to features for which you should read
the enclosed literature closely to prevent
operating and maintenance problems
WARNING: TO PREVENT FIRE OR
SHOCK HAZARD, DO NOT EXPOSE THIS
EQUIPMENT TO RAIN OR MOISTURE.
CAUTION; To prevent electnc shock,
match wide blade of plug to wide slot,
and fully insert.
ATTENTION: Pour éviter les chocs
électriques, introduire la lame la plus
large de la fiche dans la borne
correspondante de la prise et pousser
jusqu’au fond.
RISK OF EUCTRtC SHOCK
CAUTION. To reduce thè n$k of «(ectrìc shodL do not
remove cover (or back). No user-serviceebie perte
instde. Ref^ servicìng to queiìfied service personnel
DO NOT OPEN
A
Robert Minkhorst
President and Chief Executive Officer
P.S. Remember, to get the most from your MAGNAVOX product,
you must return your Warranty Registration Card within iO
days. So please mail it to us right now!
For Custximer Use:
Enter below the Senal No. which is
located on the rear of the cabinet.
Retain this informaban for future
reference
Model No
Senal No.
Page 3
Addendum
English
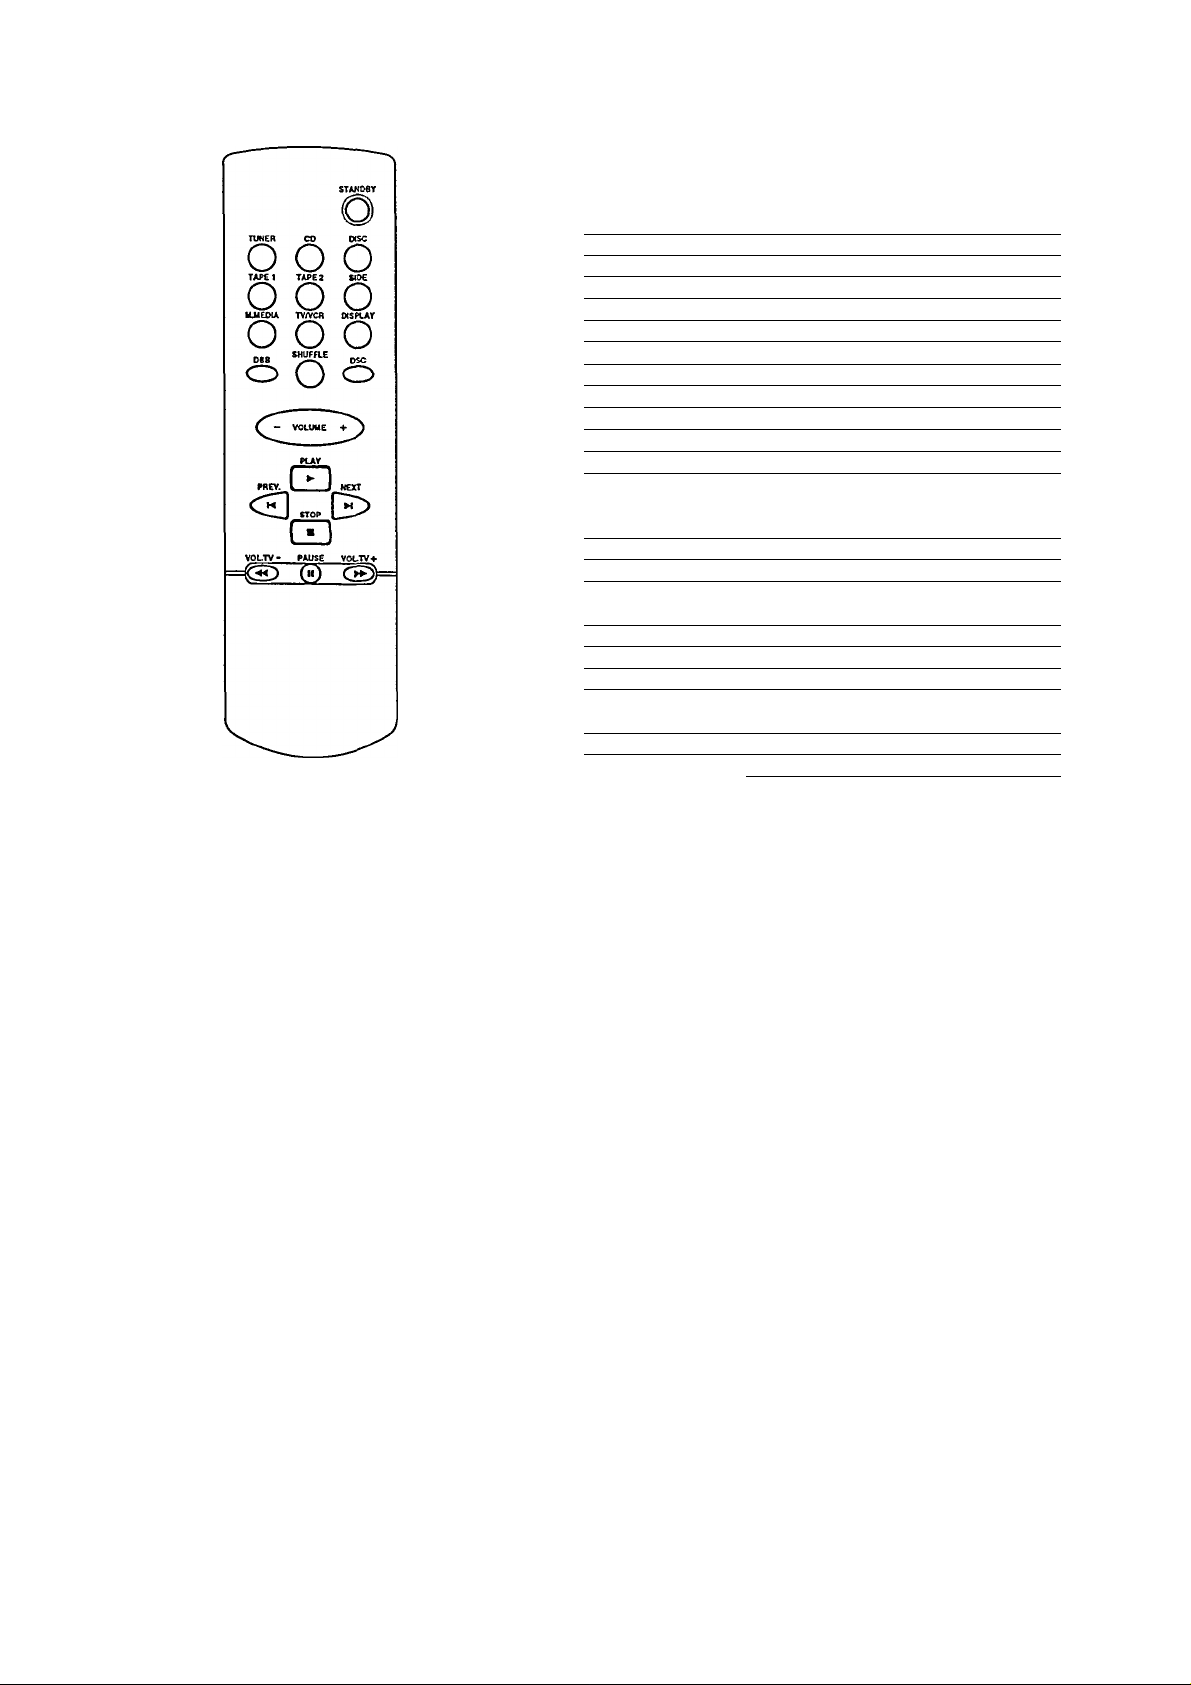
Remote Control Functions (formodel FW391C only).
Français
Fonctions de la télécommande
(uniquementpour le modèle FW39IC)
STANDBY
TUNER
CD ................................................pour sélectionner le mode CD.
DISC
TAPE1
TAPE 2
SIDE .............................................ne fonctionne pas sur ce modèle.
NI. MEDIA .....................
TV/VCR .......................................pour sélectionner le mode téléviseur/
DISPLAY .....................................ne fonctionne pas sur ce modèle.
DBB
SHUFFLE
DSC ..............................................pour sélectionner le contrôle de son numérique:
VOLUME +/—
PLAY.............................................pour débuter la lecture en mode CD.
STOP
PAUSE II .....................................perntet d'interrompre la lecture en mode CD.
TV VOLUME +/— ...................permet de régler le volume du téléviseur
..................................
........................................
............................................
......................... ..............
........................................
.............................................
...................................
.........................
............................................
M PREV./NEXT M
pour TUNER
pour CD
.......................
pour TV/VCR
◄◄/►►
pour TUNER
pour CD
.......................
pour commuter l'appareil en mode de veille.
pour sélectionner le mode syntoniseur.
pour sélectionner le nouveau disque.
ne fonctionne pas sur ce modèle.
permet de sélectionner le mode cassette.
...
.......
ne fonctionne pas sur ce modèle.
magnétoscope.
permet d'activer et de neutraliser la
suramplification des fréquences graves.
pour sélectionner au hasard les plages du CD.
OPTIMAL, JAZZ, CLASSIC, ROCK ou POP.
permet de régler le volume.
pour arrêter la lecture en mode CD.
...............
permet de choisir un émetteur présélectionné en
sens décroissant/croissant
permet de sélectionner la plage précédente/
suivante du CD.
.............
permet de sélectionner le canal précédent/
suivant.
...............
permet de sélectionner une fréquence en sens
décroissant/croissant
permet de rechercher un passage spécifique.
(code RC-5).
STANDBY
TUNER ..........................
CD .................................
DISC
TAPE1
TAPE2 ...........................
SIDE ..............................
M. MEDIA
TV/VCR
DISPLAY
DBB
...........................
.............................
...........................
....................
........................
......................
........................................
... to switch the unit to standby mode.
...to select TUNER mode.
...to select CD mode.
...to select desired disc.
...not functional for this model.
...to select TAPE mode.
...not functional for this model.
... not functional for this model.
...to select TV/VCR mode.
... not functional for this model.
...to switch on and off dynamic bass boost.
SHUFFLE .................................to play CD tracks at random.
DSC
....
...................................
VOLUME-T-/-
PLAY
......................................
STOP ......................................
...to select digital sound control: OPTIMAL, JAZ
CLASSIC, ROCK or POP.
...................
...to adjust the volume.
...to start play in CD.
...to stop play in CD.
M PREV./NEXr W
for TUNER
for CD
for TV/VCR
PAUSE II
for TUNER
for CD
TV VOLUME-f/- ..
.....................
.............................
...................
...............................
.....................
.............................
... to select a lower/higher tuner preset station.
...to select previous/next CD track.
...to select previous/next channel.
...to interrupt play in CD mode.
...to select a lower/higher frequency.
...to search a particular passage. ■
... to adjust the TV (RC 5 code) volume.
Español
Funciones del mando a distancia (solo modelo FW39IC).
STANDBY
TUNER .........................................para seleccionar el modo TUNER (sintonizador).
CD
DISC .............................................para seleccionar el siguiente disco.
TAPE 1 ................................inoperativo en este modelo.
TAPE 2 .........................................para seleccionar el modo TAPE
SIDE .............................................inoperativo en este modelo.
M. MEDIA ..................................inoperativo en este modelo.
TV/VCR
DISPLAY
DBB ..............................................para activar o desactivar el realce dinámico de
SHUFFLE
DSC ..............................................para seleccionar el control de sonido digital:
VOLUME +/—
PLAY
STOP.............................................para detener la reproducción de CD.
PAUSE II
TVVOLUME+/— ....para ajustar el volumen del TV (código RC-5).
..................................
................................................
.......................................
....................................
....................................
.............................................
M PREV./NEXT H
por TUNER........................sintonizador selecciona una presintonía anterior o
por CD
................................
por TV/VCR
◄◄/►►
por TUNER........................sintonizador selecciona una frecuencia superior/
por CD................................búsqueda de un fragmento concreto
......................
.....................................
para desconectar temporalmente la unidad (modo
de espera).
para seleccionar el modo CD.
para seleccionar el modo TV/VCR (TV/vídeo).
inoperativo en este modelo.
graves.
para reproducir las pistas del CD en un orden
aleatorio.
OPTIMAL, JAZZ, CLASSIC, ROCK o POP.
.........
para ajustar el volumen.
para dar comienzo a la reproducción de CD.
posterior.
selecciona la pista anterior/posterior del disco.
selecciona el canal anterior/siguiente.
para interrumpir la reproducción de CD.
inferior.
_
3140 109 34400
Page 4
Addendum
English
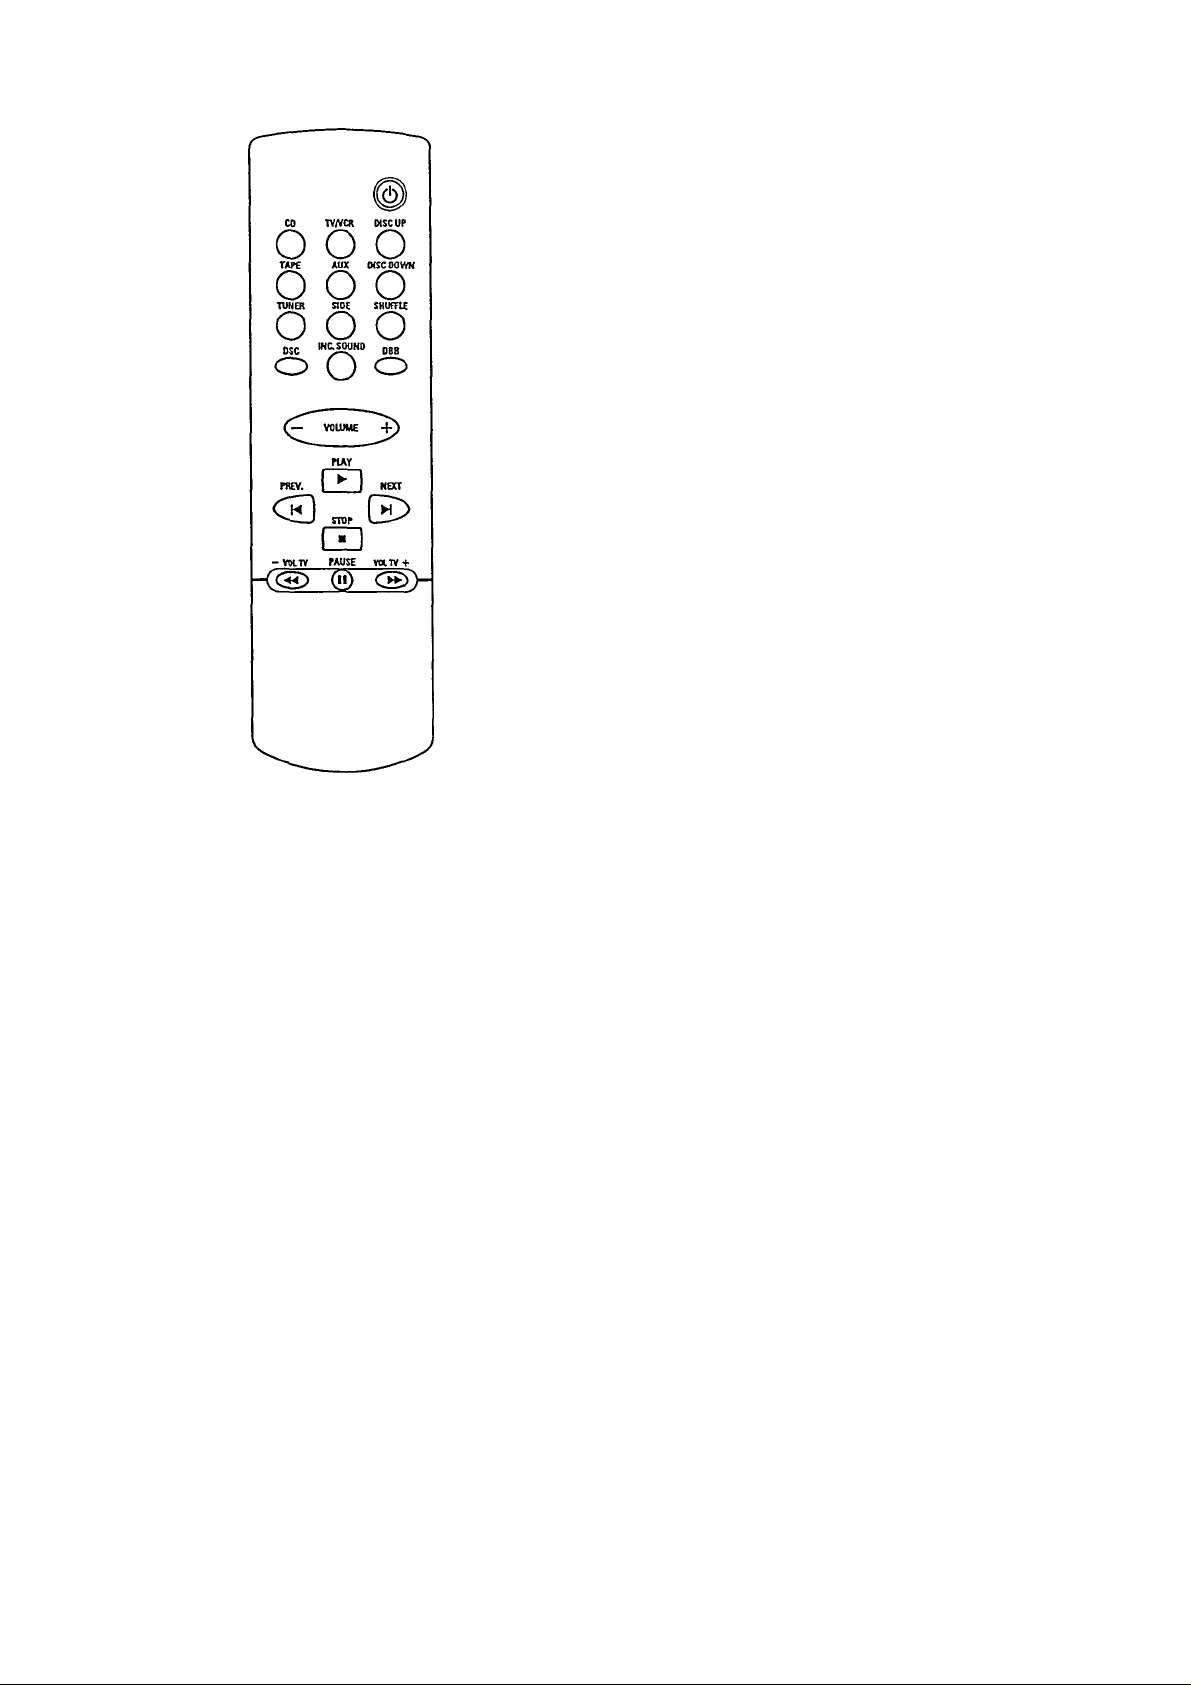
Remote Control Functions (formodel FW392Conlyl.
(!)
CD
................................................
TV/VCR
DISC UP/DOWN .....................to select desired disc.
TUNER
AUX ..............................................to select external mode.
TAPE.............................................to select TAPE mode.
SIDE .............................................not functional for this model.
SHUFFLE
DSC ..............................................to select digital sound control: OPTIMAL, JAZZ,
INCREDIBLE SOUND ...to switch on or off the surround sound effect
DBB ..............................................to switch on and off dynamic bass boost
VOLUME+/— ...........................to adjust the volume.
PLAY
............................................
STOP
...........................................
N PREV./NEXr H
for TUNER.........................to select a lower/higher tuner preset station.
for CD.................................to select previous/next CD track.
for TV/VCR
PAUSE II .....................................to interrupt play in CD mode.
■<◄/►►
for TUNER.........................to select a lower/higher frequency.
for CD
TVVOLUME +/—
..........................................
.......................................
........................................
....................................
.......................
................................
....................
to switch the unit to standby mode.
to select CD mode.
to select TV/VCR mode.
to select TUNER mode.
to play CD tracks at random.
CLASSIC, ROCK or POP.
to start play in CD.
to stop play in CD.
to select previous/next channel.
to search a particular passage.
toad]usttheTV(RC5code)volume.
Français
Fonctions de la télécommande
(uniquementpour le modèle FW392C)
(!)
.......................................
CD
...............................................
TV/VCR
.......................................
DISC UP/DOWN
TUNER
AUX .............................................pour sélectionner le mode externe.
TAPE.............................................permet de sélectionner le mode cassette.
SIDE
............................................
SHUFFLE.....................................pour sélectionner au hasard les plages du CD.
DSC .............................................pour sélectionner le contrôle de son numérique:
INCREDIBLE SOUND ...permet de mettre l'effet sonore "Surround"
DBB .............................................permet d'activer et de neutraliser la
VOLUME +/—
PLAY
............................................
STOP............................................pour arrêter la lecture en mode CD.
M PREV./NEXT M
PAUSE II ....................................permet d'interrompre la lecture en mode CD.
◄◄/►►
TV VOLUME +/— permet de régler le volume du téléviseur
.....................
.........................................
........................
pour TUNER
pour CD.......................permet de sélectionner la plage précédente/
pour TV/VCR
pour TUNER
pour CD
......................
pour commuter l'appareil en mode de veille.
pour sélectionner le mode CD.
pour sélectionner le mode téléviseur/
magnétoscope.
pour sélectionner le nouveau disque.
pour sélectionner le mode syntoniseur.
ne fonctionne pas sur ce modèle.
OPTIMAL, JAZZ, CLASSIC, ROCK ou POP.
sous/hors tension.
suramplification des fréquences graves.
permet de régler le volume.
pour débuter la lecture en mode CD.
..............
permet de choisir un émetteur présélectionné en
sens décroissant/croissant.
suivante du CD.
.............
permet de sélectionner le canal précédent/
suivant
..............
permet de sélectionner une fréquence en sens
décroissant/croissant
permet de rechercher un passage spécifique.
(code RC-5).
Español
Funciones del mando a distancia (solo modelo FW392C).
(!)
.......................................
CD
................................................
TV/VCR
.......................................
DISC UP/DOWN .....................para seleccionar el siguiente disco.
TUNER
........................................
AUX ..............................................para seleccionar el modo externo.
TAPE..............................................para seleccionar el modo TAPE
SIDE .............................................inoperativo en este modelo.
SHUFFLE
....................................
DSC ..............................................para seleccionar el control de sonido digital:
INCREDIBLE SOUND para activar y desactivar el efecto de sonido
DBB ..............................................para activar o desactivar el realce dinámico de
VOLUME +/—
PLAY ............................................para dar comienzo a la reproducción de CD.
STOP
............................................
M PREV./NEXT W
por TUNER
por CD
por TV/VCR
PAUSE II .....................................para interrumpir la reproducción de CD.
«/►►
por TUNER
por CD
TV VOLUME +/— .... para ajustar el volumen del TV (código RC-5).
.......................
...............................
.....................
.......................
...............................
para desconectar temporalmente la unidad (modo
de espera).
para seleccionar el modo CD.
para seleccionar el modo TV/VCR (TV/vídeo).
para seleccionar el modo TUNER (sintonizador).
para reproducir las pistas del CD en un orden
aleatorio.
OPTIMAL, JAZZ, CLASSIC, ROCK o POP.
envolvente.
graves.
.........
para ajustar el volumen.
para detener la reproducción de CD.
sintonizador selecciona una presintonfa anterior o
posterior.
selecciona la pista anterior/posteriordel disco.
selecciona el canal anterior/siguiente.
sintonizador selecciona una frecuencia superior/
inferior.
búsqueda de un fragmento concreto
-2-
Page 5
Index
CAUTION
RISK OF ELECTRIC SHOCK
DO NOT OPEN
CAUTION: TO REDUCE THE RISK OF ELECTRIC SHOCK,
DO NOT REMOVE COVER (OR BACK).
REFER SERVICING TO QUALIFIED SERVICE PERSONNEL
A
A
NO USER-SERVICEABLE PARTS INSIDE.
This symbol warns the user that uninsulated voltage
within the unit may have sufficient magnitude to cause
electric shock. Therefore, it is dangerous to make
any kind of contact with any inside part of this unit
This symbol alerts the user that important literature
concerning the operation and maintenance of this
unit has been included. Therefore, it should be read
carefully in orderto avoid any problems.
/
CgmerlsiteSecwile
GaraM'eUmitM 21 SyatMÍsear 27 Enhetien--------Géiéflilítés 22 Platine Cassette
OpentjonsPitabbtes —
Comnaades
liNbiKcionesSolit« Seguridad „36 FiMcinianieiilodelsisteM
Garaib'a Unitada
lafotiaacioa General —-31 Repraducfot de Casete
Preparación
Cortroles_________ dIHI Ajuste del Reloj
WARNING
To reduce the risk of fire or electric shock, do not expose this appliance to
rain or moisture.
CAUTION
Use of controls or adjustments or performance of procedures other than
herein may result in hazardous radiation exposure.
The set complies with the FCC-Rules, Part 15 and with 21 CFR 1040.10.
Canada
This digital apparatus does not exceed the Class B limits for radio noise emissions
from digital apparatus as set out in the Radio Interference Regulations of the Canadian
Department of Communications.
_____
-------
1
(^№tatiagtiieS|fsten—
R
R
B-7
CDÜaager
20 UlilísatioBilel'appanil
—22-23 Lectennle Disgaes Compacts. 23-31
— 24-25 Reglage de l'herioge 32
-----
-----------
3t39 Reproductor de СО
— 37 Siatoaizadoc
____
10
12-13 Specifications
-------
--
TroiAlesieoting_____
— Ш5
IRM
26 Rógligedelaminiderin_—32
__ 26-23Catacténstigaes Tecbaiqaes—33
Rmédeseacasiiepanne.».—.34 (0
___
42
Ajaste del Tamporizador —
___
.43 ManfHinriaato^
_44-« EspecHícKieMS-....
„4547 SolacióadeProblenas —
46
________
—17
—18
—.33
___
_______________ __________
___
,.—49
___
. 16
17
__________
41
49
50
Ш
*3)
Vi
O'
IC
(0
Ш
e
O
Û.
AVIS
RISQUE DE CHOCS ELECTRIQUES
NEFAS OUVRIR
Attention: Afin de prévenir le risque de chocs électriques,
Toute réparation devrait être confiée à un personnel qualifié.
A
A
A
A
ne pas retirer les vis.
Ce symbole Indique la présence d'une tension
suffisamment élevée pour engendrer un risque de
chocs électriques.
Ce symbole indique que le manuel d'installation
fourni avec l'appareil contient d'importantes
recommandations quant au fonctionnement et
à l'entretien de ce dernier.
Este símbolo tiene рог finalidad advertir al usuario de
la presencia defensión peligrosa no aislada dentro de
la caja del aparato, que puede ser (o suficientemente
fuerte para constituir un peligro de choque eléctrico.
Este símbolo sirve para advertir al usuario de la
presencia de instrucciones de manejo y
mantenimiento íservicio) importantes en el manual
que acompaña al aparato.
AVIS
Afin de réduire tout risque d'incendie ou de choc électrique, il ne faut pas
exposer cet appareil à la pluie ou à l'humidité.
ATTENTION
L'utilisation des commandes ou réglages ou le non-respect des procédures
ci-incluses peuventsetraduire parune exposition dangereuseà l'irradiation.
L'appareil répond aux normes FCC, Part 15 et 21 CFR 1040.10.
Canada
Cet appareil numérique n'emet pas de bruits radioélectriques dépassant les limites
applicables aux appareils numériques de Class B prescrites dans le Règlement sur le
Brouillage Radioélectrique édicté par le Ministère des Communications du Canada.
AVISO
Para reducir el riesgo de fuego o choque eléctrico, no exponga el aparato a
la lluvia o humedad.
ATENCIÓN
El uso de mando o ajustes o la ejecucción de métodos que no sean los aquí
descritos puede ocasionar peligro de exposición a radiación.
El aparato cumple las normas FCC, Parte 15 y 21 CFR 1040.10.
México
Es necesario que lea cuidadosamente su instructivo de manejo.
IVERIRQUE QUE EL VOLTAJE DE AUMENTACION I
I SEA EL REQUEWDO PARA SU APARATO \___________________
PARA EVITAR EL RIESGO DE CHOQUE ELECTRICO, NO QUÍTE LA TAPA;
EN CASO DE REQUERIR SERVICIO, DIRUASE AL PERSONAL AUTORIZADO DE PHIUPS.
NOM
Page 6
SAFETY INSTRUCTIONS - Read before operating equipment
m
s
(Q^
This product was designed and manufactured to meet strict quality and safety
standards. There are, however, some installation and operation precautions which
you should be particularly aware of.
1. Read Instructions - All the safety and operating instructions should be
read before the appliance is operated.
2. Retain Instructions - The safety and operating instructions should be
retained for future reference.
3. Heed Warnings - All warnings on the appliance and in the operating
instructions should be adhered to.
4. Follow Instructions - All operating and use instructions should be
followed.
5. Water and Moisture - The appliance should not be used near water - for
example, near a bathtub, washbowl, kitchen sink, laundry tub or swimming
pool, or in a wet basement.
6. Carts and Stands - The appliance should be used only with a cart or
stand that is recommended by the manufacturer.
6A.
An appliance and cart combination should be moved with care.
Quick stops, excessive force, and uneven surfaces may cause
the appliance and cart combination to overturn.
7. Wall or Ceiling Mounting - The appliance should be mounted to a wall
or ceiling only as recommended by the manufacturer.
8. Ventilation -The appliance should be situated so that its location or position
does not interfere with its proper ventilation. For example, the appliance
should not be situated on a bed, sofa, rug, or similar surface that may block
the ventilation openings; or, placed in a built-in installation, such as a
bookcase or cabinet that may impede the flow of air through the ventilation
openings.
9. Heat - The appliance should be situated away from heat sources such as
radiators, heat registers, stoves, or other appliances (including amplifiers)
that produce heat.
10. Power Sources - The appliance should be connected to a power supply
only of the type described in the operating instructions or as marked on the
appliance.
11. Grounding or Polarization -
Precautions should be taken so that the
grounding or polarization means of an
appliance is not defeated.
AC
'Polarized Plug
Caution; To prevent electric shock, match the wide blade of this plug to
the wide slot and fully insert. Do not use this (polarized) plug with an
extension cord, receptacle or other outlet unless the blades can be fully
inserted to prevent blade exposure.
12. Power Cord Protection - Power supply cords should be routed so that
they are not likely to be walked on or pinched by items placed upon or
against them, paying particular attention to cords and plugs, convenience
receptacles, and the point where they exit from the appliance.
13. Cleaning - The appliance should be cleaned only as recommended by the
manufacturer.
14. Power Lines - An outdoor antenna should be located away from power
lines.
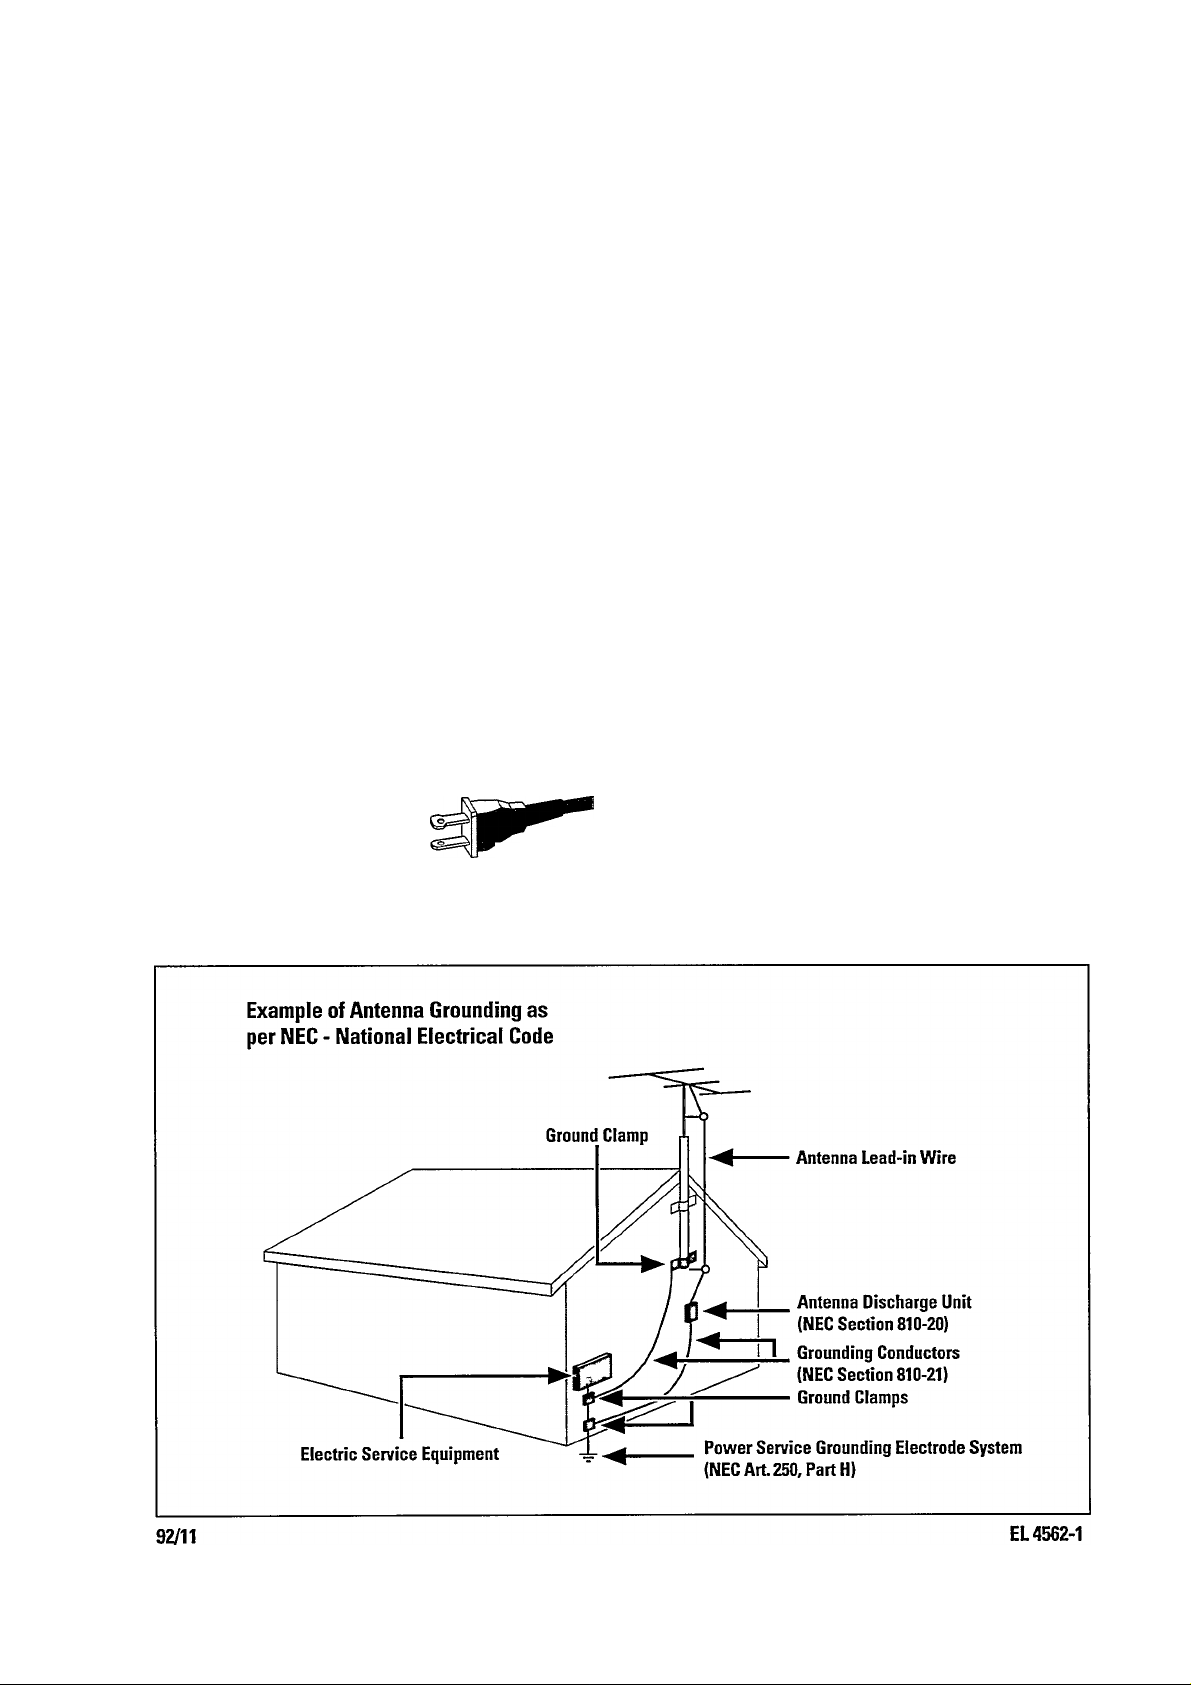
15. Outdoor Antenna Grounding - If an outside antenna is connected to the
receiver, be sure the antenna system is grounded so as to provide some
protection against voltage surges and built up static charges.
Section 810 of the Nationai Electrical Code. ANSI/NFPA No. 70-1934,
provides information with respect to proper grounding of the mast and
supporting structure, grounding of the lead-in wire to an antenna discharge
unit, size of grounding connectors, location of antenna-discharge unit,
connection to grounding electrodes, and requirements for the grounding
electrode. See Rgure below.
16. Nonuse Periods - The power cord of the appliance should be unplugged
from the outlet when left unused for a long period of time.
17. Object and Liquid Entry - Care should be taken so that objects do not fall
and liquids are not spilled into the enclosure through openings.
18. Damage Requiring Service - The appliance should be serviced by
qualified service personnel when:
A. The power supply cord or the plug has been damaged; or
B. Objects have fallen, or liquid has spilled into the appliance; or
C. The appliance has been exposed to rain; or
D. The appliance does not appear to operate normally or exhibits a marked
change in performance; or
E. The appliance has been dropped, or the enclosure damaged.
19. Servicing - The user should not attempt to service the appliance beyond
that described in the operating instructions. All other servicing should be
referred to qualified service personnel.
Note to the CATV system installer
This reminder is provided to call the CATV system installer's attention
to Article 820-40 of the NEC that provides guidelines for proper ground
ing and, in particular, specifies that the cable ground shall be con
nected to the grounding system of the building, as close to the point
of cable entry as practical.
Page 7

LIMITED WARRANTY
AUDIO SYSTEM
One Year Free Labor
One Year Free Service on Parts
This product must be carried in for repair.
WHO IS COVERED?
You must have proof of purchase to receive warranty service. A sales
receipt or other document showing that you purchased the product
is considered proof of purchase.
WHAT IS COVERED?
Warranty coverage begins the day you buy your product. For one year
thereafter, all parts will be repaired or replaced, and labor is free.
After one year from the day of purchase, you pay for the replacement
or repair of all parts, and for all labor charges.
All parts, including repaired and replaced parts, are covered only for
the original warranty period. When the warranty on the product
expires, the warranty on all replaced and repaired parts also expires.
WHAT IS EXCLUDED?
Your warranty does not cover:
• labor charges for installation or setup of the product, adjustment
of customer controls on the product, and installation or repair of
antenna systems outside of the product.
• product repair and/or part replacement because of misuse, acci
dent, unauthorized repair or other cause not within the control of
Philips Consumer Electronics Company.
• reception problems caused by signal conditions or cable or anten
na systems outside the unit.
• a product that requires modification or adaptation to enable it to
operate in any country other than the country for which it was
designed, manufactured, approved and/or authorized, or repair of
products damaged by these modifications.
• incidental or consequential damages resulting from the product.
(Some states do not allow the exclusion of incidental or conse
quential damages, so the above exclusion may not apply to you.
This includes, but is not limited to, prerecorded material, whether
copyrighted or not copyrighted.)
• a product that is used for commercial or institutional purposes.
BEFORE REQUESTING SERVICE...
Please check your owner’s manual before requesting service.
Adjustments of the controls discussed there may save you a service
call.
TO GET WARRANTY SERVICE IN U.S.A.,
PUERTO RICO OR U.S. VIRGIN ISLANDS...
Take the product to a Philips factory service center (see enclosed
list) or authorized service center for repair. When the product has
been repaired, you must pick up the unit at the center. Centers may
keep defective parts.
(In U.S.A., Puerto Rico and U.S.Virgin Islands, all implied warranties,
including implied warranties of merchantability and fitness fçr a par
ticular purpose, are limited in duration to the duration of this
express warranty. But, because some states do not allow limitations
on how long an implied warranty may last, this limitation may not
apply to you.)
TO GET WARRANTY SERVICE IN CANADA...
Take the product to a Philips consumer service center (listed below),
self-servicing dealer or authorized service depot.
Philips Electronics Ltd.
601 Milner Avenue, Scarborough, Ontario, Ml B 1M8
(416) 292-5161
4977 Levy Street, St. Laurent, Québec, H4R 2N9
(514) 956-0120
1741 Boundary Road,Vancouver, B.C.,V5M 3Y7
(604) 294-3441
(In Canada, this warranty is given in lieu of all other warranties. No
other warranties are expressed or implied, including any implied war
ranties of merchantability or fitness for a particular purpose. Philips is
not liable under any circumstances for any direct, indirect, special,
incidental or consequential damages, howsoever incurred, even if
notified of the possibility of such damages.)
WHERE IS SERVICE AVAILABLE?
Warranty service is available in all countries where the product is
officially distributed by Philips Consumer Electronics Company. In
countries where Philips Consumer Electronics Company does not
distribute the product, the local Philips service organization will
attempt to provide service (although there may be a delay if the
appropriate spare parts and technical manual(s) are not readily avail
able).
MAKE SURE YOU KEER..
Please keep your sales receipt or other document showing proof of
purchase.Attach it to this owner’s manuai and keep both nearby.Also
keep the original box and packing material in case you need to return
your product
This warranty gives you speafic legal rights.You may have other rights which vary from state/provmce to state/province.
Philips Service Company, P.O. Box 555, Jefferson City,Tennessee 37760, (423) 475-8869
REMEMBER...
Please record the model and serial numbers found on the product
below. Also, please fill out and mail your warranty registration card
promptly. It will be easier for us to notify you if necessary.
MODEL#
SERIAL#
Page 8

General Information/Safety Information
Preparations
General Information
5*
• The typeplate is located at the rear of the set.
• Recording is permissible if copyright or other rights of third
parties are not infringed.
Speakers
I All unnecessary packaging material has been omitted. We
have done our utmost to make the packaging easy to
separate into three mono-materials:
- cardboard (box)
- expandable polystyrene (buffer)
- polyethylene (bags, protective foam sheet).
Please observe the local regulations regarding the disposal
of these packaging materials.
’ Your set consists of materials which can be recycled and
reused if disassembled by a specialized company. Please
follow local regulations on recycling your old set.
5 Do not dispose dead batteries with your household waste.
Dispose batteries according to local regulations.
\ Note: Switching off the standby mode overnight will save
energy.
Safety Information
» Before operating the system, check that the operating
voltage indicated on the typeplate (or the voltage indication
beside the voltage selector) of your system is identical with
the voltage of your local power supply. If not, please consult
your dealer. The type plate is located at the rear of your
system.
• When the system is switched on, do not move it around.
• Place the system on a solid base (e.g. a cabinet).
» Place the system in a location with adequate ventilation to
prevent internal heat build-up in your system.
» Do not expose the system to excessive moisture, rain, sand
or heat sources.
» Under no circumstances should you repair the unit yourself,
as this will invalidate the warrantyl
» If the system is brought directly from a cold to a warm
location, or is placed in a very damp room, moisture may
condense on thé lens of the CD unit inside the system.
Should this occur, the CD player will not operate normally.
Leave the power on for about one hour with no disc in the
unit until normal playback is possible.
• Electrostatic discharge may cause unexpected problems.
See whether these problems disappear if you unplug the AC
power cord and plug it in again after a few seconds.
> To disconnect the system from the power supply
Accessories (Supplied)
- Remote control transmitter
- Batteries (2 x AAA) for remote control transmitter
- AM loop antenna
- FM antenna wire
- AC power cord
Inserting the batteries into the remote control
» Insert the batteries (Type R3 or AAA) into the remote
control as shown in the battery compartment.
• To avoid damage from possible battery leakage, remove
dead batteries or batteries that will not be used for a long
time. For replacement use type R3 or AAA batteries.
Rear Connection
@ AM Antenna Connection
completely, remove the AC power plug from the wall
socket.
Connect the supplied loop antenna to the AM ANTENNA
terminal. Adjust the position of the AM loop antenna forthe best
reception.
(B) FM Wire Antenna Connection
Connect the supplied FM wire antenna to the FM 300 Q terminal.
Adjust the position of the FM antenna forthe best reception.
Page 9

Rear Connection
Preparations
"S)
Outdoor Antenna
For better FM stereo reception connect an outdoor FM antenna
to the FM ANTENNA 300 D. terminal using a 300 Q dipole wire.
© Speaker Connections
You can connect the 2 supplied speakers or you can create a 4speaker system for surround sound using two extra speakers
having an impedance of at least 6 ohms.
2-speaker system (without surround connection)
Connect the right speaker to terminal R, with the red wire to
+ and the black wire to —.
Connect the left speaker to terminal L, with the red wire to
+ and the black wire to —.
Clip the stripped portion of the speaker wire as shown.
4-speaker system (with surround connection)
Connect the right speaker to terminal R, with the red wire to
+ and the black wire to —.
• Connect the left speaker to terminal L, with the red wire to
-)- and the black wire to —.
• Clip the stripped portion of the speaker wire.
® Connecting other equipment to your system
You can connect the TV, Laser Disc or VCR audio left and right
output terminals to the AUX terminal at the rear of the system.
(D AC Power Supply
After all other connections have been made, connect the AC
power cord to the set and the AC power plug to the wall outlet.
Page 10

Controls
2 SOURCE
to select the following;
TUNER : to switch to Radio mode.
CD : to switch to CD mode.
TAPE ; to switch to Tape mode.
AUX ; to switch to AUX mode (for external sources,
e.g. TV, Laser Disc or VCR sound).
3 PRESET A or T
- to select a radio station in memory. Also use for clock
and timer setting.
4 TUNING or ►>!
- to tune to radio stations
: lower frequencies.
►W : higher frequencies.
Also use for clock and timer setting.
5 AUTO PROGRAM
- to program preset stations automatically or manually.
7 DISPLAY
- to display the current setting of the set.
8 CD CAROUSEL 9 PREVIOUS/NEXT ►W
- to skip to the beginning of the current or previous/next
track or to search baciwvard/forward.
10 PROGRAM
- to program CD tracks
11 STOP'CLEAR
- to stop CD playback or to clear a program.
12 SHUFFLE
- to play all the available discs and their tracks in random
order.
13 PLAY'PAUSE
- to start or interrupt CD playback.
14 3 CD DIRECT PLAY
- to select play for each CD tray.
Page 11

Controls
15 OPEN «CLOSE
- to open or close the CD carousel tray.
16 CLOCK
- to set the clock.
17 TIMER SET
- to set the timer.
18 DEMO
- to display the various features offered by the system.
19 VOLUME
- to adjust the volume level.
20 TIMER ON«OFF
- to switch the timer on or off.
21 DIGITAL SOUND CONTROL (DSC)
- to select the desired sound effect: JAZZ, ROCK, POP or
CLASSIC.
22 PHONES
- to connect headphones (3.5mm) jack.
23 HIGH SPEED DUBBING
- to dub from TAPE DECK 2 to TAPE DECK 1 at high
speed.
24 OPTIMAL
- to select the sound setting that is tuned to the acoustics
of the supplied speakers.
25 DYNAMIC BASS BOOST (DBB)
- to switch on bass boost to enhance bass response or to
switch off bass boost.
26 INCREDIBLE SOUND (formodel FW392Conly}
- to switch on or off the surround sound effect.
27 TAPE DECK 2 28 TAPE 2 CASSEHE OPERATION
- PLAY ► : to start playback.
- REW ◄◄: to rewind the cassette.
- F.FWD ►►: to fast forward the cassette.
- STOP • OPEN: to stop playback or to open the cassette
compartment.
- PAUSE: to interrupt playback
29 TAPE ICASSEHE OPERATION
- RECORD : to start recording.
- PLAY ►: to start playback.
- REW ◄◄; to rewind the cassette.
- F.FWD ►►: to fast forward the cassette.
- STOP«OPEN; to stop playback or to open the cassette
compartment.
- PAUSE: to interrupt playback or recording.
30 TAPE DECK 1
Remote Control Functions
- First select the source you wish to
control by pressing one of the source
select keys on the remote control
(e.g. CD, TV/VCR, TUNER, AUX or
TAPE).
- Then select the desired function
(PLAY, NEXT etc.).
Note:
- Whenever a remote control button is
pressed, the source icon on the set
display will flicker. This indicates the
remote control signal is received by
the set.
- For TV/VCR operation, the accessory
TV or VCR must use the RC-5 code
remote control system.
(1) ............................................to switch the unit to standby mode.
CD ..................................................to select CD mode.
TV/VCR .........................................to select TV/VCR mode.
DISCUP/DOWN
TUNER
..........................................
AUX
........................... .................
TAPE...............................................to select TAPE mode.
SIDE ..............................................not functional for this model.
SHUFFLE .......................
DSC
...........................
INCREDIBLE SOUND ... to switch on or off the surround
............... ......
..................to select digital sound control:
to select desired disc.
to select TUNER mode.
to select external mode.
............
to play CD tracks at random.
OPTIMAL, JAZZ, CLASSIC, ROCK or
POP.
sound effect, (for model FW392C
-----
' ^
CO TOVCt ESS UP
О О О
TAPE AUX DSBEn-Л'Ч
ООО
ИЛЕЙ SlE s-ЧутЕ
ООО
KS “JS®’ 0B3
о 0 о
VOLUME
PLAY
PHF/ 1 ^ 1 NEXT
STB.
(S>
cn
-V-IW PAUSE
4® 00 CS)>
only).
DBB
..............................................
VOLUME+/—
PLAY..............................................to start play in CD.
STOP
.............................................
N PREV./NEXT M
for TUNER...........................to select a lower/higher tuner preset
for CD
for TV/VCR
PAUSE II
...........................
...................................
.........................
........................
to switch on and off dynamic bass
boost.
to adjust the volume.
to stop play in CD.
station.
to select previous/next CD track.
to select previous/next channel.
............to interrupt play in CD mode.
en
a
Ш
for TUNER...........................to select a lower/higher frequency.
for CD
...................................
for TAPE...............................to fast rewind/forward the tape.
TV VOLUME +/ —
..................
to search a particular passage.
to adjust the TV (RC 5 code) volume.
Page 12

Operating the System
Important:
Before you begin operating the system, complete the
preparation procedures. The set is in the standby mode when
the AC power plug is connected to the wail outlet and" '¿'-uu
am" flashes on the display.
Switching the system ON
• Press POWER ON or SOURCE (or CD, TUNER, TAPE or
AUX on the remote control).
Switching the system to standby mode
• Press POWER ON again (or (i) on the remote control).
Selecting the Sound Source
• Press SOURCE to select either TUNER, CD, TAPE or AUX
(or CD, TUNER, TAPE or AUX on the remote control).
The display indicates the selected sound source.
You can also select the sound source directly by selecting the
respective PLAY button or 3 CD DIRECT PLAY buttons for CD or
the PRESET, BAND or TUNING button for TUNER.
Note:
For AUX source, ensure that you have connected the audio left
and right outputs of the external equipment (TV, VCR or Laser
Disc player) to the AUX IN sockets at the rear of the set.
Volume Adjustment
Turn VOLUME right or left (or press VOLUME + or — on the
remote control) to increase or decrease the sound level.
For Personal Listening
Connect the headphones jack to the ifii socket (3.5 mm) at the
front of the set. The speakers will be muted.
Digital Sound Control (DSC)
• To enjoy a special sound effect, press JAZZ (^), CLASSIC
(.i^),ROCK(.;^)orPOP(/).
Optimal Sound
• Press OPTIMAL to hear the sound setting that is tuned to
the acoustics of the supplied speakers.
Dynamic Bass Boost (DBB)
• Press DBB to enhance the bass response.
— The DBB flag lights up.
Incredible Sound (formode!FW392C only}
• In additional to the other sound settings,
you can switch on or off the incredible
surround sound feature by pressing
INCREDIBLE SOUND.
— This creates a surround sound effect
even if the speakers are positioned close to the system.
The sound becomes "incredibly" spatial.
— The INCREDIBLE SOUND button lights up.
INCREDIBLE
SOUND
Demo mode
The system has a demonstration mode that shows the various
features offered by the system.
• Press DEMO to switch on the demonstration.
— The display will show "NCLCumC TQ THE nuilIO
NuRLJj", then a demonstration of the various features
will follow.
• Press DEMO again or POWER ON to stop the
demonstration mode.
10
Page 13

Tuner
Vi
“oi
c
UJ
Tuning to radio stations
1 Press SOURCE to select TUNER.
2 Press BAND to select the desired waveband: FM or AM.
3 Press TUNING I<^or^>-l for more than one second.
The display will show 'SCRPCJ-I' until a station with
sufficient signal strength is found.
• Repeat this procedure until the desired station is reached.
• To tune to a weak station, briefly press TUNING K^or
►►I until the display shows the right frequency and/or
when the best reception has been obtained.
Storing Preset Stations
You can store up to 20 stations in the memory. When a preset
station is selected, the preset number appears next to the
frequency on the display.
Automatic programming
1 Press BAND to select the desired waveband: FM or AM.
2 Press AUTO PROGRAM for more than 1 second to start the
automatic programming.
PROGRAM flashes and 'RLITD' is displayed.
Every available station will be stored automatically. The
frequency and preset number will be displayed briefly.
-*■ It will stop searching when all the available stations are
stored or when 20 preset stations are stored.
Manual programming
1 Press AUTO PROGRAM for less than 1 second.
— PROGRAM flashes on the display.
2 Press BAND to select the desired waveband.
3 Press TUNING [◄◄orM-I to tune to the desired
frequency.
4 Press PRESET T or A to select a preset number.
5 Press AUTO PROGRAM again.
-* PROGRAM disappears, and the station is stored.
• Repeat the above procedure to store other preset stations.
Tuning to Preset Stations
• Press PRESET T or A (or PREV or NEXT on the remote
control) to select the desired preset number.
The preset number, frequency and waveband appear on
the display.
• You can cancel the automatic programming by pressing
AUTO PROGRAM; TUNING l^^or>>l ; PRESET Tor
A; or BAND.
Note:
If you wish to maintain some previous set program stations,
select the preset number after the last set station, then start the
automatic programming.
11
Page 14

(O^
23‘
Cassette Deck
Loading a cassette
• Press STOP'OPEN.
• The cassette compartment door opens.
• Load the cassette with the open side downward and the full
spool to the left.
• Close the cassette compartment door.
Tape Playback
1 Press SOURCE to select TAPE.
2 Load the cassette into a CASSETTE DECK.
3 Press PLAY ► to start playback.
4 Press STOP»OPEN to end playback.
Fast Forward/Rewinding
1 You can rewind or fast forward the tape by pressing ◄◄ or
respectively.
2 Press STOP«OPEN to stop fast forwarding or rewinding.
Note:
It is possible to fast forward or rewind a cassette when the set
is in another source mode (e.g. TUNER, CD or AUX mode).
Continuous playback of two cassettes
1 Press SOURCE to select TAPE.
2 Load the cassettes in TAPE DECK 1 and TAPE DECK 2.
3 Press PLAY ► on TAPE DECK 2.
4 Press PAUSE on TAPE DECK 1.
5 Press PLAY ►on TAPE DECK 1.
Playback will begin with TAPE DECK 2 and will
continue with TAPE DECK 1 when TAPE DECK 2 ends.
6 Press STOP»OPEN if you want to stop playback before the
end of the tape in TAPE DECK 1 or TAPE DECK 2.
Recording (TAPE DECK 1)
1 Press SOURCE to select TUNER, CD or AUX.
2 Load a blank cassette into TAPE DECK 1.
3 Press RECORD on TAPE DECK 1 to start recording.
The RECORD flag starts flashing.
4 Press STOP»OPEN on TAPE DECK 1 to stop recording.
Note:
During recording, it is not possible to listen to another sound
source.
12
Page 15

Cassette Deck Compact Disc
Dubbing cassettes (from TAPE DECK 2 to TAPE DECK 1)
1 Load the pre-recorded cassette into TAPE DECK 2 and a
blank cassette into TAPE DECK 1.
- Make sure that both cassettes have their full spools to
the left.
• For high speed recording, press
HIGH SPEED DUBBING.
— HIGH SPEED appears on the
display.
HIGH SPEED
DUBBING
2 Press PAUSE on TAPE DECK 1. 3 Press RECDRD on TAPE DECK 1.
RECORD appears on the display.
4 Press PLAY on TAPE DECK 2.
Recording will start automatically.
5 Press STOP'DPEN on TAPE DECK 1 and TAPE DECK 2 to
stop dubbing.
Notes;
- At the end of side A, flip the cassettes to side B and repeat
the procedure.
- Dubbing of cassettes is only possible in the TAPE mode. To
ensure good dubbing, use tapes of the same length.
- During high speed dubbing operation in the Tape mode, the
sound is reduced to a low volume.
Warning!
1) This set is designed for conventional CDs. Do not use
any accessories like disc stabilizer rings or CD
treatment sheets, etc, which may damage the CD
mechanism.
2) Do not load more than one disc into each tray.
3) When the CD changer is loaded with CD(s), do not turn
over or shake the unit as this may jam the changer
mechanism.
You can load up to three discs in the CD changer for continuous
play without interruption. In addition to the conventional 12-cm
disc, 8-cm discs can also be used without an adaptor.
Loading the CD Changer
CO
"o>
c
1X1
General Information
- For recording, use only a cassette of lEC type I (normal
cassette).
- The tape in the cassette is secured at both ends with leader
tape. At the beginning and end of a cassette, nothing will be
recorded for six to seven seconds.
- The recording level is set automatically, regardless of the
position of VOLUME.
- Check and tighten slack tape with a pencil before use. Slack
tape may get jammed or may burst in the mechanism.
- To prevent accidental recording, break out the tab on the left
shoulder of the cassette side you want to protect. To re
record the cassette, cover each hole with cellophane tape.
Erasure Prevention Tabs
C-120 tape is extremely thin and may be easily deformed or
damaged. It is not recommended for use in this unit.
Store the cassettes at room temperature and do not put
them too close to a magnetic field (for example,
transformers, TVs or speakers).
Press SOURCE to select CD.
Press OPEN'CLOSE.
-*• The CD compartment slides out.
Load a disc with the printed side up in the right tray.
You can load another disc in the left tray.
To load the third disc, press the corresponding 3 CD
DIRECT PLAY button of the empty tray.
The CD changer will rotate until the empty tray is at the
right hand side and is ready for loading.
— Playback will always start with the outer right disc tray.
Press OPEN»CLOSE to close the CD compartment.
— The total number of tracks and the playing time of the
last selected disc will appear on the display.
The following display indications will help you to know whether
the disc trays are empty or loaded.
1
- indicates the
- indicates the
- indicates the
13
Page 16

Compact Disc
m
3
m'
Playing a Disc
1 Press PLAY«PAUSE (or PLAY ► on the remote control) to
start playback.
The disc tray, track number and elapsed playing time of
the current track appear on the display.
• To interrupt play, press PIAY»PAUSE (or PAUSE II on
the remote control).
The playing time flashes.
• To resume play, press PLAY»PAUSE again (or PLAY ► on
the remote control).
2 To stop play, press STOP»CLEAR (or STOP ■ on the
remote control).
Note:
All the available discs will play once, then stop. When the CD
has stopped playing, the set will switch to the standby mode
automatically after 15 minutes if no button is pressed.
When the CD tray is closed, you
can play a CD directly by pressing
the 3 CD DIRECT PLAY (1-3)
buttons. The CD player will stop at
the end of playback of the selected
disc.
3COOIRCCT PLAY
Selecting a desired track
Selecting a desired track in the stop mode
1 Press PREV or NEXT ( M PREV or NEXT M
on the remote control) until the desired track appears on the
display.
2 Press PLAY»PAUSE (or PLAY ► on the remote control) to
start playback.
— The selected track number and elapsed playing time
appear on the display.
Selecting a desired track during play mode 1 Press PREV or NEXT ►>! ( !◄ PREV or NEXT M
on the remote control) until the desired track appears on the
display.
The selected track number and elapsed playing time
appear on the display.
• If you press PREV once it will skip to the beginning of
the current track and play the track again.
Searching for a particular passage during
playback
• Press and hold SEARCH or ►>! (or or ►► on the
remote control) until the desired passage is located. During
the search, the sound is played at a faster than normal rate
and at a reduced volume. Playback returns to normal when
SEARCH or is released.
Shuffle
SHUFFLE - playing all the available discs and their tracks in
random order. It can also be used when tracks are programmed.
To shuffle all the discs and tracks
1 Press SHUFFLE.
"CLii
DHL>UI I l-l- " flashes briefly on the display.
The SHUFFLE flag, the disc and the track selected at
random appear on the display.
The discs and the tracks will now be played in random order
until you press STDP»CLEAR.
Press SHUFFLE again to resume normal playback.
The SHUFaE flag disappears from the display.
14
Page 17

Compact Disc
Programming Tracks
Programming tracks of a loaded CD is possible in the stop mode
of the CD. The display will indicate the total tracks stored in the
program. Up to 40 tracks can be stored in-the memory in any
order. When 40 tracks are stored and you attempt to store
another track, the display will show "PRUBRRt'l FULL“.
1 Load the desired discs in the disc trays.
2 Press PROGRAM to start programming.
— The PROGRAM flag flashes on the display.
3 Press the desired disc button to select the disc.
4 Press PREV or NEXT ►W to select the desired track.
5 Press PROGRAM to store the track.
• Repeat steps 3 to 5 to store other discs and tracks.
6 Press STOP»CLEAR once to end programming.
The total number of tracks programmed and total playing
time will appear on the display.
Playing the program
1 Press PLAY»PAUSE to start program playback.
-*■ The track number and elapsed playing time of the
current track will appear on the display.
2 Press STOP»CLEAR to stop program playback.
Note:
If you press any of the 3 CD DIRECT PLAY buttons, the set will
play the selected disc, and the program will be ignored
temporarily. The program flag will also temporarily disappear from
the display, then reappear when the playback for the selected
disc ends.
CD Recording
During CD recording,
• it is not advisable to fast forward/rewind your cassette in
TAPE DECK 2.
• it is not possible to listen to another sound source.
CD Recording
1 Load a blank cassette (full spool to the left) into TAPE
DECK1.
2 Press SOURCE to select CD.
3 Load a disc into the disc tray.
4 Press PREV or NEXT to select the desired track.
If desired, you can program the tracks in the order you want
them to be recorded (see Programming Tracks).
5 Press RECORD on cassette TAPE DECK 1 to start
recording.
The RECORD flag flashes on the display.
— The CD starts playing.
6 Press STOP'CLEAR on the CD player and STOP»OPEN on
cassette TAPE DECK 1 to stop recording.
"o)
Reviewing the program
Reviewing of a program is only possible in the stop mode.
• Press PREV or NEXT repeatedly to review the
programmed tracks.
Erasing the program (in the stop position)
• Press STOP«CLEAR.
-* “PROGPRm CLEHPCi''appears on the display.
Note:
The program is also erased when the set is switched off. If the
CD carousel is opened, the tracks belonging to the outer two
trays will be erased and TLFRRE]]" will flash on the display
once.
15
Page 18

Clock Setting Timer Setting
m
3
(3
Setting the clock
The clock will display in 12-hour mode, e.g. 1 PM or 12 AM.
1 Press CLOCK.
“ nF.’lJu am" starts flashing.
2 Set the hour with PRESET T or A.
3 Set the minute with TUNING l◄◄or►►l .
4 Press CLOCK again to store the setting.
The clock starts running.
Note:
- When a power interruption occurs, the clock settings are
erased, and" lc':Ou am” will flash on the display.
Setting the Tinier
• The system can switch on to TUNER or CD mode
automatically at a preset time. It can serve as an alarm to
wake you up. A half an hour after the preset time, the
system will return to the standby mode if no button is
pressed.
• Before setting the timer, make sure the clock is set correctly.
• The timer works only once for each setting.
• The volume of the timer will be at the last setting
before the set is switched off.
To stop the TIMER
• Press TIMER ON»OFF on the set.
The TIMER is now off.
To start the TIMER again
• Press TIMER ON»OFF on the set.
— The display will show the last set start time of the
TIMER and its flag.
The TIMER flag remains lit.
Note:
1. If the source selected is TUNER, the last tuned frequency
will be switched on.
2. If the source selected is CD, the first track of the last
selected disc will be played. If the CD trays are empty, the
TUNER source will be selected instead.
Timer Setting
1 Press TIMER SET.
— The TIMER flag flashes.
2 Press PRESET A to select the desired sound source.
-* The display will switch as follows:
TUNER-* CD-TUNER.
3 Press TIMER SET to confirm your selection.
— The display will show “ EJN IS:00 am" and" lc':Clu
am" flashes.
4 Press PRESET T or A to set the hour for the timer to start.
5 Press TUNING I-<^or^>-l to set the minutes for the
timer to start.
6 Press TIMER SET to store the start time.
— The TIMER is now set.
— The TIMER flag remains lit.
16
Page 19

Maintenance
Specifications
Maintenance
Cleaning the Cabinet
• Use a soft cloth slightly moistened with a mild detergent
solution. Do not use a solution containing alcohol, spirits,
ammonia or abrasives.
Cleaning Discs
• When a disc becomes dirty, clean it with a cleaning cloth.
Wipe the disc from the center out.
• Do not use solvents such as benzine, thinner, commercially
available cleaners, or anti-static spray intended for analog
records.
Cleaning the Heads and the Tape Paths
• To ensure good recording and playback quality, clean the
heads (a) and (|), the capstan (c), and pressure roller®
after every 50 hours of tape operation.
Specifications
AMPLIFIER
Output power
2 channel (front only)...............................................2 x 100 W RMS
4 channel.....................................................................4 x 35 W RMS
2 channel output only
Power band width
Frequency response.......................................................40 - 20000 Hz
Signal-to-noise ratio.................................'.
Stereo separation........................................................> 70 dB (1 kHz)
Input sensitivity
Aux......................................................................................................400 mV
Outputs
Headphones (3.5mm)
Loudspeakers.................................................................................> 6i2
TUNER
FM wave range..................................................................87.5 - 108 MHz
AM wave range
Sensitivity at 300 n, 2B dB S/N ratio, FM mono
46 dB signal-to-noise ratio, FM Stereo
FM Frequency response
Signal-to-noise ratio....................................................................> 50 dBA
Total Harmonic Distortion
CD PLAYER
Frequency range
Signal-to-noise
Channel separation.........................................................................> 60 dB
Total harmonic distortion.............................................................< 65 dB
..........................................................
...........................
................................................
.................................................................
......................................
..............................
...............................................................
.................................................................
..............................................................................
40 - 20000 Hz
32 -1000
530 -1700 kHz
....................
63 -12500 Hz (dS dB)
20 - 20000 Hz
>88 dBA
> 86 dBA
13.8pV
309|jV
<3%
W
s
UJ
• Use a cotton swab slightly moistened with cleaning fluid or
alcohol.
Demagnetizing the heads
• Use a demagnetizing cassette available at your dealer.
CASSEHE DECK
Frequency range
Normal tape (type I)
Signal-to-noise ratio
Normal tape (type I)...............................................................>48 dBA
Wow and flutter........................................................................< 0.4% DIN
....................................
80 -14000 Hz (±5 dB)
CABINET
Material/finish
Dimensions (w x h x d)...................................... 685 x 310 x 366 (mm)
Weight with speakers.........................................................16 kg approx.
Weight without speakers.....................................................9 kg approx.
...................................................
Metal and polystyrene
Subject to modification
17
Page 20

Troubleshooting Guide
m
3
w’
Warning! Under no circumstances should you try to repair the set yourself, as this will invalidate the warranty.
if a fault occurs, check the points listed below before taking the set in for repair.
Should any problems persist after you have made these checks, consult your nearest dealer or service center.
Symptom
Cause
Remedy
Radio Reception
The STEREO indicator flashes. The signal is too weak.
Severe hum or noise
The signal is too weak.
The TV or VCR is too close to the stereo system.
Adjust the antenna.
Adjust the antenna.
Separate the stereo system from the TV or VCR.
Connect an external antenna for better
reception.
Cassette Deck Operation
Recording is not possible.
Recording or playback cannot be
made or there is a decrease in
audio level.
Excessive wow or flutter, or sound
drop-out.
No cassette in the cassette deck.
The small tab has been broken.
Dirty tape heads.
Magnetic build-up in the record/playback head
Contamination of the capstans or pressure
rollers.
Insert a blank cassette into the cassette deck.
Put a piece of clear adhesive tape over the opening.
See section on cassette deck maintenance.
Use a demagnetizing cassette.
See section on cassette deck maintenance.
CD Player Operation
“NO IJI5C“ is displayed.
The disc is inserted upside down.
Moisture condensation.
There is no disc in the selected CD tray.
The CD is dirty, badly scratched or warped.
Place CD with printed side up.
Wait until lens has adjusted to normal room
temperature.
Inserta CD.
Replace or clean the CD.
Set not working.
No or poor sound.
Reversed left and right sound.
Lack of bass sound (or apparently
imprecise location of musical
instruments sound).
Clock blinking.
Remote control has no effect on
the set.
Timer networking
"PRE55 VEfia TO E;;ir
is displayed.
General
Set does not react when buttons are pressed.
Volume is not turned up.
The headphones are connected.
Speakers are not connected or are connected
wrong.
Speakers are connected wrong.
Speakers are connected wrong.
There was a power outage.
The distance to the system is too large.
Batteries are inserted incorrectly.
Batteries are dead.
Wrong sound source is selected.
Timer not on.
Dubbing/recording is active.
Demo mode is switched on.
Press POWER ON to switch the unit off, then
switch it on again. Or, unplug the AC power plug
from the wall outlet, then plug it in again.
Turn VOLUME clockwise.
Disconnect the headphones.
Check that the speakers are connected correctly.
Make sure that the stripped speaker wire is
clamped.
Check the speaker connections and
speaker location.
Check the speaker connection for proper phasing,
red/black wires to red/black terminals.
Reset the clock.
Reduce the distance.
Insert the batteries correctly.
Replace the batteries.
Select the sound source before pressing the
function button, (PLAY, PREV/NEXT, etc.)
Press TIMER 0N»0FF on the set to switch
on the timer.
Press POWER ON or DEMO to switch off demo
mode.
18
Page 21

Philips Consumer Electronics Company
Factory Service Center Locations
NOTE: If you reside in one of our Philips Factory Service Branch areas (see directory on back), you can contact the
nearest Service Branch to obtain efficient and expedient repair for your product. If your product is In-Warranty, you
should have proof-of-purchase to ensure No Charge Service.
For Out-of-Warranty service, call the location nearest you.
NOTA: Si vous résidez dans une des régions desservies par une succursale de service après vente du fabricant Philips
(voir liste ci-dessous), vous pourrez contacter la branche de service après vente la plus près de chez vous pour obtenir
un service après vente rapide et efficace. Si le produit est sous garantie, il suffira de présenter une preuve d'achat
pour bénéficier d'un service sans frais. Pour les produits non couverts par la garantie, contactez le centre le plus près
de chez vous.
NOTA: Si Ud. reside en una de nuestras zonas para sucursales Philips de servicio al de fábrica (ver directorio más
abajo), Ud. puede comunicarse con la sucursal de servicio más cercana para obtener una reparación oportuna y eficaz
de su producto. Si su producto está todavía bajo garantía, Ud. debe presentar comprobante de compra para no
ocasionar ningunos cargos por servicio. Para servicio después del vencimiento de la garantía, llame al lugar más
cercano de los abajo indicados.
Page 22

Quality service is as close as your telephone! Simply look over the list below for the number of a Factory Service Center
NEAR YOU. Your product will receive efficient and expedient carry-in, mail-in, or in-home service, and you will receive peace of
MIND, KNOWING YOUR PRODUCT IS BEING GIVEN THE EXPERT AHENTION DF PhILIPS’ FaCTDRY SERVICE. AnD, IF THE PHDNE NUMBER LISTED FOR
YOUR AREA IS LONG DISTANCE, CALL 1-800-242-9225 FOR FACTORY SERVICE.
COMMENT OBTENIR NOTRE SERVICE APRÈS VENTE RAPIDE ET EFFICACE SOIT PAR COURRIER, À DOMICILE, OU EN SE PRÉSENTANT À UN CENTRE DE SERVICE PHILIPS. PLUS
DE 600 CENTRES DE RÉCEPTION DE PRODUITS À RÉPARER À TRAVERS LE PAYS: CONTACTER LE CENTRE DE SERVICE AUX CONSOMMATEURS LE PLUS PROCHE POUR SAVOIR
CÓMO OBTENER UN SERVICIO OPORTUNO Y EFICIENTE POR CORREO, EN CASA O EN PERSONA PARA SU PRODUCTO A TRAVES DE UN CENTRO PHILIPS DE SERVICIO. MAS DE
600 SITIOS POR TODO EL PAIS PARA U RECEPCION DE PRODUCTOS NECESITADOS DE REPARACIONES: COMUNICARSE CON EL CENTRO DE SERVICIO DE FABRICA MAS
L’EMPLACEMENT DE CES DÉPÔTS DANS UN RAYON DE 50 À 75 MILES (80 KM À120 KM) DU CENTRE DE SERVICE LOCAL.
CERCANO PARA ESTOS LUGARES DENTRO DE UN RADIO DE 80 A120 KM (50 A 75 MILLAS) DEL CENTRO DE SERVICIO LOCAL.
Atlanta-AthensMacon-Chattanooga, TNNorth Georgia Area
200 North Cobb Parkway
Building 100 Suite 120
Marietta, GA 30062
(700) 795-30062
Boston-Southern Maine-
Southern New Hampshire Area Dallas, Texas 75234
1 North Avenue
Burlington, MA 01803
(617) 272-4825
Chariotte-Winston SalemGreensboro-Chapei HillRaleigh-Spartanburg, SC Area
520-G Clanton Road
Charlotte, NC 28217
(704) 529-6330
Chicago-Gary Area
1360 W. Hamilton Parkway
Itasca, IL 60143
(708) 775-0990
Cleveland-AkronYoungstown Area
24090 Detroit Road
Westlake, OH 44145
(216) 899-2040
Columbus-DaytonCincinnati Area
633 Busch Blvd
Columbus, Ohio 43229
(614) 781-2605
Connecticut-Rhode IslandSpringfield, MAArea
1294 Blue Hills Avenue
Bloomfield, CT 06002
(860) 726-9612
Dallas-Ft. Worfh Area
13375 Stemmons Freeway,
Suite 200
(214) 243-4775
Detroit/Toledo Area
25173 Dequindre Totowa, NJ 07512
Madison Heights, Ml 48071
(810) 544-2110
Knoxville-GreenevilleTri Cities-East Tennessee Area
6700 D. Papermill Road
Papermill Plaza
Knoxville, TN 37919
(423) 584-6614
Ft. Myers-Naples- Orlando, FL 32809
Southwest Florida Area
11601 Cleveland Ave., Suite 15
Ft. Myers, FL 33907
(813) 278-4242
Houston-GalvestonBeaumont-Austin-
San Antonio Area
1110 North Post Oak Road
Suite 100
Houston, TX 77055
(713) 682-3990
Los Angeles-San Diego Area Pittsburgh, PA-Steubenvilie, OH-
2910 E. LaPalma, Suite E Wheeling/Morgantown, WV Area
Anaheim, CA 92806 2891 Banksville Road
(714) 238-7250 Pittsburgh, PA 15216
Miami-Southeast Florida Area
2099 W. Atlantic Blvd. Rockford-Kenosha-
Pompano Beach, FL 33069
(305) 978-0467 5602 N. Second
North NJ-Staten IslandRockland County, NY Area
140J Commerce Way San Francisco-Oakland-
(201) 890-7200 3370 Montgomery Drive
New York Metro Area
116 Charlotte Avenue
Hicksville, NY 11801 Seattle-Tacoma/Olympia Area
(516) 933-1780 Nassau County 1055 Andover Park East
Orlando-Jacksonville-North
Florida-Southeast Georgia Area
2452 Sand Lake Road
(407) 857-8998 Center Point Business Park,
Philadelphia/S. New Jersey Area
352 Dunks Ferry Road
Bensalem, PA 19020
(215) 638-7500
Phoenix-Scottsdale-
Mesa-Tempe Area
5032 S. Ash Avenue, Ste. 101
Tempe, AZ 85282
(602) 897-7358
(412) 563-8020
Beloit-Madison Area
Loves Park, IL 61111
(815) 654-7343
San Jose Area
Santa Clara, CA 95054
(408) 492-9013
Tukwila,WA 98188
(206) 575-6288
Tampa-St.PetersburgSarasota Area
Building B-1, Suite 100
1911 U.S. Hv/y.301 North
Tampa, FL 33619
(813) 621-8181
Washington,DC-Baltimore-
Richmond, VA Area
6671-J Santa Barbara Road
Elkridge, MD 21227
(410)796-0105
HOW YOU CAN OBTAIN EFFICIENT ANO EXPEOIENT CARRY-IN, MAIL-IN, OR IN-HOME SERVICE IN CANADA FOR YOUR PRODUCT THROUGH A PHILIPS CONSUMER SERVICE CENTER
COMMENT OBTENIR NOTRE SERVICE APRÈS VENTE RAPIDE ET EFFICACE SOIT PAR COURRIER, À DOMICILE, OU EN SE PRÉSENTANT ÂUNCENTREDE SERVICE PHILIPS
CÓMO OBTENER UN SERVICIO OPORTUNO Y EFICIENTE POR CORREO, EN CASA 0 EN PERSONA EN EL CANADA PARA SU PRODUCTO A TRAVÉS DE UN CENTRO PHILIPS DE SERVICIO AL CONSUMIDOR
TORONTO
601 Milner Avenue
Scarborough, Ontario
M1B1M8
(416) 754-6064 (Tel.)
(416)292-5161 (Tel.)
MONTRÉAL
4977 Levy Street
St. Laurent, Québec
H4R 2N9
(514) 956-0120 (Tel.)
(514) 956-0828 (Fax)
VANCOUVER
1741 Boundary Road
Vancouver, B.C.
V5M3Y7
(604) 294-3441 (Tel.)
(604) 294-3574 (Fax)
(416) 754-6290 (Fax)
MAC2929 8/95
52
Page 23

Page 24

Page 25

Page 26

FW 39IC
FW 392C
Philips Consumer Electronics Company
A Division of Philips Electronics North America Corporation, Knoxville, Tennessee 37914-1810, USA
3139 N6 15981
IB7613T001
Printed In Malaysia
TL-9664/37-3
 Loading...