

VGA IN
LRL
R
AUDIO
VGA OUT
3
L
R
AUDIO IN Y
C
b
CVBS
Y/C
S-VHS
CVBS
AV3
AV2
AV1
AV4
C
r
AUDIO
2
2
OUT
AUDIO
IN
MAINS
INLET
~ MAINS
EXTERNAL 5
ANTENNA
EXTERNAL 3
EXTERNAL 1 EXTERNAL 2
EXTERNAL 4
AUDIO OUT
R
L
NO FUNCTION
PL/MAC IN
CENTER IN
MONITOR OUT
LL
RR
L
RPr
Pb
Y
CABLE
1
4
AUDIO
AUDIO
AUDIO
~ MAINS
RS232
DVI-D
Y/C S-VHS
L
R
L
R
AUDIO IN AUDIO IN
G/Y/Y
CVBS B/Pb/Cb
R/Pr/Cr V
H
AUDIO IN
R
VGA 1
VGA 2
RC-OUT
AV2 AV1 AV3
L
AUDIO
VGA 1VGA 2DVI-D
2
3
DVI-D
Y/C S-VHS
G/Y/Y
CVBS B/Pb/Cb
R/Pr/Cr V
H
VIDEO 2
(AV2)
VIDEO 1
(AV1)
VIDEO 3
(AV3)
2
MAINS INLET
3
~ MAINS
RS232
VGA 1
VGA 2
RC-OUT
CVBS 1
CVBS 2
Y/C
VGA
R/Cr/Pr
Y
Cb/Pb
Cr/Pr
DVD/HD1
RGB/DVD/HD2
G/Y
B/Cb/Pb
HD
DVI
EXTERNAL
CONTROL
VD
Return your Warranty Registration card today to ensure
CAUTION
RISK OF ELECTRIC SHOCK
DO NOT OPEN
CAUTION: TO REDUCE THE RISK OF ELECTRIC SHOCK, DO NOT
REMOVE COVER (OR BACK). NO USER-SERVICEABLE PARTS
INSIDE. REFER SERVICING TO QUALIFIED SERVICE PERSONNEL.
R
E
G
I
S
T
R
A
T
I
O
N
N
E
E
D
E
D
W
I
T
H
I
N
1
0
D
A
Y
S
Hurry!
you receive all the
benefits
you’re entitled to.
Once your PHILIPS purchase is registered, you’re eligible to receive all the privileges of owning a
PHILIPS product. So complete and return the Warranty Registration Card enclosed with your
purchase at once, and take advantage of these important benefits.
Warranty
Verification
Registering your product within
10 days confirms your right to
maximum protection under the
terms and conditions of your
PHILIPS warranty.
Owner
Confirmation
Your completed Warranty
Registration Card serves as
verification of ownership in the
event of product theft or loss.
Model
Registration
Returning your Warranty Registration
Card right away guarantees you’ll
receive all the information and special
offers which you qualify for as the
owner of your model.
Know these
safety symbols
Congratulations on your purchase, and
welcome to the “family!”
Dear PHILIPS product owner:
Thank you for your confidence in PHILIPS.You’ve selected one of
the best-built, best-backed products available today.And we’ll do
everything in our power to keep you happy with your
purchase for many years to come.
As a member of the PHILIPS “family,” you’re entitled to
protection by one of the most comprehensive warranties and
outstanding service networks in the industry.
What’s more, your purchase guarantees you’ll receive all the
information and special offers for which you qualify, plus easy
access to accessories from our convenient home shopping
network.
And most importantly you can count on our uncompromising
commitment to your total satisfaction.
All of this is our way of saying welcome-and thanks for investing
in a PHILIPS product.
Sincerely,
Lawrence J. Blanford
President and Chief Executive Officer
P.S. Remember, to get the most from your PHILIPS
product, you must return your Warranty
Registration Card within 10 days. So please mail
it to us right now!
Visit our World Wide Web Site at http://www.philips.com
This “bolt of lightning” indicates
uninsulated material within your unit
t
may cause an electrical shock. For the
safety of everyone in your household, please
do not remove product
covering.
The “exclamation point” calls attention
s
to features for which you should read
the enclosed literature closely to
prevent operating and maintenance
problems.
WARNING: TO PREVENT FIRE OR
SHOCK HAZARD, DO NOT EXPOSE THIS
EQUIPMENT TO RAIN OR MOISTURE.
CAUTION: To prevent electric shock,
match wide blade of plug to wide slot, fully
insert.
ATTENTION: Pour éviter les choc
électriques, introduire la lame la plus large de
la fiche dans la borne correspondante de la
prise et pousser jusqu’au fond.
For Customer Use
Enter below the Serial No., which is
located on the rear of the cabinet. Retain
this information for future reference.
Model No. __________________________
Serial No. __________________________
IMPORTANT SAFETY INSTRUCTIONS
Read before operating equipment
1. Read these instructions.
2. Keep these instructions.
3. Heed all warnings.
4. Follow all instructions.
5. Do not use this apparatus near water.
6. Clean only with a dry cloth.
7. Do not block any of the ventilation openings. Install in
accordance with the manufacturers instructions.
8. Do not install near any heat sources such as radiators, heat
registers, stoves, or other apparatus (including amplifiers) that
produce heat.
9. Do not defeat the safety purpose of the polarized or groundingtype plug. A polarized plug has two blades with one wider than
the other. A grounding type plug has two blades and third
grounding prong.The wide blade or third prong are provided for
your safety. When the provided plug does not fit into your
outlet, consult an electrician for replacement of the obsolete
outlet.
10. Protect the power cord from being walked on or pinched
particularly at plugs, convenience receptacles, and the point
where they exit from the apparatus.
11. Only use attachments/accessories specified by the manufacturer.
12. Use only with a cart, stand, tripod, bracket, or table
specified by the manufacturer, or sold with the
apparatus.When a cart is used, use caution when
moving the cart/apparatus combination to avoid injury
from tip-over.
13. Unplug this apparatus during lightning storms or when unused
for long periods of time.
14. Refer all servicing to qualified service personnel. Servicing is
required when the apparatus has been damaged in any way, such
as power-supply cord or plug is damaged, liquid has been spilled
or objects have fallen into apparatus, the apparatus has been
exposed to rain or moisture, does not operate normally, or has
been dropped.
15. This product may contain lead or mercury. Disposal of these
materials may be regulated due to environmental considerations.
For disposal or recycling information, please contact your local
authorities or the Electronic Industries Alliance: www.eiae.org.
16. Damage Requiring Service - The appliance should be
serviced by qualified service personnel when:
A. The power supply cord or the plug has been damaged; or
B. Objects have fallen, or liquid has been spilled into the
appliance; or
C. The appliance has been exposed to rain; or
D. The appliance does not appear to operate normally or
exhibits a marked change in performance; or
E. The appliance has been dropped, or the enclosure damaged.
17. Tilt/Stability - All televisions must comply with recommended
international global safety standards for tilt and stability
properties of its cabinets design.
• Do not compromise these design standards by applying
excessive pull force to the front, or top, of the cabinet which
could ultimately overturn the product.
• Also, do not endanger yourself, or children, by placing
electronic equipment/toys on the top of the cabinet. Such
items could unsuspectingly fall from the top of the set and
cause product damage and/or personal injury.
18. Wall Mounting - The appliance should be mounted to a wall
only as recommended by the manufacturer.
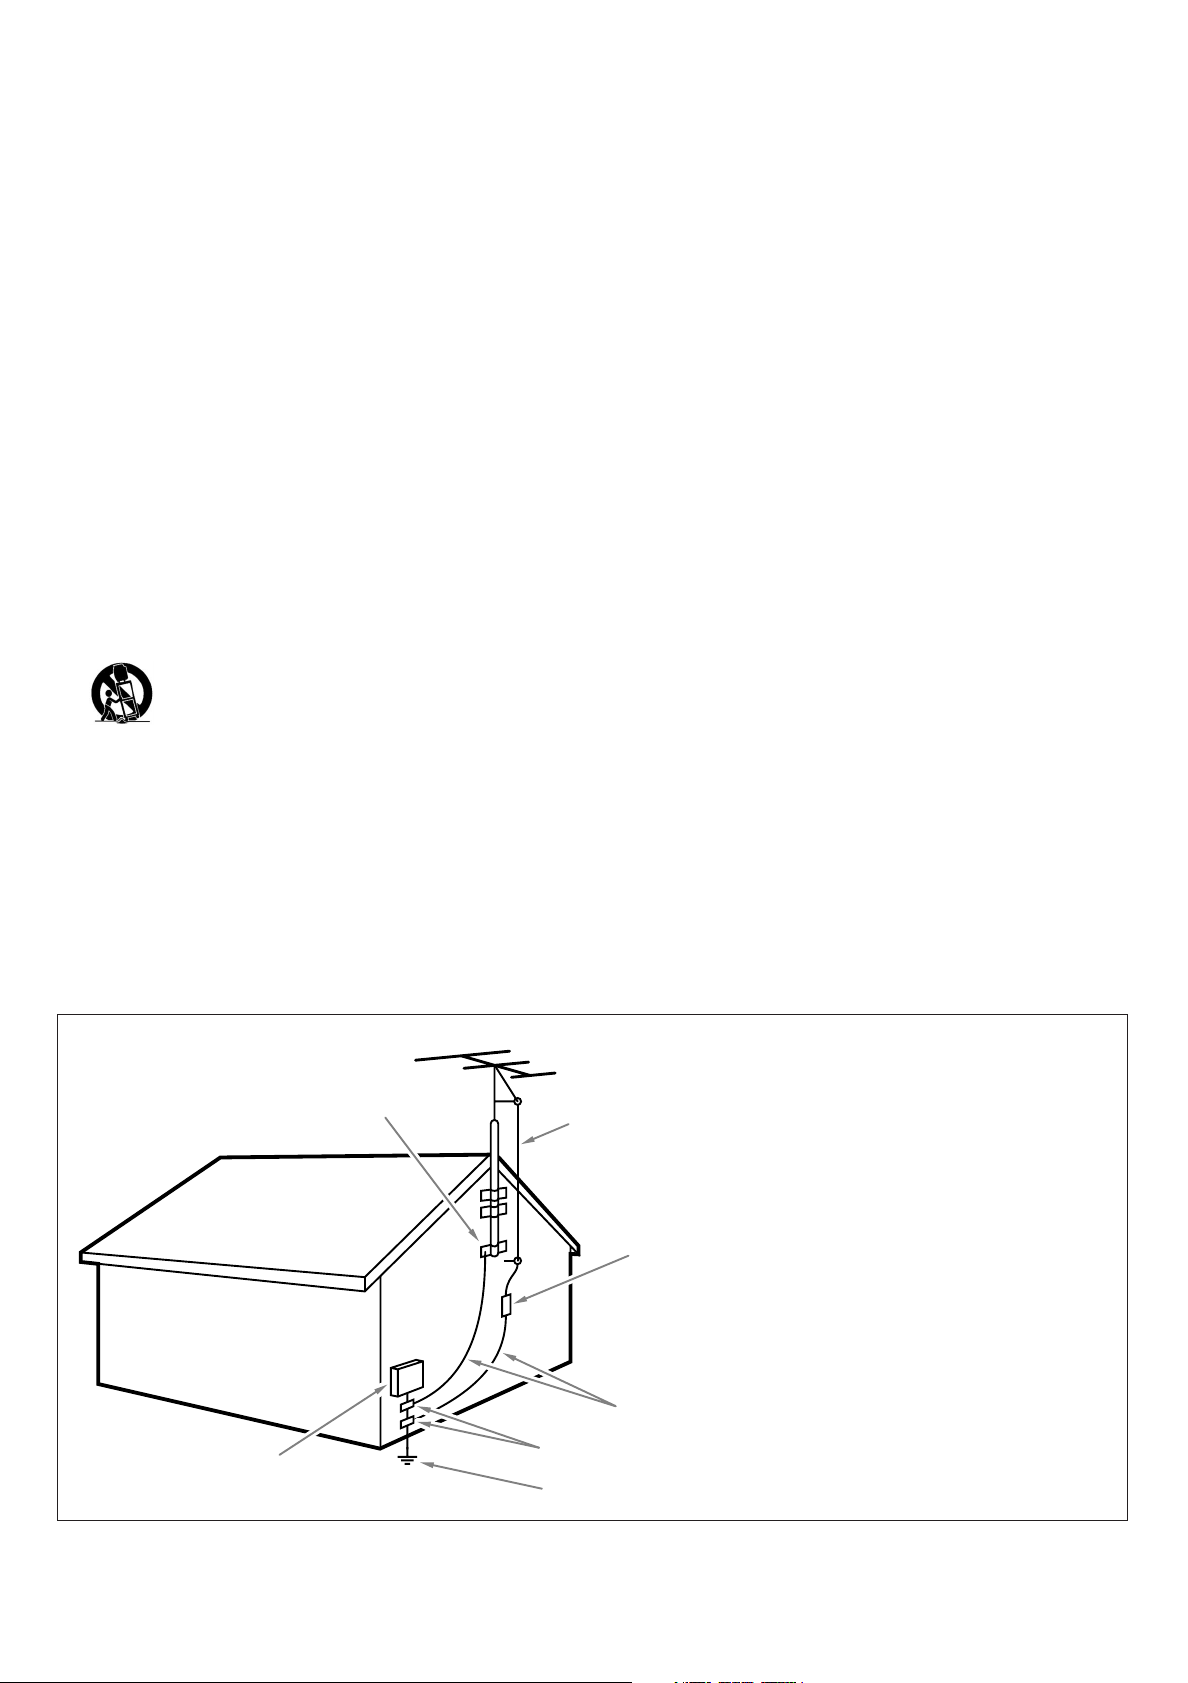
19. Power Lines - An outdoor antenna should be located away
from power lines.
20. Outdoor Antenna Grounding - If an outside antenna is
connected to the receiver, be sure the antenna system is
grounded so as to provide some protection against voltage
surges and built up static charges.
Section 810 of the National Electric Code, ANSI/NFPA No. 701984, provides information with respect to proper grounding of
the mats and supporting structure grounding of the lead-in wire
to an antenna-discharge unit, size of grounding connectors,
location of antenna-discharge unit, connection to grounding
electrodes and requirements for the grounding electrode. See
Figure below.
21. Objects and Liquid Entry - Care should be taken so that
objects do not fall and liquids are not spilled into the enclosure
through openings.
EXAMPLE OF ANTENNA GROUNDING AS PER NATIONAL ELECTRICAL CODE (NEC)
GROUND CLAMP
ELECTRIC SERVICE EQUIPMENT
Note to the CATV system installer :This reminder is provided to call the CATV system installer’s attention to Article 820-40 of the
NEC that provides guidelines for proper grounding and, in particular, specifies that the cable ground shall be connected to the grounding
system of the building, as close to the point of cable entry as practical.
ANTENNA LEAD IN WIRE
ANTENNA DISCHARGE UNIT (NEC SECTION 810-20)
GROUNDING CONDUCTORS (NEC SECTION 810-21)
GROUND CLAMPS
POWER SERVICE GROUNDING ELECTRODE SYSTEM
(NEC ART 250, PART H )

Contents
Installation
Preparation.....................................................................................................4
Use of the remote control ....................................................................5-7
Buttons in front of the TV receiver box..................................................6
To use the menus and the menu system ................................................8
Select the menu language ...........................................................................8
Store TV channels ........................................................................................9
Select TV settings ................................................................................10-11
Operation
TV menu
Picture menu.....................................................................................12-13
Sound menu ...........................................................................................13
Features menu
Channels menu
Dual Screen/PIP ..........................................................................................17
Multi-PIP ......................................................................................................18
English
Closed Captions ...........................................................................14
Sleep Timer ....................................................................................14
Channel List ...................................................................................14
Channel Lock ................................................................................14
TV Ratings Lock.............................................................................15
Movie Ratings Lock ......................................................................16
Channel Remove ..........................................................................16
Help?
If this instruction manual does not give an
answer or if ‘Before Calling Service’ do not
solve your TV problem, you can call your Local
Philips Customer or Service Center. See the
supplied World-wide guarantee booklet.
Please, have the Model and Product number
which you can find at the back of your
television set or on the packaging, ready,
before calling the Philips helpline
(800-531-0039).
Model: . . . . . . . . . . . . . . . . . . . . . . . . . . . . . . .
Product No: . . . . . . . . . . . . . . . . . . . . . . . . . . .
Connect Accessory Devices
Connecting accessory devices ..........................................................19-22
Setting the Remote Control to work accessory devices .................23
Selecting accessory devices .....................................................................24
VCR Control buttons ...............................................................................25
Record with your VCR .............................................................................25
Remote Control Direct Entry Codes for accessory devices ....26-27
Before Calling Service ........................................................................28
Tips ..............................................................................................................29
Index ...........................................................................................................29
Glossary .....................................................................................................30
Service/Warranty Information .................................................31-34
3
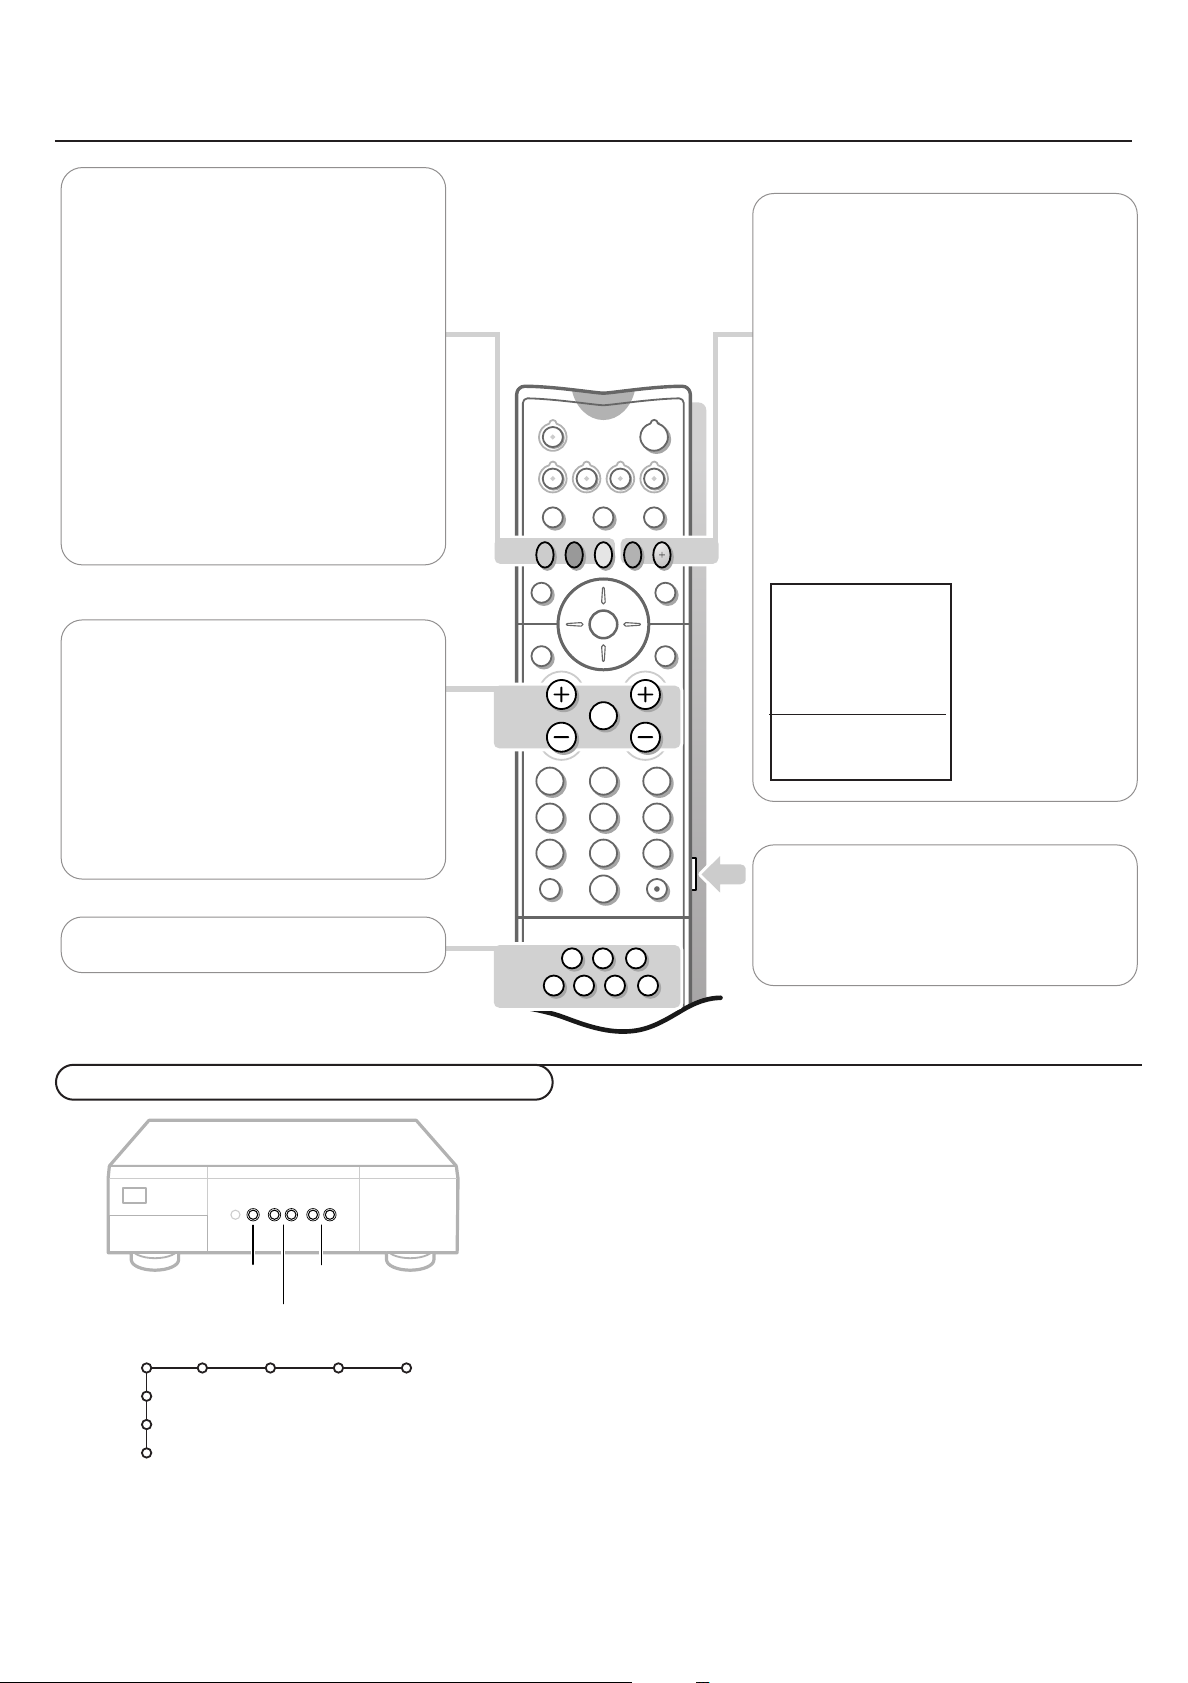
Preparation
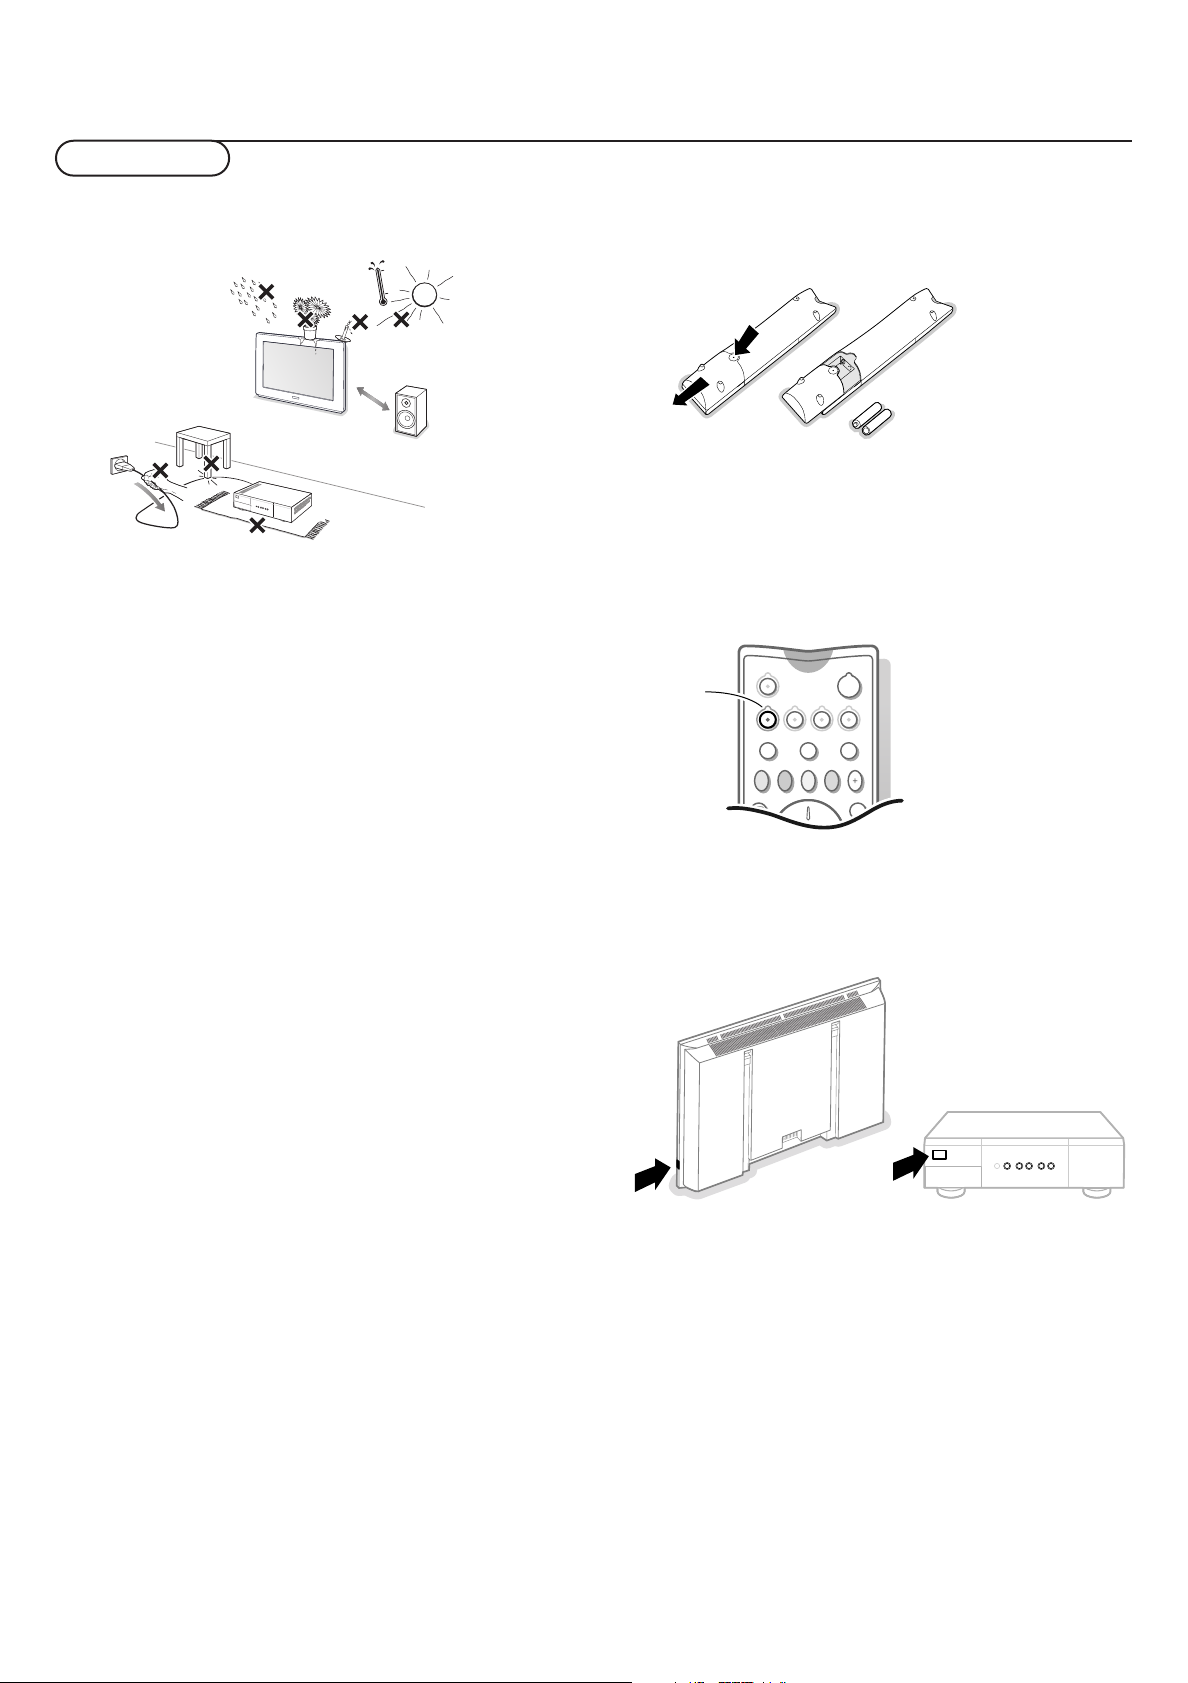
Do not insert the power plug in a wall socket before
all connections are made.
min.
4 ft
& Place the receiver box wherever you want, but make sure
that air can circulate freely through the ventilation slots. Do
not install the receiver box in a confined space such as a
book case or a similar unit.
To prevent any unsafe situations, no naked flame sources,
such as lighted candles, should be placed on or in the
vicinity.Avoid heat, direct sunlight and exposure to rain or
water.
The equipment must not be exposed to dripping or
splashing and no objects filled with liquids, such as vases,
should be placed on it.
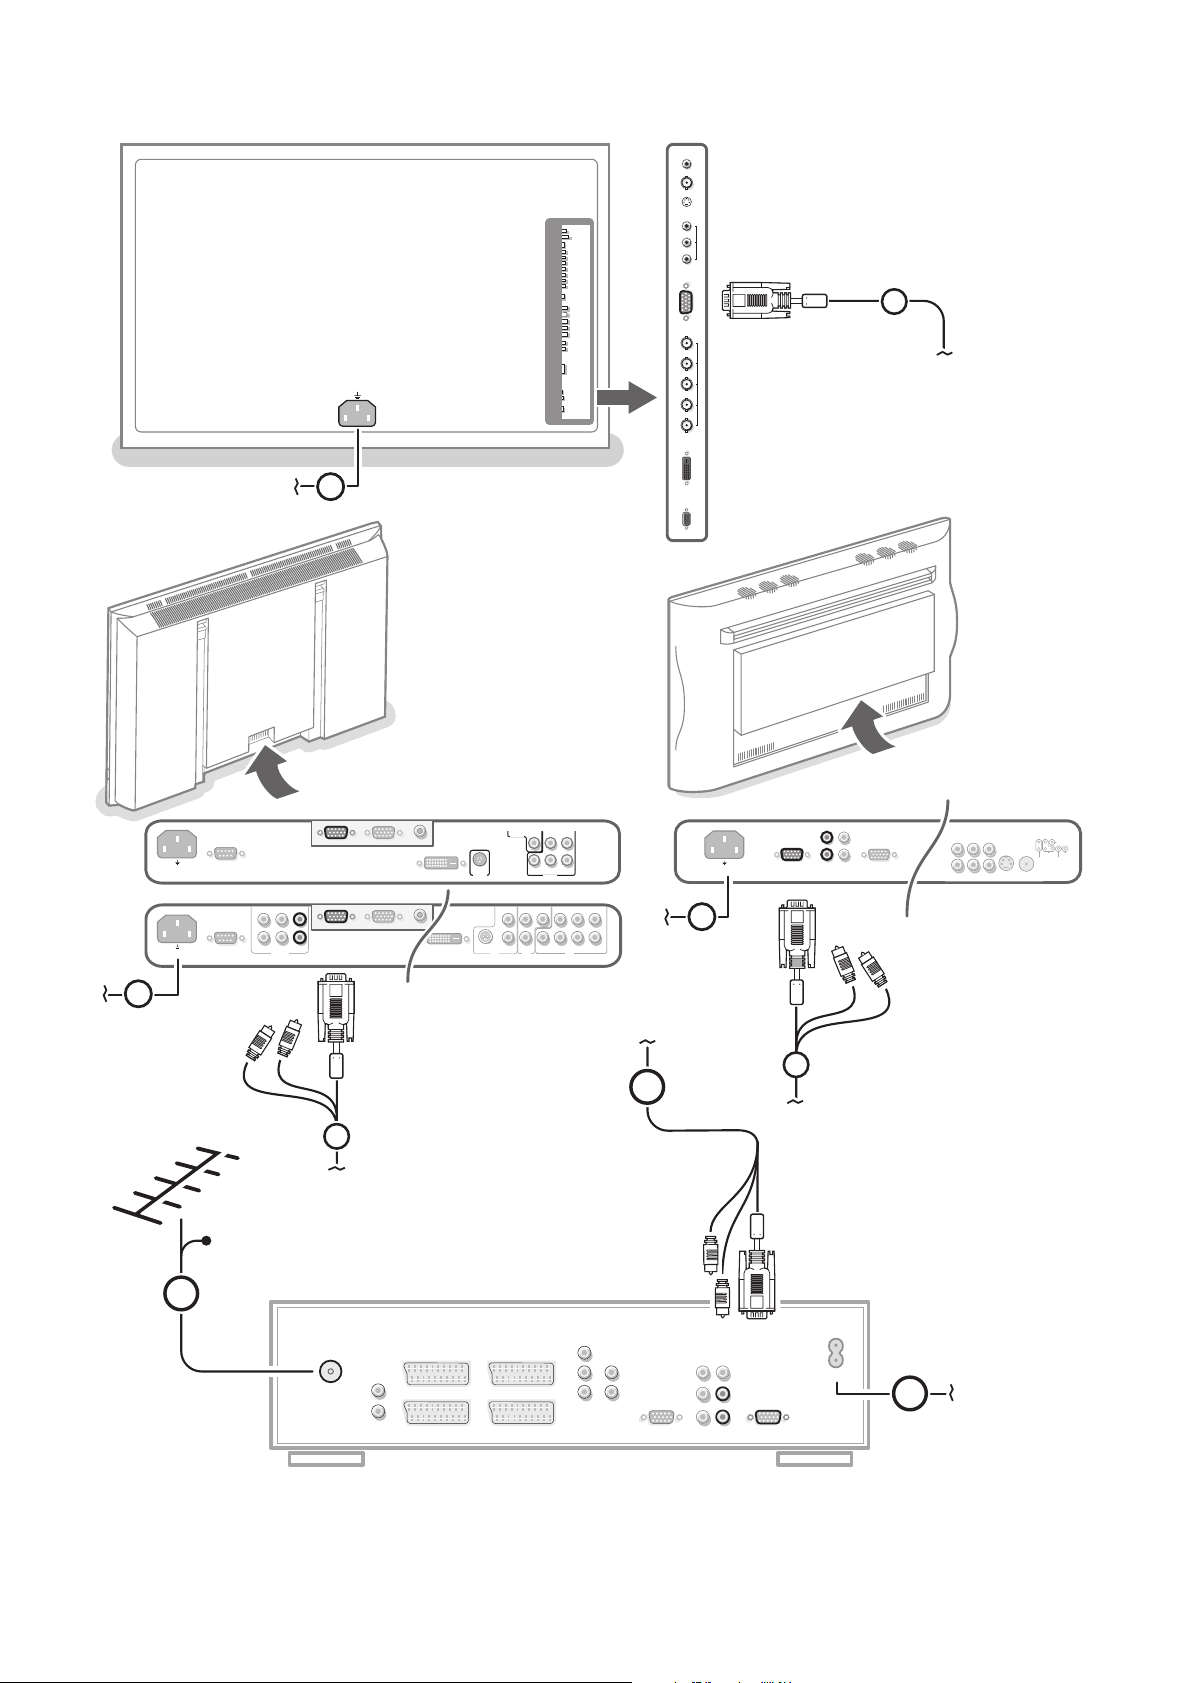
é Connect the antenna cable 1 and the VGA cable with
trailing audio cinch connectors 2 as shown in the inside
frontcover of this handbook.
Make sure all screws of the cable 2 are tightened well.
TV receiver box with speakerless monitor
In case you connect your TV receiver box with a speakerless
monitor, and without having connected an audio receiver, all
references made in this instruction book to sound reproduction,
volume control, and audio connections, are not applicable (except
for a headphone connection).
The buttons on the remote control referring to sound have no
function either.
( Remote control: Remove the cover of the battery
compartment.
Insert the 2 batteries supplied (Type R6AA-1.5V).
R6AA - 1,5V
The batteries supplied do not contain the heavy metals mercury
and cadmium. Nevertheless in many areas exhausted batteries
may not be disposed of with your household waste. Please check
on how to dispose of batteries according to local regulations.
Press the TV button (green indicator) to be sure your
remote control is in the TV mode.
TV
SOURCE
SELECT
NATURAL
MOTION
S
POWER
CBLTV
VCR AMP
SATHD DVD CD
Q
lq
DNR VCR prog EXIT INFO
+
a
CC
§ Turn the receiver on : Press the power button A at the
right side of the monitor and the one on the front of the
receiver box.
A green indicator and the screen light up.
“ To connect your computer, see the separate supplied
instruction manual with your monitor.
To connect other accessory devides, see p. 19.
In order to obtain the best result, please use only the
supplied antenna cables between the receiver box and
videorecorder, and between videorecorder and antenna
connector.
‘ Insert the power cord supplied 3 into the MAINS at the
back of the monitor and the power cord 4 at the back of
the receiver. Put both in the wall sockets with an AC power
supply of 110 V. Consult your local dealer if your AC power
supply is different.
Please, only use the power cord 3 supplied with the
monitor, for the monitor, and use the power cord supplied
with the receiver, only for the receiver.
Preparation
4
B
The green indicator blinks every time you press a button on the
remote control.
When you turn on your set for the first time, the menu
LANGUAGE automatically appears on the screen. Alternately
the explanation appears in different languages.

Operation
¬
VOL CH
213
S
q
Ï
TV
SOURCE
SELECT
CBL VCR AMP
POWER
HD SAT DVD CD
CC
l Q
VCR Prog EXITDNR
NATURAL
MOTION
INFO
+
OK
MENU
a
p
Use of the remote control
Use of the remote control
Source Select
Press this button repeatedly to select
VGA or TV Channels when in TV mode, according to where you
connected the accessory devices (p. 24).
Remark: in VGA mode only some buttons are valid. See VGA menu, p. 24.
TV CBL VCR AMP HD SAT DVD CD
Press one of these buttons to use the remote control in the TV,
CBL,VCR or Amplifier mode as indicated above the button. A green
indicator lights up. Press the same button again more than 1 second
to use the remote control in the mode indicated below the button
(HD, satellite, DVD or CD). A red indicator lights up.
Press the button again more than 1 second to return to the function
named above the button.
q Picture format
Press this button to summon a list of
available picture formats for showing video
images in the traditional 4:3 proportions.
Press this button repeatedly or press the
cursor up/down to select another picture
format:Automatic, Superzoom, 4:3, Movie
Expand 14:9, Movie Expand 16:9,
16:9 Subtitle,Widescreen.
Automatic makes the picture fill the screen as
much as possible.
Superzoom removes the black bars on the
sides of 4:3 programs with minimal distortion.
When in Movie Expand 14:9, 16:9 or
Superzoom picture format, you can make
subtitles visible with the cursor up/down.
Note: In VGA mode press the q button to
switch between a 4:3 or a Widescreen picture
format.
In Dual Screen mode press the q button to
switch between a full or a 4:3 letterbox picture
format.
4:3
Movie expand 14:9
Movie ex
and 16:9
Super zoom
Wide screen
16:9 Subtitle
AV1 , AV2,AV3,AV4,AV5, FRONT,
S Freeze Format
This function is not available with a VGA or HD source.
See Settings menu,General, Freeze format, p. 10 where you can select among three
modes to be displayed when the freeze button is pressed on the remote control:
Freeze, Replay, Photo Finish.
When the mode is
picture.The audio continues to play.
When the mode is
stored video in a single PIP window. Press the OK button to display a few seconds
of a new stored video picture.
When the mode is
of stored video pictures. Press the OK button to display a new series of frozen
pictures.
Note: Continuing to hold the S button down will cycle the TV through the various modes
(Freeze, Replay, Photo Finish).
OK Press this button to activate your choice or to confirm when in
the menus.
POWER
Press to turn on/off the TV.
The TV is never powered off completely unless it
is physically unplugged.
Q Surround mode on/off
MONO sound mode, this feature, when
• In
switched on, enables you to hear a special
effect of sound.
• In
STEREO sound mode,when Surround
is switched on, it seems as though
mode
the loudspeakers are spread further apart
from one another.
l Alternate audio
When you tune a channel where SAP
(Second Audio Program) is available, you can
toggle between
Main and SAP.
If not available, only Main can be selected.
CC Closed Caption
On/Off/On with Mute see p. 14
Ï Main menu on/off see p. 9
Freeze: press the S button to activate/de-activate a frozen
Replay: press the S button to redisplay a few seconds of
Photo Finish: press the S button to display 12 PIP windows
5Use of the remote control
MENU
OK
VOLUME
CH/PR
ZOOM
213
546
879
0
z
S
q
Ï
TV
SOURCE
SELECT
CBL VCR AMP
POWER
HD SAT DVD CD
CC
¬
VOL CH
l Q
DNR VCR Prog EXIT
NATURAL
MOTION
INFO
+
OK
MENU
SURF
a
®
C
º
‡Ò
π
†
NATURAL MOTION
Press this button repeatedly to select On or
Off. See TV menu, Picture menu, Digital
Natural Motion, p. 12.
DNR Digital Noise Reduction
Press this button repeatedly to select Off,
Minimum, Medium or Maximum.
See TV menu, Picture menu, p. 12.
VCR Prog (Only functional in VCR mode.)
Many VCRs have an automatic programming
function. If your VCR has this function, the
universal code set will assign it to this
button.
VOL Volume
Press + or - to adjust the volume.
¬ Mute
Interrupt the sound or restore it.
CH Channel selection
To browse through the TV channels or
sources stored.
VCR functions see p. 25
EXIT
Press this button to exit the menus provided
by universal devices like VCR, SAT, DVD,...
INFO + Display information
Press this button to display (when available)
information about the current channel and
program or source.
The information display is divided in two
zones.
The upper zone may present the local time
and information on the current channel:
number, name, video and audio formats of the
incoming signal, CC availability, availability of
alternate or secondary audio programs (a
plus sign appears if you have more than one
choice), ratings and program title if available.
The lower zone
11 WPIX 12:47
4:3 Stereo
(cc) MAIN+
TV-PG-DLSV
Kids with Guns
Widescreen
Surround
05:22
presents information
about the currently
selected settings:
display format, sound
mode and (if on) the
Sleep Timer icon and
the minutes
remaining.
Backlighting button
Press this button on the right side of the
remote control.The backlighting of the
buttons
VOL, CH, ¬ and the digit buttons
stays on for 5 seconds after pressing the
button.
Buttons in front of the TV receiver box
Picture Sound Features Channels
TV
Settings
Install
(Exit)
Use of the remote control
6
Should your remote be lost or broken you can still change television settings
by using the buttons on the front of the TV receiver box.
• Press the
• Press the
VOLUME - or + button to adjust the volume.
CH/PR - and + button to browse through the TV channels or
sources stored and to select them.
• Press the MENU button to summon the main menu.
Use the
Use the
VOLUME - and + buttons to select the menu item.
CH/PR - and + buttons to select the TV, Settings, Install menu or Exit,
or to select the submenu items.
Note:
- Sometimes not all the menu items are visible on the screen;
Press the
- The
CH/PR + button to reveal all items.
Exit menu lets you dismiss the menu. Select Exit and press the MENU button.

213
546
879
B
S
q
æ
Ï
TV
SOURCE
SELECT
CBL VCR AMP
HD SAT
ALT
AUDIO
DVD CD
¬
VOL CH
l Q
VCR+EXIT INFO
+
GUIDE
+
OK
MENU
SURF
a a a a a
Mah
ACTIVE
CONTROL
SOUND
PICTURE
bcfi
ZOOM
z
z Surf
With this feature you can easily switch between different TV
channels/sources that currently interest you.
In the menu system, you can set surf to two- or nine-channel.(See
Settings, General Surf, p. 10.)
Press this button to select the previously viewed TV channel or
source in case of a Two channel surf, or to select the surf ring in
case of a Nine channel surf.
In case of a Nine channel surf, a list appears at the right side of the
screen. On top, the most recently added.The puck is on the
channel number currently viewed.
Press the z button to turn to the next channel in the list or
press cursor up/down to immediately select the desired TV channel
of the list.
To add a new channel or source: tune to the channel or source you
wish to add.
Press the z button. Press the cursor right to add.
If there are already nine channels/sources in the list, the one at the
bottom of the list will be removed.
To remove a channel or source: select the channel number you
want to remove.
Press the z button. Press the cursor right to remove.
Press the OK button or wait for the time out to dismiss the Surf
display.
h Active Control
Active Control is a pro-active and automatic
system.The TV continuously measures and
corrects all incoming signals in order to provide
the best picture possible.
According to the monitor connected (with or
without an Ambient Light Sensor which
measures the light conditions of the room), the
Active Control functionality may differ.
With a monitor without a light sensor:
Press the h button to select the the Active
Control values
With a monitor with a light sensor:
Off or On.
Press the h button repeatedly to select the
Active Control values
Off, Minimum, Medium
or Maximum (recommended)
Minimum/On Sharpness, Dynamic Contrast
and Noise Reduction are controlled
automatically
Medium Sharpness, Colour, Dynamic
Contrast and Noise Reduction are
controlled automatically
Maximum Sharpness, Colour, Contrast,
Dynamic Contrast and Noise Reduction
are controlled automatically
Press the cursor in the right direction to select
INFO.
The Active Control Demo appears.
The picture settings are being adapted
continuously and automatically.
The sliders will be moving, showing how the TV
is tweaking the current picture.
None of the sliders is user controllable.
Press the OK button to switch off the Demo.
Note: Active Control is not available for digital signals
via AV4.
b Dual Screen/PIP
on/off
See Settings, General menu,
p. 10 and Dual Screen/PIP, p. 17
c Switching screens in
Dual Screen or PIP
See Settings, General menu,
p. 10 and Dual Screen/PIP,
p. 17.
Auto Buttons
To select predefined picture and sound settings.
Note:The Auto buttons are disabled when a VGA source is
being displayed.
M Sound
Press this button to show a list of predefined sound
settings, each corresponding with specific factory settings
of treble and bass.You can also use the cursor up/down.
a Picture
Press this button to show a list of predefined picture
settings, each corresponding with specific factory settings
of Contrast, Color, Sharpness, DNR, Dynamic Contrast
and Color enhancement.You can also use the cursor
up/down.
Personal refers to the personal preference settings of
picture and sound selected in the picture and sound
menu.
Remark: the moment you are in a predefined auto sound or
picture setting and you modify a setting in the picture or sound
menu, all values of the menu will overwrite the previously made
personal settings.
fi Multi-PIP
Press fi to turn on/off Multi-PIP.
The Multi-PIP format that launches on the
button press is determined by the selection
you made in the Multi-PIP Format list in the
General menu, see Settings, General, p. 10
and Multi-PIP, p. 18.
Note: Continuing to hold the fi button down
will cycle the TV through the various formats
(PIP3, PIP8, PIP12), launching a new format after
each second the button is held down. Changing
the format this way does not store the selected
format.
Press the fi button again to return to a full
main screen picture.
O ZOOM
Press the ZOOM O button to activate the
zoom function.
Press the OK button repeatedly to select
one of the zoom magnifications (x1, x4, x9,
x16).
Additionally you can shift the selected zoom
window over the screen with the cursor
buttons up/down, left/right or in a diagonal
way.
The zoom window is reset after selecting
another TV channel, another display format
or when another display format is selected
automatically.
Zooming is disabled in Dual Screen,VGA
and HD modes.
Press the
deactivate the zoom function.
ZOOM O button again to
7Use of the remote control
To use the menus and the menu system
213
Ï
¬
VOL CH
OK
MENU
S
lq
Q
CBL
INFO
+
CC
DNR VCR Prog EXIT
NATURAL
MOTION
TV
SOURCE
SELECT
VCR AMP
POWER
SATHD DVD CD
a
& Press the MENU Ï button on the remote control to summon the main
é Use the cursor in the up/down direction to select the TV, Settings or Install
return or switch
main menu on/off
cursor to select
adjustments
OK button to
“ Use the cursor in the left/right direction to select the menu item.
‘ Use the cursor up/down again to select the control you want to select or to
activate
( Press the MENU Ï button again to turn off the main menu.
Picture Sound Features Channels
TV
Settings
Install
(Exit)
pipes
puck
balls
Attention: point the remote control to the indicator of the monitor.
menu.
Note:The Main menu contains the item
Exit to dismiss the menu, only when you
turn on your receiver for the first time, or when the Main menu is summoned
with the
MENU button in front of the receiver.
menu.
Note: Sometimes not all the menu items are visible on the screen. Press the cursor
down to reveal all items.
adjust. For instance, see Picture menu.
The menu system
Pipes, balls and a puck
The hierarchy of menus and controls is represented by an animated visual
mechanism of pipes, balls and a puck. Unlike a map, however, the animated
mechanism constantly shows the current whereabouts and continually
expands the view of the immediate neighborhood.
The puck represents the user’s point of focus, by surrounding the ball
indicating the user’s current position in the menu hierarchy.
The puck is always present when the menu system is displayed.
The puck is divided into 4 wedge-shaped regions.They correspond to the
directional controls (up/down, left/right) on the remote control.The arrows
on the cursor indicate which directions to choose.
In this way users can navigate through the menu hierarchy to arrive at the
control they wish to adjust.
Pressing a valid button on the remote control shifts focus from the current
ball to the next one connected by a pipe in that direction.
Balls represent a branch of the menu hierarchy.
All menu items are represented by balls. Each ball is identified with an
identifying text label. When items (balls) of a menu level are more numerous
than can fit comfortably on the TV display, only a portion of the items are
shown as balls along the pipe.Those omitted are indicated by a cluster of balls
which indicates that there are ‘more’.
Pipes connect balls together and show the path the user can traverse through
the menu structure. Pipes represent individual branches of the menu
hierarchy.
TV
8
Picture format
Installation
Picture Sound
Interaction
Every pathway in the menu structure leads eventually to a point, where users
can set levels, change values or adjust some aspect of system performance.
List controls
Auto format
Superzoom
4:3
Movie Expand 14:9
Movie Expand 16:9
16:9 Subtitle
Widescreen
A list control is used to select one or more items from a list of options.
For instance, the display format option list with 4:3, Movie Expand 14:9, etc.
Press the right button to move the puck into the list.At least one item is the
current value and is highlighted as such.
Moving the puck up or down with the up/down button causes the list to
move down or up. A single-value list allows only one item to be selected at
one time and de-selects another.
Select the menu language
213
Ï
¬
VOL CH
OK
MENU
S
lq
Q
CBL
INFO
+
CC
DNR VCR Prog EXIT
NATURAL
MOTION
TV
SOURCE
SELECT
VCR AMP
POWER
SATHD DVD CD
a
return or switch
main menu on/off
cursor to select
adjustments
OK button to
activate
Language
Install
English
Français
Español
& Press the MENU Ï button on the remote control.
Picture Sound Features Channels
TV
Settings
Install
When you turn on your receiver for the first time and no channels are stored so far,
the receiver displays a menu nearly identical to the Install menu, but disconnected
from the rest of the menu system.This menu also has an additional item exit with
which the menu can be dismissed.
The menu Language automatically appears on the screen.The explanation appears
in different languages one at a time. Choose your preferred language and press the
OK button on the remote control. Proceed with the Install menu.
é Use the cursor down to select Install.
“ Use the cursor right to select Language.
Follow the instructions on screen.
‘ Use the cursor up/down to select your preferred language and press the OK
button to confirm your selection.
( Proceed with the Install menu.
Store TV channels
Autoprogram
Install mode
Install
Install
Antenna
Automatic
Cable
On
Off
& Select Autoprogram in the Install menu.
é Press the cursor down to select Install mode.
“ Press the cursor right.
Note: It is recommended to choose for the
In case of difficulties in autoprogramming with the automatic method, choose for
Antenna or Cable whether antenna or cable signals are present.
Antenna is selected, the receiver will detect antenna signals and will
When
search for all antenna TV channels available in your local area.
Automatic is selected, the receiver will automatically detect whether or
When
not cable signal input is present.
Cable is selected, the receiver will detect cable signals and will search
When
for all cable TV channels available in your local area.
Automatic way of autoprogramming.
‘ Press the cursor down to select Install.
Note: All channels must be unlocked in order to autoprogram. If requested, enter your
PIN code to unlock all channels. (See Channels in the TV menu, p. 14.)
( Press the cursor right.
§ The message Searching appears and the progress of autoprogramming is
displayed.
When Autoprogramming is complete, the puck navigates to Stop.A message
appears confirming the completion together with the total number of channels
found.
Note: when you navigate to Stop before autoprogramming is complete, you are given
the option to continue.
Available channels: with cable: max. from 1 to 125 - off air: max. from 2 to 69
Note: In case a particular channel is too weak for the autoprogramming to identify,
after installation is complete, you should tune to that channel by using the digit
keys on the remote control.
If the channel is not acquired, a message will appear that the channel is not
available.
9Installation

Select TV settings
The Settings menu allows you to adjust initial settings, i.e.
those which are not related to the installation of the TV
channels.
It contains items that control the settings of the receiver’s
functions, features, services and accessory devices you may
have connected.
TV
Settings
Install
General menu allows you to change settings that will
The
typically be accessed only occasionally.
Source menu allows you to select a source and/or to
The
name each input source.
General Source
General
This menu allows you to change various settings that are
presumably adjusted less frequently than most other
settings.
Settings
Menu background
Dual Screen format
Multi-PIP format
Freeze format
Reset AV settings
Caption Service
Time zone
Daylight saving
Set/Change pin
Center mode
Menu Background
General
Surf
OSD
& Select Menu Background with the cursor down.
é Press the cursor right.
“ Select Ye s or No to turn the Menu Background on or off.
Surf
& Select Surf with the cursor down.
é Select 2 channels or 9 channels with the cursor left/right.
Select
2 channels if you want the 0 button to toggle
between the current and the previously selected channel.
9 channels if you want the 0 button to summon a
Select
list of up to 9 channels which can be selected. (See Use of
the Remote Control, p. 7.)
Dual Screen format (not available for HD sources)
The Dual Screen and PIP functions allow you to view two
TV channels or sources at one time, hearing audio from the
main screen through the speakers and audio from the other
screen through the headphones.
This menu allows you to select the preferred format which
can then be displayed toggling the b button on and off.
See Dual Screen/PIP, p. 17.
& Select Dual Screen format with the cursor down.
é Press the cursor right.
“ Select Dual Screen, Large PIP, Medium PIP or Small PIP
with the cursor up/down.
When
Dual Screen is selected, and Dual Screen mode is
activated with the remote control b button, the TV splits
the screen into two equally sized screens.
When a
activated with the remote control b button, the TV
shows a full screen of video with a small, medium or large
window of video on top of it.
Note: Continuing to hold the b button down will also cycle the
TV through the various formats (Dual Screen, Large PIP, Medium
PIP, Small PIP) launching a new format after each second the
button is hold. Changing the format this way does
not store the selected format.
Multi-PIP format (not available for HD and VGA sources)
Multi-PIP format allows you to view multiple channels or
sources at one time, hearing audio from the main screen
through the speakers.
In this menu you can select which format you prefer to see
in Multi-PIP: PIP 3, PIP 8 or PIP 12, referring to the number
of PIP screens being displayed pressing the fi button on
the remote control.
Note: Continuing to hold the fi button down will also cycle the
TV through the various formats. Changing the format this way
does not store the selected format.
PIP mode is selected, and Dual Screen mode is
& Select Multi-PIP format with the cursor down.
é Press the cursor right.
“ Select PIP 3, PIP 8 or PIP 12 with the cursor up/down.
See Multi-PIP, p. 18 how to operate.
Freeze format (not available for HD and VGA sources)
Freeze format allows you to select among three options:
Freeze, Replay, Photo finish, to be activated when you press
the S button on the remote control. See p. 5. In this
menu you can select which option you prefer.
Note: Continuing to hold the S button down will also cycle the
TV through the various formats. Changing the format this way
does not store the selected format.
& Select Freeze format with the cursor down.
é Press the cursor right.
“ Select Freeze, Replay, Photo finish with the cursor up/down.
Reset AV settings
This function allows you to reset most of the picture and
sound settings to their predefined factory states.
& Select Reset AV settings with the cursor down.
é Press OK to erase settings and reset them to their default
values.
Note:This television receiver provides display of television closed
captioning conforming with the EIA-608 standard and in
accordance with Sections 15.119 of the FCC rules.
Installation
10
10

Caption Service
Closed Captioning allows you to read the voice content of
television programs on the TV screen. Designed to help the
hearing impaired, this feature uses on-screen ‘text boxes’
to show dialogue and conversations while the TV program
is in progress. Captions will appear on the screen during
captioned broadcasts.
Note:The captions do not always use correct spelling and
grammar.
Not all TV programs and product commercials are made for
broadcast with Closed Caption information included. Refer to
your area’s TV program listings for the TV channels and times of
Closed Caption shows.The captioned programs are usually
noted in the TV listings with service marks such as ‘CC’.
& Select Caption Service with the cursor down.
é Press the cursor right.
“ Select the desired Caption Service
• CC 1, 2, 3 or 4
Dialogue (and descriptions) for the action on the
captioned TV program shows on screen.
Usually CC 1 is the most used. CC 2 may be used for
alternate languages if they are being transmitted.
T 1, 2, 3 or 4
•
Often used for channel guide, schedules, bulletin board
information for Closed Caption programs, news, weather
informations or stock market reports.
Not all Caption Services are necessarily being used by a TV
channel during the transmission of a Closed Caption program.
‘ See Closed Captions in the TV-Features menu, p. 14, to turn
Caption Service On or Off.
the
Note:This television receiver provides display of television Closed
Captioning conforming with the EIA-608 standard and in
accordance with Sections 15.119 of the FCC rules.
Daylight saving
Daylight saving time is automatically set by specially
broadcasted signals.This menu item allows you to disable
the automatic setting of daylight saving time.This is useful if
you live in an area or state where daylight saving is not
applied, but you receive channels from other areas where
daylight saving signals are broadcasted.
& Select Daylight saving with the cursor right.
é Select Automatic for automatic clock correction for
daylight saving time, based on specially broadcasted signals.
“ Select Off to disable automatic clock correction based on
the specially broadcasted signals.
Center mode
When you have connected a multi channel audio receiver
to the receiver box (see Connect peripheral equipment, p.
30) and you have selected
loudspeakers of the monitor will act as center speaker,
making a separate center speaker unnecessary.
Set/Change pin
The Set/Change pin menu item allows you to create or
change a Personal Identification Number (PIN).
Center mode Yes, the
& Select Set/Change pin with the cursor down.
é If no PIN exists yet, the menu item is set to Set pin. Follow
the instructions on screen.
If a PIN has previously been entered, the menu item is set
Change pin. Follow the instructions on screen.
to
All number combinations from 0000 to 9999 are valid
numbers.
“ The General menu reappears with a message confirming
that the PIN has been created.
OSD (On Screen Display)
& Select OSD with the cursor down.
é Press the cursor right to select Normal or Minimum.
Normal to activate the continuous display of the channel
number and extended display of TV channel and channel
information on screen.
Minimum to activate the display of reduced channel
information.
See Use of the Remote Control, p. 6, Display information.
Time zone
This function allows you to select your local time zone.
Broadcasted time information will correct the clock display
for your local time.
& Select Time zone with the cursor right.
é Select your local time zone.
Important:You have forgotten your PIN !
& Select Set/Change pin in the General menu.
é Press OK.
“ Press the cursor right.
‘ Enter the overriding pin 0-7-1-1.
( Press the cursor again and enter a new personal 4-digit pin.
The previous pin is erased and the new pin is stored.
Source
This menu allows you to select the accessory device you
connected to one of the AV inputs.
& Select Source with the cursor right.
é Press the cursor down to select one of the AV inputs.
“ Press the cursor right to enter the list of types of
accessory devices attached to the selected input.
‘ Select the accessory device with the cursor up/down.
Once you have selected the source, e.g.VCR, this source
will automatically be selected when your remote control is
in VCR mode, see p. 5, and you press the
button on the remote control.
SOURCE SELECT
11Installation

TV menu
SOURCE
SELECT
NATURAL
MOTION
S
TV
CBL
VCR AMP
SATHD DVD CD
lq
DNR VCR Prog EXIT
POWER
Q
+
INFO
a
CC
switch main menu
OK
MENU
Ï
on/off
cursor to select
¬
VOL CH
adjustments
OK button to activate
213
Picture menu
TV
Color Temperature
Dig. natural motion
Dynamic Contrast
Color Enhancement
Picture format
Press the cursor right to select Picture.
Select the menu items in the Picture menu with the cursor
up/down.
Adjust the settings with the cursor left/right or enter the
list of submenu items with the cursor right.
Select a submenu item with the cursor up/down.
Note:To remove the menu background before adjusting the
picture settings, see Select Settings, General, p. 10.
Contrast
This control allows you to adjust the contrast level of the
picture.
Brightness
This control allows you to adjust the brightness level of the
picture.
Color
This control allows you to adjust the color saturation of
the picture.
Sharpness (not available for HD sources)
This control allows you to adjust the edge definition of a
picture.
Picture Sound Features Channels
Contrast
Brightness
Color
Sharpness
Tint
DNR
Auto picture
Press the MENU Ï button on the remote control to summon the main
menu.
Note:When the main menu is accessed from the keypad in front of the TV
receiver box, it has an additional Exit item, which lets you dismiss the menu.
Warning:The main menu is completely different when a VGA source is displayed.
See p. 24.
Tint (not available for HD sources)
This control allows you to select the color mix (hue) of
the picture.
Color temperature
This control allows you to select from TV channels, the
color temperature of the TV picture.
& Press the cursor right to enter the list.
é Select Normal, Warm or Cool with the cursor up/down.
“ Press the cursor left to return to the picture menu.
Digital natural motion (not available for HD sources)
Line doubling eliminates line flicker, motion compensation
reduces judder and offers smooth, yet sharp motion
reproduction in movie broadcasts.
On or Off to really see the difference in picture
Select
quality.
Dynamic Contrast (not available for HD and VGA sources)
This feature automatically makes the contrast in the darker
and the brighter picture areas more noticeable as the
image on screen changes.
Normally, select
Minimum, Maximum or Off.
Medium. It may be preferred to select
& Press the cursor right to enter the list.
é Select one of the settings with the cursor up/down.
“ Press the cursor left to return to the picture menu.
DNR (Digital Noise Reduction)
(not available for HD and VGA sources)
This feature automatically filters out and reduces the image
noise and improves picture quality when receiving weak
video signals.
& Press the cursor right to enter the list.
é Select Off, Minimum, Medium or Maximum according to
the image noise.
“ Press the cursor left to return to the picture menu.
Use of the menus
12

Color enhancement (not available for HD sources)
When activated, this feature automatically controls green
enhancement and blue stretch. It makes the colors more
vivid.
& Press the cursor right to enter the list.
é Select On or Off in order to activate/de-activate Color
Enhancement with the cursor right.
“ Press the cursor left to return to the picture menu.
Auto picture
This menu item performs the same as the
PICTURE a
item on the remote control. See Use of the Remote
Control, p. 7.
& Press the cursor right to enter the list.
é Select a predefined picture setting with the cursor
up/down.
“ Press the cursor left to return to the picture menu.
Auto picture settings will be set to
settings are changed manually: contrast, brightness, color,
sharpness, dynamic contrast, color enhancement or DNR.
Picture format (not selectable for HD sources)
This menu item performs the same as the q button on
the Remote Control. See Use of the Remote Control, p. 5.
Personal if the following
Sound menu
Sound
TV
Volume
Treble
Bass
Balance
Headphone volume
Sound mode
Alt Audio
(Mono/Stereo)
(Audio only)
Auto sound
Select the menu items in the Sound menu with the cursor
up/down and adjust the settings with the cursor left/right.
Remember, control settings are at normal mid-range levels when
the bar scale is centered.
Volume
This control allows you to adjust the volume level.
Treble
Treble attenuates or amplifies the high-frequency response of
the audio output signal.
Bass
Bass attenuates or amplifies the low-frequency response of the
audio output signal.
Balance
This control allows you to adjust the balance of the right and
left speaker’s sound output.
Alt Audio
When you tune a channel where SAP (Second Audio Program)
is available, you can toggle between
Main and SAP.
Press the cursor right to enter the list and make your preferred
audio selection with the cursor up/down.
If SAP is not available, only Main is selected.
Mono/Stereo (Only selectable in case of stereo transmission)
Mono or Stereo with the cursor left/right.
Select
Stereo has been selected, the television will reproduce
When
any stereo broadcast signal it receives.
If Stereo is not present on a selected channel and the TV is
placed in Stereo mode, the sound coming from the set will
remain monaural.
Your selection is stored per TV channel.
Audio only (disabled in VGA mode)
This control enables you to blank the TV picture if the monitor
is used as center speaker in a configuration with an audio
receiver.
Audio only On to only hear the sound and to switch off
Select
the picture.
Auto Sound
This menu item performs the same as the
SOUND item M on
the remote control. See Use of the Remote Control, p. 7.
& Press the cursor right to enter the list.
é Select a predefined sound setting with the cursor up/down.
“ Press the cursor left to return to the sound menu.
To exit the sound menu branch, press the diagonal cursor
button upright, or upleft or press the Ï menu button.
Headphone volume
This control allows you to adjust the volume level of the
headphone.
Sound mode
Surround Mode can only be selected when the sound of the TV
channels is stereo.
Sound mode On is selected, it seems as though the
When
loudspeakers are spread further apart from one another.
Note: In case you have selected Center Mode Yes in the Settings
menu (see p. 11), then the items Treble, Bass and Balance are not
selectable.
13Use of the menus

Features menu
TV
Closed Captions
Sleep Timer
Closed Captions
See Caption Service, Settings menu, General, p. 11.
Features
Off
On
On during mute
On timer
& Select Closed Captions with the cursor down.
é Press the cursor right.
“ Select On, Off or On with Mute.
When
On is selected, the TV will display the currently
displayed Caption Service, assuming that the service is
available in the broadcast.
Off is selected, the TV will not display Closed
When
Captions information.
On with Mute is selected, the TV will display the
When
currently selected Caption Service when the mute function
is active.When the mute function is not active, the TV will
not display Closed captions information.
Note:
- When Dual screen format is selected, Closed Captioning (if
activated) appears for the main screen only, and it covers the
full screen;
- When Multipip 12 is activated, Closed Caption is disabled.
Sleeptimer
With the Sleeptimer function you can set a time period
after which the TV will turn itself off.
& Select Sleeptimer with the cursor down.
é Press the cursor right to set the time.
The counter runs from 0 up to 180 mins (in 5-min
increments).When set to 0, the sleeptimer is turned off.
One minute before the sleeptimer expires, a message appears
that the TV will turn off in 60 seconds or you may cancel the
sleeptimer by pressing the OK button.You can always turn off
your TV earlier or change the set time.
Note:When a VGA source is selected, the TV will not turn off
when the sleeptimer expires.
On timer
Note:The On timer function is only available if time information
is available via the local PBS channel.
& Select On timer with the cursor down.
é Press the cursor right.
“ Select On or Off to set the On timer On or Off.
‘ When you have selected On press the cursor right.
( Select the TV channel or external source you want the On
timer to activate with the cursor up/down.
§ Press the cursor right to select the day you would like the
On timer to become active.
Select Daily to set the On timer for daily operation on
the selected TV channel or source.
è Press the cursor right to select AM or PM.
! Press the cursor right to enter the time with the digit
buttons or with the cursor up/down, left/right.
ç Press the OK key to activate.
Channels menu
TV
Install
Settings
Channel List
The list will display all the stored TV channels.
Picture Sound Features Channels
Channel List
Channel Lock
Lock after
TV Ratings Lock
Movie Ratings Lock
Channel Remove
& Select a channel number with the cursor up/down.
é Press the OK button to switch over to the selected TV
channel or AV extension.
Channel Lock
This feature provides the ability to prevent the viewing of a
selected channel. Blocked channels can still be tuned with
the digit buttons only, but the picture is greyed and the
audio is muted.
& Select Channel Lock with the cursor down.
é Press the cursor right.
A list with all stored channel numbers appears.
“ Select the channel you want to lock/unlock with the
cursor down.
‘ Press OK.
This summons a message that prompts you to enter your
PIN. (See Set/Change Pin, p. 11) Follow the instructions on
screen.
If the PIN is correct, the channel list reappears, and the
color of the box-graphic of the selected channel changes
from blue to yellow to indicate the channel is currently
locked.
You only have to enter your PIN code once while the
menu is active.
( Repeat to lock other channels.
Lock after
This allows you to activate the childlock after a selectable
time delay.
& Select Lock after with the cursor down.
é Select On with the cursor right.
“ Press the cursor right again to select AM or PM.
‘ Press the cursor right once again to enter the time.
( Enter the time with the digit buttons or with the cursor
up/down.
§ Press the MENU Ï button to turn off the menu.
Use of the menus
14
14

TV
Picture Sound Features Channels
Install
Settings
...
...
TV-Y
TV Ratings Lock
Age-based Rating Content-based Rating
All none
No Rating none
TV-Y none
TV-Y7 (FV) Fantasy Violence
TV-G none
TV-PG (D) Dialog
TV-14 (D) Dialog
TV-MA (L) Language
TV-Y7 (D) Dialogue
TV-PG (L) Language
TV-14 (S) Sex
...
TV-MA (V) Violence
Movie Ratings Lock
(L) Language
(S) Sex
(V) Violence
(L) Language
(S) Sex
(V) Violence
(S) Sex
(V) Violence
Channel List
Channel Lock
TV Ratings Lock
Channel Remove
TV Ratings Lock
Your TV is equipped with a V-chip.This allows you to control access to
individual programs based on their movie and TV ratings.
The program content advisory data are sent by the broadcaster or program
provider.
& Select TV Ratings Lock with the cursor down.
A list appears, showing the age-based TV ratings and a corresponding contentbased ratings list.
é Press the cursor right to enter the list.
“ Select an age-based TV rating with the cursor up/down, and enter, if present,
the list with content-based ratings with the cursor right, and select one
content-based rating.
‘ Press OK to activate/de-activate the selected rating.
You are asked to enter your PIN. (See Set/Change PIN, p. 11)
If the PIN is correct, the TV Ratings Lock menu reappears.
( Select another content-based rating if you like and press OK again.
You need only enter your PIN once while the menu is active.You can
lock/unlock any number of ratings on the list without re-entering your PIN.
Each ratings item has a box-graphic in front of it to indicate whether or not
programs carrying that rating are currently locked:
• a yellow-colored box: all items in the contents-based list are locked as well;
• a blue-colored box: the item is unselected;
• a half blue, half yellow-colored box: some content-based ratings are
selected/unselected.
All has been selected, all items in the age-based and in the contents-
When
based lists are locked.
Note:When
CH-/+ button.
If, while
item, is unselected, then
No Rating is the selection for items that either have no rating information or
have a rating of None.When this is selected, programs without a rating will
be locked.
When an item on the age-based list is selected, all items below that item of
the same group are locked as well.
When you select a content-based rating, all identical content-based ratings in
the younger age-based categories are also selected.
TV-Y appropriate for children of all ages with themes and elements
TV-Y7 programs designed for children age 7 and older
TV-Y7-FV programs include fantasy violence more intense than other
TV-G programs suitable for all ages.These programs contain little or
TV-PG programs contain elements that some parents may find unsuitable
TV-14 programs contain elements that may not be suitable for children
TV-MA programs are designed to be viewed by adults and may be
All has been selected AV4 and AV5 can not be selected with the
All is selected, any other item, either an age-based or content-based
All is automatically unselected.
suitable for children aged 2-6
programs in the TV-Y7 category
no violence, no strong language and little or no sexual dialogue
or situations
for younger children and which may need parental guidance.
The program may contain moderate violence, sexual dialogue
and/or situations and some strong language.
under 14 years of age.These programs include one or more of
the following: intense violence, intense sexual situations,
suggestive dialogue and strong language.
unsuitable for children under the age of 17.
These programs may contain graphic violence, explicit sexual
activity and/or crude or indecent language.
15Use of the menus

TV
Movie Ratings Lock
Channels
All
NR
G
PG
PG-13
R
NC-17
X
Movie Ratings Lock
This function allows you to control access to individual movies based on their
MPAA ratings (Motion Picture Association of America).
& Select Movie Ratings Lock with the cursor down.
A list appears, showing all valid MPAA content ratings.
é Press the cursor right to enter the list.
“ Select a movie rating with the cursor up/down.
‘ Press OK to activate/de-activate the selected rating.
You are asked to enter your PIN. (See Set/Change PIN, p. 11.)
If the PIN is correct, the Movie Ratings Lock menu reappears.
Each rating item has a box-graphic in front of it to indicate whether or not
programs carrying that rating are currently locked:
• a yellow-colored box: movies with this rating are locked;
• a blue-colored box: movies with this rating are unlocked.
All has been selected, all items on the movie ratings list become
When
selected. (All movies are locked.)
If, while
unselected.
When
When any other item has been selected, all ratings below are selected as well,
thus all movies with those ratings will be locked.
NR not rated
G movies with a mild content, suitable for all ages
PG movies for which parental guidance is recommended.
PG-13 movies for which parental guidance may be recommended if
R restricted.The movies usually contain offensive sex or bad
NC-17 even with parental permission, forbidden under age 17.
X movies which generally focus on sex, violence and/or bad
All is selected, any other item is unselected, then All is automatically
NR has been selected, no other item is selected.
They may contain a few racy or violent scenes or maybe
some bad language
under age 13
language and may be unsuitable for children under the age of 17.
Parental guidance or permission needed.
More offensive sex, violence or bad language.
language.Also known as pornography.
Use of the menus
16
Channel Remove
This feature provides the ability to remove a channel number from the
channel list.
& Select Channel Remove with the cursor down.
é Press the cursor right.
A list with all stored channel numbers appears.
“ Select the channel you want to remove with the cursor down and press OK.
‘ Repeat to remove other channels.

Dual Screen/PIP
546
879
0
SURF
Mah
ACTIVE
CONTROLSOUND PICTURE
bzc fi
ZOOM
b
c
z
Press the b button to turn on or off Dual Screen or Single PIP, according to
the format selection made in the Dual Screen Format list in the General
menu. See Select TV Settings, General, p. 10.
Audio from the main screen (the left screen in Dual Screen and the full size
screen in single PIP) plays to the speakers;
Audio from the right screen or from the single PIP plays to the headphones.
Note: Continuing to hold the b button down will cycle the TV through the
various formats (Dual Screen, Large PIP, Medium PIP, Small PIP), launching a new
format after each second the button is held down.
Making the PIP screen movable
When a single PIP format is selected, press the OK button to make the PIP
screen movable.
Press the cursor up/down, left/right to move the PIP screen in the direction
of the cursor press.
Switching screens
Press the c button to swap the main screen and the auxiliary screen.
On-Screen information
The On-Screen information, which appears when changing channels, always
refers to the highlighted screen.
To highlight a screen
Pressing the cursor left/right will toggle the highlight between the main screen
and the auxiliary screen.
Change TV channels in main screen, auxiliary screen and PIP screen
Press the channel up/down button, the digit buttons or the z button in
order to change the TV channels in the highlighted screen.
Deactivating Dual Screen mode
Press the b button again to return to a full main screen picture.
The TV tunes to the picture which was highlighted in Dual Screen mode.
Notes:
- TV or Movie ratings: When Dual Screen mode is activated, a message with a PIN
entry is summoned as TV and Movie ratings locks do not apply in Dual Screen.
Select with the cursor button up/down whether you want to suspend V-chip
blocking as long as Dual Screen mode is activated, or until the TV is turned off.
If Cancel is selected, you return to normal TV viewing.
- Channel Lock: When Dual Screen mode is activated, and a channel or source is
locked, the next channel or source is displayed;
- Display formats: When Single PIP is selected but not highlighted, the Display
Format control works normally for the Main Screen only.When Single PIP is
highlighted the Display Format control in the menu is grayed and the q button
has no effect.
When Dual Screen mode is selected, two Display formats are supported: Full
Screen or 4:3 Letterbox (4:3 format with black bars above and below the
picture).
- It is possible to display a VGA source in a Dual Screen/PIP screen, but it is NOT
POSSIBLE to activate Dual Screen/PIP when the main screen is a VGA source.
17Dual Screen/PIP

PIP 3
PIP 8
PIP 12
Multipip
In the Settings menu, General, p. 10 you selected which Multipip format you
prefer to see in Multipip.
& Press the fi button on the remote control to toggle the selected format on
or off.
Notes:
- TV or Movie ratings: when Multipip is activated, a message with a PIN entry is
summoned as TV and Movie Ratings locks do not apply in Multipip.
Select with the cursor button up/down to indicate whether you want to suspend
V-chip blocking as long as Multipipis activated, or until the TV is turned off.
If Cancel is selected, you return to normal TV viewing.
- Channel Lock: When Multipip is activated, and a channel or source is locked, this
channel or source will not appear.
The main screen displays the channel or source tuned before Multipip was
activated and the highlight is on the main screen.
The first PIP screen displays the last channel selected.The following PIP
screens display the channels or sources selected in the Surf list (from top to
bottom) followed by the channels from the channel map from the lowest to
the highest numbered.
é Press the cursor left/right, up/down or in case of PIP 12, also cursor diagonal
to highlight a PIP screen.When the highlight is on one of the PIP screens, it
begins playing video and the other PIPs freeze.The main screen always
continues playing audio and video.
Note:
- Multipip is disabled when a picture is being displayed from HD or VGA sources;
- Pictures from a HD source will never been displayed in Multipip:
- Display Format is disabled when Multipip is active.
“ Pressing the CH -/+ or the z button or the digit buttons changes the
channel or source for the currently highlighted screen.
If the currently highlighted screen is tuned to a channel or source already in
the surf list, then the next channel or source in the surf list is displayed.
Note: channels cannot be added or deleted from the Surf list when Multipip is
activated.
‘ With PIP 3 and PIP 8: Press the c button to swap between main and
subscreen.
With PIP 12: Press the c button or the OK button to view the highlighted
screen full screen. Multipip is dismissed.
18
( With PIP 3 and PIP 8: press the cursor up/down to display a following series
of PIP screens.
With PIP 12: highlight the PIP picture in the bottom right and press the cursor
down to display a following series of PIP screens.
Note: Only TV channels which are in the favorite list and pictures from the connected
and activated externals are displayed in the PIP screen.
PIP 3 and PIP 8 are not possible when a VGA source is displayed as main screen.
Multipip

CABLE
VCR
R AUDIO
L AUDIO
VIDEO
AV 1
IN
OUT
OUT IN
AV 2INVIDEO
OUT
S VIDEO
3
ANTENNA / CABLE
Connect Accessory Devices
IN
There is a wide range of audio and video devices that can be connected to your receiver.The following connection diagrams show
you how to connect them to the back or the front side of the receiver.
Note: In case of the monitor in a stand alone situation without the receiver box connected, see the instructions with the monitor.
Video Cassette Recorder
& Connect the cable TV cable 1 to the RF IN socket of
your VCR.
é Connect another RF cable 2 from the output OUT of
ANTENNA./CABLE jack.
VIDEO, L and R AUDIO input
Note: Do not place your video cassette recorder too close to the
screen as some video cassette recorders may be susceptible for
signals out of the display.
Keep a minimum distance of 20” to the screen.
your VCR to the receiver’s
“ Better playback quality can be obtained if you also connect
the Video,Audio Left and Right (only for stereo devices)
AV cables 3 to the
AV1 IN jacks.
The
VIDEO OUT connectors can be used for daisy
chaining or to record programs from your TV. See Record
with your VCR, p. 25.
If your VCR has an S-VHS video jack:
For improved picture quality, connect a S-video cable with
S-VIDEO input instead of connecting the VCR to the
the
VIDEO jack of AV1 IN.
S-Video does not provide audio, so audio cables must still
be connected to provide sound.
Note: You can also connect your VCR to the AV3 IN jacks.
VCR with other AV peripherals
ANTENNA / CABLE
VCR and Cable Box
ANTENNA / CABLE
OUT IN OUT IN
OUT
OUT IN OUT IN
VCR
VCR
S VIDEO
OUT
AV 1
IN
AV 2
IN
S VIDEO
VIDEO
L AUDIO
R AUDIO
CABLE
& Connect the cable TV antenna 1 to the cable box’s
IN jack.
é Connect the cable box’s OUT jack to the VCR’s RF
IN socket.
“ Proceed with the as above described procedure for
Video recorder, starting with step
Cable Box
é.
& Interconnect your VCR with an extra RF cable 2.
VIDEO
IN
OUT
VIDEO
L AUDIO
R AUDIO
CABLE
3
OUT
é To obtain better picture quality, also connect the Video,
Audio left and Audio right (only for stereo devices)
cables 3 to the
IN
jacks.
Note: AV
1 IN can handle CVBS and Y/C;
2 IN CVBS;
AV
AV3 IN CVBS and Y/C;
FRONT can handle CVBS and Y/C.
VIDEO, L and R AUDIO input AV 2
19Connect Accessory Devices

Satellite Receiver
VCR
CABLE
SAT
≈
R AUDIO
L AUDIO
VIDEO
AV 1
IN
OUT
IN OUT
SAT
IN
AV 2INVIDEO
OUT
S VIDEO
OUT
IN
5
3
4
ANTENNA / CABLE
DVD
R AUDIO
L AUDIO
VIDEO
OUT
VIDEO
L
R
AUDIO
AV1
IN
AV 2
IN
VIDEO
OUT
S•VIDEO
DVD
OUT
AV3
IN
AV 4
IN
AV 5
IN
VIDEO AUDIORS•VIDEO
L
G/YYB/PbPbR/PrPrLLR
R
HV
S VIDEO
2
SAT
IN
≈
OUT
SAT
Satellite Receiver with a VCR
AV 1
IN
AV 2INVIDEO
OUT
VIDEO
L AUDIO
R AUDIO
& Connect the satellite antenna cable 1 to the satellite
receiver’s
SATELLITE IN jack.
é Connect the Video,Audio left and right (only for stereo
devices),AV cables 2 to the
input AV1 IN, AV2 IN or AV3 IN jacks.
If your satellite receiver has an S-VHS video jack:
For improved picture quality, connect a S-VHS video cable
with the
receiver to the
S-VIDEO input instead of connecting the satellite
VIDEO jack of AV1 IN or AV3 IN.
VIDEO, L and R AUDIO
& Connect the cable TV cable 1 to the RF IN socket of
your VCR.
é Connect another RF cable 2 from the output of your
VCR to the receiver’s
ANTENNA/CABLE jack.
“ Connect the satellite antenna cable 3 to the satellite
receiver’s
SATELLITE IN jack.
‘ Connect the AV cables 4 to the satellite receiver’s AV
OUT
jacks and to the VCR’s AV IN jacks.
( Connect the VCR’s AV OUT jacks 5 to the receiver’s
AV1, AV2 or AV3 IN jacks.
20
DVD Player
Connect Accessory Devices
DVD player with AV connectors
Connect the AV cables to the DVD player’s AV
and to the receiver’s
If your DVD player has an
AV2 I N jacks.
S-VIDEO out(put) jack:
Connect the AV cables to the DVD player’s
and to the receiver’s
Connect an
S-VIDEO cable with the S-VIDEO input instead
AV3 IN jacks.
OUT jacks
AV OUT jacks
of connecting the DVD player to the video jack.
DVD player with Component Video Output
Connectors (AV4)
& Connect the three separate component video cables to the
DVD player’s
AV4 IN jacks on the receiver.
Y, Pb and Pr jacks and to the Y, Pb and Pr
é Connect the audio cable to the DVD player’s AUDIO L and
R jacks and to the L and R audio AV4 jacks on the receiver.
DVD player with Progressive scan output (480p 2 Fh)
Connect the DVD player to the
AV4 or AV5 IN jacks on
the receiver. See AV5 Digital HD input, p. 21.

AUDIO OUT
L
R
2
CENTER
1
AV5 Digital Set Top Box
AV 3
IN
AV 5
IN
AV 4
IN
VIDEO AUDIORS•VIDEO
L
G/YYB/PbPbR/PrPrLLR
R
HV
Connect your Set top Box to the AV5 input.
Multi channel Surround receiver
Connect a Set top Box with 2 Fh RGB output to the H, V, Y, Pb and
Pr
jacks and to the L and R AUDIO jacks.
Connect a Set top Box with 2Fh Pr, Pb,Y output to the Pr, Pb and Y
jacks and to the
L and R AUDIO jacks.
See also the manual of your High Definition Set top Box.
Note:This television is designed to accept high definition signal standards 480p
and 1080i, as specified by the Electronic Industries Association standard
EIA770.3.
Set-top boxes from different manufacturers have the possibility of differing
output standards which may cause difficulties for the television to properly
display.
Warning: in case you notice scrolling images, wrong colors or no color, no picture,
or even combinations of these on your screen, check if the connections are done
in the right way:
- for Y, Pb, Pr 2Fh: check if the cable colors match with the input connector colors
- for RGB-HV 2Fh: check additionally if the H and V cables are connected to the
respective H and V input connectors, and if necessary exchange both
connections.
& Connect the audio cable to the multi channel Surround receiver
AUDIO OUT L and R at the back of your TV receiver
and to
box 1.
Note:Turn off the TV and your surround receiver before connecting them.
Set the Surround receiver’s volume to minimum.
é If you want the loudspeakers of your monitor to act as center
speaker, also connect an audiocable to the multi channel Surround
receiver and to the
SURROUND SOUND CENTER IN at the back
of your TV receiver box 2.
“ Select Center mode Yes in the Settings, General menu. See p. 11
The loudspeakers of the monitor will now only produce center
sound, the loudspeakers connected to the audio receiver will
produce Surround Sound.The volume has to be controlled via the
multi channel Surround receiver.
Note: No sound will be heard when a TV channel or external source is
blocked via the Channel Lock menu (see p. 14).
21Connect Accessory Devices

S•VHS
VIDEO IN
AUDIO
L
R
1 2
3
Headphone
L
Camera & camcorder
& Insert the plug into the headphone socket L behind the door at
the front side of the receiver. Press the center of the door to
open.
é Press ¬ on the remote control to switch off the internal
loudspeakers of the TV.
The headphone impedance must be between 8 and 2000 Ohm.
The headphone socket has a 3.5 mm jack.
SOUND menu select Headphone volume to adjust the
In the
headphone volume.
Note:When a TV channel or external source is blocked via the Channel
Lock menu (see p. 14), also the headphone is muted.
When Dual Screen/PIP is activated (see p. 17):
- if the main screen displays a TV channel picture, you hear the sound
from the Dual Screen/PIP picture through your headphone;
- if the main screen displays a picture from an external source, you hear
the sound from the main screen through your headphone.
Connect your computer
See the separate supplied instruction manual with your monitor.
& Connect your camera or camcorder to the front input behind the
door at the front side of your receiver. Press the center of the
door to open.
é Connect the equipment to VIDEO IN 2 and AUDIO L 1 for
mono equipment.
“ For stereo equipment also connect AUDIO R 1.
S-VHS quality with an S-VHS, Hi-8 or Digital camcorder is
obtained by connecting the S-VHS cables with the S-VHS input 3
(instead of
VIDEO IN 2) and AUDIO inputs 1.
22
Connect Accessory Devices

Setting the remote control to work accessory devices
Your remote control is set to work your TV and many infrared remote (IR) control
VCRs, Cable TV Converter Boxes, DVD players, Satellite Receivers, etc.
Press the VCR, DVD, SAT, HD, CD, CBL or AMP button according to the
accessory device you want to operate with this remote control.
Toggle if needed by pressing more than one second until the correct colored
LED lights up. See Use of the Remote control, p. 5.
If the function buttons on the remote control also work the selected
accessory device, then the remote is ready and no further steps are needed.
If the functions buttons do not work the selected accessory device
According to the device(s) you own, you may make your remote control ready
for them by a direct entry code. Proceed as following.
Code Setup
& Press the desired mode button (toggle if needed by pressing more than one
second) to select the device, which you need to setup.
é Press the digit buttons 1 and 3 at the same time, for about 5 seconds,
and until the backlighting buttons and the selected mode button light up.
“ Enter with the digit buttons and within 30 seconds, the 4 digit remote code
no. for your brand of accessory device. See pages 26 and 27.
Note: If no code or an incomplete code is entered within 30 seconds, the backlight
and selected mode button will turn off and give a long blink before returning to
the previous programmed code.
If a valid 4 digit code is entered the backlight and the selected mode button,
will turn off and then blink twice.The remote control will assign that code no.
to the mode selected.
Remark: If more than one number is listed for your device, you may have to try the
other codes until your device operates with the remote.
If after repeated attempts the code number method does not work for your
accessory device, try the Auto Search method following.
Auto Search method
& Turn on the desired device (VCR, Cable box, etc.).
é Press the desired mode button to select the device which you need to search.
Point the remote control toward the accessory device. Stand at least six feet
away from the front of the device. Make sure you are in the line of sight of the
IR receiving eye of your device.
“ Press the digit buttons 1 and 3 at the same time, for about 5 seconds,
and until the backlighting buttons and the selected mode button light up.
‘ Press and release the red POWER button.
The backlighting button and the selected mode button will turn off.
The remote control will automatically start stepping to the next code in the
library simultaneously sending the code for channel up for that particular ID.
The backlighting buttons and the selected mode buttons will give a short blink
after each search.Watch the channel number indicator on your device.
Channel numbers will scan up when the unit has been identified.This may take
some minutes.
Note: For devices DVD and CD, insert a disc and press
control will send the command next track. Switch AV receivers to
PLAY on the device. The remote
TUNER function.
( Press and release the red POWER button as soon as the channel numbers
start to scan up.
The remote control will assign that code no. to the mode selected.
The backlight and the selected mode button will blink twice to indicate the
code setup has been completed.
The remote control is ready to operate with the accessory device.
Note: If any other button is pressed, or no button is pressed during Auto Search, the
Search will be ended.The backlighting and selected mode button will give a long blink.
The remote keeps its previous code.
23Connect Accessory Devices

To select connected devices
SOURCE
SELECT
SOURCE
SELECT
TV
NATURAL
MOTION
S
S j
CBL
VCR AMP
SATHD DVD
lq
DNR VCR Prog EXIT
POWER
CD
Q
+
INFO
a
CC
VGA menu
Equipment connected to the rear or to the front side of the receiver box
Press the
FRONT or VGA, according to where you connected your devices at the rear or the
SOURCE SELECT button repeatedly to select AV1, AV2,AV3,AV4,AV5,
front side of your receiver.
Press the OK button to confirm.
Remark : Most equipment (decoder, video recorder) carries out the switching itself.
This is however never the case with a computer connected to the VGA input.
If you want to change to TV channels?
Enter the channel number of the TV channel which you want to watch with the
digit buttons.
Only available when a VGA source has been connected and activated. See also the
separate supplied instruction manual with your monitor.
& Select VGA with the SOURCE SELECT button.
é Press the MENU Ï button to switch on the VGA menu.
Picture 1
G Brightness,
H Contrast,
è Color temperature,
@ Sharpness,
VGA
Picture 1 Picture 2 Sound Setup
“ Select one of the menus with the cursor left/right.
Note: Only when you have chosen the US English language, the menu items will be
displayed with additional icons.
‘ Select one of the menu items with the cursor up/down.
See the separate booklet supplied with the monitor.
Picture 2
q Format,
Sound
V Volume,
Z Zoom,
 Zoom factor,
~ Shift,
q Clock frequency,
fi Phase
( Press the cursor left/right to alter the selected adjustment.
§ Press the Ï button again to switch off the VGA menu.
Setup
‡ Language,
Connect Accessory Devices
24

VCR Control buttons
213
546
879
0
S
q
Ï
TV
SOURCE
SELECT
POWER
CBL VCR AMP
HD SAT DVD CD
CC
¬
VOL CH
l Q
DNR VCR Prog EXIT
NATURAL
MOTION
INFO
+
OK
MENU
SURF
a
VCR
®
Ò†
Cº
‡π
Most of the audio and video devices from our range of products can be
operated with the remote control of your TV.
Press the
VCR, DVD, SAT, HD,CD, CBL or AMP button according to the
devices you want to operate with this remote control. See Use of the
remote control, p. 5.
VCR buttons
After you pressed the
VCR button, press one of the VCR buttons under the
door of the remote control:
® for record,
C VCR timer,
º for pause,
Ò for rewind,
‡ for stop,
π for play,
† for fast forward,
- CH + for sequential channel selection from the video recorder
tuner,
0 to 9 to select a channel number from your video recorder tuner,
These buttons function with devices that uses the RC5 signalling standard.
Record with your VCR
To record S-VHS quality, connect an S-VHS peripheral directly to the VCR.
Record a TV program
You can record a TV program using your VCR’s tuner without affecting your TV.
& Select the channel number on your VCR.
é Set your VCR to record.
See the handbook for your VCR.
& Switch on the device.
é Select the correct channel on your TV and the correct input on your VCR.
“ Set your VCR to record.
Switching channel numbers on your TV does not disturb recording !
Record to VCR from
You can record a program on your VCR from the TV tuner via VIDEO OUT.
You record the tuner channel of the TV, even when you switch to an AV input using the
remote control.
Do not switch channels or turn off your TV when you are recording through
VIDEO OUT.
Note:When a TV channel or AV source is blocked because of a rating set via the Channels menu (see p. 14), also the record output
picture and sound are muted.
VIDEO OUT
SOURCE SELECT button on the
25Record

Remote Control Direct Entry Codes for Accessory Devices
Amplifiers Remote Code No.
Aiwa . . . . . . . . . . . . . . . . . . . . . . . . . . . .0433
Carver . . . . . . . . . . . . . . . . . . . . . . . . . . .0296
Curtis Mathes . . . . . . . . . . . . . . . . . . . . .0327
Denon . . . . . . . . . . . . . . . . . . . . . . . . . . .0187
GE . . . . . . . . . . . . . . . . . . . . . . . . . . . . . .0105
Harman/Kardon . . . . . . . . . . . . . . . . . . . .0919
JVC . . . . . . . . . . . . . . . . . . . . . . . . . . . . .0358
Linn . . . . . . . . . . . . . . . . . . . . . . . . . . . . .0296
Magnavox . . . . . . . . . . . . . . . . . . . . . . . . .0296
Marantz . . . . . . . . . . . . . . . . . . . . .0296, 0348
Nakamichi . . . . . . . . . . . . . . . . . . . . . . . .0348
Optimus . . . . . . . . . . . . . . . . . . . . . . . . .0422
Panasonic . . . . . . . . . . . . . . . . . . . . . . . . .0335
Philips . . . . . . . . . . . . . . . . . . . . . . .0296, 0919
Pioneer . . . . . . . . . . . . . . . . . . . . . .0040, 0327
Realistic . . . . . . . . . . . . . . . . . . . . . . . . . .0422
Sansui . . . . . . . . . . . . . . . . . . . . . . . . . . .0348
Sony . . . . . . . . . . . . . . . . . . . . . . . .0716, 0247
Soundesign . . . . . . . . . . . . . . . . . . . . . . . .0105
Technics . . . . . . . . . . . . . . . . . . . . . . . . . .0335
Victor . . . . . . . . . . . . . . . . . . . . . . . . . . .0358
Wards . . . . . . . . . . . . . . . . . . . . . .0040, 0105
Yamaha . . . . . . . . . . . . . . . . . . . . . . . . . .0381
Cable Remote Code No.
ABC . . . . . . . . . .0030, 0028, 0034, 0035, 0038,
. . . . . . . . . . . . . . . . . . . . . . .0040, 0041, 0044
Allegro . . . . . . . . . . . . . . . . . . . . . .0180, 0342
Americast . . . . . . . . . . . . . . . . . . . . . . . .0926
Antronix . . . . . . . . . . . . . . . . . . . . . . . . .0049
Archer . . . . . . . . . . . . . . . . .0049, 0180, 0824
Belcor . . . . . . . . . . . . . . . . . . . . . . . . . . .0083
Bell & Howell . . . . . . . . . . . . . . . . . . . . .0041
Cable Star . . . . . . . . . . . . . . . . . . . . . . . .0083
Cabletenna . . . . . . . . . . . . . . . . . . . . . . .0049
Cableview . . . . . . . . . . . . . . . . . . . . . . . .0049
Century . . . . . . . . . . . . . . . . . . . . . . . . . .0180
Citizen . . . . . . . . . . . . . . . . . . . . . .0180, 0342
Colour Voice . . . . . . . . . . . . . . . . . . . . . .0052
Comtronics . . . . . . . . . . . . . . . . . . . . . . .0067
Contec . . . . . . . . . . . . . . . . . . . . . . . . . .0046
Eastern . . . . . . . . . . . . . . . . . . . . . . . . . .0029
Emerson . . . . . . . . . . . . . . . . . . . . . . . . .0824
Everquest . . . . . . . . . . . . . . . . . . . .0042, 0067
Focus . . . . . . . . . . . . . . . . . . . . . . . . . . . .0427
GC Electronics . . . . . . . . . . . . . . . . . . . .0083
Garrard . . . . . . . . . . . . . . . . . . . . . . . . . .0180
Gemini . . . . . . . . . . . . . . . . . . . . . . . . . . .0042
General Instrument . . .0303, 0503, 0038, 0837
GoldStar . . . . . . . . . . . . . . . . . . . . .0067, 0171
Goodmind . . . . . . . . . . . . . . . . . . . . . . . .0824
Hamlin . . . . . . . . . . . . .0047, 0036, 0286, 0061
Hitachi . . . . . . . . . . . . . . . . . . . . . . . . . . .0038
Hytex . . . . . . . . . . . . . . . . . . . . . . . . . . .0034
Jasco . . . . . . . . . . . . . . . . . . .0042, 0180, 0342
Jerrold . . .0030, 0039, 0303, 0041, 0038, 0503,
. . . . . . . . . . . . . . . . . . . . . . . . . . .0042, 0837
Memorex . . . . . . . . . . . . . . . . . . . . . . . . .0027
Movie Time . . . . . . . . . . . . . . . . . . . . . . .0090
NSC . . . . . . . . . . . . . . . . . . . . . . . . . . . .0090
Oak . . . . . . . . . . . . . . . . . . . . . . . .0046, 0034
Optimus . . . . . . . . . . . . . . . . . . . . . . . . .0048
Panasonic . . . . . . . . . . . . . . .0048, 0134, 0027
Paragon . . . . . . . . . . . . . . . . . . . . . . . . . .0027
Philips . . . . . . . . . . . . . . . . . . . . . . .0052, 0180
Pioneer . . . . . . . . . . . . . . . . .0171, 0560, 0904
Popular Mechanics . . . . . . . . . . . . . . . . . .0427
Pulsar . . . . . . . . . . . . . . . . . . . . . . . . . . .0027
Quasar . . . . . . . . . . . . . . . . . . . . . . . . . .0027
RCA . . . . . . . . . . . . . . . . . . . . . . . . . . . .0048
Radio Shack . . . . . . . . .0042, 0342, 0910, 0824
Recoton . . . . . . . . . . . . . . . . . . . . . . . . . .0427
Regal . . . . . . . . . . . . . . . . . . . . . . .0047, 0286
Regency . . . . . . . . . . . . . . . . . . . . . . . . . .0029
Rembrandt . . . . . . . . . . . . . . . . . . . . . . . .0038
Runco . . . . . . . . . . . . . . . . . . . . . . . . . . .0027
SL Marx . . . . . . . . . . . . . . . . . . . . . . . . . .0067
Samsung . . . . . . . . . . . . . . . . . . . . .0067, 0171
Scientific Atlanta . . . . . .0035, 0044, 0504, 0904
Signal . . . . . . . . . . . . . . . . . . . . . . .0042, 0067
Signature . . . . . . . . . . . . . . . . . . . . . . . . .0038
Sprucer . . . . . . . . . . . . . . . . . . . . . . . . . .0048
Starcom . . . . . . . . . . . . . . . . . . . . .0030, 0042
Stargate . . . . . . . . . . . . . . . . .0067, 0042, 0824
Starquest . . . . . . . . . . . . . . . . . . . . . . . . .0042
Sylvania . . . . . . . . . . . . . . . . . . . . . . . . . .0028
TV86 . . . . . . . . . . . . . . . . . . . . . . . . . . . .0090
Tandy . . . . . . . . . . . . . . . . . . . . . . . . . . . .0285
Teleview . . . . . . . . . . . . . . . . . . . . . . . . . .0067
Texscan . . . . . . . . . . . . . . . . . . . . . . . . . .0028
Tocom . . . . . . . . . . . . . . . . . . . . . .0039, 0040
Toshiba . . . . . . . . . . . . . . . . . . . . . . . . . .0027
Tusa . . . . . . . . . . . . . . . . . . . . . . . . . . . . .0042
Unika . . . . . . . . . . . . . . . . . . . . . . .0180, 0049
United Artists . . . . . . . . . . . . . . . . . . . . .0034
Universal . . . . . . . . . . .0049, 0083, 0180, 0218
Viewstar . . . . . . . . . . . . . . . . . . . . .0285, 0090
Zenith . . . . . . . . . . . . . . . . . .0027, 0552, 0926
Zentek . . . . . . . . . . . . . . . . . . . . . . . . . . .0427
CD Players Remote Code No.
Aiwa . . . . . . . . . . . . . . . . . . . . . . . . . . . .0184
Burmester . . . . . . . . . . . . . . . . . . . . . . . .0447
California Audio Labs . . . . . . . . . . . . . . . .0056
Carver . . . . . . . . . . . . . . . . .0184, 0206, 0464
DKK . . . . . . . . . . . . . . . . . . . . . . . . . . . .0027
Denon . . . . . . . . . . . . . . . . . . . . . .0030, 0900
Emerson . . . . . . . . . . . . . . . . . . . . . . . . .0332
Fisher . . . . . . . . . . . . . . . . . . . . . . .0201, 0206
Garrard . . . . . . . . . . . . . . . . . . . . .0420, 0447
Genexxa . . . . . . . . . . . . . . . . . . . . .0059, 0332
Harman/Kardon . . . . . . . . . . . . . . .0200, 0184
Hitachi . . . . . . . . . . . . . . . . . . . . . . . . . . .0059
JVC . . . . . . . . . . . . . . . . . . . . . . . . . . . . .0099
Kenwood . . . . . . . . . . .0055, 0217, 0853,0064,
. . . . . . . . . . . . . . . . . . . . . . . . . . .0653, 0708
Krell . . . . . . . . . . . . . . . . . . . . . . . . . . . .0184
LXI . . . . . . . . . . . . . . . . . . . . . . . . . . . . .0332
Linn . . . . . . . . . . . . . . . . . . . . . . . . . . . . .0184
MCS . . . . . . . . . . . . . . . . . . . . . . . . . . . .0056
MTC . . . . . . . . . . . . . . . . . . . . . . . . . . . .0447
Magnavox . . . . . . . . . . . . . . . . . . . .0184, 0332
Marantz . . . . . . . . . . . . . . . . .0184, 0056, 0207
Mission . . . . . . . . . . . . . . . . . . . . . . . . . .0184
NSM . . . . . . . . . . . . . . . . . . . . . . . . . . . .0184
Nikko . . . . . . . . . . . . . . . . . . . . . . . . . . .0201
Onkyo . . . . . . . . . . . . . . . . . . . . . .0128, 0895
Optimus . . . . . . . . . . .0447, 0059, 0206, 0495,
. . . . . . . . . . . . . .0464, 0332, 0027, 0064,0172
Panasonic . . . . . . . . . . . . . . . . . . . .0056, 0330
Parasound . . . . . . . . . . . . . . . . . . . . . . . .0447
Philips . . . . . . . . . . . . . . . . . . . . . . .0184, 0653
Pioneer . . . . . . . . . . . .0059, 0495, 0271,0332
Proton . . . . . . . . . . . . . . . . . . . . . . . . . . .0184
QED . . . . . . . . . . . . . . . . . . . . . . . . . . . .0184
Quasar . . . . . . . . . . . . . . . . . . . . . . . . . .0056
RCA . . . . . . . . . . . . . . .0080, 0332,0206, 0791
Realistic . . . . . . . . . . . . . . . . .0206, 0207, 0447
Rotel . . . . . . . . . . . . . . . . . . . . . . .0184, 0447
SAE . . . . . . . . . . . . . . . . . . . . . . . . . . . . .0184
Sansui . . . . . . . . . . . . . . . . . . . . . . .0184, 0332
Sanyo . . . . . . . . . . . . . . . . . . . . . . . . . . . .0206
Scott . . . . . . . . . . . . . . . . . . . . . . . . . . . .0332
Sears . . . . . . . . . . . . . . . . . . . . . . . . . . . .0332
Sharp . . . . . . . . . . . . . . . . . . .0064, 0207, 0888
Sherwood . . . . . . . . . . . . . . . . . . . . . . . .0207
Sony . . . . . . . . . . . . . . . . . . .0027, 0212, 0517
Soundesign . . . . . . . . . . . . . . . . . . . . . . . .0172
Tascam . . . . . . . . . . . . . . . . . . . . . . . . . . .0447
Teac . . . . . . . . . . . . . . .0420, 0447, 0201, 0207
Technics . . . . . . . . . . . . . . . . . . . . .0330, 0056
Victor . . . . . . . . . . . . . . . . . . . . . . . . . . .0099
Wards . . . . . . . . . . . . . . . . . . . . . .0080, 0184
Yamaha . . . . . . . . . . . . . . . . . . . . . .0214, 0063
Yorx . . . . . . . . . . . . . . . . . . . . . . . . . . . .0488
Receivers Remote Code No.
ADC . . . . . . . . . . . . . . . . . . . . . . . . . . . .0558
Adcom . . . . . . . . . . . . . . . . . . . . . . . . . . .0643
Aiwa . . . . . . . . . . . . . .0148, 0432, 0185, 0216
Akai . . . . . . . . . . . . . . . . . . . . . . . .0251, 0103
Capetronic . . . . . . . . . . . . . . . . . . . . . . . .0558
Carver . . . . . . . . . . . . .0035, 0216, 0387, 0069
Casio . . . . . . . . . . . . . . . . . . . . . . . . . . . .0222
Clarinette . . . . . . . . . . . . . . . . . . . . . . . .0222
Curtis Mathes . . . . . . . . . . . . . . . . . . . . .0107
Denon . . . . . . . . . . . . . . . . . .0031, 0798, 0300
Emerson . . . . . . . . . . . . . . . . . . . . . . . . .0451
Fisher . . . . . . . . . . . . . . . . . .0069, 0246, 0387
Garrard . . . . . . . . . . . . . . . . . . . . .0451, 0490
Harman/Kardon . . . . . . . . . .0137, 0216, 0918
Inkel . . . . . . . . . . . . . . . . . . . . . . . . . . . .0089
JBL . . . . . . . . . . . . . . . . . . . . . . . . . . . . . .0137
JVC . . . . . . . . . . . . . . . . . . . . . . . . . . . . .0101
Kenwood . . . . . . . . . . .0054, 0341, 0104,0069,
. . . . . . . . . . . . . . . . . . . . . . . . . . .0213, 0340
Koss . . . . . . . . . . . . . . . . . . . . . . . . . . . .0451
LXI . . . . . . . . . . . . . . . . . . . . . . . . . . . . .0208
Linn . . . . . . . . . . . . . . . . . . . . . . . . . . . . .0216
Lloyd's . . . . . . . . . . . . . . . . . . . . . . . . . . .0222
MCS . . . . . . . . . . . . . . . . . . . . . . . .0066, 0373
Magnavox . . . . . .0216, 0418, 0558, 0155, 0222
Marantz . . . . . . . . . . . . . . . . .0216, 0155, 0066
Modulaire . . . . . . . . . . . . . . . . . . . . . . . .0222
NAD . . . . . . . . . . . . . . . . . . . . . . . . . . . .0347
NEC . . . . . . . . . . . . . . . . . . . . . . . . . . . .0262
Nakamichi . . . . . . . . . . . . . . . . . . .0374, 0124
Onkyo . . . . . . . . . . . . . . . . . .0162, 0407, 0127
Optimus . . . . . . . . . . .0208, 0204, 0213, 0246,
. . . . . . . . . . . . . .0558, 0765, 0828, 0069,0697
Panasonic . . . . . . . . . . . . . . .0066, 0336, 0545
Penney . . . . . . . . . . . . . . . . . . . . . . . . . . .0222
Philips . . . . . . . . . . . . . . . . . . . . . . .0216, 0418
Pioneer . . . . . . . .0107, 0041,0177, 0558,0657
Quasar . . . . . . . . . . . . . . . . . . . . . . . . . .0066
RCA . . . . . . . . . .0081, 0373, 0558, 0387, 0557
Realistic . . . . . . . . . . . . . . . . .0208, 0222, 0190
Sansui . . . . . . . . . . . . . . . . . .0216, 0220, 0373
Sanyo . . . . . . . . . . . . . . . . . . . . . . .0246, 0828
Scott . . . . . . . . . . . . . . . . . . . . . . .0190, 0349
Sharp . . . . . . . . . . . . . . . . . . . . . . . . . . . .0213
Sherwood . . . . . . . . . . . . . . .0529, 0518, 0089
Sony . . . . . . . . . . . . . . . . . . .0185, 0195, 0501
Soundesign . . . . . . . . . . . . . . . . . . . . . . . .0697
Teac . . . . . . . . . . . . . . . . . . . . . . . .0490, 0190
Technics . . . . . . . . . . . .0336, 0066, 0235, 0545
Victor . . . . . . . . . . . . . . . . . . . . . . . . . . .0101
Wards . . . . . . . . .0081, 0041, 0107, 0185, 0216
Yamaha . . . . . . . . . . . . . . . . . . . . . .0203, 0213
Yorx . . . . . . . . . . . . . . . . . . . . . . . . . . . .0222
Zenith . . . . . . . . . . . . . . . . . . . . . . . . . . .0884
Remote Control Direct Access Codes
26

Remote Control Direct Entry Codes for Accessory Devices
Satellite Remote Code No.
AlphaStar . . . . . . . . . . . . . . . . . . . . . . . . .0799
Amplica . . . . . . . . . . . . . . . . . . . . . . . . . .0099
Amway . . . . . . . . . . . . . . . . . . . . . . . . . .0102
Astro Industries . . . . . . . . . . . . . . . . . . . .0122
BSR . . . . . . . . . . . . . . . . . . . . . . . . . . . . .0122
Capetronic . . . . . . . . . . . . . . . . . . . . . . . .0122
Channel Master . . . . . . . . . . . . . . .0045, 0239
Chaparral . . . . . . . . . . . . . . .0080, 0236, 0243
Curtis Mathes . . . . . . . . . . . . . . . . .0088, 0099
DX Antenna . . . . . . . . . . . . . . . . . . . . . .0068
Drake . . . . . . . . . . . . . .0091, 0272, 0045, 0176
Echostar . . . . . . .0307, 0802, 0175, 0186, 0296
Expressvu . . . . . . . . . . . . . . . . . . . . . . . .0802
General Instrument . . . . . . . .0388, 0896, 0654
HTS . . . . . . . . . . . . . . . . . . . . . . . . . . . . .0802
Hitachi . . . . . . . . . . . . . . . . . . . . . . . . . . .0846
Homecable . . . . . . . . . . . . . . . . . . . . . . .0265
Hughes Network Systems . . . . . . . . . . . .0776
Hytek . . . . . . . . . . . . . . . . . . . . . . . . . . .0122
IQ . . . . . . . . . . . . . . . . . . . . . . . . . . . . . .0237
IQ Prism . . . . . . . . . . . . . . . . . . . . . . . . .0237
JVC . . . . . . . . . . . . . . . . . . . . . . . . . . . . .0802
Janeil . . . . . . . . . . . . . . . . . . . . . . . . . . . .0179
Jerrold . . . . . . . . . . . . . . . . . . . . . .0388, 0654
Legend . . . . . . . . . . . . . . . . . . . . . . . . . . .0296
Macom . . . . . . . . . . . . . . . . . . . . . .0088, 0045
Magnavox . . . . . . . . . . . . . . . . . . . .0749, 0751
Memorex . . . . . . . . . . . . . . . . . . . .0296, 0751
Next Level . . . . . . . . . . . . . . . . . . . . . . . .0896
Panasonic . . . . . . . . . . . . . . . . . . . .0179, 0728
Philips . . . . . . . . . . . . . . . . . .0227, 0749, 0751
Pico . . . . . . . . . . . . . . . . . . . . . . . . . . . . .0102
Primestar . . . . . . . . . . . . . . . . . . . .0654, 0388
RCA . . . . . . . . . . . . . . . . . . .0593, 0170, 0882
Radio Shack . . . . . . . . . . . . . . . . . . . . . . .0896
Ramsey . . . . . . . . . . . . . . . . . . . . . . . . . .0102
Realistic . . . . . . . . . . . . . . . . . . . . . . . . . .0079
STS . . . . . . . . . . . . . . . . . . . . . . . . .0237, 0068
Sony . . . . . . . . . . . . . . . . . . . . . . . . . . . .0666
Star Choice . . . . . . . . . . . . . . . . . . . . . . .0896
Star Trak . . . . . . . . . . . . . . . . . . . . . . . . .0207
Toshiba . . . . . . . . . . . . . . . . .0109, 0817, 0088
Uniden . . . . . . . .0265, 0079,0101, 0397,0751,
. . . . . . . . . . . . . . . . . . . . . . . . . . .0103, 0749
Zenith . . . . . . . . . . . . . . . . . .0091, 0883, 0088
VCR Remote Code No.
Admiral . . . . . . . . . . . . . . . . . . . . .0075, 0236
Adventura . . . . . . . . . . . . . . . . . . . . . . . .0027
Aiko . . . . . . . . . . . . . . . . . . . . . . . . . . . . .0305
Aiwa . . . . . . . . . . . . . . . . . . .0334, 0027, 0064
Akai . . . . . . . . . . . . . . . . . . .0133, 0068, 0088
America Action . . . . . . . . . . . . . . . . . . . .0305
American High . . . . . . . . . . . . . . . . . . . . .0062
Asha . . . . . . . . . . . . . . . . . . . . . . . . . . . .0267
Audiovox . . . . . . . . . . . . . . . . . . . . . . . . .0064
Beaumark . . . . . . . . . . . . . . . . . . . . . . . .0267
Bell & Howell . . . . . . . . . . . . . . . . . . . . .0131
Brocksonic . . . . . . . . . . . . . . . . . . . . . . . .0236
Broksonic . . . . . .0148, 0211, 0029, 0236, 0506
CCE . . . . . . . . . . . . . . . . . . . . . . . .0099, 0305
Calix . . . . . . . . . . . . . . . . . . . . . . . . . . . .0064
Canon . . . . . . . . . . . . . . . . . . . . . . . . . . .0062
Capehart . . . . . . . . . . . . . . . . . . . . . . . . .0047
Carver . . . . . . . . . . . . . . . . . . . . . . . . . . .0108
Cineral . . . . . . . . . . . . . . . . . . . . . . . . . .0305
Citizen . . . . . . . . . . . . . . . . . . . . . .0305, 0064
Colt . . . . . . . . . . . . . . . . . . . . . . . . . . . . .0099
Craig . . . . . . . . . .0064, 0099, 0074, 0267, 0298
Curtis Mathes . . . . . . .0062, 0068, 0087, 0189
Cybernex . . . . . . . . . . . . . . . . . . . . . . . . .0267
Daewoo . . . . . . . . . . . .0305, 0588, 0047, 0072
Daytron . . . . . . . . . . . . . . . . . . . . . . . . . .0047
Denon . . . . . . . . . . . . . . . . . . . . . . . . . . .0069
Dynatech . . . . . . . . . . . . . . . . . . . . . . . . .0027
Electrohome . . . . . . . . . . . . . . . . . . . . . .0064
Electrophonic . . . . . . . . . . . . . . . . . . . . .0064
Emerex . . . . . . . . . . . . . . . . . . . . . . . . . .0059
Emerson . . . . . .0211, 0029, 0236, 0305, 0148,
0235, 0506,0588,0088, 0239, 0027, 0064, 0070
Fisher . . . . . . . . . . . . . . . . . .0074, 0131, 0081
Fuji . . . . . . . . . . . . . . . . . . . . . . . . .0060, 0062
Funai . . . . . . . . . . . . . . . . . . . . . . . . . . . .0027
GE . . . . . . . . . . .0062, 0087, 0075,0229, 0267
Garrard . . . . . . . . . . . . . . . . . . . . . . . . . .0027
Go Video . . . . . . . . . . . . . . . . . . . .0459, 0553
GoldStar . . . . . . . . . . . . . . . . . . . . .0064, 0065
Gradiente . . . . . . . . . . . . . . . . . . . .0035, 0027
HI-Q . . . . . . . . . . . . . . . . . . . . . . . . . . . .0074
Harley Davidson . . . . . . . . . . . . . . . . . . .0027
Harman/Kardon . . . . . . . . . . . . . . .0065, 0108
Harwood . . . . . . . . . . . . . . . . . . . . . . . . .0099
Headquarter . . . . . . . . . . . . . . . . . . . . . .0073
Hitachi . . . . . . . . . . . . .0069, 0132, 0027, 0068
Hughes Network Systems . . . . . . . . . . . .0069
JVC . . . . . . . . . . . . . . . . . . . .0094, 0035, 0068
Jensen . . . . . . . . . . . . . . . . . . . . . . . . . . .0068
KEC . . . . . . . . . . . . . . . . . . . . . . . .0064, 0305
KLH . . . . . . . . . . . . . . . . . . . . . . . . . . . . .0099
Kenwood . . . . . . . . . . . . . . . .0068, 0094, 0065
Kodak . . . . . . . . . . . . . . . . . . . . . . .0062, 0064
LXI . . . . . . . . . . . . . . . . . . . . . . . . . . . . .0064
Lloyd's . . . . . . . . . . . . . . . . . . . . . .0027, 0235
Logik . . . . . . . . . . . . . . . . . . . . . . . . . . . .0099
MEI . . . . . . . . . . . . . . . . . . . . . . . . . . . . .0062
MGA . . . . . . . . . . . . . . . . . . .0070, 0088,0267
MGN Technology . . . . . . . . . . . . . . . . . . .0267
MTC . . . . . . . . . . . . . . . . . . . . . . . .0027, 0267
Magnasonic . . . . . . . . . . . . . . . . . . . . . . .0305
Magnavox . . . . . .0062, 0108, 0027, 0066, 0176
Magnin . . . . . . . . . . . . . . . . . . . . . . . . . . .0267
Marantz . . . . . . . . . . . . . . . . . . . . .0108, 0062
Marta . . . . . . . . . . . . . . . . . . . . . . . . . . . .0064
Matsushita . . . . . . . . . . . . . . .0062, 0189, 0481
Memorex . . . . . .0131, 0074, 0027, 0064, 0075,
. . . . . . . . . . . . .0062, 0073, 0267, 1064,0334,
. . . . . . . . . . . . . . . . . .0066, 0236, 1189, 1289
Minolta . . . . . . . . . . . . . . . . . . . . . .0132, 0069
Mitsubishi . . . . . . . . . . .0070, 0088, 0075, 0094
Motorola . . . . . . . . . . . . . . . . . . . .0062, 0075
Multitech . . . . . . . . . . . . . . . . . . . .0027, 0099
NEC . . . . . . . . . . . . . . .0065, 0068, 0094, 0131
Nikko . . . . . . . . . . . . . . . . . . . . . . . . . . .0064
Nikon . . . . . . . . . . . . . . . . . . . . . . . . . . .0061
Noblex . . . . . . . . . . . . . . . . . . . . . . . . . .0267
Olympus . . . . . . . . . . . . . . . . . . . . . . . . .0062
Optimus . . . . . . .1089, 1189, 0075, 1289, 0064,
. . . . . . . . . . . . . .1075, 0131, 0189, 0459,0481
Optonica . . . . . . . . . . . . . . . . . . . . . . . . .0089
Orion . . . . . . . . . . . . . .0506, 0029, 0211, 0236
Panasonic . . . . . . . . . .0062, 1189, 0189, 0252,
. . . . . . . . . . . . . . . . . . . . . . . . . . .0481, 0643
Penney . . . .0062, 0267, 0064, 0069, 0065, 0081
Pentax . . . . . . . . . . . . . . . . . . . . . .0069, 0132
Philco . . . . . . . . . . . . . . . . . .0062, 0236, 0506
Philips . . . .0108, 0062, 0089, 0645, 1108, 1208
Pilot . . . . . . . . . . . . . . . . . . . . . . . . . . . . .0064
Pioneer . . . . . . . . . . . . . . . . . . . . . . . . . .0094
Portland . . . . . . . . . . . . . . . . . . . . . . . . . .0047
Profitronic . . . . . . . . . . . . . . . . . . . . . . . .0267
Proscan . . . . . . . . . . . . . . . . . . . . .0087, 0229
Protec . . . . . . . . . . . . . . . . . . . . . . . . . . .0099
Pulsar . . . . . . . . . . . . . . . . . . . . . . . . . . .0066
Quarter . . . . . . . . . . . . . . . . . . . . . . . . . .0073
Quartz . . . . . . . . . . . . . . . . . . . . . . . . . . .0073
Quasar . . . . . . . . . . . . .0062, 0189, 0481, 1189
RCA . . . . . . . . .0087, 0176, 0229, 0069,0132,
. . . . . . . . . . . . . . . . . .0062, 0075, 0133, 0267
Radio Shack . . . . . . . . . . . . . . . . . .0027, 1064
Radix . . . . . . . . . . . . . . . . . . . . . . . . . . . .0064
Randex . . . . . . . . . . . . . . . . . . . . . . . . . .0064
Realistic . . . . . . .0027, 0131, 0074, 0075, 0064,
. . . . . . . . . . . . . . . . . . . . . . .0062, 0089, 0073
ReplayTV . . . . . . . . . . . . . . . . . . . .0641, 0643
Ricoh . . . . . . . . . . . . . . . . . . . . . . . . . . . .0061
Runco . . . . . . . . . . . . . . . . . . . . . . . . . . .0066
STS . . . . . . . . . . . . . . . . . . . . . . . . . . . . .0069
Samsung . . . . . . . . . . . . . . . . . . . . .0072, 0267
Sanky . . . . . . . . . . . . . . . . . . . . . . .0066, 0075
Sansui . . . .0068, 0506,0027, 0094,0236, 0298
Sanyo . . . . . . . . . . . . . .0074, 0073, 0131, 0267
Scott . . . . . . . . . .0211, 0148, 0070, 0072, 0239
Sears . . . . .0081, 0132, 0064, 0069, 0027, 0062,
. . . . . . . . . . . . . . . . . . . . . . .0073, 0074, 0131
Semp . . . . . . . . . . . . . . . . . . . . . . . . . . . .0072
Sharp . . . . . . . . . . . . . . . . . . . . . . .0075, 0089
Shintom . . . . . . . . . . . . . . . . . . . . . . . . . .0099
Shogun . . . . . . . . . . . . . . . . . . . . . . . . . . .0267
Singer . . . . . . . . . . . . . . . . . . . . . . . . . . .0099
Sony . . . . . . . . . .0060, 0061, 0059, 0027, 0062
Sylvania . . . . . . . . . . . .0062, 0108, 0027, 0070
Symphonic . . . . . . . . . . . . . . . . . . . . . . . .0027
TMK . . . . . . . . . . . . . . . . . . . . . . . .0235, 0267
Tatung . . . . . . . . . . . . . . . . . . . . . . . . . . .0068
Teac . . . . . . . . . . . . . . . . . . . . . . . .0027, 0068
Technics . . . . . . . . . . . . . . . . . . . . .0062, 0189
Teknika . . . . . . . . . . . . . . . . .0027, 0062, 0064
Thomas . . . . . . . . . . . . . . . . . . . . . . . . . .0027
Tivo . . . . . . . . . . . . . . . . . . . . . . . . . . . . .0645
Toshiba . . . . . . . . . . . . . . . . .0072, 0239, 0070
Totevision . . . . . . . . . . . . . . . . . . . .0064, 0267
Unitech . . . . . . . . . . . . . . . . . . . . . . . . . .0267
Vector . . . . . . . . . . . . . . . . . . . . . . . . . . .0072
Vector Research . . . . . . . . . . . . . . . . . . .0065
Video Concepts . . . . . . . . . . . . . . .0072, 0088
Videosonic . . . . . . . . . . . . . . . . . . . . . . . .0267
Wards . . . .0062, 0087, 0089, 0027, 0074, 0239,
. . . . . . . . .0267, 0069, 0075, 0099,0108, 0176
White Westinghouse . . . . . . . . . . .0305, 0236
XR-1000 . . . . . . . . . . . . . . . .0099, 0027, 0062
Yamaha . . . . . . . . . . . . . . . . . . . . . . . . . .0065
Zenith . . . .0066, 0027, 0060, 0061, 0236, 0506
Digital Video Disc Remote Code No.
Harman/Kardon . . . . . . . . . . . . . . . . . . . .0609
JVC . . . . . . . . . . . . . . . . . . . . . . . . .0650, 0585
Kenwood . . . . . . . . . . . . . . . . . . . . . . . . .0561
Magnavox . . . . . . . . . . . . . . . . . . . . . . . . .0530
Mitsubishi . . . . . . . . . . . . . . . . . . . . . . . .0548
Onkyo . . . . . . . . . . . . . . . . . . . . . .0654, 0530
Panasonic . . . . . . . . . . . . . . . . . . . .0517, 0659
Philips . . . . . . . . . . . . . . . . . . . . . . .0530, 0566
Pioneer . . . . . . . . . . . . . . . . .0598, 0552, 0659
Proscan . . . . . . . . . . . . . . . . . . . . . . . . . .0549
RCA . . . . . . . . . . . . . . . . . . . . . . . . . . . .0549
Samsung . . . . . . . . . . . . . . . . . . . . . . . . . .0600
Sharp . . . . . . . . . . . . . . . . . . . . . . . . . . . .0657
Sony . . . . . . . . . . . . . . . . . . . . . . . . . . . .0560
Technics . . . . . . . . . . . . . . . . . . . . . . . . . .0517
Theta Digital . . . . . . . . . . . . . . . . . . . . . .0598
Toshiba . . . . . . . . . . . . . . . . . . . . . . . . . .0530
Yamaha . . . . . . . . . . . . . . . . . . . . . .0517, 0572
Zenith . . . . . . . . . . . . . . . . . . . . . .0618, 0530
27Remote Control Direct Access Codes

Before Calling Service
Please make these simple checks before calling service.These tips may save you time and money since charges for television installation and
adjustments of customer controls are not covered under your warranty.
Symptoms
“Ghost” or double images
No power
No picture
No picture and power
switched on
No sound
Good sound but poor color
or no picture
Poor picture
Items to Check and Actions to follow
• This may be caused by obstruction to the antenna due to high rise buildings or hills.
Using a highly directional antenna may improve the picture.
• Check that the receiver’s AC power cord is plugged into the mains socket.
• Unplug the television, wait for 60 seconds.
Then re-insert plug into the mains socket and turn on the television again.
• Check antenna connections at the rear of the receiver to see if it is properly connected to the receiver.
• Possible broadcast station trouble. Try another channel.
• Adjust the contrast and brightness settings. Try another auto picture setting.
• Check the Closed Captions control. Some TEXT modes could block the screen.
• Switch your VGA-source to a correct display mode.
• Check the Audio only option.
• Your TV has a protective mode in case there is too much heat build-up.
Check the clearance around the vents of the device to be certain there are no blocking walls or
cabinets which would limit the air flow.
• Increase the VOLUME.
• Check that the receiver/monitor is not muted, press the ¬ button on the remote control.
• When no signal is detected, the receiver automatically switches off the sound.
This is proper operation and does not indicate a malfunction.
• Has the center mode been switched off?
• Adjust the contrast, color, tint and brightness setting.Try another auto picture setting.
• Check the VGA connection.
Snowish picture and noise
Television not responding to
remote control
No stable or not
synchronized VGA picture
Control of accessory
devices
• Check the antenna connection.
• Check whether the batteries are working. Replace if necessary.
• Clean the remote control sensor lens on the monitor.
• Operating range between receiver and the remote control should not be more than 240”.
• You can still use the buttons at the front of your receiver.
• Press the TV button to be sure your remote control is in the TV mode (green indicator).
• Check if you have selected the correct VGA mode in your PC
• The infrared signals of the screen may influence the reception sensibility of other peripherals.
Solution: Replace the batteries of the remote control of other devices. Eg. keep away a wireless
headphone from within a radius of 50”.
If your problem is not solved Telephone number Philips Customer Care Center
Turn your TV receiver off and then on again once. 800-531-0039
Never attempt to repair a defective TV yourself.
Check with your dealer or call a TV technician.
Before Calling Service
28

Tips
Care of the screen
Clean the TV with a slightly damp soft
cloth. Do not use abrasive solvent as it
can damage the TV screen.
End of life directives
We are paying a lot of attention to using
environmentally-friendly production
methods.Your new TV contains materials
which can be recycled and reused.
At the end of its life specialized companies
can dismantle the discarded TV to
concentrate the reusable materials and to
Index
a active control,
alt audio, 13
antenna, 4
auto picture, 7
autoprogramming, 9
auto sound, 7
b backlighting, 6
bass, 13
buttons in front of the receiver box, 6
c camera/camcorder, 21
channel list, 14
channel lock, 14
channel selection, 9
closed captions, 14
d display format, 5
display information, 6
Dual Screen/PIP, 17
DVD, 20
dynamic contrast, 12
f freeze format, 5
h headphone, 21
7
minimize the amount of materials that
must be disposed.
Please ensure that you dispose of your old
TV according to local regulations.
How to dispose of batteries?
The batteries supplied do not contain the
heavy metals mercury and cadmium.
Nevertheless in many areas batteries may
not be disposed of with your household
waste. Please ensure you dispose of
batteries according to local regulations.
m menu language, 9
movie ratings, 16
Multipip, 18
mute, 6
n natural motion, 12
p picture adjustments, 12
r recording, 25
remote control, 5-7
reset AV settings, 11
s SAP, 5
satellite receiver, 20
set/change PIN, 11
sleeptimer, 14
sound adjustments, 13
surround mode, 13
source select, 53 24
stereo, 13
store TV channels, 9
surf, 7
S-VHS, 25
t treble, 13
TV receiver box with speakerless
monitor
In case you connect your TV receiver box
with a speakerless monitor, and without
having connected an audio receiver, all
references made in this instruction book
to sound reproduction, volume control,
and audio connections, are not applicable
(except for a headphone connection).
The buttons on the remote control
referring to sound have no function either.
turn TV receiver on, 4
TV ratings, 15
v VCR control buttons, 25
video cassette recorder, 19
volume, 6
z zoom, 7
Miscellaneous
. Ambient temperature: + 5~ + 40°C
. Mains: 50/60 Hz Auto Voltage ranging from
95 V to 264 V
. Power consumption: around 35 W
. Standby consumption: 2 W
. Weight (excl. packaging): 8,82 lbs
. Dimensions (wxhxd):
Receiver: 17.2 x 4.2 x 13.0 in.
Regulatory Notices - Federal Communications Commission Notice
This equipment has been tested and found to comply with the limits
for a Class B digital device, pursuant to part 15 of the FCC Rules.
These limits are designed to provide reasonable protection against
harmful interference in a residential installation.This equipment
generates, uses, and can radiate radio frequency energy and, if not
installed and used in accordance with the instructions, may cause
harmful interference to radio communications. However, there is no
guarantee that interference will not occur in a particular installation. If
this equipment does cause harmful interference to radio or television
reception, which can be determined by turning the equipment off and
on, the user is encouraged to try to correct the interference by one
or more of the following measures:
Reorient or relocate the receiving antenna.
Increase the separation between the equipment and the receiver.
Connect the equipment into an outlet on a circuit different from that
to which the receiver is connected.
Consult the dealer or an experienced radio or television technician
for help.
Modifications The FCC requires the user to be notified that any changes or
modifications made to this device that are not expressly approved by
Philips Consumer Electronics may void the user’s authority to operate
the equipment.
Cables Connections to this device must be made with shielded cables with
metallic RFI/EMI connector hoods to maintain compliance with FCC
Rules and Regulations.
Canadian notice This Class B digital apparatus meets all requirements of the Canadian
Interference-Causing Equipment Regulations.
Avis Canadien Cet appareil numérique de la classe B respecte toutes les exigences
du Règlement sur le matériel brouilleur du Canada.
29Tips & Index

Glossary
Active Control
A set of automatic picture improvement
algorithms applied to the video image.
Aspect Ratio
The proportions of a rectangular display
screen. NTSC television has a 4:3 ratio;
HDTV is 16:9.
Audio/Video Inputs
Located on the rear of the TV these
connectors (RCA phono type plug) are
used for the input of audio and video
signals. Designed for use with VCRs (or
other accessories) in order to receive
higher picture resolution and offer sound
connection options.
Audio Output
An adjustable audio output which allows
for volume variations at the source.
Auto Picture and Sound Controls
Buttons on the remote control to select
predefined picture and sound settings.
Coaxial Cable
A single solid antenna wire normally
matched with a metal plug (F-type) end
connector that screws (or pushes) directly
onto a 75 Ohm input found on the
Television or VCR.
Color Temperature
TV-function to modify the general color
balance between cool and warm and to
adjust it according to your personal
preference.
CVBS
Stands for Composite Video Blanking Sync.
At this level, the color, luminance and
synchronization information are combined
in one signal.The audio signal is
transferred separately.
LED
Light Emitting Diode or indicator.
Menu
An on-screen listing of feature controls
shown on the TV screen that are made
available for user adjustments.
MPAA
Motion Picture Association of America
Multichannel Television sound (MTS)
The broadcast standard that allows for
stereo sound to be transmitted with the
TV picture.
Natural Motion
Philips Technology that makes movement
on television less jerky and appear more
natural.
NTSC (analog video signals)
National Television Standards Committee
format devised for TV broadcasting signals
in the 1940s (525 lines: 60 Hz.)
On Screen Displays (OSD)
Refers to the wording or messages
generated by the TV to help the user with
specific feature controls (color
adjustment, programming, etc.)
Picture Freeze
TV mode which allows you to “freeze” a
certain image in order to study a specific
detail at ease, e.g. to make notes of certain
program information like phone numbers.
Programming
The procedure of adding or deleting
channel numbers into the TV’s memory
circuits. In this way the TV ‘remembers’
only the locally available or desired
channel numbers and skips over any
unwanted channel numbers.
RF
Radio Frequency or modulated signal
design used as the carrier for television
broadcasts.
Second Audio Program (SAP)
Another or additional audio channel
provided for in the Multichannel Television
Sound (MTS) broadcast standard.A
monaural soundtrack included within the
recorded or video signal (usually
containing a second language translation
for the displayed programming).
Sleeptimer
Function with which you can set a time
period after which the TV should switch
itself to standby.
S-Video Input
Allows direct connection of highresolution video sources, such as a Super
VHS videocassette recorder, Laser Disc
player, etc. Provides improved picture
resolution, sharpness, and clarity.
Tint
TV-function to modify the general color
balance between cool and warm and to
adjust it according to your personal
preference.
30
Glossary

LIMITED WARRANTY
One Year Free Labor
One Year Free Service on Parts
WHO IS COVERED?
You must have proof of purchase to receive warranty service.A
sales receipt or other document showing that you purchased the
product is considered proof of purchase.
WHAT IS COVERED?
Warranty coverage begins the day you buy your product. For one
year thereafter, all parts will be repaired or replaced and labor is
free.After one year from the day of purchase, you pay for the
replacement or repair of all parts, and for all labor charges.
All parts, including repaired and replaced parts, are covered only
for the original warranty period.When the warranty on the
product expires, the warranty on all replaced and repaired parts
also expires.
WHAT IS EXCLUDED?
Your warranty does not cover:
• labor charges for installation or setup of the product, adjustment
of customer controls on the product, and installation or repair
of antenna systems outside of the product.
• product repair and/or part replacement because of misuse,
accident, unauthorized repair or other cause not within the
control of Philips Consumer Electronics Company.
• reception problems caused by signal conditions or cable or
antenna systems outside the unit.
• a product that requires modification or adaptation to enable it
to operate in any country other than the country for which it
was designed, manufactured, approved and/or authorized, or
repair of products damaged by these modifications.
• incidental or consequential damages resulting from the product.
(Some states do not allow the exclusion of incidental or
consequential damages, so the above exclusion may not apply to
you.This includes, but is not limited to,prerecorded material,
whether copyrighted or not copyrighted.)
• a product used for commercial or institutional purposes.
WHERE IS SERVICE AVAILABLE?
Warranty service is available in all countries where the product is
officially distributed by Philips Consumer Electronics Company. In
countries where Philips Consumer Electronics Company does not
distribute the product, the local Philips service organization will
attempt to provide service (although there may be a delay if the
appropriate spare parts and technical manual(s) are not readily
available).
MAKE SURE YOU KEEP ...
Please keep your sales receipt or other document showing proof
of purchase.Attach it to this owner’s manual and keep both nearby.
Also keep the original box and packing material in case you need
to return your product.
BEFORE REQUESTING SERVICE ...
Please check your owner’s manual before requesting service.
Adjustments of the controls discussed there may save you a
service call.
TO GET WARRANTY SERVICE....
Repair must be performed by an authorized service center or a
factory service center. If you do not live near a factory service
center, contact your dealer. If your dealer is an authorized service
center, he will arrange repair. If your dealer is not an authorized
service center he will direct you to the authorized service center
engaged by him to service the products he sells.
(In U.S.A., Puerto Rico and U.S.Virgin Islands, all implied warranties,
including implied warranties of merchantability and fitness for a
particular purpose, are limited in duration to the duration of this
express warranty. But, because some states do not allow
limitations on how long an implied warranty may last, this
limitation may not apply to you.)
(In Canada, this warranty is given in lieu of all other warranties. No
other warranties are expressed or implied, including any implied
warranties of merchantability or fitness for a particular purpose.
Philips is not liable under any circumstances for any direct, indirect,
special, incidental or consequential damages, howsoever incurred,
even if notified of the possibility of such damages.)
IF YOU HAVE QUESTIONS IN CANADA
Please contact Philips at:
1-800-661-6162 (French speaking)
1-800-363-7278 (English speaking)
REMEMBER...
Please record the model and serial numbers found on the product
below.Also, please fill out and mail your warranty registration card
promptly. It will be easier for us to notify you if necessary.
MODEL # _ _ _ _ _ _ _ _ _ _ _ _ _ _ _ _ _ _ _ _ _ _ _ _ _ _ _
SERIAL # _ _ _ _ _ _ _ _ _ _ _ _ _ _ _ _ _ _ _ _ _ _ _ _ _ _
31

 Loading...