

Page 1
FC8822, FC8812
Page 2

Page 3
FC8822
Wheels stuck
ݓઁሂ
Top cover or dust container not placed properly
רۆࠋࠦӧ٦ݾ
Bumper stuck
ߓԎሑᇆሂ
Robot lifted up from oor
՚ֽϴุఓᇊୃስײᆋ༏ӧచ
Colour of oor too dark
ֽϴဂ೨ขτ
Battery not inserted properly / Charging error (switch is o)
ԁሑݾԍմ༆IJܵၜܵтij
5
6
4
3
2
1
7
8
9
10
17
20
19
18
22
23
21
25
24
26
16
15
13
14
11
12
-
Page 4

Page 5

English 6
Čeština 29
Magyar 52
Română 76
Slovensky 101
Русский 124
Українська 149
Қазақша 173
Page 6
English
Introduction
Congratulations on your purchase and welcome to Philips! To fully benefit
from the support that Philips offers, register your product at
www.philips.com/welcome.
General description
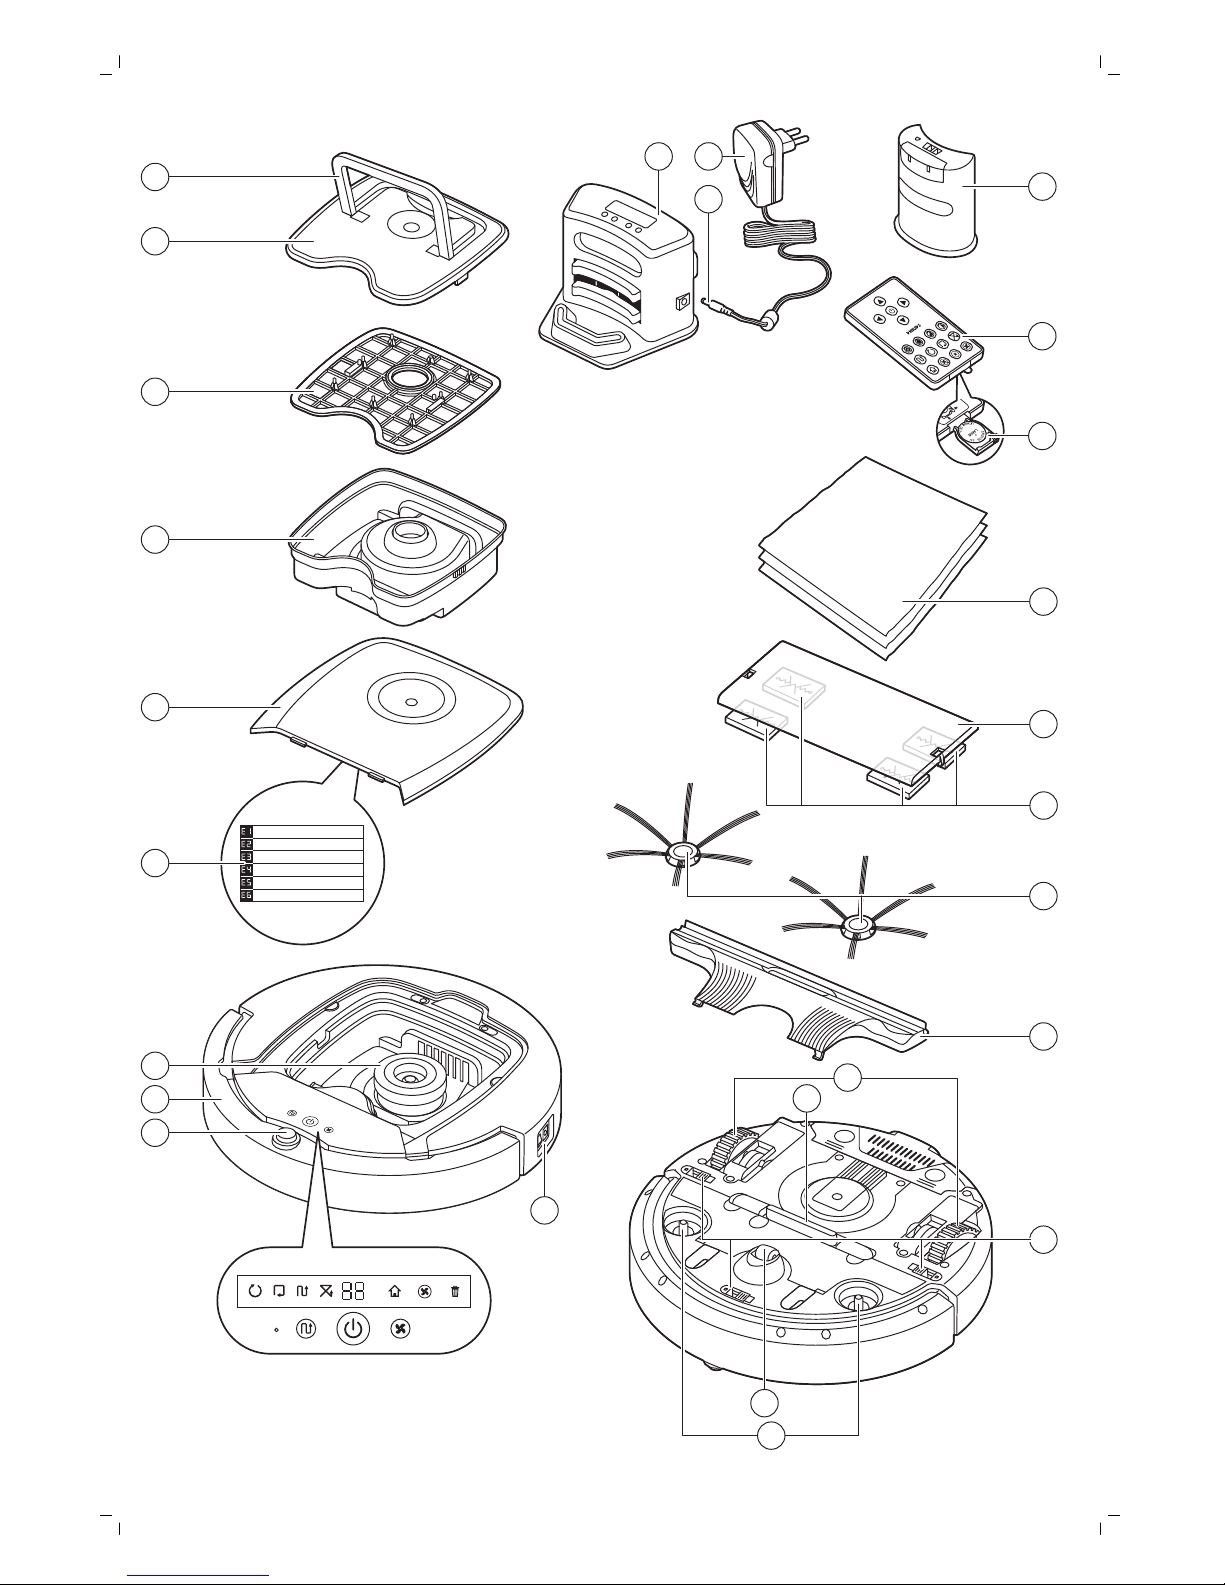
1 Handle of dust container lid
2 Dust container lid
3 Filter
4 Dust container
5 Top cover
6 Error codes table
7 Fan
8 Bumper
9 Docking station sensor
10 Power switch
11 Front wheel
12 Side brush shafts
13 Drop-off sensors
14 Wheels
15 Suction opening
16 TriActive XL nozzle
17 Side brushes
18 Fixation blocks for dry wipes
19 Dry wipe holder
20 Dry wipes
21 Battery holder
22 Remote control
23 Invisible wall (FC8822)
24 Docking station
25 Adapter
26 Small plug
Display and remote control
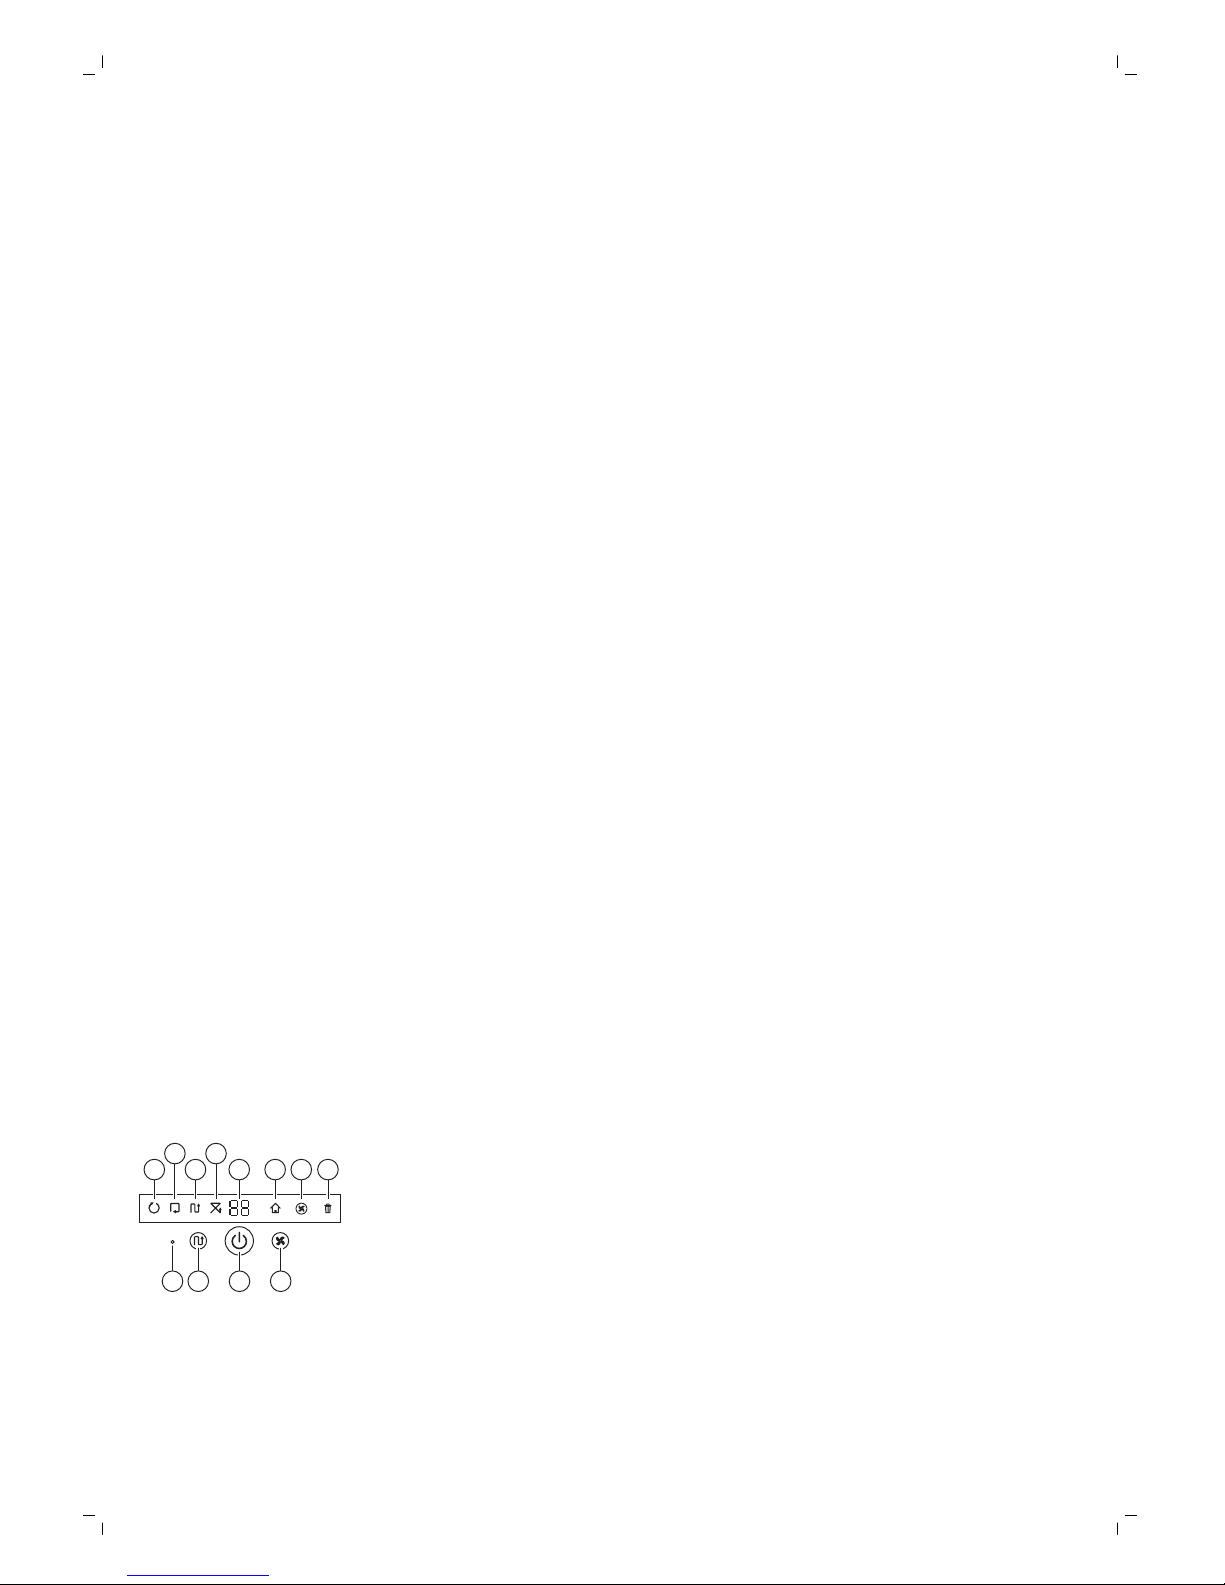
Display of robot
1
1110 129
234
5 6 7 8
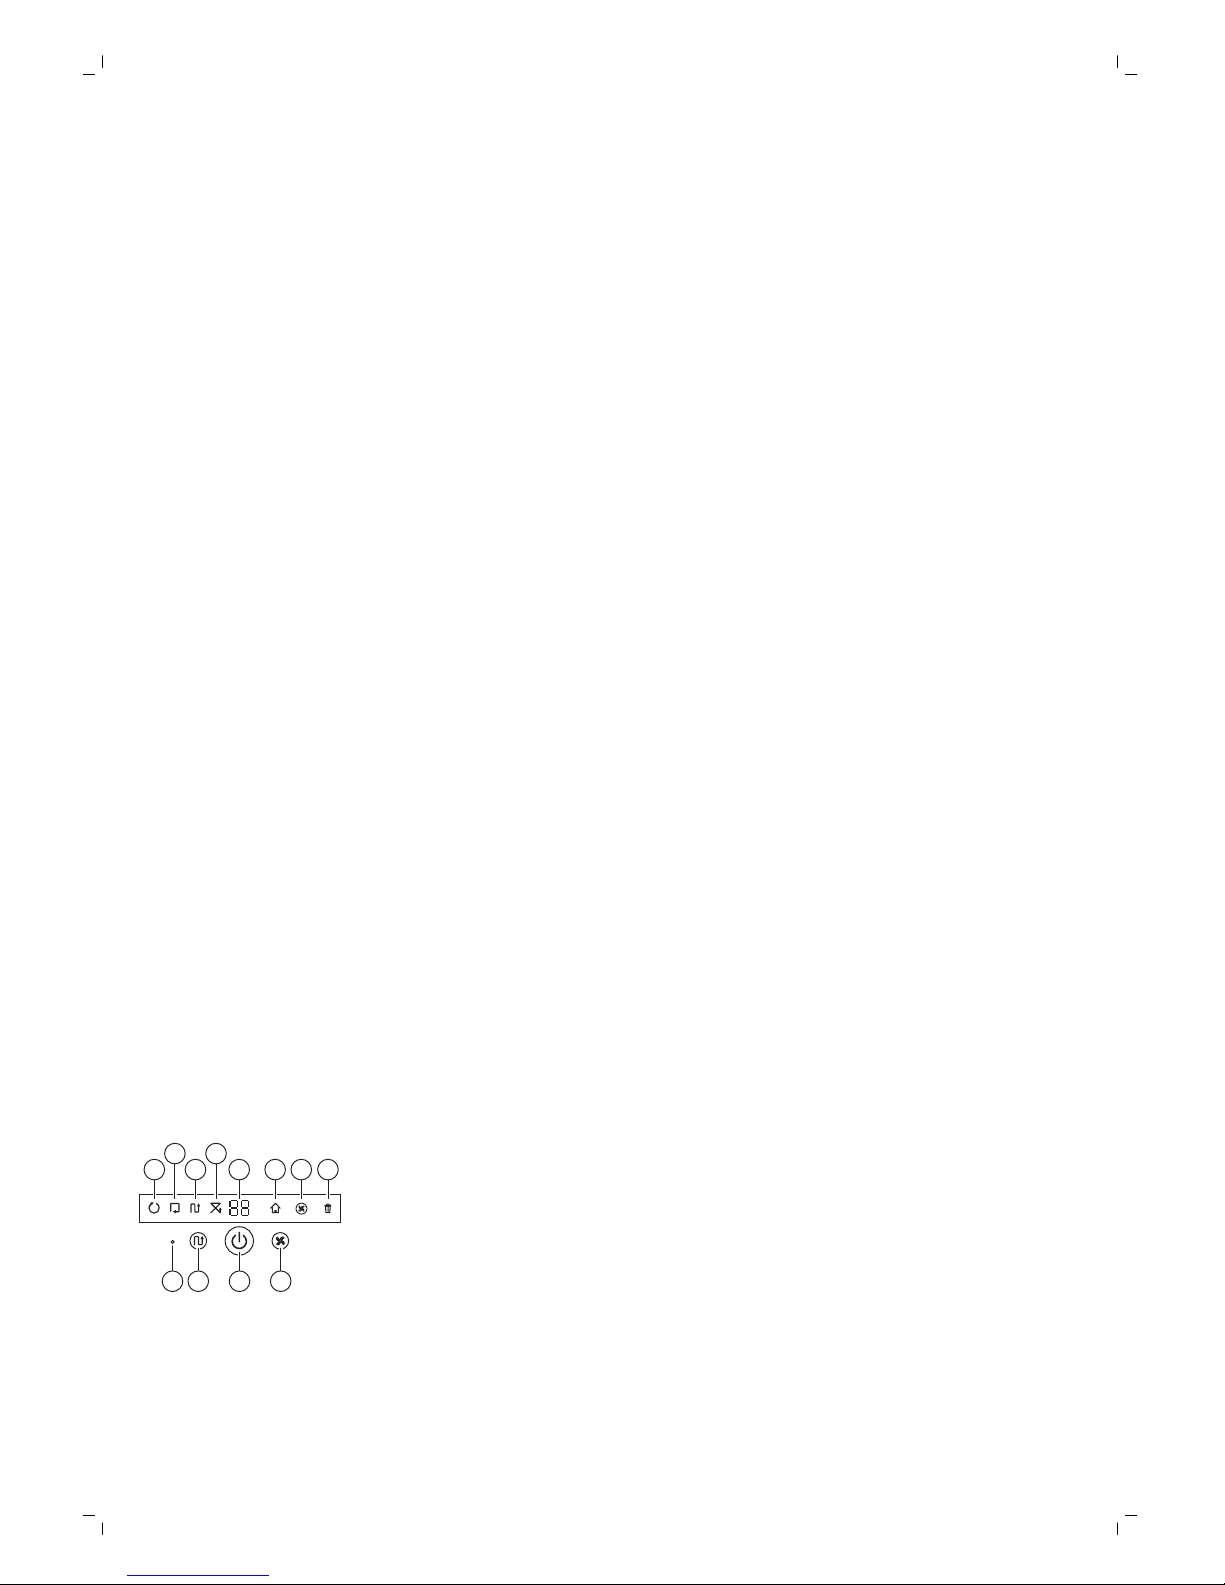
1 Spiral mode indicator
2 Wall-following mode indicator
3 Zigzag pattern mode indicator
4 Random mode indicator
5 Cleaning time
6 Docking icon
7 Fan speed indicator
8 Dustbin full indicator
9 Sound sensor
10 Mode selection button
11 Start/stop button
12 Fan speed button
6
English
Page 7
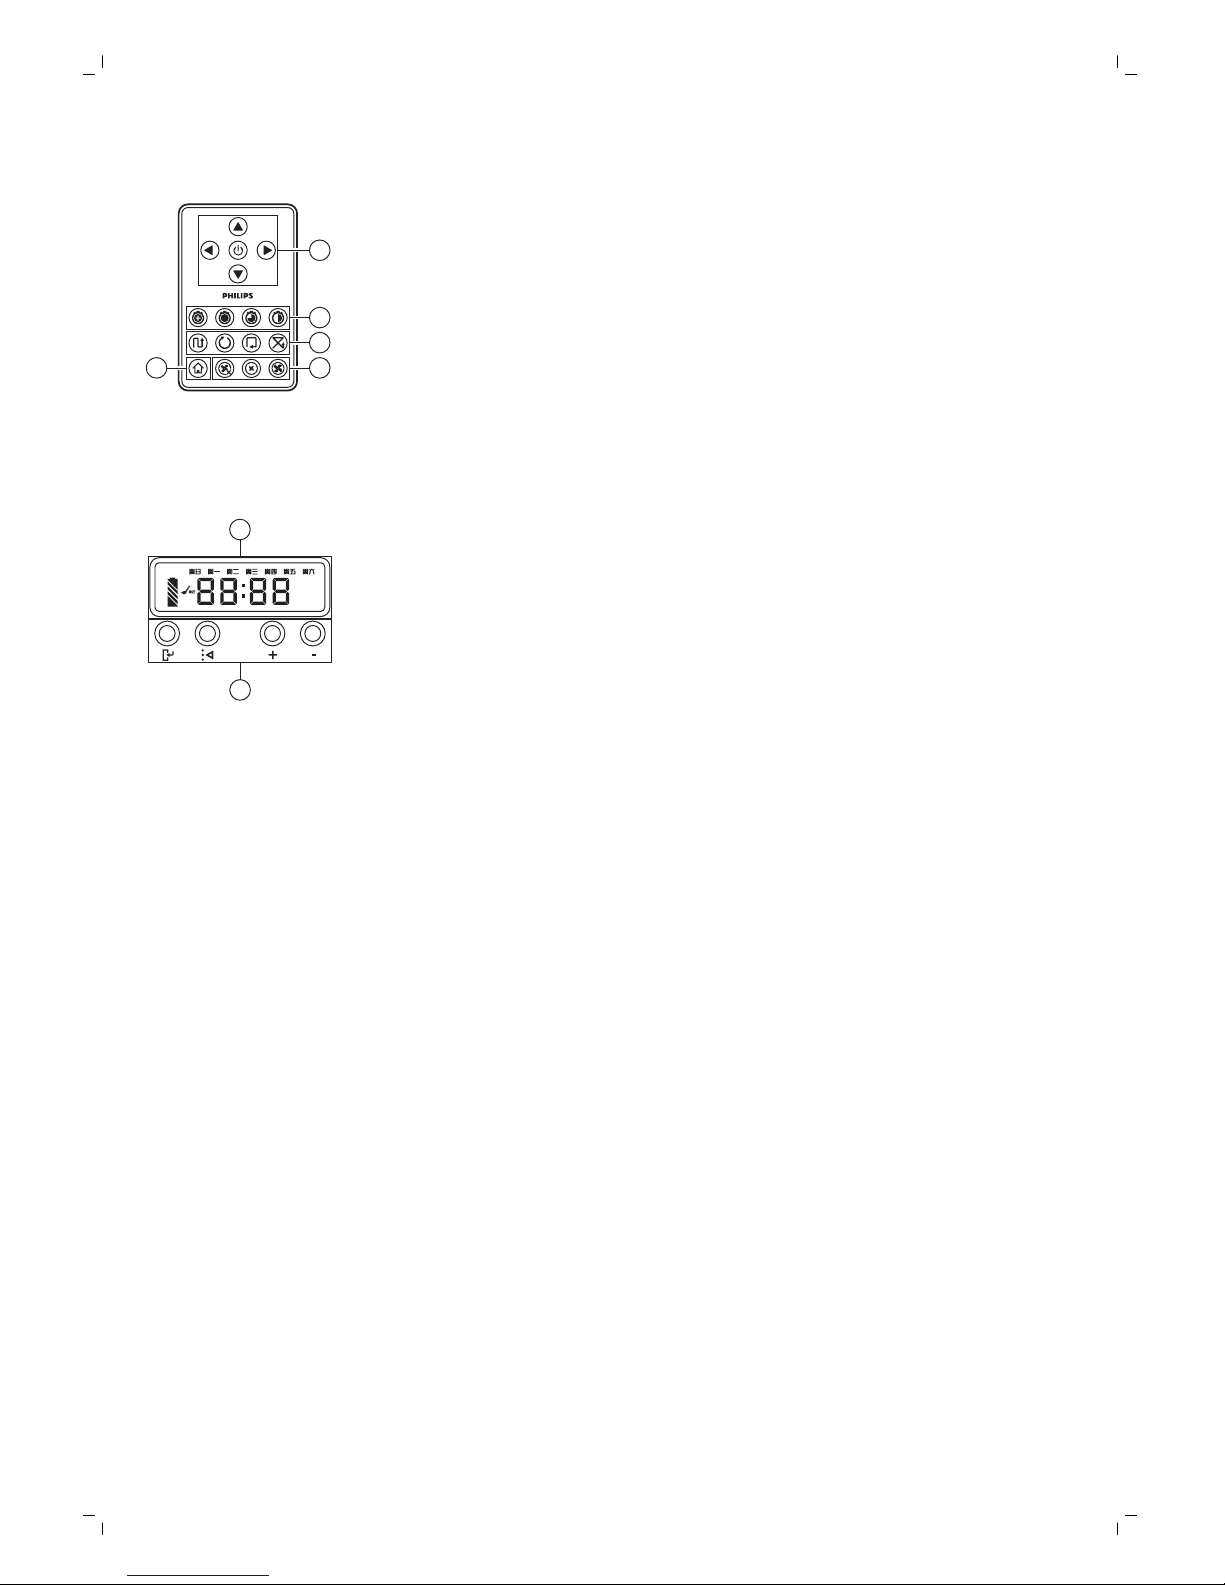
Remote control
2
1
3
45
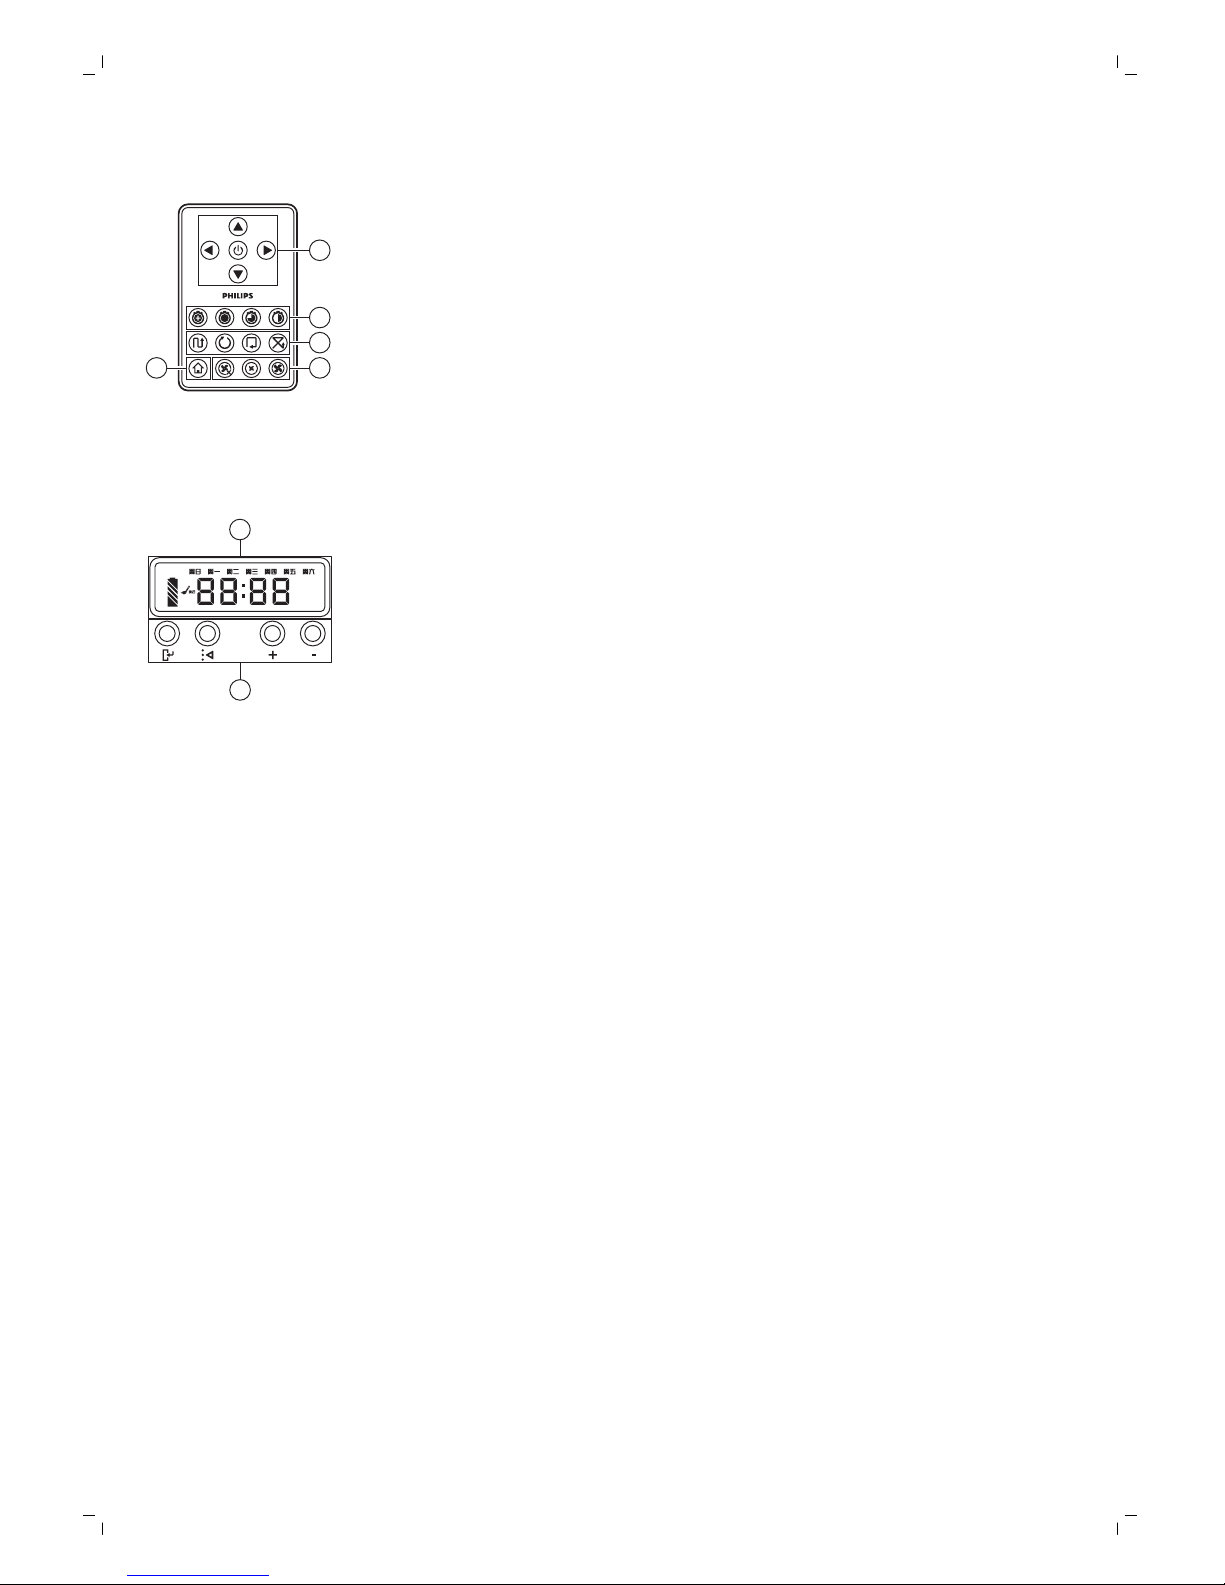
1 Navigation buttons and start/stop
2 Cleaning time buttons
3 Cleaning mode buttons
4 Fan speed buttons
5 Docking button
Control panel of docking station
1
2
1 Display with time, day and programming indications
2 Adjusting and setting buttons
How your robot works
What your robot cleans
This robot is equipped with features that make it a suitable cleaner to help
you clean the floors in your home.
The robot is especially suitable for cleaning hard floors, such as wooden,
tiled or linoleum floors. It may experience problems cleaning soft floors,
such as carpet or rugs. If you use the robot on a carpet or rug, please stay
close by the first time to see if the robot can deal with this type of floor. The
robot also needs supervision when you use it on very dark or shiny hard
floors.
How your robot cleans
Cleaning system
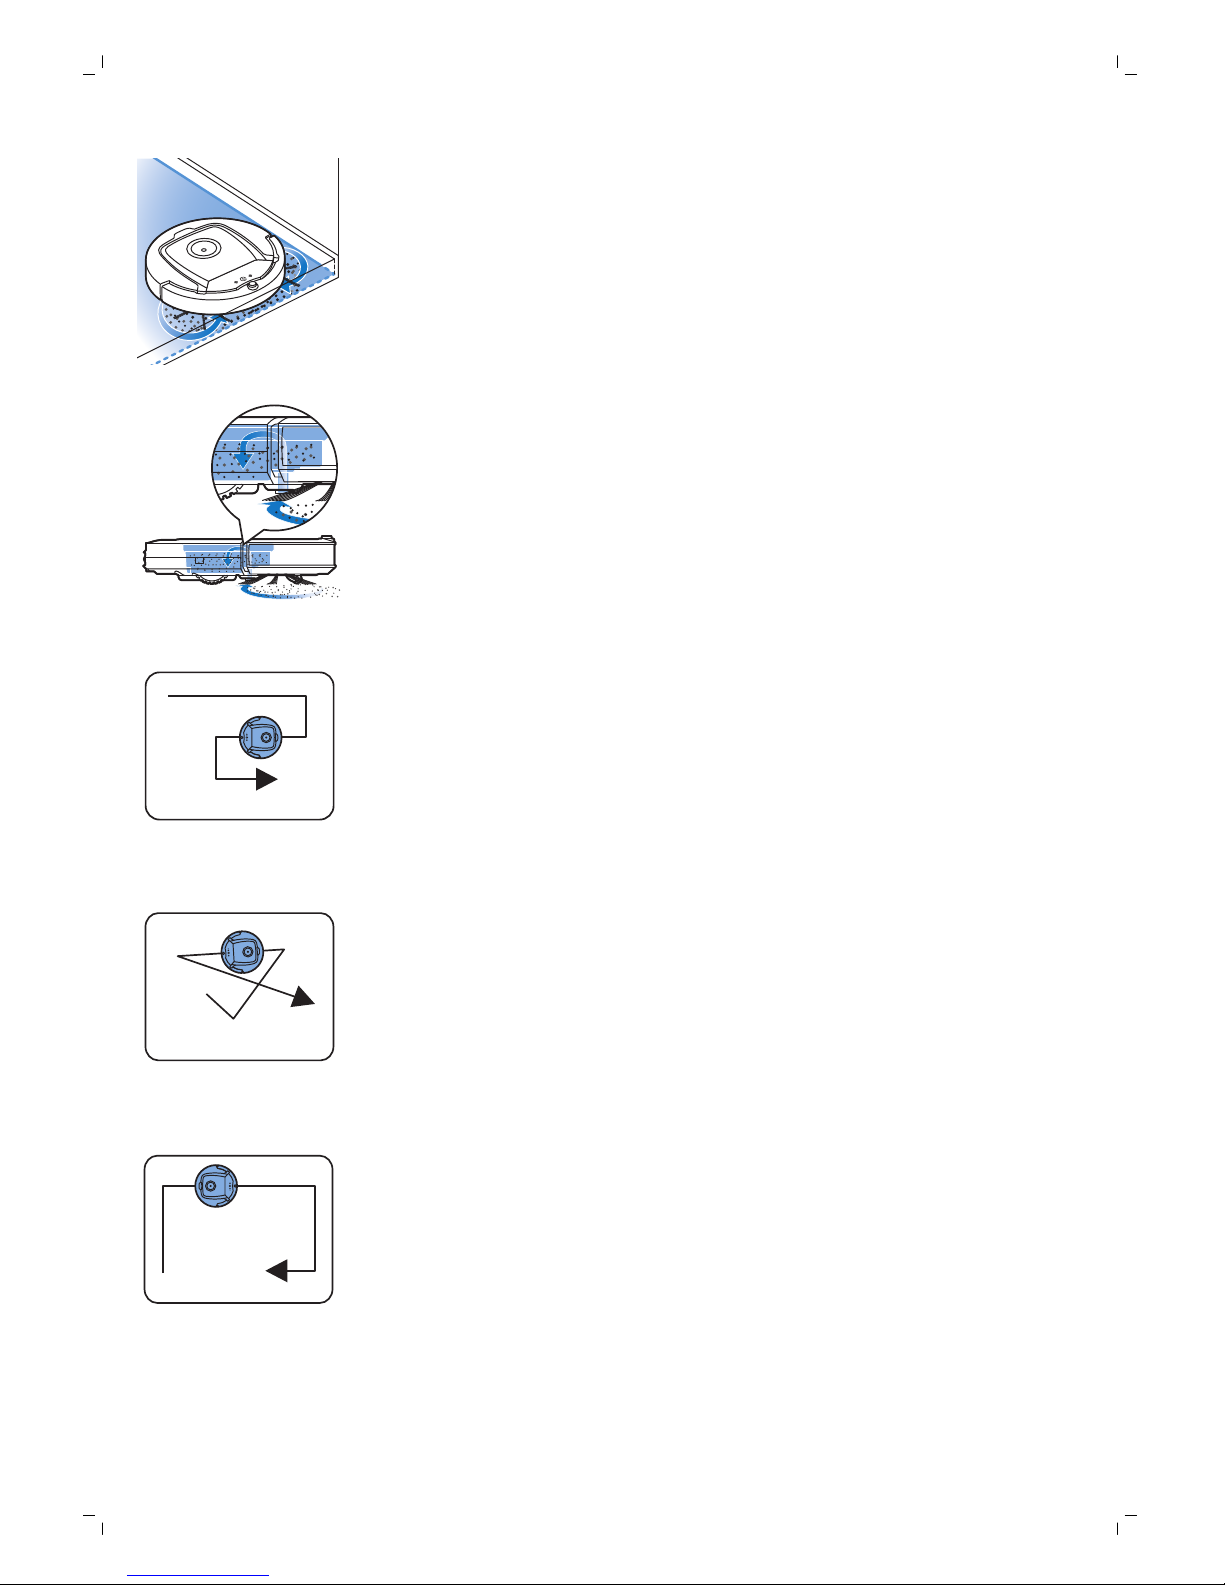
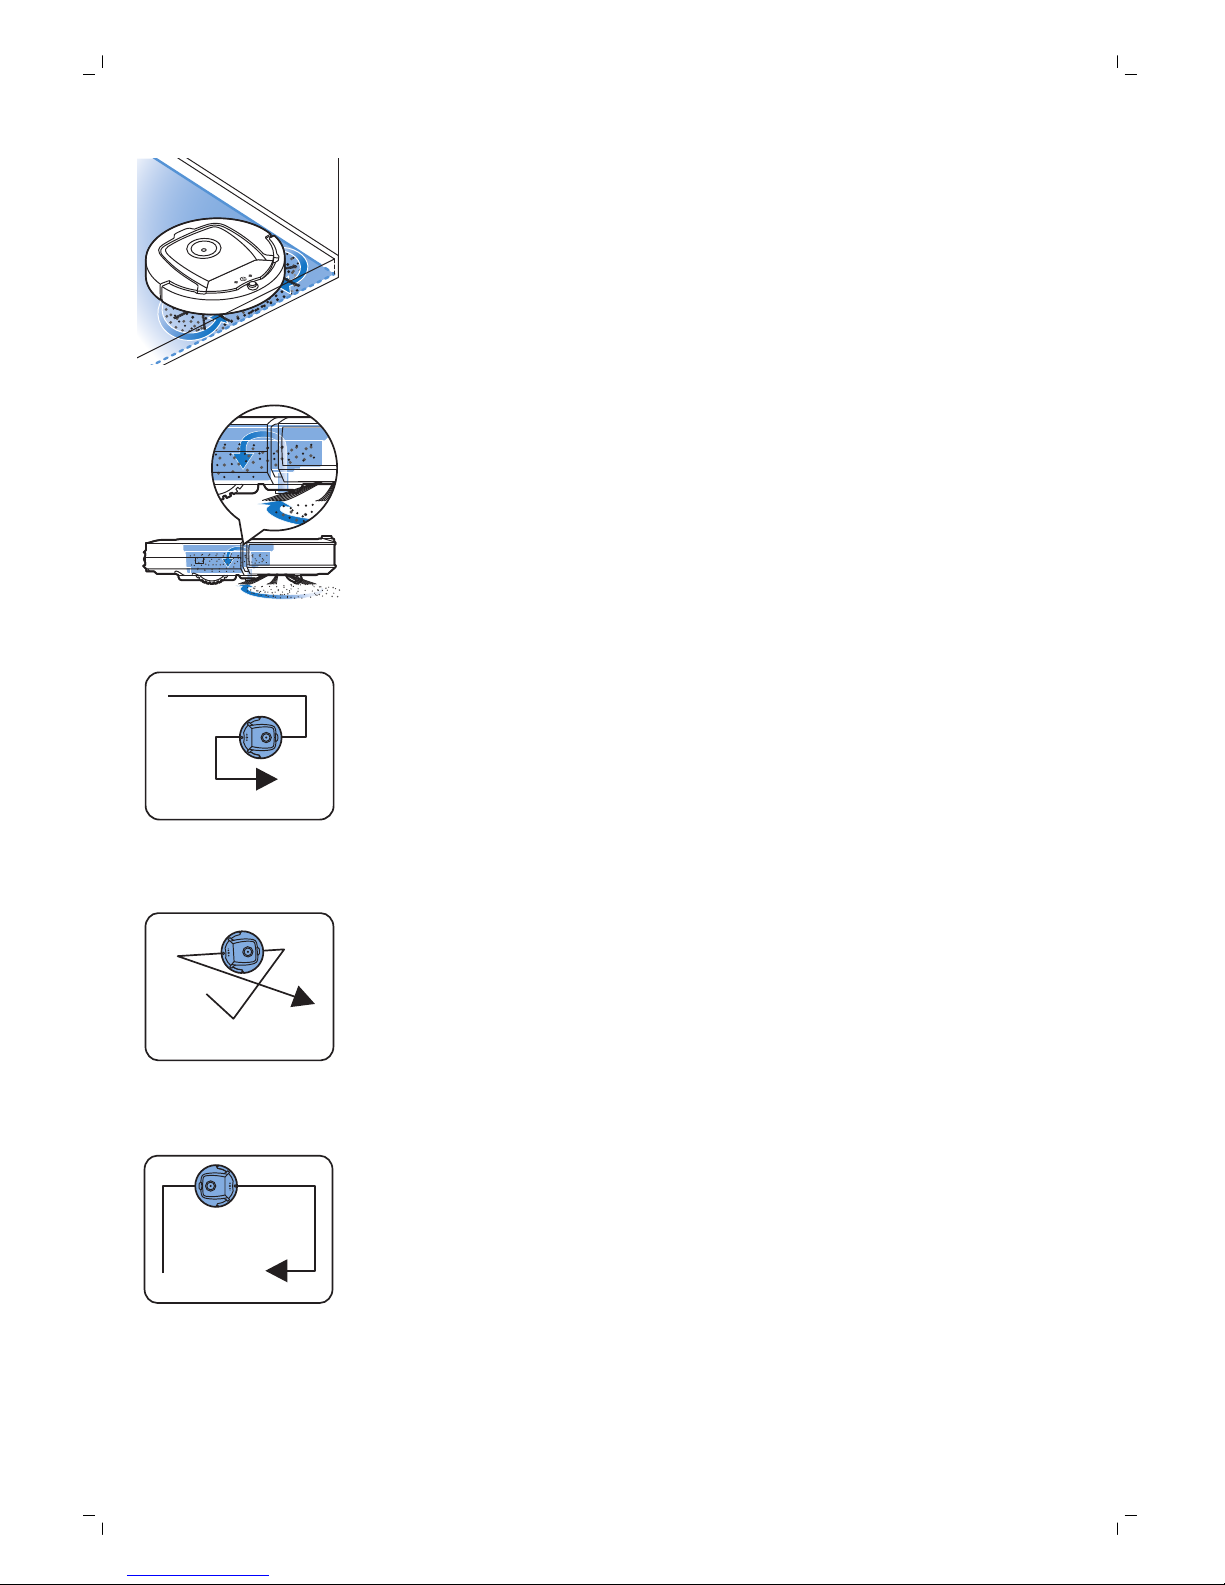
The robot has a 3-stage cleaning system to clean your floors efficiently.
7
English
Page 8
-
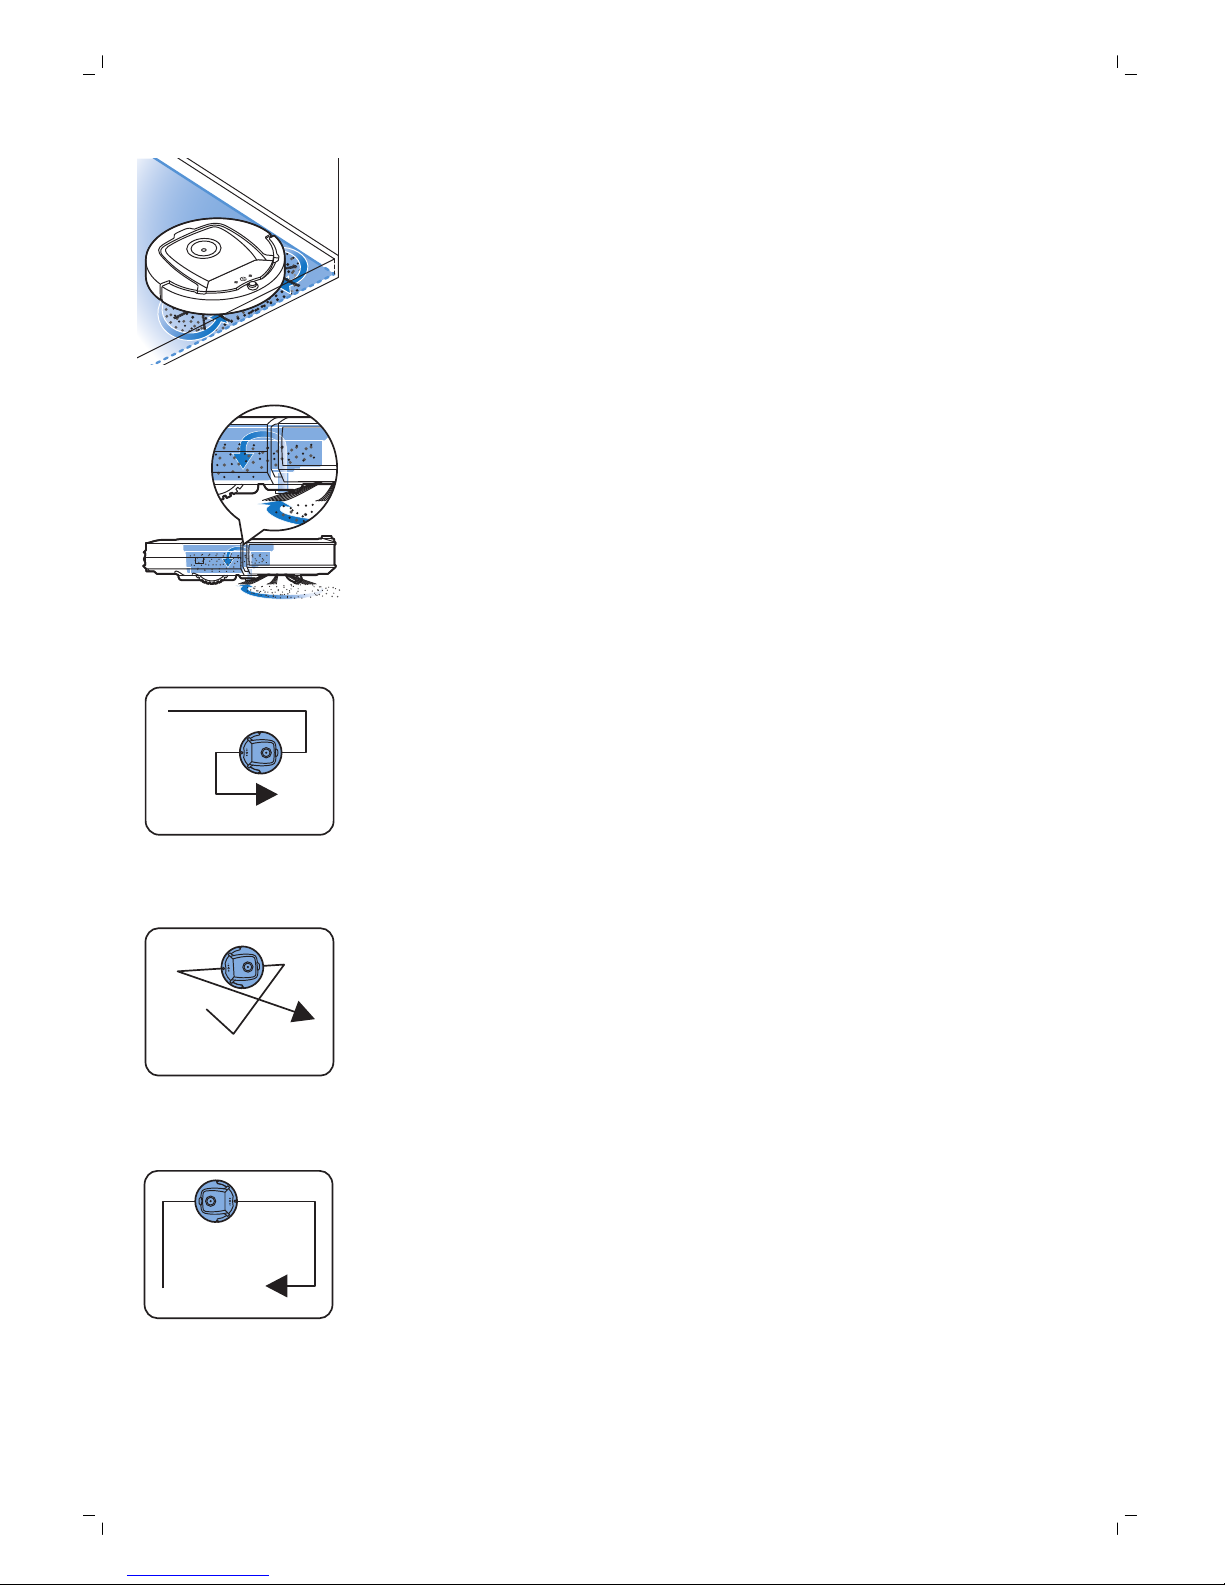
The two side brushes help the robot clean in corners and along walls.
They also help to remove dirt from the floor and move it towards the
suction opening.
-
The suction power of the robot picks up loose dirt and transports it
through the suction opening into the dust container.
-
The robot comes with a dry wipe holder that allows you to clean your
hard floor even more thoroughly with dry wipes.
Cleaning patterns
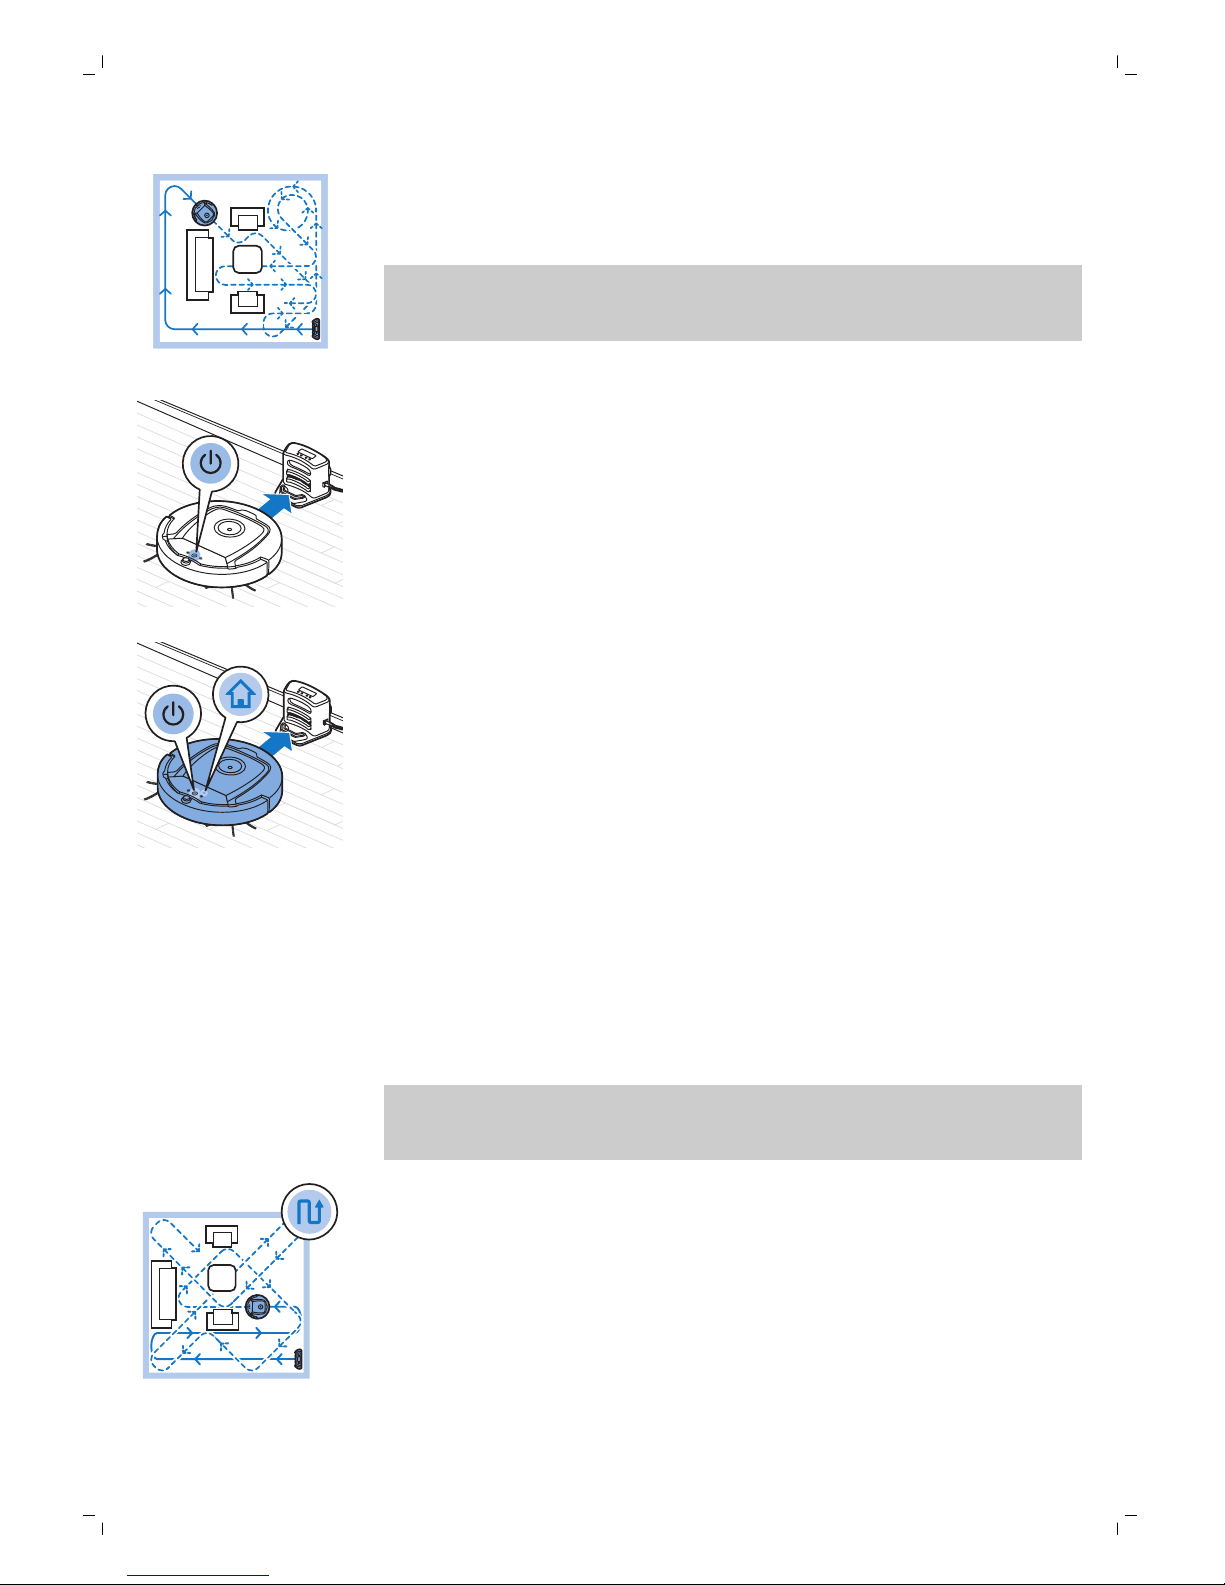
In its auto cleaning mode, the robot uses an automatic sequence of cleaning
patterns to clean each area of the room optimally. The cleaning patterns it
uses are:
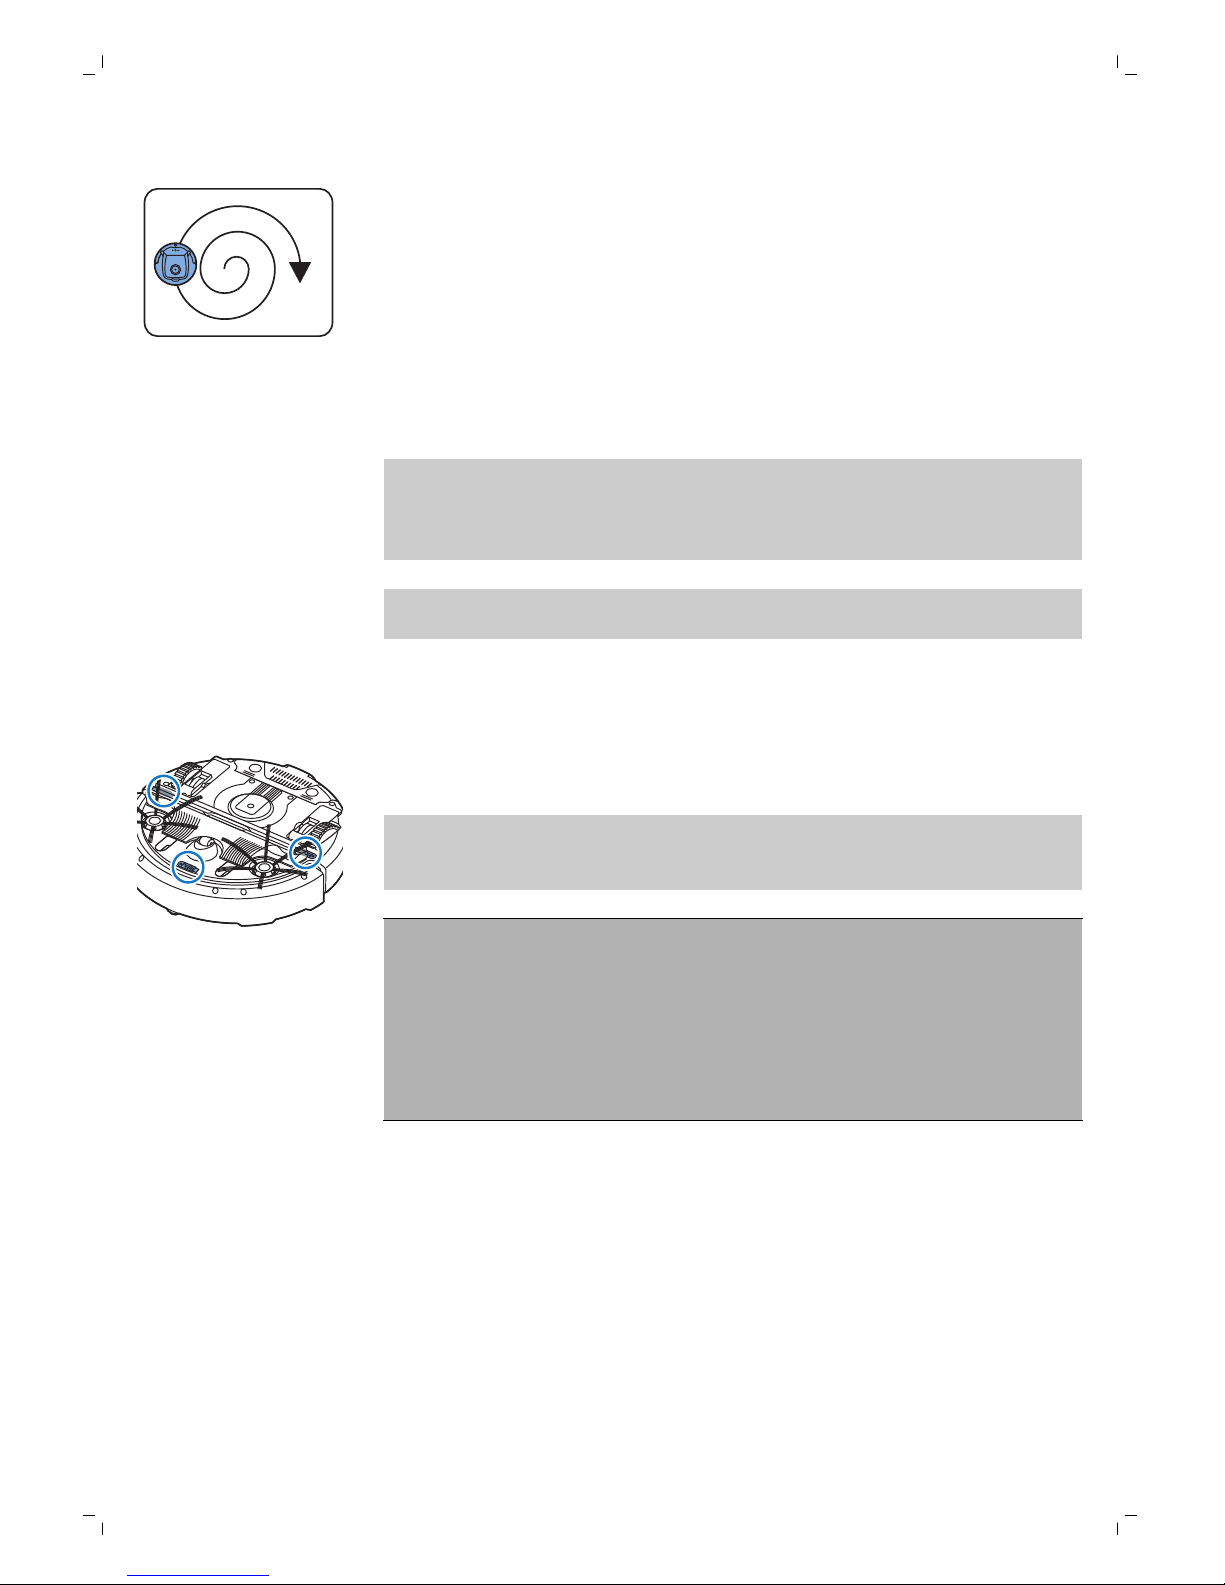
1 Z-pattern or zigzag pattern
2 Random pattern
3 Wall-following pattern
8
English
Page 9
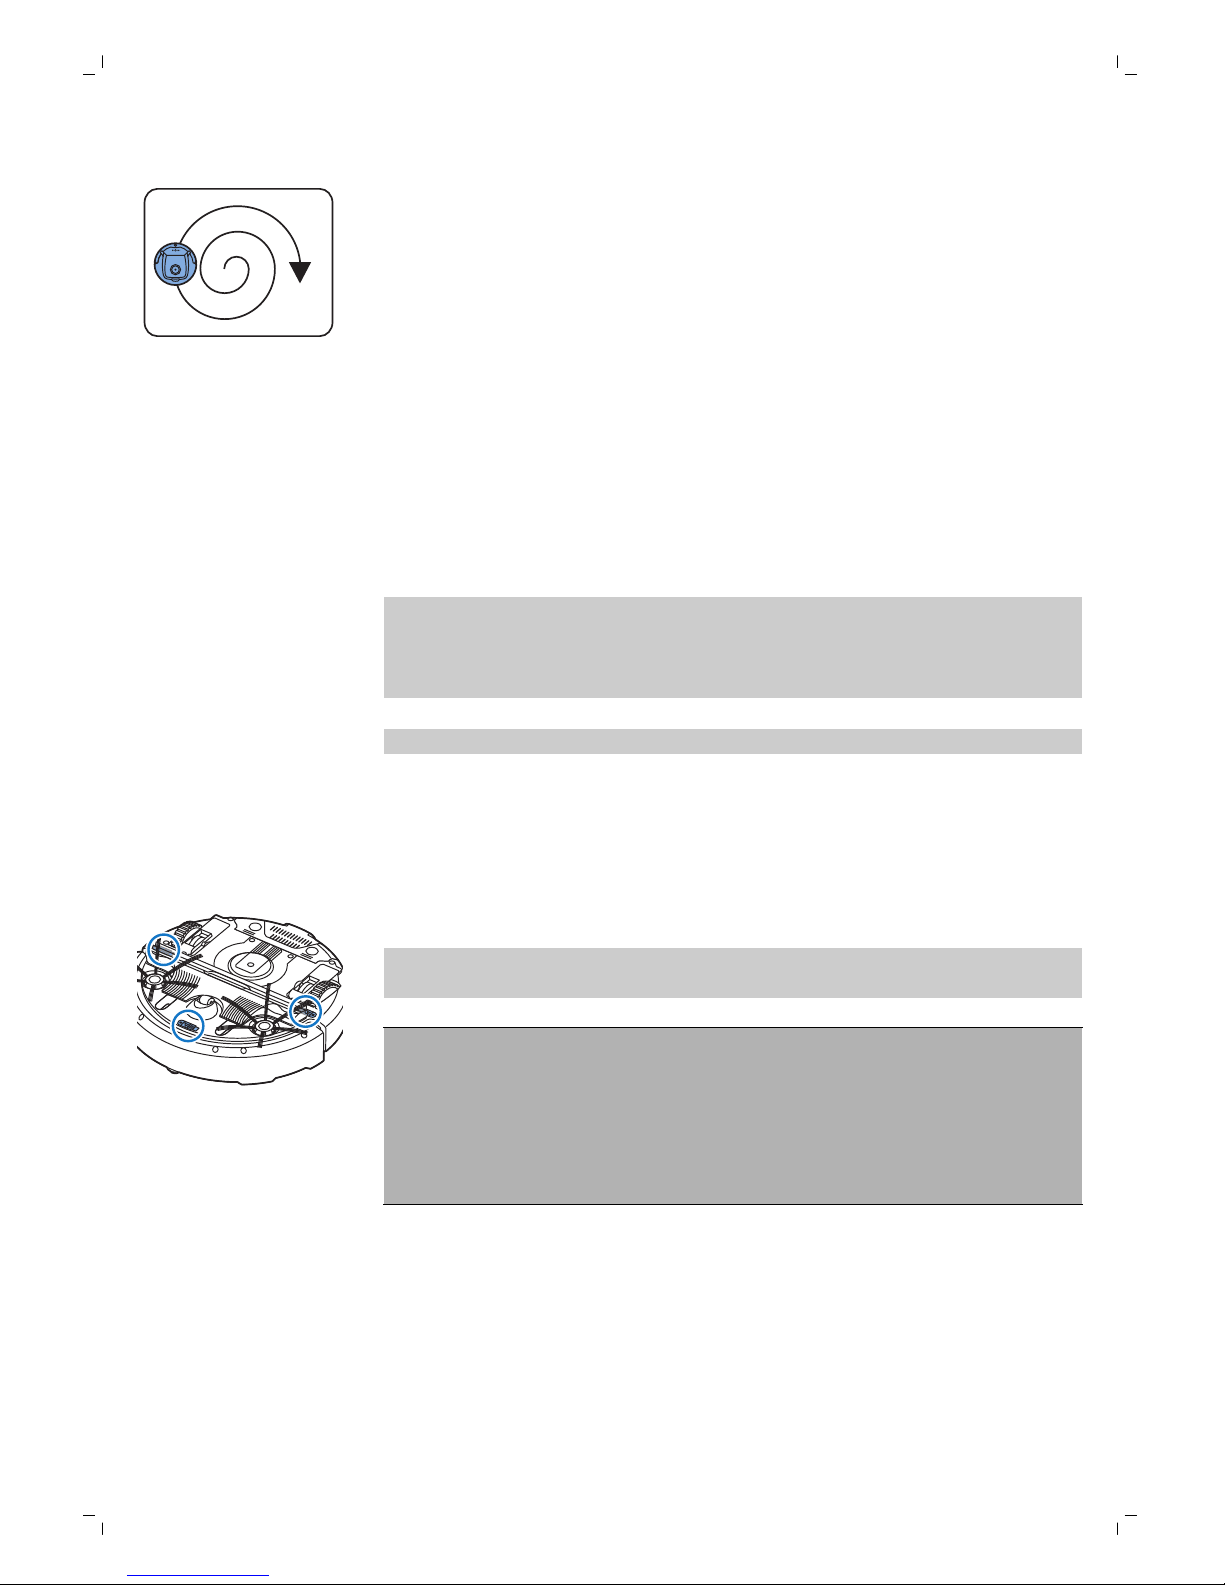
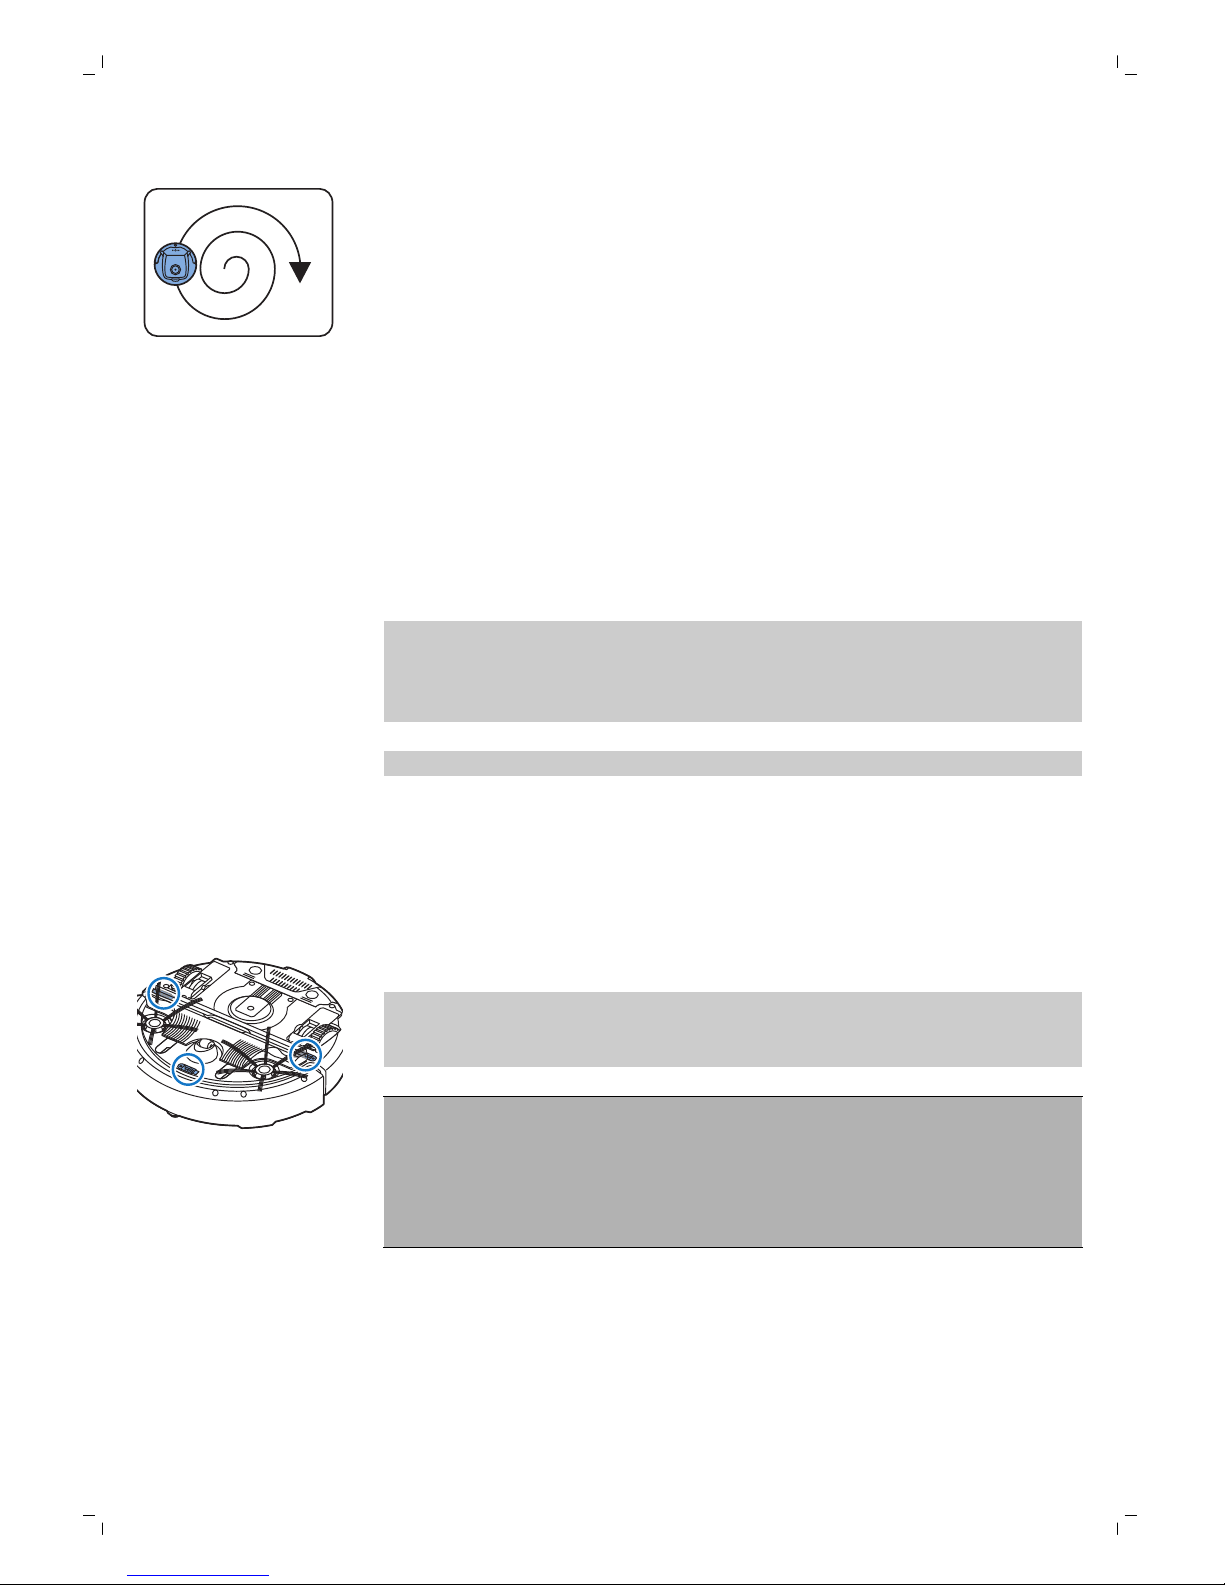
4 Spiral pattern
In its auto cleaning mode, the robot uses these patterns in a fixed
sequence:z-pattern, random pattern, wall-following pattern, and spiral
pattern.
When the robot has completed this sequence of patterns, it starts moving in
Z-pattern again. The robot continues to use this sequence of patterns to
clean the room until the rechargeable battery runs low, or until it is switched
off manually.
If the robot detects a particularly dirty area during its cleaning run, it
switches to spiral mode and switches to turbo fan speed to ensure thorough
dirt removal.
Note: You can also select each mode individually by pressing the
appropriate button on the remote control. The manually selected modes are
only active for a couple of minutes. After that, the robot switches back to
auto-cleaning mode.
For more details, see chapter 'Using your robot', section 'Cleaning modes'.
How your robot avoids height differences
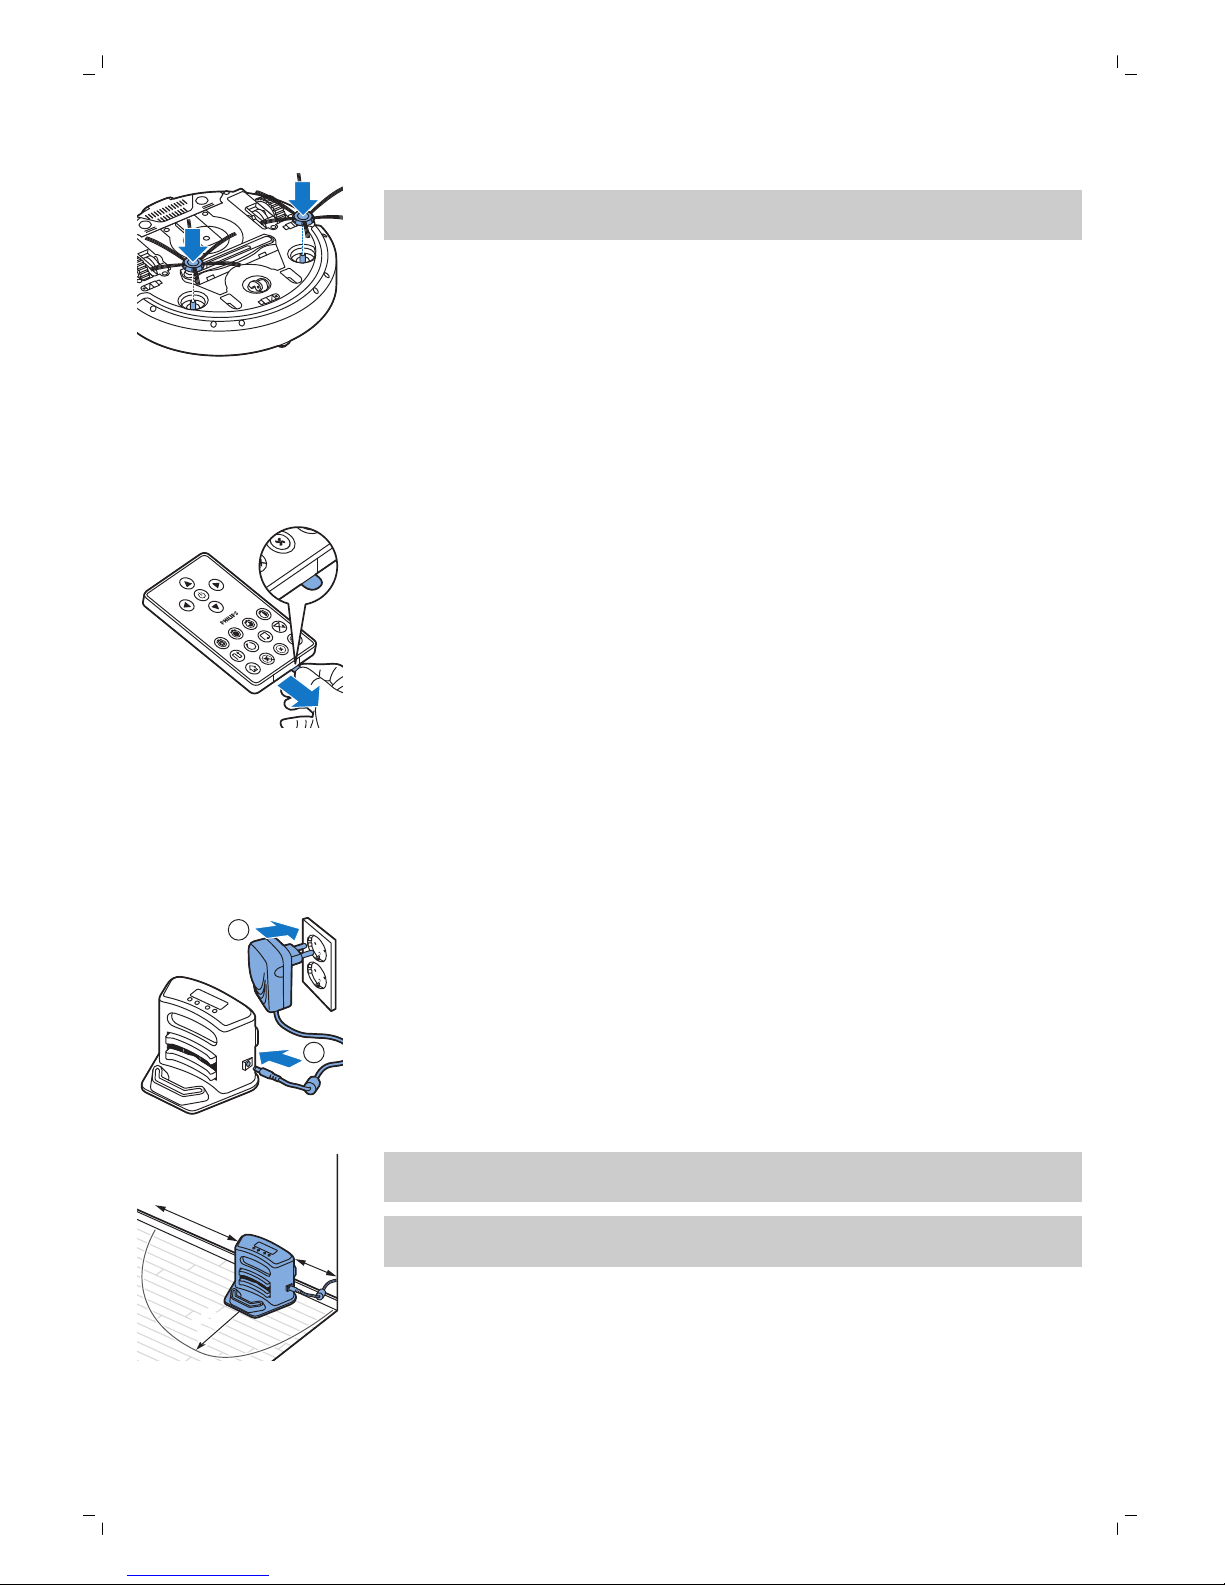
The robot has three drop-off sensors in its bottom. It uses these drop-off
sensors to detect and avoid height differences such as staircases.
Note: It is normal for the robot to move slightly over the edge of a height
difference, as its front drop-off sensor is located behind the bumper.
Caution: In some cases, the drop-off sensors may not detect a staircase or
other height difference in time. Therefore monitor the robot carefully the
first few times you use it, and when you operate it near a staircase or
another height difference. It is important that you clean the drop-off
sensors regularly to ensure the robot continues to detect height
differences properly (see chapter ' Cleaning and maintenance' for
instructions).
Before first use
Mounting the side brushes
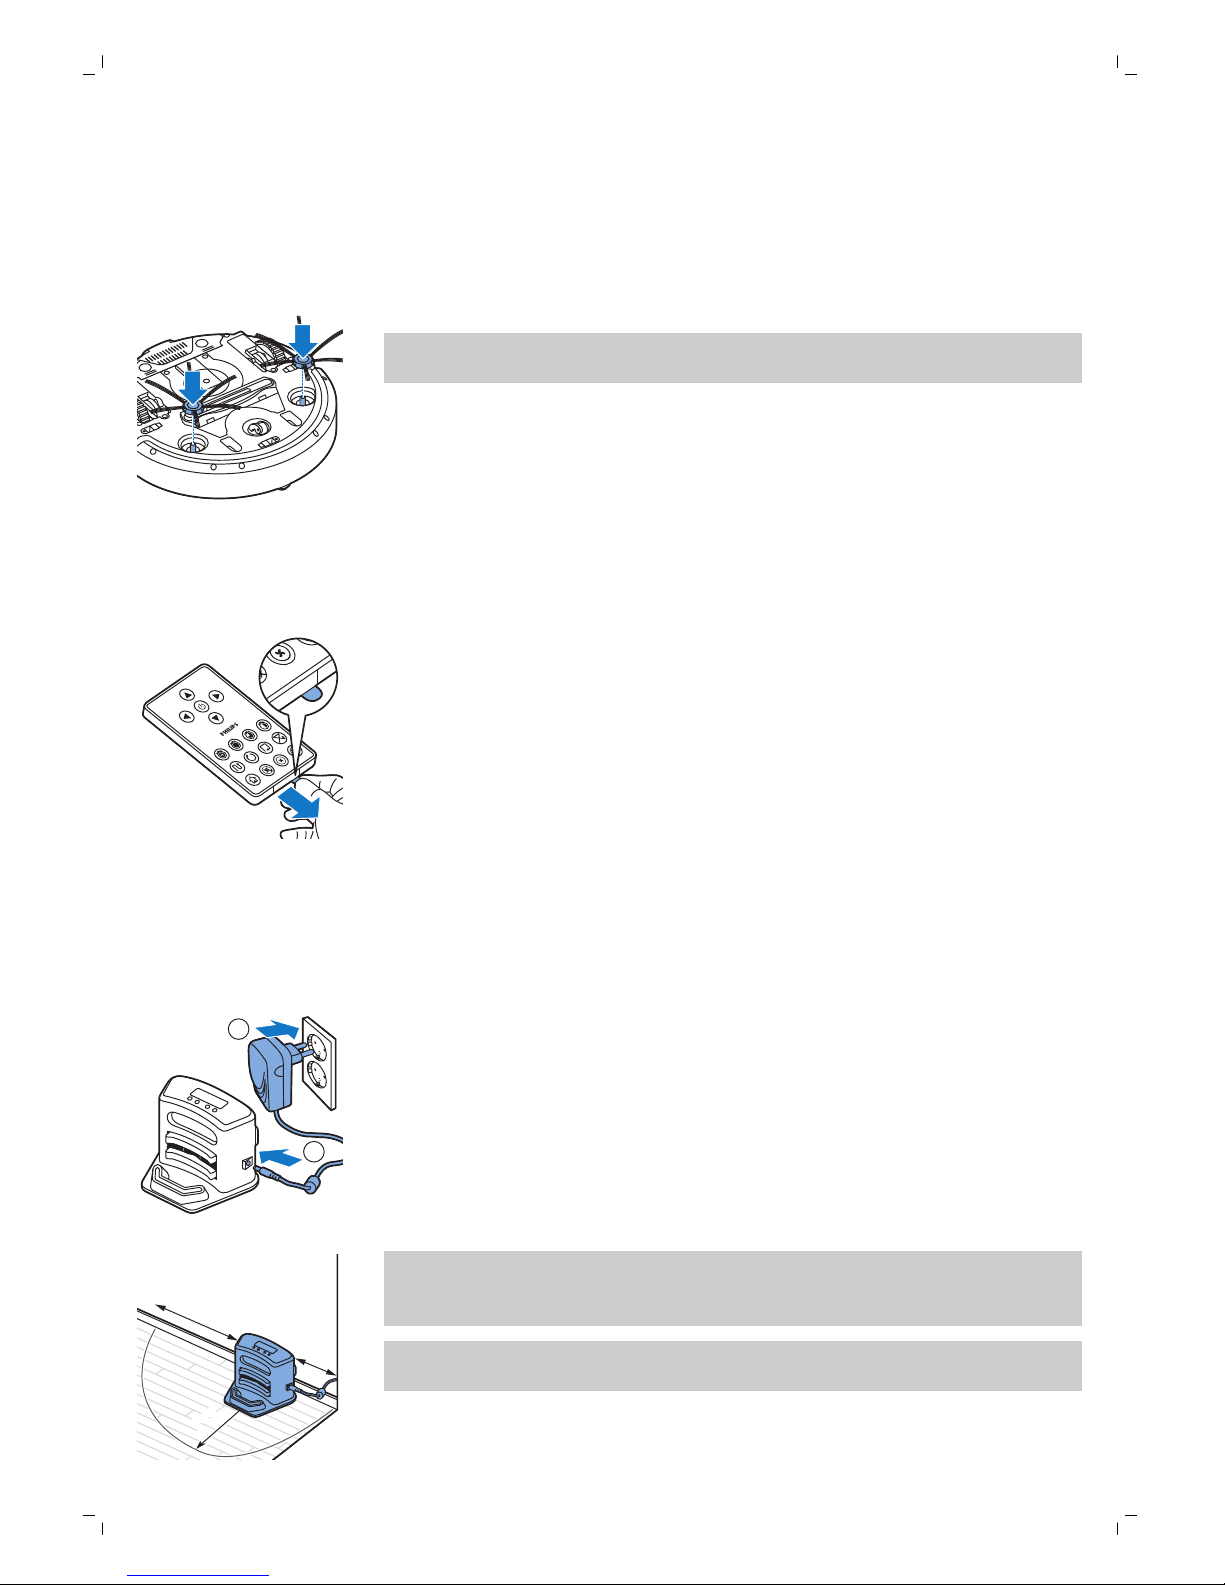
1 Unpack the side brushes and place the robot upside down on a table or
on the floor.
9
English
Page 10
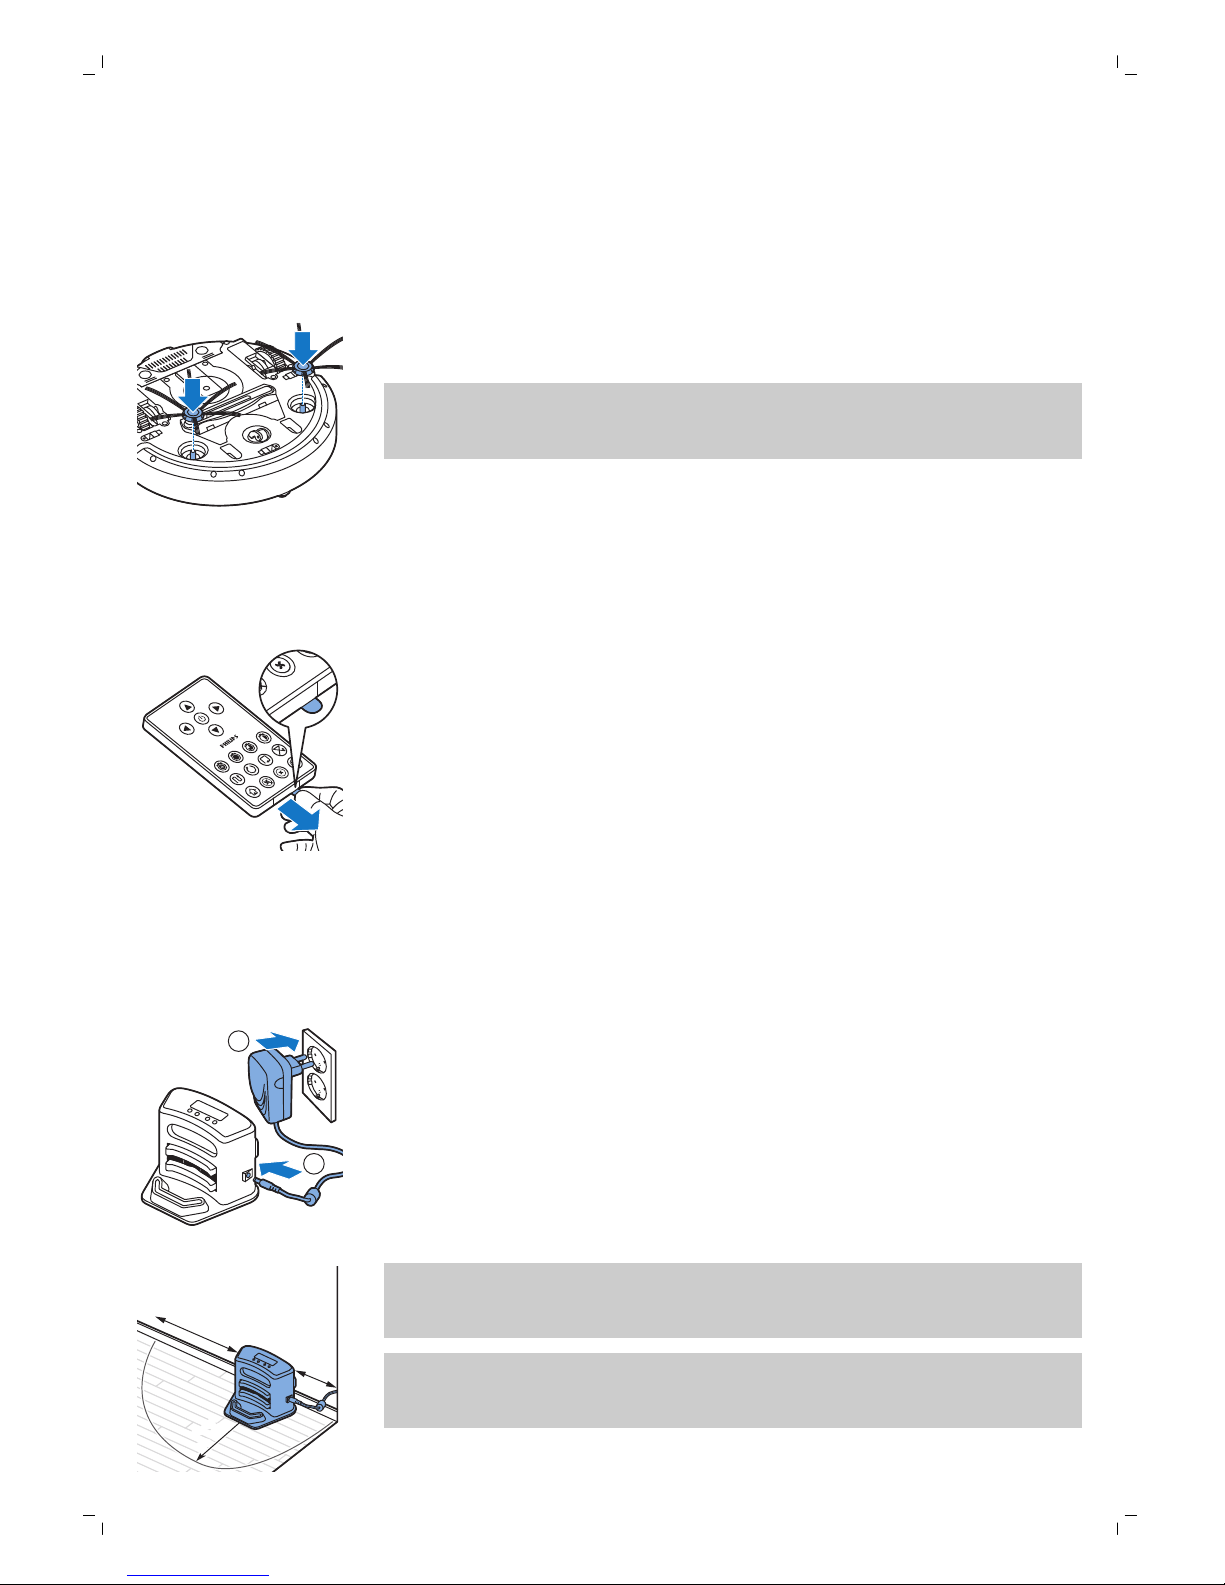
2 Push the side brushes onto the shafts on the bottom of the robot.
Note: Make sure you attach the side brushes properly. Press them onto
the shaft until you hear them lock into position with a click.
Removing the tag from the remote control
The remote control works on a CR2025 coin-shaped battery. This battery is
protected with a protection tag that has to be removed before use.
1 Pull the battery protection tag out of the battery compartment of the
remote control. Now the remote control is ready for use.
Preparing for use
Installing the docking station
1
2
1 Insert the small plug of the adapter into the socket on the docking station
(1) and insert the adapter into the wall socket (2).
-
The display of the docking station comes on.
2 Place the docking station on a horizontal, level floor against the wall.
100 厘米
100 cm
30 厘米30 厘米
30 cm
80
厘米
80 cm
Note: Make sure that there are no obstacles or height differences 80 cm
in front, 30 cm to the right and 100 cm to the left of the docking station.
Tip: To ensure the docking station stays firmly in the selected spot, fasten
it to the wall with screws or with two strips of double-sided tape.
10
English
Page 11
Charging
When charging for the first time and when the rechargeable battery of the
robot is empty, the charging time is four hours.
Your robot can be charged in two ways:
-
On the docking station, either manually or automatically during use;
-
By connecting the robot directly to the mains.
Note: When the rechargeable battery is fully charged, your robot can clean
for up to 120 minutes
Charging on the docking station
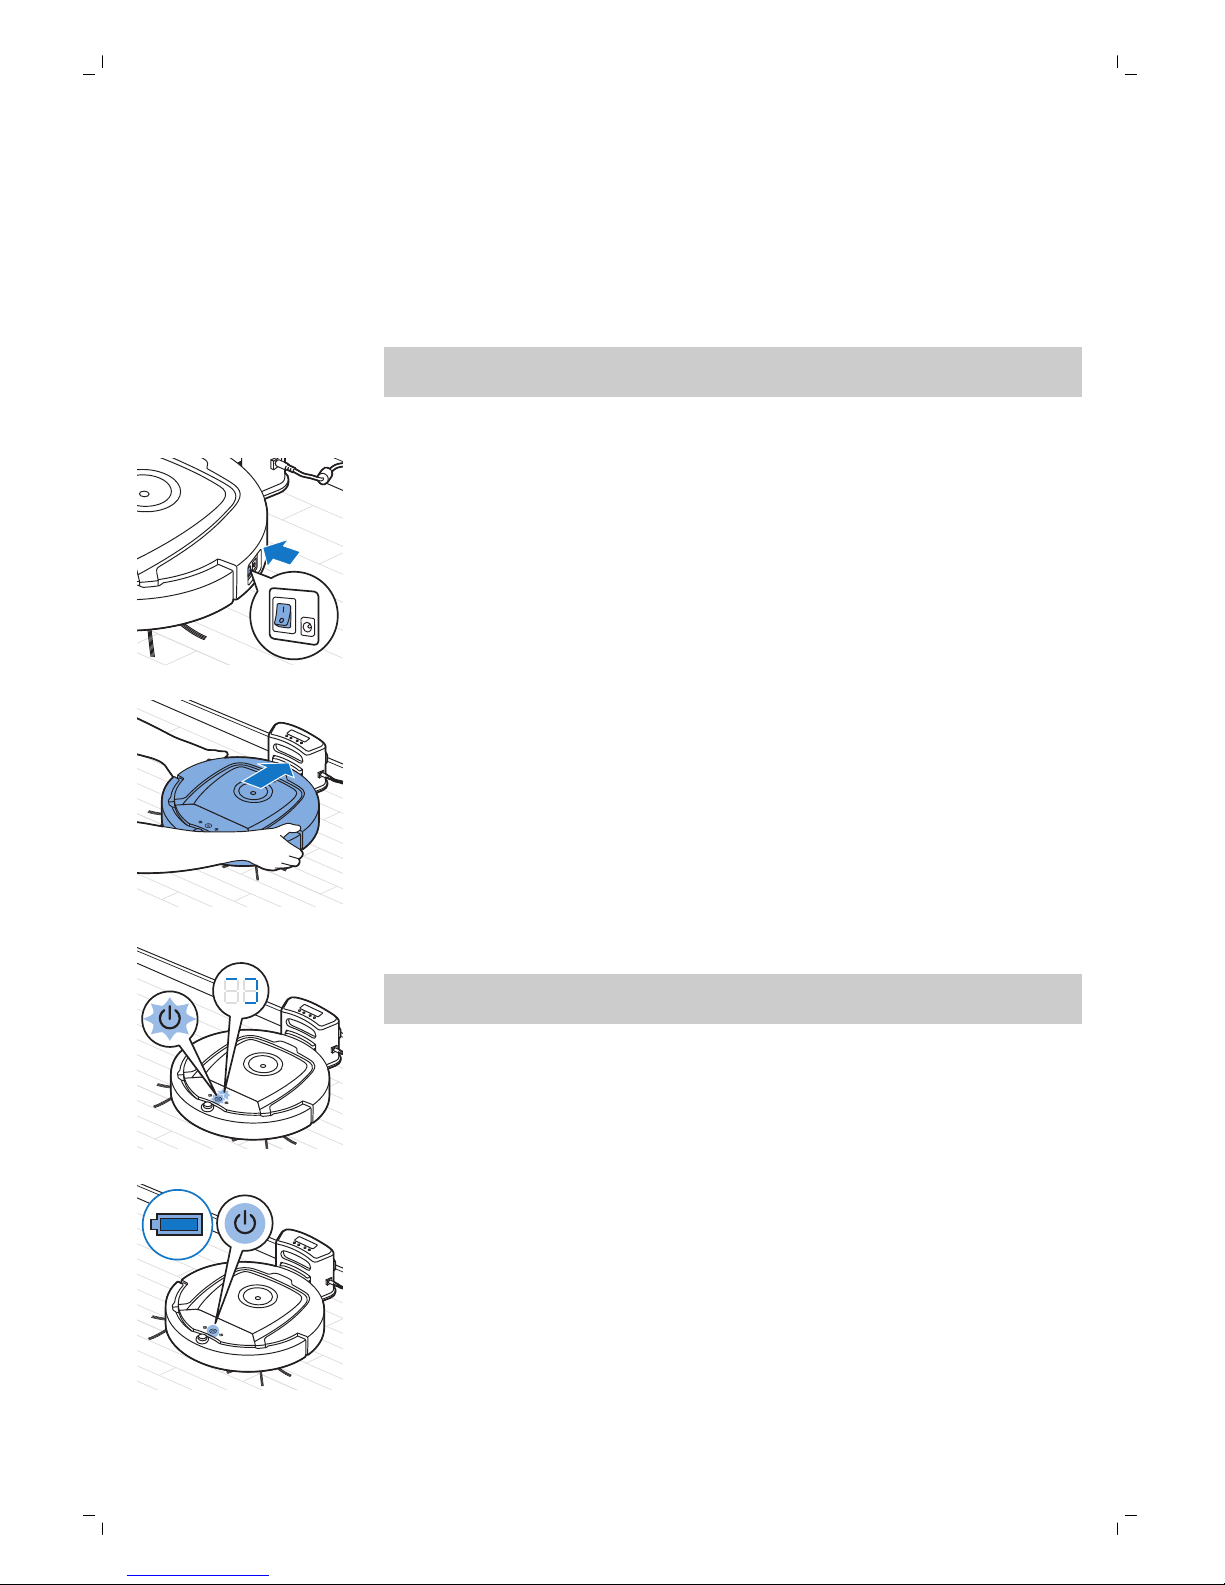
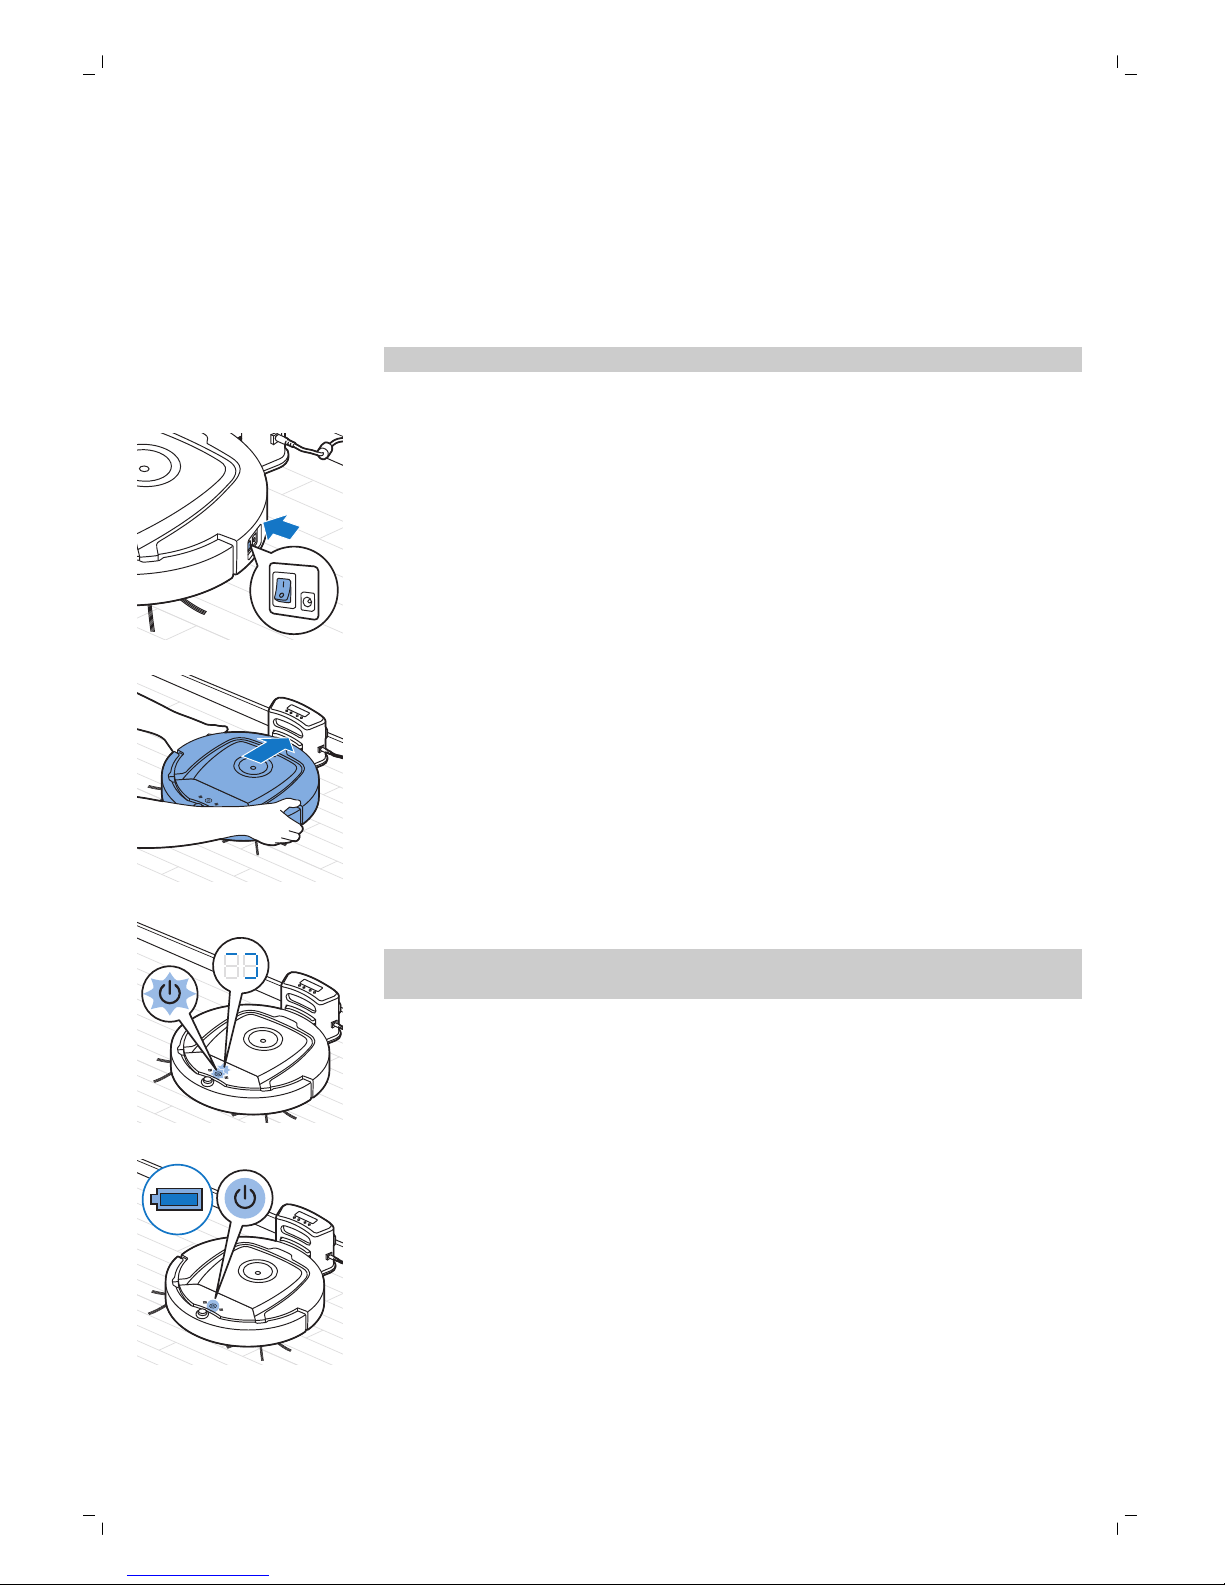
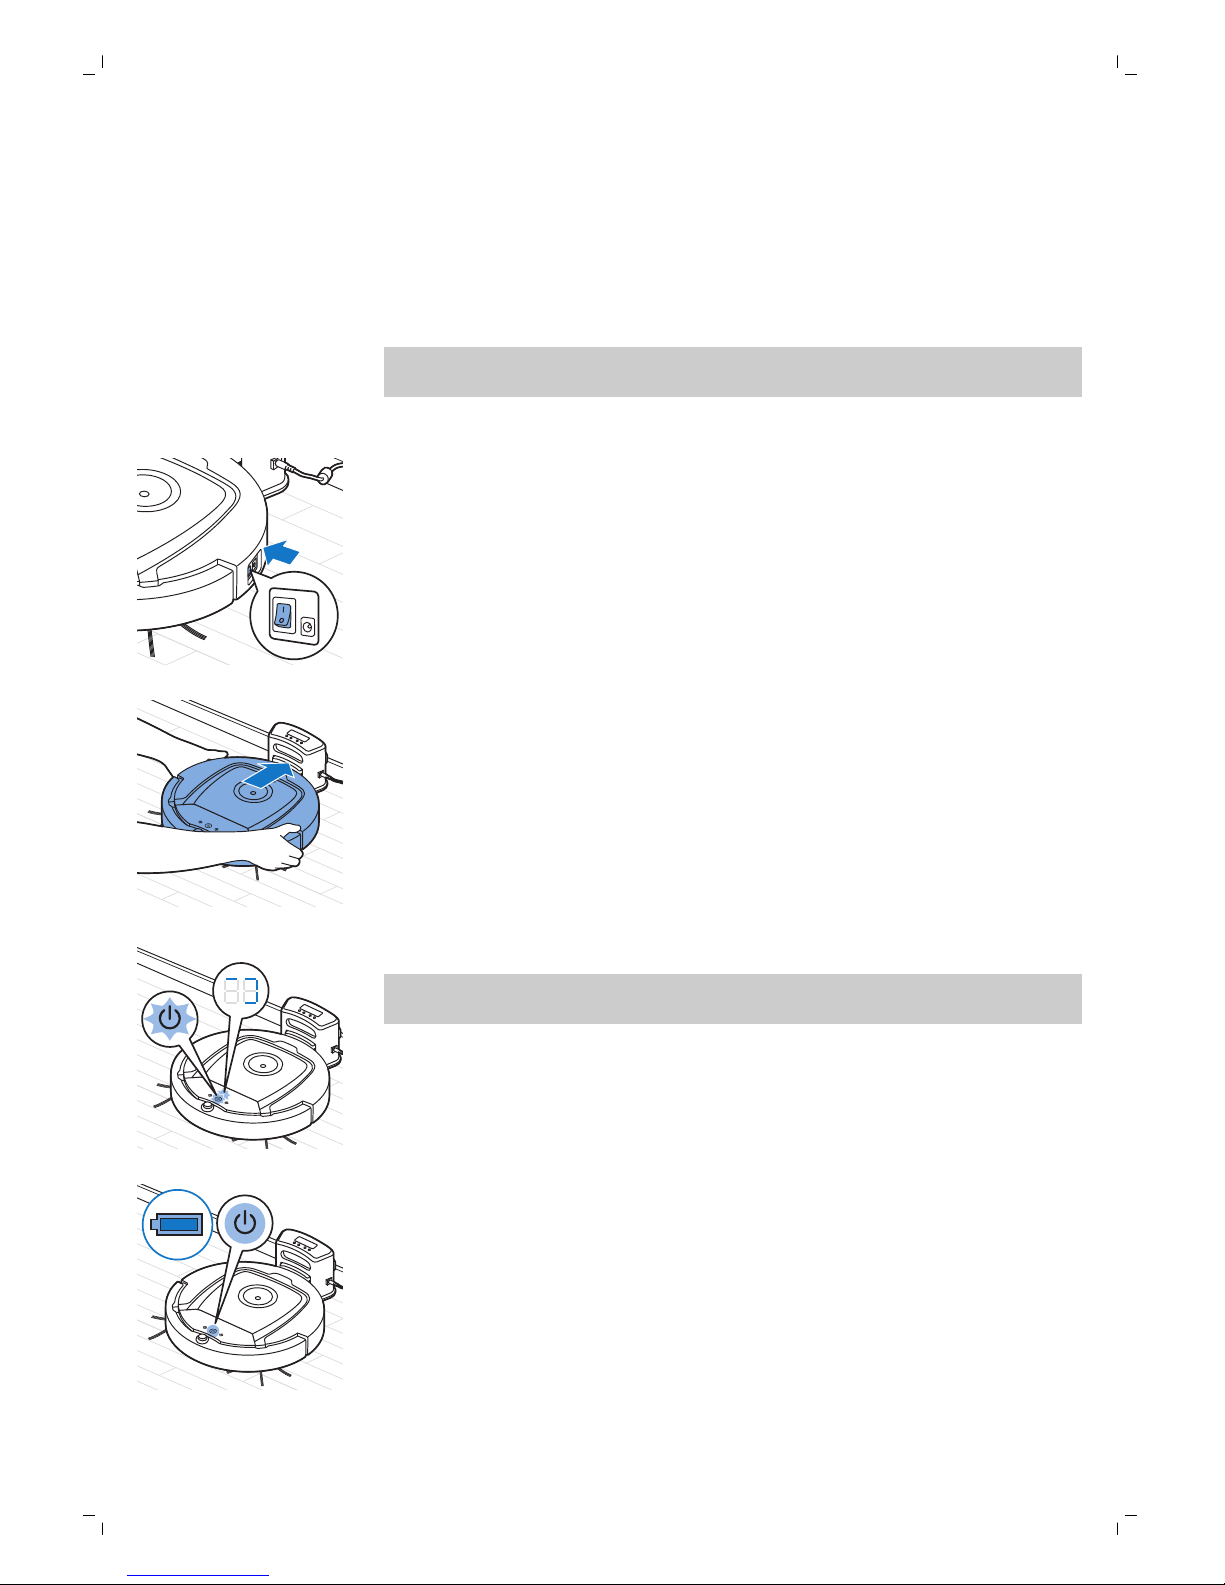
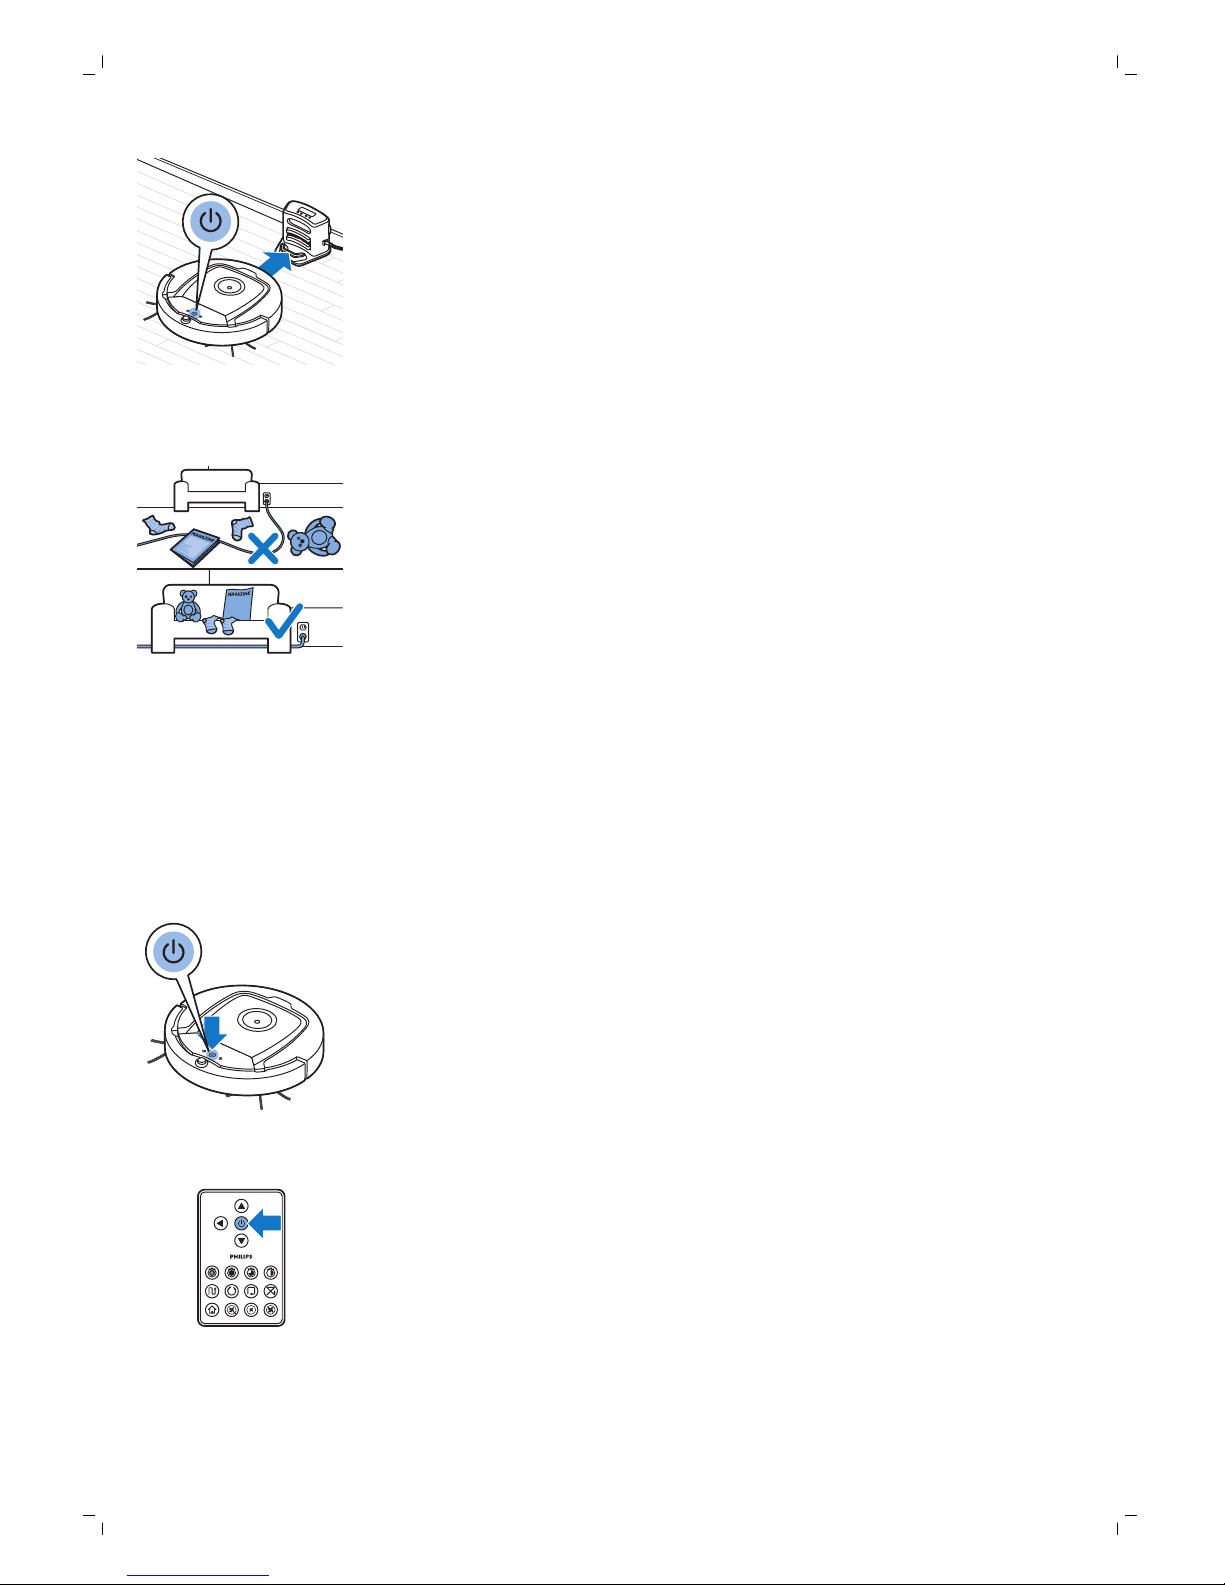
1 Press the power switch to switch on the robot.
2 Place the robot on the plugged-in docking station.
3 The start/stop button starts flashing.
Note: Because this is the first time you charge the robot, the display of
the robot shows the booting indicator.
4 When the rechargeable battery is fully charged, the start/stop button
lights up continuously.
11
English
Page 12
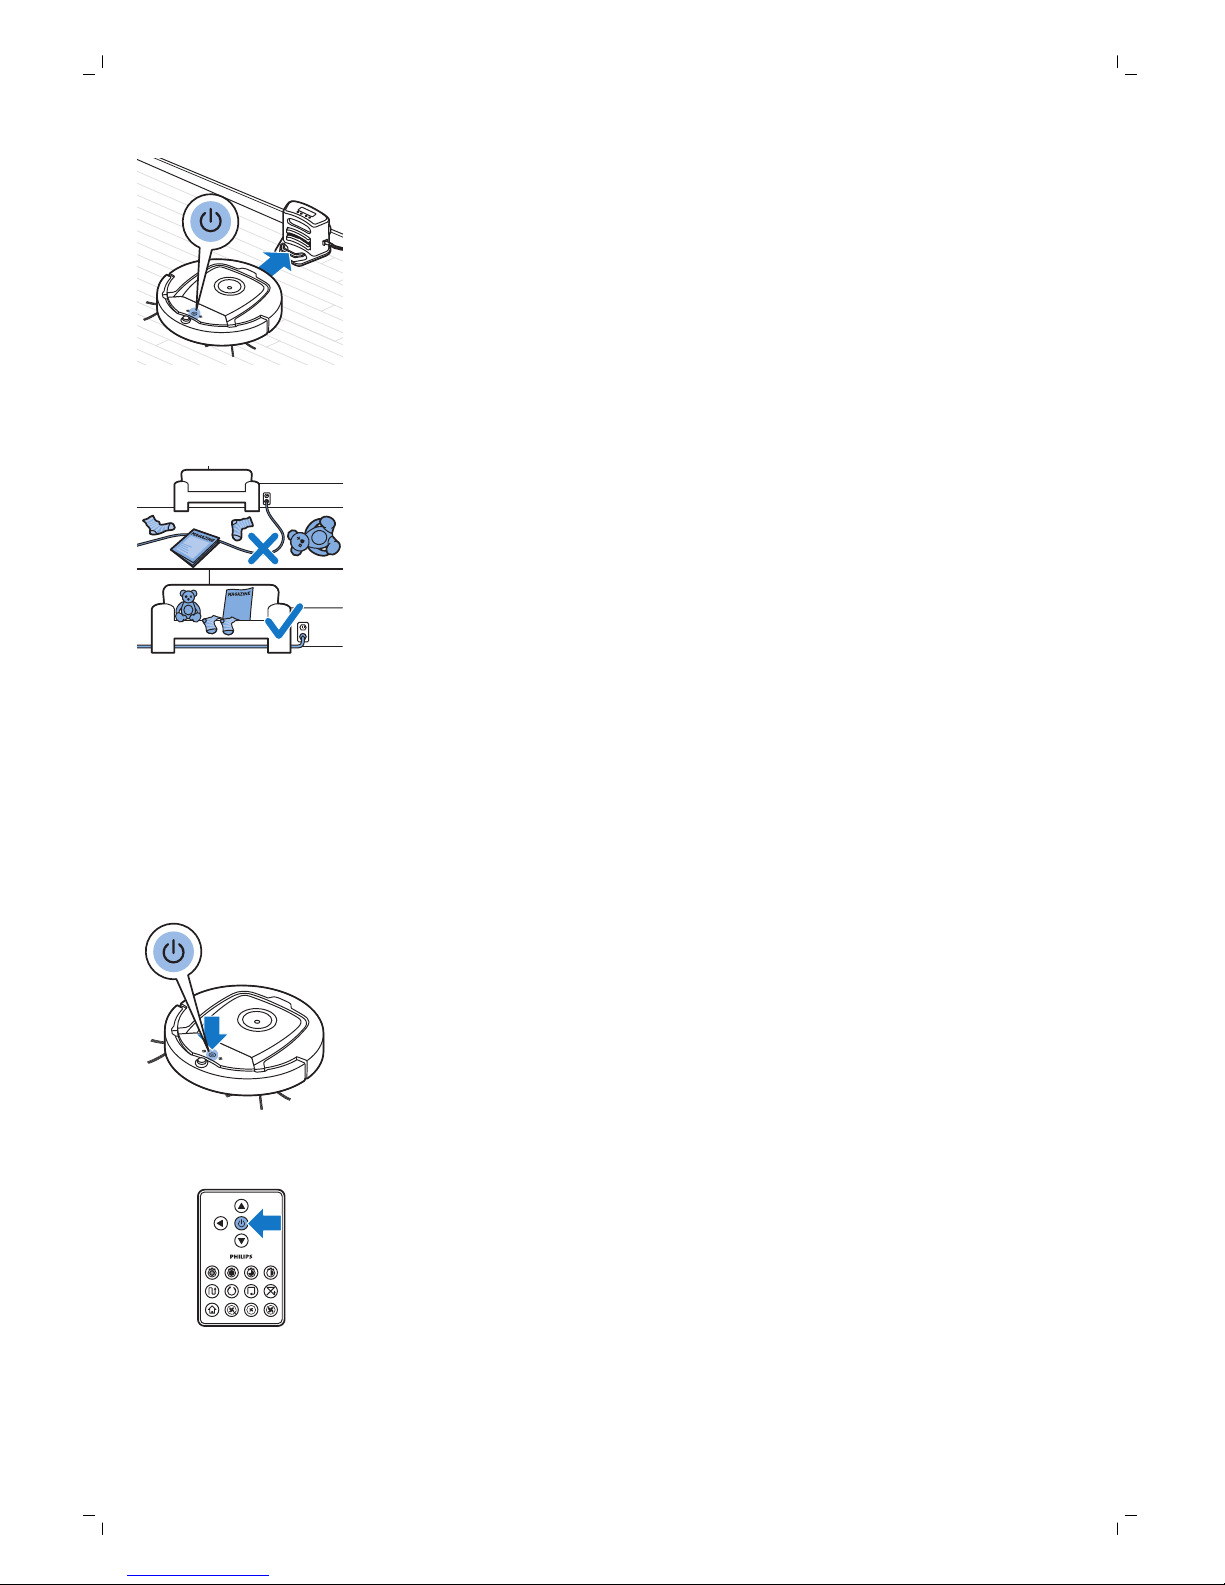
1 When the robot has finished cleaning or when only 15% of the battery
power remains, it automatically searches for the docking station to
recharge. When the robot searches for the docking station, the light in the
start/stop button turns orange.
2 When the rechargeable battery is fully charged, the start/stop button
lights up continuously.
Preparing the room for a cleaning run
Before you start the robot on its cleaning run, make sure that you remove all
loose and fragile objects from the floor. Also remove all cables, wires and
cords from the floor.
Using your robot
Starting and stopping
1 Set the power switch on the side of the robot to the 'on' position.
2 Press the start/stop button.
-
You can press the start/stop button on the robot.
-
You can also press the start/stop button on the remote control.
3 The start/stop button is continuously on and the robot starts cleaning.
12
English
Charging automatically during use
Page 13
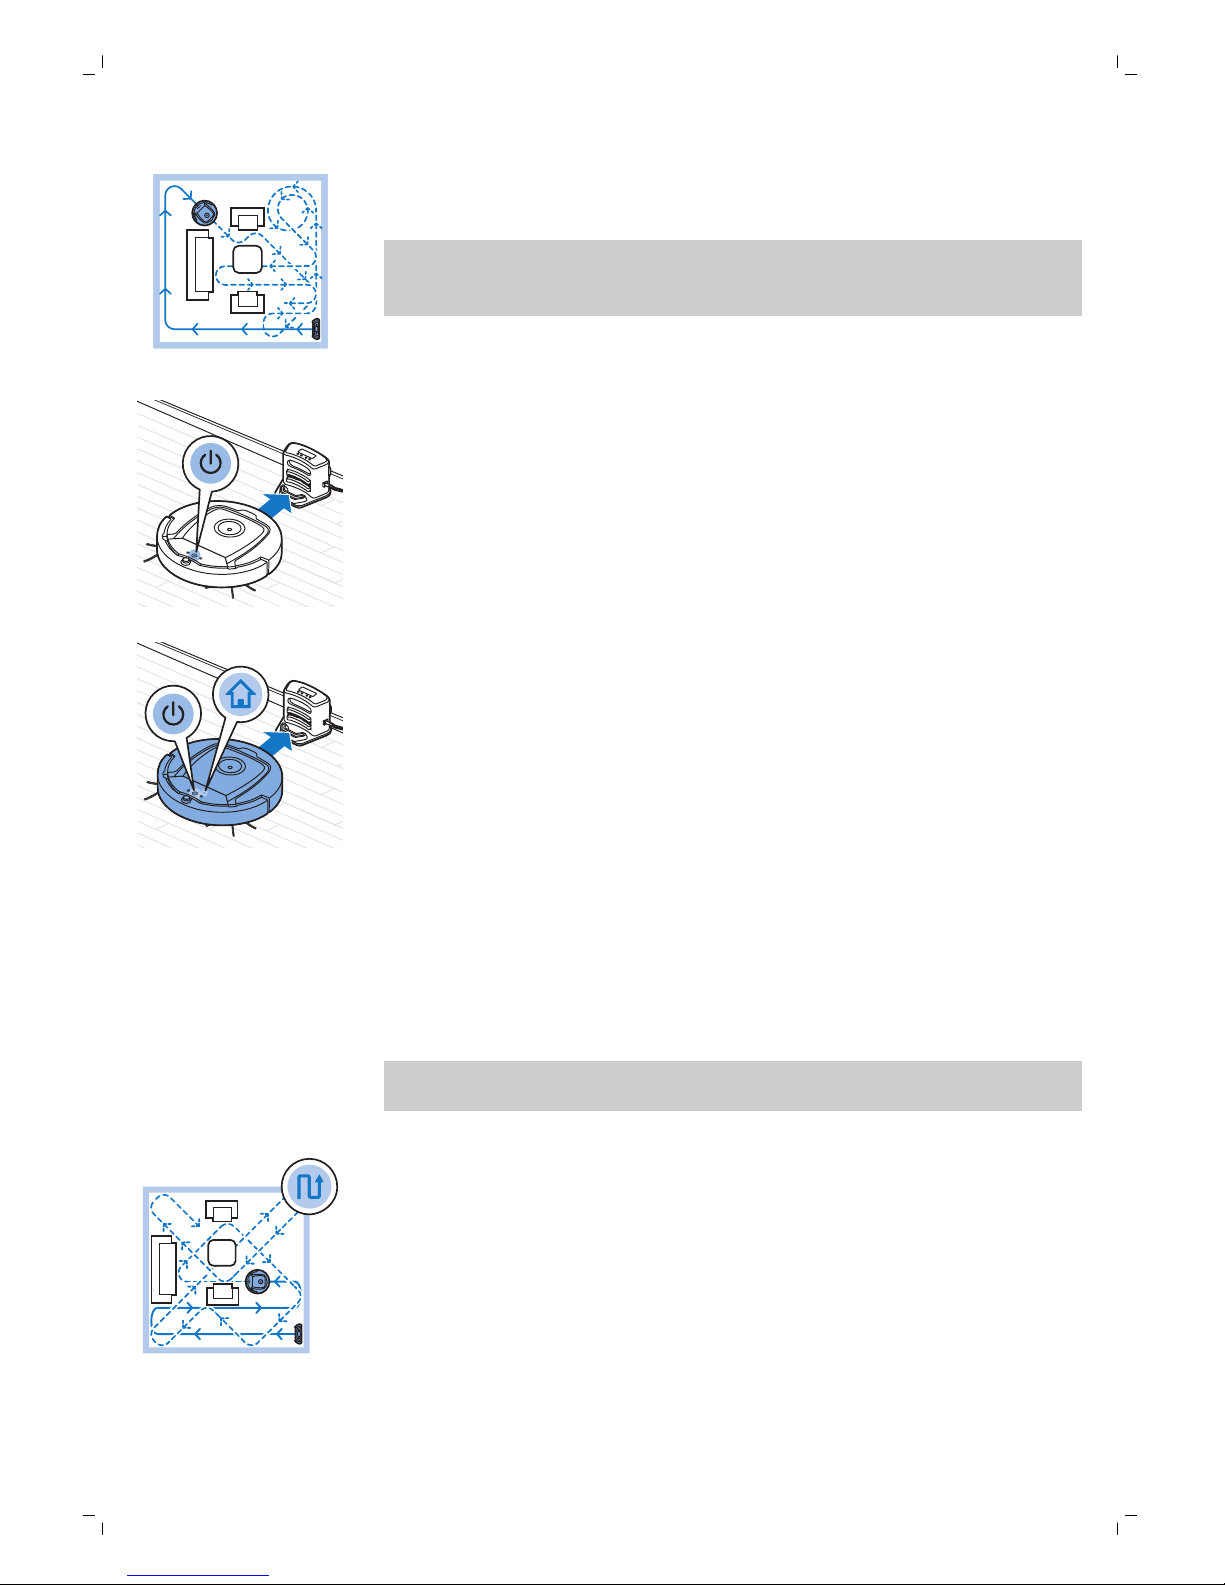
4 The robot cleans in the auto-cleaning mode until its battery runs low. In
the auto-cleaning mode, it follows repeated sequences of Z-pattern,
random, wall-following and spiral patterns.
Note: To select an individual mode, press one of the mode buttons on
the remote control. See section 'Cleaning mode selection' for more
details.
5 When the battery runs low, the start/stop button turns orange and the
robot searches for the docking station to recharge.
6 You can also press the start/stop button to interrupt or stop the cleaning
run. If you press the start/stop button again and there is still enough
energy in the rechargeable battery, the robot continues cleaning in the
auto-cleaning mode.
7 To make the robot return to the docking station before the rechargeable
battery runs low, press the docking button on the remote control. The
docking icon on the display of the robot comes on and the robot returns
to the docking station.
Cleaning mode selection
Next to the auto-cleaning mode, this robot has four individual cleaning
modes that can each be activated by pressing the appropriate button on the
remote control.
Note: The manually selected modes are only active for a couple of minutes.
After that, the robot switches back to auto-cleaning mode.
Z-pattern mode
In Z-pattern mode, the robot cleans by making Z-shaped loops through the
room to clean large areas.
13
English
Page 14
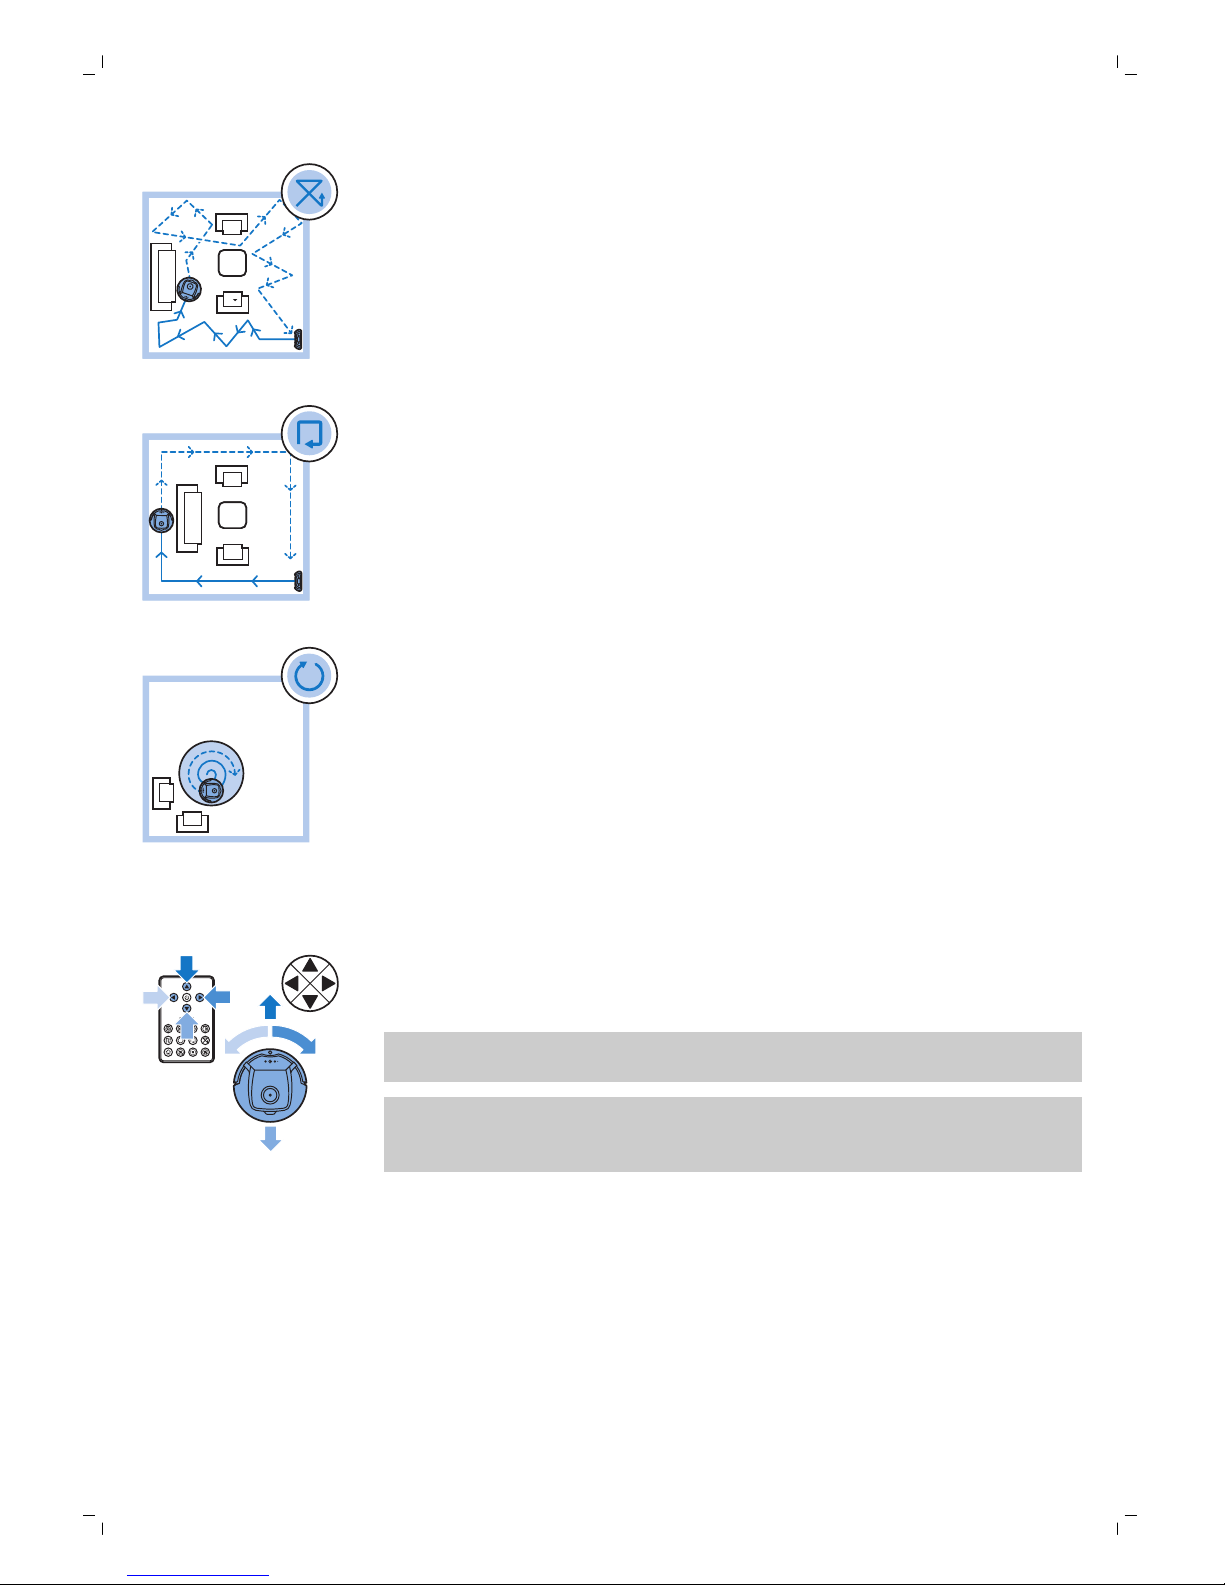
In this mode, the robot cleans the room in a mixed pattern of straight and
crisscross movements.
In this mode, the robot follows the walls of the room to give the area
alongside the
walls an extra clean.
In this mode, the robot moves in a spiral pattern to clean a small area. If the
dust detection sensor detects dirt, the robot automatically switches the fan
to turbo speed.
Manual driving
1 Use the arrow buttons above and below and to the left and right of the
start/stop button on the remote control to navigate the robot through the
room.
Note: Be careful when you drive the robot manually close to height
differences and staircases.
Note: The vacuuming function and the side brushes only work when the
robot is driven forward. The left, right or back buttons are only for
maneuvering the robot.
14
English
Spiral mode
Wall-following mode
Random mode
Page 15
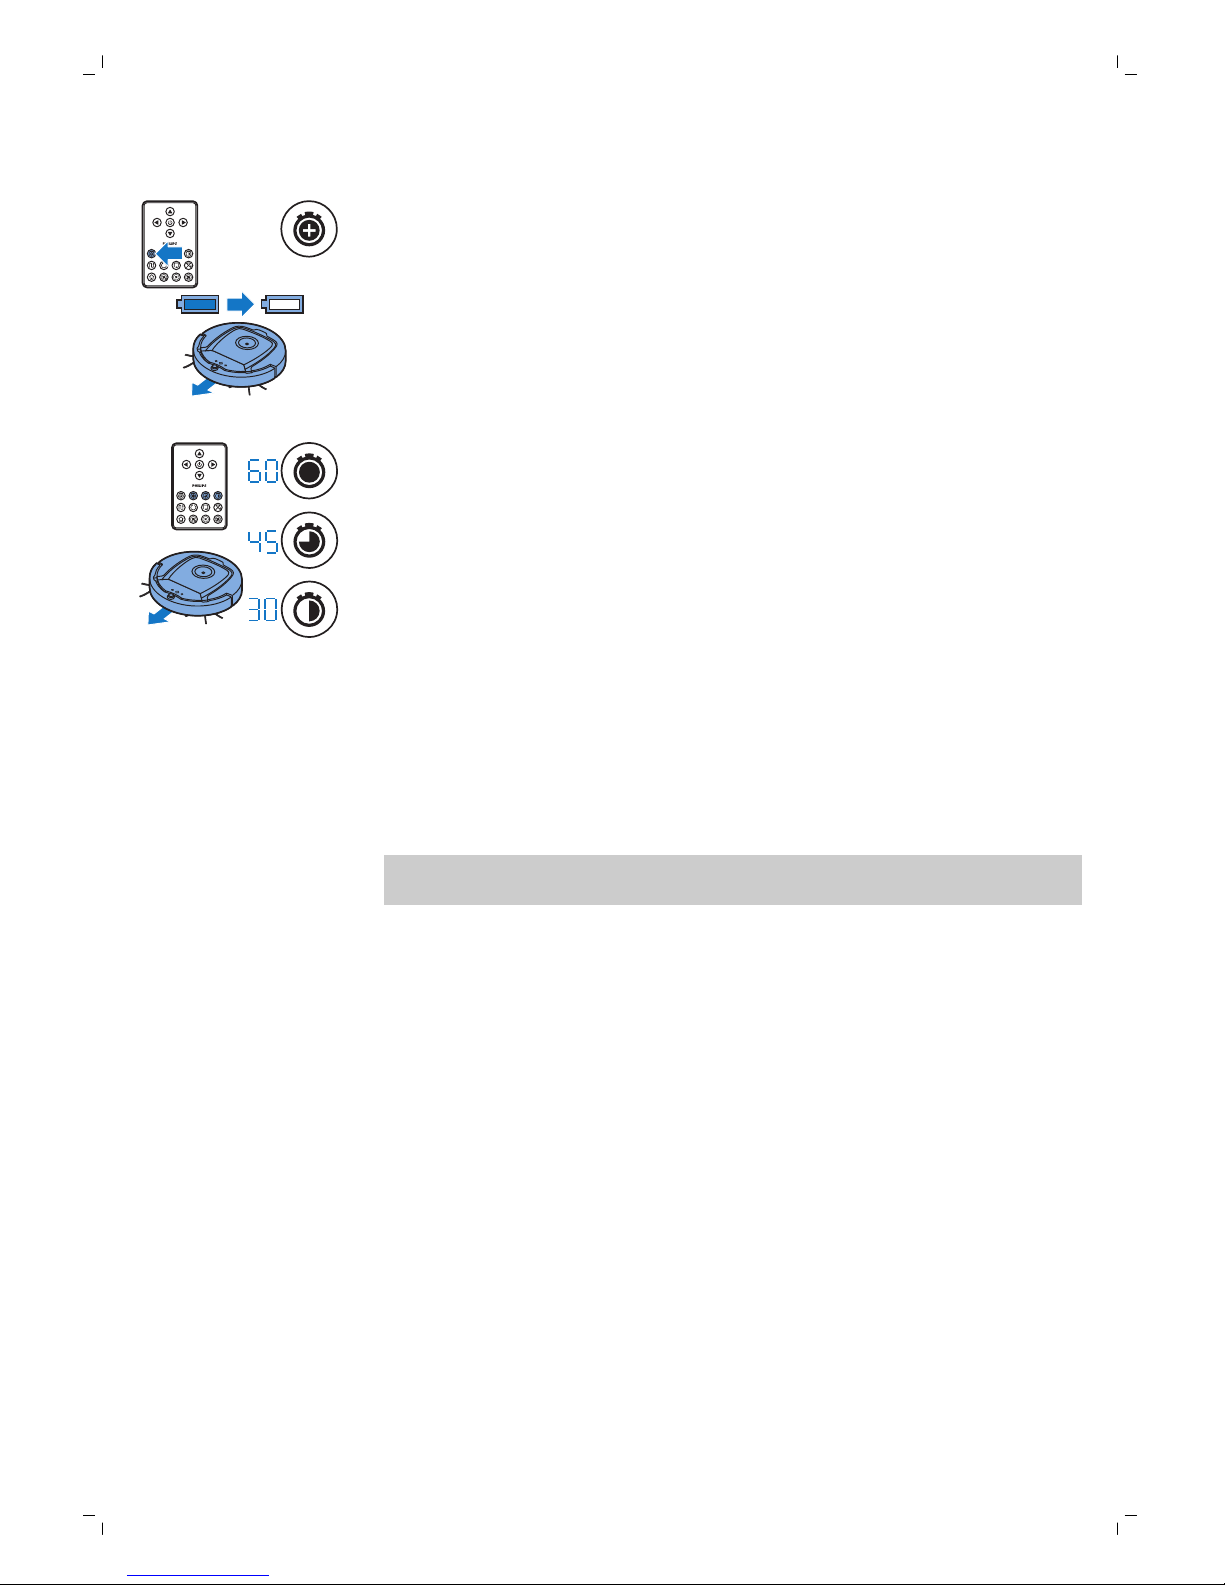
Using the cleaning time buttons
-
By default, the robot cleans in auto cleaning mode until its rechargeable
battery runs low. The robot will then automatically return to its docking
station. If you selected one of the other cleaning times (see below), you
can switch back to the default mode by pressing the maximum cleaning
time button on the remote control.
-
The other cleaning time buttons on the remote control allow you to let
the robot operate for 60, 45 and 30 minutes respectively. When the
cleaning time is finished, the robot returns to its docking station. The
docking icon will light up on the display.
-
If you do not want the robot to return to the docking station at the end of
the cleaning time, press the cleaning time button twice. The docking icon
disappears from the display. When the cleaning time is finished, the robot
stops.
Operating the docking station
Setting clock time and day
If you want to use cleaning programs, you have to set the clock time and the
day of the week on the display of the docking station first.
Note: For the pictures that belong to the steps below, see the pages at the
back of this manual.
1 Press the set button. The set mode indicator and the clock time indicator
start flashing.
2 Press the select button once. The hour indication starts flashing.
3 Use the + and - buttons on the docking station to set the hour.The set
hour appears on the display.
4 Press the select button to confirm the hour set. The minutes indication
starts flashing.
5 Use the + and - buttons on the docking station to set the minutes. The set
minutes appear on the display.
6 Press the select button to confirm the minutes set. The indication 'Su’ for
Sunday starts flashing.
7 Use the + and - buttons on the docking station to set the current day of
the week.
8 Press the select button to confirm the day of the week.
9 Press the set button to confirm the clock time and day of the week
setting. Both the set mode indicator and the clock time indicator stop
flashing and turn solid.
15
English
Page 16
Note: For the pictures that belong to the steps below, see the pages at the
back of this manual.
The programming options available are:
Program Indications on display
Cleaning every day All day indications are on
Cleaning on weekdays Mo to Fri indications are on
Cleaning on 2 consecutive days Indications of 2 days are on, e.g. Fri and Sa
Cleaning 1 day a week Indication of selected day is on
1 Press the set button. The set mode indicator and the cleaning program
indicator start flashing.
2 Press the select button once. The hour indication starts flashing.
3 Use the + and - buttons on the docking station to set the hour. The set
hour appears on the display.
4 Press the select button to confirm the hour set. The minutes indication
starts flashing.
5 Use the + and - buttons on the docking station to set the minutes. The set
minutes appear on the display.
6 Press the select button to confirm the minutes set. The indication ‘Su’ for
Sunday starts flashing.
7 Use the + and - buttons on the docking station to toggle between
cleaning programs (see the table above for the programming options
available).
8 Press the select button to confirm the program selected.
9 Press the set button to confirm the programming. Both the set mode
indicator and the cleaning program indicator stop flashing and turn solid.
10 When you have set a cleaning program, the display shows the cleaning
program indicator and the day or days selected. If you leave the robot on
standby and its rechargeable battery is fully charged, it will start cleaning
at the programmed time on the programmed day or days.
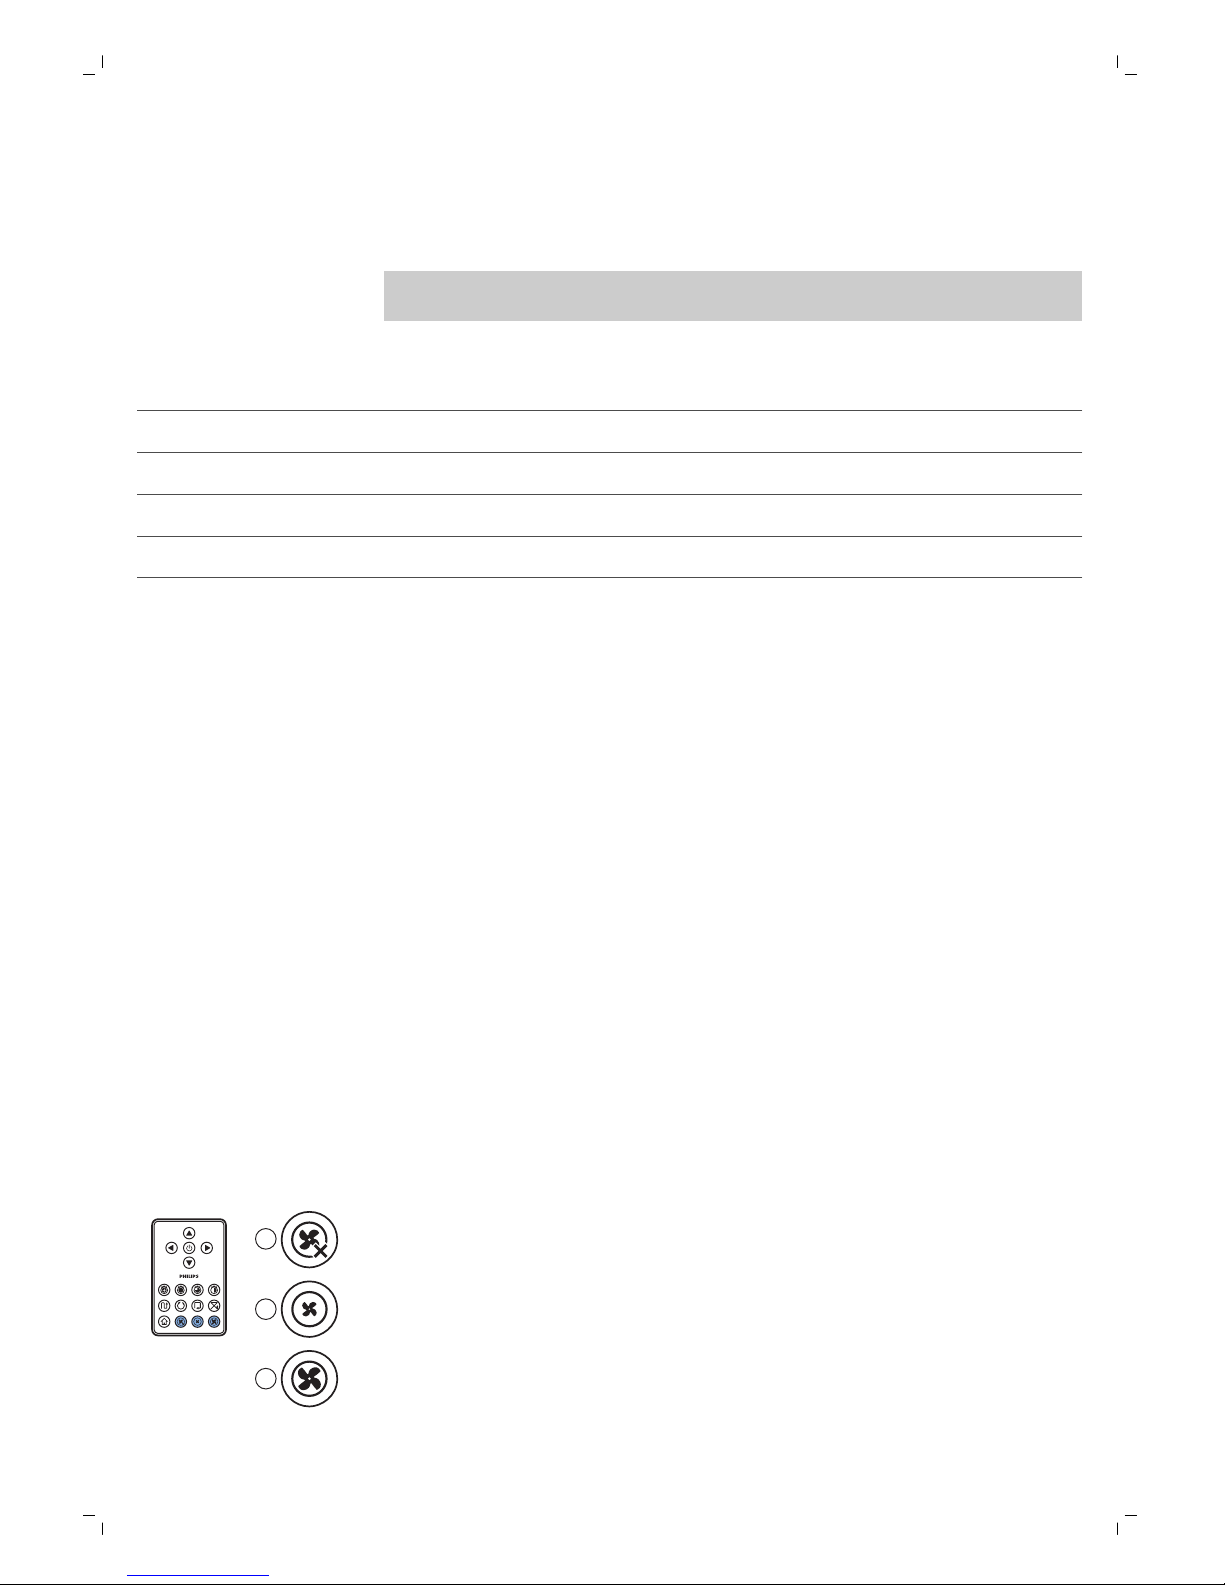
Fan speed buttons
You can use the fan speed buttons to increase the fan speed to turbo or to
switch off the fan. The default setting is normal fan speed.
1
2
3
1 Press this button to switch off the fan
2 Press this button to switch on the fan at normal speed.
3 The turbo fan button increases the fan speed.
16
English
Programming cleaning times
If you have set the time and the day of the week on the display of the
docking station, you can program cleaning times for your robot.
Page 17
Using the dry wipe attachment
The dry wipe attachment is a feature that allows you to clean hard floors
with dry wipes.
Note: If you use the dry wipe attachment, the robot may have trouble
crossing thresholds or climbing onto rugs.
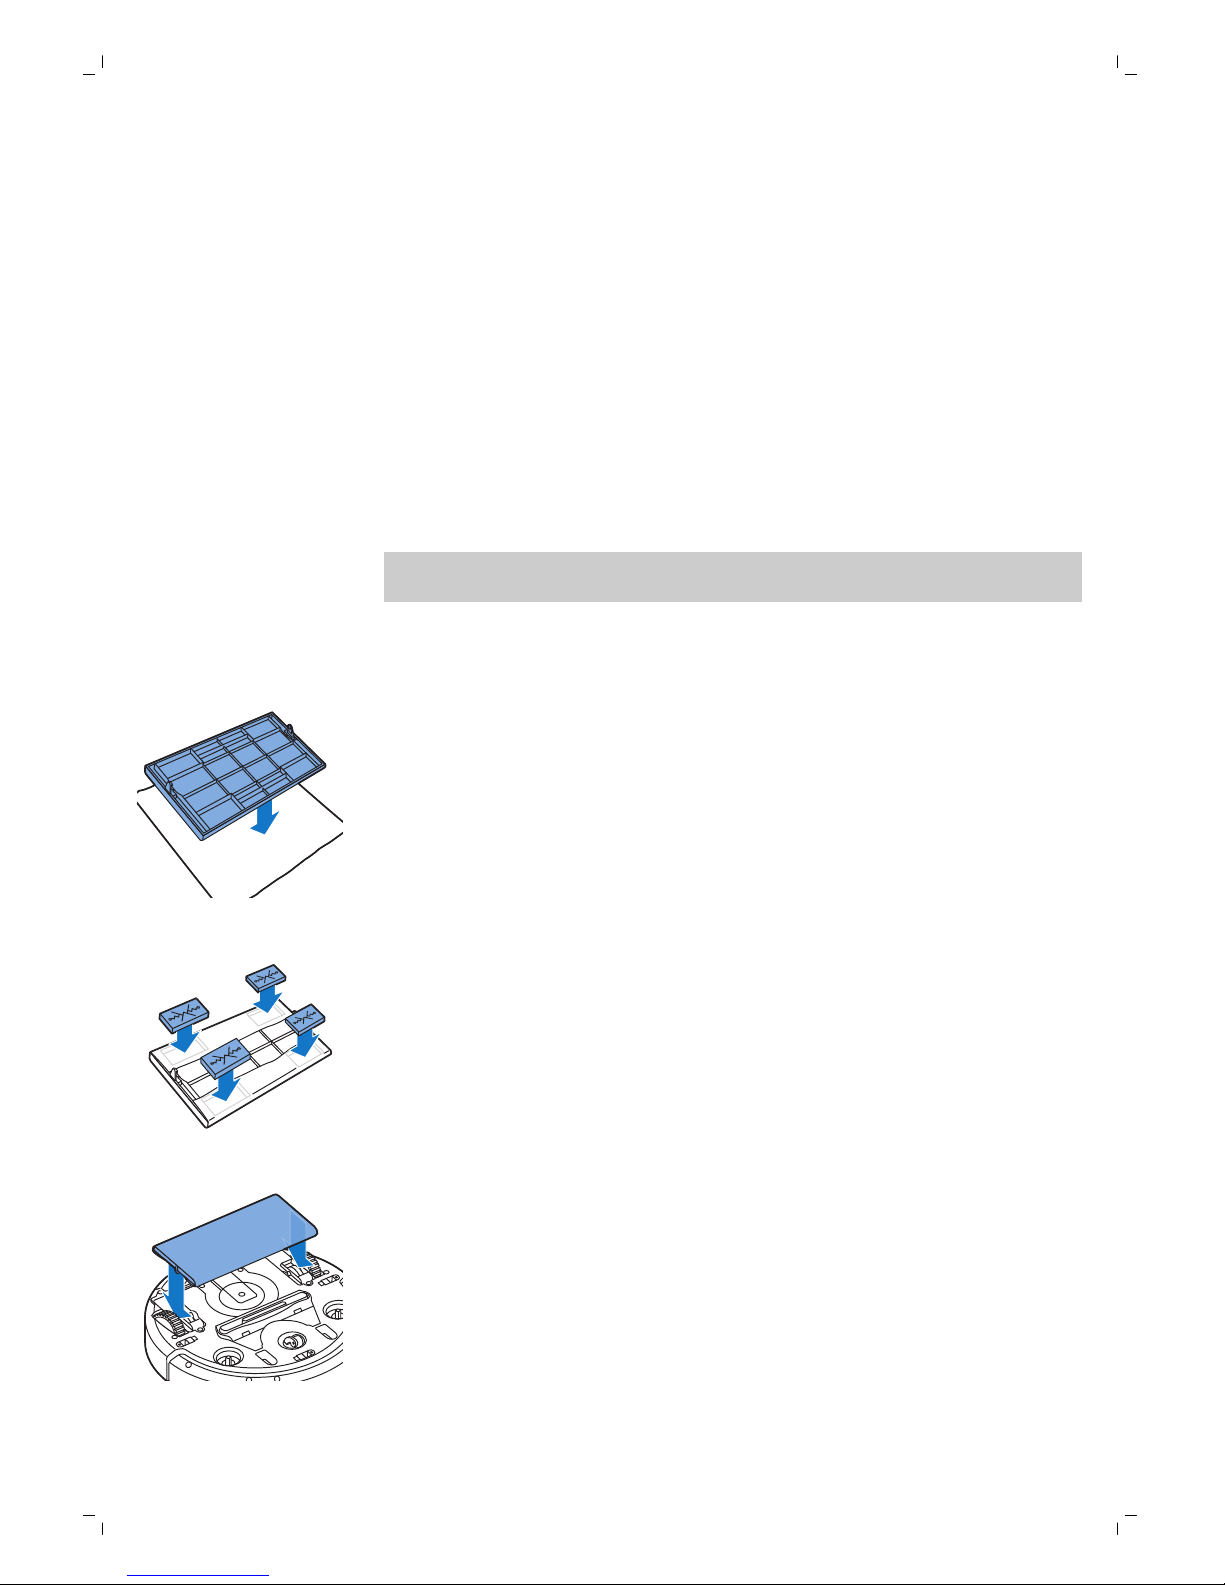
Preparing the dry wipe attachment for use
1 Turn the robot upside down and place it on the floor or on a table.
2 Place the dry wipe on a table and place the dry wipe attachment on the
wipe with its fixation lugs pointing towards you.
3 Fold both ends of the dry wipe around the dry wipe attachment and
fasten the dry wipe onto the attachment by pushing the fixation blocks
into the recesses.
4 Insert the fixation lug of the dry wipe attachment into the opening just
behind the wheel on one side of the robot and push until you hear it lock
into place with a click. Then repeat these actions on the other side.
5 Turn the robot and place it on the floor on its wheels with the dry wipe
attachment touching the floor.
17
English
Clap response
The clap response is enabled when the robot enters sleep mode in the
following situations:
-
when it stops cleaning due to an error
-
when it cannot find its docking station in 20 minutes
If you do not see the robot, you can locate it by clapping your hands once.
The robot will respond by beeping and by lighting up all icons on its display.
Page 18
1
2
3 Push one end of the dry wipe attachment towards the wheel on the
other side of the robot to release it. Then pull the attachment off the
robot.
Using the invisible wall (FC8822)
Placing the batteries in the invisible wall
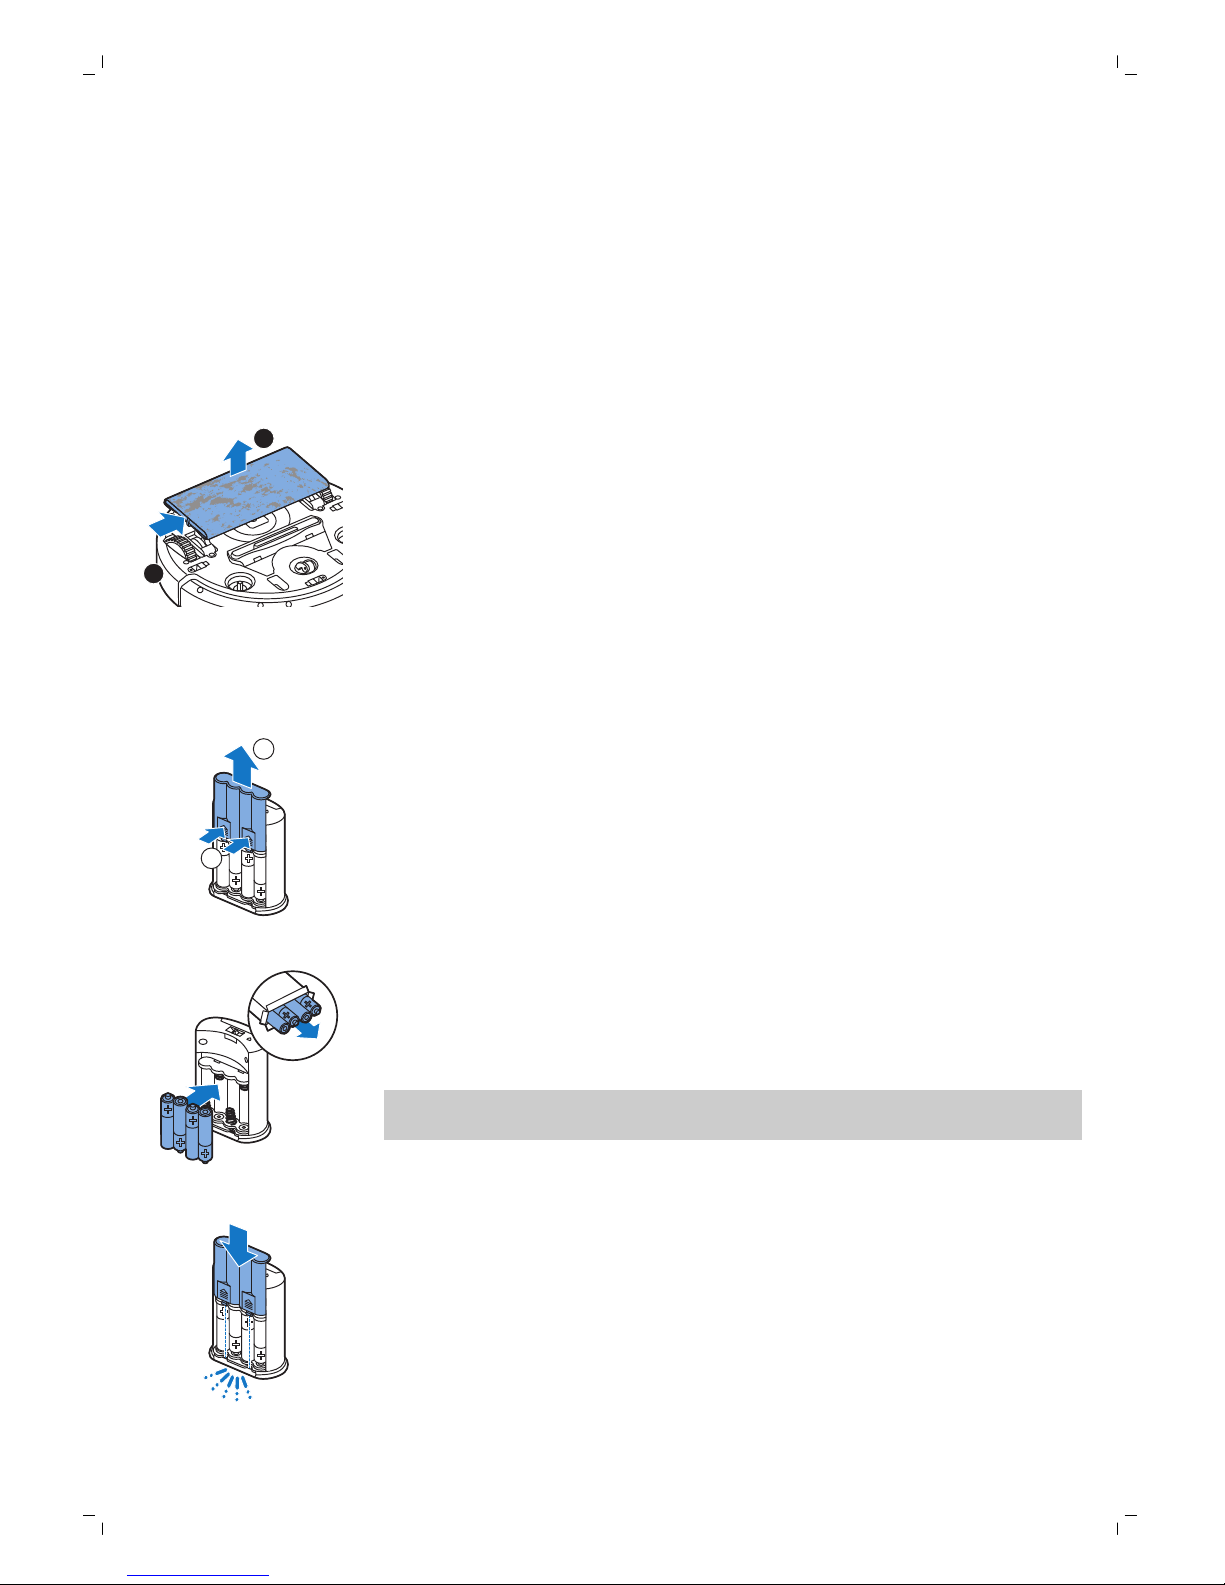
The invisible wall operates on four AA batteries.
1
2
1 Push the two release tabs at the bottom of the back cover (1) and slide
the back cover upwards and off the invisible wall (2).
2 Take four new AA batteries from the pack and insert them into the
battery compartment of the invisible wall.
Note: Make sure the + and - poles of the batteries point in the right
direction.
3 Slide the back cover onto the invisible wall again.
18
English
Removing the dry wipe attachment
1 Remove the dry wipe attachment as soon as you have finished wiping
the floor.
2 Turn the robot upside down and place it on the floor or on a table.
Using the robot with the dry wipe attachment
When
the dry wipe attachment is attached, you can use the robot in any
mode and on all hard floors. Do not use the dry wipe attachment on carpet
or rugs.
Page 19
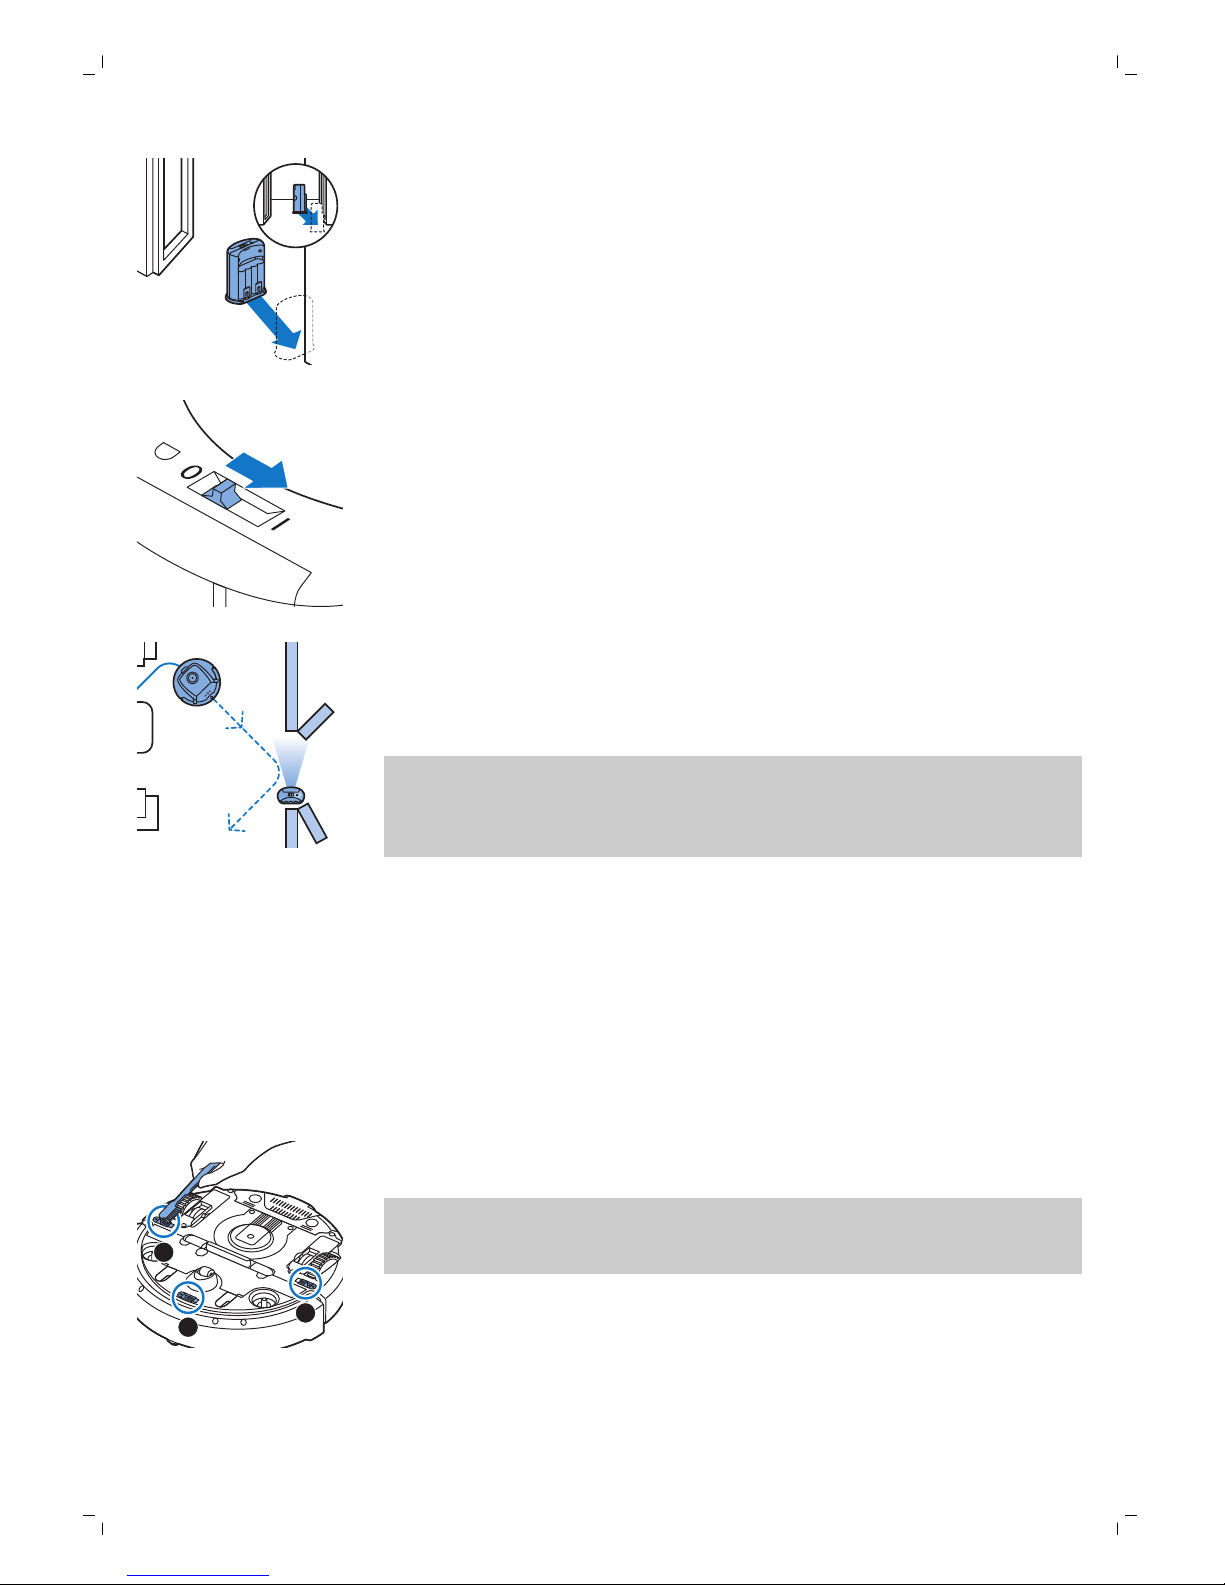
1 Place the unit at a point you do not want the robot to cross, e.g at an
open door to a room that is off-limits to the robot.
2 Switch on the invisible wall with the on/off slide on top of the unit.
3 Start the robot.
4 When the robot comes too close to the invisible wall, the light on the
invisible wall starts flashing and the invisible wall emits a beam of
infrared light. This beam of infrared light makes the robot change its
course and move away from the invisible wall.
Note: If you use the invisible wall, regularly check if the batteries still contain
sufficient power. You can check this by switching the virtual wall off and on
again. If there is enough energy in the batteries, the LED on the invisible wall
will light up briefly.
Cleaning and maintenance
Cleaning the robot
To maintain good cleaning performance, you have to clean the drop-off
sensors, the wheels, the side brushes and the suction opening from time to
time.
1 Place the robot upside down on a flat surface
3
1
2
2 Use a brush with soft bristles (e.g. a toothbrush) to remove dust or fluff
from the drop-off sensors.
Note: It is important that you clean the drop-off sensors regularly. If the
drop-off sensors are dirty, the robot may fail to detect height differences
or staircases.
19
English
Positioning the invisible wall to stop the robot
You can use the invisible wall to prevent the robot from entering a room or
area that you want to keep it out of.
Page 20
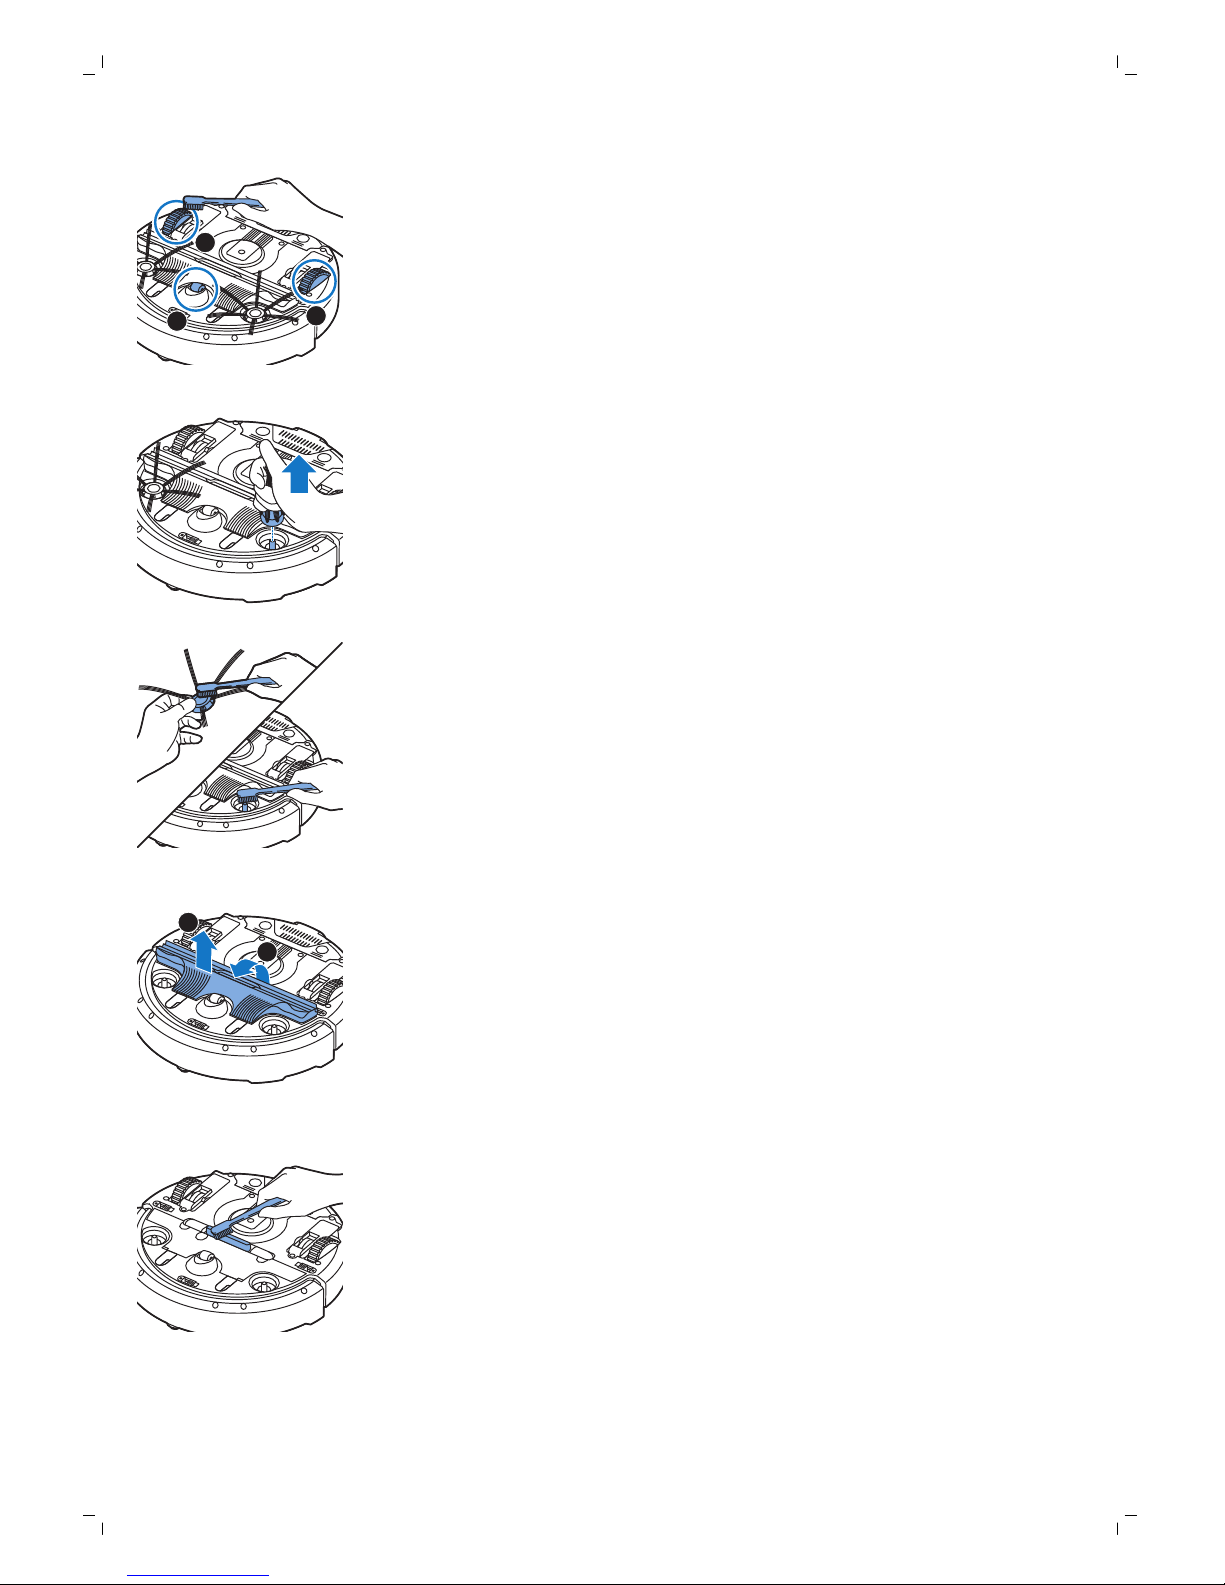
1
2
3
3 Use a brush with soft bristles (e.g. a toothbrush) to remove dust or fluff
from the front wheel and side wheels.
4 To clean the side brushes, grab them by the bristles and pull them off
their shafts.
5 Remove fluff, hairs and threads from the shaft and from the side brush
with a soft brush (e.g. a toothbrush) or a cloth.
6 Check the side brushes and the bottom of the robot for any sharp objects
that could damage your floor.
1
2
7 Undo the snap connections of the TriActive XL nozzle by inserting by
inserting your fingers at the places marked with arrows and pull the
TriActive nozzle off the robot.
8 Clean the suction opening with a soft brush (e.g. a toothbrush).
20
English
Page 21
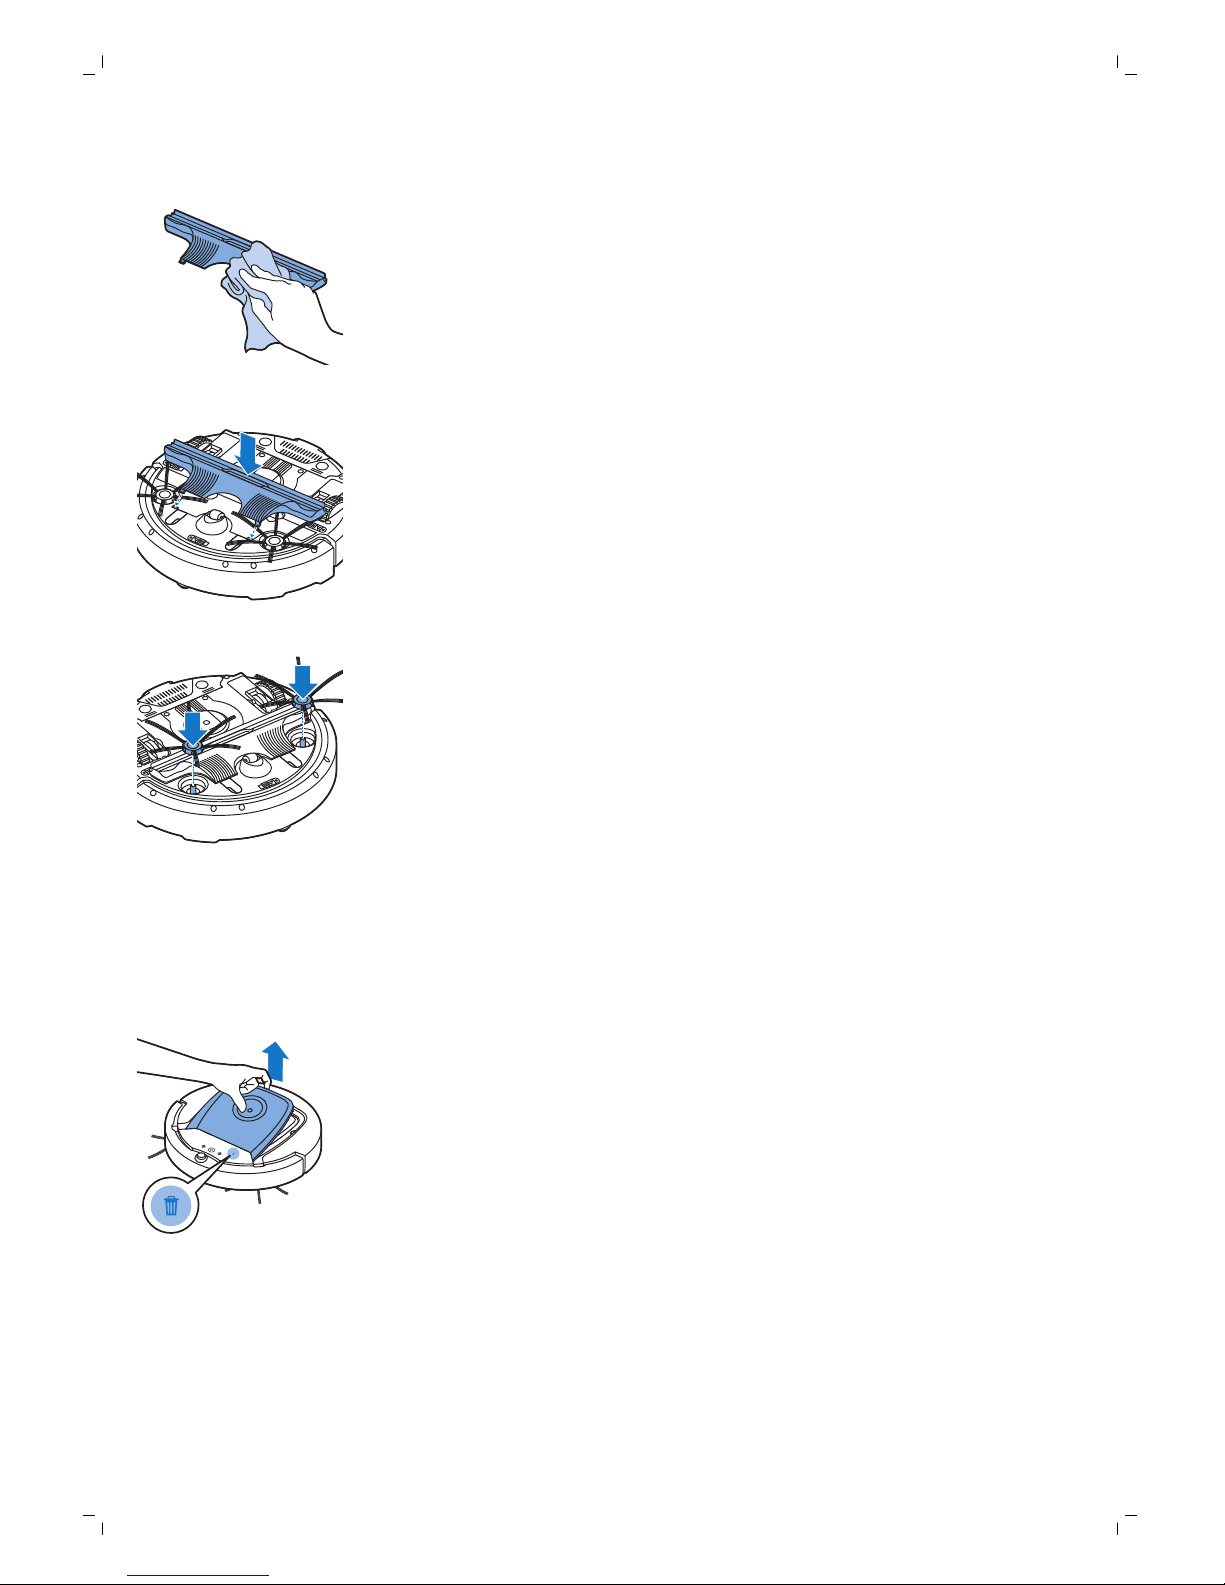
9 Remove all visible dirt from the TriActive nozzle.
10 Insert the snap hooks of the TriActive nozzle into the holes in the bottom
of the robot. Push the TriActive nozzle back into position. Check if the
nozzle can move a few millimeters up and down freely.
11 Push the side brushes onto the shafts on the bottom of the robot again.
Emptying and cleaning the dust container
Empty and clean the dust container when the dust container full indicator
lights up continuously.
1 Make sure that the power switch is in 'off' position.
2 Remove the cover.
21
English
Page 22
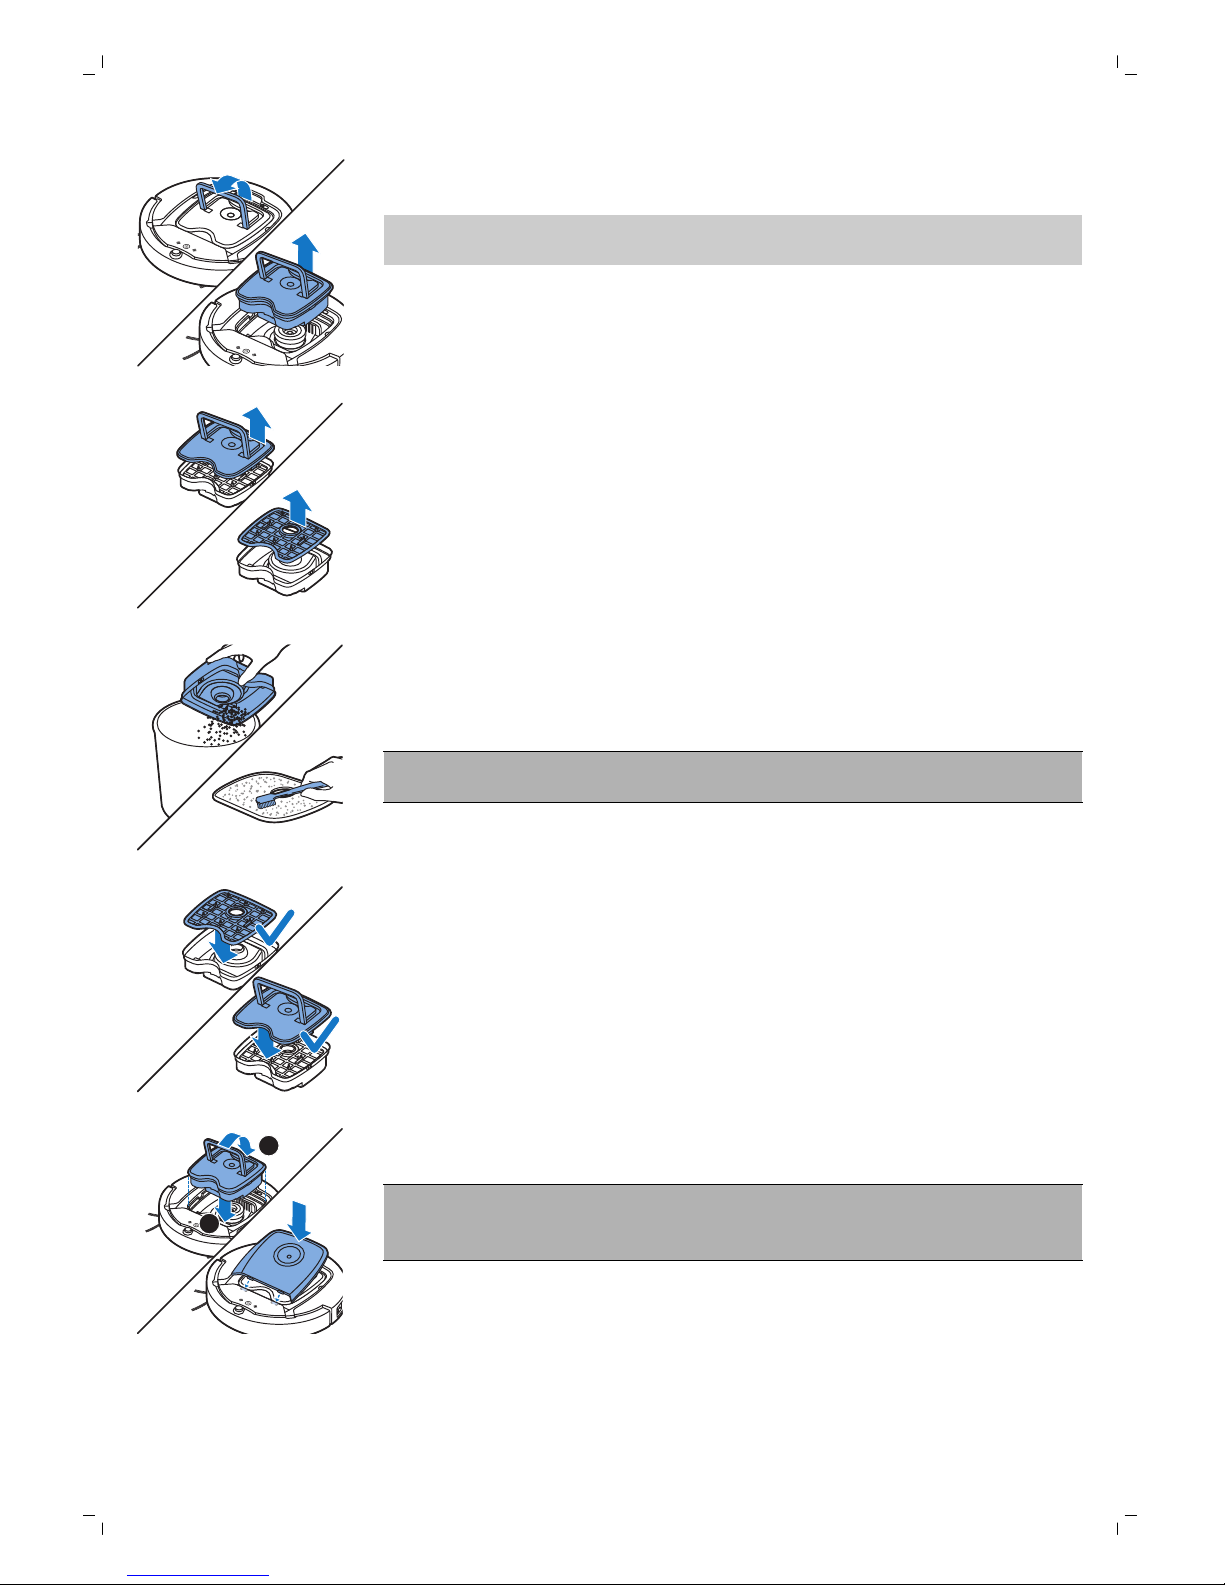
3 Pull up the handle of the dust container lid and lift the dust container out
of the dust container compartment.
Note: When you remove or reinsert the dust container, take care not to
damage the blades of the motor fan.
4 Carefully lift the lid off the dust container (1) and take out the filter (2).
5 Shake the dust container over a dustbin to empty it. Clean the filter and
the inside of the dust container with a cloth or a toothbrush with soft
bristles. Also clean the suction opening in the bottom of the dust
container.
Caution: Do not clean the dust container and the filter with water or in
the dishwasher.
6 Put the filter back into the dust container (1). Then place the lid on the
dust container(2).
1
2
7 Put the dust container back into the dust container compartment and put
the top cover back on the robot.
Caution: Always make sure the filter is present inside the dust
container. If you use the robot without the filter inside the dust
container, the motor will be damaged.
22
English
Page 23
Ordering accessories
To buy accessories or spare parts, visit www.shop.philips.com/service or go
to your Philips dealer. You can also contact the Philips Consumer Care
Center in your country (see the international warranty leaflet for contact
details).
Replacement
Replacing the filter
Replace the filter if it is very dirty or damaged. You can order a new filter kit
under type number FC8066. See 'Emptying and cleaning the dust container'
in chapter 'Cleaning and maintenance' for instructions on how to remove
the filter from the dust container and how to place it in the dust container.
Replacing the side brushes
Replace the side brushes after some time to ensure proper cleaning results.
Always replace the side brushes when you notice signs of wear or damage.
We also recommend that you replace both side brushes at the same time.
You can order spare side brushes as part of replacement kit FC8068. This kit
also contains two filters and three dry wipes.
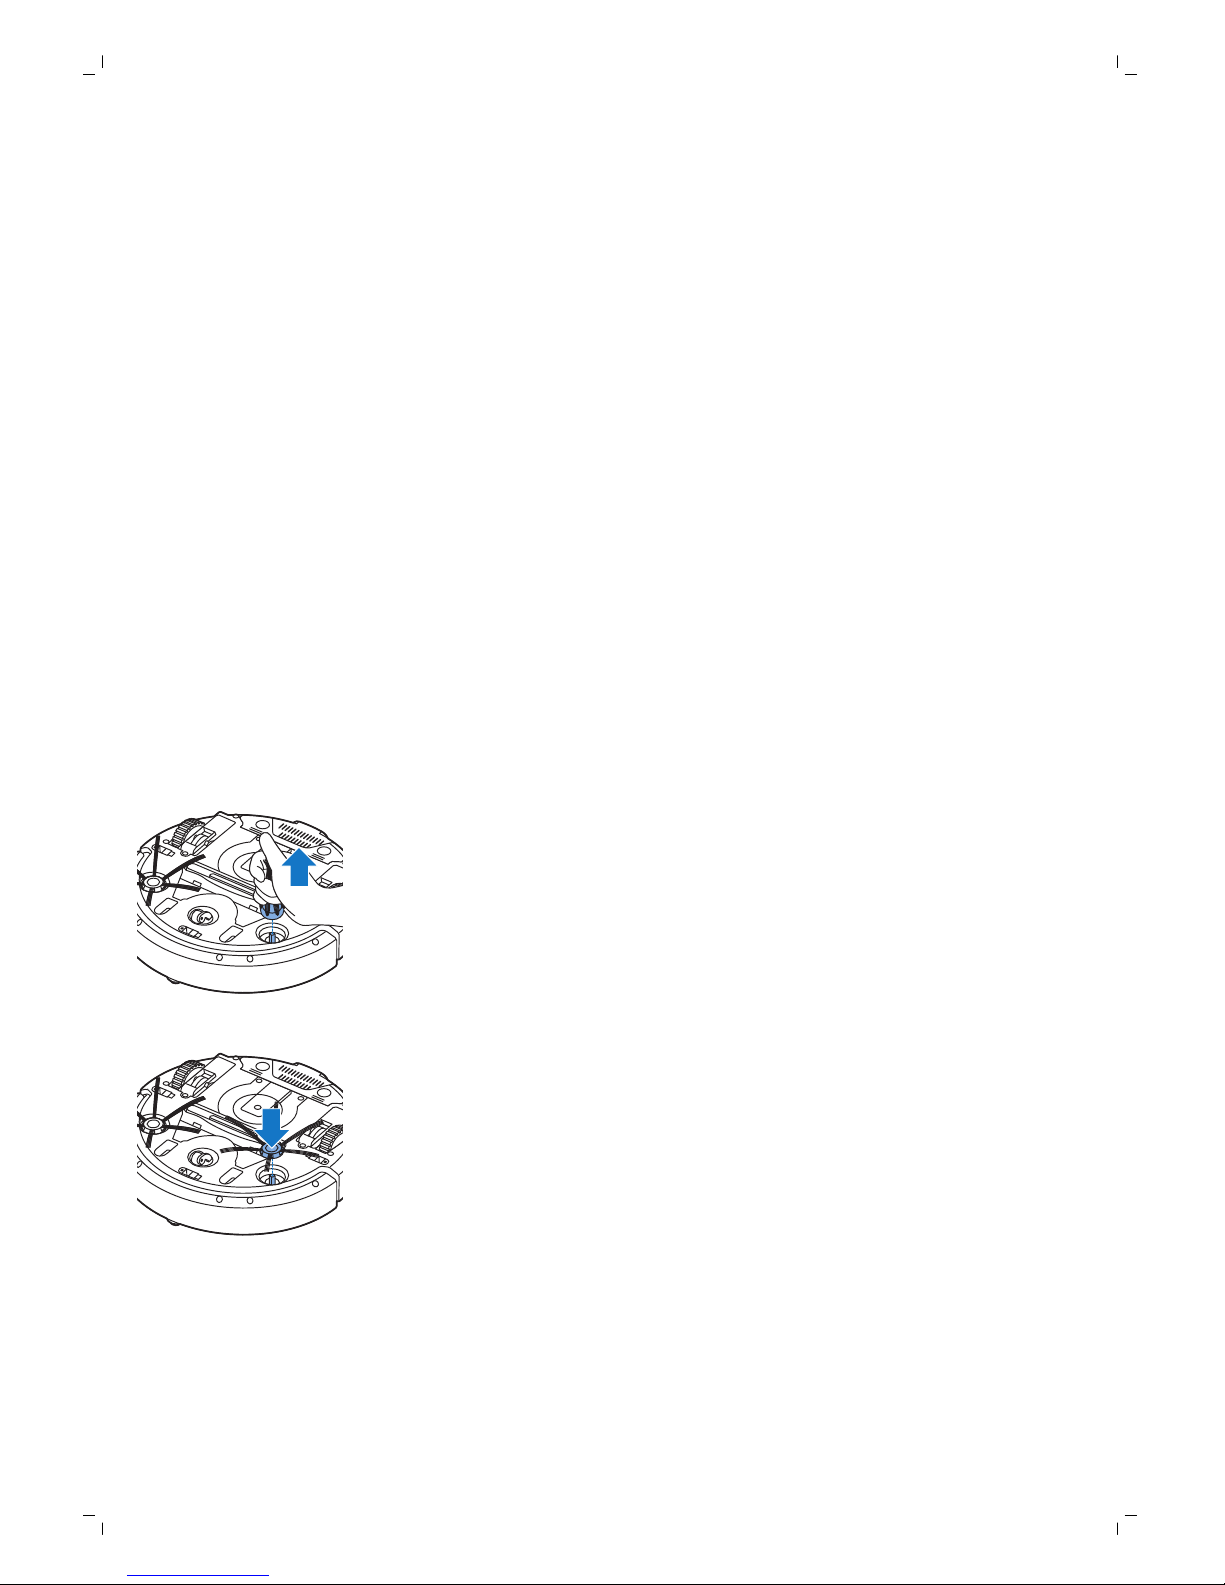
1 Make sure that the power switch is in 'off' position.
2 To replace the side brushes, grab the old side brushes by the bristles and
pull them off their shafts.
3 Push the new side brushes onto the shafts.
Replacing dry wipes
You can order new dry wipes. They are part of replacement kit FC8068. This
replacement kit also contains two side brushes and two filters.
23
English
Page 24
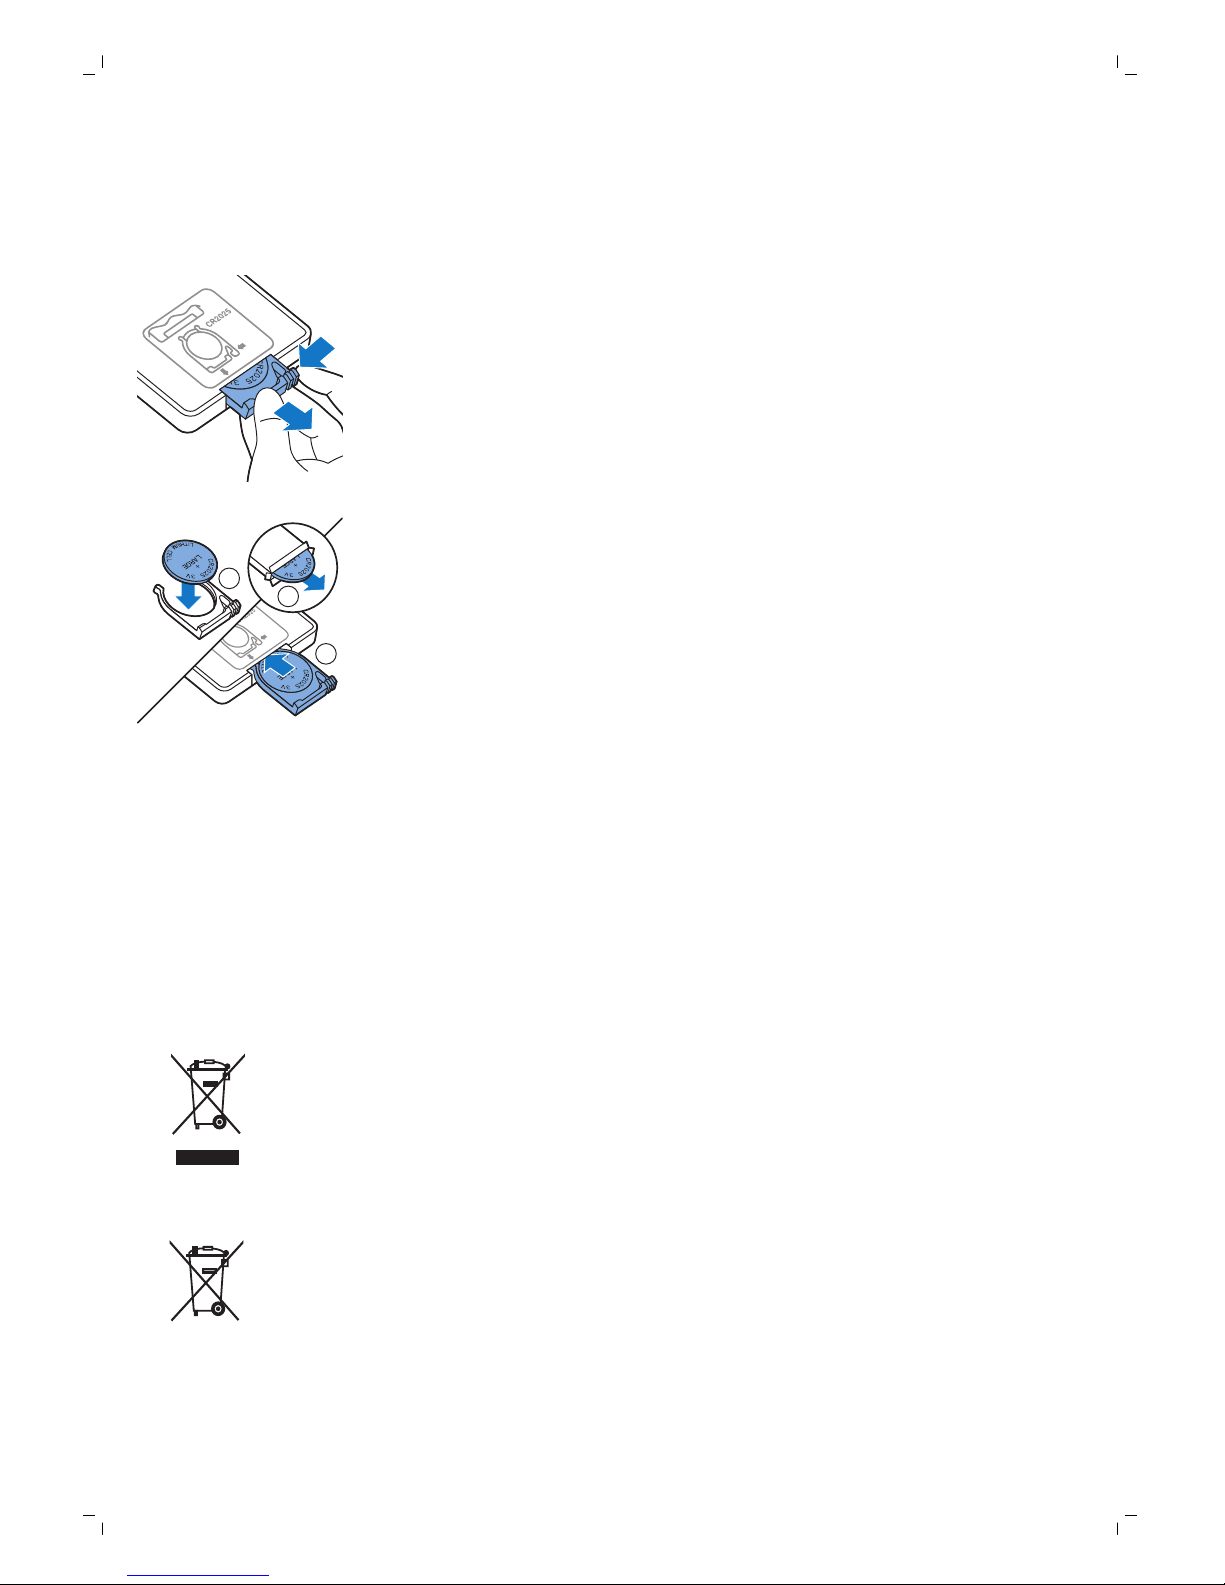
Replacing the battery of the remote control
The remote control works on a CR2025 coin-shaped battery. Replace the
battery when the robot no longer responds when you press the buttons on
the remote control.
1 Hold the remote control upside down. Push the release button on the
battery holder and at the same time slide the battery holder out of the
remote control.
2
3
1
2 Remove the empty battery from the battery holder and place a new
battery in the battery holder. Then slide the battery holder back into the
remote control.
Replacing the rechargeable battery
The rechargeable battery of the robot may only be replaced by qualified
service engineers. Take the robot to an authorized Philips service center to
have the battery replaced when you can no longer recharge it or when it
runs out of power quickly. You can find the contact details of the Philips
Consumer Care Center in your country in the international warranty leaflet.
Recycling
-
This symbol means that this product shall not be disposed of with normal
household waste (2012/19/EU).
-
This symbol means that this product contains a built-in rechargeable
battery which shall not be disposed of with normal household waste
(2006/66/EC). We strongly advise you to take your product to an official
collection point or a Philips service center to have a professional remove
the rechargeable battery.
-
Follow your country’s rules for the separate collection of electrical and
electronic products and rechargeable batteries. Correct disposal helps
prevent negative consequences for the environment and human health.
24
English
Page 25
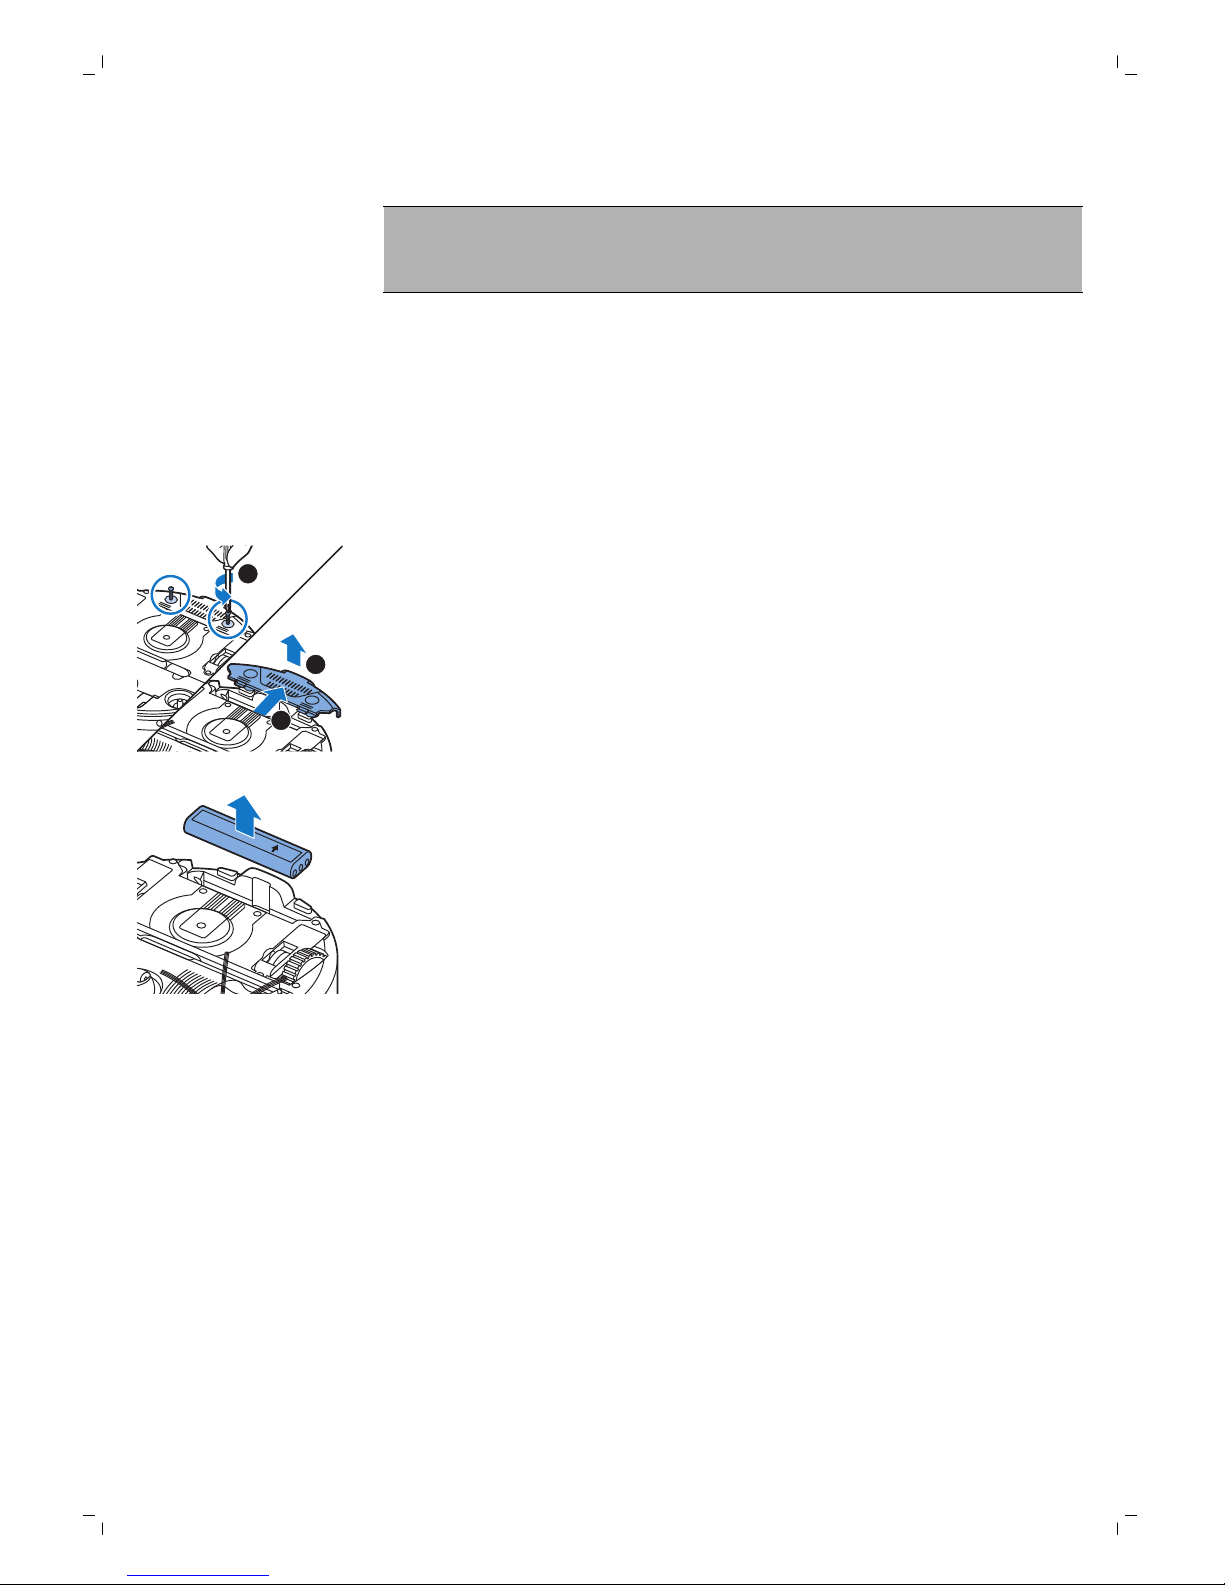
Removing the rechargeable battery
Warning: Only remove the rechargeable battery when you discard
the appliance. Make sure the battery is completely empty when
you remove it.
To remove the rechargeable battery, follow the instructions below. You can
also take the robot to a Philips service center to have the rechargeable
battery removed. Contact the Philips Consumer Care Center in your country
for the address of a service center near you.
1 Start the robot from a place somewhere in the room and not from the
docking station.
2 Let the robot run until the rechargeable battery is empty to make sure
that the rechargeable battery is completely discharged before you
remove it and dispose of it.
1
3
2
3 Undo the screws of the battery compartment lid and remove the lid.
this side up
4 Lift out the rechargeable battery and disconnect it.
5 Take the robot and the rechargeable battery to a collection point for
electrical and electronic waste.
Troubleshooting
This chapter summarizes the most common problems you could encounter
with the appliance. If you are unable to solve the problem with the
information below, visit www.philips.com/support for a list of frequently
asked questions or contact the Consumer Care Center in your country.
25
English
Page 26

Troubleshooting
Problem
Possible cause Solution
The rechargeable battery is
empty.
Charge the rechargeable battery (see
chapter 'Preparing for use').
The small plug is still inserted
in the socket on the robot.
The robot does not work on mains power.
It only works on its rechargeable battery.
Therefore, always disconnect the adapter
from the robot and the mains before use.
The robot does not start
cleaning when I press the
start/stop button.
The power switch is not set to
'on' (I) position.
Press the power switch. Press the
start/stop button on the robot or on the
remote control to start cleaning.
One or both wheels are stuck. Set the power switch to 'off'. Remove the
fluff, hair, thread or wire that is caught
around the wheel suspension.
One or both side brushes are
stuck.
Clean the side brushes (see chapter
'Cleaning and maintenance').
The top cover is not present
or is not closed properly.
When the top cover is not present or is not
closed properly, the robot does not work.
Place the top cover on the robot properly.
The bumper is stuck. Press the start/stop button. Lift the robot
so that its bumper comes free. Place the
robot at some distance from the obstacle
and press the start/stop button to make it
resume cleaning.
The warning indicator
flashes quickly.
The robot was lifted while it
was cleaning.
Press the start/stop button. Place the
robot on the floor. Then press the
start/stop button to make the robot
resume cleaning.
26
English
Page 27

Problem Possible cause Solution
The bristles of one or both
side brushes are crooked or
bent.
Soak the brush or brushes in warm water
for a while. If this does not restore the
bristles to their proper shape, replace the
side brushes (see chapter 'Replacement').
The filter in the dust container
is dirty.
Clean the filter in the dust container with a
cloth or a toothbrush with soft bristles.You
can also clean the filter and dust container
with a regular vacuum cleaner at a low
suction power setting.
If brushing or vacuuming does not help to
clean the filter, replace the filter with a
new one. We advise you to replace the
filter at least once a year.
The suction opening in the
bottom of the dust container
is clogged.
Clean the suction opening (see chapter
'Cleaning and maintenance').
The front wheel is jammed
with hair or other dirt.
Clean the front wheel (see chapter
'Cleaning and maintenance').
The robot is cleaning a very
dark or shiny surface, which
triggers the drop-off
sensors.This causes the robot
to move in an unusual
pattern.
Press the start/stop button and then move
the robot to a lighter colored piece of the
floor. If the problem continues to occur on
lighter colored floors, please go to
www.philips.com/support or contact the
Consumer Care Center in your country.
The robot does not clean
properly.
The robot is cleaning a floor
that reflects sunlight quite
strongly. This triggers the
drop-off sensors and causes
the robot to move in an
unusual pattern.
Close the curtains to block sunlight from
entering the room. You can also start
cleaning when the sunlight is less bright.
The rechargeable battery
can no longer be charged
or runs empty very fast.
The rechargeable battery has
reached the end of its life.
Replace the rechargeable battery (see
chapter 'Replacement').
The battery of the remote
control runs empty too
fast.
Perhaps you did not insert
the correct type of battery.
For the remote control, you need a
CR2025 coin-shaped battery. If the
problem persists, go to
www.philips.com/support or contact the
Consumer Care Center in your country.
27
English
Page 28

Problem Possible cause Solution
The robot is moving in
circles.
The robot is in spot-cleaning
mode.
This is normal behavior. The spiral mode
can be activated when a lot of dirt is
detected on the floor for a thorough clean.
It is also part of the auto cleaning mode.
After approximately one minute the robot
resumes its normal cleaning pattern. You
can also stop the spiral mode by selecting
a different cleaning mode on the remote
control.
There is not enough room for
the robot to navigate towards
the docking station.
Try to find another place for the docking
station. See 'Installing the docking station'
in chapter 'Preparing for use'.
The robot is still actively
searching.
Give the robot around 20 minutes to return
to the docking station.
The robot cannot find the
docking station.
The robot was not started
from the docking station.
If you want the robot to return to the
docking station after a cleaning run, start it
from the docking station.
The robot beeps when it
is on the docking station.
You try to charge the robot
with the power switch is in off
position.
Press the power switch to switch on the
robot.
Error codes
Error code
Possible cause Solution
E1 Wheels stuck Remove robot from the obstacle and press the
starts/stop button to resume cleaning.
E2 Top cover or dust
container not placed
properly
Place the dust container in and the top cover
on the robot properly. The error code
disappears from the display automatically.
E3 Bumper stuck Remove the robot from the obstacle. The error
code disappears from the display
automatically.
E4 Robot lifted from floor Put the robot back on the floor to make the
error code disappear.
E5 Color of floor too dark Place robot on a lighter area of the floor. Clean
the drop-off sensors.
Battery not inserted
properly
Read the instructions in ‘Inserting the
rechargeable battery into the robot’ in chapter
‘Before first use’.
E6
Charging error Check if the power switch is in ‘on’ position
when the robot is on the docking station
28
English
Page 29
Čeština
Úvod
Společnost Philips Vám gratuluje ke koupi a vítá Vás! Chcete-li využívat
všech výhod podpory nabízené společností Philips, zaregistrujte svůj
výrobek na stránkách www.philips.com/welcome.
Všeobecný popis
1 Rukojeť víka nádoby na prach
2 Víko nádoby na prach
3 Filtr
4 Nádoba na prach
5 Horní kryt
6 Tabulka chybových kódů
7 Ventilátor
8 Nárazník
9 Čidlo dokovací stanice
10 Vypínač
11 Přední kolečko
12 hřídele postranních kartáčků
13 Senzory pádu
14 Kolečka
15 Sací otvor
16 Hubice TriActive XL
17 Postranní kartáčky
18 Upevňovací bloky na suché utěrky
19 Držák na suché utěrky
20 Suché utěrky
21 Držák baterie
22 Dálkový ovladač
23 Neviditelná stěna (FC8822)
24 Dokovací stanice
25 Adaptér
26 Malá zástrčka
Displej a dálkový ovladač
Displej robota
1
1110 129
234
5 6 7 8
1 Indikátor spirálového režimu
2 Indikátor režimu pohybu podél stěn
3 Indikátor režimu cik-cak
4 Indikátor náhodného režimu
5 Doba úklidu
6 Ikona dokování
7 Indikátor rychlosti ventilátoru
8 Indikátor naplnění nádoby na prach
9 Snímač zvuku
10 Tlačítko pro výběr režimu
11 Tlačítko spuštění/zastavení
12 Tlačítko rychlosti ventilátoru
29
Čeština
Page 30
Dálkový ovladač
2
1
3
45
1 Navigační tlačítka a spuštění/zastavení
2 Tlačítka doby úklidu
3 Tlačítka režimu čištění
4 Tlačítka rychlosti ventilátoru
5 Tlačítko dokování
Ovládací panel dokovací stanice
1
2
1 Displej zobrazující čas, datum a programové indikátory
2 Tlačítka úprav a nastavení
Jak robot funguje
Co robot uklízí
Tento robot je vybaven funkcemi, které umožňují, aby se stal vaším
praktickým pomocníkem při úklidu podlah.
Robot je vhodný především pro čištění tvrdých podlah ze dřeva, dlaždic,
linolea apod. Čištění měkkých podlah, např. koberců, mu může činit potíže.
Pokud robota používáte k čištění koberce, zůstaňte při prvním použití poblíž,
abyste viděli, zda si dokáže s tímto typem podlahy poradit. Na robota je také
třeba dohlížet při používání na velmi tmavých nebo lesklých tvrdých
podlahách.
Jak robot uklízí
Systém čištění
Robot je vybaven třífázovým systémem úklidu, který zajišťuje efektivní úklid
podlah.
30
Čeština
Page 31
-
Dva postranní kartáčky pomáhají robotovi při čištění dosáhnout do rohů a
míst podél zdí. Také pomáhají sbírat špínu ze země a posouvat ji směrem
k sacímu otvoru.
-
Volnou špínu robot sebere díky dostatečné síle sání a skrze sací otvor ji
přemístí do nádoby na prach.
-
Robot je vybaven držákem na suché utěrky, který umožňuje ještě
pečlivější úklid podlah stíráním suchou utěrkou.
Schémata čištění
V režimu automatického čištění používá robot automatické pořadí
úklidových schémat pro optimální čištění jednotlivých oblastí místnosti.
Používaná úklidová schémata jsou:
1 Schéma Z, nebo cik- cak
2 Náhodné schéma
3 Schéma pohybu podél zdi
31
Čeština
Page 32
4 Spirálové schéma
V režimu automatického čištění robot používá tato schémata v pevném
pořadí: schéma Z, náhodné schéma, schéma pohybu podél zdi a spirálové
schéma.
Když robot dokončí toto pořadí schémat, začne se znovu pohybovat podle
schématu Z. Robot bude pokračovat v čištění místnosti pomocí tohoto
pořadí schémat, dokud se jeho baterie skoro nevybije nebo dokud ho ručně
nevypnete.
Když robot během úklidu najde silně znečištěné místo, přepne se do
spirálového režimu a zapne ventilátor na rychlost turbo, aby nečistoty
efektivně odstranil.
Poznámka: Jednotlivé režimy můžete také vybrat ručně stisknutím
příslušného tlačítka na dálkovém ovladači. Ručně vybrané režimy jsou
aktivní pouze po několik minut. Poté se robot přepne zpět do režimu
automatického čištění.
Podrobnosti najdete v kapitole „Používání robota“ v části „Režimy čištění“.
Jak se robot vyhýbá výškovým předělům
Ve spodní části je robot vybaven třemi senzory pádu. Tyto senzory pádu
slouží k tomu, aby robot rozpoznal výškové předěly, například schody.
Poznámka: Pokud se robot dostane mírně nad hranu stupně s výškovým
rozdílem, je to normální, protože senzory pádu jsou umístěny až za
nárazníkem.
Upozornění: V některých případech senzory pádu nemusí schodiště nebo
jiný výškový předěl rozpoznat včas. Proto robota při několika prvních
použitích a při provozu v blízkosti schodiště nebo jiného výškového
předělu bedlivě sledujte. Senzory pádu je důležité pravidelně čistit, aby si
robot zachoval schopnost správně rozpoznat výškové předěly (pokyny
naleznete v kapitole „Čištění a údržba“).
32
Čeština
Page 33
2 Nasuňte kolečka na hřídele na spodní části robota.
Poznámka: Ujistěte se, že jste postranní kartáčky upevnili správně.
Nasaďte je na hřídel, až uslyšíte, že s kliknutím zapadly na své místo.
Odebrání štítku z dálkového ovladače
Dálkový ovladač je napájen knoflíkovou baterií CR2025. Baterie je opatřena
ochranným štítkem, který je nutné před prvním použitím vyjmout.
1 Vytáhněte ochranný štítek z prostoru pro baterii dálkového ovladače.
Dálkový ovladač je připraven k použití.
Příprava k použití
Instalace dokovací stanice
1
2
1 Zapojte malou zástrčku adaptéru do zásuvky na dokovací stanici (1) a
adaptér zapojte do zásuvky ve zdi (2).
-
Rozsvítí se displej dokovací stanice.
2 Umístěte dokovací stanici na vodorovný povrch ke zdi.
100 厘米
100 cm
30 厘米30 厘米
30 cm
80
厘米
80 cm
Poznámka: Zkontrolujte, že ve vzdálenosti 80 cm vpředu, 30 cm napravo
a 100 cm nalevo od dokovací stanice nejsou žádné překážky ani výškové
předěly.
Tip: Aby dokovací stanice zůstala pevně na vybraném místě, připevněte ji
ke stěně šrouby nebo dvěma kousky oboustranné lepicí pásky.
33
Čeština
Před prvním použitím
Montáž postranních kartáčků
1 Vybalte postranní kartáčky a položte robota vzhůru nohama na stůl nebo
na podlahu.
Page 34
Nabíjení
První nabíjení robota, stejně jako nabíjení zcela vybité baterie, trvá čtyři
hodiny.
Robota lze nabíjet dvěma způsoby:
-
v dokovací stanici buď ručně nebo automaticky při používání;
-
připojením robota přímo do zásuvky.
Poznámka: Na plně nabitou baterii může robot uklízet až 120 minut.
Nabíjení v dokovací stanici
1 Zapněte robota stisknutím vypínače.
2 Umístěte robota do dokovací stanice připojené k elektrické zásuvce.
3 Tlačítko spuštění/zastavení začne blikat.
Poznámka: Protože jde o první nabíjení robota, na displeji robota se
zobrazí symbol spouštění systému.
4 Když je akumulátor plně nabitý, tlačítko spuštění/zastavení svítí
nepřetržitě.
34
Čeština
Page 35
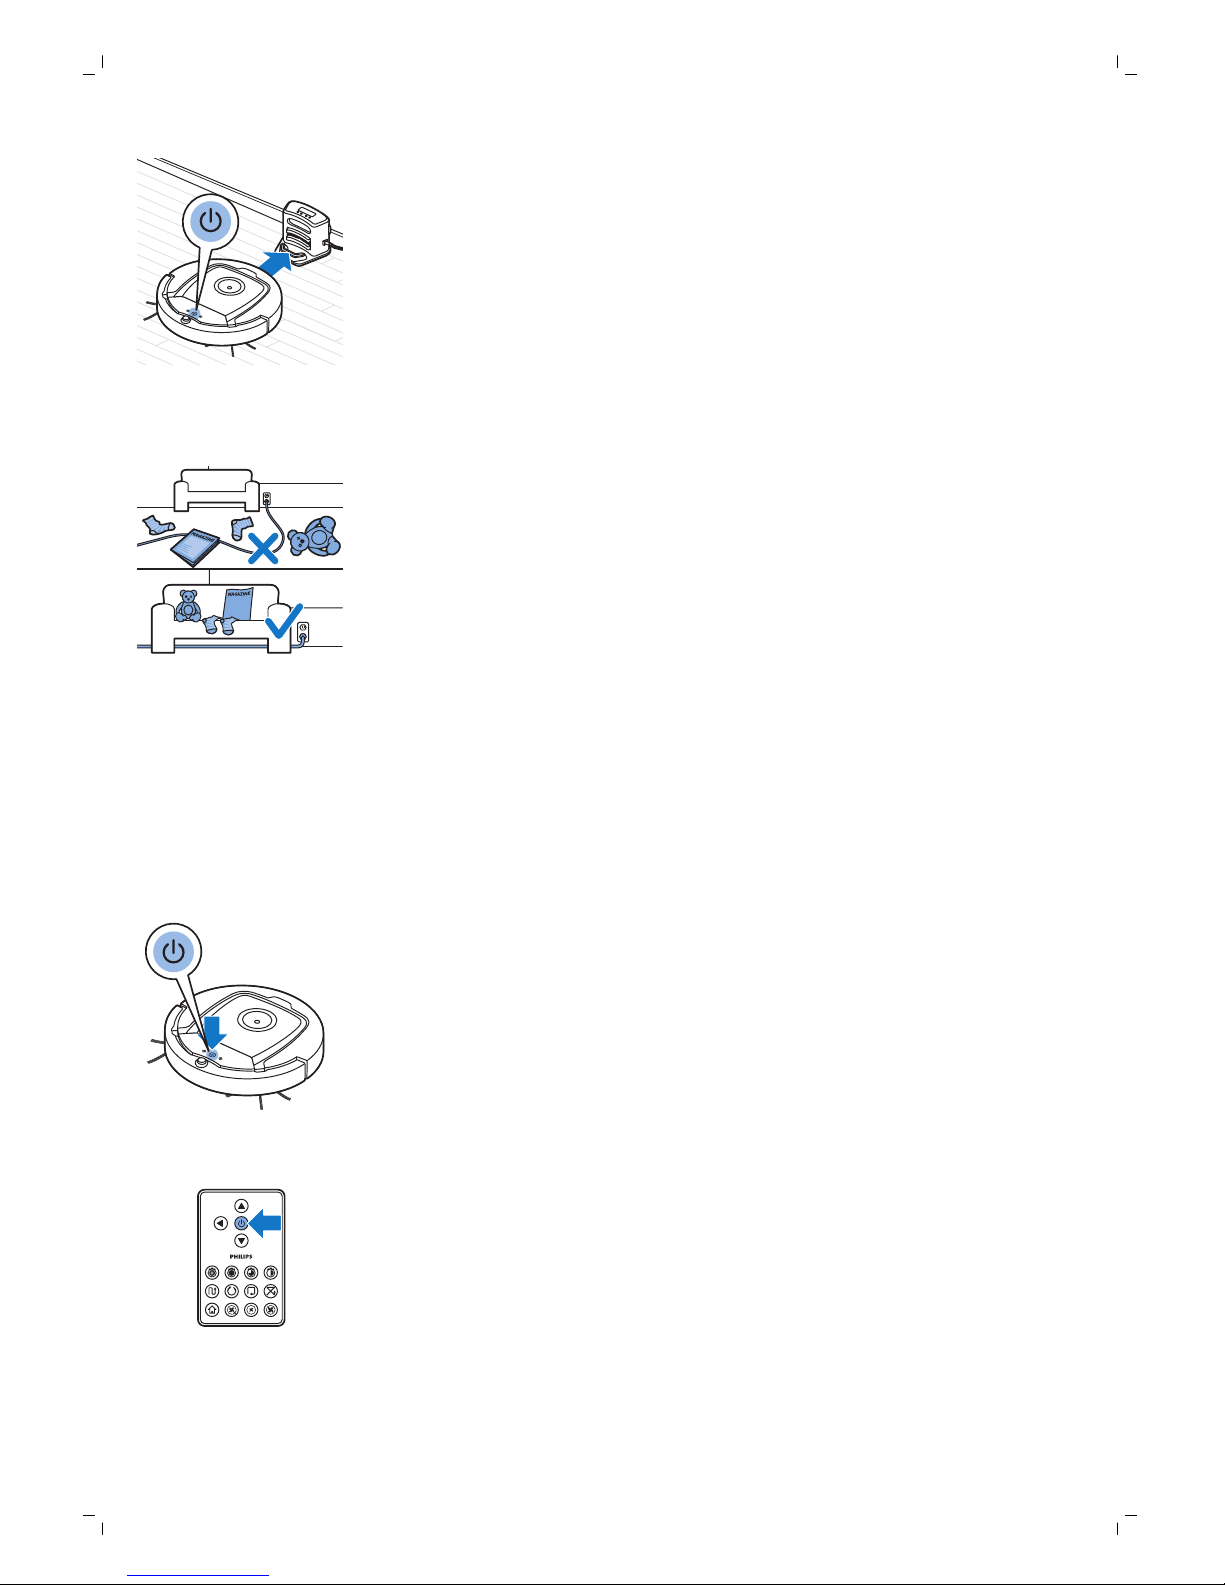
1 Když robot dokončí čištění nebo když nabití akumulátoru klesne pod
15 %, robot automaticky vyhledá dokovací stanici, aby dobil akumulátor.
Když robot hledá dokovací stanici, rozsvítí se světlo na tlačítku
spuštění/zastavení oranžově.
2 Když je akumulátor plně nabitý, tlačítko spuštění/zastavení svítí
nepřetržitě.
Příprava místnosti na úklid
Než pošlete robota na úklid, odeberte z podlahy všechny volné a křehké
předměty. Také ze země odstraňte veškeré kabely a dráty.
Používání robota
Spuštění a zastavení
1 Nastavte vypínač na straně robota do polohy „zapnuto“.
2 Stiskněte tlačítko spuštění/zastavení.
-
Můžete stisknout tlačítko spuštění/zastavení na robotovi.
-
Také lze stisknout tlačítko spuštění/zastavení na dálkovém ovladači.
3 Tlačítko spuštění/zastavení začne nepřetržitě svítit a robot začne uklízet.
35
Čeština
Automatické nabíjení při používání
Page 36
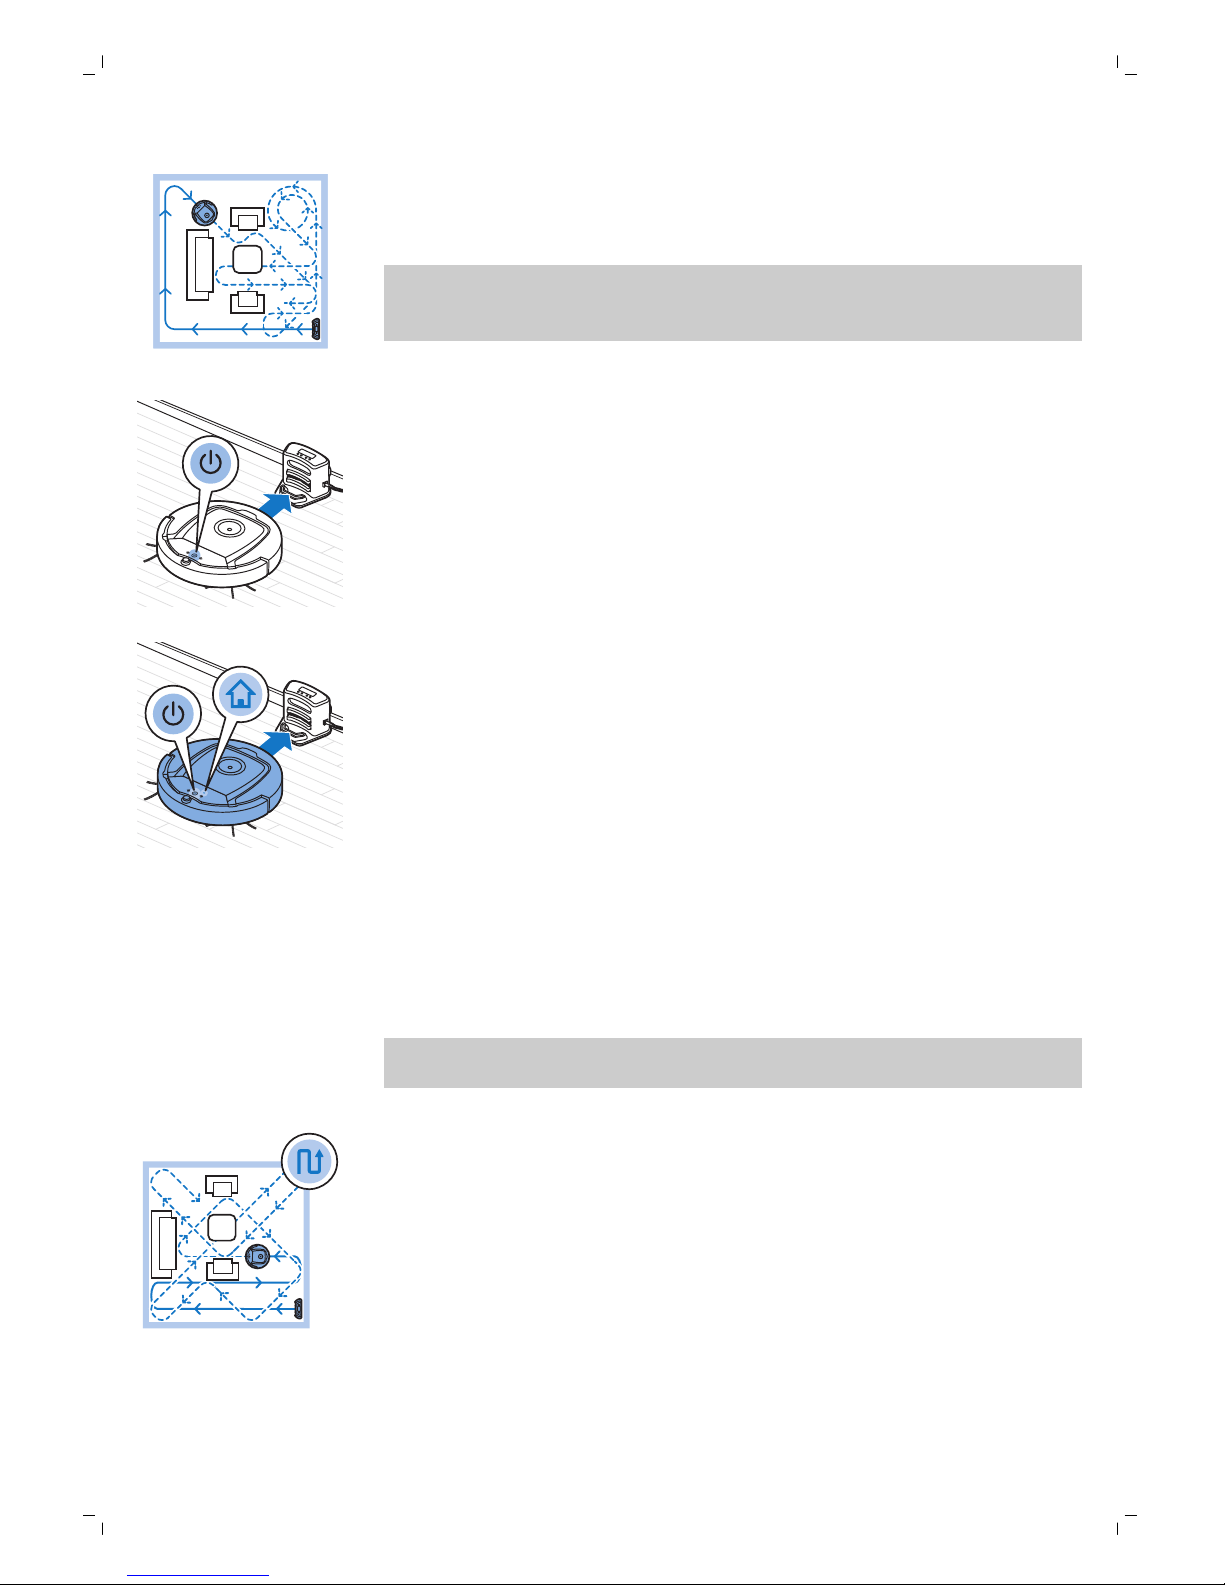
4 Robot bude uklízet v režimu automatického čištění, dokud se baterie
skoro nevybije. V režimu automatického čištění robot opakuje předem
dané pořadí schémat pohybu Z, náhodného čištění, pohybu podél stěn a
spirály.
Poznámka: Chcete-li vybrat jeden režim, stiskněte příslušné tlačítko
režimu čištění na dálkovém ovladači. Další podrobnosti najdete v části
„Výběr čisticího režimu“.
5 Když se baterie blíží vybití, rozsvítí se tlačítko spuštění/zastavení
oranžově a robot vyhledá dokovací stanici, aby se nabil.
6 Stisknutím tlačítka spuštění/zastavení lze také čištění přerušit nebo
zastavit. Když tlačítko spuštění/zastavení stisknete znovu a baterie je
dostatečně nabitá, bude robot pokračovat v režimu automatického
čištění.
7 Když budete chtít, aby se robot vrátil do dokovací stanice dříve, než bude
baterie skoro vybitá, stiskněte dokovací tlačítko na dálkovém ovladači.
Ikona dokování na displeji robota začne blikat a robot se vrátí do
dokovací stanice.
Výběr čisticího režimu
Robot má kromě režimu automatického čištění další čtyři režimy čištění,
které můžete vybrat stisknutím příslušného tlačítka na dálkovém ovladači.
Poznámka: Ručně vybrané režimy jsou aktivní pouze po několik minut. Poté
se robot přepne zpět do režimu automatického čištění.
Schéma Z
Při čištění podle schématu Z čistí robot velké plochy v místnosti pohybem ve
smyčkách tvaru písmene Z.
36
Čeština
Page 37
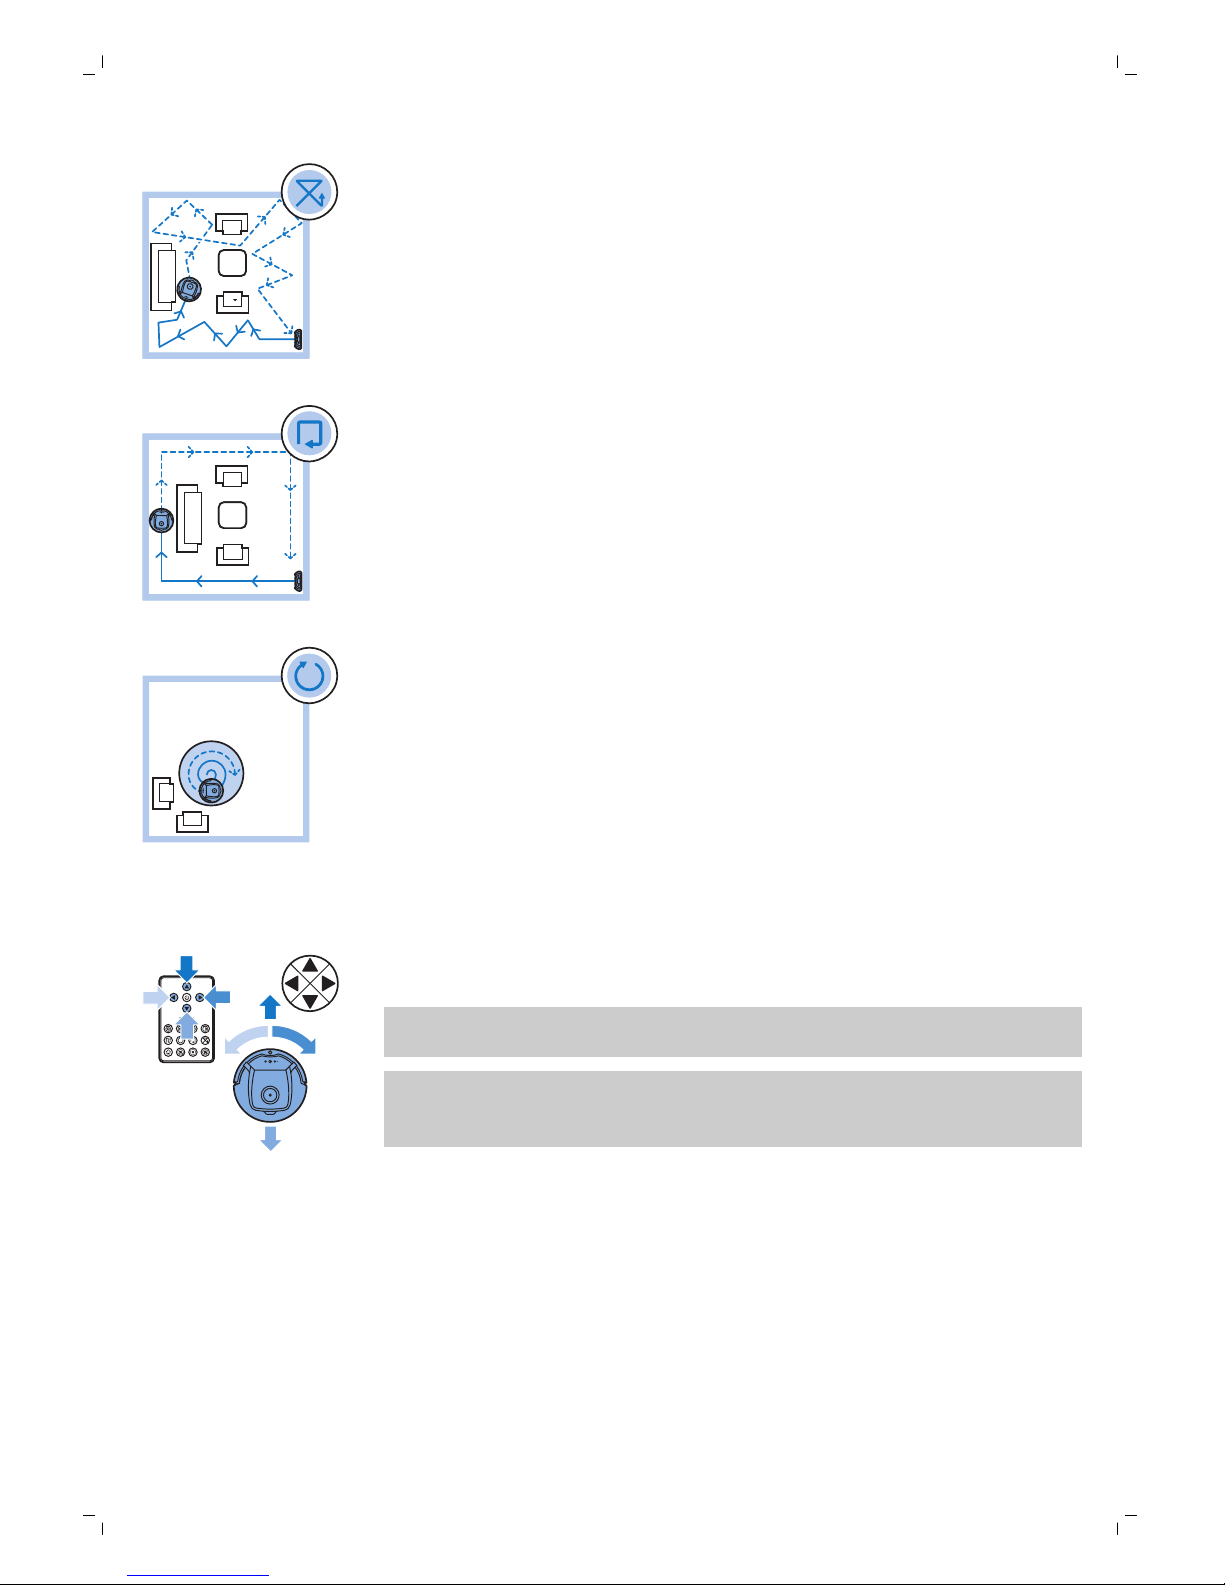
V tomto režimu se robot při úklidu místnosti pohybuje střídavě rovnými a
křížovými pohyby.
V tomto režimu se robot pohybuje podél stěn místnosti, aby oblasti podél
stěn vyčistil pečlivěji.
V tomto režimu se robot pohybuje po spirálové dráze, aby vyčistil malou
oblast. Když
čidlo prachu detekuje nečistoty, robot automaticky přepne
ventilátor na rychlost turbo.
Ruční ovládání
1 Pohyb robota po místnosti můžete ovládat tlačítky šipek kolem tlačítka
spuštění/zastavení na dálkovém ovladači.
Poznámka: Když robota ovládáte ručně, dávejte pozor na výškové
předěly a schody.
Poznámka: Funkce vysávání a postranní kartáčky fungují, pouze když
robot jede dopředu. Tlačítka doleva, doprava a dozadu slouží pouze
k manévrování s robotem.
37
Čeština
Spirálový režim
Režim pohybu podél stěn
Náhodný režim
Page 38
Používání tlačítek doby úklidu
-
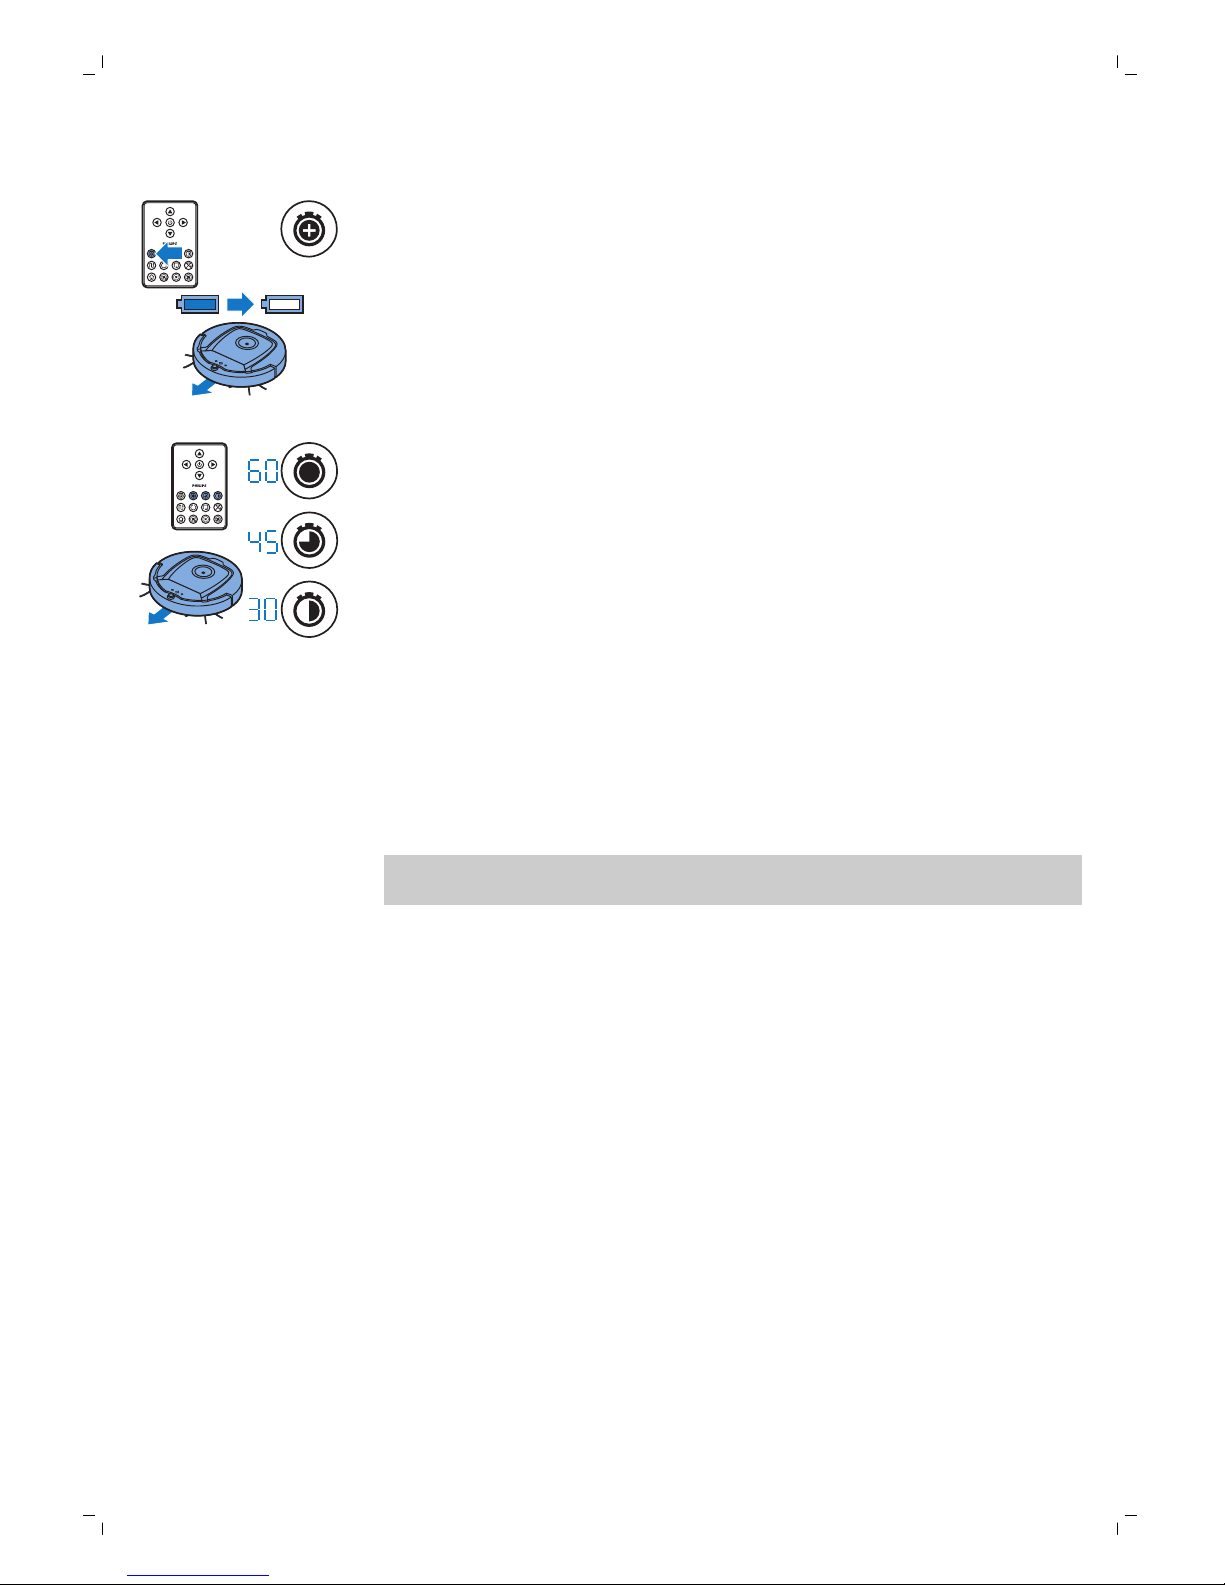
Ve výchozím nastavení bude robot uklízet v režimu automatického
čištění, dokud nebude baterie téměř vybitá. Poté se robot automaticky
vrátí do dokovací stanice. Pokud jste dříve vybrali jednu z ostatních dob
úklidu (viz níže), můžete výchozí režim znovu nastavit stisknutím tlačítka
maximální doby úklidu na dálkovém ovládání.
-
Ostatní tlačítka doby úklidu na dálkovém ovládání vám umožňují zadat
úklid na dobu 60, 45 a 30 minut. Po uplynutí doby úklidu se robot vrátí
do dokovací stanice. Na displeji se rozsvítí ikona dokování.
-
Pokud nechcete, aby se robot po dokončení úklidu vrátil do dokovací
stanice, stiskněte tlačítko doby úklidu dvakrát. Ikona dokování z displeje
zmizí. Po uplynutí doby čištění se robot zastaví.
Ovládání dokovací stanice
Nastavení data a času na hodinách
Chcete-li používat čisticí programy, musíte nejprve na displeji dokovací
stanice nastavit datum, čas a den v týdnu.
Poznámka: Obrázky k následujícím pokynům najdete na listech na konci
návodu.
1 Stiskněte tlačítko SET. Indikátor nastavení a indikátor času hodin začnou
blikat.
2 Stiskněte jednou tlačítko výběru. Začne blikat údaj hodin.
3 Pomocí tlačítek + a - na dokovací stanici nastavte hodinu. Nastavená
hodina se zobrazí na displeji.
4 Potvrďte nastavenou hodinu stisknutím tlačítka výběru. Začne blikat
indikátor času v minutách.
5 Tlačítky + nebo - na dokovací stanici nastavte minuty. Nastavené minuty
se zobrazí na displeji.
6 Potvrďte nastavené minuty stisknutím tlačítka výběru. Začne blikat
indikátor „Su“ (Sunday, neděle).
7 Pomocí tlačítek + a - na dokovací stanici nastavte dnešní den v týdnu.
8 Stisknutím tlačítka výběru potvrďte nastavený den.
9 Stisknutím tlačítka nastavení potvrďte nastavení času a dne v týdnu.
Indikátor nastavení i indikátor času hodin přestanou blikat a rozsvítí se.
38
Čeština
Page 39
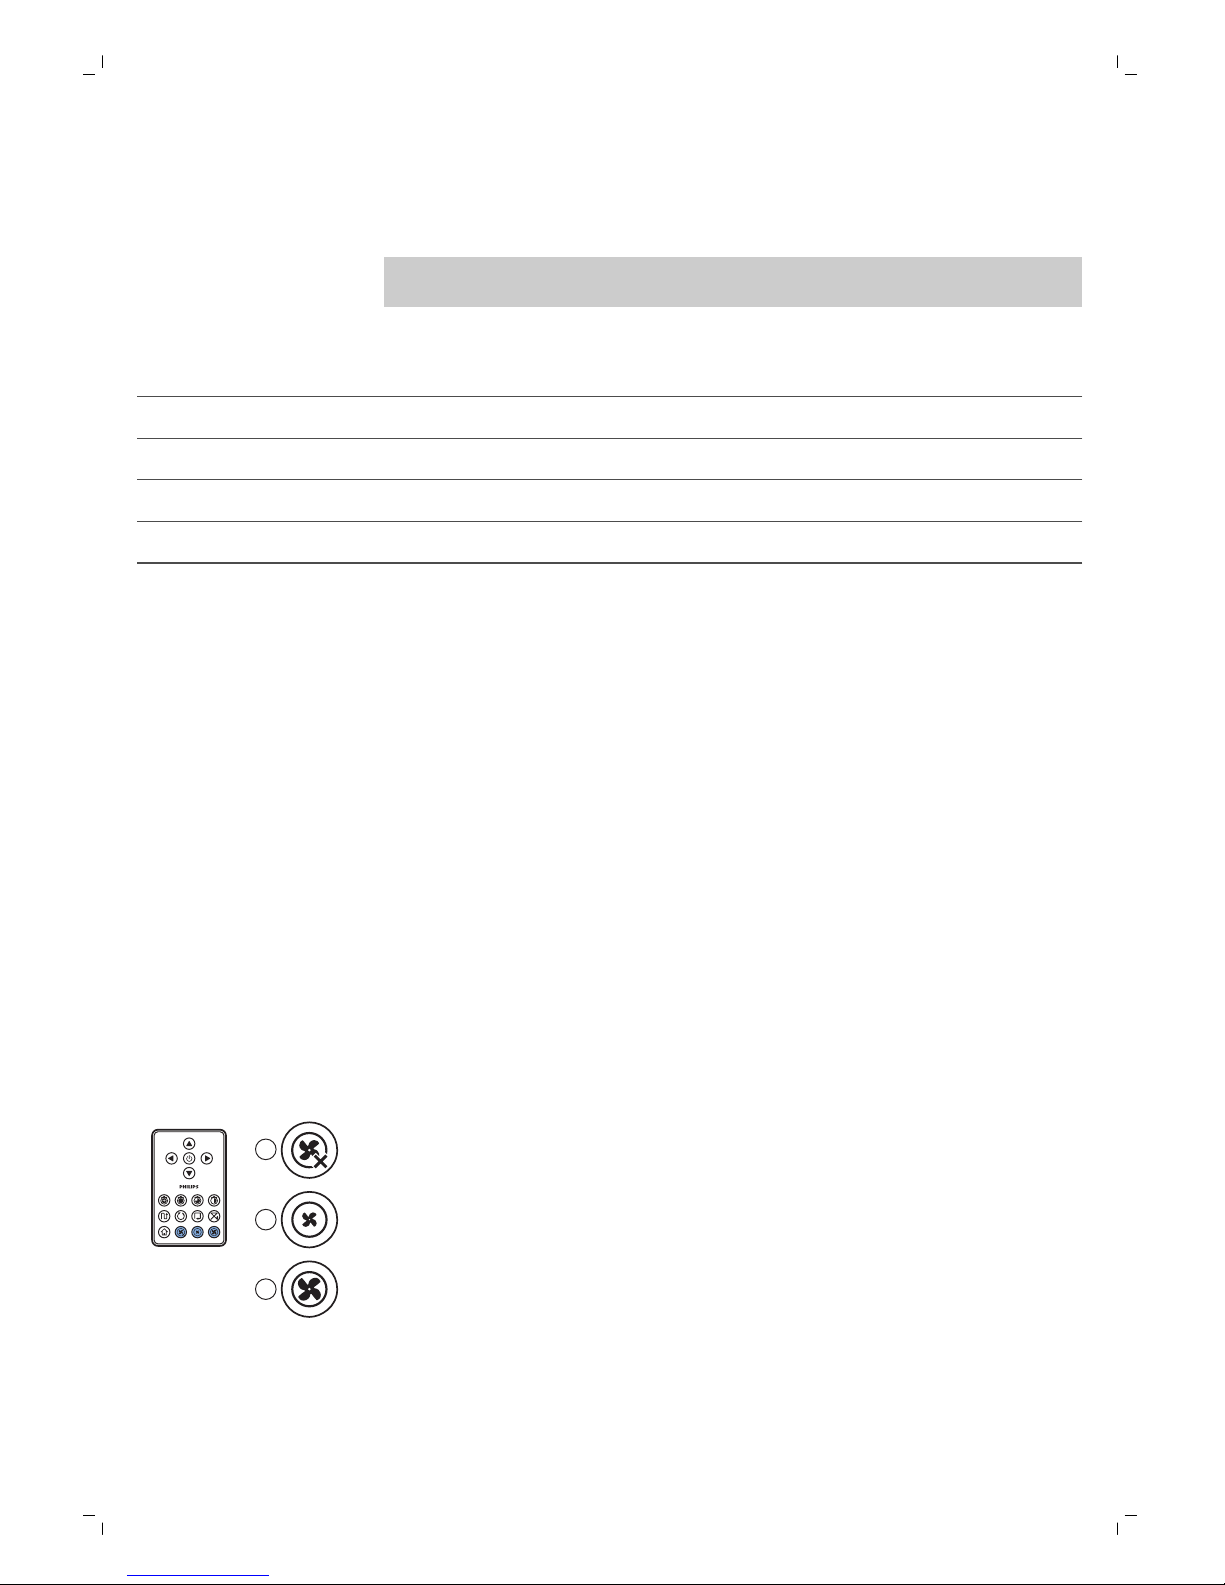
Poznámka: Obrázky k následujícím pokynům najdete na listech na konci
návodu.
Možnosti naprogramování:
Program Indikace na displeji
Každodenní úklid Zapnuté indikace celý den
Úklid v pracovní dny Zapnuté indikace Po – Pá (Mo – Fri)
Úklid 2 dny po sobě Zapnuté indikace 2 dnů, například Pá a So (Fri a Sa)
Úklid jeden den v týdnu Zapnutá indikace jednoho dne
1 Stiskněte tlačítko SET. Indikátor nastavení a indikátor programu úklidu
začnou blikat.
2 Stiskněte jednou tlačítko výběru. Začne blikat údaj hodin.
3 Tlačítky + nebo - na dokovací stanici nastavte hodiny. Na displeji se
zobrazí nastavená hodina.
4 Potvrďte nastavenou hodinu stisknutím tlačítka výběru. Začne blikat
indikátor času v minutách.
5 Tlačítky + a − na dokovací stanici nastavte minuty. Nastavené minuty se
zobrazí na displeji.
6 Potvrďte nastavené minuty stisknutím tlačítka výběru. Začne blikat
indikátor „Su“ (Sunday, neděle).
7 Pomocí tlačítek + a - na dokovací stanici lze přepínat mezi programy
úklidu (možnosti programování najdete v předcházející tabulce).
8 Stisknutím tlačítka výběru potvrďte vybraný program.
9 Stisknutím tlačítka nastavení potvrďte naprogramování. Oba indikátory,
režimu nastavení i programu úklidu, přestanou blikat a rozsvítí se.
10 Po nastavení programu úklidu se na displeji zobrazí indikátor
naprogramovaného úklidu a indikátory vybraných dnů. Když necháte
robota v pohotovostním režimu a s nabitou baterií, robot začne uklízet
v naprogramované dny v naprogramovaném čase.
Tlačítka rychlosti ventilátoru
Pomocí tlačítek rychlosti ventilátoru můžete zvýšit rychlost ventilátoru na
turbo nebo ventilátor vypnout. Ve výchozím nastavení je rychlost ventilátoru
normální.
1
2
3
1 Stisknutím tohoto tlačítka ventilátor vypnete.
2 Stisknutím tohoto tlačítka přepnete ventilátor do normální rychlosti.
3 Tlačítko rychlosti turbo zvýší otáčky ventilátoru.
39
Čeština
Programování doby úklidu
Po
nastavení data, času a dne v týdnu na displeji dokovací stanice můžete
naprogramovat dobu úklidu robota.
Page 40
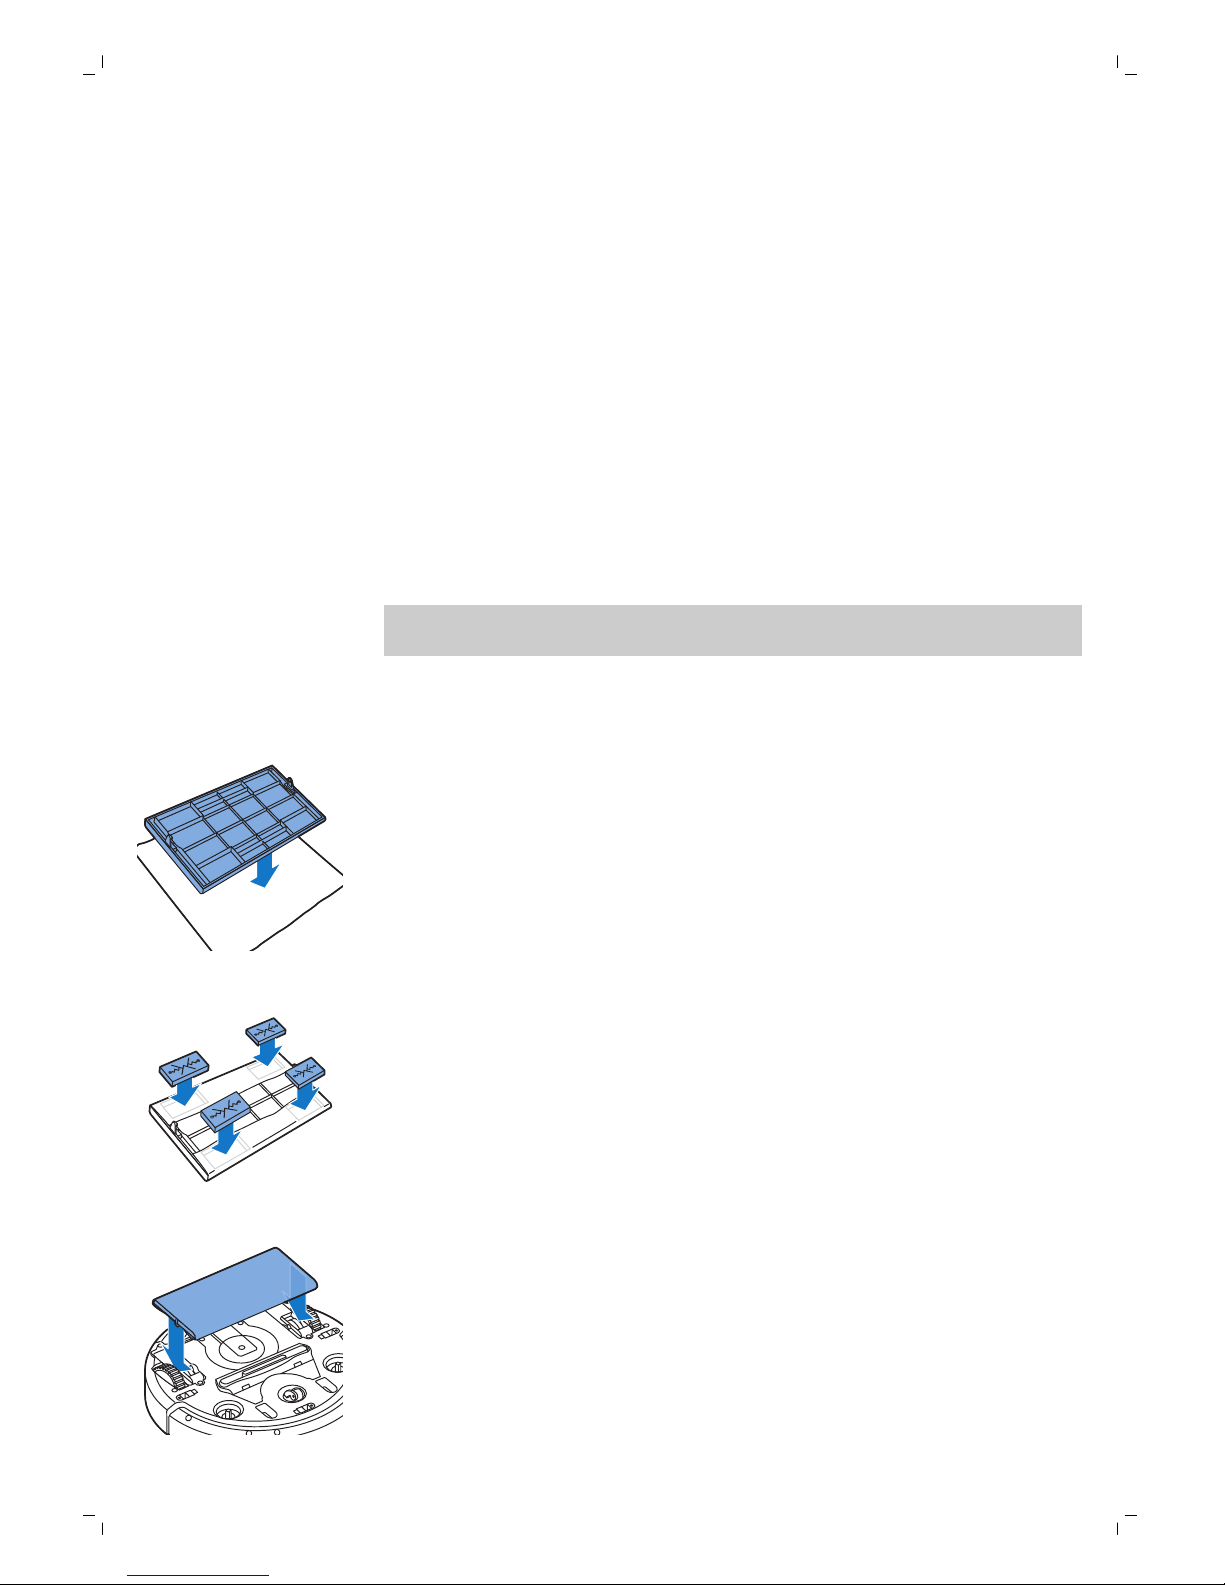
Používání nástavce na suché utěrky
Funkce nástavce na suché utěrky umožňuje vytírat podlahy suchými
utěrkami.
Poznámka: Robot s připojeným nástavcem na suché utěrky může mít
problémy při přejezdu prahů nebo výstupu na koberce.
Příprava nástavce na suché utěrky k použití
1 Obraťte robota vzhůru nohama a položte ho na stůl nebo na podlahu.
2 Položte suchou utěrku na stůl a přiložte na ni nástavec na suché utěrky
tak, aby upevňovací výstupky směřovaly směrem k vám.
3 Přeložte oba konce suché utěrky přes nástavec a utěrku připevněte
k nástavci zatlačením upevňovacích bloků do prohlubní.
4 Vložte nástavec na suché utěrky upevňovacími výstupky do otvoru za
kolečkem na straně robota a zatlačte na nástavec, až zaklapne na své
místo. Totéž zopakujte na druhé straně.
5 Robota převraťte a postavte ho na kolečka na podlahu. Nástavec na
suché utěrky se bude dotýkat podlahy.
40
Čeština
Reakce na tlesknutí
Reakce na tlesknutí, když se robot nachází v režimu spánku, je aktivní
v následujících situacích:
-
čištění bylo zastaveno z důvodu chyby,
-
naprogramovali jste příliš krátký čas čištění,
-
robot nedokázal během 20 minut najít dokovací stanici.
Pokud robota nevidíte, můžete ho najít jedním tlesknutím. Robot zareaguje
vydáním zvukového signálu a rozsvícením všech ikon na displeji.
Page 41
1
3 Zatlačte na jeden konec nástavce na suché utěrky směrem ke kolečku na
druhé
straně robota. Nástavec se uvolní. Potom ho vytáhněte z robota.
Použití
neviditelné
stěny
(FC8822)
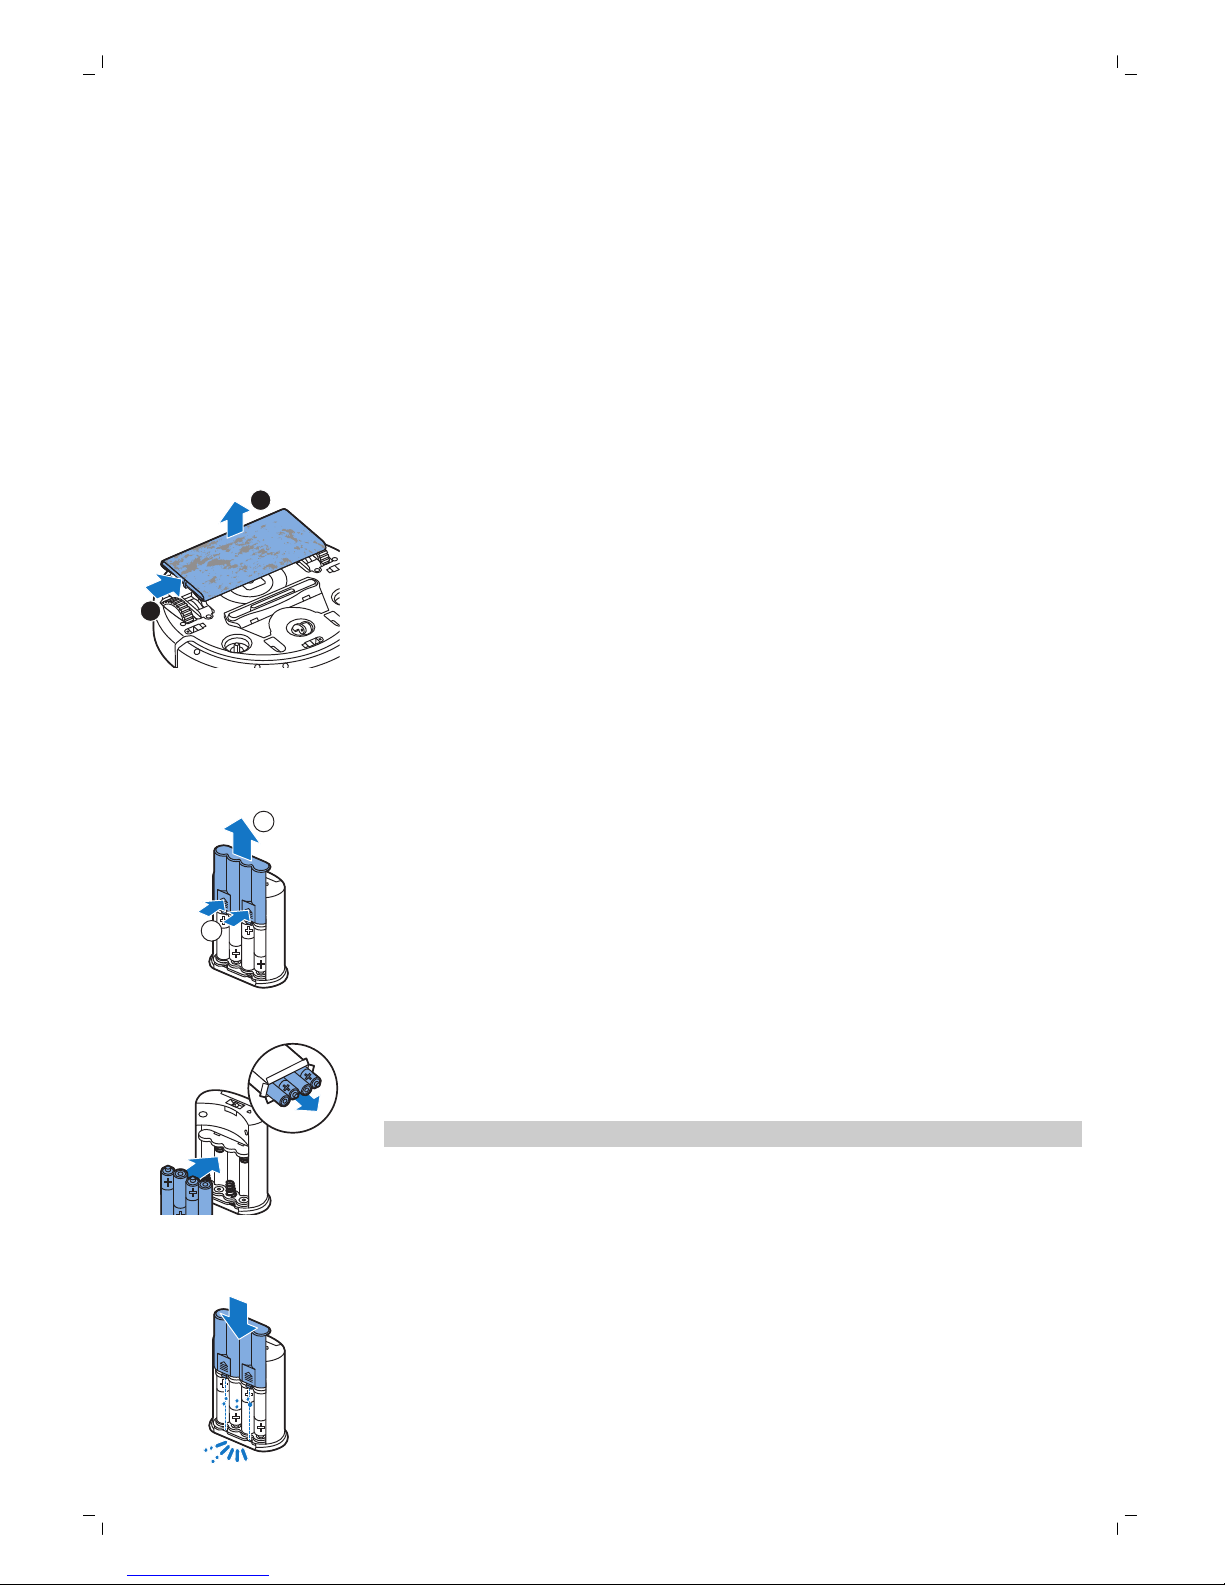
Vložení baterií do neviditelné stěny
Jednotka neviditelné stěny funguje na čtyři baterie typu AA.
1
2
1 Stiskněte dva uvolňovací jazýčky na spodní straně zadního krytu (1)
a vysuňte horní kryt nahoru a ven z jednotky neviditelné stěny (2).
2 Vybalte čtyři nové baterie typu AA a vložte je do prostoru pro baterie
jednotky neviditelné stěny.
Poznámka: Zkontrolujte správnou orientaci + a − pólů baterií.
3 Zasuňte zadní kryt na jednotce neviditelné stěny.
41
Čeština
Používání robota s nástavcem na suché utěrky
Robot s připojeným nástavcem na suché utěrky můžete používat
v libovolném režimu na všechny tvrdé povrchy. Nepoužívejte suché utěrky
na kobercích.
Odpojení nástavce na suché utěrky
1 Po dokončení vytírání ihned nástavec na suché utěrky sejměte.
2 Obraťte robota vzhůru nohama a položte ho na stůl nebo na podlahu.
Page 42
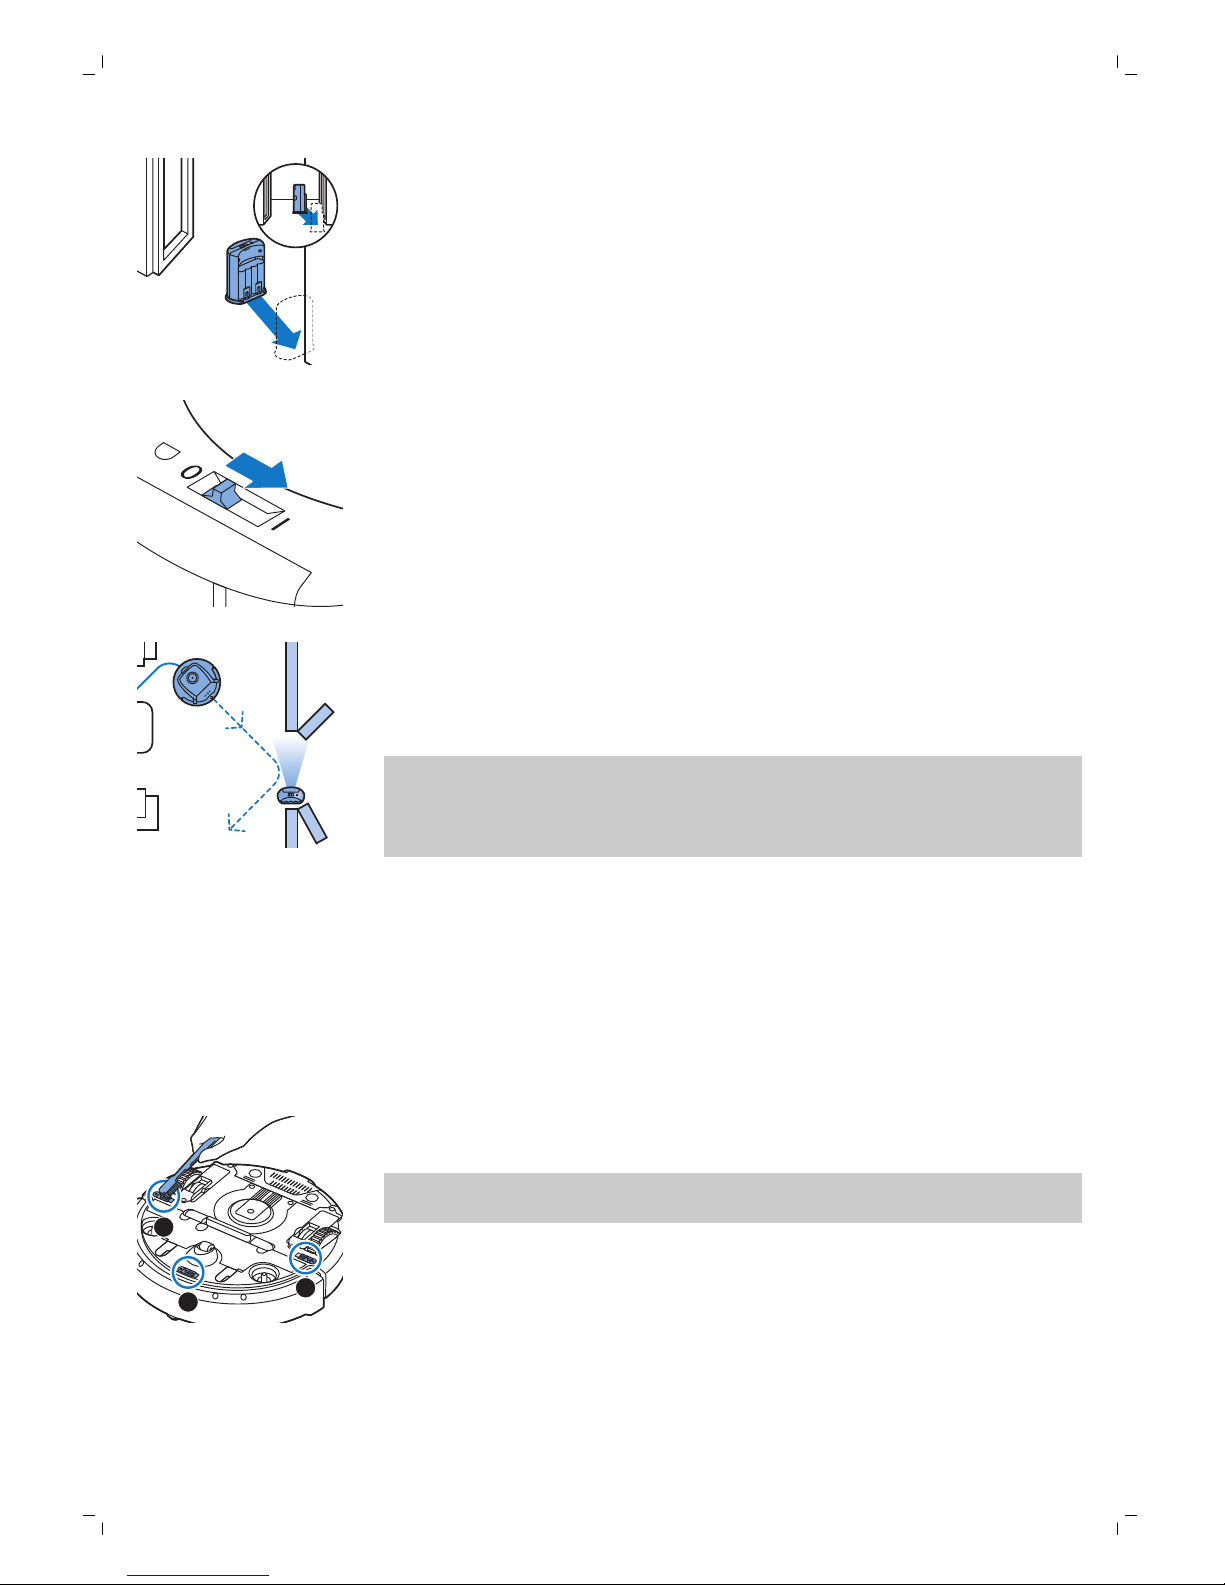
1 Umístěte jednotku do bodu, který robot nesmí překročit (například
k otevřeným dveřím místnosti, kterou nechcete robotem uklízet).
2 Posuvným vypínačem na horní straně jednotky zapněte neviditelnou
stěnu.
3 Spusťte robota.
4 Když se robot přiblíží k neviditelné stěně, kontrolka na neviditelné stěně
začne blikat a neviditelná stěna vyšle paprsek infračerveného světla.
Paprsek infračerveného světla přinutí robota změnit trasu a přesunout se
směrem pryč od jednotky neviditelné stěny.
Poznámka: Pokud používáte neviditelnou stěnu, pravidelně kontrolujte, zda
jsou baterie nabité. Můžete se přesvědčit vypnutím a opětovným zapnutím
neviditelné stěny. Jsou-li baterie dostatečně nabité, kontrolka LED na
neviditelné stěně se krátce rozsvítí.
Čištění a údržba
Čištění robota
Aby robot mohl stále dobře uklízet, je nutné občas vyčistit senzory pádu,
kolečka, postranní kartáčky a sací otvor.
1 Položte robota vzhůru nohama na rovný povrch.
3
1
2
2 Pomocí kartáčku s měkkými štětinami (např. kartáčku na zuby) odstraňte
prach a nečistoty ze senzorů pádu.
Poznámka: Senzory pádu je důležité čistit pravidelně. Se znečištěnými
senzory nemusí robot rozpoznat výškové předěly nebo schody.
42
Čeština
Zastavení robota pomocí neviditelné stěny
Neviditelná stěna slouží k tomu, aby robot nevstupoval do oblasti místnosti,
do které ho nechcete pustit.
Page 43
1
2
3
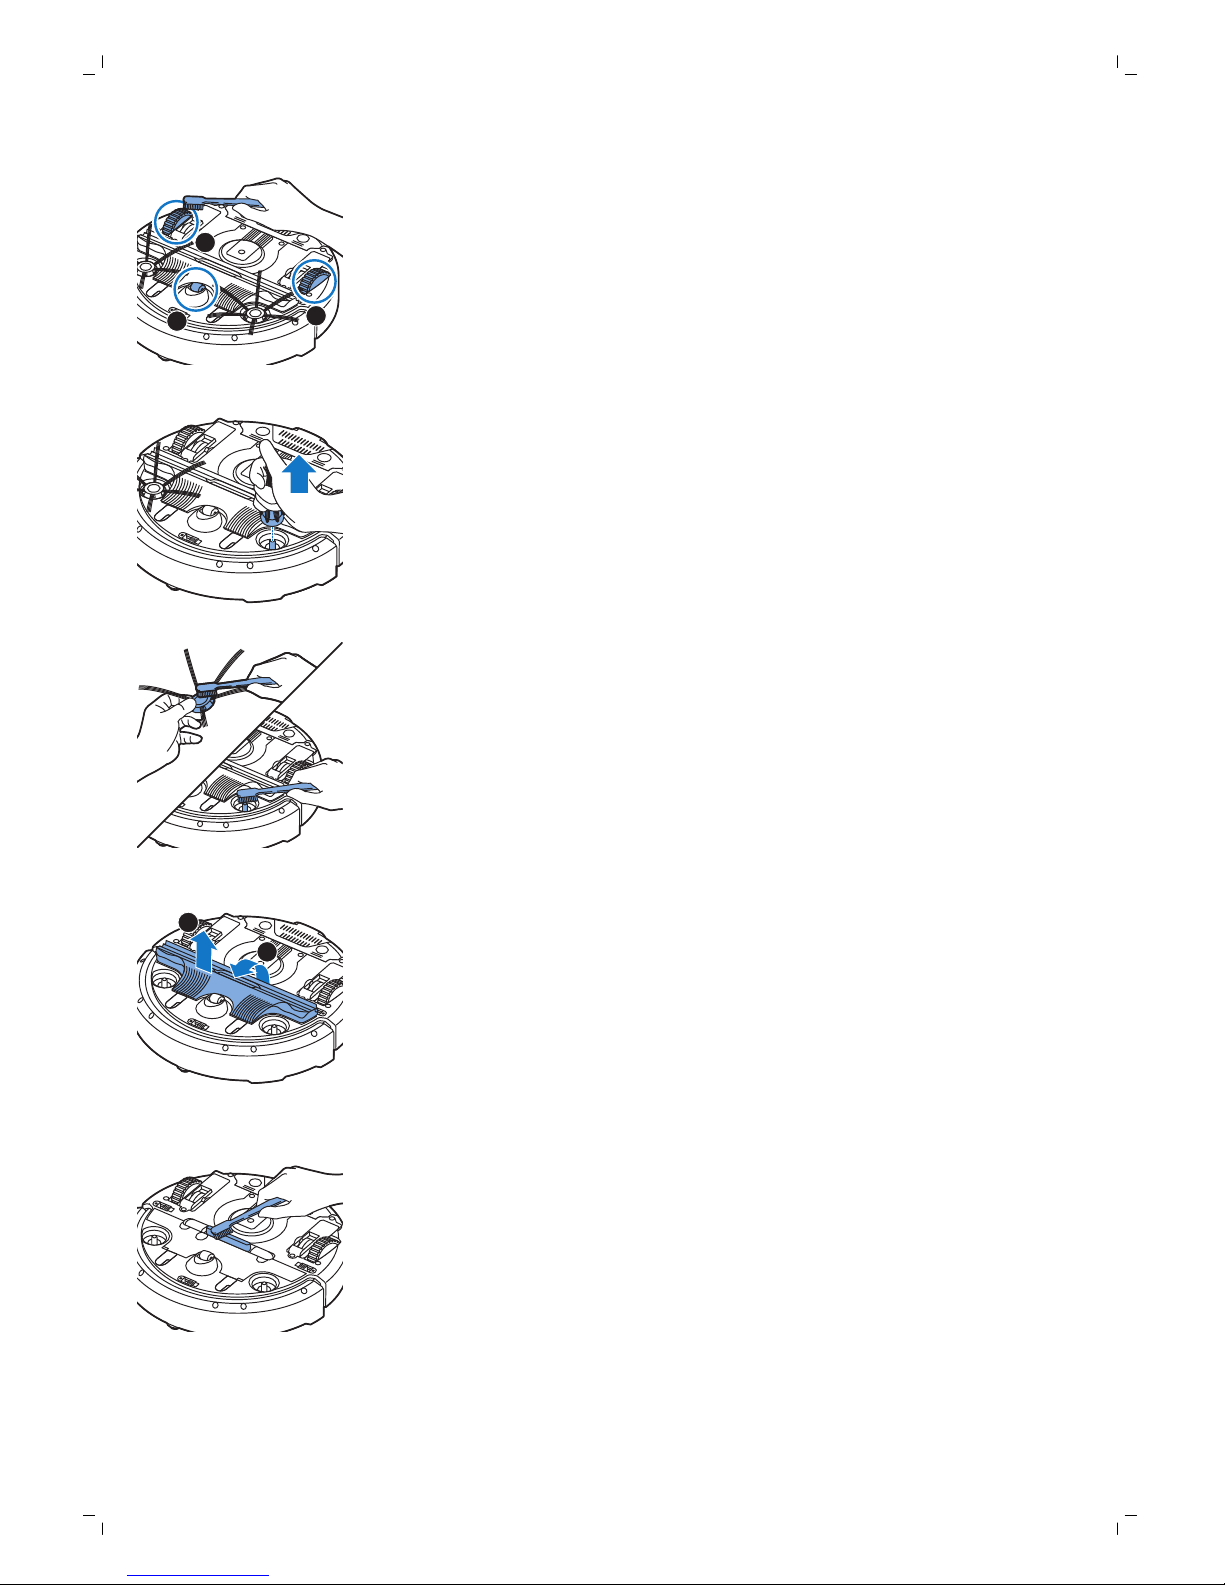
3 Pomocí kartáčku s měkkými štětinami (např. kartáčku na zuby) odstraňte
prach a nečistoty z předního kolečka a bočních koleček.
4 Postranní kartáčky před čištěním uchopte za štětiny a stáhněte je
z hřídelí.
5 Pomocí měkkého kartáčku (např. kartáčku na zuby) nebo hadříkem
odstraňte z hřídele a z postranního kartáčku nečistoty, vlasy a nitě.
6 Zkontrolujte, zda na postranních kartáčcích nebo na spodní straně robota
nejsou nějaké ostré předměty, které by mohly poškodit podlahu.
1
2
7 Vložením prstů na místa označená šipkami odpojte připojení hubice
TriActive XL a vytáhněte ji z robota ven.
8 Očistěte sací otvor pomocí kartáčku s měkkými štětinami (např. kartáčku
na zuby).
43
Čeština
Page 44
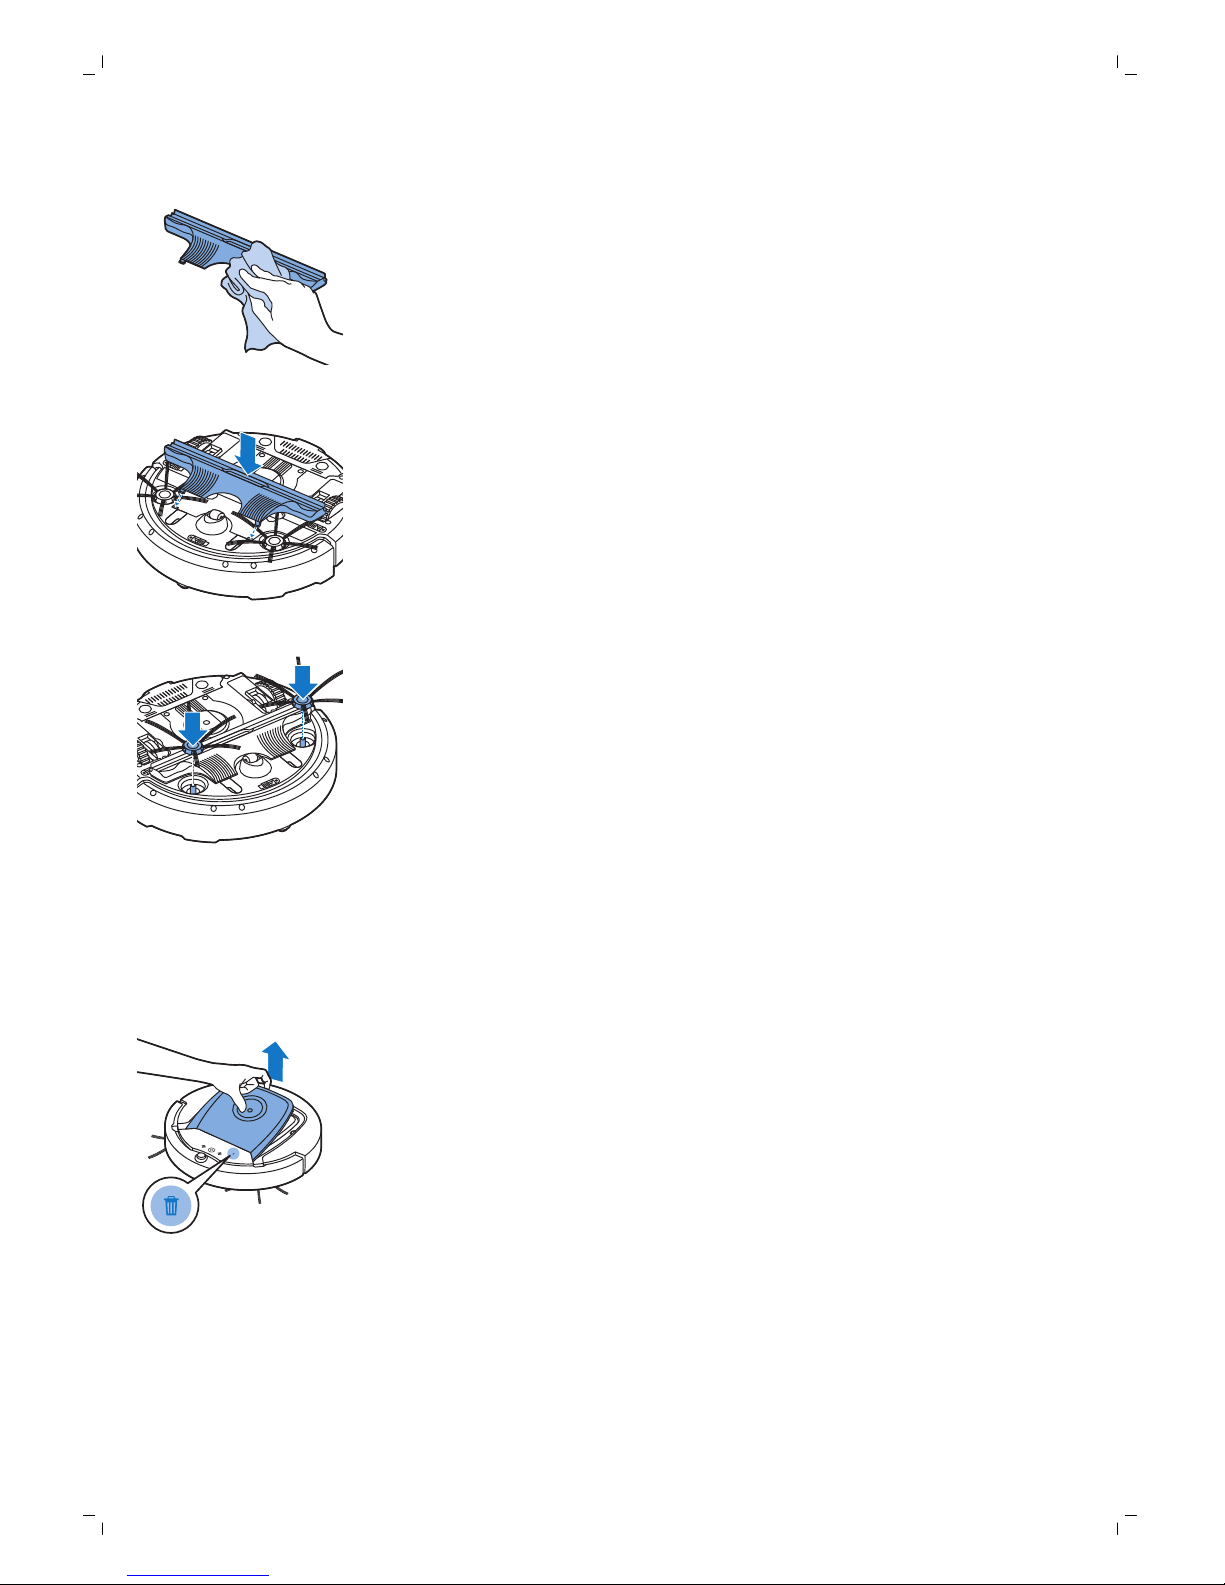
9 Odstraňte veškeré viditelné nečistoty z hubice TriActive.
10 Vložte pojistné háčky hubice TriActive do děr ve spodní části robota.
Zatlačte hubici TriActive zpět na své místo. Ověřte, že se hubice může
volně pohybovat o několik milimetrů nahoru a dolů.
11 Nasuňte kolečka zpět na hřídele na spodní části robota.
Vyprazdňování a čištění nádoby na prach
Pokud indikátor naplnění nádoby na prach nepřetržitě svítí, vysypte
a vyčistěte nádobu na prach.
1 Zkontrolujte, že je vypínač v poloze „vypnuto“.
2 Vyjměte kryt.
44
Čeština
Page 45
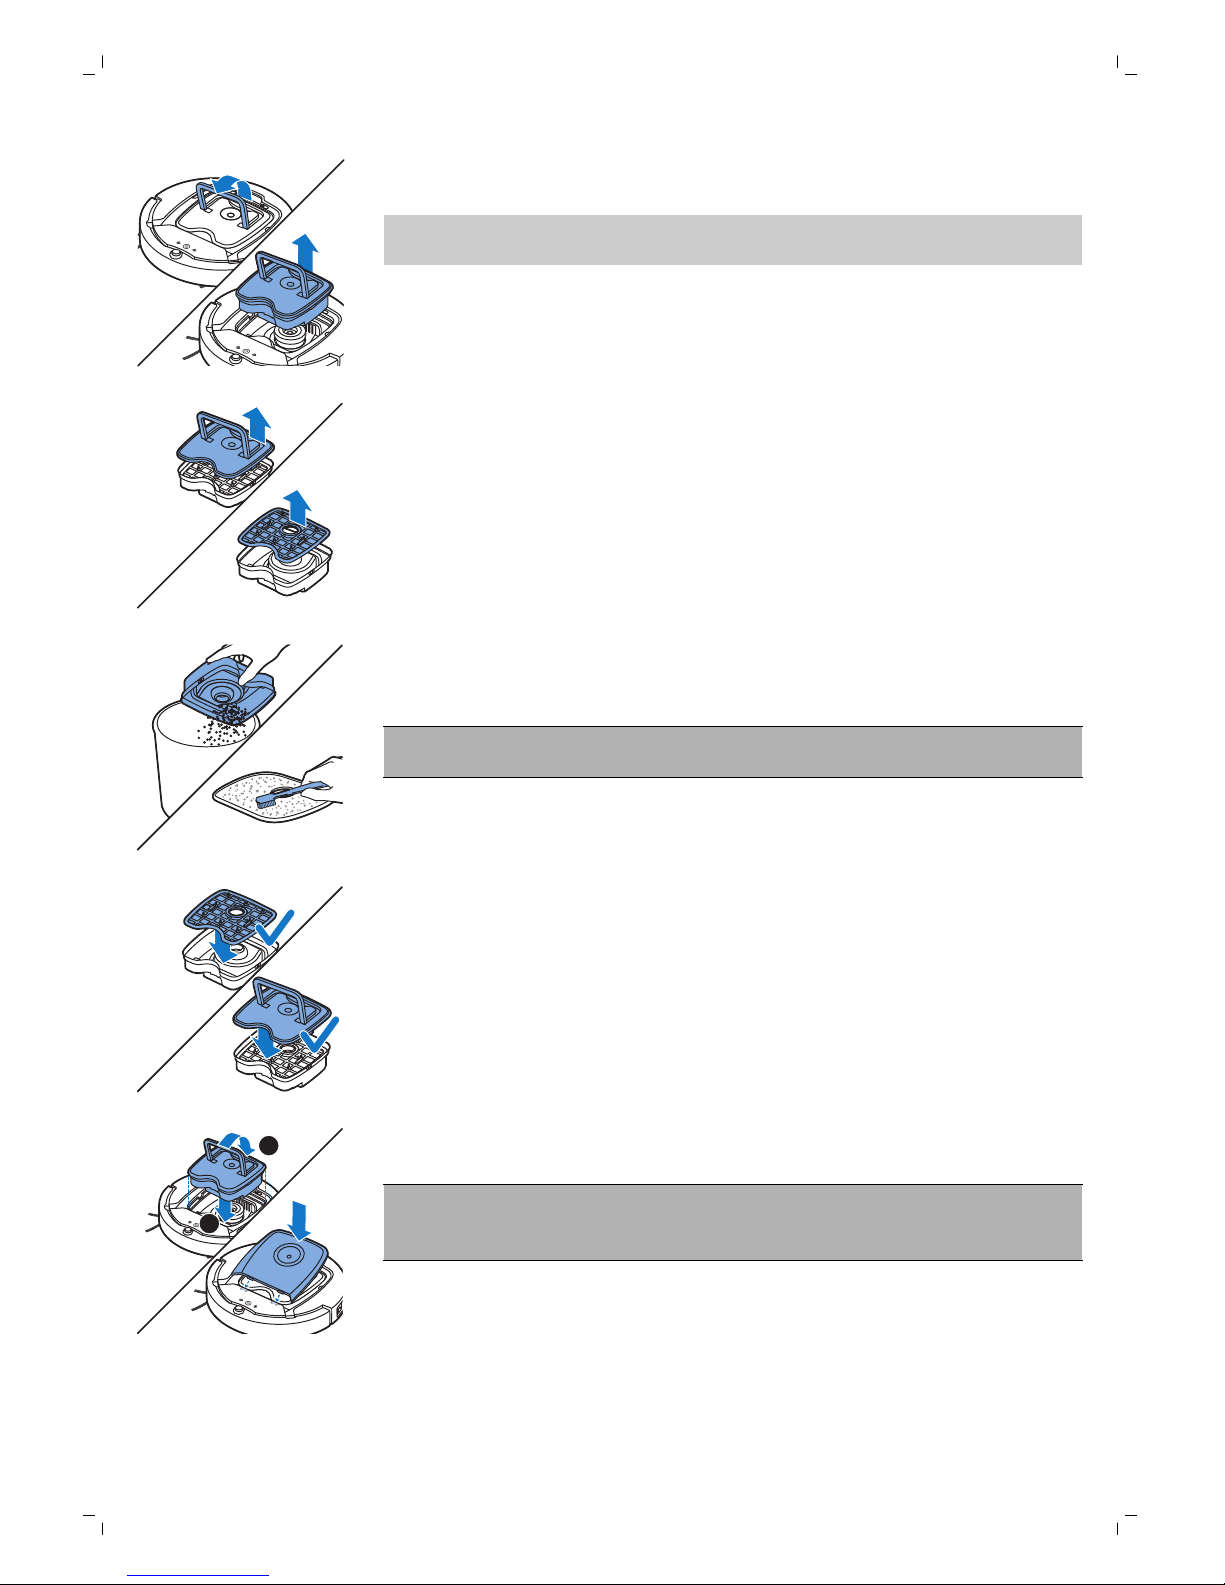
3 Zatáhněte za rukojeť víka nádoby na prach a vyjměte nádobu na prach
z prostoru pro nádobu na prach směrem nahoru.
Poznámka: Když nádobu na prach vyjímáte nebo vracíte na místo, dejte
pozor, abyste nepoškodili lopatky ventilátoru.
4 Opatrně zvedněte víko nádoby na prach (1) a vyjměte filtr (2).
5 Vyklepejte nádobou na prach nad odpadkovým košem. Vyčistěte filtr a
vnitřek nádoby na prach hadříkem nebo kartáčkem s měkkými štětinami.
Vyčistěte i sací otvor v dolní části nádoby na prach.
Upozornění: Nádobu na prach ani filtr nemyjte vodou ani v myčce na
nádobí.
6 Vložte filtr zpět do nádoby na prach (1). Poté nádobu na prach (2)
přikryjte víkem.
1
2
7 Vraťte nádobu na prach zpět do jejího prostoru a vraťte horní kryt robota
na místo.
Upozornění: Vždy se ujistěte, že se v nádobě na prach nachází filtr.
Pokud robota budete používat bez filtru v nádobě na prach, dojde
k poškození motoru.
45
Čeština
Page 46
Objednávání příslušenství
Chcete-li koupit příslušenství nebo náhradní díly, navštivte adresu
www.shop.philips.com/service nebo se obraťte na prodejce výrobků
Philips. Můžete se také obrátit na středisko péče o zákazníky společnosti
Philips ve své zemi (kontaktní údaje naleznete na letáčku s celosvětovou
zárukou).
Výměna
Výměna filtru
Pokud je filtr velmi špinavý nebo poškozený, vyměňte ho. Novou sadu filtrů
si můžete objednat pod typovým číslem FC8066. V části „Vyprazdňování a
čištění nádoby na prach“ v kapitole „Čištění a údržba“ najdete pokyny, jak
filtr vyjmout z nádoby na prach a jak ho vložit zpět.
Výměna postranních kartáčků
Po určité době postranní kartáčky vyměňte, abyste zajistili kvalitní výsledky
čištění.
Postranní kartáčky měňte vždy, když si všimnete známek opotřebení nebo
poškození. Doporučujeme měnit vždy oba kartáčky najednou. Náhradní
postranní kartáčky lze objednat jako součást výměnné soupravy FC8068.
Souprava obsahuje dva filtry a tři suché utěrky.
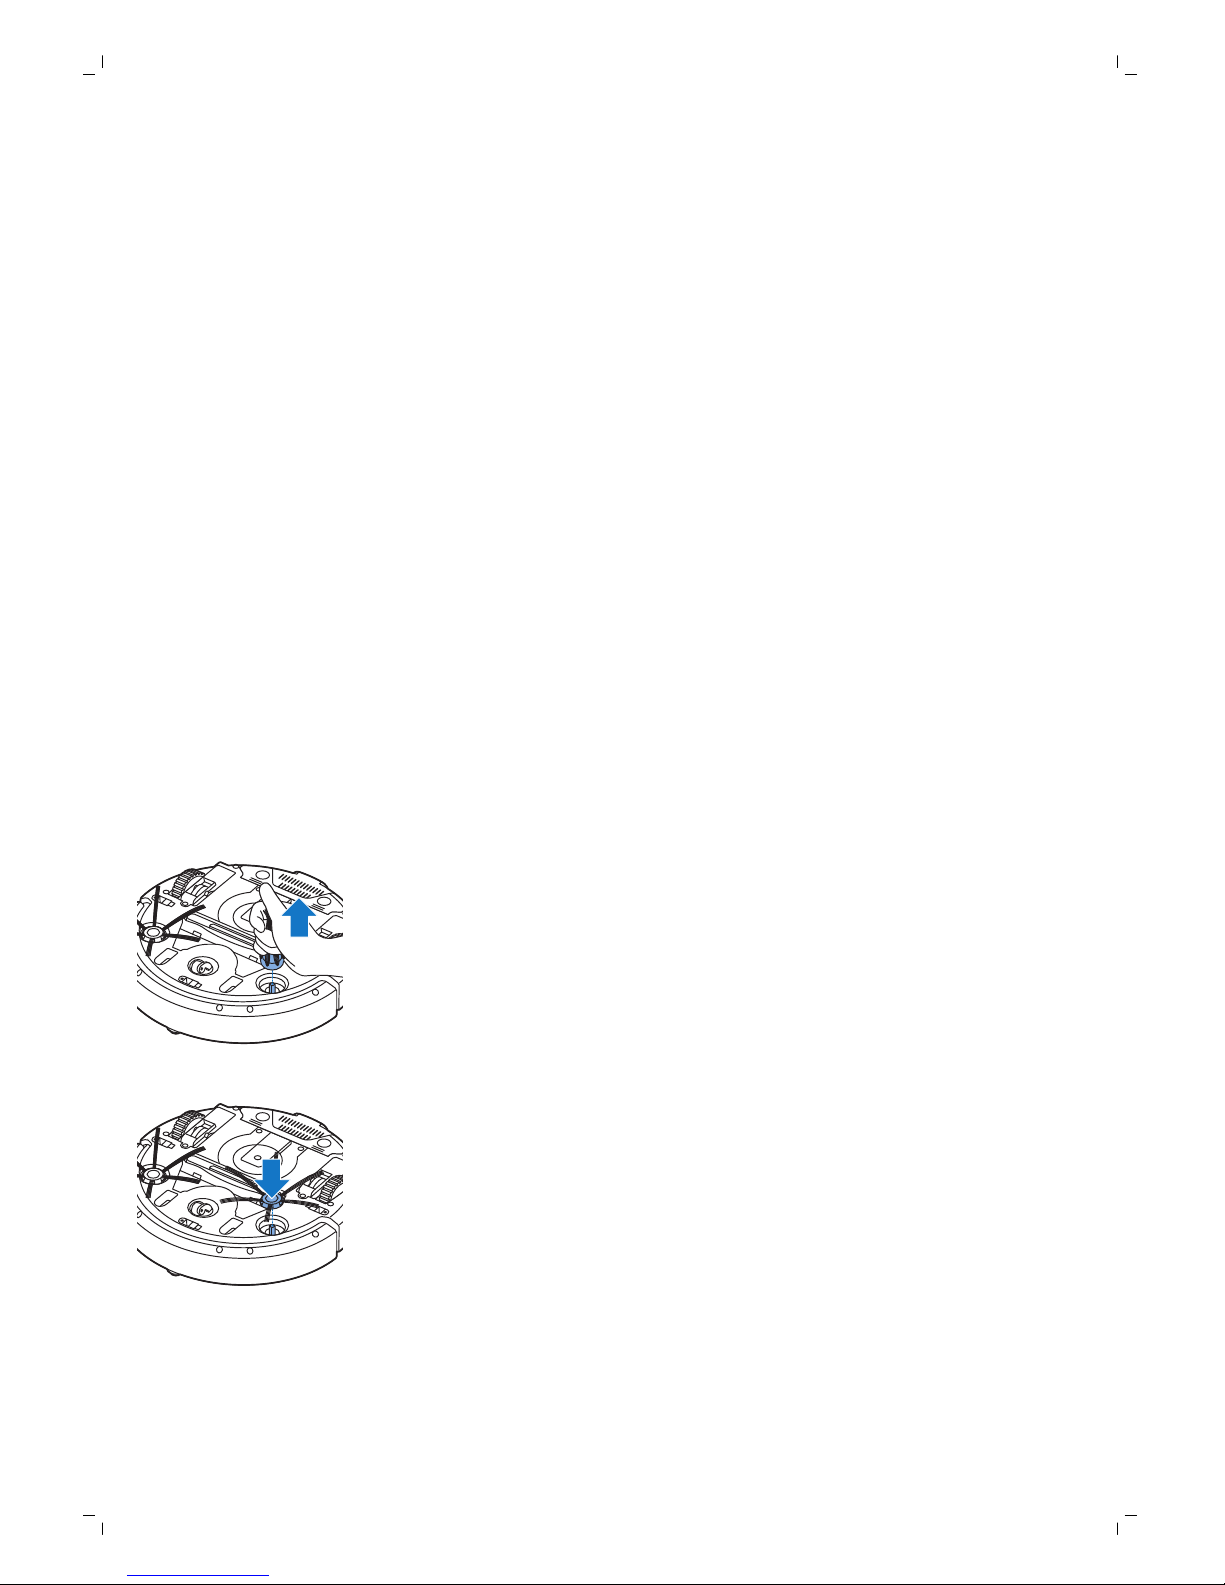
1 Zkontrolujte, že je vypínač v poloze „vypnuto“.
2 Postranní kartáčky, které chcete vyměnit, uchopte za štětiny a stáhněte je
z hřídelí.
3 Nasuňte na hřídel nový postranní kartáček.
46
Čeština
Page 47
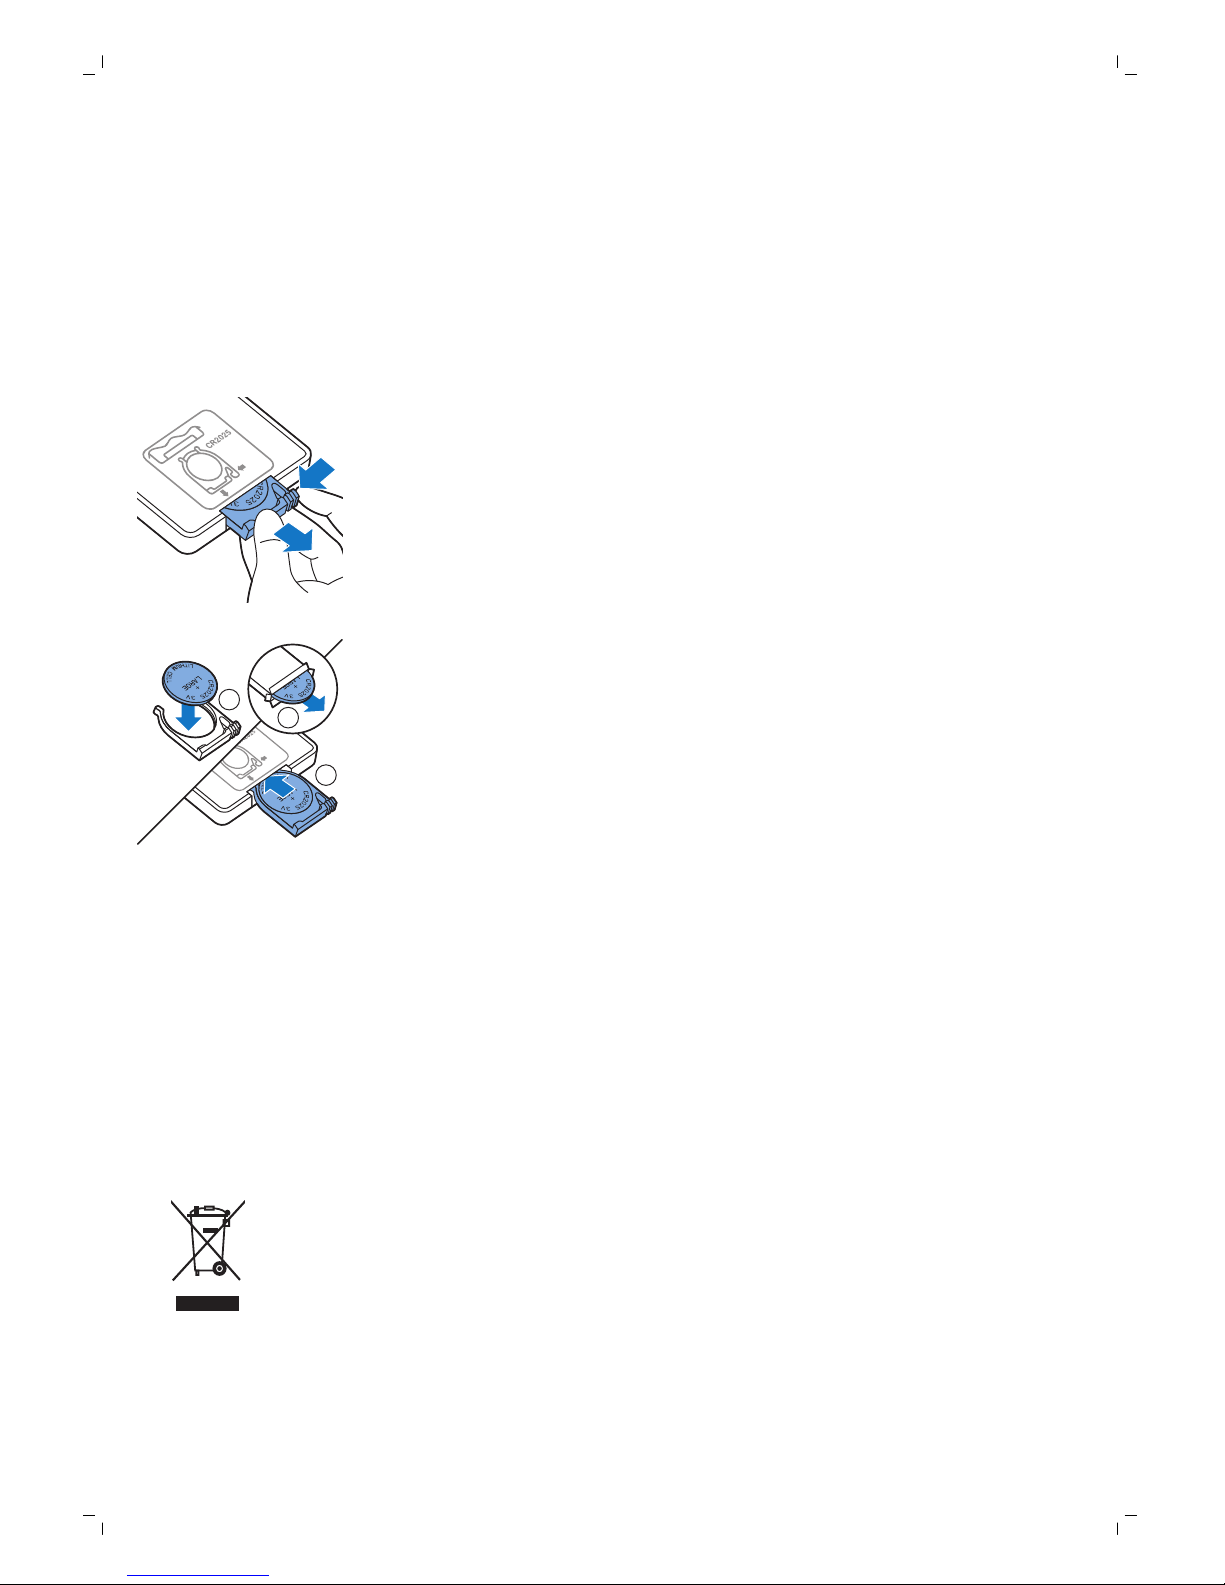
Výměna suchých utěrek
Nové suché utěrky si můžete objednat jako součást výměnné soupravy
FC8068. Výměnná souprava obsahuje také dva postranní kartáčky a dva
filtry.
Výměna baterie dálkového ovladače
Dálkový ovladač je napájen knoflíkovou baterií CR2025. Baterii vyměňte,
pokud robot nereaguje na stisknutí tlačítek dálkového ovladače.
1 Podržte dálkový ovladač vzhůru nohama. Stiskněte uvolňovací tlačítko na
držáku baterie a zároveň z dálkového ovladače vysuňte držák baterie.
2
3
1
2 Vyjměte vybitou baterii z držáku baterie a vložte do něj novou baterii.
Poté držák baterie zasuňte zpět do dálkového ovladače.
Výměna akumulátoru
Výměnu akumulátoru robota smějí provádět pouze kvalifikovaní servisní
technici. Pokud akumulátor nelze nabít nebo dochází k jeho příliš rychlému
vybíjení, odneste robota do autorizovaného servisního střediska Philips, kde
si ho můžete nechat vyměnit. Podrobnosti o středisku zákaznické péče
společnosti Philips ve své zemi naleznete na letáku s mezinárodně platnou
zárukou.
Recyklace
-
Tento symbol znamená, že výrobek nelze likvidovat s běžným
komunálním odpadem (2012/19/EU).
47
Čeština
Page 48
-
Symbol na výrobku znamená, že tento výrobek obsahuje vestavěné
dobíjecí baterie, které nemohou být likvidovány společně s běžným
domácím odpadem (2006/66/ES). Důrazně doporučujeme, abyste
výrobek zanesli do oficiálního sběrného místa nebo servisního střediska
Philips a nechali vyjmutí nabíjecí baterie na odbornících.
-
Dodržujte předpisy vaší země týkající se sběru tříděného odpadu
elektrických a elektronických výrobků a také akumulátorů. Správnou
likvidací pomůžete zabránit negativním dopadům na životní prostředí a
lidské zdraví.
Vyjmutí akumulátoru
Varování: Až budete přístroj likvidovat, vyjměte z něj akumulátor.
Před vyjmutím akumulátoru se ujistěte, že je úplně prázdný.
Při vyjmutí akumulátoru postupujte podle kroků uvedených níže. Můžete
také robota odnést do servisního střediska Philips, kde bude akumulátor
vyjmut. Chcete-li získat adresu svého nejbližšího servisního střediska,
obraťte se na Středisko péče o zákazníky Philips ve vaší zemi.
1 Spusťte robota z libovolného místa v pokoji (a nikoliv z dokovací stanice).
2 Nechte robota zapnutého, dokud se akumulátor nevybije, abyste se
ujistili, že bude akumulátor zcela vybitý, než jej vyjmete z přístroje a
zlikvidujete.
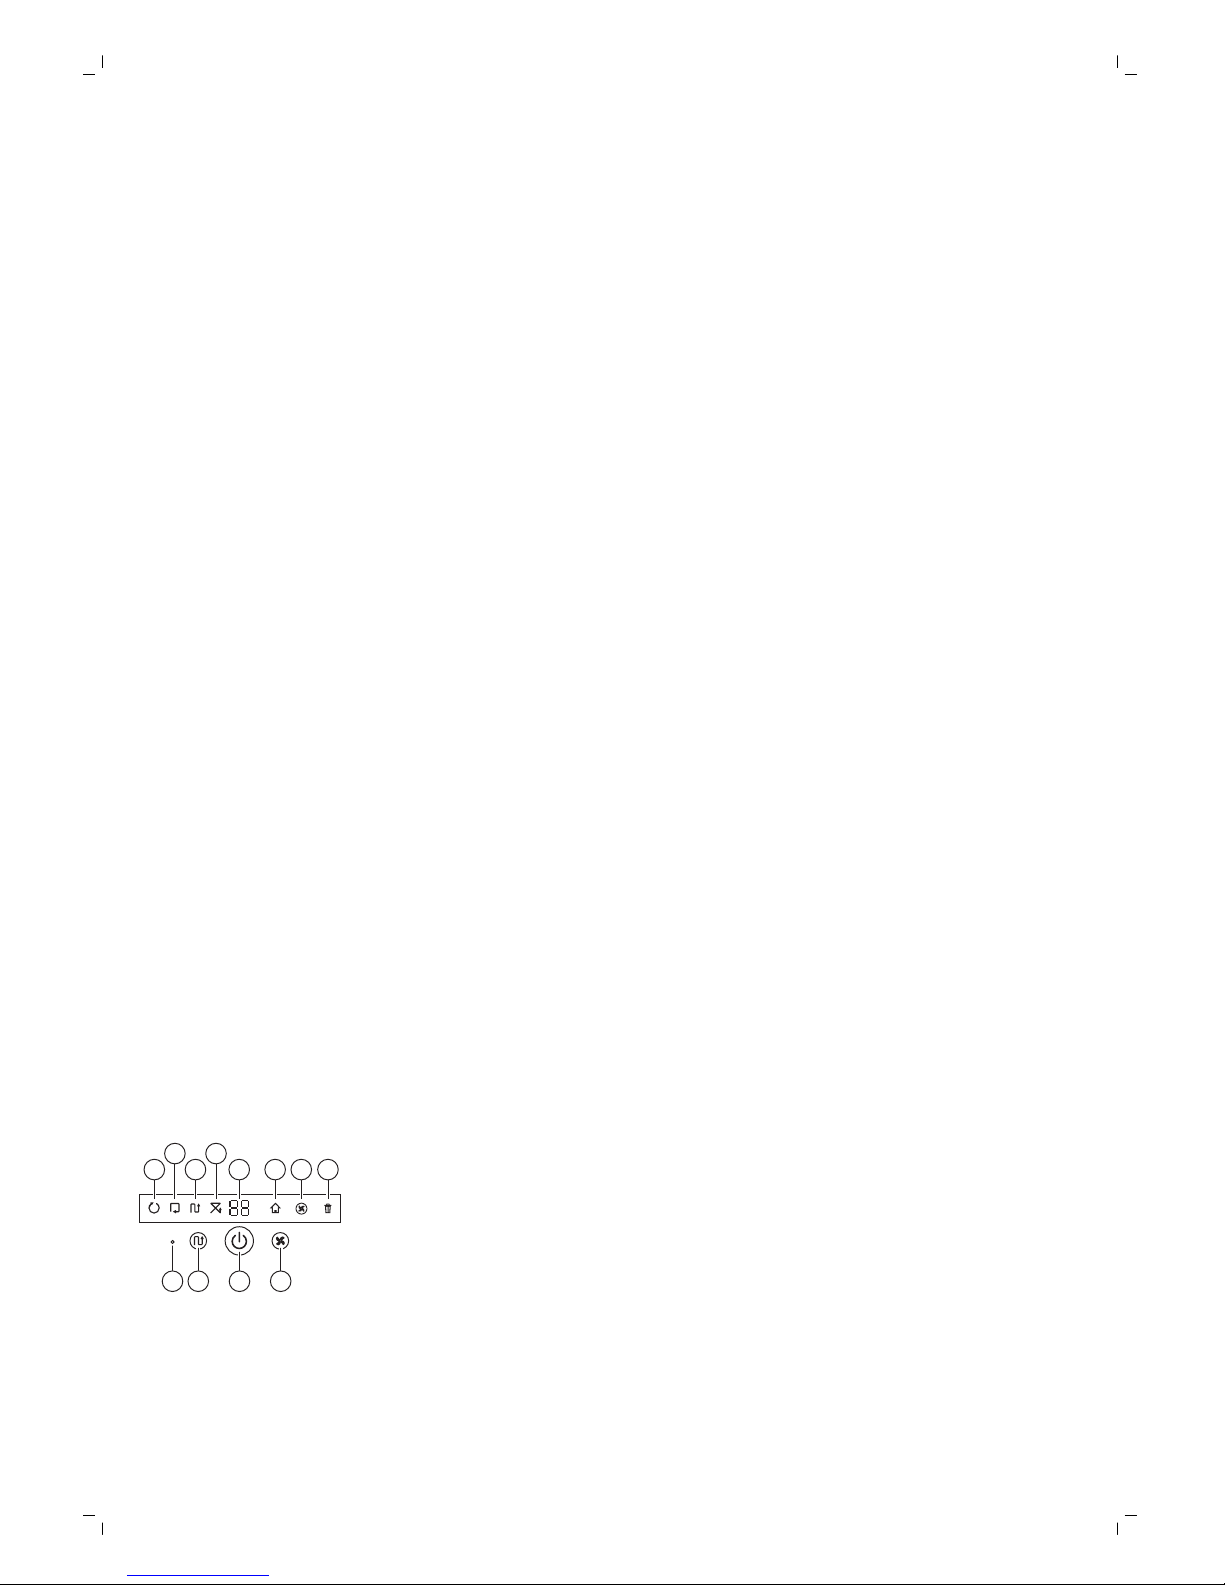
1
3
2
3 Odmontujte šrouby víka přihrádky na baterie a sejměte víko.
this side up
4 Zdvihněte akumulátor a odpojte ho.
5 Odevzdejte robota a akumulátor na sběrné místo pro likvidaci
elektroodpadu.
Řešení problémů
V této kapitole jsou shrnuty nejběžnější problémy, se kterými se můžete
u přístroje setkat. Pokud se vám nepodaří problém vyřešit podle
následujících informací, navštivte web www.philips.com/support, kde
najdete odpovědi na nejčastější dotazy. Případně kontaktujte středisko péče
o zákazníky ve své zemi.
48
Čeština
Page 49

Řešení problémů
Problém
Možná příčina Řešení
Akumulátor je vybitý. Nabijte akumulátor (viz kapitola „Příprava
k použití“).
Malá zástrčka je stále
zapojena v zásuvce robota.
Robota nelze provozovat, je-li napájen ze
sítě. Lze ho napájet pouze z baterie. Proto
před použitím vždy odpojte adaptér od
robota a ze síťové zásuvky.
Po stisknutí tlačítka
spuštění/zastavení robot
nezačne uklízet.
Vypínač není v poloze
„zapnuto“ (I).
Stiskněte vypínač. Stiskněte tlačítko
spuštění/zastavení na robotu nebo na
dálkovém ovladači pro spuštění úklidu.
Zaseklo se jedno nebo obě
kolečka.
Přepněte vypínač do polohy „vypnuto“.
Odstraňte nečistoty, vlasy a kousky nití
nebo drátů, které se zachytily kolem
závěsu kolečka.
Zasekl se jeden nebo oba
postranní kartáčky.
Vyčistěte postranní kartáčky (viz kapitola
„Čištění a údržba“).
Horní kryt chybí nebo není
správně zavřený.
Robot nefunguje, pokud horní kryt chybí
nebo není správně uzavřen. Umístěte horní
kryt na robota správně.
Zasekl se nárazník. Stiskněte tlačítko spuštění/zastavení.
Zvedněte robota, aby se jeho nárazník
uvolnil. Umístěte robota dále od překážky
a stiskněte tlačítko spuštění/zastavení, aby
v čištění pokračoval.
Indikátor varování rychle
bliká.
Robot byl během čištění
zvednut.
Stiskněte tlačítko spuštění/zastavení.
Položte robota na podlahu. Stiskněte
tlačítko spuštění/zastavení, aby robot
pokračoval v čištění.
49
Čeština
Page 50

Problém Možná příčina Řešení
Štětiny jednoho nebo obou
kartáčků jsou zkřivené nebo
ohnuté.
Namočte kartáček nebo kartáčky na chvíli
do teplé vody. Pokud se tímto štětiny
nenarovnají, postranní kartáčky vyměňte
(viz kapitola „Výměna“).
Filtr v nádobě na prach je
znečištěný.
Vyčistěte filtr nádoby na prach hadříkem
nebo kartáčkem s měkkými štětinami. Filtr
a nádobu na prach můžete vyčistit také
pomocí běžného vysavače s nízkým
stupněm sání.
Pokud čištění kartáčkem nebo vysavačem
nepomůže filtr zbavit nečistot, vyměňte
filtr za nový. Doporučujeme filtr vyměnit
alespoň jednou ročně.
Sací otvor v dolní části
nádoby na prach je ucpaný.
Vyčistěte sací otvor (viz kapitola Čištění a
údržba).
Přední kolečko se zaneslo
vlasy nebo jinými nečistotami.
Vyčistěte přední kolečko (viz kapitola
„Čištění a údržba“).
Robot uklízí velmi tmavý
nebo lesklý povrch, který
aktivuje senzory pádu. Robot
se poté pohybuje po
neobvyklých schématech.
Stiskněte tlačítko spuštění/zastavení a
přesuňte robota na světlejší podlahu.
Pokud problém přetrvává i na světlejších
podlahách, navštivte webovou stránku
www.philips.com/support nebo se obraťte
na středisko péče o zákazníky ve své zemi.
Robot neuklízí řádně.
Robot čistí podlahu, která
velmi silně odráží sluneční
světlo. To aktivuje senzory
pádu a způsobuje neobvyklý
pohyb robota.
Zatažením závěsů zabraňte slunečnímu
světlu v přístupu do místnosti. Popřípadě
můžete čištění spustit, až bude slunce
méně svítit.
Akumulátor již není
možné nabít nebo se
velmi rychle vybíjí.
Životnost akumulátoru
skončila.
Vyměňte nabíjecí baterii (viz kapitola
„Výměna“).
Baterie dálkového
ovladače se příliš rychle
vybíjí.
Možná jste do ovladače
vložili špatný typ baterie.
Pro dálkový ovladač potřebujete
knoflíkovou baterii CR2025. Pokud
problém přetrvává, navštivte webovou
stránku www.philips.com/support nebo se
obraťte na středisko péče o zákazníky ve
své zemi.
Robot se pohybuje
v kruzích.
Robot je v režimu bodového
čištění.
Jedná se o normální chování. Spirálový
režim lze aktivovat, když je na podlaze
mnoho špíny, aby bylo zaručeno důkladné
vyčištění. Je také součástí režimu
automatického čištění. Po přibližně jedné
minutě se robot vrátí do svého normálního
úklidového schématu. Spirálový režim
můžete zastavit také tím, že na dálkovém
ovladači zvolíte jiný režim čištění.
50
Čeština
Page 51

Problém Možná příčina Řešení
Robot nemá dost místa, aby
se dostal k dokovací stanici.
Zkuste pro dokovací stanici najít jiné místo.
Viz „Instalace dokovací stanice“ v kapitole
„Příprava k použití“.
Robot stále aktivně
vyhledává.
Dejte robotovi zhruba 20 minut, aby se
vrátil do dokovací stanice.
Robot nemůže najít
dokovací stanici.
Robot nebyl spuštěn
z dokovací stanice.
Pokud chcete, aby se robot po dokončení
čištění vrátil do dokovací stanice, spusťte
ho z ní.
Robot pípá, když je
v dokovací stanici.
Pokoušíte se robota nabít
s vypínačem v poloze
„vypnuto“.
Zapněte robota stisknutím vypínače.
Chybové kódy
Chybový kód
Možná příčina Řešení
E1 Zaseknutá kolečka Odstraňte překážku a tlačítkem
spuštění/zastavení obnovte úklid.
E2 Nesprávně umístěný
horní kryt nebo nádoba
na prach
Nádobu na prach správně vložte do robota a
řádně uzavřete horní kryt robota. Kód chyby
z displeje automaticky zmizí.
E3 Zaseknutý nárazník Odstraňte překážku. Kód chyby z displeje
automaticky zmizí.
E4 Robot není položen na
zemi.
Položte robota zpět na podlahu, kód chyby
z displeje automaticky zmizí.
E5 Příliš tmavá podlaha Umístěte robota na světlejší oblast podlahy.
Vyčistěte senzory pádu.
Nesprávně vložená
baterie
Přečtěte si pokyny v části „Vložení nabíjecí
baterie do robota“ v kapitole „Před prvním
použitím“.
E6
Chyba nabíjení Zkontrolujte, zda je vypínač v poloze
„zapnuto“, když je robot v dokovací stanici.
51
Čeština
Page 52
Magyar
Bevezetés
Köszönjük, hogy Philips terméket vásárolt, és üdvözöljük a Philips világában!
A Philips által biztosított támogatás teljes körű igénybevételéhez regisztrálja
a terméket a www.philips.com/welcome címen.
Általános leírás
1 Portartályfedél fogantyúja
2 Portartály fedele
3 Szűrő
4 Portartály
5 Felső fedél
6 Hibakódok táblázata
7 Ventilátor
8 Ütköző
9 Dokkolóegység érzékelője
10 Bekapcsológomb
11 Első kerék
12 Oldalsó kefetengelyek
13 Mélységérzékelők
14 Kerekek
15 Szívónyílás
16 TriActive XL szívófej
17 Oldalkefék
18 Rögzítő blokkok a száraz törlőkendők számára
19 Száraz törlőkendő tartója
20 Száraz törlőkendők
21 Elemtartó
22 Távvezérlő
23 Láthatatlan fal (FC8822)
24 Dokkolóegység
25 Adapter
26 Kisméretű csatlakozódugasz
Kijelző és távvezérlő
A robot kijelzője
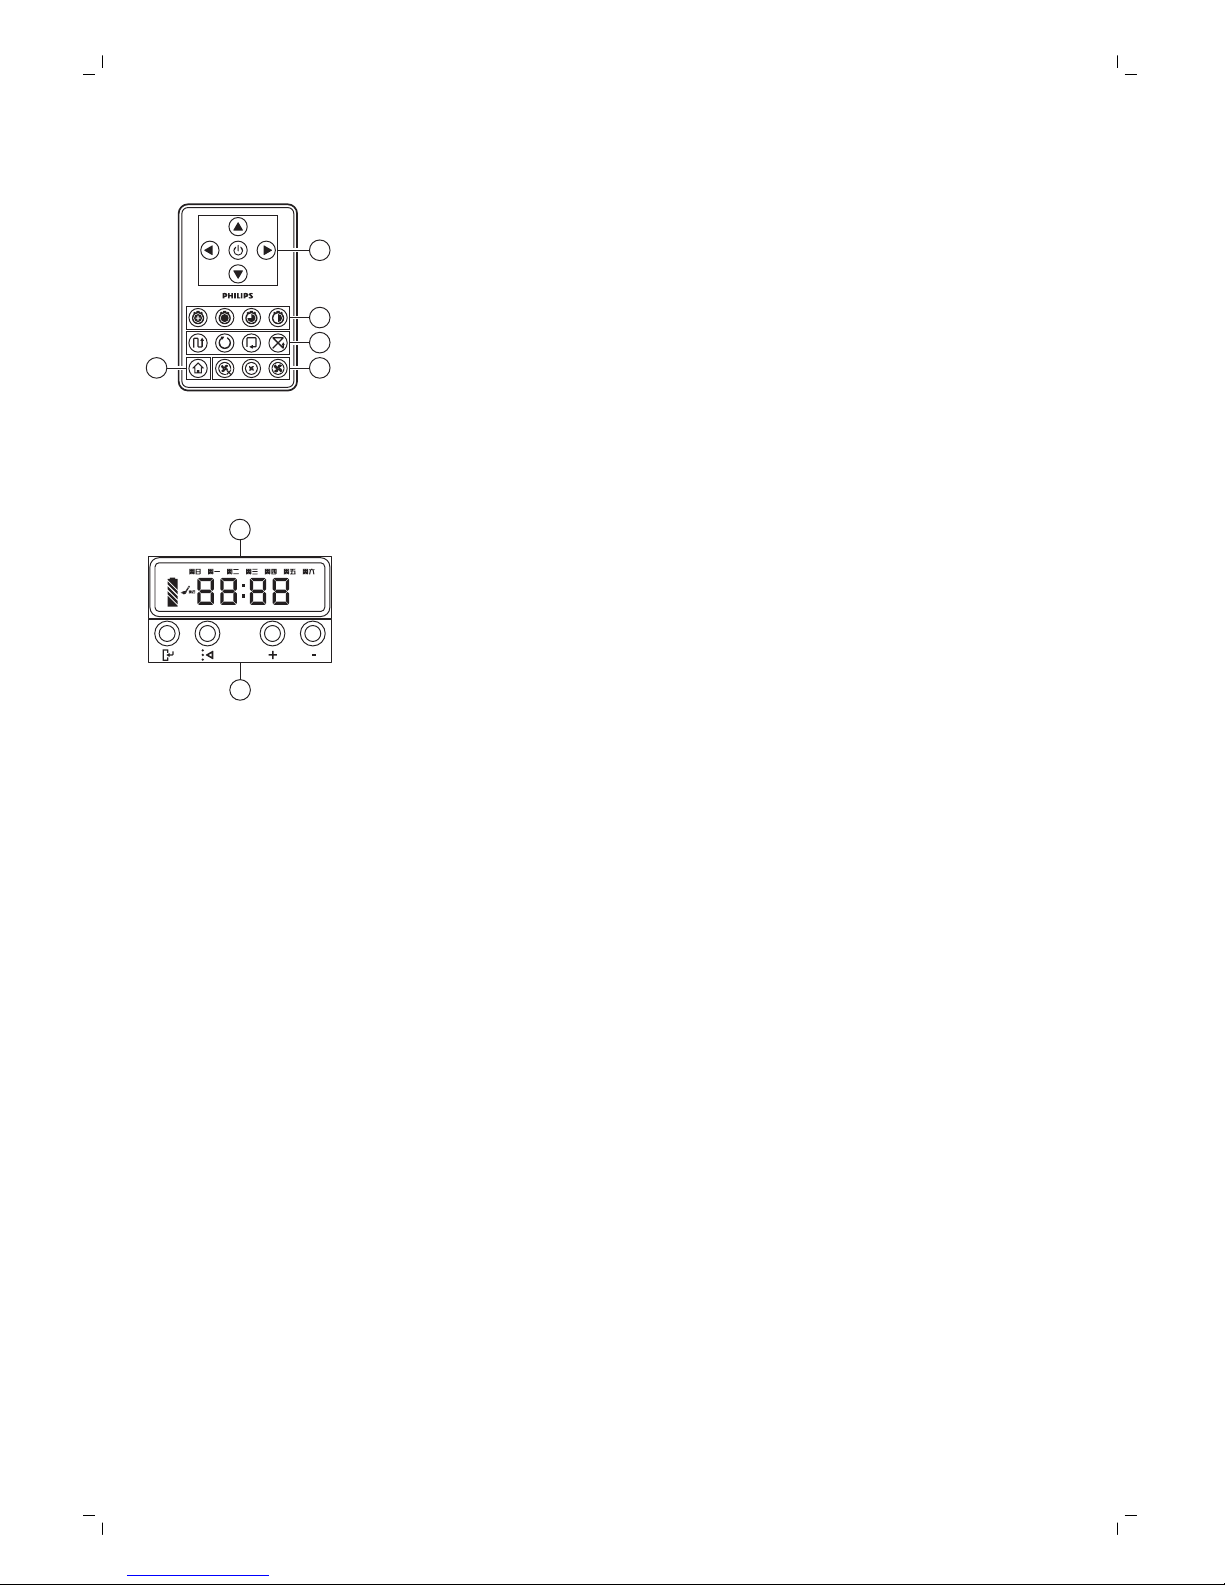
1
1110 129
234
5 6 7 8
1 Spirál mintájú üzemmód jelzőfénye
2 Falkövető üzemmód jelzőfénye
3 Cikcakk minta üzemmód jelzőfénye
4 Véletlenszerű mintájú üzemmód jelzőfénye
5 Tisztítási idő
6 Dokkolás ikon
7 Ventilátorsebesség kijelzője
8 Kukatelítettség-jelző
9 Hangérzékelő
10 Üzemmódválasztó gomb
11 Indítás és leállítás gomb
12 Ventilátorsebesség gombja
52
Magyar
Page 53
Távvezérlő
2
1
3
45
1 Navigációs gombok, illetve start/stop gomb
2 Takarítási idő gombok
3 Takarítási üzemmód gombok
4 Ventilátorsebesség gombjai
5 Dokkolás gomb
Dokkolóegység vezérlőpultja
1
2
1 Kijelző idő, nap és programozás kijelzésével
2 Beállító gombok
Hogyan működik a robotporszívó?
Mit tisztít a robotporszívó?
A robotporszívó olyan funkciókkal van ellátva, amelyeknek köszönhetően
megfelelő segítséget nyújt az otthoni padlótisztításban.
A robotporszívó különösen alkalmas kemény padlók, például fa-, csempevagy linóleumpadlók tisztítására. Puha padlók, például szőnyegek vagy
lábtörlők tisztítása során problémák merülhetnek fel. Ha a robotporszívót
első alkalommal használja szőnyeg vagy lábtörlő tisztítására, maradjon a
közelben, hogy meggyőződjön róla, hogy a készülék alkalmas az ilyen
típusú padlók tisztítására. Fekete és fényes kemény padlók tisztítása során a
robotporszívó szintén felügyeletet igényel.
Hogyan tisztít a robotporszívó?
Tisztítórendszer
A robotporszívó 3 lépcsős tisztítórendszerrel tisztítja hatékonyan a padlót.
53
Magyar
Page 54
-
A két oldalsó kefe segít a robotnak megtisztítani a padlót a sarkokban és
a fal mentén. Ezek továbbá segítenek fellazítani a padlóról a lerakódott
szennyeződést, és továbbítják azt a szívónyíláshoz.
-
A robotporszívó szívóereje felszedi a laza szennyeződést, és a
szívónyíláson keresztül a portartályba szállítja azt.
-
A robotporszívó fel van szerelve egy száraztörlőkendő-tartóval, amely
lehetővé teszi, hogy a kemény padlót száraz törlőkendővel alaposabban
megtisztítsa.
Takarítási minták
Automatikus takarítás üzemmódban a robotporszívó a takarítási minták
automatikus sorozatát használva a szoba minden egyes területét
optimálisan megtisztítja. Az alábbi takarítási mintákat használja:
1 Z minta vagy cikcakk minta
2 Véletlenszerű minta
3 Falkövető minta
54
Magyar
Page 55
4 Spirál minta
A robotporszívó az automatikus takarítási üzemmódban fix sorrendben
végrehajtja a Z mintából, a véletlenszerű, a falkövető és a spirál mintából
álló sorozat mozdulatait.
Ha a robotporszívó befejezte a mintasorozatot, ismét Z mintában kezd el
mozogni. A robotporszívó mindaddig folytatja a mintasorozat végrehajtását
a szoba tisztítása érdekében, amíg az akkumulátor le nem merül, vagy amíg
kézzel ki nem kapcsolja.
Ha a robotporszívó tisztítás közben különösen szennyezett területet érzékel,
akkor a szennyeződés alapos eltávolítása érdekében spirál üzemmódra és
turbó ventilátorsebességre vált.
Megjegyzés: Az egyes üzemmódokat külön is kiválaszthatja, ha megnyomja
a távirányító megfelelő gombját. A kézzel kiválasztott üzemmódok csak
néhány percig maradnak aktívak. Ezt követően a robotporszívó visszatér az
automatikus takarítási üzemmódhoz.
További részletekért lásd „A robotporszívó használata” című fejezet
„Takarítási üzemmódok” című részét.
Hogyan kerüli el a robotporszívó a magasságkülönbségeket?
A robotporszívó alján három mélységérzékelő található. A robotporszívó
ezek segítségével érzékeli és kerüli el a magasságkülönbségeket, például a
lépcsőket.
Megjegyzés: Normális jelenség, hogy a robotporszívó kissé túlmegy a
magasságkülönbségek szélén, mivel az első mélységérzékelője az ütköző
mögött található.
Figyelem! Bizonyos esetekben előfordulhat, hogy a mélységérzékelők
nem érzékelik kellő időben a lépcsőt vagy más magasságkülönbséget.
Ezért az első néhány használat során, vagy amikor lépcső vagy más
magasságkülönbség közelében használja, fordítson kellő figyelmet a
robotporszívóra. Annak érdekében, hogy a robotporszívó megfelelően
észlelje a magasságkülönbségeket, fontos, hogy a mélységérzékelőket
rendszeresen tisztítsa (a további információkat lásd a „Tisztítás és
karbantartás” című fejezetben).
Teendők az első használat előtt
Az oldalsó kefék felszerelése
1 Csomagolja ki az oldalsó keféket, és helyezze a robotot fejjel lefelé egy
asztalra vagy a padlóra.
55
Magyar
Page 56
2 Nyomja rá az oldalsó keféket a robotporszívó alján található tengelyekre.
Megjegyzés: Győződjön meg arról, hogy az oldalsó keféket megfelelően
rögzítette. Nyomja őket a tengelyre mindaddig, amíg a helyükre nem
kattannak.
A címke eltávolítása a távvezérlőről
A távvezérlő egy CR2025 típusú gombelemmel működik. Az elemet
védőcímke védi, amelyet használat előtt el kell távolítani.
1 Húzza ki az elem védőcímkéjét a távvezérlő elemtartó rekeszéből. Ekkor
a távvezérlő készen áll a használatra.
Előkészítés a használatra
A dokkolóegység beszerelése
1
2
1 Csatlakoztassa az adapter kis méretű csatlakozódugóját a dokkolóegység
(1) aljzatába és csatlakoztassa az adaptert a fali aljzatba (2).
-
A dokkolóegység kijelzője bekapcsol.
2 Helyezze a dokkolóegységet vízszintes, sík padlóra a fal előtt.
100 厘米
100 cm
30 厘米30 厘米
30 cm
80
厘米
80 cm
Megjegyzés: Győződjön meg róla, hogy nincsenek akadályok vagy
magasságkülönbségek a dokkolóegység elejétől 80 cm-re, a jobb
oldalától 30 cm-re és a bal oldalától 100 cm-re.
Tipp: Ahhoz, hogy a dokkolóegység biztonságosan rögzítve maradjon a
kiválasztott helyen, rögzítse a falhoz csavarokkal vagy két csíknyi
kétoldalú ragasztószalaggal.
56
Magyar
Teendők az első használat előtt
Az oldalsó
kefék felszerelése
1 Csomagolja ki az oldalsó keféket, és helyezze a robotot fejjel lefelé egy
asztalra vagy a padlóra.
Page 57
Töltés
Az első töltés alkalmával, illetve ha a robotporszívó akkumulátora lemerült, a
töltési idő négy óra.
A robotporszívó feltöltése két módon lehetséges:
-
A dokkolóegységen, manuálisan vagy automatikusan használat közben;
-
A robotporszívó közvetlen csatlakoztatásával a hálózathoz.
Megjegyzés: Ha az akkumulátor teljesen feltöltődött, a robotporszívó akár
120 percig használható tisztításra
Töltés a dokkolóegységen
1 A bekapcsológomb megnyomásával kapcsolja be a robotot.
2 Helyezze a robotot a hálózatra csatlakoztatott dokkolóegységre.
3 Az indítás és leállítás gomb villogni kezd.
Megjegyzés: Mivel első alkalommal tölti fel a robotot, a robotporszívó
kijelzőjén megjelenik az indítási jelzőfény.
4 Amikor az akkumulátor teljesen feltöltődött, a start/stop gomb
folyamatosan világít.
57
Magyar
Page 58
1 Amikor a robotporszívó befejezte a tisztítást, illetve amikor az
akkumulátor töltöttsége már csak 15%, a robotporszívó automatikusan
megkeresi a dokkolóegységet, hogy feltöltődjön. Amikor a robotporszívó
a dokkolóegységet keresi, a start/stop gomb narancssárgán kezd
világítani.
2 Amikor az akkumulátor teljesen feltöltődött, a start/stop gomb
folyamatosan világít.
A szoba előkészítése a tisztításhoz
Mielőtt elindítaná a robotporszívó a tisztító munkamenetét, távolítson el a
padlóról minden laza és törékeny tárgyat. Távolítson el a padlóról minden
kábelt és vezetéket is.
A robotporszívó használata
Indítás és leállítás
1 Állítsa a robotporszívó oldalán található tápkapcsolót „be” állásba.
2 Nyomja meg a start/stop gombot.
-
A start/stop gombot a roboton is megnyomhatja.
-
Másik lehetőségként a távvezérlő start/stop gombját is
megnyomhatja.
3 A start/stop gomb folyamatosan be van kapcsolva, és a robotporszívó
elkezdi a tisztítást.
58
Magyar
Automatikus töltés használat közben
Page 59
4 A robotporszívó mindaddig automatikus takarítási üzemmódban
működik, amíg az akkumulátor le nem merül. Az automatikus takarítási
üzemmódban ismételten végrehajtja a Z mintából, a véletlenszerű, a
falkövető és a spirál mintából álló sorozat mozdulatait.
Megjegyzés: Az egyes üzemmódok kiválasztásához nyomja meg a
távvezérlőn az üzemmód gombok egyikét. További részletekért lásd a
„Takarítási üzemmód kiválasztása” című részt.
5 Ha az akkumulátor lemerült, a start/stop gomb jelzőfénye narancssárgán
kezd világítani, és a robotporszívó megkeresi a dokkolóegységet, hogy
feltöltődjön.
6 A start/stop gomb megnyomásával meg is szakíthatja vagy leállíthatja a
takarítási folyamatot. Ha ismét megnyomja a start/stop gombot, és az
akkumulátor még mindig elegendő energiával rendelkezik, a
robotporszívó automatikus takarítási üzemmódban folytatja a takarítást.
7 Ha azt akarja, hogy a robotporszívó visszatérjen a dokkolóegységre,
mielőtt az akkumulátor lemerülne, nyomja meg a távvezérlőn a dokkolás
gombot. Miután a robotporszívó visszatér a dokkolóegységhez, a
robotporszívó ikonja bekapcsol.
Takarítási üzemmód kiválasztása
Az automatikus takarítási üzemmód mellett, a robotporszívó négy önálló
takarítási üzemmóddal rendelkezik, melyek mindegyike a távvezérlőn lévő
megfelelő gomb megnyomásával aktiválható.
Megjegyzés: A kézzel kiválasztott üzemmódok csak néhány percig
maradnak aktívak. Ezt követően a robotporszívó visszatér az automatikus
takarítási üzemmódhoz.
Z mintájú üzemmód
Z mintájú üzemmódban a robotporszívó Z alakú mozdulatokból álló
hurkokat rajzolva tisztítja a szoba nagy területeit.
59
Magyar
Page 60
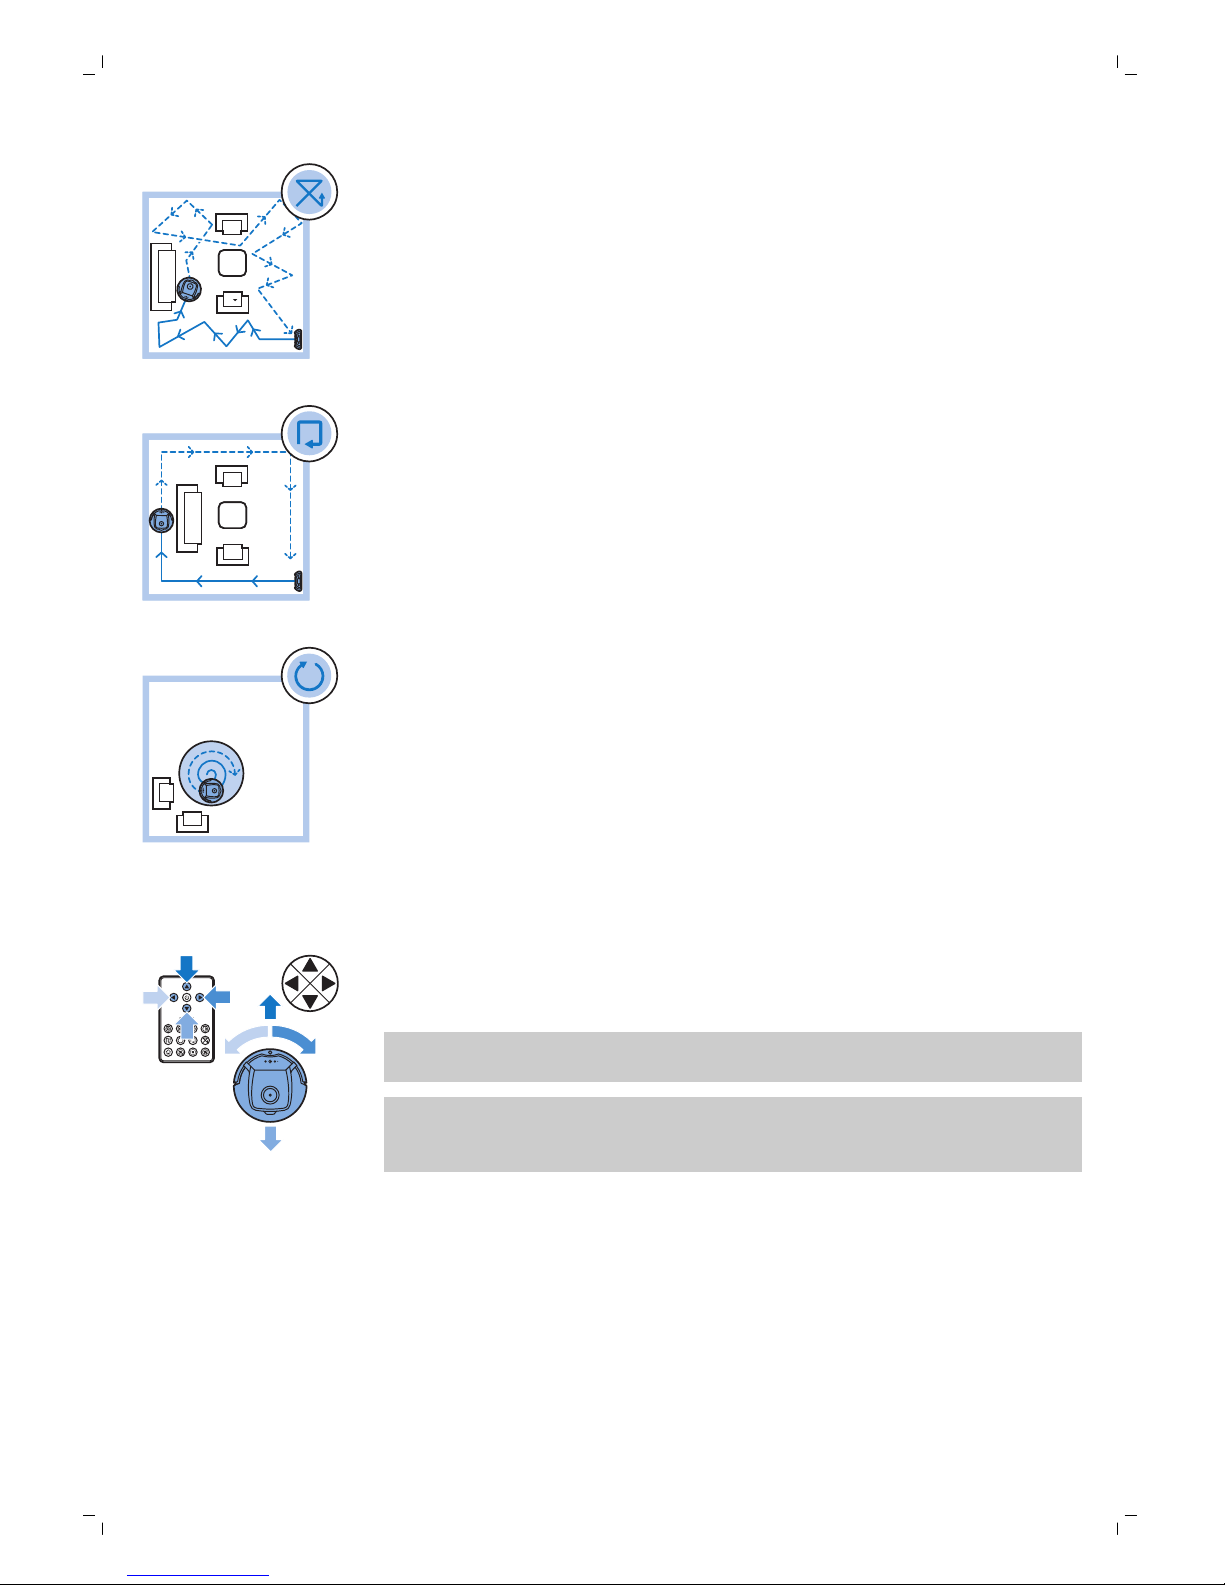
Ebben az üzemmódban a robotporszívó egyenes és cikkcakk
mozdulatokból álló vegyes mintát rajzolva tisztítja a szobát.
Ebben az üzemmódban a robotporszívó követi a szoba falait, és a falak
mentén mozogva tökéletesen megtisztítja az adott területet.
Ebben az üzemmódban a robotporszívó spirális mintájú tisztítást végez egy
kisebb területen. Ha a porérzékelő szennyeződést észlel, a robot a
ventilátort
automatikusan turbó sebességre vált.
Kézi vezérlés
1 A távirányító start/stop gombja felett, alatt, bal, illetve jobb oldalán
található nyílgombok segítségével irányíthatja a robotporszívó mozgását
a szobában.
Megjegyzés: Legyen óvatos, amikor a robotporszívót kézzel működteti
magasságkülönbség vagy lépcső közelében.
Megjegyzés: A porszívózás csak a robotporszívó előre történő haladása
közben történik, illetve az oldalsó kefék is csak ekkor működnek. A balra,
jobbra és hátra gombok csak a robotporszívó irányítására szolgálnak.
60
Magyar
Spirál mintájú üzemmód
Falkövető üzemmód
Véletlenszerű mintájú üzemmód
Page 61
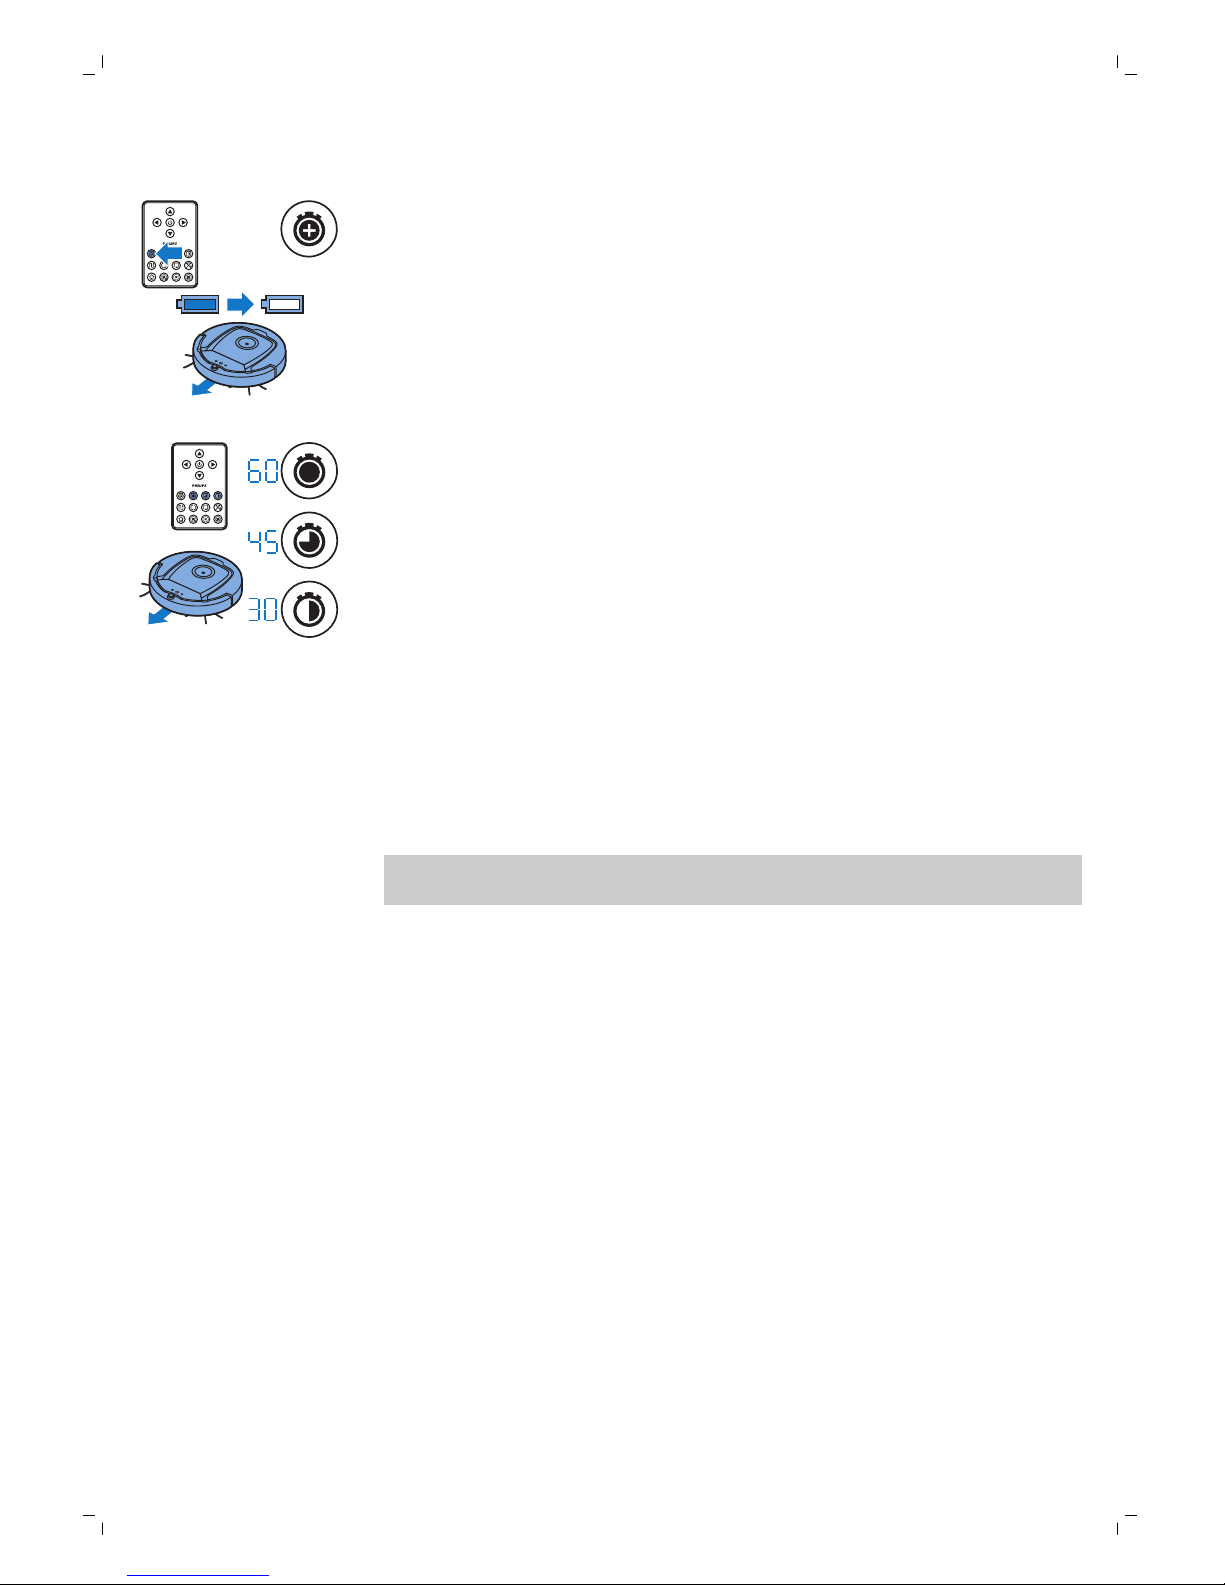
A takarítási idő gombjainak használata
-
Alapértelmezés szerint a robotporszívó mindaddig automatikus takarítási
üzemmódban működik, amíg az akkumulátor le nem merül. A
robotporszívó ezután automatikusan visszatér a dokkolóegységre. Ha a
többi takarítási idő közül választott (lásd lent), az alapértelmezett
üzemmódba való visszalépéshez nyomja meg a maximális takarítási idő
gombot a távvezérlőn.
-
A távvezérlő többi takarítási idő gombja segítségével 60, 45, illetve 30
percig működtetheti a robotot. Ha a robotporszívó befejezte a takarítást,
visszatér a dokkolóegységre, hogy feltöltődjön. A kijelzőn világítani kezd
a dokkolás ikon.
-
Ha nem szeretné, hogy a robotporszívó tisztítás után visszatérjen a
dokkolóegységre, nyomja meg kétszer a tisztítás gombot. A dokkolás ikon
eltűnik a kijelzőről. Ha a tisztítási idő lejár, a robotporszívó leáll.
A dokkolóegység működtetése
Az idő és a nap beállítása az órán
Ha használni kívánja a takarító programokat, először a dokkolóegység
kijelzőjén be kell állítania az órán a hét napját és az időt.
Megjegyzés: Az alábbi lépésekhez tartozó képekért lásd a jelen kézikönyv
hátsó oldalait.
1 Nyomja meg a beállítás gombot. A beállítás üzemmód jelzőfénye és az
óra idejének jelzőfénye villogni kezd.
2 Nyomja meg egyszer a kiválasztás gombot. Az óra értéke villogni kezd.
3 A dokkolóegység + és - gombjaival állítsa be az óra értékét. A kijelzőn
megjelenik a beállított óraérték.
4 Az óra értékének jóváhagyásához nyomja meg a kiválasztás gombot. A
perckijelzés villogni kezd.
5 A dokkolóegységen lévő + és - gomb segítségével beállíthatja a perc
értékét. A beállított percérték a kijelzőn látható.
6 Az percérték jóváhagyásához nyomja meg a kiválasztás gombot. A
vasárnapra vonatkozó „Va” kijelzés villogni kezd.
7 A dokkolóegység + és - gombjaival állítsa be a hét aktuális napját.
8 A hét napjának jóváhagyásához nyomja meg a kiválasztás gombot.
9 A beállított idő és hét napja jóváhagyásához nyomja meg a beállítás
gombot. A beállítás üzemmód jelzőfénye és az óra idejének jelzőfénye
abbahagyja a villogást, és folyamatosan kezd világítani.
61
Magyar
Page 62
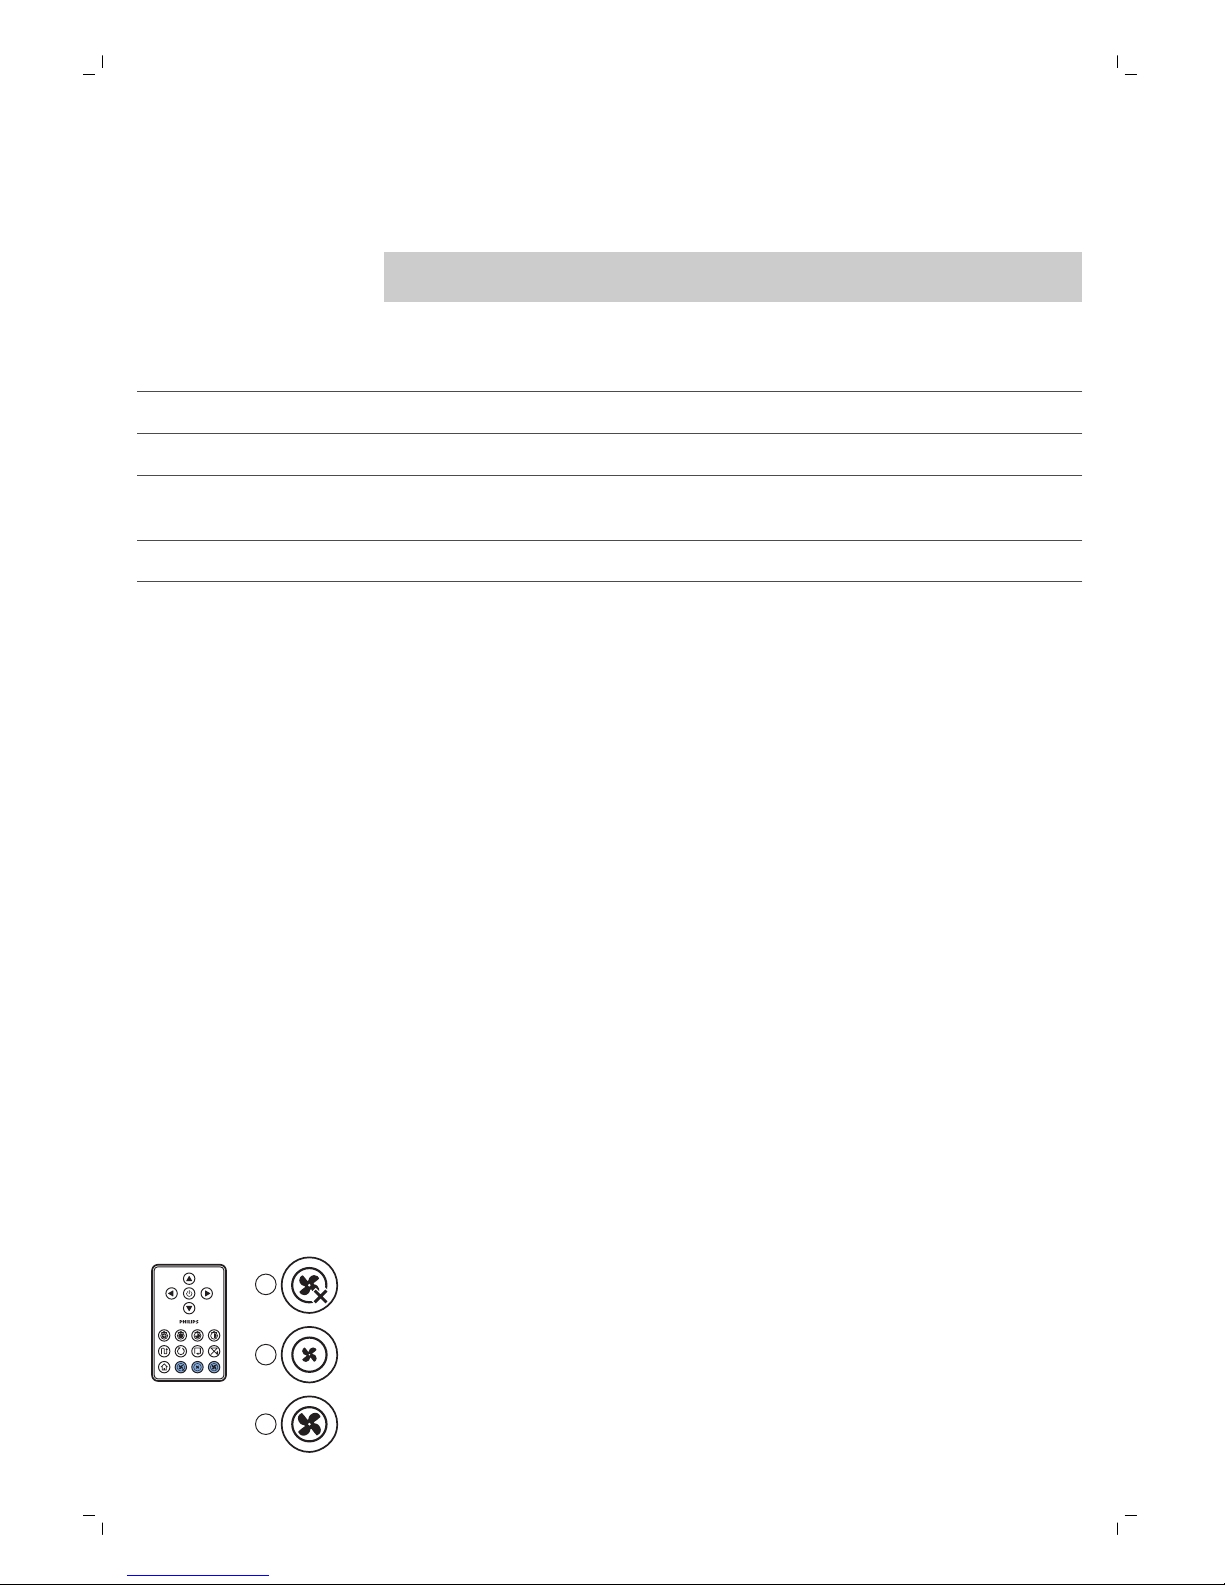
Megjegyzés: Az alábbi lépésekhez tartozó képekért lásd a jelen kézikönyv
hátsó oldalait.
A rendelkezésre álló programozási beállítások:
Program Jelzések a kijelzőn
Takarítás minden nap Az egész napos kijelzések vannak bekapcsolva
Takarítás hétköznapokon A Mo (hétfő) - Fri (péntek) kijelzések vannak bekapcsolva
Takarítás 2 egymást követő napon A 2 nap kijelzése van bekapcsolva, például Fri (péntek) és Sa
(szombat)
Takarítás a hét 1 napján A kijelölt nap kijelzése van bekapcsolva
1 Nyomja meg a beállítás gombot. A beállítás üzemmód jelzőfénye és a
takarítási program jelzőfénye villogni kezd.
2 Nyomja meg egyszer a kiválasztás gombot. Az óra értéke villogni kezd.
3 A dokkolóegységen lévő + és - gomb segítségével beállíthatja az óra
értékét. A beállított óra megjelenik a kijelzőn.
4 Az óra értékének jóváhagyásához nyomja meg a kiválasztás gombot. A
perckijelzés villogni kezd.
5 A dokkolóegységen lévő + és - gomb segítségével beállíthatja a perc
értékét. A beállított percérték a kijelzőn látható.
6 Az percérték jóváhagyásához nyomja meg a kiválasztás gombot. A
vasárnapra vonatkozó „Va” kijelzés villogni kezd.
7 A dokkolóegység + és - gombjaival válthat a takarító programok között (a
rendelkezésre álló programozási beállításokat lásd a fenti táblázatban).
8 A kiválasztott program jóváhagyásához nyomja meg a kiválasztás
gombot.
9 Az programozás jóváhagyásához nyomja meg a beállítás gombot. A
beállítás üzemmód jelzőfénye és a tisztítóprogram jelzőfénye
abbahagyja a villogást, és folyamatosan kezd világítani.
10 Amikor beállított egy tisztítóprogramot, a kijelzőn megjelenik a
tisztítóprogram jelzője, valamint a kiválasztott nap vagy napok. Ha a
robotporszívót készenléti állapotban hagyja, és az akkumulátor teljesen
fel van töltve, akkor a robotporszívó a beprogramozott napon vagy
napokon, a beprogramozott időpontban elkezdi a takarítást.
Ventilátorsebesség gombjai
A ventilátor sebességét szabályozó gombokkal ventilátor sebességét turbó
fokozatig növelheti, vagy kikapcsolhatja a ventilátort. Az alapértelmezett
beállítás a normál ventilátorsebesség.
1
2
3
1 Nyomja meg ezt a gombot a ventilátor kikapcsolásához
2 Nyomja meg ezt a gombot a ventilátor normál sebességű
bekapcsolásához.
3 A turbó ventilátor gomb növeli a ventilátor sebességét.
62
Magyar
A takarítási idők programozása
Ha a dokkolóegység kijelzőjén beállította a hét napját és az időt,
beprogramozhatja a robotporszívó takarítási időit.
Page 63
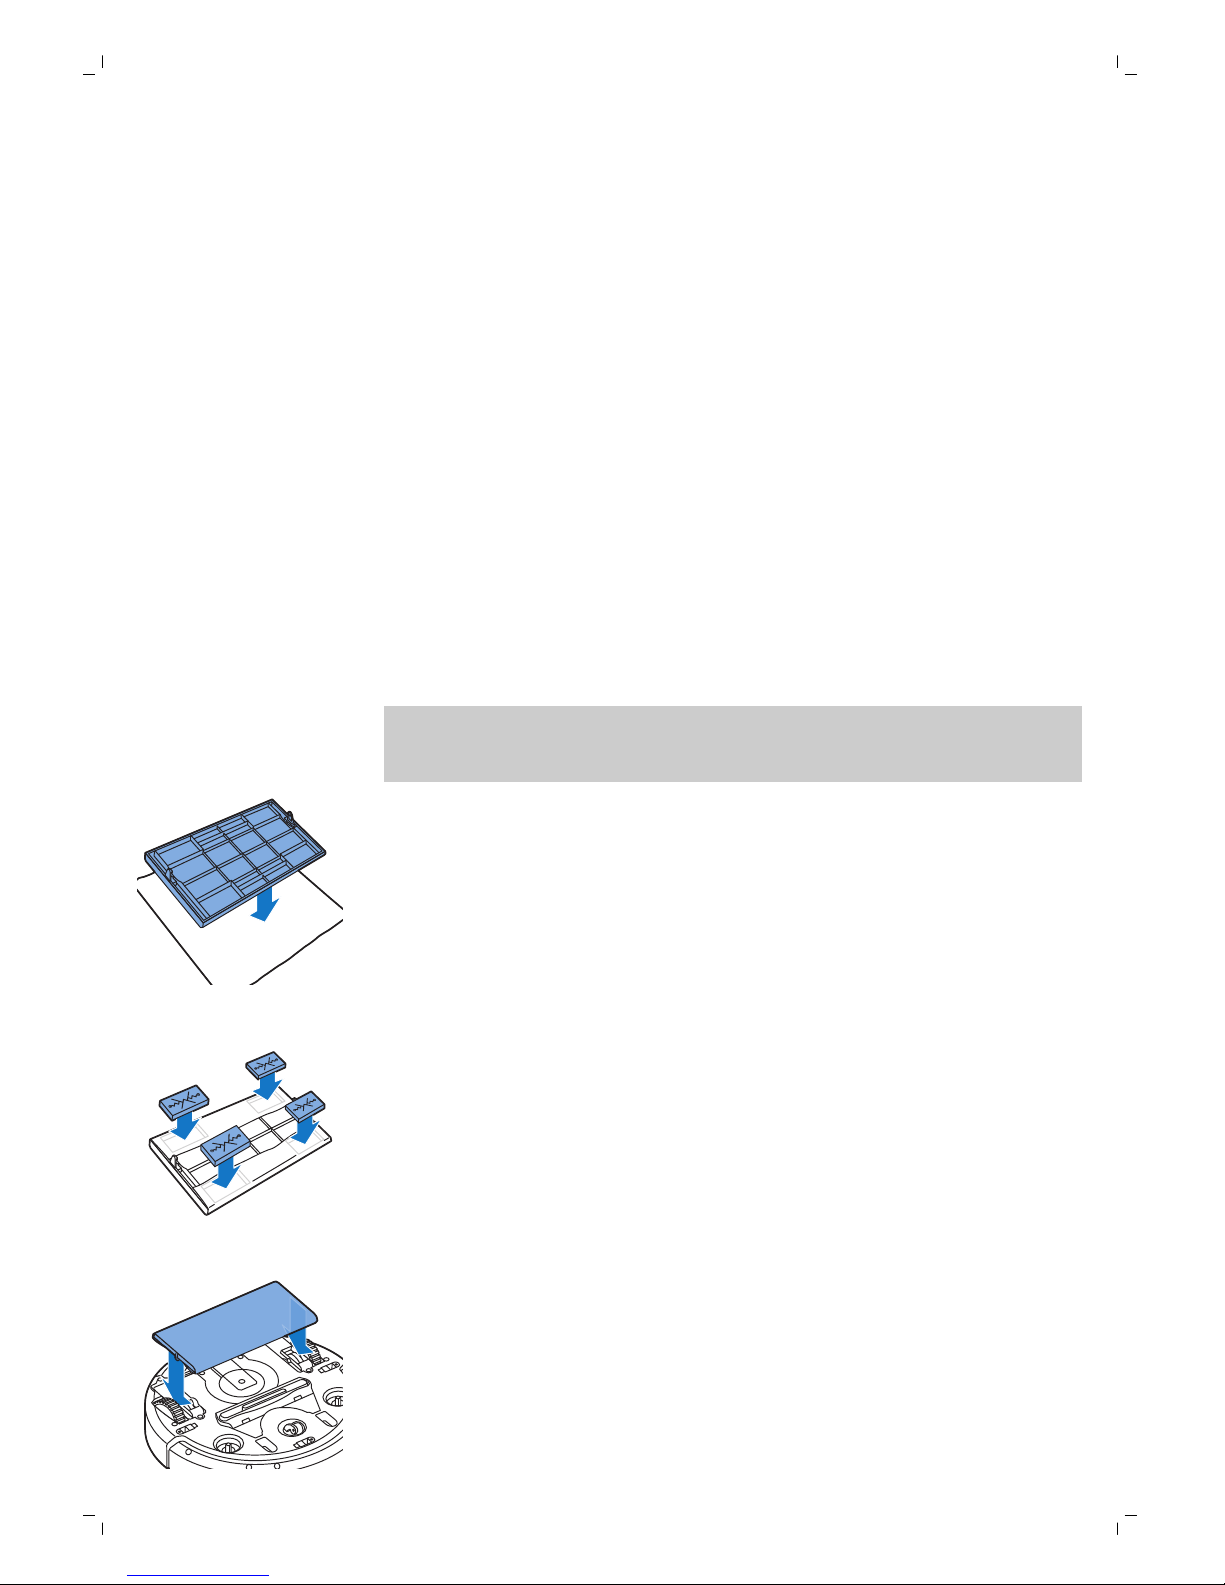
-
amikor 20 perc alatt nem találta meg a dokkolóegységet
Ha nem látja a robotporszívót, akkor úgy találhatja meg, hogy egyet tapsol a
kezével. A robotporszívó ekkor hangjelzéssel és a kijelzőn az összes ikon
világításával válaszol.
A száraz törlőkendős tartozék használata
A száraz törlőkendős tartozék egy olyan funkció, amely lehetővé teszi a
kemény padlók száraz törlőkendővel történő tisztítását.
Megjegyzés: Ha a száraz törlőkendős tartozékot használja, előfordulhat,
hogy a robotporszívó számára nehézséget okoz a küszöbökön való
áthaladás és a szőnyegekre való felgördülés.
A száraz törlőkendős tartozék előkészítése a használathoz
1 Fordítsa fejjel lefelé a robotot, és helyezze a padlóra vagy egy asztalra.
2 Helyezze a száraz törlőkendőt egy asztalra, és helyezze a száraz
törlőkendős tartozékot a kendőre úgy, hogy a rögzítőfülek Ön felé
nézzenek.
3 Hajtsa a száraz törlőkendő mindkét végét a száraz törlőkendős tartozék
köré, és a rögzítő blokkokat a mélyedésekbe nyomva erősítse a száraz
törlőkendőt a tartozékra.
4 Helyezze be a száraz törlőkendős tartozék rögzítő fülét a robotporszívó
egyik oldalán közvetlenül a kerék mögött lévő nyílásba, és addig nyomja,
amíg nem hallja, hogy az a helyére pattant. Ezután ismételje meg ezeket
a lépéseket a másik oldalon is.
5 Fordítsa vissza a robotot, és helyezze a padlóra a kerekeire úgy, hogy a
száraz törlőkendős tartozék érintkezzen a padlóval.
63
Magyar
Válasz tapssal
Ez az üzemmód akkor lép működésbe, amikor a robotporszívó alvó
üzemmódba lép a következő helyzetekben:
-
amikor egy hiba miatt abbahagyja a takarítást
-
amikor rövid takarítási időt programozott be
Page 64
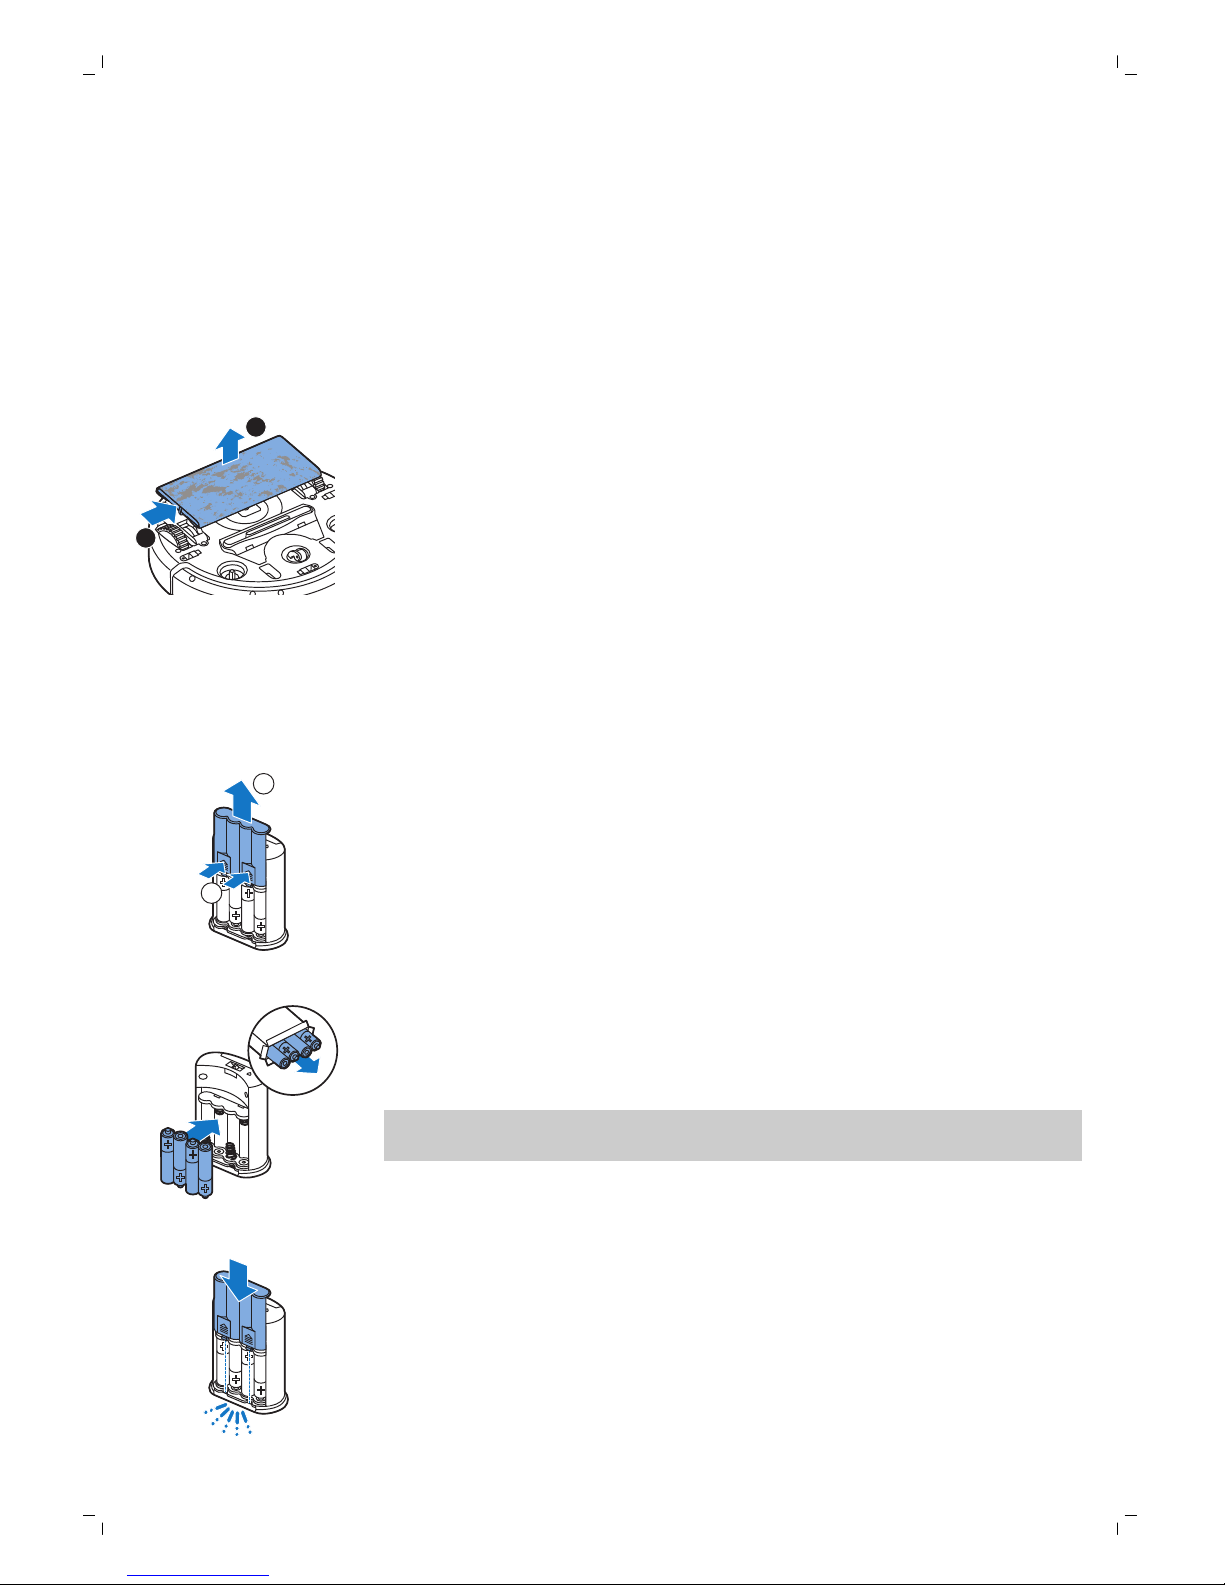
2 Fordítsa fejjel lefelé a robotot, és helyezze a padlóra vagy egy asztalra.
1
2
3 A kioldásához nyomja a száraz törlőkendős tartozék egyik végét a
robotporszívó másik oldalán lévő kerék irányába. Ezután húzza le a
tartozékot a robotporszívóról.
A láthatatlan fal használata (FC8822)
Az elemek behelyezése a láthatatlan falba
A láthatatlan fal négy AA elemmel működik.
1
2
1 Nyomja meg a hátsó fedél (1) alján található két kioldófület, majd
csúsztassa a hátsó fedelet felfelé, és vegye le a láthatatlan falról (2).
2 Vegyen ki a csomagból négy új AA elemet, és helyezze be őket a
láthatatlan fal elemtartó rekeszébe.
Megjegyzés: Ügyeljen arra, hogy az akkumulátorok + és – pólusai a
megfelelő helyzetben legyenek.
3 Csúsztassa vissza a hátsó fedelet a láthatatlan falra.
64
Magyar
A robotporszívó használata a száraz törlőkendős
tartozékkal
Ha fel van szerelve a száraz törlőkendős tartozék, a robotporszívó bármilyen
üzemmódban és mindenféle kemény padló tisztítására alkalmas. Ne
használja a száraz törlőkendős tartozékot szőnyegekhez vagy lábtörlőkhöz.
A száraz törlőkendős tartozék leszerelése
1 Szerelje le a száraz törlőkendős tartozékot, amint befejezte a padló
feltörlését.
Page 65
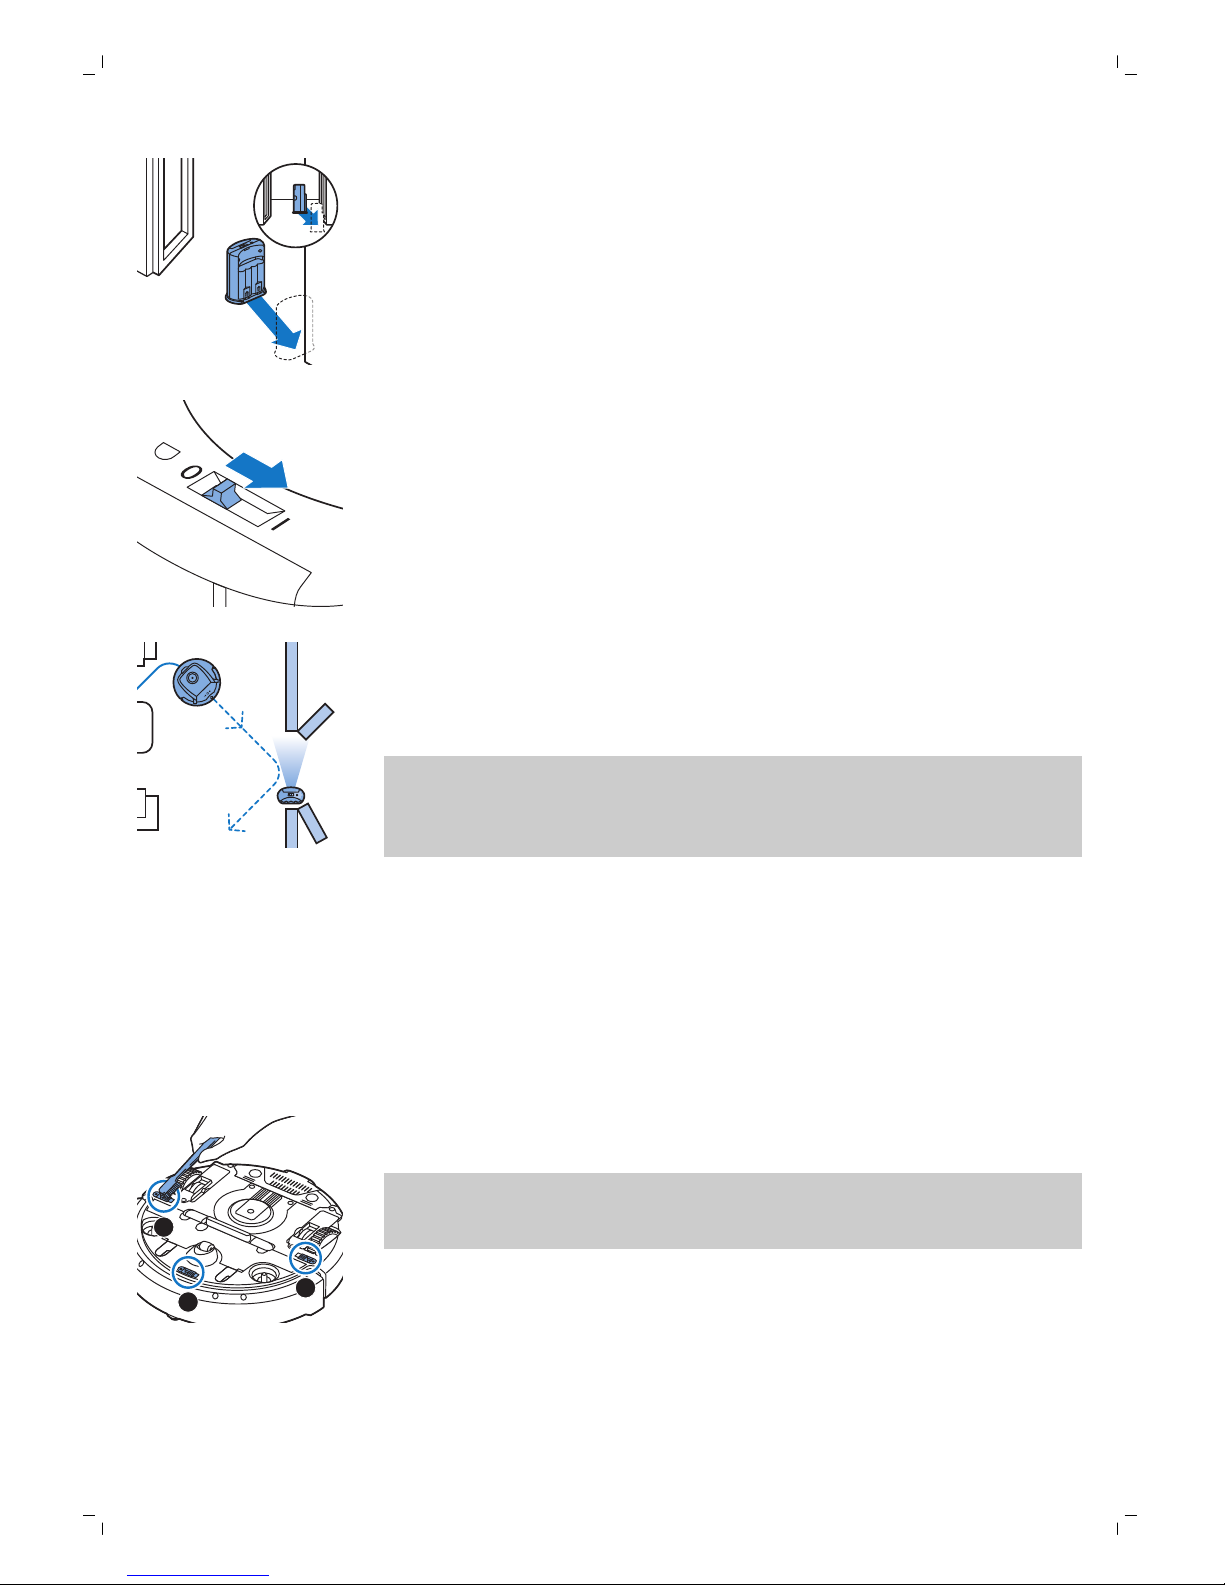
1 Helyezze az egységet egy olyan pontra, amelyen túl nem szeretné
engedni a robotporszívót, pl. egy olyan helyiség nyitott ajtajának a
közelébe, amelybe a robotporszívó nem mehet be.
2 Kapcsolja be a láthatatlan falat a tetején található be-/kikapcsoló
gombbal.
3 Indítsa el a robotporszívót.
4 Ha a robotporszívó túl közel megy a láthatatlan falhoz, annak jelzőfénye
villogni kezd, és a láthatatlan fal egy infravörös fénysugarat bocsát ki. Az
infravörös fénysugár arra kényszeríti a robotot, hogy módosítása az
útvonalát, és távolodjon el a láthatatlan faltól.
Megjegyzés: A láthatatlan fal használatakor rendszeresen ellenőrizze, hogy
az akkumulátorok töltöttsége megfelelő-e. Ennek ellenőrzéséhez kapcsolja
ki majd újra be a láthatatlan falat. Ha az akkumulátorok töltöttsége
megfelelő, a láthatatlan falon található LED röviden felvillan.
Tisztítás és karbantartás
A robotporszívó tisztítása
A kiváló tisztító teljesítmény fenntartása érdekében rendszeresen tisztítsa
meg a mélységérzékelőket, a kerekeket, az oldalsó keféket és a szívónyílást.
1 Helyezze a robotot fejjel lefelé egy sima felületre.
3
1
2
2 Egy puha sörtéjű kefével (pl. fogkefével) távolítsa el a port és a szöszt a
mélységérzékelőkről.
Megjegyzés: Fontos, hogy a mélységérzékelőket rendszeresen tisztítsa.
Ha az érzékelők szennyezettek, a robotporszívó nem észleli megfelelően
a magasságkülönbségeket.
65
Magyar
A láthatatlan fal elhelyezése a robotporszívó leállításához
A láthatatlan fal segítségével megakadályozhatja, hogy a robotporszívó
olyan helyiségbe vagy területre is bemenjen, ahová nem szeretné.
Page 66
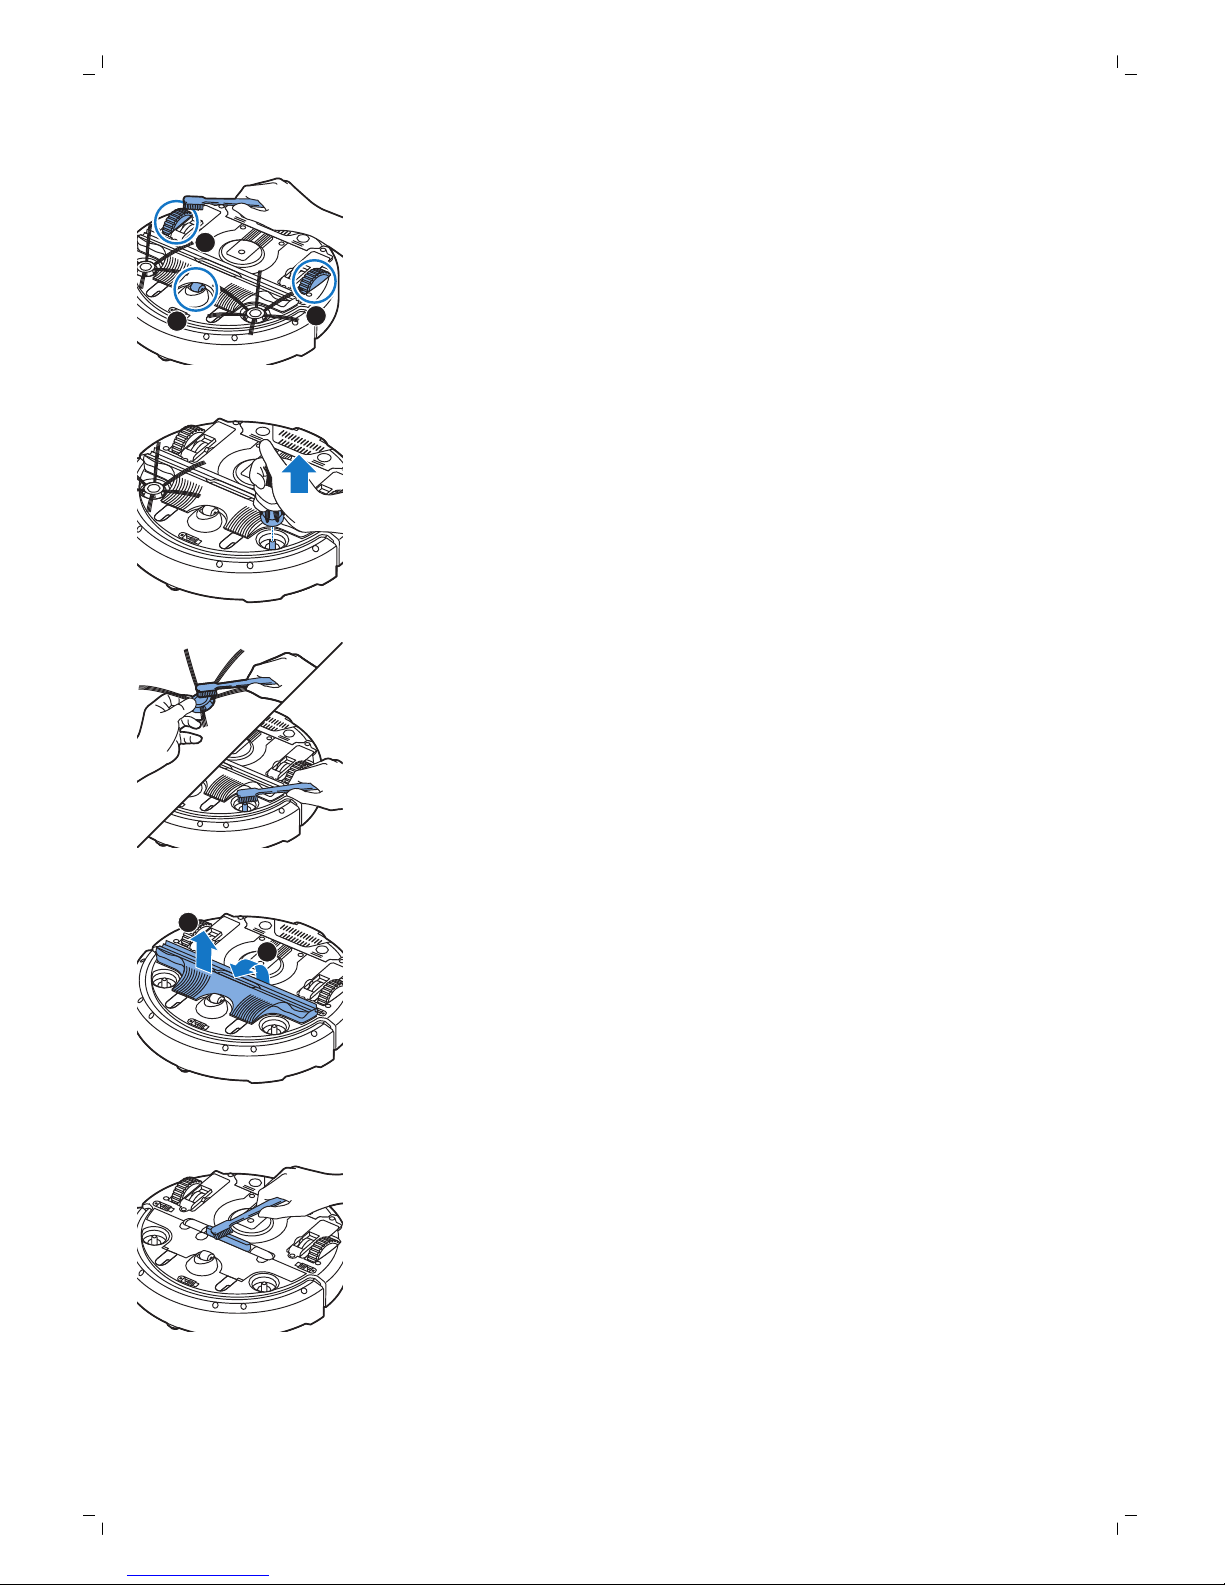
1
2
3
3 Egy puha sörtéjű kefével (pl. fogkefével) távolítsa el a port és a szöszt az
első kerékről és az oldalsó kerekekről.
4 Az oldalsó kefék tisztításához fogja meg azok sörtéit, és húzza le a
keféket a tengelyekről.
5 Egy puha kefével (pl. fogkefével) vagy ruhával távolítsa el a szöszöket,
hajszálakat és cérnaszálakat a tengelyről és az oldalkeféről.
6 Ellenőrizze, hogy az oldalsó kefékből és a robotporszívó aljából nem
állnak-e ki éles tárgyak, amelyek megsérthetik a padlót.
1
2
7 Nyissa szét a TriActive XL szívónyílás pattintó csatlakozóit: ehhez
helyezze ujjait a nyilakkal jelölt helyre, majd húzza le a TriActive
szívófejet a robotporszívóról.
8 Tisztítsa meg a szívónyílást egy puha kefe (pl. egy fogkefe) segítségével.
66
Magyar
Page 67
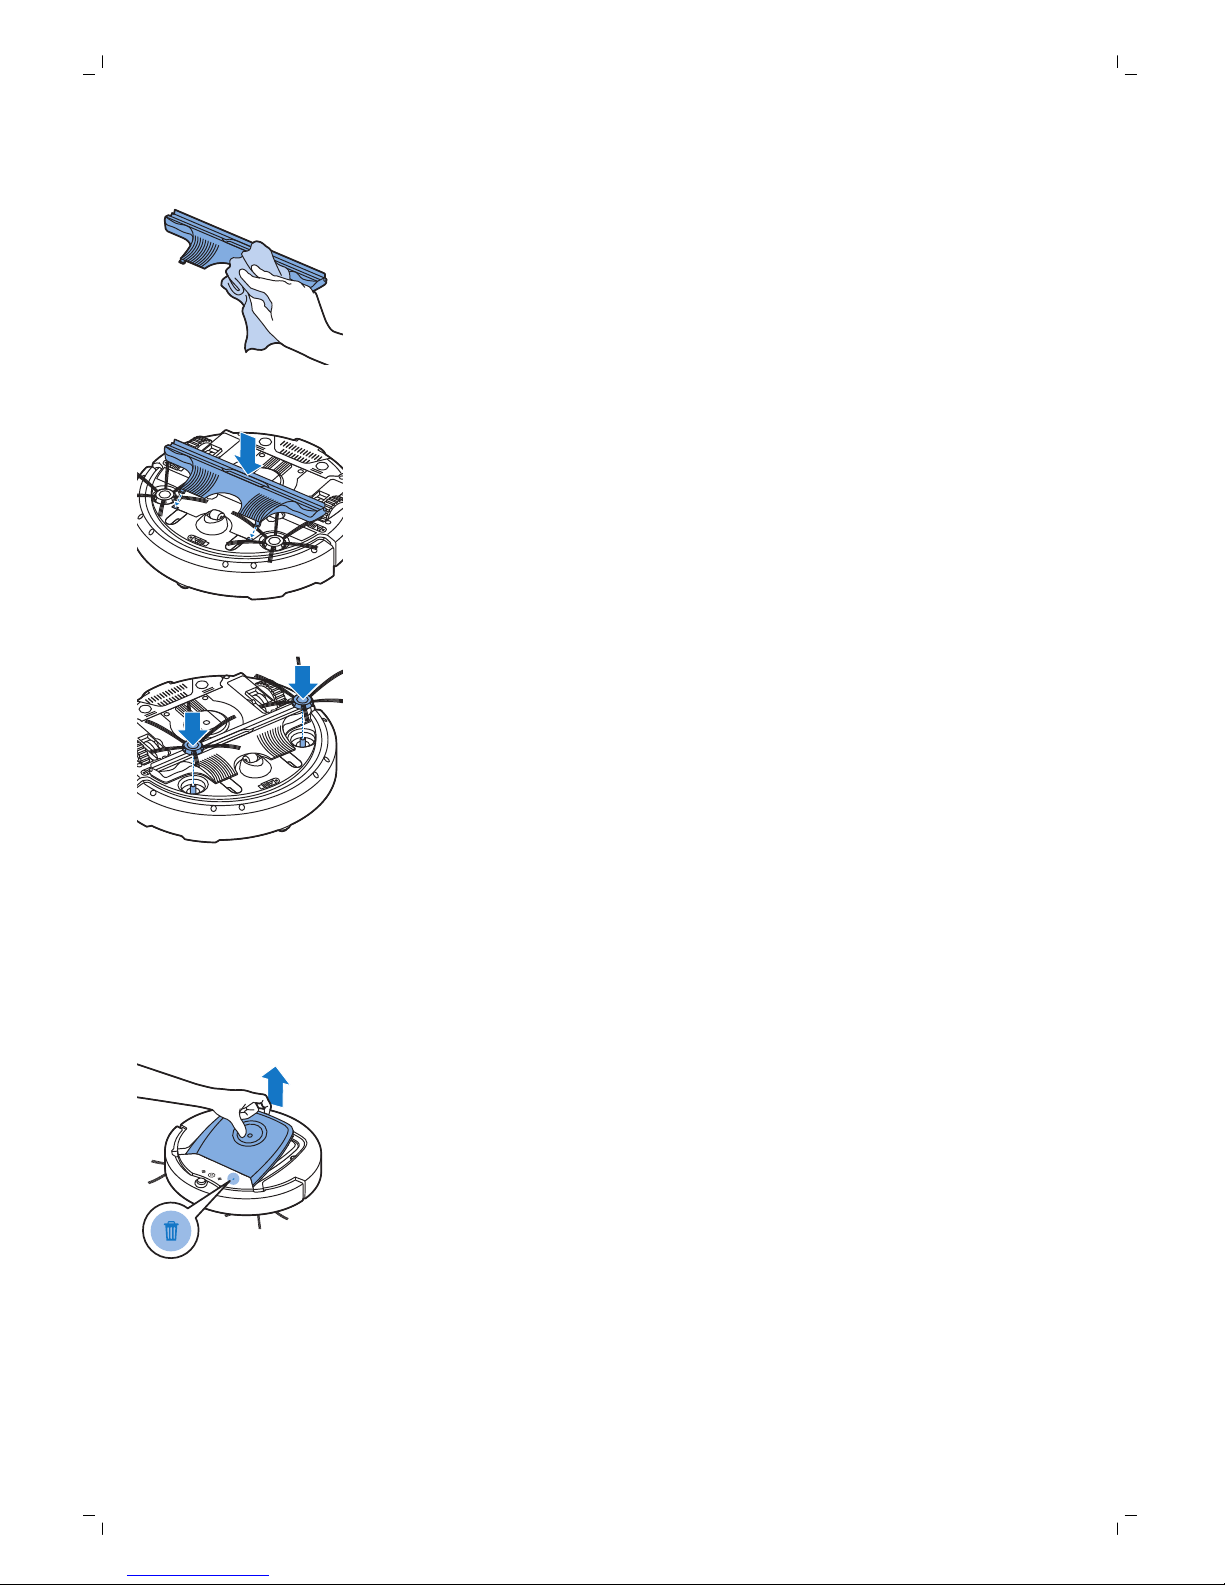
9 Távolítsa el a lerakódott szennyeződést a TriActive szívófejből.
10 Illessze be a TriActive szívófej kampóit a robotporszívó alján található
lyukakba. Nyomja vissza a TriActive szívófejet normál helyzetbe.
Győződjön meg arról, hogy a szívófej pár milliméterrel felfelé és lefelé
egyaránt elmozdítható.
11 Nyomja rá újból az oldalsó keféket a robotporszívó alján található
tengelyekre.
A portartály ürítése és tisztítása
Ürítse ki és tisztítsa meg a portartályt, ha a portartály-telítettség jelző
folyamatosan világít.
1 Győződjön meg arról, hogy a bekapcsológomb „off” (kikapcsolt)
helyzetben van.
2 Vegye le a borítást.
67
Magyar
Page 68
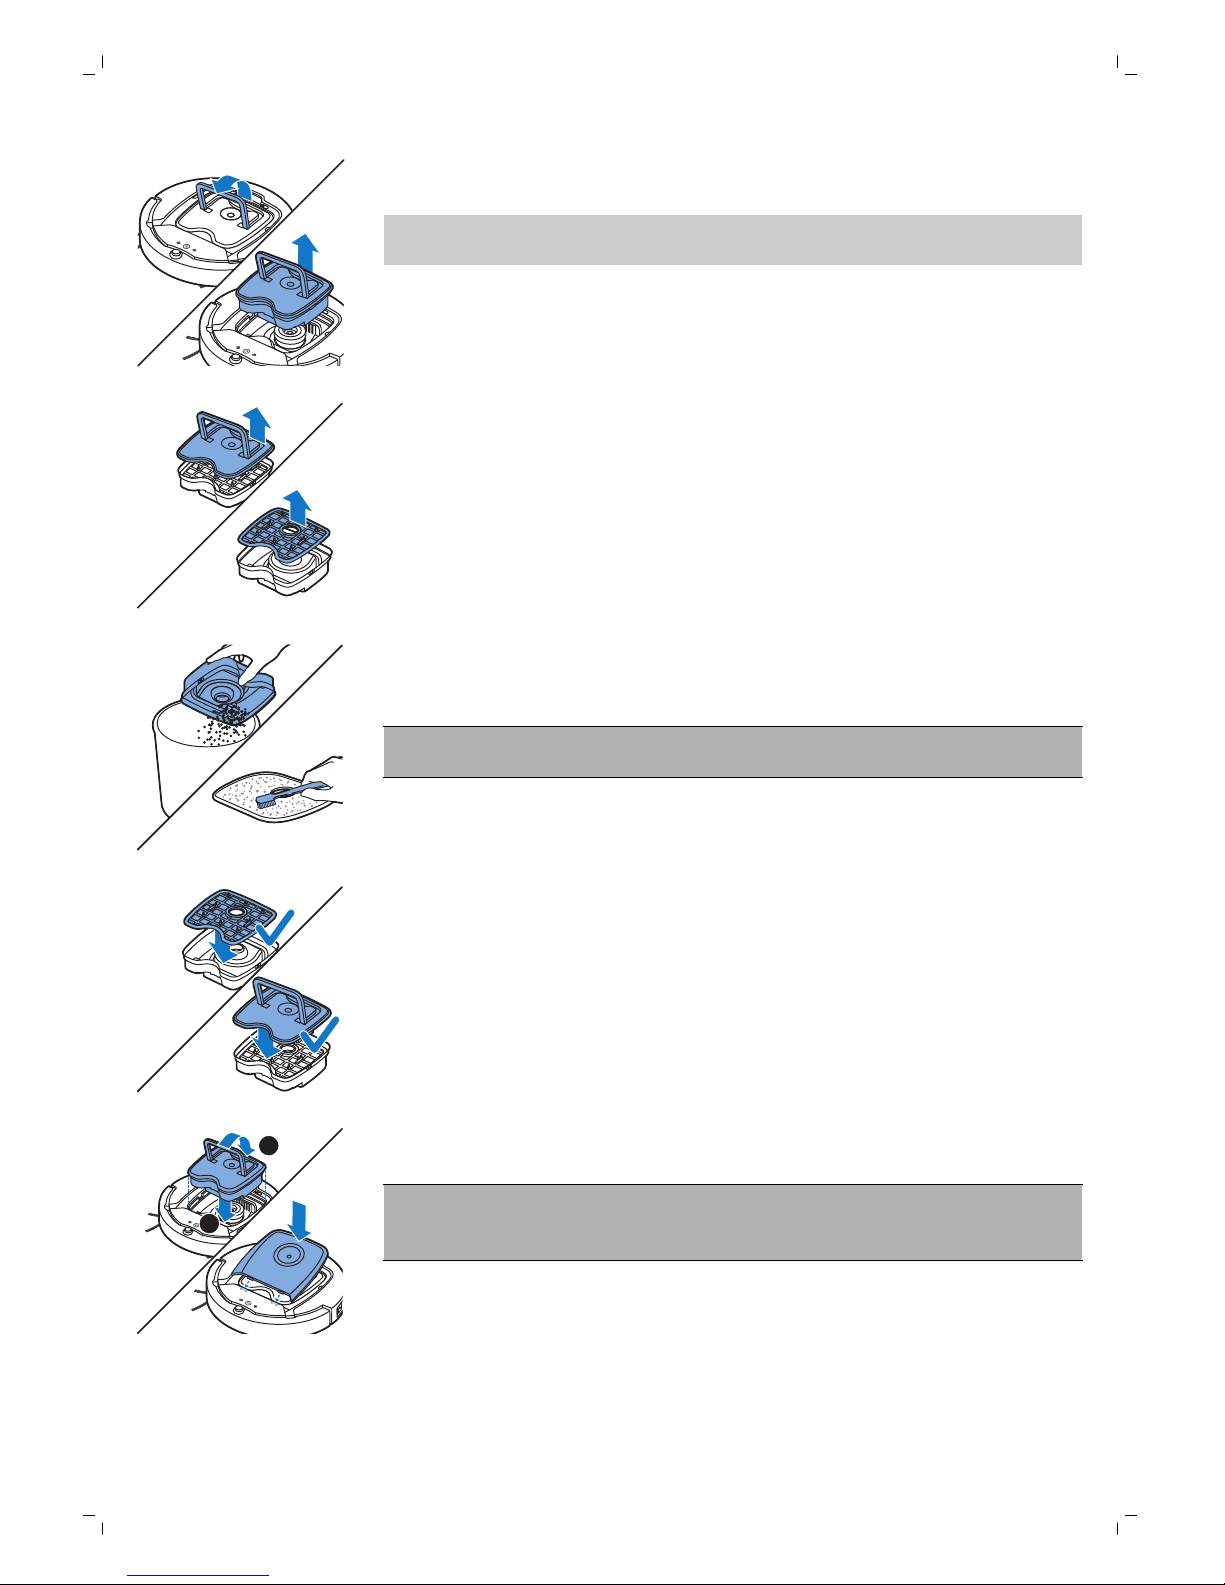
3 Húzza fel a portartály fedelének fogantyúját, és emelje ki a portartályt a
tartójából.
Megjegyzés: Amikor eltávolítja vagy visszahelyezi a portartályt, ügyeljen
arra, hogy ne sértse meg a motor ventilátorának lapátjait.
4 Óvatosan emelje fel a portartály fedelét (1), és vegye ki a szűrőt (2).
5 A szemetes fölött rázva ürítse ki a portartályt. Tisztítsa meg a szűrőt és a
portartály belsejét egy ronggyal vagy egy puha sörtéjű fogkefével.
Tisztítsa meg a portartály alján található szívónyílást is.
Figyelem! Ne tisztítsa a portartályt vagy a szűrőt vízzel vagy
mosogatógépben.
6 Helyezze vissza a szűrőt a portartályba (1). Tegye rá a fedelet a
portartályra (2).
1
2
7 Tegye vissza a portartályt a portartály-rekeszbe, és tegye vissza a felső
fedelet a robotporszívóra.
Figyelem! Mindig győződjön meg róla, hogy a szűrő a portartályban
van. Ha a robotot úgy használja, hogy a portartályban nincs szűrő, a
motor károsodhat.
68
Magyar
Page 69
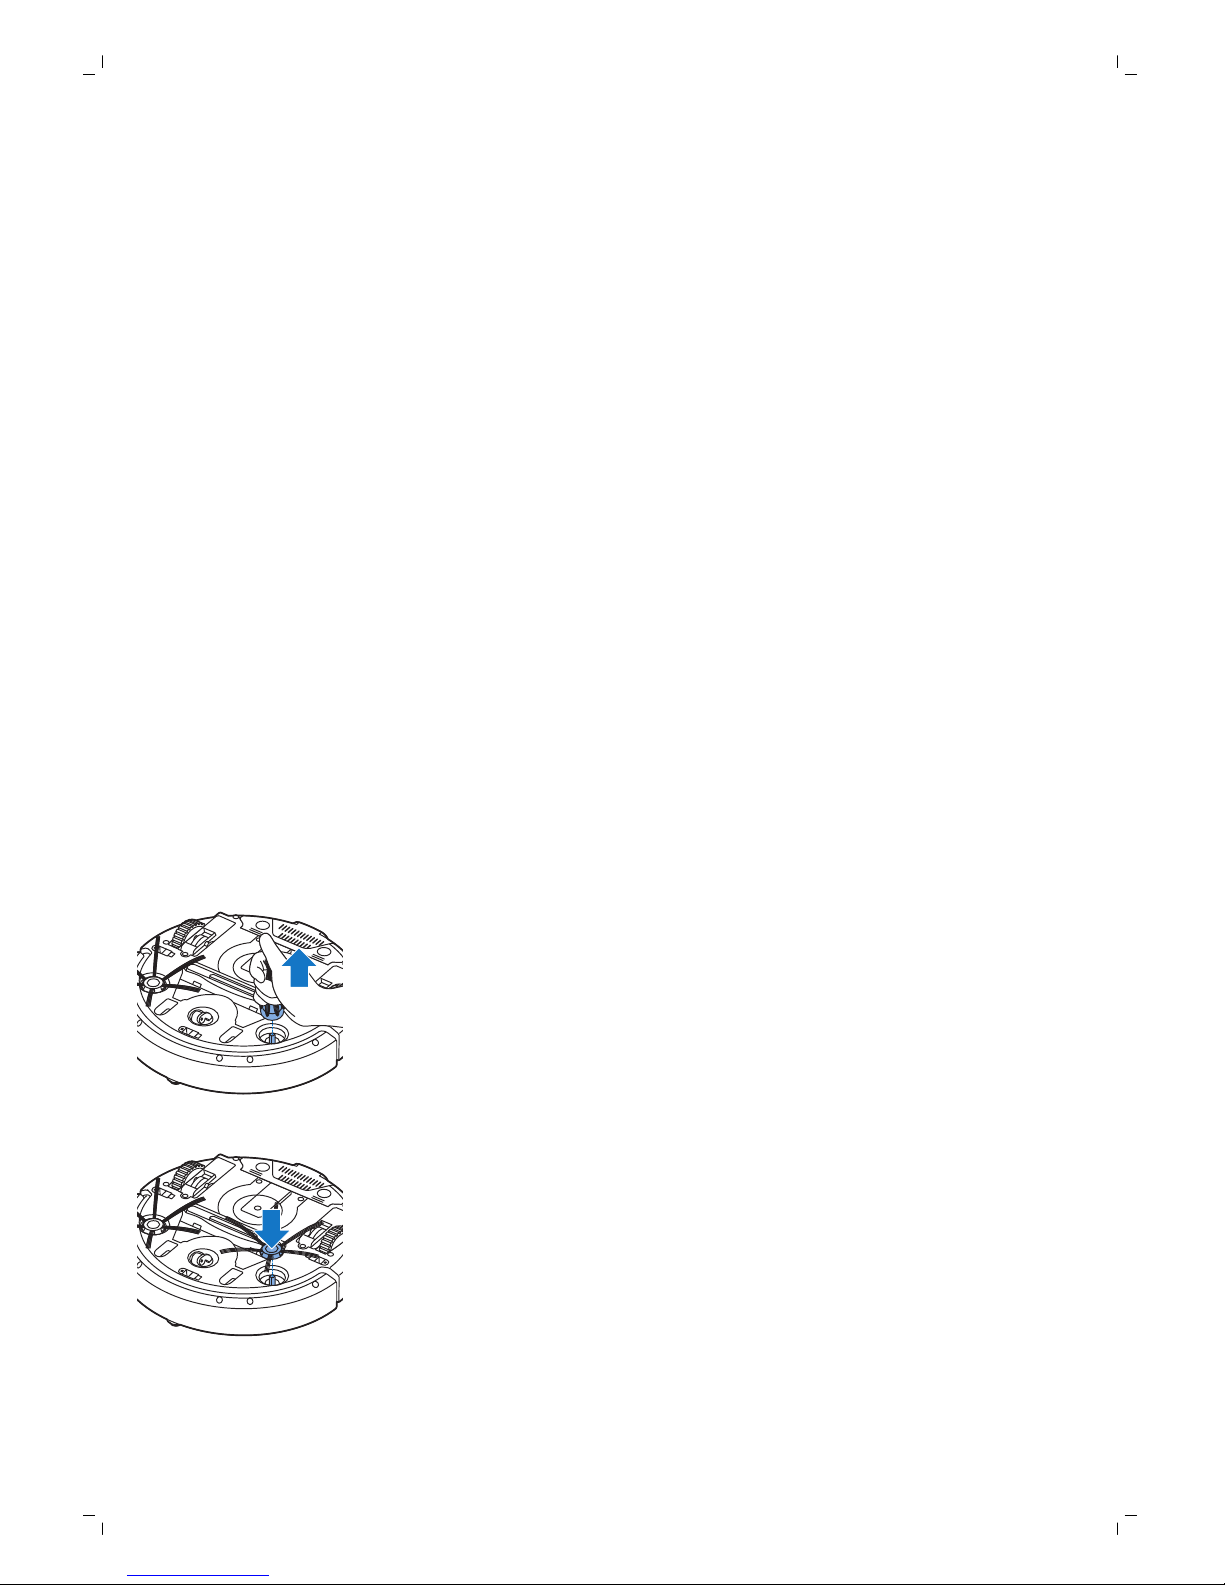
Tartozékok rendelése
Tartozékok és pótalkatrészek vásárlásához látogasson el a
www.shop.philips.com/service weboldalra vagy forduljon Philips
márkakereskedőjéhez. Fordulhat az országában működő Philips
vevőszolgálathoz is (az elérhetőségi információkat megtalálja a világszerte
érvényes garancialevélen).
Csere
A szűrő cseréje
Cserélje ki a szűrőt, ha az nagyon piszkos vagy sérült. Új szűrőkészletet az
FC8066 típusszám alatt rendelhet. A szűrő portartályból való kivételével,
illetve visszahelyezésével kapcsolatos további információkat lásd a „Tisztítás
és karbantartás” című fejezet „A portartály ürítése és tisztítása” c. részében.
Az oldalsó kefék cseréje
A megfelelő tisztítási eredmények biztosítása érdekében bizonyos idő után
cserélje ki az oldalsó keféket.
Mindig cserélje ki az oldalsó keféket, ha kopásra vagy sérülésre utaló jeleket
tapasztal. Javasoljuk továbbá, hogy mindkét oldalsó kefét egyszerre cserélje
ki. Tartalék oldalsó keféket cserekészlet részeként rendelhet az FC8068
rendelési számmal. Ez a készlet emellett két szűrőt és három száraz
törlőkendőt is tartalmaz.
1 Győződjön meg arról, hogy a bekapcsológomb „off” (kikapcsolt)
helyzetben van.
2 Az oldalsó kefék cseréjéhez fogja meg a régi oldalsó kefék sörtéit, és
húzza le a keféket a tengelyükről.
3 Nyomja az új oldalsó keféket a tengelyekre.
69
Magyar
Page 70
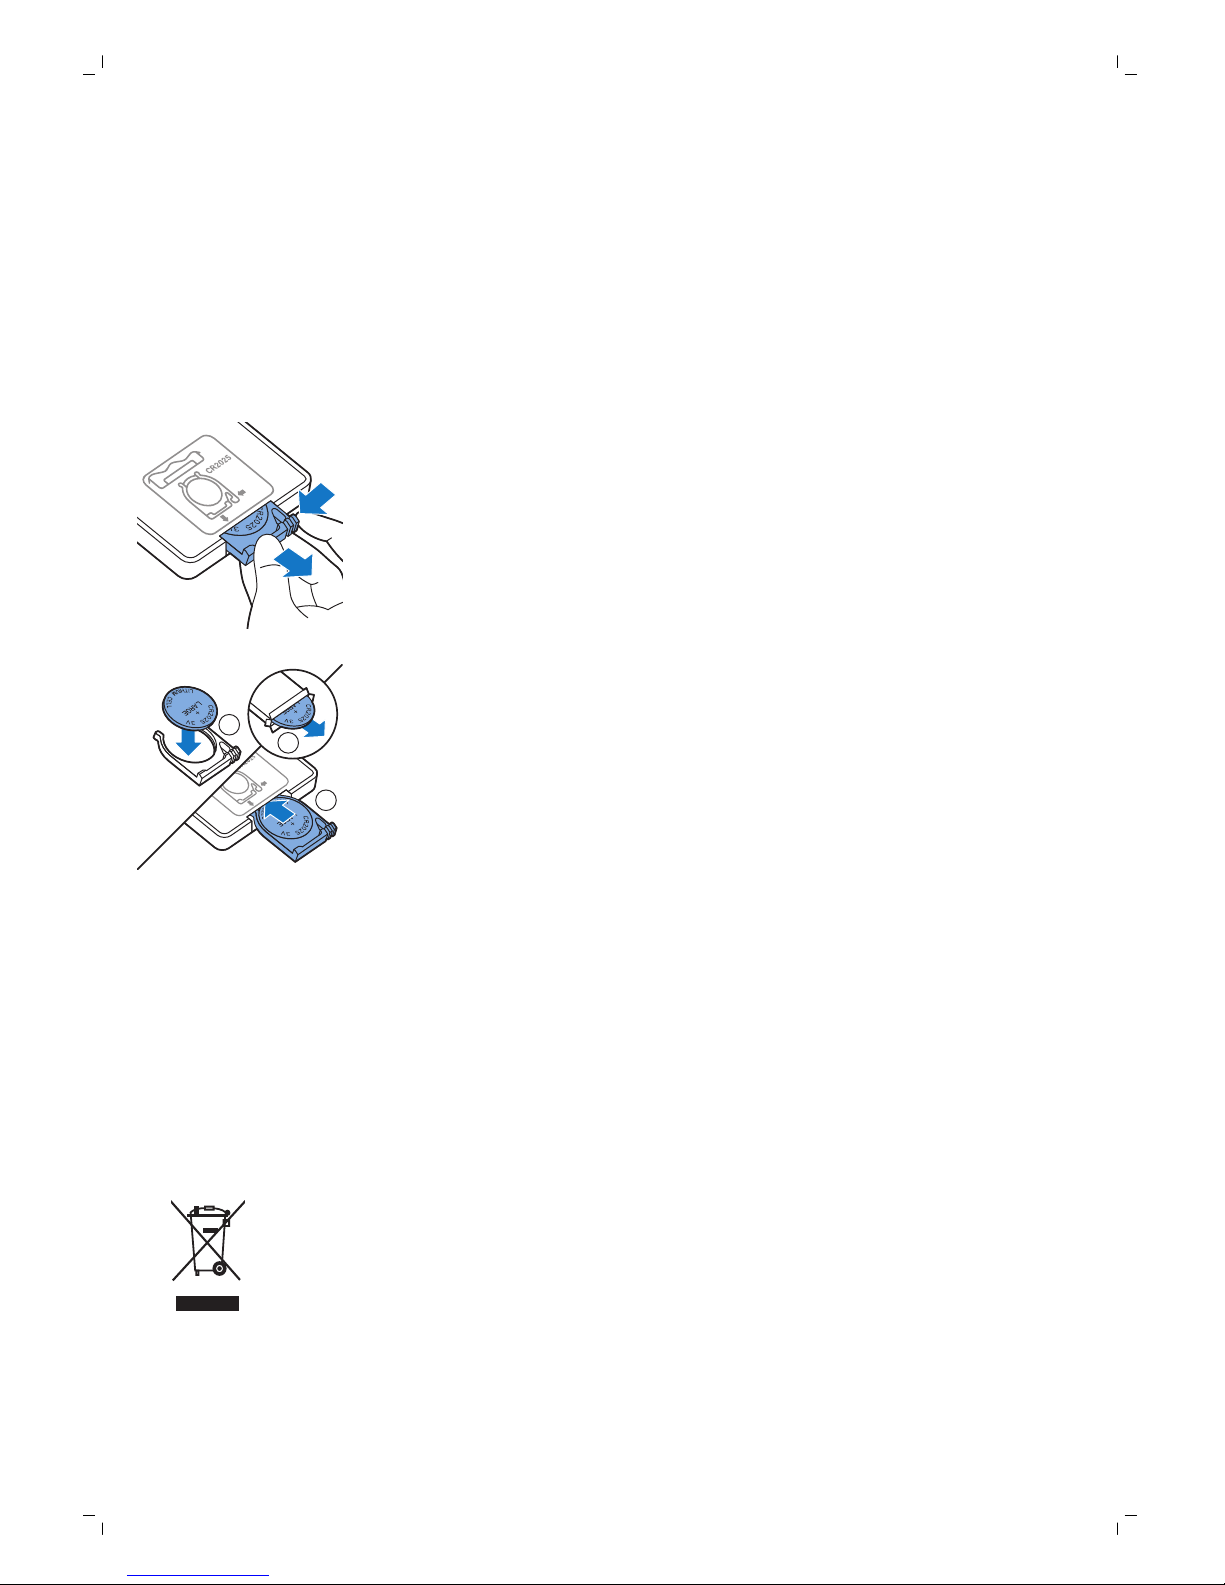
Száraz törlőkendők cseréje
Lehetősége van új száraz törlőkendők rendelésére. Ezek az FC8068
cserekészletben találhatók. Ez a cserekészlet emellett két oldalsó kefét és
két szűrőt is tartalmaz.
A távvezérlő elemének cseréje
A távvezérlő egy CR2025 típusú gombelemmel működik. Cserélje ki az
elemet, ha a robotporszívó már nem válaszol, amikor megnyomja a
távvezérlő gombjait.
1 Tartsa a távvezérlőt fejjel lefelé. Nyomja meg az elemtartó kioldó
gombját, és ugyanakkor csúsztassa ki az elemtartót a távvezérlőből.
2
3
1
2 Vegye ki a lemerült elemet az elemtartóból, és helyezze be az új elemet.
Ezután csúsztassa vissza az elemtartót a távvezérlőbe.
Az akkumulátor cseréje
A robot akkumulátorát csak szakképzett szerviztechnikus cserélheti ki. Vigye
be a robotot egy hivatalos Philips szakszervizbe, ahol az akkumulátort
kicserélik, ha azt már nem lehet újra feltölteni vagy gyorsan lemerül. Az
országában működő Philips vevőszolgálat elérhetőségi adatait a nemzetközi
garancialevélen találhatja meg.
Újrahasznosítás
-
Ez a szimbólum azt jelenti, hogy a termék nem kezelhető normál
háztartási hulladékként (2012/19/EU).
70
Magyar
Page 71
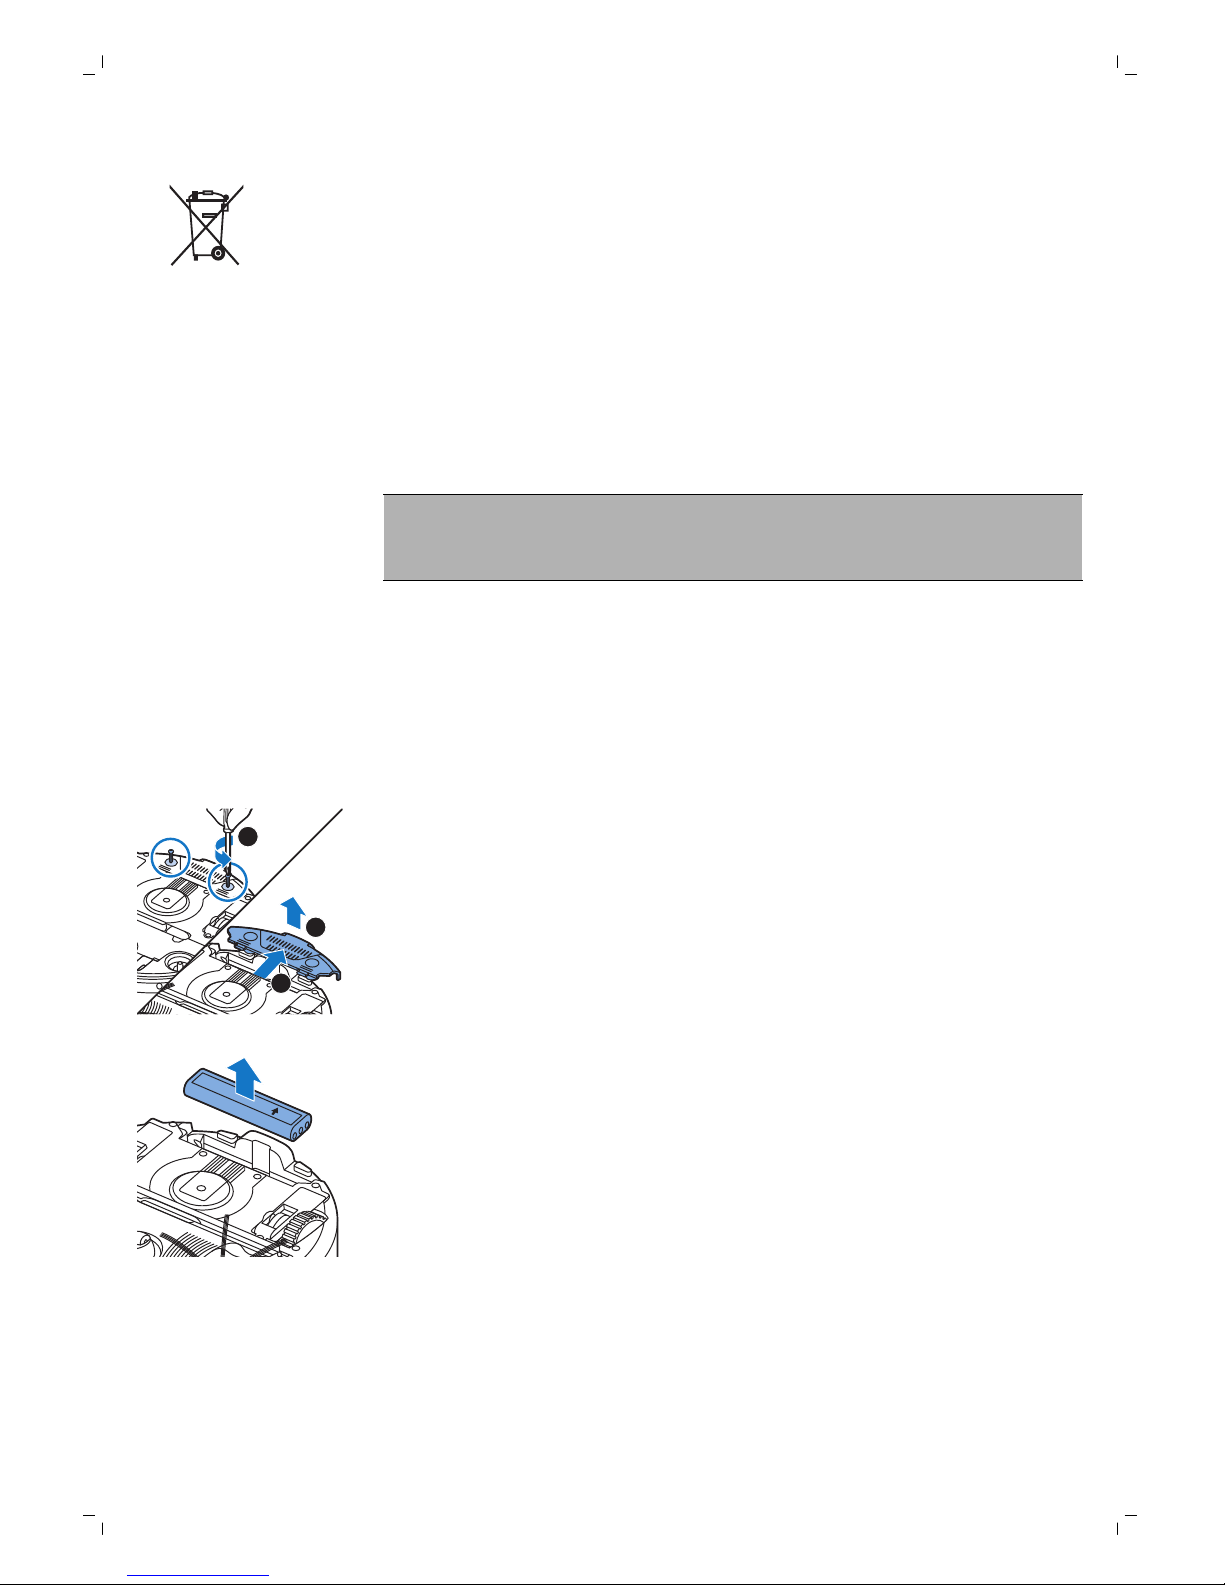
-
Ez a szimbólum azt jelenti, hogy a termék beépített újratölthető
akkumulátort tartalmaz, amelyet nem szabad háztartási hulladékként
kezelni (2006/66/EK). Javasoljuk, hogy vigye el készülékét hivatalos
gyűjtőhelyre vagy a Philips szervizközpontba, hogy szakember távolítsa
el az akkumulátort.
-
Tartsa be az elektromos és elektronikus termékek, akkumulátorok és
egyszer használatos elemek külön történő hulladékgyűjtésére vonatkozó
országos előírásokat. A megfelelő hulladékkezelés segítséget nyújt a
környezettel és az emberi egészséggel kapcsolatos negatív
következmények megelőzéséhez.
Az akkumulátor eltávolítása
Figyelmeztetés: Az akkumulátort csak akkor távolítsa el, ha
leselejtezi a készüléket. Az akkumulátor eltávolítása előtt
győződjön meg arról, hogy teljesen lemerült.
Az akkumulátor eltávolításához kövesse az alábbi utasításokat. Az
akkumulátor eltávolításához a robotot beviheti egy Philips szakszervizbe is.
A legközelebbi szakszerviz címét a Philips vevőszolgálatától tudhatja meg.
1 A robotporszívót indítsa el valahonnan a szobából, ne a
dokkolóegységről.
2 Hagyja a robotot addig működni, amíg az akkumulátor teljesen le nem
merül, hogy az akkumulátor teljesen lemerüljön, mielőtt kivenné és
kidobná.
1
3
2
3 Csavarhúzóval lazítsa ki az akkumulátortartó rekesz fedelének csavarjait,
majd vegye le a fedelet.
this side up
4 Emelje ki az akkumulátort, majd válassza le azt.
5 Vigye a robotporszívót és az akkumulátort egy elektromos és elektronikus
hulladékok gyűjtését végző hulladékudvarba.
Hibaelhárítás
Ez a fejezet összefoglalja a készülékkel kapcsolatban leggyakrabban
felmerülő problémákat. Ha a hibát az alábbi útmutató segítségével nem
tudja elhárítani, látogasson el a www.philips.com/support weboldalra a
71
Magyar
Page 72

gyakran felmerülő kérdések listájáért, vagy forduljon az országában illetékes
ügyfélszolgálathoz.
Hibaelhárítás
Probléma
Lehetséges ok Megoldás
Lemerült az akkumulátor. Töltse fel az akkumulátort (lásd az
„Előkészítés a használatra” című fejezetet).
A kisméretű csatlakozódugó
még mindig be van dugva a
robotporszívó
csatlakozóaljzatába.
A robot elektromos hálózatról nem
működik, csak a saját akkumulátoráról.
Ezért használat előtt mindig válassza le az
adaptert a robotporszívóról és a
hálózatról.
A robotporszívó a
start/stop gomb
megnyomását követően
nem kezdi el a tisztítást.
A bekapcsológombot nem
állította „on” (I) (bekapcsolt)
helyzetbe.
Nyomja meg a bekapcsológombot.
Nyomja meg a start/stop gombot a
robotporszívón vagy a távvezérlőn a
takarítás elindításához.
Az egyik vagy mindkét kerék
beszorult.
A bekapcsológombot állítsa „off”
(kikapcsolt) helyzetbe. Távolítsa el a kerék
felfüggesztésére tapadt szöszt, hajat,
cérnát vagy vezetéket.
Az egyik vagy mindkét
oldalsó kefe beszorult.
Tisztítsa meg az oldalsó keféket (lásd a
„Tisztítás és karbantartás” című fejezetet).
A felső fedél nincs a helyén
vagy nincs megfelelően
lezárva.
Ha a felső fedél nincs a helyén vagy nincs
megfelelően lezárva, a robotporszívó nem
működik. Helyezze fel megfelelően a felső
fedelet a robotporszívóra.
Az ütköző beszorult. Nyomja meg a start/stop gombot. Emelje
fel úgy a robotot, hogy az ütközője
szabaddá váljon. Helyezze a robotot
megfelelő távolságra az akadálytól, és
nyomja meg a start/stop gombot, hogy a
robotporszívó folytassa a takarítást.
A figyelmeztető jelzőfény
gyorsan villog.
A robotot felemelte,
miközben az takarított.
Nyomja meg a start/stop gombot.
Helyezze a robotot a padlóra. Ezt
követően nyomja meg a start/stop
gombot, hogy a robotporszívó folytassa a
takarítást.
72
Magyar
Page 73

Probléma Lehetséges ok Megoldás
Az egyik vagy mindkét
oldalsó kefe sörtéi görbültek
vagy hajlottak.
Egy kis időre áztassa be a keféket meleg
vízbe. Ha ennek hatására a sörték nem
nyerik vissza eredeti alakjukat, cserélje ki
az oldalsó keféket (lásd a „Csere” című
fejezetet).
A portartályban lévő szűrő
szennyezett.
Tisztítsa meg a portartály belsejében
található szűrőt egy ronggyal vagy egy
puha sörtéjű fogkefével. Alacsony
szívóerősséggel egy hagyományos
porszívóval is megtisztíthatja a szűrőt és a
portartályt.
Ha a kefével vagy a porszívóval nem
sikerül megtisztítania a szűrőt, cserélje ki a
szűrőt egy újra. Azt javasoljuk, hogy
legalább évente egyszer cserélje ki a
szűrőt.
A portartály alján található
szívónyílás eltömődött.
Tisztítsa ki a szívónyílást (lásd a „Tisztítás
és karbantartás” című fejezetet).
Az első kerék a rátapadt haj
és egyéb szennyeződés miatt
beszorult.
Tisztítsa meg az első kereket (lásd a
„Tisztítás és karbantartás” című fejezetet).
A robotporszívó nagyon sötét
vagy fényes felületet tisztít,
ami elindítja a
mélységérzékelőket. Ennek
következtében a
robotporszívó szokatlan
módon mozoghat.
Nyomja meg start/stop gombot, majd
helyezze a robotot a padló világosabb
színű részére. Ha a probléma itt is fennáll,
látogasson el a www.philips.com/support
weboldalra, vagy forduljon az országában
működő Philips ügyfélszolgálathoz.
A robotporszívó nem
tisztít megfelelően.
A robotporszívó olyan padlót
tisztít, amely elég erősen
visszatükrözi a napfényt. Ez
elindítja a
mélységérzékelőket, aminek
következtében a
robotporszívó szokatlan
módon mozoghat.
Ha szeretné megakadályozni, hogy a
napfény bevilágítson a helyiségbe, húzza
össze a függönyöket. Érdemes a takarítást
akkorra időzíteni, amikor a nap már
kevésbé süt.
Az akkumulátor már nem
tölthető, vagy nagyon
gyorsan lemerül.
Az akkumulátor elérte
élettartama végét.
Cserélje ki az akkumulátort (lásd a „Csere”
című fejezetet).
A távvezérlő eleme
nagyon gyorsan lemerül.
Előfordulhat, hogy nem a
megfelelő típusú elemet
helyezte be.
A távvezérlő csak CR2025 típusú
gombelemmel működik. Ha a probléma
továbbra is fennáll, látogasson el a
www.philips.com/support weboldalra,
vagy forduljon az országában működő
Philips ügyfélszolgálathoz.
73
Magyar
Page 74

Probléma Lehetséges ok Megoldás
A robotporszívó körkörös
mozgással végzi a
tisztítást.
A robotporszívó spirál mintájú
mozgásból álló üzemmódban
van.
Ez normális jelenség. A spirál üzemmód
akkor aktiválódik, amikor a készülék egy
erősen szennyezett területet szeretne
megtisztítani a padlón. Ez az automatikus
üzemmód része. Körülbelül egy perc
elteltével a robotporszívó visszatér a
normál tisztítási üzemmódhoz. A spirál
üzemmódot úgy is megszakíthatja, ha egy
másik tisztítási üzemmódot választ ki a
távirányítón.
A helyiségben nem áll
rendelkezésre elegendő hely
ahhoz, hogy a robotporszívó
visszatérjen a
dokkolóegységhez.
Helyezze máshová a dokkolóegységet.
Lásd az „Előkészítés a használatra” fejezet
„A dokkolóegység beszerelése” részét.
A robot még mindig keresi a
dokkolóegységet.
Várjon körülbelül 20 percet, hogy a
robotporszívó visszatérjen a
dokkolóegységre.
A robotporszívó nem
találja a
dokkolóegységet.
A robotporszívót nem a
dokkolóegységről indította el.
Ha azt szeretné, hogy a robotporszívó
tisztítás után a dokkolóegységre térjen
vissza, a tisztítást a dokkolóegységről
kezdje.
A robotporszívó sípoló
hangot ad, amikor
visszatér
dokkolóegységre.
A robotporszívót azért nem
tudja tölteni, mert
bekapcsológombja „off”
(kikapcsolt) helyzetben van.
A bekapcsológomb megnyomásával
kapcsolja be a robotot.
Hibakódok
Hibakód
Lehetséges ok Megoldás
E1 A kerekek beszorultak Távolítsa el a robotot az akadálytól, és nyomja
meg a start/stop gombot, hogy a
robotporszívó folytassa a takarítást.
E2 A felső fedél vagy a
portartály nem
megfelelően van
behelyezve
Megfelelően helyezze be a portartályt és fel a
felső fedelet a robotporszívóra. Az hibakód
automatikusan eltűnik a kijelzőről.
E3 A lökhárító beszorult Vegye le a robotporszívót az akadályról. Az
hibakód automatikusan eltűnik a kijelzőről.
E4 A robotporszívó
felemelkedett a padlóról
Helyezze vissza a robotot a padlóra, hogy a
hibakód eltűnjön.
E5 A padló túl sötét színű Helyezze a robotot a padló világosabb
területére. Tisztítsa meg a mélységérzékelőket.
74
Magyar
Page 75

Hibakód Lehetséges ok Megoldás
Az elem nem
megfelelően van
behelyezve
Olvassa el a „Teendők az első használat előtt”
c. fejezet „Az akkumulátor behelyezése a
robotba” című részében található utasításokat.
E6
Töltési hiba Ellenőrizze, hogy a bekapcsológomb „on”
(bekapcsolt) helyzetben van-e, miközben a
robotporszívó a dokkolóegységen van.
75
Magyar
Page 76
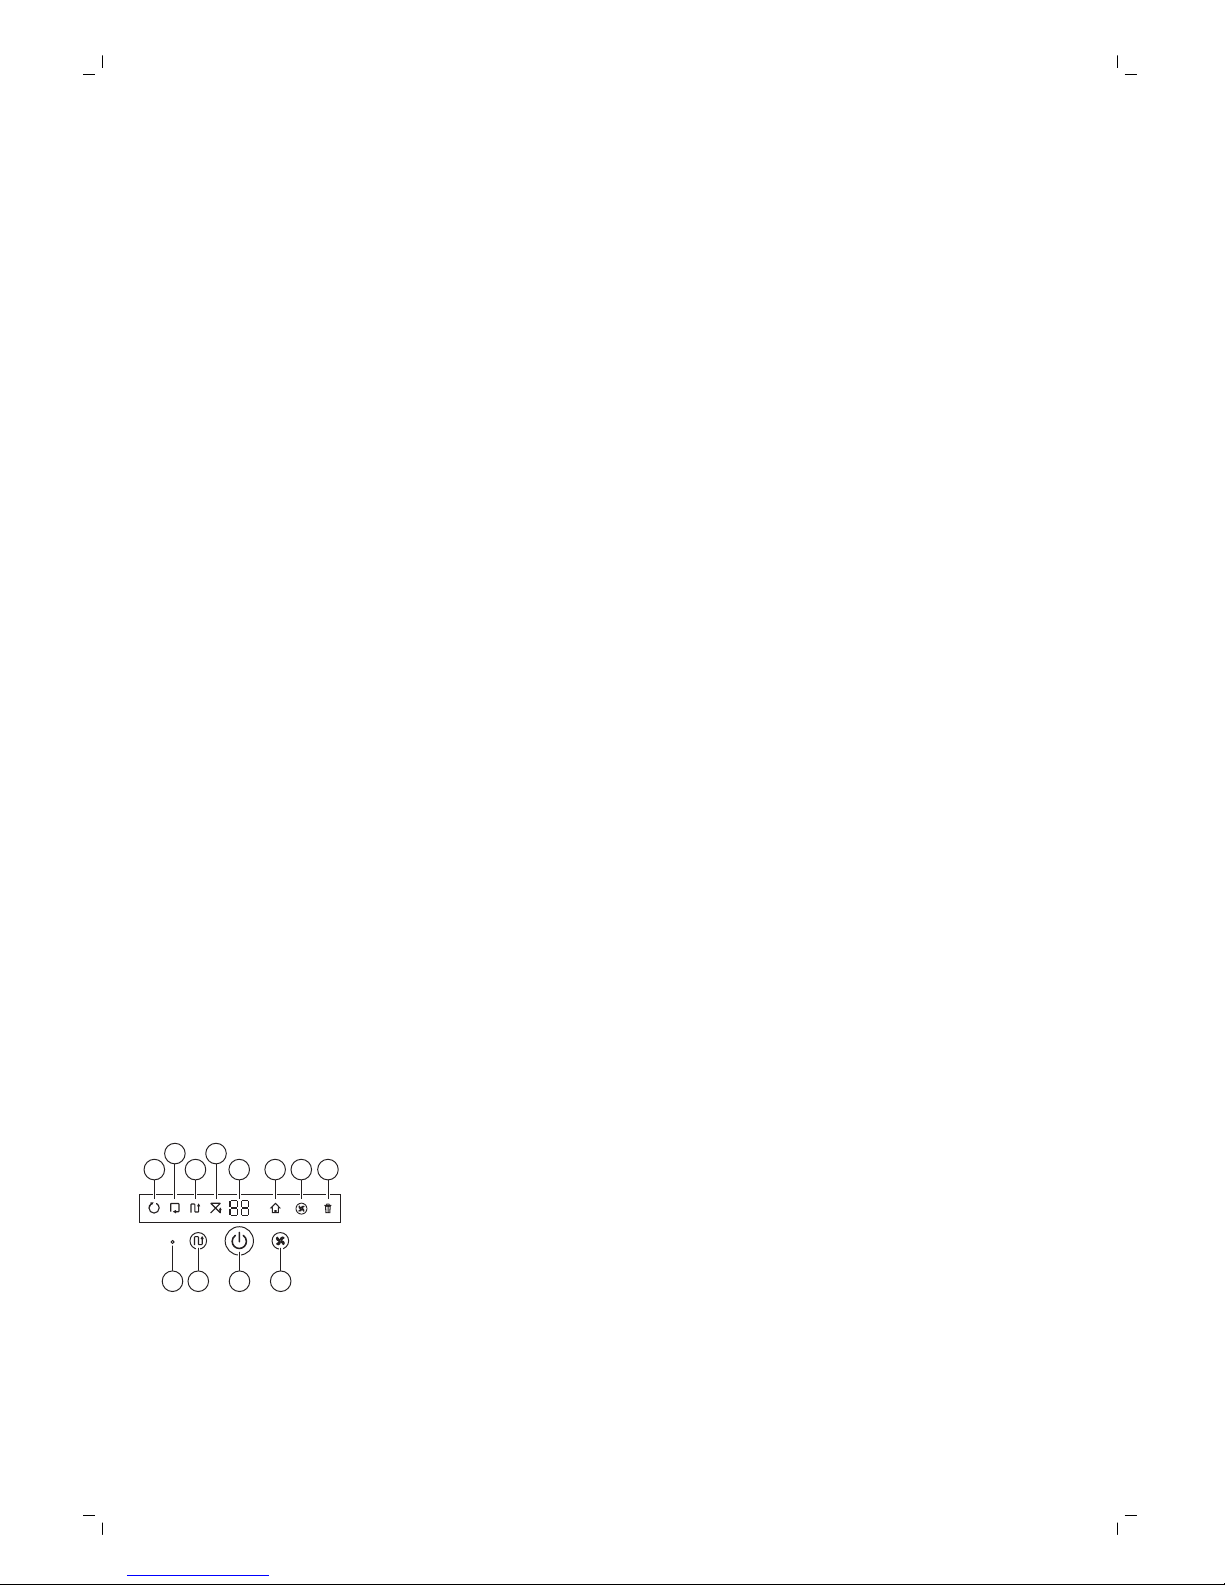
Română
Introducere
Felicitări pentru achiziţie şi bun venit la Philips! Pentru a beneficia pe deplin
de asistenţa oferită de Philips, înregistraţi-vă produsul la
www.philips.com/welcome.
Descriere generală
1 Mânerul capacului pentru compartimentul pentru praf
2 Capac pentru compartimentul pentru praf
3 Filtru
4 Compartiment pentru praf
5 Capac superior
6 Tabel coduri de eroare
7 Ventilator
8 Amortizor
9 Senzor staţie de andocare
10 Comutatorul de alimentare
11 Roată frontală
12 Axe perii laterale
13 Senzori de deplasare
14 Roţi
15 Orificiu de aspirare
16 Cap de aspirare TriActive XL
17 Perii laterale
18 Blocuri de fixare pentru lavete uscate
19 Suport pentru lavete uscate
20 Lavete uscate
21 Suport pentru baterie
22 Telecomandă
23 Perete invizibil (FC8822)
24 Staţie de andocare
25 Adaptor
26 Conector mic
Afişaj şi telecomandă
Afişajul robotului
1
1110 129
234
5 6 7 8
1 Indicator pentru modul în spirală
2 Indicator pentru modul de urmărire a peretelui
3 Indicator pentru modul în zigzag
4 Indicator pentru modul aleatoriu
5 Timp de curăţare
6 Pictogramă de andocare
7 Indicator pentru viteză ventilator
8 Indicator pentru coş de gunoi plin
9 Senzor de sunet
10 Buton pentru selectare mod
11 Buton Start/Stop
12 Buton pentru viteză ventilator
76
Română
Page 77
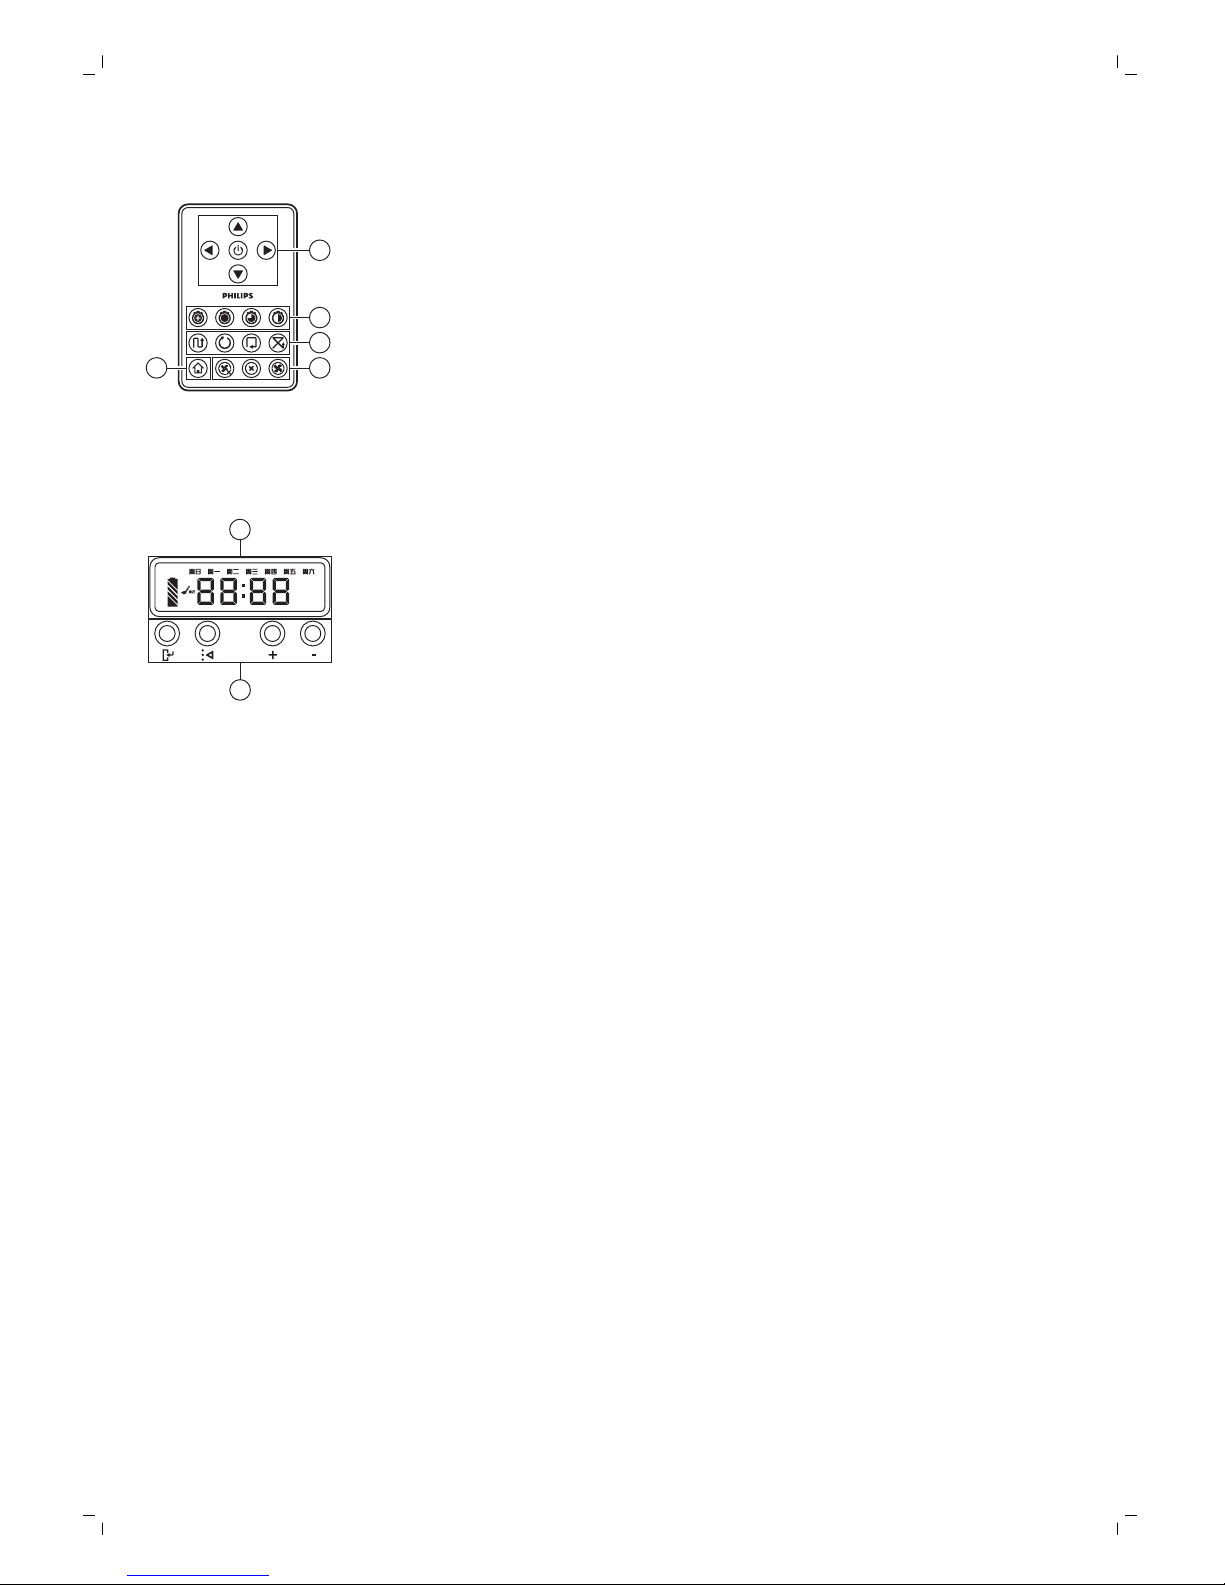
Telecomandă
2
1
3
45
1 Butoane de navigare şi start/stop
2 Butoane pentru timpul de curăţare
3 Butoane pentru modul de curăţare
4 Butoane pentru viteză ventilator
5 Buton de andocare
Panou de control al staţiei de andocare
1
2
1 Afişaj cu ora, ziua şi indicaţii de programare
2 Reglarea şi setarea butoanelor
Cum funcţionează robotul
Ce poate curăţa robotul
Acest robot este prevăzut cu funcţii care îl transformă într-un aspirator
adecvat pentru a vă ajuta să curăţaţi podelele acasă.
Robotul este potrivit în special pentru curăţarea suprafeţelor dure, ca de
exemplu, podele acoperite cu lemn, faianţă sau linoleum. Este posibil să
apară probleme la curăţarea podelelor acoperite cu materiale moi, ca de
exemplu, carpete sau covoare. Dacă utilizaţi robotul pe o carpetă sau un
covor, vă rugăm să staţi în apropiere prima dată pentru a vedea dacă robotul
poate acţiona pe acea suprafaţă. Robotul necesită, de asemenea,
supraveghere la utilizarea pe podele dure foarte închise la culoare sau
foarte lucioase.
Modul de curăţare al robotului
Sistem de curăţare
Robotul dispune de un sistem de curăţare din 3 trepte, pentru curăţarea
eficientă a podelelor.
77
Română
Page 78
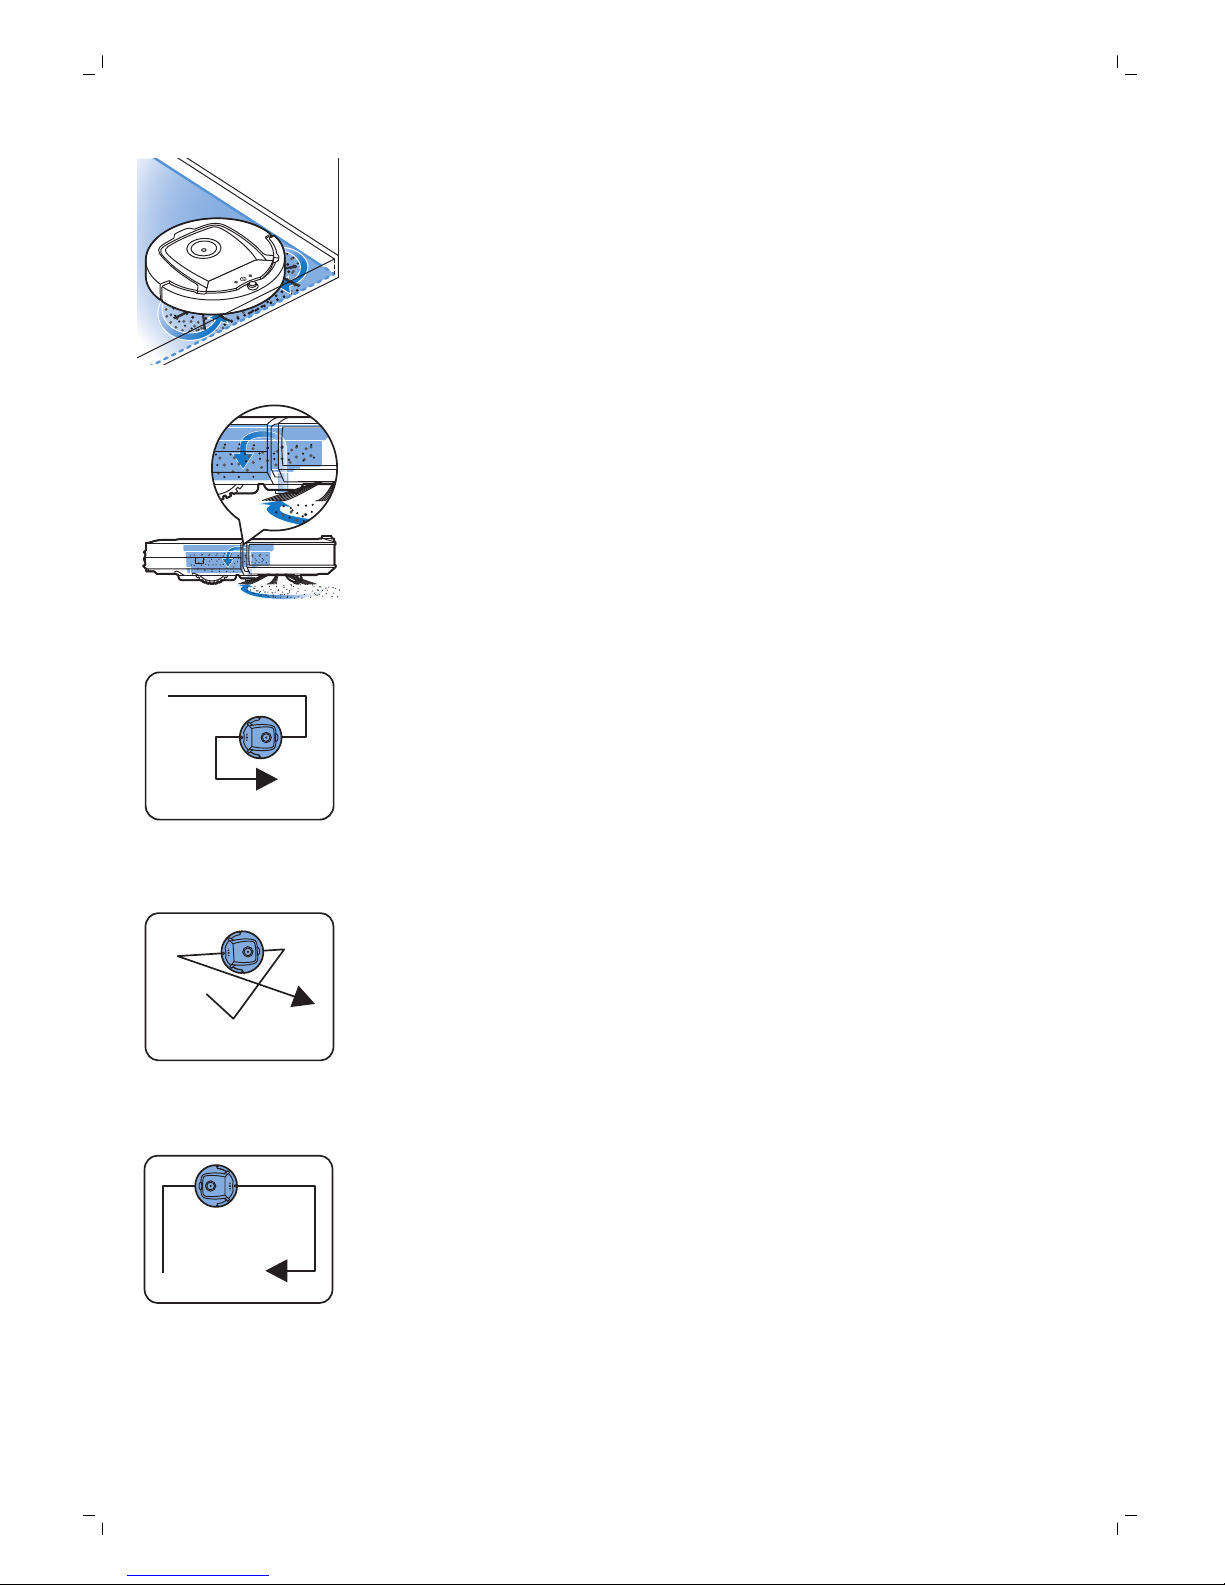
-
Cele două perii laterale ajută robotul să cureţe în colţuri şi de-a lungul
pereţilor. De asemenea, ajută la îndepărtarea prafului de pe podea şi la
deplasare acestuia către orificiul de aspirare.
-
Puterea de aspirare a robotului preia particulele de murdărie libere şi le
transportă, prin orificiul de aspirare, în compartimentul pentru praf.
-
Robotul este livrat cu un suport pentru lavete uscate care îţi permite să
cureţi podeaua dură chiar şi mai temeinic cu lavete uscate.
Modele de curăţare
În modul său de curăţare automată, robotul utilizează o succesiune
automată de modele de curăţare pentru a curăţa fiecare zonă a camerei în
mod optim. Modelele de curăţare pe care le utilizează sunt:
1 Modelul în Z sau modelul zigzag
2 Modelul aleatoriu
3 Modelul după linia peretelui
78
Română
Page 79
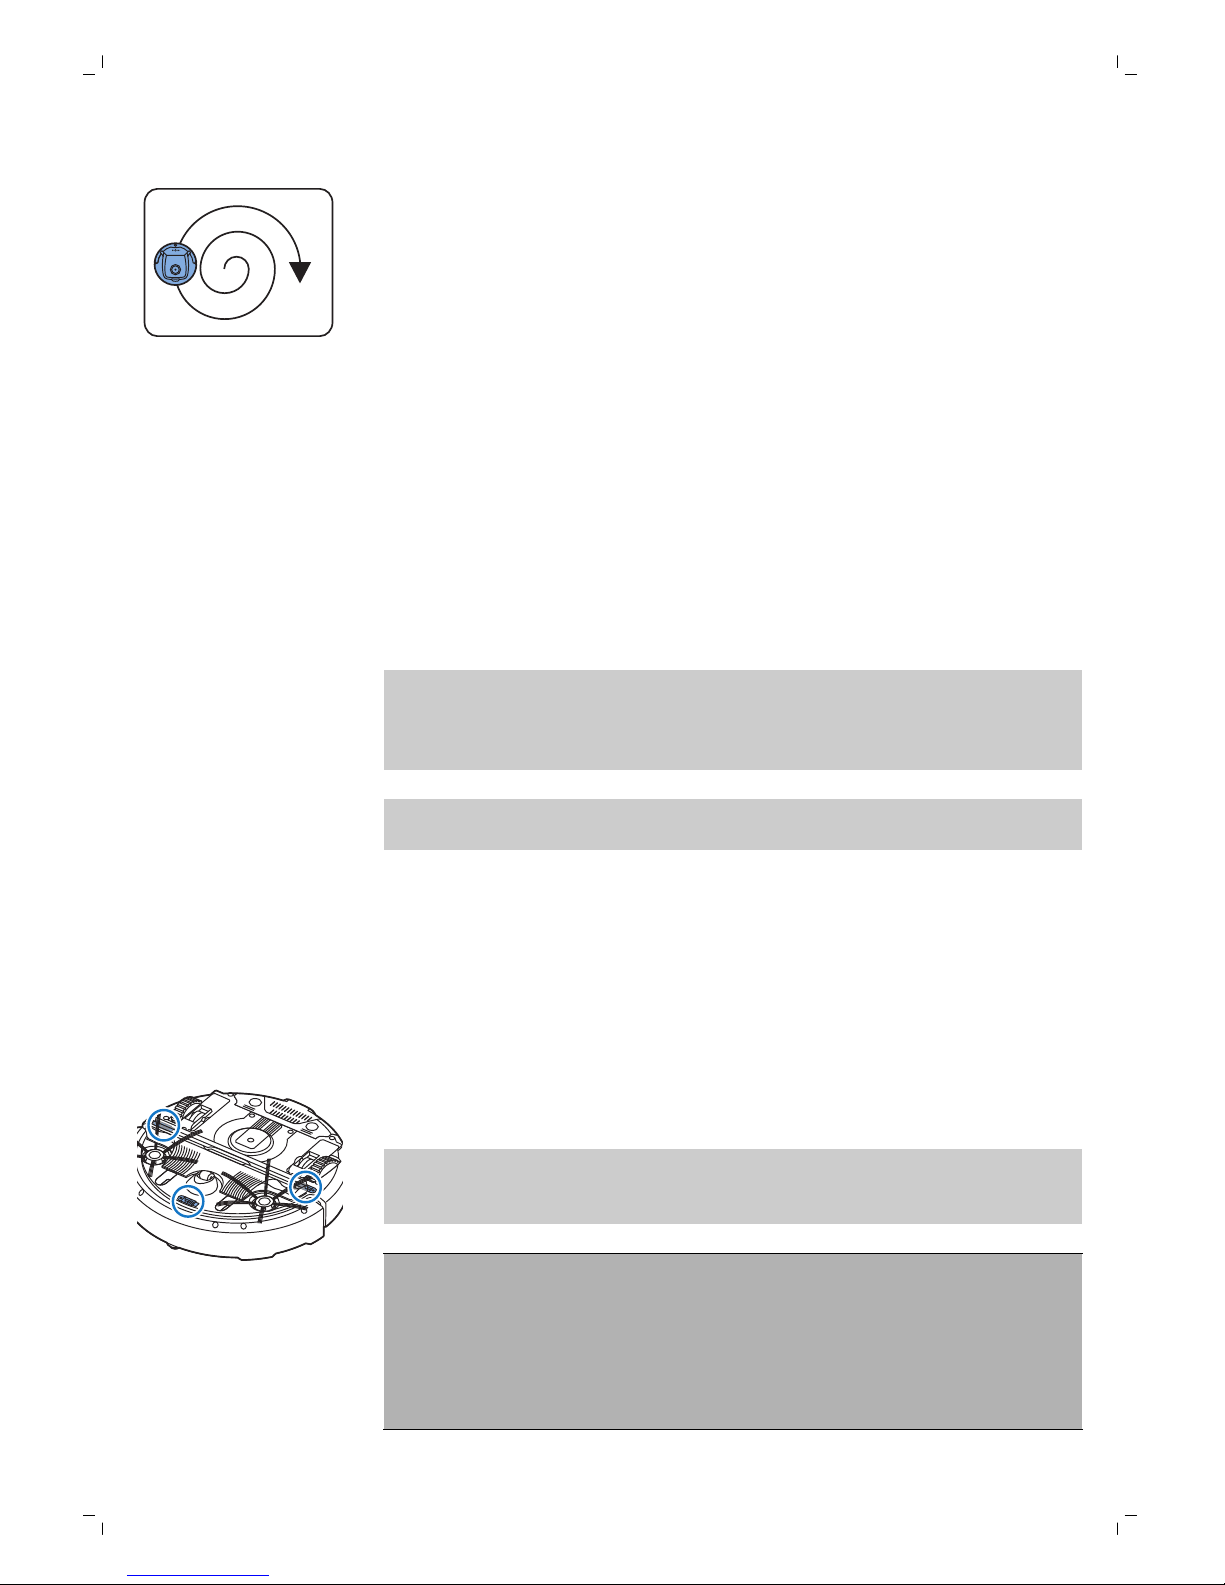
4 Modelul spiral
În modul de curăţare automată, robotul utilizează aceste modele într-o
succesiune prestabilită: modelul în z, modelul aleatoriu, modelul după linia
peretelui şi modelul în spirală.
Când robotul a terminat această succesiune de modele, începe să se mişte,
din nou, în modelul în Z. Robotul continuă să utilizeze această succesiune
de modele pentru a curăţa camera până când bateria reîncărcabilă se
descarcă sau până când este oprit manual.
Dacă robotul detectează o zonă deosebit de murdară în timpul cursei sale
de curăţare, acesta comută la modul în spirală și comută la viteza turbo a
ventilatorului pentru a asigura îndepărtarea temeinică a murdăriei.
Notă: Puteţi, de asemenea, să selectaţi fiecare mod individual prin apăsarea
butonului corespunzător de pe telecomandă. Modurile selectate manual
sunt active doar timp de două minute. După aceea, robotul comută înapoi
pe modul de curăţare automată.
Pentru mai multe detalii, consultaţi capitolul „Utilizarea robotului”, secţiunea
„Moduri de curăţare”.
Cum evită robotul diferenţele de înălţime
Robotul este prevăzut, în partea inferioară, cu trei senzori de deplasare.
Acesta utilizează aceşti senzori de deplasare pentru a detecta şi evita
diferenţele de nivel, ca de exemplu scările.
Notă: Este normal ca robotul să se deplaseze uşor peste marginea unei
diferenţe de înălţime, deoarece senzorul său de deplasare frontal este situat
în spatele amortizorului.
Atenţie: În unele cazuri, este posibil ca senzorii de deplasare să nu
detecteze o scară sau o altă diferenţă de nivel la timp. De aceea, urmăriţi
robotul cu atenţie primele dăţi când îl utilizaţi şi când îl folosiţi lângă o
scară sau o altă diferenţă de nivel. Este important să curăţaţi senzorii de
deplasare în mod regulat pentru a asigura faptul că robotul detectează
diferenţele de nivel în mod corespunzător (consultaţi capitolul „Curăţare
şi întreţinere” pentru instrucţiuni).
79
Română
Page 80
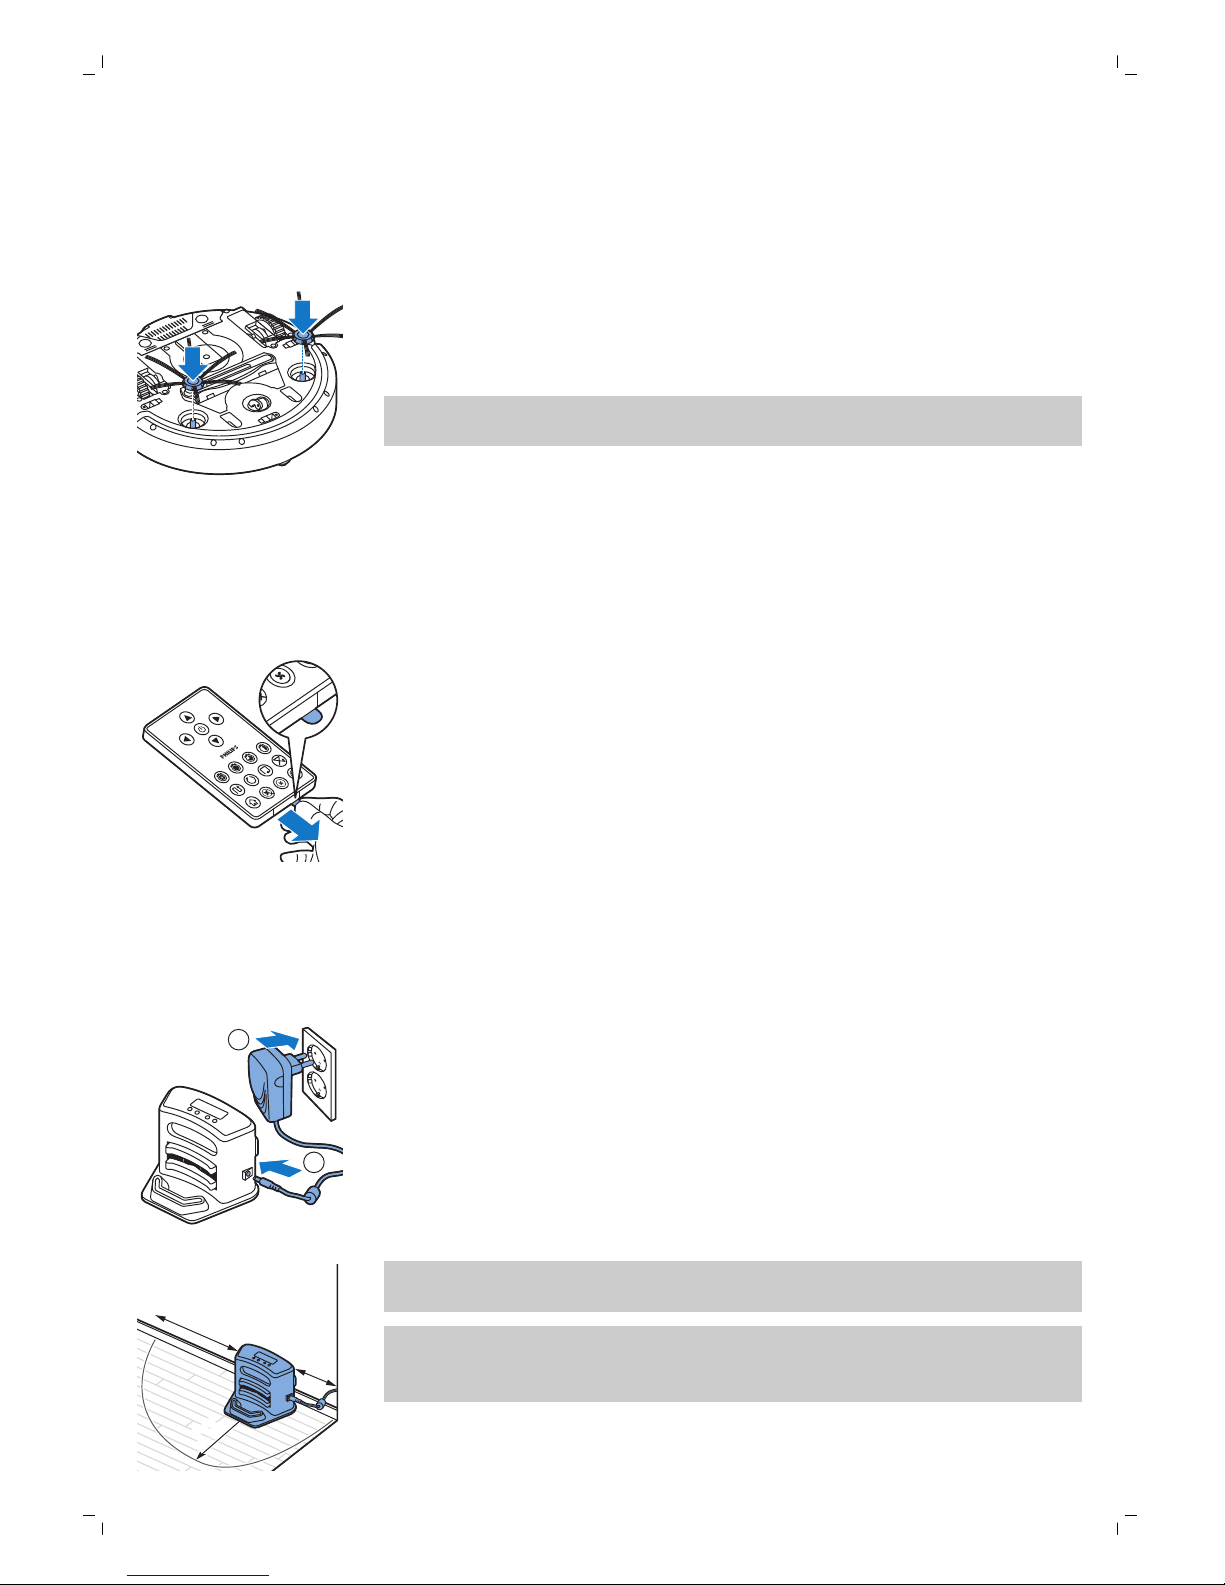
2 Împingeţi periile laterale pe axele de la baza robotului.
Notă: Asiguraţi-vă că montaţi periile laterale corespunzător. Apăsaţi pe ax
până când auziţi că acestea sunt blocate în poziţie cu un clic.
Îndepărtarea plăcuţei de pe telecomandă
Telecomanda funcţionează cu o baterie în formă de monedă de tip CR2025.
Bateria este protejată cu o etichetă de protecţie care trebuie îndepărtată
înainte de utilizare.
1 Trageţi eticheta de protecţie de pe compartimentul pentru baterii al
telecomenzii. Acum telecomanda este pregătită pentru utilizare.
Pregătirea pentru utilizare
Instalarea staţiei de andocare
1
2
1 Introduceţi mufa mică a adaptorului în priza staţiei de andocare (1) şi
introduceţi adaptorul în priza de perete (2).
-
Afişajul staţiei de andocare se aprinde.
2 Aşezaţi staţia de andocare pe o podea orizontală, lângă perete.
100 厘米
100 cm
30 厘米30 厘米
30 cm
80
厘米
80 cm
Notă: Asiguraţi-vă ca nu există obstacole sau diferenţe de nivel la 80 cm
în faţă, 30 cm la dreapta şi 100 cm la stânga staţiei de andocare.
Sugestie: Pentru a vă asigura că staţia de andocare rămâne ferm în locul
selectat, o puteţi fixa de perete cu şuruburi sau cu două bucăţi de bandă
cu faţă dublă.
80
Română
Înainte de prima utilizare
Montarea periilor laterale
1 Despachetaţi periile laterale şi aşezaţi robotul invers pe o masă sau pe
podea.
Page 81
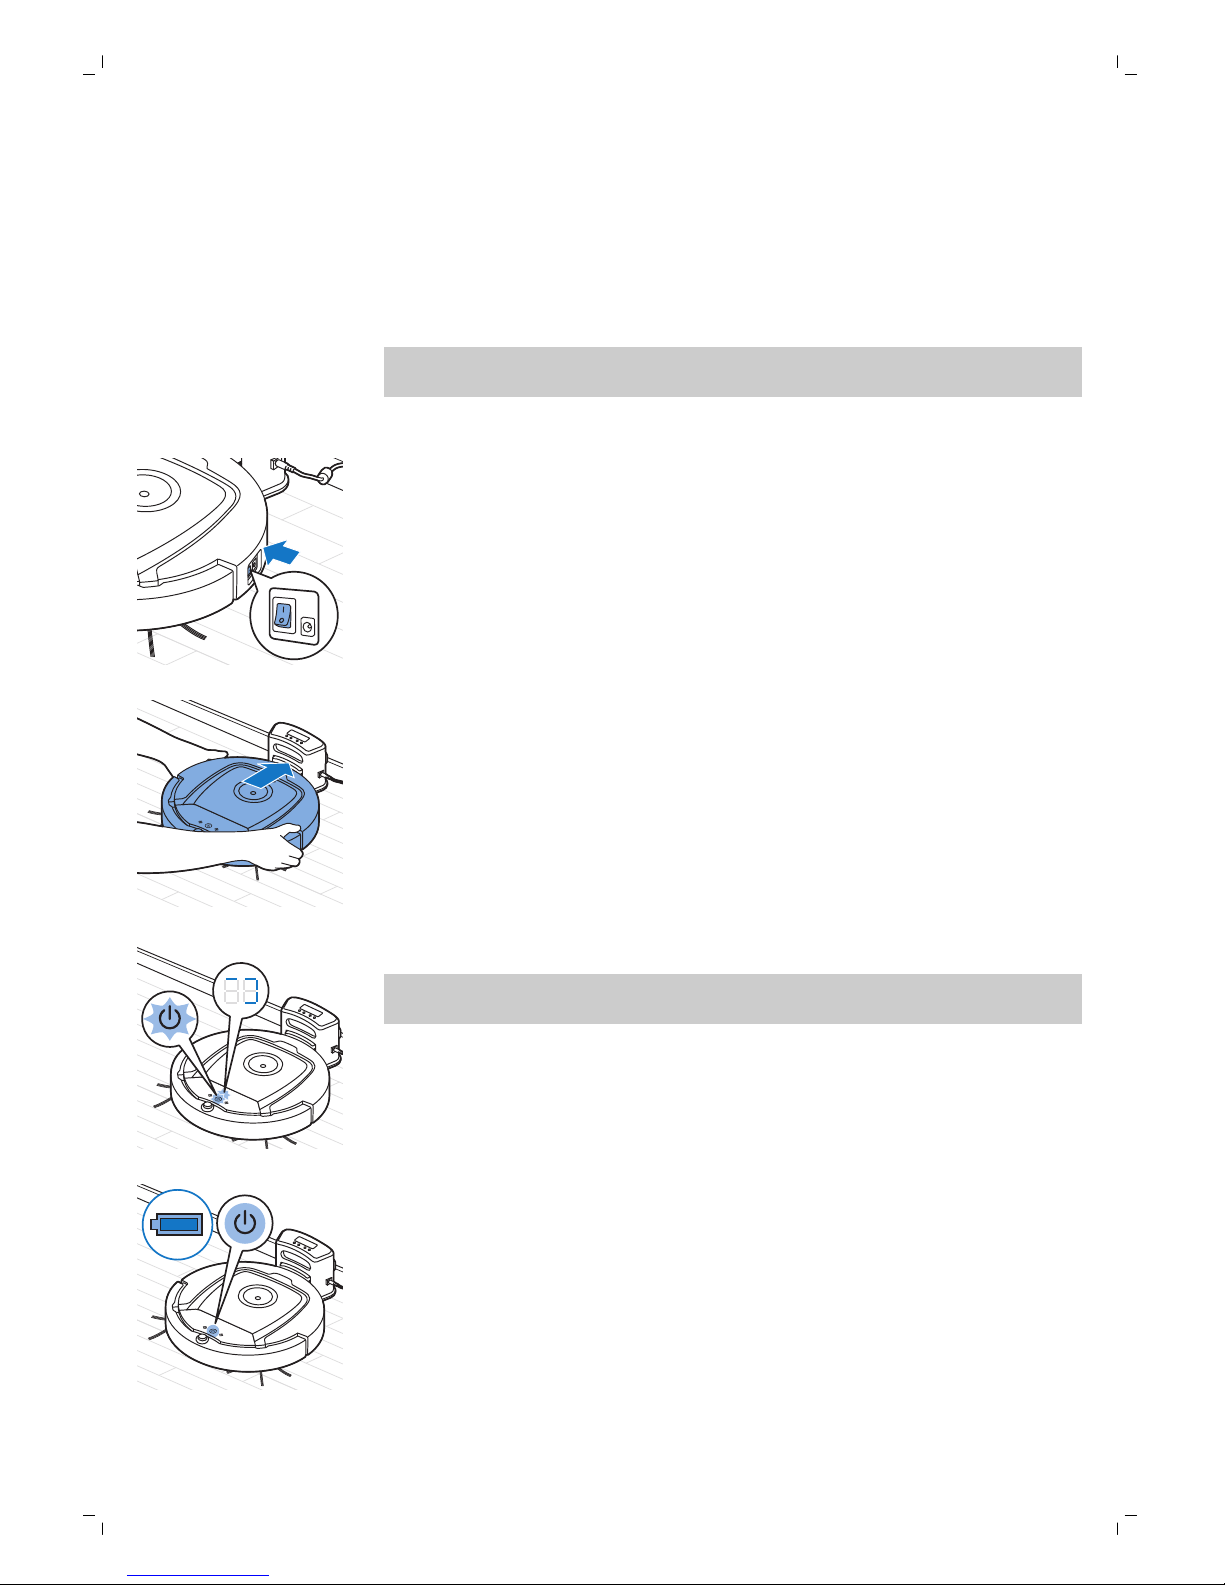
Încărcare
Când efectuaţi încărcarea pentru prima dată şi când bateria reîncărcabilă a
robotului este goală, durata de încărcare este de patru ore.
Robotul poate fi încărcat în două moduri:
-
Pe staţia de andocare, fie manual, fie în mod automat în timpul utilizării;
-
Prin conectarea robotului direct la priză.
Notă: Atunci când bateria reîncărcabilă este complet încărcată, robotul dvs.
poate curăţa până la 120 de minute
Încărcarea pe staţia de andocare
1 Apăsaţi comutatorul de alimentare pentru a porni robotul.
2 Aşezaţi robotul pe staţia de andocare conectată.
3 Butonul start/stop începe să clipească.
Notă: Deoarece aceasta este prima dată când încarci robotul, afişajul
acestuia arată indicatorul de pornire.
4 Când bateria reîncărcabilă este complet încărcată, butonul start/stop
iluminează continuu.
81
Română
Page 82
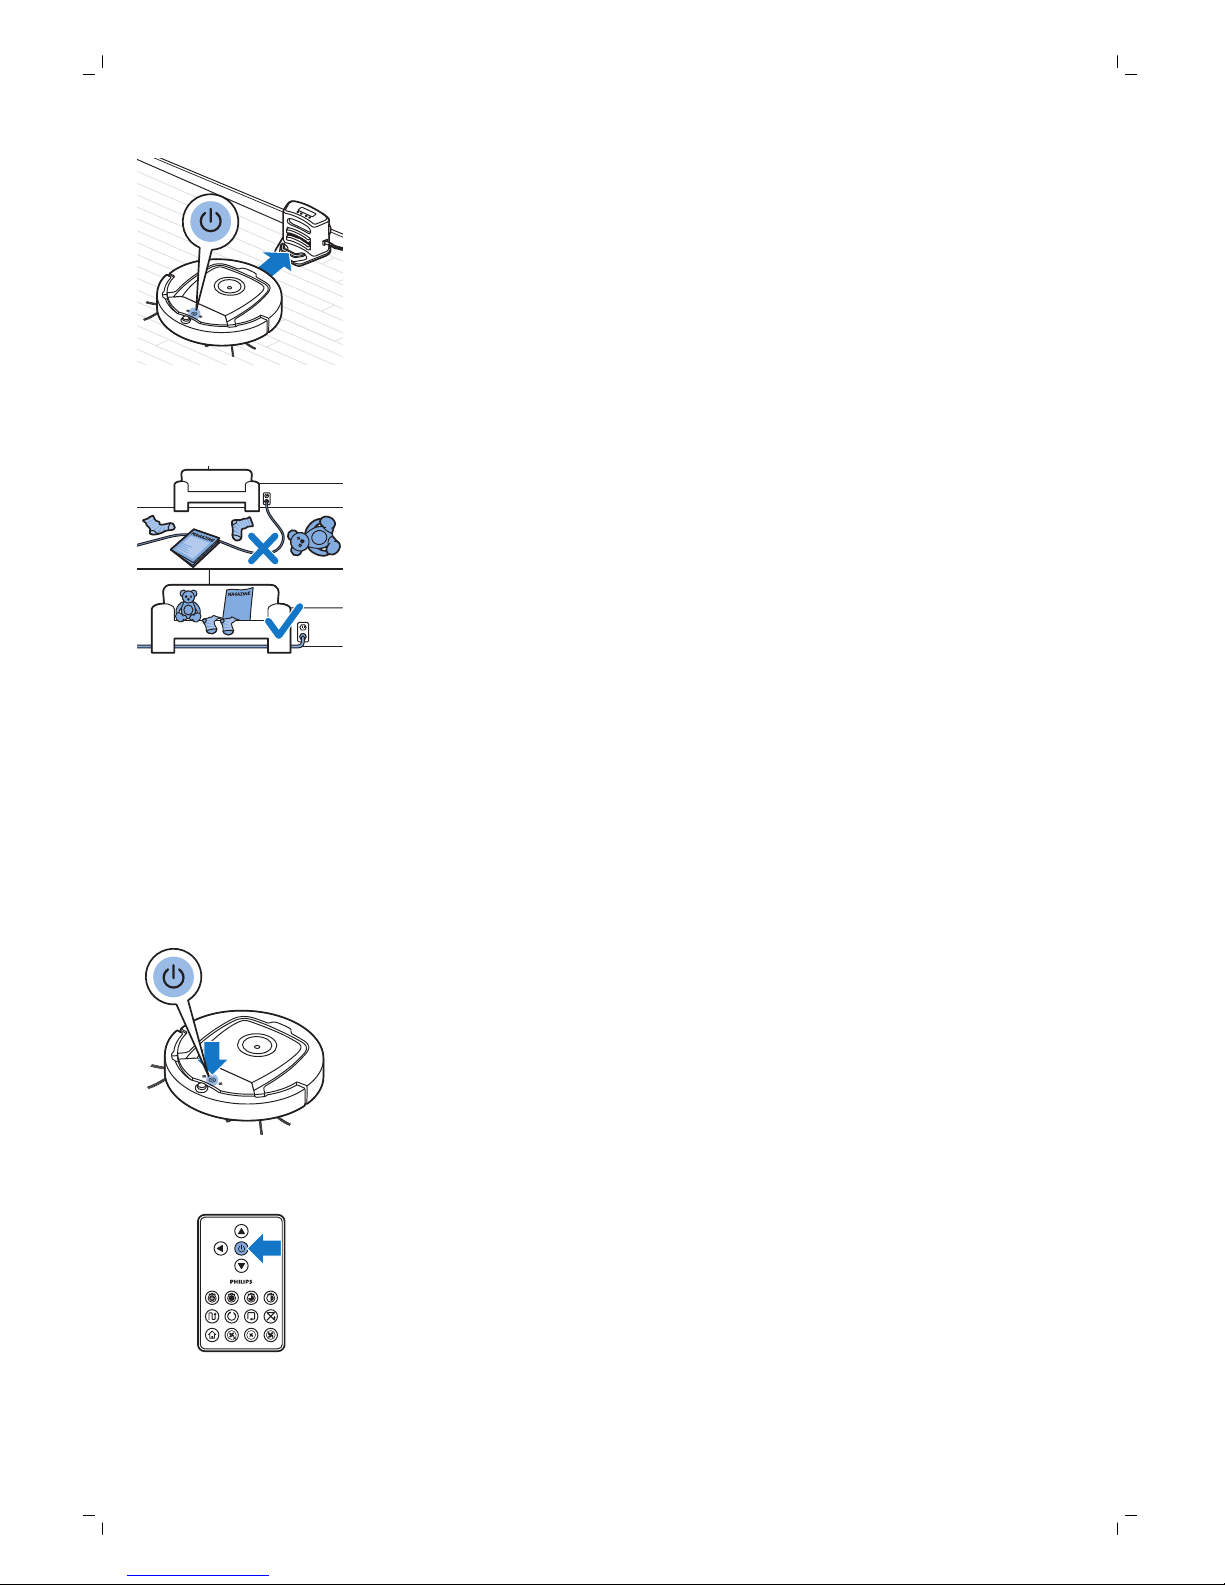
1 Atunci când robotul a încheiat curăţarea sau când nivelul bateriei este de
numai 15%, acesta caută automat staţia de andocare pentru a se
reîncărca. Când robotul caută staţia de andocare, lumina butonului
start/stop devine portocalie.
2 Când bateria reîncărcabilă este complet încărcată, butonul start/stop
iluminează continuu.
Pregătirea camerei pentru o cursă de curăţare
Înainte de a porni robotul pentru cursa sa de curăţare, asiguraţi-vă că
îndepărtaţi toate obiectele libere şi fragile de pe podea. De asemenea,
îndepărtaţi toate cablurile, firele şi şnururile de pe podea.
Utilizarea robotului
Pornirea şi oprirea
1 Setaţi comutatorul de alimentare de pe partea laterală a robotului în
poziţia „oprit”.
2 Apăsaţi butonul Start/Stop.
-
Puteţi să apăsaţi butonul start/stop al robotului.
-
Puteţi, de asemenea, să apăsaţi butonul start/stop al telecomenzii.
3 Butonul start/stop este apăsat continuu şi robotul începe curăţarea.
82
Română
Încărcarea automată în timpul utilizării
Page 83
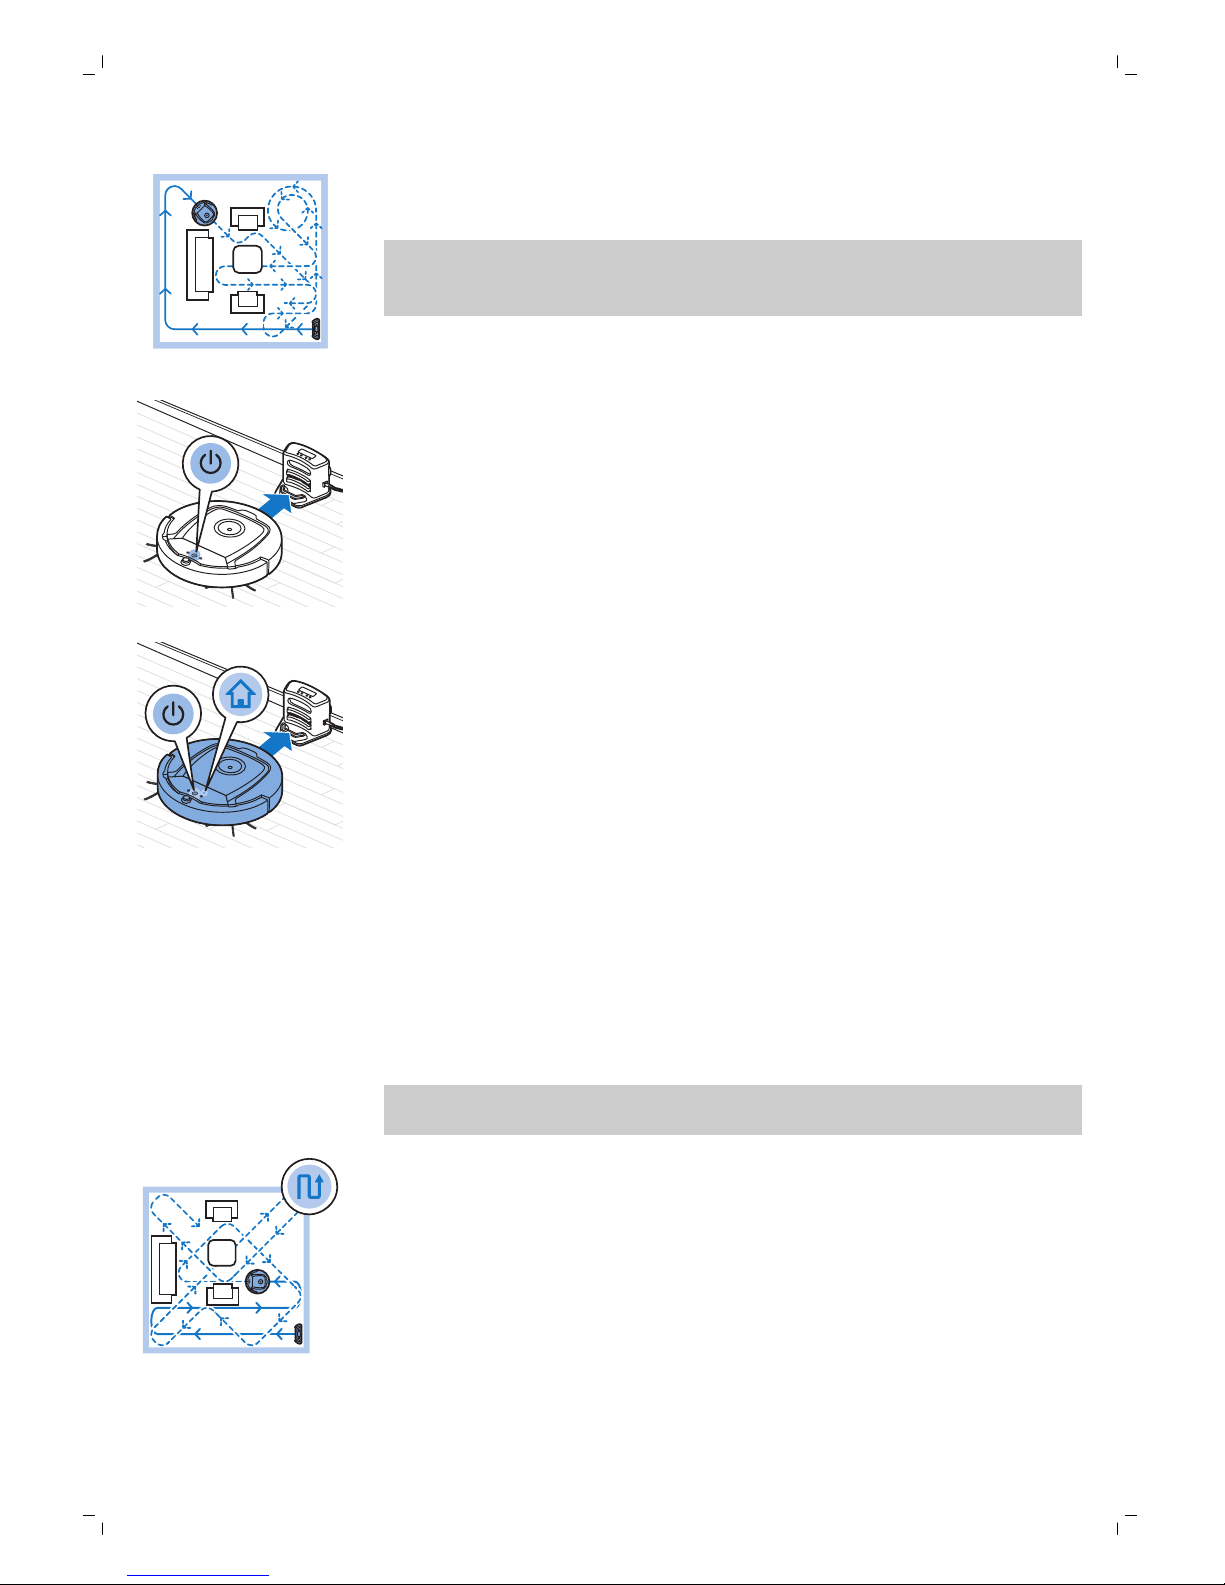
4 Robotul este în modul curăţare automată până când bateria se descarcă.
În modul curăţare automată, acesta urmează succesiunea model în Z,
aleatoriu, după linia peretelui şi în spirală.
Notă: Pentru a selecta un anumit mod, apăsaţi unul dintre butoanele de
mod de pe telecomandă. Consultaţi secţiunea „Selectarea modului de
curăţare” pentru mai multe detalii.
5 Când bateria se descarcă, butonul start/stop se aprinde cu portocaliu şi
robotul caută staţia de andocare pentru a se reîncărca.
6 Puteţi, de asemenea, să apăsaţi butonul start/stop pentru a întrerupe
cursa de curăţare. Dacă apăsaţi butonul start/stop din nou şi există
suficientă energie în bateria reîncărcabilă, robotul continuă curăţarea în
modul curăţare automată.
7 Pentru a face robotul să revină la staţia de andocare înainte ca bateria
reîncărcabilă să se descarce, apăsaţi butonul de andocare de pe
telecomandă. Pictograma de andocare de pe afişajul robotului se
aprinde şi robotul revine la staţia de andocare.
Selectarea modului de curăţare
Pe lângă modul de curăţare automată, acest robot dispune de patru moduri
de curăţare individuale care pot fi activate prin apăsarea butonului
corespunzător de pe telecomandă.
Notă: Modurile selectate manual sunt active doar timp de două minute.
După aceea, robotul comută înapoi pe modul de curăţare automată.
Modul model în Z
În modul model în Z, robotul curăţă efectuând bucle în formă de Z prin
cameră pentru a curăţa zone mari.
83
Română
Page 84
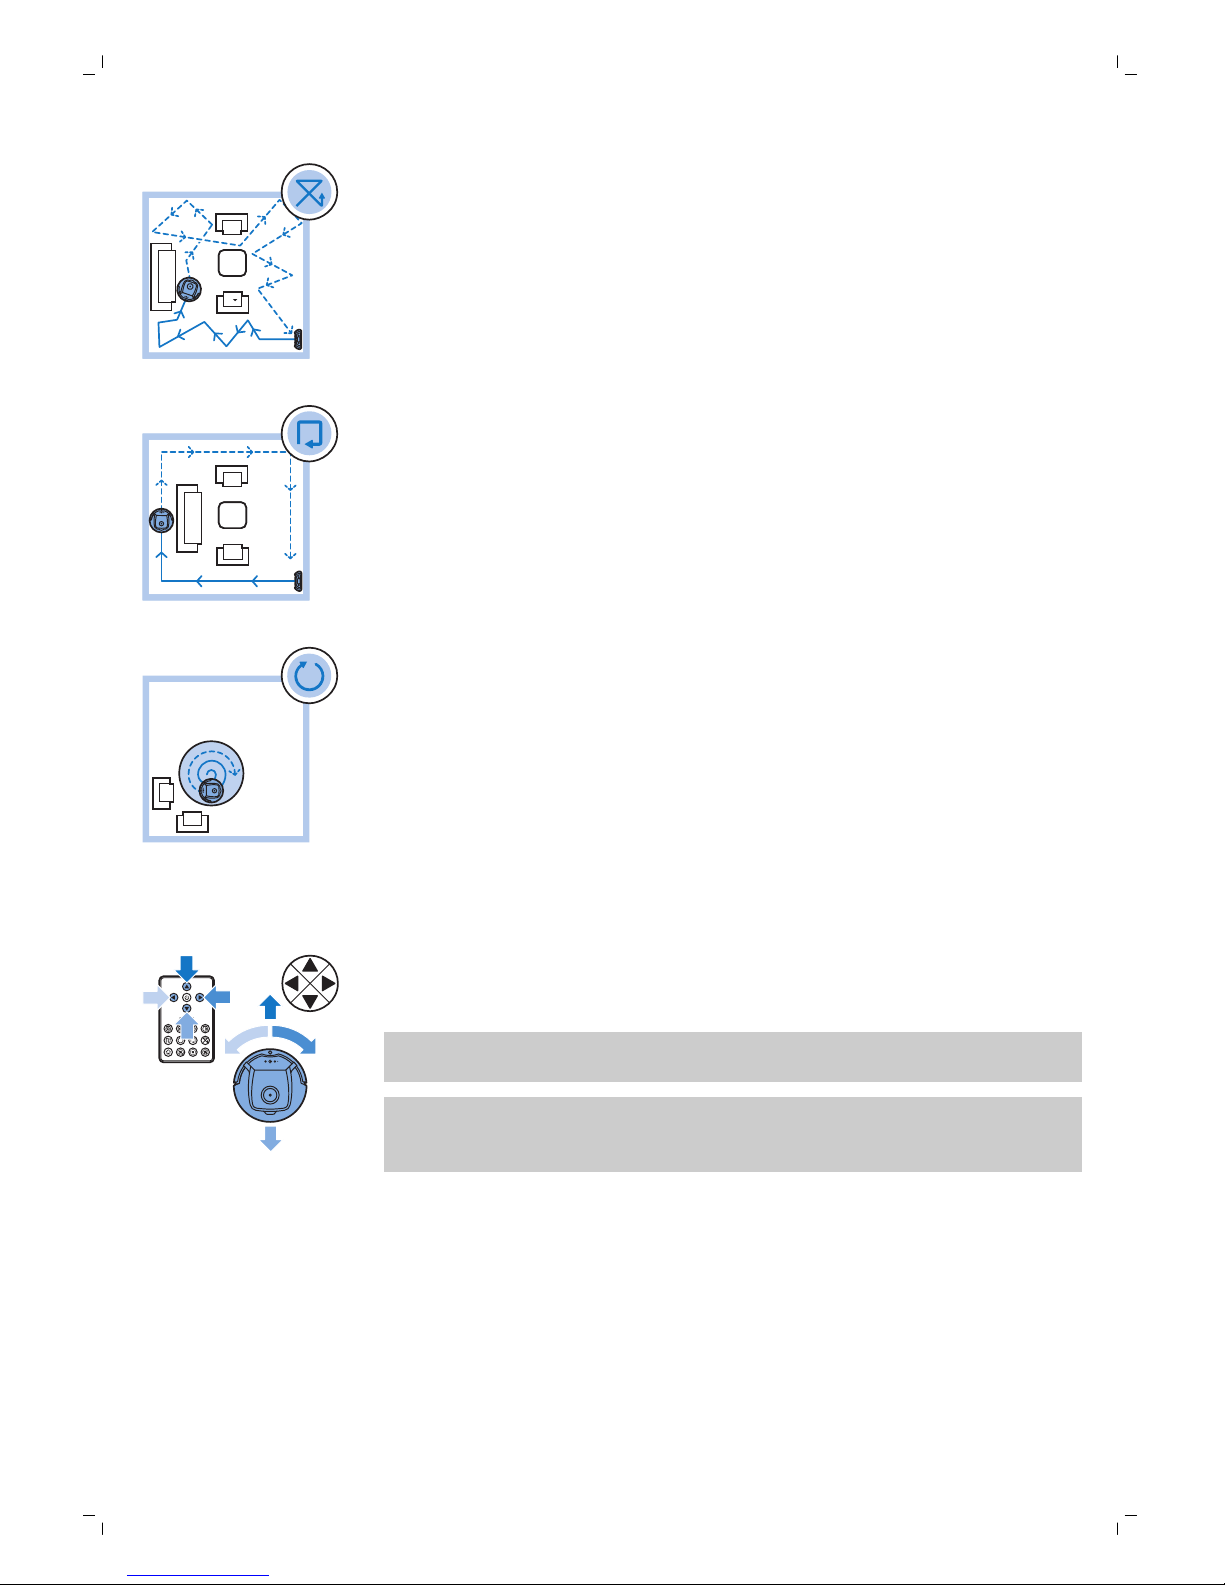
În acest mod, robotul curăţă camera conform unui model combinat de
mişcări drepte şi încrucişate.
În acest mod, robotul urmăreşte pereţii camerei pentru a curăţa suplimentar
zona de-a lungul pereţilor.
În acest mod, robotul se deplasează în spirală pentru a curăţa o zonă de
dimensiuni reduse. Dacă senzorul de detectare praf depistează murdărie,
robotul comută automat ventilatorul la viteza turbo.
Acţionarea manuală
1 Utilizaţi butoanele-săgeată de deasupra şi dedesubtul şi la stânga şi la
dreapta butonului start/stop de pe telecomandă pentru a deplasa
robotul prin cameră.
Notă: Fiţi atent când conduceţi manual robotul în apropierea unor
diferenţe de nivel şi scări.
Notă: Funcţia de aspirare şi periile laterale funcţionează numai când
robotul este condus înainte. Butoanele stânga, dreapta şi înapoi sunt
doar pentru manevrarea robotului.
84
Română
Modul în spirală
Modul de urmărire a peretelui
Modul aleator
Page 85
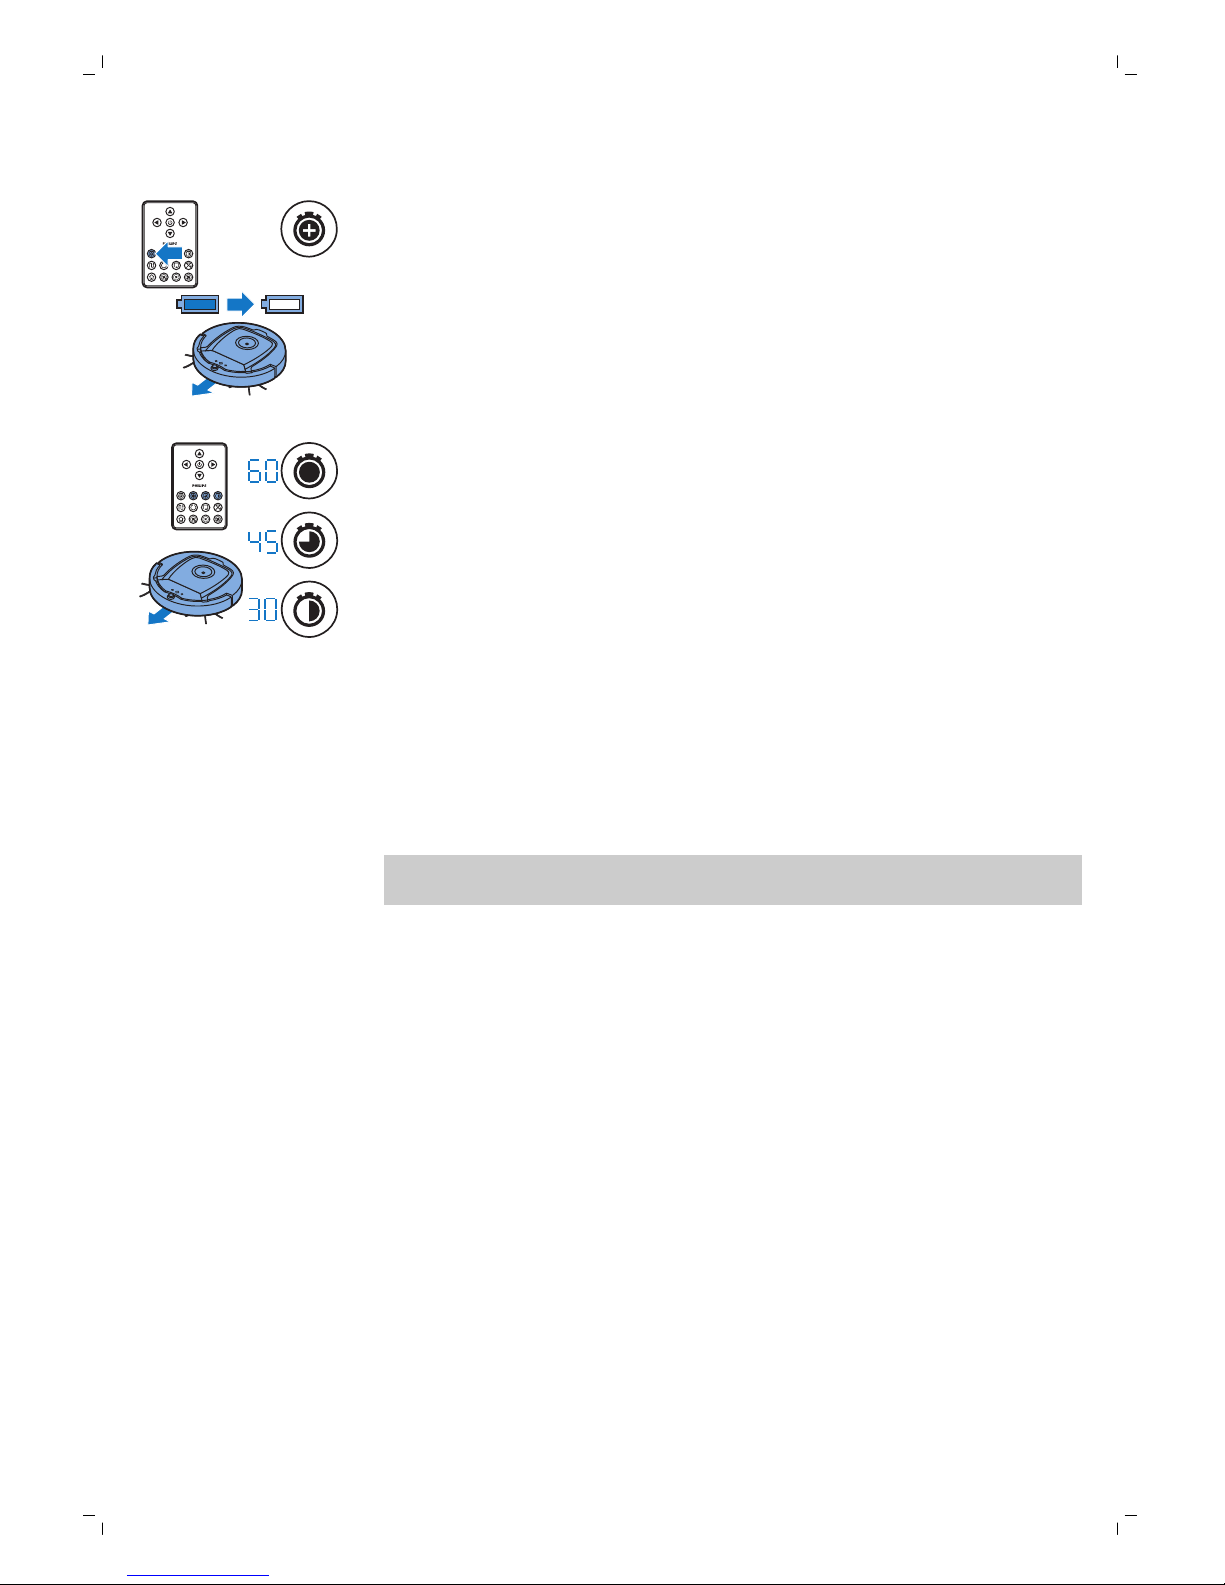
Utilizarea butoanelor pentru timpul de cură are
-
În mod implicit, robotul este în modul curăţare automată până când
bateria reîncărcabilă se descarcă. Apoi, robotul se va întoarce automat la
staţia sa de andocare. Dacă aţi selectat unul dintre celelalte timpuri de
curăţare (vedeţi mai jos), puteţi comuta înapoi la modul implicit, apăsând
butonul timpului maxim de curăţare de pe telecomandă.
-
Celelalte butoane pentru timpul de curăţare de pe telecomandă îţi permit
să laşi robotul să funcţioneze timp de 60, 45, respectiv 30 de minute. La
terminarea timpului de curăţare, robotul revine la staţia sa de andocare.
Pictograma de andocare se va aprinde pe afişaj.
-
Dacă nu doriţi ca robotul să se întoarcă la staţia de andocare după
sfârşitul timpului de curăţare, apăsaţi de două ori butonul de curăţare.
Pictograma de andocare dispare de pe afişaj. Când timpul de curăţare sa încheiat, robotul se opreşte.
Funcţionarea staţiei de andocare
Setarea orei ceasului şi a zilei
Dacă doriţi să utilizaţi programe de curăţare, trebuie să setaţi mai întâi ora
ceasului şi ziua săptămânii de pe afişajul staţiei de andocare.
Notă: Pentru imaginile care aparţin paşilor de mai jos, consultaţi paginile de
pe spatele acestui manual.
1 Apăsaţi butonul de setare. Indicatorul pentru modul de setare şi
indicatorul pentru ora ceasului încep să lumineze intermitent.
2 Apăsaţi butonul de selectare o dată. Indicatorul de oră începe să
clipească.
3 Utilizaţi butoanele + şi - de pe staţia de andocare pentru a seta ora. Ora
setată apare pe afişaj.
4 Apăsaţi butonul de selectare pentru a confirma ora setată. Indicatorul de
minute începe să clipească.
5 Utilizaţi butoanele + şi - de pe staţia de andocare pentru a seta minutele.
Minutele setate apar pe afişaj.
6 Apăsaţi butonul de selectare pentru a confirma minutele setate. Indicaţia
„Su” pentru duminică începe să lumineze intermitent.
7 Utilizează butoanele + şi - de pe staţia de andocare pentru a seta data
curentă a săptămânii.
8 Apăsaţi butonul de selectare pentru a confirma ziua săptămânii.
9 Apăsaţi butonul de setare pentru a confirma ora ceasului şi setarea zilei
săptămânii. Atât indicatorul pentru modul de setare, cât şi indicatorul
pentru ora ceasului nu mai luminează intermitent şi rămân aprinse
continuu.
85
Română
Page 86

Programarea timpilor de curăţare
Dacă aţi setat ora şi ziua săptămânii pe afişajul staţiei de andocare, puteţi
programa timpii de curăţare pentru robot.
Notă: Pentru imaginile care aparţin paşilor de mai jos, consultaţi paginile de
pe spatele acestui manual.
Opţiunile de programare disponibile sunt:
Program Indicaţii pe afişaj
Curăţare în fiecare zi Toate indicaţiile zilelor sunt aprinse
Curăţare în timpul zilelor săptămânii,
în afara weekendurilor
Indicaţiile zilelor de luni până vineri sunt aprinse
Curăţare în 2 zile consecutive Indicaţiile a 2 zile sunt aprinse, de ex. vineri şi sâmbătă
Curăţare 1 zi pe săptămână Indicaţia zilei selectate este aprinsă
1 Apăsaţi butonul de setare. Indicatorul pentru modul de setare şi
indicatorul pentru programul de curăţare încep să lumineze intermitent.
2 Apăsaţi butonul de selectare o dată. Indicatorul de oră începe să
clipească.
3 Utilizaţi butoanele + şi - de pe staţia de andocare pentru a seta ora. Ora
setată apare pe afişaj.
4 Apăsaţi butonul de selectare pentru a confirma ora setată. Indicatorul de
minute începe să clipească.
5 Utilizaţi butoanele + şi - de pe staţia de andocare pentru a seta minutele.
Minutele setate apar pe afişaj.
6 Apăsaţi butonul de selectare pentru a confirma minutele setate. Indicaţia
„Su” pentru duminică începe să lumineze intermitent.
7 Utilizaţi butoanele + şi - de pe staţia de andocare pentru a comuta între
programele de curăţare (consultaţi tabelul de mai sus pentru opţiunile de
programare disponibile).
8 Apăsaţi pe butonul de selectare pentru a confirma programul selectat.
9 Apăsaţi butonul de setare pentru a confirma programarea. Atât
indicatorul pentru modul de setare, cât şi indicatorul pentru programul de
curăţare nu mai luminează intermitent şi rămân aprinse continuu.
10 Odată ce aţi setat un program de curăţare, afişajul prezintă indicatorul
programului de curăţare şi ziua sau zilele selectate. Dacă lăsaţi robotul în
modul standby şi bateria sa reîncărcabilă este încărcată complet, acesta
va începe să cureţe la ora programată în ziua sau zilele programate.
86
Română
Page 87
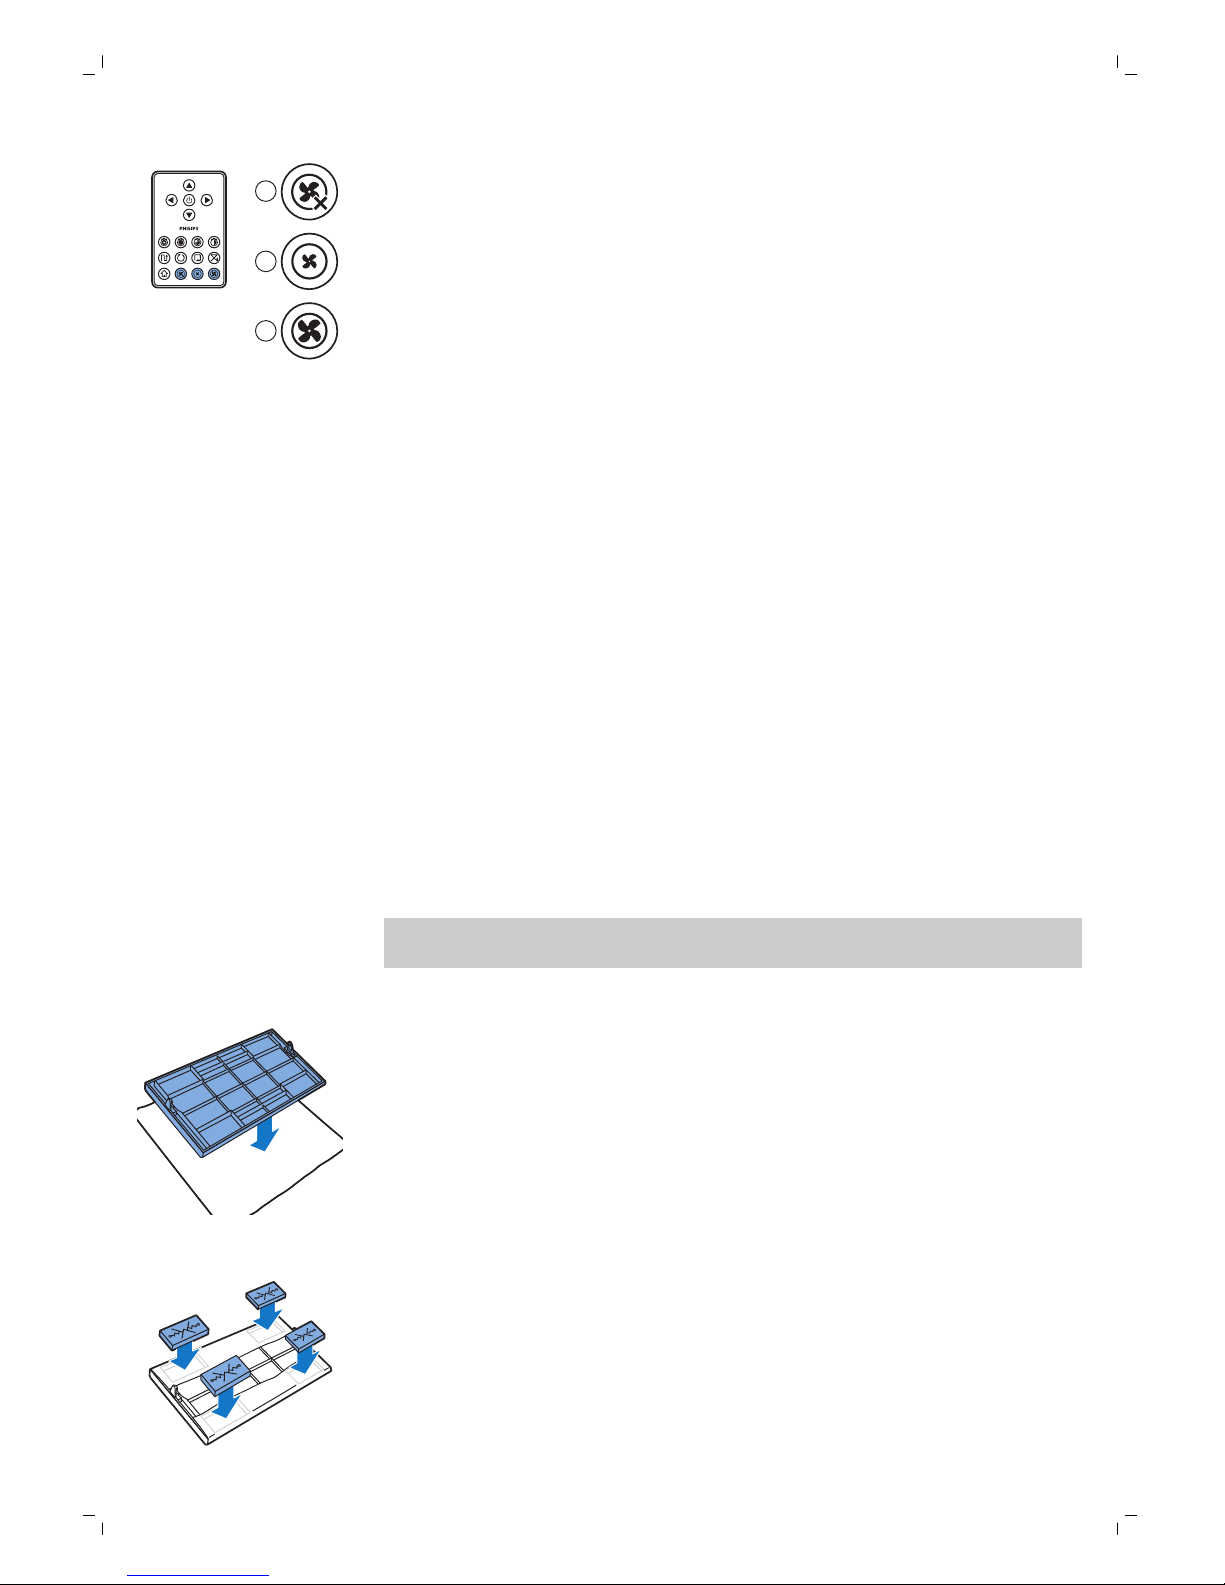
1
2
3
1 Apăsaţi acest buton pentru a opri ventilatorul
2 Apăsaţi acest buton pentru a porni ventilatorul la viteză normală.
3 Butonul pentru viteza turbo a
ventilatorului sporeşte viteza ventilatorului.
Răspuns la bătaia din palme
Funcţia de răspuns la bătaia din palme este activată când robotul intră în
modul inactiv în următoarele situaţii:
-
când întrerupe curăţarea din cauza unei erori
-
când aţi programat un timp scurt de curăţare
-
când nu îşi poate găsi staţia de andocare în 20 de minute
Dacă nu vedeţi robotul, puteţi să-l localizaţi bătând o dată din palme.
Robotul va răspunde emiţând un sunet şi aprinzând toate pictogramele de
pe afişajul său.
Utilizarea accesoriului pentru lavete uscate
Accesoriul pentru lavete uscate este o caracteristică ce îţi permite să cureţi
podelele dure cu lavete uscate.
Notă: Dacă uscaţi accesoriul pentru lavete uscate, robotul poate avea
probleme la trecerea peste praguri sau pe covoare.
Pregătirea accesoriului pentru lavete uscate pentru utilizare
1 Întoarce robotul invers şi aşeză-l pe podea sau pe o masă.
2 Aşează laveta uscată pe o masă şi aşează accesoriul pentru lavete uscate
pe lavetă cu toartele de fixare îndreptate către tine.
3 Pliază ambele capete ale lavetei uscate în jurul accesoriului pentru lavete
uscate ataşabil şi prinde laveta uscată pe accesoriu împingând blocurile
de fixare în nişele corespunzătoare.
87
Română
Butoane pentru viteză ventilator
Puteţi utiliza butoanele pentru viteză ale ventilatorului pentru a creşte viteza
ventilatorului la turbo sau pentru a opri ventilatorul. Setarea implicită este
viteza normală a ventilatorului.
Page 88
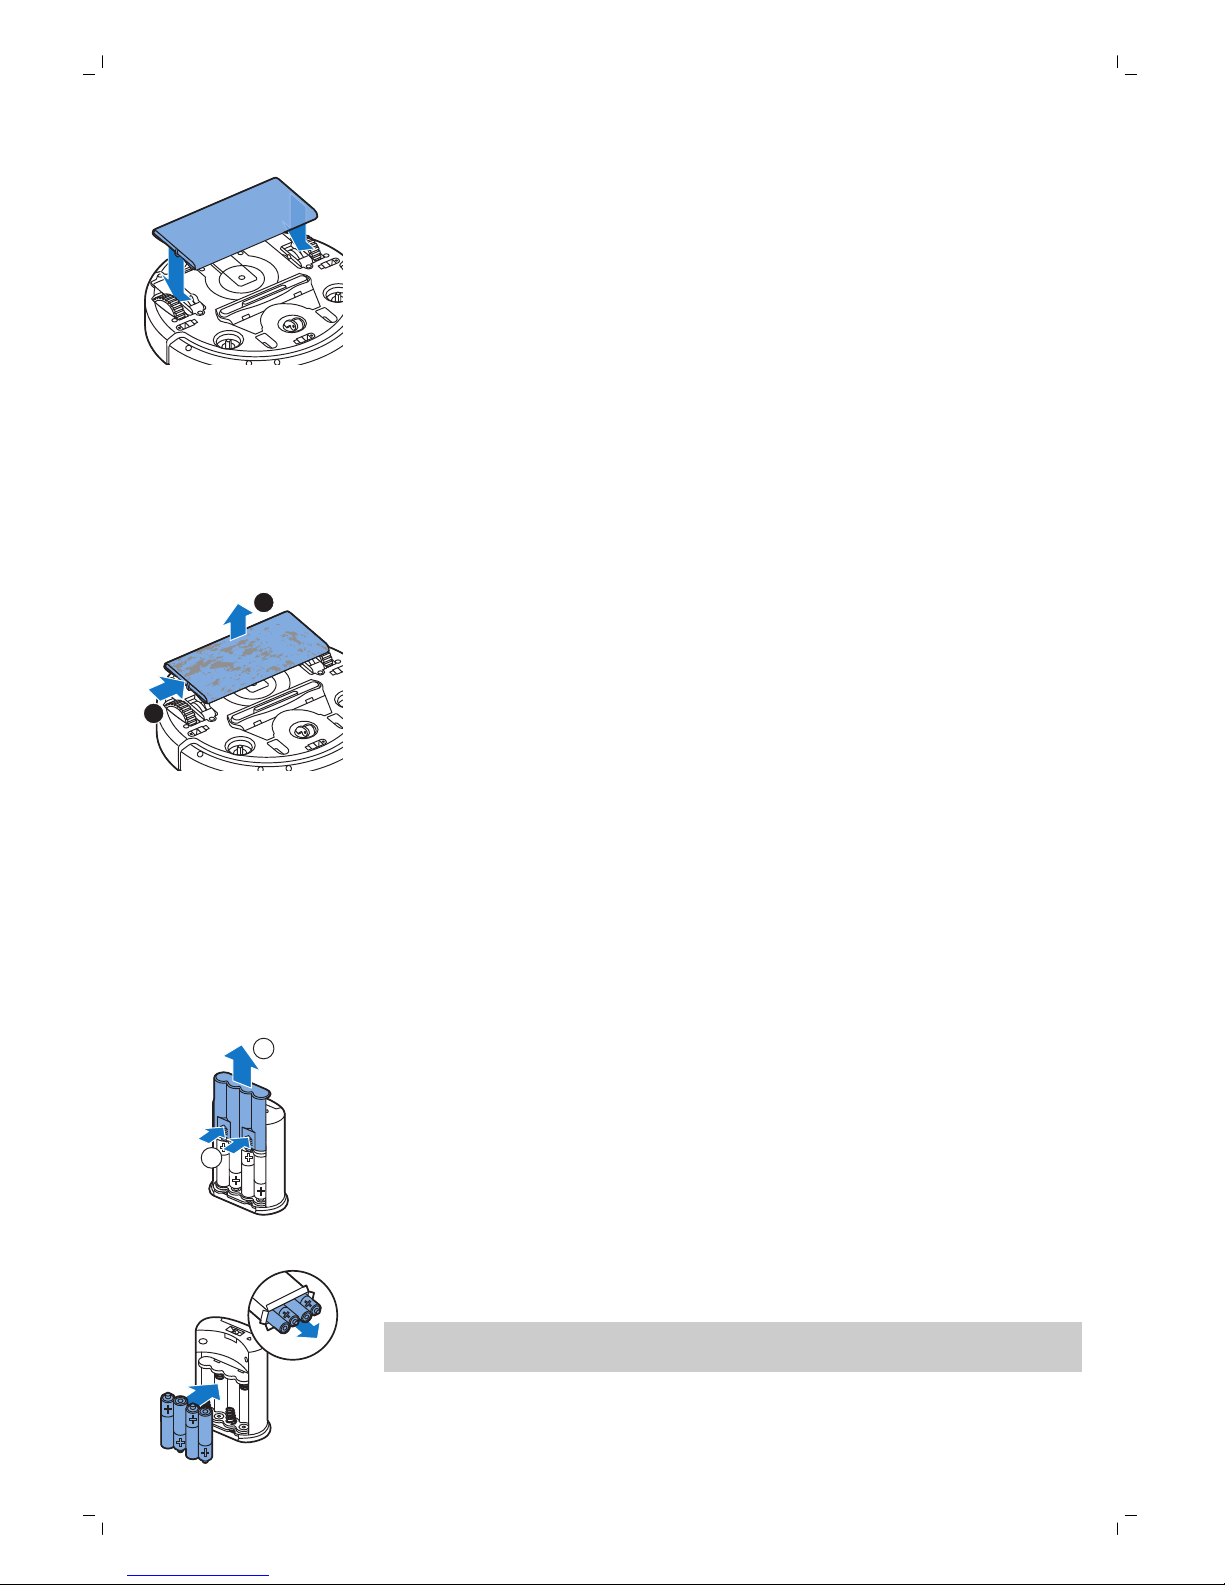
4 Introduceţi toarta de fixare a accesoriului pentru lavete uscate ataşabil în
orificiul aflat chiar în spatele roţii de pe o parte a robotului şi apăsaţi până
când auziţi că s-a fixat pe poziţie cu un clic. Apoi repetaţi aceste acţiuni
pe cealaltă parte.
5 Întoarceţi robotul şi aşează-l pe podea pe roţile sale, cu accesoriul
pentru lavete uscate atingând podeaua.
Utilizarea robotului cu accesoriul pentru lavete uscate
Atunci când este ataşat accesoriul pentru lavete uscate, puteţi utiliza robotul
în orice mod şi pe toate podelele. Nu utilizaţi accesoriul pentru lavete uscate
pe covor sau pe carpete.
Îndepărtarea accesoriului pentru lavete uscate
1 Îndepărtaţi accesoriul pentru lavete uscate imediat ce ai terminat de şters
podeaua.
2 Întoarce robotul invers şi aşeză-l pe podea sau pe o masă.
1
2
3 Apăsaţi un capăt al accesoriului pentru lavete uscate spre roata de pe
cealaltă parte a robotului pentru a-l elibera. Apoi trageţi accesoriul de pe
robot.
Utilizând peretele invizibil (FC8822)
Introducerea bateriilor în peretele invizibil
Peretele invizibil funcţionează cu patru baterii AA.
1
2
1 Împingeţi cele două lamele de eliberare din partea inferioară a capacului
posterior (1) şi glisaţi capacul posterior în sus şi scoateţi-l din peretele
invizibil (2).
2 Luaţi patru baterii AA noi din pachet şi introduceţi-le în compartimentul
pentru baterii al peretelui invizibil.
Notă: Asiguraţi-vă că polii + şi - ai bateriilor sunt îndreptaţi în direcţia
corectă.
88
Română
Page 89
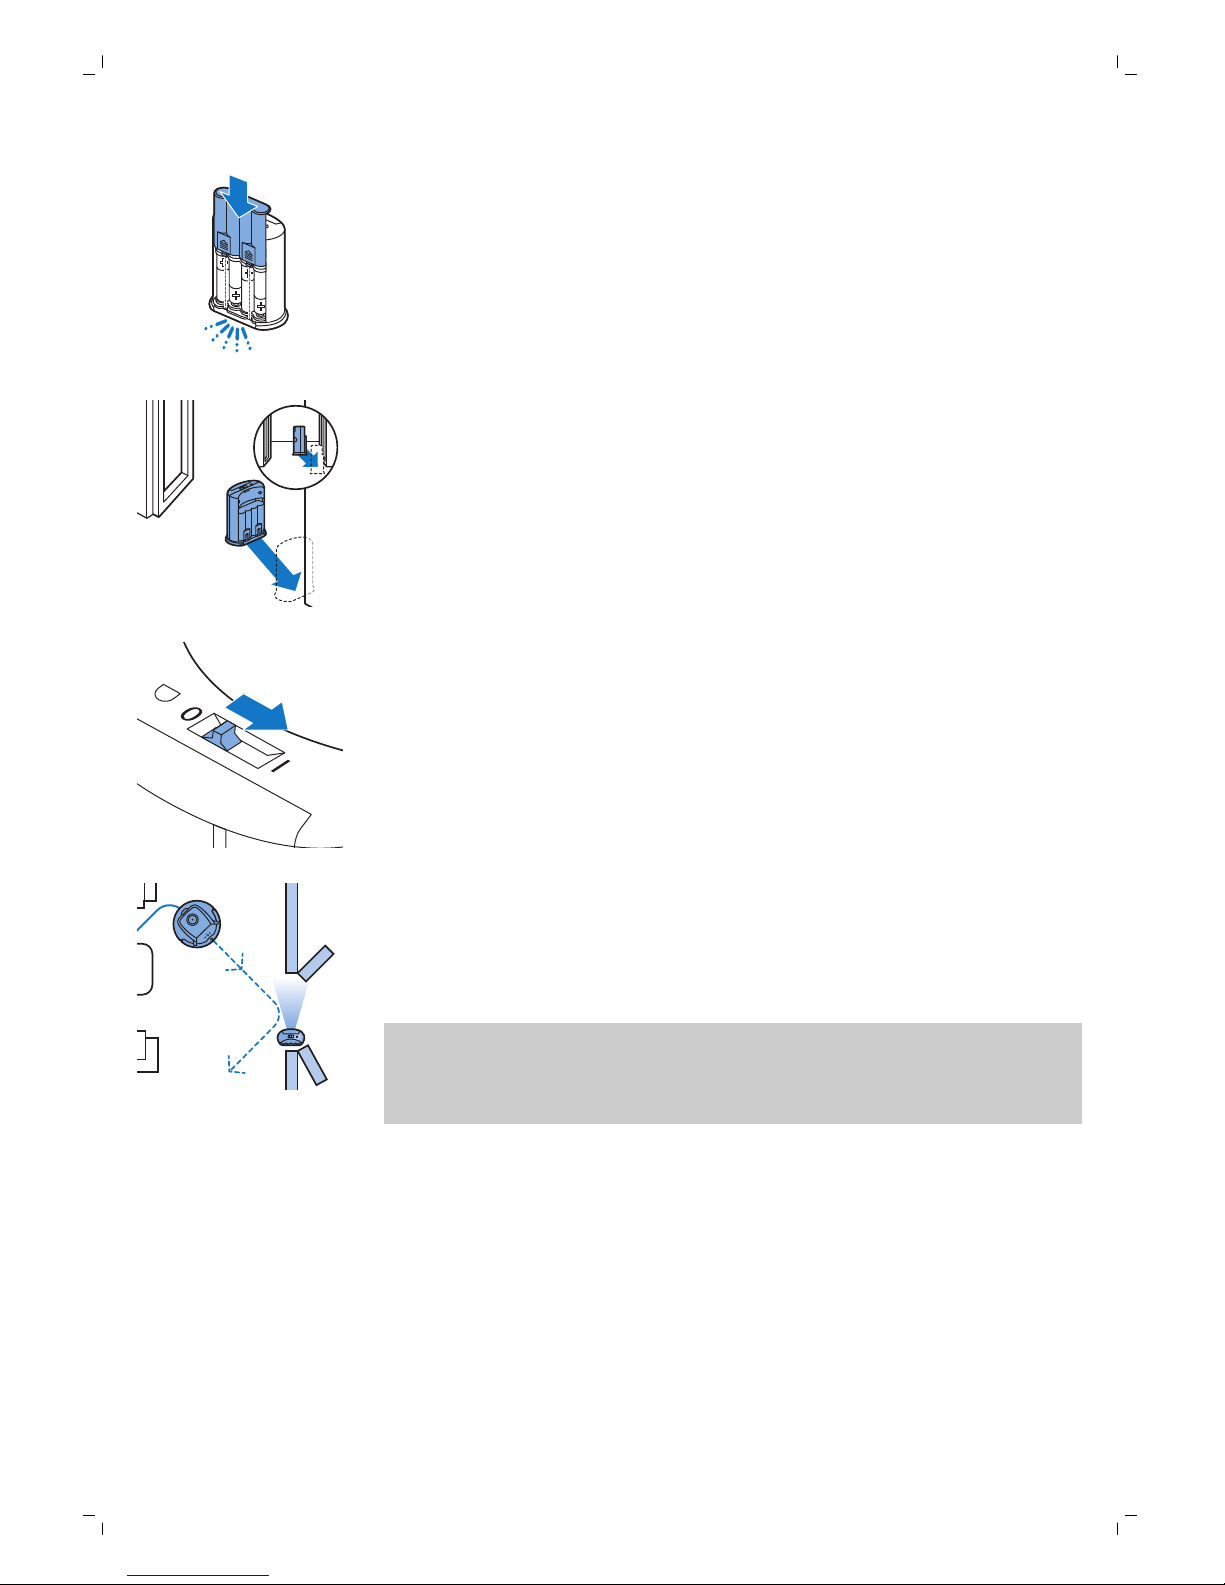
3 Glisaţi din nou capacul posterior pe peretele invizibil.
Poziţionarea peretelui invizibil pentru a opri robotul
Puteţi utiliza peretele invizibil pentru a împiedica robotul să pătrundă într-o
cameră sau într-o zonă în care nu doriţi să pătrundă.
1 Amplasaţi unitatea într-un punct dincolo de care nu doriţi ca robotul să
treacă, de exemplu lângă o uşă deschisă spre o cameră care este
restricţionată pentru robot.
2 Porniţi peretele invizibil cu comutatorul pornit/oprit din partea superioară
a unităţii.
3 Porniţi robotul.
4 Atunci când robotul se apropie prea mult de peretele invizibil, ledul de pe
peretele invizibil începe să lumineze intermitent, iar peretele invizibil
emite un fascicul de lumină infraroşie. Acest fascicul de lumină infraroşie
determină robotul să-şi schimbe ruta şi să se îndepărteze de peretele
invizibil.
Notă: Dacă utilizaţi peretele invizibil, verificaţi în mod regulat dacă bateriile
conţin în continuare suficientă energie. Puteţi verifica acest lucru oprind şi
pornind peretele virtual. Dacă în baterii este suficientă energie, LED-ul de pe
peretele invizibil va lumina scurt.
Curăţare şi întreţinere
Curăţarea robotului
Pentru a menţine performanţe de curăţare corespunzătoare, trebuie să
curăţaţi din când în când senzorii de deplasare, roţile, periile laterale şi
orificiul de aspirare.
1 Întoarceţi invers robotul pe o suprafaţă plată
89
Română
Page 90
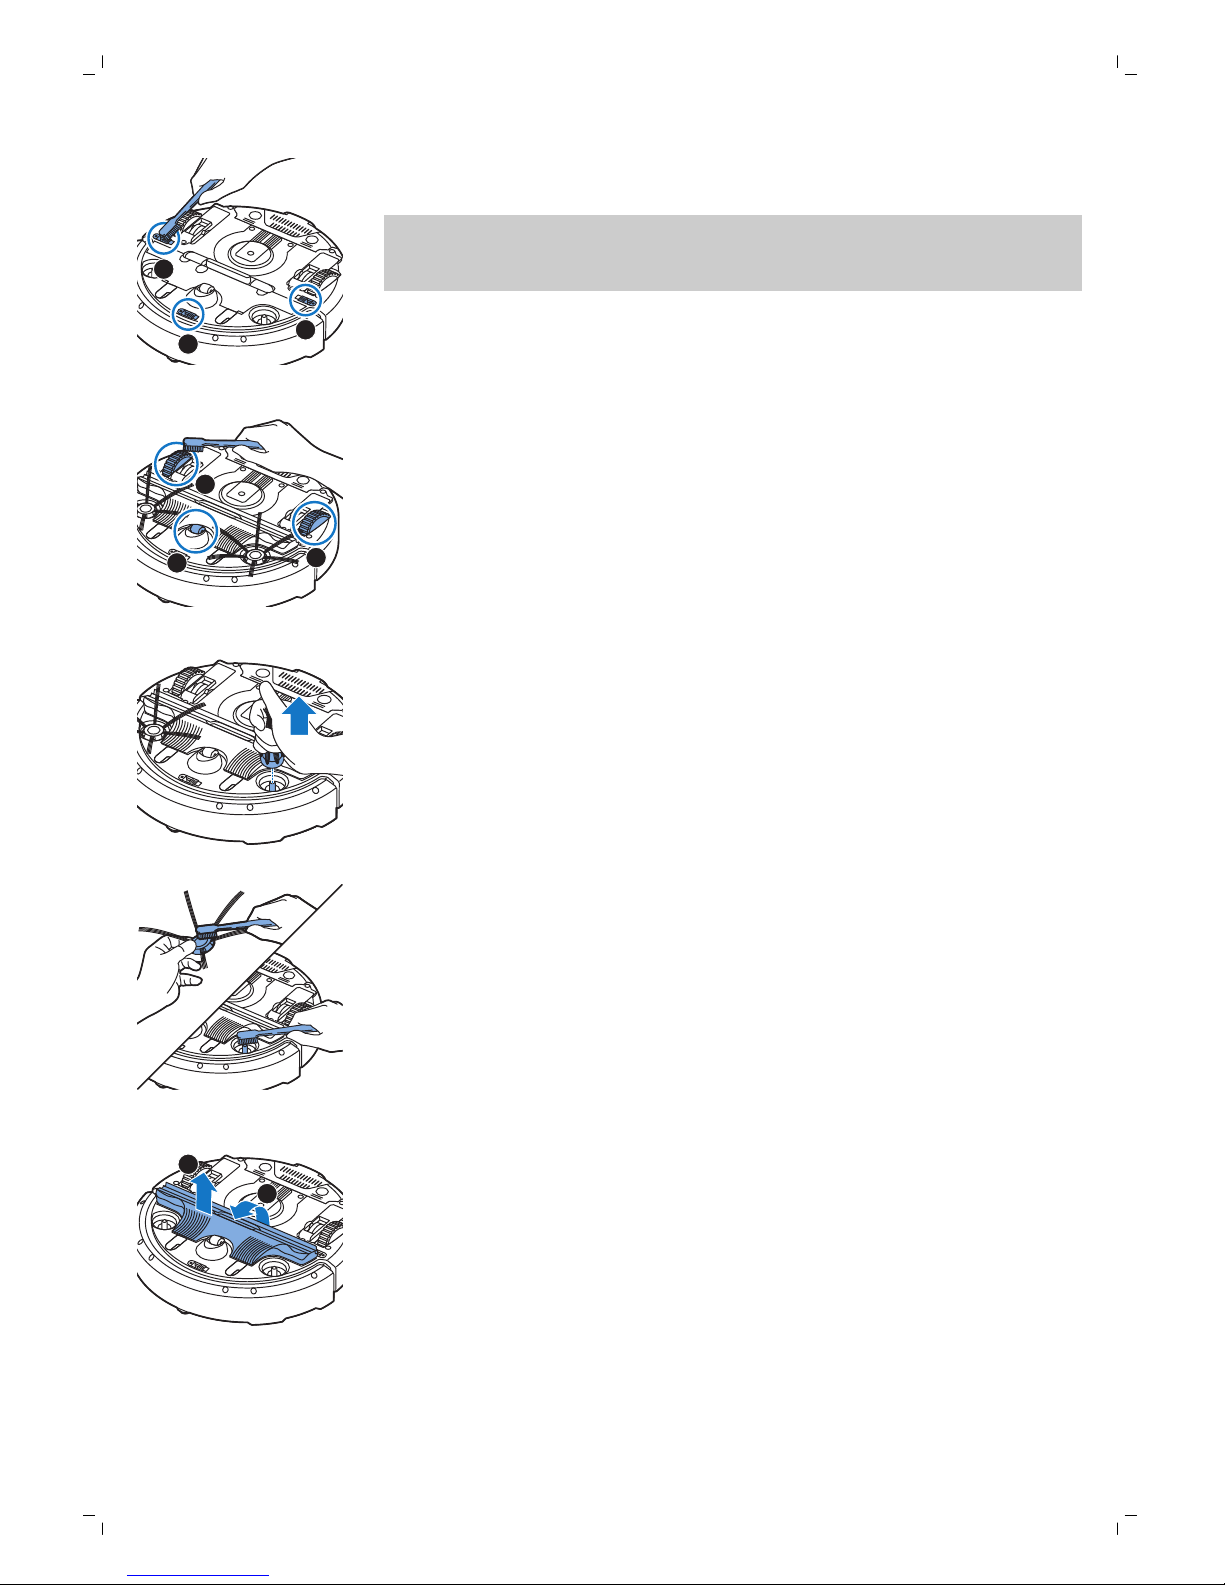
3
1
2
2 Utilizaţi o perie cu peri moi (de ex., o periuţă de dinţi) pentru a elimina
praful de pe senzorii de deplasare.
Notă: Este important să curăţaţi în mod regulat senzorii de deplasare.
Dacă senzorii de deplasare sunt murdari, este posibil ca robotul să nu
poată detecta diferenţele de nivel sau scările.
1
2
3
3 Utilizaţi o perie cu peri moi (de ex., o periuţă de dinţi) pentru a îndepărta
praful sau scamele de pe roata frontală şi de pe roţile laterale.
4 Pentru a curăţa periile laterale, prindeţi-le de peri şi trageţi-le de pe
arborii acestora.
5 Eliminaţi scamele, firele de păr şi aţele de pe ax şi de pe peria laterală cu
ajutorul unei perii moi (de ex., o periuţă de dinţi) sau al unei cârpe.
6 Verificaţi periile laterale şi partea inferioară a robotului pentru a vă
asigura că nu prezintă obiecte ascuţite care ar putea deteriora podea.
1
2
7 Desfaceţi conexiunile clemelor capului de aspirare TriActive XL prin
introducerea degetelor în zonele marcate cu săgeţi şi tragerea capului de
aspirare TriActive de pe robot.
90
Română
Page 91
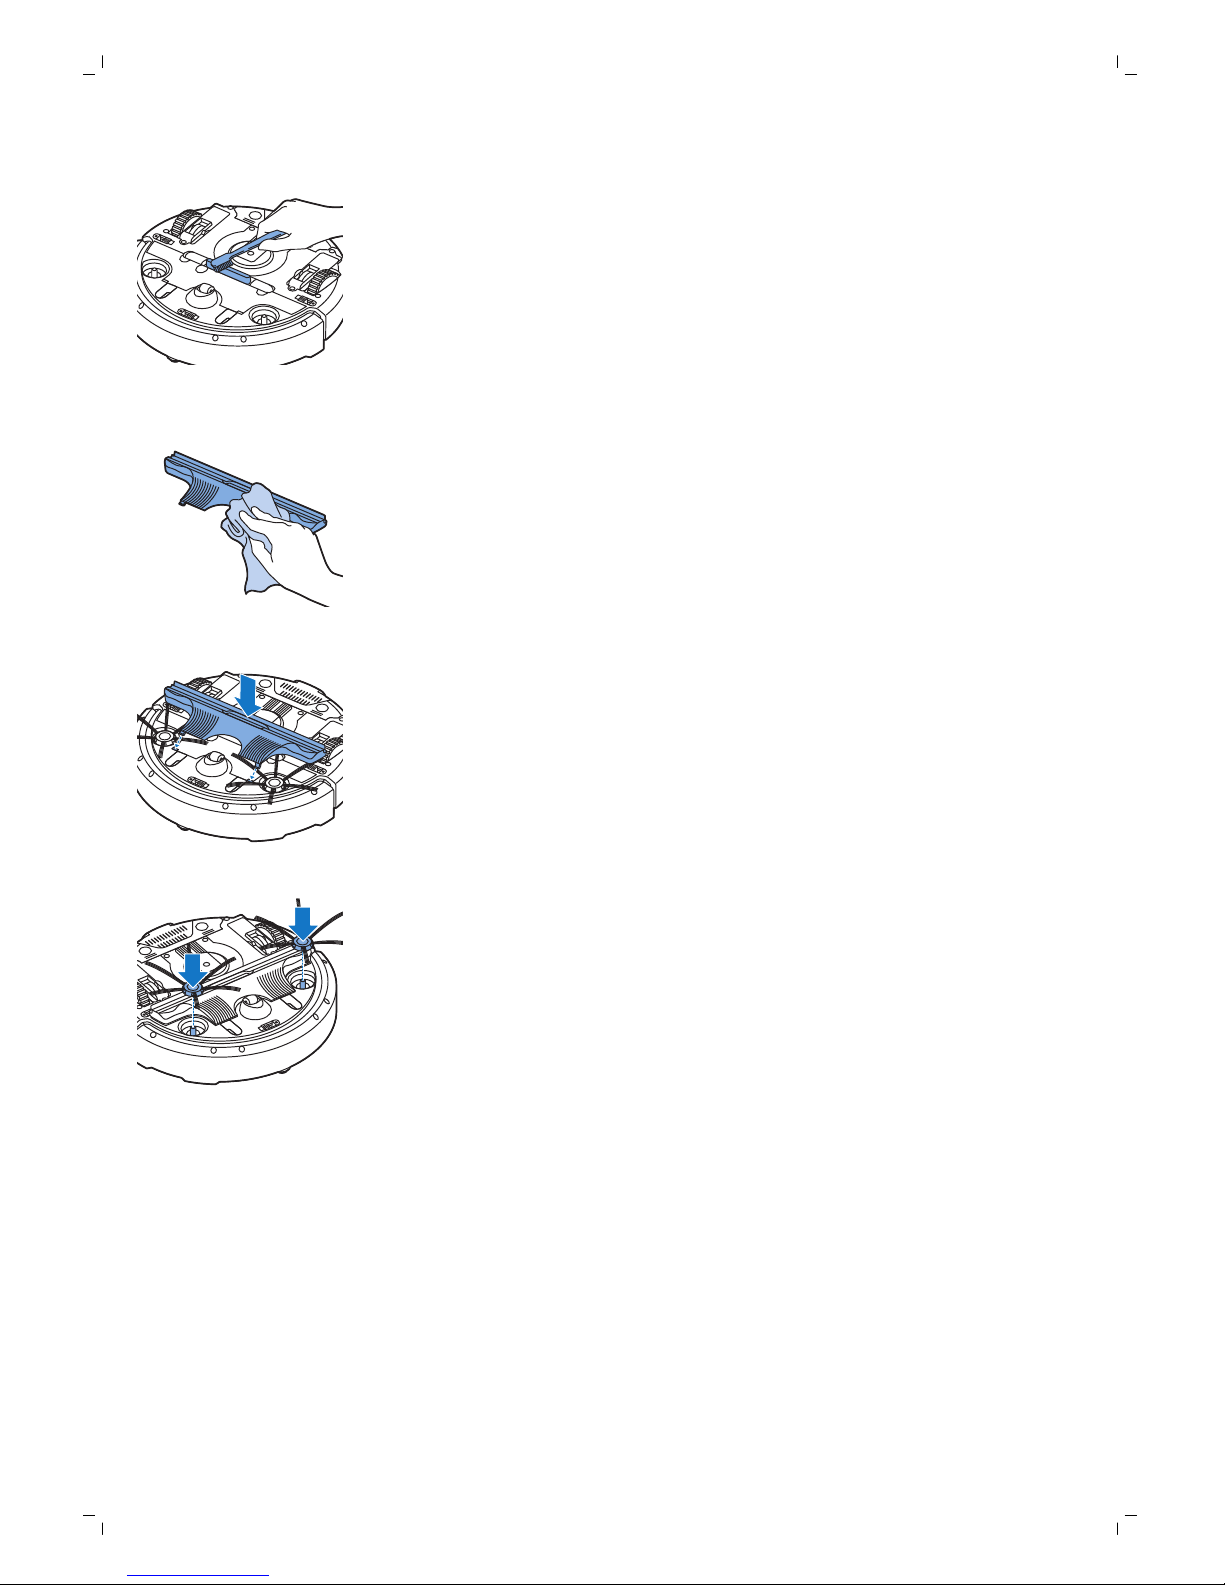
8 Curăţaţi orificiul de aspirare cu o perie moale (de ex., o periuţă de dinţi).
9 Curăţaţi tot praful vizibil de pe capul de aspirare TriActive.
10 Introduceţi cârligele de prindere ale capului de aspirare TriActive în
orificiile din partea inferioară a robotului. Apăsaţi capul de aspirare
TriActive înapoi în poziţia sa. Verificaţi dacă, capul de aspirare se poate
deplasa liber câţiva milimetri în sus şi în jos.
11 Împingeţi periile laterale pe axele de la baza robotului din nou.
Golirea şi curăţarea compartimentului pentru praf
Goliţi şi curăţaţi containerul de praf când indicatorul de umplere a
containerului de praf este aprins continuu.
1 Asiguraţi-vă că comutatorul de alimentare este în poziţia „oprit”.
91
Română
Page 92
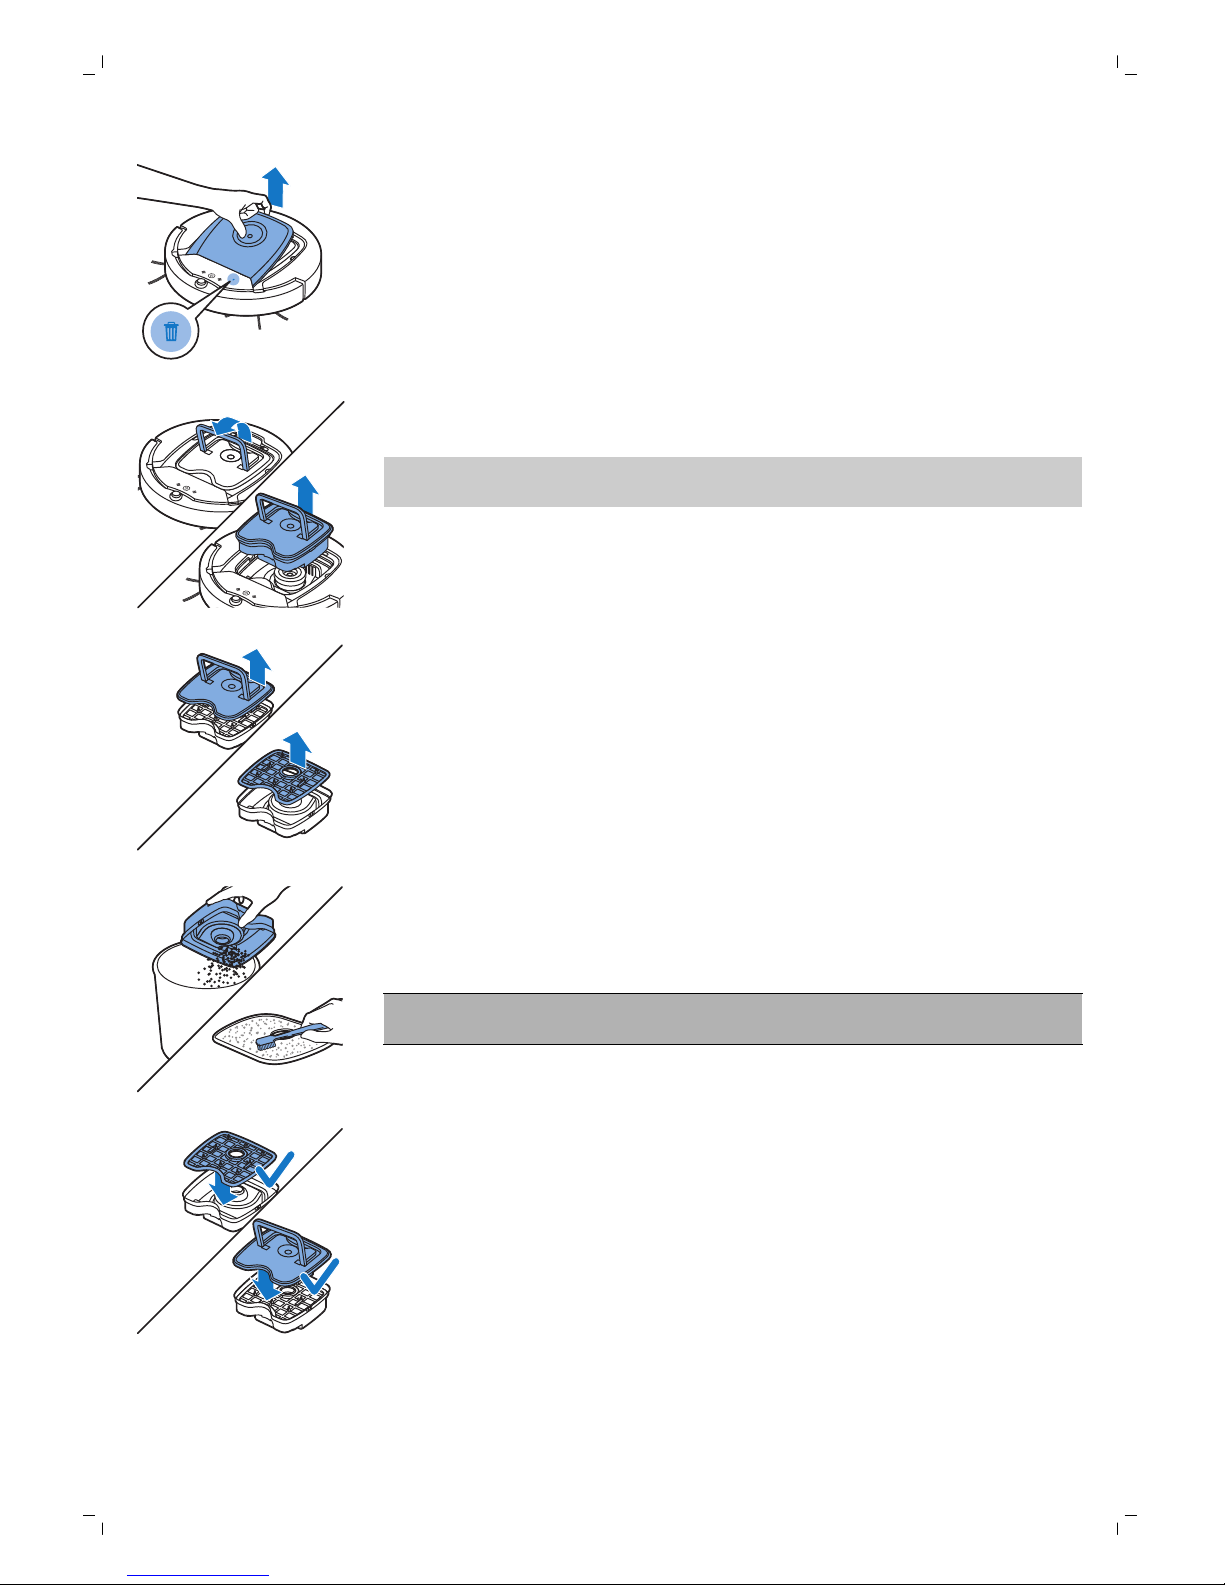
2 Scoateţi capacul.
3 Trageţi mânerul capacului compartimentului pentru praf şi ridicaţi
compartimentul pentru praf din carcasa acestuia.
Notă: La scoaterea sau la reintroducerea compartimentului pentru praf,
aveţi grijă să nu deterioraţi palele ventilatorului motorului.
4 Ridicaţi cu atenţie capacul containerului de praf (1) şi extrageţi filtrul (2).
5 Scuturaţi compartimentul pentru praf deasupra unei lăzi de gunoi, pentru
a-l goli. Curăţaţi filtrul şi interiorul containerului de praf cu o cârpă sau o
periuţă de dinţi cu peri moi. De asemenea, curăţaţi orificiul de aspirare din
partea inferioară a containerului de praf.
Atenţie: Nu curăţaţi compartimentul pentru praf şi filtrul cu apă sau în
maşina de spălat vase.
6 Puneţi filtrul la loc în containerul de praf (1). Apoi poziţionaţi capacul pe
containerul de praf(2).
92
Română
Page 93
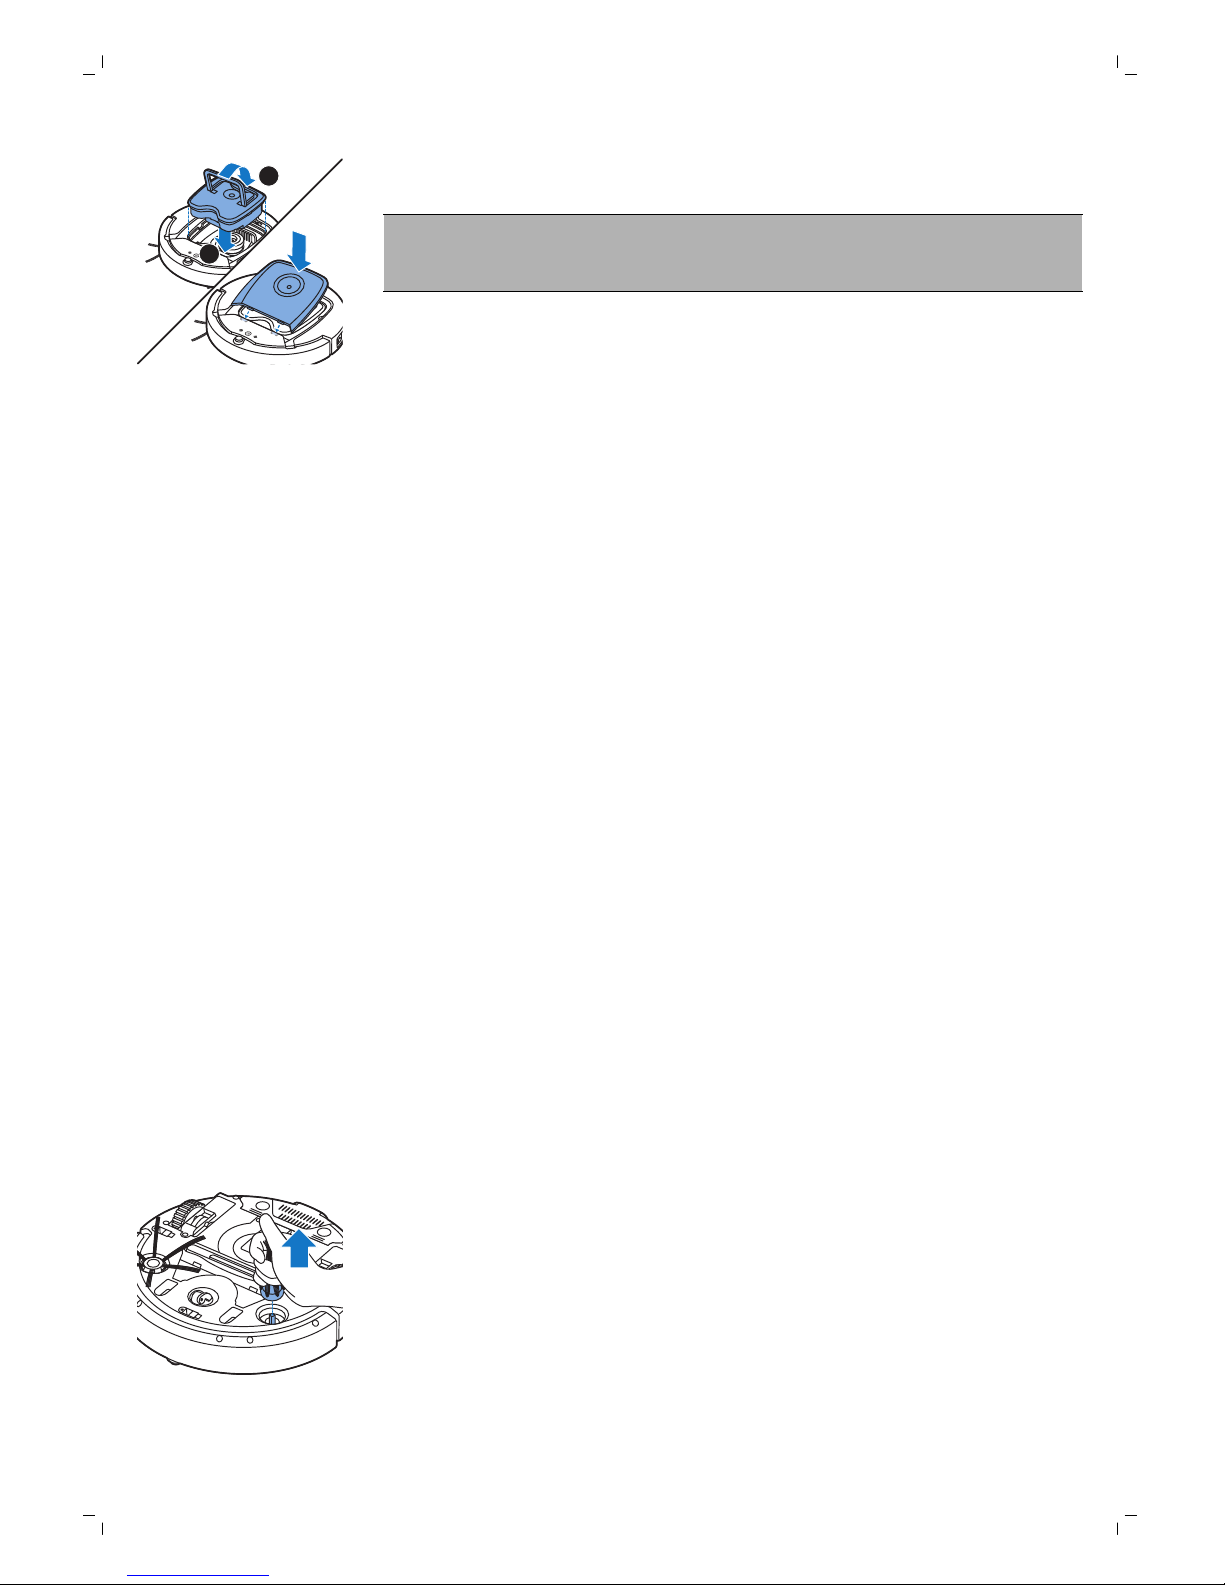
1
2
7 Aşează compartimentul pentru praf înapoi în carcasa acestuia şi pune
capacul superior înapoi pe robot.
Atenţie: Asiguraţi-vă întotdeauna că filtrul este prezent în containerul
de praf. Dacă utilizaţi robotul fără filtru în interiorul containerului de
praf, motorul acestuia va fi deteriorat.
Comandarea accesoriilor
Pentru a cumpăra accesorii sau piese de schimb, vizitaţi
www.shop.philips.com/service sau contactaţi distribuitorul dvs. Philips
local. Puteţi, de asemenea, contacta Centrul de asistenţă pentru clienţi
Philips din ţara dvs. (veţi găsi datele de contact în broşura de garanţie
internaţională).
Înlocuirea
Înlocuirea filtrului
Înlocuiţi filtrul dacă acesta este foarte murdar sau deteriorat. Puteţi
comanda un nou kit de filtru cu numărul de tip FC8066. Consultaţi „Golirea
şi curăţarea containerului de praf” în capitolul „Curăţare şi întreţinere” pentru
instrucţiuni referitoare la modul de demontare a filtrului din containerul de
praf şi modul de montare a acestuia în containerul de praf.
Înlocuirea periilor laterale
Înlocuiţi periile laterale după un timp, pentru a asigura rezultate de curăţare
corespunzătoare.
Înlocuiţi întotdeauna periile laterale când observaţi semne de uzură sau
deteriorare. Este recomandat, de asemenea, să înlocuiţi ambele perii
laterale în acelaşi moment. Puteţi să comandaţi perii laterale ca părţi dintrun kit de înlocuire FC8068. Kitul conţine, de asemenea, două filtre şi trei
lavete uscate.
1 Asiguraţi-vă că comutatorul de alimentare este în poziţia „oprit”.
2 Pentru a înlocui periile laterale, prinde periile laterale vechi de peri şi
trage-le de pe arborii acestora.
93
Română
Page 94
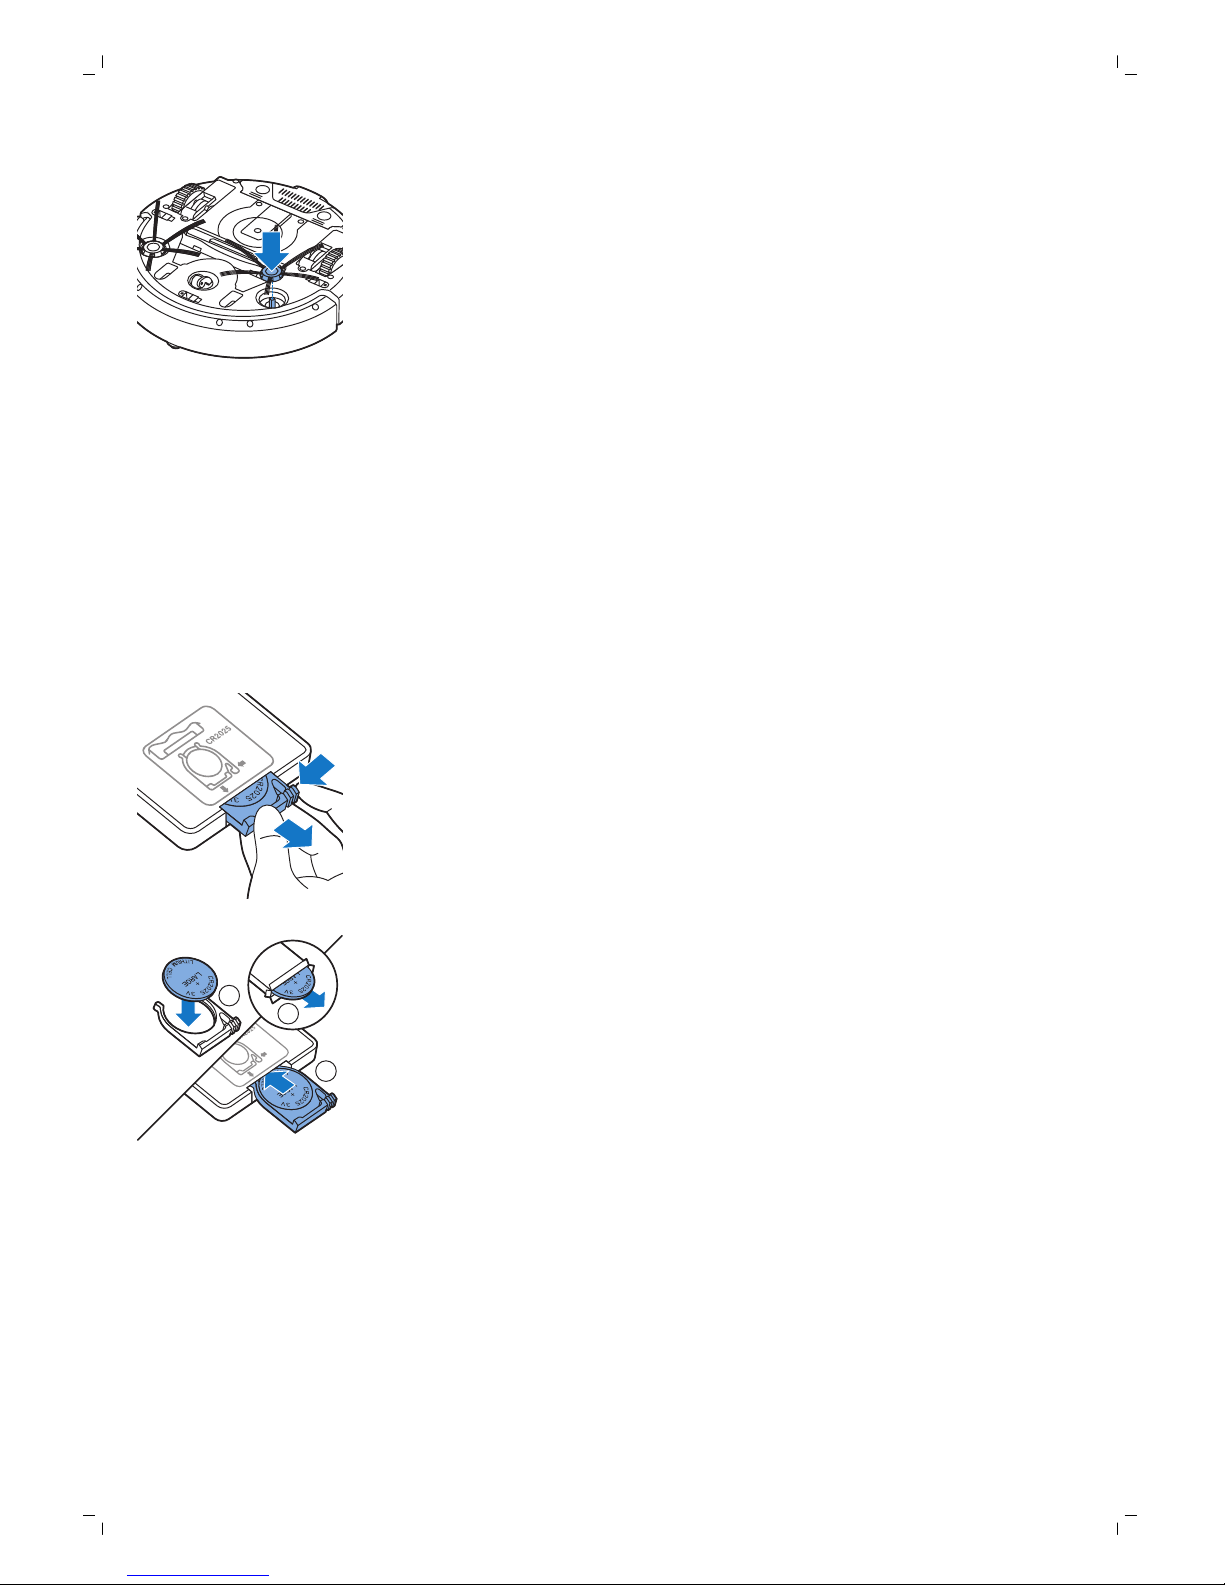
3 Împinge noile perii laterale pe arbori.
Înlocuirea lavetelor uscate
Puteţi comanda lavete uscate noi. Aceste fac parte din kitul de înlocuire
FC8068. Acest kit de înlocuire conţine, de asemenea, două perii laterale şi
două filtre.
Înlocuirea bateriei telecomenzii
Telecomanda funcţionează cu o baterie în formă de monedă de tip CR2025.
Înlocuiţi materia atunci când robotul nu mai reacţionează când apăsaţi
butoanele de pe telecomandă.
1 Ţineţi telecomanda întoarsă invers. Apăsaţi butonul de eliberare al
capacului bateriei şi în acelaşi timp glisaţi capacul bateriei de pe
telecomandă.
2
3
1
2 Îndepărtai bateria descărcată din capacul bateriei şi introduceţi o nouă
baterie în capacul bateriei. Apoi glisaţi capacul bateriei înapoi în
telecomandă.
Înlocuirea bateriei reîncărcabile
Bateria reîncărcabilă a robotului poate fi înlocuită doar de ingineri de service
calificaţi. Duceţi robotul la un centru de service autorizat Philips pentru a
înlocui bateria, atunci când nu mai este posibilă încărcarea acesteia sau
când se descarcă rapid. Puteţi găsi detaliile de contact pentru Centrul Philips
de asistenţă clienţi din ţara dvs. în broşura de garanţie internaţională.
94
Română
Page 95
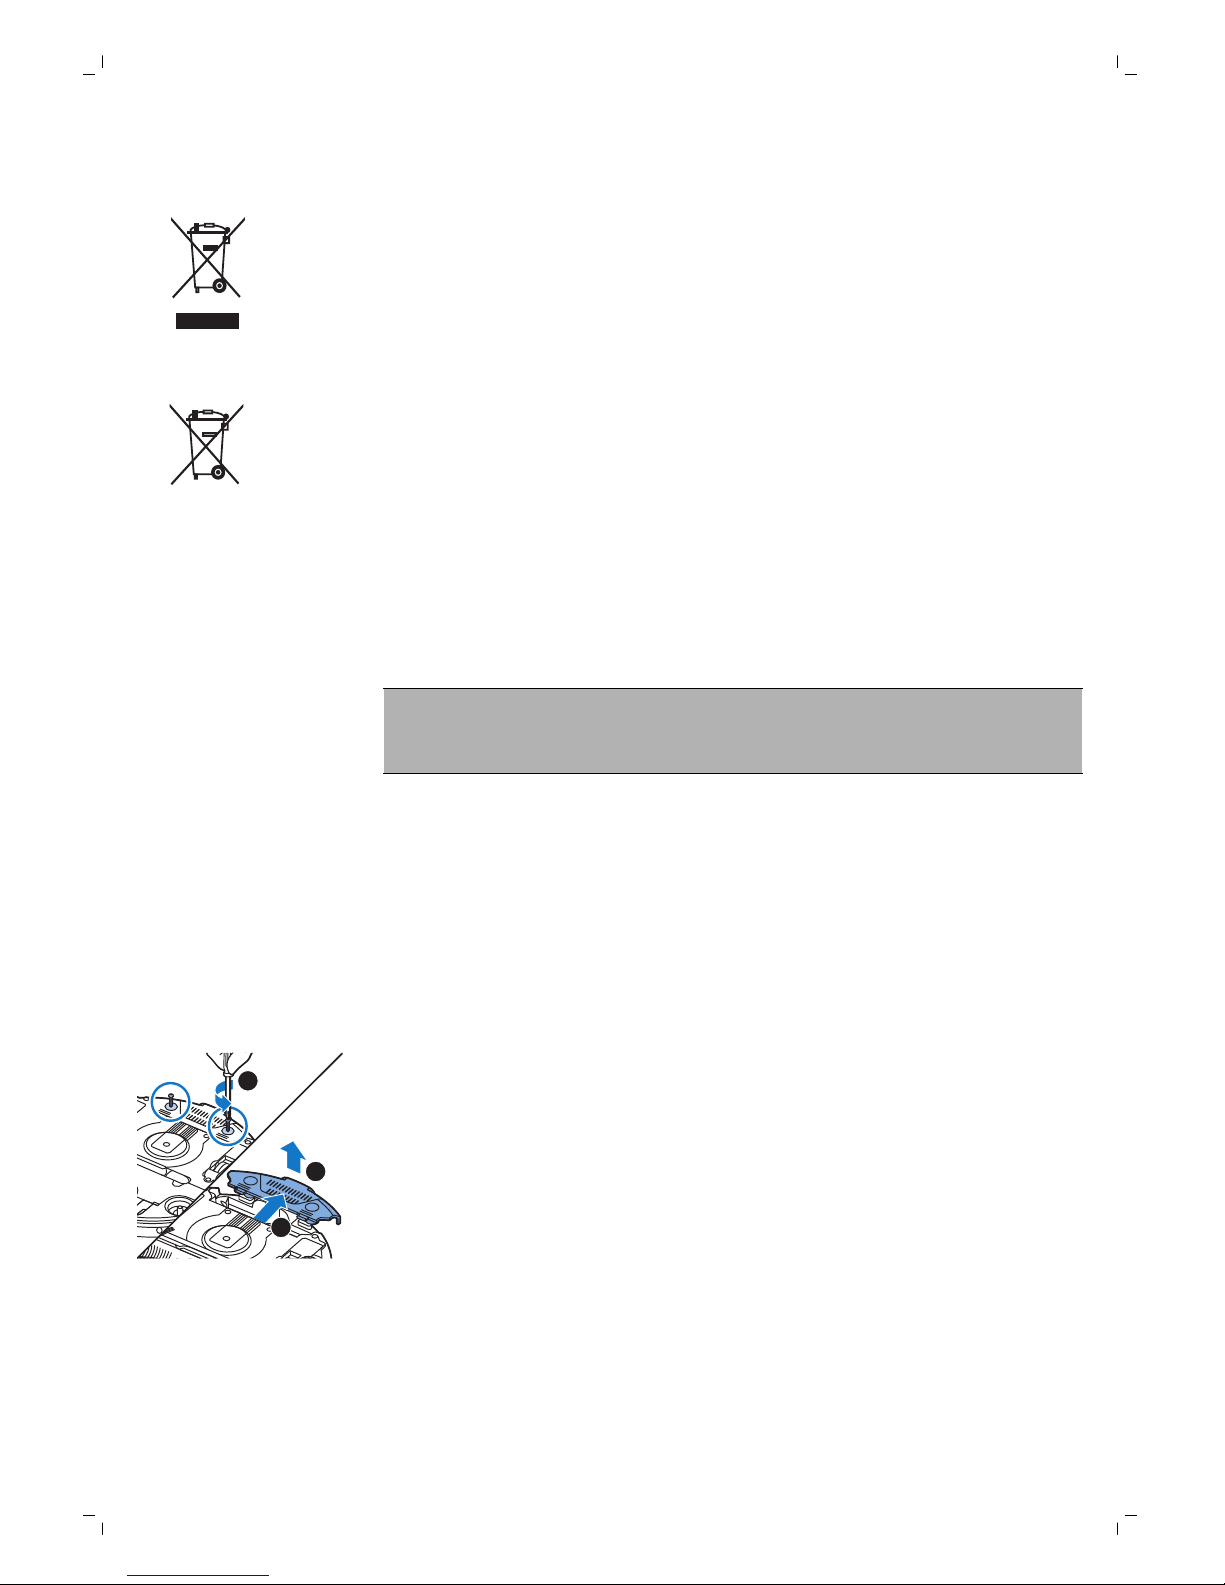
Reciclarea
-
Acest simbol înseamnă că produsul nu trebuie eliminat împreună cu
gunoiul menajer (2012/19/UE).
-
Acest simbol înseamnă că produsul conţine o baterie reîncărcabilă
încorporată care nu trebuie eliminată împreună cu gunoiul menajer
obişnuit (2006/66/CE). Vă recomandăm să duceţi produsul la un punct
oficial de colectare sau un centru de service Philips pentru ca bateria
reîncărcabilă să fie scoasă de un profesionist.
-
Respectaţi regulile specifice ţării dvs. cu privire la colectarea separată a
produselor electrice şi electronice şi a bateriilor reîncărcabile. Eliminarea
corectă ajută la prevenirea consecinţelor negative asupra mediului
înconjurător şi a sănătăţii umane.
Îndepărtarea bateriei reîncărcabile
Avertisment: Scoateţi bateria reîncărcabilă când aruncaţi
aparatul. Asiguraţi-vă că bateria este complet epuizată înainte de
a o scoate.
Pentru a scoate bateria reîncărcabilă, urmaţi instrucţiunile de mai jos. De
asemenea, puteţi duce robotul la un centru de service Philips pentru a
scoate bateria reîncărcabilă. Contactaţi Centrul Philips de asistenţă pentru
clienţi din ţara dvs. pentru a afla adresa unui centru de service din
apropierea dvs.
1 Porniţi robotul dintr-o poziţie oarecare din cameră şi nu de la staţia de
andocare.
2 Lasă robotul să funcţioneze până când bateria reîncărcabilă se descarcă,
pentru a te asigura că este complet descărcată înainte de a o scoate şi de
a o casa.
1
3
2
3 Desfaceţi şuruburile capacului compartimentului bateriei şi demontaţi
capacul.
95
Română
Page 96
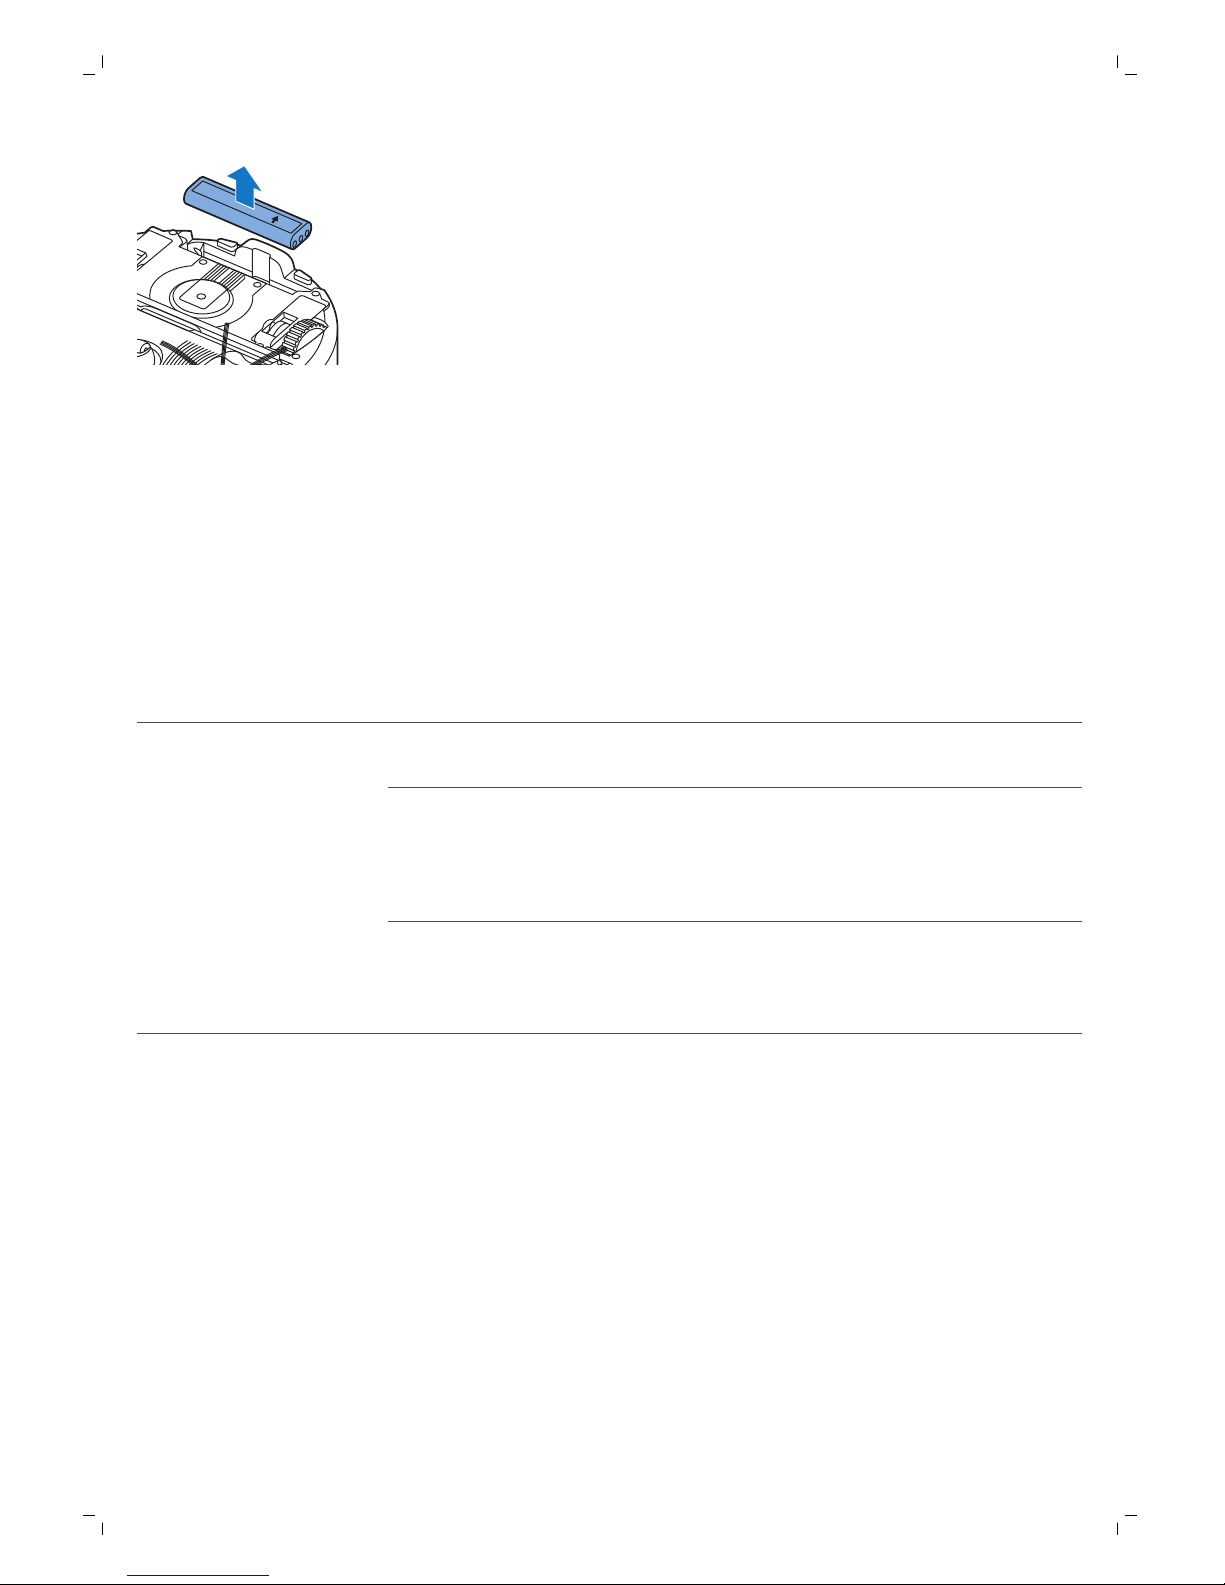
this side up
4 Ridicaţi bateria reîncărcabilă şi deconectaţi-o.
5 Duceţi robotul şi bateria reîncărcabilă la un punct de colectare pentru
deşeuri electrice şi electronice.
Depanare
Acest capitol rezumă cele mai frecvente probleme care pot surveni la
utilizarea aparatului. Dacă nu puteţi rezolva problema cu ajutorul
informaţiilor de mai jos, accesaţi www.philips.com/support pentru o listă de
întrebări frecvente sau contactaţi Centrul de asistenţă pentru clienţi din ţara
dvs.
Depanare
Problemă
Cauză posibilă Soluţie
Bateria reîncărcabilă este
goală.
Încărcaţi bateria reîncărcabilă (consultaţi
capitolul „Pregătirea pentru utilizare”).
Mica fişă este în continuare
introdusă în priza de la robot.
Robotul nu funcţionează cu energie de la
prize. Funcţionează numai pe baza
bateriei sale reîncărcabile. De aceea,
deconectaţi întotdeauna adaptorul de la
robot şi de la priză înainte de utilizare.
Robotul nu începe
curăţarea când apăs
butonul start/stop.
Comutatorul de alimentare
nu este în poziţia „pornit” (I).
Apăsaţi comutatorul de alimentare.
Apăsaţi butonul start/stop de pe robot sau
de pe telecomandă pentru a începe
curăţarea.
96
Română
Page 97
Problemă Cauză posibilă Soluţie
Una sau ambele roţi sunt
blocate.
Apăsaţi comutatorul de alimentare pe
poziţia „oprit”. Îndepărtaţi scamele, părul,
aţele sau firele prinse în jurul suspensiei
roţii.
Una sau ambele perii laterale
sunt blocate.
Curăţaţi periile laterale (consultaţi capitolul
„Curăţarea şi întreţinerea”).
Capacul superior nu este
prezent sau nu este închis
corespunzător.
Când capacul superior lipseşte sau nu este
închis corespunzător, robotul nu
funcţionează. Poziţionaţi corect capacul
superior pe robot.
Amortizorul este blocat. Apăsaţi butonul Start/Stop. Ridicaţi
robotul astfel încât amortizorul acestuia să
fie eliberat. Poziţionaţi robotul la distanţă
de obstacol şi apăsaţi butonul start/stop
pentru a reîncepe curăţarea.
Indicatorul de
avertisment luminează
intermitent, cu frecvenţă
mare.
Robotul a fost ridicat în
timpul operaţiilor de curăţare.
Apăsaţi butonul Start/Stop. Puneţi robotul
pe podea. Apoi apăsaţi butonul start/stop
pentru a face robotul să continue
curăţarea.
97
Română
Page 98

Problemă Cauză posibilă Soluţie
Perii uneia sau ambelor perii
laterale sunt îndoiţi sau
deformaţi.
Înmuiaţi peria sau periile în apă caldă un
timp. Dacă aceasta nu readuce perii la
forma lor corespunzătoare, înlocuiţi periile
laterale (consultaţi capitolul „Înlocuire”).
Filtrul din compartimentul
pentru praf este murdar.
Curăţaţi filtrul din compartimentul pentru
praf cu o cârpă sau cu o periuţă de dinţi cu
peri moi. Puteţi, de asemenea, să curăţaţi
filtrul şi containerul de praf cu un aspirator
de praf obişnuit la setarea de putere de
aspirare redusă.
Dacă perierea sau aspirarea nu ajută la
curăţarea filtrului, înlocuiţi filtrul cu unul
nou. Este recomandată înlocuirea filtrului
cel puţin o dată pe an.
Orificiul de aspirare din
partea inferioară a
compartimentului pentru praf
este înfundat.
Curăţaţi orificiul de aspirare (consultaţi
capitolul „Curăţarea şi întreţinerea”).
Roata faţă este blocată de
păr sau alte impurităţi.
Curăţaţi roata faţă (consultaţi capitolul
„Curăţarea şi întreţinerea”).
Robotul curăţă o suprafaţă
foarte închisă sau
strălucitoare, care
declanşează senzorii de
deplasare. Acest lucru
determină robotul să se
deplaseze într-un mod
neobişnuit.
Apăsaţi butonul start/stop şi apoi
deplasaţi robotul pe o zonă de culoare
mai deschisă a podelei. Dacă problema
continuă pe podele de culoare mai
deschisă, vă rugăm să vizitaţi
www.philips.com/support sau să
contactaţi Centrul de asistenţă pentru
clienţi din ţara dvs.
Robotul nu curăţă
corespunzător.
Robotul curăţă o podea care
reflectă puternic lumina
soarelui. Aceasta
declanşează senzorii de
deplasare şi determină
robotul să se deplaseze întrun mod neobişnuit.
Trageţi perdelele pentru a nu permite
luminii solare să pătrundă în cameră.
Puteţi de asemenea să începeţi curăţarea
când soarele nu este atât de puternic.
Bateria reîncărcabilă nu
se mai poate încărca sau
se descarcă foarte rapid.
Este posibil ca bateria
reîncărcabilă să fi ajuns la
sfârşitul duratei sale de viaţă.
Înlocuiţi bateria reîncărcabilă (consultaţi
capitolul „Înlocuirea”).
Bateria telecomenzii se
descarcă prea repede.
Este posibil să nu fi introdus
tipul corect de baterie.
Pentru telecomandă, aveţi nevoie de o
baterie în formă de monedă CR2025. Dacă
problema persistă, vizitaţi
www.philips.com/support sau contactaţi
Centrul de asistenţă pentru clienţi din ţara
dvs.
98
Română
Page 99

Problemă Cauză posibilă Soluţie
Robotul se deplasează în
cercuri.
Robotul este în modul
curăţare a unei zone.
Acest comportament este normal. Modul
în spirală poate fi activat pentru o curăţare
minuţioasă atunci când este detectată o
cantitate mare de praf pe podea. De
asemenea, acest mod este o parte a
modului de curăţare automată. După
aproximativ un minut, robotul continuă
modelul său normal de curăţare. De
asemenea, puteţi să opriţi modul în spirală
prin selectarea unui mod diferit de
curăţare de pe telecomandă.
Nu există suficient spaţiu
pentru ca robotul să
navigheze către staţia de
andocare.
Încercaţi să găsiţi un alt loc pentru staţia
de andocare. Consultaţi „Instalarea staţiei
de andocare” în capitolul „Pregătire pentru
utilizare”.
Robotul caută încă în mod
activ.
Lăsaţi robotului aproximativ 20 de minute
pentru a se întoarce la staţia de andocare.
Robotul nu poate găsi
staţia de andocare.
Robotul nu a fost pornit de la
staţia de andocare.
Dacă doriţi ca robotul să se întoarcă la
staţia de andocare după o cursă de
curăţare, porniţi-l de la staţia de andocare.
Robotul emite un semnal
sonor când este pe staţia
de andocare.
Încercaţi să încărcaţi robotul
cu comutatorul de alimentare
în poziţia oprit.
Apăsaţi comutatorul de alimentare pentru
a porni robotul.
Coduri de eroare
Cod de eroare
Cauză posibilă Soluţie
E1 Roţi blocate Îndepărtaţi robotul de obstacol şi apăsaţi
butonul start/stop pentru a relua curăţarea.
E2 Capacul superior sau
compartimentul pentru
praf nu sunt poziţionate
corect
Poziţionaţi în mod corespunzător
compartimentul pentru praf în robot şi capacul
superior pe robot. Codul de eroare dispare
automat de pe afişaj.
E3 Amortizor blocat Îndepărtaţi robotul de obstacol. Codul de
eroare dispare automat de pe afişaj.
E4 Robot ridicat de la
podea
Pune robotul înapoi pe podea pentru a face
codul de eroare să dispară.
E5 Culoarea podelei este
prea închisă
Poziţionaţi robotul pe o zonă mai deschisă la
culoare a podelei. Curăţaţi senzorii de
deplasare.
99
Română
Page 100

Cod de eroare Cauză posibilă Soluţie
Baterie introdusă
incorect
Citiţi instrucţiunile din „Introducerea bateriei
reîncărcabile în robot” din capitolul „Înainte de
prima utilizare”.
E6
Eroare de încărcare Verificaţi dacă comutatorul de alimentare este
în poziţia „pornit” atunci când robotul se află
pe staţia de andocare.
100
Română
 Loading...