

Page 1
Fully automatic
espresso machine
4300 series
5400 series
EN USER MANUAL
TR KULLANIM KILAVUZU
TH คู่มือผู้ใช
AR
FA
ﺮﺑرﺎﮐ ﯼﺎﻤﻨﻫار ﻪﭼﺮﺘﻓﺩ
www.philips.com/coee-care
Page 2
Page 3
A2A1 A3 A4
A14
A8A7A6
A9
A12
A13
A10
A11
A5
A17
A15
A
A20
A18
A16
A19 A21 A22 A23 A24 A25
A17A18 A16 A14 A25 A24 A22 A15 A9 A4 A12
B
Page 4
Classic Milk Frother
Series 4300
Series 5400
EP4327
EP4324
EP4321
EP5447
EP5446
EP5444
EP5443
EP5441
EP4349
EP4346
EP4343
EP4341
LatteGo
SettingsClean
Espresso Americano Cappuccino Latte Macchiato
Cafe au lait More Drinks
A20 A21 A22 A23 A24 A25
D1 D2 E1 E2
D
E
C3C4C5C6C8 C2C7
C1
C
F
Page 5

English
Contents
Machine overview (Fig. A) ____________________________________________________________________________ 7
Control panel _________________________________________________________________________________________ 8
Introduction __________________________________________________________________________________________ 8
Before first use _______________________________________________________________________________________ 9
Brewing drinks ________________________________________________________________________________________ 10
Personalizing drinks __________________________________________________________________________________ 12
Adjusting machine settings __________________________________________________________________________ 13
Removing and inserting the brew group ____________________________________________________________ 14
Cleaning and maintenance __________________________________________________________________________ 15
AquaClean water filter _______________________________________________________________________________ 17
Descaling procedure (30 min.) ______________________________________________________________________ 18
Ordering accessories _________________________________________________________________________________ 19
Troubleshooting ______________________________________________________________________________________ 20
Technical specifications______________________________________________________________________________ 25
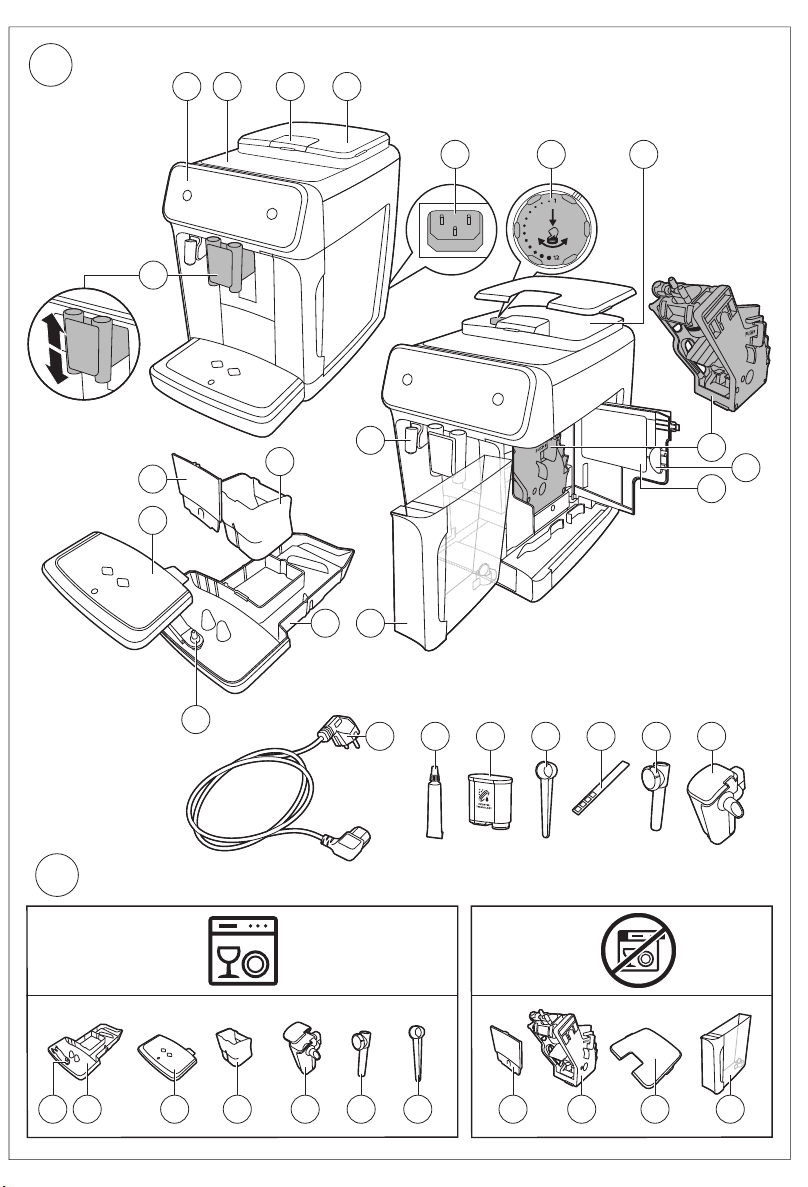
Machine overview (Fig. A)
A1 Control panel A10 Service door
A2 Cup holder A11 Data label with type number
A3 Pre-ground coffee compartment A12 Water tank
7
English
A4 Lid of bean hopper A13 Hot water spout
A5 Adjustable coffee spout A14 Coffee grounds container
A6 Socket for power cord A15 Front panel of coffee grounds
A7 Grind setting knob A16 Drip tray cover
A8 Coffee bean hopper A17 Drip tray
A9 Brew Group A18 'Drip tray full' indicator
container
Accessories
A19 Power cord A23 Water hardness test strip
A20 Grease tube A24 Classic milk frother (specific types only)
A21 AquaClean water filter A25 LatteGo (milk container) (specific types
A22 Measuring scoop
only)
Page 6
8
English
Control panel
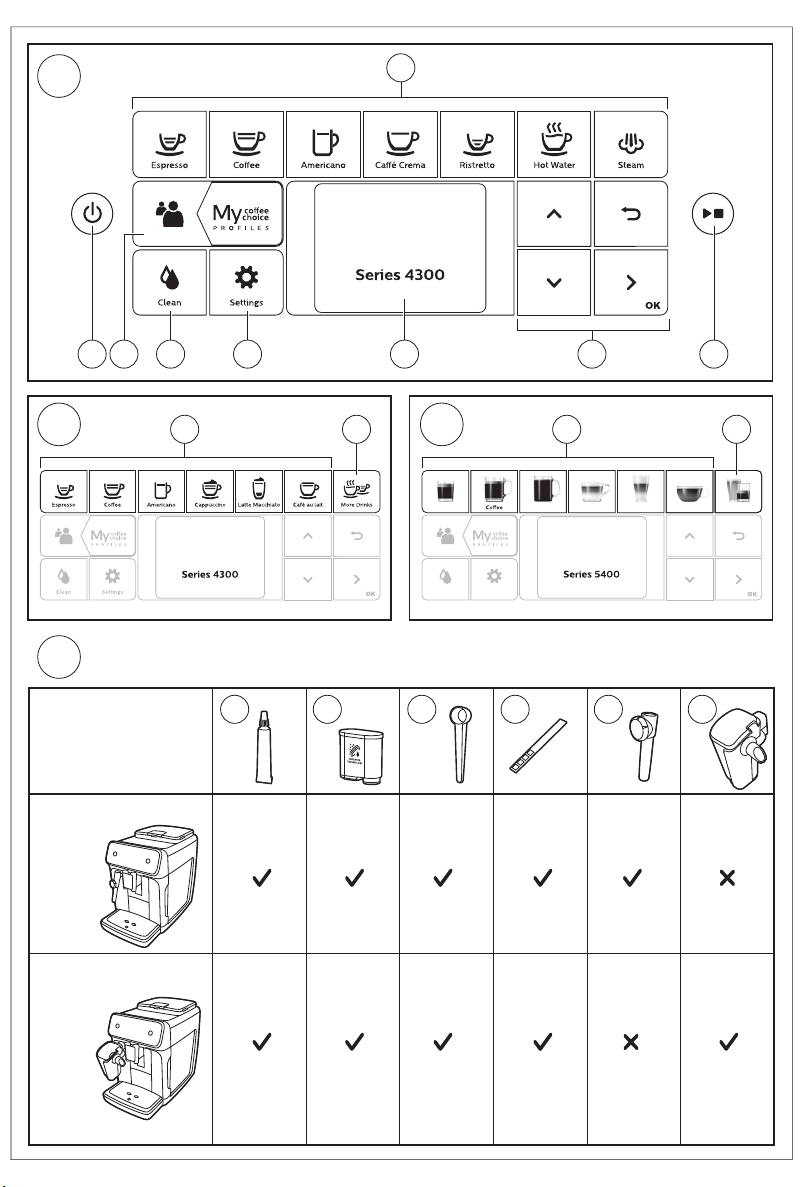
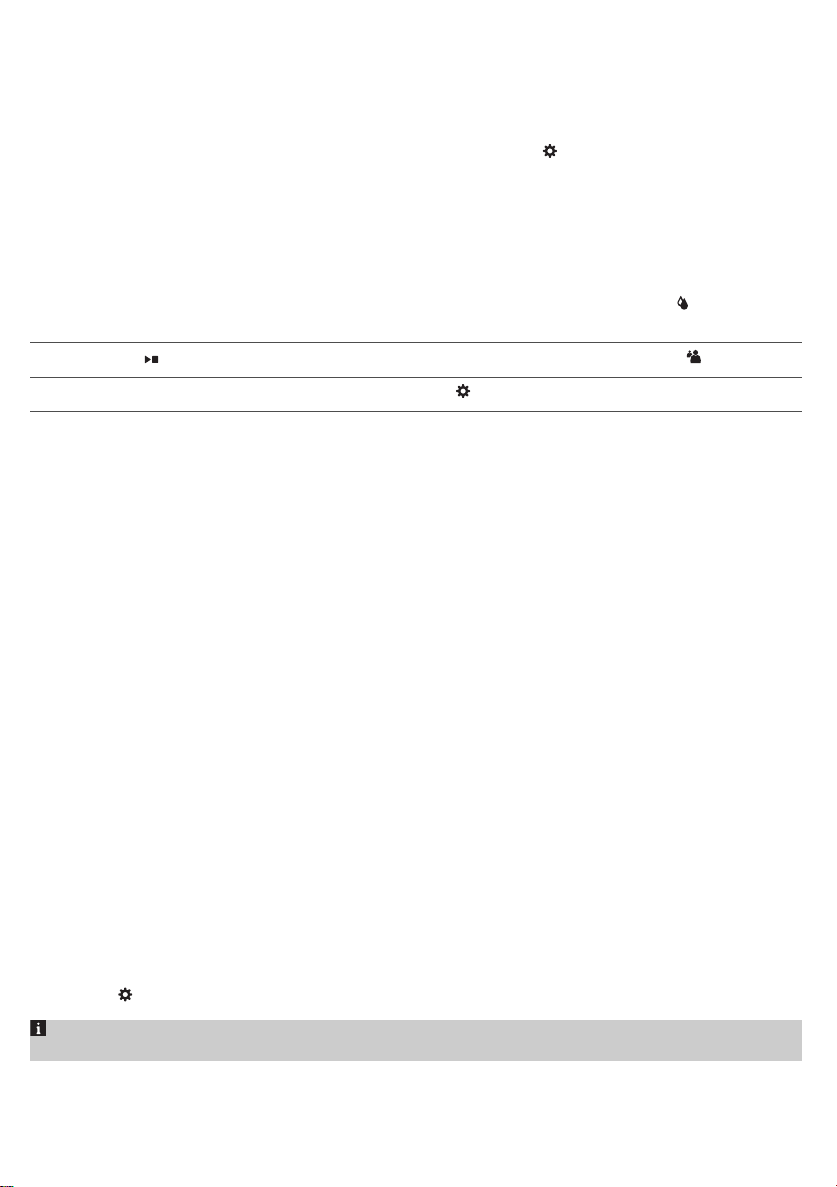
There are multiple versions of this espresso machine, with different control panels. Each version has
its own type number. You can find the type number on the data label on the inside of the service door
(Fig. A11). You can also find the type number by tapping the Settings
Refer to figure C, D and E for an overview of all buttons and icons. Below you find the description.
Use the up and down arrows to scroll through the display and tap the OK icon to select or confirm
your choices.
All types (Fig. C/D/E)
C1/D1/E1 One-touch drink icons C3. Navigation icons (up,
down, back, ok)
C2. Start/stop button C4. Display C7. Personal profiles
D2/E2 Menu with More Drinks C5. Machine settings C8. On/off button
EP4327, EP4324, EP4321 only (Fig. C)
C1 One-touch drink icons: Espresso, Coffee, Americano, Caffé Crema, Ristretto, Hot Water and Steam
EP4349, EP4346, EP4343, EP4341 only (Fig. D)
D1 One-touch drink icons: Espresso, Coffee, Americano, Cappuccino, Latte Macchiato, Café au lait
icon and selecting 'Support'.
C6. Cleaning menu
EP5447, EP5446, EP5444, EP5443, EP5441 only (Fig. E)
E1 One-touch drink icons: Espresso, Coffee, Americano, Cappuccino, Latte Macchiato, Café au lait
Introduction
Congratulations on your purchase of a Philips fully automatic coffee machine! To fully benefit from the
support that Philips offers, register your product at www.philips.com/registeryourcoffee or by
scanning the QR code (Fig. 1) in this booklet.
Read the separate safety booklet carefully before you use the machine for the first time and save it for
future reference.
To help you get started and to get the best out of your machine, Philips offers support in multiple
ways. In the box you find:
1 This user manual with picture-based usage instructions and more detailed information on cleaning
and maintenance.
2 The separate safety booklet with instructions on how to use the machine in a safe way.
3 For online support (frequently asked questions, movies etc.), scan the QR code on the cover of this
booklet or visit www.philips.com/coffee-care . You can also find the QR code by tapping the
Settings icon and selecting support.
This machine has been tested with coffee. Although it has been carefully cleaned, there may be
some coffee residues left. We guarantee, however, that the machine is absolutely new.
The machine automatically adjusts the amount of ground coffee that is used to make the best-tasting
coffee. You should brew 5 coffees initially to allow the machine to complete its self-adjustment.
Make sure you rinse the LatteGo (milk container) or the classic milk frother before first use.
Page 7
Before first use
ON
,WDOLDQR
1HGHUODQGV
(QJOLVK
(VSD³RO
/DQJXDJH
:DWHUKDUGQHVV
,WDOLDQR
1HGHUODQGV
(QJOLVK
(VSD³RO
/DQJXDJH
)ROORZWKHQH[WVWHSV
WRVHWWKHFRUUHFW
ZDWHUKDUGQHVVOHYHO
<RXDUHDERXW
WRVHWWKHODQJXDJH
WR(QJOLVK
3UHVVVWDUWVWRS
WRFRQILUP
:DWHUKDUGQHVV
<RXVHOHFWHG
UHGVTXDUHV
3UHVVWRFRQILUP
+HDWLQJXS
+HDWLQJ
5LQVLQJ
5LQVLQJ
)LOOLQJZDWHUFLUFXLW
)LOOLQJ
=
:DWHUKDUGQHVV
1 sec.
1 min.
5 sec.
30 sec.
1 min.
$TXD&OHDQ
8VH$TXD&OHDQILOWHU
WRHQMR\FXSV
ZLWKRXWGHVFDOLQJ
$OPRVWUHDG\
)LOOEHDQVUHILOOZDWHU
WDQNDQGHQMR\
\RXUFRIIHH
5HJLVWHU\RXUSURGXFW
9LVLWZZZSKLOLSVFRP
$TXD&OHDQ
:RXOG\RXLQVWDOO
DQ$TXD&OHDQILOWHU"
3UHVVWRFRQILUP
3UHVVWRUHIXVH
English
9
English
Page 8
10
CLICK
1
2
English
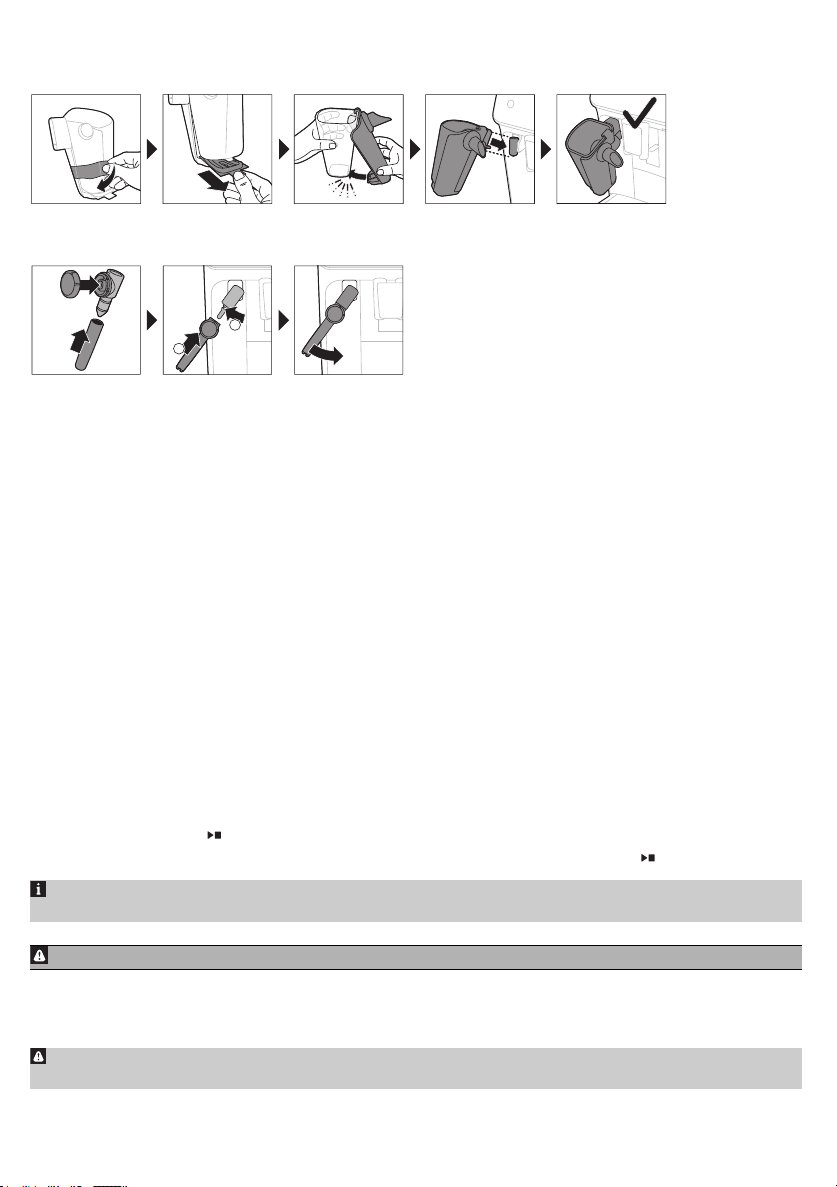
Assembling LatteGo (specific types only)
Assembling the classic milk frother (specific types only)
Brewing drinks
General steps
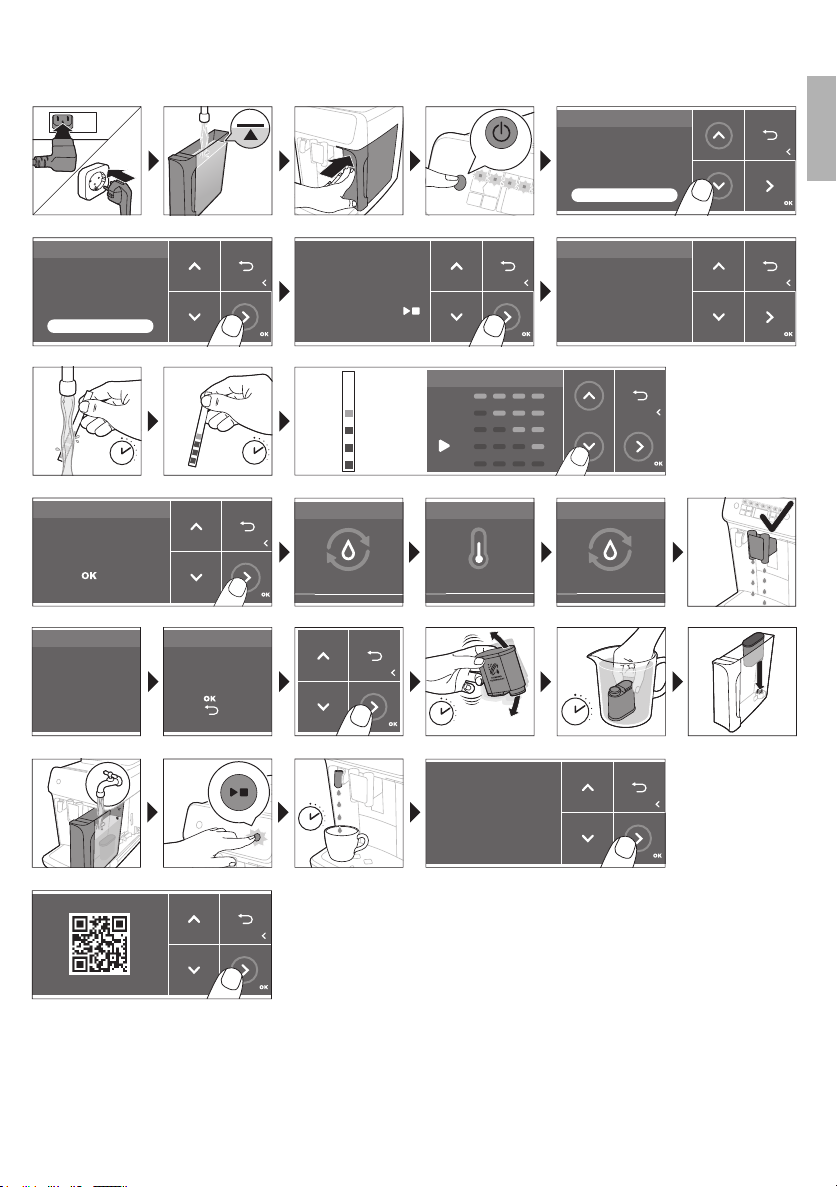
1 Fill the water tank with tap water and fill the bean hopper with beans.
2 Insert the small plug into the socket located on the back of the machine. Insert the mains plug into
the wall socket.
3 Press the on/off button to switch on the machine.
-
The machine starts heating up and performs the automatic rinsing cycle.
-
When all lights in the drink icons light up continuously, the machine is ready for use.
4 Place a cup under the coffee dispensing spout. Slide the coffee dispensing spout up or down to
adjust its height to the size of the cup or glass you are using (Fig. 2).
Brewing coffee with beans
1 To brew a coffee, tap the drink icon of your choice (Fig. 3) or tap the 'More Drinks' icon (Fig. 4)
(specific types only).
-
You can now adjust the drink to your personal taste (Fig. 5). Use the up and down arrows (Fig. 6)
to adjust the coffee strength. Tap the OK icon if you want to adjust more settings (Fig. 7).
2 Press the start/stop button at any time to start brewing the selected drink.
3 To stop dispensing coffee before the machine is finished, press the start/stop button again.
To brew 2 coffees at the same time, tap the drink icon twice or select the 2x icon scrolling the
dedicated bar.
Do not use caramelized or flavored coffee beans.
Brewing milk-based drinks with LatteGo (milk container)
LatteGo consists of a milk container, a frame and a storage lid. To avoid leakage, make sure the
frame and the milk container are properly assembled before you fill the milk container.
Page 9
English
1 To assemble LatteGo, first insert the top of the milk container under the hook at the top of the
frame (Fig. 8). Then press home the bottom part of the milk container. You hear a click when it locks
into place (Fig. 9).
Note: Make sure that the milk container and the frame are clean before you connect them.
2 Slightly tilt LatteGo and put it on the hot water spout (Fig. 10). Then press it home until it locks into
place (Fig. 11).
3 Fill LatteGo with milk (Fig. 12). Do not fill the milk container beyond the maximum indication.
If you have personalized the milk quantity, you may need to fill the milk container with more or
less milk than indicated for this drink on LatteGo.
Always use milk coming directly from the fridge for optimal results.
4 Place a cup on the drip tray.
5 Tap the milk-based drink icon of your choice or tap the 'More Drinks' icon (specific types only) to
select a different drink (see 'Personalizing drinks')
-
You can now adjust the drink to your own preference.
6 Press the start/stop button.
-
When you brew cappuccino, flat white or latte macchiato, the machine first dispenses milk and
then coffee. When you brew caffè latte or café au lait, the machine first dispenses coffee and
then milk.
-
To stop dispensing milk before the machine has dispensed the preset amount, press the
start/stop button.
7 To stop dispensing the complete drink (milk and coffee) before the machine is finished, press and
hold the start/stop button.
11
English
Frothing or heating up milk with classic milk frother
Always use milk coming directly from the fridge for the best foam quality.
1 Tilt the black silicone handle on the machine to the left and slide the milk frother onto it (Fig. 13).
2 Fill a milk jug with with approx. 100 ml milk for cappuccino and approx. 150 ml milk for latte
macchiato.
3 Insert the milk frother approx. 1 cm into the milk.
4 Tap the steam icon (Fig. 14).
5 Turn the knob on the classic milk frother to the milk frothing icon (Fig. 15) if you want to froth milk.
Turn the knob on the classic milk frother to the flat milk icon (Fig. 16) if you want heat up milk.
6 Make sure that the icon on the knob of the classic milk frother is aligned with the black arrow.
7 Press the start/stop button to start (Fig. 17).
-
The machine starts heating up, steam is forced into the milk and the milk is either frothed or
heated.
8 When the milk in the milk jug has reached the required foam volume or heat, press the start/stop
button again to stop frothing/heating milk.
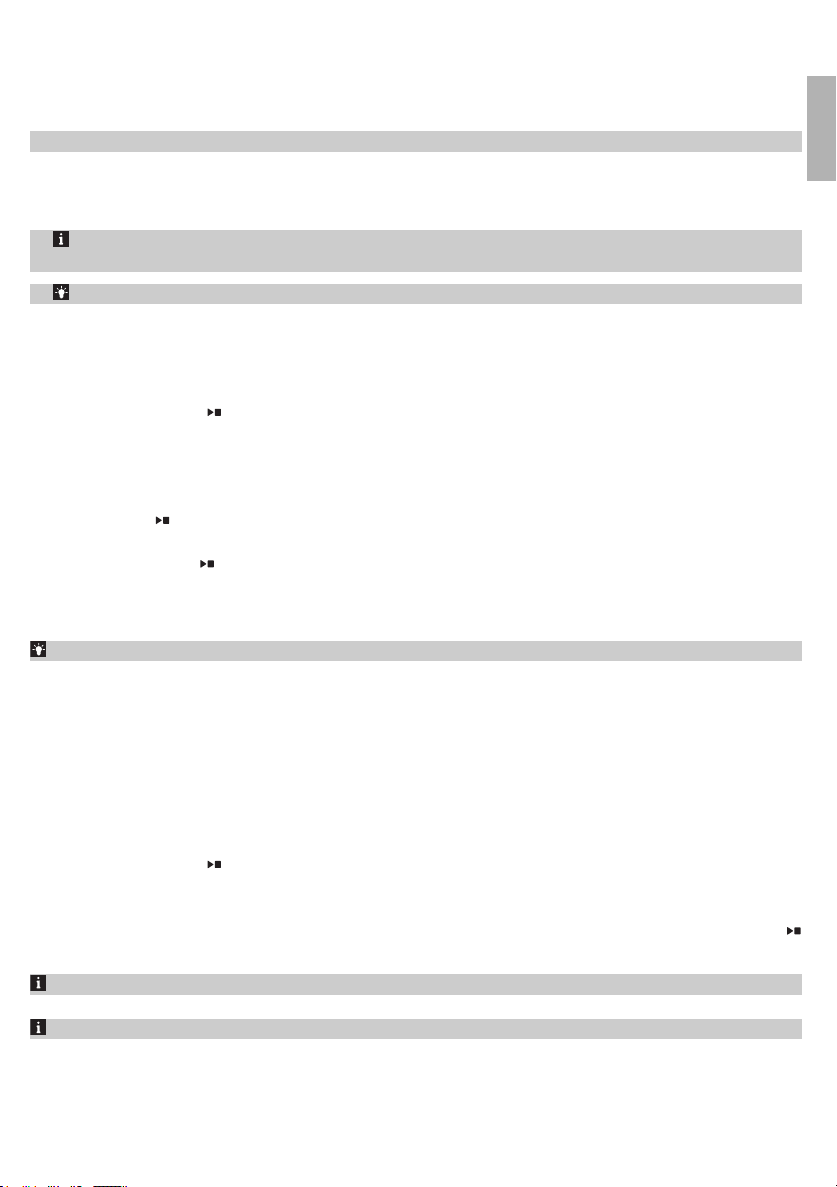
Never steam milk longer than 90 seconds. The steaming automatically stops after 90 seconds.
In order to get the best milk froth quality, you do not have to move the milk jug during milk frothing.
Extra shot (ExtraShot) (specific types only)
Your machine offers you the possibility to add an extra shot of Ristretto to your coffee and milk drinks,
for example if you want to have a stronger coffee.
Page 10
12
English
1 Place a cup under the spout
2 Tap one of the one-touch drinks icons to select a drink or tap the 'More Drinks' icon (specific types
only) to select a drink.
3 Use the up arrow to set the strength to the top level and then select the ExtraShot function (Fig. 18).
4 Tap the OK icon if you want to personalize the other settings. Then press the start/stop icon to
start brewing the drink.
5 To stop dispensing the drink before the machine has finished, press the start/stop icon again.
When you have selected the ExtraShot function, you can only brew one coffee at the time.
Brewing coffee with pre-ground coffee
You can choose to use pre-ground coffee instead of beans, for example if you prefer a different coffee
variety or decaffeinated coffee.
1 Open the lid of the pre-ground coffee compartment and pour one leveled measuring scoop of pre-
ground coffee into it (Fig. 19). Then close the lid.
2 Tap one of the one-touch drink icons or tap the 'More Drinks' icon (specific types only) to select
another drink.
3 Select the pre-ground coffee function. You can do this in 2 different ways:
-
use the down arrow to set the strength to the lowest level and then select the pre-ground function.
-
press the Settings icon and use the down arrow to select the pre-ground function.
4 To stop dispensing coffee before the machine has finished, press the start/stop button again.
When you select the pre-ground coffee function:
- it is automatically stored.
- you can only brew one coffee at a time.
- you cannot select a different aroma strength.
Dispensing hot water
1 If attached, remove LatteGo or the milk frother.
2 Place a cup under the hot water spout.
3 Tap the 'Hot Water' icon (specific types only) or tap the 'More Drinks' icon (specific types only) (Fig.
4) to select hot water.
4 Use the up and down arrows to adjust the hot water quantity and/or temperature to your
preference.
5 Press the start/stop button.
-
Hot water is dispensed from the hot water spout (Fig. 20).
6 To stop dispensing hot water before the machine is finished, press the start/stop button again.
Personalizing drinks
The machine allows you to adjust the settings of a drink to your own preference and to store the
adjusted drink in a personal profile. The different profiles have different colors.
After selecting a drink by tapping one of the one-touch drink icons or by tapping the 'More Drinks'
icon (specific types only), you can do the following things:
1 adjust the aroma strength with the up and down icons (Fig. 21). There are 5 strengths, the lowest is
the mildest and the highest is the strongest.
2 adjust the coffee quantity (Fig. 22) and/or the milk quantity (specific types only) with the up and
down icons. There are 5 quantities for each of the settings.
Page 11
English
As soon as the machine has finished brewing, the settings you selected will be stored automatically
in the profile you chose.
13
Select a profile
You can select a profile and store a recipe using My coffee choice profiles (My Coffee Choice Profiles).
1 Tap the profiles icon repeatedly to select one of the colored profiles. All profiles have a different
color.
2 Select a drink by tapping one of the one-touch drink icons or by tapping the 'More Drinks' icon
(specific types only).
3 Adjust the drink settings to your favorite taste.
4 Press start/stop button to brew the drink you selected
-
Your new settings have now been stored in the colored profile you selected.
You can always restore the factory settings of the machine (see 'Restoring factory settings').
Guest profile
Your machine is equipped with a guest profile. When the guest profile is selected, the profile icon is
off. When you select this profile, you can still personalize the settings to your own preference but the
recipes you brew will not be stored.
Adjusting machine settings
Setting the water hardness
We advise you to adjust the water hardness setting to the water hardness level in your region for
optimal performance and a longer lifetime of the machine. This also prevents you from having to
descale the machine too often. The default water hardness setting is 4: hard water.
English
Use the water hardness test strip supplied in the box to determine the water
hardness in your region:
1 Immerse the water hardness test strip in tap water or hold it under the tap for 1 second (Fig. 23).
2 Wait 1 minute. The number of squares on the test strip that turn red indicate the water hardness
(Fig. 24).
Set the machine to the correct water hardness:
1 Tap the Settings icon and use the up and down arrows to select 'Water hardness'. Then press the
OK icon to confirm.
2 Use the up and down arrows to select the water hardness level. The number of red squares
selected on the display should be the same as the number of red squares on the test strip (Fig. 25).
3 When you have set the correct water hardness, tap the OK icon to confirm.
Adjusting grinder settings
You can change the coffee strength with the grind setting knob inside the bean container. The lower
the grind setting, the finer the coffee beans are ground and the stronger the coffee. There are 12
different grind settings you can choose from.
The machine has been set up to get the best taste out of your coffee beans. Therefore we advise you
not to adjust the grind setting until you have brewed 100-150 cups (approx. 1 month of use).
Page 12
14
English
You can only adjust the grind settings when the machine is grinding coffee beans. You need to
brew 2 to 3 drinks before you can taste the full difference.
Do not turn the grind setting knob more than one notch at a time to prevent damage to the grinder.
1 Place a cup under the coffee dispensing spout.
2 Open the lid of the coffee bean hopper.
3 Tap the espresso icon and then press the start/stop
4 When the grinder starts grinding, press down the grind setting knob and turn it to the left or right.
(Fig. 26)
button.
Adjusting other machine settings
By tapping the Settings icon you can adjust the following machine settings:
-
Water hardness: you can select between 5 levels according to the water hardness in your region;
-
Standby time: you can select 15, 30, 60 or 180 min
-
Display brightness: you can select low, medium and high.
-
Language
-
Sound: you can activate or deactivate the beeping sound of the machine
-
Temperature: you can choose between 3 brewing temperatures for your coffee
-
Front illumination (specific types only): you can choose 'always on', 'on during brewing' or 'always
off'.
-
Measuring unit: you can choose between ml. or oz.
Restoring factory settings
The machine offers you the possibility to restore the factory settings at any moment.
1 Tap the Settings
2 Use the up and down icons to select 'Factory settings'. Confirm by tapping the OK icon.
3 Press the start/stop button to confirm you want to restore the settings.
-
The settings are now being restored.
icon.
The following factory settings are restored to default: water hardness, standby time, display
brightness, sound, temperature, front illumination, profiles.
Removing and inserting the brew group
Go to www.philips.com/coffee-care for detailed video instructions on how to remove, insert and
clean the brew group.
Removing the brew group from the machine
1 Switch off the machine.
2 Remove the water tank and open the service door (Fig. 27).
3 Press the PUSH handle (Fig. 28) and pull at the grip of the brew group to remove it from the
machine (Fig. 29).
Reinserting the brew group
Before you slide the brew group back into the machine, make sure it is in the correct position.
Page 13
English
1 Check if the brew group is in the correct position. The arrow on the yellow cylinder on the side of
the brew group has to be aligned with the black arrow and N (Fig. 30).
-
If they are not aligned, push down the lever until it is in contact with the base of the brew group
(Fig. 31).
2 Slide the brew group back into the machine along the guiding rails on the sides (Fig. 32) until it
locks into position with a click (Fig. 33). Do not press the PUSH button.
3 Close the service door and place back the water tank.
Cleaning and maintenance
Regular cleaning and maintenance keeps your machine in top condition and ensures good-tasting
coffee for a long time with a steady coffee flow.
Consult the table below for a detailed description on when and how to clean all detachable parts of
the machine. You can find more detailed information and video instructions on
www.philips.com/coffee-care. See figure B for an overview of which parts can be cleaned in the
dishwasher.
Detachable parts
Brew group Weekly Remove the brew group from the machine
When to clean How to clean
(see 'Removing and inserting the brew
group'). Rinse it under the tap (see 'Cleaning
the brew group under the tap').
15
English
Monthly Clean the brew group with the Philips coffee
Classic milk frother After every use First clean the milk frother while it is
Pre-ground coffee
compartment
Coffee grounds
container
Check the pre-ground coffee
compartment weekly to see if it
is clogged.
Empty the coffee grounds
container when prompted by
the machine. Clean it weekly.
oil remover tablet (see 'Cleaning the brew
group with the coffee oil remover tablets').
attached to the machine by using the 'Quick
milk clean' program (see 'Quick cleaning the
classic milk frother'). Then remove the milk
frother from the machine and disassemble it.
Clean all parts under the tap or in the
dishwasher.
Unplug the machine and remove the brew
group. Open the lid of the pre-ground coffee
compartment and insert the spoon handle
into it. Move the handle up and down until
the clogged ground coffee falls down (Fig.
34). Go to www.philips.com/coffee-care for
detailed video instructions.
Remove the coffee grounds container while
the machine is switched on. Rinse it under
the tap with some washing-up liquid or
clean it in the dishwasher. The front panel of
the coffee grounds container (Fig. A15) is
not dishwasher-safe.
Page 14
16
English
Detachable parts When to clean How to clean
Drip tray Empty the drip tray daily or as
soon as the red 'drip tray full'
indicator pops up through the
drip tray (Fig. 35). Clean the drip
tray weekly.
Remove the drip tray (Fig. 36) and rinse it
under the tap with some washing-up liquid.
You can also clean the drip tray in the
dishwasher. The front panel of the coffee
grounds container (Fig. A15) is not
dishwasher-safe.
LatteGo After every use First clean LatteGo while it is attached to the
Lubrication of the
brew group
Water tank Weekly Rinse the water tank under the tap
Machine front Weekly Clean with a non-abrasive cloth
Every 2 months Consult the lubrication table and lubricate
machine by using the 'Quick milk clean'
program (see 'Quick cleaning LatteGo'). Then
remove it from the machine and rinse it
under the tap or clean it in the dishwasher.
the brew group with the Philips grease (see
'Lubricating the brew group').
Cleaning the brew group
Regular cleaning of the brew group prevents coffee residues from clogging up the internal circuits.
Visit www.philips.com/coffee-care for support videos on how to remove, insert and clean the brew
group.
Cleaning the brew group under the tap
1 Remove the brew group (see 'Removing and inserting the brew group').
2 Rinse the brew group thoroughly with water. Carefully clean the upper filter (Fig. 37) of the brew
group.
3 Let the brew group air-dry before you place it back. Do not dry the brew group with a cloth to
prevent fibers from collecting inside the brew group.
Cleaning the brew group with the coffee oil remover tablets
Only use Philips coffee oil remover tablets.
1 Tap the Clean icon and use the up and down arrows to select 'Brew group clean'.
2 Tap the OK icon to confirm and then follow the instructions on the screen.
Lubricating the brew group
To improve your machine's performance, we suggest that you lubricate the brew group every 2
months, to ensure that the moving parts continue to move smoothly.
1 Apply a thin layer of grease on the piston (grey part) of the brew group (Fig. 38).
2 Apply a thin layer of grease around the shaft (grey part) in the bottom of the brew group (Fig. 39).
3 Apply a thin layer of grease to the guiding rails on both sides (Fig. 40).
Cleaning LatteGo (milk container) (specific types only)
Quick cleaning LatteGo
1 Make sure LatteGo is properly attached to the machine (Fig. 10).
Page 15
English
2 Place a cup under the spout.
3 Tap the Clean icon and use the up and down arrows to select the 'Quick milk clean' program.
4 Tap the OK icon to confirm and then follow the instructions on the screen to remove any milk that
may be left inside the milk system.
-
Small jets of hot water will be dispensed by the milk system.
5 Store LatteGo with the remaining milk in the fridge.
Thoroughly cleaning LatteGo
1 Remove LatteGo from the machine (Fig. 41).
2 Pour out any remaining milk.
3 Press the release button and remove the milk container from the frame of LatteGo (Fig. 42).
4 Clean all parts in the dishwasher or under the tap with lukewarm water and some washing-up
liquid.
Cleaning the classic milk frother (specific types only)
Quick cleaning the classic milk frother
1 Make sure the classic milk frother is properly attached to the machine (Fig. 13).
2 Place a cup under the spout.
3 Tap the Clean
4 Tap the OK icon to confirm and then follow the instructions on the screen to remove any milk that
may be left inside the milk frother.
-
Small jets of hot water will be dispensed by the milk system.
5 Clean the milk frother with a damp cloth.
icon and use the up and down arrows to select the 'Quick milk clean' program.
17
English
Daily cleaning of the classic milk frother
1 Let the milk frother cool down completely.
2 Tilt the milk frother to the left and remove the metal part and the silicone part (Fig. 43).
3 Disassemble the three parts (Fig. 44) and rinse them with fresh water or clean them in the
dishwasher.
4 Reassemble the three milk frother parts and reattach the milk frother to the machine.
AquaClean water filter
Your machine is AquaClean enabled. You can place the AquaClean water filter in the water tank to
preserve the taste of your coffee. It also diminishes the need for descaling by reducing limescale
build-up in your machine. You can purchase an AquaClean water filter from your local retailer, from
authorized service centers or online at www.philips.com/parts-and-accessories.
AquaClean filter status indication
When the AquaClean is active, the status of the AquaClean filter is always visible on the screen as a
percentage.
-
If the status of the AquaClean filter is 10% or less, the screen shows a message for 2 seconds each
time you switch on the machine. This message advises you to buy a new filter.
-
If the status of the filter is 0%, the machine asks you to replace the AquaClean filter every time you
switch on the machine.
Page 16
18
English
Activating the AquaClean water filter (5 min.)
The machine does not automatically detect that a filter has been placed in the water tank.
Therefore you need to activate each new AquaClean water filter that you install in the 'Clean' menu.
When the machine stops showing the filter activation message, you can still activate an AquaClean
water filter, but you will need to descale the machine first.
Your machine has to be completely limescale-free before you start using the AquaClean water
filter.
Before activating the AquaClean water filter, it has to be prepared by soaking it in water as described
below. If you don't do this, air might be drawn into the machine instead of water, which makes a lot of
noise and prevents the machine from being able to brew coffee.
1 Tap the 'Clean' icon and use the up and down arrows to select 'AquaClean'.
2 Tap the OK icon to confirm.
3 Tap the OK icon again when the activation screen appears. Follow the instructions on the screen.
4 Shake the filter for about 5 seconds (Fig. 45).
5 Immerse the filter upside down in a jug with cold water and shake/press it (Fig. 46).
6 Insert the filter vertically onto the filter connection in the water tank. Press it down to the lowest
possible point (Fig. 47).
7 Fill the water tank with fresh water and place it back into the machine.
8 If attached, remove the LatteGo (specific types only).
9 Place a bowl under the hot water spout/milk frother.
10 Press the start/stop button to start the activation process.
11 Hot water will be dispensed from the hot water spout/milk frother during 1 minute.
12 The filter is now successfully activated.
Replacing the AquaClean water filter (5 min.)
After 95 liters of water have flowed through the filter, the filter will cease to work. The AquaClean
status indicator drops to 0% to remind you to replace the filter. As long as the AquaClean status
indicator is shown on the display, you can replace the filter without having to descale the machine
first. If you do not replace the AquaClean water filter in time, the AquaClean indicator goes out after
some time. In that case you can still replace the filter but you first need to descale the machine.
When the AquaClean status indicator drops to 0% or when the machine reminds you to replace the
AquaClean filter:
1 take out the old AquaClean water filter.
2 install a new filter and activate it as described in chapter 'Activating the AquaClean water filter (5
min.)'.
Replace the AquaClean water filter at least every 3 months, even if the machine does not yet
indicate that replacement is required.
Descaling procedure (30 min.)
Please use Philips descaler only. Under no circumstances should you use a descaler based on sulfuric
acid, hydrochloric acid, sulfamic or acetic acid (vinegar) as this may damage the water circuit in your
machine and not dissolve the limescale properly. Not using the Philips descaler will void your
warranty. Failure to descale the appliance will also void your warranty. You can buy Philips descaling
solution in the online shop at www.philips.com/coffee-care.
Page 17
English
When the machine needs descaling, a message appears on the display.
1 Touch the clean icon on the user interface and select 'Descaling' in the menu.
2 Follow the instructions on the screen.
3 If attached, remove LatteGo or the milk frother.
4 Remove the drip tray and the coffee grounds container, empty them and put them back into place.
5 Remove the water tank and empty it. Then remove the AquaClean water filter.
6 Pour the whole bottle of Philips descaler in the water tank and then fill it with water up to the Calc
/ Clean indication (Fig. 48). Then place it back into the machine.
7 Place a large container (1.5 l) under the coffee dispensing spout and the water spout.
8 Press the start/stop button to start the descaling procedure. The descaling procedure lasts
approximately 30 minutes and consists of a descaling cycle and a rinsing cycle.
9 Wait until the machine stops dispensing water. Refill the water tank when the message appears on
the display. The descaling procedure is finished when the machine stops dispensing water.
10 Install and activate a new AquaClean water filter in the water tank.
-
When the descaling procedure is finished, the machine reminds you to install the new
AquaClean filter (see 'Replacing the AquaClean water filter (5 min.)').
Tip: Using the AquaClean filter reduces the need for descaling!
What to do if the descaling procedure is interrupted
You can exit the descaling procedure by pressing the on/off button on the control panel. If the
descaling procedure is interrupted before it is completely finished, do the following:
1 Empty and rinse the water tank thoroughly.
2 Fill the water tank with fresh water up to the Calc / Clean level indication and switch the machine
back on. The machine will heat up and perform an automatic rinsing cycle.
3 Before brewing any drinks, perform a manual rinsing cycle. To perform a manual rinsing cycle, first
dispense half a water tank of hot water by repeatedly selecting the hot water function and then
brew 2 cups of pre-ground coffee without adding ground coffee.
19
English
If the descaling procedure was not completed, the machine will require another descaling
procedure as soon as possible.
Ordering accessories
To clean and descale the machine, only use the Philips maintenance products. These products can be
purchased from your local retailer, from the authorized service centers or online at
www.philips.com/parts-and-accessories. To find a full list of spare parts online, enter the model
number of your machine. You can find the model number on the inside of the service door.
Maintenance products and type numbers:
-
Descaling solution CA6700
-
AquaClean water filter CA6903
-
Brew group grease HD5061
-
Coffee oil remover tablets CA6704
Brita-filters are not compatible with this machine.
Page 18
20
English
Troubleshooting
This chapter summarizes the most common problems you could encounter with the machine. Support
videos and a complete list of frequently asked questions are available on www.philips.com/coffee-
care. If you are unable to solve the problem, contact the Consumer Care Center in your country. For
contact details, see the warranty leaflet.
Warning icons
Warning
icon
Solution
The 'water tank empty' icon pops up on the display.
- The water tank is almost empty. Fill the water tank with fresh water to the
maximum level indication.
- The water tank is not in place. Place back the water tank.
The 'add beans' icons pops up on the display.
- Fill the bean hopper with coffee beans.
The 'empty coffee ground container' icon pops up on the display.
- The coffee grounds container is full. Remove and empty the coffee grounds
container while the machine is switched on. Wait 5 seconds before you place it
back.
The 'insert brew group' icon pops up on the display.
- The brew group is not in place or not placed correctly. Remove the brew group
and make sure it is locked into place. See chapter 'Removing and inserting the
brew group' for step-by-step instructions.
Error codes
Below you find a list of the error codes showing problems that you can solve yourself. Video
instructions are available on www.philips.com/coffee-care. If another error code appears, please
contact the Philips Consumer Care Center in your country. For contact details, see the warranty leaflet.
Error
code
01 The coffee funnel is
03 The brew group is dirty
04 The brew group is not
Problem Possible solution
clogged.
or not well-greased.
positioned correctly.
Switch off the machine and unplug it. Remove the brew group.
Then open the lid of the pre-ground coffee compartment and
insert the spoon handle. Move the handle up and down until
the clogged ground coffee falls down. Visit
www.philips.com/coffee-care for detailed video instructions.
Switch off the machine. Rinse the brew group with fresh water,
let it air-dry and then lubricate it. Consult chapter 'Cleaning the
brew group' or visit www.philips.com/coffee-care for detailed
video instructions. Then switch the machine on again.
Switch off the machine. Remove the brew group and reinsert it.
Make sure that the brew group is in the correct position before
you insert it. Consult chapter 'Handling the brew group or visit
www.philips.com/coffee-care for detailed video instructions.
Then switch the machine on again.
Page 19
English
21
Error
Problem Possible solution
code
05 There is air in the water
circuit.
The AquaClean filter
was not prepared
properly before
installation or it is
clogged.
11 Machine needs to
adjust to room
temperature
14 The machine is
overheated.
Restart the machine by switching it off and on again. If this
works, dispense 2-3 cups of hot water. Descale the machine if
you have not done so for a longer period of time.
Remove the AquaClean filter and try again to brew a coffee. If
this works, make sure that the AquaClean filter is prepared
properly before you place it back. Put the AquaClean filter
back into the water tank. If this still does not work, the filter
might be clogged and needs to be replaced.
Allow some time for the machine to adjust from
transport/outdoor temperature to room temperature. Switch
off the machine for 30 minutes and switch it on again. If this
does not work, contact the Consumer Care Center in your
country. For contact details, see the warranty leaflet.
Switch the machine off and switch it back on again after 30
minutes.
Troubleshooting table
This chapter summarizes the most common problems you could encounter with the machine. Support
videos and a complete list of frequently asked questions are available on www.philips.com/coffee-
care. If you are unable to solve the problem, contact the Consumer Care Center in your country. For
contact details, see the warranty leaflet.
Problem
There are some coffee
residues inside my new
coffee machine.
Cause Solution
This machine has been tested
with coffee.
Although it has been carefully cleaned,
there may be some coffee residues left.
However, the machine is absolutely
new.
English
The drip tray fills up
quickly / there is always
some water in the drip
tray.
The 'empty coffee
grounds container' icon
remains on.
The machine prompts to
empty the coffee
grounds container even
though the container is
not full.
This is normal. The machine
uses water to rinse the internal
circuit and brew group. Some
water flows through the internal
system directly into the drip
tray.
You emptied the coffee grounds
container while the machine
was switched off, or placed it
back too fast.
The machine did not reset the
counter the last time you
emptied the coffee grounds
container.
Empty the drip tray daily or as soon as
the red 'drip tray full' indicator pops up
through the drip tray cover. Tip: place a
cup under the dispensing spout to
collect rinsing water that comes out of
it.
Always empty the coffee grounds
container while the machine is switched
on. Remove the coffee grounds
container, wait at least 5 sec. and then
insert it again.
Always wait approx. 5 seconds when
you place back the coffee grounds
container. In this way the coffee
grounds counter will be reset to zero
and the number of coffee pucks is
counted correctly.
Page 20
22
English
Problem Cause Solution
Always empty the coffee grounds
container while the machine is switched
on. If you empty the coffee grounds
container when the machine is switched
off, the coffee grounds counter won't
reset.
The coffee grounds
container is too full and
the 'empty coffee
grounds container' icon
did not appear on the
display.
I cannot remove the
brew group.
I cannot insert the brew
group.
You removed the drip tray
without emptying the grounds
container.
The brew group is not in the
correct position.
The brew group is not in the
correct position.
When you remove the drip tray, also
empty the coffee grounds container
even if it contains only a few coffee
pucks. This ensures that the coffee
pucks counter is reset to zero and that
the number of coffee pucks is counted
correctly.
Reset the machine in the following way:
close the service door and place back
the water tank. Switch the machine off
and back on again and wait for the
lights in the drinks icons to come on. Try
again to remove the brew group. See
chapter 'Removing and inserting the
brew group' for step by step
instructions.
Reset the machine in the following way:
close the service door and place back
the water tank. Leave the brew group
out. Switch the machine off and unplug
it. Wait for 30 sec. and then plug the
machine back in and switch it on and
wait for the lights in the drinks icons to
come on. Then put the brew group in
the correct position and reinsert it into
the machine. See chapter 'Removing
and inserting the brew group' for step
by step instructions.
The coffee is watery. The brew group is dirty or needs
to be lubricated.
The machine is performing its
self-adjustment procedure. This
procedure is started
automatically when you use the
machine for the first time, when
you change to another type of
coffee beans or after a long
period of non-use.
Remove the brew group (see 'Removing
the brew group from the machine'),
rinse it under the tap and leave it to dry.
Then lubricate the moving parts (see
'Lubricating the brew group').
Brew 5 cups of coffee initially to allow
the machine to complete its selfadjustment procedure.
Page 21
Problem Cause Solution
The grinder is set to a too
coarse setting.
Set the grinder to a finer (lower) setting.
Brew 2 to 3 drinks to be able to before
taste the full difference.
English
23
English
The coffee is not hot
enough.
Adding milk reduces the
Coffee does not come
out or coffee comes out
slowly.
The temperature is set too low. Set the temperature to the maximum
A cold cup reduces the
temperature of the drink.
temperature of the drink.
The AquaClean water filter was
not prepared properly for
installation.
The AquaClean water filter is
clogged.
The grinder is set to a too fine
setting.
setting. To adjust the temperature,
press the 'Settings' icon.
Preheat the cups by rinsing them with
hot water.
Regardless of whether you add hot or
cold milk, adding milk always reduces
the temperature of the coffee. Preheat
the cups by rinsing them with hot water.
Remove the AquaClean filter and
dispense some hot water. If this works,
the AquaClean filter was not installed
properly. Reinstall and activate the
AquaClean filter and follow all steps in
chapter 'AquaClean water filter'.
After a long period of non-use, you
need to prepare the AquaClean water
filter for use again and dispense 2-3
cups of hot water.
Replace the AquaClean water filter
every 3 months. A filter that is older
than 3 months can become clogged.
Set the grinder to a coarser (higher)
setting. Note that this will impact the
coffee taste.
The brew group is dirty. Remove the brew group and rinse it
The coffee dispensing spout is
dirty.
The pre-ground coffee
compartment is clogged
The machine circuit is blocked
by limescale.
under the tap (see 'Cleaning the brew
group under the tap').
Clean the coffee dispensing spout and
its holes with a pipe cleaner or needle.
Switch off the machine and remove the
brew group. Open the lid of the preground coffee compartment and insert
the spoon handle into it. Move the
handle up and down until the clogged
ground coffee falls down (Fig. 34).
Descale the machine with Philips
descaler. Always descale when the
machine prompts you.
Page 22
24
English
Problem Cause Solution
The milk does not froth. Machines with LatteGo: LatteGo
is assembled incorrectly.
Make sure that the milk container is
properly assembled to the frame of
LatteGo ('click') (see 'Assembling
LatteGo (specific types only)').
Milk is leaking from the
bottom of the LatteGo
milk container.
The machine seems to
be leaking.
Machines with LatteGo: the milk
container and/or frame of
LatteGo are dirty.
Machines with classic milk
frother: the milk frother is
assembled incorrectly.
The type of milk used is not
suitable for frothing.
The frame and the milk
container are not assembled
properly.
The milk container and/or frame
of LatteGo are dirty.
The machine uses water to rinse
the internal circuit and brew
group. This water flows through
the internal system directly into
the drip tray. This is normal.
Disassemble LatteGo and rinse both
parts under the tap or clean them in the
dishwasher.
Make sure that the classic milk frother is
proplerly assembled (see 'Assembling
the classic milk frother (specific types
only)').
Different types of milk result in different
amounts of froth and different froth
qualities. We have tested the following
milk types which proved to deliver a
good milk froth result: semi-skimmed or
full-fat cow's milk and lactose-free milk.
First insert the top of the milk container
under the hook at the top of the frame.
Then press home the bottom part of the
milk container. You hear a click when it
locks into place.
Disassemble LatteGo and rinse both
parts under the tap or clean them in the
dishwasher.
Empty the drip tray every day or as
soon as the 'drip tray full' indicator pops
up through the drip tray cover. Tip:
Place a cup under the dispensing spout
to collect rinsing water and reduce the
amount of water in the drip tray.
The drip tray is too full and has
overflowed which makes it look
like the machine is leaking.
The water tank is not fully
inserted, some water is leaking
out of the water tank and air is
drawn into the machine.
The brew group is dirty/clogged. Rinse the brew group.
The machine is not placed on a
horizontal surface.
Empty the drip tray every day or as
soon as the 'drip tray full' indicator pops
up through the drip tray cover.
Make sure the water tank is in the
correct position: remove it and insert it
again pushing it as far as possible.
Place the machine on a horizontal
surface so that the drip tray does not
overflow and the 'drip tray full' indicator
works properly.
Page 23
Problem Cause Solution
I cannot activate the
AquaClean water filter
and the machine asks
for descaling.
The filter has not been installed
or replaced in time after the
screen shows the AquaClean
reminder. This means your
machine is not anymore
completely limescale free.
Descale your machine first and then
install the AquaClean water filter.
English
25
English
The new water filter
does not fit.
The machine is making a
loud noise.
You are trying to install another
filter than the Philips AquaClean
water filter.
The rubber ring on the
AquaClean water filter is not in
place.
It is normal that your machine
makes some noise during use.
The AquaClean water filter was
not prepared properly and air is
now drawn into the machine.
The water tank is not fully
inserted and air is drawn into
the machine.
Only the Philips AquaClean water filter
fits into the machine.
Place back the rubber ring on the
AquaClean water filter.
If the machine starts to make a different
kind of noise, clean the brew group and
lubricate it (see 'Lubricating the brew
group').
Remove the AquaClean water filter from
the water tank and properly prepare it
for use before you place it back. See
chapter 'AquaClean water filter' for
step-by-step instructions.
Make sure the water tank is in the
correct position: remove it and insert it
again pushing it as far as possible.
Technical specifications
The manufacturer reserves the right to improve the technical specifications of the product. All the
preset quantities are approximate.
Description
Size (w x h x d) 246 x 377 x 434 mm
Value
Weight 7 - 7.5 kg
Power cord length 1200 mm
Water tank 1.8 litres
Coffee bean hopper capacity 275 g
Coffee grounds container capacity 12 pucks
LatteGo (milk container) capacity 250 ml
Adjustable spout height 88-145 mm
Nominal voltage - Power rating - Power supply See data label on inside of service door (Fig. A11)
Page 24
26
Türkçe
İçerik
Makineye genel bakış (Şek. A)________________________________________________________________________ 26
Kontrol paneli ________________________________________________________________________________________ 26
Giriş ___________________________________________________________________________________________________ 27
İlk kullanımdan önce _________________________________________________________________________________ 28
İçecek hazırlama______________________________________________________________________________________ 29
İçecek kişiselleştirme _________________________________________________________________________________ 32
Makineyi ayarlama ___________________________________________________________________________________ 32
Demleme ünitesini takma ve çıkarma _______________________________________________________________ 34
Temizlik ve bakım_____________________________________________________________________________________ 34
AquaClean su filtresi _________________________________________________________________________________ 37
Kireç çözme işlemi (30 dk.) __________________________________________________________________________ 38
Aksesuarların sipariş edilmesi________________________________________________________________________ 39
Sorun giderme________________________________________________________________________________________ 39
Teknik özellikler_______________________________________________________________________________________ 44
Makineye genel bakış (Şek. A)
A1 Kontrol paneli A10 Bakım kapağı
A2 Kupa tutucu A11 Model numarası içeren veri etiketi
A3 Önceden öğütülmüş kahve bölmesi A12 Su haznesi
A4 Çekirdek kahve haznesi kapağı A13 Sıcak su musluğu
A5 Ayarlanabilir kahve musluğu A14 Atık kahve haznesi
A6 Güç kablosu için soket A15 Atık kahve haznesi ön paneli
A7 Öğütme ayarı döner düğmesi A16 Damlama tepsisi kapağı
A8 Kahve çekirdeği haznesi A17 Damlama tepsisi
A9 Demleme Ünitesi A18 "Damlama tepsisi dolu" göstergesi
Aksesuarlar
A19 Güç kablosu A23 Su sertliği test şeridi
A20 Yağ tüpü A24 Klasik süt köpürtücü (yalnızca belirli
A21 AquaClean su filtresi A25 LatteGo (süt haznesi) (yalnızca belirli
A22 Ölçü kaşığı
modellerde)
modellerde)
Kontrol paneli
Bu espresso makinesinin farklı kontrol panellerine sahip farklı sürümleri bulunmaktadır. Her sürümün
ayrı model numarası bulunur. Ürünün model numarasını bakım kapağının iç yüzünde bulunan veri
Page 25
Türkçe
etiketinde bulabilirsiniz (Şek. A11). Ayarlar simgesine dokunup "Destek"i seçerek de model
numarasına ulaşabilirsiniz.
Tüm düğme ve simgelere genel bakış için Şekil C, D ve E'ye bakın. Aşağıda açıklamaları bulabilirsiniz.
Yukarı ve aşağı okları kullanarak ekranı kaydırın, Tamam simgesiyle seçim ve onaylama işlemi yapın.
Tüm modeller (Şek. C/D/E)
C1/D1/E1 Tek dokunuş içecek
simgeleri
C2. Başlat/durdur düğmesi C4. Ekran C7. Kişisel profiller
C3. Gezinme simgeleri
(yukarı, aşağı, geri, tamam)
C6. Temizleme menüsü
27
Türkçe
D2/E2 Diğer İçeceklerin yer aldığı
menü
C5. Makine ayarları C8. Açma/kapama düğmesi
Yalnızca EP4327, EP4324, EP4321 modellerinde (Şek. C)
C1 Tek dokunuş içecek simgeleri: Espresso, Kahve, Americano, Caffé Crema, Ristretto, Sıcak Su ve
Buhar
Yalnızca EP4349, EP4346, EP4343, EP4341 modellerinde (Şek.
D)
D1 Tek dokunuş simge simgeleri: Espresso, Kahve, Americano, Cappuccino, Latte Macchiato, Café au
lait
Yalnızca EP5447, EP5446, EP5444, EP5443, EP5441
modellerinde (Şek. E)
E1 Tek dokunuş simgeleri: Espresso, Kahve, Americano, Cappuccino, Latte Macchiato, Café au lait
Giriş
Philips tam otomatik kahve makinesini satın aldığınız için teşekkür ederiz. Philips’in sunduğu destekten
faydalanabilmek için lütfen www.philips.com/registeryourcoffee adresinden veya bu broşürdeki QR
kodunu (Şek. 1) okutarak ürününüzü kaydedin.
Makineyi ilk kez kullanmadan önce emniyet broşürünü dikkatlice okuyun ve gelecekte de başvurmak
üzere saklayın.
Philips, başlamanıza yardımcı olmak ve makinenizden en iyi şekilde yararlanabilmenizi sağlamak için
farklı biçimlerde destek sunar. Bu kutuda şunlar yer alır:
1 Resimli kullanım talimatları ile temizlik ve bakım hakkında ayrıntılı bilgi içeren bu kullanım kılavuzu.
2 Makineyi güvenli bir biçimde kullanmayla ilgili talimatların yer aldığı ayrı bir emniyet kitapçığı
bulunmaktadır.
3 Online destek için (sıkça sorulan sorular, videolar vb.) bu kitapçığın kapağındaki QR kodunu tarayın
veya www.philips.com/coffee-care adresine gidin. QR kodunu Ayarlar
destek seçeneğini işaretleyerek de bulabilirsiniz.
simgesine dokunup
Bu makine kahveyle test edilmiştir. Özenle temizlenmiş olmasına rağmen bir miktar kahve
kalıntısıyla karşılaşabilirsiniz. Bununla birlikte, makinenin tamamen yeni bir ürün olduğunun garantisini
veririz.
Page 26
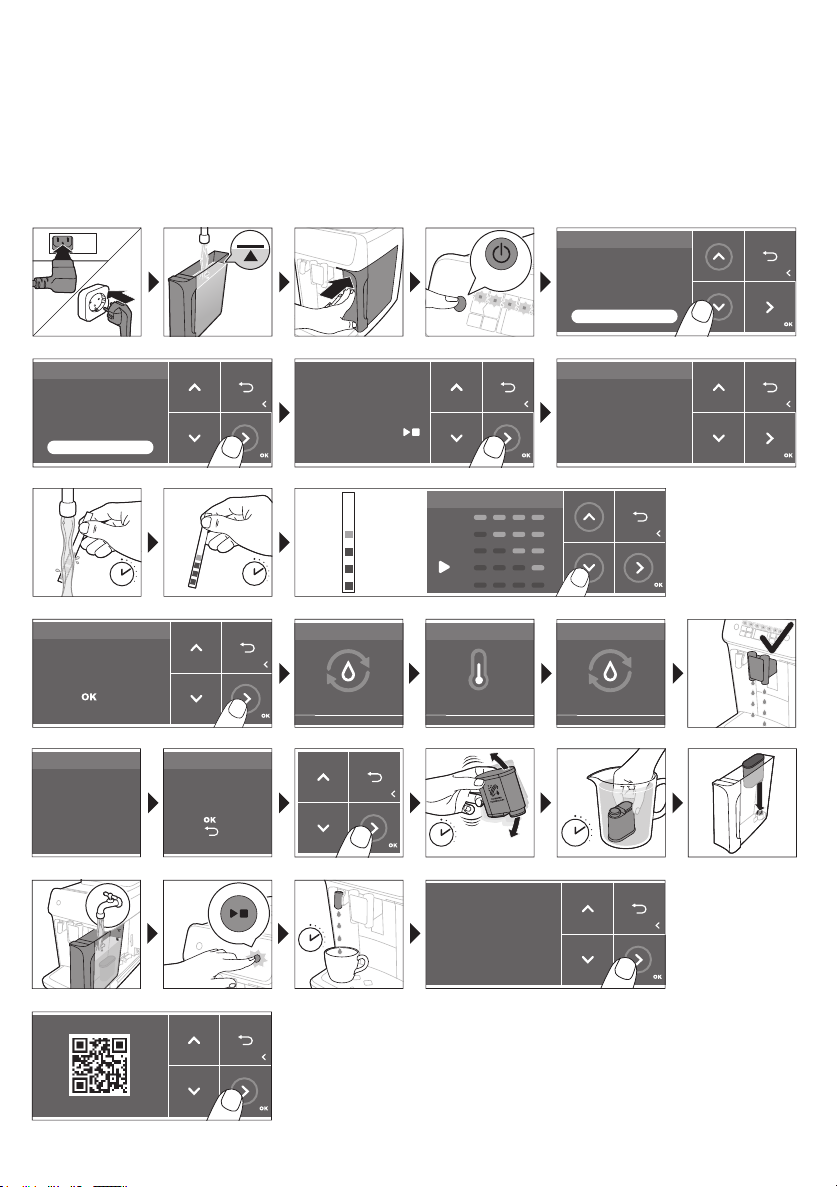
28
ON
,WDOLDQR
1HGHUODQGV
(QJOLVK
(VSD³RO
/DQJXDJH
:DWHUKDUGQHVV
,WDOLDQR
1HGHUODQGV
(QJOLVK
(VSD³RO
/DQJXDJH
)ROORZWKHQH[WVWHSV
WRVHWWKHFRUUHFW
ZDWHUKDUGQHVVOHYHO
<RXDUHDERXW
WRVHWWKHODQJXDJH
WR(QJOLVK
3UHVVVWDUWVWRS
WRFRQILUP
:DWHUKDUGQHVV
<RXVHOHFWHG
UHGVTXDUHV
3UHVVWRFRQILUP
+HDWLQJXS
+HDWLQJ
5LQVLQJ
5LQVLQJ
)LOOLQJZDWHUFLUFXLW
)LOOLQJ
=
:DWHUKDUGQHVV
1 sec.
1 min.
5 sec.
30 sec.
1 min.
$TXD&OHDQ
8VH$TXD&OHDQILOWHU
WRHQMR\FXSV
ZLWKRXWGHVFDOLQJ
$OPRVWUHDG\
)LOOEHDQVUHILOOZDWHU
WDQNDQGHQMR\
\RXUFRIIHH
5HJLVWHU\RXUSURGXFW
9LVLWZZZSKLOLSVFRP
$TXD&OHDQ
:RXOG\RXLQVWDOO
DQ$TXD&OHDQILOWHU"
3UHVVWRFRQILUP
3UHVVWRUHIXVH
Türkçe
Makine, en lezzetli kahveyi hazırlamak için kullanılan öğütülmüş kahve miktarını otomatik olarak
ayarlar. Başlangıçta cihazın kendini ayarlayabilmesine olanak tanımak için 5 kahve hazırlamanız
gerekir.
İlk kullanımdan önce LatteGo (süt haznesi) veya klasik süt köpürtücüyü duruladığınızdan emin olun.
İlk kullanımdan önce
Page 27
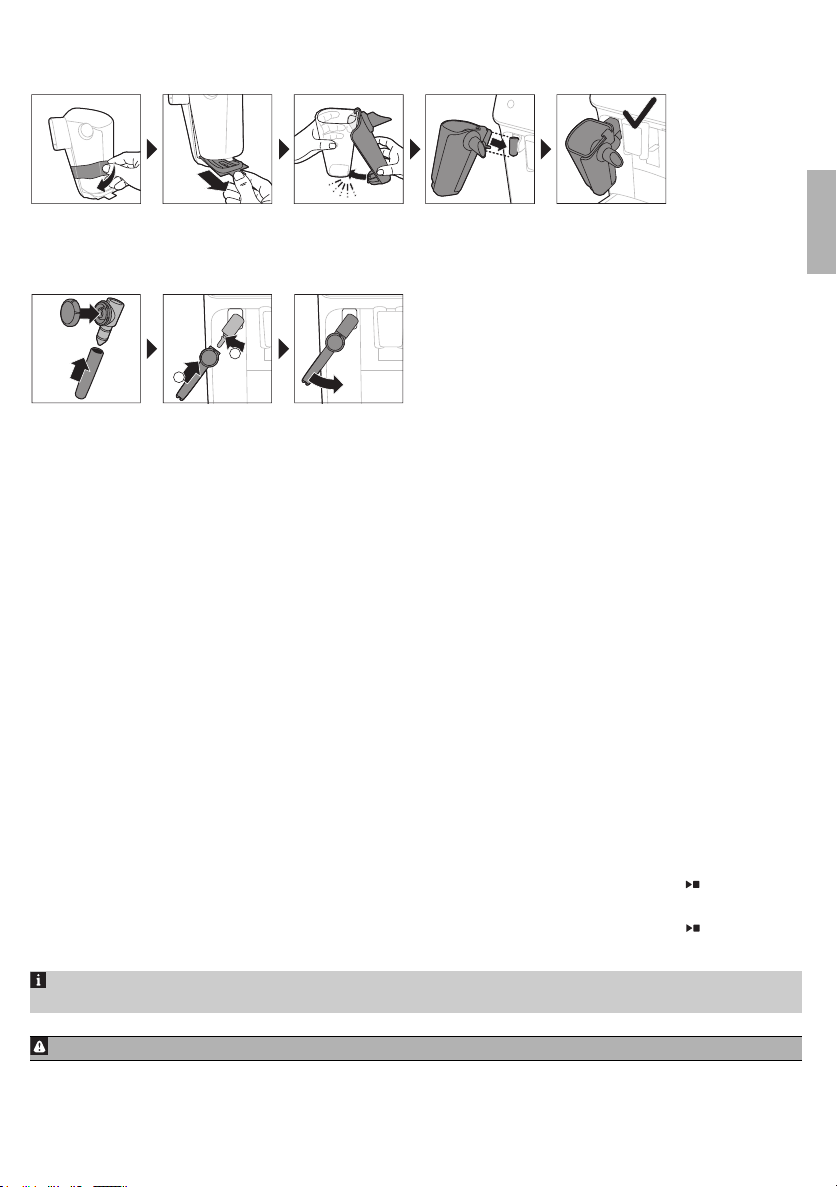
LatteGo'yu birleştirme (yalnızca belirli modellerde)
CLICK
1
2
Türkçe
29
Klasik süt köpürtücüyü birleştirme (yalnızca belirli
modellerde)
İçecek hazırlama
Genel adımlar
1 Su haznesini musluk suyuyla; çekirdek kahve haznesini çekirdekle doldurun.
2 Küçük fişi makinenin arkasında yer alan sokete takın. Cihazı prize takın.
3 Makineyi açmak için açma/kapama düğmesine basın.
-
Makine ısınmaya başlar ve otomatik durulama döngüsünü gerçekleştirir.
-
İçecek simgelerindeki tüm ışıklar sürekli olarak yanar hale geldiğinde makineniz kullanıma hazır
olur.
4 Kahve dağıtım musluğunun altına bir bardak yerleştirin. Kahve dağıtım musluğunu yukarı veya aşağı
kaydırarak kullandığınız (Şek. 2) bardak veya kupanın yüksekliğine göre ayarlayın.
Çekirdekle kahve hazırlama
1 Kahve hazırlamak için tercih ettiğiniz (Şek. 3) içeceğin simgesine ya da "Diğer İçecekler" simgesine
(Şek. 4) dokunun (yalnızca belirli modellerde).
-
Bu adımda içeceğinizi kendi damak tadınıza (Şek. 5) göre ayarlayabilirsiniz. Kahve sertliğini
ayarlamak için aşağı ve yukarı okları (Şek. 6) kullanın. Diğer ayarları (Şek. 7) değiştirmek
istiyorsanız Tamam simgesine dokunun.
2 Seçilen içeceğin hazırlanmaya başlaması için dilediğiniz zaman başlatma/durdurma düğmesine
dokunun.
3 Makine işlemi tamamlamadan kahve dağıtımını durdurmak için başlatma/durdurma düğmesine
tekrar basın.
Türkçe
Aynı anda 2 kahve hazırlamak için içecek simgesine iki kez dokunun ya da ayrı çubuğu kaydırarak 2x
simgesini seçin.
Karamelize edilmiş veya aroma eklenmiş kahve çekirdeği kullanmayın.
Page 28
30
Türkçe
LatteGo (süt haznesi) ile süt tabanlı içecek hazırlama
LatteGo, bir süt haznesi, bir çerçeve ve bir kutu kapağından oluşur. Sızıntıyı önlemek için süt
haznesini doldurmadan önce çerçeve ile süt haznesinin doğru biçimde takıldığından emin olun.
1 LatteGo'yu birleştirmek için önce süt haznesinin üst kısmını çerçevenin (Şek. 8) üstünde yer alan
kancaya yerleştirin. Ardından süt haznesinin alt kısmını yerine bastırın. Yerine (Şek. 9) oturduğunda
klik sesi duyarsınız.
Not: Birleştirmeden önce süt haznesi ile çerçevenin temiz olduğundan emin olun.
2 LatteGo'yu yavaşça eğerek sıcak su musluğuna (Şek. 10) getirin. Ardından yerine (Şek. 11) kilitlenene
kadar ittirin.
3 LatteGo'yu sütle (Şek. 12) doldurun. Süt haznesini maksimum seviye göstergesinden fazla
doldurmayın.
Süt miktarını kişiselleştirdiyseniz, süt haznesine LatteGo'da bu içecek için belirtilenden daha
fazla veya daha az süt koymanız gerekebilir.
En iyi sonuç için daima doğrudan buzdolabından çıkardığınız sütü kullanın.
4 Damlama tepsisine bir bardak yerleştirin.
5 Tercih ettiğiniz süt tabanlı içeceğin simgesine dokunun ya da "Diğer İçecekler" (yalnızca belirli
modellerde) ile farklı bir içecek (bkz. 'İçecek kişiselleştirme') seçin.
-
Bu adımda içeceğinizi tercih ettiğiniz gibi ayarlayabilirsiniz.
6 Başlatma/durdurma düğmesine basın.
-
Makine, cappuccino, flat white veya latte macchiato hazırlarken makine önce sütü sonra kahveyi
verir. Caffè latte veya café au lait hazırlanırken makine önce kahveyi sonra sütü verir.
-
Makine önceden ayarlı miktarı dağıtmadan süt dağıtımını durdurmak için başlatma/durdurma
düğmesine basın.
7 Makine işlemi tamamlamadan içeceğin (süt ve kahve) tamamının dağıtımını durdurmak için
başlatma/durdurma düğmesine basın ve düğmeyi basılı tutun.
Klasik süt köpürtücüyle süt köpürtme ve ısıtma
En iyi köpük kalitesini elde etmek için daima doğrudan buzdolabından çıkardığınız sütü kullanın.
1 Makinenin üzerindeki siyah silikon tutacağı sola eğin ve süt köpürtücüyü tutacağa (Şek. 13)
yerleştirerek takın.
2 Süt sürahisini cappuccino için yaklaşık 100 ml, latte macchiato için 150 ml sütle doldurun.
3 Süt köpürtücüyü süte yaklaşık 1cm batırın.
4 Buhar simgesine (Şek. 14) dokunun.
5 Süt köpürtmek istiyorsanız, klasik süt köpürtücü üzerindeki döner düğmeyi süt köpürtme simgesine
(Şek. 15) çevirin. Süt ısıtmak istiyorsanız, klasik süt köpürtücü üzerindeki döner düğmeyi düz süt
simgesine (Şek. 16) çevirin.
6 Klasik süt köpürtücünün döner düğmesinin üzerindeki simgenin siyah okla aynı hizada olduğundan
emin olun.
7 Başlamak için başlatma (Şek. 17)/durdurma düğmesine basın.
-
Makine ısınmaya başlar, buhar süte iletilir ve sonucunda süt köpürür veya ısınır.
8 Süt sürahisindeki süt gerekli köpük hacmine veya sıcaklığa eriştiğinde, süt köpürtme veya ısıtma
işlemini durdurmak için tekrar başlatma/durdurma düğmesine basın.
Süte asla 90 saniyeden uzun süre buhar vermeyin. Buhar verme işlemi 90 saniye sonra otomatik
olarak
durur.
Page 29
Türkçe
En iyi süt köpürtme kalitesini elde etmek için süt köpürtme işlemi sırasında süt sürahisini hareket
ettirmenize gerek yoktur.
Ekstra shot (ExtraShot) (yalnızca belirli modellerde)
Makineniz örneğin daha sert kahve istiyorsanız, kahve veya süt tabanlı içeceklerinize ekstra bir
Ristretto shot'ı ekleme olanağı tanır.
1 Musluğun altına bir bardak yerleştirin
2 İçecek seçmek için tek dokunuş içeceklerin birine dokunun ya da "Diğer İçecekler" simgesine
(yalnızca belirli modellerde) dokunun.
3 Okları kullanarak yoğunluğu en üst seviyeye ayarladıktan sonra ExtraShot fonksiyonunu (Şek. 18)
seçin.
4 Diğer ayarları kişiselleştirmek istiyorsanız Tamam simgesine basın. Ardından başlatma/durdurma
simgesine basarak içeceği hazırlamaya başlayın.
5 Makine işlemi tamamlamadan içecek dağıtımını durdurmak için başlatma/durdurma
tekrar basın.
ExtraShot işlevini seçtiğinizde aynı anda sadece bir kahve hazırlayabilirsiniz.
simgesine
Önceden öğütülmüş kahveyle kahve hazırlama
Örneğin farklı kahve çeşitleri ya da kafeinsiz kahve tercih ediyorsanız, çekirdek yerine önceden
öğütülmüş kahve kullanmayı tercih edebilirsiniz.
1 Önceden öğütülmüş kahve bölmesinin kapağını açıp içine (Şek. 19) bir ölçek düzlenmiş önceden
öğütülmüş kahve koyun. Kapağı kapatın.
2 Tek dokunuş içecek simgelerinden birine ya da başka bir içecek seçmek için "Diğer İçecekler"
simgesine (yalnızca belirli modellerde) dokunun.
3 Önceden öğütülmüş kahve fonksiyonunu seçin. Bunu iki şekilde yapabilirsiniz:
-
alt oku kullanarak sertliği en düşük seviyeye ayarladıktan sonra önceden öğütülmüş işlevini seçme.
-
Ayarlar simgesine basıp önceden öğütülmüş işlevini seçmek için alt oku kullanma.
4 Makine işlemi tamamlamadan kahve dağıtımını durdurmak için başlatma/durdurma düğmesine
tekrar basın.
31
Türkçe
önceden öğütülmüş kahve fonksiyonunu seçtiğinizde:
- Otomatik olarak kaydedilir.
- Tek seferde sadece bir kahve hazırlayabilirsiniz.
- Farklı aroma yoğunluğu seçemezsiniz.
Sıcak su dağıtımı
1 LatteGo veya süt köpürtücü takılıysa çıkarın.
2 Sıcak su musluğunun altına bir bardak yerleştirin.
3 "Sıcak Su" simgesine (yalnızca belirli modellerde) dokunun ya da sıcak suyu seçmek için "Diğer
İçecekler" simgesine (yalnızca belirli modellerde) (Şek. 4) dokunun.
4 Tercih ettiğiniz sıcak su miktarı ve/veya sıcaklığını ayarlamak için yukarı ve aşağı oklarını kullanın.
5 Başlatma/durdurma
-
Sıcak su musluğundan (Şek. 20) sıcak su akar.
6 Makine işlemi tamamlamadan sıcak su dağıtımını durdurmak için başlatma/durdurma
düğmesine tekrar basın.
düğmesine basın.
Page 30
32
Türkçe
İçecek kişiselleştirme
Bu makine, bir içeceğin ayarlarını kendi tercihinize göre ayarlamanıza ve tercihlerinizi kişisel bir profilde
saklamanıza olanak tanır. Farklı profiller farklı renklere sahiptir.
Bir içecek seçtikten sonra tek dokunuş içecek simgelerine ya da "Diğer İçecekler" simgesine (yalnızca
belirli modellerde) dokunarak şu işlemleri yapabilirsiniz:
1 Yukarı ve aşağı simgeleriyle (Şek. 21) aroma yoğunluğunu ayarlama. En düşüğü en hafif, en yükseği
en serti olmak üzere 5 farklı yoğunluk seviyesi.
2 Yukarı ve aşağı simgeleriyle kahve miktarını (Şek. 22) ve/veya süt miktarını ayarlayın (yalnızca belirli
modellerde). Her ayar için 5 miktar bulunur.
Makine demleme işlemini tamamladıktan sonra seçtiğiniz ayarlar belirlediğiniz profile otomatik
olarak kaydedilir.
Profil seçme
Profil seçmek ve tarif kaydetmek için Kahve tercihi profillerim'i kullanabilirsiniz (Kahve Tercih
Profillerim).
1 Profiller
sahiptir.
2 Tek dokunuş içecek simgelerinden birine ya da "Diğer İçecekler" simgesine (yalnızca belirli
modellerde) dokunarak bir içecek seçin.
3 İçecek ayarlarını damak tadınıza göre değiştirin.
4 Seçtiğiniz içeceği hazırlamak için başlatma/durdurma düğmesine basın.
-
çevirebilirsiniz.
simgesine arka arkaya basarak renkli profillerden birini seçin. Tüm profiller farklı renge
Yeni ayarlarını seçtiğiniz renkteki profile kaydedilir.
Dilediğiniz zaman makineyi (bkz. 'Fabrika ayarlarına sıfırlama') fabrika ayarlarına geri
Konuk profili
Makineniz konuk profiline sahiptir. Konuk profili seçildiğinde profil simgesi kapalıdır. Bu profili
seçtiğinizde ayarları kendi tercihlerinize göre kişiselleştirmeye devam edebilseniz de hazırlayacağınız
tarifler kaydedilmez.
Makineyi ayarlama
Su sertliğini ayarlama
Optimum performans ve daha uzun bir ürün ömrü elde etmek için su sertliği ayarını bölgenizdeki su
sertliği düzeyine uygun olarak ayarlamanız önerilir. Ayrıca makinede sık sık kireç çözme işlemi yapma
ihtiyacınızı ortadan kaldırır. Varsayılan su sertliği ayarı 4: sert sudur.
Bölgenizdeki su sertliğini tespit etmek için kutuda yer alan su sertliği test şeridini
kullanın:
1 Su sertliği test şeridini çeşme suyuna batırın ya da 1 saniye (Şek. 23) boyunca akan suya tutun.
2 1 dakika bekleyin. Test şeridinin üzerinde kırmızıya dönen karelerin sayısı su sertliğini (Şek. 24)
belirtir.
Page 31
Türkçe
Makinede doğru su sertliğini ayarlama:
1 Ayarlar
onaylamak için Tamam simgesine basın.
2 Su sertliği seviyesini seçmek için yukarı ve aşağı simgelerini kullanın. Ekranda seçilen kırmızı kare
sayısı, test şeridindeki (Şek. 25) kırmızı karelerle aynı sayıda olmalıdır.
3 Doğru su sertliğini ayarladıktan sonra onaylamak için Tamam simgesine dokunun.
simgesine dokunup yukarı ve aşağı okları kullanarak "Su sertliği"ni seçin. Ardından
33
Öğütücüyü ayarlama
Çekirdek haznesinin içinde yer alan öğütme ayarı döner düğmesiyle kahve yoğunluğunu
değiştirebilirsiniz. Öğütme ayarı ne kadar düşük olursa kahve çekirdekleri o kadar ince öğütülür ve
kahve o kadar sert olur. Seçebileceğiniz 12 farklı öğütme ayarı bulunur.
Makine, kahve çekirdeğinizden en lezzetli kahveyi demlemek üzere ayarlanmıştır. Bu yüzden 100 ila
150 bardak kahve demleyene (yaklaşık 1 aylık kullanım) kadar öğütücü ayarlarını değiştirmemenizi
tavsiye ederiz.
Öğütme ayarlarını sadece makine kahve çekirdeği öğütürken ayarlayabilirsiniz. Tat farkını tam olarak
alabilmek için 2 ila 3 içecek hazırlamanız gerekir.
Öğütücünün zarar görmemesi için öğütme ayarı döner düğmesini tek seferde bir kademeden daha
fazla çevirmeyin.
1 Kahve dağıtım musluğunun altına bir bardak yerleştirin.
2 Çekirdek kahve haznesinin kapağını açın.
3 Espresso simgesine dokunup başlatma/durdurma düğmesine basın.
4 Öğütücü öğütmeye başladıktan sonra öğütme ayarı döner düğmesine bastırıp sola veya sağa
çevirin. (Şek. 26)
Diğer makine ayarlarını değiştirme
Ayarlar simgesine dokunarak makinenin şu ayarlarını değiştirebilirsiniz:
-
Su sertliği: Bölgenizdeki su sertliğine göre 5 seviyeden birini seçebilirsiniz;
-
Bekleme süresi: 15, 30, 60 veya 180 dk. seçebilirsiniz
-
Ekran parlaklığı: Düşük, orta ve yüksek seçebilirsiniz.
-
Dil
-
Ses: Makinenin çıkardığı bip sesini etkinleştirebilir veya devre dışı bırakabilirsiniz.
-
Sıcaklık: kahveniz için 3 pişirme sıcaklığından birini seçebilirsiniz
-
Ön aydınlatma (yalnızca belirli modellerde): "Her zaman açık", "Pişirme sırasında açık" ve "her zaman
kapalı" ayarlarından birini seçebilirsiniz.
-
Ölçü birimi: ml veya oz birimlerinden birini seçebilirsiniz.
Türkçe
Fabrika ayarlarına sıfırlama
Makine dilediğiniz zaman fabrika ayarlarına dönme olanağı tanır.
1 Ayarlar simgesine dokunun.
2 Yukarı ve aşağı simgeleriyle "Fabrika ayarları"nı seçin. Tamam simgesine dokunarak onaylayın.
3 Ayarları sıfırlamak istediğinizi onaylamak için başlatma/durdurma
-
Ayarlarınız ilk haline getirilir.
Varsayılan fabrika ayarlarına döndürülen ayarlar şunlardır: su sertliği, bekleme süresi, ekran
parlaklığı, ses, sıcaklık, ön aydınlatma ve profiller.
düğmesine basın.
Page 32
34
Türkçe
Demleme ünitesini takma ve çıkarma
Demleme ünitesini nasıl çıkaracağınız, takacağınız ve temizleyeceğinizle ilgili ayrıntılı video talimatlar
için www.philips.com/coffee-care adresine gidin.
Demleme ünitesini makineden çıkarma
1 Makineyi kapatın.
2 Su haznesini sökün ve bakım kapağını (Şek. 27) açın.
3 PUSH koluna (Şek. 28) basın ve demleme ünitesinin tutacağından çekerek makineden (Şek. 29)
çıkarın.
Demleme ünitesini geri takma
Demleme ünitesini makineye takmadan önce doğru konumda olduğundan emin olun.
1 Demleme ünitesinin doğru konumda olup olmadığını kontrol edin. Demleme ünitesinin yanındaki
sarı silindir ile siyah ok ve N (Şek. 30) işaretinin aynı hizada olması gerekir.
-
Aynı hizada değilse kolu demleme ünitesinin (Şek. 31) tabanıyla temas edene kadar bastırın.
2 Demleme ünitesini makineye kenarlarındaki (Şek. 32) kılavuz kızakları doğrultusunda yerleştirin ve
klik (Şek. 33) sesini duyana kadar ittirin. PUSH düğmesine basmayın.
3 Bakım kapağını kapatıp su haznesini yerine koyun.
Temizlik ve bakım
Düzenli temizlik ve bakım yaptığınızda makinenizin en iyi durumda kalmasını, kahvelerinizin lezzetini
korumasını ve kararlı bir şekilde hazırlanmasını sağlarsınız.
Makinenin tüm çıkarılabilir parçalarıyla ve ne zaman temizlenmesi gerektiği hakkında ayrıntılı açıklama
için aşağıdaki tabloya göz atın. Ayrıntılı bilgiye ve videolu talimatlara www.philips.com/coffee-care
adresinden ulaşabilirsiniz. Bulaşık makinesinde yıkanabilecek parçalara genel bakış için Şekil B'yi
inceleyin.
Çıkarılabilir
parçalar
Demleme ünitesi Haftada bir Demleme ünitesini makineden (bkz.
Ne zaman temizlenmeli Nasıl temizlenmeli
'Demleme ünitesini takma ve çıkarma')
çıkarın. Musluğun (bkz. 'Demleme ünitesini
muslukta temizleme') altında durulayın.
Ayda bir Demleme ünitesini Philips kahve yağı
Klasik süt köpürtücü Her kullanımdan sonra Önce, süt köpürtücüyü makineye takılıyken
temizleyici tabletle (bkz. 'Demleme ünitesini
kahve yağı çıkarıcı tabletlerle temizleme')
temizleyin.
"Hızlı süt temizleme" programını (bkz. 'Klasik
süt köpürtücüyü hızlı temizleme') kullanarak
temizleyin. Ardından süt köpürtücüyü
makineden çıkararak parçalarını sökün. Tüm
parçaları muslukta veya bulaşık makinesinde
temizleyin.
Page 33
Türkçe
35
Çıkarılabilir
Ne zaman temizlenmeli Nasıl temizlenmeli
parçalar
Önceden öğütülmüş
kahve bölmesi
Atık kahve haznesi Makine ekranında istendiği
Damlama tepsisi Damlama tepsisini günlük
LatteGo Her kullanımdan sonra Önce, LatteGo'yu makineye takılıyken "Hızlı
Önceden öğütülmüş kahve
bölmesinde haftada bir
tıkanıklık kontrolü yapın.
zaman atık kahve haznesini
boşaltın. Haftada bir kez
temizleyin.
olarak ya da demleme tepsisi
(Şek. 35) üzerinde kırmızı
"demleme tepsisi dolu"
göstergesi göründüğünde
boşaltın. Damlama tepsisini
haftada bir temizleyin.
Makinenin fişini çekip demleme ünitesini
çıkarın. Önceden öğütülmüş kahve
bölmesinin kapağını açıp içine kaşık
tutacağını yerleştirin. Tıkanan öğütülmüş
kahve açılana (Şek. 34) kadar tutacağı yukarı
aşağı hareket ettirin. Ayrıntılı video
açıklamalar için www.philips.com/coffee-
care adresine gidin.
Makine açıkken atık kahve haznesini çıkarın.
Bir miktar yıkama sıvısıyla musluğun altında
ya da bulaşık makinesinde temizleyin. Atık
kahve haznesinin ön paneli (Şek. A15)
bulaşık makinesinde yıkamaya uygun
değildir.
Damlama tepsisini (Şek. 36) çıkarıp muslukta
bir miktar yıkama sıvısıyla birlikte durulayın.
Damlama tepsisini bulaşık makinesinde de
yıkayabilirsiniz. Atık kahve haznesinin ön
paneli (Şek. A15) bulaşık makinesinde
yıkamaya uygun değildir.
süt temizleme" programını (bkz. 'LatteGo'yu
hızlı temizleme') kullanarak temizleyin.
Ardından makineden çıkarıp muslukta ya da
bulaşık makinesinde temizleyin.
Türkçe
Demleme ünitesinin
yağlanması
Su haznesi Haftada bir Su haznesini musluk altında durulayın
Makine ön yüzü Haftada bir Aşındırıcı olmayan bir kumaşla temizleyin
2 ayda bir Yağlama tablosuna başvurun ve demleme
ünitesini Philips yağıyla (bkz. 'Demleme
ünitesini yağlama') yağlayın.
Demleme ünitesini temizleme
Demleme ünitesi düzenli olarak temizlendiğinde kahve kalıntıları iç aksamı tıkamaz. Demleme ünitesini
çıkarma, takma ve temizlemeyle ilgili destek videoları için www.philips.com/coffee-care adresini
ziyaret edin.
Demleme ünitesini muslukta temizleme
1 Demleme ünitesini (bkz. 'Demleme ünitesini takma ve çıkarma') çıkarın.
2 Demleme ünitesini suyla iyice durulayın. Demleme ünitesinin üst filtresini (Şek. 37) dikkatlice
temizleyin.
3 Yerine takmadan önce demleme ünitesinin havayla kurumasını bekleyin. Demleme ünitesinin içinde
lif birikimine yol açacağından üniteyi kumaşla kurulamayın.
Demleme ünitesini kahve yağı çıkarıcı tabletlerle temizleme
Yalnızca Philips kahve yağı çıkarıcı tabletler kullanın.
Page 34

36
Türkçe
1 Temizle simgesine dokunup yukarı ve aşağı oklarla "Demleme ünitesini temizle"yi seçin.
2 Tamam simgesine dokunup ekrandaki talimatları izleyin.
Demleme ünitesini yağlama
Makinenizin performansını artırmak için demleme ünitesini iki ayda bir yağlayarak hareketli aksamın
sorunsuz bir şekilde çalışmasını sağlamanız önerilir.
1 Demleme ünitesinin (Şek. 38) pistonuna (gri parça) bir miktar yağ uygulayın.
2 Demleme ünitesinin (Şek. 39) alt kısmındaki şaftın (gri parça) çevresine bir miktar yağ uygulayın.
3 Her iki taraftaki (Şek. 40) kızaklara bir miktar yağ uygulayın.
LatteGo'yu temizleme (süt haznesi) (yalnızca belirli
modellerde)
LatteGo'yu hızlı temizleme
1 LatteGo'nun makineye (Şek. 10) doğru biçimde takıldığından emin olun.
2 Musluğun altına bir bardak yerleştirin.
3 Temizle simgesine dokunduktan sonra yukarı ve aşağı okları kullanarak "Hızlı süt temizle"
programını seçin.
4 Tamam simgesine dokunarak onaylayın ve süt sisteminde kalmış olabilecek tüm sütü çıkarmak için
ekrandaki talimatları izleyin.
-
Süt sisteminden az miktarda sıcak su dağıtılır.
5 LatteGo'yu kalan sütle birlikte buzdolabında saklayın.
LatteGo'yu ayrıntılı temizleme
1 LatteGo'yu makineden (Şek. 41) çıkarın.
2 Kalan sütün tamamını dökün.
3 Serbest bırak düğmesine basın ve süt haznesini LatteGo (Şek. 42)'nun çerçevesinden çıkarın.
4 Tüm parçaları bulaşık makinesinde ya da muslukta ılık su ve bir miktar yıkama sıvısıyla temizleyin.
Klasik süt köpürtücüyü temizleme (yalnızca belirli
modellerde)
Klasik süt köpürtücüyü hızlı temizleme
1 Klasik süt köpürtücünün makineye (Şek. 13) doğru biçimde takıldığından emin olun.
2 Musluğun altına bir bardak yerleştirin.
3 Temizle simgesine dokunduktan sonra yukarı ve aşağı okları kullanarak "Hızlı süt temizle"
programını seçin.
4 Tamam simgesini tıklayıp onaylayın ve süt köpürtücüde kalmış olabilecek tüm sütü çıkarmak için
ekrandaki talimatları izleyin.
-
Süt sisteminden az miktarda sıcak su dağıtılır.
5 Süt köpürtücüyü nemli bir bezle temizleyin.
Klasik süt köpürtücüyü günlük temizleme
1 Süt köpürtücünün tamamen soğumasını bekleyin.
2 Süt köpürtücüyü sola eğerek metal parçayı ve silikon parçayı (Şek. 43) çıkarın.
3 Üç parçayı (Şek. 44) söküp temiz suyla durulayın ya da bulaşık makinesinde temizleyin.
4 Süt köpürtücünün üç parçasını tekrar birleştirdikten sonra süt köpürtücüyü makineye geri takın.
Page 35
Türkçe
AquaClean su filtresi
Makineniz AquaClean özelliğine sahiptir. Kahvenizin tadını korumak için su haznesine AquaClean su
filtresi yerleştirebilirsiniz. Aynı zamanda makinenizde daha az kireç birikmesini sağlayarak kireç çözme
ihtiyacını azaltır. AquaClean su filtresini bölgenizdeki perakendecilerden, yetkili servis merkezlerinden
ya da www.philips.com/parts-and-accessories adresinde internet üzerinden satın alabilirsiniz.
37
AquaClean filtre durumu göstergeleri
AquaClean etkinken AquaClean filtrelerinin durumu her zaman ekranda yüzdelik değer olarak
gösterilir.
-
AquaClean filtresinin durumu %10 veya altındaysa makine her açıldığında 2 saniye boyunca
ekranda mesaj gösterir. Bu mesaj yeni filtre satın almanızı önerir.
-
Filtrenin durumu %0 olursa makine her çalıştırıldığında sizden AquaClean filtresini değiştirmenizi
ister.
AquaClean su filtresini etkinleştirme (5 dk.)
Makine, su haznesine bir filtrenin takıldığını otomatik olarak algılamamaktadır. Bu yüzden her
taktığınız yeni AquaClean su filtresini "Temizle" menüsünden etkinleştirmeniz gerekmektedir.
Makinede gösterilen filtre etkinleştirme mesajı kaybolduktan sonra AquaClean su filtresi
etkinleştirebilirsiniz ancak öncesinde makinedeki kireci çözmeniz gerekir.
AquaClean su filtresi kullanmaya başlamadan önce makinenizin kireçten tamamen arındırılmış
olması gereklidir.
AquaClean su filtresi etkinleştirilmeden önce aşağıda açıklanan yöntemlerle suya batırılarak
hazırlanmalıdır. Bu işlem yapılmazsa makinenin içine su yerine hava girer ve hem gürültüye hem de
makinenin kahve demleyememesine neden olur.
1 Temizle simgesine dokunup yukarı ve aşağı oklarla "AquaClean"i seçin.
2 Onaylamak için Tamam simgesine dokunun.
3 Etkinleştirme ekranı açıldığında Tamam simgesine tekrar dokunun. Ekrandaki talimatları izleyin.
4 Yaklaşık 5 saniye (Şek. 45) boyunca filtreyi sallayın.
5 Filtreyi soğuk suyla dolu bir sürahiye baş aşağı batırın ve çalkalayın/bastırın (Şek. 46).
6 Filtreyi su haznesindeki filtre bağlantısına dikey olarak yerleştirin. Takabildiğiniz kadar derine (Şek.
47) takın.
7 Su haznesini temiz suyla doldurup makineye geri takın.
8 LatteGo takılıysa çıkarın (yalnızca belirli modellerde).
9 Sıcak su musluğu veya süt köpürtücü altına bir kase yerleştirin.
10 Etkinleştirme işlemine başlamak için başlatma/durdurma düğmesine basın.
11 Sıcak su musluğu veya süt köpürtücüden 1 dakika boyunca sıcak su dağıtılır.
12 Filtre başarıyla etkinleştirilir.
Türkçe
AquaClean su filtresini değiştirme (5 dk.)
Filtreden 95 litre su geçtikten sonra filtre çalışmayacaktır. AquaClean durum göstergesi %0'a düşerek
filtreyi değiştirmeniz gerektiğini hatırlatır. AquaClean filtre göstergesi ekranda gösterildiği sürece filtreyi
makinede kireç çözme işlemi yapmadan değiştirebilirsiniz. AquaClean su filtresini gerekli zamanda
değiştirmezseniz AquaClean göstergesi kaybolur. Bu durumda filtreyi yine değiştirebilirsiniz ancak
öncesinde makinede kireç çözme işlemi yapmanız gerekir.
Page 36
38
Türkçe
AquaClean durum göstergesi %0'a düştüğünde veya makine size AquaClean su filtresini değiştirmeniz
gerektiğini hatırlattığında;
1 eski AquaClean su filtresini çıkarın.
2 yeni bir filtre takın ve "AquaClean su filtresini etkinleştirme (5 dk.)" bölümünde açıklandığı gibi
etkinleştirin.
Makine değiştirmeniz gerektiğini henüz belirtmese bile AquaClean su filtresini en az 3 ayda bir
değiştirin.
Kireç çözme işlemi (30 dk.)
Yalnızca Philips kireç çözücü kullanın. Kesinlikle sülfürik asit, hidroklorik asit, sülfamik veya asetik asit
(sirke) tabanlı bir kireç çözücü kullanmayın. Bu maddeler makinenizin su aksamına zarar verip kirecin
tamamen çözülmemesine neden olabilir. Philips dışında kireç çözücü kullandığınızda garantiniz
geçersiz olur. Cihazın kirecinin temizlenmemesi de garantiyi geçersiz kılar. Philips kireç çözücü
çözümlerini www.philips.com/coffee-care adresinde yer alan online mağazadan satın alabilirsiniz.
Makinede kireç çözme işlemi yapılması gerektiğinde ekranda bir mesaj görüntülenir.
1 Kullanıcı arayüzünde Temizle simgesine dokunarak menüden "Kireç Çözme"yi seçin.
2 Ekrandaki talimatları izleyin.
3 LatteGo veya süt köpürtücü takılıysa çıkarın.
4 Damlama tepsisi ile atık kahve haznesini çıkarıp boşalttıktan sonra yerlerine takın.
5 Su haznesini sökün ve boşaltın. Ardından AquaClean su filtresini çıkarın.
6 Su haznesine Philips kireç çözücü şişesinin tamamını döktükten sonra hazneyi Calc / Clean
göstergesine (Şek. 48) kadar suyla doldurun. Ardından makineye geri takın.
7 Kahve dağıtım musluğunun ve su musluğunun altına geniş bir hazne (1,5 l) koyun.
8 Kireç çözme işlemini başlatmak için başlatma/durdurma düğmesine basın. Yaklaşık 30 dakika
süren kireç çözme işlemi bir kireç çözme döngüsü ile durulama döngüsünden oluşur.
9 Makine su dağıtmayı durdurana kadar bekleyin. Ekranda mesaj görününce su haznesini doldurun.
Makine su dağıtımını durdurduğunda kireç çözme işlemi tamamlanır.
10 Su haznesine yeni bir AquaClean su filtresi yerleştirip etkinleştirin.
-
Kireç çözme işlemi tamamlandığında makine yeni AquaClean filtresi (bkz. 'AquaClean su filtresini
değiştirme (5 dk.)') takmayı hatırlatır.
İpucu: AquaClean filtre kullanımı kireç çözme ihtiyacını azaltır.
Kireç çözme işlemi bölündüğünde yapılması gerekenler
Kontrol panelindeki açma/kapatma düğmesine basarak kireç çözme işleminden çıkabilirsiniz. Kireç
çözme işlemi tamamlamadan önce kesilirse şunları yapın:
1 Su haznesini boşaltın ve iyice durulayın.
2 Su haznesini Calc / Clean seviye göstergesine kadar temiz suyla doldurup makineyi tekrar çalıştırın.
Makine ısınır ve otomatik durulama döngüsü gerçekleştirir.
3 Herhangi bir içecek hazırlamadan önce manuel durulama döngüsü gerçekleştirin. Manuel durulama
döngüsü gerçekleştirmek için önce sıcak su fonksiyonunu arka arkaya seçerek yarım hazne sıcak su,
ardından öğütülmüş kahve eklemeden 2 bardak önceden öğütülmüş kahve dağıtın.
Kireç çözme işlemi tamamlanmamışsa makine en kısa sürede başka bir kireç çözme işlemi
isteyecektir.
Page 37
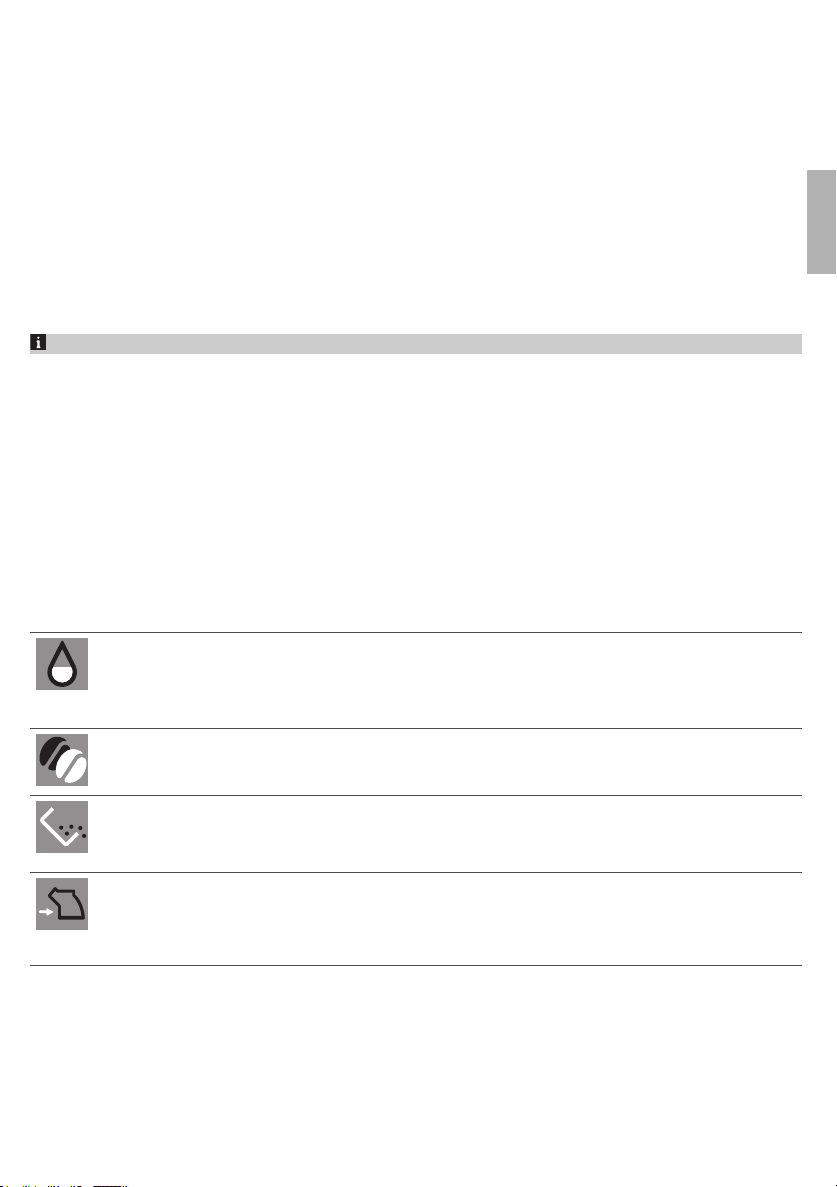
Türkçe
Aksesuarların sipariş edilmesi
Makineyi temizlemek ve kirecini çözmek için yalnızca Philips bakım ürünlerini kullanın. Bu ürünleri
bölgenizdeki perakendecilerden, yetkili servis merkezlerinden veya www.philips.com/parts-and-
accessories adresinde online mağazadan satın alabilirsiniz. Online yedek parçaların tam listesine
ulaşmak için makinenizin model numarasını girin. Model numaranızı bakım kapağının iç yüzünde
bulabilirsiniz.
Bakım ürünleri ve model numaraları:
-
Kireç çözme çözümü CA6700
-
AquaClean su filtresi CA6903
-
Demleme ünitesi yağı HD5061
-
Kahve yağı çıkarıcı tabletler CA6704
Brita filtreleri bu makineyle uyumlu değildir.
Sorun giderme
Bu bölümde makineyi kullanırken karşılaşabileceğiniz en sık sorunlara yer verilmiştir. Destek
videolarına ve sıkça sorulan soruların tamamına www.philips.com/coffee-care adresinden
ulaşabilirsiniz. Sorunu çözemezseniz ülkenizdeki Müşteri Destek Merkezi ile iletişime geçin. İletişim
bilgileri için garanti belgesini inceleyin.
Uyarı simgeleri
Uyarı
simgesi
Çözüm
Ekranda "Su haznesi boş" simgesi görünür.
- Su haznesi neredeyse boştur. Su haznesini maksimum seviye göstergesine kadar
temiz suyla doldurun.
- Su haznesi yerine oturmamış olabilir. Su haznesini yerine takın.
39
Türkçe
Ekranda "çekirdek ekle" simgesi görünür.
- Çekirdek kahve haznesini kahve çekirdeğiyle doldurun.
Ekranda "Atık kahve haznesini boşalt" simgesi görünür.
- Atık kahve haznesi doludur. Makine açıkken atık kahve haznesini çıkarıp boşaltın.
Takmadan önce 5 saniye bekleyin.
Ekranda "demleme ünitesini yerleştir" simgesi görünür.
- Demleme ünitesi yerinde değildir veya doğru takılmamıştır. Demleme ünitesini
çıkarıp yerine doğru takıldığından emin olun. Adım adım talimatlar için "demleme
ünitesini çıkarma ve takma" bölümünü inceleyin.
Hata kodları
Aşağıda kendiniz çözebileceğiniz sorunları belirten hata kodlarının listesi verilmiştir. Video talimatlara
www.philips.com/coffee-care adresinden ulaşabilirsiniz. Başka bir hata koduyla karşılaşırsanız lütfen
ülkenizde bulunan Philips Müşteri Hizmetleri Merkezi ile iletişime geçin. İletişim bilgileri için garanti
belgesini inceleyin.
Page 38
40
Türkçe
Hata
Sorun Olası çözüm
kodu
01 Kahve hunisi tıkalı. Makineyi kapatın ve fişini çekin. Demleme ünitesini çıkarın.
03 Demleme ünitesi kirli
veya iyi yağlanmamış.
04 Demleme ünitesi doğru
konumda değildir.
05 Su aksamında hava
vardır.
AquaClean filtresi
tıkanmıştır ya da
kurulumdan önce doğru
biçimde
hazırlanmamıştır.
Ardından, önceden öğütülmüş kahve bölmesinin kapağını açıp
kaşık tutacağını yerleştirin. Tıkanan öğütülmüş kahve açılana
kadar tutacağı yukarı aşağı hareket ettirin. Ayrıntılı video
talimatlar için www.philips.com/coffee-care adresine gidin.
Makineyi kapatın. Demleme ünitesini temiz suyla durulayın,
havayla kuruttuktan sonra yağlayın. "Demleme ünitesini
temizleme" bölümüne bakın ya da ayrıntılı video talimatlar için
www.philips.com/coffee-care adresine gidin. Makineyi tekrar
açın.
Makineyi kapatın. Demleme ünitesini çıkarıp tekrar takın.
Demleme ünitesini takmadan önce doğru konumda
olduğundan emin olun. "Demleme ünitesinin bakımı"
bölümüne başvurun ya da ayrıntılı video talimatlar için
www.philips.com/coffee-care adresine gidin. Makineyi tekrar
açın.
Makineyi açıp kapatarak yeniden başlatın. Sorun çözüldüyse
2-3 bardak sıcak su dağıtın. Uzun bir süredir kireç çözme işlemi
yapmadıysanız makinedeki kireci çözün.
AquaClean filtresini çıkarıp kahve hazırlamayı tekrar deneyin.
Sorun çözüldüyse AquaClean filtresini tekrar takmadan önce
doğru biçimde hazırlandığından emin olun. AquaClean filtresini
su haznesine geri takın. Sorun çözülmezse filtre tıkalı olabilir ve
değiştirilmesi gerekebilir.
11 Makinenin oda
sıcaklığına uyum
sağlaması gerekir.
14 Makine aşırı ısınmıştır. Makineyi kapatıp 30 dakika sonra tekrar açın.
Makinenin taşıma/dış mekân sıcaklığından oda sıcaklığına
uyum sağlaması için biraz bekleyin. Makineyi kapatıp 30 dakika
bekledikten sonra tekrar çalıştırın. Sorun düzelmezse
ülkenizdeki Müşteri Destek Merkeziyle iletişime geçin. İletişim
bilgileri için garanti belgesini inceleyin.
Sorun giderme tablosu
Bu bölümde makineyi kullanırken karşılaşabileceğiniz en sık sorunlara yer verilmiştir. Destek
videolarına ve sıkça sorulan soruların tamamına www.philips.com/coffee-care adresinden
ulaşabilirsiniz. Sorunu çözemezseniz ülkenizdeki Müşteri Destek Merkezi ile iletişime geçin. İletişim
bilgileri için garanti belgesini inceleyin.
Sorun
Yeni kahve makinemin
içinde bir miktar kahve
kalıntısı var.
Neden Çözüm
Bu makine kahveyle test
edilmiştir.
Özenle temizlenmiş olmasına rağmen
bir miktar kahve kalıntısıyla
karşılaşabilirsiniz. Bununla birlikte
makine kesinlikle yeni bir üründür.
Page 39
Sorun Neden Çözüm
Damlama tepsisi hemen
doluyor / damlama
tepsisinde her zaman bir
miktar su kalıyor.
"Atık kahve haznesini
boşalt" simgesi sönmedi.
Bu durum normaldir. Makine iç
aksamı ve demleme ünitesini
durulamak için su kullanır. İç
sistemdeki suyun bir kısmı
doğrudan damlama tepsisine
akar.
Atık kahve haznesini makine
kapalıyken boşaltmış ya da çok
erken takmışsınızdır.
Damlama tepsisini günlük olarak ya da
demleme tepsisi kapağı üzerindeki
kırmızı "demleme tepsisi dolu"
göstergesi göründüğünde boşaltın.
İpucu: Çıkan durulama suyunu toplamak
için dağıtım musluğunun altına bir
bardak koyun.
Atık kahve haznesini daima makine
açıkken çıkarıp boşaltın. Atık kahve
haznesini çıkarın, en az 5 saniye
bekleyip tekrar takın.
Türkçe
41
Türkçe
Atık kahve haznesi
tamamen dolu olmadığı
halde makine hazneyi
boşaltmamı istiyor.
Atık kahve haznesi
tamamen dolu olduğu
halde ekranda "atık
kahve haznesini boşalt"
simgesi görünmedi.
Demleme ünitesini
çıkaramıyorum.
Demleme ünitesini
takamıyorum.
Atık kahve haznesini en son
boşalttığınızda makine sayacı
sıfırlamamıştır.
Atık kahve haznesini
boşaltmadan damlama tepsisi
çıkarılmıştır.
Demleme ünitesi doğru
konumda değildir.
Demleme ünitesi doğru
konumda değildir.
Atık kahve haznesini geri takarken
daima yaklaşık 5 saniye bekleyin.
Böylece atık kahve sayacı her zaman
sıfırlanır ve ölçekler doğru şekilde sayılır.
Atık kahve haznesini daima makine
açıkken çıkarıp boşaltın. Atık kahve
haznesini makine kapalıyken
boşaltırsanız kahve atık kahve sayacı
sıfırlanmaz.
Damlama tepsisini çıkarırken içinde
sadece birkaç ölçek kahve olsa bile atık
kahve haznesini her zaman boşaltın.
Böylece kahve ölçeği sayacı sıfırlanır ve
kahve ölçekleri doğru şekilde sayılır.
Şu adımları uygulayarak makineyi
sıfırlayın: bakım kapağını kapatıp su
haznesini yerine koyun. Makineyi
kapatıp açtıktan sonra içecek ışıklarının
yanmasını bekleyin. Demleme ünitesini
çıkarmayı tekrar deneyin. Adım adım
talimatlar için "Demleme ünitesini
çıkarma ve takma" bölümünü inceleyin.
Şu adımları uygulayarak makineyi
sıfırlayın: bakım kapağını kapatıp su
haznesini yerine koyun. Demleme
ünitesini dışarıda bırakın. Makineyi
kapatıp fişini çekin. 30 saniye kadar
bekledikten sonra makinenin fişini takıp
makineyi çalıştırın ve içecek ışıklarının
yanmasını bekleyin. Ardından demleme
ünitesini doğru konuma getirip
makineye takmayı deneyin. Adım adım
talimatlar için "Demleme ünitesini
çıkarma ve takma" bölümünü inceleyin.
Page 40
42
Türkçe
Sorun Neden Çözüm
Kahve çok sulu. Demleme ünitesi kirlenmiştir
veya yağlanması gerekiyordur.
Demleme ünitesini (bkz. 'Demleme
ünitesini makineden çıkarma') çıkarın,
muslukta durulayıp kurumasını bekleyin.
Ardından hareketli aksamını (bkz.
'Demleme ünitesini yağlama') yağlayın.
Kahve yeterince sıcak
değil.
Kahve gelmiyor ya da
çok yavaş geliyor.
Makine otomatik ayarlama
işlemi yapıyordur. Bu işlem
makineyi ilk kez kullandığınızda,
başka bir kahve çekirdeği türüne
geçtiğinizde veya uzun bir süre
kullanılmadığında otomatik
olarak başlatılır.
Öğütücü ayarı fazla kalın
seçilmiştir.
Sıcaklık çok düşük ayarlanmıştır. Sıcaklık ayarını maksimuma getirin.
Soğuk bardak kullanıldığında
içeceğin sıcaklığı düşer.
Süt eklendiğinde içeceğin
sıcaklığı düşer.
AquaClean su filtresi takılmak
üzere doğru hazırlanmamıştır.
Makinenin otomatik ayarlama işlemini
tamamlamasına olanak tanımak için
başlangıçta 5 bardak kahve hazırlayın.
Öğütücüyü daha ince (düşük) bir ayara
getirin. Tat farkını tam olarak
hissedebilmek için 2 ila 3 içecek
hazırlayın.
Sıcaklığı ayarlamak için "Ayarlar"
simgesine basın.
Doldurmadan önce sıcak suyla
durulayarak bardakları ısıtın.
Eklediğiniz sütün sıcak veya soğuk
olmasına bağlı olmadan, süt ekleme
işlemi her zaman kahvenin sıcaklığını
düşürür. Doldurmadan önce sıcak suyla
durulayarak bardakları ısıtın.
AquaClean filtresini çıkarıp bir miktar
sıcak su dağıtın. Sorun çözüldüyse
AquaClean filtresi doğru takılmamıştır.
AquaClean su filtresini yeniden takıp
etkinleştirin ve "AquaClean su filtresi"
bölümündeki tüm adımları uygulayın.
Ürünü kullanmadığınız uzun bir sürenin
ardından AquaClean su filtresini tekrar
kullanım için hazırlamanız ve 2-3 bardak
sıcak su dağıtmanız gerekir.
AquaClean su filtresi tıkalıdır. AquaClean su filtresini 3 ayda bir
Öğütücü ayarı fazla ince
seçilmiştir.
Demleme ünitesi kirlidir. Demleme ünitesini çıkarıp muslukta
değiştirin. 3 aydan eski filtreler
tıkanabilir.
Öğütücüyü daha kalın (yüksek) bir ayara
getirin. Bu işlemin kahve tadını
etkileyeceğini unutmayın.
'Demleme ünitesini muslukta
(bkz.
temizleme') durulayın.
Page 41
Sorun Neden Çözüm
Kahve dağıtım musluğu
kirlenmiştir.
Kahve dağıtım musluğunu ve deliklerini
bir boru temizleyici ya da iğne
yardımıyla temizleyin.
Türkçe
43
Önceden öğütülmüş kahve
bölmesi tıkanmıştır.
Makine aksamı kireçten
tıkanmıştır.
Süt köpürmüyor. LatteGo'lu makineler: LatteGo
hatalı birleştirilmiştir.
LatteGo'lu makineler:
LatteGo'nun süt haznesi
ve/veya çerçevesi kirlidir.
Klasik süt köpürtücülü
makineler: Süt köpürtücü hatalı
birleştirilmiştir.
Köpürtmeye uygun olmayan
türde süt kullanılmıştır.
Makineyi kapatıp demleme ünitesini
çıkarın. Önceden öğütülmüş kahve
bölmesinin kapağını açıp içine kaşık
tutacağını yerleştirin. Tıkanan öğütülmüş
kahve açılana (Şek. 34) kadar tutacağı
yukarı aşağı hareket ettirin.
Makinenin kirecini Philips kireç çözücü
ile giderin. Makine her istediğinde kireç
çözme işlemi yapın.
Süt haznesinin LatteGo çerçevesine
doğru biçimde takıldığından ("klik sesi")
(bkz. 'LatteGo'yu birleştirme (yalnızca
belirli modellerde)') emin olun.
LatteGo parçalarını söküp musluğun
altında suya tutun veya bulaşık
makinesinde yıkayın.
Klasik süt köpürtücünün doğru biçimde
birleştirildiğinden (bkz. 'Klasik süt
köpürtücüyü birleştirme (yalnızca belirli
modellerde)') emin olun.
Farklı süt çeşitleri farklı miktarda ve
nitelikte köpük çıkarır. Aşağıdaki süt
türlerini test ederek iyi bir süt köpüğü
sonucu sağladığını gözlemledik: yarım
yağlı veya tam yağlı inek sütü ve
laktozsuz süt.
Türkçe
LatteGo süt haznesinin
altından süt sızıyor.
Makine sızıntı yapıyor
gibi görünüyor.
Çerçeve ile süt haznesi doğru
birleştirilmemiştir.
LatteGo'nun süt haznesi
ve/veya çerçevesi kirlidir.
Makine iç aksamı ve demleme
ünitesini durulamak için su
kullanır. İç sistemdeki bu suyun
bir kısmı doğrudan damlama
tepsisine akar. Bu durum
normaldir.
Önce süt haznesinin üst kısmını
çerçevenin üstünde yer alan kancaya
yerleştirin. Ardından süt haznesinin alt
kısmını yerine bastırın. Yerine
oturduğunda klik sesi duyarsınız.
LatteGo parçalarını söküp musluğun
altında suya tutun veya bulaşık
makinesinde yıkayın.
Damlama tepsisini her gün ya da
demleme tepsisi kapağı üzerindeki
"demleme tepsisi dolu" göstergesi
göründüğünde boşaltın. İpucu:
Durulama suyunu toplamak için dağıtım
musluğunun altına bir bardak
yerleştirerek damlama tepsisinde
birikecek su miktarını azaltabilirsiniz.
Page 42
44
Türkçe
Sorun Neden Çözüm
Damlama tepsisi tamamen dolu
olduğu için taşmakta ve
makinenin sızıntı yaptığı
izlenimini yaratmaktadır.
Damlama tepsisini her gün ya da
demleme tepsisi kapağı üzerindeki
"demleme tepsisi dolu" göstergesi
göründüğünde boşaltın.
AquaClean su filtresini
etkinleştiremiyorum,
makine kireç çözme
işlemi istiyor.
Yeni su filtresi yerine
takılmıyor.
Makine çok gürültü
yapıyor.
Su haznesi tamamen takılmamış
olduğu için su haznesinden bir
miktar su taşmakta, makineye
hava girmektedir.
Demleme ünitesi
kirli/tıkanmıştır.
Makine yatay bir yüzeye
yerleştirilmemiştir.
Ekranda AquaClean hatırlatıcısı
göründükten sonra filtre
zamanında takılmamış veya
değiştirilmemiştir. Yani
makineniz artık tamamen
kireçten arındırılmış değildir.
Philips AquaClean su filtresi
dışında bir filtre kullanmaya
çalışıyorsunuz.
AquaClean su filtresinin
üzerindeki kauçuk halka yerinde
değildir.
Makinenin kullanım sırasında bir
miktar ses çıkarması normaldir.
Su haznesinin doğru konumda
olduğundan emin olun: Hazneyi çıkarıp
olabildiğince ileri ittirerek tekrar takın.
Demleme ünitesini durulayın.
Damlama tepsisinin taşmaması ve
"damlama tepsisi dolu" göstergesinin
doğru çalışması için makineyi yatay bir
düzleme koyun.
Önce makinenizdeki kireci çözdükten
sonra AquaClean su filtresini takın.
Makineye sadece Philips AquaClean su
filtresi takılabilir.
Lastik halkayı AquaClean su filtresine
geri takın.
Ancak makineden farklı sesler geliyorsa
demleme ünitesini temizleyip yağlayın
(bkz. 'Demleme ünitesini yağlama').
AquaClean su filtresi doğru
biçimde hazırlanmadığından
makinenin içine hava sızmıştır.
Su haznesi tamamen
takılmamıştır ve makineye hava
girmektedir.
Su haznesinden AquaClean su filtresini
çıkarın ve tekrar takmadan önce doğru
biçimde hazırlayın. Adım adım talimatlar
için "AquaClean su filtresi" bölümüne
bakın.
Su haznesinin doğru konumda
olduğundan emin olun: Hazneyi çıkarıp
olabildiğince ileri ittirerek tekrar takın.
Page 43
Türkçe
Teknik özellikler
Üretici, ürünün teknik özelliklerini geliştirme hakkını saklı tutar. Tüm ön ayar miktarları yaklaşıktır.
Açıklama Değer
Ölçüler (g x y x d) 246 x 377 x 434 mm
45
Türkçe
Ağırlık
Güç kablosu uzunluğu 1.200 mm
Su haznesi 1,8 litre
Kahve çekirdeği haznesi kapasitesi 275 g
Atık kahve haznesi kapasitesi 12 ölçek
LatteGo (süt haznesi) kapasitesi 250 ml
Ayarlanabilir musluk yüksekliği 88-145 mm
Anma gerilimi - Güç değeri - Güç kaynağı Bakım kapağının iç yüzündeki veri etiketine bakın
7 - 7,5 kg
(Şek. A11)
Page 44
46
ภาษาไทย
สารบัญ
ภาพรวมของเครื่อง (รูป A)______________________________________________________________________ 46
แผงควบคุม_________________________________________________________________________________ 47
ข้อมูลเบื้องต้น ______________________________________________________________________________ 47
ก่อนใช้งานครั้งแรก ___________________________________________________________________________ 48
การชงเครื่องดื่ม______________________________________________________________________________ 49
การปรับแต่งเครื่องดื่ม__________________________________________________________________________ 51
การปรับการตั้งค่าเครื่อง ________________________________________________________________________ 52
การถอดและใส่หัวชง __________________________________________________________________________ 53
การทำความสะอาดและบำรุงรักษา ________________________________________________________________ 53
ตัวกรองน้ำ AquaClean _______________________________________________________________________ 56
ขั้นตอนการขจัดคราบตะกรัน (30 นาที) ____________________________________________________________ 57
การสั่งซื้ออุปกรณ์เสริม_________________________________________________________________________ 58
การแก้ปัญหา _______________________________________________________________________________ 58
ข้อมูลทางเทคนิค _____________________________________________________________________________ 62
ภาพรวมของเครื่อง (รูป A)
A1 แผงควบคุม A10 ฝาเครื่อง
A2 ช่องใส่ถ้วย A11 ป้ายข้อมูลพร้อมหมายเลขรุ่น
A3 ช่องใส่กาแฟที่บดไว้ล่วงหน้า A12 แท้งค์น้ำ
A4 ฝาที่ใส่เมล็ดกาแฟ A13 หัวจ่ายน้ำร้อน
A5 ปากพวยรินกาแฟแบบปรับได้ A14 ที่ใส่กากกาแฟ
A6 ช่องสำหรับสายไฟ A15 แผงด้านหน้าของที่ใส่กากกาแฟ
A7 ปุ่มการตั้งค่าการบด A16 ฝาปิดถาดรองน้ำ
A8 ที่ใส่เมล็ดกาแฟ A17 ถาดรองน้ำ
A9 หัวชง A18 สัญลักษณ์ 'ถาดรองน้ำเต็ม'
อุปกรณ์เสริม
A19 สายไฟ A23 แผ่นทดสอบความกระด้างของน้ำ
A20 หลอดน้ำมัน A24 ที่ทำฟองนมแบบดั้งเดิม (เฉพาะบางรุ่นเท่านั้น)
A21 ตัวกรองน้ำ AquaClean A25 LatteGo (ภาชนะเก็บน้ำนม)
A22 ทัพพีตวง
(เฉพาะบางรุ่นเท่านั้น)
Page 45
ภาษาไทย
แผงควบคุม
เครื่องชงกาแฟนี้มีหลายรุ่นโดยมีแผงควบคุมที่แตกต่างกันไป แต่ละรุ่นจะมีหมายเลขรุ่นเฉพาะ
คุณสามารถดูหมายเลขรุ่นได้บนป้ายข้อมูลที่อยู่ด้านในของฝาเครื่อง (รูป A11) นอกจากนี้ คุณยังสามารถดูหมายเลขรุ่นได้โดยแตะไอคอน
Settings
โปรดดูภาพรวมของปุ่มและไอคอนทั้งหมดในรูป C, D และ E คุณสามารถดูคำอธิบายได้ที่ด้านล่าง
ใช้ลูกศรขึ้นและลงเลื่อนไปมาในจอภาพ แล้วแตะไอคอน OK เพื่อเลือกหรือยืนยันตัวเลือกของคุณ
ทุกรุ่น (รูป C/D/E)
ไอคอน One-touch Drink C1/D1/E1 C3. ไอคอนสำหรับการนําทาง (ขึ้น ลง
C2. เริ่ม/หยุด ปุ่ม C4. หน้าจอแสดงผล C7. โปรไฟล์ส่วนตัว
เมนู D2/E2 พร้อมเครื่องดื่มเพิ่มเติม C5. การตั้งค่าเครื่อง C8. ปุ่มเปิด/ปิด
เฉพาะ EP4327, EP4324, EP4321 (รูป C)
ไอคอน One-touch Drink C1: Espresso, Coffee, Americano, Caffé Crema, Ristretto, Hot Water และ Steam
เฉพาะ EP4349, EP4346, EP4343, EP4341 (รูป D)
ไอคอน One-touch Drink D1: Espresso, Coffee, Americano, Cappuccino, Latte Macchiato, Café au lait
และเลือก 'Support'
C6. เมนูการทําความสะอาด
กลับ OK)
47
ภาษาไทย
เฉพาะ EP5447, EP5446, EP5444, EP5443, EP5441 (รูป E)
ไอคอน One-touch Drink E1: Espresso, Coffee, Americano, Cappuccino, Latte Macchiato, Café au lait
ข้อมูลเบื้องต้น
ขอแสดงความยินดีที่คุณได้เป็นเจ้าของเครื่องชงกาแฟอัตโนมัติอย่างเต็มรูปแบบของ Philips! ลงทะเบียนผลิตภัณฑ์ของคุณที่
www.philips.com/registeryourcoffee หรือสแกนรหัส QR (รูปที่ 1) ในคู่มือเล่มนี้ เพื่อรับสิทธิประโยชน์อย่างเต็มที่จากบริการที่ Philips
มอบให้
โปรดอ่านคู่มือความปลอดภัยแยกต่างหากอย่างละเอียดก่อนใช้เครื่องเป็นครั้งแรก และเก็บไว้เพื่ออ้างอิงต่อไป
Philips ให้การสนับสนุนในหลายๆ ด้าน เพื่อช่วยให้คุณเริ่มต้นใช้งานและใช้เครื่องให้เกิดประโยชน์สูงสุด ภายในกล่อง
คุณจะพบสิ่งต่อไปนี้
1 คู่มือการใช้งานฉบับนี้ที่มีคำแนะนำการใช้งานพร้อมรูปภาพประกอบและข้อมูลเพิ่มเติมโดยละเอียดเกี่ยวกับการทำความสะอาดและก-
ารบำรุงรักษา
2 คู่มือความปลอดภัยแยกต่างหากที่มีคำแนะนำเกี่ยวกับวิธีการใช้งานเครื่องอย่างปลอดภัย
3 หากต้องการรับการสนับสนุนทางออนไลน์ (คำถามที่พบบ่อย ภาพยนตร์ ฯลฯ) โปรดสแกนรหัส QR ที่อยู่บนหน้าปกของคู่มือฉบับนี้
หรือไปที่ www.philips.com/coffee-care นอกจากนี้ คุณยังสามารถดูรหัส QR ได้โดยแตะไอคอน Settings และเลือก Support
เครื่องนี้ได้รับการทดสอบด้วยกาแฟแล้ว แม้ว่าจะได้รับการทำความสะอาดเป็นอย่างดี แต่อาจมีกากกาแฟที่ตกค้างหลงเหลืออยู่
อย่างไรก็ตาม เราขอรับประกันว่าเครื่องนี้เป็นเครื่องใหม่
Page 46
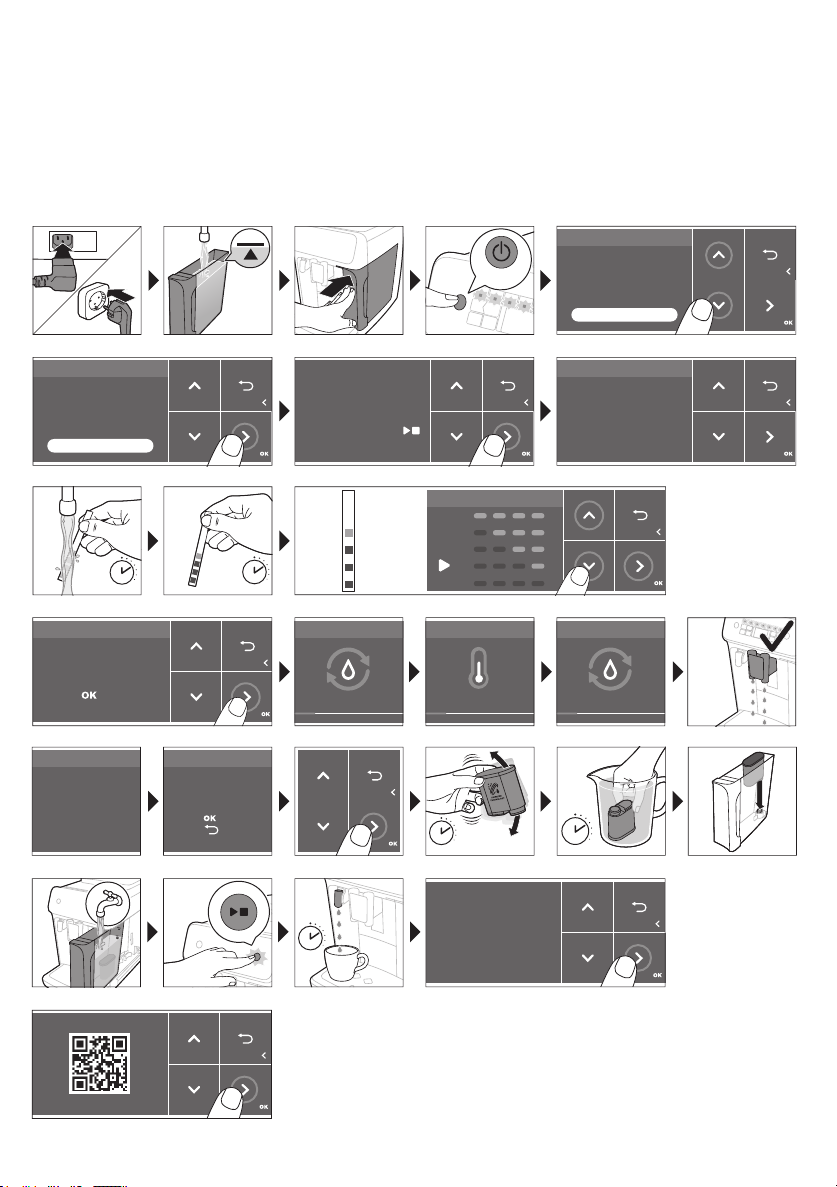
48
ON
,WDOLDQR
1HGHUODQGV
(QJOLVK
(VSD³RO
/DQJXDJH
:DWHUKDUGQHVV
,WDOLDQR
1HGHUODQGV
(QJOLVK
(VSD³RO
/DQJXDJH
)ROORZWKHQH[WVWHSV
WRVHWWKHFRUUHFW
ZDWHUKDUGQHVVOHYHO
<RXDUHDERXW
WRVHWWKHODQJXDJH
WR(QJOLVK
3UHVVVWDUWVWRS
WRFRQILUP
:DWHUKDUGQHVV
<RXVHOHFWHG
UHGVTXDUHV
3UHVVWRFRQILUP
+HDWLQJXS
+HDWLQJ
5LQVLQJ
5LQVLQJ
)LOOLQJZDWHUFLUFXLW
)LOOLQJ
=
:DWHUKDUGQHVV
1 sec.
1 min.
5 sec.
30 sec.
1 min.
$TXD&OHDQ
8VH$TXD&OHDQILOWHU
WRHQMR\FXSV
ZLWKRXWGHVFDOLQJ
$OPRVWUHDG\
)LOOEHDQVUHILOOZDWHU
WDQNDQGHQMR\
\RXUFRIIHH
5HJLVWHU\RXUSURGXFW
9LVLWZZZSKLOLSVFRP
$TXD&OHDQ
:RXOG\RXLQVWDOO
DQ$TXD&OHDQILOWHU"
3UHVVWRFRQILUP
3UHVVWRUHIXVH
ภาษาไทย
เครื่องจะปรับปริมาณกาแฟบดที่ใช้โดยอัตโนมัติเพื่อทำให้กาแฟมีรสชาติดีที่สุด คุณควรชงกาแฟ 5 ถ้วยในการใช้งานครั้งแรก
เพื่อให้เครื่องได้ทำการปรับแต่งโดยอัตโนมัติจนเสร็จสมบูรณ์
ตรวจสอบว่าคุณได้ล้าง LatteGo (ภาชนะเก็บน้ำนม) หรือที่ทำฟองนมแบบดั้งเดิมก่อนใช้งานครั้งแรก
ก่อนใช้งานครั้งแรก
Page 47
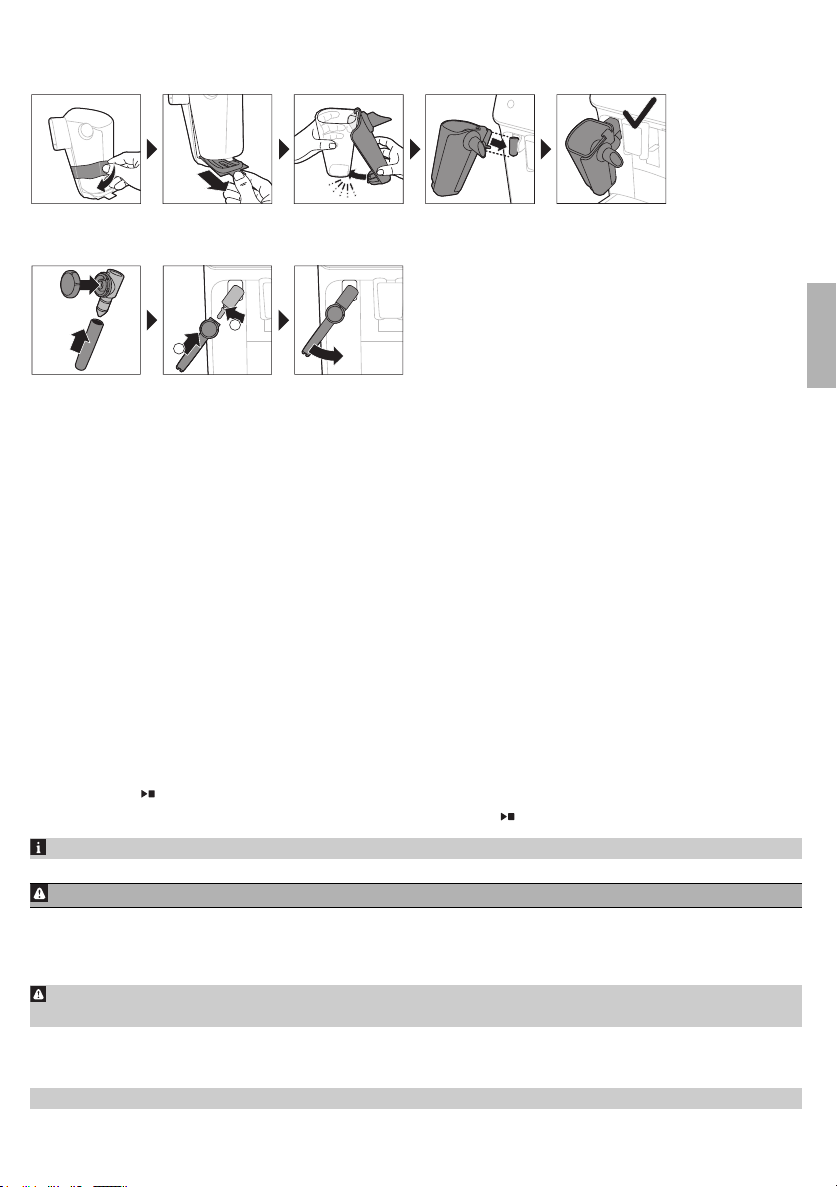
ภาษาไทย
CLICK
1
2
การประกอบ LatteGo (เฉพาะบางรุ่นเท่านั้น)
การประกอบที่ทำฟองนมแบบดั้งเดิม (เฉพาะบางรุ่นเท่านั้น)
การชงเครื่องดื่ม
ขั้นตอนทั่วไป
1 เติมน้ำดื่มสะอาดลงในแท้งค์น้ำและเติมเมล็ดกาแฟลงในที่ใส่เมล็ดกาแฟ
2 เสียบปลั๊กขนาดเล็กเข้ากับช่องเสียบที่อยู่ตรงด้านหลังของเครื่อง เสียบปลั๊กไฟเข้ากับเต้ารับบนผนัง
3 กดปุ่มเปิด/ปิดเพื่อเปิดเครื่อง
- เครื่องจะเริ่มทำความร้อนและดำเนินกระบวนการล้างโดยอัตโนมัติ
- เมื่อไฟทั้งหมดในไอคอนเครื่องดื่มสว่างขึ้นอย่างต่อเนื่อง แสดงว่าเครื่องพร้อมใช้งาน
4 วางถ้วยไว้ใต้ปากพวยรินกาแฟ เลื่อนปากพวยรินกาแฟขึ้นหรือลงเพื่อปรับความสูงให้เหมาะกับขนาดของถ้วยหรือแก้วที่คุณใช้ (รูปที่
2)
49
ภาษาไทย
การชงกาแฟด้วยเมล็ดกาแฟ
1 หากต้องการชงกาแฟ แตะไอคอนเครื่องดื่มที่คุณเลือก (รูปที่ 3) หรือแตะไอคอน 'More Drinks' (รูปที่ 4) (เฉพาะบางรุ่นเท่านั้น)
- จากนั้นคุณสามารถปรับเครื่องดื่มให้เข้ากับรสชาติส่วนตัวของคุณ (รูปที่ 5) ใช้ลูกศรขึ้นและลง (รูปที่
6)เพื่อปรับความเข้มของกาแฟ แตะไอคอน OK หากคุณต้องการปรับการตั้งค่าเพิ่มเติม (รูปที่ 7)
2 กดปุ่มเริ่ม/หยุด
3 หากต้องการหยุดการจ่ายกาแฟก่อนที่เครื่องจะทำงานจนเสร็จ ให้กดปุ่มเริ่ม/หยุด อีกครั้ง
หากต้องการชงกาแฟ 2 ถ้วยพร้อมกัน ให้แตะไอคอนเครื่องดื่มสองครั้ง หรือเลือกไอคอน 2 ครั้งโดยเลื่อนแถบที่กำหนดไว้เฉพาะ
เมื่อใดก็ได้เพื่อเริ่มชงเครื่องดื่มที่เลือก
ห้ามใช้เมล็ดกาแฟเคลือบคาราเมลหรือแต่งรส
การชงเครื่องดื่มใส่นมด้วย LatteGo (ภาชนะเก็บน้ำนม)
LatteGo ประกอบด้วยภาชนะเก็บน้ำนม กรอบ และฝาภาชนะ เพื่อป้องกันการรั่วซึม
ตรวจดูให้แน่ใจว่าได้ประกอบกรอบและภาชนะเก็บนมเข้าด้วยกันอย่างถูกต้องก่อนที่คุณจะใส่นมลงในภาชนะเก็บน้ำนม
1 ในการประกอบ LatteGo ก่อนอื่นให้ใส่ด้านบนของภาชนะเก็บน้ำนมเข้าไปใต้ขอล็อคที่ด้านบนของกรอบ (รูปที่ 8)
จากนั้นกดส่วนฐานของภาชนะเก็บน้ำนมให้เข้าที่ คุณจะได้ยินเสียงดังคลิกเมื่อส่วนดังกล่าวล็อคเข้าที่ (รูปที่ 9)
หมายเหตุ: ตรวจดูให้แน่ใจว่าภาชนะเก็บน้ำนมและกรอบสะอาดก่อนที่คุณจะประกอบเข้าด้วยกัน
2 เอียง LatteGo เล็กน้อย และวางลงบนหัวจ่ายน้ำร้อน (รูปที่ 10) จากนั้นกดจนกว่าจะล็อคเข้าที่ (รูปที่ 11)
Page 48
50
ภาษาไทย
3 เติมนมใน LatteGo (รูปที่ 12) อย่าเติมนมในภาชนะเก็บน้ำนมเกินขีดแสดงระดับสูงสุด
หากคุณได้ปรับแต่งปริมาณนม คุณอาจต้องเติมนมลงในภาชนะเก็บน้ำนมมากหรือน้อยกว่าที่ระบุไว้สำหรับเครื่องดื่มนี้บน
LatteGo
ใช้นมที่ออกมาจากตู้เย็นโดยตรงเสมอเพื่อผลลัพธ์ที่ดีที่สุด
4 วางถ้วยบนถาดรองน้ำ
5 แตะไอคอนเครื่องดื่มใส่นมตามที่คุณเลือก หรือแตะไอคอน 'More Drinks' (เฉพาะบางรุ่นเท่านั้น) เพื่อเลือกเครื่องดื่มแบบอื่น (ดู
'การปรับแต่งเครื่องดื่ม')
- จากนั้นคุณสามารถปรับเครื่องดื่มให้ตรงตามความต้องการของคุณได้
6 กดปุ่มเริ่ม/หยุด
- เมื่อคุณชงคาปูชิโน่ แฟลตไวท์ หรือลาเต้มัคคิอาโต เครื่องจะจ่ายนมก่อน แล้วตามด้วยกาแฟ เมื่อคุณชงกาแฟลาเต้หรือกาเฟโอเลต์
เครื่องจะจ่ายกาแฟก่อน แล้วตามด้วยนม
- หากต้องการหยุดการจ่ายนมก่อนที่เครื่องจะจ่ายตามปริมาณที่ตั้งไว้ล่วงหน้า ให้กดปุ่มเริ่ม/หยุด อีกครั้ง
7 หากต้องการหยุดการจ่ายเครื่องดื่มทั้งหมด (นมและกาแฟ) ก่อนที่เครื่องจะทำงานจนเสร็จ ให้กดปุ่มเริ่ม/หยุด ค้างไว้
การทำฟองนมหรือการอุ่นนมด้วยที่ทำฟองนมแบบดั้งเดิม
ใช้นมที่ออกมาจากตู้เย็นโดยตรงเสมอเพื่อให้ได้ฟองนมที่มีคุณภาพดีที่สุด
1 เอียงด้ามจับซิลิโคนสีดำบนเครื่องไปทางซ้าย และเลื่อนที่ทำฟองนมเข้าไปบนด้ามจับ (รูปที่ 13)
2 เติมนมในเหยือกนมประมาณ 100 มล. สำหรับคาปูชิโน่ และประมาณ 150 มล. สำหรับลาเต้ มัคคิอาโต
3 เสียบที่ทำฟองนมลงไปในนมประมาณ 1 ซม.
4 แตะไอคอนไอน้ำ (รูปที่ 14)
5 หมุนลูกบิดบนที่ทำฟองนมแบบดั้งเดิมไปที่ไอคอนการทำฟองนม (รูปที่ 15) ถ้าคุณต้องการทำฟองนม
หมุนลูกบิดบนที่ทำฟองนมแบบดั้งเดิมไปที่ไอคอนแฟลตมิลด์ (รูปที่ 16) ถ้าคุณต้องการอุ่นนม
6 ตรวจดูให้แน่ใจว่าไอคอนบนลูกบิดของที่ทำฟองนมแบบดั้งเดิมตรงกับลูกศรสีดํา
7 กดปุ่มเริ่ม/หยุด เพื่อเริ่มการทำงาน (รูปที่ 17)
- เครื่องจะเริ่มทำความร้อน ไอน้ำจะถูกแทรกเข้าไปในนม และนมก็จะถูกทำให้เป็นฟองหรืออุ่นให้ร้อน อย่างใดอย่างหนึ่ง
8 เมื่อนมในเหยือกนมมีฟองหรือได้ความร้อนถึงระดับที่ต้องการแล้ว กดปุ่มเริ่ม/หยุด อีกครั้ง เพื่อหยุดการทำฟองนม/อุ่นนม
ห้ามอุ่นนมนานเกิน 90 วินาที การนึ่งจะหยุดทำงานโดยอัตโนมัติหลังจาก 90 วินาที
เพื่อให้ได้คุณภาพฟองนมที่ดีที่สุด คุณไม่จำเป็นต้องขยับเหยือกนมระหว่างการทำฟองนม
ช็อตเพิ่ม (ExtraShot) (เฉพาะบางรุ่นเท่านั้น)
คุณสามารถเพิ่มช็อตริสเตรตโตให้กับกาแฟและเครื่องดื่มนมของคุณด้วยเครื่องนี้ได้ หากคุณอยากให้กาแฟเข้มขึ้น เป็นต้น
1 วางถ้วยไว้ใต้หัวจ่าย
2 แตะไอคอน One-touch Drink อันใดอันหนึ่งเพื่อเลือกเครื่องดื่ม หรือแตะไอคอน 'More Drinks' (เฉพาะบางรุ่นเท่านั้น)
เพื่อเลือกเครื่องดื่ม
3 ใช้ลูกศรขึ้นเพื่อตั้งค่าความเข้มให้อยู่ในระดับสูงสุด แล้วเลือกฟังก์ชัน ExtraShot (รูปที่ 18)
4 แตะไอคอน OK หากคุณต้องการปรับแต่งการตั้งค่าอื่นๆ ให้เป็นแบบเฉพาะตัว จากนั้น กดไอคอนเริ่ม/หยุด เพื่อเริ่มชงเครื่องดื่ม
5 หากต้องการหยุดจ่ายเครื่องดื่มก่อนที่เครื่องจะทำงานเสร็จ ให้กดไอคอนเริ่ม/หยุด อีกครั้ง
เมื่อคุณเลือกฟังก์ชัน ExtraShot คุณสามารถชงกาแฟได้ครั้งละ 1 ถ้วยเท่านั้น
การชงกาแฟด้วยกาแฟบดล่วงหน้า
คุณสามารถเลือกใช้กาแฟที่บดไว้ล่วงหน้าแทนเมล็ดกาแฟ เช่น หากคุณต้องการประเภทกาแฟที่แตกต่างหรือกาแฟไม่มีคาเฟอีน
Page 49
ภาษาไทย
1 เปิดฝาช่องใส่กาแฟที่บดไว้ล่วงหน้าและเทกาแฟที่บดไว้ล่วงหน้าหนึ่งถ้วยตวงลงไปในช่องใส่กาแฟที่บดไว้ล่วงหน้า (รูปที่ 19)
จากนั้นปิดฝา
2 แตะไอคอน One-touch Drink หรือแตะไอคอน 'More Drinks' (เฉพาะบางรุ่นเท่านั้น) เพื่อเลือกอีกเครื่องดื่มหนึ่ง
3 เลือกฟังก์ชันกาแฟบดล่วงหน้า โดยสามารถทําได้ใน 2 วิธีที่แตกต่างกัน ดังนี้
- ใช้ลูกศรลงเพื่อตั้งค่าความเข้มให้อยู่ในระดับต่ำสุด แล้วเลือกฟังก์ชันบดล่วงหน้า
- กดไอคอน Settings และใช้ลูกศรลงเพื่อเลือกฟังก์ชันบดล่วงหน้า
4 หากต้องการหยุดจ่ายกาแฟก่อนที่เครื่องจะทำงานเสร็จ ให้กดปุ่มเริ่ม/หยุด อีกครั้ง
เมื่อคุณเลือกฟังก์ชันกาแฟบดล่วงหน้า:
- ค่าจะถูกจัดเก็บไว้โดยอัตโนมัติ
- คุณสามารถชงกาแฟได้เพียงครั้งละหนึ่งถ้วย
- คุณไม่สามารถเลือกความเข้มของกลิ่นที่แตกต่างกันได้
51
การจ่ายน้ำร้อน
1 ถอด LatteGo หรือที่ทำฟองนมออก หากติดตั้งอยู่
2 วางถ้วยไว้ใต้หัวจ่ายน้ำร้อน
3 แตะไอคอน 'Hot Water' (เฉพาะบางรุ่นเท่านั้น) หรือแตะไอคอน 'More Drinks' (เฉพาะบางรุ่นเท่านั้น) (รูปที่ 4)
เพื่อเลือกน้ำร้อน
4 ใช้ลูกศรขึ้นและลงเพื่อปรับปริมาณและ/หรืออุณหภูมิของน้ำร้อนตามความชอบของคุณ
5 กดปุ่มเริ่ม/หยุด
- น้ำร้อนจะจ่ายจากหัวจ่ายน้ำร้อน (รูปที่ 20)
6 หากต้องการหยุดการจ่ายน้ำร้อนก่อนที่เครื่องจะทำงานจนเสร็จ ให้กดปุ่มเริ่ม/หยุด อีกครั้ง
การปรับแต่งเครื่องดื่ม
คุณสามารถใช้เครื่องนี้ปรับการตั้งค่าเครื่องดื่มตามความชอบของคุณเอง และจัดเก็บค่าเครื่องดื่มที่ปรับแล้วในโปรไฟล์ส่วนตัว
โปรไฟล์ที่แตกต่างกันจะมีสีที่แตกต่างกัน
หลังจากที่เลือกเครื่องดื่มโดยแตะไอคอน One-touch Drink อันใดอันหนึ่ง หรือแตะไอคอน 'More Drinks' แล้ว (เฉพาะบางรุ่นเท่านั้น)
คุณสามารถทําสิ่งต่อไปนี้
1 ปรับความเข้มของกลิ่นโดยใช้ไอคอนขึ้นและลง (รูปที่ 21) ความเข้มของกลิ่นมี 5 ระดับ โดยระดับที่ต่ำสุดคือกลิ่นที่อ่อนสุด
และระดับที่สูงสุดคือกลิ่นที่เข้มสุด
2 ปรับปริมาณกาแฟ (รูปที่ 22) และ/หรือปริมาณนม (เฉพาะบางรุ่นเท่านั้น) โดยใช้ไอคอนขึ้นและลง
การตั้งค่าแต่ละแบบปรับปริมาณได้ 5 ระดับ
ในทันทีที่เครื่องชงเสร็จ เครื่องจะจัดเก็บการตั้งค่าที่คุณเลือกไว้ในโปรไฟล์ที่คุณเลือกโดยอัตโนมัติ
เลือกโปรไฟล์
คุณสามารถเลือกโปรไฟล์และจัดเก็บสูตรได้โดยใช้โปรไฟล์กาแฟที่ฉันเลือก (โปรไฟล์กาแฟที่ฉันเลือก)
1 แตะไอคอนโปรไฟล์ ซ้ำๆ เพื่อเลือกโปรไฟล์สีอันใดอันหนึ่ง โปรไฟล์ทั้งหมดจะมีสีที่แตกต่างกัน
2 เลือกเครื่องดื่มโดยแตะไอคอน One-touch Drink หรือแตะไอคอน 'More Drinks' (เฉพาะบางรุ่นเท่านั้น)
3 ปรับการตั้งค่าเครื่องดื่มตามรสที่คุณชื่นชอบ
4 กดปุ่มเริ่ม/หยุด เพื่อชงเครื่องดื่มที่คุณเลือก
เครื่องได้จัดเก็บการตั้งค่าใหม่ของคุณไว้ในโปรไฟล์สีที่คุณเลือกเรียบร้อยแล้ว
คุณสามารถคืนค่าการตั้งค่าจากโรงงานของเครื่องได้ (ดู 'การเรียกคืนการตั้งค่าจากโรงงาน')
ภาษาไทย
Page 50
52
ภาษาไทย
โปรไฟล์สำหรับแขก
เครื่องของคุณมีการติดตั้งโปรไฟล์สำหรับแขก เมื่อเลือกโปรไฟล์สำหรับแขก ไอคอนโปรไฟล์จะปิด เมื่อคุณเลือกโปรไฟล์นี้
คุณยังคงสามารถปรับแต่งการตั้งค่าให้ตรงตามความชอบของคุณเองได้ แต่จะไม่จัดเก็บสูตรที่คุณชง
การปรับการตั้งค่าเครื่อง
การตั้งค่าความกระด้างของน้ำ
เราขอแนะนำให้คุณปรับความกระด้างของน้ำให้ตรงกับความกระด้างของน้ำในพื้นที่ของคุณ
เพื่อประสิทธิภาพที่เหมาะสมที่สุดและอายุการใช้งานของเครื่องที่ยาวนานขึ้น
ซึ่งจะช่วยป้องกันไม่ให้คุณต้องขจัดตะกรันออกจากเครื่องบ่อยเกินไป ตามค่าเริ่มต้น ความกระด้างของน้ำจะถูกตั้งค่าเป็น 4: น้ำกระด้าง
ใช้แผ่นทดสอบความกระด้างของน้ำที่ให้มาในกล่องเพื่อตรวจสอบความกระด้างของน้ำในภูมิภาคของคุ
ณ:
1 จุ่มแผ่นทดสอบความกระด้างของน้ำในน้ำประปาหรือปล่อยให้น้ำประปาไหลผ่านเป็นเวลา 1 วินาที (รูปที่ 23)
2 รอ 1 นาที จำนวนสี่เหลี่ยมบนแผ่นทดสอบที่เปลี่ยนเป็นสีแดงจะบ่งบอกความกระด้าง (รูปที่ 24)ของน้ำ
ตั้งค่าเครื่องให้ตรงกับความกระด้างของน้ำ
1 แตะไอคอน Settings และใช้ลูกศรขึ้นและลงเพื่อเลือก 'ความกระด้างของน้ำ' จากนั้นกดไอคอน OK เพื่อยืนยัน
2 ใช้ลูกศรขึ้นและลงเพื่อเลือกระดับความกระด้างของน้ำ
จำนวนสี่เหลี่ยมสีแดงที่เลือกในหน้าจอควรตรงกับจำนวนสี่เหลี่ยมสีแดงบนแผ่นทดสอบ (รูปที่ 25)
3 เมื่อคุณตั้งค่าความกระด้างของน้ำที่ถูกต้องแล้ว แตะไอคอน OK เพื่อยืนยัน
การปรับการตั้งค่าตัวบด
คุณสามารถเปลี่ยนความเข้มของกาแฟได้ด้วยปุ่มการตั้งค่าการบดภายในที่ใส่เมล็ดกาแฟ การตั้งค่าการบดยิ่งต่ำ
เมล็ดกาแฟก็จะยิ่งถูกบดละเอียดมากขึ้น และกาแฟก็จะมีรสชาติเข้มข้นยิ่งขึ้น คุณสามารถเลือกการตั้งค่าการบดที่แตกต่างกันได้ 12 ระดับ
เครื่องได้รับการตั้งค่าให้ได้รับรสชาติที่ดีที่สุดจากเมล็ดกาแฟของคุณ ดังนั้น
เราจึงแนะนำไม่ให้คุณปรับการตั้งค่าการบดจนกว่าคุณจะชงกาแฟไปแล้ว 100-150 ถ้วย (การใช้งานประมาณ 1 เดือน)
คุณสามารถปรับการตั้งค่าการบดได้ในขณะที่เครื่องกำลังบดเมล็ดกาแฟอยู่เท่านั้น คุณจำเป็นต้องชงเครื่องดื่ม 2 ถึง 3 แก้วก่อน
จึงจะสามารถรับรู้ถึงความแตกต่างได้อย่างเต็มที่
ห้ามหมุนปุ่มการตั้งค่าการบดมากกว่าครั้งละหนึ่งช่องเพื่อป้องกันความเสียหายต่อตัวบด
1 วางถ้วยไว้ใต้ปากพวยรินกาแฟ
2 เปิดฝาที่ใส่เมล็ดกาแฟ
3 แตะไอคอนเอสเพรสโซ่ แล้วกดปุ่มเริ่ม/หยุด
4 เมื่อตัวบดเริ่มทำงานให้กดปุ่มการตั้งค่าการบดแล้วหมุนไปทางซ้ายหรือขวา
การปรับการตั้งค่าอื่นๆ ของเครื่อง
เมื่อแตะที่ไอคอน Settings คุณจะสามารถปรับการตั้งค่าของเครื่องได้ดังต่อไปนี้
- ความกระด้างของน้ำ: คุณสามารถเลือกได้ 5 ระดับตามความกระด้างของน้ำในพื้นที่ของคุณ
- เวลารอทำงาน: คุณสามารถเลือก 15, 30, 60 หรือ 180 นาที
- ความสว่างของจอแสดงผล: คุณสามารถเลือกต่ำ กลาง และสูง
- ภาษา
Page 51
ภาษาไทย
- เสียง: คุณสามารถเปิดหรือปิดใช้งานเสียงเตือนของเครื่องได้
- อุณหภูมิที่เหมาะสม คุณสามารถเลือกอุณหภูมิการชงกาแฟได้ 3 ระดับ
- ไฟส่องสว่างด้านหน้า (เฉพาะบางรุ่นเท่านั้น): คุณสามารถเลือก 'เปิดตลอดเวลา' หรือ 'เปิดขณะชง' หรือ 'ปิดตลอดเวลา'
- หน่วยวัด: คุณสามารถเลือกระหว่าง มล. หรือออนซ์
การเรียกคืนการตั้งค่าจากโรงงาน
คุณสามารถเรียกคืนการตั้งค่าจากโรงงานในเครื่องนี้เมื่อใดก็ได้
1 แตะไอคอน Settings
2 ใช้ไอคอนขึ้นและลงเพื่อเลือก 'Factory settings' (การตั้งค่าจากโรงงาน) ยืนยันโดยแตะที่ไอคอน OK
3 กดปุ่มเริ่ม/หยุด เพื่อยืนยันว่าคุณต้องการเรียกคืนการตั้งค่า
- ขณะนี้ กำลังคืนค่าการตั้งค่า
53
โดยจะคืนค่าการตั้งค่าจากโรงงานต่อไปนี้เป็นค่าเริ่มต้น: ความกระด้างของน้ำ เวลารอทำงาน ความสว่างของจอแสดงผล เสียง อุณหภูมิ
ไฟส่องสว่างด้านหน้า โปรไฟล์
การถอดและใส่หัวชง
ไปที่ www.philips.com/coffee-care เพื่อดูวิดีโอแนะนำอย่างละเอียดเกี่ยวกับวิธีถอด ใส่ และทำความสะอาดหัวชง
การถอดหัวชงออกจากเครื่อง
1 ปิดเครื่อง
2 ถอดแท้งค์น้ำออก แล้วเปิดฝา (รูปที่ 27)เครื่อง
3 กดด้ามจับ (รูปที่ 28) PUSH แล้วดึงตรงที่จับของหัวชงเพื่อถอดออกจากเครื่อง (รูปที่ 29)
การใส่หัวชงกลับเข้าไปใหม่
ก่อนที่คุณจะเลื่อนหัวชงกลับเข้าไปในเครื่อง ตรวจสอบให้แน่ใจว่าหัวชงอยู่ในตำแหน่งที่ถูกต้อง
1 ตรวจสอบว่าหัวชงอยู่ในตำแหน่งที่ถูกต้อง ลูกศรบนกระบอกสีเหลืองที่ด้านข้างของหัวชงจะต้องตรงกับลูกศรสีดำและตัว N (รูปที่ 30)
- หากไม่ตรงกัน ให้กดคันโยกลงจนสัมผัสกับฐานของหัว (รูปที่ 31)ชง
2 เลื่อนหัวชงกลับเข้าไปในเครื่องตามรางนำทางที่อยู่ด้านข้าง (รูปที่ 32)จนกว่าจะล็อคเข้าที่และได้ยินเสียงคลิก (รูปที่ 33) ห้ามกดปุ่ม
PUSH
3 ปิดฝาเครื่องและใส่แท้งค์น้ำกลับเข้าไปที่เดิม
การทำความสะอาดและบำรุงรักษา
การทำความสะอาดและดูแลรักษาเครื่องเป็นประจำช่วยให้เครื่องของคุณอยู่ในสภาพที่ดีเยี่ยม
และทำให้มั่นใจได้ว่ากาแฟจะมีรสชาติที่ดีเป็นระยะเวลานานและมีการไหลของกาแฟที่สม่ำเสมอ
ดูตารางที่ด้านล่างสำหรับคำอธิบายอย่างละเอียดเกี่ยวกับเวลาและวิธีการทำความสะอาดส่วนที่สามารถถอดออกได้ทั้งหมดของเครื่อง
คุณสามารถดูข้อมูลและวิดีโอแนะนำอย่างละเอียดเพิ่มเติมได้ใน www.philips.com/coffee-care
ดูภาพรวมว่าชิ้นส่วนใดบ้างที่สามารถทำความสะอาดในเครื่องล้างจานได้ในรูป B
ส่วนที่ถอดออกได้ เวลาที่ควรทำความสะอาด วิธีทำความสะอาด
หัวชง ทุกสัปดาห์ ถอดหัวชงออกจากเครื่อง (ดู 'การถอดและใส่หัวชง')
ล้างทำความสะอาดโดยเปิดน้ำให้ไหลผ่าน (ดู
'การทำความสะอาดหัวชงโดยเปิดน้ำให้ไหลผ่าน')
ภาษาไทย
Page 52
54
ภาษาไทย
ส่วนที่ถอดออกได้ เวลาที่ควรทำความสะอาด วิธีทำความสะอาด
ทุกเดือน ทำความสะอาดหัวชงด้วยเม็ดขจัดคราบน้ำมันกาแฟของ
Philips (ดู
'การทำความสะอาดหัวชงด้วยเม็ดขจัดคราบน้ำมันกาแฟ')
ที่ทำฟองนมแบบดั้งเดิม หลังการใช้ อันดับแรก
ช่องใส่กาแฟที่บดไว้ล่วงหน้า
ที่ใส่กากกาแฟ เทกากกาแฟออกจากที่ใส่เมื่อเครื่องเตือน
ถาดรองน้ำ เทถาดรองน้ำทุกวัน หรือทันทีที่สัญลักษณ์
LatteGo หลังการใช้ อันดับแรก ทําความสะอาด LatteGo
ตรวจสอบช่องใส่กาแฟที่บดไว้ล่วงหน้าทุกสัปดาห์เพื่อดูว่ามีสิ่งอุดตันหรือไม่
ทำความสะอาดทุกสัปดาห์
'ถาดรองน้ำเต็ม' สีแดงโผล่พ้นถาดรองน้ำ
(รูปที่ 35)
ทำความสะอาดถาดรองน้ำทุกสัปดาห์
ทําความสะอาดที่ทำฟองนมในขณะที่ยังติดอยู่กับเครื่องโดยใช้โปรแกรม'การทำความสะอาดนมอย่างรวดเร็ว' (ดู
'การทำความสะอาดที่ทำฟองนมแบบดั้งเดิมอย่างรวดเร็ว')
จากนั้นถอดที่ทำฟองนมออกจากเครื่องและถอดแยกชิ้นส่วน
ทำความสะอาดชิ้นส่วนทั้งหมดโดยเปิดน้ำให้ไหลผ่านหรือในเครื่องล้างจาน
ถอดปลั๊กเครื่องและถอดหัวชงออก
เปิดฝาปิดช่องใส่กาแฟที่บดไว้ล่วงหน้าแล้วใส่ด้ามจับช้อนเข้าไป
ขยับด้ามจับขึ้นลงจนกว่ากาแฟบดที่อุดตันอยู่จะร่วงลงมา
(รูปที่ 34) ไปที่ www.philips.com/coffee-care
เพื่อดูวิดีโอแนะนำอย่างละเอียด
ถอดใส่กากกาแฟออกในระหว่างที่เครื่องเปิดอยู่
ล้างโดยการเปิดน้ำให้ไหลผ่านและใช้น้ำยาทำความสะอาด
หรือทำความสะอาดในเครื่องล้างจาน
แผงด้านหน้าของที่ใส่กากกาแฟ (รูป A15)
ไม่สามารถทำความสะอาดในเครื่องล้างจานได้
ถอดถาดรองน้ำออก (รูปที่ 36)
และล้างโดยการเปิดน้ำให้ไหลผ่านและใช้น้ำยาทำความสะอาด
คุณสามารถทำความสะอาดถาดรองน้ำในเครื่องล้างจานได้เช่นกัน แผงด้านหน้าของที่ใส่กากกาแฟ (รูป A15)
ไม่สามารถทำความสะอาดในเครื่องล้างจานได้
ในขณะที่ยังติดอยู่กับเครื่องโดยใช้โปรแกรม
'การทำความสะอาดนมอย่างรวดเร็ว' (ดู 'การทําความสะอาด
LatteGo อย่างรวดเร็ว') จากนั้นจึงนำออกจากเครื่อง
และล้างโดยเปิดก๊อกให้น้ำไหลผ่านหรือทําความสะอาดในเครื่องล้างจาน
การหล่อลื่นหัวชง ทุก 2 เดือน ดูตารางการหล่อลื่น และหยดน้ำมันหล่อลื่นของ Philips
แท้งค์น้ำ ทุกสัปดาห์ ล้างทำความสะอาดแท้งค์น้ำโดยเปิดน้ำให้ไหลผ่าน
ด้านหน้าของเครื่อง ทุกสัปดาห์ ทำความสะอาดด้วยผ้าที่เช็ดโดยไม่เป็นรอย
ใส่หัวชง (ดู 'การหล่อลื่นหัวชง')
การทำความสะอาดหัวชง
การทำความสะอาดหัวชงเป็นประจำจะป้องกันไม่ให้กาแฟที่ตกค้างอุดตันวงจรภายใน ไปที่ www.philips.com/coffee-care
เพื่อดูวิดีโอสนับสนุนเกี่ยวกับวิธีถอด ใส่ และทำความสะอาดหัวชง
การทำความสะอาดหัวชงโดยเปิดน้ำให้ไหลผ่าน
1 ถอดหัวชง (ดู 'การถอดและใส่หัวชง')ออก
2 ล้างหัวชงให้สะอาดด้วยน้ำ ทำความสะอาดตัวกรอง (รูปที่ 37)ด้านบนของหัวชงอย่างระมัดระวัง
Page 53
ภาษาไทย
3 ปล่อยให้หัวชงแห้งสนิทก่อนที่คุณจะใส่กลับเข้าไป ห้ามเช็ดหัวชงด้วยผ้าเพื่อป้องกันไม่ให้ใยผ้าไปติดสะสมอยู่ภายในหัวชง
การทำความสะอาดหัวชงด้วยเม็ดขจัดคราบน้ำมันกาแฟ
ใช้เม็ดขจัดคราบน้ำมันกาแฟของ Philips เท่านั้น
1 แตะไอคอน Clean และใช้ลูกศรขึ้นและลงเพื่อเลือก 'Brew group clean' (ทำความสะอาดหัวชง)
2 แตะไอคอน OK เพื่อยืนยัน แล้วทําตามคําแนะนําบนหน้าจอ
การหล่อลื่นหัวชง
เพื่อปรับปรุงประสิทธิภาพของเครื่อง ขอแนะนําให้หล่อลื่นหัวชงทุกๆ 2 เดือน
เพื่อให้แน่ใจว่าชิ้นส่วนที่เคลื่อนไหวยังคงเคลื่อนไหวได้อย่างนุ่มนวล
1 ทาน้ำมันหล่อลื่นบางๆ บนลูกสูบ (ส่วนสีเทา) ของหัว (รูปที่ 38)ชง
2 ทาน้ำมันหล่อลื่นบางๆ รอบแกน (ส่วนที่เป็นสีเทา) ที่ด้านล่างของหัวชง (รูปที่ 39)
3 ทาน้ำมันหล่อลื่นบางๆ ที่รางทั้งสองด้าน (รูปที่ 40)
การทําความสะอาด LatteGo (ภาชนะเก็บน้ำนม) (เฉพาะบางรุ่นเท่านั้น)
การทําความสะอาด LatteGo อย่างรวดเร็ว
1 ตรวจสอบให้แน่ใจว่า LatteGo ต่ออยู่กับเครื่องอย่างถูกต้อง (รูปที่ 10)
2 วางถ้วยไว้ใต้หัวจ่าย
3 แตะไอคอน Clean และใช้ลูกศรขึ้นและลงเพื่อเลือกโปรแกรม 'Quick milk clean' (ทําความสะอาดนมอย่างรวดเร็ว)
4 แตะไอคอน OK เพื่อยืนยัน แล้วทําตามคําแนะนําบนหน้าจอ เพื่อขจัดนมที่อาจค้างอยู่ในระบบนมออกมา
- ระบบนมจะพ่นน้ำร้อนออกมาเล็กน้อย
5 เก็บ LatteGo ที่มีนมเหลืออยู่ไว้ในตู้เย็น
55
ภาษาไทย
ทําความสะอาด LatteGo อย่างทั่วถึง
1 ถอด LatteGo ออกจากเครื่อง (รูปที่ 41)
2 เทนมที่หลงเหลืออยู่ออก
3 กดปุ่มปลดล็อคและถอดภาชนะเก็บน้ำนมออกจากกรอบของ LatteGo (รูปที่ 42)
4 ทำความสะอาดชิ้นส่วนทั้งหมดในเครื่องล้างจาน หรือเปิดน้ำอุ่นให้ไหลผ่านและใช้น้ำยาทำความสะอาด
การทำความสะอาดที่ทำฟองนมแบบดั้งเดิม (เฉพาะบางรุ่นเท่านั้น)
การทำความสะอาดที่ทำฟองนมแบบดั้งเดิมอย่างรวดเร็ว
1 ตรวจดูให้แน่ใจว่าที่ทำฟองนมแบบดั้งเดิมต่ออยู่กับเครื่องอย่างถูกต้อง (รูปที่ 13)
2 วางถ้วยไว้ใต้หัวจ่าย
3 แตะไอคอน Clean และใช้ลูกศรขึ้นและลงเพื่อเลือกโปรแกรม 'Quick milk clean' (ทําความสะอาดนมอย่างรวดเร็ว)
4 แตะไอคอน OK เพื่อยืนยัน แล้วทําตามคําแนะนําบนหน้าจอ เพื่อขจัดนมที่อาจค้างอยู่ในที่ทำฟองนมออกมา
- ระบบนมจะพ่นน้ำร้อนออกมาเล็กน้อย
5 ทำความสะอาดที่ทำฟองนมด้วยผ้าเปียกหมาดๆ
การทำความสะอาดที่ทำฟองนมแบบดั้งเดิมในแต่ละวัน
1 ปล่อยให้ที่ทำฟองนมเย็นลง
2 เอียงที่ทำฟองนมไปทางซ้าย และถอดส่วนที่เป็นโลหะและส่วนที่เป็นซิลิโคนออก (รูปที่ 43)
3 ถอดส่วนประกอบชิ้นส่วนทั้งสามส่วนออก (รูปที่ 44) และล้างด้วยน้ำสะอาดหรือทำความสะอาดในเครื่องล้างจาน
4 ประกอบชิ้นส่วนของที่ทำฟองนมทั้งสามชิ้นเข้าด้วยกัน แล้วต่อที่ทำฟองนมเข้ากับเครื่องอีกครั้ง
Page 54
56
ภาษาไทย
ตัวกรองน้ำ AquaClean
เครื่องของคุณเปิดใช้งาน AquaClean อยู่ คุณสามารถใส่ตัวกรองน้ำ AquaClean ไว้ในถังใส่น้ำได้เพื่อรักษารสชาติของกาแฟ
และยังช่วยลดความจำเป็นในการขจัดคราบตะกรันโดยลดการสะสมของคราบหินปูนในเครื่อง คุณสามารถซื้อตัวกรองน้ำ AquaClean
ได้จากร้านค้าปลีกใกล้บ้านคุณ ศูนย์บริการที่ได้รับอนุญาต หรือทางออนไลน์ที่ www.philips.com/parts-and-accessories
ตัวบ่งชี้สถานะเครื่องกรอง AquaClean
ในขณะที่ AquaClean ทํางาน จะมองเห็นสถานะของเครื่องกรอง AquaClean บนหน้าจอเป็นเปอร์เซ็นต์ตลอดเวลา
- หากสถานะของเครื่องกรอง AquaClean เหลือไม่เกิน 10% หน้าจอจะแสดงข้อความเป็นเวลา 2 วินาทีในแต่ละครั้งที่คุณเปิดเครื่อง
ข้อความดังกล่าวแนะนําให้คุณซื้อเครื่องกรองใหม่
- หากสถานะของเครื่องกรองเป็น 0% เครื่องจะขอให้คุณเปลี่ยนเครื่องกรอง AquaClean ทุกครั้งที่คุณเปิดเครื่อง
การเปิดใช้งานตัวกรองน้ำ AquaClean (5 นาที)
เครื่องจะไม่ตรวจพบโดยอัตโนมัติว่ามีการใส่ตัวกรองลงในแท้งค์น้ำ เพราะฉะนั้น คุณจึงจำเป็นต้องเปิดใช้งานเครื่องกรองน้ำ
AquaClean ใหม่แต่ละเครื่องที่คุณติดตั้งในเมนู 'Clean'
เมื่อเครื่องหยุดแสดงข้อความเปิดใช้งานเครื่องกรองแล้ว คุณยังคงสามารถเปิดใช้งานเครื่องกรองน้ำ AquaClean ได้
แต่คุณจะต้องขจัดตะกรันในเครื่องออกก่อน
เครื่องของคุณจะต้องไม่มีคราบหินปูนอยู่เลยก่อนที่คุณจะเริ่มต้นใช้เครื่องกรองน้ำ AquaClean ได้
ก่อนที่จะเปิดใช้งานตัวกรองน้ำ AquaClean จะต้องมีการเตรียมการด้วยการแช่ตัวกรองไว้ในน้ำตามที่อธิบายด้านล่าง หากคุณไม่ทำเช่นนี้
อากาศอาจถูกดูดเข้าไปในเครื่องแทนน้ำ ซึ่งทำให้มีเสียงดังมากและป้องกันไม่ให้เครื่องสามารถชงกาแฟได้
1 แตะไอคอน 'Clean' และใช้ลูกศรขึ้นและลงเพื่อเลือก 'AquaClean'
2 แตะไอคอน OK เพื่อยืนยัน
3 แตะไอคอน OK อีกครั้ง เมื่อหน้าจอการเปิดใช้งานปรากฏขึ้น ทําตามคําแนะนําบนหน้าจอ
4 เขย่าตัวกรองเป็นเวลา 5 วินาที (รูปที่ 45)
5 แช่ตัวกรองโดยคว่ำลงในเหยือกที่มีน้ำเย็น แล้วเขย่าหรือกดตัวกรอง (รูปที่ 46)
6 ใส่ตัวกรองบนช่องเชื่อมต่อตัวกรองในแท้งค์น้ำในแนวตั้ง กดตัวกรองลงไปให้ถึงจุดที่ต่ำที่สุด (รูปที่ 47)
7 เติมน้ำสะอาดลงในแท้งค์น้ำ แล้วใส่กลับเข้าไปในเครื่อง
8 หากต่ออยู่ ให้ถอด LatteGo ออก (เฉพาะบางรุ่นเท่านั้น)
9 วางชามไว้ใต้หัวจ่ายน้ำร้อน/ที่ทำฟองนม
10 กดปุ่มเริ่ม/หยุด เพื่อเริ่มกระบวนการเปิดใช้งาน
11 เครื่องจะจ่ายน้ำร้อนออกจากหัวจ่ายน้ำร้อน/ที่ทำฟองนมในช่วงเวลา 1 นาที
12 ตอนนี้มีการเปิดใช้งานเครื่องกรองเรียบร้อยแล้ว
การเปลี่ยนตัวกรองน้ำ AquaClean (5 นาที)
หลังจากที่มีน้ำ 95 ลิตรไหลผ่านตัวกรอง ตัวกรองจะหยุดทำงาน ตัวบ่งชี้สถานะ AquaClean ลดลงเป็น 0%
เพื่อเตือนให้คุณเปลี่ยนเครื่องกรอง ตราบใดที่ตัวบ่งชี้สถานะ AquaClean ยังคงแสดงบนจอแสดงผล
คุณก็ยังคงสามารถเปลี่ยนเครื่องกรองได้โดยไม่จำเป็นต้องขจัดตะกรันในเครื่องออกก่อน หากคุณเปลี่ยนเครื่องกรองน้ำ AquaClean
ไม่ทันเวลาที่กำหนด ตัวบ่งชี้ AquaClean จะดับลงหลังจากนั้น ในกรณีนี้ คุณยังสามารถเปลี่ยนตัวกรองได้
แต่คุณต้องขจัดตะกรันออกจากเครื่องก่อน
เมื่อตัวบ่งชี้สถานะ AquaClean ลดลงเป็น 0% หรือเครื่องเตือนให้คุณเปลี่ยนเครื่องกรอง AquaClean ให้ปฏิบัติดังนี้
1 ถอดเครื่องกรองน้ำ AquaClean อันเก่าออก
Page 55
ภาษาไทย
2 ติดตั้งเครื่องกรองอันใหม่และเปิดใช้งานตามที่อธิบายไว้ในบท 'การเปิดใช้งานเครื่องกรองน้ำ AquaClean (5 นาที)'
เปลี่ยนตัวกรองน้ำ AquaClean อย่างน้อยทุก 3 เดือน แม้เครื่องจะยังไม่ระบุว่าจำเป็นต้องเปลี่ยน
ขั้นตอนการขจัดคราบตะกรัน (30 นาที)
โปรดใช้น้ำยาขจัดคราบตะกรันของ Philips เท่านั้น ไม่ควรใช้น้ำยาขจัดคราบตะกรันที่มีกรดซัลฟูริก กรดไฮโดรคลอริก กรดซัลเฟมิก
หรือกรดแอซีติก (น้ำส้มสายชู) ไม่ว่าในกรณีใดๆ
เนื่องจากอาจเป็นอันตรายต่อวงจรน้ำในเครื่องของคุณและไม่ละลายคราบหินปูนอย่างถูกต้อง การไม่ใช้น้ำยาขจัดคราบตะกรันของ Philips
จะทำให้การรับประกันเป็นโมฆะ นอกจากนี้ การไม่ขจัดคราบตะกรันออกจากเครื่องจะทำให้การรับประกันเป็นโมฆะเช่นกัน
คุณสามารถซื้อน้ำยาขจัดคราบตะกรันของ Philips ได้ในร้านค้าออนไลน์ที่ www.philips.com/coffee-care
เมื่อจำเป็นต้องขจัดตะกรันในเครื่อง จะมีข้อความปรากฏขึ้นบนจอแสดงผล
1 แตะไอคอน Clean บนอินเทอร์เฟซผู้ใช้ และเลือก 'Descaling' (การขจัดตะกรัน) ในเมนู
2 ทําตามคําแนะนําบนหน้าจอ
3 ถอด LatteGo หรือที่ทำฟองนมออก หากติดตั้งอยู่
4 ถอดถาดรองน้ำและที่ใส่กากกาแฟออก เททิ้งแล้วใส่กลับเข้าไปในเครื่อง
5 ถอดแท้งค์น้ำออกและเทน้ำทิ้ง จากนั้นถอดตัวกรองน้ำ AquaClean ออก
6 เทน้ำยาขจัดคราบตะกรันของ Philips ทั้งขวดลงในแท้งค์น้ำ จากนั้นเติมน้ำจนถึงเครื่องหมาย (รูปที่ 48)คราบตะกรัน/ทำความสะอาด
จากนั้นใส่กลับเข้าไปในเครื่อง
7 วางภาชนะขนาดใหญ่ (1.5 ลิตร) ไว้ใต้ปากพวยรินกาแฟและหัวจ่ายน้ำ
8 กดปุ่มเริ่ม/หยุด เพื่อเริ่มขั้นตอนการขจัดตะกรัน ขั้นตอนการขจัดคราบตะกรันใช้เวลาประมาณ 30 นาที
และประกอบด้วยกระบวนการขจัดคราบตะกรันและกระบวนการล้าง
9 รอจนกว่าเครื่องจะหยุดจ่ายน้ำ เติมน้ำในแท้งค์ เมื่อข้อความปรากฏขึ้นบนจอแสดงผล
กระบวนการขจัดคราบตะกรันจะเสร็จเรียบร้อยเมื่อเครื่องหยุดจ่ายน้ำ
10 ติดตั้งและเปิดใช้งานเครื่องกรองน้ำ AquaClean ในแท้งค์น้ำ
- เมื่อเสร็จขั้นตอนการขจัดตะกรันแล้ว เครื่องจะเตือนให้คุณติดตั้งเครื่องกรอง AquaClean เครื่องใหม่ (ดู 'การเปลี่ยนตัวกรองน้ำ
AquaClean (5 นาที)')
57
ภาษาไทย
เคล็ดลับ: การใช้ตัวกรอง AquaClean จะลดความจำเป็นในการขจัดคราบตะกรัน!
ควรทำอย่างไรหากขั้นตอนการขจัดคราบตะกรันถูกรบกวน
คุณสามารถออกจากกระบวนการขจัดคราบตะกรันได้โดยกดปุ่มเปิด/ปิดบนแผงควบคุม
หากกระบวนการขจัดคราบตะกรันถูกรบกวนก่อนที่จะดำเนินการเสร็จสิ้น ให้ดำเนินการดังต่อไปนี้
1 เทและล้างแท้งค์น้ำให้สะอาด
2 เติมน้ำสะอาดลงในแท้งค์น้ำจนถึงเส้นบอกระดับคราบตะกรัน/ทำความสะอาด แล้วเปิดสวิตช์เครื่องอีกครั้ง
เครื่องจะทำความร้อนและดำเนินกระบวนการล้างโดยอัตโนมัติ
3 ก่อนที่จะชงเครื่องดื่มใดๆ ให้ดำเนินกระบวนการล้างแบบกำหนดเอง เพื่อเดินรอบการล้างด้วยตนเอง
ให้เริ่มด้วยการจ่ายน้ำร้อนในปริมาณครึ่งแท้งค์น้ำโดยเลือกฟังก์ชันน้ำร้อนซ้ำๆ กัน จากนั้นชงกาแฟที่บดไว้ล่วงหน้า 2
ถ้วยโดยไม่ต้องเพิ่มกาแฟบด
หากขจัดคราบตะกรันตามกระบวนการไม่สำเร็จ เครื่องจะต้องดำเนินกระบวนการการขจัดคราบตะกรันอีกครั้งโดยเร็วที่สุด
Page 56
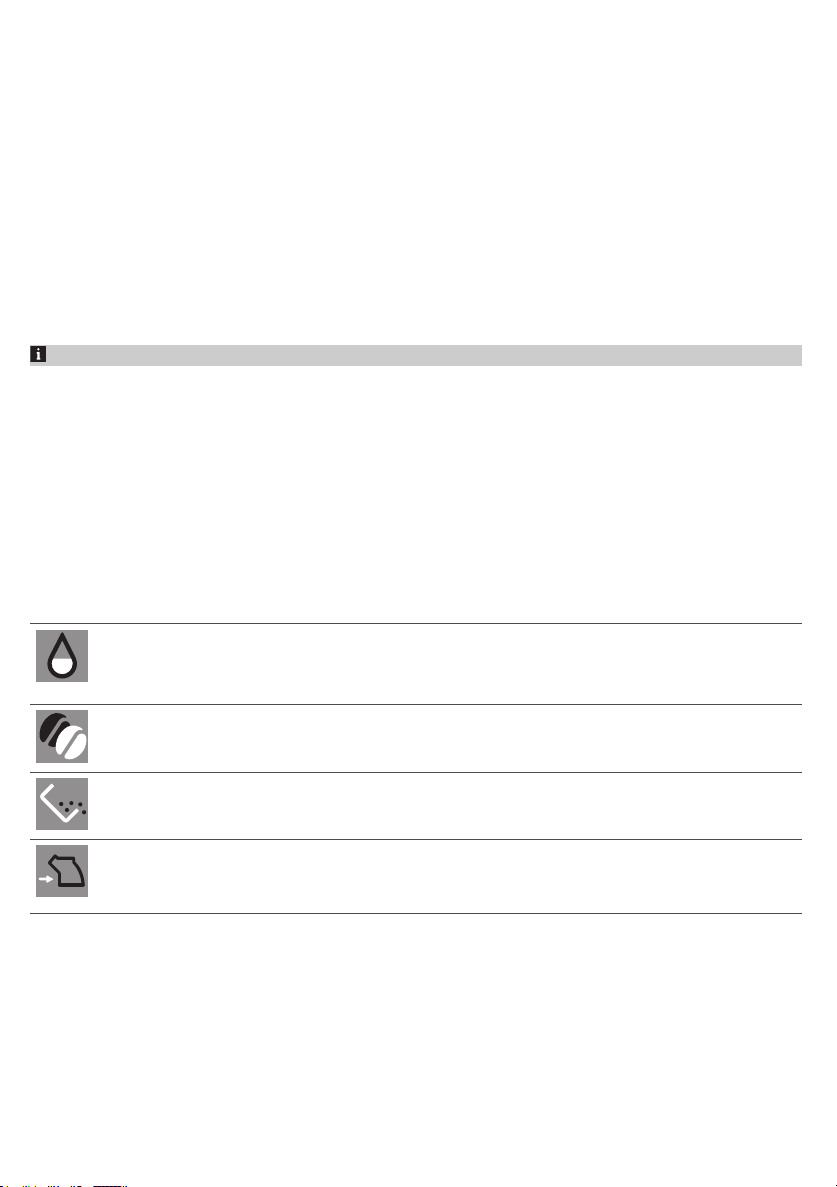
58
ภาษาไทย
การสั่งซื้ออุปกรณ์เสริม
ใช้ผลิตภัณฑ์ดูแลรักษาของ Philips เท่านั้นในการทำความสะอาดและขจัดคราบตะกรันออกจากเครื่อง
สามารถซื้อผลิตภัณฑ์เหล่านี้ได้จากร้านค้าปลีกในท้องถิ่นของคุณ จากศูนย์บริการที่ได้รับอนุญาต หรือทางออนไลน์ที่
www.philips.com/parts-and-accessories หากต้องการดูรายการอะไหล่ทั้งหมดทางออนไลน์ ให้ป้อนหมายเลขรุ่นของเครื่อง
คุณสามารถดูหมายเลขรุ่นได้ที่ด้านในของฝาเครื่อง
ผลิตภัณฑ์ดูแลรักษาและหมายเลขรุ่น:
- น้ำยาขจัดคราบตะกรัน CA6700
- ตัวกรองน้ำ AquaClean CA6903
- น้ำมันหล่อลื่นหัวชง HD5061
- เม็ดขจัดคราบน้ำมันกาแฟ CA6704
เครื่องกรอง Brita ใช้กับเครื่องนี้ไม่ได้
การแก้ปัญหา
บทนี้ได้รวบรวมปัญหาทั่วไปเกี่ยวกับเครื่องซึ่งคุณอาจพบได้ สามารถดูวิดีโอสนับสนุนและรายการคำถามที่พบบ่อยทั้งหมดได้ใน
www.philips.com/coffee-care หากคุณไม่สามารถแก้ไขปัญหาได้ โปรดติดต่อศูนย์บริการลูกค้าในประเทศของคุณ
สำหรับรายละเอียดการติดต่อ โปรดดูเอกสารแผ่นพับเกี่ยวกับการรับประกัน
ไอคอนเตือน
ไอคอนเตือน การแก้ปัญหา
ไอคอน 'ไม่มีน้ำในแท้งค์' ปรากฏขึ้นบนจอแสดงผล
- น้ำในแท้งค์ใกล้หมด เติมน้ำสะอาดลงในแท้งค์น้ำจนถึงเส้นบอกระดับสูงสุด
- แท้งค์น้ำถูกประกอบไม่เข้าที่ ใส่แท้งค์น้ำกลับเข้าไป
ไอคอน 'เติมเมล็ดกาแฟ' ปรากฏขึ้นบนจอแสดงผล
- เติมเมล็ดกาแฟในที่ใส่เมล็ดกาแฟ
ไอคอน 'เทที่ใส่กากกาแฟ' ปรากฏขึ้นบนจอแสดงผล
- ที่ใส่กากกาแฟเต็ม ถอดและเทที่ใส่กากกาแฟในระหว่างที่เครื่องเปิดอยู่ รอ 5 วินาทีก่อนแล้วค่อยใส่กลับ
ไอคอน 'ใส่หัวชง' ปรากฏขึ้นบนจอแสดงผล
- หัวชงไม่ได้ถูกใส่ให้เข้าที่หรือใส่ไม่ถูกต้อง ถอดหัวชงออกและตรวจสอบให้แน่ใจว่าล็อคเข้าที่แล้ว ดูบท
'การถอดและใส่หัวชง' เพื่อดูคำแนะนำทีละขั้นตอน
รหัสข้อผิดพลาด
รายการรหัสข้อผิดพลาดที่แสดงปัญหาที่คุณสามารถแก้ไขได้ด้วยตัวเองแสดงอยู่ที่ด้านล่างนี้ สามารถดูวิดีโอแนะนำได้ที่
www.philips.com/coffee-care หากรหัสข้อผิดพลาดอื่นปรากฏขึ้น โปรดติดต่อศูนย์บริการลูกค้า Philips ในประเทศของคุณ
สำหรับรายละเอียดการติดต่อ โปรดดูเอกสารแผ่นพับเกี่ยวกับการรับประกัน
Page 57
ภาษาไทย
59
รหัสข้อผิด
ปัญหา การแก้ปัญหาที่เป็นไปได้
พลาด
01 กรวยกาแฟอุดตัน ปิดเครื่องและถอดปลั๊กออก ถอดหัวชงออก จากนั้น
03 หัวชงสกปรกหรือเคลือบน้ำมัน-
ไม่เรียบร้อย
04 หัวชงอยู่ในตำแหน่งที่ไม่ถูกต้อง ปิดเครื่อง ถอดหัวชงออกและใส่กลับเข้าไปใหม่
05 มีอากาศอยู่ภายในวงจรน้ำ รีสตาร์ทเครื่องโดยปิดเครื่องแล้วเปิดอีกครั้ง หากสามารถใช้งานได้ ให้จ่ายน้ำร้อน 2-3
เตรียมเครื่องกรอง AquaClean
ไม่ถูกต้องก่อนที่จะติดตั้ง
หรือเครื่องกรองอุดตัน
11 เครื่องจำเป็นต้องปรับตัวให้เข้า-
กับอุณหภูมิห้อง
14 เครื่องร้อนเกินไป ปิดเครื่องและเปิดใหม่อีกครั้งหลังจากที่ปล่อยทิ้งไว้ 30 นาที
เปิดฝาปิดช่องใส่กาแฟบดล่วงหน้า แล้วใส่ด้ามช้อน
ขยับด้ามจับขึ้นลงจนกว่ากาแฟบดที่อุดตันอยู่จะร่วงลงมา ไปที่
www.philips.com/coffee-care เพื่อดูวิดีโอแนะนำอย่างละเอียด
ปิดเครื่อง ล้างหัวชงด้วยน้ำเปล่า เป่าให้แห้ง แล้วจึงหยดน้ำมันหล่อลื่น ดูบท
'การทําความสะอาดหัวชง' หรือไปที่ www.philips.com/coffee-care
เพื่อดูวิดีโอแนะนำอย่างละเอียด จากนั้นเปิดเครื่องอีกครั้ง
ตรวจดูให้แน่ใจว่าหัวชงอยู่ในตำแหน่งที่ถูกต้อง ก่อนที่จะใส่เข้าไป ดูบท
'การจับหัวชง' หรือไปที่ www.philips.com/coffee-care
เพื่อดูวิดีโอแนะนำอย่างละเอียด จากนั้นเปิดเครื่องอีกครั้ง
ถ้วย ขจัดตะกรันในเครื่อง หากคุณไม่ได้ขจัดตะกรันมานานแล้ว
ถอดเครื่องกรอง AquaClean ออก และลองชงกาแฟอีกครั้ง หากสามารถใช้งานได้
ตรวจสอบให้แน่ใจว่าคุณเตรียมเครื่องกรอง AquaClean
อย่างถูกต้องก่อนที่จะใส่กลับเข้าไป ใส่เครื่องกรอง AquaClean
กลับเข้าไปในแท้งค์น้ำ หากยังคงใช้งานไม่ได้
แสดงว่าเครื่องกรองอาจจะอุดตันและจำเป็นต้องเปลี่ยนใหม่
เผื่อเวลาไว้ให้เครื่องปรับตัวจากอุณหภูมิระหว่างการขนส่ง/ภายนอกเป็นอุณหภูมิห้อง
ปิดเครื่อง 30 นาที และเปิดเครื่องอีกครั้ง หากยังคงไม่ทำงาน
โปรดติดต่อศูนย์บริการลูกค้าในประเทศของคุณ สำหรับรายละเอียดการติดต่อ
โปรดดูเอกสารแผ่นพับเกี่ยวกับการรับประกัน
ภาษาไทย
ตารางการแก้ปัญหา
บทนี้ได้รวบรวมปัญหาทั่วไปเกี่ยวกับเครื่องซึ่งคุณอาจพบได้ สามารถดูวิดีโอสนับสนุนและรายการคำถามที่พบบ่อยทั้งหมดได้ใน
www.philips.com/coffee-care หากคุณไม่สามารถแก้ไขปัญหาได้ โปรดติดต่อศูนย์บริการลูกค้าในประเทศของคุณ
สำหรับรายละเอียดการติดต่อ โปรดดูเอกสารแผ่นพับเกี่ยวกับการรับประกัน
ปัญหา
มีเศษกาแฟตกค้างอยู่ในเครื่องชงกาแฟใหม่ของฉัน
ถาดรองน้ำเต็มเร็ว /
มีน้ำในถาดรองน้ำอยู่ตลอดเวลา
ไอคอน 'เทที่ใส่กากกาแฟ'
ยังแสดงอยู่
สาเหตุ การแก้ปัญหา
เครื่องนี้ได้รับการทดสอบด้วยกาแฟแล้ว แม้ว่าจะได้รับการทำความสะอาดเป็นอย่างดี
ซึ่งเป็นเรื่องปกติ
เครื่องใช้น้ำเพื่อล้างทำความสะอาดวงจรภายในและหัวชง
น้ำบางส่วนจะไหลผ่านวงจรภายในลงไปยังถาดรองน้ำโดยตรง
คุณเทที่ใส่กากกาแฟในขณะที่ยังปิดเครื่องอยู่ หรือใส่กลับเร็วเกินไป
แต่อาจมีกากกาแฟที่ตกค้างหลงเหลืออยู่
ถึงอย่างไรก็ยังคงเป็นเครื่องใหม่อย่างสมบูรณ์
เทถาดรองน้ำทุกวัน หรือทันทีที่สัญลักษณ์
'ถาดรองน้ำเต็ม' สีแดงโผล่พ้นฝาปิดถาดรองน้ำ
เคล็ดลับ:
วางถ้วยไว้ใต้ช่องจ่ายเพื่อรองน้ำล้างที่ไหลออกมาจากช่องจ่าย
เทที่ใส่กากกาแฟในระหว่างที่เครื่องเปิดอยู่เสมอ
ถอดที่ใส่กากกาแฟ รออย่างน้อย 5 วินาที
แล้วใส่กลับเข้าไปอีกครั้ง
Page 58
60
ภาษาไทย
ปัญหา สาเหตุ การแก้ปัญหา
เครื่องเตือนให้เทที่ใส่กากกาแฟแม้ว่าที่ใส่จะยังไม่เต็ม
เครื่องไม่ได้รีเซ็ตตัวนับเมื่อคุณเทที่ใส่กากกาแฟครั้งล่าสุด
รอประมาณ 5 วินาทีเสมอ
เมื่อคุณใส่ที่ใส่กากกาแฟกลับเข้าไป
วิธีนี้จะรีเซ็ตตัวนับกากกาแฟเป็นศูนย์
และนับจำนวนก้อนกาแฟได้อย่างถูกต้อง
เทที่ใส่กากกาแฟในระหว่างที่เครื่องเปิดอยู่เสมอ
หากคุณเทที่ใส่กากกาแฟเมื่อเครื่องปิดอยู่
เครื่องจะไม่รีเซ็ตตัวนับกากกาแฟ
ที่ใส่กากกาแฟเต็มเกินไป
และไอคอน 'เทที่ใส่กากกาแฟ'
ไม่ปรากฏบนจอแสดงผล
ฉันไม่สามารถถอดหัวชงออกได้ หัวชงไม่อยู่ในตำแหน่งที่ถูกต้อง รีเซ็ตเครื่องตามวิธีต่อไปนี้
ฉันไม่สามารถใส่หัวชงได้ หัวชงไม่อยู่ในตำแหน่งที่ถูกต้อง รีเซ็ตเครื่องตามวิธีต่อไปนี้
กาแฟมีน้ำมากเกินไป หัวชงสกปรกหรือจำเป็นต้องได้รับการหล่อ-
คุณถอดถาดรองน้ำออกโดยไม่ได้เทที่ใส่กากกาแฟ
ลื่น
เครื่องกำลังดำเนินขั้นตอนการปรับแต่งโดยอัตโนมัติอยู่
ขั้นตอนนี้จะเริ่มต้นโดยอัตโนมัติเมื่อคุณใช้เครื่องเป็นครั้งแรก
เมื่อคุณเปลี่ยนประเภทของเมล็ดกาแฟ
หรือหลังจากที่ไม่ใช้งานเป็นเวลานาน
เมื่อคุณถอดถาดรองน้ำออก
คุณต้องเทที่ใส่กากกาแฟด้วย
แม้ว่าจะมีก้อนกาแฟอยู่เพียงเล็กน้อย
ซึ่งจะทำให้แน่ใจได้ว่าตัวนับก้อนกาแฟจะถูกรีเซ็ตเป็นศูนย์ และนับจํานวนก้อนกาแฟได้อย่างถูกต้อง
ปิดฝาเครื่องและใส่แท้งค์น้ำกลับเข้าไปที่เดิม
ปิดเครื่อง แล้วเปิดเครื่องใหม่อีกครั้ง
และรอให้ไฟในไอคอนเครื่องดื่มติดสว่าง
ลองถอดหัวชงอีกครั้ง ดูบท 'การถอดและใส่หัวชง'
เพื่อดูคำแนะนำทีละขั้นตอน
ปิดฝาเครื่องและใส่แท้งค์น้ำกลับเข้าไปที่เดิม
ปล่อยหัวชงไว้ข้างนอก ปิดเครื่องและถอดปลั๊กออก รอ
30 วินาที แล้วเสียบเครื่องกลับเข้ามา
เปิดเครื่องและรอให้ไฟในไอคอนเครื่องดื่มติดสว่าง
จากนั้นใส่หัวชงในตำแหน่งที่ถูกต้อง
และใส่กลับเข้าไปในเครื่องอีกครั้ง ดูบท
'การถอดและใส่หัวชง' เพื่อดูคำแนะนำทีละขั้นตอน
ถอดหัวชง (ดู 'การถอดหัวชงออกจากเครื่อง')
ล้างโดยการเปิดน้ำให้ไหลผ่าน และปล่อยให้แห้ง
จากนั้นหยดน้ำมันหล่อลื่นใส่ส่วนที่เคลื่อนไหว (ดู
'การหล่อลื่นหัวชง')
ชงกาแฟ 5 ถ้วยในการใช้งานครั้งแรก
เพื่อให้เครื่องได้ดำเนินขั้นตอนการปรับแต่งโดยอัตโนมัติจนเสร็จสมบูรณ์
ตัวบดถูกตั้งให้อยู่ในระดับที่หยาบเกินไป ตั้งค่าตัวบดให้อยู่ในระดับที่ละเอียดขึ้น (ต่ำลง)
กาแฟไม่ค่อยร้อน อุณหภูมิถูกตั้งให้ต่ำเกินไป ตั้งอุณหภูมิไว้ที่ค่าสูงสุด ปรับอุณหภูมิโดยกดไอคอน
แก้วที่เย็นจะทำให้อุณหภูมิของเครื่องดื่มลดลง
การเพิ่มนมจะทำให้อุณหภูมิของเครื่องดื่มลดลง
ชงเครื่องดื่ม 2 ถึง 3
แก้วเพื่อให้สามารถรับรู้ถึงความแตกต่างได้อย่างเต็มที่
'Settings'
อุ่นถ้วยให้ร้อนด้วยการล้างด้วยน้ำร้อน
ไม่ว่าคุณจะเพิ่มนมที่ร้อนหรือเย็น
การเพิ่มนมจะทำให้อุณหภูมิของกาแฟลดลงเสมอ
อุ่นถ้วยให้ร้อนด้วยการล้างด้วยน้ำร้อน
Page 59
ปัญหา สาเหตุ การแก้ปัญหา
กาแฟไม่ออกมา
หรือกาแฟออกมาช้า
ตัวกรองน้ำ AquaClean
ไม่ได้รับการเตรียมอย่างถูกต้องสำหรับการติดตั้ง
ถอดเครื่องกรอง AquaClean ออก
และจ่ายน้ำร้อนออกมาบางส่วน หากสามารถใช้งานได้
แสดงว่าติดตั้งเครื่องกรอง AquaClean ไม่ถูกต้อง
ติดตั้งใหม่และเปิดใช้งานเครื่องกรอง AquaClean
และทําตามขั้นตอนทั้งหมดในบท 'เครื่องกรองน้ำ
AquaClean'
หลังจากที่ไม่ได้ใช้งานเป็นเวลานาน
คุณจำเป็นต้องเตรียมเครื่องกรองน้ำ AquaClean
เพื่อการใช้งานอีกครั้ง และจ่ายน้ำร้อน 2-3 ถ้วย
ภาษาไทย
61
ตัวกรองน้ำ AquaClean อุดตัน เปลี่ยนตัวกรองน้ำ AquaClean ทุกๆ 3 เดือน
ตัวบดถูกตั้งให้อยู่ในระดับที่ละเอียดเกินไป ตั้งค่าตัวบดให้อยู่ในระดับที่หยาบขึ้น (สูงขึ้น)
หัวชงสกปรก ถอดหัวชง
ปากพวยรินกาแฟสกปรก ทำความสะอาดปากพวยรินกาแฟและช่องตรงปากพว-
ช่องใส่กาแฟที่บดไว้ล่วงหน้าอุดตัน ปิดเครื่องและถอดหัวชงออก
วงจรของเครื่องมีคราบหินปูนอุดตัน ขจัดคราบตะกรันออกจากเครื่องด้วยน้ำยาขจัดคราบต-
นมไม่กลายเป็นฟอง เครื่องที่มาพร้อม LatteGo: ประกอบ
LatteGo ไม่ถูกต้อง
เครื่องที่มาพร้อม LatteGo:
ภาชนะเก็บน้ำนมและ/หรือกรอบของ
LatteGo สกปรก
ตัวกรองที่มีอายุมากกว่า 3 เดือนอาจอุดตันได้
ภาษาไทย
โปรดทราบว่าการดำเนินการนี้จะส่งผลกระทบต่อรสชาติของกาแฟ
และล้างให้สะอาดโดยการเปิดน้ำให้ไหลผ่าน (ดู
'การทำความสะอาดหัวชงโดยเปิดน้ำให้ไหลผ่าน')
ยรินกาแฟด้วยที่ทำความสะอาดท่อหรือเข็ม
เปิดฝาปิดช่องใส่กาแฟที่บดไว้ล่วงหน้าแล้วใส่ด้ามจับช้อนเข้าไป
ขยับด้ามจับขึ้นลงจนกว่ากาแฟบดที่อุดตันอยู่จะร่วงลงมา (รูปที่ 34)
ะกรันของ Philips
ขจัดตะกรันทุกครั้งเมื่อเครื่องแจ้งเตือน
ตรวจดูให้แน่ใจว่าประกอบภาชนะเก็บน้ำนมเข้ากับกรอบของ LatteGo อย่างถูกต้อง (มีเสียง 'คลิก') (ดู
'การประกอบ LatteGo (เฉพาะบางรุ่นเท่านั้น)')
ถอดส่วนประกอบทั้งหมดของ LatteGo ออก
และล้างทั้งสองส่วนโดยเปิดน้ำให้ไหลผ่าน
หรือทำความสะอาดในเครื่องล้างจาน
เครื่องที่มาพร้อมที่ทำฟองนมแบบดั้งเดิม:
ประกอบที่ทำฟองนมไม่ถูกต้อง
ประเภทของนมที่ใช้ไม่เหมาะกับการทำฟองนม
ตรวจสอบให้แน่ใจว่าประกอบที่ทำฟองนมแบบดั้งเดิมอย่างถูกต้อง (ดู 'การประกอบที่ทำฟองนมแบบดั้งเดิม
(เฉพาะบางรุ่นเท่านั้น)')
นมประเภทที่แตกต่างกันจะให้ปริมาณของฟองนมและคุณภาพของฟองนมที่แตกต่างกัน
เราได้ทดสอบนมประเภทต่อไปนี้แล้วว่าให้ผลลัพธ์ของการตีฟองที่ดี นมกึ่งพร่องมันเนยหรือนมครบส่วน
และนมที่ปราศจากน้ำตาลแล็กโทส
Page 60
62
ภาษาไทย
ปัญหา สาเหตุ การแก้ปัญหา
มีนมซึมออกมาจากด้านล่างของภาชนะเก็บน้ำนม LatteGo
กรอบและภาชนะเก็บน้ำนมไม่ได้ถูกประกอบอย่างถูกต้อง
ก่อนอื่นให้ใส่ด้านบนของภาชนะเก็บน้ำนมเข้าไปใต้ขอล็อคที่ด้านบนของกรอบ
จากนั้นกดส่วนฐานของภาชนะเก็บน้ำนมให้เข้าที่
คุณจะได้ยินเสียงดังคลิกเมื่อส่วนดังกล่าวล็อคเข้าที่
ภาชนะเก็บน้ำนมและ/หรือกรอบของ
LatteGo สกปรก
เครื่องดูเหมือนจะมีการรั่วซึม เครื่องใช้น้ำเพื่อล้างทำความสะอาดวงจรภ-
ฉันไม่สามารถเปิดใช้งานตัวกรองน้ำ AquaClean ได้
และเครื่องขอให้ขจัดคราบตะกรัน
ตัวกรองน้ำใหม่ไม่พอดี คุณกำลังพยายามติดตั้งเครื่องกรองอื่นที่ไม่-
ายในและหัวชง
น้ำนี้จะไหลผ่านวงจรภายในลงไปยังถาดรองน้ำโดยตรง ซึ่งเป็นเรื่องปกติ
ถาดรองน้ำเต็มและล้น
ซึ่งทำให้ดูเหมือนว่าเครื่องมีการรั่วซึม
ไม่ได้ใส่แท้งค์น้ำจนสุด
น้ำบางส่วนรั่วออกจากแท้งค์น้ำ
และอากาศถูกดูดเข้าไปในเครื่อง
หัวชงสกปรก/อุดตัน ล้างหัวชง
เครื่องไม่ได้วางอยู่บนพื้นผิวราบ วางเครื่องบนพื้นผิวราบเพื่อให้ถาดรองน้ำไม่ล้น
ติดตั้งหรือเปลี่ยนเครื่องกรองไม่ทันเวลาที่กำหนด หลังจากที่หน้าจอแสดงคำเตือนของ
AquaClean
ซึ่งหมายความว่าเครื่องของคุณไม่ได้ปลอดคราบหินปูนแล้ว
ใช่เครื่องกรองน้ำ Philips AquaClean
ห่วงยางบนตัวกรองน้ำ AquaClean
อยู่ในตำแหน่งที่ไม่ถูกต้อง
ถอดส่วนประกอบทั้งหมดของ LatteGo ออก
และล้างทั้งสองส่วนโดยเปิดน้ำให้ไหลผ่าน
หรือทำความสะอาดในเครื่องล้างจาน
เทถาดรองน้ำทุกวัน หรือทันทีที่สัญลักษณ์
'ถาดรองน้ำเต็ม' โผล่พ้นฝาปิดถาดรองน้ำ เคล็ดลับ:
วางถ้วยไว้ใต้ปากพวยเพื่อรองน้ำที่ชะล้าง
และลดปริมาณน้ำในถาดรองน้ำ
เทถาดรองน้ำทุกวัน หรือทันทีที่สัญลักษณ์
'ถาดรองน้ำเต็ม' โผล่พ้นฝาปิดถาดรองน้ำ
ตรวจสอบว่าแท้งค์น้ำอยู่ในตำแหน่งที่ถูกต้อง
ถอดและใส่เข้าไปใหม่อีกครั้งโดยดันเข้าไปให้ลึกที่สุด
และสัญลักษณ์ 'ถาดรองน้ำเต็ม' ทำงานอย่างถูกต้อง
ขจัดคราบตะกรันออกจากเครื่องของคุณก่อน
แล้วจึงติดตั้งตัวกรองน้ำ AquaClean
เครื่องกรองน้ำ Philips AquaClean
เท่านั้นที่ใส่ในเครื่องได้พอดี
ใส่ห่วงยางบนตัวกรองน้ำ AquaClean กลับเข้าไป
เครื่องมีเสียงดัง การที่เครื่องของคุณมีเสียงดังบ้างระหว่างใ-
ช้งานเป็นเรื่องปกติ
ตัวกรองน้ำ AquaClean
ไม่ได้รับการเตรียมอย่างถูกต้อง
และอากาศถูกดูดเข้าไปในเครื่อง
ไม่ได้ใส่แท้งค์น้ำให้เข้าไปจนสุด
และอากาศถูกดูดเข้าไปในเครื่อง
หากเครื่องเริ่มมีเสียงแปลกๆ
ให้ทำความสะอาดหัวชงและหยดน้ำมันหล่อลื่น (ดู
'การหล่อลื่นหัวชง')
ถอดตัวกรองน้ำ AquaClean ออกจากแท้งค์น้ำ
และเตรียมอย่างถูกต้องเพื่อการใช้งานก่อนที่จะใส่กลับเข้าไปในเครื่อง ดูบท 'ตัวกรองน้ำ AquaClean'
เพื่อดูคำแนะนำทีละขั้นตอน
ตรวจสอบว่าแท้งค์น้ำอยู่ในตำแหน่งที่ถูกต้อง
ถอดและใส่เข้าไปใหม่อีกครั้งโดยดันเข้าไปให้ลึกที่สุด
Page 61
ข้อมูลทางเทคนิค
ผู้ผลิตขอสงวนสิทธิ์ในการปรับปรุงข้อมูลทางเทคนิคของผลิตภัณฑ์ ปริมาณที่กำหนดไว้ทั้งหมดเป็นค่าโดยประมาณ
ลักษณะ ค่า
ภาษาไทย
63
ขนาด (กว้าง x สูง x หนา)
น้ำหนัก 7 - 7.5 กก.
ความยาวสายไฟ 1200 มม.
แท้งค์น้ำ 1.8 ลิตร
ความจุของที่ใส่เมล็ดกาแฟ 275 กรัม
ความจุของที่ใส่กากกาแฟ 12 ก้อน
ความจุของ LatteGo (ภาชนะเก็บน้ำนม) 250 มล.
ความสูงของปากพวยแบบปรับได้ 88แรงดันไฟฟ้าที่ระบุ - ระดับกำลังไฟ - แหล่งจ่ายไฟ ดูป้ายข้อมูลที่อยู่ด้านในฝาเครื่อง (รูป
377 x 434 มม.
246 x
145 มม.
ภาษาไทย
A11)
Page 62

Page 63
ﺔﻴﺑﺮﻌﻟﺍ
64
ﺕﺎﻳﻮﺘﺤﻤﻟﺍ
64 ___________________________________________________________________________(ﺃ ﻞﻜﺸﻟﺍ) ﺔﻨﻴﻛﺎﻤﻟﺍ ﻰﻠﻋ ﺔﻣﺎﻋ ﺓﺮﻈﻧ
65 __________________________________________________________________________________________ﻢﻜﺤﺘﻟﺍ ﺔﺣﻮﻟ
65 _____________________________________________________________________________________________ ﺔﻣﺪﻘﻣ
66 ______________________________________________________________________________________ ﻡﺍﺪﺨﺘﺳﺍ ﻝﻭﺃ ﻞﺒﻗ
67 ______________________________________________________________________________________ﺕﺎﺑﻭﺮﺸﻤﻟﺍ ﺮﻴﻀﺤﺗ
69 ____________________________________________________________________________________ ﺕﺎﺑﻭﺮﺸﻤﻟﺍ ﺺﻴﺼﺨﺗ
70 __________________________________________________________________________________ ﺔﻨﻴﻛﺎﻤﻟﺍ ﺕﺍﺩﺍﺪﻋﺇ ﻂﺒﺿ
71 ____________________________________________________________________________ ﺎﻬﺒﻴﻛﺮﺗﻭ ﺮﻴﻀﺤﺘﻟﺍ ﺔﻋﻮﻤﺠﻣ ﺔﻟﺍﺯﺇ
71 ______________________________________________________________________________________ ﺔﻧﺎﻴﺼﻟﺍﻭ ﻒﻴﻈﻨﺘﻟﺍ
74 __________________________________________________________________________________ AquaClean ﻩﺎﻴﻣ ﺮﺘﻠﻓ
75 ___________________________________________________________________________ (ﺔﻘﻴﻗﺩ 30) ﺕﺎﺒﺳﺮﺘﻟﺍ ﺔﻟﺍﺯﺇ ءﺍﺮﺟﺇ
76 ________________________________________________________________________________________ ﺕﺎﻘﺤﻠﻤﻟﺍ ﺐﻠﻃ
76 ______________________________________________________________________________ ﺎﻬﺣﻼﺻﺇﻭ ءﺎﻄﺧﻷﺍ ﻑﺎﺸﻜﺘﺳﺍ
81 ______________________________________________________________________________________ ﺔﻴﻨﻔﻟﺍ ﺕﺎﻔﺻﺍﻮﻤﻟﺍ
(ﺃ ﻞﻜﺸﻟﺍ) ﺔﻨﻴﻛﺎﻤﻟﺍ ﻰﻠﻋ ﺔﻣﺎﻋ ﺓﺮﻈﻧ
ﺔﻣﺪﺨﻟﺍ ﺏﺎﺑ 10 - ﺃ ﻢﻜﺤﺘﻟﺍ ﺔﺣﻮﻟ 1 - ﺃ
ﻉﻮﻨﻟﺍ ﻢﻗﺭ ﻊﻣ ﺕﺎﻧﺎﻴﺒﻟﺍ ﻖﺼﻠﻣ 11 - ﺃ ﺏﻮﻜﻟﺍ ﻞﻣﺎﺣ 2 - ﺃ
ﻩﺎﻴﻣ ﻥﺍﺰﺧ 12 - ﺃ ﻥﻮﺤﻄﻤﻟﺍ ﻦﺒﻟﺍ ﺓﺮﺠﺣ 3 - ﺃ
ﻦﺧﺎﺴﻟﺍ ءﺎﻤﻟﺍ ﺔﻫﻮﻓ 13 - ﺃ ﺏﻮﺒﺤﻟﺍ ﻊﻤﻗ ءﺎﻄﻏ 4 - ﺃ
ﺓﻮﻬﻘﻟﺍ ﺐﺳﺍﻭﺭ ﺔﻳﻭﺎﺣ 14 - ﺃ ﻞﻳﺪﻌﺘﻠﻟ ﺔﻠﺑﺎﻗ ﺓﻮﻬﻗ ﺔﻫﻮﻓ 5 - ﺃ
ﺓﻮﻬﻘﻟﺍ ﺐﺳﺍﻭﺭ ﺔﻳﻭﺎﺤﻟ ﺔﻴﻣﺎﻣﻷﺍ ﺔﺣﻮﻠﻟﺍ 15 - ﺃ ﺔﻗﺎﻄﻟﺍ ﻚﻠﺴﻟ ﺲﺒﻘﻣ 6 - ﺃ
ﻂﻴﻘﻨﺘﻟﺍ ﺔﻴﻨﻴﺻ ءﺎﻄﻏ 16 - ﺃ ﻦﺤﻄﻟﺍ ﺩﺍﺪﻋﺇ ﺾﺒﻘﻣ 7 - ﺃ
ﻂﻴﻘﻨﺘﻟﺍ ﺔﻴﻨﻴﺻ 17 - ﺃ ﺓﻮﻬﻘﻟﺍ ﺏﻮﺒﺣ ﻊﻤﻗ 8 - ﺃ
"ﺔﺌﻠﺘﻤﻣ ﻂﻴﻘﻨﺘﻟﺍ ﺔﻴﻨﻴﺻ" ﺮﺷﺆﻣ 18 - ﺃ ﺮﻴﻀﺤﺘﻟﺍ ﺔﻋﻮﻤﺠﻣ 9 - ﺃ
ﺕﺎﻘﺤﻠﻤﻟﺍ
ءﺎﻤﻟﺍ ﺮﺴﻋ ﺭﺎﺒﺘﺧﺍ ﻂﻳﺮﺷ 23 - ﺃ ﺔﻗﺎﻄﻟﺍ ﻚﻠﺳ 19 - ﺃ
(ﻂﻘﻓ ﺓﺩﺪﺤﻣ ﻉﺍﻮﻧﺃ) ﻲﻜﻴﺳﻼﻜﻟﺍ ﺐﻴﻠﺤﻟﺍ ﺩﺎﺑﺯﺇ ﺯﺎﻬﺟ 24 - ﺃ ﻡﻮﺤﺸﻟﺍ ﺏﻮﺒﻧﺃ 20 - ﺃ
(ﻂﻘﻓ ﺓﺩﺪﺤﻣ ﻉﺍﻮﻧﺃ) (ﺐﻴﻠﺤﻟﺍ ﺔﻳﻭﺎﺣ) LatteGo 25ﺃ AquaClean ﻩﺎﻴﻤﻟﺍ ﺮﺘﻠﻓ 21 - ﺃ
ﺱﺎﻴﻘﻟﺍ ﺔﻓﺮﻐﻣ 22 - ﺃ
Page 64
ﺔﻴﺑﺮﻌﻟﺍ
ﻢﻜﺤﺘﻟﺍ ﺔﺣﻮﻟ
ﺩﻮﺟﻮﻤﻟﺍ ﻉﻮﻨﻟﺍ ﻢﻗﺭ ﻰﻠﻋ ﺭﻮﺜﻌﻟﺍ ﻚﻨﻜﻤﻳ .ﻪﺑ ﺹﺎﺧ ﻉﻮﻧ ﻢﻗﺭ ﻪﻟ ﺭﺍﺪﺻﺇ ﻞﻛ .ﺔﻔﻠﺘﺨﻣ ﻢﻜﺤﺗ ﺕﺎﺣﻮﻟ ﻊﻣ ،ﻮﺳﺮﺒﺳﻹﺍ ﺮﻴﻀﺤﺗ ﺔﻨﻴﻛﺎﻣ ﻦﻣ ﺓﺩﺪﻌﺘﻣ ﺕﺍﺭﺍﺪﺻﺇ ﻙﺎﻨﻫ
."ﻢﻋﺪﻟﺍ" ﺪﻳﺪﺤﺗﻭ
ﺔﻴﺑﺮﻌﻟﺍ
ﺕﺍﺩﺍﺪﻋﻹﺍ ﺰﻣﺭ ﻰﻠﻋ ﻂﻐﻀﻟﺎﺑ ﻉﻮﻨﻟﺍ ﻢﻗﺭ ﻰﻠﻋ ﺭﻮﺜﻌﻟﺍ ﺎﹱﻀﻳﺃ ﻚﻨﻜﻤﻳ .(11ﺃ ﻞﻜﺸﻟﺍ) ﺔﻣﺪﺨﻟﺍ ﺏﺎﺑ ﻞﺧﺍﺩ ﺩﻮﺟﻮﻤﻟﺍ ﺕﺎﻧﺎﻴﺒﻟﺍ ﻖﺼﻠﻣ ﻰﻠﻋ
.ﻞﻔﺳﻷﺍ ﻲﻓ ﻒﺻﻮﻟﺍ ﺪﺠﺗ .ﺯﻮﻣﺮﻟﺍﻭ ﺭﺍﺭﺯﻷﺍ ﻞﻛ ﻰﻠﻋ ﺔﻣﺎﻋ ﺓﺮﻈﻧ ءﺎﻘﻟﻹ (ـﻫ)ﻭ (ﺩ)ﻭ ،(ﺝ) ﻝﺎﻜﺷﻷﺍ ﻰﻟﺇ ﻊﺟﺭﺍ
.ﻚﺗﺍﺭﺎﻴﺘﺧﺍ ﺪﻴﻛﺄﺗﻭ ﺪﻳﺪﺤﺘﻠﻟ "ﻖﻓﺍﻮﻣ" ﺰﻣﺭ ﻰﻠﻋ ﻂﻐﺿﺍﻭ ﺔﺷﺎﺸﻟﺍ ﺮﺒﻋ ﻞﻘﻨﺘﻠﻟ ﻞﻔﺳﻷﻭ ﻰﻠﻋﻷ ﻦﻴﻤﻬﺴﻟﺍ ﻡﺪﺨﺘﺳﺍﻭ
(C/D/E .ﻞﻜﺷ) ﻝﺎﻜﺷﻷﺍ ﻞﻛ
ﻒﻴﻈﻨﺘﻟﺍ ﺔﻤﺋﺎﻗ .6ﺝ ،ﻒﻠﺨﻠﻟ ،ﻞﻔﺳﻷ ،ﻰﻠﻋﻷ) ﻞﻘﻨﺘﻟﺍ ﺯﻮﻣﺭ .3ﺝ
(ﻖﻓﺍﻮﻣ
ﺔﻴﺼﺨﺸﻟﺍ ﺕﻼﻴﻀﻔﺘﻟﺍ .7ﺝ ﺔﺷﺎﺸﻟﺍ .4ﺝ ﺭﺯ ﻑﺎﻘﻳﻹﺍ/ءﺪﺒﻟﺍ .2ﺝ
ﻑﺎﻘﻳﻹﺍ/ﻞﻴﻐﺸﺘﻟﺍ ﺭﺯ .8ﺝ ﺔﻨﻴﻛﺎﻤﻟﺍ ﺕﺍﺩﺍﺪﻋﺇ .5ﺝ ﻯﺮﺧﺃ ﺕﺎﺑﻭﺮﺸﻣ ﺔﻤﺋﺎﻗ 2ـﻫ/2ﺩ
ﺮﻴﻀﺤﺘﻟﺍ ﺔﻌﻳﺮﺳ ﺕﺎﺑﻭﺮﺸﻤﻟﺍ ﺯﻮﻣﺭ C1/D1/E1
(ﺝ ﻞﻜﺸﻟﺍ) ﻂﻘﻓ EP4321 ،EP4324 ،EP4327
ﺭﺎﺨﺑﻭ ﻦﺧﺎﺳ ءﺎﻣ ،ﻮﺘﻳﺮﺘﺴﻳﺭ ،ﺓﻮﻬﻗ ﺔﻤﻳﺮﻛ ،ﻮﻧﺎﻜﻳﺮﻣﺃ ،ﺓﻮﻬﻗ ،ﻮﺳﺮﺒﺳﺇ :ﺮﻴﻀﺤﺘﻟﺍ ﺔﻌﻳﺮﺳ ﺕﺎﺑﻭﺮﺸﻤﻟﺍ ﺯﻮﻣﺭ 1ﺝ
(ﺩ ﻞﻜﺸﻟﺍ) ﻂﻘﻓ EP4341 ،EP4343 ،EP4346 ،EP4349
ﺐﻴﻠﺤﻟﺎﺑ ﺓﻮﻬﻗ ،ﻦﺧﺎﺳ ءﺎﻣ ،ﻮﺗﺎﻴﻛﺎﻣ ﻪﻴﺗﻻ ،ﻮﻨﻴﺸﺘﺑﺎﻛ ،ﻮﻧﺎﻜﻳﺮﻣﺃ ،ﺓﻮﻬﻗ ،ﻮﺳﺮﺒﺳﺇ :ﺮﻴﻀﺤﺘﻟﺍ ﺔﻌﻳﺮﺳ ﺕﺎﺑﻭﺮﺸﻤﻟﺍ ﺯﻮﻣﺭ 1ﺩ
(ـﻫ ﻞﻜﺸﻟﺍ) ﻂﻘﻓ EP5441 ،EP5443 ،EP5444 ،EP5446 ،EP5447
ﺐﻴﻠﺤﻟﺎﺑ ﺓﻮﻬﻗ ،ﻦﺧﺎﺳ ءﺎﻣ ،ﻮﺗﺎﻴﻛﺎﻣ ﻪﻴﺗﻻ ،ﻮﻨﻴﺸﺘﺑﺎﻛ ،ﻮﻧﺎﻜﻳﺮﻣﺃ ،ﺓﻮﻬﻗ ،ﻮﺳﺮﺒﺳﺇ :ﺮﻴﻀﺤﺘﻟﺍ ﺔﻌﻳﺮﺳ ﺕﺎﺑﻭﺮﺸﻤﻟﺍ ﺯﻮﻣﺭ 1ـﻫ
65
ﺔﻣﺪﻘﻣ
ﻞﻴﺠﺴﺘﺑ ﻞﻀﻔﺗ ،Philips ﻩﺮﻓﻮﺗ ﻱﺬﻟﺍ ﻢﻋﺪﻟﺍ ﻦﻣ ﻞﻣﺎﻛ ﻞﻜﺸﺑ ﺓﺩﺎﻔﺘﺳﻼﻟ !ﺲﺒﻴﻠﻴﻓ ﻦﻣ ﻞﻣﺎﻜﻟﺎﺑ ﺔﻴﻜﻴﺗﺎﻣﻮﺗﻭﻷﺍ ﺓﻮﻬﻘﻟﺍ ﻊﻨﺻ ﺔﻨﻴﻛﺎﻤﻟ ﻚﺋﺍﺮﺷ ﻰﻠﻋ ﺎﻨﻴﻧﺎﻬﺗ
.ﺐﻴﺘﻜﻟﺍ ﺍﺬﻫ ﻲﻓ (1 ﻞﻜﺸﻟﺍ) QR ﺰﻣﺭ ﺓءﺍﺮﻗ ﻭﺃ www.philips.com/registeryourcoffee ﻰﻠﻋ ﻚﺠﺘﻨﻣ
.ﻞﺒﻘﺘﺴﻤﻟﺍ ﻲﻓ ﻪﻴﻟﺇ ﻉﻮﺟﺮﻠﻟ ﻪﻈﻔﺣﺍﻭ ﺓﺮﻣ ﻝﻭﻷ ﺔﻨﻴﻛﺎﻤﻟﺍ ﻡﺍﺪﺨﺘﺳﺍ ﻞﺒﻗ ﺔﻳﺎﻨﻌﺑ ﻞﺼﻔﻨﻤﻟﺍ ﺔﻣﻼﺴﻟﺍ ﺐﻴﺘﻛ ﺃﺮﻗﺍ
:ﺪﺠﺗ ﻕﻭﺪﻨﺼﻟﺍ ﻲﻓ .ﺓﺩﺪﻌﺘﻣ ﻕﺮﻄﺑ ﻢﻋﺪﻟﺍ ﺲﺒﻴﻠﻴﻓ ﺔﻛﺮﺷ ﻡﺪﻘﺗ ،ﺔﻨﻴﻛﺎﻤﻟﺍ ﻦﻣ ﺞﺋﺎﺘﻨﻟﺍ ﻞﻀﻓﺃ ﻰﻠﻋ ﻝﻮﺼﺤﻟﺍﻭ ءﺪﺒﻟﺍ ﻰﻠﻋ ﻚﺗﺪﻋﺎﺴﻤﻟ
.ﻢﻋﺪﻟﺍ ﺪﻳﺪﺤﺗﻭ
ﺔﻨﻴﻛﺎﻤﻟﺍ ﻥﺃ ﻚﻟ ﻦﻤﻀﻧ ﻦﺤﻧ ،ﻚﻟﺫ ﻊﻣﻭ .ﺓﻮﻬﻘﻟﺍ ﺎﻳﺎﻘﺑ ﻦﻣ ﺾﻌﺑ ﻰﻘﺒﻳ ﺪﻗ ،ﺔﻳﺎﻨﻌﺑ ﺎﻬﻔﻴﻈﻨﺗ ﻢﺗ ﻪﻧﺃ ﻦﻣ ﻢﻏﺮﻟﺍ ﻰﻠﻋ .ﺓﻮﻬﻘﻟﺎﺑ ﺔﻨﻴﻛﺎﻤﻟﺍ ﻩﺬﻫ ﺭﺎﺒﺘﺧﺍ ﻢﺗ
ﺔﻨﻴﻛﺎﻤﻠﻟ ﺡﺎﻤﺴﻠﻟ ﺔﻳﺍﺪﺒﻟﺍ ﻲﻓ ﺓﻮﻬﻘﻟﺍ ﻦﻣ ﻉﺍﻮﻧﺃ 5 ﺮﻴﻤﺨﺗ ﺐﺠﻳ .ﻕﺍﺬﻣ ﻞﻀﻓﺄﺑ ﺓﻮﻬﻘﻟﺍ ﻊﻨﺼﻟ ﻡﺪﺨﺘﺴﻤﻟﺍ ﻥﻮﺤﻄﻤﻟﺍ ﻦﺒﻟﺍ ﺔﻴﻤﻛ ﻂﺒﻀﺑ ﺎﹱﻴﺋﺎﻘﻠﺗ ﺔﻨﻴﻛﺎﻤﻟﺍ ﻡﻮﻘﺗ
ﺕﺍﺩﺍﺪﻋﻹﺍ ﺰﻣﺭ ﻰﻠﻋ ﻂﻐﻀﻟﺎﺑ QR ﺰﻣﺭ ﻰﻠﻋ ﺭﻮﺜﻌﻟﺍ ﺎﹱﻀﻳﺃ ﻚﻨﻜﻤﻳ . www.philips.com/coffee-care
.ﺎﹱﻣﺎﻤﺗ ﺓﺪﻳﺪﺟ
.ﻲﺗﺍﺬﻟﺍ ﺎﻬﺘﺒﺿ ﻝﺎﻤﻛﺈﺑ
.ﻝﻭﻷﺍ ﻡﺍﺪﺨﺘﺳﻻﺍ ﻞﺒﻗ ﻲﻜﻴﺳﻼﻜﻟﺍ ﺐﻴﻠﺤﻟﺍ ﺩﺎﺑﺯﺇ ﺯﺎﻬﺟ ﻭﺃ (ﺐﻴﻠﺤﻟﺍ ﺔﻳﻭﺎﺣ) LatteGo ﻒﻄﺷ ﻦﻣ ﺪﻛﺄﺗ
1.ﺔﻧﺎﻴﺼﻟﺍﻭ ﻒﻴﻈﻨﺘﻟﺍ ﻦﻋ ﹰﻼﻴﺼﻔﺗ ﺮﺜﻛﺃ ﺕﺎﻣﻮﻠﻌﻣﻭ ﺭﻮﺼﻟﺍ ﻰﻟﺇ ﺓﺪﻨﺘﺴﻤﻟﺍ ﻡﺍﺪﺨﺘﺳﻻﺍ ﺕﺎﻤﻴﻠﻌﺗ ﻊﻣ ﺍﺬﻫ ﻡﺪﺨﺘﺴﻤﻟﺍ ﻞﻴﻟﺩ
2 .ﺔﻨﻣﺁ ﺔﻘﻳﺮﻄﺑ ﺔﻨﻴﻛﺎﻤﻟﺍ ﻡﺍﺪﺨﺘﺳﺍ ﺔﻴﻔﻴﻛ ﻝﻮﺣ ﺕﺎﻤﻴﻠﻌﺗ ﻊﻣ ﻞﺼﻔﻨﻤﻟﺍ ﺔﻣﻼﺴﻟﺍ ﺐﻴﺘﻛ
3ﺓﺭﺎﻳﺰﺑ ﻞﻀﻔﺗ ﻭﺃ ﺐﻴﺘﻜﻟﺍ ﺍﺬﻫ ﻑﻼﻏ ﻰﻠﻋ QR ﺰﻣﺭ ﺃﺮﻗﺍ ،(ﺦﻟﺇ ﻡﻼﻓﻷﺍﻭ ﺔﻟﻭﺍﺪﺘﻤﻟﺍ ﺔﻠﺌﺳﻷﺍ) ﺖﻧﺮﺘﻧﻹﺍ ﺮﺒﻋ ﻢﻋﺪﻟﺍ ﻰﻠﻋ ﻝﻮﺼﺤﻠﻟ
Page 65
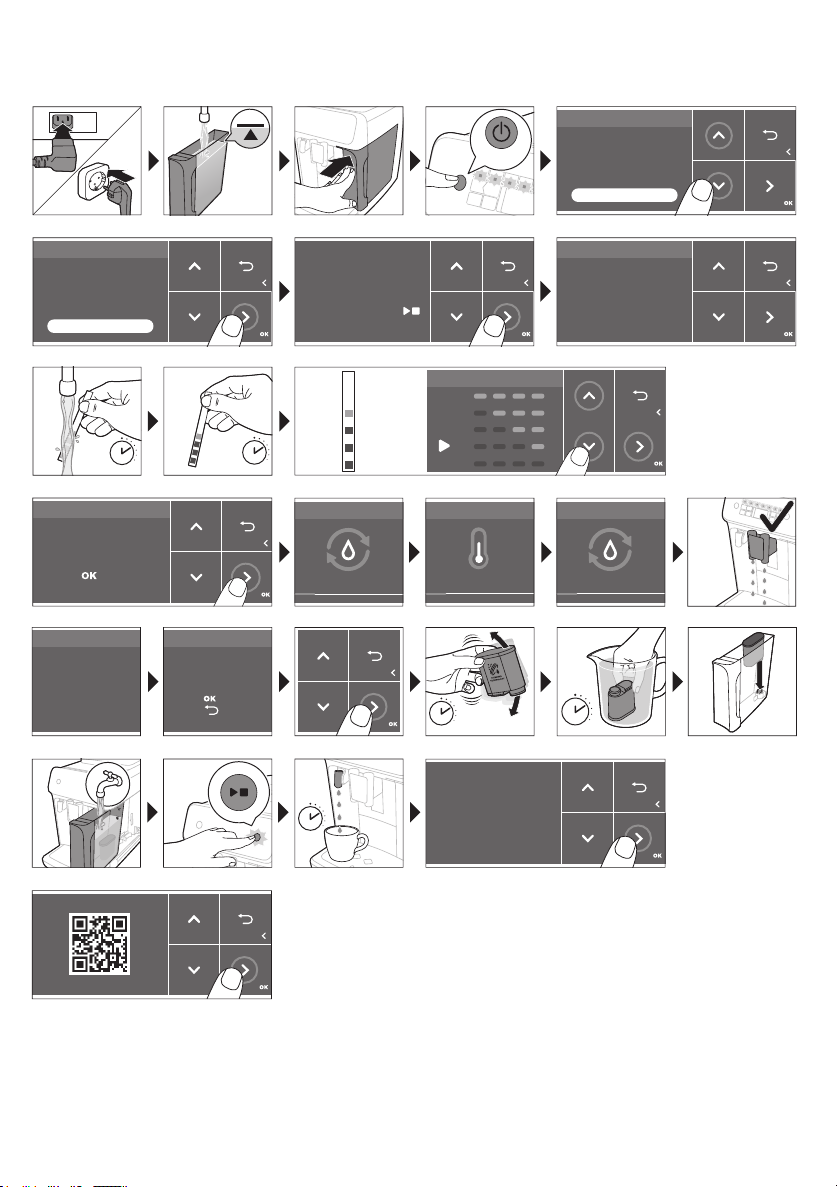
66
ON
,WDOLDQR
1HGHUODQGV
(QJOLVK
(VSD³RO
/DQJXDJH
:DWHUKDUGQHVV
,WDOLDQR
1HGHUODQGV
(QJOLVK
(VSD³RO
/DQJXDJH
)ROORZWKHQH[WVWHSV
WRVHWWKHFRUUHFW
ZDWHUKDUGQHVVOHYHO
<RXDUHDERXW
WRVHWWKHODQJXDJH
WR(QJOLVK
3UHVVVWDUWVWRS
WRFRQILUP
:DWHUKDUGQHVV
<RXVHOHFWHG
UHGVTXDUHV
3UHVVWRFRQILUP
+HDWLQJXS
+HDWLQJ
5LQVLQJ
5LQVLQJ
)LOOLQJZDWHUFLUFXLW
)LOOLQJ
=
:DWHUKDUGQHVV
1 sec.
1 min.
5 sec.
30 sec.
1 min.
$TXD&OHDQ
8VH$TXD&OHDQILOWHU
WRHQMR\FXSV
ZLWKRXWGHVFDOLQJ
$OPRVWUHDG\
)LOOEHDQVUHILOOZDWHU
WDQNDQGHQMR\
\RXUFRIIHH
5HJLVWHU\RXUSURGXFW
9LVLWZZZSKLOLSVFRP
$TXD&OHDQ
:RXOG\RXLQVWDOO
DQ$TXD&OHDQILOWHU"
3UHVVWRFRQILUP
3UHVVWRUHIXVH
ﺔﻴﺑﺮﻌﻟﺍ
ﻡﺍﺪﺨﺘﺳﺍ ﻝﻭﺃ ﻞﺒﻗ
Page 66
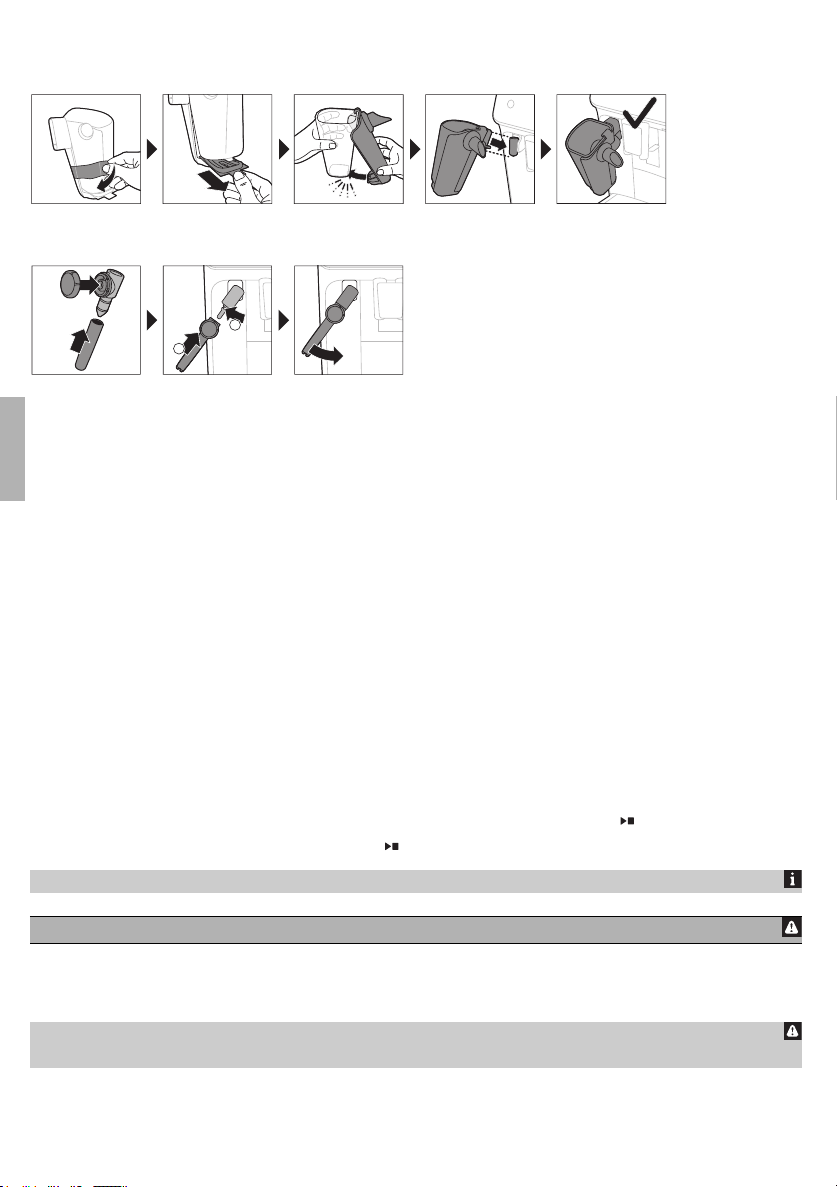
ﺔﻴﺑﺮﻌﻟﺍ
CLICK
1
2
ﺔﻴﺑﺮﻌﻟﺍ
(ﻂﻘﻓ ﺓﺩﺪﺤﻣ ﻉﺍﻮﻧﺃ) LatteGo ﻊﻴﻤﺠﺗ
(ﻂﻘﻓ ﺓﺩﺪﺤﻣ ﻉﺍﻮﻧﺃ) ﻲﻜﻴﺳﻼﻜﻟﺍ ﺐﻴﻠﺤﻟﺍ ﺩﺎﺑﺯﺇ ﺯﺎﻬﺟ ﻊﻴﻤﺠﺗ
ﺕﺎﺑﻭﺮﺸﻤﻟﺍ ﺮﻴﻀﺤﺗ
ﺔﻣﺎﻋ ﺕﺍﻮﻄﺧ
.ﺔﻴﺋﺎﻘﻠﺘﻟﺍ ﻒﻄﺸﻟﺍ ﺓﺭﻭﺩ ﺬﻔﻨﺗﻭ ﻦﻴﺨﺴﺘﻟﺍ ﻲﻓ ﺔﻨﻴﻛﺎﻤﻟﺍ ﺃﺪﺒﺗ
.ﻡﺍﺪﺨﺘﺳﻼﻟ ﺓﺰﻫﺎﺟ ﺔﻨﻴﻛﺎﻤﻟﺍ ﻥﻮﻜﺗ ،ﺭﺍﺮﻤﺘﺳﺎﺑ ﺕﺎﺑﻭﺮﺸﻤﻟﺍ ﺯﻮﻣﺭ ﻲﻓ ءﺍﻮﺿﻷﺍ ﻊﻴﻤﺟ ءﻲﻀﺗ ﺎﻣﺪﻨﻋ
67
1.ﺏﻮﺒﺤﻟﺎﺑ ﺏﻮﺒﺤﻟﺍ ﻊﻤﻗ ﻸﻣﺍﻭ ﺔﻴﻔﻨﺤﻟﺍ ﻩﺎﻴﻤﺑ ﻩﺎﻴﻤﻟﺍ ﻥﺍﺰﺧ ﻸﻣﺍ
2.ﻱﺭﺍﺪﺠﻟﺍ ﺲﺒﻘﻤﻟﺍ ﻲﻓ ﻲﺋﺎﺑﺮﻬﻜﻟﺍ ﺭﺎﻴﺘﻟﺍ ﺲﺑﺎﻗ ﻞﺧﺩﺃ .ﺔﻨﻴﻛﺎﻤﻟﺍ ﻦﻣ ﻲﻔﻠﺨﻟﺍ ءﺰﺠﻟﺎﺑ ﺩﻮﺟﻮﻤﻟﺍ ﺲﺒﻘﻤﻟﺍ ﻲﻓ ﺮﻴﻐﺼﻟﺍ ﺲﺑﺎﻘﻟﺍ ﻞﺧﺩﺃ
3.ﺔﻨﻴﻛﺎﻤﻟﺍ ﻞﻴﻐﺸﺘﻟ ﻞﻴﻐﺸﺘﻟﺍ ﻑﺎﻘﻳﺇ/ﻞﻴﻐﺸﺘﻟﺍ ﺭﺯ ﻰﻠﻋ ﻂﻐﺿﺍ
-
4ﻞﻜﺸﻟﺍ) ﻪﻣﺪﺨﺘﺴﺗ ﻱﺬﻟﺍ ﺱﺄﻜﻟﺍ ﻭﺃ ﺏﻮﻜﻟﺍ ﻢﺠﺣ ﻰﻟﺇ ﺎﻬﻋﺎﻔﺗﺭﺍ ﻂﺒﻀﻟ ﻞﻔﺳﻷ ﻭﺃ ﻰﻠﻋﻷ ﺓﻮﻬﻘﻟﺍ ﺐﺻ ﺔﻫﻮﻓ ﺔﻟﺎﻣﺈﺑ ﻢﻗ .ﺓﻮﻬﻘﻟﺍ ﺐﺻ ﺔﻫﻮﻓ ﺖﺤﺗ ﺎﹱﺑﻮﻛ ﻊﺿ
.(2
ﺏﻮﺒﺤﻟﺍ ﻦﻣ ﺔﻋﻮﻨﺼﻤﻟﺍ ﺓﻮﻬﻘﻟﺍ ﺮﻴﻀﺤﺗ
ﻰﻠﻋ ﻂﻐﺿﺍ .ﺓﻮﻬﻘﻟﺍ ﺰﻴﻛﺮﺗ ﻂﺒﻀﻟ ﻞﻔﺳﻷﻭ ﻰﻠﻋﻷ (6 ﻞﻜﺸﻟﺍ) ﻦﻴﻤﻬﺴﻟﺍ ﻡﺪﺨﺘﺳﺍﻭ .ﻞﻀﻔﻤﻟﺍ (5 ﻞﻜﺸﻟﺍ) ﻚﻗﺍﺬﻣ ﺐﺴﺣ ﺏﻭﺮﺸﻤﻟﺍ ﻂﺒﺿ ﻥﻵﺍ ﻚﻨﻜﻤﻳ
.(7 ﻞﻜﺸﻟﺍ) ﺕﺍﺩﺍﺪﻋﻹﺍ ﻦﻣ ﺪﻳﺰﻤﻟﺍ ﻂﺒﺿ ﺪﻳﺮﺗ ﺖﻨﻛ ﺍﺫﺇ "ﻖﻓﺍﻮﻣ" ﺰﻣﺭ
ﻑﺎﻘﻳﻹﺍ/ءﺪﺒﻟﺍ ﺭﺯ ﻰﻠﻋ ﻂﻐﺿﺍ
.ﺺﺼﺨﻤﻟﺍ ﻂﻳﺮﺸﻟﺍ ﻚﻳﺮﺤﺘﺑ 2x ﺰﻣﺭ ﺩﺪﺣ ﻭﺃ ﻦﻴﺗﺮﻣ ﺏﻭﺮﺸﻤﻟﺍ ﺰﻣﺭ ﻰﻠﻋ ﻂﻐﺿﺍ ،ﻪﺴﻔﻧ ﺖﻗﻮﻟﺍ ﻲﻓ ﺓﻮﻬﻘﻟﺍ ﻦﻣ ﻦﻴﺑﻮﻛ ﺮﻴﻀﺤﺘﻟ
.ﺔﻬﻜﻨﺑ ﻭﺃ ﻞﻴﻣﺍﺮﻜﺑ ﺔﻃﻮﻠﺨﻤﻟﺍ ﺓﻮﻬﻘﻟﺍ ﺏﻮﺒﺣ ﻡﺪﺨﺘﺴﺗ ﻻ
(ﺐﻴﻠﺤﻟﺍ ﺔﻳﻭﺎﺣ) LatteGo ﺯﺎﻬﺟ ﻝﻼﺧ ﻦﻣ ﺐﻴﻠﺤﻟﺍ ﻰﻠﻋ ﻱﻮﺘﺤﺗ ﻲﺘﻟﺍ ﺕﺎﺑﻭﺮﺸﻤﻟﺍ ﺮﻴﻀﺤﺗ
ءﻞﻣ ﻞﺒﻗ ﺢﻴﺤﺻ ﻞﻜﺸﺑ ﺐﻴﻠﺤﻟﺍ ﺔﻳﻭﺎﺣﻭ ﺭﺎﻃﻹﺍ ﻊﻴﻤﺠﺗ ﻦﻣ ﺪﻛﺄﺗ ،ﺏﺮﺴﺘﻟﺍ ﺐﻨﺠﺘﻟ .ﻦﻳﺰﺨﺘﻟﺍ ءﺎﻄﻏﻭ ﺭﺎﻃﺇﻭ ﺐﻴﻠﺤﻟﺍ ﺔﻳﻭﺎﺣ ﻦﻣ LatteGo ﺯﺎﻬﺟ ﻥﻮﻜﺘﻳ
.(9 ﻞﻜﺸﻟﺍ) ﺎﻬﻧﺎﻜﻣ ﻲﻓ ﺖﺒﺜﺗ ﺎﻣﺪﻨﻋ ﺓﺮﻘﻧ ﻊﻤﺴﺗ .ﺐﻴﻠﺤﻟﺍ ﺔﻳﻭﺎﺣ ﻦﻣ ﻲﻠﻔﺴﻟﺍ ءﺰﺠﻠﻟ "ﺺﺼﺨﻤﻟﺍ ﻥﺎﻜﻤﻟﺍ"
1.(ﻂﻘﻓ ﺓﺩﺪﺤﻣ ﻉﺍﻮﻧﺃ) "ﻯﺮﺧﺃ ﺕﺎﺑﻭﺮﺸﻣ" (4 ﻞﻜﺸﻟﺍ) ﺰﻣﺭ ﻰﻠﻋ ﻂﻐﺿﺍ ﻭﺃ (3 ﻞﻜﺸﻟﺍ) ﻩﺭﺎﺘﺨﺗ ﻱﺬﻟﺍ ﺏﻭﺮﺸﻤﻟﺍ ﺰﻣﺭ ﻰﻠﻋ ﻂﻐﺿﺍ ،ﺓﻮﻬﻘﻟﺍ ﻦﻣ ﺏﻮﻛ ﺮﻴﻀﺤﺘﻟ
-
2.ﺏﻮﻠﻄﻤﻟﺍ ﺏﻭﺮﺸﻤﻟﺍ ﺮﻴﻀﺤﺗ ءﺪﺒﻟ ﺖﻗﻭ ﻱﺃ ﻲﻓ
3.ﻯﺮﺧﺃ ﺓﺮﻣ ﻑﺎﻘﻳﻹﺍ/ءﺪﺒﻟﺍ ﺭﺯ ﻰﻠﻋ ﻂﻐﺿﺍ ،ﺔﻨﻴﻛﺎﻤﻟﺍ ﻞﻤﻋ ءﺎﻬﺘﻧﺍ ﻞﺒﻗ ﺓﻮﻬﻘﻟﺍ ﺐﺻ ﻑﺎﻘﻳﻹ
.ﺐﻴﻠﺤﻟﺍ ﺔﻳﻭﺎﺣ
1ﻰﻠﻋ ﻂﻐﺿﺍ ﻢﺛ .(8 ﻞﻜﺸﻟﺍ) ﺭﺎﻃﻹﺍ ﻦﻣ ﻱﻮﻠﻌﻟﺍ ءﺰﺠﻟﺍ ﻲﻓ ﻑﺎﻄﺨﻟﺍ ﺖﺤﺗ ﺐﻴﻠﺤﻟﺍ ﺔﻳﻭﺎﺣ ﻦﻣ ﻱﻮﻠﻌﻟﺍ ءﺰﺠﻟﺍ ﻝﺎﺧﺩﺈﺑ ﹰﻻﻭﺃ ﻢﻗ ،LatteGo ﺯﺎﻬﺟ ﻊﻴﻤﺠﺘﻟ
Page 67
ﺔﻴﺑﺮﻌﻟﺍ
68
.ﺎﻤﻬﻠﻴﺻﻮﺗ ﻞﺒﻗ ﺭﺎﻃﻹﺍﻭ ﺐﻴﻠﺤﻟﺍ ﺔﻳﻭﺎﺣ ﺔﻓﺎﻈﻧ ﻦﻣ ﺪﻛﺄﺗ :ﺔﻈﺣﻼﻣ
.LatteGo ﺯﺎﻬﺟ ﻰﻠﻋ ﺏﻭﺮﺸﻤﻟﺍ ﺍﺬﻬﻟ ﺢﺿﻮﻣ ﻮﻫ ﺎﻤﻣ ﻞﻗﺃ ﻭﺃ ﺮﺜﻛﺃ ﺐﻴﻠﺤﺑ ﺐﻴﻠﺤﻟﺍ ﺔﻳﻭﺎﺣ ءﻞﻣ ﻰﻟﺇ ﺝﺎﺘﺤﺗ ﺪﻘﻓ ،ﺐﻴﻠﺤﻟﺍ ﺔﻴﻤﻛ ﺺﻴﺼﺨﺘﺑ ﺖﻤﻗ ﺍﺫﺇ
.ﺞﺋﺎﺘﻨﻟﺍ ﻞﻀﻓﺃ ﻰﻠﻋ ﻝﻮﺼﺤﻠﻟ ﺔﺟﻼﺜﻟﺍ ﻦﻣ ﺓﺮﺷﺎﺒﻣ ﻡﺩﺎﻘﻟﺍ ﺐﻴﻠﺤﻟﺍ ﺎﹱﻤﺋﺍﺩ ﻡﺪﺨﺘﺳﺍ
ﻒﻠﺘﺨﻣ ('ﺕﺎﺑﻭﺮﺸﻤﻟﺍ
.ﻲﺼﺨﺸﻟﺍ ﻚﻗﻭﺫ ﺐﺴﺣ ﺏﻭﺮﺸﻤﻟﺍ ﻂﺒﺿ ﻥﻵﺍ ﻚﻨﻜﻤﻳ
،ﺐﻴﻠﺤﻟﺎﺑ ﺓﻮﻬﻘﻟﺍ ﻭﺃ ﻪﻴﺗﻻ ﻪﻴﻓﺎﻜﻟﺍ ﺮﻴﻀﺤﺗ ﺪﻨﻋﻭ .ﺓﻮﻬﻘﻟﺍ ﻢﺛ ﺐﻴﻠﺤﻟﺍ ﹰﻻﻭﺃ ﺔﻨﻴﻛﺎﻤﻟﺍ ﺐﺼﺗ ،ﻮﺗﺎﻴﻛﺎﻣ ﻪﻴﺗﻼﻟﺍ ﻭﺃ ﺖﻳﺍﻭ ﺕﻼﻔﻟﺍ ﻭﺃ ﻮﻨﻴﺸﺘﺑﺎﻜﻟﺍ ﺮﻴﻀﺤﺗ ﺪﻨﻋ
.ﺐﻴﻠﺤﻟﺍ ﻢﺛ ﺓﻮﻬﻘﻟﺍ ﹰﻻﻭﺃ ﺔﻨﻴﻛﺎﻤﻟﺍ ﺐﺼﺗ
. ﻑﺎﻘﻳﻹﺍ/ءﺪﺒﻟﺍ ﺭﺯ ﻰﻠﻋ ﻂﻐﺿﺍ ،ﺎﹱﻘﺒﺴﻣ ﺓﺩﺪﺤﻤﻟﺍ ﺔﻴﻤﻜﻟﺍ ﺐﺼﺑ ﺔﻨﻴﻛﺎﻤﻟﺍ ﻡﻮﻘﺗ ﻥﺃ ﻞﺒﻗ ﺐﻴﻠﺤﻟﺍ ﺐﺻ ﻑﺎﻘﻳﻹ
ﻲﻜﻴﺳﻼﻜﻟﺍ ﺐﻴﻠﺤﻟﺍ ﺩﺎﺑﺯﺇ ﺯﺎﻬﺟ ﻡﺍﺪﺨﺘﺳﺎﺑ ﺐﻴﻠﺤﻟﺍ ﻦﻴﺨﺴﺗ ﻭﺃ ﺩﺎﺑﺯﺇ
.ﺓﻮﻏﺮﻠﻟ ﺓﺩﻮﺟ ﻞﻀﻓﺃ ﻰﻠﻋ ﻝﻮﺼﺤﻠﻟ ﺔﺟﻼﺜﻟﺍ ﻦﻣ ﺓﺮﺷﺎﺒﻣ ﻡﺩﺎﻘﻟﺍ ﺐﻴﻠﺤﻟﺍ ﺎﹱﻤﺋﺍﺩ ﻡﺪﺨﺘﺳﺍ
.ﺎﹱﻨﺧﺎﺳ ﺎﹱﺒﻴﻠﺣ ﺪﻳﺮﺗ ﺖﻨﻛ ﺍﺫﺇ ﻡﺎﺨﻟﺍ (16 ﻞﻜﺸﻟﺍ) ﺐﻴﻠﺤﻟﺍ ﺰﻣﺭ ﻰﻟﺇ ﻲﻜﻴﺳﻼﻜﻟﺍ
.ﻪﻨﻴﺨﺴﺗ ﻭﺃ ﺐﻴﻠﺤﻟﺍ ﺩﺎﺑﺯﺇ ﻢﺘﻳ ﺚﻴﺣ ﺐﻴﻠﺤﻟﺍ ﻰﻟﺇ ﺭﺎﺨﺒﻟﺍ ﻝﺎﺧﺩﺇ ﻢﺘﻳﻭ ،ﻦﻴﺨﺴﺘﻟﺍ ﻲﻓ ﺔﻨﻴﻛﺎﻤﻟﺍ ﺃﺪﺒﺗ
.ﺐﻴﻠﺤﻟﺍ ﻦﻴﺨﺴﺗ/ﺩﺎﺑﺯﺇ
2ﻞﻜﺸﻟﺍ) ﻪﻧﺎﻜﻣ ﻲﻓ ﺖﺒﺜﻳ ﻰﺘﺣ ﻪﻟ "ﺺﺼﺨﻤﻟﺍ ﻥﺎﻜﻤﻟﺍ" ﻰﻠﻋ ﻂﻐﺿﺍ ﻢﺛ .(10 ﻞﻜﺸﻟﺍ) ﻦﺧﺎﺴﻟﺍ ءﺎﻤﻟﺍ ﺔﻫﻮﻓ ﻲﻓ ﻪﻌﺿﻭ ﹰﻼﻴﻠﻗ LatteGo ﺯﺎﻬﺟ ﺔﻟﺎﻣﺈﺑ ﻢﻗ
.(11
3.ﻪﻴﻟﺇ ﺭﺎﺸﻤﻟﺍ ﻰﺼﻗﻷﺍ ﺪﺤﻟﺍ ﺪﻌﺑ ﺐﻴﻠﺤﻟﺍ ﺔﻳﻭﺎﺣ ﻸﻤﺗ ﻻ .(12 ﻞﻜﺸﻟﺍ) ﺐﻴﻠﺤﻟﺎﺑ LatteGo ﺔﻳﻭﺎﺣ ﻸﻣﺍ
4.ﻂﻴﻘﻨﺘﻟﺍ ﺔﻴﻨﻴﺻ ﻰﻠﻋ ﺎﹱﺑﻮﻛ ﻊﺿ
5ﺺﻴﺼﺨﺗ' ﺮﻈﻧﺍ) ﺏﻭﺮﺸﻣ ﺪﻳﺪﺤﺘﻟ (ﻂﻘﻓ ﺓﺩﺪﺤﻣ ﻉﺍﻮﻧﺃ) "ﻯﺮﺧﺃ ﺕﺎﺑﻭﺮﺸﻣ" ﺰﻣﺭ ﻰﻠﻋ ﻂﻐﺿﺍ ﻭﺃ ﻩﺪﻳﺮﺗ ﻱﺬﻟﺍ ﺐﻴﻠﺤﺑ ﻁﻮﻠﺨﻤﻟﺍ ﺏﻭﺮﺸﻤﻟﺍ ﺰﻣﺭ ﻰﻠﻋ ﻂﻐﺿﺍ
-
6. ﻑﺎﻘﻳﻹﺍ/ءﺪﺒﻟﺍ ﺭﺯ ﻰﻠﻋ ﻂﻐﺿﺍ
-
-
7. ﻑﺎﻘﻳﻹﺍ/ءﺪﺒﻟﺍ ﺭﺯ ﻰﻠﻋ ﻂﻐﻀﻟﺎﺑ ﺭﺍﺮﻤﺘﺳﻻﺍ ﻊﻣ ﻂﻐﺿﺍ ،ﺎﻬﻠﻤﻋ ﻦﻣ ﺔﻨﻴﻛﺎﻤﻟﺍ ءﺎﻬﺘﻧﺍ ﻞﺒﻗ (ﺓﻮﻬﻘﻟﺍﻭ ﺐﻴﻠﺤﻟﺍ) ﻪﻠﻤﻛﺄﺑ ﺏﻭﺮﺸﻤﻟﺍ ﺐﺻ ﻑﺎﻘﻳﻹ
1.(13 ﻞﻜﺸﻟﺍ) ﻪﻴﻠﻋ ﺐﻴﻠﺤﻟﺍ ﺩﺎﺑﺯﺇ ﺯﺎﻬﺟ ﺐﺤﺳﺍﻭ ﺭﺎﺴﻴﻟﺍ ﻰﻟﺇ ﺔﻨﻴﻛﺎﻤﻟﺍ ﻰﻠﻋ ﺩﻮﺟﻮﻤﻟﺍ ﺩﻮﺳﻷﺍ ﻥﻮﻜﻴﻠﻴﺴﻟﺍ ﺾﺒﻘﻣ ﻞﻣﺃ
2.ﻮﺗﺎﻴﻛﺎﻣ ﻪﻴﺗﻼﻟﺍ ﺩﺍﺪﻋﻹ ﺐﻴﻠﺤﻟﺍ ﻦﻣ ﻞﻣ 150 ﻲﻟﺍﻮﺣﻭ ﻮﻨﻴﺸﺗﻮﺑﺎﻜﻟﺍ ﺩﺍﺪﻋﻹ ﺐﻴﻠﺤﻟﺍ ﻦﻣ ﻞﻣ 100 ﻲﻟﺍﻮﺤﺑ ﺐﻴﻠﺤﻟﺍ ﻖﻳﺮﺑﺇ ﻸﻣﺍ
3 .ﺐﻴﻠﺤﻟﺍ ﻲﻓ ﻢﺳ 1 ﻲﻟﺍﻮﺣ ﺐﻴﻠﺤﻟﺍ ﺩﺎﺑﺯﺇ ﺯﺎﻬﺟ ﻞﺧﺩﺃ
4.(14 ﻞﻜﺸﻟﺍ) ﺭﺎﺨﺒﻟﺍ ﺰﻣﺭ ﻰﻠﻋ ﻂﻐﺿﺍ
5ﺐﻴﻠﺤﻟﺍ ﺩﺎﺑﺯﺇ ﺯﺎﻬﺟ ﻰﻠﻋ ﺾﺒﻘﻤﻟﺍ ﺭﺩﺃ .ﺐﻴﻠﺣ ﺓﻮﻏﺭ ﺪﻳﺮﺗ ﺖﻨﻛ ﺍﺫﺇ ﺐﻴﻠﺤﻟﺍ (15 ﻞﻜﺸﻟﺍ) ﺩﺎﺑﺯﺇ ﺰﻣﺭ ﻰﻟﺇ ﻲﻜﻴﺳﻼﻜﻟﺍ ﺐﻴﻠﺤﻟﺍ ﺩﺎﺑﺯﺇ ﺯﺎﻬﺟ ﻰﻠﻋ ﺾﺒﻘﻤﻟﺍ ﺭﺩﺃ
6.ﺩﻮﺳﻷﺍ ﻢﻬﺴﻟﺍ ﻊﻣ ﻲﻜﻴﺳﻼﻜﻟﺍ ﺐﻴﻠﺤﻟﺍ ﺩﺎﺑﺯﺇ ﺯﺎﻬﺟ ﺾﺒﻘﻣ ﻰﻠﻋ ﺩﻮﺟﻮﻤﻟﺍ ﺰﻣﺮﻟﺍ ﺓﺍﺫﺎﺤﻣ ﻦﻣ ﺪﻛﺄﺗ
7.(17 ﻞﻜﺸﻟﺍ) ءﺪﺒﻠﻟ ﻑﺎﻘﻳﻹﺍ/ءﺪﺒﻟﺍ ﺭﺯ ﻰﻠﻋ ﻂﻐﺿﺍ
8ﻑﺎﻘﻳﻹ ﻯﺮﺧﺃ ﺓﺮﻣ ﻑﺎﻘﻳﻹﺍ/ءﺪﺒﻟﺍ ﺭﺯ ﻰﻠﻋ ﻂﻐﺿﺍ ،ﺔﺑﻮﻠﻄﻤﻟﺍ ﺓﺭﺍﺮﺤﻟﺍ ﻭﺃ ﺔﺑﻮﻠﻄﻤﻟﺍ ﺓﻮﻏﺮﻟﺍ ﻢﺠﺣ ﻰﻟﺇ ﺐﻴﻠﺤﻟﺍ ﻖﻳﺮﺑﺇ ﻲﻓ ﺐﻴﻠﺤﻟﺍ ﻞﺼﻳ ﺎﻣﺪﻨﻋ
.ﺔﻴﻧﺎﺛ 90 ﺪﻌﺑ ﺎﹱﻴﺋﺎﻘﻠﺗ ﺭﺎﺨﺒﻟﺍ ﻒﻗﻮﺘﻳ .ﺔﻴﻧﺎﺛ 90 ﻦﻣ ﺮﺜﻛﻷ ﺭﺎﺨﺒﻟﺎﺑ ﺐﻴﻠﺤﻟﺍ ﺔﺠﻟﺎﻌﻣ ﺐﻨﺠﺗ
.ﺐﻴﻠﺤﻟﺍ ﺓﻮﻏﺮﻟ ﺓﺩﻮﺟ ﻞﻀﻓﺃ ﻰﻠﻋ ﻝﻮﺼﺤﻠﻟ ﺐﻴﻠﺤﻟﺍ ﺩﺎﺑﺯﺇ ﺔﻴﻠﻤﻋ ﻝﻼﺧ ﺐﻴﻠﺤﻟﺍ ﻖﻳﺮﺑﺇ ﻚﻳﺮﺤﺗ ﻰﻟﺇ ﺝﺎﺘﺤﺗ ﻻ
(ﻂﻘﻓ ﺓﺩﺪﺤﻣ ﻉﺍﻮﻧﺃ) (ExtraShot) ﺔﻴﻓﺎﺿﺇ ﺔﻋﺮﺟ
.ﺍﹰﺰﻴﻛﺮﺗ ﺮﺜﻛﺃ ﺓﻮﻬﻗ ﻰﻟﺇ ﺖﺠﺘﺣﺍ ﺍﺫﺇ ﹰﻼﺜﻣ ،ﺐﻴﻠﺤﻟﺍﻭ ﺓﻮﻬﻘﻟﺍ ﺕﺎﺑﻭﺮﺸﻣ ﻰﻟﺇ ﻮﺘﻳﺮﺘﺴﻳﺮﻟﺍ ﻦﻣ ﺔﻴﻓﺎﺿﺇ ﺔﻋﺮﺟ ﺔﻓﺎﺿﺇ ﺔﻴﻧﺎﻜﻣﺇ ﻚﻟ ﺔﻨﻴﻛﺎﻤﻟﺍ ﺮﻓﻮﺗ
1ﺔﻫﻮﻔﻟﺍ ﺖﺤﺗ ﺎﹱﺑﻮﻛ ﻊﺿ
2 .ﺏﻭﺮﺸﻣ ﺪﻳﺪﺤﺘﻟ (ﻂﻘﻓ ﺓﺩﺪﺤﻣ ﻉﺍﻮﻧﺃ) "ﻯﺮﺧﺃ ﺕﺎﺑﻭﺮﺸﻣ" ﺰﻣﺭ ﻰﻠﻋ ﻂﻐﺿﺍ ﻭﺃ ﺏﻭﺮﺸﻣ ﺭﺎﻴﺘﺧﻻ ﺮﻴﻀﺤﺘﻟﺍ ﺔﻌﻳﺮﺳ ﺕﺎﺑﻭﺮﺸﻤﻟﺍ ﺯﻮﻣﺭ ﺪﺣﺃ ﻰﻠﻋ ﻂﻐﺿﺍ
3.(18 ﻞﻜﺸﻟﺍ) ExtraShot ﺔﻔﻴﻇﻭ ﺩﺪﺣ ﻢﺛ ﻯﻮﺘﺴﻣ ﻰﻠﻋﺃ ﻰﻠﻋ ﺰﻴﻛﺮﺘﻟﺍ ﻂﺒﻀﻟ ﻰﻠﻋﻷ ﻢﻬﺴﻟﺍ ﻡﺪﺨﺘﺳﺍ
4.ﺏﻭﺮﺸﻤﻟﺍ ﺮﻴﻀﺤﺗ ءﺪﺒﻟ ﻑﺎﻘﻳﻹﺍ/ءﺪﺒﻟﺍ ﺰﻣﺭ ﻰﻠﻋ ﻂﻐﺿﺍ ﻢﺛ .ﻯﺮﺧﻷﺍ ﺕﺍﺩﺍﺪﻋﻹﺍ ﺺﻴﺼﺨﺗ ﺪﻳﺮﺗ ﺖﻨﻛ ﺍﺫﺇ "ﻖﻓﺍﻮﻣ" ﺰﻣﺭ ﻰﻠﻋ ﻂﻐﺿﺍ
5 .ﻯﺮﺧﺃ ﺓﺮﻣ ﻑﺎﻘﻳﻹﺍ/ءﺪﺒﻟﺍ ﺰﻣﺭ ﻰﻠﻋ ﻂﻐﺿﺍ ،ﺔﻨﻴﻛﺎﻤﻟﺍ ﻞﻤﻋ ءﺎﻬﺘﻧﺍ ﻞﺒﻗ ﺏﻭﺮﺸﻤﻟﺍ ﺐﺻ ﻑﺎﻘﻳﻹ
Page 68
.ﺓﺮﻣ ﻞﻛ ﻲﻓ ﺓﻮﻬﻘﻟﺍ ﻦﻣ ﺪﺣﺍﻭ ﺏﻮﻛ ﺮﻴﻀﺤﺗ ﻚﻨﻜﻤﻳ ،ExtraShot ﺔﻔﻴﻇﻭ ﺪﻳﺪﺤﺗ ﺪﻌﺑ
ﻥﻮﺤﻄﻤﻟﺍ ﻦﺒﻟﺎﺑ ﺓﻮﻬﻘﻟﺍ ﺮﻴﻀﺤﺗ
.ﻦﻴﻴﻓﺎﻜﻟﺍ ﺔﻋﻭﺰﻨﻣ ﺓﻮﻬﻗ ﻭﺃ ﺓﻮﻬﻘﻟﺍ ﻦﻣ ﺔﻔﻠﺘﺨﻣ ﺔﻠﻴﻜﺸﺗ ﻞﻀﻔﺗ ﺖﻨﻛ ﺍﺫﺇ ،ﻝﺎﺜﻤﻟﺍ ﻞﻴﺒﺳ ﻰﻠﻋ ،ﻦﺒﻟﺍ ﺏﻮﺒﺣ ﻦﻣ ﹰﻻﺪﺑ ﻥﻮﺤﻄﻤﻟﺍ ﻦﺒﻟﺍ ﻡﺍﺪﺨﺘﺳﺍ ﺭﺎﻴﺘﺧﺍ ﻚﻨﻜﻤﻳ
.ﺎﹱﻘﺒﺴﻣ ﺔﻧﻮﺤﻄﻤﻟﺍ ﺓﻮﻬﻘﻟﺍ ﺔﻔﻴﻇﻭ ﺩﺪﺣ ﻢﺛ ﻯﻮﺘﺴﻣ ﻞﻗﺃ ﻰﻠﻋ ﺰﻴﻛﺮﺘﻟﺍ ﻂﺒﻀﻟ ﻞﻔﺳﻷ ﻢﻬﺴﻟﺍ ﻡﺪﺨﺘﺳﺍ
.ﺎﹱﻘﺒﺴﻣ ﺔﻧﻮﺤﻄﻤﻟﺍ ﺓﻮﻬﻘﻟﺍ ﺔﻔﻴﻇﻭ ﺪﻳﺪﺤﺘﻟ ﻞﻔﺳﻷ ﻢﻬﺴﻟﺍ ﻡﺪﺨﺘﺳﺍﻭ
:ﺎﹱﻘﺒﺴﻣ ﺔﻧﻮﺤﻄﻤﻟﺍ ﺓﻮﻬﻘﻟﺍ ﺔﻔﻴﻇﻭ ﺩﺪﺤﺗ ﺎﻣﺪﻨﻋ
.ﺓﺮﻣ ﻞﻛ ﻲﻓ ﻂﻘﻓ ﺪﺣﺍﻭ ﺓﻮﻬﻗ ﺏﻮﻛ ﺮﻴﻀﺤﺗ ﻚﻨﻜﻤﻳ -
ﺔﻴﺑﺮﻌﻟﺍ
ﺕﺍﺩﺍﺪﻋﻹﺍ ﺰﻣﺭ ﻰﻠﻋ ﻂﻐﺿﺍ
.ﺎﹱﻴﺋﺎﻘﻠﺗ ﺎﻬﻨﻳﺰﺨﺗ ﻢﺘﻳ -
.ﻒﻠﺘﺨﻣ ﺔﻬﻜﻧ ﺰﻴﻛﺮﺗ ﺪﻳﺪﺤﺗ ﻚﻨﻜﻤﻳ ﻻ -
ﻦﺧﺎﺴﻟﺍ ءﺎﻤﻟﺍ ﺐﺻ
.(20 ﻞﻜﺸﻟﺍ) ﻦﺧﺎﺴﻟﺍ ءﺎﻤﻟﺍ ﺔﻫﻮﻓ ﻦﻣ ﻦﺧﺎﺴﻟﺍ ءﺎﻤﻟﺍ ﺐﺻ ﻢﺘﻳ
ﺔﻴﺑﺮﻌﻟﺍ
69
1.ءﺎﻄﻐﻟﺍ ﻖﻠﻏﺃ ﻢﺛ .(19 ﻞﻜﺸﻟﺍ) ﺎﻬﻴﻓ ﻥﻮﺤﻄﻤﻟﺍ ﻦﺒﻟﺍ ﻦﻣ ﺔﻳﻮﺘﺴﻣ ﻞﻴﻛ ﺔﻓﺮﻐﻣ ﺐﺻﻭ ﻥﻮﺤﻄﻤﻟﺍ ﻦﺒﻟﺍ ﺓﺮﺠﺣ ءﺎﻄﻏ ﺢﺘﻓﺍ
2.ﺮﺧﺁ ﺏﻭﺮﺸﻣ ﺪﻳﺪﺤﺘﻟ (ﻂﻘﻓ ﺓﺩﺪﺤﻣ ﻉﺍﻮﻧﺃ) "ﻯﺮﺧﺃ ﺕﺎﺑﻭﺮﺸﻣ" ﺰﻣﺭ ﻰﻠﻋ ﻂﻐﺿﺍ ﻭﺃ ﺮﻴﻀﺤﺘﻟﺍ ﺔﻌﻳﺮﺳ ﺕﺎﺑﻭﺮﺸﻤﻟﺍ ﺯﻮﻣﺭ ﺪﺣﺃ ﻰﻠﻋ ﻂﻐﺿﺍ
3:ﻦﻴﺘﻔﻠﺘﺨﻣ ﻦﻴﺘﻘﻳﺮﻄﺑ ﺍﺬﻫ ءﺍﺮﺟﺇ ﻚﻨﻜﻤﻳ .ﺎﹱﻘﺒﺴﻣ ﺔﻧﻮﺤﻄﻤﻟﺍ ﺓﻮﻬﻘﻟﺍ ﺔﻔﻴﻇﻭ ﺩﺪﺣ
-
-
4.ﻯﺮﺧﺃ ﺓﺮﻣ ﻑﺎﻘﻳﻹﺍ/ءﺪﺒﻟﺍ ﺭﺯ ﻰﻠﻋ ﻂﻐﺿﺍ ،ﺔﻨﻴﻛﺎﻤﻟﺍ ﻞﻤﻋ ءﺎﻬﺘﻧﺍ ﻞﺒﻗ ﺓﻮﻬﻘﻟﺍ ﺐﺻ ﻑﺎﻘﻳﻹ
1.ﺐﻴﻠﺤﻟﺍ ﺩﺎﺑﺯﺇ ﺯﺎﻬﺟ ﻭﺃ LatteGo ﺯﺎﻬﺟ ﺔﻟﺍﺯﺈﺑ ﻢﻗ ،ﻪﺒﻴﻛﺮﺗ ﺔﻟﺎﺣ ﻲﻓ
2.ﻦﺧﺎﺴﻟﺍ ءﺎﻤﻟﺍ ﺔﻫﻮﻓ ﺖﺤﺗ ﺎﹱﺑﻮﻛ ﻊﺿ
3.ﻦﺧﺎﺴﻟﺍ ءﺎﻤﻟﺍ ﺪﻳﺪﺤﺘﻟ (4 ﻞﻜﺸﻟﺍ) (ﻂﻘﻓ ﺓﺩﺪﺤﻣ ﻉﺍﻮﻧﺃ) "ﻯﺮﺧﺃ ﺕﺎﺑﻭﺮﺸﻣ" ﺰﻣﺭ ﻰﻠﻋ ﻂﻐﺿﺍ ﻭﺃ (ﻂﻘﻓ ﺓﺩﺪﺤﻣ ﻉﺍﻮﻧﺃ) "ﻦﺧﺎﺴﻟﺍ ءﺎﻤﻟﺍ" ﺰﻣﺭ ﻰﻠﻋ ﻂﻐﺿﺍ
4.ﻪﻠﻀﻔﺗ ﺎﻣ ﻰﻠﻋ ﺓﺭﺍﺮﺤﻟﺍ ﺔﺟﺭﺩ ﻭﺃ/ﻭ ﻦﺧﺎﺴﻟﺍ ءﺎﻤﻟﺍ ﺔﻴﻤﻛ ﻂﺒﻀﻟ ﻞﻔﺳﻷﻭ ﻰﻠﻋﻷ ﻦﻴﻤﻬﺴﻟﺍ ﻡﺪﺨﺘﺳﺍ
5. ﻑﺎﻘﻳﻹﺍ/ءﺪﺒﻟﺍ ﺭﺯ ﻰﻠﻋ ﻂﻐﺿﺍ
-
6.ﻯﺮﺧﺃ ﺓﺮﻣ ﻑﺎﻘﻳﻹﺍ/ءﺪﺒﻟﺍ ﺭﺯ ﻰﻠﻋ ﻂﻐﺿﺍ ،ﺎﻬﻠﻤﻋ ﻦﻣ ﺔﻨﻴﻛﺎﻤﻟﺍ ءﺎﻬﺘﻧﺍ ﻞﺒﻗ ﻦﺧﺎﺴﻟﺍ ءﺎﻤﻟﺍ ﺐﺻ ﻑﺎﻘﻳﻹ
ﺕﺎﺑﻭﺮﺸﻤﻟﺍ ﺺﻴﺼﺨﺗ
ﺕﺎﻔﻠﻤﻟ ﻥﻮﻜﻳﻭ .ﺔﻴﺼﺨﺸﻟﺍ ﺕﻼﻴﻀﻔﺘﻠﻟ ﻒﻠﻣ ﻲﻓ ﻁﻮﺒﻀﻤﻟﺍ ﺏﻭﺮﺸﻤﻟﺍ ﻦﻳﺰﺨﺗﻭ ﺹﺎﺨﻟﺍ ﻚﻠﻴﻀﻔﺗ ﺐﺴﺣ ﺏﻭﺮﺸﻤﻟﺍ ﺕﺍﺩﺍﺪﻋﺇ ﻂﺒﺿ ﺔﻨﻴﻛﺎﻤﻟﺍ ﻚﻟ ﺢﻴﺘﺗ
.ﺔﻔﻠﺘﺨﻣ ﻥﺍﻮﻟﺃ ﺔﻔﻠﺘﺨﻤﻟﺍ ﺕﻼﻴﻀﻔﺘﻟﺍ
ﺎﻣ ﻞﻤﻋ ﻚﻨﻜﻤﻳ ،(ﻂﻘﻓ ﺓﺩﺪﺤﻣ ﻉﺍﻮﻧﺃ) "ﻯﺮﺧﺃ ﺕﺎﺑﻭﺮﺸﻣ" ﺰﻣﺭ ﻰﻠﻋ ﻂﻐﻀﻟﺎﺑ ﻭﺃ ﺮﻴﻀﺤﺘﻟﺍ ﺔﻌﻳﺮﺳ ﺕﺎﺑﻭﺮﺸﻤﻟﺍ ﺯﻮﻣﺭ ﺪﺣﺃ ﻰﻠﻋ ﻂﻐﻀﻟﺎﺑ ﺏﻭﺮﺸﻣ ﺭﺎﻴﺘﺧﺍ ﺪﻌﺑ
:ﻲﻠﻳ
.ﺕﺍﺩﺍﺪﻋﻹﺍ
.ﻪﺗﺮﺘﺧﺍ ﻱﺬﻟﺍ ﺕﻼﻴﻀﻔﺘﻟﺍ ﻒﻠﻣ ﻲﻓ ﺎﹱﻴﺋﺎﻘﻠﺗ ﺎﻬﺗﺮﺘﺧﺍ ﻲﺘﻟﺍ ﺕﺍﺩﺍﺪﻋﻹﺍ ﻦﻳﺰﺨﺗ ﻢﺘﻴﺳ ،ﺏﻭﺮﺸﻤﻟﺍ ﺮﻴﻀﺤﺗ ﻦﻣ ﺔﻨﻴﻛﺎﻤﻟﺍ ءﺎﻬﺘﻧﺍ ﺩﺮﺠﻤﺑ
ﺕﻼﻴﻀﻔﺗ ﻒﻠﻣ ﺭﺎﻴﺘﺧﺍ
."ﺓﻮﻬﻘﻟﺍ ﻦﻣ ﻲﺗﺍﺭﺎﻴﺘﺧﺍ" ﺕﻼﻴﻀﻔﺗ ﺕﺎﻔﻠﻣ ﻡﺍﺪﺨﺘﺳﺎﺑ ﺕﺎﻔﺻﻮﻟﺍ ﻦﻳﺰﺨﺗﻭ ﺕﻼﻴﻀﻔﺗ ﻒﻠﻣ ﺭﺎﻴﺘﺧﺍ ﻚﻨﻜﻤﻳ
1 .ﻯﻮﻗﻷﺍ ﻲﻫ ﻰﻠﻋﻷﺍﻭ ﻒﺧﻷﺍ ﻲﻫ ﺎﻬﻠﻗﺃ ،ﺓﻮﻘﻟﺍ ﻦﻣ ﺕﺎﺟﺭﺩ 5 ﻙﺎﻨﻫ .(21 ﻞﻜﺸﻟﺍ) ﻞﻔﺳﻷﻭ ﻰﻠﻋﻷ ﻦﻴﻤﻬﺴﻟﺍ ﻡﺍﺪﺨﺘﺳﺎﺑ ﺔﻬﻜﻨﻟﺍ ﺰﻴﻛﺮﺗ ﻂﺒﺿ
2ﻦﻣ ﺩﺍﺪﻋﺇ ﻞﻜﻟ ﺕﺎﻴﻤﻛ 5 ﻙﺎﻨﻫﻭ .ﻞﻔﺳﻷﻭ ﻰﻠﻋﻷ ﻦﻴﻤﻬﺴﻟﺍ ﻡﺍﺪﺨﺘﺳﺎﺑ (ﻂﻘﻓ ﺓﺩﺪﺤﻣ ﻉﺍﻮﻧﺃ) ﺐﻴﻠﺤﻟﺍ ﺔﻴﻤﻛ ﻭﺃ/ﻭ ﺓﻮﻬﻘﻟﺍ (22 ﻞﻜﺸﻟﺍ) ﺔﻴﻤﻛ ﻂﺒﺿ
1.ﻒﻠﺘﺨﻣ ﻥﻮﻟ ﺕﻼﻴﻀﻔﺘﻟﺍ ﺕﺎﻔﻠﻣ ﻦﻣ ﻒﻠﻣ ﻞﻜﻟﻭ .ﺔﻧﻮﻠﻤﻟﺍ ﺕﻼﻴﻀﻔﺘﻟﺍ ﺕﺎﻔﻠﻣ ﺪﺣﺃ ﺭﺎﻴﺘﺧﻻ ﺭﺮﻜﺘﻣ ﻞﻜﺸﺑ ﺕﻼﻴﻀﻔﺘﻟﺍ ﺕﺎﻔﻠﻣ ﺰﻣﺭ ﻰﻠﻋ ﻂﻐﺿﺍ
2 .(ﻂﻘﻓ ﺓﺩﺪﺤﻣ ﻉﺍﻮﻧﺃ) "ﻯﺮﺧﺃ ﺕﺎﺑﻭﺮﺸﻣ" ﺰﻣﺭ ﻰﻠﻋ ﻂﻐﻀﻟﺍ ﻭﺃ ﺮﻴﻀﺤﺘﻟﺍ ﺔﻌﻳﺮﺳ ﺕﺎﺑﻭﺮﺸﻤﻟﺍ ﺯﻮﻣﺭ ﺪﺣﺃ ﻰﻠﻋ ﻂﻐﻀﻟﺎﺑ ﺎﹱﺑﻭﺮﺸﻣ ﺮﺘﺧﺍ
3 .ﻞﻀﻔﻤﻟﺍ ﻚﻗﺍﺬﻣ ﺐﺴﺣ ﺏﻭﺮﺸﻤﻟﺍ ﺕﻼﻴﻀﻔﺗ ﻂﺒﺿﺍ
Page 69
ﺔﻴﺑﺮﻌﻟﺍ
70
.ﻪﺗﺮﺘﺧﺍ ﻱﺬﻟﺍ ﻥﻮﻠﻤﻟﺍ ﺕﻼﻴﻀﻔﺘﻟﺍ ﻒﻠﻣ ﻲﻓ ﺓﺪﻳﺪﺠﻟﺍ ﻚﺗﻼﻴﻀﻔﺗ ﻦﻳﺰﺨﺗ ﻥﻵﺍ ﻢﺗ
.('ﻊﻨﺼﻤﻟﺍ ﺕﺍﺩﺍﺪﻋﺇ ﺓﺩﺎﻌﺘﺳﺍ' ﺮﻈﻧﺍ) ﺔﻨﻴﻛﺎﻤﻟﺍ ﻲﻓ ﺔﻴﺿﺍﺮﺘﻓﻻﺍ ﺕﺍﺩﺍﺪﻋﻹﺍ ﺓﺩﺎﻌﺘﺳﺍ ﺎﹱﻣﻭﺩ ﻚﻨﻜﻤﻳ
ﻒﻴﻀﻟﺍ ﺕﻼﻴﻀﻔﺗ ﻒﻠﻣ
ﻞﻈﻳ ،ﺍﺬﻫ ﺕﻼﻴﻀﻔﺘﻟﺍ ﻒﻠﻣ ﺭﺎﺘﺨﺗ ﺎﻣﺪﻨﻋﻭ .ﺕﻼﻴﻀﻔﺘﻟﺍ ﻒﻠﻣ ﺰﻣﺭ ﺊﻔﻄﻨﻳ ،ﻒﻴﻀﻟﺍ ﺕﻼﻴﻀﻔﺗ ﻒﻠﻣ ﺭﺎﻴﺘﺧﺍ ﺪﻨﻋﻭ .ﻒﻴﻀﻟﺍ ﺕﻼﻴﻀﻔﺘﻟ ﻒﻠﻤﺑ ﺓﺩﻭﺰﻣ ﺔﻨﻴﻛﺎﻤﻟﺍ
.ﺕﺎﺑﻭﺮﺸﻤﻟﺍ ﺮﻴﻀﺤﺘﻟ ﺎﻬﻌﺒﹽﺘﺗ ﻲﺘﻟﺍ ﺕﺎﻔﺻﻮﻟﺍ ﻦﻳﺰﺨﺗ ﻢﺘﻳ ﻦﻟ ﻦﻜﻟﻭ ﻚﺗﻼﻴﻀﻔﺗ ﻰﻠﻋ ﺕﺍﺩﺍﺪﻋﻹﺍ ﺺﻴﺼﺨﺗ ﻚﻧﺎﻜﻣﺈﺑ
ﺔﻨﻴﻛﺎﻤﻟﺍ ﺕﺍﺩﺍﺪﻋﺇ ﻂﺒﺿ
ءﺎﻤﻟﺍ ﺮﺴﻋ ﻂﺒﺿ
ﻚﹻﺒﹻﹽﻨﹷﺠﹹﻳ ﺎﹱﻀﻳﺃ ﺍﺬﻫ .ﺔﻨﻴﻛﺎﻤﻟﺍ ﺮﻤﻋ ﺔﻟﺎﻃﺇﻭ ﻞﺜﻣﻷﺍ ءﺍﺩﻷﺍ ﻰﻠﻋ ﻝﻮﺼﺤﻠﻟ ﻚﺘﻘﻄﻨﻣ ﻲﻓ ءﺎﻤﻟﺍ ﺮﺴﻋ ﻯﻮﺘﺴﻤﻟ ﺎﹱﻘﻓﻭ ءﺎﻤﻟﺍ ﺮﺴﻋ ﺩﺍﺪﻋﺇ ﻂﺒﻀﺑ ﻚﺤﺼﻨﻧ
ﺓﺪﻳﺪﺷ ﻩﺎﻴﻣ :4 ﻮﻫ ﻲﺿﺍﺮﺘﻓﻻﺍ ءﺎﻤﻟﺍ ﺓﺪﺷ ﺩﺍﺪﻋﺇ .ﺍﹰﺮﻴﺜﻛ ﺯﺎﻬﺠﻟﺍ ﺔﻟﺍﺯﺇ ﻰﻟﺇ ﺭﺍﺮﻄﺿﻻﺍ
:ﻚﺘﻘﻄﻨﻣ ﻲﻓ ءﺎﻤﻟﺍ ﺮﺴﻋ ﺪﻳﺪﺤﺘﻟ ﻕﻭﺪﻨﺼﻟﺍ ﻲﻓ ﺩﻮﺟﻮﻤﻟﺍ ءﺎﻤﻟﺍ ﺮﺴﻋ ﺭﺎﺒﺘﺧﺍ ﻂﻳﺮﺷ ﻡﺪﺨﺘﺳﺍ
:ﺢﻴﺤﺼﻟﺍ ءﺎﻤﻟﺍ ﺮﺴﻋ ﻰﻠﻋ ﺔﻨﻴﻛﺎﻤﻟﺍ ﻂﺒﺿﺍ
.(25 ﻞﻜﺸﻟﺍ) ﺭﺎﺒﺘﺧﻻﺍ ﻂﻳﺮﺷ ﻰﻠﻋ ءﺍﺮﻤﺤﻟﺍ ﺕﺎﻌﺑﺮﻤﻟﺍ
4ﻪﺗﺮﺘﺧﺍ ﻱﺬﻟﺍ ﺏﻭﺮﺸﻤﻟﺍ ﺮﻴﻀﺤﺘﻟ ﻑﺎﻘﻳﻹﺍ/ءﺪﺒﻟﺍ ﺭﺯ ﻰﻠﻋ ﻂﻐﺿﺍ
-
1.(23 ﻞﻜﺸﻟﺍ) ﺓﺪﺣﺍﻭ ﺔﻴﻧﺎﺛ ﺓﺪﻤﻟ ﺔﻴﻔﻨﺤﻟﺍ ﺖﺤﺗ ﻪﻛﺮﺗﺍ ﻭﺃ ﺔﻴﻔﻨﺤﻟﺍ ءﺎﻣ ﻲﻓ ءﺎﻤﻟﺍ ﺮﺴﻋ ﺭﺎﺒﺘﺧﺍ ﻂﻳﺮﺷ ﺮﻤﻏﺍ
2.ءﺎﻤﻟﺍ (24 ﻞﻜﺸﻟﺍ) ﺮﺴﻋ ﻰﻟﺇ ﺮﻤﺣﻷﺍ ﻥﻮﻠﻟﺍ ﻰﻟﺇ ﻝﻮﺤﺘﻳ ﻱﺬﻟﺍ ﺭﺎﺒﺘﺧﻻﺍ ﻂﻳﺮﺷ ﻰﻠﻋ ﺕﺎﻌﺑﺮﻤﻟﺍ ﺩﺪﻋ ﺮﻴﺸﻳ .ﺓﺪﺣﺍﻭ ﺔﻘﻴﻗﺩ ﺮﻈﺘﻧﺍ
1.ﺪﻴﻛﺄﺘﻠﻟ "ﻖﻓﺍﻮﻣ" ﺰﻣﺭ ﻰﻠﻋ ﻂﻐﺿﺍ ﻢﺛ ."ءﺎﻤﻟﺍ ﺮﺴﻋ" ﺪﻳﺪﺤﺘﻟ ﻞﻔﺳﻷﻭ ﻰﻠﻋﻷ ﻦﻴﻤﻬﺴﻟﺍ ﻡﺪﺨﺘﺳﺍﻭ ﺕﺍﺩﺍﺪﻋﻹﺍ ﺰﻣﺭ ﻰﻠﻋ ﻂﻐﺿﺍ
2ﺩﺪﻌﻟ ﺎﹱﻳﻭﺎﺴﻣ ﺔﺷﺎﺸﻟﺍ ﻰﻠﻋ ﺓﺩﺪﺤﻤﻟﺍ ءﺍﺮﻤﺤﻟﺍ ﺕﺎﻌﺑﺮﻤﻟﺍ ﺩﺪﻋ ﻥﻮﻜﻳ ﻥﺃ ﺐﺠﻳ .ءﺎﻤﻟﺍ ﺮﺴﻋ ﻯﻮﺘﺴﻣ ﺪﻳﺪﺤﺘﻟ ﻞﻔﺳﻷﻭ ﻰﻠﻋﻷ ﻦﻴﻤﻬﺴﻟﺍ ﻡﺪﺨﺘﺳﺍ
3.ﺪﻴﻛﺄﺘﻠﻟ "ﻖﻓﺍﻮﻣ" ﺰﻣﺭ ﻰﻠﻋ ﻂﻐﺿﺍ ،ﺢﻴﺤﺼﻟﺍ ءﺎﻤﻟﺍ ﺔﺑﻼﺻ ﺪﻳﺪﺤﺗ ﺪﻌﺑ
ﺔﻨﺤﻄﻤﻟﺍ ﺕﺍﺩﺍﺪﻋﺇ ﻂﺒﺿ
ﻥﺎﻛﻭ ﻞﻀﻓﺃ ﺔﻧﻮﺤﻄﻣ ﻦﺒﻟﺍ ﺏﻮﺒﺣ ﺖﻧﺎﻛ ،ﻞﻗﺃ ﻦﺤﻄﻟﺍ ﺩﺍﺪﻋﺇ ﻥﺎﻛ ﺎﻤﻠﻛ .ﺏﻮﺒﺤﻟﺍ ﺔﻳﻭﺎﺣ ﻞﺧﺍﺩ ﻦﺤﻄﻟﺍ ﺩﺍﺪﻋﺇ ﺡﺎﺘﻔﻣ ﻡﺍﺪﺨﺘﺳﺎﺑ ﺓﻮﻬﻘﻟﺍ ﺔﻬﻜﻧ ﺓﻮﻗ ﺮﻴﻴﻐﺗ ﻚﻨﻜﻤﻳ
.ﺎﻬﻨﻴﺑ ﻦﻣ ﺭﺎﻴﺘﺧﻻﺍ ﻚﻨﻜﻤﻳ ﺔﻔﻠﺘﺨﻤﻟﺍ ﻦﺤﻄﻟﺍ ﺕﺍﺩﺍﺪﻋﺇ ﻦﻣ ﺩﺍﺪﻋﺇ 12 ﻙﺎﻨﻫ .ﻯﻮﻗﺃ ﺓﻮﻬﻘﻟﺍ ﻕﺍﺬﻣ
ﺎﹱﺑﻮﻛ 150 ﻰﻟﺇ 100 ﻦﻣ ﺮﹽﻀﺤﺗ ﻰﺘﺣ ﻦﺤﻄﻟﺍ ﺩﺍﺪﻋﺇ ﻂﺒﺿ ﻡﺪﻌﺑ ﻚﺤﺼﻨﻧ ﻚﻟﺬﻟ .ﻚﺑ ﺔﺻﺎﺨﻟﺍ ﻦﺒﻟﺍ ﺏﻮﺒﺣ ﻦﻣ ﻕﺍﺬﻣ ﻞﻀﻓﺃ ﻰﻠﻋ ﻝﻮﺼﺤﻠﻟ ﺔﻨﻴﻛﺎﻤﻟﺍ ﺩﺍﺪﻋﺇ ﻢﺗ
.(ﻡﺍﺪﺨﺘﺳﻻﺍ ﻦﻣ ﺮﻬﺷ ﻲﻟﺍﻮﺣ)
ﺔﻓﺮﻌﻣ ﻦﻣ ﻦﻜﻤﺘﺗ ﻥﺃ ﻞﺒﻗ ﺕﺎﺑﻭﺮﺸﻣ 3 ﻰﻟﺇ 2 ﻦﻣ ﺮﻴﻤﺨﺗ ﻰﻟﺇ ﺝﺎﺘﺤﺗ .ﻦﺒﻟﺍ ﺏﻮﺒﺣ ﻦﺤﻄﺑ ﺔﻨﻴﻛﺎﻤﻟﺍ ﻡﻮﻘﺗ ﺎﻣﺪﻨﻋ ﻦﺤﻄﻟﺍ ﺕﺍﺩﺍﺪﻋﺇ ﻂﺒﺿ ﻂﻘﻓ ﻚﻨﻜﻤﻳ
.ﻕﺍﺬﻤﻟﺍ ﻲﻓ ﻞﻣﺎﻜﻟﺍ ﻕﺮﻔﻟﺍ
.ﺔﻨﺤﻄﻤﻟﺍ ﻒﻠﺗ ﻥﻭﺩ ﺔﻟﻮﻟﯾﺢﻠﻟ ﺓﺮﻣ ﻝﮐ ﻲﻓ ﺪﺣﺍﻭ ﻦﺳ ﻦﻣ ﺮﺜﻛﺃ ﻦﺤﻄﻟﺍ ﺩﺍﺪﻋﺇ ﺡﺎﺘﻔﻣ ﺮﻳﺪﺗ ﻻ
ﻯﺮﺧﻷﺍ ﺔﻨﻴﻛﺎﻤﻟﺍ ﺕﺍﺩﺍﺪﻋﺇ ﻂﺒﺿ
:ﺔﻴﻟﺎﺘﻟﺍ ﺔﻨﻴﻛﺎﻤﻟﺍ ﺕﺍﺩﺍﺪﻋﺇ ﻂﺒﺿ ﻚﻨﻜﻤﻳ
؛ﻚﺘﻘﻄﻨﻣ ﻲﻓ ءﺎﻤﻟﺍ ﺔﺑﻼﺻ ﻯﻮﺘﺴﻤﻟ ﺎﹱﻘﻓﻭ ﺕﺎﻳﻮﺘﺴﻣ 5 ﻦﻴﺑ ﺭﺎﻴﺘﺧﻻﺍ ﻚﻨﻜﻤﻳ :ءﺎﻤﻟﺍ ﺮﺴﻋ
ﺕﺍﺩﺍﺪﻋﻹﺍ ﺰﻣﺭ ﻰﻠﻋ ﻂﻐﻀﻟﺎﺑ
1.ﺓﻮﻬﻘﻟﺍ ﺐﺻ ﺔﻫﻮﻓ ﺖﺤﺗ ﺎﹱﺑﻮﻛ ﻊﺿ
2 .ﺓﻮﻬﻘﻟﺍ ﺏﻮﺒﺣ ﻊﻤﻗ ءﺎﻄﻏ ﺢﺘﻓﺍ
3. ﻑﺎﻘﻳﻹﺍ/ءﺪﺒﻟﺍ ﺭﺯ ﻰﻠﻋ ﻂﻐﺿﺍ ﻢﺛ ﻮﺳﺮﺒﺳﻹﺍ ﺰﻣﺭ ﻰﻠﻋ ﻂﻐﺿﺍ
4(26 ﻞﻜﺸﻟﺍ) .ﻦﻴﻤﻴﻟﺍ ﻭﺃ ﺭﺎﺴﻴﻟﺍ ﻰﻟﺇ ﻪﻠﻳﻮﺤﺘﺑ ﻢﻗﻭ ﻦﺤﻄﻟﺍ ﺩﺍﺪﻋﺇ ﺡﺎﺘﻔﻣ ﻰﻠﻋ ﻞﻔﺳﻷ ﻂﻐﺿﺍ ،ﻦﺤﻄﻟﺍ ﻲﻓ ﺔﻨﺤﻄﻤﻟﺍ ﺃﺪﺒﺗ ﺎﻣﺪﻨﻋ
-
Page 70
ﺔﻴﺑﺮﻌﻟﺍ
71
ﺔﻘﻴﻗﺩ 180 ﻭﺃ 60 ﻭﺃ 30 ﻭﺃ 15 ﺭﺎﻴﺘﺧﺍ ﻚﻨﻜﻤﻳ :ﺩﺍﺪﻌﺘﺳﻻﺍ ﺖﻗﻭ
.ﹴﻝﺎﻋﻭ ،ﻂﺳﻮﺘﻣﻭ ،ﺾﻔﺨﻨﻣ ﻦﻴﺑ ﺭﺎﻴﺘﺧﺍ ﻚﻨﻜﻤﻳ :ﺔﺷﺎﺸﻟﺍ ﻉﻮﻄﺳ
ﺔﻨﻴﻛﺎﻤﻟﺍ ﺓﺮﻓﺎﺻ ﺕﻮﺻ ﻞﻴﻌﻔﺗ ءﺎﻐﻟﺇ ﻭﺃ ﻞﻴﻌﻔﺗ ﻚﻨﻜﻤﻳ :ﺕﻮﺼﻟﺍ
ﺓﻮﻬﻘﻟﺍ ﺮﻴﻀﺤﺘﻟ ﺓﺭﺍﺮﺣ ﺕﺎﺟﺭﺩ 3 ﻦﻴﺑ ﻦﻣ ﺭﺎﻴﺘﺧﻻﺍ ﻚﻨﻜﻤﻳ :ﺓﺭﺍﺮﺤﻟﺍ ﺔﺟﺭﺩ
."ﺎﹱﻣﻭﺩ ﻞﻴﻐﺸﺘﻟﺍ ﻑﺎﻘﻳﺇ" ﻭﺃ "ﺮﻴﻀﺤﺘﻟﺍ ءﺎﻨﺛﺃ" ﻭﺃ ،"ﺎﹱﻣﻭﺩ ﻞﻴﻐﺸﺘﻟﺍ" ﺭﺎﻴﺘﺧﺍ ﻚﻨﻜﻤﻳﻭ :(ﻂﻘﻓ ﺓﺩﺪﺤﻣ ﻉﺍﻮﻧﺃ) ﺔﻴﻣﺎﻣﻷﺍ ﺓءﺎﺿﻹﺍ
ﺔﻴﻗﻭﺃ ﻭﺃ ﻞﻣ ﻦﻴﺑ ﺭﺎﻴﺘﺧﻻﺍ ﻚﻨﻜﻤﻳ :ﺱﺎﻴﻘﻟﺍ ﺓﺪﺣﻭ
ﻊﻨﺼﻤﻟﺍ ﺕﺍﺩﺍﺪﻋﺇ ﺓﺩﺎﻌﺘﺳﺍ
.ﺔﻈﺤﻟ ﻱﺃ ﻲﻓ ﺔﻴﺿﺍﺮﺘﻓﻻﺍ ﺕﺍﺩﺍﺪﻋﻹﺍ ﺓﺩﺎﻌﺘﺳﺍ ﺔﻴﻧﺎﻜﻣﺇ ﺔﻨﻴﻛﺎﻤﻟﺍ ﻚﻟ ﺮﻓﻮﺗ
.ﺕﺍﺩﺍﺪﻋﻹﺍ ﺓﺩﺎﻌﺘﺳﺍ ﻥﻵﺍ ﻱﺮﺠﻳ
ﺔﻴﺑﺮﻌﻟﺍ
ﺕﺎﻔﻠﻣ ،ﺔﻴﻣﺎﻣﻷﺍ ﺓءﺎﺿﻹﺍ ،ﺓﺭﺍﺮﺤﻟﺍ ﺔﺟﺭﺩ ،ﺕﻮﺼﻟﺍ ،ﺔﺷﺎﺸﻟﺍ ﻉﻮﻄﺳ ،ﺩﺍﺪﻌﺘﺳﻻﺍ ﺖﻗﻭ ،ءﺎﻤﻟﺍ ﺔﺑﻼﺻ :ﺔﻴﻟﺎﺘﻟﺍ ﺔﻴﺿﺍﺮﺘﻓﻻﺍ ﺕﺍﺩﺍﺪﻋﻹﺍ ﺓﺩﺎﻌﺘﺳﺍ ﻢﺘﺗ
ﺎﻬﺒﻴﻛﺮﺗﻭ ﺮﻴﻀﺤﺘﻟﺍ ﺔﻋﻮﻤﺠﻣ ﺔﻟﺍﺯﺇ
ﺎﻬﺒﻴﻛﺮﺗﻭ ﺮﻴﻀﺤﺘﻟﺍ ﺔﻋﻮﻤﺠﻣ ﺔﻟﺍﺯﺇ ﺔﻴﻔﻴﻛ ﻝﻮﺣ ﻮﻳﺪﻴﻔﻟﺍ ﻊﻃﺎﻘﻤﺑ ﺔﺤﺿﻮﻣ ﺔﻴﻠﻴﺼﻔﺗ ﺕﺎﻤﻴﻠﻌﺗ ﻰﻠﻋ ﻝﻮﺼﺤﻠﻟ www.philips.com/coffee-care ﻰﻟﺇ ﻞﻘﺘﻧﺍ
ﺔﻐﻠﻟﺍ
-
.ﺕﻼﻴﻀﻔﺘﻟﺍ
.ﺎﻬﻔﻴﻈﻨﺗﻭ
-
-
-
-
-
-
-
1 . ﺕﺍﺩﺍﺪﻋﻹﺍ ﺰﻣﺭ ﻰﻠﻋ ﻂﻐﺿﺍ
2 .ﺪﻴﻛﺄﺘﻠﻟ "ﻖﻓﺍﻮﻣ" ﺰﻣﺭ ﻰﻠﻋ ﻂﻐﺿﺍ ."ﺔﻴﺿﺍﺮﺘﻓﻻﺍ ﺕﺍﺩﺍﺪﻋﻹﺍ" ﺪﻳﺪﺤﺘﻟ ﻞﻔﺳﻷﻭ ﻰﻠﻋﻷ ﻦﻴﻤﻬﺴﻟﺍ ﻡﺪﺨﺘﺳﺍ
3.ﺕﺍﺩﺍﺪﻋﻹﺍ ﺓﺩﺎﻌﺘﺳﺍ ﻲﻓ ﻚﺘﺒﻏﺭ ﻰﻠﻋ ﺪﻴﻛﺄﺘﻠﻟ ﻑﺎﻘﻳﻹﺍ/ءﺪﺒﻟﺍ ﺭﺯ ﻰﻠﻋ ﻂﻐﺿﺍ
ﺔﻨﻴﻛﺎﻤﻟﺍ ﻦﻣ ﺮﻴﻀﺤﺘﻟﺍ ﺔﻋﻮﻤﺠﻣ ﺔﻟﺍﺯﺇ
ﺮﻴﻀﺤﺘﻟﺍ ﺔﻋﻮﻤﺠﻣ ﻝﺎﺧﺩﺇ ﺓﺩﺎﻋﺇ
.ﺢﻴﺤﺼﻟﺍ ﺎﻬﻧﺎﻜﻣ ﻲﻓ ﺎﻬﻌﺿﻭ ﻦﻣ ﺪﻛﺄﺗ ،ﺔﻨﻴﻛﺎﻤﻟﺍ ﻰﻟﺇ ﻯﺮﺧﺃ ﺓﺮﻣ ﺮﻴﻀﺤﺘﻟﺍﺍ ﺔﻋﻮﻤﺠﻣ ﺔﺣﺍﺯﺈﺑ ﻡﻮﻘﺗ ﻥﺃ ﻞﺒﻗ
.(30 ﻞﻜﺸﻟﺍ) Nﻭ ﺩﻮﺳﻷﺍ ﻢﻬﺴﻟﺎﺑ
.(31 ﻞﻜﺸﻟﺍ) ﺮﻴﻀﺤﺘﻟﺍﺍ ﺔﻋﻮﻤﺠﻣ ﺓﺪﻋﺎﻗ ﻊﻣ ﺲﻣﻼﺘﻳ ﻰﺘﺣ ﻞﻔﺳﻷ ﻊﻓﺮﻟﺍ ﻉﺍﺭﺫ ﻊﻓﺩﺍ ،ﻪﺗﺍﺫﺎﺤﻣ ﻢﺘﺗ ﻢﻟ ﺍﺫﺇ
.PUSH ﺭﺰﻟﺍ ﻰﻠﻋ ﻂﻐﻀﻟﺎﺑ ﻢﻘﺗ ﻻ .(33 ﻞﻜﺸﻟﺍ) ﺓﺪﺣﺍﻭ ﺓﺮﻘﻨﺑ
-
ﺔﻧﺎﻴﺼﻟﺍﻭ ﻒﻴﻈﻨﺘﻟﺍ
.ﺓﻮﻬﻘﻠﻟ ﺮﻤﺘﺴﻤﻟﺍ ﻖﻓﺪﺘﻟﺍ ﻊﻣ ﺔﻠﻳﻮﻃ ﺓﺮﺘﻔﻟ ﺓﻮﻬﻘﻠﻟ ﺪﻴﺟ ﻕﺍﺬﻣ ﻥﺎﻨﻤﻀﻳﻭ ﺎﻬﺗﻻﺎﺣ ﻞﻀﻓﺃ ﻲﻓ ﺔﻨﻴﻛﺎﻤﻟﺍ ﻰﻠﻋ ﻥﺎﻤﻈﺘﻨﻤﻟﺍ ﺔﻧﺎﻴﺼﻟﺍﻭ ﻒﻴﻈﻨﺘﻟﺍ ﻆﻓﺎﺤﻳ
1.ﺔﻨﻴﻛﺎﻤﻟﺍ ﻞﻴﻐﺸﺗ ﻑﺎﻘﻳﺈﺑ ﻢﻗ
2.(27 ﻞﻜﺸﻟﺍ) ﺔﻣﺪﺨﻟﺍ ﺏﺎﺑ ﺢﺘﻓﺍﻭ ﻩﺎﻴﻤﻟﺍ ﻥﺍﺰﺧ ﺔﻟﺍﺯﺈﺑ ﻢﻗ
3.(29 ﻞﻜﺸﻟﺍ) ﺔﻨﻴﻛﺎﻤﻟﺍ ﻦﻣ ﻪﺘﻟﺍﺯﻹ ﺮﻴﻀﺤﺘﻟﺍ ﺔﻋﻮﻤﺠﻣ ﺔﻀﺒﻗ ﻲﻓ ﻪﺒﺤﺳﺍﻭ (28 ﻞﻜﺸﻟﺍ) PUSH ﺾﺒﻘﻤﻟﺍ ﻰﻠﻋ ﻂﻐﺿﺍ
1ﺮﻴﻀﺤﺘﻟﺍﺍ ﺔﻋﻮﻤﺠﻣ ﺐﻧﺎﺟ ﻰﻠﻋ ءﺍﺮﻔﺼﻟﺍ ﺔﻧﺍﻮﻄﺳﻻﺍ ﻰﻠﻋ ﺩﻮﺟﻮﻤﻟﺍ ﻢﻬﺴﻟﺍ ﺓﺍﺫﺎﺤﻣ ﺐﺠﻳ .ﺢﻴﺤﺼﻟﺍ ﺎﻬﻧﺎﻜﻣ ﻲﻓ ﺮﻴﻀﺤﺘﻟﺍﺍ ﺔﻋﻮﻤﺠﻣ ﺖﻧﺎﻛ ﺍﺫﺇ ﺎﻤﻣ ﻖﻘﺤﺗ
2ﺎﻬﻧﺎﻜﻣ ﻲﻓ ﺎﻬﺘﻴﺒﺜﺗ ﻢﺘﻳ ﻰﺘﺣ (32 ﻞﻜﺸﻟﺍ) ﻦﻴﺒﻧﺎﺠﻟﺍ ﻰﻠﻋ ﺓﺩﻮﺟﻮﻤﻟﺍ ﺔﻴﻠﻴﻟﺪﻟﺍ ﻥﺎﺒﻀﻘﻟﺍ ﻝﻮﻃ ﻰﻠﻋ ﺔﻨﻴﻛﺎﻤﻟﺍ ﻰﻟﺇ ﻯﺮﺧﺃ ﺓﺮﻣ ﺮﻴﻀﺤﺘﻟﺍﺍ ﺔﻋﻮﻤﺠﻣ ﺔﺣﺍﺯﺈﺑ ﻢﻗ
3.ﻯﺮﺧﺃ ﺓﺮﻣ ﻪﻧﺎﻜﻣ ﻲﻓ ﻩﺎﻴﻤﻟﺍ ﻥﺍﺰﺧ ﻊﺿﻭ ﺔﻣﺪﺨﻟﺍ ﺏﺎﺑ ﻖﻠﻏﺃ
Page 71
ﺔﻴﺑﺮﻌﻟﺍ
72
ﻦﻣ ﺪﻳﺰﻣ ﻰﻠﻋ ﺭﻮﺜﻌﻟﺍ ﻚﻨﻜﻤﻳ .ﺎﻬﻔﻴﻈﻨﺗ ﺔﻴﻔﻴﻛﻭ ﻚﻔﻠﻟ ﺔﻠﺑﺎﻘﻟﺍ ﺔﻨﻴﻛﺎﻤﻟﺍ ءﺍﺰﺟﺃ ﻊﻴﻤﺟ ﻒﻴﻈﻨﺗ ﺖﻗﻭ ﻝﻮﺣ ﻞﺼﻔﻣ ﻒﺻﻭ ﯽﻞﻋ ﻝﻮﺼﺤﻠﻟ ﻩﺎﻧﺩﺃ ﻝﻭﺪﺠﻟﺍ ﻊﺟﺍﺭ
ﻲﺘﻟﺍ ءﺍﺰﺟﻷﺍ ﻰﻠﻋ ﺔﻣﺎﻋ ﺓﺮﻈﻧ ءﺎﻘﻟﻹ (ﺏ) ﻞﻜﺸﻟﺍ ﺮﻈﻧﺍ .www.philips.com/coffee-care ﻰﻠﻋ ﻮﻳﺪﻴﻔﻟﺍ ﻊﻃﺎﻘﻤﺑ ﺔﺤﺿﻮﻣ ﺕﺍﺩﺎﺷﺭﺇﻭ ﺔﻠﺼﻔﻤﻟﺍ ﺕﺎﻣﻮﻠﻌﻤﻟﺍ
.ﻥﻮﺤﺼﻟﺍ ﺔﻟﺎﺴﻏ ﻲﻓ ﺎﻬﻔﻴﻈﻨﺗ ﻦﻜﻤﻳ
ﻒﻴﻈﻨﺘﻟﺍ ﺔﻘﻳﺮﻃ
ﻒﻴﻈﻨﺘﻟﺍ ﺖﻗﻭ ﻚﻔﻠﻟ ﺔﻠﺑﺎﻘﻟﺍ ءﺍﺰﺟﻷﺍ
ﺔﻋﻮﻤﺠﻣ ﺔﻟﺍﺯﺇ' ﺮﻈﻧﺍ) ﺔﻨﻴﻛﺎﻤﻟﺍ ﻦﻣ ﺮﻴﻀﺤﺘﻟﺍ ﺔﻋﻮﻤﺠﻣ ﺔﻟﺍﺯﺈﺑ ﻢﻗ
ﺔﻋﻮﻤﺠﻣ ﻒﻴﻈﻨﺗ' ﺮﻈﻧﺍ) ﺔﻴﻔﻨﺤﻟﺍ ﺖﺤﺗ ﺎﻬﻔﻄﺷﺍ .('ﺎﻬﺒﻴﻛﺮﺗﻭ ﺮﻴﻀﺤﺘﻟﺍ
.('ﺔﻴﻔﻨﺤﻟﺍ ﺖﺤﺗ ﺮﻴﻀﺤﺘﻟﺍ
ﻞﻳﺰﻤﻟﺍ ﺲﺒﻴﻠﻴﻓ ﺹﺮﻗ ﻡﺍﺪﺨﺘﺳﺎﺑ ﺮﻴﻀﺤﺘﻟﺍ ﺔﻋﻮﻤﺠﻣ ﻒﻴﻈﻨﺘﺑ ﻢﻗ
ﺖﻳﺰﻟ ﺔﻠﻳﺰﻣ ﺹﺍﺮﻗﺄﺑ ﺮﻴﻀﺤﺘﻟﺍ ﺔﻋﻮﻤﺠﻣ ﻒﻴﻈﻨﺗ' ﺮﻈﻧﺍ) ﺓﻮﻬﻘﻟﺍ ﺖﻳﺰﻟ
.('ﺓﻮﻬﻘﻟﺍ
ﻡﺍﺪﺨﺘﺳﺎﺑ ﺔﻨﻴﻛﺎﻤﻟﺎﺑ ﺐﹽﻛﺮﻣ ﻮﻫﻭ ﺐﻴﻠﺤﻟﺍ ﺩﺎﺑﺯﺇ ﺯﺎﻬﺟ ﹰﻻﻭﺃ ﻒﹽﻈﻧ
ﺩﺎﺑﺯﺇ ﺯﺎﻬﺠﻟ ﻊﻳﺮﺴﻟﺍ ﻒﻴﻈﻨﺘﻟﺍ' ﺮﻈﻧﺍ) "ﻊﻳﺮﺴﻟﺍ ﺐﻴﻠﺤﻟﺍ ﻒﻴﻈﻨﺗ" ﺞﻣﺎﻧﺮﺑ
ﺔﻨﻴﻛﺎﻤﻟﺍ ﻦﻣ ﺐﻴﻠﺤﻟﺍ ﺩﺎﺑﺯﺇ ﺯﺎﻬﺟ ﺔﻟﺍﺯﺈﺑ ﻢﻗ ﻢﺛ .('ﻲﻜﻴﺳﻼﻜﻟﺍ ﺐﻴﻠﺤﻟﺍ
ﺔﻟﺎﺴﻏ ﻲﻓ ﻭﺃ ﺔﻴﻔﻨﺤﻟﺍ ﺖﺤﺗ ءﺍﺰﺟﻷﺍ ﻊﻴﻤﺟ ﻒﻴﻈﻨﺘﺑ ﻢﻗ .ﻪﻜﻴﻜﻔﺗﻭ
.ﻥﻮﺤﺼﻟﺍ
ﺓﺮﺠﺣ ءﺎﻄﻏ ﺢﺘﻓﺍ .ﺮﻴﻀﺤﺘﻟﺍ ﺔﻋﻮﻤﺠﻣ ﺔﻟﺍﺯﺈﺑ ﻢﻗﻭ ﺔﻨﻴﻛﺎﻤﻟﺍ ﻞﺼﻓﺍ
ﻰﻠﻋﻷ ﺾﺒﻘﻤﻟﺍ ﻙﺮﺣ .ﺎﻬﻴﻓ ﺔﻘﻌﻠﻤﻟﺍ ﺾﺒﻘﻣ ﻞﺧﺩﺃﻭ ﻥﻮﺤﻄﻤﻟﺍ ﻦﺒﻟﺍ
ﻞﻘﺘﻧﺍ .(34 ﻞﻜﺸﻟﺍ) ﺔﻘﻟﺎﻌﻟﺍ ﺔﻧﻮﺤﻄﻤﻟﺍ ﺓﻮﻬﻘﻟﺍ ﻂﻘﺴﺗ ﻰﺘﺣ ﻞﻔﺳﻷﻭ
ﺕﺎﻤﻴﻠﻌﺗ ﻰﻠﻋ ﻝﻮﺼﺤﻠﻟ www.philips.com/coffee-care ﻰﻟﺇ
.ﻮﻳﺪﻴﻔﻟﺍ ﻊﻃﺎﻘﻤﺑ ﺔﺤﺿﻮﻣ ﺔﻠﺼﻔﻣ
ﺎﻬﻔﻄﺷﺍ .ﺔﻨﻴﻛﺎﻤﻟﺍ ﻞﻴﻐﺸﺗ ءﺎﻨﺛﺃ ﺓﻮﻬﻘﻟﺍ ﺐﺳﺍﻭﺭ ﺔﻳﻭﺎﺣ ﺔﻟﺍﺯﺈﺑ ﻢﻗ
ﺔﻟﺎﺴﻏ ﻲﻓ ﺎﻬﻔﻈﻧ ﻭﺃ ﻞﻴﺴﻐﻟﺍ ﻞﺋﺎﺳ ﻦﻣ ﺾﻌﺒﺑ ﺔﻴﻔﻨﺤﻟﺍ ﺖﺤﺗ
(15ﺃ ﻞﻜﺸﻟﺍ) ﺔﻧﻮﺤﻄﻤﻟﺍ ﺓﻮﻬﻘﻟﺍ ﺔﻳﻭﺎﺤﻟ ﺔﻴﻣﺎﻣﻷﺍ ﺔﺣﻮﻠﻟﺍ .ﻥﻮﺤﺼﻟﺍ
.ﻥﻮﺤﺼﻟﺍ ﺔﻟﺎﺴﻏ ﻲﻓ ﻒﻴﻈﻨﺘﻠﻟ ﺔﻨﻣﺁ ﺖﺴﻴﻟ
ﺔﻴﻔﻨﺤﻟﺍ ﺖﺤﺗ ﺎﻬﻔﻄﺷﺍﻭ (36 ﻞﻜﺸﻟﺍ) ﻂﻴﻘﻨﺘﻟﺍ ﺔﻴﻨﻴﺻ ﺔﻟﺍﺯﺈﺑ ﻢﻗ
ﻂﻴﻘﻨﺘﻟﺍ ﺔﻴﻨﻴﺻ ﻒﻴﻈﻨﺗ ﺎﹱﻀﻳﺃ ﻚﻨﻜﻤﻳ .ﻒﻴﻈﻨﺘﻟﺍ ﻞﺋﺎﺳ ﻦﻣ ﺾﻌﺒﺑ
ﺔﻧﻮﺤﻄﻤﻟﺍ ﺓﻮﻬﻘﻟﺍ ﺔﻳﻭﺎﺤﻟ ﺔﻴﻣﺎﻣﻷﺍ ﺔﺣﻮﻠﻟﺍ .ﻥﻮﺤﺼﻟﺍ ﺔﻟﺎﺴﻏ ﻲﻓ
.ﻥﻮﺤﺼﻟﺍ ﺔﻟﺎﺴﻏ ﻲﻓ ﻒﻴﻈﻨﺘﻠﻟ ﺔﻨﻣﺁ ﺖﺴﻴﻟ (15ﺃ ﻞﻜﺸﻟﺍ)
ﻉﻮﺒﺳﺃ ﻞﻛ ﺮﻴﻀﺤﺘﻟﺍ ﺔﻋﻮﻤﺠﻣ
ﺮﻬﺷ ﻞﻛ
ﻡﺍﺪﺨﺘﺳﺍ ﻞﻛ ﺪﻌﺑ ﻲﻜﻴﺳﻼﻜﻟﺍ ﺐﻴﻠﺤﻟﺍ ﺩﺎﺑﺯﺇ ﺯﺎﻬﺟ
ﻉﻮﺒﺳﺃ ﻞﻛ ﻥﻮﺤﻄﻤﻟﺍ ﻦﺒﻟﺍ ﺓﺮﺠﺣ ﺺﺤﻓﺍ
.ﺓﺩﻭﺪﺴﻣ ﺖﻧﺎﻛ ﺍﺫﺇ ﺎﻣ ﺔﻓﺮﻌﻤﻟ
ﻲﻄﻌﺗ ﺎﻣﺪﻨﻋ ﺓﻮﻬﻘﻟﺍ ﺐﺳﺍﻭﺭ ﺔﻳﻭﺎﺣ ﻍﺍﺮﻓﺈﺑ ﻢﻗ
.ﻉﻮﺒﺳﺃ ﻞﻛ ﺎﻬﻔﻈﻧ .ﻚﻟﺬﻟ ﺓﺭﺎﺷﺇ ﺔﻨﻴﻛﺎﻤﻟﺍ
ﻝﻮﺤﺗ ﺩﺮﺠﻤﺑ ﻭﺃ ﺎﹱﻴﻣﻮﻳ ﻂﻴﻘﻨﺘﻟﺍ ﺔﻴﻨﻴﺻ ﻍﺍﺮﻓﺈﺑ ﻢﻗ
ﻦﻣ ﺮﻤﺣﻷﺍ ﻥﻮﻠﻟ "ﺔﺌﻠﺘﻤﻣ ﻂﻴﻘﻨﺘﻟﺍ ﺔﻴﻨﻴﺻ" ﺮﺷﺆﻣ
ﺔﻴﻨﻴﺻ ﻒﻈﻧ .(35 ﻞﻜﺸﻟﺍ) ﻂﻴﻘﻨﺘﻟﺍ ﺔﻴﻨﻴﺻ ﻝﻼﺧ
.ﻉﻮﺒﺳﺃ ﻞﻛ ﻂﻴﻘﻨﺘﻟﺍ
ﻥﻮﺤﻄﻤﻟﺍ ﻦﺒﻟﺍ ﺓﺮﺠﺣ
ﺓﻮﻬﻘﻟﺍ ﺐﺳﺍﻭﺭ ﺔﻳﻭﺎﺣ
ﻂﻴﻘﻨﺘﻟﺍ ﺔﻴﻨﻴﺻ
ﻡﺍﺪﺨﺘﺳﺎﺑ ﺔﻨﻴﻛﺎﻤﻟﺎﺑ ﺔﺒﹽﻛﺮﻣ ﻲﻫﻭ LatteGo ﺔﻳﻭﺎﺣ ﹰﻻﻭﺃ ﻒﹽﻈﻧ
ﺔﻳﻭﺎﺤﻟ ﻊﻳﺮﺴﻟﺍ ﻒﻴﻈﻨﺘﻟﺍ' ﺮﻈﻧﺍ) "ﻊﻳﺮﺴﻟﺍ ﺐﻴﻠﺤﻟﺍ ﻒﻴﻈﻨﺗ" ﺞﻣﺎﻧﺮﺑ
ﺭﻮﺒﻨﺼﻟﺍ ءﺎﻤﺑ ﺎﻬﻔﻄﺷﺍﻭ ﺔﻨﻴﻛﺎﻤﻟﺍ ﻦﻣ ﺎﻬﻟﺯﺃ ﻢﺛ .('LatteGo ﺐﻴﻠﺤﻟﺍ
.ﻥﻮﺤﺼﻟﺍ ﺔﻟﺎﺴﻏ ﻲﻓ ﺎﻬﻔﹽﻈﻧ ﻭﺃ
ﻡﻮﺤﺸﻟﺍ ﻡﺍﺪﺨﺘﺳﺎﺑ ﺮﻴﻀﺤﺘﻟﺍ ﺔﻋﻮﻤﺠﻣ ﺖﻴﻳﺰﺗﻭ ﺖﻴﻳﺰﺘﻟﺍ ﻝﻭﺪﺟ ﻊﺟﺍﺭ
.('ﺮﻴﻀﺤﺘﻟﺍ ﺔﻋﻮﻤﺠﻣ ﺖﻴﻳﺰﺗ' ﺮﻈﻧﺍ) ﺲﺒﻴﻠﻴﻓ ﻦﻣ
ﺔﻴﻔﻨﺤﻟﺍ ﺖﺤﺗ ﻩﺎﻴﻤﻟﺍ ﻥﺍﺰﺧ ﻒﻄﺷﺍ ﻉﻮﺒﺳﺃ ﻞﻛ ﻩﺎﻴﻣ ﻥﺍﺰﺧ
ﺔﻄﺷﺎﻛ ﺮﻴﻏ ﺔﺷﺎﻤﻘﺑ ﺎﻬﻔﹽﻈﻧ ﻉﻮﺒﺳﺃ ﻞﻛ ﺔﻨﻴﻛﺎﻤﻟﺍ ﺔﻬﺟﺍﻭ
ﻡﺍﺪﺨﺘﺳﺍ ﻞﻛ ﺪﻌﺑ LatteGo ﺯﺎﻬﺟ
ﻦﻳﺮﻬﺷ ﻞﻛ ﺮﻴﻀﺤﺘﻟﺍ ﺔﻋﻮﻤﺠﻣ ﺖﻴﻳﺰﺗ
ﺮﻴﻀﺤﺘﻟﺍ ﺔﻋﻮﻤﺠﻣ ﻒﻴﻈﻨﺗ
ﻰﻠﻋ ﻝﻮﺼﺤﻠﻟ www.philips.com/coffee-care ﺓﺭﺎﻳﺰﺑ ﻢﻗ .ﺔﻴﻠﺧﺍﺪﻟﺍ ﺮﺋﺍﻭﺪﻟﺍ ﺪﺳ ﻦﻣ ﺓﻮﻬﻘﻟﺍ ﺕﺎﻔﻠﺨﻣ ﺮﻴﻀﺤﺘﻟﺍ ﺔﻋﻮﻤﺠﻤﻟ ﻢﻈﺘﻨﻤﻟﺍ ﻒﻴﻈﻨﺘﻟﺍ ﻊﻨﻤﻳ
.ﺎﻬﻔﻴﻈﻨﺗﻭ ﺎﻬﺒﻴﻛﺮﺗﻭ ﺮﻴﻀﺤﺘﻟﺍ ﺔﻋﻮﻤﺠﻣ ﺔﻟﺍﺯﺇ ﺔﻴﻔﻴﻛ ﻝﻮﺣ ﻢﻋﺪﻟﺍ ﻮﻳﺪﻴﻓ ﻊﻃﺎﻘﻣ
Page 72
ﺔﻴﺑﺮﻌﻟﺍ
ﺔﻴﺑﺮﻌﻟﺍ
73
ﺔﻴﻔﻨﺤﻟﺍ ﺖﺤﺗ ﺮﻴﻀﺤﺘﻟﺍ ﺔﻋﻮﻤﺠﻣ ﻒﻴﻈﻨﺗ
.ﺮﻴﻀﺤﺘﻟﺍ
ﺓﻮﻬﻘﻟﺍ ﺖﻳﺰﻟ ﺔﻠﻳﺰﻣ ﺹﺍﺮﻗﺄﺑ ﺮﻴﻀﺤﺘﻟﺍ ﺔﻋﻮﻤﺠﻣ ﻒﻴﻈﻨﺗ
.ﺓﻮﻬﻘﻟﺍ ﺖﻳﺰﻟ ﺔﻠﻳﺰﻤﻟﺍ ﺲﺒﻴﻠﻴﻓ ﺹﺍﺮﻗﺃ ﻂﻘﻓ ﻡﺪﺨﺘﺳﺍ
ﻒﻴﻈﻨﺘﻟﺍ ﺰﻣﺭ ﻰﻠﻋ ﻂﻐﺿﺍ
ﺮﻴﻀﺤﺘﻟﺍ ﺔﻋﻮﻤﺠﻣ ﺖﻴﻳﺰﺗ
.ﺔﺳﻼﺴﺑ ﻙﺮﺤﺘﻟﺍ ﻲﻓ ﺔﻛﺮﺤﺘﻤﻟﺍ ءﺍﺰﺟﻷﺍ ﺭﺍﺮﻤﺘﺳﺍ ﻥﺎﻤﻀﻟ ،ﻦﻳﺮﻬﺷ ﻞﻛ ﺮﻴﻀﺤﺘﻟﺍ ﺔﻋﻮﻤﺠﻣ ﻢﻴﺤﺸﺘﺑ ﻚﺤﺼﻨﻧ ،ﺔﻨﻴﻛﺎﻤﻟﺍ ءﺍﺩﺃ ﻦﻴﺴﺤﺘﻟ
(ﻂﻘﻓ ﺓﺩﺪﺤﻣ ﻉﺍﻮﻧﺃ) LatteGo ﺐﻴﻠﺤﻟﺍ ﺔﻳﻭﺎﺣ ﻒﻴﻈﻨﺗ
LatteGo ﺐﻴﻠﺤﻟﺍ ﺔﻳﻭﺎﺤﻟ ﻊﻳﺮﺴﻟﺍ ﻒﻴﻈﻨﺘﻟﺍ
ﻒﻴﻈﻨﺘﻟﺍ ﺰﻣﺭ ﻰﻠﻋ ﻂﻐﺿﺍ
.ﺐﻴﻠﺤﻟﺍ ﻡﺎﻈﻧ ﺔﻄﺳﺍﻮﺑ ءﺎﻤﻟﺍ ﻦﻣ ﺓﺮﻴﻐﺻ ﺕﺎﻘﻓﺩ ﹼﺐﺻ ﻢﺘﻴﺳ
-
1.('ﺎﻬﺒﻴﻛﺮﺗﻭ ﺮﻴﻀﺤﺘﻟﺍ ﺔﻋﻮﻤﺠﻣ ﺔﻟﺍﺯﺇ' ﺮﻈﻧﺍ) ﺮﻴﻀﺤﺘﻟﺍ ﺔﻋﻮﻤﺠﻣ ﺔﻟﺍﺯﺈﺑ ﻢﻗ
2.ﺮﻴﻀﺤﺘﻟﺍ ﺔﻋﻮﻤﺠﻤﻟ (37 ﻞﻜﺸﻟﺍ) ﻱﻮﻠﻌﻟﺍ ﺮﺘﻠﻔﻟﺍ ﺹﺮﺤﺑ ﻒﻈﻧ .ءﺎﻤﻟﺎﺑ ﺍﹰﺪﻴﺟ ﺮﻴﻀﺤﺘﻟﺍ ﺔﻋﻮﻤﺠﻣ ﻒﻄﺷﺍ
3ﺔﻋﻮﻤﺠﻣ ﻞﺧﺍﺩ ﻊﻤﺠﺘﻟﺍ ﻦﻣ ﻑﺎﻴﻟﻷﺍ ﻊﻨﻤﻟ ﺵﺎﻤﻗ ﺔﻌﻄﻘﺑ ﺮﻴﻀﺤﺘﻟﺍ ﺔﻋﻮﻤﺠﻣ ﻒﻔﺠﺗ ﻻ .ﻯﺮﺧﺃ ﺓﺮﻣ ﺎﻬﻌﺿﻭ ﻞﺒﻗ ءﺍﻮﻬﻟﺍ ﻲﻓ ﻒﺠﺗ ﺮﻴﻀﺤﺘﻟﺍ ﺔﻋﻮﻤﺠﻣ ﻉﺩ
1 ."ﺮﻴﻀﺤﺘﻟﺍ ﺔﻋﻮﻤﺠﻣ ﻒﻴﻈﻨﺗ" ﺪﻳﺪﺤﺘﻟ ﻞﻔﺳﻷﻭ ﻰﻠﻋﻷ ﻦﻴﻤﻬﺴﻟﺍ ﻡﺪﺨﺘﺳﺍﻭ
2.ﺔﺷﺎﺸﻟﺍ ﻰﻠﻋ ﺮﻬﻈﺗ ﻲﺘﻟﺍ ﺕﺎﻤﻴﻠﻌﺘﻟﺍ ﻊﺒﺗﺍ ﻢﺛ ﺪﻴﻛﺄﺘﻠﻟ "ﻖﻓﺍﻮﻣ" ﺰﻣﺭ ﻰﻠﻋ ﻂﻐﺿﺍ
1.(38 ﻞﻜﺸﻟﺍ) ﺮﻴﻀﺤﺘﻟﺍ ﺔﻋﻮﻤﺠﻣ ﻦﻣ (ﻱﺩﺎﻣﺮﻟﺍ ءﺰﺠﻟﺍ) ﺲﺒﻜﻤﻟﺍ ﻰﻠﻋ ﻢﺤﺸﻟﺍ ﻦﻣ ﺔﻘﻴﻗﺭ ﺔﻘﺒﻃ ﻊﺿ
2.(39 ﻞﻜﺸﻟﺍ) ﺮﻴﻀﺤﺘﻟﺍ ﺔﻋﻮﻤﺠﻣ ﻦﻣ ﻲﻠﻔﺴﻟﺍ ءﺰﺠﻟﺍ ﻲﻓ (ﻱﺩﺎﻣﺮﻟﺍ ءﺰﺠﻟﺍ) ﺩﻮﻤﻌﻟﺍ ﻝﻮﺣ ﻢﺤﺸﻟﺍ ﻦﻣ ﺔﻘﻴﻗﺭ ﺔﻘﺒﻃ ﻊﺿ
3.(40 ﻞﻜﺸﻟﺍ) ﻦﻴﺒﻧﺎﺠﻟﺍ ﻼﻛ ﻰﻠﻋ ﻥﺎﺒﻀﻘﻟﺍ ﻰﻠﻋ ﻢﺤﺸﻟﺍ ﻦﻣ ﺔﻘﻴﻗﺭ ﺔﻘﺒﻃ ﻊﺿ
1.(10 ﻞﻜﺸﻟﺍ) ﺔﻨﻴﻛﺎﻤﻟﺎﺑ ﺔﺤﻴﺤﺻ ﺔﻘﻳﺮﻄﺑ LatteGo ﺐﻴﻠﺤﻟﺍ ﺔﻳﻭﺎﺣ ﺐﻴﻛﺮﺗ ﻦﻣ ﺪﻛﺄﺗ
2.ﺔﻫﻮﻔﻟﺍ ﺖﺤﺗ ﺎﹱﺑﻮﻛ ﻊﺿ
3."ﻊﻳﺮﺴﻟﺍ ﺐﻴﻠﺤﻟﺍ ﻒﻴﻈﻨﺗ" ﺞﻣﺎﻧﺮﺑ ﺪﻳﺪﺤﺘﻟ ﻞﻔﺳﻷﻭ ﻰﻠﻋﻷ ﻦﻴﻤﻬﺴﻟﺍ ﻡﺪﺨﺘﺳﺍﻭ
4 .ﺐﻴﻠﺤﻟﺍ ﻡﺎﻈﻧ ﻞﺧﺍﺩ ﹴﻖﺒﺘﻣ ﺐﻴﻠﺣ ﻱﺃ ﺔﻟﺍﺯﻹ ﺔﺷﺎﺸﻟﺍ ﻰﻠﻋ ﺮﻬﻈﺗ ﻲﺘﻟﺍ ﺕﺎﻤﻴﻠﻌﺘﻟﺍ ﻊﺒﺗﺍ ﻢﺛ ﺪﻴﻛﺄﺘﻠﻟ "ﻖﻓﺍﻮﻣ" ﺰﻣﺭ ﻰﻠﻋ ﻂﻐﺿﺍ
5 .ﺔﺟﻼﺜﻟﺍ ﻲﻓ ﻲﻘﺒﺘﻤﻟﺍ ﺐﻴﻠﺤﻟﺍ ﻊﻣ LatteGo ﺐﻴﻠﺤﻟﺍ ﺔﻳﻭﺎﺣ ﻊﺿ
LatteGo ﺐﻴﻠﺤﻟﺍ ﺔﻳﻭﺎﺤﻟ ﻞﻣﺎﺸﻟﺍ ﻒﻴﻈﻨﺘﻟﺍ
(ﻂﻘﻓ ﺓﺩﺪﺤﻣ ﻉﺍﻮﻧﺃ) ﻲﻜﻴﺳﻼﻜﻟﺍ ﺐﻴﻠﺤﻟﺍ ﺩﺎﺑﺯﺇ ﺯﺎﻬﺟ ﻒﻴﻈﻨﺗ
ﻲﻜﻴﺳﻼﻜﻟﺍ ﺐﻴﻠﺤﻟﺍ ﺩﺎﺑﺯﺇ ﺯﺎﻬﺠﻟ ﻊﻳﺮﺴﻟﺍ ﻒﻴﻈﻨﺘﻟﺍ
ﻒﻴﻈﻨﺘﻟﺍ ﺰﻣﺭ ﻰﻠﻋ ﻂﻐﺿﺍ
.ﺐﻴﻠﺤﻟﺍ ﻡﺎﻈﻧ ﺔﻄﺳﺍﻮﺑ ءﺎﻤﻟﺍ ﻦﻣ ﺓﺮﻴﻐﺻ ﺕﺎﻘﻓﺩ ﹼﺐﺻ ﻢﺘﻴﺳ
ﻲﻜﻴﺳﻼﻜﻟﺍ ﺐﻴﻠﺤﻟﺍ ﺩﺎﺑﺯﺇ ﺯﺎﻬﺠﻟ ﻲﻣﻮﻴﻟﺍ ﻒﻴﻈﻨﺘﻟﺍ
-
1.(41 ﻞﻜﺸﻟﺍ) ﺔﻨﻴﻛﺎﻤﻟﺍ ﻦﻣ LatteGo ﺯﺎﻬﺟ ﺔﻟﺍﺯﺈﺑ ﻢﻗ
2.ﻲﻘﺒﺘﻤﻟﺍ ﺐﻴﻠﺤﻟﺍ ﺐﻜﺳﺍ
3.(42 ﻞﻜﺸﻟﺍ) LatteGo ﺯﺎﻬﺟ ﺭﺎﻃﺇ ﻦﻣ ﺐﻴﻠﺤﻟﺍ ﺔﻳﻭﺎﺣ ﺔﻟﺍﺯﺈﺑ ﻢﻗﻭ ﺮﻳﺮﺤﺘﻟﺍ ﺭﺯ ﻰﻠﻋ ﻂﻐﺿﺍ
4.ﻞﻴﺴﻐﻟﺍ ﻞﺋﺎﺳ ﻦﻣ ﺾﻌﺑﻭ ﺮﺗﺎﻓ ءﺎﻤﺑ ﺔﻴﻔﻨﺤﻟﺍ ﺖﺤﺗ ﻭﺃ ﻥﻮﺤﺼﻟﺍ ﺔﻟﺎﺴﻏ ﻲﻓ ءﺍﺰﺟﻷﺍ ﻊﻴﻤﺟ ﻒﻈﻧ
1.(13 ﻞﻜﺸﻟﺍ) ﺔﻨﻴﻛﺎﻤﻟﺎﺑ ﺔﺤﻴﺤﺻ ﺔﻘﻳﺮﻄﺑ ﻲﻜﻴﺳﻼﻜﻟﺍ ﺐﻴﻠﺤﻟﺍ ﺩﺎﺑﺯﺇ ﺯﺎﻬﺟ ﺐﻴﻛﺮﺗ ﻦﻣ ﺪﻛﺄﺗ
2.ﺔﻫﻮﻔﻟﺍ ﺖﺤﺗ ﺎﹱﺑﻮﻛ ﻊﺿ
3."ﻊﻳﺮﺴﻟﺍ ﺐﻴﻠﺤﻟﺍ ﻒﻴﻈﻨﺗ" ﺞﻣﺎﻧﺮﺑ ﺪﻳﺪﺤﺘﻟ ﻞﻔﺳﻷﻭ ﻰﻠﻋﻷ ﻦﻴﻤﻬﺴﻟﺍ ﻡﺪﺨﺘﺳﺍﻭ
4 .ﺐﻴﻠﺤﻟﺍ ﺩﺎﺑﺯﺇ ﺯﺎﻬﺟ ﻞﺧﺍﺩ ﹴﻖﺒﺘﻣ ﺐﻴﻠﺣ ﻱﺃ ﺔﻟﺍﺯﻹ ﺔﺷﺎﺸﻟﺍ ﻰﻠﻋ ﺮﻬﻈﺗ ﻲﺘﻟﺍ ﺕﺎﻤﻴﻠﻌﺘﻟﺍ ﻊﺒﺗﺍ ﻢﺛ ﺪﻴﻛﺄﺘﻠﻟ "ﻖﻓﺍﻮﻣ" ﺰﻣﺭ ﻰﻠﻋ ﻂﻐﺿﺍ
5.ﺔﻠﻠﺒﻣ ﺵﺎﻤﻗ ﺔﻌﻄﻘﺑ ﺐﻴﻠﺤﻟﺍ ﺩﺎﺑﺯﺇ ﺯﺎﻬﺟ ﻒﻈﻧ
1 .ﺎﹱﻣﺎﻤﺗ ﺩﺮﺒﻳ ﺐﻴﻠﺤﻟﺍ ﺩﺎﺑﺯﺇ ﺯﺎﻬﺟ ﻙﺮﺗﺍ
Page 73
ﺔﻴﺑﺮﻌﻟﺍ
74
AquaClean ﻩﺎﻴﻣ ﺮﺘﻠﻓ
ﺔﻟﺍﺯﺇ ﻰﻟﺇ ﺔﺟﺎﺤﻟﺍ ﻦﻣ ﻞﻠﻘﻳ ﻪﻧﺃ ﺎﻤﻛ .ﺓﻮﻬﻘﻟﺍ ﻢﻌﻃ ﻰﻠﻋ ﻅﺎﻔﺤﻠﻟ ﻩﺎﻴﻤﻟﺍ ﻥﺍﺰﺧ ﻲﻓ AquaClean ﻩﺎﻴﻣ ﺮﺘﻠﻓ ﻊﺿﻭ ﻚﻨﻜﻤﻳ .ﻙﺯﺎﻬﺟ ﻰﻠﻋ AquaClean ﻦﻴﻜﻤﺗ ﻢﺗ
ﺔﻣﺪﺨﻟﺍ ﺰﻛﺍﺮﻣ ﻦﻣ ﻭﺃ ﻲﻠﺤﻤﻟﺍ ﺔﺋﺰﺠﺘﻟﺍ ﻊﺋﺎﺑ ﻦﻣ AquaClean ﻩﺎﻴﻣ ﺮﺘﻠﻓ ءﺍﺮﺷ ﻚﻨﻜﻤﻳ .ﺔﻨﻴﻛﺎﻤﻟﺍ ﻲﻓ ﺲﻠﻜﻟﺍ ﻢﻛﺍﺮﺗ ﻦﻣ ﺪﺤﻟﺍ ﻖﻳﺮﻃ ﻦﻋ ﺔﻴﺴﻠﻜﻟﺍ ﺕﺎﺒﺳﺮﺘﻟﺍ
.www.philips.com/parts-and-accessories ﻰﻠﻋ ﺖﻧﺮﺘﻧﻹﺍ ﺮﺒﻋ ﻭﺃ ﺓﺪﻤﺘﻌﻤﻟﺍ
AquaClean ﺮﺘﻠﻓ ﺔﻟﺎﺣ ﺮﺷﺆﻣ
.ﺔﻳﻮﺌﻣ ﺔﺒﺴﻨﻛ ﺔﺷﺎﺸﻟﺍ ﻰﻠﻋ ﺎﹱﻣﻭﺩ AquaClean ﺮﺘﻠﻓ ﺔﻟﺎﺣ ﺮﻬﻈﺗ ،ﺔﻄﺸﻧ AquaClean ﺮﺘﻠﻓ ﺔﻔﻴﻇﻭ ﻥﻮﻜﺗ ﺎﻣﺪﻨﻋ
ﻚﺤﺼﻨﺗ ﺔﻟﺎﺳﺮﻟﺍ ﻩﺬﻫﻭ .ﺔﻨﻴﻛﺎﻤﻟﺍ ﺎﻬﻴﻓ ﻞﹽﻐﺸﺗ ﺓﺮﻣ ﻞﻛ ﻲﻓ ﻦﻴﺘﻴﻧﺎﺛ ﺓﺪﻤﻟ ﺔﻟﺎﺳﺭ ﺔﺷﺎﺸﻟﺍ ﺽﺮﻌﺗ ،ﻞﻗﺃ ﻭﺃ %10 ﺪﻨﻋ AquaClean ﺮﺘﻠﻓ ﺔﻟﺎﺣ ﺖﻧﺎﻛ ﺍﺫﺇ
.ﺪﻳﺪﺟ ﺮﺘﻠﻓ ءﺍﺮﺸﺑ
.ﺔﻨﻴﻛﺎﻤﻟﺍ ﺎﻬﻴﻓ ﻞﹽﻐﺸﺗ ﺓﺮﻣ ﻞﻛ ﻲﻓ AquaClean ﺮﺘﻠﻓ ﻝﺍﺪﺒﺘﺳﺍ ﺔﻨﻴﻛﺎﻤﻟﺍ ﻚﻨﻣ ﺐﻠﻄﺗ ،%0 ﺮﺘﻠﻔﻟﺍ ﺔﻟﺎﺣ ﺖﻧﺎﻛ ﺍﺫﺇ
(ﻖﺋﺎﻗﺩ 5) AquaClean ﻩﺎﻴﻣ ﺮﺘﻠﻓ ﻞﻴﻌﻔﺗ
ﺔﻤﺋﺎﻗ ﻲﻓ ﻪﺒﻴﻛﺮﺘﺑ ﻡﻮﻘﺗ ﺪﻳﺪﺟ AquaClean ءﺎﻣ ﺮﺘﻠﻓ ﻞﻛ ﻞﻴﻌﻔﺗ ﻲﻐﺒﻨﻳ ﻚﻟﺬﻟ .ﻩﺎﻴﻤﻟﺍ ﻥﺍﺰﺧ ﻲﻓ ﺮﺘﻠﻓ ﺩﻮﺟﻭ ﻦﻋ ﺎﹱﻴﺋﺎﻘﻠﺗ ﻒﺸﻜﻟﺎﺑ ﺔﻨﻴﻛﺎﻤﻟﺍ ﻡﻮﻘﺗ ﻻ
."ﻒﻴﻈﻨﺘﻟﺍ"
ﻲﻓ ﺓﺩﻮﺟﻮﻤﻟﺍ ﺕﺎﺒﺳﺮﺘﻟﺍ ﺔﻟﺍﺯﺇ ﻰﻟﺇ ﺝﺎﺘﺤﺘﺳ ﻦﻜﻟﻭ ،AquaClean ءﺎﻣ ﺮﺘﻠﻓ ﻞﻴﻌﻔﺗ ﻚﻧﺎﻜﻣﺈﺑ ﻞﻈﻳ ،ﺮﺘﻠﻔﻟﺍ ﻞﻴﻌﻔﺗ ﺔﻟﺎﺳﺭ ﺽﺮﻋ ﻦﻋ ﺔﻨﻴﻛﺎﻤﻟﺍ ﻒﻗﻮﺘﺗ ﺎﻣﺪﻨﻋ
.ﹰﻻﻭﺃ ﺔﻨﻴﻛﺎﻤﻟﺍ
2.(43 ﻞﻜﺸﻟﺍ) ﻥﻮﻜﻴﻠﻴﺴﻟﺍ ﻦﻣ ﻉﻮﻨﺼﻤﻟﺍ ءﺰﺠﻟﺍﻭ ﻲﻧﺪﻌﻤﻟﺍ ءﺰﺠﻟﺍ ﻝﺯﺃﻭ ﺭﺎﺴﻴﻟﺍ ﻰﻟﺇ ﺐﻴﻠﺤﻟﺍ ﺩﺎﺑﺯﺇ ﺯﺎﻬﺟ ﻞﻣﺃ
3 .ﻥﻮﺤﺼﻟﺍ ﺔﻟﺎﺴﻏ ﻲﻓ ﺎﻬﻠﺴﻏﺍ ﻭﺃ ﻒﻴﻈﻧ ءﺎﻤﺑ ﺎﻬﻔﻄﺷﺍﻭ (44 ﻞﻜﺸﻟﺍ) ﺔﺛﻼﺜﻟﺍ ءﺍﺰﺟﻷﺍ ﻚﻜﻓ
4.ﺔﻨﻴﻛﺎﻤﻟﺎﺑ ﺐﻴﻠﺤﻟﺍ ﺩﺎﺑﺯﺇ ﺯﺎﻬﺟ ﺐﻴﻛﺮﺗ ﺪﻋﺃﻭ ﺐﻴﻠﺤﻟﺍ ﺩﺎﺑﺯﺇ ﺯﺎﻬﺠﻟ ﺔﺛﻼﺜﻟﺍ ءﺍﺰﺟﻷﺍ ﻊﻴﻤﺠﺗ ﺪﻋﺃ
-
-
.AquaClean ءﺎﻣ ﺮﺘﻠﻓ ﻡﺍﺪﺨﺘﺳﺍ ﻲﻓ ءﺪﺒﻟﺍ ﻞﺒﻗ ﺕﺎﺒﺳﺮﺘﻟﺍ ﻦﻣ ﺎﹱﻣﺎﻤﺗ ﺔﻴﻟﺎﺧ ﺔﻨﻴﻛﺎﻤﻟﺍ ﻥﻮﻜﺗ ﻥﺃ ﺐﺠﻳ
ﺔﻨﻴﻛﺎﻤﻟﺍ ﻰﻟﺇ ءﺍﻮﻬﻟﺍ ﺐﺤﺳ ﻢﺘﻳ ﺪﻘﻓ ،ﻚﻟﺬﺑ ﻢﻘﺗ ﻢﻟ ﺍﺫﺇ .ﻩﺎﻧﺩﺃ ﺢﺿﻮﻣ ﻮﻫ ﺎﻤﻛ ءﺎﻤﻟﺍ ﻲﻓ ﻪﻌﻘﻧ ﻖﻳﺮﻃ ﻦﻋ ﻩﺩﺍﺪﻋﺇ ﺐﺠﻳ ،AquaClean ﻩﺎﻴﻣ ﺮﺘﻠﻓ ﻞﻴﻌﻔﺗ ﻞﺒﻗ
.ﺓﻮﻬﻘﻟﺍ ﺮﻴﻀﺤﺗ ﻦﻣ ﺔﻨﻴﻛﺎﻤﻟﺍ ﻊﻨﻤﻳﻭ ءﺎﺿﻮﻀﻟﺍ ﻦﻣ ﺮﻴﺜﻛ ﺙﻭﺪﺣ ﻲﻓ ﺐﺒﺴﺘﻳ ﺎﻤﻣ ،ءﺎﻤﻟﺍ ﻦﻣ ﹰﻻﺪﺑ
(ﻖﺋﺎﻗﺩ 5) AquaClean ﻩﺎﻴﻣ ﺮﺘﻠﻓ ﺐﻴﻛﺮﺗ ﺓﺩﺎﻋﺇ
.ﺮﺘﻠﻔﻟﺍ ﻝﺍﺪﺒﺘﺳﺍ ﻰﻟﺇ ﺔﺟﺎﺤﻟﺎﺑ ﻙﺮﻴﻛﺬﺘﻟ %0 ﻰﻟﺇ AquaClean ﺮﺘﻠﻓ ﺔﻟﺎﺣ ﺮﺷﺆﻣ ﺾﻔﺨﻨﻳﻭ .ﻞﻤﻌﻟﺍ ﻦﻋ ﺮﺘﻠﻔﻟﺍ ﻒﻗﻮﺘﻳ ،ﺮﺘﻠﻔﻟﺍ ﺮﺒﻋ ءﺎﻤﻟﺍ ﻦﻣ ﺍﹰﺮﺘﻟ 95 ﻖﻓﺪﺗ ﺪﻌﺑ
ﺮﺘﻠﻓ ﻝﺪﺒﺘﺴﺗ ﻢﻟ ﺍﺫﺇ .ﹰﻻﻭﺃ ﺔﻨﻴﻛﺎﻤﻟﺍ ﻦﻣ ﺕﺎﺒﺳﺮﺘﻟﺍ ﺔﻟﺍﺯﺇ ﻰﻟﺇ ﺔﺟﺎﺤﻟﺍ ﻥﻭﺩ ﺮﺘﻠﻔﻟﺍ ﻝﺍﺪﺒﺘﺳﺍ ﻚﻨﻜﻤﻳ ،ﺔﺷﺎﺸﻟﺍ ﻰﻠﻋ ﺮﻬﻈﻳ AquaClean ﺮﺘﻠﻓ ﺔﻟﺎﺣ ﺮﺷﺆﻣ ﻡﺍﺩ ﺎﻣﻭ
1."AquaClean" ﺪﻳﺪﺤﺘﻟ ﻞﻔﺳﻷﻭ ﻰﻠﻋﻷ ﻦﻴﻤﻬﺴﻟﺍ ﻡﺪﺨﺘﺳﺍﻭ "ﻒﻴﻈﻨﺘﻟﺍ" ﺰﻣﺭ ﻰﻠﻋ ﻂﻐﺿﺍ
2.ﺪﻴﻛﺄﺘﻠﻟ "ﻖﻓﺍﻮﻣ" ﺰﻣﺭ ﻰﻠﻋ ﻂﻐﺿﺍ
3.ﺔﺷﺎﺸﻟﺍ ﻰﻠﻋ ﺮﻬﻈﺗ ﻲﺘﻟﺍ ﺕﺎﻤﻴﻠﻌﺘﻟﺍ ﻊﺒﺗﺍ .ﻞﻴﻌﻔﺘﻟﺍ ﺔﺷﺎﺷ ﺮﻬﻈﺗ ﺎﻣﺪﻨﻋ ﻯﺮﺧﺃ ﺓﺮﻣ "ﻖﻓﺍﻮﻣ" ﺰﻣﺭ ﻰﻠﻋ ﻂﻐﺿﺍ
4.ﺎﹱﺒﻳﺮﻘﺗ (45 ﻞﻜﺸﻟﺍ) ﹴﻥﺍﻮﺛ 5 ﺓﺪﻤﻟ ﺮﺘﻠﻔﻟﺍ ﺝﺭ
5 . ﻂﻐﺿﺍ / ﺝﺭ ﻭ ﺩﺭﺎﺒﻟﺍ ءﺎﻤﻟﺎﺑ ﻖﻳﺮﺑﺇ ﻲﻓ ﺐﻘﻋ ﻰﻠﻋ ﺎﹱﺳﺃﺭ ﺮﺘﻠﻔﻟﺍ ﺮﻤﻏﺍ
6.ﺔﻨﻜﻤﻣ (47 ﻞﻜﺸﻟﺍ) ﺔﻄﻘﻧ ﻰﻧﺩﺃ ﻰﻟﺇ ﻞﻔﺳﻷ ﻪﻴﻠﻋ ﻂﻐﺿﺍ .ﻩﺎﻴﻤﻟﺍ ﻥﺍﺰﺧ ﻲﻓ ﺮﺘﻠﻔﻟﺍ ﺔﻠﺻﻭ ﻲﻓ ﻱﺩﻮﻤﻋ ﻞﻜﺸﺑ ﺮﺘﻠﻔﻟﺍ ﺐﻴﻛﺮﺘﺑ ﻢﻗ
7.ﺔﻨﻴﻛﺎﻤﻟﺍ ﻲﻓ ﻯﺮﺧﺃ ﺓﺮﻣ ﻪﻌﺿﻭ ﺔﺑﺬﻌﻟﺍ ﻩﺎﻴﻤﻟﺎﺑ ﻩﺎﻴﻤﻟﺍ ﻥﺍﺰﺧ ﻸﻣﺍ
8.(ﻂﻘﻓ ﺓﺩﺪﺤﻣ ﻉﺍﻮﻧﺃ) ﺎﻬﻟﺯﺄﻓ ،ﺔﺒﹽﻛﺮﻣ LatteGo ﺐﻴﻠﺤﻟﺍ ﺔﻳﻭﺎﺣ ﺖﻧﺎﻛ ﺍﺫﺇ
9 .ﺐﻴﻠﺤﻟﺍ ﺩﺎﺑﺯﺇ ﺯﺎﻬﺟ/ﻦﺧﺎﺴﻟﺍ ءﺎﻤﻟﺍ ﺔﻫﻮﻓ ﻞﻔﺳﺃ ﹰءﺎﻋﻭ ﻊﺿ
10.ﻞﻴﻌﻔﺘﻟﺍ ﺔﻴﻠﻤﻋ ءﺪﺒﻟ ﻑﺎﻘﻳﻹﺍ/ءﺪﺒﻟﺍ ﺭﺯ ﻰﻠﻋ ﻂﻐﺿﺍ
11.ﺓﺪﺣﺍﻭ ﺔﻘﻴﻗﺩ ﻝﻼﺧ ﺐﻴﻠﺤﻟﺍ ﺩﺎﺑﺯﺇ ﺯﺎﻬﺟ/ﻦﺧﺎﺴﻟﺍ ءﺎﻤﻟﺍ ﺔﻫﻮﻓ ﻦﻣ ﻦﺧﺎﺴﻟﺍ ءﺎﻤﻟﺍ ﺐﺻ ﻢﺘﻴﺳ
12.ﺡﺎﺠﻨﺑ ﺮﺘﻠﻔﻟﺍ ﻞﻴﻌﻔﺗ ﻥﻵﺍ ﻢﺗ
Page 74
ﺔﻴﺑﺮﻌﻟﺍ
ﹰﻻﻭﺃ ﺐﺠﻳ ﻦﻜﻟ ﺮﺘﻠﻔﻟﺍ ﻝﺍﺪﺒﺘﺳﺍ ﻚﻧﺎﻜﻣﺈﺑ ﻝﺍﺰﻳ ﻻ ،ﺔﻟﺎﺤﻟﺍ ﻩﺬﻫ ﻲﻓ .ﺖﻗﻮﻟﺍ ﻦﻣ ﺓﺮﺘﻓ ﺪﻌﺑ AquaClean ﺮﺷﺆﻣ ﺊﻔﻄﻨﻳ ،ﺐﺳﺎﻨﻤﻟﺍ ﺖﻗﻮﻟﺍ ﻲﻓ AquaClean ءﺎﻣ
.ﺔﻨﻴﻛﺎﻤﻟﺍ ﻲﻓ ﺓﺩﻮﺟﻮﻤﻟﺍ ﺕﺎﺒﺳﺮﺘﻟﺍ ﺔﻟﺍﺯﺇ
:AquaClean ﺮﺘﻠﻓ ﻝﺍﺪﺒﺘﺳﺍ ﻰﻟﺇ ﺔﺟﺎﺤﻟﺎﺑ ﺔﻨﻴﻛﺎﻤﻟﺍ ﻙﺮﻛﺬﺗ ﺎﻣﺪﻨﻋ ﻭﺃ %0 ﻰﻟﺇ AquaClean ﺮﺘﻠﻓ ﺔﻟﺎﺣ ﺮﺷﺆﻣ ﺾﻔﺨﻨﻳ ﺎﻣﺪﻨﻋ
.ﻝﺍﺪﺒﺘﺳﻻﺍ ﺔﻴﻠﻤﻋ ﺖﻧﺎﺣ ﻪﻧﺃ ﻰﻟﺇ ﺔﻨﻴﻛﺎﻤﻟﺍ ﺮﻴﺸﺗ ﻢﻟ ﺍﺫﺇ ﻰﺘﺣ ،ﻞﻗﻷﺍ ﻰﻠﻋ ﺮﻬﺷﺃ 3 ﻞﻛ AquaClean ﻩﺎﻴﻣ ﺮﺘﻠﻓ ﻝﺪﺒﺘﺳﺍ
(ﺔﻘﻴﻗﺩ 30) ﺕﺎﺒﺳﺮﺘﻟﺍ ﺔﻟﺍﺯﺇ ءﺍﺮﺟﺇ
ﻭﺃ ﻚﻴﺘﻳﺮﺒﻜﻟﺍ ﺾﻣﺎﺣ ﻰﻠﻋ ﻱﻮﺘﺤﻳ ﺕﺎﺒﺳﺮﺗ ﻞﻳﺰﻣ ﻡﺍﺪﺨﺘﺳﺍ ﻑﻭﺮﻈﻟﺍ ﻦﻣ ﻑﺮﻇ ﻱﺃ ﺖﺤﺗ ﻚﻴﻠﻋ ﺐﺠﻳ ﻻ .ﻂﻘﻓ ﺲﺒﻴﻠﻴﻓ ﻦﻣ ﺕﺎﺒﺳﺮﺘﻟﺍ ﻞﻳﺰﻣ ﻡﺍﺪﺨﺘﺳﺍ ﻰﺟﺮﻳ
ﻞﻜﺸﺑ ﺲﻠﻜﻟﺍ ﺔﺑﺍﺫﺇ ﻡﺪﻋﻭ ﺔﻨﻴﻛﺎﻤﻟﺍ ﻲﻓ ﺔﻴﺋﺎﻤﻟﺍ ﺓﺮﺋﺍﺪﻟﺍ ﻒﻠﺗ ﻰﻟﺇ ﻱﺩﺆﻳ ﺪﻗ ﻚﻟﺫ ﻥﻷ (ﻞﺨﻟﺍ) ﻚﻴﺘﻴﺳﻷﺍ ﺾﻤﺣ ﻭﺃ ﻚﻴﻣﺎﻔﻠﺴﻟﺍ ﺾﻤﺣ ﻭﺃ ﻚﻳﺭﻮﻠﻛﻭﺭﺪﻴﻬﻟﺍ ﺾﻤﺣ
.ﻚﻧﺎﻤﺿ ءﺎﻐﻟﺇ ﻰﻟﺇ ﺎﹱﻀﻳﺃ ﻱﺩﺆﻴﺳ ﺯﺎﻬﺠﻟﺍ ﺕﺎﺒﺳﺮﺗ ﺔﻟﺍﺯﺇ ﻲﻓ ﻞﺸﻔﻟﺍ .ﻚﻧﺎﻤﺿ ءﺎﻐﻟﺇ ﻰﻟﺇ ﻱﺩﺆﻴﺳ ﺲﺒﻴﻠﻴﻓ ﻦﻣ ﺕﺎﺒﺳﺮﺘﻟﺍ ﻞﻳﺰﻤﻟ ﻚﻣﺍﺪﺨﺘﺳﺍ ﻡﺪﻋ .ﺢﻴﺤﺻ
.www.philips.com/coffee-care ﻰﻠﻋ ﺖﻧﺮﺘﻧﻹﺍ ﺮﺒﻋ ﻕﻮﺴﺘﻟﺍ ﺮﺠﺘﻣ ﻦﻣ ﺲﺒﻴﻠﻴﻓ ﻦﻣ ﺕﺎﺒﺳﺮﺘﻟﺍ ﺔﻟﺍﺯﺇ ﻝﻮﻠﺤﻣ ءﺍﺮﺷ ﻚﻨﻜﻤﻳ
.ﺔﺷﺎﺸﻟﺍ ﻰﻠﻋ ﺔﻟﺎﺳﺭ ﺮﻬﻈﺗ ،ﺕﺎﺒﺳﺮﺘﻟﺍ ﺔﻟﺍﺯﺇ ﻰﻟﺇ ﺔﻨﻴﻛﺎﻤﻟﺍ ﺝﺎﺘﺤﺗ ﺎﻣﺪﻨﻋ
ﻒﻴﻈﻨﺘﻟﺍ ﺰﻣﺭ ﺲﻤﻟﺍ
ﺔﻴﺑﺮﻌﻟﺍ
.ﺔﻨﻴﻛﺎﻤﻟﺍ ﻲﻓ ﻯﺮﺧﺃ ﺓﺮﻣ
.ﻒﻄﺸﻟﺍ ﺓﺭﻭﺩﻭ
.ءﺎﻤﻟﺍ ﻑﺮﺻ ﻦﻋ ﺔﻨﻴﻛﺎﻤﻟﺍ
.('(ﻖﺋﺎﻗﺩ 5) AquaClean ﻩﺎﻴﻣ ﺮﺘﻠﻓ ﺐﻴﻛﺮﺗ ﺓﺩﺎﻋﺇ' ﺮﻈﻧﺍ) ﺪﻳﺪﺟ AquaClean ﺮﺘﻠﻓ ﺐﻴﻛﺮﺘﺑ ﺔﻨﻴﻛﺎﻤﻟﺍ ﻙﺮﻛﺬﺗ ،ﺕﺎﺒﺳﺮﺘﻟﺍ ﺔﻟﺍﺯﺇ ءﺍﺮﺟﺇ ﻲﻬﺘﻨﻳ ﺎﻣﺪﻨﻋ
75
1 .ﻢﻳﺪﻘﻟﺍ AquaClean ءﺎﻣ ﺮﺘﻠﻓ ﻝﺯﺃ
2."(ﻖﺋﺎﻗﺩ 5) AquaClean ءﺎﻣ ﺮﺘﻠﻓ ﻞﻴﻌﻔﺗ" ﻞﺼﻔﻟﺍ ﻲﻓ ﺢﺿﻮﻣ ﻮﻫ ﺎﻤﻛ ﻪﻠﻴﻌﻔﺘﺑ ﻢﻗﻭ ﺍﹰﺪﻳﺪﺟ ﺍﹰﺮﺘﻠﻓ ﺐﹽﻛﺭ
1.ﺔﻤﺋﺎﻘﻟﺍ ﻲﻓ "ﺕﺎﺒﺳﺮﺘﻟﺍ ﺔﻟﺍﺯﺇ" ﺩﺪﺣﻭ ﻡﺪﺨﺘﺴﻤﻟﺍ ﺔﻬﺟﺍﻭ ﻰﻠﻋ
2.ﺔﺷﺎﺸﻟﺍ ﻰﻠﻋ ﺮﻬﻈﺗ ﻲﺘﻟﺍ ﺕﺎﻤﻴﻠﻌﺘﻟﺍ ﻊﺒﺗﺍ
3.ﺐﻴﻠﺤﻟﺍ ﺩﺎﺑﺯﺇ ﺯﺎﻬﺟ ﻭﺃ LatteGo ﺯﺎﻬﺟ ﺔﻟﺍﺯﺈﺑ ﻢﻗ ،ﻪﺒﻴﻛﺮﺗ ﺔﻟﺎﺣ ﻲﻓ
4.ﺎﻤﻬﻧﺎﻜﻣ ﻲﻓ ﺎﻤﻬﻌﺿﻭ ﺎﻤﻬﻏﺮﻓﺃﻭ ﺓﻮﻬﻘﻟﺍ ﺐﺳﺍﻭﺭ ﺔﻳﻭﺎﺣﻭ ﻂﻴﻘﻨﺘﻟﺍ ﺔﻴﻨﻴﺻ ﺔﻟﺍﺯﺈﺑ ﻢﻗ
5.AquaClean ﻩﺎﻴﻣ ﺮﺘﻠﻓ ﺔﻟﺍﺯﺈﺑ ﻢﻗ ﻢﺛ .ﻪﻏﺍﺮﻓﺇﻭ ﻩﺎﻴﻤﻟﺍ ﻥﺍﺰﺧ ﺔﻟﺍﺯﺈﺑ ﻢﻗ
6ﻪﻌﺿ ﻢﺛ .ﻒﻴﻈﻨﺘﻟﺍ/ﺲﻠﻜﻟﺍ (48 ﻞﻜﺸﻟﺍ) ﺮﺷﺆﻣ ﻰﻟﺇ ﻞﺼﻳ ﻰﺘﺣ ءﺎﻤﻟﺎﺑ ﻪﺋﻼﻣﺍ ﻢﺛ ﻩﺎﻴﻤﻟﺍ ﻥﺍﺰﺧ ﻲﻓ ﺲﺒﻴﻠﻴﻓ ﻦﻣ ﺕﺎﺒﺳﺮﺘﻟﺍ ﻞﻳﺰﻣ ﻦﻣ ﺔﻠﻣﺎﻛ ﺔﺟﺎﺟﺯ ﺐﺻ
7.ءﺎﻤﻟﺍ ﺔﻫﻮﻓﻭ ﺓﻮﻬﻘﻟﺍ ﺐﺻ ﺔﻫﻮﻓ ﻞﻔﺳﺃ (ﺍﹰﺮﺘﻟ 1.5) ﺍﹰﺮﻴﺒﻛ ﺍﹰءﺎﻋﻭ ﻊﺿ
8ﺕﺎﺒﺳﺮﺘﻟﺍ ﺔﻟﺍﺯﺇ ﺓﺭﻭﺩ ﻦﻣ ﻥﻮﻜﺘﻳﻭ ﺔﻘﻴﻗﺩ 30 ﺓﺪﻤﻟ ﺎﹱﺒﻳﺮﻘﺗ ﺕﺎﺒﺳﺮﺘﻟﺍ ﺔﻟﺍﺯﺇ ءﺍﺮﺟﺇ ﺮﻤﺘﺴﻳﻭ .ﺕﺎﺒﺳﺮﺘﻟﺍ ﺔﻟﺍﺯﺇ ءﺍﺮﺟﺇ ءﺪﺒﻟ ﻑﺎﻘﻳﻹﺍ/ءﺪﺒﻟﺍ ﺭﺯ ﻰﻠﻋ ﻂﻐﺿﺍ
9ﻒﻗﻮﺘﺗ ﺎﻣﺪﻨﻋ ﺕﺎﺒﺳﺮﺘﻟﺍ ﺔﻟﺍﺯﺇ ءﺍﺮﺟﺇ ﻲﻬﺘﻨﻳ .ﺔﺷﺎﺸﻟﺍ ﻰﻠﻋ ﺔﻟﺎﺳﺮﻟﺍ ﺮﻬﻈﺗ ﺎﻣﺪﻨﻋ ءﺎﻤﻟﺍ ﻥﺍﺰﺧ ءﻞﻣ ﺪﻋﺃﻭ .ءﺎﻤﻟﺍ ﻑﺮﺻ ﻦﻋ ﺔﻨﻴﻛﺎﻤﻟﺍ ﻒﻗﻮﺘﺗ ﻰﺘﺣ ﺮﻈﺘﻧﺍ
10.ءﺎﻤﻟﺍ ﻥﺍﺰﺧ ﻲﻓ ﻪﻠﹽﻌﻓﻭ ﺍﹰﺪﻳﺪﺟ AquaClean ءﺎﻣ ﺮﺘﻠﻓ ﺐﹽﻛﺭ
-
!ﺕﺎﺒﺳﺮﺘﻟﺍ ﺔﻟﺍﺯﺇ ﻰﻟﺇ ﺔﺟﺎﺤﻟﺍ ﻦﻣ ﻞﻠﻘﻳ AquaClean ﺮﺘﻠﻓ ﻡﺍﺪﺨﺘﺳﺍ :ﺔﺤﻴﺼﻧ
ﺕﺎﺒﺳﺮﺘﻟﺍ ﺔﻟﺍﺯﺇ ءﺍﺮﺟﺇ ﺔﻌﻃﺎﻘﻣ ﺖﻤﺗ ﺍﺫﺇ ﻞﻌﻔﺗ ﺍﺫﺎﻣ
ﺔﻟﺍﺯﺇ ءﺍﺮﺟﺇ ﺔﻌﻃﺎﻘﻣ ﺖﻤﺗ ﺍﺫﺇ .ﻢﻜﺤﺘﻟﺍ ﺔﺣﻮﻟ ﻰﻠﻋ ﺩﻮﺟﻮﻤﻟﺍ ﻞﻴﻐﺸﺘﻟﺍ ﻑﺎﻘﻳﺇ/ﻞﻴﻐﺸﺘﻟﺍ ﺭﺯ ﻰﻠﻋ ﻂﻐﻀﻟﺍ ﻖﻳﺮﻃ ﻦﻋ ﺕﺎﺒﺳﺮﺘﻟﺍ ﺔﻟﺍﺯﺇ ءﺍﺮﺟﺇ ﻦﻣ ﺝﻭﺮﺨﻟﺍ ﻚﻨﻜﻤﻳ
:ﻲﻠﻳ ﺎﻤﺑ ﻢﻘﻓ ،ﺎﹱﻣﺎﻤﺗ ﻪﻨﻣ ءﺎﻬﺘﻧﻻﺍ ﻞﺒﻗ ﺕﺎﺒﺳﺮﺘﻟﺍ
.ﺔﻴﻜﻴﺗﺎﻣﻮﺗﻭﺃ
.ﺔﻧﻮﺤﻄﻣ ﺓﻮﻬﻗ ﺔﻓﺎﺿﺇ ﻥﻭﺩ ﺔﻧﻮﺤﻄﻤﻟﺍ ﺓﻮﻬﻘﻟﺍ ﻦﻣ ﻦﻴﺑﻮﻛ ﺮﻴﻀﺤﺗ ﻢﺛ ﻦﺧﺎﺴﻟﺍ ءﺎﻤﻟﺍ ﺔﻔﻴﻇﻮﻟ ﺭﺮﻜﺘﻤﻟﺍ
.ﻦﻜﻤﻣ ﺖﻗﻭ ﺏﺮﻗﺃ ﻲﻓ ﺕﺎﺒﺳﺮﺘﻟﺍ ﺔﻟﺍﺯﻹ ﺮﺧﺁ ﺍﹰءﺍﺮﺟﺇ ﺔﻨﻴﻛﺎﻤﻟﺍ ﺐﻠﻄﺘﺴﻓ ،ﺕﺎﺒﺳﺮﺘﻟﺍ ﺔﻟﺍﺯﺇ ءﺍﺮﺟﺇ ﻞﻤﺘﻜﻳ ﻢﻟ ﺍﺫﺇ
1.ﺍﹰﺪﻴﺟ ﻪﻔﻄﺷﻭ ﻩﺎﻴﻤﻟﺍ ﻥﺍﺰﺧ ﻍﺍﺮﻓﺈﺑ ﻢﻗ
2ﻒﻄﺷ ﺓﺭﻭﺩ ﻱﺮﺠﺗﻭ ﺔﻨﻴﻛﺎﻤﻟﺍ ﻦﺨﺴﺘﺳ .ﻯﺮﺧﺃ ﺓﺮﻣ ﺔﻨﻴﻛﺎﻤﻟﺍ ﻞﻴﻐﺸﺘﺑ ﻢﻗﻭ ﻒﻴﻈﻨﺘﻟﺍ/ﺲﻠﻜﻟﺍ ﻯﻮﺘﺴﻣ ﺮﺷﺆﻣ ﻰﺘﺣ ﺏﺬﻌﻟﺍ ءﺎﻤﻟﺎﺑ ﻩﺎﻴﻤﻟﺍ ﻥﺍﺰﺧ ﻸﻣﺍ
3ﺪﻳﺪﺤﺘﻟﺍ ﻖﻳﺮﻃ ﻦﻋ ﻦﺧﺎﺴﻟﺍ ءﺎﻤﻟﺍ ﻦﻣ ﻥﺍﺰﺧ ﻒﺼﻧ ﹰﻻﻭﺃ ﹼﺐﺻ ،ﺔﻳﻭﺪﻳ ﻒﻄﺷ ﺓﺭﻭﺩ ءﺍﺮﺟﻹ .ﺔﻳﻭﺪﻳ ﻒﻄﺷ ﺓﺭﻭﺩ ءﺍﺮﺟﺈﺑ ﻢﻗ ،ﺕﺎﺑﻭﺮﺸﻣ ﻱﺃ ﺮﻴﻀﺤﺗ ﻞﺒﻗ
Page 75
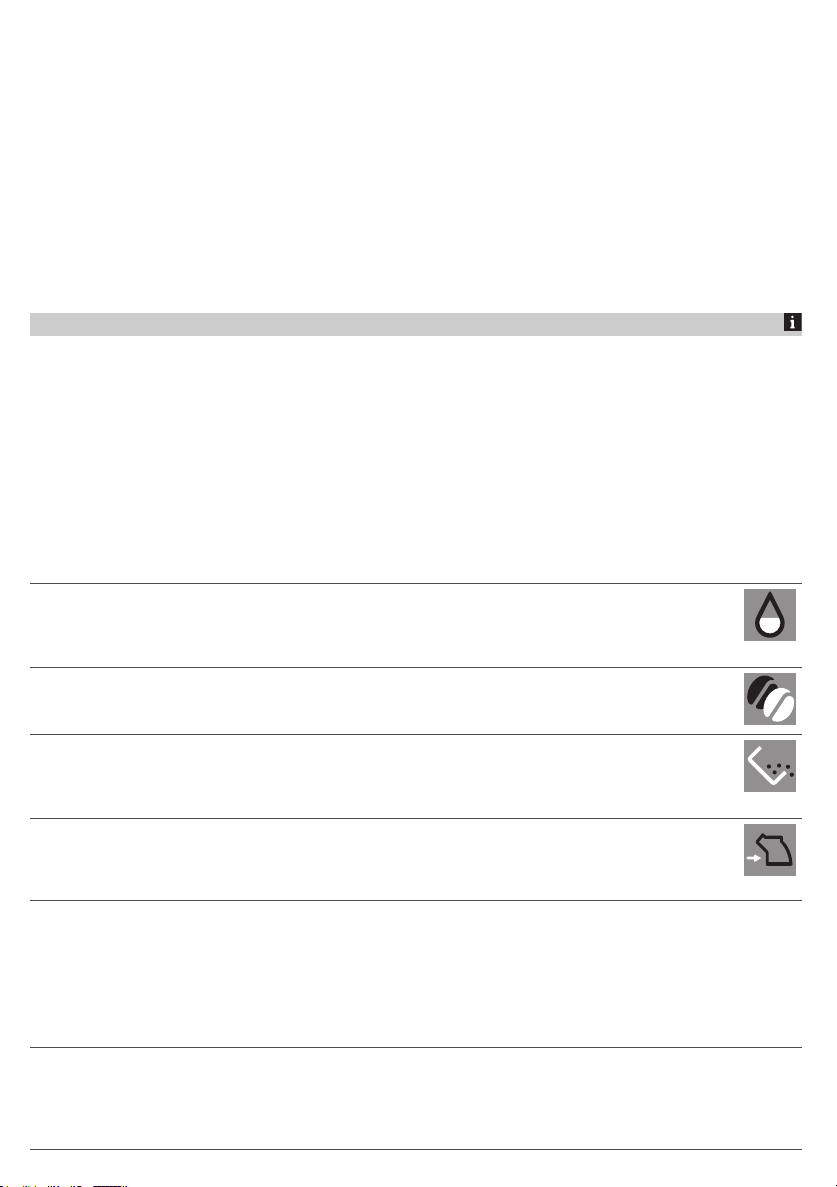
ﺔﻴﺑﺮﻌﻟﺍ
76
ﺕﺎﻘﺤﻠﻤﻟﺍ ﺐﻠﻃ
ﺔﻣﺪﺨﻟﺍ ﺰﻛﺍﺮﻣ ﻦﻣ ،ﻲﻠﺤﻤﻟﺍ ﺔﺋﺰﺠﺘﻟﺍ ﻊﺋﺎﺑ ﻦﻣ ﺕﺎﺠﺘﻨﻤﻟﺍ ﻩﺬﻫ ءﺍﺮﺷ ﻦﻜﻤﻳ .ﻂﻘﻓ ﺲﺒﻴﻠﻴﻓ ﻦﻣ ﺔﻧﺎﻴﺼﻟﺍ ﺕﺎﺠﺘﻨﻣ ﻡﺪﺨﺘﺳﺍ ،ﺎﻬﺒﻴﻛﺮﺗﻭ ﺔﻨﻴﻛﺎﻤﻟﺍ ﻒﻴﻈﻨﺘﻟ
ﻞﻳﺩﻮﻣ ﻢﻗﺭ ﻞﺧﺩﺃ ،ﺖﻧﺮﺘﻧﻹﺍ ﺮﺒﻋ ﺭﺎﻴﻐﻟﺍ ﻊﻄﻘﺑ ﺔﻠﻣﺎﻛ ﺔﻤﺋﺎﻗ ﻰﻠﻋ ﺭﻮﺜﻌﻠﻟ .www.philips.com/parts-and-accessories ﻰﻠﻋ ﺖﻧﺮﺘﻧﻹﺍ ﺮﺒﻋ ﻭﺃ ﺓﺪﻤﺘﻌﻤﻟﺍ
.ﺔﻣﺪﺨﻟﺍ ﺏﺎﺑ ﻞﺧﺍﺩ ﻦﻣ ﻞﻳﺩﻮﻤﻟﺍ ﻢﻗﺭ ﻰﻠﻋ ﺭﻮﺜﻌﻟﺍ ﻚﻨﻜﻤﻳ .ﻚﺑ ﺔﺻﺎﺨﻟﺍ ﺔﻨﻴﻛﺎﻤﻟﺍ
:ﻉﺍﻮﻧﻷﺍ ﻡﺎﻗﺭﺃﻭ ﺔﻧﺎﻴﺼﻟﺍ ﺕﺎﺠﺘﻨﻣ
CA6700 ﺕﺎﺒﺳﺮﺘﻟﺍ ﺔﻟﺍﺯﺇ ﻝﻮﻠﺤﻣ
AquaClean CA6903 ﻩﺎﻴﻣ ﺮﺘﻠﻓ
HD5061 ﺮﻴﻤﺨﺘﻟﺍ ﺔﻋﻮﻤﺠﻣ ﻢﺤﺷ
CA6704 ﺓﻮﻬﻘﻟﺍ ﺖﻳﺰﻟ ﺔﻠﻳﺰﻣ ﺹﺍﺮﻗﺃ
.ﺔﻨﻴﻛﺎﻤﻟﺍ ﻩﺬﻫ ﻊﻣ ﺔﻘﻓﺍﻮﺘﻣ ﺮﻴﻏ Brita ﺮﺗﻼﻓ
ﺎﻬﺣﻼﺻﺇﻭ ءﺎﻄﺧﻷﺍ ﻑﺎﺸﻜﺘﺳﺍ
ﻰﻠﻋ ﺔﻌﺋﺎﺸﻟﺍ ﺔﻠﺌﺳﻷﺎﺑ ﺔﻠﻣﺎﻛ ﺔﻤﺋﺎﻗﻭ ﻢﻋﺪﻟﺎﺑ ﺔﺻﺎﺨﻟﺍ ﻮﻳﺪﻴﻔﻟﺍ ﻊﻃﺎﻘﻣ ﺮﻓﻮﺘﺗ .ﺔﻨﻴﻛﺎﻤﻟﺍ ﻊﻣ ﺎﻬﻬﺟﺍﻮﺗ ﺪﻗ ﻲﺘﻟﺍ ﺎﹱﻋﻮﻴﺷ ﺮﺜﻛﻷﺍ ﺕﻼﻜﺸﻤﻟﺍ ﻞﺼﻔﻟﺍ ﺍﺬﻫ ﺺﺨﻠﻳ
ﺮﻈﻧﺍ ،ﻝﺎﺼﺗﻻﺍ ﻞﻴﺻﺎﻔﺗ ﻰﻠﻋ ﻝﻮﺼﺤﻠﻟ .ﻙﺪﻠﺑ ﻲﻓ ﻚﻠﻬﺘﺴﻤﻟﺍ ﺔﻳﺎﻋﺭ ﺰﻛﺮﻤﺑ ﻞﺼﺗﺎﻓ ،ﺔﻠﻜﺸﻤﻟﺍ ﻞﺣ ﻦﻣ ﻦﻜﻤﺘﺗ ﻢﻟ ﺍﺫﺇ .www.philips.com/coffee-care
.ﻥﺎﻤﻀﻟﺍ ﺭﻮﺸﻨﻣ
ﺮﻳﺬﺤﺘﻟﺍ ﺯﻮﻣﺭ
ﻞﺤﻟﺍ
.ﺔﺷﺎﺸﻟﺍ ﻰﻠﻋ "ﻍﺭﺎﻓ ءﺎﻤﻟﺍ ﻥﺍﺰﺧ" ﺰﻣﺭ ﺮﻬﻈﻳ
-.ﻯﻮﺘﺴﻤﻠﻟ ﺮﺷﺆﻣ ﻰﺼﻗﺃ ﻰﻟﺇ ﺏﺬﻌﻟﺍ ءﺎﻤﻟﺎﺑ ﻩﺎﻴﻤﻟﺍ ﻥﺍﺰﺧ ﻸﻣﺍ .ﻍﺭﺎﻓ ﻪﺒﺷ ﻩﺎﻴﻤﻟﺍ ﻥﺍﺰﺧ
-.ﻯﺮﺧﺃ ﺓﺮﻣ ﻩﺎﻴﻤﻟﺍ ﻥﺍﺰﺧ ﻊﺿ .ﻪﻧﺎﻜﻣ ﻲﻓ ﺩﻮﺟﻮﻣ ﺮﻴﻏ ﻩﺎﻴﻤﻟﺍ ﻥﺍﺰﺧ
ﺮﻳﺬﺤﺘﻟﺍ ﺰﻣﺭ
-
-
-
-
.ﺔﺷﺎﺸﻟﺍ ﻰﻠﻋ "ﺎﹱﺑﻮﺒﺣ ﻒﺿﺃ" ﺰﻣﺭ ﺮﻬﻈﻳ
- .ﺓﻮﻬﻘﻟﺍ ﺏﻮﺒﺤﺑ ﺏﻮﺒﺤﻟﺍ ﻊﻤﻗ ﻸﻣﺍ
.ﺔﺷﺎﺸﻟﺍ ﻰﻠﻋ "ﺔﻧﻮﺤﻄﻤﻟﺍ ﺓﻮﻬﻘﻟﺍ ﺔﻳﻭﺎﺣ ﻍﺮﻓﺃ" ﺰﻣﺭ ﺮﻬﻈﻳ
-ﻞﺒﻗ ﹴﻥﺍﻮﺛ 5 ﺓﺪﻤﻟ ﺮﻈﺘﻧﺍ .ﺔﻨﻴﻛﺎﻤﻟﺍ ﻞﻴﻐﺸﺗ ءﺎﻨﺛﺃ ﺎﻬﻏﺍﺮﻓﺇﻭ ﺓﻮﻬﻘﻟﺍ ﺐﺳﺍﻭﺭ ﺔﻳﻭﺎﺣ ﺔﻟﺍﺯﺈﺑ ﻢﻗ .ﺔﺌﻠﺘﻤﻣ ﺓﻮﻬﻘﻟﺍ ﺐﺳﺍﻭﺭ ﺔﻳﻭﺎﺣ
.ﺎﻬﻌﺿﻭ ﺓﺩﺎﻋﺇ
.ﺔﺷﺎﺸﻟﺍ ﻰﻠﻋ "ﺮﻴﻀﺤﺘﻟﺍ ﺔﻋﻮﻤﺠﻣ ﻞﺧﺩﺃ" ﺰﻣﺭ ﺮﻬﻈﻳ
-ﻲﻓ ﺎﻬﺘﻴﺒﺜﺗ ﻦﻣ ﺪﻛﺄﺗﻭ ﺮﻴﻀﺤﺘﻟﺍ ﺔﻋﻮﻤﺠﻣ ﺔﻟﺍﺯﺈﺑ ﻢﻗ .ﺢﻴﺤﺻ ﻞﻜﺸﺑ ﺎﻬﻌﺿﻭ ﻢﺘﻳ ﻢﻟ ﻭﺃ ﺎﻬﻧﺎﻜﻣ ﻲﻓ ﺖﺴﻴﻟ ﺮﻴﻀﺤﺘﻟﺍ ﺔﻋﻮﻤﺠﻣ
.ﺓﻮﻄﺨﺑ ﺓﻮﻄﺧ ﺕﺍﺩﺎﺷﺭﻹﺍ ﻰﻠﻋ ﻝﻮﺼﺤﻠﻟ "ﺎﻬﺒﻴﻛﺮﺗﻭ ﺮﻴﻀﺤﺘﻟﺍ ﺔﻋﻮﻤﺠﻣ ﺔﻟﺍﺯﺇ" ﻞﺼﻔﻟﺍ ﻊﺟﺍﺭ .ﺎﻬﻧﺎﻜﻣ
ﺄﻄﺨﻟﺍ ﺩﺍﻮﻛﺃ
ﻊﻗﻮﻤﻟﺍ ﻰﻠﻋ ﻮﻳﺪﻴﻓ ﻊﻃﺎﻘﻣ ﻲﻓ ﺕﺎﻤﻴﻠﻌﺗ ﺮﻓﻮﺘﺗﻭ .ﻚﺴﻔﻨﺑ ﺎﻬﻠﺤﺗ ﻥﺃ ﻚﻨﻜﻤﻳ ﻲﺘﻟﺍ ﻞﻛﺎﺸﻤﻟﺍ ﺮﻬﻈﹹﺗ ﻲﺘﻟﺍ ءﺎﻄﺧﻷﺍ ﺩﺍﻮﻛﺄﺑ ﺔﻤﺋﺎﻗ ﻲﻠﻳ ﺎﻤﻴﻓ ﺪﺠﺘﺳ
،ﻝﺎﺼﺗﻻﺍ ﻞﻴﺻﺎﻔﺗ ﻰﻠﻋ ﻝﻮﺼﺤﻠﻟ .ﻙﺪﻠﺑ ﻲﻓ Philips ءﻼﻤﻋ ﺔﻣﺪﺧ ﺰﻛﺮﻤﺑ ﻝﺎﺼﺗﻻﺍ ﻰﺟﺮﹹﻳ ،ﺮﺧﺁ ﺄﻄﺧ ﺩﻮﻛ ﺮﻬﻇ ﺍﺫﺇﻭ .www.philips.com/coffee-care
.ﻥﺎﻤﻀﻟﺍ ﺭﻮﺸﻨﻣ ﺮﻈﻧﺍ
ﻦﻜﻤﻤﻟﺍ ﻞﺤﻟﺍ ﺔﻠﻜﺸﻤﻟﺍ ﺄﻄﺨﻟﺍ ﺩﻮﻛ
ﺓﻮﻬﻘﻟﺍ ﺓﺮﺠﺣ ءﺎﻄﻏ ﺢﺘﻓﺍ ﻢﺛ .ﺮﻴﻀﺤﺘﻟﺍ ﺔﻋﻮﻤﺠﻣ ﻝﺯﺃ .ﺎﻬﻠﺼﻓﺍﻭ ﺔﻨﻴﻛﺎﻤﻟﺍ ﻞﻴﻐﺸﺗ ﻒﻗﻭﺃ
ﺓﻮﻬﻘﻟﺍ ﻂﻘﺴﺗ ﻰﺘﺣ ﻞﻔﺳﻷﻭ ﻰﻠﻋﻷ ﺾﺒﻘﻤﻟﺍ ﻙﹼﺮﺣ .ﺎﻬﻴﻓ ﺔﻘﻌﻠﻤﻟﺍ ﺾﺒﻘﻣ ﻞﺧﺩﺃﻭ ﺔﻧﻮﺤﻄﻤﻟﺍ
ﺕﺎﻤﻴﻠﻌﺗ ﻰﻠﻋ ﻝﻮﺼﺤﻠﻟ www.philips.com/coffee-care ﺓﺭﺎﻳﺰﺑ ﻞﻀﻔﺗ .ﺔﻘﻟﺎﻌﻟﺍ ﺔﻧﻮﺤﻄﻤﻟﺍ
.ﻮﻳﺪﻴﻔﻟﺍ ﻊﻃﺎﻘﻤﺑ ﺔﺤﺿﻮﻣ ﺔﻠﺼﻔﻣ
.ﺩﻭﺪﺴﻣ ﺓﻮﻬﻘﻟﺍ ﻊﻤﻗ 01
Page 76
ﺔﻴﺑﺮﻌﻟﺍ
ﻦﻜﻤﻤﻟﺍ ﻞﺤﻟﺍ ﺔﻠﻜﺸﻤﻟﺍ ﺄﻄﺨﻟﺍ ﺩﻮﻛ
77
ﻢﺛ ﻒﺠﺗ ﻰﺘﺣ ﺎﻬﻛﺮﺗﺍﻭ ،ﻒﻴﻈﻧ ءﺎﻤﺑ ﺮﻴﻀﺤﺘﻟﺍ ﺔﻋﻮﻤﺠﻣ ﻒﻄﺷﺍ .ﺔﻨﻴﻛﺎﻤﻟﺍ ﻞﻴﻐﺸﺗ ﻑﺎﻘﻳﺈﺑ ﻢﻗ
ﺓﺭﺎﻳﺰﺑ ﻞﻀﻔﺗ ﻭﺃ "ﺮﻴﻀﺤﺘﻟﺍ ﺔﻋﻮﻤﺠﻣ ﻒﻴﻈﻨﺗ" ﻞﺼﻔﻟﺍ ﻊﺟﺍﺭ .ﺎﻬﻤﹽﺤﺷ
ﻊﻃﺎﻘﻤﺑ ﺔﺤﺿﻮﻣ ﺔﻠﺼﻔﻣ ﺕﺎﻤﻴﻠﻌﺗ ﻰﻠﻋ ﻝﻮﺼﺤﻠﻟ www.philips.com/coffee-care
.ﻯﺮﺧﺃ ﺓﺮﻣ ﺔﻨﻴﻛﺎﻤﻟﺍ ﻞﹽﻐﺷ ﻢﺛ .ﻮﻳﺪﻴﻔﻟﺍ
ﺔﻋﻮﻤﺠﻣ ﻥﺃ ﻦﻣ ﺪﻛﺄﺗﻭ .ﺎﻬﺒﻴﻛﺮﺗ ﺪﻋﺃ ﻢﺛ ﺮﻴﻀﺤﺘﻟﺍ ﺔﻋﻮﻤﺠﻣ ﻝﺯﺃ .ﺔﻨﻴﻛﺎﻤﻟﺍ ﻞﻴﻐﺸﺗ ﻑﺎﻘﻳﺈﺑ ﻢﻗ
ﻭﺃ "ﺮﻴﻀﺤﺘﻟﺍ ﺔﻋﻮﻤﺠﻣ ﻊﻣ ﻞﻣﺎﻌﺘﻟﺍ" ﻞﺼﻔﻟﺍ ﻊﺟﺍﺭ .ﺎﻬﺒﻴﻛﺮﺗ ﻞﺒﻗ ﺢﻴﺤﺼﻟﺍ ﺎﻬﻌﺿﻮﻣ ﻲﻓ ﺮﻴﻀﺤﺘﻟﺍ
ﺔﺤﺿﻮﻣ ﺔﻠﺼﻔﻣ ﺕﺎﻤﻴﻠﻌﺗ ﻰﻠﻋ ﻝﻮﺼﺤﻠﻟ www.philips.com/coffee-care ﺓﺭﺎﻳﺰﺑ ﻞﻀﻔﺗ
.ﻯﺮﺧﺃ ﺓﺮﻣ ﺔﻨﻴﻛﺎﻤﻟﺍ ﻞﹽﻐﺷ ﻢﺛ .ﻮﻳﺪﻴﻔﻟﺍ ﻊﻃﺎﻘﻤﺑ
ﺍﺬﻫ ﺢﺠﻧ ﺍﺫﺇ .ﻯﺮﺧﺃ ﺓﺮﻣ ﺎﻬﻠﻴﻐﺸﺗ ﺓﺩﺎﻋﺇ ﻢﺛ ﺎﻬﻠﻴﻐﺸﺗ ﻑﺎﻘﻳﺇ ﻖﻳﺮﻃ ﻦﻋ ﺔﻨﻴﻛﺎﻤﻟﺍ ﻞﻴﻐﺸﺗ ﺪﻋﺃ
ﻢﻟ ﺖﻨﻛ ﺍﺫﺇ ﺔﻨﻴﻛﺎﻤﻟﺍ ﻦﻣ ﺕﺎﺒﺳﺮﺘﻟﺍ ﻝﺯﺃﻭ .ﻦﺧﺎﺴﻟﺍ ءﺎﻤﻟﺍ ﻦﻣ ﺏﺍﻮﻛﺃ 3 ﻭﺃ ﻦﻴﺑﻮﻛ ﹼﺐﺼﻓ ،ءﺍﺮﺟﻹﺍ
.ﺔﻠﻳﻮﻃ ﺓﺮﺘﻔﻟ ﻚﻟﺫ ﻞﻌﻔﺗ
ﻪﻧﺃ ﻦﻣ ﺪﻛﺄﺘﻓ ،ءﺍﺮﺟﻹﺍ ﺍﺬﻫ ﺢﺠﻧ ﺍﺫﺇ .ﻯﺮﺧﺃ ﺓﺮﻣ ﺓﻮﻬﻘﻟﺍ ﺮﻴﻀﺤﺗ ﻝﻭﺎﺣﻭ AquaClean ﺮﺘﻠﻓ ﻝﺯﺃ
ﺮﺘﻠﻓ ﺐﻴﻛﺮﺗ ﺪﻋﺃ .ﻯﺮﺧﺃ ﺓﺮﻣ ﻪﻌﺿﻭ ﻞﺒﻗ ﺢﻴﺤﺻ ﻞﻜﺸﺑ AquaClean ﺮﺘﻠﻓ ﺩﺍﺪﻋﺇ ﻢﺗ
ﻰﻟﺇ ﺝﺎﺘﺤﻳﻭ ﺍﹰﺩﻭﺪﺴﻣ ﺮﺘﻠﻔﻟﺍ ﻥﻮﻜﻳ ﺪﻘﻓ ،ﻚﻟﺫ ﺢﺠﻨﻳ ﻢﻟ ﺍﺫﺇ .ءﺎﻤﻟﺍ ﻥﺍﺰﺧ ﻲﻓ AquaClean
ﺔﻴﺑﺮﻌﻟﺍ
ﺔﺟﺭﺩ ﻊﻣ ﻒﻴﻜﺘﺗﻭ ﺔﻴﺟﺭﺎﺨﻟﺍ ﺔﺌﻴﺒﻟﺍ/ﻞﻘﻨﻟﺍ ﺔﺌﻴﺑ ﺓﺭﺍﺮﺣ ﻦﻣ ﺃﺪﻬﺗ ﻰﺘﺣ ﺖﻗﻮﻟﺍ ﺾﻌﺒﻟ ﺔﻨﻴﻛﺎﻤﻟﺍ ﻙﺮﺗﺍ
ﺍﺫﺇ .ﻯﺮﺧﺃ ﺓﺮﻣ ﺎﻬﻠﻴﻐﺸﺗ ﺪﻋﺃ ﻢﺛ ﺔﻘﻴﻗﺩ 30 ﺓﺪﻤﻟ ﺮﻈﺘﻧﺍﻭ ،ﺔﻨﻴﻛﺎﻤﻟﺍ ﻞﻴﻐﺸﺗ ﻒﻗﻭﺃ .ﺔﻓﺮﻐﻟﺍ ﺓﺭﺍﺮﺣ
،ﻝﺎﺼﺗﻻﺍ ﻞﻴﺻﺎﻔﺗ ﻰﻠﻋ ﻝﻮﺼﺤﻠﻟ .ﻙﺪﻠﺑ ﻲﻓ ءﻼﻤﻌﻟﺍ ﺔﻣﺪﺧ ﺰﻛﺮﻤﺑ ﻞﺼﺗﺎﻓ ،ءﺍﺮﺟﻹﺍ ﺍﺬﻫ ﺢﺠﻨﻳ ﻢﻟ
.ﻥﺎﻤﻀﻟﺍ ﺭﻮﺸﻨﻣ ﺮﻈﻧﺍ
.ﺔﻘﻴﻗﺩ 30 ﺪﻌﺑ ﺎﻬﻠﻴﻐﺸﺗ ﺪﻋﺃﻭ ،ﺔﻨﻴﻛﺎﻤﻟﺍ ﻞﻴﻐﺸﺗ ﻒﻗﻭﺃ .ﺔﻌﻔﺗﺮﻣ ﺔﻨﻴﻛﺎﻤﻟﺍ ﺓﺭﺍﺮﺣ 14
.ﻪﻟﺍﺪﺒﺘﺳﺍ
ﺮﻴﻏ ﻭﺃ ﺔﺨﺴﺘﻣ ﺮﻴﻀﺤﺘﻟﺍ ﺔﻋﻮﻤﺠﻣ
.ﺍﹰﺪﻴﺟ ﺔﻤﺤﺸﻣ
ﺎﻬﻧﺎﻜﻣ ﻲﻓ ﺖﺴﻴﻟ ﺮﻴﻀﺤﺘﻟﺍ ﺔﻋﻮﻤﺠﻣ
.ﺢﻴﺤﺼﻟﺍ
.ءﺎﻤﻟﺍ ﺓﺮﺋﺍﺩ ﻲﻓ ءﺍﻮﻫ ﺪﺟﻮﻳ 05
AquaClean ﺮﺘﻠﻓ ﺩﺍﺪﻋﺇ ﻢﺘﻳ ﻢﻟ
ﻮﻫ ﻭﺃ ﺐﻴﻛﺮﺘﻟﺍ ﻞﺒﻗ ﺢﻴﺤﺻ ﻞﻜﺸﺑ
.ﺩﻭﺪﺴﻣ
ﻊﻣ ﻒﹽﻴﻜﺘﻟﺍ ﻰﻟﺇ ﺔﻨﻴﻛﺎﻤﻟﺍ ﺝﺎﺘﺤﺗ
ﺔﻓﺮﻐﻟﺍ ﺓﺭﺍﺮﺣ ﺔﺟﺭﺩ
ﺎﻬﺣﻼﺻﺇﻭ ءﺎﻄﺧﻷﺍ ﻑﺎﺸﻜﺘﺳﺍ ﻝﻭﺪﺟ
ﻰﻠﻋ ﺔﻌﺋﺎﺸﻟﺍ ﺔﻠﺌﺳﻷﺎﺑ ﺔﻠﻣﺎﻛ ﺔﻤﺋﺎﻗﻭ ﻢﻋﺪﻟﺎﺑ ﺔﺻﺎﺨﻟﺍ ﻮﻳﺪﻴﻔﻟﺍ ﻊﻃﺎﻘﻣ ﺮﻓﻮﺘﺗ .ﺔﻨﻴﻛﺎﻤﻟﺍ ﻊﻣ ﺎﻬﻬﺟﺍﻮﺗ ﺪﻗ ﻲﺘﻟﺍ ﺎﹱﻋﻮﻴﺷ ﺮﺜﻛﻷﺍ ﺕﻼﻜﺸﻤﻟﺍ ﻞﺼﻔﻟﺍ ﺍﺬﻫ ﺺﺨﻠﻳ
ﺮﻈﻧﺍ ،ﻝﺎﺼﺗﻻﺍ ﻞﻴﺻﺎﻔﺗ ﻰﻠﻋ ﻝﻮﺼﺤﻠﻟ .ﻙﺪﻠﺑ ﻲﻓ ﻚﻠﻬﺘﺴﻤﻟﺍ ﺔﻳﺎﻋﺭ ﺰﻛﺮﻤﺑ ﻞﺼﺗﺎﻓ ،ﺔﻠﻜﺸﻤﻟﺍ ﻞﺣ ﻦﻣ ﻦﻜﻤﺘﺗ ﻢﻟ ﺍﺫﺇ .www.philips.com/coffee-care
ﻞﺤﻟﺍ
ﺐﺒﺴﻟﺍ ﺔﻠﻜﺸﻤﻟﺍ
03
04
11
.ﻥﺎﻤﻀﻟﺍ ﺭﻮﺸﻨﻣ
ﻦﻣ ﺾﻌﺑ ﻰﻘﺒﻳ ﺪﻗ ،ﺔﻳﺎﻨﻌﺑ ﺎﻬﻔﻴﻈﻨﺗ ﻢﺗ ﻪﻧﺃ ﻦﻣ ﻢﻏﺮﻟﺍ ﻰﻠﻋ
.ﺎﹱﻣﺎﻤﺗ ﺓﺪﻳﺪﺟ ﺔﻨﻴﻛﺎﻤﻟﺍ ﻥﺃ ﻚﻟ ﺪﻛﺆﻧ ،ﻚﻟﺫ ﻊﻣﻭ .ﺓﻮﻬﻘﻟﺍ ﺎﻳﺎﻘﺑ
ﺮﺷﺆﻣ ءﻲﻀﻳ ﻥﺃ ﺩﺮﺠﻤﺑ ﻭﺃ ﺎﹱﻴﻣﻮﻳ ﻂﻴﻘﻨﺘﻟﺍ ﺔﻴﻨﻴﺻ ﻍﺍﺮﻓﺈﺑ ﻢﻗ
ءﺎﻄﻏ ﻝﻼﺧ ﻦﻣ ﺮﻤﺣﻷﺍ ﻥﻮﻠﻟﺎﺑ "ﺔﺌﻠﺘﻤﻣ ﻂﻴﻘﻨﺘﻟﺍ ﺔﻴﻨﻴﺻ"
ﻑﺮﺼﻟﺍ ﺭﻮﺒﻨﺻ ﺖﺤﺗ ﺎﹱﺑﻮﻛ ﻊﺿ :ﺔﺤﻴﺼﻧ .ﻂﻴﻘﻨﺘﻟﺍ ﺔﻴﻨﻴﺻ
.ﻪﻨﻣ ﺝﺮﺨﺗ ﻲﺘﻟﺍ ﻒﻄﺸﻟﺍ ﻩﺎﻴﻣ ﻊﻤﺠﻟ
ﻞﻴﻐﺸﺗ ءﺎﻨﺛﺃ ﺓﻮﻬﻘﻟﺍ ﺐﺳﺍﻭﺭ ﺔﻳﻭﺎﺣ ﻍﺍﺮﻓﺈﺑ ﺎﹱﻤﺋﺍﺩ ﻢﻗ
ﹴﻥﺍﻮﺛ 5 ﺮﻈﺘﻧﺍﻭ ،ﺓﻮﻬﻘﻟﺍ ﺐﺳﺍﻭﺭ ﺔﻳﻭﺎﺣ ﺔﻟﺍﺯﺈﺑ ﻢﻗ .ﺔﻨﻴﻛﺎﻤﻟﺍ
.ﻯﺮﺧﺃ ﺓﺮﻣ ﺎﻬﺒﻴﻛﺮﺘﺑ ﻢﻗ ﻢﺛ ،ﻞﻗﻷﺍ ﻰﻠﻋ
ﺐﺳﺍﻭﺭ ﺔﻳﻭﺎﺣ ﻊﻀﺗ ﺎﻣﺪﻨﻋ ﹴﻥﺍﻮﺛ 5 ﻲﻟﺍﻮﺣ ﺎﹱﻤﺋﺍﺩ ﺮﻈﺘﻧﺍ
ﺩﺍﺪﻋ ﻂﺒﺿ ﺩﺎﻌﹹﻴﺳ ،ﺔﻘﻳﺮﻄﻟﺍ ﻩﺬﻬﺑﻭ .ﻯﺮﺧﺃ ﺓﺮﻣ ﺓﻮﻬﻘﻟﺍ
ﺓﻮﻬﻘﻟﺍ ﺹﺍﺮﻗﺃ ﹼﺪﻋ ﻢﺘﻳ ﹼﻢﺛ ﻦﻣﻭ ﺮﻔﺼﻟﺍ ﻰﻠﻋ ﺔﻧﻮﺤﻄﻤﻟﺍ ﺓﻮﻬﻘﻟﺍ
.ﺔﺤﻴﺤﺻ ﺔﻘﻳﺮﻄﺑ
.ﺔﻨﻴﻛﺎﻤﻟﺍ ﻩﺬﻫ ﺭﺎﺒﺘﺧﺍ ﺪﻨﻋ ﺓﻮﻬﻗ ﺎﻨﻣﺪﺨﺘﺳﺍ ﺪﻘﻟ ﻞﺧﺍﺩ ﺓﻮﻬﻘﻟﺍ ﺎﻳﺎﻘﺑ ﺾﻌﺑ ﺪﺟﻮﺗ
.ﺓﺪﻳﺪﺠﻟﺍ ﺓﻮﻬﻘﻟﺍ ﺔﻨﻴﻛﺎﻣ
ءﺎﻤﻟﺍ ﺔﻨﻴﻛﺎﻤﻟﺍ ﻡﺪﺨﺘﺴﺗ .ﻲﻌﻴﺒﻃ ﺮﻣﺃ ﺍﺬﻫ
.ﺮﻴﻀﺤﺘﻟﺍ ﺔﻋﻮﻤﺠﻣﻭ ﺔﻴﻠﺧﺍﺪﻟﺍ ﺓﺮﺋﺍﺪﻟﺍ ﻒﻄﺸﻟ
ﻲﻠﺧﺍﺪﻟﺍ ﻡﺎﻈﻨﻟﺍ ﻝﻼﺧ ﻦﻣ ﻩﺎﻴﻤﻟﺍ ﺾﻌﺑ ﻖﻓﺪﺘﺗ
.ﻂﻴﻘﻨﺘﻟﺍ ﺔﻴﻨﻴﺻ ﻲﻓ ﺓﺮﺷﺎﺒﻣ
ﺖﻧﺎﻛ ﺎﻣﺪﻨﻋ ﺔﻧﻮﺤﻄﻤﻟﺍ ﺓﻮﻬﻘﻟﺍ ﺔﻳﻭﺎﺣ ﺖﻏﺮﻓﺃ ﺪﻘﻟ
ﺔﻋﺮﺴﺑ ﺎﻬﻌﺿﻭ ﺕﺪﻋﺃ ﺖﻧﺃ ﻭﺃ ،ﺓﺄﻔﻄﻣ ﺔﻨﻴﻛﺎﻤﻟﺍ
ﺓﺮﻣ ﺮﺧﺁ ﻲﻓ ﺩﺍﺪﻌﻟﺍ ﻂﺒﺿ ﺓﺩﺎﻋﺈﺑ ﺔﻨﻴﻛﺎﻤﻟﺍ ﻢﻘﺗ ﻢﻟ
.ﺓﻮﻬﻘﻟﺍ ﺐﺳﺍﻭﺭ ﺔﻳﻭﺎﺣ ﻍﺍﺮﻓﺈﺑ ﺎﻬﻴﻓ ﺖﻤﻗ
ﺪﺟﻮﻳ / ﺔﻋﺮﺴﺑ ﻂﻴﻘﻨﺘﻟﺍ ﺔﻴﻨﻴﺻ ﺊﻠﺘﻤﺗ
ﻂﻴﻘﻨﺘﻟﺍ ﺔﻴﻨﻴﺻ ﻲﻓ ءﺎﻤﻟﺍ ﺾﻌﺑ
ﺓﻮﻬﻘﻟﺍ ﺔﻳﻭﺎﺣ ﻍﺮﻓﺃ" ﺰﻣﺭ ﻞﻈﻳ
.ﺎﹱﺌﻴﻀﻣ "ﺔﻧﻮﺤﻄﻤﻟﺍ
.ﺓﺮﻴﺒﻛ
ﺐﺳﺍﻭﺭ ﺔﻳﻭﺎﺣ ﻍﺍﺮﻓﺇ ﺔﻨﻴﻛﺎﻤﻟﺍ ﺐﻠﻄﺗ
ﺮﻴﻏ ﺔﻳﻭﺎﺤﻟﺍ ﻥﺃ ﻦﻣ ﻢﻏﺮﻟﺍ ﻰﻠﻋ ﺓﻮﻬﻘﻟﺍ
.ﺔﺌﻠﺘﻤﻣ
.ﺎﹱﻣﻭﺩ
Page 77
ﺔﻴﺑﺮﻌﻟﺍ
78
ﻞﻴﻐﺸﺗ ءﺎﻨﺛﺃ ﺓﻮﻬﻘﻟﺍ ﺐﺳﺍﻭﺭ ﺔﻳﻭﺎﺣ ﻍﺍﺮﻓﺈﺑ ﺎﹱﻤﺋﺍﺩ ﻢﻗ
ﻑﺎﻘﻳﺇ ﺪﻨﻋ ﺓﻮﻬﻘﻟﺍ ﺕﺎﻔﻠﺨﻣ ﺔﻳﻭﺎﺣ ﻍﺍﺮﻓﺈﺑ ﺖﻤﻗ ﺍﺫﺇ .ﺔﻨﻴﻛﺎﻤﻟﺍ
ﺕﺎﻔﻠﺨﻣ ﺩﺍﺪﻋ ﻂﺒﺿ ﺓﺩﺎﻋﺇ ﻢﺘﺗ ﻦﻠﻓ ،ﺔﻨﻴﻛﺎﻤﻟﺍ ﻞﻴﻐﺸﺗ
ﻞﺤﻟﺍ ﺐﺒﺴﻟﺍ ﺔﻠﻜﺸﻤﻟﺍ
.ﺓﻮﻬﻘﻟﺍ
ﺔﻳﻭﺎﺣ ﻍﺍﺮﻓﺈﺑ ﺎﹱﻀﻳﺃ ﻢﻗ ،ﻂﻴﻘﻨﺘﻟﺍ ﺔﻴﻨﻴﺻ ﺔﻟﺍﺯﺈﺑ ﻡﻮﻘﺗ ﺎﻣﺪﻨﻋ
ﻦﻣ ﻞﻴﻠﻗ ﺩﺪﻋ ﻰﻠﻋ ﻱﻮﺘﺤﺗ ﺖﻧﺎﻛ ﺍﺫﺇ ﻰﺘﺣ ﺓﻮﻬﻘﻟﺍ ﺐﺳﺍﻭﺭ
ﺓﻮﻬﻘﻟﺍ ﺩﺍﺪﻋ ﻂﺒﺿ ﺓﺩﺎﻋﺇ ﺍﺬﻫ ﻦﻤﻀﻳ .ﺓﻮﻬﻘﻟﺍ ﺕﺍﺮﻛ
.ﺔﺤﻴﺤﺻ ﺔﻘﻳﺮﻄﺑ ﺓﻮﻬﻘﻟﺍ ﺹﺍﺮﻗﺃ ﹼﺪﻋﻭ ﺮﻔﺼﻟﺍ ﻰﻠﻋ ﺔﻧﻮﺤﻄﻤﻟﺍ
ﺔﻣﺪﺨﻟﺍ ﺏﺎﺑ ﻖﻠﻏﺃ :ﺔﻴﻟﺎﺘﻟﺍ ﺔﻘﻳﺮﻄﻟﺎﺑ ﺔﻨﻴﻛﺎﻤﻟﺍ ﻂﺒﺿ ﺓﺩﺎﻋﺈﺑ ﻢﻗ
ﻞﻴﻐﺸﺗ ﻒﻗﻭﺃ .ﻯﺮﺧﺃ ﺓﺮﻣ ﻪﻧﺎﻜﻣ ﻲﻓ ﻩﺎﻴﻤﻟﺍ ﻥﺍﺰﺧ ﻊﺿﻭ
ءﻲﻀﺗ ﻰﺘﺣ ﺮﻈﺘﻧﺍﻭ ﻯﺮﺧﺃ ﺓﺮﻣ ﺎﻬﻠﻴﻐﺸﺗ ﺪﻋﺃ ﻢﺛ ﺔﻨﻴﻛﺎﻤﻟﺍ
ﺮﻴﻀﺤﺘﻟﺍ ﺔﻋﻮﻤﺠﻣ ﺔﻟﺍﺯﺇ ﻝﻭﺎﺣ .ﺕﺎﺑﻭﺮﺸﻤﻟﺍ ﺯﻮﻣﺭ ﻲﻓ ءﺍﻮﺿﻷﺍ
"ﺎﻬﺒﻴﻛﺮﺗﻭ ﺮﻴﻀﺤﺘﻟﺍ ﺔﻋﻮﻤﺠﻣ ﺔﻟﺍﺯﺇ" ﻞﺼﻔﻟﺍ ﻊﺟﺍﺭ .ﻯﺮﺧﺃ ﺓﺮﻣ
.ﺓﻮﻄﺨﺑ ﺓﻮﻄﺧ ﺕﺍﺩﺎﺷﺭﻹﺍ ﻰﻠﻋ ﻝﻮﺼﺤﻠﻟ
ﺔﻣﺪﺨﻟﺍ ﺏﺎﺑ ﻖﻠﻏﺃ :ﺔﻴﻟﺎﺘﻟﺍ ﺔﻘﻳﺮﻄﻟﺎﺑ ﺔﻨﻴﻛﺎﻤﻟﺍ ﻂﺒﺿ ﺓﺩﺎﻋﺈﺑ ﻢﻗ
ﺔﻋﻮﻤﺠﻣ ﻙﺮﺗﺍ .ﻯﺮﺧﺃ ﺓﺮﻣ ﻪﻧﺎﻜﻣ ﻲﻓ ﻩﺎﻴﻤﻟﺍ ﻥﺍﺰﺧ ﻊﺿﻭ
ﺓﺪﻤﻟ ﺮﻈﺘﻧﺍ .ﺎﻬﻠﺼﻓﺍﻭ ﺔﻨﻴﻛﺎﻤﻟﺍ ﻞﻴﻐﺸﺗ ﻑﺎﻘﻳﺈﺑ ﻢﻗ .ﺮﻴﻀﺤﺘﻟﺍ
ﻰﺘﺣ ﺮﻈﺘﻧﺍﻭ ﺎﻬﻠﹽﻐﺷﻭ ﺔﻨﻴﻛﺎﻤﻟﺍ ﻞﻴﺻﻮﺗ ﺪﻋﺃ ﻢﺛ ﺔﻴﻧﺎﺛ 30
ﺔﻋﻮﻤﺠﻣ ﻊﺿ ﻢﺛ .ﺕﺎﺑﻭﺮﺸﻤﻟﺍ ﺯﻮﻣﺭ ﻲﻓ ءﺍﻮﺿﻷﺍ ءﻲﻀﺗ
.ﺔﻨﻴﻛﺎﻤﻟﺍ ﻲﻓ ﺎﻬﺒﻴﻛﺮﺗ ﺪﻋﺃﻭ ﺢﻴﺤﺼﻟﺍ ﺎﻬﻧﺎﻜﻣ ﻲﻓ ﺮﻴﻀﺤﺘﻟﺍ
ﻝﻮﺼﺤﻠﻟ "ﺎﻬﺒﻴﻛﺮﺗﻭ ﺮﻴﻀﺤﺘﻟﺍ ﺔﻋﻮﻤﺠﻣ ﺔﻟﺍﺯﺇ" ﻞﺼﻔﻟﺍ ﻊﺟﺍﺭ
.ﺓﻮﻄﺨﺑ ﺓﻮﻄﺧ ﺕﺍﺩﺎﺷﺭﻹﺍ ﻰﻠﻋ
ﻦﻣ ﺮﻴﻀﺤﺘﻟﺍ ﺔﻋﻮﻤﺠﻣ ﺔﻟﺍﺯﺇ' ﺮﻈﻧﺍ) ﺔﻋﻮﻤﺠﻣ ﺔﻟﺍﺯﺈﺑ ﻢﻗ
ﻢﺛ .ﻒﺠﺘﻟ ﺎﻬﻛﺮﺗﺍﻭ ﺔﻴﻔﻨﺤﻟﺍ ﺖﺤﺗ ﺎﻬﻔﻄﺷﺍ ،ﺮﻴﻀﺤﺘﻟﺍ ('ﺔﻨﻴﻛﺎﻤﻟﺍ
('ﺮﻴﻀﺤﺘﻟﺍ ﺔﻋﻮﻤﺠﻣ ﺖﻴﻳﺰﺗ' ﺮﻈﻧﺍ) ءﺍﺰﺟﻷﺍ ﺖﻴﻳﺰﺘﺑ ﻢﻗ
.ﺔﻛﺮﺤﺘﻤﻟﺍ
ﺔﻨﻴﻛﺎﻤﻠﻟ ﺡﺎﻤﺴﻠﻟ ﺔﻳﺍﺪﺒﻟﺍ ﻲﻓ ﺓﻮﻬﻘﻟﺍ ﻦﻣ ﺏﺍﻮﻛﺃ 5 ﺮﻴﻤﺨﺘﺑ ﻢﻗ
.ﻲﺗﺍﺬﻟﺍ ﻂﺒﻀﻟﺍ ءﺍﺮﺟﺇ ﻝﺎﻤﻛﺈﺑ
ﺔﻳﻭﺎﺣ ﻍﺍﺮﻓﺇ ﻥﻭﺩ ﻂﻴﻘﻨﺘﻟﺍ ﺔﻴﻨﻴﺻ ﺔﻟﺍﺯﺈﺑ ﺖﻤﻗ ﺪﻘﻟ
.ﺕﺎﻔﻠﺨﻤﻟﺍ
.ﺢﻴﺤﺼﻟﺍ ﺎﻬﻧﺎﻜﻣ ﻲﻓ ﺖﺴﻴﻟ ﺮﻴﻀﺤﺘﻟﺍ ﺔﻋﻮﻤﺠﻣ .ﺮﻴﻀﺤﺘﻟﺍ ﺔﻋﻮﻤﺠﻣ ﺔﻟﺍﺯﺇ ﻲﻨﻨﻜﻤﻳ ﻻ
.ﺢﻴﺤﺼﻟﺍ ﺎﻬﻧﺎﻜﻣ ﻲﻓ ﺖﺴﻴﻟ ﺮﻴﻀﺤﺘﻟﺍ ﺔﻋﻮﻤﺠﻣ .ﺮﻴﻀﺤﺘﻟﺍ ﺔﻋﻮﻤﺠﻣ ﺐﻴﻛﺮﺗ ﻲﻨﻨﻜﻤﻳ ﻻ
.ﺖﻴﻳﺰﺗ ﻰﻟﺇ ﺝﺎﺘﺤﺗ ﻭﺃ ﺔﺨﺴﺘﻣ ﺮﻴﻀﺤﺘﻟﺍ ﺔﻋﻮﻤﺠﻣ .ﺔﻴﺋﺎﻣ ﺓﻮﻬﻘﻟﺍ
ﺃﺪﺒﻳ .ﻲﺗﺍﺬﻟﺍ ﻂﺒﻀﻟﺍ ﺔﻴﻠﻤﻋ ءﺍﺮﺟﺈﺑ ﺔﻨﻴﻛﺎﻤﻟﺍ ﻡﻮﻘﺗ
ﻝﻭﻷ ﺔﻨﻴﻛﺎﻤﻟﺍ ﻡﺍﺪﺨﺘﺳﺍ ﺪﻨﻋ ﺎﹱﻴﺋﺎﻘﻠﺗ ءﺍﺮﺟﻹﺍ ﺍﺬﻫ
ﺏﻮﺒﺣ ﻦﻣ ﺮﺧﺁ ﻉﻮﻧ ﻰﻟﺇ ﺮﻴﻴﻐﺘﻟﺍ ﺪﻨﻋ ﻭﺃ ،ﺓﺮﻣ
.ﻡﺍﺪﺨﺘﺳﻻﺍ ﻡﺪﻋ ﻦﻣ ﺔﻠﻳﻮﻃ ﺓﺮﺘﻓ ﺪﻌﺑ ﻭﺃ ،ﻦﺒﻟﺍ
ﺔﺌﻠﺘﻤﻣ ﺔﻧﻮﺤﻄﻤﻟﺍ ﺓﻮﻬﻘﻟﺍ ﺔﻳﻭﺎﺣ
ﺔﻳﻭﺎﺣ ﻍﺮﻓﺃ" ﺰﻣﺭ ﺮﻬﻈﻳ ﻢﻟﻭ ﺔﻳﺎﻐﻠﻟ
.ﺔﺷﺎﺸﻟﺍ ﻰﻠﻋ "ﺔﻧﻮﺤﻄﻤﻟﺍ ﺓﻮﻬﻘﻟﺍ
ﺮﻴﻀﺤﺘﺑ ﻢﻗ .(ﻞﻗﺃ) ﻕﺩﺃ ﺩﺍﺪﻋﺇ ﻰﻠﻋ ﺔﻨﺤﻄﻤﻟﺍ ﻂﺒﻀﺑ ﻢﻗ
ﻕﺮﻔﻟﺍ ﻕﻭﺬﺗ ﻦﻣ ﻦﻜﻤﺘﺗ ﻰﺘﺣ ﺕﺎﺑﻭﺮﺸﻣ 3 ﻰﻟﺇ ﻦﻴﺑﻭﺮﺸﻣ
.ﻞﻣﺎﻜﻟﺍ
ﺔﺟﺭﺩ ﻂﺒﻀﻟﻭ .ﺩﺍﺪﻋﺇ ﻰﺼﻗﺃ ﻰﻠﻋ ﺓﺭﺍﺮﺤﻟﺍ ﺔﺟﺭﺩ ﻂﺒﺿﺍ
."ﺕﺍﺩﺍﺪﻋﻹﺍ" ﺰﻣﺭ ﻰﻠﻋ ﻂﻐﺿﺍ ،ﺓﺭﺍﺮﺤﻟﺍ
.ﻦﺧﺎﺴﻟﺍ ءﺎﻤﻟﺎﺑ ﺎﻬﻔﻄﺷ ﻖﻳﺮﻃ ﻦﻋ ﺏﺍﻮﻛﻷﺍ ﻦﺨﺳ .ﺏﻭﺮﺸﻤﻟﺍ ﺓﺭﺍﺮﺣ ﺔﺟﺭﺩ ﻦﻣ ﻞﻠﻘﻳ ﺩﺭﺎﺒﻟﺍ ﺏﻮﻜﻟﺍ
،ﺩﺭﺎﺒﻟﺍ ﻭﺃ ﻦﺧﺎﺴﻟﺍ ﺐﻴﻠﺤﻟﺍ ﻒﻴﻀﺗ ﺖﻨﻛ ﺍﺫﺇ ﺎﻤﻋ ﺮﻈﻨﻟﺍ ﺾﻐﺑ
.ﺓﻮﻬﻘﻟﺍ ﺓﺭﺍﺮﺣ ﺔﺟﺭﺩ ﻦﻣ ﺎﹱﻤﺋﺍﺩ ﻞﻠﻘﻳ ﺐﻴﻠﺤﻟﺍ ﺔﻓﺎﺿﺇ ﻥﺈﻓ
.ﻦﺧﺎﺴﻟﺍ ءﺎﻤﻟﺎﺑ ﺎﻬﻔﻄﺷ ﻖﻳﺮﻃ ﻦﻋ ﺏﺍﻮﻛﻷﺍ ﻦﺨﺳ
."ﺍﹰﺪﺟ ﻦﺸﺧ" ﺩﺍﺪﻋﻹﺍ ﻰﻠﻋ ﺔﻨﺤﻄﻤﻟﺍ ﻂﺒﺿ ﻢﺘﻳ
ﺔﻀﻔﺨﻨﻣ ﺔﺟﺭﺩ ﻰﻠﻋ ﺓﺭﺍﺮﺤﻟﺍ ﺔﺟﺭﺩ ﻂﺒﺿ ﻢﺘﻳ
.ﺏﻭﺮﺸﻤﻟﺍ ﺓﺭﺍﺮﺣ ﺔﺟﺭﺩ ﻦﻣ ﻞﻠﻘﻳ ﺐﻴﻠﺤﻟﺍ ﺔﻓﺎﺿﺇ
.ﻲﻓﺎﻜﻟﺍ ﺭﺪﻘﻟﺎﺑ ﺔﻨﺧﺎﺳ ﺖﺴﻴﻟ ﺓﻮﻬﻘﻟﺍ
.ﺍﹰﺪﺟ
Page 78
ﺔﻴﺑﺮﻌﻟﺍ
ﻞﺤﻟﺍ ﺐﺒﺴﻟﺍ ﺔﻠﻜﺸﻤﻟﺍ
79
ﺢﺠﻧ ﺍﺫﺇ .ﻦﺧﺎﺴﻟﺍ ءﺎﻤﻟﺍ ﺾﻌﺑ ﹼﺐﺻﻭ AquaClean ﺮﺘﻠﻓ ﻝﺯﺃ
ﺔﻘﻳﺮﻄﺑ ﻪﺒﻴﻛﺮﺗ ﻢﺘﻳ ﻢﻟ AquaClean ﺮﺘﻠﻓ ﻥﺈﻓ ،ءﺍﺮﺟﻹﺍ ﺍﺬﻫ
ﻊﻴﻤﺟ ﻊﺒﺗﺍﻭ ﻪﻠﹽﻌﻓﻭ AquaClean ﺮﺘﻠﻓ ﺐﻴﻛﺮﺗ ﺪﻋﺃ .ﺔﺤﻴﺤﺻ
."AquaClean ءﺎﻤﻟﺍ ﺮﺘﻠﻓ" ﻞﺼﻔﻟﺍ ﻲﻓ ﺓﺩﺭﺍﻮﻟﺍ ﺕﺍﻮﻄﺨﻟﺍ
ﻚﻴﻠﻌﻓ ،ﺔﻠﻳﻮﻃ ﺓﺮﺘﻔﻟ ﺔﻨﻴﻛﺎﻤﻟﺍ ﻡﺍﺪﺨﺘﺳﺍ ﻦﻋ ﺖﻔﻗﻮﺗ ﺍﺫﺇ
ﹼﺐﺻﻭ ﻯﺮﺧﺃ ﺓﺮﻣ ﻡﺍﺪﺨﺘﺳﻼﻟ AquaClean ءﺎﻤﻟﺍ ﺮﺘﻠﻓ ﺩﺍﺪﻋﺈﺑ
.ﻦﺧﺎﺴﻟﺍ ءﺎﻤﻟﺍ ﻦﻣ ﺏﺍﻮﻛﺃ 3 ﻭﺃ ﻦﻴﺑﻮﻛ
ﻥﺃ ﻦﻜﻤﻳ .ﺮﻬﺷﺃ 3 ﻞﻛ AquaClean ﻩﺎﻴﻣ ﺮﺘﻠﻓ ﻝﺪﺒﺘﺳﺍ
ﻰﻟﺇ ﺮﻬﺷﺃ 3 ﻦﻣ ﺮﺜﻛﺃ ﻪﻴﻠﻋ ﻰﻀﻣ ﻱﺬﻟﺍ ﺮﺘﻠﻔﻟﺍ ﺽﺮﻌﺘﻳ
ﻆﺣﻻ .(ﺔﺟﺭﺩ ﻰﻠﻋﺃ) ﻦﺸﺧ ﺩﺍﺪﻋﻹﺍ ﻰﻠﻋ ﺔﻨﺤﻄﻤﻟﺍ ﻂﺒﻀﺑ ﻢﻗ
.ﺓﻮﻬﻘﻟﺍ ﻢﻌﻃ ﻰﻠﻋ ﺮﺛﺆﻳ ﻑﻮﺳ ﺍﺬﻫ ﻥﺃ
ﺮﻈﻧﺍ) ﺔﻴﻔﻨﺤﻟﺍ ﺖﺤﺗ ﺎﻬﻔﻄﺷﺍﻭ ﺮﻴﻀﺤﺘﻟﺍ ﺔﻋﻮﻤﺠﻣ ﺔﻟﺍﺯﺈﺑ ﻢﻗ
ﺔﻴﺑﺮﻌﻟﺍ
.('ﺔﻴﻔﻨﺤﻟﺍ ﺖﺤﺗ ﺮﻴﻀﺤﺘﻟﺍ ﺔﻋﻮﻤﺠﻣ ﻒﻴﻈﻨﺗ'
ﺓﺮﺑﺇ ﻭﺃ ﻒﻈﻨﻤﺑ ﺎﻬﺗﺎﺤﺘﻓﻭ ﺓﻮﻬﻘﻟﺍ ﺐﺻ ﺔﻫﻮﻓ ﻒﻴﻈﻨﺘﺑ ﻢﻗ
ﺢﺘﻓﺍ .ﺮﻴﻀﺤﺘﻟﺍ ﺔﻋﻮﻤﺠﻣ ﺔﻟﺍﺯﺇﻭ ﺔﻨﻴﻛﺎﻤﻟﺍ ﻞﻴﻐﺸﺗ ﻑﺎﻘﻳﺈﺑ ﻢﻗ
.ﺎﻬﻴﻓ ﺔﻘﻌﻠﻤﻟﺍ ﺾﺒﻘﻣ ﻞﺧﺩﺃﻭ ﻥﻮﺤﻄﻤﻟﺍ ﻦﺒﻟﺍ ﺓﺮﺠﺣ ءﺎﻄﻏ
ﺔﻧﻮﺤﻄﻤﻟﺍ ﺓﻮﻬﻘﻟﺍ ﻂﻘﺴﺗ ﻰﺘﺣ ﻞﻔﺳﻷﻭ ﻰﻠﻋﻷ ﺾﺒﻘﻤﻟﺍ ﻙﺮﺣ
.(34 ﻞﻜﺸﻟﺍ) ﺔﻘﻟﺎﻌﻟﺍ
ﻦﻣ ﺕﺎﺒﺳﺮﺘﻟﺍ ﻞﻳﺰﻤﺑ ﺔﻨﻴﻛﺎﻤﻟﺍ ﻦﻣ ﺕﺎﺒﺳﺮﺘﻟﺍ ﺔﻟﺍﺯﺈﺑ ﻢﻗ
ﺐﻠﻄﺗ ﺎﻣﺪﻨﻋ ﺎﹱﻣﻭﺩ ﺔﻨﻴﻛﺎﻤﻟﺍ ﻦﻣ ﺕﺎﺒﺳﺮﺘﻟﺍ ﻝﺯﺃﻭ .ﺲﺒﻴﻠﻴﻓ
.ﻚﻟﺫ ﺔﻨﻴﻛﺎﻤﻟﺍ ﻚﻨﻣ
.ﺩﺍﺪﺴﻧﻻﺍ
.ﺏﻮﺒﻧﻷﺍ
ﻞﻜﺸﺑ AquaClean ﻩﺎﻴﻣ ﺮﺘﻠﻓ ﺩﺍﺪﻋﺇ ﻢﺘﻳ ﻢﻟ
.ﺐﻴﻛﺮﺘﻠﻟ ﺢﻴﺤﺻ
.ﺩﻭﺪﺴﻣ AquaClean ﻩﺎﻴﻣ ﺮﺘﻠﻓ
."ﺍﹰﺪﺟ ﺪﻴﺟ" ﺩﺍﺪﻋﻹﺍ ﻰﻠﻋ ﺔﻨﺤﻄﻤﻟﺍ ﻂﺒﺿ ﻢﺘﻳ
.ﺔﺨﺴﺘﻣ ﺮﻴﻀﺤﺘﻟﺍ ﺔﻋﻮﻤﺠﻣ
.ﺔﺨﺴﺘﻣ ﺓﻮﻬﻘﻟﺍ ﺐﺻ ﺔﻫﻮﻓ
.ﺓﺩﻭﺪﺴﻣ ﻥﻮﺤﻄﻤﻟﺍ ﻦﺒﻟﺍ ﺓﺮﺠﺣ
.ﺔﻴﺴﻠﻜﻟﺍ ﺕﺎﺒﺳﺮﺘﻟﺎﺑ ﺔﻨﻴﻛﺎﻤﻟﺍ ﺓﺮﺋﺍﺩ ﺮﻈﺣ ﻢﺘﻳ
.ءﻂﺒﺑ ﺝﺮﺨﺗ ﻭﺃ ﺝﺮﺨﺗ ﻻ ﺓﻮﻬﻘﻟﺍ
ﺭﺎﻃﺇ ﻲﻓ ﺢﻴﺤﺻ ﻞﻜﺸﺑ ﺐﻴﻠﺤﻟﺍ ﺔﻳﻭﺎﺣ ﺐﻴﻛﺮﺗ ﻦﻣ ﺪﻛﺄﺗ
ﺓﺩﺪﺤﻣ ﻉﺍﻮﻧﺃ) LatteGo ﻊﻴﻤﺠﺗ' ﺮﻈﻧﺍ) ("ﺓﺮﻘﻧ") LatteGo
.('(ﻂﻘﻓ
ﺖﺤﺗ ﻦﻳﺃﺰﺠﻟﺍ ﻼﻛ ﻒﻄﺷﺍﻭ LatteGo ﺯﺎﻬﺟ ﻚﻴﻜﻔﺘﺑ ﻢﻗ
.ﻥﻮﺤﺼﻟﺍ ﺔﻟﺎﺴﻏ ﻲﻓ ﺎﻤﻬﻔﻈﻧ ﻭﺃ ﺔﻴﻔﻨﺤﻟﺍ
ﺔﻘﻳﺮﻄﺑ ﻲﻜﻴﺳﻼﻜﻟﺍ ﺐﻴﻠﺤﻟﺍ ﺩﺎﺑﺯﺇ ﺯﺎﻬﺟ ﺐﻴﻛﺮﺗ ﻦﻣ ﺪﻛﺄﺗ
ﻉﺍﻮﻧﺃ) ﻲﻜﻴﺳﻼﻜﻟﺍ ﺐﻴﻠﺤﻟﺍ ﺩﺎﺑﺯﺇ ﺯﺎﻬﺟ ﻊﻴﻤﺠﺗ' ﺮﻈﻧﺍ) ﺔﺤﻴﺤﺻ
.('(ﻂﻘﻓ ﺓﺩﺪﺤﻣ
ﻦﻣ ﺔﻔﻠﺘﺨﻣ ﺕﺎﻴﻤﻛ ﺎﻬﻨﻋ ﺞﺘﻨﻳ ﺐﻴﻠﺤﻟﺍ ﻦﻣ ﺔﻔﻠﺘﺨﻣ ﻉﺍﻮﻧﺃ
ﻉﺍﻮﻧﺃ ﺭﺎﺒﺘﺧﺎﺑ ﺎﻨﻤﻗ ﺪﻘﻟ .ﺪﺑﺰﻠﻟ ﺔﻔﻠﺘﺨﻣ ﺺﺋﺎﺼﺧﻭ ﺪﺑﺰﻟﺍ
:ﺐﻴﻠﺤﻠﻟ ﺓﺪﻴﺟ ﺓﻮﻏﺭ ﻡﺪﻘﺗ ﺎﻬﻧﺃ ﺖﺘﺒﺛﺃ ﻲﺘﻟﺍ ﺔﻴﻟﺎﺘﻟﺍ ﺐﻴﻠﺤﻟﺍ
ﻦﻣ ﹴﻝﺎﺧ ﺐﻴﻠﺣﻭ ﻢﺳﺪﻟﺍ ﻞﻣﺎﻛ ﻭﺃ ﻢﺳﺪﻟﺍ ﻞﻴﻠﻗ ﺐﻴﻠﺣ
.ﺯﻮﺘﻛﻼﻟﺍ
ﺔﻳﻭﺎﺣ ﻊﻴﻤﺠﺗ ﻢﺗ :LatteGo ﺯﺎﻬﺟ ﺎﻬﺑ ﺕﺎﻨﻴﻛﺎﻣ
.ﺢﻴﺤﺻ ﺮﻴﻏ ﻞﻜﺸﺑ LatteGo
ﺐﻴﻠﺤﻟﺍ ﺔﻳﻭﺎﺣ :LatteGo ﺯﺎﻬﺟ ﺎﻬﺑ ﺕﺎﻨﻴﻛﺎﻣ
.ﻥﺎﺨﺴﺘﻣ LatteGo ﺯﺎﻬﺟ ﺭﺎﻃﺇ ﻭﺃ/ﻭ
ﻢﺗ :ﻲﻜﻴﺳﻼﻜﻟﺍ ﺐﻴﻠﺤﻟﺍ ﺩﺎﺑﺯﺇ ﺯﺎﻬﺟ ﺎﻬﺑ ﺕﺎﻨﻴﻛﺎﻣ
.ﺢﻴﺤﺻ ﺮﻴﻏ ﻞﻜﺸﺑ ﺐﻴﻠﺤﻟﺍ ﺩﺎﺑﺯﺇ ﺯﺎﻬﺟ ﻊﻴﻤﺠﺗ
.ﺩﺎﺑﺯﻺﻟ ﺐﺳﺎﻨﻣ ﺮﻴﻏ ﻡﺪﺨﺘﺴﻤﻟﺍ ﺐﻴﻠﺤﻟﺍ ﻉﻮﻧ
.ﺐﻴﻠﺤﻟﺍ ﺩﺎﺑﺯﺇ ﻢﺘﻳ ﻻ
Page 79
80
ﺔﻴﺑﺮﻌﻟﺍ
ﻞﺤﻟﺍ ﺐﺒﺴﻟﺍ ﺔﻠﻜﺸﻤﻟﺍ
ﻞﻔﺳﺃ ﺐﻴﻠﺤﻟﺍ ﺔﻳﻭﺎﺣ ﻦﻣ ﻱﻮﻠﻌﻟﺍ ءﺰﺠﻟﺍ ﺐﻴﻛﺮﺘﺑ ﹰﻻﻭﺃ ﻢﻗ
"ﺺﺼﺨﻤﻟﺍ ﻥﺎﻜﻤﻟﺍ" ﻰﻠﻋ ﻂﻐﺿﺍ ﻢﺛ .ﺭﺎﻃﻹﺍ ﻰﻠﻋﺃ ﻲﻓ ﻑﺎﻄﺨﻟﺍ
ﺖﺒﺜﺗ ﺎﻣﺪﻨﻋ ﺓﺮﻘﻧ ﻊﻤﺴﺗ .ﺐﻴﻠﺤﻟﺍ ﺔﻳﻭﺎﺣ ﻦﻣ ﻲﻠﻔﺴﻟﺍ ءﺰﺠﻠﻟ
.ﺎﻬﻧﺎﻜﻣ ﻲﻓ
ﻭﺃ ﺔﻴﻔﻨﺤﻟﺍ ﺖﺤﺗ ﻦﻳﺃﺰﺠﻟﺍ ﻼﻛ ﻒﻄﺷﺍﻭ LatteGo ﺔﻳﻭﺎﺣ ﻚﻜﻓ
.ﻥﻮﺤﺼﻟﺍ ﺔﻟﺎﺴﻏ ﻲﻓ ﺎﻤﻬﻔﻈﻧ
ﺮﺷﺆﻣ ءﻲﻀﻳ ﻥﺃ ﺩﺮﺠﻤﺑ ﻭﺃ ﺎﹱﻴﻣﻮﻳ ﻂﻴﻘﻨﺘﻟﺍ ﺔﻴﻨﻴﺻ ﻍﺍﺮﻓﺈﺑ ﻢﻗ
ءﺎﻄﻏ ﻝﻼﺧ ﻦﻣ ﺮﻤﺣﻷﺍ ﻥﻮﻠﻟﺎﺑ "ﺔﺌﻠﺘﻤﻣ ﻂﻴﻘﻨﺘﻟﺍ ﺔﻴﻨﻴﺻ"
ﻊﻤﺠﻟ ﺐﺼﻟﺍ ﺔﻫﻮﻓ ﺖﺤﺗ ﺎﹱﺑﻮﻛ ﻊﺿ :ﺔﺤﻴﺼﻧ .ﻂﻴﻘﻨﺘﻟﺍ ﺔﻴﻨﻴﺻ
.ﻂﻴﻘﻨﺘﻟﺍ ﺔﻴﻨﻴﺻ ﻲﻓ ءﺎﻤﻟﺍ ﺔﻴﻤﻛ ﻞﻴﻠﻘﺗﻭ ﻒﻄﺸﻟﺍ ﻩﺎﻴﻣ
ﺮﺷﺆﻣ ءﻲﻀﻳ ﻥﺃ ﺩﺮﺠﻤﺑ ﻭﺃ ﺎﹱﻴﻣﻮﻳ ﻂﻴﻘﻨﺘﻟﺍ ﺔﻴﻨﻴﺻ ﻍﺍﺮﻓﺈﺑ ﻢﻗ
ءﺎﻄﻏ ﻝﻼﺧ ﻦﻣ ﺮﻤﺣﻷﺍ ﻥﻮﻠﻟﺎﺑ "ﺔﺌﻠﺘﻤﻣ ﻂﻴﻘﻨﺘﻟﺍ ﺔﻴﻨﻴﺻ"
.ﻂﻴﻘﻨﺘﻟﺍ ﺔﻴﻨﻴﺻ
ﻪﺘﻟﺍﺯﺈﺑ ﻢﻗ :ﺢﻴﺤﺼﻟﺍ ﻪﻧﺎﻜﻣ ﻲﻓ ﻩﺎﻴﻤﻟﺍ ﻥﺍﺰﺧ ﻥﺃ ﻦﻣ ﺪﻛﺄﺗ
.ﺔﻨﻜﻤﻣ ﺔﻄﻘﻧ ﺪﻌﺑﺃ ﻰﻟﺇ ﻪﻌﻓﺩﺍﻭ ﻯﺮﺧﺃ ﺓﺮﻣ ﻪﺒﻴﻛﺮﺗﻭ
.ﺮﻴﻀﺤﺘﻟﺍ ﺔﻋﻮﻤﺠﻣ ﻒﻄﺷﺍ .ﺓﺩﻭﺪﺴﻣ/ﺔﺨﺴﺘﻣ ﺮﻴﻀﺤﺘﻟﺍ ﺔﻋﻮﻤﺠﻣ
ﺔﻴﻨﻴﺻ ﺯﻭﺎﺠﺗ ﻢﺘﻳ ﻻ ﺚﻴﺤﺑ ﻲﻘﻓﺃ ﺢﻄﺳ ﻰﻠﻋ ﺔﻨﻴﻛﺎﻤﻟﺍ ﻊﺿ
ﻞﻜﺸﺑ "ﺔﺌﻠﺘﻤﻣ ﻂﻴﻘﻨﺘﻟﺍ ﺔﻴﻨﻴﺻ" ﺮﺷﺆﻣ ﻞﻤﻌﻳﻭ ﻂﻴﻘﻨﺘﻟﺍ
.ﺢﻴﺤﺻ
ﻢﻗ ﻢﺛ ﹰﻻﻭﺃ ﻚﺑ ﺔﺻﺎﺨﻟﺍ ﺔﻨﻴﻛﺎﻤﻟﺍ ﻦﻣ ﺕﺎﺒﺳﺮﺘﻟﺍ ﺔﻟﺍﺯﺈﺑ ﻢﻗ
.AquaClean ﻩﺎﻴﻣ ﺢﺷﺮﻣ ﺐﻴﻛﺮﺘﺑ
ﻞﻜﺸﺑ ﺐﻴﻠﺤﻟﺍ ﺔﻳﻭﺎﺣﻭ ﺭﺎﻃﻹﺍ ﻊﻴﻤﺠﺗ ﻢﺘﻳ ﻻ
.ﺢﻴﺤﺻ
.ﻥﺎﺨﺴﺘﻣ LatteGo ﺭﺎﻃﺇ ﻭﺃ/ﻭ ﺐﻴﻠﺤﻟﺍ ﺔﻳﻭﺎﺣ
ﺔﻴﻠﺧﺍﺪﻟﺍ ﺓﺮﺋﺍﺪﻟﺍ ﻒﻄﺸﻟ ءﺎﻤﻟﺍ ﺔﻨﻴﻛﺎﻤﻟﺍ ﻡﺪﺨﺘﺴﺗ
ﻦﻣ ﻩﺎﻴﻤﻟﺍ ﻩﺬﻫ ﻖﻓﺪﺘﺗ .ﺮﻴﻀﺤﺘﻟﺍ ﺔﻋﻮﻤﺠﻣﻭ
ﺔﻴﻨﻴﺻ ﻲﻓ ﺓﺮﺷﺎﺒﻣ ﻲﻠﺧﺍﺪﻟﺍ ﻡﺎﻈﻨﻟﺍ ﻝﻼﺧ
.ﻲﻌﻴﺒﻃ ﺮﻣﺃ ﺍﺬﻫ .ﻂﻴﻘﻨﺘﻟﺍ
ﺎﻬﻠﻌﺠﻳ ﺎﻤﻣ ﺾﻴﻔﺗﻭ ﺍﹰﺪﺟ ﺔﺌﻠﺘﻤﻣ ﻂﻴﻘﻨﺘﻟﺍ ﺔﻴﻨﻴﺻ
.ﺏﺮﺴﺗ ﺔﻨﻴﻛﺎﻤﻟﺍ ﺖﻧﺎﻛ ﻮﻟ ﺎﻤﻛ ﻭﺪﺒﺗ
،ﻞﻣﺎﻛ ﻞﻜﺸﺑ ءﺎﻤﻟﺍ ﻥﺍﺰﺧ ﺐﻴﻛﺮﺗ ﻢﺘﻳ ﻢﻟ
ﻞﺧﺪﻳﻭ ءﺎﻤﻟﺍ ﻥﺍﺰﺧ ﺝﺭﺎﺧ ءﺎﻤﻟﺍ ﺾﻌﺑ ﺏﺮﺴﺘﻳﻭ
.ﺔﻨﻴﻛﺎﻤﻟﺍ ﻰﻟﺇ ءﺍﻮﻬﻟﺍ
.ﻲﻘﻓﺃ ﺢﻄﺳ ﻰﻠﻋ ﺔﻨﻴﻛﺎﻤﻟﺍ ﻊﺿﻭ ﻢﺘﻳ ﻻ
ﺖﻗﻮﻟﺍ ﻲﻓ ﻪﻟﺍﺪﺒﺘﺳﺍ ﻭﺃ ﺮﺘﻠﻔﻟﺍ ﺐﻴﻛﺮﺗ ﻢﺘﻳ ﻢﻟ
ﺮﻴﻛﺬﺘﻟﺍ ﺔﻟﺎﺳﺮﻟ ﺔﺷﺎﺸﻟﺍ ﺽﺮﻋ ﺪﻌﺑ ﺐﺳﺎﻨﻤﻟﺍ
ﻥﺃ ﻲﻨﻌﻳ ﺍﺬﻫﻭ .AquaClean ﺮﺘﻠﻓ ﻝﺍﺪﺒﺘﺳﺎﺑ
.ﺕﺎﺒﺳﺮﺘﻟﺍ ﻦﻣ ﺎﹱﻣﺎﻤﺗ ﺔﻴﻟﺎﺧ ﺖﺴﻴﻟ ﺔﻨﻴﻛﺎﻤﻟﺍ
ﺐﻴﻠﺣ ﺔﻳﻭﺎﺣ ﻉﺎﻗ ﻦﻣ ﺐﻴﻠﺤﻟﺍ ﺏﺮﺴﺘﻳ
.LatteGo
.ﺔﻨﻴﻛﺎﻤﻟﺎﺑ ﺐﻳﺮﺴﺗ ﺩﻮﺟﻭ ﺮﻬﻈﻳ
ﻩﺎﻴﻣ ﺮﺘﻠﻓ ﻞﻴﻌﻔﺗ ﻲﻨﻨﻜﻤﻳ ﻻ
ﺔﻟﺍﺯﺇ ﺔﻨﻴﻛﺎﻤﻟﺍ ﺐﻠﻄﺗﻭ AquaClean
.ﺕﺎﺒﺳﺮﺘﻟﺍ
ﺮﺘﻠﻔﻟﺍ ﻮﻫ Philips ﻦﻣ AquaClean ءﺎﻤﻟﺍ ﺮﺘﻠﻓ ﻂﻘﻓ
.ﺔﻨﻴﻛﺎﻤﻠﻟ ﻢﺋﻼﻤﻟﺍ
ﻲﻓ AquaClean ﻩﺎﻴﻣ ﺮﺘﻠﻓ ﻲﻓ ﺔﻴﻃﺎﻄﻤﻟﺍ ﺔﻘﻠﺤﻟﺍ ﻊﺿ
.ﺢﻴﺤﺼﻟﺍ ﺎﻬﻧﺎﻜﻣ
ﻢﻗ ،ءﺎﺿﻮﻀﻟﺍ ﻦﻣ ﻒﻠﺘﺨﻣ ﻉﻮﻧ ﺭﺍﺪﺻﺈﺑ ﺔﻨﻴﻛﺎﻤﻟﺍ ﺕﺃﺪﺑ ﺍﺫﺇ
ﺔﻋﻮﻤﺠﻣ ﺖﻴﻳﺰﺗ' ﺮﻈﻧﺍ) ﺎﻬﺘﻴﻳﺰﺗﻭ ﺮﻴﻀﺤﺘﻟﺍ ﺔﻋﻮﻤﺠﻣ ﻒﻴﻈﻨﺘﺑ
.('ﺮﻴﻀﺤﺘﻟﺍ
ﻢﻗﻭ ﻩﺎﻴﻤﻟﺍ ﻥﺍﺰﺧ ﻦﻣ AquaClean ﻩﺎﻴﻣ ﺮﺘﻠﻓ ﺔﻟﺍﺯﺈﺑ ﻢﻗ
.ﻯﺮﺧﺃ ﺓﺮﻣ ﻪﻌﺿﻭ ﻞﺒﻗ ﻡﺍﺪﺨﺘﺳﻼﻟ ﺢﻴﺤﺻ ﻞﻜﺸﺑ ﻩﺩﺍﺪﻋﺈﺑ
ﻰﻠﻋ ﻝﻮﺼﺤﻠﻟ "AquaClean ﻩﺎﻴﻣ ﺮﺘﻠﻓ" ﻞﺼﻔﻟﺍ ﻊﺟﺍﺭ
.ﺓﻮﻄﺨﺑ ﺓﻮﻄﺧ ﺕﺍﺩﺎﺷﺭﻹﺍ
ﻪﺘﻟﺍﺯﺈﺑ ﻢﻗ :ﺢﻴﺤﺼﻟﺍ ﻪﻧﺎﻜﻣ ﻲﻓ ﻩﺎﻴﻤﻟﺍ ﻥﺍﺰﺧ ﻥﺃ ﻦﻣ ﺪﻛﺄﺗ
.ﺔﻨﻜﻤﻣ ﺔﻄﻘﻧ ﺪﻌﺑﺃ ﻰﻟﺇ ﻪﻌﻓﺩﺍﻭ ﻯﺮﺧﺃ ﺓﺮﻣ ﻪﺒﻴﻛﺮﺗﻭ
ءﺎﻤﻟﺍ ﺮﺘﻠﻓ ﺮﻴﻏ ﺮﺧﺁ ﺮﺘﻠﻓ ﺐﻴﻛﺮﺗ ﻝﻭﺎﺤﺗ ﺖﻧﺃ
.Philips ﻦﻣ AquaClean
AquaClean ﻩﺎﻴﻣ ﺮﺘﻠﻓ ﻲﻓ ﺔﻴﻃﺎﻄﻤﻟﺍ ﺔﻘﻠﺤﻟﺍ
.ﺢﻴﺤﺼﻟﺍ ﺎﻬﻧﺎﻜﻣ ﻲﻓ ﺖﺴﻴﻟ
ءﺎﺿﻮﻀﻟﺍ ﺾﻌﺑ ﺔﻨﻴﻛﺎﻤﻟﺍ ﺭﺪﺼﺗ ﻥﺃ ﻲﻌﻴﺒﻄﻟﺍ ﻦﻣ
.ﻡﺍﺪﺨﺘﺳﻻﺍ ءﺎﻨﺛﺃ
ﻞﻜﺸﺑ AquaClean ﻩﺎﻴﻣ ﺮﺘﻠﻓ ﺩﺍﺪﻋﺇ ﻢﺘﻳ ﻢﻟ
.ﺔﻨﻴﻛﺎﻤﻟﺍ ﻲﻓ ءﺍﻮﻬﻟﺍ ﺐﺤﺳ ﻥﻵﺍ ﻢﺘﻳﻭ ﺢﻴﺤﺻ
ﺐﺤﺳ ﻢﺘﻳﻭ ﻞﻣﺎﻜﻟﺎﺑ ﻩﺎﻴﻤﻟﺍ ﻥﺍﺰﺧ ﺐﻴﻛﺮﺗ ﻢﺘﻳ ﻢﻟ
.ﺔﻨﻴﻛﺎﻤﻟﺍ ﻰﻟﺇ ءﺍﻮﻬﻟﺍ
.ﻡءﻼﻣ ﺮﻴﻏ ﺪﻳﺪﺠﻟﺍ ﻩﺎﻴﻤﻟﺍ ﺮﺘﻠﻓ
.ﻲﻟﺎﻋ ﺕﻮﺼﺑ ءﺎﺿﻮﺿ ﺔﻨﻴﻛﺎﻤﻟﺍ ﺭﺪﺼﺗ
Page 80
ﺔﻴﺑﺮﻌﻟﺍ
ﺔﻴﺑﺮﻌﻟﺍ
ﺔﻴﻨﻔﻟﺍ ﺕﺎﻔﺻﺍﻮﻤﻟﺍ
.ﺔﻴﺒﻳﺮﻘﺗ ﺎﹱﻘﺒﺴﻣ ﺓﺩﺪﺤﻤﻟﺍ ﺕﺎﻴﻤﻜﻟﺍ ﻊﻴﻤﺟ .ﺞﺘﻨﻤﻠﻟ ﺔﻴﻨﻔﻟﺍ ﺕﺎﻔﺻﺍﻮﻤﻟﺍ ﻦﻴﺴﺤﺗ ﻲﻓ ﻖﺤﻟﺎﺑ ﺔﻌﻨﺼﻤﻟﺍ ﺔﻛﺮﺸﻟﺍ ﻆﻔﺘﺤﺗ
ﺔﻤﻴﻘﻟﺍ ﻒﺻﻮﻟﺍ
ﻢﻠﻣ 434 × 377 × 246 (ﻖﻤﻌﻟﺍ × ﻉﺎﻔﺗﺭﻻﺍ × ﺽﺮﻌﻟﺍ) ﻢﺠﺤﻟﺍ
ﻢﺠﻛ 7.5 - 7 ﻥﺯﻮﻟﺍ
ﻢﻠﻣ 1200 ﺔﻗﺎﻄﻟﺍ ﻚﻠﺳ ﻝﻮﻃ
ﺮﺘﻟ 1.8 ﻩﺎﻴﻣ ﻥﺍﺰﺧ
ﻢﺟ 275 ﺓﻮﻬﻘﻟﺍ ﺏﻮﺒﺣ ﻊﻤﻗ ﺔﻌﺳ
ﺓﺮﻛ 12 ﺓﻮﻬﻘﻟﺍ ﺐﺳﺍﻭﺭ ﺔﻳﻭﺎﺣ ﺔﻌﺳ
ﻞﻣ 250 (ﺐﻴﻠﺤﻟﺍ ﺔﻳﻭﺎﺣ) LatteGo ﺯﺎﻬﺟ ﺔﻌﺳ
ﻢﻠﻣ 88-145 ﻞﻳﺪﻌﺘﻠﻟ ﻞﺑﺎﻘﻟﺍ ﺔﻫﻮﻔﻟﺍ ﻉﺎﻔﺗﺭﺍ
(11ﺃ ﻞﻜﺸﻟﺍ) ﺔﻣﺪﺨﻟﺍ ﺏﺎﺑ ﻞﺧﺍﺩ ﺩﻮﺟﻮﻤﻟﺍ ﺕﺎﻧﺎﻴﺒﻟﺍ ﻖﺼﻠﻣ ﻊﺟﺍﺭ ﺔﻗﺎﻄﻟﺍ ﺭﺪﺼﻣ - ﺔﻴﻠﻴﻐﺸﺘﻟﺍ ﺓﺭﺪﻘﻟﺍ - ﺔﻴﻠﻴﻐﺸﺘﻟﺍ ﺔﻴﺘﻟﻮﻔﻟﺍ
81
Page 81
ﯽﺳﺭﺎﻓ
82
ﺐﻟﺎﻄﻣ ﺖﺳﺮﻬﻓ
82 ______________________________________________________________________________ (A ﻞﮑﺷ) ﻩﺎﮕﺘﺳﺩ ﯽﻠﮐ ﯼﺎﻤﻧ
83 ___________________________________________________________________________________________ ﻝﺮﺘﻨﮐ ﻞﻧﺎﭘ
83 _____________________________________________________________________________________________ ﯽﻓﺮﻌﻣ
84 ____________________________________________________________________________________ﻩﺩﺎﻔﺘﺳﺍ ﻦﯿﻟﻭﺍ ﺯﺍ ﻞﺒﻗ
85 ___________________________________________________________________________________ ﺎﻫﯽﻧﺪﯿﺷﻮﻧ ﻥﺩﺮﮐ ﻡﺩ
87 ________________________________________________________________________________ﺎﻫﯽﻧﺪﯿﺷﻮﻧ ﯼﺯﺎﺳﯽﺼﺨﺷ
88 __________________________________________________________________________________ ﻩﺎﮕﺘﺳﺩ ﺕﺎﻤﯿﻈﻨﺗ ﻡﺎﺠﻧﺍ
89 ___________________________________________________________________ ﻥﺩﺮﮐﻡﺩ ﻪﻋﻮﻤﺠﻣ ﻦﺘﺧﺍﺪﻧﺍ ﺎﺟ ﻭ ﻥﺩﺭﻭﺁ ﻥﻭﺮﯿﺑ
90 _________________________________________________________________________ﻩﺎﮕﺘﺳﺩ ﻥﺩﺮﮐ ﺲﯾﻭﺮﺳ ﻭ ﻥﺩﺮﮐ ﺰﯿﻤﺗ
92 __________________________________________________________________________________ AquaClean ﺏﺁ ﺮﺘﻠﯿﻓ
93 ____________________________________________________________________________ (ﻪﻘﯿﻗﺩ 30) ﯽﯾﺍﺩﺯﺏﻮﺳﺭ ﺪﻨﯾﻻﺮﻓ
94 ____________________________________________________________________________________ ﯽﺒﻧﺎﺟ ﻡﺯﺍﻮﻟ ﺵﺭﺎﻔﺳ
94 ____________________________________________________________________________________________ ﯽﺑﺎﯾ ﺐﯿﻋ
100 ________________________________________________________________________________________ﯽﻨﻓ ﺕﺎﺼﺨﺸﻣ
(A ﻞﮑﺷ) ﻩﺎﮕﺘﺳﺩ ﯽﻠﮐ ﯼﺎﻤﻧ
ﺲﯾﻭﺮﺳ ﺏﺭﺩ A10 ﻝﺮﺘﻨﮐ ﻞﻧﺎﭘ A1
ﻉﻮﻧ ﻩﺭﺎﻤﺷ ﻩﺍﺮﻤﻫ ﻪﺑ ﺕﺎﻋﻼﻃﺍ ﺐﺴﭼﺮﺑ A11 ﯽﻧﺍﻮﯿﻟﺎﺟ A2
ﺏﺁ ﻥﺰﺨﻣ A12 ﻩﺪﺷ ﺏﺎﯿﺳﺁ-ﺶﯿﭘ ﻩﻮﻬﻗ ﻪﻈﻔﺤﻣ A3
ﻍﺍﺩ ﺏﺁ ﻪﭽﯾﺭﺩ A13 ﻩﻮﻬﻗ ﻪﻧﺍﺩ ﻒﯿﻗ ﺏﺭﺩ A4
ﻩﻮﻬﻗ ﻪﻟﺎﻔﺗ ﻑﺮﻇ A14 ﻢﯿﻈﻨﺗ ﻞﺑﺎﻗ ﻩﻮﻬﻗ ﻪﭽﯾﺭﺩ A5
ﻩﻮﻬﻗ ﻪﻟﺎﻔﺗ ﻑﺮﻇ ﯽﯾﻮﻠﺟ ﺏﺎﻗ A15 ﻕﺮﺑ ﻢﯿﺳ ﺖﮐﻮﺳ A6
ﻥﺎﺠﻨﻓ ﯽﻨﯿﺳ ﺵﻮﭘﺭﺩ A16 ﺏﺎﯿﺳﺁ ﻢﯿﻈﻨﺗ ﻩﺮﯿﮕﺘﺳﺩ A7
ﻥﺎﺠﻨﻓ ﯽﻨﯿﺳ A17 ﻩﻮﻬﻗ ﻪﻧﺍﺩ ﻒﯿﻗ A8
'ﻩﻮﻬﻗ ﻥﺎﺠﻨﻓ ﻥﺪﺷ ﺮﭘ' ﺮﮕﻧﺎﺸﻧ A18 ﻥﺩﺮﮐﻡﺩ ﻪﻋﻮﻤﺠﻣ A9
ﯽﺒﻧﺎﺟ ﻡﺯﺍﻮﻟ
ﺏﺁ ﯽﺘﺨﺳ ﺖﺴﺗ ﺭﺍﻮﻧ A23 ﻕﺮﺑ ﻢﯿﺳ A19
(ﺹﺎﺧ ﯼﺎﻫﻝﺪﻣ ﯽﺧﺮﺑ ﺭﺩ ﺎﻬﻨﺗ) ﮏﯿﺳﻼﮐ ﺯﺎﺳﺮﯿﺷﻒﮐ A24 ﺲﯾﺮﮔ ﺏﻮﯿﺗ A20
(ﺹﺎﺧ ﯼﺎﻫﻝﺪﻣ ﯽﺧﺮﺑ ﺭﺩ ﺎﻬﻨﺗ) (ﺮﯿﺷ ﻑﺮﻇ) LatteGo A25 AquaClean ﺏﺁ ﺮﺘﻠﯿﻓ A21
ﯼﺮﯿﮔﻩﺯﺍﺪﻧﺍ ﮏﻘﺷﺎﻗ A22
Page 82
ﯽﺳﺭﺎﻓ
83
ﻝﺮﺘﻨﮐ ﻞﻧﺎﭘ
ﺩﻮﺧ ﻪﺑ ﺹﻮﺼﺨﻣ ﻉﻮﻧ ﻩﺭﺎﻤﺷ ﯼﺍﺭﺍﺩ ﻉﻮﻧ ﺮﻫ .ﺪﻨﺘﺴﻫ ﯽﺗﻭﺎﻔﺘﻣ ﯼﺎﻫﻝﺮﺘﻨﮐ ﻞﻧﺎﭘ ﯼﺍﺭﺍﺩ ﻪﮐ ﺩﺭﺍﺩ ﺩﻮﺟﻭ ﺯﺎﺳﻮﺳﺮﭙﺳﺍ ﻩﺎﮕﺘﺳﺩ ﻦﯾﺍ ﺯﺍ ﯽﻔﻠﺘﺨﻣ ﻉﺍﻮﻧﺍ
ﺍﺭ ﻉﻮﻧ ﻩﺭﺎﻤﺷ .ﺪﯿﻨﮐ ﻩﺪﻫﺎﺸﻣ (A11 ﻞﮑﺷ) ﺲﯾﻭﺮﺳ ﺏﺭﺩ ﯽﻠﺧﺍﺩ ﺢﻄﺳ ﻪﺑ ﻩﺪﺷ ﻕﺎﺼﻟﺍ ﺕﺎﻋﻼﻃﺍ ﺐﺴﭼﺮﺑ ﯼﻭﺭ ﺪﯿﻧﺍﻮﺗﯽﻣ ﺍﺭ ﻉﻮﻧ ﻩﺭﺎﻤﺷ .ﺪﺷﺎﺑﯽﻣ
.ﺪﯿﻨﮐ ﻩﺪﻫﺎﺸﻣ ﺰﯿﻧ 'ﯽﻧﺎﺒﯿﺘﺸﭘ' ﻪﻨﯾﺰﮔ ﺏﺎﺨﺘﻧﺍ ﻭ
.ﺪﯿﻨﮐ ﻩﺪﻫﺎﺸﻣ ﺍﺭ ﺕﺎﺤﯿﺿﻮﺗ ﺪﯿﻧﺍﻮﺗﯽﻣ ﺮﯾﺯ ﺭﺩ .ﺪﯿﻨﮐ ﻪﻌﺟﺍﺮﻣ E ﻭ C، D ﯼﺎﻫﻞﮑﺷ ﻪﺑ ﺎﻫﻦﮑﯾﺁ ﻭ ﺎﻫﻪﻤﮐﺩ ﻪﻤﻫ ﯽﻠﮐ ﯼﺎﻤﻧ ﻩﺪﻫﺎﺸﻣ ﯼﺍﺮﺑ
ﺎﯾ ﺏﺎﺨﺘﻧﺍ ﺍﺭ ﻥﺎﺗﺮﻈﻧﺩﺭﻮﻣ ﻪﻨﯾﺰﮔ (OK) ﺪﯿﯾﺄﺗ ﻦﮑﯾﺁ ﻥﺩﺮﺸﻓ ﺎﺑ ﻭ ﺪﯿﻨﮐ ﻩﺩﺎﻔﺘﺳﺍ ﻦﯿﯾﺎﭘ ﻭ ﻻﺎﺑ ﯼﺎﻫﻪﻤﮐﺩ ﺯﺍ ﺪﯿﻧﺍﻮﺗﯽﻣ ﺮﮕﺸﯾﺎﻤﻧ ﺭﺩ ﺎﻫﻮﻨﻣ ﻦﯿﺑ ﯽﯾﺎﺠﺑﺎﺟ ﯼﺍﺮﺑ
ﯼﺭﺎﮐﺰﯿﻤﺗ ﯼﻮﻨﻣ .C6 ،ﻦﯿﯾﺎﭘ ،ﻻﺎﺑ) ﯽﺑﺎﯾﺮﯿﺴﻣ ﯼﺎﻫﻦﮑﯾﺁ .C3
(ﺪﯿﯾﺄﺗ ،ﺖﺸﮔﺯﺎﺑ
ﯽﺼﺨﺷ ﯼﺎﻫﻞﯾﺎﻓﻭﺮﭘ .C7 ﺮﮕﺸﯾﺎﻤﻧ .C4 ﻪﻤﮐﺩ ﻒﻗﻮﺗ/ﻉﻭﺮﺷ .C2
ﺵﻮﻣﺎﺧ/ﻦﺷﻭﺭ ﻪﻤﮐﺩ .C8 ﻩﺎﮕﺘﺳﺩ ﺕﺎﻤﯿﻈﻨﺗ .C5 ﺮﺘﺸﯿﺑ ﯼﺎﻫﯽﻧﺪﯿﺷﻮﻧ ﻪﺑ ﻁﻮﺑﺮﻣ ﯼﻮﻨﻣ D2/E2
(C ﻞﮑﺷ) EP4327، EP4324، EP4321 ﯼﺎﻫﻝﺪﻣ ﻂﻘﻓ
ﺭﺎﺨﺑ ﻭ ﻍﺍﺩ ﺏﺁ ،ﻮﺗﺮﺘﺴﯾﺭ ،ﻡﺮﮐ ﻪﻓﺎﮐ ،ﻮﻧﺎﮑﯾﺮﻣﺍ ،هﻮﻬﻗ ،ﻮﺳﺮﭙﺳﺍ :ﯽﺴﻤﻟﮏﺗ ﻥﺪﯿﺷﻮﻧ ﯼﺎﻫﻦﮑﯾﺁ C1
ﻦﮑﯾﺁ ﯼﻭﺭ ﺮﺑ ﻥﺩﺯ ﻪﺑﺮﺿ ﺎﺑ ﺪﯿﻧﺍﻮﺗﯽﻣ
.ﺪﯿﻨﮐ ﺪﯿﯾﺄﺗ
(C/D/E ﻞﮑﺷ) ﻉﺍﻮﻧﺍ ﻪﻤﻫ
ﯽﺴﻤﻟﮏﺗ ﻥﺪﯿﺷﻮﻧ ﯼﺎﻫﻦﮑﯾﺁ C1/D1/E1
ﯽﺳﺭﺎﻓ
(D ﻞﮑﺷ) EP4341 ﻭ EP4349، EP4346، EP4343 ﯼﺎﻫﻝﺪﻣ ﻂﻘﻓ
ﻪﻟ ﻭﺍ ﻪﻓﺎﮐ ،ﻮﺗﺎﯿﮐﺎﻣ ﻪﺗﻻ ،ﻮﻨﯿﭼﻮﭘﺎﮐ ،ﻮﻧﺎﮑﯾﺮﻣﺍ ،هﻮﻬﻗ ،ﻮﺳﺮﭙﺳﺍ :ﯽﺴﻤﻟﮏﺗ ﻥﺪﯿﺷﻮﻧ ﯼﺎﻫﻦﮑﯾﺁ D1
(E ﻞﮑﺷ) EP5441 ﻭ EP5447, EP5446, EP5444, EP5443 ﯼﺎﻫﻝﺪﻣ ﺭﺩ ﺎﻬﻨﺗ
ﻪﻟ ﻭﺍ ﻪﻓﺎﮐ ،ﻮﺗﺎﯿﮐﺎﻣ ﻪﺗﻻ ،ﻮﻨﯿﭼﻮﭘﺎﮐ ،ﻮﻧﺎﮑﯾﺮﻣﺍ ،هﻮﻬﻗ ،ﻮﺳﺮﭙﺳﺍ :ﯽﺴﻤﻟﮏﺗ ﻥﺪﯿﺷﻮﻧ ﯼﺎﻫﻦﮑﯾﺁ E1
ﯽﻓﺮﻌﻣ
ﺍﺭ ﺩﻮﺧ ﻝﻮﺼﺤﻣ ،Philips ﺵﻭﺮﻓ ﺯﺍ ﺲﭘ ﺕﺎﻣﺪﺧ ﺯﺍ ﻪﻨﯿﻬﺑ ﻩﺩﺎﻔﺘﺳﺍ ﯼﺍﺮﺑ !ﻢﯿﻨﮐﯽﻣ ﺽﺮﻋ ﮏﯾﺮﺒﺗ Philips ﮏﯿﺗﺎﻣﻮﺗﺍ ﻡﺎﻤﺗ ﺯﺎﺳﻩﻮﻬﻗ ﻩﺎﮕﺘﺳﺩ ﺪﯾﺮﺧ ﺖﺑﺎﺑ
.ﺪﯿﻨﮐ ﺖﺒﺛ ﻪﭽﺑﺎﺘﮐ ﻦﯾﺍ ﺭﺩ (1 ﺮﯾﻮﺼﺗ) QR ﺪﮐ ﻥﺩﺮﮐ ﻦﮑﺳﺍ ﻖﯾﺮﻃ ﺯﺍ ﺎﯾ www.philips.com/registeryourcoffee ﺖﯾﺎﺳﺏﻭ ﺭﺩ
ﯽﻠﺤﻣ ﺭﺩ ﯼﺪﻌﺑ ﺕﺎﻋﺎﺟﺭﺍ ﺖﻬﺟ ﻭ ﺪﯿﻨﮐ ﻪﻌﻟﺎﻄﻣ ﺍﺭ ﻥﺁ ﻩﺍﺮﻤﻫ ﻪﺑ ﻩﺪﺷ ﻪﺋﺍﺭﺍ ﻪﻧﺎﮔﺍﺪﺟ ﯽﻨﻤﯾﺍ ﯽﭽﺑﺎﺘﮐ ،ﺪﯿﻨﮐ ﻩﺩﺎﻔﺘﺳﺍ ﻩﺎﮕﺘﺳﺩ ﺯﺍ ﺭﺎﺑ ﻦﯿﺘﺴﺨﻧ ﻪﮑﻨﯾﺍ ﺯﺍ ﻞﺒﻗ
.ﺪﯾﺭﺍﺩ ﻪﮕﻧ ﺐﺳﺎﻨﻣ
ﻪﺋﺍﺭﺍ ﯽﻧﺎﺒﯿﺘﺸﭘ ﺕﺎﻣﺪﺧ ﻒﻠﺘﺨﻣ ﯼﺎﻫﺵﻭﺭ ﻪﺑ Philips ،ﻦﮑﻤﻣ ﻞﮑﺷ ﻦﯾﺮﺘﻬﺑ ﻪﺑ ﻥﺁ ﺯﺍ ﻩﺩﺎﻔﺘﺳﺍ ﻭ ﻩﺎﮕﺘﺳﺩ ﺎﺑ ﺭﺎﮐ ﻉﻭﺮﺷ ﺖﻬﺟ ﮏﻤﮐ ﺖﻓﺎﯾﺭﺩ ﯼﺍﺮﺑ
:ﻪﺒﻌﺟ ﺕﺎﯾﻮﺘﺤﻣ .ﺪﻫﺩﯽﻣ
ﺰﯿﻧ «ﯽﻧﺎﺒﯿﺘﺸﭘ» ﻪﻨﯾﺰﮔ ﺏﺎﺨﺘﻧﺍ ﻭ
ﻦﯾﺍ ﺎﺑ .ﺪﺷﺎﺑ ﻩﺪﻧﺎﻣ ﯽﻗﺎﺑ ﻥﺁ ﻥﻭﺭﺩ ﻩﻮﻬﻗ ﯼﺭﺍﺪﻘﻣ ﺖﺳﺍ ﻦﮑﻤﻣ ﺎﻣﺍ ﺖﺳﺍ ﻩﺪﺷ ﺰﯿﻤﺗ ﺖﻗﺩ ﻪﺑ ﻩﺎﮕﺘﺳﺩ ﺪﻨﭼ ﺮﻫ .ﺖﺳﺍ ﻩﺪﺷ ﺖﺴﺗ ﻩﻮﻬﻗ ﺎﺑ ﻩﺎﮕﺘﺳﺩ ﻦﯾﺍ
ﻩﺎﮕﺘﺳﺩ ﻪﮑﻨﯾﺍ ﯼﺍﺮﺑ .ﺪﻨﮐﯽﻣ ﻢﯿﻈﻨﺗ ﺩﻮﺷﯽﻣ ﻩﺩﺎﻔﺘﺳﺍ ﻢﻌﻃ ﻦﯾﺮﺘﻬﺑ ﺎﺑ ﯽﻧﺪﯿﺷﻮﻧ ﻪﯿﻬﺗ ﯼﺍﺮﺑ ﻪﮐ ﺍﺭ ﻩﺪﺷ ﺏﺎﯿﺳﺁ ﻩﻮﻬﻗ ﺭﺍﺪﻘﻣ ﺭﺎﮐﺩﻮﺧ ﺭﻮﻃ ﻪﺑ ﻩﺎﮕﺘﺳﺩ
ﺕﺎﻤﯿﻈﻨﺗ ﻦﮑﯾﺁ ﯼﻭﺭ ﺮﺑ ﻥﺩﺯ ﻪﺑﺮﺿ ﺎﺑ ﺪﯿﻧﺍﻮﺗﯽﻣ ﺍﺭ QR ﺪﮐ .ﺪﯿﻨﮐ ﺪﯾﺩﺯﺎﺑ www.philips.com/coffee-care
.ﺪﯿﻨﮐ ﻩﺪﻫﺎﺸﻣ
.ﺖﺳﺍ ﻮﻧ ًﻼﻣﺎﮐ ﻩﺎﮕﺘﺳﺩ ﻪﮐ ﻢﯿﻨﮐﯽﻣ ﻦﯿﻤﻀﺗ ،ﻝﺎﺣ
.ﺪﯿﻨﮐ ﻡﺩ ﻩﻮﻬﻗ ﺭﺎﺑ 5 ﺮﻣﺍ ﻭﺪﺑ ﺭﺩ ﺖﺴﯾﺎﺑﯽﻣ ﺪﻫﺩ ﻡﺎﺠﻧﺍ ﺍﺭ ﺩﻮﺧ ﯽﻤﯿﻈﻨﺗﺩﻮﺧ ﻞﺣﺍﺮﻣ
1.ﯼﺭﺍﺪﻬﮕﻧ ﻭ ﺲﯾﻭﺮﺳ ﻭ ﯼﺭﺎﮐﺰﯿﻤﺗ ﻩﺭﺎﺑﺭﺩ ﺮﺗﻞﻣﺎﮐ ﺕﺎﻋﻼﻃﺍ ﻭ ﯼﺮﯾﻮﺼﺗ ﻩﺩﺎﻔﺘﺳﺍ ﯼﺎﻫﻞﻤﻌﻟﺍﺭﻮﺘﺳﺩ ﺎﺑ ﯼﺭﺎﺟ ﯼﺮﺑﺭﺎﮐ ﯼﺎﻤﻨﻫﺍﺭ ﻪﭼﺮﺘﻓﺩ
2 .ﺮﺗﻦﻤﯾﺍ ﯼﺍﻩﻮﯿﺷ ﻪﺑ ﻩﺎﮕﺘﺳﺩ ﺎﺑ ﺭﺎﮐ ﻩﻮﺤﻧ ﯼﺎﻫﻞﻤﻌﻟﺍﺭﻮﺘﺳﺩ ﺎﺑ ﻪﻧﺎﮔﺍﺪﺟ ﯽﻨﻤﯾﺍ ﻪﭽﺑﺎﺘﮐ
3ﺖﯾﺎﺳﺏﻭ ﺯﺍ ﺎﯾ ﺪﯿﻨﮐ ﻦﮑﺳﺍ ﺍﺭ ﻪﭽﺑﺎﺘﮐ ﻦﯾﺍ ﺪﻠﺟ ﯼﻭﺭ QR ﺪﮐ ،(ﻪﺑﺎﺸﻣ ﺩﺭﺍﻮﻣ ﻭ ﺎﻫﻢﻠﯿﻓ ،ﻝﻭﺍﺪﺘﻣ ﺕﻻﺍﺆﺳ) ﻦﯾﻼﻧﺁ ﯽﻧﺎﺒﯿﺘﺸﭘ ﺖﻓﺎﯾﺭﺩ ﺖﻬﺟ
Page 83
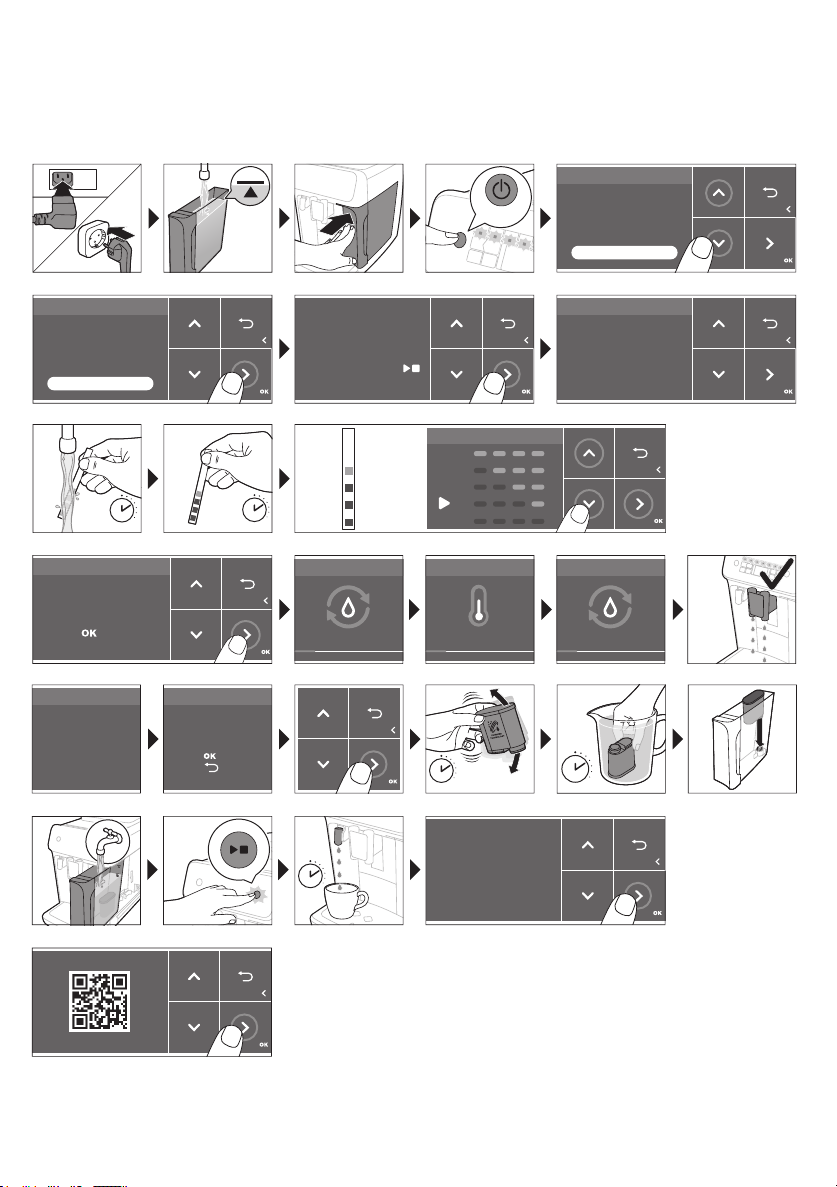
84
ON
,WDOLDQR
1HGHUODQGV
(QJOLVK
(VSD³RO
/DQJXDJH
:DWHUKDUGQHVV
,WDOLDQR
1HGHUODQGV
(QJOLVK
(VSD³RO
/DQJXDJH
)ROORZWKHQH[WVWHSV
WRVHWWKHFRUUHFW
ZDWHUKDUGQHVVOHYHO
<RXDUHDERXW
WRVHWWKHODQJXDJH
WR(QJOLVK
3UHVVVWDUWVWRS
WRFRQILUP
:DWHUKDUGQHVV
<RXVHOHFWHG
UHGVTXDUHV
3UHVVWRFRQILUP
+HDWLQJXS
+HDWLQJ
5LQVLQJ
5LQVLQJ
)LOOLQJZDWHUFLUFXLW
)LOOLQJ
=
:DWHUKDUGQHVV
1 sec.
1 min.
5 sec.
30 sec.
1 min.
$TXD&OHDQ
8VH$TXD&OHDQILOWHU
WRHQMR\FXSV
ZLWKRXWGHVFDOLQJ
$OPRVWUHDG\
)LOOEHDQVUHILOOZDWHU
WDQNDQGHQMR\
\RXUFRIIHH
5HJLVWHU\RXUSURGXFW
9LVLWZZZSKLOLSVFRP
$TXD&OHDQ
:RXOG\RXLQVWDOO
DQ$TXD&OHDQILOWHU"
3UHVVWRFRQILUP
3UHVVWRUHIXVH
ﯽﺳﺭﺎﻓ
.ﺪﯿﯾﻮﺸﺑ ﺍﺭ ﺎﻬﻧﺁ ﺎﻤﺘﺣ ﮏﯿﺳﻼﮐ ﺯﺎﺳﺮﯿﺷﻒﮐ ﻭ (ﺮﯿﺷ ﻑﺮﻇ) LatteGo ﻩﺩﺎﻔﺘﺳﺍ ﺯﺍ ﻞﺒﻗ
ﻩﺩﺎﻔﺘﺳﺍ ﻦﯿﻟﻭﺍ ﺯﺍ ﻞﺒﻗ
Page 84
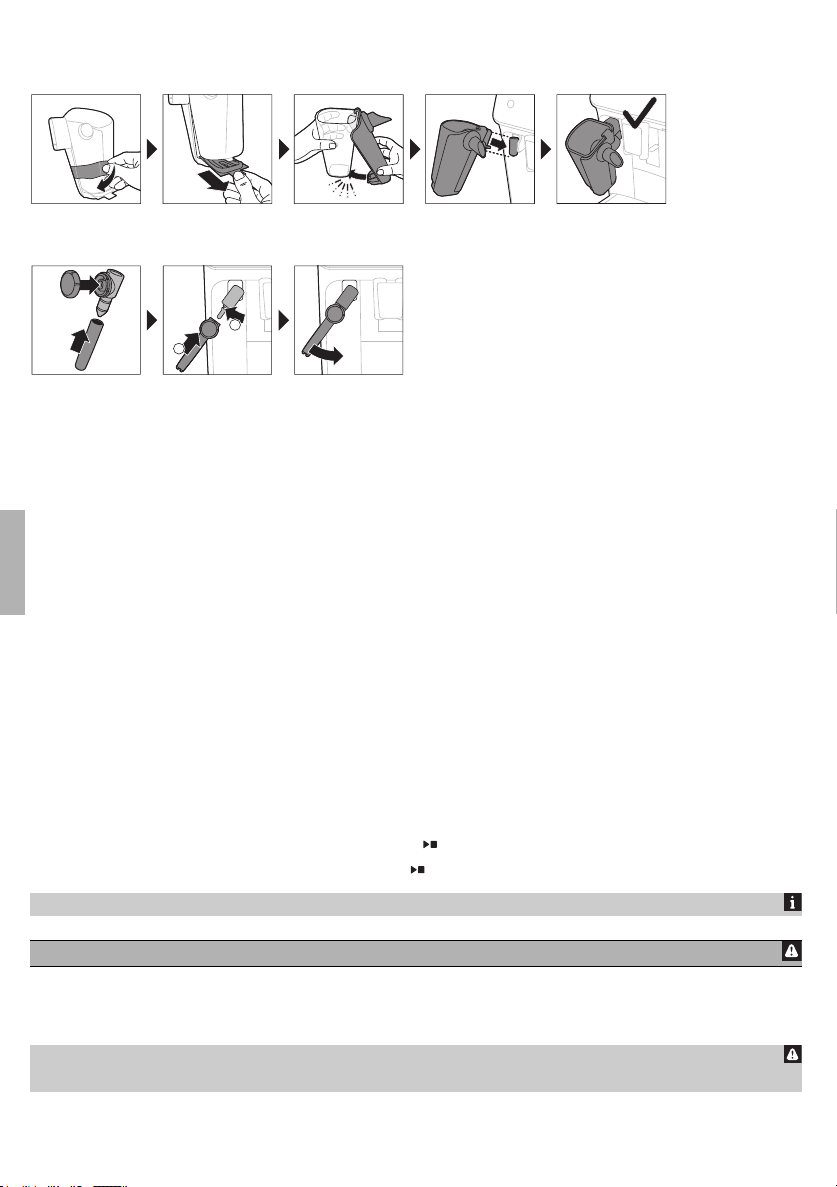
ﯽﺳﺭﺎﻓ
CLICK
1
2
ﯽﺳﺭﺎﻓ
(ﺹﺎﺧ ﯼﺎﻫﻝﺪﻣ ﯽﺧﺮﺑ ﺭﺩ ﻂﻘﻓ) LatteGo ﻥﺩﺮﮐ ﺭﺍﻮﺳ
(ﺹﺎﺧ ﯼﺎﻫﻝﺪﻣ ﯽﺧﺮﺑ ﺭﺩ ﻂﻘﻓ) ﮏﯿﺳﻼﮐ ﺯﺎﺳﺮﯿﺷﻒﮐ ﻥﺩﺮﮐ ﻢﻫﺮﺳ
ﺎﻫﯽﻧﺪﯿﺷﻮﻧ ﻥﺩﺮﮐ ﻡﺩ
ﯽﻠﮐ ﻞﺣﺍﺮﻣ
.ﺪﻫﺩﯽﻣ ﻡﺎﺠﻧﺍ ﺍﺭ ﺭﺎﮐﺩﻮﺧ ﯽﺸﮑﺑﺁ ﻪﺧﺮﭼ ﻭ ﺪﻨﮐﯽﻣ ﻥﺪﺷ ﻡﺮﮔ ﻪﺑ ﻉﻭﺮﺷ ﻩﺎﮕﺘﺳﺩ
.ﺖﺳﺍ ﻩﺩﺎﻔﺘﺳﺍ ﻩﺩﺎﻣﺁ ﻩﺎﮕﺘﺳﺩ ،ﺪﻨﻧﺎﻤﺑ ﻦﺷﻭﺭ ﻪﺘﺳﻮﯿﭘ ﺭﻮﻃ ﻪﺑ ﯽﻧﺪﯿﺷﻮﻧ ﯼﺎﻫﻦﮑﯾﺁ ﺭﺩ ﺎﻫﻍﺍﺮﭼ ﻪﻤﻫ ﯽﺘﻗﻭ
.ﺪﯿﻨﮐ ﺎﺠﺑﺎﺟ
85
1.ﺪﯾﺰﯾﺮﺑ ﻩﺎﮕﺘﺳﺩ ﻒﯿﻗ ﺭﺩ ﺍﺭ ﻩﻮﻬﻗ ﯼﺎﻫﻪﻧﺍﺩ ﻭ ﺪﯿﻨﮐ ﺮﭘ ﺮﯿﺷ ﺏﺁ ﺎﺑ ﺍﺭ ﺏﺁ ﻥﺰﺨﻣ
2.ﺪﯿﻨﮐ ﻞﺻﻭ ﺰﯾﺮﭘ ﻪﺑ ﺍﺭ ﻪﺧﺎﺷﻭﺩ .ﺪﯿﻨﮐ ﺩﺭﺍﻭ ﻩﺎﮕﺘﺳﺩ ﺖﺸﭘ ﺖﮐﻮﺳ ﺭﺩ ﺍﺭ ﮏﭼﻮﮐ ﺶﯿﻓ
3.ﺪﯿﻫﺩ ﺭﺎﺸﻓ ﺍﺭ ﺵﻮﻣﺎﺧ/ﻦﺷﻭﺭ ﻪﻤﮐﺩ ،هﺎﮕﺘﺳﺩ ﻥﺩﺮﮐ ﻦﺷﻭﺭ ﯼﺍﺮﺑ
-
4ﻦﯿﯾﺎﭘ ﺎﯾ ﻻﺎﺑ ﻪﺑ ﺍﺭ ﻩﻮﻬﻗ ﺝﻭﺮﺧ ﻪﭽﯾﺭﺩ ،ﺩﻮﺧ (2 ﺮﯾﻮﺼﺗ) ﻩﺩﺎﻔﺘﺳﺍ ﺩﺭﻮﻣ ﻥﺍﻮﯿﻟ ﺎﯾ ﻥﺎﺠﻨﻓ ﻉﺎﻔﺗﺭﺍ ﻢﯿﻈﻨﺗ ﯼﺍﺮﺑ .ﺪﯿﻫﺩ ﺭﺍﺮﻗ ﻩﻮﻬﻗ ﺝﻭﺮﺧ ﻪﭽﯾﺭﺩ ﺮﯾﺯ ﻥﺎﺠﻨﻓ ﮏﯾ
ﻩﻮﻬﻗ ﯼﺎﻫﻪﻧﺍﺩ ﻥﺩﺮﮐ ﻡﺩ
ﻭ ﻻﺎﺑ (6 ﺮﯾﻮﺼﺗ) ﯼﺎﻫﺶﻠﻓ ﺯﺍ ﻩﻮﻬﻗ ﺖﻈﻠﻏ ﻢﯿﻈﻨﺗ ﯼﺍﺮﺑ .ﺪﯿﻨﮐ ﻢﯿﻈﻨﺗ ﺩﻮﺧ ﯽﺼﺨﺷ (5 ﺮﯾﻮﺼﺗ) ﻪﻘﺋﺍﺫ ﺎﺑ ﻖﺑﺎﻄﻣ ﺍﺭ ﻥﺎﺗﯽﻧﺪﯿﺷﻮﻧ ﺪﯿﻧﺍﻮﺗﯽﻣ ﻥﻮﻨﮐﺍ
.ﺪﯿﻨﮐ ﮏﯿﻠﮐ ﺪﯿﯾﺄﺗ ﻪﻨﯾﺰﮔ ﯼﻭﺭ ،ﺪﯾﺭﺍﺩ ﺮﺘﺸﯿﺑ (7 ﺮﯾﻮﺼﺗ) ﺕﺎﻤﯿﻈﻨﺗ ﻡﺎﺠﻧﺍ ﺪﺼﻗ ﻪﮐ ﯽﺗﺭﻮﺻ ﺭﺩ .ﺪﯿﻨﮐ ﻩﺩﺎﻔﺘﺳﺍ ﻦﯿﯾﺎﭘ
ﻒﻗﻮﺗ/ﻉﻭﺮﺷ ﻪﻤﮐﺩ ،ﺩﻮﺧ ﺮﻈﻧﺩﺭﻮﻣ ﯽﻧﺪﯿﺷﻮﻧ ﻥﺩﺮﮐ ﻡﺩ ﻉﻭﺮﺷ ﯼﺍﺮﺑ
.ﺪﯿﻨﮐ ﺏﺎﺨﺘﻧﺍ ﺍﺭ 2x ﻦﮑﯾﺁ ،ﺹﻮﺼﺨﻣ ﺭﺍﻮﻧ ﺭﺩ ﺶﯾﺎﻤﯿﭘ ﺎﺑ ﺎﯾ ﺪﯿﻧﺰﺑ ﻪﺑﺮﺿ ﯽﻧﺪﯿﺷﻮﻧ ﻦﮑﯾﺁ ﯼﻭﺭ ﺭﺎﺑ ﻭﺩ ،هﻮﻬﻗ ﻥﺎﺠﻨﻓ 2 ﻥﺎﻣﺰﻤﻫ ﻥﺩﺮﮐ ﻡﺩ ﯼﺍﺮﺑ
.ﺪﯿﻨﮑﻧ ﻩﺩﺎﻔﺘﺳﺍ ﺭﺍﺩﻢﻌﻃ ﺎﯾ ﯽﻠﻣﺍﺭﺎﮐ ﻩﻮﻬﻗ ﯼﺎﻫﻪﻧﺍﺩ ﺯﺍ
(ﺮﯿﺷ ﻑﺮﻇ) LatteGo ﺎﺑ ﺮﯿﺷ ﻪﯾﺎﭘ ﯼﺎﻫﯽﻧﺪﯿﺷﻮﻧ ﻥﺩﺮﮐ ﻡﺩ
ﺪﯾﻮﺷ ﻦﺌﻤﻄﻣ ،ﺮﯿﺷ ﻑﺮﻇ ﻥﺩﺮﮐ ﺮﭘ ﺯﺍ ﻞﺒﻗ ،ﯽﺘﺸﻧ ﺯﺍ ﯼﺮﯿﮔﻮﻠﺟ ﯼﺍﺮﺑ .ﺖﺳﺍ ﺭﺍﺩﺭﻮﺧﺮﺑ ﯼﺭﺍﺪﻬﮕﻧ ﺵﻮﭘﺭﺩ ﮏﯾ ﻭ ﺐﻟﺎﻗ ﮏﯾ ،ﺮﯿﺷ ﻑﺮﻇ ﮏﯾ ﺯﺍLatteGo
.ﺪﻨﺷﺎﺑ ﻩﺪﺷﻢﻫﺮﺳ ﯽﺘﺳﺭﺩ ﻪﺑ ﺮﯿﺷ ﻑﺮﻇ ﻭ ﺐﻟﺎﻗ
.ﺪﯿﻨﺷ ﺪﯿﻫﺍﻮﺧ ﮏﯿﻠﮐ ﯼﺍﺪﺻ ﮏﯾ ،ﺩﻮﺷ ﻞﻔﻗ ﺩﻮﺧ (9 ﺮﯾﻮﺼﺗ) ﻞﺤﻣ ﺭﺩ ﻑﺮﻇ ﯽﺘﻗﻭ .ﺪﯿﻫﺩ ﺭﺎﺸﻓ ﻞﺧﺍﺩ
1ﻪﺑﺮﺿ (ﺹﺎﺧ ﯼﺎﻫﻝﺪﻣ ﯽﺧﺮﺑ ﺭﺩ ﺎﻬﻨﺗ) 'ﺮﺘﺸﯿﺑ ﯼﺎﻫﯽﻧﺪﯿﺷﻮﻧ' (4 ﺮﯾﻮﺼﺗ) ﻦﮑﯾﺁ ﺎﯾ ﺩﻮﺧ (3 ﺮﯾﻮﺼﺗ) ﺮﻈﻧﺩﺭﻮﻣ ﯽﻧﺪﯿﺷﻮﻧ ﻦﮑﯾﺁ ﯼﻭﺭ ،هﻮﻬﻗ ﻥﺩﺮﮐ ﻡﺩ ﯼﺍﺮﺑ
.ﺪﯿﻧﺰﺑ
-
2.ﺪﯿﻫﺩ ﺭﺎﺸﻓ ﺍﺭ
3.ﺪﯿﻫﺩ ﺭﺎﺸﻓ ًﺍﺩﺪﺠﻣ ﺍﺭ ﻒﻗﻮﺗ/ﻉﻭﺮﺷ ﻪﻤﮐﺩ ،هﺎﮕﺘﺳﺩ ﺭﺎﮐ ﻥﺎﯾﺎﭘ ﺯﺍ ﻞﺒﻗ ﻩﻮﻬﻗ ﺝﻭﺮﺧ ﻒﻗﻮﺗ ﯼﺍﺮﺑ
1ﻪﺑ ﺍﺭ ﺮﯿﺷ ﻑﺮﻇ ﯽﻨﯿﯾﺎﭘ ﺶﺨﺑ ﺲﭙﺳ .ﺪﯿﻧﺰﺑ ﺎﺟ (8 ﺮﯾﻮﺼﺗ) ﺐﻟﺎﻗ ﯼﻻﺎﺑ ﺏﻼﻗ ﺮﯾﺯ ﺍﺭ ﺮﯿﺷ ﻑﺮﻇ ﯽﯾﻻﺎﺑ ﺖﻤﺴﻗ ﺍﺪﺘﺑﺍ ،LatteGo ﻥﺩﺮﮐ ﻢﻫﺮﺳ ﯼﺍﺮﺑ
Page 85
ﯽﺳﺭﺎﻓ
86
.ﺪﻨﺘﺴﻫ ﺰﯿﻤﺗ ﻭﺩ ﺮﻫ ﺪﯾﻮﺷ ﻦﺌﻤﻄﻣ ﺐﻟﺎﻗ ﻭ ﺮﯿﺷ ﻑﺮﻇ ﻥﺩﺮﮐ ﻞﺼﺘﻣ ﺯﺍ ﻞﺒﻗ :ﻪﺟﻮﺗ
ﯼﻭﺭ ﻪﭽﻧﺁ ﻪﺑ ﺖﺒﺴﻧ ﯼﺮﺘﻤﮐ ﺎﯾ ﺮﺘﺸﯿﺑ ﺭﺍﺪﻘﻣ ﺎﺑ ﺍﺭ ﺮﯿﺷ ﻑﺮﻇ ﺪﺷﺎﺑ ﻡﺯﻻ ﺖﺳﺍ ﻦﮑﻤﻣ ،ﺪﯾﺩﺍﺩ ﺮﯿﯿﻐﺗ ﯽﺼﺨﺷ ﺕﺎﻤﯿﻈﻨﺗ ﺎﺑ ﺍﺭ ﺮﯿﺷ ﺭﺍﺪﻘﻣ ﺮﮔﺍ
.ﺪﯿﻨﮐ ﺮﭘ ﺖﺳﺍ ﻩﺪﺷ ﺮﮐﺫ ﯽﻧﺪﯿﺷﻮﻧ ﻦﯾﺍ ﯼﺍﺮﺑ LatteGo
.ﺖﺳﺍ ﻩﺪﺷ ﻩﺩﺭﻭﺁ ﻥﻭﺮﯿﺑ ﻝﺎﭽﺨﯾ ﺯﺍ ﻪﻈﺤﻟ ﻥﺎﻤﻫ ﺭﺩ ﻪﮐ ﺪﯿﻨﮐ ﻩﺩﺎﻔﺘﺳﺍ ﯼﺮﯿﺷ ﺯﺍ ﻪﺸﯿﻤﻫ ،ﻪﻨﯿﻬﺑ ﺞﯾﺎﺘﻧ ﯼﺍﺮﺑ
ﺪﯿﻨﮐ ﺏﺎﺨﺘﻧﺍ ﺕﻭﺎﻔﺘﻣ ('ﺎﻫﯽﻧﺪﯿﺷﻮﻧ ﯼﺯﺎﺳﯽﺼﺨﺷ' ﻩﺪﻫﺎﺸﻣ) ﯽﻧﺪﯿﺷﻮﻧ
.ﺪﯿﻨﮐ ﻢﯿﻈﻨﺗ ﺩﻮﺧ ﯽﺼﺨﺷ ﺢﯿﺟﺮﺗ ﺎﺑ ﻖﺑﺎﻄﻣ ﺍﺭ ﻥﺎﺗﯽﻧﺪﯿﺷﻮﻧ ﺪﯿﻧﺍﻮﺗﯽﻣ ﻥﻮﻨﮐﺍ
ﻡﺩ ﻪﻟ ﻭﺍ ﻪﻓﺎﮐ ﺎﯾ ﻪﺗﻻ ﻪﻓﺎﮐ ﯽﺘﻗﻭ .ﺪﻫﺩﯽﻣ ﻥﻭﺮﯿﺑ ﻩﻮﻬﻗ ﺲﭙﺳ ﻭ ﺮﯿﺷ ﺍﺪﺘﺑﺍ ﻩﺎﮕﺘﺳﺩ ،ﺪﯿﻨﮐﯽﻣ ﻡﺩ ﻮﺗﺎﯿﮐﺎﻣ ﻪﺗﻻ ﺎﯾ ﺖﯾﺍﻭ ﺖﻠﻓ ،ﻮﻨﯿﭼﻮﭘﺎﮐ ﯽﺘﻗﻭ
.ﺪﻫﺩﯽﻣ ﻥﻭﺮﯿﺑ ﺮﯿﺷ ﺲﭙﺳ ﻭ ﻩﻮﻬﻗ ﺍﺪﺘﺑﺍ ﻩﺎﮕﺘﺳﺩ ،ﺪﯿﻨﮐﯽﻣ
.ﺪﯿﻫﺩ ﺭﺎﺸﻓ ﺍﺭ ﻒﻗﻮﺗ/ﻉﻭﺮﺷ ﻪﻤﮐﺩ ،ﺪﯿﻨﮐ ﻒﻗﻮﺘﻣ ﺍﺭ ﻩﺎﮕﺘﺳﺩ ﺯﺍ ﻥﺁ ﺝﻭﺮﺧ ،ﺮﯿﺷ ﻢﯿﻈﻨﺗﺶﯿﭘ ﺭﺍﺪﻘﻣ ﻡﺎﻤﺗ ﻥﺩﺍﺩ ﻥﻭﺮﯿﺑ ﺯﺍ ﻞﺒﻗ ﻪﮑﻨﯾﺍ ﯼﺍﺮﺑ
ﮏﯿﺳﻼﮐ ﺯﺎﺳﺮﯿﺷﻒﮐ ﺎﺑ ﺮﯿﺷ ﻥﺩﺮﮐ ﻡﺮﮔ ﺎﯾ ﺮﯿﺷ ﻒﮐ ﻪﯿﻬﺗ
.ﺖﺳﺍ ﻩﺪﺷ ﻩﺩﺭﻭﺁ ﻥﻭﺮﯿﺑ ﻝﺎﭽﺨﯾ ﺯﺍ ﻪﻈﺤﻟ ﻥﺎﻤﻫ ﺭﺩ ﻪﮐ ﺪﯿﻨﮐ ﻩﺩﺎﻔﺘﺳﺍ ﯼﺮﯿﺷ ﺯﺍ ﻪﺸﯿﻤﻫ ،ﻒﮐ ﺖﯿﻔﯿﮐ ﻦﯾﺮﺘﻬﺑ ﯼﺍﺮﺑ
.ﺪﯿﻧﺎﺧﺮﭽﺑ ﺰﯾﺭ ﻒﮐ ﺎﺑ ﺮﯿﺷ (16 ﺮﯾﻮﺼﺗ) ﻦﮑﯾﺁ ﺖﻤﺳ ﻪﺑ ﺍﺭ ﮏﯿﺳﻼﮐ ﺯﺎﺳﺮﯿﺷﻒﮐ ﯼﻭﺭ ﻪﻤﮐﺩ ،ﺪﯿﻨﮐ ﻡﺮﮔ ﺍﺭ
.ﺩﻮﺷﯽﻣ ﻩﺩﺍﺩ ﺕﺭﺍﺮﺣ ﺎﯾ ﺪﻨﮐﯽﻣ ﻒﮐ ﺮﯿﺷ ﻭ ﺩﻮﺷﯽﻣ ﺩﺭﺍﻭ ﺮﯿﺷ ﻞﺧﺍﺩ ﻪﺑ ﺭﺎﺨﺑ ،ﺪﻨﮐﯽﻣ ﺮﯿﺷ ﻥﺩﺮﮐ ﻍﺍﺩ ﻪﺑ ﻉﻭﺮﺷ ﻩﺎﮕﺘﺳﺩ
2.ﺩﻮﺷ ﻞﻔﻗ (11 ﺮﯾﻮﺼﺗ) ﻞﺤﻣ ﺭﺩ ﻪﮐ ﯽﯾﺎﺟ ﺎﺗ ﺪﯿﻫﺩ ﺭﺎﺸﻓ ﻞﺧﺍﺩ ﻪﺑ ﺲﭙﺳ .ﺪﯿﻫﺩ ﺭﺍﺮﻗ ﻍﺍﺩ ﺏﺁ (10 ﺮﯾﻮﺼﺗ) ﻪﭽﯾﺭﺩ ﯼﻭﺭ ﻭ ﺪﯿﻨﮐ ﻢﺧ ﯽﻤﮐ ﺍﺭ LatteGo
3.ﺪﯿﻨﮑﻧ ﺮﭘ ﻩﺪﺷ ﺺﺨﺸﻣ ﺮﺜﮐﺍﺪﺣ ﺖﻣﻼﻋ ﺯﺍ ﺮﺗﻻﺎﺑ ﺍﺭ ﺮﯿﺷ ﻑﺮﻇ .ﺪﯿﻨﮐ ﺮﭘ (12 ﺮﯾﻮﺼﺗ) ﺮﯿﺷ ﺎﺑ ﺍﺭ LatteGo
4.ﺪﯿﻫﺩ ﺭﺍﺮﻗ ﺎﻫﻪﮑﭼ ﻥﺩﺮﮐ ﻊﻤﺟ ﯽﻨﯿﺳ ﯼﻭﺭ ﻥﺎﺠﻨﻓ ﮏﯾ
5ﻉﻮﻧ ﮏﯾ ،(ﺹﺎﺧ ﯼﺎﻫﻝﺪﻣ ﯽﺧﺮﺑ ﺭﺩ ﺎﻬﻨﺗ) 'ﺮﺘﺸﯿﺑ ﯼﺎﻫﯽﻧﺪﯿﺷﻮﻧ' ﻦﮑﯾﺁ ﯼﻭﺭ ﻥﺩﺯ ﻪﺑﺮﺿ ﺎﺑ ﺎﯾ ﺪﯿﻧﺰﺑ ﻪﺑﺮﺿ ﺩﻮﺧ ﺮﻈﻧ ﺩﺭﻮﻣ ﺮﯿﺷ ﻪﯾﺎﭘ ﯽﻧﺪﯿﺷﻮﻧ ﻦﮑﯾﺁ ﯼﻭﺭ
-
6.ﺪﯿﻫﺩ ﺭﺎﺸﻓ ﺍﺭ ﻒﻗﻮﺗ/ﻉﻭﺮﺷ ﻪﻤﮐﺩ
-
-
7.ﺪﯿﻫﺩ ﺭﺎﺸﻓ ﺍﺭ ﻒﻗﻮﺗ/ﻉﻭﺮﺷ ﻪﻤﮐﺩ ،هﺎﮕﺘﺳﺩ ﺭﺎﮐ ﻥﺎﯾﺎﭘ ﺯﺍ ﻞﺒﻗ (ﻩﻮﻬﻗ ﻭ ﺮﯿﺷ) ﻞﻣﺎﮐ ﯽﻧﺪﯿﺷﻮﻧ ﺝﻭﺮﺧ ﻒﻗﻮﺗ ﯼﺍﺮﺑ
1.ﺪﯿﻫﺩ ﺭﺍﺮﻗ (13 ﺮﯾﻮﺼﺗ) ﻥﺁ ﯼﻭﺭ ﺍﺭ ﺯﺎﺳﺮﯿﺷﻒﮐ ﻭ ﺪﯿﻨﮐ ﻢﺧ ﭗﭼ ﺖﻤﺳ ﻪﺑ ﺍﺭ ﻩﺎﮕﺘﺳﺩ ﯽﻧﻮﮑﯿﻠﯿﺳ ﯽﮑﺸﻣ ﻪﺘﺳﺩ
2.ﺪﯿﻨﮐ ﺮﭘ ﻮﺗﺎﯿﮐﺎﻣ ﻪﺗﻻ ﺎﺑ ﺮﯿﺷ ﺮﺘﯿﻟﯽﻠﯿﻣ 150 ﺩﻭﺪﺣ ﻭ ﻮﻨﯿﭼﻮﭘﺎﮐ ﯼﺍﺮﺑ ﺮﯿﺷ ﺮﺘﯿﻟﯽﻠﯿﻣ 100 ﺩﻭﺪﺣ ﺎﺑ ﺍﺭ ﺮﯿﺷ ﭺﺭﺎﭘ
3 .ﺪﯾﺮﺒﺑ ﻭﺮﻓ ﺮﯿﺷ ﺭﺩ ﺮﺘﻣﯽﺘﻧﺎﺳ1 ﺩﻭﺪﺣ ﺍﺭ ﺯﺎﺳﺮﯿﺷﻒﮐ
4.ﺪﯿﻧﺰﺑ ﻪﺑﺮﺿ ﺭﺎﺨﺑ (14 ﺮﯾﻮﺼﺗ) ﻦﮑﯾﺁ ﯼﻭﺭ
5ﺮﯿﺷ ﺪﯾﺭﺍﺩ ﺮﻈﻧ ﺭﺩ ﺮﮔﺍ .ﺪﯿﻧﺎﺧﺮﭽﺑ ﺮﯿﺷ ﻥﺩﺮﮐ ﻒﮐ (15 ﺮﯾﻮﺼﺗ) ﻦﮑﯾﺁ ﺖﻤﺳ ﻪﺑ ﺍﺭ ﮏﯿﺳﻼﮐ ﺯﺎﺳﺮﯿﺷﻒﮐ ﯼﻭﺭ ﻪﻤﮐﺩ ،ﺪﯿﻨﮐ ﻪﯿﻬﺗ ﺮﯿﺷ ﻒﮐ ﺪﯾﺭﺍﺩ ﺮﻈﻧ ﺭﺩ ﺮﮔﺍ
6.ﺪﺷﺎﺑ ﮓﻧﺭﻩﺎﯿﺳ ﺶﻠﻓ ﯼﺎﺘﺳﺍﺮﻤﻫ ﮏﯿﺳﻼﮐ ﺯﺎﺳﺮﯿﺷﻒﮐ ﻪﻤﮐﺩ ﻦﮑﯾﺁ ﺪﯾﻮﺷ ﻦﺌﻤﻄﻣ
7.ﺪﯿﻫﺩ ﺭﺎﺸﻓ ﺍﺭ ﻒﻗﻮﺗ/ﻉﻭﺮﺷ ﻪﻤﮐﺩ ،(17 ﺮﯾﻮﺼﺗ) ﻉﻭﺮﺷ ﯼﺍﺮﺑ
8ﺍﺭ ﺮﯿﺷ ﻥﺩﺍﺩ ﺕﺭﺍﺮﺣ/ﺮﯿﺷ ﻒﮐ ﻪﯿﻬﺗ ، ﻒﻗﻮﺗ/ﻉﻭﺮﺷ ﻪﻤﮐﺩ ﺩﺪﺠﻣ ﻥﺩﺍﺩ ﺭﺎﺸﻓ ﺎﺑ ،ﺪﯿﺳﺭ ﺮﻈﻧﺩﺭﻮﻣ ﯼﺎﻣﺩ ﺎﯾ ﻒﮐ ﻢﺠﺣ ﻪﺑ ﺮﯿﺷ ﭺﺭﺎﭘ ﻥﻭﺭﺩ ﺮﯿﺷ ﯽﺘﻗﻭ
.ﺪﯿﻨﮐ ﻒﻗﻮﺘﻣ
.ﺩﺩﺮﮔﯽﻣ ﻒﻗﻮﺘﻣ ﺭﺎﮐﺩﻮﺧ ﺭﻮﻃ ﻪﺑ ﻪﯿﻧﺎﺛ 90 ﺯﺍ ﺪﻌﺑ ﻥﺩﺮﮐ ﺭﺎﺨﺑ .ﺪﯿﻫﺪﻧ ﺭﺎﺨﺑ ﻪﯿﻧﺎﺛ 90 ﺯﺍ ﺶﯿﺑ ﺍﺭ ﺮﯿﺷ ﺰﮔﺮﻫ
.ﺪﯿﻫﺪﺑ ﺖﮐﺮﺣ ﺍﺭ ﺮﯿﺷ ﭺﺭﺎﭘ ﺮﯿﺷ ﻒﮐ ﻪﯿﻬﺗ ﻦﯿﺣ ﺭﺩ ﺪﯾﺎﺒﻧ ،ﺖﯿﻔﯿﮐ ﻦﯾﺮﺘﻬﺑ ﺎﺑ ﺮﯿﺷ ﻒﮐ ﻪﯿﻬﺗ ﯼﺍﺮﺑ
(ﺹﺎﺧ ﯼﺎﻫﻝﺪﻣ ﯽﺧﺮﺑ ﺭﺩ ﺎﻬﻨﺗ) ﯽﻓﺎﺿﺍ ﺕﺎﺷ
.ﺪﯿﺷﺎﺑ ﻪﺘﺷﺍﺩ ﯼﺮﺗﺦﻠﺗ ﻩﻮﻬﻗ ﺪﯿﻠﯾﺎﻣ ﺮﮔﺍ ﻝﺎﺜﻣ ﯼﺍﺮﺑ ،ﺪﻫﺩﯽﻣ ﺍﺭ ﺮﯿﺷ ﻪﯾﺎﭘ ﯼﺎﻫﯽﻧﺪﯿﺷﻮﻧ ﻭ ﻩﻮﻬﻗ ﻪﺑ ﻮﺗﺮﺘﺴﯾﺭ ﺮﺘﺸﯿﺑ ﺕﺎﺷ ﮏﯾ ﻥﺩﺮﮐ ﻪﻓﺎﺿﺍ ﻥﺎﮑﻣﺍ ﻩﺎﮕﺘﺳﺩ
.ﺪﯿﻫﺩ ﺭﺎﺸﻓ ﺍﺭ
1ﺪﯿﻫﺩ ﺭﺍﺮﻗ ﻪﭽﯾﺭﺩ ﺮﯾﺯ ﻥﺎﺠﻨﻓ ﮏﯾ
2 .ﺪﯿﻧﺰﺑ ﻪﺑﺮﺿ (ﺹﺎﺧ ﯼﺎﻫﻝﺪﻣ ﯽﺧﺮﺑ ﺭﺩ ﺎﻬﻨﺗ) 'ﺮﺘﺸﯿﺑ ﯼﺎﻫﯽﻧﺪﯿﺷﻮﻧ' ﻦﮑﯾﺁ ﺎﯾ ﺮﯿﺷ ﻪﯾﺎﭘ ﯽﻧﺪﯿﺷﻮﻧ ﯼﺎﻫﻦﮑﯾﺁ ﺯﺍ ﯽﮑﯾ ﯼﻭﺭ ﯽﻧﺪﯿﺷﻮﻧ ﮏﯾ ﺏﺎﺨﺘﻧﺍ ﯼﺍﺮﺑ
3.ﺪﯿﻨﮐ ﺏﺎﺨﺘﻧﺍ ﺍﺭ (ﯽﻓﺎﺿﺍ ﺕﺎﺷ) ExtraShot (18 ﺮﯾﻮﺼﺗ) ﺩﺮﮑﻠﻤﻋ ﺲﭙﺳ ﻭ ﺪﯿﻨﮐ ﻩﺩﺎﻔﺘﺳﺍ ﺢﻄﺳ ﻦﯾﺮﺗﻻﺎﺑ ﯼﻭﺭ ﯽﺨﻠﺗ ﻢﯿﻈﻨﺗ ﯼﺍﺮﺑ ﻻﺎﺑ ﺶﻠﻓ ﺯﺍ
4ﻒﻗﻮﺗ/ﻉﻭﺮﺷ ﻦﮑﯾﺁ ،ﯽﻧﺪﯿﺷﻮﻧ ﻥﺩﺮﮐ ﻡﺩ ﻉﻭﺮﺷ ﯼﺍﺮﺑ ﺲﭙﺳ .ﺪﯿﻧﺰﺑ ﻪﺑﺮﺿ ﺪﯿﯾﺄﺗ ﻦﮑﯾﺁ ﯼﻭﺭ ،ﺪﯾﺭﺍﺩ ﺍﺭ ﺕﺎﻤﯿﻈﻨﺗ ﺮﯾﺎﺳ ﯼﺯﺎﺳﯽﺼﺨﺷ ﺪﺼﻗ ﻪﮐ ﯽﺗﺭﻮﺻ ﺭﺩ
Page 86
.ﺪﯿﻨﮐ ﻡﺩ ﻩﻮﻬﻗ ﻪﻟﺎﯿﭘ ﮏﯾ ﺪﯿﻧﺍﻮﺗﯽﻣ ﺎﻬﻨﺗ ﻥﺎﻣﺯ ﺮﻫ ﺭﺩ ،ﺪﯾﺍﻩﺩﺮﮐ ﺏﺎﺨﺘﻧﺍ ﺍﺭ ExtraShot ﺩﺮﮑﻠﻤﻋ ﯽﺘﻗﻭ
ﻩﺪﺷ ﺏﺎﯿﺳﺁ-ﺶﯿﭘ ﻩﻮﻬﻗ ﺎﺑ ﻩﻮﻬﻗ ﻥﺩﺮﮐ ﻡﺩ
ﺢﯿﺟﺮﺗ ﺍﺭ ﻦﯿﺌﻓﺎﮐ ﻥﻭﺪﺑ ﻩﻮﻬﻗ ﺎﯾ ﻩﻮﻬﻗ ﺕﻭﺎﻔﺘﻣ ﻪﺘﯾﺭﺍﻭ ﮏﯾ ﺮﮔﺍ ،ﻝﺎﺜﻣ ﯼﺍﺮﺑ ،ﺪﯿﻨﮐ ﻩﺩﺎﻔﺘﺳﺍ ﻩﺪﺷ ﺏﺎﯿﺳﺁ-ﺶﯿﭘ ﻩﻮﻬﻗ ﺯﺍ ﺪﯿﻧﺍﻮﺗﯽﻣ ﻩﻮﻬﻗ ﯼﺎﻫﻪﻧﺍﺩ ﯼﺎﺟ ﻪﺑ
.ﺪﯾﺪﻨﺒﺑ ﺍﺭ ﺵﻮﭘﺭﺩ
.ﺪﯿﻨﮐ ﺏﺎﺨﺘﻧﺍ ﺍﺭ ﺏﺎﯿﺳﺁ-ﺶﯿﭘ ﺩﺮﮑﻠﻤﻋ ﺲﭙﺳ ﻭ ﺪﯿﻨﮐ ﻩﺩﺎﻔﺘﺳﺍ ﺢﻄﺳ ﻦﯾﺮﺘﻤﮐ ﯼﻭﺭ ﯽﺨﻠﺗ ﻢﯿﻈﻨﺗ ﯼﺍﺮﺑ ﻦﯿﯾﺎﭘ ﺶﻠﻓ ﺯﺍ
.ﺪﯿﻨﮐ ﻩﺩﺎﻔﺘﺳﺍ ﺏﺎﯿﺳﺁ-ﺶﯿﭘ ﺩﺮﮑﻠﻤﻋ ﺏﺎﺨﺘﻧﺍ ﯼﺍﺮﺑ ﻦﯿﯾﺎﭘ ﺶﻠﻓ ﺯﺍ ﻭ ﺪﯿﻫﺩ ﺭﺎﺸﻓ ﺍﺭ
:ﺪﯿﻨﮐ ﺏﺎﺨﺘﻧﺍ ﺍﺭ ﻩﺪﺷ ﺏﺎﯿﺳﺁ-ﺶﯿﭘ ﻩﻮﻬﻗ ﺩﺮﮑﻠﻤﻋ ﯽﺘﻗﻭ
.ﺩﻮﺷﯽﻣ ﻩﺮﯿﺧﺫ ﺭﺎﮐﺩﻮﺧ ﺭﻮﻃ ﻪﺑ -
.ﺪﯿﻨﮐ ﻡﺩ ﻩﻮﻬﻗ ﻥﺎﺠﻨﻓ ﮏﯾ ﺎﻬﻨﺗ ﺪﯿﻧﺍﻮﺗﯽﻣ ﺭﺎﺑ ﺮﻫ ﺭﺩ -
.ﺪﯿﻨﮐ ﺏﺎﺨﺘﻧﺍ ﯼﺮﮕﯾﺩ ﻢﻌﻃ ﻥﺍﺰﯿﻣ ﺪﯿﻧﺍﻮﺗﯽﻤﻧ -
ﯽﺳﺭﺎﻓ
ﺕﺎﻤﯿﻈﻨﺗ ﻦﮑﯾﺁ
ﻍﺍﺩ ﺏﺁ ﺖﻓﺎﯾﺭﺩ
.ﺪﯿﻨﮐ ﺏﺎﺨﺘﻧﺍ ﺍﺭ ﻍﺍﺩ ﺏﺁ ﻪﻨﯾﺰﮔ ،(ﺹﺎﺧ
.ﺩﻮﺷﯽﻣ ﺝﺭﺎﺧ ﻍﺍﺩ ﺏﺁ (20 ﺮﯾﻮﺼﺗ) ﻪﭽﯾﺭﺩ ﺯﺍ ﻍﺍﺩ ﺏﺁ
ﯽﺳﺭﺎﻓ
87
5 .ﺪﯿﻫﺩ ﺭﺎﺸﻓ ًﺍﺩﺪﺠﻣ ﺍﺭ ﻒﻗﻮﺗ/ﻉﻭﺮﺷ ﻦﮑﯾﺁ ،هﺎﮕﺘﺳﺩ ﺭﺎﮐ ﻥﺎﯾﺎﭘ ﺯﺍ ﻞﺒﻗ ﯽﻧﺪﯿﺷﻮﻧ ﺝﻭﺮﺧ ﻒﻗﻮﺗ ﯼﺍﺮﺑ
.ﺪﯿﻫﺩﯽﻣ
1ﺲﭙﺳ .ﺪﯾﺰﯾﺮﺑ (19 ﺮﯾﻮﺼﺗ) ﻥﺁ ﺭﺩ ﺍﺭ ﻩﺪﺷ ﺏﺎﯿﺳﺁ-ﺶﯿﭘ ﻩﻮﻬﻗ ﻞﻣﺎﮐ ﯼﺮﯿﮔﻩﺯﺍﺪﻧﺍ ﮏﻘﺷﺎﻗ ﮏﯾ ﻭ ﺪﯿﻨﮐ ﺯﺎﺑ ﺍﺭ ﻩﺪﺷ ﺏﺎﯿﺳﺁ-ﺶﯿﭘ ﻩﻮﻬﻗ ﻪﻈﻔﺤﻣ ﺏﺭﺩ
2ﻪﺑﺮﺿ (ﺹﺎﺧ ﯼﺎﻫﻝﺪﻣ ﯽﺧﺮﺑ ﺭﺩ ﺎﻬﻨﺗ) 'ﺮﺘﺸﯿﺑ ﯼﺎﻫﯽﻧﺪﯿﺷﻮﻧ' ﻦﮑﯾﺁ ﺎﯾ ﯽﺴﻤﻟﮏﺗ ﯽﻧﺪﯿﺷﻮﻧ ﯼﺎﻫﻦﮑﯾﺁ ﺯﺍ ﯽﮑﯾ ﯼﻭﺭ ﺮﮕﯾﺩ ﯽﻧﺪﯿﺷﻮﻧ ﮏﯾ ﺏﺎﺨﺘﻧﺍ ﯼﺍﺮﺑ
.ﺪﯿﻧﺰﺑ
3:ﺪﯿﻫﺩ ﻡﺎﺠﻧﺍ ﻒﻠﺘﺨﻣ ﺵﻭﺭ 2 ﻪﺑ ﺪﯿﻧﺍﻮﺗﯽﻣ ﺍﺭ ﺭﺎﮐ ﻦﯾﺍ .ﺪﯿﻨﮐ ﺏﺎﺨﺘﻧﺍ ﺍﺭ ﻩﺪﺷ ﺏﺎﯿﺳﺁ-ﺶﯿﭘ ﻩﻮﻬﻗ ﺩﺮﮑﻠﻤﻋ
-
-
4.ﺪﯿﻫﺩ ﺭﺎﺸﻓ ًﺍﺩﺪﺠﻣ ﺍﺭ ﻒﻗﻮﺗ/ﻉﻭﺮﺷ ﻪﻤﮐﺩ ،هﺎﮕﺘﺳﺩ ﺭﺎﮐ ﻥﺎﯾﺎﭘ ﺯﺍ ﻞﺒﻗ ﻩﻮﻬﻗ ﺝﻭﺮﺧ ﻒﻗﻮﺗ ﯼﺍﺮﺑ
1.ﺪﯿﻨﮐ ﺍﺪﺟ ﺍﺭ ﻥﺁ ،ﺯﺎﺳﺮﯿﺷﻒﮐ ﺎﯾ LatteGo ﻥﺩﻮﺑ ﻞﺼﺘﻣ ﺕﺭﻮﺻ ﺭﺩ
2.ﺪﯿﻫﺩ ﺭﺍﺮﻗ ﻍﺍﺩ ﺏﺁ ﻪﭽﯾﺭﺩ ﺮﯾﺯ ﻥﺎﺠﻨﻓ ﮏﯾ
3ﯼﺎﻫﻝﺪﻣ ﯽﺧﺮﺑ ﺭﺩ (4 ﺮﯾﻮﺼﺗ) ﺎﻬﻨﺗ) 'ﺮﺘﺸﯿﺑ ﯼﺎﻫﯽﻧﺪﯿﺷﻮﻧ' ﻦﮑﯾﺁ ﯼﻭﺭ ﻥﺩﺯ ﻪﺑﺮﺿ ﺎﺑ ﺎﯾ ﺪﯿﻧﺰﺑ ﻪﺑﺮﺿ (ﺹﺎﺧ ﯼﺎﻫﻝﺪﻣ ﯽﺧﺮﺑ ﺭﺩ ﺎﻬﻨﺗ) 'ﻍﺍﺩ ﺏﺁ' ﻦﮑﯾﺁ ﯼﻭﺭ
4.ﺪﯿﻨﮐ ﻩﺩﺎﻔﺘﺳﺍ ﻦﯿﯾﺎﭘ ﻭ ﻻﺎﺑ ﯼﺎﻫﺶﻠﻓ ﺯﺍ ﺩﻮﺧ ﻩﺍﻮﺨﻟﺩ ﯼﺎﻣﺩ ﺎﯾ/ﻭ ﻍﺍﺩ ﺏﺁ ﺭﺍﺪﻘﻣ ﻢﯿﻈﻨﺗ ﯼﺍﺮﺑ
5.ﺪﯿﻫﺩ ﺭﺎﺸﻓ ﺍﺭ ﻒﻗﻮﺗ/ﻉﻭﺮﺷ ﻪﻤﮐﺩ
-
6.ﺪﯿﻫﺩ ﺭﺎﺸﻓ ًﺍﺩﺪﺠﻣ ﺍﺭ ﻒﻗﻮﺗ/ﻉﻭﺮﺷ ﻪﻤﮐﺩ ،هﺎﮕﺘﺳﺩ ﺭﺎﮐ ﻥﺎﯾﺎﭘ ﺯﺍ ﻞﺒﻗ ﻍﺍﺩ ﺏﺁ ﺝﻭﺮﺧ ﻒﻗﻮﺗ ﯼﺍﺮﺑ
ﺎﻫﯽﻧﺪﯿﺷﻮﻧ ﯼﺯﺎﺳﯽﺼﺨﺷ
ﯽﺼﺨﺷ ﻞﯾﺎﻓﻭﺮﭘ ﮏﯾ ﺭﺩ ﺍﺭ ﻩﺪﺷ ﻢﯿﻈﻨﺗ ﯽﻧﺪﯿﺷﻮﻧ ﻭ ﺪﯿﻨﮐ ﻝﺎﻤﻋﺍ ﺩﻮﺧ ﯽﺼﺨﺷ ﺕﺎﺤﯿﺟﺮﺗ ﺎﺑ ﻖﺑﺎﻄﻣ ﺍﺭ ﯽﻧﺪﯿﺷﻮﻧ ﮏﯾ ﺕﺎﻤﯿﻈﻨﺗ ﺪﻫﺩﯽﻣ ﻩﺯﺎﺟﺍ ﻩﺎﮕﺘﺳﺩ
.ﺪﻨﺘﺴﻫ ﺕﻭﺎﻔﺘﻣ ﯼﺎﻫﮓﻧﺭ ﻪﺑ ﻒﻠﺘﺨﻣ ﯼﺎﻫﻞﯾﺎﻓﻭﺮﭘ .ﺪﯿﻨﮐ ﻩﺮﯿﺧﺫ
ﯽﺧﺮﺑ ﺭﺩ ﺎﻬﻨﺗ) 'ﺮﺘﺸﯿﺑ ﯼﺎﻫﯽﻧﺪﯿﺷﻮﻧ' ﻦﮑﯾﺁ ﯼﻭﺭ ﺮﺑ ﻥﺩﺯ ﻪﺑﺮﺿ ﺎﺑ ﺎﯾ ﯽﺴﻤﻟ-ﮏﺗ ﯽﻧﺪﯿﺷﻮﻧ ﯼﺎﻫﻦﮑﯾﺁ ﯼﻭﺭ ﺮﺑ ﻥﺩﺯ ﻪﺑﺮﺿ ﺎﺑ ،ﯽﻧﺪﯿﺷﻮﻧ ﮏﯾ ﺏﺎﺨﺘﻧﺍ ﺯﺍ ﺲﭘ
:ﺪﯿﻫﺩ ﻡﺎﺠﻧﺍ ﺍﺭ ﺮﯾﺯ ﺩﺭﺍﻮﻣ ﺪﯿﻧﺍﻮﺗﯽﻣ (ﺹﺎﺧ ﯼﺎﻫﻝﺪﻣ
.ﺪﻨﺘﺴﻫ ﻢﻌﻃ ﻦﯾﺮﺗﯼﻮﻗ ﺭﺍﺪﻘﻣ
.ﺩﺭﺍﺩ ﺩﻮﺟﻭ ﺕﺎﻤﯿﻈﻨﺗ
.ﺪﺷ ﺪﻨﻫﺍﻮﺧ ﻩﺮﯿﺧﺫ ﺎﻤﺷ ﯽﺑﺎﺨﺘﻧﺍ ﻞﯾﺎﻓﻭﺮﭘ ﺭﺩ ﺭﺎﮐﺩﻮﺧ ﺭﻮﻃ ﻪﺑ ﺪﯾﺍﻩﺩﺮﮐ ﺏﺎﺨﺘﻧﺍ ﻪﮐ ﯽﺗﺎﻤﯿﻈﻨﺗ ،ﺪﻨﮐ ﻡﺩ ﺍﺭ ﯽﻧﺪﯿﺷﻮﻧ ﻩﺎﮕﺘﺳﺩ ﻪﮑﻨﯾﺍ ﺾﺤﻣ ﻪﺑ
1ﻦﯾﺮﺗﻻﺎﺑ ﻭ ﻦﯾﺮﺗﻢﯾﻼﻣ ،ﺭﺍﺪﻘﻣ ﻦﯾﺮﺗﻦﯿﯾﺎﭘ ﻪﮐ ﺩﺭﺍﺩ ﺩﻮﺟﻭ ﻢﻌﻃ ﻥﺍﺰﯿﻣ 5 .ﺪﯿﻨﮐ ﺏﺎﺨﺘﻧﺍ ﺍﺭ ﻢﻌﻃ ﻥﺍﺰﯿﻣ ،ﻦﯿﯾﺎﭘ ﻭ ﻻﺎﺑ (21 ﺮﯾﻮﺼﺗ) ﯼﺎﻫﻦﮑﯾﺁ ﺯﺍ ﻩﺩﺎﻔﺘﺳﺍ ﺎﺑ
2ﺯﺍ ﮏﯾ ﺮﻫ ﯼﺍﺮﺑ ﺭﺍﺪﻘﻣ 5 .ﺪﯿﻨﮐ ﻢﯿﻈﻨﺗ ﻦﯿﯾﺎﭘ ﻭ ﻻﺎﺑ ﯼﺎﻫﻦﮑﯾﺁ ﺯﺍ ﻩﺩﺎﻔﺘﺳﺍ ﺎﺑ ﺍﺭ (ﺹﺎﺧ ﯼﺎﻫﻝﺪﻣ ﯽﺧﺮﺑ ﺭﺩ ﺎﻬﻨﺗ) ﺮﯿﺷ ﺭﺍﺪﻘﻣ ﺎﯾ/ﻭ ﻩﻮﻬﻗ (22 ﺮﯾﻮﺼﺗ) ﺭﺍﺪﻘﻣ
Page 87
ﯽﺳﺭﺎﻓ
88
ﻞﯾﺎﻓﻭﺮﭘ ﺏﺎﺨﺘﻧﺍ
ﺍﺭ ﻪﯿﻬﺗ ﺭﻮﺘﺳﺩ ﮏﯾ ﻭ ﻩﺩﺮﮐ ﺏﺎﺨﺘﻧﺍ ﺍﺭ ﻞﯾﺎﻓﻭﺮﭘ ﮏﯾ ﺪﯿﻧﺍﻮﺗﯽﻣ (My Coffee Choice Profiles) ﻦﻣ ﻩﻮﻬﻗ ﺏﺎﺨﺘﻧﺍ ﯼﺎﻫﻞﯾﺎﻓﻭﺮﭘ ﻪﻨﯾﺰﮔ ﺯﺍ ﻩﺩﺎﻔﺘﺳﺍ ﺎﺑ
.ﺪﯿﯾﺎﻤﻧ ﻩﺮﯿﺧﺫ
ﺎﻫﻞﯾﺎﻓﻭﺮﭘ ﻦﮑﯾﺁ ﯼﻭﺭ ﻢﻫ ﺮﺳ ﺖﺸﭘ ﺭﺎﺑ ﺪﻨﭼ ،ﯽﮕﻧﺭ ﯼﺎﻫﻞﯾﺎﻓﻭﺮﭘ ﺯﺍ ﯽﮑﯾ ﺏﺎﺨﺘﻧﺍ ﯼﺍﺮﺑ
.ﺪﻨﺘﺴﻫ
.ﺪﯿﻨﮐ ﺏﺎﺨﺘﻧﺍ ﺍﺭ ﯽﻧﺪﯿﺷﻮﻧ
.ﺪﻧﻮﺷﯽﻣ ﻩﺮﯿﺧﺫ ،ﺪﯾﺍﻩﺩﺮﮐ ﺏﺎﺨﺘﻧﺍ ﻪﮐ ﯽﮕﻧﺭ ﻞﯾﺎﻓﻭﺮﭘ ﺭﺩ ﻥﻮﻨﮐﺍ ﺪﯾﺪﺟ ﺕﺎﻤﯿﻈﻨﺗ
.ﺪﯿﻨﮐ ﯽﺑﺎﯾﺯﺎﺑ ﺍﺭ ('ﻪﻧﺎﺧﺭﺎﮐ ﺕﺎﻤﯿﻈﻨﺗ ﯽﺑﺎﯾﺯﺎﺑ' ﻩﺪﻫﺎﺸﻣ) ﻩﺎﮕﺘﺳﺩ ﻪﻧﺎﺧﺭﺎﮐ ﺕﺎﻤﯿﻈﻨﺗ ﺪﯿﻧﺍﻮﺗﯽﻣ ﻪﺸﯿﻤﻫ
-
ﻥﺎﻤﻬﻣ ﻞﯾﺎﻓﻭﺮﭘ
ﺏﺎﺨﺘﻧﺍ ﺍﺭ ﻞﯾﺎﻓﻭﺮﭘ ﻦﯾﺍ ﯽﺘﻗﻭ .ﺩﻮﺷﯽﻣ ﺵﻮﻣﺎﺧ ﻞﯾﺎﻓﻭﺮﭘ ﻦﮑﯾﺁ ،ﺪﺷﺎﺑ ﻩﺪﺷ ﺏﺎﺨﺘﻧﺍ ﻥﺎﻤﻬﻣ ﻞﯾﺎﻓﻭﺮﭘ ﯽﺘﻗﻭ .ﺖﺳﺍ ﻥﺎﻤﻬﻣ ﻞﯾﺎﻓﻭﺮﭘ ﮏﯾ ﯼﺍﺭﺍﺩ ﺎﻤﺷ ﻩﺎﮕﺘﺳﺩ
.ﺪﺷ ﺪﻨﻫﺍﻮﺨﻧ ﻩﺮﯿﺧﺫ ﺎﻤﺷ ﻩﻮﻬﻗ ﻥﺩﺮﮐ ﻡﺩ ﯼﺎﻫﺭﻮﺘﺳﺩ ﺎﻣﺍ ﺪﯿﻨﮐ ﯼﺯﺎﺳﯽﺼﺨﺷ ﺩﻮﺧ ﺕﺎﺤﯿﺟﺮﺗ ﺎﺑ ﻖﺑﺎﻄﻣ ﺍﺭ ﺕﺎﻤﯿﻈﻨﺗ ﺩﻮﺑ ﺪﯿﻫﺍﻮﺧ ﺭﺩﺎﻗ ﻥﺎﮐﺎﻤﮐ ،ﺪﯿﻨﮐ
ﻩﺎﮕﺘﺳﺩ ﺕﺎﻤﯿﻈﻨﺗ ﻡﺎﺠﻧﺍ
ﺏﺁ ﯽﺘﺨﺳ ﻢﯿﻈﻨﺗ
ﺮﻣﺍ ﻦﯾﺍ ،ﻦﯿﻨﭽﻤﻫ .ﺪﯿﻫﺩ ﺭﺍﺮﻗ ﺩﻮﺧ ﻪﻘﻄﻨﻣ ﺏﺁ ﯽﺘﺨﺳ ﻪﺟﺭﺩ ﯼﻭﺭ ﺍﺭ ﺏﺁ ﯽﺘﺨﺳ ﻢﯿﻈﻨﺗ ﻢﯿﻨﮐﯽﻣ ﻪﯿﺻﻮﺗ ﻩﺎﮕﺘﺳﺩ ﺮﺗﻻﺎﺑ ﺮﻤﻋ ﻝﻮﻃ ﻭ ﻪﻨﯿﻬﺑ ﺩﺮﮑﻠﻤﻋ ﯼﺍﺮﺑ
.ﺖﺨﺳ ﺏﺁ :ﺖﺳﺍ 4 ﺽﺮﻓﺶﯿﭘ ﺏﺁ ﯽﺘﺨﺳ ﻪﺟﺭﺩ .ﺪﯿﺷﺎﺑ ﻪﺘﺷﺍﺪﻧ ﻩﺎﮕﺘﺳﺩ ﻪﺘﺳﻮﯿﭘ ﯽﯾﺍﺩﺯﺏﻮﺳﺭ ﻪﺑ ﯼﺯﺎﯿﻧ ﺪﻨﮐﯽﻣ ﮏﻤﮐ
1ﺕﻭﺎﻔﺘﻣ ﯼﺎﻫﮓﻧﺭ ﯼﺍﺭﺍﺩ ﺎﻫﻞﯾﺎﻓﻭﺮﭘ ﻪﻤﻫ .ﺪﯿﻧﺰﺑ ﻪﺑﺮﺿ
2ﮏﯾ (ﺹﺎﺧ ﯼﺎﻫﻝﺪﻣ ﯽﺧﺮﺑ ﺭﺩ ﺎﻬﻨﺗ) 'ﺮﺘﺸﯿﺑ ﯼﺎﻫﯽﻧﺪﯿﺷﻮﻧ' ﻦﮑﯾﺁ ﯼﻭﺭ ﺮﺑ ﻥﺩﺯ ﻪﺑﺮﺿ ﺎﺑ ﺎﯾ ﯽﺴﻤﻟ-ﮏﺗ ﯽﻧﺪﯿﺷﻮﻧ ﯼﺎﻫﻦﮑﯾﺁ ﯼﻭﺭ ﺮﺑ ﻥﺩﺯ ﻪﺑﺮﺿ ﺎﺑ
3 .ﺪﯿﻨﮐ ﻝﺎﻤﻋﺍ ﺩﻮﺧ ﻪﻘﺋﺍﺫ ﺎﺑ ﻖﺑﺎﻄﻣ ﺍﺭ ﯽﻧﺪﯿﺷﻮﻧ ﺕﺎﻤﯿﻈﻨﺗ
4ﺪﯿﻫﺩ ﺭﺎﺸﻓ ﺍﺭ ﻒﻗﻮﺗ/ﻉﻭﺮﺷ ﻪﻤﮐﺩ ،ﺩﻮﺧ ﺮﻈﻧ ﺩﺭﻮﻣ ﯽﻧﺪﯿﺷﻮﻧ ﻥﺩﺮﮐ ﻡﺩ ﯼﺍﺮﺑ
:ﺪﯿﻨﮐ ﻩﺩﺎﻔﺘﺳﺍ ﺩﻮﺧ ﻪﻘﻄﻨﻣ ﺭﺩ ﺏﺁ ﯽﺘﺨﺳ ﻦﯿﯿﻌﺗ ﯼﺍﺮﺑ ﻩﺎﮕﺘﺳﺩ ﻪﺒﻌﺟ ﺭﺩ ﻩﺪﺷ ﻪﺋﺍﺭﺍ ﺏﺁ ﯽﺘﺨﺳ ﺖﺴﺗ ﺭﺍﻮﻧ ﺯﺍ
:ﺪﯿﻨﮐ ﻢﯿﻈﻨﺗ ﺢﯿﺤﺻ ﺏﺁ ﯽﺘﺨﺳ ﺱﺎﺳﺍ ﺮﺑ ﺍﺭ ﻩﺎﮕﺘﺳﺩ
.ﺪﯿﻫﺩ
.ﺪﺷﺎﺑ ﻥﺎﺴﮑﯾ ﺖﺴﺗ (25 ﺮﯾﻮﺼﺗ) ﺭﺍﻮﻧ ﯼﻭﺭ ﺰﻣﺮﻗ ﯼﺎﻫﻊﺑﺮﻣ
ﺏﺎﯿﺳﺁ ﺕﺎﻤﯿﻈﻨﺗ ﻡﺎﺠﻧﺍ
ﯼﺮﺗﻦﯿﯾﺎﭘ ﺭﺍﺪﻘﻣ ﯼﻭﺭ ﺏﺎﯿﺳﺁ ﻢﯿﻈﻨﺗ ﻪﭼﺮﻫ .ﺪﯿﻫﺩ ﺮﯿﯿﻐﺗ ﺍﺭ ﻩﻮﻬﻗ ﻢﻌﻃ ﻥﺍﺰﯿﻣ ﺪﯿﻧﺍﻮﺗﯽﻣ ﻩﻮﻬﻗ ﯼﺎﻫﻪﻧﺍﺩ ﻑﺮﻇ ﻥﻭﺭﺩ ﺏﺎﯿﺳﺁ ﻢﯿﻈﻨﺗ ﻪﻤﮐﺩ ﺯﺍ ﻩﺩﺎﻔﺘﺳﺍ ﺎﺑ
ﺎﻬﻧﺁ ﻦﯿﺑ ﺯﺍ ﺪﯿﻧﺍﻮﺗﯽﻣ ﻪﮐ ﺩﺭﺍﺩ ﺩﻮﺟﻭ ﺏﺎﯿﺳﺁ ﻒﻠﺘﺨﻣ ﻢﯿﻈﻨﺗ 12 .ﺩﻮﺑ ﺪﻫﺍﻮﺧ ﺮﺗﯼﻮﻗ ﻩﻮﻬﻗ ﻢﻌﻃ ﻭ ﻩﺪﺷ ﺏﺎﯿﺳﺁ ﯼﺮﺗﺰﯾﺭ ﻩﺯﺍﺪﻧﺍ ﺎﺑ ﻩﻮﻬﻗ ﯼﺎﻫﻪﻧﺍﺩ ،ﺪﺷﺎﺑ
.ﺪﯿﻨﮐ ﺏﺎﺨﺘﻧﺍ
ﻡﺩ ﻩﻮﻬﻗ ﻥﺎﺠﻨﻓ ۱۰۰-۱۵۰ ﻪﮐ ﯽﺘﻗﻭ ﺎﺗ ﻢﯿﻨﮐﯽﻣ ﻪﯿﺻﻮﺗ ،ﻦﯾﺍﺮﺑﺎﻨﺑ .ﺪﻨﮐ ﻡﺩ ﻢﻌﻃ ﻦﯾﺮﺘﻬﺑ ﺎﺑ ﺍﺭ ﺎﻤﺷ ﻩﻮﻬﻗ ﯼﺎﻫﻪﻧﺍﺩ ﻪﮐ ﺖﺳﺍ ﻩﺪﺷ ﻢﯿﻈﻨﺗ ﯼﻮﺤﻧ ﻪﺑ ﻩﺎﮕﺘﺳﺩ
.ﺪﯿﻫﺪﻧ ﺮﯿﯿﻐﺗ ﺍﺭ ﺏﺎﯿﺳﺁ ﺕﺎﻤﯿﻈﻨﺗ ،(ﻩﺩﺎﻔﺘﺳﺍ ﻩﺎﻣ ۱ ﺩﻭﺪﺣ) ﺪﯾﺍﻩﺩﺮﮑﻧ
ﻦﯾﺍ ﻩﻮﻬﻗ ﻢﻌﻃ ﺕﻭﺎﻔﺗ ﻪﺟﻮﺘﻣ ﻪﮑﻨﯾﺍ ﯼﺍﺮﺑ .ﺪﻨﮐﯽﻣ ﺏﺎﯿﺳﺁ ﺍﺭ ﻩﻮﻬﻗ ﯼﺎﻫﻪﻧﺍﺩ ﻩﺎﮕﺘﺳﺩ ﻪﮐ ﺪﯿﻨﮐ ﻝﺎﻤﻋﺍ ﺪﯿﻧﺍﻮﺗﯽﻣ ﯽﻧﺎﻣﺯ ﺎﻬﻨﺗ ﺍﺭ ﺏﺎﯿﺳﺁ ﺕﺎﻤﯿﻈﻨﺗ
.ﺪﯿﻨﮐ ﻡﺩ ﻩﻮﻬﻗ ﺭﺎﺑ 3 ﺎﺗ 2 ﺖﺳﺍ ﻡﺯﻻ ﺪﯾﻮﺸﺑ ﻩﺎﮕﺘﺳﺩ
1.ﺪﯾﺭﺍﺩ ﻪﮕﻧ ﺮﯿﺷ ﺮﯾﺯ (23 ﺮﯾﻮﺼﺗ) ﻪﺒﻧﺎﺛ 1 ﺕﺪﻣ ﻪﺑ ﻭ ﺪﯿﻨﮐ ﺲﯿﺧ ﺏﺁ ﺮﯿﺷ ﺮﯾﺯ ﺍﺭ ﺏﺁ ﯽﺘﺨﺳ ﺖﺴﺗ ﺭﺍﻮﻧ
2.ﺪﻫﺩﯽﻣ ﻥﺎﺸﻧ ﺍﺭ ﺏﺁ (24 ﺮﯾﻮﺼﺗ) ﯽﺘﺨﺳ ﻪﺟﺭﺩ ،ﺪﻧﻮﺷﯽﻣ ﺰﻣﺮﻗ ﺖﺴﺗ ﺭﺍﻮﻧ ﯼﻭﺭ ﻪﮐ ﯽﯾﺎﻫﻊﺑﺮﻣ ﺩﺍﺪﻌﺗ .ﺪﯿﻧﺎﻤﺑ ﺮﻈﺘﻨﻣ ﻪﻘﯿﻗﺩ 1
1ﺭﺎﺸﻓ ﺍﺭ ﺪﯿﯾﺎﺗ ﻪﻤﮐﺩ ،ﺪﯿﯾﺎﺗ ﯼﺍﺮﺑ ،ﺲﭙﺳ .ﺪﯿﻨﮐ ﻩﺩﺎﻔﺘﺳﺍ ﻦﯿﯾﺎﭘ ﻭ ﻻﺎﺑ ﯼﺎﻫﺶﻠﻓ ﺯﺍ 'ﺏﺁ ﯽﺘﺨﺳ' ﺏﺎﺨﺘﻧﺍ ﯼﺍﺮﺑ ﻭ ﺪﯿﻧﺰﺑ ﻪﺑﺮﺿ ﺕﺎﻤﯿﻈﻨﺗ ﻦﮑﯾﺁ ﯼﻭﺭ
2ﻥﺎﻤﻫ ﺩﺍﺪﻌﺗ ﺎﺑ ﺖﺴﯾﺎﺑﯽﻣ ﺮﮕﺸﯾﺎﻤﻧ ﯼﻭﺭ ﻩﺪﺷ ﺏﺎﺨﺘﻧﺍ ﺰﻣﺮﻗ ﯼﺎﻫﻊﺑﺮﻣ ﺩﺍﺪﻌﺗ .ﺪﯿﻨﮐ ﻩﺩﺎﻔﺘﺳﺍ ﻦﯿﯾﺎﭘ ﻭ ﻻﺎﺑ ﯼﺎﻫﻦﮑﯾﺁ ﺯﺍ ﺏﺁ ﯽﺘﺨﺳ ﻪﺟﺭﺩ ﺏﺎﺨﺘﻧﺍ ﯼﺍﺮﺑ
3.ﺪﯿﯾﺎﻤﻧ ﻖﯾﺪﺼﺗ ﺍﺭ ﻥﺁ ﺪﯿﯾﺄﺗ ﻦﮑﯾﺁ ﯼﻭﺭ ﻥﺩﺮﮐ ﮏﯿﻠﮐ ﺎﺑ ،ﺪﯾﺩﺮﮐ ﻢﯿﻈﻨﺗ ﺍﺭ ﺏﺁ ﯽﺘﺨﺳ ﺢﯿﺤﺻ ﺭﺍﺪﻘﻣ ﯽﺘﻗﻭ
Page 88
.ﺪﯿﻧﺎﺧﺮﭽﻧ ﻥﺎﻣﺯ ﺮﻫ ﺭﺩ ﺪﺣﺍﻭ 1 ﺯﺍ ﺶﯿﺑ ﺍﺭ ﺏﺎﯿﺳﺁ ﻢﯿﻈﻨﺗ ﻪﻤﮐﺩ ،هﺎﮕﺘﺳﺩ ﺏﺎﯿﺳﺁ ﻥﺪﯾﺩ ﺐﯿﺳﺁ ﺯﺍ ﯼﺮﯿﮔﻮﻠﺟ ﯼﺍﺮﺑ
ﻩﺎﮕﺘﺳﺩ ﺕﺎﻤﯿﻈﻨﺗ ﺮﯾﺎﺳ ﻡﺎﺠﻧﺍ
:ﺪﯿﻫﺩ ﻡﺎﺠﻧﺍ ﻩﺎﮕﺘﺳﺩ ﺭﺩ ﺍﺭ ﺮﯾﺯ ﺕﺎﻤﯿﻈﻨﺗ ﺪﯿﻧﺍﻮﺗﯽﻣ ﺕﺎﻤﯿﻈﻨﺗ ﻦﮑﯾﺁ ﯼﻭﺭ ﺮﺑ ﻥﺩﺯ ﻪﺑﺮﺿ ﺎﺑ
؛ﺪﯿﻨﮐ ﺏﺎﺨﺘﻧﺍ ﯽﺘﺨﺳ ﻪﺟﺭﺩ 5 ﻦﯿﺑ ﺯﺍ ﺩﻮﺧ ﻪﻘﻄﻨﻣ ﺭﺩ ﺏﺁ ﯽﺘﺨﺳ ﺱﺎﺳﺍ ﺮﺑ ﺪﯿﻧﺍﻮﺗﯽﻣ ﺎﻤﺷ :ﺏﺁ ﯽﺘﺨﺳ
ﺪﯿﻨﮐ ﺏﺎﺨﺘﻧﺍ ﺍﺭ ﻪﻘﯿﻗﺩ 180 ﺎﯾ 60 ،30 ،15 ﯼﺎﻫﻥﺎﻣﺯ ﺯﺍ ﯽﮑﯾ ﺪﯿﻧﺍﻮﺗﯽﻣ ﺎﻤﺷ :ﺭﺎﮐ ﻪﺑ ﻩﺩﺎﻣﺁ ﻥﺎﻣﺯ
.ﺪﯿﻨﮐ ﺏﺎﺨﺘﻧﺍ ﺍﺭ ﺩﺎﯾﺯ ﻭ ﻂﺳﻮﺘﻣ ،ﻢﮐ ﯼﺎﻫﺖﻟﺎﺣ ﺯﺍ ﯽﮑﯾ ﺪﯿﻧﺍﻮﺗﯽﻣ ﺎﻤﺷ :ﺮﮕﺸﯾﺎﻤﻧ ﯽﯾﺎﻨﺷﻭﺭ
ﺪﯿﻨﮐ ﻝﺎﻌﻓﺮﯿﻏ ﺎﯾ ﻝﺎﻌﻓ ﺍﺭ ﻩﺎﮕﺘﺳﺩ ﻕﻮﺑ ﯼﺍﺪﺻ ﺪﯿﻧﺍﻮﺗﯽﻣ ﺎﻤﺷ :ﺍﺪﺻ
ﺪﯿﻨﮐ ﺏﺎﺨﺘﻧﺍ ﺍﺭ ﺩﻮﺧ ﻩﺍﻮﺨﻟﺩ ﻪﻨﯾﺰﮔ ﻩﻮﻬﻗ ﻥﺩﺮﮐ ﻡﺩ ﯼﺎﻣﺩ 3 ﻦﯿﺑ ﺯﺍ ﺪﯿﻧﺍﻮﺗﯽﻣ ﺎﻤﺷ :ﺎﻣﺩ
'ﺵﻮﻣﺎﺧ ﻪﺸﯿﻤﻫ' ﺎﯾ 'ﻥﺩﺮﮐ ﻡﺩ ﻦﯿﺣ ﻦﺷﻭﺭ' ،'ﻦﺷﻭﺭ ﻪﺸﯿﻤﻫ' ﯼﺎﻫﻪﻨﯾﺰﮔ ﻦﯿﺑ ﺯﺍ ﺪﯿﻧﺍﻮﺗﯽﻣ ﺎﻤﺷ :(ﺹﺎﺧ ﯼﺎﻫﻝﺪﻣ ﯽﺧﺮﺑ ﺭﺩ ﺎﻬﻨﺗ) ﻮﻠﺟ ﯽﯾﺎﻨﺷﻭﺭ
.ﺪﯿﻨﮐ ﺏﺎﺨﺘﻧﺍ ﺲﻧﻭﺍ ﺎﯾ ﺮﺘﯿﻟﯽﻠﯿﻣ ﺪﺣﺍﻭ ﻭﺩ ﻦﯿﺑ ﺯﺍ ﺪﯿﻧﺍﻮﺗﯽﻣ ﺎﻤﺷ :ﯼﺮﯿﮔﻩﺯﺍﺪﻧﺍ ﺪﺣﺍﻭ
ﻪﻧﺎﺧﺭﺎﮐ ﺕﺎﻤﯿﻈﻨﺗ ﯽﺑﺎﯾﺯﺎﺑ
ﯽﺳﺭﺎﻓ
.ﺪﯿﻨﮐ ﯽﺑﺎﯾﺯﺎﺑ ﺍﺭ ﻪﻧﺎﺧﺭﺎﮐ ﺕﺎﻤﯿﻈﻨﺗ ،ﻥﺎﻣﺯ ﺮﻫ ﺭﺩ ﻪﮐ ﺪﻨﮐﯽﻣ ﻢﻫﺍﺮﻓ ﻥﺎﺘﯾﺍﺮﺑ ﺍﺭ ﻥﺎﮑﻣﺍ ﻦﯾﺍ ﻩﺎﮕﺘﺳﺩ
.ﺪﻧﻮﺷﯽﻣ ﯽﺑﺎﯾﺯﺎﺑ ﺕﺎﻤﯿﻈﻨﺗ ﻥﻮﻨﮐﺍ
ﯽﺳﺭﺎﻓ
Language
.ﺪﯿﻨﮐ ﺏﺎﺨﺘﻧﺍ
89
1.ﺪﯿﻫﺩ ﺭﺍﺮﻗ ﻩﻮﻬﻗ ﺝﻭﺮﺧ ﻪﭽﯾﺭﺩ ﺮﯾﺯ ﻥﺎﺠﻨﻓ ﮏﯾ
2 .ﺪﯿﻨﮐ ﺯﺎﺑ ﺍﺭ ﻩﻮﻬﻗ ﻪﻧﺍﺩ ﻒﯿﻗ ﺏﺭﺩ
3.ﺪﯿﻫﺩ ﺭﺎﺸﻓ ﺍﺭ ﻒﻗﻮﺗ/ﻉﻭﺮﺷ ﻪﻤﮐﺩ ﺲﭙﺳ ﻭ ﺪﯿﻧﺰﺑ ﻪﺑﺮﺿ ﻮﺳﺮﭙﺳﺍ ﻦﮑﯾﺁ ﯼﻭﺭ
4(26 ﺮﯾﻮﺼﺗ) .ﺪﯿﻧﺎﺧﺮﭽﺑ ﺖﺳﺍﺭ ﺎﯾ ﭗﭼ ﺖﻤﺳ ﻪﺑ ﺍﺭ ﻥﺁ ﻭ ﺪﯿﻫﺩ ﺭﺎﺸﻓ ﻦﯿﯾﺎﭘ ﻪﺑ ﺍﺭ ﺏﺎﯿﺳﺁ ﻢﯿﻈﻨﺗ ﻪﻤﮐﺩ ،ﺩﺮﮐ ﺭﺎﮐ ﻪﺑ ﻉﻭﺮﺷ ﺏﺎﯿﺳﺁ ﻪﮐ ﯽﺘﻗﻭ
-
-
-
-
-
-
-
-
1 .ﺪﯿﻧﺰﺑ ﻪﺑﺮﺿ ﺕﺎﻤﯿﻈﻨﺗ ﻦﮑﯾﺁ ﯼﻭﺭ
2 .ﺪﯿﻨﮐ ﺪﯿﯾﺄﺗ ﺍﺭ ﺕﺎﯿﻠﻤﻋ ﺪﯿﯾﺄﺗ ﻦﮑﯾﺁ ﯼﻭﺭ ﻥﺩﺮﮐ ﮏﯿﻠﮐ ﺎﺑ .ﺪﯿﻨﮐ ﻩﺩﺎﻔﺘﺳﺍ 'ﻪﻧﺎﺧﺭﺎﮐ ﺕﺎﻤﯿﻈﻨﺗ' ﺏﺎﺨﺘﻧﺍ ﯼﺍﺮﺑ ﻦﯿﯾﺎﭘ ﻭ ﻻﺎﺑ ﯼﺎﻫﻦﮑﯾﺁ ﺯﺍ
3.ﺪﯿﻫﺩ ﺭﺎﺸﻓ ﺍﺭ ﻒﻗﻮﺗ/ﻉﻭﺮﺷ ﻪﻤﮐﺩ ،ﺪﯿﻨﮐ ﯽﺑﺎﯾﺯﺎﺑ ﺍﺭ ﺕﺎﻤﯿﻈﻨﺗ ﺪﯾﺭﺍﺩ ﺮﻈﻧ ﺭﺩ ﻪﮑﻨﯾﺍ ﺪﯿﯾﺄﺗ ﯼﺍﺮﺑ
-
،ﻮﻠﺟ ﯽﯾﺎﻨﺷﻭﺭ ،ﺎﻣﺩ ،ﺍﺪﺻ ،ﺮﮕﺸﯾﺎﻤﻧ ﯽﯾﺎﻨﺷﻭﺭ ،ﺭﺎﮐ ﻪﺑ ﻩﺩﺎﻣﺁ ﻥﺎﻣﺯ ،ﺏﺁ ﯽﺘﺨﺳ :ﺪﻧﻮﺷﯽﻣ ﯽﺑﺎﯾﺯﺎﺑ ﺽﺮﻓﺶﯿﭘ ﺖﻟﺎﺣ ﻪﺑ ﺮﯾﺯ ﻪﻧﺎﺧﺭﺎﮐ ﺕﺎﻤﯿﻈﻨﺗ
.ﺎﻫﻞﯾﺎﻓﻭﺮﭘ
ﻥﺩﺮﮐﻡﺩ ﻪﻋﻮﻤﺠﻣ ﻦﺘﺧﺍﺪﻧﺍ ﺎﺟ ﻭ ﻥﺩﺭﻭﺁ ﻥﻭﺮﯿﺑ
ﻪﺑ ﻥﺩﺮﮐ ﻡﺩ ﻪﻋﻮﻤﺠﻣ ﻥﺩﺮﮐ ﺰﯿﻤﺗ ﻭ ﻦﺘﺧﺍﺪﻧﺍ ﺎﺟ ،ﻥﺩﺭﻭﺁ ﻥﻭﺮﯿﺑ ﻩﻮﺤﻧ ﺹﻮﺼﺧ ﺭﺩ ﻞﻣﺎﮐ ﯽﯾﻮﯾﺪﯾﻭ ﯼﺎﻫﻞﻤﻌﻟﺍﺭﻮﺘﺳﺩ ﻩﺪﻫﺎﺸﻣ ﺖﻬﺟ
.ﺪﯿﻨﮐ ﻪﻌﺟﺍﺮﻣ www.philips.com/coffee-care
ﻩﺎﮕﺘﺳﺩ ﺯﺍ ﻥﺩﺮﮐﻡﺩ ﻪﻋﻮﻤﺠﻣ ﻥﺩﺭﻭﺁ ﻥﻭﺮﯿﺑ
ﻥﺩﺮﮐﻡﺩ ﻪﻋﻮﻤﺠﻣ ﺩﺪﺠﻣ ﻦﺘﺧﺍﺪﻧﺍﺎﺟ
.ﺩﺭﺍﺩ ﺭﺍﺮﻗ ﺢﯿﺤﺻ ﺖﯿﻌﺿﻭ ﺭﺩ ﺪﯾﻮﺷ ﻦﺌﻤﻄﻣ ،ﺪﯿﻨﮐ ﺩﺭﺍﻭ ﻩﺎﮕﺘﺳﺩ ﻪﺑ ﺍﺭ ﻥﺩﺮﮐﻡﺩ ﻪﻋﻮﻤﺠﻣ ﻪﮑﻨﯾﺍ ﺯﺍ ﻞﺒﻗ
1.ﺪﯿﻨﮐ ﺵﻮﻣﺎﺧ ﺍﺭ ﻩﺎﮕﺘﺳﺩ
2.ﺪﯿﻨﮐ ﺯﺎﺑ ﺍﺭ ﺲﯾﻭﺮﺳ (27 ﺮﯾﻮﺼﺗ) ﺏﺭﺩ ﻭ ﺪﯾﺭﻭﺎﯿﺑ ﻥﻭﺮﯿﺑ ﺍﺭ ﺏﺁ ﻥﺰﺨﻣ
3.ﺪﯾﺭﻭﺎﯿﺑ ﻥﻭﺮﯿﺑ (29 ﺮﯾﻮﺼﺗ) ﻩﺎﮕﺘﺳﺩ ﺯﺍ ﺍﺭ ﻥﺁ ﻭ ﺪﯿﺸﮑﺑ ﺍﺭ ﻥﺩﺮﮐﻡﺩ ﻪﻋﻮﻤﺠﻣ ﻩﺮﯿﮔ ﻭ ﺪﯿﻫﺩ ﺭﺎﺸﻓ ﺍﺭ (ﻥﺩﺍﺩ ﺭﺎﺸﻓ) PUSH (28 ﺮﯾﻮﺼﺗ) ﻪﺘﺳﺩ
Page 89
ﯽﺳﺭﺎﻓ
90
.ﺩﻮﺷ ﺎﺘﺳﺍﺮﻤﻫ (30
.ﺪﻨﮐ ﺍﺪﯿﭘ ﺱﺎﻤﺗ ﻥﺩﺮﮐ ﻡﺩ (31 ﺮﯾﻮﺼﺗ) ﻪﻋﻮﻤﺠﻣ ﻒﮐ ﺎﺑ ﻪﮐ ﯽﯾﺎﺟ ﺎﺗ ﺪﯿﻫﺩ ﺭﺎﺸﻓ ﻦﯿﯾﺎﭘ ﻪﺑ ﺍﺭ ﻪﺘﺳﺩ ،ﺪﻨﺘﺴﯿﻧ ﺎﺘﺳﺍﺮﻤﻫ ﺮﮔﺍ
.ﺪﯿﻫﺪﻧ ﺭﺎﺸﻓ ﺍﺭ PUSH ﻪﻤﮐﺩ .ﺩﻮﺷ
ﻩﺎﮕﺘﺳﺩ ﻥﺩﺮﮐ ﺲﯾﻭﺮﺳ ﻭ ﻥﺩﺮﮐ ﺰﯿﻤﺗ
ﺕﺪﻣﯽﻧﻻﻮﻃ ﯼﺍﺮﺑ ﺍﺭ ﻥﺁ ﺐﺳﺎﻨﻣ ﻥﺎﯾﺮﺟ ﻩﺍﺮﻤﻫ ﻪﺑ ﻩﻮﻬﻗ ﺏﻮﺧ ﻢﻌﻃ ﻭ ﺪﻨﮐﯽﻣ ﻆﻔﺣ ﺏﻮﻠﻄﻣ ﺖﯿﻌﺿﻭ ﺭﺩ ﺍﺭ ﻥﺁ ﻩﺎﮕﺘﺳﺩ ﻢﻈﻨﻣ ﻥﺩﺮﮐ ﺲﯾﻭﺮﺳ ﻭ ﯼﺭﺎﮐﺰﯿﻤﺗ
.ﺪﻨﮐﯽﻣ ﻦﯿﻤﻀﺗ
ﻭ ﺮﺗﻞﻣﺎﮐ ﺕﺎﻋﻼﻃﺍ .ﺪﯿﻨﮐ ﻪﻌﺟﺍﺮﻣ ﺮﯾﺯ ﻝﻭﺪﺟ ﻪﺑ ﻩﺎﮕﺘﺳﺩ ﻩﺪﻧﻮﺷﺍﺪﺟ ﺕﺎﻌﻄﻗ ﻪﻤﻫ ﻥﺩﺮﮐ ﺰﯿﻤﺗ ﻩﻮﺤﻧ ﻭ ﻥﺎﻣﺯ ﺹﻮﺼﺧ ﺭﺩ ﻞﻣﺎﮐ ﺕﺎﺤﯿﺿﻮﺗ ﻩﺪﻫﺎﺸﻣ ﯼﺍﺮﺑ
ﻞﺑﺎﻗ ﺕﺎﻌﻄﻗ ﻪﺑ ﻁﻮﺑﺮﻣ ﺕﺎﯿﻠﮐ ﻩﺪﻫﺎﺸﻣ ﯼﺍﺮﺑ .ﺪﯿﻨﮐ ﻪﻈﺣﻼﻣ www.philips.com/coffee-care ﺖﯾﺎﺳﺏﻭ ﻖﯾﺮﻃ ﺯﺍ ﺍﺭ ﯽﯾﻮﯾﺪﯾﻭ ﯼﺎﻫﻞﻤﻌﻟﺍﺭﻮﺘﺳﺩ
.ﺪﯿﻨﯿﺒﺑ ﺍﺭ B ﻞﮑﺷ ﯽﯾﻮﺸﻓﺮﻇ ﻦﯿﺷﺎﻣ ﺭﺩ ﻮﺸﺘﺴﺷ
ﻥﺩﺮﮐ ﺰﯿﻤﺗ ﻩﻮﺤﻧ
ﻥﺩﺮﮐ ﺰﯿﻤﺗ ﻥﺎﻣﺯ ﻩﺪﻧﻮﺷﺍﺪﺟ ﺕﺎﻌﻄﻗ
1ﺮﯾﻮﺼﺗ) N ﻑﺮﺣ ﻭ ﻩﺎﯿﺳ ﺶﻠﻓ ﺎﺑ ﺪﯾﺎﺑ ﻥﺩﺮﮐﻡﺩ ﻪﻋﻮﻤﺠﻣ ﺭﺎﻨﮐ ﺩﺭﺯ ﺭﺪﻨﻠﯿﺳ ﯼﻭﺭ ﺶﻠﻓ .ﺖﺳﺍ ﺢﯿﺤﺻ ﺖﯿﻌﺿﻭ ﺭﺩ ﻥﺩﺮﮐﻡﺩ ﻪﻋﻮﻤﺠﻣ ﺎﯾﺁ ﺪﯿﻨﮐ ﯽﺳﺭﺮﺑ
2ﻞﻔﻗ ﺢﯿﺤﺻ ﺖﯿﻌﺿﻭ ﺭﺩ (33 ﺮﯾﻮﺼﺗ) ﮏﯿﻠﮐ ﯼﺍﺪﺻ ﺎﺑ ﺎﺗ ﺪﯿﻨﮐ ﺩﺭﺍﻭ ﻩﺎﮕﺘﺳﺩ ﻪﺑ (32 ﺮﯾﻮﺼﺗ) ﻑﺮﻃ ﻭﺩ ﺭﺩ ﺎﻤﻨﻫﺍﺭ ﯼﺎﻫﻞﯾﺭ ﺩﺍﺪﺘﻣﺍ ﺭﺩ ﺍﺭ ﻥﺩﺮﮐﻡﺩ ﻪﻋﻮﻤﺠﻣ
3.ﺪﯿﻫﺩ ﺭﺍﺮﻗ ﺩﻮﺧ ﯼﺎﺟ ﺭﺩ ﺍﺭ ﺏﺁ ﻥﺰﺨﻣ ﻭ ﺪﯾﺪﻨﺒﺑ ﺍﺭ ﺲﯾﻭﺮﺳ ﺏﺭﺩ
ﺎﺟ ﻭ ﻥﺩﺭﻭﺁ ﻥﻭﺮﯿﺑ' ﻩﺪﻫﺎﺸﻣ) ﻩﺎﮕﺘﺳﺩ ﺯﺍ ﺍﺭ ﻥﺩﺮﮐﻡﺩ ﻪﻋﻮﻤﺠﻣ
ﺏﺁ ﺮﯿﺷ ﺮﯾﺯ ﺍﺭ ﻥﺁ .ﺪﯾﺭﻭﺎﯿﺑ ﻥﻭﺮﯿﺑ ('ﻥﺩﺮﮐﻡﺩ ﻪﻋﻮﻤﺠﻣ ﻦﺘﺧﺍﺪﻧﺍ
.ﺪﯿﯾﻮﺸﺑ ('ﺏﺁ ﺮﯿﺷ ﺮﯾﺯ ﻥﺩﺮﮐﻡﺩ ﻪﻋﻮﻤﺠﻣ ﻥﺩﺮﮐ ﺰﯿﻤﺗ' ﻩﺪﻫﺎﺸﻣ)
ﻡﺩ ﻪﻋﻮﻤﺠﻣ ﻥﺩﺮﮐ ﺰﯿﻤﺗ' ﻩﺪﻫﺎﺸﻣ) ﺹﺮﻗ ﺎﺑ ﺍﺭ ﻥﺩﺮﮐﻡﺩ ﻪﻋﻮﻤﺠﻣ
ﻩﻮﻬﻗ ﻦﻏﻭﺭ ﻩﺪﻨﻨﮐ ﮎﺎﭘ ('ﻩﻮﻬﻗ ﻦﻏﻭﺭ ﻩﺪﻨﻨﮐ ﮎﺎﭘ ﯼﺎﻫﺹﺮﻗ ﺎﺑ ﻥﺩﺮﮐ
.ﺪﯿﻨﮐ ﺰﯿﻤﺗ Philips
ﺯﺎﺳﺮﯿﺷﻒﮐ ﻊﯾﺮﺳ ﻥﺩﺮﮐ ﺰﯿﻤﺗ' ﻩﺪﻫﺎﺸﻣ) ﻪﻣﺎﻧﺮﺑ ﺯﺍ ﻩﺩﺎﻔﺘﺳﺍ ﺎﺑ ﺍﺪﺘﺑﺍ
،(ﺮﯿﺷ ﻊﯾﺮﺳ ﻥﺩﺮﮐ ﺰﯿﻤﺗ) 'Quick milk clean' ('ﮏﯿﺳﻼﮐ
.ﺪﯿﻨﮐ ﺰﯿﻤﺗ ،ﺖﺳﺍ ﻞﺼﺘﻣ ﻩﺎﮕﺘﺳﺩ ﻪﺑ ﻪﮐ ﯽﻟﺎﺣ ﺭﺩ ﺍﺭ ﺯﺎﺳﺮﯿﺷﻒﮐ
ﻢﻫ ﺯﺍ ﺍﺭ ﻥﺁ ﺕﺎﻌﻄﻗ ﻭ ﻩﺩﺮﮐ ﺍﺪﺟ ﻩﺎﮕﺘﺳﺩ ﺯﺍ ﺍﺭ ﺯﺎﺳﺮﯿﺷﻒﮐ ﺲﭙﺳ
ﺰﯿﻤﺗ ﯽﯾﻮﺸﻓﺮﻇ ﻦﯿﺷﺎﻣ ﺭﺩ ﺎﯾ ﺏﺁ ﺮﯿﺷ ﺮﯾﺯ ﺍﺭ ﺕﺎﻌﻄﻗ ﻪﻤﻫ .ﺪﯿﻨﮐ ﺯﺎﺑ
.ﺪﯿﻨﮐ
.ﺪﯾﺭﻭﺎﯿﺑ ﻥﻭﺮﯿﺑ ﺍﺭ ﻥﺩﺮﮐﻡﺩ ﻪﻋﻮﻤﺠﻣ ﻭ ﺪﯿﺸﮑﺑ ﻕﺮﺑ ﺯﺍ ﺍﺭ ﻩﺎﮕﺘﺳﺩ
ﮏﻘﺷﺎﻗ ﻪﺘﺳﺩ ﻭ ﺪﯿﻨﮐ ﺯﺎﺑ ﺍﺭ ﻩﺪﺷ ﺏﺎﯿﺳﺁ-ﺶﯿﭘ ﻩﻮﻬﻗ ﻪﻈﻔﺤﻣ ﺏﺭﺩ
ﺭﺩﻮﭘ ﺎﺗ ﺪﯿﻫﺪﺑ ﺖﮐﺮﺣ ﻦﯿﯾﺎﭘ ﻭ ﻻﺎﺑ ﻪﺑ ﺍﺭ ﻪﺘﺳﺩ .ﺪﯾﺮﺒﺑ ﻭﺮﻓ ﻥﺁ ﺭﺩ ﺍﺭ
ﯼﺎﻫﻞﻤﻌﻟﺍﺭﻮﺘﺳﺩ .ﺪﺘﻔﯿﺑ (34 ﺮﯾﻮﺼﺗ) ﻦﯿﯾﺎﭘ ﻩﺩﺮﮐ ﺮﯿﮔ ﻩﻮﻬﻗ
www.philips.com/coffee-care ﺭﺩ ﺍﺭ ﻞﻣﺎﮐ ﯽﯾﻮﯾﺪﯾﻭ
.ﺪﯿﻨﮐ ﻪﻈﺣﻼﻣ
ﻥﻭﺮﯿﺑ ﺖﺳﺍ ﻦﺷﻭﺭ ﻩﺎﮕﺘﺳﺩ ﻪﮐ ﯽﻣﺎﮕﻨﻫ ﺍﺭ ﻩﻮﻬﻗ ﻪﻟﺎﻔﺗ ﻑﺮﻇ
ﺭﺩ ﺎﯾ ﺏﺁ ﺮﯿﺷ ﺮﯾﺯ ﯽﯾﻮﺸﻓﺮﻇ ﻊﯾﺎﻣ ﯽﻤﮐ ﺯﺍ ﻩﺩﺎﻔﺘﺳﺍ ﺎﺑ ﺍﺭ ﻥﺁ .ﺪﯾﺭﻭﺎﯿﺑ
ﻞﮑﺷ) ﻩﻮﻬﻗ ﻪﻟﺎﻔﺗ ﻑﺮﻇ ﯼﻮﻠﺟ ﺏﺎﻗ .ﺪﯿﯾﻮﺸﺑ ﯽﯾﻮﺸﻓﺮﻇ ﻦﯿﺷﺎﻣ
.ﺖﺴﯿﻧ ﺐﺳﺎﻨﻣ ﯽﯾﻮﺸﻓﺮﻇ ﻦﯿﺷﺎﻣ ﺭﺩ ﻦﺘﺴﺷ ﯼﺍﺮﺑ (A15
ﺎﺑ ﻭ ﺪﯾﺭﻭﺎﯿﺑ ﻥﻭﺮﯿﺑ ﺍﺭ (36 ﺮﯾﻮﺼﺗ) ﺎﻫﻪﮑﭼ ﻥﺩﺮﮐ ﻊﻤﺟ ﯽﻨﯿﺳ
ﯽﻨﯿﺳ .ﺪﯿﯾﻮﺸﺑ ﺏﺁ ﺮﯿﺷ ﺮﯾﺯ ﯽﯾﻮﺸﻓﺮﻇ ﻊﯾﺎﻣ ﯽﻤﮐ ﺯﺍ ﻩﺩﺎﻔﺘﺳﺍ
.ﺪﯿﯾﻮﺸﺑ ﺰﯿﻧ ﯽﯾﻮﺸﻓﺮﻇ ﻦﯿﺷﺎﻣ ﺭﺩ ﺪﯿﻧﺍﻮﺗﯽﻣ ﺍﺭ ﺎﻫﻪﮑﭼ ﻥﺩﺮﮐ ﻊﻤﺟ
ﺭﺩ ﻦﺘﺴﺷ ﯼﺍﺮﺑ (A15 ﻞﮑﺷ) ﻩﻮﻬﻗ ﻪﻟﺎﻔﺗ ﻑﺮﻇ ﯼﻮﻠﺟ ﺏﺎﻗ
.ﺖﺴﯿﻧ ﺐﺳﺎﻨﻣ ﯽﯾﻮﺸﻓﺮﻇ ﻦﯿﺷﺎﻣ
ﯽﮕﺘﻔﻫ ﻥﺩﺮﮐﻡﺩ ﻪﻋﻮﻤﺠﻣ
ﻪﻧﺎﻫﺎﻣ
ﻩﺩﺎﻔﺘﺳﺍ ﺭﺎﺑ ﺮﻫ ﺯﺍ ﺲﭘ ﮏﯿﺳﻼﮐ ﺯﺎﺳﺮﯿﺷﻒﮐ
ﺭﻮﻃ ﻪﺑ ﺍﺭ ﻩﺪﺷ ﺏﺎﯿﺳﺁ-ﺶﯿﭘ ﻩﻮﻬﻗ ﻪﻈﻔﺤﻣ
.ﺪﺷﺎﺑ ﻩﺪﺸﻧ ﺩﻭﺪﺴﻣ ﻪﮐ ﺪﯿﻨﮐ ﯽﺳﺭﺮﺑ ﯽﮕﺘﻔﻫ
ﺍﺭ ﻩﻮﻬﻗ ﻪﻟﺎﻔﺗ ﻑﺮﻇ ،ﺩﺮﮐ ﻡﻼﻋﺍ ﻩﺎﮕﺘﺳﺩ ﯽﺘﻗﻭ
.ﺪﯿﻨﮐ ﺰﯿﻤﺗ ﯽﮕﺘﻔﻫ ﺕﺭﻮﺻ ﻪﺑ ﺍﺭ ﻥﺁ .ﺪﯿﻨﮐ ﯽﻟﺎﺧ
ﺎﯾ ﻪﻧﺍﺯﻭﺭ ﺕﺭﻮﺻ ﻪﺑ ﺍﺭ ﺎﻫﻪﮑﭼ ﻥﺩﺮﮐ ﻊﻤﺟ ﯽﻨﯿﺳ
ﻥﺎﺠﻨﻓ ﻥﺪﺷ ﺮﭘ' ﮓﻧﺭ ﺰﻣﺮﻗ ﺮﮕﻧﺎﺸﻧ ﺖﻗﻭ ﺮﻫ
ﺮﯾﻮﺼﺗ) ﺎﻫﻪﮑﭼ ﻥﺩﺮﮐ ﻊﻤﺟ ﯽﻨﯿﺳ ﯼﻭﺭ 'ﻩﻮﻬﻗ
ﻥﺩﺮﮐ ﻊﻤﺟ ﯽﻨﯿﺳ .ﺪﯿﻨﮐ ﯽﻟﺎﺧ ،ﺪﺷ ﺮﻫﺎﻇ (35
.ﺪﯿﻨﮐ ﺰﯿﻤﺗ ﯽﮕﺘﻔﻫ ﺕﺭﻮﺻ ﻪﺑ ﺍﺭ ﺎﻫﻪﮑﭼ
ﺏﺎﯿﺳﺁ-ﺶﯿﭘ ﻩﻮﻬﻗ ﻪﻈﻔﺤﻣ
ﻩﺪﺷ
ﻩﻮﻬﻗ ﻪﻟﺎﻔﺗ ﻑﺮﻇ
ﻥﺎﺠﻨﻓ ﯽﻨﯿﺳ
Page 90
ﯽﺳﺭﺎﻓ
ﻥﺩﺮﮐ ﺰﯿﻤﺗ ﻩﻮﺤﻧ ﻥﺩﺮﮐ ﺰﯿﻤﺗ ﻥﺎﻣﺯ ﻩﺪﻧﻮﺷﺍﺪﺟ ﺕﺎﻌﻄﻗ
91
ﺯﺍ ﻩﺩﺎﻔﺘﺳﺍ ﺎﺑ ﺖﺳﺍ ﻞﺻﻭ ﻩﺎﮕﺘﺳﺩ ﻪﺑ ﻪﮑﯿﻟﺎﺣ ﺭﺩ ﺍﺭ LatteGo ﺍﺪﺘﺑﺍ
Quick milk' ('LatteGo ﻊﯾﺮﺳ ﯼﺭﺎﮐﺰﯿﻤﺗ' ﻩﺪﻫﺎﺸﻣ) ﻪﻣﺎﻧﺮﺑ
ﻩﺎﮕﺘﺳﺩ ﺯﺍ ﺍﺭ ﻥﺁ ﺲﭙﺳ .ﺪﯿﯾﻮﺸﺑ (ﺮﯿﺷ ﻊﯾﺮﺳ ﻥﺩﺮﮐ ﺰﯿﻤﺗ) 'clean
.ﺪﯿﯾﻮﺸﺑ ﯽﯾﻮﺸﻓﺮﻇ ﻦﯿﺷﺎﻣ ﺭﺩ ﺎﯾ ﺏﺁ ﺮﯿﺷ ﺮﯾﺯ ﻭ ﺪﯾﺭﻭﺎﯿﺑ ﻥﻭﺮﯿﺑ
ﺲﯾﺮﮔ ﺎﺑ ﺍﺭ ﻥﺩﺮﮐﻡﺩ ﻪﻋﻮﻤﺠﻣ ﻭ ﺪﯿﻨﮐ ﻪﻌﺟﺍﺮﻣ ﯼﺭﺎﮐﻦﻏﻭﺭ ﻝﻭﺪﺟ ﻪﺑ
ﯼﺭﺎﮐﻦﻏﻭﺭ Philips ('ﻥﺩﺮﮐﻡﺩ ﻪﻋﻮﻤﺠﻣ ﯼﺭﺎﮐﻦﻏﻭﺭ' ﻩﺪﻫﺎﺸﻣ)
.ﺪﯿﻨﮐ
ﺪﯿﯾﻮﺸﺑ ﺏﺁ ﺮﯿﺷ ﺮﯾﺯ ﺍﺭ ﺏﺁ ﻥﺰﺨﻣ ﯽﮕﺘﻔﻫ ﺏﺁ ﻥﺰﺨﻣ
ﺪﯿﻨﮐ ﺰﯿﻤﺗ ﺶﺧﺪﺿ ﻝﺎﻤﺘﺳﺩ ﮏﯾ ﺎﺑ ﯽﮕﺘﻔﻫ ﻩﺎﮕﺘﺳﺩ ﯼﻮﻠﺟ
ﻩﺩﺎﻔﺘﺳﺍ ﺭﺎﺑ ﺮﻫ ﺯﺍ ﺲﭘ LatteGo
ﻩﺎﻣ 2 ﺮﻫ ﻥﺩﺮﮐﻡﺩ ﻪﻋﻮﻤﺠﻣ ﯼﺭﺎﮐﻦﻏﻭﺭ
ﻥﺩﺮﮐﻡﺩ ﻪﻋﻮﻤﺠﻣ ﯼﺭﺎﮐﺰﯿﻤﺗ
ﻩﻮﺤﻧ ﻩﺭﺎﺑﺭﺩ ﯽﻧﺎﺒﯿﺘﺸﭘ ﯼﺎﻫﻮﯾﺪﯾﻭ .ﺪﻨﮐﯽﻣ ﯼﺮﯿﮔﻮﻠﺟ ﻩﻮﻬﻗ ﻪﻟﺎﻔﺗ ﻂﺳﻮﺗ ﻩﺎﮕﺘﺳﺩ ﯽﻠﺧﺍﺩ ﯼﺎﻫﺭﺍﺪﻣ ﻥﺪﺷ ﺩﻭﺪﺴﻣ ﺯﺍ ﻥﺩﺮﮐﻡﺩ ﻪﻋﻮﻤﺠﻣ ﻢﻈﻨﻣ ﻥﺩﺮﮐ ﺰﯿﻤﺗ
.ﺪﯿﻨﮐ ﻩﺪﻫﺎﺸﻣ www.philips.com/coffee-care ﺖﯾﺎﺳﺏﻭ ﺭﺩ ﺍﺭ ﻥﺩﺮﮐﻡﺩ ﻪﻋﻮﻤﺠﻣ ﻥﺩﺮﮐ ﺰﯿﻤﺗ ﻭ ﻦﺘﺧﺍﺪﻧﺍﺎﺟ ،ﻥﺩﺭﻭﺁ ﻥﻭﺮﯿﺑ
ﺏﺁ ﺮﯿﺷ ﺮﯾﺯ ﻥﺩﺮﮐﻡﺩ ﻪﻋﻮﻤﺠﻣ ﻥﺩﺮﮐ ﺰﯿﻤﺗ
ﯽﺳﺭﺎﻓ
.ﺩﻮﺷ ﯼﺮﯿﮔﻮﻠﺟ ﻥﺩﺮﮐ ﻡﺩ ﻪﻋﻮﻤﺠﻣ ﻥﻭﺭﺩ ﻝﺎﻤﺘﺳﺩ ﯼﺎﻫﺯﺮﭘ ﻥﺪﺷ
ﻩﻮﻬﻗ ﻦﻏﻭﺭ ﻩﺪﻨﻨﮐ ﮎﺎﭘ ﯼﺎﻫﺹﺮﻗ ﺎﺑ ﻥﺩﺮﮐ ﻡﺩ ﻪﻋﻮﻤﺠﻣ ﻥﺩﺮﮐ ﺰﯿﻤﺗ
.ﺪﯿﻨﮐ ﻩﺩﺎﻔﺘﺳﺍ Philips ﻩﻮﻬﻗ ﻦﻏﻭﺭ ﻥﺩﺮﮐ ﮎﺎﭘ ﯼﺎﻫﺹﺮﻗ ﺯﺍ ﺎﻬﻨﺗ
ﻥﺩﺮﮐ ﺰﯿﻤﺗ ﻦﮑﯾﺁ ﯼﻭﺭ
1.ﺪﯾﺭﻭﺎﯿﺑ ﻥﻭﺮﯿﺑ ﺍﺭ ﻥﺩﺮﮐﻡﺩ ('ﻥﺩﺮﮐﻡﺩ ﻪﻋﻮﻤﺠﻣ ﻦﺘﺧﺍﺪﻧﺍ ﺎﺟ ﻭ ﻥﺩﺭﻭﺁ ﻥﻭﺮﯿﺑ' ﻩﺪﻫﺎﺸﻣ) ﻪﻋﻮﻤﺠﻣ
2.ﺪﯿﻨﮐ ﺰﯿﻤﺗ ﺖﻗﺩ ﺎﺑ ﺍﺭ ﻥﺩﺮﮐ ﻡﺩ ﻪﻋﻮﻤﺠﻣ ﯽﯾﻻﺎﺑ (37 ﺮﯾﻮﺼﺗ) ﺮﺘﻠﯿﻓ .ﺪﯿﯾﻮﺸﺑ ﺏﺁ ﺎﺑ ﻞﻣﺎﮐ ﺭﻮﻃ ﻪﺑ ﺍﺭ ﻥﺩﺮﮐ ﻡﺩ ﻪﻋﻮﻤﺠﻣ
3ﻊﻤﺟ ﺯﺍ ﺎﺗ ﺪﯿﻨﮑﻧ ﮏﺸﺧ ﻝﺎﻤﺘﺳﺩ ﺎﺑ ﺍﺭ ﻥﺩﺮﮐ ﻡﺩ ﻪﻋﻮﻤﺠﻣ .ﺩﻮﺷ ﮏﺸﺧ ﺍﻮﻫ ﺭﺩ ﺪﯿﻫﺩ ﻩﺯﺎﺟﺍ ﻩﺎﮕﺘﺳﺩ ﻥﻭﺭﺩ ﻪﺑ ﻥﺩﺮﮐ ﻡﺩ ﻪﻋﻮﻤﺠﻣ ﻥﺪﻧﺍﺩﺮﮔﺯﺎﺑ ﺯﺍ ﻞﺒﻗ
1 .ﺪﯿﻨﮐ ﻩﺩﺎﻔﺘﺳﺍ ﻦﯿﯾﺎﭘ ﻭ ﻻﺎﺑ ﯼﺎﻫﺶﻠﻓ ﺯﺍ 'ﻥﺩﺮﮐﻡﺩ ﻪﻋﻮﻤﺠﻣ ﻥﺩﺮﮐ ﺰﯿﻤﺗ' ﺏﺎﺨﺘﻧﺍ ﯼﺍﺮﺑ ﻭ ﺪﯿﻧﺰﺑ ﻪﺑﺮﺿ
2.ﺪﯿﻨﮐ ﻝﺎﺒﻧﺩ ﺍﺭ ﻪﺤﻔﺻ ﯼﻭﺭ ﯼﺎﻫﻞﻤﻌﻟﺍﺭﻮﺘﺳﺩ ﺲﭙﺳ ﻭ ﺪﯿﻧﺰﺑ ﻪﺑﺮﺿ (ﺪﯿﯾﺄﺗ) OK ﻦﮑﯾﺁ ﯼﻭﺭ ﺪﯿﯾﺄﺗ ﯼﺍﺮﺑ
ﻥﺩﺮﮐﻡﺩ ﻪﻋﻮﻤﺠﻣ ﯼﺭﺎﮐﻦﻏﻭﺭ
ﺖﮐﺮﺣ ﯽﺘﺣﺍﺭ ﻪﺑ ﮎﺮﺤﺘﻣ ﺕﺎﻌﻄﻗ ﺪﯾﻮﺷ ﻦﺌﻤﻄﻣ ﺎﺗ ﺪﯿﻨﮐ ﯼﺭﺎﮐﻦﻏﻭﺭ ﺭﺎﺑ ﮏﯾ ﻩﺎﻣ 2 ﺮﻫ ﺍﺭ ﻥﺩﺮﮐ ﻡﺩ ﻪﻋﻮﻤﺠﻣ ﻢﯿﻨﮐﯽﻣ ﺩﺎﻬﻨﺸﯿﭘ ،هﺎﮕﺘﺳﺩ ﺩﺮﮑﻠﻤﻋ ﺩﻮﺒﻬﺑ ﯼﺍﺮﺑ
.ﺪﻨﻨﮐﯽﻣ
(ﺹﺎﺧ ﯼﺎﻫﻝﺪﻣ ﯽﺧﺮﺑ ﺭﺩ ﻂﻘﻓ) (ﺮﯿﺷ ﻑﺮﻇ) LatteGo ﻥﺩﺮﮐ ﺰﯿﻤﺗ
LatteGo ﻊﯾﺮﺳ ﯼﺭﺎﮐﺰﯿﻤﺗ
ﻥﺩﺮﮐ ﺰﯿﻤﺗ ﻦﮑﯾﺁ ﯼﻭﺭ
.ﺪﯿﻨﮐ
.ﺪﺷ ﺪﻨﻫﺍﻮﺧ ﺝﺭﺎﺧ ﺮﯿﺷ ﻢﺘﺴﯿﺳ ﺯﺍ ﻍﺍﺩ ﺏﺁ ﮏﭼﻮﮐ ﯼﺎﻫﻩﺭﺍﻮﻓ
-
1.ﺪﯿﻟﺎﻤﺑ (ﮓﻧﺭﯼﺮﺘﺴﮐﺎﺧ ﻪﻌﻄﻗ) ﻥﺩﺮﮐ ﻡﺩ (38 ﺮﯾﻮﺼﺗ) ﻪﻋﻮﻤﺠﻣ ﻥﻮﺘﺴﯿﭘ ﯼﻭﺭ ﺲﯾﺮﮔ ﮎﺯﺎﻧ ﻪﯾﻻ ﮏﯾ
2.ﺪﯿﻟﺎﻤﺑ (ﮓﻧﺭﯼﺮﺘﺴﮐﺎﺧ ﻪﻌﻄﻗ) ﻥﺩﺮﮐ ﻡﺩ (39 ﺮﯾﻮﺼﺗ) ﻪﻋﻮﻤﺠﻣ ﻦﯿﯾﺎﭘ ﺭﺩ ﺭﻮﺤﻣ ﻑﺍﺮﻃﺍ ﺲﯾﺮﮔ ﮎﺯﺎﻧ ﻪﯾﻻ ﮏﯾ
3.ﺪﯿﻟﺎﻤﺑ (40 ﺮﯾﻮﺼﺗ) ﻑﺮﻃ ﻭﺩ ﯼﺎﻫﻞﯾﺭ ﯼﻭﺭ ﺲﯾﺮﮔ ﮎﺯﺎﻧ ﻪﯾﻻ ﮏﯾ
1.ﺖﺳﺍ ﻞﺼﺘﻣ (10 ﺮﯾﻮﺼﺗ) ﻩﺎﮕﺘﺳﺩ ﻪﺑ ﺐﺳﺎﻨﻣ ﺭﻮﻃ ﻪﺑ LatteGo ﺪﯾﻮﺷ ﻦﺌﻤﻄﻣ
2.ﺪﯿﻫﺩ ﺭﺍﺮﻗ ﻪﭽﯾﺭﺩ ﺮﯾﺯ ﻥﺎﺠﻨﻓ ﮏﯾ
3.ﺪﯿﻨﮐ ﻩﺩﺎﻔﺘﺳﺍ ﻦﯿﯾﺎﭘ ﻭ ﻻﺎﺑ ﯼﺎﻫﺶﻠﻓ ﺯﺍ (ﺮﯿﺷ ﻊﯾﺮﺳ ﻥﺩﺮﮐ ﺰﯿﻤﺗ) 'Quick milk clean' ﻪﻣﺎﻧﺮﺑ ﺏﺎﺨﺘﻧﺍ ﯼﺍﺮﺑ ﻭ ﺪﯿﻧﺰﺑ ﻪﺑﺮﺿ
4ﻝﺎﺒﻧﺩ ﺍﺭ ﻪﺤﻔﺻ ﯼﻭﺭ ﯼﺎﻫﻞﻤﻌﻟﺍﺭﻮﺘﺳﺩ ،ﺮﯿﺷ ﻢﺘﺴﯿﺳ ﻥﻭﺭﺩ ﻩﺪﻧﺎﻤﯿﻗﺎﺑ ﺮﯿﺷ ﻥﺩﺮﮐ ﮎﺎﭘ ﯼﺍﺮﺑ ﺲﭙﺳ ﻭ ﺪﯿﻧﺰﺑ ﻪﺑﺮﺿ (ﺪﯿﯾﺄﺗ) OK ﻦﮑﯾﺁ ﯼﻭﺭ ﺪﯿﯾﺄﺗ ﯼﺍﺮﺑ
Page 91
92
ﯽﺳﺭﺎﻓ
LatteGo ﻞﻣﺎﮐ ﻥﺩﺮﮐ ﺰﯿﻤﺗ
(ﺹﺎﺧ ﯼﺎﻫﻝﺪﻣ ﯽﺧﺮﺑ ﺭﺩ ﻂﻘﻓ) ﮏﯿﺳﻼﮐ ﺯﺎﺳﺮﯿﺷﻒﮐ ﻥﺩﺮﮐ ﺰﯿﻤﺗ
ﮏﯿﺳﻼﮐ ﺯﺎﺳﺮﯿﺷﻒﮐ ﻊﯾﺮﺳ ﻥﺩﺮﮐ ﺰﯿﻤﺗ
ﻥﺩﺮﮐ ﺰﯿﻤﺗ ﻦﮑﯾﺁ ﯼﻭﺭ
.ﺪﯿﻨﮐ
.ﺪﺷ ﺪﻨﻫﺍﻮﺧ ﺝﺭﺎﺧ ﺮﯿﺷ ﻢﺘﺴﯿﺳ ﺯﺍ ﻍﺍﺩ ﺏﺁ ﮏﭼﻮﮐ ﯼﺎﻫﻩﺭﺍﻮﻓ
ﮏﯿﺳﻼﮐ ﺯﺎﺳﺮﯿﺷﻒﮐ ﻪﻧﺍﺯﻭﺭ ﻥﺩﺮﮐ ﺰﯿﻤﺗ
-
5 .ﺪﯿﻨﮐ ﯼﺭﺍﺪﻬﮕﻧ ﻝﺎﭽﺨﯾ ﺭﺩ ﺍﺭ ﻩﺪﻧﺎﻤﯿﻗﺎﺑ ﺮﯿﺷ ﯼﻭﺎﺣ LatteGo
1.ﺪﯾﺭﻭﺎﯿﺑ ﻥﻭﺮﯿﺑ (41 ﺮﯾﻮﺼﺗ) ﻩﺎﮕﺘﺳﺩ ﺯﺍ ﺍﺭ LatteGo
2.ﺪﯾﺰﯾﺮﺑ ﺭﻭﺩ ﺍﺭ ﻩﺪﻧﺎﻤﯿﻗﺎﺑ ﺮﯿﺷ
3.ﺪﯾﺭﻭﺎﯿﺑ ﻥﻭﺮﯿﺑ (42 ﺮﯾﻮﺼﺗ) LatteGo ﺐﻟﺎﻗ ﺯﺍ ﺍﺭ ﺮﯿﺷ ﻑﺮﻇ ﻭ ﺪﯿﻫﺩ ﺭﺎﺸﻓ ﺍﺭ ﯼﺯﺎﺳﺎﻫﺭ ﻪﻤﮐﺩ
4.ﺪﯿﯾﻮﺸﺑ ﯽﯾﻮﺸﻓﺮﻇ ﻊﯾﺎﻣ ﯽﻤﮐ ﻭ ﻡﺮﻟﻭ ﺏﺁ ﺎﺑ ﺏﺁ ﺮﯿﺷ ﺮﯾﺯ ﺎﯾ ﯽﯾﻮﺸﻓﺮﻇ ﻦﯿﺷﺎﻣ ﺭﺩ ﺍﺭ ﺕﺎﻌﻄﻗ ﻪﻤﻫ
1.ﺖﺳﺍ ﻞﺼﺘﻣ (13 ﺮﯾﻮﺼﺗ) ﻩﺎﮕﺘﺳﺩ ﻪﺑ ﺐﺳﺎﻨﻣ ﺭﻮﻃ ﻪﺑ ﮏﯿﺳﻼﮐ ﺯﺎﺳﺮﯿﺷﻒﮐ ﺪﯾﻮﺷ ﻦﺌﻤﻄﻣ
2.ﺪﯿﻫﺩ ﺭﺍﺮﻗ ﻪﭽﯾﺭﺩ ﺮﯾﺯ ﻥﺎﺠﻨﻓ ﮏﯾ
3.ﺪﯿﻨﮐ ﻩﺩﺎﻔﺘﺳﺍ ﻦﯿﯾﺎﭘ ﻭ ﻻﺎﺑ ﯼﺎﻫﺶﻠﻓ ﺯﺍ (ﺮﯿﺷ ﻊﯾﺮﺳ ﻥﺩﺮﮐ ﺰﯿﻤﺗ) 'Quick milk clean' ﻪﻣﺎﻧﺮﺑ ﺏﺎﺨﺘﻧﺍ ﯼﺍﺮﺑ ﻭ ﺪﯿﻧﺰﺑ ﻪﺑﺮﺿ
4ﻝﺎﺒﻧﺩ ﺍﺭ ﻪﺤﻔﺻ ﯼﻭﺭ ﯼﺎﻫﻞﻤﻌﻟﺍﺭﻮﺘﺳﺩ ،ﺯﺎﺳﺮﯿﺷﻒﮐ ﻥﻭﺭﺩ ﻩﺪﻧﺎﻤﯿﻗﺎﺑ ﺮﯿﺷ ﻥﺩﺮﮐ ﮎﺎﭘ ﯼﺍﺮﺑ ﺲﭙﺳ ﻭ ﺪﯿﻧﺰﺑ ﻪﺑﺮﺿ (ﺪﯿﯾﺄﺗ) OK ﻦﮑﯾﺁ ﯼﻭﺭ ﺪﯿﯾﺄﺗ ﯼﺍﺮﺑ
5.ﺪﯿﻨﮐ ﺰﯿﻤﺗ ﺲﯿﺧ ﻝﺎﻤﺘﺳﺩ ﮏﯾ ﺎﺑ ﺍﺭ ﺯﺎﺳﺮﯿﺷﻒﮐ
1 .ﺩﻮﺷ ﺩﺮﺳ ﻞﻣﺎﮐ ﺭﻮﻃ ﻪﺑ ﺯﺎﺳﺮﯿﺷﻒﮐ ﺪﯿﻫﺩ ﻩﺯﺎﺟﺍ
2.ﺪﯿﻨﮐ ﺍﺪﺟ ﺍﺭ ﯽﻧﻮﮑﯿﻠﯿﺳ (43 ﺮﯾﻮﺼﺗ) ﺶﺨﺑ ﻭ ﯼﺰﻠﻓ ﺶﺨﺑ ﻭ ﺪﯿﻨﮐ ﻢﺧ ﭗﭼ ﺖﻤﺳ ﻪﺑ ﺍﺭ ﺯﺎﺳﺮﯿﺷﻒﮐ
3 .ﺪﯿﯾﻮﺸﺑ ﯽﯾﻮﺸﻓﺮﻇ ﻦﯿﺷﺎﻣ ﺭﺩ ﺎﯾ ﯽﻧﺪﯿﻣﺎﺷﺁ ﺏﺁ ﺎﺑ ﺍﺭ ﺎﻬﻧﺁ ﻭ ﺪﯿﻨﮐ ﺍﺪﺟ ﺍﺭ (44 ﺮﯾﻮﺼﺗ) ﻪﻌﻄﻗ ﻪﺳ ﺮﻫ
4.ﺪﯿﻨﮐ ﻞﺻﻭ ﻩﺎﮕﺘﺳﺩ ﻪﺑ ًﺍﺩﺪﺠﻣ ﺍﺭ ﺯﺎﺳﺮﯿﺷﻒﮐ ﻭ ﻩﺩﺮﮐ ﻢﻫﺮﺳ ﻩﺭﺎﺑﻭﺩ ﺍﺭ ﺯﺎﺳﺮﯿﺷﻒﮐ ﺶﺨﺑ ﻪﺳ
AquaClean ﺏﺁ ﺮﺘﻠﯿﻓ
ﺎﺑ ﺮﺘﻠﯿﻓ ﻦﯾﺍ .ﺪﯿﻫﺩ ﺭﺍﺮﻗ ﺏﺁ ﻥﺰﺨﻣ ﺭﺩ ﺍﺭ AquaClean ﺏﺁ ﺮﺘﻠﯿﻓ ﺪﯿﻧﺍﻮﺗﯽﻣ ﺩﻮﺧ ﻩﻮﻬﻗ ﻢﻌﻃ ﻆﻔﺣ ﯼﺍﺮﺑ .ﺖﺳﺍ AquaClean ﺮﺘﻠﯿﻓ ﻪﺑ ﺰﻬﺠﻣ ﺎﻤﺷ ﻩﺎﮕﺘﺳﺩ
ﺰﮐﺍﺮﻣ ،ﯽﻠﺤﻣ ﺵﻭﺮﻓ ﯽﮔﺪﻨﯾﺎﻤﻧ ﺯﺍ ﺪﯿﻧﺍﻮﺗﯽﻣ ﺍﺭ AquaClean ﺏﺁ ﺮﺘﻠﯿﻓ .ﺩﺮﺑﯽﻣ ﻦﯿﺑ ﺯﺍ ﺰﯿﻧ ﺍﺭ ﯽﯾﺍﺩﺯﺏﻮﺳﺭ ﻪﺑ ﺯﺎﯿﻧ ﺎﻤﺷ ﻩﺎﮕﺘﺳﺩ ﺭﺩ ﮏﻫﺁ ﺏﻮﺳﺭ ﺶﻫﺎﮐ
.ﺪﯿﻨﮐ ﻪﯿﻬﺗ www.philips.com/parts-and-accessories ﺖﯾﺎﺳﺏﻭ ﺭﺩ ﻦﯾﻼﻧﺁ ﺕﺭﻮﺻ ﻪﺑ ﺎﯾ ﺯﺎﺠﻣ ﺕﺎﻣﺪﺧ
AquaClean ﺮﺘﻠﯿﻓ ﺖﯿﻌﺿﻭ ﺮﮕﻧﺎﺸﻧ
.ﺩﻮﺷﯽﻣ ﻩﺩﺍﺩ ﻥﺎﺸﻧ ﺪﺻﺭﺩ ﺕﺭﻮﺻ ﻪﺑ ﺮﮕﺸﯾﺎﻤﻧ ﯼﻭﺭ ﻪﺸﯿﻤﻫ AquaClean ﺮﺘﻠﯿﻓ ﺖﯿﻌﺿﻭ ،ﺖﺳﺍ ﻝﺎﻌﻓ AquaClean ﺩﺮﮑﻠﻤﻋ ﯽﺘﻗﻭ
ﺶﯾﺎﻤﻧ ﻪﯿﻧﺎﺛ 2 ﺕﺪﻣ ﻪﺑ ﺍﺭ ﯽﻣﺎﯿﭘ ﺮﮕﺸﯾﺎﻤﻧ ،ﺪﯿﻨﮐﯽﻣ ﻦﺷﻭﺭ ﺍﺭ ﻩﺎﮕﺘﺳﺩ ﻪﮐ ﺭﺎﺑ ﺮﻫ ،ﺪﺷﺎﺑ ﺮﺘﻤﮐ ﺎﯾ %10 ﺭﺍﺪﻘﻣ ﯼﻭﺭ AquaClean ﺮﺘﻠﯿﻓ ﺖﯿﻌﺿﻭ ﺮﮔﺍ
.ﺪﯿﻨﮐ ﯼﺭﺍﺪﯾﺮﺧ ﺪﯾﺪﺟ ﺮﺘﻠﯿﻓ ﮏﯾ ﺪﻨﮐﯽﻣ ﻪﯿﺻﻮﺗ ﺎﻤﺷ ﻪﺑ ﻡﺎﯿﭘ ﻦﯾﺍ .ﺪﻫﺩﯽﻣ
.ﺪﯿﯾﺎﻤﻧ ﺾﯾﻮﻌﺗ ﺍﺭ AquaClean ﺮﺘﻠﯿﻓ ﺪﻨﮐﯽﻣ ﺖﺳﺍﻮﺧﺭﺩ ﺎﻤﺷ ﺯﺍ ﺪﯿﻨﮐ ﻦﺷﻭﺭ ﺍﺭ ﻩﺎﮕﺘﺳﺩ ﻪﮐ ﺭﺎﺑ ﺮﻫ ،ﺪﺷﺎﺑ %0 ﺮﺘﻠﯿﻓ ﺖﯿﻌﺿﻭ ﺮﮔﺍ
(ﻪﻘﯿﻗﺩ 5) AquaClean ﺏﺁ ﺮﺘﻠﯿﻓ ﯼﺯﺎﺳﻝﺎﻌﻓ
ﺍﺭ AquaClean ﺏﺁ ﺮﺘﻠﯿﻓ ﻪﮐ ﺭﺎﺑ ﺮﻫ ﺖﺳﺍ ﻡﺯﻻ ،ﻦﯾﺍﺮﺑﺎﻨﺑ .ﺖﺳﺍ ﻩﺪﺷ ﻪﺘﺷﺍﺬﮔ ﺏﺁ ﻥﺰﺨﻣ ﻥﻭﺭﺩ ﺮﺘﻠﯿﻓ ﻪﮐ ﺪﻫﺩ ﯽﻤﻧ ﺺﯿﺨﺸﺗ ﺭﺎﮐﺩﻮﺧ ﺭﻮﻃ ﻪﺑ ﻩﺎﮕﺘﺳﺩ
.ﺪﯿﯾﺎﻤﻧ ﻝﺎﻌﻓ 'ﻥﺩﺮﮐ ﺰﯿﻤﺗ' ﯼﻮﻨﻣ ﻖﯾﺮﻃ ﺯﺍ ﺍﺭ ﻥﺁ ﺪﯿﻨﮐﯽﻣ ﺐﺼﻧ
ﻩﺎﮕﺘﺳﺩ ﺍﺪﺘﺑﺍ ﺖﺳﺍ ﻡﺯﻻ ﺎﻣﺍ ،ﺪﯿﻨﮐ ﻝﺎﻌﻓ ﺍﺭ AquaClean ﺏﺁ ﺮﺘﻠﯿﻓ ﮏﯾ ﺪﯿﻧﺍﻮﺗﯽﻣ ﻥﺎﮐﺎﻤﮐ ،ﺪﻫﺩ ﯽﻤﻧ ﺶﯾﺎﻤﻧ ﺍﺭ ﺮﺘﻠﯿﻓ ﯼﺯﺎﺳﻝﺎﻌﻓ ﻡﺎﯿﭘ ﺮﮕﯾﺩ ﻩﺎﮕﺘﺳﺩ ﯽﺘﻗﻭ
.ﺪﯿﻨﮐ ﯽﯾﺍﺩﺯﺏﻮﺳﺭ ﺍﺭ
.ﺪﺷﺎﺑ ﻩﺪﺷ ﯽﯾﺍﺩﺯﺏﻮﺳﺭ ﻞﻣﺎﮐ ﺭﻮﻃ ﻪﺑ ﺎﻤﺷ ﻩﺎﮕﺘﺳﺩ ﺖﺳﺍ ﻡﺯﻻ ﺪﯿﻨﮐ AquaClean ﺏﺁ ﺮﺘﻠﯿﻓ ﺯﺍ ﻩﺩﺎﻔﺘﺳﺍ ﻪﺑ ﻉﻭﺮﺷ ﻪﮑﻨﯾﺍ ﺯﺍ ﻞﺒﻗ
-
-
Page 92
ﯽﺳﺭﺎﻓ
ﺭﺩ .ﺪﯿﻨﮐ ﻩﺩﺎﻣﺁ ﺖﺳﺍ ﻩﺪﺷ ﻩﺩﺍﺩ ﺢﯿﺿﻮﺗ ﻦﯿﯾﺎﭘ ﺭﺩ ﻪﮐ ﯽﺷﻭﺭ ﻪﺑ ﺏﺁ ﺭﺩ ﻥﺩﺮﮐ ﺭﻭﻪﻃﻮﻏ ﺎﺑ ﺍﺭ ﻥﺁ ﺖﺴﯾﺎﺑﯽﻣ AquaClean ﺏﺁ ﺮﺘﻠﯿﻓ ﯼﺯﺎﺳﻝﺎﻌﻓ ﺯﺍ ﻞﺒﻗ
ﻩﺯﺎﺟﺍ ﻭ ﻩﺪﺷ ﻩﺎﮕﺘﺳﺩ ﺭﺩ ﺩﺎﯾﺯ ﯼﺍﺪﺻ ﻭ ﺮﺳ ﻪﺑ ﺮﺠﻨﻣ ﻪﮐ ﺩﻮﺷ ﺩﺭﺍﻭ ﻩﺎﮕﺘﺳﺩ ﻥﻭﺭﺩ ﻪﺑ ﺍﻮﻫ ﺏﺁ ﯼﺎﺟ ﻪﺑ ﺖﺳﺍ ﻦﮑﻤﻣ ،ﺪﯿﻫﺪﻧ ﻡﺎﺠﻧﺍ ﺍﺭ ﺭﺎﮐ ﻦﯾﺍ ﻪﮐ ﯽﺗﺭﻮﺻ
.ﺪﯿﻨﮐ ﻡﺩ ﺍﺭ ﻩﻮﻬﻗ ﻪﮐ ﺪﻫﺩ ﯽﻤﻧ
(ﻪﻘﯿﻗﺩ 5) AquaClean ﺏﺁ ﺮﺘﻠﯿﻓ ﺾﯾﻮﻌﺗ
ﺮﺘﻠﯿﻓ ﺾﯾﻮﻌﺗ ﻪﺑ ﺯﺎﯿﻧ ﺎﺗ ﺪﻨﮐﯽﻣ ﺖﻓﺍ %0 ﺢﻄﺳ ﻪﺑ AquaClean ﺖﯿﻌﺿﻭ ﺮﮕﻧﺎﺸﻧ .ﺪﺷ ﺪﻫﺍﻮﺧ ﻒﻗﻮﺘﻣ ﻥﺁ ﺩﺮﮑﻠﻤﻋ ﺮﺘﻠﯿﻓ ﻥﺎﯿﻣ ﺯﺍ ﺏﺁ ﺮﺘﯿﻟ 95 ﺭﻮﺒﻋ ﺯﺍ ﺲﭘ
ﺍﺭ ﻩﺎﮕﺘﺳﺩ ﺍﺪﺘﺑﺍ ﻪﮑﻨﯾﺍ ﻪﺑ ﺯﺎﯿﻧ ﻥﻭﺪﺑ ﺪﯿﻧﺍﻮﺗﯽﻣ ﺩﻮﺷﯽﻣ ﻩﺩﺍﺩ ﻥﺎﺸﻧ ﺮﮕﺸﯾﺎﻤﻧ ﯼﻭﺭ AquaClean ﺖﯿﻌﺿﻭ ﺮﮕﻧﺎﺸﻧ ﻪﮐ ﯽﻧﺎﻣﺯ ﺎﺗ .ﺪﻨﮐ ﯼﺭﻭﻻﺩﺎﯾ ﺎﻤﺷ ﻪﺑ ﺍﺭ
ﻮﺤﻣ ﯽﺗﺪﻣ ﺯﺍ ﺲﭘ AquaClean ﺮﮕﻧﺎﺸﻧ ،ﺪﯿﻨﮑﻧ ﺾﯾﻮﻌﺗ ﻊﻗﻮﻣ ﻪﺑ ﺍﺭ AquaClean ﺏﺁ ﺮﺘﻠﯿﻓ ﻪﮐ ﯽﺗﺭﻮﺻ ﺭﺩ .ﺪﯿﻨﮐ ﺾﯾﻮﻌﺗ ﺍﺭ ﺮﺘﻠﯿﻓ ﺪﯿﻨﮐ ﯽﯾﺍﺩﺯﺏﻮﺳﺭ
ﯽﺳﺭﺎﻓ
.ﺪﯿﯾﺎﻤﻧ ﯽﯾﺍﺩﺯﺏﻮﺳﺭ ﺍﺭ ﻩﺎﮕﺘﺳﺩ ﻥﺁ ﺯﺍ ﻞﺒﻗ ﺖﺳﺍ ﻡﺯﻻ ﺎﻣﺍ ،ﺪﯿﻨﮐ ﺾﯾﻮﻌﺗ ﺍﺭ ﺮﺘﻠﯿﻓ ﺪﯿﻧﺍﻮﺗﯽﻣ ﻥﺎﮐﺎﻤﮐ ﺐﺳﺎﻨﻣ ﻥﺎﻣﺯ ﺭﺩ ﻡﺍﺪﻗﺍ ﻡﺪﻋ ﺕﺭﻮﺻ ﺭﺩ .ﺩﻮﺷﯽﻣ
:ﺪﻨﮐﯽﻣ ﯼﺭﻭﻻﺩﺎﯾ ﺎﻤﺷ ﻪﺑ ﺍﺭ AquaClean ﺮﺘﻠﯿﻓ ﺾﯾﻮﻌﺗ ﻪﺑ ﺯﺎﯿﻧ ﻩﺎﮕﺘﺳﺩ ﯽﺘﻗﻭ ﺎﯾ ﺪﻨﮐﯽﻣ ﺖﻓﺍ %0 ﻪﺑ AquaClean ﺖﯿﻌﺿﻭ ﺮﮕﻧﺎﺸﻧ ﯽﺘﻗﻭ
93
1.ﺪﯿﻨﮐ ﻩﺩﺎﻔﺘﺳﺍ 'AquaClean' ﺏﺎﺨﺘﻧﺍ ﯼﺍﺮﺑ ﻦﯿﯾﺎﭘ ﻭ ﻻﺎﺑ ﯼﺎﻫﺶﻠﻓ ﺯﺍ ﻭ ﺪﯿﻧﺰﺑ ﻪﺑﺮﺿ 'ﻥﺩﺮﮐ ﺰﯿﻤﺗ' ﺩﺎﻤﻧ ﯼﻭﺭ
2.ﺪﯿﻫﺩ ﺭﺎﺸﻓ ﺍﺭ ﺪﯿﯾﺄﺗ ﻪﻤﮐﺩ ،ﺪﯿﯾﺄﺗ ﯼﺍﺮﺑ ،ﺲﭙﺳ
3.ﺪﯿﻨﮐ ﻝﺎﺒﻧﺩ ﺍﺭ ﻪﺤﻔﺻ ﯼﻭﺭ ﯼﺎﻫﻞﻤﻌﻟﺍﺭﻮﺘﺳﺩ .ﺪﯿﻧﺰﺑ ﻪﺑﺮﺿ ﺪﯿﯾﺄﺗ ﻦﮑﯾﺁ ﯼﻭﺭ ًﺍﺩﺪﺠﻣ ﺪﺷ ﺮﻫﺎﻇ ﯼﺯﺎﺳﻝﺎﻌﻓ ﻪﺤﻔﺻ ﯽﺘﻗﻭ
4.ﺪﯿﻫﺩ ﻥﺎﮑﺗ (45 ﺮﯾﻮﺼﺗ) ﻪﯿﻧﺎﺛ 5 ﺩﻭﺪﺣ ﺍﺭ ﺮﺘﻠﯿﻓ
5 .ﺪﯿﻫﺩ ﺭﺎﺸﻓ/ﺪﯿﻫﺩ ﻥﺎﮑﺗ ﺍﺭ (46 ﺮﯾﻮﺼﺗ) ﻥﺁ ﻭ ﺪﯿﻨﮐ ﺭﻭﻪﻃﻮﻏ ﺩﺮﺳ ﺏﺁ ﭺﺭﺎﭘ ﺭﺩ ﺍﺭ ﺮﺘﻠﯿﻓ
6.ﺪﯿﻫﺩ ﺭﺎﺸﻓ ﻦﯿﯾﺎﭘ ﻪﺑ ﻦﮑﻤﻣ (47 ﺮﯾﻮﺼﺗ) ﺪﺣ ﻦﯾﺮﺘﺸﯿﺑ ﺎﺗ ﺍﺭ ﻥﺁ .ﺪﯿﻫﺩ ﺭﺍﺮﻗ ﺏﺁ ﻥﺰﺨﻣ ﻥﻭﺭﺩ ﺮﺘﻠﯿﻓ ﻂﺑﺍﺭ ﺭﺩ ﯼﺩﻮﻤﻋ ﺭﻮﻃ ﻪﺑ ﺍﺭ ﺮﺘﻠﯿﻓ
7.ﺪﯿﻫﺩ ﺭﺍﺮﻗ ﻩﺎﮕﺘﺳﺩ ﻥﻭﺭﺩ ﻭ ﺪﯿﻨﮐ ﺮﭘ ﯽﻧﺪﯿﻣﺎﺷﺁ ﺏﺁ ﺎﺑ ﺍﺭ ﺏﺁ ﻥﺰﺨﻣ
8.ﺪﯿﻨﮐ ﺍﺪﺟ ﺍﺭ ﻥﺁ (ﺹﺎﺧ ﯼﺎﻫﻝﺪﻣ ﯽﺧﺮﺑ ﺭﺩ ﺎﻬﻨﺗ) LatteGo ﻝﺎﺼﺗﺍ ﺕﺭﻮﺻ ﺭﺩ
9 .ﺪﯿﻫﺩ ﺭﺍﺮﻗ ﺯﺎﺳﺮﯿﺷﻒﮐ/ﻍﺍﺩ ﺏﺁ ﻪﭽﯾﺭﺩ ﺮﯾﺯ ﻪﺳﺎﮐ ﮏﯾ
10.ﺪﯿﻫﺩ ﺭﺎﺸﻓ ﺍﺭ ﻒﻗﻮﺗ/ﻉﻭﺮﺷ ﻪﻤﮐﺩ ،ﯼﺯﺎﺳﻝﺎﻌﻓ ﺪﻨﯾﻻﺮﻓ ﻉﻭﺮﺷ ﯼﺍﺮﺑ
11.ﺪﺷ ﺪﻫﺍﻮﺧ ﺝﺭﺎﺧ ﺯﺎﺳﺮﯿﺷﻒﮐ/ﻍﺍﺩ ﺏﺁ ﻪﭽﯾﺭﺩ ﺯﺍ ﻍﺍﺩ ﺏﺁ ﻪﻘﯿﻗﺩ 1 ﯽﻃ
12.ﺖﺳﺍ ﻩﺪﺷ ﻝﺎﻌﻓ ﺖﯿﻘﻓﻮﻣ ﺎﺑ ﺮﺘﻠﯿﻓ ﻥﻮﻨﮐﺍ
1 .ﺪﯾﺭﻭﺎﯿﺑ ﻥﻭﺮﯿﺑ ﺍﺭ ﯽﻤﯾﺪﻗ AquaClean ﺏﺁ ﺮﺘﻠﯿﻓ
2.ﺪﯿﯾﺎﻤﻧ ﻝﺎﻌﻓ ﺍﺭ ﻥﺁ '(ﻪﻘﯿﻗﺩ 5) AquaClean ﺏﺁ ﺮﺘﻠﯿﻓ ﯼﺯﺎﺳﻝﺎﻌﻓ' ﺶﺨﺑ ﺭﺩ ﻩﺪﺷ ﻪﺋﺍﺭﺍ ﯽﯾﺎﻤﻨﻫﺍﺭ ﺎﺑ ﻖﺑﺎﻄﻣ ﻭ ﺪﯿﻨﮐ ﺐﺼﻧ ﺪﯾﺪﺟ ﺮﺘﻠﯿﻓ ﮏﯾ
ﻩﺪﺸﻧ ﻩﺩﺍﺩ ﺶﯾﺎﻤﻧ ﻩﺎﮕﺘﺳﺩ ﻂﺳﻮﺗ ﺮﺘﻠﯿﻓ ﺾﯾﻮﻌﺗ ﻪﺑ ﺯﺎﯿﻧ ﻡﺎﯿﭘ ﺯﻮﻨﻫ ﺮﮔﺍ ﯽﺘﺣ ﺪﯿﻨﮐ ﺾﯾﻮﻌﺗ ﺭﺎﺑﮏﯾ ﻩﺎﻣ 3 ﺮﻫ ﻢﮐﺖﺳﺩ ﺍﺭ AquaClean ﺏﺁ ﺮﺘﻠﯿﻓ
(ﻪﻘﯿﻗﺩ 30) ﯽﯾﺍﺩﺯﺏﻮﺳﺭ ﺪﻨﯾﻻﺮﻓ
ﺪﯿﺳﺍ ،ﮏﯾﺮﻠﮐﻭﺭﺪﯿﻫ ﺪﯿﺳﺍ ،ﮏﯾﺭﻮﻔﻟﻮﺳ ﺪﯿﺳﺍ ﻪﯾﺎﭘ ﺮﺑ ﻩﺪﺷ ﺪﯿﻟﻮﺗ ﺮﯿﮔﺏﻮﺳﺭ ﺯﺍ ﺪﯾﺎﺒﻧ ﯽﻄﯾﺍﺮﺷ ﭻﯿﻫ ﺖﺤﺗ .ﺪﯿﻨﮐ ﻩﺩﺎﻔﺘﺳﺍ Philips ﺮﯿﮔﺏﻮﺳﺭ ﺯﺍ ﺎﻬﻨﺗ
ﻡﺪﻋ .ﺪﻨﻨﮐ ﯽﻤﻧ ﻞﺣ ﯽﺑﻮﺧ ﻪﺑ ﺍﺭ ﺏﻮﺳﺭ ﻭ ﺪﻨﻧﺎﺳﺭﯽﻣ ﺐﯿﺳﺁ ﻩﺎﮕﺘﺳﺩ ﺏﺁ ﺭﺍﺪﻣ ﻪﺑ ﺩﺍﻮﻣ ﻦﯾﺍ ﺍﺮﯾﺯ ﺪﯿﻨﮐ ﻩﺩﺎﻔﺘﺳﺍ (ﻪﮐﺮﺳ) ﮏﯿﺘﺳﺍ ﺪﯿﺳﺍ ﺎﯾ ﮏﯿﻣﺎﻔﻟﻮﺳ
ﺮﯿﮔﺏﻮﺳﺭ ﻝﻮﺼﺤﻣ .ﺪﻨﮐﯽﻣ ﻞﻃﺎﺑ ﺍﺭ ﻥﺁ ﺖﻧﺎﻤﺿ ﺰﯿﻧ ﻩﺎﮕﺘﺳﺩ ﯽﯾﺍﺩﺯﺏﻮﺳﺭ ﻡﺪﻋ .ﺪﻨﮐﯽﻣ ﻞﻃﺎﺑ ﺍﺭ ﻩﺎﮕﺘﺳﺩ ﺖﻧﺎﻤﺿ Philips ﺮﯿﮔﺏﻮﺳﺭ ﺯﺍ ﻩﺩﺎﻔﺘﺳﺍ
.ﺪﯿﻨﮐ ﯼﺭﺍﺪﯾﺮﺧ www.philips.com/coffee-care ﺖﯾﺎﺳﺏﻭ ﺭﺩ ﻦﯾﻼﻧﺁ ﺕﺭﻮﺻ ﻪﺑ ﺪﯿﻧﺍﻮﺗﯽﻣ ﺍﺭ Philips
.ﺩﻮﺷﯽﻣ ﺮﻫﺎﻇ ﺮﮕﺸﯾﺎﻤﻧ ﯼﻭﺭ ﺮﺑ ﯽﻣﺎﯿﭘ ،ﺩﺭﺍﺩ ﯽﯾﺍﺩﺯﺏﻮﺳﺭ ﻪﺑ ﺯﺎﯿﻧ ﻩﺎﮕﺘﺳﺩ ﯽﺘﻗﻭ
.ﺪﯿﻧﺍﺩﺮﮔ ﺯﺎﺑ ﻩﺎﮕﺘﺳﺩ ﻥﻭﺭﺩ ﻪﺑ ﻩﺭﺎﺑﻭﺩ ﺍﺭ ﻥﺁ ﺲﭙﺳ
.ﺖﺳﺍ
1.ﺪﯿﯾﺎﻤﻧ ﺏﺎﺨﺘﻧﺍ ﻮﻨﻣ ﺭﺩ ﺍﺭ 'ﯽﯾﺍﺩﺯﺏﻮﺳﺭ' ﻪﻨﯾﺰﮔ ﺲﭙﺳ ﻭ ﺪﯿﻨﮐ ﺲﻤﻟ ﯼﺮﺑﺭﺎﮐ ﻂﺑﺍﺭ ﺭﺩ ﺍﺭ ﻥﺩﺮﮐ ﺰﯿﻤﺗ ﻦﮑﯾﺁ
2.ﺪﯿﻨﮐ ﻝﺎﺒﻧﺩ ﺍﺭ ﻪﺤﻔﺻ ﯼﻭﺭ ﯼﺎﻫﻞﻤﻌﻟﺍﺭﻮﺘﺳﺩ
3.ﺪﯿﻨﮐ ﺍﺪﺟ ﺍﺭ ﻥﺁ ،ﺯﺎﺳﺮﯿﺷﻒﮐ ﺎﯾ LatteGo ﻥﺩﻮﺑ ﻞﺼﺘﻣ ﺕﺭﻮﺻ ﺭﺩ
4.ﺪﯿﻧﺍﺩﺮﮔﺯﺎﺑ ﺩﻮﺧ ﯼﺎﺟ ﻪﺑ ﻭ ﻩﺩﺮﮐ ﯽﻟﺎﺧ ﺍﺭ ﺎﻬﻧﺁ ،ﺪﯿﻨﮐ ﺍﺪﺟ ﺍﺭ ﻩﻮﻬﻗ ﻪﻟﺎﻔﺗ ﻑﺮﻇ ﻭ ﺎﻫﻪﮑﭼ ﻥﺩﺮﮐ ﻊﻤﺟ ﯽﻨﯿﺳ
5.ﺩﺭﻭﺎﯿﺑ ﻥﻭﺮﯿﺑ ﺍﺭ AquaClean ﺏﺁ ﺮﺘﻠﯿﻓ ﺲﭙﺳ .ﺪﯿﻨﮐ ﯽﻟﺎﺧ ﺍﺭ ﻥﺁ ﻭ ﺪﯾﺭﻭﺎﯿﺑ ﻥﻭﺮﯿﺑ ﺍﺭ ﺏﺁ ﻥﺰﺨﻣ
6.ﺪﯿﻨﮐ ﺮﭘ ﺏﺁ ﺎﺑ Calc / Clean (48 ﺮﯾﻮﺼﺗ) ﺖﻣﻼﻋ ﺢﻄﺳ ﺎﺗ ﺍﺭ ﻥﺁ ﺲﭙﺳ ﻭ ﺪﯾﺰﯾﺮﺑ ﺏﺁ ﻥﺰﺨﻣ ﺭﺩ ﻞﻣﺎﮐ ﺭﻮﻃ ﻪﺑ ﺍﺭ Philips ﺮﯿﮔﺏﻮﺳﺭ ﯼﺮﻄﺑ ﯼﺍﻮﺘﺤﻣ
7.ﺪﯿﻫﺩ ﺭﺍﺮﻗ ﺏﺁ ﺝﻭﺮﺧ ﻪﭽﯾﺭﺩ ﻭ ﻩﻮﻬﻗ ﺝﻭﺮﺧ ﻪﭽﯾﺭﺩ ﺮﯾﺯ (ﯼﺮﺘﯿﻟ 1.5) ﮒﺭﺰﺑ ﻑﺮﻇ ﮏﯾ
Page 93
ﯽﺳﺭﺎﻓ
94
.ﺖﺳﺍ ﯽﺸﮑﺑﺁ ﻪﺧﺮﭼ ﮏﯾ ﻭ ﯽﯾﺍﺩﺯﺏﻮﺳﺭ
.ﺖﺳﺍ ﻩﺪﺷ ﻞﯿﻤﮑﺗ ،ﺩﻮﺷ ﻒﻗﻮﺘﻣ ﻩﺎﮕﺘﺳﺩ ﺯﺍ ﺏﺁ ﺝﻭﺮﺧ ﻪﮐ ﯽﺘﻗﻭ ﯽﯾﺍﺩﺯﺏﻮﺳﺭ
('(ﻪﻘﯿﻗﺩ 5) AquaClean ﺏﺁ ﺮﺘﻠﯿﻓ ﺾﯾﻮﻌﺗ' ﻩﺪﻫﺎﺸﻣ) ﺮﺘﻠﯿﻓ ﻪﮐ ﺪﻨﮐﯽﻣ ﯼﺭﻭﻻﺩﺎﯾ ﺎﻤﺷ ﻪﺑ ﻩﺎﮕﺘﺳﺩ ،ﺖﻓﺎﯾ ﻥﺎﯾﺎﭘ ﯽﯾﺍﺩﺯﺏﻮﺳﺭ ﺪﻨﯾﻻﺮﻓ ﯽﺘﻗﻭ
.ﺪﯿﻨﮐ ﺐﺼﻧ ﺍﺭ ﺪﯾﺪﺟ AquaClean
!ﺪﻫﺩﯽﻣ ﺶﻫﺎﮐ ﺍﺭ ﯽﯾﺍﺩﺯﺏﻮﺳﺭ ﻪﺑ ﺯﺎﯿﻧ AquaClean ﺮﺘﻠﯿﻓ ﺯﺍ ﻩﺩﺎﻔﺘﺳﺍ :ﻪﺘﮑﻧ
ﻢﻫﺪﺑ ﻡﺎﺠﻧﺍ ﯽﻣﺍﺪﻗﺍ ﻪﭼ ﺪﺸﻧ ﻞﯿﻤﮑﺗ ﯽﯾﺍﺩﺯﺏﻮﺳﺭ ﺪﻨﯾﻻﺮﻓ ﻪﮑﯿﺗﺭﻮﺻ ﺭﺩ
ﻞﯿﻤﮑﺗ ﺯﺍ ﻞﺒﻗ ﯽﯾﺍﺩﺯﺏﻮﺳﺭ ﺪﻨﯾﻻﺮﻓ ﻪﮐ ﯽﺗﺭﻮﺻ ﺭﺩ .ﺪﯾﻮﺷ ﺝﺭﺎﺧ ﯽﯾﺍﺩﺯﺏﻮﺳﺭ ﺪﻨﯾﻻﺮﻓ ﺯﺍ ﺪﯿﻧﺍﻮﺗﯽﻣ ﻝﺮﺘﻨﮐ ﻞﻧﺎﭘ ﺭﺩ ﺵﻮﻣﺎﺧ/ﻦﺷﻭﺭ ﻪﻤﮐﺩ ﻥﺩﺍﺩ ﺭﺎﺸﻓ ﺎﺑ
:ﺪﯿﻫﺩ ﻡﺎﺠﻧﺍ ﺍﺭ ﺮﯾﺯ ﻞﺣﺍﺮﻣ ﺖﺳﺍ ﻡﺯﻻ ،ﺩﻮﺷ ﻒﻗﻮﺘﻣ
.ﺪﻫﺩﯽﻣ ﻡﺎﺠﻧﺍ ﺍﺭ ﺭﺎﮐﺩﻮﺧ ﯽﺸﮑﺑﺁ ﻪﺧﺮﭼ ﮏﯾ
.ﺪﯿﻨﮐ ﻡﺩ ﺏﺎﯿﺳﺁ-ﺶﯿﭘ ﻩﻮﻬﻗ ﻥﺎﺠﻨﻓ 2 ،هﺪﺷ ﺏﺎﯿﺳﺁ ﻩﻮﻬﻗ ﻥﺩﺮﮐ ﻪﻓﺎﺿﺍ ﻥﻭﺪﺑ ﺲﭙﺳ ﻭ ﺪﯿﻨﮐ ﯽﻟﺎﺧ ﺍﺭ ﺏﺁ ﻥﺰﺨﻣ ﻥﻭﺭﺩ ﻍﺍﺩ ﺏﺁ ﻒﺼﻧ
.ﺖﺷﺍﺩ ﺪﻫﺍﻮﺧ ﺯﺎﯿﻧ ﺖﻗﻭ ﻉﺮﺳﺍ ﺭﺩ ﺮﮕﯾﺩ ﯽﯾﺍﺩﺯﺏﻮﺳﺭ ﺪﻨﯾﻻﺮﻓ ﮏﯾ ﻪﺑ ﻩﺎﮕﺘﺳﺩ ،ﺩﻮﺸﻧ ﻞﻣﺎﮐ ﯽﯾﺍﺩﺯﺏﻮﺳﺭ ﺪﻨﯾﻻﺮﻓ ﻪﮑﯿﺗﺭﻮﺻ ﺭﺩ
8ﻪﺧﺮﭼ ﮏﯾ ﻞﻣﺎﺷ ﻭ ﺪﺸﮐﯽﻣ ﻝﻮﻃ ﻪﻘﯿﻗﺩ 30 ﺩﻭﺪﺣ ﯽﯾﺍﺩﺯﺏﻮﺳﺭ ﺪﻨﯾﻻﺮﻓ .ﺪﯿﻫﺩ ﺭﺎﺸﻓ ﺍﺭ ﻒﻗﻮﺗ/ﻉﻭﺮﺷ ﻪﻤﮐﺩ ،ﯽﯾﺍﺩﺯﺏﻮﺳﺭ ﺪﻨﯾﻻﺮﻓ ﻉﻭﺮﺷ ﯼﺍﺮﺑ
9ﺪﻨﯾﻻﺮﻓ .ﺪﯿﻨﮐ ﺮﭘ ﺏﺁ ﺎﺑ ًﺍﺩﺪﺠﻣ ﺍﺭ ﻥﺁ ،ﺪﺷ ﺮﻫﺎﻇ ﺮﮕﺸﯾﺎﻤﻧ ﯼﻭﺭ ﺏﺁ ﻥﺰﺨﻣ ﻥﺩﺮﮐ ﺮﭘ ﻡﺎﯿﭘ ﯽﺘﻗﻭ .ﺩﻮﺷ ﻒﻗﻮﺘﻣ ﻩﺎﮕﺘﺳﺩ ﺯﺍ ﺏﺁ ﺝﻭﺮﺧ ﺎﺗ ﺪﯿﻧﺎﻤﺑ ﺮﻈﺘﻨﻣ
10.ﺪﯿﯾﺎﻤﻧ ﻝﺎﻌﻓ ﻭ ﻩﺩﺮﮐ ﺐﺼﻧ ﺏﺁ ﻥﺰﺨﻣ ﺭﺩ ﺍﺭ ﺪﯾﺪﺟ AquaClean ﺏﺁ ﺮﺘﻠﯿﻓ
-
1.ﺪﯿﯾﻮﺸﺑ ﻞﻣﺎﮐ ﺭﻮﻃ ﻪﺑ ﻭ ﺪﯿﻨﮐ ﯽﻟﺎﺧ ﺍﺭ ﺏﺁ ﻥﺰﺨﻣ
2ﻭ ﺪﻨﮐﯽﻣ ﺏﺁ ﻥﺩﺮﮐ ﻡﺮﮔ ﻪﺑ ﻉﻭﺮﺷ ﻩﺎﮕﺘﺳﺩ .ﺪﯿﻨﮐ ﻦﺷﻭﺭ ﻩﺭﺎﺑﻭﺩ ﺍﺭ ﻩﺎﮕﺘﺳﺩ ﻭ ﻩﺩﺮﮐ ﺮﭘ ﯽﻧﺪﯿﻣﺎﺷﺁ ﺏﺁ ﺎﺑ Calc / Clean ﺖﻣﻼﻋ ﺢﻄﺳ ﺎﺗ ﺍﺭ ﺏﺁ ﻥﺰﺨﻣ
3،ﻍﺍﺩ ﺏﺁ ﺩﺮﮑﻠﻤﻋ ﺭﺮﮑﻣ ﺏﺎﺨﺘﻧﺍ ﺎﺑ ﺍﺪﺘﺑﺍ ،ﯽﺘﺳﺩ ﯽﺸﮑﺑﺁ ﻪﺧﺮﭼ ﻡﺎﺠﻧﺍ ﯼﺍﺮﺑ .ﺪﯿﻫﺩ ﻡﺎﺠﻧﺍ ﺍﺭ ﯽﺘﺳﺩ ﯽﺸﮑﺑﺁ ﻪﺧﺮﭼ ،ﯽﻧﺪﯿﺷﻮﻧ ﻉﻮﻧ ﺮﻫ ﻥﺩﺮﮐ ﻡﺩ ﺯﺍ ﻞﺒﻗ
ﯽﺒﻧﺎﺟ ﻡﺯﺍﻮﻟ ﺵﺭﺎﻔﺳ
ﺯﺍ ﺪﯿﻧﺍﻮﺗﯽﻣ ﺍﺭ ﺕﻻﻮﺼﺤﻣ ﻦﯾﺍ .ﺪﯿﻨﮐ ﻩﺩﺎﻔﺘﺳﺍ Philips ﺹﻮﺼﺨﻣ ﯼﺭﺍﺪﻬﮕﻧ ﻭ ﺲﯾﻭﺮﺳ ﺕﻻﻮﺼﺤﻣ ﺯﺍ ﺎﻬﻨﺗ ﻩﺎﮕﺘﺳﺩ ﯽﯾﺍﺩﺯﺏﻮﺳﺭ ﻭ ﻥﺩﺮﮐ ﺰﯿﻤﺗ ﯼﺍﺮﺑ
ﯼﺍﺮﺑ .ﺪﯿﻨﮐ ﻪﯿﻬﺗ www.philips.com/parts-and-accessories ﺖﯾﺎﺳﺏﻭ ﺭﺩ ﻦﯾﻼﻧﺁ ﺕﺭﻮﺻ ﻪﺑ ﺎﯾ ﺯﺎﺠﻣ ﺕﺎﻣﺪﺧ ﺰﮐﺍﺮﻣ ،ﯽﻠﺤﻣ ﺵﻭﺮﻓ ﯽﮔﺪﻨﯾﺎﻤﻧ
ﺏﺭﺩ ﯽﻠﺧﺍﺩ ﺢﻄﺳ ﯼﻭﺭ ﺪﯿﻧﺍﻮﺗﯽﻣ ﺍﺭ ﻝﺪﻣ ﻩﺭﺎﻤﺷ .ﺪﯿﻨﮐ ﺩﺭﺍﻭ ﺍﺭ ﺩﻮﺧ ﻩﺎﮕﺘﺳﺩ ﻝﺪﻣ ﻩﺭﺎﻤﺷ ،ﻦﯾﻼﻧﺁ ﺕﺭﻮﺻ ﻪﺑ ﯽﮐﺪﯾ ﺕﺎﻌﻄﻗ ﻞﻣﺎﮐ ﺖﺴﯿﻟ ﻩﺪﻫﺎﺸﻣ
.ﺪﯿﻨﮐ ﻩﺪﻫﺎﺸﻣ ﺲﯾﻭﺮﺳ
:ﻉﻮﻧ ﻩﺭﺎﻤﺷ ﻭ ﯼﺭﺍﺪﻬﮕﻧ ﻭ ﺲﯾﻭﺮﺳ ﺕﻻﻮﺼﺤﻣ
CA6700 ﯽﯾﺍﺩﺯﺏﻮﺳﺭ ﻝﻮﺼﺤﻣ
AquaClean CA6903 ﺏﺁ ﺮﺘﻠﯿﻓ
HD5061 ﻥﺩﺮﮐﻡﺩ ﻪﻋﻮﻤﺠﻣ ﺲﯾﺮﮔ
CA6704 ﻩﻮﻬﻗ ﻦﻏﻭﺭ ﻩﺪﻨﻨﮐ ﮎﺎﭘ ﯼﺎﻫﺹﺮﻗ
.ﺪﻨﺘﺴﯿﻧ ﺭﺎﮔﺯﺎﺳ ﻩﺎﮕﺘﺳﺩ ﻦﯾﺍ ﺎﺑ Brita ﯼﺎﻫﺮﺘﻠﯿﻓ
ﯽﺑﺎﯾ ﺐﯿﻋ
ﻞﻣﺎﮐ ﺖﺴﯿﻟ ﻭ ﯽﻧﺎﺒﯿﺘﺸﭘ ﯼﺎﻫﻮﯾﺪﯾﻭ .ﺪﯾﻮﺷ ﻪﺟﺍﻮﻣ ﺎﻬﻧﺁ ﺎﺑ ﻩﺎﮕﺘﺳﺩ ﺎﺑ ﻪﻄﺑﺍﺭ ﺭﺩ ﺖﺳﺍ ﻦﮑﻤﻣ ﻪﮐ ﺖﺳﺍ ﻩﺪﺷ ﺮﮐﺫ ﯽﺗﻼﮑﺸﻣ ﻦﯾﺮﺗﻝﻮﻤﻌﻣ ﺶﺨﺑ ﻦﯾﺍ ﺭﺩ
ﺕﺎﻣﺪﺧ ﺰﮐﺮﻣ ﺎﺑ ،ﺪﯿﺘﺴﯿﻧ ﻞﮑﺸﻣ ﻊﻓﺭ ﻪﺑ ﺭﺩﺎﻗ ﻪﮐ ﯽﺗﺭﻮﺻ ﺭﺩ .ﺪﻨﺷﺎﺑﯽﻣ ﺩﻮﺟﻮﻣ www.philips.com/coffee-care ﺖﯾﺎﺳﺏﻭ ﺭﺩ ﻝﻭﺍﺪﺘﻣ ﯼﺎﻫﺶﺳﺮﭘ
.ﺪﯿﻨﮐ ﻪﻌﺟﺍﺮﻣ ﻝﻮﺼﺤﻣ ﺖﻧﺎﻤﺿ ﯼﺎﻤﻨﻫﺍﺭ ﻪﭼﺮﺘﻓﺩ ،ﺱﺎﻤﺗ ﺕﺎﻋﻼﻃﺍ ﻩﺪﻫﺎﺸﻣ ﺖﻬﺟ .ﺪﯾﺮﯿﮕﺑ ﺱﺎﻤﺗ ﺩﻮﺧ ﺭﻮﺸﮐ ﺭﺩ ﻥﺎﯾﺮﺘﺸﻣ
-
-
-
-
Page 94
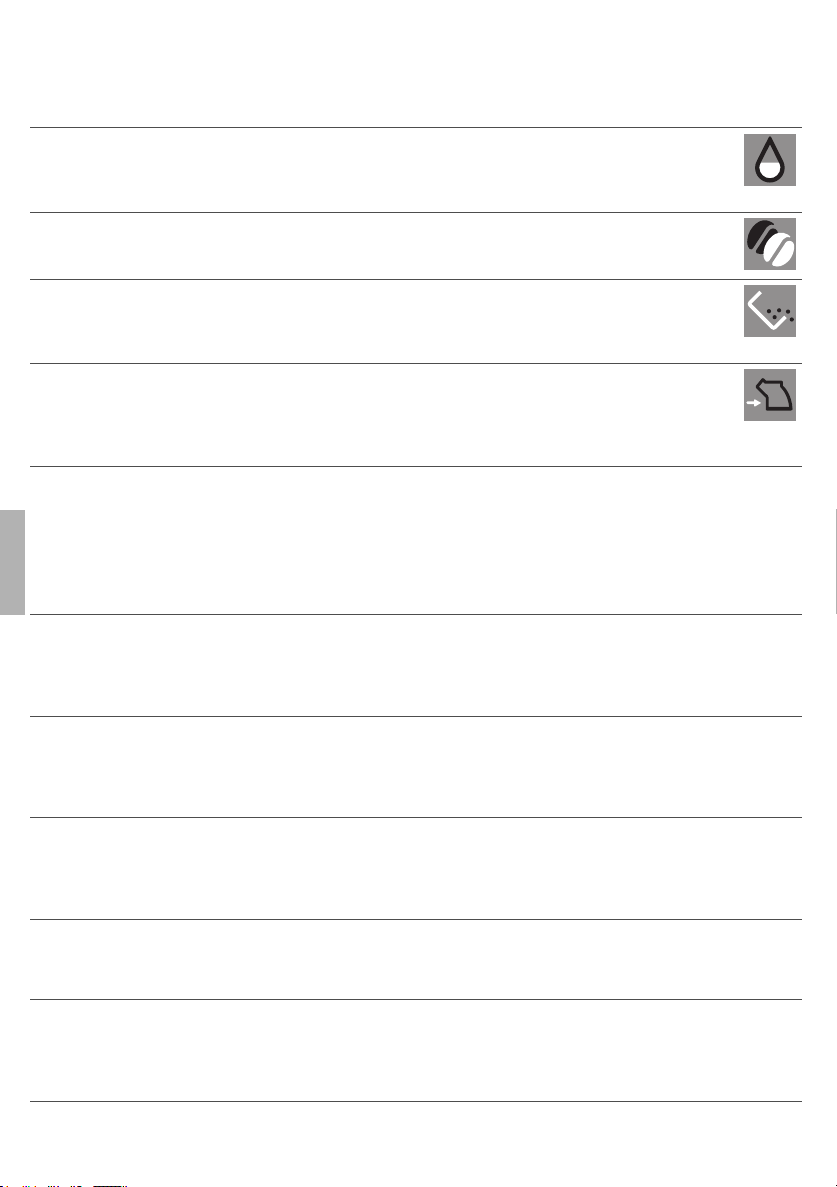
ﯽﺳﺭﺎﻓ
ﺭﺍﺪﺸﻫ ﯼﺎﻫﻦﮑﯾﺁ
ﺭﺎﮑﻫﺍﺭ
.ﺩﻮﺷﯽﻣ ﺮﻫﺎﻇ ﺮﮕﺸﯾﺎﻤﻧ ﯼﻭﺭ 'ﺏﺁ ﻥﺰﺨﻣ ﻥﺩﻮﺑ ﯽﻟﺎﺧ' ﻦﮑﯾﺁ
.ﺩﻮﺷﯽﻣ ﺮﻫﺎﻇ ﺮﮕﺸﯾﺎﻤﻧ ﯼﻭﺭ 'ﻩﻮﻬﻗ ﯼﺎﻫﻪﻧﺍﺩ ﻥﺩﺮﮐ ﻪﻓﺎﺿﺍ' ﻦﮑﯾﺁ
.ﺩﻮﺷﯽﻣ ﺮﻫﺎﻇ ﺮﮕﺸﯾﺎﻤﻧ ﯼﻭﺭ 'ﻩﻮﻬﻗ ﻪﻟﺎﻔﺗ ﻑﺮﻇ ﻥﺩﺮﮐ ﯽﻟﺎﺧ' ﻦﮑﯾﺁ
.ﺪﯿﻨﮐ ﺮﺒﺻ ﻪﯿﻧﺎﺛ 5 ﻩﺎﮕﺘﺳﺩ ﻥﻭﺭﺩ ﻥﺁ ﺩﺪﺠﻣ ﻥﺩﺍﺩ ﺭﺍﺮﻗ
.ﺩﻮﺷﯽﻣ ﺮﻫﺎﻇ ﺮﮕﺸﯾﺎﻤﻧ ﯼﻭﺭ 'ﻥﺩﺮﮐﻡﺩ ﻪﻋﻮﻤﺠﻣ ﻦﺘﺧﺍﺪﻧﺍﺎﺟ' ﻦﮑﯾﺁ
ﺶﺨﺑ ،ﻪﻠﺣﺮﻣ ﻪﺑ ﻪﻠﺣﺮﻣ ﯼﺎﻫﻞﻤﻌﻟﺍﺭﻮﺘﺳﺩ ﻩﺪﻫﺎﺸﻣ ﯼﺍﺮﺑ .ﺩﻮﺷﯽﻣ ﻞﻔﻗ ﯽﺑﻮﺧ ﻪﺑ ﺩﻮﺧ ﻞﺤﻣ ﺭﺩ ﺪﯾﻮﺷ ﻦﺌﻤﻄﻣ ﻭ ﺪﯾﺭﻭﺎﯿﺑ
.ﺪﯿﻨﮐ ﻪﻈﺣﻼﻣ ﺍﺭ 'ﻥﺩﺮﮐﻡﺩ ﻪﻋﻮﻤﺠﻣ ﻦﺘﺧﺍﺪﻧﺍ ﺎﺟ ﻭ ﻥﺩﺭﻭﺁ ﻥﻭﺮﯿﺑ'
ﺖﯾﺎﺳ ﺏﻭ ﺭﺩ ﯽﯾﻮﯾﺪﯾﻭ ﯼﺎﻫﻞﻤﻌﻟﺍﺭﻮﺘﺳﺩ .ﺩﻮﺷﯽﻣ ﻩﺩﺍﺩ ﺶﯾﺎﻤﻧ ﺪﻨﻫﺩﯽﻣ ﻥﺎﺸﻧ ﺍﺭ ﺎﻤﺷ ﻂﺳﻮﺗ ﻊﻓﺭ ﻞﺑﺎﻗ ﺕﻼﮑﺸﻣ ﻪﮐ ﯽﯾﺎﻄﺧ ﯼﺎﻫﺪﮐ ﺖﺴﯿﻟ ﻪﻣﺍﺩﺍ ﺭﺩ
ﺩﻮﺧ ﺭﻮﺸﮐ ﺭﺩ ﻥﺎﯾﺮﺘﺸﻣ ﺕﺎﻣﺪﺧ ﺰﮐﺮﻣ ﺎﺑ ًﺎﻔﻄﻟ ،ﺪﺷ ﺮﻫﺎﻇ ﯼﺮﮕﯾﺩ ﯼﺎﻄﺧ ﺪﮐ ﻪﮐ ﯽﺗﺭﻮﺻ ﺭﺩ .ﺪﻨﺷﺎﺑﯽﻣ ﺩﻮﺟﻮﻣ www.philips.com/coffee-care
ﯽﺳﺭﺎﻓ
.ﺪﯿﻨﮐ ﻪﻌﺟﺍﺮﻣ ﻝﻮﺼﺤﻣ ﺖﻧﺎﻤﺿ ﯼﺎﻤﻨﻫﺍﺭ ﻪﭼﺮﺘﻓﺩ ،ﺱﺎﻤﺗ ﺕﺎﻋﻼﻃﺍ ﻩﺪﻫﺎﺸﻣ ﺖﻬﺟ .ﺪﯾﺮﯿﮕﺑ ﺱﺎﻤﺗ
ﻦﮑﻤﻣ ﺭﺎﮑﻫﺍﺭ ﻞﮑﺸﻣ ﺎﻄﺧ ﺪﮐ
ﺭﺍﺪﺸﻫ ﻦﮑﯾﺁ
-.ﺪﯿﻨﮐ ﺮﭘ ﯽﻧﺪﯿﻣﺎﺷﺁ ﺏﺁ ﺎﺑ ،ﺮﺜﮐﺍﺪﺣ ﺖﻣﻼﻋ ﺢﻄﺳ ﺎﺗ ﺍﺭ ﺏﺁ ﻥﺰﺨﻣ .ﺖﺳﺍ ﯽﻟﺎﺧ ًﺎﺒﯾﺮﻘﺗ ﺏﺁ ﻥﺰﺨﻣ
-.ﺪﯿﻫﺩ ﺭﺍﺮﻗ ﻩﺎﮕﺘﺳﺩ ﻥﻭﺭﺩ ﺍﺭ ﺏﺁ ﻥﺰﺨﻣ .ﺩﺭﺍﺪﻧ ﺭﺍﺮﻗ ﺩﻮﺧ ﯼﺎﺟ ﺭﺩ ﺏﺁ ﻥﺰﺨﻣ
- .ﺪﯿﻨﮐ ﺮﭘ ﻩﻮﻬﻗ ﯼﺎﻫﻪﻧﺍﺩ ﺎﺑ ﺍﺭ ﻩﻮﻬﻗ ﯼﺎﻫﻪﻧﺍﺩ ﻒﯿﻗ
-ﺯﺍ ﻞﺒﻗ .ﺪﯿﻨﮐ ﯽﻟﺎﺧ ﺍﺭ ﻥﺁ ﻭ ﺪﯾﺭﻭﺎﯿﺑ ﻥﻭﺮﯿﺑ ﺍﺭ ﻩﻮﻬﻗ ﻪﻟﺎﻔﺗ ﻑﺮﻇ ﺖﺳﺍ ﻦﺷﻭﺭ ﻩﺎﮕﺘﺳﺩ ﻪﮐ ﯽﻟﺎﺣ ﺭﺩ .ﺖﺳﺍ ﺮﭘ ﻩﻮﻬﻗ ﻪﻟﺎﻔﺗ ﻑﺮﻇ
-ﻥﻭﺮﯿﺑ ﺍﺭ ﻥﺩﺮﮐ ﻡﺩ ﻪﻋﻮﻤﺠﻣ .ﺖﺳﺍ ﻪﺘﻓﺮﮕﻧ ﺭﺍﺮﻗ ﯽﺘﺳﺭﺩ ﻪﺑ ﺩﻮﺧ ﻞﺤﻣ ﺭﺩ ﺎﯾ ﺖﺴﯿﻧ ﻩﺎﮕﺘﺳﺩ ﻥﻭﺭﺩ ﻥﺩﺮﮐ ﻡﺩ ﻪﻋﻮﻤﺠﻣ
ﺎﻄﺧ ﯼﺎﻫﺪﮐ
95
ﺏﺭﺩ ﺲﭙﺳ .ﺪﯾﺭﻭﺎﯿﺑ ﻥﻭﺮﯿﺑ ﺍﺭ ﻥﺩﺮﮐﻡﺩ ﻪﻋﻮﻤﺠﻣ .ﺪﯿﺸﮑﺑ ﻕﺮﺑ ﺯﺍ ﻭ ﻩﺩﺮﮐ ﺵﻮﻣﺎﺧ ﺍﺭ ﻩﺎﮕﺘﺳﺩ
ﻭ ﻻﺎﺑ ﻪﺑ ﺍﺭ ﻪﺘﺳﺩ .ﺪﯿﻨﮐ ﺩﺭﺍﻭ ﻥﺁ ﺭﺩ ﺍﺭ ﮏﻘﺷﺎﻗ ﻪﺘﺳﺩ ﻭ ﻩﺩﺮﮐ ﺯﺎﺑ ﺍﺭ ﺏﺎﯿﺳﺁ-ﺶﯿﭘ ﻩﻮﻬﻗ ﻪﻈﻔﺤﻣ
ﯼﺎﻫﻞﻤﻌﻟﺍﺭﻮﺘﺳﺩ ﺯﺍ ﻉﻼﻃﺍ ﺖﻬﺟ .ﺪﺘﻔﯿﺑ ﻦﯿﯾﺎﭘ ﻩﺩﺮﮐ ﺮﯿﮔ ﻩﻮﻬﻗ ﺭﺩﻮﭘ ﺎﺗ ﺪﯿﻫﺪﺑ ﺖﮐﺮﺣ ﻦﯿﯾﺎﭘ
.ﺪﯿﻨﮐ ﻪﻈﺣﻼﻣ www.philips.com/coffee-care ﺖﯾﺎﺳﺏﻭ ،ﻞﻣﺎﮐ ﯽﯾﻮﯾﺪﯾﻭ
ﺍﻮﻫ ﺭﺩ ﺪﯿﻫﺩ ﻩﺯﺎﺟﺍ ﻭ ﺪﯿﯾﻮﺸﺑ ﺮﯿﺷ ﺏﺁ ﺎﺑ ﺍﺭ ﻥﺩﺮﮐ ﻡﺩ ﻪﻋﻮﻤﺠﻣ .ﺪﯿﻨﮐ ﺵﻮﻣﺎﺧ ﺍﺭ ﻩﺎﮕﺘﺳﺩ
ﺎﯾ ﺪﯿﻨﯿﺒﺑ ﺍﺭ 'ﻥﺩﺮﮐﻡﺩ ﻪﻋﻮﻤﺠﻣ ﯼﺭﺎﮐﺰﯿﻤﺗ' ﻞﺼﻓ .ﺪﯿﻨﮐ ﯼﺭﺎﮐﻦﻏﻭﺭ ﺍﺭ ﻥﺁ ﺲﭙﺳ ﻭ ﺩﻮﺷ ﮏﺸﺧ
-www.philips.com/coffee ﺖﯾﺎﺳﺏﻭ ،ﻞﻣﺎﮐ ﯽﯾﻮﯾﺪﯾﻭ ﯼﺎﻫﻞﻤﻌﻟﺍﺭﻮﺘﺳﺩ ﺯﺍ ﻉﻼﻃﺍ ﺖﻬﺟ
.ﺪﯿﻨﮐ ﻦﺷﻭﺭ ﺍﺭ ﻩﺎﮕﺘﺳﺩ ًﺍﺩﺪﺠﻣ ﺲﭙﺳ .ﺪﯿﻨﮐ ﻪﻈﺣﻼﻣ care
ﺯﺍ ﻞﺒﻗ .ﺪﯾﺯﺍﺪﻨﯿﺑ ﺎﺟ ًﺍﺩﺪﺠﻣ ﻭ ﺪﯾﺭﻭﺎﯿﺑ ﻥﻭﺮﯿﺑ ﺍﺭ ﻥﺩﺮﮐ ﻡﺩ ﻪﻋﻮﻤﺠﻣ .ﺪﯿﻨﮐ ﺵﻮﻣﺎﺧ ﺍﺭ ﻩﺎﮕﺘﺳﺩ
ﻩﺩﺎﻔﺘﺳﺍ' ﻞﺼﻓ .ﺖﺳﺍ ﻩﺩﺎﺘﻓﺍ ﺎﺟ ﯽﺘﺳﺭﺩ ﻪﺑ ﻪﮐ ﺪﯾﻮﺷ ﻦﺌﻤﻄﻣ ﻥﺩﺮﮐ ﻡﺩ ﻪﻋﻮﻤﺠﻣ ﻥﺩﺮﮐ ﺩﺭﺍﻭ
ﺖﯾﺎﺳﺏﻭ ،ﻞﻣﺎﮐ ﯽﯾﻮﯾﺪﯾﻭ ﯼﺎﻫﻞﻤﻌﻟﺍﺭﻮﺘﺳﺩ ﺯﺍ ﻉﻼﻃﺍ ﺖﻬﺟ ﺎﯾ ﺪﯿﻨﯿﺒﺑ ﺍﺭ 'ﻥﺩﺮﮐﻡﺩ ﻪﻋﻮﻤﺠﻣ ﺯﺍ
.ﺪﯿﻨﮐ ﻦﺷﻭﺭ ﺍﺭ ﻩﺎﮕﺘﺳﺩ ًﺍﺩﺪﺠﻣ ﺲﭙﺳ .ﺪﯿﻨﮐ ﻪﻈﺣﻼﻣ www.philips.com/coffee-care
ﻊﻗﺍﻭ ﺮﺛﻮﻣ ﺭﺎﮑﻫﺍﺭ ﻦﯾﺍ ﺮﮔﺍ .ﺪﯿﻨﮐ ﯼﺯﺍﺪﻧﺍﻩﺍﺭ ًﺍﺩﺪﺠﻣ ﺍﺭ ﻥﺁ ﻩﺎﮕﺘﺳﺩ ﻥﺩﺮﮐ ﻦﺷﻭﺭ ﻭ ﺵﻮﻣﺎﺧ ﺎﺑ
ﺍﺭ ﻩﺎﮕﺘﺳﺩ ﯽﻧﻻﻮﻃ ﻥﺎﻣﺯ ﺕﺪﻣ ﯼﺍﺮﺑ ﻪﮐ ﯽﺗﺭﻮﺻ ﺭﺩ .ﺪﯾﺮﯿﮕﺑ ﻩﺎﮕﺘﺳﺩ ﺯﺍ ﻍﺍﺩ ﺏﺁ ﻥﺎﺠﻨﻓ 2-3 ،ﺪﺷ
.ﺪﯿﻫﺩ ﻡﺎﺠﻧﺍ ﺍﺭ ﺭﺎﮐ ﻦﯾﺍ ﻥﻮﻨﮐﺍ ،ﺪﯾﺩﺮﮑﻧ ﯽﯾﺍﺩﺯﺏﻮﺳﺭ
ﺮﺛﻮﻣ ﺭﺎﮑﻫﺍﺭ ﻦﯾﺍ ﺮﮔﺍ .ﺪﯿﻨﮐ ﻥﺎﺤﺘﻣﺍ ﺍﺭ ﻩﻮﻬﻗ ﻥﺩﺮﮐ ﻡﺩ ﻭ ﺪﯾﺭﻭﺎﯿﺑ ﻥﻭﺮﯿﺑ ﺍﺭ AquaClean ﺮﺘﻠﯿﻓ
ﻩﺩﺎﻣﺁ ﯽﺘﺳﺭﺩ ﻪﺑ ﻩﺎﮕﺘﺳﺩ ﺭﺩ ﻥﺩﺍﺩ ﺭﺍﺮﻗ ﺯﺍ ﻞﺒﻗ AquaClean ﺮﺘﻠﯿﻓ ﺪﯾﻮﺷ ﻦﺌﻤﻄﻣ ،ﺪﺷ ﻊﻗﺍﻭ
ﻊﻗﺍﻭ ﺮﺛﻮﻣ ﺭﺎﮑﻫﺍﺭ ﻦﯾﺍ ﺮﮔﺍ .ﺪﯿﻧﺍﺩﺮﮔ ﺯﺎﺑ ﺏﺁ ﻥﺰﺨﻣ ﻥﻭﺭﺩ ﻪﺑ ﺍﺭ AquaClean ﺮﺘﻠﯿﻓ .ﺖﺳﺍ ﻩﺪﺷ
.ﺪﯿﻨﮐ ﺾﯾﻮﻌﺗ ﺍﺭ ﻥﺁ ﺪﺷﺎﺑ ﻡﺯﻻ ﻭ ﺪﺷﺎﺑ ﺩﻭﺪﺴﻣ ﺮﺘﻠﯿﻓ ﺖﺳﺍ ﻦﮑﻤﻣ ،ﺪﺸﻧ
.ﺖﺳﺍ ﺩﻭﺪﺴﻣ ﻩﻮﻬﻗ ﻒﯿﻗ 01
ﺎﯾ ﺖﺳﺍ ﻒﯿﺜﮐ ﻥﺩﺮﮐ ﻡﺩ ﻪﻋﻮﻤﺠﻣ
ﻩﺪﺸﻧ ﯼﺭﺎﮐﺲﯾﺮﮔ ﯽﺘﺳﺭﺩ ﻪﺑ
.ﺖﺳﺍ
ﺎﺟ ﯽﺘﺳﺭﺩ ﻪﺑ ﻥﺩﺮﮐ ﻡﺩ ﻪﻋﻮﻤﺠﻣ
.ﺖﺳﺍ ﻩﺩﺎﺘﻔﯿﻧ
.ﺩﺭﺍﺩ ﺩﻮﺟﻭ ﺏﺁ ﺭﺍﺪﻣ ﺭﺩ ﺍﻮﻫ 05
ﻪﺑ ﺐﺼﻧ ﺯﺍ ﻞﺒﻗ AquaClean ﺮﺘﻠﯿﻓ
ﻪﮐ ﻦﯾﺍ ﺎﯾ ﺩﻮﺑ ﻩﺩﺎﺘﻔﯿﻧ ﺎﺟ ﯽﺘﺳﺭﺩ
.ﺖﺳﺍ ﻩﺪﺷ ﺩﻭﺪﺴﻣ
03
04
Page 95
96
ﯽﺳﺭﺎﻓ
ﻦﮑﻤﻣ ﺭﺎﮑﻫﺍﺭ ﻞﮑﺸﻣ ﺎﻄﺧ ﺪﮐ
ﻩﺎﮕﺘﺳﺩ .ﺪﻨﮐ ﺍﺪﯿﭘ ﺖﻘﺑﺎﻄﻣ ﻕﺎﺗﺍ ﯼﺎﻣﺩ ﺎﺑ ﻥﻭﺮﯿﺑ/ﻞﻘﻧﻭﻞﻤﺣ ﻦﯿﺣ ﯼﺎﻣﺩ ﺯﺍ ﻩﺎﮕﺘﺳﺩ ﺪﯿﻫﺩ ﻩﺯﺎﺟﺍ
ﺎﺑ ،ﺪﺸﻧ ﻊﻗﺍﻭ ﺮﺛﻮﻣ ﺭﺎﮑﻫﺍﺭ ﻦﯾﺍ ﺮﮔﺍ .ﺪﯿﻨﮐ ﻦﺷﻭﺭ ًﺍﺩﺪﺠﻣ ﺲﭙﺳ ﻭ ﻩﺩﺮﮐ ﺵﻮﻣﺎﺧ ﻪﯿﻧﺎﺛ 30 ﺍﺭ
،ﺱﺎﻤﺗ ﺕﺎﻋﻼﻃﺍ ﻩﺪﻫﺎﺸﻣ ﺖﻬﺟ .ﺪﯾﺮﯿﮕﺑ ﺱﺎﻤﺗ ﺩﻮﺧ ﺭﻮﺸﮐ ﺭﺩ ﻥﺎﯾﺮﺘﺸﻣ ﺕﺎﻣﺪﺧ ﺰﮐﺮﻣ
.ﺪﯿﻨﮐ ﻪﻌﺟﺍﺮﻣ ﻝﻮﺼﺤﻣ ﺖﻧﺎﻤﺿ ﯼﺎﻤﻨﻫﺍﺭ ﻪﭼﺮﺘﻓﺩ
.ﺪﯿﻨﮐ ﻦﺷﻭﺭ ًﺍﺩﺪﺠﻣ ﻪﻘﯿﻗﺩ 30 ﺯﺍ ﺲﭘ ﻭ ﻩﺩﺮﮐ ﺵﻮﻣﺎﺧ ﺍﺭ ﻩﺎﮕﺘﺳﺩ ﻩﺪﺷ ﻍﺍﺩ ﺪﺣ ﺯﺍ ﺶﯿﺑ ﻩﺎﮕﺘﺳﺩ
ﻕﺎﺗﺍ ﯼﺎﻣﺩ ﺎﺑ ﺩﺭﺍﺩ ﺯﺎﯿﻧ ﻩﺎﮕﺘﺳﺩ
ﺪﻨﮐ ﺍﺪﯿﭘ ﺖﻘﺑﺎﻄﻣ
.ﺖﺳﺍ
11
14
ﯽﺑﺎﯾﺐﯿﻋ ﻝﻭﺪﺟ
ﻞﻣﺎﮐ ﺖﺴﯿﻟ ﻭ ﯽﻧﺎﺒﯿﺘﺸﭘ ﯼﺎﻫﻮﯾﺪﯾﻭ .ﺪﯾﻮﺷ ﻪﺟﺍﻮﻣ ﺎﻬﻧﺁ ﺎﺑ ﻩﺎﮕﺘﺳﺩ ﺎﺑ ﻪﻄﺑﺍﺭ ﺭﺩ ﺖﺳﺍ ﻦﮑﻤﻣ ﻪﮐ ﺖﺳﺍ ﻩﺪﺷ ﺮﮐﺫ ﯽﺗﻼﮑﺸﻣ ﻦﯾﺮﺗﻝﻮﻤﻌﻣ ﺶﺨﺑ ﻦﯾﺍ ﺭﺩ
ﺕﺎﻣﺪﺧ ﺰﮐﺮﻣ ﺎﺑ ،ﺪﯿﺘﺴﯿﻧ ﻞﮑﺸﻣ ﻊﻓﺭ ﻪﺑ ﺭﺩﺎﻗ ﻪﮐ ﯽﺗﺭﻮﺻ ﺭﺩ .ﺪﻨﺷﺎﺑﯽﻣ ﺩﻮﺟﻮﻣ www.philips.com/coffee-care ﺖﯾﺎﺳﺏﻭ ﺭﺩ ﻝﻭﺍﺪﺘﻣ ﯼﺎﻫﺶﺳﺮﭘ
.ﺪﯿﻨﮐ ﻪﻌﺟﺍﺮﻣ ﻝﻮﺼﺤﻣ ﺖﻧﺎﻤﺿ ﯼﺎﻤﻨﻫﺍﺭ ﻪﭼﺮﺘﻓﺩ ،ﺱﺎﻤﺗ ﺕﺎﻋﻼﻃﺍ ﻩﺪﻫﺎﺸﻣ ﺖﻬﺟ .ﺪﯾﺮﯿﮕﺑ ﺱﺎﻤﺗ ﺩﻮﺧ ﺭﻮﺸﮐ ﺭﺩ ﻥﺎﯾﺮﺘﺸﻣ
ﺭﺎﮑﻫﺍﺭ
ﺖﺳﺍ ﻦﮑﻤﻣ ﺎﻣﺍ ﺖﺳﺍ ﻩﺪﺷ ﺰﯿﻤﺗ ﺖﻗﺩ ﻪﺑ ﻩﺎﮕﺘﺳﺩ ﺪﻨﭼ ﺮﻫ
،ﻝﺎﺣ ﻦﯾﺍ ﺎﺑ .ﺪﺷﺎﺑ ﻩﺪﻧﺎﻣ ﯽﻗﺎﺑ ﻥﺁ ﻥﻭﺭﺩ ﻩﻮﻬﻗ ﯼﺭﺍﺪﻘﻣ
.ﺖﺳﺍ ﻮﻧ ًﻼﻣﺎﮐ ﻩﺎﮕﺘﺳﺩ
ﺾﺤﻣ ﻪﺑ ﺎﯾ ﻪﻧﺍﺯﻭﺭ ﺕﺭﻮﺻ ﻪﺑ ﺍﺭ ﺎﻫﻪﮑﭼ ﻥﺩﺮﮐ ﻊﻤﺟ ﯽﻨﯿﺳ
ﺮﻫﺎﻇ 'ﺎﻫﻪﮑﭼ ﻥﺩﺮﮐ ﻊﻤﺟ ﯽﻨﯿﺳ ﻥﺩﻮﺑ ﺮﭘ' ﺮﮕﻧﺎﺸﻧ ﻪﮐ ﻪﮑﻨﯾﺍ
.ﺪﯿﻨﮐ ﯽﻟﺎﺧ ﺎﻫﻪﮑﭼ ﻥﺩﺮﮐ ﻊﻤﺟ ﯽﻨﯿﺳ ﺵﻮﭘﺭﺩ ﻖﯾﺮﻃ ﺯﺍ ﺪﺷ
ﺏﺁ ﺎﺗ ﺪﯿﻫﺩ ﺭﺍﺮﻗ ﯽﺟﻭﺮﺧ ﻪﭽﯾﺭﺩ ﺮﯾﺯ ﻥﺍﻮﯿﻟ ﮏﯾ :ﻪﺘﮑﻧ
.ﺩﻮﺷ ﻊﻤﺟ ﻥﺁ ﺭﺩ ﻩﺎﮕﺘﺳﺩ ﺯﺍ ﻩﺪﺷ ﺝﺭﺎﺧ ﯼﻮﺸﺘﺴﺷ
ﻩﺎﮕﺘﺳﺩ ﻥﺩﻮﺑ ﻦﺷﻭﺭ ﺖﻟﺎﺣ ﺭﺩ ﺍﺭ ﻩﻮﻬﻗ ﻪﻟﺎﻔﺗ ﻑﺮﻇ ﻪﺸﯿﻤﻫ
5 ﻞﻗﺍﺪﺣ ،ﺪﯾﺭﻭﺎﯿﺑ ﻥﻭﺮﯿﺑ ﺍﺭ ﻩﻮﻬﻗ ﻪﻟﺎﻔﺗ ﻑﺮﻇ .ﺪﯿﻨﮐ ﯽﻟﺎﺧ
.ﺪﯿﻫﺩ ﺭﺍﺮﻗ ﻩﺎﮕﺘﺳﺩ ﺭﺩ ًﺍﺩﺪﺠﻣ ﺲﭙﺳ ﻭ ﺪﯿﻨﮐ ﺮﺒﺻ ﻪﯿﻧﺎﺛ
.ﺖﺳﺍ ﻩﺪﺷ ﺖﺴﺗ ﻩﻮﻬﻗ ﺎﺑ ﻩﺎﮕﺘﺳﺩ ﻦﯾﺍ ﻩﺎﮕﺘﺳﺩ ﺭﺩ ﻩﻮﻬﻗ ﻪﻟﺎﻔﺗ ﯼﺭﺍﺪﻘﻣ
ﯽﺸﮑﺑﺁ ﯼﺍﺮﺑ ﺏﺁ ﺯﺍ ﻩﺎﮕﺘﺳﺩ .ﺖﺳﺍ ﯼﺩﺎﻋ ﺮﻣﺍ ﻦﯾﺍ
ﻩﺩﺎﻔﺘﺳﺍ ﻥﺩﺮﮐ ﻡﺩ ﻪﻋﻮﻤﺠﻣ ﻭ ﯽﻠﺧﺍﺩ ﺭﺍﺪﻣ
ًﺎﻤﯿﻘﺘﺴﻣ ﯽﻠﺧﺍﺩ ﻢﺘﺴﯿﺳ ﺯﺍ ﺏﺁ ﯼﺭﺍﺪﻘﻣ .ﺪﻨﮐﯽﻣ
ﺍﺪﯿﭘ ﻥﺎﯾﺮﺟ ﺎﻫﻪﮑﭼ ﻥﺩﺮﮐ ﻊﻤﺟ ﯽﻨﯿﺳ ﻪﺑ
ﯽﻟﺎﺧ ﯽﺘﻟﺎﺣ ﺭﺩ ﺍﺭ ﻩﻮﻬﻗ ﻪﻟﺎﻔﺗ ﻑﺮﻇ ﺎﻤﺷ
ﻥﺁ ﺎﯾ ﺖﺳﺍ ﻩﺩﻮﺑ ﺵﻮﻣﺎﺧ ﻩﺎﮕﺘﺳﺩ ﻪﮐ ﺪﯾﺍﻩﺩﺮﮐ
.ﺪﯾﺪﻧﺍﺩﺮﮔﺮﺑ ﻩﺎﮕﺘﺳﺩ ﻞﺧﺍﺩ ﻪﺑ ﺩﻭﺯ ﺭﺎﯿﺴﺑ ﺍﺭ
ﻞﯿﻟﺩ ﻞﮑﺸﻣ
.ﺩﺭﺍﺩ ﺩﻮﺟﻭ ﻦﻣ ﺪﯾﺪﺟ ﺯﺎﺳﻩﻮﻬﻗ
ﺮﭘ ﺩﻭﺯ ﺭﺎﯿﺴﺑ ﻩﻮﻬﻗ ﻥﺎﺠﻨﻓ ﯽﻨﯿﺳ
ﺭﺩ ﺏﺁ ﯼﺭﺍﺪﻘﻣ ﻪﺸﯿﻤﻫ / ﺩﻮﺷﯽﻣ
ﺩﻮﺟﻭ ﺎﻫﻪﮑﭼ ﻥﺩﺮﮐ ﻊﻤﺟ ﯽﻨﯿﺳ
.ﺩﺭﺍﺩ
.ﺪﻨﮐﯽﻣ
'ﻩﻮﻬﻗ ﻪﻟﺎﻔﺗ ﻑﺮﻇ ﻥﺩﺮﮐ ﯽﻟﺎﺧ' ﻦﮑﯾﺁ
.ﺪﻧﺎﻣﯽﻣ ﯽﻗﺎﺑ ﻦﺷﻭﺭ
ﻩﺎﮕﺘﺳﺩ ﻪﺑ ﻩﻮﻬﻗ ﻪﻟﺎﻔﺗ ﻑﺮﻇ ﻥﺪﻧﺍﺩﺮﮔﺯﺎﺑ ﺯﺍ ﻞﺒﻗ ﻪﺸﯿﻤﻫ
ﻩﻮﻬﻗ ﻪﻟﺎﻔﺗ ﺮﮕﺷﺭﺎﻤﺷ ،ﺐﯿﺗﺮﺗ ﻦﯾﺪﺑ .ﺪﯿﻨﮐ ﺮﺒﺻ ﻪﯿﻧﺎﺛ 5 ﺩﻭﺪﺣ
ﻩﻮﻬﻗ ﯼﺎﻫﮎﻮﭘ ﺩﺍﺪﻌﺗ ﻭ ﺩﻮﺷﯽﻣ ﯽﻧﺎﺸﻧﺯﺎﺑ ﺮﻔﺻ ﺩﺪﻋ ﯼﻭﺭ
.ﺪﺷ ﺪﻨﻫﺍﻮﺧ ﺵﺭﺎﻤﺷ ﯽﺘﺳﺭﺩ ﻪﺑ
ﻩﺎﮕﺘﺳﺩ ﻥﺩﻮﺑ ﻦﺷﻭﺭ ﺖﻟﺎﺣ ﺭﺩ ﺍﺭ ﻩﻮﻬﻗ ﻪﻟﺎﻔﺗ ﻑﺮﻇ ﻪﺸﯿﻤﻫ
ﺖﻟﺎﺣ ﺭﺩ ﺍﺭ ﻩﻮﻬﻗ ﻪﻟﺎﻔﺗ ﻑﺮﻇ ﻪﮐ ﯽﺗﺭﻮﺻ ﺭﺩ .ﺪﯿﻨﮐ ﯽﻟﺎﺧ
ﻩﻮﻬﻗ ﻪﻟﺎﻔﺗ ﺮﮕﺷﺭﺎﻤﺷ ،ﺪﯿﻨﮐ ﯽﻟﺎﺧ ﻩﺎﮕﺘﺳﺩ ﻥﺩﻮﺑ ﺵﻮﻣﺎﺧ
.ﺪﺷ ﺪﻫﺍﻮﺨﻧ ﺮﻔﺻ
ﻪﻟﺎﻔﺗ ﻑﺮﻇ ،ﺪﯿﻨﮐﯽﻣ ﺍﺪﺟ ﺍﺭ ﺎﻫﻪﮑﭼ ﻥﺩﺮﮐ ﻊﻤﺟ ﯽﻨﯿﺳ ﯽﺘﻗﻭ
ﮎﻮﭘ ﺪﻨﭼ ﺎﻬﻨﺗ ﻪﮐ ﯽﺗﺭﻮﺻ ﺭﺩ ﯽﺘﺣ ،ﺪﯿﻨﮐ ﯽﻟﺎﺧ ﺰﯿﻧ ﺍﺭ ﻩﻮﻬﻗ
ﻪﮐ ﺪﯾﻮﺷﯽﻣ ﻦﺌﻤﻄﻣ ﺐﯿﺗﺮﺗ ﻦﯾﺪﺑ .ﺖﺳﺍ ﻩﺪﻧﺎﻣ ﻥﺁ ﺭﺩ ﻩﻮﻬﻗ
ﯼﺎﻫﮎﻮﭘ ﺩﺍﺪﻌﺗ ﻭ ﺖﺳﺍ ﻩﺪﺷ ﺮﻔﺻ ﻩﻮﻬﻗ ﻪﻟﺎﻔﺗ ﺮﮕﺷﺭﺎﻤﺷ
.ﺪﺷ ﺪﻨﻫﺍﻮﺧ ﺵﺭﺎﻤﺷ ﯽﺘﺳﺭﺩ ﻪﺑ ﻩﻮﻬﻗ
،ﺪﯾﺍﻩﺩﺮﮐ ﯽﻟﺎﺧ ﺍﺭ ﻩﻮﻬﻗ ﻪﻟﺎﻔﺗ ﻑﺮﻇ ﻪﮐ ﺭﺎﺑ ﻦﯾﺮﺧﺁ
.ﺖﺳﺍ ﻩﺩﺮﮑﻧ ﺮﻔﺻ ﺍﺭ ﺮﮕﺷﺭﺎﻤﺷ ﻩﺎﮕﺘﺳﺩ
ﯽﻟﺎﺧ ﺍﺭ ﻩﻮﻬﻗ ﻪﻟﺎﻔﺗ ﻑﺮﻇ ﻪﮑﻨﯾﺍ ﻥﻭﺪﺑ ﺎﻤﺷ
ﺍﺪﺟ ﺍﺭ ﺎﻫﻪﮑﭼ ﻥﺩﺮﮐ ﻊﻤﺟ ﯽﻨﯿﺳ ،ﺪﯿﻨﮐ
.ﺪﯾﺍﻩﺩﺮﮐ
ﻪﻟﺎﻔﺗ ﻑﺮﻇ ﻪﮐ ﯽﺘﻗﻭ ﯽﺘﺣ ﻩﺎﮕﺘﺳﺩ
ﯽﻟﺎﺧ ﻡﺎﯿﭘ ،ﺖﺳﺍ ﻩﺪﺸﻧ ﺮﭘ ﻩﻮﻬﻗ
ﺶﯾﺎﻤﻧ ﺍﺭ ﻩﻮﻬﻗ ﻪﻟﺎﻔﺗ ﻑﺮﻇ ﻥﺩﺮﮐ
.ﺪﻫﺩﯽﻣ
ﺮﭘ ﺪﺣ ﺯﺍ ﺶﯿﺑ ﻩﻮﻬﻗ ﻪﻟﺎﻔﺗ ﻑﺮﻇ
ﻥﺩﺮﮐ ﯽﻟﺎﺧ' ﻦﮑﯾﺁ ﯽﻟﻭ ﺖﺳﺍ ﻩﺪﺷ
ﺮﮕﺸﯾﺎﻤﻧ ﯼﻭﺭ 'ﻩﻮﻬﻗ ﻪﻟﺎﻔﺗ ﻑﺮﻇ
.ﺩﻮﺷ ﯽﻤﻧ ﺮﻫﺎﻇ
Page 96
ﯽﺳﺭﺎﻓ
ﺭﺎﮑﻫﺍﺭ ﻞﯿﻟﺩ ﻞﮑﺸﻣ
97
ﺍﺭ ﺲﯾﻭﺮﺳ ﺏﺭﺩ :ﺪﯿﻨﮐ ﯽﻧﺎﺸﻧﺯﺎﺑ ﺮﯾﺯ ﺵﻭﺭ ﻪﺑ ﺍﺭ ﻩﺎﮕﺘﺳﺩ
ﺍﺭ ﻩﺎﮕﺘﺳﺩ .ﺪﯿﻫﺩ ﺭﺍﺮﻗ ﺩﻮﺧ ﯼﺎﺟ ﺭﺩ ﺍﺭ ﺏﺁ ﻥﺰﺨﻣ ﻭ ﺪﯾﺪﻨﺒﺑ
ﯼﺎﻫﻍﺍﺮﭼ ﺎﺗ ﺪﯿﻧﺎﻤﺑ ﺮﻈﺘﻨﻣ ﻭ ﺪﯿﻨﮐ ﻦﺷﻭﺭ ًﺍﺩﺪﺠﻣ ﻭ ﺵﻮﻣﺎﺧ
ﺪﯿﻨﮐ ﯽﻌﺳ ﻩﺭﺎﺑﻭﺩ .ﺪﻧﻮﺷ ﻦﺷﻭﺭ ﺎﻫﯽﻧﺪﯿﺷﻮﻧ ﯼﺎﻫﻦﮑﯾﺁ
ﻩﺪﻫﺎﺸﻣ ﯼﺍﺮﺑ .ﺪﯾﺭﻭﺎﯿﺑ ﻥﻭﺮﯿﺑ ﺍﺭ ﻥﺩﺮﮐ ﻡﺩ ﻪﻋﻮﻤﺠﻣ
ﻭ ﻥﺩﺭﻭﺁ ﻥﻭﺮﯿﺑ' ﺶﺨﺑ ،ﻪﻠﺣﺮﻣ ﻪﺑ ﻪﻠﺣﺮﻣ ﯼﺎﻫﻞﻤﻌﻟﺍﺭﻮﺘﺳﺩ
.ﺪﯿﻨﮐ ﻪﻈﺣﻼﻣ ﺍﺭ 'ﻥﺩﺮﮐﻡﺩ ﻪﻋﻮﻤﺠﻣ ﻦﺘﺧﺍﺪﻧﺍ ﺎﺟ
ﺍﺭ ﺲﯾﻭﺮﺳ ﺏﺭﺩ :ﺪﯿﻨﮐ ﯽﻧﺎﺸﻧﺯﺎﺑ ﺮﯾﺯ ﺵﻭﺭ ﻪﺑ ﺍﺭ ﻩﺎﮕﺘﺳﺩ
ﻡﺩ ﻪﻋﻮﻤﺠﻣ .ﺪﯿﻫﺩ ﺭﺍﺮﻗ ﺩﻮﺧ ﯼﺎﺟ ﺭﺩ ﺍﺭ ﺏﺁ ﻥﺰﺨﻣ ﻭ ﺪﯾﺪﻨﺒﺑ
ﻕﺮﺑ ﺯﺍ ﻭ ﻩﺩﺮﮐ ﺵﻮﻣﺎﺧ ﺍﺭ ﻩﺎﮕﺘﺳﺩ .ﺪﯾﺭﺍﺬﮕﺑ ﻥﻭﺮﯿﺑ ﺍﺭ ﻥﺩﺮﮐ
ﺍﺭ ﻩﺎﮕﺘﺳﺩ ﺲﭘ ﺲﭙﺳ ﻭ ﺪﯿﻧﺎﻤﺑ ﺮﻈﺘﻨﻣ ﻪﯿﻧﺎﺛ 30 .ﺪﯿﺸﮑﺑ
ﺎﺗ ﺪﯿﻧﺎﻤﺑ ﺮﻈﺘﻨﻣ ﻭ ﺪﯿﻨﮐ ﻦﺷﻭﺭ ﻭ ﺪﯿﻧﺰﺑ ﻕﺮﺑ ﻪﺑ ًﺍﺩﺪﺠﻣ
ﺲﭙﺳ .ﺪﻧﻮﺷ ﻦﺷﻭﺭ ﺎﻫﯽﻧﺪﯿﺷﻮﻧ ﯼﺎﻫﻦﮑﯾﺁ ﯼﺎﻫﻍﺍﺮﭼ
ﻭ ﻩﺩﺮﮐ ﻢﯿﻈﻨﺗ ﺢﯿﺤﺻ ﺖﯿﻌﺿﻭ ﺭﺩ ﺍﺭ ﻥﺩﺮﮐ ﻡﺩ ﻪﻋﻮﻤﺠﻣ
ﻩﺪﻫﺎﺸﻣ ﯼﺍﺮﺑ .ﺪﯿﻫﺩ ﺭﺍﺮﻗ ﻩﺎﮕﺘﺳﺩ ﻥﻭﺭﺩ ًﺍﺩﺪﺠﻣ
ﻭ ﻥﺩﺭﻭﺁ ﻥﻭﺮﯿﺑ' ﺶﺨﺑ ،ﻪﻠﺣﺮﻣ ﻪﺑ ﻪﻠﺣﺮﻣ ﯼﺎﻫﻞﻤﻌﻟﺍﺭﻮﺘﺳﺩ
.ﺪﯿﻨﮐ ﻪﻈﺣﻼﻣ ﺍﺭ 'ﻥﺩﺮﮐﻡﺩ ﻪﻋﻮﻤﺠﻣ ﻦﺘﺧﺍﺪﻧﺍ ﺎﺟ
ﺯﺍ ﻥﺩﺮﮐﻡﺩ ﻪﻋﻮﻤﺠﻣ ﻥﺩﺭﻭﺁ ﻥﻭﺮﯿﺑ' ﻩﺪﻫﺎﺸﻣ) ﻪﻋﻮﻤﺠﻣ
ﻭ ﺪﯿﯾﻮﺸﺑ ﺏﺁ ﺮﯿﺷ ﺮﯾﺯ ،ﺪﯾﺭﻭﺎﯿﺑ ﻥﻭﺮﯿﺑ ﺍﺭ ﻥﺩﺮﮐ ﻡﺩ ('ﻩﺎﮕﺘﺳﺩ
ﻩﺪﻫﺎﺸﻣ) ﺕﺎﻌﻄﻗ ﺲﭙﺳ .ﺩﻮﺷ ﮏﺸﺧ ﺪﯿﻫﺩ ﻩﺯﺎﺟﺍ
ﯽﺳﺭﺎﻓ
ﯼﺭﺎﮐﻦﻏﻭﺭ ﺍﺭ ﻥﺁ ﮎﺮﺤﺘﻣ ('ﻥﺩﺮﮐﻡﺩ ﻪﻋﻮﻤﺠﻣ ﯼﺭﺎﮐﻦﻏﻭﺭ'
ﺪﻫﺩ ﻡﺎﺠﻧﺍ ﺍﺭ ﺩﻮﺧ ﯽﻤﯿﻈﻨﺗﺩﻮﺧ ﺪﻨﯾﻻﺮﻓ ﻩﺎﮕﺘﺳﺩ ﻪﮑﻨﯾﺍ ﯼﺍﺮﺑ
.ﺪﯿﻨﮐ ﻡﺩ ﻩﻮﻬﻗ ﻥﺎﺠﻨﻓ 5 ﺮﻣﺍ ﻭﺪﺑ ﺭﺩ
.ﺖﺳﺍ ﻩﺩﺎﺘﻔﯿﻧ ﺎﺟ ﯽﺘﺳﺭﺩ ﻪﺑ ﻥﺩﺮﮐ ﻡﺩ ﻪﻋﻮﻤﺠﻣ ﺍﺭ ﻥﺩﺮﮐ ﻡﺩ ﻪﻋﻮﻤﺠﻣ ﻢﻧﺍﻮﺗﯽﻤﻧ
.ﺖﺳﺍ ﻩﺩﺎﺘﻔﯿﻧ ﺎﺟ ﯽﺘﺳﺭﺩ ﻪﺑ ﻥﺩﺮﮐ ﻡﺩ ﻪﻋﻮﻤﺠﻣ ﺎﺟ ﺍﺭ ﻥﺩﺮﮐ ﻡﺩ ﻪﻋﻮﻤﺠﻣ ﻢﻧﺍﻮﺗﯽﻤﻧ
ﻪﺑ ﺯﺎﯿﻧ ﺎﯾ ﺖﺳﺍ ﻒﯿﺜﮐ ﻥﺩﺮﮐ ﻡﺩ ﻪﻋﻮﻤﺠﻣ
.ﺩﺭﺍﺩ ﯼﺭﺎﮐﻦﻏﻭﺭ
.ﺪﯿﻨﮐ
ﻡﺎﺠﻧﺍ ﺍﺭ ﺩﻮﺧ ﯽﻤﯿﻈﻨﺗﺩﻮﺧ ﺪﻨﯾﻻﺮﻓ ﻩﺎﮕﺘﺳﺩ
ﯽﻧﺎﻣﺯ ﺭﺎﮐﺩﻮﺧ ﺭﻮﻃ ﻪﺑ ﺪﻨﯾﻻﺮﻓ ﻦﯾﺍ .ﺪﻫﺩﯽﻣ
ﺭﺎﺑ ﻦﯿﺘﺴﺨﻧ ﯼﺍﺮﺑ ﺍﺭ ﻩﺎﮕﺘﺳﺩ ﻪﮐ ﺩﻮﺷﯽﻣ ﻉﻭﺮﺷ
ﯼﺎﻫﻪﻧﺍﺩ ﺕﻭﺎﻔﺘﻣ ﻉﻮﻧ ﮏﯾ ،ﺪﯿﻨﮐﯽﻣ ﻩﺩﺎﻔﺘﺳﺍ
ﺕﺪﻣ ﺯﺍ ﺲﭘ ﻪﮑﻨﯾﺍ ﺎﯾ ﺪﯿﻨﮐﯽﻣ ﺩﺭﺍﻭ ﻥﺁ ﺭﺩ ﻩﻮﻬﻗ
ﻪﺑ ﺍﺭ ﻥﺁ ﻩﺎﮕﺘﺳﺩ ﺯﺍ ﻩﺩﺎﻔﺘﺳﺍ ﻡﺪﻋ ﯽﻧﻻﻮﻃ ﻥﺎﻣﺯ
.ﺪﯾﺮﯿﮔﯽﻣ ﺭﺎﮐ
.ﻡﺭﻭﺎﯿﺑ ﻥﻭﺮﯿﺑ
.ﻡﺯﺍﺪﻨﯿﺑ
.ﺖﺳﺍ ﻖﯿﻗﺭ ﻩﻮﻬﻗ
ﺎﺗ 2 .ﺪﯿﻨﮐ ﻢﯿﻈﻨﺗ (ﺮﺗﻦﯿﯾﺎﭘ) ﺮﺗﺰﯾﺭ ﺖﻟﺎﺣ ﮏﯾ ﯼﻭﺭ ﺮﺑ ﺍﺭ ﺏﺎﯿﺳﺁ
ﻢﯿﻈﻨﺗ ﺖﺷﺭﺩ ﺭﺎﯿﺴﺑ ﺖﻟﺎﺣ ﮏﯾ ﯼﻭﺭ ﺮﺑ ﺏﺎﯿﺳﺁ
ﯼﺎﻫﯽﻧﺪﯿﺷﻮﻧ ﯽﻌﻗﺍﻭ ﻢﻌﻃ ﺕﻭﺎﻔﺗ ﺎﺗ ﺪﯿﻨﮐ ﻡﺩ ﯽﻧﺪﯿﺷﻮﻧ 3
.ﺪﯿﻨﮐ ﻪﺑﺮﺠﺗ ﺍﺭ ﻩﺎﮕﺘﺳﺩ ﻦﯾﺍ
ﻢﯿﻈﻨﺗ ﯼﺍﺮﺑ .ﺪﯿﻨﮐ ﻢﯿﻈﻨﺗ ﺩﻮﺟﻮﻣ ﺖﻟﺎﺣ ﺮﺜﮐﺍﺪﺣ ﯼﻭﺭ ﺎﻣﺩ
.ﺖﺳﺍ ﻩﺪﺷ ﻢﯿﻈﻨﺗ ﻢﮐ ﺭﺎﯿﺴﺑ ﺭﺍﺪﻘﻣ ﮏﯾ ﯼﻭﺭ ﺎﻣﺩ .ﺖﺴﯿﻧ ﻡﺮﮔ ﯽﻓﺎﮐ ﻩﺯﺍﺪﻧﺍ ﻪﺑ ﻩﻮﻬﻗ
.ﺪﯿﻫﺩ ﺭﺎﺸﻓ ﺍﺭ 'ﺕﺎﻤﯿﻈﻨﺗ' ﻦﮑﯾﺁ ،ﺎﻣﺩ
.ﺪﯿﻨﮐ ﻡﺮﮔ ﻞﺒﻗ ﺯﺍ ﻡﺮﮔ ﺏﺁ ﺮﯾﺯ ﻮﺸﺘﺴﺷ ﺎﺑ ﺍﺭ ﺎﻫﻥﺎﺠﻨﻓ .ﺩﺭﻭﺁﯽﻣ ﻦﯿﯾﺎﭘ ﺍﺭ ﯽﻧﺪﯿﺷﻮﻧ ﯼﺎﻣﺩ ﺩﺮﺳ ﻥﺎﺠﻨﻓ
،ﺪﯿﻨﮐﯽﻣ ﻪﻓﺎﺿﺍ ﺩﺮﺳ ﺎﯾ ﻍﺍﺩ ﺮﯿﺷ ﺎﯾﺁ ﻪﮑﻨﯾﺍ ﺯﺍ ﺮﻈﻨﻓﺮﺻ
ﯽﻧﺪﯿﺷﻮﻧ ﯼﺎﻣﺩ ﺶﻫﺎﮐ ﺚﻋﺎﺑ ﺮﯿﺷ ﻥﺩﻭﺰﻓﺍ
.ﺩﺭﻭﺁﯽﻣ ﻦﯿﯾﺎﭘ ﺍﺭ ﻩﻮﻬﻗ ﯼﺎﻣﺩ ﻪﺸﯿﻤﻫ ﺮﯿﺷ ﻥﺩﻭﺰﻓﺍ
.ﺪﯿﻨﮐ ﻡﺮﮔ ﻞﺒﻗ ﺯﺍ ﻡﺮﮔ ﺏﺁ ﺮﯾﺯ ﻮﺸﺘﺴﺷ ﺎﺑ ﺍﺭ ﺎﻫﻥﺎﺠﻨﻓ
.ﺖﺳﺍ ﻩﺪﺷ
.ﺩﻮﺷﯽﻣ
Page 97
98
ﯽﺳﺭﺎﻓ
ﺭﺎﮑﻫﺍﺭ ﻞﯿﻟﺩ ﻞﮑﺸﻣ
ﺯﺍ ﻍﺍﺩ ﺏﺁ ﯼﺭﺍﺪﻘﻣ ﻭ ﺪﯾﺭﻭﺎﯿﺑ ﻥﻭﺮﯿﺑ ﺍﺭ AquaClean ﺮﺘﻠﯿﻓ
ﺮﺘﻠﯿﻓ ،ﺪﺷ ﻊﻗﺍﻭ ﺮﺛﻮﻣ ﺭﺎﮑﻫﺍﺭ ﻦﯾﺍ ﺮﮔﺍ .ﺪﯿﻨﮐ ﺝﺭﺎﺧ ﻩﺎﮕﺘﺳﺩ
ﺮﺘﻠﯿﻓ .ﺩﻮﺑ ﻩﺪﺸﻧ ﺐﺼﻧ ﯽﺘﺳﺭﺩ ﻪﺑ AquaClean
ﻪﻤﻫ ﻭ ﺪﯿﯾﺎﻤﻧ ﻝﺎﻌﻓ ﻭ ﻩﺩﺮﮐ ﺐﺼﻧ ًﺍﺩﺪﺠﻣ ﺍﺭ AquaClean
ﺍﺭ 'AquaClean ﺏﺁ ﺮﺘﻠﯿﻓ ' ﺶﺨﺑ ﺭﺩ ﻩﺪﺷ ﺮﮐﺫ ﻞﺣﺍﺮﻣ
.ﺪﯿﻫﺩ ﻡﺎﺠﻧﺍ
ﻡﺯﻻ ،هﺎﮕﺘﺳﺩ ﺯﺍ ﻩﺩﺎﻔﺘﺳﺍ ﻡﺪﻋ ﯽﻧﻻﻮﻃ ﻥﺎﻣﺯ ﺕﺪﻣ ﺯﺍ ﺲﭘ
ﻩﺩﺎﻣﺁ ﻩﺩﺎﻔﺘﺳﺍ ﯼﺍﺮﺑ ًﺍﺩﺪﺠﻣ ﺍﺭ AquaClean ﺏﺁ ﺮﺘﻠﯿﻓ ﺖﺳﺍ
.ﺪﯿﯾﺎﻤﻧ ﺝﺭﺎﺧ ﻩﺎﮕﺘﺳﺩ ﺯﺍ ﻍﺍﺩ ﺏﺁ ﻥﺎﺠﻨﻓ 2-3 ﻭ ﺪﯿﻨﮐ
.ﺪﯿﻨﮐ ﺾﯾﻮﻌﺗ ﺭﺎﺑﮏﯾ ﻩﺎﻣ ﺮﻫ 3 ﺮﻫ ﺍﺭ AquaClean ﺏﺁ ﺮﺘﻠﯿﻓ
ﺖﺳﺍ ﻦﮑﻤﻣ ﺖﺳﺍ ﻩﺎﻣ 3 ﺯﺍ ﺶﯿﺑ ﻥﺁ ﺮﻤﻋ ﻝﻮﻃ ﻪﮐ ﯼﺮﺘﻠﯿﻓ
.ﺪﺷﺎﺑ ﻩﺪﺷ ﺩﻭﺪﺴﻣ
.ﺪﯿﻨﮐ ﻢﯿﻈﻨﺗ (ﺮﺗﻻﺎﺑ) ﺮﺗﺖﺷﺭﺩ ﺖﻟﺎﺣ ﮏﯾ ﯼﻭﺭ ﺮﺑ ﺍﺭ ﺏﺎﯿﺳﺁ
ﺭﺍﺬﮔﺮﯿﺛﺎﺗ ﻩﻮﻬﻗ ﻢﻌﻃ ﺮﺑ ﺮﻣﺍ ﻦﯾﺍ ﻪﮐ ﺪﯿﺷﺎﺑ ﻪﺘﺷﺍﺩ ﻪﺟﻮﺗ
.ﺩﻮﺑ ﺪﻫﺍﻮﺧ
ﻩﺪﻫﺎﺸﻣ) ﺏﺁ ﺮﯿﺷ ﺮﯾﺯ ﻭ ﺪﯾﺭﻭﺎﯿﺑ ﻥﻭﺮﯿﺑ ﺍﺭ ﻥﺩﺮﮐ ﻡﺩ ﻪﻋﻮﻤﺠﻣ
.ﺪﯿﯾﻮﺸﺑ ('ﺏﺁ ﺮﯿﺷ ﺮﯾﺯ ﻥﺩﺮﮐﻡﺩ ﻪﻋﻮﻤﺠﻣ ﻥﺩﺮﮐ ﺰﯿﻤﺗ'
ﺰﯿﻤﺗ ﻥﺯﻮﺳ ﺎﯾ ﻦﮐﺯﺎﺑﻪﻟﻮﻟ ﺎﺑ ﺍﺭ ﻥﺁ ﺬﻓﺎﻨﻣ ﻭ ﻩﻮﻬﻗ ﺝﻭﺮﺧ ﻪﭽﯾﺭﺩ
.ﺪﯿﻨﮐ
ﻥﻭﺮﯿﺑ ﺍﺭ ﻥﺩﺮﮐﻡﺩ ﻪﻋﻮﻤﺠﻣ ﻭ ﺪﯿﻨﮐ ﺵﻮﻣﺎﺧ ﺍﺭ ﻩﺎﮕﺘﺳﺩ
ﻭ ﺪﯿﻨﮐ ﺯﺎﺑ ﺍﺭ ﻩﺪﺷ ﺏﺎﯿﺳﺁ-ﺶﯿﭘ ﻩﻮﻬﻗ ﻪﻈﻔﺤﻣ ﺏﺭﺩ .ﺪﯾﺭﻭﺎﯿﺑ
ﻦﯿﯾﺎﭘ ﻭ ﻻﺎﺑ ﻪﺑ ﺍﺭ ﻪﺘﺳﺩ .ﺪﯾﺮﺒﺑ ﻭﺮﻓ ﻥﺁ ﺭﺩ ﺍﺭ ﮏﻘﺷﺎﻗ ﻪﺘﺳﺩ
(34 ﺮﯾﻮﺼﺗ) ﻦﯿﯾﺎﭘ ﻩﺩﺮﮐ ﺮﯿﮔ ﻩﻮﻬﻗ ﺭﺩﻮﭘ ﺎﺗ ﺪﯿﻫﺪﺑ ﺖﮐﺮﺣ
.ﺪﺘﻔﯿﺑ
ﺐﺼﻧ ﯼﺍﺮﺑ ﯽﺑﻮﺧ ﻪﺑ AquaClean ﺏﺁ ﺮﺘﻠﯿﻓ
.ﺩﻮﺑ ﻩﺪﺸﻧ ﻩﺩﺎﻣﺁ
.ﺖﺳﺍ ﺩﻭﺪﺴﻣ AquaClean ﺏﺁ ﺮﺘﻠﯿﻓ
ﻩﺪﺷ ﻢﯿﻈﻨﺗ ﺰﯾﺭ ﺭﺎﯿﺴﺑ ﺖﻟﺎﺣ ﮏﯾ ﯼﻭﺭ ﺮﺑ ﺏﺎﯿﺳﺁ
.ﺖﺳﺍ
.ﺖﺳﺍ ﻒﯿﺜﮐ ﻥﺩﺮﮐ ﻡﺩ ﻪﻋﻮﻤﺠﻣ
.ﺖﺳﺍ ﻒﯿﺜﮐ ﻩﻮﻬﻗ ﺝﻭﺮﺧ ﻪﭽﯾﺭﺩ
ﺖﺳﺍ ﺩﻭﺪﺴﻣ ﺏﺎﯿﺳﺁ-ﺶﯿﭘ ﻩﻮﻬﻗ ﻪﻈﻔﺤﻣ
ﺎﯾ ﺩﻮﺷﯽﻤﻧ ﺝﺭﺎﺧ ﻩﺎﮕﺘﺳﺩ ﺯﺍ ﻩﻮﻬﻗ
.ﺩﻮﺷﯽﻣ ﺝﺭﺎﺧ ﺪﻨﮐ ﺭﺎﯿﺴﺑ
.ﺪﯿﻨﮐ ﯽﯾﺍﺩﺯﺏﻮﺳﺭ Philips ﺮﯿﮔﺏﻮﺳﺭ ﺎﺑ ﺍﺭ ﻩﺎﮕﺘﺳﺩ
ﯽﯾﺍﺩﺯﺏﻮﺳﺭ ﺍﺭ ﻥﺁ ﻩﺎﮕﺘﺳﺩ ﯼﺭﻭﻻﺩﺎﯾ ﺾﺤﻣ ﻪﺑ ﻪﺸﯿﻤﻫ
.ﺪﯿﻨﮐ
LatteGo ﺐﻟﺎﻗ ﺭﺩ ﯽﺘﺳﺭﺩ ﻪﺑ ﺮﯿﺷ ﻑﺮﻇ ﻪﮐ ﺪﯾﻮﺷ ﻦﺌﻤﻄﻣ
ﻥﺩﺮﮐ ﺭﺍﻮﺳ' ﻩﺪﻫﺎﺸﻣ) ('ﮏﯿﻠﮐ ﯼﺍﺪﺻ') ﺖﺳﺍ ﻩﺩﺎﺘﻓﺍ ﺎﺟ
.('(ﺹﺎﺧ ﯼﺎﻫﻝﺪﻣ ﯽﺧﺮﺑ ﺭﺩ ﻂﻘﻓ) LatteGo
ﺎﯾ ﺏﺁ ﺮﯿﺷ ﺮﯾﺯ ﺍﺭ ﻪﻌﻄﻗ ﻭﺩ ﺮﻫ ﻭ ﺪﯾﺭﻭﺎﯿﺑ ﻥﻭﺮﯿﺑ ﺍﺭ LatteGo
.ﺪﯿﯾﻮﺸﺑ ﯽﯾﻮﺸﻓﺮﻇ ﻦﯿﺷﺎﻣ ﺭﺩ
ﻢﻫﺮﺳ ﯽﺘﺳﺭﺩ ﻪﺑ ﮏﯿﺳﻼﮐ ﺯﺎﺳﺮﯿﺷﻒﮐ ﺪﯾﻮﺷ ﻦﺌﻤﻄﻣ
ﺭﺩ ﻂﻘﻓ) ﮏﯿﺳﻼﮐ ﺯﺎﺳﺮﯿﺷﻒﮐ ﻥﺩﺮﮐ ﻢﻫﺮﺳ' ﻩﺪﻫﺎﺸﻣ)
.ﺖﺳﺍ ﻩﺪﺷ ('(ﺹﺎﺧ ﯼﺎﻫﻝﺪﻣ ﯽﺧﺮﺑ
ﯼﺎﻫﺖﯿﻔﯿﮐ ﺎﺑ ﻭ ﻒﮐ ﯽﺗﻭﺎﻔﺘﻣ ﺮﯾﺩﺎﻘﻣ ﺮﯿﺷ ﻒﻠﺘﺨﻣ ﻉﺍﻮﻧﺍ
ﻪﮐ ﻢﯾﺩﺮﮐ ﺖﺴﺗ ﺍﺭ ﺮﯾﺯ ﺮﯿﺷ ﻉﺍﻮﻧﺍ ﺎﻣ .ﺪﻨﻨﮐﯽﻣ ﺪﯿﻟﻮﺗ ﺕﻭﺎﻔﺘﻣ
ﺎﯾ ﻪﻣﺎﺧﻢﯿﻧ ﺮﯿﺷ :ﺩﻮﺑ ﺏﻮﻠﻄﻣ ﺖﯿﻔﯿﮐ ﺎﺑ ﺮﯿﺷ ﻒﮐ ﺎﻬﻧﺁ ﻪﺠﯿﺘﻧ
.ﺯﻮﺘﮐﻻ ﻥﻭﺪﺑ ﺮﯿﺷ ﻭ ﻭﺎﮔ ﺏﺮﭼﺮﭘ
.ﺖﺳﺍ ﻩﺪﺷ ﺩﻭﺪﺴﻣ ﺏﻮﺳﺭ ﺎﺑ ﻩﺎﮕﺘﺳﺩ ﺭﺍﺪﻣ
ﻪﺑ LatteGo: LatteGo ﻪﺑ ﺰﻬﺠﻣ ﻩﺎﮕﺘﺳﺩ
.ﺖﺳﺍ ﻩﺪﺸﻧ ﻢﻫ ﺮﺳ ﯽﺘﺳﺭﺩ
ﺎﯾ/ﻭ ﺮﯿﺷ ﻑﺮﻇ :LatteGo ﻪﺑ ﺰﻬﺠﻣ ﻩﺎﮕﺘﺳﺩ
.ﺖﺳﺍ ﻒﯿﺜﮐ LatteGo ﺐﻟﺎﻗ
:ﮏﯿﺳﻼﮐ ﺯﺎﺳﺮﯿﺷﻒﮐ ﯼﺍﺭﺍﺩ ﻩﺎﮕﺘﺳﺩ
.ﺖﺳﺍ ﻩﺪﺸﻧ ﻢﻫﺮﺳ ﯽﺘﺳﺭﺩ ﻪﺑ ﺯﺎﺳﺮﯿﺷﻒﮐ
ﺮﯿﺷ ﻒﮐ ﻪﯿﻬﺗ ﯼﺍﺮﺑ ﻩﺪﺷ ﻩﺩﺎﻔﺘﺳﺍ ﺮﯿﺷ ﻉﻮﻧ
.ﺪﺷﺎﺑﯽﻤﻧ ﺐﺳﺎﻨﻣ
.ﺪﻨﮐﯽﻤﻧ ﻒﮐ ﺮﯿﺷ
Page 98
ﯽﺳﺭﺎﻓ
ﺭﺎﮑﻫﺍﺭ ﻞﯿﻟﺩ ﻞﮑﺸﻣ
99
ﺎﺟ ﺐﻟﺎﻗ ﯼﻻﺎﺑ ﺏﻼﻗ ﺮﯾﺯ ﺍﺭ ﺮﯿﺷ ﻑﺮﻇ ﯽﯾﻻﺎﺑ ﺖﻤﺴﻗ ﺍﺪﺘﺑﺍ
ﺭﺎﺸﻓ ﻞﺧﺍﺩ ﻪﺑ ﺍﺭ ﺮﯿﺷ ﻑﺮﻇ ﯽﻨﯿﯾﺎﭘ ﺶﺨﺑ ﺲﭙﺳ .ﺪﯿﻧﺰﺑ
ﯼﺍﺪﺻ ﮏﯾ ،ﺩﻮﺷ ﻞﻔﻗ ﺩﻮﺧ ﻞﺤﻣ ﺭﺩ ﻑﺮﻇ ﯽﺘﻗﻭ .ﺪﯿﻫﺩ
.ﺪﯿﻨﺷ ﺪﯿﻫﺍﻮﺧ ﮏﯿﻠﮐ
ﺎﯾ ﺏﺁ ﺮﯿﺷ ﺮﯾﺯ ﺍﺭ ﻪﻌﻄﻗ ﻭﺩ ﺮﻫ ﻭ ﺪﯾﺭﻭﺎﯿﺑ ﻥﻭﺮﯿﺑ ﺍﺭ LatteGo
.ﺪﯿﯾﻮﺸﺑ ﯽﯾﻮﺸﻓﺮﻇ ﻦﯿﺷﺎﻣ ﺭﺩ
ﺾﺤﻣ ﻪﺑ ﺎﯾ ﻪﻧﺍﺯﻭﺭ ﺕﺭﻮﺻ ﻪﺑ ﺍﺭ ﺎﻫﻪﮑﭼ ﻥﺩﺮﮐ ﻊﻤﺟ ﯽﻨﯿﺳ
ﺮﻫﺎﻇ 'ﺎﻫﻪﮑﭼ ﻥﺩﺮﮐ ﻊﻤﺟ ﯽﻨﯿﺳ ﻥﺩﻮﺑ ﺮﭘ' ﺮﮕﻧﺎﺸﻧ ﻪﮐ ﻪﮑﻨﯾﺍ
.ﺪﯿﻨﮐ ﯽﻟﺎﺧ ﺎﻫﻪﮑﭼ ﻥﺩﺮﮐ ﻊﻤﺟ ﯽﻨﯿﺳ ﺵﻮﭘﺭﺩ ﻖﯾﺮﻃ ﺯﺍ ﺪﺷ
ﻪﭽﯾﺭﺩ ﺮﯾﺯ ﻥﺍﻮﯿﻟ ﮏﯾ ،ﻮﺸﺘﺴﺷ ﺏﺁ ﻥﺩﺮﮐ ﻊﻤﺟ ﯼﺍﺮﺑ :ﻪﺘﮑﻧ
ﻥﺩﺮﮐ ﻊﻤﺟ ﯽﻨﯿﺳ ﻥﻭﺭﺩ ﺏﺁ ﺭﺍﺪﻘﻣ ﻭ ﺪﯿﻫﺩ ﺭﺍﺮﻗ ﯽﺟﻭﺮﺧ
.ﺪﯿﻫﺩ ﺶﻫﺎﮐ ﺍﺭ ﺎﻫﻪﮑﭼ
ﺾﺤﻣ ﻪﺑ ﺎﯾ ﻪﻧﺍﺯﻭﺭ ﺕﺭﻮﺻ ﻪﺑ ﺍﺭ ﺎﻫﻪﮑﭼ ﻥﺩﺮﮐ ﻊﻤﺟ ﯽﻨﯿﺳ
ﺮﻫﺎﻇ 'ﺎﻫﻪﮑﭼ ﻥﺩﺮﮐ ﻊﻤﺟ ﯽﻨﯿﺳ ﻥﺩﻮﺑ ﺮﭘ' ﺮﮕﻧﺎﺸﻧ ﻪﮐ ﻪﮑﻨﯾﺍ
.ﺪﯿﻨﮐ ﯽﻟﺎﺧ ﺎﻫﻪﮑﭼ ﻥﺩﺮﮐ ﻊﻤﺟ ﯽﻨﯿﺳ ﺵﻮﭘﺭﺩ ﻖﯾﺮﻃ ﺯﺍ ﺪﺷ
ﺍﺭ ﻥﺁ :ﺖﺳﺍ ﻩﺩﺎﺘﻓﺍ ﺎﺟ ﯽﺘﺳﺭﺩ ﻪﺑ ﺏﺁ ﻥﺰﺨﻣ ﺪﯾﻮﺷ ﻦﺌﻤﻄﻣ
ﺎﺟ ًﺍﺩﺪﺠﻣ ﺮﺘﺸﯿﺑ ﻪﭼ ﺮﻫ ﻥﺩﺍﺩ ﺭﺎﺸﻓ ﺎﺑ ﻭ ﺪﯾﺭﻭﺎﯿﺑ ﻥﻭﺮﯿﺑ
ﯽﺳﺭﺎﻓ
.ﺪﯿﯾﻮﺸﺑ ﺍﺭ ﻥﺩﺮﮐ ﻡﺩ ﻪﻋﻮﻤﺠﻣ .ﺖﺳﺍ ﺩﻭﺪﺴﻣ/ﻒﯿﺜﮐ ﻥﺩﺮﮐ ﻡﺩ ﻪﻋﻮﻤﺠﻣ
ﯽﻨﯿﺳ ﺯﺍ ﻊﯾﺎﻣ ﺎﺗ ﺪﯿﻫﺩ ﺭﺍﺮﻗ ﯽﻘﻓﺍ ﺢﻄﺳ ﮏﯾ ﯼﻭﺭ ﺍﺭ ﻩﺎﮕﺘﺳﺩ
ﯽﻨﯿﺳ ﻥﺩﻮﺑ ﺮﭘ' ﺮﮕﻧﺎﺸﻧ ﻭ ﺪﻨﮑﻧ ﺰﯾﺭﺮﺳ ﺎﻫﻪﮑﭼ ﻥﺩﺮﮐ ﻊﻤﺟ
.ﺪﻨﮐ ﺭﺎﮐ ﯽﺘﺳﺭﺩ ﻪﺑ 'ﺎﻫﻪﮑﭼ ﻥﺩﺮﮐ ﻊﻤﺟ
.ﺪﯾﺯﺍﺪﻨﯿﺑ
ﯼﺪﻨﺑﻢﻫﺮﺳ ﯽﺘﺳﺭﺩ ﻪﺑ ﺮﯿﺷ ﻑﺮﻇ ﻭ ﺐﻟﺎﻗ
.ﺪﻧﺍﻩﺪﺸﻧ
.ﺖﺳﺍ ﻒﯿﺜﮐ LatteGo ﺐﻟﺎﻗ ﺎﯾ/ﻭ ﺮﯿﺷ ﻑﺮﻇ
ﻭ ﯽﻠﺧﺍﺩ ﺭﺍﺪﻣ ﯽﺸﮑﺑﺁ ﯼﺍﺮﺑ ﺏﺁ ﺯﺍ ﻩﺎﮕﺘﺳﺩ
ﺭﺍﺪﻘﻣ ﻦﯾﺍ .ﺪﻨﮐﯽﻣ ﻩﺩﺎﻔﺘﺳﺍ ﻥﺩﺮﮐ ﻡﺩ ﻪﻋﻮﻤﺠﻣ
ﻊﻤﺟ ﯽﻨﯿﺳ ﻪﺑ ًﺎﻤﯿﻘﺘﺴﻣ ﯽﻠﺧﺍﺩ ﻢﺘﺴﯿﺳ ﺯﺍ ﺏﺁ
ﯼﺩﺎﻋ ﺮﻣﺍ ﻦﯾﺍ .ﺪﻨﮐﯽﻣ ﺍﺪﯿﭘ ﻥﺎﯾﺮﺟ ﺎﻫﻪﮑﭼ ﻥﺩﺮﮐ
.ﺖﺳﺍ
ﻭ ﻩﺪﺷ ﺮﭘ ﺭﺎﯿﺴﺑ ﺎﻫﻪﮑﭼ ﻥﺩﺮﮐ ﻊﻤﺟ ﯽﻨﯿﺳ
ﺮﻈﻧ ﻪﺑ ﺩﻮﺷﯽﻣ ﺚﻋﺎﺑ ﻪﮐ ﺖﺳﺍ ﻩﺩﺮﮐ ﺰﯾﺭﺮﺳ
.ﺖﺳﺍ ﻩﺎﮕﺘﺳﺩ ﺯﺍ ﯽﺘﺸﻧ ﺪﺳﺮﺑ
ﺭﺩ ،ﺖﺳﺍ ﻩﺩﺎﺘﻔﯿﻧ ﺎﺟ ﻞﻣﺎﮐ ﺭﻮﻃ ﻪﺑ ﺏﺁ ﻥﺰﺨﻣ
ﻭ ﺖﺳﺍ ﻩﺩﺮﮐ ﺖﺸﻧ ﻥﺰﺨﻣ ﺯﺍ ﺏﺁ ﯼﺭﺍﺪﻘﻣ ﻪﺠﯿﺘﻧ
.ﺩﻮﺷﯽﻣ ﻩﺪﯿﺸﮐ ﻩﺎﮕﺘﺳﺩ ﻥﻭﺭﺩ ﻪﺑ ﺍﻮﻫ
.ﺩﺭﺍﺪﻧ ﺭﺍﺮﻗ ﯽﻘﻓﺍ ﺢﻄﺳ ﯼﻭﺭ ﻩﺎﮕﺘﺳﺩ
LatteGo ﺮﯿﺷ ﻑﺮﻇ ﻦﯿﯾﺎﭘ ﺯﺍ ﺮﯿﺷ
.ﺪﻨﮐﯽﻣ ﺖﺸﻧ
.ﺩﺭﺍﺩ ﯽﺘﺸﻧ ﻩﺎﮕﺘﺳﺩ ﺪﺳﺭﯽﻣ ﺮﻈﻧ ﻪﺑ
ﺏﺁ ﺮﺘﻠﯿﻓ ﺲﭙﺳ ﻭ ﻩﺩﺮﮐ ﯽﯾﺍﺩﺯﺏﻮﺳﺭ ﺍﺭ ﻩﺎﮕﺘﺳﺩ ﺍﺪﺘﺑﺍ
.ﺪﯿﻨﮐ ﺐﺼﻧ ﺍﺭ AquaClean
ﻥﺁ ﺯﺍ ﺲﭘ ﻭ ﺮﯿﺧﺎﺗ ﺎﺑ ﺎﯾ ﺖﺳﺍ ﻩﺪﺸﻧ ﺐﺼﻧ ﺮﺘﻠﯿﻓ
ﺮﮕﺸﯾﺎﻤﻧ ﯼﻭﺭ AquaClean ﺮﺘﻠﯿﻓ ﯼﺭﻭﻻﺩﺎﯾ ﻪﮐ
ﻥﺍﺪﺑ ﻦﯾﺍ .ﺖﺳﺍ ﻩﺪﺷ ﺾﯾﻮﻌﺗ ﺩﻮﺑ ﻩﺪﺷ ﺮﻫﺎﻇ
ﺏﻮﺳﺭ ﻥﻭﺪﺑ ًﻼﻣﺎﮐ ﺮﮕﯾﺩ ﻩﺎﮕﺘﺳﺩ ﻪﮐ ﺖﺳﺎﻨﻌﻣ
.ﺖﺴﯿﻧ
ﻩﺎﮕﺘﺳﺩ ﻦﯾﺍ ﺎﺑ Philips AquaClean ﺏﺁ ﺮﺘﻠﯿﻓ ﻩﺯﺍﺪﻧﺍ ﺎﻬﻨﺗ
.ﺩﺭﺍﺩ ﺖﻘﺑﺎﻄﻣ
ﺏﺁ ﺮﺘﻠﯿﻓ ﺯﺍ ﺮﯿﻏ ﯼﺮﮕﯾﺩ ﺮﺘﻠﯿﻓ ﺪﯾﺭﺍﺩ ﺮﻈﻧ ﺭﺩ ﺎﻤﺷ
.ﺪﯿﻨﮐ ﺐﺼﻧ ﺍﺭ Philips AquaClean
.ﺪﯿﻨﮐ ﺭﺍﻮﺳ AquaClean ﺏﺁ ﺮﺘﻠﯿﻓ ﯼﻭﺭ ﺍﺭ ﯽﮑﯿﺘﺳﻼﭘ ﺮﺷﺍﻭ AquaClean ﺏﺁ ﺮﺘﻠﯿﻓ ﯼﻭﺭ ﯽﮑﯿﺘﺳﻼﭘ ﺮﺷﺍﻭ
.ﺖﺳﺍ ﻩﺪﺸﻧ ﺐﺼﻧ
ﻪﻋﻮﻤﺠﻣ ،ﺪﯾﻮﻨﺷﯽﻣ ﻩﺎﮕﺘﺳﺩ ﺯﺍ ﯽﺗﻭﺎﻔﺘﻣ ﯼﺍﺪﺻ ﻭ ﺮﺳ ﺮﮔﺍ
ﯼﺭﺎﮐﻦﻏﻭﺭ' ﻩﺪﻫﺎﺸﻣ) ﯼﺭﺎﮐﻦﻏﻭﺭ ﻭ ﻩﺩﺮﮐ ﺰﯿﻤﺗ ﺍﺭ ﻥﺩﺮﮐ ﻡﺩ
ﺍﺪﺻ ﻭ ﺮﺳ ﺭﺎﮐ ﻦﯿﺣ ﺭﺩ ﻩﺎﮕﺘﺳﺩ ﻪﮐ ﺖﺳﺍ ﯽﻌﯿﺒﻃ
.ﺪﺷﺎﺑ ﻪﺘﺷﺍﺩ
.ﺪﯿﻨﮐ ('ﻥﺩﺮﮐﻡﺩ ﻪﻋﻮﻤﺠﻣ
ﻞﺒﻗ ﻭ ﺪﯾﺭﻭﺎﯿﺑ ﻥﻭﺮﯿﺑ ﺏﺁ ﻥﺰﺨﻣ ﺯﺍ ﺍﺭ AquaClean ﺏﺁ ﺮﺘﻠﯿﻓ
ﻩﺩﺎﻣﺁ ﺐﺳﺎﻨﻣ ﻮﺤﻧ ﻪﺑ ﺍﺭ ﻥﺁ ﻩﺎﮕﺘﺳﺩ ﻥﻭﺭﺩ ﻪﺑ ﻥﺪﻧﺍﺩﺮﮔﺯﺎﺑ ﺯﺍ
ﻪﺑ ﻪﻠﺣﺮﻣ ﯼﺎﻫﻞﻤﻌﻟﺍﺭﻮﺘﺳﺩ ﺯﺍ ﻉﻼﻃﺍ ﯼﺍﺮﺑ .ﺪﯿﻨﮐ ﻩﺩﺎﻔﺘﺳﺍ
ﯼﺯﺎﺳﻩﺩﺎﻣﺁ ﯽﺘﺳﺭﺩ ﻪﺑ AquaClean ﺏﺁ ﺮﺘﻠﯿﻓ
ﻩﺎﮕﺘﺳﺩ ﻥﻭﺭﺩ ﻪﺑ ﺍﻮﻫ ﻪﺠﯿﺘﻧ ﺭﺩ ﻭ ﺖﺳﺍ ﻩﺪﺸﻧ
.ﺩﻮﺷﯽﻣ ﻩﺪﯿﺸﮐ
.ﺪﯿﻨﮐ ﻪﻌﺟﺍﺮﻣ 'AquaClean ﺏﺁ ﺮﺘﻠﯿﻓ' ﺶﺨﺑ ﻪﺑ ،ﻪﻠﺣﺮﻣ
ﺍﺭ AquaClean ﺏﺁ ﺮﺘﻠﯿﻓ ﻢﻧﺍﻮﺗﯽﻤﻧ
ﺖﺳﺍﻮﺧﺭﺩ ﻩﺎﮕﺘﺳﺩ ﻭ ﻢﻨﮐ ﻝﺎﻌﻓ
.ﺪﻨﮐﯽﻣ ﯽﯾﺍﺩﺯﺏﻮﺳﺭ
ﺭﺩ ﻥﺁ ﻞﺤﻣ ﺎﺑ ﺪﯾﺪﺟ ﺏﺁ ﺮﺘﻠﯿﻓ ﻩﺯﺍﺪﻧﺍ
.ﺩﺭﺍﺪﻧ ﺖﻘﺑﺎﻄﻣ ﻩﺎﮕﺘﺳﺩ
ﺩﺎﺠﯾﺍ ﯼﺩﺎﯾﺯ ﯼﺍﺪﺻ ﻭ ﺮﺳ ﻩﺎﮕﺘﺳﺩ
.ﺪﻨﮐﯽﻣ
Page 99
100
ﯽﺳﺭﺎﻓ
ﺭﺎﮑﻫﺍﺭ ﻞﯿﻟﺩ ﻞﮑﺸﻣ
ﺍﺭ ﻥﺁ :ﺖﺳﺍ ﻩﺩﺎﺘﻓﺍ ﺎﺟ ﯽﺘﺳﺭﺩ ﻪﺑ ﺏﺁ ﻥﺰﺨﻣ ﺪﯾﻮﺷ ﻦﺌﻤﻄﻣ
ﺎﺟ ًﺍﺩﺪﺠﻣ ﺮﺘﺸﯿﺑ ﻪﭼ ﺮﻫ ﻥﺩﺍﺩ ﺭﺎﺸﻓ ﺎﺑ ﻭ ﺪﯾﺭﻭﺎﯿﺑ ﻥﻭﺮﯿﺑ
.ﺪﯾﺯﺍﺪﻨﯿﺑ
.ﺪﻨﺘﺴﻫ ﯽﺒﯾﺮﻘﺗ ﻢﯿﻈﻨﺗﺶﯿﭘ ﺮﯾﺩﺎﻘﻣ ﻪﻤﻫ .ﺪﻧﺍﺩﯽﻣ ﻅﻮﻔﺤﻣ ﺩﻮﺧ ﯼﺍﺮﺑ ﺍﺭ ﻝﻮﺼﺤﻣ ﯽﻨﻓ ﺕﺎﺼﺨﺸﻣ ﺩﻮﺒﻬﺑ ﻖﺣ ﻩﺪﻨﻨﮐﺪﯿﻟﻮﺗ
ﺮﺘﻣﯽﻠﯿﻣ x 377 x 434 246 (ﻝﻮﻃ×ﻉﺎﻔﺗﺭﺍ×ﺽﺮﻋ) ﻩﺯﺍﺪﻧﺍ
ﻞﮑﺷ) ﺲﯾﻭﺮﺳ ﺏﺭﺩ ﯽﻠﺧﺍﺩ ﺢﻄﺳ ﻪﺑ ﻩﺪﺷ ﻕﺎﺼﻟﺍ ﺕﺎﻋﻼﻃﺍ ﺐﺴﭼﺮﺑ
ﺪﯿﻨﮐ ﻩﺪﻫﺎﺸﻣ ﺍﺭ (A11
.ﺩﻮﺷﯽﻣ ﻩﺪﯿﺸﮐ ﻩﺎﮕﺘﺳﺩ ﻥﻭﺭﺩ ﻪﺑ ﺍﻮﻫ ﻪﺠﯿﺘﻧ
ﻡﺮﮔﻮﻠﯿﮐ 7.5 - 7 ﻥﺯﻭ
ﺮﺘﻣﯽﻠﯿﻣ 1200 ﻕﺮﺑ ﻢﯿﺳ ﻝﻮﻃ
ﺮﺘﯿﻟﯽﻠﯿﻣ 250 (ﺮﯿﺷ ﻑﺮﻇ) LatteGo ﺖﯿﻓﺮﻇ
ﺮﺘﻣﯽﻠﯿﻣ 88-145 ﻢﯿﻈﻨﺗ ﻞﺑﺎﻗ ﻪﭽﯾﺭﺩ ﻉﺎﻔﺗﺭﺍ
ﺭﺩ ﻭ ﺖﺳﺍ ﻩﺩﺎﺘﻔﯿﻧﺎﺟ ﯽﺘﺳﺭﺩ ﻪﺑ ﺏﺁ ﻥﺰﺨﻣ
ﯽﻨﻓ ﺕﺎﺼﺨﺸﻣ
ﺭﺍﺪﻘﻣ ﻒﯿﺻﻮﺗ
ﺮﺘﯿﻟ 1.8 ﺏﺁ ﻥﺰﺨﻣ
ﻡﺮﮔ 275 ﻩﻮﻬﻗ ﻪﻧﺍﺩ ﻒﯿﻗ ﺖﯿﻓﺮﻇ
ﮎﻮﭘ 12 ﻩﻮﻬﻗ ﻪﻟﺎﻔﺗ ﻑﺮﻇ ﺖﯿﻓﺮﻇ
ﻪﯾﺬﻐﺗ ﻊﺒﻨﻣ - ﻥﺍﻮﺗ ﺥﺮﻧ - ﯽﻤﺳﺍ ﮊﺎﺘﻟﻭ
Page 100

 Loading...