

Page 1
Fully automatic
espresso machine
1200 series
2200 series
3200 series
EN USER MANUAL
DA BRUGERVEJLEDNING
DE BENUTZERHANDBUCH
FI KÄYTTÖOPAS
SV ANVÄNDARHANDBOK
EL ΕΓΧΕΙΡΙΔΙΟ ΧΡΉΣΉΣ
ES MANUAL DEL USUARIO
FR MODE D’EMPLOI
IT MANUALE UTENTE
NL GEBRUIKSAANWIJZING
NO BRUKERHÅNDBOK
PT MANUAL DO UTILIZADOR
www.philips.com/coee-care
OMNIA COVER_FRONT_A5_WEE.indd 1 14-05-19 13:32
Page 2
Page 3
My Coffee Choice
A2A1 A3 A4
A14
A6
A8A7
A9
A12
A13
A10
A11
A5
A17
A15
A
B1 B2 B3 B4 B5
B10B11
B7B6 B8 B9
B
A19A18
A16
A20 A21 A22 A23 A24
Page 4
Classic Milk Frother
1200 series
2200 series
3200 series
EP2220
EP2221
EP2224
EP3221
EP2230
EP2231
EP2235
EP2236
EP3241
EP3243
EP3246
EP3249
LatteGo
Classic Milk Frother
EP1220
EP1222
EP1224
A19 A20 A21 A22 A23 A24
A17A18 A16 A14 A24 A23 A21 A15 A9 A4 A12
C
D
Page 5

English
Contents
Machine overview (Fig. A) ____________________________________________________________________________ 7
Control panel (Fig. B) _________________________________________________________________________________ 7
Introduction __________________________________________________________________________________________ 8
Before first use _______________________________________________________________________________________ 8
Brewing drinks________________________________________________________________________________________ 10
Adjusting machine settings __________________________________________________________________________ 12
Removing and inserting the brew group ____________________________________________________________ 14
Cleaning and maintenance __________________________________________________________________________ 14
AquaClean water filter _______________________________________________________________________________ 17
Setting the water hardness __________________________________________________________________________ 18
Descaling procedure (30 min.) _______________________________________________________________________ 19
Ordering accessories _________________________________________________________________________________ 20
Troubleshooting ______________________________________________________________________________________ 20
Technical specifications______________________________________________________________________________ 26
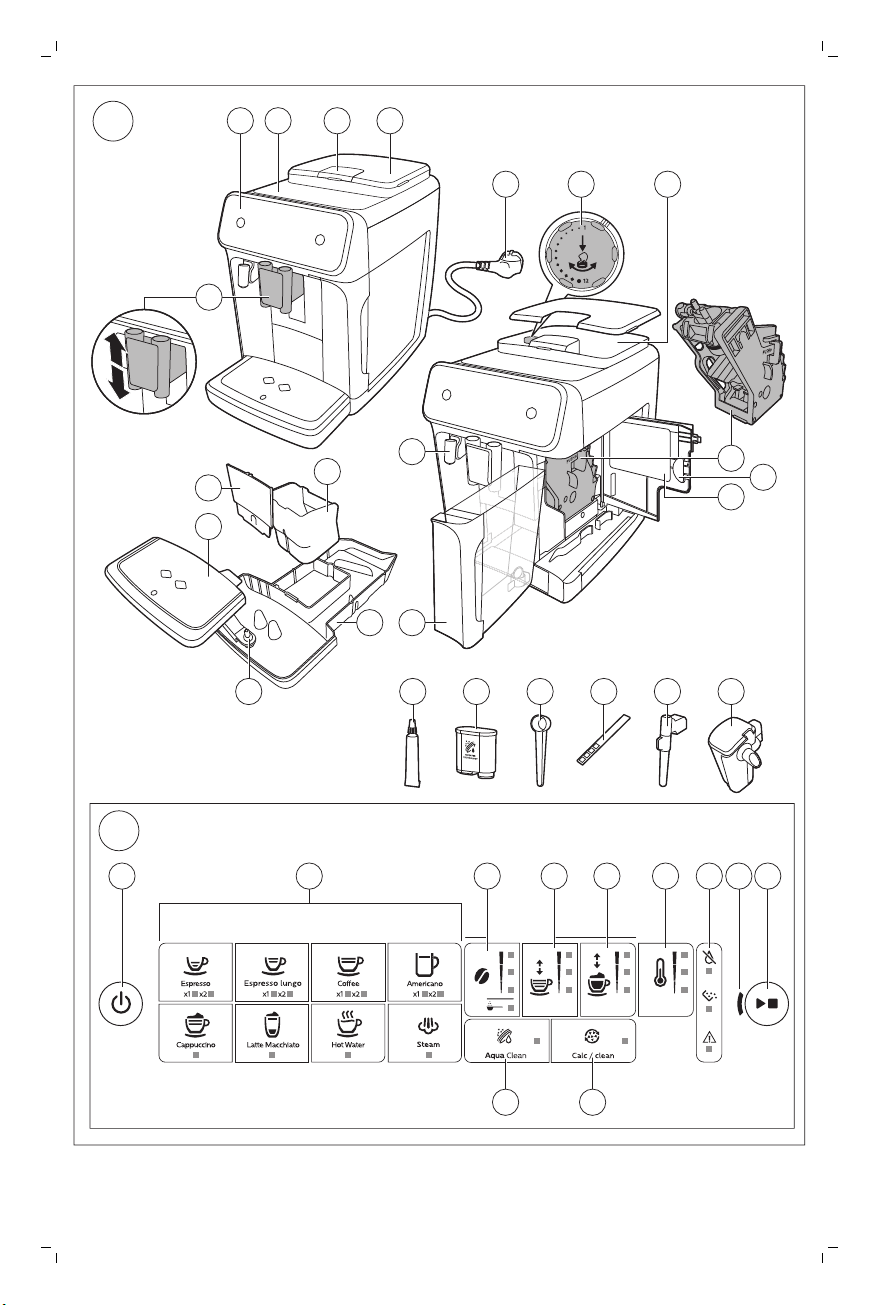
Machine overview (Fig. A)
A1 Control panel A10 Service door
A2 Cup holder A11 Data label with type number
A3 Pre-ground coffee compartment A12 Water tank
7
English
A4 Lid of bean hopper A13 Hot water spout
A5 Adjustable coffee spout A14 Coffee grounds container
A6 Mains plug A15 Front panel of coffee grounds
A7 Grind setting knob A16 Drip tray cover
A8 Coffee bean hopper A17 Drip tray
A9 Brew group A18 'Drip tray full' indicator
container
Accessories
A19 Grease tube A22 Water hardness test strip
A20 AquaClean water filter A23 Classic milk frother (specific types only)
A21 Measuring scoop A24 LatteGo (milk container) (specific types
only)
Control panel (Fig. B)
Refer to figure B for an overview of all buttons and icons. Below you find the description.
English
Page 6
8
English
Some of the buttons/icons are for specific types only.
B1 On/off button B7 Warning icons
B2 Drink icons* B8 Start light
B3 Aroma strength/pre-ground coffee icon B9 Start/stop button
B4 Drink quantity icon B10 Calc / Clean icon
B5 Milk quantity icon (specific types only) B11 AquaClean icon
B6 Coffee temperature icon (specific types only)
* Drink icons: espresso, espresso lungo, coffee, americano, cappuccino, latte macchiato, hot water,
steam (specific types only)
Introduction
Congratulations on your purchase of a Philips fully automatic coffee machine! To fully benefit from the
support that Philips offers, please register your product at www.philips.com/welcome.
Read the separate safety booklet carefully before you use the machine for the first time and save it for
future reference.
To help you get started and to get the best out of your machine, Philips offers support in multiple
ways. In the box you find:
1 This user manual with picture-based usage instructions and more detailed information on cleaning
and maintenance.
There are multiple versions of this espresso machine, which all have different features. Each
version has its own type number. You can find the type number on the data label on the inside of
the service door (see fig A11).
2 The separate safety booklet with instructions on how to use the machine in a safe way.
3 For online support (frequently asked questions, movies etc.), scan the QR code on the cover of this
booklet or visit www.philips.com/coffee-care
This machine has been tested with coffee. Although it has been carefully cleaned, there may be
some coffee residues left. We guarantee, however, that the machine is absolutely new.
The machine automatically adjusts the amount of ground coffee that is used to make the best-tasting
coffee. You should brew 5 coffees initially to allow the machine to complete its self-adjustment.
Make sure you rinse the LatteGo (milk container) or the classic milk frother before first use.
Before first use
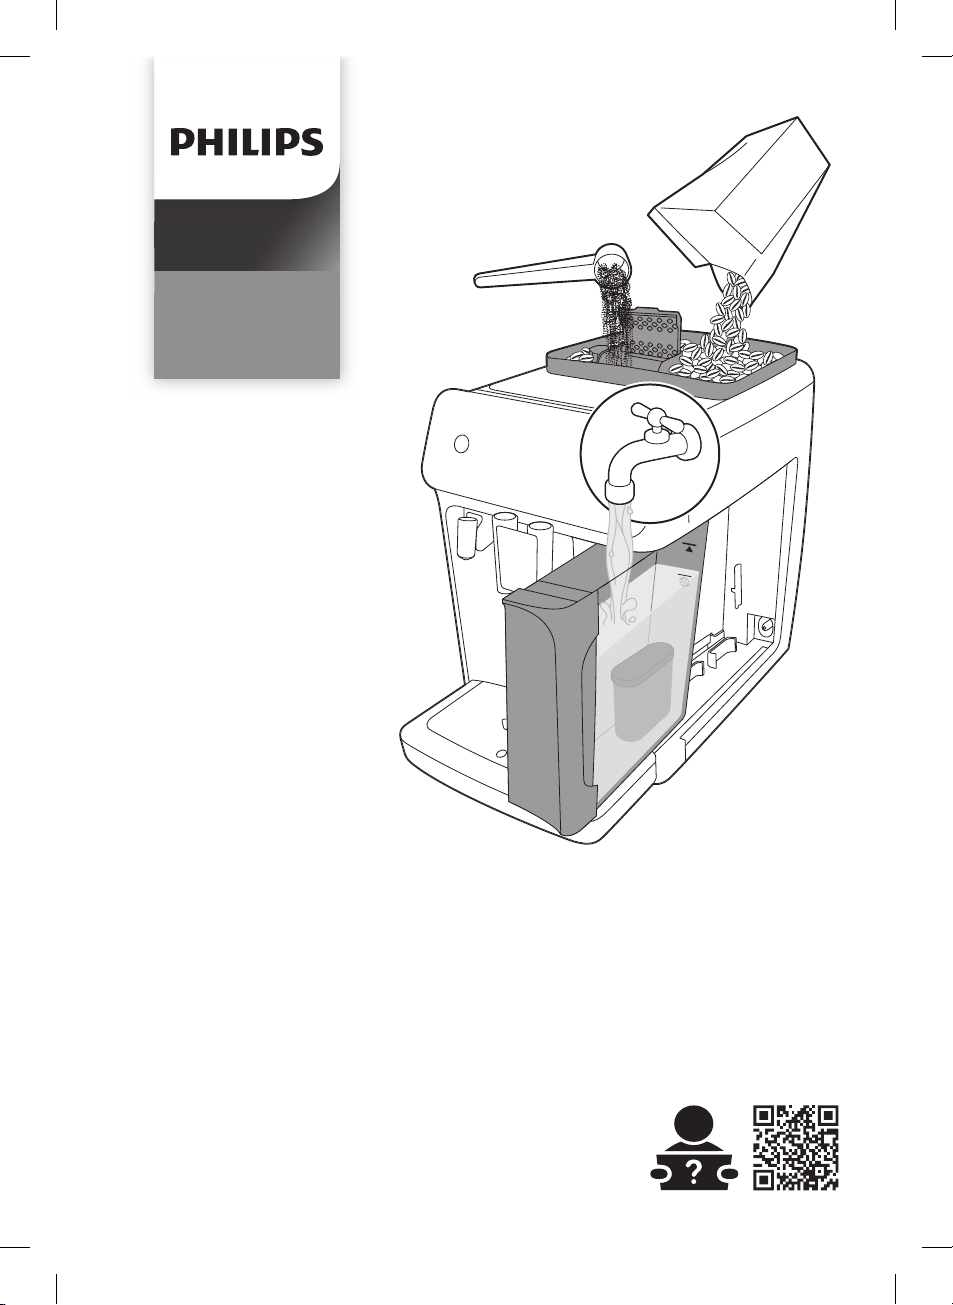
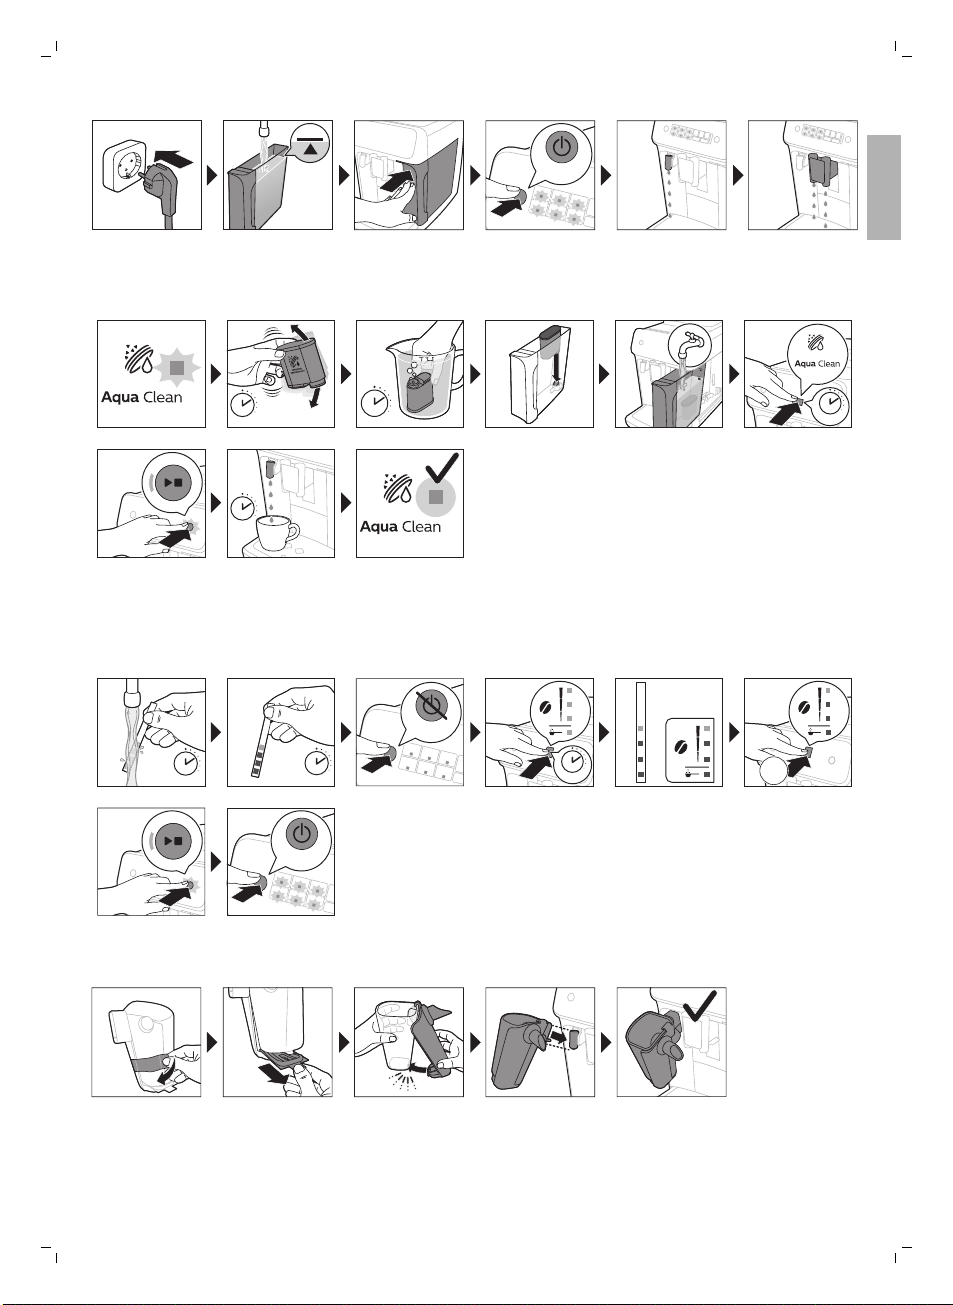
1. Setting up the machine
After you have switched on the machine, some water may be dispensed from the hot water spout or
coffee spout. This is normal.
Page 7
ON
5 sec.
30 sec.
1 min.
3 sec.
1 sec.
OFF
1 min.
3 sec.
=
3x
ON
CLICK
English
2. Activating the AquaClean water filter (5 min.)
For more information see chapter 'AquaClean water filter'.
3. Setting the water hardness
See chapter 'Setting the water hardness' for step-by-step instructions. The default water hardness
setting is 4: hard water.
9
English
4. Assembling LatteGo (specific types only)
Page 8
1
2
10
English
5. Assembling the classic milk frother (specific types only)
Brewing drinks
General steps
1 Fill the water tank with tap water and fill the bean hopper with beans.
2 Press the on/off button to switch on the machine.
-
The machine starts heating up and performs the automatic rinsing cycle. During heating up, the
lights in the drinks icons light up and go out slowly one by one.
-
When all lights in the drink icons light up continuously, the machine is ready for use.
3 Place a cup under the coffee dispensing spout. Slide the coffee dispensing spout up or down to
adjust its height to the size of the cup or glass you are using (Fig. 1).
Personalizing drinks
This machine allows you to adjust the settings of a drink to your own preference. After selecting a
drink you can:
1 Adjust the aroma strength by tapping the aroma strength icon (Fig. 2). There are 3 strengths, the
lowest is the mildest and the highest is the strongest.
2 Adjust the drink quantity by tapping the drink quantity (Fig. 3) and/or the milk quantity icon
(specific types only). There are 3 quantities: low, medium and high.
You can also adjust the coffee temperature to your own preference (see 'Adjusting the coffee
temperature').
Brewing coffee with beans
1 To brew a coffee, tap the drink icon of your choice.
-
The aroma strength and quantity lights go on and show the previously selected setting.
-
You can now adjust the drink to your preferred taste (see 'Personalizing drinks').
2 Press the start/stop button.
-
The light in the drink icon flashes while the drink is being dispensed.
Specific types only: An americano is made of espresso and water. When you brew an americano,
the machine first dispenses an espresso and then water.
3 To stop dispensing coffee before the machine is finished, press the start/stop button again.
To brew 2 coffees at the same time, tap the drink icon twice. The 2x light lights up.
Brewing milk-based drinks with LatteGo (milk container)
LatteGo consists of a milk container, a frame and a storage lid. To avoid leakage, make sure the
frame
and the milk container are properly assembled before you fill the milk container.
Page 9
English
1 To assemble LatteGo, first insert the top of the milk container under the hook at the top of the
frame (Fig. 4). Then press home the bottom part of the milk container. You hear a click when it locks
into place (Fig. 5).
Note: Make sure that the milk container and the frame are clean before you connect them.
2 Slightly tilt LatteGo and put it on the hot water spout (Fig. 6). Then press it home until it locks into
place (Fig. 7).
3 Fill LatteGo with milk up to the level indicated on the milk container for the drink you are brewing
(Fig. 8). Do not fill the milk container beyond the maximum indication.
If you have personalized the milk quantity, you may need to fill the milk container with more or
less milk than indicated for this drink on LatteGo.
Always use milk coming directly from the fridge for optimal results.
4 Place a cup on the drip tray.
5 Tap the milk-based drink icon of your choice.
-
You can now adjust the drink to your own preference (see 'Personalizing drinks').
6 Press the start/stop
-
The light in the drink icon flashes while the drink is being dispensed. When you brew a
cappuccino or latte macchiato, the machine first dispenses milk and then coffee. When you
brew caffè latte, the machine first dispenses coffee and then milk.
-
To stop dispensing milk before the machine has dispensed the preset amount, press the
start/stop
7 To stop dispensing the complete drink (milk and coffee) before the machine is finished, press and
hold the start/stop button.
button.
button.
11
English
Frothing milk with classic milk frother
Always use milk coming directly from the fridge for the best foam quality.
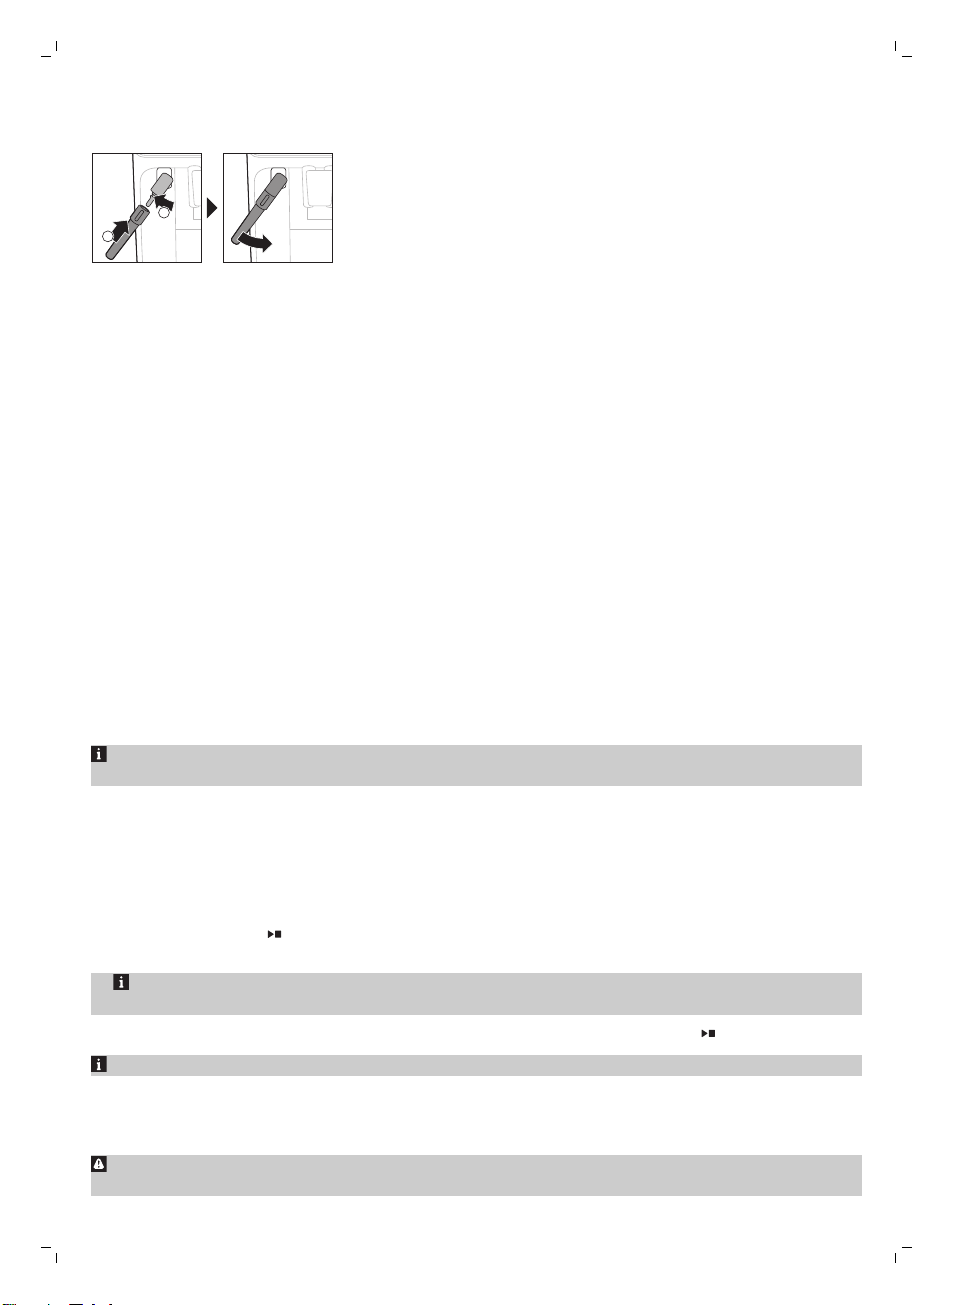
1 Tilt the black silicone handle on the machine to the left and slide the milk frother onto it (Fig. 9).
2 Fill a milk jug with with approx. 100 ml milk for cappuccino and approx. 150 ml milk for latte
macchiato.
3 Insert the milk frother approx. 1 cm into the milk.
4 Tap the steam icon (Fig. 10).
-
The light in the steam icon goes on and the start light starts pulsing.
5 Press the start/stop
-
The machine starts heating up, steam is forced into the milk and the milk is frothed.
6 When the milk foam in the milk jug has reached the required volume, press the start/stop
again to stop frothing milk.
Never froth milk longer than 90 seconds. The frothing automatically stops after 90 seconds.
You do not have to move the milk jug during milk frothing to get the best milk froth quality.
button to froth the milk (Fig. 11).
button
Brewing coffee with pre-ground coffee
You can choose to use pre-ground coffee instead of beans, for example if you prefer a different coffee
variety or decaffeinated coffee.
1 Press the on/off button to switch on the machine and wait until it is ready for use.
2 Open the lid of the pre-ground coffee compartment and pour one leveled measuring scoop of pre-
ground coffee into it (Fig. 12). Then close the lid.
Page 10
12
English
3 Place a cup under the coffee dispensing spout.
4 Select a single drink.
5 Press the aroma strength icon for 3 seconds (Fig. 13).
-
The pre-ground coffee light goes on and the start light starts pulsing.
6 Press the start/stop
7 To stop dispensing coffee before the machine is finished, press the start/stop button again.
With pre-ground coffee you can only brew one coffee at a time.
Pre-ground coffee is not a setting that is saved as a previous selected strength setting. Each time
you want to use pre-ground coffee, you need to press the aroma strength icon for 3 seconds.
When you select pre-ground coffee, you cannot select a different aroma strength.
button.
Dispensing hot water
1 If attached, remove LatteGo or the milk frother.
2 Tap the hot water icon (Fig. 14).
-
The drink quantity lights go on and show the previous selected drink setting for hot water.
3 Adjust the hot water quantity to your preference by tapping the drink quantity icon (Fig. 3).
4 Press the start/stop
-
The light in the hot water icon flashes and hot water is dispensed from the hot water spout (Fig.
15).
5 To stop dispensing hot water before the machine is finished, press the start/stop
button.
button again.
Adjusting machine settings
Programming the highest default setting of your drinks
The machine has 3 default settings for each drink: low, medium, high. You can only adjust the quantity
of the highest setting. The new quantity can be stored as soon as the start light starts to pulse.
Before you start programming the quantity of a milk drink, assemble LatteGo and pour milk in it.
1 To adjust the highest quantity setting, press and hold the icon of the drink you want to adjust for 3
seconds.
-
The upper light of the drinks quantity icon and the upper light of the milk quantity icon (specific
types only) starts to pulse and the start/stop
programming mode.
2 Press the start/stop button. The machine starts to brew the selected beverage.
-
The start light lights up continuously at first. When the machine is ready to store the adjusted
volume, the start/stop light starts to pulse.
3 Press the start/stop
-
In case of cappuccino or latte macchiato, first the milk will be dispensed. Press the start/stop
button when the cup contains the desired milk quantity. The machine automatically starts
dispensing the coffee. Press the start/stop button again when the cup contains the desired
quantity.
After you have programmed the new highest default quantity for a drink, the machine will dispense
this new amount each time you select the highest quantity of this drink.
button again when the cup contains the desired quantity of coffee or milk.
button starts to pulse, indicating that you are in
Page 11
English
You can only adjust the highest default quantity level.
If you want to go back to the default quantity settings, see ' Restoring factory settings'.
Adjusting the coffee temperature
Machines without temperature icon
1 Press the on/off button to switch off the machine.
2 When the machine is switched off: press and hold the coffee quantity icon until the lights in this
icon go on (Fig. 16).
3 Tap the quantity icon to select the required temperature: normal, high or max.
-
Respectively 1, 2 or 3 lights are on.
4 When you have finished setting the coffee temperature, press the start/stop
5 Press the on/off button to switch on the machine again.
If you do not switch off the machine yourself, it will switch off automatically after some time.
button.
Machines with temperature icon (EP3221 only)
1 Tap the coffee temperature icon repeatedly to select the desired temperature.
Restoring factory settings
The machine offers you the possibility to restore the drinks default settings at any moment.
You can only restore the default settings when the machine is switched off.
1 Press the on/off button to switch the machine off.
2 Press and hold the espresso icon for 3 seconds.
-
The middle lights in the drink setting icons light up. The start/stop light starts to pulse, indicating
that the settings are ready to be restored.
3 Press the start/stop button to confirm you want to restore the settings.
4 Press the on/off button to switch on the machine again.
13
English
Adjusting grinder settings
You can change the coffee strength with the grind setting knob inside the bean container. The lower
the grind setting, the finer the coffee beans are ground and the stronger the coffee. There are 12
different grind settings you can choose from.
The machine has been set up to get the best taste out of your coffee beans. Therefore we advise you
not to adjust the grinder settings until you have brewed 100-150 cups (approx. 1 month of usage).
You can only adjust the grind settings when the machine is grinding coffee beans. You need to
brew 2 to 3 drinks before you can taste the full difference.
Do not turn the grind setting knob more than one notch at a time to prevent damage to the grinder.
1 Place a cup under the coffee dispensing spout.
2 Open the lid of the coffee bean hopper.
3 Tap the espresso icon and then press the start/stop
4 When the grinder starts grinding, press down the grind setting knob and turn it to the left or right.
(Fig. 17)
button.
Page 12
14
English
Deactivate the beeps of the control panel
1 Press the on/off button to switch off the machine.
2 When the machine is switched off, tap and hold the coffee icon (espresso lungo icon for EP3221)
until the light in the icon goes on. The start light starts flashing.
3 Tap the coffee icon again to deactivate the beeps of the control panel. The light in the coffee icon
goes out.
4 Press the start/stop button to confirm your choice.
5 Press the on/off button to switch on the machine again. The beeps of the control panel have now
been deactivated.
Note: If the light in the coffee icon does not go on after tapping and holding the icon, this means that
the beeps of the control panel already have been deactivated. To activate them again, tap the icon
again and confirm by pressing the start/stop button.
The beeps in the on/off button and in the start/stop button cannot be deactivated.
Removing and inserting the brew group
Go to www.philips.com/coffee-care for detailed video instructions on how to remove, insert and
clean the brew group.
Removing the brew group from the machine
1 Switch off the machine.
2 Remove the water tank and open the service door (Fig. 18).
3 Press the PUSH handle (Fig. 19) and pull at the grip of the brew group to remove it from the
machine (Fig. 20).
Reinserting the brew group
Before you slide the brew group back into the machine, make sure it is in the correct position.
1 Check if the brew group is in the correct position. The arrow on the yellow cylinder on the side of
the brew group has to be aligned with the black arrow and N (Fig. 21).
-
If they are not aligned, push down the lever until it is in contact with the base of the brew group
(Fig. 22).
2 Slide the brew group back into the machine along the guiding rails on the sides (Fig. 23) until it
locks into position with a click (Fig. 24). Do not press the PUSH button.
3 Close the service door and place back the water tank.
Cleaning and maintenance
Regular cleaning and maintenance keeps your machine in top condition and ensures good-tasting
coffee for a long time with a steady coffee flow.
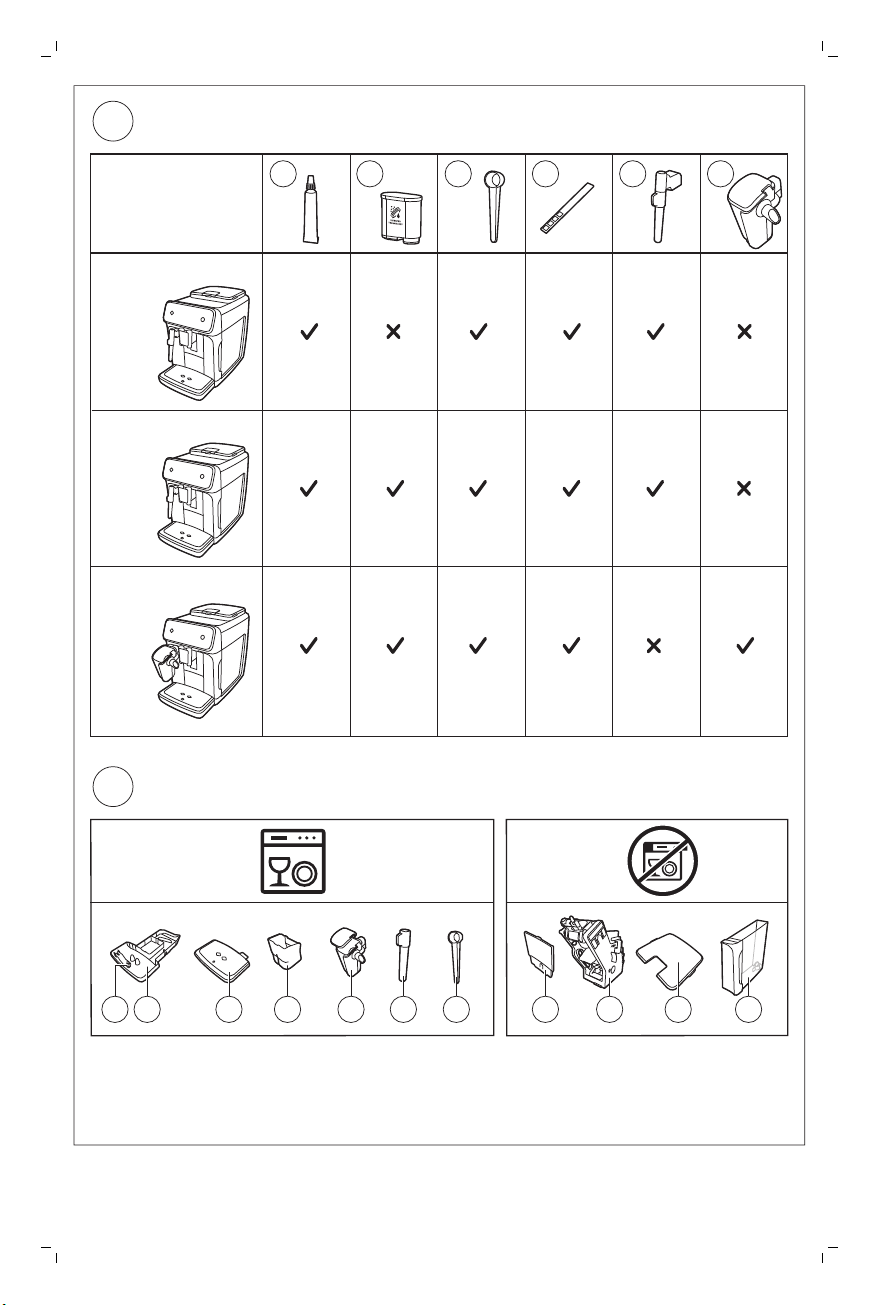
Consult the table below for a detailed description on when and how to clean all detachable parts of
the machine. You can find more detailed information and video instructions on
www.philips.com/coffee-care. See figure D for an overview of which parts can be cleaned in the
dishwasher.
Page 13
English
15
Detachable
When to clean How to clean
parts
Brew group Weekly Remove the brew group from the machine (see
Monthly Clean the brew group with the Philips coffee oil
Classic milk frother After every use First dispense hot water with the milk frother
Pre-ground coffee
compartment
Coffee grounds
container
Check the pre-ground coffee
compartment weekly to see
if it is clogged.
Empty the coffee grounds
container when prompted by
the machine. Clean it weekly.
'Removing and inserting the brew group'). Rinse it
under the tap (see 'Cleaning the brew group
under the tap').
remover tablet (see 'Cleaning the brew group
with the coffee oil remover tablets').
attached to the machine for thorough cleaning.
Then remove the milk frother from the machine
and disassemble it. Clean all parts under the tap
or in the dishwasher.
Unplug the machine and remove the brew group.
Open the lid of the pre-ground coffee
compartment and insert the spoon handle into it.
Move the handle up and down until the clogged
ground coffee falls down (Fig. 25). Go to
www.philips.com/coffee-care for detailed video
instructions.
Remove the coffee grounds container while the
machine is switched on. Rinse it under the tap
with some washing-up liquid or clean it in the
dishwasher. The front panel of the coffee
grounds container is not dishwasher-safe.
English
Drip tray Empty the drip tray daily or
LatteGo After every use Rinse LatteGo under the tap or clean it in the
Lubrication of the
brew group
Water tank Weekly Rinse the water tank under the tap
as soon as the red 'drip tray
full' indicator pops up
through the drip tray (Fig.
26). Clean the drip tray
weekly.
Every 2 months Consult the lubrication table and lubricate the
Remove the drip tray (Fig. 27) and rinse it under
the tap with some washing-up liquid. You can
also clean the drip tray in the dishwasher. The
front panel of the coffee grounds container (fig.
A15) is not dishwasher-safe.
dishwasher.
brew group with the Philips grease (see
'Lubricating the brew group').
Cleaning the brew group
Regular cleaning of the brew group prevents coffee residues from clogging up the internal circuits.
Visit www.philips.com/coffee-care for support videos on how to remove, insert and clean the brew
group.
Cleaning the brew group under the tap
1 Remove the brew group (see 'Removing and inserting the brew group').
Page 14

16
English
2 Rinse the brew group thoroughly with water. Carefully clean the upper filter (Fig. 28) of the brew
group.
3 Let the brew group air-dry before you place it back. Do not dry the brew group with a cloth to
prevent fibers from collecting inside the brew group.
Cleaning the brew group with the coffee oil remover tablets
Only use Philips coffee oil remover tablets.
1 Put a cup under the coffee spout. Fill the water tank with fresh water.
2 Put a coffee oil remover tablet in the pre-ground coffee compartment.
3 Tap the coffee icon and then press the aroma strength icon for 3 seconds to select the pre-ground
coffee function (Fig. 2).
4 Do not add pre-ground coffee. Press the the start/stop
half a cup of water has been brewed, unplug the machine.
5 Let the coffee oil remover solution act for at least 15 minutes.
6 Insert the mains plug back into a wall socket and switch on the machine to complete the brewing
cycle. Empty the cup.
7 Remove the water tank and open the service door. Remove the brew group (see 'Removing the
brew group from the machine') and rinse it thoroughly under the tap.
8 Reinsert the brew group and water tank and place a cup under the coffee spout.
9 Tap the coffee icon and then press the aroma strength icon for 3 seconds to select the pre-ground
coffee function (Fig. 2). Do not add pre-ground coffee. Press the start/stop
brewing cycle. Repeat this twice. Empty the cup.
button to start the brewing cycle. When
button to start the
Lubricating the brew group
Lubricate the brew group every 2 months, to ensure that the moving parts continue to move smoothly.
1 Apply a thin layer of grease on the piston (grey part) of the brew group (Fig. 29).
2 Apply a thin layer of grease around the shaft (grey part) in the bottom of the brew group (Fig. 30).
3 Apply a thin layer of grease to the rails on both sides (Fig. 31).
Cleaning LatteGo (milk container)
Cleaning LatteGo after every use
1 Remove LatteGo from the machine (Fig. 32).
2 Pour out any remaining milk.
3 Press the release button and remove the milk container from the frame of LatteGo (Fig. 33).
4 Clean all parts in the dishwasher or under the tap with lukewarm water and some washing-up
liquid.
Cleaning the classic milk frother
Cleaning the classic milk frother after every use
Clean the milk frother each time you use it for hygiene reasons and to avoid the build-up of milk
residues.
1 Place a cup under the milk frother.
2 Tap the steam icon and then press the start/stop
remove any milk that may be left inside the milk frother.
3 To stop dispensing steam after a few seconds, press the start/stop button again.
4 Clean the milk frother with a damp cloth.
button to start dispensing steam and to
Page 15
English
Daily cleaning of the classic milk frother
1 Let the milk frother cool down completely.
2 Tilt the milk frother to the left (Fig. 34) and remove both the metal part and the silicone part (Fig.
35).
3 Disassemble the two parts (Fig. 36) and rinse them with fresh water or clean them in the
dishwasher.
4 Reassemble the two milk frother parts and reattach the milk frother to the machine.
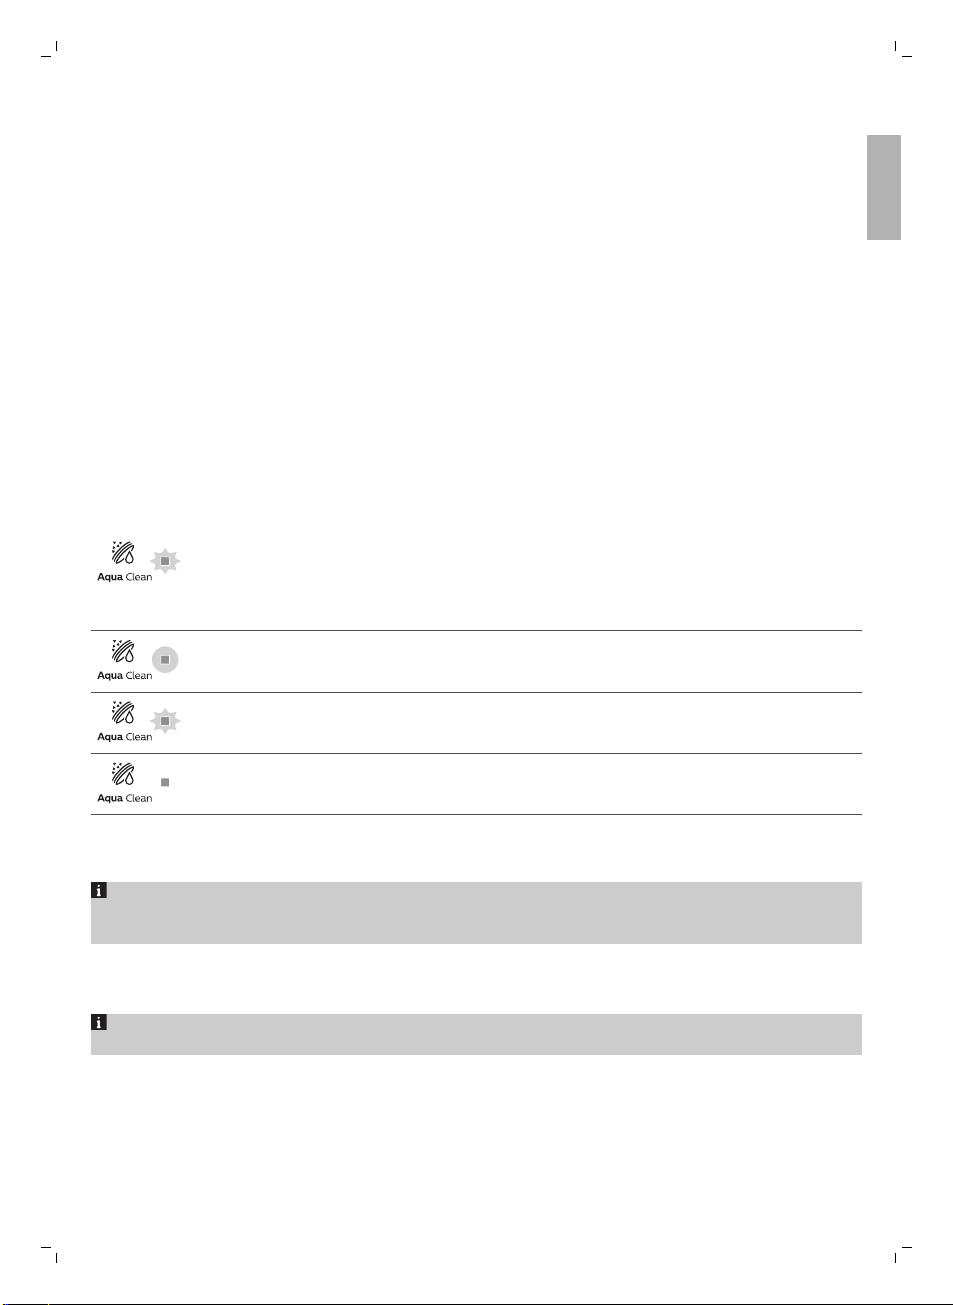
AquaClean water filter
Your machine is AquaClean enabled. You can place the AquaClean water filter in the water tank to
preserve the taste of your coffee. It also diminishes the need for descaling by reducing limescale
build-up in your machine. You can purchase an AquaClean water filter from your local retailer, from
authorized service centers or online at www.philips.com/parts-and-accessories.
AquaClean icon and light
Your machine is equipped with an AquaClean water filter light (Fig. 37) to indicate the status of the
filter. Use the table below to see what actions are required when the light is on or when it is flashing.
When you use the machine for the first time, the AquaClean light starts flashing
orange. This indicates that you can start using the AquaClean water filter. If you do
not activate an AquaClean water filter, the light will switch off automatically after a
while.
Once you have installed the filter and activated it with the AquaClean icon, the
AquaClean light turns blue to confirm that the AquaClean water filter is active.
17
English
When the filter is exhausted, the AquaClean light starts flashing orange again to
remind you to replace the filter with a new one.
When the orange AquaClean light is off, you can still activate an AquaClean filter,
you will need to descale the machine first.
Activating the AquaClean water filter (5 min.)
The machine does not automatically detect that a filter has been placed in the water tank.
Therefore you need to activate each new AquaClean water filter that you install with the AquaClean
icon.
When the orange AquaClean light is off, you can still activate an AquaClean water filter, but you will
need to descale the machine first.
Your machine has to be completely limescale-free before you start to use the AquaClean water
filter.
Before activating the AquaClean water filter, it has to be prepared by soaking it in water as described
below. If you don't do this, air might be drawn into the machine instead of water, which makes a lot of
noise and prevents the machine from being able to brew coffee.
1 Shake the filter for about 5 seconds (Fig. 38).
2 Immerse the filter upside down in a jug with cold water, shake/press it a bit and wait until no more
air bubbles come out (Fig. 39).
Page 16

18
English
3 The filter is now prepared for use and can be inserted into the water tank.
4 Insert the filter vertically onto the filter connection in the water tank. Press it down to the lowest
possible point (Fig. 40).
5 Fill the water tank with fresh water and place it back into the machine.
6 If attached, remove the LatteGo.
7 Place a bowl under the hot water spout/milk frother.
8 Press the AquaClean icon for 3 seconds (Fig. 41). The start light starts to pulse.
9 Press the start/stop
10 Hot water will be dispensed from the hot water spout/milk frother (3 min.).
11 When the activation process is finished, the blue AquaClean light goes on to confirm that the
AquaClean water filter has been activated correctly.
button to start the activation process.
Replacing the AquaClean water filter (5 min.)
After 95 liters of water have flowed through the filter, the filter will cease to work. The AquaClean light
turns orange and starts to flash to remind you to replace the filter. As long as it flashes, you can
replace the filter without having to descale the machine first. If you do not replace the AquaClean
water filter, the orange light will go out eventually. In that case you can still replace the filter but you
first need to descale the machine.
When the orange AquaClean light flashes:
1 Take out the old AquaClean water filter.
2 Install a new filter and activate it as described in chapter 'Activating the AquaClean water filter (5
min.)'.
Replace the AquaClean water filter at least every 3 months, even if the machine does not yet
indicate that replacement is required.
Deactivating the AquaClean reminder
If you do not want to use Philips AquaClean water filters anymore, you can always deactivate the
AquaClean reminders:
1 Press the on/off button to switch off the machine.
2 When the machine is switched off, press and hold the AquaClean icon until the light in this icon
goes on. The start light starts flashing.
3 Tap the AquaClean icon again to deactivate the reminders. The light in the AquaClean icon goes
off.
4 Press the start/stop button to confirm your choice.
5 Press the on/off button to switch on the machine again. The AquaClean reminders are now
deactivated.
Note: The activation of a new AquaClean filter will automatically re-activate the AquaClean reminders.
Setting the water hardness
We advise you to adjust the water hardness to the water hardness in your region for optimal
performance and a longer lifetime of the machine. This also prevents you from having to descale the
machine too often. The default water hardness setting is 4: hard water.
Page 17

English
19
Use the water hardness test strip supplied in the box to determine the water
hardness in your region:
1 Immerse the water hardness test strip in tap water or hold it under the tap for 1 second (Fig. 42).
2 Wait 1 minute. The number of squares on the test strip that turn red indicate the water hardness
(Fig. 43).
Set the machine to the correct water hardness:
1 Press the on/off button to switch off the machine.
2 When the machine is switched off, tap and hold the aroma strength icon until all lights in the icon
go on (Fig. 2).
3 Tap the aroma strength icon 1, 2, 3 or 4 times. The number of lights that are on should be the same
as the number of red squares on the test strip (Fig. 44). When there are no red squares on the test
strip (so all squares are green) please select 1 light.
4 When you have set the correct water hardness, press the start/stop
5 Press the on/off icon to switch on the machine.
Since you only set the water hardness once, the aroma strength function is used to select the water
hardness. This does not affect the aroma strength of the drinks you make afterwards.
button.
Descaling procedure (30 min.)
Please use Philips descaler only. Under no circumstances should you use a descaler based on sulfuric
acid, hydrochloric acid, sulfamic or acetic acid (vinegar) as this may damage the water circuit in your
machine and not dissolve the limescale properly. Not using the Philips descaler will void your
warranty. Failure to descale the appliance will also void your warranty. You can buy Philips descaling
solution in the online shop at www.philips.com/coffee-care.
When the Calc / Clean light starts to flash slowly, you need to descale the machine.
1 If attached remove LatteGo or milk frother.
2 Remove the drip tray and the coffee grounds container, empty them and put them back into place.
3 Remove the water tank and empty it. Then remove the AquaClean water filter.
4 Pour the whole bottle of Philips descaler in the water tank and then fill it with water up to the Calc
/ Clean indication (Fig. 45). Then place it back into the machine.
5 Place a large container (1.5 l) under the coffee dispensing spout and the water spout.
6 Press the Calc / Clean icon for 3 sec. and then press the start/stop button.
7 The first phase of the descaling procedure starts. The descaling procedure lasts approx. 30 minutes
and consists of a descaling cycle and a rinsing cycle. During the descaling cycle the Calc / Clean
light flashes to show that the descaling phase is in progress.
8 Let the machine dispense the descaling solution until the display reminds you that the water tank
is empty.
9 Empty the water tank, rinse it and then refill it with fresh water up to the Calc / Clean indication.
10 Empty the container and place it back under the coffee dispensing spout and the water spout.
Press the start/stop button again.
11 The second phase of the descaling cycle, the rinsing phase, starts and lasts 3 minutes. During this
phase the lights on the control panel go on and off to show that the rinsing phase is in progress.
12 Wait until the machine stops dispensing water. The descaling procedure is finished when the
machine stops dispensing water.
13 The machine will now heat up again. When the lights in the drink icons light up continuously, the
machine is ready for use again.
English
Page 18

20
English
14 Install and activate a new AquaClean water filter in the water tank (see 'Activating the AquaClean
water filter (5 min.)').
-
When the descaling procedure is finished, the AquaClean light flashes for a while to remind you
to install a new AquaClean water filter.
Tip: Using the AquaClean filter reduces the need for descaling!
What to do if the descaling procedure is interrupted
You can exit the descaling procedure by pressing the on/off button on the control panel. If the
descaling procedure is interrupted before it is completely finished, do the following:
1 Empty and rinse the water tank thoroughly.
2 Fill the water tank with fresh water up to the Calc / Clean level indication and switch the machine
back on. The machine will heat up and perform an automatic rinsing cycle.
3 Before brewing any drinks, perform a manual rinsing cycle. To perform a manual rinsing cycle, first
dispense half a water tank of hot water by repeatedly tapping the hot water icon (Fig. 14) and then
brew 2 cups of pre-ground coffee without adding ground coffee.
If the descaling procedure was not completed, the machine will require another descaling
procedure as soon as possible.
Ordering accessories
To clean and descale the machine, only use the Philips maintenance products. These products can be
purchased from your local retailer, from the authorized service centers or online at
www.philips.com/parts-and-accessories. To find a full list of spare parts online, enter the model
number of your machine. You can find the model number on the inside of the service door.
Maintenance products and type numbers:
-
Descaling solution CA6700
-
AquaClean water filter CA6903 (Fig. 46)
-
Brew group grease HD5061
-
Coffee oil remover tablets CA6704
Troubleshooting
This chapter summarizes the most common problems you could encounter with the machine. Support
videos and a complete list of frequently asked questions are available on www.philips.com/coffee-
care. If you are unable to solve the problem, contact the Consumer Care Center in your country. For
contact details, see the warranty leaflet.
Warning icons
Warning
icon
Solution
The 'water tank empty' light is on
The water tank is almost empty. Fill the water tank with fresh water to the
-
maximum level indication.
The water tank is not in place. Place back the water tank.
-
Page 19

English
21
Warning
icon
Solution
The 'empty coffee grounds container' light is on
The coffee grounds container is full. Remove and empty the coffee grounds
-
container while the machine is switched on.
The alarm light is on
The coffee grounds container and/or the drip tray is not in place or not placed
-
correctly. Place back the coffee grounds container and/or the drip tray and make
sure they are in the correct position.
The service door is open. Remove the water tank and make sure the service door
-
is closed.
The alarm light is flashing
The brew group is not in place or not placed correctly. Remove the brew group
-
and make sure it is locked into place. See chapter 'Removing and inserting the
brew group' for step-by-step instructions.
The brew group is blocked. Remove the brew group and rinse it with water under
-
the tap. Then lubricate the brew group and place it back into the machine. See
chapter 'Cleaning and maintenance' for step-by-step instructions.
The alarm light is on and the start light flashes.
Some air is trapped inside the machine. To release the air from the machine, fill the
water tank with water, place a cup under the classic milk frother and press the
flashing start/stop button.
Be careful: small jets of hot water will be dispensed from the classic milk frother to
release the air.
AquaClean light is flashing: place or replace the AquaClean water filter and activate
it. See chapter 'AquaClean water filter' for step-by-step instructions.
English
Descaling light is flashing slowly: Descale the machine (see 'Descaling procedure (30
min.)').
The lights in the drink icons light up and go out one by one.
The machine is heating up and/or trying to release the air that was drawn into the
machine. Wait until all drink lights light up continuously.
Page 20

22
English
Warning
Solution
icon
The lights of all warning icons are flashing.
Reset the machine by unplugging it and plugging it back in. Before switching the
machine back on, follow these steps:
Remove the AquaClean water filter from the water tank.
-
Place back the water tank. Push it into the machine as far as possible to make
-
sure it is in the right position.
Open the lid of the pre-ground coffee compartment and check if this is clogged
-
with coffee powder. To clean it, insert a spoon handle into the pre-ground coffee
compartment and move the handle up and down until the clogged ground
coffee falls down (Fig. 25). Remove the brew group and remove all ground coffee
that has fallen down. Place back the clean brew group.
Switch the machine back on.
-
If the problem is solved the AquaClean filter was not prepared well. Prepare the
AquaClean filter before placing it back by following steps 1 and 2 in chapter
'Activating the AquaClean water filter (5 min).
If the lights continue to flash, the machine could be overheated. Switch the machine
off, wait 30 minutes and switch it on again. If the lights are still flashing, contact the
Consumer Care Center in your country. For contact details, see the international
warranty leaflet.
Troubleshooting table
This chapter summarizes the most common problems you could encounter with the machine. Support
videos and a complete list of frequently asked questions are available on www.philips.com/coffee-
care. If you are unable to solve the problem, contact the Consumer Care Center in your country. For
contact details, see the warranty leaflet.
Problem
The drip tray fills up
quickly.
Cause Solution
This is normal. The machine
uses water to rinse the internal
circuit and brew group. Some
water flows through the internal
system directly into the drip
tray.
Empty the drip tray daily or as soon as
the red 'drip tray full' indicator pops up
through the drip tray cover. Tip: place a
cup under the dispensing spout to
collect rinsing water that comes out of
it.
The 'empty coffee
grounds container' light
remains on.
The machine prompts to
empty the coffee
grounds container even
though the container is
not full.
You emptied the coffee grounds
container while the machine
was switched off.
The machine did not reset the
counter the last time you
emptied the coffee grounds
container.
Always empty the coffee grounds
container while the machine is switched
on. Remove the coffee grounds
container, wait at least 5 sec. and then
insert it again.
Always wait approx. 5 seconds when
you place back the coffee grounds
container. In this way the coffee
grounds counter will be reset to zero.
Page 21

Problem Cause Solution
Always empty the coffee grounds
container while the machine is switched
on. If you empty the coffee grounds
container when the machine is switched
off, the coffee grounds counter won't
reset.
English
23
English
The coffee grounds
container is too full and
the 'empty coffee
grounds container' light
did not go on.
I cannot remove the
brew group.
I cannot insert the brew
group.
The coffee is watery. The brew group is dirty or needs
You removed the drip tray
without emptying the grounds
container.
The brew group is not in the
correct position.
The brew group is not in the
correct position.
to be lubricated.
When you remove the drip tray, also
empty the coffee grounds container
even if it contains only a few coffee
pucks. In this way the coffee grounds
counter will be reset to zero, re-starting
to correctly count the coffee pucks.
Reset the machine in the following way:
close the service door and place back
the water tank. Switch the machine off
and back on again. Try again to remove
the brew group. See chapter 'Removing
and inserting the brew group' for step
by step instructions.
Reset the machine in the following way:
close the service door and place back
the water tank. Leave the brew group
out. Switch the machine off and unplug
it. Wait for 30 sec. and then plug the
machine back in and switch it on. Then
put the brew group in the correct
position and reinsert it into in the
machine. See chapter 'Removing and
inserting the brew group' for step by
step instructions.
Remove the brew group (see 'Removing
the brew group from the machine'),
rinse it under the tap and leave it to dry.
Then lubricate the moving parts (see
'Lubricating the brew group').
The coffee is not hot
enough.
The machine is performing its
self-adjustment procedure. This
procedure is started
automatically when you use the
machine for the first time, when
you change to another type of
coffee beans or after a long
period of non-use.
The grinder is set to a too
coarse setting.
The temperature is set too low. Set the temperature to the maximum
Brew 5 cups of coffee initially to allow
the machine to complete its selfadjustment procedure.
Set the grinder to a finer (lower) setting.
Brew 2 to 3 drinks to be able to before
taste the full difference.
(see 'Adjusting the coffee temperature').
Page 22

24
English
Problem Cause Solution
A cold cup reduces the
temperature of the drink.
Preheat the cups by rinsing them with
hot water.
Adding milk reduces the
Coffee does not come
out or coffee comes out
slowly.
The brew group is dirty. Remove the brew group and rinse it
The coffee dispensing spout is
temperature of the drink.
The AquaClean water filter was
not prepared properly for
installation.
The AquaClean water filter is
clogged.
The grinder is set to a too fine
setting.
dirty.
Regardless of whether you add hot or
cold milk, adding milk always reduces
the temperature of the coffee. Preheat
the cups by rinsing them with hot water.
Remove the AquaClean water filter and
try to brew a coffee again. If this works,
make sure that you have prepared the
AquaClean water filter properly before
you place it back. See chapter
'AquaClean water filter' for step-by-step
instructions.
After a long period of non-use, you
need to prepare the AquaClean water
filter for use again and then place it
back. See step 1 - 3 of chapter
'Activating the AquaClean water filter'.
Replace the AquaClean water filter
every 3 months. A filter that is older
than 3 months can become clogged.
Set the grinder to a coarser (higher)
setting. Note that this will impact the
coffee taste.
under the tap (see 'Cleaning the brew
group under the tap').
Clean the coffee dispensing spout and
its holes with a pipe cleaner or needle.
The machine grinds the
coffee beans, but coffee
does not come out.
The pre-ground coffee
compartment is clogged
The machine circuit is blocked
by limescale.
The pre-ground coffee
compartment is clogged.
Switch off the machine and remove the
brew group. Open the lid of the preground coffee compartment and insert
the spoon handle into it. Move the
handle up and down until the clogged
ground coffee falls down (Fig. 25).
Descale the machine with Philips
descaler. Always descale the machine
when the descaling light starts to flash.
Switch off the machine and remove the
brew group. Open the lid of the preground coffee compartment and insert
the spoon handle into it. Move the
handle up and down until the clogged
ground coffee falls down (Fig. 25).
Page 23

Problem Cause Solution
The milk does not froth. Machines with LatteGo: LatteGo
is incorrectly assembled.
Make sure that the milk container is
properly assembled to the frame of
LatteGo ('click').
English
25
English
Machines with LatteGo: the milk
container and/or frame of
LatteGo are dirty.
Machines with classic milk
frother: the milk frother is dirty.
The type of milk used is not
Milk is leaking from the
bottom of the LatteGo
milk container.
The machine seems to
be leaking.
suitable for frothing.
The frame and the milk
container are not assembled
properly.
The machine uses water to rinse
the internal circuit and brew
group. This water flows through
the internal system directly into
the drip tray. This is normal.
The drip tray is too full and has
overflowed which makes it look
like the machine is leaking.
Disassemble LatteGo and rinse both
parts under the tap or clean them in the
dishwasher (see 'Cleaning LatteGo after
every use').
Thoroughly clean the milk frother (see
'Cleaning the classic milk frother ').
Different types of milk result in different
amounts of froth and different froth
qualities. We have tested the following
milk types which proved to deliver a
good milk froth result: semi-skimmed or
full-fat cow's milk and lactose-free milk.
First insert the top of the milk container
under the hook at the top of the frame.
Then press home the bottom part of the
milk container. You hear a click when it
locks into place.
Empty the drip tray every day or as
soon as the 'drip tray full' indicator pops
up through the drip tray cover. Tip:
Place a cup under the dispensing spout
to collect rinsing water and reduce the
amount of water in the drip tray.
Empty the drip tray every day or as
soon as the 'drip tray full' indicator pops
up through the drip tray cover.
The water tank is not fully
inserted and air is drawn into
the machine.
The brew group is dirty/clogged. Rinse the brew group.
The machine is not placed on a
horizontal surface.
The water tank is not fully
inserted and air is drawn into
the machine.
Make sure the water tank is in the
correct position: remove it and insert it
again pushing it as far as possible.
Place the machine on a horizontal
surface so that the drip tray does not
overflow and the 'drip tray full' indicator
works properly.
Make sure the water tank is in the
correct position: remove it and insert it
again pushing it as far as possible.
Page 24

26
English
Problem Cause Solution
I cannot activate the
AquaClean water filter
and the machine asks
for descaling.
The filter has not been installed
or replaced in time after the
AquaClean water filter light
started to flash. This means
your machine is not completely
limescale free.
Descale your machine first and then
install the AquaClean water filter.
The new water filter
does not fit.
The machine is making a
loud noise.
You are trying to install another
filter than the AquaClean water
filter.
The rubber ring on the
AquaClean water filter is not in
place.
It is normal that your machine
makes noise during use.
The AquaClean water filter was
not prepared properly and air is
now drawn into the machine.
The water tank is not fully
inserted and air is drawn into
the machine.
Only the AquaClean water filter fits into
the machine.
Place back the rubber ring on the
AquaClean water filter.
If the machine starts to make a different
kind of noise, clean the brew group and
lubricate it (see 'Lubricating the brew
group').
Remove the AquaClean water filter from
the water tank and properly prepare it
for use before you place it back. See
chapter 'AquaClean water filter' for
step-by-step instructions.
Make sure the water tank is in the
correct position: remove it and insert it
again pushing it as far as possible.
Technical specifications
The manufacturer reserves the right to improve the technical specifications of the product. All the
preset quantities are approximate.
Description
Size (w x h x d) 246 x 372 x 433 mm
Value
Weight 7 - 7.5 kg
Power cord length 1000 mm
Water tank 1.8 litres, removable
Coffee bean hopper capacity 275 g
Coffee grounds container capacity 12 pucks
LatteGo (milk container) capacity 250 ml
Adjustable spout height 85-145 mm
Nominal voltage - Power rating - Power supply See data label on inside of service door (fig. A11)
Page 25

Français
93
Sommaire
Présentation de la machine (Fig. A)__________________________________________________________________ 93
Panneau de commande (Fig. B) _____________________________________________________________________ 93
Introduction __________________________________________________________________________________________ 94
Avant la première utilisation _________________________________________________________________________ 95
Préparation de boissons _____________________________________________________________________________ 96
Réglage des paramètres de la machine _____________________________________________________________ 99
Retrait et insertion du groupe de percolation_______________________________________________________ 101
Nettoyage et entretien _______________________________________________________________________________ 101
Filtre à eau AquaClean ______________________________________________________________________________ 104
Réglage de la dureté de l’eau _______________________________________________________________________ 106
Procédure de détartrage (30min.)___________________________________________________________________ 106
Commande d'accessoires____________________________________________________________________________ 107
Dépannage ___________________________________________________________________________________________ 108
Caractéristiques techniques _________________________________________________________________________ 114
Présentation de la machine (Fig. A)
A1 Panneau de commande A10 Porte d'accès au groupe café
A2 Support de tasse A11 Étiquette de données avec référence
A3 Compartiment à café prémoulu A12 Réservoir d'eau
Français
A4 Couvercle du bac à grains A13 Buse de distibution d'eau chaude
A5 Buse de distribution du café réglable A14 Bac à marcs de café
A6 Cordon d'alimentation A15 Panneau avant du bac à marc de café
A7 Bouton de réglage de la mouture A16 Grille du plateau égouttoir
A8 Réservoir à grains de café A17 Plateau égouttoir
A9 Chambre d'extraction A18 Indicateur «Plateau égouttoir plein»
Accessoires
A19 Tube de graisse A22 Bande de test de la dureté de l’eau
A20 Filtre à eau AquaClean A23 Mousseur à laitclassique (certains
A21 Cuillère de mesure A24 LatteGo (réservoir de lait) (certains
modèles uniquement)
modèles uniquement)
Panneau de commande (Fig. B)
Veuillez vous reporter à la figureB pour une présentation de tous les boutons et icônes. La
description figure au-dessous.
Français
Page 26

94
Français
Certains boutons et icônes sont présents sur certains modèles uniquement.
B1 Bouton marche/arrêt B7 Icônes d’alerte
B2 Icônes de boissons * B8 Voyant de démarrage
B3 Icône de l’intensité d’arôme/de mouture du café B9 Marche/arrêt (bouton)
B4 Icône de la quantité de boisson B10 Icône Calc/Clean
B5 Icône de la quantité de lait (certains modèles
uniquement)
B6 Icône de la température du café (certains
modèles uniquement)
* Icônes de boissons: espresso, espresso lungo, café, americano, cappuccino, latte macchiato, eau
chaude, vapeur (certains modèles uniquement)
B11 Icône AquaClean
Introduction
Félicitations pour votre achat d’une machine à café Philips entièrement automatique! Pour bénéficier
pleinement de l’assistance Philips, veuillez enregistrer votre produit sur le site
www.philips.com/welcome.
Lisez attentivement le livret de sécurité distinct avant d’utiliser la machine pour la première fois, et
conservez-le pour un usage ultérieur.
Pour vous aider à vous familiariser avec votre machine et en profiter au maximum, Philipsoffre une
assistance à plusieurs égards. La boîte contient les éléments suivants:
1 Le présent mode d’emploi avec les instructions d’utilisation illustrées et de plus amples
informations sur le nettoyage et l’entretien.
Il existe plusieurs versions de cette machine à espresso, présentant différentes fonctionnalités.
Chaque version a sa propre référence. Vous trouverez le numéro de référence sur l'étiquette de
données située à l'intérieur de la porte d'accès (voir fig. A11).
2 Le livret de sécurité séparé, avec les instructions relatives à l’utilisation sûre de la machine à café.
3 Pour une assistance en ligne (foire aux questions, vidéos, etc.), veuillez scanner le code QR figurant
sur la couverture du présent mode d’emploi ou visiter la page www.philips.com/coffee-care
Cette machine a été testée avec du café. Bien qu'elle ait été soigneusement nettoyée, il se peut
que quelques résidus de café subsistent. Nous garantissons néanmoins que la machine est
entièrement neuve.
La machine à café règle automatiquement la quantité de café moulu utilisée pour obtenir un café au
goût optimal. Il convient de préparer initialement 5cafés pour permettre à la machine de compléter
son autoréglage.
Veillez à rincer le LatteGo (réservoir de lait) ou le mousseur à lait classique avant la première
utilisation.
Page 27

ON
5 sec.
30 sec.
1 min.
3 sec.
1 sec.
OFF
1 min.
3 sec.
=
3x
ON
Français
Avant la première utilisation
1. Préparation de la machine
Après avoir allumé la machine, un peu d'eau peut s'écouler de la buse de distribution d’eau chaude
ou de la buse de distribution du café. Ce phénomène est normal.
2. Activation du filtre à eau AquaClean (5min.)
Pour plus d’informations, reportez-vous au chapitre «Filtre à eau AquaClean».
95
Français
3. Réglage de la dureté de l’eau
Reportez-vous au chapitre «Réglage de la dureté de l’eau» pour obtenir des instructions par
étapes. Le réglage par défaut de la dureté de l’eau est 4: eau calcaire.
Page 28

CLICK
1
2
96
Français
4. Assemblage de LatteGo (certains modèles uniquement)
5. Assemblage du mousseur à lait classique (certains modèles
uniquement)
Préparation de boissons
Étapes générales
1 Remplissez le réservoir avec de l’eau du robinet et le bac à grains avec des grains de café.
2 Mettez l’appareil en marche en appuyant sur le bouton marche/arrêt.
-
La machine commence à chauffer et effectue le cycle de rinçage automatique. Lorsque la
machine chauffe, les voyants dans les icônes de boissons s’allument et s’éteignent lentement
un par un.
-
Lorsque tous les voyants dans les icônes des boissons restent allumés, la machine est prête à
l’emploi.
3 Placez une tasse sous la buse de distribution du café. Faites coulisser la buse de distribution vers
le haut ou vers le bas pour adapter sa hauteur à la taille de la tasse ou du verre utilisé (Fig. 1).
Personnalisation des boissons
Cette machine permet de régler les paramètres d’une boisson selon vos préférences. Ainsi, après avoir
sélectionné une boisson, vous pouvez:
1 Régler l’intensité de l’arôme en appuyant sur l’icône de l’intensité d’arôme (Fig. 2). Vous pouvez
choisir parmi 3niveaux d’intensité, le plus bas étant le plus faible et le plus haut le plus intense.
2 Régler la quantité de boisson en appuyant sur l’icône de la quantité de boisson (Fig. 3) et/ou de la
quantité de lait (certains modèles uniquement). Vous pouvez choisir parmi 3quantités: faible,
moyen et intense.
Vous pouvez également régler la température du café selon vos préférences (voir 'Réglage de la
température du café').
Préparation du café avec des grains
1 Pour préparer un café, appuyez sur l’icône des boissons de votre choix.
-
Les voyants de l’intensité d’arôme et de la quantité s’allument et affichent le réglage
sélectionné précédemment.
-
Vous pouvez maintenant régler le goût de votre choix (voir 'Personnalisation des boissons').
Page 29

Français
2 Appuyez sur le bouton marche/arrêt .
-
Le voyant de l’icône des boissons clignote pendant que la boisson est versée.
Certains modèles uniquement: Un americano est réalisé à partir d’espresso et d’eau. Lorsque
vous préparez un americano, la machine verse d’abord un espresso, puis l’eau.
3 Pour arrêter l’écoulement de café avant que la machine ait terminé, appuyez de nouveau sur le
bouton marche/arrêt .
Pour préparer 2cafés en même temps, appuyez deuxfois sur l’icône des boissons. Le voyant 2x
s’allume.
Préparation de boissons à base de lait avec LatteGo
(réservoir de lait)
LatteGo est composé d’un réservoir de lait, d’un cadre et d’un couvercle de rangement. Afin d’éviter
toute fuite, assurez-vous que le cadre et le réservoir de lait sont correctement assemblés avant de
remplir le réservoir de lait.
1 Pour installer LatteGo, insérez tout d’abord la partie supérieure du réservoir de lait sous le crochet
en haut du cadre (Fig. 4). Ensuite, remettez la partie inférieure du réservoir de lait en place. Vous
entendez un clic lorsqu’il est verrouillé et correctement en place (Fig. 5).
Remarque: Assurez-vous que le réservoir de lait et le cadre sont propres avant de les installer.
2 Inclinez légèrement LatteGo et placez-le sur la buse de l’eau chaude (Fig. 6). Ensuite, appuyez
jusqu’à ce qu’il s’enclenche et soit en place (Fig. 7).
3 Remplissez le réservoir de lait LatteGo avec du lait jusqu’au niveau indiqué sur le réservoir de lait
pour la boisson que vous êtes en train de préparer (Fig. 8). Ne remplissez pas le réservoir de lait
au-delà de l’indication maximum.
Si vous avez personnalisé la quantité de lait, vous devrez peut-être remplir le réservoir de lait
avec une quantité de lait supérieure ou inférieure à celle indiquée pour cette boisson sur LatteGo.
Pour un résultat optimal, utilisez toujours du lait sortant directement du réfrigérateur.
4 Placez une tasse sur le plateau égouttoir.
5 Appuyez sur l’icône des boissons à base de lait de votre choix.
-
Vous pouvez à présent régler les paramètres de la boisson selon vos préférences (voir
'Personnalisation des boissons').
6 Appuyez sur le bouton marche/arrêt .
-
Le voyant de l’icône des boissons clignote pendant que la boisson est versée. Lorsque vous
préparez un cappuccino ou un latte macchiato, la machine verse d’abord le lait et ensuite le
café. Lorsque vous préparez un caffè latte, la machine verse d’abord le café, puis le lait.
-
Pour arrêter l’écoulement de lait avant que la machine ait versé la quantité prédéfinie, appuyez
sur le bouton marche/arrêt .
7 Pour arrêter de verser la boisson complète (café et lait) avant que la machine ait terminé,
maintenez le bouton marche/arrêt enfoncé.
97
Français
Production de mousse de lait avec mousseur à lait classique
Pour une qualité de mousse optimale, utilisez toujours du lait provenant directement du
réfrigérateur.
Page 30

98
Français
1 Inclinez le manche en silicone noir situé à gauche sur la machine et faites glisser le mousseur à lait
sur celui-ci (Fig. 9).
2 Remplissez un pot à lait avec environ 100ml de lait pour le cappuccino et environ 150ml pour le
latte macchiato.
3 Immergez le mousseur à lait d’environ 1cm dans le lait.
4 Appuyez sur l’icône de la vapeur (Fig. 10).
-
Le voyant de l’icône de la vapeur s’allume et le voyant de démarrage commence à clignoter.
5 Appuyez sur le bouton marche/arrêt pour faire mousser le lait (Fig. 11).
-
La machine commence à chauffer, la vapeur est injectée dans le lait et le lait mousse.
6 Lorsque la mousse de lait dans le pot à lait a atteint le volume requis, appuyez de nouveau sur le
bouton marche/arrêt pour arrêter de faire mousser le lait.
Ne faites jamais mousser le lait pendant plus de 90secondes. La production de mousse cesse
automatiquement après 90secondes.
Vous ne devez pas déplacer le pot à lait pendant que le lait mousse pour obtenir une mousse
d'une qualité optimale.
Préparation d’un café avec du café prémoulu
Vous pouvez choisir d’utiliser un café prémoulu au lieu de grains, par exemple si vous préférez une
variété de café différente ou décaféinée.
1 Appuyez sur le bouton activer/désactiver pour allumer la machine à café et patientez jusqu’à ce
qu’elle soit prête à l’emploi.
2 Ouvrez le couvercle du compartiment du café prémoulu et versez une mesurette de café prémoulu
nivelé dans le compartiment (Fig. 12). Fermez le couvercle.
3 Placez une tasse sous la buse de distribution du café.
4 Sélectionnez une seule boisson.
5 Appuyez sur l’icône de l’intensité d’arôme pendant 3secondes (Fig. 13).
-
Le voyant du café prémoulu s’allume et commence à clignoter.
6 Appuyez sur le bouton marche/arrêt .
7 Pour arrêter l’écoulement de café avant que la machine ait terminé, appuyez de nouveau sur le
bouton marche/arrêt .
Avec le café prémoulu, vous pouvez préparer un seul café à la fois.
Le café prémoulu n’est pas un paramètre enregistré comme un paramètre d’intensité
précédemment sélectionné. Chaque fois que vous souhaitez utiliser du café prémoulu, vous devez
donc appuyer sur l’icône d’intensité d’arôme pendant 3secondes.
Lorsque vous sélectionnez du café prémoulu, vous ne pouvez pas sélectionner une intensité
d’arôme différente.
Verser l’eau chaude
1 S’il est attaché, retirez LatteGo ou le mousseur à lait.
2 Touchez l’icône de l’eau chaude (Fig. 14).
-
Les voyants de la quantité de boisson s’allument et affichent le paramètre de la boisson
sélectionné précédemment pour l’eau chaude.
Page 31

Français
3 Réglez la quantité d’eau chaude selon votre convenance en appuyant sur l’icône de la quantité de
boisson (Fig. 3).
4 Appuyez sur le bouton marche/arrêt .
-
Le voyant de l’icône d’eau chaude clignote et de l’eau chaude s’écoule de la buse de
distribution de l’eau chaude (Fig. 15).
5 Pour arrêter l’écoulement d’eau chaude avant que la machine ait terminé, appuyez de nouveau sur
le bouton marche/arrêt .
Réglage des paramètres de la machine
Programmation du réglage par défaut maximum pour vos
boissons
La machine a 3réglages par défaut pour chaque boisson: faible, moyen et intense. Vous pouvez
uniquement régler la quantité pour le réglage maximum. La nouvelle quantité peut être mémorisée
dès que le voyant de démarrage commence à clignoter.
Avant de commencer à programmer la quantité d’une boisson de lait, assemblez LatteGo et versez
du lait dedans.
1 Pour régler le paramètre de la quantité maximale, maintenez appuyé pendant 3secondes l’icône
de la boisson que vous souhaitez régler.
-
Le voyant supérieur de l’icône de la quantité de boisson, le voyant supérieur de l’icône de la
quantité de lait (certains modèles uniquement) et le bouton marche/arrêt commencent à
clignoter, indiquant que vous êtes en mode de programmation.
2 Appuyez sur le bouton marche/arrêt . La machine commence à préparer la boisson sélectionnée.
-
Le voyant de démarrage reste initialement allumé. Lorsque la machine est prête à stocker le
volume modifié, le voyant de marche/arrêt commence à clignoter.
3 Appuyez de nouveau sur le bouton marche/arrêt lorsque la tasse contient la quantité souhaitée
de café ou de lait.
-
Pour un cappuccino ou un latte macchiato, le lait sera versé en premier. Appuyez sur le bouton
marche/arrêt lorsque la tasse contient la quantité souhaitée de café ou de lait. La machine
commencera alors à verser le café automatiquement. Appuyez de nouveau sur le bouton
marche/arrêt lorsque la tasse contient la quantité souhaitée.
Après avoir programmé la nouvelle quantité par défaut maximum pour une boisson, la machine
distribue cette nouvelle quantité chaque fois que vous sélectionnez la quantité maximale pour cette
boisson.
99
Français
Vous pouvez uniquement paramétrer le niveau le plus élevé de la quantité par défaut.
Si vous souhaitez revenir aux paramètres par défaut de la quantité, reportez-vous à la section
«Restaurer les paramètres usine».
Réglage de la température du café
Machines sans l’icône de la température
1 Appuyez sur le bouton marche/arrêt pour éteindre la machine.
Page 32

100
Français
2 Lorsque la machine est éteinte: maintenez enfoncé l’icône de la quantité de café jusqu’à ce que
les voyants de cette icône s’allument (Fig. 16).
3 Appuyez sur l’icône de quantité pour sélectionner la température requise: normale, élevée ou max.
-
1, 2 ou 3voyants s’allument alors respectivement.
4 Lorsque vous aurez fini de régler la température du café, appuyez sur le bouton marche/arrêt
5 Remettez l’appareil en marche en appuyant sur le bouton marche/arrêt.
Si vous n’éteignez pas la machine par vous-même, elle s’éteindra automatiquement après un
certain temps.
.
Machines avec l’icône de température (EP3221 uniquement)
1 Appuyez plusieurs fois sur l’icône de la température du café pour sélectionner la température
souhaitée.
Rétablir les paramètres d’usine
La machine à café offre la possibilité de rétablir les paramètres de boissons par défaut à tout moment.
Vous pouvez uniquement rétablir les paramètres par défaut lorsque la machine est éteinte.
1 Appuyez sur le bouton marche/arrêt pour éteindre la machine.
2 Appuyez sur l’icône espresso pendant 3secondes.
-
Les voyants centraux dans le paramètre de la boisson s’allument. Le voyant marche/arrêt
commence à clignoter, indiquant que les réglages sont prêts à être rétablis.
3 Appuyez sur le bouton marche/arrêt pour confirmer que vous souhaitez rétablir les paramètres.
4 Remettez l’appareil en marche en appuyant sur le bouton marche/arrêt.
Réglage des paramètres du moulin
Vous pouvez modifier l’intensité du café avec le bouton de réglage de la mouture dans le réservoir à
grains. Plus le paramètre de mouture est bas, plus les grains de café sont fins et plus le café est
intense. Vous pouvez choisir parmi 12paramètres de mouture différents.
L'appareil a été configuré de manière à extraire une saveur optimale de vos grains de café. Nous vous
conseillons donc de ne pas modifier les réglages du moulin avant d'avoir préparé 100 à 150tasses
(environ 1mois d'utilisation).
Vous pouvez uniquement régler les paramètres de mouture lorsque la machine moût des grains de
café. Vous devez préparer2 ou 3boissons avant de sentir toute la différence de goût.
Ne tournez pas le bouton de réglage de la mouture de plus d’un cran à la fois afin d’éviter
d’endommager le moulin à café.
1 Placez une tasse sous la buse de distribution du café.
2 Ouvrez le couvercle du réservoir à grains.
3 Appuyez sur l’icône de l’espresso, puis appuyez sur le bouton marche/arrêt .
4 Lorsque le moulin commence à moudre, enfoncez le bouton de réglage de la mouture et tournez-
le vers la gauche ou la droite. (Fig. 17)
Désactivation des signaux sonores du panneau de commande
1 Appuyez sur le bouton marche/arrêt pour éteindre la machine.
Page 33

Français
2 Si la machine à café est éteinte, touchez l’icône du café (icône espresso lungo pour EP3221) et
maintenez-la enfoncée jusqu’à ce que le voyant de l’icône s’allume. Le voyant de marche
commence à clignoter.
3 Touchez l’icône du café à nouveau pour désactiver les signaux sonores du panneau de commande.
Le voyant de l’icône du café s’éteint.
4 Appuyez sur le bouton marche/arrêt pour valider votre choix.
5 Remettez l’appareil en marche en appuyant sur le bouton marche/arrêt. Les signaux sonores du
panneau de commande sont désormais désactivés.
Remarque: Si le voyant de l’icône du café ne s’allume pas lorsque vous touchez l’icône et la
maintenez enfoncée, cela signifie que les signaux sonores du panneau de commande sont déjà
désactivés. Pour les réactiver, touchez de nouveau l’icône, puis confirmez votre choix en appuyant sur
le bouton marche/arrêt.
Les signaux sonores du bouton activer/désactiver et du bouton marche/arrêt ne peuvent pas être
désactivés.
101
Retrait et insertion du groupe de percolation
Consultez le site www.philips.com/coffee-care pour obtenir des instructions vidéo détaillées sur le
retrait, l'insertion et le nettoyage du groupe de percolation.
Retrait du groupe de percolation de la machine
1 Éteignez la machine.
2 Retirez le réservoir d’eau et ouvrez la porte de service (Fig. 18).
3 Appuyez sur la manette PUSH (Fig. 19) et tirez le groupe de percolation pour l’enlever de la
machine (Fig. 20).
Français
Réinsertion du groupe de percolation
Avant de faire glisser le groupe de percolation dans la machine, vérifiez qu’il est dans la bonne
position.
1 Assurez-vous que le groupe de percolation est positionné correctement. La flèche située sur le
cylindre jaune sur le côté du groupe de percolation doit être alignée sur la flèche noire et N (Fig. 21).
-
Si ce n’est pas le cas, poussez le levier vers le bas jusqu’à ce qu’il touche la base du groupe de
percolation (Fig. 22).
2 Replacez le groupe de percolation dans la machine en le faisant glisser le long des rainures
latérales (Fig. 23) de guidage jusqu’à ce qu’il soit enclenché (Fig. 24). N’appuyez pas sur le bouton
PUSH.
3 Fermez la porte d’accès et replacez le réservoir d’eau.
Nettoyage et entretien
Un nettoyage et un entretien réguliers optimisent le fonctionnement de votre machine, préservent le
bon goût du café pendant longtemps et assurent un débit du café stable.
Consultez le tableau ci-dessous pour savoir quand et comment nettoyer toutes les parties
détachables de la machine. Vous trouverez plus d'informations détaillées et des instructions vidéo sur
Page 34

102
Français
www.philips.com/coffee-care. Reportez-vous à la figureD pour savoir quelles pièces peuvent être
nettoyées au lave-vaisselle.
Pièces
Quand nettoyer Comment nettoyer
amovibles
Groupe de
percolation
Toutes les semaines Retirez le groupe café de la machine (voir 'Retrait
et insertion du groupe de percolation'). Rincez-le
sous le robinet (voir 'Nettoyage du groupe de
percolation sous l'eau').
Tous les mois Nettoyez le groupe de percolation à l’aide de la
Mousseur à
laitclassique
Compartiment à
café prémoulu
Bac à marc de
café
Plateau égouttoir Videz le plateau égouttoir
Après chaque utilisation Tout d’abord, versez l’eau chaude avec le
Vérifiez le compartiment du
café prémoulu toutes les
semaines pour voir s’il est
obstrué.
Videz le bac à marc de café
lorsque la machine le
demande. Nettoyez-le une
fois par semaine.
tous les jours ou dès que le
voyant rouge «Plateau
égouttoir plein» s’allume à
travers le couvercle du
plateau égouttoir (Fig. 26).
Nettoyez le plateau
égouttoir une fois par
semaine.
tablette (voir 'Nettoyage du groupe de
percolation à l'aide de tablettes de dégraissage
pour café') de dégraissage pour café Philips.
mousseur à lait fixé à la machine pour un
nettoyage en profondeur. Ensuite, retirez le
mousseur à lait de l’appareil et démontez-le.
Nettoyez toutes les pièces sous le robinet ou
passez-les au lave-vaisselle.
Débranchez la machine et retirez le groupe de
percolation. Ouvrez le couvercle du
compartiment à café prémoulu et insérez-y le
manche d’une cuillère. Agitez le manche de haut
en bas pour faire tomber (Fig. 25) le bouchon de
café moulu. Visitez: www.philips.com/coffee-
care. pour des instructions vidéo détaillées.
Retirez le bac à marc de café lorsque l’appareil
est allumé. Rincez-le sous le robinet avec du
liquide vaisselle ou nettoyez-le dans le lavevaisselle. Le panneau avant du bac à marc de
café ne résiste pas au lave-vaisselle.
Retirez le plateau égouttoir (Fig. 27) et nettoyezle sous le robinet avec un peu de liquide
vaisselle. Vous pouvez également passer le
plateau égouttoir au lave-vaisselle. Le panneau
avant du bac à marc de café (fig. A15) ne résiste
pas au lave-vaisselle.
LatteGo Après chaque utilisation Rincez LatteGo sous le robinet ou passez-le au
Lubrification du
groupe de
percolation
Réservoir d’eau Toutes les semaines Rincez le réservoir d’eau sous le robinet
Tous les deuxmois Consultez le tableau de lubrification et lubrifiez le
lave-vaisselle.
groupe de percolation avec la graisse Philips (voir
'Lubrification du groupe de percolation').
Page 35

Français
Nettoyage du groupe de percolation
Un nettoyage régulier du groupe de percolation empêche les résidus de café d'obstruer les circuits
internes. Visitez www.philips.com/coffee-care pour visionner des vidéos d'assistance pour le retrait,
l'insertion et le nettoyage du groupe de percolation.
Nettoyage du groupe de percolation sous l'eau
1 Retirez le groupe (voir 'Retrait et insertion du groupe de percolation') de percolation.
2 Rincez soigneusement le groupe de percolation avec de l’eau. Nettoyez soigneusement le filtre
(Fig. 28) supérieur du groupe de percolation.
3 Laissez le groupe de percolation sécher à l’air libre avant de le remettre en place. Évitez de sécher
le groupe de percolation avec un chiffon, afin d’empêcher que des fibres ne tombent dedans.
Nettoyage du groupe de percolation à l'aide de tablettes de dégraissage pour
café
Utilisez uniquement des tablettes de dégraissage pour café Philips.
1 Placez une tasse sous la buse de distribution du café. Remplissez le réservoir d’eau claire.
2 Placez une tablette de dégraissage pour café dans le compartiment du café prémoulu.
3 Appuyez sur l’icône du café, puis appuyez sur l’icône de l’intensité d’arôme pendant 3secondes
pour sélectionner la fonction de mouture du café (Fig. 2).
4 N’ajoutez pas de café prémoulu. Appuyez sur le bouton marche/arrêt
de préparation. Lorsque la moitié d’une tasse a été préparée, débranchez la machine.
5 Laissez agir la solution de dégraissage pour café pendant au moins 15minutes.
6 Rebranchez la fiche secteur sur une prise murale et allumez la machine pour achever le cycle de
préparation du café. Videz la tasse.
7 Retirez le réservoir d’eau et ouvrez la porte de service. Retirez le groupe de percolation (voir
'Retrait du groupe de percolation de la machine') et rincez-le soigneusement sous l’eau du robinet.
8 Réinsérez le groupe de percolation et le réservoir d’eau et placez une tasse sous la buse de
distribution de café.
9 Appuyez sur l’icône du café, puis appuyez sur l’icône de l’intensité d’arôme pendant 3secondes
pour sélectionner la fonction de mouture du café (Fig. 2). N’ajoutez pas de café prémoulu. Appuyez
sur le bouton marche/arrêt pour commencer le cycle de préparation. Répétez à deuxième fois.
Videz la tasse.
pour commencer le cycle
103
Français
Lubrification du groupe de percolation
Lubrifiez régulièrement le groupe de percolation tous les 2mois, afin que ses pièces en mouvement
puissent continuer à bouger correctement.
1 Appliquez une fine couche de graisse sur le piston (partie grise) du groupe de percolation (Fig. 29).
2 Appliquez une fine couche de graisse autour de l’axe (partie grise) dans le fond du groupe de
percolation (Fig. 30).
3 Appliquez une fine couche de graisse sur les rails des deux côtés (Fig. 31).
Nettoyage de LatteGo (récipient à lait)
Nettoyage de LatteGo après chaque utilisation
1 Retirez LatteGo de la machine (Fig. 32).
2 Versez le lait restant.
3 Appuyez sur le bouton de déverrouillage et retirez le réservoir de lait du cadre de LatteGo (Fig. 33).
4 Nettoyez toutes les pièces dans le lave-vaisselle ou sous le robinet à l’eau tiède avec du liquide
vaisselle.
Page 36

104
Français
Nettoyage du mousseur à lait classique
Nettoyage du mousseur à lait classique après chaque utilisation.
Nettoyez le mousseur à lait chaque fois que vous l’utilisez pour des raisons d’hygiène et pour éviter
l’accumulation de résidus de lait.
1 Placez une tasse sous le mousseur à lait.
2 Appuyez sur l’icône de la vapeur, puis appuyez sur le bouton marche/arrêt pour commencer à
verser la vapeur et pour enlever le lait éventuellement encore présent dans le mousseur à lait.
3 Pour arrêter de verser de la vapeur après quelques secondes, appuyez de nouveau sur le bouton
marche/arrêt .
4 Nettoyez le mousseur à lait avec un chiffon humide.
Nettoyage quotidien du mousseur à lait classique
1 Laissez complètement refroidir le mousseur à lait.
2 Inclinez le mousseur à lait vers la gauche (Fig. 34) et retirez la partie métallique et la partie (Fig. 35)
en silicone.
3 Désassemblez les deux pièces (Fig. 36) et rincez-les à l’eau fraîche ou passez-les au lave-vaisselle.
4 Réassemblez les deuxparties du mousseur à lait et fixez de nouveau le mousseur à lait sur la
machine.
Filtre à eau AquaClean
Votre machine à café est équipée de la technologie AquaClean. Vous pouvez placer le filtre à eau
AquaClean dans le réservoir d’eau pour préserver la saveur du café. Cela permet également de
recourir moins souvent au détartrage, car les dépôts de calcaire dans votre machine s’en trouvent
réduits. Vous pouvez acheter un filtre à eau AquaClean chez votre revendeur local, dans les centres
de service agréés ou en ligne sur le site www.philips.com/parts-and-accessories.
Icône et voyant AquaClean
Votre machine est équipée d’un voyant de filtre à eau AquaClean (Fig. 37) indiquant l’état du filtre.
Utilisez le tableau ci-dessous pour voir les actions requises lorsque le voyant est allumé ou lorsqu’il
clignote.
Lorsque vous utilisez la machine pour la première fois, le voyant AquaClean
commence à clignoter en orange. Cela signifie que vous pouvez commencer à
utiliser le filtre à eau AquaClean. Si vous n’activez pas un filtre à eau AquaClean, le
voyant s’éteint automatiquement après un certain temps.
Une fois que vous avez installé le filtre et que vous l’avez activé avec l’icône
AquaClean, le voyant AquaClean s’allume en bleu pour confirmer que le filtre à eau
AquaClean est actif.
Lorsque le filtre est usagé, le voyant AquaClean se met à clignoter en orange pour
vous rappeler de remplacer le filtre.
Lorsque le voyant orange d’AquaClean est éteint, vous pouvez encore activer un
filtre AquaClean, mais il faudra d’abord détartrer la machine.
Page 37

Français
105
Activation du filtre à eau AquaClean (5min.)
La machine ne détecte pas automatiquement qu’un filtre a été placé dans le réservoir d’eau. Il faut
donc activer chaque nouveau filtre à eau AquaClean que vous installez avec l’icône AquaClean.
Lorsque le voyant AquaClean orange est éteint, vous pouvez encore activer un filtre à eau AquaClean,
mais il faudra d’abord détartrer la machine.
Avant que vous puissiez commencer à utiliser le filtre à eau AquaClean, votre machine doit être
totalement exempte de calcaire.
Avant d’activer le filtre à eau AquaClean, il convient de le préparer en le trempant dans de l’eau, tel
qu’indiqué ci-dessous. Si vous omettez cette opération, de l’air risque d’être aspiré dans la machine à
café au lieu de l’eau, provoquant un bruit soutenu et empêchant la machine de préparer du café.
1 Secouez la cartouche pendant environ 5secondes (Fig. 38).
2 Plongez le filtre à l’envers dans un pichet d’eau froide, secouez-le et maintenez-le quelque peu
dans l’eau jusqu’à ce qu’aucune bulle d’air ne sorte plus (Fig. 39).
3 Le filtre est à présent prêt pour être utilisé et peut être inséré dans le réservoir d’eau.
4 Insérez le filtre verticalement dans le raccordement du filtre dans le réservoir d’eau. Appuyez
dessus jusqu’au point le plus bas possible (Fig. 40).
5 Remplissez le réservoir d’eau fraîche et remettez-le dans l’appareil.
6 S’il est attaché, retirez le LatteGo.
7 Placez un bol sous la buse de distribution d’eau chaude/le mousseur à lait.
8 Appuyez sur l'icône AquaClean pendant 3 secondes (Fig. 41). Le voyant de marche se met à
clignoter.
9 Appuyez sur le bouton marche/arrêt
10 L’eau chaude sera versée depuis la buse de distribution d’eau chaude/le mousseur à lait (3min.).
11 Lorsque l’activation est terminée, le voyant AquaClean bleu s’allume pour confirmer que le filtre à
eau AquaClean a été activé correctement.
pour commencer la procédure d’activation.
Français
Remplacement du filtre à eau AquaClean (5min.)
Après que 95litres d’eau se sont écoulés à travers le filtre, le filtre cessera de fonctionner. Le voyant
AquaClean s’allume en orange et se met à clignoter pour vous rappeler de remplacer le filtre. Tant
qu’il clignote, vous pouvez remplacer le filtre sans devoir d’abord détartrer la machine à café. Si vous
ne remplacez pas le filtre à eau AquaClean, le voyant orange finit par s’éteindre. Dans ce cas, vous
pouvez toujours remplacer le filtre, mais vous devez d’abord détartrer la machine à café.
Lorsque le voyant orange d’AquaClean clignote:
1 Retirez l’ancien filtre à eau AquaClean.
2 Installez un nouveau filtre et activez-le tel que décrit au chapitre «Activation du filtre à eau
AquaClean (5min.)».
Veuillez remplacer le filtre à eau AquaClean au minimum tous les 3mois, même si la machine
n’indique pas encore que c’est nécessaire.
Désactivation du rappel AquaClean
Si vous ne souhaitez plus utiliser de filtres à eau AquaClean Philips, vous pouvez toujours désactiver
les rappels AquaClean:
1 Appuyez sur le bouton marche/arrêt pour éteindre la machine.
2 Si la machine à café est éteinte, appuyez sur l’icône AquaClean et maintenez-la enfoncée jusqu’à
ce que le voyant de cette icône s’allume. Le voyant de marche commence à clignoter.
Page 38

106
Français
3 Touchez l’icône AquaClean de nouveau pour désactiver les rappels. Le voyant de l’icône
AquaClean s’éteint.
4 Appuyez sur le bouton marche/arrêt pour valider votre choix.
5 Remettez l’appareil en marche en appuyant sur le bouton marche/arrêt. Les rappels AquaClean
sont maintenant désactivés.
Remarque: L’activation d’un nouveau filtre AquaClean réactivera automatiquement les rappels
AquaClean.
Réglage de la dureté de l’eau
Il est conseillé de régler la dureté de l’eau en fonction de la dureté de l’eau dans votre région pour
des performances optimales et une durée de vie accrue de la machine. Cela vous évite également de
devoir détartrer la machine trop souvent. Le réglage par défaut de la dureté de l’eau est 4: eau
calcaire.
Utilisez la bandelette de test de dureté de l’eau fournie dans la boîte pour
déterminer la dureté de l’eau dans votre région:
1 Immergez la bandelette de test de dureté de l’eau dans l’eau du robinet ou maintenez-la sous le
robinet pendant 1seconde (Fig. 42).
2 Attendez une minute. Le nombre de carrés sur la bandelette de test qui rougissent indique la
dureté de l’eau (Fig. 43).
Réglez la machine sur la dureté de l’eau adéquate:
1 Appuyez sur le bouton marche/arrêt pour éteindre la machine.
2 Si la machine à café est éteinte, appuyez et maintenez l’icône de l’intensité d’arôme jusqu’à ce que
tous les voyants de l’icône s’allument (Fig. 2).
3 Appuyez sur l’icône de l’intensité d’arôme 1, 2, 3 ou 4fois. Le nombre de voyants allumés ou censés
l’être doit être identique au nombre de carrés rouges sur la bande de test (Fig. 44). Lorsqu’il n’y a
aucun carré rouge sur la bandelette de test (si tous les carrés sont verts) sélectionnez 1voyant.
4 Lorsque vous avez défini la dureté de l’eau adéquate, appuyez sur le bouton marche/arrêt .
5 Appuyez sur l’icône de marche/arrêt pour allumer la machine.
Dans la mesure où vous réglez la dureté de l’eau une seule fois, la fonctionde l’intensité d’arôme
est utilisée pour sélectionner la dureté de l’eau. Cela n’affecte pas l’intensité d’arôme des boissons
que vous préparez par la suite.
Procédure de détartrage (30 min.)
N’utilisez que du détartrant Philips. N’utilisez jamais un détartrant à base d’acide sulfurique, d’acide
chlorhydrique, d’acide sulfamique ou d’acide acétique (vinaigre), car cela risque d’endommager le
circuit d’eau de votre machine et de ne pas dissoudre le calcaire correctement. La non-utilisation d’un
détartrant Philips annule votre garantie. Ne pas détartrer l’appareil annule également votre garantie.
Vous pouvez acheter la solution de détartrage Philips dans la boutique en ligne sur
www.philips.com/coffee-care.
Lorsque le voyant Calc/Clean se met à clignoter lentement, vous devez détartrer la machine à café.
1 S’il est attaché, retirez LatteGo ou le mousseur à lait.
2 Retirez le plateau égouttoir et le bac à marc de café, videz-les et replacez-les dans la machine.
3 Enlevez le réservoir d’eau et videz-le. Retirez ensuite le filtre à eau AquaClean.
Page 39

Français
4 Versez le contenu d’une bouteille complète de solution de détartrage Philips dans le réservoir
d’eau, puis remplissez ce dernier d’eau jusqu’au niveau Calc/Clean (Fig. 45). Puis, replacez-le dans
la machine.
5 Placez un grand récipient (1,5l) sous la buse de distribution de café et sous la buse de distribution
d’eau.
6 Appuyez sur l'icône Calc / Clean pendant 3secondes, puis appuyez sur le bouton marche/arrêt.
7 La première phase de la procédure de détartrage commence. La procédure de détartrage dure
environ 30minutes et consiste en un cycle de détartrage et un cycle de rinçage. Pendant le cycle
de détartrage, le voyant Calc/Clean clignote pour indiquer que la phase de détartrage est en
cours.
8 Laissez la machine verser la solution de détartrage jusqu’à ce que l’écran vous rappelle que le
réservoir d’eau est vide.
9 Videz le réservoir d’eau, rincez-le et remplissez-le d’eau propre jusqu’au niveau Calc/Clean.
10 Videz le récipient et placez-le de nouveau sous la buse de distribution du café et la buse de
distribution d’eau. Appuyez de nouveau sur le bouton marche/arrêt .
11 La deuxième phase du cycle de détartrage, c’est-à-dire le rinçage, commence et dure trois
minutes. Au cours de cette phase les voyants du panneau de commande s’allument et s’éteignent
pour indiquer que la phase de rinçage est en cours.
12 Patientez jusqu’à ce que la machine arrête de verser l’eau. Le cycle de détartrage est terminé
lorsque la machine cesse de verser l’eau.
13 La machine à café recommencera à chauffer. Lorsque les voyants dans les icônes des boissons
restent allumés, la machine est de nouveau prête à l’emploi.
14 Installez et activez un nouveau filtre à eau AquaClean dans le réservoir à eau (voir 'Activation du
filtre à eau AquaClean (5min.)').
-
Lorsque la procédure de détartrage est terminée, le voyant AquaClean clignote pendant un
certain temps pour vous rappeler d’installer un nouveau filtre à eau AquaClean.
107
Français
Conseil: L'utilisation du filtre AquaClean réduit le besoin de détartrage!
Que faire si la procédure de détartrage est interrompue
Vous pouvez interrompre la procédure de détartrage en appuyant sur le bouton marche/arrêt du
panneau de commande. Si la procédure de détartrage s'interrompt avant son arrêt complet, procédez
comme suit:
1 Videz le réservoir d'eau et rincez-le soigneusement.
2 Remplissez le réservoir d’eau avec de l’eau fraîche jusqu’à l’indication Calc/Clean, puis remettez la
machine en marche. La machine chauffera et effectuera un cycle de rinçage automatique.
3 Avant de préparer des boissons, effectuez un cycle de rinçage manuel. Pour effectuer un cycle de
rinçage manuel, versez d’abord la moitié d’un réservoir d’eau chaude en touchant plusieurs fois
l’icône (Fig. 14), puis préparez deuxtasses de café prémoulu sans ajouter de café moulu.
Si la procédure de détartrage n’est pas allée jusqu’au bout, la machine nécessitera une nouvelle
procédure de détartrage dès que possible.
Commande d'accessoires
Veuillez utiliser uniquement les produits de maintenance Philips pour nettoyer et détartrer la
machine. Vous pouvez acheter ces produits chez votre revendeur local, dans les centres de service
agréés ou en ligne sur le site www.philips.com/parts-and-accessories. Pour trouver la liste complète
Page 40

108
Français
des pièces de rechange en ligne, entrez le numéro de modèle de votre machine à café. Vous trouverez
le numéro de modèle à l’intérieur de la porte d’accès.
Produits d’entretien et références:
-
Solution de détartrage CA6700
-
Filtre à eau AquaClean CA6903 (Fig. 46)
-
Graisse pour groupe de percolation HD5061
-
Tablettes de dégraissage pour café CA6704
Dépannage
Cette rubrique récapitule les problèmes les plus courants que vous pouvez rencontrer avec la
machine. Des vidéos d’assistance et la liste complète des questions fréquemment posées sont
disponibles sur le site www.philips.com/coffee-care. Si vous n’arrivez pas à résoudre le problème,
veuillez contacter le ServiceConsommateurs de votre pays. Vous trouverez ses coordonnées dans le
dépliant de garantie.
Icônes d’alerte
Icône
d’alerte
Solution
Le voyant «réservoir d’eau vide» est allumé
Le réservoir d’eau est presque vide. Remplissez le réservoir d’eau avec de l’eau
-
fraîche jusqu’à atteindre l'indication maximum.
Le réservoir d'eau n'est pas à sa place. Replacez le réservoir d’eau.
-
Le voyant «bac à marc de café vide» est allumé.
Le bac à marc de café est plein. Retirez et videz le bac à marc de café lorsque
-
l’appareil est allumé.
Le voyant d’alerte est allumé
Le bac à marc de café et/ou le plateau égouttoir n’est pas en place ou n’est pas
-
placé correctement. Remettez le bac à marc de café et/ou le plateau égouttoir
en place et assurez-vous qu’ils sont dans la bonne position.
Le portillon de l'appareil est ouvert. Retirez le réservoir d’eau et assurez-vous
-
que la porte d’accès est fermée.
Le voyant d’alerte clignote
Le groupe de percolation n’est pas en place ou n’est pas placé correctement.
-
Retirez le groupe de percolation et assurez-vous qu’il est correctement
enclenché. Reportez-vous au chapitre «Retrait et insertion du groupe de
percolation» pour obtenir des instructions par étapes.
Le groupe de percolation est bloqué. Enlevez le groupe de percolation et rincez-
-
le sous le robinet. Lubrifiez ensuite le groupe de percolation et remettez-le en
place dans la machine à café. Reportez-vous au chapitre «Nettoyage et
entretien» pour obtenir des instructions par étapes.
Le voyant d'alarme est allumé et le voyant de démarrage clignote.
Un peu d'air est bloqué à l'intérieur de la machine. Pour retirer l'air de la machine,
remplissez le réservoir d'eau avec de l'eau, placez une tasse sous le mousseur à lait
classique et appuyez sur le bouton marche/arrêt clignotant.
Attention : de petits jets d'eau chaude seront émis par le mousseur à lait classique
pour éliminer l'air.
Page 41

Français
109
Icône
d’alerte
Solution
Le voyant AquaClean clignote: placez ou remplacez le filtre à eau AquaClean et
activez-le. Reportez-vous au chapitre «Filtre à eau AquaClean» pour obtenir des
instructions par étapes.
Le voyant de détartrage clignote lentement: Détartrez la machine (voir 'Procédure
de détartrage (30min.)').
Les voyants des icônes de boisson s’allument et s’éteignent un par un.
La machine à café chauffe et/ou essaye d’éliminer l’air aspiré dans la machine.
Patientez jusqu’à ce que tous les voyants de la boisson s’allument de manière
continue.
Les voyants de toutes les icônes d’alerte clignotent.
Réinitialisez la machine en le débranchant et en la branchant de nouveau. Avant de
rallumer la machine, procédez comme suit:
Retirez le filtre AquaClean du réservoir d’eau.
-
Replacez le réservoir d’eau. Insérez-le dans la machine à café le plus loin
-
possible pour vous assurer qu'il est bien en position.
Ouvrez le couvercle du compartiment du café prémoulu et vérifiez s’il est bouché
-
avec de la poudre. Pour le nettoyer, insérez le manche d’une cuillère dans le
compartiment du café prémoulu et agitez le manche de haut en bas jusqu’à ce
que le café moulu tombe (Fig. 25). Retirez le groupe de percolation et retirez tout
le café moulu qui est tombé. Replacez le groupe de percolation propre.
Rallumez la machine.
-
Si le problème est résolu, le filtre AquaClean n'a pas été bien préparé. Préparez le
filtre AquaClean avant de le remettre en place en suivant les étapes1 et2du
chapitre «Activation du filtre à eau AquaClean (5min.)».
Si les voyants continuent de clignoter, la machine pourrait être en surchauffe.
Éteignez la machine et rallumez-la après 30minutes. Si les voyants continuent de
clignoter, contactez le ServiceConsommateursPhilips de votre pays. Vous trouverez
ses coordonnées dans le dépliant de garantie internationale.
Français
Tableau de dépannage
Cette rubrique récapitule les problèmes les plus courants que vous pouvez rencontrer avec la
machine. Des vidéos d’assistance et la liste complète des questions fréquemment posées sont
disponibles sur le site www.philips.com/coffee-care. Si vous n’arrivez pas à résoudre le problème,
veuillez contacter le ServiceConsommateurs de votre pays. Vous trouverez ses coordonnées dans le
dépliant de garantie.
Problème Cause Solution
Le plateau égouttoir se
remplit rapidement.
Ce phénomène est normal.
L’appareil utilise l’eau pour
rincer le circuit interne et le
groupe de percolation. De l’eau
coule dans le système interne
directement dans le plateau
égouttoir.
Videz le plateau égouttoir tous les jours
ou dès que le voyant rouge «Plateau
égouttoir plein» s’allume à travers le
couvercle du plateau égouttoir. Conseil:
placez une tasse sous la buse de
distribution pour recueillir l’eau de
rinçage qui s’en échappe.
Page 42

110
Français
Problème Cause Solution
Le voyant «bac à marc
de café vide» reste
allumé.
Vous avez vidé le bac à marc de
café alors que l’appareil était
éteint.
Videz toujours le bac à marc de café
lorsque l’appareil est allumé. Retirez le
bac à marc de café, attendez au moins
5secondes, puis réinsérez-le.
La machine invite à vider
le bac à marc de café
même si celui-ci n’est
pas plein.
Le bac à marc de café
est rempli au-delà de sa
capacité maximale et le
voyant «videz le bac à
marc de café» ne s’est
pas allumé.
Je ne peux pas retirer le
groupe de percolation.
Je ne peux pas insérer le
groupe de percolation.
La machine n’a pas réinitialisé le
compteur la dernière fois que
vous avez vidé le bac à marc de
café.
Vous avez retiré le plateau
égouttoir sans vider le bac à
marc.
Le groupe de percolation n’est
pas positionné correctement.
Le groupe de percolation n’est
pas positionné correctement.
Attendez toujours environ 5secondes
lorsque vous replacez le bac à marc de
café. Le compteur du cycle du café sera
ainsi remis à zéro.
Videz toujours le bac à marc de café
lorsque l’appareil est allumé. Si vous
videz le bac à marc de café alors que la
machine est éteinte, le compteur du
cycle du café ne se réinitialise pas.
Lorsque vous retirez le plateau
égouttoir, videz également le bac à
marc de café, même s’il ne contient que
très peu de doses de café. Le compteur
du cycle du café sera ainsi remis à zéro
et recommencera à compter
correctement les doses de café.
Réinitialisez la machine à café de la
manière suivante: fermez la porte
d’accès et replacez le réservoir d’eau.
Mettez l’appareil hors tension, puis
remettez-le en marche. Réessayez de
retirer le groupe de percolation.
Reportez-vous au chapitre «Retrait et
insertion du groupe de percolation»
pour obtenir des instructions par
étapes.
Réinitialisez la machine à café de la
manière suivante: fermez la porte
d’accès et replacez le réservoir d’eau.
Laissez le groupe de percolation à
l’extérieur. Mettez la machine hors
tension et débranchez-la. Patientez
pendant 30secondes, puis rebranchez
la machine et allumez-la. Puis,
positionnez correctement le groupe de
percolation et réinsérez-le dans la
machine. Reportez-vous au chapitre
«Retrait et insertion du groupe de
percolation» pour obtenir des
instructions par étapes.
Page 43

Problème Cause Solution
Le café est aqueux. Le groupe de percolation est
sale et doit être lubrifié.
Enlevez le groupe de percolation (voir
'Retrait du groupe de percolation de la
machine'), rincez-le sous le robinet et
laissez-le sécher. Ensuite, lubrifiez les
pièces en mouvement (voir
'Lubrification du groupe de
percolation').
Français
111
Le café n’est pas assez
chaud.
Le café ne s’écoule pas
ou s’écoule lentement.
L’appareil est en mode réglage
automatique. Cette procédure
démarre automatiquement
lorsque vous utilisez la machine
pour la première fois, lorsque
vous optez pour un autre type
de grains de café ou après une
longue période de nonutilisation de l’appareil.
Le réglage du moulin est défini
sur une mouture trop grosse.
La température sélectionnée
est trop basse.
Une tasse froide permet de
réduire la température de la
boisson.
L’ajout de lait réduit la
température de la boisson.
Le filtre à eau AquaClean n’a
pas été correctement préparé
pour l’installation.
Préparez d’abord 5tasses de café pour
permettre à la machine de mener à
terme la procédure de réglage
automatique.
Réglez le moulin sur une mouture plus
fine (numéro inférieur). Il faut préparer 2
ou 3boissons pour pouvoir goûter
pleinement la différence.
Réglez la température sur le niveau
maximum (voir 'Réglage de la
température du café').
Préchauffez les tasses en les rinçant à
l’eau chaude.
Que vous ajoutiez du lait chaud ou
froid, l’ajout de lait réduit toujours la
température du café. Préchauffez les
tasses en les rinçant à l’eau chaude.
Retirez le filtre à eau AquaClean, puis
essayez de nouveau de préparer un
café. Si cela fonctionne, assurez-vous
que le filtre à eau AquaClean a été
correctement préparé avant de le
remettre en place. Reportez-vous au
chapitre «Filtre à eau AquaClean» pour
obtenir des instructions par étapes.
Français
Lorsque l’appareil reste inutilisé
pendant une longue période, vous
devez préparer de nouveau le filtre à
eau AquaClean pour son utilisation,
puis le remettre en place. Reportezvous aux étapes1 à 3du chapitre
«Activation du filtre à eau AquaClean».
Page 44
112
Français
Problème Cause Solution
Le filtre à eau AquaClean est
obstrué.
Il convient de remplacer le filtre à eau
AquaClean tous les 3mois. Un filtre qui
date de plus de 3mois risque d’être
obstrué.
L’appareil moud le café,
mais le café ne sort pas.
Le réglage du moulin est défini
sur une mouture trop fine.
Le groupe de percolation est
sale.
La buse de distribution du café
est sale.
Le compartiment du café
prémoulu est obstrué
Du calcaire obstrue le circuit de
l’appareil.
Le compartiment du café
prémoulu est obstrué.
Réglez le moulin sur une mouture plus
grosse (numéro supérieur). Veuillez
noter que cela influera sur le goût du
café.
Enlevez le groupe de percolation et
rincez-le sous le robinet (voir
'Nettoyage du groupe de percolation
sous l'eau').
Nettoyez la buse de distribution du café
et ses trous avec un nettoyeur de
conduite ou une aiguille.
Débranchez la machine et retirez le
groupe de percolation. Ouvrez le
couvercle du compartiment à café
prémoulu et insérez-y le manche d’une
cuillère. Agitez le manche de haut en
bas pour faire tomber (Fig. 25) le
bouchon de café moulu.
Détartrez la machine à café avec le
détartrant Philips. Détartrez toujours la
machine si le voyant de détartrage
commence à clignoter.
Débranchez la machine et retirez le
groupe de percolation. Ouvrez le
couvercle du compartiment à café
prémoulu et insérez-y le manche d’une
cuillère. Agitez le manche de haut en
bas pour faire tomber (Fig. 25) le
bouchon de café moulu.
Le lait ne mousse pas. Machines avec LatteGo:
LatteGo est correctement
monté.
Machines avec LatteGo: le
réservoir de lait et/ou le cadre
du LatteGo sont sales.
Machines avec mousseur à lait
classique: le mousseur à lait est
sale.
Assurez-vous que le réservoir de lait est
correctement fixé sur le cadre de
LatteGo (entendre le «clic»).
Démontez LatteGo et rincez les
deuxparties sous le robinet ou
nettoyez-les dans le lave-vaisselle (voir
'Nettoyage de LatteGo après chaque
utilisation').
Nettoyez soigneusement le mousseur à
lait (voir 'Nettoyage du mousseur à lait
classique ').
Page 45

Problème Cause Solution
Le type de lait utilisé ne
convient pas pour produire de
la mousse.
Selon le type de lait, la quantité et la
qualité de la mousse seront différentes.
Nous avons testé les types de laits
suivants, qui ont produit une mousse
satisfaisante: du lait de vache demiécrémé ou entier et du lait sans lactose.
Français
113
Le lait s’échappe par le
fond du réservoir de lait
LatteGo.
La machine semble fuir. L’appareil utilise l’eau pour
Le cadre et le réservoir à lait ne
sont pas assemblés
correctement.
rincer le circuit interne et le
groupe de percolation. Cette
eau coule dans le système
interne directement dans le
plateau égouttoir. Ce
phénomène est normal.
Le plateau égouttoir est trop
plein et a débordé, ce qui
donne l’impression que la
machine fuit.
Le réservoir d’eau n’est pas
complètement inséré et l’air est
aspiré dans la machine.
Le groupe de percolation est
sale/obstrué.
La machine n’est pas placée sur
une surface horizontale.
Veuillez d’abord insérer la partie
supérieure du réservoir à lait sous le
crochet en haut du cadre. Ensuite,
remettez la partie inférieure du réservoir
à lait en place. Vous entendez un clic
lorsqu’il est verrouillé et correctement
en place.
Videz le plateau égouttoir tous les jours
ou dès que le voyant «Plateau
égouttoir plein» s’allume à travers le
couvercle du plateau égouttoir. Conseil:
Placez une tasse sous la buse de
distribution pour recueillir l’eau de
rinçage et réduire la quantité d’eau
dans le plateau égouttoir.
Videz le plateau égouttoir tous les jours
ou dès que le voyant «Plateau
égouttoir plein» s’allume à travers le
couvercle du plateau égouttoir.
Assurez-vous que le réservoir d’eau est
dans la bonne position: retirez puis
insérez de nouveau ce dernier en le
poussant aussi loin que possible.
Rincez le groupe de percolation.
Placez la machine sur une surface
horizontale afin que le plateau égouttoir
ne déborde pas et que le voyant
«plateau égouttoir plein» fonctionne
correctement.
Français
Je ne peux pas activer le
filtre à eau AquaClean et
la machine demande
d’effectuer un
détartrage.
Le réservoir d’eau n’est pas
complètement inséré et l’air est
aspiré dans la machine.
Le filtre n’a pas été installé ou
remplacé à temps quand le
voyant du filtre à eau
AquaClean a commencé à
clignoter. Cela signifie que votre
machine n’est pas entièrement
libre de calcaire.
Assurez-vous que le réservoir d’eau est
dans la bonne position: retirez puis
insérez de nouveau ce dernier en le
poussant aussi loin que possible.
Détartrez d’abord votre machine, puis
installez le filtre à eauAquaClean.
Page 46

114
Français
Problème Cause Solution
Ce nouveau filtre à eau
ne convient pas.
Vous essayez d’installer un
autre filtre que le filtre à eau
AquaClean.
Seul le filtre à eau AquaClean est
adapté à la machine.
La machine émet un
bruit fort.
L’anneau en caoutchouc sur le
filtre à eau AquaClean n’est pas
en place.
Il est normal que votre machine
fasse du bruit au cours de
l’utilisation.
Le filtre à eau AquaClean n’a
pas été préparé correctement
et l’air est maintenant aspiré
dans la machine.
Le réservoir d’eau n’est pas
complètement inséré et l’air est
aspiré dans la machine.
Replacez le joint en caoutchouc sur le
filtre à eau AquaClean.
Si la machine se met à produire un son
différent, nettoyez le groupe de
percolation et lubrifiez-le (voir
'Lubrification du groupe de
percolation').
Retirez le filtre à eau AquaClean du
réservoir d’eau et préparez-le
correctement pour l’utilisation avant de
le remettre en place. Reportez-vous au
chapitre «Filtre à eau AquaClean» pour
obtenir des instructions par étapes.
Assurez-vous que le réservoir d’eau est
dans la bonne position: retirez puis
insérez de nouveau ce dernier en le
poussant aussi loin que possible.
Caractéristiques techniques
Le fabricant se réserve le droit d’améliorer les spécifications techniques du produit. Toutes les
quantités prédéfinies sont approximatives.
Description
Dimensions (lxHxP) 246x372x433mm
Valeur
Poids 7 - 7.5kg
Longueur du câble électrique 1000mm
Réservoir d’eau 1,8litre, amovible
Capacité du réservoir à grains de café 275g
Capacité du bac à marc de café 12rondelles
Capacité de LatteGo (réservoir de lait) 250ml
Hauteur du bec verseur réglable 85-145 mm
Tension nominale - Puissance nominale Alimentation électrique
Reportez-vous à l'étiquette de données située à
l’intérieur de la porte d’accès (fig. A11)
Page 47
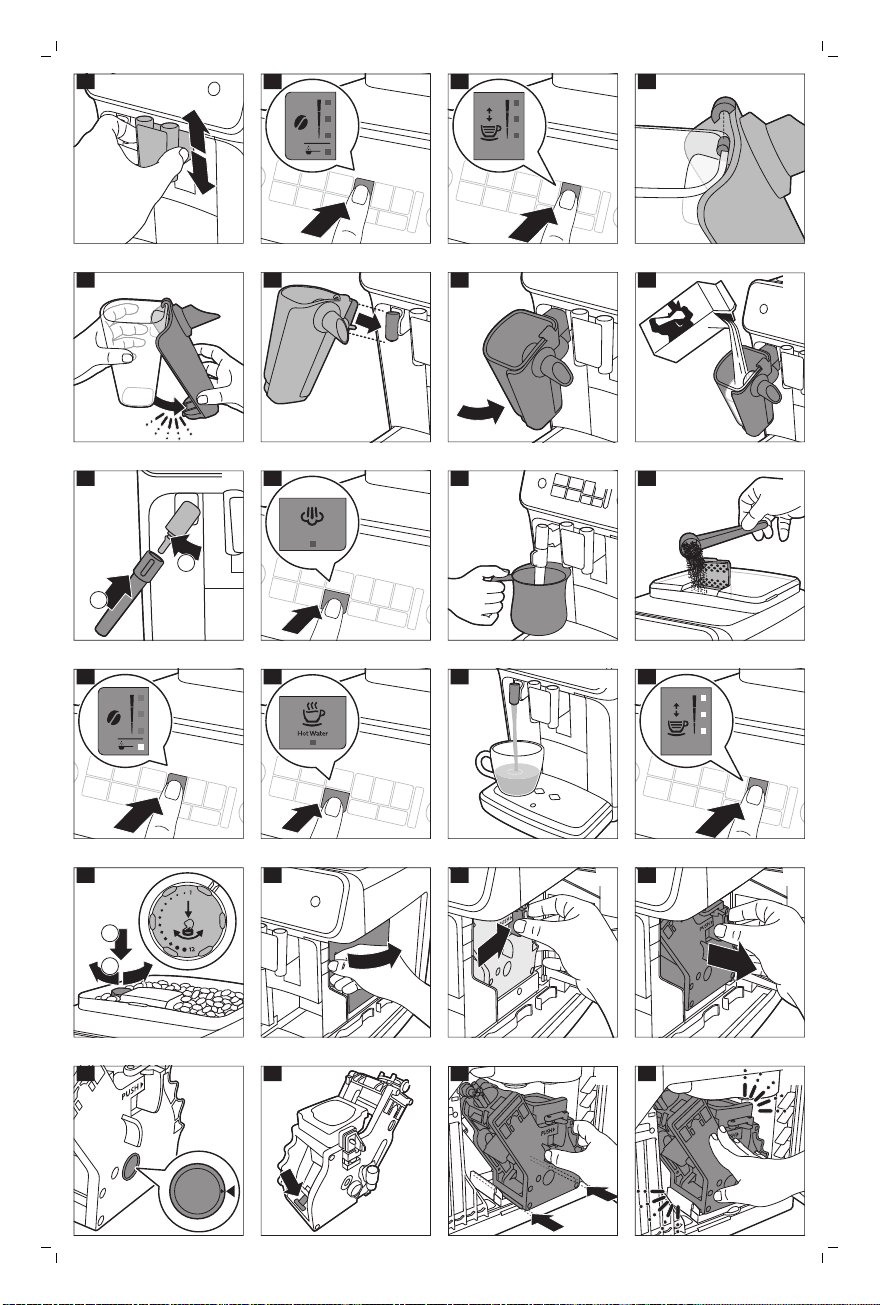
123
4
CLICK
567
8
1
2
9
Steam
10111213141516
1
2
171819
20
21
22
23
24
Page 48

25
262728
29
30
31
32
2
1
33
34
35
36
37
5 sec.
38
30 sec.
39
40
3 sec.
41
1 sec.
42
1 min.
43=44
12
45
Aqua Clean
46
 Loading...