

Page 1

Mode d’emploi
Page 2

Philips Consumer Eiectronics Company
Factory Service Center Locations
NOTE: If you reside in one of our Philips Factory Service Branch areas (see directory on back), you can contact the nearest Service Branch to
obtain efficient and expedient repair for your product. If your product is In-Warranty, you should have proof-of-purchase to ensure No Charge
Service. For Out-of-Warranty service, call the location nearest you.
NOTA: Si vous résidez dans une des régions desservies par une succursale de service après vente du fabricant Philips (voir liste ci-dessous), vous
pourrez contacter la branche de service après vente la plus près de chez vous pour obtenir un service après vente rapide et efficace. Si le produit
est sous garantie, il suffira de présenter une preuve d'achat pour bénéficier d'un service sans frais. Pour les produits non couverts par la garantie,
contactez le centre le plus près de chez vous.
NOTA: Si Ud. reside en una de nuestras zonas para sucursales Philips de servicio al de fábrica (ver directorio más abajo), Ud. puede comunicarse
con la sucursal de servicio más cercana para obtener una reparación oportuna y eficaz de su producto. Si su producto está todavía bajo garantía,
Ud. debe presentar comprobante de compra para no ocasionar ningunos cargos por servicio. Para servicio después del vencimiento de la
garantía, llame al lugar más cercano de los abajo indicados.
In Ganada
How you can obtain efficient and expedient carry-in, mail-in, or in-home service for your product
Please contact Philips at 1 -800-661 -6162 (French speaking)
1-800-363-7278 (English speaking)
Au Canada
Comment obtenir le service après-vente pour les produits apportés ou envoyés par la poste à notre centre de service ou le service à domicile
Veuillez contacter philips á: 1 -800-661 -6162 (Francophone)
1-800-363-7278
En el Canadá
Cómo recibir servicio efficiente para su producto, en persona, por correo o a domicilio
Favor de comunicarse con Philips al: 1-800-661-6162 (francófono)
1-800-363-7278 (anglòfono)
54
MAC2929 8/98
EL4482-3 Rev. Y
3135 015 07541
Page 3

Quality service is as close as your telephone! Simply look over the list below for the number of a Factory Service Center
NEAR YOU. Your product will receive efficient and expedient carry-in, mail-in, or in-home service, and you will receive peace of mind,
knowing your product is being given the expert ahention of Philips’ Factory Service. And, if the phone number listed for your area
IS LONG DISTANCE, CALL 1-800-242-9225 for Factory Service.
COMMENT OBTENIR NOTRE SERVICE APRÈS VENTE RAPICE ET EFFICACE SOIT PAR COURRIER, À OOMICILE, OU EN SE PRÉSENTANT À UN CENTRE DE SERVICE PHILIPS. PLUS DE 60B CENTRES DE
RÉCEPTION DE PRODUITS À RÉPARER À TRAVERS LE PAYS: CONTACTER LE CENTRE DE SERVICE AUX CONSOMMATEURS LE PLUS PROCHE POUR SAVOIR L’EMPLACEMENT DE CES DÉPÔTS DANS
CÖMO OBTENER UN SERVICIO OPORTUNO Y EFICIENTE POR CORREO. EN CASA O EN PERSONA PARA SU PRODUCTO A TRAVÉS DE UN CENTRO PHILIPS DE SERVICIO. MAS DE 600 SITIOS POR
TODO EL PAIS PARA U RECEPCION DE PRODUCTOS NECESITADOS DE REPARACIONES: COMUNICARSE CON EL CENTRO DE SERVICIO DE FABRICA MAS CERCANO PARA ESTOS LUGARES DENTRO
UN RAYON DE 50 À 75 MILES (80 KM À120 KM) DU CENTRE DE SERVICE LOCAL.
DE UN RADIO DE 80 A120 KM (50 A 75 MILLAS) DEL CENTRO DE SERVICIO LOCAL.
GEORGIA
Philips Factory Service of Georgia
200 N. Cobb Pkwy., Suite 120
Marietta, GA 30062
(770) 795-0085
FLORIDA
Philips Factory Service of Florida
1911 US Highway 301 North
Tampa, FL 33619
(813) 621-8181
WESTERN U.S.A.
Philips Factory Service Western Region
681 East Brokaw Rd.
San Jose, CA 95112
(408) 436-8566
NORTH CAROLINA
Philips Factory Service of N. Carolina
520 G Clanton Rd.
Charlotte, NC 28217
(704) 529-6330
TEXAS
Philips Factory Service of Texas
1110 N. Post Oak Rd., Suite 100
Houston, TX 77055
(713) 682-3990
CENTRAL U.S.A.
Philips Factory Service Central US
950 Keynote Circle
Brooklyn Heights, OH 44131
(216)741-3334
MICHIGAN
Philips Factory Service of Michigan
25173 Dequindre
Madison Heights, Ml 48071
(248) 544-2110
ILLINOIS
Philips Factory Service of Illinois
1360 W. Hamilton Pkwy.
Itasca, IL 60143
(630) 775-0990
TENNESSEE
Philips Factory Service of East Tennessee
6700 D Papermill Rd.
Knoxville, TN 37919
(423) 584-6614
MID-ATLANTIC
Philips Factory Service Mid-Atlantic
352 Dunks Ferry Rd.
Bensalem, PA 19020
(215) 638-7500
MAC2929 8/98
55
Page 4

Return your Warranty Registration card today to ensure you
receive all the benefits you’re entitled to.
Once your PHILIPS purchase is registered, you’re eligible to receive all the privileges of owning a
PHILIPS product. So complete and return the Warranty Registration Card enclosed with your pur
chase at once. And take advantage of these important benefits.
. Warranty i
Verification
Registering your produot vwthln
10 days confirms your right to
maximum proiecrion under the
terms and conditions of your
PHIURS warranty
Congratulations on your purchase,
and welcome to the “family!”
Dear PHILIPS product owner:
Thank you for your confidence in PHILIPS. You’ve selected one of the best-built, best-backed prod
ucts available today. And we’ll do everything in our power to keep you happy with your purchase
for many years to come.
As a member of the PHILIPS “family,” you’re entitled to protection by one of the most comprehensive
warranties and outstanding service networks in the industry.
What’s more, your purchase guarantees you’ll receive all the information and special offers for which
you qualify, plus easy access to accessories from our convenient home shopping network.
And most importantly you can count on our uncompromising commitment to your total satisfaction.
All of this is our way of saying welcome-and thanks for investing in a PHILIPS product.
Sincerely,
. Owner I
Confirmation
Your completed Warrant
Registration Card serves as
verification of ownershp In the
event of product theft or loss.
PHILIPS
.Modeii
Registration
Returrang your Warranty
Registration Card right away guar
antees you’!! receive all the inform^on and special offers which
you qualify for as the owner of your
model.
Robert Minkhorst
President and Chief Executive Officer
Know these
S&ÎQty symbols
WARNING
RISK OF ELECTRIC SHOCK
A
PHILIPS
DO NOT OPEN
RISQUE DE CHOC ELECTRIQUE NE
PAS OUVRIR
A
P.S. Remember, to get the most from your PHILIPS
product, you must return your
Warranty Registration Card within 10 days. So
please mail it to us right now!
This “bolt of lightning” indicates uninsulated material within your unit may cause an electrical
shock. For the safety of everyone in your household, please do not remove product covering.
/K The “exclamation poinf calls attention to features for which you should read the enclosed lit
erature closely to prevent operating and maintenance problems.
WARNING; TO PREVENT FIRE OR SHOCK HAZARD. DO NOT EXPOSE THIS EQUIPMENT
TO RAIN OR MOISTURE.
CAUTION: To prevent electric shock, match wide blade of plug to wide slot, and fully insert.
ATTENTION: Pour éviter les chocs électriques, introduire la lame la plus large de la fiche dans la
borne correspondante de la prise et pousser jusqu’au fond.
Visit our World Wide Web Site at http://www.philipsmagnavox.com
Page 5
SAFETY PRECAUTIONS
CAUTION: This Digital Video Disc Player employs a Laser System.
To ensure proper use of this product, please read this owner’s manual carefully and retain for future
reference. Should the unit require maintenance, contact an authorized service location - see service
procedure.
Use of controls, adjustments or the performance of procedures other than those specified herein may result
in hazardous radiation exposure.
To prevent direct exposure to laser beam, do not try to open the enclosure.
Visible laser radiation when open and interlocks defeated.
DO NOT STARE INTO BEAM.
FCC NOTICE: This equipment has been tested and found to comply with the limits for a Class B digital device,
pursuant to part 15 of the FCC Rules. These limits are designed to provide reasonable protection
against harmful interference in a residential installation.
This equipment generates, uses, and can radiate radio frequency energy and, if not installed and
used in accordance with the instructions, may cause harmful interference to radio communications.
However, there is no guarantee that interference will not occur in a particular installation.
If this equipment does cause harmful interference to radio or television reception, which can be
determined by turning the equipment off and on, the user is encouraged to try to correct the
interference by one or more of the following measures:
- Reorient or relocate the receiving antenna.
- Increase the separation between the equipment and receiver.
- Connect the equipment into an outlet on a circuit different from that to which the receiver is
connected.
- Consult the dealer or an experienced radio/TV technician for help.
WARNING: Changes or modifications made to this equipment, not expressly approved by Philips Consumer
Electronics Company, or parties authorized by Philips Consumer Electronics Company, could void
the user’s authority to operate the equipment.
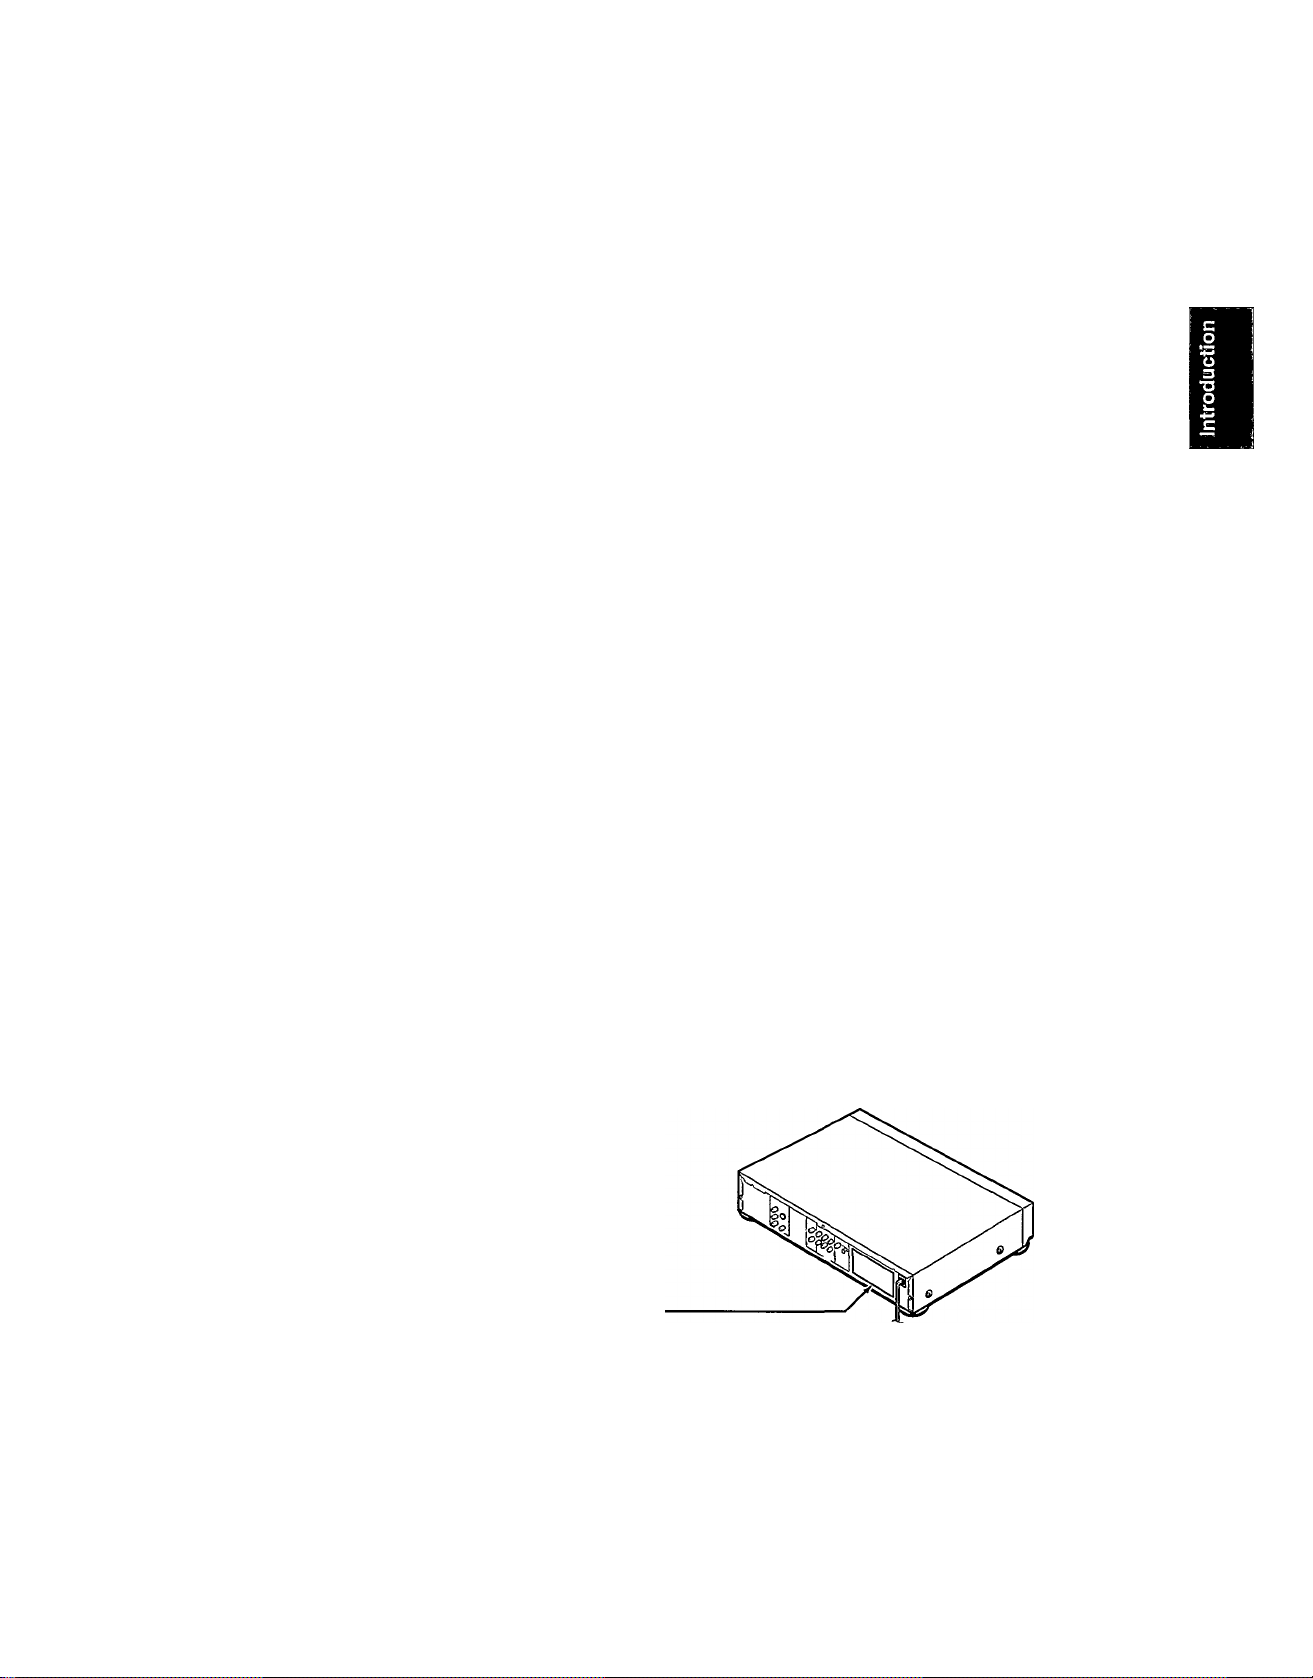
Location of the required label
PRODUCT IS CERTIFIED BY THE MANUFACTURER TO
COMPLY WITH DHHS RULES 21 CFR SUBCHAPTER J
APPLICABLE AT THE DATE OF MANUFACTURE.
MANUFACTURED
DISTRIBUTED BY:
PHILIPS CONSUMER ELECTRONICS CO.
P. 0. BOX 14810 KNOXVILLE, TN 37914 -1810
Page 6
IMPORTANT SAFETY INSTRUCTIONS
CAUTION: PLEASE READ AND OBSERVE ALL WARNINGS AND INSTRUCTIONS GIVEN IN THIS OWNER’S MANUAL AND
THOSE MARKED ON THE UNIT. RETAIN THIS BOOKLET FOR FUTURE REFERENCE.
This set has been designed and manufactured to assure personai safety, improper use can result in electric shock or fire hazard.
The safeguards incorporated in this unit will protect you if you observe the following procedures for installation, use and servicing.
This unit is fully transistorized and does not contain any parts that can be repaired by the user.
DO NOT REMOVE THE CABINET COVER, OR YOU MAY BE EXPOSED TO DANGEROUS VOLTAGE. REFER SERVICING TO
QUALIFIED SERVICE PERSONNEL ONLY.
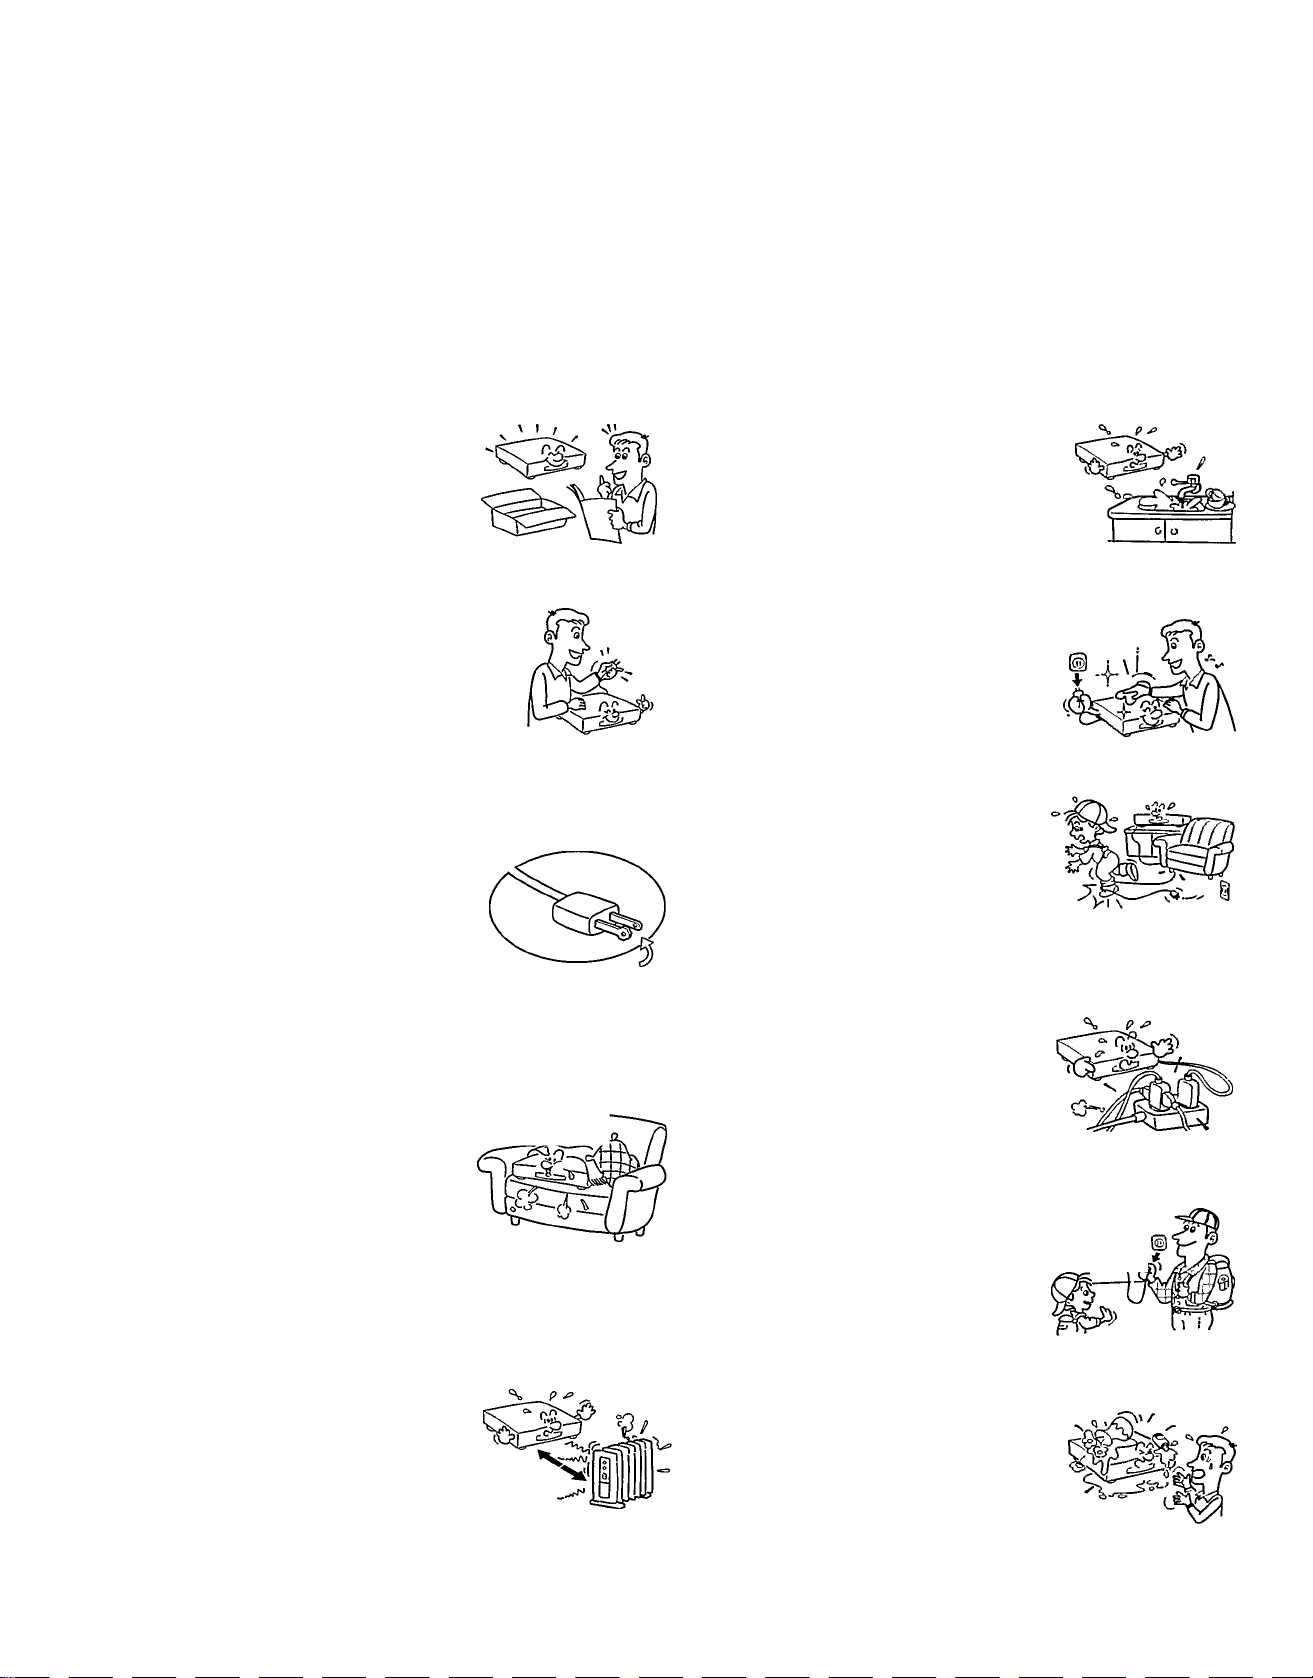
1. Read owner’s manual
After unpacking this product, read
the owner’s manual carefully, and
follow all the operating and other
instructions.
Power Sources
This product should be operated
only from the type of power source
indicated on the marking label. If
you are not sure of the type of power
supply to your home, consult your
product dealer or local power com
pany. For products intended to
operate from battery power, or other sources, refer to the
operating instructions.
Grounding or Polarization
This product may be equipped with
a polarized alternating current line
plug (a plug having one blade wider
than the other). This plug will fit into
the power outlet only one way. This
is a safety feature. Ifyou are unable
to insert the plug fully into the out
let, try reversing the plug. If the plug should still fail to fit,
contact your electrician to replace your obsolete outlet. Do
not defeat the safety purpose of the polarized plug.
4. Ventilation
Slots and openings in the cabinet
are provided for ventilation and to
ensure reliable operation of the
product and to protect it from over
heating. These openings must not
be blocked or covered. The open
ings should never be blocked by
placing the product on a bed. sofa,
rug or other similar surface. This product should not be
placed in a built-in installation such as a bookcase or rack
unless proper ventilation is provided or the manufacturer’s
instructions have been adhered to.
Water and Moisture
Do not use this product near water
- for example, near a bath tub, wash
bowl, kitchen sink, or laundry tub; in
a wet basement; or near a swim
ming pool and the like.
Cleaning
Unplug this product from the wall
outlet before cleaning. Do not use
liquid cleaners or aerosol cleaners.
Use a damp cloth for cleaning.
8. Power-Cord Protection
Power-supply cords should be
routed so that they are not likely to
be walked on or pinched by items
placed upon or against them, pay
ing particular attention to cords at
plugs, convenience receptacles,
and the point where they exit from
the product.
Overloading
Do not overload wall outlets, ex
tension cords, or integral
convenience receptacles as this
can result in a risk of fire or electric
shock.
10. Lightning
For added protection for this prod
uct during a storm, or when it is left
unattended and unused for long
periods of time, unplug it from the ' - ^ ■ P
wall outlet. This will prevent dam
age to the product due to lightning
and power-line surges.
5. Heat
The product should be situated
away from heat sources such as
radiators, heat registers, stoves,
or other products (including ampli
fiers) that produce heat.
11. Object and Liquid Entry
Never push objects of any kind into
this productthrough openings as they
may touch dangerous voltage
points or short-out parts that could
result in afire or electric shock. Never
spill liquid of any kind on the product.
Page 7

IMPORTANT SAFETY INSTRUCTIONS
12. Attachments
Do not use attachments not recommended by the product
manufacturer as they may cause hazards.
13. Accessories
Do not place this product on an
unstable cart, stand, tripod,
bracket, or table. The product may
fall, causing serious injury to a
child or adult, and serious dam
age to the product. Use only with
a cart, stand, tripod, bracket, or
table recommended by the manu
facturer, or sold with the product. Any mounting of the
product should follow the manufacturer’s instructions, and
should use a mounting accessory recommended by the
manufacturer.
A product and cart combination should be moved with care.
Quick stops, excessive force, and uneven surfaces may
cause the product and cart combination to overturn.
18. Damage Requiring Service
Unplug this product from the wall outlet and refer servicing to
qualified service personnel under the following conditions:
a) When the power-supply cord or plug is damaged.
b) If liquid has been spilled, or objects have fallen into the
product.
c) If the product has been exposed to rain or water.
d) If the product does not operate normally by following the
operating instructions. Adjust only those controls that
are covered by the operating instructions as an improper
adjustment of other controls may result in damage and
will often require extensive work by a qualified techni
cian to restore the product to its normal operation.
e) If the product has been dropped or damaged in any way.
f) When the product exhibits a distinct change in per
formance - this indicates a need for service.
19.Servicing
Do not attempt to service this prod
uct yourself as opening or removing
covers may expose you to danger
ous voltage or other hazards. Refer
all servicing to qualified service
personnel.
14. Disc T ray
Keep your fingers well clear of the
disc tray as it is closing. It may cause
serious personal injury.
15. Burden
Do not place a heavy object on the
product or step on it. The object may
fall, causing serious personal in
jury and serious damage to the
product.
16.Headphones
When you use headphones, keep
the volume at a moderate level. If
you use the headphones continu
ously at a high volume, it may cause
hearing damage.
20. Replacement Parts
When replacement parts are required, be sure the service
technician has used replacement parts specified by the
manufacturer or have the same characteristics as the origi
nal part. Unauthorized substitutions may result in fire, electric
shock, or other hazards.
21. Safety Check
Upon completion of any service or
repairs to this product, ask the ser
vice technician to perform safety
checks to determine that the prod
uct is in proper operating condition.
17. Disc
Do not use a cracked, deformed,
or repaired disc. These discs
are easily broken and may cause
serious personal injury and prod
uct malfunction.
Page 8

Introduction 3
Precautions
Notes on Handling
When shipping the DVD video piayer, the original shipping
carton and packing materials come in handy. For maximum
protection, repack the unit as it was originally packed at the
factory.
Do not use volatile liquids, such as insect spray, near the
DVD video player. Do not leave rubber or plastic products in
contact with the DVD video player for a long time. They will
leave marks on the cabinet.
The top and rear panels of the DVD video player may
become warm after a long period of use. This is not a
malfunction.
When the DVD video player is not in use, be sure to remove
the disc and turn off the power.
If you do not use the DVD video player for a long period, the
unit may not function properly in the future. Use the DVD
video player occasionally.
Notes on Location
When you place this DVD video player near a TV, radio, or
VCR, the playback picture may become poor and the sound
may be distorted. In this case, place the DVD video player
away from the TV, radio, or VCR.
Notes on Cleaning
Notes on Moisture Condensation
Moisture condensation damages the DVD video player. Please read the following carefully.
Moisture condensation occurs, for example, when you pour a
cold drink into a glass on a warm day. Drops of water form on
the outside of the glass. In the same way, moisture may
condense on the optical pick-up lens inside this unit, one of the
most crucial internal parts of the DVD video player.
Examples of moisture
Moisture condensation occurs during the following cases.
When you bring the DVD video player directly from a cold
place to a warm place.
When you use the DVD video player in a room where you
just turned on the heater, or a place where the cold wind from
the air conditioner directly hits the unit.
In summer, when you use the DVD video player in a hot and
humid place just after you move the unit from an air
conditioned room.
Use a soft, dry cloth for cleaning.
• For stubborn dirt, soak the cloth in a weak detergent solution,
wring the cloth well and wipe the unit. Use a dry cloth to wipe
it dry.
Do not use any type of solvent, such as thinner and benzine,
as they may damage the surface of the DVD video player.
• If you use a chemical saturated cloth to clean the unit, follow
that product’s instructions.
Do not use the DVD video player when moisture condensation may occur.
If you use the DVD video player in such a situation, it may
damage discs and internal parts. Remove the disc, connect
the power cord of the DVD video player to the wall outlet,
turn on the DVD video player, and leave it for two or three
hours. After two or three hours, the DVD video player will
have warmed up and evaporated any moisture. Keep the
DVD video player connected to the wall outlet and moisture
condensation will seldom occur.
Page 9

Introduction J
Table of Contents
^ Introduction
■ SAFETY PRECAUTIONS..........................................3
■ IMPORTANT SAFETY INSTRUCTIONS.............4. 5
■ Precautions
................................................................
^ Connections
Connecting to a TV.................................................12
Connecting to an Audio System and TV
with Color difference Inputs
....................................
^ Basic Playback
Playing a Disc
Basic Playback
Using the Shuttle Ring
Using the Jog Dial
Resuming Playback from the Same Location
...................................................
^ Advanced Playback
Playing From the Desired Location
Locating a Specific Location On the Disc
Playing Repeatedly................................................23
Repeating a Title, Chapter, orTrack
Repeating a Specific Segment
Playing in a Favorite Order...............................24,25
Setting Tities, Chapters, or Tracks in a Favorite Order
Playing in Random Order
Playing Titles in Random Order
Playing Chapter or Tracks in Random Order
......................................
Zooming a Picture..................................................27
Zooming a Picture
.......................
13
16-19
22
26
Identification of Controls
Front Panel / Rear Panel / DVD display
6
Remote Control
Preparing the Remote Control
Operating with the Remote Control
Connecting to Optional Equipment
Connecting to an Ampiifier Equipped With a Doiby Digital Decoder
Connecting to an Amplifier Equipped With 5.1 ch Audio Input
Connecting to an Amplifier Equipped With a Dolby Pro Logic Surround
Connecting to an Amplifier Equipped With a DTS Decoder
Connecting to an Amplifier Equipped With an MPEG2 Audio Decoder
Connecting to an Amplifier Equipped With a Digital Audio Input
................
..................
.8-11
14,15
Locating a Specific Title, Chapter, or Track.. 20, 21
Locating a Title Using the Title Menu
Locating a Title
Locating a Specific Chapter or Track Directly
Locating a Specific Chapter orTrack
Selecting the Camera Angle
Changing the Camera Angle
Selecting a Language
Selecting a Playback Audio Setting
Selecting Subtitles
Turning Subtitles On or Off
Selecting a Subtitle Language
.................................................
..................................
............................................
28
29
30
Using the On-Screen Display................................31
Checking the Operational Status
Checking the Remaining Time and Setting Status
^ Function Setup
Customizing the Settings.
Selecting a Setting Category
LANGUAGE Setting
PICTURE Setting
AUDIO Setting
DISPLAY Setting
OPERATION Setting
^ Others
Notes on Discs......................................................51
Before Calling Service Personnel..........................52
Specifications.........................................................53
. 32-47
Operating Other Equipment With the
Remote Control
Programming the Remote Control
Brand Code Table
Buttons to Operate
Table of Languages
Factory Service Center Locations
................................................
................................................
....................
48, 49
50
54, 55
Limited Warranty.....................................................56
Page 10

Introduction )
Identification of Controls
See the page in I ^ for details.
Front Panel / Rear Panel / DVD Display
Front Panel
Rear Panel
■ POWER ON / STANDBY indicator
— POWER ON / STANDBY button [T^
-------------------------
■ PHONES jack p|2^
REPEAT button [2^
DVD dispiay | 9 ^
BiTSTREAM/PCM OPTiCAL AUDiO OUT jack [t4^pi¥)
(Open/Ciose) button |16^
,
-----
PAUSE button [l7^
- PLAY button |17^
STOP button [T7^
PREVi (Previous) button [21 y
NEXT button [il^-
5.1 OH SURROUND AUDiO OUT jacks [Ts^
MiXED AUDiO OUT jacks [j^
SViDEO OUT jack
ViDEO OUT jack
Coior difference
ViDEO OUT jacks (Y/Cb/Cr)
BiTSTREAM/PCM COAXiAL AUDiO OUT jack
----------------
_ r»L
cesTEn
S,3W0CF£fl-
51CMSI.'J?fiOV*a
AUDIO OUTB
When connecting the opticai digitai
cabie, remove the cap and fit the
connector into the jack firmiy.
When not using the jack, keep the
cap inserted to protect it from dust M
intrusion.
er PCM
r^'
Power cord
Power plug
8
Page 11

DVD Display
Pressing of the FL-DIM button on the remote Normal
control changes the brightness of the display. Q j A
__________
Dimmed
Off
VIDEO CD/Audio CD indicator ■
Operating status indicator
-------
Titie number indicator
TITLE
o o
LI LI
CHP/TRACK
o o o
LI LI LI
► li
CD TOTAL REMAIN
0-0 0-0 p
LI-LI LI-LI O
Chapter/track number indicator
DVD indicator
---------------------
Totai piaying time/remaining time/elapsed time indicators
The indicators vary depending on the kinds of discs you piay.
MEMORY] I
(REPEAT! A-
■ MEMORY indicator
-SHUFFLE indicator
-------
PBC indicator
-B allIISi
-Angle icon indicator
Repeat playback mode indicators
Other indicators
When playing the
same titie, chapter or
track repeatedly. ||3>
When playback is
►’ll paused.
During random
playback. (26)
When playing a
specific segment
IfigPBfflA-B repeatedly. (A-B
------------------
memorvi
repeat) ¡23)
During memory
piayback.
IREPEATI
When playing the entire
disc repeatediy. [23^
ALL
When the camera angie
can be changed. |28)
a
Page 12

Introduction J
Identification of Controls (continued)
The instructions in this manual describe the functions on the remote control. See the page number inside the I ^ for
details.
Remote Control
Page 13

Preparing the Remote Control
Operating with the Remote Control
Insert the batteries into the remote control so you can use it to
operate the DVD video player.
Make sure to match the + and - on the
batteries to the marks inside the battery
compartment.
This section shows you how to use the remote control.
Point the remote control at the
remote sensor on the DVD video
player and press the buttons.
Within about 20 feet
Distance: Within about 20 feet from the front
of the remote sensor
Angle: Within about 30° in each direction
of the front of the remote sensor
* Do not expose the remote sensor of the
DVD video player to a strong light source
such as direct suniight or illumination. If you
do so, you may not be able to operate the
DVD video player with the remote control.
Close the cover.
i
Notes o№tteries
Improper use of batteries may cause battery leakage and corrosion. To
operate the remote control correctly, follow the instructions below.
• Do not insert batteries into the remote control in the wrong direction.
• Do not charge, heat, open, or short-circuit the batteries. Do not throw
batteries into a fire.
• Do not leave dead or exhausted batteries in the remote control.
• Do not use different types of batteries together, or mix old and new
batteries.
• If you do not use the remote control for a long period of time, remove
the batteries to avoid possible damage from battery corrosion.
• If the remote control does not function correctly or if the operating
range becomes reduced, replace all batteries with new ones.
• If battery leakage occurs, wipe the battery liquid from the battery
compartment, then insert new batteries.
Notes on
Direct the remote control at the remote sensor of the DVD video
player.
' Do not drop or give the remote control a shock.
' Do not leave the remote control near an extremely hot or humid place.
' Do not spill water or put anything wet on the remote control.
' Do not open the remote control.
Built-in Locator of the Remote Control
m 'fMS
* •
The remote control lets you know its location by beeping
each time the main power is turned on.
1 Press the POWER ON / STANDBY button on the front
panel of the DVD video player to turn the DVD video
player on.
The remote control beeps so that you can easily locate it.
The remote control should be within about 20 feet from
the DVD video player, not being obstructed.
2 To turn off the beep, press any button on the remote
control.
• Re-execution requires an interval of about thirty seconds.
• The built-in iocator may not work depending on the
condition, (ex. obstructions, direction of the remote control,
etc.)
Page 14

Connections J For details of output sound, see .
Connecting to a TV
Connect the DVD video player to your TV.
Connecting to a TV
Selecting the output sound
From the on-screen displays, set the “Audio Out Select” to “Analog 2ch.”
To wall outlet
^Notes^
' Refer to the owner’s manual of the connected TV as well.
' When you connect the DVD video player to your TV, be sure to turn off the power and unplug both units from the wall outlet before
making any connections.
’ If your television set has one audio input jack, use a Y cable adapter (not supplied) to connect to your TV.
■ Connect the DVD video player directly to your TV. If you connect the DVD video player to a VCR, TVA/CR combination or video selector,
the playback picture may be distorted as DVD video discs are copy protected.
Connecting headphones
Connect headphones to the PHONES jack on the front panel
using a stereo plug.
Before connecting, temporarily turn down the volume with
the LEVEL volume control. Readjust to your preference
when playback begins.
12
manual for details.
Page 15

Connections J For details of output sound, see |||>.
Connecting to an Audio System and TV with
Coior Difference inputs
You can listen to the sound of discs in stereo and enjoy the enhanced picture quality of discs on a TV equipped with
color difference inputs.
Connecting to an Audio System and TV with Color Difference Inputs
Selecting the output sound
From the on-screen displays, set the “Audio Out Seiecf to “Anaiog 2ch.”
To wall outlet
difference video inputs
Color difference outputs/inputs
Some TVs or monitors are equipped with color difference inputs. Connecting to these inputs aiiows you to enjoy higher
quaiity picture piayback.
Actual labels for color difference inputs may vary depending on the TV manufacturer, (ex. Y, R-Y, B-Y or “Component
video”)
In some TVs or monitors, the color levels of the playback picture may be reduced slightly or the tint may change. In such a
case, adjust the TV or monitor for optimum performance.
i<5
• Refer to the owner’s manual of the connected equipment (TV, audio system) as well.
• When you connect the DVD video player to other equipment, be sure to turn off the power and unplug all of the equipment from the wall
outlet before making any connections.
• If you place the DVD video player near a tuner or radio, the radio broadcast sound might be distorted. In this case, piace the DVD video
piayer away from the tuner and radio.
• The output sound of the DVD video player has a wide dynamic range. Be sure to adjust the receiver’s volume to a moderate listening
level. Othen/vise, the speakers may be damaged by a sudden high voiume sound.
• Turn off the amplifier before you connect or disconnect the DVD video piayer’s power cord. If you leave the amplifier power on, the
speakers may be damaged.
13
Page 16

Connections J For details of output sound, see (29^.
Connecting to Optional Equipment
You can enjoy high quality dynamic sounds by connecting the DVD
video player to optional audio equipment.
For connection to your TV, see pages 12 and 13.
Select the connection type depending on your audio equipment.
Connecting to an Amplifier Equipped With a Dolby Digital Decoder
■ : Front speakp
□ : Rear speaker
ni : Sub woofer
0 : Center speaker
t=> : Signal flow
Dolby Digital
Dolby Digital is the surround sound technology used in theaters showing the latest movies, and Is
now available to reproduce this realistic effect in the home. You can enjoy motion picture and live
concert DVD video discs with this dynamic realistic sound by connecting the DVD video player to a 6
channel amplifier equipped with a Dolby Digital decoder or Dolby Digital processor. If you have a
Dolby Pro Logic Surround decoder, you will obtain the full benefit of Pro Logic from the same DVD
movies that provide full 5.1-channel Dolby Digital soundtracks, as well as from titles with the Dolby
Surround mark.
Manufactured under license from Dolby
Laboratories Licensing Corporation. “Dolby," “AC-3,’
“Pro Logic," and the double-D symbol are
trademarks of Dolby Laboratories Licensing
Corporation.
Use DVD video discs encoded via the
Dolby Digital recording system.
Make the following setting.
Setting Select: Page
Audio Out Select Bitstream
Recording system
□□
H>
Ü>
Connecting to an Amplifier Equipped With 5.1 ch Audio Inputs
5.1 ch surround sound
The Dolby Digital decoder equipped with this DVD video player enables you to obtain the full benefit
of 5.1 channel Dolby Digital sound tracks when you connect the DVD video player to a Dolby Digital
ready amplifier equipped with 5.1 channel audio inputs.
Dolby Pro Logic Surround sound can be obtained also if its recording system is selected. Use DVD video discs recorded on the
Dolby Digital recording system.
Make the following setting.
Setting Select: Page
Audio Out Select Analog 6ch
Recording system
□□
Connecting to an Amplifier Equipped With Dolby Pro Logic Surround
Dolby Pro Logic Surround
You can enjoy Dolby Pro Logic Surround Sound by connecting an amplifier and speaker system
(right and left front speakers, a center speaker, and one or two rear speakers).
■ With an amplifier equipped with Dolby Digital,
Connect the equipment the same way as described in “Connecting to an Ampiifier Equipped With
a Dolby Digital Decoder.” Refer to that amplifier’s owner’s manual and set the amplifier so you
can enjoy Dolby Pro Logic Surround sound.
Note: Be sure to set “Audio Out Select” to “Analog 2ch” when you enjoy sounds of Dolby Pro Logic Surround using this connection.
14
(38>
HD
Page 17

Warning
• Do not set “Audio Out Select" to “Bitstream” from the menu (sg) [38^ unless you are connecting (via the BITSTREAM/PCM AUDiO OUT jack) an
AV decoder that has the Doiby Digitai, Digitai Theater Systems (DTS) or MPEG2 decoding function. High voiume sound may damage your hearing
as weii as the speakers.
• When piaying DTS-encoded discs (DVD video discs and audio CDs), excessive noise may be output from the anaiog stereo jacks. To avoid
possibie damage to the audio system, you shouid take proper precautions when the MiXED AUDiO OUT jacks of the DVD video player is
connected to an amplification system. To enjoy DTS Digital Surround™ playback, an external 5.1 channel DTS Digital Surround™ decoder system
must be connected to the BITSTREAM/PCM AUDIO OUT jack of the DVD video player.
Connecting to an Amplifier Equipped With a DTS Decoder
Digital Theater Systems (DTS)
DTS Is a high quality surround technology used in theaters and now available for home use, on DVD
video discs or audio CDs.
If you have a DTS decoder or processor, you can obtain the full benefit of 5.1 channel DTS encoded
sound tracks on DVD video discs or audio CDs.
“DTS” and “DTS Digital Surround’ are trademarks
of Digital Theater Systems, Inc.
Use DVD video discs or audio CDs
encoded via the DTS recording
system.
Make the following setting.
Setting Select: Page
Audio Out Select
Recording system
Connecting to an Amplifier Equipped With an MPEG 2 Audio Decoder
MPEG 2 sound
You can enjoy motion picture and live concert DVD video discs with dynamic realistic sound by
connecting an amplifier equipped with an MPEG 2 audio decoder or MPEG 2 audio processor.
Make the following setting.
Audio Out Select Bitstream
Recording system MPEG
Connecting to an Amplifier Equipped With a Digital Audio Input
Two-Channel Digital Stereo
You can enjoy Two-Channel Digital Stereo Sound by connecting an amplifier equipped with a digital
audio input and speaker system (right and left front speakers).
Setting
Bitstream
DTS
Select: Page
H>
ID
D
D
O Or©
0 O
U
Connect either.
Optical digital cable
75 £i coaxial cable
Notes
• DO NOT connect the BITSTREAM/PCM AUDIO OUT jack of the DVD video player to the AC-3 RF input of a Dolby Digital Receiver. This input on your /W
Receiver Is reserved for Laserdisc use only and is incompatible with the BITSTREAM/PCM AUDIO OUT jack of the DVD video player.
• Connect the BITSTREAM/PCM AUDIO OUT jack of the DVD video player to the “DIGITAL” or “CO/VXIAL" input of a Receiver or Processor.
• Refer to the owner's manual of the connected equipment as well.
• When you connect the DVD video player to other equipment, be sure to turn off the power and unplug all of the equipment from the wall outlet before making any connections.
• The output sound of the DVD video player has a wide dynamic range. Be sure to adjust the receiver’s volume to a moderate listening level. Othenvise, the
speakers may be damaged by a sudden high volume sound.
• Turn off the amplifier before you connect or disconnect the DVD video player’s power cord. If you leave the amplifier power on, the speakers may be damaged. ^g
To OPTICAL type with a digital audio
digital audio input input
-------------------
—"II" I
To COAXIAL type
digital audio input
Amplifier equipped
a
□
oo ooooo
oo
Setting
Audio Out Select PCM
Select: Page
D
Make the following setting.
Page 18

Basic Playback ^
Playing a Disc
CAUTION
Keep your fingers well clear of the disc fray as it is
closing. It may cause serious personal injury.
POWER indicator DVD display
II PAUSE
This section shows you how to play a disc.
Basic Playback
Preparations
• When you want to view a disc, turn on the TV and put the TV in Auxiliary (Line) input mode.
• When you want to enjoy the sound of discs from the audio system, turn on the audio system and set the amplifier to receive Auxiliary input.
• For connection details, see “Connections.” - (15)
Press POWER.
i
The DVD video player turns on and the POWER indicator on the
player illuminates.
When the DVD video player is turned on for the first time,
If you hear a beep by the remote control’s
locator, press any button on the remote
control to turn it off. [lj^
I Note I
an initial set-up menu screen appears. See below to make
the settings before proceeding to step 2.
Press ^ on the front panel
(or hold down ■/EJECT on the remote control for
longer than one second).
The disc tray opens.
Place the disc on the disc tray.
Press PLAY (►).
i
■ First Setup screen
From this screen, make the
following settings.
On-screen Language: Select
the appropriate on-screen
language.
TV Shape: Select a picture size
according to the aspect ratio of
your TV. (See (36> for details.)
The disc tray closes and playback starts.
If you insert a DVD video disc that contains a title menu, or insert a
PBC (Playback Control)-equipped VIDEO CD, a menu screen may
appear. See ‘To start playback from the menu screen.”
To start playback of a PBC-equipped VIDEO CD from the menu
screen, set “PBC” to “On” via the on-screen displays. [32> [46>
16
With the label facing up
TfwnJc yw for your pvr^xise ^
DVD-Video
Pieose moke o selecHon for
On-Screen Longuoge and your IV sh^
ond press ENTER ljufton on your remote control.
brstssupL
Oft-Soeen longvoge n.\ti
TVShape
c±>
bNibH
O-
EMI
s
I , To select the items
on the screen.
, After selecting an
item, press this.
I^Note^
' There are two different disc sizes. Place the
disc in the correct guide on the disc tray. If the
disc is out of the guide, it may damage the disc
and cause the DVD video player to
malfunction.
■ Do not place anything except DVD video discs,
VIDEO CDs, or audio CDs on the disc tray.
I^Notesf
• For PBC (Playback Control) of VIDEO CDs,
see “On VIDEO CD.” ||i>
■ You may need to press the TITLE or MENU
button on the remote control to display the
disc menu screen (depending on the actual
DVD video discs.)
1 Press the A / T buttons to select “On-Screen Language,” and press the
ENTER button.
The languages are listed.
2 Select a language using the A / T buttons, and press the ENTER button.
3 Press the T button to select “TV Shape,” and press the ENTER button.
4 Select a picture size (see [36^) using the A / T buttons, and press the
ENTER button.
5 Finally press the SETUP button.
All your selections are entered and the First Setup screen disappears.
To change your settings, see “Customizing the Function Settings.” [32^
Page 19

1
■MENU
■ ENTER
■ ■/EJECT
■ JOG/PAUSE
To obtain a higher quaiity picture
Occasionally, some picture noise may appear on the TV screen while
playing a DVD video disc because the high resolution pictures on
these discs include a lot of information. While the amount of noise
depends on the TV you use with this DVD video player, you should
generally reduce the sharpness adjustment on your TV when viewing
DVD video discs.
About ¿VD? ^ ^
The ¿£5? icons on the heading bar show the playable discs
for the function described under that heading.
: You can use this function with DVD video discs.
: You can use this function with VIDEO CDs.
: You can use this function with audio CDs.
To start playback from the menu screen
1 Press A/T/-^/^or the number buttons to select
the title you want.
Example
®§®
2 Press ENTER.
The DVD video player begins playback
from the selected title.
• When not using the menu screen of a
PBC-featured VIDEO CD, set “PBC” to
“Off via the on-screen displays.
dDlie)
To pause playback (still playback)
Press JOG/PAUSE during playback.
To resume normal playback, press the PLAY
(►) button.
•
To stop playback
Press ■/EJECT.
To remove the disc
eject Hold down ■ /EJECT (for longer than one
CjLv second) until the disc tray opens.
Remove the disc after the disc tray
opens completely.
Be sure to hold down the ■/EJECT button for
longer than one second to close the disc tray
after you remove the disc.
• The sound is muted during still playback.
Noti
• Do not move the DVD video player during playback. Doing so may damage the disc.
• Use the ■ /EJECT button on the remote control or DVD video player to open and close the disc tray. Do not push the disc tray while it is moving. Doing
so may cause the DVD video player to malfunction.
• Do not push up on the disc tray or put any objects other than discs on the disc tray. Doing so may cause the DVD video player to malfunction.
• In many instances, a menu screen will appear after playback of a movie is completed. Prolonged display of an on-screen menu may damage your television set,
permanently etching that image onto its screen. To avoid this, be sure to press the ■ /EJECT button on your remote control once the movie is completed.
• If you pause a picture and leave it still for a long while, the screen saver of the DVD video player automatically appears (when “Screen Savef is set to
“On" |43>). To turn off the screen saver, press the PLAY button.
About This Owner’s Manual
This owner’s manual explains the basic instructions of this DVD video player. Some DVD video discs are produced in a manner
that allows specific or limited operation during playback. As such, the DVD video player may not respond to all operating
commands. This is not a defect in the DVD video player. Refer to the instruction notes of discs.
“ 0” may appear on the TV screen during operation. A “ 0” means that the operation is not permitted by the DVD video
player or the disc.
17
Page 20

Basic Playback J
Playing a Disc
(continued)
Fast reverse
Fast forward
You can play discs at various speeds, and resume playback from the
location where you stopped piayback.
Using the Shuttle Ring
You can play discs at various speeds by turning the shuttle ring.
Press and hold JOG/PAUSE during playback.
I
The JOG/PAUSE button lights and the
playback pauses.
Turn the shuttle ring.
The playback speed can be controlled by the
extent of the wheel rotation.
Frame
by Frame
Slow-
Motion
Resuming
,VCDj?
• JOG/PAUSE
■ Jog dial
• Shuttle ring
DVD> VCD>
Using the Jog Dial
You can advance or reverse a picture frame by frame from the
jog dial.
During playback, press JOG/PAUSE
(CZ^ on the remote control.
The picture pauses.
Turn the jog dial.
Prolonged absence of operation may
automatically cancel this function. If it
occurs, start over again from step 1.
Slow Slow
To finish operating the shuttle ring
Press JOG/PAUSE again to turn it off.
^ote^
• The playback speed may differ depending on the disc.
> if you slow down the playback speed of a DVD video disc by turning
the ring leftward, the DVD video player performs reverse frame
playback. The reverse frame playback may advance more rapidly than
in the forward direction.
Rightward: To advance the picture frame by
frame.
Leftward: To reverse the picture frame by
frame. (Only when using a DVD
video disc.)
To finish operating the jog dial
Press JOG/PAUSE again to turn it off.
Note:
’ The sound is muted during frame by frame playback.
’ The reverse frame playback may advance more rapidly than in the
forward direction.
18
Page 21

/ \
DVD:? ,VCD3 xn
Resuming Playback from the Same Location
You can stop playback and resume playback later from the
same location on the disc.
Press ■ /EJECT at the location
r
where you want to interrupt playback.
The DVD video player memorizes the
iocation where playback is stopped.
RESUME
I
To start playback from the beginning regardless of the location where you stopped playback
1 Press ■/EJECT twice.
EJECT
2 Press PLAY (►).
Press RESUME.
The DVD video piayer resumes playback
from the location where you stopped
piayback.
__________
The DVD video piayer’s memory is cieared.
If you are using a DVD video disc, piayback
starts from the beginning of the current titie.
If you are using a VIDEO CD/audio CD,
playback starts from the beginning of the disc.
• If you want to return to the beginning of a DVD
video disc, open and close the disc tray once
with the it button before pressing the ►
button.
Notes I
• The DVD video player’s memory is also cleared when:
- you unplug the DVD video player from the wall outlet after you stop
playback.
- you open the disc tray.
- you adjust/chanqe parental lock ¡4^ or select a disc menu
language setting .
• There may be a difference in the location where playback resumes
depending on the disc.
• Settings you changed using the menu screens while the DVD video
player keeps a location in the memory may function only after the
memory is cleared.
19
Page 22

Basic Playback ^
Locating a Specific Titie, Chapter, or Track
DVD video disc
Title 2
Chapter 2 Chapter 3
Track 1 1Track 2 1Tracks1Track 4 1Tracks
Normally, DVD video discs are divided into titles, and the titles are sub-divided into chapters. VIDEO CDs and audio
CDs are divided into tracks. You can quickly locate any specific title, chapter, or track.
_______________________________________________________________________________________________DVD2 _________________________________________________________________________________________________________DVD>
Locating a Title Using the Title Menu
Locating a Title
----------
VIDEO CD/Audio CD-------------
1
If a DVD video disc contains a titie menu, you can iocate a
specific titie using the titie menu.
MiLt
O
I
I
Press TITLE.
The titie menu appears on the TV screen.
Example of a title menu
Press A/T/^/^to select the title
you want.
If the titles in the title menu are assigned a
number, you can directly locate a specific
title by choosing its assigned number with
the number buttons.
You can locate a specific title by entering a title number.
Press T-C.
9
m rri fsi
m m m
m m m
9
r5~] PR
Make sure that the space next to Title is
highlighted.
Example
Tide:!)
Chapter: 1
Press the corresponding number
buttons for the title you want.
Example: To select title 2, press
d]
To select title 12, press
. LU-m
or
• Q-Q
Title.H
diopter: 1
diopter 1
bNtbH
O
9
[Note^
> The instructions above describe the basic procedure. The procedure
varies depending on the contents of the DVD video disc. If different
instructions appear on the TV screen, foilow those instructions.
• if you dispiay the titie menu during playback and press the TITLE
button again without selecting any title, the DVD video player may
resume playback from the point where you first pressed the TITLE
button. If it does not, press ► to resume playback.
Press ENTER.
The DVD video player starts playback from
chapter 1 of the selected title.
(You may not need to press ENTER if you
use the number buttons at step 2.)
20
CE>
9
j|Notes^
' Some DVD video discs may have chapters, but no titles.
' You can shift the highlight between Title and Chapter by pressing the
A / T buttons.
' To clear the “Title” and “Chapter” display, press the T-C button
repeatedly.
■ You can select a preferred language for on-screen displays.|3^ |34^
Press ►.
The DVD video player starts playback from
chapter 1 of the selected title.
Page 23

If you know the chapter or track number you want to play, you
can locate It directly.
You can fast forward or reverse through consecutive
chapters or tracks.
EeZI
I
®i®
I
QD cm HE]
CT) m m
I
cm cm cm
cm Q
Press T-C.
Skip steps 1 and 2 if you are using a VIDEO
CD/audio CD.
(DVD video disc)
Tille: D
Chapter: 1
Press T to highlight the space next to
Chapter.
(DVD video disc)
Titie: 1
Chapter: ■!
Press the corresponding number
buttons of the chapter or track you
want.
You can use the S button to select
numbers from 10 through 99.
Example: To select chapter or track 25
• ixi-ci]
or
Press ►.
-----------
(DVD video disc) Audio CD)
Title- 1 Track
Chapter: @
(VIDEO CD/
--------^
©
Press !◄ or ►! repeatedly to display
the chapter or track number you
want.
The DVD video player starts playback from
the selected chapter or track.
M: To locate preceding chapters or tracks
When you press the M button, the
DVD video player starts playback from
the beginning of the current chapter or
track.
When you press the M button twice,
the DVD video player starts playback
from the beginning of the preceding
chapter or track.
►I: To locate succeeding chapters or
tracks
If you press and hold the M or N button
during playback, the DVD video player
performs fast reverse or fast forward
playback. You can select the speed by
pressing the button further.
To locate chapters or track during fast
reverse or fast forward playback, first press
the ► button to resume normal playback,
and then use the M or W button.
I
To select a title and chapter number at the same time
Example: To select chapter 25 in title 2
I Noteg|
To clear the “Title” and “Chapter” display, press the T-C button
repeatedly.
The DVD video player starts playback from
the selected chapter or track.
Fm -*■ 1X1 -*• Ci!) rm -»■ rm -»ctt-:)
I
Title number Chapter number
Tile: 2
Chapter: 1
jjp^otes^
’ Some titles may not display chapter numbers.
’ When you set “Title Stop” to “Off [46^, you can access chapters in
another title. If you go back to the preceding title by pressing the M
button, the DVD video player locates the first chapter of the title. When
“Title Stop” is set to “On,” you can access chapters only within the
current title.
21
Page 24

Advanced Playback ^
Location
You can play a disc from the desired location.
Locating a Specific Location On the Disc
You can locate a specific iocation by entering its corresponding time (hours, minutes, seconds).
T.C
ESS] Press the number buttons to enter mmm the time.
in in m
I
m
Î
Press T-C twice.
You may have to press further depending on
the disc. Press the button repeatedly until
the following indication appears.
Example
n~]-»rT1-»-r5~|-»r3~l->-rô~l
(one hour, 25 minutes, 30 seconds)
Press ►.
The DVD video piayer starts piayback from
the desired location.
ote:
' Some discs may not respond to this feature.
’ Some scenes may not be located precisely as you specified.
’ This locating is available only within the current title of the DVD video disc or within the current track of the VIDEO CD/audio CD.
22
Page 25

Advanced Playback )
Playing Repeatedly
You can play a specific title, chapter, track, or segment repeatedly.
(Title repeat, chapter/track repeat, A-B repeat)
,DVDp VCDJ? ,CDP
Repeating a Title, Chapter, or Track
Repeating a Specific Segment
You can play the same title, chapter, or track repeatedly. (Title,
chapter/track repeat)
Begin playback of the title, chapter, or track you want to repeat. [|x>
r
REPEAT
o
I
Press REPEAT.
Each time you press the REPEAT button, the
repeat mode changes as follows.
DVD video disc
Ciiop'er Repeat
Tit'e Repeot
Repeat CH
VIDEO CD/audio CD
Tfock Repeat
A*1 Repeat
Repeat Off
Repeats the same
chapter.
Repeats the same title.
Resumes normal
playback.
Repeats the same
track.
Repeats the entire
disc.
Resumes normal
playback.
You can play a specific segment repeatedly.
(A-B repeat)
REPEAT
i
REPEAT Press REPEAT A-B again at the end
@ of the segment (point B).
During playback, press REPEAT A-B at the beginning of the segment (point A) you want to play repeatedly.
A-
I
A-B
The DVD video player automatically returns
to point A and starts repeat playback of the
selected segment (A-B).
To resume normal playback
h1U n IJ
O
ClCAfi
Some discs may not respond to the repeat function.
Hold down RETURN/CLEAR for longer than
one second.
----------------------------------
To resume normal playback
HtiUHN
CLEAR
^ Notes I
• Some discs may not respond to the A-B repeat function.
> You cannot set the A-B repeat function for a segment that includes
multiple camera angles.
• You can specify a segment only within the current title.
• There may be a slight difference between point A and the location
where playback actually resumes depending on the disc.
Hold down RETURN/CLEAR for longer than
O
one second.
23
Page 26

Advanced Playback ^
Playing in a Favorite Order
Tirie:2
Chaplen»25^
You can combine your favorite tities, chapters, or tracks and play them
in any order. You can program up to 28 selections into the memory.
(Memory playback)
TìHelì2
Cnaoten 12
rif
- iLll
Setting Titles, Chapters, or Tracks in a Favorite Order
The DVD video player automatically plays titles, chapters, or tracks in the order you program.
I
I
MEMORY
o
m r2~i m
m fsi m
m m m
nn Q
ENTER
O
Insert a disc and press MEMORY
during stop.
The following menu appears.
T C
81—■ —H
4 ,
7[^
T: Title number C: Chapter number
Select the items in the order you
want by pressing the number
buttons, then ENTER for each item.
Each time you press the ◄ / ► button, the
- - indication next to T and C is highlighted
in turn. Highlight where you want to enter,
then press the number buttons.
Example To play chapter 25 in title 2, chapter
Memory 1 (¿)
Memory 2 QD -*■ CH] -*•
Memory “►□!!
Memory 4 m-^0------------------------►[n-^O
IS EE 22 I--------------1
17 EE 24 EE
oE^
181-----i 2SI—E
19 EE 261
3E~~^
20 EE 27 EE
4PEq 21 PE 28EE
12 in title 2, all the chapters in title
1, and chapter 2 in title 4.
Title number
----------------------------------------------
T C T c
-------
i
Chapter number
I
I—^
EMTBi
EMreR
► O
ENTER
I
ce:^
To select another chapter in the same title,
you do not need to select the title number.
Press >■ while the MEMORY menu
appears on the TV screen.
The DVD video player starts memory
playback.
immi
T c T c
_____
T C T c
i®3S see isEE 22EE
2iKJt£ »'¿3 isErii 23EE
3ffiE 10EE 17EE 24EE
i'SSSL 11 EE 18E—i 25EE
SE^ 12EE 19EE 24IEE
SEE 13EE 20EE 27[—E
7EE 14 EE 21 EE 28 EE
_________________
24
To select tracks from a VIDEO CD/audio CD
in order, press the number buttons for the
track, then press the ENTER button for each
selection you want.
Page 27

■A/T/^/>-
■2
3
To change the programmed selections
1 While the MEMORY menu appears on the TV screen,
press A / T to move the highlighted bar to the item you
want to change.
2 Change the selection following the instructions in step 2.
To cancel the programmed selections
1 While the MEMORY menu appears on the TV screen,
press A / T to move the highlighted bar to the item you
want to cancel.
2 Hold down the RETURN/CLEAR button for longer than
one second.
___________
____________
To resume normal playback from memory
playback_____________________________________
Hold down the RETURN/CLEAR button for
longer than one second.
CLEAR MEMORY indicator disappears.
To program during playback
If you press the MEMORY button during playback, a menu
appears to accept your programming.
If you further press the OSD button, you can display the
MEMORY menu also. Follow steps 2 and 3.
____________________
Notes I
• Some discs may not respond to the memory playback function.
• If you press the REPEAT button during memory playback, the DVD video player repeats the current memory playback.
• You cannot select title, chapter, and track numbers not included on the disc.
• If you press the MEMORY button while the MEMORY menu appears on the TV screen, the MEMORY menu disappears.
• The programmed selections will be cleared when:
- you turn off the DVD video player, or
- you remove the disc.
25
Page 28

Advanced Playback J
Playing in Random Order
You can play titles, chapters within a titie, or tracks in random order.
(Random playback)
^DVD2
Playing Titles in Random Order
Playing Chapters or Tracks in Random Order
The DVD video player automatically selects the titles in a DVD
video disc and plays them randomly.
SHUFFLE Press SHUFFLE twice while playback
(2) is stopped.
Í
I
Title Shuffle
If you press the SHUFFLE button during
playback, the DVD video player automatically
starts random playback after finishing the
current title.
Press ►.
The DVD video player starts random
playback.
Press the ► button within about 5 seconds
after you press the SHUFFLE button.
The DVD video
title, or tracks in
randomly.
m rri fi~i
m m m
m m m
m Q
SHUFFLE
o
I
player automatically selects chapters within a
a VIDEO CD/audio CD, and plays them
Press T-C, then press the appropriate
number buttons for the title which
contains the chapters you want to
play in random order.
Skip this step if you are using a VIDEO CD/
audio CD.
Example: To play the chapters in title 2 in
random order, press
(DVD video disc)
T-C
Press SHUFFLE while playback is stopped.
(DVD video disc) (VIDEO CD/audio CD)
Chapter Shuffle
Title: 2
Chapter: 1
If you press the SHUFFLE button during
playback, the DVD video player
automatically starts random playback after
finishing the current chapter or track.
T.t’d'H
chapter
TraJc Shuffle
Track: B
To resume normal playback
KCIUHN
CLEAR
^Note^
' Some discs may not respond to the random playback function.
' You cannot use the random playback function in conjunction with the
memory playback function.
Hold down RETURN/CLEAR for longer than
one second.
O
26
ex:
Í
To resume normal playback
HCIUMiV
o
CLEAR
Unote^
' Some discs may not respond to the random playback function.
■ You cannot use the random playback function in conjunction with the
memory playback function.
■ If you press the W button during random playback, the DVD video player
goes to another chapter or track and starts random playback.
Press ►.
The DVD video player starts random
playback.
Press the ► button within about five
seconds after you press the SHUFFLE
button.
Hold down RETURN/CLEAR for longer than
one second.
Page 29

Advanced Playback J
•ZOOM
Zooming a Picture
You can magnify areas within a picture.
Zooming a Picture
You can zoom in on a picture and shift the zooming point as weii.
Press ZOOM during normal, slow or still playback.
If you further press the ZOOM button
repeatedly, the magnification level increases.
Zoom 1
RETURN/
CLEAR
To resume normal playback
ZOOM ) Press ZOOM repeatedly so that “Zoom”
disappears.
^DVP2
Zoom 2
Zoom 3
To reduce the magnification level, press the
RETURN/CLEAR button.
If you press the A / T / •< / ►■ buttons, the
0^0
zoom point shifts.
When the zoom point reaches an edge of the
picture, the color of “Zoom” changes.
If you hold down the RETURN/CLEAR
button for longer than one second, the zoom
point returns to the center of the picture after
reduction of the magnification level.
Notes
' Some discs may not respond to zoom function.
' During some scenes, the buttons may not work as described above.
' Zooming does not work on subtitles or menu screens included on DVD video discs.
’
During zoom playback, the
cancel the zoom playback.
' The magnification level varies depending on the picture size you select. ¡32^ [3^
A / T / •◄ / ►
buttons cannot work on menu screens included on the DVD video discs. If you want to view the menu screens,
27
Page 30

Advanced Playback ^
Selecting the Camera Angle
A preferred angle can be selected from several angles.
Changing the Camera Angle
If the scene was recorded from multiple angles, you can easily change the camera angle of the scene you are watching.
RETURN/
CLEAR
DVP>
B
ANGLE
I
ANGLE
Press ANGLE whiie piaying a scene recorded with muitipie angies.
While playing a scene recorded with multiple
angles, the angle icon (Q) appears in the
DVD display and on the TV screen.
Press the ANGLE button while the angle icon
is displayed.
Press ANGLE or A while the angle
number appears on the TV screen.
Each time you press the ANGLE or A button,
the camera angle changes.
Angle: D
To turn off the angle number indication
HCIUHN
O
To disable the angle icon display on the TV
From the on-screen displays, set “On-Screen Displays” to
“Off.” ilD [42>
Monitor the DVD display when you want to change the
camera angle.
Hold down RETURN/CLEAR for longer than
one second.
_________
Angle
Angle: S
T: Cycles backward
You can change the camera angle directly by
pressing the number buttons corresponding
to its angle number instead of using the A /
T buttons.
I Notes f
' You can phange the camera angle during still playback. The camera angle changes to the new setting when you resume normal playback.
If you pause a picture immediately after changing a camera angle, the resumed playback picture may not display the new camera angle.
28
Page 31

Advanced Playback )
Selecting a Language
■RETURN/
CLEAR
A preferred language can be selected from several languages.
Selecting a Playback Audio Setting
You can select a preferred language and sound recording system from those included on the DVD video disc.
About recording systems
This DVD video player uses the Dolby Digital, DTS, MPEG2
and PCM recording systems and cannot play DVD video
discs recorded in any other recording system.
Dolby Digital 5.1 Channel is displayed as 6CH.”
Selecting sound channels of VIDEO CDs
A VIDEO CD may have left and right sound channeis and
contain sounds or languages on each. You can switch these
two channels to hear a preferred sound or language.
During playback, press AUDIO repeatedly to
О
-.j L.R
select the sound channel.
Both the left and right channels are heard.
The left channel is heard.
The right channel is heard.
Notes
' Some discs allow you to change audio selections only via the disc
menu. If this is the case, press the MENU button and choose the
appropriate language from the selections on the disc menu.
' When you turn on the DVD video player or replace a disc, player
returns to the initial default setting. ¡35^
When you select a sound track which is not included on the disc, the
DVD video player plays a prior sound track programmed on the disc.
Analog 2ch
5.1CH SURROUND
AUDiO OUT jacks
48 kHz/16 bit Bitstream 48 kHz/20 bit
48 kHz/16 bit
48 kHz/20 bit
48 kHz/20 bit
96 kHz/16 bit
96 kHz/20 bit
96 kHz/20 bit
—
48 kHz/16 bit
44.1 kHz/16 bit
BITSTREAM/PCM
jack
48 kHz/16 bit 48 kHz/16 bit 48 kHz/16 bit
48 kHz/16 bit 48 kHz/20 bit 48 kHz/16 bit
Bitstream
Bitstream(2ch)
44.1 kHz/16 bit 44,1 kHz/16 bit 44.1 kHz/16 bit
44.1 kHz/16 bit
MIXED AUDIO
OUT jacks
_
—
—
_
48 kHz/24 bit 48 kHz/16 bit
96 kHz/16 bit 48 kHz/16 bit
96 kHz/20 bit
96 kHz/24 bit
—
48 kHz/16 bit 48 kHz/16 bit
44.1 kHz/16 bit
]: 3D (N-2-2) sound enhancement can function.
BfTSTBEAM/PCM
48 kHz/16 bit
48 kHz/16 bit
48 kHz/16 bit
44.1 kHz/16 bit 44.1 kHz/16 bit
i
AUDIO
o
Press AUDIO during playback.
The current audio setting appears for about 3
seconds.
Audio: 1 ENG PQ,\ 2CH
I
Position I
number —Language
---------
Recording system
-Audio channel
The abbreviation of the ianguage appears
instead of the language name. Refer to the
list of languages and their abbreviations. (|^
I
AUDIO
О
Press AUDIO or A while the audio setting appears on the TV screen.
Each time you press the AUDIO or A button,
the audio settings included on the DVD video
disc change.
Example
Audio: 1 ENG РШ 2CH
I
Audio: 2 FRE DD 6CH
r
Audio: 3 SPA РОЛ 2CH
I
T: Cycles backward
To turn off the audio setting display
________________
, paunij
Hold down RETURN/CLEAR for longer than
cTSn one second.
Output sound conversion table (sampling frequency/quantization bit)
Audio selection from the menu screen [32^ [38^ and output jacks on the rear panel
Discs Sound recording system
Dolby Digital
48 kHz/16 bit 48 kHz/16 bit
48 kHz/20 bit 48 kHz/16 bit 48 kHz/20 bit
48 kHz/24 bit
DVD
video discs
VIDEO CDs
Audio CDs Linear PCM 44.1 kHz/16bit 44.1 kHz/16 bit
Linear
PCM
96 kHz/16 bit
96 kHz/20 bit 48 kHz/16 bit 48 kHz/20 bit
96 kHz/24 bit 48 kHz/16 bit 48 kHz/20 bit
DTS
MPEG2
MPEG1
BfTSTREAMiPCM
Bitstream(2ch)
44,1 kHz/16 bit 44.1 kHz/16 bit
Bitstream Analog 6ch
jack
Bitstream 48 kHz/20 bit
48 kHz/16 bit 48 kHz/20 bit
48 kHz/16 bit
Bitstream
MIXED AUDIO
OUT jacks
48 kHz/16 bit
48 kHz/16 bit
—
48 kHz/16 bit
44.1 kHz/16 bit
BITSTREAM/PCM
jack
—
—
—
_
_
—
_
Bitstream
—
—
44.1 kHz/16 bit 44.1 kHz/16 bit
_____________
PCM
jack
— —
MiXED AUDiO
OUT jacks
48 kHz/20 bit
48 kHz/16 bit
48 kHz/20 bit
48 kHz/20 bit
48 kHz/16 bit
48 kHz/20 bit
48 kHz/20 bit
48 kHz/16 bit
44.1 kHz/16 bit
1,2
^DVD5
29
Page 32

Advanced Playback ^
Selecting Subtitles
Good evenlngl-j
You can display subtitles on the TV screen and select a preferred subtitle
language.
Turning Subtitles On or Off
You can select whether to display subtitles or not.
SUBTITLE
(q)
I
Bonsoirl 1
,DVD2
Press SUBTITLE during playback.
The current subtitle setting appears for about
three seconds.
SubHrie ‘ 1 ENG On
Press -< or while the subtitle setting
appears on the TV screen, to select
“On” or “Off.”
On: Subtitles are displayed.
Subtitle: 1 ENG On
Good evening!
■Subtitles
Off: Subtitles are not displayed.
RETURN/
CLEAR
•SUBTITLE
____
DVDi
Selecting a Subtitle Language
You can select a subtitle language from those included on the
DVD video disc.
SUBTITLE
Press SUBTITLE during piayback.
(S)
The current subtitle setting appears for about
three seconds.
SUBTriLE
®§®
(o)
Subtitle: 1 ENG On
The abbreviation of the language appears
instead of the language name. Refer to the
list of languages and their abbreviations
Press SUBTITLE or A while the subtitle setting appears on the TV screen.
Each time you press the SUBTITLE or A
button, the subtitle languages included on
the DVD video disc change.
Example
I
I Language
Position number
SubHrie:! B^G On
SubHrie:2 FRE On
i
I Notes I
Some DVD video discs are set to display subtitles automaticaily, and
you cannot turn them off even if you set the subtitle function to off.
During some scenes, the subtities may not appear immediately after
you select “On.”
Some DVD video discs will allow you to make subtitle selections and
turn subtitles on or off only via the disc menu.
30
I
SubHrie:3 SPA On
■: Cycles backward
To turn off the subtitle setting indicator
RETURN
_____________
Hold down RETURN/CLEAR for longer than
CL«R one second.
I Notesf
• When you turn on the DVD video player or replace a disc, the player
returns to the initial default setting. (3^
When you select a subtitle language which is not included on the disc,
the DVD video player plays a prior language programmed on the disc.
• During some scenes, the subtitles may not appear immediately after
you change the subtitle language by pressing the A / T buttons.
Page 33

Advanced Playback J
Using the On-Screen
Display
You can view information about a disc and its operationai status
on the TV screen.
Checking the Operational Status
You can view the current title number, track number, and total playing time of the disc on the TV screen.
№D
Press OSD while playback is stopped.
Each time you press the OSD button, the on-screen display changes as follows.
(DVD video disc)
Example Current title number
Title: 2
---------
Chapter: 1 -
i
I—Turns off.
Stop-
■ Operational status
- Current chapter number
(VIDEO CD/audio CD)
Example — Current track number
Track; 1 Total 1:46:30-
l
L- Turns off.
Checking the Remaining Time and Setting Status
You can view the elapsed time, remaining time, and setting status of the disc on the TV screen.
OSD Press OSD during playback.
(G3)) Each time you press the OSD button, the on-screen display changes as follows.
(DVD video disc)
Current title number
Playback mode
Example
3D(№2-2):On
The abbreviation of the language (e.g. ENG) appears instead of
the language name. Refer to the list of languages and their
abbreviations. |
■ Current chapter number
Elapsed Remain
ciapsea remain r ciapaeu unit; aiiu
Title:
diopter;
Sublille:12 ENGOif
0:10:15 0:50:45 remaining time Of the
0:03:08 0:10:24 J
Chapter Repeat
------------------
Audio: 1 6MGDD 2CH
Angle: 1
--------------
Operational status
n Elapsed time and
remaining time of the
current title
Ploy
Elapsed time and
current chapter
■ Current 3-D (N-2-2)
setting
- Current audio setting
- Current subtitle setting
■ Current angle setting
i
(VIDEO CD/audio CD)
Current track number
Playback mode
Example
Track: 3 0:01:20 0:02:001^
Disc 0:05:12 0:43:00
- Track Repeat
3D(N-2-2):0n-
i
L- Turns off.
Cperational status
Play
Elapsed Remain
Slop - — Operational status
t-Total playing time of
the disc
DVDT. vcd:» ,cp-;
- Elapsed time and
remaining time of the
current track
Elapsed time and
^
remaining time of the
disc
- Current 3-D (N-2-2)
setting
Bit Role: Ennmnini
Data transfer rate (Mbit/s)
= Amount of picture, sound and subtitle data in the DVD video disc
transferred per second.
The larger the value is. the more data processed, but this does not
necessarily insure better picture quality.
£6.0 Mbps
i
L Turns off.
31
Page 34

Function Setup ^
Customizing the Settings
■2
-2
№ 'to) IS ^
flCrURE ; AUDIO DISPLftY OP6RMIOW
You can change the default settings to customize performance to your
preference.
Selecting a Setting Category
The setting menu asks you to select a setting for LANGUAGE, PICTURE, AUDIO, DISPLAY and OPERATION. Each selected category
will provide you setting details.
SETUP
i
Press SETUP during stop.
The setting menu appears.
UANGUAGEl
On-Saeen Language pNGl
Dix Menu language
Audio languoge I'.VH
Subtiile Language
E3
EB
®§®
I
Press ◄ / ►■ to select the category.
• Categories
TjwBBxee
On-Screen lenguege
Due Menu Lenguege
Audm Language
Subtitle languoge
|B«1
Ea
Gia
oa
Note^
' The setting menu disappears when you press the SETUP button.
' The SETUP button can function even during normal playback,
however some operations may be inaccessible, and a message will
appear. In this case, try again after playing is stopped.
piciue
'Elodlntl CS
Dynamic KengeCoftrel Q
Kereelce Vocal E3
ExtonMAu&Ftofures PTl
30(H•^5)
_____
OSD BodcgrMixl Color [251
Extanded SUM* Murts
Screen Sever EM
PICTURE
■^))
AUDIO
LH
DISPLAY
32
Pau$e/SfrH
IPatnfdleck
Remote CoiAmalien
1 Title Step
|psc
E3
EH
Ea
Page 35

Setting
Details
Page
r
r
J*
On-Screen Language To select the display language.
Disc Menu Language
Audio Language
Subtitle Language
TV Shape
Black Level
Audio Out Select
Dynamic Range Control
Karaoke Vocal
Extended Audio Features
3D (N-2-2)
On-Screen Displays
OSD Background Color
Extended Subtitle Features
Screen Saver
^DVD?
¿VD?
^DVD;>
¿VD?
¿VD?
^VCD?
^DVD?
¿VD?
^dvd;) ^VCD? To turn on or off the screen saver.
To select a preferred language for disc menus.
To select a preferred language for the sound track.
To select a preferred language for subtitles.
To select a picture size according to the aspect ratio of
your TV.
To select the black level (contrast) of playback pictures.
To select an output sound type according to your
system connection.
To turn on or off a function that makes faint sounds
easier to hear, even if you lower the volume in late
hours playback.
To turn on or off the vocal output in DVD KARAOKE
disc playback.
To turn on or off special language for visually impaired
persons.
To turn on or off the 3-D (N-2-2) Sound Enhancement.
To turn on or off the operational status display
(On-screen display) on the TV screen.
To select the background color for on-screen displays.
To turn on or off special subtitles for hearing impaired
persons.
34
34
35
35
36
37
38
40
40
40
41
42
42
42
43
Pause/Still
Parental Lock
Remote Confirmation
Title Stop
PBC
^DVD?
To select the resolution of still pictures.
To turn on or off the parental lock function.
To turn on or off the confirmation beeper for each press
of a remote control button.
To turn on or off the function that automatically stops
playback after playing one title.
To use the menu screen when playing a PBCcontrollable VIDEO CD.
44
44
46
46
46
(Continued)
33
Page 36

Function Setup ^
Customizing the Settings (continued)
After you select LANGUAGE [32>, adjust the categories to your preference.
LANGUAGE Setting
(Continued from page 32.)
®i®
I
Press A / T to select the item, then press ENTER.
ENTER
O
On-Screen Language <3^
®o® ^ O
On-Scre«n lonquaqe
Due Menu languoge
Audio Language
Subrille Languoge QH
Disc Menu Language ¿HP
On*Screectlanguoge
Audio Language
SubHiie Languoge
is3a
French
Spanish
Eia Essa
Frendi
Spanish
C^rs
BB
I
To select other languages:
OfrScnwtangwoi it.'.'i EngUi
Aodclongvog* ni3
SuUiUlmgwot
Select a preferred language by pressing a
/ T, then press ENTER.
If you do not adjust any other settings, proceed
to step 4.
ENTER
O
Select a preferred language by pressing a /
T, then press ENTER.
If you do not adjust any other settings, proceed to
step 4.
ti m
Fnach
Spowli
1) Select “Others” and press the ENTER button.
2) Obtain the abbreviation of the preferred language from
the list [so^.
3) Select the first character by pressing the a / T buttons.
4) Press the ◄ / ► buttons to shift and select the second
|C«I. IHH 1
character by pressing the
5) Press the ENTER button.
a / T
buttons.
34
■ Some DVD video discs may not include your pre-selected language. In this case, the
DVD video player automatically displays disc menus consistent with the disc’s initial
language setting.
Page 37

•MENU
■3
■3
HtJUMN
If you press the RETURN/CLEAR button while a menu appears on the screen, you will
o
return to the previous menu screen.
Audio Language
njoi ovLtT anpi
LANGUAGE
lOft'Satenlongueg«
|Dit<M«nvLengvog« U.'!T
Aiiiit lon^og«
I SubHtU language
|B»1
m
ITJU
French
Spanish
Others
,dvd;>
LNItH
Select a preferred language by pressing ▲ /
T, then press ENTER.
o
If you do not adjust any other settings, proceed to
step 4.
I
To select other languages:
« n &
Jj
LANSUAgg*
Oo-SateolangMs* i’::d
DiKMcrntmuoat I'.'.'i
SiMd* Uagoeet Bjjfl
[agisb
Frtnd)
Pll
Sponol)
(HZ3B0
' Some DVD video discs may be played in a different language than you selected. A
prior language may be programmed on the disc.
1) Select “Others” and press the ENTER button.
2) Obtain the abbreviation of the preferred language
from the list [so^.
3) Select the first character by pressing the a /
buttons.
4) Press the -4 / ► buttons to shift and select the second
character by pressing the a / T buttons.
5) Press the ENTER button.
t
^ Select a preferred language by pressing
A / T, then press ENTER.
If you do not adjust any other settings, proceed
to step 4.
I
To select other languages:
1) Select “Others” and press the ENTER button.
OD-SffMiilatgwgt
DbcMtaolanggeei l>::^ Frtnd)
Ao&lsnguae*
' If you select “No Subtitles," subtitles are not displayed.
’ Some DVD video discs may be set to display subtitles in a different language than
you selected. A prior subtitle language may be programmed on the disc.
> Some DVD video discs allow you to change subtitle selections only via the disc menu.
If this is the case, press the MENU button and choose the appropriate subtitle
language from the selection on the disc menu.
ftil
EagCsli
Spoflot)
NoSvfctite
23
2) Obtain the abbreviation of the preferred language
from the list [so^.
3) Select the first character by pressing the a /
buttons.
4) Press the -4 / ► buttons to shift and select the
second character by pressing the
5) Press the ENTER button.
a / T
T
buttons.
i
SETUP
Press SETUP.
The setting menu disappears.
35
Page 38

Function Setup J
Customizing the Settings (continued)
PICTURE
After you select PICTURE adjust the categories to your preference.
PICTURE Setting
O
©
I
0 (Continued from page 32.)
o
ENTER
O
Press A / T to seiect the item, then press ENTER.
TV Shape
4:3 LetterBox:
Select when a 4:3 TV is connected.
Displays theatrical images with masking
bars above and below the picture.
4:3 Normal:
16:9 Widescreen: Select when a 16:9 wide TV is
®§®
Select when a 4:3 TV is connected.
Displays pictures cropped to fill your TV
screen. Either or both sides of the
picture are cut off.
connected.
Select your TV type by pressing a / T, and then press ENTER.
o
If you do not adjust any other settings, proceed
to step 4.
•
• The displayable picture size is preset on the DVD video disc. Therefore, the playback
picture of some DVD video discs may not conform to the picture size you select.
■ When you play DVD video discs recorded in the 4:3 picture size only, the playback
picture always appears in the 4:3 picture size regardless of the TV shape setting.
■ If you select “16:9 Widescreen” and you own a 4:3 TV set, the DVD playback picture
will be horizontally distorted during playback. Images will appear to be horizontally
compressed. Always be sure that your TV shape conforms to the actual TV in use.
36
Page 39

■ 3
■ 3
»TUP
Black Level ^
JSSfiL
IVSkw tlFTn
1 'rfSInTiHNrml 1
Press SETUP.
Erihan»d
HtZiVtVi
: if you press the RETURN/CLEAR button while a menu appears on the screen, you will
return to the previous menu screen.
Enhanced: Increased black level (contrast).
Normal: Standard black level (contrast).
_v /~S ocici^i me uiciuiv icv
^ then press ENTER.
Select the black level by pressing ▲ / T,
-> If you do not adjust any other settings, proceed
to step 4.
i
The setting menu disappears.
37
Page 40

Function Setup J
Customizing the Settings (continued)
After you select AUDIO HD, adjust the categories to your preference.
AUDIO Setting
(Continued from page 32.)
® i®
I
bNltH
O
Press A / T to seiect the item, then press ENTER.
Audio Out Seiect c!SS^
fAUDiOl
AodioOutS*I«l i-fifii.L'-'i.l
Dynamic Konge Control CT
Ktfooke Vocal EHl
Extended Au&Feotures t?!
3D(H-M]
El
pm
Analog 6ch
Analog 2di
PCM
Select the output sound type according to your system connection.
For details of sound recording systems, see
Bitstream:
Select when connected to an amplifier equipped with a Dolby Digital,
DTS, MPEG1 or MPEG2 decoder. [u>
The DVD video player outputs digital audio information in the bitstream
format when you play a DVD video disc recorded on the Dolby Digital,
DTS, MPEG1 or MPEG2 recording system.
Analog 6ch:
Select when connected to a Dolby Digital ready amplifier equipped with
5.1 ch audio inputs.
This DVD video player is equipped with a Dolby Digital decoder.
The next screen will appear for the detailed setting. See HD-
Analog 2ch:
Select when connected to a TV, or Dolby Pro Logic or stereo system via
the analog audio jacks, lip [lD
PCM:
Select when connected to a 2 channel digital stereo amplifier. ¡j5>
The DVD video player outputs sounds in the PCM 2ch format when you
play a DVD video disc recorded on the Dolby Digital, MPEG1 or MPEG2
recording system.
38
^ Select the output sound type by pressing
A/t, then press ENTER.
-> If you do not adjust any other settings, proceed
to step 4.
Page 41

RETURN/
CLEAR
3
■ 3
HtIUKN
If you press the RETURN/CLEAR button while a menu appears on the screen, you will
o
return to the previous menu screen.
When you select “Analog 6Ch” (
Make the follow settings for the built-in 5.1 ch surround decoder.
1) Select an item by pressing the
C{C«nl«r]$peok«r
S{SvrrMmd}SpMker
Subwoofer
Center Channel May
Surround Channel May E23
jTettTone
turn 1
[•a
isa
___
2) Make the settings (see below) by pressing ihe A./T/</>■ buttons, and press the
ENTER button.
a/t
buttons, and press the ENTER button.
C.S.Speaker Large: When the main speakers can reproduce low frequency signals below 120 Hz.
Size Small: When the main speakers cannot reproduce low frequency signals below 120 Hz.
C(Center) On: When you connect center speakers.
Speaker Off:
S(Surround)
Speaker Off:
Subwoofer On:
• Adjusting the delay time:
When enjoying 5.1 ch surround playback, it is ideal to choose a listening position that is the same distance
from each speaker. By adjusting the delay time of the center/surround speakers, you oan virtually create an
ideal listening environment (as if the center/surround speakers were at their ideal locations respectively as
below.)
Center Channel 0msec: When Df equals Dc.
Delay 1 msec: When (A) is approx. 34 cm (13 inch)
Surround 0msec: When Df equals Ds.
Channel Delay 1 msec: When (B) is approx. 34 cm (13 inch)
When center speakers are not connected.
On: When you connect surround speakers.
When surround speakers are not conneoted.
When you connect a sub woofer.
Off: When a sub woofer is not connected.
2msec: When (A) is approx. 68 cm (27 inch)
3msec: When (A) is approx. 102 cm (40 inch)...
*(A) = Df-Dc
Get your optimum value (0,1,2... 5)
dividing (A) by 34.
2msec: When (B) is approx. 68 cm (27 inch)
3msec: When (B) is approx. 102 cm (40 inch)...
*(B) = Df-Ds
Get your optimum value (0,1,2 ... 15) ^11 speakers should be located within a
dividing (B) by 34. circle with a radius of Df.
A/T
◄ /►
3) Select “Test Tone" and press the ENTER button.
The DVD video player outputs a test signal to each speaker.
Press the ◄ / ► buttons to switch the receiving speakers, and adjust the channel
balance on the amplifier so that each signal is heard at its appropricate volume
level.
(Continued)
39
Page 42

Function Setup ^
Customizing the Settings (continued)
'^)))
AUDIO
AUDIO Setting (continued)
(Continued)
Dynamic Range Control
On: Dynamic range is reduced.
(audioi
1 Audio Out Stled Off
Dynamic longe Control
Karooke Vocal
Extended Audio Features IS]
ЗD[N-^3]
lonHH
E)3
Eia
Off: Fuil dynamic range is heard.
ENTER Select “On” or “Off” by pressing A / T,
© (3 then press ENTER.
-> If you do not adjust any other settings, proceed
to step 4.
Karaoke Vocal ¿HP
Audio Out Select
Dynamic Range Control
Extended Audio Fecdures ^
|3D(N-M}
sa
sa
Eia 1
1
On
Extended Audio Features
.wopn
Audio Out Select
Dyrtamic Range Control
Karate Vocal
Extended Audio Features [»¡J
|ЗD(H-^2)
C3
E23
Ea 1
SO
On
• This function works only during playback of Dolby Digital recorded discs.
' The level of Dynamic Range Reduction may differ depending on the DVD video disc.
On: The primary vocai is output when it is recorded on the disc.
Off: The primary vocai is not output.
CH) /-s OClClil WII U1 V.»I1
® ^ then press ENTER.
The vocal output feature is used during playback of Dolby Digital (multi-channel)
recorded DVD KARAOKE discs. This feature allows you to turn off vocal audio tracks,
or restore them for background accompaniment.
On: Some DVD video discs contain special language track that describes
the actions on-screen for visually impaired persons. The DVD video
player automatically plays this special feature.
Off: The DVD video player does not play this special feature.
© © "r 0© then press ENTER
Select “On” or “Off” by pressing a / ’
If you do not adjust any other settings, proceed
to step 4.
Select “On” or “Off” by pressing a/t,
OCICl#!. V.M1 >J1 VAl
40
-> If you do not adjust any other settings, proceed
to step 4.
Page 43

■ 3
■ 3
neiuMN
: If you press the RETURN/CLEAR button while a menu appears on the screen, you will
O
return to the previous menu screen.
3D (N-2-2) ^ ¿cop
3-D (N-2-2) Sound Enhancement
You can enjoy expansive surround type effects from two speakers.
On: The 3-D (N-2-2) Sound enhancement functions.
Off: The 3-D (N-2-2) Sound enhancement does not function.
Audio Out S«lect
Dynomic Rang# Control
Korook« Vocal ISO
I ExHfxkd Foolurei OUI
I'i IM
E3
CIO
El
On
0^©
CNItlH
o
Select “On” or “Off” by pressing a/t, then press ENTER.
If you do not adjust any other settings, proceed
to step 4.
i
•PUP
Press SETUP.
The setting menu disappears.
' You may sense a difference in volume between “On” and “Off”.
' 3-D (N-2-2) sound enhancement may not function (or may not be realized) depending
on the sound output setting or recording system ¡29^.
' If 3-D (N-2-2) sound enhancement is on, Dolby Pro Logic Surround may not function
on output sounds at all, or may function differently than usual.
Spatializet® 3-Dimensional Sound Processing provided by Desper Products. Inc.
Certain audio features of this product manufactured under a license from Desper Products, Inc.,
Spatializei® and the circle-in-square device are trademarks owned by Desper Products, Inc.
41
Page 44

Function Setup ^
Customizing the Settings (continued)
DISPLAY
After you select DISPLAY [^, adjust the categories to your preference.
DISPLAY Setting
I
Cv)
ENTER
O
(Continued from page 32.)
Press A / T to select the item, then press ENTER.
On-Screen Displays
On: Operational modes are displayed on-screen, (e.g. “Play”, Q)
Off: Operational modes are not displayed.
OivScreen Disalovs i»?Tl
OSD Bodcgrowd Color PTW
Extonded Svbride Features
ScreenSover
OSD Background Color
On-ScrMn Displays [??1
I Extended StMlIe Features |23l
I Screen Saver m
0»
_ Cv) _ . X—X aeieci wn or wii
Gray: Gray background.
Blue: Blue background.
Ox
/-TN enter
Select “On” or “Off” by pressing A / T,
W then press ENTER.
If you do not adjust any other settings, proceed
to step 4.
Select the background color by pressing
o
A / T, then press ENTER.
If you do not adjust any other settings, proceed
to step 4.
42
Extended Subtitle Features
«saAYi____ _______ _______
On-Screen Duplays FM
OSD Background Color B51EMOn
Screen Saver
On: Some DVD video discs contain special subtitles, an enhancement of
closed captioning for hearing impaired persons. The DVD video player
automatically displays these special subtitles.
Off: The DVD video player does not display these special subtitles.
(T) ^ V /-"S. oeieci vjii ur
® ® ^ press ENTER,
Select “On” or “Off” by pressing a/'
^ If you do not adjust any other settings, proceed
to step 4.
Page 45

■ 3
■ 3
O
Screen Saver
PWIAY
On-SoMfi Ditpioys PB
OSD Bodcground Color Pffl
ExHnMSubltiloFoc^t E3
-----------------
Off
al
: If you press the RETURN/CLEAR button while a menu appears on the screen, you will
return to the previous menu screen.
On: The screen saver works.
Off: The screen saver does not work.
EOTER Select “On” or “Off” by pressing A / T,
© ^ then press ENTER.
i
srrup
-> If you do not adjust any other settings, proceed
to step 4.
Press SETUP.
The setting menu disappears.
43
Page 46

FunctionSetup J
Customizing the Settings (continued)
After you select OPERATION adjust the categories to your preference.
OPERATION Setting
(Continued from page 32.)
uea rrom page
®S®
S
A / T to select the item, then press ENTER.
Press
bNIbH
O
Pause/Still
¿VD?
Auto: For normal use. Pictures can pause without shaking.
Frame: The resolution of still pictures is raised, so that you can make
Pouie/Sfl] BES
Parenld Lode P!TÌ
KeoMleConfìrnMtwn
TirieStep
PK E3
inme
especially a motionless picture more clearer when you pause it.
Select “Auto” or “Frame” by pressing a/
® ® G) ▼> then press ENTER.
^ If you do not adjust any other settings, proceed
to step 4.
Parental Lock
Parental Lock
DVD video discs equipped with the parental lock function are rated according to their content. The contents
allowed by a parental lock level and the way a DVD video disc can be controlled may vary from disc to disc.
For example, if the disc allowed you could edit out violent scenes unsuitable for children and replace them with
more suitable scenes, or lock out playback of the disc altogether.
• DVD video discs may or may not respond to the parental lock settings. This is not a defect in the DVD video player. Make
sure this function works with your DVD video discs.
On: Select when you activate the parental lock feature or change the
lOPBiATIOi^
pouM/siii rra
E«nwt« ConRrmcrion L3
Title Stop EI3
P8C El
El
On
settings.
The next screen will appear for the detailed setting. (45>
Off: The parental lock feature does not function.
44
iOPEWnONi
poiwsa ^
Parental lo<k On
KraMteCofAmriioa £3
firieSMi) ^
PK El
pn
ISetwily cullili
^ (X) ^ ^ OtiltiUl WII Ul V.M
Select “On” or “Off” by pressing A / T,
W then press ENTER
Press the number buttons to create a personal four-digit security code, then press ENTER.
If you make a mistake before pressing the ENTER
button, press the CLEAR button and enter your 4digit security code again.
If you do not adjust any other settings, proceed
to step 4.
Page 47

RETURN/
CLEAR
■ 3
■ 3
l/EJECT
■ Number buttons
When you select “On” [44>:
Level/
Level6
Levels
tevel4
levels
levels
Levell
ttCIUMN
: If you press the RETURN/CLEAR button while a menu appears on the
screen, you will return to the previous menu screen.
O
1) Press the ◄ / ► buttons to select the country whose standards were
used to rate the DVD video disc.
Levri6
Levels
Level4
levels
Levels
level t
2) Press the A / T buttons to select the parental lock level, then press the
ENTER button.
You cannot play DVD video discs rated higher than the level you
selected unless you cancel the parental lock function.
For example, when you select level 7, discs rated higher than level 7
are locked out and cannot be played.
The parental lock level is equivalent to the following USA movie
ratings.
LEVEL 7: NC-17
LEVEL 6: R
LEVELS: PG
LEVEL 1:G
LEVEL 4: PG 13
The parental lock levels for “CANADA” are included for future use.
Check the appropriate parental lock level when you buy a DVD video
disc equipped with the parental lock feature in the future.
■ To change the parental lock level:
Follow the above procedure.
■ To change your 4-digit security code:
After selecting “On” or “Off’ j4|) , press the ■ /EJECT button four
times, then press the ENTER button.
EJ^CT EJECT EJECT ETCT
The 4-digit security code is cleared.
Press the number buttons to create a new 4-digit security code, then
press the ENTER button.
(Continued)
45
Page 48

Function Setup ^
Customizing the Settings (continued)
OPERATION Setting (continued)
(Continued)
Remote Confirmation ¿3? <3^
PauM/Slil
Por«nldted(
Remete Cen5rmetíen foiri
Tille Step
PBC
Titie Stop
S, W ■<’?
[OPERATION
Peuse/Sta ES3
Porentelledc E2
Remete Cenfirmatien
PBC [¡3
P <4) ®
PTTP!
0»
E21
S3
E2]
[¡a
lEHl
On
off k
On: Beeper sounds with each press of a remote control button.
Off: The beeper does not sound.
Seiect “On” or “Off” by pressing A / T,
0
0
then press ENTER.
^ If you do not adjust any other settings, proceed
to step 4.
On: Player stops playing the disc after playback of a title is completed.
Off: Player continues playing the disc after playback of a title is completed.
C0) ^ OClCLil VII Ul VII
Select “On” or “Off” by pressing a/’
0 (2) ® press ENTER.
If you do not adjust any other settings, proceed
to step 4.
46
PBC 3"
lOPgtATTON
Pouse/Sta Pffl Off
Perentdledc [¡¡J
Remete ConRnnetien
Title Step
' PBC is the abbreviation of
Playback Control.
_
On: To view the menu screen when playing a PBC-featured VIDEO CD.
Off: For playback without using the menu screen.
Select “On” or “Off” by pressing a/t,
0^0 4 O then press ENTER
-5- If you do not adjust any other settings, proceed
to step 4.
Page 49

■ 3
■ 3
KBIU№4
: If you press the RETURN/CLEAR button while a menu appears on the screen, you will
o
return to the previous menu screen.
i
SETUP
Press SETUP.
The setting menu disappears.
47
Page 50

Function Setup J
Operating Other Equipment with the Remote Contrai
You can operate the basic functions of selected TVs, amplifiers, and
receivers using the supplied remote control.
Programming the Remote Control
You can operate other equipment with the DVD video piayer’s
remote controi.
i
m m m
m m m
m m m
f
RETURN
O
CLEAR
ENTER
O
Press and hold RETURN/CLEAR and
ENTER simultaneously until JOG/
PAUSE lights up.
Release RETURN/CLEAR and ENTER.
Press the number buttons that
correspond to your equipment’s
brand code (listed at right).
Example: To program brand code 040, press
ro~] m-» ro~i
When you press the last digit, the JOG/
PAUSE button blinks twice, then turns off.
Brand Code Table
TV brand code
Brand name Brand code
GE
Goldstar
JVC
Magnavox
Motorola
NEC
Panasonic
Philips
ProScan
Proton
Quasar
RCA
Samsung
Sanyo
Sears
Sharp
Sony
Technics
Thomson
Toshiba
Yamaha
Zenith
021, 023, 036, 037, 041,077,103,105,150,160,163,
019,
245
003, 017, 024, 026, 032, 042, 072,105, 227
002,
039, 047, 092, 098,109
029,
020, 022, 024, 029, 040, 065,112,113, 140, 217
018,
062
041,
017,
024, 029, 042, 099, 246
037,
041,094,138,149,190, 210
040
036
004,
025,
038, 105, 249
041,
037,
016,
017,
080,
013,
106,
032,
001,
037,
127,
029,
017,
014,
096,149
017,
023, 031, 036, 059, 077, 103, 159
024,
026,032,042,043,105,184,226,237,253
091, 141,254
086,
040, 042, 080, 081, 082, 086, 088, 091,100,105,
036,
162
062,
085, 089, 096,136,162, 217, 222,258
009,
055, 075
149
128
043,
082, 086, 088
024
015
■ENTER
-JOG/PAUSE
■RETURN/
CLEAR
Point the remote control at the
equipment you want to operate.
I
^Notes^
’ The same brand may use different codes depending on the model.
Enter the correct number, referring to the brand code table.
' For some brands, several codes are provided. Try each of them until
the remote control operates your equipment.
' Some equipment may not respond to all of the functions in the table in
the next page, or may not be operated at all with this remote control. In
this case, operate that equipment with its own remote control.
' If you replace the remote control’s batteries, remember to reprogram
the brand code.
48
Amplifier brand code
Brand name Brand code
Denon 411
Harman/Kardon 405
JVC
Magnavox
Marantz
Philips
Pioneer
Sony
Technics
Yamaha
425
420
420,424
420
401,422
415
423, 434
408, 410, 427, 433
Receiver brand code
Brand name Brand code
Carver
Denon
Harman/Kardon
Inkel
JVC
Kenwood
Magnavox
Marantz
Onkyo
Optimus
Panasonic
Philips
Pioneer
RCA
Sansui
Sony
Technics
Yamaha
505,
502,
530,
517,
521,
510,
538,
503,
528,
512,
511,
557,
544,
516,
557,
545,
511,
525,
512,
704
531
519
630
523,
557,
511,
535,
552,
612
677
582,
600,
558,
549,
564,
526,
557,605,714
556,589, 590
559,562, 569, 607, 645
538, 557,560, 603, 628
539, 542, 610
554, 556,568, 624, 645, 672, 683, 699,718
645, 674
605, 644, 645, 679
594, 600, 661
620, 632
588
551,556,583, 650, 691
Page 51

Buttons to operate
^У!I ITC
T\/ nH fA.f \
1 V VUL ^+/ )
TV
To mute the sound.
To select channels.
To turn up or down
the volume.
Amplifier
To mute the sound.
To turn up or down
the volume.
Receiver
To mute the sound.
To turn up or down
the volume.
49
Page 52

Function Setup ^
Table of Languages
Table of Languages and Their Abbreviations
Abbreviation
of the
Language
—
CHI (ZH)
OUT (NL)
ENG (EN)
FRE (FR)
GER (DE)
ITA (IT)
JPN (JA)
KOR(KO)
MAY (MS) Malay
SPA (ES)
AA
AB
AF
AM
AR
AS
AY
AZ
BA
BE
BG
BH
Bl
BN
BO
BR
CA
CO
CS
CY
DA
DZ
EL
Language
No alternate
language
Chinese
Dutch
English
French
German
Italian
Japanese
Korean
Spanish
Afar
Abkhazian
Afrikaans
Amharic
Arabic
Assamese
Aymara
Azerbaijani
Bashkir
Belorussian
Bulgarian
Bihari
Bislama
Bengali, Bangla
Tibetan
Breton
Catalan
Corsican
Czech
Welsh
Danish
Bhutan!
Greek
Abbreviation
of the
Language
EO
ET
EU
FA
Fl
FJ
FO
FY
GA
GD
GL
GN
GU
HA
Hl
HR
HU
HY
lA
IE
IK
IN
IS
IW
Jl
JW
KA
KK
KL
KM
KN
KS
KU
KY
LA
Language
Esperanto
Estonian
Basque
Persian
Finnish
Fiji
Faroese
Frisian
Irish
Scottish Gaelic
Galician
Guarani
Gujarati
Hausa
Hindi
Croatian
Hungarian
Armenian
Interlingua
Interlingue
Inupiak
Indonesian
Icelandic
Hebrew
Yiddish
Javanese
Georgian
Kazakh
Groenlandie
Cambodian
Kannada
Kashmiri
Kurdish
Kirghiz
Latin
Abbreviation
of the
Language
LN Lingala
LO Laotian
LT Lithuanian
LV
MG
Ml Maori
MK Macedonian
ML Malayalam
MN Mongolian
MO Moldavian
MR Marathi
MT Maltese
MY Burmese
NA Nauru
NE
NO Norwegian
OC
OM (Afan) Oromo
OR Oriya
PA
PL Polish
PS
PT Portuguese
QU Quechua
RM Rhaeto-Romance
RN Kirundi
RO Rumanian
RU Russian
RW Kinyarwanda
SA Sanskrit
SD
SG Sango
SH Serbo-Croatian
SI
SK Slovak
Language
Latvian, Lettish
Malagasy
Nepali
Occitan
Panjabi
Pashto, Pushto
Sindhi
Singhalese
Abbreviation
of the
Language
SL Slovenian
SM Samoan
SN
SO Somali
SO
SR
SS
ST Sesotho
SU Sundanese
SV Swedish
SW Swahili
TA Tamil
TE
TG Tajik
TH Thai
TI Tigrinya
TK
TL Tagalog
TN Setswana
TO
TR Turkish
TS
TT Tatar
TW Twi
UK Ukrainian
UR Urdu
UZ Uzbek
VI
VO Volapük
WO Wolof
XH Xhosa
YO Yoruba
ZU Zulu
Language
Shona
Albanian
Serbian
Siswati
Telugu
Turkmen
Tongan
Tsonga
Vietnamese
50
Page 53

others J
Notes on Discs
On Handling Discs
' Do not touch the playback side of the disc.
Playback side
Do not attach paper or tape to discs.
Cieaning Discs
' Fingerprints and dust on the disc cause picture and sound
deterioration. Wipe the disc from the center outward with a soft cioth.
Always keep the disc clean.
' If you cannot wipe off the dust with a soft cloth, wipe the disc iightiy
with a slightly moistened soft cloth, then dry the disc with a dry cloth.
' Do not use any type of solvent such as thinner, benzine, commercially
available cleaners, or antistatic spray for vinyl IPs. It may damage the
disc.
Storing Discs
• Do not store discs in a place subject to direct sunlight or heat.
• Do not store discs in places subject to moisture and dust, such as in a
bathroom or near a humidifier.
• Store discs vertically In a case. Stacking or placing objects on discs
may cause warping.
About This Owner’s Manual
This owner’s manual explains the basic instructions of this DVD video
player. Some DVD video discs are produced in a manner that allows
specific or iimited operation during piayback. As such, the DVD video
player may not respond to all operating commands. This is not a defect
in the DVD video player. Refer to the instruction notes of discs.
“ 0" may appear on the TV screen during operation. A“ 0” means
that the operation is not permitted by the DVD video player or the disc.
Notes on Region Numbers
The region number of this DVD video player is 1. If region numbers,
which stand for their playable area, are printed on your DVD video disc
and you do not find (i^ or disc playback will not be allowed by the
player. (In this case, the DVD video player displays a message.)
Playable Discs
This DVD video player can play the following discs.
Disc mark Contents Disc size
Maximum
playback time
Approx. 4 hours
(single sided disc)
Approx. 8 hours
(doubie sided disc)
Approx. 80 minutes
(single sided disc)
Approx. 160 minutes
DVD
video
discs
mJVl>
m
Audio
+
Video
(moving
pictures)
12 cm
8 cm
(double sided disc)
VIDEO
COMPACT
CDs
DSE
IDIGITAL VIDEOl
COMPACT
Audio
CDs
You cannot play discs other than those listed above.
This DVD video player uses the NTSC color system and cannot play
DVD video discs recorded in any other color system (PAL, SECAM,
etc.).
DIG
TAL AUDIO
Audio+
Video
(moving
pictures)
Audio
12 cm
8 cm
12 cm
8 cm
(CD single)
Approx. 74 minutes
Approx. 20 minutes
Approx. 74 minutes
Approx. 20 minutes
On VIDEO CDs
This DVD video player supports VIDEO CDs equipped with the PBC
(Version 2.0) function. (PBC is the abbreviation of Playback Control.)
You can enjoy two playback variations depending on types of discs.
• VIDEO CD not equipped with PBC function
(Version 1.1)
Sound and movie can be played on this DVD video player in the same
way as an audio CD.
• VIDEO CD equipped with PBC function
(Version 2.0)
In addition to operation of a VIDEO CD not equipped with the PBC
function, you can enjoy playback of interactive software with search
function by using the menu displayed on the TV screen (Menu
Playback). Some of the functions described in this owner’s manual
may not work with some discs.
Notes on Copyright
It is forbidden by law to copy, broadcast, show, broadcast on cable, play
in public, and rent copyrighted material without permission.
DVD video discs are copy protected; and any recordings made from
these discs will be distorted.
This product incorporates copyright protection technology that is
protected by method claims of certain U.S. patents and other intellectual
property rights owned by Macrovision Corporation and other rights
owners. Use of this copyright protection technology must be authorized
by Macrovision Corporation, and is intended for home and other limited
viewing uses only unless otherwise authorized by Macrovision
Corporation. Reverse engineering or disassembly is prohibited.
51
Page 54

others 3
Before Calling Service Personnel
Check the following guide for the possible cause of a problem before contacting service.
Symptoms and Correction
Symptom Cause
No power • The power plug is disconnected. • Connect the power plug securely into the
No picture
No sound
The playback picture has
occasional distortion.
Brightness is unstable or
noise is noticeable in the
playback pictures.
The DVD video player does
not start playback.
A disc is not played according
to its program.
Buttons do not work.
The remote control does not
work properly.
• The TV is not set to receive DVD signal
output.
• The video cable is not connected
securely.
• The equipment connected with the audio
cable is not set to receive DVD signal
output.
• The audio cable is not connected
securely.
• The audio receiver or TV is turned off. • Turn on the equipment connected with the
• The setting of output sound type is
incorrect.
• The disc is dirty.
• It is in fast forward or fast reverse
playback.
• The copy protection is in effect.
• No disc is inserted. • Insert a disc. (Check that the DVD
• An. unplayable disc is inserted. • Insert a playable disc. (Check the disc
• The disc is placed upside down.
• The disc is not placed within the guide. • Place the disc correctly inside the guide in
• The disc is dirty.
• The parental lock function is set.
• It is in the repeat, random, or memory
playback.
• Power supply fluctuations or other
abnormalities such as static electricity
may interrupt correct operations.
• The remote control is not pointed at the
remote sensor of the DVD video player.
• The remote control is too far from the
DVD video player.
• The batteries in the remote control are
exhausted.
Correction Page
wall outlet.
• Select the appropriate video input mode
on the TV so the picture from the DVD
video player appears on the TV screen.
• Connect the video cable securely into the
jacks.
• Select the correct input mode of the audio
receiver so you can listen to the sound
from the DVD video player.
• Connect the audio cable securely into the
jacks.
audio cable.
• Select the proper audio setting. 29, 32,
• Eject the disc and clean it. 51
• Sometimes a small amount of picture
distortion may appear. This is not a
malfunction.
• Connect the DVD video player directly to
the TV. Avoid connecting the DVD video
player to a VCR or TVA/CR combination.
indicator or VIDEO CD/audio CD indicator
in the DVD display is lit.)
type and color system.)
• Place the disc with the playback side
down (label facing up).
the disc tray.
• Clean the disc. 51
• Cancel the parental lock function or
change the parental lock level.
• These operations may prevent a proper
progressing of the disc’s contents.
• Turn the power on or off with the POWER
button. Or, disconnect the power plug and
insert it into the wall outlet again.
• Point the remote control at the remote
sensor of the DVD video player.
• Operate the remote control within about
20 feet.
• Replace the batteries with new ones.
12,13
16
12,13
16
12,13,
14,15
“
38
12
9
51
16
16
32,44
“
11
11
11
52
Page 55

others J
Specifications
DVD Video Player / Outputs / Supplied Accessories
[DVD Video Player]
Power supply
Power consumption 19W
Mass
External dimensions 430 X 81 X 300 mm (W/H/D)
Signal system
Laser Semiconductor laser, wavelength 650 nm
Frequency range DVD linear sound : 48 kHz sampling 4 Hz to 22 kHz
Signal-to-noise ratio More than 112 dB
Audio dynamic range
Harmonic distortion Less than 0.001 %
Wow and flutter
Operating conditions Temperature: 5 °C to 35 °C, Operation status: Horizontal
[Outputs]
Video output
S video output (Y) 1.0 V (p-p), 75 Q, negative sync.. Mini DIN 4-pin x 1
Color different output (Y) 1.0 V (p-p), 75 £1, negative sync., pin jack x 1
Audio output (OPTICAL) Optical connector x 1
Audio output (COAXIAL) 0.5 V (p-p), 75 £i, pin jack x 1
Audio output (MIXED OUT) 2.0 V (rms), 220 £2, pin jacks (L, R) x 1
Audio output (5.1 CH SURROUND)
Headphone terminal 32 £2 (10 mW), impedance; more than 8 £2
120 VAC, 60 Hz
3.6 kg
Standard NTSC
96 kHz sampling 4 Hz to 44 kHz
Audio CD : 4 Hz to 20 kHz
More than 112 dB
Below measurable level (less than ±0.001 % (W.PEAK))
1.0 V (p-p), 75 £1, negative sync., pin jack x 1
(C) 0.286 V (p-p), 75 Q.
(Cb)/(Cr) 0.7 V (p-p), 75 £1
2.0 V (rms), 220 £1, pin jacks x 6
[Supplied Accessories]
S video cable
Audio/video cable
Remote control
Batteries (AA)
Designs and specifications are subject to change without notice.
.....................
..............
..................
....................
..............
..............
..............
..............
1
1
1
3
53
Page 56

Philips Consumer Electronics Company
Factory Service Center Locations
NOTE: If you reside in one of our Philips Factory Service Branch areas (see directory on back), you can contact the nearest Service Branch to
obtain efficient and expedient repair for your product. If your product is in-Warranty, you should have proof-of-purchase to ensure No Charge
Service. For Out-of-Warranty service, call the location nearest you.
NOTA: Si vous résidez dans une des régions desservies par une succursale de service après vente du fabricant Philips (voir liste ci-dessous), vous
pourrez contacter la branche de service après vente la plus près de chez vous pour obtenir un service après vente rapide et efficace. Si le produit
est sous garantie, il suffira de présenter une preuve d'achat pour bénéficier d'un service sans frais. Pour les produits non couverts par la garantie,
contactez le centre le plus près de chez vous.
NOTA: Si Ud. reside en una de nuestras zonas para sucursales Philips de servicio al de fábrica (ver directorio más abajo), Ud. puede comunicarse
con la sucursal de servicio más cercana para obtener una reparación oportuna y eficaz de su producto. Si su producto está todavía bajo garantía,
Ud. debe presentar comprobante de compra para no ocasionar ningunos cargos por servicio. Para servicio después del vencimiento de la
garantía, llame al lugar más cercano de los abajo indicados.
In Canada
How you can obtain efficient and expedient carry-in, mail-in, or in-home service for your product
Please contact Philips at 1 -800-661 -6162 (French speaking)
1-800-363-7278 (English speaking)
Au Canada
Comment obtenir le service après-vente pour les produits apportés ou envoyés par la poste à notre centre de service ou le service à domicile
Veuillez contacter philips á; 1 -800-661 -6162 (Francophone)
1-800-363-7278
En el Canadá
Cómo recibir servicio efficiente para su producto, en persona, por correo o a domicilio
Favor de comunicarse con Philips al: 1-800-661-6162 (francófono)
1-800-363-7278 (anglòfono)
54
MAC2929 8/98
EL4482-3 Rev. Y
3135 015 07541
Page 57

Quality service is as close as your telephone! Simply look over the list below for the number of a Factory Service Center
NEAR YOU. Your product will receive efficient and expedient carry-in, mail-in, or in-home service, and you will receive peace of mind,
KNOWING your product IS BEING GIVEN THE EXPERT AHENTION OF PHILIPS’ FACTORY SERVICE. AND, IF THE PHONE NUMBER LISTED FOR YOUR AREA
IS LONG DISTANCE, CALL 1-800-242-9225 FOR FACTORY SERVICE.
COMMENT OBTENIR NOTRE SERVICE APRÈS VENTE RAPICE ET EFFICACE SOIT PAR COURRIER, À DOMICILE, OU EN SE PRÉSENTANT À UN CENTRE OE SERVICE PHILIPS. PLUS DE 60D CENTRES DE
RÉCEPTION DE PRODUITS À RÉPARER À TRAVERS LE PAYS: CONTACTER LE CENTRE DE SERVICE AUX CDNSOMMATEURS LE PLUS PROCHE POUR SAVOIR L’EMPLACEMENT DE CES DÉPÔTS DANS
CÓMO OBTENER UN SERVICIO OPORTUNO Y EFICIENTE POR CORREO, EN CASA O EN PERSONA PARA SU PRODUCTO A TRAVÉS DE UN CENTRO PHILIPS DE SERVICIO. MAS DE 600 SITIOS POR
TODO EL PAIS PARA LA RECEPCION DE PRODUCTOS NECESITADOS DE REPARACIONES: COMUNICARSE CON EL CENTRO DE SERVICIO DE FABRICA MAS CERCANO PARA ESTOS LUGARES DENTRO
UN RAYON DE 50 À 75 MILES (80 KM À120 KM) DU CENTRE DE SERVICE LOCAL.
DE UN RADIO DE 80 A120 KM (50 A 75 MILUS) DEL CENTRO DE SERVICIO LOCAL.
GEORGIA
Philips Factory Service of Georgia
200 N. Cobb Pkwy., Suite 120
Marietta, GA 30062
(770) 795-0085
FLORIDA
Philips Factory Service of Fiorida
1911 US Highway 301 North 950 Keynote Circie
Tampa, FL 33619
(813) 621-8181
WESTERN U.S.A.
Philips Factory Service Western Region
681 East Brokaw Rd.
San Jose, CA 95112
(408) 436-8566
NORTH CAROLINA
Philips Factory Service of N. Caroiina
520 G Cianton Rd.
Chariotte, NC 28217
(704) 529-6330
TEXAS
Philips Factory Service of Texas
1110 N. Post Oak Rd., Suite 100
Houston, TX 77055
(713) 682-3990
CENTRAL U.S.A.
Philips Factory Service Centrai US
Brookiyn Heights, OH 44131
(216) 741-3334
MICHIGAN
Philips Factory Service of Michigan
25173 Dequindre
Madison Heights, Ml 48071
(248) 544-2110
ILLINOIS
Philips Factory Service of iliinois
1360 W. Hamiiton Pkwy.
itasca, IL 60143
(630) 775-0990
TENNESSEE
Philips Factory Service of East Tennessee
6700 D Papermill Rd.
Knoxville, TN 37919
(423) 584-6614
MID-ATLANTIC
Philips Factory Service Mid-Atlantic
352 Dunks Ferry Rd.
Bensaiem, PA 19020
(215) 638-7500
MAC2929 8/98
55
Page 58

LIMITED WARRANTY
DVD VIDEO PLAYER
90 Days Free Labor
One Year Exchange Warranty on Parts
This product must be carried in for repair.
WHO IS COVERED?
You must have proof of purchase to receive warranty service. A sales
receipt or other document showing that you purchased the product is
considered proof of purchase.
MAKE SURE YOU KEEP...
Please keep your sales receipt or other document showing proof of
purchase. Attach it to this owner’s manual and keep both nearby. Also
keep the original box and packing material in case you need to return
your product.
WHAT IS COVERED?
Warranty coverage begins the day you buy your product. For 90 days
thereafter, all parts will be repaired or replaced, and labor is free. From
90 days to one year from the day of purchase, all parts will be repaired or
replaced, but you pay for all labor charges. After one year from the day
BEFORE REQUESTING SERVICE...
Please check your owner’s manual before requesting service.
Adjustments of the controls discussed there may save you a service
call.
of purchase, you pay for the replacement or repair of all parts, and for
all labor charges.
All parts, including repaired and replaced parts, are covered only for
the original warranty period. When the warranty on the product
expires, the warranty on all replaced and repaired parts also expires.
WHAT IS EXCLUDED?
Your warranty does not cover:
• labor charges for installation or setup of the product, adjustment of
customer controls on the product, and installation or repair of
antenna systems outside of the product.
• product repair and/or part replacement because of misuse, accident,
unauthorized repair or other cause not within the control of Philips
Consumer Electronics Company.
• reception problems caused by signal conditions or cable or antenna
systems outside the unit
• a product that requires modification or adaptation to enable it to
operate in any country other than the country for which it was
designed, manufactured, approved and/or authorized, or repair of
products damaged by these modifications.
• incidental or consequential damages resulting from the product
(Some states do not allow the exclusion of incidental or consequen
tial damages, so the above exclusion may not apply to you. This
includes, but is not limited to, prerecorded material, whether copy
righted or not copyrighted.)
• a product that is used for commercial or institutional purposes
(including but not limited to rental purposes).
WHERE IS SERVICE AVAILABLE?
Warranty service is available in all countries where the product is offi
cially distributed by Philips Consumer Electronics Company. In coun
tries where Philips Consumer Electronics Company does not distribute
the product, the local Philips service organization will attempt to pro
vide service (although there may be a delay if the appropriate spare
parts and technical manual(s) are not readily available).
TO GET WARRANTY SERVICE IN U.S.A.,
PUERTO RICO OR U.S. VIRGIN ISLANDS...
Take the product to a Philips factory service center (see enclosed list)
or authorized service center for repair. When the product has been
repaired, you must pick up the unit at the center. Centers may keep
defective parts.
(In U.S.A., Puerto Rico and U.S. Virgin Islands, all implied warranties,
including implied warranties of merchantability and fitness for a particu
lar purpose, are limited in duration to the duration of this express war
ranty. Because some states do not allow limitations on how long an
implied warranty may last, this limitation may not apply to you.)
TO GET WARRANTY SERVICE IN CANADA...
Please contact Philips at:
I -800-661-6162 (French Speaking)
1-800-363-7278 (English Speaking)
(In Canada, this warranty is given in lieu of all other warranties. No
other warranties are expressed or implied, including any implied war
ranties of merchantability or fitness for a particular purpose. Philips is
not liable under any circumstances for any direct, indirect, special. Inci
dental or consequential damages, howsoever incurred, even if notified
of the possibility of such damages.)
REMEMBER...
Please record the model and serial numbers found on the product
below. Also, please fill out and mail your warranty registration card
promptly. It will be easier for us to notify you if necessary.
MODEL#
SERIAL#
_____________________________________________
_____________________________________________
56
This warranty gives you specific legal rights. You may have other rights which vary from state/province to state/province.
Philips Service Company, P.O. Box 555, Jefferson City, Tennessee 37760, (423)475-8869
EL6191E002 / MAC 60S8 / 8-97
IB8066B001
Printed in Japan
 Loading...