

Page 1

English
CONTENTS 1
Welcome To Digital Television
Congratulations on choosing the Philips' DTR 6600 digital terrestrial receiver. This receiver will allow you to access
free-to-view digital terrestrial television, radio, interactive and dedicated scrambled channels. The embedded MHP
feature makes your receiver compatible with the MHP interactive television applications that are carried on some
of the channels.
Note: "Decoder" is used in all the menu screens. The term "decoder" also stands for "STB (Set Top Box)", "Receiver" or "Digital
receiver". In the user manual all descriptions refer to "receiver".
Page 2

English
2 CONTENTS
1 Safety Instructions ___________________________3
2 Unpacking __________________________________3
3 Product description __________________________4
3.1 Front view _________________________________4
3.2 Rear view __________________________________5
3.3 Smart card reader ___________________________5
4 Preparing, setting and using your Remote
Control _____________________________________6
4.1 Installation of batteries ________________________6
4.2 Setting of your remote control _________________6
4.2.1 Mode setting ________________________________6
4.2.2 Volume and mute control setting _________________6
4.2.3 Changing the brand setting of your remote control for TV,
VCR, DVD or Amplifier-Tuner ___________________6
4.3 Using the remote to control your digital receiver
The remote control is set to STB mode __________7
5 Connection and Installation ___________________8
5.1 Connections ________________________________8
5.1.1 Connect the receiver to your TV and VCR _________8
5.1.2 Connect your HiFi appliance ____________________9
5.1.3 Connect your receiver to the telephone line (for future
use) _______________________________________9
5.2 Receiver installation __________________________9
6 Day to Day operation _______________________10
6.1 Switch your receiver _________________________10
6.2 Wake up or Switch your receiver to standby _____10
6.3 Select TV or Radio mode _____________________10
6.4 How to switch between channel in the list _______10
6.5 How to use the channel Banner _______________11
6.5.1 Channel Banner Icons ________________________11
6.5.2 How to Select Current / Next Programs _________11
6.5.3 How to Select Channels ______________________12
6.6 How to Change momentarily the current Program
Options __________________________________12
6.7 How to Display More Program Info ____________12
6.8 How to Run MHP Interactive Applications _______13
6.9 Reminders and Timers _______________________13
6.9.1 Difference Between Reminder and Timer _________13
6.9.2 Viewing and Recording Reminders/Timers _________14
6.9.3 Reminder/Timer Conflicts _____________________14
6.9.4 Timer Manager _____________________________14
6.10 Program Guide _____________________________15
7 Main Menu _________________________________16
7.1 Menu Structure ____________________________16
8 Change the setting of your receiver ___________18
8.1 Channel Manager ___________________________18
8.1.1 How to skip a channel ________________________18
8.1.2 How to move a channel ______________________18
8.1.3 How to rename a channel _____________________18
8.1.4 How to lock a channel ________________________19
8.2 Specially for parents _________________________19
8.2.1 Your PIN code ______________________________20
8.3 Your Preferences ___________________________20
8.3.1 Display Options _____________________________20
8.3.2 Language Options ___________________________21
8.4 Installation _________________________________21
8.4.1 Local Time _________________________________21
8.4.2 Settings ___________________________________21
8.4.3 Installation / Signal Meter ______________________23
8.4.4 Installation / Channel Search ___________________24
8.4.5 Installation / Decoder Status ____________________24
8.4.6 Installation / Factory Reset _____________________24
9 Advanced Settings __________________________25
9.1 Easy Recording _____________________________25
9.2 Change the Remote Control and receiver "Device"
Settings ___________________________________26
9.3 Master PIN Code ___________________________26
10 Decoder Software Upgrade __________________27
11 Programming the Remote Control for your STB,
TV, Video Recorder, DVD and Tuner
Amplifier. __________________________________28
11.1 Setting up your remote control ________________28
11.2 Using your remote control for your TV _________29
11.3 Using your remote control for your VCR ________30
11.4 Using Remote Control For Your DVD Player _____31
11.5 Using Remote Control For Your Tuner / Amplifier _32
12 Troubleshooting guide ______________________33
13 Technical Specification ______________________34
BRAND CODE LIST ____________________________35
Contents
Page 3

SAFETY INSTRUCTIONS 3
1 Safety Instructions
English
All the safety and operating Instructions should be read
and understood before the receiver is operated.
For best results, position your receiver away from
radiators or other heat sources. Leave a space of at least
3 cm around the receiver for ventilation making sure that
the ventilation holes are not obstructed.
This receiver is intended for use in a domestic
environment only and should never be operated or
stored in excessively hot, humid or damp conditions.
Make sure no objects or fluids enter the housing through
the ventilation slots. Should this happen, disconnect your
receiver from the mains and consult your retailer.
For cleaning, use damp chamois leather. Never use any
abrasive cloth, sponge or cleaner.
When connecting or disconnecting cables to the receiver
always ensure the receiver is disconnected from the
mains.
Please wait before connecting your receiver - read on.
Do not disassemble the equipment. There are no user
serviceable parts.
Mains connection
Before connecting the receiver to the mains, check that
the mains supply voltage corresponds to the voltage
printed on the rear of the receiver. If the mains voltage is
different, consult your dealer.
Please wait before connecting your receiver - read
on.
As you unpack your digital receiver, please make sure the
following accessories are included:
- Remote control with separately packed Philips alkaline
batteries
- Mains cord
- One SCART cable
- One Phone cord
- One RF coaxial cable
- User Manual
- Philips guarantee card
Warning: Plastic bags can be dangerous. To avoid suffocation
keep the bag away from babies and children.
2 Unpacking
Page 4
3 Product description
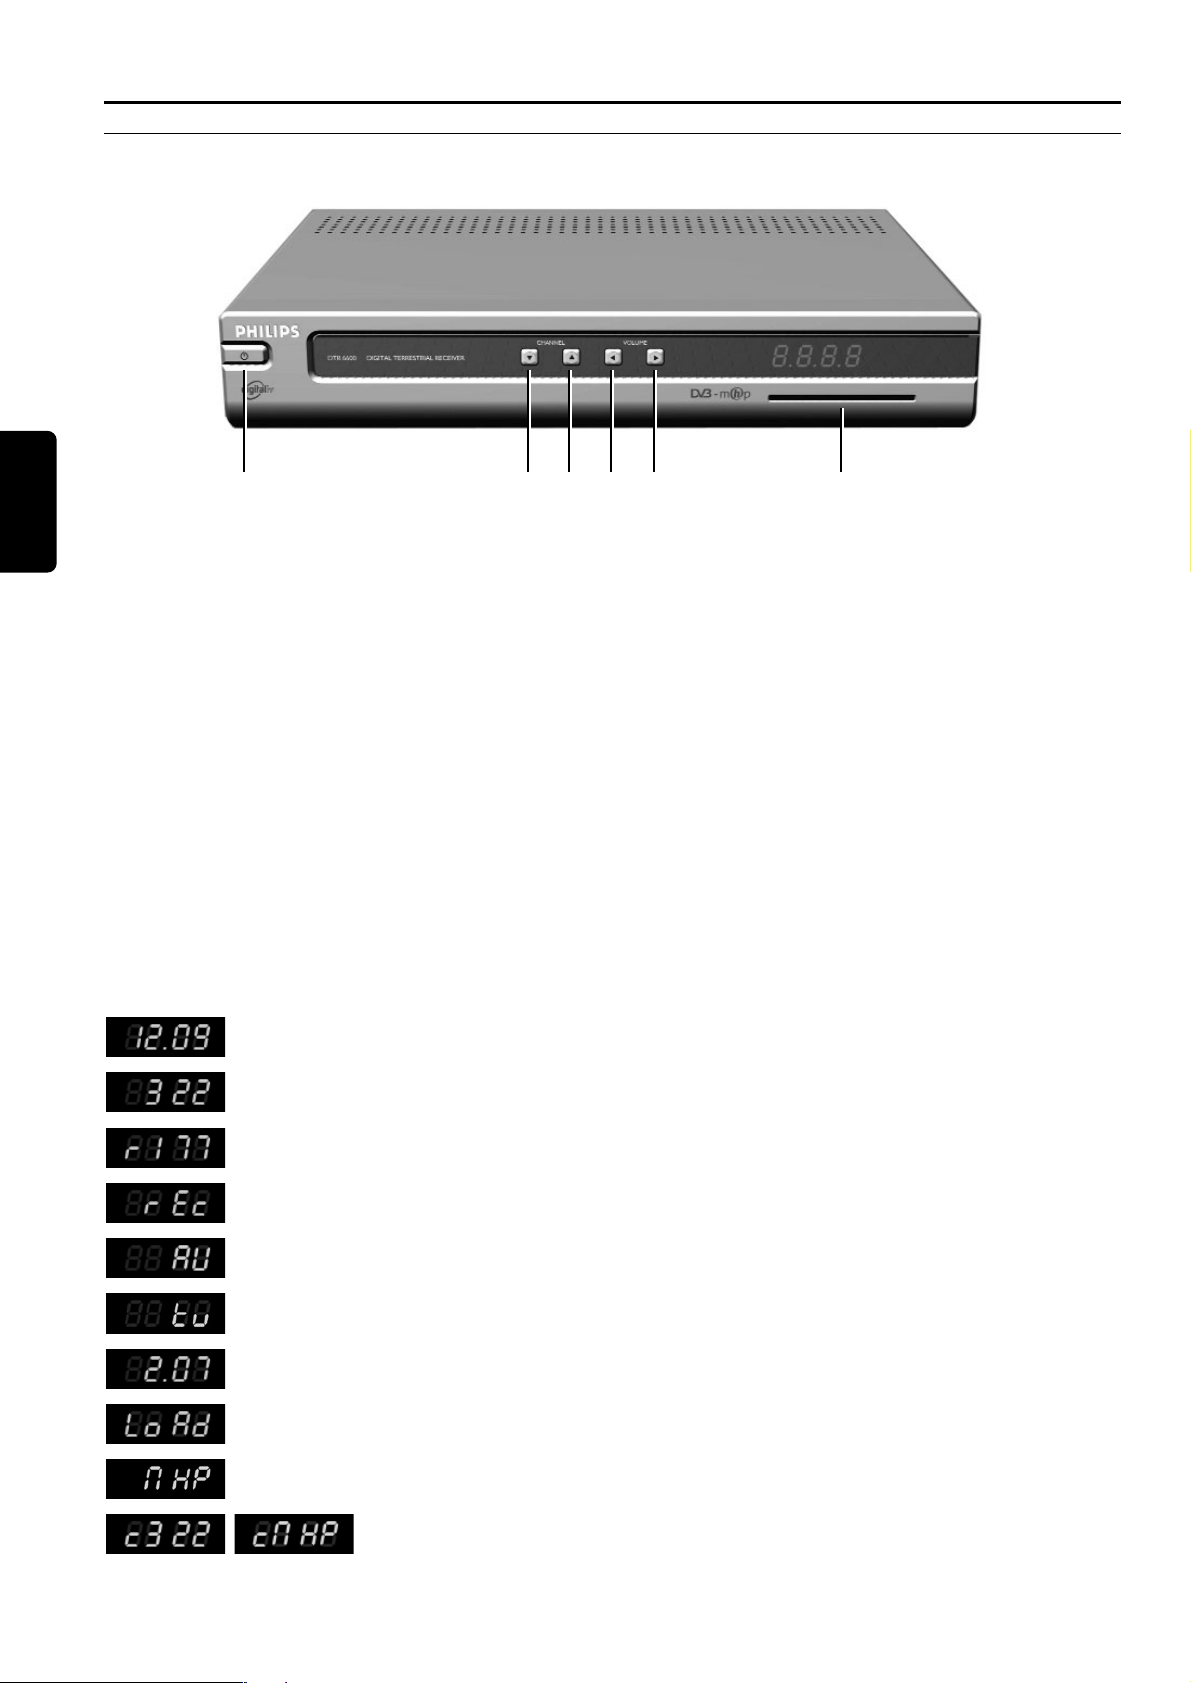
3.1 Front view
1 Standby Switch your receiver from the digital TV mode into the standby mode.
2/3 Down/Up ● In standby mode, wakes up the receiver.
● In normal viewing or in Channel Banner, tunes program Up/Down to consecutive
channels.
● In the Menu system, exit to normal viewing and then switch channels.
4/5 Left/Right ● In normal viewing, changes the volume level.
● In Channel Banner, switches between now/next programs.
● In the Menu, exits to normal viewing and then change audio volume.
6 Smart Card Slot ● To insert a smart card (see section 3.3).
Front Panel Display
The front panel LED display gives you information about the current state of your receiver.
Status indicator table
Current time displayed in 24-hour format when the box is in the standby mode.
Receiver is tuned to one of the TV channels.
Receiver is tuned to one of the radio channels.
Recording is in progress.
The VCR connected to the VCR SCART of your receiver is playing back a tape. Stop VCR
play back to return to the viewing mode.
Your decoder is switched into the TV mode. Press the TV / STB remote control key to
return to he STB mode.
Dot in the middle blinks when you press remote control keys.
Receiver upgrade is in progress.
On the currently tuned channel, there is an interactive application available.
c letter on the left part of display indicates a modem connection. It blinks during
initialization of connection.
4 PRODUCT DESCRIPTION
English
123456
Page 5
PRODUCT DESCRIPTION 5
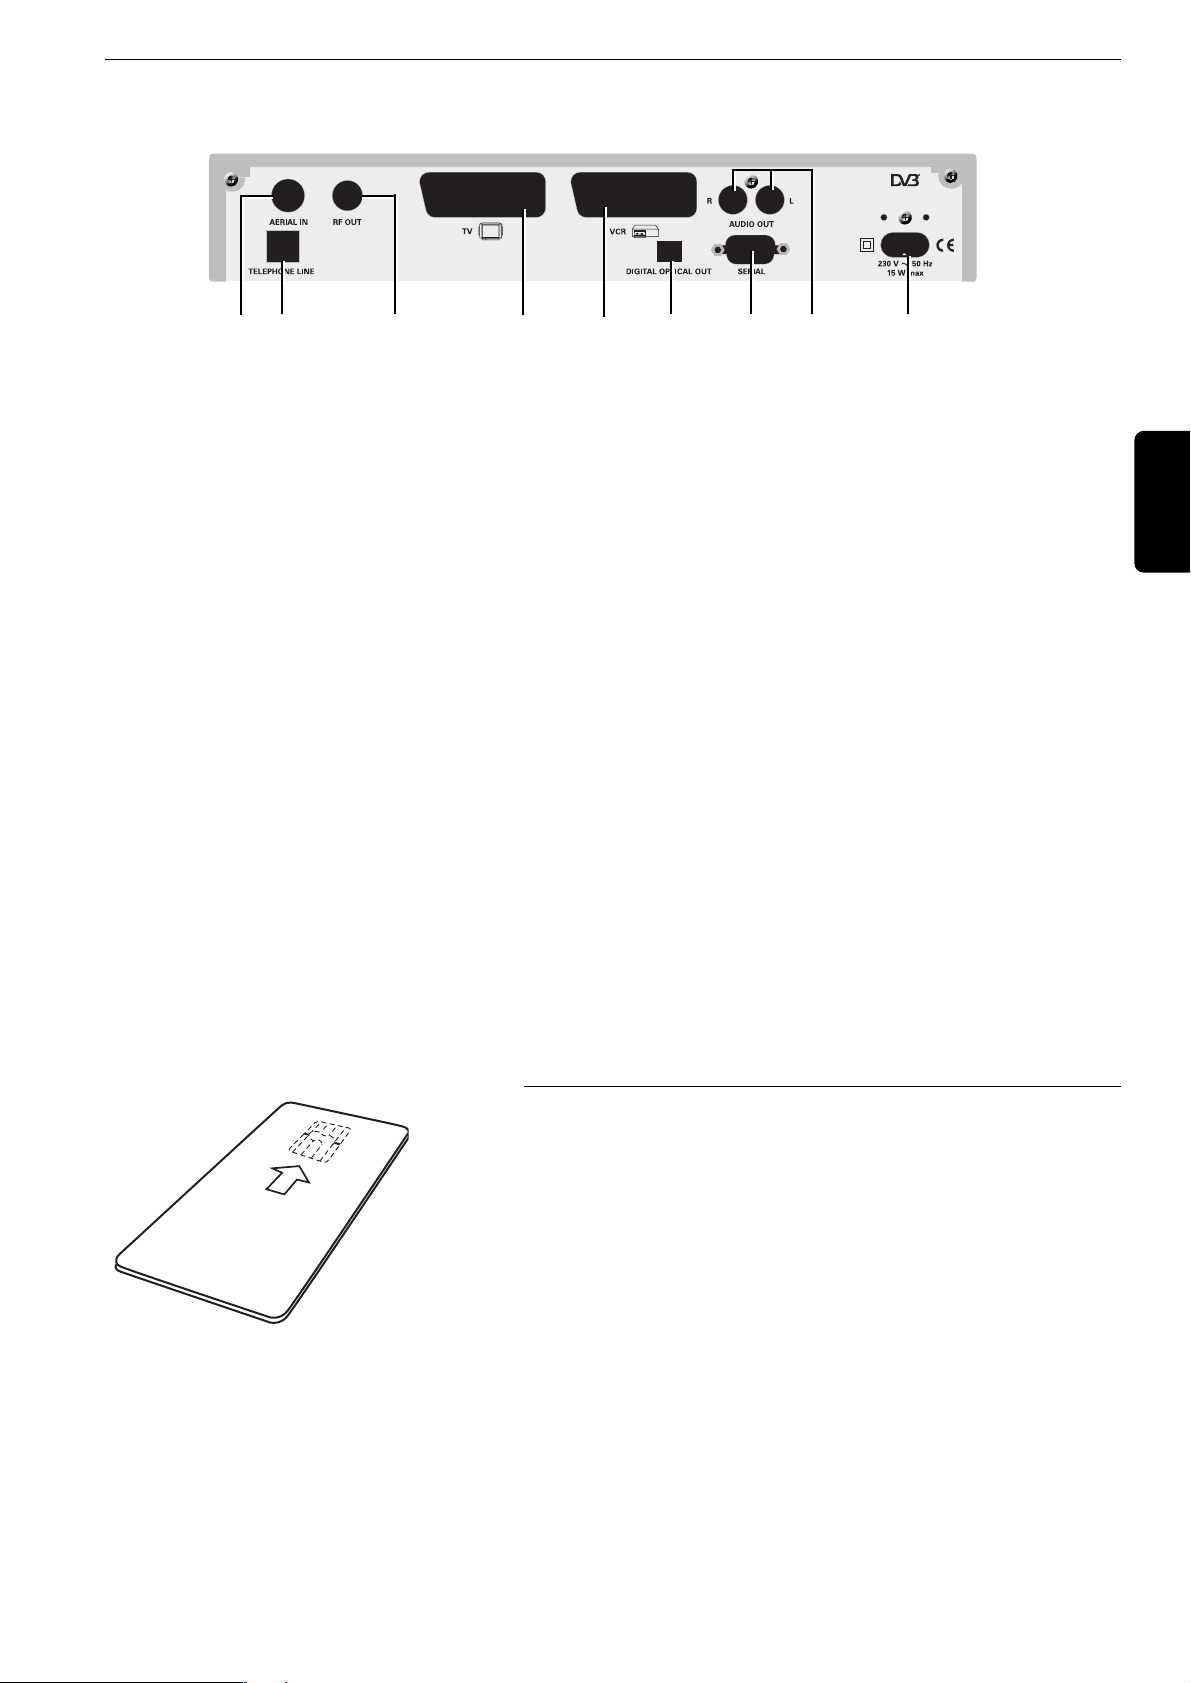
3.2 Rear view
1 Aerial In (SELV) To connect the plug of your aerial cable.
2 Telephone Line (TNV3) To connect the supplied telephone cord to be connected to your
telephone line.
3 RF Out (SELV) To connect the supplied RF coaxial cable to be connected to the aerial
input socket of your TV or VCR.
4 TV SCART (SELV) (1) (2) To connect the supplied SCART lead to be connected to the SCART
socket input of your TV set.
5 VCR SCART (SELV) (1) To connect a SCART lead to be connected to the SCART socket input
(EXT1) of your VCR or DVD Recorder.
6 Optical Audio (SELV) To connect to one of the Optical audio input of your HiFi / audio
receiver system.
7 RS232 (SELV) Data interface used during servicing.
8 L/R Audio Output (SELV) To connect to the Left/Right audio Cinch inputs of your HIFI/audio
receiver system.
9 Power Plug (HV) To connect the supplied mains cord to be connected to the power
socket.
SELV: Safety Extra Low Voltage.
HV: Hazardous Voltage.
TNV 3: Telecommunication Network Voltage 3.
(1) SCART is also called Euroconnector or Peritel.
(2) The supply SCART lead is suited for RGB format which allows the best picture quality. Consult the user manual of your TV set to
select its RGB capable SCART socket input.
Note: The label showing the type and the serial number is underneath your receiver.
3.3 Smart card reader
Your receiver is fitted with a smart card reader.
The smart card is intended for Pay TV channels or for future applications.
Inserting your smart card shall be done on the front panel right side
opening.
Note: the smart card golden or Silver contacts shall be downside at card
insertion.
English
12 3 4 5 6 7 8 9
Page 6
6 PREPARING SETTING USING REMOTE CONTROL
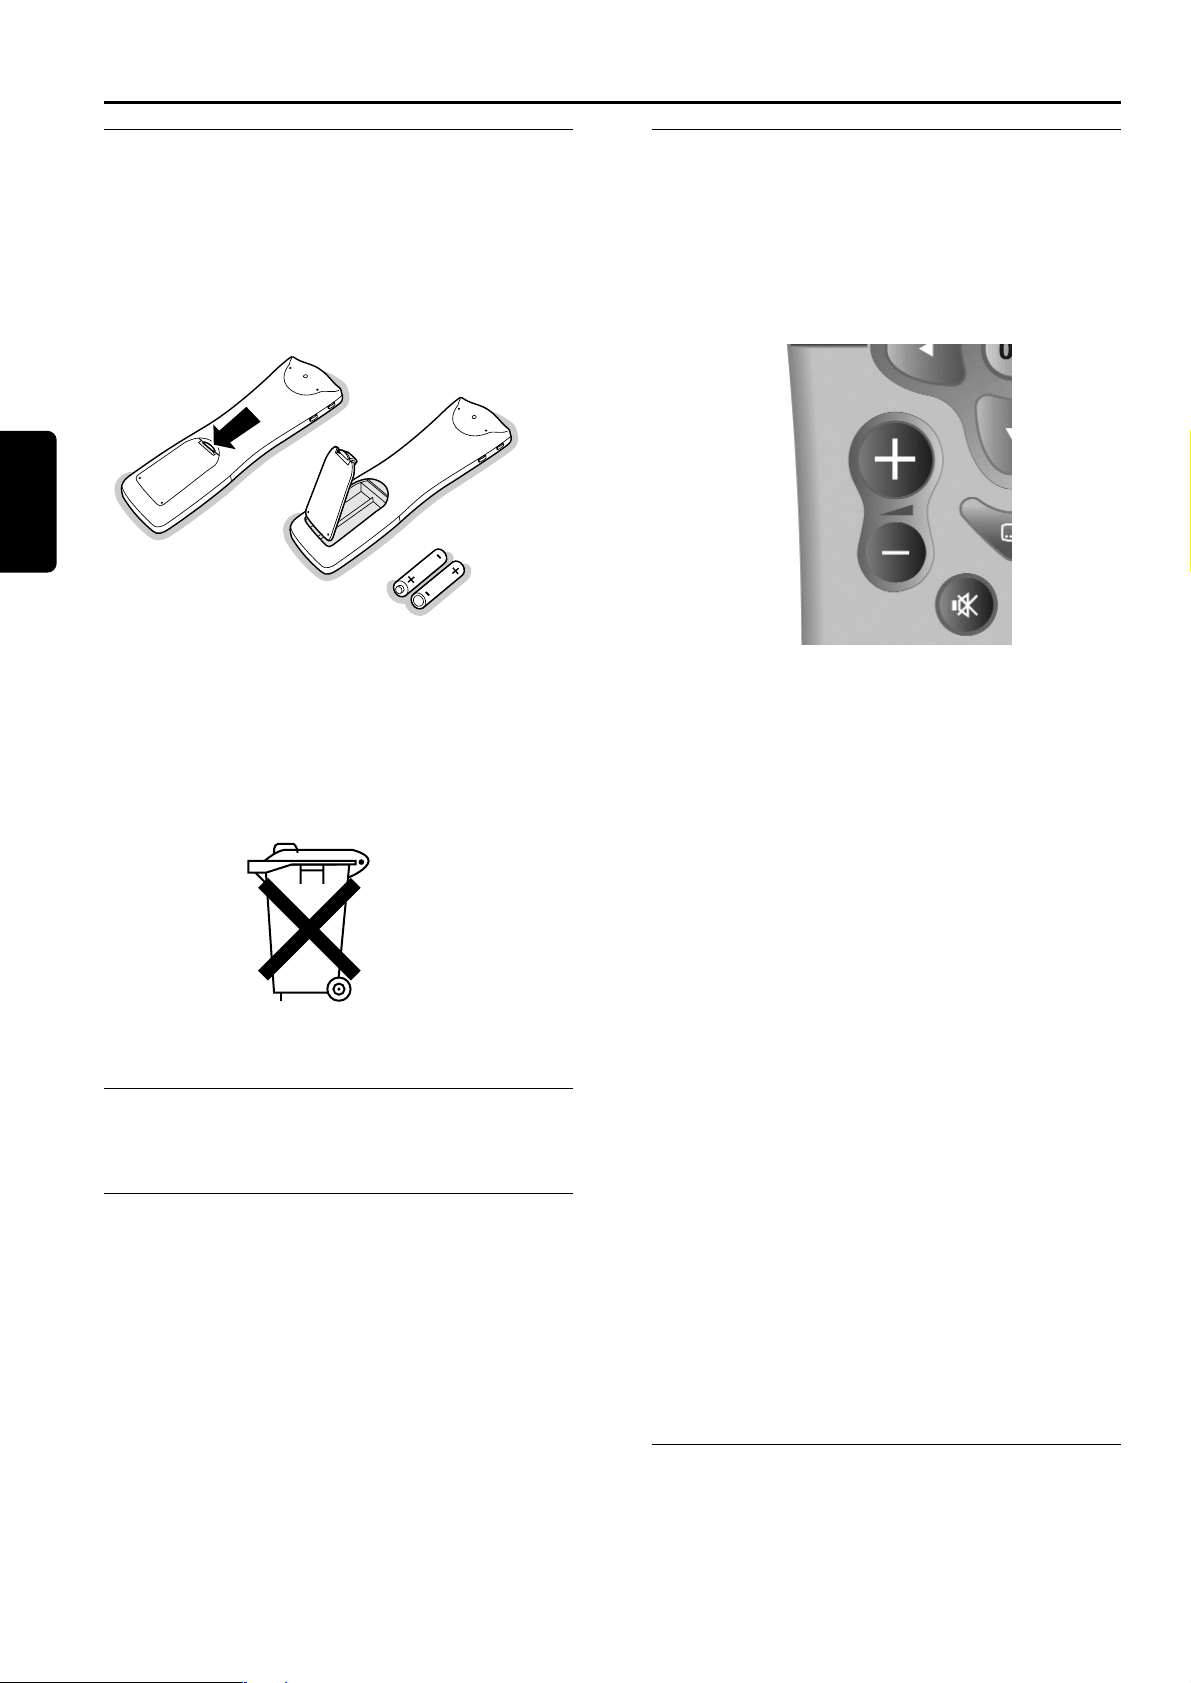
4.1 Installation of batteries
● Remove the remote control back cover.
● Insert the two batteries (type R06 / AA 1.5 V)
supplied.
● Position them as shown in the diagram in the battery
compartment.
● Replace the cover.
The Philips batteries supplied with your receiver's
remote control do not contain heavy metals such as
Mercury or Nickel Cadmium. Nevertheless in many
countries exhausted batteries may not be disposed of
with your household waste. Please ensure you dispose of
exhausted batteries according to local regulations.
4.2 Setting of your remote
control
4.2.1 Mode setting
Your 5 in 1 Remote control allows the control of most of
your Audio / Video equipment through various modes,
which are: Terrestrial receiver mode so called STB (Set
Top Box), TV, VCR, DVD and Amplifier-Tuner.
Pressing the MODE button once will remind you the
mode you are in through blinking lights: left for STB,
middle for TV, right for VCR, left-middle for DVD and
middle-right for Amplifier-Tuner.
To set a given mode press the MODE button several
times until the desired mode is signalled by the light(s).
The setting sequence is STB ➔ TV ➔ VCR ➔ DVD ➔
Amplifier-Tuner.
4.2.2 Volume and mute control setting
When the remote control is set to STB mode the Volume
+ / Volume - / Mute buttons can either control the
corresponding functions of your TV sets or the
corresponding function of your digital receiver. Refer to
chapters 4.2.2.1 or 4.2.2.2.
Note: we recommend Volume and mute control via your digital
receiver. Refer to chapter 4.2.2.1 for setting.
4.2.2.1 You want the remote to control the volume
and mute via your digital receiver (recommanded).
To set the volume/mute control to STB
1 Select the STB mode
2 Press simultaneously 1 and 9 buttons until the LED
blinks twice then release the buttons.
3 Enter code 993, the LED is blinking once after each digit
entry.
4 Press the "green" button, the LED shall blink twice to
acknowledge the new setting.
4.2.2.2 You want the remote to control the volume
and mute of your TV set / Set volume
control to TV.
The factory setting of your remote is set to allow the
control of the volume / mute of a Philips TV set. If your
TV set has a different brand check in the TV brand list
what code(s) might apply then change the setting of your
remote control according to the method described in
chapter 11.1.
Note: to set or reset the volume/mute control to TV follow
procedure below:
1 Select the STB mode.
2 Press simultaneously 1 and 9 buttons until the LED blinks
twice then release the buttons.
3 Enter code 993, the LED is blinking once after each entry.
4 Press the "yellow" button, the LED shall blink twice to
acknowledge the new setting.
4.2.3 Changing the brand setting of your
remote control for TV, VCR, DVD or
Amplifier-Tuner
Refer to chapter 11 for brand setting procedure.
4 Preparing, setting and using your Remote Control
English
Page 7
PREPARING SETTING USING REMOTE CONTROL 7
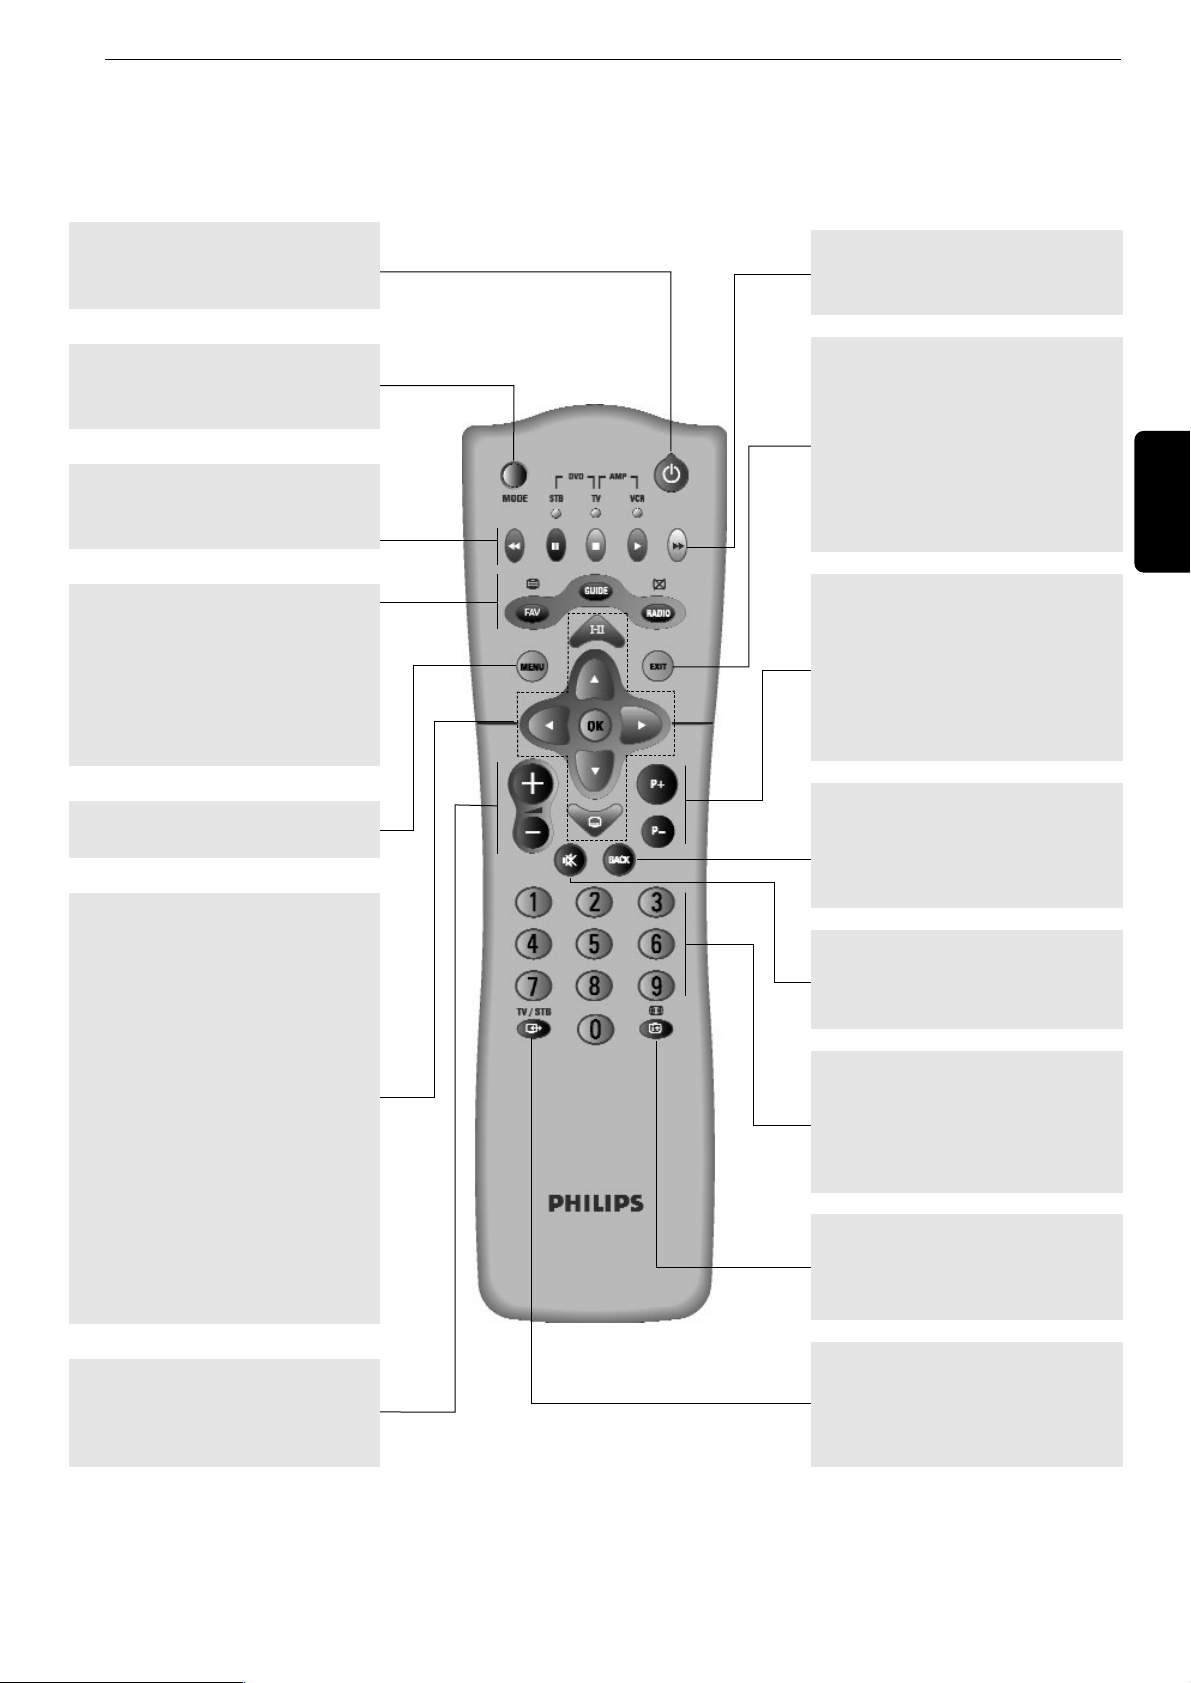
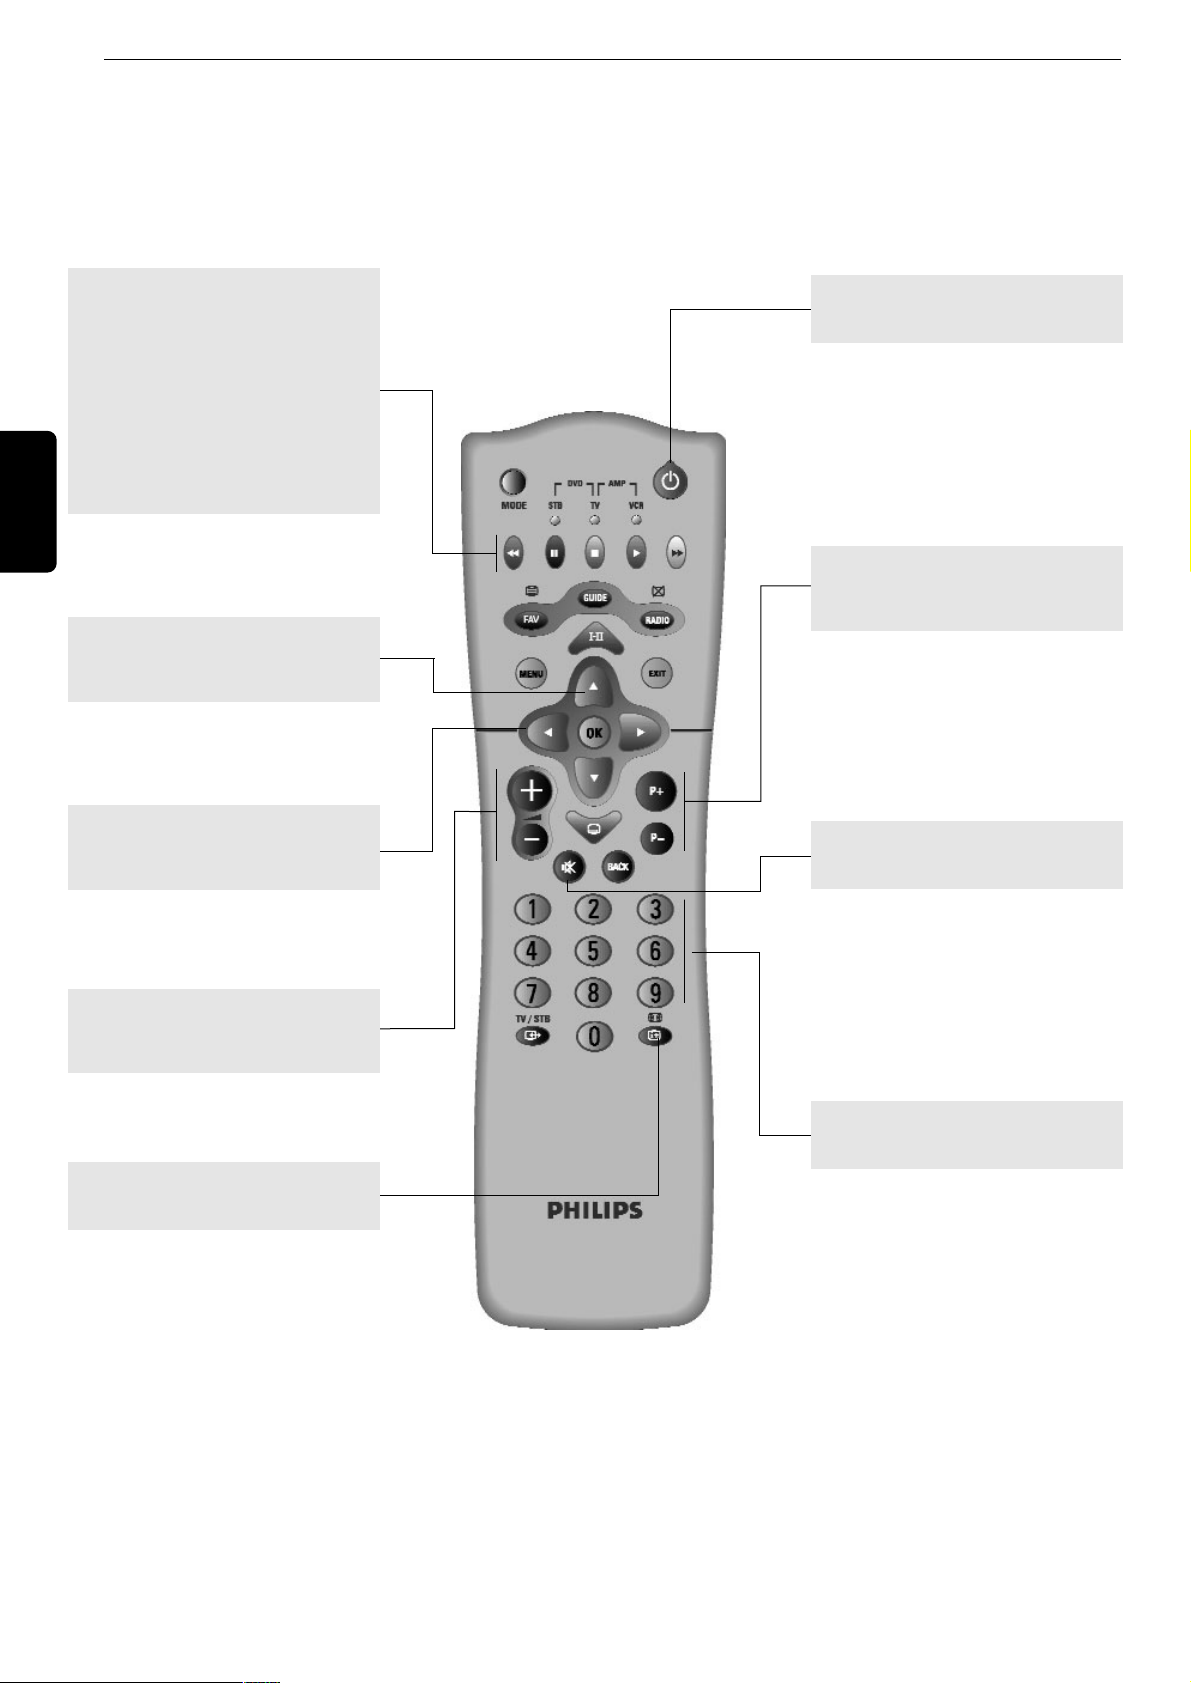
4.3 Using the remote to control your digital receiver The remote
control is set to STB mode
English
MODE
Selects the remote control mode
(STB, TV, VCR, DVD, AMP-TUNER).
MENU
Opens / Closes the Menu.
FAV
Open / close the current channel list.
GUIDE
Open / close the Program Guide
RADIO
Toggles between TV and Radio
modes.
AA
+/-
Change the volume level on your TV
or Digital Receiver (refer to 4.2 for
setting).
44
Open the Options menu to change
momentarily soundtrack / subtitles /
teletext / display format setting.
VW
- Switches the Channel Banner in
the browsing mode. - Scrolls
selection up/down in a menu or
channel list.
CB
- In Channel Banner, switch
between the current and next
program.
OK key
Confirms your choices.
ii
Open the Options menu to change
momentarily soundtrack / subtitles /
teletext / display format setting.
Standby
**
Switches your receiver into the
standby mode.
mm
Switches between viewing mode,
Channel Banner, and Channel
Banner with Extended Info.
TV/STB
aa
Toggles between watching terrestrial
digital programs via your receiver
and standard analogue programs via
your TV set.
0-9
- In viewing mode: Selects channels
- In menu ; Selects directly menu
item or Sets new parameter value
- In standby Wakes up the Digital
Receiver.
EXIT
Returns to normal viewing mode.
If [EXIT] is pressed and held for at
least 2 seconds, the currently
launched application is killed and
normal viewing is resumed. After
that the "autostart" status is switched
off temporarily as long as the box is
tuned to this channel.
P+ P-
- In viewing mode: Tunes to the
higher/lower channel within the
same channel list.
- scrolls one page up or down in
channel list
- In standby Wakes up the Digital
Receiver.
WHITE/TXT
TXT button used in MHP
applications.
MUTE H
Mutes the sound on your TV or
Digital Receiver (refer to 4.2 for
setting).
RED, GREEN, YELLOW, BLUE
Contextual buttons used in MHP
applications.
BACK
- In viewing mode: Returns to the
previously tuned channel
- In menu mode returns to the
previous screen.
Page 8
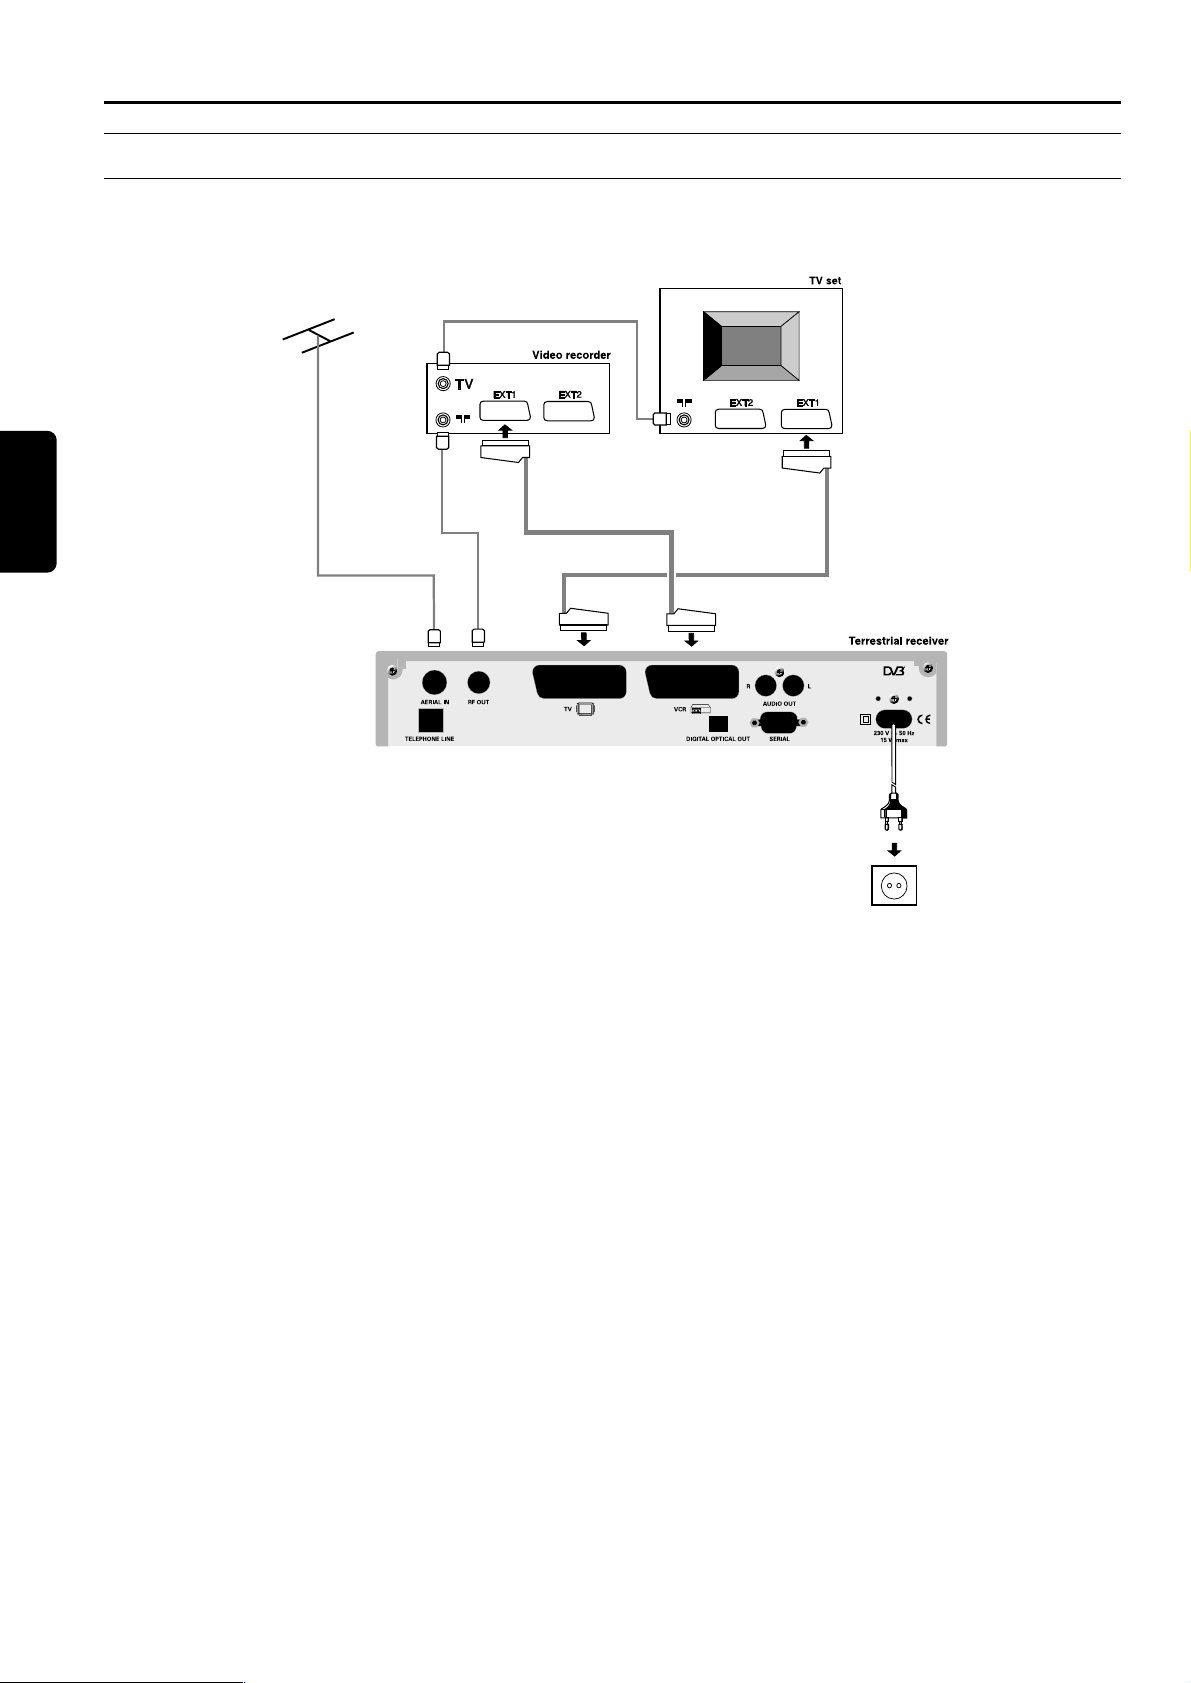
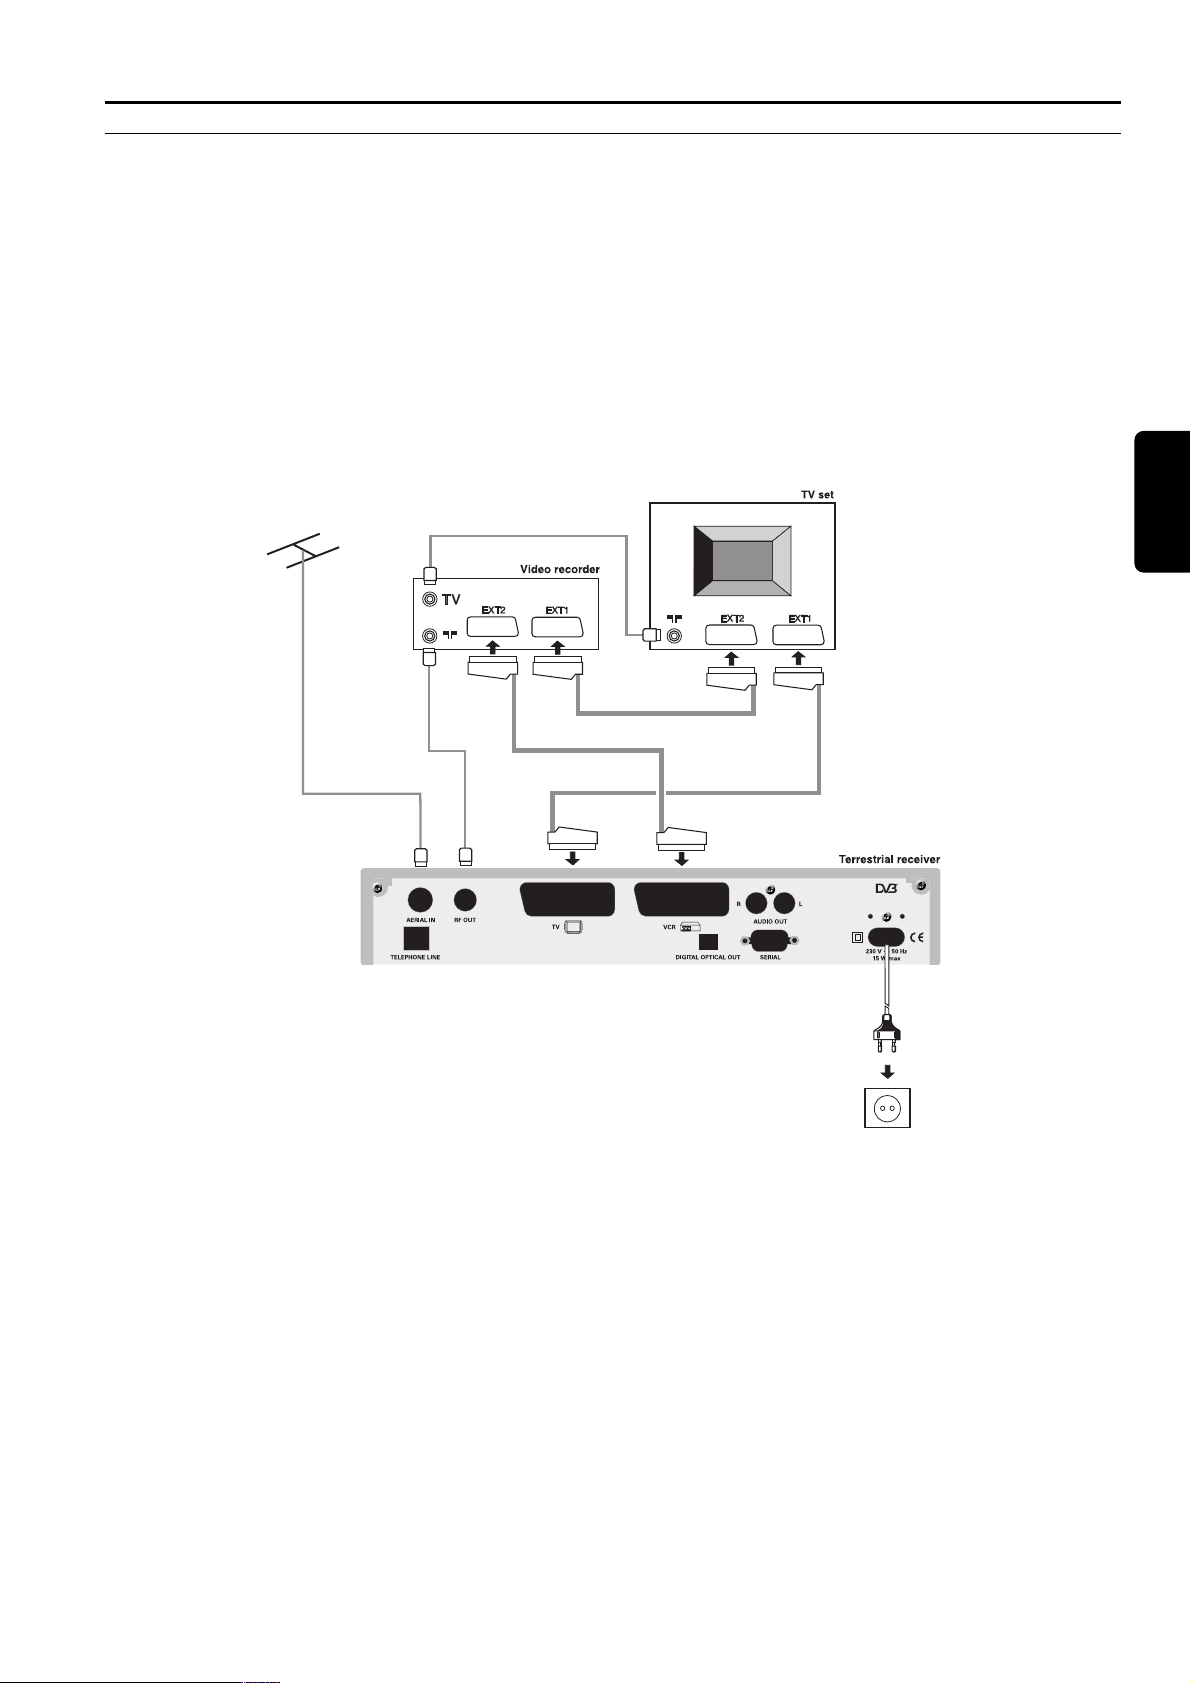
5 Connection and Installation
5.1 Connections
5.1.1 Connect the receiver to your TV and VCR
Incorporate the receiver in your existing installation as shown below / decoder receiver.
1 Plug your aerial lead plug into the "AERIAL IN" socket of your digital receiver.
2 Connect the "RF OUT" socket of your digital receiver to the "Aerial input" socket of your VCR by means of the RF coaxial
lead supplied with your digital receiver.
3 Connect the "RF OUT" socket of your VCR to the "Aerial input" socket of your TV set by means of a RF coaxial lead.
4 Connect the "TV" SCART socket of your digital receiver to the RGB capable SCART socket of your TV set by means of the
SCART lead supplied with your digital receiver.
5 Connect the "VCR" SCART socket of your digital receiver to the "EXT1" SCART socket of your VCR (so called OUT) by
means of a SCART lead.
6 Plug all your equipment, excluding your digital receiver, into the mains.
7 Go to chapter 5.2 to proceed with the channel scan of your digital receiver.
Notes:
1 This connection also applies if your VCR has two SCART sockets.
2 With this connection set up you can:
- Watch digital TV while you record analogue TV.
- Watch analogue TV while you record digital TV.
- Record the digital TV channel you are watching.
- Watch Play Back from your VCR.
8 CONNECTION AND INSTALLATION
English
Page 9

CONNECTION AND INSTALLATION 9
English
5.1.2 Connect your HiFi appliance
Depending on your HiFi / Audio receiver equipment, you
might have several options to connect your digital
receiver.
● Analogue connection
Connect the L/R audio output sockets to the relevant L/R
audio input sockets of your audio equipment by means of
a double CINCH cable (not supplied). Consult the user
manual of your HiFi/Audio receiver equipment to choose
the proper analogue audio inputs.
Note: With this connection set up you can control the audio
volume up/down and mute with the remote control of your
digital receiver and alternatively with your HiFi's remote control.
● Digital connection
Connect the audio "DIGITAL OPTICAL OUTPUT"
socket to the relevant digital audio optical input socket of
your audio equipment by means of an appropriate
connection (not supplied). Consult the user manual of
your HiFi/Audio receiver equipment to choose the
proper digital audio optical input.
Note: With this connection set up you can only control the
audio volume Up/Down and mute with your Hifi / audio
receiver remote control, refer to its User Manual.
5.1.3 Connect your receiver to the telephone line (for future use)
Connect the Telephone Line socket to the wall telephone
outlet by means of the supplied telephone cord.
Note: The equipment has been approved pursuant to
Commission Decision 99/303/EC for pan-European connection
to the public switched telephone network (PSTN). However,
due to differences between the individual PSTNs provided for in
different countries, the approval does not, of itself, give an
unconditional assurance of successful operation on every PSTN
network termination point.
In the event of problems, you should contact your equipment
supplier in the first instance.
5.2 Receiver installation
1 Switch on the TV set and select a program. Plug the
Receiver's power supply cord to the mains. The receiver
front panel display gets on.
Note: During power up after connection to mains, it is normal
for the front display to turn off for few seconds. It shall turn on
later on by showing MHP.
2 Now you should see the Welcome screen on your TV
screen. After a few seconds, the Welcome screen
disappears.
3 Next, a screen appears that allows you to select the
language. Highlight your language by pressing V/ W
and then press OK.
4 A screen appears that allows you to select the country
where you operate the receiver. Highlight the country by
pressing V/W and then press OK. Pressing OK
initiates the channel search procedure. Once it has been
completed, follow the prompts displayed on the screen.
5 Pressing OK stores any found channels and tunes the
box to the first found TV channel.
6 Now you are ready to enjoy viewing your terrestrial
receiver. Refer to chapter 6 Day to Day operation to
learn more about using your receiver.
Note : If any of the WELCOME, Language selection or Country
selection screen is not displayed, press two times the TV/STB
button to get the screen displayed
Page 10

6 Day to Day operation
6.1 Switch your receiver
When you connect your receiver to mains the receiver front panel
display gets on, after a few seconds the Welcome screen is shortly shown
then after few tenth of seconds the receiver is either in standby or in
viewing mode.
Note: During power up after connection to mains, it is normal for the front
display to turn off for few seconds. It shall turn on later on by showing MHP.
6.2 Wake up or Switch your receiver to
standby
● You watch TV or listen to radio, press the standby button to switch your
receiver to standby.
● Your receiver is in standby, to wake it up:
- Either press the
P+ or the P- button.
- Or press one digit button.
6.3 Select TV or Radio mode
Your receiver may work in two modes: TV or radio. To switch between
these two modes, press the RADIO key. If you are watching one of the
TV channels, pressing RADIO tunes to the last tuned radio channel
belonging to the previously selected channel list. Pressing RADIO again
returns to the TV mode - to the last tuned TV channel.
On switching the mode, the Channel Banner appears for its timeout. In
the radio mode, the radio label appears/disappears at random positions
on the screen to avoid damaging your TV screen.
Radio Label
6.4 How to switch between channel in the
list
Your receiver gives you access to TV Channel List and to Radio Channel
List.
To display the currently selected channel list, press the FAV key. To
change the channel list press C or B keys. Then select the channel by
pressing V or W, or number keys. Each time you highlight a noncurrent channel, the [OK] icon appears in the Channel Banner. To
tune to this channel, press OK.
Note: Channels lists allow you to work in so-called browsing mode. In this mode,
the box remains tuned to the same channel, while you browse through channels
and programs.
TV Channel List
10 DAY TO DAY OPERATION
English
Page 11
DAY TO DAY OPERATION 11
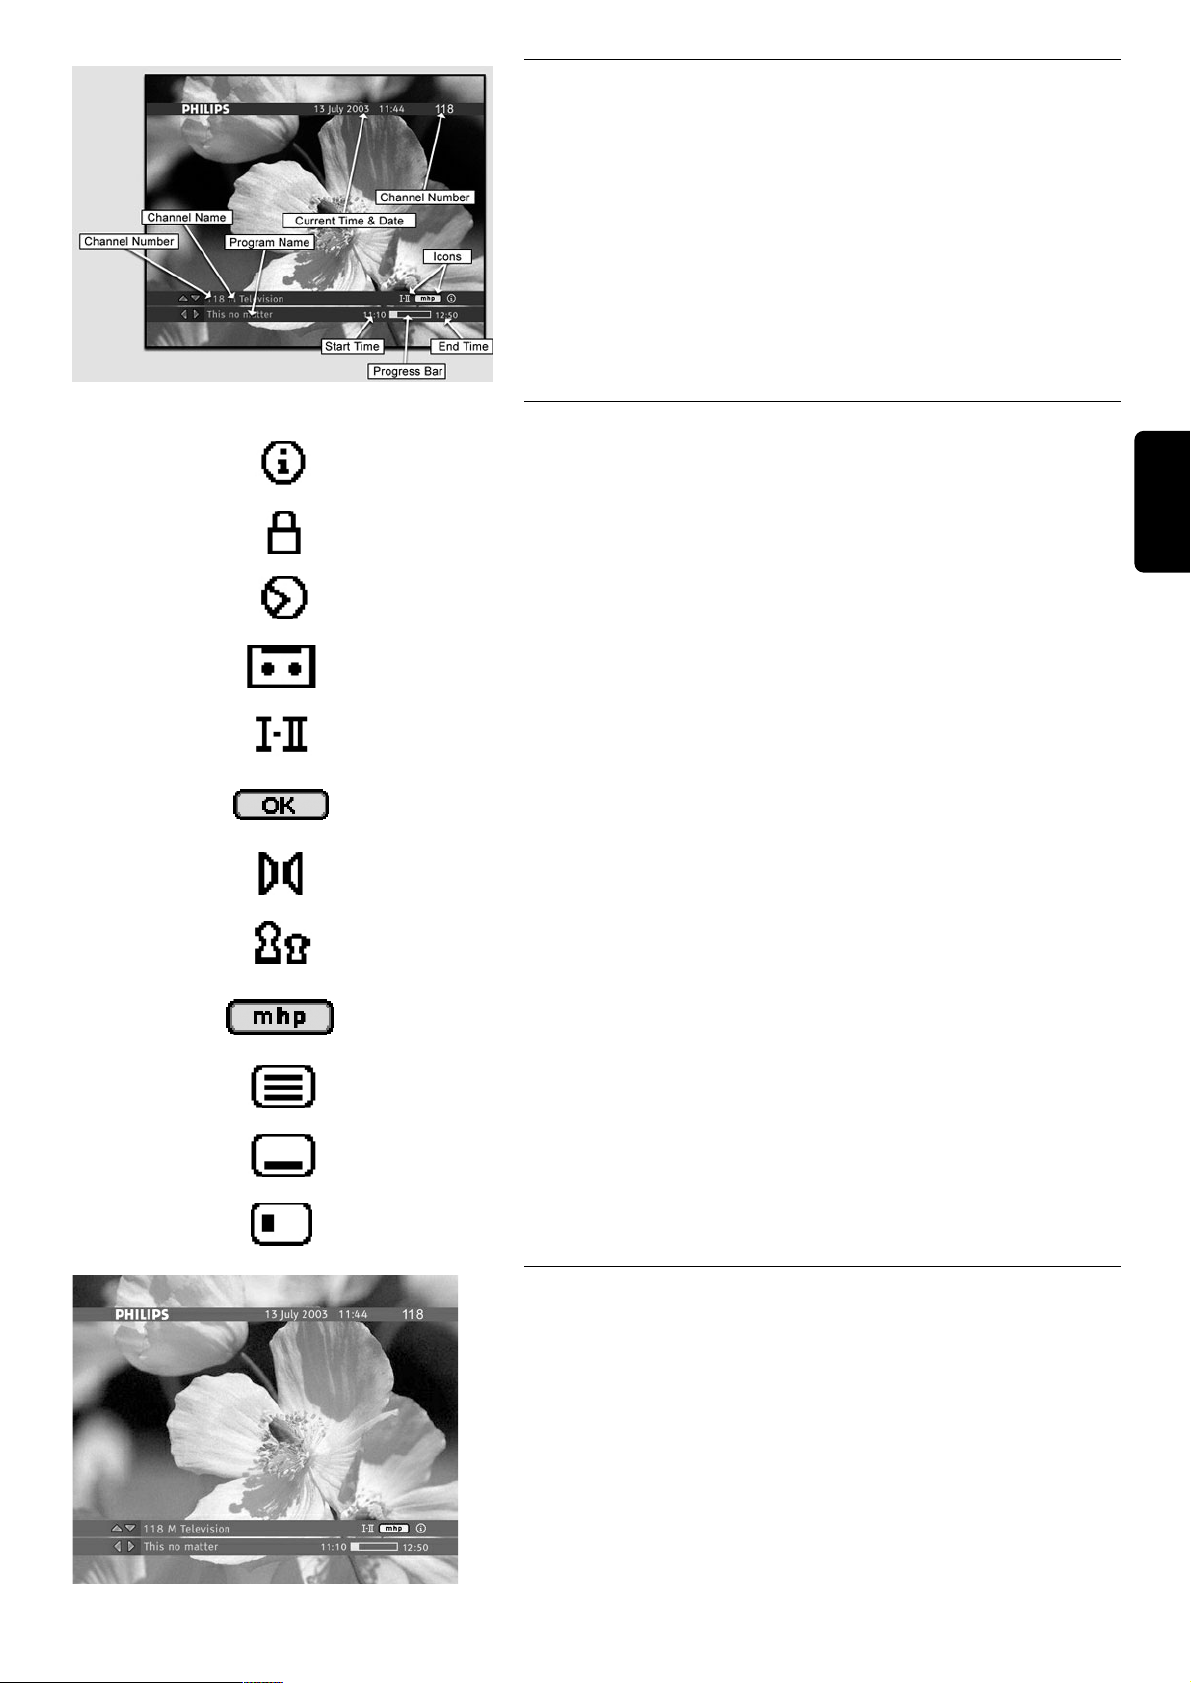
6.5 How to use the channel Banner
Channel Banner appears at the bottom of the screen when you tune
your receiver to a new channel or when you press the
mm
key. It offers
you basic information about individual programs and facilitates surfing
through channels and programs. When you are in the Channel Banner,
you can only browse through channels belonging to the currently
selected channel list. The Channel Banner disappears automatically
after a few seconds, or when you press EXIT.
6.5.1 Channel Banner Icons
This icon informs that some program information is available for the
program displayed in Channel Banner.
This icon informs that the current channel is locked.
This icon informs that the viewing reminder has been set for a particular
program.
This icon informs that the recording reminder has been set for a
particular program.
This icon informs that a program with more than one soundtrack is
broadcast.
This icon informs you that pressing OK tunes to the channel that the
Channel Banner refers to, or sets/cancels a reminder.
This icon informs you that the program is broadcast with the surround
sound.
This icon informs you that the particular program is parentally locked.
This symbol informs that you may launch external applications by
pressing OK.
This icon informs that teletext is broadcast on the currently tuned
channel.
This icon informs that you may select subtitles for the current program.
This icon informs you that the current channel is scrambled.
6.5.2 How to Select Current / Next Programs
The Channel Banner allows you to display information concerning the
current program and the next program broadcast on the selected
channel. Press C / B to see what is broadcast next on the currently
selected channel.
If you select one of the future programs, pressing OK allows you to
set/cancel a reminder. For more information on setting reminders, see
the Reminders and Timers section later in this manual.
Current Program Info
English
Page 12

6.5.3 How to Select Channels
There are three different ways of changing channels:
- Press V or W to scroll through the current channel list. Please note
that your receiver remains tuned to the current channel.
- When you press P+ / P-, your receiver tunes to the next
higher/lower channel from the currently selected channel list.
- You can also select channels by entering their numbers directly. Once
you press a number key, the channel number entry box appears in the
upper right corner of the screen.
● Please note that pressing BACK allows you to switch between two
channels: the current channel and the previously tuned channel within
the selected channel list.
Channel Number Entry Box Note:
1 Skipped channel cannot be watched using P+ or P- button channel selection.
2 Skipped channels can only be watched using the digit button channel
selection.
6.6 How to Change momentarily the
current Program Options
Press the 44or iikey, to gain access to the Options menu. This menu
allows you to change the Audio Language, Subtitle Language, or the
Display Format for the currently broadcast program, and the Teletext
Language for the currently tuned channel.
Audio Language
If available, you can select among different audio languages.
Subtitle Language
If available, you can select among different subtitle languages.
Options Menu
Teletext Language
If available, you can select among different teletext languages.
Display Format
If you have a TV set with 4:3 picture format, and the transmission is in
16:9 format (or the other way round), you can change display format for
the currently broadcast program.
For example, if you have a TV set with the 4:3 picture format and the
transmission is 16:9, you can select Letter-box, Pan-Scan or Full
Screen. If you select Letter-box, you will get a complete picture with
black areas at the top and bottom.
Display Format (Letter-box)
6.7 How to Display More Program Info
The [ i ] icon displayed in the Channel Banner informs that pressing
the mmkey displays some additional information about the currently
selected program. If there are more pages of program info, pressing
mm
displays consecutive pages of program info. To remove the Program
Info window from the screen, press EXIT, or mmwhen the last page of
program info is displayed.
Program Info Window
12 DAY TO DAY OPERATION
English
Page 13
DAY TO DAY OPERATION 13
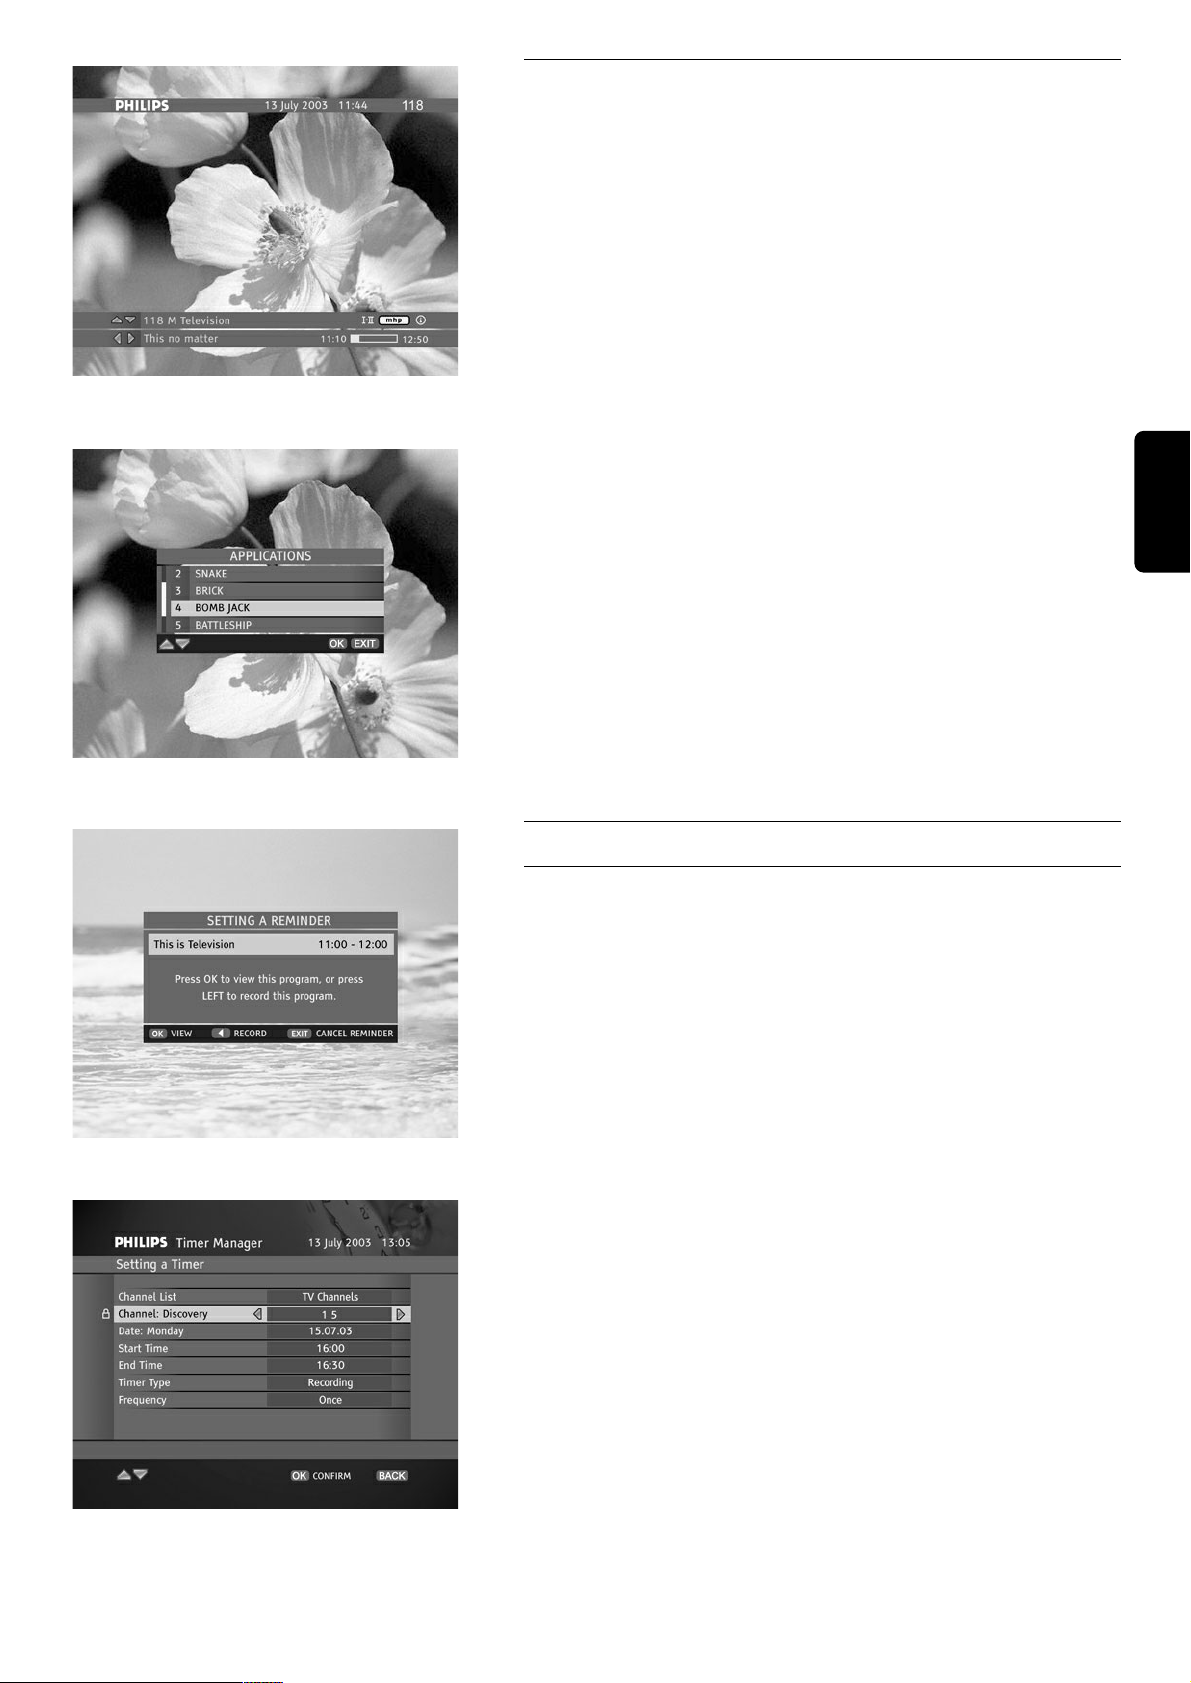
6.8 How to Run MHP Interactive
Applications
Your receiver supports downloading and running MHP interactive
applications. Some applications are run automatically on tuning to a
respective channel. Other applications will be launched manually.
If you tune to a channel on which interactive applications are broadcast,
you will see the [ mhp ] icon on the Channel Banner. This icon is
displayed alternately with the [ OK ] icon prompting you to press the
OK key. Pressing OK brings up the Applications window allowing you
to select the application you want to run. Once you select the
application, press OK again. However, if you are not interested in
running interactive applications, press EXIT to remove the
Applications window from the screen.
To quit the interactive application, press and hold the EXIT key for at
least 2 seconds. You can also quit the application by following the onscreen descriptions brought to you by the application itself or tuning to a
different channel by pressing P+/ P-
Please note that if you do not want any interactive applications to be run
automatically, set the Application AutoSTART option in the Display
Options screen to NO.
Applications Window
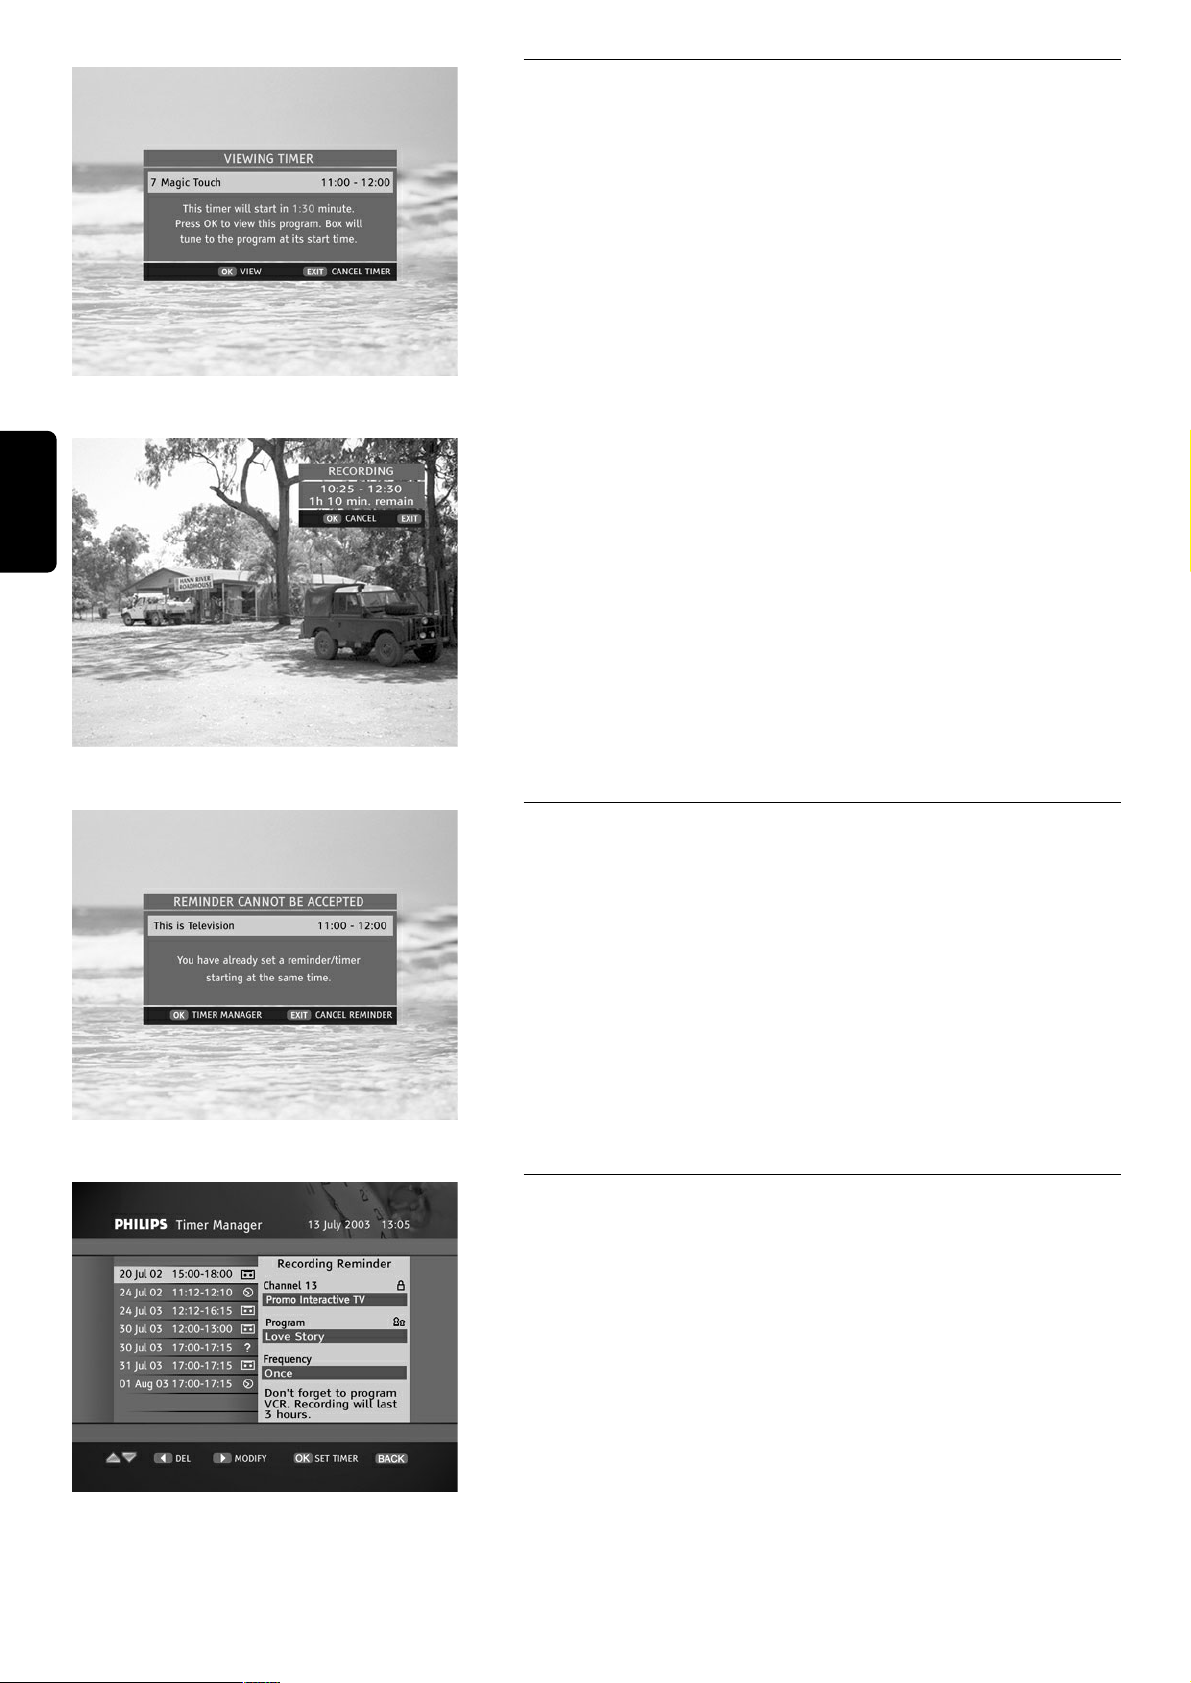
6.9 Reminders and Timers
6.9.1 Difference Between Reminder and Timer
The aim of the reminder/timer is to remind you that the program you
scheduled for viewing is about to start. The main difference between a
reminder and a timer is that you set reminders from the Channel
Banner. To set a reminder, select one of the future programs in the
Channel Banner and press OK. Then you are prompted to decide
whether you want to set a viewing or a recording reminder.
Setting a Reminder
Timers are independent from the broadcast schedule. You will set timers
from the Timer Manager. To get access to the Timer Manager, select
the Timer Manager item from the Main Menu. Timer Manager
contains all timers and reminders defined so far. It allows you not only to
set timers but also to delete or modify selected timers/reminders. You
will be asked to enter Timer Manager each time any conflicts between
reminders/timers occur. You will find more information on Timer
Manager later in this manual.
Setting a Timer
English
Interactive Applications Icon
Page 14
6.9.2 Viewing and Recording Reminders/Timers
There are two types of reminders/timers: a viewing reminder/timer
and a recording reminder/timer. If you have set a reminder/timer, its
pop-up appears 1.5 minute before the program starts. If you do not
respond to the viewing reminder/timer pop-up, the reminder/timer is
canceled. If you do not respond to the recording reminder/timer pop-up,
the receiver tunes to the appropriate channel at specified start time.
Viewing Timer Pop-up
Please note that when you set a recording reminder/timer, the recording
is protected from being interrupted. If you want to interrupt the
recording, press EXIT. This brings up a pop-up informing you how long
the recording will last. Then, you will be asked to press OK to interrupt
the recording or press EXIT to dismiss the pop-up from the screen.
Recording Pop-up
6.9.3 Reminder/Timer Conflicts
Your receiver allows you to set up to 8 reminders/timers. Each
subsequent reminder/timer is checked against any conflicts with the
previously set reminders/timers. If you set a reminder or timer and such
a conflict occurs, a conflict pop-up appears. You will be prompted to
press EXIT to cancel the current reminder, or to press OK to get
access to Timer Manager. The currently set reminder will be listed in
the Timer Manager as a disabled reminder (marked with the ? sign).
This reminder can only be accepted if you delete any conflicting
timers/reminders or you change some of its data. For more info, see the
Timer Manager section below.
Reminder Conflict Pop-up
6.9.4 Timer Manager
Timer Manager contains a list of all reminders and timers defined so far.
In the Timer Manager you can perform the following operations.
Setting a Timer
Press
OK to set a new timer. This will bring up the Setting a Timer
screen. Fill in any required data and press OK to confirm. If the data are
valid and there are no conflicts with the previous reminders/timers, you
return to the Timer Manager screen. The newly defined timer appears
in the Timer Manager list.
Timer Manager
14 DAY TO DAY OPERATION
English
Page 15

DAY TO DAY OPERATION 15
Modifying Reminders/Timers
In the Timer Manager screen, highlight the timer/reminder you want to
modify and then press B. This will bring up either Modifying a Timer
or Modifying a Reminder screen. Change the reminder/timer data and
then press OK to confirm.
Deleting Timers/Reminders
Highlight the reminder/timer you are not interested in and press C.
Then you will be prompted to confirm the delete operation.
Modifying a Timer
6.10 Program Guide
Your receiver gives you access to a Program Guide.
To display all programs broadcast on the currently tuned channel press
the GUIDE key. The displayed list contains all programs of the current
day and highlight is on the currently broadcast program.
You can scroll through the program list using the V / W or the RED /
GREEN keys.
To display the program list of the next days, press the C / B keys.
Program list will be updated.
Pressing P+ / P- allows you to display the program list of subsequent
channels from the currently selected channel list. If no information are
available it will be reported by an " On Screen " message.
Program Guide
You can also filter the program list to display only programs that belong
to a selected category. Pressing the YELLOW key allows you to access
to the Category filtering menu. Once you have selected the desired
Category and sub-category, press OK to update the current program list
accordingly.
Category selection
To set a viewing or recording reminder on one of the future program,
bring the highlight on the selected program using the V / W keys. Then
press OK to display the setting/canceling reminder menu. The
procedure of setting a reminder in the Program Guide is the same as for
a program selected in the Channel Banner. Refer to chapter 6.9 of this
manual.
Setting a reminder in Program Guide
English
Page 16
7 Main Menu
7.1 Menu Structure
Your receiver offers Menu System that allows you to change the way many of the features of your receiver operate. To gain
access to the Menu, press the MENU key. The Main Menu consists of 7 submenus. To evoke one of the submenus,
highlight its name using V or W keys and then press OK. You may also press the number key to highlight a respective
menu item. To return to the Main Menu from one of its submenus, press BACK. To exit the Menu System immediately,
press MENU or EXIT.
Here is a short overview of basic functions performed by individual submenus.
Channel Manager
Allows you to change the organization of the TV and Radio channel lists.
You will be able to skip, move, lock and rename selected channels. Also
see the Channel Manager section below.
Timer Manager
You will find here a list of any reminders and timers defined so far. You
will mainly use Timer Manager to set timers and to delete/modify
timers/reminders. For more information, see the Timer Manager section
earlier in this manual.
For Parents
This submenu allows you to protect your children from viewing
unsuitable material. Here, you can also change your current PIN code.
16 MAIN MENU
English
Page 17

MAIN MENU 17
Data Channels
Allows you to run one of the available Off-the-Air applications.
Your Preferences
Allows you to define your preferences concerning on-screen display as
well as audio and subtitle languages. You will find more information in
the Your Preferences section later in this manual.
Installation
Allows you to configure your system, to set up your modem, to search
for existing channels, to check receiver's status, to set up local time, and
to restore factory settings of your receiver. For more information, see
the Installation section later in this manual.
Help
Gives you access to the on-line help information concerning the basic
functionality of your receiver.
English
Page 18

8 Change the setting of your receiver
8.1 Channel Manager
When you select the Channel Manager item from the Main Menu, you
get access to Channel Manager submenu. This submenu allows you to
change the way all your channel lists are organized.
You can Skip, Move, Lock and Rename channels on your TV or Radio
Channels lists. You simply select the list you wish to modify by pressing
B in the Channel List menu, and then you select the Modify menu by
pressing W. Then by pressing B you select the action you would like to
take (Skip, Move, Lock, Rename). You accept your selection by
pressing OK.
Channel Manager
8.1.1 How to skip a channel
The Skip Channels command allows you to mark any channel to be
skipped in the zapping and browsing mode. Once you select the Skip
Channels command in the Modify option, the selected list of channels
appears with the highlight on the currently tuned channel. Simply select
the channel you want to skip and then press OK. This marks the channel
with symbol. You can remove the "skipped" status by pressing OK
on the skipped channel.
Note:
1-Skipped channel cannot be watched using P+ or P- button channel selection.
2-Skipped channels can only be watched using the digit button channel
selection.
Skipping a Channel
8.1.2 How to move a channel
The Move Channels command allows you to mark any channel to be
moved. Once you select the Move Channels command in the Modify
option, the selected list of channels appears. Simply select the channel
you want to move and then press OK. This marks the channel with
symbol. Then you can move this channel by pressing V / W, P+ / P-,
number buttons and then press
OK again to confirm its new position.
Moving a Channel Within a List
8.1.3 How to rename a channel
The Rename Channels command allows you to rename any channel on
the list. Once you select the Rename Channels command in the
Modify option, the selected list of channels appears. Simply select the
channel you want to rename and then press OK. This brings up the
virtual keyboard pop-up where you will be able to find any characters
you need. When you rename the selected channel, pressing OK will
confirm the change and close the vitual keyboard pop-up.
Renaming a Channel
18 CHANGE THE SETTING OF YOUR RECEIVER
English
Page 19

CHANGE THE SETTING OF YOUR RECEIVER 19
8.1.4 How to lock a channel
The Lock Channels command allows you to mark any channel to be
locked. Once you select the Lock Channels command in the Modify
option, the selected list of channels appears. Simply select the channel
you want to lock and then press OK. This marks the channel with
symbol. You can remove the "locked" status by pressing OK on the
locked channel.
Locking a Channel
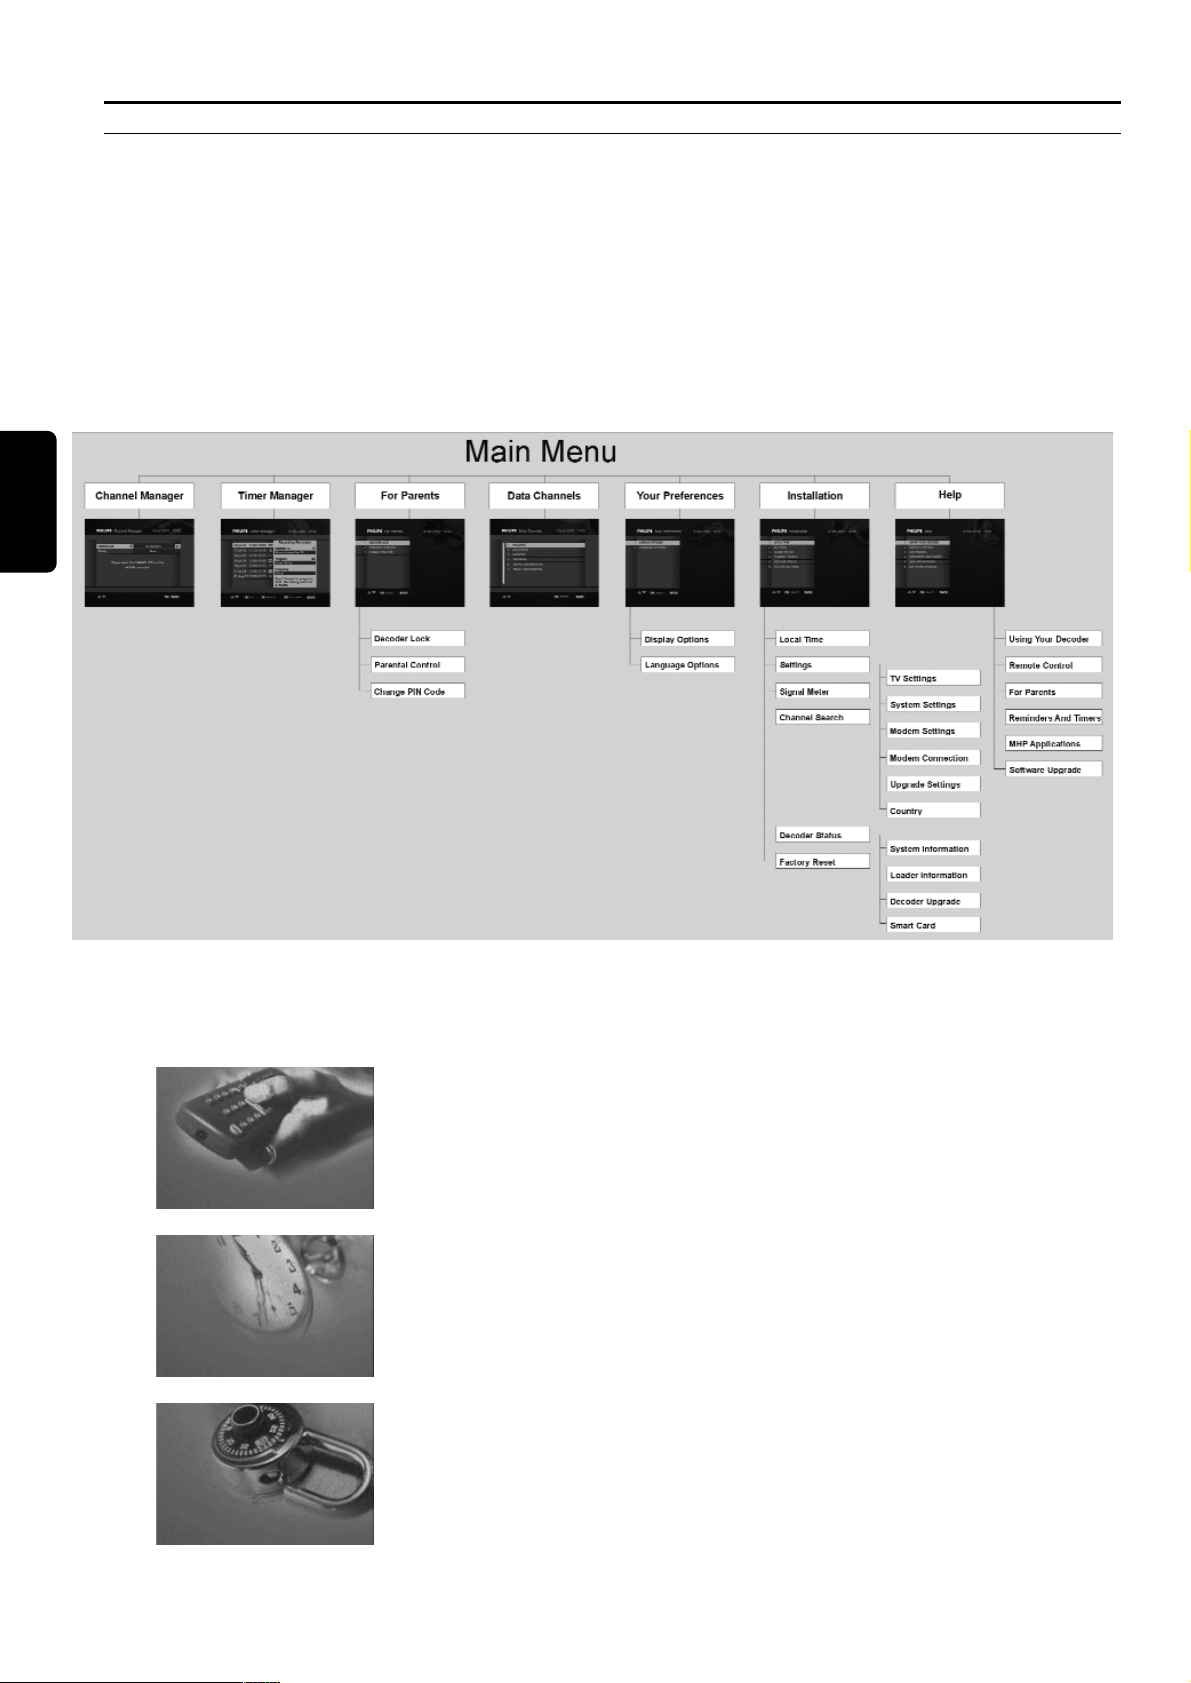
8.2 Specially for parents
Your digital receiver gives you access to a few options allowing you to
protect your children from viewing unsuitable material. Press the
MENU key and then select the For Parents submenu to bring up a list
of protection items. The following protection levels are available:
- The Decoder Lock item may facilitate viewing for those viewers who
have full access to the receiver. If you switch the Decoder Lock
option to No, you will not be prompted to enter the PIN code.
- You may set the current parental level, for example 13 Years using the
Parental Level option. Then any programs unsuitable for the audience
younger than 13 years will be blocked from viewing.
For Parents Submenu
- If you decide to change your PIN code, select the Change PIN Code
item. Change your PIN code to a value you can easily remember. If you
happen to forget your PIN, refer to the chapter 9.3 of current manual.
- Additionally, you may protect whole channels. For more info on how
to lock channels, refer to the chapter 8.1.4 of this manual. On tuning
to such a channel, you will be prompted to type in the PIN code.
Receiver Lock
Parental Level
English
Page 20
8.2.1 Your PIN code
PIN code is your personal 4-digit number that is used to restrict access
to your receiver. Initially, it is assigned the 1234 value. You can use PIN
to prevent children from viewing unsuitable programs. It is also used to
protect receiver's settings from being changed. Whenever an attempt to
get access to a program or feature locked by PIN is detected, you will be
prompted to type your PIN code. You can change your PIN code using
the Change PIN Code item from the For Parents submenu.
Enter PIN Code
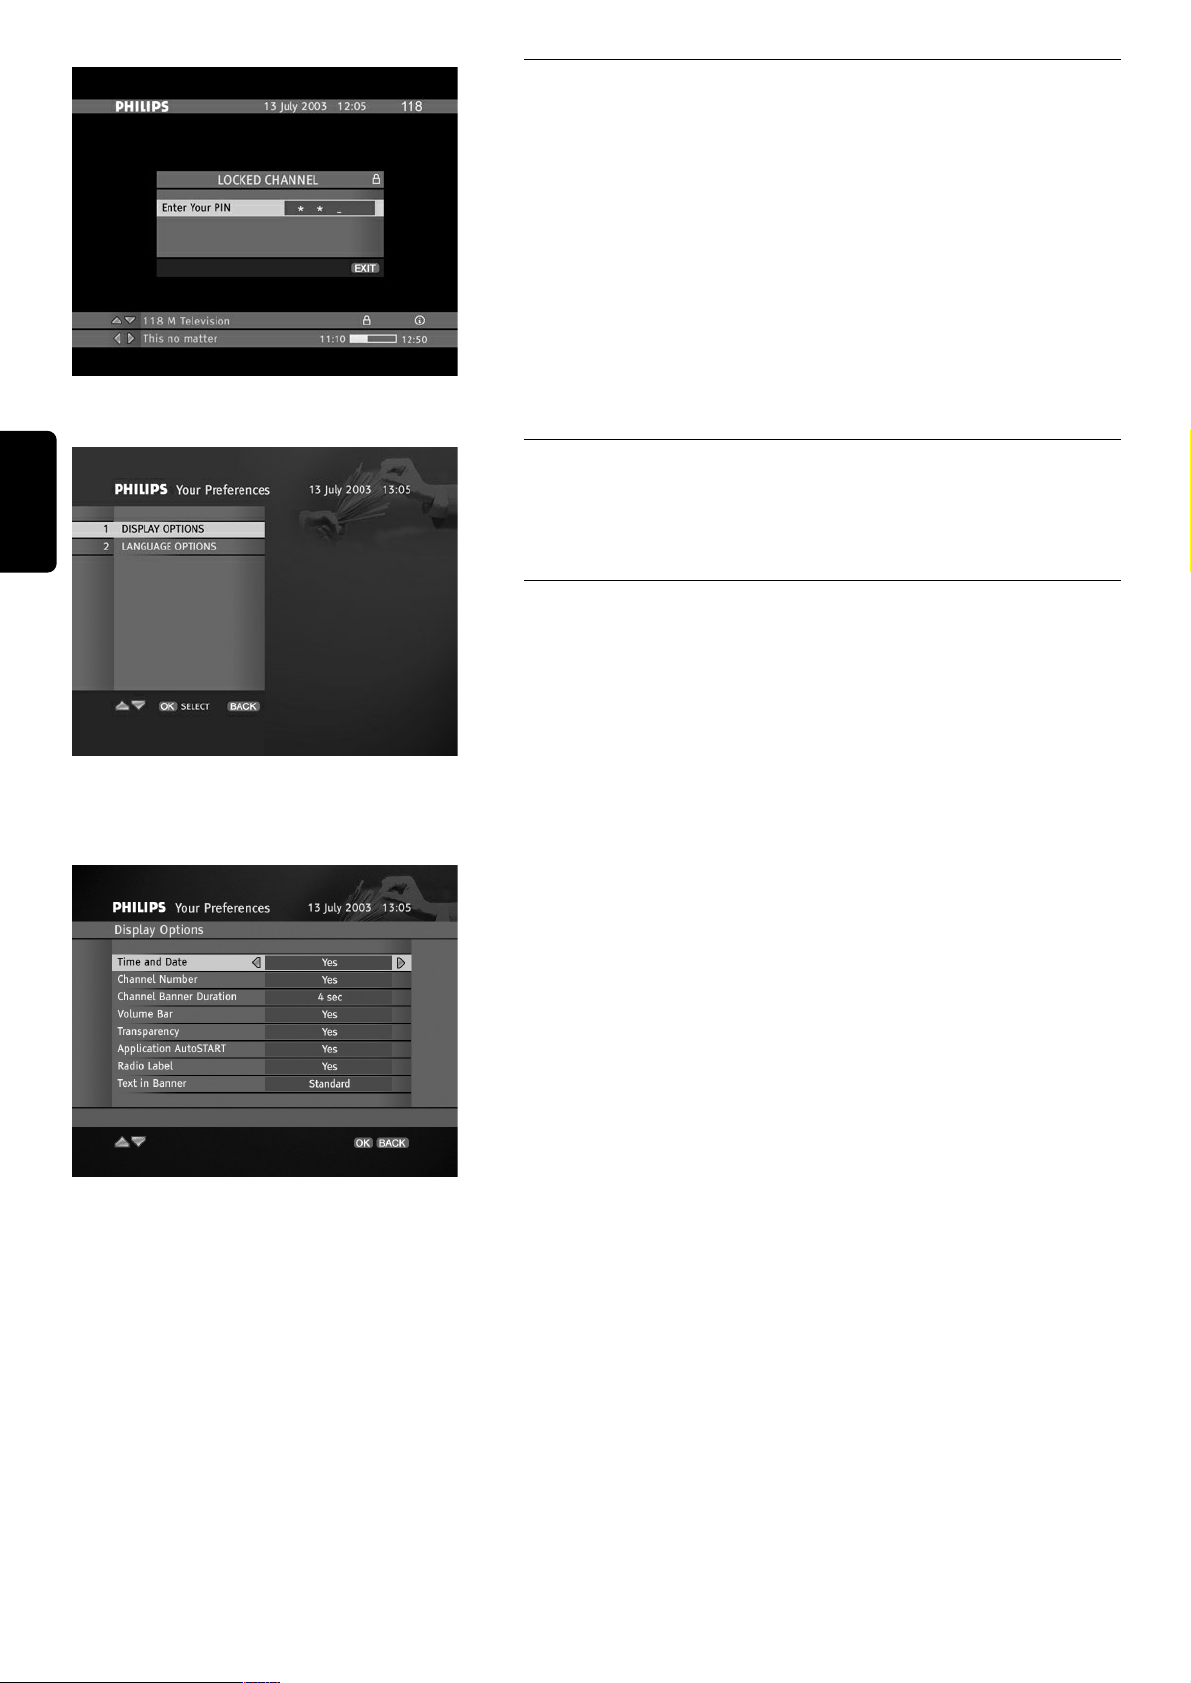
8.3 Your Preferences
Your Preferences submenu contains two items: Display Options and
Language Options.
8.3.1 Display Options
The Display Options screen allows you to define some options related
to displaying information on the screen.
Time and Date
Blocks the current time and date from being displayed in the Channel
Banner mode.
Your Preferences Submenu
Channel Number
Blocks the channel number from being displayed in the top right corner
of the screen.
Channel Banner Duration
Specifies how long the Channel Banner remains displayed.
Volume Bar
Bocks the volume bar from being displayed.
Note:
1-The YES option shall be set if Volume & Mute are controlled via the receiver
(so called STB).
2-The NO option shall be set if Volume & Mute are controlled by the TV set.
Transparency
Changes the transparency of the on-screen display.
Display Options Screen
Application AutoSTART
Defines whether MHP applications are to be launched automatically once
you tune to a channel on which external applications are broadcast.
Radio Label
Defines whether "radio labels" shall be displayed when the box is tuned
to one of the radio channels.
Text in Banner
Defines the font size used to display channel name and program name as
well as program info.
20 CHANGE THE SETTING OF YOUR RECEIVER
English
Page 21

CHANGE THE SETTING OF YOUR RECEIVER 21
8.3.2 Language Options
The Language Options screen allows you to define some options
related to language preferences. Change any languages according to your
preferences and then press OK to confirm them.
Language Options Screen
8.4 Installation
Once your terrestrial receiver has been properly installed and
configured, you will rarely use the Installation submenu. However, the
Installation submenu will be useful, if for example, you buy a new TV
and you want to make sure your receiver makes the best use of the new
TV's features, or you change your antenna setup.
Below, you will find description of some of the Installation submenu
screens.
Installation Submenu
8.4.1 Local Time
You may need to adjust your local time. Use the C / B keys to change
the Time Zone until the Local Time setting corresponds to your local
time. Then press the OK key to confirm any changes.
Local Time Submenu
8.4.2 Settings
The Settings submenu allows you to change
TV/system/modem/upgrade/country settings.
Settings Submenu
English
Page 22
8.4.2.1 Installation / Settings / TV Settings
The TV Settings screen contains two options: TV Screen Format and
Display Format. Change the TV Screen Format setting, if necessary.
You may also change the default Display Format value (Letter-box) to
change the way the video is transformed if the broadcast aspect ratio is
different than the aspect ratio of your TV. Read the descriptions that
appear in the TV Settings screen before you make a decision.
TV Settings Screen
8.4.2.2 Installation / Settings / System Settings
The System Settings screen contains some of the configuration
parameters you may change.
Video Standard
This option is preconfigured depending on the Country selection. There
are two possible standards: PAL and SECAM.
TV SCART Output, VCR SCART Output
Select the appropriate format of the output signals.
Note: to get the best picture quality and sharpness set the "TV SCART output"
option to "RGB".
Dolby Digital
If you use the Dolby Digital receiver, change the value of the Dolby
Digital option to Ye s.
System Settings Screen
Note: If you set this option to Yes, when the broadcast carries Dolby Digital:
- No audio will be available at receiver's TV & VCR SCARTs as well as L/R audio
outputs. Only Dolby Digital bit stream (AC3 - 5.1) will be available at Digital
Optical Out.
- During a timer, the receiver will automatically switch back to PCM (2 channel
in digital) and audio will be available at receiver's TV & VCR SCARTs as well as
L/R audio outputs to allow recording of audio.
You will find detailed info concerning: the Easy Recording, Recording
Type and Device settings in the Advanced Settings section later in this
manual (see chapter 9).
8.4.2.3 Installation / Settings / Modem Settings
Your receiver is equipped with an internal modem. To configure your
modem parameters use the remote control keys presented in the help
bar. Pressing
RED allows you to enter a virtual keyboard where you will
be able to find any characters you need. Once you have configured your
modem, press OK to confirm its configuration.
Modem Settings Screen
Virtual Keyboard
22 CHANGE THE SETTING OF YOUR RECEIVER
English
Page 23

CHANGE THE SETTING OF YOUR RECEIVER 23
8.4.2.4 Installation / Settings / Modem Connection
Connection menu allows you to check the modem connection as well as
to check the parallel set detection. If any problems are detected, the
appropriate message will be shown. In case no problems are detected,
you will be able to check if the modem is connected by following the
instructions on the screen
Modem Connection
8.4.2.5 Installation / Settings / Decoder Upgrade Settings
Selecting Upgrade Settings from the Settings submenu brings it up on
screen. In this screen you can change the way your decoder is upgraded.
If you set Auto Upgrade to Ye s , your decoder will automatically initiate
the upgrade procedure when available. Otherwise you will be asked for
permission to initiate the procedure.
Upgrade Check After Power On should be set to Ye s if you want to
check for new upgrades every time you switch your decoder on.
You can also set the exact time and frequency of checking for new
upgrades in Upgrade Check in Operate Mode. Note that your
decoder must be in running mode in order to check for upgrade in the
specified time.
Decoder Upgrade Settings
8.4.2.6 Installation / Settings / Country
Selecting Country item allows you to change any presets for a particular
country. If you change the country and confirm your choice, your
decoder will be configured to work in the country you selected.
Note that changing the country will initiate the channel search and you
will lose your current channel list.
Select Country
8.4.3 Installation / Signal Meter
Selecting the Signal Meter from the Installation submenu brings up the
Signal Meter screen. This screen displays the signal strength/level as
well as the BER value of the signal broadcast at the specified frequency.
Signal Meter
English
Page 24
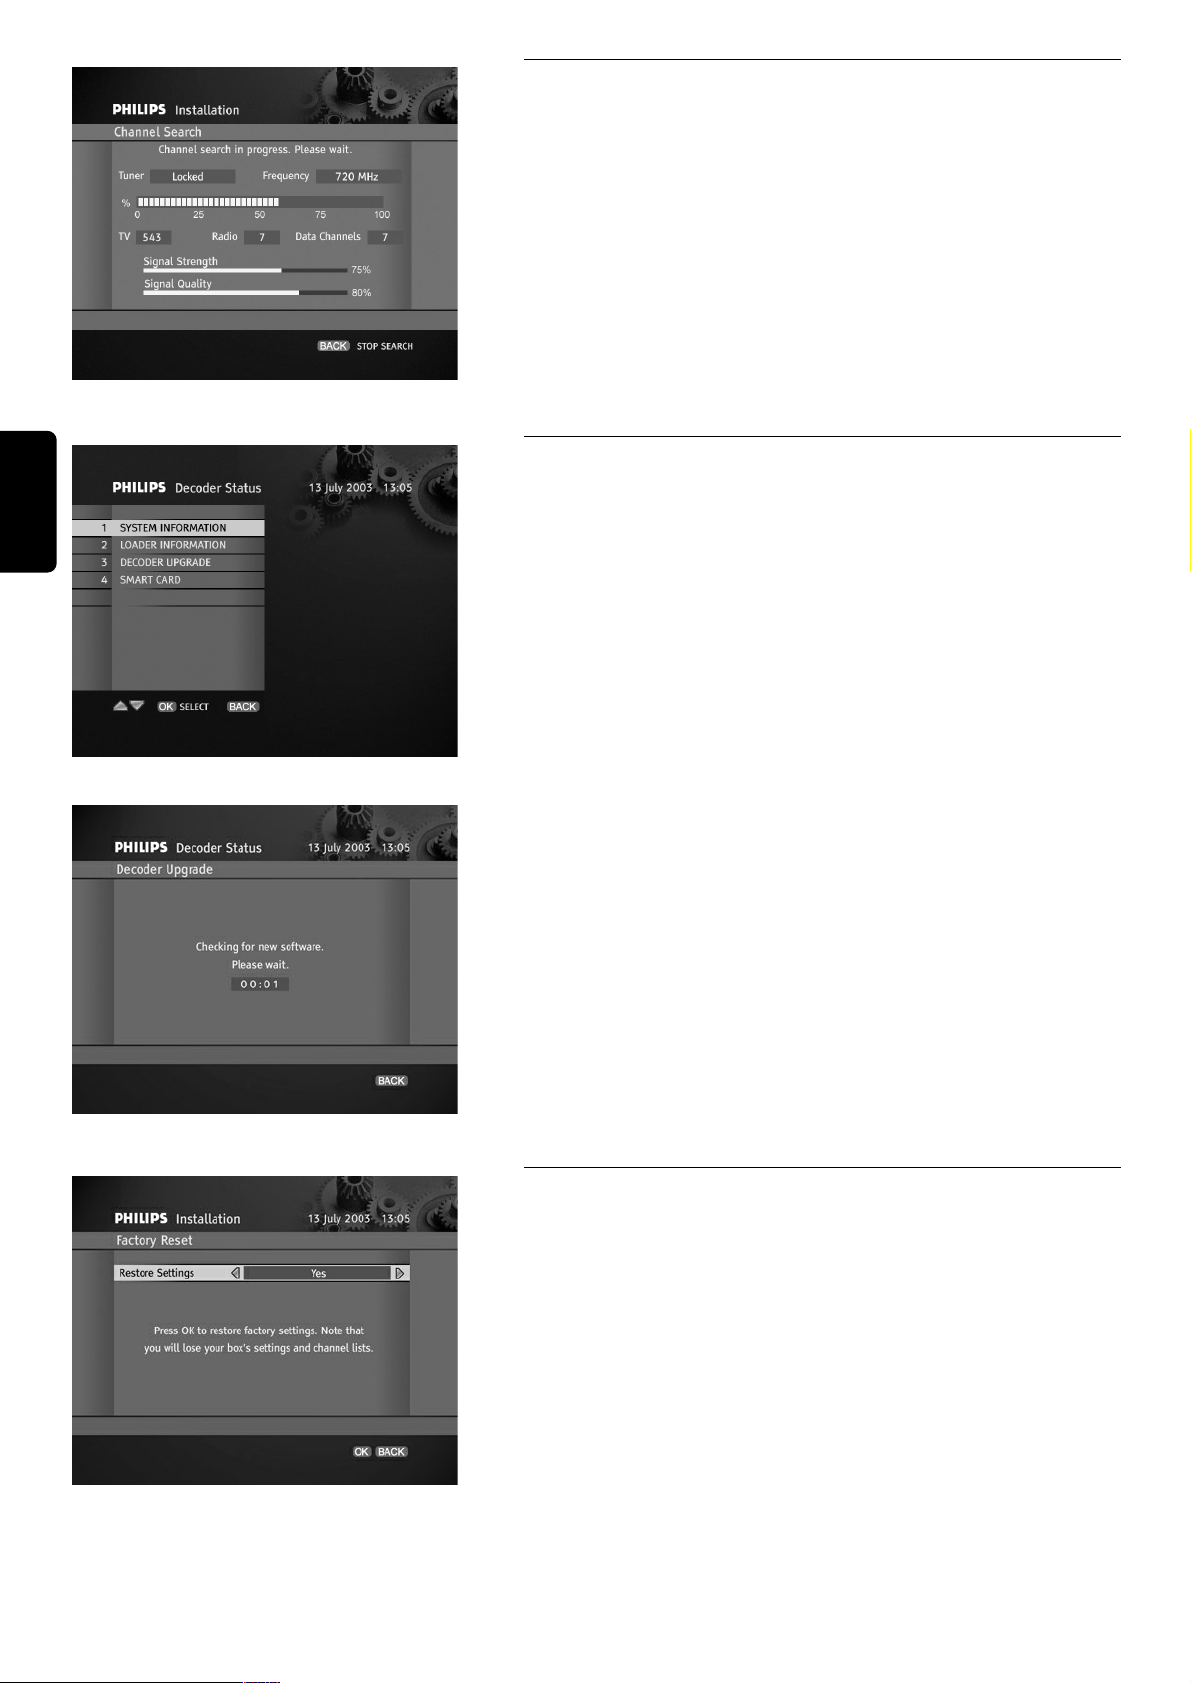
8.4.4 Installation / Channel Search
Once you select the Channel Search item from the Installation
submenu, you will have two channel search methods to choose from.
You can either Search for New Channels or Reinstall All Channel
Lists. In the first method only new channels will be added to your
existing list, whereas in the second one your current channel list will be
replaced by a new one. Pressing OK initializes the channel searching
procedure. You may interrupt this procedure by pressing BACK. Follow
the prompts displayed on the screen.
Channel Searching
8.4.5 Installation / Decoder Status
The Decoder Status submenu gives you access to some system and
loader information. It also allows you to perform the receiver upgrade
procedure.
Selecting the Decoder Upgrade item from the Decoder Status
submenu initiated the receiver's upgrade process. Once the upgrade
process is initiated, it takes complete control of the receiver, so the
receiver's normal operation is suspended. You may interrupt this
procedure by pressing BACK.
Selecting the Smart Card item from the Decoder Status submenu
gives you access to information concerning the inserted smart card.
Decoder Status Submenu
Receiver Upgrade
8.4.6 Installation / Factory Reset
Once you select the Factory Reset option, the Restore Settings
option is set to NO. If you decide to restore all factory settings of the
receiver, he presses C/B to change the value of the Restore Settings
option to YES. Pressing BACK returns to the Installation submenu.
Note that pressing
OK restores factory settings of the STB settings, and
restarts the first-time installation process (the Language screen
appears).
Factory Reset
24 CHANGE THE SETTING OF YOUR RECEIVER
English
Page 25
ADVANCED SETTINGS 25
9 Advanced Settings
9.1 Easy Recording
The Easy Recording feature allows you to perform recordings without the necessity to program your video recorder (VCR
or DVD recorder). You set a recording reminder or timer from the Channel Banner or Timer Manager, and the VCR
starts/ends recording at the correct time. Please note, however, that you may utilize the Easy Recording feature provided
that your equipment supports it.
● First of all, consult User Manual of your recorder equipment to check if it supports Easy Recording. Please note that most
Philips VCR/DVD recorders support one of the two Easy Recording options: either Prepare Record (to be checked first)
or Record Link.
● Also, both your TV and VCR shall be equipped with two SCART sockets.
If your equipment satisfies above two conditions, connect your receivers as shown in the Connection diagram below.
Then, select the System Settings item from the Settings submenu, enable the Easy Recording feature by setting its
option to YES, and assign to the Recording Type an appropriate value: either Prepare Record or Record Link. You might
have to test both settings to find out the one applicable for your recorder.
Assuming the settings of your receiver and recorder (refer to your VCR or DVD recorder user manual) are done , to
perform a recording you shall:
- Program a timer with your receiver (refer to 6.9 section).
- Put your recorder in the appropriate status to be controlled by your receiver (refer to the VCR or DVD recorder user
manual).
At timer occurrence your recorder shall start and stop recording automatically.
Note: While the recording is in progress, your receiver is protected from inadvertent action to disrupt the recording. Please note that
during the recording the "rEc" label is displayed on the front panel display. To cancel the running recording, press EXIT. This brings up a
small window prompting you for confirmation. To cancel the recording altogether, press OK.
English
Page 26

9.2 Change the Remote Control and receiver "Device" Settings
If you have other equipment in your home and the Philips remote control of your digital receiver interferes with them, you
can change the setting of your remote control and the setting of your receiver as well. By default, your receiver is
recognized as Device 1 and the remote control is set to control Device 1. You may change this identifier to Device 2 using
the System Settings screen from the Settings submenu. Please note however, that you will also have to change the
remote control setting in order to be able to control Device 2.
To change the setting of your remote control, proceed as follows:
1 Make sure that the remote control is in the STB mode (Press Mode button, the STB LED shall blink, if a different LED does,
press the Mode button as many time as necessary to get STB LED blinking).
2 Press number keys 1 and 3 simultaneously and hold them until LED blinks twice.
3 Release these two keys. The STB LED is still on to indicate that the remote control is in the programming mode.
4 Enter the new code setting within 60 seconds (the LED is blinking once after each digit entry): Either 0048 for Device 2 or
0038 for Device 1 (factory setting).
Alternatively you may reset your remote control to its default setting (Device 1) by removing and waiting for more than 3
minutes to insert batteries.
9.3 Master PIN Code
If you have forgotten your PIN code, you have the possibility to reset it to its default PIN code (1234). To reset the PIN
code, type in the so-called Master PIN Code (00799700). Type in the Master PIN code in quick succession on the level of
the Main Menu. Before you enter the Master PIN code, press the mmkey. Please keep this code secret to prevent your
children from using it.
26 ADVANCED SETTINGS
English
Page 27
DECODER SOFTWARE UPGRADE 27
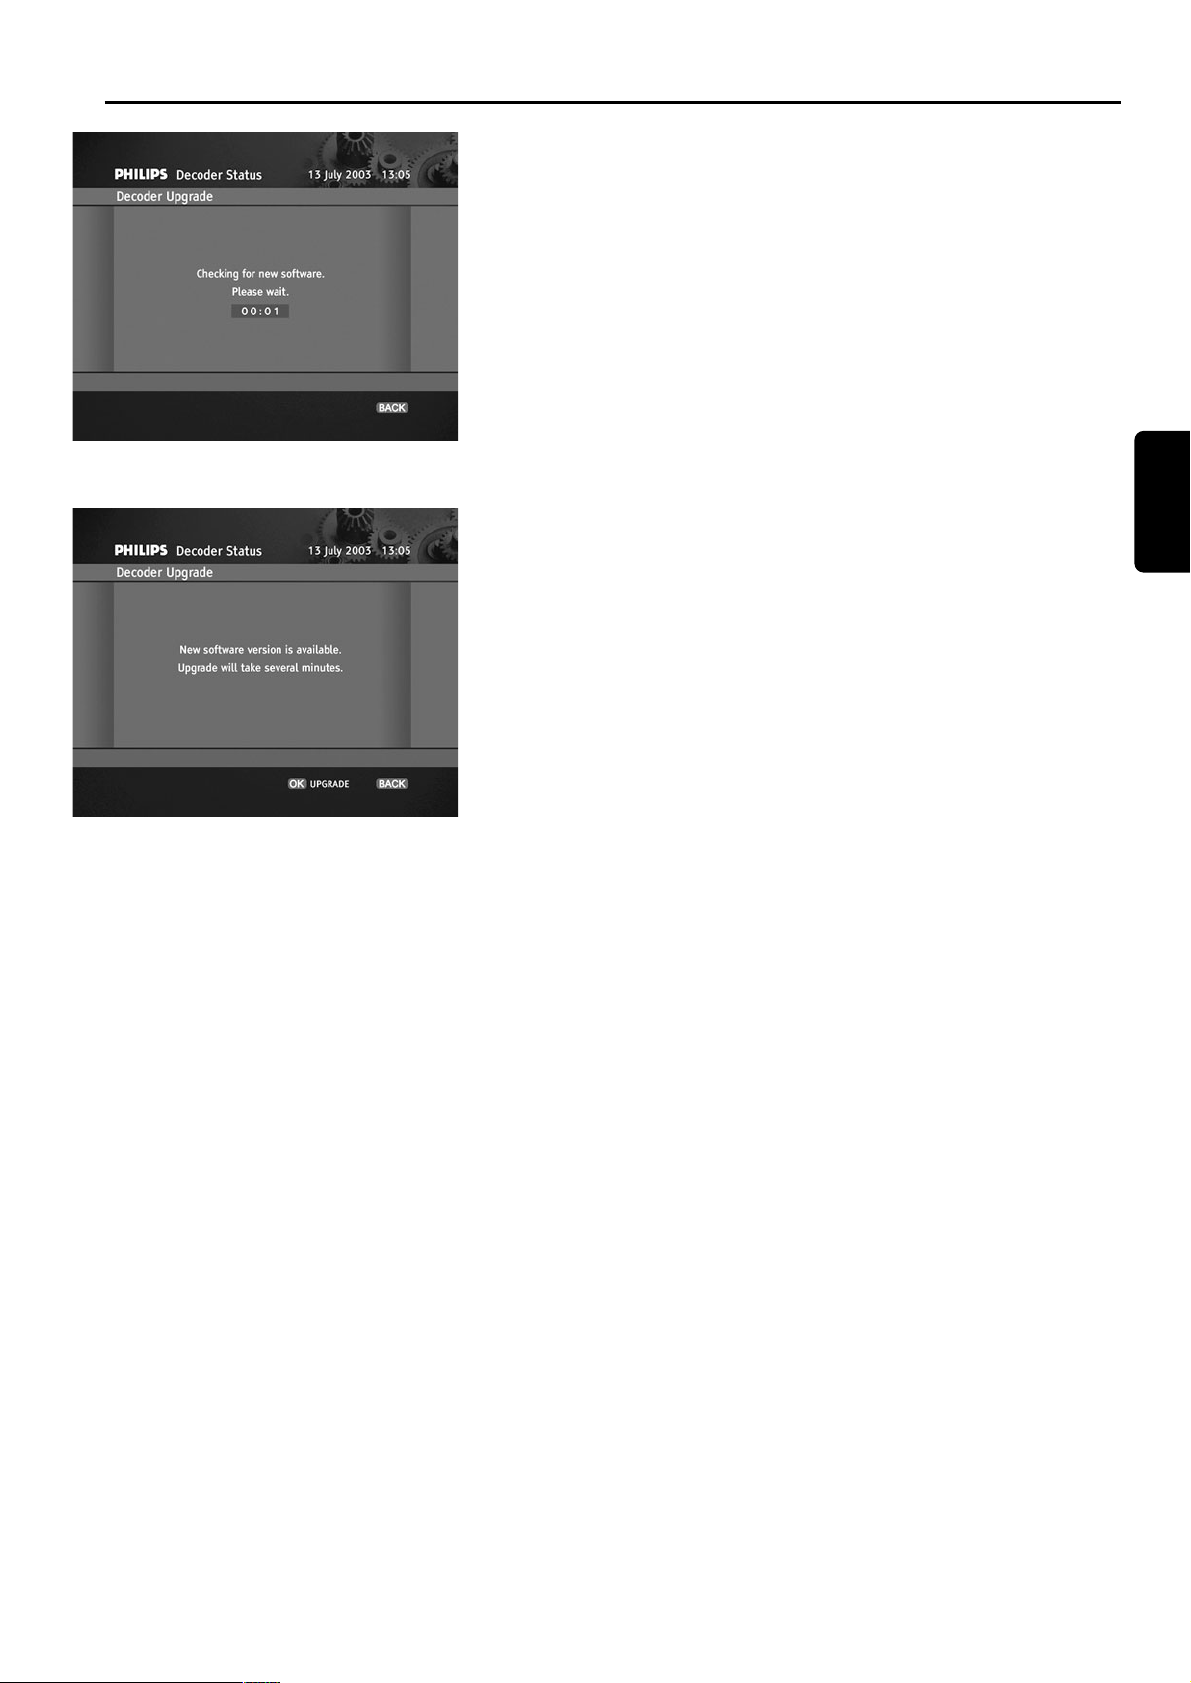
10 Decoder Software Upgrade
Your receiver's software may be upgraded. To check whether a new
software version is available for your receiver, select the Decoder
Status from the Installation submenu. Then, select the Decoder
Upgrade item from the Decoder Status submenu. If new software
exists, you will be prompted to press OK to initiate the upgrading
process.
Checking For Upgrade
Also, when you switch your receiver into the standby mode, the check is
made whether new software version is available. If new software is
detected, either the upgrade is made in the standby mode (the Auto
Upgrade option is set to Ye s), or you are informed about upgrade
availability when you switch your receiver into the operate mode (the
Auto Upgrade option is set to No).
To modify the Auto Upgrade option, press the MENU key. From the
Main Menu, select the Installation submenu and then select the
Settings submenu. Next, select the Decoder Upgrade Settings item
to get access to the Auto Upgrade item.
Upgrade Can Be Initiated
English
Page 28

11 Programming the Remote Control for your STB, TV,
Video Recorder, DVD and Tuner Amplifier.
11.1 Setting up your remote control
By default at power up, for instance at first installation or at battery replacememt, your remote control is preset to control
your terrestrial receiver as well as most of the Philips audio/video appliances.
If you have other brands of appliances, or if the presets do not control your Philips appliance, please follow the procedure
here below.
Note: some of the functions described in the next pages may not be available or have the same behaviour for all brand of the same
appliances.
1 Press the MODE button to select the type of appliance you want to set up (TV, VCR, DVD or Amp/Tuner).
Pressing the MODE button once will remind you of the MODE you are in through green light indicators: left for STB,
middle for TV, right for VCR, left/middle for DVD, middle/right for Amp/Tuner.
To set the MODE, press the MODE button several times until the desired mode is signaled by the light(s). The sequence is:
STB ➔ TV ➔ VCR ➔ DVD ➔ Amp/Tuner. At every key press, lights blink to indicate in which MODE you are in.
2 Press digits 1 and 3 simultaneously untill, the lights corresponding the selected mode blinks twice and remain on.
3 Enter the 4 digit code. The lights corresponding to the selected mode blinks once at each digit entry. You will find a list of
codes at the end of this manual. (If several codes are possible, go through this procedure with the 1st code and try your
remote control. If you are not successful, repeat the procedure with the second code, and so on).
4 If a valid 4-digit code has been entered, the lights will switch off and blink twice. If not, go back to step 1.
Pressing any key other than digit keys and standby button will automatically exit this procedure.
We advice you to fill in the table below to remind your personal remote control settings, this will be helpful the day you have
to replace the remote control batteries (see NOTE 2 below).
Important Notes:
1- You need to reset the STB mode to the factory mode.
If you have made a mistake changing the default setting of the STB mode resulting in the impossibility to control your terrestrial
receiver, then please refer to above description.
2- Battery change.
If the battery change takes more than 1 minute the remote control may return to the Philips brand factory settings. Therefore you
shall proceed with a new setting of your remote control, with the help of the table above, for your non Philips branded appliances.
3- All manufacturers are concerned about the constant improvement of their products. Although the RC2585108 is compatible with
most of the equipment of the following list, Philips cannot guarantee its operation with the complete range of products on the market.
English
28 PROGRAMMING THE REMOTE CONTROL
Philips Brand Your appliance Your code
factory setting brand / type setting
TV set 0666
Video Recorder 1608
DVD player / Recorder 0566
Amplifier / Tuner 1316 (Philips tuner)
STB (Your Satellite Receiver) 0038 (Device 1)
Volume control
(see chapters 4.2.2.1 and 4.2.2.2)
Page 29

PROGRAMMING THE REMOTE CONTROL 29
11.2 Using your remote control for your TV
TV mode (TV)
Note: Some of the functions described below may not be available or may not have the same behaviour for all appliances.
English
MENU
- Opens / Closes the Menu.
bb
- Teletext On/Off.
GUIDE
- Selects between first and second
audio channel.
¯¯
- Toggles between Teletext and
TV/Teletext mix modes.
RED, GREEN, YELLOW, BLUE,
WHITE
- Contextual keys in teletext mode.
AA
+/-
- Adjusts TV volume.
44 /ii
- Scroll one page up / down in
program list.
VWCB
- Move the selection up, down and
change settings in menu.
OK key
- Acknowledges a menu item
selection.
Standby
**
- Power / Standby / On.
mm
(Wide screen)
- Selects the TV picture format
(16:9, 4:3,).
TV/STB
aa
- Toggles between the different TV
set mode (TV, AV1,AV2, Front,).
0-9
- Selects the relevant TV program.
EXIT
- Menu off.
MUTE
HH
- Mutes the TV sound.
P+ P-
- Selects the next or previous TV
program.
BACK
- Selects the last watched TV
program.
Page 30

11.3 Using your remote control for your VCR
VCR mode (VCR)
Note: Some of the functions described below may not be available or may not have the same behaviour for all appliances.
30 PROGRAMMING THE REMOTE CONTROL
English
MENU
- Opens / Closes the Menu.
G
- Fast rewind.
K
- Pause.
L
- Stop.
B
- Play.
F
- Fast forward.
mm
- Displays On Screen Messages.
0-9
- Selects the relevant TV program.
EXIT
- Menu off.
FAV
- Subtitle On/Off.
VWCB
- Move the selection up, down and
change settings in menu.
OK
- Acknowledges a menu item
selection.
AA
+/-
- Adjusts TV volume.
TV/STB
aa
- Toggles between the different TV
set mode (VCR, AUX 1,
AUX 2, ...).
Standby
**
- Power / Standby / On.
RADIO
- Selects between first and second
audio channels.
P+ P-
- Selects the next or previous
program for the VCR.
MUTE H
- Mutes the TV sound.
Page 31

PROGRAMMING THE REMOTE CONTROL 31
11.4 Using Remote Control For Your DVD Player
DVD mode (DVD)
Note: Some of the functions described below may not be available or may not have the same behaviour for all appliances.
English
MENU
- Opens / Closes the Menu.
G
- Search reverse.
K
- Pause.
L
- Stop.
B
- Play.
F
- Search forward.
mm
- Displays On Screen Messages.
0-9
- Selects directly DVD tracks.
EXIT
- Menu off.
MUTE H
- Mutes the TV sound.
P+ P-
- Selects next previous chapter or
title.
VWCB
- Move the selection up, down and
change settings in menu.
OK
- Acknowledges a menu item
selection.
AA
+/-
- Adjusts TV volume.
TV/STB
aa
- Toggles between DVD and TV
watching.
Standby
**
- Power / Standby / On.
bb
- Teletext On/Off.
GUIDE
- Selects, when available, the view
angle.
RADIO
- Selects when available, an
alternate audio track.
Page 32
32 PROGRAMMING THE REMOTE CONTROL
English
11.5 Using Remote Control For Your Tuner / Amplifier
TUNER-AMPLIFIER mode (AMP)
Note: Some of the functions described below may not be available or may not have the same behaviour for all appliances.
(*) Indicates the commands which are only available for Philips Tuner / Amplifiers.
G (*)
- Selects DVD source.
K (*)
- Selects STB receiver source.
L
- Select TV source.
B (*)
- Selects VCR source.
F (*)
- Selects tuner source.
mm
- Displays On Screen Messages.
0-9 (*)
- Selects the relevant TV program.
MUTE H
- Mutes the Amplifier - Tuner sound.
P+ P- (*)
- Selects the next or previous TV
program.
VW
- Selects next / previous radio
preset.
AA
+/-
- Adjusts the Amplifier - Tuner
volume.
Standby
**
- Power / Standby / On.
CB
- Searches radio programs down /
up.
Page 33

TROUBLESHOOTING GUIDE 33
12 Troubleshooting guide
Check the guide below for a possible cause of the problem you are experiencing. The most common problems that arise
are related to cable connections. Make sure that your receiver is properly connected.
English
Symptom
Nothing lights up on your receivers
front panel.
Your remote control fails to operate
your receiver.
There is no sound/picture but the
current time is displayed on the
receivers front panel.
There is no sound/picture. However,
front panel display is correct.
Main Menu can be displayed but you
cannot select channels.
Main Menu and Channel Banner can
be displayed, but there is no reception
(black screen).
The picture is not sharp and text is
difficult to read.
Intermittent reception (mosaic effect
or frozen image).
Remedy
Check that the mains power cord is correctly connected. Disconnect this cord,
and then reconnect it to ensure it is in place.
Check that power is available at the wall socket.
Make sure your receiver is in the operate mode.
Make sure that you are pointing your remote control at the receiver front panel.
Make sure that the remote control is set to STB mode (see 4.2.1).
Check the batteries in your remote control.
Check if your remote is set to the "Device" (1 or 2) setting corresponding to your
receiver(see 8.4.2.2 and 9.2).
Your receiver is in standby. Press P+ / P- button on your remote control to wake
up your receiver. Alternatively, press Up / Down button on the receivers front
panel.
You are viewing TV via your UHF aerial TV connection. Press the TV/STB
remote control button twice.
Make sure that the SCART connections are correct.
Connections are correct but the TV set is NOT switched to external AV source.
Press twice the TV/STB remote control button, if the problem is not fixed refer
to the user manual of your TV set.
Your receiver has not been properly configured. Perform the Channel Search
procedure. (Select the Installation submenu from the Main Menu.). Optionally
return to factory setting.
Aerial is not receiving the signal. Check the installation and the aerial positioning
(Check signal quality).
Transmitted signal is too weak. Check the installation and the aerial positioning.
This effect may also be produced by severe weather conditions.
The TV SCART output video format is not set to RGB. Change setting of the TV
SCART item to RGB in the System Setting menu.
The TV SCART lead is not connected to the RGB capable SCART socket of your
TV set (refer to TV set user manual for proper connection).
The SCART lead for TV connection is not RGB capable (not fully wired). Use the
SCART cable supplied with your receiver for the connection to the TV set.
You may have defective cable links. Check all connections and cables.
Poor signal due to the incorrect positioning of the aerial. Reorient the aerial and
fasten it securely.
Page 34

English
Video Decoding
MPEG-2 DVB compliant up to MP@ ML
Video bit rate: up to 15 Mbit/sec
Video format: 4:3 (letter- box if source in 16:9)
and 16:9
Resolution: up to 720x576 pixels
Audio Decoding
MPEG layer I / II
Operation/Features
Automatic channel installation via scanning
Automatic channel list update
TV & Radio modes
Free-to-air reception
channel editing for personalized installation (skip, add, move)
Subtitles
Parental lock with PIN code
Fully remotely controlled
Menu controlled installation and operation using On Screen Display
User programmable VCR timers
Automatic recording via: reminders, timer programming and Easy
recording for Philips VCR and DVD + RW
Automatic VCR playback: Audio L/R + CVBS or RGB/Fast blanking
Receiver compatible with services based on MHP
Now & next event in
Channel Banner
Software upgrade via over the air download
Suited for feeding a Video projector
Event list per channel (Program Guide)
Application System Resources
Processor clock speed: 180 MHz
SDRAM - CPU/Video-Graphics 40 MB
Flash memory: 8MB
Antenna interface & Demodulation
Signal input connector: IEC 60169-2-Part2 female
Loop through connector: IEC 60169-2-Part2 male
DVB standard compliance: DVB-T, ETS 300 744
Modulation: COFDM (QPSK, QAM
Modes: 16, 64)
Input frequency range: VHF III: 174 MHz - 231 MHz
UHF IV/V: 470MHz - 862 MHz
Loop through frequency range: 47 - 862 MHz
Connections
TV SCART:
Output: CVBS or S-Video or RGB/
Fast blanking Volume
controlled audio L/R, Slow blanking
VCR SCART:
Input: CVBS or RGB / Fast
blanking, Slow blanking , Audio L/R
Output: CVBS or S-Video Audio L/R,
Slow blanking during timer if
Prepare Record mode is
activated
Audio CINCH:
Analog audio output: L / R
Digital audio output: S/PDIF
Serial interface: D-9 female
Accessories
- Remote control: Type RC2585108
- Batteries: 2 x 1.5V type AA/R06
- Scart cable RF coaxial cable
- Worldwide Guarantee booklet
- User manual
- Telephone modem cable
- Mains cord
Miscellaneous
Temperature range (°C)
Operating +5 to 45
Storage: -10 to +70
Mains: 230 V ~ +/-10%; 50Hz
Power consumption: 15W max
Weight: 2kg (approximately)
Including packaging 2.5 kg
Dimensions: 290 x 210 x 55 mm
Due to continued product improvements, this
information is subject to change without notice.
34 TECHNICAL SPECIFICATION
13 Technical Specification
This product is in conformity with the requirements of the 95/47/EC and 2002/21/EC directives.
Page 35

English
BRAND CODE LIST
BRAND CODE LIST 35
TV
A.R. Systems 0064 0583
Accent 0064
Accuphase 0583
Acec 0039
Adcom 0652
Admiral 0120 0445 0114 0190 0291
Adyson 0244 0243
AEA 0064
Agashi 0243 0291 0244
AGB 0543
Agef 0114
Aiko 0036 0243
Aim 0064 0099 0439
Aiwa 0728
Akai 0235 0398 0064 0460 0036 0099 0245 0741
0190 0543 0742 0629 0583 0507 0244 0658
0243 0291 0633
Akiba 0245 0309 0482 0064 0321
Alaron 0243
Allorgan 0233 0321 0244
Allstar 0064
Amplivision 0244 0427 0397
Amstrad 0036 0543 0291 0381 0398 0245 0064 0460
0439 1064 0675
Anam 0064 0036
Anam National 0064 0677
Anglo 0036 0291
Anitech 0036 0291 0064 0309 0129
Ansonic 0397 0064 0036 0695 0401 0190 0319 0129
0438 0286 0274 0039 0131
Apollo 0500
Arc en Ciel 0136 0223
Arcam 0243 0244
Ardem 0513 0741 0064 0583
Aristona 0583 0064 0039
Arthur Martin 0190 0427
ASA 0132 0373 0097 0131 0114
Asberg 0064 0129
Asora 0036
Astra 0064
Asuka 0245 0244 0243 0291 0309
Atlantic 0064 0243 0233 0286
Atori 0036
Auchan 0190 0427
Audiosonic 0036 0064 0401 0136 0741 0742 0244 0397
0291 0245 0513
Audioton 0244 0513 0397 0291
Autovox 0114 0233 0244 0274
AWA 0038 0063 0036 0401 0439 0064 0243 0633
0244 0135 0291
Axxent 0036
Bang & Olufsen 0592 0114
Barco 0407 0190
Basic Line 0401 0064 0190 0695 0583 0036 0245 0309
0244 0482
Bastide 0244
Baur 0222 0539 0064
Bazin 0244
Beko 0513 0741 0397 0064 0633 0742
Beon 0064 0445
Best 0397
Bestar 0064 0397 0401
Bestar-Daewoo 0401
Black Diamond 1064 0583
Black Panther 0129
Black Star 0274
Blacktron 0309
Blackway 0309 0245
Blaupunkt 0222 0227 0354 0482 0197
Blue Sky 0064 0741 1064 0514 0695 0742 0651 0583
0245 0309 0482
Blue Star 0309
Bondstec 0274
Boots 0244 0036
Bosch 0354
BPL 0064 0309
Brandt 0652 0136 0223 0362
Brandt Electronique 0362
Brinkmann 0064 0695 0445 0513
Brionvega 0064 0114
Brother 0291
Bruns 0114
BSR 0190 0321
BTC 0245
Canton 0245
Capsonic 0291
Carad 0637 0064
Carena 0482 0064
Carrefour 0063 0097 0064
Carver 0197
Cascade 0036 0064
Casio 0064 0190
Cathay 0064
CCE 0064 0244
Centrum 1064
Centurion 0064
Century 0114 0274 0265
CGE 0101 0445 0274 0397 0190
Cimline 0036 0245
City 0036
Clarivox 0445 0064 0097 0129
Clatronic 0064 0397 0398 0741 0245 0291 0583 0244
0274 0036 0129 0606 0675
CMS 0243
CMS hightec 0244
Concorde 0036
Condor 0064 0397 0243 0036 0309 0129 0274 0445
0438 0190 0291
Conrad 0064
Contec 0243 0036 0038 0063 0291 0064
Continental Edison 0136 0223 0514
Cosmel 0036 0064
Crosley 0114 0274 0101 0190
Crown 0036 0397 0513 0064 0514 0741 0633 0742
0445 0606 0235 0366
CS Electronics 0243 0245 0274
CTC 0274
Curtis Mathes 0120
Cybertron 0245
D-Vision 0064
Daewoo 0661 0651 0401 0064 0583 0036 0243 0245
0244
Dainichi 0245 0243
Dansai 0064 0291 0243 0036 0063 0244
Dansette 0439
Dantax 0397 0513 0741 0633 0742
Daytron 0036 0401 0064
de Graaf 0235 0190
Deitron 0064 0401 0245
Denko 0291
Denver 0064 0633
Desmet 0064 0036 0114
Diamant 0064
Diamond 0291
Digiline 0064
Dik 0064
Page 36

English
36 BRAND CODE LIST
Dixi 0036 0064 0274 0244 0114
Domeos 0695
Domland 0421
DTS 0036
Dual 0244 0064 0286 0421 0190
Dumont 0114 0131 0129 0244 0097 0099
Dunai 0190
Dux 0064 0039
Dynatron 0064 0039
E-Elite 0245
Edison-Minerva 0514
Elbe 0462 0265 0286 0319 0397 0190 0064 0245
0438 0637 0244 0543
Elbe-Sharp 0543
Elcit 0114 0274 0543 0129 0190
Elekta 0036 0064 0291 0309
ELG 0064
Elin 0243 0064 0132 0131 0190 0036
Elite 0245 0064
Elman 0129
Elta 0036 0291 0243
Emco 0274
Emerson 0114 0274 0064 0398 0097 0309 0651 0513
0397 0190
Emperor 0309
Erres 0064 0039
ESC 0064 0244
Estèle 0190
Etron 0064 0036 0190
Eurofeel 0291 0244
Euroman 0243 0291 0064 0244 0397
Europa 0064
Europhon 0064 0543 0129 0190 0244 0583 0274 0243
Excel 0064 0583
Expert 0233 0427 0286 0190
Exquisit 0064 0274
Family Life 0064
Fenner 0401 0036
Fidelity 0539
Filsai 0244
Finlux 0132 0131 0064 0741 0373 0244 0099 0190
0543 0742 0097 0114 0129 0438 0658 0519
0507 0500 0445 0633
Firstline 0064 0401 0695 0741 0651 0190 0036 0321
0243 0274 0129 0244 0438 0265 0099 0235
Fisher 0131 0244 0063 0235 0397 0072 0114 0190
0099
Flint 0064 0637 0099 0245 0482 0291
FNR 0129
Formenti 0190 0064 0583 0513 0243 0114
Formenti-Phoenix 0243
Fortress 0120 0114
Fraba 0064 0397
Friac 0036 0064 0129 0397 0682
Frontech 0274 0291 0244 0036 0190
Fujitsu 0233 0099 0129 0244 0190 0036 0064 0286
Fujitsu General 0036 0244 0233 0190
Funai 0695 0291 0321 0439
Future 0064 0583
Galaxi 0129 0064 0190
Galaxis 0397 0445 0064 0129 0583
Galeria 0036
GBC 0190 0036 0401 0245
GE 0309 0587 0136 0362
Geant Casino 0190 0427
GEC 0190 0064 0543 0583 0099 0244
Geloso 0274 0036 0190 0401
General 0136
General Technic 0036
Genesis 0036
Genexxa 0245 0064 0439 0190 0036
Goldfunk 0695
Goldhand 0243
GoldStar 0064 0036 0397 0317 0244 0274 0243 0583
0190 0136 0633
Gooding 0514
Gorenje 0397
GPM 0245
Gradiente 0197 0064
Graetz 0398 0190 0064 0366 0583
Gran Prix 0675
Grandin 0064 0036 0190 0637 0741 0742 0695 0401
0309 0245 0482 0427 0606
Gronic 0129 0244 0190
Grundig 0222 0514 0097 0064 0583 0614 0036 0063
0397
Halifax 0291 0243 0244
Hampton 0243 0244
Hanseatic 0064 0583 0190 0319 0309 0421 0661 0397
0036 0321 0244 0114
Hantarex 0036 0064 0129 0543
Hantor 0064
Hauppauge 0064
HCM 0036 0439 0064 0244 0245 0445 0309 0291
Hema 0244 0036
Hifivox 0136 0223
Highline 0291 0064
Hisawa 0309 0245 0427 0482 0637
Hit 0114
Hitachi 0252 1252 0063 0135 0500 0190 0605 0223
0244 0221 0543 0099 0064 0583 0136 0661
0132 0519 0539 0507
Hitachi Fujian 0135 0252
Hitsu 0036 0482 0245 0637
HMV 0114
Hornyphone 0064 0039
Hoshai 0245 0482
Huanyu 0401 0243
Hygashi 0244 0243
Hyper 0036 0243 0244 0274
Hypson 0064 0741 0291 0244 0309 0482 0427 0265
Iberia 0064 0583
ICE 0291 0064 0398 0036 0583 0245 0244 0243
Ices 0245 0243
Icos 0039
Imperial 0064 0190 0397 0101 0583 0438 0445 0274
0223
Indiana 0064
Ingelen 0514 0637 0741 0190
Ingersoll 0036
Inno Hit 0036 0099 0064 0245 0317 0244 0543 0274
0129 0309
Innovation 0064 0583
Interactive 0064 0039 0114 0539 0354 0190 0397 0136
Interbuy 0036 0064 0291 0274 0539 0583
Interfunk 0064 0039 0114 0539 0354 0190 0397 0136
0274
Internal 0064 0651 0401
International 0243
Intervision 0309 0244 0482 0064 0398 0513 0397 0421
0514 0245 0129 0190 0291 0274 0036 0583
Irradio 0036 0064 0245 0274 0317 0398
Isukai 0245 0064 0309 0482
ITC 0244
ITS 0064 0398 0245 0309 0291 0243 0036 0583
ITT 0190 0507 0500 0373 0366 0235 0637
ITT Nokia 0190 0500 0507 0373 0235 0366 0633 0637
0658
ITV 0291 0064 0274 0401
Page 37

English
BRAND CODE LIST 37
Jean 0063
Jubilee 0583
JVC 0680 0063 0398 0245 0633 0445
Kaisui 0245 0309 0064 0243 0482 0244 0036
Kamp 0243
Kapsch 0190 0233 0286 0131
Karcher 0064 0397 0637 0190 0309 0129 0291
Kathrein 0583 0064
Kawa 0398
Kawasho 0243
Kendo 0637 0064 0190 0539 0397 0438 0129 0274
Kennedy 0190 0233 0462
Kenwood 0132
Kingsley 0243
Kiton 0583 0064
Kneissel 0064 0397 0637 0438 0401 0583 0462 0286
0319 0265
Kolster 0064 0129
Konka 0064 0398 0741 0445 0245
Kontakt 0514
Korpel 0064 0583
Korting 0114 0397
Kotron 0439 0291
Koyoda 0036
Kraking 0265
Kriesler 0039
KTV 0244
Kuba 0190
Kuba Electronic 0190
Kyoshu 0439 0445 0291
Kyoto 0190 0243 0244
LaSAT 0513 0397
Leader 0036
Lemair 0438
Lenco 0064 0036 0190 0401 0583 0131
Lenoir 0036
Lesa 0274
Levis Austria 0064 0583
Leyco 0291 0099 0064 0321 0606
LG 0064 0397 0036 0244 0583 0274 0243 0317
0190 0633 0741 0136
Liesenk & Tter 0354 0064 0583
Liesenkotter 0064 0354 0039 0583
Lifetec 0064 0036 0401 0695 0539 0682 1064 0583
0245 0291
Loewe 0539 0064 0682 0397 0114 0319
Logik 0038 0398
Logix 0695
Luma 0064 0233 0190 0438 0583 0401 0036 0286
Lumatron 0233 0064 0190 0286 0244 0291
Lux May 0064 0036 0583
Luxman 0606
Luxor 0221 0317 0507 0519 0235 0190 0373 0500
0244 0658
Madison 0064 0583
Magnadyne 0114 0274 0543 0129 0190
Magnafon 0543 0129 0243
Magnavox 0064 0063
Magnum 0675 0741 0064
Mandor 0291
Manesth 0064 0583 0244 0291 0321 0190
Manhattan 0064 0695 1064 0190
Marantz 0064 0583 0439
Marelli 0114
Mark 0064 0244 0243 0401 0036 0741 0742
Masuda 0245 0398 0036 0291 0064 0244 0583
Matsushita 0677
Mediator 0064 0583 0039
Medion 0064 0695 0539 0583
Megas 0637
Melectronic 0373 0064 0539 0136 0274 0132 0131 0401
0036 0244 0507 0519 0243 0438 0190 0583
0651 0661 0222
Melvox 0427
Memorex 0036
Memphis 0099 0036
Mercury 0064 0036 0583
Metz 0222 0474 0394 0415 0064 0114 0583 0614
0695
MGA 0064 0583 0245 0131
Micromaxx 0064 0695 1064
Minato 0064 0583
Minerva 0514 0222 0097 0543 0135
Min
oka 0439 0064
Mitsubishi 0135 0120 0539 0064 0381 0114 0063 0583
0235
Mitsuri General 0190
Mivar 0319 0317 0318 0397 0243 0636 0543 0244
Monaco 0036
Morgan's 0064 0583
Motorola 0120
MTC 0397 0539 0190 0243
Multistandard 0129
Multitec 0064 0695 0513
Multitech 0036 0513 0064 0397 0583 0244 0243 0274
0129 0291
Murphy 0131 0243 0099 0190
Musikland 0064 0245 0274 0583
Myryad 0583 0064
NAD 0190
Naiko 0064 0633 0583
Nakimura 0401 0064 0583
Naonis 0190
NAT 0253
National 0253
NEC 0197 0063 0482 0036 0401 0244 0064 0038
Neckermann 0064 0397 0227 0583 0190 0354 0445 0114
0274 0244 0438 0539
NEI 0064 0398 0190
Nesco 0274
Netsat 0064 0583
Neufunk 0064 0036 0583 0637 0245 0309
New Tech 0064 0036 0583 0244
New World 0245
Nicamagic 0243
Nobliko 0129 0097 0243
Nogamatic 0136 0223
Nokia 0190 0507 0519 0500 0366 0235 0401 0658
0633 0373 0637 0136
Nordic 0244
Nordmende 0136 0223 0587 0222 0064 0362 0190
Norfolk 0190
Normerel 0064 0583
Novak 0039
Novatronic 0064 0132 0401 0583
Nurnberg 0190
Oceanic 0190 0427 0321 0235 0500 0507
Odeon 0291
Okano 0397 0064 0291 0099 0036
Omega 0291
Onwa 0398 0629 0245 0460 0129
Opera 0064 0583
Optimus 0677
Optonica 0120
Orbit 0064 0583
Orion 0064 0583 0682 0321 0038 0036 0129 0291
0439 0543
Orline 0064 0245 0583
Ormond 0695 1064 0064 0583
Orsowe 0543
Osaki 0099 0245 0244 0291 0064 0439 0401 0583
Osio 0064 0583 0317
Page 38

38 BRAND CODE LIST
English
Oso 0245
Osume 0099 0063 0245 0064
Otto Versand 0063 0120 0539 0064 0583 0222 0136 0321
0253 0274 0244 0036 0309 0543
Pacific 0064 0583
Pael 0243
Palladium 0397 0064 0227 0445 0583 0274 0354 0114
0190 0244 0438 0682
Palsonic 0291 0439 0064 0244 0245 0583
Panama 0036 0244 0291 0243 0064 0274
Panasonic 0677 0253 0394 0543 0064 0190
Panavision 0064 0438 0583
Pathe Cinema 0190 0265 0243 0427 0319 0397
Pathe Marconi 0136 0223
Pausa 0036
Perdio 0099 0190 0064 0243 0309 0583
Perfekt 0064 0583
Pershin 0427
Philco 0114 0101 0445 0274 0190 0397 0064
Philharmonic 0244
Philips 0666 0064 0583 0039 0114 0401
Phoenix 0064 0114 0513 0397 0243 0190 0099
Phonola 0064 0583 0039 0114 0243
Pilot 0064 0583
Pioneer 0064 0397 0136 0190 0513
Pionier 0397 0513
Plantron 0064 0291 0036
Playsonic 0244
Policom 0129 0136 0223 0233 0265
Poppy 0036
Portland 0401 0651
Powerpoint 0514
Prandoni-Prince 0274 0543
Precision 0244
Prima 0036 0291
Prinz 0099 0221
Profex 0036 0190
Profi 0036
Profitronic 0064 0129
Proline 0099 0064 0039 0652
Prosonic 0064 0243 0397 0401 0606 0398 0695
Protech 0064 0244 0036 0274 0129 0291 0445 0695
0309
Provision 0064 0583 1064
Pye 0064 0401 0583 0039 0114
Pymi 0036
Quadra Vision 0427
Quasar 0274
Quelle 0064 0038 0136 0539 0063 0244 0274 0101
0354 0097 0131 0132 0222 0227 0291 0317
0695 0321 0373 0036
Questa 0063
R-Line 0064
Radialva 0136 0245 0190 0064
Radiola 0064 0583 0039 0244
Radiomarelli 0114 0543 0274 0064
RadioShack 0064
Radiotone 0036 0064 0397 0606 0445 0291 0439 0675
Rank 0097
Rank Arena 0063
RBM 0097
RCA 0652 0120 0587 0362
Recor 0064
Rectiligne 0064
Rediffusion 0063
Redstar 0064 0583
Reflex 0064 0695
Revox 0064 0397
Rex 0233 0438 0274 0190 0286 0291
RFT 0114 0319 0397 0099 0291
Rhapsody 0243
Ricoh 0064 0583
Roadstar 0036 0291 0245 0445 0064 0309 1064
Robotron 0114
Rodex 0064 0583
Rowa 0291 0244
Royal Lux 0397 0439
Saba 0652 0114 0190 0136 0543 0223 0362 0587
Saccs 0265
Sagem 0482 0637 0309
Saisho 0543 0036 0038 0244 0190 0291 0381
Saivod 0064
Salora 0317 0221 0190 0543 0366 0235
Salsa 0362
Sambers 0543 0129
Samsung 0064 0583 0614 0645 0036 0244 0397 0291
0243 0317 0099 0235
Sandra 0243 0244
Sanela 0265
Sansui 0064 0398 0682
Santon 0036
Sanyo 0235 0319 0063 0038 0397 0366 0099 0243
0244 0131 0072 0036 0190 0064 0135
Save 0064
SBR 0064 0583 0039
Schaub Lorenz 0633
Schneider 0064 0583 0039 0421 0286 0244 0274 0398
0245 0190 0695 0675 1064
Scotland 0190
SEG 0244 0291 0036 0274 0063 0129 0190 0064
0243 0695 0514 0661 1064
SEI 0114 0129 0190 0543 0321 0233 0064
Sei-Sinudyne 0129 0233 0321 0543 0064 0114
Seleco 0398 0233 0286 0190 0438
Sencora 0036
Sentra 0245 0036
Serino 0482 0637 0243
Sharp 0120 1220 0063 0321 0680 0543
Shintoshi 0064
Shorai 0321
Siarem 0190 0114 0129 0543
Siemens 0227 0222 0354 0064
Siera 0064 0583 0039
Siesta 0397
Silva 0243 0064
Silver 0063 0064 0583 0742 0190
Singer 0114 0129 0274 0427 0462 0036 0064
Sinudyne 0114 0129 0321 0190 0543 0233 0064
Sky 0064
Skymaster 0132
Smaragd 0514
Solavox 0099 0190 0064
Sonawa 0245
Sonitron 0235 0397 0366 0244
Sonneclair 0064
Sonoko 0064 0036 0291 0309 0244
Sonolor 0235 0190 0427 0309
Sontec 0064 0397 0321 0036
Sony 1532 1678 1037 0038 0063 0129 0064
Sound & Vision 0129 0245 0401
Soundwave 0064 0445
Spectra 0036
Ssangyong 0036
Standard 0245 0036 0244 0064 1064 0401
Starlite 0036 0190 0064 0291
Stenway 0309 0245
Stern 0233 0286 0190 0291 0438
Strato 0064 0291 0036
Stylandia 0244
Sunkai 0321 0482 0245 0064 0514 0637
Sunstar 0398 0064 0036 0606
Sunwood 0064 0036
Superla 0543 0243
SuperTech 0036 0064 0243 0583 0245
Page 39

BRAND CODE LIST 39
English
Supra 0401 0036
Susumu 0362 0245
Sutron 0036
Swissline 0274
Sydney 0243 0244
Sysline 0064
Sytong 0243
T+A 0474
Tandberg 0394 0438 0136 0223
Tandy 0120 0245 0099 0244 0274 0190
Tashiko 0063 0244 0197 0243 0190
Tatung 0099 0543 0244 0064 0038
Teac 0244 0539 0064 0482 0291 0036 0439 0695
TEC 0244 0036 0274 0362 0286
Tech Line 0064 0695
Techica 0245
TechniSat 0682
Tedelex 0244 0633
Teiron 0036
Teleavia 0136 0223
Telecor 0064 0190 0245 0244 0286 0421
Telefunken 0136 0101 0128 0362 0289 0223 0064 0513
0652
Telefusion 0064
Telegazi 0064 0190 0286 0245 0291
Telemeister 0064
Telesonic 0064
Telestar 0064 0606
Teletech 0036 0274 0064 0695
Teleton 0244 0233 0190 0286 0063
Televideon 0190 0243
Televiso 0427
Temco 0321
Tempest 0036 0064
Tennessee 0064
Tensai 0131 0245 0064 0244 0321 0036 0132 0401
0398 0274
Tenson 0036
Tevion 0064 0675 0695
Texet 0244 0401 0036 0243 0245
Thomson 0652 0136 0362 0223 0064 0587
Thorn 0265 0101 0064 0131 0362 0539 0401 0135
0136 0252 0099
Thorn-Ferguson 0131 0135 0136 0265 0362
Tokai 0099 0064 0190 0244 0401 0036
Tokyo 0243
Tomashi 0309 0245
Toshiba 0535 0063 0097 0129 0244 0136
Towada 0129 0244
Toyoda 0036
Trakton 0291
Trans Continens 0695 0244 0064
Transonic 0064 0482 0614 0539 0291
Transtec 0243
Trident 0543 0244
Tristar 0245
Triumph 0543 0373 0583 0064
Tsoschi 0309
TVTEXT 95 0583
Uher 0064 0233 0401 0445 0513 0397 0286
Ultravox 0114 0129 0401 0274 0243 0190 0064
Unic Line 0064 0500 0482
United 0064 0741 0742
Universum 0373 0132 0222 0500 0274 0519 0507 0397
0227 0445 0038 0539 0321 0063 0097 0190
0291 0131 0064 0438 0317 0101 0354 0695
0244 0136 0658 0036
Univox 0114 0064 0190 0265
Vestel 0064 0190 0244 0583 0695 1064
Vexa 0036 0064
Videologique 0243 0245 0244
Videosat 0274
VideoSystem 0064
Videotechnic 0243 0244 0401
Videoton 0190
Vidikron 0129
Vidtech 0063
Visiola 0243
Vision 0064 0244
Vistar 0233
Vortec 0064
Voxson 0114 0064 0445 0190
Waltham 0244 0695 0445 0064 0136
Watson 0064 0190 0245 0606 0421 0036 0695 1064
Watt Radio 0129 0190 0243
Wega 0063 0114 0064
Wegavox 0036
Weltblick 0064 0244
White Westinghouse 0243 0064
Windstar 0309
Xrypton 0064
Yamishi 0309 0482 0245 0064 0244
Yo ka n 0064
Yoko 0244 0064 0245 0291 0036 0397 0366 0243
0274
Yorx 0245
Zanussi 0233 0244
Zenor 0366
VCR
Adyson 0099
Aiwa 0334 0027 0068 0375 0379 0064
Akai 0133 0342 0068 0047 0379 0267
Akiba 0099
Akura 0099 0068
Allorgan 0267
Allstar 0108
Ambassador 0047
Amstrad 0027 0305 0099
Anitech 0099
Aristona 0108
ASA 0064 0108
Asuka 0099 0064 0108 0027 0065
Audiosonic 0305
Audioton 0047
AVP 0379
AWA 0064 0305 0070
Baird 0133 0305 0131 0068 0027
Bang & Olufsen 0526
Basic Line 0305 0047 0099
Bestar 0305 0047
Black Panther 0305
Blaupunkt 0253 0108 0222 0061
Blue Sky 0064 0375 0099 0379 0305
Bondstec 0047 0099
Brandt 0068 0347 0348 0520
Brandt Electronique 0068
Brinkmann 0375
Carena 0108
Carrefour 0072
Casio 0027
Cathay 0305
Catron 0047
CGE 0068 0027
Cimline 0099
Clatronic 0047 0099
Combitech 0379
Condor 0047 0305
Crown 0305 0099 0047
Cyrus 0108
Page 40

40 BRAND CODE LIST
English
Daewoo 0305 0047 0072 0379
Dansai 0099 0305
Daytron 0305
de Graaf 0069 0108 0131 0075
Decca 0027 0068 0108 0035 0094 0375
Deitron 0305
Denko 0099
Diamant 0064
Dual 0068 0108 0305 0027
Dumont 0027 0108 0131
Elbe 0305 0065
Elcatech 0099
Elin 0267
Elsay 0099
Elta 0099 0305
Emerson 0099 0072
ESC 0305 0267 0047
Etzuko 0099
Europhon 0047
Fenner 0047
Ferguson 0068 0347 0348 0520 0027 0305
Fidelity 0027 0099 0267 0379
Finlandia 0131 0108 0069 0027 0075 0411
Finlux 0027 0108 0131 0069
Firstline 0099 0375 0070 0064 0072 0069 0305
Fisher 0074 0131 0065 0047
Frontech 0047 0099
Fujitsu 0027
Funai 0027
Galaxi 0027
Galaxis 0305
GBC 0047
GEC 0108
General 0047
General Technic 0375
Genexxa 0131
Goldhand 0099
GoldStar 0064 0027
Graetz 0068 0131 0267
Granada 0131 0075 0108 0267 0064 0253 0069 0027
Grandin 0099 0064 0047 0027 0305
Grundig 0222 0108 0374 0253 0347 0375 0099
Hanimex 0379
Hanseatic 0064 0305 0108 0065
Hantor 0047
Harwood 0099
HCM 0099
Hisawa 0379
Hischito 0072
Hitachi 0069 0068 0027 0267 0108 0131 0411
Hornyphone 0108
Hypson 0099 0305 0379
Impego 0047
Imperial 0027 0267
Ingersoll 0267
Inno Hit 0047 0267 0305 0099
Interbuy 0064 0099
Interfunk 0108 0131
Internal 0305
International 0305 0064
Intervision 0027 0305 0064 0375
Irradio 0099 0064 0108
ITT 0133 0068 0411 0131 0267
ITT
Nokia 0075
ITV 0305 0064 0047
JVC 0068 0094 0035 0411
Kaisui 0099
Karcher 0305
Kendo 0133 0342 0375 0099 0064
Kenwood 0068 0065
KIC 0027
Kimari 0074
Kneissel 0379 0375 0064
Korpel 0099
Kuba 0074
Kuba Electronic 0074
Kuwa 0253
Kyoto 0099
Lenco 0305
Leyco 0099
LG 0064 0027 0305
Lifetec 0375
Loewe 0108 0064 1189
Logik 0267 0099 0133
Lumatron 0305
Luxor 0133 0070 0099 0089 0131 0074 0075
Magnavox 0108
Manesth 0099 0072 0108
Marantz 0108 0065 0089
Mark 0305 0047
Matsui 0375 0064 0267 0379 0027
Mediator 0108
Medion 0375 0379
Melectronic 0027 0064 0065
Memorex 0131 0027 0064 0075 0074
Memphis 0099
Metz 0222 0374 0108 1189 0253 0064
Micormay 0375
Migros 0027
Minerva 0222
Mitsubishi 0070 0094 0108
Multitec 0064
Multitech 0027 0099 0047 0131
Murphy 0027
Myryad 0108
NAD 0131
National 0253
NEC 0068 0065 0094 0131 0064
Neckermann 0068 0108
Nesco 0099 0027 0379
Nikkai 0047 0099 0305
Nokia 0131 0133 0342 0068 0305 0267 0075 0069
0108
Nordmende 0068 0411 0347 0348 0521 0555 0094 0520
Oceanic 0027 0075 0133 0108 0131 0068
Okano 0342 0375 0099 0305
Orbit 0099
Orion 0379 0375
Orson 0027
Osaki 0027 0064 0099
Osume 0099
Otto Versand 0108
Palladium 0099 0342 0064 0068 0267
Palsonic 0099 0027
Panasonic 1189 0253
Pathe Cinema 0070
Pathe Marconi 0068
Perdio 0027
Philco 0065 0099
Philips 1608 0108 0411
Phonola 0108
Pioneer 0094 0108 0069
Portland 0047 0305
Prinz 0027
Profitronic 0108 0267
Proline 0027 0347 0348
Prosco 0305
Prosonic 0305 0027
Protech 0108
Provision 0305
Pye 0108
Quasar 0305
Quelle 0108
Page 41

BRAND CODE LIST 41
English
Radialva 0064 0099 0108 0075
Radiola 0108
Rank 0068
Rex 0068 0411
RFT 0047 0099
Roadstar 0267 0099 0064 0305
Royal 0099
Saba 0068 0347 0348 0411 0521 0089 0607 0305
Saisho 0375
Salora 0070 0133 0131
Samsung 0267 0459
Samurai 0047
Sansui 0068 0094 0133 0099 0375
Sanyo 0131 0074 0075 0094
Saville 0379 0305 0267
SBR 0108
Scan Sonic 0267
Schaub Lorenz 0068 0131 0027 0133 0342
Schneider 0099 0027 0064 0108 0305 0267 0069
Seaway 0305
SEG 0099 0267 0305 0108
SEI 0108
Sei-Sinudyne 0108
Seleco 0068 0035 0411 0047 0064
Sentra 0099 0047
Setron 0099
Sharp 0075 0089 0064
Shintom 0099 0131
Shivaki 0064
Siemens 0222 0064 0131 0108 0347 0374
Siera 0108
Silva 0064
Silver 0305
Singer 0072
Sinudyne 0108
Smaragd 0375
Solavox 0047
Sonitron 0074
Sonneclair 0099
Sonoko 0305
Sonolor 0075 0089
Sontec 0064 0305
Sony 0060 0061 0059 0133 1059
Soundwave 0064
Ssangyong 0099
Standard 0305
Starlite 0064 0131
Stern 0305
Sunkai 0375 0305
Sunstar 0027
Suntronic 0027
Sunwood 0099
Supra 0064 0267
Symphonic 0027 0099
Tandberg 0305
Tashiko 0027 0075 0267 0108 0064
Tatung 0027 0068 0108 0075 0070 0375 0379
Teac 0099 0068 0027 0305 0064 0108 0334
TEC 0047 0305 0099
Tech Line 0099
TechniSat 0375
Teleavia 0068 0520
Telefunken 0068 0347 0348 0411 0520 0521 0305 0607
Teletech 0099 0305 0027
Tempest 0047
Tenosal 0099
Tensai 0027 0064 0099
Tevion 0375
Thomson 0347 0348 0068 0094 0411 0520 0521 0555
0305
Thorn 0068 0131 0064
Thorn-Ferguson 0347
Tokai 0099 0064 0068 0131
Tokiwa 0099
Topline 0375
Toshiba 0072 0068 0411 0070 0108
Towada 0099
Tracton 0047
Trakton 0047
TVA 0047
Uher 0064 0267
Ultravox 0305
Unitech 0267
United Quick Star 0305
Universum 0027 0108 0267 0064 0133 0375 0222 0131
Victor 0035 0094
Watson 0108 0379
Weltblick 0064
Yamaha 0068
Yamishi 0099 0305
Yo ka n 0099
Yoko 0064 0099 0047 0267
SAT - STB
Philips 0038
AMP
Arcam 0668
Curtis Mathes 0327
JBL 1030 0695
Marantz 0348
Mark 1030
Optimus 0040
Philips 0668
Pioneer 0040 0327
Sansui 0348
Teac 0448
Yamaha 0170 0381
TUNER
Aiwa 0148 1432
Akai 0142
Arcam 1116 1216
Audiolab 1216
Carver 0387
Denon 1187 1131 1387
Fisher 0387
Grundig 1216 1116
Harman/Kardon 0137
Inkel 0518
JBL 0137
JVC 0101
Kenwood 1054 1340 1596
Marantz 1216 1116 1316
Micromega 1216
Myryad 1216
NAD 0347
Onkyo 0162
Panasonic 1335 1336 1790 1545
Philips 1216 1116 1316
Pioneer 1050 0316
Sansui 1116
Sanyo 0387
Schneider 0137
Sherwood 0518
Page 42

42 BRAND CODE LIST
English
Sony 1085 1185 1285
Teac 0137
Technics 1335 1336 1790 1545
Thorens 1216
Victor 0101
DVD
3DLAB 0566
A-Trend 0741
Acoustic Solutions 0757
AEG 0815
Afreey 0725
Boman 0810
Brandt 0678
Clatronic 0815
Cyber Home 0741
Cytron 0678
Daewoo 0797
Dansai 0797
Denon 0517
Denver 0815
Denzel 0692
Diamond 0678
Dual 0692 0678 0757
Elta 0717
Emerson 0618
Encore 0725
Enzer 0692
Ferguson 0678
Finlux 0768
GoldStar 0618 0768
Graetz 0692
Grundig 0566 0802
Grunkel 0797
Hanseatic 0768
Hitachi 0692 0600
JVC 0650 0585 0566 0530
Karcher 0810
Kenwood 0561 0517 0764
Kiss 0692
Lenco 0678 0797
LG 0618 0768
Lifetec 0678
Loewe 0566
Magnavox 0530
Marantz 0566
Matsui 0678
MBO 0717
Medion 0810 0678
Metz 0598 0552
Micromedia 0530 0566
Micromega 0566
Microsoft 0549
Monyka 0692
Mustek 0757
Mx Onda 0678
NAD 0768
Naiko 0797
Neufunk 0692
Onkyo 0530
Optimus 0598 0552
Oritron 0678
Palsonic 0716
Panasonic 0517
Philips 0566 0530
Pioneer 0598 0552
Proline 0678
Proscan 0549
Radionette 0768
Raite 0692
RCA 0549
REC 0716 0517
Roadstar 0717 0716
Rotel 0650 0585
Saba 0678
Salora 0768
Sampo 0725
Samsung 0600
Schaub Lorenz 0815
Schneider 0678 0810
Scott 0678
SEG 0692
Sharp 0657
Sherwood 0768
Silva 0815
Singer 0717
Skymaster 0757
SM Electronic 0717 0757
Sony 0560 0600
Soundwave 0810
Standard 0678
Sunwood 0815
Teac 0768 0598 0618
Technics 0517
Technika 0797
Tensai 0717 0678
Tevion 0678
Theta Digital 0598
Thomson 0578 0549
Tokai 0692 0725
Tokaido 0725
Toshiba 0530
United 0815
Universum 0768 0618
XMS 0815 0716
Yamaha 0517 0566
Yamakawa 0692
Yukai 0757
Zenith 0530 0618 0768
 Loading...