

Philips CE139DR BROCHURE

Always there to help you
Register your product and get support at
www.philips.com/welcome
Question?
Contact
Philips
CE139DR
User manual

Contents
1 Safety 2
2 Your car audio system 3
Introduction 3
What's in the box 3
Overview of the system 4
3 Install the car audio system 6
Connect wires 7
Mount into the dashboard 8
Attach the front panel 9
4 Get started 10
For the rst time use 10
Set the time format 10
Set the clock 11
Select a source 11
Select a listening zone 11
Mute the button beep 11
5 Listen to FM/MW radio stations 12
Switch to FM/MW radio mode 12
Select a tuner region 12
Select a tuner sensitivity 12
Search for a radio station 12
Store radio stations in memory 12
Play with RDS 13
6 Listen to DAB radio stations 15
Switch to DAB mode 15
Scan for on-air stations 15
Program radio stations 15
Display DAB information 16
Set up for weak reception 16
Use the DRC (Dynamic Range Control) 16
Disable the DAB reception 16
Reset the DAB tuner 17
Remove invalid stations 17
Check the current version of DAB
rmware 17
7 Play from a storage device 17
Control play 18
Switch tracks 18
8 Play from an iPod/iPhone 19
Compatible iPod/iPhone models 19
Connect your iPod/iPhone 19
Control play 19
Charge your iPod/iPhone 20
9 Listen to an external player 20
10 Adjust sound 21
11 Additional information 21
Reset the system 21
Replace the fuse 21
Upgrade the rmware 22
12 Product information 23
13 Troubleshooting 24
14 Notice 25
Care of the environment 25
Trademark notice 25
Copyright 25
1EN

1 Safety
Read and understand all instructions before you
use this device. If damage is caused by failure to
follow instructions, the warranty does not apply.
• Modication of the product could result
in hazardous radiation of EMC or other
unsafe operation.
• The device is designed for negative ground
(earth) 12 V DC operation only.
• To ensure safe driving, adjust the volume to
a safe and comfortable level.
• Improper fuses can cause damage or
re. When you need to change the fuse,
consult a professional.
• Use only the supplied mounting hardware
for a safe and secure installation.
• To avoid short circuits, do not expose the
device to rain or water.
• The device shall not be exposed to
dripping or splashing.
• Do not place any sources of danger on
the device (e.g. liquid lled objects, lighted
candles).
• Never insert objects into the ventilation
slots or other openings on the device.
• Clean the device with soft, damp cloth.
Never use substances such as alcohol,
chemicals or household cleaners on the
device.
2 EN
2 Your car audio
system
Congratulations on your purchase, and
welcome to Philips! To fully benet from the
support that Philips offers, register your product
at www.philips.com/welcome.
Introduction
With this system, you can:
• enjoy audio from a USB storage device,
SD/SDHC card, iPod/iPhone, and external
player,
• charge your iPod/iPhone, and
• listen to radio stations.
You can enrich sound output with these sound
effects:
• Dynamic bass boost (DBB)
• Digital sound control (DSC)
Playable media:
• USB storage device
• Compatibility: USB 2.0, USB 1.1
• Class support: MSC (Mass Storage
Class)
• Maximum capacity: 32 GB
• SD/SDHC card
• Maximum capacity: 32 GB
• Files
• File system: FAT16, FAT32
• Maximum number of folders: 99
• Maximum number of tracks/les: 999
• Maximum level of directory: 8
• .mp3 les
Sampling frequencies: 32 kHz, 44.1 kHz,
48 kHz
Bitrates: 8-320 kbps and variable
bitrates
• .wma les
Versions: V4, V7, V8, V9 (L1 and L2)
Sampling frequencies: 44.1 kHz, 48 kHz
Bitrates: 64-192 kbps and variable
bitrates
• ID3 tag V2.0 or later
• Unsupported les:
AAC, WAV, and PCM les
DRM protected WMA les (.wav, .m4a,
.m4p, .mp4, and .aac)
WMA les in lossless format
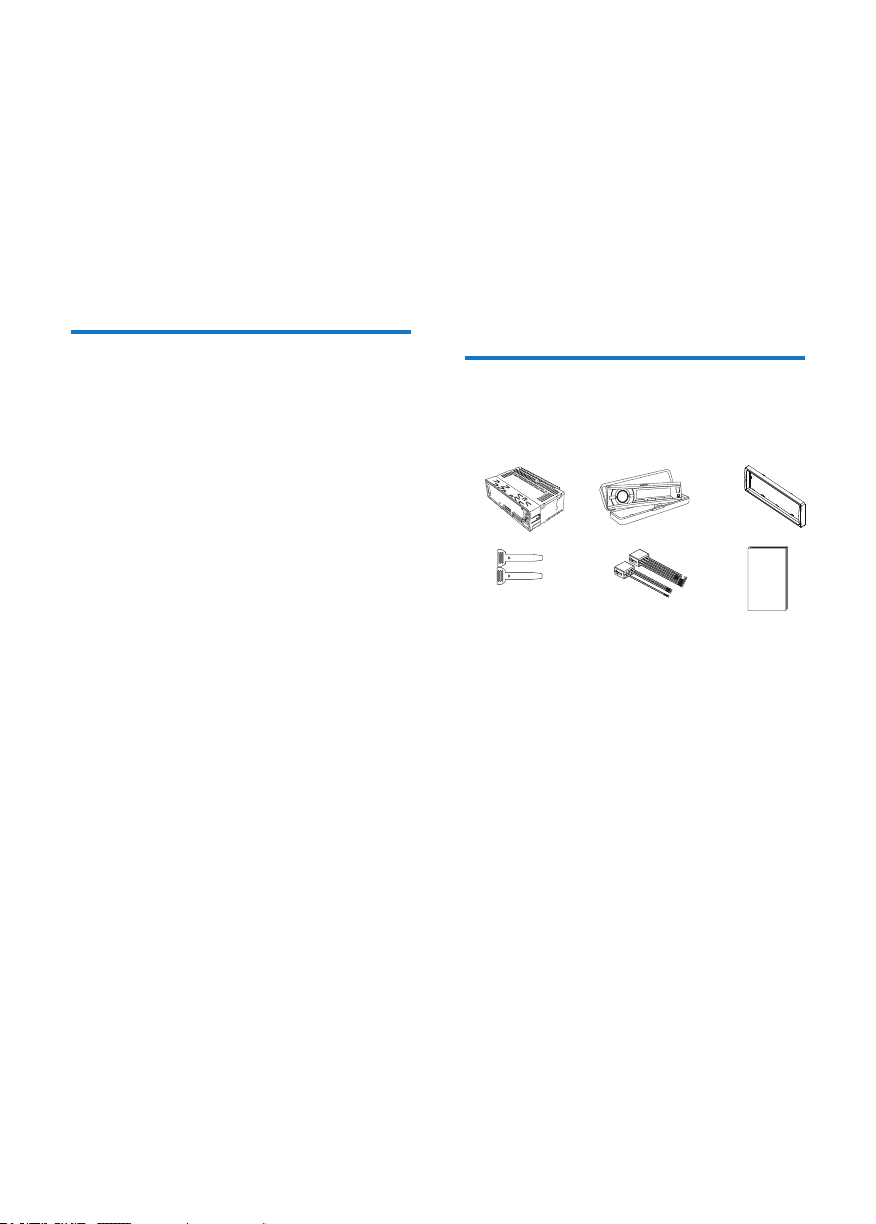
What's in the box
Check and identify the contents of the package:
abc
fed
a Main unit (with a sleeve)
b Carrying case (with front panel included)
c Trim plate
d Disassembly tool X 2
e ISO male connector X 2
f User manual
3EN
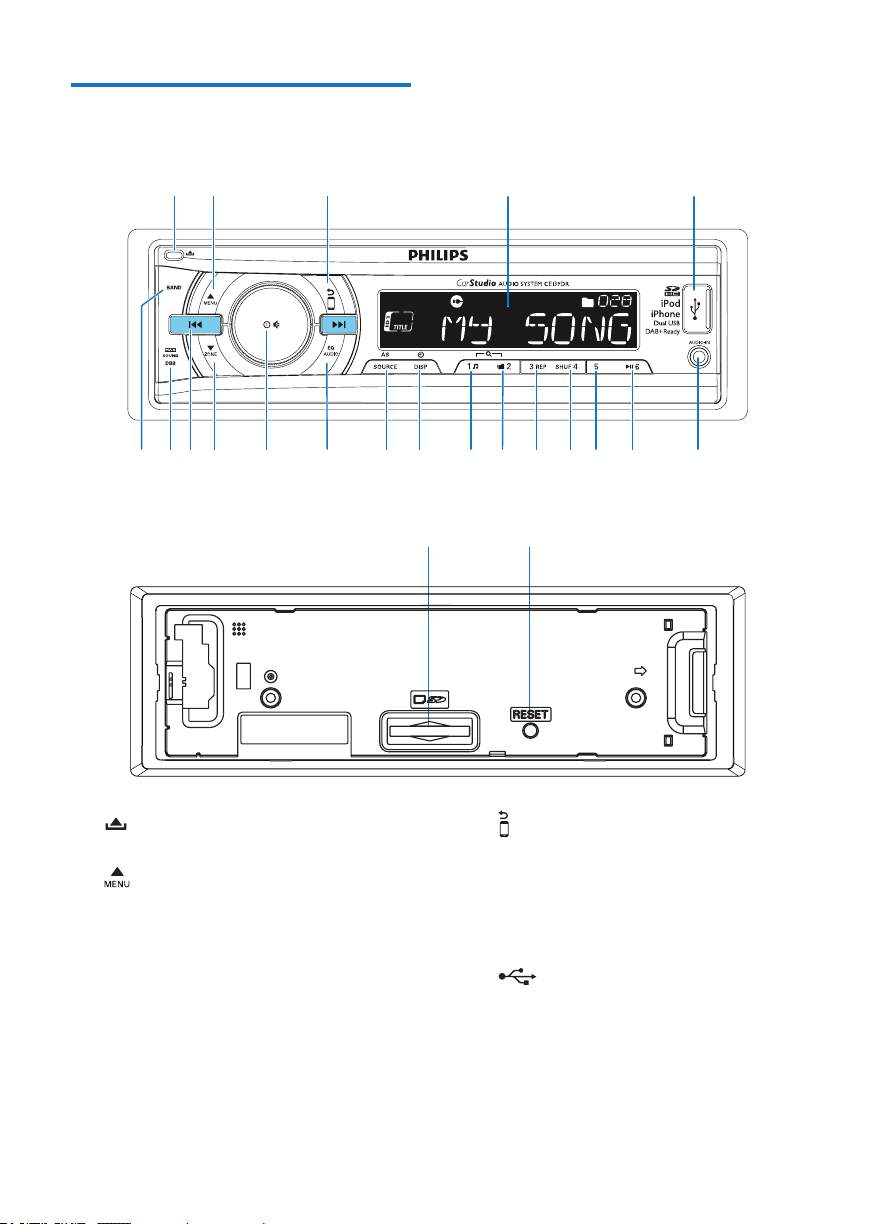
Overview of the system
ab cd e
tsrq ponm lk jihfg
uv
a
• Unlock the front panel.
b
• For .wma and .mp3 tracks, press to
select the previous folder.
• In DAB mode, press to access the
DAB menu.
• Press and hold to access the system
menu.
• Press to select a tuner band.
4 EN
c
• Return to the previous menu.
• For iPod/iPhone, press repeatedly to
select a control mode: control play on
the iPod/iPhone or on this system.
d LCD screen
e
• Connect to a USB storage device.
• Connect to a compatible iPod/iPhone.

f AUDIO-IN
• Connect to the audio output socket
(usually the headphone socket) of an
external device.
g
• Start, pause, or resume the play of
tracks.
• In FM/MW radio mode, press to select
the preset radio station of No. 6.
• In FM/MW radio mode, press and hold
to store the current radio station at
channel No. 6.
h
• In FM/MW radio mode, press to select
the preset radio station of No. 5.
• In FM/MW radio mode, press and hold
to store the current radio station at
channel No. 5.
i
• In FM/MW radio mode, press to select
the preset radio station of No. 4.
• In FM/MW radio mode, press and hold
to store the current radio station at
channel No. 4.
• For .wma and .mp3 tracks, press
repeatedly to select a play mode:
play all tracks randomly ([SHUFFLE
ALL]), play tracks in the current
folder or album randomly ([SHUFFLE
FLD]/[SHUFFLE ALB]), or play
all tracks in the storage device in
sequence ([SHUFFLE OFF]).
j
• In FM/MW radio mode, press to select
the preset radio station of No. 3.
• In FM/MW radio mode, press and hold
to store the current radio station at
channel No. 3.
• For .wma and .mp3 tracks, press
repeatedly to select a repeat mode.
k
• In FM/MW radio mode, press to select
the preset radio station of No. 2.
• In FM/MW radio mode, press and hold
to store the current radio station at
channel No. 2.
• For .wma and .mp3 tracks on a storage
device, press to access the folder list.
l
• In FM/MW radio mode, press to select
the preset radio station of No. 1.
• In FM/MW radio mode, press and hold
to store the current radio station at
channel No. 1.
• For .wma and .mp3 tracks on a storage
device, press to access the track list.
• Press to access the music menu of an
iPod/iPhone.
m
/DISP
• Press repeatedly to display available
information about the current track.
• Press repeatedly to display available
information that is transmitted by a
DAB/RDS radio station.
• Press and hold to display the set clock.
n AS/SOURCE
• Press repeatedly to select a source.
• In FM/MW radio mode, press and hold
to activate the automatic search of
radio stations.
o
• Press repeatedly to select a preset
sound equalizer.
• Press and hold to activate the setup of
bass, treble, balance, and fader.
p
• Press to turn on the system.
• Press and hold to turn off the system.
• Press to mute the speakers or release
them from mute status.
• Press to conrm an option.
• Rotate to switch between menu
options.
• Rotate to adjust the volume level.
5EN
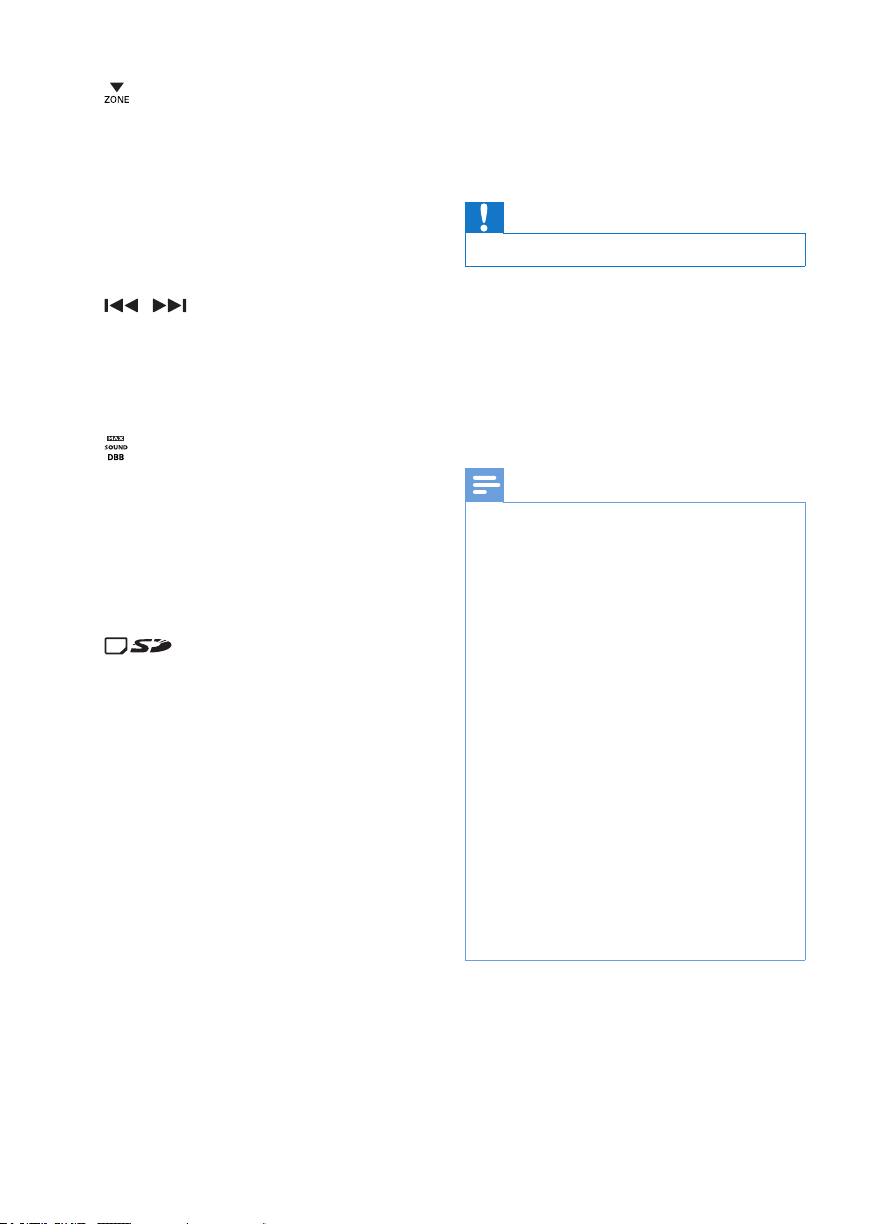
q
• For .wma and .mp3 tracks on a storage
device, press to select the next folder.
• In DAB mode, press and hold to access
the list of radio stations.
• In a mode other than DAB mode,
press and hold to activate the selection
of listening zones.
• Press to select a tuner band.
r
/
• Tune to a radio station.
• Press to skip to the previous/next
track.
• Press and hold to rewind a track or
search fast forward.
s
• Press to enable or disable the MAX
Sound feature.
• Press and hold to enable or disable
the DBB (dynamic bass boost) sound
effect.
t BAND
• Press repeatedly to select a tuner band.
u
• Insert an SD/SDHC card.
v RESET
• Press to reset the system.
3 Install the car
audio system
Caution
Use the controls only as stated in this user manual.
•
Always follow the instructions in this chapter in
sequence.
These instructions are for a typical installation.
However, if your car has different requirements,
make the adjustment accordingly. If you have
any question regarding installation kits, consult
your local retailer.
Note
This system is designed for negative ground (earth) 12V
•
DC operation only.
• Always install this system in the car dashboard. Other
locations can be dangerous as the rear of the system
heats up during use.
• To avoid short-circuit: before you connect, make sure
that the ignition is off.
• Make sure that you connect the yellow and red power
supply leads after all other leads are connected.
• Make sure that all loose leads are insulated with
electrical tape.
• Make sure that the leads do not get caught under
screws iron parts that will move (e.g. seat rail).
• Make sure that all ground (earth) leads are run to a
common ground (earth) point.
• Use only the supplied mounting hardware for a safe
and secure installation.
• Improper fuses can cause damage or re. When you
need to change the fuse, consult a professional.
• When you connect other devices to this system, make
sure that the rating of the car circuit is higher than the
total fuse value of all the connected devices.
• Never connect speaker wires to the metal body or
chassis of the car.
• Never connect speaker wires with stripes to one
another.
6 EN

Connect wires
Note
Make sure that all loose leads are insulated with
•
electrical tape.
• Consult a professional to connect wires as instructed
below.
1 Check the car's wiring carefully and
connect them to the the supplied ISO
male connectors.
2 Connect other wires if necessary.
a
b
ISO male
connectors
1 Green strip, black-
edged green strip
2 White strip, black-
edged white strip
3 Gray strip, black-
edged gray strip
4 Purple strip, black-
edged purple strip
e Red strip Ignition key +12V
f Blue strip Motor/electric
g White-edged blue
strip
h Black strip Ground
i Yellow strip To the +12V car
Connect to
Rear left speaker
Front left speaker
Front right speaker
Rear right speaker
DC when ON/ACC
antenna relay control
lead
Amplier relay
control lead
battery which is
energized at all times
Sockets or
connectors on rear
panel
1 USB connector A USB storage device
2 Purple strip OE remote control
3 FM/MW radio
antenna socket
4 DAB radio receiver
socket
5 REAR R Rear right speaker
6 REAR L Rear left speaker
7 For ISO male
connectors
Tip
The pin arrangement for the ISO connectors depends
•
on the type of your vehicle. To avoid damage to the
unit, connect properly.
fedc
External sockets or
connectors
or iPod/iPhone
module
FM/MW radio
antenna
DAB radio receiver
ISO male connectors
g
7EN

Connect the DAB radio receiver
Note
The DAB radio receiver and DAB radio antenna are
•
not bundled. Consult your local retailer for purchase.
• Make sure that no lead other than the DAB radio
antenna contacts the antenna connector of the DAB
radio receiver.
• Risk of injury: Never install the DAB radio receiver and
its accessories on the airbag cover.
• Risk of overheating: Do not x the DAB radio receiver
to the metal surface of the main unit.
• Risk of electromagnetic interference: Do not install the
DAB radio receiver over any sensors or vents.
• Risk of short circuit, malfunction, or damage to this
product: Do not alter the cable of DAB radio receiver
or dismantle the receiver box.
• Risk of damage to the DAB radio receiver: Never pull
its cable when you remove it.
3 Secure the DAB radio receiver to your car.
Mount into the dashboard
• If the car does not have an on-board drive
or navigation computer, disconnect the
negative terminal of the car battery.
• If the car battery is not disconnected, to
avoid short-circuit, make sure that the bare
wires do not touch each other.
1 Make sure that the car dashboard opening
is within these measurements:
1 Connect the DAB radio receiver to the
main unit.
2 Connect a DAB radio antenna to the DAB
radio receiver.
8 EN
5mm
183 mm
53mm
 Loading...