

Philips AJ3120-04Z, AJ3120-00Z User Manual
Clock Radio
ALARM
88
92
96
100
104
108
FM
MW
Kilohertz
Megahertz
530
630
800
1000
1300
1600
Kilohertz
Megahertz
FM
MW
•• • SLEEP
OFF •• •
ALARM RESET
SET TIME
SET ALARM
CLOCK
VOLUME
TUNING
BAND
MW•FM
FM AM CLOCK RADIO
AJ3120
SLEEP
1!2 4 5 6 783
@
#
ALARM
88
92
96
100
104
108
FM
MW
Kilohertz
Megahertz
530
630
800
1000
1300
1600
Kilohertz
Megahertz
FM
MW
• • • SLEEP
OFF
•••
ALARM RESET
SET TIME
SET ALARM
CLOCK
VOLUME
TUNING
BAND
MW•FM
FM AM CLOCK RADIO
AJ3120
SLEEP
AJ 3120
English
Français
Español
English
Français
Español
Deutsch
Nederlands
Italiano
AJ 3120 - Clock radio
Meet Philips at the Internet
http://www.philips.com
Printed in Hong Kong
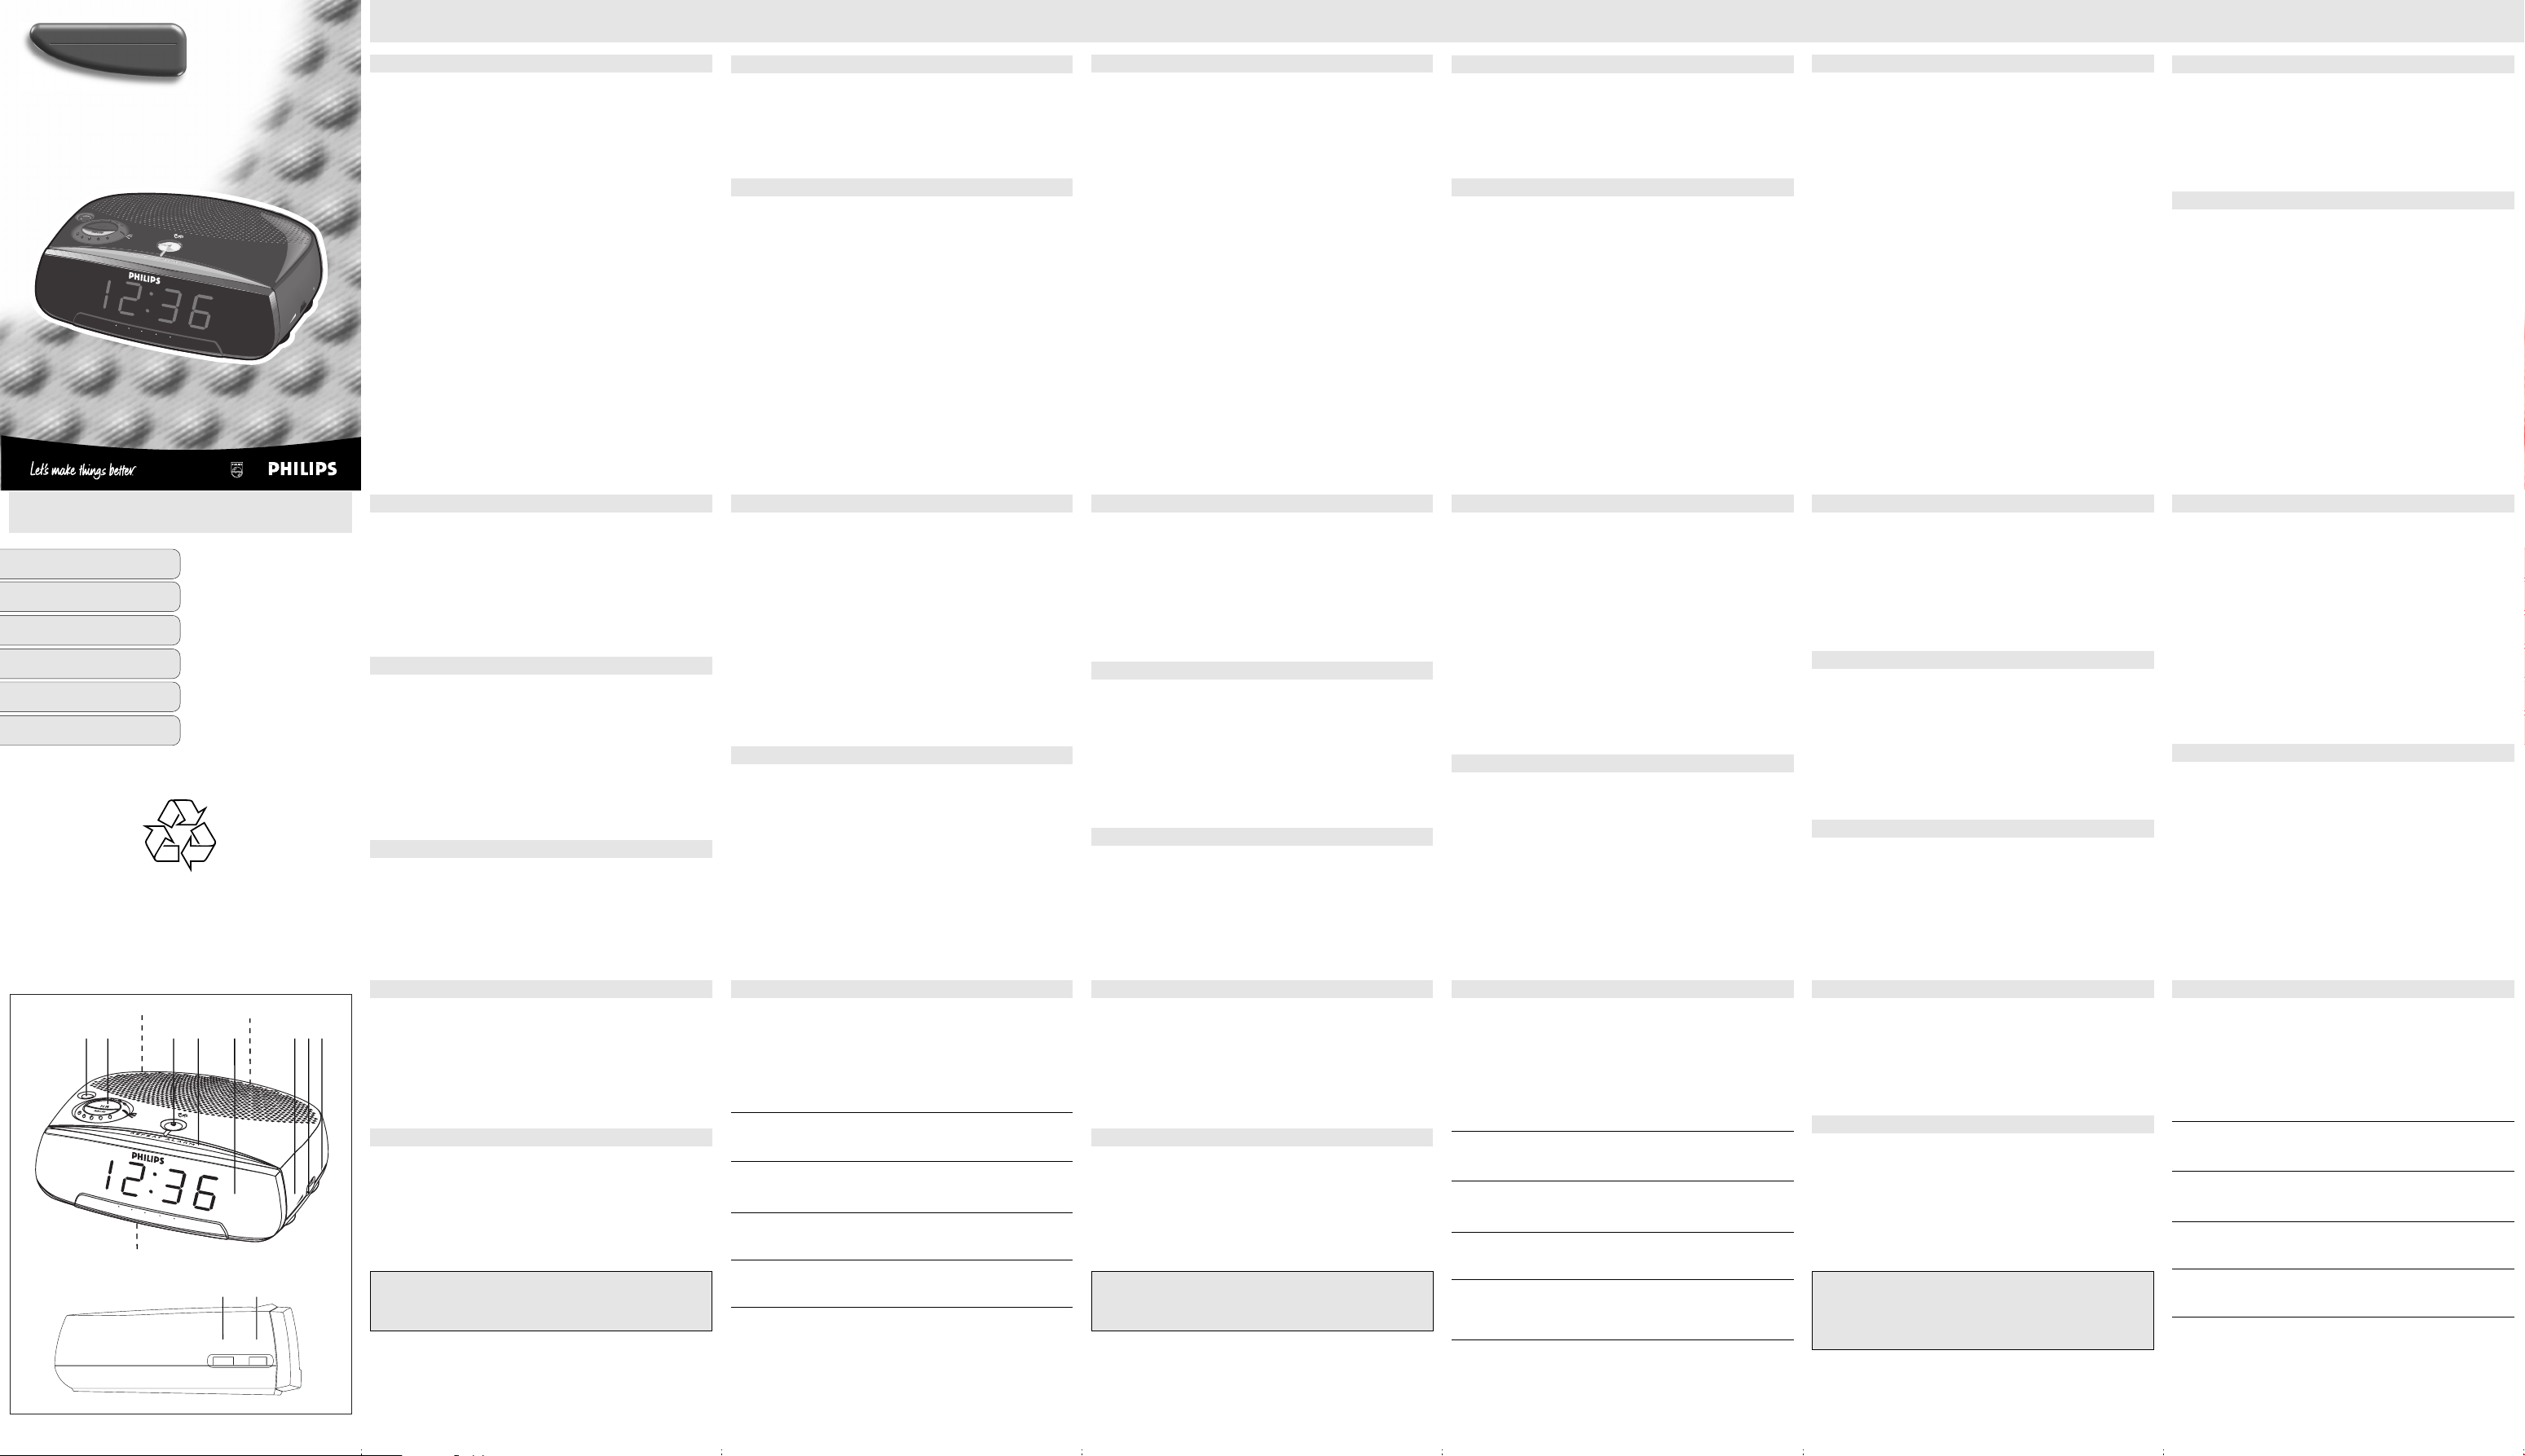
CONTROLS
1 SLEEP -
activates the radio for sleep function
2 Clock control
- CLOCK :
to run on clock time
- SET ALARM :
- SET TIME :
- HR/MIN :
3 ALARM RESET -
4
SLEEP OFF
-
switches off the radio sleep function
-
switches off the active alarm for a 8-9 minute period
sets the alarm time
sets the clock time
adjusts the hours/ minutes for the clock and alarm times
stops the active alarm for 24 hours
/REPEAT ALARM
5 DISPLAY - show the clock/ alarm times and status of the set
6 VOLUME - adjusts the sound level
7 BAND - select FM/AM (MW or LW) waveband
8 TUNING - tunes to radio stations
9 RADIO
OFF• ON
-
switches the radio off/on
0 ALARM
OFF switches off the alarm
–
–
RAD activates the radio for alarm setting
–
BUZ activates the buzzer for alarm setting
! Battery door -
opens to store a 9 volt 6F22 type battery (not included) for
power backup
@ Mains lead -
#
Pigtail aerial- improves FM reception
for AC mains supply
RADIO
You can use this set solely as a radio!
Adjust RADIO OFF
1
2
Select your waveband by adjusting the BAND switch
3
Adjust TUNING to tune to your desired station
4
Turn the VOLUME control to adjust the volume level
5
Adjust RADIO OFF
•
ON to ON to switch on the radio.
.
•
ON to OFF to switch off the radio.
.
.
To improve reception:
FM:
extend and
AM:
position the pigtail for optimum reception
uses a built-in aerial inside the set. Direct the aerial by adjusting the
position of your set
.
.
SETTING THE CLOCK AND ALARM TIMES
The time is displayed using the 24-hour clock
IMPORTANT!
To adjust the clock and alarm times accurately, always make sure
you press the HR or MIN buttons separately and not
simultaneously.
1
Turn the clock control to SET TIME or
time respectively.
2
Press HR or MIN repeatedly or hold down on the respective button to adjust
the hours and minutes.
3
Release HR or MIN when you reach the correct setting.
4
After you have set both the hour and minutes, turn the clock control to
SET ALARM
to set the clock or alarm
CLOCK to run on clock time.
SELECTING THE ALARM MODE
GENERAL
If you wish to use the alarm, you must first set the alarm time first. You can
choose from two different alarm modes to wake you up: by radio or buzzer.
•
Select your choice of alarm mode by adjusting ALARM to RAD or BUZ.
INSTALLATION
POWER SUPPLY
1
Check if the mains supply, as shown on the type plate located on the
bottom of the set, corresponds to your local mains supply. If it does not,
consult your dealer or service centre.
2
Connect the mains lead to the wall socket.
3
To disconnect the set from the mains supply completely, remove the plug from
the wall socket.
POWER BACKUP
The power back-up allows your alarm and clock time settings to be stored for up
to a day when there is a power interruption e.g. mains failure. The complete clock
radio and display illumination will be switched off. As soon as the mains supply
returns, the display will indicate the correct time.
1
Remove the battery door to insert a 9 volt 6F22 type battery (not included) for
power backup.
2
Replace the battery door.
NOTE:
If no backup battery is installed or the power interruption is prolonged, you
will need to set the clock and alarm times again.
Batteries contain chemical substances so should be disposed of
properly.
Standby power consumption . . . . . . . . . . . . . . . . . . . . . . . . . . . . . . . . . . . . . .3W
For users in the U.K.: please follow the instructions on the reverse of this
sheet.
SWITCHING OFF THE ALARM
There are three ways of switching off the alarm. Unless you cancel the alarm
completely, the 24 hour alarm reset option will be automatically selected after
1 hour and 59 minutes, from the time your alarm time first goes off.
24 HOUR ALARM RESET
If you want the alarm mode to be stopped immediately but also wish to retain the
same alarm setting for the following day:
•
Press ALARM RESET during the alarm call.
CANCELING THE ALARM COMPLETELY
To cancel the set alarm time before it goes off, or during the alarm call:
•
Adjust ALARM to OFF position.
REPEAT ALARM
This repeats your alarm call at 8-9 minute intervals.
1
During the alarm call, press SLEEP OFF
2
Repeat if desired for up to 1 hour and 59 minutes.
/REPEAT ALARM
.
SLEEP
About Sleep
This set has a built-in timer which enables the set to be automatically switched
off during radio playback after a fixed period of 59 minutes. This allows you to lie
back, listen and fall asleep.
Setting SLEEP
1
Check that the clock control is in CLOCK position.
2
Set RADIO to OFF position.
3
Press SLEEP to activate the sleep function.
™
To cancel sleep, or to switch off the sleep period ends press
SLEEP OFF
/REPEAT ALARM
.
BOUTONS DE COMMANDE
1 SLEEP -
2
3 ALARM RESET -
4
5
active la fonction sommeil du radio
Mise à l`heure de l’horloge
- CLOCK :
pour faire fonctionner à l’heure de l’horloge
- SET ALARM :
- SET TIME :
- HR/MIN :
pour fixer l’heure de l’alarme
pour fixer l’heure de l’horloge
adjuste les heures/ minutes pour l’horloge et l’alarme
arrête l’alarme our une période de 24 heures
SLEEP OFF
/REPEAT ALARM
-
ferme/éteint le mode sommeil de l’appareil
-
ferme/éteint l’alarme pour une période de 8-9 minutes
ÉCRAN AFFICHEUR- démontre les heures de l’horloge/l’alarme et le statut
de réglage du radio-réveil
6 VOLUME -
7 BAND -
8 TUNING -
9 RADIO
0 ALARM
!
ajuste le niveau du son
sélectionne la bande de fréquence FM/AM
(MW ou LW)
réglage pour stations de radio
OFF• ON
-
pour mettre en marche ou fermer le radio
–
OFF éteint l’alarme
–
RAD active le radio pour le réglage de l’alarme
–
BUZ active la sonnerie pour réglage de l’alarme
Couvercle du logement de la pile- s’ouvre pour placer une pile de type
9 volt 6F22 (non-incluse) pour réserve d’alimentation
@
Cordon d’Alimentation sur le Secteur- pour une alimentation sur Courant
Alternatif
#
Antenne
en’tire bouchon’ -
pour améliorer la réception FM
RADIO
Vous pouvez utiliser le radio-horloge uniquement comme un radio
1
Ajustez le bouton OFF
2
Sélectionnez votre bande en ajustant la touche BAND
3
Ajustez TUNING pour trouver votre station de radio
4
Tournez le bouton du VOLUME pour ajuster le volume.
5
Ajustez le bouton OFF
Pour améliorer la réception:
FM:
pour la réception en FM, modifiez légèrement la position de l’antenne
en ‘tire-bouchon’
AM:
utilise une antenne incorporée dans l’appareil. Dirigez l’antenne en
ajustant la position de votre appareil
•
ON du RADIO à ON pour mettre en marche le radio.
•
ON du RADIO à OFF pour fermer le radio.
.
.
!
.
.
RÉGULATION DE L’HEURE DE L’HORLOGE ET DE L’ALARME
L’heure est affichée suivant le format de 24 heures.
IMPORTANT!
1
2
3
4
Afin d’ajuster les heures de l’horloge et de l’alarme avec précision,
soyez toujours certains d’appuyer sur les touches HR ou MIN
séparément et non simultanément.
Tournez le bouton du contrôle de l’horloge à SET TIME ou bien SET
ALARM pour régler l’heure respective de l’horloge ou de l’alarme.
Appuyez les touches HR ou MIN à répétition ou appuyez continuellement le
bouton respectif pour ajuster les heures et minutes.
Relâchez les touches HR ou MIN lorsque vous atteindrez le réglage désiré.
Lorsque vous aurez réglé les heures et les minutes, tournez le bouton du con-
trôle de l’horloge à CLOCK pour retourner à l’heure de l’horloge.
CHOISIR LE MODE ALARME
GÉNÉRAL
Si vous désirez utiliser l’alarme, vous devrez premièrement régler l’heure de
l’alarme. Vous pouvez choisir entre deux modes d’alarme pour votre reveil: radio
ou sonnerie.
•
Sélectionnez le mode d’alarme souhaité en mettant ALARM sur RAD ou BUZ.
INSTALLATION
SOURCE D’ALIMENTATION
1
Vérifiez si la source d’alimentation, telle que démontrée sur la plaque-type
située au dessous de l’appareil, correspond à votre source d’alimentation
locale. Sinon, consultez votre marchand ou centre de service.
2
Branchez le cordon d’alimentation dans la prise de courant au mur.
3
Pour débrancher l’appareil complètement de la source d’alimentation, enlevez
le cordon de la prise de courant au mur.
RÉSERVE D’ALIMENTATION
La réserve d’alimentation permet de garder en mémoire le réglage de votre
alarme et de votre horloge pour jusqu’à une journée quand il y a interruption du
courant électrique, p.ex. défaut du secteur. Le radio-réveil au complet et
l’éclairage de l’écran afficheur seront fermés/éteints. Lorsque le courant
électrique reviendra en vigueur, l’heure correcte sera indiquée sur l’écran
afficheur.
1
Retirez le couvercle de logement de la pile afin d’y introduire une pile de type
9 volt 6F22 (non-incluse) pour réserve de la source d’alimentation.
2
Replacez le couvercle de piler.
NOTE:
Si aucune pile de réserve n’est installée ou l’interruption du courant
électrique est prolongée, vous devrez régler les temps de l’horloge et de
l’alarme à nouveau.
Les piles contiennent des substances chimiques et devraient
être jetées adéquatement.
Consommation de puissance en attente . . . . . . . . . . . . . . . . . . . . . . . . . . . . .3W
POUR FERMER L’ALARME
Il y a trois façons de fermer l’alarme. A moins que vous annulez l’alarme
complètement, l’option “reset” 24 heure de l’alarme sera automatiquement
sélectionné après 1 heure et 59 minutes, à partir du temps où votre alarme
sonnera pour la première fois.
“RESET” D’ALARME 24 HEURES
Si vous désirez que le mode d’alarme soit arrêté immédiatement mais vous
désirez également garder le même réglage pour la journée suivante:
•
Appuyez le bouton ALARM RESET pendant le cri de l’alarme.
ANNULER L’ALARME COMPLÈTMENT
Pour enlever l’heure réglée de l’alarme avant qu’il s’active, ou pendant le cri de
l’alarme:
•
Mettez ALARM en position OFF.
ALARME DE RÉPÉTITION
Ceci répète votre appel d’alarme à des intervales de 8-9 minutes.
1
Durant l’appel d’alarme, appuyez SLEEP OFF
2
Répétez si désiré pour jusqu’à 1 heure et 59 minutes.
S
OMMEIL
A
propos du Sommeil
Cet appareil est équipé d’une minuterie intégrée qui permet d’arrêter l’appareil
automatiquement en mode radio après un temps fixe de 59 minutes. Cette fonction vous permet de vous allonger, d’écouter et de vous endormir au son de la
radio.
/REPEAT ALARM
.
Réglage du SOMMEIL
1
Assurez-vous que le contrôle de l’horloge est en position CLOCK.
2
Réglez le RADIO à la position OFF.
3
Appuyez SLEEP pour activer la fonction sommeil.
™
Pour annuler le sommeil, ou pour fermer les bouts de la période
de sommeil, appuyez
SLEEP OFF
/REPEAT ALARM
.
CONTROLES
1 SLEEP -
2 C
3 ALARM RESET -
4
5 DISPLAY -
6 VOLUME -
7 BAND -
8 TUNING -
9 RADIO
activa el radio para la función de sueño
ontroles del Reloj
- CLOCK :
enciende la hora del reloj
- SET ALARM :
- SET TIME :
- HR/MIN :
programa la hora de la alarma
programa la hora del reloj
ajusta las horas/ minutos de la hora del reloj y la alarma
detiene la alarma activada por 24 horas
SLEEP OFF
/REPEAT ALARM
-
apaga la función de adormitar de el radio
-
apaga la alarma activada por un período de 8-9 minutos
visualiza la hora del reloj/alarma y el estatus de la unidad
ajusta el nivel del sonido
selecciona las bandas de FM/AM
(MW o LW)
sintoniza estaciones de radio
OFF• ON
-
enciende/apaga el radio
0 ALARM
OFF apaga la alarma
–
–
RAD enciende el radio para los ajustes de la alarma
–
BUZ enciende el zumbador para los ajustes de la alarma
!
Puerta de Batería- retire para la instalación de batería tipo 9 volt 6F22
( no incluida)
@
Cable de corriente- para alimentación por corriente continua
#
Antena flexible- mejora la recepción de FM
RADIO
¡Usted puede usar el radio reloj como solamente radio
1
Cambie RADIO OFF
2
Para seleccionar la banda solo ajuste el interruptor de BAND
3
Adjuste TUNING para encontrar su estacion de radio
4
Gire el control de VOLUME para ajustar el nivel del volumen
5
Ajuste RADIO OFF
Para mejorar la recepción:
FM:
para la FM, ajuste la antena flexible
AM:
utiliza la antena interna dentro de la unidad. Dirija la antena para
ajustar la posición de su unidad
•
ON a ON para encender el radio.
•
ON a OFF para apagar el radio.
.
!
.
.
.
.
PROGRAMANDO LA HORA DE SU RELOJ Y ALARMA
El horario se muestra utilizando el reloj de 24 horas.
¡I
MPORTANTE!
Para ajustar el horario del reloj y la alarma asegúrese de pulsar
siempre los botones HR o MIN por separado, no simultáneamente.
1
Para programar su reloj y alarma respectivamente cambie de controle del
reloj a
SET
TIME o
2
Oprima repetitivamente HR o MIN o mantenga presionado los botones
respectivos para ajustar los dígitos de las horas y minutos.
3
Cuando termine con los ajustes deseados, suelte HR o MIN.
4
Después de ajustar ambos la hora y minutos, cambie de controle del reloj a
CLOCK para activar la hora del reloj.
SET ALARM
.
SELECCIONANDO EL MODO ALARMA
GENERAL
Si desea utilizar la alarma, primeramente deberá de ajustar el horario. Como
despertador, podrá seleccionar entre dos modos distintos de alarma: radio o
zumbador.
•
Seleccione el modo de alarma ajustando ALARM a RAD o BUZ.
INSTALACION
Suministro de alimentación
1
Revise si el suministro de alimentación, como se muestra en la placa de la
parte inferior de la unidad, corresponda al suministro de fuente de
alimentación local. En caso que contrario, consulte a su distribuidor o centro
de servicio.
2
Enchufe el cable de alimentación al tomacorriente de la pared.
3
Para desconector la unidad de la fuente de alimentación completamente,
remueva el interruptor del tomacorriente de la pared.
BATERÍA DE RESPALDO
La reserva de potencia le alimentación mantener las características de su alarma
y reloj hasta un día en caso de interrupción en la fuente de alimentación. i.e
apagones. La completa iluminación del radio reloj y alarmas serán apagadas. Tan
pronto retorne la fuente de alimentación, la pantalla indicará la hora correcta.
1
Retire la puerta de las baterías para insertar una batería tipo 9 voltios 6F22
( no incluida) como reserva de alimentación.
2
Coloque la puerta de las baterías.
NOTA:
En caso de que no se haya instalado baterías de reserva o la interrupción
se haya prolongado, necesitará programar la hora del reloj y la alarma
nuevamente.
Se debe deshacer la batería de manera correcta, ya que la
batería contiene sustancias químicas.
Consumo eléctrico posición de espera . . . . . . . . . . . . . . . . . . . . . . . . . . . . . .3W
APAGANDO LA ALARMA
Hay tres maneras de apagar la alarma. En caso que desea apagar completamente
su alarma, la opción de 24 hour alarm reset se seleccionará automáticamente
después de 1 hora y 59 minutos, a partir de la hora que su alarma se apague.
PARA CANCELAR LA ALARMA DE 24 HORAS
Si desea que el modo de alarma se detenga inmediatamente pero desea retener
las características de la misma alarma para el día siguiente:
•
Oprima ALARM RESET cuando la alarma suene.
PARA APAGAR LA ALARMA COMPLETAMENTE
Para apagar la función de la alarma antes de su desactivación, o cuando la
alarma suene:
•
Ajuste ALARM a la posición de apagado OFF.
REPETIR ALARMA
Es para activar el repetidor de la alarma por intervalos de 8-9 minutos.
1
Cuando se active el zumbador de la alarma, oprima SLEEP OFF
2
Repite en caso deseado hasta por 1 hora y 59 minutos.
S
LEEP (Sueño)
A
cerca de Sleep (Sueño)
/REPEAT ALARM
Este aparato lleva incluido un temporizador que permite el apagado automático
durante la escucha de la radio después de un período fijo de 59 minutos. Esto le
permite reposar, escuchar y dormirse.
Programación de SLEEP
1
Revise que controle del reloj esta en la posición de CLOCK.
2
Ajuste RADIO a la posición OFF.
3
Oprima SLEEP para activar la función de sueño.
™
Para cancelar la función de sueño, o para apagar los períodos de sueño
SLEEP OFF
oprima
/REPEAT ALARM
.
.
MAINTENANCE
•
If you do not intend to use the set for a long time, withdraw the mains plug
from the wall socket. In addition to this, it is advisable to remove the battery
from the clock radio. This will prevent any danger of leakage and the clock
radio will not be damaged.
•
Do not expose the set to humidity, rain, sand or excessive heat caused by
heating equipment or direct sunlight.
•
To clean the set, use a soft, slightly dampened chamois leather. Do not use
any cleaning agents containing alcohol, ammonia, benzene or abrasives as
these may harm the housing.
ENVIRONMENTAL INFORMATION
09
We have reduced packaging to the minimum for easy separation into two
materials: paper and cardboard.
Your set consists of materials which can be recycled if disassembled by a
specialized company. Please observe local regulations on the disposal of packing
materials and old equipment.
This product complies with the radio interference requirements of the
European Union.
RADIO
ALARM
OFF• ON
OFF•RAD•BUZ •
The type plate is located on the bottom of the set.
TROUBLESHOOTING
If a fault occurs, first check the points listed below before taking the set for repair.
If you are unable to remedy a problem by following these hints, consult your dealer or
service centre.
WARNING: Under no circumstances should you try to repair the set yourself, as this
will invalidate the guarantee. Do not open the set as there is a risk of
electric shock.
Problem
–
Possible Cause
• Remedy
No sound/power
–
Volume not adjusted
• Adjust the volume
Occasional crackling sound during FM broadcast
–
Weak signal
•
Extend and position the pigtail
Continuous crackling/hiss disturbance during AM broadcast
–
Electrical interference from TV, computer, fluorescent lamp, etc.
• Move set away from other electrical equipment
The alarm does not function
–
Alarm time not set and or alarm mode not selected
• Set
the alarm time and / select alarm mode
–
Volume too low for RADIO
• Adjust the volume
Radio alarm not adjusted to radio station
–
• Tune to a radio station
ENTRETIEN
•
Si vous n’avez pas l’intention d’utiliser votre appareil pour une longue période,
débranchez le cordon électrique de la prise de courant au mur. II va de soi qu’il
faut également retirer la batterie de l’appareil. Vous éviterez ainsi les riques
de fuite et, par conséquent, d’endommagement du radio-réveil.
•
N’exposez pas l’appareil à l’humidité, la pluie, le sable ou une chaleur
excessive provenant d’équipement chauffant ou bien du soleil direct.
•
Pour nettoyer l’appareil, utilisez un chamois de cuir doux et légèrement
humide. N’utilisez aucun nettoyant contenant de l’alcohol, de l’ammoniac,
benzine, ou de tels abrasifs, puisque ceux-ci pourraient endommager le boîtier.
INFORMATION ÉCOLOGIQUE
Pour faciliter le triage, nous avons réduit l’emballage à un minimum en deux
matières: papier et carton.
Votre appareil consiste en des matières pouvant être recyclées si l’appareil est
démonté par une compagnie spécialisée. Veuillez s’il-vous-plait observer les
règlements locaux concernant la disposition de matériels d’emballage et
d’équipement usagé.
Ce produit satisfait aux conditions imposées par I’Union Européenne
en matière d’interférences radio.
La plaquette de type se trouve à la base de l’équipement.
GUIDE DU CONCILIATEUR
Si un défaut se produit, vérifiez premièrement les points suivants avant d’apporter
votre appareil pour réparation.
S’il vous est impossible de remédier au problème en suivant ces suggestions,
consultez votre distributeur ou centre de service.
AVERTISSEMENT:Vous ne devriez, en aucune circonstance, tenter de réparer
P
roblème
–
Cause possible
•
Solution
l’appareil vous-même puisque ceci rendra votre garantie
nulle et sans effet
au risque de recevoir des chocs électriques.
. Ne jamais ouvrir vous-même l’équipement
Son / alimentation absents
–
Volume non ajusté
•A
justez le volume
Crépitement occasionnel pendant la diffusion FM
–
Signal faible
•
Ajustez l’antenne en ‘tire-bouchon’
Crépitements/sifflement continus pendant la diffusion AM
–
Interférence électrique d’une télévision, d’un ordinateur, lampe
fluorescente, etc.
•
Placez l’appareil à un endroit éloigné d’autre équipement électrique
L’alarme ne fonctionne pas
–
L’heure de l’alarme n’est pas fixé et/ou le mode de l’alarme n’est pas
sélectionné
•
Fixez l’heure de l’alarme et sélectionnez le mode d’alarme
–
Volume trop bas pour le RADIO
•A
justez le volume
–
L’alarme Radio n’est pas ajusté au station de radio
•
Réglez TUNING pour trouver une station
MANTENIMIENTO
•
Si no va a usar su unidad por un período largo, desenchúfelo de la fuente de
potencia y también sacar la pila del aparato en evitación de daños por
eventuales fugas.
•
No exponer la unidad a humedad, lluvia, arena o calor excesivo causado por
aparatos de calefacción o luz directa.
•
Para limpiar su unidad, use a paño de gamuza ligeramente humedecido. No
use agentes de limpiezas que contengan alcohol, amoníaco, benceno, o
abrasivos que causan daños a la casa.
INFORMACIÓN AMBIENTAL
Hemos reducido el embalaje al mínimo para la fácil separación en dos material:
papel y cartón.
Esta unidad contiene material que se pueden reciclar si son desmontados por
compañías especializadas.
Observe las regulaciones locales en lo referente a la disposición de materiales de
embalaje y aparatos usados.
Este producto cumple los requisitos sobre interferencias de radio de la
Unión Europea.
La placa de especificaciones está situada en la parte inferior del
equipo.
SOLUCIONANDO PROBLEMAS
En caso de falla, revise primero los puntos enumerados a continuación, antes de
llevar su unidad para reparación
En caso que usted no pueda remediar el problema siguiendo los pasos
mencionados, consulte a su distribuidor o centro de servicio.
ADVERTENCIA:¡No abra el equipo, ya que puede recibir un choque eléctrico!
.
Bajo ninguna circunstancias trate de arreglar la unidad usted
mismo, esto invalidará la garantía
.
Problema
–
P
osible causa
•
Solución
No hay sonido/ alimentación
–
V
olumen no ajustado
•A
juste el volumen
Distorsiones esporádicas en sonido al sintonizar FM
–
Señal débil
•
Ajuste la antena flexible
Distorsiones continuas / Sonido de silbido durante la recepción de AM
–
Interferencias eléctricas de TV, computadoras, lámparas fluorescentes, etc.
•
Aleje la unidad de otros equipos eléctricos
La alarma no funciona
–
La alarma no ha sido programada o el modo alarma no ha sido seleccionado
•
Programe la hora de la alarma y / seleccione el modo alarma
–
V
olumen demasiado bajo para RADIO
•A
juste el volumen
–
La alarma de el radio no ha sido ajustada a estaciones de radio
•
Sintonice a estaciones de radio
Deutsch
Nederlands
Italiano
BEDIENELEMENTE
1 SLEEP -
2
3 ALARM RESET -
4
5 DISPLAY -
6 VOLUME -
7 BAND -
8 TUNING -
9 RADIO
aktiviert das Radio für die Einschlaffunktion
Uhrenfunktionsschalter
- CLOCK :
zum Anzeigen der Uhrzeit
- SET ALARM :
- SET TIME :
- HR/MIN :
setzt die Weckzeit für Wecker fest
setzt die Uhrzeit fest
stellt die Stunden / Minuten für die Uhr- und Weckzeiten ein
stoppt den aktiven Signalton 24 Stunden lang
SLEEP OFF
/REPEAT ALARM
-
schaltet die Radioschlaffunktion aus
-
schaltet den aktiven Signalton für eine Zeitspanne von 8-9 Minuten aus
zeigt die Uhr/-Weckzeiten und den Status des Geräts an
stellt den Lautstärkepegel ein
wählt Wellenbereich FM (UKW) /AM
(MW oder LW)
stellt die Radiostationen ein
OFF• ON
-
schaltet das Radio aus/ein
0 ALARM
–
OFF schaltet Wecker aus
–
RAD aktiviert das Radio für Wecker
–
BUZ aktiviert den Summton für Wecker
! B
atteriedeckel- lässt sich zum Einlegen einer 9 Volt Batterie 6F22
(nicht enthalten) als Reservebatterie öffnen
@
Stromkabel- für Versorgung durch das Stromnetz (Wechselstrom)
#
Drahtantenne- verbessert den Empfang von FM (UKW)
RADIO
Sie können den Radiowecker nur als Radio verwenden
1
Stellen Sie die RADIO OFF
2
Wählen Sie Ihren Wellenbereich durch Einstellen des Schalters BAND
3
Stellen Sie TUNING auf Ihren gewünschten Radiosender ein
4
Stellen Sie den Lautstärkepegel mit dem Lautstärkeregler VOLUME ein
5
Stellen Sie RADIO OFF
•
ON auf ON um das Radio einzuschalten.
•
ON auf OFF , um das Radio auszuschalten.
!
.
.
.
Verbesserung des Empfangs:
FM(UKW):
AM:
Ziehen Sie die Drahtantenne auf der Rückseite des Gerätes für
den günstigsten Empfang vollständig aus
benutzt eine eingebaute Antenne im Inneren des Gerätes. Richten Sie
die Antenne durch Drehen des Gerätes aus
.
.
EINSTELLEN DER UHR- UND WECKZEITEN
Die Zeit wird im 24-Stunden-Modus angezeigt.
Wichtig! Zum genauen Einstellen der Uhr- und Weckzeiten unbedingt immer die
Tasten HR bzw MIN hintereinander, nicht gleichzeitig drücken.
1
Schalten Sie den Uhrenfunktionsschalter auf SET TIME oder
um die Uhr- bzw. Weckzeiten einzustellen.
2
Drücken Sie die Taste HR bzw MIN wiederholt oder halten Sie die jeweilige
Taste gedrückt, um die Stunden und Minuten einzustellen.
3
Lassen Sie die Taste HR bzw MIN los, wenn die gewünschte Einstellung erreicht ist.
4
Nach dem Einstellen der Stunde und Minuten den Uhrenfunktionsschalter
auf CLOCK schalten, so dass der Uhrenbetrieb aktiviert ist.
SET ALARM
WAHL DES WECKBETRIEBS
ALLGEMEINES
Wenn Sie die Weckfunktion verwenden wollen, müssen Sie zuerst die Weckzeit
einstellen. Sie können zwischen zwei verschiedenen Weckbetrieben zum
Aufwecken wählen.
•
Wählen Sie den gewünschten Weckbetrieb, indem Sie ALARM auf RAD oder
BUZ einstellen.
INSTALLATION
STROMVERSORGUNG
1
Prüfen Sie, ob die Versorgung durch das Stromnetz, angegeben auf dem
Typenschild auf der Unterseite des Gerätes, der örtlichen Netzspannung
entspricht. Falls nicht, wenden Sie sich an Ihren Fachhändler oder an den
Kundendienst.
2
Schließen Sie das Netzkabel an die Wandsteckdose an.
3
Zum vollständigen Abtrennen des Gerätes vom Stromnetz den Stecker von der
Wandsteckdose abtrennen.
RESERVEBATTERIE
Mittels der Reservebatterie können Sie die Einstellungen der Weck- und der
Uhrzeit bis zu einem Tag lang speichern, wenn der Strom beispielsweise durch
einen Stromausfall unterbrochen wird. Der gesamte Radiowecker und die
Anzeigenbeleuchtung wird abgeschaltet. Sobald die Netzstromversorgung wieder
hergestellt ist, erscheint in der Anzeige die korrekte Zeit.
1
Entfernen Sie den Batteriedeckel und setzen Sie eine 9 Volt Batterie 6F22
(nicht enthalten) als Reservebatterie ein.
2
Bringen Sie den Batteriedeckel wieder an.
HINWEIS:
Wenn keine Reservebatterie eingelegt oder der Stromausfall lange ist,
müssen Sie die Uhr- und Weckzeiten neu einstellen.
Batterien enthalten chemische Substanzen und müssen
ordnungsgemäß entsorgt werden.
Standby -Leistungsaufnahme . . . . . . . . . . . . . . . . . . . . . . . . . . . . . . . . . . . . .3W
AUSSCHALTEN DES WECKERS
Es gibt drei Arten, den Wecker abzustellen. Falls Sie den Wecker nicht ganz
abschalten, wird die 24-Stunden-Weckoption nach 1 stunde 59 Minuten ab
dem Zeitpunkt aktiviert, an dem der Wecker das erste Mal läutete.
24 STUNDEN-WECKOPTION
Falls Sie den Wecker unmittelbar abstellen wollen, aber trotzdem dieselbe
Weckeinstellung für den nächsten Tag beibehalten wollen:
•
Drücken Sie die Taste ALARM RESET während des Läutens.
VÖLLIGES ABSTELLEN DES WECKERS
Zum Abschalten der Weckzeit bevor der Wecker läutet oder während des Läutens:
•
Stellen Sie ALARM auf die Position OFF.
WIEDERHOLUNG DES WECKALARMS
Zum Wiederholen des Weckalarms in 8-9 Minuten-Intervallen.
1
Drücken Sie während des Läutens SLEEP OFF
2
Falls erwünscht, kann dieser Vorgang bis zu 1 stunde 59 Minuten wiederholt
werden.
,
/REPEAT ALARM
.
SLEEP(SCHLAFEN)
Über Sleep
Dieses Gerät verfügt über einen eingebauten Zeitschalter, der ermöglicht, dass
sich das Gerät während des Radiobetriebs automatisch abschaltet nach einer
fixen Zeitspanne von 59 Minuten. So können Sie sich bequem zurücklehnen,
zuhören und einnicken.
Einstellung von SLEEP
1
Prüfen Sie, ob sich der Uhrenfunktionsschalter in der Position CLOCK
befindet.
2
Stellen Sie RADIO auf die Position OFF.
3
Drücken Sie SLEEP, um die Einschlaffunktion zu aktivieren.
™
Zum Aufheben der Einschlaffunktion oder zum Abschalten der Einschlafzeit
SLEEP OFF
die Taste
/REPEAT ALARM
drücken.
BEDIENING
1 SLEEP -
2
3 ALARM RESET -
4
5 DISPLAY -
6 VOLUME -
7 BAND -
8 TUNING -
9 RADIO
om de radio voor de inslaapfunctie te activeren
Klokbediening
- CLOCK :
om op kloktijd te lopen
- SET ALARM :
- SET TIME :
- HR/MIN :
om de wektijd wekker voor te stellen
om de kloktijd in te stellen
om de uren / minuten voor de klok- en wektijd in te stellen
om de actieve wekker 24 uur lang uit te zetten
SLEEP OFF
/REPEAT ALARM
-
om de radio inslaapfunctie uit te schakelen
-
om de actieve wekker 8-9 minutenlang uit te zetten
geeft de klok/wektijden aan, alsook de status van de instellingen
om het volume in te stelllen
om de FM/AM
(MW of LW)
golfbanden te selecteren
om de radio op zenders af te stemmen
OFF• ON
-
om de radio aan/uit te zetten
0 ALARM
–
OFF om wekker uit te schakelen
–
RAD om de radio voor wekker te activeren
–
BUZ om de zoemer voor wekker te activeren
! B
atterijdeur- kan geopend worden om een 9 volt 6F22 type batterij (niet
inbegrepen) in te zetten voor stroomback-up
@
Snoer- voor AC wisselstroomvoeding
#
Varkensstaart antenne- verbetert FM ontvangst
RADIO
U kunt de radiowekker ook gewoon als radio gebruiken
1
Zet de t RADIO OFF
2
Kies uw golfband aan hand van de BAND schakelaar
3
Stem op uw zender af aan de hand van de
4
Zet het VOLUME op het gewenste niveau
5
Zet de RADIO OFF
Voor een betere ontvangst:
FM:
trek de varkensstaart antenne achteraan het apparaat uit voor optimale
ontvangst
AM:
werkt met een antenne die in het apparaat is ingebouwd. Voor een
betere ontvangst moet u de antenne richten door het toestel verplaatsen
of draaient
•
ON schakelaar op ON om de radio aan te zetten.
•
ON schakelaar op OFF om de radio uit te zetten.
.
.
TUNING
.
!
knop
.
.
INSTELLEN VAN DE KLOK- EN WEKTIJDEN
De tijd wordt op de display aangegeven aan de hand van een 24-uren klok.
BELANGRIJK!
1
Zet de klokbediening op SET TIME of
klok- of wekkertijden in te stellen.
2
Druk herhaaldelijk op HR of MIN of houd één van die toetsen ingedrukt om de
uren en minuten in te stellen.
3
Laat HR of MIN los wanneer de tijd correct ingesteld is.
4
Nadat u zowel de uren als de minuten heeft ingesteld, schakelt u de
klokbediening naar CLOCK om op de kloktijd te lopen.
Om de klok- en wektijden precies in te stellen, moet u erop letten
dat u de HR of MIN toetsen altijd afzonderlijk indrukt en nooit
tegelijkertijd.
SET ALARM
om respectievelijk de
KIEZEN VAN EEN WEKMODUS
ALGEMEEN
Indien u de wekker wilt gebruiken moet u eerst een wektijd instellen. U kunt
kiezen tussen twee verschillende wekmodi: de radio of de zoemer.
•
Maak uw keuze van wekmodus door ALARM op RAD of BUZ te zetten.
I
NSTALLATIE
STROOMVOEDING
1
Controleer als de stroomtoevoer van uw stopcontact dezelfde is als
aangegeven staat op het informatieplaatje aan de onderkant van het
apparaat. Indien dit niet het geval is, moet u uw verdeler of een
klantendienst raadplegen.
2
Schakel de stekker van het snoer in een stopcontact.
3
Om de stroomtoevoer volledig af te sluiten, moet u de stekker uit het stopcontact verwijderen.
STROOMBACK-UP
Dankzij de stroomback-up is het apparaat bij stroomonderbrekingen in staat uw
wek- en kloktijden een dag lang in het geheugen te bewaren. De gehele
wekkerradio- en displayverlichting is in dat geval uitgeschakeld. De juiste tijd
verschijnt weer op de display zodra de stroomtoevoer hersteld is.
1
Verwijder het batterijdeurtje om een 9 volt 6F22 type batterij (niet inbegrepen)
in te zetten voor stroomback-up.
2
Zet het batterijdeurtje terug.
OPMERKING:
U moet de klok- en wektijden opnieuw instellen indien er bij een
stroomonderbreking geen back-up batterij geïnstalleerd was of de
stroomonderbreking te lang duurde.
Batterijen bevatten chemische stoffen en moeten dus
volgens de reglementering worden weggeworpen.
Stroomvebruik in stand-by . . . . . . . . . . . . . . . . . . . . . . . . . . . . . . . . . . . . . . .3W
UITZETTEN VAN DE WEKKER
Er bestaan drie verschillende manieren om de wekker uit te zetten. Tenzij u de
wekker volledig wilt uitschakelen, wordt de 24 uur terugsteloptie van de wekker
automatisch geselecteerd na 1 uur en 59 minuten, gerekend vanaf de tijd dat uw
wekker voor het eerst aanging.
24 UUR TERUGSTELLING VAN DE WEKKER
Indien u de wekkerfunctie meteen wilt uitzetten terwijl u dezelfde
wekkerinstellingen voor de volgende dag wilt behouden:
•
Druk op ALARM RESET terwijl de wekker luidt.
OM DE WEKKER VOLLEDIG UIT TE ZETTEN
Om de ingestelde wektijd voordat de wekker luidt of tijdens het luiden te
annuleren:
•
Zet ALARM in de OFF stand.
HERHAALWEKKER
Dit kenmerk laat uw wekker om de 8-9 minuten opnieuw luiden.
1
Terwijl de wekker luidt, drukt u op SLEEP OFF
2
U kunt dit indien gewenst maximum 1 uur en 59 minuten lang herhalen.
/REPEAT ALARM
.
INSLAAPFUNCTIE
Over de inslaapfunctie
Dit apparaat is uitgerust met een ingebouwde timer die de radio van het apparaat
automatisch kan uitschakelen na een vaststaande periode van 59 minuten. Dit
kenmerk staat u toe rustig neer te liggen terwijl u luistert en in slaap valt.
Instellen van de SLAAPFUNCTIE
1
Controleer of de klokbediening in de CLOCK stand staat.
2
Zet de RADIO in de OFF stand.
3
Druk op SLEEP om de inslaapfunctie te activeren.
™
Om de inslaapfunctie uit te zetten of de inslaapperiode te annuleren, druk
SLEEP OFF
op
/REPEAT ALARM
.
COMANDI
1 SLEEP -
2
3 ALARM RESET -
4
5 DISPLAY -
attiva la radio in modalità di spegnimento automatico
Selettore orologio
- CLOCK :
funzionamento con orologio
- SET ALARM :
- SET TIME :
- HR/MIN :
imposta l’ora per la sveglia
imposta l’ora dell’orologio
regolano le ore / i minuti per l’orario dell’orologio e delle sveglie
interrompe la sveglia attivata per 24 ore
SLEEP OFF
/REPEAT ALARM
-
disinserisce la funzione di spegnimento automatico della radio
-
disinserisce la sveglia attivata per un periodo di 8-9 minuti
visualizza gli orari dell’orologio / delle sveglie e le eventuali
suonerie attivate
6 VOLUME -
7 BAND -
8 TUNING -
9 RADIO
regola il livello del sonoro
seleziona la banda FM/AM
(MW o LW)
per sintonizzarsi su un’emittente radio
OFF• ON
-
accende/spegne la radio
0 ALARM 1
–
OFF spegne la sveglia
–
RAD attiva la radiosveglia
–
BUZ attiva la suoneria per la sveglia
!
Sportellino batteria- per accedere al vano batteria; inserire una batteria da
9 V tipo 6F22 (non inclusa) per il sistema di alimentazione di riserva
@
Cavo di alimentazione- per l’alimentazione a corrente elettrica
#
Antenna a filo- per migliorare la ricezione in FM
RADIO
È possibile utilizzare la radiosveglia semplicemente come radio
1
Portare l’interruttore RADIO OFF
2
Selezionare la banda d’onda con l’interruttore BAND
3
Con il selettore TUNING, sintonizzarsi sull’emittente desiderata
4
Girare il selettore del VOLUME per regolare il volume al livello desiderato
5
Portare l’interruttore RADIO OFF
•
ON su ON per accendere la radio.
•
ON su OFF per spegnere la radio.
!
.
.
Come migliorare la ricezione:
FM:
per una migliore ricezione, estrarre completamente l’antenna a filo
situata dietro l’apparecchio
AM:
l’apparecchio utilizza un’antenna incorporata. Per migliorare la ricezione,
spostare l’apparecchio stesso
.
.
COME IMPOSTARE L’OROLOGIO E LE SVEGLIE
L’orario viene visualizzato nel formato a 24 ore.
IMPORTANTE!
Per impostare in modo accurato l’orologio e le radiosveglie,
accertarsi sempre di premere i pulsanti HR o MIN
separatamente e non simultaneamente.
1
Portare il selettore dell’orologio su SET TIME o
rispettivamente l’orologio o le radiosveglie.
2
Premere HR o MIN ripetutamente, o mantenere il tasto premuto, per
regolare le ore e i minuti.
3
L
asciare HR o MIN quando viene visualizzato l’orario corretto.
4
Dopo aver impostato le ore e i minuti, riportare il selettore dell’orologio su
CLOCK per visualizzare l’orario.
SET ALARM
per impostare
COME SELEZIONARE LA FUNZIONE DI SVEGLIA
INFORMAZIONI GENERALI
Se si desidera utilizzare la sveglia, è necessario innanzitutto impostare l’orario di
attivazione. È possibile selezionare fra due modalità di risveglio: con la
radiosveglia o con la suoneria.
•
Selezionare il tipo di sveglia preferito portando ALARM su RAD o BUZ.
MONTAGGIO
ALIMENTAZIONE
1
Controllare che la corrente di rete, indicata sulla piastrina posta sotto
all’apparecchio, corrisponda alla tensione della rete locale. In caso
contrario, consultare il proprio rivenditore oppure il centro di assistenza.
2
Collegare il cavo di alimentazione alla presa a muro.
3
Per scollegare completamente l’apparecchio dalla rete, estrarre la spina dalla
presa a muro.
SISTEMA DI ALIMENTAZIONE DI RISERVA
Il sistema di alimentazione di riserva consente alla radiosveglia di mantenere in
memoria le impostazioni delle sveglie e dell’orologio per un giorno, nel caso in cui
si verificasse un’interruzione del sistema di alimentazione principale, ad es.
sospensione della corrente elettrica. La radiosveglia e l’illuminazione del display
si spegneranno completamente. Non appena verrà ripristinata l’alimentazione
elettrica, il display riprenderà a visualizzare l’orario corretto.
1
Rimuovere lo sportellino del vano batteria e inserire una batteria da 9 V del
tipo 6F22 (non inclusa) per il sistema di alimentazione di riserva.
2
Rimontare lo sportellino del vano batteria.
NOTA:
Se non venisse montata una batteria di riserva, o se il periodo di
interruzione della corrente fosse più lungo, sarà necessario impostare
nuovamente l’orologio e le sveglie.
Le batterie contengono delle sostanze chimiche e devono pertanto
essere smaltite a norma di legge.
Consumo di potenza in modo standby . . . . . . . . . . . . . . . . . . . . . . . . . . . . . . .3W
COME SPEGNERE LA SVEGLIA
Per spegnere la sveglia vi sono tre possibilità. Se non si disinserisce la sveglia
completamente, la funzione di riprogrammazione sveglia dopo 24 ore sarà
automaticamente selezionata dopo 1 ora e 59 minuti dal momento in cui la
sveglia si attiva per la prima volta all’orario impostato.
.
RIPROGRAMMAZIONE SVEGLIA DOPO 24 ORE
Se si desidera che la sveglia si spenga immediatamente, ma che l’orario
impostato rimanga lo stesso per il giorno successivo:
•
Premere ALARM RESET mentre suona la sveglia.
COME DISINSERIRE COMPLETAMENTE LA SVEGLIA
Per disinserire completamente la funzione di sveglia, prima dell’attivazione o
mentre suona la sveglia:
•
Portare ALARM su OFF.
COME RIATTIVARE LA SUONERIA
Questa funzione riattiva la suoneria ad intervalli di 8-9 minuti.
1
Quando suona la sveglia, premere SLEEP OFF
2
La funzione rimane attiva fino a 1 ora e 59 minuti.
/REPEAT ALARM
SPEGNIMENTO AUTOMATICO (SLEEP)
Funzione di spegnimento automatico (Sleep)
La radiosveglia è dotata di un timer incorporato, che consente all’apparecchio di
spegnersi automaticamente durante l’ascolto della radio dopo un tempo
predefinito di 59 minuti. In questo modo è possibile rilassarsi, ascoltare la radio e
addormentarsi.
Come impostare la funzione di SLEEP
1
Controllare che il selettore dell’orologio sia in posizione CLOCK.
2
Portare l’interruttore RADIO su OFF.
3
Premere il tasto SLEEP per attivare la funzione di spegnimento automatico .
™
Per annullare la funzione di spegnimento automatico, oppure per
sospenderla prima dello scadere dei minuti, premere
SLEEP OFF
/REPEAT ALARM
.
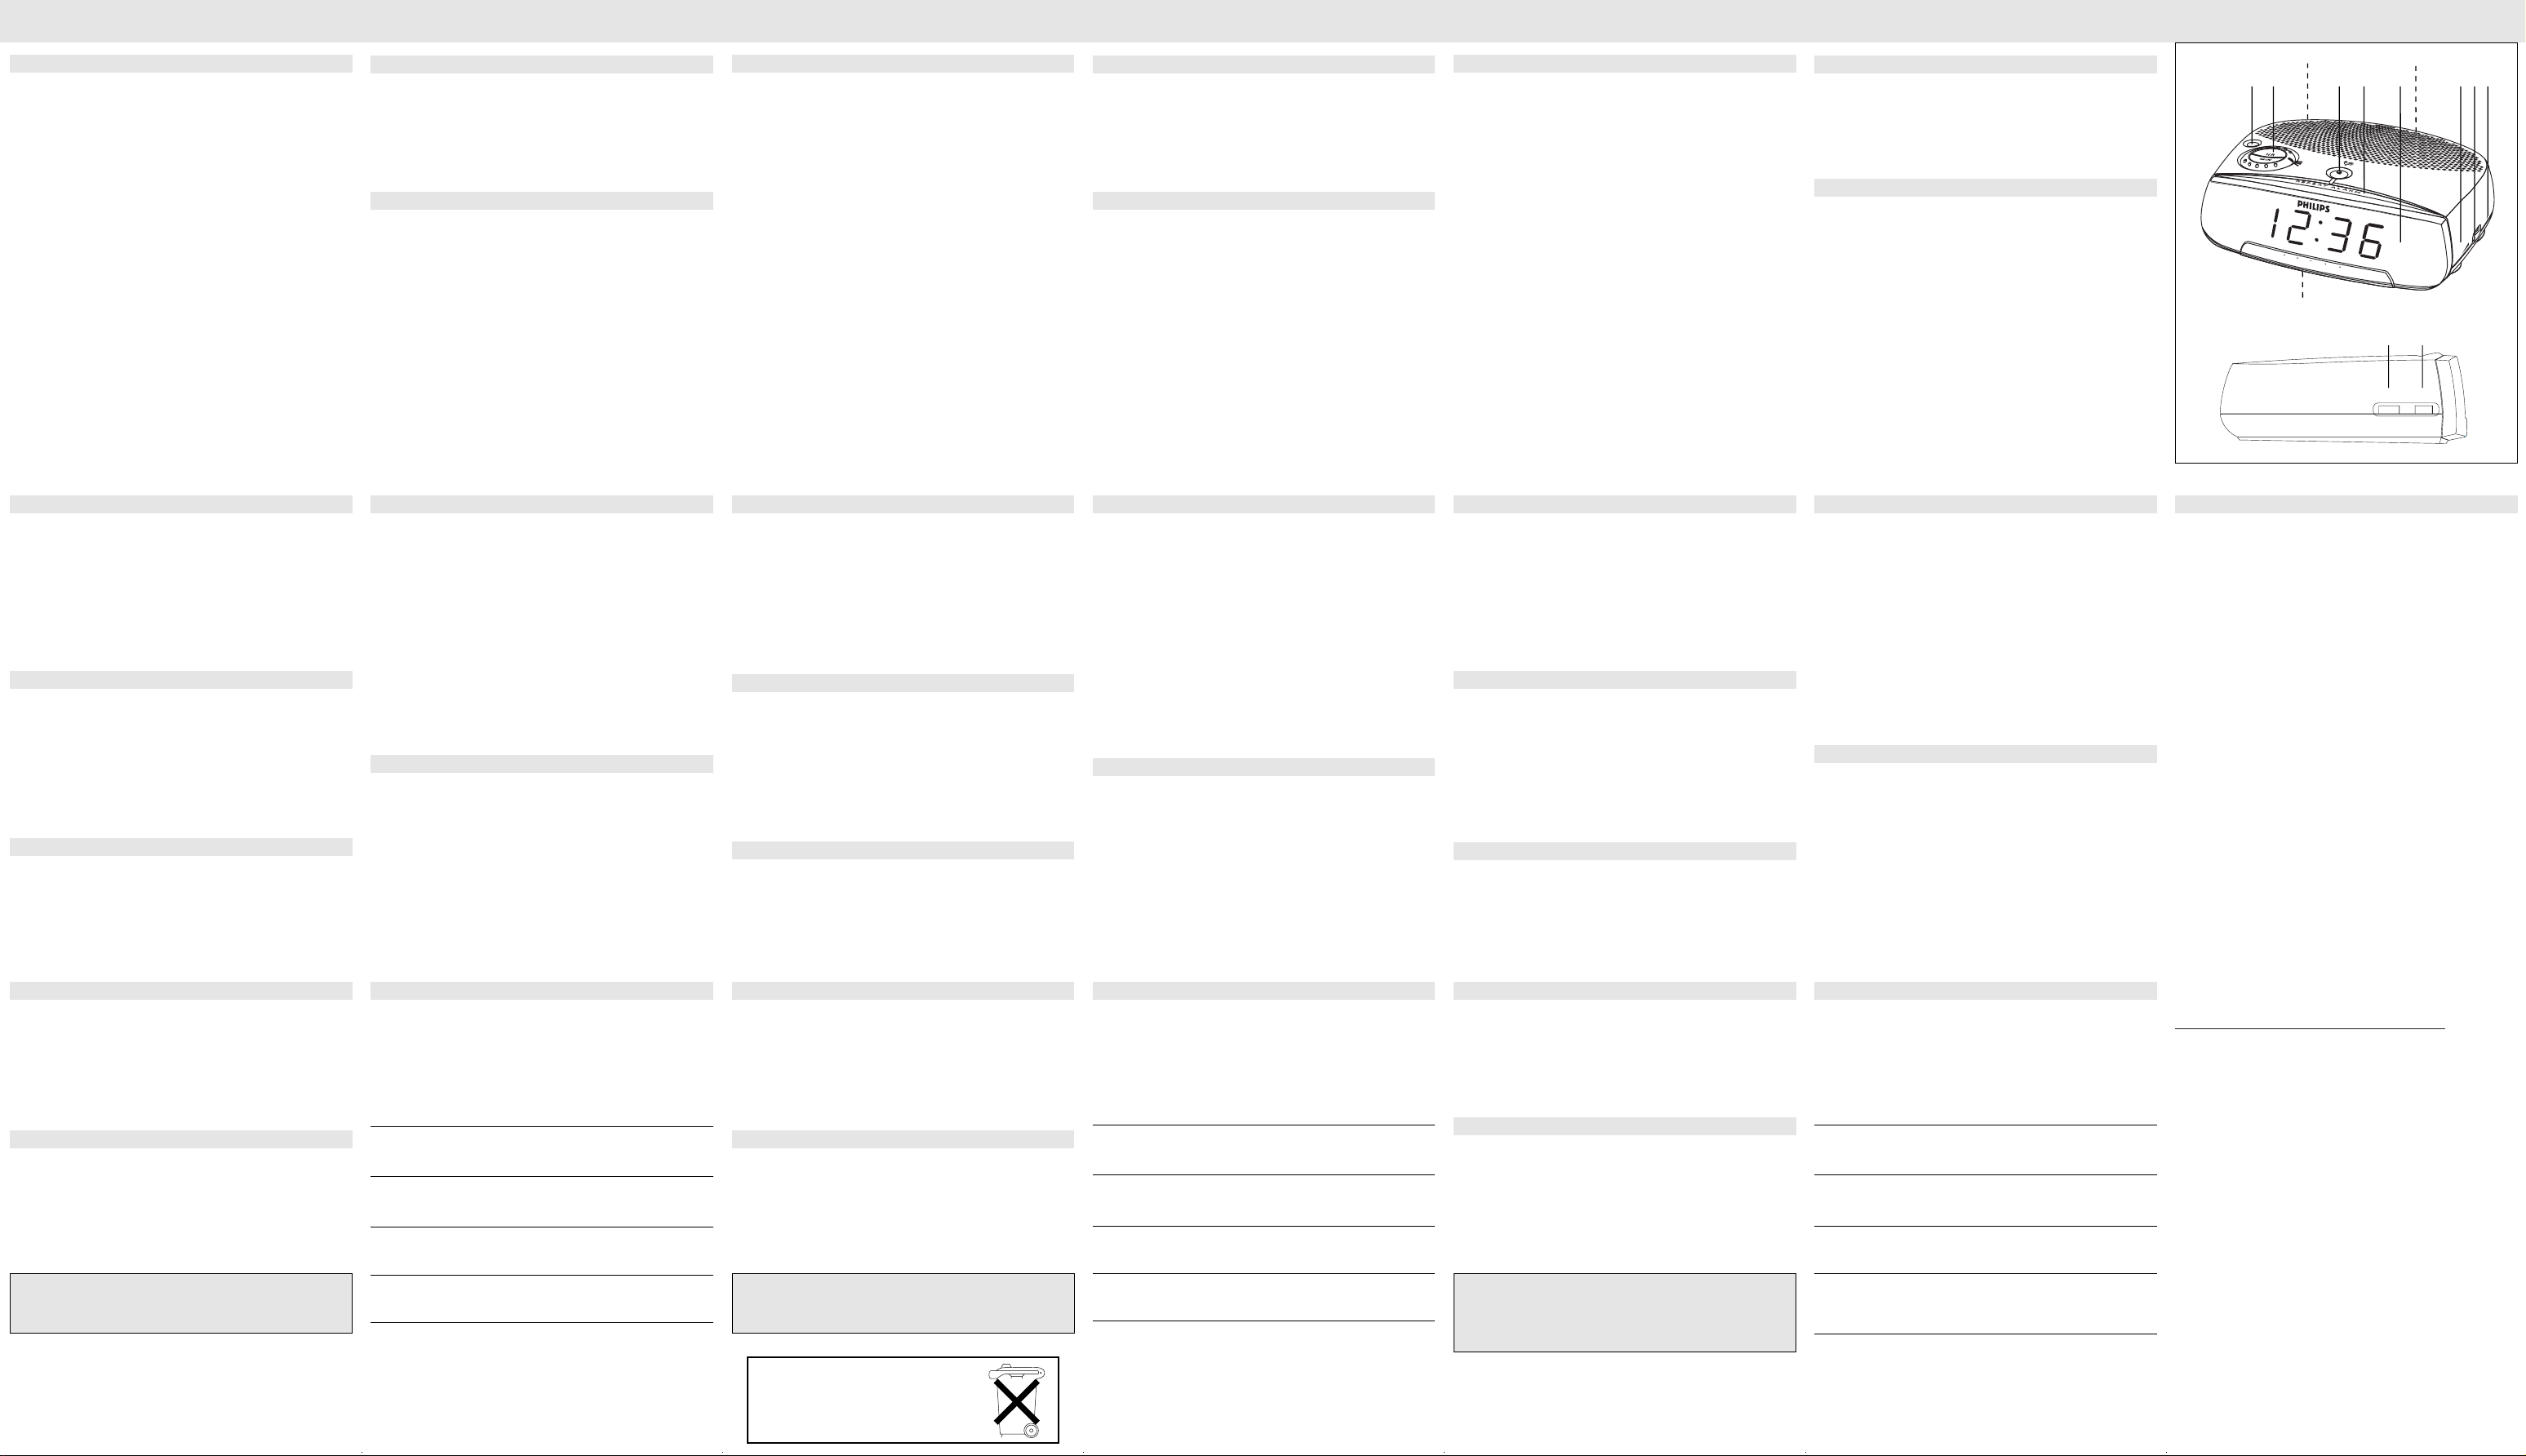
@
#
1!2 4 5 6 783
SLEEP
CLOCK
SET ALARM
ALARM RESET
SET TIME
• • • SLEEP
OFF •••
ALARM
FM
Megahertz
MW
88
Kilohertz
92
530
96
630
100
800
104
1000
1300
FM AM CLOCK RADIO
AJ3120
TUNING
BAND
MW•FM
VOLUME
108
Megahertz
1600
FM
Kilohertz
MW
09
RADIO
ALARM
OFF• ON
OFF•RAD•BUZ •
Important notes for users in the U.K.
Mains plug
This apparatus is fitted with an approved 13 Amp plug. To change a fuse in this type
of plug proceed as follows:
1 Remove fuse cover and fuse.
2 Fix new fuse which should be a BS1362 5 Amp, A.S.T.A. or BSI approved type.
3 Refit the fuse cover.
If the fitted plug is not suitable for your socket outlets, it should be cut off and an
appropriate plug fitted in its place. If the mains plug contains a fuse, this should
have a value of 5 Amp. If a plug without a fuse is used, the fuse at the
distribution board should not be greater than 5 Amp.
.
Note: The severed plug must be disposed of to avoid a possible shock hazard
should it be inserted into a 13 Amp socket elsewhere.
How to connect a plug
The wires in the mains lead are coloured with the following code: blue = neutral
(N), brown = live (L). As these colours may not correspond with the colour
markings identifying the terminals in your plug, proceed as follows:
• Connect the blue wire to the terminal marked N or coloured black.
• Connect the brown wire to the terminal marked L or coloured red.
• Do not connect either wire to the earth terminal in the plug, marked E (or e) or
coloured green (or green and yellow).
Before replacing the plug cover, make certain that the cord grip is clamped over
the sheath of the lead - not simply over the two wires.
Copyright in the U.K.
Recording and playback of material may require consent. See Copyright Act 1956
and The Performer’s Protection Acts 1958 to 1972.Protection Acts 1958 to 1972.
WARTUNG
•
Wenn Sie voraussichtlich das Gerät lange Zeit nicht verwenden, sollten Sie
den Netzstecker aus der Wandsteckdose herausziehen. Nehmen Sie außerdem
die Batterie aus dem Gerät heraus, um Beschädigungen des Gerätes durch
eventuell auslaufende Batterien zu vermeiden.
•
Das Gerät nicht Feuchtigkeit, Regen, Sand oder übermäßiger Hitze aussetzen,
die von Heizgeräten oder direktem Sonnenlicht erzeugt wird.
•
Zum Reinigen des Gerätes ein weiches, leicht angefeuchtetes Fensterleder
benutzen. Verwenden Sie keine Reinigungsmittel, die Alkohol, Ammonium,
Benzol oder Poliermittel verwenden, die das Gehäuse angreifen könnten.
UMWELT-HINWEIS
Wir haben das Verpackungsmaterial auf ein Minimum von zwei Kategorien
reduziert: Papier und Pappe.
Ihr Gerät besteht aus Material, das beim Auseinandernehmen durch eine
Expertenfirma wiederverwertet werden kann. Bitte beachten Sie örtliche
Bestimmungen für das Entsorgen von Verpackungsmaterial und alten Geräten.
Dieses Produkt entspricht den Funkentstörvorschriften der
Europäischen Union.
Das Typenschild befindet sich auf der Geräteunterseite.
STÖRUNGSBEHEBUNG
Falls eine Störung auftritt, überprüfen Sie zuerst die unten angeführten Punkte,
bevor Sie das Gerät reparieren lassen.
Wenn Sie trotz Befolgung dieser Hinweise die Störung nicht beheben können,
wenden Sie sich an Ihren Fachhändler oder an den Kundendienst
WARNUNG: Das Gerät nicht öffnen, weil Stromschlaggefahr besteht. U
Umständen sollten Sie versuchen, das Gerät selbst zu reparieren, da
dies die Garantie ungültig macht
.
.
nter keinen
Problem
–
Mögliche Ursache
•
Lösung
Kein Ton/Strom
–
Lautstärke nicht eingestellt
•
Stellen Sie die Lautstärke ein
Gelegentliches Rauschen bei FM- (UKW-) Empfang
–
Schwaches Signal
•
Ziehen Sie die Drahtantenne vollständig aus
Ständige Störungen durch Rauschen/Pfeifen bei AM- Empfang
–
E
lektrische Störungen von TV, Computer, Leuchtstofflampen usw
•
Rücken SIe das Gerät weg von anderen Elektrogeräten
.
Der Wecker funktioniert nicht
–
Weckzeit nicht eingestellt und/oder Weckbetrieb nicht gewählt
•
Stellen Sie die Weckzeit ein und/oder wählen Sie den Weckbetrieb
–
Lautstärke zu niedrig für RADIO
•
Stellen Sie die Lautstärke ein
–
Radioweckalarm nicht auf eine Radiostation eingestellt
•
Stellen Sie eine Radiostation ein
ONDERHOUD
•
Indien u het apparaat gedurende lange tijd niet gaat gebruiken, moet u de
stekker uit het stopcontact verwijderent. Bovendien moet u dan de batterij uit
het toestel verwijderen om lekken en beschadiging aan het toestel te
voorkomen.
•
Stel het apparaat niet bloot aan vochtigheid, regen, zand of overmatige hitte
van verwarmingstoestellen of direct zonlicht.
•
Om het apparaat schoon te maken gebruikt u een zachte, lichtbevochtigde
zeem. Gebruik geen producten die alcohol, ammonia, benzine of
schuurproducten bevatten, daar deze de behuizing schade kunnen toebrengen.
MILIEU-INFORMATE
Wij hebben de verpakking eenvoudig gehouden zodat ze gemakkelijk op te
splitsen is in slechts twee soorten materialen: papier en karton.
Uw apparaat is vervaardigd van materialen die gerecycleerd kunnen worden, op
voorwaarde dat zij door een gespecialiseerd bedrijf gedemonteerd worden.
Gelieve de plaatselijke reglementen betreffende het wegwerpen van
verpakkingsmateriaal en oude toestellen in acht te nemen.
Dit apparaat voldoet aan de radio-ontstoringseisen van de Europese
Unie.
Het typeplaatje bevindt zich op de onderkant van het apparaat.
Batterijen niet weggooien,
ñ
maar inleveren als KCA.
PROBLEMEN OPLOSSEN
I
ndien zich een probleem voordoet, kunt u eerst de volgende punten nakijken
voordat u het apparaat naar een herstellingsdienst brengt.
Indien u er aan de hand van de onderstaande tips niet in slaagt het probleem te
verhelpen, raadpleegt u best uw verdeler of een erkende herstellingsdienst
.
WAARSCHUWING: Maak het apparaat niet open want dan loopt u het risico een
elektrische schok te krijgen. U
mag in geen geval het apparaat
zelf proberen te herstellen, dit zou uw garantie teniet doen
Probleem
–
Mogelijke oorzaak
•
Oplossing
Geen klank/ stroom
–
Volume niet ingesteld
•
Stel het volume in
Occasioneel kraakgeluid bij FM uitzending
–
Zwak signaal
•
Trek de varkensstaart volledig uit
Voortdurend gekraak/gesis bij AM uitzending
–
Elektrische storing van TV, computer, fluorescerende lamp, enz
•
Verplaats het apparaat verder weg van andere elektrische apparaten
.
De wekker werkt niet
–
Wektijd niet ingesteld en/of wekmodus niet geselecteerd
•
Stel de wektijd in en/of selecteer een wekmodus
–
Het volume staat te laag voor de RADIO
•
Stel het volume in
–
Radiowekker is niet op een radiozender afgestemd
•
Stem op een radiozender af
MANUTENZIONE
•
Se non si intende utilizzare l’apparecchio per un periodo di tempo prolungato,
estrarre la spina dalla presa di rete a muro, e togliere la batteria per evitare
danni e/o pericoli derivanti da possibili perdite.
•
Non esporre l’apparecchio ad umidità, pioggia, sabbia, temperature
eccessivamente elevate e irradiazione solare.
•
Per pulire l’apparecchio, utilizzare una pelle di camoscio morbida, leggermente
inumidita. Non utilizzare alcun detergente che contenga alcool, ammoniaca,
.
benzina o sostanze abrasive in genere, che potrebbero danneggiarne.
INFORMAZIONI PER LA PROTEZIONE AMBIENTALE
L’imballo dell’apparecchio è stato ridotto al minimo, in modo da semplificarne il
riciclaggio differenziato, come carta e cartone.
L’apparecchio è stato fabbricato con materiali riciclabili, se scomposto da
un’azienda specifica del settore. Si prega di osservare le normative locali vigenti
in materia di smaltimento degli imballaggi e delle apparecchiature obsolete.
Questo prodotto è conforme ai requisiti delle interferenze radio della
Unione Europea.
La targhetta dati si trova in fondo all’apparecchio.
GUIDA DI AIUTO
In caso di malfunzionamento, consultare i punti elencati qui di seguito prima di far
eseguire la revisione l’apparecchio.
Se il problema persistesse anche dopo aver seguito i consigli forniti, consultare il
rivenditore o il centro di assistenza
ATTENZIONE:
Non aprire l’apparecchio, per non correre il rischio di scosse elettriche. Non cercare, in nessuna circostanza, di riparare l’apparecchio da soli, poiché questo renderebbe nulla la garanzia
.
.
ProblemA
–
Causa possibile
•
Intervento
Nessun suono / non si accende
–
Volume non regolato
•
Regolare il volume
Interferenze sonore intermittenti in FM
–
Segnale debole
•
Estrarre completamente l’antenna a filo
Interferenze/disturbi sonori costanti in AM
–
Interferenze elettriche provenienti da apparecchi TV, computer, lampade
fluorescenti, ecc
•
Allontanare la radiosveglia dagli altri apparecchi elettric
.
La sveglia non funziona
–
Orario di sveglia non impostato oppure modalità di sveglia non selezionata
•
Impostare l’orario / selezionare la modalità di sveglia
–
Volume troppo basso per la RADIO
•
Regolare il volume
–
Radiosveglia non impostata su un’emittente radio
•
Sintonizzarsi su un’emittente radio
i Italia
DICHIARAZIONE DI CONFORMITA’
Si dichiara che l’apparecchio AJ 3120 Philips risponde
alle prescrizioni dell’art. 2 comma 1 del D. M. 28 Agosto
1995 n. 548.
Fatto a Eindhoven
Philips Consumer Electronics
Philips, Glaslaan 2, SFF 10
5616 JB Eindhoven, The Netherlands
 Loading...