

Page 1

Philips Hospitality TV
Installation Manual for
22HFL30x7x/10
26HFL30x7x/10
32HFL30x7x/10
42HFL30x7x/10
Version 1.1
Page 2

Contents
1. Requirements before starting the installation .......................................................................................................... 2
2. Find out the state of the TV ...................................................................................................................................... 3
3. Re-install TV .............................................................................................................................................................. 4
4. Installation wizard ..................................................................................................................................................... 6
5. Channel options ...................................................................................................................................................... 13
a. Reordering channels ........................................................................................................................................... 13
b. Rename channels ................................................................................................................................................ 15
c. Hide channels ...................................................................................................................................................... 15
6. Professional Settings ........................................................................................................................................... 16
7. Welcome Logo ........................................................................................................................................................ 26
7.1 Hotel Information .................................................................................................................................................... 26
8. Clone ....................................................................................................................................................................... 27
9. Feature settings ....................................................................................................................................................... 28
10. CSM (Consumer Setup menu) ................................................................................................................................. 29
1
Page 3

1. Requirements before starting the installation
Before starting the installation, make sure that you have everything you need at hand.
Master remote control 22AV8573 or Guest remote control 22AV1108A
And
USB stick
You will need the master remote control or the guest remote control to access the menus.
To access the setup menu press the ‘RC5 SETUP’ key, and then press the ‘Home/Menu’ button.
For the guest remote control, press the following keys sequential: 3,1,9,7,5,3, ‘MUTE’.
Note: The sequence: 3,1,9,7,5,3, ‘MUTE’ will not show the Setup Menu if High Security Menu is enabled. For
cloning settings from one TV to another TV, you will need to have a USB stick. This stick needs to be
formatted as FAT32 and should be empty.
For the best guest experience check if the software version on the TV is the latest one. This can be done using the
Master Remote control by pressing Recall Button and checking on page 2.1 - Current Main Software’. This also can
be done with the Guest Remote by pressing 1,2,3,6,5,4.
Go to: http://www.support.philips.com/support
Enter the model number and check to confirm you have the latest version available.
Confirm the software version present on TV is identical with the one from website. If not please download the latest
version from website, unzip and save on to a USB key The USB key must be formatted as FAT32 and preferably
empty to avoid and accidental upload of wrong setting and software. Follow the instruction how to upgrade the
software.
If the software version from your TV is identical with the one available on website it is not necessary to upgrade.
If an upgrade is necessary you can upgrade and clone files at the same time automatically. (Upgrade -> Automatic
Reboot -> Clone) --- See Instant Initial Cloning
Initial instant cloning option can only be used if you reinstall TV or TV is out the box.
2
Page 4

2. Find out the state of the TV
It is important to know if a TV is in ‘virgin mode’ (out of the box) or installed before.
If you can see this screen below, you know that the TV is in ‘virgin mode’ and you can install the set. See chapter 4 of
this manual.
If you power on the set and then press the ‘Home’ button on the guest remote, you will see this screen appear, if the
TV already has been installed or the wizard was already skipped.
Professional Settings ON Professional Settings OFF
You can start the installation wizard again by reinstalling the TV as explained in chapter 3 of this manual.
Disable the Professional Settings
Access the setup menu press the ‘RC5 SETUP’ key, and then press the ‘Home/Menu’ button. (For the guest remote
control, press the following keys in sequence: 3,1,9,7,5,3, ‘MUTE’).
Go to, Professional Mode and select the OFF option and confirm with “OK”. Go back with the arrow keys and select
Store settings. Do confirm with “OK”. After restart the TV will have the PBS mode set to OFF.
Note: All settings can be done without disabling the Professional Mode, but all settings from ‘Professional Settings’ which were not saved will
discarded during the transition to Consumer Mode.
3
Page 5

3. Re-install TV
If you want to start an installation from scratch you can always re-install the TV. This can be done by using the
option: Re-install TV set.
If Professional mode is active you can access the setup menu by pressing the ‘RC5 SETUP’ key, and then press the
‘Home/Menu’ button (For the guest remote control, press the following keys in sequence: 3,1,9,7,5,3, ‘MUTE’) , then
go to TV Setup, confirm with “OK”. This menu will appear:
If the Professional mode is disabled, you can access the Setup menu with the guest remote control.
Select “Setup” and press “OK”
Select the option TV settings for this menu
4
Page 6

Press “OK” to access the sub-menu, navigate to “Reinstall TV”.
Press “OK” to reinstall TV set.
If all is correct select “Start now” and press “OK”.
After this operation the TV will power off and on and display the installation wizard.
Note: All settings are at default values and no channel plan is available.
5
Page 7

4. Installation wizard
When you turn on the TV for the first time, or you have reinstalled the TV, you should see the following screen.
Here you will need to select your preferred language. Please select with Up and Down arrow keys and confirm with
‘OK’ or press the Left arrow key.
After this, you will need to select the country. Depending on the country selection, some pre-defined settings will be
activated, because of local broadcast requirements. Example: digital/analog channels could be disabled; reordering
and deleting channels can in some cases not be possible.
Note: If you are experiencing some issues after selecting your country, please select ‘Others’ in the menu.
The next step is to select ‘Wall mounted’ or ‘On a TV stand’. This option changes some settings for the audio and
image of the TV.
6
Page 8

The next step is to choose between ‘Shop’ and Home’ use.
If you select “SHOP” an ‘e-sticker’ banner will be displayed on the TV. This is for commercial purpose only.
Now you can select the visual and hearing impaired options. If you select ‘On’, your TV will automatically turn on
settings to help visual and hearing impaired people. THE MOST COMMON OPTION IS TO TURN THIS FUNCTION OFF.
On the following page we can start the channel installation wizard. You can also press “Back” to correct any previous
setting. We recommend you only select your preferred options as this will result in longer installation times.
7
Page 9
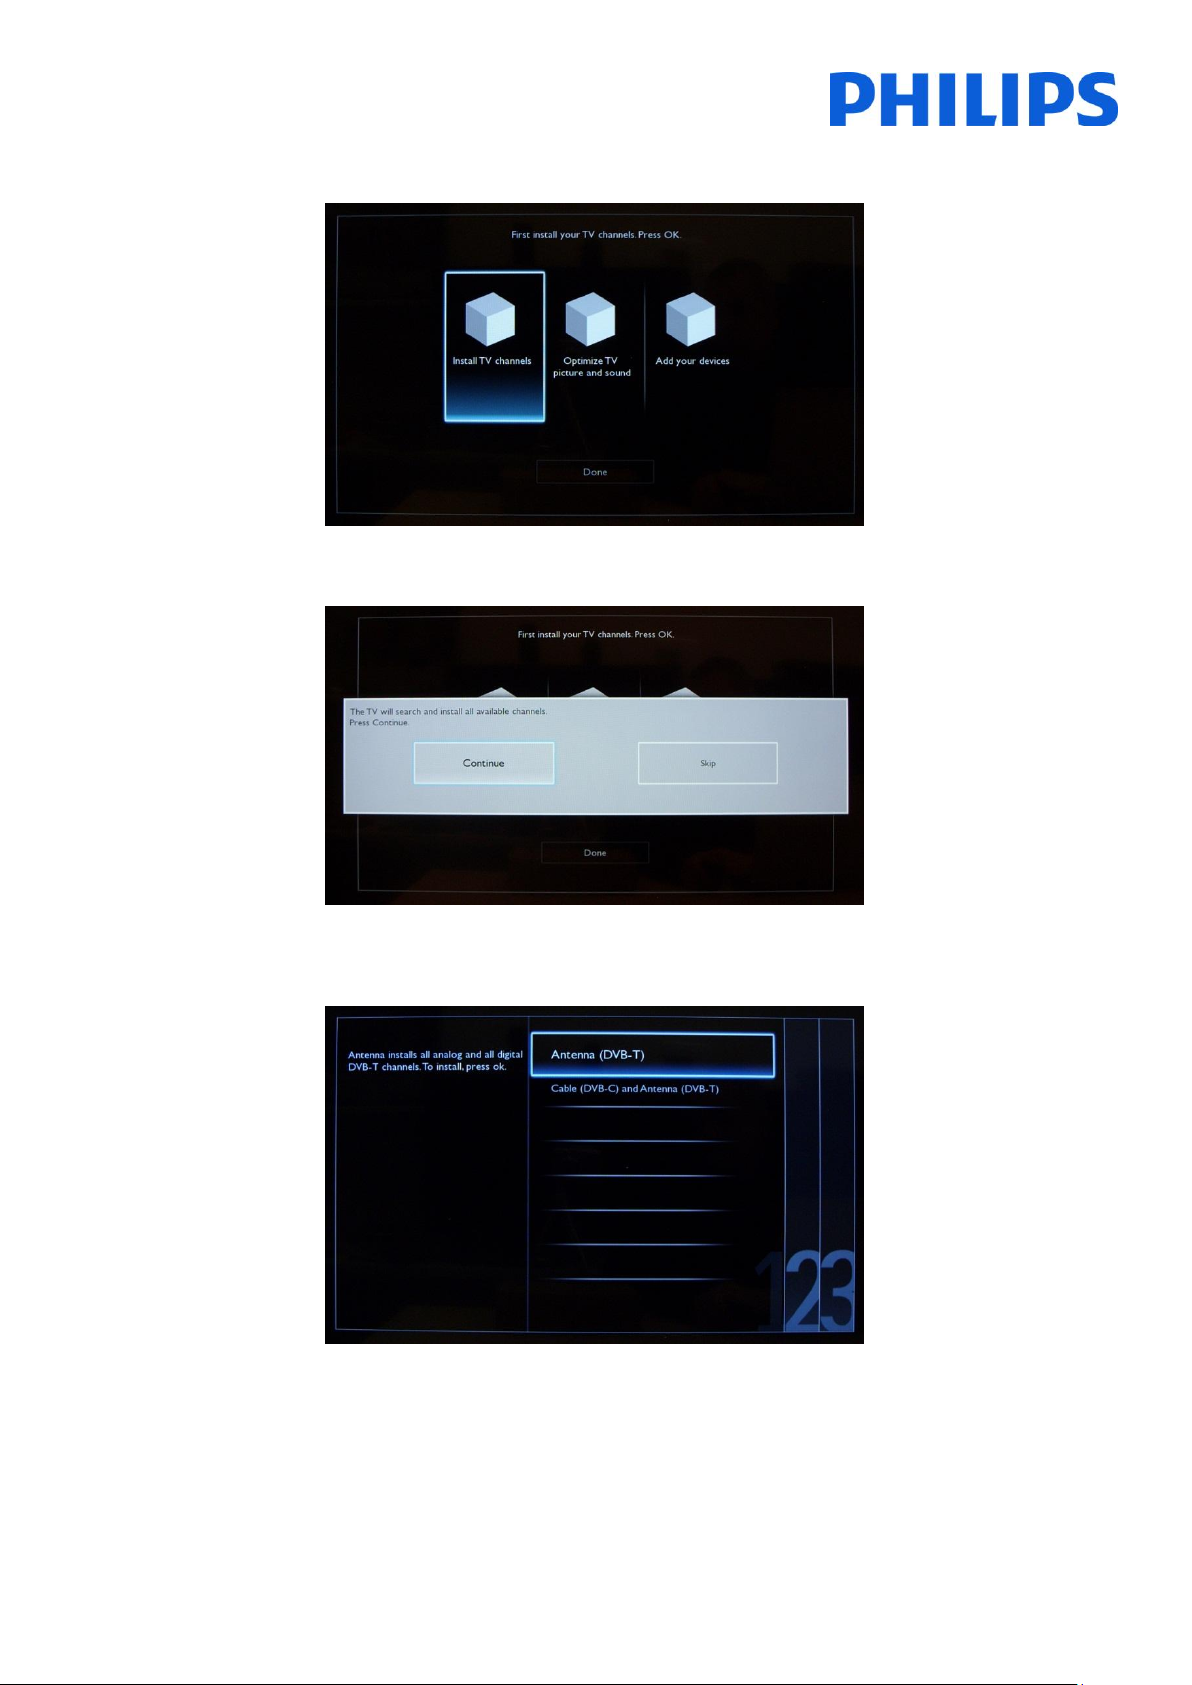
For the channel installations, select ‘Install TV channels’ and press ‘OK’
Then you can select ‘Continue’ and press ‘OK’ again.
Here you can select the type of channels you would like to install and what preference you will use.
8
Page 10

It is advisable to check the settings before starting the search.
The “Frequency scan” contains two options:
- “Quick”: this is a fast method to search channels but it might skip some channels (depending on the
network).
- “Full”: the scan will search on all frequencies and will store all channels available. This is the safe method if
you don’t know the network parameters, but it takes more time.
- Advanced: If you know the network parameters like Network ID, Network Frequency, you can use this
option, otherwise the safe option is tu use the Full option.
-
9
Page 11

The Symbol Rate options are: Automatic and Manual. If you do not know the correct values for this option, please
use the Automatic option.
Analogue channel: If you don’t have or you don’t want to install analogue channels, you can disable the search for
this type of channels.
The “Reset” option will reset the search settings to default. After you have checked or changed settings, you can
select “Done” and select “Start” to start the channel search.
During the channel search you can see the progress bar and how many channels are found at that time.
When the search is done, you should see “Channel search complete” and a summary of the channels found.
Press “OK” button on remote control to finish the search.
10
Page 12

If you would like to change the picture and sound settings, you can go to “Optimize TV picture and sound” and press
the “OK” button on remote control.
A wizard will start to guide you through the process of setting the sound and picture on the TV set.
Select “Continue” to start the wizard and press the “OK” on remote control.
The wizard will ask you some questions about which image you prefer, select the option you desire and press “OK”
on the remote control.
Once this wizard is done, you will return to the installation menu again. The last option in this menu is “Add your
devices”. This can be done if you would like to add a DVD player or STB.
When you are done with this, select “Done” and press ‘OK’ on the remote control.
11
Page 13

After pressing “Done” you have completed the installation of the TV and you should see this screen. Press “OK” on
the remote control to exit this wizard.
Note: This wizard will not be available anymore when you start the TV the next time.
The only way to re-use this wizard is to reinstall the TV set.
12
Page 14

5. Channel options
a. Reordering channels
To reorder TV channels you need the channel plan from the Professional Settings menu. In the consumer menu you
cannot rearrange channels. The Professional Settings menu can be accessed by using the Yellow remote (RC
22AV8573 Master Remote control) and pressing the MENU Button or with the TV remote press 3,1,9,7,5,3, MUTE).
The Professional Settings menu will appear like in the picture below. Go to the “Channel setup” option and press
“OK” to access the submenu.
The warning message which informs you that “all unsaved changes will be discarded” will popup. Select ‘Yes’ and
press the “OK” to confirm.
The channel grid will contain all installed channels.
With the channel grid displayed, press the “OPTION” button on the remote control to display settings for channels.
13
Page 15

Select “Reorder” and Press the “OK” button on the remote control to reorder channels.
Navigate to the channel that you want to move and press “OK” on the remote control to select that channel.
The arrows around the channel indicate that the channel is selected and can be moved. Use the arrow keys to move
the channel to the new position. When you have reached the new position press “OK” on the remote control to
confirm the new position of the channels.
Once you finished with the reordering, press “Options” on the remote control again. Press “OK” on the remote
control to confirm that you are done with the re-ordering.
14
Page 16

Meanings for the letters in top left corner:
A: Analogue channels
H: Hidden channel – not available in the channel grid.
These channels are shown only If the “Show hidden
channels” option is used.
b. Rename channels
Select the channel, press the “Options” button on remote control and select “Rename” to change name of a channel.
If you then press the “OK” button a virtual QWERTY keyboard will pop up.
c. Hide channels
Important: You cannot delete channels from the channel grid, but you can use the option to hide the channels.
Select the Channel, press the “Options” button and select “Hide channels”. You will see an “H” in the channel square.
Select “Show hidden channels” if you want to see all channels, hidden or not hidden. Using this option will not
remove the hidden attribute.
15
Page 17

6. Professional Settings
[Professional Settings]
Settings especially designated for hospitality.
[Professional Mode]
[Off]: The TV operates as a basic (consumer) TV.
[On]: All settings in the Professional Settings Setup menu are
active.
Only by switching on this mode the TV will act as a Hospitality TV.
[Room ID]
Entry field to store 4 digits to set the Room Identifier.
Room ID can be used to distinguish between different
floors/rooms/setups when using SmartInstall.
[Consumer setup]
A shortcut to enter the consumer installation menu.
Consumer installation menu should be accessed to change e.g.
picture and sound settings and update channels.
Note: Using this shortcut will trigger a popup screen which warns about losing
settings in the Professional settings menu if you continue. Select discard if you
want to stay in the Professional settings menu or continue.
[Channel setup]
A shortcut to enter the channel grid (check Channel Options).
In this grid you can reorder, rename and hide channels.
Note: Using this shortcut will trigger a popup screen which warns about losing
settings in the Professional settings menu if you continue. Select discard if you
want to stay in the Professional settings menu or continue.
16
Page 18

[USB to TV]
Check Cloning section
[TV to USB]
Check Cloning section
[RF to TV]
Option used for SmartInstall
Note: Setup and configuration for SmartInstall is not covered by this manual
[Reset]
Reset all settings from Professional mode to default values.
[Switch on channel]
When the TV is switched on it will start up on the specified
source/channel.
Available EXT1, EXT2, VGA, HDMI, HDMI side, AV side or one of the installed TV
channels.
[Switch on volume]
When the guest switches the TV on, it will play at the specified
volume level.
Selectable value from 00 until 60.
17
Page 19

[Maximum volume]
This option specifies the maximum allowable volume level of the
TV.
Selectable value from 00 until 60.
[Switch on picture format]
This settings allows you to set a switch on picture format.
The power on function allows the TV to enter a specific mode
([On], [Standby], or [Last status]) of operation when the mains
power is activated (cold start):
[On]: The TV will always turn on (show startup channel) after the
mains power is connected.
[Standby]: When set, the TV will always turn to standby (status
as defined in Low power standby option) after the mains power
is connected.
[Smart Power]
The power consumption for the Smart power mode is defined by
the Smart Picture setting in the TV Setup part.
[Off]: The TV will start with Standard Smart Picture setting, but
the setting can be changed in the guest setup mode.
[On]: The TV will start with default Smart Picture setting and
Smart Picture setup and is not selectable in the guest setup.
[Display message]
[On]: To enable the welcome message.
[Off]: No welcome message
[Line 1]
Line 1: First line of the welcome message.
18
Page 20

When pressing “OK” button on remote control while editing line
1 or 2, a virtual keyboard will pop up on screen.
Note: Maximum 20 characters per line.
[Line 2]
Line 2: Second line of the welcome message.
[Clear]
Will delete the current welcome message.
[Message Time-out]
Sets the period of time to display the welcome message on the
screen when TV is turned on from standby.
Selectable values: 20, 25, 30 seconds.
[Display logo]
Enables / disables to show the stored welcome Logo at start-up
when TV starts up in Green Mode (see Power Settings):
[Off]: When set to Off, the TV will hide the Welcome Logo at
start-up.
[On]: When set to On, the TV will show the Welcome Logo at
start-up.
Note: If no welcome logo is loaded the feature is greyed out.
[Display information]
[On]: Enables hotel information to be available in guest menu.
[Off]: Disables hotel information to be available in guest menu.
Check upload hotel info.
19
Page 21

[Info key enable]
Enables the possibility to see Hotel Info by pressing the Info
button on the remote control.
[USB to TV]
This option uploads the pictures used for Hotel Info in to the TV.
You should only use this when configuring the master TV. You
can then clone the settings to another TV.
Note: All pictures used for Hotel Info will be cloned.
[Local KB lock]
[Off]: The local keyboard (controls buttons on the TV) buttons
are enabled.
[On]: The local keyboard (controls buttons on the TV) buttons
are disabled, power button still enabled.
[All]: All local keyboard (controls buttons on the TV) buttons are
disabled.
[RC lock]
[OFF]: All buttons on Guest remote control will function
normally.
[On]: All buttons on the Guest remote control are disabled.
Master remote control 22AV8573 (yellow) or RC2573 (green) commands are not
affected by this setting.
[OSD display]
Set this function to show or hide on screen information.
[Off]: On screen information is suppressed.
[On]: Normal on screen information is displayed.
[High security]
[Off]: Professional setup menu can be accessed by both Guest
remote control and Master remote control 22AV8573 (yellow) or
RC2573 (green).
Guest remote control access to set up menu is only possible with
code 3,1,9,7,5,3, mute.
[On]: Professional setup menu can only be accessed by the
Master remote control 22AV8573 (yellow) or RC2573 (green).
20
Page 22

[Auto scart]
Enables auto scart switching (or break-in) in Professional mode.
[On]: Enables auto scart switching or break-in.
[Power On Scart]: Enables auto TV start On/Off when detecting
scart break-in.
(never use this feature without a connected STB)
[Off]: Disables auto scart switching or break-in.
[HDMI-CEC in]
[Off]: Disables HDMI-CEC feature.
[On]: Enables HDMI-CEC feature.
Philips EasyLink (HDMI-CEC) enables one-touch play and one-touch
standby between HDMI-CEC compliant devices.
[USB break-in]
[Off]: When a USB device is plugged in, the [Multimedia] menu
will not appear automatically, but users can access [Multimedia]
menu from the Consumer menu by selecting “Browse USB”.
[On]: When a USB device is plugged in, the [Multimedia] menu
appears automatically.
[Enable teletext]
Enables or disables the use of Teletext OSD on pressing the
Teletext button:
[Off]: Disables Teletext.
[On]: Enables Teletext.
[Enable MHEG]
Enables or disables the use of MHEG OSD on pressing the MHEG
button:
[Off]: Disables MHEG.
[On]: Enables MHEG.
[Enable EPG]
Enables or disables the use of EPG OSD on pressing EPG button:
[Off]: No EPG services available
[Now & Next]: EPG (Now/Next) services available
[8 Day EPG]: EPG (8 Day) services available
Note: EPG availability depends on local conditions.
21
Page 23

[Enable subtitle]
Enables or disables the use of subtitles in a DVB broadcast
channel:
[Off]: No subtitle services available
[On]: Subtitle services available
[Enable USB]
[Off]: Disables USB multimedia function.
[On]: Enables USB multimedia functions.
Feature is not influencing cloning and/or software upgrade via
USB.
[Blue mute]
[Off]: The background color is set to black in case of no video
signal on selected source.
[On]: The background color is set to blue in case of no video
signal on selected source.
[Digit timeout]
Defines the time interval between numeric buttons when users
press digits on the remote control.
Selectable values from 0.5 to 9.9 seconds.
[Selectable AV]
Allows the installer to define which external sources to be
displayed on the source list when pressing AV button on the
Guest remote control.
Note: Only the sources marked [X] appear in the source list.
[Watch TV]
Select the function for Watch TV button on the remote control.
22
Page 24

[Download program]
To select channel to download clock information.
Note: Correct clock information is needed to provide correct EPG data and to
have MyChoice working.
[Country selection]
To select the original country from the channel chosen at
“Download program”.
[Time offset]
To set the time offset.
In case the clock download information is not correct for your
region you can set an offset here to correct this.
Note: Selectable value between -12 and +12.
[TV speaker enable]
[Off]: Disables the TV Main speakers. The headphone output is
not affected by this setting.
[On]: Enables the TV Main speakers.
[Independent main speakers]
[Off]: The volume +/- on the Guest remote control will affect
both the TV Main speaker and the headphone volume.
[On]: The volume +/- on the Guest remote control will affect
both the TV Main speaker and the headphone volume.
After pressing “MUTE”, the volume +/- on the Guest remote
control will not reactivate the TV Main speaker volume, but will
only control the headphone volume.
[Default main speaker volume]
Set the default volume level for TV Main speaker after
“Unmuting”.
Note: This option is only visible if “Independent Main speaker mute” is set to
“On”.
23
Page 25

[Blank channel]
The Blank channel function disables the display of video on the
TV, but does not affect the audio output.
Select or deselect can be done by pressing “OK” button on the
remote control.
Note: The channels marked with X will not display video on the TV.
[Auto channel update]
[ON]: Enables automatic channel update.
[OFF]: Disables automatic channel update.
[Auto software update]
[ON]: Enables software update
[OFF]: Disables software update
[Skip scrambled signals]
[Off]: Allows scrambled channels in the channel list.
[On]: Skips the scrambled channels in the channel list.
[Multi remote control]
To set the color of the TV in multi remote.
Guest remote control supports up to four televisions operating in
one room without interference from each other’s remote
controls. Each TV and a Guest remote control can be set to
match.
Check multi-remote
[MyChoice]
[Off]: Disables MyChoice function.
[On]: Enables MyChoice function.
24
Page 26

[ThemeTV]
[OFF]: Disables ThemeTV
[ON]: Enables ThemeTV
[Startup]: Will show the ThemeTV screen at startup
MyChoice configuration:
R0 – Ring 0 (All channels)
R1 – Ring 1 (Free to view channels)
Note: MyChoice setup is not included in this manual.
ThemeTV Configuration:
Edit the names for ThemeTV categories
Note: ThemeTV setup is not included in this manual
To select the TV channels for every ThemeTV category.
Note: ThemeTV setup is not included in this manual
The channels marked with X will be part of this selected ThemeTV
ring. Select or deselect can be done by pressing
Store changes.
This will store all settings and restart TV to apply all changes.
After storing PBS settings, the TV will restart to apply the new parameters. Now you can clone all settings to other TV
sets by using the option TV to USB and USB to TV. Check how to clone settings.
25
Page 27

7. Welcome Logo
There are 2 Philips logos displayed at startup. Second logo can be replaced by picture uploaded via USB.
File format: 1280 x 720.png file.
Note: below timing values are approximate indications and can differ from real situation!
How to upload Welcome Logo
1. Create graphics file: 1280 x 720 .png with logo.
2. File name: T911HE_WelcomeLogo.png (File name is case-sensitive)
3. Save into TV cloning data folder “T911HE_CloneData”
4. Insert USB device into TV
5. Enter Professional settings menu
6. Select “Welcome logo”
7. Select USB -> TV
8. Select “Display logo”
9. Select “On” to enable Welcome Logo
10. Store setting before exiting the Professional setup menu.
7.1 Hotel Information
Any JPEG can be used for the Hotel information and triggered from consumer menu screen.
How to upload page Hotel Info
1. Create JPEG’s graphics file with maximum resolution 1920 x 1080.
2. File name: T911HE_HotelInfo.jpeg (File name is case-sensitive)
a. For multiple files as Hotel Info the names should be consecutive (TV will create a slideshow)
Example for 4 pictures as Hotel Info: T911HE_HotelInfo.jpeg
T911HE_HotelInfo1.jpeg
T911HE_HotelInfo2.jpeg
T911HE_HotelInfo3.jpeg
3. Save the file into TV cloning data folder T911HE_CloneData
4. Insert the USB device into the TV
5. Enter Professional settings menu
6. Go to Hotel Info
7. Select USB -> TV
8. Select “Display information”
9. Select “On” to enable Hotel Information
26
Page 28

8. Clone
For instant initial cloning and software upgrade the files
on the USB key should be:
a. “T91HE_CloneData” folder
b. upgrade_loader.pkg
Steps to follow for a new TV:
1. Mount the TV in place
2. Insert the USB key on the side USB port
3. Plug in the mains power cord
4. Power on the TV (a “software upgrading in
progress” message will appear)
5. The TV will reboot and display the installation
wizard, after 3 second the message “Instant
initial cloning” will appear.
6. TV will reboot again to apply settings;
You can then remove the USB key.
7. You are now done. TV has the last software
version installed and all settings cloned from the
master TV.
With cloning it is possible to copy to/from a USB device TV the configuration data and the channel list data. Place a
USB Memory stick in the USB side connector of the TV.
*USB device should be formatted as FAT or FAT32.
Access the Professional menu by pressing the ‘RC5 SETUP’ key, and then press the ‘Home/Menu’ button.(For the
guest remote control, press the following keys in sequence: 3,1,9,7,5,3, ‘MUTE’). Access the Professional settings and
go to:
[USB to TV]
1. Select [USB to TV] and press OK.
2. The clone data will be loaded from the USB device into the TV. To activate the loaded settings, wait until
the OSD message is displayed to remove the power cord.
3. Remove and re-insert the power cord.
[TV to USB]
1. Select [TV to USB] and press OK.
2. The clone data will be loaded from the TV into USB device.
3. Wait until the OSD message returns to its earlier state before removing the USB device
Instant initial clone:
A TV out of the box will trigger the instant initial cloning. Before connecting the power cord and power on the TV,
insert the USB key with cloning data. After power on the TV will search on USB key for cloning files, will clone and
will power down. After power down you can remove the USB key and power on the TV to check the result of the
cloning and correct functionality of TV (e.q: Welcome message, welcome logo, hotel info, starting channel, startup
volume).
Instant initial cloning and software upgrade:
27
Page 29

9. Feature settings
[Multi RC]
This function allows that up to four televisions can be installed in a room whereas every TV will listen to its own RC.
Once the TV is set, also every RC can be set to remember its connected TV:
[Off] This function is not used; all TVs will listen to a ‘blue’ RC.
[Blue] The TV will listen to a ‘blue’ RC. Press and hold both the menu and blue button on the RC for about
five seconds.
[Green] The TV will listen to a ‘green’ RC. Press and hold both the menu and green button on the RC for
about five seconds.
[Yellow] The TV will listen to a ‘yellow’ RC. Press and hold both the menu and yellow button on the RC for
about five seconds.
[Red] The TV will listen to a ‘red’ RC. Press and hold both the menu and red button on the RC for about five
seconds.
Press and hold OK button for about five seconds to check the current color off the Multi Remote settings of TV and
user remote.
[MyChoice]
With MyChoice it is possible to activate two channel rings: R0 when MyChoice PIN is valid, and R1 if not.
[Off]: Single channel map as configured during channel installation.
[On] Channel ring R0 to be available to guest in case of valid PIN entered; R1 if not.
[Theme TV]
With Theme TV it is possible to activate a customizable user interface to select up to 15 different themes that
contains Channel references. Theme TV can be presented on the display by means of pressing the Theme TV button
on the RC, or automatically after starting up the TV:
[On]: Show Theme TV on the display after pressing the Theme TV button on the RC.
[Off]: Theme TV disabled.
[Startup]: Show Theme TV on startup and able to show the Theme TV by pressing the TTV button on the RC.
28
Page 30

10. CSM (Consumer Setup menu)
The CSM contains data about the TV software, serial number and other details. The menu can be accessed using a
standard remote control or using the master remote control.
1. Using the standard remote control: press the following key sequence “1,2,3,6,5,4”
2. Using master remote control (22AV8753D): Press the RECALL button, available only if PBS mode is ON.
Notes: Activation of the CSM is only possible if there is no (user) menu on the screen.
How to save the CSM content on USB stick:
1. Insert the USB stick
2. Enter the CSM
3. The CSM content will be saved on USB stick as a text file
4. File name example: “CSM_32HFL3007D10_FZ1A1146015773.txt”
a. Where 32HFL3007D10 is the TV model number
b. Where FZ1A1046015773 is the TV serial number
29
 Loading...