

Page 1
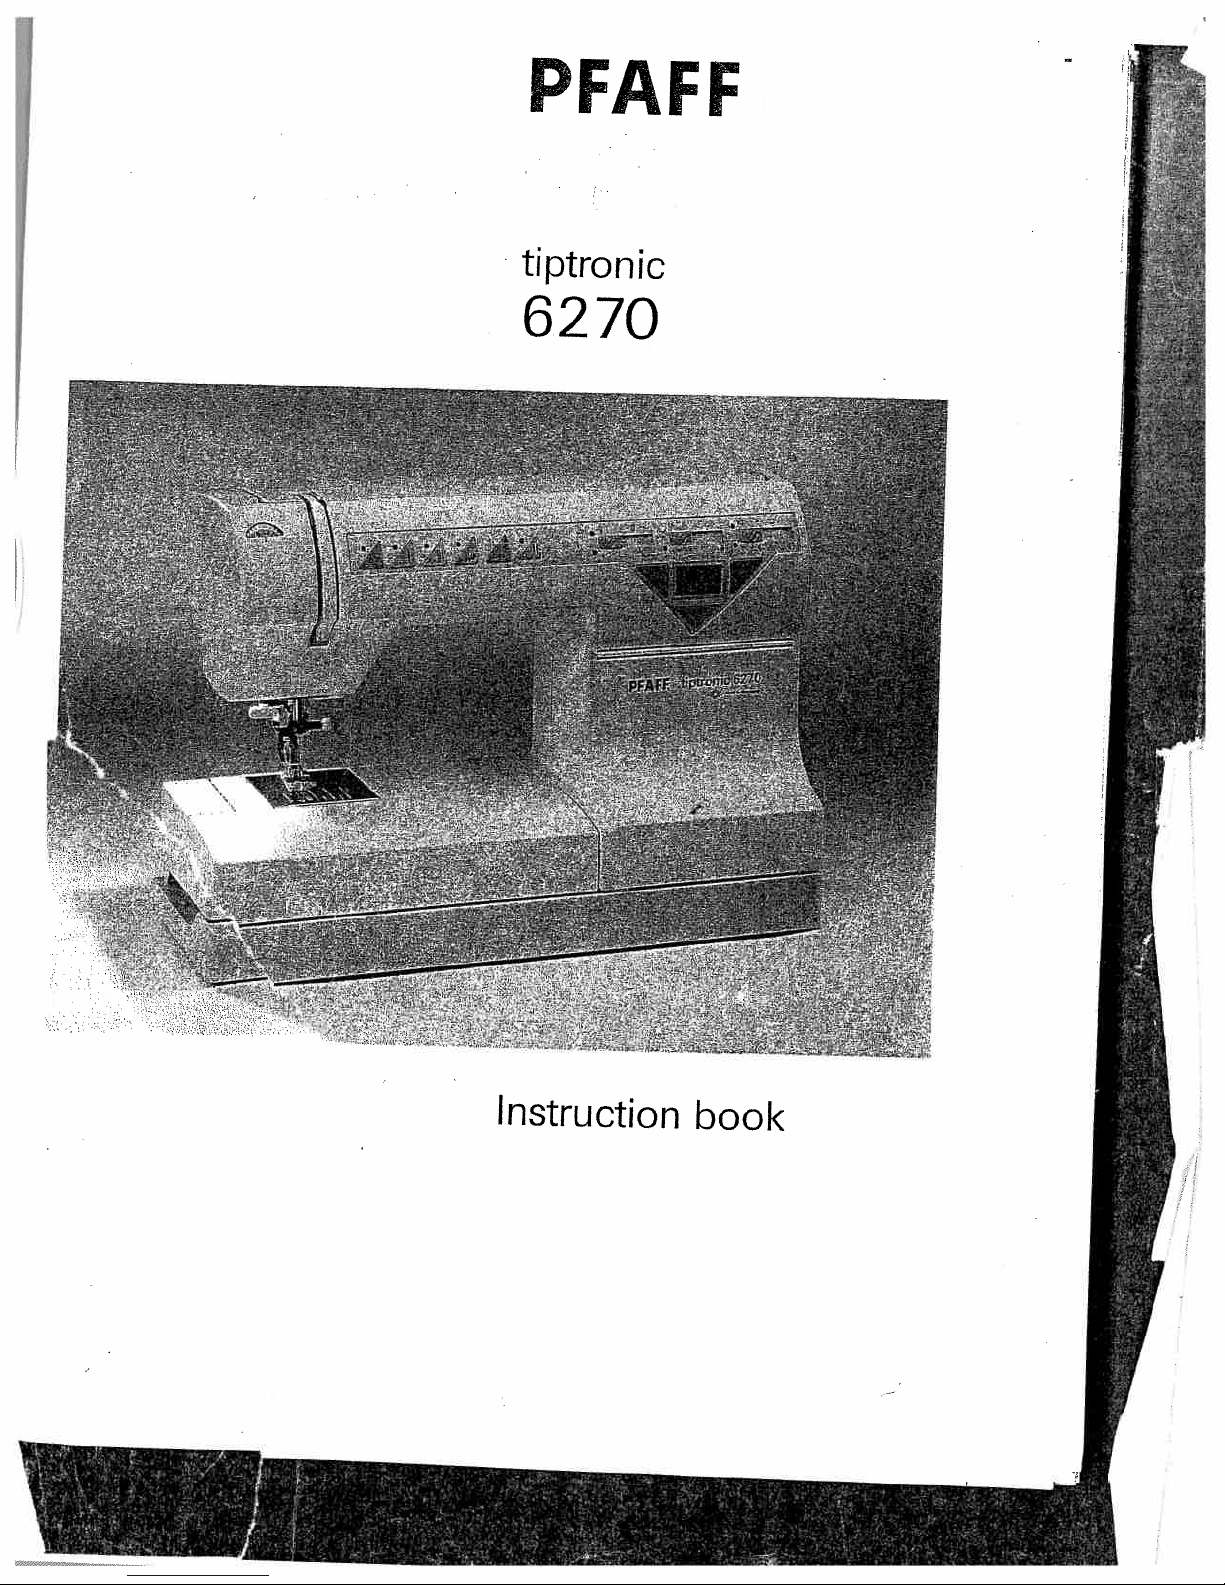
PFAFF
tiptronic
6270
Instruction
book
Page 2

For
easier
please
understanding
unfold
this
page
of
when
this
reading
instruction
it.
I
book
;afety
r
he
plug
ie
wires
3
the
ith
the
ie
wire
d
with
e
wire
rked
t
off
mains
fective
ly
3
A
I
the
fuse
plug
must
electrical
e
also
the
United
leads
with
Blue:
Brown:
colours
colour
which
the
which
with
mains
spare
cover
observe
rules
Kingdom
must
three
in
the
Neutral
Live
of
the
coding
is
coloured
letter
N
is
coloured
the
letter
plugs
leads
fuses
must
never
suppliers
be
the
definitely
pins.
mains
wires
of
or
coloured
L
or
are
definitely
must
must
be
be
used
or
the
general
only
not
lead
are
in
the
the
terminals
blue
brown
coloured
be
replaced
used
marked
without
PFAFF
safety
be
coloured
mains
must
black.
must
red.
not
to
as
approved
3
A
fuse
agencies.
notes
connected
according
lead
in
your
be
connected
be
connected
be
used,
complete.
or
with
cover.
on
page
to
the
of
this
appliance
plug,
proceed
to
but
disposed
by
ASTA
the
corresponding
Spare
fuse
2.
safety-lead
to
the
following
the
terminal
to
the
terminal
according
covers
terminal
may
not
as
follows:
which
which
of
immediately.
to
BS
colour
are
available
code:
correspond
is
mar
is
1362
code.
I
nor
to
Page 3
___________
10
-
—11
[
PFAFF
J7
-
I
-
1;
I
I
PFAF:
ptronc6
27
O
--
-
-
-----
35
34
:.
jr
.-
—
4
-
-
—
33
—j
Page 4
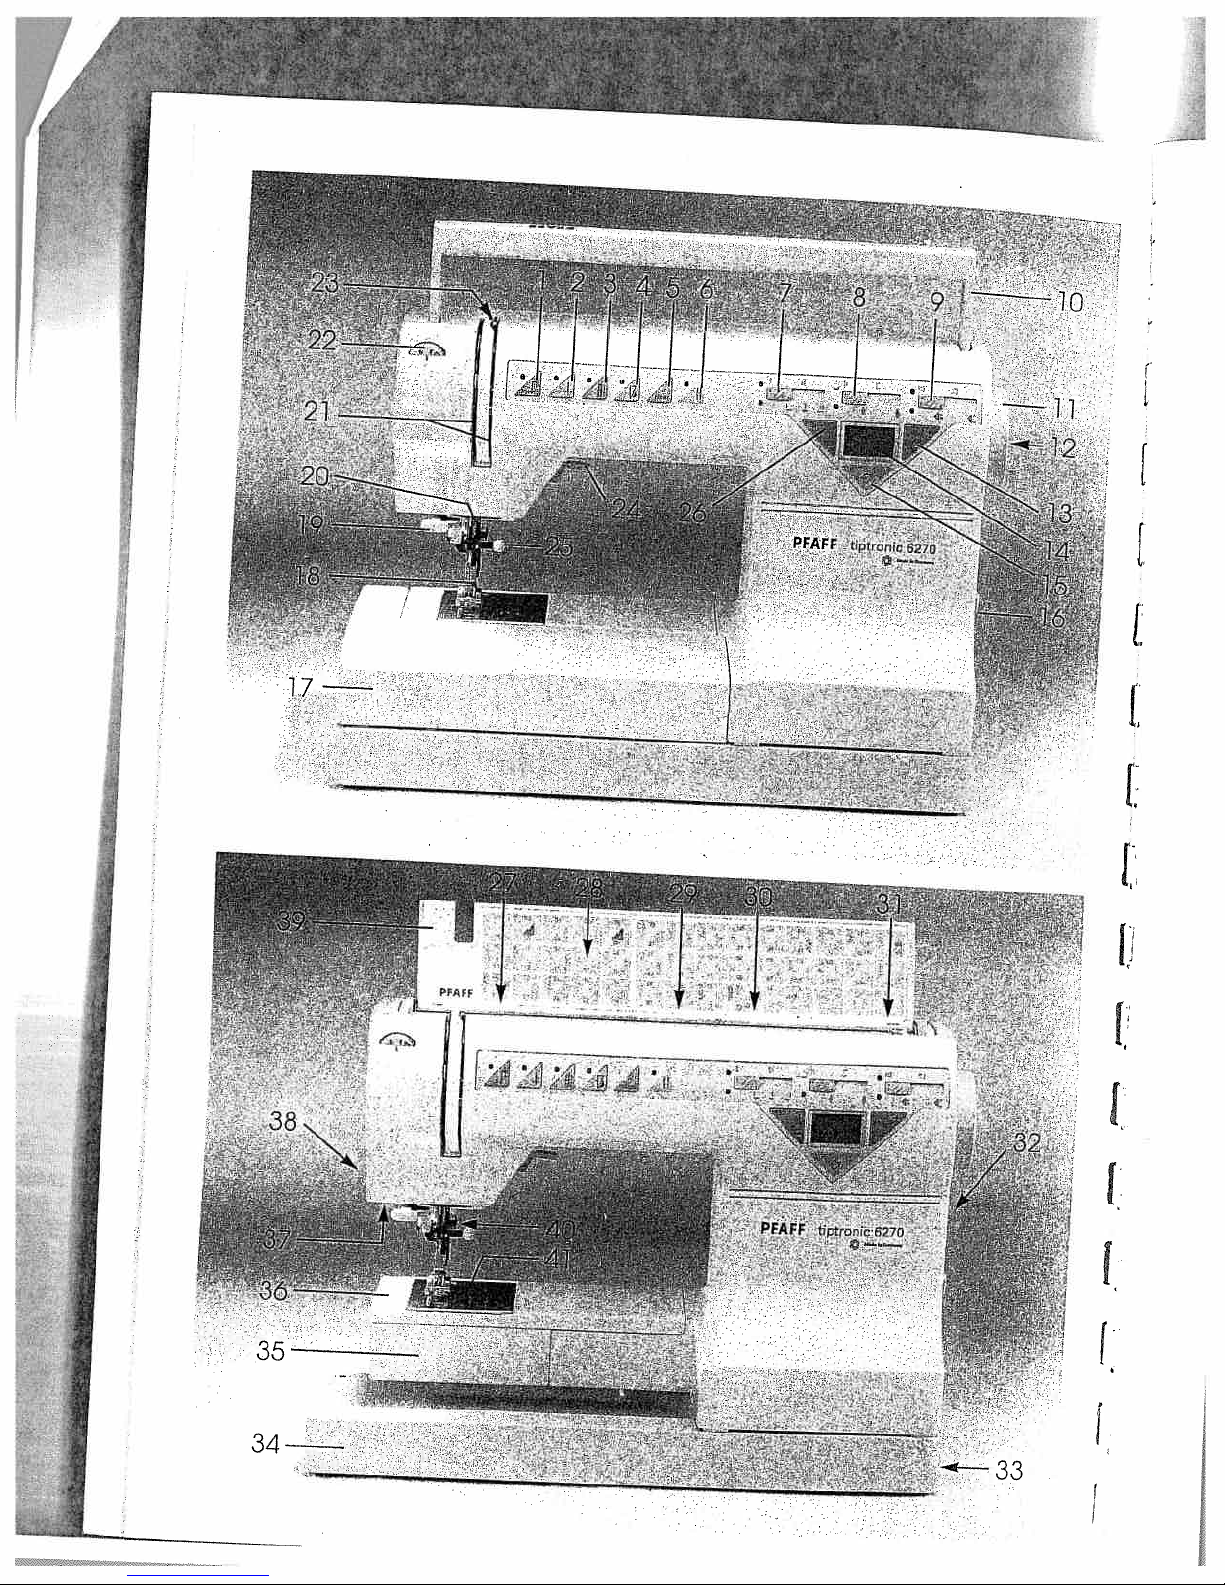
Parts
(1)
(2)
(3)
(4)
(5)
(6)
(7)
(8)
(9)
(10)
(11)
(12)
(13)
(1
4)
(15)Clear
(16)
(1
7)
(18>Sewing
(1
9)
Thread
(20)
(21)
Threading
(22>
Needle
(23>
Take-up
(24)
Presser
(25)
Needle
(26)
Program
(27)
Thread
(28)
Program
(29)
Spool
(30)
Second
(31)
Bobbin
Connection
(32)
Connection
(33)
(34)
Base
(35)
Hook
(36)
Free
(37)
Sewing
(38)
Thread
(39)
Top
(40)
Dual
(41)
Needle
of
Key
for
Key
for
Key
for
Key
for
Clear
key
Twin
needle
Stitch
width
Stitch
length
Balance
Carrying
Handwheel
Handwheel
Program
Liquid
crystal
key
Master
Accessory
Needle
threader
guides
thread
bar
holder
guide
holder
spare
winder
plate
cover
arm
lamp
trimmer
cover
Feed/IDT
plate
the
sewing
“reverse
“needle
“buttonhole/tacking/Single
“slow
slide
handle
keyfor
“beginning
switch
box
foot
slot
lever
lifter
key
table
socket
socket
sewing”
“pattern
indicator
slide
slide
key/pattern
release
display
holder
tension
with
for
tens
for
bobbin
with
spool
system
sewing”
up/down
start”
key/needle
key/buttonhole
length
disk
unitdigits
pattern”
of
with
sewing
set
screw
digits
winding
unwinding
holder
“lead
cord”
“foot
controller”
(top
feed)
position”
disk
machine
pattern”
positions
length/stitch
foot
density
I
I
Page 5

IMPORTANT
For
the
United
When
you
Read
all
instructions
D/LF%IGER
1.
The
sewing
from
the
2.
Always
3.
Do
not
4.
Do
not
in
or
drop
l!ARI\IING
1.
Do
not
or
near
2.
Use
this
recommended
3.
Never
operate
has
been
dealer
or
4.
Never
operate
F
5.
6.
7.
8.
9.
1
0.
11.
1
2.
1
3.
4.
1
1
5.
1
6.
1
7.
Please
sewing
Never
Do
Do
red.
To
Never
Do
Keep
Always
Do
Do
Switch
threading
Always
making
Hold
also
machine
drop
not
use
not
operate
disconnect,
operate
not
unplug
fingers
use
not
use
not
pull
the
unplug
any
plug
observe
States
use
an
machine
electric
unplug
reach
place
into
allow
to
children.
sewing
dropped
service
the
or
insert
out-of-doors.
turn
on
by
away
the
proper
bent
or
push
sewing
needle,
sewing
other
when
rewinding
the
only
electric
before
To
outlet
sewing
for
a
or
store
water
be
machine
by
the
this
sewing
or
center
sewing
and
where
all
a
soft
pulling
from
or
blunt
fabric
machine
changing
user
general
SAFETY
appliance,
using
reduce
should
immediately
machine
sewing
a
sewing
or
other
To
reduce
used
as
only
manufacturer
machine
damaged,
for
examination,
machine
foot
control
any
object
aerosol
controls
surface
on
cord.
all
moving
needle
needles.
while
off
needle,
machine
servicing
into
safety
basic
this
the
risk
never
before
machine
machine
liquid.
the
a
toy.
Close
for
its
or
free
into
(spray>
to
off
such
To
parts.
plate.
The
Use
stitching.
(“0”>
when
threading
from
adjustments
cord
reel.
notes
sewing
of
electric
be
left
after
that
risk
of
intended
as
contained
if
it
has
dropped
with
any
from
any
opening.
products
(O”)
as
a
unplug,
Special
wrong
needles
It
the
electric
Do
on
INSTRUCTIONS
safety
machine.
unattended
using
replacing
has
fallen
where
burns,
attention
a
damaged
into
repair,
air
the
are
position,
bed
or
grasp
plate
recommended
may
making
bobbin,
mentioned
not
page
2.
precautions
shock
and
bulb.
it
can
fire,
is
use
as
in
water.
electrical
openings
accumulation
being
then
couch
the
care
can
deflect
any
outlet
allow
should
when
before
cleaning.
Replace
into
water.
fall
or
electric
necessary
described
this
manual.
cord
Return
or
mechanical
blocked.
used
remove
where
plug,
not
is
required
cause
the
needle,
adjustments
or
changing
when
removing
in
the
plug
to
always
plugged
bulb
Unplug
be
pulled
shock,
when
in
this
or
plug,
the
appliance
Keep
of
lint
dust
or
where
plug
the
air
the
cord.
around
the
needle
by
the
manufacturer
causing
in
the
presser
instruction
whip
when
be
in.
Always
with
same
immediately.
into
a
or
injury
this
sewing
manual.
if
it
is
not
adjustment
ventilation
and
oxygen
from
outlet
openings
the
sewing
to
it
needle
foot
covers,
manual.
rewinding.
adhered
unplug
type
tub
or
to
persons:
machine
Use
working
to
the
nearest
openings
loose
is
being
may
break
only.
to
break.
area,
etc.
lubricating,
to
as
this
rated
sink
only
attachments
properly,
cloth.
administe
be
blocked.
machine
such
or
follows:
appliance
1
5
watts.
Do
not
is
used
authorized
of
needle.
as
when
the
place
by
if
it
SAVE
This
sewing
machine
is
designed
and
manufactured
THESE
for
HOUSEHOLD
INSTRUCTIONS
use
only.
1
Page 6

Notes
on
safety
1
11.
1
8.
9.
0.
2.
Notes
nes
IEC
3.
4.
5.
6.
7.
To
open
inside
repair.
of
Be
The
supply
+1—10
+1-4
on
in
accordance
60
335-2-28
1.
The
user
with
ment
observe
2.
When
during
replacing
ries,
always
from
the
plug.
The
maximum
sewing
The
tension
adjusted
The
machine
accordance
specification
Do
not
the
machine.
Do
not
—
there
—
its
function
—
it
is
wet
can
occur
brought
Do
not
this
than
is
wrongly
liability
pull
by
appliance
socket
If
pose
it
any
avoid
the
the
Repairs
our
qualified
sure
to
machine
with
%
%.
safety
must
regard
to
of
the
needle
the
sewing
leaving
maintenance
mechanical
disconnect
mains
lamp
is
of
by
a
must
with
plate.
insert
any
use
the
is
visible
is
e.g.
with
when
into
a
the
mains
its
cord.
that
for
operated,
for
any
the
risk
machine.
machine
are
service
use
only
is
designed
a
nominal
and
a
rated
for
household
with
exercise
the
up
and
area
the
machine
by
pulling
permissible
1
5
watts.
the
drive
PFAFF
mechanic.
be
operated
the
indications
objects
sewing
damage
disturbed
condensation
a
cold
warm
room.
plug
is
used
for
which
we
damage
of
electric
There
which
solely
the
staff.
original
voltage
frequency
EN
60
335-2-28
adequate
sewing
and
down
must
while,
unattended,
work
or
parts
or
the
out
wattage
belt
must
into
openings
machine
machine
out
of
another
it
is
intended
cannot
caused.
shock,
are
no
parts
the
user
responsibility
PFAFF
for
a
mains
of
caution
move
constantly
sewing.
when
accesso
machine
the
mains
for
only
in
on
if:
which
is
the
pur
or
accept
do
not
can
parts.
of
machi
the
be
the
on
if
and
Environment
The
Ambient
Humidity
Storage
The
interference;
near
broadcasting
This
nic-mechanical
supervised
subjected
static
chemicals
For
be
firm
Care
Always
which
ped.
Cleaning
Housing
To
clean
lint-free
soft
cloth
Please
Do
not
ducts
the
housing.
1
3.
When
outer
controlled
85
°C.
therefore
damage.
recommended
temperature
temperature:
machine
electronic
sewing
to:
electricity,
or
ventilation
operated
and
horizontal.
of
the
protect
may
be
and
the
cloth.
with
note!
use
any
such
as
used
components
foot
Constant
not
20
%
to
is
suppressed
however,
devices
transmitters
machine
device.
use
in
the
dust
heat-radiating
liquids.
purposes
on
an
machine
the
machine
caused
display
housing,
To
remove
alcohol.
insecticides
petrol
or
properly,
of
control
use
permitted
environment
1
0
80
°C
%
—25
it
should
such
etc.
is
a
high-quality
It
is
home.
dampness,
the
open
surface
by
it
being
use
only
any
or
liquid
the
temperature
a
non-electronically
can
reach
at
a
low
speed
in
order
to
is:
to
40
°C
°C
+60
to
and
as
immune
not
be
radios,
°C
electro
a
machine
It
should
direct
objects,
machine
for
not
sunlight
corrosive
must
which
from
damage
hit
or
drop-
a
clean,
stubborn
chemical
chemicals
dry,
dirt
pro
to
up
to
is
avoid
to
operated
TVs,
PCs,
be
only
is
both
soft,
use
clean
of
the
a
2
Page 7
Modern,
—
Computerized
Congratulations!
You
have
that
offers
Your
new
material
through
ft
features
technology,
just
sewing
If
you
the
instruction
wrong.
After
the
things
make
If
you
no
problem!
in
thick
the
as
uncomplicated
machine.
now
all,
this
the
full
use
have
any
uncomplicated
bought
unique
sewing
its
stride
and
very
and
take
book,
is
the
machine
of
further
high-quality
a
advantages.
machine
and
thin
latest
this
instruction
time
enough
nothing
only
them.
for
as
way
can
questions,
sewing
can
take
will
sew
you.
in
design
book
your
PFAFF
to
study
can
to
learn
do,
and
—
product
any
and
go
all
to
that
is
is
Your
PFAFF
with
any
So
now
you
many
your
fashion
dealer
help
you
can
enjoyable
ideas.
or
advice
get
will
started!
hours
be
you
at
of
your
need.
We
service
wish
creating
3
Page 8
i&
Index
Accessories
Accessory
Adjusting
Alphabet
Appliqués
Appliquefoot
Applying
Automatic
Balance
Balance
Bartack
Basting
Bias
tape
Blind
Bobbin
Bobbin
Bobbin
Bobbin
Bobbin
Borders
Braces
Buttonhole
Buttonholes
Buttonhole,
Buttonhole
Buttonhole,
Buttonhole/tacking/single
Carrycase
Changing
Changing
Changing
Cleaning
Clear
key
Closed
Closed
Combined
Cording
Couching
Cross
Cross
Darning
Darning
Darning
Darning
Decorative
Detachable
Dual
4
overlock
overlock
hem
stitch
tears
with
with
Feed
slide
patches
darning
slide
stitch
binder
stitch
case
thread,
thread
winding
winding
balance
fully
with
programmable
a
sewing
the
needle
the
needle
and
oiling
borders
foot
foot
stitch
zigzag
straight
stitches
work
compartment
support
and
needles
keys
key
raising
tension
through
automatic
gimp
foot
stitch
stitch
stitch
stitch
thread
plate
with
the
the
needle
pattern
edge
thread
,
81—101
1
19—21
85,
64—67’
114
73—75
74,
1
29,
30
03—il
37—40
54+74
11
23,
89
66
65
67
65
36
16
28
31
124
1
24
36
60
61
85
11
3
63
87
75
75
8
Page
92
ioi
75
40
37
54
51
53
23
27
24
22
86
1
90
2
9
8
Page 9

Index
Elastic
Electrical
Electronics
Embroidery
Embroiderytechniques
J
Explanation
Eyelet
embroidery
Eyelets
Fagoting
Fancy
elastic
Faults
Felling
foot
Foot
control
Free
arm
Fringe
foot
Function
Gathering
Gathering
Handwheel
Hemstitching
Hem
with
Honeycomb
Inserting
Inserting
Knit-edge
Lacework
Large-area
Leather
Left
Lightbulb
Light
Linen
Lowering
Maintenance
Master
Monograms
Needle
Needle
Needle
Needle
Needle
embroidery
needle
knit
embroidery
switch
chart
positions
thread
threader
up/down
stitch
connection
stitch
for
stitch
stitch
keys
with
with
release
the
twin
stitch
the
bobbin
zippers
foot
embroidery
position
mending
the
feed
and
tension
programs
sewing
elastic
straight
disk
needle
stitch
dog
sewing
position
recommendations
threads
stitch
faults
table
1
33—45
81—101
98,
36,
95—97
76,
111
38,
125
32
121—126
1
91
118,119
38
68
26
36
6,
11
77
79
87
88
68
63
93
7
Page
50
99
56
62
62
1
26
1
09
1
18
37
71
70
1
9
69
sg
24
59
1
10
7
3
7
5
Page 10
index
Oiling
Open
appliqué
Open
overlook
Overlock
Pattern
Pattern
Pattern
Pattern
Pattern
Pintuck
Plain
stem
Practical
Presser
Program
Program
Pullover
Quilting
Quilting
Reverse
Richelieu
Right
Roll-hemming
Ruffler
Safety
Seam
Semiautomatic
Serging
Serging
7/9
Sewing
Sewing
Sewing
Sewing
Sewing
Sewing-function
Sewing
Sewing
Sewing
Shell
Shirring
Single
Slow
Smocking
Special
Stitch
Stitch
6
needle
notes
finishing
with
with
hole
aids
chart
faults
feet
feet
lamp
on
with
edging
foot
pattern
sewing
effect
accessory
density
length
sewing
foot
stitches
length
sequence
sequence
start
(clear
width
foot
stitch
sewing
bar
lifter
keys
unit
keys
tens
stitch
and
patchwork
position
stitches
processing
the
zigzag
and
(special
(standard
keys
buttons
zigzag
table
foot
stitch
memory
key)
digits
digits
overlook
stitch
their
remedies
accessories)
accessories)
stitch
.
foot
foot
Page
124
117
60
60,
61
40
41
47-80
100,
38,
57—63
52.
126
108
36,
1
111
36
72
108
39
39
112
114
68
50
37
25
55
52
80
36
—45
110
101
11
36
94
68
78
66
53
52
27
37
37
61
I
38
58
ci
37
36
I
5
ii
ti
key
of
2nd
tack
(buttonhole)
106,107
I
Page 11
Index
Fi’
I
r
r
-
I
Zigzag
Stitch
Stitch
Stitch
Straight
Stretch
Stretch
Stretch
Suspenders
Tacking
Technical
Thread
Thread
Thread
Threading
Threading
Threading
Top
cover
Top
feed
Topstitching
Twin
needle
Twin-needle
Twin
needle
Utility
and
Utility
stitches
Utility
stitch
Winding
stitch
length
width
width
stitch
buttonhole
triple
triple
section
spool
tension
cutter
the
the
indicator
decorative
table
from
slide
slide
straight
zigzag
needle
sewing
cording
a
second
key
key
stitch
stitch
thread
machine
foot
stitches
spool
holder
23,
69,
47—80
51
1
3—32
24,
11
36
—56
8,
21
Page
37
38
37
51
67
57
58
89
36
20
32
27
25
25
24
16
30
68
86
6
9
52
7
Page 12
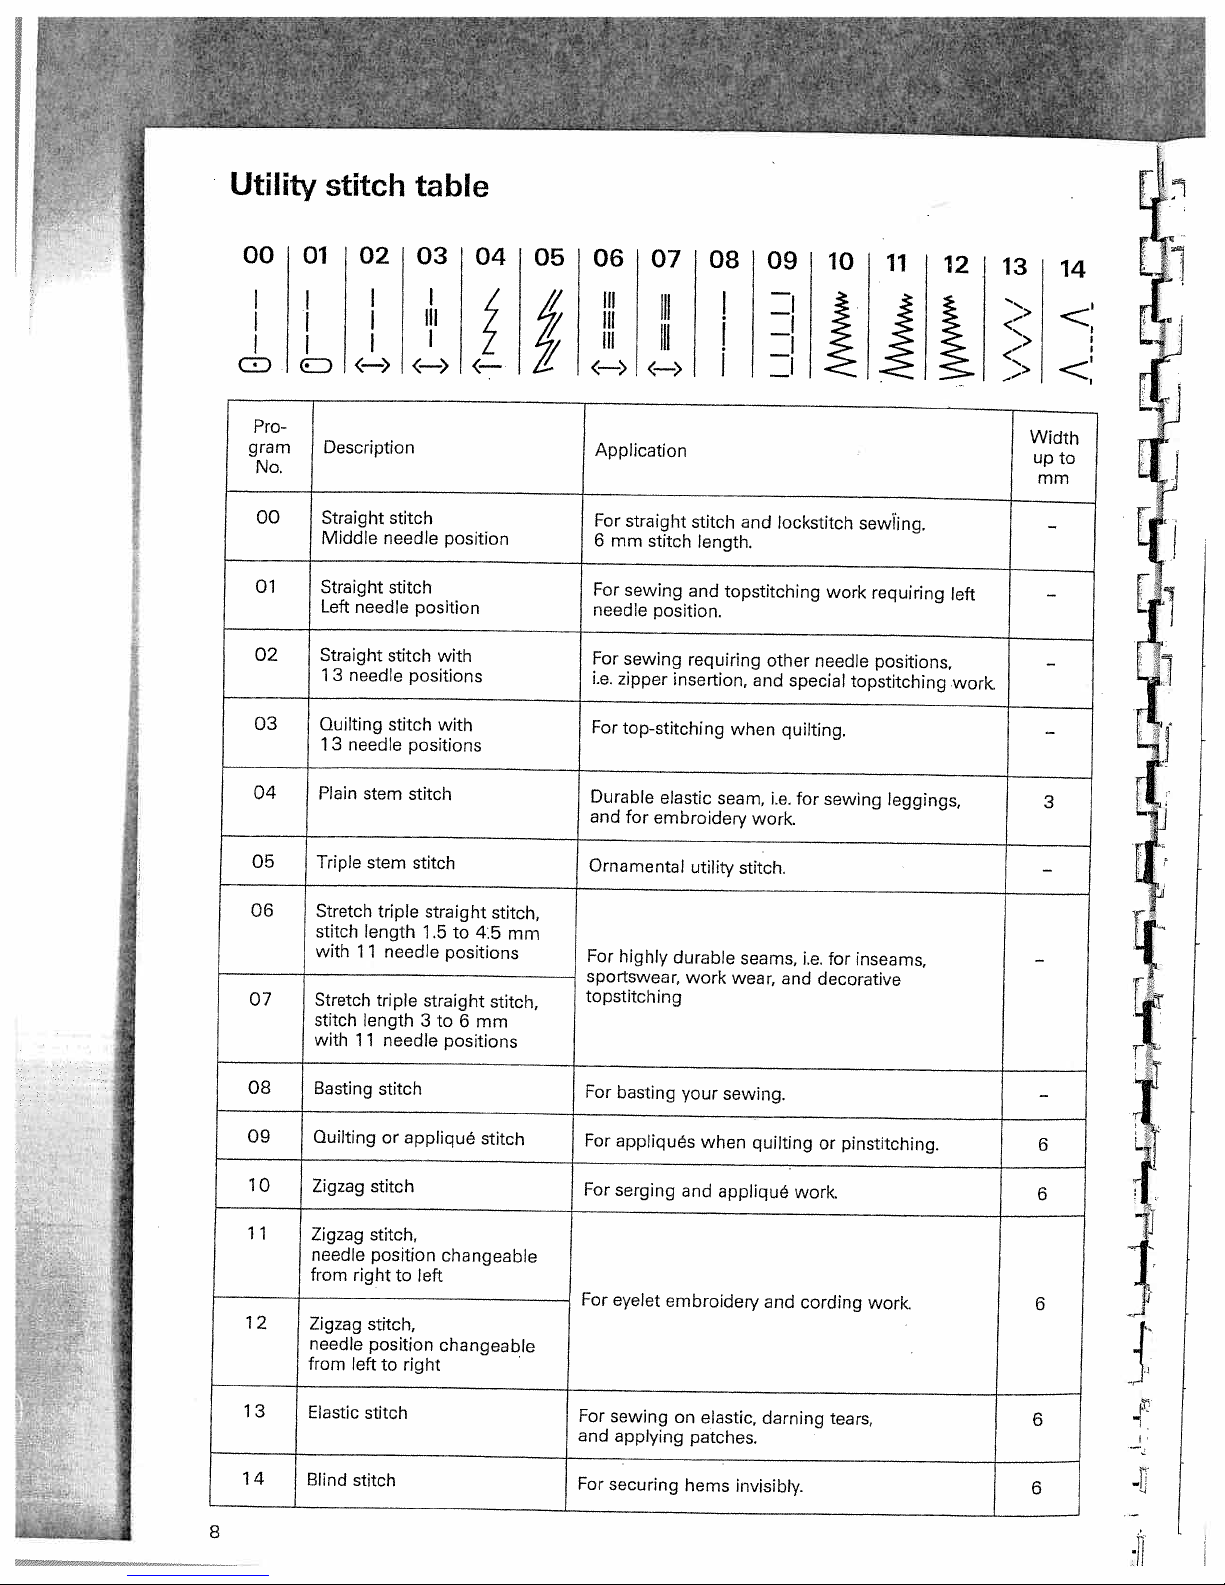
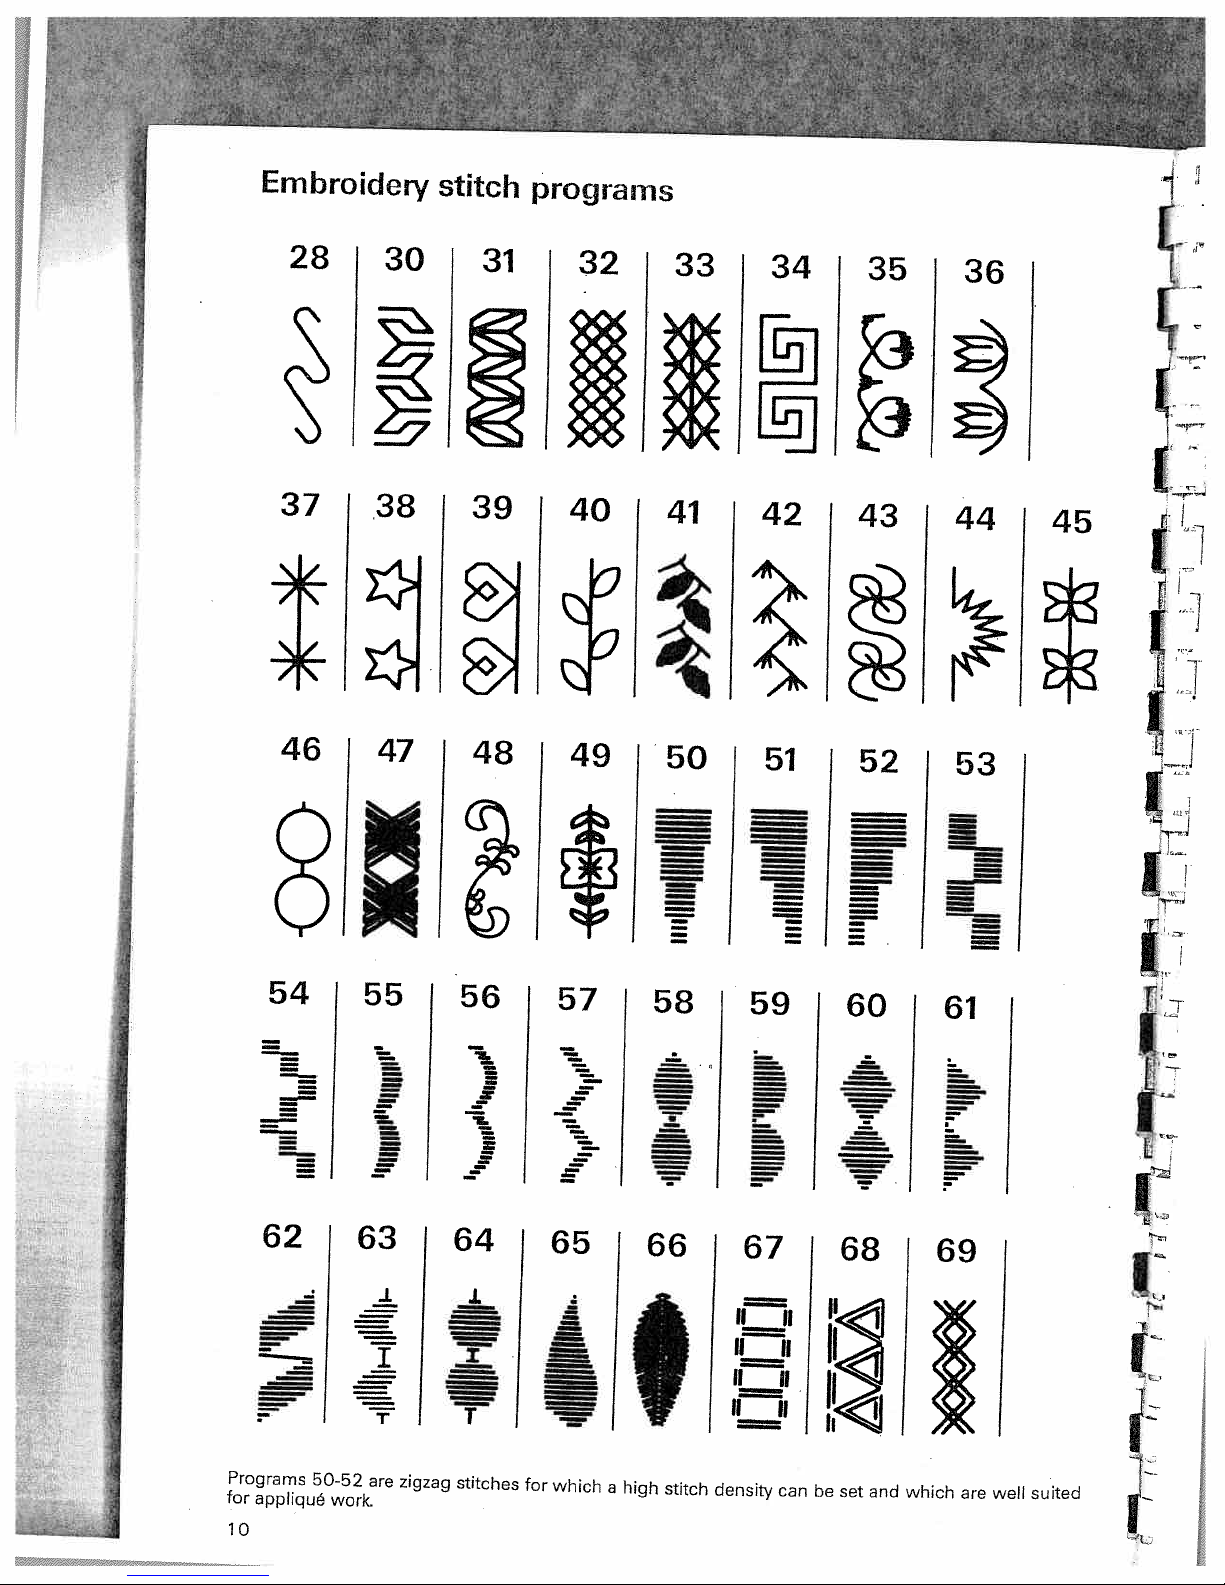
Utility
stitch
table
000102l03
‘
I
I
I
I
J
Pro
gram
No.
00
01
02
03
04
i
El)
I
Description
Straight
Middle
Straight
Left
Straight
1
Quilting
1
Plain
GD
I
3
3
I
needle
needle
needle
stem
I
<—>
stitch
needle
stitch
position
stitch
positions
stitch
positions
stitch
1
III
I
position
with
with
05O6l07lO8I09
‘
,,,
Application
For
6
For
needle
For
i.e.
For
Durable
and
IA
III
I
III
ill
I
<—>
straight
mm
stitch
sewing
position.
sewing
zipper
top-stitching
elastic
for
embroidery
I
i
I
I
I
stitch
length.
topstitching
and
requiring
insertion,
seam,
I
I
and
and
when
work.
:‘
I
lockstitch
other
needle
special
quilting.
i.e.
for
10
sewling.
work
topstitching
sewing
requiring
positions,
leggings,
left
work.
13!
—>
>
Width
up
mm
—
—
3
14
to
—
—
05
06
07
08
09
1
1
1
2
1
3
Triple
stem
stitch
Stretch
stitch
with
Stretch
stitch
with
Basting
Quilting
Zigzag
0
1
Zigzag
needle
from
Zigzag
needle
from
Elastic
length
1
1
triple
length
1
1
stitch
stitch,
position
right
stitch,
position
left
stitch
triple
needle
needle
stitch
appliqué
or
to
right
to
straight
to
1
.5
positions
straight
to
3
6
positions
changeable
left
changeable
stitch,
45
stitch,
mm
stitch
mm
Ornamental
For
highly
sportswear,
topstitching
For
basting
For
appliqués
For
serging
For
eyelet
For
sewing
and
applying
utility
durable
work
wear,
your
sewing.
when
and
appliqué
embroidery
on
elastic,
patches.
stitch.
seams,
quilting
and
darning
i.e.
and
work
cording
for
inseams,
decorative
or
pinstitching.
work
tears,
—
—
I
—
6
6
6
6
1
4
Blind
stitch
8
For
securing
hems
invisibly.
6
Page 13

Utility
stitch
table
ii
Pro-
gram
No.
1
5
1
6
1
7
1
8
1
9
16
17
:>
I
<‘i
:>
Description
Elastic
blind
Shell-edging
Blind
stitch
Fancy
elastic
Stretch
triple
18
ii
I(
stitch
stitch
stitch
zigzag
19
I
II
I
20
Application
For
edge
For
i.e.
For
Needle
For
of
For
21
22
I
17=1
I
171
=i
i
I
securing
at
the
decorative
for
lingerie.
securing
position
over-stitching
fabric.
sewing
elastic
hems
same
hems
hems
changeable
23
invisibly
time.
on
invisibly.
two
butt-joined
onto
24
Also
light
stretch
and
for
fabrics,
to
the
fabrics.
25
serging
stretch
right
ayers
I
26
an
fabrics.
27
I
29
IllIflilli
HhIIll
1111111111
I
11111111
I!
Width
up
to
mm
6
6
6
6
6
26
27
24
25
20
21
22
23
Open
overlock
Closed
with
Light
Pullover
Honeycomb
Closed
Fagoting
Cross
overlook
edge
knit
overlock
hem
thread
patchwork
stitch
stitch
stitch
stitch
stitch
stitch
stitch
stitch
For
simultaneously
edges
For
simultaneously
several
comes
For
sewing
Also
as
For
simultaneously
seam
edges
For
sewing
cloth
seams
Seaming
For
joining
butt-joined
Flat
joining
Also
suitable
of
firm
fabric
close
light
fancy-stitch
a
on
on
and
and
corsetry
fabric
seam
as
materials.
layers.
an
industrial
to
knit
open
elastic
for
finishing
layers.
for
fancy
a
seaming
seaming
An
overlook
fabrics.
seam
seaming
knits.
threads,
fancy
on
parts
and
elastic
hem.
and
and
seam.
on
knitted
and
covering
hems.
fabrics
for
butt-joined
finishing
finishing
seam
finishing
that
over-stitching
that
fabrics.
terry
fray
seams.
seam
one
easily.
6
or
6
r
I
r
6
6
6
6
,
6
6
29
Darning
program
To
small
reinforce
holes.
damaged
areas
or
darn
to
6
9
Page 14
rn
co
0
0
C)
cJ,
r..
P.
C)
-I
0
C’s,
_____________
_____________
CA)%Z%,J
C)
00
i;t
ILEL.
C;,
C1
c2
Co
c*5
01
C)
C.1
pp
%J
co
(0
€(*
i511L51’
rY
J
6j
01
0
1111
“i’I”IIIIIIIIlIII
(.1
Co
iiiiiiiiiiiII1Ill
C;1
CD
C)
(7!
k)
tII’jI’
4
[
c—4
J
.-
!
cji
01
-*
(‘3
—-L
—
-
——4-
“m’I”31’ol’h’m
-
0)
III
11111111
hII1(tl,fttIIIIIljIIP’
C)
(A)
0)
11111
Is,.)
,-
‘lItliii.
.“lII”J
CD
-
—
o
..1I1IllhI1,_.411111111
“IIItIIII”IIIIIIlIi’,
0)
II1IIIIH*—
0)
a.
‘idllflllfIIIIIi’u”
‘IjIIIjIIIIr’IIIIfI,fl;r
0)
=
=
=
=
1=
=
=
=
“IIIII”lIIIl”
.IqIIIIIIIrI9IIIIlII.
1
-
F1
p1:
ic
r
Page 15
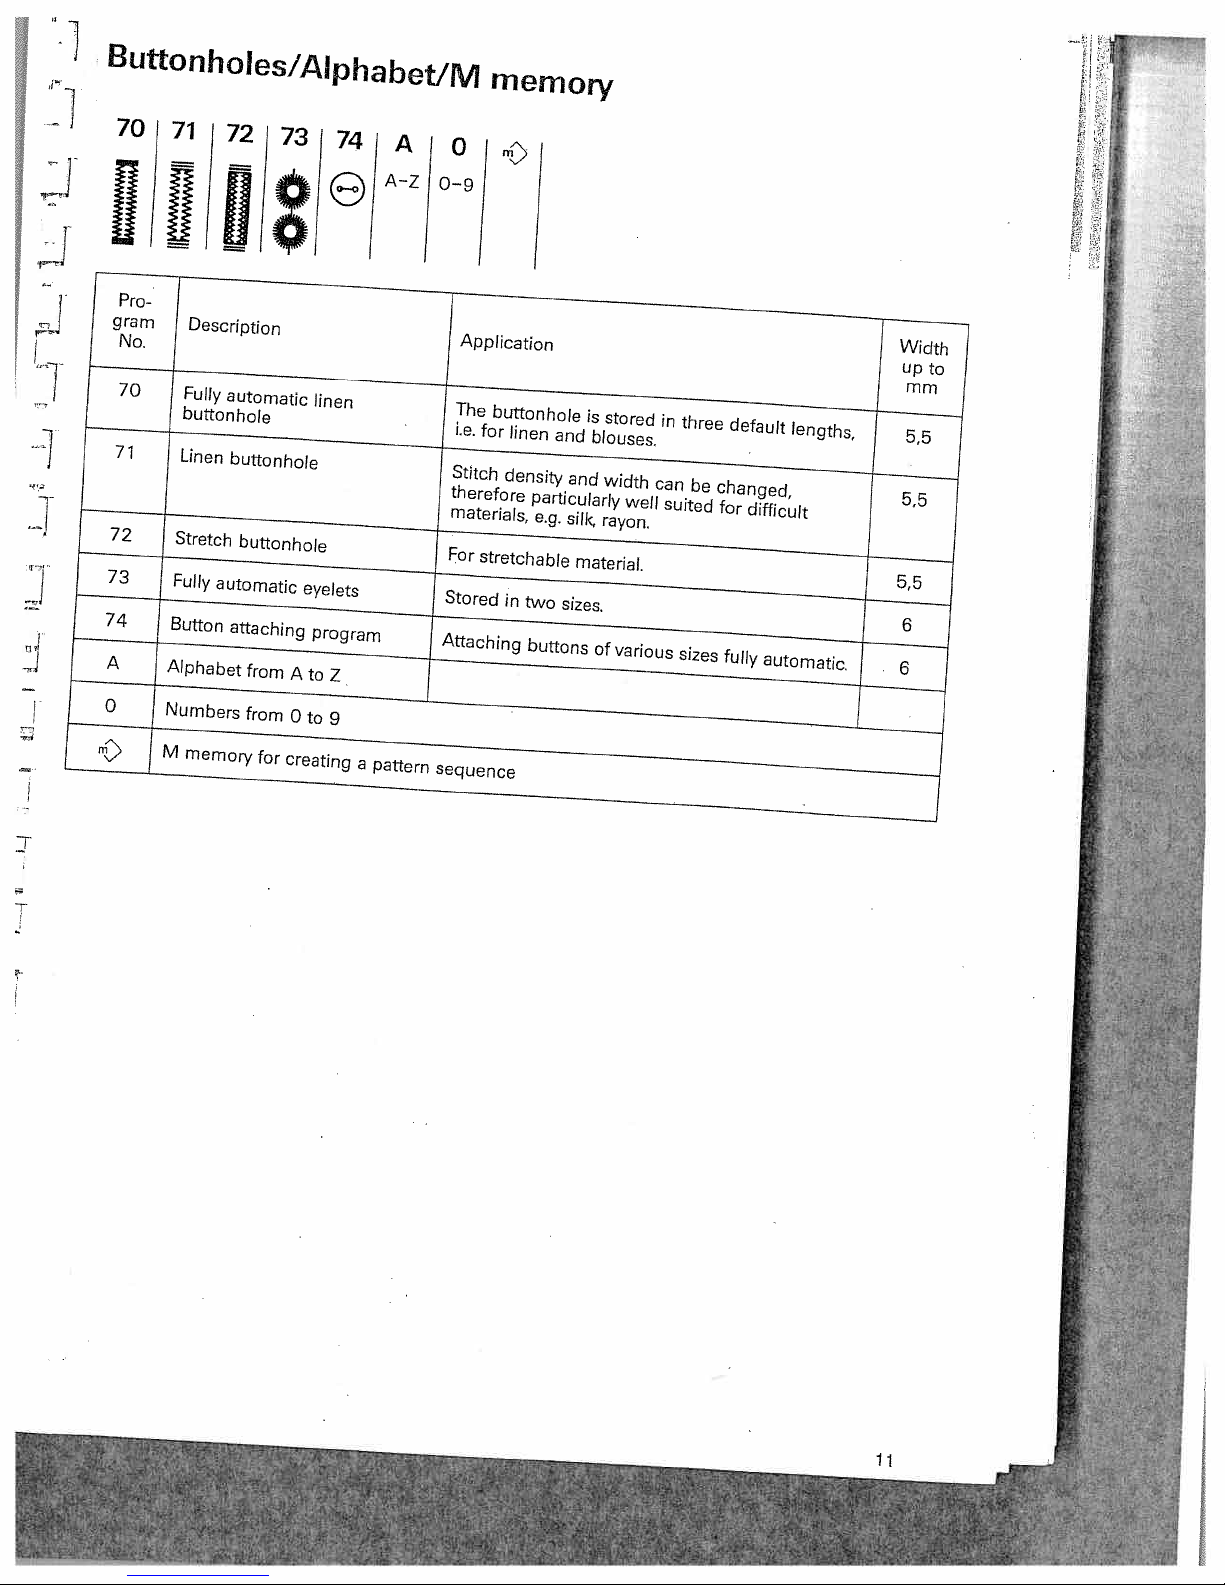
Buttonholes/iUphabetlM
70
71
72
73
74
A
memory
0
H
Pro-
gram
No.
70
71
72
73
74
A
0
m
Description
Fully
buttonhole
Linen
Stretch
Fully
Button
Alphabet
Numbers
M
memory
fl8t9
automatic
buttonhole
buttonhole
automatic
attaching
from
from
for
linen
eyelets
program
A
to
0
to
creating
Application
The
buttonhole
i.e.
for
linen
Stitch
density
therefore
materials,
For
stretchable
Stored
in
two
Attaching
Z
9
a
pattern
sequence
is
and
blouses.
and
particularly
e.g.
silk,
material.
sizes.
buttons
of
stored
width
well
rayon.
various
in
can
suited
three
be
sizes
default
changed,
for
difficult
fully
automatic.
lengths,
Width
up
mm
5,5
5,5
5,5
6
6
to
4
I
Yêc
11
Page 16
V.
--
•V.)
.•
•
Page 17

section
Tech,ijcat
C’,
CD
z
:,-
—
crz
0,
CD
(00
Co
0
0C
()
Page 18
Contents
tJ
i
Ji
:i
zr
PIAFF
d
3
bptronc
6270
I
—
—
Electrical
Detachable
Bobbin
Bobbin
the
needle
Bobbin
Bobbin
Threading
Needle
Presser
Drawing
Thread
Changing
Dual
feed
Changing
Needle
Lowering
connection
winding
winding
case
thread
the
threader
foot
up
the
trimmer
the
(IDT)
the
thread
the
work
tension
needle
lifter
bobbin
sewing
needle
tension
feed
Support
through
thread
foot
dog
thread
Pages
Page
Pages
Page
Page
Page
Page
Page
Page
Page
Page
Page
Pages
Page
Page
Page
18
22
23
24
25
25
27
27
27
28
29,
31
32
32
16,17
19—21
30
15
Page 19
4
I
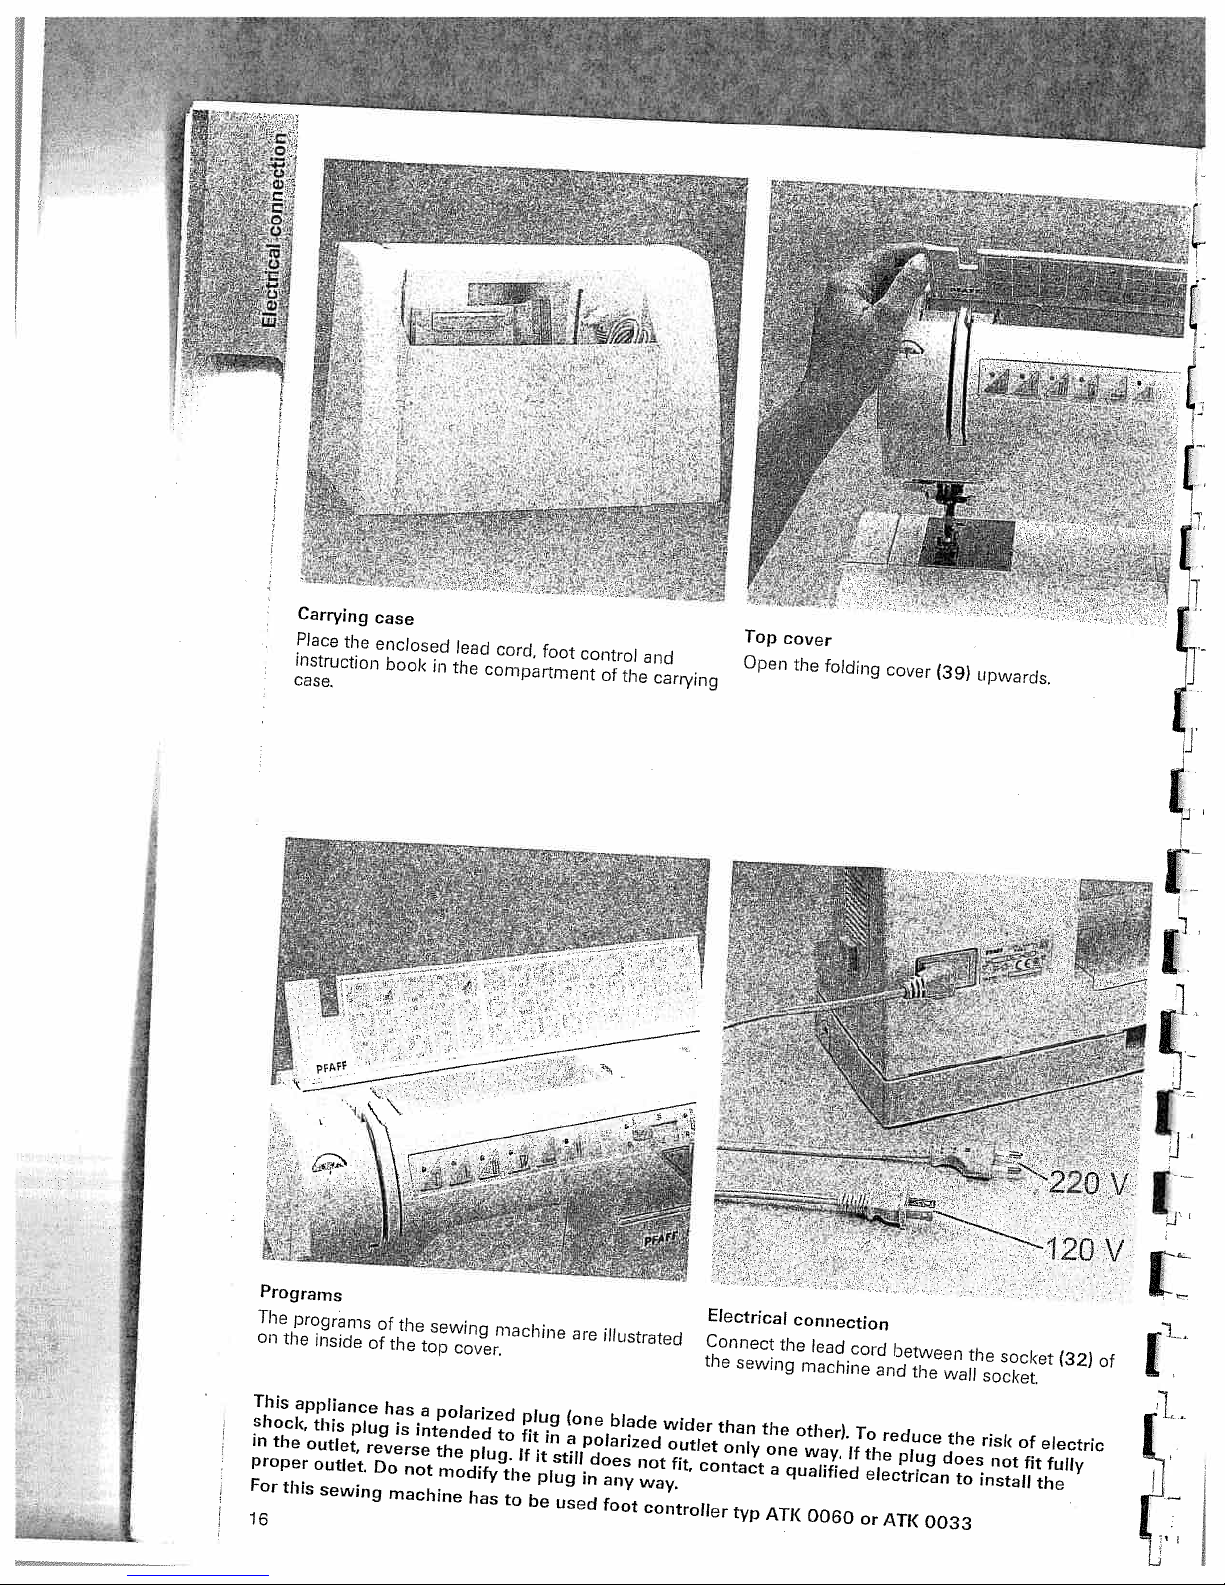
Carrying
Place
the
instruction
case.
case
enclosed
book
lead
in
the
cord,
foot
compartment
control
of
the
and
carrying
Top
Open
cover
the
folding
cover
(39)
upwards.
(frJI
Programs
The
programs
on
the
inside
This
appliance
shock,
in
proper
For
16
the
this
outlet
outlet
this
plug
sewing
of
the
of
the
has
is
reverse
Do
not
machine
sewing
top
cover.
a
polarized
intended
the
modify
plug.
has
machine
plug
to
fit
If
it
the
plug
to
be
in
still
used
are
(one
a
polarized
does
in
illustrated
blade
wider
not
any
way.
foot
controller
outlet
fit,
Electrical
Connect
the
sewing
than
only
contact
typ
connection
the
the
one
a
qualified
ATK
lead
machine
other).
way.
0060
cord
and
To
reduce
If
the
electrican
or
ATIK
—
between
the
plug
0033
wall
the
does
to
the
socket.
risk
not
install
-220
socket
of
fit
the
120
(32)
electric
fully
V
V
of
Page 20
J
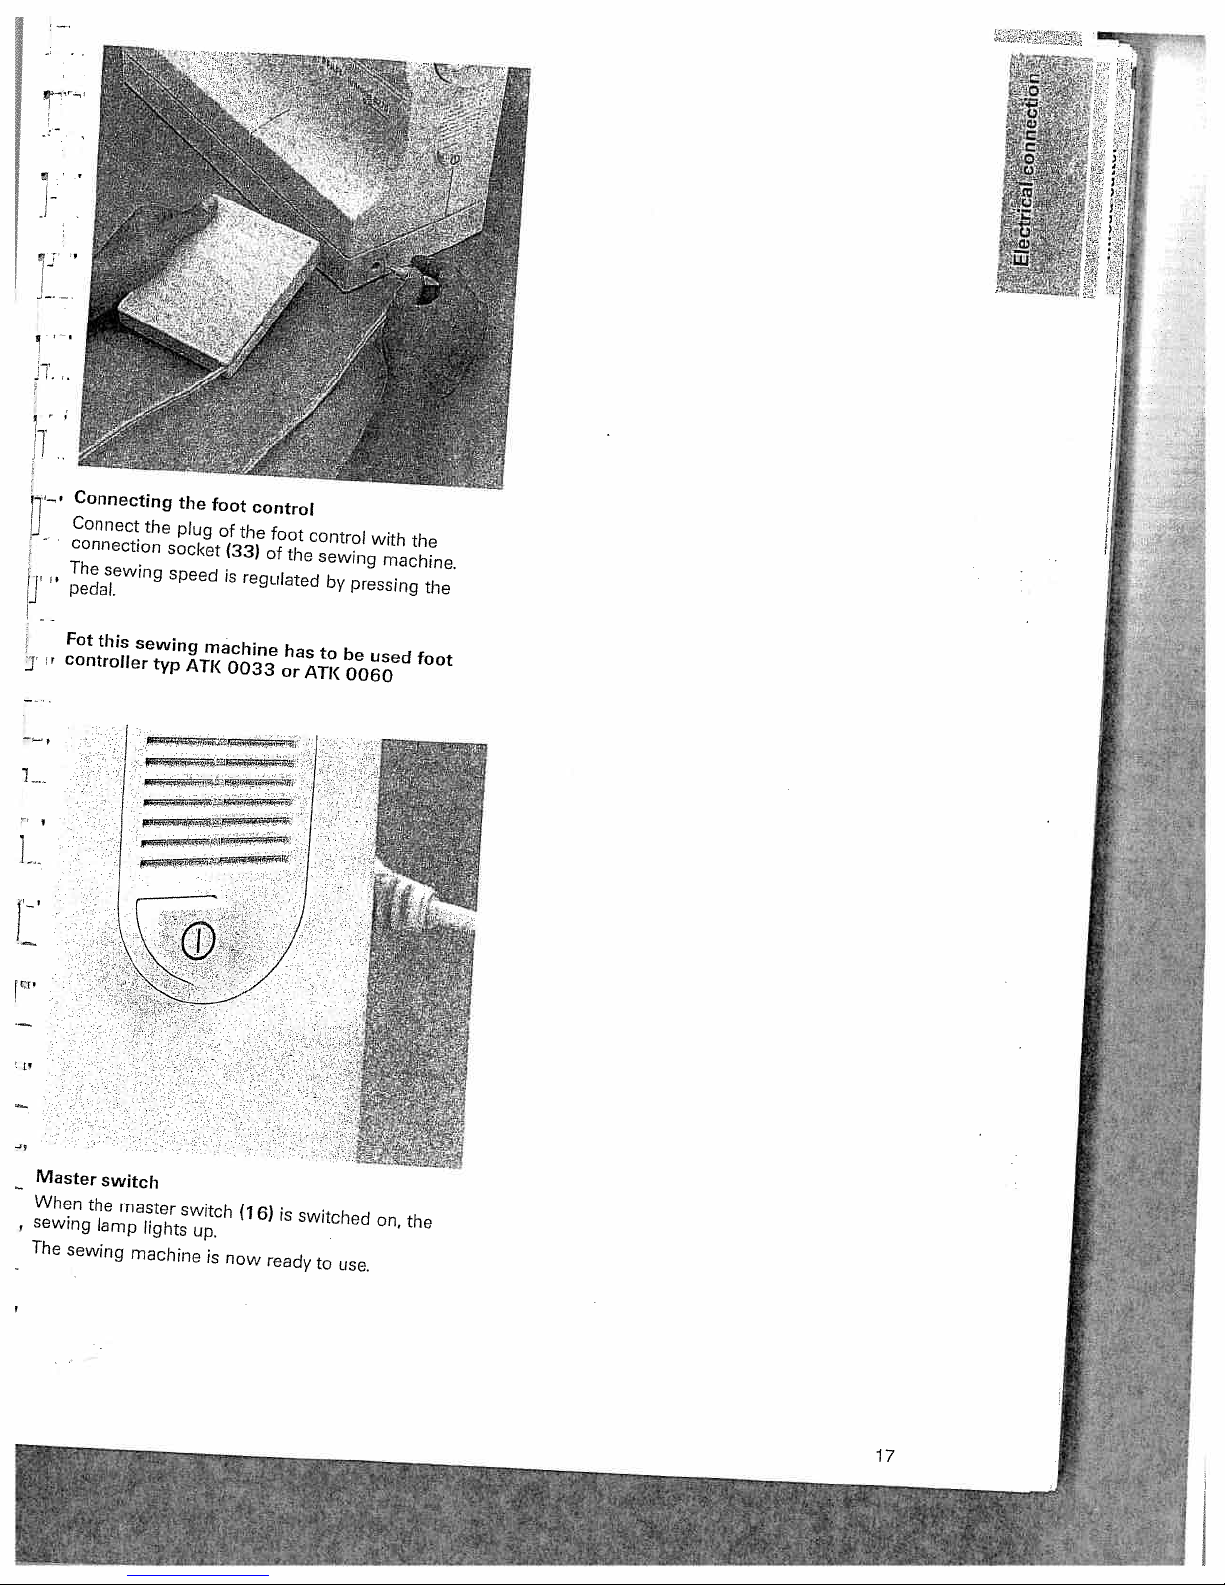
Connecting
Connect
connection
The
sewing
pedal.
Fot
this
controller
the
socket
speed
sewing
typ
the
plug
ATK
foot
of
the
(33)
is
regulated
machine
0033
control
foot
of
the
has
or
control
sewing
by
to
ATI(
with
pressing
be
used
0060
the
machine.
the
foot
Master
When
sewing
The
switch
the
lamp
sewing
master
lights
machine
switch
up.
is
(1
now
6)
ready
is
switched
on,
the
to
use.
17
Page 21
.
‘7
0.
0.-C
c
0..
r
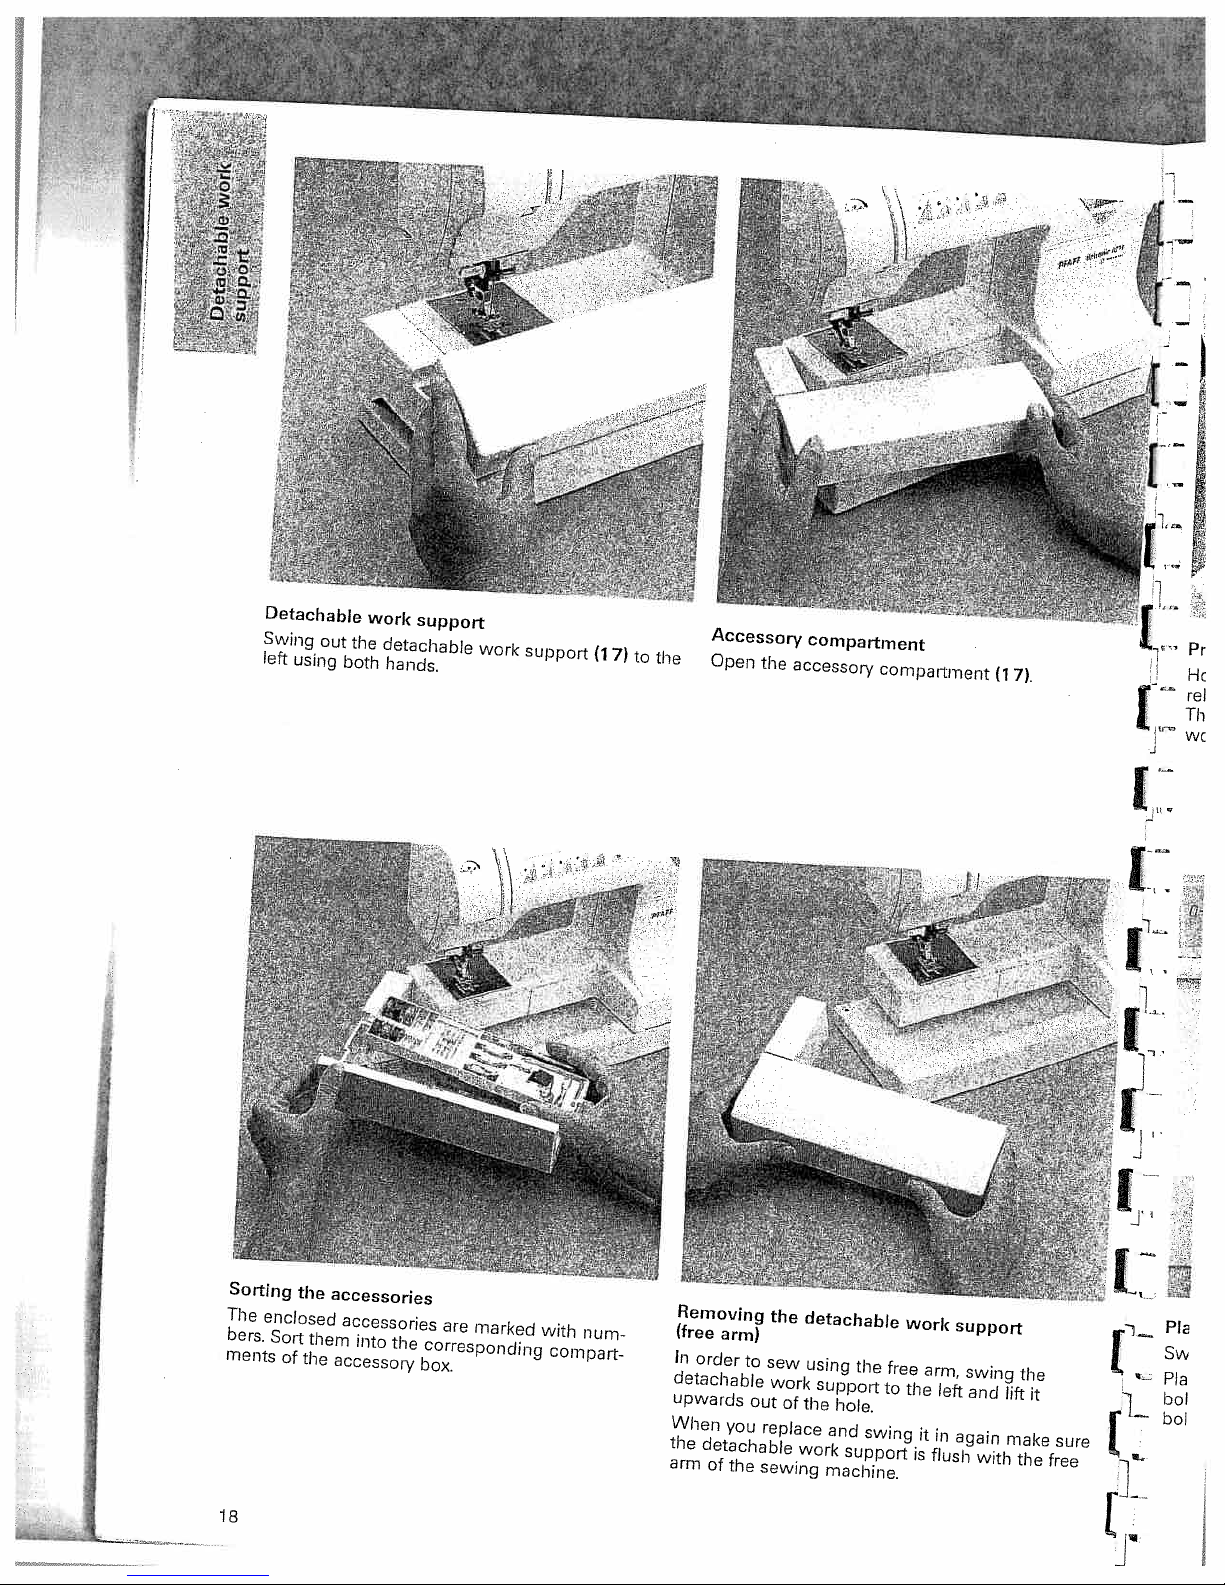
Detachable
Swing
out
left
using
work
the
both
support
detachable
hands.
work
V
support
Accessory
(1
7)
to
the
Open
the
accessory
compartment
compartment
Pr
(1
7).
Hr
rel
Th
wc
U
Sorting
The
bers.
ments
18
the
enclosed
Sort
them
of
the
accessories
accessories
into
the
accessory
L
are
marked
corresponding
box.
with
compart
num
Removing
(free
arm)
In
order
detachable
upwards
When
the
detachable
arm
of
you
the
to
out
sewing
the
sew
work
of
replace
work
detachable
using
the
support
the
hole.
and
support
machine.
free
to
swing
work
arm,
the
it
is
left
in
flush
support
swing
and
again
with
the
lift
make
the
—
Pla
Sw
—
it
sure
free
Pla
bol
bol
-j*
Page 22

.‘
—
Preparing
Hold
the
release
The
needle
wound.
the
handwheel
disk
(1
will
machine
fully
2)
not
(11)
in
move
for
firmly
the
while
bobbin
and
direction
the
winding
turn
of
bobbin
the
the
arrow.
is
being
C)
•
0•
£0
Placing
Switch
‘
Place
bobbin
I
bobbin.
the
off
the
winder
bobbin
the
empty
master
bobbin
(31)
switch.
snaps
so
that
into
the
the
black
slot
pin
of
the
Push
the
bobbin
Note:
The
the
of
bobbin
to
the
right
can
to
only
the
be
right
wound
if
it
is
moved
fully
19
Page 23
fr
A
11
;
.
PFAFF
i...
-
-i
.
,,-,,
.,
‘4
.
----—
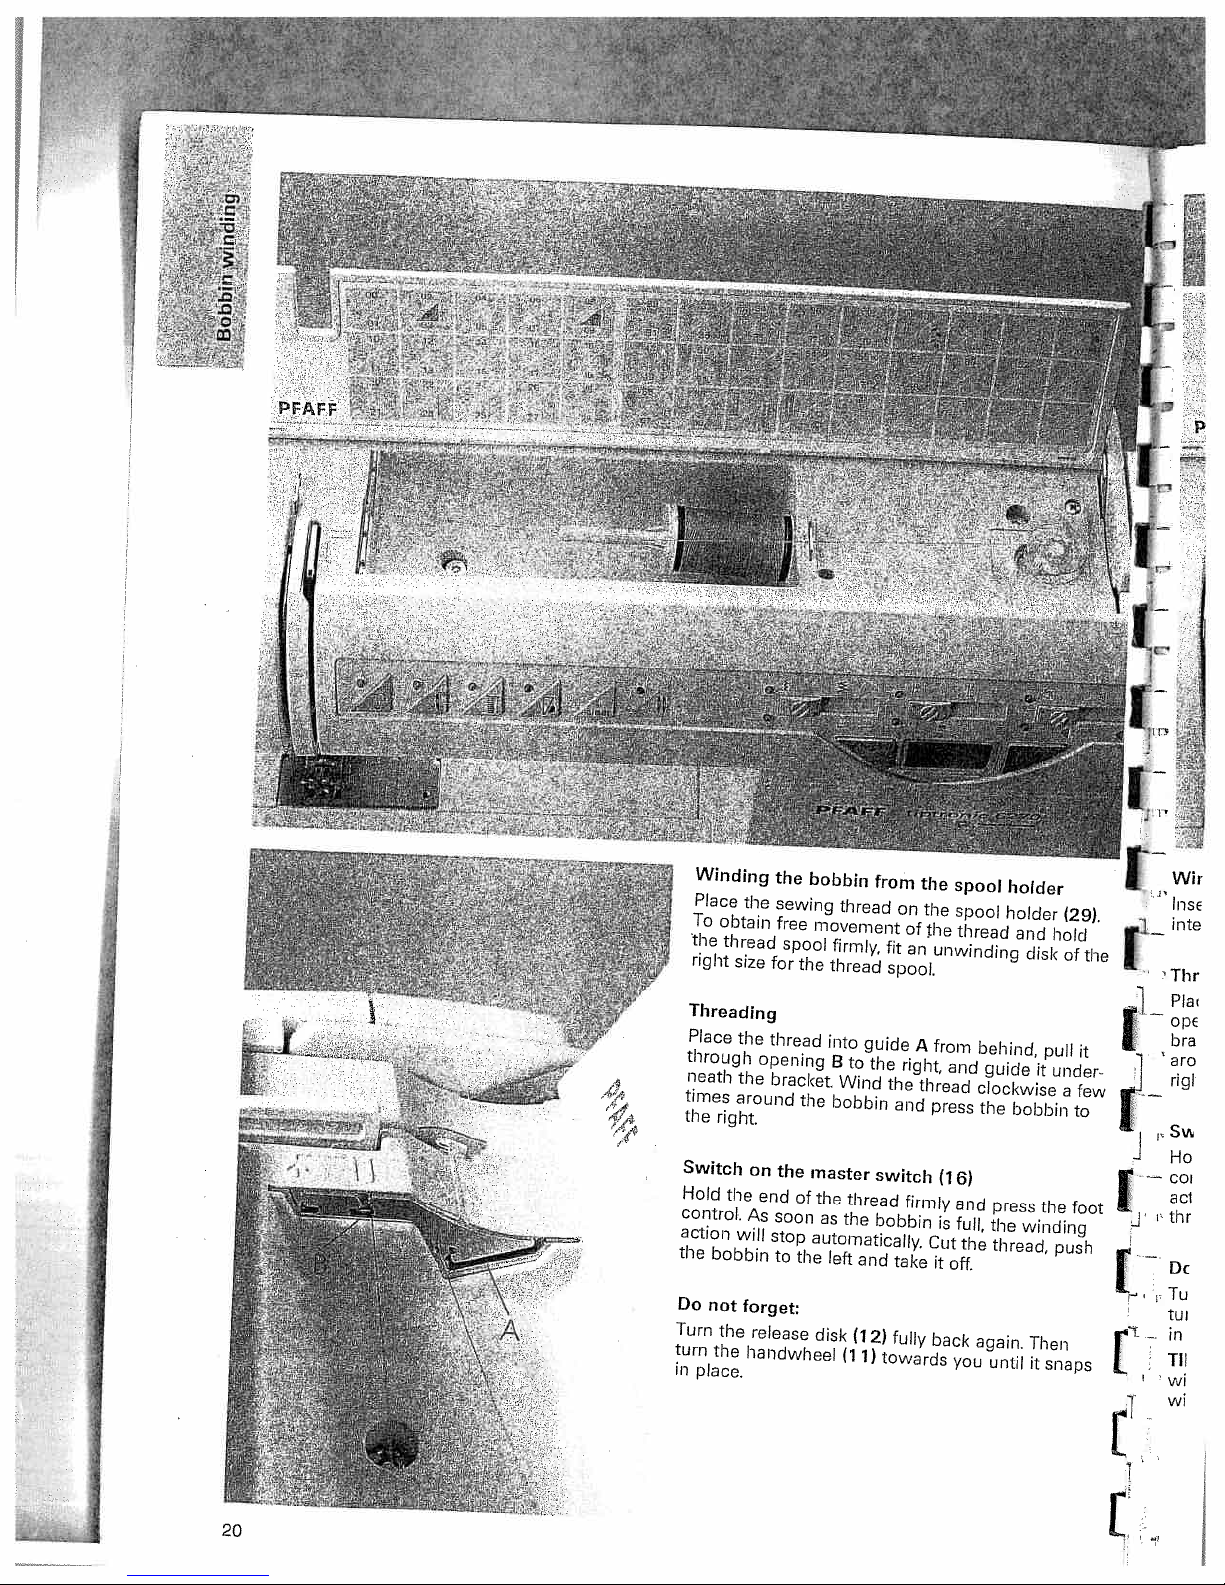
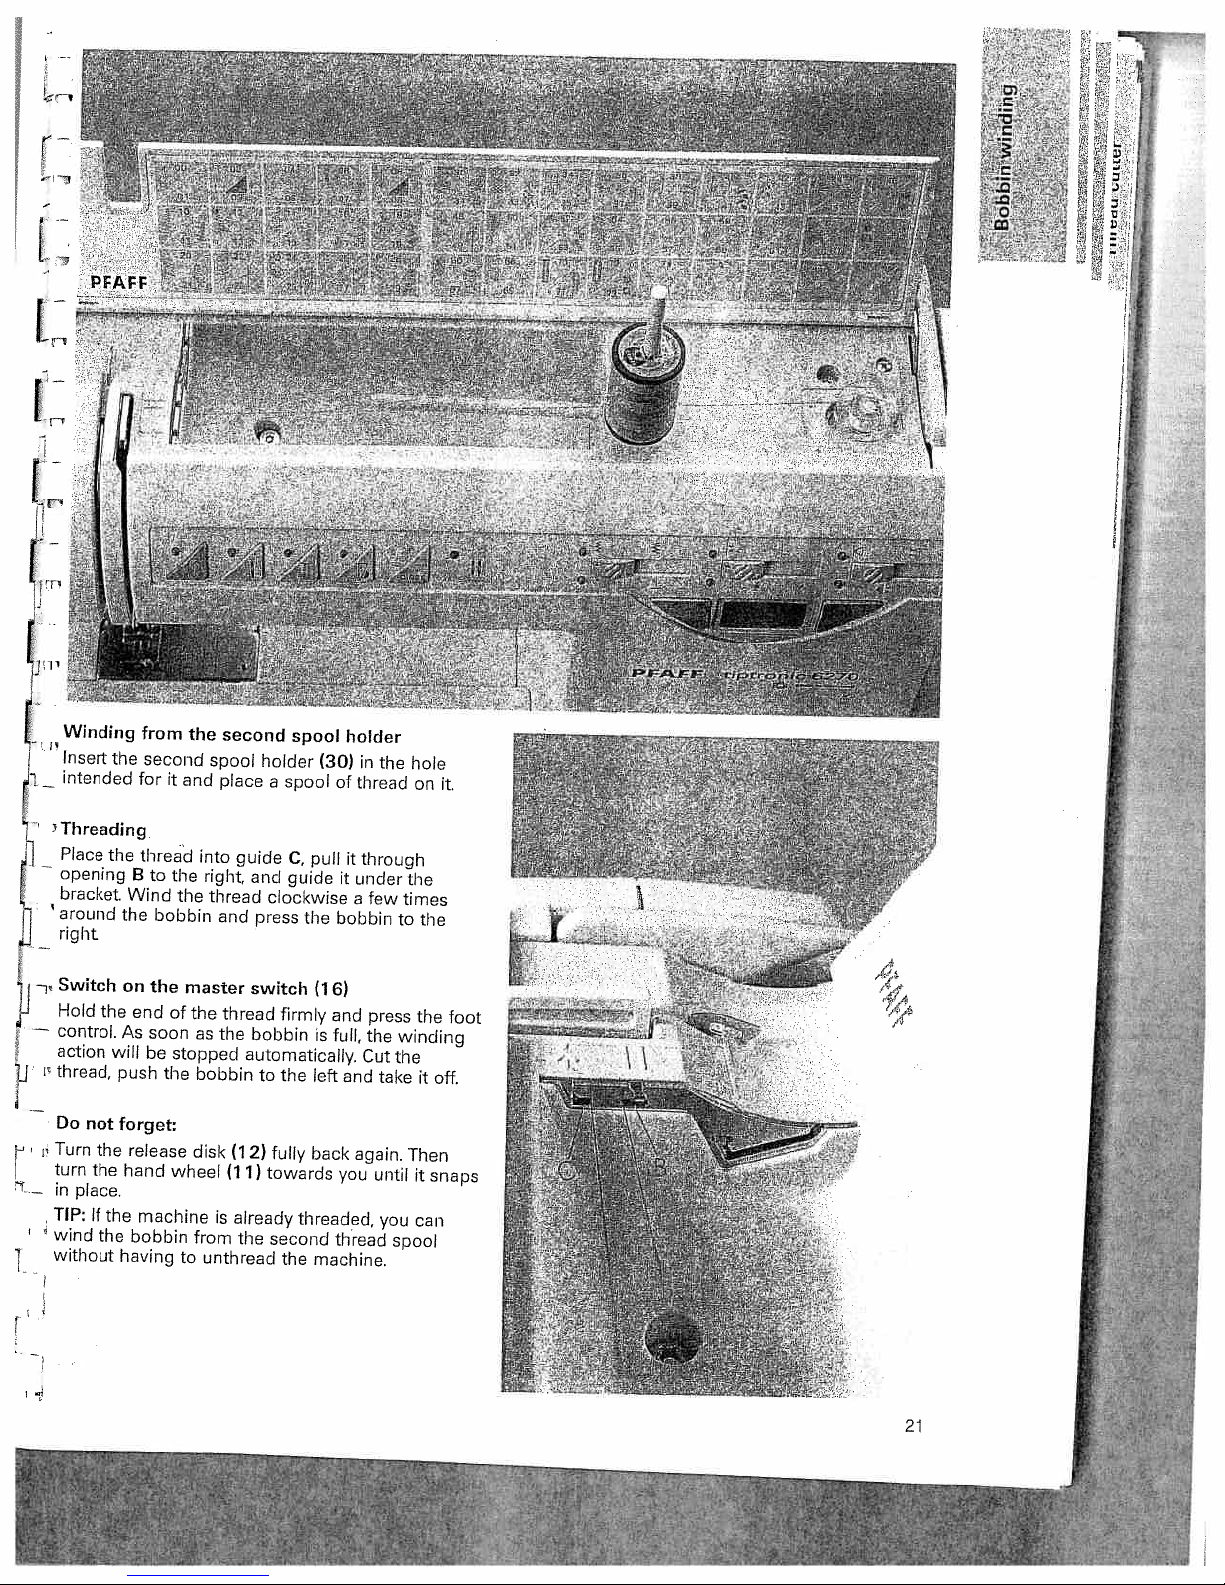
Winding
Place
To
the
right
Threading
Place
through
neatl
times
the
obtain
thread
size
the
the
around
right.
the
for
thread
opening
bracket.
the
bobbin
sewing
free
spool
the
the
from
thread
movement
firmly,
thread
into
guide
B
to
the
Wind
bobbin
on
of
fit
an
spool.
right,
the
and
the
spool
the
spool
the
thread
unwinding
A
from
and
thread
press
holder
holder
and
disk
behind,
guide
clockwise
the
bobbin
pull
it
(29).
hold
of
under
a
few
to
it
the
Ew
r
ns€
I
‘
inte
‘Thr
Pla
op€
bra
1
aro
rigi
20
Switch
Hold
control.
action
the
bobbin
Do
not
Turn
turn
in
place.
the
will
forget;
the
the
on
the
end
of
As
soon
stop
to
the
release
handwheel
master
the
as
thread
the
switch
bobbin
automatically.
left
and
take
disk
(12)
fully
(11)
towards
firmly
Cut
it
back
i
Ho
(1
6)
and
press
the
is
full,
the
the
thread,
foot
winding
push
off.
co’
aol
i
thr
Dc
Tu
tu
in
Til
wi
W
.1
you
again.
until
Then
it
snaps
Page 24
-
[-;;
r’
PFAFF
-c
C)
:J
j
L
r
JJ
Jr
1
Winding
Insert
intended
Threading
Place
opening
bracket
around
right.
-
Switch
Hold
control.
action
thread,
11.
from
the
second
for
the
thread
S
to
Wind
the
bobbin
on
the
the
end
As
soon
will
he
push
the
it
and
the
the
master
of
the
as
stopped
the
bobbin
-
second
spool
place
into
guide
right,
thread
and
thread
the
automatically.
holder
spool
a
C,
and
guide
clockwise
press
switch
firmly
bobbin
to
the
spool
pull
the
(1
left
(30)
is
holder
in
of
thread
it
through
under
it
a
bobbin
6)
and
full,
Cut
and
the
few
press
the
take
hole
on
the
times
the
to
the
winding
the
it
off.
it.
foot
:
•
4.
-,
1.’
J
Do
not
forget:
Turn
the
the
place.
If
the
release
hand
the
bobbin
having
turn
—
in
TIP:
wind
without
wheel
machine
to
disk
(12)
(11)
already
is
from
unthread
the
fully
towards
threaded,
second
the
back
again.
you
thread
machine.
Then
until
you
spool
it
can
snaps
21
Page 25
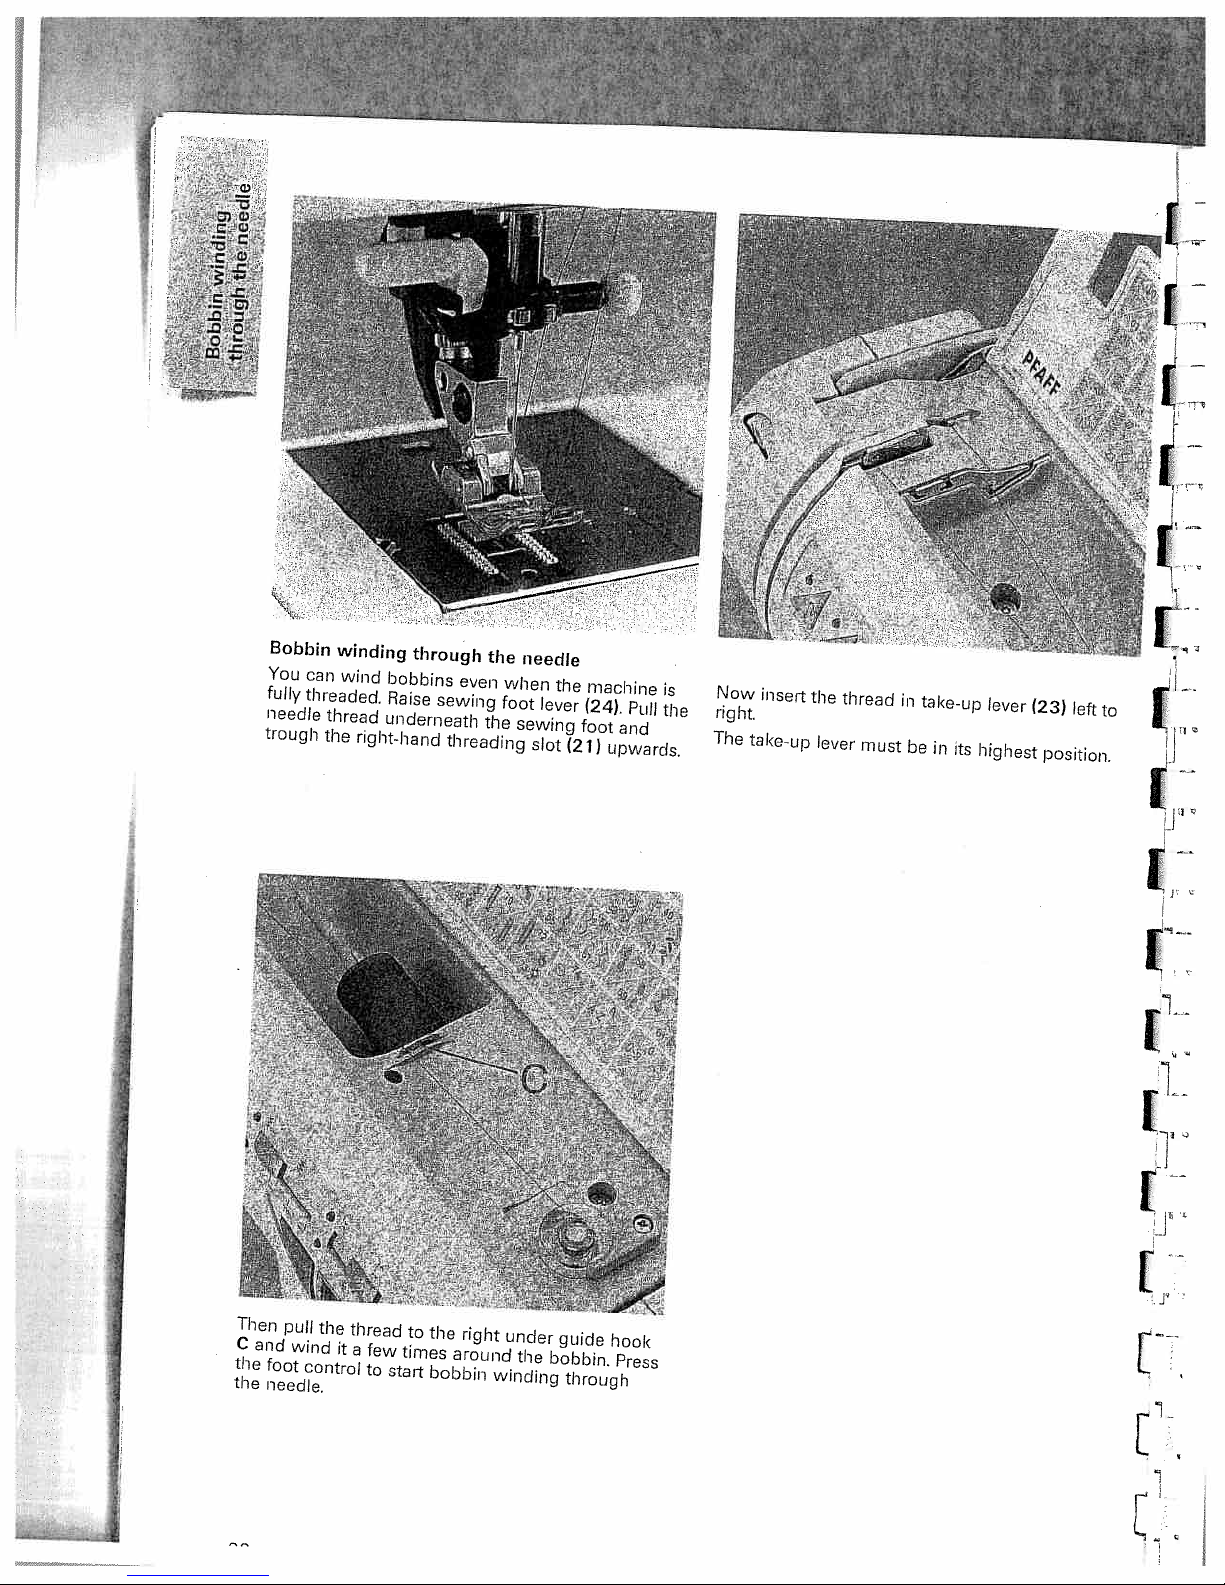
Bobbin
You
fully
needle
trough
winding
can
wind
threaded.
thread
the
through
bobbins
Raise
underneath
right-hand
even
sewing
threadng
the
the
needle
when
foot
sewing
slot
the
lever
machine
(24).
foot
(21)
Pull
and
upwards.
is
the
Now
right.
The
insert
take-up
the
lever
thread
must
in
take-up
be
lever
(23)
left
to
in
its
highest
position.
r
t
Then
pull
the
thread
C
and
wind
the
foot
the
needle.
it
control
to
a
few
times
to
start
the
around
bobbin
right
under
the
winding
guide
bobbin.
through
hook
Press
Page 26
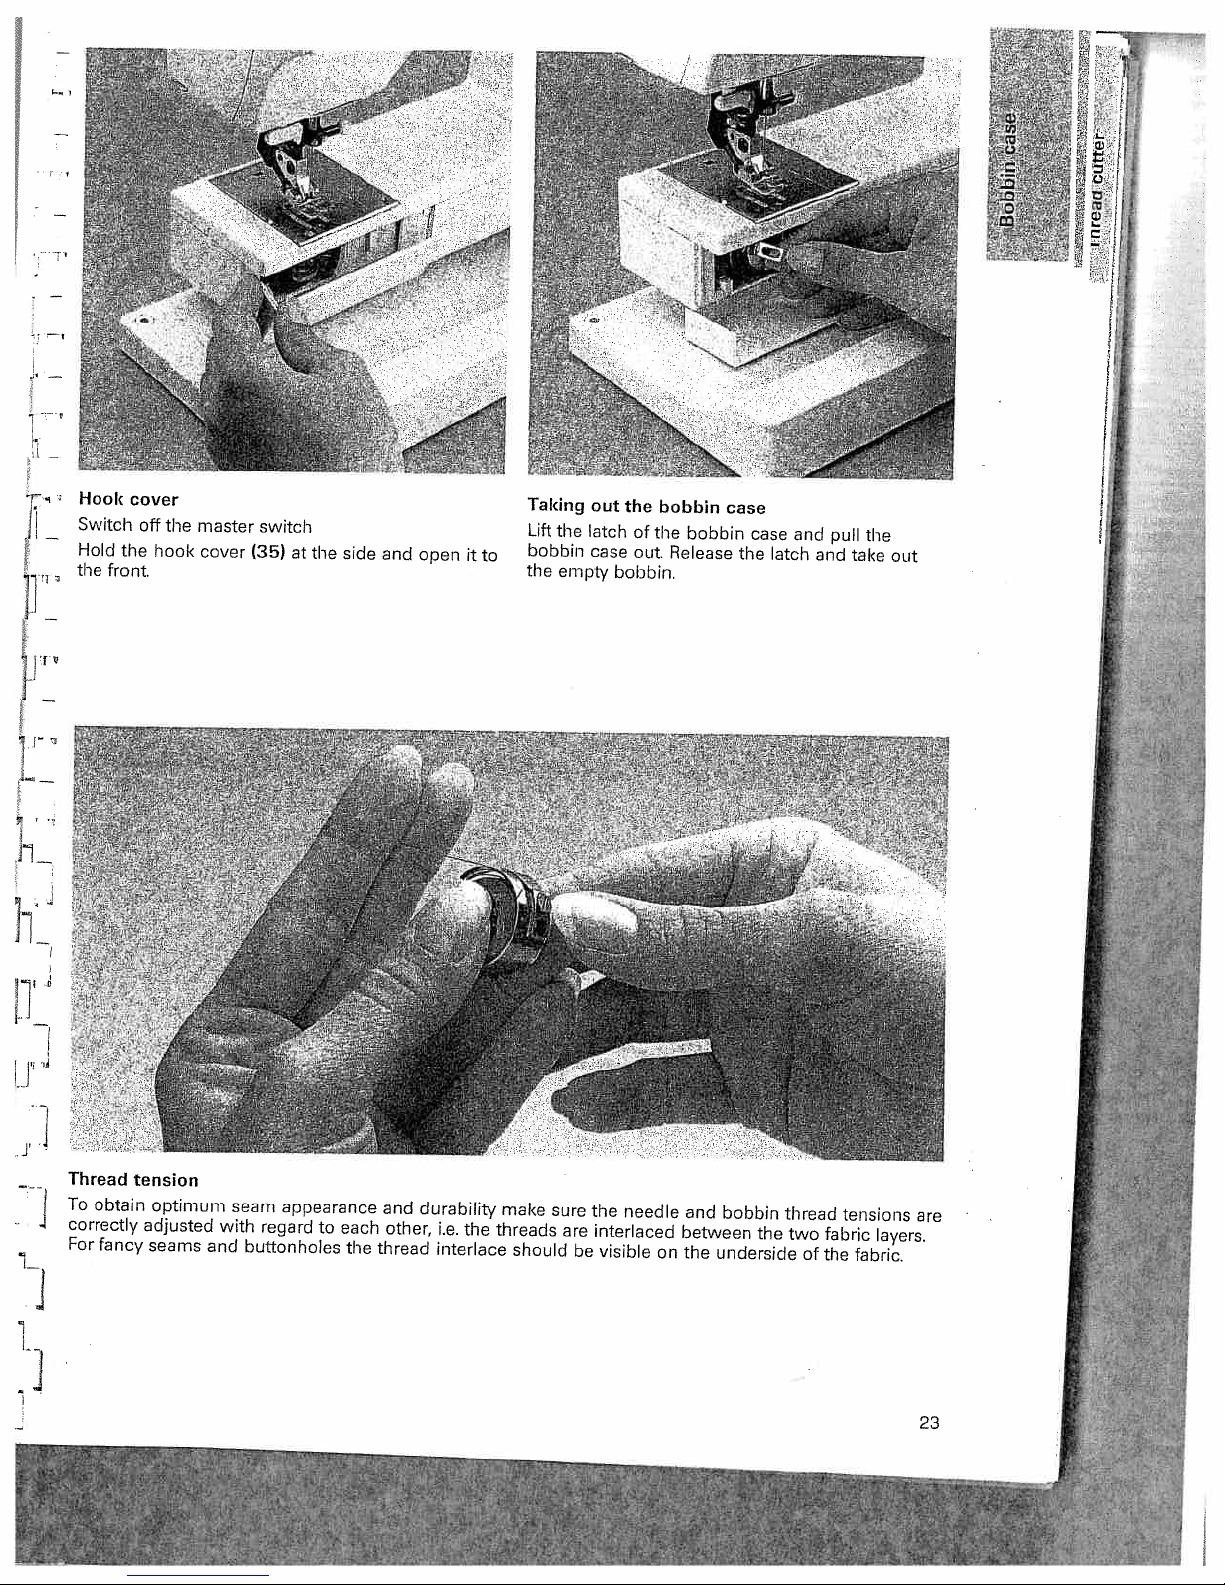
Hook
Switch
Hold
the
front.
cover
the
off
the
hook
master
cover
switch
(35)
Taking
Lift
at
the
side
and
open
bobbin
i
to
the
the
empty
out
latch
case
the
of
the
out
bobbin.
bobbin
bobbin
Release
case
the
case
latch
and
and
pull
take
the
out
I
LII
Thread
To
correctly
For
obtain
fancy
tension
optimum
adjusted
seams
seam
with
and
appearance
regard
buttonholes
each
the
and
other,
thread
to
durability
i.e.
the
interlace
make
threads
should
sure
are
the
interlaced
be
visible
needle
on
and
bobbin
between
the
underside
the
thread
two
of
tensions
fabric
the
are
layers.
fabric.
23
Page 27
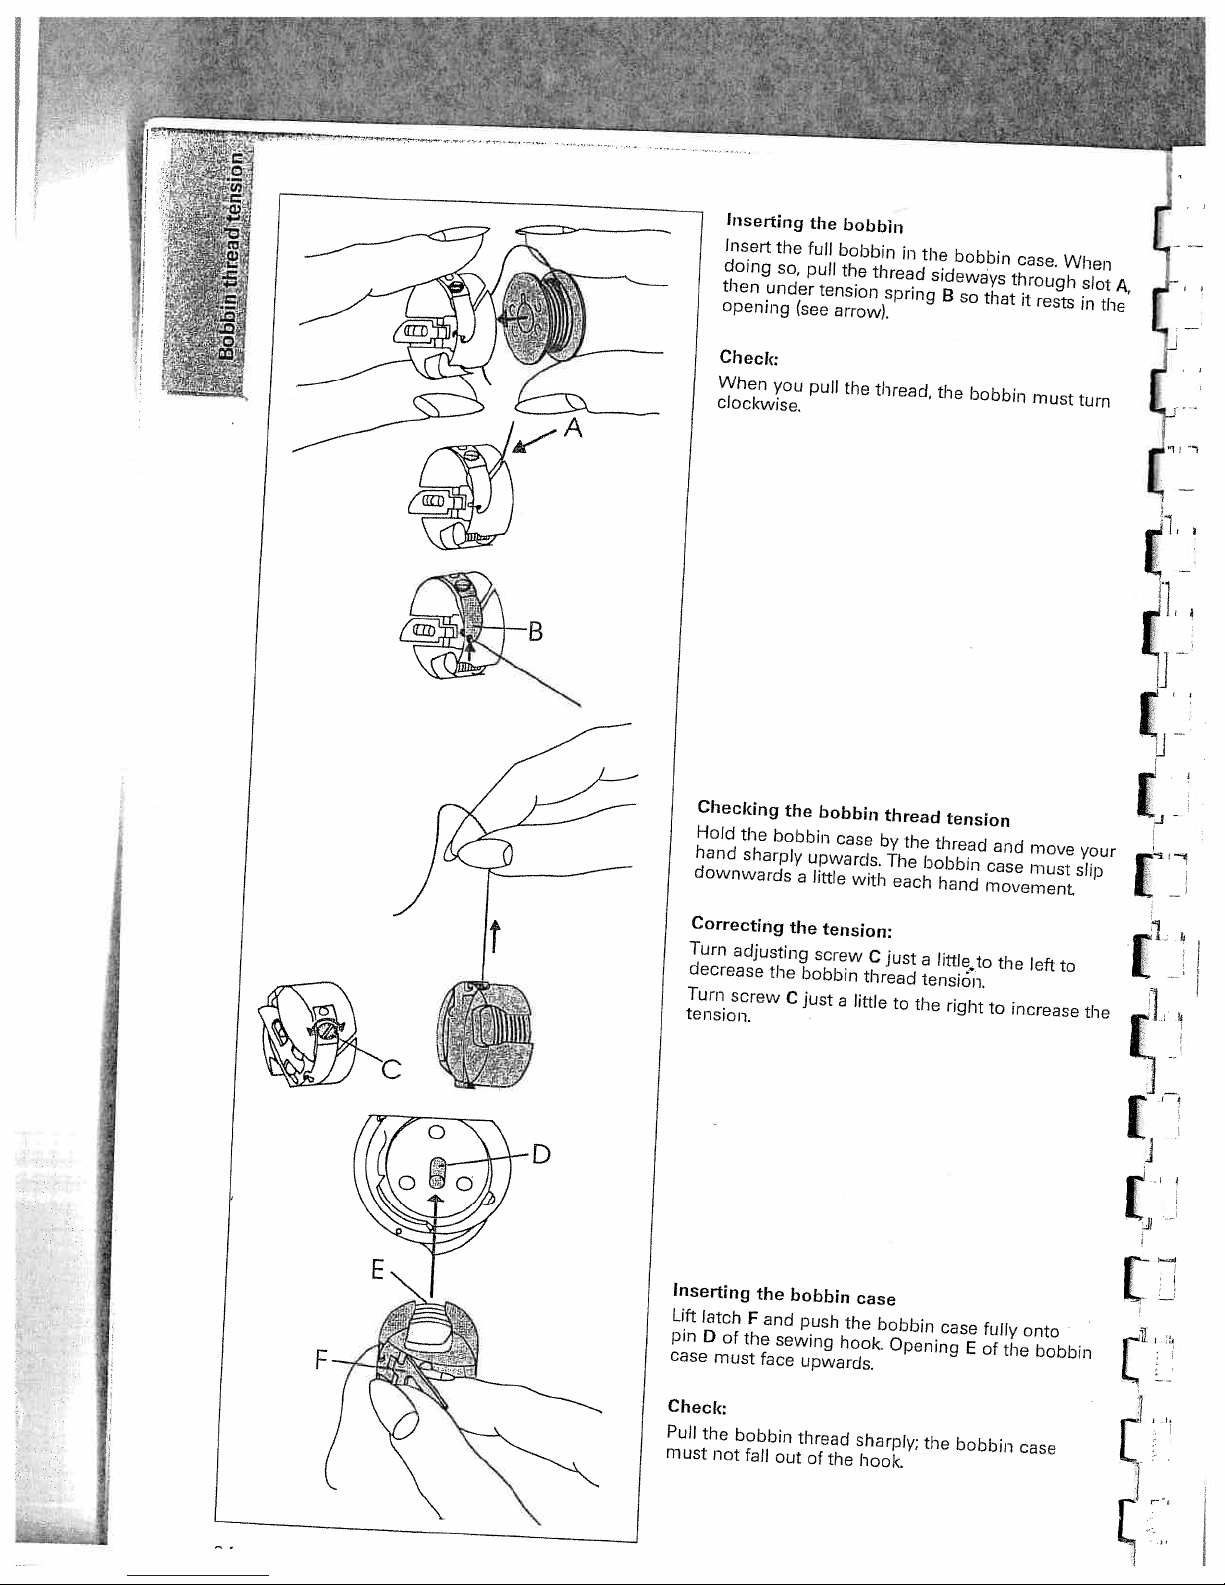
Inserting
Insert
the
doing
so,
then
under
opening
Check:
When
you
clockwise.
the
full
pull
(see
pull
bobbin
bobbin
the
tension
arrow).
the
in
thread
spring
thread,
the
bobbin
sideways
B
so
the
that
bobbin
case.
through
it
rests
must
When
slot
in
turn
A,
the
I
ti:
Checking
Hold
hand
downwards
Correcting
Turn
decrease
Turn
tension.
Inserting
Lift
latch
pin
D
case
must
the
sharply
adjusting
screw
the
F
of
the
bobbin
the
and
sewing
face
the
upwards,
a
little
the
screw
bobbin
C
just
bobbin
push
upwards.
bobbin
case
with
tension:
a
little
the
hook
by
C
thread
case
bobbin
thread
the
The
bobbin
each
just
a
tension,
to
the
Opening
tension
thread
hand
littleto
right
case
and
case
movement.
the
to
increase
fully
E
of
the
move
must
left
onto
bobbin
your
slip
[I
to
the
[E
I
Check:
Pull
must
the
not
bobbin
fall
out
thread
of
the
sharply;
hook.
the
bobbin
case
Page 28
17
PFAFF
1
20:
22
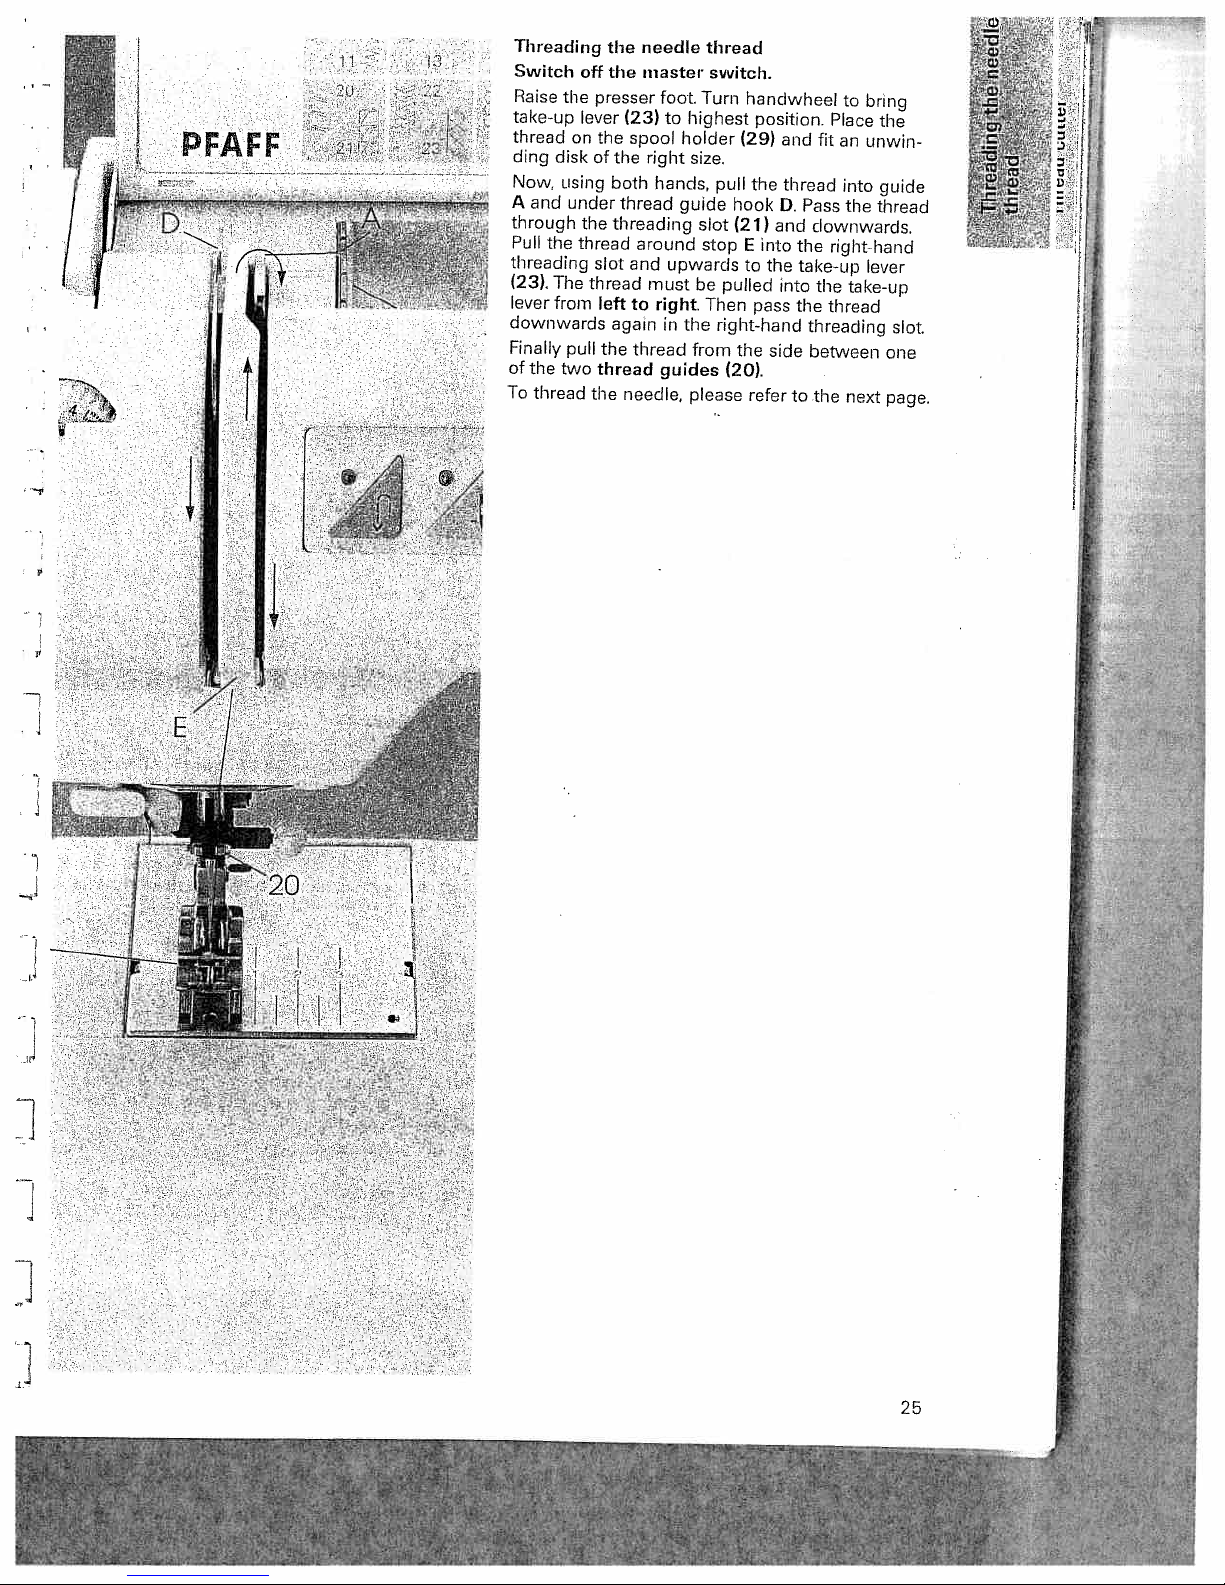
Threading
Switch
Raise
the
take-up
thread
on
ding
disk
Now,
using
A
and
under
through
Pull
the
threading
(23).
The
lever
from
downwards
Finally
pull
of
the
two
To
thread
the
the
off
presser
lever
the
of
the
thread
slot
thread
left
the
thread
the
needle
master
foot
to
(23)
spool
the
right
both
hands,
thread
threading
around
and
must
to
right.
again
in
thread
guides
needle,
thread
switch.
Turn
highest
holder
size.
guide
slot
stop
upwards
be
Then
the
from
please
handwheel
position.
(29)
pull
the
hook
(21)
and
E
into
the
to
pulled
pass
right-hand
the
side
(20).
refer
and
fit
thread
D.
Pass
downwards,
the
take-up
into
the
the
threading
between
to
the
to
bring
Place
the
an
unwin
into
guide
the
thread
right-hand
lever
take-up
thread
one
next
page.
slot.
‘::.
25
Page 29
•
‘•
+‘-•
1
‘V
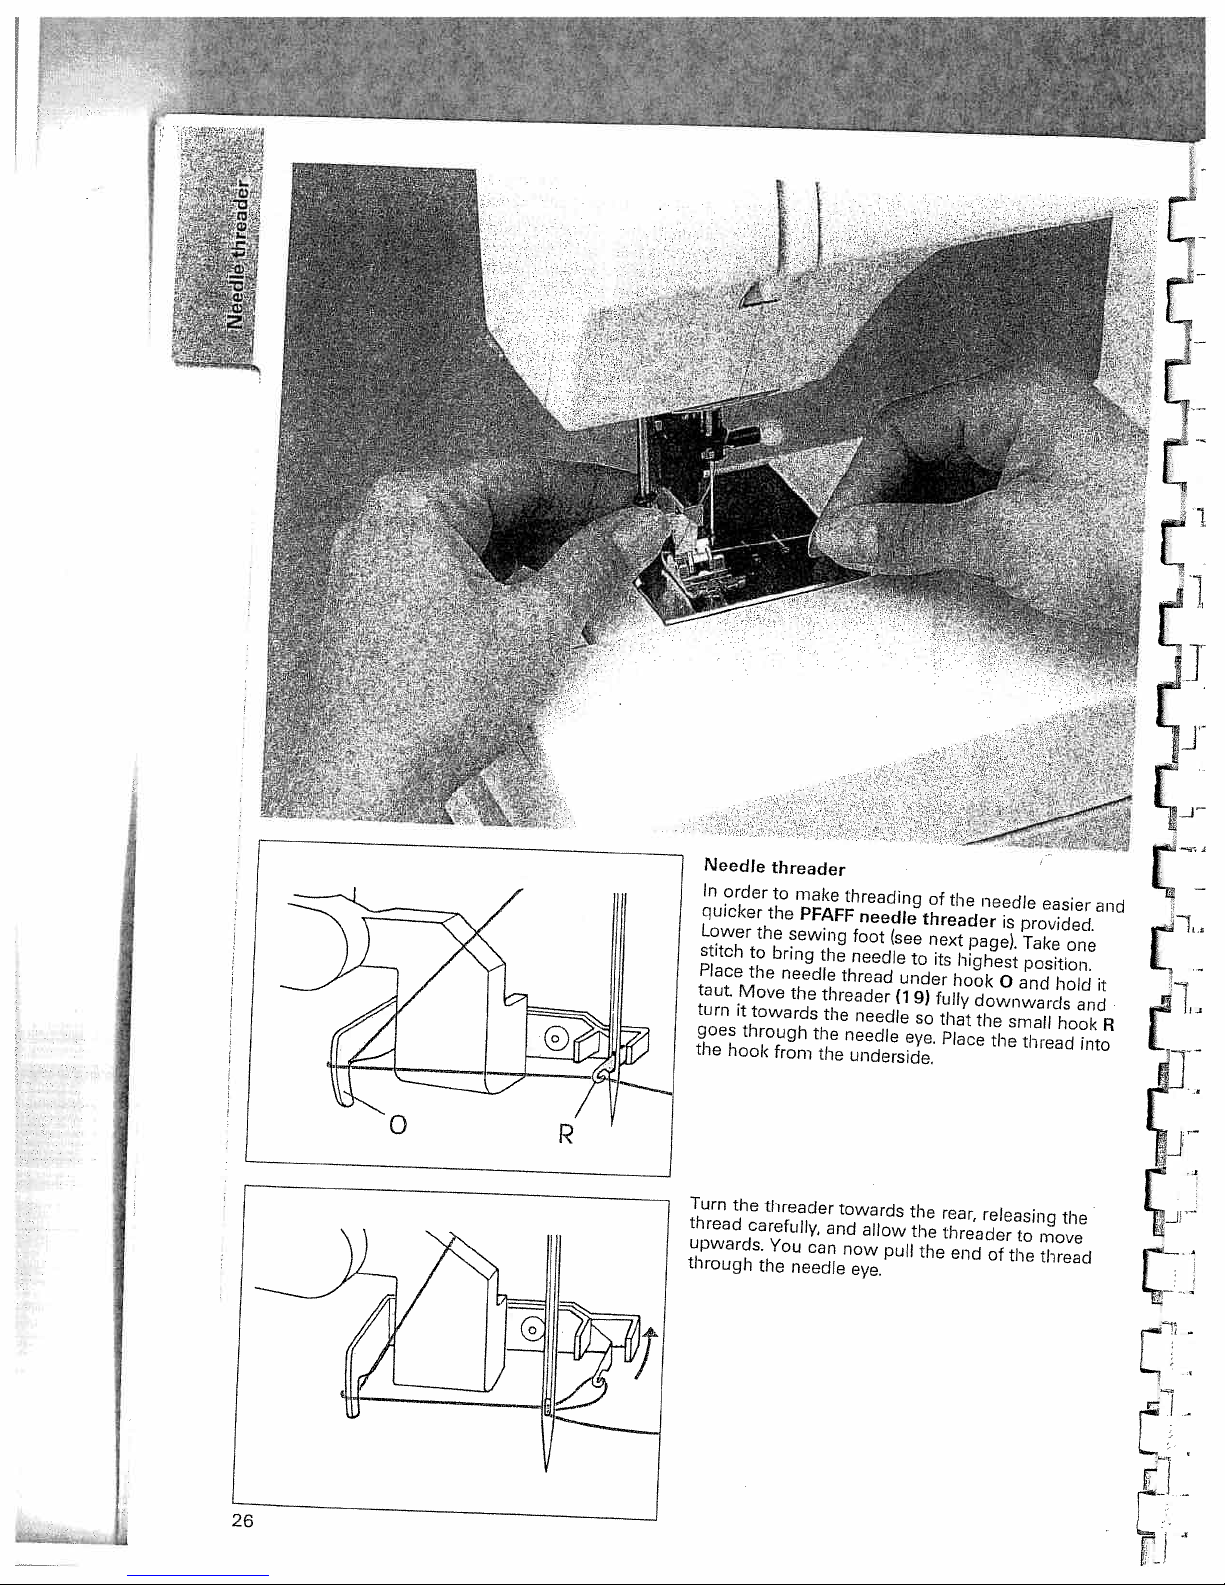
Needle
In
order
quicker
Lower
stitch
Place
taut
turn
goes
the
hook
Turn
the
thread
upwards.
through
threader
to
the
the
to
bring
the
Move
it
towards
through
from
threader
carefully,
You
the
make
PFAFF
sewing
needle
the
the
can
needle
threading
foot
the
needle
thread
threader
the
needle
the
underside.
towards
and
now
eye.
needle
needle
allow
pull
(see
under
(1
eye.
of
threader
next
to
its
9)
fully
so
that
the
the
the
the
needle
page).
highest
hook
downwards
the
Place
rear,
releasing
threader
end
the
of
is
0
small
the
easier
provided.
Take
one
position.
and
hold
hook
thread
the
to
move
thread
and
it
and
R
into
ii
26
Page 30
Presser
The
sewing
presser
For
darning
darning
bar
lifter
foot
bar
lifter
the
position
is
raised
(24).
sewing
(see
foot
page
or
lowered
lifter
73).
must
with
be
the
set
Drawing
Raise
tap
at
needle
the
the
foot
thread
up
the
sewing
control
to
bobbin
foot
once,
draw
thread
Hold
up
the
taking
the
needle
one
bobbin
thread
stitch.
thread.
Pull
and
the
I
Z
\
\
Bobbin
Close
under
J
the
the
thread
hook
sewing
cover
foot
(35)
to
the
and
—
left.
pull
the
thread
Thread
Pull
thread
the
trimmer
cutter
threads
from
(38).
the
back
to
the
front
over
the
27
Page 31

S..
--
--
Li:
-
_..-x..
Removing
Turn
off
Set
the
foot
Press
and
downwards
that
it
disengages
In
the
case
backwards
the
the
needle
the
of
and
sewing
master
at
sewing
at
the
press
foot
switch
its
highest
foot
the
back
from
the
buttonhole
it
upwards.
point
upwards
at
the
sewing
foot
Raise
same
foot
5,
at
push
the
the
time
holder
front
the
sewing
so
8)
(1
strip
Attaching
Place
(18)
so
lowered,
foot
holder,
The
Dual
the
sewing
that
the
Feed
the
when
pins
sewing
foot
the
of
must
foot
under
presser
the
foot
be
disengaged
the
sewing
bar
engage
lifter
(see
in
foot
(24)is
the
page
holder
sewing
30).
Li
L
L4
1:1.
J
Check:
Please
check
that
the
attached
‘)Q
by
raising
sewing
the
presser
foot
bar
is
properly
lifter.
Ei
[11
ri
Page 32

-
-
—
.1
The
built-in
For
sewing
solution:
industrial
the
top
fed
accurately.
silk
and
seam
pucker.
perfect
next
(see
dual
difficult
built-in
sewing
and
bottom
rayon
The
matching
page).
fabric
Dual
machines,
On
fabrics
even
of
materials
Feed.
at
the
light
or
the
feeding
checked
feed
same
difficult
dual
(IDT
PFAFF
The
feeds
it
fabric
action
and
system)
offers
sSrne
the
time.
fabrics
feed
striped
as
fabric
The
also
the
on
fabric
such
prevents
ensures
fabrics
ideal
from
is
as
29
Page 33

C
1
C
Engaging
Raise
the
(40>
so
sewing
that
the
it
Dual
snaps
foot
Feed
Now
in
place.
push
the
Dual
Feed
Disengaging
Hold
the
places.
out
also
to
the
the
Pull
illustration
Dual
the
rear,
the
Feed
Dual
and
Dual
with
let
on
Feed
it
page
Feed
two
move
(40)
fingers
down
slowly
29).
at
the
a
little
upwards
marked
and
(see
jiL
I
Important!
For
all
sewing
jobs
with
I
I
30
the
Dual
Feed,
only
use
sewing
feet
that
are
cutout
at
the
back
(0.
1,
3,
4).
Page 34

11
p
I
I
JA
Changing
Switch
To
remove:
needle
screw
To
insert:
to
the
rear.
needle,
needle
off
at
its
(25)
The
pushing
and
the
master
Lower
highest
and
Lower
tighten
needle
pull
flat
the
it
up
switch
the
point.
the
side
the
sewing
needle
A
of
sewing
as
far
set
Now
the
foot
as
screw
foot
looserj
out
needle
it
will
and
(25)
and
set
the
the
insert
go.
firmly.
set
must
Hold
downwards.
face
the
the
I
F
I
.
31
Page 35

M’
F
Setting
Set
tension
The
embroidering
and
the
required
normal
3.
the
(22)
1
needle
using
setting
and
thread
amount
mark
for
sewing
buttonhole
on
A.
tension
the
needle
is
sewing
4
to
5.
thread
For
between
I
[.
2
ii
Lowering
For
certain
has
to
(35)
feed
dog
32
and
be
dropped.
meve
is
the
feed
sewing
slide
lowered.
-,
work,
To
dog
C
do
fully
i.e.
this,
darning,
open
to
the
the
the
right
\
feed
hook
Now
r
S..
dog
cover
the
Page 36

I
If
I
I
iii
/1
1
:1
Electron.
Sewj
Patter,tCtions
Pages
‘3to4
5
mflhinatjo
2
/
I.
I
/
L
I
I
I
I
/
I
Page 37

/1
,
—
Contents
Sewing
Slide
Stitch
Stitch
buttonhole
stitch
function
keys/Program
width/Needle
width!
length!
density
Balance/Pattern
Pattern
sequence
keys
keys
length
positions
Page
Page
Page
Page
Page
Pages
36
37
38
35
40
41
to
45
35
4
4
;f
Page 38

Sewing
function
keys
Backward
When
pressing
amp
lights
wards.
To
again.
If
the
sew
case
Needle
With
needle
when
Buttonhole/Tacking/Single
This
1.
In
buttonhole
2.
If
the
sewn
•
or
•
3.
If
the
immediately
a
fancy
continue
key
is
backwards
the
green
stop
this
key
is
to
the
foot
key
has
programs
key
is
automatically
the
pattern.
key
is
stitch.
sewing
the
up
and
pressed
until
lamp
(2)
you
be
in
control
three
71/72
length
pressed
pressed
in
a
key
backward
the
machine
forward
while
the
does
can
determine
the
fabric
is
released.
functions.
you
yourself
before
at
the
while
utility
stitch
(1)
sewing,
sewing,
key
is
not
or
can
and
sewing
beginning
sewing,
sewing
will
press
the
released.
light
up.
whether
in
the
up-position
Pattern
determine
save
start,
a
and
at
the
key
sew
machine
In
the
(3)
the
it
of
the
tack
end
the
back
the
this
a
tack
is
green
key
seam
sewn
of
will
is
Slow
When
reduced.
Clear
key
With
this
ning
of
In
the
case
the
programmed
Twin-needle
In
some
case
you
width
is
possible
sewing
this
key
(5)
key
a
program
of
programs
must
reduced
to
sew
(4)
is
pressed
it
is
possible
which
buttonhole
length
key
(6)
the
not
use
and
the
with
the
red
a
the
has
and
can
lamp
twin
lamp
twin
to
be
sewing
return
already
darning
deleted.
lights
needle.
goes
needle.
speed
to
the
been
programs
up.
If
the
out,
In
it
is
is
begin
started.
this
stitch
Sti
foi
W
or
F
T
36
C:
Page 39

Slide
time
Any
adjusts
Stitch
Stitch
means
Stitch
this
With
stitch
or
for
determining
Balance
With
this
the
or
keys/program
program
a
new
width
this
to
and
the
slide
slide
itself
width
of
length
slide
key
density.
the
slide
slide
key
pattern
length.
keys
corresponding
key
needle
position
key.
key
slide
can
you
case
of
In
buttonhole
key
(9)
can
you
selected
is
(7)
(8)
determine
program
determine
default
are
length.
machine
the
setting.
determined
length
stitch
this
the
key
balance
70
±
Program
toggle
With
program
the
goes
same
pattern
selection
key
switch
jumping
for
sequence.
can
be
tens
the
carried
digits
you
“+“
10programs
alphabet,
toggle
With
out
(26)
can
the
in
browse
numbers
switch
reverse
at
through
a
time.
“-“
order.
and
the
The
the
by
unit
“+“
After
toggle
reverse
74,
also
is
pattern,
the
on
digits
you
74
73
possible
or
memory
alpha-numeric
display
the
Program
±
toggle
With
from
ber
from
again
is
pattern
and
number
continuing
switches
selected
to
item
ni)
With
another.
Patten
this
character
memory.
short
for
a
key
switch
00
to
00.
‘+/—“
group
sequence
key
shown
When
time.
for
74.
With
in
with
it
(alphabet
the
saving
(0
select
the
switch
order
etc.
numbers)
symbol
to
9)
a
pattern
selection
starting
With
toggle
to
switch
from
key
(1
saved
are
m
(1
you
from
5)
or
lights
3)
num
starts
select
inside
one
special
in
a
00
a
the
up
37
Page 40

I
1
—-—
Setting
Any
adjusts
or
The
in
10,
When
(7)
stitch
mm.
—
time
pattern
stitch
the
top
the
lights
or
the
a
new
itself
width.
or
line
upper
up,
you
pattern
stitch
program
to
a
pattern
on
lamp
can
width
width/pattern
specific
width
the
left,
i.e.
of
the
infinitely
within
is
selected
default
shown
is
3.0
stitch
adjust
a
value
mm
range
width
the
in
for
width
the
from
machine
for
the
the
display
program
slide
desired
0
to
stitch
key
6
1
-
If
the
recalled
the
program
digits,
default
by
thus
setting
pressing
keys
for
reselecting
had
the
both
been
“+1—”
the
altered,
toggle
unit
digits
pattern.
it
can
switches
and
tens
be
of
[1j
rFj
Adjusting
When
(7)
has
ons.
07.
When
‘1-”
is
that
change
38
the
This
selecting
shown
the
the
the
bottom
lit
up,
is
possible
needle
needle
needle
you
in
is
light
can
one
the
in
position
of
set
in
programs
of
these
upper
center
position.
the
stitch
up
to
programs
display
position.
1
3
02,
line.
width
needle
03,
the
This
Now
slide
positi
06
symbol
means
you
and
can
key
The
display
i.e.
i.e.
the
shows
the
needle
i.e.
needle
to
L6
moves
to
the
3J
moves
the
2,5
02
left
2,5
02
three
right
6
positions
positions
iii
—_i
I’
11
Cl
Page 41

7
-ii
Setting
Any
timeanew
adjusts
length or
the
When
lights
(8>
stitch
length
stitch
length,
upper
lineofthe
In
program
12,1
(8,
the
stitch
itselftoa
buttonhole
upper
up,
you
withinarange
6,0
70
6
mm)
length/buttonhole
programisselected
specific
default
length.
lampofthe
can
stitch length slide
infinitely
from 0.5to6
this
mm
in
case,
displayincenter
three
different
buttonhole
canbeadjusted
value
adjust
position.
with
is
length
the
for
the
shown
slide
machine
stitch
the
desired
mm.
in
the
lengths
key
key
The
(8).
If
the
default
setting
recalledbypressing
the
program
digits,
thus
keys
reselecting
for
has
the
both
the
been
“+/—“
unit
pattern.
altered,itcan
switches
toggle
digits
and
tens
be
of
Setting
Any
time
adjusts
stitch
the
new programisselected
a
itselftoa
density
specific
default
value
the
machine
for
density.
stitch
adjust
from
length
0.2
case,
the
to
desired
1
is
position.
When
lights
(8)
stitch
The
in
the
the
density
stitch
upper
upper
lampofthe
up,
you
withinarange
density,
lineofthe
can
infinitely
0.30
mminthis.
displayincenter
the
slide
mm.
shown
stitch
key
If
the default
setting
has
recalledbypressing the
the
digits,
program
thus
for both
keys
reselecting
been
“+1—”
the
altered,
toggle
unit
digits
pattern.
it
can
switches
and
tens
be
of
39
Page 42

ci
j
Setting
Appearance
depend
wool
you
to
the
tiptronic
called
default
lamp
of
can
alter
The
balance
line
on
The
more
shorter
of
the
pattern
,.-
the
on
is
fed
reach
balance
setting
the
the
the
the
are
balance
and
the
in
a
optimum
is
balance
balance
setting
right
slide
the
are
size
of
material
different
provided
to
change
of
the
balance
slide
within
is
shown
key
backwards
set
less
.
—i-.
‘-
an
embroidery
it
is
embroidered
way
as
embroidery
with
a
the
backwards
is
key
(9)
a
range
in
is
pushed
stitches,
densely.
.
silk.
In
pattern
correction
0.
When
has
lit
from
the
upper
to
the
i.e.
the
pattern
on
order
quality
system
feed.
the
up,
you
—7
display
left
the
stitches
—
i.e.
for
The
upper
+7
to
——‘.——
The
more
longer
of
the
Any
time
adjusts
balance.
If
the
recalled
the
program
digits,
the
are
the
pattern
a
new
itself
default
by
pressing
thus
reselecting
-4——.-—--—--_—,
slide
backwards
are
set
program
to
a
specific
setting
keys
for
key
has
the
both
is
more
“+1—”
the
pushed
stitches,
densely.
is
selected
default
been
unit
pattern.
to
i.e.
value
altered,
toggle
digits
I
the
right
the
the
machine
for
it
can
switches
and
tens
the
stitches
c.
the
be
of
I
Setting
Any
adjusts
pattern
When
has
for
The
display
40
time
the
lit
up,
fancy
selected
line
the
a
new
itself
length.
lower
you
stitches.
on
pattern
program
to
a
lamp
can
pattern
the
length
specific
of
adjust
length
right
is
selected
default
the
the
is
value
balance
desired
shown
the
machine
for
slide
pattern
in
the
the
key
top
(9)
length
If
the
recalled
the
program
digits,
default
by
thus
setting
pressing
keys
for
reselecting
has
the
both
been
“+1—”
the
altered,
toggle
unit
digits
pattern.
it
can
switches
and
tens
be
[1
of
t
Page 43

I
—
Li
.
.
order
in
M
for
display
sequence
the
memory
tens
Pattern
In
combine
ters
memory
alphanumeric
sequence
The
key
The
L
J
create
to
several
M
where
is
patterns
memory.
a
characters
when
lost
is
digits
shows:
pattern
a
Your
maximum
the
selected
(26).
sequence
alphanumeric
or
tiptronic
10
of
be
can
machine
pressing
by
00
has
patterns
stored.
is
must
you
charac
an
or
The
switched
the
M
30
pattern
off.
program
The
left
shown
tion.
that
number
position
in
m
If
there
the
is
is
of
shown
stored
of
upper
the
display
programmed
no
next
patterns
display
indicated
is
to
the
indicated
is
line.
in
symbol
pattern
The
right
the
this
sequence.
the
in
pattern
posi
means
p
L
pattern
with
the
(26).
the
a
alphabet
Select
program
Creating
Select
digits
ter
sequence
with
desired
the
key
program
the
alphanumeric
unit
for
digits
key
(1
for
3),
tens
charac
P.
i.e.
Page 44

By
pressing
into
the
the
This
number
—1
ii
pattern
display
indication
of
in
this
key
for
patterns
case.
m
the
sequence.
short
a
in
the
stored
selected
time:
m)
upper
The
11
display
in
character
following
P
the
pattern
line
is
stored
appears
shows
sequence
the
in
The
top
the
pattern
position
that
you
you
can
this
case
line
one.
are
see
P.
on
shown
The
in
the
the
the
bottom
most
right
in
m)
indicates
the
display;
line
memory.
recently
in
on
the
Next
entered
the
position
this
left
to
case
shows
the
right
pattern,
of
P
is
at
you
in
I
I
I
Input
Select
tens
be
sewn.
the
the
digits;
entire
m
the
L,ç
-
text,
Memory
pattern
i.e.
“PFAFF”.
with
sequence
LI_iC
the
•.
program
is
now
key
ready
for
FE
:
C]
ri
IT
/
The
stitch
width
set
for
the
last
to
all
characters
width
must
character.
he
of
the
altered
word.
when
In
character
any
case
storing
the
the
last
is
valid
stitch
for
[jE
L
42
rZ
IL
Page 45

Page 46

Page 47

It
you
wish
to
tack
a
pattern
“Buttonhole/Tacking/Single
starting
the
to
pattern
sew.
If
sequence,
you
wish
press
sewing.
sequence,
pattern
tack
a
key
(3)
also
again
(3)
press
before
at
the
while
key
end
of
If
you
wish
sequence,
program
pattern
to
reset
press
keys
for
sequence.
the
tens
an
“+/—“
already
digits,
51
m)P
started
toggle
thus
pattern
switches
reselecting
of
the
the
Deleting
To
sequence
the
(pattern)
In
order
switch
Now
J
delete
clear
the
which
to
off
pattern
a
pattern
character
a
select
key
delete
the
the
(5).
Itisalways
deleted.
is
the
sewing
sequence
sequence
(pattern)
pattern
entire
machine
from
sequence
the
pattern
and
is
deleted.
the
last
sequence,
then
pattern
and
press
character
on
again.
43
Page 48

Apart
patterns
keys
select
from
for
the
characters
in
a
tens
number
pattern
digits
it
sequence.
(26)
of
the
is
also
and
desired
possible
Use
forunit
the
digits
pattern
to
combine
program
(13)
(i.e.
60).
Width,
length
and
balance
to
can
still
be
altered.
r
Press
the
pattern
sequence,
Any
a
short
been
input
time:
44
sequence.
time
time
added
the
m)-key
a
foBowing
i.e.
60,
pattern
to
to
(1
Input
61
inform
the
pattern
m)
Program
5).
the
and
is
stored
you
message
3
entire
53.
a
message
that
your
sequence.
appears
3
53
60
pattern
is
stored
appears
pattern
After
for
a
has
the
short
in
last
the
for
To
In
the
stored
this
tion
ted;
The
the
check
top
in
example.
of
the
in
this
bottom
m
memory.
the
line
the
pattern
case
line
sequence,
on
the
pattern
In
the
top
shown
program
on
the
select
left
the
sequence
line
in
60
left
tells
the
number
is
on
the
the
is
at
you
patterns
of
indicated,
right
display
the
first
that
anew.
patterns
three
the
posi
is
indica
position.
you
are
-f
F.
in
F
in
I
-j
Page 49

________
ilj
You
can
program
forwards.
have
already
<
recall
key
Thus,
the
for
unit
you
stored.
pattern
digits
can
sequence
(13)
always
with
backwards
check
what
the
I.
or
you
L
1-
1
7*
I
p1
I
The
If
characters
1
is
j
This
I
J
pattern
you
shown
means
have
stored
in
in
that
sequence
your
the
display
the
more
pattern
m)---
pattern
full
is
than
sequence
for
a
10
-
-
patterns
1
0
short
time:
10
sequence
the
is
30
or
following
full.
:i
<.4
-
I-.
1
45
Page 50

-
j
I
CD
0
f+
0
C’,
0
Co
0)
CD
o
fancy
and
UtNity
stitches
fl
I
I
r
Page 51

1
\
4r
1j
-
11
1
j
Contents
Sewing
Nonelastic
Elastic
Overlock
Covering
Buttonholes
Sewing
Hem
Gathering
Smocking
Darning
Inserting
table
stitches
stitches
stitches
aids
with
zippers
stitches
twin
effect
needle
Page
Pages
Pages
Pages
Pages
Pages
Pages
Page
Pages
Page
Pages
Pages
50
to
51
to
57
and
60
and
62
64
to
68
69
and
70
72
73to75
and
76
56
63
61
63
67
71
77
-
Rofl-hemming
processing
Lace
edging
Shell
Page
Page
Page
78
79
80
49
Page 52

!
Explanation
recommendations
Whenever
a
basic
can
sewing
the
following
tables
sewing
type
with
stitch
of
tension
the
Program
automatically.
You
and
In
recommend
These
for
The
thread
sew
prog
a
program
change
purpose
for
give
the
sewing
Dual
of
the
length,
these
tables
different
you
selected
setting,
Feed
number
table
is
stitch
using
you
further
foot
for
selected,
width
settings
slide
will
sewing
information
programs:
you
need,
and
whether
engaged
sewing
the
and
according
keys
find
the
purposes.
the
or
machine
balance
to
fabric
7,
8
and
settings
required
needle
you
should
disengaged.
Th
sets
[1
9.
we
C
1
I
I
50
I
Stitch
Stitch
Dual
Needle
Sewing
width
length
Feed
thread
foot
in
mm
in
mm
engaged
disengaged
tension
number
•
0
[1
Page 53

‘
-
Ii
i-i
-
-
J
J1-J
F
1—.
I
J
J
J
J
prog
Basting
]
With
trying
machine
stitch
•
•
Sew
the
•
Repeat
the
TIP:
insert
Light
stitches
feed
08
Place
To
fabrics
dog.
stitch
Program
it
on.
will
you
have
the
one
required
this
work.
prevent
dress
(6
mm).
>
-
08
When
only
fabric
stitch,
amount
as
pins
are
6,0
you
you
make
to
press
under
then
many
the
fabric
crosswise
easier
Then
‘S
5!’
times
to
you
can
press
one
the
the
pull
layers
baste
--
baste
the
to
do
•
the
stitch.
foot
sewing
fabric
as
you
from
the
with
not
£
garment
a
foot
For
control
foot
need
shifting,
basting
long
need
3
control
each
each
to
the
to
direction.
straight
to
lower
El
[j
0/1
before
the
further
time.
rear
finish
the
by
prog
00-02
Straight
Program
needle
up
to
Some
the
needle
sewing
use
Program
always
You
can
with
slide
with
left
stitch
00
position.
6
mm
sewing
in
a
make
set
key
needle
is
the
The
as
required.
jobs
position,
zipper.
02.
Before
sure
up
to
(7).
position
2,5
basic
stitch
can
i.e.
topstitching
To
change
the
needle
1
3
different
Program
straight
be
done
you
01
that
e
length
the
change
is
needle
is
cannot
stitch
can
easier
needle
at
its
a
3—5
with
be
by
a
collar
its
highest
positions
straight
he
changed.
0/1
center
increased
changing
or
position,
position,
point
stitch
.1
j
Page 54

-_fr_
7’
-
7’-
[1
[1
[ji
[1
lprog
1O-12
Zigzag
Zigzag
finishing
always
and
over
In
Program
changes
the
needle
program
can
be
broidery
>!
>
3-6
stitch
stitch
of
all
make
the
edge
1
0
from
position
12
toward
regulated
and
cording
1
0
edges.
sure
the
the
-%
%
1-2
can
he
While
the
needle
alternately.
width
middle
changes
the
to
one
work.
-I
used
finishing
of
the
outwards.
toward
right,
side,
for
trouble-free
goes
zigzag
i.e.
the
i.e.
for
3-5
an
into
In
the
stitch
eyelet
I
edge,
the
fabric
stitch
Program
left,
width
em
and
0/1
11
in
For
finishing
is
very
pin
C,
thus
this
way
The
edge
edge
guide
adjusting
Important:
gram
11.
useful.
you
of
screw
Only
difficult
During
preventing
can
sew
the
cutting
B.
You
can
A.
use
fabrics,
sewing,
curling
beautiful
has
adjust
the
blind
blind
to
the
of
smooth
be
this
stitch
stitch
thread
the
guided
edge
fabric
foot
foot
lies
edge.
seams.
along
guide
in
Pro
No.
over
with
3
In
n1
[21
1
52
Programs
be
set
suited
50
to
particularly
for
appliqué
52
dense.
are
work,
zigzag
Therefore
stitches
they
which
are
can
well
[1
-
LI
J
Page 55

jz,
U
I
=L
I—.-—
-
—
....‘
L_1.
—
—
•
.II
—
*
.—
—
I
k
‘IL
41
)i
-
I—
:•-;r
.,
I
I
Al
—
—
.
A
—
—
.
-
1I_
[i—
t:
‘I
1
j
i1
1
c
il.
prog
14,
Blind
Blind
sewing
•
Serge
•
Fold
quarter
•
Now
an
•
Now
told
•
When
up
15
stitch
stitch
up
turn
inch
place
against
one
._
by
the
of
of
the
thread
4,5
14
hand
edge
hem
an
the
finished
the
needle
L..
is
best
is
no
of
allowance
inch
hem
fabric
edge
guide
enters
of
the
j
2,5
suited
longer
the
away
to
hem
hem.
and
from
the
edge
under
B.
the
fabric.
—
-
•
for
invisible
necessary.
pin
the
left
leaving
exposed.
th
fold
3-5
parallel
bottom
sewing
it
must
hems;
about
foot
-
to
fold.
only
and
half
with
3
pic
‘
If
the
edge
stitches
guide
‘
are
B
by
visible
turning
4
on
adjusting
the
right
side,
screw
adjust
A.
1<
a
Prog.
15
--
Prog.
14
h
Program
The
hem
it
is
not
1
5
is
is
sewn
necessary
a
blind
and
to
stitch
serged
serge
the
for
at
stretchy
the
fabric
same
edge.
fabrics.
time,
i.e.
53
Page 56

14
riiii1!
—
I
4i
:,,
prog
29
Automatic
Program
damaged
•
Stitch
length.
•
Press
sewing
length
The
saved
often
The
program
(5),
i.e.
as
,,auto”
over
the
is
you
>
>
darning
29
areas
reverse
the
thus
darning
6
is
the
darning
need.
is
is
mainly
of
fabric.
damaged
key;
saved.
length
cancelled
cancelled
,‘
1,5
intended
program
%1jA
area
the
can
by
from
for
at
machine
and
now
pressing
the
3
strengthening
the
required
finishes
the
darning
be
repeated
the
clear
display.
ri
0/1/5
key
IIiiII
III
lull
IIuIlI
Illhllhll
itI
11(11
IIlIIflI
litJ(j
Depending
pattern
the
pattern
Fig.
1:
Fig.
2:
may
If
the
move
In
key
this
again
left
on
shift
pattern
the
case
1
the
balance
type
to
using
you
one
shifts
of
the
have
fabric,
side.
this
key
You
balance
way
right.
to
move
the
2
can
you
darning
straighten
key
have
the
(8).
balance
—
to
F
1_i
I
as
54
Bartack
Program
mely
•
Lower
•
Sew
bartaclc
needle
the
1
thick
the
on
is
in
operation
3
fabrics.
the
not
the
allows
feed
bartack
dog
sewn
fabric,
once
you
(see
with
in
turn
again.
to
its
sew
page
program
entire
the
fabric,
bartacks
32).
width,
F
on
extre
1
3.
If
the
leave
and
the
repeat
C’:
FLi
Page 57

1.J
iii
t
1
ii
I
1-1
Ji
uEjj
Sewing
With
hole
buttons
•
Remove
•
Place
•
Turn
the
in
the
•
Now
now
•
Make
hole
•
The
completed.
TIP:
You
lower
on
Program
the
the
the
handwheel
button
button.
lower
held
sure
in
the
machine
can
the
feed
buttons
74
with
sewing
button
that
so
the
the
by
that
button.
sews
sew
dog.
you
no
on
the
presser
shank
needle
the
Now
a
on
buttons
can
sew
problem
foot.
the
place
towards
needle
bar
of
sew
tack
lifter;
the
also
and
easier
on
all.
at
marked.
you
enters
foot
enters
on
the
the
two
and
the
the
button
button.
program
still
and
four
position
left
the
if
you
hole
is
right
is
Sewing
a
Attach
Place
and
a
sew
buttons
on
sewing
match
it
on
with
foot
between
as
described
no.
stems
2.
the
holes
at
left.
of
the
button
•
Remove
apart
•
Wrap
the
the
stem
match
with
and
sewing
pull
the
thread
button
and
and
knot
fabric
it
Page 58

Eyelets
You
tiptronic
•
Place
•
During
The
tacks
•
Cut
The
machine
choose
key
(8).
can
the
machine
it
the
from,
sew
very
fabric
sewing,
at
the
eyelet
has
which
0
eyelets
quickly
under
press
now
end.
open.
two
with
and
sews
different
you
Program
simply.
the
the
only
can
sewing
“single
one
eyelet
change
73
of
foot
pattern”
eyelet
sizes
using
the
and
key
to
slide
(3).
I
ri
r
1
i
r:,i
r”1
56
[j1
L
Page 59

I
L
[Z
Li
Li
11
U
og
A’
06
Stretch
This
program
great
strength
and
sleeve
the
stitch
Program
Program
at
the
longest
topstitching
coats.
-
triple
straight
is
used
needed,
is
seams.
length
06
07
The
you
canbelengthened
up
to
6
stitch
edgesorlapels
3
stitch
for
heavier
need.
mm.
length
•
sewing
i.e.
inside
This
is
on
all
the
up
why
is
suitable
classic
3-5
seams
trouser
fabric,
4.5
to
Program
for
jackets
where
seams
the
mm,
fancy
0/1
longer
and
07
and
TIP:
It
Program
“single
until
you
machine
stays
in
“single
you
wish
07,
pattern”.
reach
will
the
pattern”
1’
/
to
the
use
Do
the
stop
material.
function
7/
topstitch
functions
not
last
stitch
after
the
Now
a
press
stitch,
turn
switches
/
collar
“needle
the
before
the
edge
single
the
and
fabric;
itself
down”
pattern
corner,
the
off.
,2
with
needle
the
0
?
and
key
the
/
/
2
/
.0
With
program
or
body
Unlike
program
Therefore
jackets
the
and
suits
only
it
—
can
stretch
every
is
also
coats.
03
also
processed.
be
triple
other
well
-
elastic
straight
stitch
suited
‘_
fabrics
stitch,
is
sewn
topstitching
for
-.:
for
leggings
in
this
threefold.
2
I1
57
Page 60

prog
04
Plain
stem
This
zigzag-like
seams
on
sportswear.
TIP:
This
subjected
trousers.
1,5
stitch
stretchy
stitch
to
great
stitch
is
also
,
,,
2,5
is
fabrics,
suitable
strain,
very
i.e.
A—I
•
suitable
i.e.
for
for
crotch
3-5
for
leggings
sewing
seams
sewing
and
seams
on
l1
[;j
0/1
prog
19
Stretch
The
and
hems
•
Serge
•
Fold
•
Topstitch
4—6
triple
stretch
decorative
on
T-shirts
the
up
hem
the
zigzag
triple
seam
edge
allowance.
hem
2—3
zigzag
and
of
the
from
‘i’
stitch
stitch
which
underwear.
hem.
the
is
•
is
very
right
a
highly
side.
3—5
suitable
F
[:1
rim
i;i
0/1
elastic
for
Ci
58
r1jl
pi
E:J
[i
Page 61

[!]
Li
J1j
Jj
LJ
j
A/\/\/\t
Elastic
This
highly
elastic,
•
Lap
ends
secure.
•
Mark
•
Stitch
and
stretching
•
On
skirts
prepared
stitch
elastic
i.e.
on
elastic
elastic
or
edge
underwear.
of
elastic
and
onto
elastic
trousers
with
‘iA
stitch
by
fabric
fabric
is
half
into
while
the
elastic
/JA
used
for
an
inch
quarters.
matching
sewing.
elastic
stitch.
sewing
is
sewn
and
quarter
NvV
on
stitch
to
marks
pnto
the
Honeycomb
Honeycomb
hemming,
wear
and
•
Fold
the
stitch
it.
stitch
stitch
and
is
T-shirts.
edge
very
of
is
the
used
suitable
hem
for
elastic
over
for
and
hems
double
decorative
on
under
and
over-
ii
di
U
j]
r
uJ
H
I
I
I
59
I
Page 62

fr
_;
What
For
selection
a
layers
They
you
TIP:
mend
fabric
wider
prog
is
knit
of
have
can
When
you
better
stitch
an
overlock
and
other
of
fabric
a
high
sew
them
you
use
and
widths.
>)AcIA_
>
stretch
overlock
and
finish
elasticity,
fast,
sew
overlock
blind
prevents
%!
stitch?
stitch
fabrics
stitches.
them
are
too.
foot
tunneling
These
in
more
seams,
No.
N
N
the
one
N
N
tiptronic
we
3.
It
of
join
two
operation.
durable,
recom
guides
the
seam
offers
and
the
at
prog
25
L
Closed
Program
You
can
knitted
TIP:
Make
sewing.
>
>
overlock
25
also
collars
sure
6
is
ideal
use
durably.
that
stitch
for
it
for
the
A
3
sewing
l%/dl-
sewing
cuff
0
jersey
on
is
stretched
3-5
sleeve
knit
0/1I3
fabrics.
cuffs
during
1
or
I
i1r
riJrI
r
20
Open
With
als
or
TIP:
Make
position
overlock
this
stitch
fabrics
just
sure
6
stitch
it
which
that
misses
3
is
no
do
the
the
problem
not
fray
needle
edge
0
of
to
too
in
the
3-5
join
much.
its
right-hand
fabric.
firm
0/1/3
materi
60
Page 63

I
I
1.
[
L
I
]
C
H
prog
21
J
Closed
jJ
it
you
Program
thread
wish
overlock
21.
protects
6
to
With
j
H-a
0
Cs.-..
:Q1.
I-r
stitch
with
edge
that
an
C
edge
frays
additional
against
thread
easily,
3-5
fraying.
OI1/3
select
edge
23
Pullover
Used
accessory)
open-knit
TIP:
To
joining,
slight
together
prevent
it
tension.
6
stitch
this
fabrics.
is
advisable
with
stitch
the
the
seam
3
can
to
knit-edge
even
from
add
0
be
stretching
a
woolly
foot
used
3—S
(special
for
thread
0/1
sewing
during
with
3
stitch
use
a
fabric
this
the
fabric
.1
-
-I
II.
61
Page 64

:-
-
z-
•
•
;•-•
—
/
—
(DC?)
D(D
—
CD
0
TCD
0
C
-+
c0
0)0
D
0
CD
03
0—-
0;
o
0
.CD
-E
a’
0
a
-
0)0
CD
0)
o_
0
o-
vA
A’
‘
—r
0
CD
T1
O’
C)
CD
m
(DO’
cD
Q.C)
0)
—h!•
O
C)
0
CD
CCD
C
CD
ci<
CD
M
D)
-h
D
ctCDg
<
Do0
00
0
•
OCD
—
Page 65

I
J
J
J
1’
prog
Cross
This
tive
•
Serge
•
Baste
•
Stitch
doing
stitched.
hem
highly
hems,
the
hem
over
so,
stitch
elastic
i.e.
fabric
to
the
make
on
the
I
A
stitch
T-shirts
edge.
left
hem
sure
lV%A’Aa.
very
is
and
underwear,
from
the
fabric
the
suitable
right
side.
edge
is
for
fufly
decora-
When
J
over
prog
Light
Light
stitch.
stretch
•
Sew the
•
Now
the
needle
knit
knit
It
is
fabrics,
the
right
mending
mending
very
cuff
seam
side
enters
I
stitch
suitable
i.e.
sweat
with
on
margin
of
the
close
A
stitch
for
an
fabric.
against
is
a
stretchable
over-stitching
shirts
or
sportswear.
overlock
can
be
over-stitched
Make
the
stitch.
sure
seam.
covering
cuffs
that
the
in
from
/
63
Page 66

Buttonholes
The
tiptronic
sewing
Depending
choose
grams.
Buttonholes
doubled
silk,
a
tunneling
To
threads
Mark
disappearing-ink
buttonhole
organza
paper
produce
the
programs
on
between
fabric.
backing
during
beautiful
are
ideally
starting
first
6270
the
are
generally
However,
and
to
pen
offers
to
fabric
three
rayon
prevent
sewing.
seams,
suitable.
point
and
you
choose
and
different
sewn
for
fabric,
of
the
always
different
from.
type
onto
some
it
the
material
good
buttonhole
buttonhole
of
work,
buttonhole
a
piece
materials,
is
necessary
embroidery
sew
a
you
from
with
sample
pro
to
of
i.e
r;’iI
!i
•1
r
I
ji:
ii
ho
pr
•Ei.;1
12
Note:
Before
the
guide
i.e.
so
can
use
a
that
of
the
starting
the
red
any
buttonhole
arrow
buttonhole,
foot
is
at
the
fully
first
always
to
the
red
push
front,
mark.
[
I
1
T
ri
Ii
[1
64
L
[El
r
Page 67

F
-p
J
1
Fully
1
J
Program
holes
_program
12
mm
.L
cally.
using
However,
-
how
s
J
Mark
•
slide
Place
.
buttonhole.
J
secure
•
Trim
Cut
seam
1
automatic
70
in
shirts,
is
selected,
and
You
can
the
slide
the
itisdone:
the
buttonholes
fully
forward.
fabric
the
threads.
the
the
open
ripper.
linen
is
very
blouses
width
a
change
keys
stitch
under
The
machine
beginning
buttonhole
buttonhole
suitable
and
a
buttonhole
of
4
the
and
(7
density
and
the
sewing
and
for
bed
mm
length
8).
cannot
push
will
end
with
sewing
sewing
linen.
is
foot
automatically
of
a
with
sewn
of
the
be
the
and
the
scissors
button
When
a
autornati
buttonhole
altered.
buttonhole
buttonhole.
length
sew
or
a
a
This
the
of
prog
Programmable
In
Program
width
of
the
•
Push
the
•
Sew
the
•
Press
the
sews
the
bead.
Shortly
machine
•
As
soon
same
now
secures
The
buttonholes
same
the
length
is
also
as
length,
sews
it
buttonhole
length.
program
by
pressing
cancelled.
-_>I,%
buttonholes
you
bartack
before
the
two
press
second
length
now
the
..1’
can
appears
5,
71
buttonhole
buttonhole
right-hand
“buttonhole
first
automatically
the
automatically.
are
“auto”
number.
I
lvI
determine
yourself.
slide
bead
the
key
and
the
second
sews
buttonhole
key
(3)
buttonhole
now
is
sewn
automatically
You
can
clear
fully
(3).
the
slower.
again.
stored.
in
the
cancel
key
I
the
to
the
required
Now
second
bartack
beads
The
bartack
display
then
(5),
length
front.
length.
the
buttonhole
are
machine
All
further
at
the
saved
“auto”
E1
and
machine
the
the
and
the
next
to
ST
11
65
Page 68

b
+
Self-defined
difficult
On
the
machine
beads
With
stored
the
help
the
length
(3)
“buttonhole”.
display.
The
machine
end
of
the
two
beads
The
machine
secure
If
you
wish
matically
pressing
The
point
you
cannot
buttonhole
do
of
it
again,
key
then
second
fabrics
feeds
not
turn
buttonholes
the
semiautomatic
of
the
‘Auto”
will
second
are
of
will
to
sew
switch
3.
disappears.
use
semiautomatic
has
been
bartack
such
differently
out
the
second
now
sew
buttonhole
equal
length,
now
sew
the
next
to
stored.
(semiautomatic)
as
silk
and
same
you
can
control.
bartack
disappears
slowly
bead.
press
the
second
buttonhole
fully
automatic
In
Programs
control
it
may
the
length.
correct
yourself,
from
just
As
happen
buttonhole
this
To
define
press
the
before
soon
the
key
bartack
fully
mode
71
and
until
the
with
the
as
again.
auto
that
the
and
by
72
key
Compensating
the
balance
A
further
balance
qually
If
balance
move
the
cally
If
the
balance
move
the
cally
the
left
the
machine
he
left
the
machine
he
key.
long
slide
made
slide
made
key
correction
With
buttonhole
bead
is
key
slide
key
sews,
longer.
bead
is
key
slide
key
sews,
shorter.
the
(9)
this
too
(9)
right,
i.e.
too
(9)
left,
i.e.
buttonhole
possibility
you
can
beads,
short
(Fig.
to
the
right
the
the
Left
long
(Fig.
to
the
left
the
fewer
the
left
is
also
more
bead
b),
The
bead
bead
offered
a),
push
The
reverse
will
push
farther
reverse
will
length
correct
farther
automati
the
automati
by
the
une
the
you
stitches
you
stitches
with
Ii
j1
66
[T
Page 69

LJ
LZ]
[TJ
ButtonhoJe
J
To
[
produce
sportswear,
all
For
important,
buttonhole.
•
Place
pull
front
•
Pull
•
Push
the
•
Pull
buttonhole
with
highly
we
stretchable
in
order
the
gimp
the
thread
threads
the
the
buttonhole
buttonhole.
the
loopofthe
and
recommend
gimp
durable
fabrics,
to
thread
ends
in
to
cut
thread
avoid
over
under
the
slide
girnp
off
the loose
too,
buttonholes,
using
a
gimp
a
gimp
overstretching
the
back
sewing
the
fully
and
forward,
into
thread
right
left
thread
i.e..
thread
ridge
foot
of
then
the
ends.
for
thread.
is
of
the
A
to
ridge
very
and
the
sew
Stretch
Program
in
also
i.e.innational
You
buttonhole
•
•
B.
•
•
The
buttonholes
same
cancel
then
buttonhole
stretchable
Push
Sew
length.
Press
sews
Shortly
automatically
As
same
now
secures
72
used
he
can
determine
yourself.
the
butonhole
first
the
the
buttonhole
the
first
before
soon
as
length,
sews
it
buttonhole
length.
the
saved
“Auto”
is
is
very
useful
materials,
for
making
costume
the
slide
buttonhole
bartack
the
second
sews
slower.
the
two
buttonhole
press
second
length
now
length
deleted.
key
is
sewn
appears
the
automatically.
are
“Auto”
also
for
i.e.
in
decorative
blouses.
length
fully
bead
key
(3).
and
the
bartack
again.
(3)
buttonhole
now
stored.
automatically
in
pressing
by
sewing
jogging
and
width
to
the
at
the
The
second
beads
the
buttonholes
suits.
front
required
bead.
machine
are
machine
All
further
clear
of
at
It
the
the
and
the
You
buttonholes,
machine
the
The
bartack
display.
the
can
now
can
key,
2
67
Page 70

I
1
Needle
In
order
and
bobbin
adapted
stitches
Check
interlace
of
the
If
the
means
lies
on
set
too
To
adjust
page
thread
to
to
is
the
of
two
interlace
the
the
loose.
the
24.
tension
obtain
thread
each
other.
3
to
5.
tension
the
two
fabric
layers.
lies
needle
underside,
bobbin
perfect
tensions
using
threads
on
the
thread
the
thread
The
a
top
tension
needle
sewing
must
normal
wide
must
side
tension
results,
be
setting
zigzag
lie
of
is
too
thread
please
the
correctly
stitch.
in
the
the
fabric,
tight
tension
needle
for
utility
The
middle
If
it
refer
this
is
to
Topstitching
With
Program
position
foot
along
you
wish
simply
guide
the
needle
guide
is
screw
inserted
F.
so
the
to
plate,
02
that
you
fabric
topstitch
the
fabric
or
into
you
use
can
edge
at
hole
can
always
a
along
edge
change
for
topstitching
wider
the
guide
C
and
the
guide
width
guide
is
needle
the
than
marks
8.
The
secured
sewing
work.
this,
on
edge
with
11
If
1:41
r
68
Sewing
To
ensure
seam
the
same
sewing
aid
correct
we
recommend
thickness
foot
for
to
thick
feeding
as
support
seams
placing
the
it
at
the
beginning
a
piece
workpiece
of
under
of
fabric
the
the
F
of
[
Jr
Page 71

E1
•i
1
Sewing
With
but
Using
touchtohems
knitted
easily.
widths.
the
also
hems
twin
make
the
articles
Twin
The
twin
with
needle
topstitch
needle
on
or
needles
most
the
you
you
stretch
cycling
are
common
needle
twin
can
seams.
can
materials
shorts
available
is
2.5
not
lend
both
in
mm.
embroider,
only
a
professional
such
quickly
different
as
T-shirts,
and
•
First
•
Then
fabric.
•
Finally,
the
TIP:
to
baste
seam.
On
fold
stitch
trim
difficult
the
up
the
the
hem
allowance
hem
hem
overlapping
fabrics
before
from
the
such
as
topstitching.
and
right
hem
rib
20
press.
side
edge
knits
of
back
it
is
the
to
easier
Threading
Replace
•
Push
spool
•
Tension
slot
along
right
the
on
on
(21).
the
the
sewing
the
each
disk
Make
disk
twin
second
holder.
C
is
sure
to
needle
needle
spool
inside
the
that
left
with
the
one
and
a
holder
left-hand
thread
one
twin
and
is
thread
needle.
place
threading
guided
to
a
the
•
Continue
making
tangled.
Pull
through
needles.
the
to
insert
sure
threads
thread
that
the
the
the
to
guide
threads
threads
right
(20)
and
and
in
do
the
not
to
the
thread
normal
become
left
the
way
.
Page 72

prog
>
>
-‘
A
00
Gathering
With
Program
can
gather
and
neat
gathering
•
Mark
and
stitch
inches
a
You
foot
width
the
can
with
sleeves,
even
seams.
first
of
thread
now
00
gathers
along
away
straight
atastitch
skirts
line
on
it.
at
stitch
using
6
you
the
Leave
the
the
the
stitch
or
valances.
should
right
about
end.
other
length
row
first
sew
side
four
one
3-5
of6mm
To
obtain
two
of
the
or
five
at
a
sewing-
as
a
guide.
0/1
you
or
three
fabric
Now
•
threads.
yourself.
•
Finally,
the
gather
knot
gather.
You
the
fabric
determine
the
thread
by
the
ends
pulling
amount
together
the
bottom
of
gather
to
secure
70
Page 73

7
Gathering
athering
with
II
wound
a
Mark
fabric.
the
Make
I
leave
then
needle
Raise
thread
Lower
stitches,
thread
From
gather
thread.
After
gather
Finally,
with
sleeves
elastic
onto
first
the
few
a
must
sewing
the
around
the
but
until
then
by
sewing
by
knot
elastic
threads.
the
gathering
staing
the
be
sewing
do
these
you
on
amount
the
you
pulling
the
or
bobbin.
needle
the
at
foot
the
foot
not
are
determine
can
both
threads
threads
waist
The
stitches
down
middle
and
needle.
again
pull
sewn.
you
still
elastic
seams
elastic
row
place
the
pull
change
and
the
on
using
the
in
of
and
ends
the
on
threads.
the
no
is
thread
Program
fabric.
the
the
sew
of
amount
the
the
elastic.
problem
wrong
sewing
elastic
a
the
elastic
amount
must
side
The
few
elastic
of
at
not
24,
foot.
more
of
also
grooves
sewing
the
accessory)
in
(special
evenly
foot
The
during
The
for
elastic
pintuck
gathering.
TIP:
ideal
the
of
this
action.
is
foot
guide
71
Page 74

prog
__
[
I:
1”
F
C)
C.)
0
2
U,
00
Shirring
fine
With
silk
or
shirring
additional
hand.
oy
than
normal
bobbin
tighter
greater
with
and
fabrics
with
Since
case
you
the
bobbin
set
shirring
-
&astic
light
you
elastic
elastic
bobuin
must
the
3—4
threads
materials
make
can
thread
case
threads
threads,
set
be
bobbin
effect
and
such
beautiful
you
wind
the
very
thread
you
should
are
tension
loose.
obtain.
3—5
as
the
nucli
However,
tension
batiste,
elastic
shirring
use
thicker
on
the
0/1
ruyon
an
thread
tIre
For
the
sew
First
•
gather.
Mark
•
stitch
and
can
•
You
fool
width
•
If
you
have
you
length
irregular
be
the
Knot
•
seamonthe
the
sew
during
rowtodetermine
test
a
ne
first
along
stitch
now
away
several
stretch
to
sewiilcj,
threads
reverse
on
it.
the
using
rows,
the
beginning
at
right
the
ether
Iirst
the
one
fabrictoits
otherwise
side.
the
side
rowate
one
beside
the
and
amount
of
as
the
oi
shining
end
the
sewing
a
other,
iginal
of
fubi
urIc.
the
ci
ic
—
will
I,
Ii
U
72
-,fl
[I
Page 75

p
rog
I
Darning
the
Attach
Set
the
pinofthe
you
do
presser
Now
tighten
Darning
Lower
the
the
rear. This
notch
B
•
Place
•
Lower
•
Drawupthe
when
•
Darn
over
fabric evenly
doing
prevents
•
When
area,
turn
the
damaged
You
determine
yourself
TIP:
If
small
means
you
straight
with
darning
needleatits
darning
this,
guide
bar.
Wire
screw
position:
presser
positions
(darning
the
the
you
so,
you
by
darning
feed dog
bobbin
start
the
in
move
tearing
have
the
fabric
area
the
moving
knots
have
position).
sewing.
damaged
the
been
stitch
foot:
highest
foot
fork
mustbebehind
E
D.
bar
work
the
of
the
stitched
again.
stitch
the
appearonthe underside,
position
fully
G
lifter
the
(see
thread
required direction.
fabricinshallow
darn
90 degrees
length
fabric
moving
hole
into
itself
places
set
A
and
push
presser
in
page
areabymoving
evenly
the
and
Inter.
back
the
bar
darning
32).
hold
over
and
for
this
and
fabric
and
C.
around
lifter
the
curves.
the
darn
forth.
push
When
screw
lightly
it
hoop.
When
work
too
tne
the
F.
to
into
threads
the
This
darning
over
this
slowly.
t
-i—_
---..
zZ
73
Page 76

prog
3r
:‘j
i
jf
r
l
t/”ye;
ttyt
;,
.
29
Automatic
Program
damaged
Stitch
•
Iength.
•
Press
sewing
length
saved
The
as
often
program
The
29
over
the
the
is
you
6
darning
is
areas
the
reveise
darning
thus
darning
need.
is
I
I’
‘ii
mainly
of
damaged
saved.
cancelled
II
II
‘ii
I
1,5
fabric.
key,
length
intended
area
the
program
can
by
•
machine
nowberegealed
piessin
for
strengthening
at
the
the
and
3
required
finishes
the
n
Iii
Iii
Il
1
I
I
‘illi’
liJ
darning
clear
0/1
as
key.
13
Darning
Darning
means
•
Sew
until
sure
with
of
over
it
the
with
is
6
elastic
elastic
repairing
the
well
stitch
0,2—1
stitch
damaged
damacred
covered,
rows
stitch
Wher
overlap
is
area
•
also
fabric
with
i
each
doing
0;
,
3—5
SUitable
very
a
stitches
of
rows
SC),
make
other
:
ELI
1
type
the
Denending
pattern
pattern
the
Fig.
Fig.
74
on
shift
may
again
pattern
the
1:
It
move
In
this
2:
left.
key
the
case
one
to
using
shifts
balance
you
2
of
material,
You
side.
balance
the
way
this
right.
ke
iavtomove
the
can
you
darning
stiaighten
key
(9).
have
the
to
r
balance
C
Page 77

prog
“90
‘4.
I
i—-
S
prog
A
13
Sewing
best
The
damaged
•
Baste
damaged
•
Over-stitch
•
Now
seam
In
TIP:
‘needle
the
on
way
the
cut
on
order
6
patches
area
piece
area
back
the
down”
to
its
to
0,2-1
darn
with
of
from
edges
the
reverse
turn
larger
a
piece
new
tne
with
damaged
side.
the
at
function.
•
holes
of
new
material
right
elastic
material
corners
side.
3—5
is
to
material.
onto
stitch.
more
cover
the
up
easily.
is
it
provides
bigger
the
close
Oil
easier
of
of
length
the
a
the
to
0’l
the
the
to
use
13
Darning
For
tears,
to
place
fabric.
much
•
Place
fabric.
than
•
Now
of
•
Cut
the
tears
a
This
better
a
The
the
over-stitch
the
tear.
back
edge.
6
frayed
piece
strengthens
darn.
piece
piece
damaged
material
the
edges
of
of
0,2-1
material
material
must
area.
the
damaged
or
the
always
on
•
smaller
on
fabric
on
the
holes
the
underside
and
the
underside
be
a
area
underside
3—5
little
by
75
Page 78

___
_____
/
/
/
/
I
Inserting
pro
00
[
-
---1
3
•
Attach
•
Place
.
3-5
4
the
Program
required
-
•
•:
Sewing
There
we
recommend
both
led
on
avaiinble
such
plastic
all
For
close
up
zipper
the
left
are
sides,
one
as
zippers
types
foot
or
zippers
in
different
and
side.
in
jeans
to
can
right,
shops
of
the
ways
inserting
for
men’s
Difierent
and
we
recommend
for
all
zippers
teeth
attached
be
aepending
sew
to
the
or
ladies
types
stores.
other
materials.
itisimportant
of
the
zipper.
to
or
in
zipper
of
For
metal
the
toe
zippers.
concealed
slacks
zippers
ii
fir
zippers,
to
This
foot
n
inthod
concea
are
ateriels
sew
is
why
mIner
of
For
skirts
and
right
the
to
on
•
•
Sew
fabric,
Now
of
the
teeth
in
you
zippers
the
the
half
raise
zipper
zipper
zipper
run
at
02
fun
positon
of
the
can
and
conceaied
foot
Linder
the
can
the
zipper,
sewing
sew
stitch
the
side
set
to
rest
the
the
of
foot
the
on
sewing
the
the
leave
and
of
crosswise
both
right
root.
needie
the
the
side.
foot
close
seam
sides
Uninq
tin’
a’,
needle
the
scan
to
so
that
in
zipper
the
the
end
insertion.
Using
one
of
1
3
set
the
the
zipper
right
the
changed
needle
needie
teeth.
side,
to
must
the
the
only
so
the
that
It
needle
right.
be
the
needle
it
enters
sewing
If
the
moved
positions
position
foot
to
close
foot
the
must
is
attached
to
is
left
vot
the
engaged
only
car
edue
he
left,
also
of
on
the
76
Page 79

•
•
•
Sew
same
Stop
leave
foot
You
the
distance.
shortly
thu
arid
can
second
needle
open
now
before
the
sew
half
in
zipper.
to
the
the
of
the
the
end
fabric.
end
zipper
of
the
Raise
of
the
parallel
seam
the
seam.
at
and
sewing
I,
the
N
C)
-
Trouser
•
•
•
•
•
Iron
an
overlap
Baste
that
Attach
needle
Stitch
Shortly
zipper
the
the
zippers
seam
the
teeth
the
at
close
before
and
of
zipper
zipper
the
along
finish
margin
about
under
are
still
toot
required
the
the
end
sewing
over,
1/8’.
the
visible.
on
position.
edge
of
making
overlapping
the
right
of
the
seanr
the
seam.
the
sure
and
zipper.
open
edge
set
there
the
the
•
is
so
Close
onto
•
Afterwards
TIP:
To
using
the
the
achieve
the
other
euge
zipper
stitch
and
zipper
along
accurate
guide.
baste
half
seams
tIre
the
basted
we
overlap
seam,
recumniend
evenly
77
Page 80

__
prog
1
____
I
I1
-
oo
Roll
hemming
With
the
silk
fabrics
without
Hemming
produces
•
Fold
per
•
Place
toot
•
Leave
foot
hemmer
•
Lower
evenly
make
side
hainq
the
foid>.
the
and
the
and
the
sure
of
-
hemmer
or
secures
a
neat
fabric
folded
sew
needle
push
foot.
sewing
into
the
the
sewinq
the
foot
valances
to
roil
the
and
edge
fabric
a
few
tue
hemmer
tabric
durable
sttclles
in
the
fabric
foot
feet.
you
with
the
edges
over
edge
and
does
can
ecicics
twice
tam
into
Toot.
=
no
against
ecige
under
c.
tile
guide
When
not
roll
hem
proolem
ucforehan
finish
cibout
Kdise
scroll
the
run
under
3-5.7
blouses
at
frayinq
1
the
the
of
fabric
doing
all
and
1
6”
heroine
sewn
the
edqe
so,
the
and
rqhf
I
iF
HLE
E
E
C)
0
75
TIP:
iooks
For
belier
silk
avonorchiffon
wtn
zigzag
sutcnes.
fabrics,
r
-
r
i
oiled
a
em
-
‘
L
L[
r
1
Page 81

‘;:‘
.‘
‘.‘•.
—
-
-
S
—
—
,.
—
!r:;:
(
....
prog
4
00
Lace
inserts
,-
—-.
.,.,,
I
—
;,
‘V
.L
•‘
You
can
wear
•
First
•
Stitch
•
Cut
and
•
Stitch
dense
•
Trim
Lace
edges
Lace
trimmings
designing
This
is
•
First
•
Stitch
corner.
•
Fold
•
All
other
or
haste
open
iron
the
the
serge
the
the
produce
other
both
the
it
over
zigzag
excess
arid
way
lace
corner
sides
the
edges
over
both
the
t
2,5
beautiful
a
childrens
lace
of
fabric
to
the
edges
stitches
fabric.
provide
enhancing
to
do
it:
raw
edges.
onto
the
and
are
clone
the
to
the
under
side.
many
stitch
clotries
riqht
lace
the
of
the
home
right
over
in
the
•
effect
at
lace
lace
new
decor
side
same
3-5
on
witri
lace
side
a
narrow
at
with
ways
up
it
diagonally.
christening
inserts.
of
the
fabric
width.
the
middle
small
of
faurics.
to
tire
first
way.
0
J
/]
and
•
_,I
4.
-(1.1
—‘I’.
‘1’
41
‘“.4
I
i
i
I
4
V
-
79
Page 82

_________
________________
-L
‘,
I
w
--rj
C,
rog
p
16
Shell
edging
Shell
edging
suchassilk
shell
Serge
over
During
under
This
ettect.
as
you
to
provides
an
edgingispulled
the
the
used
gntei
tne
•
•
4,5
is
and
edge
set
raw
the
left.
sewing,
sewing
very
tIre
rayon
finish
edge
make
more
a
1.5
effective
materials.
needle
and
toot
__
for thin,
underwesi.
on
threaci
in.
roil
sure
that
half
at
proirment
•
Itisfrequently
tension
seam
the
the
foot
the
shell
4—5
soft
too.
fabric
fabrics
The
the
allowance
runs
width
edging
/
0
farther
only
If
you
you
pretty
a
cotton
light
addacolored
can
strengthen
contrast
thiead
fabi
ic
pearl
the
at
the
can
yet
underneath
suet
same
aiso
cotton
thread
edging
time
place
and
Instead
a
difierent
the
at
of
TIP:
edge
obtain
pearl
a
1
colored
I
on
Page 83

Appicaton
exarnpes
Decorative
traditiona
Pages
81
stitches
ernbrode’
101
o
and
techniques
2
C!)
Page 84

Contents
General
Combined
Embroidery
notes
borders
with
twin
needle
:‘
rV
84
Page
85
Page
Page
86
Large-area
cross
Leather
Suspenders
Alphabet
stitch
embroidery
Monograms
Appliqué
Linen
Ri
Hem
embroidery
eli
cli
stitching
Eyelet
Quilting
u
e
embroidery
embroidery,
(braces)
work
Page
Page
Page
Page
Page
Page
Page
Page
Pages
Pages
Pages
87
88
89
90
91
92
93
94
95—97
98,
100,
99
101
Page 85

El
a
I’-’
r
_,L
C
General
Embroidery
With
tie
easy
to
Thread
In
general
be
looser
cuicitiou
In
tihtenecl
nobum
censistent
rance
of
Sewing
Sewing
Cactioni
ioihr
eideR’
turns
ni
notes
right
come
tension
the
than
by
case
qualty
the
feet
foot
be
gilt
on
too,
is
tips
up
with
thread
for
the
bobbin
turning
little
a
embroidery
no
2
Dual
snice
otherwise
Ut;
shifted.
embroidery
an
art
id
a
tricks
benutifLil
tension
sowing
thread
the
to
the
and
a
is
nest
Feed
must
that
(±
large
right.
three
design
suited
must
re
v.’ovu,
embroidery
fur
3>
tension
knu
This
hmensinnil
Isee
for
I’
the
ci
be
earned
it
emla
cminr
1
I
inst
rIch
screw
will
page
cmlii
hrsenqaged
iibr
oilieR
is
unite
he
result
oppea
21
oidnrv
pat
first.
resLilts,
must
on
m
during
the
a
Ralance
Every
embroidery
ira
ni
length
However,
jersey,
adjust
the
page
10).
density
Reinforcing
Errilrroiciery
or
urck,
U
Marry
materials
tIre
embroidered
Therefore
away
paper
In
this
way
enihroiderrrrg
Wate—solihic
vyinne
wbicl
embroider
stal’iilizer
cloth.
Alternatively
with
the
can
be
ory
very
cider
er’nt)roldierr
coriiparecl
after
frrni
without
if
silk
or
settings
in
nid
is
easier
we
ritnterra
1
on
can
ci
cipplyirru
and
ng,
and
you
embroider
heavy
mant
pattern
the
material
on
any
when
tend
stitches
reconrmend
rider
u
it
can
stabilizer
i
you
place
Alter
be
removed
“Sew
Perfect”
to
it
for
most
placing
tire
gel
pattern
width
setting
wnol
wih
r
tIre
cases
oatturn
width
material,
the
to
corer
are
tIre
iii
ea
sb
Its
hi’
rerlinved
is
ur’i
eriihrorrlerrnq
the
riraterual
those
on
tin’
r’riaten
paper
can
is
stored
on
ditlicult
it
may
balance
can
hc
no
nratler
n
inter
act,
set
to
glnce
to
he
cci
ri
In’
a
trarrspcureirr
the
iruaterral
easily
can
The
reIn’
ot
stabilizinci
niatc,rir
ials
you
underneath
be
washed
witl
ii
tbc’
he
rrucessar
icucrtl
altered
cil
especially
very
a
enrbr
avoided
very
the
nSnio
be
ts
It
i
its
rnac’l
mater
slide
stitch
whether
is
reinforced.
dense.
niec
ordered
easily
gniiittnie
and
water
i
rrioistenrril
r
erriforcr
nI
tIe’
spray.
hecorncrs
can
emhon
After
out
opti
key
wner
01
After
snlrulilr
eanily
uric
als
gil
to
(sue
rear
on
‘ii
Let
toe
i.e.
ru
__1
i
-
L
r
-J
Page 86

Ci
ill
•0nibined
he
VOU
v
iibining
nzai
are
-
Howevet,
s.
ce
borders
following
con
different
rayon
available
of
embruider
give
we
create
embroidery
embroidery
in
only
:‘
•
.*/
-41
jAt
/fl
a
C
Ai\
zA1
A-
you
borders
many
use
work.
•,/tt\
4.
threads
one
-t
H
-
-
a
o
colors
throao
/‘
/
\.
—
few
examples
width
any
piograms.
are
and
,i
J
-
-
ve’
different
size
bt
Coats
suitable
for
one
of
-
f
‘
:-
.
.
V
H
-
A
,
-
-
--
y
j,
i.
A
-
y
-
-k
‘-
-yr
I
!
r.,
-
t
o
Ci
additional
—an
1’
variety
effects
Thisisavaiiable
of
hades
bore
metallic
use
your
embroidery
Ptaff
deale’ina
85
Page 87

Page 88

F
ii1
‘.
r
!:
ci
e
It
i1
I
by
the
do
.11
El,
for
J1
Embroidering
ou
?
using
beautiful
nation.
Only
these
Note:
As
soon
twin
not
width
(6)
will
mum
the
pattern
can
the
use
embroidery
needle
use
the
using
go
stitch
achieve
twin
borders
a
twin
as
embroidery
indicator
twin
the
out
width
using
with
additional
needle.
can
needle
needle.
stitch
in
some
has
the
the
be
designs.
(6)
width
been
twin
twin
embroider-v
The
illustrations
made
with
a
programs
lights
If
you
slide
programs.
set
needle.
needle
with
width
up.
reduce
key
and
are
in
Then
‘/011
effects
show
a
little
of
2.5
selected
this
the
(7),
an
can
what
imaqi
mm
case
stitch
indicator
opti
sew
I
I
tf.
?
I
4-
‘1)
I...
—
)
.
r
I
i-i
it
‘Ii
-
-
TI
;
IL
9.
I’.
.
ii
‘
05;
:
El
Er
41
Ii
iHI
20
Threading
•
Insert
•
Attach
spool
•
In
tension
YOLI
over
•
Continue
sure
•
Pull
(20)
the
pass
the
the
tIre
of
left
disk
tension
the
threads
threads
and
the
twin
twin
second
thread
threading
C
one
ciisk
threading
thread
needle.
on
During
thread
are
right
the
needle
spool
each
C
slot
threading.
left
in
the
not
twisted
and
needles.
holder
holder.
(21)
and
usual
left
one
into
you
and
tin
way,
with
thread
will
nial.e
end
place
find
but
each
sure
i
iqht
make
guide
one
tl
other.
rat
ri
:
EL1
—t
86
UI
I
/
ii
J/
—
I
Page 89

•1
a’
a.
•
j
:
,,
,i-
Large-area
combining
By
embroider
very
iC
Transfer
stencil.
on
)ased
Apply
•
of
side
•
Transfer
Eniijroioor
•
dots
the
Embroider
liP;
single
make
easily
3
attern.
embroidery
individual
large-area
embroidery
embroidery
equal-sided
an
fabric.
embroidery
the
the
with
for
or
pentagon
Program
suitable
the
The
iron-on
the
the
pattern and
up
the
programs
borders.
this.
pattern
tear-away
64.
pentagon
‘needle
pentagon
Geometric
illustrated
pentagon.
stabilizei
pattern.
wit.
using
down”.
by
you
the
to
above
Pr’ieran
the
In
simply
can
shapes
fabric
to
the
48
keys
this
turning
aso
was
way
using
wrong
tnd
foi
you
the
Cross-stitch
matter
No
blouses
to
simple
tiptronic,
the
Even
hand.
before,
work
problem
different
little
with
•
Place
Mark
•
tailoring
embroider
Press
69.
each
•
Pull
the
eti
tog
The
TIP:
clone
be
i
on
the
miii).
(3
whether
home
or
make
if
all.
at
sizes,
effort.
stabilizer
pattern
the
chalk
the
pahlern,
threads
or.
border
with
arrow
decor,
with
they
and
you
these
Since
you
or
the
iii
it
“single
embroidery
a
wide
border
you
the
have
borders
the
can
under
as
disappear
desired
to
the
cioss
embroider
as
can
if
done
border
they
be
graphic
cross-stitch
look
never
program
achieve
the
shown
linen
in
different
tire
mg-ink
color
pattern’
with
key
and
back
the
on
i
stitci
narrowercioss-stitch
o
tapes
program
are
cross-stitch
made
can
be
border.
illustration
pen,
using
the
at
knot
wide
5
to
81
critts,
as
desiqns
sewn
with
set
effects
nncl
Pioqiani
end
them
border
nind
at
of
by
on
of
and
are
with
can
.0
-Ju
C)
0
I
E
C)
cQ
‘-
i0
4
87
Page 90

4-.
0
0
C
Embroidering
t’\/ith
the
no
oroblem
Since
leather
iron-on
under
short,
easily.
Embroidering
using
Teflon
the
leather
needle
Please
remain
it,
because
a
Teflon
covering
leather.
and
or
note
visible
backing
tiptronic
The
Depending
thread,
needle
a
that
leather
at
all.
stretches
stitch
leather
leather
sewing
allows
needle
when
or
you
place
length
we
with
ripping
can
embroider
easily,
two
should
tears
between
can
be
foot
(special
the
foot
on
the
recommend
large
a
penetration
out
you
layers
made
to
thickness
eye
tire
leather
should
of
stabilizer
not
be
stitcl
even
accessory).
shoe
rising
li
30
holes
thread.
use
set
easier
easily
of
a
Nl.
in
with
an
too
holes
The
over
the
special
leather
by
Tins
•
Apply
menacing.
•
Embroider
center
•
Sew
single
•
Attach
thread
and
•
Finally,
the
TIP:
eyelets
is
the
the
riensity)
cordinci
Leave
which
way
iron-on
Program
of
the
clots
pattern
tire
cording
with
Proqram
embroider
seam
enough
are
to
or
belt.
with
key).
punched
do
it:
tear-awn
62
program
foot
50
the
with
space
stabilizer
(extended)
64
and
over-stitch
(reduced
triangular
Program
in
the
m
later.
over
(do
not
in
stitch
border
61
-
embroidery
as
an
the
forget
the
omp
width
parallel
for
the
the
To
•
II
—
H
1
LI
E
LI
2
w
F
Page 91

——
suspenders
no
::n
_mbroider
the
•
Cur
suspenders
tear-away
or
•
Embroider
with
Progranr
•
[niuroider
Program
with
•
Eirrbroider
the
and
•
Now
finish
fasteners.
with
custom
tlmm
suspenders
we
stabilizer
over
the
the
cope
the
a
difference
make
exactly
recommend
the
50.
row
of
61
circles
finish
suspenders
a
parr
to
to
shape.
as
middle
triangles
with
with
o
yoir
To
applyrng
an
interfacrng.
of
eyelet
Program
and
sssponders
own
taste
2
strengthen
the
sLispendors
parallel
Program
55
sew
on
an
to
the
and
the
ron-on
this
73
strap
89
Page 92

El
-1
El
El
rf
Alphabet
With
your
or
even
without
personal
a
make
Cl)
I
0)
towels,
The
a)
tion
a
U,
U,
tiptronic
entire
any
touch
unmistakable
scarves
alphabet
marks
texts
problem
etc
also
you
in
at
not
only
presents
contains
can
‘wi
a
piotessional
all
in
to
numbers
this
your
out
te”
clothes
of
initials,
way
terry
and
manner
you
cloth
names
can
but
also
punclul
give
Use
the
alphabet.
sewn
Use
the
chesi
red
selected
othei
for
unit
Letter
The
otters
to
mm
6
sequence
program
The
p
ograni
a
Iphan
with
digits.
can
can
They
in
letter
the
he
can
[lie
immediately.
numbers
size
key
key
umeric
prograni
are
altered
be
sewn
M
for
“A”
[or
cha
selected
be
combined
memory
tens
is
rlisplayed
unit
i
actei
key
with
using
with
tsee
diqits
digits
[or
slide
a
pattern
Ni
tens
the
to
pages
to
select
and
to
select
mber
digits,
program
key
width
a
word
41
con
0
(7).
—43).
the
lie
the
is
till
key
of
up
-î
90
Page 93

iiog
Mo
matter
NO
ebric,
monogram
an
tree-hand
the
1
Transfer
•
the
to
Lowei
•
see
01500
•
rabric.
Frame
•
uroider
darning
the
Knot
•
Any
If
TIP:
stitches
“
terry
Di
with
lawn
srwn
wth
terry
:ht
rams
whether
with
the
guiding
beginning.
the
areatobe
feed
the
32
pages
pi000
a
faorio
the
it
vith
threads
the
remaining
sew
you
wii
clotn
narrow
wider
a
cloTh
you
darning
initials
any
however
with
initials
embroidered.
and
dog
and
73).
writer-soluble
of
inanenthroicler’
Program
position.
and
stabilizer
but
fast
more
be
monogrum
the
zigzag
zigzag
are
oops
work
foot
the
attach
50.
pull
move
dense.
stitches
stitch.
properly
on
and
of
needs
off
dissolved
is
clothorwoven
terry
Program
your
own
a
little
50
design.
practice
disappearing—ink
the
darning
stabilizer
Do
riot
hoop
forget
on
and
the stabilizer
ii
waterL
the
niList
materia
and
This
first
makes
sow:
be
then
covered.
to
pro
ovei
sure
you
foot
thr
pen
em
LISO
Block
feed
hand
stitch
•
Apply
neat
•
Mark
•
Now
50
capitals
dog
guiding
along
iron
h
the
embroider
does
is
the
on
monogram
are
not
required.
marked
backing
little
easier
a
needtobe
lines
or
on
the
marked
All
place
the
to
lowered,
you
using
fabric.
lines
embroider.
have
to
Program
stabilizer
with
rio
i.e.
rIo
undci
Program
The
free
is
50
0
E
I
0
0
91
Page 94

—
It’
9-
0.
0
Appliqué
Apphques
beautiful
stitched
accessory),
underside
can
also
foot
effect
seam
for
be
are
with
because
the
Sewn
quickl
1
You
can
tIre
it
zigzag
witl
niade
n
aenlique
has
seam.
rout
akc
a
any
and
a
special
Curves
problem
always
perfect,
foot
cutout
produce
densely
special
and
at
on
corners
alL
the
a
Prepare
SketcI
base
the
Removc
material
Now
ertrs
rread
U
be
down
an
tire
TIP:
clue
Air
reached
09
1
5
Usrrrc:
sirr
base
you
WI
even
omer
Stitch
stitcl
orrdn
Thrs
riur
tire
r,lrtrr.,
your
r
the
materral.
material
the
and
carr
wrth
the
run
you
‘
function
sean
edqr’
no.
a
r,l
by
strtct
aird
open
lOis
applique
motif
paper
iron
start
the
smaller
ft
r.
50
r’fl
rrsrrrq
srrorrkr
eirdtlr
a
teat
Iron
and
it
sewrnq
ziqzag
ad
to
I
Also
Sn
U
is
‘ct
tin
ai
rlvre
penuroi
woi
you
paper
on
hackinq
onto
tIre
stitch
the
stitch
i
a
curve
you
dli
rr
rake
rat
no
oartrcularlv
S
a
crt
quilt
rave
of
approxrnrcrtelt
lout
even
Ic
as
wish
backed
the
from
base
over-stitch
The
lenqth
lrS(
turn
sure
In
ayirrcr
lirit
and
a
tspr
rue
folloWS.
to
attach
frisible
appliqué
the
fabric.
thinner
tIre
toe
tire
needle
occr
line
viol
applrqrre
ninth
clot
(See
material
applique
all
settrr
needle
fabric
irs
utriul
l
din
stitch
of
rnuuhly
3.0
;lcce:,srrn
rtirj
on
web
the
rq
arid
passes
later.
Ire
nrrrr
your
on
outside
sI
cold
appli
no
sew
1
ci
:i
I
71.
Page 95

LineI
1
pn
huique
•
bed
-
i
•.e
.ujlurt\
c
enibroidery
uroiciery
en
and
its
to
linen
cliheront
which
table
simple
enibrodert
More
stitches
IS
C
ear
in
linen
production
moi
and
web-
\JCP
ir
times
production.
rapidly
is
variants
and
combinations
and
<nown
was
exquisit
mci
ae
and
widely
casino
creaou
o
popular
used
appea
in
them
Transfer
•
pr
•
Use
Ei
•
choice.
patiCi
Knot
•
tue
n
to
a
nbroidei
the
stabilize.
your
the
stabilizer
It
is
i’
I
and
threads
pattern
right
side
an
as
pattern
your
recommended
needle
or
using
the
of
underlay
with
down
the
tI
fabric.
to
inverse
in
clisappeai
progiants
use
keys
sine
iiig
ink
0
ni
youi
single
the
to
bus
and
i
eiyiovc
0
I
0)
0)
-J
93
Page 96

Richel
This
is
•
Transfer
fahr’1c
•
Then
under
the
To
•
around
(at
easy
ieu
vet’
7
fabric
mae
about
to
using
place
the
all
artiste
make
your
area
and
the
contours
1
form
with
pattern
the
disappearing-ink
two
layers
to
be
stabilizer
embi
oider’,’
nm
stitch
of
ba
OLH
sewmq
onto
of
waler
embroidered
in
11010
twice
tenctlr
and
the
air
wit!
it
c-’ulrt
machine.
right
side
pen.
soluble
and
ernhuider’
1
stable,
straight
embroider’
1
of
the
stabilizer
tiqhc’n
hoop
sew
stitch
00
•
Ca
will
stabilizer.
•
Embroider
strtch.
•
Till’
much
•
Finally
piece
efull’1
form
sb
more
dissolve
of
cut
nut
the
cutouts,
the
lii
i/El
ii
shape
emhrordery
the
contours
ovides
and
the
stahrliznr
Is!
mc
but
th
stability
is
finished.
do
with
troll
part
not
in
a
i
the
cut
dense
ut
Ill
water,
a
c’,
awal
7igzaq
WOl
1111!
F
L
1
s
that
tIe’
I
will
I
voi
ii
r
I
Page 97

emstitching
embroidery
is
wever,
titching
easier.
iid
are
There
disposal;
u
o
anging
need
on
needle,
iormal
hemstilching
1
you
ohich
is
:iiead
With
‘tread
:otronic
techniques.
various
technique
for
only
with
hand-made
the tiptronic
two specific
and
wing
length
needle.
size
you
80,
stitch
a
materialiscoarse-weave
can
remove
very
suitable,
the
hemstitching
6270
you
can
is
very
embrnidery
6270
hemstitching
can
obtain
and
width
For
very
canbeused
thieads
single
i.e.
embioicic
programsofyour
produce
well
lnowu.
is
1HLICi1
proqranis
new
ehocts
For
hemstitchiuq
thin
fabric
Best
linen
easily.
darning
or
hemstitrhing
Hem
qLuckei
at
by
a
hod
ci
h
Cotton
with
0
as
oin
95
Page 98

I.”*’
1
e;.øu:$
‘I
Fagoting:
•
Draw
the
in
hand
edges.
at
the
this
threads
as
•
Embroider
fabric
enter
threads:
C.)
Cl)
I
at
hemstitchinq
with
Program
When
side
of
the
will
bunch
the
you
required
67
do
edges
the
or
68
this
the
into
threads.
width
along
needle
the
the
diawn
same
both
mUst
Traditiona’
•
Using
a
piece
•
Now
and
draw
your
hiemstitch
•
Oveostitch
selected
must
thieads
“single
of
von
program.
enter
at
hemstitching
pattern’
scrap
fabric
can
count
the
required
work.
the
remaining
When
close
to
both
sides.
the
ott
sedU
the
tllrr’dds
nunibur
threads
you
udgea
Erogrom
of
do
this,
in
hi’’
67
on
thieacl
v,ith
the
draw
the
tpo
c
68
nsa
U
needle
uP
he
ii
90
El
i
Page 99

ch
5
st
the
tile
enter
base
hem
a
hem
along
withahemstitch
over
the
hem
right
side.
the
hem
Taboo
to
twice
V\ihen
to
the
with
the
left.
and
Program
you
right
rain
do
seam
this
dnd
67
eaton
the
or
68
needle
only
Hemstitching
This
edoe
fahrrcs.
•
Sew
the
It
usinq
edge
finish
is
very
of
as
is
suitable
Program
the
an
edge
used
fabric.
67
for
fur
or
finish
very
ligat
Ti
ills
68atloot
and
rugles
thin
wiutii
uioii
C-,
0
2
C)
r
(,
/
Page 100

-I
——1
a
I
a
1
0
.0
a)
>-
w
--around
Eyelet
aditional
to
1w
easily
accessory).
This
is
Practically
suitable
StitCh
or
eor
classic
suitab1e.
stitch
width,
embroidery
eyoet
niade
laboriously
with
the
very
effective
all
for
this
fancy
eyeet
Set
the
and
Ui”
cut-ri
help
stitch
zgzag
stitches.
embroidery,
ocedie
the
embroidery
of
an
on
types
stitch,
macInn’
portion
he
nra
eyelet
hlouses.
o
at
its
Whcn
P
the
blind
Proqrnin
left
stitches
can
elate
bed
tiptronic
stitch,
nositiun
000
hr
niarh
(special
or
tabie
1
nvenly
agO
arc
elastic
2
select
is
naP
quitE
linen.
vry
tin
98
 Loading...