

Page 1
-II
C,
D
rf
0
1\)
C
C
C-’)
C
1%)
C
D
0)
C
B
D
0
Page 2
<
A
Please
of
this
fold
this
instruction
page
manual
open
to
when
simplify
reading
the
understanding
it
Safety
For
the
The
leads
with
three
The
wires
As
the
with
the
The
wire
with
the
The
wire
marked
Cut
off
Defective
Only
3
the
fuse
The
plug
from
electrical
Please
rules
United
must
pins.
in
Blue:
Brown:
colours
colour
which
letter
which
with
mains
mains
A
spare
cover
must
also
Kingdom
definitely
the
of
coding
is
N
or
is
the
letter
plugs
leads
fuses
must
never
suppliers
observe
mains
Neutral
Live
the
wires
coloured
coloured
coloured
are
must
be
be
the
only
not
lead
of
the
L
or
coloured
definitely
must
be
marked
used
or
the
general
be
are
the
in
terminals
blue
black.
brown
be
replaced
used
3
without
PFAFF
connected
coloured
mains
must
be
must
red.
not
to
as
approved
A
or
with
fuse
agencies.
safety
to
according
lead
in
your
connected
be
connected
be
used,
complete.
the
cover.
notes
the
safety-lead
to
the
of
this
appliance
plug,
proceed
to
to
but
disposed
by
ASTA
corresponding
on
Spare
page
fuse
2.
following
the
terminal
the
according
covers
terminal
may
as
follows:
terminal
of
immediately.
colour
I
code:
not
correspond
which
which
to
BS
code.
are
available
nor
1
to
is
362
a
plug
marked
is
and
Important
For
Australia
•
If
the
agent
•
The
out
•
Young
appliance.
•
Switch
•
Before
safety
only
supply
or
appliance
supervision.
children
off
servicing
cord
similarly
or
instructions
is
damaged,
qualified
is
not
iniended
should
unplug
the
the
appliance
person
be
supervised
machine
it
must
for
use
when
or
replacing
in
replaced
order
by
young
to
ensure
leaving
to
avoid
lamps,
by
the
a
hazard.
children
that
they
it
unattended.
unplug
manufacturer
or
infirm
do
not
play
the
machine.
or
persons
with
its
service
with
the
Page 3
:.
--
5O
4O
4t
42
1
43
iptronic
2040
-
4
-
PFAFF
-.-fl-a-,-a,:.
-L
.
,c.
a
a
-
,-a
z:itronic
2040
Page 4
(36)
(37)
(38)
(39)
(40)
(41)
(42)
(43)
(44)
(45)
(46)
(47)
(48)
(49)
(50)
(51)
(52>
(53)
(54)
(1
(1
(20)
(21>
(22)
(23)
(24)
(25)
(26)
(27)
(28)
(29)
(30)
(31)
(32)
(33)
(34)
(35)
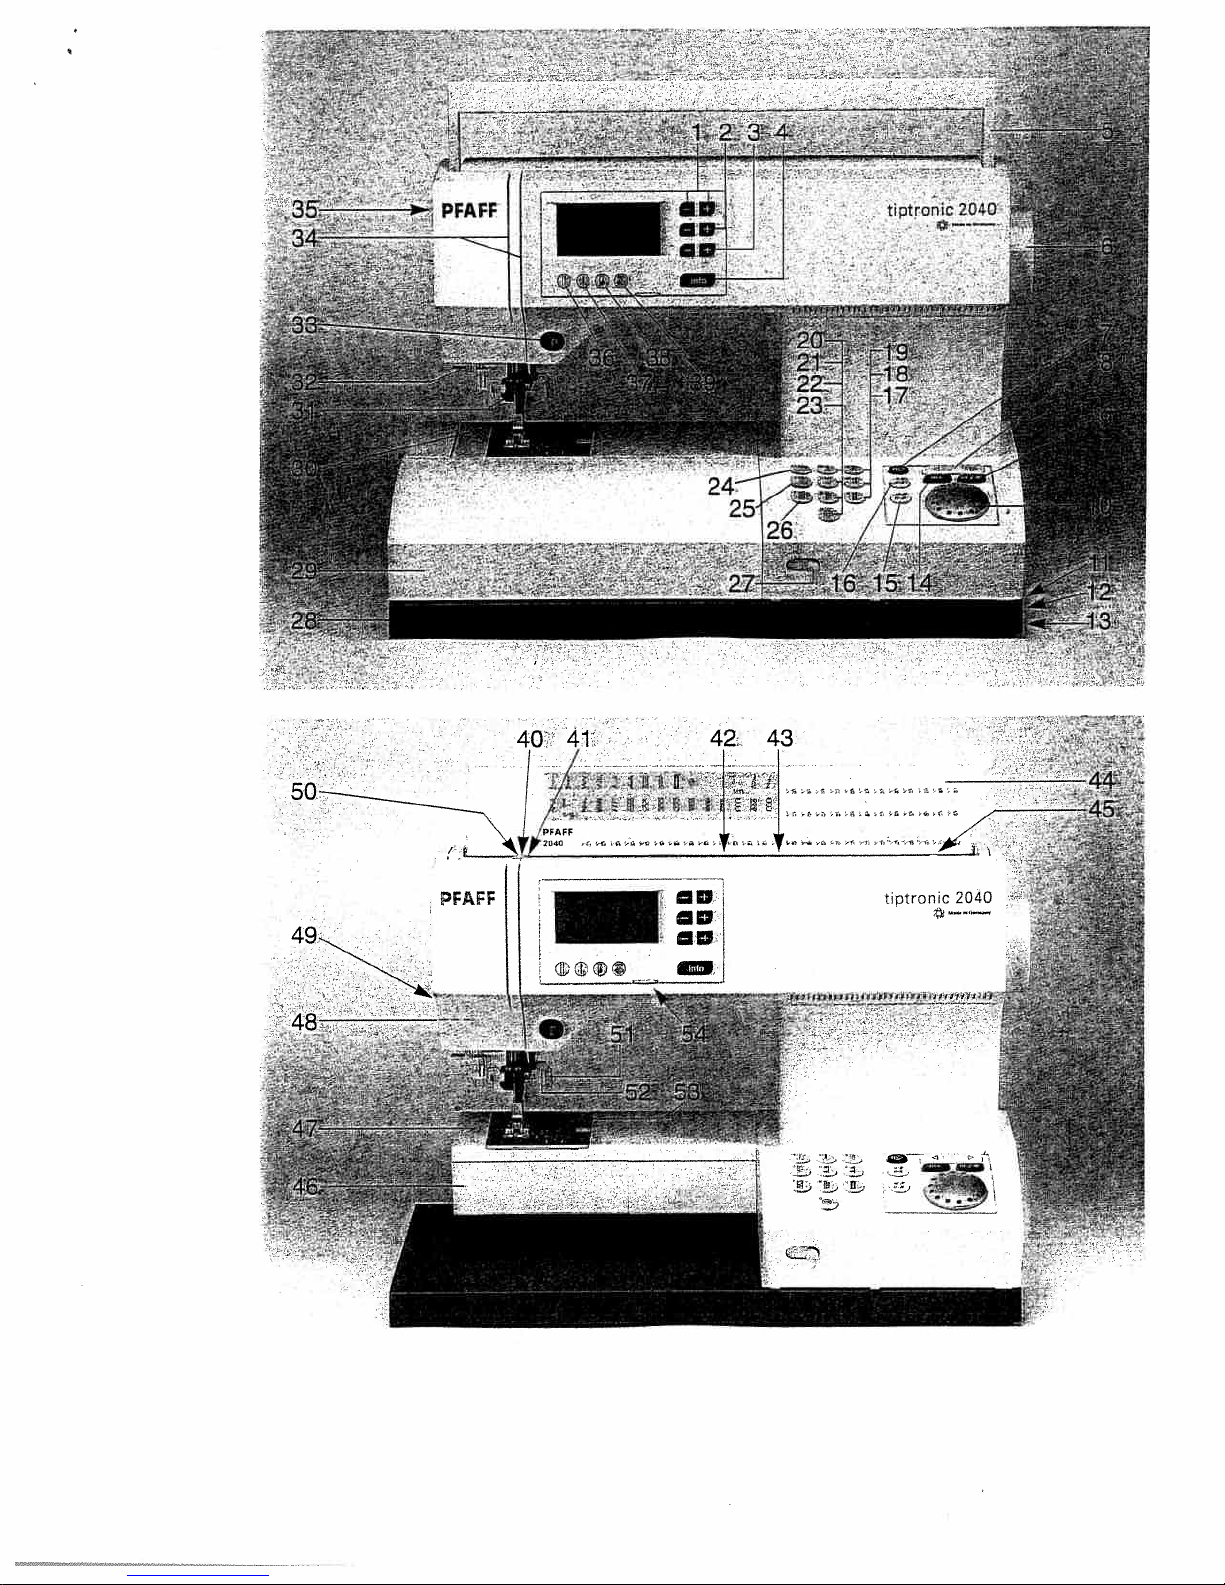
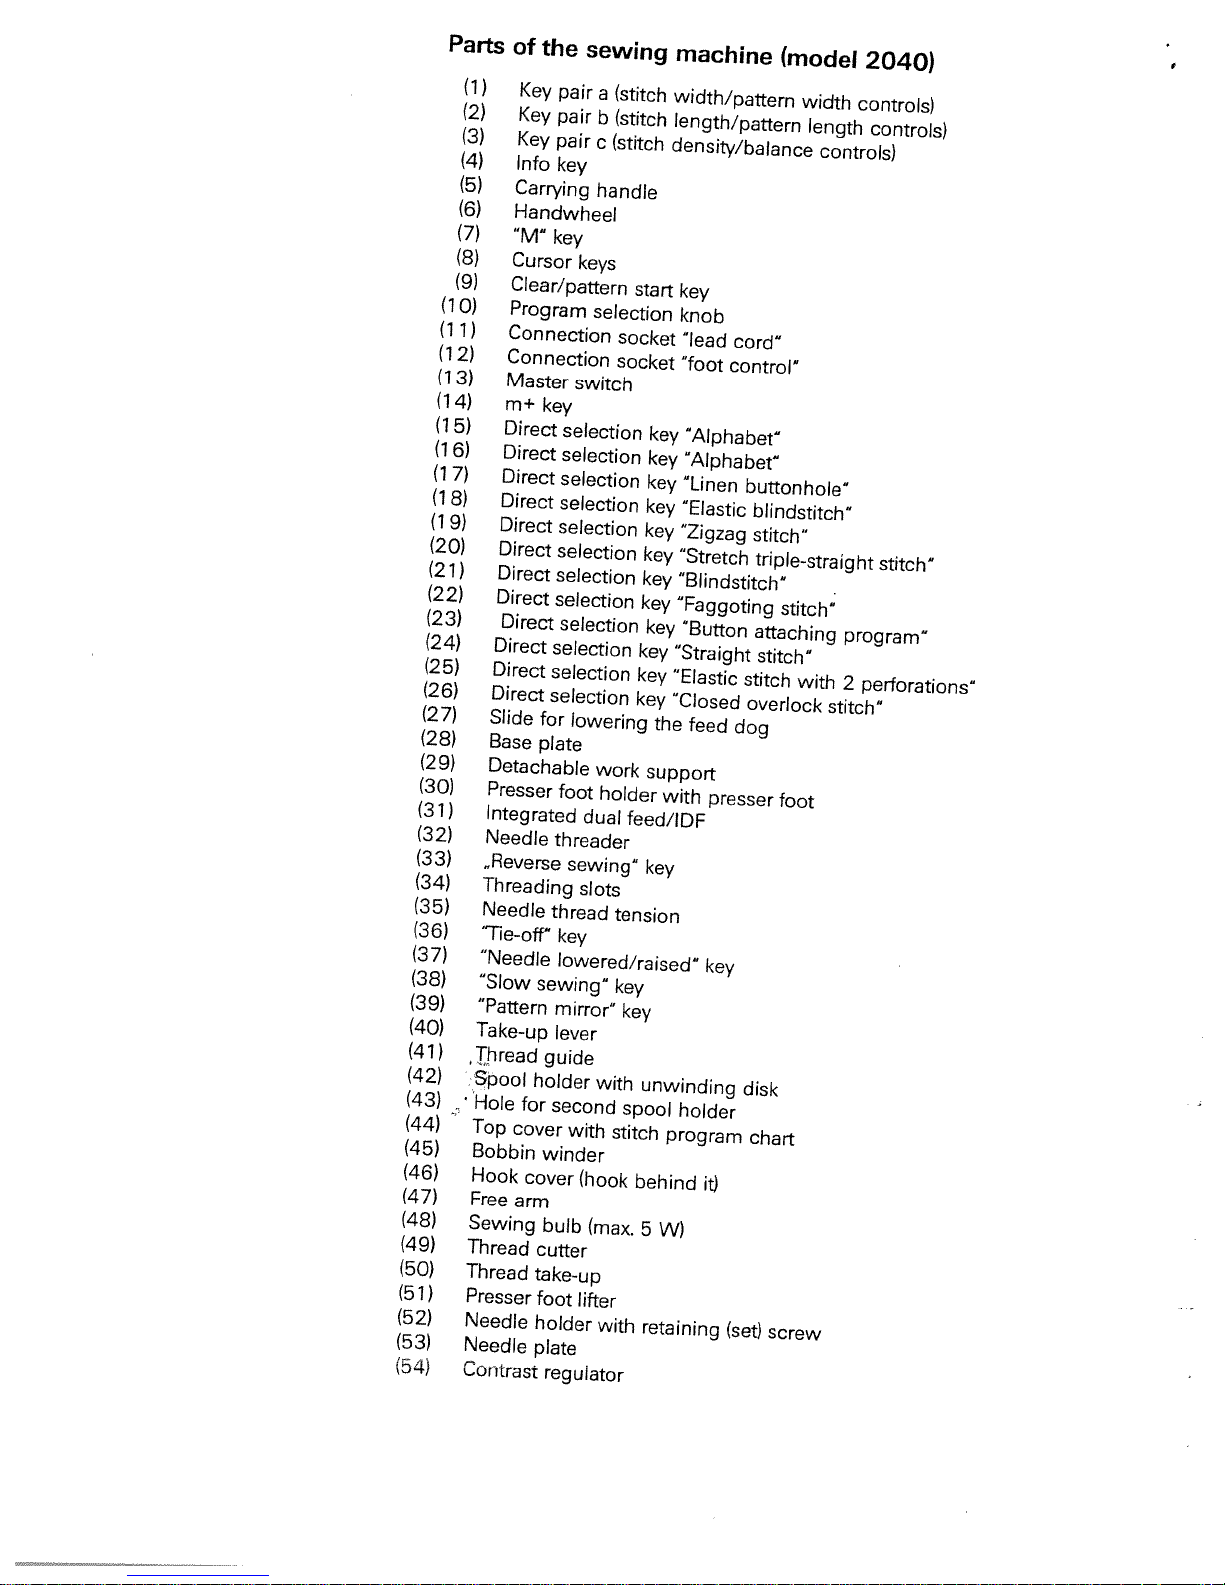
Parts
(10)
(11)
(1
(1
(14)
(1
(1
(1
7)
8)
9)
(5)
(6)
(7)
(8)
(9)
2)
3)
5)
6)
(1)
(2>
(3)
(4)
Clear/pattern
Program
Connection
Connection
Master
m+key
Direct
Direct
Direct
Direct
Direct
Direct
Direct
Direct
Direct
Direct
Direct
Direct
Slide
Base
Detachable
Presser
Integrated
Needle
,,Reverse
Threading
Needle
‘Tie-off”
“Needle
“Slow
“Pattern
Take-up
hread
Spool
‘Hole
Top
Bobbin
Hook
Free
Sewing
Thread
Thread
Presser
Needle
Needle
Contrast
of
the
sewing
Key
pair
Key
pair
Key
pair
Info
key
Carrying
Handwheel
“M”
key
Cursor
cover
arm
keys
switch
selection
selection
selection
selection
selection
selection
selection
selection
selection
selection
selection
selection
for
lowering
plate
foot
dual
threader
sewing”
slots
thread
key
lowered/raised”
sewing”
mirror”
lever
guide
holder
for
second
with
winder
cover
(hook
bulb
(max.
cutter
take-up
foot
lifter
holder
plate
regulator
a
(stitch
b
(stitch
c
(stitch
handle
start
selection
socket
socket
key
key
key
key
key
key
key
key
key
key
key
key
work
support
holder
feed/IDF
key
tension
key
key
with
unwinding
spool
stitch
behind
5
with
retaining
machine
width/pattern
length/pattern
density/balance
key
knob
“lead
cord”
“foot
control”
“Alphabet”
“Alphabet”
“Linen
“Elastic
“Zigzag
“Stretch
“Blindstitch”
“Faggoting
“Button
“Straight
“Elastic
“Closed
the
with
holder
program
W)
feed
presser
key
it)
buttonhole”
stitch
overlock
dog
disk
(set)
(model
width
length
controls)
blindstitch”
stitch”
triple-straight
stitch”
attaching
stitch”
with
stitch”
foot
chart
screw
2040)
controls)
controls)
stitch”
program”
2
perforations”
Page 5

IMPORTANT
For
This
an
Read
United
the
sewing
electric
all
States
machine
appliance,
instructions
SAFETY
only
designed
is
safety
basic
using
before
INSTRUCTIONS
manufactured
and
precautions
sewing
this
for
should
machine,
HOUSEHOLD
always
be
adhered
use
to
only.
as
When
follows:
you
use
from
unplug
reach
place
or
drop
To
machine
for
or
DANGER
sewing
The
1.
appliance
Always
2.
watts.
not
Do
3.
not
Do
4.
in
place
\/1ARNING:
allow
Do
1.
by
Use
2.
attachments
Never
3.
it
if
authorized
Never
4.
the
Never
5.
Do
6.
Do
7.
administered.
To
8.
Never
9.
Do
10.
Keep
11.
needle.
Always
1
2.
Do
1
3.
Do
14.
Switch
1
5.
threading
Always
1
6.
when
not
near
or
this
has
sewing
not
not
disconnect,
not
fingers
not
not
children.
sewing
operate
been
operate
drop
use
operate
operate
unplug
use
use
pull
the
needle,
unplug
making
to
recommended
dropped
dealer
machine
or
out-of-doors.
away
the
bent
or
sewing
reduce
the
sewing
a
store
into
To
be
machine
this
or
the
insert
where
turn
on
a
pulling
by
proper
or
push
changing
sewing
any
should
electric
machine
sewing
a
water
reduce
used
sewing
or
service
sewing
and
any
aerosol
controls
all
soft
from
blunt
fabric
machine
other
risk
the
never
outlet
machine
sewing
or
the
a
as
only
by
machine
damaged,
center
machine
foot
object
surface
on
moving
all
needle
needles.
while
needle,
machine
user
electric
of
immediately
before
machine
other
risk
Close
toy.
its
for
the
control
into
(spray)
off
to
such
cord.To
plate.
stitching.
(“0”)
off
from
servicing
shock:
unattended
left
be
replacing
has
that
where
liquid.
burns,
of
attention
intended
manufacturer
has
it
if
dropped
or
examination,
for
any
with
from
free
opening.
any
products
position,
(“0”)
bed
a
as
unplug,
Special
parts.
wrong
The
needles
Use
It
making
when
threading
electric
the
adjustments
using
after
bulb.
into
fallen
can
it
electric
fire,
necessary
is
as
use
as
damaged
a
into
openings
air
accumulation
the
being
are
couch
or
the
grasp
care
plate
recommended
deflect
may
bobbin,
outlet
when
and
Replace
water.
fallorbe
shock,
described
contained
cord
Return
water.
electrical
repair,
blocked.
used
remove
then
where
plug,
required
is
cause
can
the
adjustments
any
changing
or
when
mentioned
plugged
before
bulb
Unplug
pulled
or
when
in
this
in
plug,ifit
or
or
the
the
not
the
by
needle,
removing
in
in.
cleaning.
with
immediately.
into
injury
this
manual.
this
manual.
appliance
the
or
Keep
lint,
of
where
from
plug
openings
air
cord.
around
needle
the
manufacturer
causing
in
presser
instruction
the
same
tub
a
persons:
to
sewing
not
is
dust,
oxygen
outlet.
the
to
it
needle
foot,
covers,
unplug
type
Use
working
and
sewing
break.
to
Always
mechanical
ventilation
the
this
rated
sink.
or
machine
only
nearest
the
to
adjustment.
openings
loose
being
is
be
may
machine
only.
break.
area,
etc.
lubricating,
manual.
5
1
not
Do
is
used
properly,
of
cloth.
blocked.
such
as
or
general
observe
Please
also
the
safety
notes
page
on
SAVE
2.
THESE
INSTRUCTIONS
Page 6

Notes
on
safety
for
domestic
sewing
1.
2.
3.
4.
5.
6.
7.
8.
9.
I
0.To
1.Only
I
I
2.The
I3.During
14.
user
The
needle
the
When
parts
the
The
The
The
Do
Do
—
—
—
Do
No
purpose
the
service
rated
up
to
According
accepted
should
leaving
or
mains
maximum
tension
machineistobeput
place
not
not
use
is
there
function
its
is
wet,
it
into
a
pull
not
liability
avoid
machine
staff.
original
machine
frequency
conventional
85°C.
to
over-heating.
changes
Environment
recommended
he
mbient
Jr
loom
he
ons;
his
upervised
ust,
hemicals
he
temperature
humidity 20% to
temperature
machine
however,itshould
sewing
use
severe
or
machineisto
reatment
protect
Iways
leaning
stubborn
note!
not
use
housing.
and
any
ousing
ny
lease
o
e
must
exercise
and constantly
the
machine,
accessories,
always
plug.
permissable
of
the
drive
any
objects
the
sewing
visible
warm
other
the
for
is
machine
dampness,
liquids.
display:
dirt,
damage
disturbed
is
with
e.g.
the
will
riskofelectric
which
PFAFF
Constant
to
the
any
suppressed
in
the machine against
insecticides
condensation,
room.
mains
be
accepted
than
that
the user
parts
designed
is
of
+1—
use,
use at
laws
mains
be
made
environment
1
0°C
80%.
—
25°C
not
is
a
the
home.Itshould
direct
used
be
To
clean the
a
soft
use
plug
concerning
high-quality
onafirm
machines
EN
adequate
observe
during
disconnect
wattage
belt
may
operation
into
in
openings
machine
outofthe
for
for
whichitis
shock,
can
may
be
foramains
4%.
the
outer parts
low
interruptions
to
it.
is:
40°C
to
to+60°C
and
insensitive
operated
be
sunlight,
damage
housing useadry,
cloth
moistened
or
chemical
in
60335-2-28
caution
the
onlybeadjusted
if:
that
any
do
repair.
used.
speeds
electromagnetic
electronic-mechanical
be
static
and even
with
sewing
maintenance
the
for
the
sewing
according
on
the
may
be
socket
damage
intended
not
supply
caused,
in
operated
products
by
causedifthis
open
Thisissolely
withamains
ofanon-electrically
is
not permissible,
to
interference according
the
direct
electricity,
surface
which
with
accordance
and/or
regard
area
machine
machine.
caused
the
should
in
could
alcohol.
such
to
the
while
work
from
lamp
PFAFF
by
a
the
indications
to
by
its
cord.
orifitisoperated
machine.
the
responsibility
compatibility,
the
mains
vicinity
suchaway
heat-producing
which
clean,
is
caused
be
soft,
petrolorliquid
as
up
and
working.
or
when
the
is
15watts.
mechanic.
introducing
machine
There
rated
voltage
driven
order
in
power
of
electronic
appliance;
thatitis
open
byitbeing
lint-free cloth.
with
IEC
changing mechanical
mains
on
incorrectly.
no
to
for
335-2-28
down
movement
by
the
specification
a
cold
is
used
are
no
parts
our
of
+7-
of
foot
control
to avoid
liability
line
be
international
devices.
it
isamachine
not
subjected
objects,
ventilation
hitordropped.
To
chemicals
pulling
machine
forany
inside
qualified
10%
can
damage
can
be
changed
corrosive
purposes.
remove
to
out
plate.
and
heat
due
conven
for
to:
clean
of
a
or
Page 7
Modern,
uncomplicated
-
Sewing
Congratulations!
quality
Your
material
thick
It
nology,
uncomplicated
machine.
and
difference
out
study
wrong.
all
make
If
problem!
service
product
new
and
features
the
to
separately.
the
the
things
full
have
you
by
sewing
in
its
thin for
the
this
and
It
applies
model
operation
in
instruction
all,
After
use
any
Your
any
with
push-button
have
You
offers
that
machine
stride
very
the
of
and
you.
latest
instruction
your
as
both
2040.
you
this
machine
them.
further
help
now
book,
is
or
If
PFAFF
dealer
purchased
unique
can
sew
will
design
in
book
PFAFF
the
to
Should
we
have
take
nothing
only
the
can
questions,
will
advice
control
advantages.
take
through
and
just
is
sewing
2030
there
pointed
time
can
way
and
do,
that
be
you
high-
a
any
tech
as
model
be
that
enough
go
learn
to
to
is
no
your
at
need.
-
any
to
you
can
now
So
many
hion
enjoyable
ideas.
get
hours
started!
creating
of
We
wish
your
you
fas
3
Page 8
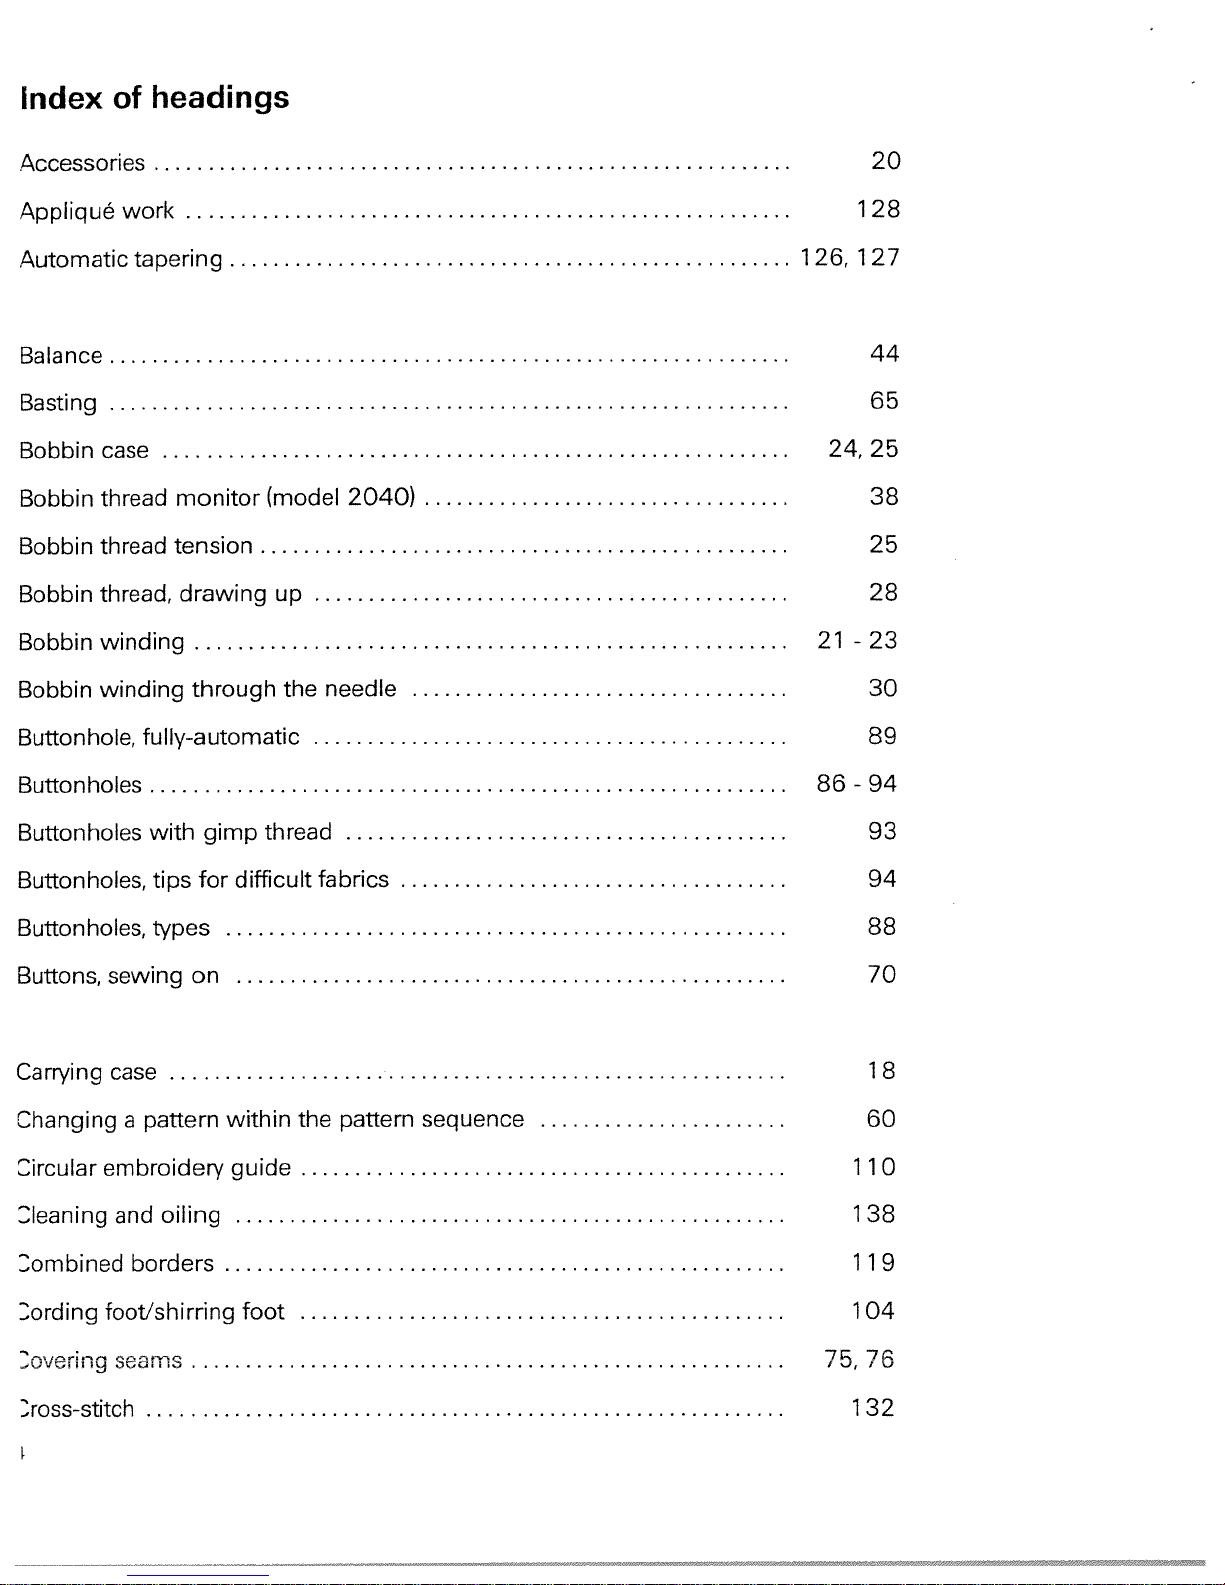
index
headings
of
Accessories
Appliqué
Automatic
Balance
Basting
Bobbin
Bobbin
Bobbin
Bobbin
Bobbin
Bobbin
case
thread
thread
thread,
winding
winding
Buttonhole,
work
tapering
monitor
tension
drawing
through
fully-automatic
(model
up
the
2040)
needle
1
26,127
24,
21
20
1
28
44
65
25
38
25
28
-
23
30
89
Buttonholes
Buttonholes
Buttonholes,
Buttonholes,
Buttons,
Carrying
with
tips
types
sewing
case
on
Changingapattern
Circular
Dleaning
Dombined
ording
Dovering
embroidery
and
oiling
borders
foot/shirring
seams
gimp
for
within
thread
difficult
guide
foot
fabrics
the
pattern
sequence
86-94
11
1
11
104
75,
93
94
88
70
1
60
38
76
8
0
9
Dross-stitch
1
32
Page 9
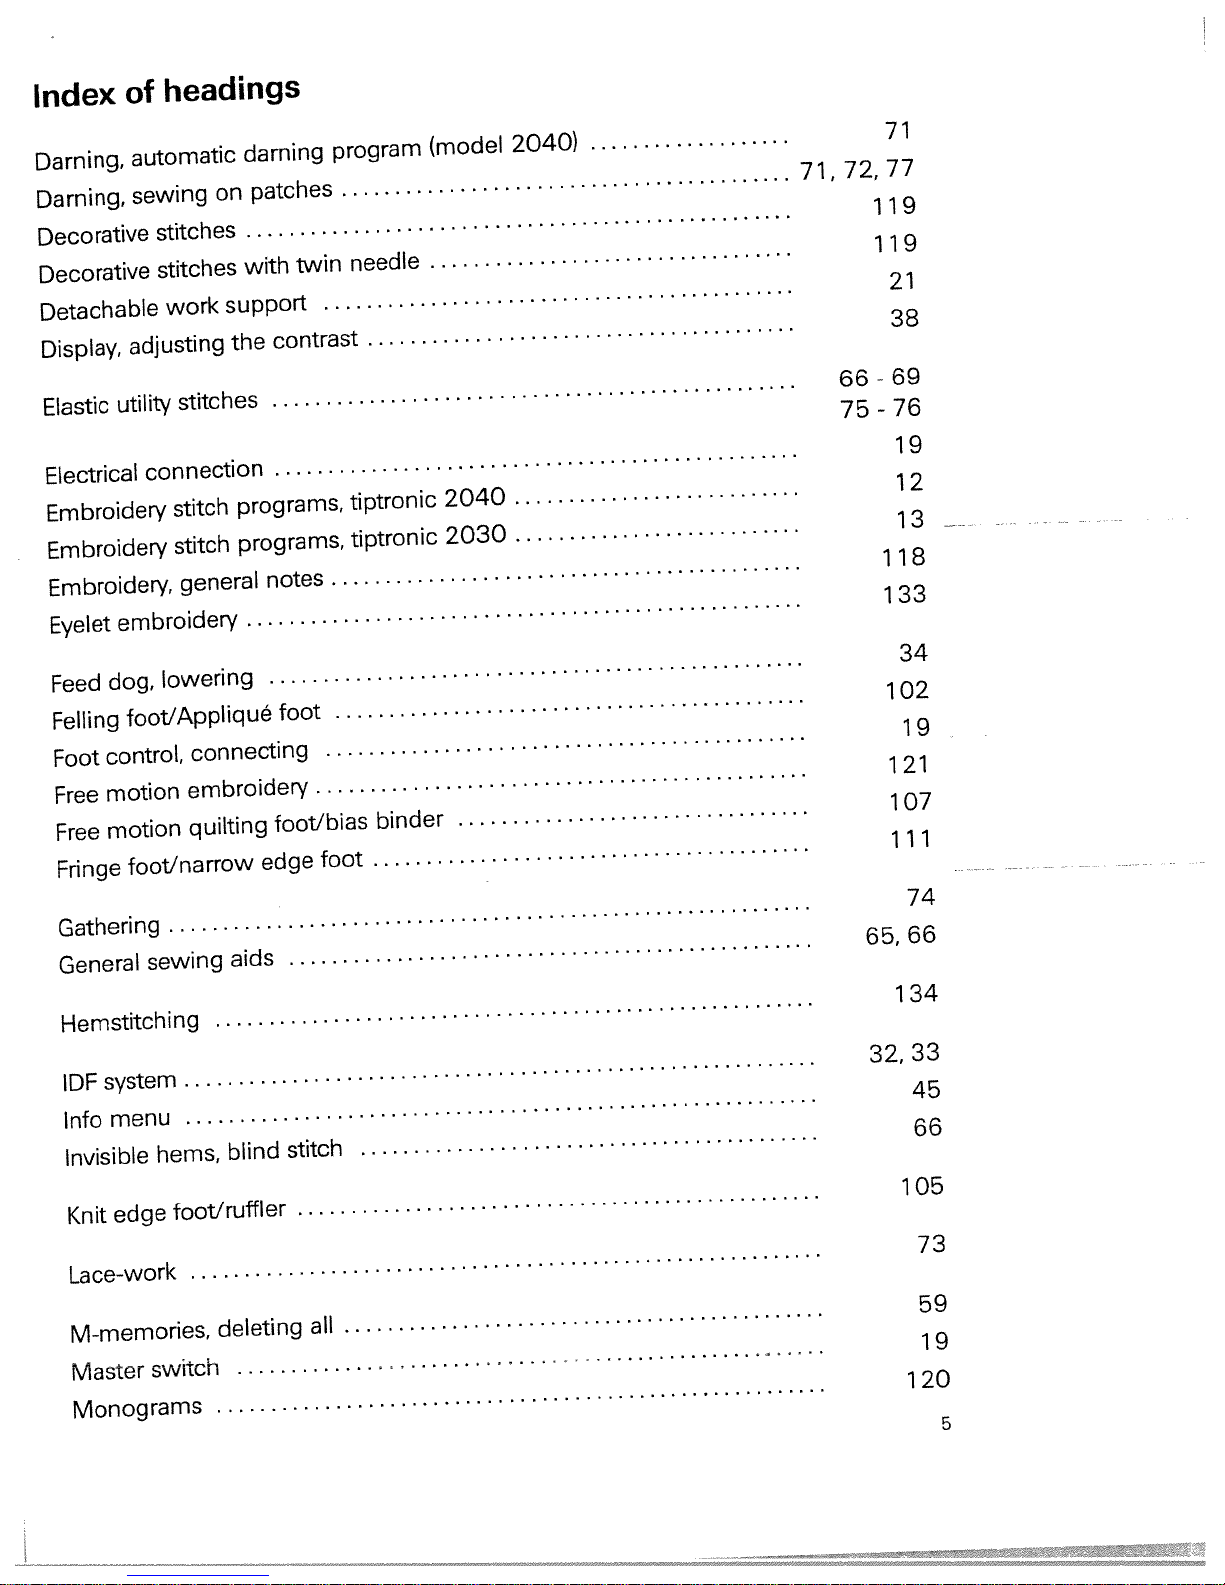
Index
of
Darning,
Darning,
Decorative
Decorative
Detachable
Display,
Elastic
utility
Electrical
Embroidery
Embroidery
Embroidery,
Eyelet
Feed
Felling
Foot
Free
Free
embroidery
dog,
foot/Appliqué
control,
motion
motion
Fringe
Gathering
General
Hemstitching
system
IDF
menu
Info
Invisible
edge
Knit
Lace-work
M-memories,
Master
Monograms
headings
automatic
sewing
adjusting
connection
foot/narrow
sewing
switch
on
stitches
stitches
support
work
stitches
stitch
stitch
general
lowering
connecting
embroidery
quilting
hems,
foot/ruffler
deleting
darning
patches
twin
with
contrast
the
programs,
programs,
notes
foot
foot/bias
edge
aids
stitch
blind
program
needle
tiptronic
tiptronic
foot
all
binder
...
(model
2040
2030
2040)
71,72,77
66
75
65,
32,
1
11
-
-
71
1
21
38
69
76
1
11
1
1
1
1
111
1
9
9
9
1
2
3
1
8
33
34
02
1
21
07
74
66
34
33
45
105
1
9
66
73
59
1
20
9
5
Page 10
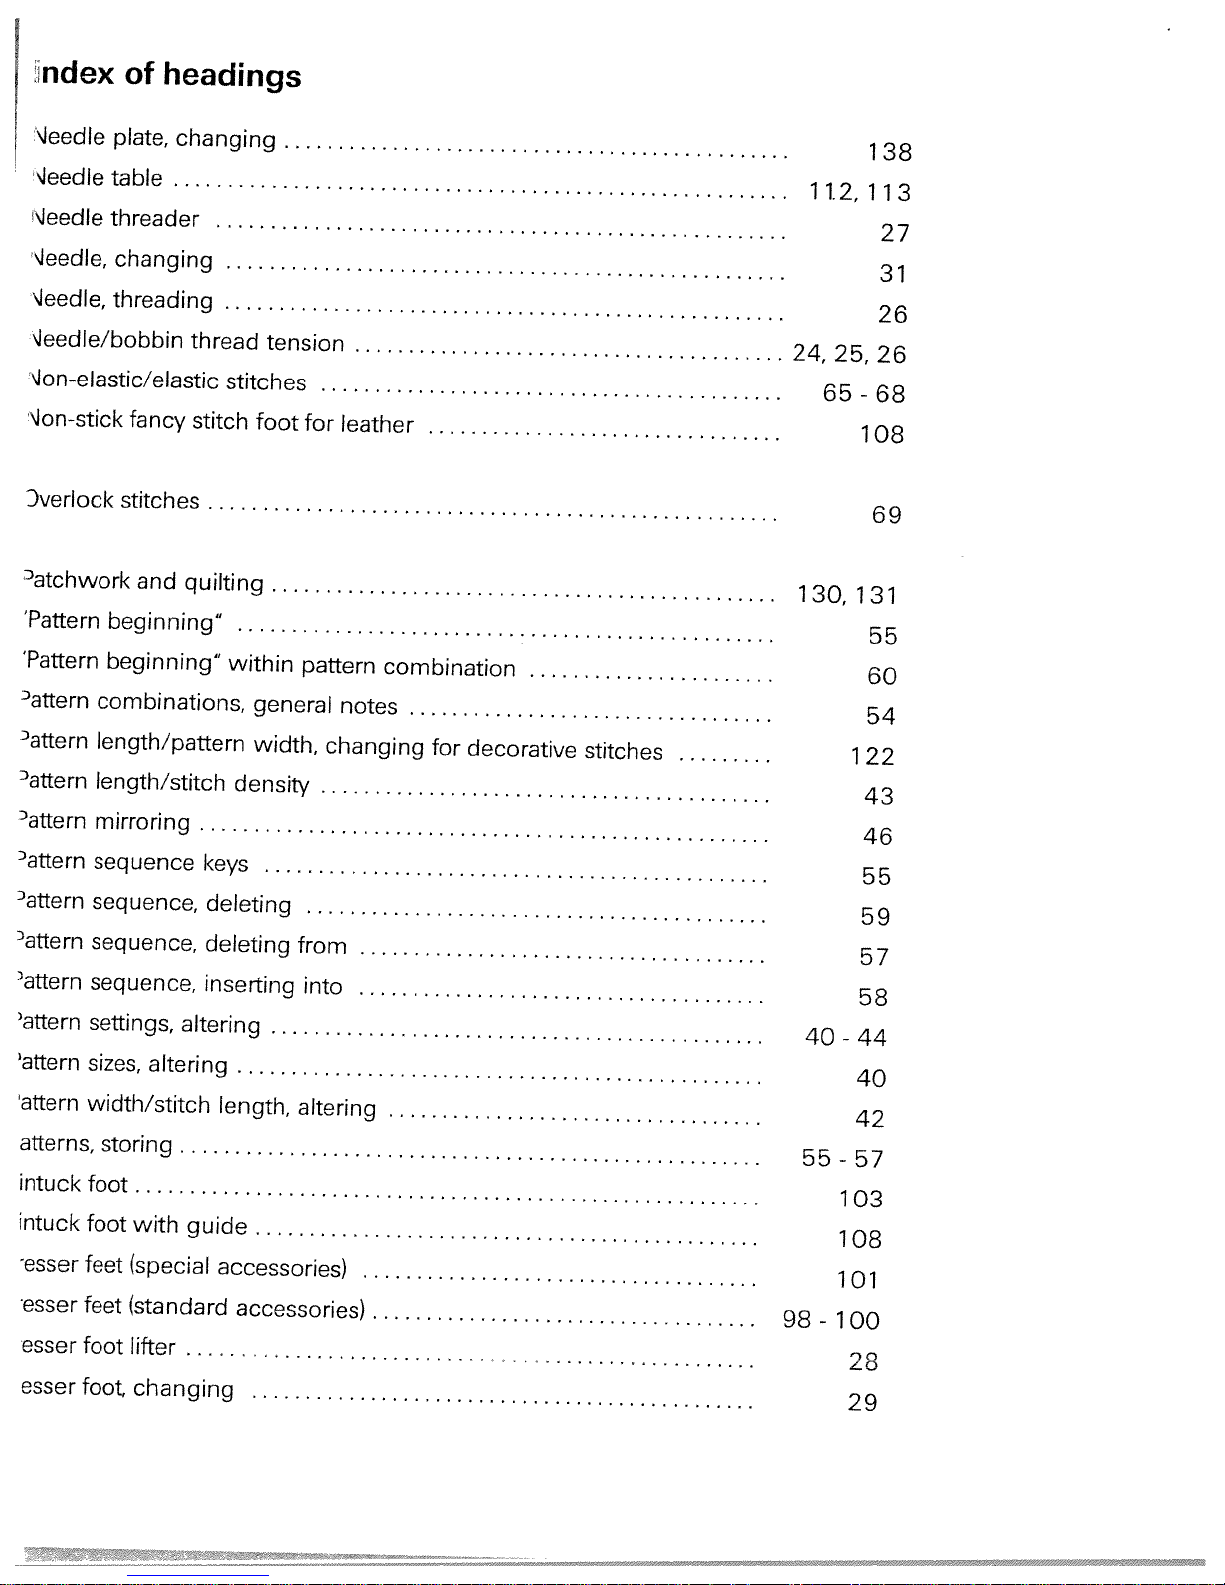
ndex
of
headings
Jeedle
‘.Jeedle
‘Jeedle
‘Jeedle,
\Jeedle,
plate,
table
threader
changing
threading
“Jeedle/bobbin
“Jon-elastic/elastic
\ion-stick
Dverlock
3
atchwork
‘Pattern
‘Pattern
attern
attern
attern
attern
attern
attern
attern
attern
attern
attern
attern
atterns,
intuck
intuck
esser
•esser
•esser
esser
fancy
stitches
and
beginning”
beginning”
combinations,
length/pattern
length/stitch
mirroring
sequence
sequence,
sequence,
sequence,
settings,
sizes,
altering
width/stitch
storing
foot
foot
with
feet
(special
feet
(standard
foot
lifter
changing
foot
changing
thread
stitches
stitch
quilting
within
density
keys
deleting
deleting
inserting
altering
length,
guide
accessories)
accessories)
tension
foot
for
pattern
general
width,
from
into
altering
leather
combination
notes
changing
for
decorative
stitches
98
1
24,
130,
40
55
1.2,
65
-
25,
-
-
1
1
1
1
29
-
1
131
1
55
59
57
58
44
40
42
57
03
08
01
00
28
1
11
55
60
54
22
43
46
38
3
27
31
26
26
68
08
69
Page 11
headings
Index
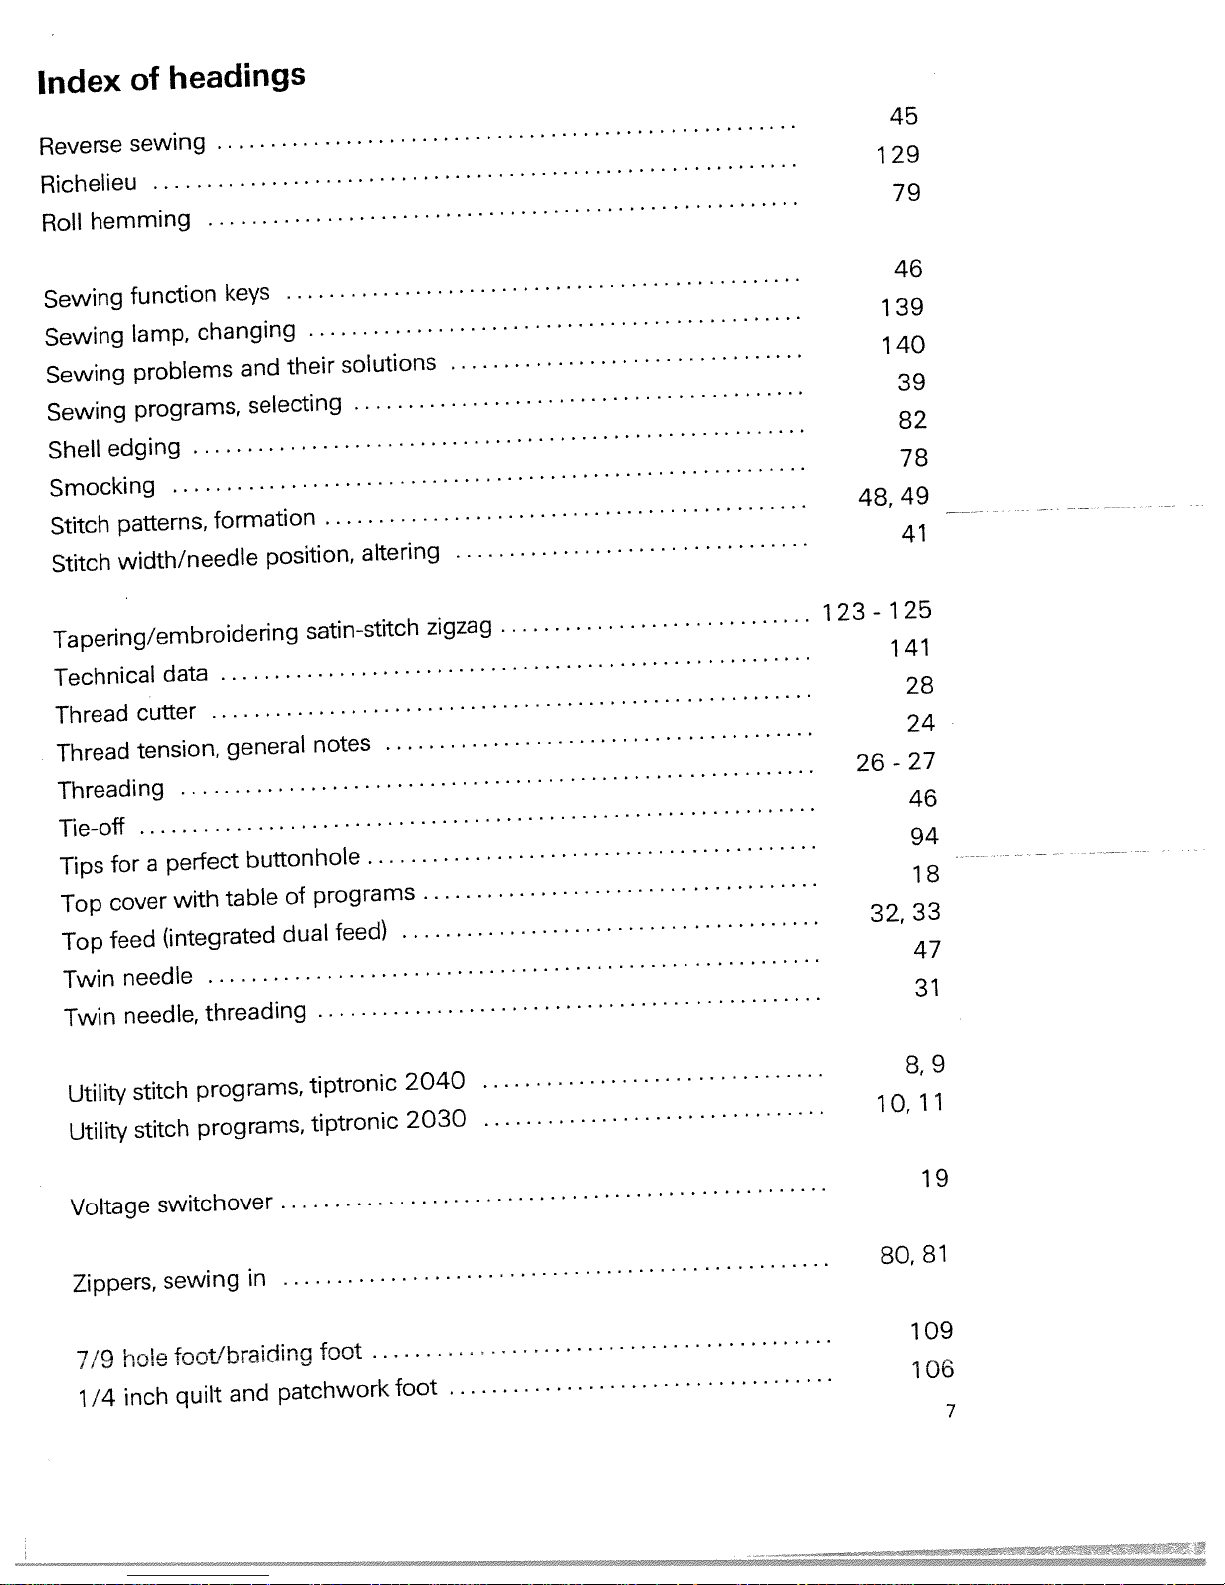
Reverse
of
sewing
Richelieu
hemming
Roll
Sewing
Sewing
Sewing
Sewing
Shell
function
lamp,
problems
programs,
edging
keys
changing
Smocking
Stitch
Stitch
patterns,
width/needle
formation
Tapering/embroidering
Technical
Thread
Thread
data
cutter
tension,
general
Threading
Tie-off
perfect
a
for
Tips
table
Top
Top
Twin
Twin
cover
feed
with
(integrated
needle
needle,
threading
their
and
selecting
position,
satin-stitch
notes
buttonhole
programs
of
dual
solutions
altering
feed)
zigzag
45
29
1
79
46
39
1
40
1
39
82
78
49
48,
41
25
1
-
1
23
141
28
24
27
-
26
46
94
8
1
33
32,
47
31
Utility
Utility
stitch
stitch
Voltage
Zippers,
hole
7/9
inch
/4
1
programs,
programs,
switchover
sewing
in
foot/braiding
and
quilt
tiptronic
tiptronic
foot
patchwork
2040
2030
foot
1
80,
0,
8,
9
11
1
9
81
1
09
1
06
7
Page 12
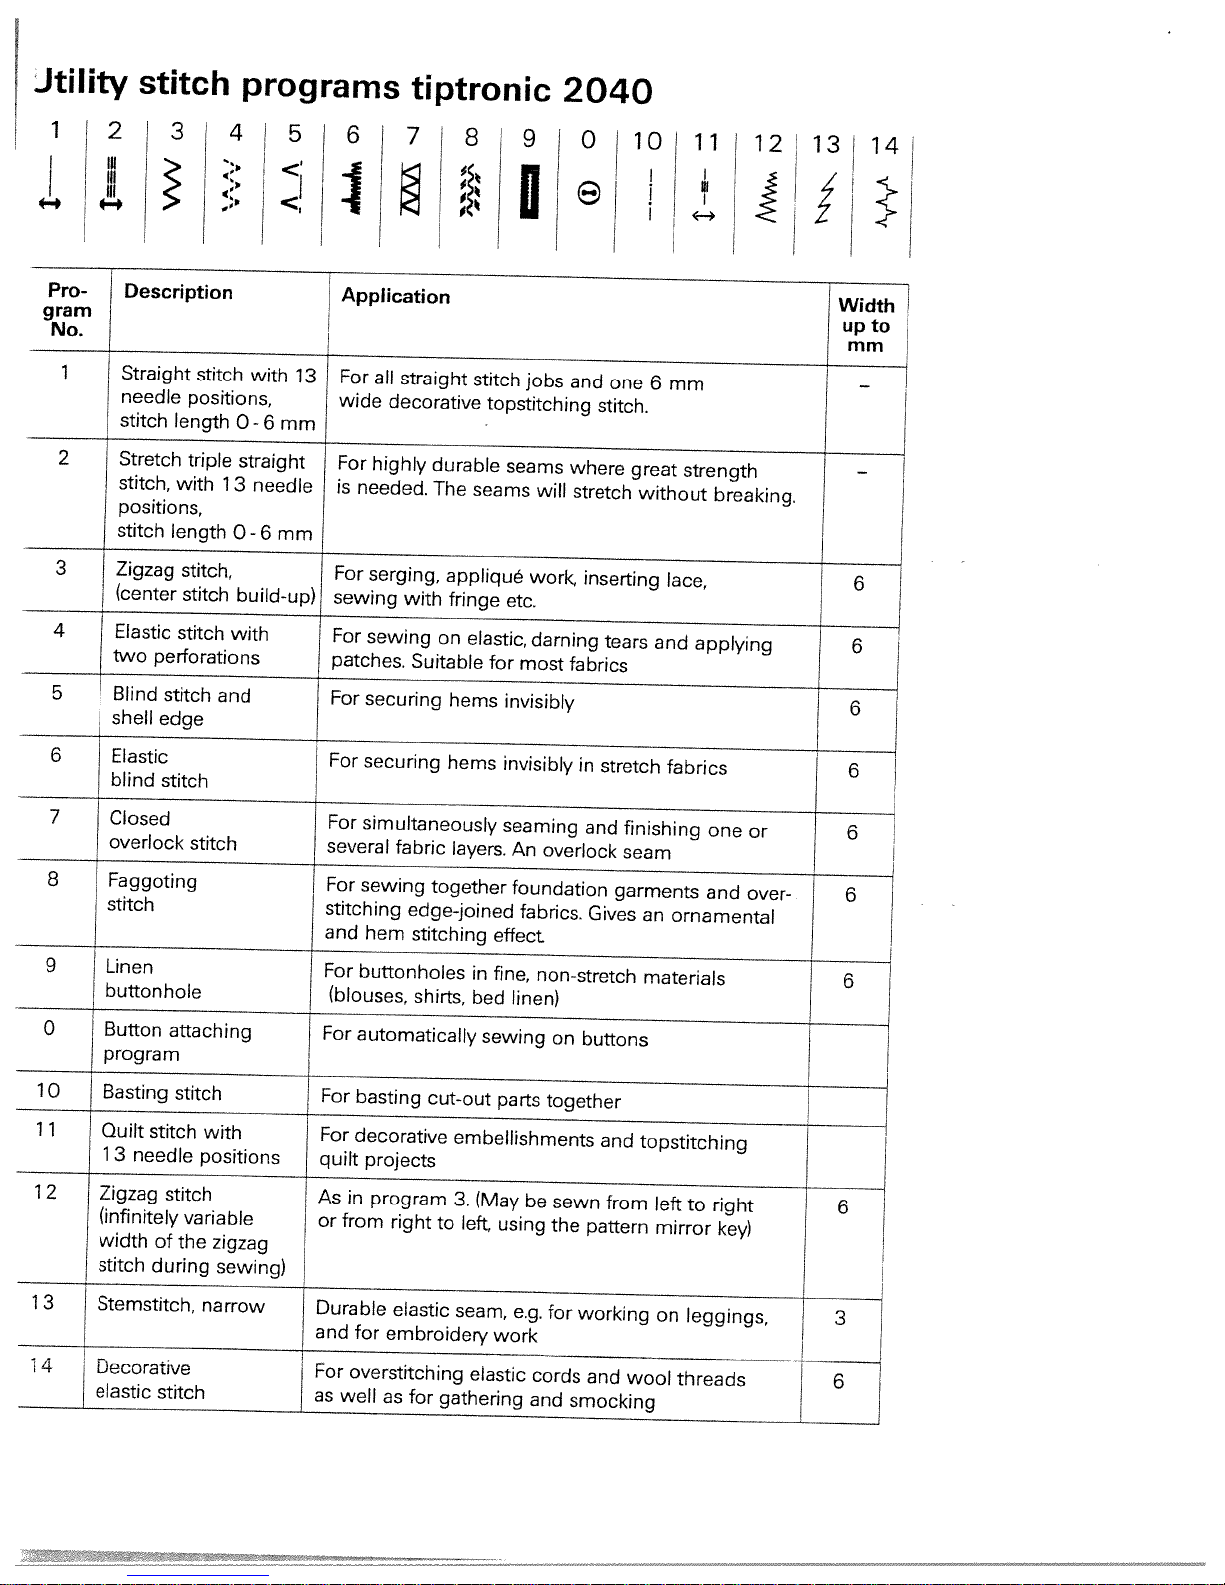
Jtility
stitch
programs
tiptronic
2040
1
4.4
Pro-
gram
No.
1
2
3
4
5
ID
Ill
ill
4.4
Description
Straight
needle
stitch
Stretch
stitch,
positions,
stitch
Zigzag
(center
Elastic
two
Blind
shell
“i.
stitch
positions,
length
triple
with
1
length
stitch,
stitch
stitch
with
perforations
stitch
and
edge
with
0-6mm
straight
needle
3
0-
mm
6
build-up)
13
Application
For
all
straight
wide
decorative
For
highly
is
needed.
For
serging,
sewing
For
patches.
For
with
sewing
securing
durable
The
appliqué
fringe
on
Suitable
hems
stitch
topstitching
seams
seams
etc.
elastic,
for
most
invisibly
jobs
will
work,
darning
and
stitch.
where
stretch
inserting
tears
fabrics
one
10
i!I
6
great
without
and
11
mm
strength
lace,
applying
12
breaking.
13
14
Width
upto
mm
—
—
6
6
6
6
7
8
9
0
1
0
1
1
1
2
1
3
1
4
Elastic
blind
Closed
overlock
Faggoting
stitch
Linen
buttonhole
I
Button
program
Basting
Quilt
stitch
1
3
needle
Zigzag
(infinitely
width
of
stitch
during
Stemstitch,
Decorative
elastic
stitch
stitch
stitch
attaching
stitch
with
positions
stitch
variable
the
narrow
zigzag
sewing)
For
securing
For
simultaneously
several
For
sewing
stitching
and
hem
For
buttonholes
(blouses,
For
automatically
For
basting
For
decorative
quilt
projects
As
in
or
from
Durable
and
for
For
overstitching
as
well
fabric
edge-joined
stitching
shirts,
cut-out
program
right
elastic
embroidery
as
for
hems
invisibly
seaming
layers.
An
together
to
gathering
foundation
effect
in
fine,
bed
linen)
sewing
parts
embellishments
3.
(May
left,
using
seam,
e.g.
work
elastic
overlock
fabrics.
non-stretch
on
together
be
sewn
the
for
cords
and
smocking
in
stretch
and
finishing
seam
garments
Gives
buttons
and
from
pattern
working
and
wool
fabrics
one
and
an
ornamental
materials
topstitching
left
to
right
mirror
on
leggings,
threads
key)
or
over-
6
6
6
6
3
6
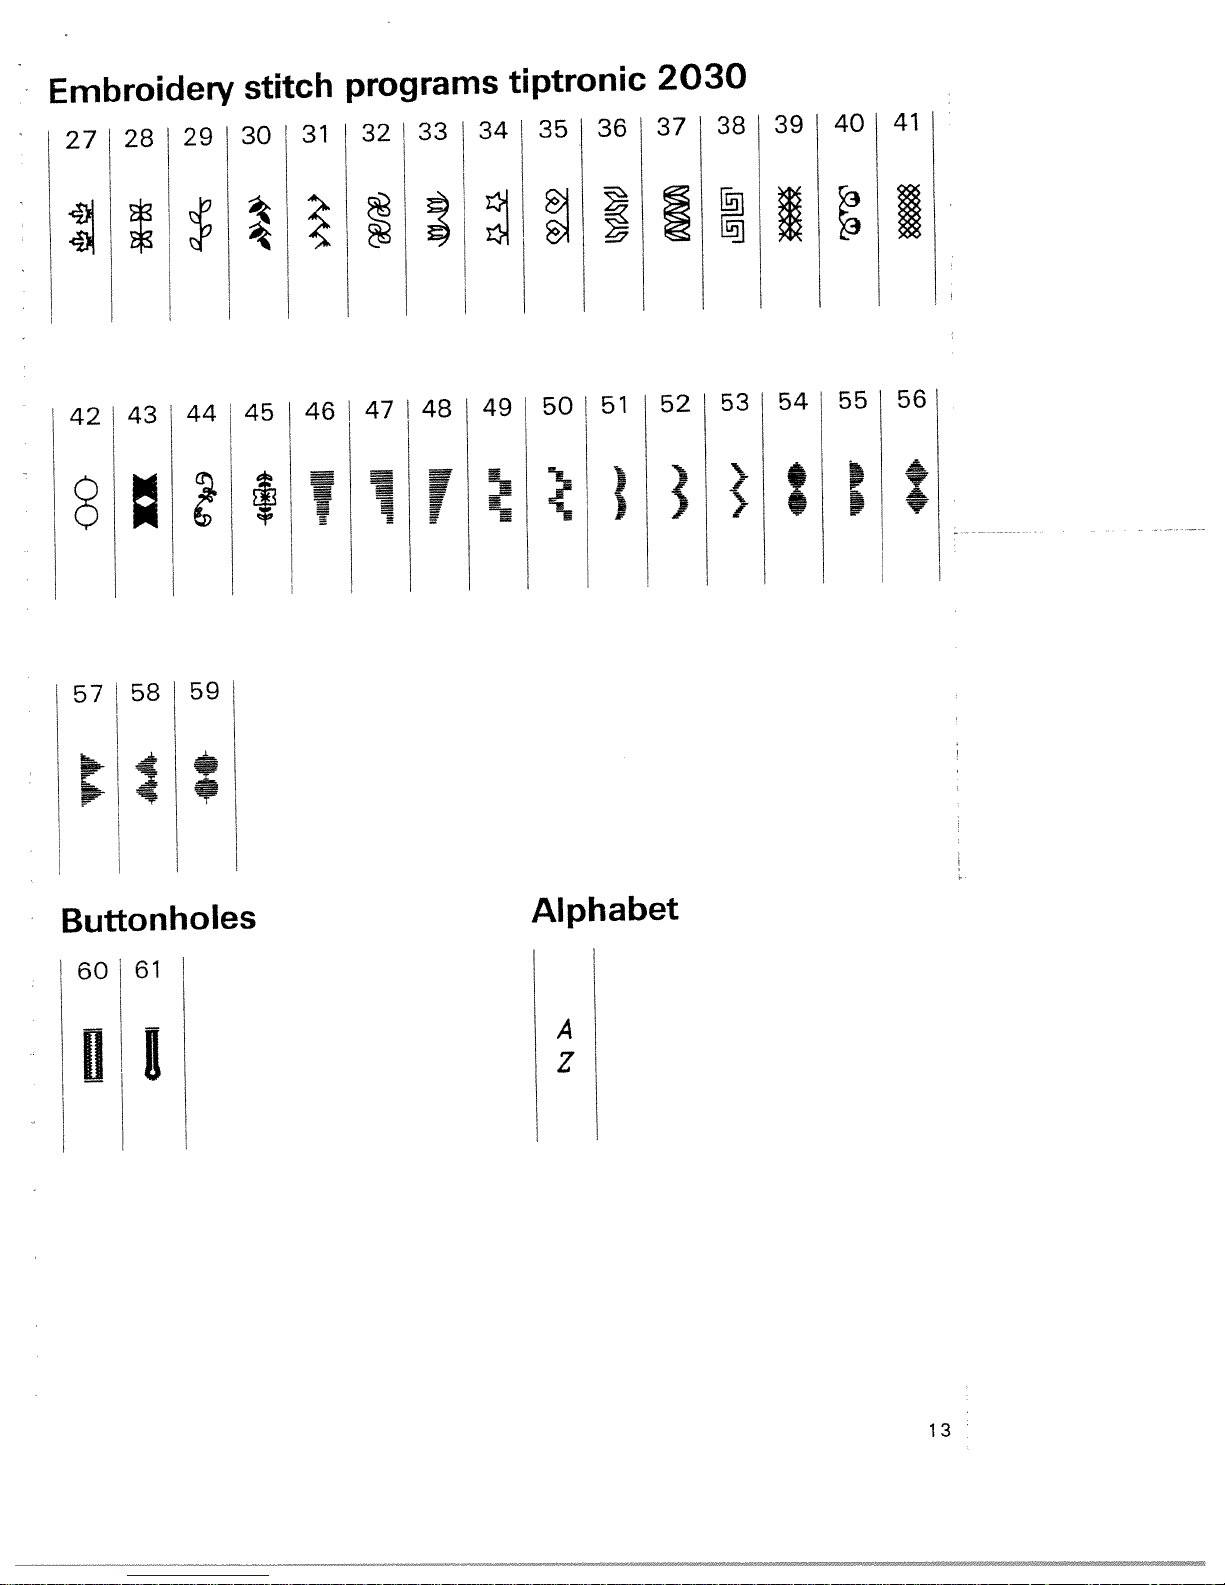
Page 13

Utility
15
Hir
stitch
16
17
programs
tiptronic
22
21
i
171
2040
23
24
28
f
C
I
27
II
25
I
26
Pro-
gram
No.
1
1
1
1
1
20
5
6
7
8
9
21
Description
Quilting,
pinstitch
or
Stemstitch,
Closed
stitch
selvage
triple
stitch
overlock
hem
with
Stretch
zigzag
Open
Honeycomb
Cross
appliqué
wide
stitch
stitch
overlock
thread
stitch
Application
appliqué
For
Durable
and
For
(Extremely
For
For
seams
Gives
For
layers
elastic
embroidery
for
inserting
closing
sewing
and
an
simultaneous
of
work
seam,
elastic
durable
serging
and
elastic
on
ornamental
for
extremely
fabric
when
e.g.
work
in
seam
thread,
elastic
closing
quilting
working
for
sportswear
active
for
seams
overstitching
hem
seam
and
pinstitching
or
and
wear)
seams
for
serging
leggings,
on
bathing
terry
sportswear
one
of
suits.
cloth
or
more
Width
upto
mm
6
3
6
6
6
6
6
6
6
6
4
6
9
light
knit
linen
seam
wear
and
decoration
serging
and
patching
etc.)
edges
and
jersey
work
work
in
table
stitch
fabric
stitch
stitch
stitch
stitching
stitching
stitching
28
Pullover
Light-knit
patching
Cross
Cross
Hem
Hem
Hem
22
23
24
25
26
27
—
Elastic
open-knit
construction
fabric
sewing
For
(undergarments
cross-stitching
For
cross-stitching
For
securing
For
garments
of
and
Page 14
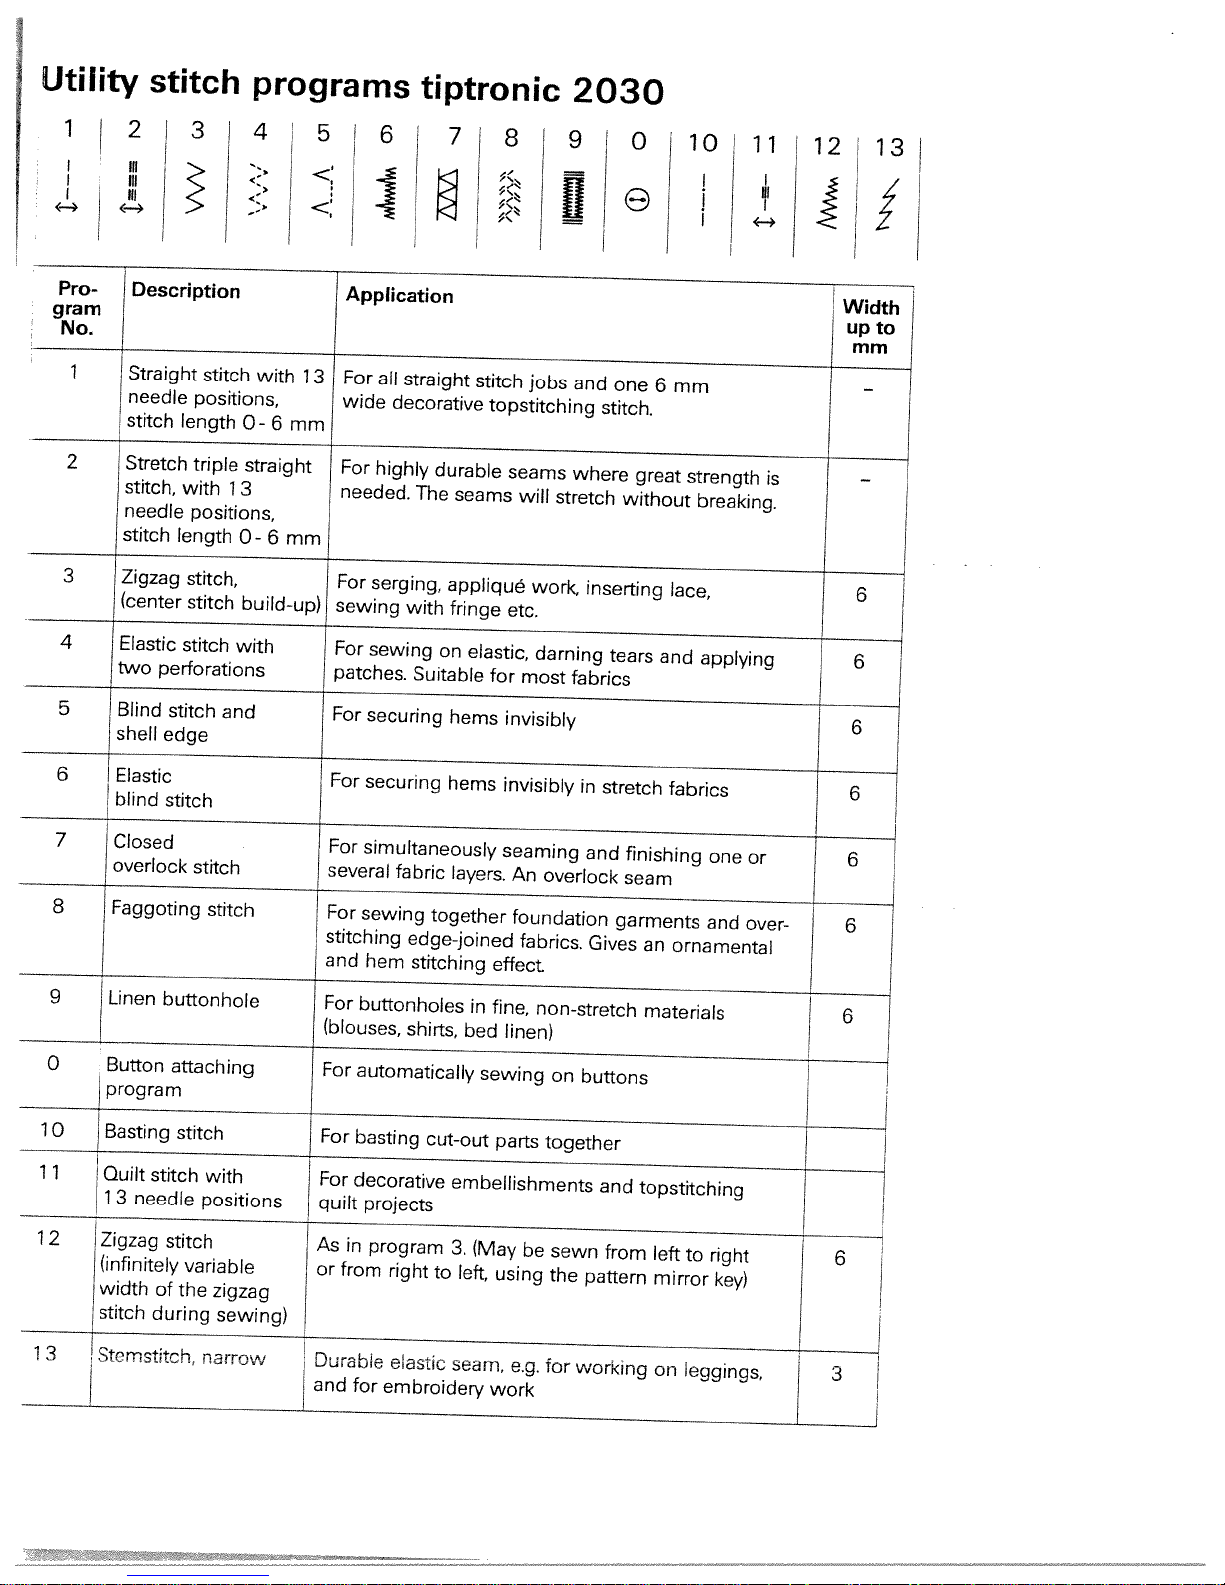
Utility
1234
stitch
programs
tiptronic
6
I
2030
101
‘11
Ill
12
13
Pro-
gram
No.
2
3
4
5
6
7
8
9
0
1
Description
1
.—
Straight
needle
stitch
Stretch
stitch,
needle
stitch
Zigzag
(center
Elastic
perforations
LtNo
Blind
shell
edge
Elastic
blind
Closed
overlock
Faggoting
Linen
buttonhole
Button
program
stitch
positions,
length
triple
with
positions,
length
stitch,
stitch
stitch
stitch
stitch
stitch
stitch
attaching
with
0-
straight
1
3
0-
build-up)
with
and
Application
Width
upto
mm
1
3
For
at!
straight
wide
decorative
6
mm
For
highly
needed.
mm
6
For
sewing
For
patches.
For
For
For
several
For
stitching
and
For
(blouses,
For
The
serging,
with
sewing
Suitable
securing
securing
simultaneously
fabric
sewing
edge-joined
hem
stitching
buttonholes
shirts,
automatically
stitch
durable
seams
appliqué
fringe
on
elastic,
hems
hems
layers.
together
in
bed
sewing
jobs
topstitching
seams
will
stretch
work,
etc.
darning
for
most
invisibly
invisibly
seaming
An
overlock
foundation
fabrics.
effect
fine,
non-stretch
linen)
on
and
stitch.
where
inserting
fabrics
in
stretch
and
Gives
buttons
one
6
great
without
tears
finishing
seam
garments
an
materials
mm
strength
breaking.
lace,
and
applying
fabrics
one
and
ornamental
is
or
over-
—
1
6
6
6
6
6
6
6
T
1
0
Basting
1
1
Quilt
1
3
1
2
Zigzag
(infinitely
width
stitch
1
3
Stmstitch,
1
stitch
needle
stitch
of
during
stitch
with
positions
variable
the
zigzag
sewing)
narrow
For
j
For
quilt
As
or
from
Durabie
and
basting
decorative
projects
in
program
right
&astic
for
embroidery
cut-out
to
parts
embellishments
3.
(May
left,
using
seam,
work
be
e.g.
together
sewn
the
pattern
for
working
and
from
topstitching
left
to
right
mirror
on
key)
eggings,
—
6
3
Page 15

Utility
14
stitch
15
programs
16
tiptronic
2030
22
23
24
25
26
Pro-
gram
No.
1
1
1
1
4
5
6
7
8
1
1
9
Description
Decorative
elastic
Quilting,
stitch
pinstitch
or
Stemstitch,
Stretch
zigzag
stitch
overlock
Open
Honeycomb
appliqué
wide
triple
stitch
stitch
1
Application
overstitching
For
well
as
appliqué
For
Durable
and
For
(Extremely
For
For
seams
for
as
elastic
embroidery
for
inserting
closing
sewing
and
gathering
work
seam,
elastic
durable
and
elastic
on
ornamental
for
elastic
when
work
in
seam
serging
cords
smocking
and
quitting
for
e.g.
sportswear
for
seams
thread,
hem
wool
and
pinstitching
or
working
and
wear)
active
overstitching
seams
threads
leggings,
on
bathing
terry
suits
cloth
Width
upto
mm
6
6
3
6
6
6
20
21
22
23
24
25
26
Cross
Closed
stitch
selvage
Pullover
Cross
Hem
Hem
Hem
stitch
hem
overlock
with
thread
stitch
stitch
stitching
stitching
stitching
Gives
simultaneous
For
more
Elastic
fabric
cross-stitching
For
securing
For
decoration
extremely
an
layers
assembly
and
of
jersey
edges
of
elastic
closing
fabric
and
work
garments
serging
table
in
seam
and
for
serging
seam
linen
sportswear
one
of
open-knit
for
and
or
6
6
6
6
6
11
Page 16
ø
-
—
c)
L/?/
00
co
nr9
0)
W
:—z--
‘‘
-
m
(0
—-
(31
0
(3)
(31
IIhJ.
\!JA/
-
dW
+1
-——---—-—-
(31
-
III
III
111111
lIllIliuhjIf
-
-
wfluhllIlljI
C)
(0
-
(51
(
mIHff
llhlIII1’llillhI
--
Q
—-————-
UJ
iiri
U
‘dIIP
(31
.JJ
Md1d
(31
co
5
CC)
—
-—
---
F
ci
0
—--—
N)
--
—-—-
—
--
p4e
0
.-1
,
t
Page 17
coO
t’)
CD
1
cQ)
\LjjAW
ø
11
()
zzz!
-
(0
0
WI.”
rxv>c
Oo
—
4
C)
Zz
CD
C’,
(31
llIh
11111111111
,11njrnllllil
Imilhuji
IIuIhIMIftlll
(31
0
JL.J
hnilhP
w
w
..
AIk
Ih
0)
_1P
Z3ZZ_
C)
Page 18
Page 19

Contents
Carrying
case
Page
1
8
cover
Top
stitch
Electrical
Voltage
with
program
connection
switchover
Accessories
Detachable
Bobbin
Bobbin
winding
case
Needle/bobbin
Threading
Needle
Pulling
Presser
Thread
threader
up
foot
cutter
Changing
Winding
the
a
needle
Changing
Threading
Feed/IDF
Dual
Lowering
chart
work
thread
needle
the
bobbin
the
lifter
presser
the
bobbin
needles
twin
dog
feed
support
through
needle
tension
thread
thread
feet
Page
Page
Page
Page
Page
Page
Page
Page
Page
Page
Page
Page
Page
Page
Page
Page
Page
Page
Page
1
1
1
20
21
21
24
24
26
27
28
28
28
29
30
31
8
9
9
31
32
34
23
-
25
-
25
-
33
-
17
Page 20
4!’
I
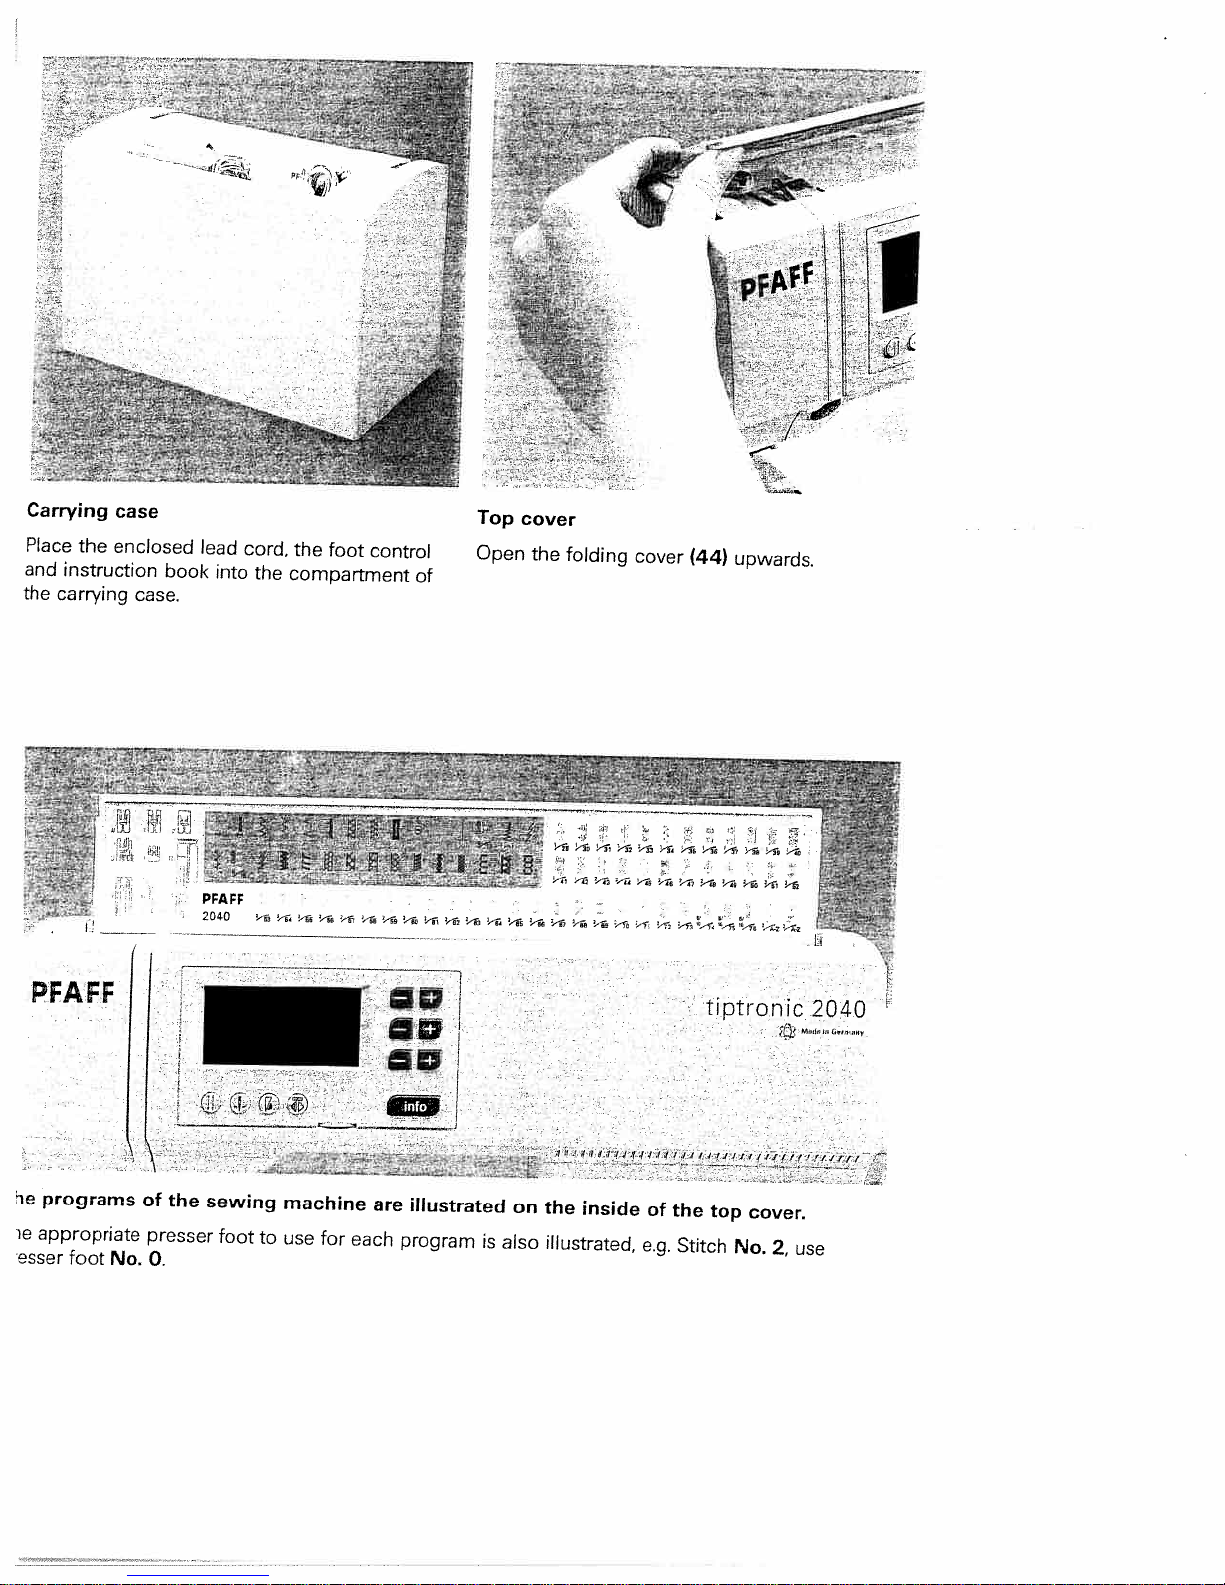
Carrying
Place
the
and
instruction
the
carrying
PFAFF
case
enclosed
book
case.
lead
into
PFAFF
2040
cord,
the
compartment
the
foot
control
-%
of
Top
cover
Open
the
folding
‘4
‘
-1,
-i
.-1,
cover
-1
(44)
upwards.
-A
-1
tiptronic
2040
Mthbh;
t,,,,,,,.,y
-‘
ie
programs
ie
appropriate
esser
foot
No.
of
the
presser
0.
sewing
foot
machine
to
use
for
each
are
illustrated
program
A
iVllJY.I1J)JJ1.’
on
the
inside
is
also
illustrated,
of
e.g.
the
Stitch
top
11If1II!ff
No.
cover.
2,
Jilt!
use
Page 21
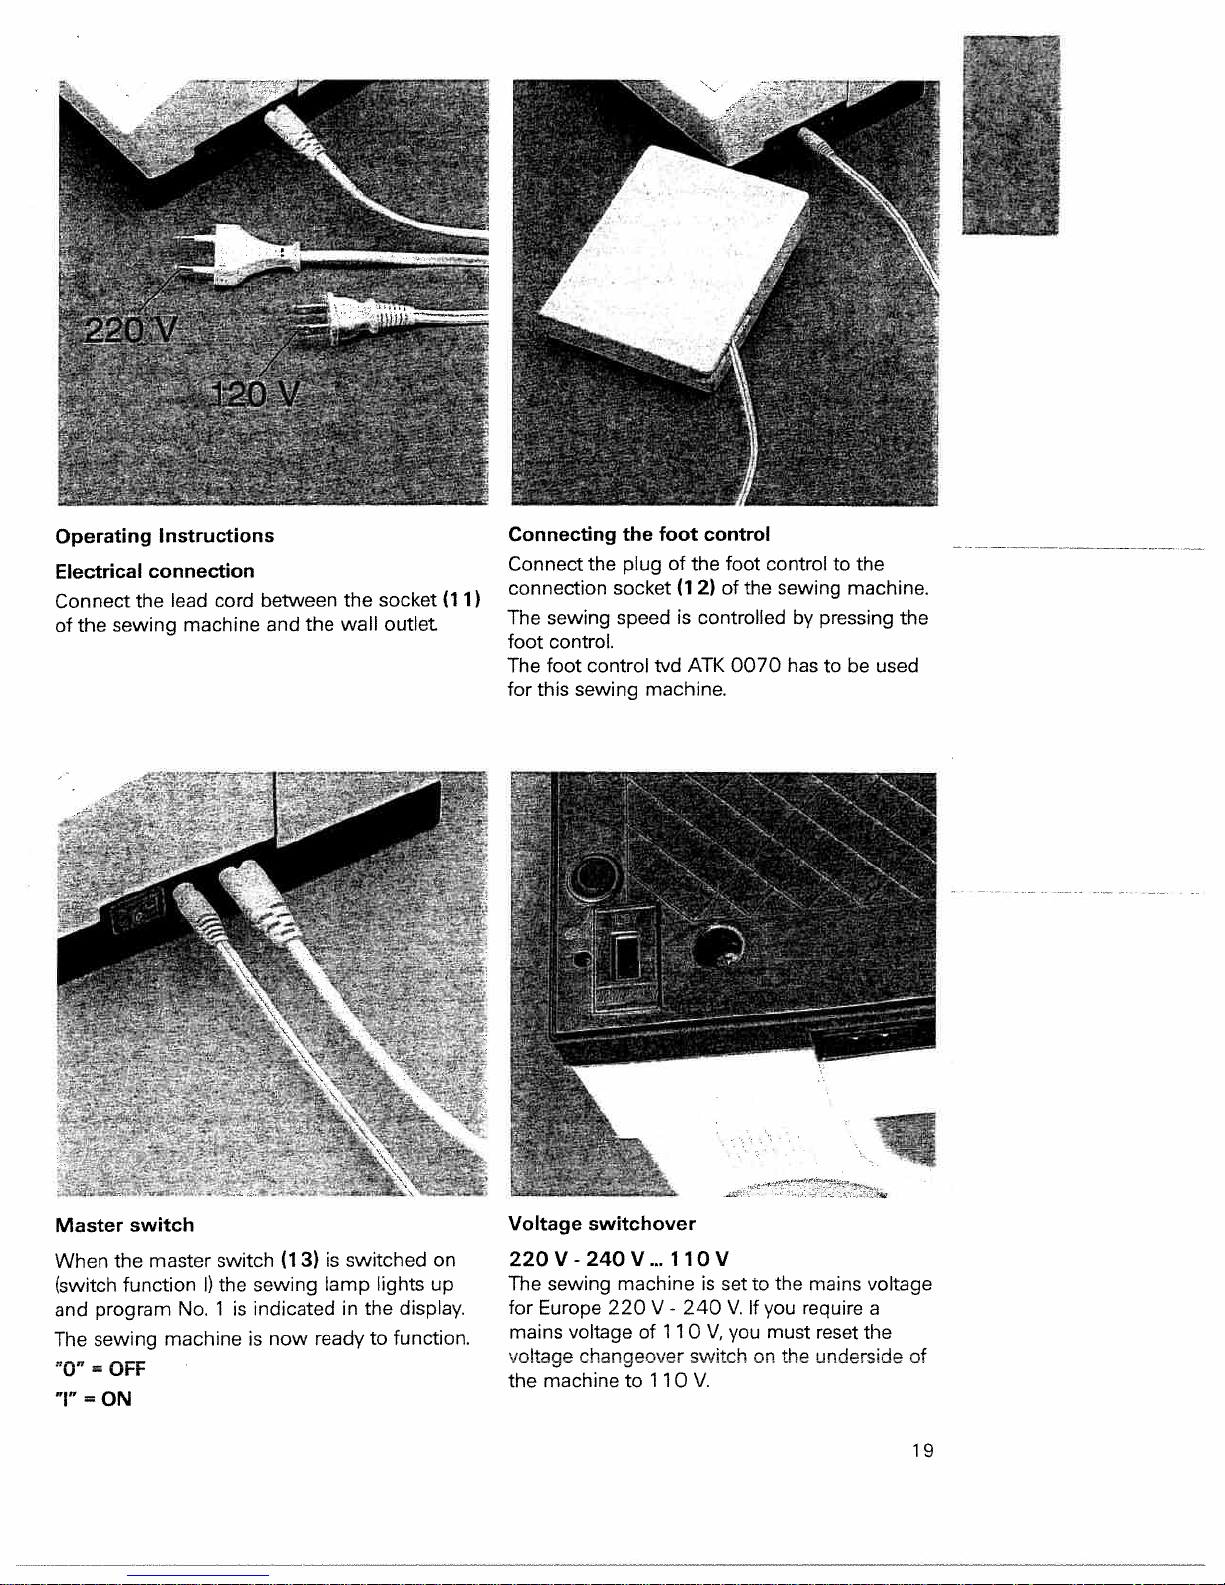
Operating
Electrical
Connect
sewing machine
the
of
Instructions
connection
lead cord
the
between
the
and
the
wall
socket
outlet
(11)
Connecting
Connect
the
the
plugofthe
connection socket
The
foot
The
for
sewing
control.
foot
this
speed
control
sewing
machine.
foot
control
foot controltothe
of
the
(1
2)
is
controlledbypressing
tvd
ATK
sewing
0070
has
tobeused
machine.
the
-
Master
When
(switch
program
and
sewing
The
switch
the
master
functionI)the
machineisnow
switch
No.1is
—--
sewing
indicated
(1
---
3)
ready
--
is
switched
lamp
in
lights
the
function.
to
display.
OFF
=
ON
1”
on
up
Voltage
switchover
22OV-24OV..
The
sewing
for
Europe
mains
voltage
machineto110V.
the
machine
220
voltageof1
changeover
nOV
is
set
V-240V.If
10V.
you
switchonthe
the
to
you
require
must reset
mains
the
underside
voltage
a
of
19
Page 22
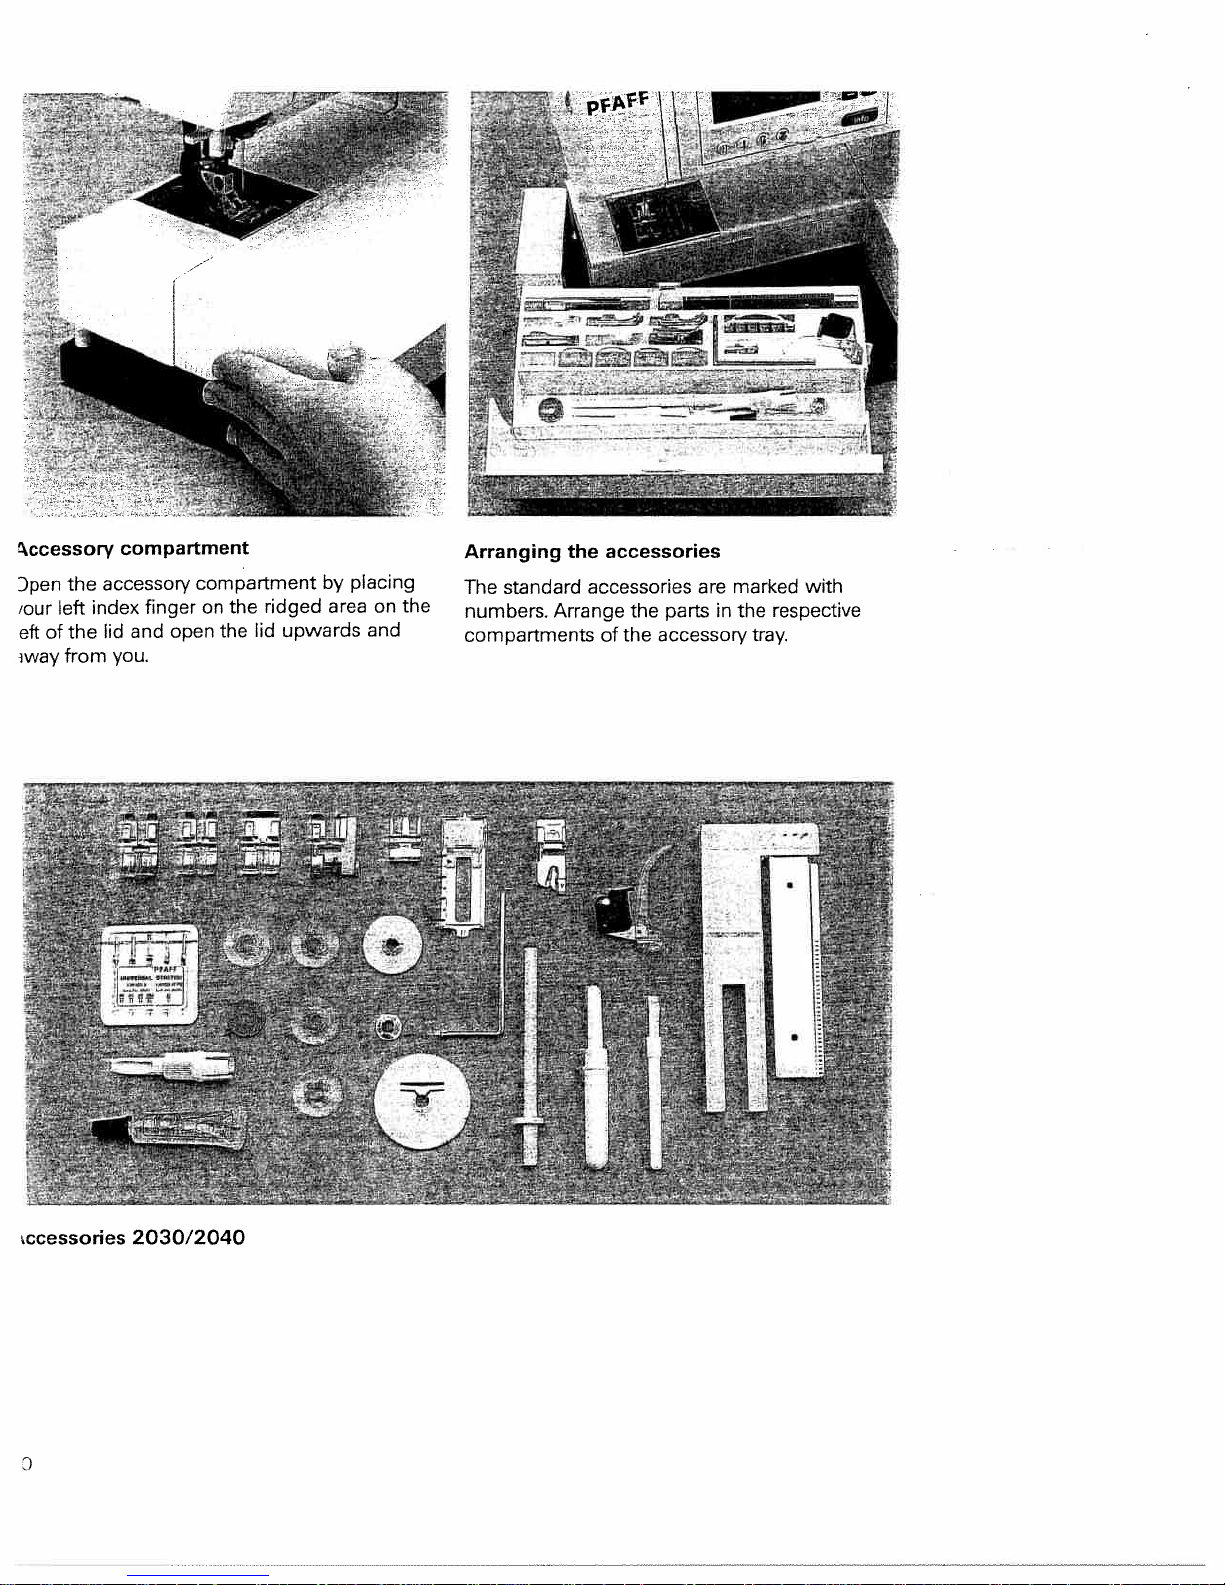
ccessory
Dpen
the
‘our
left
of
the
eft
from
iway
compartment
accessor,’
fingeronthe
index
lid
and
you.
compartment
open
the
ridged
lid
by
areaonthe
upwards
placing
and
Arranging
The
standard
numbers.
Arrange
compartments
accessories
the
accessories
of
the
the
partsinthe
accessory
are
marked
respective
tray.
with
ccessories
2030/2040
Page 23
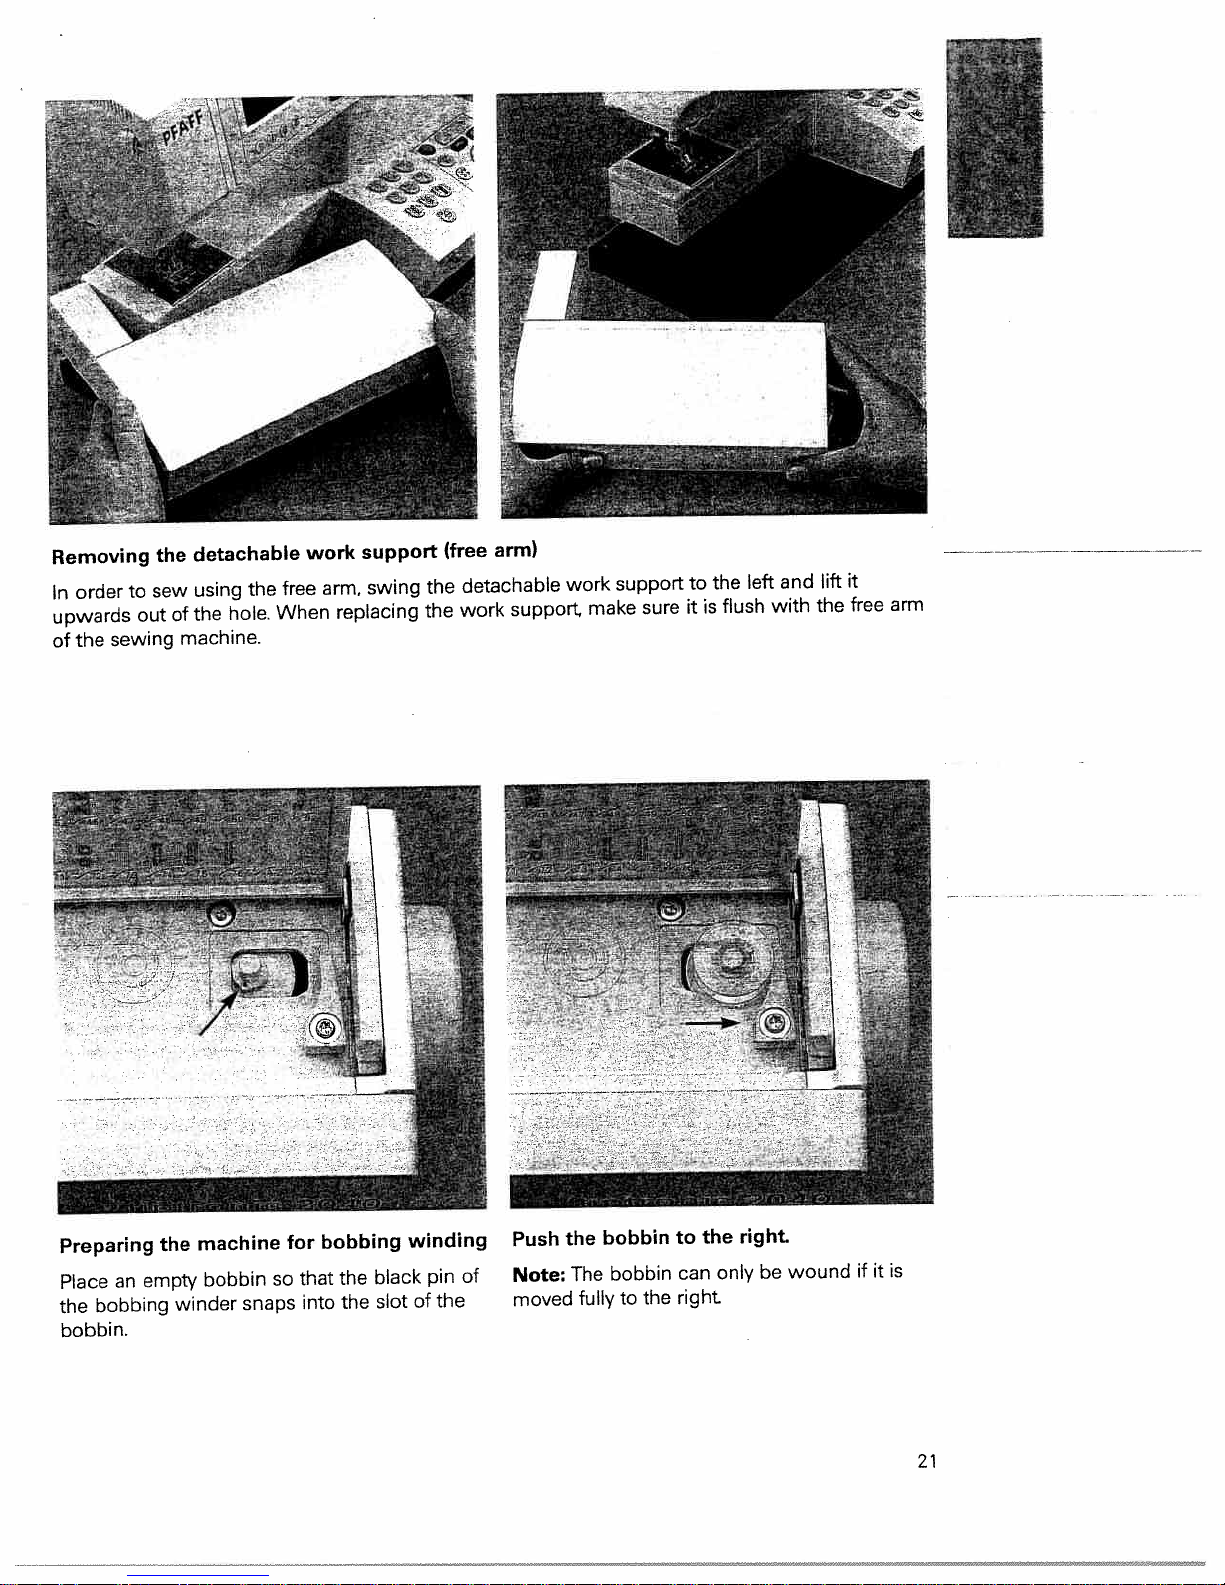
Removing
order
In
upwards
sewing
the
of
to
sew
out
the
of
machine.
L
detachable
the
using
hole.
the
work
free
When
support
arm,
replacing
swing
the
the
(free
work
arm)
detachable
support,
work
make
support
sure
it
lift
and
left
the
to
arm
free
the
with
flush
is
it
Preparing
an
Place
bobbing
the
the
empty
winder
machine
bobbin
snaps
so
for
that
into
bobbing
the
the
winding
black
slot
bobbin.
of
pin
the
of
Push
Note:
moved
the
The
fully
bobbin
bobbin
the
to
to
can
right
the
only
right
be
wound
ifitis
21
Page 24
I
Ô3:
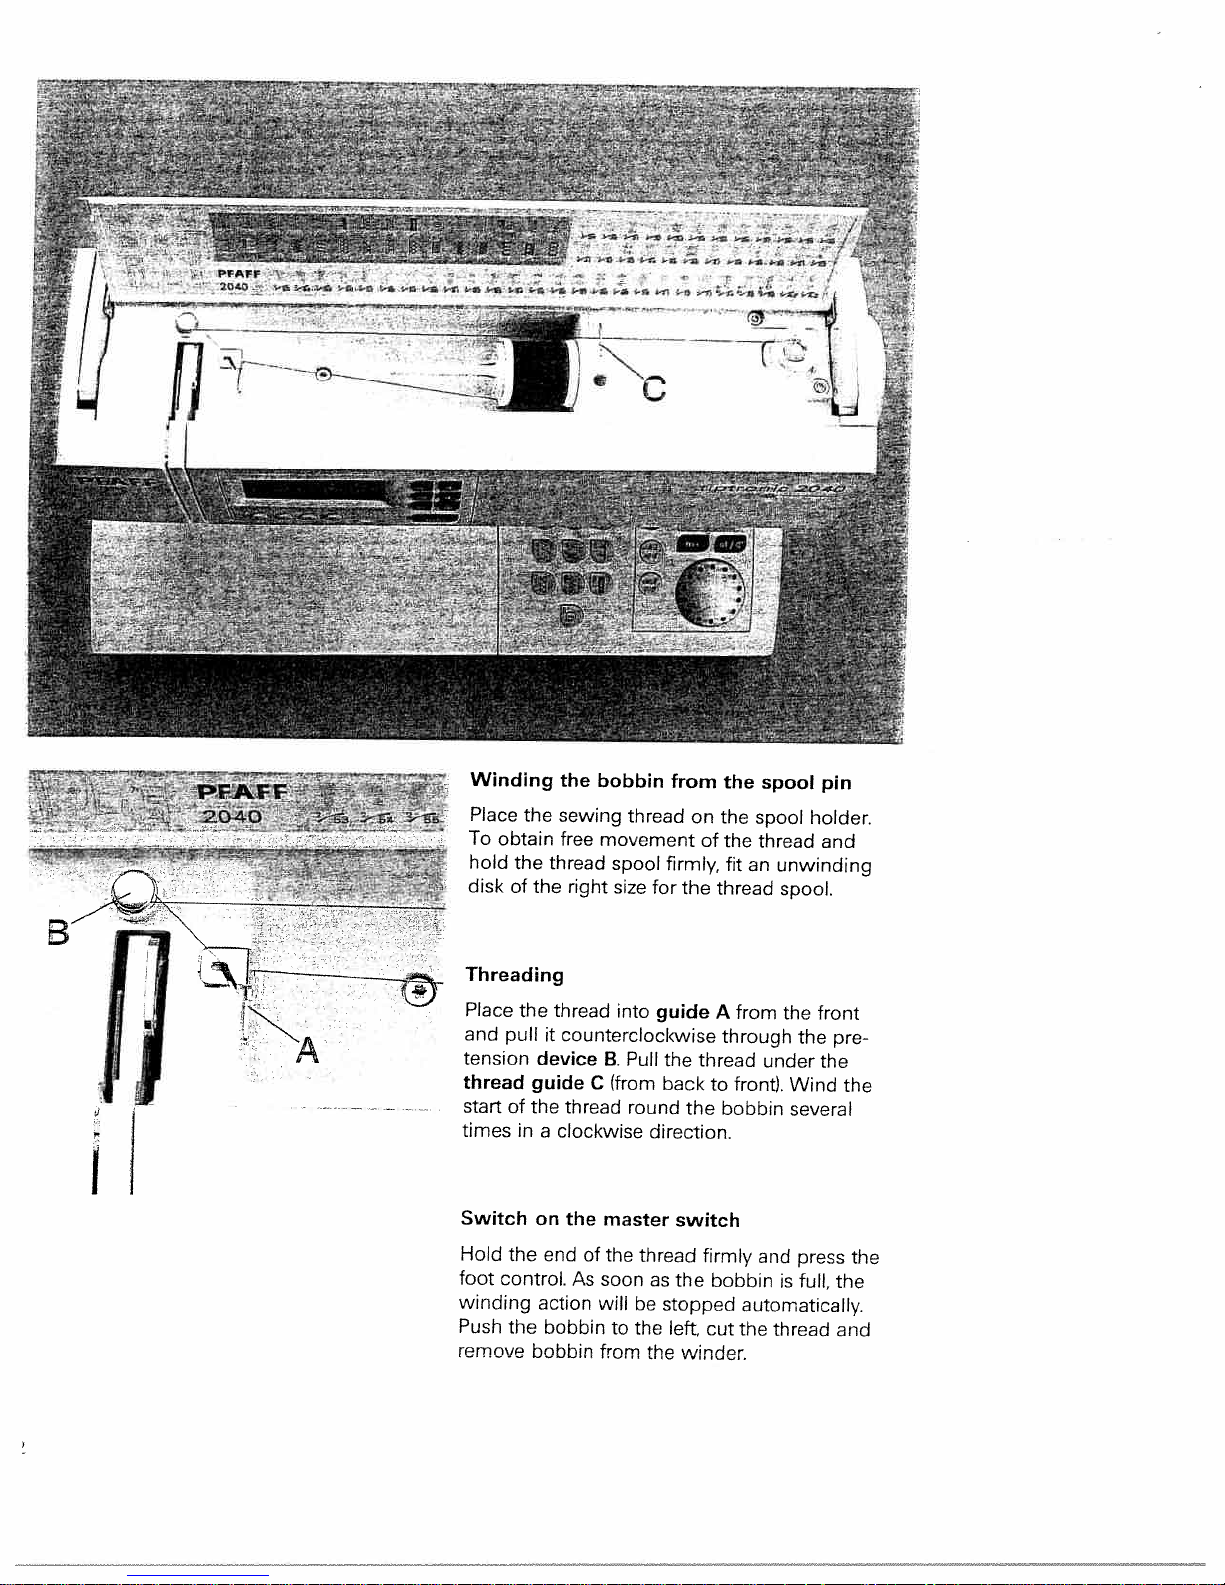
Winding
Place
obtain
To
hold
the
disk
of
Threading
Place
the
and
pull
tension
thread
start
of
times
in
Switch
Hold
the
foot
control.
winding
Push
the
remove
the
bobbin
the
sewing
free
movement
thread
the
right
thread
it
counterclockwise
device
guide
the
a
on
action
bobbin
C
thread
clockwise
the
end
of
As
bobbin
B.
master
soon
will
from
thread
spool
size
into
Pull
(from
round
the
to
from
firmly,
for
guide
the
back
direction.
switch
thread
as
the
be
stopped
the
left,
the
the
on
the
of
the
fitanunwinding
the
thread
from
A
through
thread
to
front).
the
bobbin
firmly
bobbin
automatically.
the
cut
winder.
spool
spool
thread
spool.
the
under
and
is
thread
pin
holder.
and
front
the
the
Wind
several
press
full,
pre
the
the
the
and
Page 25
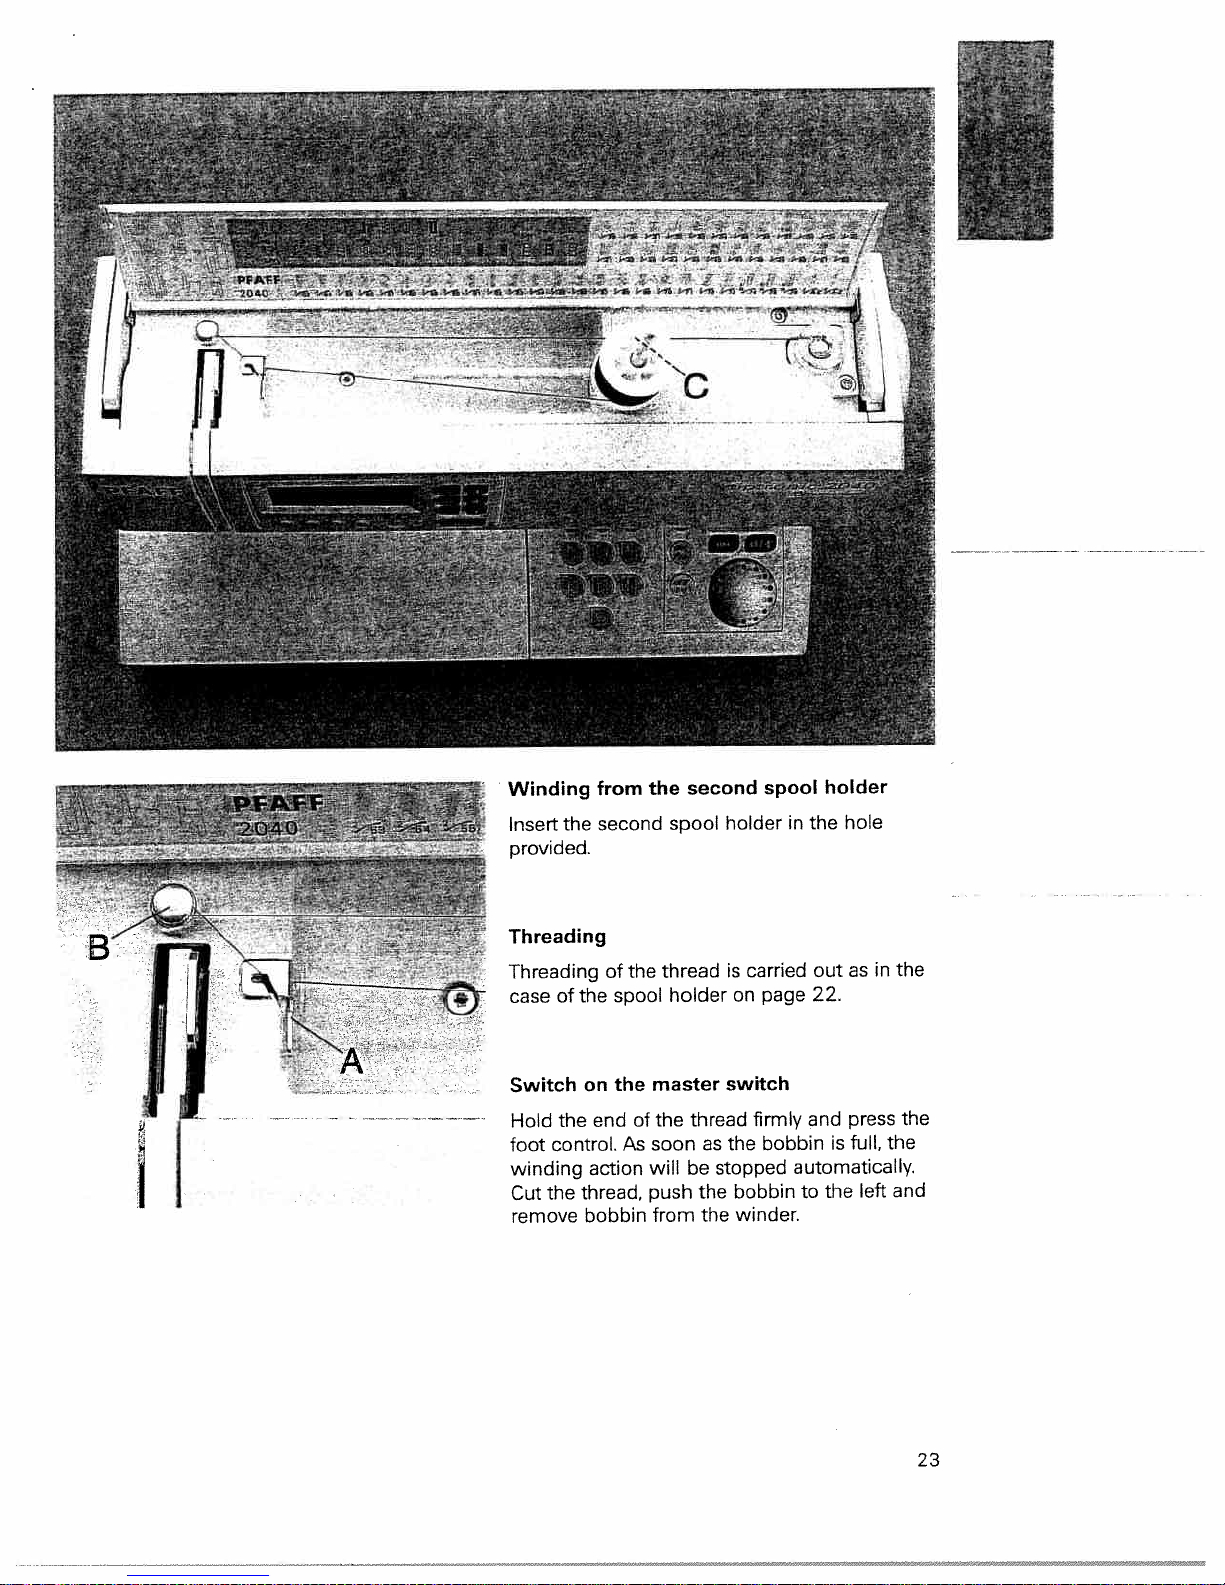
second
the
the
from
second
spool
Winding
.2040
5
--
-
-
-
-
.
-
.—.
-
%
Insert
provided.
spool
holderinthe
holder
hole
B
I
Threading
Threading
of
case
Switch
the
Hold
control.
foot
winding
the
Cut
remove
of
the
on
end
action
thread,
bobbin
thread
the
holder
spool
master
the
thread
of
the
soon
As
willbestopped
push
from
as
the
the
carried
is
on
switch
firmly
the
bobbin
winder.
out
page
22.
and
bobbin
automatically.
the
to
is
as
press
full,
left
the
in
the
the
and
23
Page 26

cover
look
witch off
the
bid
towards
it
pen
hook
main
switch
cover
the
(26)
front
the
out the
latch
case
and
case.
Taking
Lift
the
left
at
side
and
bobbin
latch
bobbin
of
outofthe
take
bobbin
the
the
bobbin
empty
case
case
machine.
bobbin
and
Release
out
pull
of
the
the
the
hread
tension
iEtEi1
To
obtain
durability
thread
regard
interlace
following
The
Thread
fabric:
the
The
needle
bobbin
thread
The
Thread
of
the
fabric:
The
needle
bobbin
The
thread
For
decorative
thread
of
side
perfect
a
make
tensions
each
to
between
interlace
thread
thread
tension
interlace
thread
thread
tension
interlace
fabric.
the
sure
are
other,
is
valid for
is
tension
is
tension
stitches
should
seam
the
correctly
i.e.
the
visible
tension
is
must
visible
tension
is
must
and
appearance
needle
adjusted
threads
the
fabric
two
general
on
is
too
too
loose.
corrected.
be
on
is
too
too
tight
be
corrected.
buttonholes
visible
be
and
and
bobbin
with
evenly
layers.
sewing
the
top
or
tight
the
underside
looseorthe
the
on
side
the
the
under
work:
of
Page 27
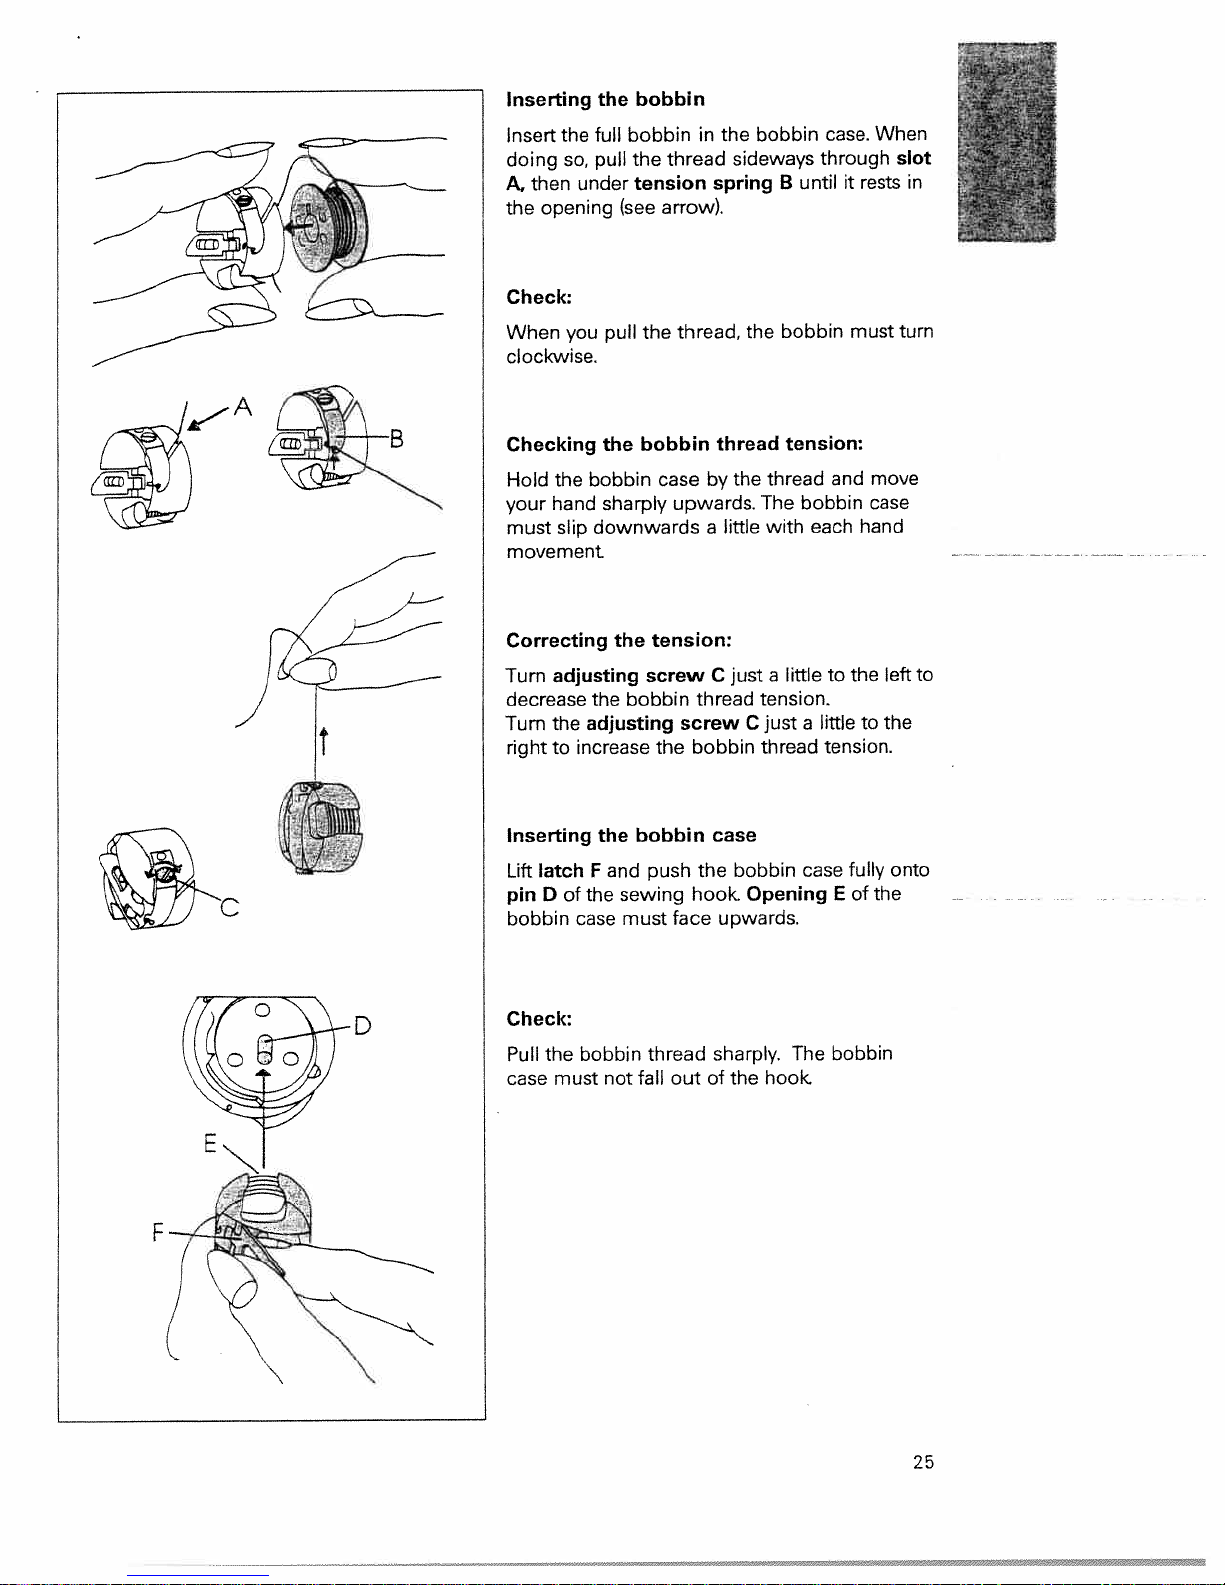
Inserting
Insert
the
doing
so,
then
A.
opening
the
Check:
When
you
clockwise.
the bobbin
full
bobbin
pull
the
tension
under
(see
pull
the
in
thread
arrow).
thread,
the
sideways
spring
the
bobbin
B
bobbin
When
case.
through
untilitrests
must
slot
in
turn
Checking
Hold
your
must
movement
Correcting
Turn
decrease
Turn
righttoincrease
Inserting
Lift
latch
pin
bobbin
the
the bobbin
sharply
hand
slip
downwards
adjusting
the
the
adjusting
the
F
of
the
D
case must
the
and
sewing
Check:
bobbin
case
tension:
screw
bobbin
the
bobbin
push
thread
by
upwards.
little
a
C
thread
screw
bobbin
case
the
hook
face
upwards.
tension:
the thread
The
with
a
little
just
tension.
C
just
thread
bobbin
Opening
and
bobbin
each
the
to
littletothe
a
tension.
fully
case
of
E
move
case
hand
the
left
onto
to
F
Pull
case
the
must
bobbin
not
thread
fall
out
sharply.
of
the
hook
The
bobbin
25
Page 28
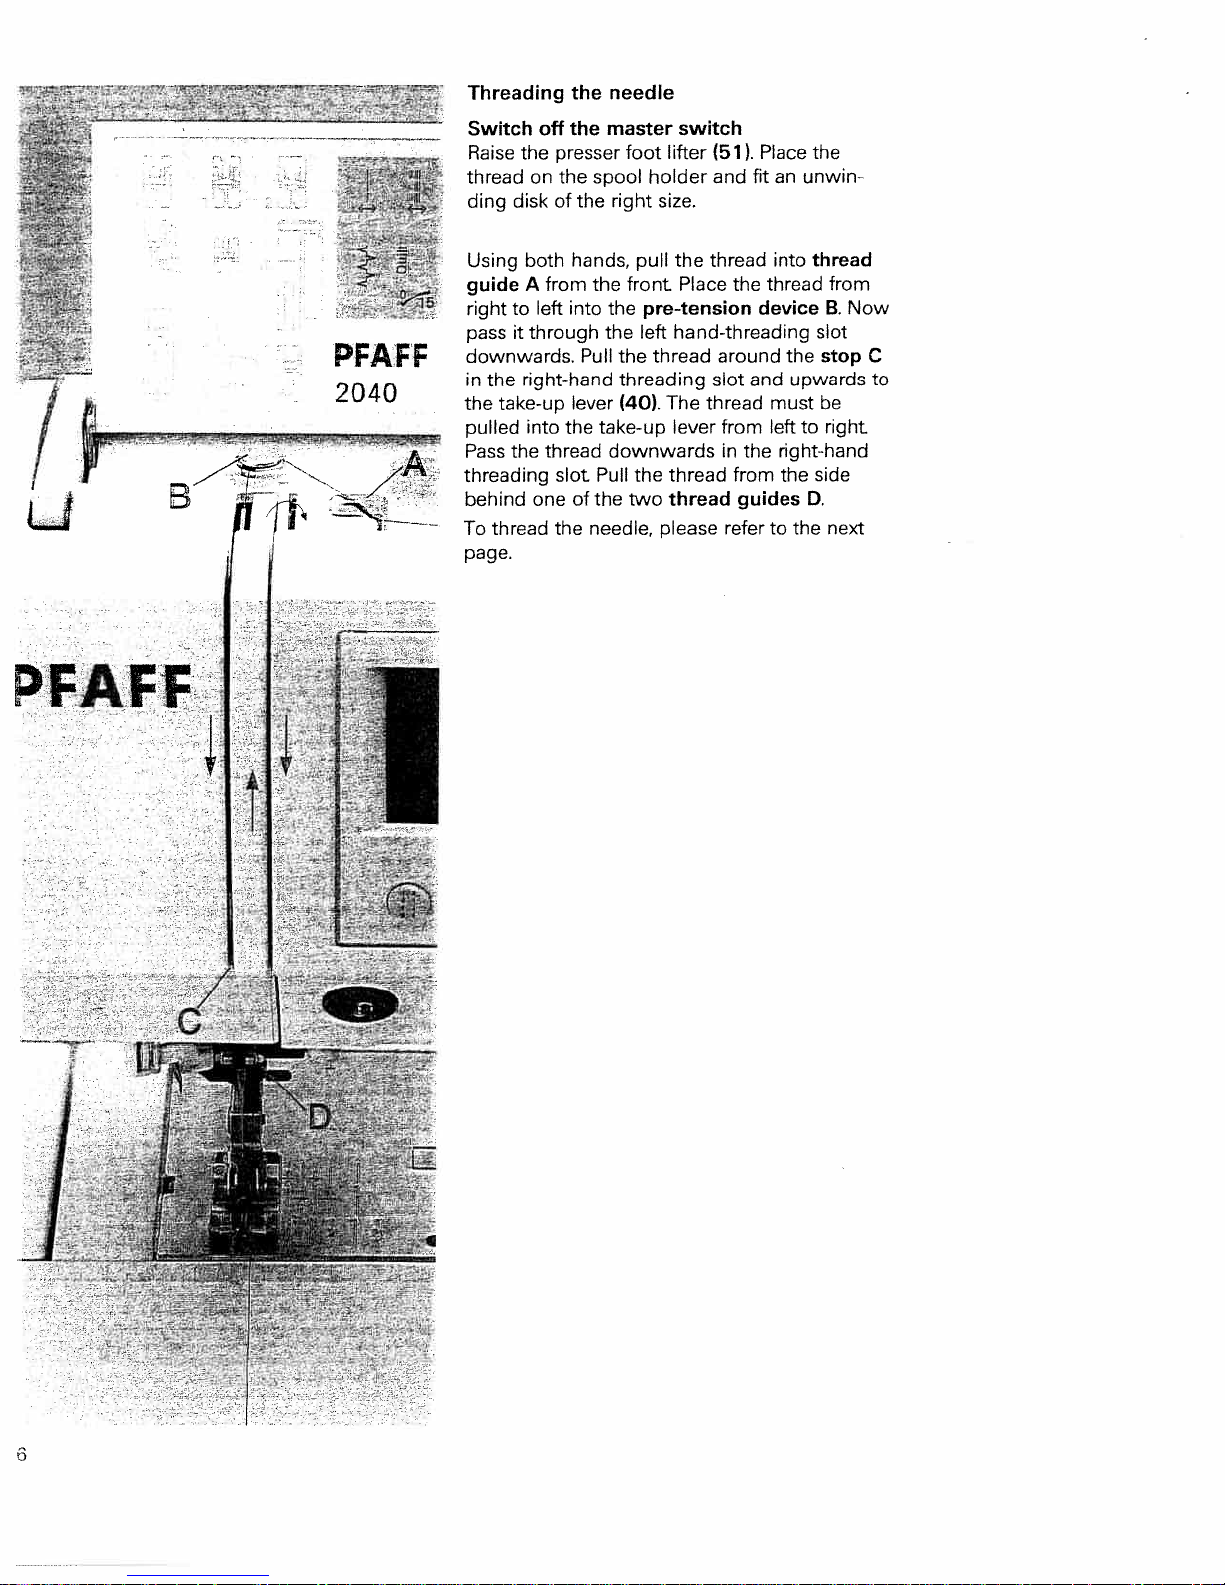
Threading
the
needle
Switch
Raise
thread
ding
Using
guideAfrom
righttoleft
pass
downwards.
in
the
pulled
Pass
threading
behind
To
page.
the
on
diskofthe
both
through
it
right-hand
the
take-up
into
the
one
thread
off
presser
the
thread
slot
the
the
spool
hands,
the
into
Pull
lever
the
of
the
needle,
Pull
master
foot
holder
right
size.
pull
front
pre-tension
the
left
the
the
thread
threading
(40).
take-up
downwards
the
two
please
switch
lifter
the
Place
hand-threading
The
lever
thread
thread
Place
(51).
fitanunwin
and
thread
the
deviceB.Now
around
slot
and
thread
from
in
the
from
guides
refertothe
the
into
thread
thread
slot
the
upwards
must
left
to
right-hand
the
side
D.
from
stop
be
right
next
C
to
Page 29
‘L
:
‘‘
•
-
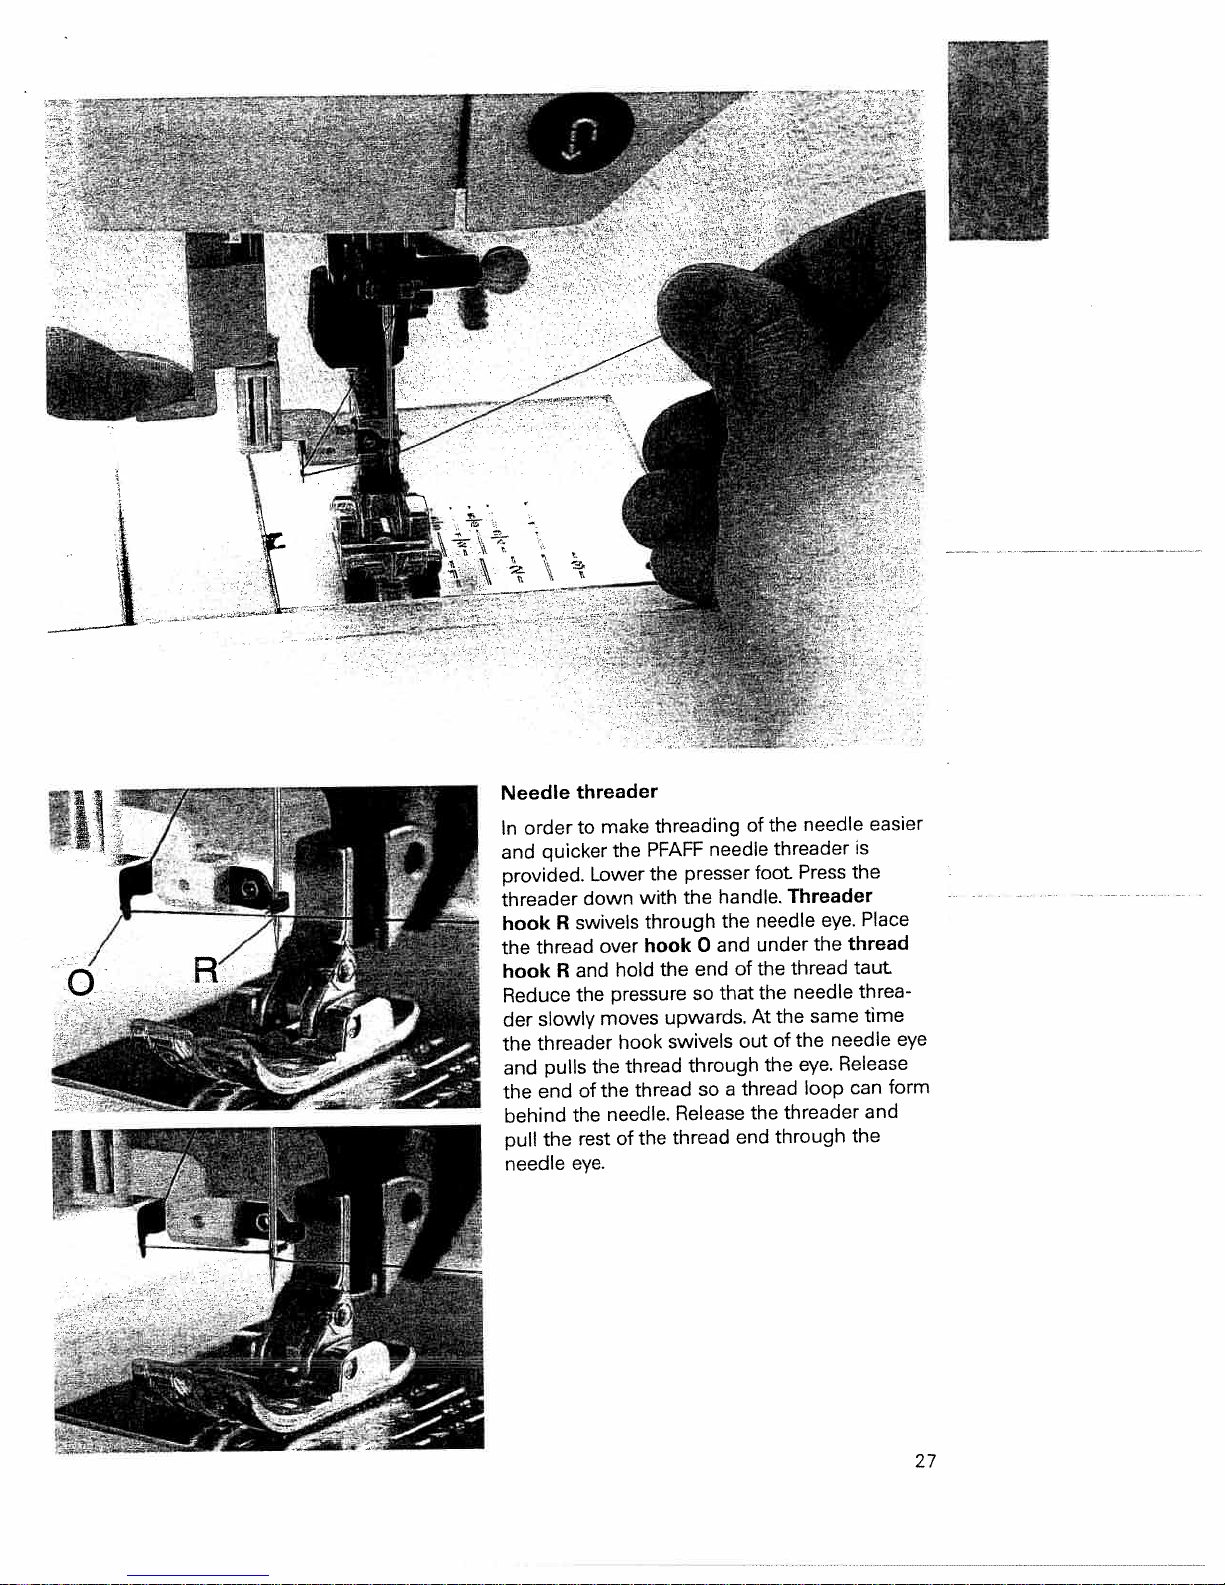
Needle
order
In
quicker
and
provided.
threader
hook
thread
the
hook
Reduce
slowly
der
threader
the
pulls
and
end
the
behind
the
pull
needle
threader
to
down
swivels
R
and
R
the
of
the
rest
eye.
make
the
Lower
over
hold
pressure
moves
hook
thread
the
the
needle.
of
threading
PFAFF
the
with
through
hook
the
upwards.
swivels
thread
the
thread
needle
presser
handle.
the
and
0
end
that
so
through
so
Release
the
of
a
end
of
the
foot
needle
under
the
the
At
out
the
thread
the
needle
threader
Press
Threader
the
thread
needle
the
same
the
of
eye.
loop
threader
through
the
eye.
thread
needle
Release
can
easier
is
Place
taut
threa
time
eye
form
and
the
27
Page 30
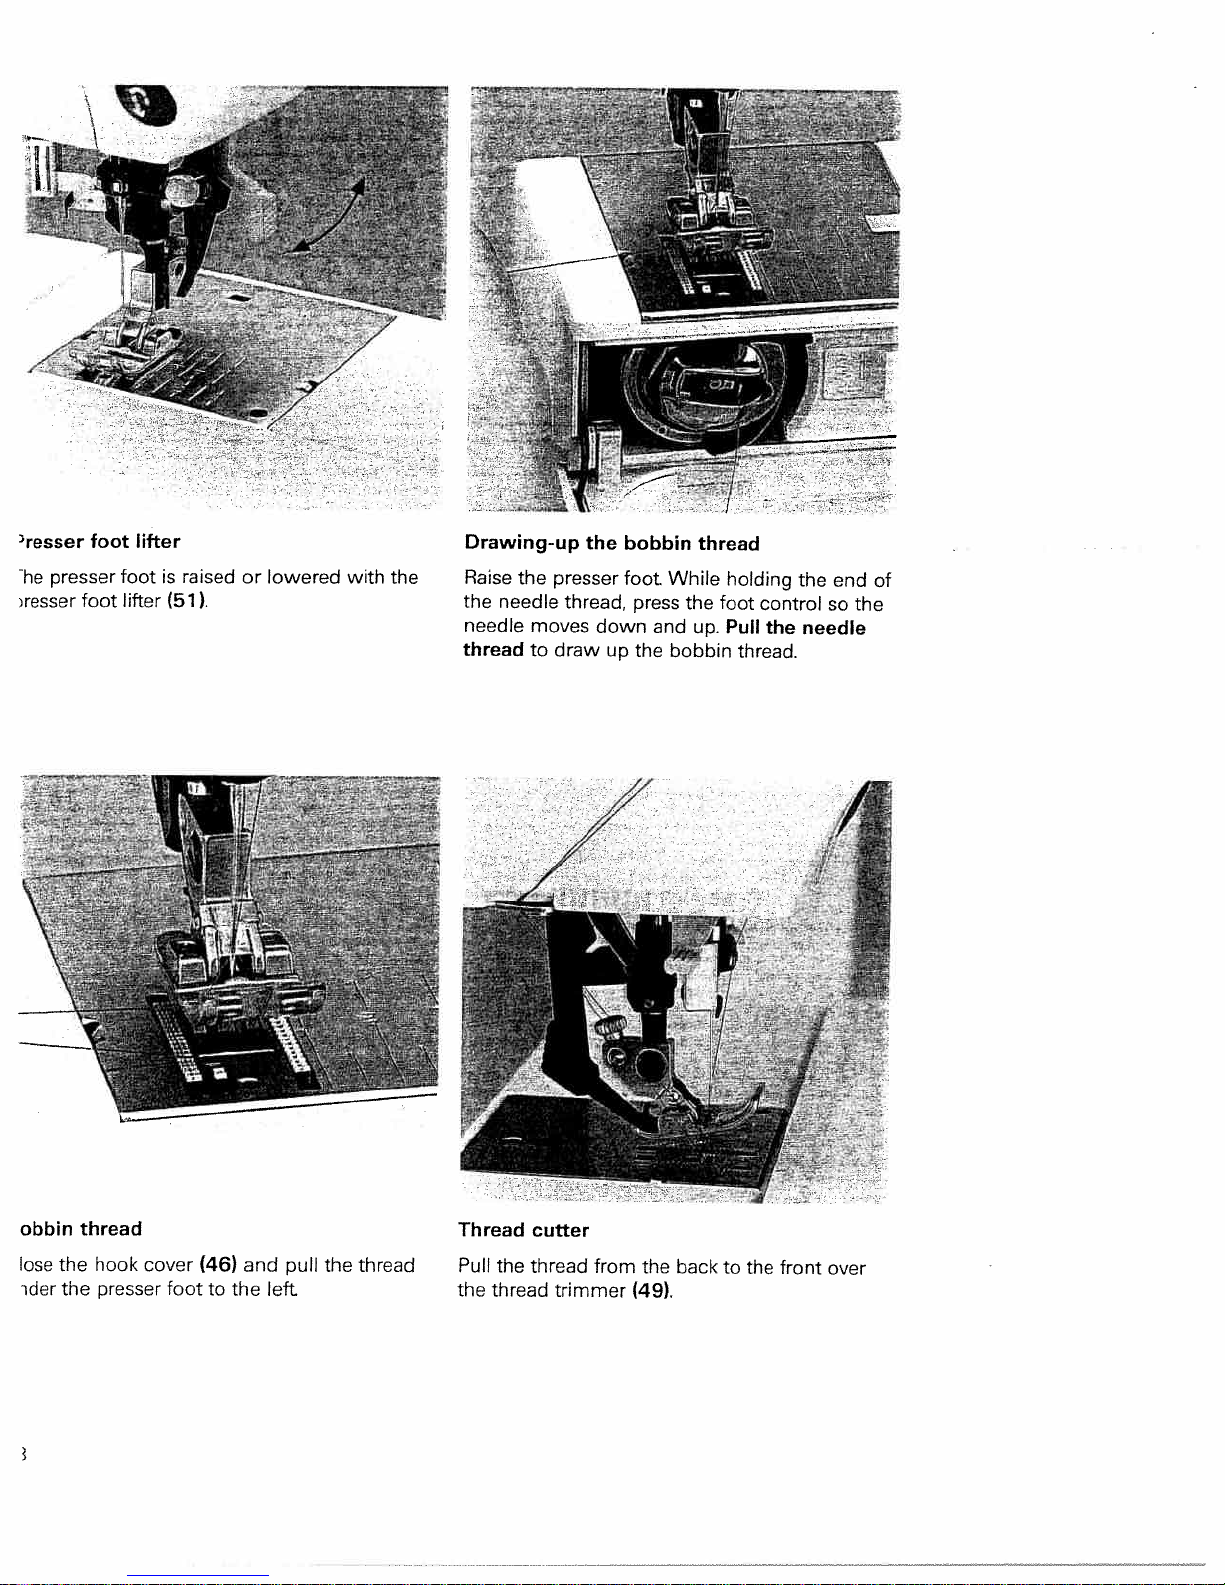
resser
presser
The
)resser
foot
foot
lifter
foot
lifter
is
(51).
raised
or
lowered
with
the
Drawing-up
Raise
the
the
needle
needle
thread
moves
to
the
presser
thread,
draw
bobbin
foot
down
up
press
and
the
thread
While
the
up.
bobbin
holding
foot
Pull
thread.
the
control
the
end
so
needle
of
the
obbin
lose
ider
the
the
thread
hook
presser
cover
foot
(46)
to
the
and
left.
pull
the
thread
Thread
Pull
the
thread
the
cutter
thread
trimmer
from
the
(49).
back
to
front
the
over
Page 31

•[
Removing
Switch
the
Press
the
at
and
disengages
it
until
(30).
off
the
the
front
same
presser
master
part
time
from
of
the
the
foot
switch
presser
rear
presser
the
foot
part
upwards
downwards
holder
foot
Attaching
the
Place
holder
(51)
the
(30),
is
presser
the
presser
so
lowered,
foot
presser
foot
when
that
the
holder.
pins
foot
under
of
the
the
the
presser
presser
foot
foot
foot
engage
lifter
in
Check:
properly
is
presser
foot
foot
lifter.
Please
attached
check
by
raising
the
presser
the
that
the
the
required
(35)
Setting
Set
tension
dial.
normal
The
embroidery,
needle
amount
using
setting
darning
thread
the
for
and
tension
the
of
markings
sewing
buttonhole
needle
on
3
is
the
5.
-
sewing
thread
tension
For
3.
29
Page 32

Winding
It
possible
is
machine
lifter
(51)
thread
through
bobbin
a
to
fully
is
the
to
underneath
right-hand
the
through
wind
threaded.
position.
top
the
bobbins
Raise
presser
threader
the
even
Pull
foot
needle
the
the
slot
when
presser
needle
and
(34).
the
foot
upward
Place
take-up
Note:
position.
the
The
I
thread
lever
take-up
“FE
(40).
from
lever
PFFF
2040
left
must
right
to
be
through
its
at
the
highest
uide
imes
cot
the
around
control.
thread
the
to
the
bobbin
right
in
under
clockwise
a
thread
guide
direction.
C.
Hold
Wind
the
the
end
beginning
of
the
of
thread
the
firmly
thread
and
several
press
the
Page 33

Changing
Switch
remove:
To
screw
To
the
(52)
insert
needle,
off
the
master
the
Lower
the
of
The
pushing
needle
needle
flat
switch
the
side
itupas
presser
and
of
A
the
far
foot
pull
as
and
the
needle
it
will
set
needle
must
go.
the
out
face
Hold
needle
to
downwards.
the
to
needle
the
its
rear.
highest
Lower
tighten
and
position.
presser
the
the
Loosen
foot
screw
set
A
the
and
set
(52)
insert
firmly.
needle:
twin
of
sure
right
It
the
the
thread
that
in
not
is
sewing
on
you
the
usual
and
with
possible
each
left
needle
pass
manner,
into
twin
the
of
one
to
the
the
a
with
spool
thread
making
thread
needle”).
the
use
twin
holders.
each
guide
automatic
Threading
Replace
spool
make
threading
threads
“Embroidering
Note:
needle.
to
sure
and
Insert
During
the
the
thread
needle
threading
and
left
threads
second
the
right
do
the
threader
in
sides
not
become
needles
spool
the
of
(for
with
holder
threading
left
tension
twisted
additional
twin
a
and
disk
together.
details,
needle.
place
slot
B.
one
(34),
Continue
Pull
see
the
31
Page 34

The
IDF
For
sewing
system.
time.
prevents
feed
checked
of
the
System/Integrated
difficult
industrial
on
As
material
The
puckering
and striped
layers.
top
materials
fed
is
fabrics.
Dual
PFAFF
machines,
precisely.
of
seam.
the
The
the
On
IDE
Feed
provides
IDF
light
The
keeps
(top
feeds
or
even
all
feed)
ideal
the
the
difficult
feeding
layers
solution:
fabric
fabrics
action
of
quilt
from
such as
also
projects
the
the
Integrated
top
ensures
and
bottom
silkorrayon
perfect
aligned
to
Dual
the
prevent
Feed,
at
the
dual
matching
stretching
IDF
same
fabric
of
Page 35

Engaging
Important
the
use
out
the
Raise
downwards
the
For
presser
presser
top
until
all
feet
feed/IDF
work
with
foot
engages.
it
with
the
Press
the
center
the
Dual
top
Feed
back
feed
(IDF),
cut
(31)
Disengaging
Dual
the
Hold
a
32).
points.
little,
the
marked
wards
release
page
IDF
the
Feed
Press
then
slowly
top
with
pull
feed/IDF
two
top
the
away
it
upward
fingers
feed
from
(see
(31)
also
at
you
the
down
and
fig.
on
Stripes
and
match
plaids
perfectly
due
sewn.
to
material
the
of
feed
even
the
to
be
33
Page 36

kPP
Lowering
For
certain
cleaned,
Raise
the
to
engage
the
sewing
the
presser
the
feed
feed
feed
work
dog
foot
-
dog
dog
such
has
before
move
:
to
be
lowering
/
•
as
free-motion
lowered.
the
slide
the
:
quilting
feed
to
the
right
dog.
or
Push
1.
darning
slide
—
A
and
when
the
machine
to
the
left.
must
be
-
•
)U
can
also
lower
the
feed
dog
by
opening
engage
the
feed
dog
move
the
slide
the
to
the
left
hook
cover
and
moving
•;
slide
\•
B
B
to
the
right
Page 37

Page 38

Contents
Adjusting
display
the
on
Bobbin
(model
Selecting
Altering
Altering
width/needle
Altering
width/stitch
Altering
length/stitch
Balance
lnfo
Sewing
Twin
Formation
thread
2040)
pattern
the
key/reverse
needle
contrast
the
sewing
the
stitch
pattern
the
length
pattern
the
density
function
of
monitor
sizes
position
sewing
keys
stitch
the
programs
key
patterns
Page
Page
Page
Page
Page
Page
Page
Page
Page
Page
Page
Page
38
38
39
40
41
42
43
44
45
46
47
48/49
37
Page 39

Adjusting
The
contrast
transported.
This
setting
the
setting
can
contrast
on
be
readjusted
the
on
display
the
display
with
may
the
change
contrast
after
long
regulator
use
(54).
or
due
to
the
machine
being
Bobbin
If
the
The
the
bobbin
symbol
thread
bobbin
is
symbol
disappears
38
monitor
nearing
appears
(model
its
after
end
on
the
[2
the
full
2040)
yd
display.
bobbin
(2
m)
is
‘/
3
inserted
yd
(3
and
m)1
you
or
there
start
to
is
sew
no
thread
again.
on
the
bobbin,
Page 40

are
the
are
of
three
the
sewing
in
return
Selection
There
With
1.
in
Clockwise
Counterclockwise
you
If
will
you
sewing
the
ways
selection
programs.
in
last
the
program
to
selecting
of
knob
ascending
in
=
program,
programs
your
(selection
order
descending
No.
0.
No.
76
desired
key,
order
(No.
61
sewing
model
the
in
program:
2030):
case
With
2.
selection
programs
the
3.
With
numerical
I.
e.
press
program
for
model
of
the
alphabet
the
you
If
key
number
scrolling
direct
the
of
(0
programs.
direct
2030),
selection
most
9)
—
selection
backward
and
program
wishtoselect
then
2
press
appears
continue
and
keys
commonly
the
for
keys
selection:
program
3.
key
on
and
for
selection
to
No.
input
The
display.
the
forward
scroll
to
instant
used
the
23,
of
Model
in
descending
<in
2030:
ascending
Program
order
order
selection
key
39
Page 41

Altering
key
With
pattern
select
..%
w
width
the
pattern
pairs
and/or
needle
To
Stitch
Pattern
Needle
sizes
and
a.
b
position
change:
width
c
pattern
width
position
(located
length,
straight
for
for
the
to
change
straight
right
stitches.
stitches
the
of
density
Each
the
display)
or
change
the
you
is
visible
can
balance
Use
a
change
of
on
the
key
a
selected
display.
pair
the
stitch
and/or
pattern,
and
...2
<
<III>
vsz
40
Stitch
Pattern
Stitch
Pattern
Balance
length
length
density
density
C
Page 42

Altering
selected
The
stitch
the
program
1
width
can
be
sewn
various
in
widths,
e.g.
zigzag
stitch
No.
3.
:i
:
:
1,
stitch
position
pair
key
No.
stitch
and
2
move
to
a
needle
Altering
Straight
positions
the
stitch
by
No.
pressing
the
No.
needle
11
can
to
be
left
sewn
right
or
in
any
of
of
center.
3
1
different
needle
41
Page 43

Altering
e.g.
Program
For
decorative
program
the
63
pattern
63
stitches,
comes
width
(Program
the
up
in
56
overall
standard
a
on
model
width
width
of
2030).
the
and
pattern
can
be
is
shown
altered
on
using
the
key
display.
pair
a.
When
entered.
Altering
The
stitch
the
length
stitch
42
of
length
program
a
can
be
altered
using
key
pair
b.
Page 44

IF
1.
Altering
pattern
The
the
pattern
length
length
decorative
of
patterns
can
be
altered
using
key
pair
Ii
programs
altered.
or
density
The
less
such
pattern
densely.
buttonhole,
as
length
stitch
various
more
the
can
densely
stitch
be
Altering
With
pattern
red
will
satin
remain
stitches,
constant
etc.
but
the
the
stitch
pattern
density
will
of
embroide
be
the
43
Page 45

Embroider’,’
silk
Your
the
balance.
To
close
ted
a
pattern,
display.
This
Balance
patterns
tiptronic
With
up
or
you
symbol
has
this
stretch
will
can
vary
a
correction
system
out
a
see
a
indicates
on
the
pattern,
symbol
that
different
system
reverse
use
with
the
balance
feed
the
a
fabric
that
balance
“0
types
allows
of
a
after
can
-
you
pattern
to
it
at
be
altered
heavy
to
alter
the
material
sew
can
the
bottom
on
optimum
be
adjusted.
reverse
this
is
fed
feed.
right-hand
stitch
differently
embroidery
After
corner
program.
than
having
of
fine
stitches:
selec
the
The
With
or
without
In
the
sewn
In
the
standard
key
minus
shorter.
plus
setting
pair
c
preceding
range
range
44
you
the
of
can
sign)
the
patterns
the
balance
change
indicates
patterns
are
the
or
programs
sewn
is
reverse
the
value
longer
feed
are
set
and
of
the
sewn
thus
machine
shorter
longer
from
and
or
-9
thus
the
stretched
to
(+)9.Anumber
overall
out
length
(with
will
be
Page 46

key
Info
info
The
pressing
By
Symbols
key
in
this
the
is
below
key,
info
the
you
menu:
key
can
pairs
receive
c.
—
a
information
about
the
selected
stitch
program.
Needle
Needle
Top
Top
Feed
Page
recommendation
thread
engaged
feed
disengaged
feed
lowered
dog
number
tension
the
of
info
menu
Reverse
key
This
when
•
manual
•
programming
•
determines
program
sewing
•
(see
sewing
has
pressed,
finish
on
page
following
the
the
(model
lace
26
1
will
of
the
length
while
on>
a
2040)
functions:
reverse
buttonhole
buttonhole
the
of
tapering
sew
darning
automatically
45
Page 47

Sewing
There
“tie-oW
“pattern
function
are
at
mirror”.
four
the
keys
sewing
beginning
function
and/or
keys
the
below
end,
the
setting
display.
“needle
With
these
raised/lowered”,
keys
you
can
“slow
choose
sewing”
between
and
Tie-off
When
you
machine
can
tie
then
be
“Needle
You
can
stop
sewing.
disappears
“Slow
By
pressing
appears
“Pattern
This
symbol
When
ting
the
the
46
key
(36)
press
this
has
tied
at
off
the
end
completed
raised/lowered”
determine
The
when
sewing”
on
the
the
key
“slow
display
mirror”
will
appear
“pattern
pattern
will
key
off,
the
of
and
wiither
symbol
the
key
(38)
key
(39)
mirror”
be
before
symbol
seam
a
tied
off.
key
the
appears
is
pressed
sewing”
and
disappears
on
the
key
mirrored.
starting
or
The
(37)
needle
key
IP
display
has
to
disappears
pattern.
machine
should
above
the
again.
the
speed
when
for
been
sew,
from
The
will
keyonthe
of
the
all
patterns
pressed,
symbol
the
the
display.
symbol
be
appears
and
stop
in
its
display
the
machine
keyispressed
that
point
a
appears
the
highest
can
will
Press
on
symbol
position
when
is
reduced
again.
be
sewn
appear
the
on
the
the
below
display.
the
key
while
display.
will
disappear.
or
in
needle
by
inverted,
The
the
half.
the
Once
sewing
pattern
fabric
lowered
is
The
mirrored.
i.e.
symbol
the
so
when
symbol
indica
you
will
you
and
Page 48

needle
Twin
Depending
symbol
cannot
Reduce
a
insert
and
mm
2
may
be
the
twin
on
appear
used
pattern
needle
safely
the
to
sew
needle
on
sew
width
with
the
the
the
a
position
display.
program
the
until
distance
selected
the
or
symbol
This
the
at
warning
between
pattern.
width
currently
symbol
of
indicates
the
pattern,
a
set
disappears.
needles
that
width.
of
this
no
warning
twin
a
You
more
need’e
may
than
now
47
Page 49

____
[
_____
Formation
stitch
The
Some
outside
retained.
of
the
pattern
patterns
F•
stitch
formation
right
are
piercing
patterns
varies.
formed
point
from
of
the
the
left.
needle
i.e.
when
changes.
the
The
stitch
left-hand
width
is
changed
piercing
point
only
always
is
the
The
right
patterns
will
s
%%f
needle
changes
48
always
entry
in
that
position,
width.
are
retain
formed
right-hand
the
regardless
from
of
the
any
Note:
that
are
Do
not
display
Do
formed
use
lights
not
useatwin
a
twin
up
from
(see
one
needle
page
needle
side!
if
this
47).
to
sew
symbol
patterns
in
the
Page 50

hFF
_______________
-
-
w_
info
:
/I
•
-
Patterns
when
they
-
formed
are
that
widened/narrowed.
are
D’
left
the
and
right
the
from
the
center
will
change
equally
from
49
Page 51

H
I
I
Page 52

Contents
Pattern
Keys
Storing
Deleting
sequence
Subsequent
the
Deleting
Deleting
Changing
within
“Pattern
combinations
for
the
patterns
pattern
the
pattern
the
from
inserting
sequence
pattern
a
all
M-memories
pattern
a
pattern
beginning”
sequence
pattern
into
sequence
sequence
function
Page
Page
Page
Page
Page
Page
Page
Page
Page
54
55
55
57
58
59
59
60
60
L
57
-
53
Page 53

Pattern
Your
tiptronic
machine.
the
overwrite
The
tiptronic
Up
to
combinations
offers
The
delete
or
2040
20
patterns
you
pattern
the
has
or
letters
the
possibility
combinations
memories.
6
rn-memories,
can
be
stored
of
are
the
storing
stored,
tiptronic
in
each
pattern
after
2030
memory.
and
having
has
word
sequences
been
rn-memories.
3
sewed
in
once,
the
until
memories
you
of
54
Page 54

for
Keys
following
The
tiptronic
rn-key:
m+:
for
cl/key
activated:
Cursor
keys
A-Z
the
2030)
m)
storing
pattern
Pattern
keys:
(2
pattern
for
x
keys
opening
on
sequence
can
selected
beginning:
is
sewn
selecting
for
2040,
the
found
be
closing
or
patterns
for
from
the
to
next
rn-memory
an
rn-memory
the
in
deleting
the
an
x
1
patterns
beginning
rn-memory/scrolling
the
on
2030):
selection
in
the
of
for
knob
rn-memory
the
pattern.
through
the
(selection
direct
/
when
rn-memories
the
selection
key
of
on
an
the
model
the
rn-memory
which
fonts
are
not
is
activated.
rn-memory
Opening
Press
the
All
cursor
an
rn-key
the
rn-memories
key
(8).
m
appear
on
the
display.
Select
an
empty
rn-memory
scrolling
by
using
the
55
Page 55

0
CD
D
0)
CD
CD
(\
:;l
CD
3
0
0
Cl)
Cl)
D
CO
CD
0)
0)
CO
-1
CD
Cl)
3
0
r_f)
—
CD
-f
Z
CD
a
1
,
-
°CD
zr
CDg
a
CD
-,
CPCD
a
—
01
C)
CDCD
CD
Lu
DCD
0
D
-f
CD
a
Cl)
0)
?.
Cl)
cD
-‘
CD
:-
CDD
I!
ØCD
D(f)
CD
CD
-f
D
CD
cDg
Page 56

Once
All
ne’s
Tip:
you
patterns,
memory
order
In
(36)
machine
the
have
once
entered
that
even
embroider
to
you
have
after
stops
the
been
you
started
have
automatically.
pattern
embroidered
switch
pattern
a
embroider.
to
sequence,
once,
the
off
sequence
you
are
machine.
in
Thus
start
can
automatically
M-memory
the
embroidery
the
embroider
to
stored
only
once,
tied-off
is
immediately.
and
remain
press
on
in
the
tie-off
the
completion
machi
key
and
in
the
The
the
within
pattern
cursor
following
Subsequent
wish
If
you
position
deleted.
having
After
to
the
in
Press
deleting
delete
pattern
the
deleted
clear
the
of
pattern
a
sequence.
key
pattern,
pattern
a
(9).
position.
pattern
the
sequence,
—.
must
part
of
sequence
scroll
be
the
using
below
memory
the
the
moves
cursor
pattern
up
keys
which
the
to
the
to
to
is
cursor
desired
be
57
Page 57

Subsequent
wish
you
If
position
inserted
key(14).
having
After
in
(the
inserting
insert
to
the
position
inserted
pattern
of
pattern
a
sequence.
of
the
the
pattern
a
into
tip
pattern,
of
the
The
the
the
into
pattern
cursor
cursor).
cursor
the
moves
pattern
sequence,
must
Select
to
sequence
the
the
scroll
in
be
desired
position
using
front
pattern
of
of
the
the
the
and
cursor
pattern
store
pattern
keys
which
using
it
inserted.
to
the
istobe
the
desired
m+
pattern
Inserting
you
If
cursor
the
store
The
a
wish
key.
beginning
it
using
pattern
to
Once
will
58
insert
of
the
the
the
m+
be
the
at
pattern
a
cursor
pattern
key
inserted
beginning
at
is
sequence
4).
(1
at
beginning
the
positioned
beginning
the
of
the
at
pattern
of
beginning
the
appears
of
the
pattern
a
pattern
sequence
the
on
sequence,
pattern
the
of
display.
sequence.
scroll
Select
the
to
sequence,
desired
the
left
the
using
symbol
pattern
the
for
and
Page 58

__________
________
:l
Deleting
can
You
empty.
r
the
delete
pattern
the
sequence
pattern
.-.
sequence
-
by
----
-
pressing
the
until
-
the
memory
completely
is
-
-
clear
;
u;
---
key
(9)
M-memories
can
all
delete
M-memories
all
once
at
Deleting
You
machine.
by
holding
down
the
clear
key
(9)
while
turning
on
the
59
Page 59

Ii
I-
—
_*_
-
1-
Changing
If
you
wish
position
or
mirrored.
the
a
to
cursor
pattern
within
subsequently
below
change
the
the
desired
pattern
the
sequence
length
pattern.
or
Now
width
the
ofapattern
pattern
can
within
be
enlarged,
the
pattern
narrowed
sequence,
down
“Pattern
If
you
position
Then
have
the
press
beginning”
interrupted
cursor
the
60
function
the
—i
clear/pattern
sewing
as
far
to
beginning
operation
the
left
as
key
and
possible,
(9).
would
until
like
the
to
symbol
start
the
pattern
.(‘
appears
sequence
on
the
again,
display.
Page 60

Page 61

Contents
General
Non-elastic/elastic
Overlock
Sewing
Darning/inserting
Lace
Gathering
Covering
Smocking
Hemming
Zipper
Shell
sewing
on
work
edging
stitches
buttons
stitches
aids
stitches
patches
Page
Page
Page
Page
Page
Page
Page
Page
Page
Page
Page
Page
65
65
69
70
71
73
74
75
78
79
80
82
66
-
68
-
77
72,
-
76
-
81
-
63
Page 62

.
.
...
.
.
..
-*
C)
...
D
D
<
CDCfl°
0
-
o
,
CD
,,...
—.
3
—
.
..,
..
•
.
-
:
,CD©<CI)
0
..\
•..
•:..,
-
-
.
.
o3
(DV
(D
Z3
CD
C1-urDCD
0
0
-
CD
Ct)
D
‘
S..-f
CD
—.
C
C-”
CD
D
,
°
0
C!)
-<
-
CD
—+
p-
E3CD
‘D
CO
—
°
D
CD
C
CD
-
-f
Q
D
C)
CD
CD
D
CD
!+
CD-<
3
-
z-
0
-(D
-
?c-
-‘
D
(0
CD
I
I
,..,.
.
•••.•
.,
,.
..,,...
-v
ig.
-+
Z
—
3
,---
D
‘
ca
-1CD
...
.•
.
÷
I
I:
D(
I
-,
I
I
31
0
—CD
-33r-
Cn
00
o
-D
I-
3
-
(0
D
DCD5
DC!)
o
-
CD
c,’
CDDo3
o
D
CD
CD
C)-CDDD
Ci)COCD(D
-D
DD
3.
Cd)
—.
i
I
!I
I
—
Q-
D
-f
-
—
D
CD
0
—
°
—
-
D
0
I
‘
C!)
3
I
O
g-0g-
DrOC)
CO
(1),rCQD
CDC
—
-<
D
o-
p)
C,)
CD
0
rn
‘
0
,‘
D
C))
-
WC!).CI)
CDD
C”D-gD
C)
D
-,
P-D-o
CDCD,,
-I
--
D
CD
Cl.
<
D-<
f())
-I
CDC)C-”CD
C’)<C
D
QD
CD0”
CO
.
CD
(0
c’)
C)]
Page 63

Feed
To
ensure
thick
fabric
the
aid
seam,
of
presser
for
precise
the
thick
we
recommend
same
foot
seams
feeding
thickness
support
to
at
the
placing
as
it
-
—
-U-
beginning
the
•‘r
a
work
—-
piece
under
of
of
a
Blind
stitch
Prog.
6
Blind
stitch
eliminates
—
Serge
Fold
—
Fold
/2
inch
1
beyond
of
your
—
Place
the
crease
—
When
must
stitches
the
adjust
screw
the
and
the
the
the
only
edge
is
the
press
hem
(1
the
project
fabric
A.
best
need
edge
back
cm)
fold
line
needle
pick
are
guide
suited
for
the
of
hem
the
on
the
of
just
created.
should
under
runs
along
enters
up
one
visible
Bbyturning
for
hand
hem.
allowance
itself
serge
now
the
presser
the
fiber
on
the
invisible
sewing.
approximately
so
edge
The
facing
be
edge
guide
crease
of
the
face
adjusting
hems
inwards.
extends
wrong
foot
line
fabric.
side,
up.
B.
so
and
side
that
it
If
Progr
Elastic
Prog.
The
same
For
66
5
elastic
time,
the
blind
work
stitch
blind
thus
sequence
_J
stitch
serging
5
especially
is
the
see
the
Progr.
raw
edge
description
6
suitable
is
for
not
necessan,’.
above.
stretch
fabrics.
The
hem
is
serged
and
sewn
at
the
Page 64

Zigzag
edges
Raw
zigzag
fabric
the
overcasts
swing
stitch
stitch
the
of
on
the
-
can
3.
the
edge
needle.
3
Prog.
serged/finished
be
sure
Make
swing
left
the
of
the
of
fabric
needle
the
on
easily
needle
the
with
pierces
and
right
I
Stretch
The
highly
triple
stretch
elastic
particularly
undergarments.
the
Serge
—
the
Fold
—
Topstitch
—
zigzag
triple
and
suitable
edge
hem
hem
the
I
zigzag
decorative
for
the
of
inwards
from
stitch
stitch
hems
hem.
at
ti
1
the
the
Prog.
-
produces
seam,
T-shirts
on
required
face
1
which
side.
7
a
is
and
width.
the
stitch
for
needed,
is
fabric,
sewing
the
all
e.g.
longer
seams
crotch
straight
Stretch
Prog.
This
where
seams.
stitch
triple
2
program
great
The
length
used
is
strength
heavier
required.
the
If
Tip:
prog.
needle
The
machine
fabric.
you
1,
wish
use
stops,
the
will
topstitch
to
function
remain
allowing
“needle
the
in
you
a
collar
fabric
easily
to
point
lowered”.
when
pivot
with
the
the
67
Page 65

Elastic
Prog.
Due
sewing
—
If
its
—
If
6
—
Divide
mark.
pin
marks.
—
Stretch
marks
—
Overlap
elastic
—
On
sewn
stitch.
stitch
4
to
its
on
replacing
edge.
needed
mm
long
the
You
the
elastic
the
as
stitch.
skirts
onto
high
elasticity
elastic,
elastic,
gather
straight
fabric
may
elastictofit
you
sew.
the
ends
and
pants
the
e.g.
cut
the
edge
and
find
the
to
slightly
(trousers)
prepared
this
undergarments.
onto
off
fabric
stitch
elastic
it
easier
fabric
the
and
edge
stitch
old
edge
into
to
at
the
fabric,
secure
the
is
elastic
with
(see
quarters
handle
matching
matching
elastic
with
ideal
close
page
with
the
the
if
elastic
for
74).
you
is
and
the
to
Honeycomb
Prog.
1
9
The
honeycomb
hem,
tive
ments
Fold
the
and
seam
overstitch
which
T-shirts.
with
stitch
stitch
is
or
the
is
very
suitable
hem
edge
honeycomb
an
elastic
for
over
stitch.
and
undergar
twice
decora
and
68
Page 66

Overlock
elastic
For
tiptronic
the
selection
multiple
join
operation.
one
more
are
We
Tip:
3
No.
guides
tunneling
Adjust
ensure
clears
presser
the
stitches
and
overlock
of
layers
durable
recommend
sewing
when
fabric
the
of
stitch
the
the
that
raw
the
foot
knits
2040
They
seam
the
width
right-hand
edge
and
and
of
have
than
more
other
the
stitches.
fabric
a
standard
use
you
overlock
precisely
wider
at
and
the
of
stretch
2030
These
and
higher
blind
seams.
guide
swing
fabric
provide
stitches
serge
elasticity
stitches.
stitch
and
stitch
of
the
of
and
fabrics,
them
This
prevents
widths.
foot
the
needle
the
a
foot
pin
in
and
I
N
N
N
N
to
of
N
N
N
overlock
Open
18
Prog.
open
The
joining
excessively.
or
I
stitch
overlock
edge-finishing
stitch
works
fabrics
well
that
when
do
not
fray
selvage
a
fabric
this
the
with
that
stitch
fabric
frays
an
edge
easily,
additional
against
you
overlock
21
wish
prog.
thread
fraying.
Closed
Prog.
If
select
edge
further
sew
to
21.
protects
stitch
With
thread
Pullover
22
Prog.
together
Used
accessories),
open-knit
also
can
prevent
To
TIP:
sewing,
under
it
light
stitch
this
fabrics.
joined
be
advisable
is
tension.
the
with
stitch
Fashion-knit
effortlessly
seam
the
knit-edge
even
can
from
add
to
foot
be
garment
with
stretching
woolen
a
(special
used
this
for
sections
stitch.
while
thread
69
Page 67

Sewing
With
and
—
Remove
—
Mark
the
—
Turn
tion
hole
—
Lower
be
Make
hole
—
Continue
will
on
program
four-hole
the
button
the
the
button
in
the
the
held
in
sure
of
the
complete
buttons
you
0
buttons.
the
presser
button
on
the
handwheel
so
button.
presser
place
by
the
needle
button.
sewing
the
can
foot
position
marked
towards
the
needle
foot
the
also
on
the
program
easily
and
on
lifter.
shank
button.
lower
your
fabric.
you
enters
The
of
enters
for
you.
sew
The
on
the
fabric.
and
button
the
the
two
feed
Place
posi
the
left
will
foot
right
machine
Sewing
Attach
—
Leave
between
on
the
the
as
described
on
presser
the
buttons
feed
holes
foot
dogs
on
with
lowered.
the
of
the
shanks
button
left
Place
and
a
sew
match
it
70
—
Remove
fabric
Wrap
it
apart
the
the
stem
match
with
and
sewing
pul’
the
thread
button
and
and
knot
Page 68

Automatic
darning
-
Prog.
73
——
areas
Stitch
2040)
73
of
over
mainly
is
fabric.
the
for
damaged
strengthening
the
at
area
dama
required
—=
,
(Model
Program
ged
—
length.
and
now
finishes
the
repeated
be
darning
machine
the
darning
saved.
key;
program
length
can
‘.-
Press
sewing
length
The
as
saved
often
the
thus
is
darning
as
needed.
reverse
the
Depending
straighten
pattern
the
If
balance
the
the
on
the
pattern
shifts
the
in
fabric,
of
type
using
way
this
plus-section.
the
you
darning
the
balance
have
adjustment
correct
to
pattern
may
capability
pattern
the
lf
balance
the
shift
slightly
(see
shifts
the
in
of
out
chapter
way
this
minus-section.
square.
You
“Balance”.
have
you
can
page
to
44).
correct
71
Page 69

A
41
-A
-
-,
-:
Darning
Prog.
1
Attach
darning
towards
position.
darning
darning
the
should
long,
foot
foot
presser
place
plastic
clamp/needle
Darning
slowly
and
engages
Warning!
tension
—
Place
engaged
the
embroidery
—
Lower
the
—
Draw
up
threads
with
the
you
until
With
thumb
together.
as
foot
itself
arm
set
position:
push
in
the
darning
Only
work
hoop.
feed
the
bobbin
when
foot
the
far
as
holder.
around
must
screw.
Lower
it
lightly
in
this
for
to
dog.
you
straight
No.
needle
and
Insert
it
will
The
be
position.
position
darning.
be
repaired
thread
start
stitch
6.Turn
is
index
the
go
“C-shaped”
the
behind
the
presser
to
the
and
sewing.
the
set
finger
pin
into
presser
the
rear
is
the
in
a
hold
handwheel
its
at
highest
press
of
the
the
hole
guide
bar.
needle
bar
lifter
until
it
thread
darning!
the
The
the
of
—
Repair
fabric
length
of
the
When
damaged
stitch
directions
repair
TIP:
Remember,
dogs
lowered,
by
you.
will
allow
of
straight
small
knots
your
work
you
over
than
An
the
evenly
of
the
hole.
have
area,
the
over
a
even,
you
stitch.
to
damaged
forwards
seam
covered
turn
the
area
again.
a
tear
single
pass.
when
the
stitch
medium-to-fast
to
sew
Sewing
appear
area/hole
and
backwards.
is
determined
the
width
fabric
90
Darning
will
produceastronger
sewing
length
with
is
sewing
a
more
consistent
slowly
too
on
the
reverse
by
guiding
The
the
by
of
the
degrees
in
both
feed
the
determined
speed
length
may
cause
side
of
the
size
and
72
Page 70

:.
,‘,
Lace-work:
Tablecloths,
beautifully
edges
Lace
Prog.
Prog.
1
3
trims
Lace
home
decor
Serge/clean-finish
—
zigzag
Lay
—
or
the
overlapping
the
Stitch
—
napkins
enhanced
provide
projects,
overlock
on
lace
slightly.
lace
to
the
and
a
the
with
lovely
crafts
the
stitch.
right
fabric.
clothing
trimmings.
lace
enhancement
and
edges
fabric
of
side
all
can
garments.
with
fabric,
the
be
-1.
4
;v71
corners
1
3
or
lace
the
the
continue
inserts
1
3
with
overlock
on
slightly.
into
lace
stitching
until
heirloom
wear,
lace
with
the
stitch.
right
the
miter
a
edges
all
effect
children’s
inserts.
fabric
side
to
are
edges
the
at
the
stitched.
can
clothes
of
next
be
with
fabric,
the
corner,
corner.
achieved
and
a
pivot
on
other
edges
Lace
Prog.
Prog.
Serge/clean-finish
—
zigzag
Lay
—
overlapping
Fold
to
—
and
Continue
—
a
Lace
Prog.
Prog.
beautiful
A
christening
garments
Baste
—
Stitch
—
using
Carefully
—
center.
ment
From
both
stitch.
of
your
lace
the
very
straight
slit
Press
front
the
edges
Cut
project
close
the
these
of
away
the
to
to
stitch
fabric
side
the
the
close
face
both
1.
edges
of
lace
excess
behind
your
with
the
to
side
edges
towards
project
fabric
stitching.
a
the
of
of
the
small
fabric.
lace
the
lace
gar
the
overstitch
zigzag
the
on
at
the
back
73
Page 71

-
y
Gathering
1
Prog.
straight
A
skirts
cuffs,
gathers
even
gathering
of
Mark
—
the
of
5
4
-
beginning
Sew1or
edge
Gather
—
(bottom)
—
Distribute
thread
is
It
TIP:
gathering
pulling
with
stitch
or
stitches.
first
the
fabric.
inches
and
2
the
of
the
threads
the
ends
important
to
the
on
straight
can
valances.
should
you
gathering
Sew
(10
end
more
presser
fabric
gathers
together
avoid
gathering
be
along
1
3
-
of
rows
foot
by
the
to
use
to
thread
stitch
used
To
sew
line
this
cm)
the
of
as
pulling
desired
evenly
secure
to
a
breakage
threads.
gather
to
obtain
two
on
line.
thread
of
seam.
stitching,
a
guide.
the
and
strong
neat
three
or
right
the
Leave
at
using
bobbin
fullness.
knot
gathering.
the
thread
when
sleeves,
and
rows
side
about
the
the
the
when
Gathering
Prog.
19
Gathering
suitable
such
as
nes.
Mark
—
Sew
a
—
middle
wheel
lowest
the
place
and
the
of
Lower
—
stitches
fabric.
fabric.
When
—
thread,
gather.
to
mined
thread.
with
with
visible,
for
blouse
first
the
few
the
of
towards
the
needle.
presser
the
secure
to
Continue
you
pull
The
the
by
Secure
elastic
elastic
sleeves,
gathering
stitches
presser
yourself
position.
elastic
attaching
finished
are
the
on
amount
amount
all
thread
elastic
until
Raise
foot
the
ends
thread
threads
gathering
waist
row
the
foot.
until
thread
and
elastic
attaching
of
of
you
ends.
particularly
is
seams
on
needle
Turn
the
presser
the
around
sew
thread
elastic
elastic
the
gathering
on
pull
seams
the
the
needle
few
a
threads
the
the
neckli
or
fabric.
is
in
hand-
foot
the
more
the
to
elastic
threads
deter
is
elastic
the
is
in
back
to
74
you
If
TIP:
accessory),
foot
the
in
grooves.
ensure
that
pierced
work
from
During
the
the
by
the
with
elastic
the
stitching
elastic
needle.
the
side
cording
threads
and
of
thread
drawn
the
is
foot
should
into
gathering
stretched
not
(special
laid
be
the
seam
or
Page 72

—
-
-.
—
Covering
Covering
is
finish
fiatlock
seams,
collar
Faggoting
8
Prog.
faggoting
The
a
with
connecting
Serge
—
allowance
Place
—
edges
the
apart
Stitch
—
making
fabric
seams
stitches
desired.
effect
hem
the
the
from
sure
on
stitch
the
are
This
type
lends
that
plackets
creates
stitch
finished
edges
wrong
the
under
effect
stitching
two
fabric
to
fabric
approximately
right
the
the
that
and
right
used
or
side
needle
a
raglan
fabric
and
the
left
-E-
a
when
stitch
of
professional
seams.
a
very
often
is
It
edges.
press
side.
presser
inch
1/8
fabric,
the
of
pierces
sides.
seam
flat
produces
look
elastic
used
seam
the
foot
mm>
(3
the
seam
for
with
i
stitch
Cross
Prog.
a
This
to
decorative
hem
20
highly
elastic
hems,
stitch
e.g.
on
very
rs
T-shirts
suitable
and
for
undergar
ments.
edge.
raw
the
hem
the
When
fabric
finish
hem
sewing,
edge
allowance
the
from
fully
is
the
to
right
make
overstitched.
side
sure
reverse
of
the
side.
the
under
Serge/clean
—
Fold
—
Stitch
—
fabric.
neath
the
easier
faggoting
on
small
in
the
to
mm
3
bottom
hole
guide
and5mm
of
the
at
it
find
may
You
TIP:
the
using
the
when
The
inserted
is
needle
It
is
small
plate.
available
post
the
in
edges
accessory).
widths.
guide
of
the
guide
fabric
(special
the
front
75
Page 73

Fancy
Prog.
The
that
Overlap
—
inch
the
elastic
14
fancy
require
(2
fancy
elastic
a
the
cm>
elastic
stitch
flat
two
and
stitch
seam,
fabric
overstitch
stitch.
is
e.g.
edges
very
useful
terry
each
cloth.
about
edge
for
fabrics
3/4
with
of
an
Light-knit
23
Prog.
The
light-knit
covering
cuffs
ching
sportswear.
or
the
Sew
—
overlock
Now
—
the
ched
that
sure
against
(Model
stitch.
from
the
mending
mending
It
stretch
in
onto
cuff
stitch.
seam
the
face
needle
the
seam.
stitch
2040)
stitch
very
is
materials,
workpiece
the
allowance
side
enters
suitable
can
the
of
is
the
a
e.g.
stretchable
for
overstit
sweatshirts
with
overstit
be
fabric
Make
close
fabric.
an
11
to
sewing
and
stitch
are
create
machine
much
201
quilting
joined
Quilting
Prog.
traditional
In
batting)
1
stitches
The
technique
2020
76
beautiful
easer
enable
0
three
together
makes
and
you
(2
layers
small
with
family
heirlooms.
accomplishing
to
The
achieve
faster!
fabric
tiptronic
hand
a
and
this
won-
derful
program
This
stitch
jackets
on
stitch
create
hand-quilted
11.
works
and
other
with
unique
new
look
equally
overcoats.
decorative
patterns.
machine,
by
for
well
Combining
stitch
with
e.g.
topstitching
quilt
the
programs
can
Page 74

-
-
-
r
-
Darning
3
Prog.
elastic
The
tears
holes,
area
If
the
over
sew
covered.
slightly
these
sure
make
tears,
For
advisable
than
larger
on
color,
strengthens
stronger,
damaged
the
away
back
the
on
the
with
is
stitch
damaged
and
slightly
only
is
rows
with
it
additional
No
damaged
stitch
the
edges
frayed
place
to
damaged
the
wrong
the
fabric
the
longer-lasting
described
as
area
side
material
of
excess
elastic
very
of
rows
piece
a
side
and
your
stitch
suitable
areas.
damaged,
stitches
backing
areas.
overlap
small
or
of
area
the
of
ensures
darn.
close
work.
for
until
needed
is
When
each
holes
fabric,
of
and
fabric.
Overstitch
above
the
to
repairing
may
you
is
it
doing
other.
is
it
slightly
the
This
much
a
the
cut
and
stitching
well
for
so,
same
Sewing-on
3
Prog.
best
The
piece
Cut
—
by
of
a
patch,
damaged
Strengthen
—
iron-on
Baste
—
damaged
Overstitch
—
stitch.
Cut
back
—
close
side
patches
way
covering
new
piece
area
stabilizer.
new
the
area.
the
darn/repair
to
fabric
fabric
of
the
fabric
the
damaged
to
the
the
damaged
ofamatching
slightly
hole.
or
wrong
piece
side
of
edges
seam.
larger
larger
of
material
with
fabric
area
the
on
holes
color.
than
patch
over
the
the
is
with
the
elastic
reverse
to
a
the
with
77
Page 75

Smocking
Smocking
parallel
gathering
children’s
different
are
effect
Smocking
1)
beautiful
For
and
two
finished
usually
garment
linen
fine
Using
or
pen
guide
a
as
presser
the
foot
qué
rear
the
insert
Position
the
from
fabric
the
right
foot
under
groove
the
gathering
first
inches
beginning
guide
approximately
sew
first
the
different
remaining
seams
one
width
made
fabric
a
chalk,
end
the
the
the
(1
on
row.
effect
wear
Light
also
needle
Prog.
-
achieved
is
across
Smocking
and
methods
with
smocking
half
of
before
firm
best
are
pen,
draw
the
for
(the
foot
works
the
of
guide
edge
edge
gathered
be
to
up.
side
presser
the
at
seam,
of
0
cm>
end
and
stitching
this
Different
gathering
rows
1
heirloom
gimp
three
to
fabric.
the
materials
suited
or
a
first
presser
guide
and
Pdsition
foot
center
the
of
1
effects.
using
sewing
by
your
creating
of
thread
effects
times
The
completion
for
other
straight
gathering
special
well):
through
1
tihten
under
so
of
leaving
gimp
the
line
inch
spacing
the
numerous
create
to
fabric
is
mainly
used
techniques.
the
(non-elastic)
will
you
desired
the
smocked
as
such
technique.
this
non-permanent
on
line
seam.
accessory
the
holder
the
(2
screw.
the
gimp
foot
the
opening.
—
presser
exactly
Sew
loosen
foot
inch
the
runs
it
the
approximately
—
next
2.5
will
at
Place
cm)
achieve
thread
seam.
the
(2
Continue
guide
edge
a
in
There
smocked
need
section
the
of
batiste
fabric
the
Attach
appli
screw
and
cm)
2.5
Place
thread
along
the
the
the
will
row
from
sew
to
for
or
4
edge
the
is
at
spacing.
thread
fabric
entire
Smocking
2)
this
For
bobbin
the
be
may
thread.
normal
than
bobbin
However,
tension,
obtain.
material
are
satin
Mark
along
Sew
beginning
remaining
stretched
not
(do
TIPS:
case
a
sew
Carefully
gather
and
technique,
without
regular
a
Since
case
the
the
this
For
such
also
first
the
this
and
parallel
to
overstretch
may
You
specialty
for
seam
test
width.
effect
elastic
bobbin
must
tighter
greater
as
suitable.
line
its
the
pull
fabric
the
with
elastic
tension.
sewing
threads
threads,
set
be
you
the
of
kind
lightweight
the
on
and
line
of
end
seams
original
fabric).
having
find
work
first!
ends
evenly
elastic
thread
The
an
or
are
the
extremely
the
set
gathering
smocking,
knit
fabric
knot
seams.
the
the
length
a
convenience!
a
the
of
over
threads
wound
is
needle
embroidery
much
tension
loose.
bobbin-thread
effect
fine
fabric,
be
to
threads
the
For
material
during
second
gimp
the
onto
thread
thicker
on
you
light
and
or
silk
gathered.
at
the
must
sewing
bobbin
Always
the
will
the
be
78
Page 76

hemming
Roll
Prog.
the
With
blouses,
of
the
iron
edges
the
durable
and
Double-fold
—
mm
2
Place
—
hemmer
Turn
—
needle
foot
hemmer.
Lower
—
guide
mer.
edge
the
of
does
presser
1
the
and
When
roll
scarves,
edges
from
per
folded
the
and
handwheel
is
at
slide
the
the
the
of
hemmer
not
foot
hemmer
with
hemmer
or
beforehand.
fraying
finish.
edge
fabric
the
fold).
fabric
a
sew
lowest
its
fabric
the
presser
edge
fabric
roll-hemming,
fabric
opening.
underneath
run
you
ruffles
and
few
towards
foot
butts
can
Hemming
produces
edge
edge
stitches
point.
into
and
evenly
against
Ensure
the
No.
finish
without
(about
under
you
Raise
the
while
into
make
right
7
the
having
a
1/8
the
secure.
to
until
the
scroll
sewing.
the
sure
the
the
side
edges
prevents
neat
inch
the
presser
of
hem
the
edge
left
fabric
of
to
/
the
raw
the
Program
narrow
A
finished
3
zigzag
rolled
stitch
hem.
also
makes
a
nicely
79
Page 77

Sewing
Prog.
in
zippers
1
Inserting
both
centered
sides)
zippers
(concealed
on
are
There
we
For
zipper
are
plastic,
We
recommend
such
zipper
your
to
all
types
to
the
engaged
be
depending
recommend
skirts
zipper.
lapped
zippers
metal,
few.
fabrics
plastic
finish
For
close
can
right
Additionally,
using
the
If
close
one
presser
needle
foot
be
is
moved
enters
the
the
only
different
men’s
works
available
jeans
as
denim.
will
completed
of
zippers
teeth
you
to
the
of
the
foot
must
attached
to
ways
inserting
ladies’
or
best
retail
in
and
metal
For
work
well
it
of
the
foot
in
the
the
on
set
can
edge
13needle
is
attached
be
only
on’
the
the
left
to
sew
pants
Different
stores:
outerwear
zippers
other
all
and
garment
is
important
zipper.
holder
method
needle
the
of
the
positions
on
moved
left
in
zippers.
a
centered
(trousers>,
types
to
for
materials
create
The
zipper
to
of
insertion.
so
zipper
the
to
the
needle
the
of
invisible,
name
heavier
softer
a
sew
to
foot
left
the
that
teeth
available.
side,
right
right
must
For
a
it
by
foot
zipper
footsothat
the
desired,
zipper,
the
and
to
presser
the
stitch
zipper
under
in
the
can
of
the
or
pin
the
the
side
into
half
material.
the
zipper.
now
the
zipper
the
presser
of
the
the
of
Raise
sew
—
Attach
—
Baste
it
along
needle
a
—
Sew
in
a
—
close
You
end
the
in
place
right-hand
leaving
presser
of
rest
the
right
and
the
foot
the
foot
the
cross-wise
side.
position
teeth
Bring
position.
needle
seam
and
run
the
the
to
seam.
or
If
80
Page 78

Sew
—
same
first
Stop
-
leave
presser
You
—
the
distance
half.
shortly
the
foot
will
second
before
needle
and
now
from
be
half
in
open
able
of
the
the
the
the
center
end
material.
zipper.
the
complete
to
zipper
seam
the
of
paralleL
seam
Raise
the
as
the
seam.
the
the
and
(4
zippers
the
mm)
front
left
narrower
seam
than
allowance
actual
the
over
seam
Trouser
Press
—
in
allowance.
overlapping
the
teeth
zipper
the
to
under
still
are
foot
required
visible.
the
on
position.
right
and
zipper
the
Baste
—
the
that
so
Engage
—
the
the
needle
3/8
edge
set
Stitch
—
Shortly
—
zipper
Close
—
onto
Stitch
TIP:
mend
To
close
before
and
the
the
along
achieve
using
to
finish
zipper
other
the
the
the
sewing
and
zipper
basted
the
accurate
edge
edge
end
guide.
of
of
baste
half.
seam.
seams
the
the
the
the
zipper
seam,
seam.
overlap
we
teeth.
open
recom
the
evenly
81
Page 79

“Pattern
mirroring”
Tip:
If
you
the
edging
same
you
fabric
add
you
edge
and
time.
also
can
underneath.
a
colored
can
obtain
Instead
place
pearl
strengthen
pretty
a
pearl
of
different
a
cotton
the
contrast
cotton
colored
thread
shell
at
thread
at
the
light
edging
Shell
fabrics
frequently
ments.
the
with
“Pattern
tighter
The
farther
raw
edge
While
left.
the
under
provides
This
effect
such
Select
mirror”
the
and
is
as
used
blind
the
shell
press
sewing,
presser
a
very
silk
an
as
key
needle
edging
make
foot
more
effective
rayon
and
edge
stitch
thread
will
seam
the
at
prominent
for
thin,
fabrics.
finish
5
No.
and
tension
in.
pull
allowancetothe
the
sure
of
half
the
shell
on
Serge
fabric
foot
soft
It
is
undergar
mirror
is
set,
the
runs
width.
edging
it
the
82
Page 80

Page 81

Contents
General
Inserting
Inserting
Types
Fully
Semi-automatic
manual
Manual
Buttonholes
Tips
notes
the
the
buttonholes
of
automatic
finish
buttonhole
perfect
a
for
buttonholes
on
buttonhole
buttonhole
buttonhole
buttonhole!
gimp
with
buttonhole
guide
foot
thread
Page
Page
Page
Page
Page
Page
Page
Page
Page
86
87
87
88
89
90-
92
93
94
91
85
Page 82

Buttonholes
Your
tiptronic
buttonholes
different
The
accurately.
plush,
Your
—
fully
—
semi-automatically
—
manual
The
buttonholes
tiptronic
knitted
tiptronic
automatically
values
for
Perfect
—
has
the
on
jackets,
uses
buttonhole
buttonholes
fabrics
offers
you
semi-automatic
a
perfect
on
and
pants
the
heavy
three
_‘/
:
buttonhole
(trousers),
model
guide
can
knits.
ways
and
2030)
No.
be
sewn
of
sewing
manual
I’fl
for
every
blouses
give
1
0
and
on
buttonhole
fabric
or
stretch
your
sensors
even
buttonhole:
a
and
fabrics,
hand-made
to
ensure
the
most
are
entered
garment
4
garment
that
difficult
Whether
different
the
every
of
fabrics
during
you
buttonholes
professional
buttonhole
such
the
sewing
wish
is
as
operation.
to
sew
(3
touch.
sized
velvet,
86
Page 83

Inserting
Push
—
housing
Press
small
Inserting
buttonhole
Use
Before
toward
foot
(also
the
the
gap
starting
see
buttonhole
the
metal
the
at
guide
between
buttonhole
the
to
the
“Changing
part
back
towards
foot
sew,
front
of
of
the
No.
to
the
guide:
the
the
the
guide
5
pull
the
presser
buttonhole
needle
front
and
No.
foot
sew
to
runner
the
second
foote
guide
The
plate.
as
far
as
back
the
5:
buttonholes.
the
of
mark
red
page
it
of
29).
into
white
will
the
the
plastic
It
go.
machine
slot
must
(between
extends
part
spring
bed.
the
back
two
over
slightly
arrows)
needle
the
so
on
that
the
plate.
there
a
is
87
Page 84

You
holes:
1)
for
2)
for
3)
can
Linen
blouses,
Stretch
(No.
stretch
Keyhole
(No.
61
choose
buttonhole
buttonhole
60
on
fabrics
buttonhole
on
shirts,
the
the
from
dresses,
model
model
the
No.
No.
No.
2030)
following
9
etc.
75
2030)
76
button-
for
jackets,
-
4)
Round
(only
for
ladies’
and
dresses
5)
Eyelet
(only
for
belts
coats
buttonhole
on
model
outer
No.
on
model
and
undergarments
garments,
72
2040)
and
2040)
pants
No.
(trousers)
74
especially
blouses
88
Page 85

FF
i1
Fully
Select
automatic
desired
the
buttonhole
buttonhole
(e.g.
No.
9).
You
immediately
can
start
sewing.
adjust
can
you
c,
and
b
a,
pairs
key
the
Using
density.
stitch
the
length
and
width
of
the
buttonhole
and
the
89
Page 86

Semi-automatic
You
can
also
pressing
time
hole.
the
after you
buttonhole
finish
“reverse
have
buttonhole
a
sewing”
started
sewing
manually
key
(33)
the
by
one
button
IF
The
word
Before
buttonhole
key
the
(33)
“man”
left
once
is
side
the
again.
appears
of
the
same
in
the
buttonhole
length as
dspIay,
the
indicating
ends,
right
the
side
a
machine
of
the
manual
will
buttonhole
finish
slow
00
of
the buttonhole
down.
press
the
When
“reverse
the
is
left
side
sewing”
desired.
of
the
90
Page 87

The
on
machine
display.
the
sew
will
ill
the
second
bartack
and
complete
buttonhole.
the
The
word
“auto”
appears
be
now
stitch
will
density
with
a
of
new
a
remaining
AB
Note:
If
canceled.
buttonholes
length
the
Reprogramming
or
automatically.
sewn
programmed
length
value
buttonhole
new
a
or
is
density
changed,
required.
is
programming
the
is
91
Page 88

r
‘I
kFF
Manual
You
can
the
“reverse
previously,
Once
you
machine
buttonhole
also
set
sewing”
disappears.
have
reached
will
now
the
sew
length
key.
the
the
The
first
-
of
the
word
desired
bartack
.
.
buttonhole
“man”
length,
and
while
appears
press
the
second
sewing.
on
the
the
display.
“reverse
buttonhole
Select
sewing”
the
The
seam.
-
desired
buttonhole
key
once
buttonhole.
length,
again.
The
Press
set
I
Before
ted,
the
the
buttonhole
“reverse
machine
complete
appears
the
left
machine
sewing”
will
the
on
side
with
sew
buttonhole.
the
dspiay.
of
wHI
key
the
the
slow
a
second
once
second
—-
buttonhole
down.
bartack,
again.
bartack
The
word
To
The
“auto”
is
comple
complete
press
and
the
All
remaining
ted
fully
Note:
deleted
buttonholes
automatically.
the
programming
when
another
can
of
the
program
now
be
buttonhole
is
selected
repea
is
92
Page 89

Buttonhole
Buttonholes
more
are
pearl
Use
available
length
of
extending
foot
hole
pull
and
with
that
durable
cotton
sewing
at
gimp
from
Pass
into
up
gimp
are
and
or
thread
the
the
the
thread
sewn
professional
regular
a
shops.
over
center,
thread
right
with
Place
the
back
ends
and
gimp
gimp
metal
under
left
threads
appearing.
thread
center
the
bar
the
of
guides
button
the
foot
on
of
the
Button
loop
bartack
the
foot
pull
of
final
the
thread
Cut
bartack
ends
is
off
presser
the
of
front
the
hole
After
the
of
hidden
the
at
can
9
No.
completing
gimp
below
threads
gimp
now
thread
the
sewn.
be
buttonhole,
the
until
buttonhole
behind
just
the
clamp
a
thread
gimp
a
of
foot
the
the
presser
rear
hold
thread.
with
length
Pass
back
seam
gimp
until
foot
the
of
the
the
of
of
thread
must
the
gimp
gimp
thread
presser
buttonhole.
the
loop
thread
ends
down
not
is
thread
be
just
Keyhole
Place
the
on
Sew
curved
Warning:
left
sewing
the
buttonhole
center
the
buttonhole
clamp
the
right-hand
the
end
towards
the
excess
at
pull
The
the
curve,
gimp
under
foot
from
raised
in
a
over
After
the
front
little
the
the
Guide
from
more
metal
foot
the
the
clamp
the
the
of
and
gimp
machine
with
fabric
needie.
and
taut
bar
pull
thread
a
extending
up
along
the
sews
straight
surface.
Carefully
sewing
finish
into
pin.
Pull
from
the
first
sew
right
the
few
the
the
the
center,
the
and
at
foot
stitches
thread
gimp
curve.
buttonhole.
the
left
After
front
guides
side.
the
of
on
Cut
of
the
off
93
Page 90

With
difficult
—
A
wider,
—
Buttonholes
optimally
—
Materials
other
—
Keyhole
(see
—
Linen
—
Buttonholes
always
the
following
fabrics:
less
with
that
lightweight
buttonholes
“Keyhole
buttonholes
sew
dense
that
the
shift
buttonhole
are
normally
test
a
tips
perfect
buttonhole
are
to
be
buttonhole
or
stretch
stabilizer.
are
particularly
with
are
particularly
selected
buttonhole
sewn
easily
gimp
on
buttonholes
is
recommended
very
foot
In
should
stable
threadi.
dense
little
a
the
same
close
to
this
case,
be
and
and
attractive
larger
fabric/stabilizer
can
be
on
a
reinforced
use
the
reinforced
durable
than
the
achieved
heavy
presser
with
if
a
if
you
button
as
on
fabrics.
edge,
may
foot
water-soluble,
gimp
thread
use
embroidery
diameter.
your
project
even
sometimes
No.
1.
is
inserted
It
the
most
tissue
and
important
is
not
paper
while
darning
feed
or
sewing
thread.
to
94
Page 91

Page 92

Contents
Presser
(standard
Special
Felling
foot/appliqué
Shirring
Cording
edge
Knit
inch
1/4
patchwork
motion
Free
binder
bias
Pintuck
Non-stick
leather
for
Hole
7/9
Circular
Fringe
Needle
feet
accessories)
accessory
foot
footJshirring
foot/ruffler
and
quilt
foot
quilting
with
foot
fancy
stitch
foot/braiding
embroidery
foot/narrow
chart
table
foot
foot/
guide
guide
edge
foot
foot
foot
foot
Page
Page
Page
Page
Page
Page
Page
Page
Page
Page
Page
Page
Page
Page
98-100
101
102
103
104
105
106
107
108
108
109
110
111
2
11
3
11
-
97
Page 93

Presser
0
1
feet
Standard
Order
Fancy
Order
(normal
No.:
stitch
No.:
presser
98-694
foot
98-6
accessories)
foot
81
6-00
dual
<for
94814-00
feed)
2
Fancy
stitch
foot
(not
Order
3
Blind
Order
No.:
stitch
No.:
98-694
and
98-694
897-00
overlock
890-00
for
dual
foot
feed)
Page 94

Zipper
4
Order
and
No.:
98-694
884-00
presser
edge
foot
5
6
Buttonhole
No.:
Order
Darning
NoW:
Order
foot
93-036
foot
93-035
990-9
960-9
1
1
Hemmer
7
98-694
No.:
Order
81
8-00
99
Page 95

8
10
Edge
guide
Order
No.:
Buttonhole
Order
No.:
98-802
guide
93-037
422-00
595-91
Bulb
remover/Needle
Order
Second
Seam
Brush
Oil
No.:
spool
ripper
93-038
holder
plate
920-91
changer
Page 96

Special
accessories/presser
feet
(available
from
your
dealer):
Designation
Appliqué
Open
rias
Pintuck
needles
Pintuck
needles
Cording
Fringe
Straight
Needle
Felling
Felling
Shirring
Shirring
Ruffler
Cording
Eyelet
Eyelet
Eyelet
Roll
Hemmer
Hemmer
Knit-edge
Non-stick
Circular
Faggoting
Quilting
Quilting
Pintuck
Braid
7/9
Narrow-edge
Rollerfoot
Free
Quilt
toe
binder
foot
with
foot
with
tongue
foot
stitch
plate
foot
foot
foot
foot
plate
plate
plate
hemmer
foot
hole
mohon
vvork
foot
appliqué
grooves
5
needle
grooves
7
needle
(2)
foot
with
mm
4.5
mm
6.5
(metal)
toot
dia.
dia.
dia.
mm
2
mm
4
(without
foot
presser
embroidery
guide
patchwork
and
patchwork
and
with
foot
foot
foot
quilt
finger
round
4
6
8
(for
foot
spacing
spacing
with
mm
mm
mm
dual
dual
foot
guide
guide
foot
guard
(size
(size
round
hole
feed)
foot
foot
80
80
feed)
1
1
(for
twin
.6
twin
.6
hole
-
-
dual
2.0)
2.0)
feed)
No.
Order
93-042
93-036
98-053
93-042
93-042
93-035
941
931
484-9
950-9
953-9
952-45
93-042-943-9
98-694
98-694
93-043
93-042
93-036
93-036
821
822-00
946-91
948-9
998-9
967-9
98-999
93-036
93-036
93-036
93-036
98-694
94
98-6
98-694
93-042
93-036
93-036
93-036
I
93-036
93-036
93-036
93-036
6
93-03
93-036
703-03/001
91-046
93-036
93-036
-91
-91
-00
650-00
5-91
91
976-45
947-45
948-45
873-00
3-00
82
8-00
81
957-91
962-9
953-9
952-46
925-91
927-9
942-9
936-91
946-9
939-9
963-91
91
1
1
1
1
1
1
1
0_si
appliqué
full
binding
tape
creating
medium
to
creating
creating
center
top-stitching
sewing
center
flat-felled
For
to
gathering
work
work
view
edges
pintucks
pintucks
fabrics
the
pintuck
fringe/loop
effects
Only
needle
very
(silk,
Only
needle
medium
Sewing
For
Allows
For
bias
For
light
For
lightweight
Enhances
uncorded
For
embroidery
Warning!
in
For
and
materials
Warning!
in
.j
light
For
weight_fabrics
gathering
For
weight_fabrics
For
placing
dense
pleats_at_regular_intervals.
cording
For
embroidery
eyelet
For
hemming
For
sewing
For
embroidering
For
1
Circular
1
sewing
For
fabrics
of
seam
quilting
For
1
embroidering
For
1
knitted
embroidery
together
with
effect
pintucks
oversewing
For
oversewing
For
1
threads
topstitching
For
1
sewing
edge
the-ditch
For
For
-
For
lace
main
to
sewing
quilt
all
sewing
quilting
work
of
weight
effect
use
position.
seams,
light
jersey
use
position.
seams
weight
on
on
edges
a
and
or
second
fabric
leather
work
surface
work
with
on
fabrics
on
an
of
straight
quilting
and
etc.)
straight
on
fabrics
light
very
to
light
loose
or
fabrics
leather
two
hem-stitch
patchwork
areas
cording
decorative
narrow
and
stitch
soft
stitch
medium
edges
jobs
between
edges.
fabric
stitch-in
contain
following
The
pages
application
examples
of
some
special
accessory
feet.
101
Page 97

Felling
Flat
felled
commonly
sportswear
shirts
are
can
You
tive
by
color.
The
rent
widths.
—
Attach
holder.
—
Place
—
Overlap
about
—
Place
of
the
fully
under
—
Sew
stitch.
—
Separate
hem
over
by
edge.
sewing.
foot
make
using
the
the
3/8
this
felling
along
into
the
Pull
seams
known
and
children’s
more
durable
these
sewing
a
felling
foot
felling
fabrics
the
raw
to
5/8
overlapping
foot
the
presser
the
folded
the
fabric
the
felling
foot
the
two
are
particularly
jeans
as
seams
is
foot
wrong
edge
The
and
foot
and
fabric
seams.
wear,
with
this
particularly
thread
available
to
the
sides
of
the
-
1.5
(1
edge
fabric
foot
edge
with
feed
The
is
overstitched
layers
strong
blouses
technique.
of
a
in
presser
together.
lower
cm).
over
must
a
the
protruding
hem
taut
and
Seams
and
decora
contrasting
two
diffe
foot
ply
by
the
tongue
placed
be
straight
is
turned
along
during
on
the
are
Appliqué
Appliqués
a
beautiful
patterns
and
designs.
stitched
has
special
a
stitch
seam.
—
Attach
—
Transfer
side
Remember
to
be
—
Iron
the
material.
paper
—
Position
place
—
Place
—
Overstitch
stitch
oversews
occurs
You
seam
the
your
of
a
drawn
fusible
from
and
on
a
stabilizer
zigzag.
later.
foot
are
easily
effect
you
can
with
cutout
appliqué
fusible,
that
as
Cut
out
the
press
your
all
contours
Make
the
sewn
By
using
can
make
the
on
drafted
paper-backed
any
mirror
webbing
your
back
your
base
fabric.
under
sure
outer
edge
create
a
perfect
appliqué
its
foot
pattern
letters
images.
motif
of
the
applique
your
with
that
and
always
different
countless
sole
for
to
or
numbers
onto
the
and
applique.
work
narrow
a
the
that
so
materials
densely
which
foot,
the
the
paper
webbing.
appliqué
peel
pieces
area.
needle
no
fraying
produce
new
satin-
have
the
in
satin
Program:
Stitch
Tension:
1
length:
1
3
-
5
102
Program:
Stitch
Stitch
Tension:
3
length:
width:
2
0.35
1
.5
-
2
-
3
Page 98

Pintuck
This
easily
cotton
as
and
touch
Attach
—
Insert
—
30/7
1
spacing;
Thread
—
Using
—
ment
Increase
—
the
slightly
thread
defined
Sew
—
second
parallel
produce
Program:
Stitch
Tension:
foot
classic
duplicated
and
children’s
pintucking.
by
the
twin
a
05
size
the
water-soluble
a
line
adjusting
to
tension”).
pintucks.
your
pintuck,
in
length:
heirloom
on
light
clothes
pintuck
needle
H-ZWI;
80).
two
your
for
bobbin
the
screw
right
the
pintuck
first
groove
a
evenly
1
2.5
5
sewing
many
woolens.
are
foot
on
1.6
needles
first
thread
of
(see
This
allow
in
spaced
technique
types
Undergarments
given
your
mm
2.0
or
(see
marker,
pintuck
tension
bobbin
the
chapter
help
will
When
first
the
foot
the
pintucks.
fabric
of
nostalgic
a
machine
needle
page
draw
on
form
you
pintuck
This
can
(e.g.
31).
a
by
case
“Bobbin
well-
start
will
be
such
place
turning
the
on
run
to
If
Tip:
effect,
accessory)
cial
plate.
to
prior
pintuck
thin
For
grooves
7
heavier
grooves
5
Inserting
optical
even
cording
A
gimp
Remove
—
Thread
—
the
Replace
—
the
provides
sewing.
support
during
Gently
—
pi
you
you
The
sewing
materials
materials
a
effect
more
thread
hole
needle
ntucks.
would
attach
can
on
cording
and
and
gimp
by
raised.
tongue
in
the
gimp
the
the
at
the
plate
space
Feed
that
so
sewing.
the
pull
like
the
tongue
and
use
the
use
the
thread
making
is
your
needle
center
needle
for
the
it
fabric
emphasize
to
cording
a
front
produces
the
small
the
large
not
pintucks.
plate.
thread
plate.
the
and
the
gimp
does
edge
pre-shapes
a
pintuck
cording
pintuck
cording
creates
pintuck
the
used
from
of
front
The
sewing
gimp
thread
become
not
while
taut
pintuck
the
the
(spe
needle
tongue
of
the
better-defined
with
foot
tongue,
with
foot
tongue.
similar
a
appear
inserting
when
through
below
needle
the
between
notch
machine
under
while
the
thread
knotted
sewing
fabric
for
a
plate.
work
the
103
Page 99

7:
Cording
Cording
fine
a
cord
seam.
With
to
braiding.
effective
—
Attach
—
Place
the
through
lies
under
—
Overstitch
satin
stitch.
purl
the
Tip:
You
overstitching
thread
of
Program:
Stitch
Stitch
length:
width:
Tension:
foot
is
a
is
this
Appliqués
with
the
pearl
one
seam.
can
a
different
1
2
3
technique
overstitched
you
this
seam.
cording
thread
of
the
the
presser
the
pearl
This
produces
also
obtain
medium
a
0.4
-
1.5-2
can
can
foot
grooves
thread
color.
0.6
in
which
to
obtain
also
in
the
foot
at
with
what
a
remarkable
pearl
pearl
produce
an
be
foot
the
at
the
back.
a
is
thread
thread
a
effect
made
so
it
front
narrow
known
effect
with
purl
similar
more
leads
and
a
as
or
by
Shirring
Beautiful
quickly
lightweight
projects.
—
Attach
bar
of
holder.
into
the
—
Place
the
presser
face
down,
out
—
Hold
The
harder
effect
—
sure
Be
through
—
Disengage
down
tion
of
the
back.
foot
gathering
and
the
the
Push
front
the
the
you
to
the
the
at
the
easily
children’s
shirring
foot
the
bar.
fabric
foot
on
the
top
fabric
you
achieve.
guide
foot
the
shirring
front
groove
into
to
and
pull
the
effects
with
foot
the
foot
be
top
slightly
and
of
the
wear
by
rear
upwards
gathered,
the
through
the
greater
fabric
foot
remove
the
on
shirring
or
hooking
groove
fabric
taut
edges
by
presser
can
home
until
face
to
the
while
the
pushing
it
in
foot
be
achieved
e.g.
foot
decorating
the
of
the
it
snaps
up,
remain
foot
sewing.
gathering
evenly
direc
the
holder
on
rear
foot
under
flat
cut
it
at
1
04
Tip:
Tighter
sing
the
length.
Program:
Stitch
Tension:
needle
1
length:
3
gathers
thread
3
-
5
can
be
achieved
tension
and
the
by
increa
stitch
Page 100

:
,?
edge/piping/beading
Knit
seams
Thick
sewn
be
can
obtain
to
order
shoulder
(e.g.
wool
a
wing
This
seam.
strength
and
shape.
Program:
Stitch
Tension:
length:
3
in
easily
thread,
will
keep
15
-
knitted
perfect
a
seams).
give
6.0
5
with
the
it
fabrics
the
we
pulled
seam
from
foot
or
knit
on
seam
recommend
slightly
additional
stretching
imitation
foot
edge
knit
taut
out
furs
fabrics
overse
into
of
In
the
Ruffler
With
spaced
very
is
ruffler
The
Folding
1.
Folding
2.
second
Folding
3.
securing
When
dealer,
Program:
Stitch
Tension:
the
useful
ruffler
pleats
you
full
length:
you
automatically
ruffles,
for
be
can
securing
and
pleats
in
fabric
pleats
another
to
the
buy
operating
1
3
5
-
3
can
used
fabric
in
one
fabric,
in
ruffler
instructions
make
while
frills,
three
in
pleats
and
operation.
attaching
fabric
from
closely
home
different
fabric.
in
securing
one
in
your
or
sewing.
textiles,
lace
operation.
PFAFF
included.
are
widely
This
etc.
ways:
a
to
and
105
 Loading...