

Page 1
L
.—
c-I)
--
C)
D
I
I
/
‘.
Page 2
Fold
i
out
this
page
Some
rules
safety
Contents
Removing
Openng
Removing
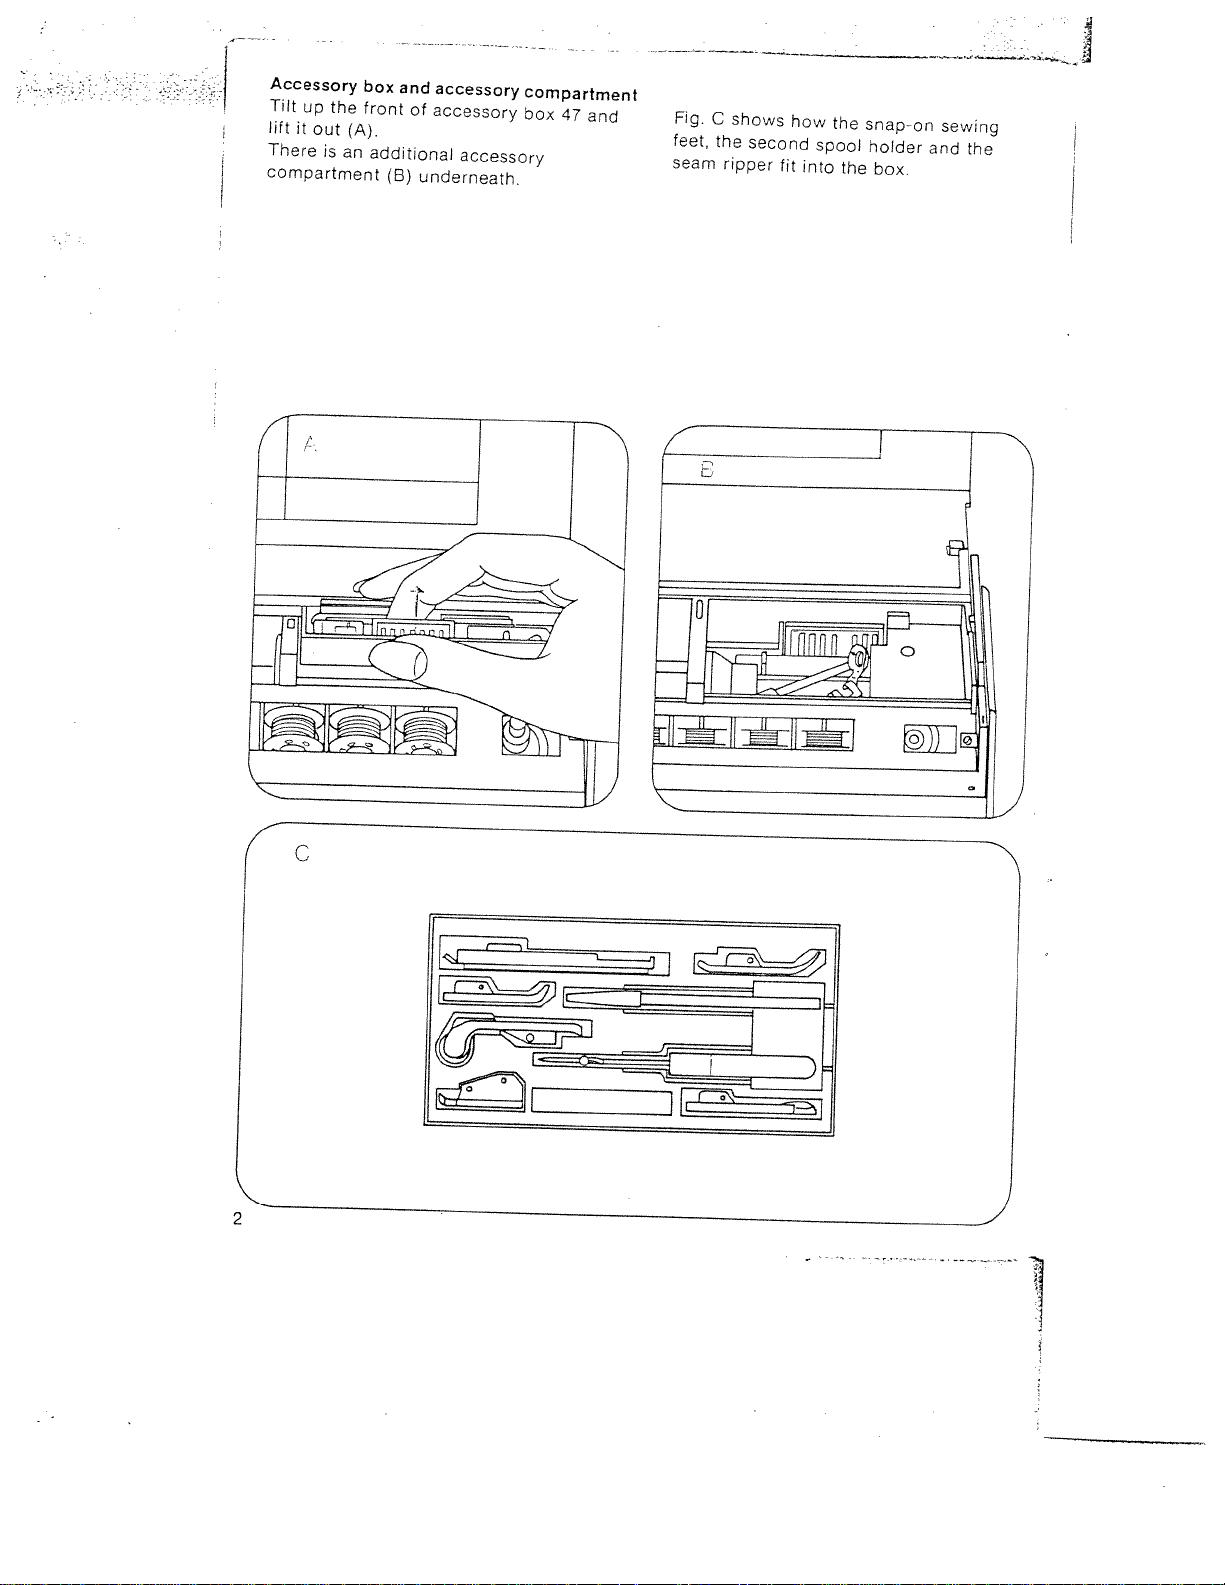
Accessory
Electrical
Placing
Upper
Threading
Disengaging
Winding
Removing
iflsertng
Inserting
Drawing
Presser
Thread
Thread
Regulating
Reverse
Finger-tip
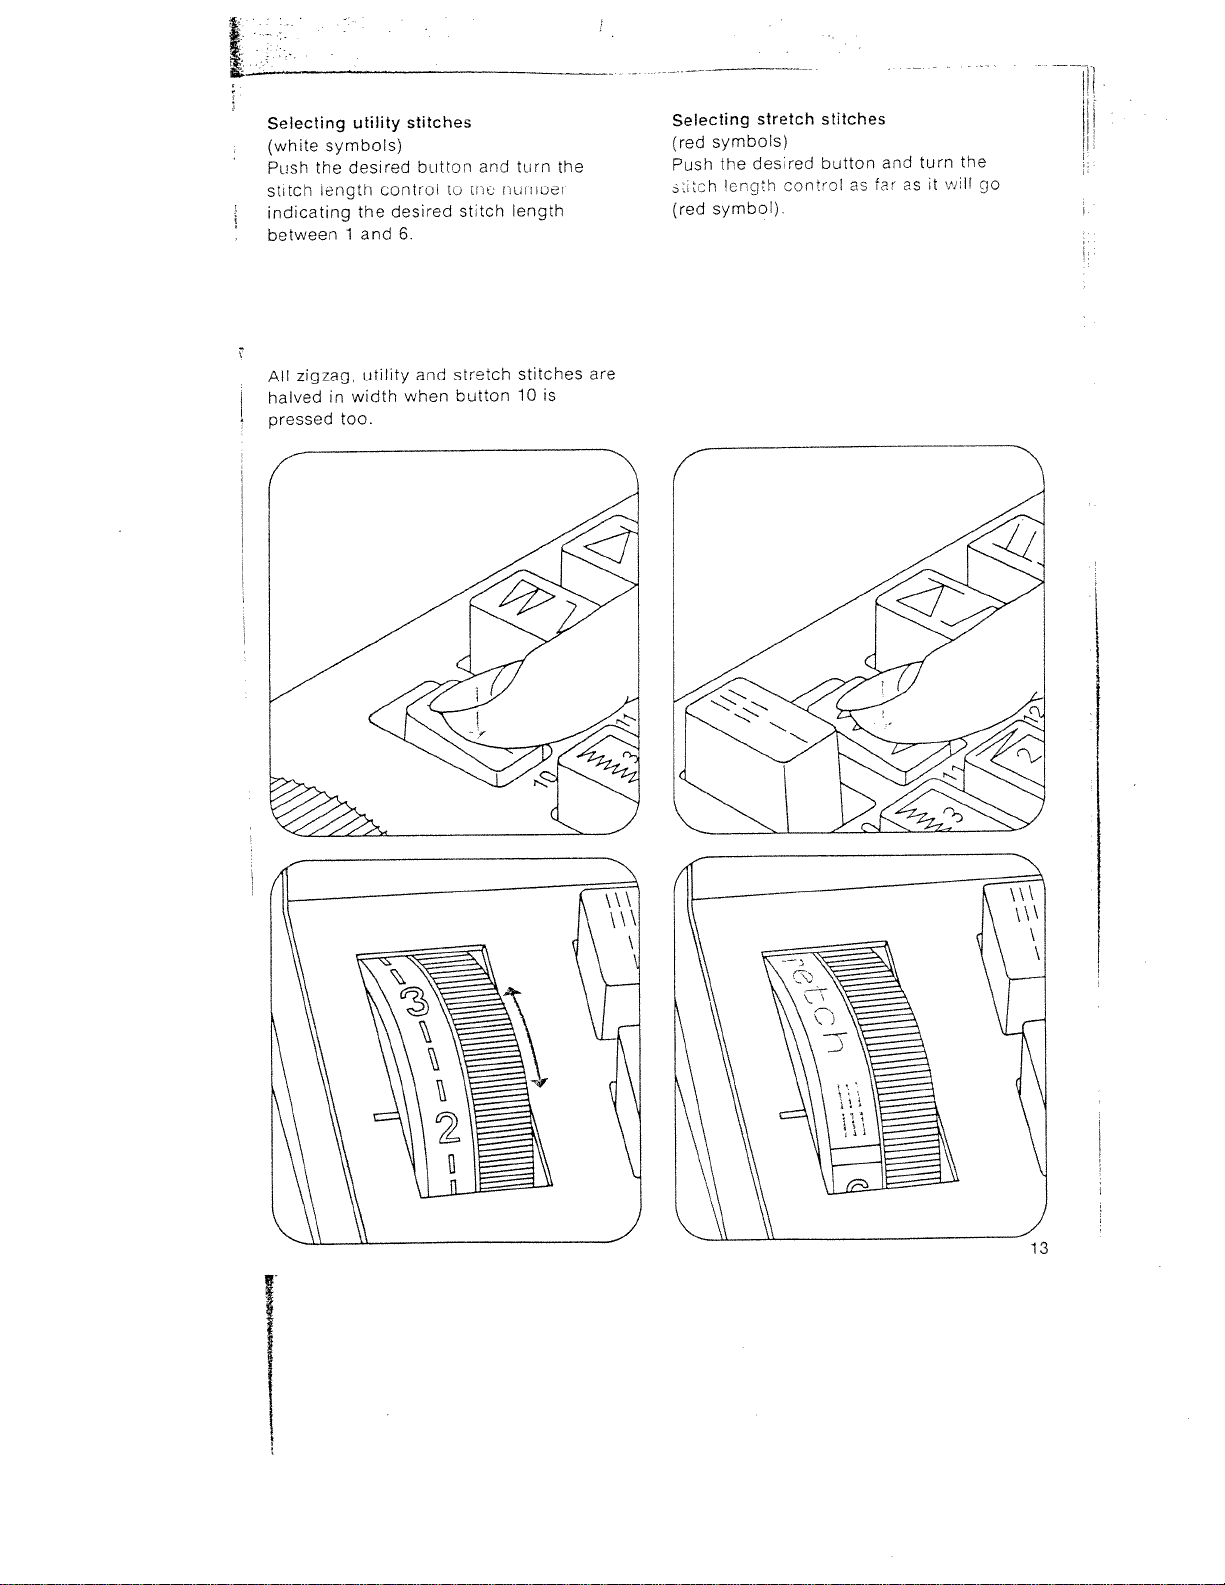
Selecting
Selecting
UtilitySelecting
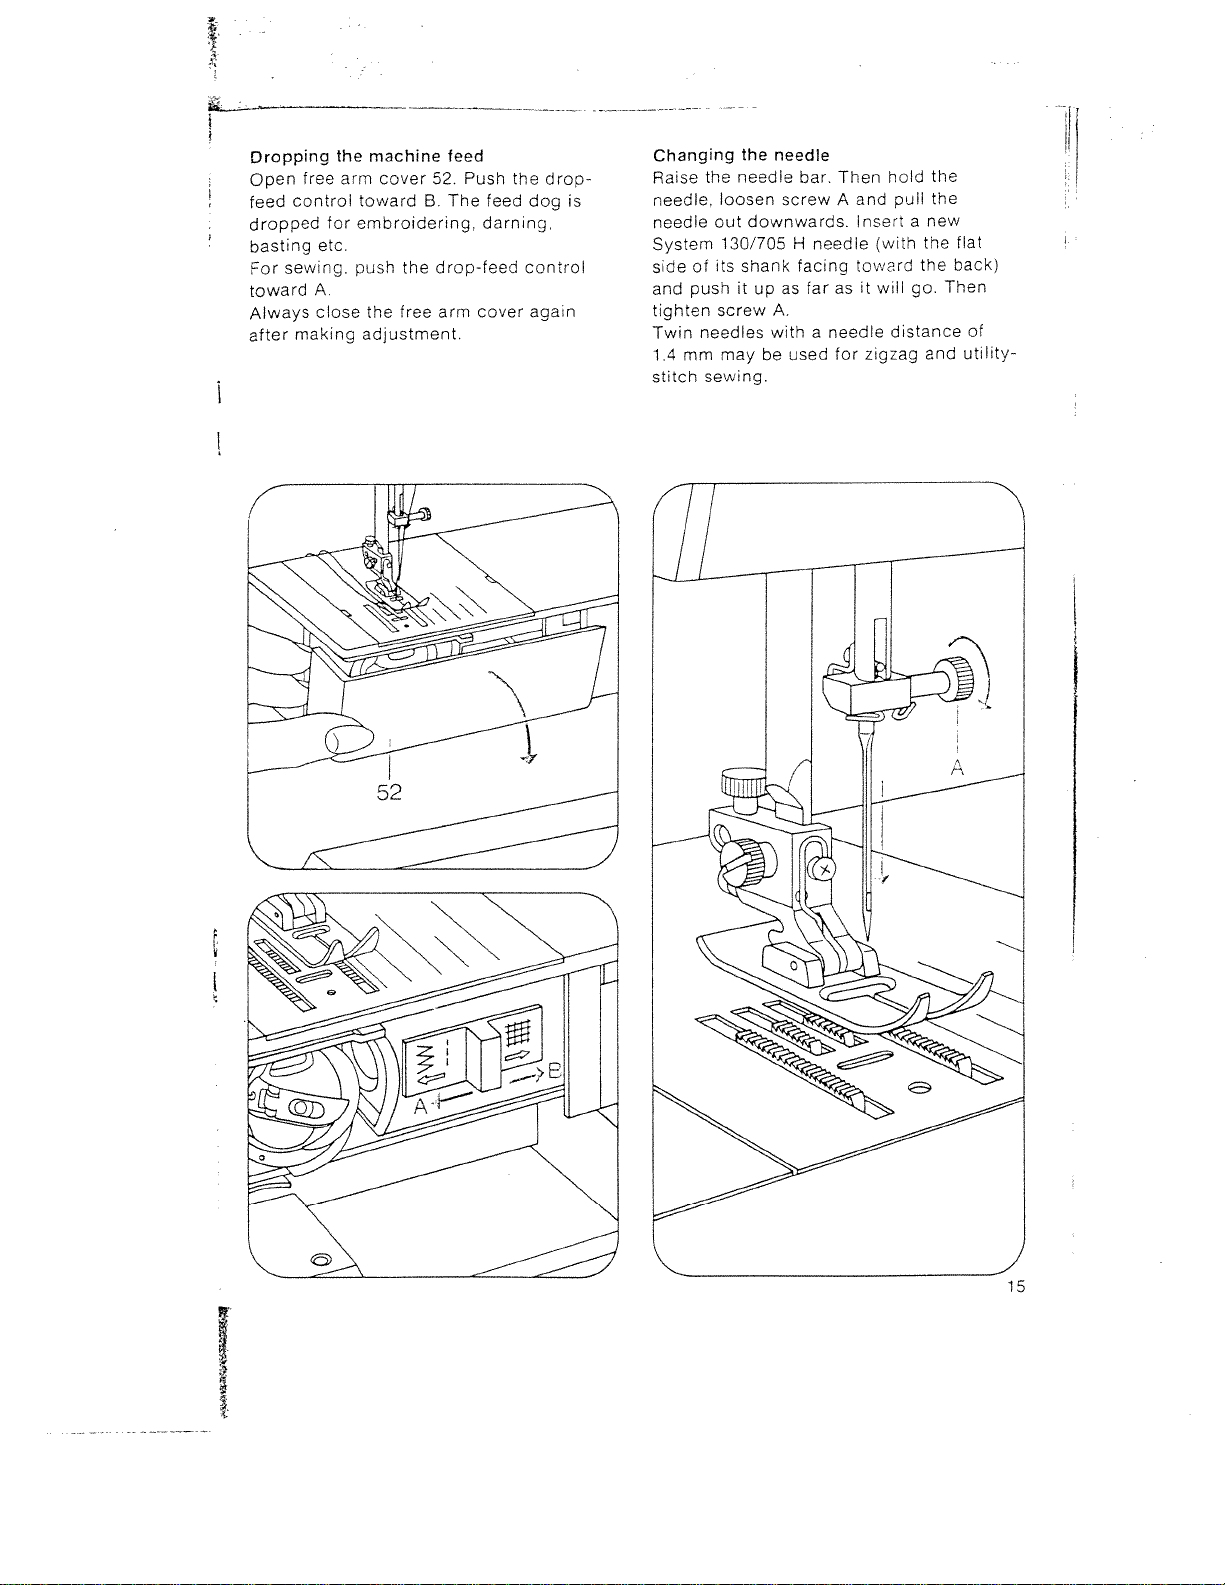
Dropping
Changing
Biectronic
Needle
Basting
Electronic
Changing
Sewing
Speciai
Sewing
Changing
Cleaning
Changing
Troebie
the
the
hinged
and
box
connection
spool
threading
he
the
the
bobbin
bobbin
the
bobbin
the
bobbin
up
the
bar
lifter
cutter
tension
the
sewing
controls
utility
stretch
and
stretch-stitch
the
the
the
bobbin
positioner
top
the
feet
sov;ng
buttonholes
the
and
the
shooting
carrying
opening
and
of
thread
needle
sewing
case
bobbin
stitch
stitches
stitches
needle
machine
needle
thread
speed
sewing
toot
light
oiling
fuse
case
top
the
accessory
and
on
and
case
thread
length
position
feed
selector
feet
bulb
cover
cover
swIng-out
compartment
control
foot
pin
mechanism
bobbin
combinations
straight
for
monitor
arm
stitching
Page
16,17
16,
16.
16,
20.21
24,
22
22
23
25
17
18
19
20
13
14
14
15
15
17
17
10
11
12
13
the
to
bobbin
clean
interrupt
to
your
sewing.
power
change
for
bulb
or
or
a
in
injuring
avoid
the
on
sure
sewing
plate,
machine
and
use
lamp.
to
needle
you
or
leave
a
unplug
you
when
have
or
the
15-watt
when
have
foot,
you
machine
light
careful
Be
a)
1
2
3
4
4
5
5
6
7
7
8
8
9
9
ii
fingers
Make
b)
cord
the
needle
the
oil
sewing
while.
Only
c)
the
whenever
needle,
sewing
Page 3

Parts
your
of
sewing
machine
Carrying
30
Hinged
31
Hand
32
33
Stop
34
Master
Finger-tip
35
36
Stitch
37
Swing-out
accessory
38
Needle
Sewing
39
sewing
40
Needle
41
Needle
42
Presser
43
Presser
44
Reverse-teed
45
Stitch
46
Space
of
47
Accessory
compartment
48
Bobbin
49
Top
Basting
50
51
Foot
Free
52
enclosing
53
Free
54
Thread
Threading
55
Take-
56
57
Spool
58
Threading
Bobbin
59
(bobbin
60
Bobbin
61
Bobbin
62
Needle
(“up
wheel
motion
switch
length
plate
foot
foot
holder
thread
chart
for
customer
winder
speed
stitch
control
arm
arm
guide
up
pin
tension
winding)
rack
thread
positioner
and
handle
top
cover
knob
controls
control
sewing
compartment
holder
bar
lifter
bar
with
control
entering
service
box
underneath
regulator
button
cover,
sewing
SlOtS
lever
with
slot
down
arm
with
with
screw
tension
thread
phone
with
hook
unreeling
bobbin
for
stud
monitor
posihoning)
with
cutter
numbei
accessory
discs
winding
Page 4

6U!Aowe
eq
eq
o
0j
eq
o
ejpu
ai
ie
6u
bUi/HJE3
ss
eSD
eseD
‘eAOD
paipui
AO
Aq
JAOD
[
epiSUi
pe6uq
81
°A
JAO3
dO
IRM
AOD
PUH
(v)
J8L
Si
6uiuad
pjot
L4
u
3q
fl
P14D
1DiS
ULJ
8L4
iJ
JeAOD
p
6uowaH
pu
JepUn
qDEe
puq
()
pu
eL
()
H
no
POWWODDE
UiMS
H
(c)
5uiudo
nO
eqj
WJU
nO-buiMS
S
uedQ
pJEMo
p
no-6u!MS
HHM
9I
L4
()
O
SiJOSSODD
uije
JflOA
)
j
I
N
4
I
Page 5
CD
—
C
—
a
CD’<
C
U;-
oo
—
®
0
a
3
CD
0
Co0.DO
—
8
p.
t
-‘
®n
a
CD
Cd)
0
o
—‘
an
00
S<%<
CDO
OCt
Cd)
‘-<
E°’
o-i
CD
DC)
V
-CD
z
a
0
CDCQ
Cd)
0
t
a
0
CD
t3tn
CD®
a
‘0
—0
C/C
OD
o
0
a
_D)
a
Dv)
00
0-CD—a
—
0-a®
a
0
x
0(0
-L
Page 6

[.
Electrical
Take
the
the
from
of
out
sewing
For
place
and
Itisalso
in
the
it
hand.
by
connection
foot
right,
it.
it
possible
machine
turn
under
control
Fig.
the
during
C,
foot
the
to
keep
and
foot
Outofthe
and
pull
control
table.
the
sewing
control
machine
the
round
foot
and
lead
control
operate
plug
Push
B
machine
pedal,
soon
replace
slightly
the
into
34.
down
sewing.
into
plug
switch
Your
Press
starts
the
As
automatically
To
it
rewind
Push
A
the
A
the
as the
the
and
the
control
into
red
the
returns
then
the
wall
indicator
is
now
foot
The
faster
machine
lead
control
back
machine
socket.
ready
control.
more
the
to
in
the
release
automatically.
into
Press
lamp
for
The
press
you
machine
stops
its
‘up’
foot
it
and
the
socket
master
lights
sewing.
machine
down
runs.
needle
the
position.
control
will
it
machine.
and
up.
pull
I
3
Page 7
6010519
oods
V
jjsW$
509
9
a6s
p509
cods
sipj
pus
Si
psaip
iepjop
psaJp
puooa
I
iepjop
ui
Sloods
ui
sioods
iepjop
55
cods
pesn
epeeu-uitvft
i!
uc
app
jo
p
6u!IeeJUfl
iuoij
jo
p
6uijeeiun
UI
UMOpS
pauiciuoa
io
6
uiMaS
d
OSip
snsip
iuois
UI
ui
puc
psaip;
uo
:pceip
epj
:psaJpi
Q
o
8P1
:Jepop
ep
uiqqoq
uc
cods
api
iiesui
ecoid
u!d
pus
s
ap
jo
3
5uiMsJp
buipuiM
ap;
cods
uo
cods
jo
A.iossaocc
pus
cods
cods
psaip
api
jo
xoq
JOd
dn
IVd
Olu!
cui
JOd
OIUI
iadd
J8A8j
85189
aq
iois
MOIeq
ueqj
peeiq
iOjS
01
JOLflO
OL4
v
01W
weip
powqi
V
buipeapi
isnw
ci)
1!
epin5
01
eq
5uipsaiqj
pioq
eq
u
6uities
pueiq
woj
api
9
lOIS
NDEq
epinb
pg
uo
elpecu-oMi
uei
eq
q6u
,to
api
iOOJ
Ul
pue
OIUI
eLfi
buiMes
jo
ap
o
pus
!Pi
epsn5
lOIS
epaeu
dn,,
cods
epinO
dn-eu
9
oiu
e{peeu
MEJp
epin6
2
N81
aLg
pue
uoiisod
11
MEip
pus
(
wo
99
JeAeJ
iq5u
W04
eq
q6iJ
j9P1011
peeiq
cue
o
pue
Apejiw;g
eq
p
Page 8
euO
B451J
i0
PE9JL1
eLfl
peoJq
epinb
spueu
epn5
uo
pnoqs
oq
aq
J9L4O
ei
eipau
peDod
ui
Ui
eq
aj
apo
e
PICH
dos
0±
dois
5ui6e6uesi
eq
puq
uodow
se5e6uesp
et
6E5ue-eJ
uoiow
qou
a
i-i
uMes
qou>j
6uiMes
Awi
spto
buiMes
,wE
puo
noA
wo
wsiuElpaw
wrn
Gq
sa
wsiuELDew
wsuqDw
un
noA
pCen
6U!peJq
jpaeu
ajpu
wo
iuo
o
DEq
C
Page 9

wincirng
Disengage
the
spool
thread
s.
from
the
tension
a
few
times
the
right
bobbin
take
it
Out.
mechanism.
-npcrtan:.
bobbin
winninq
disenq
on
;.
stud
is
me
holder
it.
spool,
to
full
Then
Leu-
bobbin
the
Place
C
59,
and
start
push
sewing
.
lead
wind
push
the
reengage
t
The
ng
and
a
.
it
boobin
from
mechanism.
place
bobbin
it
around
it
around
the
winder.
toward
cc,r
a
second
a
D.
bobbin
the
ui
w’der
spool
on
P
When
the
spindle
te
bobbin
the
toward
left
sewing
r
spool
Insert
of
tniead
bobbin
the
and
48
(A)
Winding
eye
Raise
need1e
sewing
spindle
Draw
foot,
around
fe’
1v
a
Push
the
bobbin
toward
the
sewing
(8)
the
to
mechanism.
48
the
and
up
bobbin
turns
the
the
the
bobbin
sewing
its
highest
so
that
needle
into
of
thread
bobbin
winder.
left
and
mechanism.
foot
pin
thread
slot
tension
toward
through
point.
Place
58,
on
Push
take
and
C
enters
under
and
stud
the
the
the
it
the
bring
Disengage
bobbin
a
the
from
59.
bobbin.
right
full
Re-engage
Out.
needle
the
slot
Then
to
bobbin
the
on
D.
sewing
above
wind
start
6
Page 10
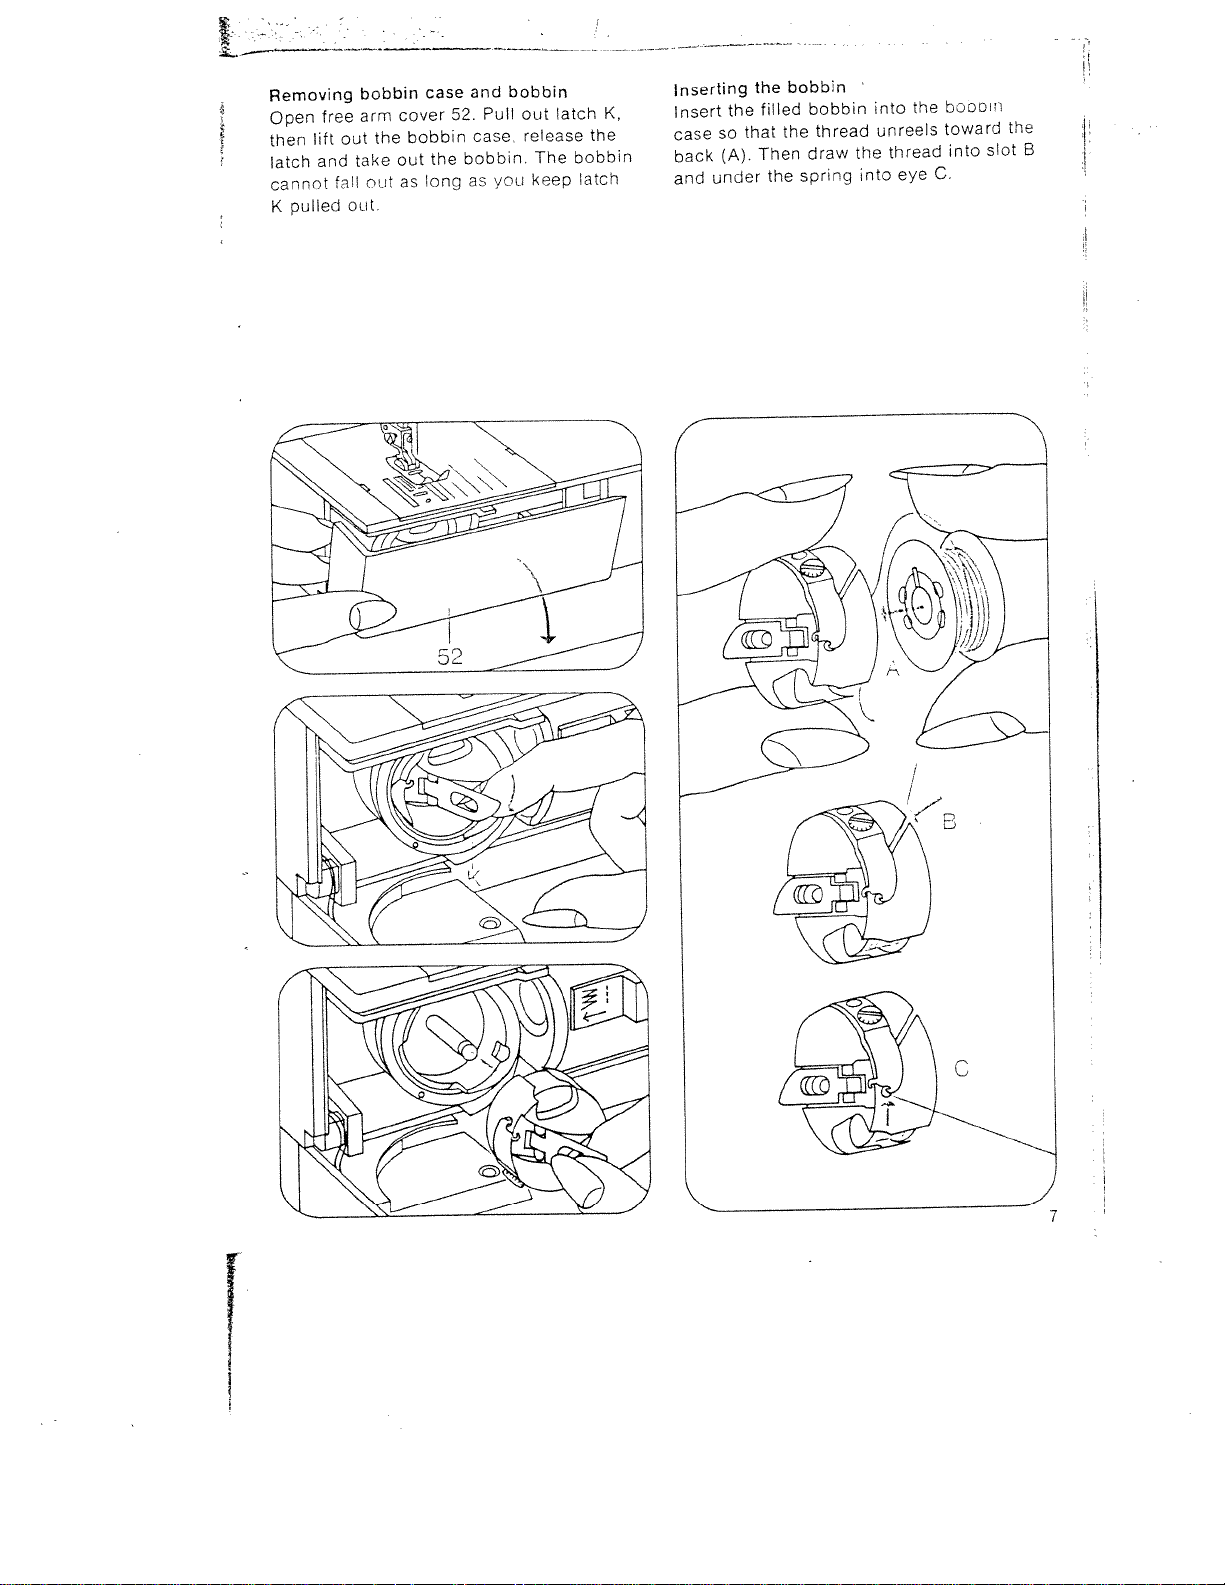
Removing
free
Open
lift
then
and
latch
cannnt
pulled
K
fall
out
out.
bobbin
arm
the
take
cit
cover
bobbin
out
as
case
the
long
and
52.
case,
bobbin.
as
Pull
y’i
bobbin
out
release
The
keeo
latch
the
bobbin
latch
the
the
that
filled
Then
the
bobbin
bobbin
the
draw
spring
thread
the
into
into
unreels
thread
eye
the
b000L
toward
into
C.
slot
the
B
Inserting
K,
Insert
case
back
and
so
(A).
under
Page 11
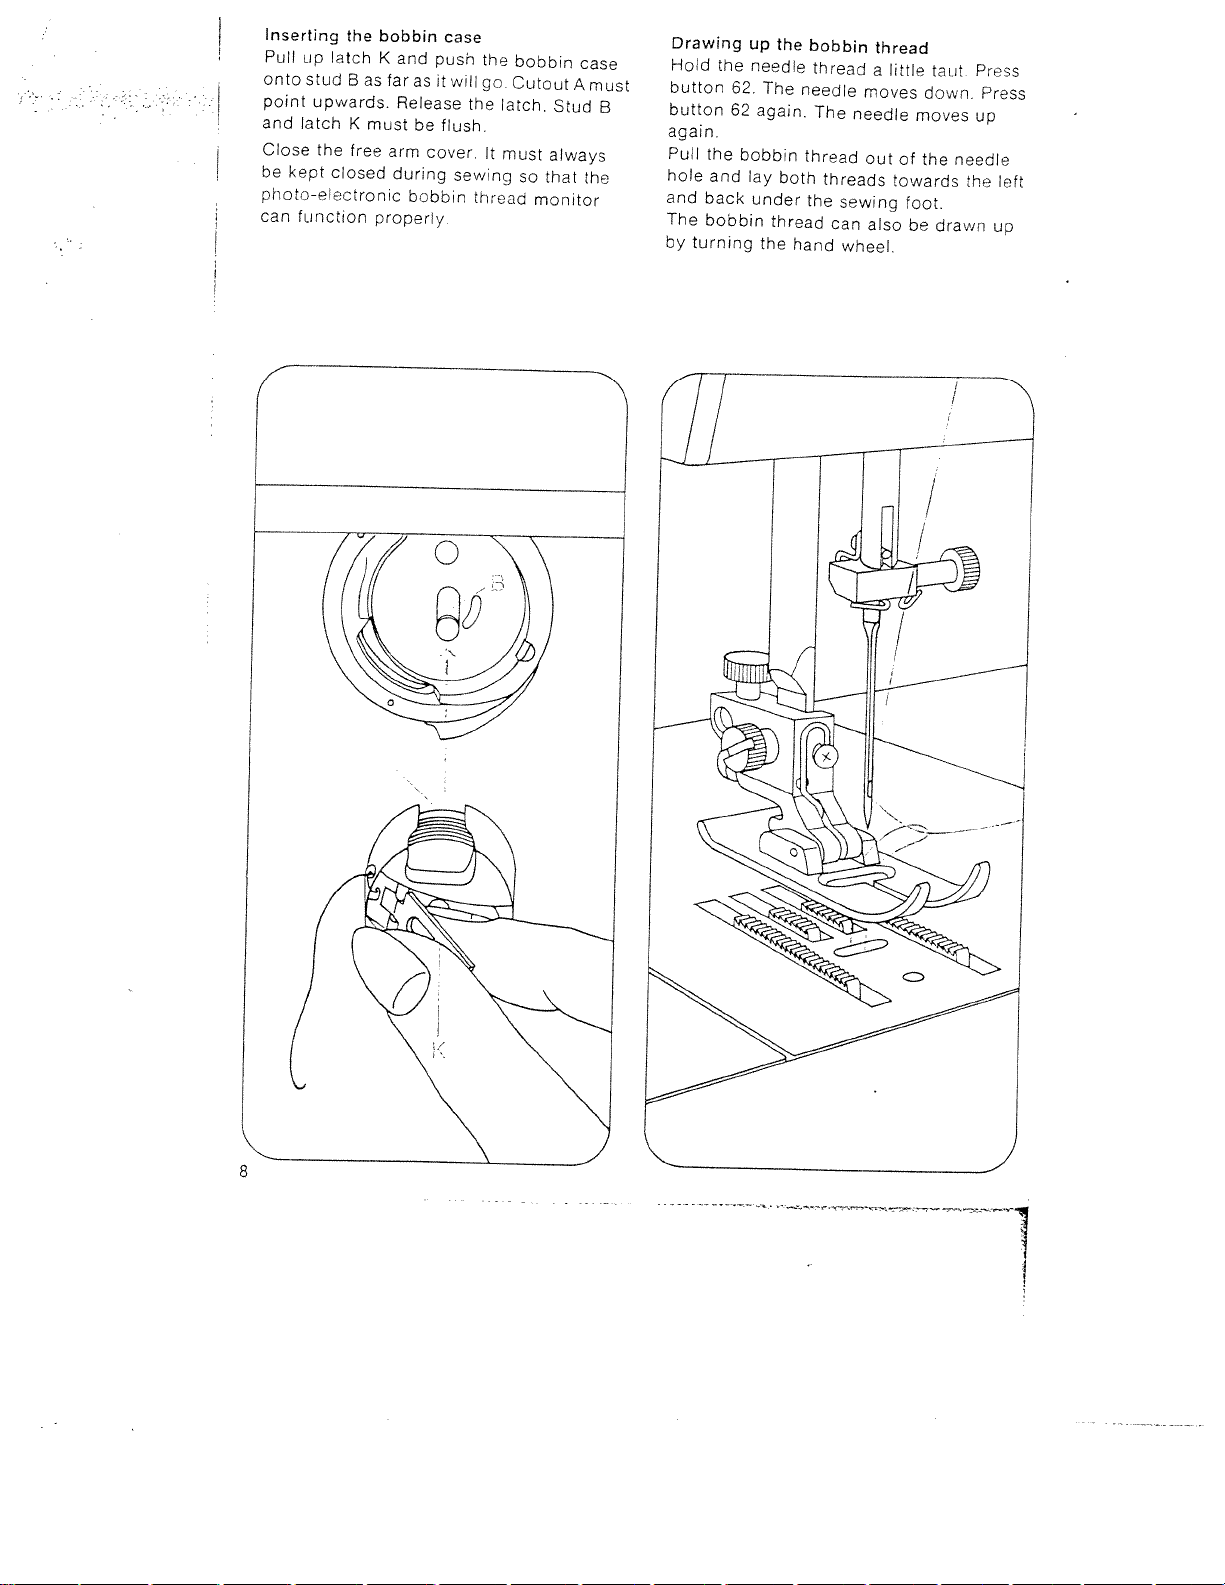
Inserting
Pull
onto
point
and
Close
be
up
stud
latch
kept
the
latch
B
upwards.
the
closed
photo-electronic
can
function
K
free
as
must
bobbin
K
and
far
as
Release
be
arm
during
bobbin
properly.
case
push
it
will
flush.
cover.
the
go.
the
sewing
thread
It
bobbin
Cutout
latch.
must
so
Stud
always
that
monitor
A
case
must
the
Drawing
Hold
button
B
button
again.
Pull
hole
and
The
by
the
the
and
back
bobbin
turning
up
needle
62.
62
bobbin
lay
under
the
The
again.
thread
the
both
hand
bobbin
thread
needle
The
thread
threads
the
needle
sewing
can
wheel.
thread
a
little
moves
out
also
down.
moves
the
of
towards
foot.
be
tauL
drawn
Press
Press
up
needle
the
left
up
8
-—-
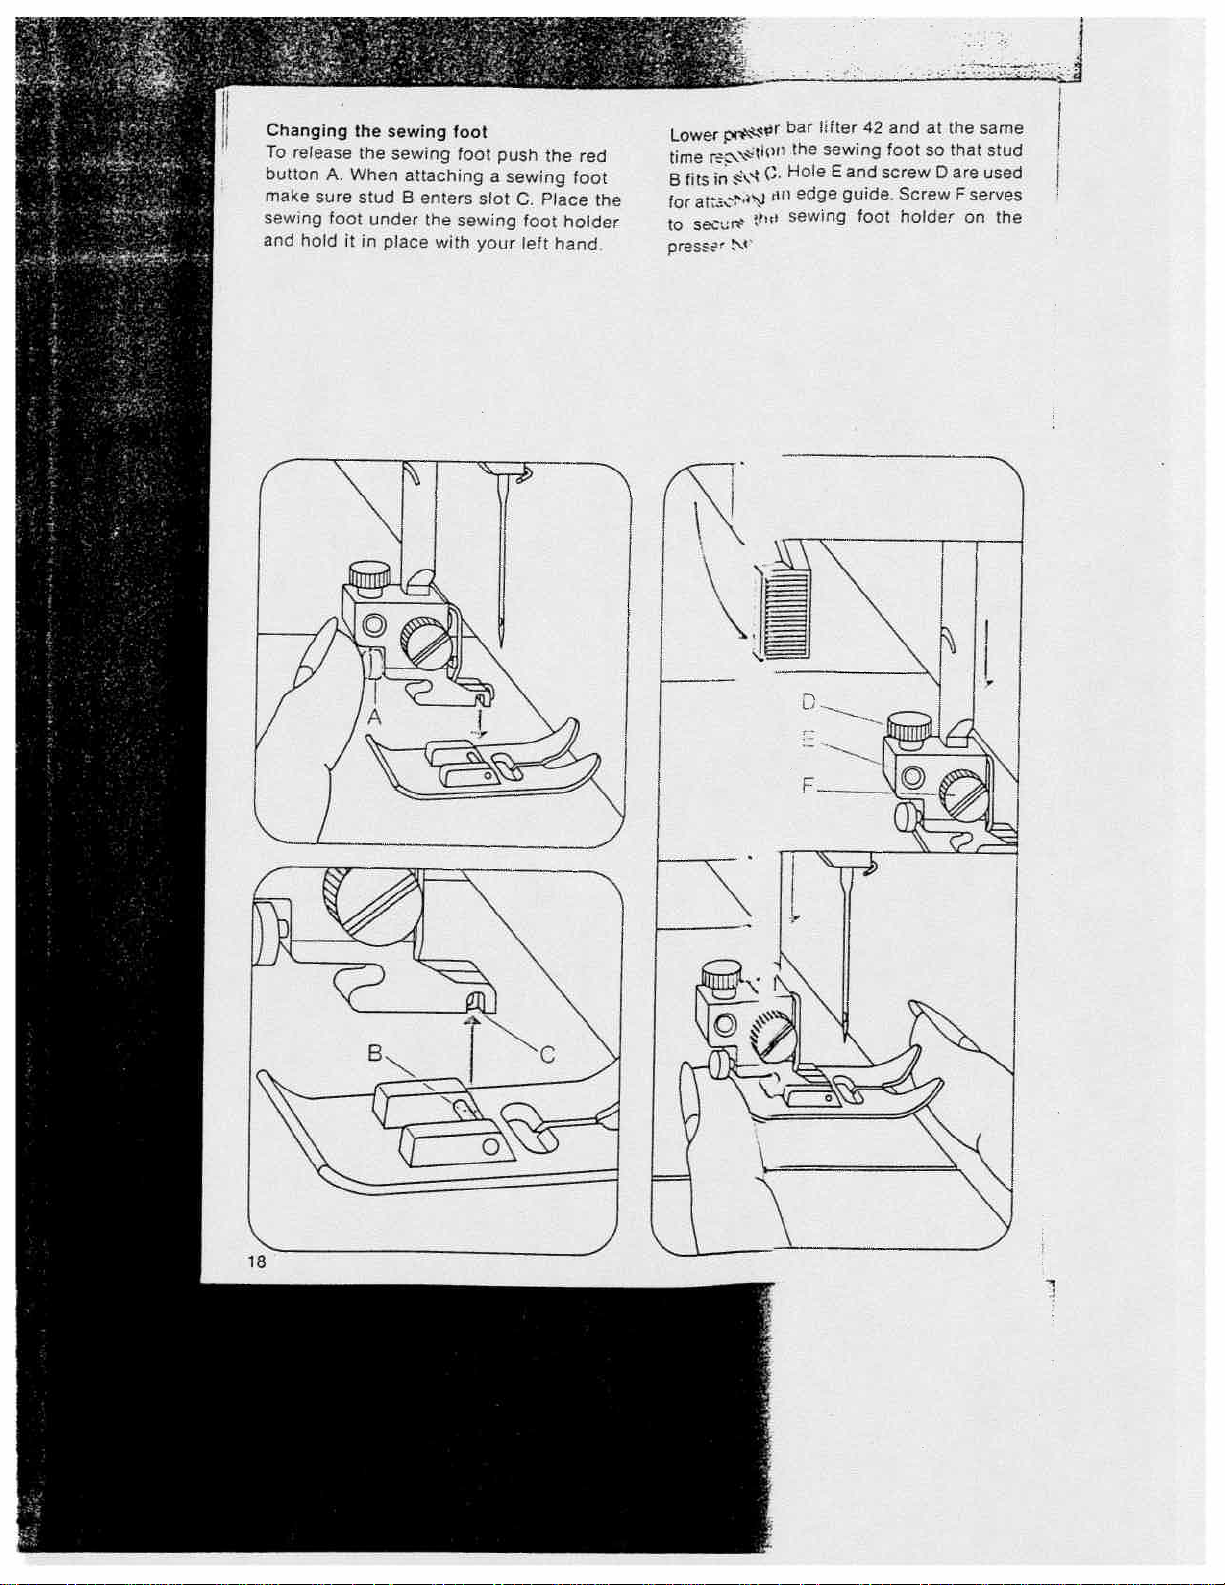
Page 12

ress
ress
D
left
up
Presser
Lever
=
A
=
B
=
C
bar
42
has
sewing
The
sewng
The
inserting
sewing
Toe
sewing.
lifter
three
foot
foot
extra-thick
foot
positions:
raised.
is
raised
is
o,;red
is
further
materials.
for
for
Thread
thread
The
located
the
Raise
machine
the
thre-ids
downwards
cutter
at
sewing
into
cutter
the
back
toward
the
cut
to
is
foot.
cutter
them.
of
an
the
oblique
the
Pull
back.
slot
presser
the
and
slot
work
Draw
pull
bar.
out
the
znern
of
)
9
Page 13

Upper
tension
=
•
•
I
Setting
A
setting
3
and5.The
tighter
Lower
tension
=
Regulating
B
Turn
right
=
Both
o
D=Upper
tension
E=Lower
tension
mark.
is
the
it
left
for
a
tensions
tension
too
tension
too
(41)
The
in
the
white
higher
tension.
screw.
foralooser
tighter
are
too
fight.
too
tight.
normal
the
tension.
correct.
loose
loose
range
number,
tension,
or
or
tension
between
lower
upper
correct
The
the
Let
hang
the
or
slide
not
should gradually
jerk
you
bobbin
down
down
your
lower
freely
hand
case
by
tension
by
its
move
upwards
with
the
own
downwards
full
a
thread.
weight,
bobbin
lightly.
must
It
but
when
10
N
j
4
•1
Page 14

V.
V.;
V
V
-
0
C])
-n
0
U)
-:
ci
-o
0
—.
CD
:3
(D
(DO
U)
O
CD
c0—
w
U)3OU)00
—
U)
Z
0
cUCD
0)
0C0
CD
0
0U)CD
‘H
CD
0
U)
(DO
ci
0
00
0
U)
—
0(0
OD
U)
0
0
:3
cr
cic(D
0
U)
0
0
—U)
3uD
ci>
U)
U)
Page 15
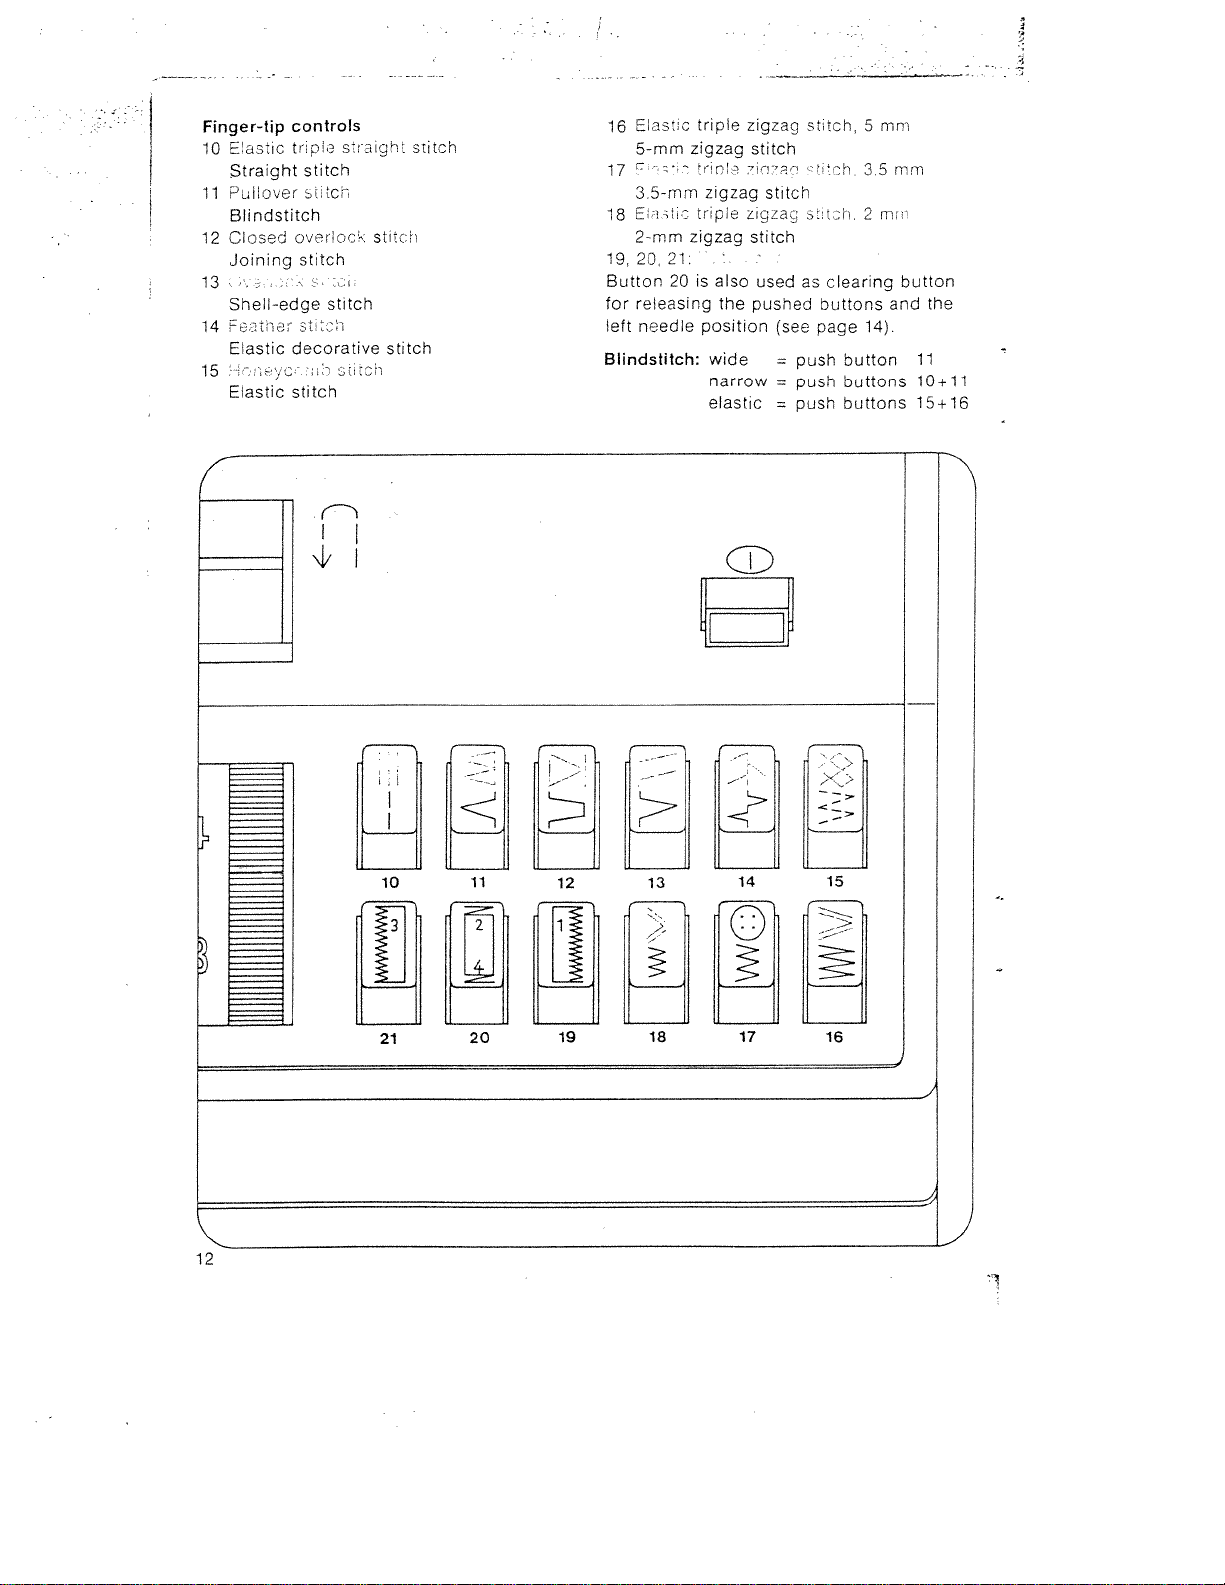
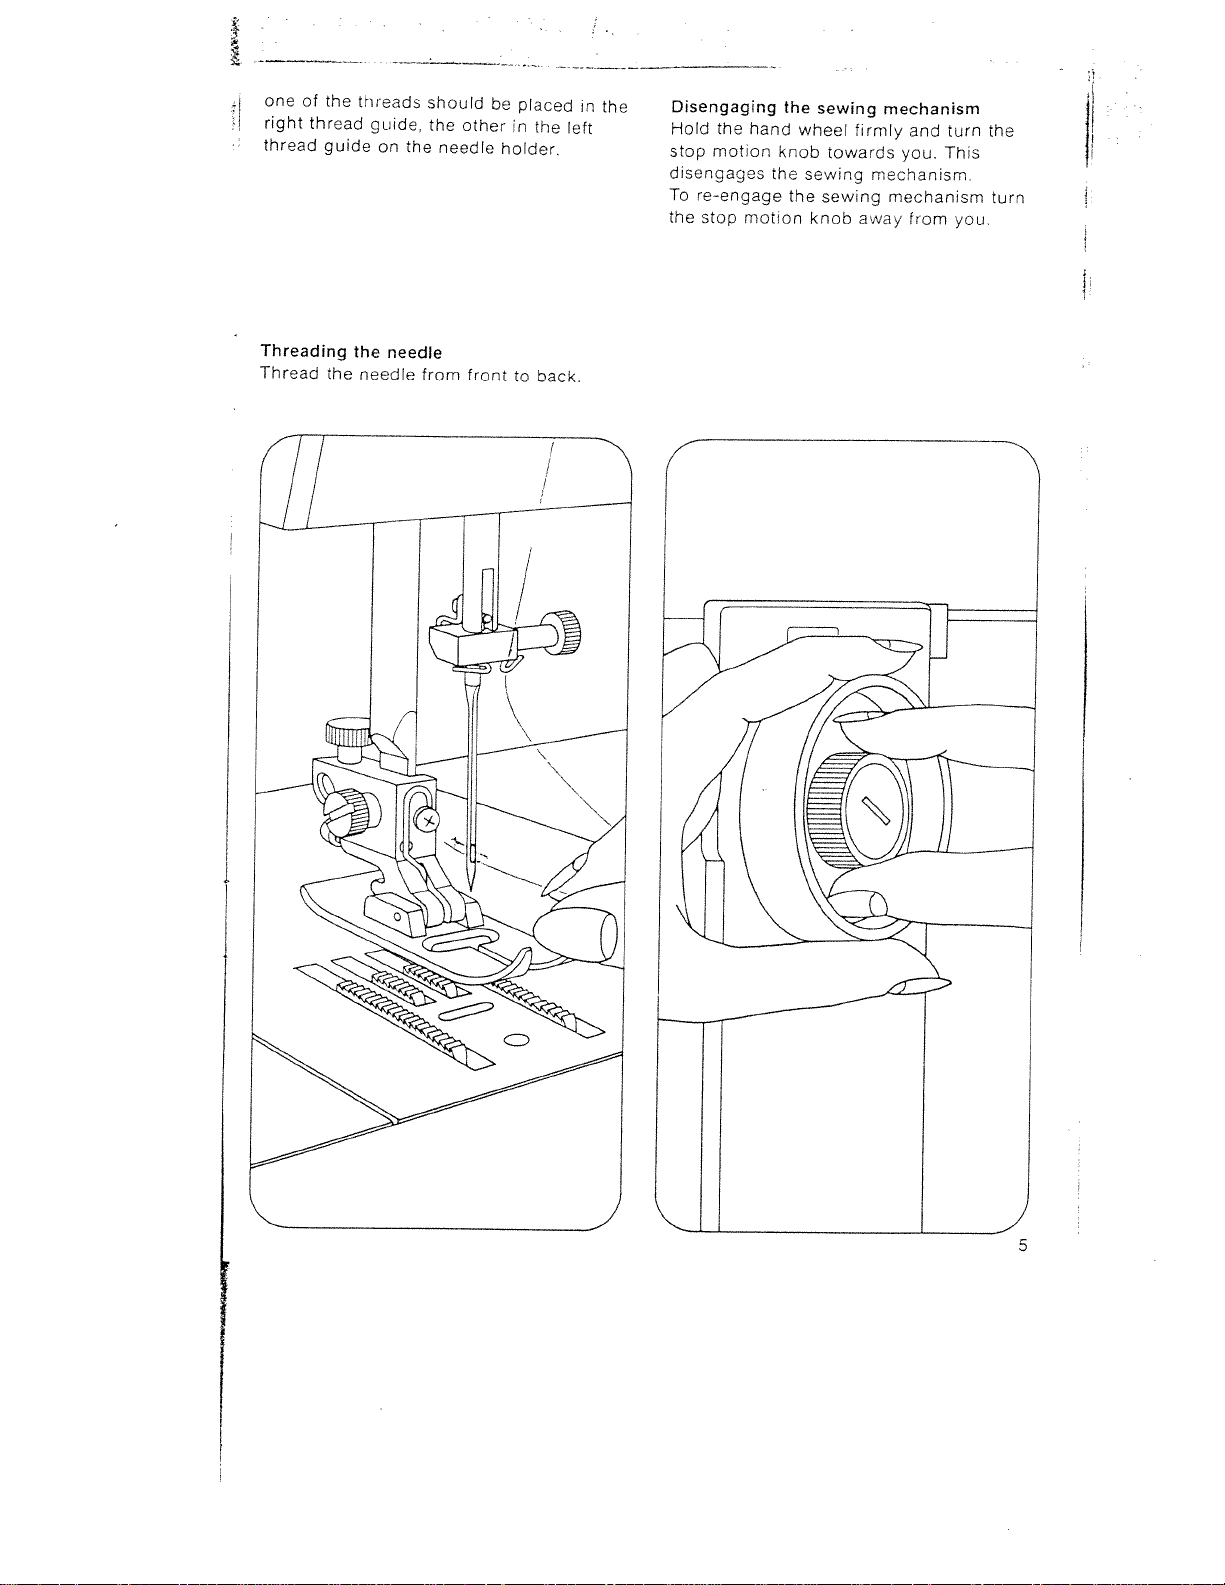
Finger-tip
Easic
10
Straight
11
Pu
Blindstitch
12
C.osed
Joining
13
Shell-edge
eone:
14
Elastic
15’
Elastic
lover
controls
S
trpD
stitch
.oo
‘c
cv
stitch
stitch
decorative
stitch
stl:c”
stitch
st’tch
Elost’c
16
5-mm
17
3.5-mm
18
2-mm
19,
20.
Button
releasing
for
left
needle
Blindstitch:
21.
20
triple
zigzag
r
n
zigzag
triple
zigzag
is
also
position
wide
narrow
elastc
the
zigzag
stitch
‘m
stitch
zrozac;
stitch
used
pushed
(see
=
=
sttch.
rh
-,:‘rr
as clearing
buttons
page
button
push
buttons
push
push
buttons
5
3.5
2
14)
mm
m
and
mm
button
the
11
10+11
15+
16
12
Page 16
—
0-
-o-—cn
((3
C-)
(I)
ci
0
—
T
0)
-‘
(0—
(J)<N
-o
0)
—
D
cc
CD
Ci)
.
CO
ci3
0
ciE
-cD
ci
0)
2-
—
(0
ci—.
(0
0:
C).
C)
U)
0)
C)
-
0)
0
2
0
ci
0.
¶2
C)
C)
ci
U)
—
D
‘o
Zr
O
DC)
CO
,
0-
(0
03
CO
(0
C)
U)
00.
Q)0
(0(0
ci
-o
C
0.
C)
ci
CO
C)
00)
0-
ci
C)
0(0
¶2.
C).
(1)
C)
CO
C).
C)
Zr
Dci
¶20
ci
)U
(ft
CO
C
-
0
(C)
0))
Page 17
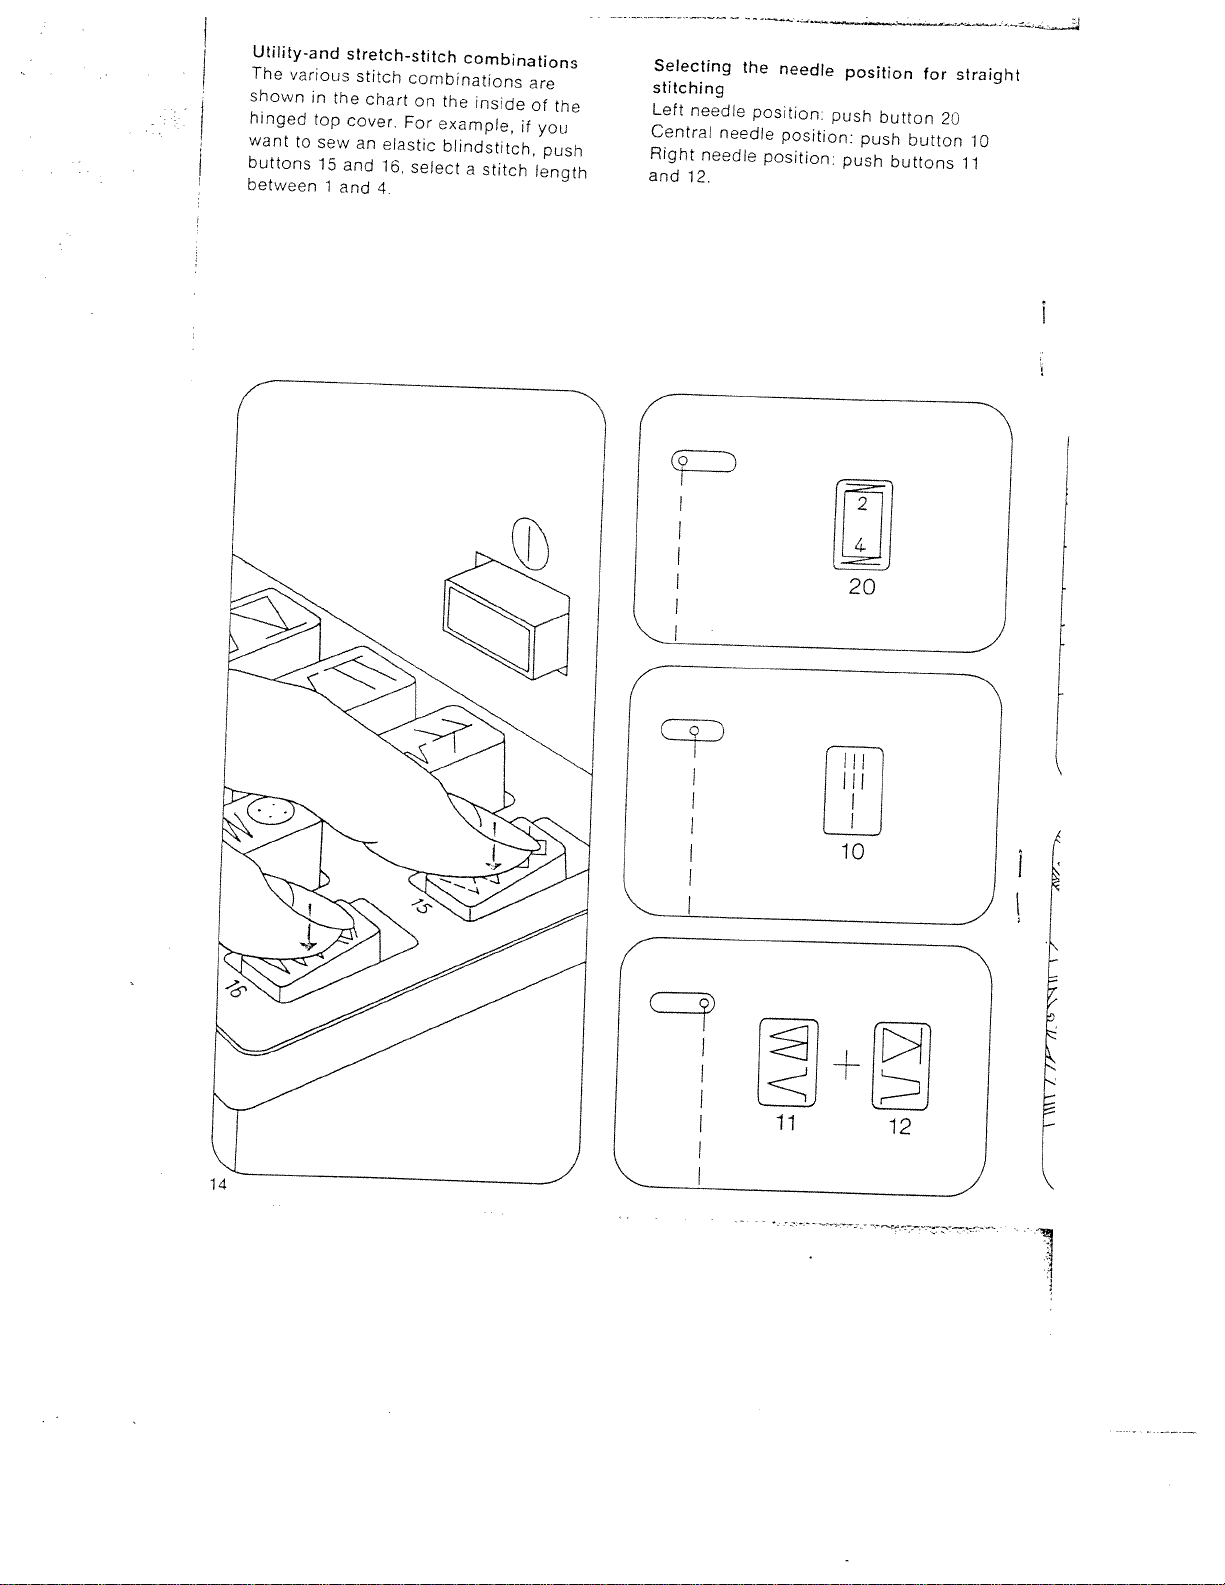
Utility-and
The
various
shown
hinged
want
to
buttons
between
in
top
sew
15
1
the
and
and
stretch-stitch
stitch
combinations
chart
on
cover.
For
an
elastic
16,
select
4.
combinations
the
inside
example,
blindstitch,
a
stitch length
are
of
the
if
you
push
Selecting
stitching
Left
Central
Right
and
needle
needle
12.
the
needle
needle
position:
position:
position:
position
push
push
push
button
buttons
for
button
straight
20
10
11
4
14
L
4
LL
11
LZ
)
12
1
Page 18
5-00
CL
a-
-n
y
5-
Z
(0
CD
Q
CD
3
C)_.
CD
S
C)3CDDC
CD
CD
cC
0
CD
D
—
5-CD
Ct)
CD
CD
(9
CD
CO
5-
2CD
-‘
CD
-o
CD
CL
5-
Q(Q
5-
CD
(0
3:
D
(00Zr
CD
(j)CD
CD
Zr
H
-
CD
CD
CD
<
CD
CD
-L
Zr
CD
CD
C)CDCDCD
0
5-o
-ZrD-CD
CD
3
Zr
C)
(0(t)
C’)
C-)
QCD
CL
3
-.
‘
0
Zr
5-
CD
CD
CL
DCt)CDCDCD
CD
5
-D
.3
CD
CD
-D
Zr
CD
CD
CL
5-CD
CL
C)0CD
ci
CL5-
CD
CL
CD
o
C)
o
CD(0CD
-D
—.0
(/
CD
0
CD
—D
C)CDcii
crCCD
Z)CDCD
I
r
CD
C)
C)Zr
cV-.-
CD CD
CD
CD
CD
CD
‘2.
Zr
NCL=CD-
ZrCDj5-CD
—
o2
ZrCDCD
Zr
CD
CD
95-
CDCD
CDCD
CD
CD
CD
CDCD
ci2
0
CD
>
CD
5CD
0)
Page 19

Important
The
bobbin
gaged
during
winder
sewing.
must
always
he
disen
Electronic
61
Bobbin
62
Needle
(‘up
50
Basting
lamp
49
Top
34
Master
and
A
speed
controls
thread
positioner
down”
stitch
regulator
switch
monitor
button
positioning)
wth
nd
c’
16
Page 20
4
Electronic
The
red
monitor
bobbin
goes
and
sewing
Important:
kept
The
Pfaff
(important
Needle
At
the end
the
needleisin
pressing button
needle
corners
press
return
It
is
possible
the
needle
press
needle
when the
signal
61
thread
out
closed.
positioner
to
and
the
to
button
remains
bobbin
starts
when
continues.
Free
1029
when
of
its
lowest
turning
button
its
highest
to
in
its
62
machine
thread
lamp
of
to
flash
is
running
a
full
bobbin
arm
cover
has
a
special
re-ordering).
each
sewing
its
‘up’
62
you
position
the
again
position.
continue
“down”
during sewing
in
down
stops.
monitor
bobbin
when
out.
52
operation
position.
can
fabric.
the
sewing
position.
the
The lamp
is
must
bobbin
bring
for
needle
fabric
thread
the
inserted
By
the
sewing
If
you
will
with
If
the
be
you
Basting
Press
basting
green
indicator
the
machine
the
fabric
you
the
each
foot
darning
the
the
it
you
50
to
52.
on
the
time
pedal
Move
until
obtained,
position,
release
for
When
your
button
lampAgoes
control
cover
Electronic
The
infinitely
sewing
moving
When
towards
slower.
(+)
The
remains
speed
machine
regulator
the regulating
minus
When
the
machine
piercing
the
is.
under
press
machine
fabric
length
then
press
again.
basting
have
from
again.
the
top
same
stitch
lamp
feed
(page
foot
the sewing
and
under
of
stitch
holding
down
Repeat
stitch.
finished
the
The
out.
Push
left
again.
speed
variable
can
49.
(—)
it
is
moved
sews faster.
power
no
button
(page
release
sews
pedal
selector
be
slide
the
of
A
lights
the
the
the
this
green
the
top
selected
machine
the
matter
15)
one
required
foot
basting
and
Close
50.
The
up.
and
screw
20).
Place
foot.
Each
the
foot
stitch.
sewing
fabricinthis
pedal
operation
move
press
indicator
drop-feed
free
speed
of
by
is
moved
sews
towards
needle
what
Drop
foot
is
and
arm
the
plus
the
Page 21
1
J81
at.fl
O
UO
6UM
pu
po
eflS
OO
eqi
U8M
B
pnS
jepufl
u
6U!M
5uM8S
qM
1OO
OO
6U
0S
6UN
noA
snd
6U!M
OO
8
p8)
O0
JPl
0
ew
JO
q
6uMS
3
ao
PU
ep
6
e5P
2
OO
pU
oO
os
0
MaJS
efl
Ma°S
)8pt°
eq
pnS
a
pesfl
s8Mes
UO
Page 22
C)OJ
C
IoJoz
CD
3
E5
(1)
.
CD
-
0
‘
00
‘—0
0-—--
9o
g
0
0
IGm
-
0
zy0
CD
CD
C
CD
0
o
0-.—
o
(0
P1
\—,
/
VL)
/
/
4
4
Page 23

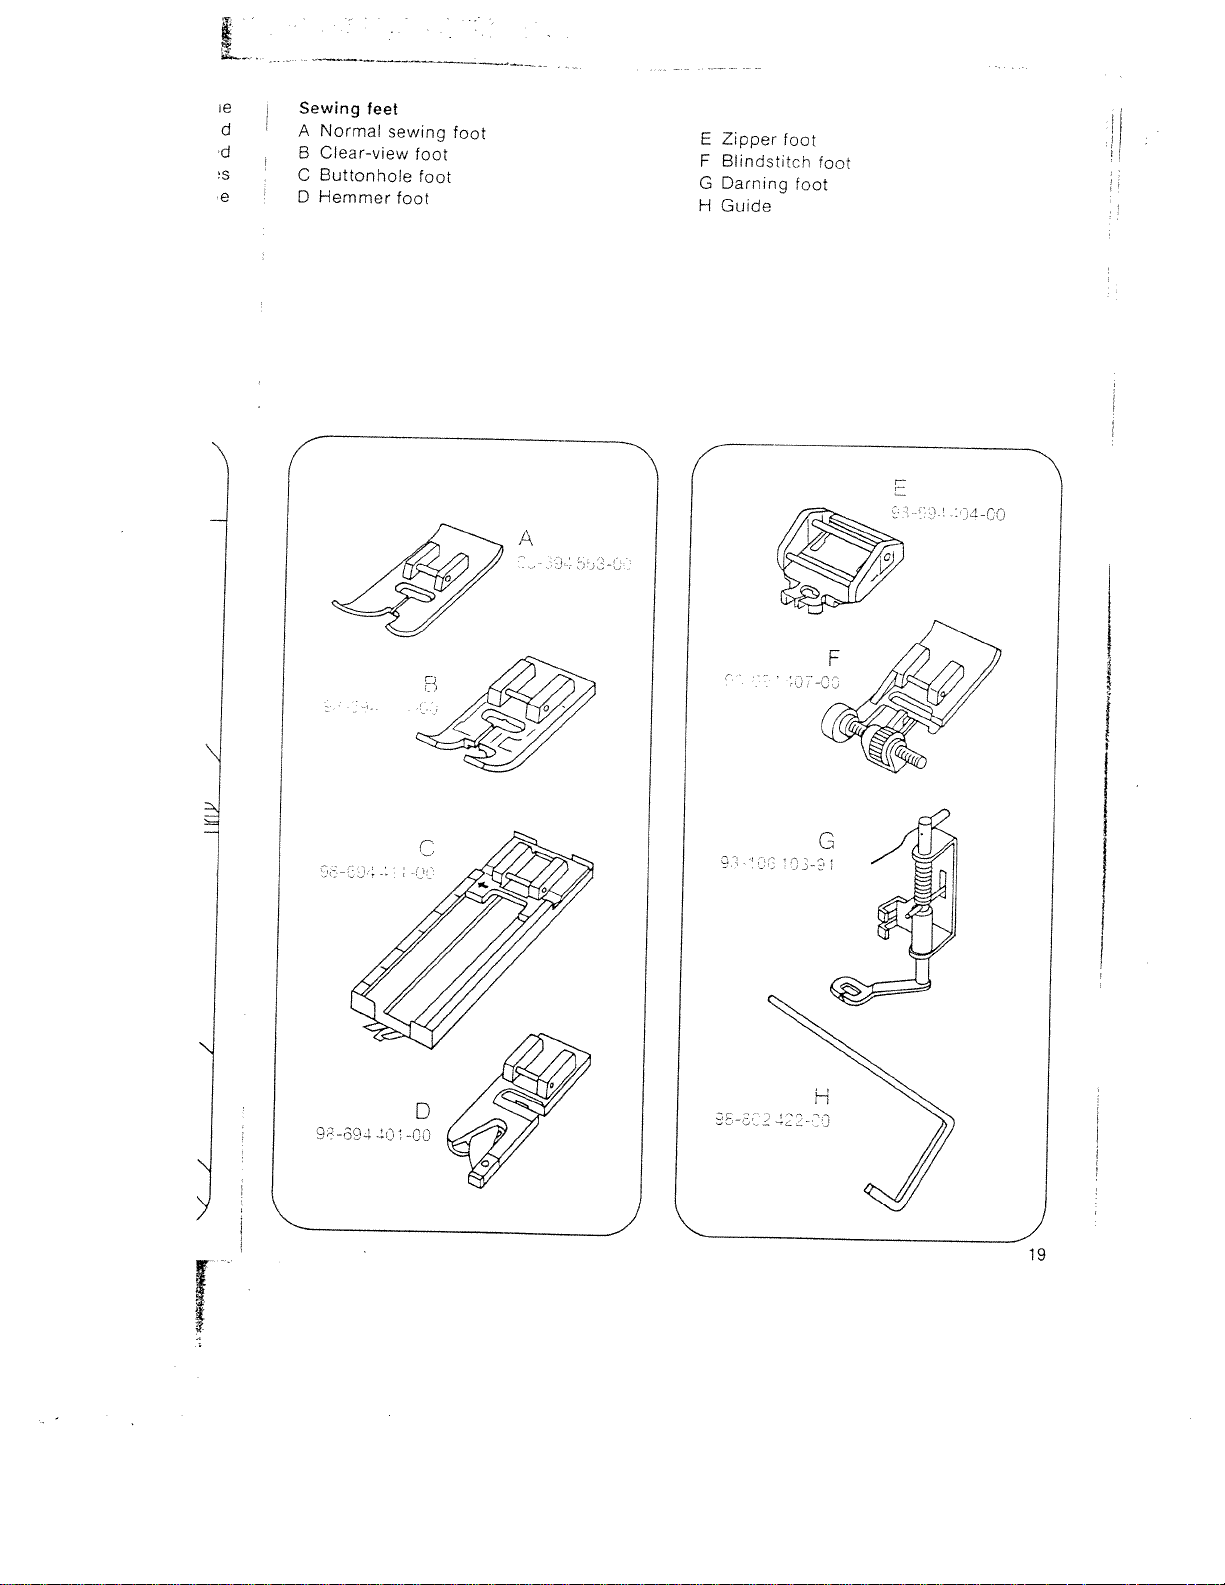
Speciat
A
Blindstitch
Blindstitch
turning
B
Zipper
First
Then
The
sideways
left
Darning
C
Remove
secure
screw
sewing
insert
push
zipper
zipper
H.
foot
the
screw
for
chain.
foot
the
darning
feet
foot
guide
its
its
foot
stitching
sewing
D.
rear
front
can
E
pin
pin
foot
foot
is
adjusted
be
alonq
into
into
adjusted
holder
in
position
groove
groove
the
by
rh:
and
F,
6.
with
The
applications
described
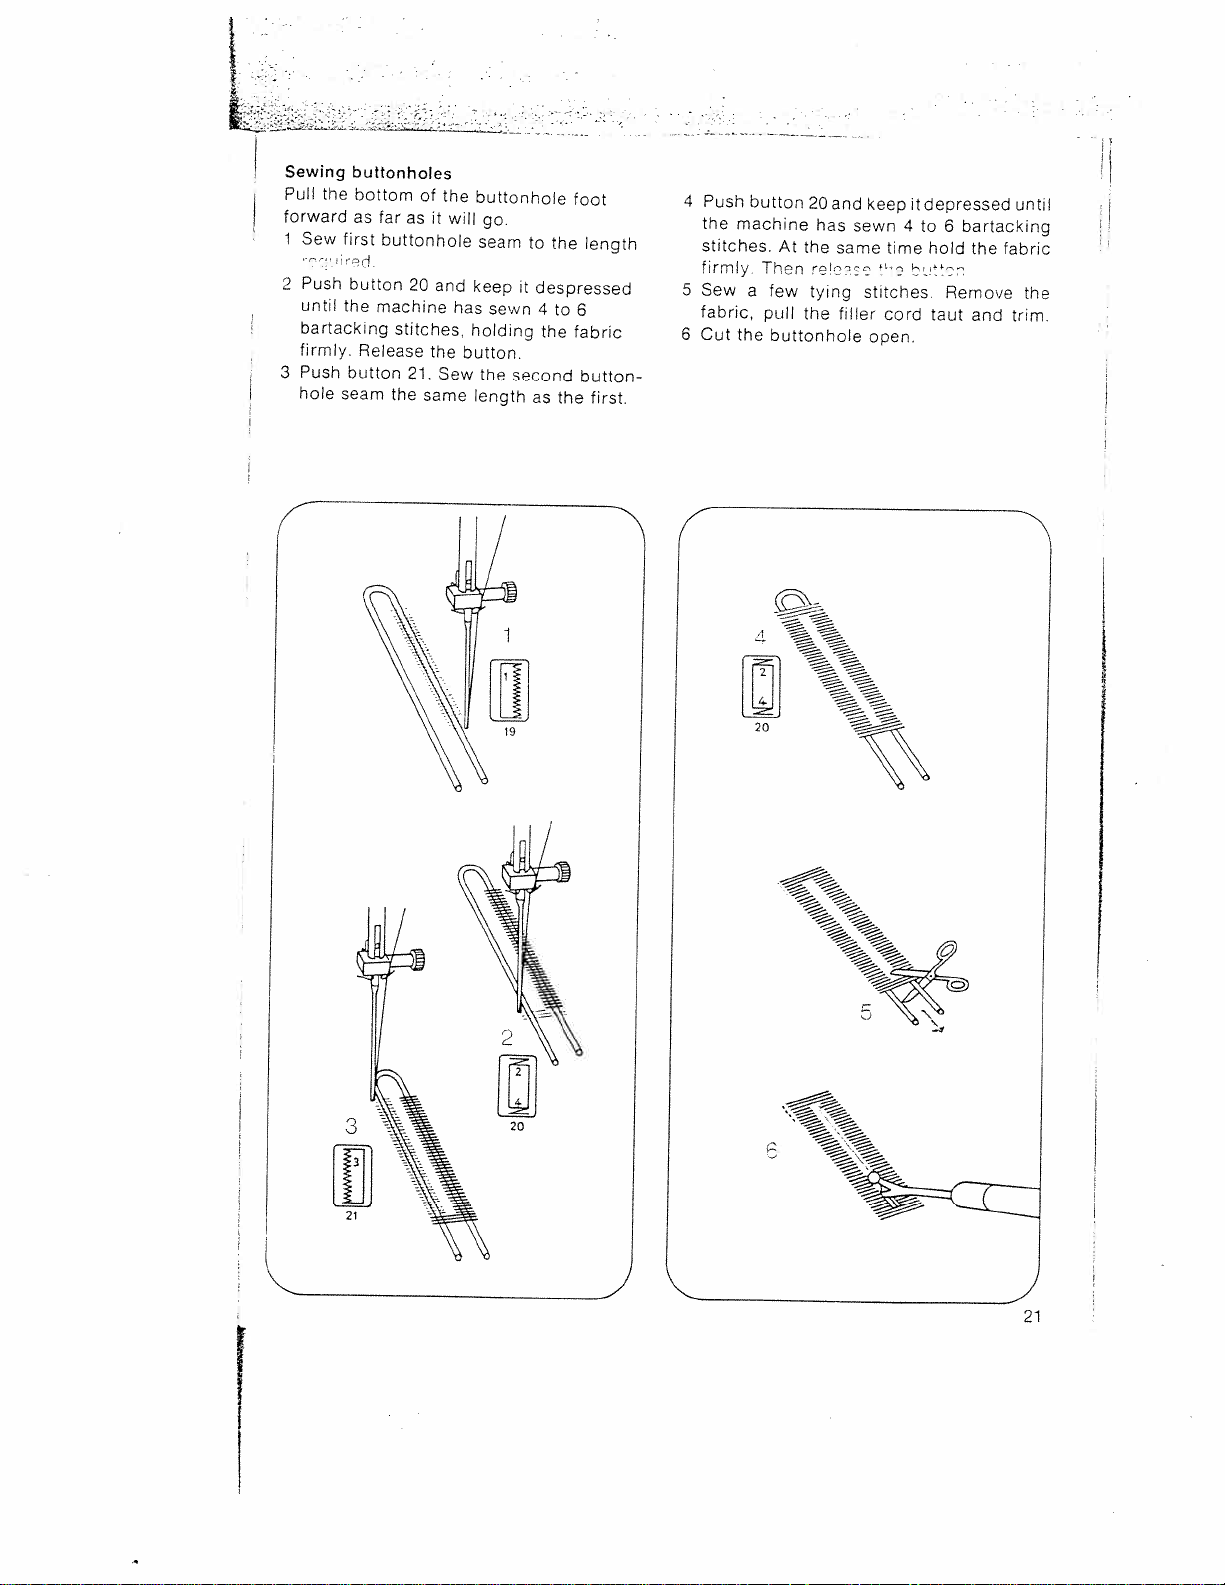
Buttonhole
Push
density
stitch
buttonhole
foov;s
the
foot,
lug
D.
As
you
This
serves
length.
button
in
length
(C:
pull
sew,
in
our
settings
19
the
control
foot.
Place
it
arrow
to
of
Sewing
(A).
buttonhole
Insert
c
taut
and
E
determine
these
Regulate
(B).
Attach
the
.
me
clamp
moves
the
sewing
hints
range
filler
rear
along
buttonhole
the
it
feet
booklet.
stitch
of
the
the
cord
lug
in
front
scale
are
as
of
F.
20
1
Page 24
JCJ)
Cct
H.
=
CD
03
CD
o
CD
cr
c:
0
C
:3-
0
Co
0
0
-
—
Co
:3
(0
ci
0)
Co
C1.
6:-
(00)
-‘
0
3
—
8
6:
C
-
(D
-6:
-0)
0)
g
C)
•:3
0
o
DZ
3
D
-
6:
ç
HY3O
CD
CD
6:D
<
=
C
o
Co
CU
0)
(1)
D
cc1
‘)
:3V
r
0=
0
C3
0(0
3
:3-
30)Co
6:0
0C
o.o6:
0C0
)
)
:3-”
6:
]D
CD
CD
CD
°
—
0)
C
—
0)3
E.
3D
o
-o
--
-
I/___
r\)
Page 25
‘4
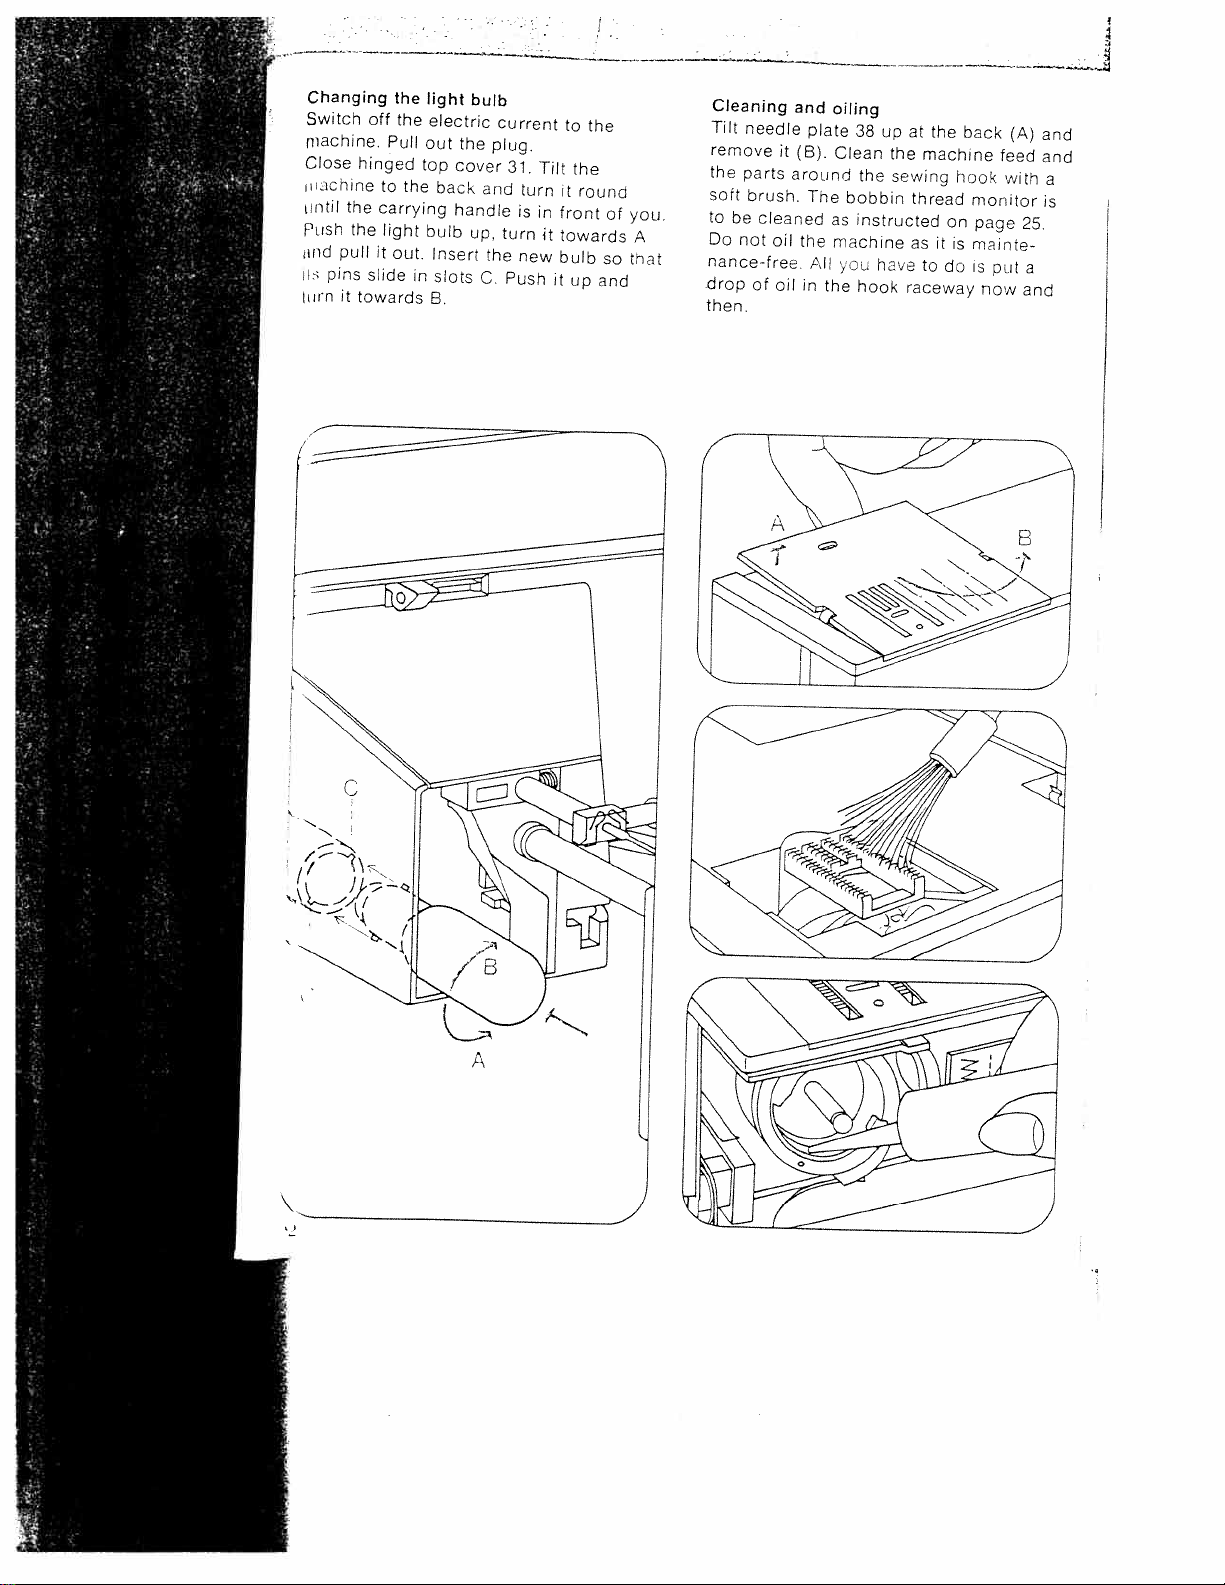
Changing
Switch
machine.
Close
unchine
the
Otil
push
pull
md
pins
is
it
in
off
hinged
carrying
the
it
slide
towards
Pull
to
light
out.
the
the
the
light
electric
out
top
bulb
in
back
Insert
slots
B.
bulb
the
cover
handle
up,
C.
current
plug.
and
the
31
turn
Push
turn
is
new
Tilt
in
it
to
the
it
round
front
towards
bulb
it
up
the
of
so
and
you.
A
that
Cleaning
Tilt
needle
remove
the
parts
soft
brush.
to
be
cleaned
Do
not
nance-free.
drop
of
then.
it
oil
oil
and
plate
(B).
around
The
the
AH
in
oiling
Clean
bobbin
as
machine
ou
the
38
up
the
the
sewing
instructed
hae
hook
at
the
machine
thread
as
it
to
do
raceway
on
is
back
hook
monitor
page
mainte
s
now
put
(A)
feed
with
and
and
a
is
25.
a
and
Page 26
the
plug
from
holderAat
to
the
fuseBout
new
FF2A
fuses
dealer.
fuse
left
fuse
socket.
the
with
of
and
are
backofthe
coin
a
holder
replace
obtainable
and
take
it
A.
the
at
your
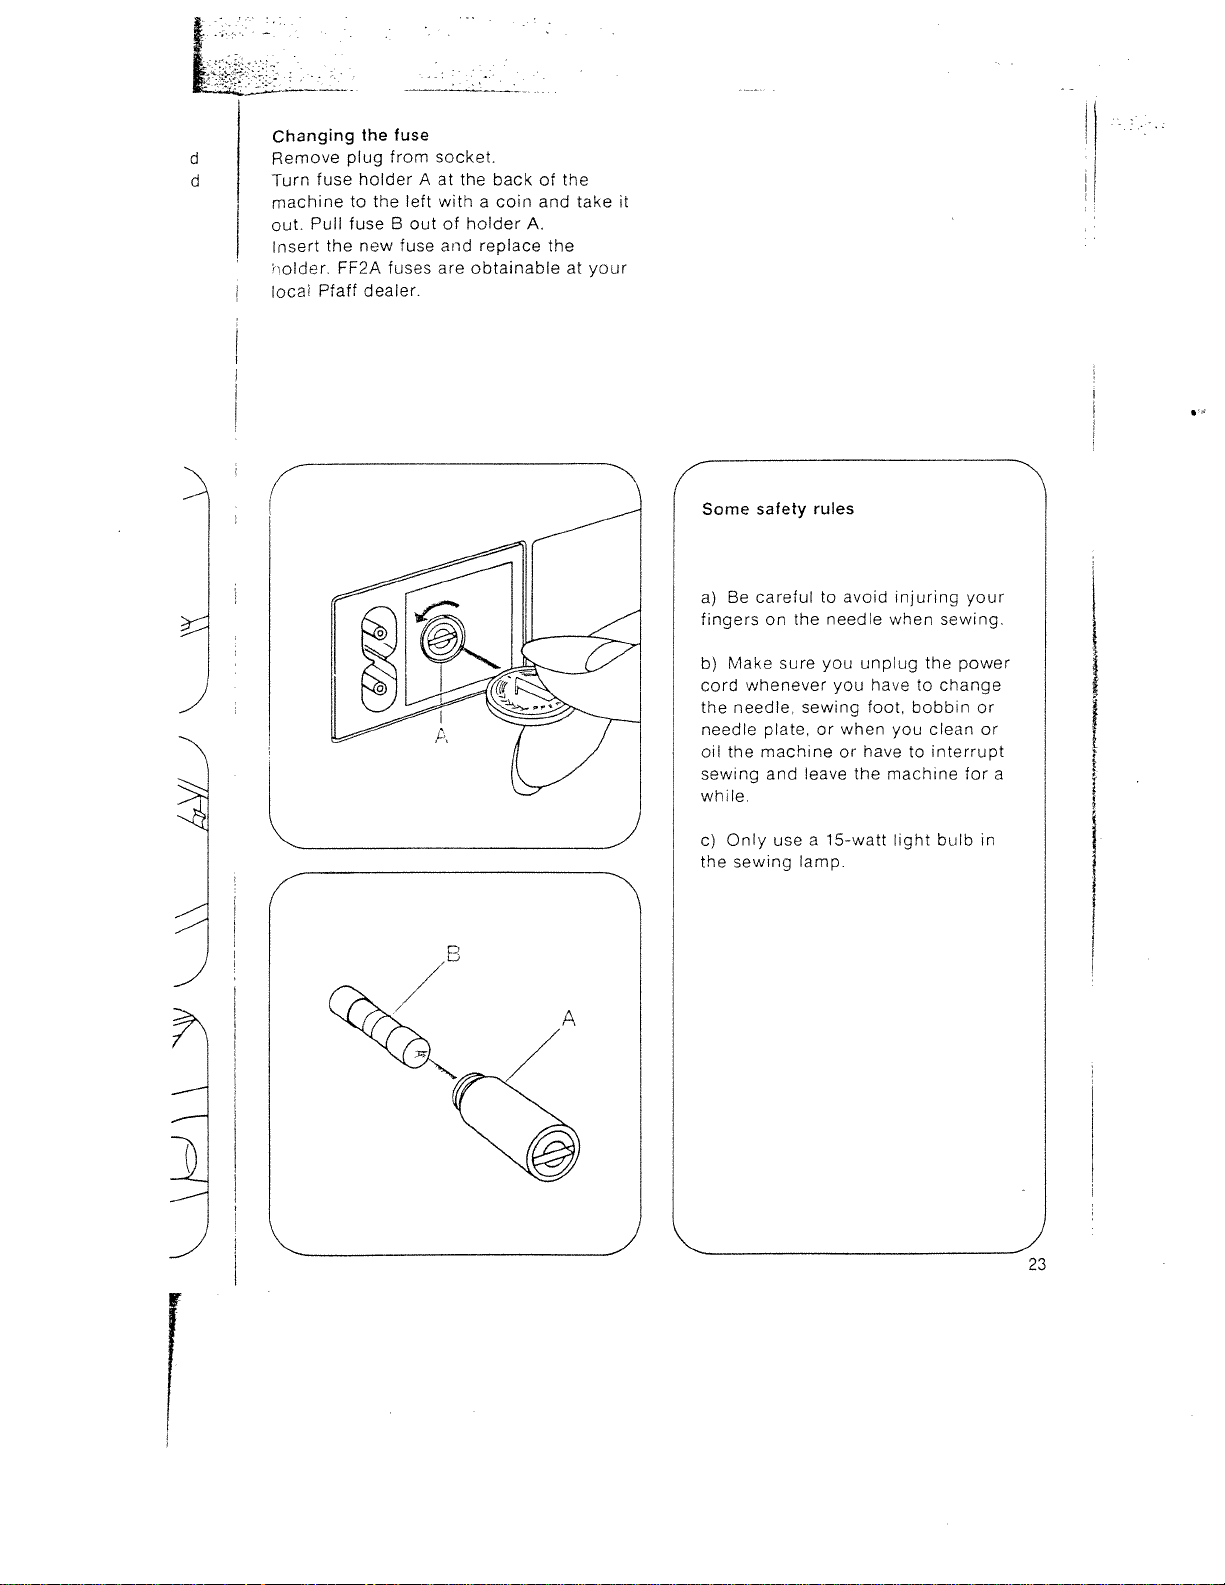
Changing
d
d
Remove
Turn
machine
out.
insert
‘older.
local
fuse
Pull
the
Pfaff
4
4
Some
Be
a)
fingers
Make
b)
cord
the
needie
the
oil
sewing
while.
Only
c)
the
safety
careful
on
the
sure
whenever
needle,
plate,orwhen
machine
and
use
sewing
rules
to
needle
you
sewing
leave
15-watt
a
lamp.
injuring
avoid
when
unplug
you
have
foot,
you
or
havetointerrupt
the
machine
light
sewing.
the power
change
to
bobbin
clean cr
bulb
your
for
N
or
a
in
I.
)
23
Page 27

Trouble
6
shooting
Cause:
Machine
1.
Needle
Wrong
Needle
Machine
Needle
2.
Needle
For
any
Thread
Poor-quality
thread
excessive
3.
Needle
Needle
Needle
Needle
Needle
because
Bobbin
not
needle
bent
threaded
too
of
tension
that
not
bent.
too
bent
work
case
skips
rserted
or
thin
thread
the
or
has
storage.
breaks
pushed
thin
and
is
improperly
used.
blunt.
for
breaks
above
too
knotty
become
or
strikes
pushed
stitches
correctly.
improperly.
thread
reasons.
strong.
thread
too
up
as
thick.
too
needle
or
inserted.
used.
far
used,
dry
asitwill
plate
pulled.
by
Remedy:
Push
needle
shank
side
Insert
system
Insert
new
Check
threading.
Select
Thread
See
Regulate
Used
Insert
it
Insert
See
Let
Only
When
against
needle
or
go.
will
nachine
par.
only
new
go.
new
Needle
guide
inserting
it
Chart.
1
up
facing
130/705
needle.
according
above.
thred
good-quality
needle
needle.
and
Thread
feed
the
material
the
until
it
as
farasit
toward
tensions
and
the
bobbin
snaps
H
push
work
into
will
the
needle.
to
thread.
it
Chart
alone.
lightly.
case,
place.
go,
back.
Needle
up
as
press
its
far
flat
and
as
24
4.
Seam
Tension
Thread
Bobbin
Kinks
material.
is
Out
too
thread
appear
not
of
adjustment.
thick,
wound
on
uniform
knotty
top
or
unevenly.
and
hard.
bottom
Check
upper
and
lower
tensions.
Use
first-class
During
tnread
bobbin
of
Thread
both
bobbin
in
tension
machine
tensions.
hand,
thread
winding,
but
stud.
properly
pass
only.
do
it
and
not
through
check
hold
the
Page 28

4
Cause:
Machine
5.
has
Lint
rows
Feed
right.)
at
Machine
6.
Thread
Electronic
7.
Thread
free
the
lamp,
case,
indicator
hook.
The
8.
system
bobbin
The
right.
accumulated
feed
of
dropped.
dog
ends
ends
arm
the
n
behind
lamp
machine
feeds
runs
hook
is
winder
dog.
hook
in
bobbin
and
cover
the
to
not
irregularly
between
(Drop-feed
difficulty
with
raceway.
thread
have
dirt
over
raceway,
hook
and
right
the
sews
only
functioning
is
engaged:
the
on
slowly,
not
or
tooth
control
monitor
collected
indicator
the
in
the
behind
it
at
bobbin
second
the
the
is
at
all
is
does
in
needle
the
Remedy:
Remove
Flick
Remove
into
not
Remove
care
the
has
Move
drop-feed
hook
function
should
second
no
the
needle
thread
raceway.
thread
indicator
piercing
winder
be
plate
control
ends
ends
taken
power
to
and
and
and
in
lamp.
the
and
to
put
the
left
clean
the
dirt.
the
out
left.
drop
a
Special
area
electronic
(switch
lint.
of
round
off)
oil
9.
The
10.
Fuse
The
machine
The
is
machine
sewing
faulty.
stitch
one
only
sews
press
foot
control
from
foot
machine
Take
button
Insert
is
50.
not
ne’N
running
fuse.
basting.
for
is
set
the
and
up
lights
lamp
and
25
r
Page 29

C
m
C:
cU)I
Q
oI
):
cuD
•
Tr
DD
3CJ)
CD
C
cm
CD
1
CD
CI)
J1D
CD
CD
Page 30

LJ
JL
CO
Cl)
C
CC
D
U)
H
-D
C
D
C)
ro
(0
7
Page 31
Contents
Page
Topstitching
Blindstitching
Buttonholes
Button
sewing
Inserting
Completely
Zip
resembling
Zip
closure
Darning
Applique
clearvew
z
ps:
work
foot.
in
with
the
concealed
a
seam
ladies
and
edge
slacks
cording
zip
guide
closure
can
3
4
5
6
7
8/9
io
1 1
be
done
with
the
Page 32
__________________________________
I
V
L
l
/
/
/
/
/
/
/
/
_t
/
/
/
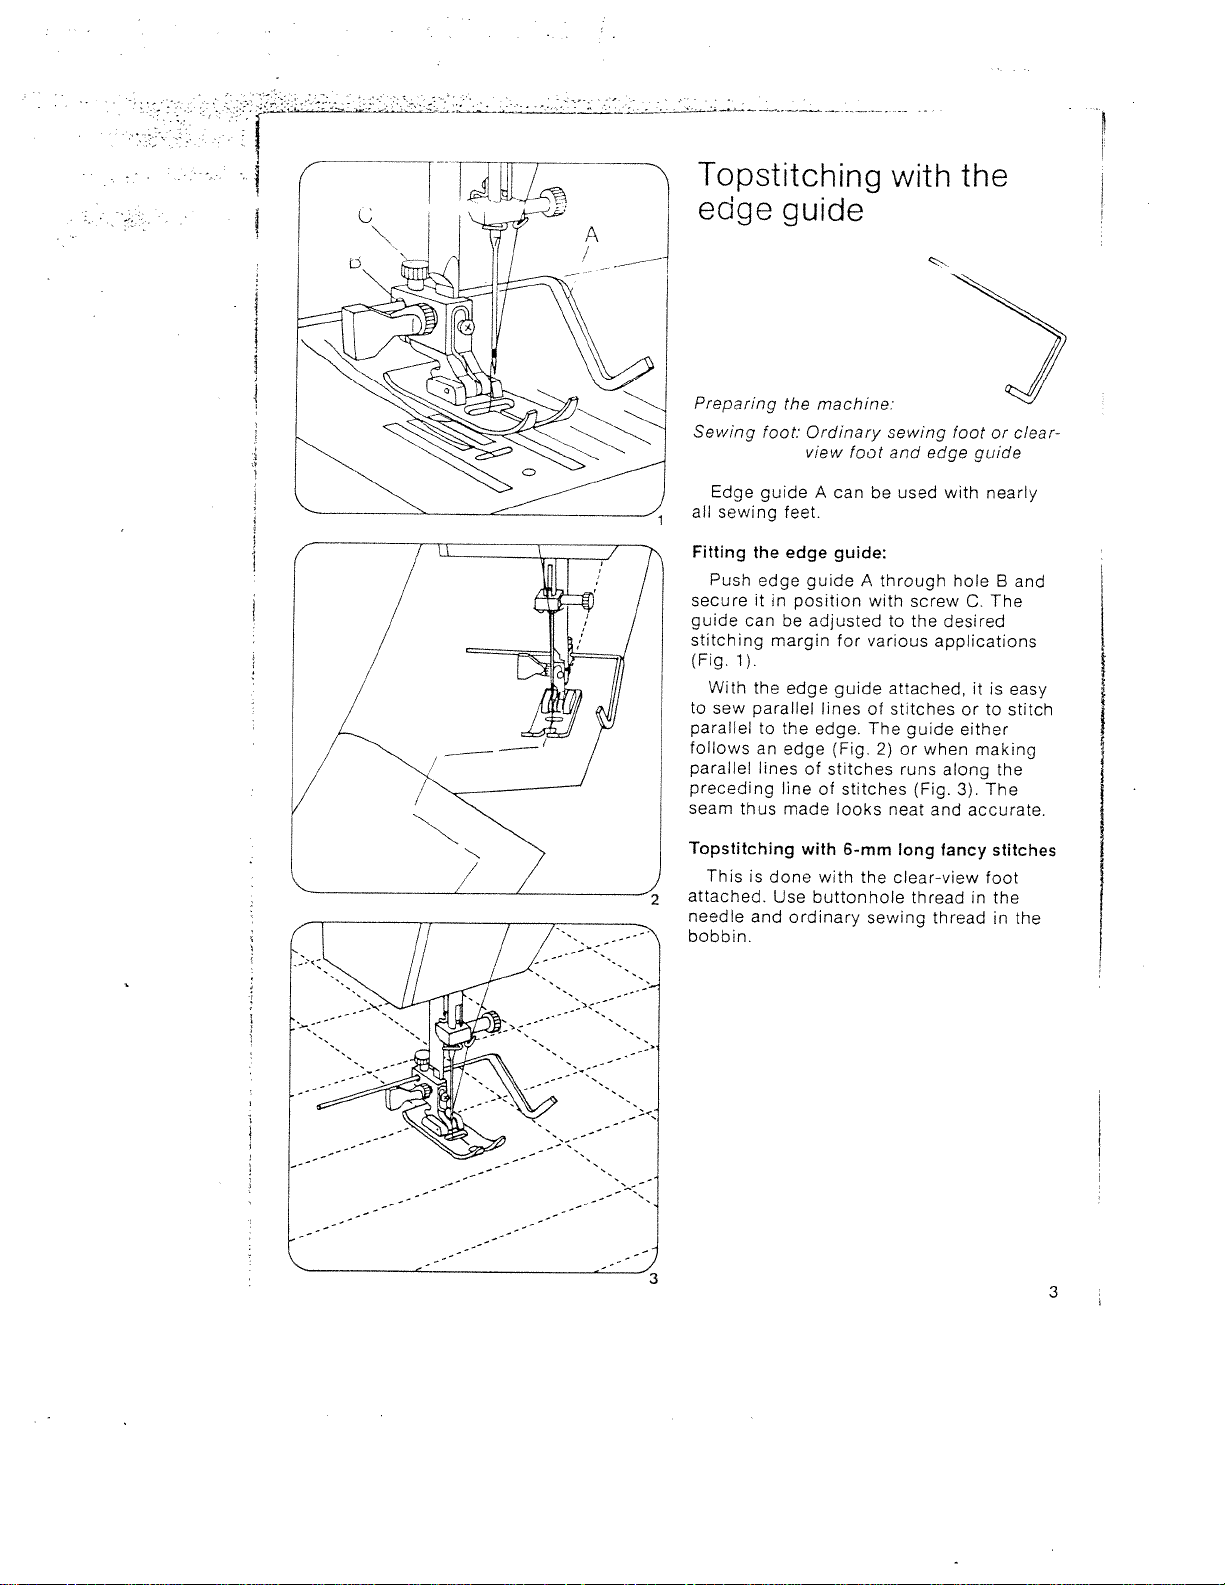
Topstitching
edge
Preparing
Sewing
i
Fitting
secure
guide
stitching
(Fig.
to
parallel
follows
parallel
preceding
seam
Push
With
sew
the
edge
it
can
1).
the
parallel
to
an
lines
thus
guide
the
foot:
edge
in
position
be
margin
edge
the
edge
line
made
machine:
OrdInary
can
guide:
guide
adjusted
for
guide
lines
edge.
(Fig.
of
stitches
of
stitches
looks
be
A
through
with
various
of
The
2)
with
sewing
used
screw
to
the
applications
attached,
stitches
guide
or
when
runs
(Fig.
neat and
the
foot
with
hole
C.
desired
it
or
either
making
along
3).
accurate.
or
nearly
B
The
is
easy
stitch
to
the
The
clear
and
Topstitching
/
-
-
-
-
J
-
-
-
- -
-
2
3
This
attached.
needle
bobbin
is
and
done
Use
ordinary
with
6-mm
with
buttonhole
the
sewing
long
fancy
clear-view
thread
thread
in
stitches
foot
the
in
the
3
Page 33
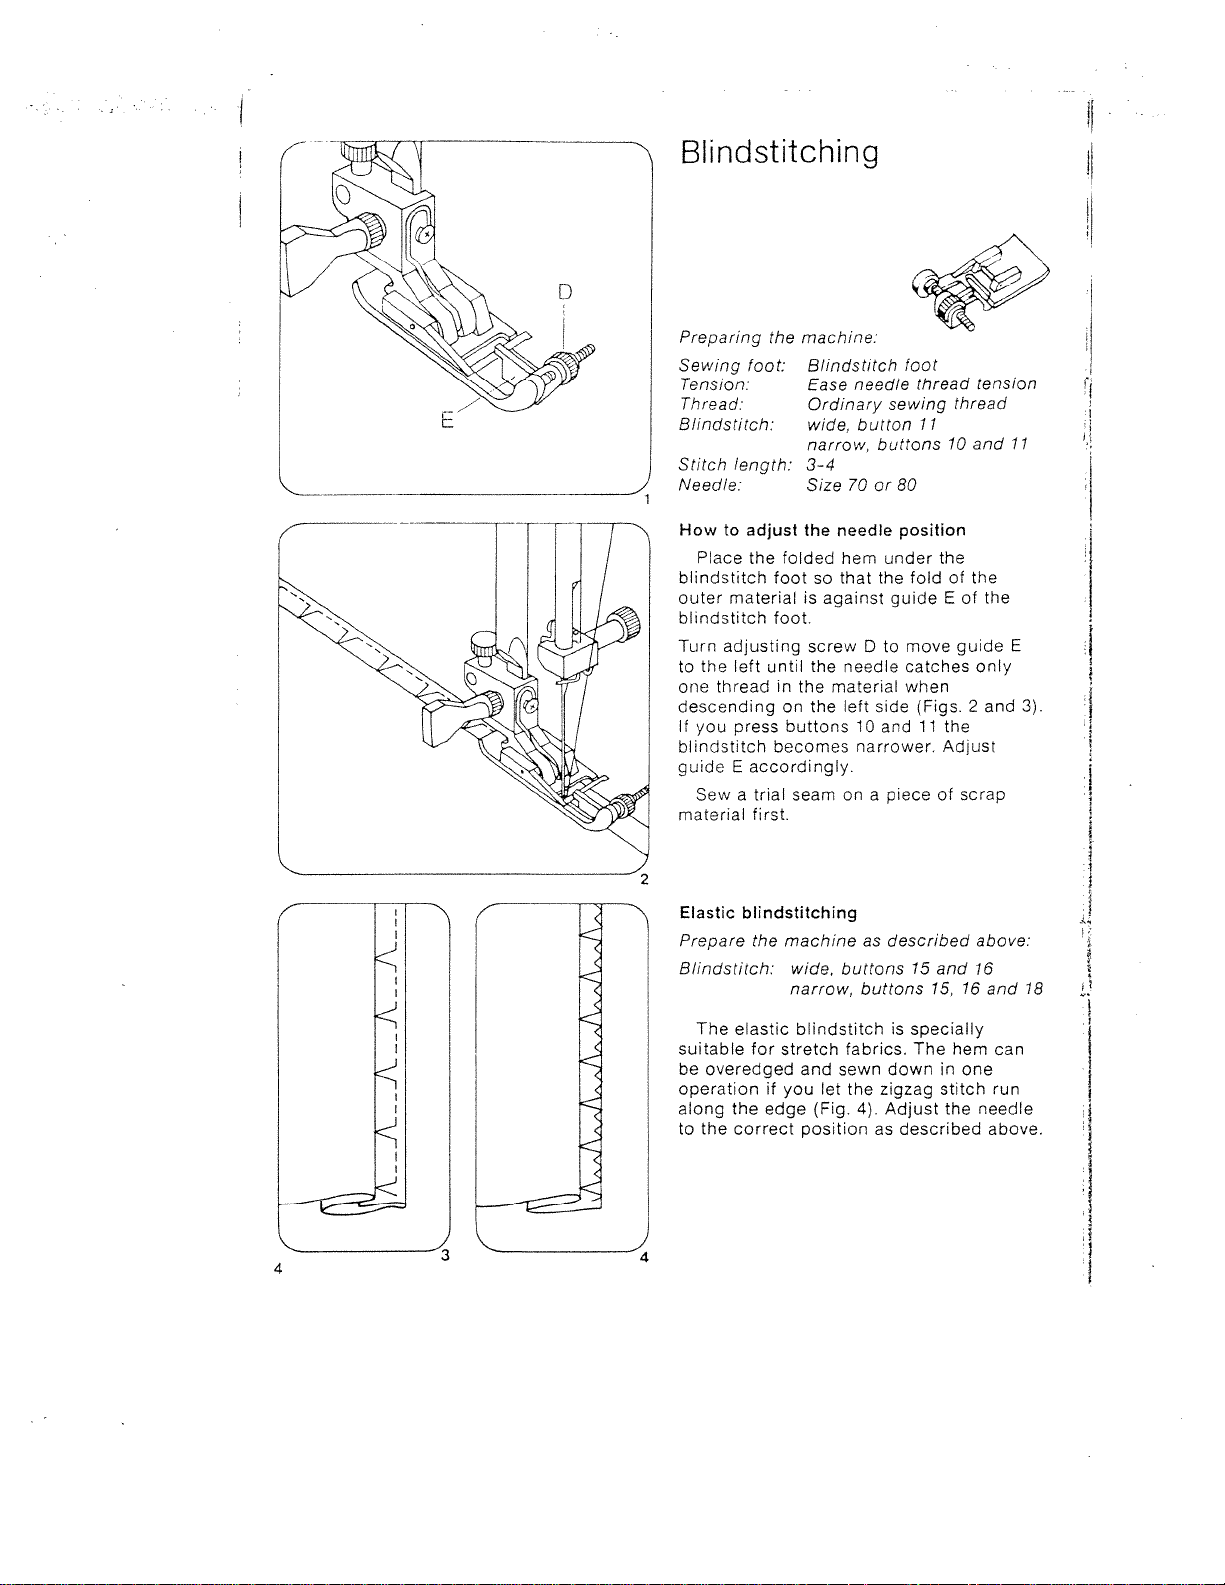
Blindstitching
of
Preparing
Sewing
Tension:
Thread:
8/indstitch:
Stitch length:
Needle:
How
to
Place
blindstitch
outer
material
blindstitch
Turn
adjusting
left
the
to
thread
one
descending
If
press
you
blindstitch
guideEaccordingly.
Sew
a
material
Elastic
Prepare
B/indstitch:
machine:
the
Blinds
foot:
Ease
Ordinary
wide,
narrow,
3-4
Size
adjust
the
the
folded
foot
so
is
foot.
screw
until
the
in
the
on
the
buttons
becomes
trial
seam
first.
blindstitching
the
machine
wide,
narrow,
needle
button
70
needle
hem
that
against
needle
material
left
10
narrower.
on
buttons
foot
fitch
thread
sewing
11
buttons
or
80
position
under
the
fold
guide
move
D
to
catches
when
side
(Figs.2and
and
lithe
pieceofscrap
a
as
described
15
buttons
tension
thread
10
and
the
the
of
of
the
E
guide
only
Adjust
above:
and
16
15,16and
11
E
3).
1
1
I
18
-j
is
The
elastic
-j
-j
suitable
overedged
be
operation
along
the
to
the
correct
for
stretch
if
edge
you
blindstitch
fabrics.
and
sewn
let
the
(Fig.
position
specially
downinone
zigzag
4).
Adjust
described
as
The
hem
stitch
the
can
run
needle
above.
-J
EJj
4
Page 34
•
:,
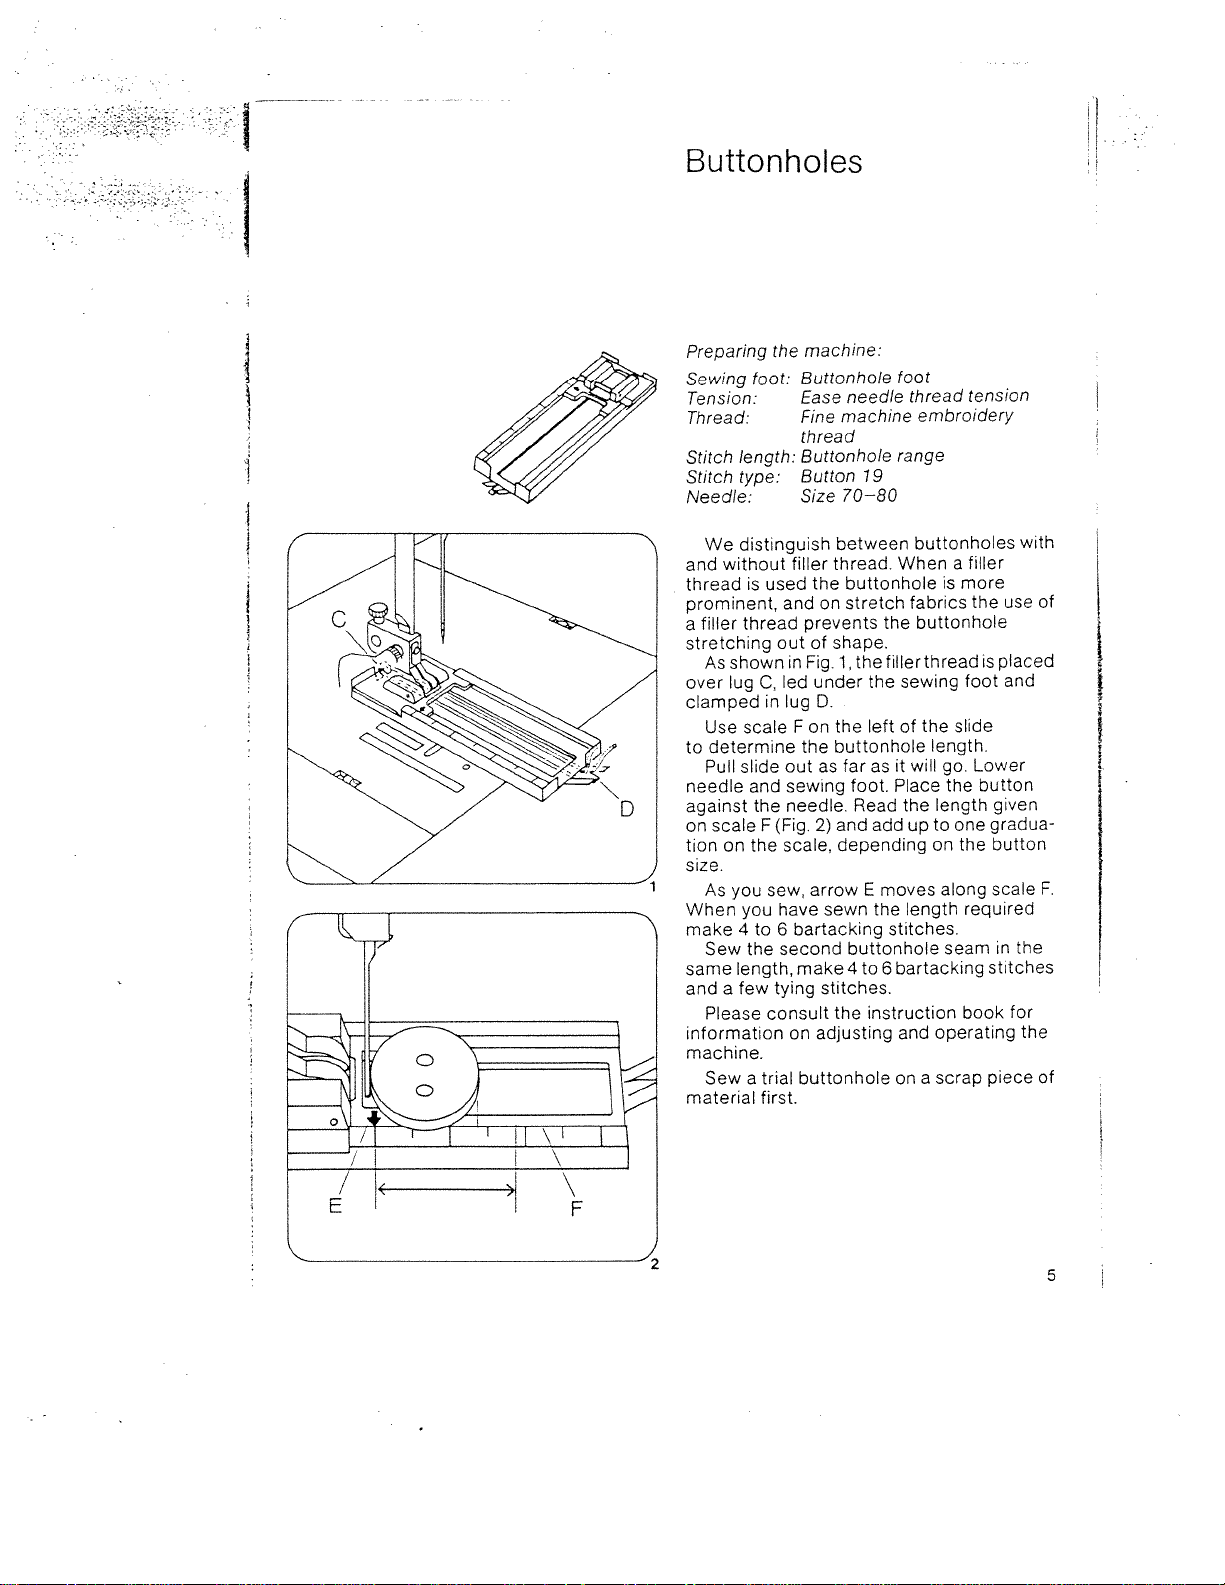
Buttonholes
machine:
Preparing
Sewing
Tension:
Thread:
Stitch
Stitch
Needle:
the
foot:
length:
type:
Buttonhole
Ease
Fine
thread
Buttonhole
Button
Size
needle
machine
19
70—80
foot
thread
embroidery
range
tension
We
distinguish
without
and
thread
prominent,
a
stretching
over
clamped
to
against
on
tion
size.
When
make
same
and
material
is
filler
thread
As
shown
lug
Use
scale
determine
Pull
slide
needle
information
machine.
and
the
scale
on
the
As
you
you
4to6
Sew
the
length,
a
few
Please
Sewatrial
filler
the
used
and
prevents
out
of
in
Fig.
under
led
C,
in
lug
F
on
the buttonhole
out
sewing
needle.
F
(Fig.
scale,
arrow
sew,
have
bartacking
second
make
tying
consult
on
buttonhole
first.
between
thread.
buttonhole
stretch
on
shape.
1
the
D.
the
far
as
foot.
Read
and
2)
depending
sewn
buttonhole
4
to
stitches.
the
adjusting
buttonholes
When
fabrics
buttonhole
the
fillerthread
the
sewing
the
left
of
will
it
as
Place
the
addupto
moves
E
the
length
stitches.
bartacking
6
instruction
and
on
a
filler
a
more
is
the
foot
slide
length.
Lower
go.
button
the
length
one
on
the
along
required
seam
book
operating
scrap
use
placed
is
and
given
gradua
button
scale
in
the
stitches
for
piece
with
of
F.
the
of
5
Page 35
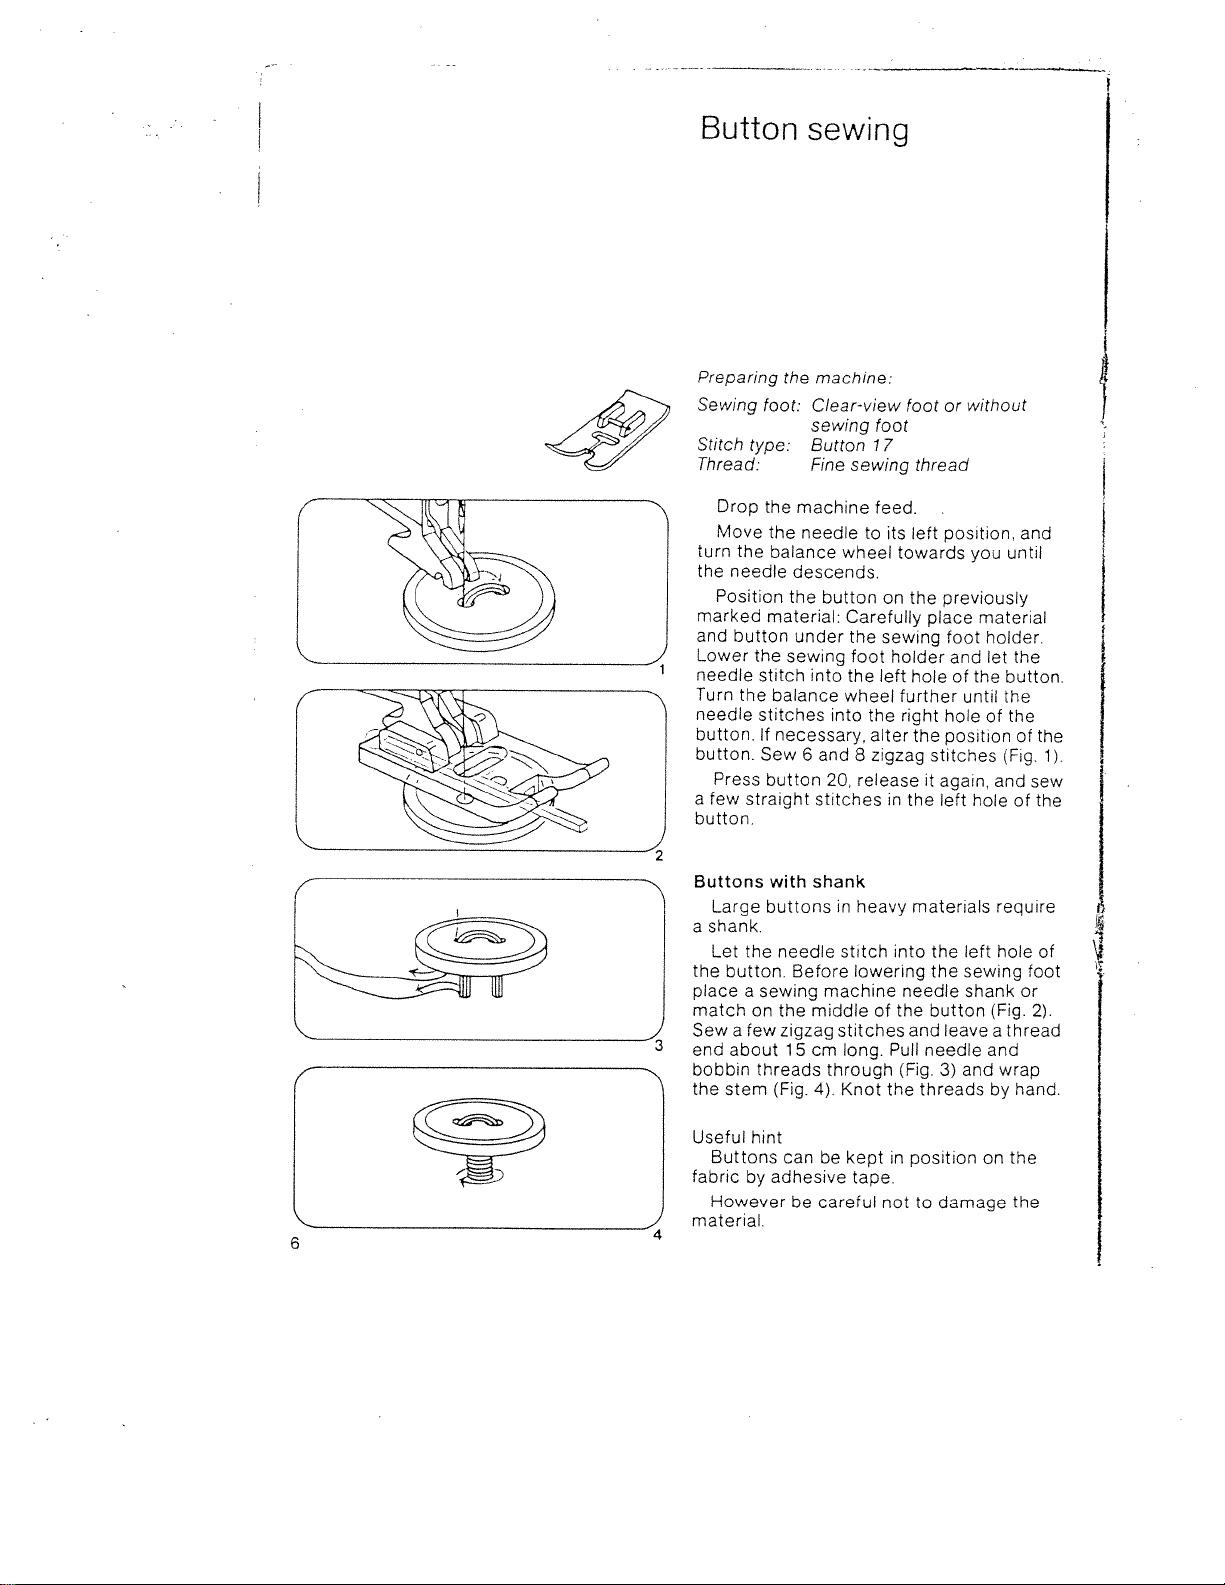
Button
sewing
Preparing
Sewing
Stitch
Thread:
Drop
Move
turn
the
the
needle
Position
marked
and
button
Lower
needle
Turn
the
needle
button.
button.
Press
few
a
button.
Buttons
Large
shank.
a
Let
the
button.
place
match
Sew
a
end
about
bobbin
the
stem
foot:
type:
the
the
balance
material:
the
stitch
balance
stitches
If
necessary,
Sew
button
straight
with
buttons
needle
the
sewing
a
on
the
few
zigzag
threads
(Fig.
the
machine:
Clear-view
sewing
Button
Fine
sewing
machine
needle
wheel
descends.
the
button
Carefully
under
into
and
6
stitches
shank
Before
machine
middle
through
4).
the
foot
the
wheel
into
8
20,
in
stitch
lowering
stitches
Knot
release
heavy
sewing
15cmlong.
foot
1
7
feed.
to
its
towards
on
sewing
holder
left
further
the
alter
zigzag
in
into
of
the
Pull
(Fig.3)and
the
foot
thread
left
the
place
hole
right
the
stitches
it
again,
left
the
materials
the
the
needle
button
and
needle
threads
without
or
position,
previously
foot
holeofthe
position
leave
you
and
of
the
until
hole
left
sewing
shank
until
material
holder.
let
button.
the
(Fig.
and
require
hole
(Fig.
thread
a
and
wrap
by
and
the
of
sew
of
foot
or
2).
hand.
the
1)
the
of
Useful
hint
Buttons
fabric
However
material.
6
4
by
can
adhesive
be
careful
keptinposition
be
tape.
not
to
damage
on
the
the
Page 36

Inserting
zips
Preparing
Sewing
Stitch
Stitch
Thread:
How
to
Insert
groove
pin
enters
positioned
middle,
involved
Completely
Baste
foot
to
the
open
run
along
of
the
foot(Fig.
of
the
needle
foot
and
zipper
then
sew
Sew
margin.
leave
the
the
zipper
Lower
end.
the
foot:
length:
type:
fit
the
the
and
F
groove
to
depending
(Fig.
in
zip
the
left
zip
the
zip
at
down
close
foot
again,
across
the
other
Shortly
needle
foot
the
zipper
machine:
Zipper
2—3
Button
Ordinary
zipper
rear
pin
push
the
right,
1).
concealed
by
hand
far
as
under
right
2).Sew
the
required
in
the
the
continue
the
side
before
down
and
foot
foot
10
sewing
foot
zipper
of
the
shoeupuntil
This
G.
to
the
on
zip
first.
it
as
the
foot
guiding
about
material,
zip
(Fig.
end.
of
the
the
in
open
again
zipper
the
sewing
closure
Push
will
so
edge
width.
3).
the
zip
end
the
the
and
thread
foot
foot
left
go.
that
on
half
Leave
raise
Lower
seam
at
of
material,
zip
(Fig.
sew
D
in
rear
the
front
can
or
in
the
operation
the
zipper
Place
its
teeth
the
sole
the
length
the
the
zipper
the
and
the
same
the
seam
raise
4).
to
the
be
Useful
We
sewers
seam
hint
recommend
use
an
is
straight
edge
and
that
guide
neat.
less
to
experienced
ensure
the
7
Page 37
_
______
_
___________
_____
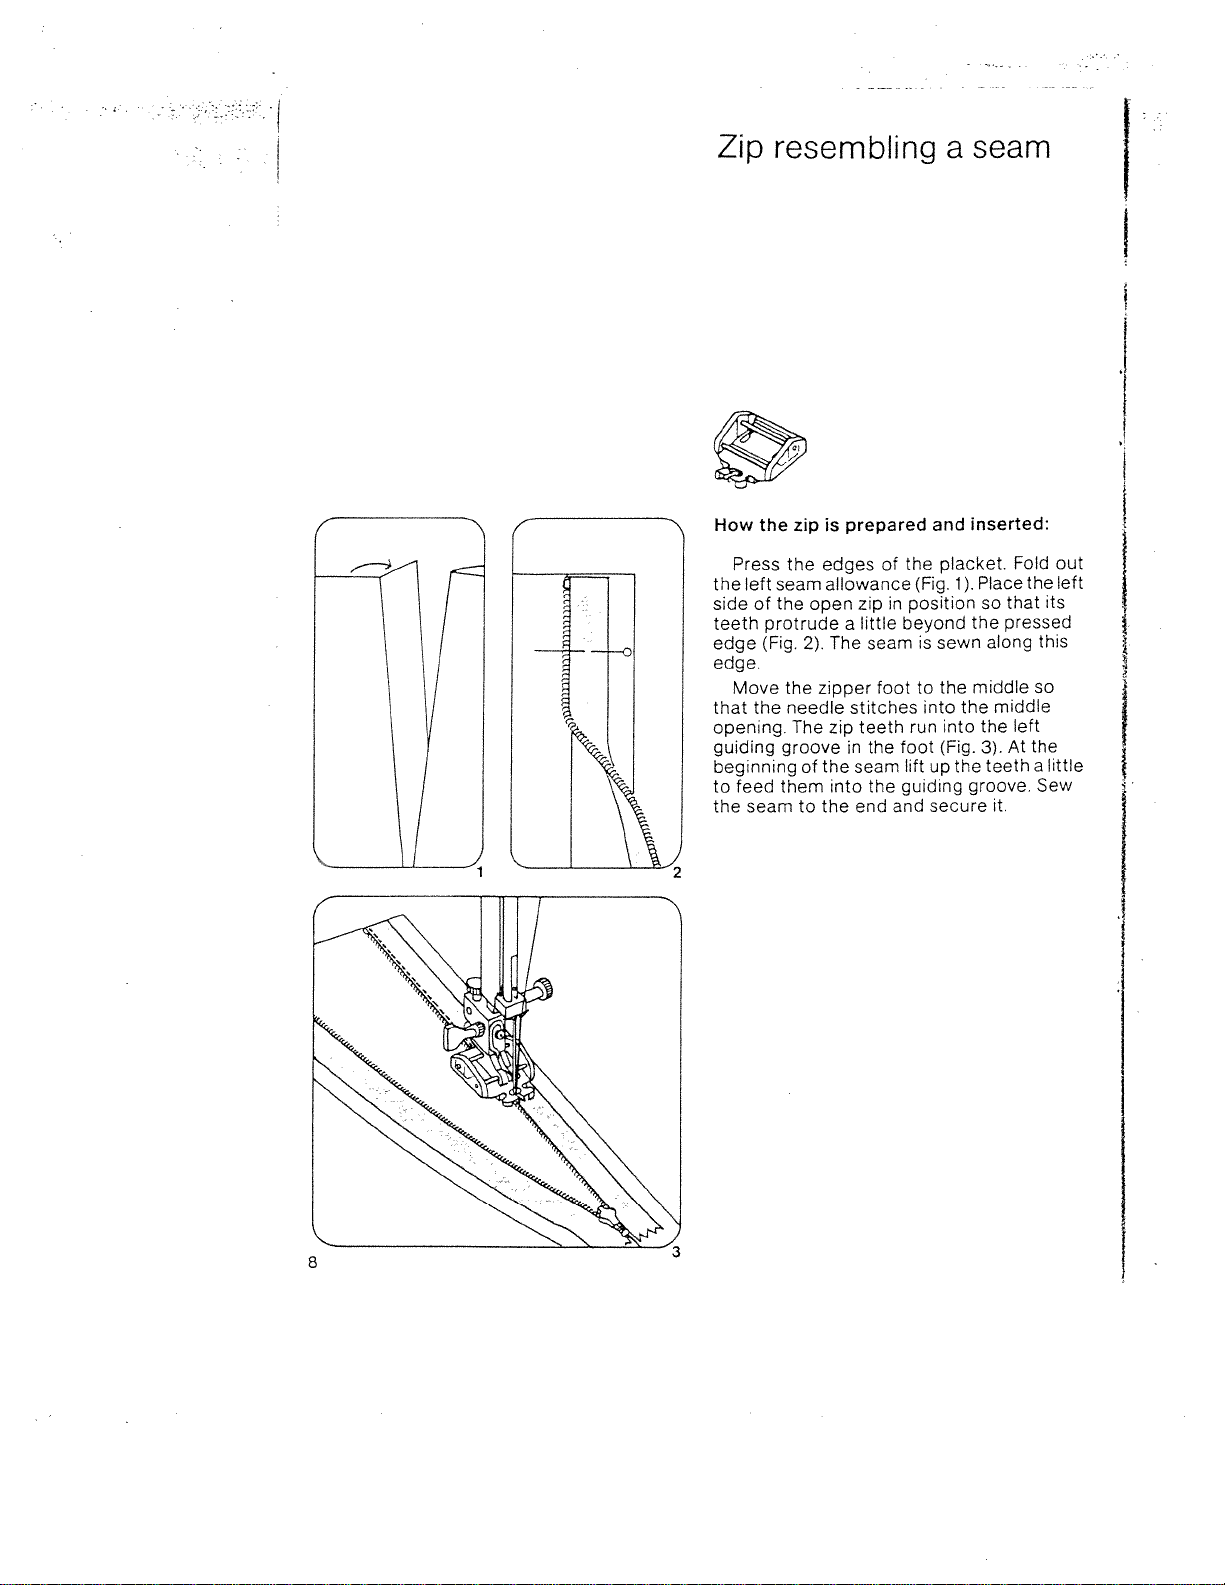
Zip
resembling
a
seam
D
inserted:
How
the
zipisprepared
Press
the
the
left
sideofthe
teeth
(Fig.
—
edge
edge.
Move
that
the
opening.
guiding
beginningofthe
to
feed
the
seamtothe
edges
seam
allowance
zip
open
protrudealittle
The
zip
into
seam
stitches
teeth
seam
the
end
2).
the zipper
needle
The
grooveinthe
them
and
placket.
of
the
(Fig.
position
in
beyond
is
sewn
foottothe
into
into
run
foot
(Fig.
liftupthe
guiding
secure
and
Place
1).
so
the
middle
the
the
3).
groove.
that
pressed
along
middle
At
teeth
it.
Fold
the
left
this
so
the
a
Sew
out
left
its
little
8oL
\
Page 38

beginning
Remove
allowance
the
to
teeth
in
the
sew
Now
teeth
7).
(Fg.
of
pin,
the
wth
fabric,asshowninFig.
run
now
(Fig.
foot
down
along
run
Pin
zi
Close
at
seam
the
into
6).
the
the
other
turn
(Fig.
Out
zip
tape,
the
Finish
zip
guiding
side
right
tape
of
4).
the
and
guiding
sewing
letting
edge
zip
Open
right
pin
5.
to
The
the
of
material
zip.
seam
atter
the
zip
groove
zip.
the
the
zip
foot
9
Page 39
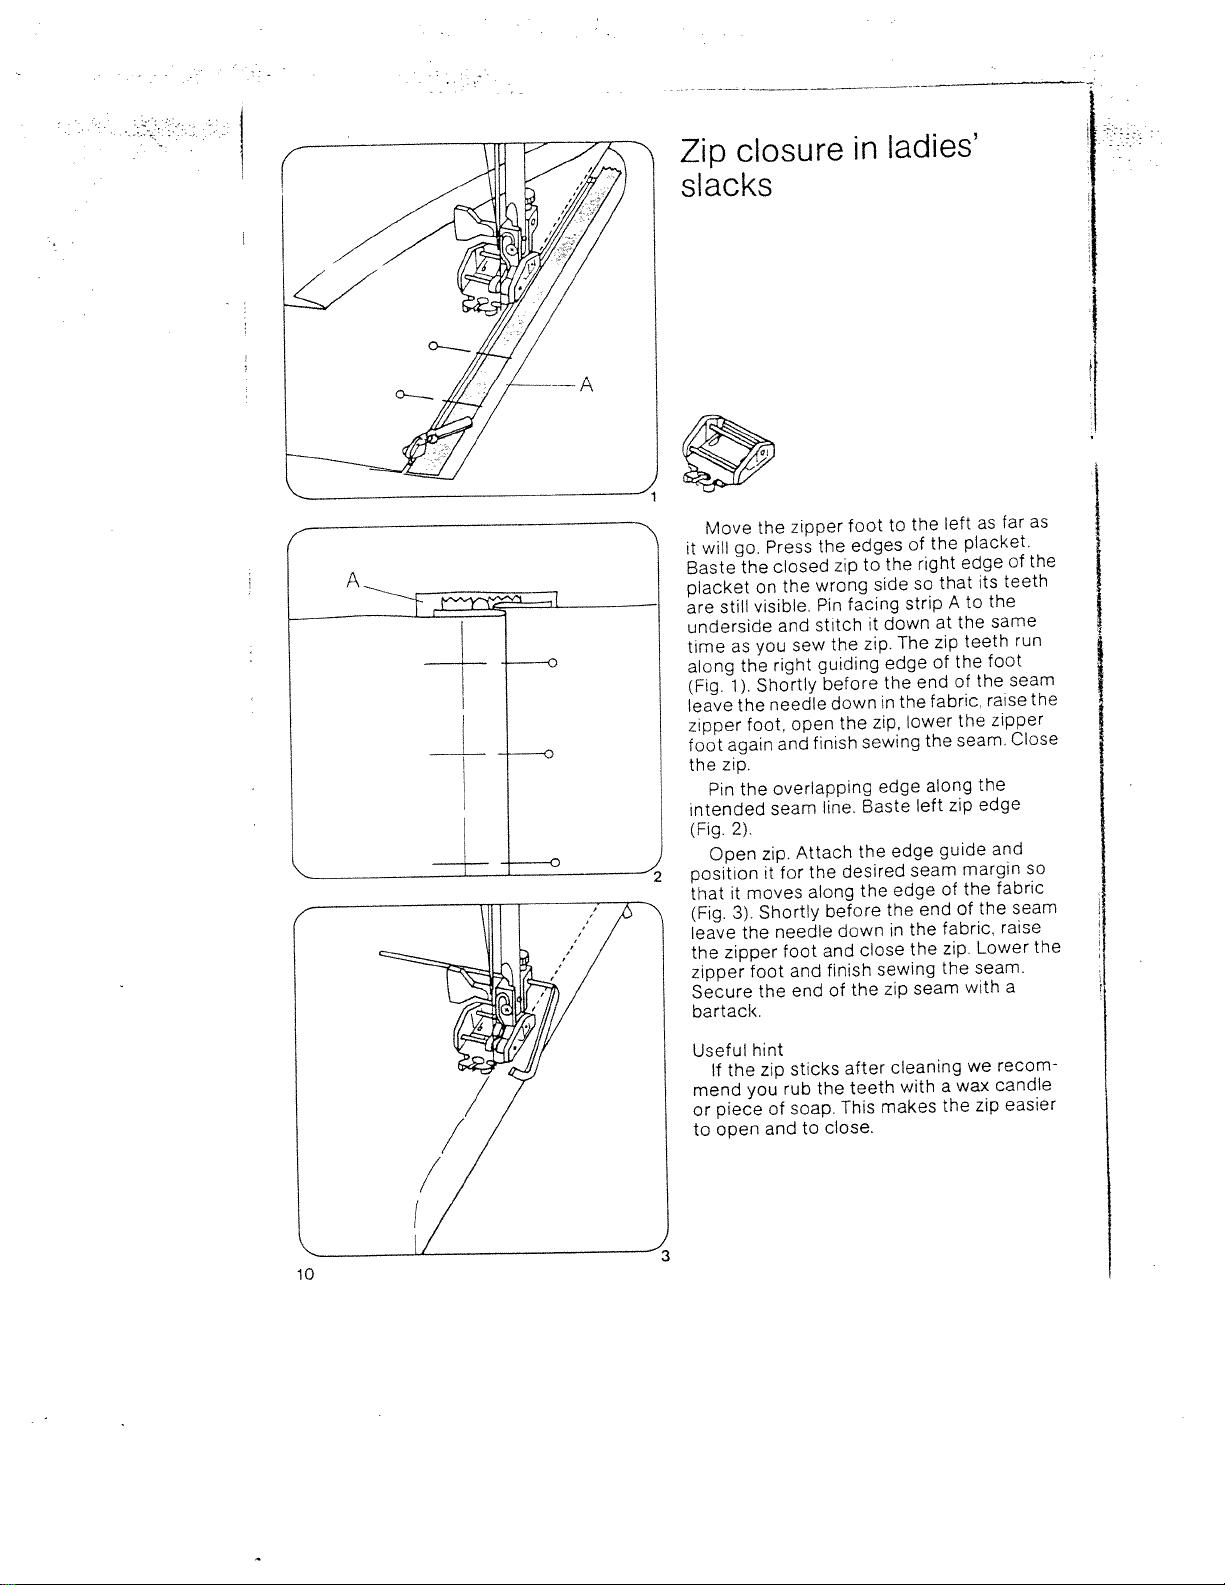
ladies’
Zip
closure
in
slacks
D
far
as
as
left
the
to
foot
zipper
the
4
—0
Move
will
it
go.
the
Baste
placket
still
are
underside
as
time
the
along
1).
(Fig.
the
leave
zipper
again
foot
zip.
the
Pin
the
intended
2).
(Fig.
Open
position
it
that
3).
(Fig.
the
leave
the
zipper
zipper
Secure
bartack.
Press
closed
the
on
visible.
and
sew
you
right
Shortly
needle
open
foot,
and
overlapping
seam
zip.
for
it
moves
Shortly
needle
foot
and
foot
end
the
the
wrong
Pin
stitch
guiding
before
finish
line.
Attach
the
along
before
and
finish
edges
zip
facing
the
down
the
desired
down
of
to
side
it
zip.
zip.
sewing
Baste
the
the
close
the
of
the
strip
down
The
edge
the
the
in
lower
edge
edge
seam
edge
the
the
in
the
sewing
zip
the
right
so
zip
of
end
fabric,
the
along
left
end
seam
that
A
the
at
the
o
the
seam.
zip
guide
of
of
fabric,
zip.
the
placket.
edge
its
the
to
same
teeth
foot
the
raise
zipper
the
edge
and
margin
fabric
the
the
Lower
seam.
with
of
teeth
run
seam
Close
seam
raise
a
the
the
so
the
hint
Useful
If
the
mend
piece
or
open
to
10
you
zip
of
and
sticks
rub
soap.
to
the
close.
after
teeth
This
cleaning
with
makes
a
the
we
wax
zip
recom
candle
easier
Page 40
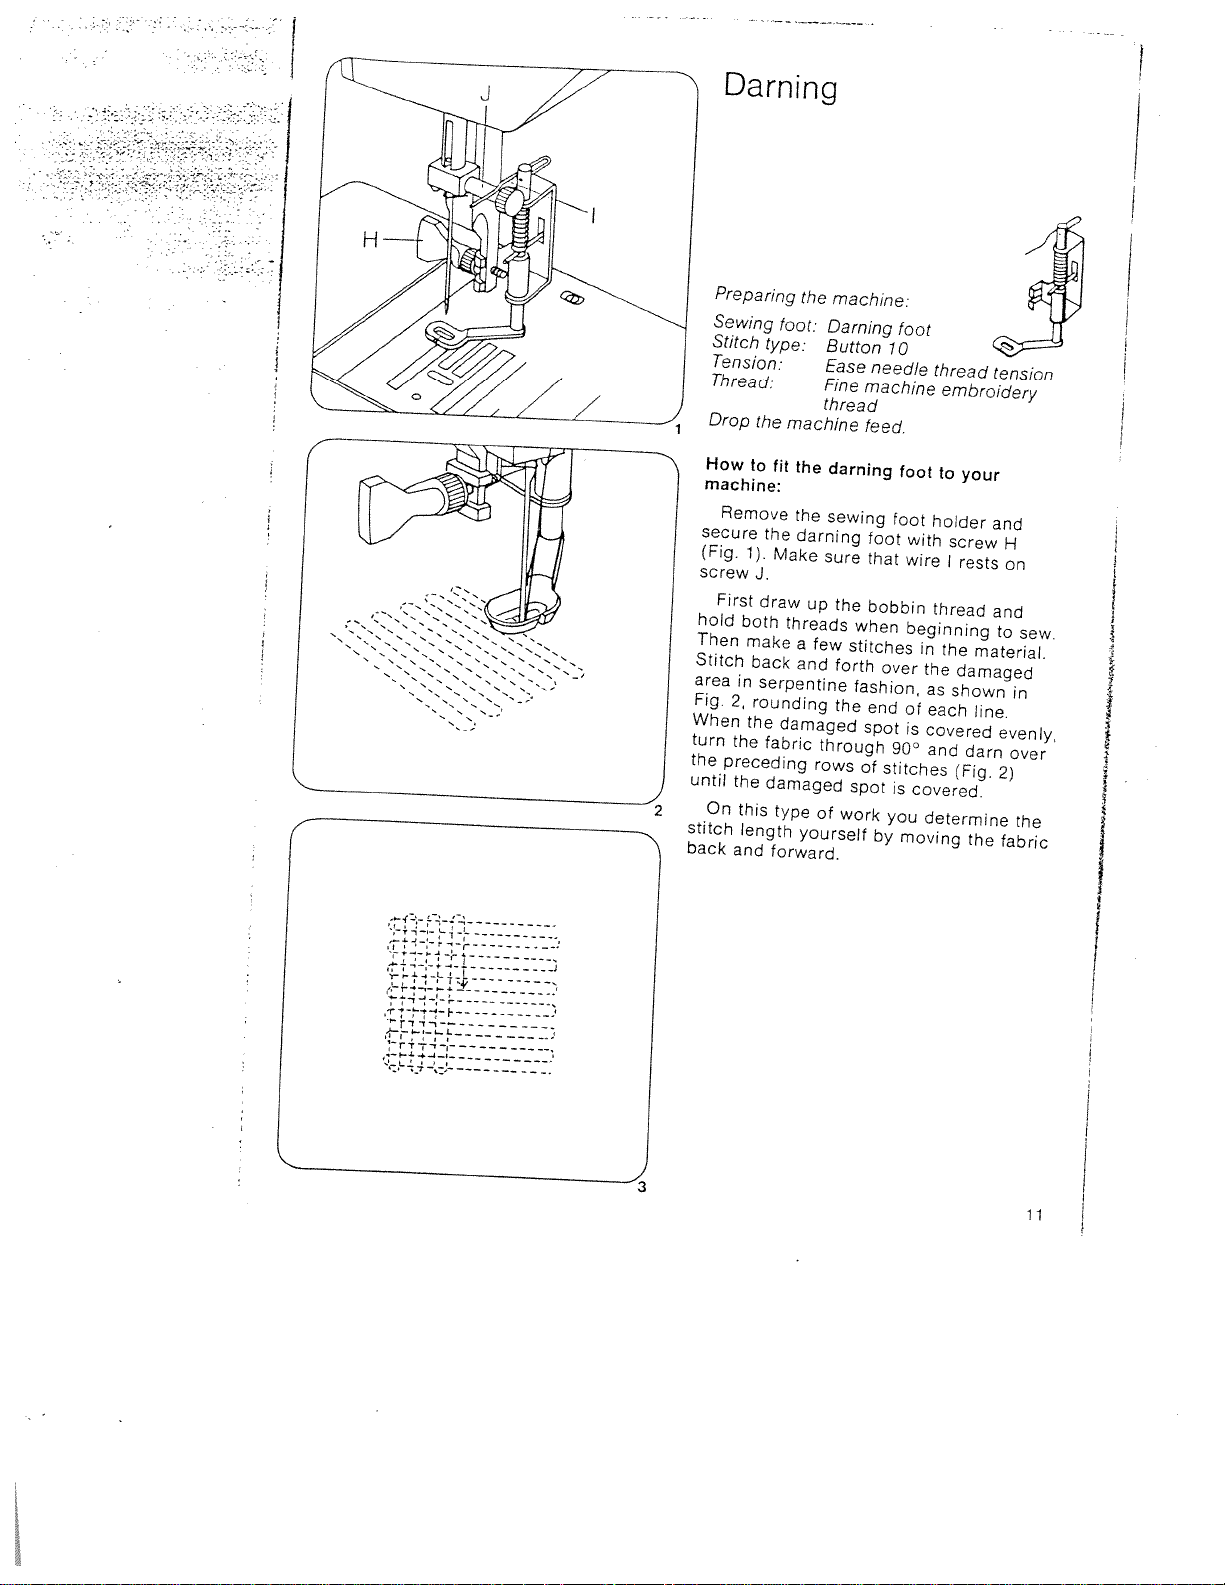
H—
Darning
Preparing
Sewing
Stitch
Tension:
0
//
Thread:
Drop
How
machine:
Remove
secure
(Fig.
screw
First
hold
both
Then
Stitch
area
in
Fig.
2,
When
turn
the
the
preceding
until
On
stitch
back
the
this
length
and
)
2
foot:
type:
the
machine
to
fit
the
1>.
Make
J.
draw
threads
make
back
serpentine
rounding
the
damaged
fabric
damaged
type
forward.
the
g1ot
Ease
Fine
thread
the
darning
the
sewing
darning
sure
up
a
few
and
through
rows
of
yourself
machine:
needle
machine
feed.
foot
that
the
bobbin
when
stitches
forth
over
fashion,
the
end
spot
of
spot
work
by
foot
foot
with
wire
beginning
of
is
9O
stitches
is
covered.
you
moving
thread
embroidery
to
your
holder
screw
I
rests
thread
in
the
the
damaged
as
shown
each
covered
and
darn
(Fig.
determine
tension
and
H
on
and
to
material.
line.
evenly,
2)
the
fabric
sew.
in
over
the
11
 Loading...