

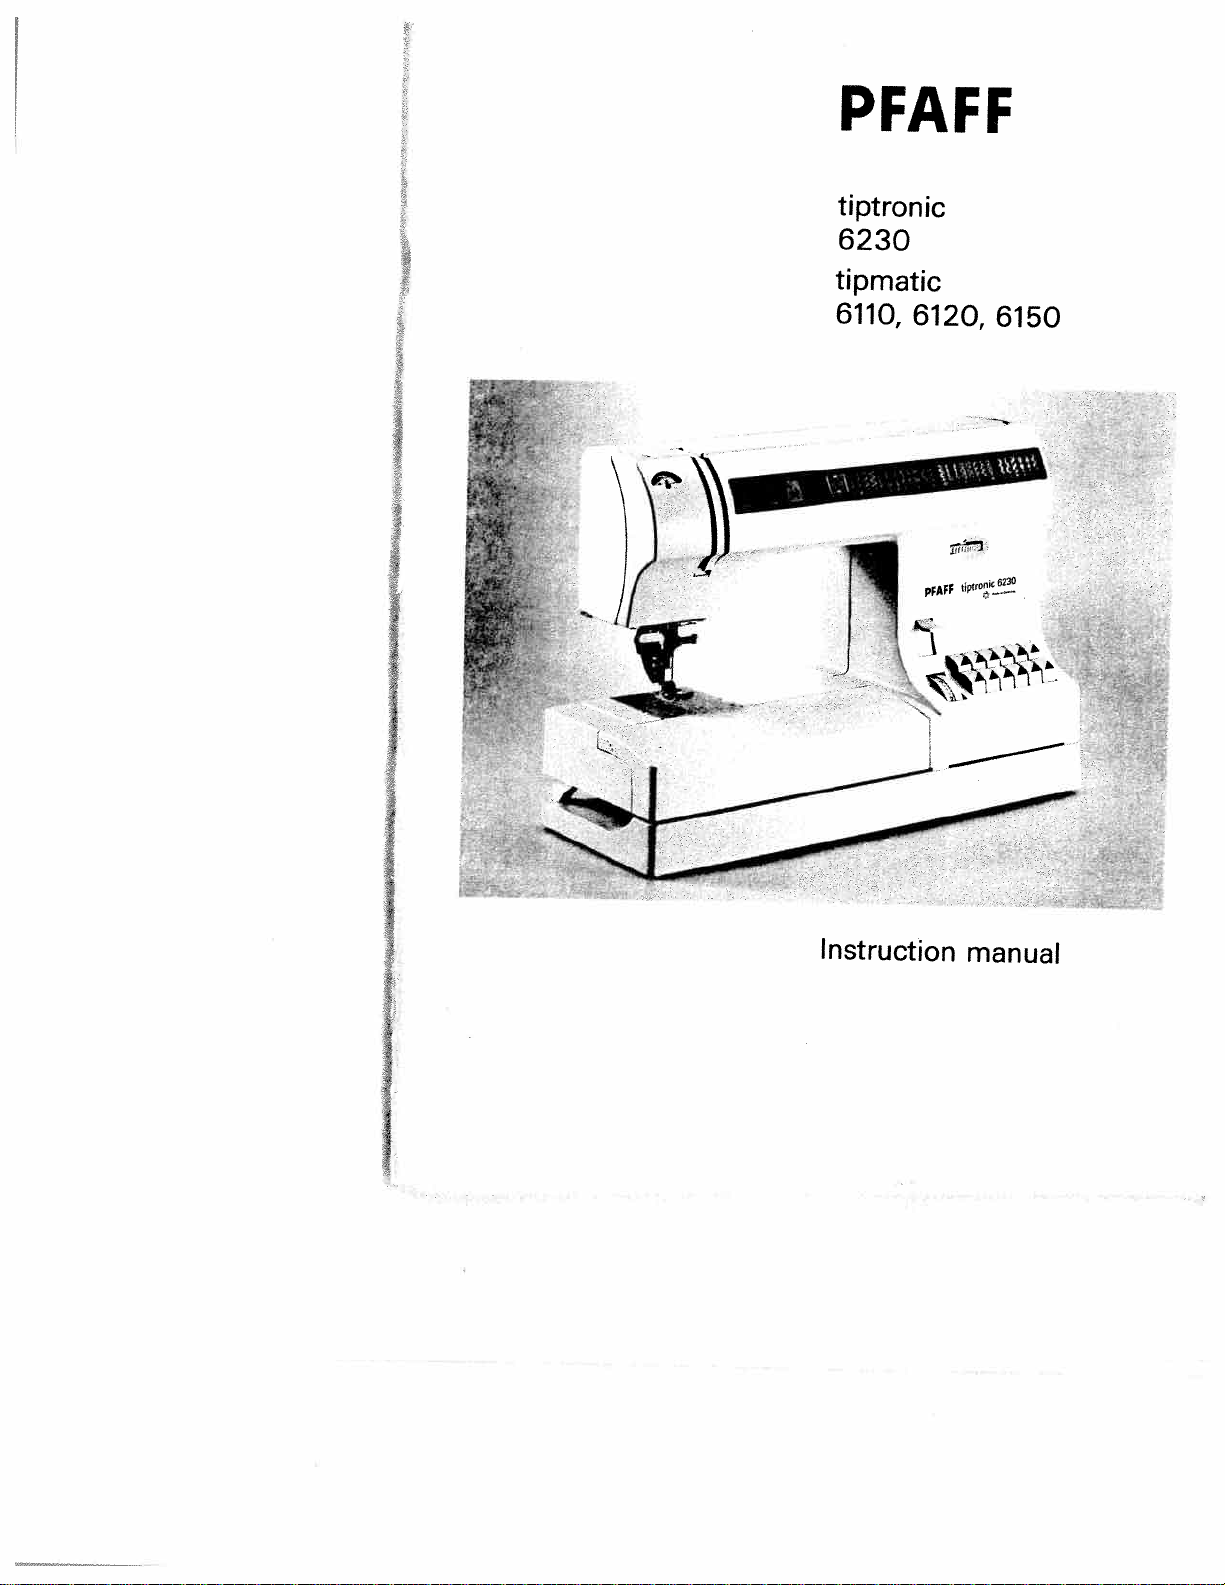
Page 1
•0
03
an
og
0)
C-)
.sfl
NJ
‘1
0
IT’
C.)
-a
01
0
D
C’,
1
C
C)
D
C
3
0)DC
0)
Page 2
I
I
I
I
For
please
easier
fold
understanding
this
or
the
of
last
page
Safety
For
The
to
the
with
The
according
As
the
of
this
colour
proceed
The
nected
the
The
connected
with
Cut-off
used,
mains
Only
approved
the
fuse
the
corresponding
The
plug
cover.
electrical
Please
on
page
this
the
leads
three
wires
Blue:
Brown:
colours
appliance
coding
wire
to
lettter
wire
the
mains
but
leads
3
A
Spare
also
2.
instruction
open
rules
United
must
safety
pins.
in
the
to
the
as
follows:
which
the
terminal
N
or
which
to
the
letter
plugs
disposed
must
spare
ASTA
by
cover
must
must
never
fuse
suppliers
observe
when
Kingdom
definitely
lead
mains
following
Neutral
Live
of
the
may
of
the
is
coloured
coloured
is
coloured
terminal
L
or
coloured
of
be
fuses
according
colour
covers
or
the
book
reading
only
terminal
lead
wires
not
correspond
terminals
which
black.
which
are
definitely
immediately.
replaced
must
be
be
marked
code.
be
used
are
the
PFAFF
general
not
be
nor
I
are
coloured
code:
in
the
in
blue
must
is
marked
brown
is
red.
completely.
used
to
BS
3
A
without
available
agencies.
safety
it.
connected
to
mains
your
must
marked
not
to
Defective
as
1362
or
fuse
notes
a
plug
with
plug.
be
with
be
with
from
lead
the
con
be
and
nfinIisfctentnPaZn>
Page 3
owl
‘.a
OCD
-
—
MrsJ
Page 4
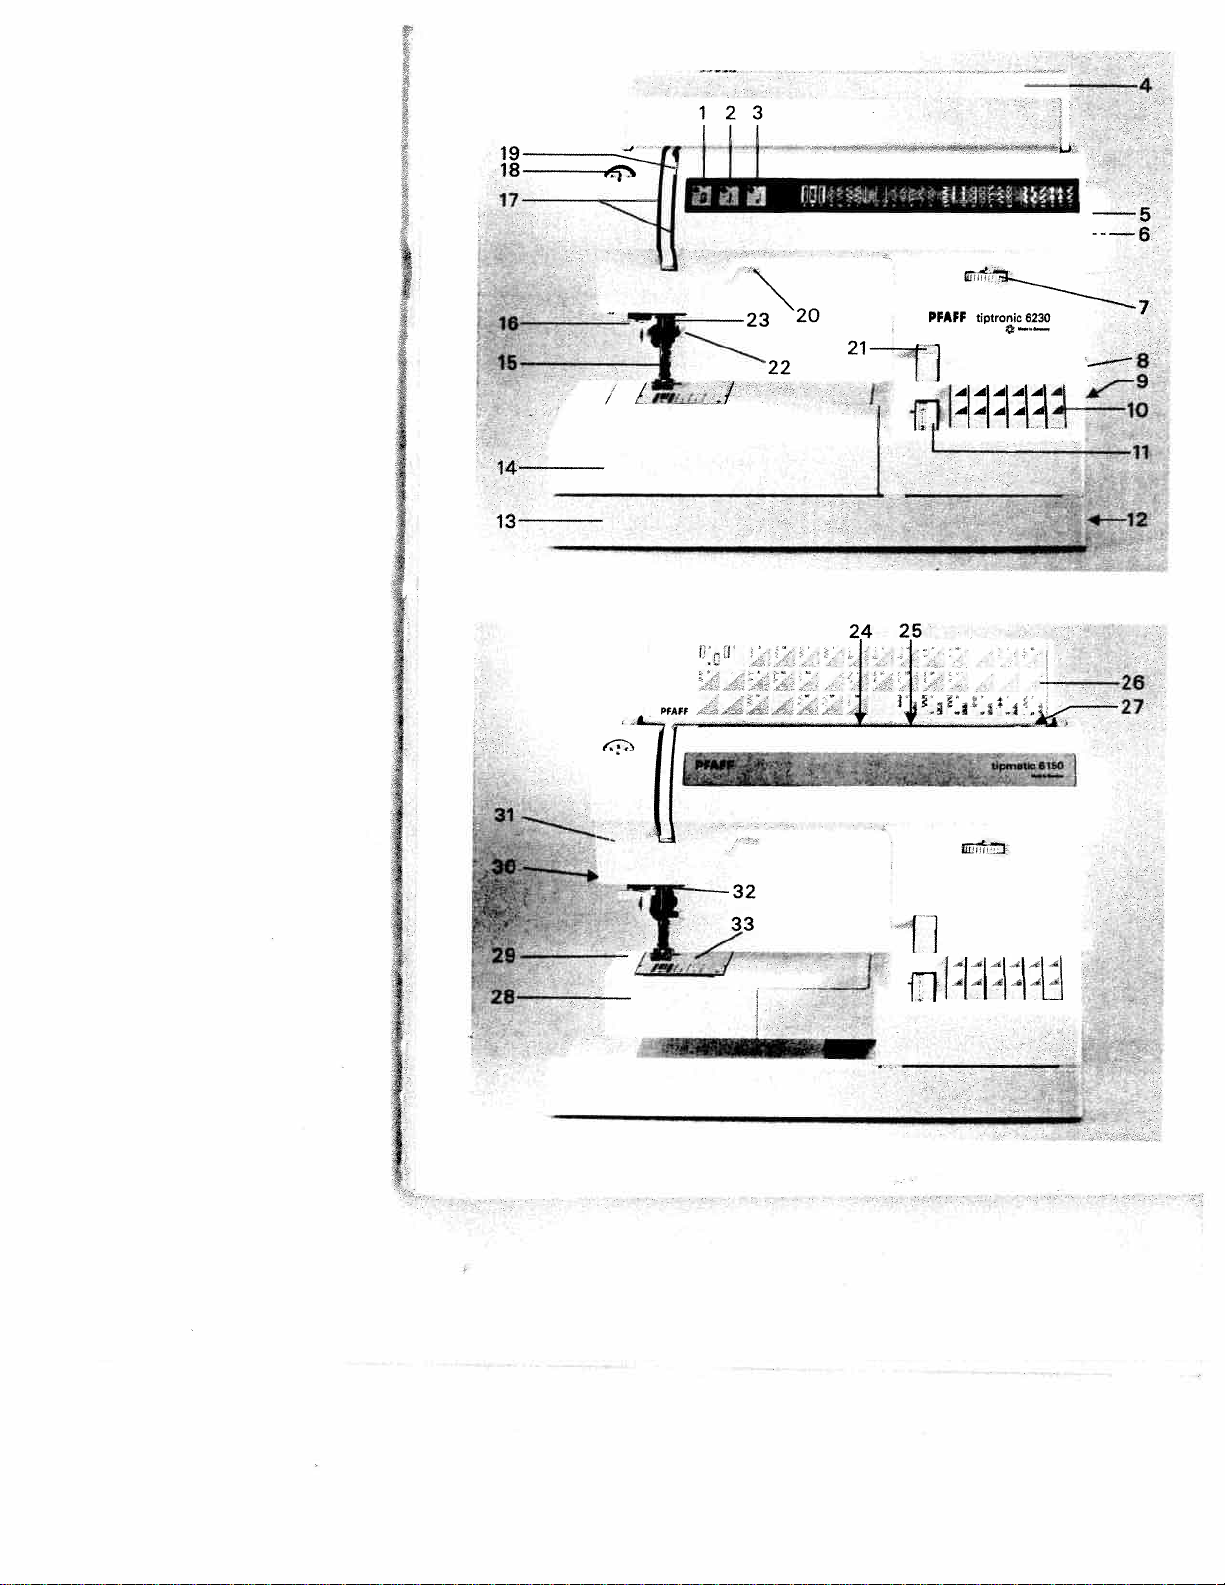
Parts
(10)
(11)
(1
(13)
(14)
(15)Sewing foot
(16)
(17)
(18)Needle
(19)
(20)
(21)
(22)
(23)
(24)
(25)
(26)
(27)
(28)
(29)
(30)
(31)
(32)
(33)
of
(1)
Key
Key
(2)
(3)
Key
(4)
Carrying
Hand-wheel
(5)
(6)
Hand-wheel
(7)
Fancy
(8)
Main
Connection
(9)
Connection
Touch
Stitch
Connection
2)
Base
Detachable
Needle
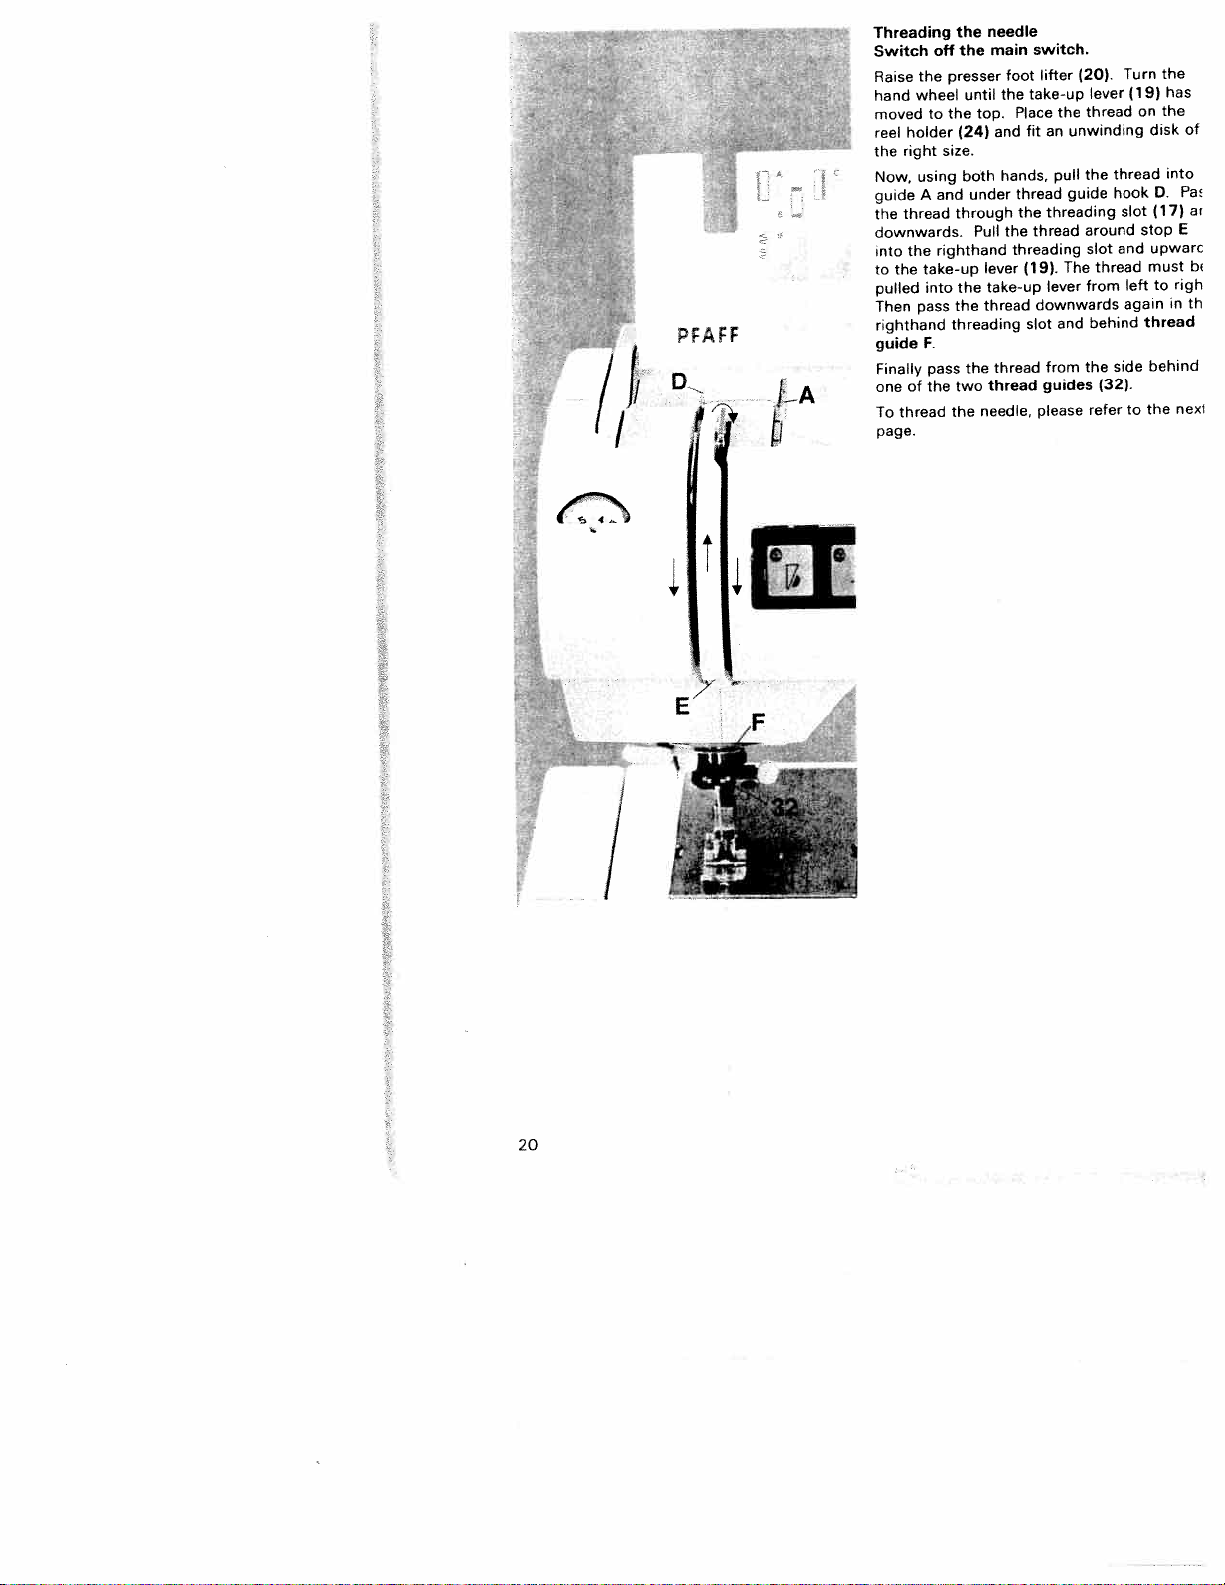
Threading
Take-up
Presser
Key
Needle
Dual
Reel
Second spare
Lid
Bobbin
Hook
Free
Thread
Sewing
Thread
Needle
the
for
,,slow
for
,,needle
for
,,tacking”
handle
stitch
switch
controls
length
plate
threader
thread
lever
bar
for ,,reverse
holder
feed
holder
with
program
winder
cover
arm
trimmer
lamp
guide
plate
sewing machine
sewing”
down position”
release
knob
socket
socket
knob
socket
work
holder
slit
tension
lifter
sewing”
with
(top
feed)
with
reel
(max.15watt)
(Model
(Model
disk
,,mains
,,foot
control with
,,foot
control”
support
with
sewing foot
fixing
unwinding
holder
table
6230)
cord”
screw
(Models
6230)
(Model
disk
(Model
mains
(Model
6230
6230)
6230)
6230)
cord”
and
(Model
6150)
6150)
Page 5
DANGER
1
The
appliance
Always
2.
3.
Do
4
Do
not
To
sewing
not
not
place
reduce
unplug
reach
place
in
machine
from
or
for
or
the
the
before
a
store
drop
risk
should
electric
sewing
a
into
electric
of
never
outlet
relamping.
machine
sewing
water
Important
For
the
United
This
sewing
HOUSEHOLD
basic
safety
lows:
Read
shock:
be
left
immediately
Replace
that
has
machine
or
other
where
liquid.
States
machine
use
precautions
all
instructions
unattended
after
bulb
with
fallen
it
safety
only
is
only.
when
using
same
into
can
fall
instructions
designed
When
you
should
before
plugged
and
before
type
water.
Unplug
or
be
pulled
and
use
always
using
rated
manufactured
an
electric
be
adhered
this
in.
Always
cleaning
15
Watts
immediately.
into
tub
a
sewing
unplug
it.
or
for
appliance,
to
as
machine.
this
sink.
fol
Do
WARNING
I
2.
3
adlustment
4
Never
of
cloth.
5
Never
6
Do
7.
Do
administered.
8.
To
Never
9.
blocked.
10
Do
11
Keep
machine
1
2.
Always
1
3.
Do
14
Do
1
5
Switch
as
1
6.
Always
when
17.
Hold
Please
Do
not
allow
used
by
Use
this
attachments
Never
operate
perly,
if
nearest
operate
the
sewing
drop
not
use
not
operate
disconnect,
operate
not
unplug
fingers
use
not
use
not
pull
the
threading
unplug
making
plug
also
observe
ro
reduce
to
or
near
sewing
recommended
it
has
been
authorized
machine
or
insert
outdoors.
on
by
away
needle.
the
bent
or
push
sewing
needle,
sewing
any
when
the
the
be
used
children
machine
this
sewing
dropped
dealer
the
sewing
where
turn
all
a
soft
pulling
from
proper
or
blunt
fabric
machine
changing
other
rewinding
general
risk
and
any
aerosol
controls
surface
all
needle
machine
user
of
as
a
only
by
machine
or
machine
foot
object
on
cord.
moving
needles.
while
off
servicing
into
safety
burns,
toy.
for
the
or
damaged,
service
control
into
Isprayl
to
such
plate
stitching.
l,.0”(
needle,
from
cord
fire,
Close
ifs
intended
manufacturer
if
it
center
with
free
any
opening.
products
off
(.01
as
a
To
unplug,
parts
The
Use
needles
when
threading
the
adjustments
reel
notes
on
electric
attention
has
a
or
for
any
position,
bed
Special
wrong
It
may
making
electric
Do
page
shock,
is
use
as
as
damaged
dropped
examination,
air
openings
from
the
are
being
then
or
couch
grasp
care
plate
recommended
deflect
any
bobbin,
outlet
mentioned
not
allow
2
or
necessary
described
contained
cord
into
water.
blocked.
accumulation
used
remove
where
the
plug,
is
required
can
cause
the
adjustments
or
changing
when
plug
Injury
in
or
repair,
or
the
not
by
needle,
removing
in
to
whip
SAVE
to
when
in
this
plug,
where
plug
the
the
the
the
this
Return
air
around
persons:
this
sewing
manual.
manual.
if
it
is
the
electrical
Keep
ventilation
lint,
of
oxygen
from
openings
cord
the
needle
manufacturer
causing
in
the
needle
presser
covers,
instruction
when
rewinding.
THESE
machine
Use
only
not
working
appliance
or
mechanical
dust,
outlet.
to
openings
and
loose
is
being
may
be
sewing
break.
only.
it
to
break
ai’ea,
foot,
etc.
lubricating,
manual
INSTRUCTIONS
to
such
is
pro
the
or
Page 6
Notes
on
safety
Notes
machines
or
28
The
1.
with
of
sewing
When
2.
maintenance
mechanical
always
the
plug.
The
3.
sewing
The
4.
be
The
5.
according
specification
Do
6.
the
Do
7.
—
—
Do
8.
socket
If
9.
pose
rated,
any
To
10.
open
inside
repair.
of
11.
Be
parts.
safety
on
according
Section
335,
IEC
must
user
regard
the
needle
area
leaving
disconnect
by
mains
maximum
lamp
tension
adjusted
machine
to
place
not
machine.
not
use
thereisvisible
its
function
e.g.
wet,
is
it
not
pull
its
by
appliance
this
than
damage
avoid
the
our
sure
intended
will
we
the
machine.
machine
the
This
qualified
to
domestic
for
exercise
the
to
and
during
the
work
parts
pulling
permissible
15
is
the
of
by
a
must
the
plate.
any
sewing
the
is
disturbed,
with
the
mains
cord.
not
caused.
risk
solely
is
only
use
DIN
to
28.
and
up
constantly
work.
machine,
or
accessories,
or
the
Watts.
drive
Pfaff
put
be
indications
objects
damage.
condensation.
is
used
orifit
accept
electric
of
There
which
the
service
original
sewing
57
adequate
down
when
machine
the
out
wattage
belt
mechanic.
into
in
openings
machine
out
plug
for
another
is
any
shock,
are
the
responsibility
staff.
700,
observe
during
changing
mains
must
operation
on
of
wrongly
liability
no
user
PFAFF
Section
caution
moving
from
for
only
the
if:
the
pur
do
paris
can
the
the
on
ope
for
not
Environment
recommended
The
temperature
80%.
sewing
This
nic-mechanical
supervised
rated
dust,
tic
rosive
For
usedona
even.
Treatment
Always
by
Cleaning
Housing:
To
cloth
stubborn
paraffin.
Please
ducts
for
electricity,
ventilation
hitting
clean
not
Do
cleaning
such
in
severe
chemicals
protect
the
which
dirt,
Note!
use
such
10°
machine
appliance;
in
use
a
way
dampness,
heat-producing
purposes
surface,
free
the
or
dropping.
housing,
free
is
use
insecticides
any
petrol
as
the
environment
to
40°
C
is
home.
the
that
liquids.
or
machine
fluff.
of
soft
a
lgasl
housing.
C,
high-quality
a
it
it
direct
the
which
a
use
cloth
Humidity
is
a
should
It
not
is
machine
is
against
dry,
To
with
or
or
thin
Ambient
is:
machine
subjected
sunlight,
objects,
both
clean
remove
alcohol
chemical
chemicals
20%
electro
be
must
firm
damage
and
any
to
for
ope
to:
sta
cor
be
and
soft
or
pro
2
Page 7
Modern,
—
Sewing
uncomplicated
puchbutton
by
control
Congratulations!
product
sewing
and
It
and
your
If
book
After
the
If
lem!
any
So
enjoyable
that
machine
will
sew
instruction
PFAFF
now
nothing
this
all
have
Your
you
the
take
PFAFF
hours
features
this
you
machine
you
helporadvice
now
any
—
offers
through
very
sewing
time
can
the
is
can
further
can
You
have
unique
can
take
thick
latest
book
machine
enough
wrong
go
only
way
do and
questions,
dealer
you
need.
get started!
creating
of
bought
advantages.
any
material
and
design
in
is
Just
to
to
to
make
will
be
We
your
high-quality
a
for
thin
and
uncomplicated
as
the
study
learn
all
full
use
that
at your
wish
fashion
new
Your
stride
in
its
you.
technology
instruction
things
the
of
them
isnoprob
service
many
you
ideas.
as
with
3
Page 8
Contents
Accessories
Accessory
Applique
Appliqué
Bias
tape
Blind
stitch
Bobbin
Bobbin
Bobbin
Borders
Buttonholes
Changing
Changing
Changing
Cleaning
Closed
overlock
Detachable
Cording
Cording
Covering
Darning
Darning
Darning
Darning
Decorative
Dual
fabric
Elastic
stitch
Elastic
stitches
Electrical
Eyelet
embroidery
Fancy
elastic
Fancy
elastic
Fancy
stitch
Faults.
Foot
control
Foot
control
Free
arm.
Fringe
foot
Function
Gathering
Gathering
Gathering
General
Hand
wheel
Hem
with
Hemstitching
Honeycomb
Inserting
Inserting
Inserting
work
Lace
Lamp
.
feller
Lap
Left
needle
buttonhole
Linen
Linen
buttonhole
4
compartment
foot
binder
case.
thread
winding
.
.
.
the
the
the
and
work
foot
foot
stitches
.
tears
with
with
stitches
feed
connection
table
. .
.
.
.
keys
foot
with
with
sewing
release
the
stitch
bobbin
patches
zippers
.
position
and
tension
.
needle
needle
sewing
oiling
stitch
.
.
elastic
straight
knob.
stitch
.
.
elastic
straight
aids
twin
.
needles
.
.
.
. .
. .
support
.
.
.
.
.
.
.
.
disk
needle
.
.
.
.
.
with
plate
foot
.
.
.
.
.
stitch
stitch
.
.
.
.
.
thread
.
.
.
.
gimp
.
.
.
.
.
.
.
stitch
.
.
.
.
.
. .
.
.
.
.
.
.
.
.
thread
.
72
—
81
14
66
78
.
.
.
77
38
18,
.
.
.
.
.
.
19
15
—
62.
46, 47
63,
19
1
7
64
26
.
.
84
23
.
.
.
.
84
42
14
. .
.
76
78
.
.
44.
51
45
—
53
53
53
.
.
.
.
.
.
52.
51
61
24,
41
40
12,
68
—
64
25
43
13
30
.
.
.
45
10
86
1
3
13
14
79
31
75
.
.
.
.
.
. .
.
.
.
.
.
-
50
49
35
1
5
48
69
41
.
.
.
.
16
52
54,
57
85
55
75
36
47
.
.
47
Page 9
58
65
778428,61
29,61
35—58222228663656
34,60
85
39
28
364020
20
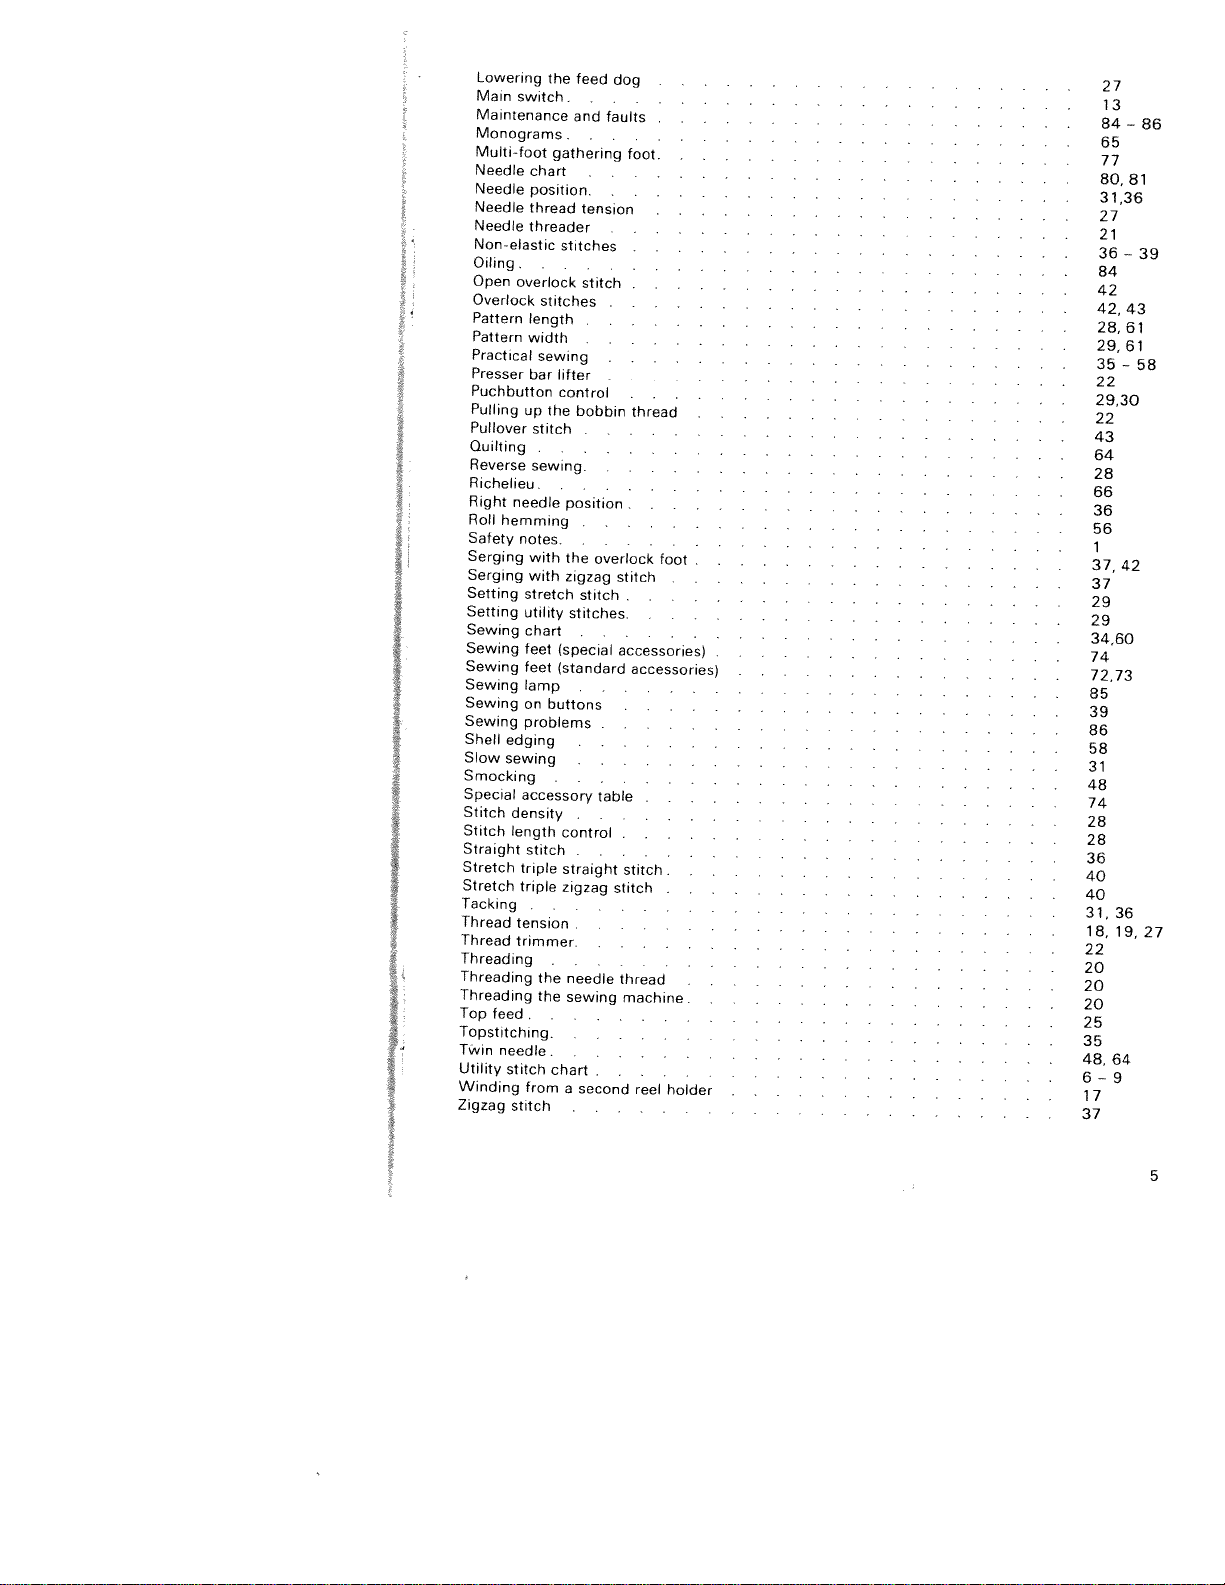
Lowering
Main
Maintenance
Monograms
Multi4oot
Needle
Needle
Needle
Needle
Nonelastic
Oiling
Open
Overlock
Pattern
Pattern
Practical
Presser
Puchbutton
Pulling
Pullover
Quilting
Reverse
the
switch
chart
position.
thread
threader
.
overlock
stitches
length
width
sewing
bar
up
the
stitch
.....
sewing.
feed
and
gathering
tension
stitches
stitch
.
litter
control
bobbin
.
dog
faults
.
foot.
thread
13
84—86
-
.
-
Richelieu.........
Right
needle
notes
with
with
stretch
utility
chart
feet
feet
lamp
on
problems
edging
sewing
accessory
density
length
stitch
triple
triple
tension
trimmer
stitch
from
stitch
buttons
.
.
.
the
the
.
chart
position
the
overlock
zigzag
stitch
stitches.
lspecial
(standard
.
control
straight
zigzag
.
needle
sewing
.
.
second
a
stitch
.
accessories(
accessories(
.
.
.
.
table
stitch.
stitch
thread
machine.
.
.
reel
foot
holder
37
74
86
74
28
6—9
17
Roll
hemming
Safety
Serging
Serging
Setting
Setting
Sewing
Sewing
Sewing
Sewing
Sewing
Sewing
Shell
Slow
Smocking
Special
Stitch
Stitch
Straight
j
Stretch
Stretch
Tacking
J
Thread
Thread
Threading
Threading
Threading
Top
feed.
Topstitching.
Twin
needle.
Utility
Winding
Zigzag
Page 10
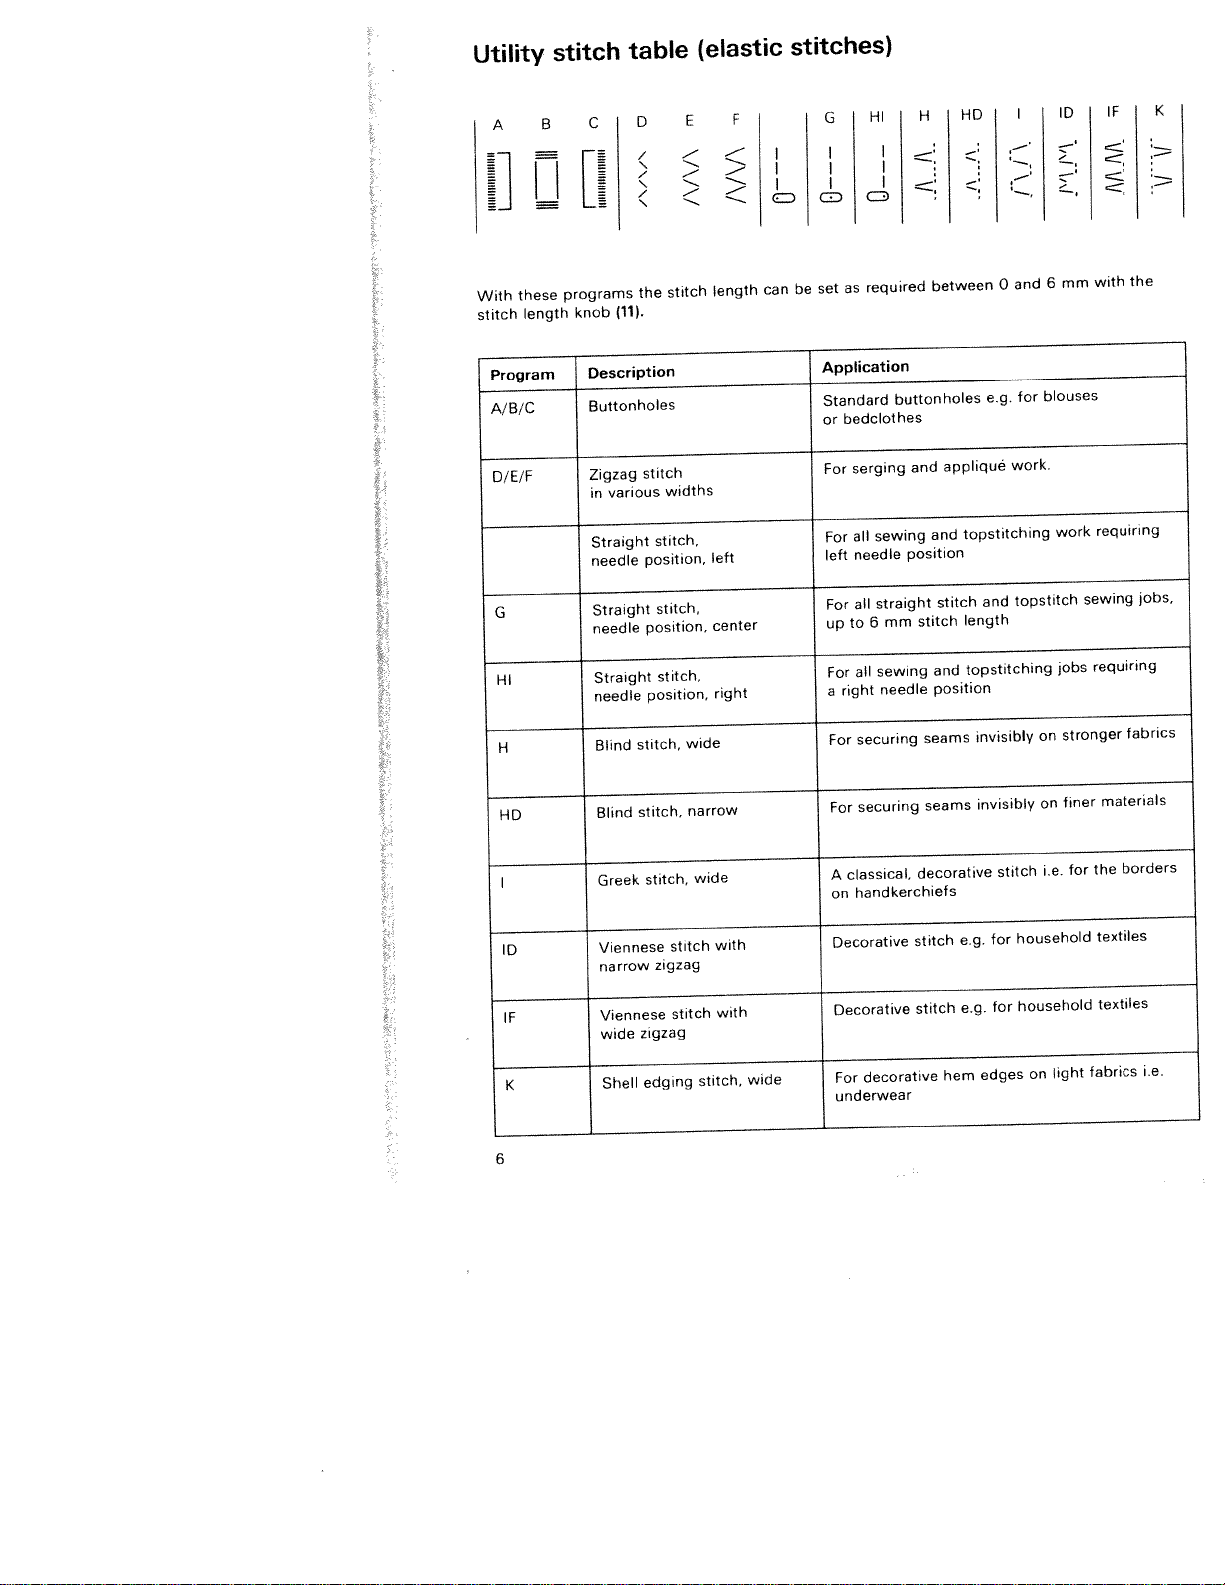
Utility
these
With
stitch
length
stitch
programs
knob
table
D
(11).
<
/
“
(
the
E
<
-‘
<
stitch
(elastic
F
‘-
length
stitches)
I
ED
be
can
ED
set
HD
H
HI
G
_:
_:
I
I
c
required
as
:
between
“:
ID
‘
c—’
,—‘
“
-
mm
6
and
0
with
I
‘
,
the
K
IF
Program
A/B/C
D/E/F
G
HI
H
HD
I
ID
Description
Buttonholes
stitch
Zigzag
various
in
Straight
position,
needle
Straight
position,
needle
Straight
needle
stitch,
Blind
stitch,
Blind
stitch,
Greek
Viennese
narrow
widths
stitch,
stitch,
stitch,
position,
stitch
zigzag
wide
narrow
wide
left
center
right
with
Application
Standard buttonholes
bedclothes
or
appliqué
and
serging
For
and
sewing
For
all
position
needle
left
mm
needle
stitch
stitch
and
position
seams
seams
decorative
stitch
all
For
to
6
up
all
For
right
a
securing
For
For
securing
classical,
A
handkerchiefs
on
Decorative
straight
sewing
e.g.
topstitching
and
length
topstitching
invisibly
invisibly
stitch
for
e.g.
blouses
for
work.
topstitch
on
on
i.e.
household
work
jobs
stronger
finer
for
requiring
sewing
requiring
materials
the
textiles
jobs,
fabrics
borders
light
textiles
fabrics
i.e.
household
for
e.g.
decorative
stitch
hem
edges
on
with
zigzag
edging
stitch
stitch,
wide
IF
Viennese
wide
1<
Shell
Decorative
For
underwear
6
Page 11
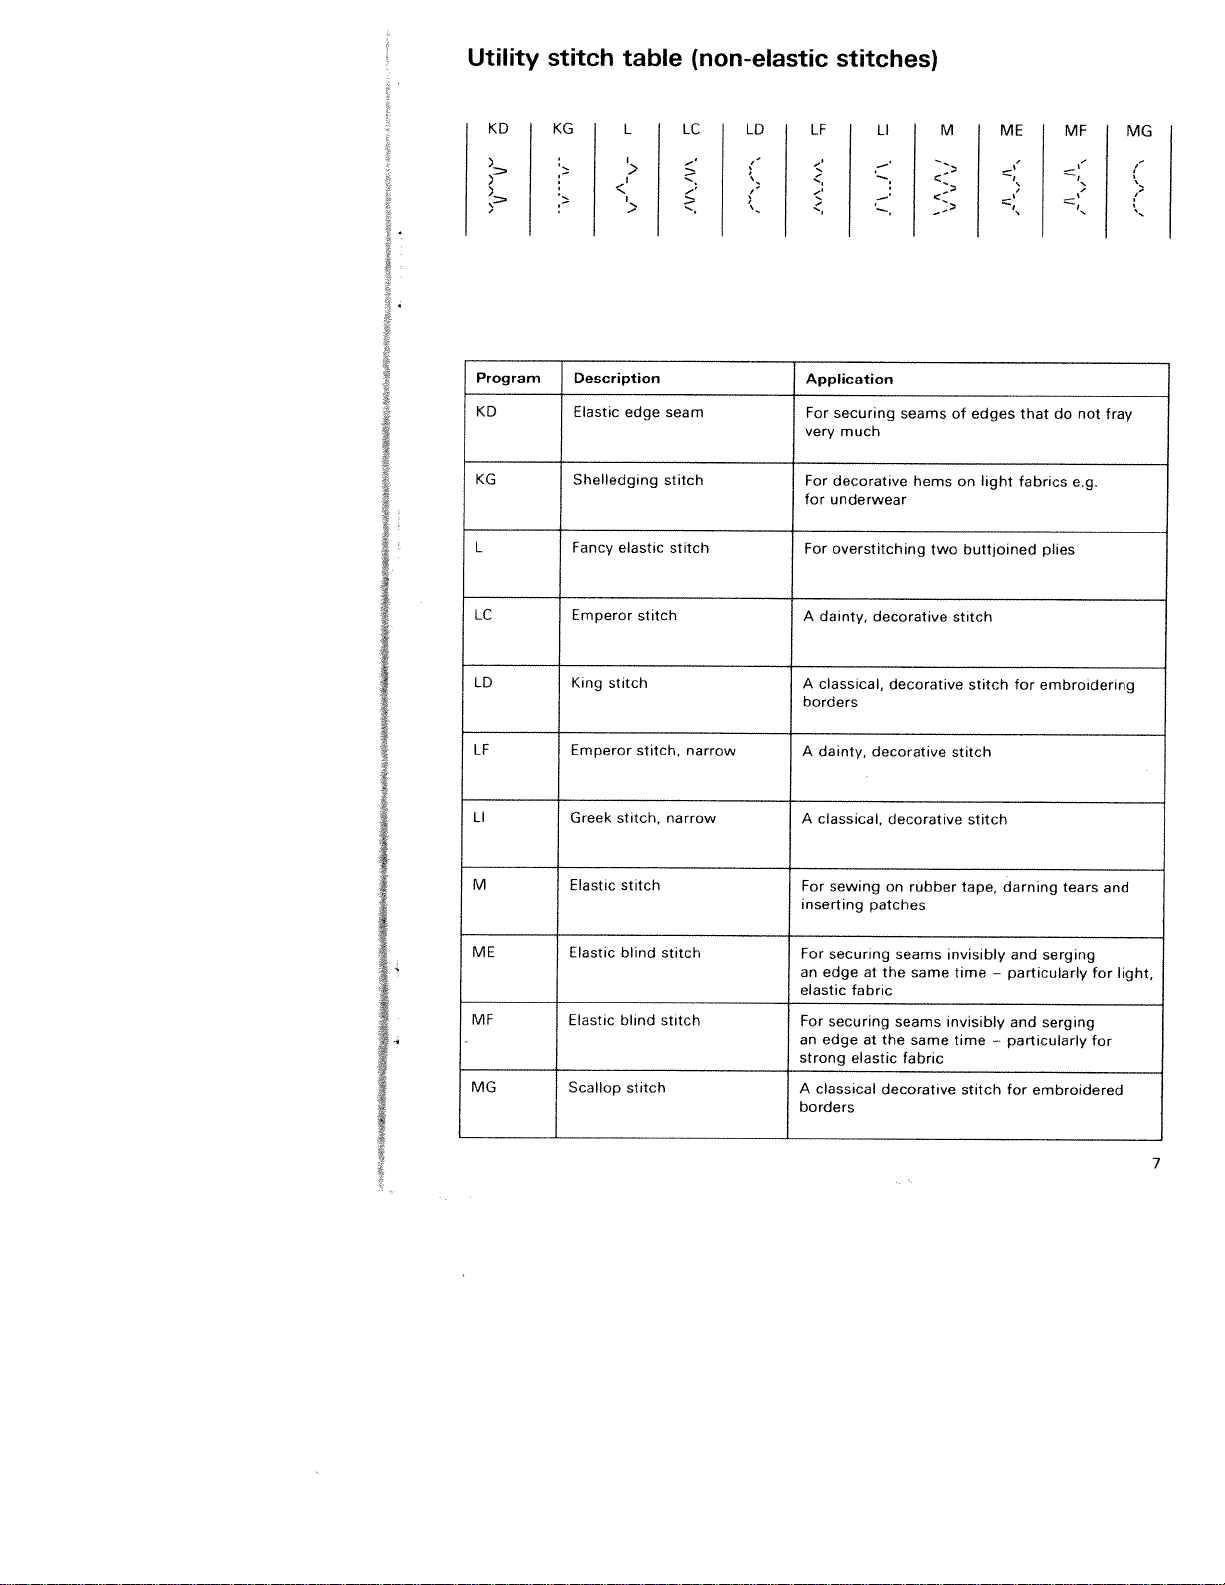
Utility
stitch
table
(non-elastic
stitches)
I
KU
Program Description
KD
KG
L
LC
LU
KG
Elastic
Shelledging
Fancy
Emperor
King
elastic
stitch
L
edge
stitch
seam
stitch
stitch
LC
LU
LF
Application
For
securing
very
much
For
decorative
underwear
for
For
overstitching
A
dainty,
A
classical,
borders
LI
seams
hems
decorative
decorative
two
M
of
on
stitch
ME
edges
light
buttjoined
stitch
that
fabrics
plies
for
embroidering
do
MF
not fray
e.g.
MG
I
I
S
LF
LI
M
ME
MF
MG
Emperor
Greek
Elastic
Elastic
Elastic
Scallop
stitch,
stitch
blind
blind
stitch
stitch,
narrow
stitch
stitch
narrow
A
dainty,
A
classical,
sewing
For
inserting
For
securing
an
edge
elastic
For
securing
an
edge
strong
A
classical
borders
decorative
patches
at
fabric
at
elastic
decorative
on
rubber
seams
the
same
seams
the
same
fabric
decorative
stitch
stitch
tape,
invisibly
time
invisibly
time
stitch
darning
and
—
particularly
and
—
particularly
for
tears
serging
serging
embroidered
and
for light,
for
7
Page 12
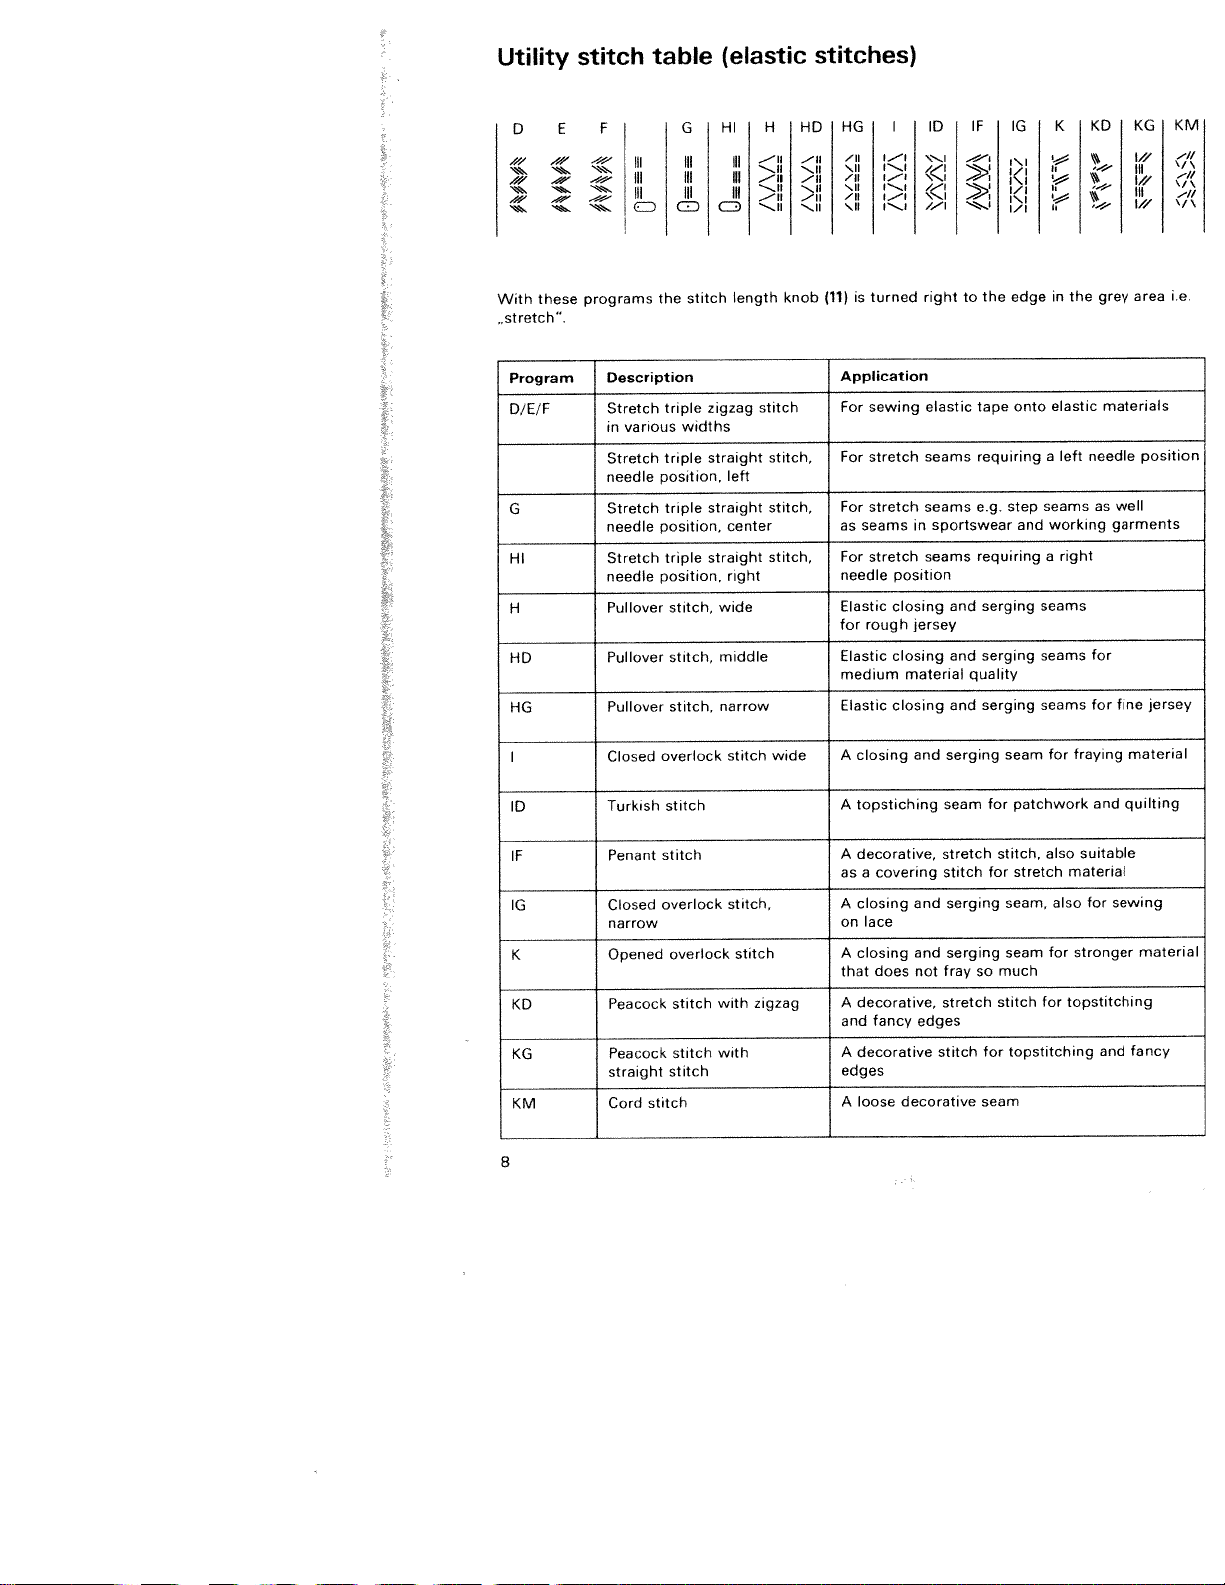
Utility
stitch
table
(elastic
stitches)
D
l’
‘
‘..
,,,
‘,
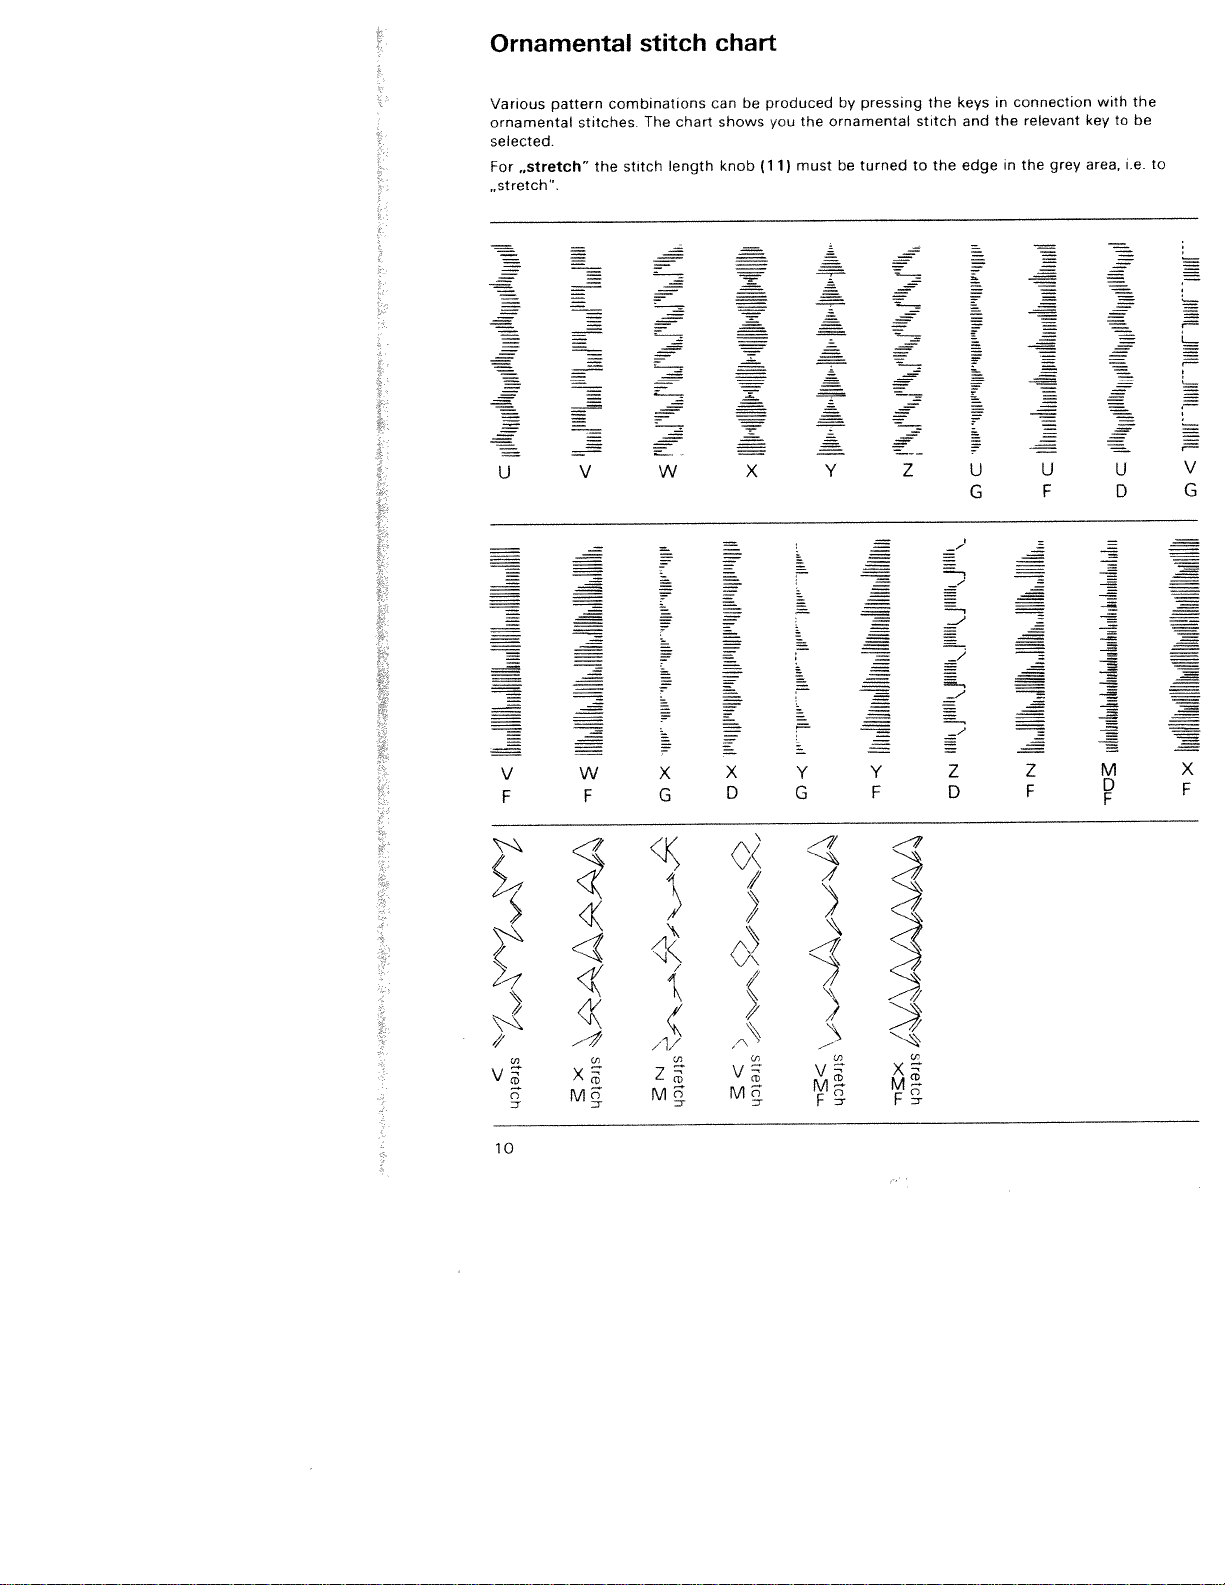
With
,,stretch”.
Program
D/E/F
G
Hi
H
HD
HG
‘,
,.—
‘.‘.
,
‘.
these
E
F
—
‘.‘,
,,—
‘..
programs
Description
Stretch
in
Stretch
needle
Stretch
needle
Stretch
needle
Pullover
Pullover
Pullover
Ill
III
Ill
I
II
JcD1E1c
various
G
lii
Hi
Iii
Ih
the
stitch
triple
widths
triple
position,
triple
position,
triple
position,
stitch,
stitch,
stitch,
Hi
I
iii
ill
length
zigzag
straight
left
straight
center
straight
right
wide
middle
narrow
I
IG
I
ID
\I
/
right
IF
I
I
the
edge
to
I
HO
H
I
I
‘i
I
ii
__.—ii
0
—ii
“,ii
I
“,,ii
I
—“i
..—‘ii
(11)
knob
HG
\ii
‘sit
is
I
i”i
I
‘—‘—
i”..i
I
i”.,.i1/_”I1”.j
1
turned
KO
K
I
i
the
grey
in
KMI
KGI
I
I
11/
I
I
I
III
—‘I,
—II
1/,’
i.e.
area
Application
materials
stitch
stitch,
stitch,
stitch,
For
sewing
stretch
For
stretch
For
seams
as
stretch
For
needle
Elastic
for
rough
Elastic
medium
Elastic
in
position
closing
jersey
closing
material
closing
elastic
seams
seams
sportswear
seams
and
and
and
tape
requiring
e.g.
requiring
serging
serging
quality
serging
onto
step
and
elastic
left
a
seams
working
a
right
seams
seams
seams
needle
as
for
for
position
well
garments
jersey
fine
material
fraying
for
so
for
seam
for
stitch,
for
much
stitch
seam
patchwork
also
stretch
seam,
also
for
seam
for
topstitching
and
suitable
material
for
sewing
stronger
topstitching
and
quilting
material
fancy
I
ID
IF
lG
K
KO
KG
KM
Closed
Turkish
Penant
Closed
narrow
Opened
Peacock
Peacock
straight
Cord
overlock
stitch
stitch
overlock
overlock
stitch
stitch
stitch
stitch
stitch
with
with
stitch,
stitch
wide
zigzag
A
closing
topstiching
A
A
decorative,
as
a
A
closing
on
lace
A
closing
that
decorative,
A
fancy
and
decorative
A
edges
A
loose
covering
does
decorative
and
and
and
not
edges
serging
seam
stretch
stitch
serging
serging
fray
stretch
stitch
8
Page 13
Utility
stitch
table
(elastic
stitches)
L
I
I
Program
L
LD
LF
LI
LK
LDK
LD
‘5’
J’t%
5
LF
-ii
I
41
-ii
Description
Feather
Dutch
Scroll
Weaving
Diagonal
Diagonal
I
I
I
stitch
stitch
LI
NJ
‘.ii
•.ii
.1i
stitch
I
I
I
stitch
stitch,
stitch,
LK
,X’
Xi
Xi
narrow
wide
LDK
\XI
\)<i
LEI
\..i
iii
‘“i
in
Application
For
Also
A
A
An
A
A
LGK
XI
III
•
X’
XI
overstitching
suitable
decorative
decorative
ornamental
decorative,
decorative,
I
I
LMK
,“
7”
f
I
I
for
stitch
stitch
seam
elastic
elastic
M
\/\
\/‘s
two
stretchy
e.g.
e.g.
stitch
stitch
I
MD
/1,’
\i\
I
I
\I
I
/1/
butt;oined
materials.
for
home
home
for
for
e.g.
I
I
bath
ME
“.i.\
—I’
plies
textiles
textiles
MF
‘.i\
I
equipment
I
MG
I
11/
I
i
ll\
I
11/
I
II\
11/
LEI
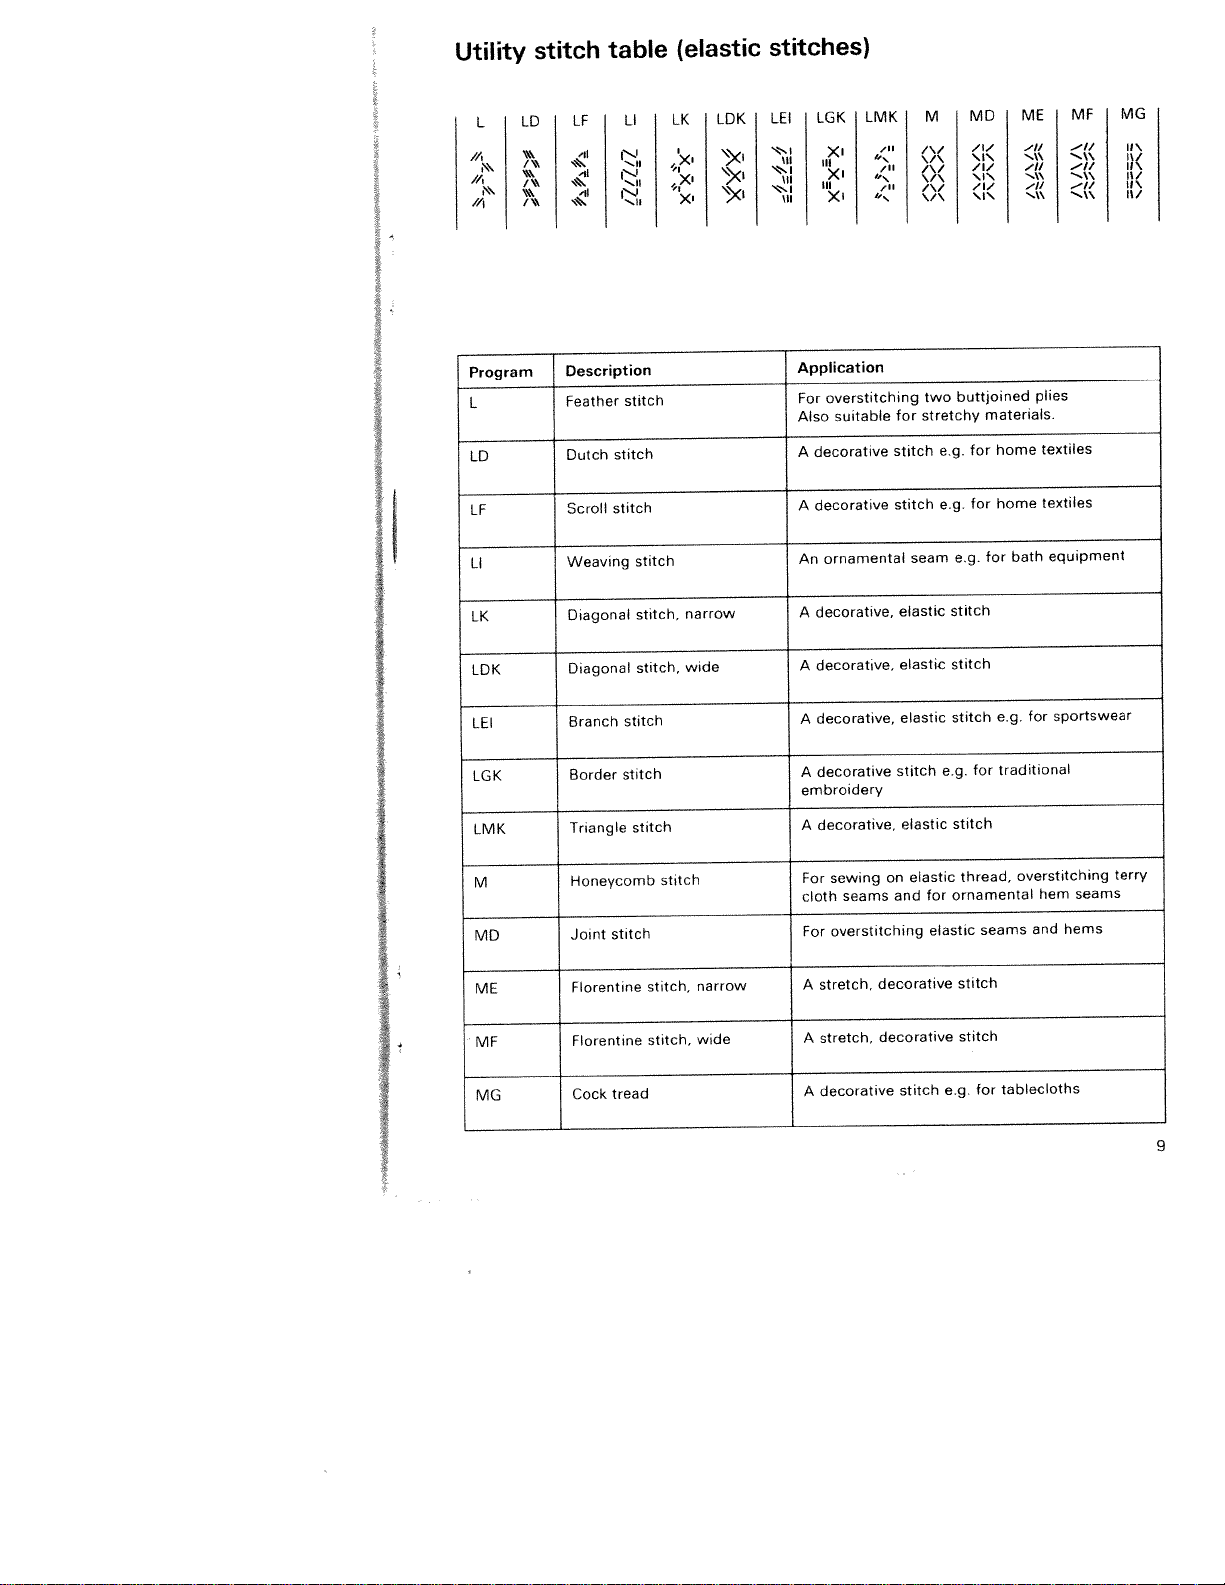
LGK
LMK
M
MD
ME
MF
MG
stitch
Branch
stitch
Border
Triangle
Honeycomb
stitch
Joint
Florentine
Florentine
tread
Cock
stitch
stitch,
stitch,
stitch
narrow
wide
decorative,
A
A
decorative
embroidery
A
decorative,
sewing
For
seams
cloth
For
overstitching
stretch,
A
stretch,
A
decorative
A
elastic
stitch
elastic
elastic
on
for
and
decorative
decorative
stitch
stitch
e.g.
stitch
ornamental
elastic
stitch
stitch
e.g.
for
thread,
seams
for
for
e.g.
traditional
overstitching
hem
and
tablecloths
sportswear
terry
seams
hems
9
Page 14
C
E
-
U)
C
.r
t
o
C)
o
>
-C
0
a)
0
_
0
LL
0
_:
.
lIlIlllliiiIliliiIlIilIlllllililIliiiiiiiiiIiIiiilliliiIIIiil
0
oC
2
0
—
C
a)
1111111
Oil)!
Iiiiul
liii))
ililh
liii!
lniil
I)))))!
1111111
111111
D
iIl1IIt!IlII1111lIlIIl11hJIIIIIII1IIIIII111I
ii>
111111
11111
0Ii
liii!
.2
-
C
0
C
a) a)
C
t
f
—
C
I
iihi
Ih
‘iii,i
I
ii
1iIi
I
ih
‘liii
I
ih
iil
I
iiii
I
Ii’
il
IIlilill,dlliitlh,.iili,
C
-
-C
0
C
llIlllhIIIllIIllhIIllIllIIli.ilIlllhlIliIIIliUlIlIlIll
°‘
a)
—
—
—
.0
2
I’
:>(
01
tiiLiitl1
..,iiLiilL..iiilL.i
a)a)
o
c
00
>-
2
a)
ilillflililIiTliIII
I
Oil
Tili
11111111
II
iij
111111
liii
iillIllilillijillIiltIiijIllIlIliliillITllI!IfllIlIlllIliljI
‘lIhi
liii
‘IllIj
91111
111111
liii
it,,
..
x
o
::‘•—
—
a)
0
C)
0
o
—
a)
C
V
-
a)
a)
i’
ii—
‘I
‘I
o
0
2
a)DC)
iIlIIlidlTlIIiIllIiIIiIIIillTlhIlilUIi
i’’
il
il’,
iilii.
D
(_
—\
1f”ilifJiTI”TN}ill[’’iTjiTHh[’lliilTl[
111111
liii!
‘liii
iii!!
iiIh
ijj
r’
ci
‘iii
95a)
Q)
C
>
C)
lilt
1
III,IqIIp
ii
jliiJlijifi
ijlilIIil
lj1i
D
_L
a)
1IllIII
II
VIIIILilII{ll.
ifIIIIIJlIWIL
ill
II
1
D
‘
11111
PIljjjljjjIIlj
11111111
{fjjjjIIIIjlIl
liii
II
I1IIIUI
j
1
stretch
>
C
x
N
stretch
I
stretch
stretch
stretch
stretch
Page 15
PFAFF
onlc
6230
I
pt
/
———
sewing
the
connection
work
case
thread
the
threader
the
up
foot
trimmer
the
the
thread
the
sewing
length
controls
keys
of
tension
needle
bobbin
lifter
sewing
needle
tension
feed
knob
support
thread
foot
dog
Operation
I
I
J
I
I
-i
I
I
Electrical
Detachable
Bobbins
Bobbin
Bobbin
Threading
Needle
Pulling
Sewing
Thread
Changing
Feed
Dual
feed
Top
Changing
Needle
Lowering
Reverse
Stitch
Pushbutton
Function
machine
page
page
pages
pages
page
page
page
page
page
page
page
page
page
page
page
page
page
page
page
page
1
1
1
20
21
22
22
22
23
24,
25
26
27
27
28
28
29,
31
2,
4
15
1
9
8,
i!II
3
1
17
—
9
1
25
30
11
Page 16
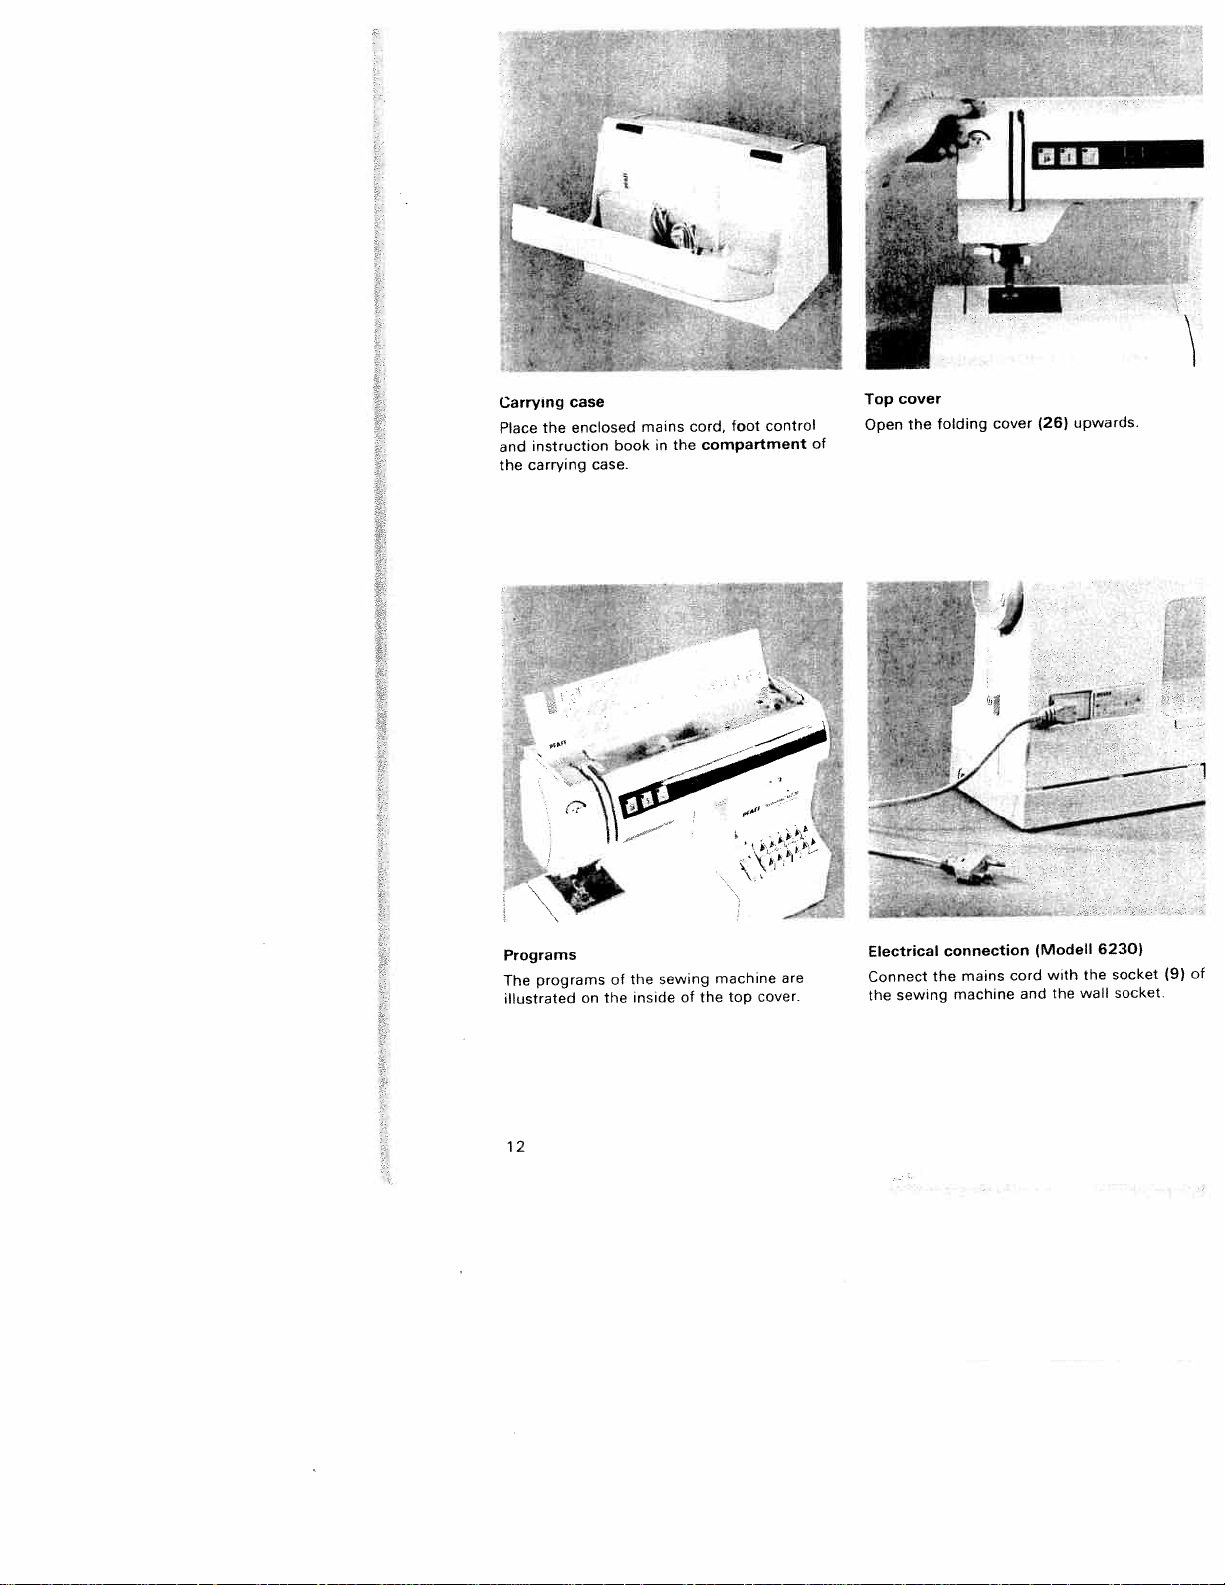
Carrying
Place
instruction
and
carrying
the
the
case
enclosed
case.
book
mains
in
cord,
compartment
the
foot
control
Ii
F.
N
cover
Top
folding
cover
the
Open
of
(26)
upwards.
N’
Programs
programs
The
illustrated
12
]
0’
with
the
the
wall
6230)
socket
socket
(9)
of
(Modell
cord
and
sewing
connection
mains
the
machine
Electrical
Connect
the
top
are
cover
of
inside
the
on
the
of
machine
sewing
the
Page 17
-
-
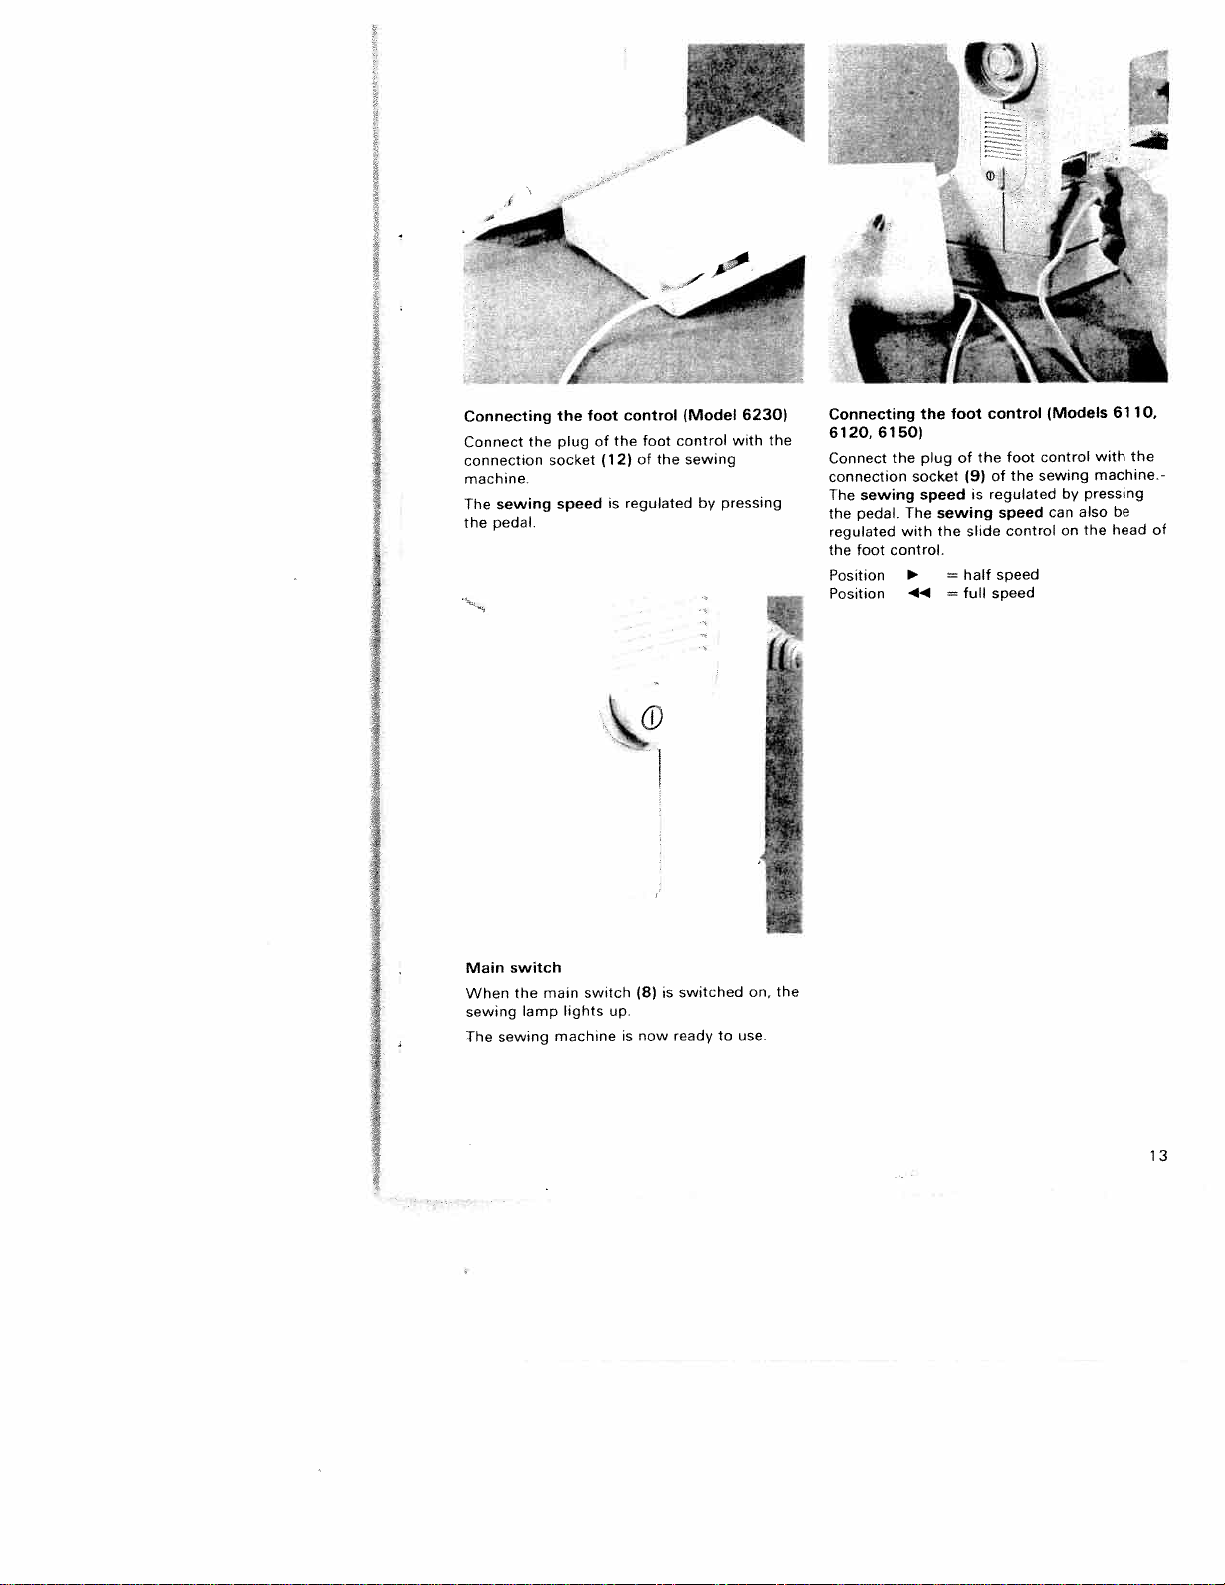
Connecting
Connect
connection
machine.
The
sewing
the
pedal.
switch
Main
the
When
sewing
The
sewing
the
lamp
the
plug
socket
speed
main
lights
machine
foot
of
(12)
switch
control
the
is
regulated
up.
is
foot
of
(8)
now
the
is
ready
(Model
control
sewing
by
switched
6230)
with
pressing
to
use.
on.
the
the
Connecting
6150)
6120.
Connect
connection
The
sewing
the
pedal.
regulated
foot control.
the
Position
Position
the
socket
The
with
44
foot
the
plug of
speed
sewing
the
=
=
(9)
is
slide
half
full
control
foot
the
of
regulated
speed
control
speed
speed
the
(Models
control
sewing
by
can
on
with
machine.
pressing
also
the
6110.
be
head
the
of
13
Page 18
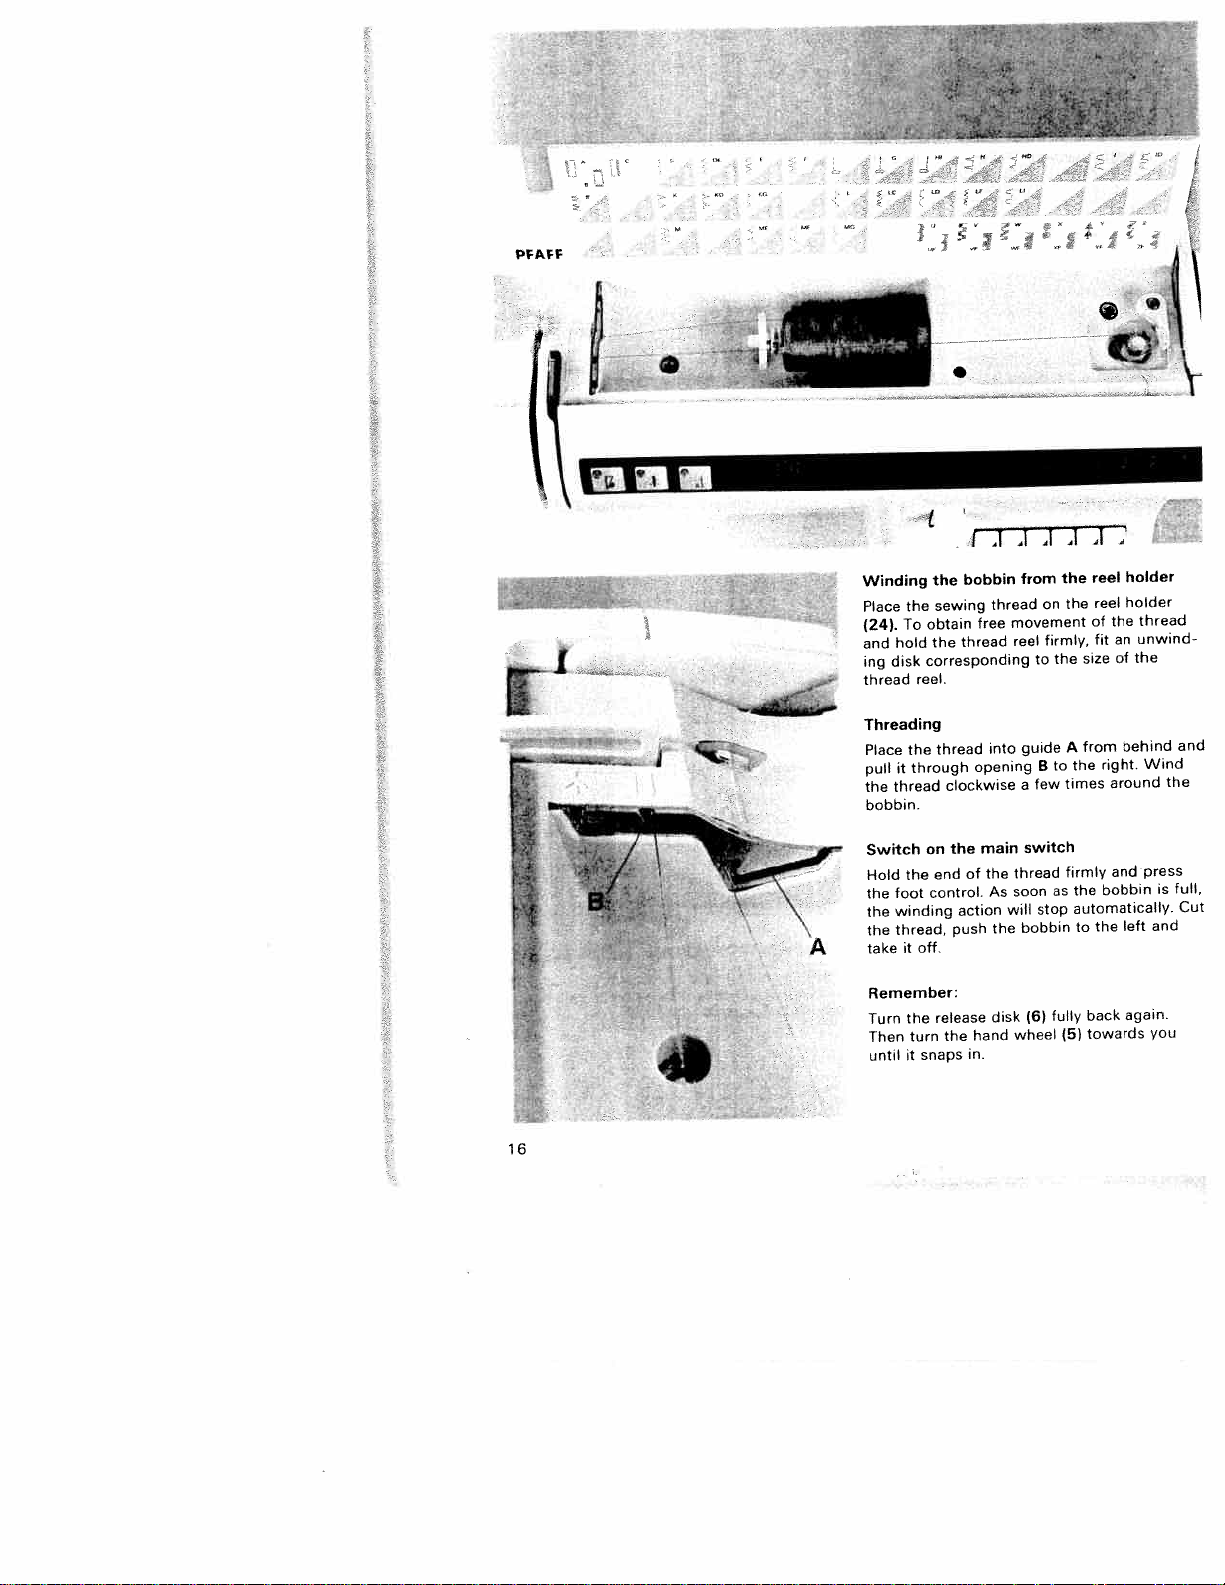
Winding
the
Place
To
(24).
hold
and
disk
ing
thread
Threading
the
Place
it
pull
the
thread
bobbin.
S
bobbin
the
sewing
obtain
thread
the
corresponding
reel.
thread
through
clockwise
I
J
thread
free
into
opening
41
41
from
on
movement
firmly,
reel
the
to
guide
to
B
few
a
41
the
the
A
the
times
A
.41
reel
reel
of
fit
size
from
the
an
of
right.
around
.4
holder
holder
unwind
the
behind
I
thread
and
Wind
the
switch
main
the
on
Switch
press
and
firmly
thread
the
of
end
the
A
Hold
the
the
the
take
foot
winding
thread,
off.
it
control.
push
action
As
the
soon
will
stop
bobbin
the
as
automatically.
the
to
bobbin
left
and
full,
is
Cut
Remember:
Turn
Then
until
the
turn
it
release
snaps
the
disk
hand
in.
(6)
wheel
fully
(5)
towards
you
again.
back
16
Page 19
I
I
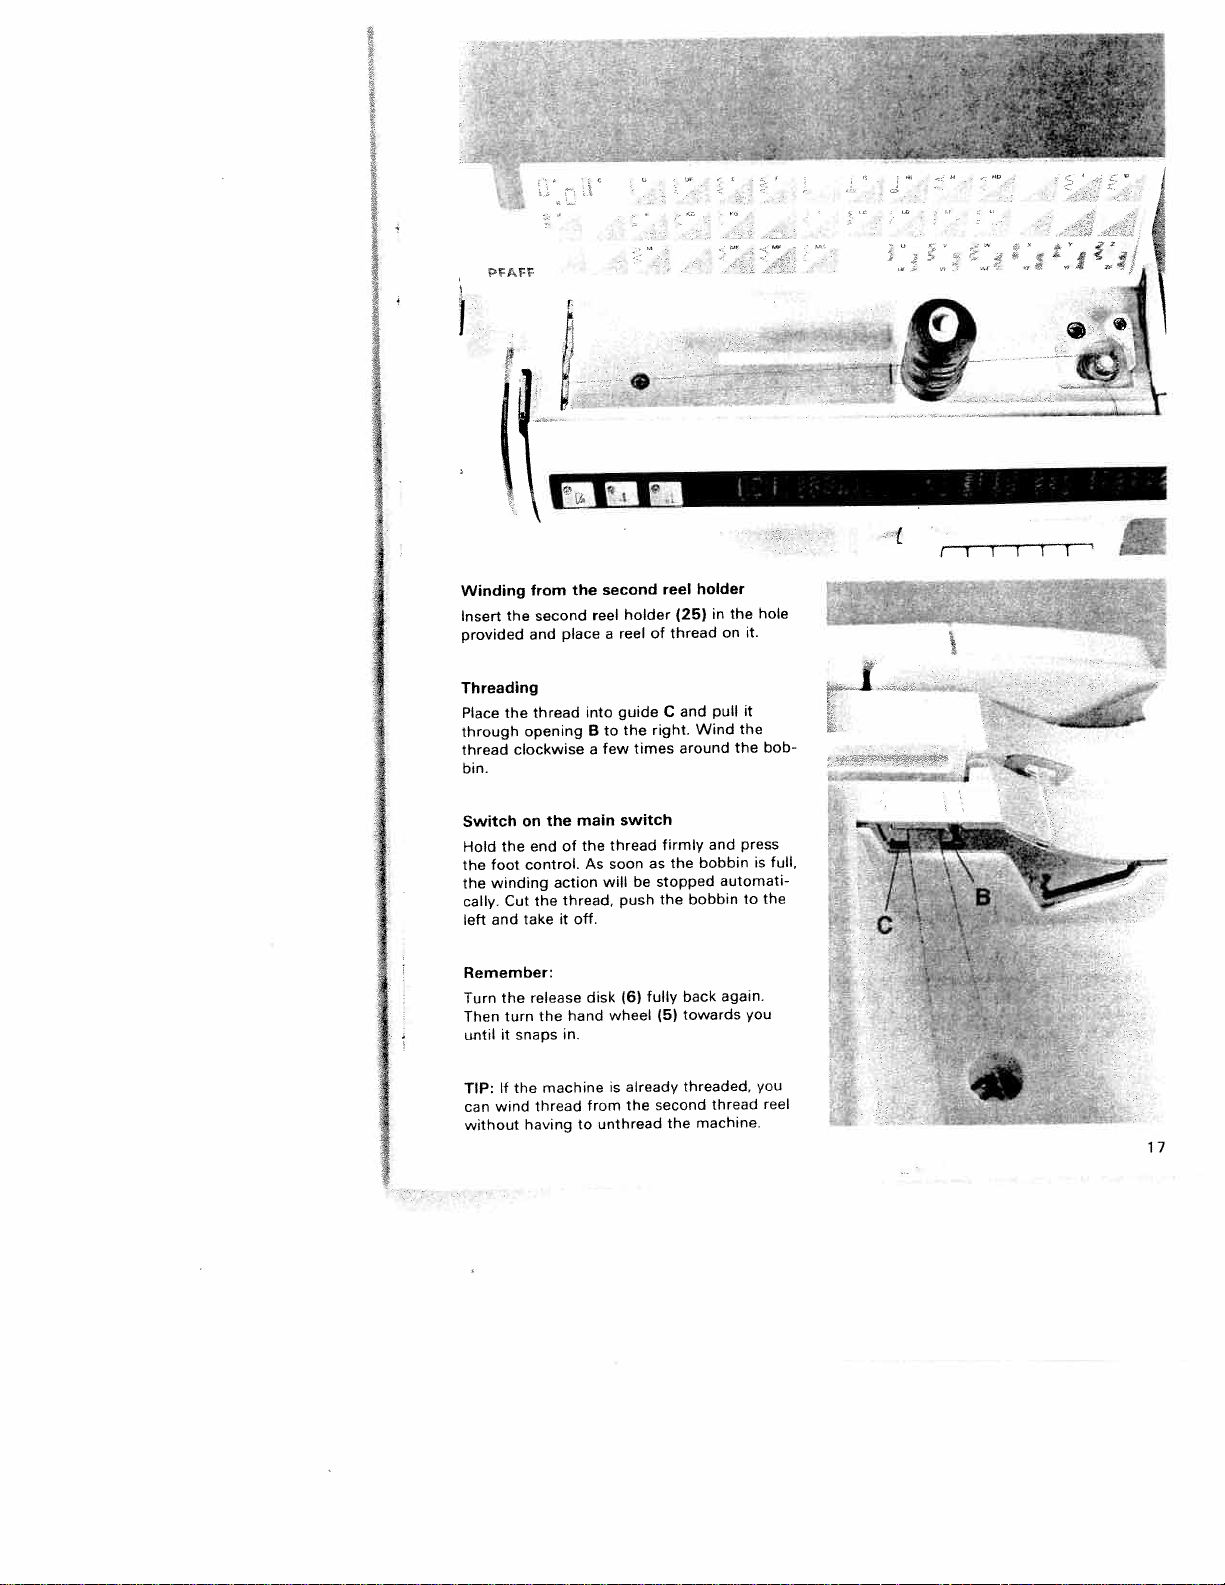
Winding
Insert
provided
Threading
Place
through
thread
bin.
Switch
Hold
foot
the
winding
the
cally.
and
left
3
V
from
second
the
and
thread
the
opening
clockwise
on
the
end
control.
the
Cut
take
the
action
it
the
place
main
the
of
thread,
off.
reel
into
B
a
As
second
holder
reel
a
guide
the
to
few
switch
thread
soon
will
push
times
as
be
reel
(25)
thread
of
C
right.
firmly
the
stopped
the
holder
and
Wind
around
bobbin
bobbin
the
in
on
pull
and
automati
the
the
press
-4
I
I
I
I
I
hole
it.
it
bob
full,
is
the
to
I
Remember:
the
Turn
turn
Then
snaps
it
until
If
the
TIP:
wind
can
without
release
the
machine
thread
having
hand
in
disk
from
to
(6)
wheel
already
is
the
unthread
fully
(5)
second
back
towards
threaded,
the
again.
thread
machine.
you
you
reel
17
Page 20
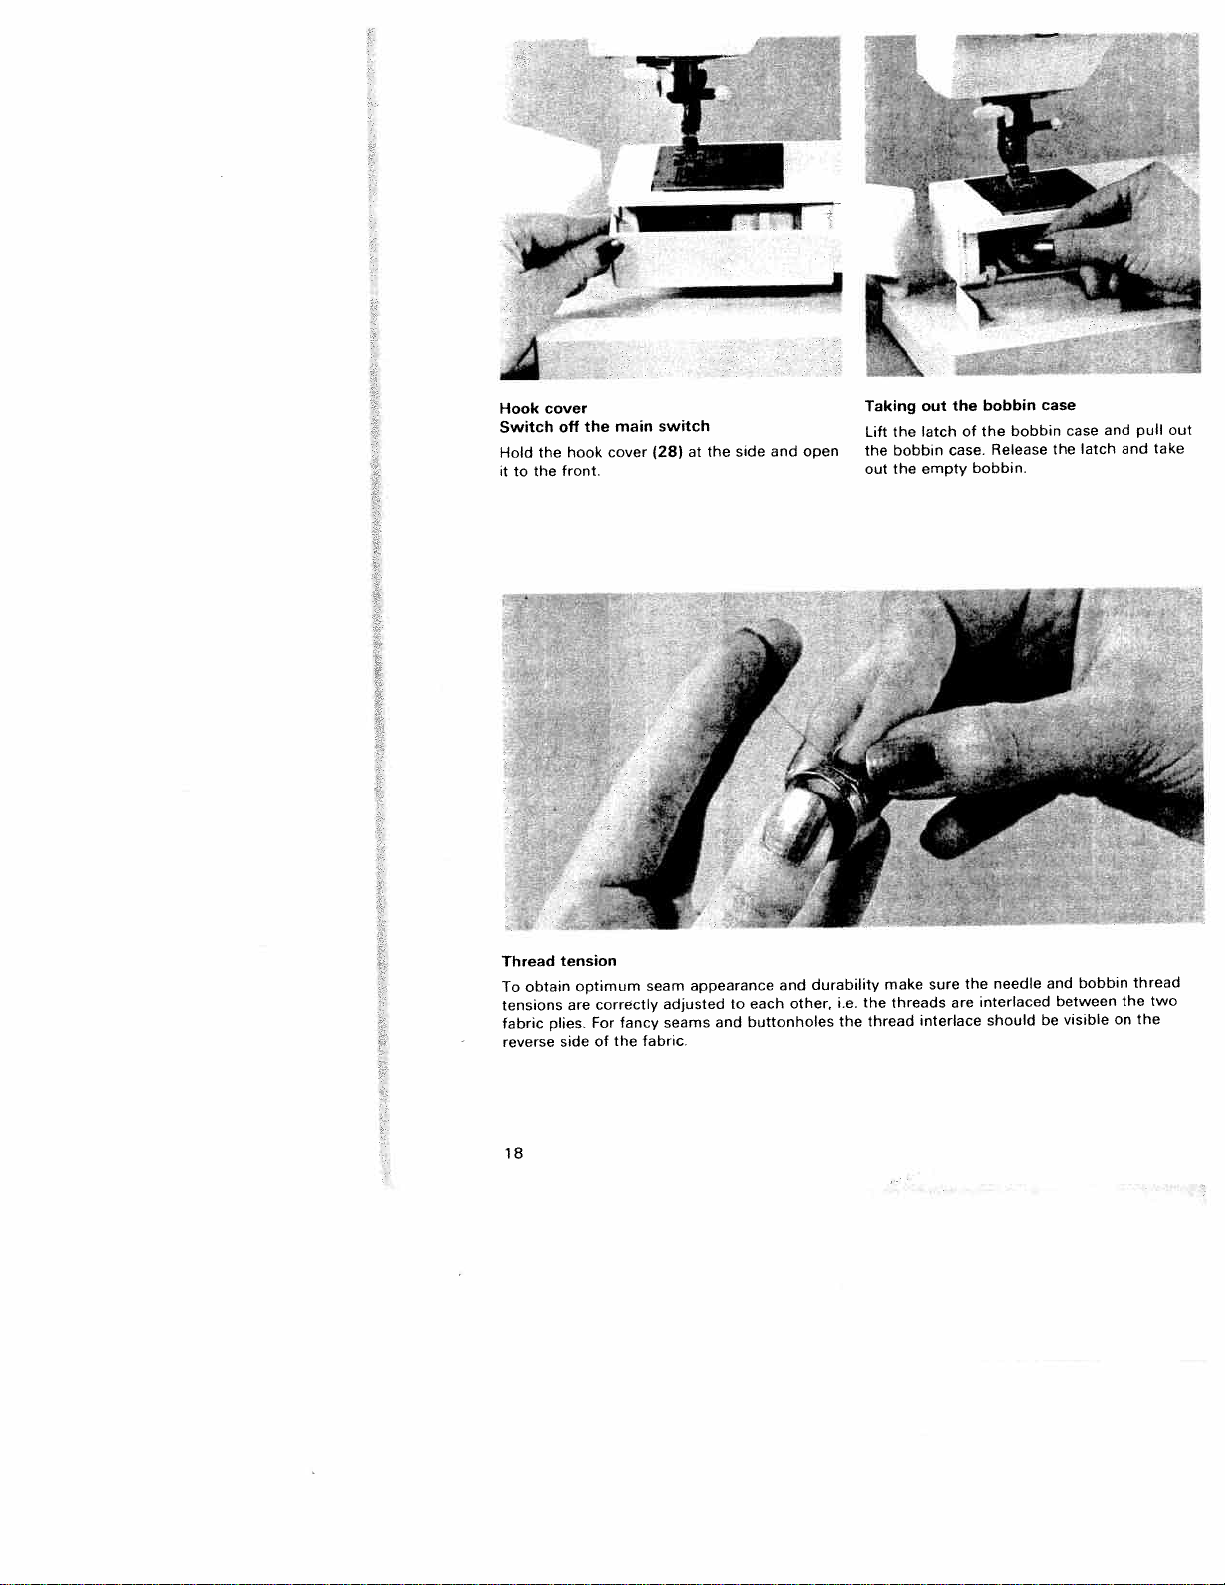
A
Hook
Switch
Hold
it
to
the
cover
the
off
hook
front.
the
main
cover
switch
(28)
bobbin
bobbin
out
latch
empty
the
of
case.
bobbin.
Taking
the
Lift
side
at
the
and
open
the
out
the
the
Release
bobbin
case
the
case
latch
and
and
pull
out
take
Thread
obtain
To
lensions
fabric
reverse
18
tension
plies.
side
optimum
correctly
are
For
of
fancy
the
seam
adjusted
seams
fabric.
appearance
to
and
and
other,
each
buttonholes
durability
i.e.
the
Ihe
thread
make
threads
sure
are
interlace
the
interlaced
should
needle
and
between
be
bobbin
visible
on
the
thread
two
the
Page 21

the
doing
it
you
the
hand
slip
rests
the
full
slot
pull
the
bobbin
sharply
downwards
Inserting
Insert
When
through
until
Check:
When
turn clockwise.
Checking
Hold
your
must
movement.
bobbin
bobbin
so,
A,
in
bobbin
pull
then
the
the
opening
thread,
case
upwards.
in
the
the thread
under
tension
(see
the
thread
the
by
little
a
bobbin
bobbin
tension
thread
The
with
case.
sideways
spring
arrow).
and
bobbin
each
B
must
move
case
hand
Correcting
Turn
decrease
to
Turn
increase
Inserting
Lift
onto
the
Check:
Pull
case
adjusting
screw
cover
pin
bobbin
the
must
the
the
F
of
0
case
bobbin
not
the
the
C
lust
tension.
and
the
tension:
screw
bobbin
bobbin
push
must
thread
fall
C
a
little
case
the
sewing
face
sharply;
outofthe
just
thread
to
bobbin
hook.
little
a
tension.
the
right
Opening
upwards.
the
hook.
case
to
the
to
bobbin
fully
left
E
of
F
19
Page 22
/
(/
PFAFF
D
F;
jA
b
Threading
Switch
the
Raise
wheel
hand
moved
reel
holder
right
the
Now,
using
A
guide
the
thread
downwards.
the
nto
the
to
take-up
into
pulled
pass
Then
righthand
F.
guide
Finally
of
one
thread
To
page.
the
off
presser
the
to
size.
and
through
righthand
the
the
threading
pass
two
the
the
the
until
(24)
both
under
the
needle
main
top.
Pull
lever
take-up
thread
thread
thread
needle,
foot
the
and
hands,
the
threading
switch.
(20).
lifter
the
pull
guide
threading
thread
The
lever
downwards
and
from
guides
please
lever
thread
the
around
slot
thread
from
behind
the
refer
take-up
Place
fitanunwinding
thread
the
(19).
slot
(32).
Turn
(19)
thread
hook
slot
and
left
again
side
to
on
disk
stop
upwarc
must
thread
behind
the
the
the
D.
(17)
to
has
into
in
of
Pa
ar
E
b
righ
th
nexi
a
V
/
20
Page 23
/
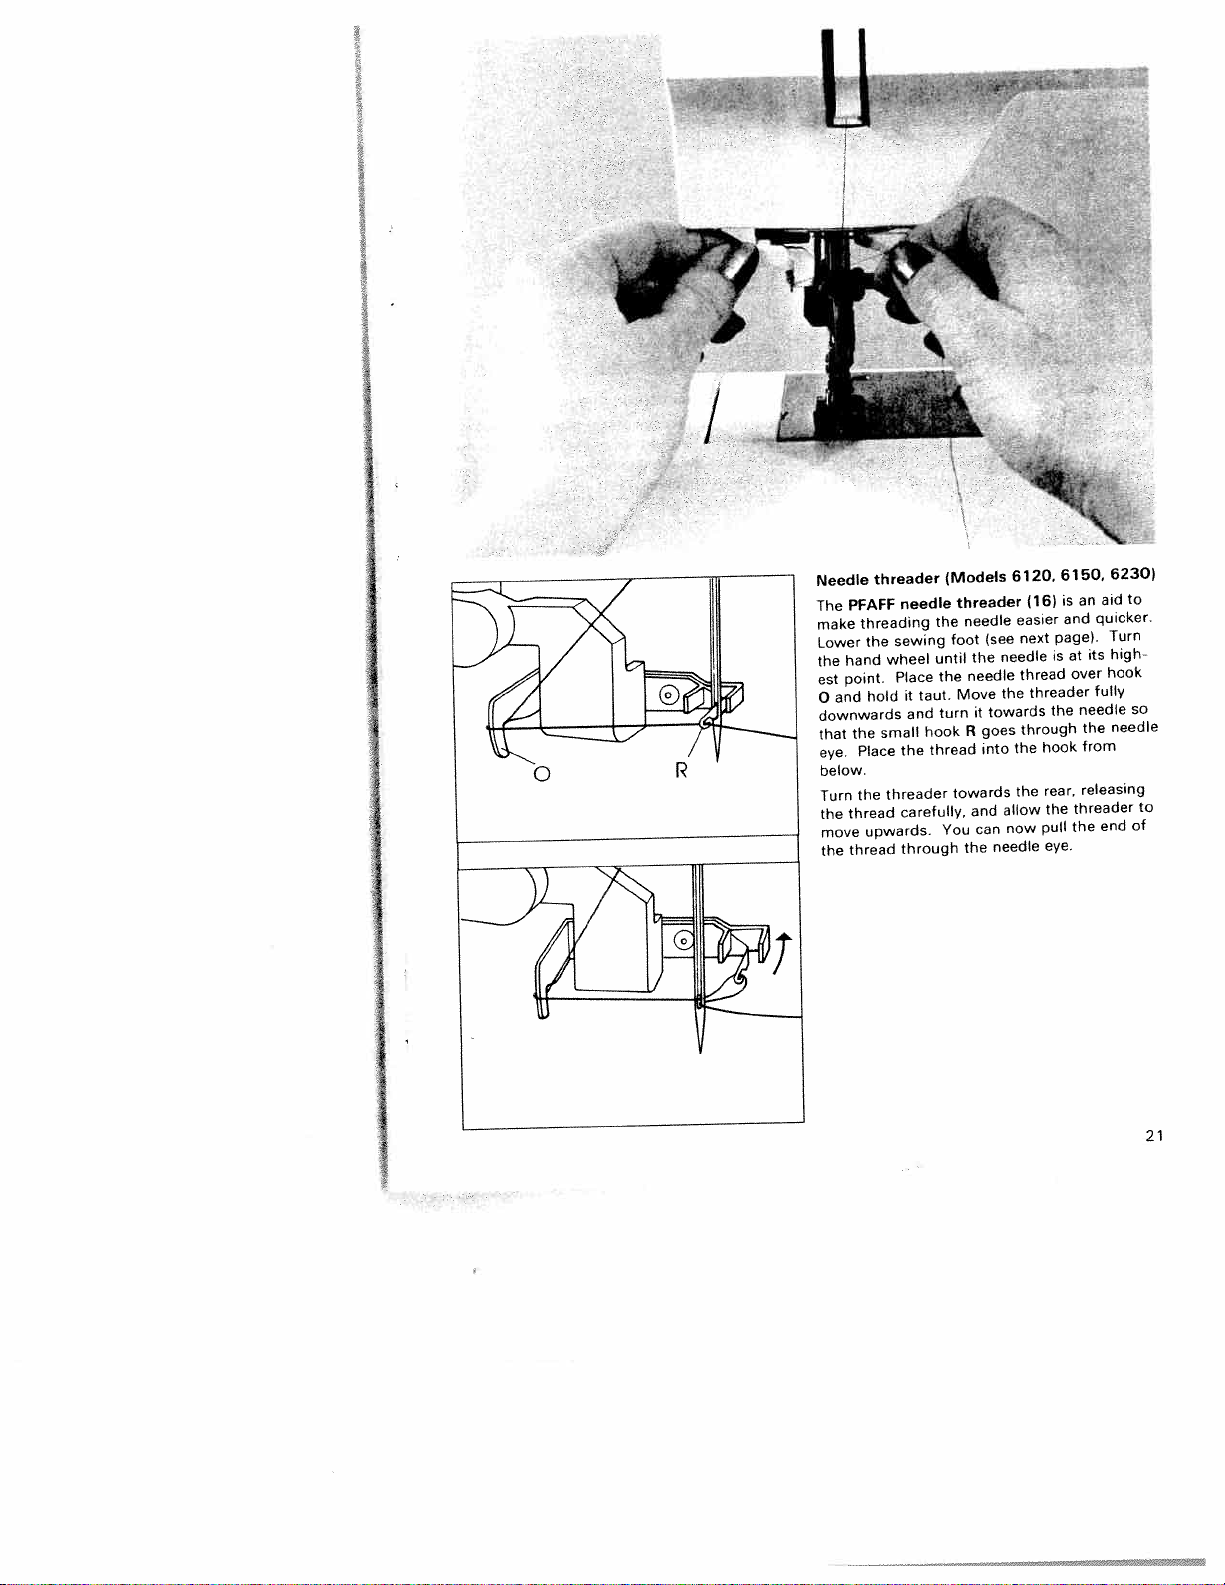
Needle
PFAFF
The
threading
make
Lower
hand
the
point.
est
and
o
downwards
the
that
Place
eye.
below.
the
Turn
thread
the
move
thread
the
threader
needle
sewing
the
wheel
Piace
hold
small
the
threader
carefully,
upwards.
through
it
and
taut.
hook
(Models
the
until
the
turn
thread
You
threader
needle
foot
the
needle
Move
it
R
towards
and
can
the
(see
needle
the
towards
goes
into
allow
needle
6120.
easier
next
thread
through
the
the
now
(16)
page).
is
threader
the
hook
rear,
the
pull
eye.
6150.
an
is
and
at
over
needle
threader
the
6230)
aid
quicker.
Turn
high
its
hook
fully
needle
the
from
releasing
end
to
so
to
of
21
Page 24
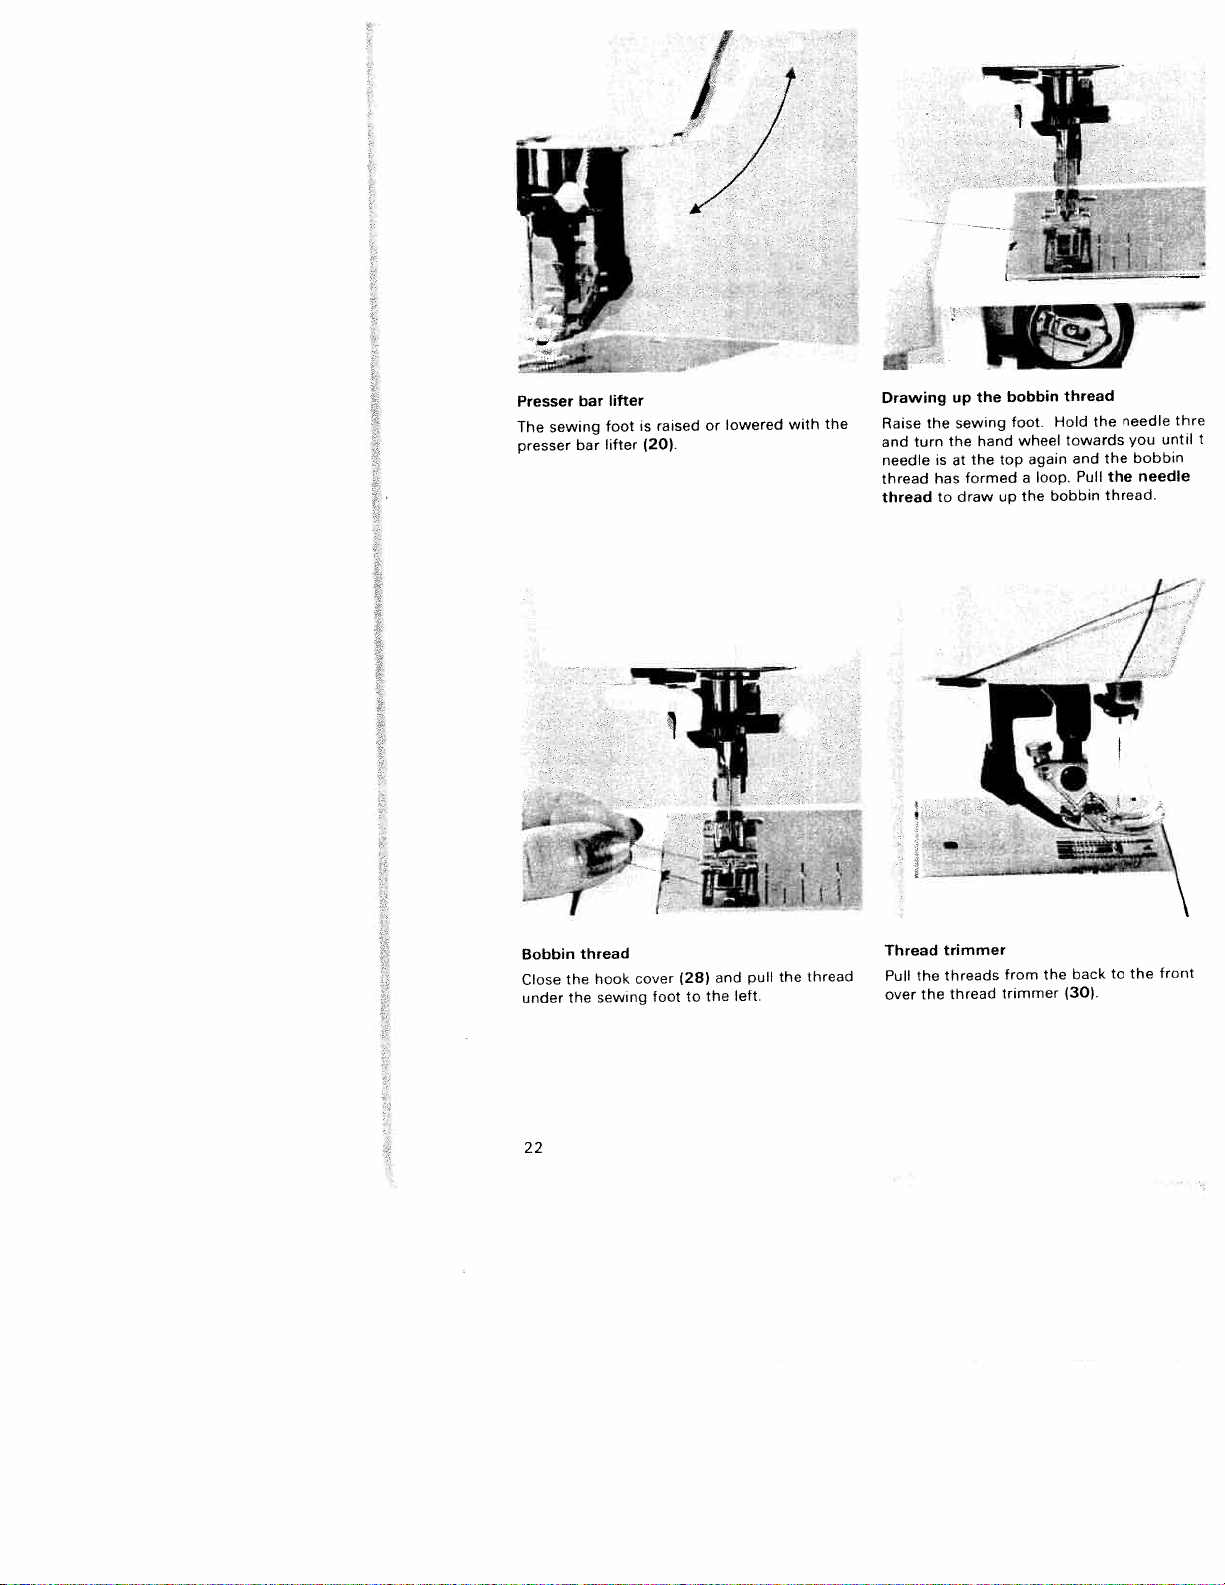
Presser
The
presser
sewing
bar
bar
lifter
foot
lifter
is
(20).
raised
I,
or
lowered
with
the
Drawing
Raise
turn
and
needle
thread
thread
the
is
has
to
up
sewing
the
at
formed
draw
the
hand
the
bobbin
foot.
top
up
wheel
again
loop.
a
the
thread
Hold
towards
and
bobbin
Pull
the
the
the
thread.
needle
you
bobbin
needle
thre
until
—r
thread
Bobbin
the
Close
under
the
22
hook
sewing
cover
foot
(28)
to
the
and
left.
pull
the
thread
Thread
Pull
over
the
the
trimmer
threads
thread
from
trimmer
the
back
(30).
front
the
to
Page 25
U
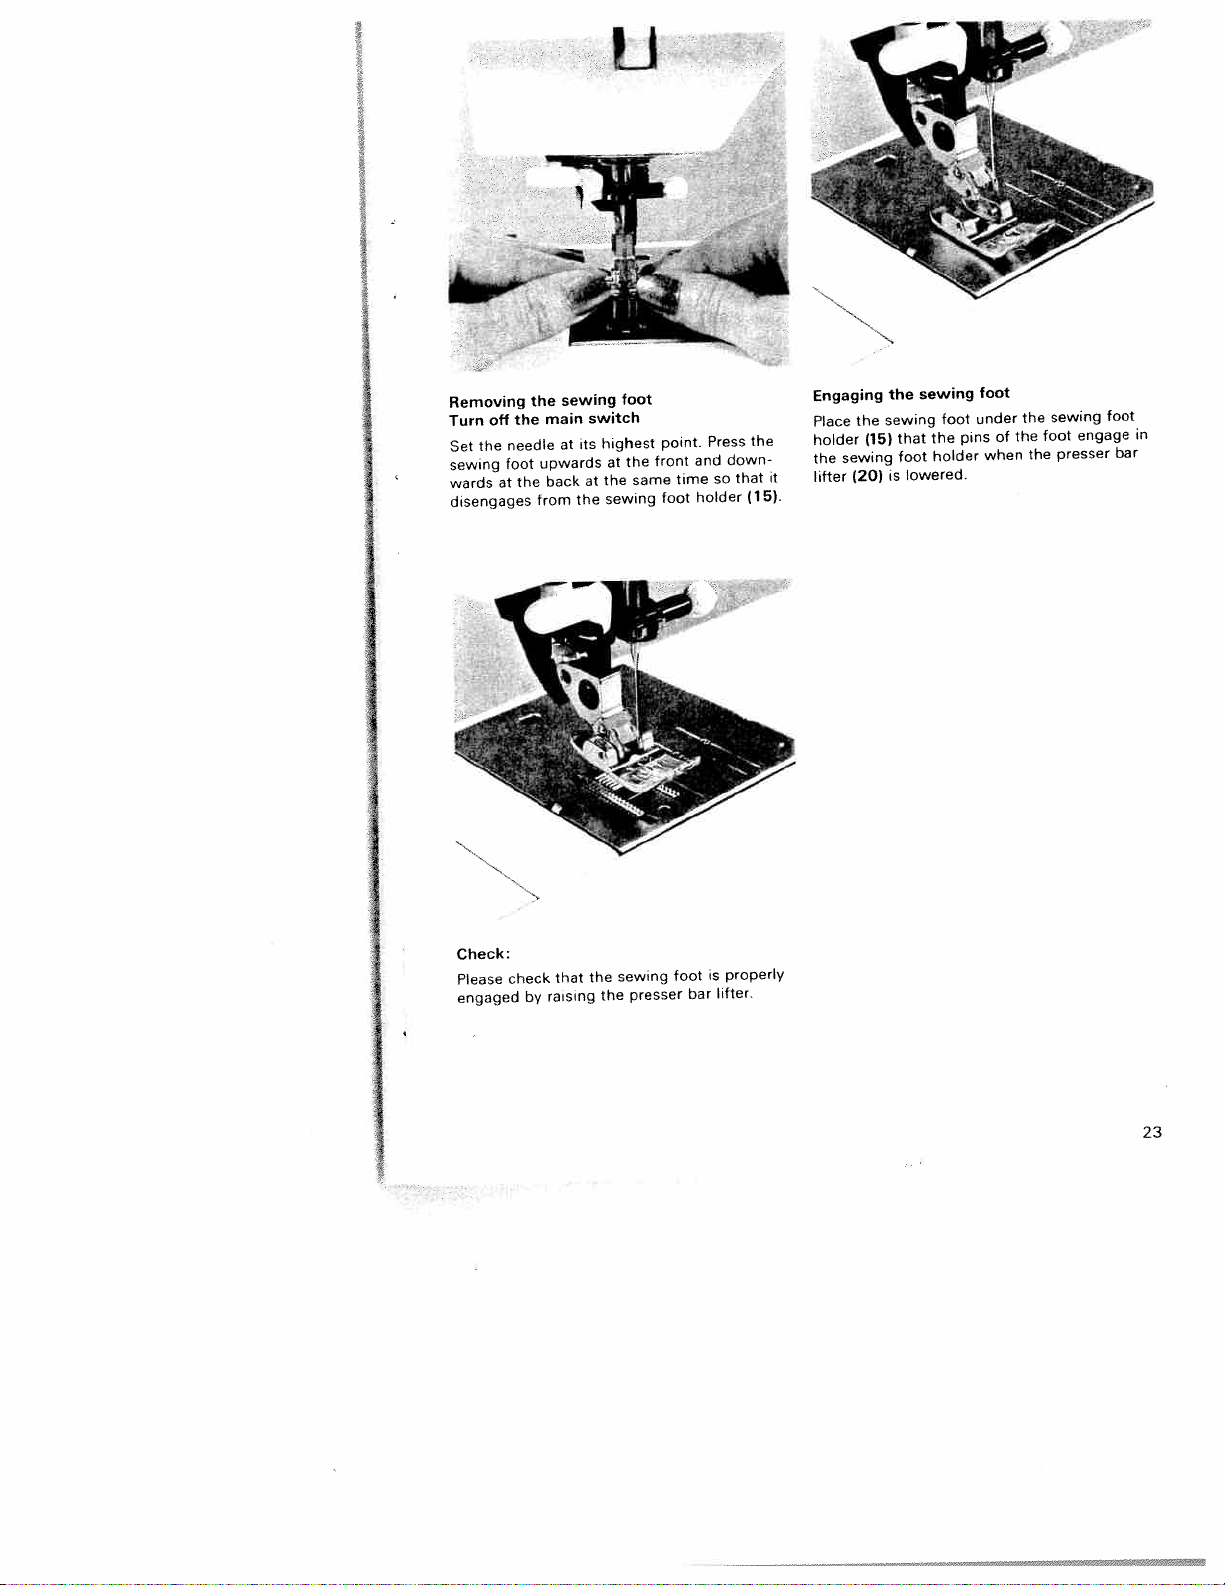
Removing
off
Turn
the
Set
sewing
at
wards
disengages
Check:
Please
engaged
the
needle
foot
the
check
by
the
main
upwards
back
from
raising
sewing
at
that
its
at
the
switch
highest
at
the
sewing
the
the
foot
the
same
sewing
presser
point.
front
toot
time
foot
and
holder
bar
Press
so
properly
is
lifter.
down
that
the
(15).
foot
the
holder
pins
foot
under
when
the
foot
the
of
the
presser
engage
in
bar
foot
sewing
sewing
the
(15)
sewing
(20)
the
sewing
that
foot
lowered.
is
Engaging
Place
holder
the
lifter
it
23
Page 26
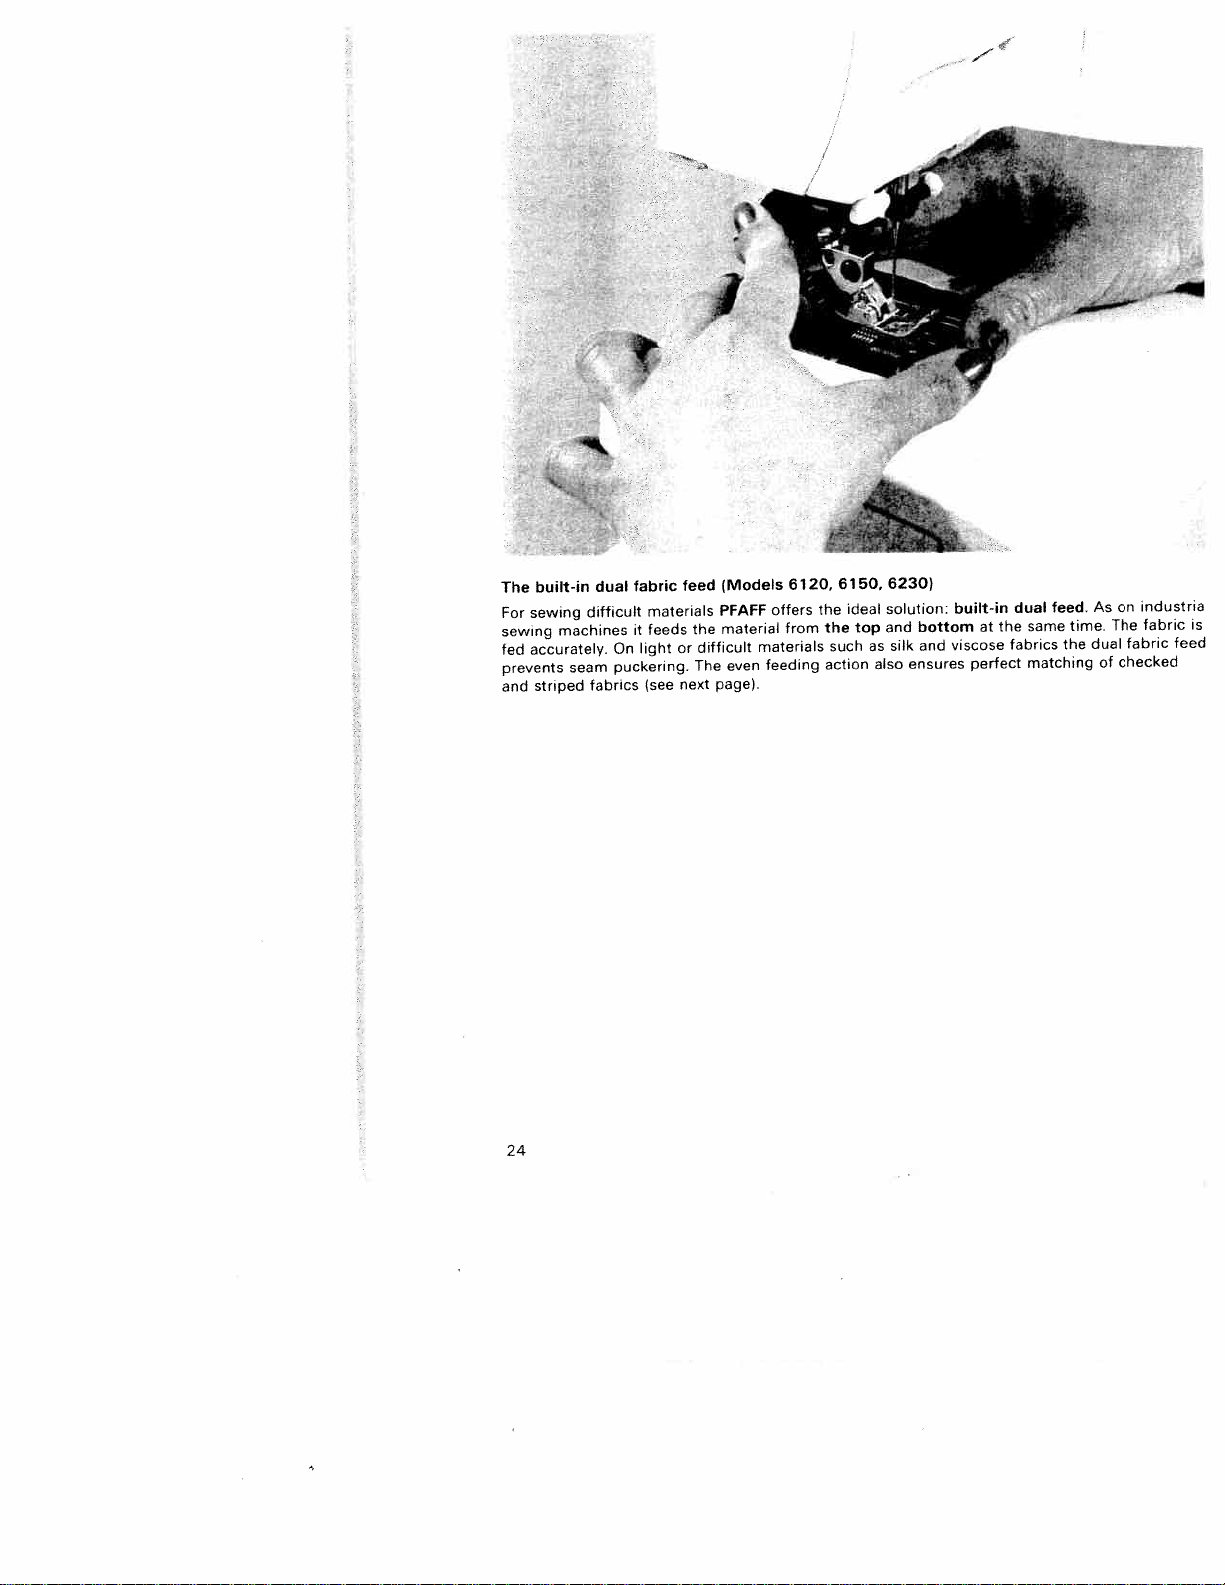
The
For
sewing
sewing
accurately.
fed
prevents
and
24
built-in
machines
striped
seam
dual
difficult
On
puckering.
fabrics
fabric
materials
it
feeds
light
(see
feed
or
next
PFAFF
the
difficult
The
page).
(Models
material
even
6120,
offers
from
materials
feeding
the
the
such
action
6150,
ideal
top
solution:
and
as
also
6230)
silk
bottom
and
ensures
built-in
viscose
perfect
feed.
the
time.
As
dual
of
The
fabric
checked
fabric
is
feed
dual
same
the
at
fabrics
matching
industria
on
Page 27
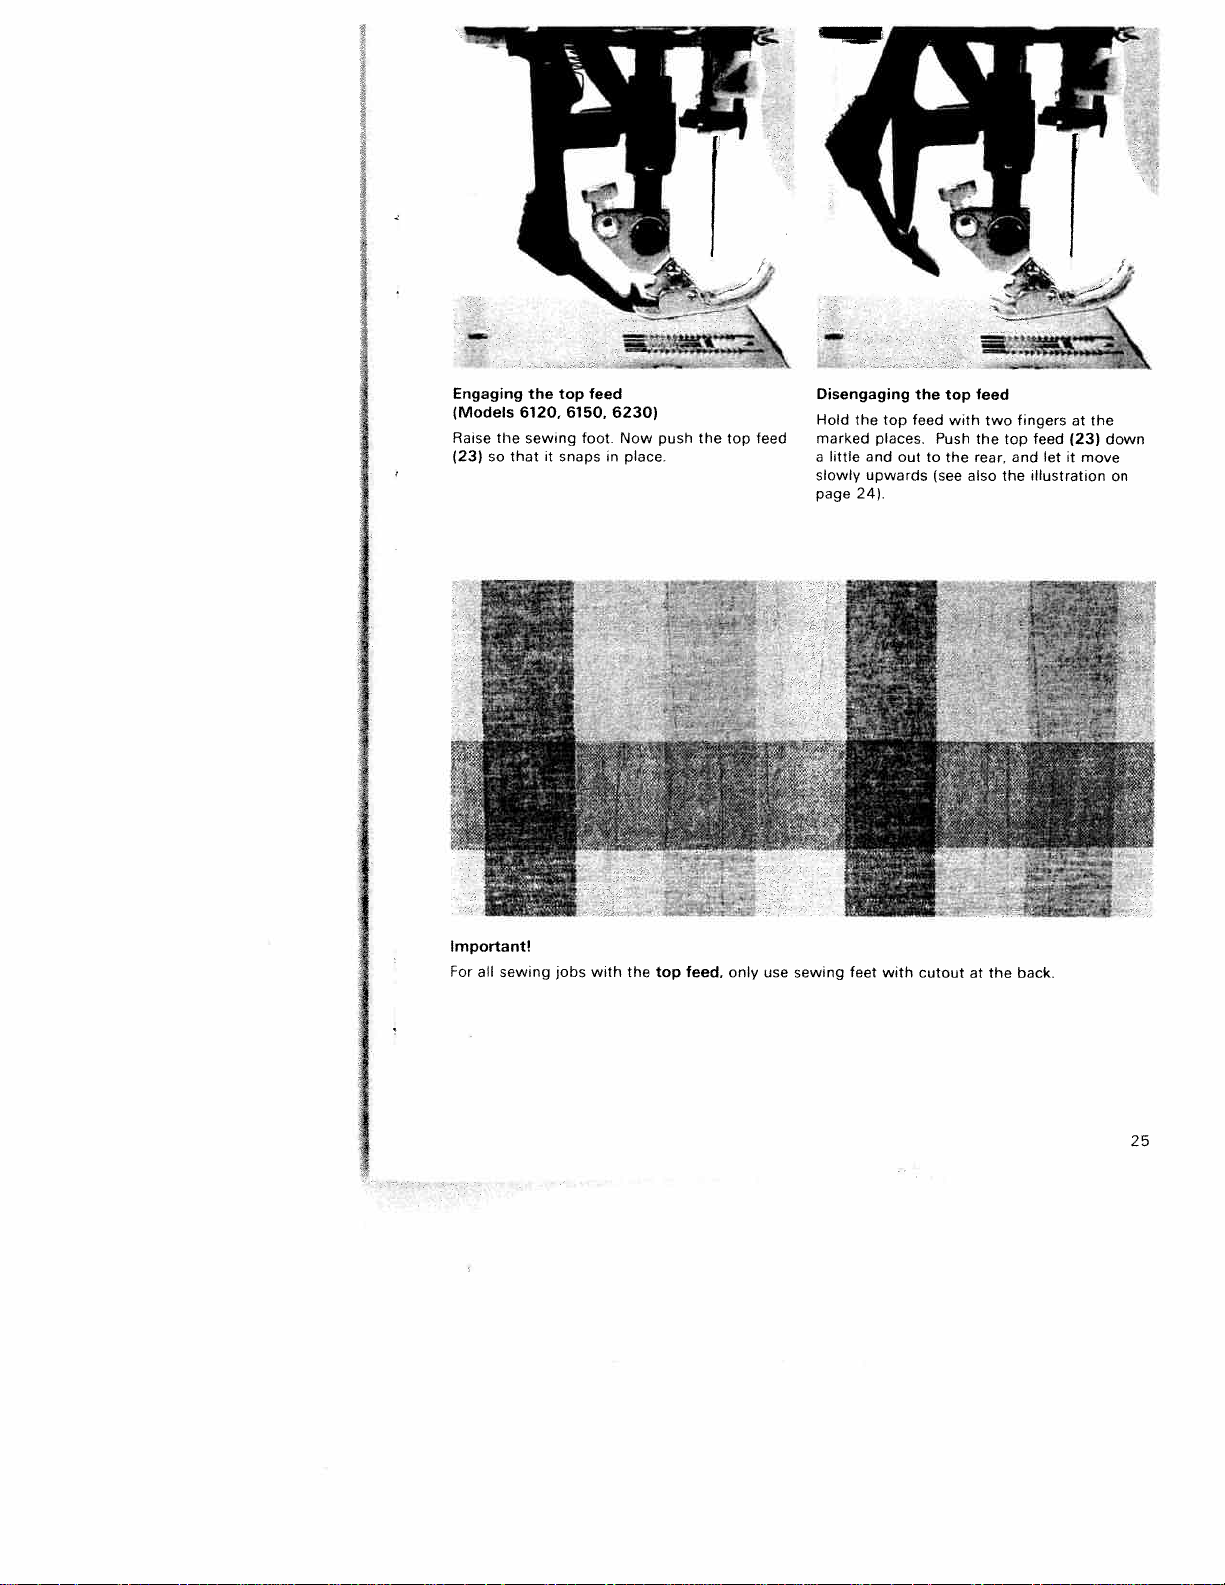
Engaging
(Models
Raise
the
(23) so
Important!
For
all
the
top
6120.
sewing
that
it
snapsinplace
sewing jobs
6150.
foot.
feed
with
6230)
Now
the
push
top
the
feed,
top
only
feed
use
Disengaging
Hold
marked
a
slowly
page
sewing
little
the
and
upwards
24(.
feet
top
places.
out
with
the
feed
to
cutout
Push
(see
top
with
the
feed
the
rear,
also
at
two
the
fingers
top
and
the
back.
at
feed
(23)
let
it
illustration
the
down
move
on
25
Page 28

Changing
Switch
To
the
[A
26
the
downa
To
Face
insert
go.
screw
remove:
needle
Fixing
rds.
insert:
to
the
Hold
(22)
off
the
the
the
main
Lower
its
at
screw
The flat
rear.
needle.
needle
firmly.
needle
switch
highest
(22)
Lower
pushing
the
side
and
and
sewing
point.
pull
of
A
the
it
tighten
foot
the
the
sewing
up
Now
needle
as
the
and
loosen
needle
foot
far
fixing
set
out
must
dnd
asitwill
Page 29

I
I
I
Setting
the
Set
the
required
tension
(18)
The
normal
embroidering.
between
2
need’e
using
setting
and
amount
darning
3.
thread
mark
for
A
on
A
sewing
and
tension
the
needle
is
4
buttonhole
to
J
thread
5
sewing
I
For
Lowering
For
certain
dog
has
hook
cover
right.
the
sewing
tobedropped.
and
Now
the
feed
press
feed
dog
work,
dog
slide
e
To
is
darning,
g.
this,
do
B
fully
lowered.
open
to
the
the
feed
the
27
Page 30

PFAFF
tiptr
L
Reverse
machine
The
reverse
sewing
in
sews
kept
is
(21)
key
Li
1
reverse
pressed.
11A)
longasthe
as
AA
Stitch
You
to
o
knob,
red
length
can
set
mm
6
turningtothe
by
stitch
fl1
knob
(11)
length
stitch
the
infinitely
length.
with
the
marking
stitch
for
from
length
the
Al
desi
You
ween
density
range.
the
28
will
the
farther
find
for
The
figure
sewing
stitch
you
the
symbol
arid
0
buttonholes
becomes
turn
1.
towards
buttonhole
optimal
The
more
O
in
this
is
concentrated
bet
stitch
You
far
with
as
must
it
a
will
grey
the
turn
to
go
background.
stitch
sew
the
length
stretch
knob
(11)
stitches
as
Page 31

PFAFF
T—
‘
4
I
tiptronic
A
1
A
A
A
6230
Pushbutton
Setting
Under
table
tions.
stitches
Each
program
can
find
lighted
right
button
ted
and
releases
key
G
again
ced
by
the
with
On
display.
on
the
half.
utility
all
model
are
on
the
the
models
width
controls
stitches
id
(26)
the
stitches
6230
additionally
has
the
bushbutton
is
pressed
machine
keys
that
6150
of
you
been
the
the
is
have
stitches
can
ready
and
find
and
the
most
illustrated
given
controls.
program
been
6230
stitch
a
to
can
the
program
combina
important
on
letter
is
sew.
activated.
is
pressed
be
the
that
If
selec
Key
redu
you
the
B
If
_
j
PFAFF
1
)
.
4
j
I
tiptronic
.4
4J
6230
Setting
All
the
stretch
stretch
and
turn
edge
Key
B
been
key
the
G
stitches
Important:
stitches
fancy
i.e.
turned
stretch
stitches
stitches,
material.
the
of
releases
activated.
is
pressed
can
with
stitch
to•
stitch
the
be
When
models
knob
stitches
with
i.e.
Press
grey
the
keys
On
models
again
reduced
sewing
(7)
a
they
length
area.
6150
must
grey
the
that
the
by
background
are
suitable
selected
knob
have
6150
width
half.
with
and
be
(11)
already
and
of
utility
6230
switched
key
right
6230
the
are
for
down
to
if
the
off,
29
Page 32

AIAAA
and
Utility
striking
By
combinations
The
stitch
utility
sewing
the
All
stitch
the
program
keys
that
stretch
two
in
length
range
combinations
table
already
are
or
the
several
knob
in
stitch
utility
can
in
or
the
activated
combinations
you
keys
range
stitch
eitherbeset
stretch
the
illustrated
are
You
lid.
with
can
can
range
key
m
in
rele
B.
PFAFF
I
stitch
Fancy
(Models
Each
Select
and
rect
length
30
fancy
turn
letter
a
fancy
is
6150
the
between
knob
and
stitch
stitch
fancy
under
tiptronic
6230)
given
been
has
the
from
stitch
marking.
0,5
the program
knob
1
and
mm
(7)
The
6230
MdinGem..’y
letter.
a
to
the
stitch
table
cor
Fancy
(Models
Pattern
pressing
stitch
The
10.
mm.
For
knob
grey
stitches
6150
combinations
the
knob.
stitch
stretch”
upwards
area.
PFAFF
and
and
keys
will
You
length
you
as
tiptronic
combinations
6230)
can
together
find
is
between
turn
must
far
as
it
0—
be
the
will
6230
produced
with
setting
the
go,
the
0,5
stitch
i.e.
fancy
on
and
into
by
pa
1
lengi
Page 33

I
I
I
I
Function
The
tiptronic
1.
Sewing
When
key
green
diode
now
sews
again
the
machine
2.
Needle
Each
time
automatically
key
(2)
is
needle
now
there
is
an
the
key
again
the
needle
keys
(Model
has
slowly
(1)
slow
lights
at
half
green
diode
sews
at
full
position
sewing
goes
pressed
remains
interruption
the
diode
automatically
three
sewing’
up.
speed.
speed
up/down
is
interrupted
to
its
the
diode
in
6230)
function
The
If
the
extinguished
is
highest
the
material
sewing.
in
is
extinguished
goes
keys.
is
pressed
sewing
keyispressed
again.
the
position.
lights
up.
If
again.
up
machine
and
needle
The
each
you
and
the
the
If
time
press
I
it
3.
Tacking
If
key
lights
stitch
key
is
together
(3)
,,tacking”
up.
when
pressed
with
The
machine
the
again
the
is
foot
function.
pressed
now
control
the
diode
the
only
is
activated.
is
green
diode
sews
one
If
extinguished
the
31
Page 34

Utility
stitches
and
practical
sewing
Sewing
General
chart
sewing
Nonelastic
Elastic
Overlock
Covering
stitches
stitches
stitches
Buttonhole
Hems
with
Smocking
Gathering
Darning
Inserting
zippers
Rollhemming
Sewing
lace
Shelledging
stitches
twin
aids
needle
page
pages
pages
pages
pages
pages
pages
page
page
pages
pages
pages
page
page
Page
48
48
56
57
58
34
35
36
40,
42,
44,
46,
49,
51
54,
—
39
45
43
45
47
50
—
53
55
33
Page 35

Explanation
following
The
mended
relevant
These
instructions
selected
the
choice
The
needle
the
sewing
switched
a
b
prog
.......
--
n
settings
sewing
charts
carried
is
on
Models
Model
Program
Stitch
Stitch
Top
disengaged
Needle
Number
of
the
charts
also
that
programs:
of
the
thread
or
off.
length
width
feed
sewing
show
that
you
operations.
provide
necessary
are
sewing
tension
with
out
—
6120
6110
pattern
in
in
engaged
off
thread
the
of
chart
the
require
you
foot,
and
the
6230
mm
mm
0
tension
sewing
on•
recom
with
when
the
whether
top
foot
for
further
sewing
setting
feed
the
of
the
34
Page 36

Needle
In
needle
correctly
setting
Check
The
the
If
the
fabric,
too
needle
To
adjust
refer
order
interlace
middle
interlace
this
tight.
thread
to
and
for
the
page
thread
to
obtain
adapted
utility
tension
of
means
If
it
the
bobbin
of
the
lies
lies
tension
bobbin
19.
tension
perfect
thread
to
stitches
using
the
two
two
on
the
on
each
fabric
the
needle
the
is
thread
sewing
tensions
other.
is
a
wide
threads
top
reverse
set
3
to
plies.
side
thread
too
tension,
The
5.
zigzag
must
side,
loose.
results
must
of
the
tension
please
normal
stitch.
lie
the
in
the
be
is
Topstitching
With
programs
needle
always
edge
for
topstitch
guide
the
needle
plate,
guide
is
with
fixing
position
guide
topstitching
at
a
fabric
or
inserted
screw
the
wider
use
G
and
in
such
sewing
along
into
F.
work.
width
edge
hole
the
HI
a
you
way
foot
than
guide
guide
C
If
and
can
that
along
you
this,
8.
change
you
wish
marks
The
is
secured
the
simply
edge
can
fabric
to
on
the
the
I.
Sewing
To
the
fabric
under
ensure
seam
of
the
aid
correct
we
the
sewing
for
thick
feeding
recommend
same
thickness
foot
seams
to
support
at
the
placing
as
beginning
a
piece
the
work
it.
of
of
35
Page 37

prog
HLi
0/1
3
C’
—
Taste3
a
b
—
—
—
-
-
-
Basting
With
ment
foot
stitch.
press
Lower
—
top
Place
—
Sew
—
rear
Repeat
—
finish
TIP:
shifting,
basting
baste
Then
feed.
key
before
control
For
the
feed.
one
by
To
with
you
stitch
(3)
trying
the
each
foot
bottom
the
fabric
the
stitch,
the
this
work.
the
prevent
insert
direction,
long
do
(Mode)
basting
machine
further
control
required
many
as
the
dress
straight
need
not
on.
it
feed
under
then
material
Light
6230)
you
stitch
each
pull
amount.
times
pins
fabrics
to
can
When
will
time,
and
sewing
the
the
plies
crosswise
stitches
lower
baste
you
make
only
you
disengage
fabric
you
as
from
are
(6
the
press
have
foot.
easier
mm).
bottom
a
need
to
increased
collar
with
stitch
G
needle
sewing
the
or
sewing
of
three
position
key
position
position
adjusting
make
is
the
position.
to
up
jobs
needle
needle
on
B.
in
on
the
sure
basic
6
can
in
the
it
mm
position,
zipper.
a
positions.
the
middle
the
position
in
is
straight
The
as
done
be
left
right
the
stitch
required.
e.g.
You
release
—
—
key
—
of
highest
stitch
length
easier
topstitching
have
key
H
needle
the
with
by
a
the
all
G
and
position.
can
I
Straight
the
Program
middle
be
Some
gar
one
to
changing
the
a
choice
Needle
the
to
keys
Needle
Needle
to
When
please
the
to
36
Page 38

i
I
I
I
prog
Z*j
J6j_j35IO3J
Zigzag
stitch
With
keys
of
the
zigzag
combining
additional
always
make
material
and
D,
the
widths
sure
over
and
E
stitches
keys
When
the
the
F
DIE
you
from
or
needle
edge
can
alter
2
to
E/F
serging
goes
alternately
you
L_____
the
width
6
mm.
By
obtain
the
edge,
into
the
For
serging
No.
3
lies
over
fabric
smooth
The
edge
along
guide
important:
key
F.
is
edge
edge
with
very
pin
seams.
of
adjusting
difficult
useful.
C.
In
the
guide
Only
thus
this
cutting
B.
use
materials,
While
preventing
way
you
has
You
can
screw
the
blind
sewing,
can
to
adjust
A.
blind
curling
be
stitch
the
sew
guiding
this
stitch
thread
of
beautiful
edge
foot
foot
the
with
37
Page 39

Blind
Blind
sewing
Serge
—
Fold
—
Now
—
edge
Now
—
so
guide
When
—
must
stitch
stitch
by
the
unfold
protrudes
place
that
the
B.
the
only
hand
edge
the
H
edge
needle
pick
best
is
is
the
the
crease
inwards
suited
unnecessary.
the
of
again
hem
about
by
under
fabric
line
enters
one
up
hem.
by
runs
fibre
the
for
the
half
invisible
so
an
the
along
crease
of
hem
that
sewing
the
width.
inch.
edge
hems;
the
line
fabric.
hem
foot
it
the
If
adjust
screw
Program
elastic
The
time,
edge.
stitches
edge
A.
materials
hem
i.e.
are
guide
-J
-J
Th<
MF/Stretch
sewn
is
not
it
is
visible
by
B
(except
and
necessary
on
turning
is
a
serged
the
—
blind
model
face
adjusting
at
serge
to
stitch
6110).
the
side,
same
the
for
fabi
38
Page 40

a!
U
I
prog
I
E
4
I
Li
23!—
Sewing
—
Insert
—
Place
button
left.
on
the
a
match
and
buttons
sewing
sew
with
foot.
between
it
on
the
as
stems
holes
described
of
the
the
on
Sewing
With
orogram
hole
buttons
—
Remove
dog.
—
Turn
tion
left
—
Now
now
is
-
Now
needle
button.
Then
automatically
tion
-
—
Now
that
jiittnii
the
the
hole
lower
sew
release
sew
the
on
button
held
also
needle
buttons
with
the
hand
in
the
the
on
with
E
sewing
by
the
enters
with
goes
a
you
no
wheel
so
button.
presser
the
button.
few
enters
can
problem
foot
towards
that
shank
the
key
into
stitches.
sew
the
bar
right
B
the
in
and
of
Make
and
the
on
at
lower
you
needle
lifter;
the
hole
the
left
Make
left
two
all
foot.
sure
hand
and
enters
the
in
needle
hole
and
the
that
the
sure
four-
feed
posi
button
posi
of
the
the
the
—
Remove
fabric
Wrap
knot
ii.
apart.
the
the
stem
match
with
and
sewing
pull
the
thread
button
and
and
39
Page 41

Stretch
This
where
trouser
length
triple
program
great
seams.
knob,
straight
is
used
strength
The
the
longer
stitch
for
is
farther
sewing
needed,
you
stitch
the
all
e.g.
turn
seams
inside
the
length.
stitch
a
Stretch
The
elastic
suitable
Serge
—
Fold
—
Topstitch
—
1
prog
DFFSTc
E
D
stretch
and
the
F
triple
decorative
for
the
hem
1”
StrpcP
triple
hems
edge
the
zigzag
zigzag
inwards
hem
on
of
46
6
4
stitch
seam
T-shirts
the
from
--
stitch
hem.
at
the
•
which
the
is
and
required
face
35
5
3
highly
a
very
is
underwear.
side.
jJ
01
0
width.
40
Page 42

III
I
on
part
with
them
or
the
I
1-2,5
high
elastic
old
fabric
tape,
in
tape
trousers
I
I
elasticity
elastic
with
prepared
or
place.
elastic
overlapping
with
prepared
6
tapes,
place
elastic
the
tape
6
in
stitch.
elastic
edge
•
this
e.g.
close
mm
this
underneath,
it
stitches.
prog
1
a
M
bIMI125161._13-510I
[
Elastic
stitch
Owing
for
—
-.
of
sew
On
sewn
stitch.
sewing
Cut
edge.
Gather
stitches.
Push
the
elastic
pin
it
Sew
the
skirts
to
off
the
firmly
it
over
onto
its
the
the
on
elastic
stitch
on
long
way
Leave
a
with
3
5
is
underwear.
to
the
straight
between
the
little
tape
is
elastic
I
I
used
and
0/1
and
ends
I
I
Stretch
I>
I
6
prog
a
M
bMIStretchI6I_I35I0I
Honeycomb
Honeycomb
decorative
hems
—
Fold
overstitch
on
underwear
the
stitch
stitch
hemming,
edge
of
it.
is
used
and
and
the
III
for
is
T-shirts.
hem
•
very
over
elastic
I
3-5
and
suitable
double
I
0/1
for
and
41
Page 43

N
N
N
N
What
is
knitted
For
models
selection
of
plies
They
tion.
seams,
them
sew
When
TIP:
recommend
guides
of
tion
prog
a
b1KStretch
overlock
Open
With
this
materials
much.
Make
TIP:
position
with
fabric
they
the
the
K
an
and
of
have
fast,
you
fabric
seam
stitch
or
sure
just
overlock
other
pushbutton
overlock
and
higher
a
more
are
too.
sew
you
use
better
at
,‘
H
Sreich
stitch
it
is
fabrics
that
misses
stitch?
stretch
stitches.
serge
overlock
blind
wider
>
6
61-
no
which
the
the
controls
them
elasticity
durable,
and
stitch
problem
needle
edge
materials
seams,
stitch
prevents
•
do
offer
These
one
in
and
foot
widths
]35j03j
to
not
in
the
of
than
you
3-5
loin
fray
its
the
a
two
join
opera
usual
can
we
No.
contrac
0/1
firm
too
righthand
material.
is
s
sure
You
or
ideal
stitch
for
can
knitted
that
sewing
use
the
it
collars
cuff
for
jersey
sewing
durably,
stretched
is
fabrics
on
too.
while
overlock
Closed
Program
It
3.
especially.
sleeve
TIP:
sewing.
3
I
cuff
Make
42
Page 44

—
‘
..
_4
•4
.s.•-_’
‘_4
I
I
I
•
_4_
_4,_•,,,-e4•
4.44?_A
a-
I
—
4?—
I
I
3
I
•-_‘_
‘,
I
I
-‘:.4:%—--
%-‘‘
4?
—‘-.
,‘-
‘,‘—,.-:—-—-
__•4__
Aa,
—
-;
‘4
a-
4_
,
.,
—
A
—
_i
-‘—-
“
-..->
‘,
-
—
-*
—
—4.
>
Pullover
This
Fully
together
led
to
TIP:
open
woollen
stitch
fashioned
the
To
prevent
while
thread
stitch
is
with
right
joining,
suitable
parts
it
Make
of
the
under
the
seam
it
for
can
sure
needle
is
advisable
slight
open
be
that
from
tension.
knit
easily
the
not
stretching
to
to
fabrics
sewn
material
the
add
is
left
a
43
Page 45

is
What
can
You
sewing
typical
the
professional
seams.
a
use
a
covering
the
flat
,,flatlock
look
following
covering
to
stitch?
seam.
effect”
collar
programs
This
which
plackets
for
produces
lends
raglan
or
prog
a
:
L
L
Stretch
Stretchl
:
•
6
6
3-5
1
I
-
Fagoting
With
seams
corsetry.
Serge
—
on
—
Place
the
—
Sew
needle
left
stitch
fagoting
with
the
inside.
the
the
edges
on
enters
side.
stitch
hemstitching
fabric
fabric
about
face
the
the
you
edges
under
1/8
side,
material
can
effect,
and
the
of
making
an
make
tack
sewing
inch
the
on
eg.
sure
very
baste
foot
apart.
right
elastic
on
over
with
the
and
44
Page 46

prog
1
i
JaLH-2I6j•3-5j1
L
IbI
Fancy
Fancy
that
—
Place
overlap
stitch
need
elastic
elastic
the
each
11-216
stitch
stitch
a
flat
two
by
about
edge
seam,
fabric
is
3/4
with
very
e.g.
edges
of
fancy
-.-l
useful
terry
an
so
inch
elastic
HI
for
cloth.
that
and
materials
they
over-
stitch.
I,l)IJ
progj
‘
I
I
I
!aLFIStretchI5I.3-5I1
0
IbI
Pennant
Pennant
stitches.
cularly
elastic
wear.
—
Sew
stitch.
—
The
stitched
Make
shadow
-
stitch
stitch
Since
suitable
material
the
seam
sure
of
band
allowance
from
that
the
I
is
one
it
can
for
overstitching
e.g.
onto
the
the
seam.
be
sweat
right
needle
-
of
the
can
-
the
many
stretched
shirts
part
now
side
enters
with
of
covering
the
or
be
the
-
is
it
bands
sports
overlock
over
fabric.
in
the
I
-
parti
on
45
Page 47

PFAFF
i
t
ptron
6230
tipmatic
6110,
ic
6120,
6150
)
PFAFF
instruction
-
manual
Page 48

Buttonholes
Sewing
models
does
fabric
8uttonholes
doubled
of
materials,
necessary
material
the
Avalon
special
a
is
It
it
when
materials
woollens,
placed
material
the
much
produce
To
darning
Mark
either
always
buttonholes
pushbutton
with
not
are
fabric.
e.g.
use
to
from
Madeira)
(by
comes
such
which
or
over
is
easier
beautiful
threads
starting
the
a
with
a
sew
have
generally
However,
organza
silk,
silk
contracting
nonwoven
into
velvet,
as
are
under
not
make.
to
are
point
magic
sample
very
is
to
paper
is
contact
difficult
the
braked
seams,
ideally
pen
easy
controls
turned.
be
sewn
for
and
backing
for
ideal
fibre
with
leather
to
fabric.
and
suitable.
the
of
dress
or
buttonhole
all
with
the
since
piece
a
onto
some
viscose,
prevent
to
sewing.
while
purpose.
this
dissolves
which
water.
thick
or
it
feed,
this
In
buttonholes
embroidering
buttonhole
and
pin,
first.
the
it
For
can
way
is
be
are
or
Note:
Before
the
front.
red
interval
fixing
guide
mark.
starting
i.e.
of
the
of
so
The
0,5
length
the
that
any
buttonhole
the
marks
red
They
cm.
of
buttonhole,
arrow
red
are
are
buttonhole.
the
always
foot
is
arranged
guide
a
fully
at
to
the
when
push
at
the
first
an
46
Page 49

___________
B
ABC
b
Linen
Insert
to
—
Press
required
Then
a
the
Then
seam
Now
tack
securely.
—
When
to
buttonhole
—
Cut
scissors
prog
A
BCI
buttonholes
the
the
front.
keyCand
press
stitches
few
material
press
to
press
stitches,
the
the
left
the
I
I
:
buttonhole
length.
keyB.Keep
for
securely.
key
A
the
same
key
B
while
keyisreleased
position
with
buttonhole
or
seam
a
I
I
I
I—I
44,5
sew
the
again
few
a
-
and
length.
holding
and
open
ripper.
I
-..
slide
first
the
it
bartack,
sew
and
the
you
stitches.
with
I
and
push
seam
pressed
while
back
sewafew
the
material
needle
sew
can
pair
a
the
3
3
it
to
and
holding
second
jumps
up
of
fully
the
sew
bar
the
5
Linen
buttonhole
To
produce
for
sportswear,
thread.
For
stretchable
all
thread
is
overstretching
—
Place
the
and
pull
foot
to
Pull
the
ridge
B.
—
Push
the
then
sew
—
Pull
the
buttonhole
ends.
highly
very
gimp
the
the
threads
buttonhole
the
loop
with
durable
we
materials,
important,
of
the
thread
thread
front.
into
buttonhole.
of
the
and
cut
gimp
recommend
in
buttonhole.
over
ends
the
slide
gimp
off
the
thread
buttonholes,
using
too,agimp
ordertoavoid
back
the
under
the
left
fully
thread
loose
and
right
forward.
into
thread
e.g.
gimp
a
ridge
sewing
of
the
A
47
Page 50

I.!
iii
ii
lii
Il
progi
G
-
Lit
t
I
I’’Iv
I
.t
i
rr
Ta
bIGl3-13-510I
with
sional
such
shorts
available
are
common
jersey
First
—
width.
Then
—
side
Finally,
to
TIP:
easier
ng
page
the
the
touch
as
both
needles
the
On
to
To
64.
hems
twin
twin
shirts,
T
is
iron
stitch
the
of
trim
Seam.
difficult
baste
thread
needle
but
to
quickly
in
mm.
4
the
fabric.
also
needle
hems
knitted
different
for
hem
the
the
fabrics
the
the
stretch
hem
Sewing
With
embroider,
Using
--
-jiI’tt’
i.r
-_-I
—
twin
the
can
you
topstitch
make
you
stretch
on
articles
easily.
and
widths.
not
Do
fabrics.
at
over
through
overlapping
such
over
hen
needle,
twin
,,
•
can
forget
the
t.*
i.
23;i
3.510/h
needle
only
not
add
materials
or
Twin
The
to
required
from
hem
ribknits
as
before
please
.,
‘t,
seams.
profes
a
cycling
needles
most
use
the
edge
topstitch
only
It
refer
face
back
threads
elastic
with
light
are
and
case
the
greater
Sew
effect
materials
particularly
When
should
you
wind
elastic
bobbin
must
stronger
the
sample
a
the
thread
thread
be
gathering
such
suitable
smocking
an
use
elastic
is
a
the
loosely.
set
bobbin
the
seem
as
additional
thread
lot
tension
effect.
check
to
batiste,
for
with
thicker
The
thread
viscose
effective
elastic
an
by
than
of
general
the
bobbin
hand.
the
tension
degree
or
the
bob
rule
Or
Smocking
Fine
silk
smocking.
thread
case
Since
normal
bin
is
the
—
gathering.
—
sew
can
You
foot
is
to
must
otherwise
Knot
—
When
—
of
the
away
pull
the
from
sewing
the
threads
rows
the
each
several
material
gathering
the
on
additional
the
at
first
rows
while
the
reverse
row.
uneven.
is
beginning
row
side
sewing
side
sewing
a
you
side
by
since
end
and
mate
the
of
fabric
the
of
face
the
on
line
first
the
Mark
rial.
48
Page 51

\i
6
...
6
•
3 5
35
C)
1
01
Gathering
Program
With
you
can
a
gather
neat
obtain
twoorthree
-
Mark
the
fabric
and
or
five
end.
You
can
sewing
guide.
Now
gather
threads.
gather
—
Finally,
secure
with
straight
Gata
stitch
sleeves,
and
even
gathering
first
line
on
stitch
along
inchesofthread
now
stitch
foot
width
using
the
part
You
determine
yourself
knot
the
thread
the gather.
skirts
gather
seams.
the
the
by
stitch
length
or
you
face side
it.
Leave
protruding
other
the
first
pulling
the
amount
ends
together
of6mm
valances.
should
about
seams
one
the
of
the
at
the
at
as
bottom
of
to
To
sew
four
a
49
Page 52

(
a
‘::‘.
Gathering
Gathering
at
blem
thread
Mark
—
reverse
Make
-.
M,
The
sewing
place
Lower
—
more
the
From
—
gather
thread.
After
amount
threads.
Finally,
—
must
then
needle
elastic
with
sleeves
with
all
the
side
few
a
leave
foot.
the
the
stitches,
then
by
sewing
of
knot
not
first
must
elastic
sewing
thread
on
the
gather
elastic
or
elastic
be
gathering
the
of
starting
the
Raise
but
you
amount
you
the
waist
threads.
wound
fabric.
stitches
needle
at
be
the
thread
foot
do
until
determine
can
by
threads
threads
seams
onto
seam
the
sewing
around
again
not
these
you
still
pulling
down
middle
pull
pull
change
and
The
the
on
using
and
the
are
the
both
the
is
in
foot
the
on
no
elastic
bobbin,
the
program
the
of
and
needle.
sew
ends
sewn.
amount
the
the
elastic
elastic.
pro
fabric.
the
a
elastic
few
of
of
The
TIP:
ideal
also
guide
foot
operation.
cording
for
the
foot
gathering.
elastic
(special
The
evenly
accessory)
grooves
during
the
in
is
this
sewing
50
Page 53

prog
‘1’
a
b
Darning
Insert
the
Set
push
When
C.
itself
behind
Darning
Lower
to
the
into
notch
Place
—
Lower
—
Draw
threads
—
Darn
part
doing
This
—
When
darning
and
determine
You
yourself,
TIP:
If
this
means
slowly.
G
G
with
darning
the
needleatits
the
pin
of
youdothis,
around
the
fixing
screw
position:
the
presser
rear.
This
(darning
E
the
darning
the
feed
the
up
when
over
the
evenlyinthe
move
so,
prevents
have
you
area,
darn
over
by
moving
small
knots
you
—
-
the
straight
foot:
the
darning
presser
F.
bar
positions
dog.
bobbin
you
damaged
required
the
tearing
stitched
turn
the
the
stitch
the
appear
have been
—
highest
guide
bar.
Now
lifter
position).
work
thread
start
part
of
the
fabric
damaged
length
part
0
-
stitch
position
foot
fork
WireEmust
tighten
and
the
presser
in
the
and
sewing.
area
by
direction.
in
shallow
darn
the
evenly
by
area
back
on
the
moving
23
6
23
aEcer
and
fully
into
hole
places
G
be
screw
D.
pushitlightly
lifter
bar
darning
hold
moving
hoop.
the
the
When
curves.
later.
over
the
90
degrees
again.
work
for
this
and
forth.
side,
reverse
the
part
too
51
Page 54

I
I!
a
Darning
Darning
suitable
Sew
—
stitches
so,
other.
prog
M
M
over
make
with
with
means
until
021
021
elastic
the
sure
I
elastic
of
damaged
it
the
6
6
stitch
stitch
repairing
is
well
stitch
•35011
also
is
damaged
area
covered.
rows
a
with
When
overlap
very
fabric.
rows
0
of
doing
each
Sewing
best
The
damaged
the
rial.
Baste
—
damaged
Overstitch
-.
Now
—
the
TIP:
with
function.
prog
M
cut
seam
order
In
model
on
way
the
I
15
patches
to
area
piece
area
its
back
on
the
to
6230.
darn
from
edges
the
turn
<
with
of
damaged
reverse
at
use
6
larger
new
the
with
the
a
the
I
holes
piece
material
face
elastic
side.
corners
needle
35
is
new
of
onto
side.
stitch.
material
more
down”
0
cover
to
mate
the
to
up
easily
52
Page 55

(0
V
C)
ci,
.
a
o
r
-
•
-,
0
D—43c
COO
3
—
oC
DD
00
CDE_
—
3
LD
0
0
0
•
E’
DO
0
Q
Z
:
_
2fl
D
ci,
=
00
aoO
0
D-,
0
—
0
ci,
Page 56

progl
a
b
Sewing
are
There
skirts
For
concealed
ladies’
of
types
stores.
recommend
all
for
all
For
up
right
why
is
holder
foot
method
the
Using
also
can
the
to
is
toot
position
foot
the
moved
be
G
G
in
slacks
zippers
For
other
types
close
the
one
edge
engaged
3
3
zippers
different
recommend
we
both
on
concealed
tough
metal
materials.
of
zipper
to
of
of
the
set
of
must
engaged
is
to
are
materials
zippers
the
to
foot
the
insertion.
three
the
needle
the
on
only
the
>
—
—
ways
sides,
available
zippers,
teeth
left
zipper
the
be
left,
left.
-—-
to
inserting
and
on
it
is
can
right,
or
needle
so
teeth.
right
changed
the
.
sew
for
one
in
such
and
important
the
of
engaged
be
depending
positions
that
side,
needle
L
3-5
3-5
zippers.
in
men’s
side.
shops
as
plastic
zipper.
enters
it
the
If
to
the
Different
denim
the
the
must
zipper
or
and
zippers
sew
to
This
in
you
close
sewing
needle
right,
4
4
the
we
on
only
If
Inserting
Engage
—
Place
—
that
Sew
—
the
in
close
Now
—
the
wise
the
the
in
material,
the
you
end
seam.
zippers
the
zipper
teeth
half
zipper.
can
of
zipper
of
the
concealed
foot
under
at
run
zipper,
the
raise
the
sew
zipper
the
the
rest
and
to
the
on
the
sewing
side
leave
sewing
of
stitch
both
right
of
the
the
the
the
foot
seam
sides
side.
foot
foot.
needle
cross
so
and
to
54
Page 57

—
Sew
the
Stop
and
the
You
—
Trouser
Iron
—
there
—
Baste
edge
Engage
—
the
Stitch
the
same
shortly
leave
sewing
can
zippers
the
is
the
so
needle
close
second
distance.
the
foot
now
seam
overlap
an
zipper
that
the
at
before
needle
sew
margin
the
zipper
the
along
of
half
the
in
open
and
the
to
of
under
teeth
footonthe
required
the
the
end
the
over,
about
the
are
edge
zipper
of
material.
the
of
end
making
15/32)
overlapping
still
position.
of
the
zipper.
the
visible.
right
the
parallel
seam
Raise
seam.
sure
4
and
zipper.
mm.
set
at
—
Shortly
the
—
Close
evenly
—
Afterwards
TIP:
mend
To
zipper
the
achieve
using
before
onto
and
zipper
the
stitch
the
the
finish
and
other
along
accurate
edge
end
sewing
baste
guide.
of
zipper
the
seams
the
the
the
half.
basted
seam,
overlap
we
seam.
seam.
recom
open
55
Page 58

Roll
With
silk
and
hand
fraying
finish.
—
—
—
—
hemming
the
fabrics
without
Hemming
Fold
(5/64)
Place
hemmer
Leave
sewng
scroll
Lower
edge
make
right
hemmer
and
the
the
the
of
the
evenly
sure
side
valances
or
having
produces
fabric
mm
2
folded
and
needle
foot
the
sewing
the
of
you
to
secures
edge
per
fabric
sew
push
and
hemmer.
the
in
fabric
sewing
the
a
fold).
a
in
foot
can
with
iron
the
tidy
over
few
the
the
hemer.
does
rollhem
no
the
edges
and
double
edge
stitches.
material.
fabric
and
When
foot.
problem
edges
durable
under
guide
not
blouses,
against
(about
Raise
Into
the
doing
run
at
before
the
the
under
all
edge
the
fabric
so,
th
TIP:
rolled
For
hem
sIlk,
vScuse
looks
better
or
Qhlffor
with
rnateriots
Ljziq
o
stitches
56
Page 59

inserts
Lace
can
You
christening
lace
with
First
fabric.
Stitch
—
margin.
open
Cut
—
middle
Stitch
—
small
Cut
—
edges
Lace
trimmings
Lace
designing
is
This
First
Stitch
first
Fold
—
All
—
produce
baste
both
over
and
back
the
serge
corner.
the
other
wear
inserts,
the
and
dense
the
and
way
the
corner
sides
a
or
lace
the
edges
fabric
iron
both
waste
provide
enhancing
to
the
lace
beautiful
other
of
over
it
edges
zigzag
do
raw
onto
and
are
children’s
the
to
the
under
to
of
material.
many
home
it:
edges.
the
stitch
done
effect
face
lace
the
the
the
stitches.
new
face
over
the
in
on
clothes
side
with
lace
side.
lace
ways
textiles.
side
it
same
the
of
narrow
a
the
at
with
of
the
to
up
diagonally.
way.
.3
.‘--
-
..—
5]
Page 60

-
• -
•
•--
-
-,•4
P’-,
•
•
:
i’_
_-,
•;,‘‘r’J;.
--
•
-;
-•
—.
.-
•
--:
‘•;
,•
,
••
•.;_
-,‘-
edging
Shell
edging
Shell
fabrics
frequently
wear,
thread
pulled
Serge
margin
While
runs
width,
nent
such
too.
tension
in
under
shell
as
used
The
the
over
sewing,
only.
very
is
silk
tighter
the
raw
to
the
edging
as
edge
This
,:
effective
and
an
farther
the
make
sewing
provides
effect
edge
you
and
left.
sure
viscose
finish
set
the
iron
foot
for
the
shell
that
at
a
45O
thin,
materials.
under
on
needle
edging
seam
the
the
half
more
soft
fabric
the
promi
It
foot
the
at
thread
thread
light
at
wool
the
the
fabric
shell
same
you
edging
time
also
can
underneath.
and
place
TIP:
you
edge
obtain
is
instead
different
a
a
can
pretty
of
strengthen
woollen
a
coloured
contrast
coloured
a
add
If
you
is
58
Page 61

4
I
Decorative
embroidery
Sewing
Decorative
Monograms
Appliqué
Richelieu
Quilting
Eyelet
Hemstitching
table
embroidery
and
techniques
for
embroidery
stitches
traditional
page
60
61—64
page
65
page
page
66
page
66
67
page
page
68
page 69
59
Page 62

the
host
from.
work
Ptaff
parts
the
use
material
the
marking
few
a
stitch
embroidery
stitches
own
your
6150
models
fancy
of
can
You
variations
colours
recommend
we
threads
dealer.
be
to
iron-on
an
under
paper
contracting.
from
These
chalk.
or
hours
recommendations
work:
length
home
and
decorative
and
produce
selecting
by
sizes.
or
using
are
which
embroidered
backing
fabric.
the
pattern
lines
be
can
width
and
textiles
6230
available
or
You
with
will
ironed
apply
can
even
For
special
you
place
This
a
gar
or
offer
stitches
greater
different
embroi
should
prevents
can
magic
dissolve
away.
all
to
altered
be
from
silk
mark
you
a
to
pen
The
as
Decorative
enhance
B
S
To
ments
whole
choose
embroidery
combinations,
dery
embroidery
your
For
either
backing
the
out
or
after
following
embroidery
The
desired.
60
Page 63

/
/
j
1
I
I
I
I
I
I
I
I
I
Changing
can
You
aid
the
density
tonhole
set
you
apart.
vary
of
for
range.
is,
the
the
pattern
the
stitch
embroidery
The
farther
the
pattern
length
larger
length
is
the
length
knob.
generally
stitch
the
pattern
infinitely
The
in
density
stretched
is
stitch
the
with
but
Changing
machine
The
mm
of
6
the
alter
the
All
reduced
the
for
width
stitches
to
pattern
automatically
fancy
the
select
are
width
a
now
of
width
stitches.
key
reduced
mm.
3
G
Sets
width
stitch
a
If
you
the
at
by
same
half
wish
to
time.
i.e.
I
61
Page 64

B
S
ft
B
0
n
r
t
Borders
combining
By
can
you
Madeira
They
different
size
Apply
—
paper
Embroider
—
with
and
Embroider
—
Finally,
—
point.
are
for
sew
embroider
embroidery
available
sizes.
piece
one
iron-on
under
over
program
the
add
different
However,
backing
the
V/F.
border
stitch
program
borders
threads
many
in
embroidery
of
fabric.
marked
the
After
back
parallel
U
embroidery
any
of
are
colour
only
place
or
that,
again
to
every
to
X
very
shades
use
work.
silk
middle
turn
it.
programs
width.
suitable.
one
backing
point
the
reverse.
in
fifth
and
thread
fabric
zigzag
this
In
coloured
additional
Apply
—
paper
Embroider
—
program
sew
Embroider
—
You
—
program
program
border
embroidery
effect.
iron-on
under
the
border
now
can
embroidery
backing
the
over
M/D/F.
program
stitch
and
DIE
U/F.
fabric.
the
Then
back
the
thread
marked
again
UIG
the
example
or
turn
straight
final
used
is
place
middle
the
in
parallel
zigzag
multi
as
silk
fabric
reverse.
to
row
row
an
backing
with
and
it.
with
with
62
Page 65

b
L.
N
N
Borders
combining
By
desired
dered
to
way
Apply
—
paper
Mark
—
You
—
M/F
line.
back
Then
—
combination
LIE
—
with
you
effects.
embellish
iron-On
under
the
can
Stretch.
Then
down
sew
Stretch
L
L
L
a
different
can
This
the
centre
now
turn
the
close
completes
combination
embroidery
achieve
easily
isasimple
tablecloths
backing
fabric.
tailors
with
with
begin
Embroider
fabric
the
border
the
to
Stretch.
L/G/K
or
along
in
first
the
N
N
of
other
and
and
place
chalk.
combination
the
and
reverse.
border
border.
N
N
‘4
‘4
N
stitches
keys
embroi
pleasing
garments.
silk
the
embroider
as
backing
marked
with
the
Combinations
additional
An
coloured
ferent
used
You
from
—
-.
-.
for
can
our
Apply
paper
Mark
You
MIF
line.
back
Then
combination
LIE
—
the
obtain
PFAFF
iron-on
under
the
can
Stretch.
Then
down
sew
Stretch
effect
middle
middle
now
turn
close
with
thread.
in
it
dealer.
backing
the
begin
Embroider
the
border
the
to
LIGIK
completes
coloured
can
border
great
a
fabric.
with
with
fabric
the
Stretch.
>..
>
>,
>
>
>..
>
>.
thread
produced
be
Multicolour
this
in
variety
place
or
tailors
the
along
and
reverse.
in
border
first
border.
the
with
thread
example.
shades
of
backing
silk
chalk.
combination
marked
the
embroider
with
dif
was
the
63
Page 66

Twin
You
using
what
little
neeate
achieve
can
twin
the
beautiful
imagination.
further
needle.
borders
embroidery
illustrations
The
be
can
made
effects
with
by
show
a
Note:
Only
for
use
embroidery.
all
mm
of
width
a
with
need
twin
a
2,5
needle
twin
the
Place
make
each
Pull
guide
the
of
you
the
the
second
thread
left
disk
right
the
sure
other.
(32)
the
twin
threading
pass
threads
the
threads
and
C.
over
needle.
reel
on
While
one
threads
right
thread
holder
each
thread
tension
farther
and
holder
(17)
slot
threading,
left
disk
than
are
and
the
not
left
needles
place
you
and
C.
normal,
twisted
into
will
make
one
thread
one
find
sure
but
with
Threading
Insert
—
Fit
reel
In
tension
that
thread
—
—
64
Page 67

Monograms
matter
No
fabric,
woven
D,
grams
your
of
als
Freehand
practice
Transfer
—
part
the
Lower
—
(see
foot
Place
—
Tauten
—
embroider
forget
Knot
—
(Any
If
you
TIP:
slowly,
terry
On
presewn
oversewn
makes
covered.
whether
E
own
guiding,
the
in
the
to
the
piece
a
the
to
the
waste
the
cloth
with
with
sure
with
F
or
be
feed
page
part
it
use
threads
sew
stitches
the
%
you
the
can
you
design.
however,
beginning.
initials
embroidered.
dog
51).
Avalon
of
in
the
with
darning
the
and
dissolved
is
but
fast
will
monogram
the
narrow
wider
a
terry
-
Id
work
darning
monogram
with
and
embroidery
an
zigzag
pull
move
be
zigzag
zigzag
cloth
I.
Ii
needs
the
insert
on
position
in
made
loops
terry
on
foot
magic
the
stitch.
off
water).
the
must
stitches
stitch
the
fabric.
the
dense.
are
cloth
and
any
little
a
pen
darning
hoop
Avalon
material
first
and
This
properly
Do
pro
initi
4.
44..
embroider.
to
easier
little
a
dog
stitch
0.
iron-on
are
does
guiding
along
or
E
not
the
F.
backing
need
required.
is
marked
place
or
you
i.e.
have
using
lowered,
be
to
All
lines
paper
capitals
Block
feed
The
or
no
to
freehand
is
do
programs
Apply
—
underneath.
fabric.
the
the
on
marked
lines
with
the
to
—
Now
zigzag
embroider
stitch.
monogram
the
Mark
—
and
not
be
then
65
Page 68

pl
1
Appliqué
Appliqués
a
duce
materials
rent
variations
densely
(special
cutout
Insert
—
machine
Transfer
side,
fabric.
bers
Now
qué
paper
Place
—
base
Afterwards
—
row
make
so
work
are
beautiful
galore.
stitched
accessoriesf,
its
on
appliqué
the
your
smooth
Remember
to
have
the
iron
material.
off
and
material.
dense
and
sure
no
that
quickly
fancy
and
seam
sole
drafted
side,
be
backing
Cut
iron
overstitch
the
fraying
patterns
You
for
drawn
on
zigzag
needle
made
effect.
can
with
because
zigzag
the
foot
pattern
the
of
that
fabric
the
applique
the
occurs
and
you
make
the
in
fusible
any
a
as
motif
contours
all
stitches
passes
By
it
the
letters
mirror
later.
always
using
can
perfect,
a
applique
has
seam.
sewing
the
to
backing
onto
and
out
parts
D
the
diffe
obtain
special
a
face
or
image.
the
with
or
outer
pro
num
pull
E
foot
appli
on
the
the
nar
Also
edge
Richetieu
very
This
embroidery
me.
mach
Transfer
—
fabric
the
Then
—
backing
and
embroidery
Insert
—
make
To
—
around
stitch
After
—
the
mm
2
away
Embroider
—
stitch.
The
—
the
lity.
Finally,
—
Avalon
your
ready.
is
artistic
place
tauten
foot
of
that,
areas
along
the
backing
work
piece
form
is
easy
pattern
your
using
two
under
the
hoop.
number
embroidery
the
contours
all
approx.
carefully
that
their
backing
the
material
with
you
all
embroidery
of
of
make
to
onto
magic
the
of
plies
area
the
and
fabric
0.
double
mm
1
cut
form
will
contours,
material.
contours
more
much
to
have
backing
individually
and
bar
with
the
pen.
embroidery
be
to
backing
more
with
length.
the
out
the
with
provides
shape
is
do
made
eyelet
your
face
embroidered
in
stable,
straight
a
fabric
cutouts
do
but
dense
a
this
and
dissolve
water,
in
embroidery
sewing
side
Avalon
an
sew
from
at
not
zigzag
part
stabi
the
and
of
about
cut
of
66
Page 69

Quilting
Quilting
method
developed
has
become
enthusiasts
quilt
A
material.
material
of
changing
This
auilt.
made
the
back
of
one
quilt
is
layer.
Of
course,
bits
of
Trie
Dual
doing
this.
is
traditional
a
that
the
to
make
an
in
our
always
consists
Lots
of
are
joined
patternstoform
is
tacked
of
polyester
layer
of
uniform
material
often
the
Feed
piece
also
work
together
is
sewing
wives
of
use
of
artistic
hobby
country,
of
geometrically
together
onto
padding
the
quilt
of
material
bordered
of
piecing
of
particular
American
material
too.
three
the
the
and
that
with
must
technique.
with
layers
shaped
in
continually
top
middle
connected
usually
The
the
individual
the
be
very
assistance
settlers
remnants
many
of
pieces
layer
layer
consists
entire
back
precise.
of
when
The
the
to
And
Cut
templates
self.
already
—
Spread
form
together.
together
—
The
serged
ironed
1
In
material
small
practical
the
always
seam.
on
0
When
into
covers.
this
is
out
A
small
seam
up
traditional
stitches
program
stitching
Embroidered
plain
for
this
your
cushions,
what
you
the
parts
you
have
seam
allowance
be
includedinthe
out
the
parts
squares
These
to
form
allowances
but
just
quilts
are
sewn
—
with
the
ID
stretch
coloured
work.
quilt
wall
do.
your
of
bought
as
that
squares
the
surfaceofthe
smoothed
these
together
it
but
sewing
about
stitches
material.
finished
is
hangings
quilt
of
0,7cmshould
templates.
the
in
you
are
of
quilts
three
by
is
quicker
machine
or
stretch.
L
mm
3
Use
you
or
can
then
out
beside
look
or
with
made
pattern
match
are
—
layers
hand
and
very
foot
can
bed
sewn
quilt.
not
never
e.g.
your
and
of
with
more
with
There
the
good
number
make
is
it
67
Page 70

Eyelet
Traditional
to
had
quite
made
Ispecial
plate
is
This
Practically
linen
this
for
stitch,
blind
(Models
classic
For
very
are
Remove
Set
—
Isee
Place
—
making
the
of
down
Place
—
dery
threads
the
around
Draw
the
You
—
selected
tant
The
other
Afterwards
—
embroidery
eyelet
made
he
easily
accessory).
etfective
very
utility
elastic
6150,
eyelet
suitable.
the
presser
the
511.
page
eyelet
the
sure
needle
the
at
marked
the
hoop.
and
plate.
eyelet
the
the
up
few
first
now
can
program.
turn
to
stitches
embroidery
laboriously
with
stitch
all
stitches
stitch
6230).
embroidery,
sewing
bar
plate
A
pin
plate.
tront.
one
Cut
push
pin.
bobbin
stitches.
stitch
fabric
the
should
secure
on
fits
fabric
the
The
By
the
blouses,
such
foot.
lifter
on
Then
or
fabric
fabric
thread
around
be
with
by
help
types
as
fancy
or
in
the
the
in
taut
two
doing
slowly
very
straight
which
hand
of
bed
are
a
program
darning
needle
middle
push
in
of
over
must
and
the
this
and
close
long
an
suitable
zigzag
stitches
the
an
the
hold
cut
it
stitches.
can
eyelet
or
position
plate,
plate
embroi
fabric
the
fit
with
is
evenly.
to
ago
be
table
stitch,
or
E
cutout
pin
snugly
it
impor
each
for
the
a
e
liP:
fancy
blind
around,
select
around
If
stitch
stitch,
you
key
or
the
choose
with
the
not
afterwards
A
cut.
at
model
cut
all.
another
will
To
program,
6150
be
only
complete
stitch
and
or
6230
partly
this,
evenly
g.
a
or
stitched
just
F
in
68
Page 71

I
C
0C
DC30.3
Cl,
3CDCD23
Cs,
-
3-
CDCDDCDC
g
C
-n7(9
CDDC
N
3
0
CD
CD
3
C)
Z
3
—.
CD
C
DC
CD
CD
_
CC.
DC
DC
3-
3
3-OC—DC<D
CD
2.3
3
-
Q
C
0.3
0
0
DC
CD
E
<
CD
a
0
‘<
C
0
“
CDDC—.3C)03
3-
DC DC
p
3
DC
0
CD
DC
CD
CD
Q.3-0
DC
DC
X
DC
3
01
gCD
CDCD
—
CD
CD
CDDCC,
C,
3-
CD
CDCD
3
3-DC
(fl
(DO
30.
C
00®
:3
3
CD
0
CDI
0
DC
3
3-CD
.0
CD
CD
0.
CD
3
DC
CD
CC.
II)
CD
CD
DC
E3
3
-,
<
CD
3
CD
2.DC0CD
3-CD.
0.
DC
DC
-,
CDD(D-<
3
DC
0
CD
33
3-
CD
0
-<
.CCD
DC9-CDDC
CD
DC
CD
3
0.
CD
3-
DC
3-0.0.DC
-+
ODC
3-
CDDC0
-V
rlo-3
DCD
3-
0
3-CD
0
CD
—3-
3-.DCCD
-3
0
C
-,
3
CD
CD
3-DC
3-
C)
3-
3-
DC
DC
DI
CD
-nQ
3
03
a
—CD
0.3
(03
DC
DC
3
0.
2.3
3
CD
CD
g
2
CD
—
9
3-C
C-
Q
E
CD<
DC
CD
3-
DC
DC
3
0.
DC
DC
DC
0
CD
*
CC
V
3
Cs,
—
C,
CD
CI)
CD
3CD
—CD
CD
3.
DCD-
CD
C
0
3
9-
CD
C)
3-0
o
3
C
CD*
D’
CD
CD
CI)
0
3.3
0<
C
3
C
CD
0.0
...3
32
3-9-
CD
3-
CD
(DCD
0.
CD
C—CD®
D
DID
DC
2.
DC
<
g
-
g
3
DCCD
-°2
,
g
03
DCCD
-
3
V
0)
(0
I!
Page 72

Accessories
Sewing
Special
Felling
Gathering
Cording
Bias
Multistitch
Cording
Appliqué
Fringe
Needle
feet
accessory
foot
foot
foot
binder
foot
foot
foot
table
and
(normal
gatherer
needles
accessories)
table
pages
74
page
75
page
75
page
page 76
77
page
77
page
78
page
78
page
79
page
pages
72,
80,
73
81
71
Page 73

Sewing
feet
(accessories)
o
NO
Part
Fancy
Part
(Model
sewing
No.
6120—6230)
No.
6110)
stitch
No.
6120
Normal
Part
(Model
(Modell
I(O
Clearviewfoot
stitch
(Fancy
No.
Part
(Model
98-694
98-694
98-694
98-694
6110—
foot
—
foot
foot
816-00
847-00
for
814-00
6230)
L,(Q
not
864-00
6230)
feed
top
suitable
for
top
feed>
LJILc
q’
Blind
Part
(Model
Part
(Model
$4
No.
No.
j)
çv-9-’
-.
A
stitch
98-694
6120—
98-694
6110)
tSfr
and
S’T
overlock
890-00
6230)
845-00
rV
foot
K.
PvT
1fA1
3
4
Part
(Model
Part
(Model
72
98-694
No.
6120—6230>
98-694
No.
61101
884-00
843-00
foot
sewing
edge
and
Zipper
Page 74

Sewing
feet
(accessorlesi
5
6
7
Buttonhole
No.
Part
(Model
Darning
No.
Part
(Model
For
Model
Hemmer
No.
Part
(Model
Model
For
foot
98-694882-00
6230)
—
6110
foot
93-035960-91
6230)
6110
6110
98-694818-00
6230)
—
6110
6110
special
special
accessory
accessory
R
8
Part
(Model
Second
Seam
Brush
Oil
No.
6110
ripper
tube
(.
98-802422-00
6230)
—
holder
spool
9333vC3
-‘t
73
guide
Edge
Page 75

Sewing
Special
They
feet
accessories
available
are
special
accessory)
are
a
at
intended
charge
from
for
special
your
dealer.
sewing
work.
Accessory
Appliqué
binder
Bias
(remove
Cording
needles
(twin
Cording
needles
(twirl
Cording
Fringe
Straight
Needle
Lap-feller,
Lap-feller,
Gathering
Mu)tistitch
(remove
Cording
Eyelet
hemmer,
Roll
Hemmer,
Hemmer
Knit
Darning
Teflon
foot
edge
foot
foot
foot,
foot,
tongue
stitch
plate
foot
foot
plate
foot
foot
holder(
5
with
7
with
with
4.5
6.5
foot
gathering
holder)
4
mm
(not
foot
grooves
needle
grooves
needle
(2(
foot
mm
mm
mm
2
(for
for
(model
with
round
top
top
foot
feed
61
spacing
spacing
round
hole
teed(
61
10(
1
hole
0(
16to
1.6
appliqué
binding
tape
cording
sewing
For
embroidery
Caution’
use
Only
in
stitch
position!
top-stitching
For
sewing
materials
soft
jersey.
lap-feller
For
lap-feller
For
gathering
For
etc.
placing
For
pleats
cording
For
eyelet
For
hemming
For
hemming
For
hemming
For
sewing
For
darning
For
sewing
For
synthetics
and
work
size
straight
middle
very
etc.)
on
work
edges
work
801
loop
needle
light
(silk
seams
seams
frills,
dense
etc.
frills,
embroidery
edges
edges
edges
knitted
damaged
leather
with
seams
and
or
fabrics
and
loose
parts
1
Sewing
For
For
bias
For
(needle
-00
7-91
number
Part
93-042941-91
98-053484-91
93-042950-91
20)
2.0)
93-042953-91
93.03595245
943-91
93-042
98-69482
98-694822-00
93-042946-91
93-042
948-91
93-036998-91
98-999650-00
93-036915-91
93-036976-45
98-694873-00
98-694823-00
98-694818-00
93-042957-91
93-035960-91
93-0369
1
to
The
74
following
pages
contain
application
examples
some
special
of
accessories.
Page 76

I
Lap-feller
too.
Jeans.
colour.
the
Place
Overlap
about
3/8’
place
Now
tongue
be
must
along
Sew
stitch.
Afterwards
protruding
is
turned
stitched
apart
plies
seams
and
You
the
of
placed
over
along
Lap-feller
strong,
sportswear
and
effectiveifyou
trasting
—
—
—
—
This
fabric
to
this
the
the
separate
hem
during
are
makes
children’s
can
a
use
reverse
edgeofthe
raw
5/8’.
overlapping
lap
fully
folded
into
by
the
not
make
sewing
felling
the
edge.
sewing
only
them
these
under
edge
the
the
foot
ornamental
very
wear,
seams
threadofa
to
side
lower
edge
foot.
the
with
fabric
lap-feller
and
the
Pull
suitable
men’s
reverse
The
sewing
straight
and
is
ply
over
over-
two
shirts
very
fabric
feed
The
but
for
con
side.
by
the
foot
the
hem
fabric
progi
I
a
I
I
G
3
curtains,
or
with
is
no
barofthe
foot
it
the
top
lie
little.
sure
at
over
You
stitch
the
foot
gathering
the
longer
gathering
the
holder
snaps
fabrictobe
foot,
through
face
stitching
The
effect
you
the
the
the
the
also
can
gathering
harder
guide
foot.
length.
Gathering
Beautiful
wear
easily
hand
Engage
—
rear
the
until
Place
sewing
the
parts
While
—
a
gathering
Be
through
Disengage
—
down
back
holder.
TIP:
gatherbyadjusting
and
1
can
necessary.
foot
into
and
side
gathering
front,
groove
I
I
-
—
effects,
be
into
Push
the
the
foot
the
to
must
you
you
you
the
and
regulate
the
—
I
e.g.
made
foot.
foot
the
foot
the
front
gathered
gatherfree
cutout.
side
face
pull
pull,
achieve.
fabric
foot
take
of
the
the
needle
13-51
children’s
on
quickly
Gathering
hooking
by
groove
rear
upwards
bar.
under
fabric
the
the
edges
by
it
Out
sewing
amount
thread
and
The
top
greater
evenly
pushing
the
to
foot
tension
Latterin
by
the
the
from
fabric
fabric
of
foot
of
the
it
75
Page 77

Cording
The
classic
used
be
cotton
as
children’s
cording.
with
Engage
—
Replace
—
or
2
Thread
—
page
Now
—
tight
prominent.
If
TiP:
effect,
edge
front
fabric
the
more
foot
without
and
wear
mml.
up
64).
set
lat
you
you
volume.
sewing
the
the
with
the
about
wish
can
of
during
any
light
can
cording
needle
needle
to
fit
the
technique
problems
wollens
be
with
two
to
5),
emphasize
cording
a
needle
sewing
given
foot.
needle
thread
make
plate.
and
cording
of
fabrics
on
Underclothing
traditional
a
needle
twin
a
threads
tension
seam
the
cording
the
tongue”
This
gives
shapes
the
Isee
quite
more
on
cording
can
such
11.6
the
and
look
You
gimp
wider.
this
In
tongue.
To
—
Thread
—
the
Replace
—
ween
machine
thread.
cloth
tangled
During
—
lightly.
You
—
to
cording
distance
constant.
TIP:
five
on
page
With
are
foot.
can
thread;
case,
do
needle
guide
There
groove
the
closer
the
plate,
can
obtain
this,
the
the
provides
This
during
sewing
use
the
seam.
between
are
74).
seven
together
a
this
however,
remove
gimp
plate
needle
needle
thread
so
the
work
two
and
groove
similar
makes
from
that
sewing.
the
grooves
This
seven
a
do
the
thread
plate.
plate
space
must
does
it
cording
along
ensures
cording
different
foot
than
effect
the
not
needle
through
below
and
for
in
an
groove
with
by
cording
use
to
The
the
the
fed
be
not
pull
the
already
that
seams
cording
the
the
using
a
plate.
the
notch
sewing
gimp
become
the
cording
foot
sewn
five
look
cording
the
top.
bet
under
material
sewn
the
always
is
feet:
Isee
cordings
groove
a
hole
of
the
foot
a
table
76
Page 78

tape
Bias
Binding
giving
of
appearance.
about
tape
Remove
—
and
screw
the
Cut
—
gonal.
Push
—
pull
and
Adjust
—
about
at
bias
Stitch
tape
into
must
edges.
enclose
TIP:
You
zigzag
using
with
fabric
the
the
tape,
about
before
the
be
binder
bias
For
inch
an
the
on
beginning
tape
out
it
binder
1/16
or
slot
placed
During
the
obtain
can
stitch
edges
foot
the
adjust
an
you
of
raw
tape
this
wide.
holder
into
the
to
from
inch
insert
the
between
sewing,
edge
or
a
is
smooth
a
you
binder.
the
of
scrollofthe
the
back.
that
so
the
the
or
the
binder.
automatically.
additional
an
fancy
a
very
need
with
bias
the
folded
needle
so
the
the
unfolded
sewing
along
edge
The
bias
bias
stitch.
easy
and
tape
needle
edge
position.
to
raw
tape
effect
method
neat
at
the
be
tape
bias
foot
a
binder
enters
of
bias
bound
edge
will
by
dia
the
Multistitch
is
This
closely
make
magic.
multistitch
The
different
three
Folding
1
Folding
2.
them
Folding
3.
and
on
you
When
from
your
instructions
a
really
the
the
on
sewing
buy
PFAFF
gathering
classic
or
gathering
ways:
fabric
fabric
in
one
fabric
the
the
are
widely
operation.
on
multistitch
dealer,
included.
foot
sewing
spaced
in
pleats.
pleats
in
in
pleats,
lace
foot
at
full
footi
pleats
can
and
sewing
same
the
gathering
operating
You
as
be
sewing
used
them
time.
can
if
foot
by
in
77
Page 79

J,I%I
I
progl
O35-lj
C
a
I
jO.35.lj
C
b
c:j
I
-
1,5
2
1.5
2
j
I
3
cording
I
foot
I
Cording
Cording
fine
or
a
With
seam.
to
similar
more
made
Mark
-.
avoiding
possible.
Engage
—
thread
ling
foot.
the
groove
back
overstitch
Now
—
and
row
have
made
You
TIP:
overstitching
of
thread
foot
is
a
cord
braiding.
the
the
can
a
technique
is
this
effective
required
tight
too
cording
in
then
under
dense
a
also
medium
a
different
in
overstitched
can
you
Appliqués
with
motif
curves
foot
of
the
one
place
the
the
filling
the
zigzag
socalled
obtain
colour.
which
obtain
this
on
or
and
front
filling
foot
stitches
purl
a
special
pearl
to
can
seam.
the
angles
shoe.
thread
seam.
thread
pearl
produce
effect
an
also
fabric,
place
grooves
thread
with
Now
effect
thread
if
the
with
be
in
nar
you
beautiful
a
materials
stitched
it
zigzag
Insert
the
machine.
Transfer
smooth
side,
fabric.
have
bers
iron
Now
material.
que
off.
paper
Place
and
material.
base
Afterwards
row
and
reach
a
iModel
work
the
needle
fraying
foot
quickly
are
and
galore.
has
a
seam
appliqué
your
side,
Remember
be
to
the
backing
iron
overstitch
dense
curve,
62301
more
passes
occurs
fancy
patterns
You
seam
special
drafted
drawn
Cut
on
zigzag
use
function
easily.
the
later.
of
the
the
the
outer
made
effect.
can
with
foot
that
and
you
make
the
cutout
in
pattern
fusible
the
any
mirrored
in
fabric
motif
applique
contours
all
stitches.
needle
to
Also
edge
By
the
help
make
always
using
can
a
appliqué
on
sewing
to
letters
onto
Out
parts
down”
you
so
obtain
perfect.
sole
its
the
backing
or
fashion.
the
and
with
When
guide
sure
that
diffe
face
pull
on
pro
foot,
for
num
appli
the
the
nar
you
the
no
Appliqué
Appliqués
duce
purl
a
rent
variations
densely
because
the
—
fil
of
—
the
-.
by
—
a
—
78
Page 80

Fnnge
With
can
foot
Mark
-.
magic
—
Use
fringe
—
Embroider
les you
inward.
For
—
a
test
—
When
of
too fast,
—
Knot
foot
this
produce
is
very
out
a
thicker
longer
seam
the
the
special
fantastic
useful
any
pen.
paper
silk
foot.
have
stitch
first.
you
machine
you
threads
pattern
the
to
threads
have
will
foot
for
terry
underlay
motif,
work
you
length;
finished,
carefully,
pull
on
for
loop
effects
cloth.
you
row
by
from
may
is
it
pull
becauseifyou
the
last
the
reverse
embroidery
no
in
with
wish
and
engage
row.
outside
the
have
best
the
loops
time.
to
side.
For
to
sew
work
you
This
the
the
circ
choose
a
out
pull
tight.
79
Page 81

Needle
Selection
chart
of
Fabric
607075
the
light
needle
right
weight
needle
guarantees
better
Fabric
sewing
weight
medium
needle
8090
material.
chosen
the
of
weight
Fabric
heavy
needle
120
110
100
Needle
Type
130/705H
Needle
70/SO
130/705
Needle
70/110
130/705
Needle
90
+
75
130/705
Needle
70/110
130/705
Needle
90-110
130/705
Needle
70-120
130/705
Needle
80-110
130
H-N
Needle
70-110
130/705
Needle
100
size:
size:
size:
size
size:
size:
size:
size
size:
points
H-SUK
H-PS
H-SKF
H-J
H-LR
H-PCL
H-WING
Shape
-
for
needle
fine
wool
and
Simplex
Pfaff
for
for
linen,
fabrics,
embroidery
warpknits,
stretch
delicate
fine
chiffon,
velvet,
lastex,
fabric
stretch
synthetic
batiste,
fancy
interlock,
needle,
and
very
warp-
ball
ball
Suitable
Universal
wovens,
organdy,
seams
Openknits,
Quiana,
Special
suitable
eye
of
Type
point
and
ball
Small
point
—
Medium
point
—
—
Medium
point
knits
Simplex,
Lycra,
light
suede,
fabrics,
heavy
sailcloth
calf
and
linen
goatskin
fabrics,
corsetry
ball
Large
point
—
—
—
round
Sharp
point
twist
Narrow
Open
Lastex
Twill,
blue
Leather,
workwear,
jeans,
point
(right)
and
buttonhole
30/3
seams
organdy
foils
on
and
silk
heavily
glass
or
wedge
Narrow
with
point
groove
twist
ball
Light
with
point
eye
long
Hemstitching
point
left
Imitation
oilcloth
Topstitching
synthetic
Effective
dressed
leather,
with
threads,
hemstitch
materials,
plastics,
cambric
80
Page 82

Needle
Table
Fancy
Before
sew
Description
130/705
Size:
130/705
Size:
Size:
Size:
pattern
sew
you
through
Fancy
1
30/7
Size:
Size:
Size:
Hemming/special
80
80
90
100
with
the
fabric
the
stitch/zigzag
05
80
80
80
H-ZWI
H-ZWI
twin
desired
H-ZWI
Stitch
length
2,5
2.5
2,5
2,5
3.0
needles
ornamentation,
correctly.
0,5
0,5
0.5
mm
mm
mm
mm
mm
patterns
double
suitable
normal
normal
wide
extra
cording
whether
be
hand
Needle
distance
wheel
1,6
2.0
2,5
3,0
4.0
can
1,6
2,0
2,5
mm
mm
mm
mm
mm
check
to
generally
mm
mm
mm
Stitch
width
—
—
—
—
-
the
turn
way
In
this
mm
1,5
—
mm
1.5
—
mm
1,5
—
needle
wide
thin
thin
breakage
for
cording
cording
cording
wide
the
avoided.
ornamentation
ornamentation
ornamentation
needles
needle
130/705
H-ZWI-HO
80
Size:
100
Size:
2,3
2,0
decorative
—
mm
3,0
—
very
thin
thin
very
mm
3,0
—
—
hemming
effect
fabrics
batiste
—
glass
and
are
particularly
suitable
81
Page 83

I
E
r
Maintenance
Changing
Cleaning
Changing
Sewing
the
and
the
problems
and
needle
oiling
sewing
fault-finding
plate
lamp
and
their
solution
Page
Page
Page
Page
84
84
85
86
83
Page 84

Changing
very
is
It
machine,
longer
machine,
the
Removal:
Switch
Raise
—
detachable
Push
—
the
sewing
right
way
screwdriver
the
the
important
because
service
off
the
the
opening
and
out
needle
q
needle
life.
the
main
the
sewing
work
point
between
machine.
the
its
of
into
plate
plate
clean
to
will
it
The
more
switch
foot
support.
of
a
Twist
needle
mounting.
the
out.
reward
more
care
small
needle
plate
left
and
often
it
and
screwdriver
lightly
it
Now
opening
oil
you
needs.
remove
plate
will
snap
push
the
you
to
with
and
sewing
use
the
and
the
half
the
a
into
take
Cleaning
Switch
Remove
—
feed
Clean
—
brush.
Then
—
hours
see
and
machine
The
must
and
and
off
dog.
the
apply
of
where
on
I
Lht
oiling
the
the
feed
a
operation)
to
oil
the
is
be
not
main
needle
dog
drop
apply
bottle
otherwise
oiled.
switch
plate
and
of
to
the
supplied.
and
hook
every
oil
hook.
the
in
oil
maintenance
lower
area
15
the
the
with
20
to
can
You
illustration
free
the
Replacing
Place
—
push
until
start
lying
84
the
down
it
you
sewing,
flat.
needle
hear
with
it
check
plate
snap
both
that
in
flat
at
hands
place.
the
the
at
Before
needle
back
the
front
plate
and
you
is
Page 85

-
Changing
Switch
Disconnect
control
Take
--
sewing
The
needle
off
off
head
the
the
plug
the
sewing
the
lamp
of
main
mains
from
the
detachable
Ibulb)
sewing
the
lamp
switch
is
plug
machine.
work
located
machine
and
the
support.
inside
toot
the
Removal
makeiteasier
To
recommend
hand
the
Hold
—
Push
—
will
Insertion
Insert
turn
engage.
Now
—
and
firmly.
Important!
maximum
The
Watts!
15
the
the
go,
it
push
turn
wheel
and
the
so
placing
as
sewing
bulb
turn
bulb
that
the
it
clockwise
permissible
change
to
the
illustrated.
machine
its
into
it
the
in
both
bulb
the
sewing
tightly
holder
anticlockwise
diagonal
of
stops
into
fully
that
so
bulb
bulb
machine
far
as
holder
bulb
the
the
is
it
wattage
we
to
holder
held
on
it
as
remove
and
is
85
Page 86

Sewing
problems
Problem/cause:
machine
The
1.
Needle
Wrong
Needle
Machine
Needle
2.
See
Thread
Thread
has
Thread
3.
Needle
Needle
Needle
Needle
plate
ing
The
4.
The
Thread
The
Thread
of
5.
Needle
reasons
become
Needle
because
the
bobbin
Seam
tension
bobbin
fabric.
Machine
not
is
needle
bent
is
is
is
too
tension
poor
is
is
too
is
is
is
is
fabric
is
is
tangling
irregularly
lint
Sewing
feed
dog
dog
Feed
27
6.
There
is
The
right.
at
machine
are
not
thread
dry
breaks
not
bent.
too
bent,
case
sewn
needs
too
thread
has
teeth
is
thread
Skips
properly
in
is
or
properly
small
above
is
or
after
thick.
pushed
thick
and
you
thick,
at
does
collected
rows.
lowered,
and
use,
blunt.
for
breaks
tight.
too
slubs
has
toolong
off
fully
or
has
are
not
is
unevenly
adtusting.
slubbed
unevenly
is
top
not
running
is
remnants
their
stitches
inserted.
threaded.
thread.
thin.
too
hit
pulling
properly
bottom
or
feed
between
slide
solutions
in
in.
the
or
or
B
with
in
or
it,
storage.
needle
push’
or
inserted
hard.
wound.
feeds
(see
the
side
the
page
difficulty
hook
race.
Remedy:
Push
flat
side
needle
Use
Insert
Check
a
Use
above
See
Adjust
Only
needle
Use
Insert
Insert
needle
See
the
Let
Only
When
fully
it
Check
Only
not
Do
on
it
Thread
bobbin
Remove
Push
Remove
the
needle
new
a
how
larger
thread
use
new
new
machine
guide
you
into
top
use
wind
through
up
thread
slide
hook.
facing
good
needle
needle
insert
and
perfect
correctly.
needle
the
fully
the
system
needle
machine
needle
tension
threads
with
chart
the
fabric
the
stop.
bottom
thread
the
tensions.
(see
B
threads
upwards,
back
130/705
is
large
and
Ipage
teed
the
threads
freehand,
winding
plate,
page
threaded
eye
push
80.
the
lightly.
bobbin
tensions.
Check
remove
27)
and
H.
(System
fully
81).
fabric.
case,
tension.
needle
to
apply
but
lint
left.
130
NI.
in.
push
run
and
brush.
with
to
oil
of
drop
a
Important
main
The
the
rate
switch
86
switch
threaded
off
note:
the
main
must
needle
be
switch.
turned
without
This
off
fabric.
Important
is
before
When
sewing
leaving
if
there
feet
are
and
the
needles
machine,
any
children
are
even
nearby.
replaced
short
for
not
Do
periods.
ope.
Page 87

L9
Page 88

co
Page 89

PFAFF
G.
M.
Plaff
Aktiengesellschaft
Werk
GritznerstraL,e
76227
Gedrucki
Druckerei
76356
Technische
Nr.:
OG
Karisruhe-Durlach
Karlsruhe
in
Deutschland
Gablenz
Weingarten, Stettiner
29629996-65/OOO
englisch
GmbH
Anderungen vorbehaften
8/93
11
StraSe
17
 Loading...