

Page 1
PFAFF
pt
ronic
ti
6232
matic
tip
6152,
6122,
PFAFF
tptro&c
[1
6112
6232
r
Instruction
manual
Page 2
When
or
reading
the
last
this
page
instruction
open
to
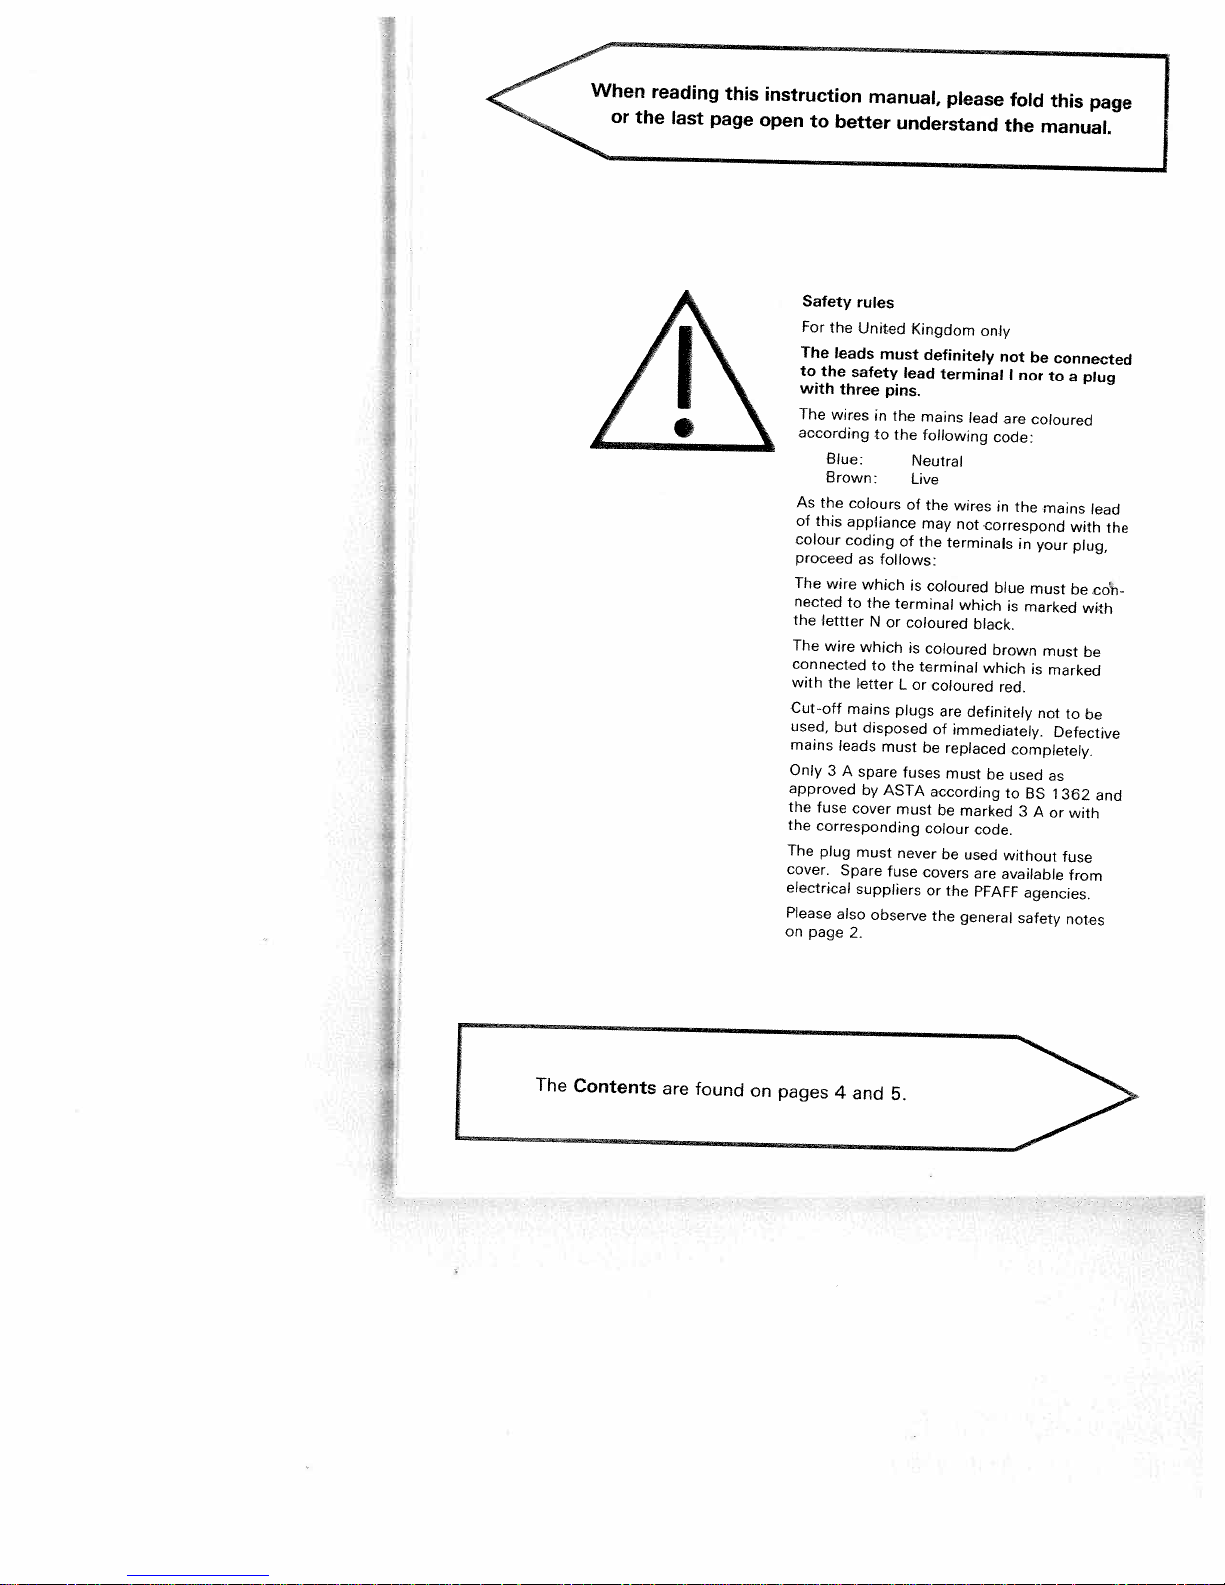
Safety
For
The
to
with
The
according
As
of
this
colour
proceed
The
nected
the
The
connected
with
Cut
used,
mains
Only
approved
the
fuse
the
corresponding
The
cover.
electrical
Please
on
page
better
the
leads
the
three
wires
Blue:
Brown:
the
wire
lettter
wire
the
off
but
leads
3
A
plug
Spare
also
manual,
rules
United
must
safety
in
to
colours
appliance
coding
as
follows:
which
to
the
N
which
to
letter
mains
disposed
spare
by
cover
must
suppliers
observe
2.
understand
Kingdom
definitely
lead
pins.
the
mains
the
following
Neutral
Live
of
the
may
of
the
is
coloured
terminal
or
coloured
is
coloured
the
terminal
L
or
coloured
plugs
of
must
be
fuses
ASTA
according
must
colour
never
fuse
covers
or
the
please
only
terminal
lead
wires
not
correspond
terminals
which
black.
which
are
definitely
immediately.
replaced
must
be
marked
code.
be
used
are
the
PFAFF
general
fold
the
not
I
are
code:
in
the
blue
is
brown
red.
completely.
be
used
to
without
available
this
manual.
be
nor
to
coloured
mains
in
your
must
marked
must
is
marked
not
as
BS
3
A
or
agencies.
safety
page
connected
a
plug
lead
with
plug,
be
coi
with
be
to
be
Defective
1362
and
with
fuse
from
notes
the
ThZntrounnPaeZnE>
Page 3
________
____
4
123
1
14
13
22
frilAl
PcAcF
PEAFF
PFAFF
in
34
35
24
25
ALAJiAiAAAAAA
A4AA4IMIAAAAA
,I__I
41AAAAA4—27
-
tiptn,nic
ftfflI
6232
—5
—1
10
11
2
26
I
I
I
I
31
30—..
29
28
:1-
/
$!-I
H
in
Page 4
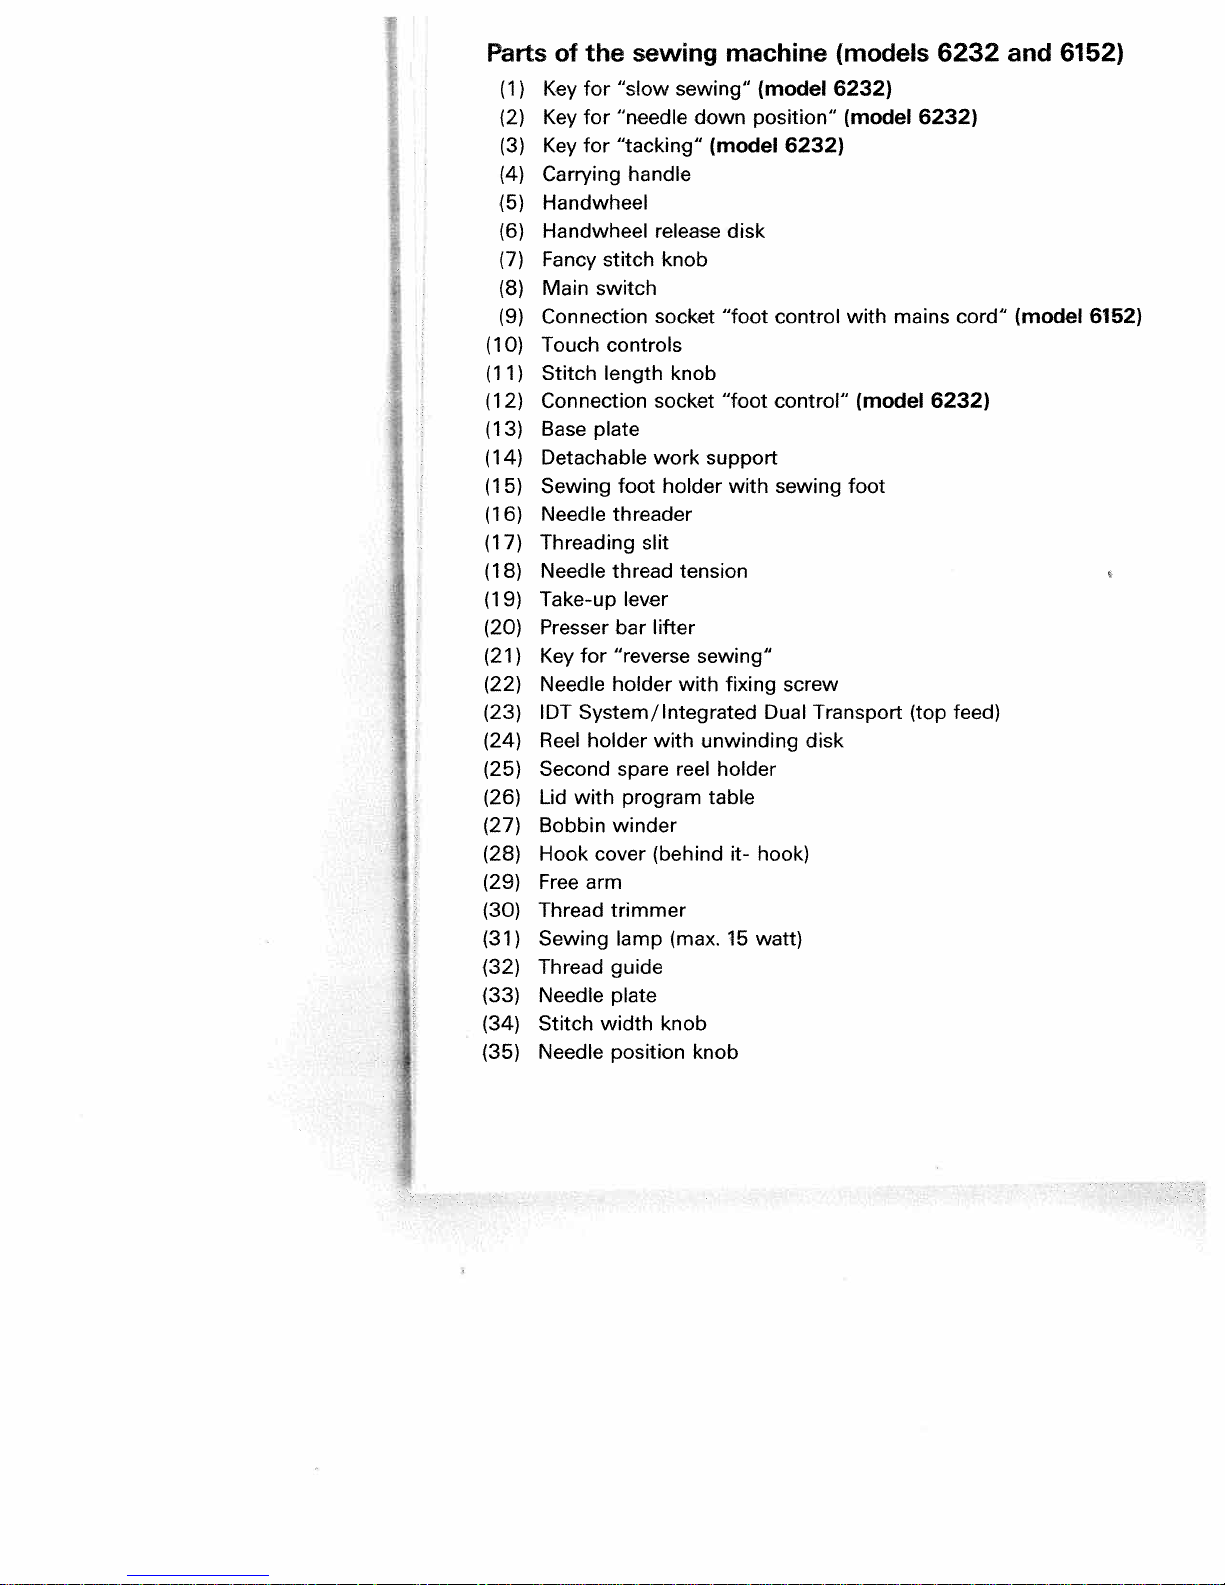
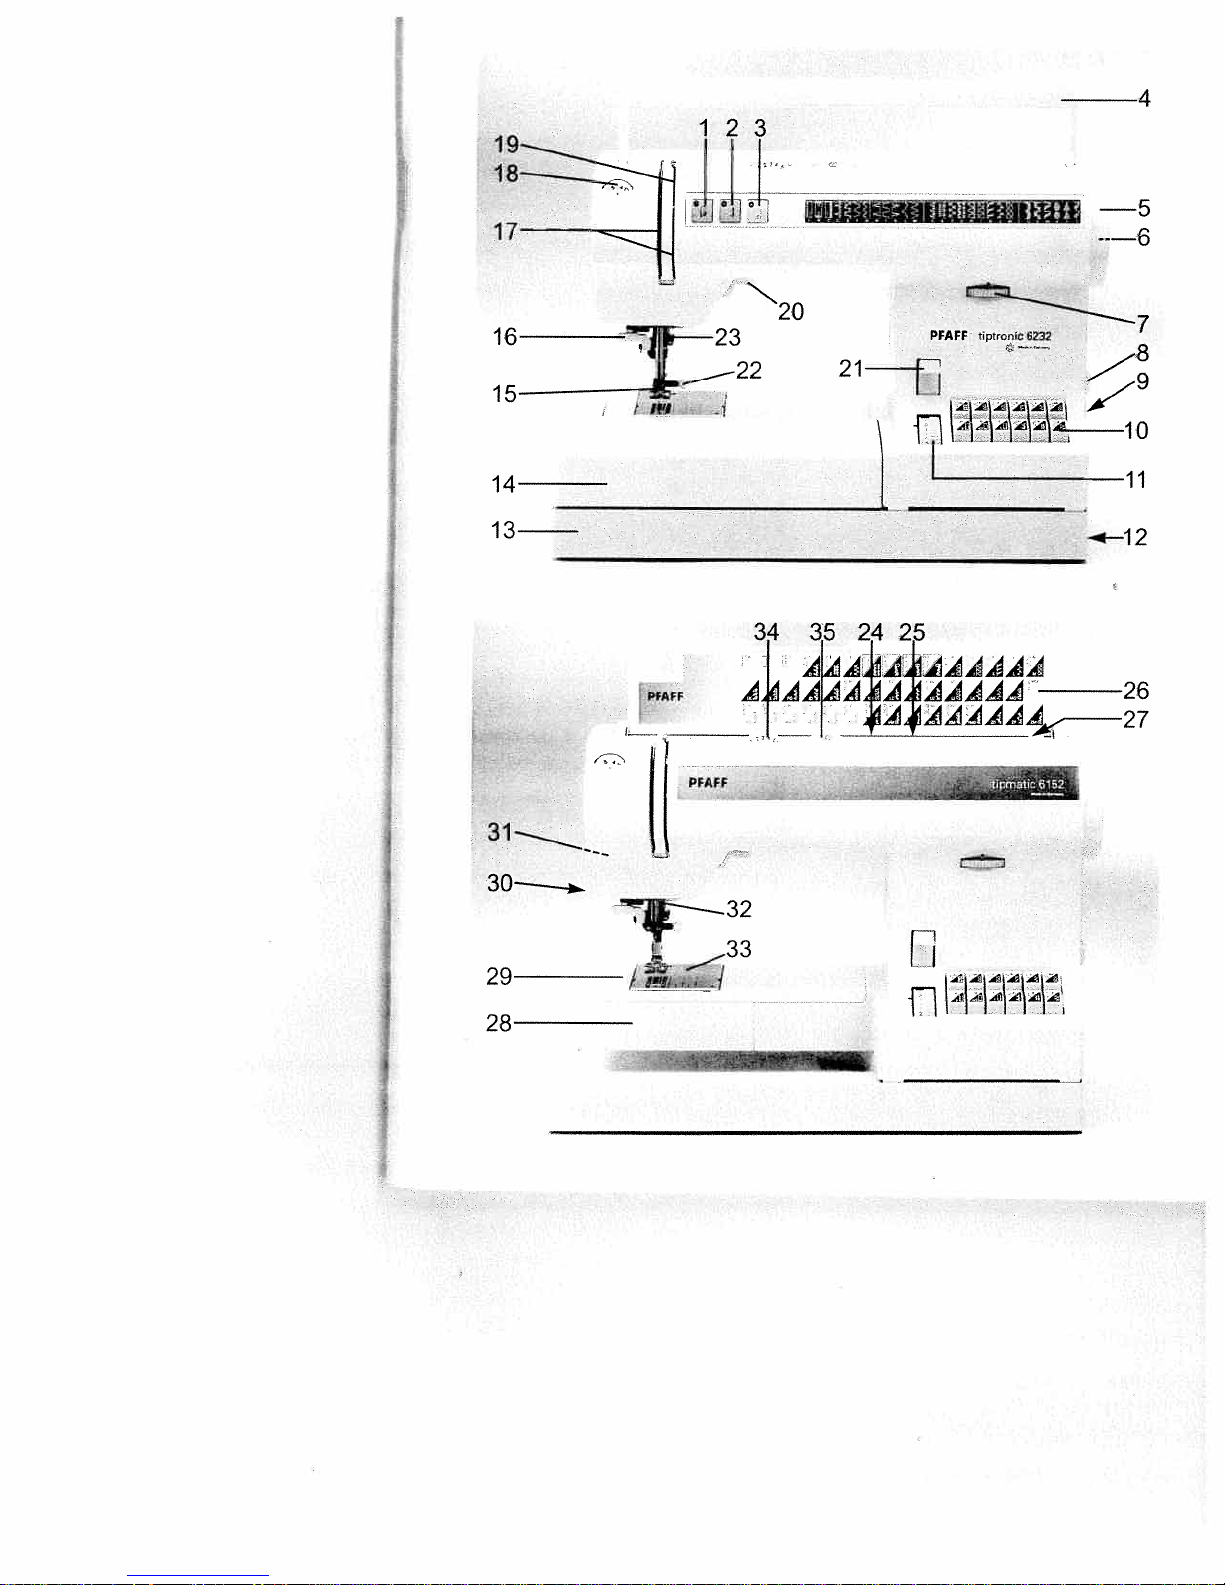
Parts
(1>
(2)
(3)
(4)
(5)
(6)
(7)
(8)
(9)
(10)
(11)
(12)
(13)
(14)
(15)
(16)
(17)
(18)
(19)
(20)
(21)
(22)
(23)
(24)
(25)
(26)
(27)
(28)
(29)
(30)
(31)
(32)
(33)
(34)
(35)
of
the
for
Key
Key
Key
Carrying
Handwheel
Handwheel
Fancy
Main
Connection
Touch
Stitch
Connection
Base
Detachable
Sewing foot
Needle
Threading
Needle
Take-up
Presser
Key
Needle
IDT
Reel
Second
Lid
Bobbin
Hook
Free
Thread
Sewing
Thread
Needle
Stitch
Needle
“stow
for
“needle
for
“tacking”
handle
stitch
switch
controls
length
plate
threader
thread
lever
bar
for
“reverse
holder
System/Integrated
holder
spare
program
with
winder
cover
arm
trimmer
lamp
guide
plate
width knob
position
sewing
sewing”
release
knob
socket
knob
socket
work
holder
slit
tension
lifter
with
with
reel
(behind
(max.
machine
(model
position”
down
(model
“foot
“foot
support
sewing”
fixing
unwinding disk
holder
table
knob
disk
with
it-
15
6232)
control
control”
sewing
screw
Dual
hook)
watt)
(models
6232)
(model
with
(model
foot
Transport
6232)
mains
(top
6232
cord”
6232)
feed)
and
(model
6152)
6152)
Page 5

To
DANGER
1.
The
sewing
appliance
Always
Do
not
not
place
unplug
reach
place
2.
3.
4.Donot
VVARNING
1.Donot
2.
3.
4.
5.
6.
7.
8.
9.
10.Donot
11.
12.
13.Donot
14.
5.
1
1
6.
17.
Please
allowtobe
byornear
used
Use
this
operate
operate the
sewing
the
droporinsert
not
use
operate
not
disconnect,
operate
unplug
fingers
use
use
not
pull
the
threading
unplug
making
plug
also
observe
sewing
attachments
Never
perly,ifit
nearest authorized
adjustment.
Never
of
cloth.
Never
Do
Do
administered.
To
Never
blocked.
Keep
machine needle.
Always
Do
Switch
as
Always
when
Hold
reduce
machine
from
inordrop
recommended
has
outdoors.
away
the
bent
or
sewing machine
needle,
when
should
the
electric
before
sewing
for
a
or
store
into
To
reduce
used
children.
machine
this
sewing machine
been
dropped
dealer
sewing
machine
any
where
turn
all
onasoft
by
pullingoncord.Tounplug,
from
proper needle
or
blunt
push
fabric
changing
sewing
other
any
rewinding
the
general
the
outlet
relamping.
machine
sewing
a
water
the
asatoy.
only
by
or
machine
and
foot
object
aerosol
controls
surface
all
moving
needles.
while
off
machine
user
into
safety
Important
For
the
United
When
you
ons
tions
riskofelectric
never
machine
or
riskofburns,
for
the
or
damaged,
service
control
into
spray)
to
off
such
plate.
stitching.
(“0”)
needle,
from
servicing
cord
use
should
before
unattended
be
left
immediately
Replace
has
that
whereitcan
other
liquid.
Close
attention
its
intended
manufacturer
ifithas
or
center
with
any
free
any
opening.
products
(“0”)
position,
asabed
parts.
Special
The
wrong
needles
Use
It
when
making any
threading
the
electric
adjustments
reel.
Do
notes
on
alwaysbeadheredtoas
using
shock:
bulb with
fallen into
fire,
a
dropped
for
air
from
may
not allow
page
safety
only
States
electrical
an
sewing
this
when
after
using
same
fall
electric
is
necessary
described
use
as
containedinthis
as
damaged
into
examination,
openings
the
accumulation
are being
then
or
couch
grasp
the
care
plate
can
recommended
deflect
bobbin,
outlet
mentioned
2.
appliance, basic
machine.
plugged
before
and
type
water.
Unplug
or be
pulled
shock,
when
cord
or
water.
repair,
blocked.
or
used
remove
where
the
plug,
not
is
required
cause the
by
the
needle,
adjustments
changing
or
when
removing
in
plug
to
whip
instructions
safety
follows:
in.
Always
cleaning
rated15
in
plug,
the
Waifs.
immediately.
into
or
injurytopersons:
this
sewing
this
manual. Use
manual.
ifitis
Return
the
electrical
Keep
ventilation
of
lint,
oxygen
where
plug
from
air
openings
the
cord.
around
the
needle
manufacturer
the
causing
in
the
presser
covers,
instruction
when
a
dust,
needle area,
rewinding.
precauti
Read
all
unplug
it.
tuborsink.
machine
not
working
appliance
or
mechanical
and
is
being
outlet.
may be
sewing
to
break.
only.
ittobreak.
foot,
etc.
lubricating,
manual.
instruc
this
only
to
openings
loose
such
Do
is
pro
the
or
Keep
This
sewing
these
machineisdesigned
instructions
and
manufactured
in
a
for
safe
place
HOUSEHOLD
use
only.
Page 6
Notes
Notes
on
nes
in
accordance
IEC
60
335-2-28
1.
The
with
ment
observe
2.
When
during
replacing
ries,
from
mains
3.
The
maximum
sewing
4.
tension
The
be
adjusted
5.
The
machine
dance
cification
6.Donot
the
machine.
7.
Do
not
—
there
its
—
is
—
it
can
brought
8.
Do
not
ketbyits
9.
If
this
pose
if
it
is
liability
any
10.Toavoid
open
inside
repair,
of
our
11.
Be
sure
12.The
supply
10%
machine
and
safety
user
must
regard
of
the
the
leaving
maintenance
always
mains
the
plug.
lamp
with
plate.
insert
use
is
visible
function
wet,
occur
pull
cord.
appliance
than
that
wrongly
the
the
machine.
the
machine
Repairs
qualified
to
use
with
a
on
safety
for
household
with
exercise
to
the
needle
sewing
the
mechanical
disconnect
by
permissible
is
15
watts.
of
the
by
a
PFAFF
must
the
indications
any
objects
the
sewing
damage
is
disturbed
with
e.g.
when
into
warm
a
the
mains
is
used
for
which
operated,
for
any
risk
of
There
are
solely
service
only
is
designed
a
nominal
rated
frequency
EN
60
adequate
up
and
and
must
area
while
machine
work
parts
the
pulling
wattage
drive
belt
mechanic.
be
operated
into
machine
condensation
a
cold
machine
room.
plug
outofthe
for
it
is
we
damage
electric
are
which
the
the
staff.
original
for
voltage
sewing
machi
335-2-28
caution
down
move
constantly
sewing.
unattended,
or
when
or
accesso
machine
out
the
must
only
in
accor
on
the
openings
if:
which
another
intended
cannot
accept
caused.
shock,
do
no
parts
user
can
responsibility
PFAFF
parts.
a
mains
of
+1—
of
+1—
for
pur
spe
is
soc
4%.
and
the
on
or
not
13.
When
the
outer
cally
to
85°C.
therefore
damage.
Environment
The
recommended
Ambient
Humidity
Storage
The
interference;
ted
TVs,
This
nic-mechanical
supervised
subjected
static
sive
For
only
both
Care
Always
which
ped.
Cleaning
Housing
To
soft,
dirt
Please
Do
ducts
clean
temperature:
machine
near
PCs,
sewing
electricity,
chemicals
ventilation
be
operated
firm
of
the
protect
may
and
clean
the
lint-free
use
a
note!
not
use
such
the
temperature
electronic
and
soft
housing.
properly,
used
components
controlled
Constant
not
permitted
20%
80%
to
suppressed
is
however,
broadcasting
machine
device.
use
in
the
to:
dust,
heat-radiating
or
liquids.
purposes
on
horizontal.
machine
the
be
caused
display:
housing,
cloth.
cloth
any
insecticides
as
petrol
the
of
foot
control
use
atalow
environment
10°C
to
—25°C
it
should
devices
dampness,
machine
To
an
with
or
is
It
home.
by
use
remove
liquid
such
transmitters
high-quality
a
is
a
the
open
it
being
only
alcohol.
or
temperature
non-electroni
a
can
in
order
is:
40°C
to
+80°C
and
immune
notbeopera
as
machine
It
should
direct
objects,
machine
surface
from
damage
hit
clean,
a
any
chemical
chemicals
reach
speed
to
avoid
radios,
etc;
electro
for
not
sunlight.
corro
must
which
or
drop
dry,
stubborn
pro
to
of
up
is
to
be
is
2
Page 7

Modern
Sewing
Congratulations!
sewing
and
design
these
PFAFF
small
the
make
which
will
and
are
instructions
the
take
carefully,
investment
is
options
the
machine
sew
sewing
the
most
product
new
rial
The
machine
that
your
If
you
booklet
A
approach
of
to
and
at
state-of-the-art.
your
uncomplicated
the
You
features
through
technology
machine
to
time
nothing
of
way
only
machine
them.
of
touch
have
unique
can
are
read
your
purchased
advantages.
handle
thick
justaseasy
can
to
almost
and
incorporated
You
itself.
through
wrong.
go
is
time
really
to
has
of
thin
will
the
worth
find
offer
button
a
a
top-quality
Your
any
you.
for
this
in
discover
also
use
to
instruction
This
it!
about
out
and
—
mate
as
all
how
have
reality.
Your
a
great
If
you
PFAFF
get
So
time
have
dealer
ready
turning
any
is
to
your
questions
always
have
some
fashion
—
happy
ideas
no
to
fun!
problem!
help.
And
into
4
3
Page 8
Contents
Top-stitching
Foot
control
Appliqué
Appliqué
Cording
Blind
Borders
Decorative
Dual
Threading
Gathering
Gathering
Elastic
Elastic
Electrical
Thread
Thread
Feather
Sewing
Fringe
Free
Function
Foot
Placing
Straight
Closed
Handwheel
Main
Tacking
Hemstitch
Integrated
Lap-feller
Sewing
Buttonholes
Cording
Gathering
Sewing
Left
Eyelet
Multi-stitch
Monograms
ShellPattern
Pattern
Changing
Needle
Selecting
Needle
Needle
Presser
Removing
Sewing
General
Sewing
Threading
Trouble-shooting
Sewing
Setting
Utility
Threading
4
foot
stitch
fabric
stitch
stitches
connection
trimmer
tension
stitch
on
foot
arm
keys
control
sewing
stitch
overlock
switch
on
foot
foot
slowly
needle
embroidery
edging
width
length
the
threader
needle
position
tables
bar
the
feet
information
light
the
tables
utility
stitches
the
foot
seam
Dual
buttons
lifter
.
stitches
feed
the
needle
with
the
with
straight
elastic
patches
thread
stitch
release
disc
Transport
position
gathering
attachment
needle
position
up/down
sewing
foot
(normal/special
on
sewing
machine
stitches
tables
needle
thread
thread
thread
on
spool
ltop
sewing
stitch
.
holder
feed)
.
accessories)
21
50
41
4.6,47.68
80
77
32
31
71
79
65
58
61
61
27
22
31
32
82,83
23
24
74.76
35
87
21
88
34,60
29
6—9
Page 9
Needle
feed
Top
the
Oiling
overlock
Open
Overlock
Patchwork
Practical
Pullover
Quilt
and
(Integrated
sewing
stitch
stitches
quilt
sewing
stitch
patchwork
Dual
machine
.
foot
Transport)
tension
thread
Quilting
Right
Cleaning
Sewing
on
and
zippers
oiling
position
needle
Richelieu
Repairing
Stabilizing
Reverse
Hemming
Bias-tape
Notes
Smocking
Special
Inserting
Winding
Bobbin
Winding
Winding
Selecting
Stitch
Stitch
Changing
Decorative
Embroidering
Darning
j
Darning
Darning
Stretch
J
Stretch
Setting
tears
edges
sewing
with
binder
safety
on
accessories
lace
the
case
through
from
stitch
density
length
the
stitches
with
with
triple
triple
stretch
twin
the
table
bobbin
the
second
the
width
adjustment
needle
a
with
elastic
the
straight
the
straight
zigzag
stitches
needle
plate
dense
stitch
stitch
needle
spooi
button
zigzag
stitch
stitch
holder
.
stitch.
.
Trouble-shooting
Tapering
Pushbutton
Dropping
Covering
Non-elastic
Drawing
Bobbin
Serging
Serging
Detachable
Honeycomb
Lingerie
Lingerie
Maintenance
Pennant
Zigzag
Fancy
Fancy
Fancy
Accessory
Accessories
Twin
the
stitch
up
thread
with
with
buttonhole
buttonhole
stitch
stitch
elastic
stitch
stitch
needle
controls
dog
feed
stitches
bobbin
the
tension
blindstitch
zigzag
support
work
stitch
with
trouble-shooting
and
stitch
knob
table
compartment
needles
and
stitch
thread
and
gimp
overlock
thread,
stitch.
27,35
25,26
86
42
42,43
70
33—58
43
81
70
31
86
54,55
69
53
56
28
48
79
48
76
57
15—18
19.20
18
17
31
28
28
86
60—69,71,72
66—58
51—53
52
51
40
40
29
88
66—68
29,30
27
44,45
36—39
23
19,20
38,
42
37,
37
14
41
47
47
86—88
45
37
45
30
10
14
73—83
48,64
S
Page 10
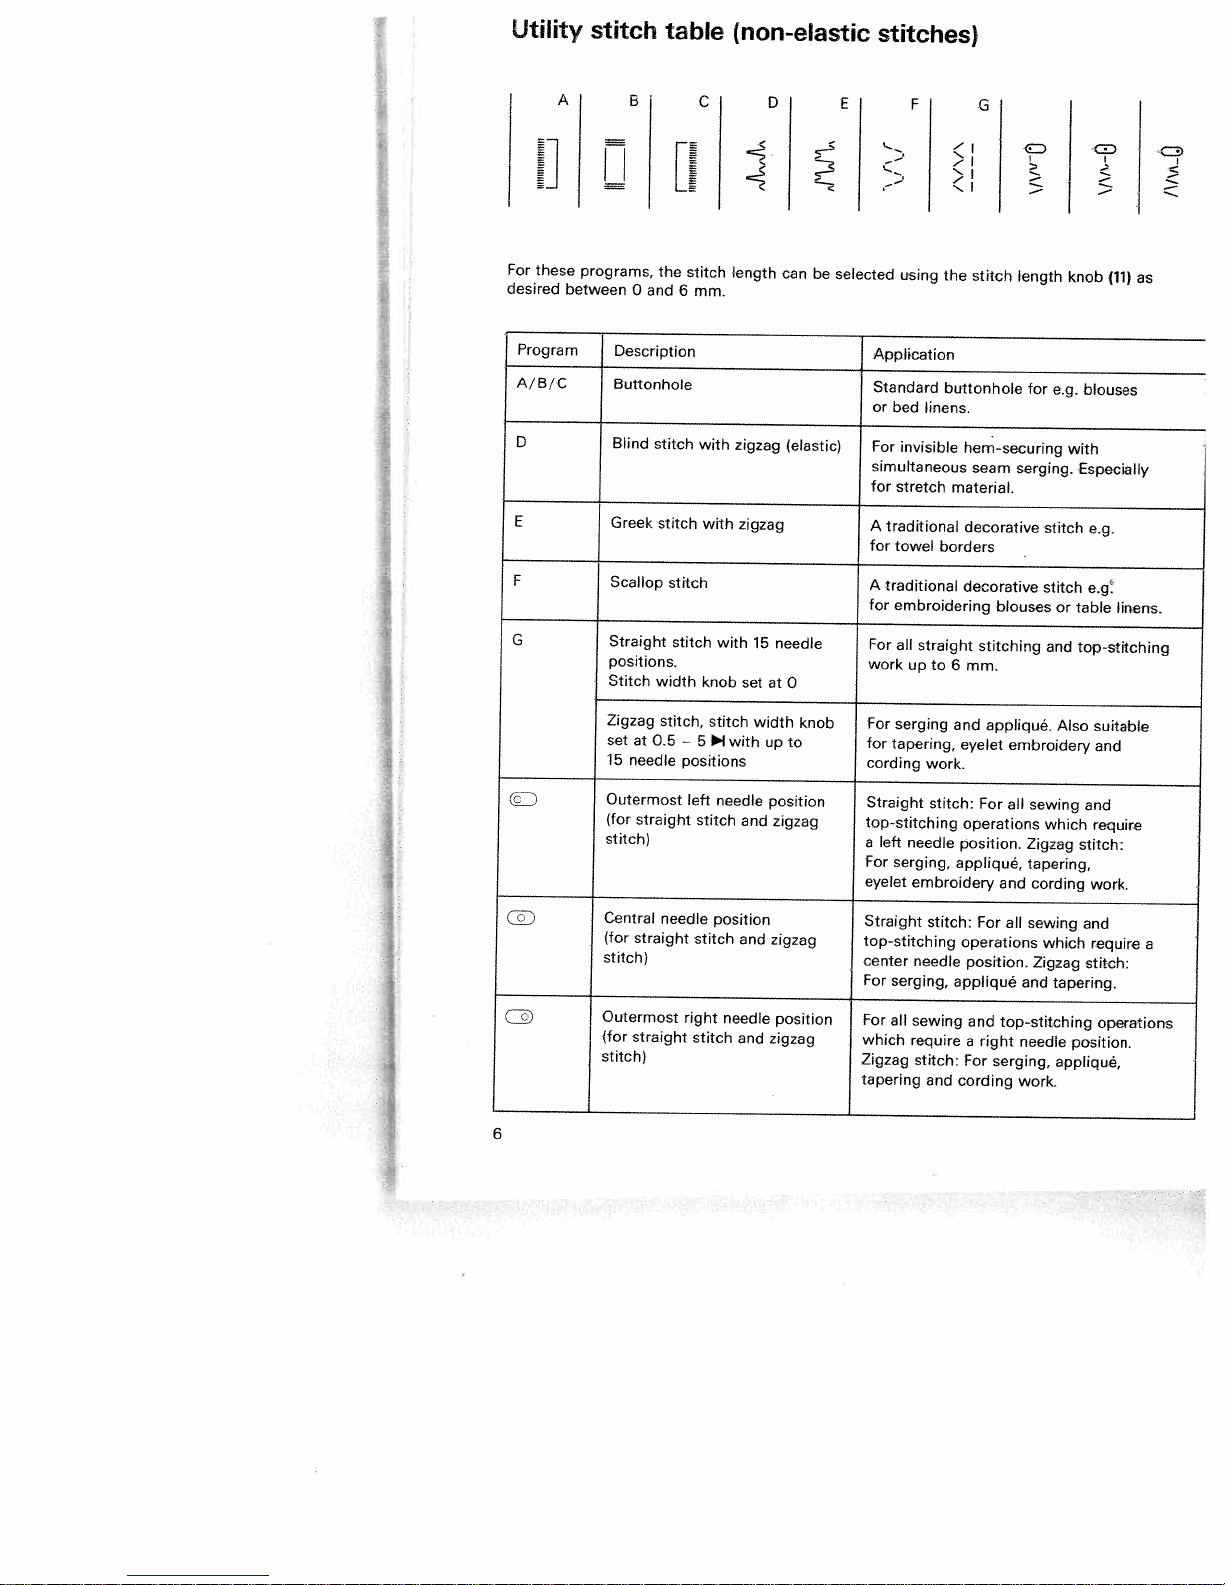
Utility
For
these
desired
stitch
programs,
between
table
the
0
and
6
stitch
mm.
(non-elastic
length
can
be
selected
stitches)
using
the
stitch
length
knob
(11)
as
Program
A/B/C
D
E
F
G
ZD
Description
Buttonhole
Blind
Greek
Scallop
Straight
positions.
Stitch
Zigzag
at
set
15
needle
Outermost
straight
(for
stitch)
Central
(for
straight
stitch)
stitch
stitch
stitch
width
stitch,
0.5
needle
with
with
stitch
knob
—
51with
positions
left
stitch
stitch
zigzag
zigzag
with
stitch
needle
position
and
set
and
15
at
width
up
position
zigzag
zigzag
(elastic)
needle
0
knob
to
Application
Standard
or
bed
linens.
For
invisible
simultaneous
for
stretch
A
traditional
for
towel
traditional
A
for
embroidering
For
all
straight
work
upto6
For
serging
for
tapering,
cording
work.
Straight
top-stitching
left
a
needle position.
For
serging,
eyelet
embroidery
Straight
top-stitching
center
For
stitch:
needle
serging,
buttonhole
hem-securing
material.
decorative
borders
decorative
and
eyelet
stitch:
operations
appliqué,
operations
appliqué
seam
blouses
stitching
mm.
appliqué.
For
and
For
position.
for
e.g.
serging.
stitch
stitch
or
and
Also
embroidery
all
sewing
which
Zigzag
tapering,
cording
all
sewing
which
Zigzag
and
tapering.
blouses
with
Especially
e.g.
e.g.
table
linens.
top-stitching
suitable
and
and
require
stitch:
work.
and
require
stitch:
a
3
6
Outermost
(for
straight
stitch)
right
stitch
needle
and
position
zigzag
For
all
which
Zigzag
tapering
sewing
require
stitch:
and
and
right
a
For
cording
top-stitching
needle
serging,
work.
operations
position.
appliqué,
Page 11
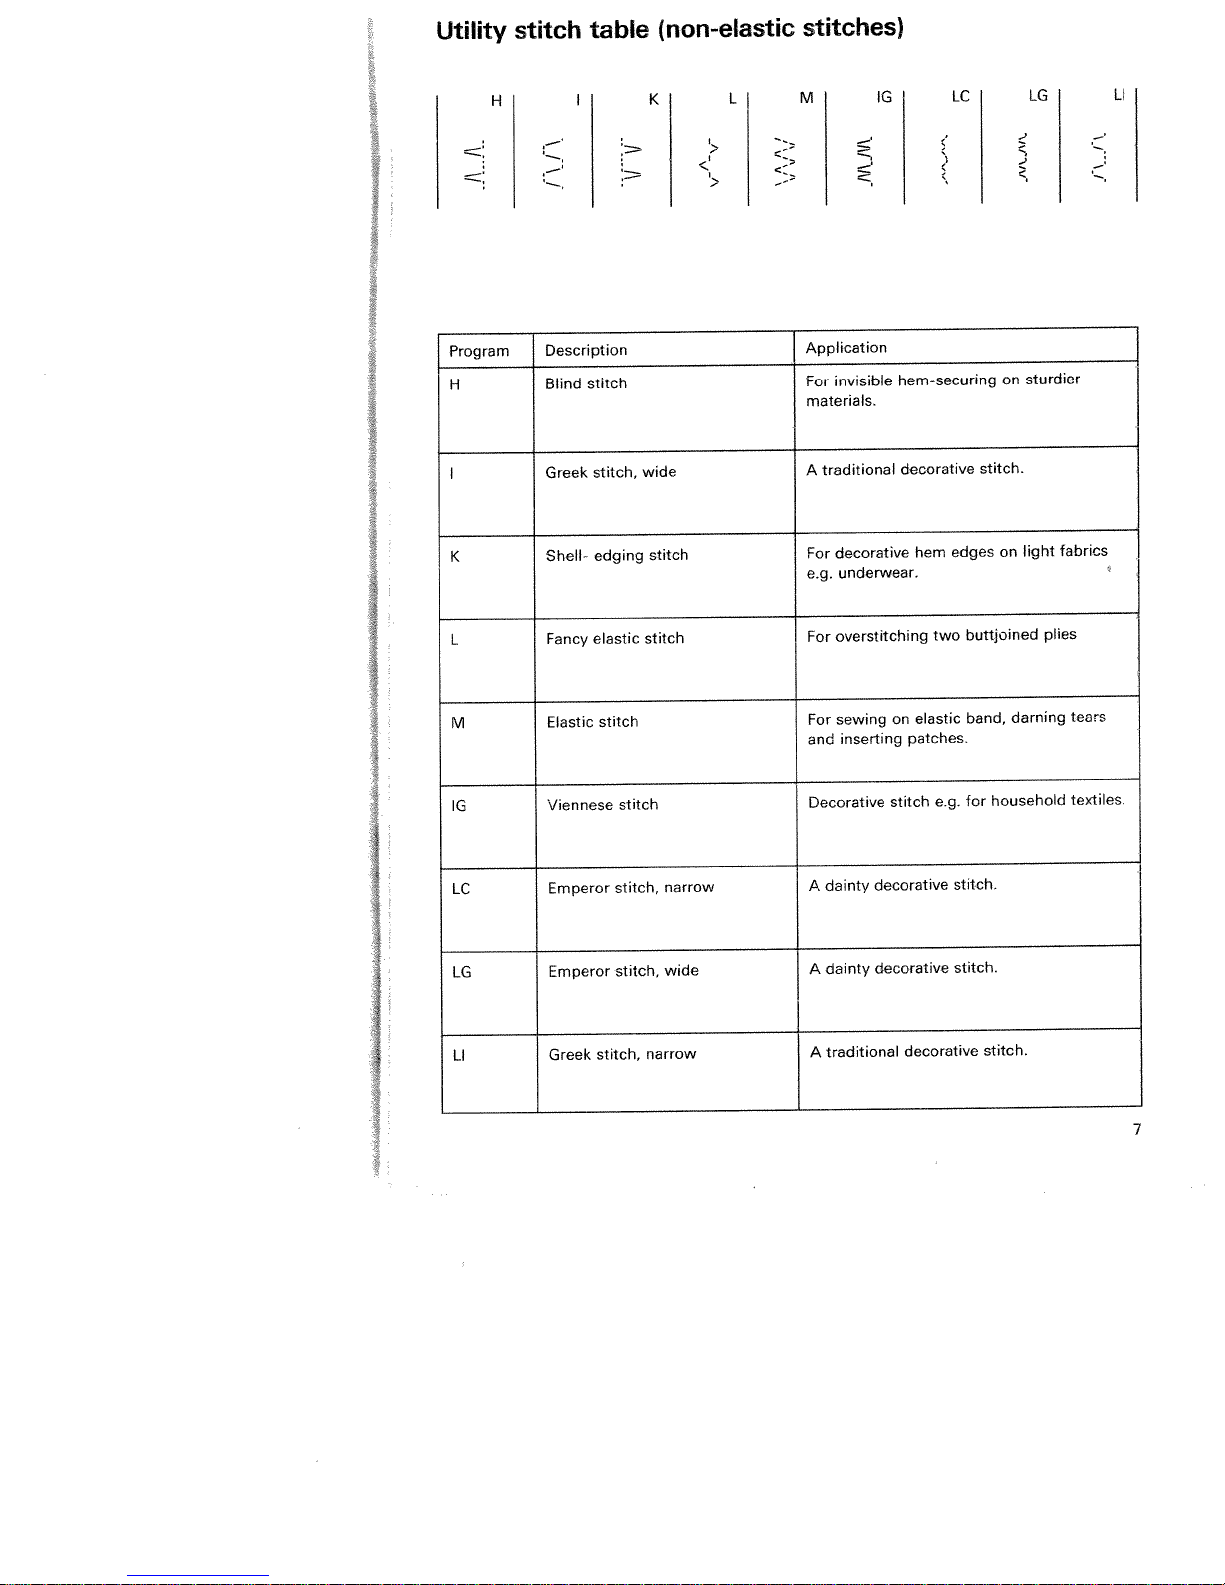
Utility
stitch
table
(non-elastic
stitches)
Program
H
I
K
L
H
I
Description
Blind
stitch
stitch,
Greek
edging
Shell-
elastic
Fancy
K
wide
stitch
stitch
LI
M
Application
invisible
For
materials.
traditional
A
decorative
For
underwear.
e.g.
overstitching
For
IG
hem-securing
decorative
hem
two
LC
stitch.
edges
buttjoined
on
on
LG
sturdier
light
plies
LI
fabrics
M
IG
LC
LG
LI
Elastic
Viennese
Emperor
Emperor
Greek
stitch
stitch,
stitch,
stitch,
stitch
narrow
wide
narrow
sewing
For
inserting
and
Decorative
A
dainty
dainty
A
traditional
A
elastic
on
patches.
stitch
decorative
decorative
decorative
e.g.
band,
for
stitch.
stitch.
darning
household
stitch.
tears
textiles.
7
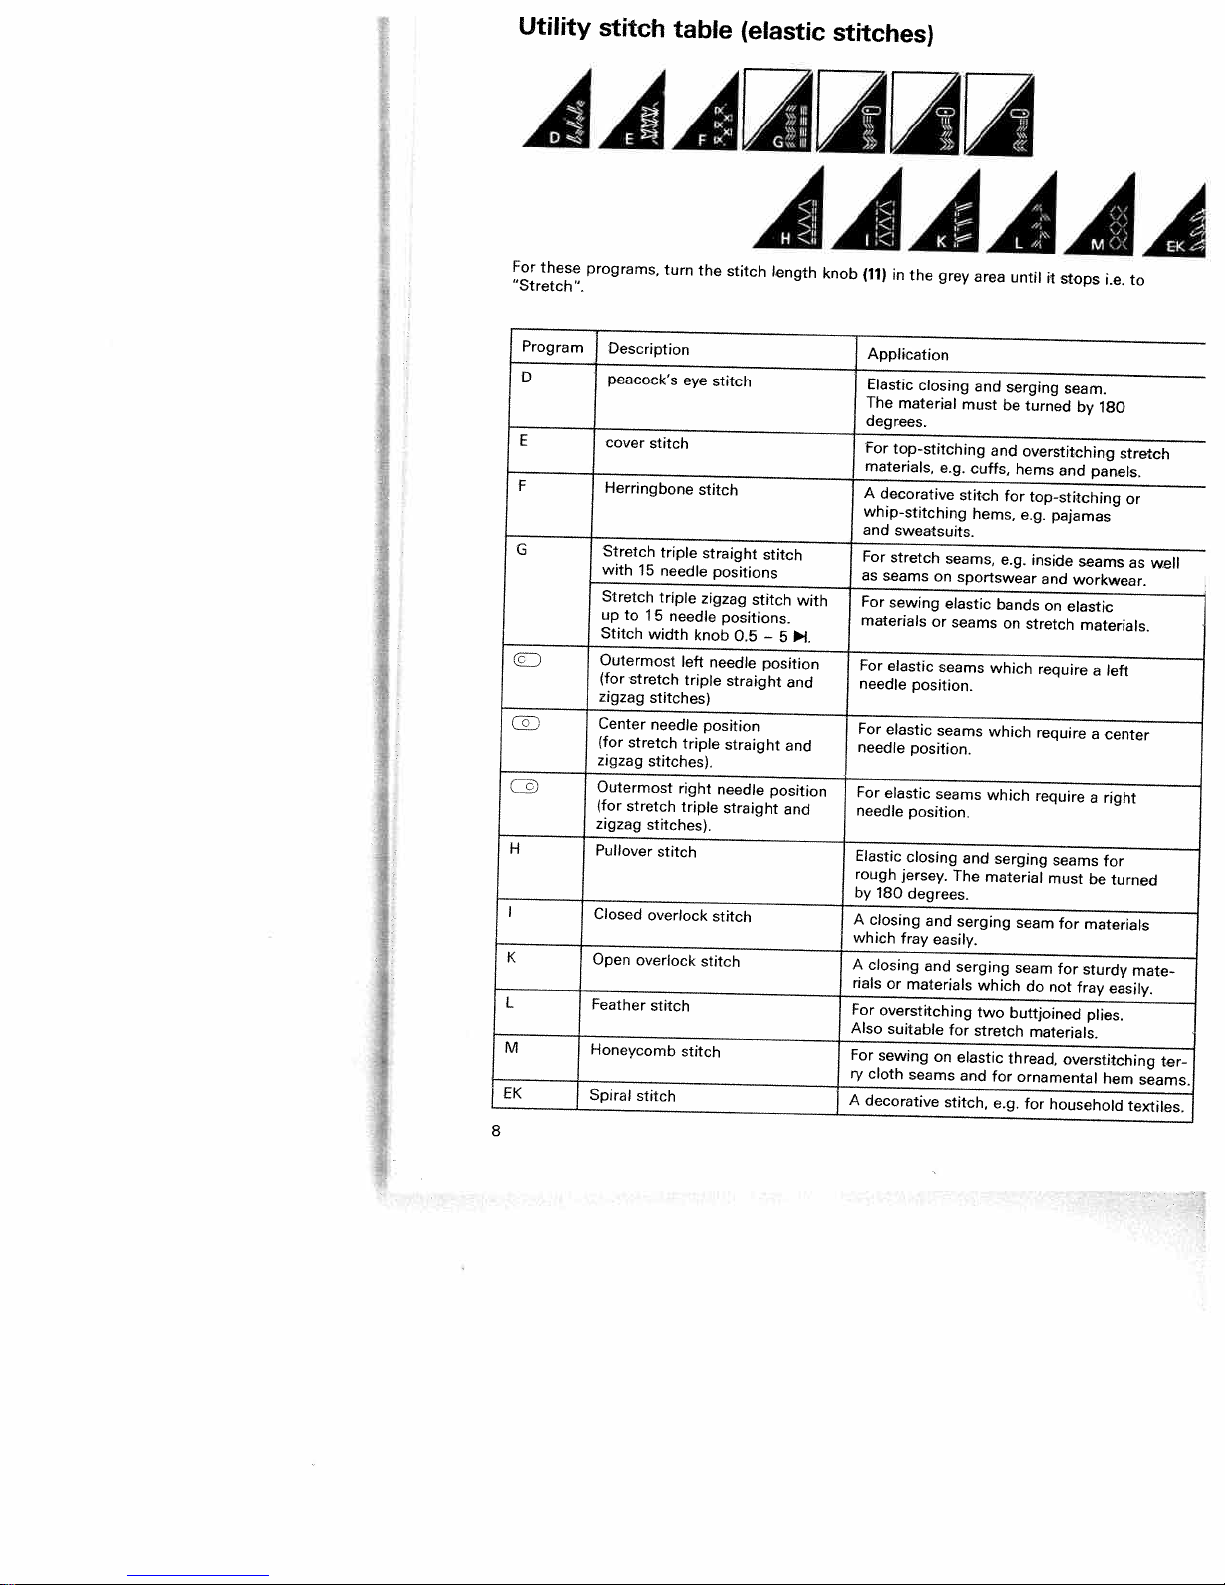
Page 12
Utility
stitch
table
(elastic
stitches)
‘dl
AAAL..__
For
“Stretch”.
G
H
I
K
L
M
EK
8
these
Program
0
E
F
programs,
Description
peacock’s
cover
Herringbone
Stretch
with
15
Stretch
up
to
Stitch
Outermost
(for
stretch
zigzag
Center
(for
stretch
zigzag
Outermost
(for
stretch
zigzag
Pullover
Closed
Open
overlock
Feather
Honeycomb
Spiral
stitch
turn
the
eye
stitch
stitch
stitch
triple
straight
needle positions
triple
zigzag
15
needle
left
triple
triple
right
triple
stitch
positions.
knob
needle
position
needle
stitch
stitch
width
stitches)
needle
stitches).
stitches).
stitch
overlock
stitch
AAA
stitch
length
knob
(11)
in
the
Application
Elastic
closing
The
material
degrees.
For
top-stitching
materials,
A
decorative
whip-stitching
and
sweatsuits.
stitch
0.5
straight
straight
straight
stitch
—
5
bt
position
and
and
position
and
with
For
as
seams
For
materials
For
needle
For
needle
For
elastic
needle
Elastic
rough
by
180
A
closing
which
A
closing
rials
For
overstitching
Also
For
sewing
cloth
ry
A
decorative
stretch
sewing
elastic
position.
elastic
position.
position.
closing
jersey.
degrees.
fray
or
materials
suitable
seams
grey
e.g.
on
or
seams
seams
seams
and
easily.
and
on
area
and
must
cuffs,
stitch
hems,
seams,
sportswear
elastic
seams
and
The
material
serging
serging
which
two
for
stretch
elastic
and
stitch,
1AA
until
it
stops
i.e.
to
serging
turned
overstitching
hems
and
top-stitching
e.g.
pajamas
inside
and
on
stretch
require
require
require
seams
must
seam
for
seam
for
do
not
buttjoined
materials.
thread,
ornamental
for
household
seam.
by
180
stretch
panels.
or
seams
workwear.
elastic
materials.
left
a
center
a
right
a
for
be
turned
materials
sturdy
fray
easily.
plies.
overstitching
hem
as
mate
textiles.
be
and
for
e.g.
bands
on
which
which
which
serging
for
e.g.
well
tar
seams.
Page 13
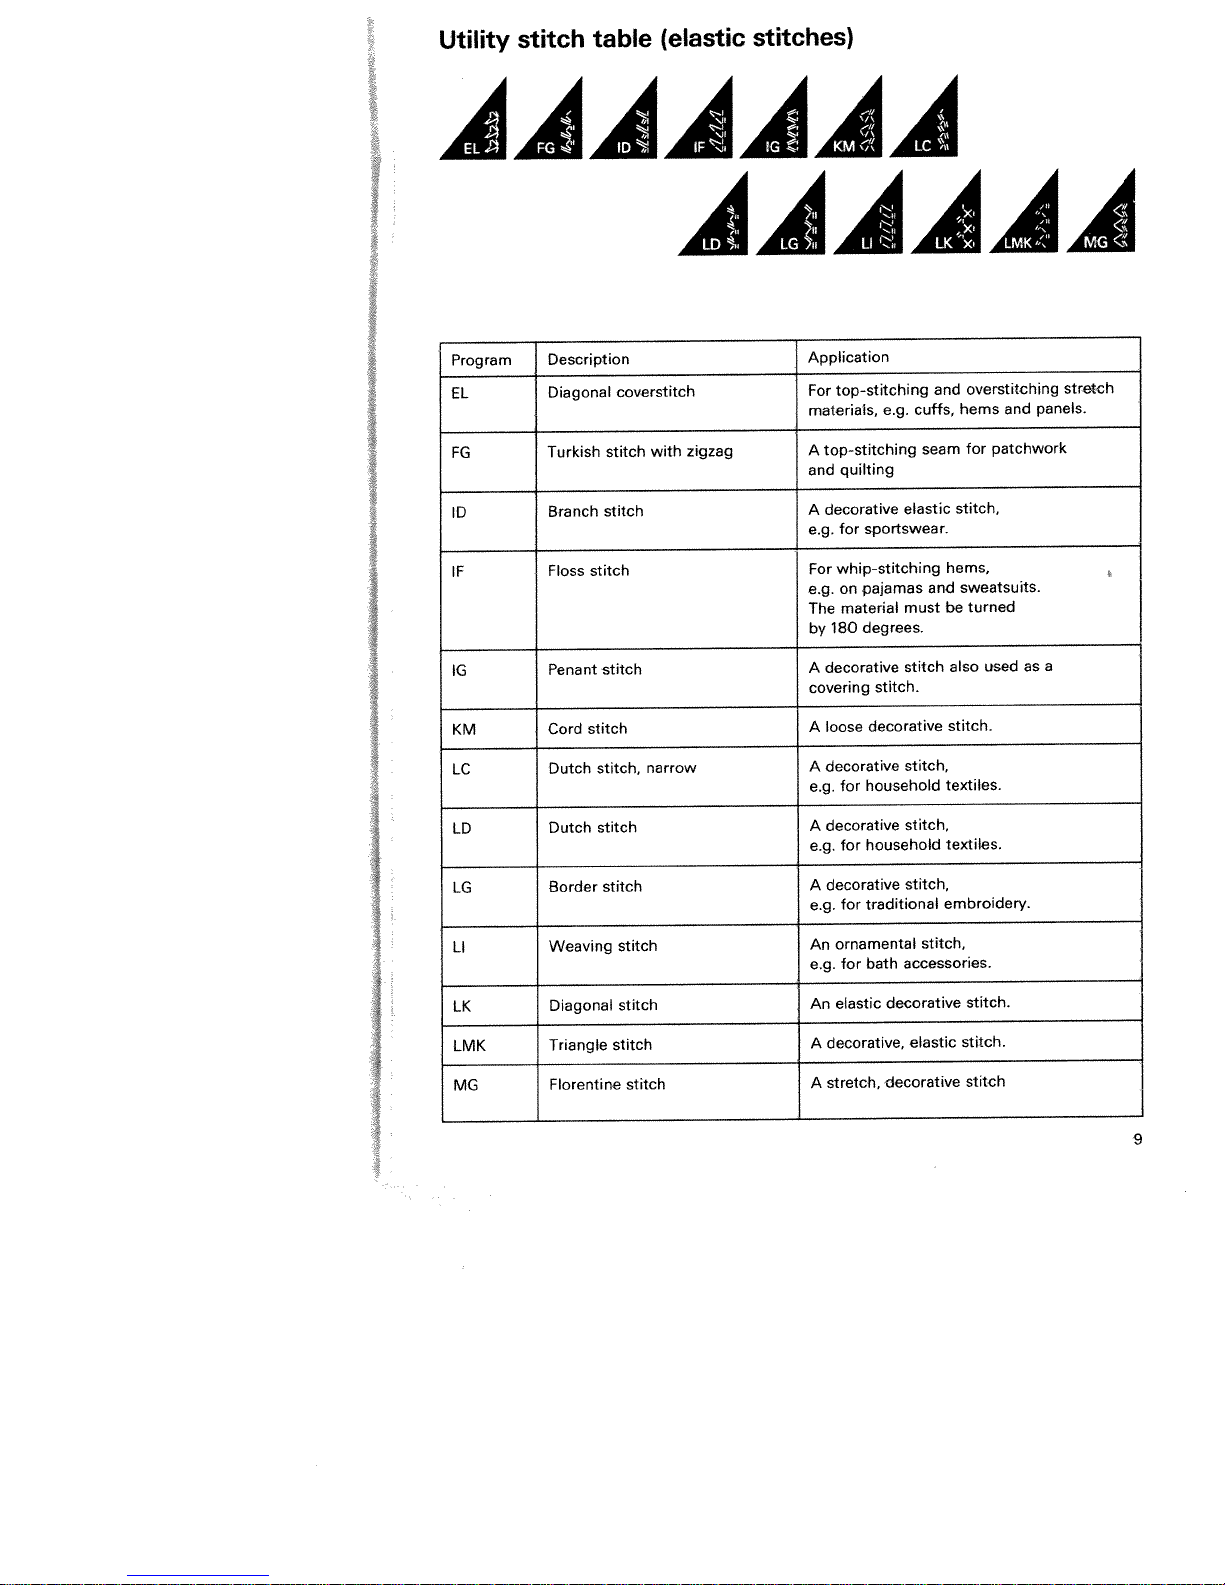
Utility
stitch
table
(elastic
stitches)
AAAAAAA
AAAAAA
Program
EL
FG
ID
IF
lG
KM
LC
LD
LG
Description
Diagonal
Turkish
stitch
Branch
stitch
Floss
stitch
Penant
stitch
Cord
Dutch
stitch,
stitch
Dutch
stitch
8order
coverstitch
stitch
narrow
with
zigzag
Application
top-stitching
For
materials,
top-stitching
A
quilting
and
decorative
A
sportswear.
for
e.g.
whip-stitching
For
pajamas
on
e.g.
material
The
degrees.
180
by
A
decorative
covering
A
loose
A
decorative
household
for
e.g.
decorative
A
household
for
e.g.
A
decorative
traditional
for
e.g.
cuffs,
e.g.
elastic
must
stitch
stitch.
decorative
stitch,
stitch,
stitch,
and
hems
seam
stitch,
hems,
sweatsuits.
and
be
also
stitch.
textiles.
textiles.
embroidery.
overstitching
and
patchwork
for
turned
as
used
stretch
panels.
a
LI
LK
LMK
MG
Weaving
Diagonal
Triangle
Florentine
stitch
stitch
stitch
stitch
ornamental
An
for
e.g.
elastic
An
decorative,
A
stretch,
A
bath
decorative
decorative
stitch,
accessories.
stitch.
elastic
stitch.
stitch
9
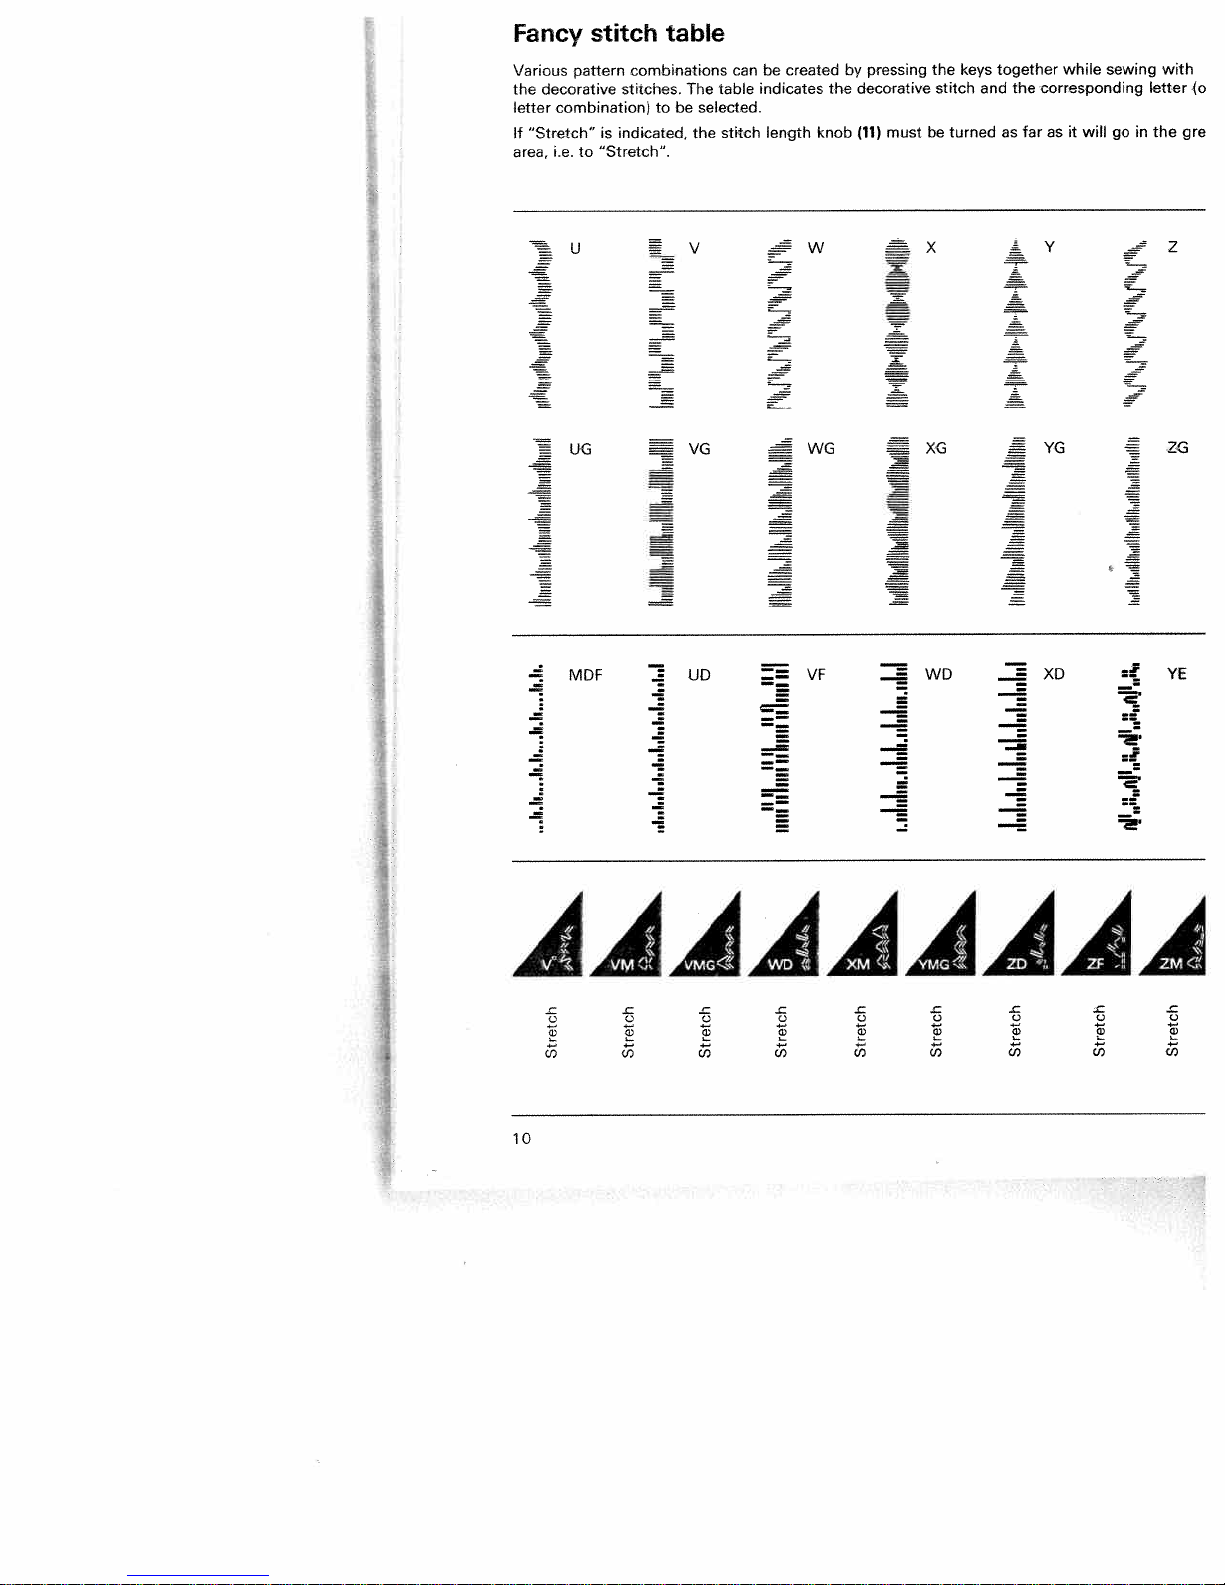
Page 14
g
I
—
!
—
-
(1
De
.
C)
<
°
m
o
0
C
o_
0
P
C
I
ii
111
C•)
C
1fIIIIJ!lI!llIIlIIIIIlIlillhlIuiIIIIIIIIIIllIIIl
11
Ill
111111111
lift
111111
liii
111111111
liii
iiiii
lI’’IIIII’llhIIhI’iINhjIIiIIIIIIiIIIIVIii
iIIIIIllHhIl!II1lIIkIiIIlIIIllHUIlIIlIlliIUh1AhifiiIlIhi
lii’’i
liii’’’
iii’
I
il111fI1u’IIitllfli1
-<
C,
jllIIlIfIjjIlIIljjBjIlIIJjjJIfIIlIIj(!fII(ffjjjljjIIIIh
x
N
cW4
btt
Stretch
Stretch
Stretch
Stretch
Stretch
tIh.
Stretch
retch
St
StCetch
Stretch
Page 15
1iii1
tiptronc
4
PFAFF
6232
li
J
cr1
the
sewing
support
thread
foot
Dual
dog
knob
connection
work
case
thread
the
threader
the
up
bar
lifter
trimmer
the
the
thread
the
sewing
length
controls
position
keys
of
tension
needle
bobbin
sewing
needle
tension
feed
knob
knob
Operation
Electrical
Detachable
Bobbins
Bobbin
Bobbin
Threading
Needle
Pulling
Presser
Thread
Changing
System/Integrated
IDT
feed
Top
Changing
Needle
Lowering
Reverse
Stitch
j
J
J
Pushbutton
Stitch
Needle
Function
width
machine
Transport
page
page
page
page
page
page
page
page
page
page
page
page
page
page
page
page
page
page
page
page
page
page
3
1
1
2,
14
15—18
20
19,
20
21
22
23
23
23
24
26
25,
26
27
27
27
28
28
30
29,
31
31
32
11
Page 16
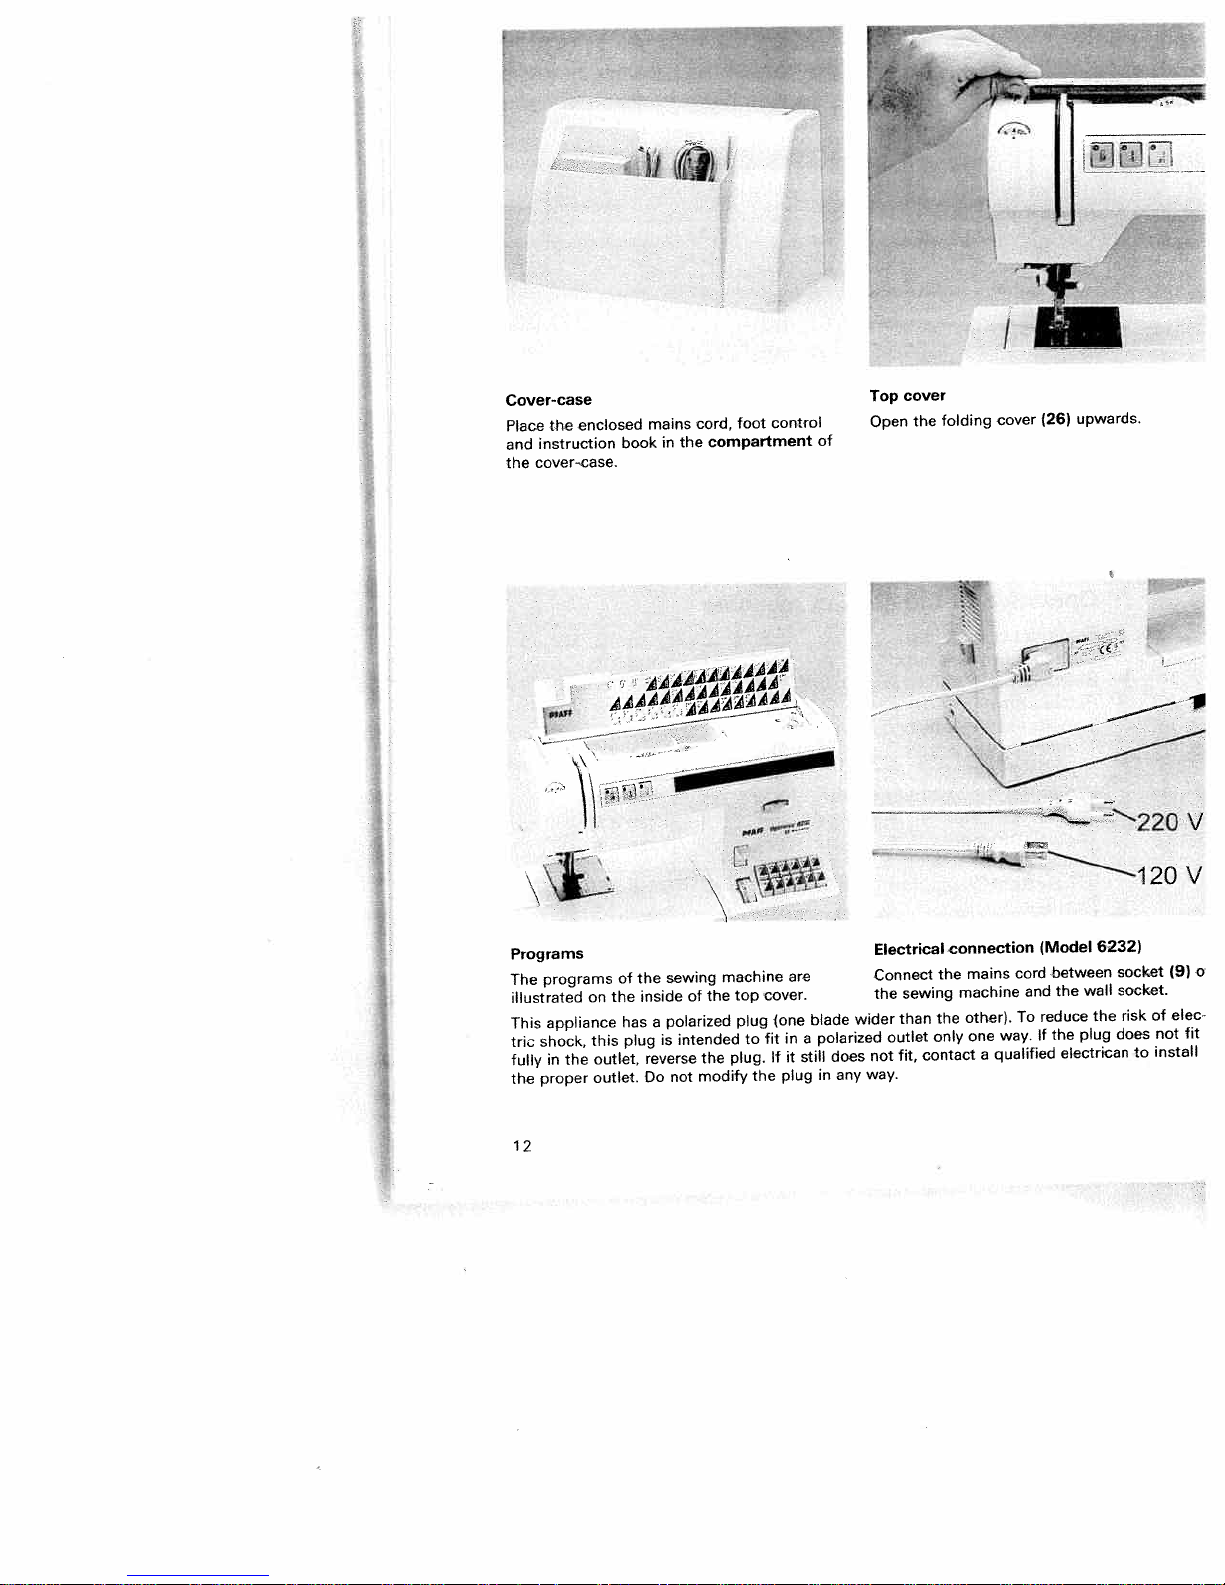
Cover-case
Place
the
instruction
and
cover-case,
the
enclosed
MAMA
book
mains
in
4AAf
cord.
compartment
the
MMAM
foot
control
P.
JL!Ji
cover
Top
upwards.
(26)
cover
folding
the
Open
of
Programs
programs
The
illustrated
appliance
This
shock,
tric
in
fully
proper
the
12
the
on
this
outlet,
outlet.
the
of
has
plug
the
inside
a
reverse
Do
sewing
of
polarized
intended
is
modify
not
\
the
the
M
machine
top
plug
to
plug.
the
are
cover.
one
fitina
it
If
plug
blade
polarized
still
in
does
any
Electrical
Connect
the
wider
not
way.
sewing
than
outlet
fit,
connection
the
the
only
contact
mains
machine
other).
one
qualified
a
way.
cord
and
To
(Model
between
the
reduce
If
the
electrican
wall
plug
6232)
the
socket
socket.
risk
does
to
20
of
not
install
(9)
elec
v
V
o
fit
Page 17

Connecting
(Model
Connect
connecting
sewing
The
pedal.
the
this
For
controller
6232)
the
sewing
typ
the
plug
socket
speed
ATK
foot
the
of
(12)
is
machine
0060
control
foot
the
of
regulated
has
or
control
sewing
to
ATK
by
be
0033.
with
machine.
pressing
used
the
foot
Connecting
(Models
Connect
connecting
the
to
and
regulated
tionally,
slide
the
Position
Position
6112,
the
you
on
socket
wall
by
the
*4
foot
the
6112,
plug
socket.
pressing
regulate
can
front
=
=
of
(9)
half
full
control
6152)
the
of
The
the
part
speed
speed
foot
the
the
—
sewing
foot
of
control
sewing
control.
sewing
the
foot
the
to
machine
speed
Addi
speed
control.
is
by
I
I
Main
When
sewing
The
switch
the
lamp
sewing
main
lights
machine
switch
up.
tised
be
has
For
controller
the
switched
is
8)
ready
now
is
on,
use.
to
typ
AW
0253
machine
sewing
this
to
013.
AE
or
foot
13
Page 18
Li
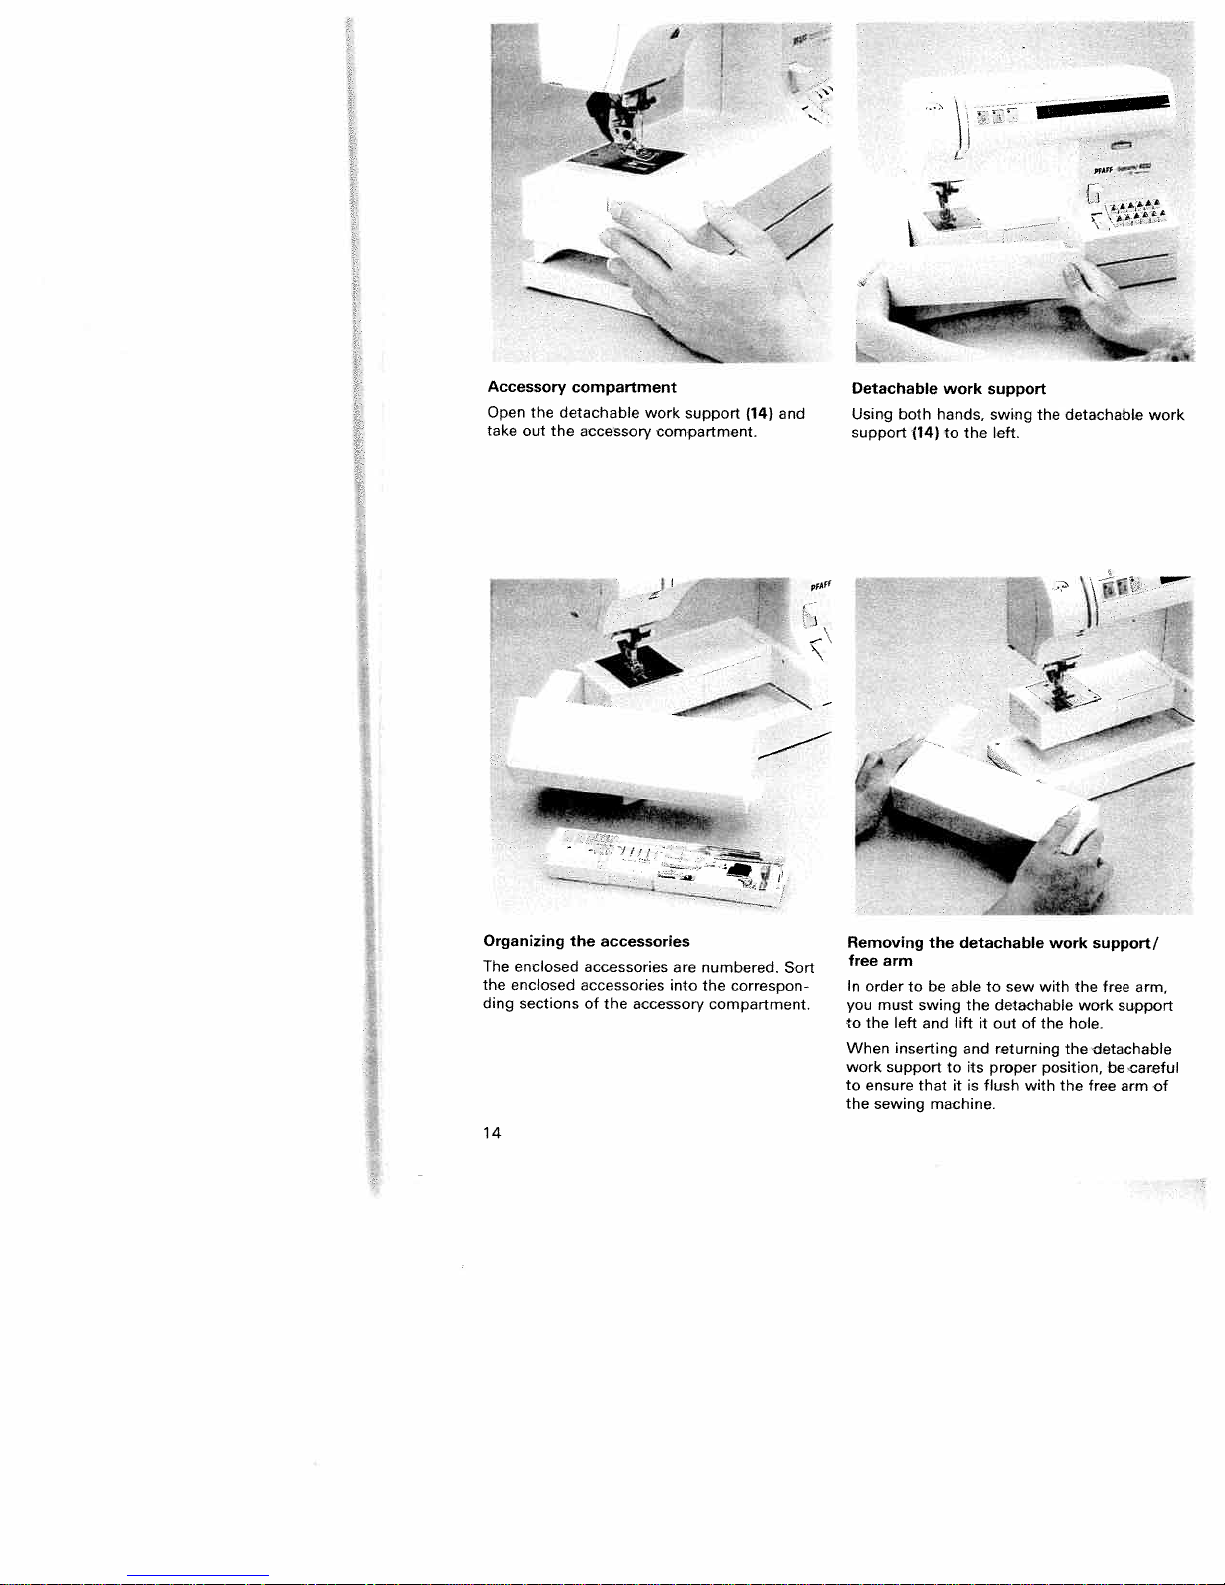
Accessory
the
Open
take
out
Organizing
The
enclosed
enclosed
the
sections
ding
14
compartment
detachable
accessory
the
the
accessories
accessories
of
work
compartment,
accessories
the
accessory
support
are
into
numbered.
the
and
(14)
correspon
compartment.
Sort
Detachable
Using
support
Removing
free
arm
In
order
you
must
to
the
left
When
inserting
work
support
to
ensure
the
sewing
both
to
(14)
the
be
swing
and
that
machine.
work
hands,
to
the
detachable
able
lift
and
to
it is
to
the
it
its
flush
support
swing
left.
sew
detachable
out
of
returning
proper
with
the
detachable
work
with
hole.
the
the
position,
the
\\ø
support!
free
the
work
detachable
be
free
work
arm,
support
careful
arm
of
Page 19
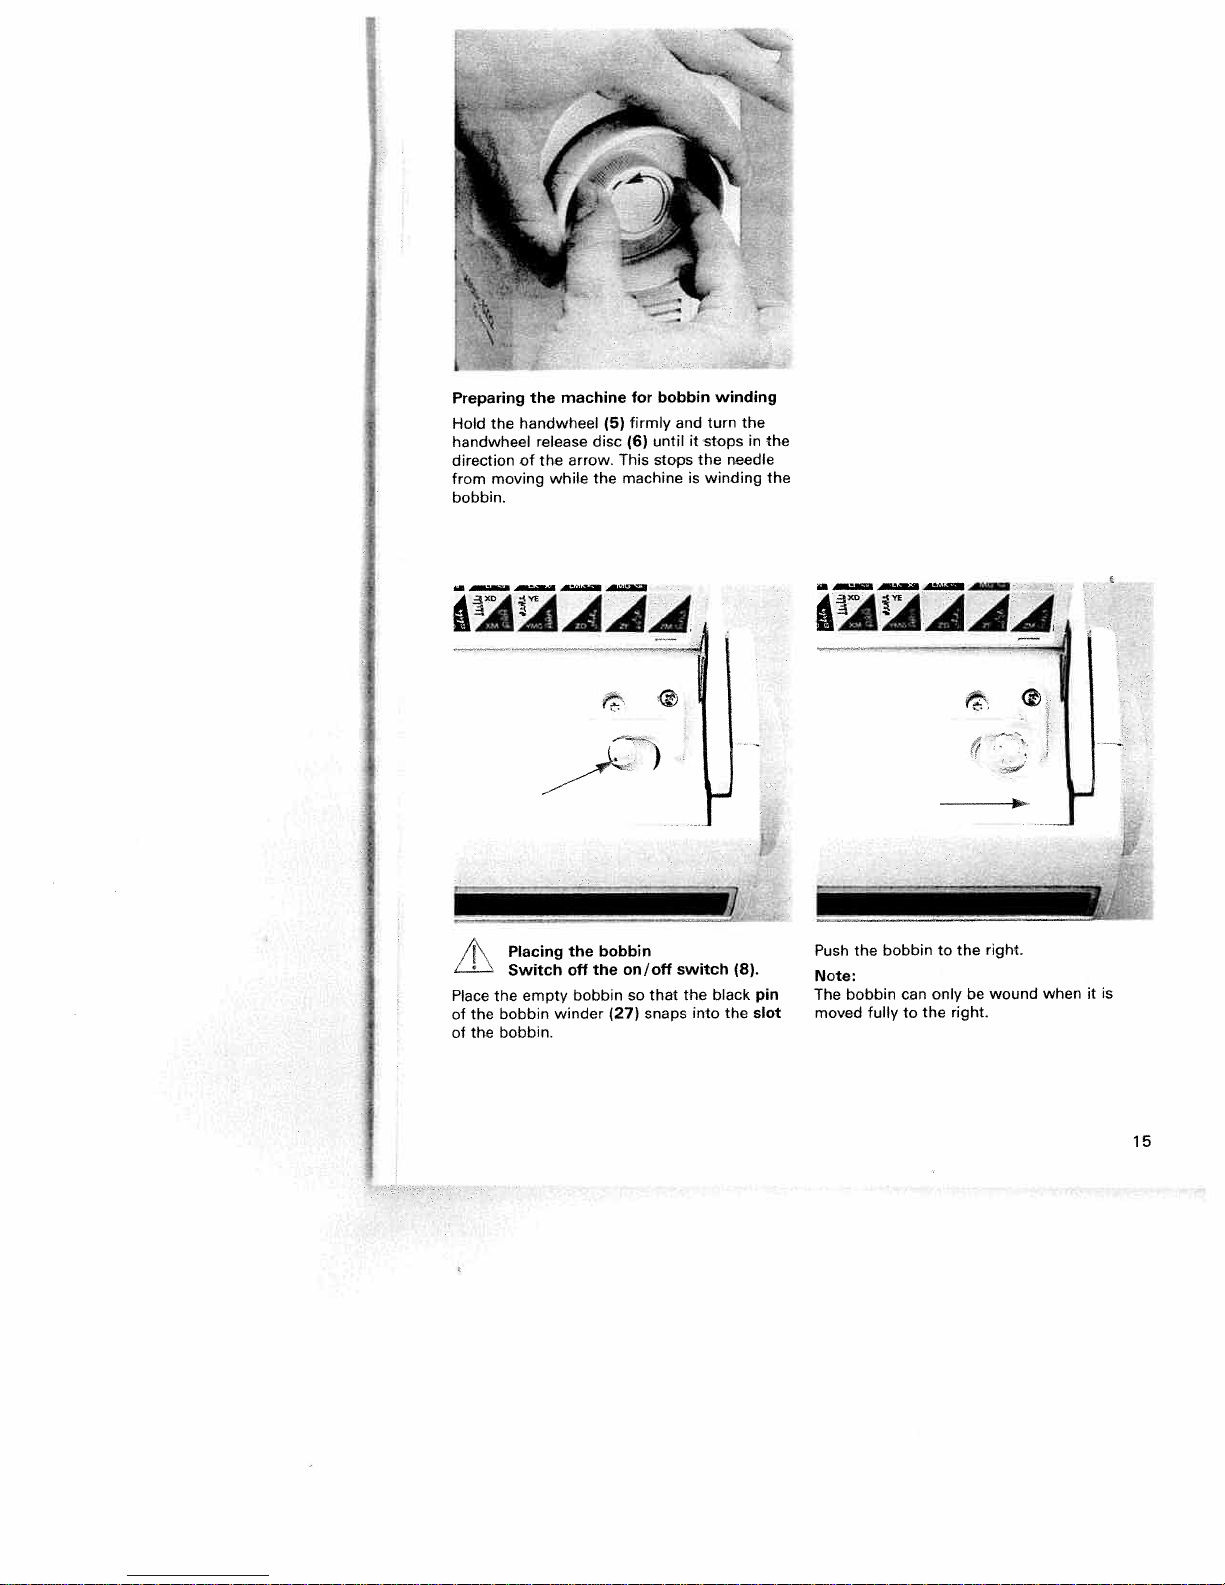
Preparing
Hold
the
handwheel
direction
from
moving
bobbin.
machine
the
handwheel
release
arrow.
of
the
while
disc
the
(5)
This
machine
for
firmly
(6)
bobbin
until
stops
and
it
stops
the
is
winding
winding
turn
needle
the
in
the
the
AAAA
the
Placing
/‘i”
Place
of
the
the
of
the
bobbin
bobbin.
Switch
empty
off
bobbin
winder
(
bobbin
the
(27)
on/off
so
snaps
)
that
switch
the
into
black
the
(8).
pin
slot
4AAAA
the
bobbin
fully
bobbin
can
to
to
the
onlybewound
right.
the
Push
Note:
The
moved
right.
when
it
is
15
Page 20
tr
r
w
AAAAAAAA44A4
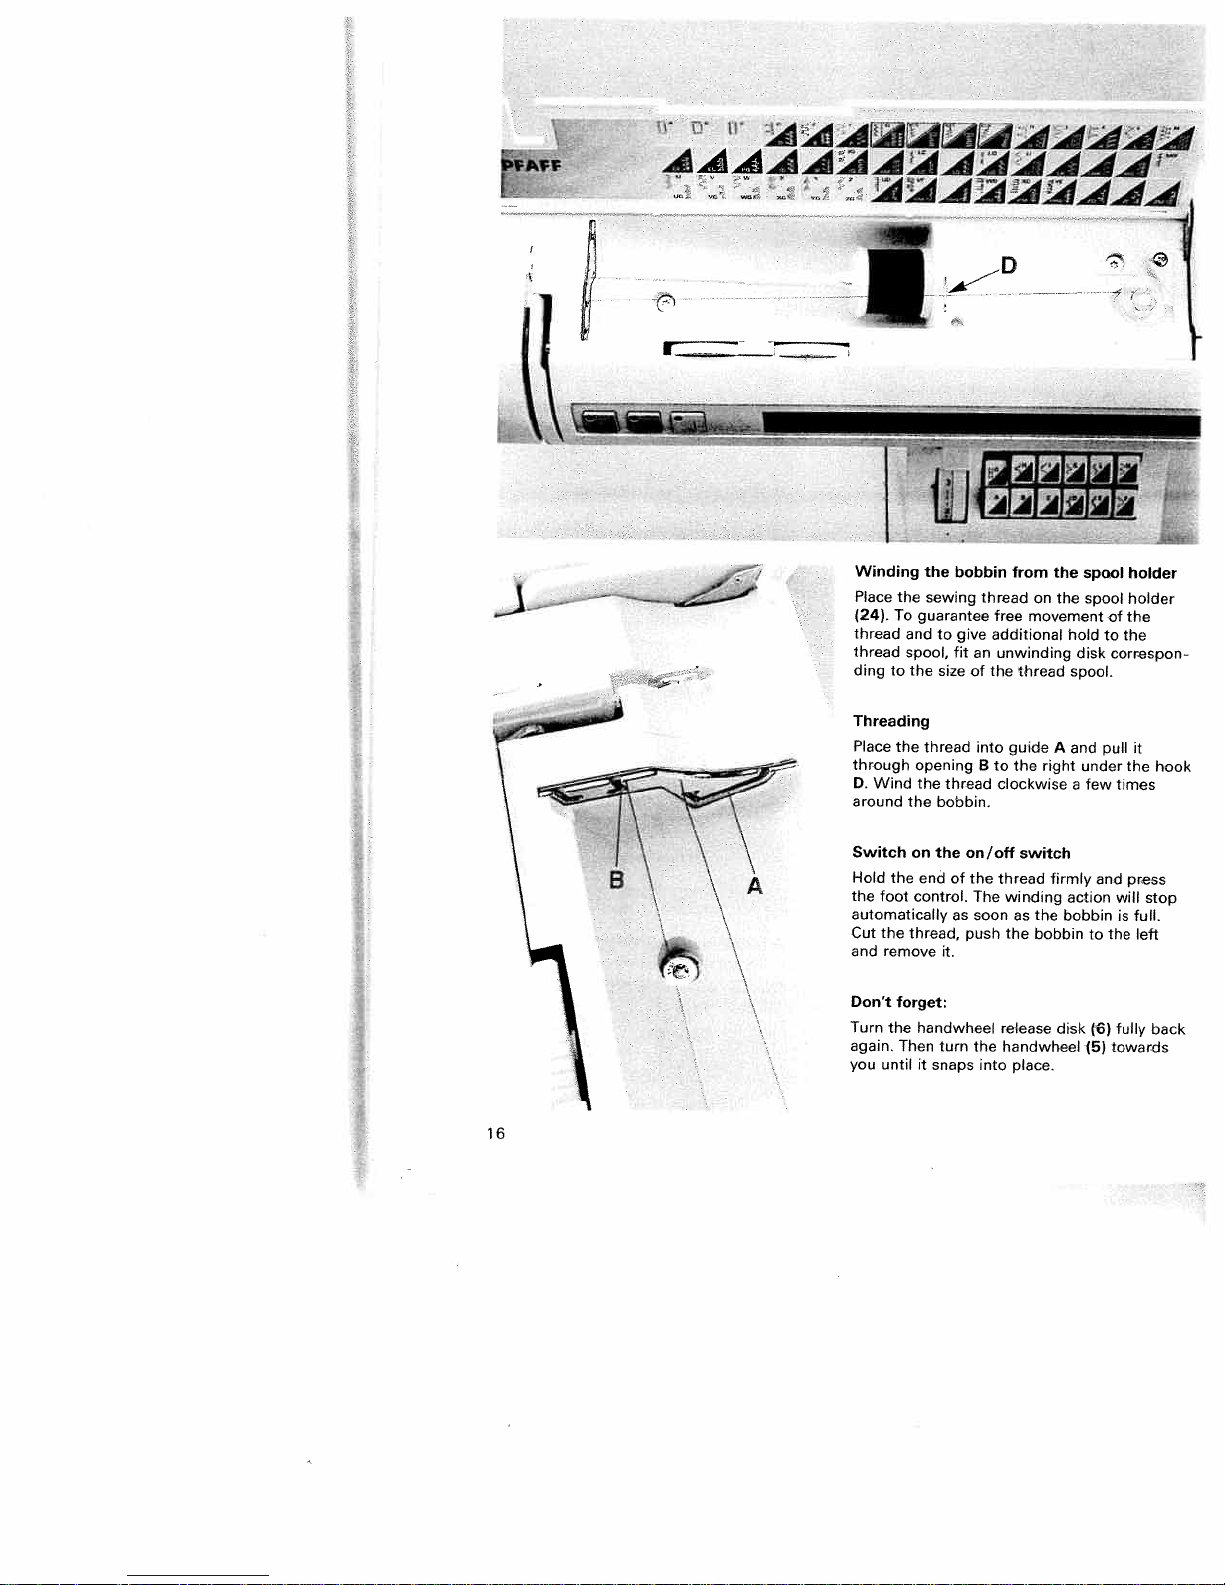
Winding
Place
(24).
thread
thread
ding
the
To
and
spool,
to
the
sewing
guarantee
to
the
sizeofthe
bobbin
thread
give
fit
an
from
on
free
movement
additional
unwinding
thread
the
the
spool
hold
disk
spool.
spool
holder
holder
of
the
to
the
correspon
Threading
Place
the
Wind
foot
the
remove
the
until
opening
the
the
on
the
control.
thread,
forget:
handwheel
Then
thread
thread
bobbin.
the
endofthe
it.
turn
it
snaps
through
D.
around
Switch
Hold
the
automatically
Cut
and
Don’t
Turn
again.
you
16
as
into
B
on/off
The
soon
push
the
into
guide
to
the
clockwise
switch
thread
winding
as
the
bobbin
the
release
handwheel
place.
A
right
firmly
disk
and
under
few
a
action
bobbin
(5)
pull
and
to
(6)
it
the
times
press
will
full.
is
left
the
fully
towards
hook
stop
back
Page 21
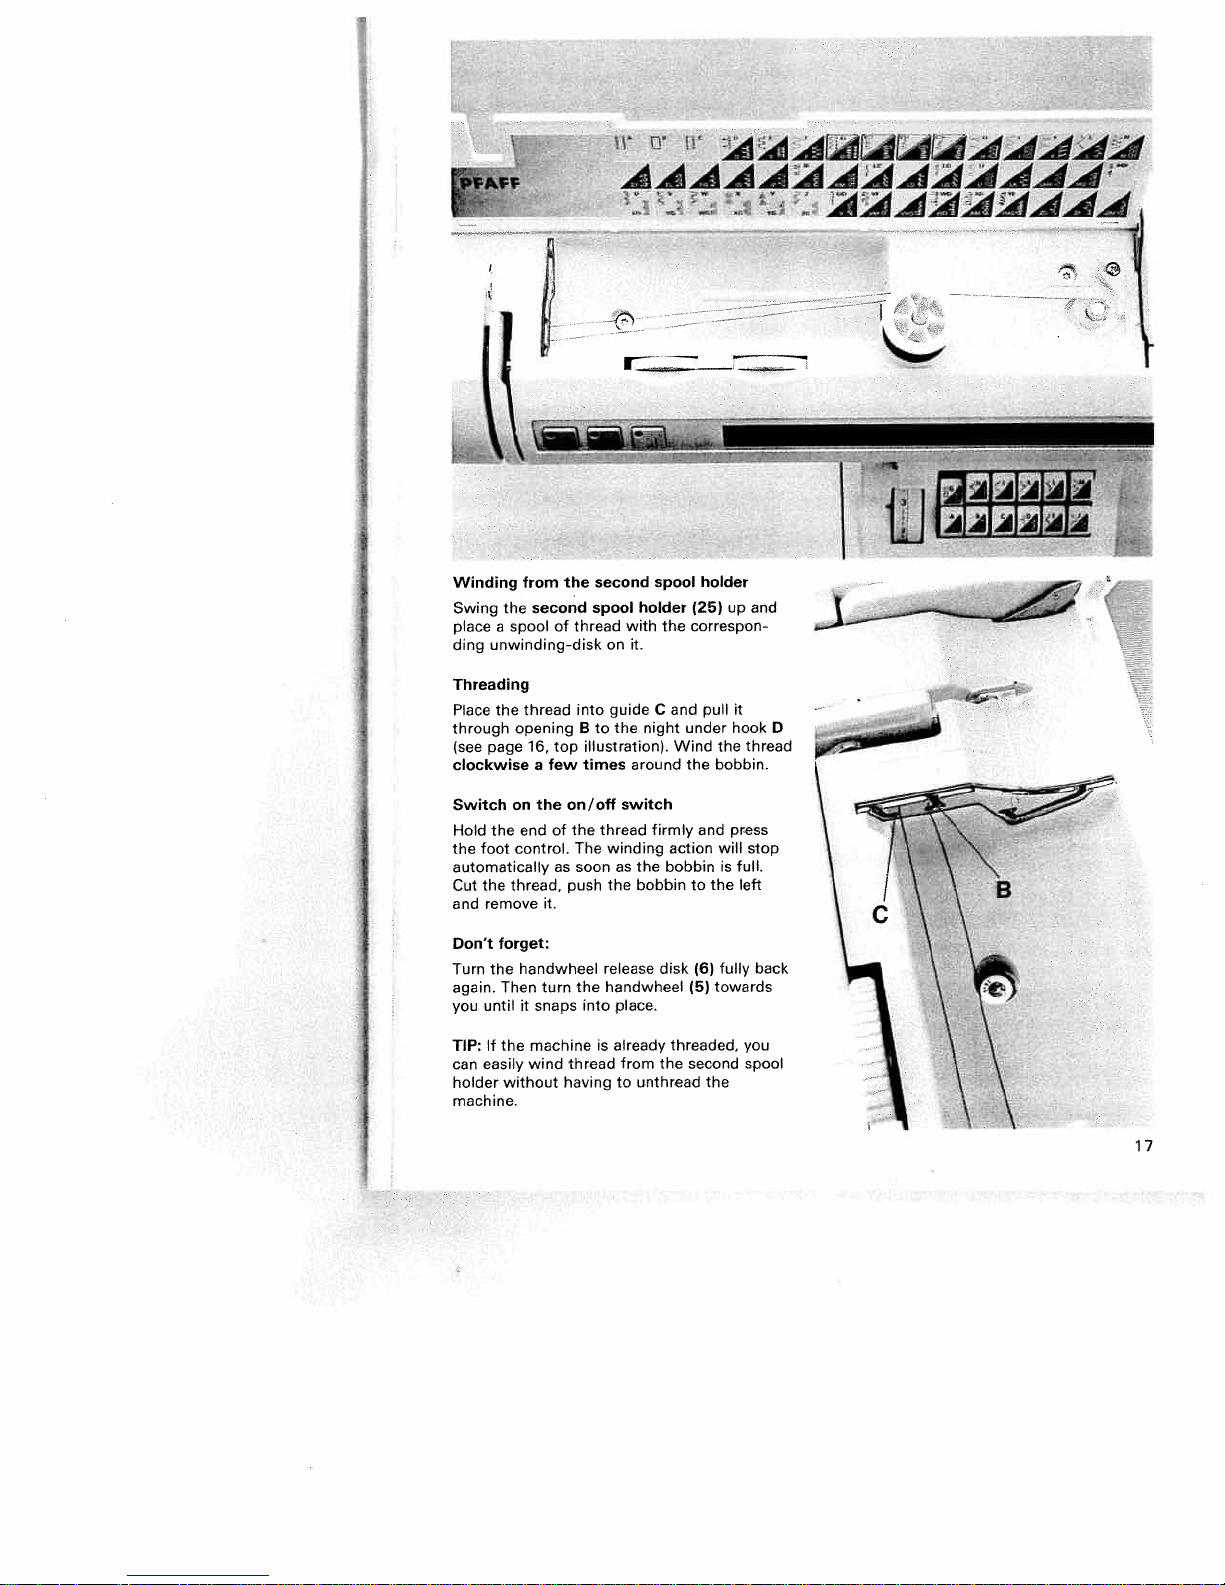
Winding
Swing
place
a
unwinding-disk
ding
the
spooi
from
second
of
____________
W
AAAAAAA4AAAAd4
the
thread
second
spool
on
holder
with
it.
spool
the
holder
up
(25)
correspon
and
ji1±1I
L
Threading
thread
the
Place
through
(see
clockwise
Switch
Hold
the
automatically
Cut
and
Don’t
Turn
again.
you
TIP:Ifthe
can
holder
machine.
page
the
foot
the
remove
forget:
the
Then
until
easily
without
opening
on
end
control.
thread,
handwheel
it
16,
top
few
a
the
on/off
of
as
push
it.
turn
snaps
machine
wind
thread
having
guide
into
Btothe
illustration>.
times
switch
the thread
The
winding
soon
as
the
release
the
handwheel
into
place.
is
already
from
to
C
night
around
firmly
bobbin
the
bobbin
disk
the
unthread
pull
and
under
Wind
the
and
action
the
to
(6)
(5)
threaded,
second
the
it
hook
thread
the
bobbin.
press
will
stop
full.
is
left
fully
towards
you
spool
D
back
17
Page 22
1.
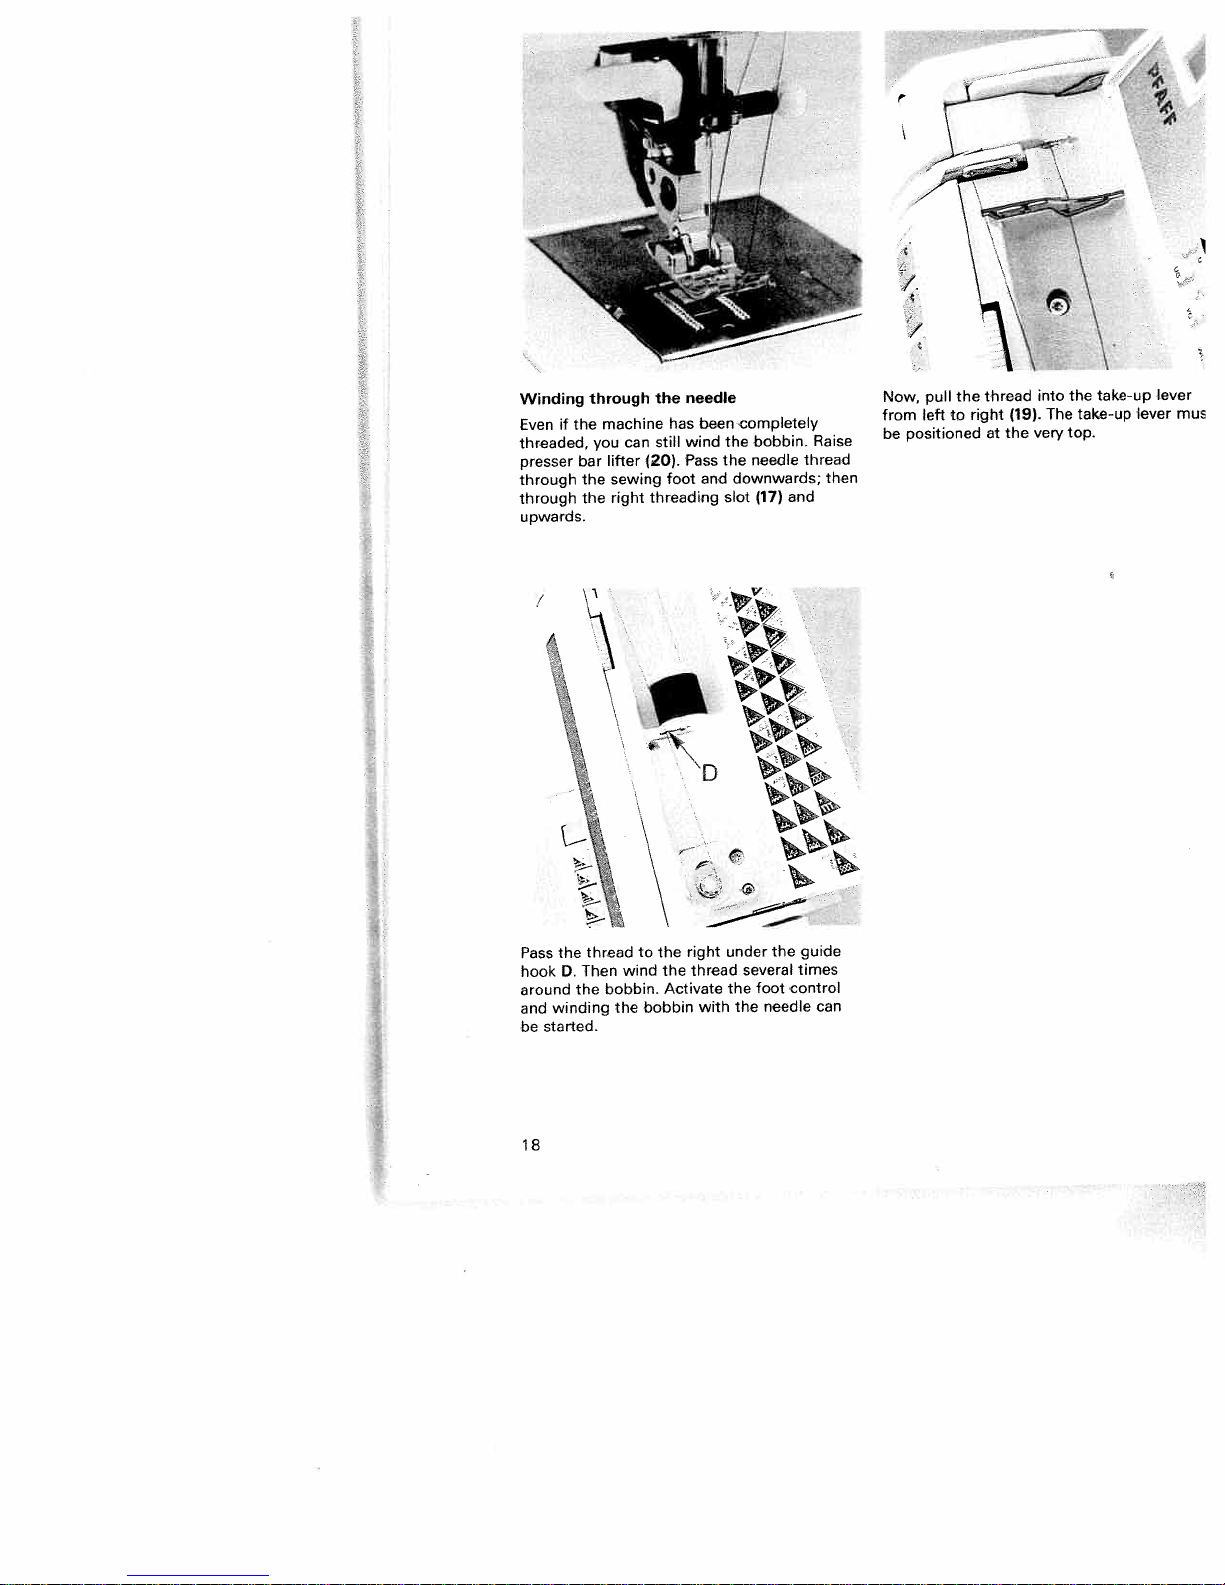
Winding
Even
if
threaded,
presser
through
through
upwards.
,1
the thread
Pass
hook
D.
around
winding
and
started.
be
the
bar
the
the
4
Then
the
through
machine
you
lifter
sewing
right
wind
bobbin.
the
can
to
bobbin
the
has
still
(20).
foot
threading
the
the
Activate
needle
been
wind
Pass
and
right
thread
with
completely
the
bobbin.
needle
the
downwards;
slot
(17)
the
under
several
foot
the
the
needle
thread
and
guide
times
control
Raise
then
can
Now, pull
left
from
positioned
be
take-up
fever
lever
mu
the
right
(19).
the
at
to
very
The
take-up
top.
the
into
thread
18
Page 23
I
I
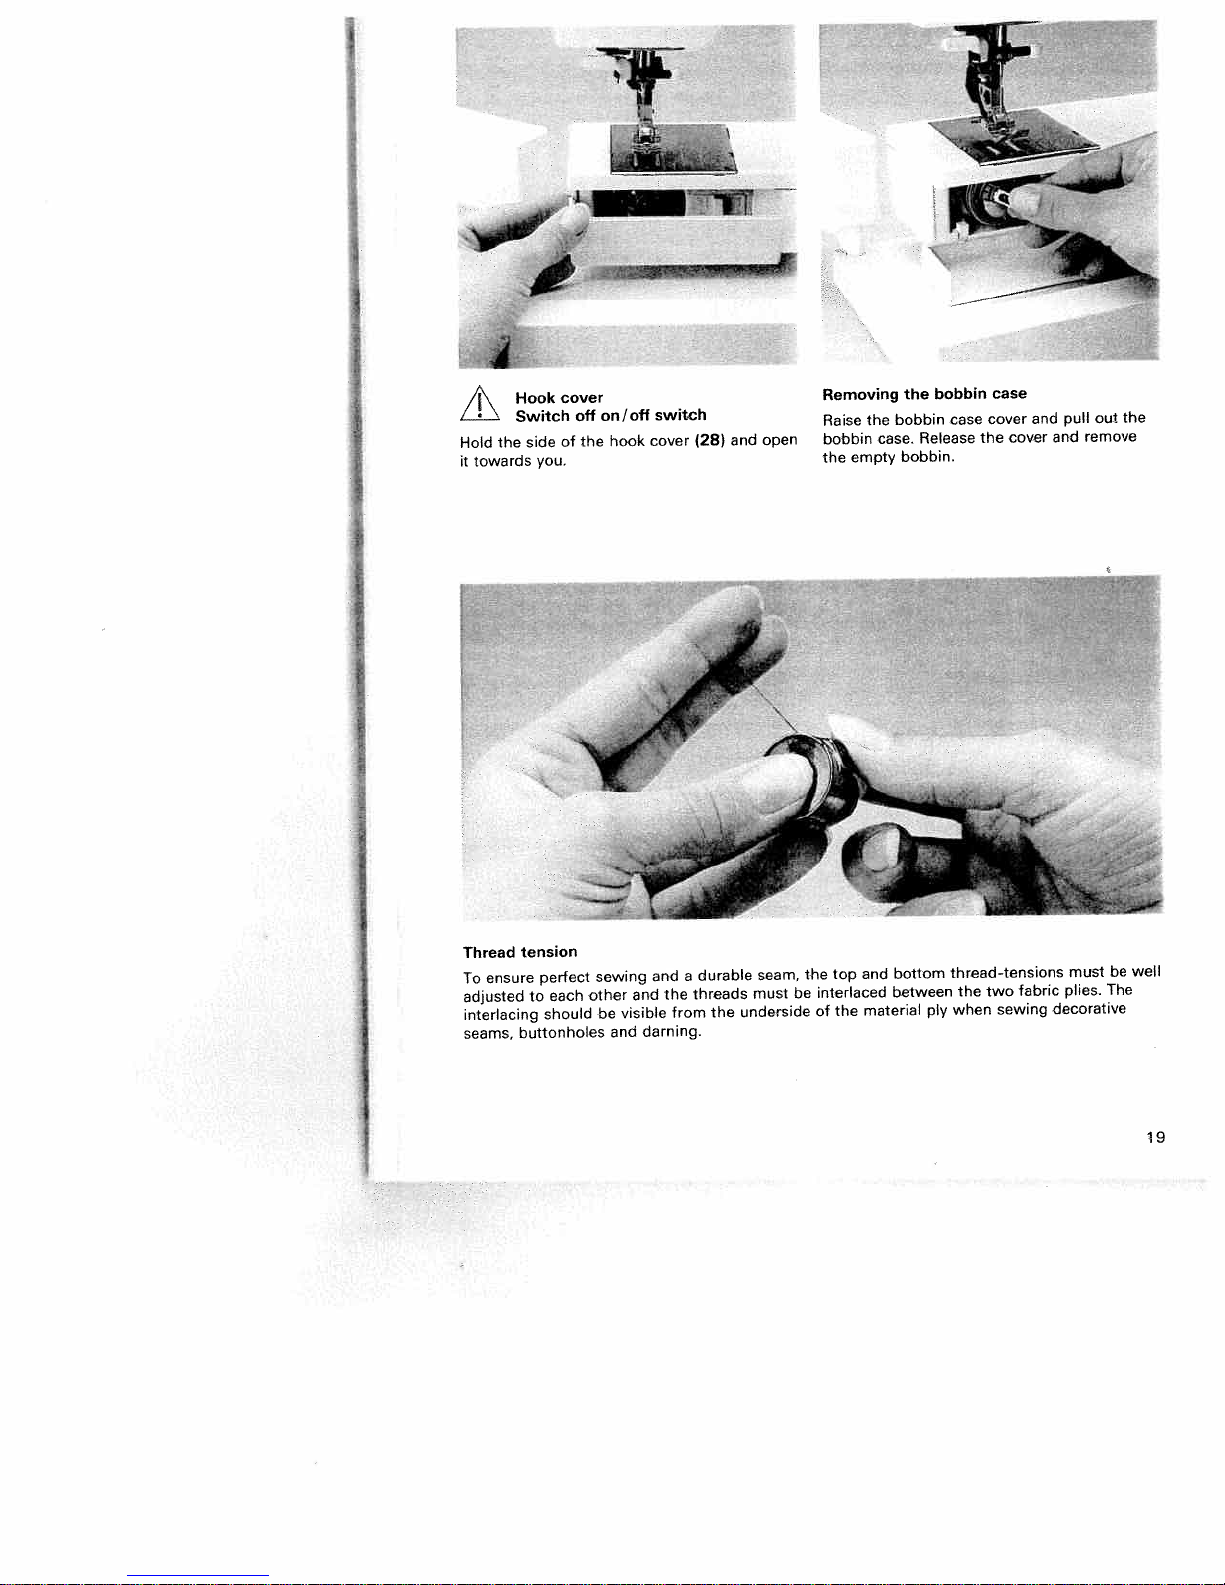
Hold
it
towards
the
Hook
Switch
side
you.
cover
off
the
of
__
on/off
hook
switch
cover
(28)
and
-
open
Removing
the
Raise
bobbin
the
empty
case.
the
bobbin
Release
bobbin.
bobbin
case
cover
the
case
cover
and
and
pull
out
remove
the
Thread
ensure
To
adjusted
interlacing
seams,
tension
perfect
each
to
should
buttonholes
sewing
other
be
and
and
visible
darning.
and
the
a
from
durable
threads
the
seam,
must
underside
the
interlaced
be
of
top
the
and
between
material
bottom
thread-tensions
the
when
ply
two
sewing
fabric
must
plies.
decorative
be
The
well
19
Page 24
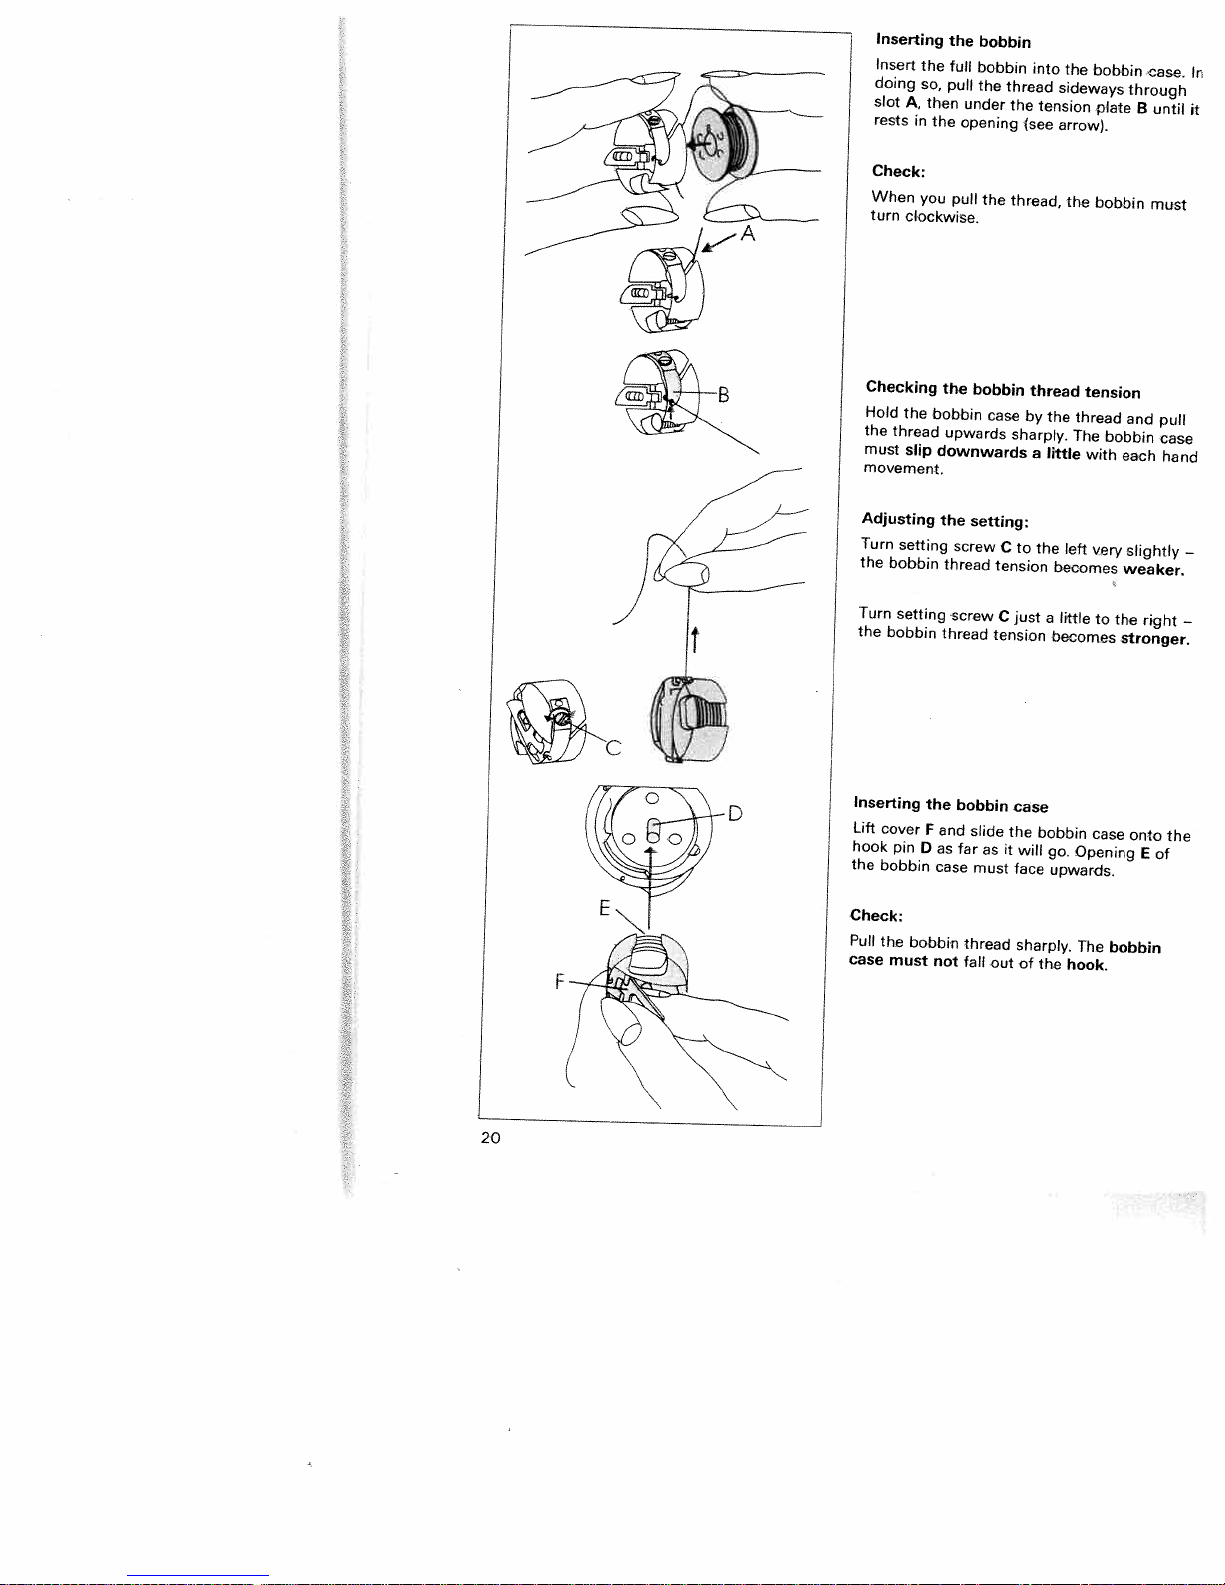
Inserting
Insert
doing
slot
A,
rests
Check:
When
turn
clockwise.
in
the
so,
then
you
the
the
full
pull
under
opening
pull
bobbin
bobbin
the
thread
the
into
the
(see
thread,
the
sideways
tension
arrow).
the
bobbin
plate
bobbin
case.
through
B
until
must
In
it
Checking
Hold
the
must
movement.
Adjusting
Turn
the
Turn
the
Inserting
Lift
cover
hook
the
bobbin
the
thread
slip
setting
bobbin
setting
bobbin
pin
the
bobbin
upwards
downwards
the
screw
thread
screw
thread
the
bobbin
F
and
D
as
far
case
bobbin
case
setting:
C
tension
C
tension
slide
asitwill
must
thread
by
sharply.
a
to
the
just
case
the
bobbin
face
the
thread
The
little
left
becomes
a
little
becomes
go.
Opening
upwards.
tension
bobbin
with
very
to
the
case
and
pull
case
each
slightly
weaker.
right
stronger.
onto
E
of
hand
—
—
the
Check:
Pull
the
bobbin
thread
case
must
not
fall
sharply.
ut
The
of
the
bobbin
hook.
I-
20
Page 25
thread
needle
until
top.
(24)
disk.
both
under
through
righthand
the
the
and
behind
needle,
the
the
off
bar
lifter
take-up
the
Place
fit
and
hands,
thread
the
Pull
take-up
the
into
downwards
Finally,
slot.
one
please
on/off
(20)
thread
the
the
pull
guide
lefthand
the
threading
lever
take
again
of
switch
turn
and
lever
(19)
the
on
corresponding
thread
the
thread
(19).
up
pass
the
refer
0.
hook
threading
around
slot
The
lever
(19)
in
the
thread
the
thread
two
to
the
the
has
into
Pass
slot
and
thread
from
righ
next
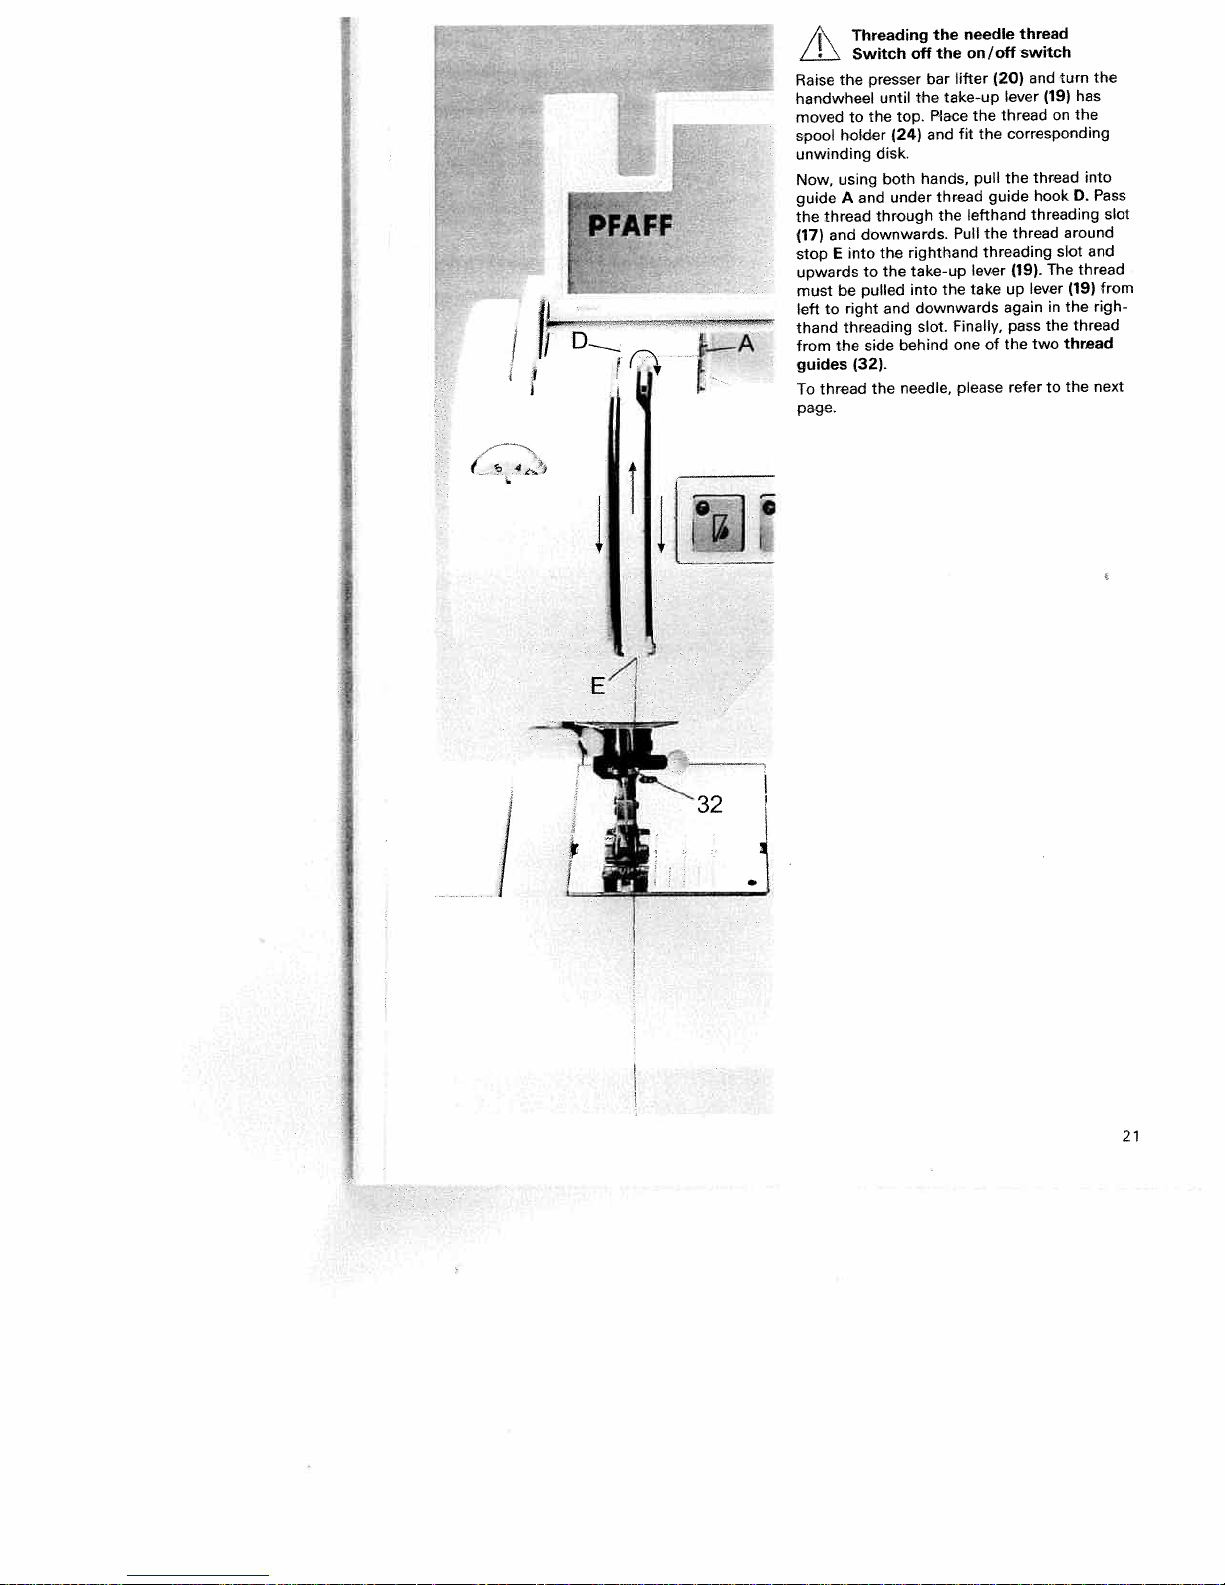
Threading
4”.
Switch
L.!’.
presser
the
Raise
handwheel
moved
spool
unwinding
Now,
guide
the
(17)
stop
upwards
must
1L
D
J/
I
-
left
thand
from
guides
To
page.
holder
using
A
thread
and
E
be
to
threading
t.he
thread
the
to
and
downwards.
into
to
pulled
right
side
(32).
the
1
I
I
I
I
21
Page 26

Needle
To
make
quiccker,
PFAFF
sewing
wheel
tion.
hold
and
fully
downwards
needle
the
needle
from
Turn
the
releasing
threader
the
thread
threader
needle
foot
until
Place
so
below.
needle
to
threading
you
have
threader
(see
the
needle
the
it
taut.
that
the
eye.
the
thread
move
through
Models
the
been
next
needle
Move
and
small
Place
threader
upwards.
the
needle
provided
(16).
page).
is
at
thread
the
turn
it
hook
thread
the
towards
carefully,
needle
6122,
Lower
Turn
its
under
needle
towards
and
You
6152,
easier
highest
threader
R
goes
in
the
can
eye.
with
the
the
hook
to
allow
now
6232)
and
the
hand-
posi
the
through
the
rear,
I
0
hook
the
pull
22
Page 27
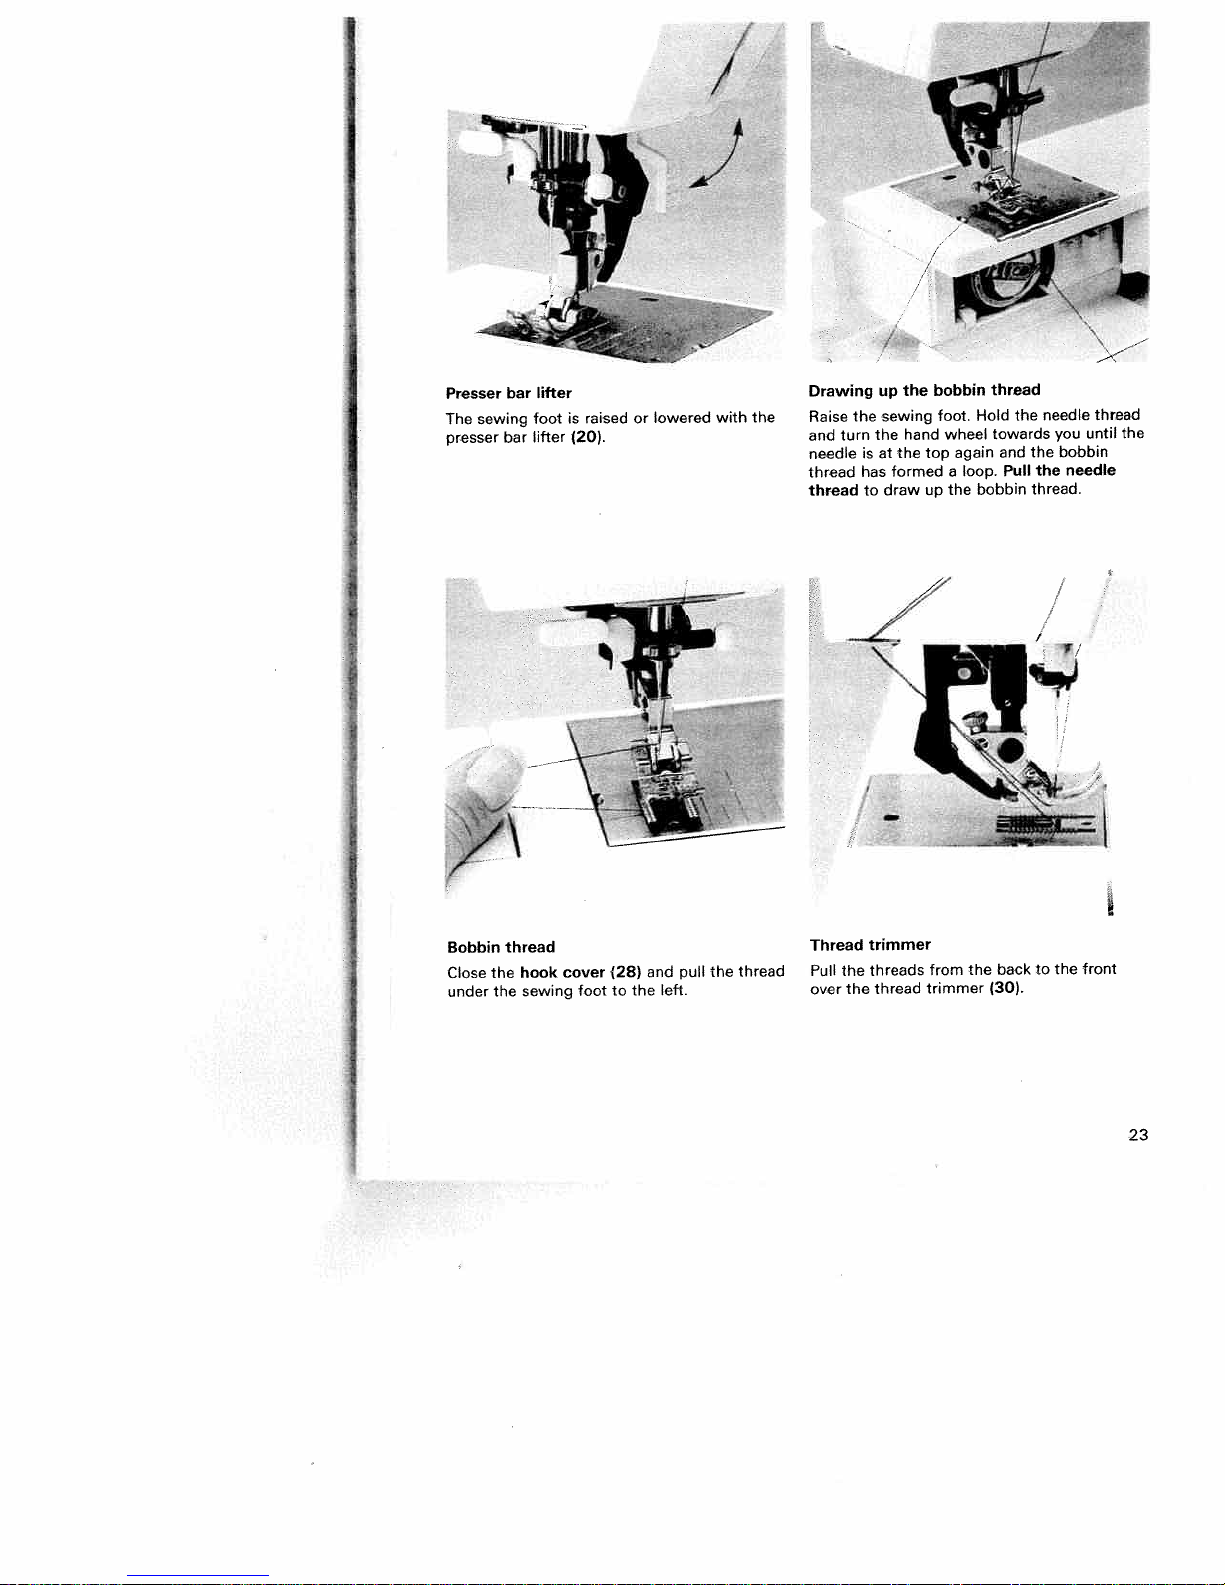
Presser
The
presser
bar
sewing
bar
lifter
foot
litter
is
(20).
raised
or
)
lowered
/
with
the
Drawing
Raise
the
turn
and
needleisat
has
thread
to
thread
bobbin
the
up
sewing
foot.
wheel
hand
the
top
the
formedaloop.
up
draw
again
the
thread
Hold
towards
and
Pull
bobbin
the
needle
you
the
the
thread.
until
bobbin
needle
thread
the
Bobbin
Close
under
the
the
thread
hook
sewing
cover
foot
(28)
to
the
and
left.
pull
the
thread
Thread
Pull
over
the
the
trimmer
threads
thread
from
trimmer
the
back
(30).
front
the
to
23
Page 28
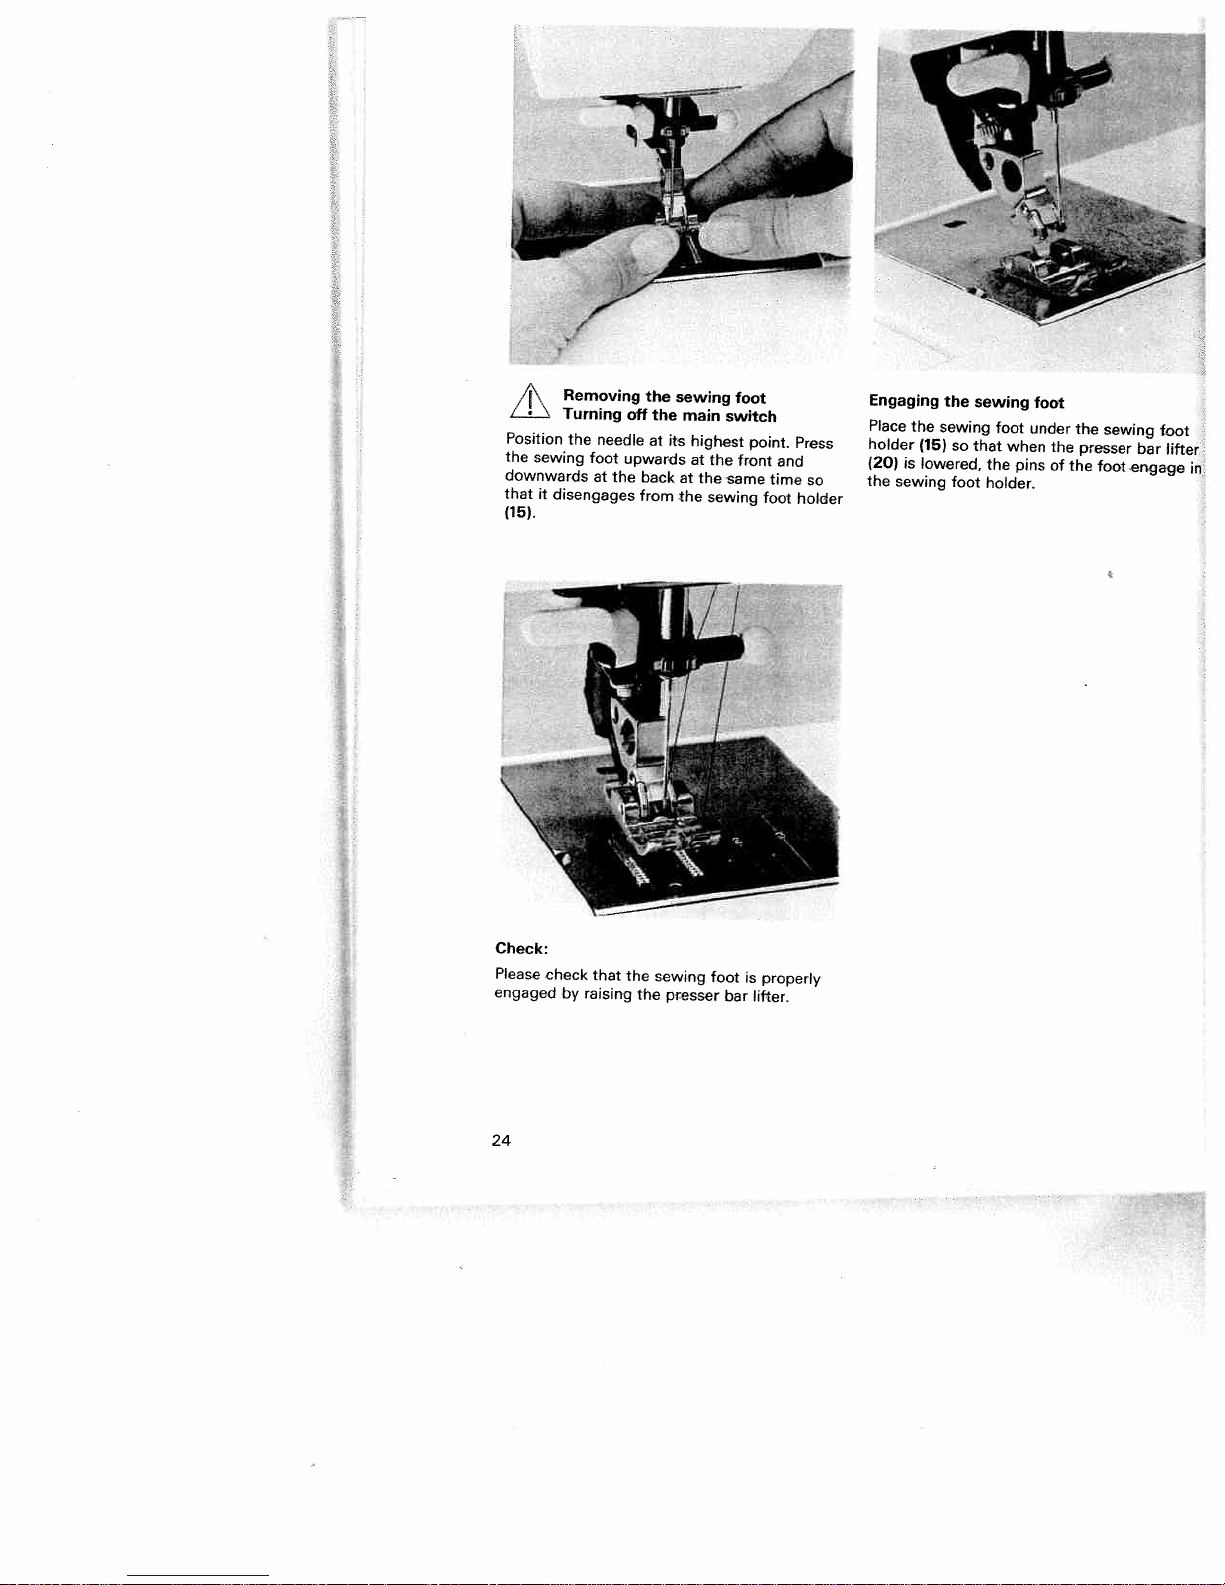
/j\
Position
the
sewing
downwards
that
it
(15).
Check:
Please
engaged
Removing
Turning
the
disengages
check
by
raising
needle
foot
at
that
off
upwards
the
the
the
at
back
from
the
sewing
the
its
sewing
presser
main
highest
at
at
the
the
the
sewing
foot
foot
switch
front
same
is
bar
point.
time
foot
properly
lifter.
and
Press
so
holder
Engaging
Place
holder
(20)
is
the
sewing
the
(15)
lowered,
the
sewing
so
foot
sewing
foot
that
the
holder.
when
pins
foot
under
the
of
the
presser
the
sewing
foot
foot
bar
engage
lifter
in
24
Page 29

The
built-in
(Models
PFAFF
feeds
the
machines.
fabrics,
rayon
6122,
offers
dual
the
material
The
the
I
6152,
ideal
fabric
feed/lOT
6232)
solution
from
is
dual
feed
the
fed
System
for
top
and
precisely.
prevents
(Integrated
sewing
bottom
When
seam
Dual
difficult
simultaneously
sewing
puckering.
Transport)
materials:
light
or
the
is
as
difficult
built-in
done
materials
dual
industrial
in
feed.
such as
This
sewing
silk
system
and
I
I
25
Page 30

Engaging
(Models
Important!
only
feed,
back.
Raise
downwards
(23)
the
the
6122.
For
use
sewing
top
6152,
all
sewing
toot.
until
feed
6232)
sewing
it
feet
Then
snaps
jobs
with
push
with
cutout
into
the
place.
the
top
Disengaging
feed
Hold
marked
little
slowly
page
and
top
the
at
the
places.
upwards
25>.
dual
out to
the
feed
Push
the
lalso
top
with
rear,
feed
the
see
two
top
and
the
fingers
feed
(23)
let
it
illustration
at
move
the
dovn
or
The
26
even
feeding
action
also
ensures
perfect
matching
of
checked
and
striped
fabrics.
Page 31

A
To
screw
To
the
firmly.
Changing
remove:
(22)
insert:
needle,
Switch
and
The
off
Lower
pull
flat
pushing
the
the
the
side
the
it
ii
-.--,
needle
on/off
sewing
needle
A
as
up
of
switch
foot
downwards.
needle
the
as
far
it
and
goes.
set
must
the
Hold
face
needle
to
the
at
the
needLe
its
fear.
highest
and
II
Lower
tighten
/
point.
the
sewing
the
Now
fixing
loosen
foot
screw
and
the
122)
fixing
insert
I
the
Setting
required
the
Set
with
The
embroidering,
it
between
is
the
normal
help
needle
of
setting
darning
2
the
and
\\
needle
for
thread
thread
marking
sewing
and
3.
tension
tension
A.
4
is
buttonhole
to
(18)
For
5.
sewing
Dropping
certain
For
has
dog
cover
hook
right.
Now
to
the
sewing
be
and
the
teed
work,
dropped.
move
feed
dog
dog
slide
e.g.
To
is
darning,
this,
do
fully
B
dropped.
B
open
to
the
the
feed
the
27
Page 32

PFAFF
H
1q
tiptronk
Reverse
machine
The
reverse
the
Between
“buttonhole”
stitch
mum
embroidering.
and
dialto0,
sewing
sews
sewing
numbers0and
the
symbol.
density
higher
the
in
key
The
for
the
reverse
(21)
This
sewing
further
as
only
is
pressed.
will
you
1
is
area
buttonholes
you
densityofthe
the
turn
long
find
opti
the
stitch.
stitch
by
turning
button
adjustment
length
required
infinitely
the
button
point
4ength.
11
oe
mer
length
stitch
adjust
and
6
buttontothe
the
adjustment
length
the
mm
Stitch
the
With
as
you
ween
king
can
0
on
4
4
colored
far
the
as
6152
on
the
stitch
it
length
willgoin
Ft
Jeans
tie
the
sew
To
background
adjustment
area.
grey
Satin”
the
Special
see
stretch
you
knob
page
must
(11)
stitches
turn
as
model
29>,
28
Page 33

_____
a
n
L
Note:
In
the
stitch
The
(26)
Only
pages
—
I
PFAFF
individual
combinations
program
in
the
models
—
10.
6
PFAFF
models,
6232
tiptronic
various
which
table
shown
6152
and
tiptronic
6232
stitch
are
have
6232
possible
there.
all
combinations
with
stitch
of
the
Pushbutton
Setting
Each
programm
can
you
pressing
selected
releases the
B
Under
the
with
table
combinations
important
the
lighted
on
possible.
are
machine
your
combinations
Setting
All
the
stitches
stretch
stretch
turn
and
will
it
go
B
releases
Key
activated.
been
Important:
models
with
(7)
knob
to•
utility
find
the
and
lid
all
stitches
stretch
stitches.
material.
the
in
the
When
must
controls
stitches
has
the
on
correct
the
machine
keys
(26)
the
utility
On
display.
are
found
specified
stitches
with
i.e.
Press
stitch
grey
the
6152
be
been
pushbutton
button,
that
you
will
model
additionally
are
colored
a
they
the selected
length
area.
keys
sewing
and
switched
given
is
have
stitches
6232
on
the
and
are
that
with
6232,
the
ready
been
find
inside
described
suitable
knob
have
the
off,
letter
a
controls,
program
sew.
to
activated.
program
the
stitch
and
the
most
illustrated
of
background
for
key
as
(11)
already
utility
stitches
fancy
turned
i.e.
that
By
is
the
on
down
far
stitch
Key
lid
are
as
Note
In
this
the
vely.
length
for
model
program
Select
knob
special
the
the
table,
(11)
model
stretch
the
desired
as
far
6152
stitches
stretch
stretch
as
&
“Jeans
stitches
stitch
it
will
Satin”
colored
are
not
on
a
are
found
by
pressing
the
go
grey
in
background.
bottom
in
the
the corresponding
area.
right
On
half
key.
of
Then
a
square
turn
the
pushbuttons
the
and
respecti
stitch
in
29
Page 34

I
PAFF
tiptronic
1AL4/
Mad
6232
.,
ri
Utility
and
striking
By
The
stitch
All
the
stitch
that
are
already
t.11
stretch
two
length
stitch
or
several
knob
combinations
activated
L
tiptronic
combinations
keys
an
either
are
with
you
be
illustrated
key
Made
can
create
in
the
B.
6232
in
Germany
normal
on
combinations
sewing
the
program
f.
PFAFF
•1
I
in
the
utility
stitch
range.
range
table
orinthe
in
the
lid.
stretch
You
can
tiptronic
I
Il1H
/
range.
release
6232
—
ke.
Fancy
(Models
Each
Select
turn
and
rect
letter
length
30
stitch
fancy
a
is
6152
stitch
fancy
the
under
between
knob
and
stitch
fancy
the
6232)
has
stitch
0.5
been
from
knob
marking.
and
given
the
1
program
(7)
The
mm.
a
to
stitch
letter.
the
table
cor
Fancy
stitches
(Models
Pattern
combinations
sing
the
knob.
An
combinations
table
on
0.5
and
ted,
you
far
as
asitwill
6152
keys
overview
page
1
mm.
must
and
and
together
can
10.
The
Wherever
turn
go,
combinations
6232)
can
with
of
the
be
found
stitch
the
stitch
i.e.
in
the
beireated
the
possible
in
length
“stretch
length
grey
the
fancy
area.
pattern
fancy
is
is
knob
pres
by
stitch
stitch
between
indica
(11
Page 35

34
____________________
knob
width
Stitch
The
the
needle
Basic
to
Exception:
length
In
sewing”
knob
setting:
symbol
the
chapter
must
0.
(34).
not
Straight
“Utility
(pages
width
stitch
recommendations
selection
width
sewing
you
can
be
can
When
in
be
the
Turn
(maximum
stitch
stitches
—
33
the
in
individual
of
also
change
infinitely
selecting
material.
the
stitch
stitch
is
you
58),
tables
the
width
width).
sewn
and
will
for
stitches.
the
adjusted
practical
stitch
width,
knob
with
find
the
During
via
the
(34)
stitch
stitch
width.
35
caD
Needle
In
the
needle
nal
the
ning
ments
position
turning
right.
right
far
as
of
tion
needle
Note:
you
If
right,
increase
stitch.
the
position
positioning
center
positions
needle
the
to
the
to
the
furthest
The
can
it
will
as
needle
the
must
have
can
you
or
The
to
needle
positioning
left
left
knob
be
go
not
selected
now
reduce
reverse
left
the
knob
position
can
right.
or
as
(35)
needle
achieved
the
to
being
is
in
be
the
use
the
(see
be
can
far
left.
the
needle
the
width
applies
page
(D
selected
knob
furthest
The
be
as
position
turning
by
When
changed,
material.
width
of
66).
14
(35)
achieved
will
it
to
the
position
knob
left
the
for
also
additio
tur
by
in
needle
to
go
the
the
posi
the
to
(34)
side
needle
incre
by
the
knob
the
to
of
31
Page 36

1’
‘
,
(ii
L’i
izJ
oj’n
L
1’
Function
The
1.
When
green
now
I
23
again
machine
2.
Needle
Each
automatically
If
key
needle
there
the
the
tiptronic
Sewing
diode
sews
the
time
(2)
now
is
key
needle
keys
slowly
key
(1)
lights
at
green
sews
position
sewing
is
pressed
remains
an
interruption
again
the
automatically
(Model
has
“slow
half
diode
at
moves
three
sewing”
up.
speed.
full
up/down
is
interrupted
to
the
in
diode
6232)
function
The
If
is
extinguished
speed
its
uppermost
diode
the
material
in
sewing.
is
extinguished
goes
is
pressed
sewing
the
again.
the
lights
up
keys.
key
If
again.
machis
is
pres
needle
posit
up.
each
you
th
and
Th
tir
pr
ant
:J
3.
Tacking
If
key
(3)
(
lights
stitch
key
is
together
“tacking”
up.
The
when
pressed
with
machine
the
again
the
is
foot
function
pressed
now
control
the
diode
(see
the
only
is
activated,
is
page
green
dior
sews
one
extinguishe
36).
If
r
LJz1L
32
Page 37

I
I
I
Utility
Sewing
General
Non-elastic
Elastic
Overlock
Covering
Buttonhole
Hemming
Smocking
Gathering
Darning
Sewing
Rolling
Sewing
Shell
chart
stitches
on
lace
edging
stitches
sewing
stitches
stitches
stitches
with
zippers
aids
the
and
twin
practical
needle
sewing
page
34
35
page
36—39
page
pages 40,
42,
page
44,
page
pages
page
page
pages
pages
pages
page
page
page
46,
48
48
49,
51
54,
56
57
58
43
45
—
41
47
50
53
55
33
Page 38

Explanation
The
following
ded
settings
vant
sewing
These
instructions
the
selected
The
choice
the
needle
sewing
ched
on
Always
not
otherwise
charts
is
tarried
or
use
of
the
charts
that
operations.
also
that
programs.
of
the
thread
off,
the
“center”
specified
sewing
you
provide
are
sewing
tension
out
show
require
you
necessary
toot,
and
with
the
needle
in
the
chart
the
recommen
for
the
with
when
the
whether
top
feed
position
instructions.
further
sewing
setting
rele
(
of
the
swit
if
a
b
prog
A
prog
Models
Model
Program
Stitch
Stitch
Top
Needle
Number
feed
6232,
6112
pattern
length
width
thread
of
6152,
in
mm
in
mm
engaged
disengaged
tension
the
sewing
--
6122
on
•
off
0
toot
Page 39

Need’e
sewing
tensions
other,
the
in
Check
threads
The
fabric
two
If
the
threads
If
the
threads
ply.
adjustment
The
described
is
Sewing
ensure
To
sewing
foot
workpiece.
the
results,
The
range
the
needle
needle
on
thread
must
normal
tension
plies.
interlaced
are
are
aid
a
recommend
we
piece
a
tension
the
perfectly
be
setting
5.
—
4
with
be
must
thread
thread
interlaced
of
page
on
thick
for
consistent
of
needle
interlaced
tension
above
tension
below
the
20.
seams
fabric
ensure
To
and
tuned
for
broad
a
is
the
is
the
bobbin
when
feed
supporting
the
of
bobbin
utility
zigzag
between
too
too
thread
same
perfect
each
to
stitches
high,
fabric
top
low,
lower
beginning
the
thread
stitch.
the
the
the
fabric
tension
presser
height
is
ply.
as
Topstitching
Straight
needle
various
you
the
can
fabric
always
top-stitch
position.
than
width
guide
the
guide
edge
guide
edge
with
red
stitch
edge
width
If
you
marks
fixing
G
positions
guide
for
wish
this,
(standard
inserted
is
screw
be
can
the
top-stitching
determined
is
to
simply
the
on
A
sewn
such
n
sewing
top-stitch
guide
needle
accesory
into
F.
the
hole
using
a
work.
by
plate,
No.
way
foot
the
at
fabric
C
a
8).
and
any
along
The
needle
wider
or
that
along
use
The
is
of
15
/
secu
35
Page 40

7I
Basting
Wth
ment
toot
stitch.
press
—
Lower
top
Place
—
Sew
required
—
Reooat
finsh
TIP:
insert
position.
long
bottom
prog
ke
t
key
before
control
For
the
feed.
one
To
prevent
dress
straight
feed
stitch
the
the
the
Light
3
t
(3)
each
foot
fabric
stitch,
amount
this
seam.
pins
I
(model
“basting”
trying
the
machine
further
control
bottom
as
the
crosswise
fabrics
stitches
need
j0t
0
To
under
then
to
many
fabric
not
it
on.
feed
the
are
(6
be
6232)
you
stitch
each
pull
times
mm).
can
When
will
time.
and
the
sewing
the
rear.
as
layers
to
easier
lowered.
baste
you
only
you
switch
fabric
the
In
you
from
basting
to
this
make
have
baste
3
-
a
press
off
foot.
the
need
shifting,
case
prog
a
Straight
gar
one
to
the
to
with
the
the
Program
stitch
required.
by
changing
ching
select
page
Please
position
length
a
up
31).
G
G
stitch
Gisthe
It
collar
to
ensure
when
2.5
2.51
can
is
easier
the
or
1
5
that
adjusting
I
basic
be
needle
sewing
different
0
0
increased
to
the
straight
do
position,
in
needle
needle
its
•
-
some
zipper.
a
setting.
]35J
stitch.
upto6
sewing
e.g.
positions
is
at
35j011
topstit
You
its
highest
The
mm
0
as
jobs
can
(see
Page 41

prog
T_G
r__
G
r
stitch
Zigzag
addition
In
stitch
G,
various
ging
should
rial
sewing
the
sure
make
over
and
width
The
2mm.
to
width
only
foot.
the
the
for
____
2-5
j
1-2
1-2
2-5lI
overlock
l,
5
materials.
be
When
needle
alternately.
edge
serging
stitching,
also
is
this
In
positioned
serging
goes
can
ê
—
suitable
case,
halfway
into
ecucea
be
3-5
3-5
zigzag
the
the
stitch
ser
for
mate
the
under
edge,
materi&
no
0/1/31
0/3
10
serging
For
is
3
No.
over
lies
edge.
fabric
smooth
raw
The
B.
guide
adjusting
Important:
for
used
needle
the
Choose
not
(00
difficult
very
pin
seams.
edge
You
screw
serging
position
stitch
a
use
useful,
C,
this
In
must
can
When
any
thus
A.
with
width
other
materials,
When
preventing
way
be
adjust
the
the
to
you
guided
this
the
zigzag
the
in
the
needle
blind
sewing,
can
along
edge
blind
utmost
range
positionl.
the
curling
sew
guide
stitch
stitch,
right
3
stitch
thread
of
beautiful
edge
with
foot
select
.
5
—
foot
the
is
mm
37
Page 42

4.
K
Ia’
jbj
Blind
Slind
hems;
—
—
—
—
—
—
Serge
Fold
Now
edge
Now
so
guide
Using
select
When
must
,-
4
progi
H
H
stitch
stitch
sewing
the
untold
protrudes
place
that
B.
the
the
the
only
12.5
the
edge
the
I
,
1I1
i2.5)5iI
H
is
by
edge
the
the
crease
needle
needle
needle
pick
.j
I
-4
I
best
hand
of
inwards
hem
by
fabric
up
‘ir
1
I
J
i’l
suited
no
is
the
hem.
by
again
about
under
line
runs
positioning
position
enters
one
fiber
—.
K
•
—
1—51
for
invisible
longer
the
hem
so
that
1
cm.
the
along
knob
the
to
the
crease
of
the
3—5
necessary.
width.
the
sewing
edge
(35),
right
line,
fabric.
hem
foot
cZj.
,1
I
I
I
If
the
stitches
adjust
screw
If
the
using
the
needle
the
penetration
3
edge
A.
guide
width
are
position
knob
of
visible
B
by
to
(34)
the
on
turning
the
needle
you
the
right
in
right
adjusting
tEZ
can
regulate
the
crease.
side,
is
used,
ir<
I,
Th<
it
Remember!
If,
when
3,
you
position
sure
that
sewing
the
break.
38
blind
select
,,right”
the
a
needle
foot.
stitching
position
CZ
Otherwise
and
does
with
other
stitch
not
the
sewing
than
width
strike
needle
foot
needle
5,
the
will
No.
make
bar
Program
als.
of
time,
edge.
The
i.e.
D
hem
it
is
is
a
is
not
blind
sewn
stitch
and
necessary
for
serged
to
elastic
serge
materi
at
the
same
the
fabric
Page 43

prog
G
a
b
G
E
Sewingonbuttons
With
can
sew
problematall.
no
—
Remove
dog.
—
Turn
the
enters
—
Now
the
—
Sewonthe
the
in
Securing
—
Select
knob
—
Change
35)
two holes.
—
Sew
stitch0{stitch
zigzag
two-
on
sewing
the
handwheel
the
buttoninsuchaway
the
left
lower
the
button
off
button.
needle
also
button.
the
straight
(34)
to
0.
the
needle
that
the
so
few
securing
a
0
four-hole
foot
towards
in
the
foot
blade.
Take
the
position
enters
stitches.
width4mm)
and
that
button.
care
right-hand
and
hole
presser
the
enters
stitchbyturning
needle
buttons
lower
you
the
lifter;
ensure
to
the
with
the
oneofthe
the
and
needle
this
width
with
move
holds
hole
knob
you
feed
that
Sewingonbuttons
—
—
Insert
Place
button
sewing
the
matchstick
a
and
sewiton
left.
—
Remove
the
—
Wrap
sewing
button
the
the
stem
thread
match
apart.
you
end
with
stems
foot.
between
describedonthe
as
and
pull
have
just
it.
knot
the
the
created
holes
fabric
of
and
with
the
39
Page 44
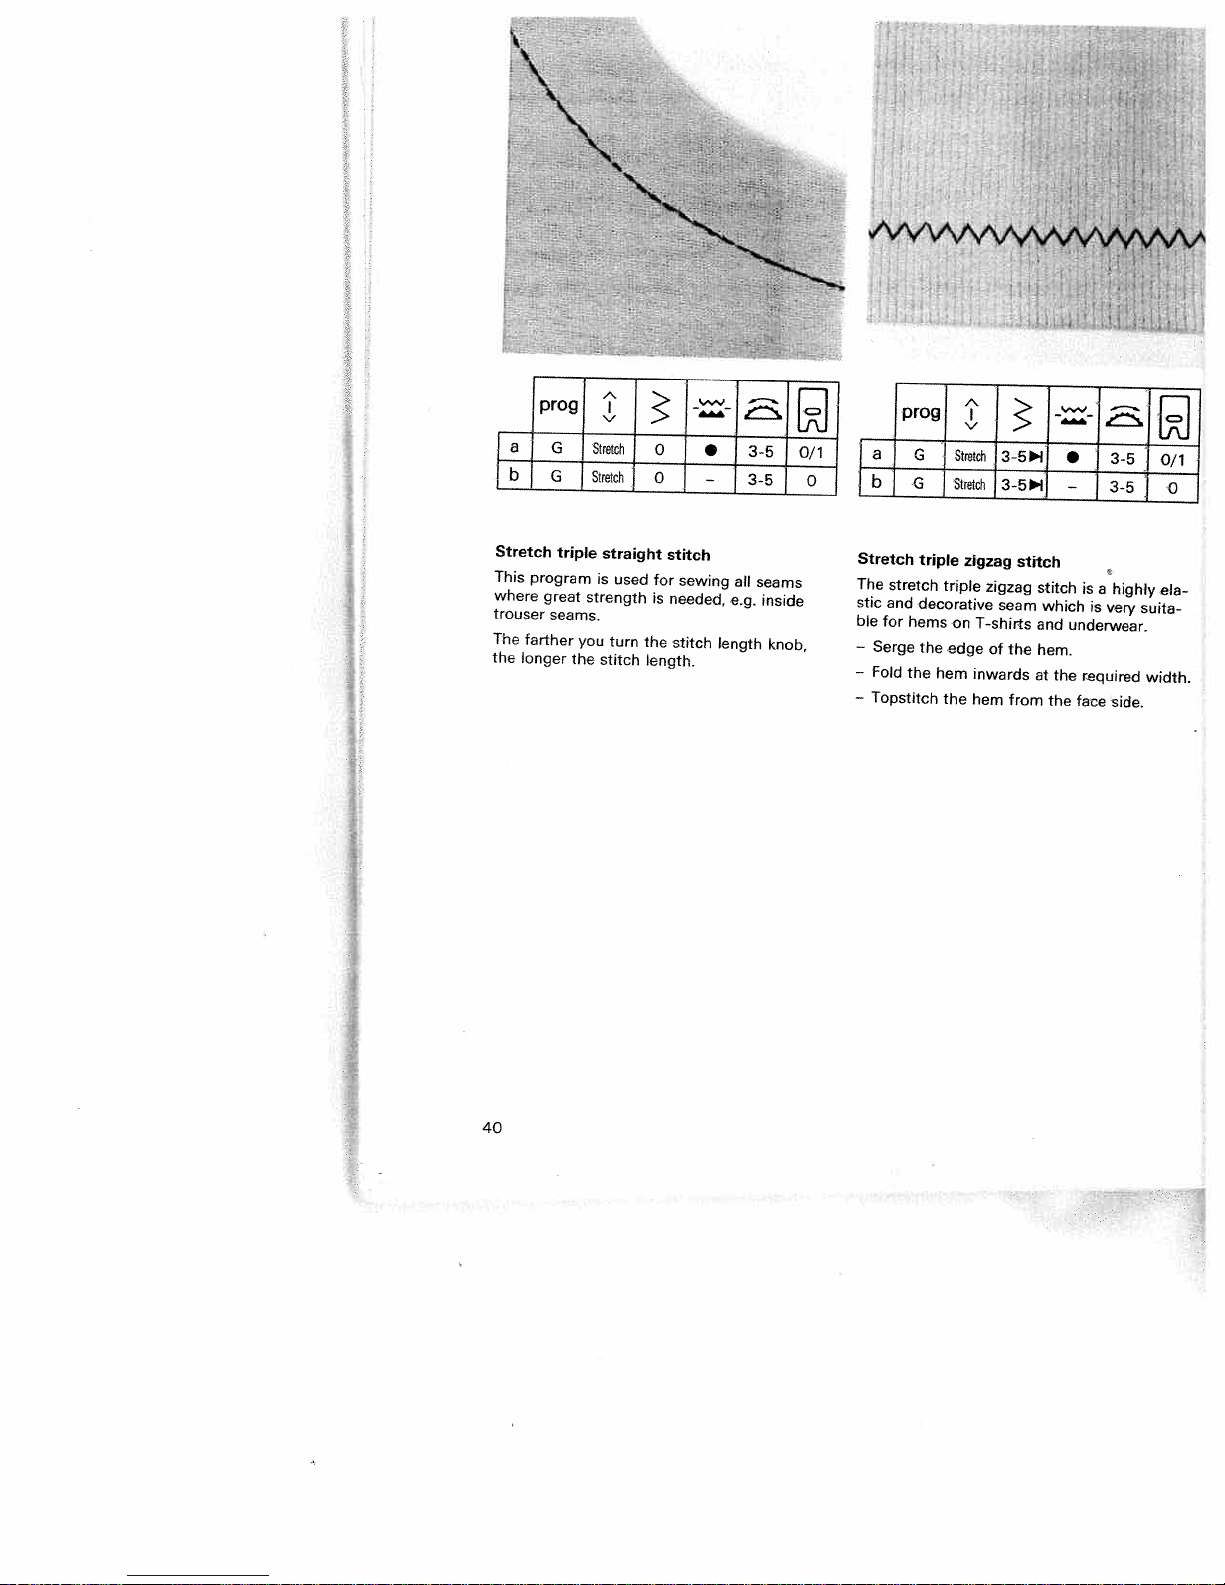
___________________
a
Stretch
This
where
trouser
The
the
program
farther
longer
Iprog
great
G
G
triple
seams.
the
Stretch
Stretch]
j
straight
is
strength
you
stitch
i
used
turn
I
0
0
for
is
the
length.
I
i1]IiI
•
I
-
stitch
sewing
needed,
stitch
length
1
1
all
e.g.
_—
3-5
seams
inside
I
I
knob.
f—i
0/11
0
a
b
Stretch
The
stic
ble
—
Serge
Fold
—
Topstitch
for
prog
G
triple
stretch
triple
and
decorative
hems
the
edge
the
hem
the
i
Sttch
Stretch
zigzag
on
T-shirts
inwards
hem
1
I
I3-
5
zigzag
seam
of
the
from
stitch
stitch
and
hem.
at
i’inj
-
•
is
which
is
underwear.
the
required
the
face
I
a
L3.j
3-5
highly
very
side.
J
0/1
J
1
ela
suita
width.
I
0
40
Page 45

•1,
IprogJ
M
r____
M
stitch
of
for
sewing
the
off
edge.
the
the
or
pins.
it
on
of
overstitch
skirts
Onto
as
above
11-2.5
high
its
old
fabric
stitch.
workpiece
it
lay
using
elastic
the
and
the
underneath
using
r
Elastic
Because
used
wear.
—
Cut
fabric
—
Gather
straight
Slide
—
tape
with
Sew
—
ends
and
—
On
sewn
red
5’l
5’l
elasticity,
on
elastic
elastic
with
the
with
trousers,
edge
T
band
the
between
elastic
band
the
which
the
•
tape,
it
to
elastic
the
elastic
this
e.g.
close
6
mm
the
and
stitch.
overlap
elastic
has
3-5
3-5
stitch
long
fasten
stitch.
been
stitch.
on
to
the
elastic
Allow
a
tape
[J
0/1
is
under
it
little
is
prepa
0
the
-I
I
[pro
M
a
M
b
Honeycomb
honeycomb
The
hem
rative
on
hems
the
—
Fold
Stretch
Stretch
stitch
which
underwear
hem
stitch
is
over
51
51
is
an
particularly
T-shirts.
and
double
•
—
elastic
and
3-5
3-5
and
suitable
overstitch
0/1
0
deco
for
it.
41
Page 46

What
isanoverlock
For
elastic
models
key
two
fabric
neously.
seams,
Tip:
We
No.
when
3
particularly
puckering
materials
offer
layers
They
are
very
durable
recommend
sewing
well
even
overlock
together
more
and
on
broad
stitch?
and
elastic
and
quickly
using
overlock
prevents
seams.
knits,
stitches
and
blind
the
serge
than
seams.
the
pushbutton
which
simulta-
normal
sewn.
stitch
It
seam
sew
foot
guides
from
I
a
I
I
b
1
I
Open
With
which
together
TIP:
Make
right
not
in
I
1
prog
K
K
overlock
this
do
of
the
it.
I
Stretch
I
Stretch
stitch,
not
fray
perfectly.
sure
material
I
stitch
thicker
that
too
1
J
I
I
i
the
just
I
materials
much
needle
over
..w
•
—
can
the
-
j
I
j
J
be
sews
N
N
N
N
N
N
N
N
N
N
—.
3-5
and
edge
N
N
sewn
to
1
Fl
t.rJ
j
0/1/3
I
°“
J
fabrics
the
and
i
I
I
42
Page 47

-
—
,.•__
.k*’’
*••
*..—.
,
•‘
iprog
a
b
Closed
overlock
With
program
quality
perfectly.
cuffs
and
long-lasting.
TIP:
Ensure
while
it
is
Remember’
sewing
foot
than
needle
width
5
l,
not
strike
wise
the
knit
that
being
position
make
the
needle
“I
Stretch
Stretch
I
collars
If,
No.
bar
i
stitch
you
You
the
sewn.
when
3,
sure
of
will
I
>
can
can
which
sleeve
overlock
you
,,center”
the
break.
lIl
I—Hti
I
especially
also
select
that
the
sewing
•
-
are
cuff
a
JD
3-5
1
3-5
sew
sew
on
well-sewn
is
stretched
stitching
position
and
needle
foot.
jersey
sleeve
with
stitch
does
Other
jO/1/3l
0/3
J
and
other
___,
,,-_4,_,,__
‘::;:..
::::.;.
—
*
4
—
—
Pullover
This
stitch
Fashion-knit
ned
effortlessly
that
the
needle,
not
TIP:
To
prevent
while
sewing,
thread
under
.s’t..
.4
-‘—-..
stitch
is
garment
material
to
suitable
with
is
the
the
it
is
light
4
*t1_4
:-
—
for
sections
this
fed
to
left.
seam
advisable
tension.
-t
.,-,
—::
;:‘
a
—
—
open-knit
stitch.
the
right
from
to
fabrics.
can
also
Make
of
stretching
add
a
be
sure
the
woolen
joi
43
Page 48

::.::-
::::.
:.
.:..
...
S.-.-:
5..
S
::.:;.:
0
D
—
I
0-C
0)
I!
•
c,1c1
0
3
0
0’
CD
—
o
2C
0
________
______
___
_______——
CCD’
—
0
—
F1
—
-
0)
OCO<
D
co
0-)
;
.9
-
cr5’Q
:;-
I
<
0
CO
D
0
Page 49

S
progj
al
bi
Fancy
fancy
The
that
rials
Place
—
overlap
edge
L
L
elastic
require
the
with
11.2
1.2
elastic
two
about
by
fancy
stitch
fabric
I
15
stitch
flat
a
2
elastic
5
is
seam,
edges
cm
3-51
•
13-51
—
useful
very
e.g.
that
so
overstitch
and
stitch.
terry
for
they
mate
cloth.
each
1
0
prog
lG
r
r
Pennant
pennant
The
covering
particularly
is
on
bands
sportswear.
Sew
—
stitch.
seam
The
—
ched
sure
seam.
the
-
stitch
stitches.
elastic
the
from
that
Stretch
-
(models
stitch
suitable
band
allowance
the
needle
the
5l
-
one
is
Since
for
material,
the
onto
right
•
-
I
6152
of
can
it
overstitching
e.g.
part
now
can
of
side
enters
j;Ejjjj
3-5
I
and
many
the
stretched
be
sweatshirts
with
be
fabric.
the
the
in
1
-
6232)
types
th
overlock
overstit
shadow
1
-
of
it
or
Make
of
45
Page 50

Buttonholes
Sewing
with
models
does
fabric
Buttonhoies
doubled
of
e.g.
als,
use
to
sary
material
(from
Avalon
Itisa
pose.
dissolves
For
water.
woolens,
over
placed
material
the
easier
much
produce
To
darning
pose.
the
Mark
with
either
always
buttonholes
pushbutton
not
are
fabric.
organza
silk,
silk
contracting
from
Madeira)
special
when
materials
which
or
is
to
beautiful
threads
starting
magic
a
sample
a
sew
have
generally
However,
paper
non-woven
comes
it
are
under
braked
not
make.
are
point
very
is
be
to
and
backing
is
such
difficult
the
seams,
ideally
of
pen
buttonhole
easy
controls
turned.
sewn
for
viscose,
while
ideal
into
velvet
as
to
fabric.
and
suited
the
dress
or
all
with
since
a
onto
materi
some
is
it
prevent
to
sewing.
this
for
which
fiber
with
contact
embroidering
thick
or
it
feed,
this
In
buttonholes
this
to
buttonhole
and
pin,
first.
the
the
piece
neces
pur
can
way
the
be
are
or
pur
Note:
starting
Before
guide
the
i.e.
front,
mark.
red
interval
determining
push
are
of
arrow
are
the
always
foot
is
arranged
guide
a
buttonhole.
fully
at
to
the
when
the
first
an
at
buttonhole,
any
buttonhole
of
the
that
so
The
0.5
of
the
red
cm.
the
marks
They
length
red
46
Page 51

___
_______
___
___
_______
F’.z
A
it
IprogH
I
a
IA/B/C
lbIA/B/C
buttonhole
—
Insert
the
forwards
—
Press
Lingerie
—
—
—
—
—
Note:
tonholes,
with
approx.
needle
key
seam
to
Then
press
few
stitches
a
material
the
Then
press
buttonhole
Now
press
tack
stitches
securely.
securing
For
stitch
(turn
the
left
knob
(35)
Cut
open
seam
ripper.
If
you
the
stitch
3mm.
position
the
needle
you
1
I
fl
Lii
buttonhole
as
far
as
C
and
required
key
B.
for
securely.
keyAand
seam
key
B
while
the
width
position
to
buttonhole
would
reduce
can
width
this
In
D.
5fr1
‘l
it
sew
Keep
the
to
the
again
holding
seams,
knob
Sew
like
knob
case,
foot
will
the
length.
bartack.
sew
same
and
(34)
(needle
with
to
sew
the
0
—
and
go.
first
it
pressed
back
sew
the
select
to
a
few
scissors
very
buttonhole
(34)
the
use
3
1
slide
buttonhole
while
the
length.
a
few
material
straight
0)
and
position
stitches.
or
fine
down
center
I
the
and
holding
second
select
a
but-
to
5
5
J
foot
sew
bar-
width
og
a
IA/B/Cl
[blA/B/Cj
Lingerie
sew
To
sportswear,
thread.
elastic
On
cularly
from
stretching.
—
Lay
the
sion
neath
—
Clamp
protrusion
—
Slide
possible
as
described
—
Pull
the
buttonhole
TIP:
In
can
also
described
buttonhole
especially
materials
important
gimp
A
and
the
the
the
buttonhole
loop
addition
sew
on
j
I
Eli
durable
recommend
we
to
thread
pass
the
presser
threads
B.
and
sew
in
the
left-hand
of
the
and
cut
to
traditional
ornamental
page
68.
with
gimp
the
prevent
over
thread
foot
to
the
runner
the
gimp
the
H
1
I
gimp
buttonholes,
using
thread
the
rear
the
ends
towards
left
and
as
buttonhole
column.
thread
threads.
buttonholes,
buttonholes
1
thread
gimp
a
is
buttonhole
protru
under-
front.
the
right
far
forwards
as
into
the
as
I
e.g.
parti
on
of
you
47
Page 52

prog
Ia
Hemming
With
see
der
seams.
Using
sional
such
shorts
available
are
width
nal
needle
the
must
needle
First
—
red
Then
—
Finally,
—
the
Use
material!
Tip:
wear
topstitching
On
how
G
G
the
the
touch
as
both
make
for
seam.
only
On
it
page
to
with
twin
page
twin
T-shirts,
quickly
for
from
sure
position
and
fold
the
topstitch
cut
jersey
a
difficult
advisable
is
64
thread
3
3
the
needle
but
64),
needle
hems
to
knitted
different
in
topstitching
striking
that
D.
iron
hem.
the
protruding
the
needle
materials
it.
will
you
the
0
0
twin
you
and
to
also
you
on
you
the
hem
twin
I.
needle
can
stretch
articles
easily.
widths.
the
select
width
when
baste
find
not
make
can
4
is
needle
from
hem
such
the
description
a
needle.
3-5
3-5
only
topstitch
add
materials
or
Twin
The
mm.
the
fabric
of
the
sewing
as
hem
embroi
profes
a
cycling
needles
traditio
To
plate,
center
face
edge
ribbed
0/1
0
prevent
you
desi
side.
back
stretch
before
of
knit-
to
roj
a
b
Smocking
light
Fine,
are
silk
work.
king
thread
and
case
thread.
the
than
bobbin
the
forget
tension,
Sew
—
gather.
Mark
—
fabric
Each
—
presser
When
—
another,
original
seams.
lar.
Knot
—
of
G
G
effect
fabrics
especially
For
should
you
wind
the
As
normal
case
however,
the
test
a
the
and
additional
foot’s
sewing
length
Otherwise,
the
seam
the
3-4
3-4
smocking
it
elastic
more
seam
first
sew
you
threads
j
with
such
suitable
use
by
bobbin
must
the
intense
line
along
seam
width
several
must
when
the
on
0
0
elastic
as
an
hand
thread
be
higher
determine
to
on
from
stretch
the
the
at
reverse
I
lw’I
•
]
—
Batist,
for
work
additional
with
is
thread,
at
set
the
the
face
the
it.
be
can
the
seams
sewing
gather
beginning
I
threads
rayon
beautiful
with
elastk
the
much
the
very
bobbin
gathering
the
side
sewn
first
next
fabric
the
the
will
side.
the
tens
subf
a
s
e
bob
str
low
tI
1ev
of
at
ro
to
be
ar
48
Page 53

Ia
IbI
j
prog
I
I
<
I
j
1
la.’II
I
o
•
°
13-510/11
-
1351
‘.,
G
e
6
f1
°
4
4
4
4
I
I
Gathering
Using
skirts
mm.
To
should
—
Mark
fabric
protrude
—
Each
presser
—
Gather
bobbin
of
gather
—
Finally,
secure
with
program
and
valances
ensure
sew
the
and
approx.
subsequent
foot
the
thread.
the
the
two
first
sew
piece
by
thread
gather.
the
G
you
consistent
or
three
line
along
10
width
of
You
how
straight
can
with
on
—
seam
from
fabric
determine
much
ends
the
it.
a
rows
Allow
20
can
the
you
are
stitch
gather
stitch
gathering
of
face
cm.
be
last.
pulling
by
pull
knotted
sleeves,
length
you
gathering.
side
of
the
threads
sewn
the
amount
the
to
of
the
one
the
thread.
6
to
49
Page 54

prog
a
[b
i’
Stretch
M
Stretch
M
}
--
0/1
3-5
•
51
0
3-5
—
5l
Gathering
Sleeve
using
ease
thread
bobbin.
Mark
—
reverse
Sew
—
leave
must
Raise
thread
Lower
—
ches.
both
You
—
amount
The
—
pulling
by
Finally,
—
with
waist
and
an
not
does
first
the
side
few
a
needle
the
in
be
presser
the
around
the
Then
ends.
determine
you
gather
knot
elastic
seams
elastic
have
gathering
of
stitches
the
the
presser
pull
pull
can
ends
the
the
the
in
center
the
the
the
also
threads
thread.
to
fabric.
using
the
foot
needle.
foot
elastic
amount
threads.
be
of
thread
can
be
seam
fabric.
of
and
and
altered
the
be
The
wound
program
presser
the
lay
sew
thread
of
elastic
and
gathered
elastic
Onto
the
on
needle
The
elastic
the
few
a
evenly
gather
after
threads.
elastic.
the
M
foot.
sewing
the
and
by
with
stit
at
the
The
Tip:
particularly
grooves
guide
sewing
the
cording
suitable
process.
the
foot
(special
for
elastic
accessories)
gathering.
is
fed
Due
evenly
to
dun
i
50
Page 55

I
I
Darning
Insert
the
Set the
the
pinofthe
of
the
C
the
guide
the
presser
the
fixing
Darning
Lower
the
lightly
to
lifter
into
—
Place
—
Drop
—
Pull
up
threads
—
Darn
fabric
bed direction
ends
the
fabric
—
When
area,
ged
darn
You
determine
moving
Tip:
If
you
knots
will
fabric.
with
the straight
darning
needle at
darning
sewing foot
fork
G
bar. The
screw
position:
presser-foot
the
rear.
notch
B
the
darning
the
feed
the
bobbin
when
you
the
damaged
back
and
you
area
move
appear
while
ripping
have
rotate
once again.
the stitch
fabric
the
withasmall
the
the
foot:
its
highest
foot
holder.
should
wireEmust
tighten
F.
Now
lifter
This
snaps the
(darning
work
dog.
thread
start
areabyguiding
forth
evenly
ensuring
curve.
again.
finished
the
fabricahalf
and
back
fabric
on
the
stitch
point
and
into
doing
itself
be
screw
pushing
presser-foot
darning
hold
the
that
each
helps
the
turn
yourself
push
the
around
behind
D.
the
the
prescri
to
dama
and
small
fully
When
position
while
position).
in
the
and
sewing.
in
This
sewing
length
forth.
too
slowly,
reverse sideofthe
hole
this.
it
hoop.
line
avoid
by
51
Page 56

prog
a
b
Darning
Darning
suitable
Sew
—
well
is
rows
M
M
with
with
for
over
covered.
overlap.
0.2-i
0,2-1
the
elastic
the
repairing
damaged
the
5l
elastic
damaged
Take
stitch
care
•
—
stitch
area
to
I
3-5
3-5
especially
is
areas.
rows
in
ensure
Lxi
I
0/1
0
until
that
the
•
]
J
-
it
isnecessary
the
onto
side
with
back
of
corners
6232
I
3-5
of
the
the
select
damagt
the
the
elash
the
to
fabric.
the
of
0
to
fabt
th
I.
!I
I
1
0.2-1.5
0.2-1,5
patches
piece
new
area
the
the
the
case
1>
5l
j
holes
fabric
of
piece
the
of
fabric
damaged
reverse
turning
of
function.
well,
of
face
edges
the
model
I
f
onto
fabric
area
side
prog
I
I
M
I
a
M
b
cover
a
Baste
damaged
Sew
stitch.
Now
—
seam
To
Tip:
patch,
“needle
on
larger
new
the
over
cut
from
simplify
the
in
down”
Sewing
To
sew
area.
it
—
—
52
Page 57

Repairing
On
tears,
tears
frayed
edges
fultolayapiece
sideofthe
forces
the
fabric,
workpiece
repair.
—
Layapieceofmaterial
fabric.Itmust
damaged
the
—
Now
sew
dance
—
Cut
the
the
seam.
over
the
with
underlayed
always
area.
the
or small
of
material
The
underlayed
and
underneath
be
damaged
size of
the
pieceofmaterial
under
ensures
little
a
tear.
holesitis
reverse
the
fabric
rein
perfect
the
larger
than
areainaccor
back
use
to
53
Page 58

-.
prog
1
I
8
G
Sewing
methods
recommend
and
men’s
zipper.
recommend
fabrics
recommend
we
important
is
It
close
very
This
per.
per
foot
presser
Additionally,
enters
one
using
foot
the
If
be
only
left,
ged
left.
the
I
on
of
ladies’
Various
such
to
is
either
foot
close
of
is
moved
the
I
‘-H
3
zippers
sewing
the
using
as
for
the
why
on
holder.
you
to
the
engaged
needle
I
I
fully
trousers
zippers
a
denim.
plastic
a
all
edge
it
is
the
can
the
15
the
to
>
>
0
0
There
zippers.
on
concealed
are
metal
For
types
of
possible
right
set
edge
available
right,
right.
must
Il—H
-
are
the
available.
zipper
all
zipper.
of
the
or
the
the
of
only
teeth
needle
the
If
I
1
35J
3-51
various
skirts
For
for
zipper,
semi-concealed
We
strong
for
materials
other
to
zippers
the
of
the
insert
to
needle
the
zipper
the
be
left
needle
toot
moved
of
so
teeth
positions.
is
we
sew
the
that
must
enga
to
4
4
zip
zip
foot
so
the
zipper
and
that
the
the
on
foot.
zipper,
presser
sewing
zipper
the
lay
the
and
right-hanc
underneat
it
teeth
leave
toot
the
sew
of
the
the
the
ne.
and
seam
cr:
zipper
zipper
the
foot
alongside
half
raise
zipper.
can
of
sewn-in
of
continue
the
concealed,
Fully
the
Insert
—
side.
in
Baste
—
presser
the
run
per
in
Stitch
—
—
t
by
in
close
Now
to
seam.
the
the
fabric,
the
you
end
Page 59

The
—
—
—
—
—
—
—
Iron
to
about
Baste
the
Insert
and
Stitch
Sew
the
Stop
in
the
open
Now
trouser
ensure
same
over
teeth
move
the
after
fabric.
the
you
4
the
the
along
second
zipper.
can
zipper
the
that
mm.
zipper
are
zipper
the
distance.
tte
first
Raise
finish
seam
the
visible.
needle
the
half
half
the
allowances,
underlap
under
foot
edge
of
presser
sewing
the
on
to
the
of
the
and
the
the
zipper
leave
the
taking
protrudes
underlap
right
correct
zipper,
the
foot
seam.
hand
parallel
needle
ard
care
by
so
that
side
position.
at
/
F’
4.
—
Just
before
the
end
of
the
seam,
open
the
overlap
recom
55
—
Tip:
mend
zipper
Close
evenly
Then
To
the
sew
achieve
using
and
to
finish
zipper
the
other
through
a
the
perfect
edge
sewing
and
half
the
guide.
baste
basted
seam,
the
seam.
the
of
the
zipper.
seam.
we
Page 60

Stabilizing
the
With
cravats
silk
having
prevents
ming
durable
clean,
Fold
—
twice
Lay
—
hemmer
Leave
—
presser
scroll
Lower
—
edge
ensure
the
On
Tip:
hem
roll
stitch.
to
the
the
right
edges
hemmer
and
preiron
beginning
(each
folded
and
the
foot
into
the
evenly
that
silk,
is
you
valances
the
edges
the
edge
approx.
fabric
sew
needle
and
fabric.
the
presser
into
fabric
the
the
of
halt
viscose
particularly
is
of
a
in
insert
foot
the
and
can
with
fabric
from
the
the
mm>.
2
edge
few
the
the
hemmer.
does
presser
attractive
stabilize
ease,
edges.
result.
fabric
underneath
stitches.
fabric,
hemmer
and
chiffon
fraying
raise
guide
Take
not
foot.
fabrics,
with
blouses,
withott
The
edge
the
run
anc
car
unc
thE
foe
a
hen
a
o’
:.
fa
t,,
zLz
/
-
.—,
.—
56
Page 61

a
b
2
0
3-5
G
2.510
-
•
351
L
1
j
0
can
e.g.
First
fabric.
the
Sew
margin.
The
middle
the
Sew
small,
34)
Cut
can
the
First
Sew
fabric
Fold
Process
way.
lace
achieve
on
the
both
on
fabric
over
dense
between
back
beautify
desired
how
serge
the
up
the
a
babywear
is
lace
sides
underneath
and
both
zigzag
2
extra
the
lace
done:
it’s
the
onto
lace
the
to
corner
all
the
beautiful
basted
of
ironed
edges
and
fabric.
remodel
and
suitable
edges.
cut
the
first
and
following
and
onto
the
the
to
of
stitch
4).
face
corner.
sew
effect
children’s
the
lace
lace
the
lace
the
(stitch
home
lace
as
side
over
sides
by
face
a
at
cut
is
side.
with
width
often
of
diagonally.
it
in
inserting
clothing.
side
narrow
down
a
textiles
as
the
same
the
of
knob
you
Inserting
You
lace.
—
:
;..
—
—
—
—
Attaching
You
with
like.
Here’s
—
—
—
—
.,‘.
_/
‘
r
/
57
Page 62

_V_fl.
__VVV_•_V
—*.a—.
—
*fr
.:_.
•VV4
prog
K
rt
K
bI
Shell-edging
Shell-edging
fabrics
soft
as
used
needle
the
teed.
edge
Serge
—
allowance
Take
—
underneath
This
edging.
I
I
l’.’l
I
1.5
1.5
is
such
edging
an
thread
fabric
the
to
that
care
intensifies
I
I
1
especially
as
on
tension,
the
the
presser
the
the
4.5
silk
underwear.
edge
left.
fabric
effect
IIl
i
attractive
and
the
and
foot
.
—
viscose.
deeper
iron
only
of
1
runs
while
the
-5
The
the
on
It
sewing.
shell-
I
1
thin,
is
higher
the
seam
half
often
shell
Tip:
the
also
seam.
be
By
seam
creating
used
sewing
A
you
fine
instead
colored
a
strengthen
attractive
an
fabric
of
of
woolen
a
woolen
the
another
shell-edge
contrast
color
thread.
thread
in
cao
tha
58
Page 63

Decorative
embroidery
Sewing
Decorative
Monograms
Embroidering
zigzag
Appliqué
Richelieu
Patchwork
Quilt
Eyelet
Hemstitching
table
stitch/Tapering
and
patchwork
embroidery
stitches
techniques
for
stitches
with
quilt
and
embroidery
the
dense
foot
traditional
page
page
page
page
page
page 69
page
page
page
page
60
61
65
66
69
70
70
71
72
—
64
—
68
J
59
Page 64

Decorative
enhance
To
and
6152
and
fancy
can
You
variations
or
colors
recommend
are
which
the
For
use
either
backing
material
the
the
out
marking
or
a
after
following
work:
dery
stitch
The
varied
Always
otherwise
not
stitches
home
6232
decorative
produce
selecting
by
For
sizes.
using
available
to
parts
iron-on
an
under
paper
from
embroidery
chalk.
hours
few
recomendations
length
required.
as
the
use
indicated.
textiles
you
offer
stitches
even
embroidery
special
from
embroidered
be
backing
the
contracting.
pattern
These
can
or
and
center
or
whole
a
greater
different
embroidery
your
fabric.
with
lines
be
apply
stitch
needle
garments
choose
to
embroidery
combinations,
work
Pfaff
you
place
or
This
You
a
dissolve
will
ironed
to
width
position
range
we
dealer.
should
prevents
can
magic
away.
all
can
models
of
from.
threads
silk
mark
pen
The
embroi
be
(j
if
60
Page 65

Changing
can
You
aid
the
density
stitch
buttonhole
the
density
stretched
of
you
vary
the
apart.
the
the
stitch
for
set
pattern
pattern
embroidery
range.
is,
the
length
length
The
farther
length
knob
larger
infinitely
(11).
generally
is
the
the
The
stitch
pattern
with
in
is
4
Changing
the
With
stitches
widened
tely
when
that
needle
is
stitch
—
not
the
even
the
pattern
width
during
or
stitch
in
made
the
width
knob
sewing
narrower.
width
material.
(34)
—
changed,
is
decorative
be
can
sure
Make
the
infini
61
Page 66

I
Borders
combining
By
can
you
Madeira
They
different
for
size
Apply
—
paper
Embroider
—
plover
5
that,
back
Embroider
—
Finally.
—
point.
embroider
embroidery
available
are
sizes.
one
iron-on
under
turn
again
add
different
piece
with
the
the
in
stitch
program
borders
threads
in
many
However,
embroidery
of
backing
fabric.
the
program
marked
fabric
reverse.
U
embroidery
of
color
only
place
or
Y/G,
middle
sew
and
parallel
to
X
any
are
use
the
to
every
very
shades
one
work.
silk
stitch
point.
it.
programs
width.
suitable.
thread
backing
width
After
border
fifth
zigzag
and
this
In
red
embroidery
effect.
Apply
—
paper
Embroider
—
over
turn
again
Set
—
You
—
program
finally,
U/G,
border
iron-on
under
marked
the
fabric
the
reverse.
in
program
now
can
G,
the
stitch
embroidery
thread
backing
fabric.
the
program
with
middle
and
X/G
stitch
stitch
outside
width
is
sew
parallel
the
width
zigzag
l.
5
example
used
place
or
V/F.
point.
the
to
straight
—
3
row
as
stitch
After
border
it.’
4
mm
with
multi-colo
additional
an
silk
backing
width
that,
back
row
and.
program
lI
with
62
Page 67

S
Borders
combining
By
desired
dered
to
way
Apply
—
paper
Mark
—
You
—
M/G
along
and
reverse.
Then
—
combination
mm
5
I/F
—
tes
turn
the
with
you
effects.
embellish
iron-on
under
the
now
can
Stretch,
the
embroider
sew
fri.
Stretch,
border.
the
material
the
border
I’
‘4
‘4
combination
a
different
easily
can
This
backing
the
center
begin
stitch
marked
close
1/K
stitch
in
reverse.
embroidery
achieve
simple
is
a
tablecloths
fabric.
tailor’s
with
with
width
line.
down
back
the
to
Stretch,
width
Embroider
and
of
other
and
and
place
or
chalk.
combination
the
5
turn
Then
the
border
first
stitch
mm
5
one
embroider
stitches
keys
pleasing
garments.
silk
Embroider
frI.
the
border
width
frI.
row.
back
as
embroi
backing
fabric
in
with
comple
Then
the
down
Combinations
additional
An
colored
ferent
used
You
des
—
—
—
for
can
from
Apply
paper
Mark
can
You
Stretch,
H
along
embroider
and
reverse.
Then
combination
4
-
2
Stretch,
FIG
—
pletes
the
purchase
your
iron-on
under
the
the
sew
mm.
the
1!
with
effect
thread.
middle
PFAFF
backing
the
middle
begin
now
stitch
marked
close
M/G
stitch
border.
colored
can
Multicolored
border
in
it
dealer.
fabric.
with
with
width
line.
back
the
to
Stretch,
I
•1
thread
dif
be
great
a
or
tailor’s
down
first
width
produced
in
place
the
fri.
5
Then
3
thread
example.
this
variety
silk
chalk.
combination
Embroider
the
turn
border
the
border
stitch
4
mm,
—
with
of
backing
with
width
was
sha
fabric
in
the
com
I
63
Page 68

,t1
I1
It:!
I
needle
Twin
can
You
using
some
made
Note:
Only
use
mm
2.0
Threading
Insert
—
Fit
—
reel
the
In
—
tension
that
thread
Carry
—
make
each
the
of
using
the
of
you
achieve
twin
beautiful
the
your
twin
a
for
all
the
twin
the
second
thread
left
disk
pass
right
threading
on
sure
other.
further
needle.
imagination.
needle
embroidery.
twin
needle.
reel
on
threading
During
C.
one
over
threads
the
The
borders
with
needle
holder
each
slot
thread
tension
in
embroidery
illustrations
that
width
a
and
holder.
you
(17)
threading,
left
disk
usuat
the
not
are
can
place
and
C.
way,
twisted
effects
show
be
of
up
will
make
one
by
to
one
find
sure
but
with
thread
into
left
and
and
right
thread
the
needles.
I
64
—
-
guide
(32)
threads
the
Pull
Page 69

4/Ij1i
-c.,_’
Cii
Monograms
Whether
fabric,
the
embroider
Sewing
however,
—
—
—
—
—
Tip;
rial
When
gram
stitch
zigzag
are
working with
with
program
this
require
Draw
the
Invisible-ink
Drop
the
bringitinto
and
(see
page
Place
Avalon
Spread
and
embroider
off
the
Tie
remaining
(Any
sewing
By
slowly,
embroidering
must
and
stitch.Inthis
completely sewn
help
the
G,
stitch
initials
of
withoutaset
way
a
initials
marker.
feed
dog.
51>.
under
the
fabric
using
threads
pieces
quickly
you
will
firstbesewn
then
overstitched
terry-cloth
of
the
width
your own
practice.
little
onto
Insert
darning
the
in
an
the
and
and
achieve
on
terry-cloth,
way
over.
darning
2.5-5‘l,
design.
pattern does,
the
fabric
the
darning
position
fabric.
embroidery
zigzag
remove
dissolve
moving
dense
narrow
with
a
withabroader
the
terry-cloth
or woven
foot
you
with
hoop
stitch.
Avalon.
the
in
water.)
the
stitches.
the
and
an
foot
mate
mono
zigzag
loops
can
Embroidering
Here
means
sary.
program
—
—
—
the
You
Iron
Before
the
Sew
using
feed
that
G,
the
fabric.
along
the
block
dogisnot
free
sewing
can
simply
stitch
fabricoruse
sewing,
draw
the
lines
zigzag
letters
sew
width
stitch.
is
somewhat
dropped
isnolonger
along
2
5-.5
a
paper
the
monogram
have
you
which
neces
the
lines
‘I
underlay.
sketched
easier.
with
onto
I
65
Page 70

ED
)
Embroidering
Tapering
your
With
infinitely
usage
zag
ring”.
zigzag
embroidery.
Even
this
stitch
By
stitch
embroidering
Apply
paper
needle
Set
—
select
,,buttonholo”
position
Turn
—
consistently
again
throughout
Note:
position,
direction.
one
varied
regulating
iron-on
under
zigzag
the
to
If
you
with
machine
in
technique
becomes
you
the
thread
c.
width
from
while
0
the
selected
stitch
the
a
the
its
narrower
the
can
backing
fabric.
stitch
and
knob
sewing
procedure.
dense
zigzag
width.
in
—
width
create
tension
G,
select
to
0
the
width
which
or
set
(34)
5
right
will
zigzag
stitch
Anglo-Saxon
In
a
is
—
this
of
interesting
place
“buttonhole”,
to
stitch
center
the
smoothly
mm
1
constant
a
at
or
only
stitch!
can
dense
called
silk
length
and
loft
change
“tape
dense
backing
needle
and
back
needle
be
zig
to
speed
111
embroidering
Unven
backing
iron-on
Apply
—
—
—
in
paper
needle
Set
select
,,buttonhole”
position
Increase
using
If
Note:
position,
direction.
one
under
zigzag
the
you
the
(.
or
width
the
thread
stitch
and
decrease
selected
stitch
fabric.
knob
tension
C,
select
the
width
the
(34).
or
set
right
will
place
to
stitch
the
width
silk
“buttonhole”,
length
center
the
of
left
or
change
enly
backing
to
needle
stitch
needle
in
66
Page 71

embroidery
Floral
this
For
stitch
zag
variable
positions.
—
Apply
paper
Draw
—
self-erasing
needle
Set
—
select
,,buttonhole”.
—Flowers:
Select
embroider
stitch
flower
the
sewing.
—
Leaves:
Select
embroider
width
handwheel
halfofthe
first
tionedinthe
—
Turn
the
der
flower
was
stitch
iron-on
under
the
zigzag
center
width
right
using
the
other
arrangement,
used
width
backing
the
contures
textile
thread
stitch
needle
individual
according
with
needle
halfofthe
the
towards
material.
material
half
in
and
fabric.
of
pen.
tension
the
width
leaf
180
of
only
combination
various
the
or
place
flower
a
to
stitch
set
0,
position
pedals.
the
to
knob
width
position
Vary
leaf.
knob
after
you
the
until
degrees
leaf.
the
dense
a
with
needle
backing
silk
with
motif
,,buttonhole”,
length
and
CZ
Regulate
contures
during
(34)
and
CD
stitch
the
Turn
(34).
finishing
is
needle
embroi
and
zig
the
a
to
the
of
the
the
posi
67
Page 72
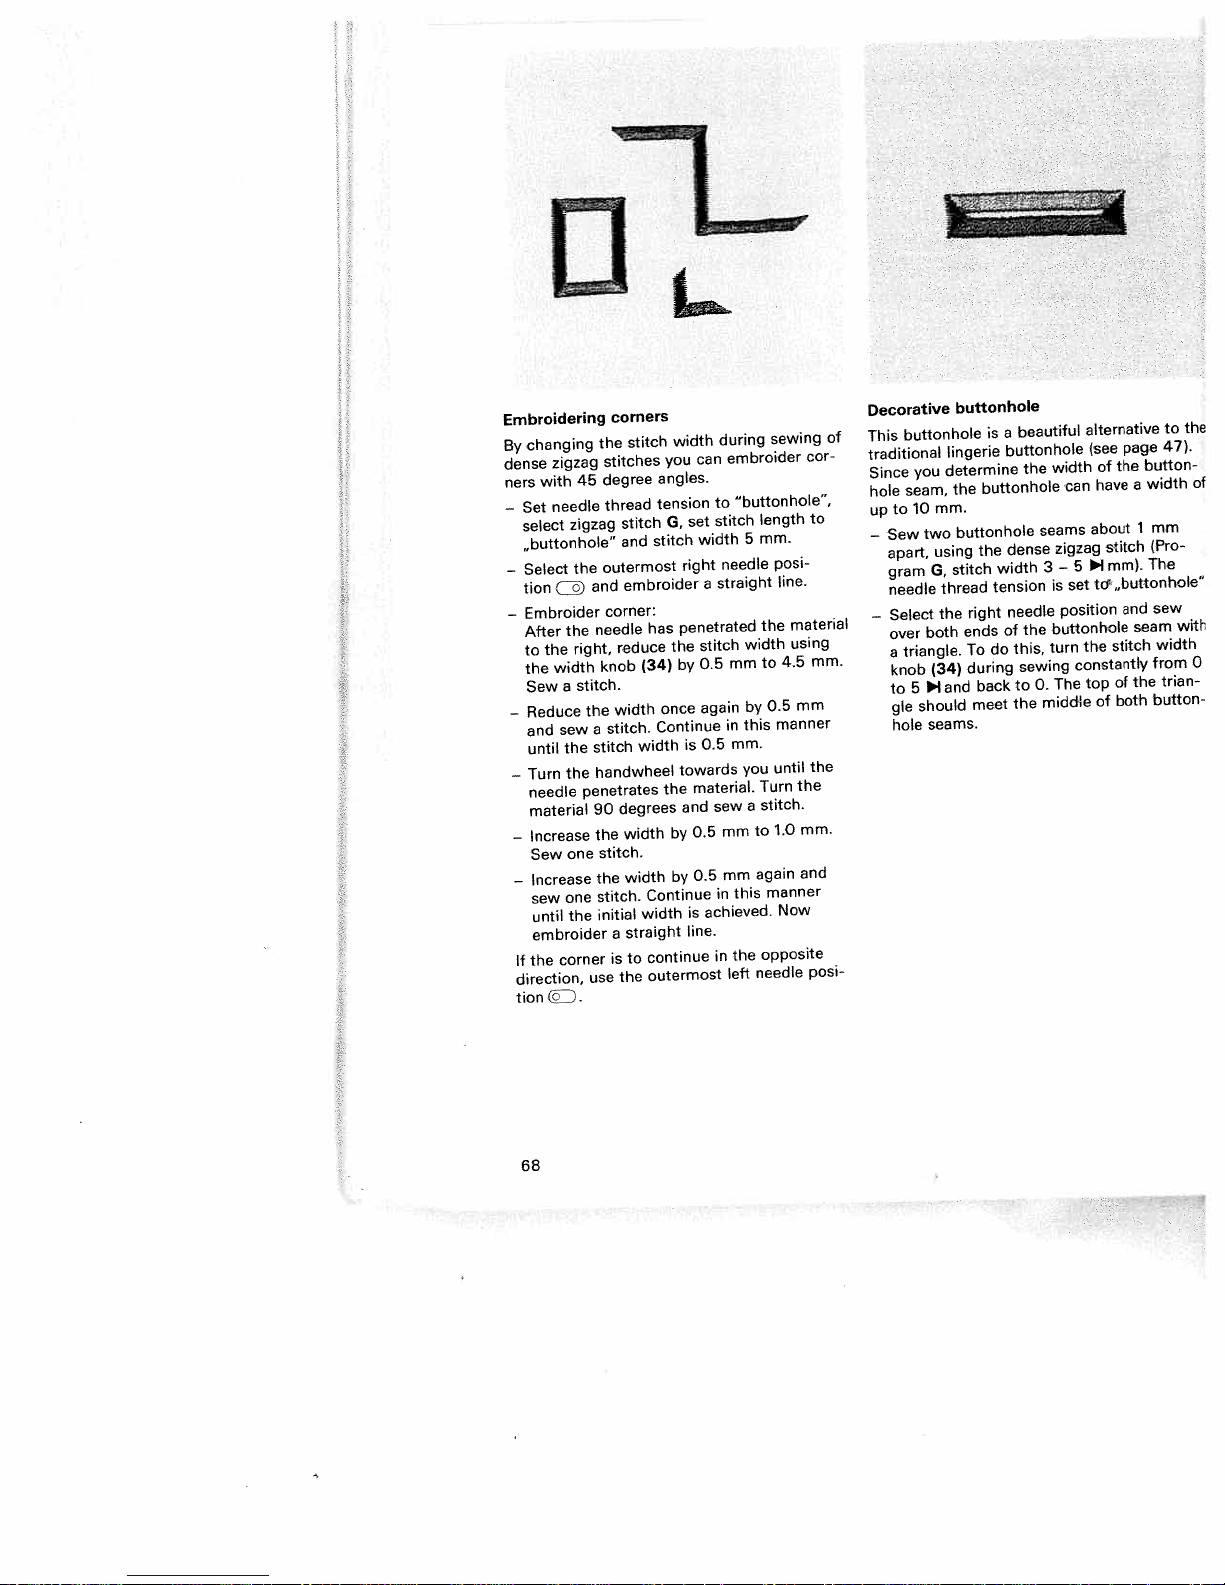
DL
Embroidering
changing
By
zigzag
dense
ners
—
with
Set
select
45
needle
zigzag
,,buttonhole”
the
Select
—
(J
tion
Embroider
—
—
—
After
the
to
the
Sew
Reduce
and
until
Turn
the
width
a
sew
the
the
right,
stitch.
needle
material
Increase
—
one
Sew
Increase
—
one
sew
the
until
embroider
corner
If
the
direction,
tionD.
corners
stitch
the
stitches
degree
thread
stitch
and
outermost
embroider
and
corner:
needle
reduce
knob
width
the
stitch.
a
stitch
handwheel
penetrates
degrees
90
width
the
stitch.
width
the
stitch.
initial
straight
a
to
is
the
use
width
you
angles.
tension
G.
stitch
has
the
(34)
once
Continue
width
the
by
by
Continue
width
continue
outermost
during
can
to
stitch
set
width
needle
right
straight
a
penetrated
stitch
0.5
by
again
in
is
0.5
towards
material.
sew
and
mm
0.5
mm
0.5
in
is
achieved.
line.
in
sewing
embroider
“buttonhole”,
length
mm.
5
posi
line.
the
width
4.5
to
mm
0.5
by
manner
this
mm.
until
you
Turn
stitch.
a
1.0
to
again
manner
this
Now
opposite
the
needle
left
of
cor
to
material
using
mm.
mm
the
the
mm.
and
posi
Decorative
buttonhole
This
traditional
you
Since
seam,
hole
10
to
up
two
Sew
—
apart,
gram
needle
Select
—
over
triangle.
a
knob
5
to
should
gle
hole
lingerie
determine
mm.
using
stitch
G,
thread
the
both
(34)
and
i
seams.
buttonhole
is
a
buttonhole
the
buttonhole
the
width
tension
right
of
ends
do
To
during
back
meet
beautiful
buttonhole
width
the
seams
zigzag
dense
3
is
needle
buttonhole
the
turn
this,
sewing
The
to
0.
midde
the
alternative
(see
of
have
can
about
stitch
l
5
—
tcl,,buttonhole”
set
position
the
constantly
top
of
page
the
mm).
and
stitch
of
both
button
width
a
1
The
seam
the
to
47).
mm
(Pro
sew
width
from
trian
button
the
of
witt’
0
68
Page 73

I
I
I
I
I.
Appliqué
Appliqués
duce
a
materials
rent
different
densely
(special
cutout
seam.
can
be
material,
-.
Insert
machine.
—
Transfer
side,
fabric.
drawn
be
—
Now
qué material.
paper
—
Place
base
—
Afterwards
dense
mm,
thread
Make
outer
Tip:
For
ends,
the
narrower
stitch
the
that
are
beautiful
variations.
stitched
accesories),
on
the
The
fusible
used
making
the
your
smooth
Remember
iron
the
off.
and
material.
zigzag
stitch
tension
sure
edge
appliqué
you
ends
quickly
fancy
and
seam
underside
to
iron
it
appliqué
drafted
side,
as
mirror image.
a
backing
Cut
iron
on
over-stitch
stitch
length
isinthe
the
needle
that
so
pieces
can make
using
are
pointed.
made
effect.
patterns
You
can
with
because
for
backing
appliqué
the
easier
foot
pattern
of
the
that
e.g.
fabric
the
motif
the
applique
all
stitch
G,
“buttonhole”.
stitches
fraying
no
which
the
the
width
and
By
you
can
make
the
appliqué
it
hasaspecial
the
buttonhole
fabric
for
you
the
in
to
fusible
letters
Onto
out
contours
width
buttonhole”
occurs
are
dense
knob
always
using
sew
a
perfect,
“Vliesof
onto
to
appliqué.
sewing
the
backing
have
the
and
parts
The
over
pointed
zigzag
diffe
the
face
appli
pull
on
with
2—4
needle
area.
the
later.
(34)
pro
many
foot
ix”
to
the
so
the
Richelieu
This
especially
insert
embroidery
sewing
—
Usingamagic
the
face
—
Then
underneath
and
clamp
into
an
—
Insert
—
To
lend
sew
all
straight
—
Then
to
the
be
hollow.
—
Embroider
stitch.
—
Due
to
much
-.
Finally,
fleeceincold
design
at
machine.
sideofthe
place
embroidery
decorative
more
of
the contours
stitch
carefully
contour
The
the
the
fleece,
more
simply
is
finished.
artistic
two
the
both
durability
stable
water
is
easy
marker,
layers
parts
the
embroidery
(stitch
out
cut
from
fleece
contours
this
and
dissolve
form
fabric.
to
fabric
frame.
length
the
the
must
part
and
to
draw
of
Avalon
be
to
twice
areas
with
strong.
the
your
of
eyelet
sew
with
your
embroidered
and
the
foot
the
embroidery,
using
approx.
fabric
which
not
move.
dense
a
of
the
embroidery
one-of-a-kind
and
motif
fleece
fleece
number
mm
2
work
your
the
1
are
onto
1.
mm).
next
to
zigzag
is
I
69
Page 74

Patchwork
Patching
techniques
American
North
of
leftover
into
ped
Patchwork
hand.
by
possibility
in
much
a
A
patchwork
of
fabric:
ers
A
number
combined
patchwork
is
This
onto
sewn
consists
is
often
The
quilt
—
sories
sewing
needle
the
of
inch
1/4
inner
the
quilt
and
which
fabric.
a
creative
quilts
Nowadays,
to
shorter
of
different
in
which
basted
then
the
of
one
bound
and
see
page
patchwork
(6.3
edge.
quilting
were
pioneer
Over
hobby.
used
your
make
time.
always
quilt
geometric
forms
to
back
piece
this
by
patchwork
81)
and
the
to
and
mm),
are
traditional
originally
womentomake
years
the
sewn
be
to
however,
creative
consists
pieces
variations
top
the
fleece
a
of
quilt
the
of
fabric.
bottom
foot
is
particulary
quilting.
edge
outer
inch
1/8
used
it
you
ideas
of
to
of
layer
which
The
layer.
(special
The
of
(3.15
fabric
handicraft
by
use
develo
has
exclusively
the
have
reality
a
three
of
are
create
a
quilt.
the
then
and
usually
entire
acces
helpful
distance
foot
the
mm)
lay
quilt
for
is
to
here’s
And
—
Using
templates,
patchwork.
seam
—
Spread
accordance
squares
These
will
and
seam
The
—
quilting,
down,
Baste
—
fleece
the
Traditionally,
—
sewn
This
procedure
with
a
gram
approximately
Embroidery
for
uni-colored
the
use
continue
then
a
into
spread.
how
own
your
cut
The
allowance
these
with
which
squares
form
allowances
but
never
finished
the
insert
together
sewing
FG
Stretch
decorative
cushion,
it’s
or
the
templates
pieces
you
will
the
instead
ironed!
these
with
is
machine,
3
stitches
materials.
to
a
done:
commercially
pieces
inch
of
1/4
out
pattern
the
then
can
then
ply
top
are
are
ply
top
and
the
three
small
faster
Stretch.
L
or
next
mm
are
stitch
your
sew
hanging
wall
available
you
in
be
of
to
bottom
fabric
should
6.3
front
put
sewn
th
not
be
of
mm).
of
form
and
together.
together
quilt.
sergnd
smoothed
quilt
the
quilt
layers
include
you
for
need
stitchesbyhand,
and
e.g.
more
with
practical
the
Always
to
the
Here
foot
quilt,
you
No.
or
seam.
suitable
should
1.
You
making
bed
a
particularly
your
a
in
small
when
onto
layer.
are
pro
sew
car
it
70
Page 75

embroidery
Eyelet
Traditional
to
be
had
made
be
plate
eyelet
very
is
This
linen.
Use
blind
stitch,
of
ches
classic
For
stitch
a
—
Remove
the
Set
—
position
Place
—
making
of
the
down
Place
—
dery
threads
eyelet
the
around
—
Drawupthe
first
the
can
You
—
selected
important
evenly.
each
Afterwards
—
made
quite
the
width
the
needle
at
the
hoop.
the
The
other.
eyelet
easily
(special
effective
utility
stitch,
knob
eyelet
3
sewing
the
presser
(see
eyelet
sure
the
marked
Cut
and
plate.
pin.
few
now
program.
to
stitches
secure
embroidery
laboriously
with
accessory).
on
stitches
elastic
(model
embroidery,
l
—
5
bar
page
plate
A
fits
pin
plate.
front.
fabric
one
the
push
The
bobbin
stitches.
stitch
When
the
turn
mm
foot.
lifter
51).
Then
or
fabric
thread
around
should
with
by
the
blouses,
such
stitch
6152,
is
at
the
on
the
in
push
taut
two
fabric
you
fabric
straight
which
hand
help
bed-
as
or
6232).
program
very
the
needle
middle
in
the
of
over
must
and
the
do
slowly
be
previously
can
of
zigzag
the
fancy
suitable.
darning
the
embroi
an
fabric
the
fit
hold
cut
this
very
stitch.
an
or
6,
plate,
cutout
plate
pin
snugly
it
with
it
and
close
now
table
stit
with
for
is
the
in
to
If
you
TIP:
decorative
6232,
partly
only
then
must
or
choose
stitch
blind
a
stitched
use
another
from
stitch,
around
keyAto
the
in
which
stitch
program,
Model
or
not
around
6152
the
at
e.g.
cut
all,
the
a
or
is
you
cut.
71
Page 76
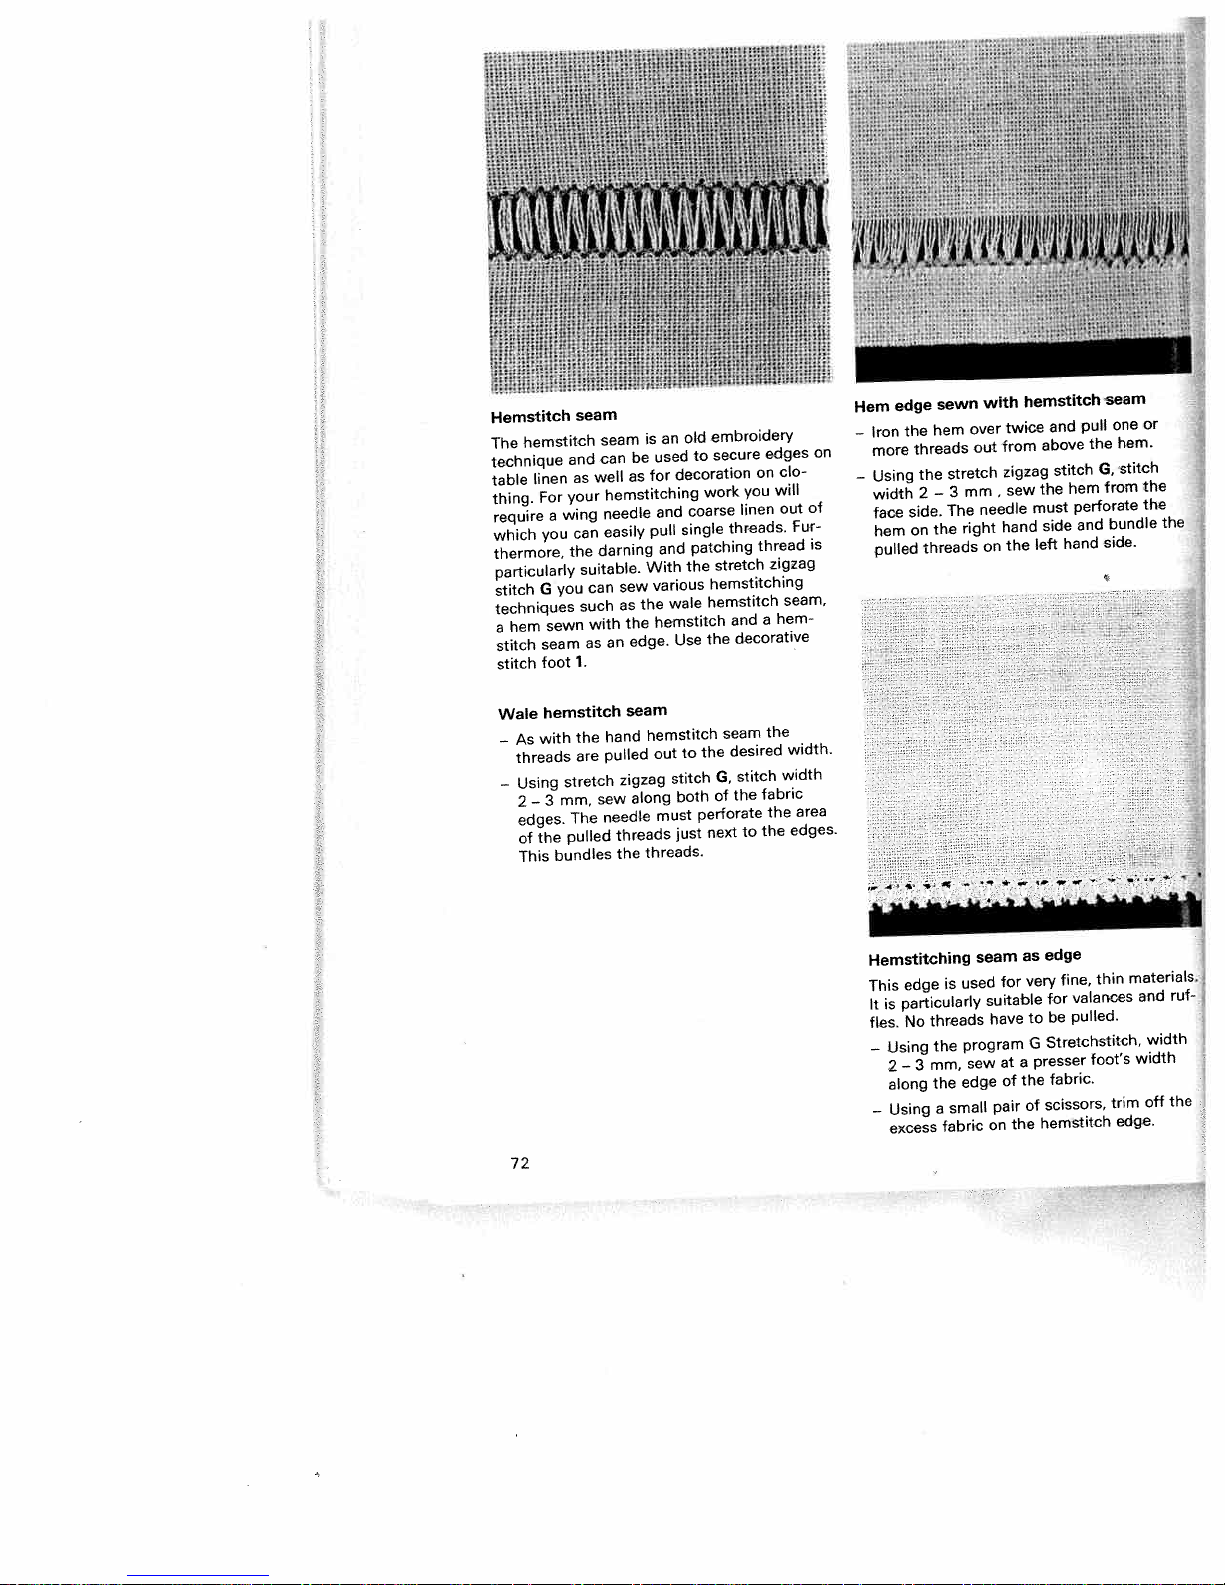
1’
Hemstitch
hemstitch
The
technique
linen
table
For
thing.
require
which
thermore,
particularly
G
stitch
techniques
hem
a
stitch
stitch
Wale
with
As
—
threads
Using
—
—
2
edges.
the
of
This
seam
and
as
your
wing
a
can
you
the
suitable.
you
such
sewn
as
seam
1.
foot
hemstitch
the
are
stretch
mm,
3
The
pulled
bundles
seam
be
can
as
well
hemstitching
needle
easily
darning
sew
can
as
the
with
edge.
an
seam
hand
pulled
zigzag
along
sew
needle
threads
the
an
is
used
decoration
for
and
pull
and
With
various
wale
the
hernstitch
Use
hemstitch
out
stitch
both
must
just
threads.
embroidery
old
secure
to
work
coarse
single
patching
stretch
the
hemstitching
hemstitch
the
the
to
G,
of
perforate
next
on
you
linen
threads.
thread
and
decorative
seam
desired
stitch
the
to
edges
clo
will
out
zigzag
hem-
a
the
width
fabric
the
the
Fur
seam.
width.
area
edges.
hemstitch
with
sewn
edge
Hem
twice
over
hem
the
Iron
—
more
on
Using
—
of
is
width
face
hem
pulled
side.
on
Hemstitching
edge
This
particularly
It
is
No
fles.
Using
—
—
2
along
Using
—
excess
threads
the
—
2
the
threads
threads
the
3
mm,
the
a
fabric
stretch
mm
3
The
right
used
is
program
sew
edge
small
out
needle
seam
from
zigzag
,sew
hand
the
on
for
suitable
have
at
of
pair
the
on
above
the
must
side
left
as
very
to
G
presser
a
the
of
hemstitch
seam
pull
and
the
G.
stitch
from
hem
perforate
bundle
and
side.
hand
edge
thin
fine,
valances
for
pulled.
be
Stretchstitch,
foot’s
fabric.
scissors,
one
hem.
stitch
materials.
width
trim
edge.
or
the
the
and
width
off
the
ruf
the
72
Page 77

Accessories
Presser
Special
Felling
Gathering
Cording
Bias-tape
Multi-stitch
Cording
Appliqué
Fringe
Needle
feet
accessories
foot
foot
foot
binder
foot
foot
foot
table
‘
and
(normal
gathering
page
page
needles
accessories)
table
attachment
page
page
page
page
page
page
page
page
page
81
82,
83
74,
76
77
77
78
79
79
80
80
75
73
Page 78

Sewing
Standard
0
Part
(models
Part
(model
1
Fancy-stitch
Part
(models
Clear
1
(fancy-stitch
for
Part
(models
feet
No.
No.
No.
view
top
No.
(normal
presser
98-694
6122-6232)
96-694
6112)
foot
98-694
61
22-8232)
foot
foot
feed)
98-694
6122-6232)
accessories)
foot
6-00
81
847-00
top
(for
814-00
not
suitable
1
864-0
feed)
3
4
Blind
Part
(models
Part
(model
Zipper-
Part
(models
Part
(model
stitch
98-694
No.
6122
98-694
No.
6112)
and
No.
6122-6232)
No.
6112)
and
edge-stitching
98-694
98-694
overlock
890-00
6232)
845-00
884-00
843-00
foot
foot
74
Page 79

Sewing
feet
(normal
accessories)
5
6
7
Buttonhole
Part
No.
(models
Darning
No.
Part
(models
For
model
Hemmer
Part
No.
(models
For
model
foot
98-694
6122-6232)
foot
93-035
6122-6232)
6112
98-694
6122-6232)
6112
882-00
960-9
special
818-00
special
1
accessory
accessory
N
a
8
Edge
No.
Part
(models
Second
Seam
Brush
tube
Oil
guide
98-802
6122-6232)
spool
ripper
422-00
holder
75
Page 80

Sewing
Accessory
Appliqué
Open
tape
Bias
(remove
Cording
(twin
Cording
(twin
Cording
Fringe
Straight-stitch
Needle
Lap-feller
Lap-feller
Gathering
Multh
(remove
Cording
Eyelet
Eyelet
Roll
Hemer.
Herner
<nil-edge
Earning
Teflon
Decorative
Compass
Fagotting
Petchwodr
Fatchwek
Corh:rg
Emidir
/9
-me-form
Fingem
Lamp
the
Or
feet
foot
appliqué
binder
foot
foot,
needle
foot,
needle
tongue
toot
plate
stitch
sewing
foot
olte
elate
herner.
-
(no
foot
foot
hole
2
uy
change:
toliowing
(special
foot
holder)
grooves
5
with
grooves
7
with
(2)
foot
with
mm
4.5
mm
5.5
foot
gathering
6
0
$
0
mm
2
(for
mm
...
suitable
foot
(model
stitch
guide
guide
oc’t
tom
ceccreuva
foot
foot
embroidery
accessory)
needle
needle
with
round
foot
holder)
mm
mm
feed)
top
Tor
6112)
foot
wirhoul
top
iwith
501cc
pages
for
spacing
spacing
round
hole
top
top
feed)
foor
fooi
you
special
hole
feeo
feed
will
1.6
1.6
.
tind
6
llL)
61121
sewing
2.0>
to
2.0)
to
,.
exampies
work.
They
Part
93-042
93-036
98-053
93-042
93-042
93-035
93-042
98-694
98-694
93-042
93-042
93-036
98-999
93-036
93-036
93-036
i
98-694
98-694
98-694
93-042
93-035
93-036
93-036
93-036
93-036
93-036
93-036
e3-036
1
93-036
93-036
93-036
1
93-036
1
93-036
of
No.
some
are
941-91
931-91
484-91
950-91
953-9
952-45
821
available
943-9
-00
822-00
946-9
948-9
998-9
650-00
915-91
947-45
948-45
873-00
823-00
818-00
957-9
960-91
917-91
962-9
953-9
952-46
925-91
927-9
942-91
936-9
946-9
963-9
910-91
960-91
the
of
at
1
1
1
1
1
1
1
1
1
1
1
1
special
extra
an
Sewing
applique
For
binding
For
tape
bias
cording
For
(needle
sewing
For
Caution!
stitch
position
topstitching
For
and
and
silk
lap-felled
For
gathering
For
placing
For
pleats
For
For
For
For
For
For
For
For
For
Foundation
Quilt
sewing
Sewing
For
For
For
All
accessory
from
charge
work
work
edges
work
80)
size
loop
Only
center
in
very
sewing
materials
soft
etc.)
jersey,
dense
valances
on
cording
embroidery
eyelet
hemming
hemming
knitted
sewing
damaged
darning
leather
sewing
embroidering
circle-shaped
wear
patchwork
and
spaces
overstitching
yarn
sewing
embroidery
of
types
your
with
embroider
straight
use
needle
seams
light
seams
valances
or
edges
edges
berweerc
and
work
sewing
feet.
dee
loose
fabrics
p1w
syni
a.
embrck;
cords
ribba
a
—
Page 81

I
4
_______
progi
[-
p;
Lap-feller
Lap-feller
strong
sportswear
and
jeans.
effective
trasting
Place
—
—
Overlap
about
—
Now
tongue
must
-.
Sew
stitch.
Then
—
truding
turned
along
apart
G
seams
This
too.
and
You
if
you
color.
fabric reverse
the
the
ito
place
the
of
placed
be
along
pull
the
hem
over
the edge.
during
:
3
3
makes
children’s
can
use
raw
cm.
1.5
this
lap-felling
the
fabric
into
by
sewing.
I
0
0
are
not
them
make
sewing
a
of
edge
overlapping
under
fully
folded
edge
apart
lap-feller.
the
the
foot
Pull
the
013-5ILap-i
only
wear,
these
side
the
foot.
and
two
—
13-51
ornamental
very
men’s
seams
thread
to
lower
edge
The
the
with
and
feed
is
over-stitched
fabric
suitable
ofacon
reverse
ply
over
fabric
sewing
straight
The
plies
very
the
hem
fefler
but
for
shirts
side.
by
the
foot.
pro
is
Gathering
Beautiful
or
wear
easily
with
gathering
Engage
—
rear
foot
the
it
snaps
—
Place
sewing
the
top
parts
During
—
fabric
the
ter
Be
sure
through
Disengage
—
down
back
holder.
You
TIP:
gather
the
and
foot
gathering
curtains,
the gathering
by
the
bar
of
holder.
into
fabric
the
foot,
through
face side
lie
stitching
a
little.
gathering
you
the
at
the
over
can
by
adjusting
stitch
hand.
gathering
the
the
and
The
guide
foot.
the
front,
the
groove
also
length.
effects,
be
can
foot
into
Push
front
to
be
the
the
foot
to
you
harder
effect
the
gathering
and
regulate
the
e.g.
made
foot.
foot
by
the
foot
the
bar.
gathered
gather-free
cutout.
side.
face
have
to
you
you
fabric
foot
take
it
of
the
the
needle
on
children’s
and
quickly
This
eliminates
groove
upwards
under
fabric
The
the
the
pushing
the
the
fabric
top
grea
evenly
foot
of
hooking
rear
pull
pull,
achieve.
edges
by
outtothe
sewing
amount
thread tension
of
until
from
it
I
77
Page 82

Cording
classic
The
used
be
cotton
as
children’s
cording.
with
Engage
—
Replace
—
(1.6
Thread
—
page
Now
—
tight
prominent.
TIP:
effect,
front
the
more
or
It
edge
fabric
volume.
toot
sewing
without
and
wear
the
the
2
up
64).
set
(at
you
you
during
mm).
with
the
about
wish
can
of
any
light
can
cording
needle
needle
to
fit
the
technique
problems
wollens.
given
be
foot.
with
needle
two
thread
to
5),
emphasize
“cording
a
needle
sewing
of
Underclothing
a
twin
a
the
make
plate.
and
cording
fabrics
on
traditional
needle
threads
tension
seam
cording
the
tongue”
This
gives
(see
quite
on
shapes
the
can
such
and
look
more
the
cording
You
gimp
wider.
this
In
tongue.
To
Thread
—
the
Replace
—
—
TIP:
a
(see
With
are
foot.
obtain
can
thread;
case,
this,
do
needle
the
ween
machine
thread.
plate,
cloth
during
gled
While
lightly
can
You
guide
to
cording
distance
constant.
There
five-groove
table
the
closer
similar
a
this
however,
remove
gimp
the
plate
needle
the
needle
provides
thread
This
so
sewing.
sewing
the
use
work
the
seam.
between
two
are
and
page
on
seven-groove
together
makes
thread
from
plate
that
the
grooves
This
a
the
space
cording
different
76).
by
effect
cording
the
use
not
do
needle
through
below
The
plate.
the
and
for
be
must
not
does
it
pull
in
an
along
ensures
seams
cording
cording
seven-groove
the
foot
with
than
using
a
plate.
the
to
notch
sewing
the
fed
become
the
the
already
that
sewn
the
a
look
cording
hole
the
top.
bet
gimp
under
material
cording
sewn
the
always
is
feet:
toot
cordings
five-groove
of
the
tan
foot
78
Page 83

progI
a
bjG
I
I
2.5
G
I
2.5
j
I1
I
ja.a*jIjl
I
Bias
0
I
o
3-5
O
j
-
I
I
tape
binder
I
I
Bias-tape
Binding
lending
rance.
unfolded.
wide,
Remove
foot holder
—
Cut
diagonally
bias
—
Guide
binder
—
Set
the
needle
bias-tape
ded
position.
—
Sew
along
edgetobe
binder.
ween
automatically
the
sewing
Tip:
You
using
the
binder
withabias
fabric
edgesasmooth,
You
will
need: bias
the
presser
and
tape.
the
tape
and
pullitout
tape
binderinsuchaway
perforates
edge
few
centimeters
a
bias
the
the
The
can
zigzag
bound
raw
bias
encloses
operation,
achieve
tape
tape
stitchora
tapeisa
foot
screwonthe
across the
into
the
scrollofthe
towards the
1
—
1.5
or
adjust the
(about
before
into
the
edge
mustbeplaced
edges.
the
additional
an
simple
way
neat
the
tape
from
an
insert
bias
stitch.
edge
effect
appea
sewing
binder.
tape
back.
that
the
needle
inch)
the
tape
bet
tape
during
tape,24mm
and
beginningofthe
mm
you
slotofthe
The
raw
fancy
the
fol
by
of
Multi-stitch
The
classic
widely
or
multi-stitch
in
three
1.
Folding
Folding
2.
them
Folding
3.
on
and
usly.
When
you
attachment
ting
instructions
gathering
sewing
pleats
spaced
gathering
different
simultaneously.
ways:
the
fabricinpleats.
the
fabricinpleats
the
fabricinpleats,
sewing
lace
buy
your
at your
are
attachment
footl
You
can
them
dealer,
make’closely
magic.
and
sewing
sewing
simultaneo
full
opera
asifby
attachment canbeused
onto
multi-stitch gathering
PFAFF
included.
The
them
79
Page 84

e
prog
C
a
b
Cording
Cording
tine
a
or
seam.
purl
similar
more
made
Mark
—
ding
Engage
—
ling
foot.
groove
Now
—
and
made
You
TIP:
overstitching
thread
jO.3511
jO.35-1J
C
foot
a
is
cord
With
braiding.
to
the
too
the
yarn
then
under
overstitch
dense
what
can
of
a
I
‘H
technique
over-stitched
is
this
impressive
required
curves
tight
cording
in
one
place
the
zigzag
called
is
also
medium
a
different
1
2
2
you
Appliqués
motif
the
of
the
foot
the
stitches.
obtain
color.
in
by
or
foot
filling
filling
a
—
0
which
can
this
on
angles
and
front
shoe.
purl
a
pearl
—
to
obtain
can
seam.
the
grooves
yarn
yarn
Now
seam.
special
thread
t..
pearl
produce
also
fabric,
if
place
in
with
you
effect
{J
Cording
1
thread
effect
an
be
avoi
possible.
the
ot
back
the
narrow
have
with
fool
a
fil
the
by
beautiful
a
materials
different
densely
foot.
the
for
the
Insert
machine.
Transfer
smooth
side,
fabric.
drawn
be
iron
Now
material.
qué
paper
Place
material.
base
Afterwards
and
row
reach
(model
work
the
needle
fraying
foot
quickly
are
and
variations.
because
zigzag
appliqué
your
Remember
mirrored
in
the
off.
iron
and
overstitch
dense
curve,
a
6232)
more
passes
occurs
fancy
patterns
stitched
it
seam.
drafted
side,
backing
Cut
on
zigzag
use
function
easily.
the
later.
has
that
the
the
made
effect.
foot
of
the
outer
and
you
You
seam
special
a
in
pattern
the
e.g.
fashion.
fabric
motif
appliqué
all
stitches.
“needle
to
Also
always
using
By
can
can
with
the
to
fusible
letters
onto
out
contours
help
make
edge
obtain
make
the
cutout
sewing
the
backing
the
and
parts
When
down”
you
so
have
sure
that
diffe
face
pull
with
guide
pro
a
appli
on
app)-
on
you
is
to
the
the
no
the
no
Appliqué
Appliqués
duce
rent
many
perfect,
qué
sole
—
—
-.
a
—
—
80
Page 85

________________
a
b
Fringe
With
can
produce
foot
—
Mark
magic
—
Use
fringe
—
Embroider
you
—
For
a
longer
test
—
When
of
too fast,
—
Knot
prog
I
1
foot
this
is
very
a
have
thicker
seam
the
(3
out
pen.
silk
foot.
you
machine
the
I
I
s,I_—
10.3511
10.35-lI
special foot
fantastic
useful
for
pattern
any
paper
underlay
motif,
the
work
threads
first.
have
will
from
length;itis
finished,
carefully,
pull
to
stitch
you
threadsonthe
j
--
2
0
2
-
for
loop
embroidery
effectsinno
terry
cloth.
wish
you
and
rowbyrow.
outside
the
you
may
havetochoose
best
pull
becauseifyou
the
last
reverse
I
I
2-3
J
2-3
time.
with
the
engage
For
circles
inward.
sew
to
work
the
loops tight.
side.
Fne
This
the
a
out
foot
you
pull
1
1
Quilt
When
always
red
the
edgeofthe
the
Patching
(Sewing
—
—
I
prog
a
J
b
and
patchwork
using
sew
seam
allowance of
distance
inner right
piecesofmaterial
Insert
the
Sew
the
straight
inch
fabric
When
wance guide
edge
stitch.
seam
along
working with
of
the
I
0.25
1
0.25
the
the
from
foot
quilt
piecesoffabric
allowance,
0
j
-
foot
quilt
and
piecesoffabric
1/4or1/8
the
needletothe outer
is
inch
1/4
edge
1/8
patchwork
and
When
the outer
a
the
fabric
foot.
‘
—
I
•
-
patchwo
(0.63
inch
together>
together
working
guide
right
inch
1/8
along
I
1
45
]
foot,
with
the
inch
cm>
(0.31
cm).
foot.
with
witha1/4
piece
the
edgeofthe
seam
the
inner
I
IGuiftandI
I
I
patch-
Jworkfootj
requi
because
right
and
to
the
of
foot.
allo
right
Quilting
(Sewing
and
bottom
—
Sew
straight
seam
through
the
(see
layerofthe
three
fabric
stitch)
page
the
top
approx.
70).
layer,
quilt)
plies
3
fleece
e.g.
mm
layer
with
the
nexttothe
Page 86

Page 87
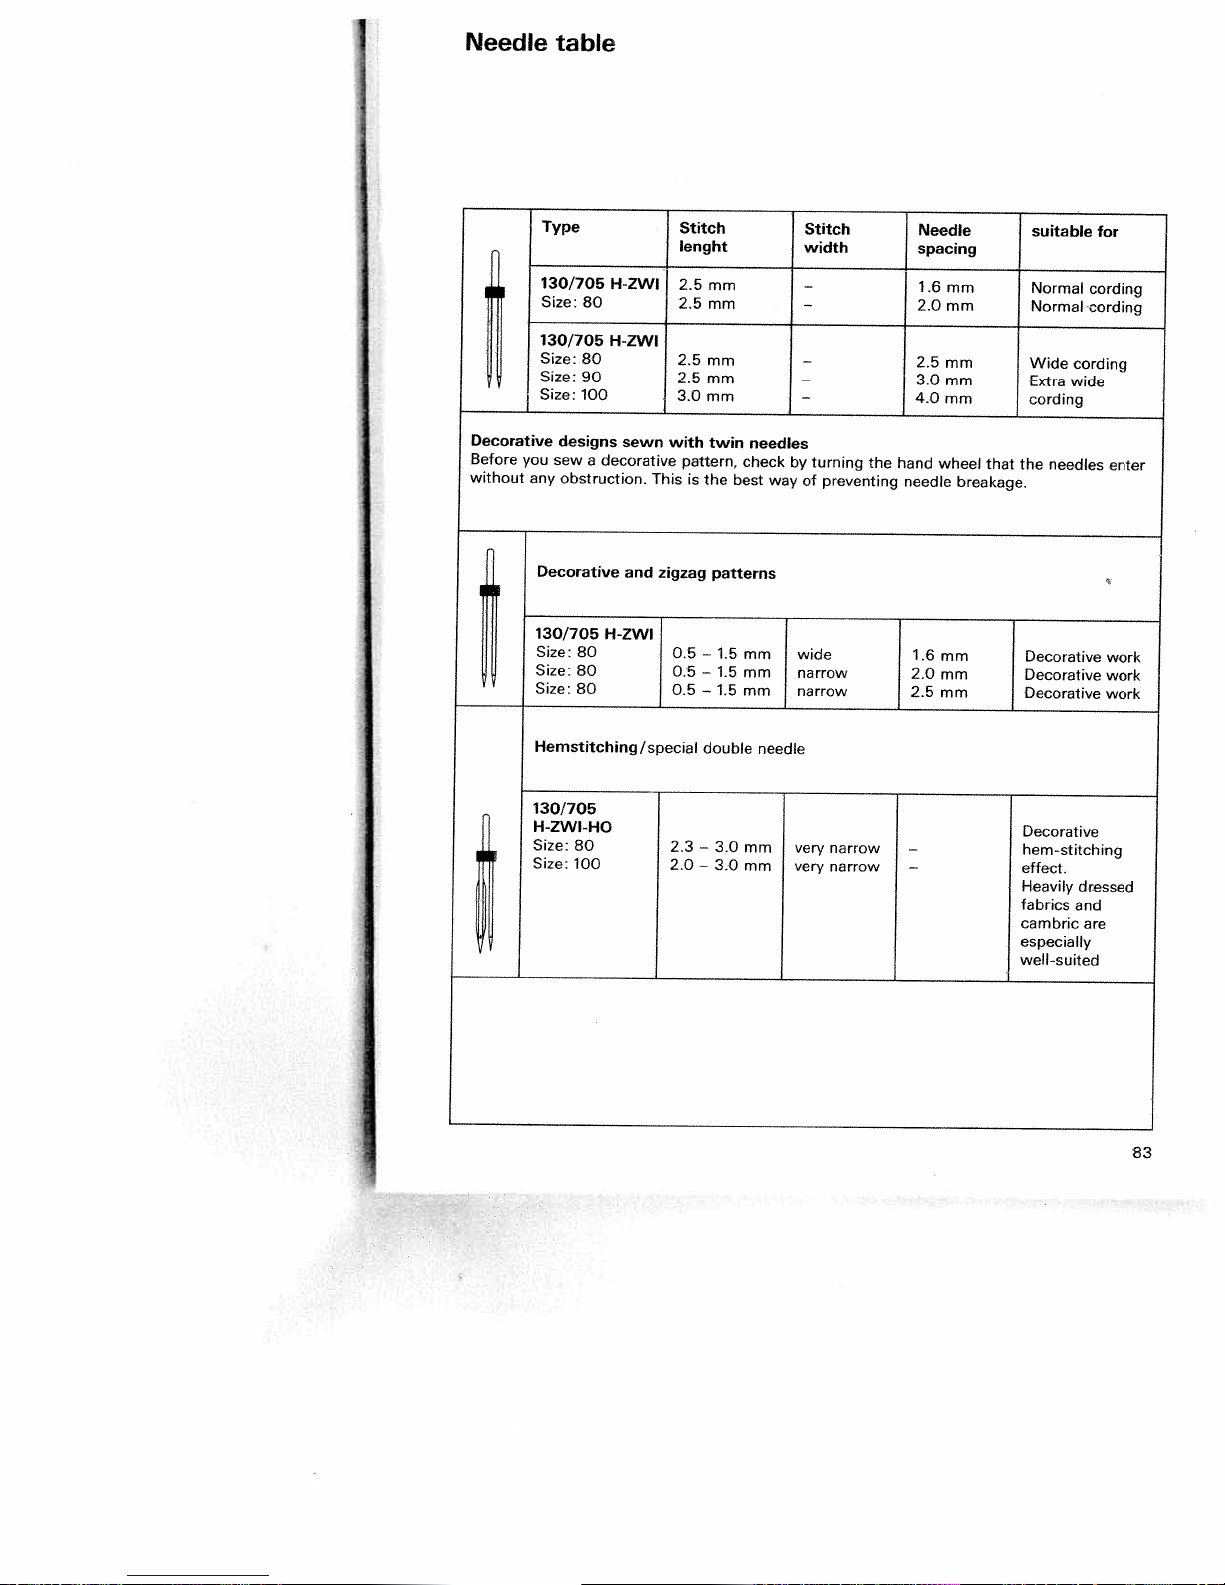
Needle
table
Ifli
}
Decorative
Before
you
without
n
Type
130/705
Size:
130/705
Size:
Size:
Size:
any
Decorative
130/705
Size:
Size:
Size:
80
80
90
100
designs
sew
a
decorative
obstruction.
H-ZWI
80
80
80
H-ZWI
H-ZWI
sewn
and
Hemstitching/special
with
This
zigzag
0.5
0,5
0.5
Stitch
lenght
2.5
2.5
2.5
2.5
3.0
pattern,
is
—
—
—
mm
mm
mm
mm
mm
twin
the
patterns
1.5
1.5
1.5
double
check
best
mm
mm
mm
needles
way
needle
Stitch
width
-
—
—
-
—
turning
by
of
wide
narrow
narrow
the
preventing
[
2.5
3.0
4.0
hand
needle
1.6
2.0
2.5
Needle
spacing
1.6
mm
2.0
mm
mm
mm
mm
wheel
mm
mm
mm
that
breakage.
suitable
Normal
Normal
Wide
E,ctra
cording
the
needles
Decorative
Decorative
Decorative
for
cording
cording
cording
wide
enter
work
work
work
[]
[j
liii
130/705
H-ZWI-HO
Size:
80
Size:
100
2.3
2.0
—
3.0
mm
very
—
narrow
3.0
mm
very
narrow
—
—
Decorative
hem-stitching
effect.
Heavily
dressed
fabrics
and
cambric
are
especially
well-suited
83
Page 88

I
Changing
Switch
A
Itisvery
machine,
longer
service
machine,
Removal:
—
Raise
chable
—
Push
the
the
opening
sewing
and
the
of
its
into
the
plate
out.
Replacing
—
Place
pushitdown
until
you
sewing,
start
lying
flat.
the
off
the
importanttoclean
because
the
the
work
machine.
needle plate
mounting.
the
it
will
The
life.
more
careitneeds.
sewing foot
support.
pointofa
left
needleonflatatthe
hearitsnapinplace.
small
between
Twistitlightlytothe
Now
opening
with
both
check
that
needle
main
switch
and
reward
more often
and remove
screwdriver
needle plate
will
snap
push
the
and
take
handsatthe
the
plate
oil
the
you
you
half way
screwdriver
the
back
Before
needle
sewing
with
use
the
and
needle
and
front
plate
deta
into
right
you
a
out
the
is
A
—
Remove
Cleaning
Switch
off
needle plate
the
and
the
dog.
—
Clean
the
feed
brush.
Then
applyadrop
hoursofoperation)tothe
where
see
andonthe
Otherwise,
and
must
dog and
to
apply
provided
machineismaintenance-tree
the
notbeoiled.
oiling
of
the
main
oil
oil
and
hook
every
oil
bottle.
switch
hook.
in
the
lower
area
15to20
You
illustration
the
with
teed
the
can
86
Page 89

Maintenance
Changing
Cleaning
Replacin
9
Troubleshooting
the
and
the
needle
Oiling
sewing
and
plate
lamp
Page
Page
Page
Page
86
86
87
88
85
Page 90

I
4’
,
bJj
Disconnect
—
control
Take
—
sewing
The
head
Changing
Switch
plug
off
of
the
the
the
lamp
sewing
the
the
oft
mains
the
from
detachable
located
is
machine.
sewing
main
plug
machine.
work
inside
lamp
switch
and
support
the
the
foot
(14).
needle
r
Removal
able
be
To
recommend
as
side
Hold
—
—
Push
go.
the
At
—
anti-clockwise
Insertion
Insert
—
turnitso
engage.
Now
—
turn
Note:
lamp
The
accessory)
easier.
to
placing
illustrated.
sewing
the
lamp
the
same
lamp
the
that
the
push
clockwise
it
changer
will
I
change
into
time,
and
both
lamp
make
the
the
machine
its
turn
remove
the
in
stops
fully
that
so
(available
changing
sewing
sewing
tightly.
holder
lamp
the
diagonal
of
into
it
is
as
Ii
machine
as
it.
the
the
held
a
the
lamp,
far
a
holder
lamp
holder
firmly.
special
lamp
half
we
its
on
will
it
as
turn
and
and
much
Important!
maximum
The
lamp
with
plug-in
a
permissible
socket
wattage
15
is
of
watts!
the
87
Page 91

Trouble-shooting
Problem:
machine
The
1.
The
The
Needle
Machine
Needle
Needle
2.
See
Thread
Thread
has
or
Thread
Needle
3.
Needle
Needle
Needle
Needle
plate
the
The
4.
Seam
The
Thread
The
Thread
side
5.
Sewing
dog
Feed
at
6.
There
needle
wrong
is
is
reasons
tension
is
become
is
is
is
is
is
because
fabric.
bobbin
tension
is
bobbin
bunching
fabric.
of
Machine
teeth
dog
right.
Machine
are
bent
is
too
poor
too
not
bent.
too
bent,
is
too
lint
is
needle
not
thread
breaks
case
sewn
thread
has
rows.
is
thread
skips
properly
not
blunt.
or
properly
small
above.
is
or
dry
thick.
pushed
thick
and
you
is
needs
thick,
does
collected
lowered,
running
is
inserted.
is
for
breaks
tight.
too
slobs
has
after
off
fully
too
or
has
pulling
are
not
unevenly
adjusting.
slubbed
unevenly
is
at
top
feed
not
slide
remnants
stitches
inserted.
threaded.
thread.
too-long
in.
thin.
hit
properly
or
between
with
in
it,
the
or
or
bottom
feeds
or
(see
B
difficulty
the
in
storage.
needle
pushing
inserted.
hard.
wound.
page
hook
irregularly
teed
the
27)
race.
Remedy:
Push
side
flat
needle
Use
Insert
Check
a
Use
above.
See
Adjust
Only
needle
Use
(System
Insert
Insert
needle
See
the
Let
Only
When
push
Check
Only
not
Do
runiton
but
Thread
bobbin
and
Remove
Push
Remove
oil
of
needle
new
a
how
larger
thread
use
new
new
machine
guide
you
fully
it
top
use
wind
up
slide
to
facing
good
130
needle
needle.
insert
and
perfect
correctly.
needle
the
the
fully
the
system
needle.
machine
needle.
tension.
threads.
with
N).
chart
fabric
the
into
bottom
thread
through
thread
(see
B
threads
hook.
upwards,
back.
130/705
large
and
(pages
feed
the
the
threads.
free-hand,
tensions.
plate,
page
threaded.
is
eye
push
the
lightly.
bobbin
stop.
tensions.
the
Check
remove
27)
and
fully
and
82
fabric.
winding
needle
to
apply
H.
case,
lint
left.
one
in.
83).
tension.
with
brush.
drop
Important
Before
not
Do
you
If
is
This
88
note:
you
start
leave
important
replace
threaded
the
machine, even
the
it
sewing
children
feet
machine
for
are
needles,
or
a
nearby.
without
short
you
fabric
time,
must
do
switch.
main
the
off
switch
in
it.
switch.
main
the
off
not
forget
to
switch
Page 92

Parts
(4)
(5)
(6)
(8)
(9)
(10)
(11)
(13)
(14)
(15)
(16)
(17)
(18)
(19)
(20)
(21)
(22)
(23)
(24)
(25)
(26)
(27)
(28)
(29)
(30)
(31)
(32)
(33)
(34)
(35)
of
the
Carrying
Handwheel
Handwheel
Main
Connection
Touch
Stitch
Base
Detachable
Sewing
Needle
Threading
Needle
Take-up
Presser
Key
Needle
IDT
Reel
Second
Lid
Bobbin
Hook
Free
Thread
Sewing
Thread
Needle
Stitch
Needle
handie
switch
controls
length
plate
foot
threader
thread
lever
bar
for
“reverse
holder
System/Integrated
holder
spare
with
program
winder
cover
arm
trimmer
lamp
guide
plate
width
position
sewing
release
socket
knob
work
holder
slit
tension
lifter
with
with
reel
(behind
(max.
knob
machine
disk
“foot
support
with
(Model
sewing”
fixing
unwinding
holder
table
it-
15
knob
control
sewing
6122)
screw
Dual
hook)
watt)
(Models
with
foot
Transport
disk
mains
(top
6122
cord”
feed)
and
(Model
6112)
6122)
 Loading...