

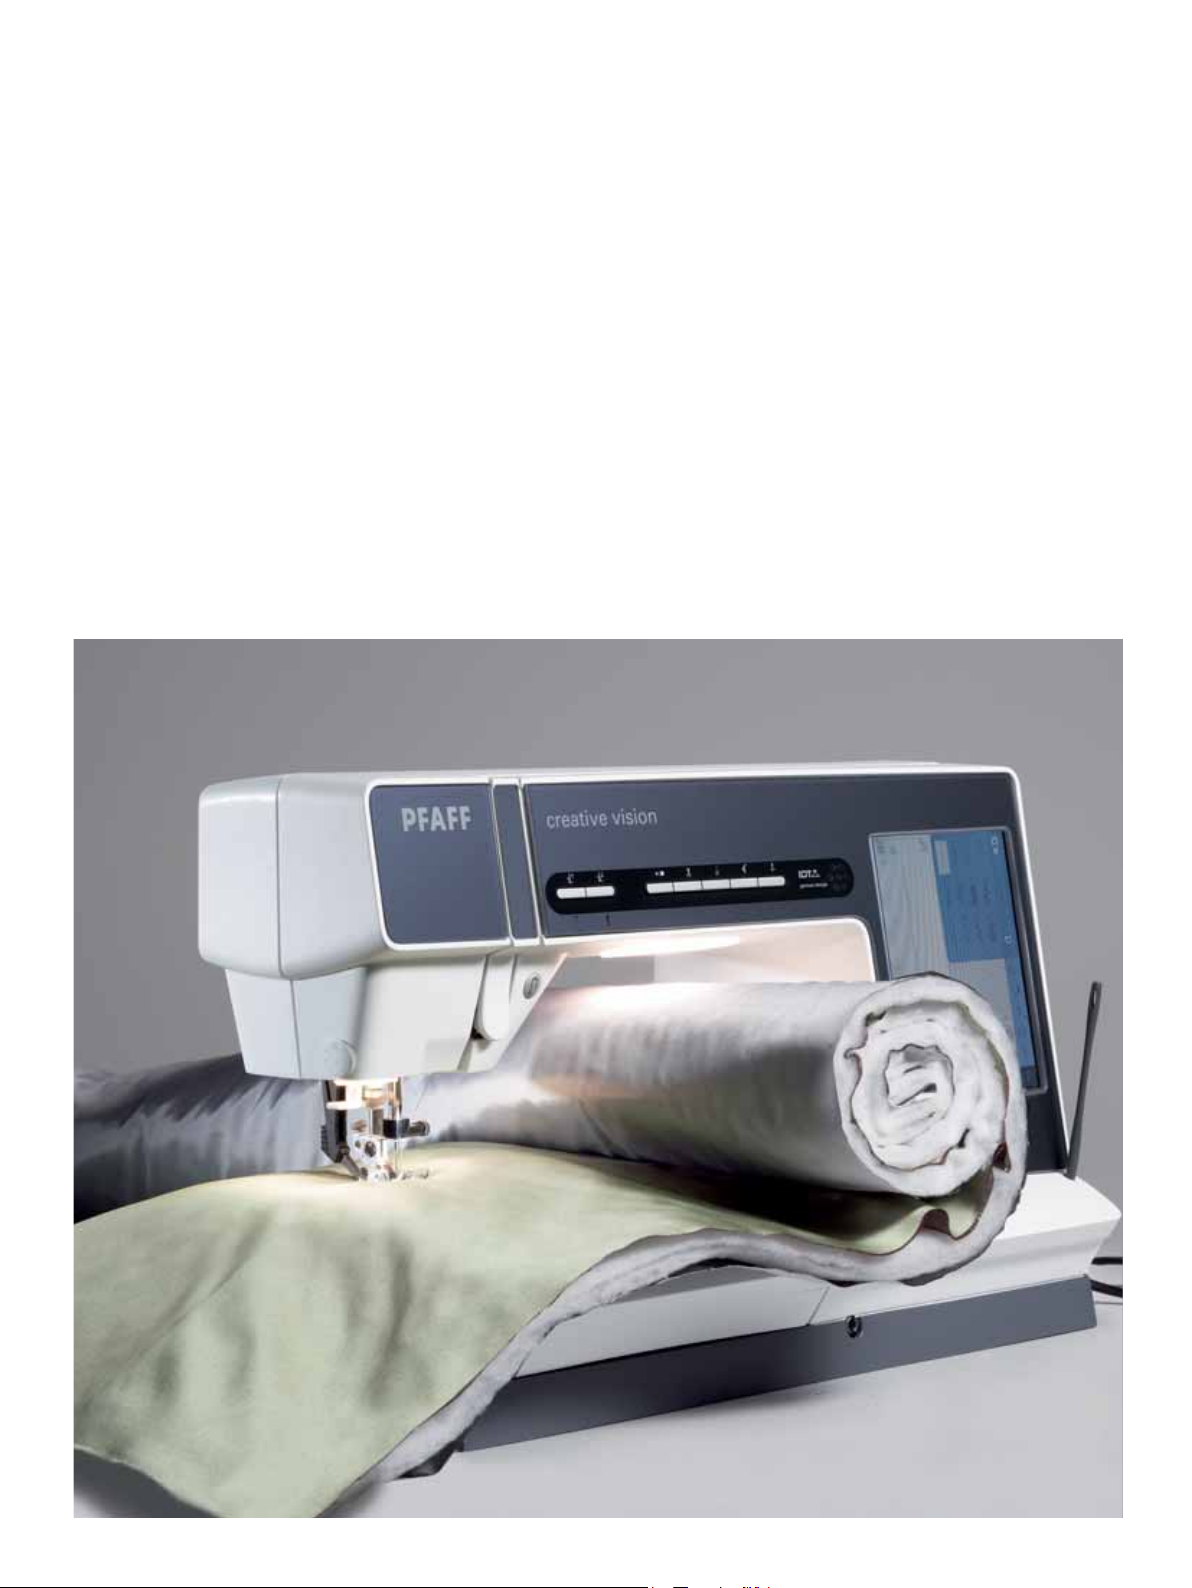
Page 1
Sewing mode
Page 2
Sewing mode
In sewing mode view you can select stitches, adjust and sew them. You can also go to Stitch Creator and
to sequencing to create your own stitches and sequences. Your selected stitch will be shown in full scale in
the stitch fi eld. The recommendations and machine settings will be shown at the top.
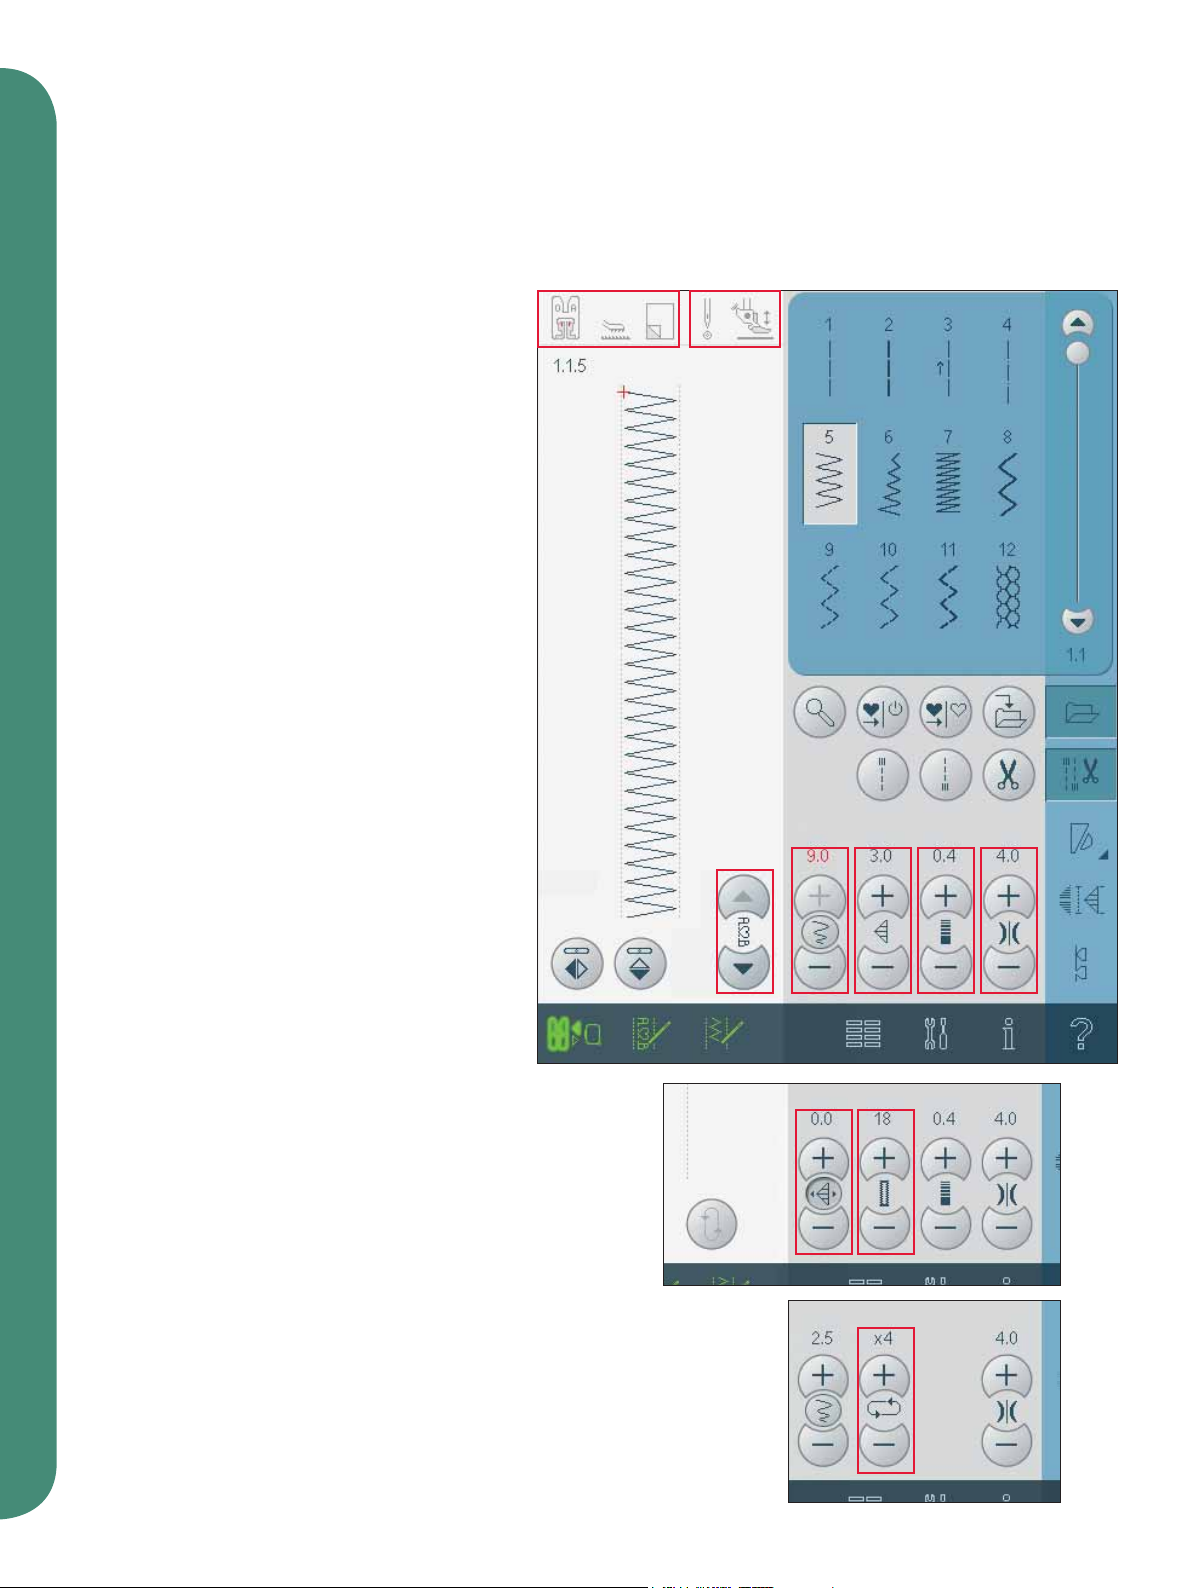
Sewing mode - overview
1. Sewing recommendations
2. Machine settings
3. Stitch selection area
4. Scroll bar (Scroll through stitch
categories)
5. Selected stitch number
6. Stitch fi eld
7. Mirroring side to side
8. Mirroring end to end
9. Sequence start position
10. Zoom to all
11. Stitch width
12. Width/position toggle
13. Stitch length
14. Stitch density
15. Needle thread tension
16. Save options
a) Save personal default stitch
b) Save to Personal menu
c) Save to Personal fi le
Sewing mode
17. Tie-off options
a) Tie-off beginning
b) Tie-off end
c) Thread snips
18. Speed control
19. Sewing programs
20. Balance
21. Repeat buttonhole
22. Stitch positioning
23. Buttonhole slit length
24. Button stitch repetition
Note: All symbols and options will not be
shown at the same time.
1
5
6
78
2
3
4
16a 16b 16c
21
10
17a 17b 17c
11
9
12
22 23
13 14 15
16
17
18
19
20
4:2
24
Page 3
Select a stitch
To select a stitch, touch the actual stitch in the
stitch selection area (3). You can scroll through
the list of stitches, using the scroll bar on the right
hand side. The number of the actual subcategory is
shown below the scroll bar (4).
You can also select a stitch from the selection
menu.
Sewing recommendations (1)
Shows recommendations for the actual selected
stitch.
a) Presser foot recommendation
b) IDT recommended
c) Stabilizer recommended
Machine settings (2)
Shows your settings for different modes.
a) Set for stitch width safety
b) Set for sensormatic free-motion
c) Set for twin needle
d) Set for spring foot free-motion
3
4
1a 1b 1c 2a 2b
2c 2d
Sewing mode
Raise and lower the presser foot
Your machine features the automatic presser foot
up and extra lift button and the presser foot down
and pivot button.
To lower the presser foot, place the fabric under
the presser foot and press the presser foot down
button (B) or step on the foot control. To raise the
presser foot, press the presser foot up button (A) or
press the thread snips button (C) to cut needle and
bobbin thread and raise the foot. When the needle
stops in the down position, the presser foot raises
to pivot height.
AB C
4:3
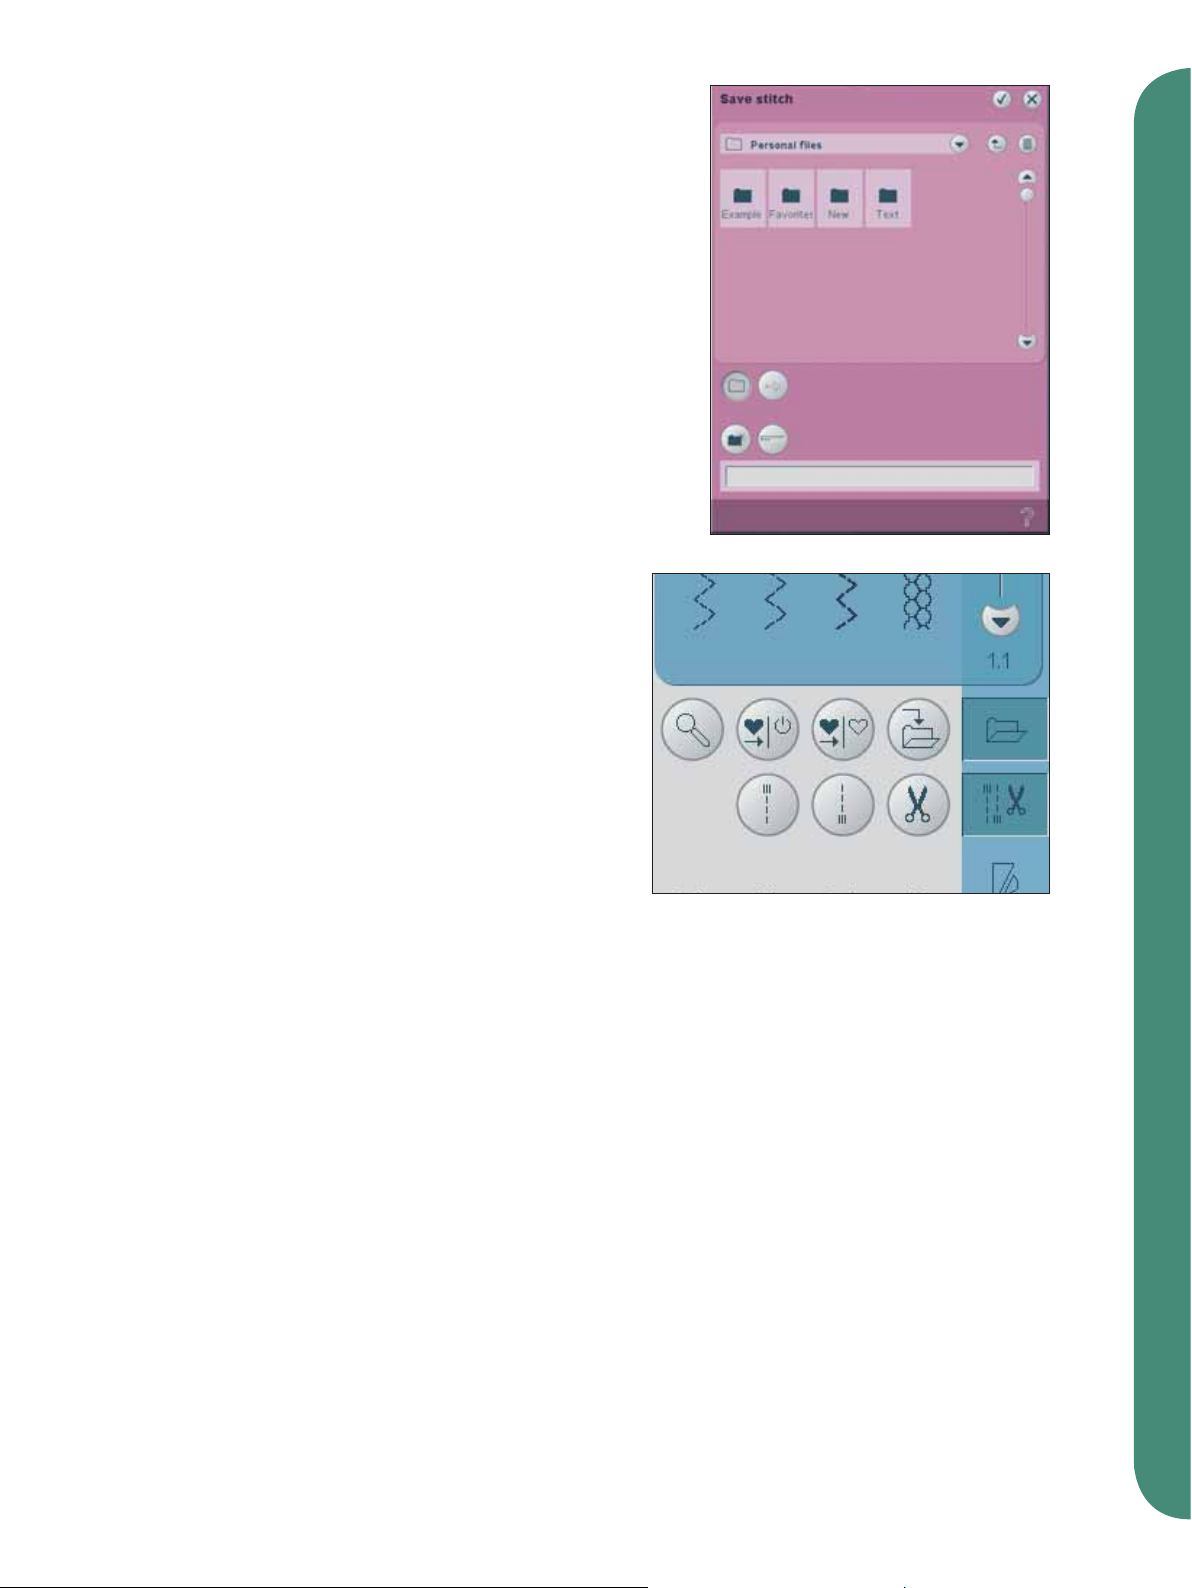
Page 4
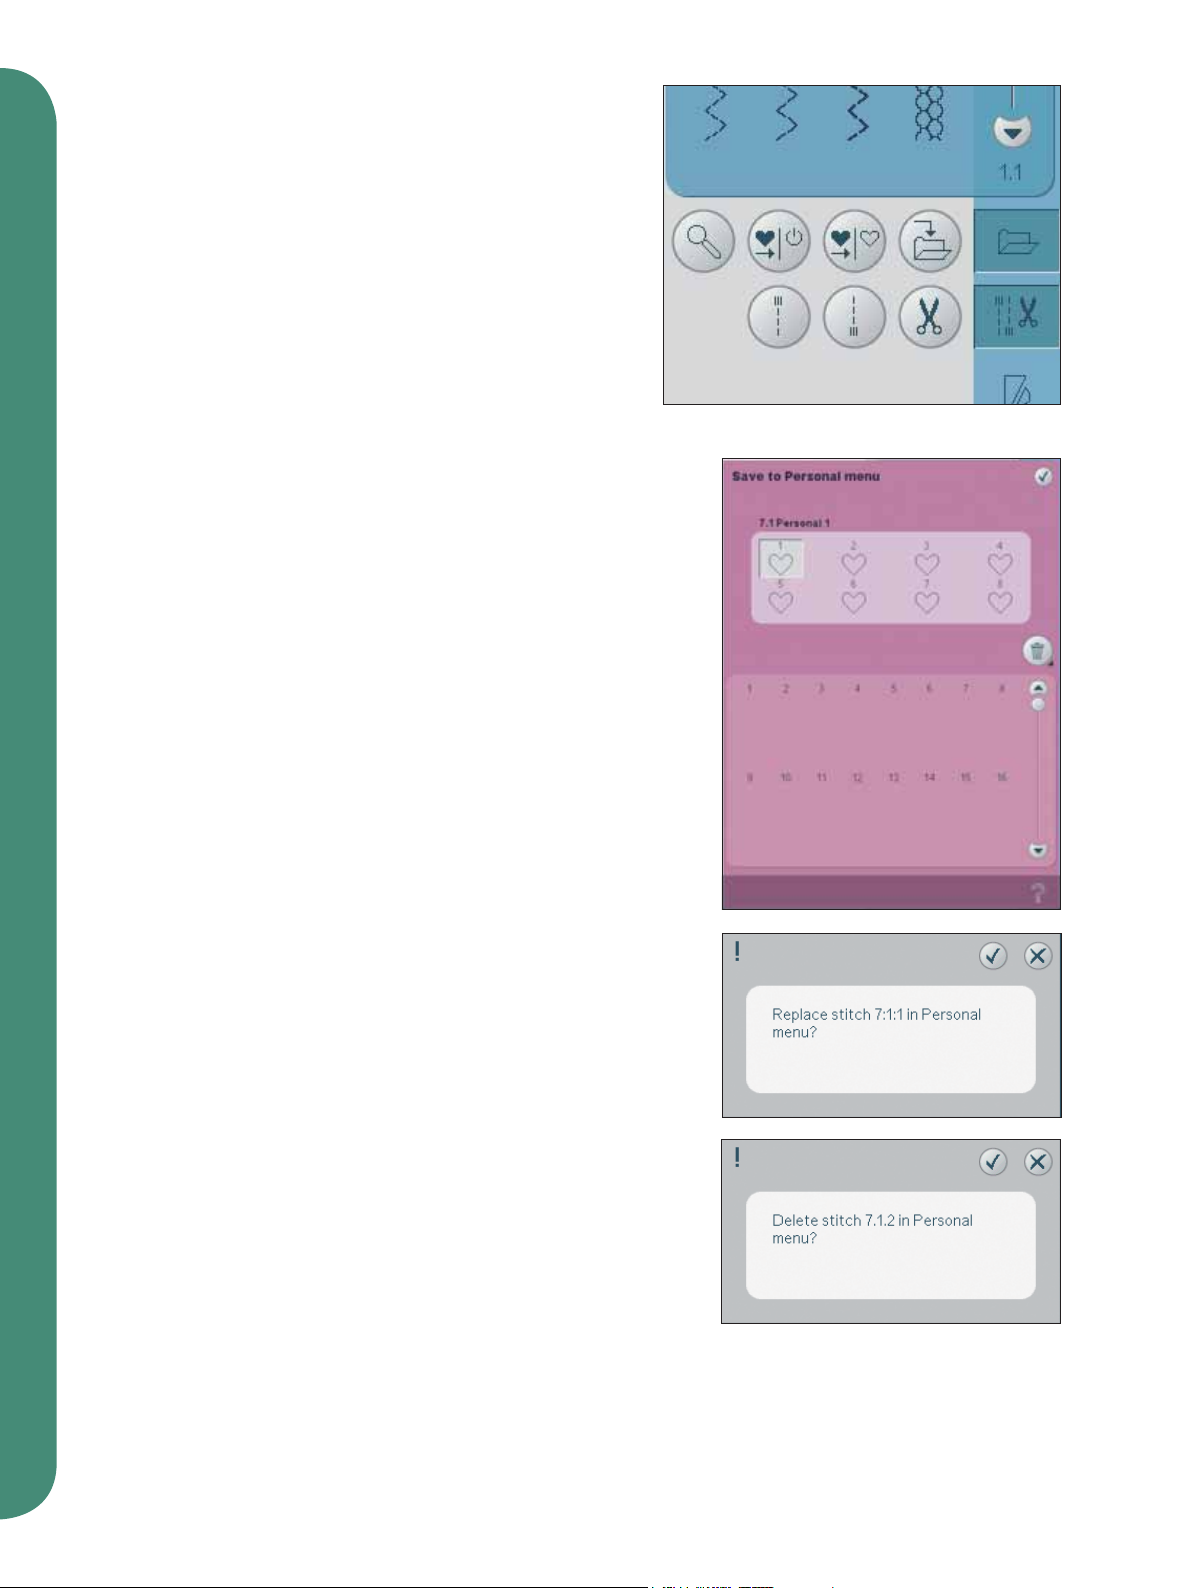
Option bar
Save options (16)
Select where to save your stitch, open the different
save options under save (16).
Save personal default stitch (16a)
Select your stitch and then touch this icon (16a) to
confi rm your default stitch. This stitch will now be
selected when you turn on your machine.
Save to Personal menu (16b)
To save a stitch into your Personal menu, touch the
save options icon (16) and select save to Personal
menu (16b). A new window will open. Choose
which subcategory you want to save your stitch
in (A). All your previously saved stitches will be
shown in the Personal menu.
You can scroll through the list to fi nd a free
position, using the arrows (B). Any box without
a stitch is a free position and can be used to save
your new stitch. Simply touch the position and
your stitch is saved.
Any box with a stitch is an occupied position. You
can overwrite a previously stored stitch. Simply
touch the stitch to overwrite. A pop-up will ask
you to confi rm that you want to overwrite the
previously stored stitch. Cancel the saving process
by touching the cancel icon. The saving window
will close and you return to the previous screen.
Sewing mode
To delete a saved stitch or sequence, touch the
delete icon (C). The delete icon will be active until a
stitch is selected and deleted or until the delete icon
is touched again. A pop-up will ask you to confi rm
the deletion.
Long touch the delete icon to delete all stitches
saved in the current subcategory at one time.
Note: If using the long touch function, even the stitches
in the actual subcategory not visible on screen, will be
deleted.
16a 16b 16c
A
16
C
B
4:4
Page 5
Save to Personal fi les (16c)
To save a stitch into your Personal fi les, touch the
save icon (16) and select save to Personal fi les (16c).
The icon will open a new window where you can
select where to save your stitch. You can save
either to a folder in your Personal fi les or to an
approved external device.
Tie-off options (17)
These options let you program tie-offs both at the
beginning and the end, and thread snips at the end
of the stitch.
When touching the tie-off icon, three options
open to let you select different functions; tie-off
beginning (17a), tie-off end (17b) and thread snips
(17c).
When you have activated your settings, you can
hide the three icons by touching the tie-off icon
on the option bar again. The tie-off icon will show
your settings by changing the color of the chosen
function. The settings will remain active until you
switch them off.
Note: For immediate tie-off, use the tie-off button, found
on the front of the machine.
17a 17b 17c
Sewing mode
17
Sewing with tie-off options selected
1. The tie-off beginning (17a) will be performed
as soon as you start to sew.
2. Press the reverse button to perform tie-off
end (17b). The action indicator will be lit. The
machine will fi nish the stitch and do a tie-off.
When a thread snip (17c) is programmed, the
machine will automatically cut the threads
after performing the tie-off end. The needle
and presser foot will raise.
Note: Stop sewing and press the reverse button
twice to activate reverse sewing. The reverse
indicator will be lit. No tie-off will be performed.
Press the reverse button when sewing in reverse to
activate tie-off end. Both the reverse indicator and
the action indicator will be lit.
To go back to sewing forward, stop sewing in
reverse and press the reverse button. No indicators
will be lit and no tie-off will be performed.
4:5
Page 6

Speed control (18)
This function enables you to easily reduce the
maximum sewing speed. Just touch the speed
control icon to reduce the speed. To return to
normal speed, deselect the icon.
You can change the set speed limit. Long touch the
speed control icon to get a pop-up. Set the speed
limit you would like by sliding the button right
or left and then close the pop-up. The next time
you touch the speed control icon, the speed will be
reduced to the limit you have chosen.
You can sew without closing the pop-up.
Note: If selecting the highest speed in the slider, it is like
choosing no speed limit at all. The icon in the option bar
will then be deselected and the speed limit will be set to
default.
18
Sewing programs (19)
Sewing programs - overview
A Tapering program
B Single stitch program
C Patchwork program
D Preview fi eld
E Set number of stitch repetitions in single stitch
program
Note: Not all programs can be used at the same time.
You can sew without closing this pop-up.
Sewing mode
Tapering program (A)
Tapering increases or decreases the width of the
stitch during sewing to create symmetrical or
asymmetrical tapers.
Activate tapering by selecting any of the tapering
icons (A). The default angle is 45 degrees. Long
touch the tapering icon to open a window with
different angle choices. Touch the angle you want
for your taper.
If tapering is deactivated and then activated again,
the angle will be set to the previously selected
angle.
When tapering is activated at both the beginning
and at the end and you start to sew, the stitch
width will start at 0mm. It becomes wider until the
selected stitch width is reached. Sew your desired
length and press the reverse button. The width
is reduced until the width is 0mm and the action
indicator on the machine will be lit until the taper
is fi nished.
19
A
B
D
C
A
E
4:6
Page 7

Single stitch program (B)
Activate the single stitch program by touching the
icon (B). When selecting the single stitch program,
you decide how many repetitions of the stitch you
want to sew.
Set the number of repetitions using the icons on
the right (E). The number of repetitions chosen are
shown between the + and - icons. The estimated
length of the repetitions is shown in the preview
fi eld (D). The machine will stop automatically
when the repetitions are sewn.
Patchwork program (C)
The patchwork program makes it possible for you
to program an exact repeatable seam length. This is
very useful when quilting.
To program a seam length, activate the patchwork
program (C). Sew your desired seam length and
press the reverse button. The action indicator on
the machine will be lit until the last repetition of
the stitch is fi nished. This will set the length of the
seam. The length of the patchwork sequence is
shown in millimeters in the preview fi eld (D).
After you have programmed the patchwork
sequence, the patchwork program icon is inactive.
The single stitch program is now activated instead.
The programmed length of your patchwork can be
adjusted using the single stitch adjustment icons
(E).
B
D
D
C
E
E
Sewing mode
Combining Tapering and Patchwork or Single
stitch programs
Combining Tapering and Patchwork or Single
stitch programs makes it possible to repeat a
tapered seam with the same length.
Activate tapering by selecting any of the tapering
icons (A) then activate Patchwork by touching the
icon (C). Follow the instructions for tapering on the
previous page. When the reverse button is pressed
the action indicator will be lit until the taper and
last repetion of the stitch is fi nished.
The seam is now programmed and the single stitch
program is activated. When you start sewing again
the seam will automatically be repeated with the
same length.
The length of the seam is shown in millimeters in
the preview fi eld (D). Between the + and - icons (E)
the number of repetitions in the program is shown.
Use the + and - icons to adjust the length of the
seam.
Note: The tapering is included in the repetitions shown
on the screen.
A
E
D
C
4:7
Page 8

Balance (20)
When sewing on special fabrics or doing a special
technique, the balance may need to be adjusted.
Start by sewing a stitch on a piece of scrap fabric.
Touch the balance icon on the option bar to open
the balance window. Balance the stitch, using the
+ and - icons (G). Use the pan icons (F) to see the
whole stitch. Change the picture on the screen to
match your sewn sample. When you sew again, the
balance will be corrected.
Buttonholes can also be balanced.
Mirroring (7 and 8)
To mirror stitches or sequences side to side touch
icon (7). For mirroring end to end touch icon (8).
20
F
G
Zoom to all (10)
If the stitch or sequence is wider than what can be
shown on the screen, you may use the zoom to all
icon to see the whole width of the sequence.
Note: Zoom to all is only visible if the stitch or sequence
is wider than the stitch fi eld.
Sewing mode
10
78
4:8
Page 9

Stitch settings
Your machine will set the best settings for
each selected stitch. You can make your own
adjustments on the selected stitch.
The setting changes only affect the selected stitch.
Your changed settings will be reset to default when
selecting another stitch. The changed settings
are not automatically saved when turning your
machine off. You can save the adjusted stitch in
Personal menu.
Note: The set stitch width and the stitch length are
shown above the icons. When trying to exceed minimum
or maximum settings for width and length, a warning
sound will be heard.
The default value will be shown in black. Value changes
are shown in red.
Stitch width (11)
Increase or decrease the stitch width using + and -.
11
9131415
12
Sewing mode
Stitch positioning (22)
For straight stitches the stitch positioning icon (22)
is shown instead of the stitch width icon. Use +
to move the needle to the right and - to move the
needle to the left. For straight stitches the machine
has 37 needle positions.
It is possible to change the needle position of all
stitches. Touch the width/position toggle (12)
icon to toggle between stitch width and stitch
positioning. The stitch position can only be
changed to the limit of the maximum stitch width.
Changing the stitch position will also limit the
stitch width adjustment.
Stitch length (13)
Increase or decrease the stitch length using + and
-. If lengthening a zigzag stitch or a decorative
stitch, the entire stitch will be longer. If lengthening
a satin stitch where the density can be adjusted,
the entire stitch will be longer but the density will
remain the same.
22
Stitch length +Stitch length -
4:9
Page 10

Stitch density (14)
The stitch density control adjusts the density (the
closeness of the satin stitches that make up the
entire stitch). The density does not affect the actual
length of the entire stitch.
Touch + to decrease the density. Touch - to increase
the density.
Note: This is often used with specialty threads and when
a less dense satin stitch is desired.
Thread tension (15)
Touch + to increase, and - to decrease the needle
thread tension.
For the best stitch appearance and durability make
sure the needle thread tension is correctly adjusted,
i.e. for general sewing, the threads evenly meet
between the two fabric layers.
If the bobbin thread is visible on the top side of
the fabric, the needle thread tension is too tight.
Reduce the needle thread tension.
If top thread is visible on the underside of the
fabric, the needle thread tension is too loose.
Increase the needle thread tension.
For decorative stitches and buttonholes the top
Sewing mode
thread should be visible on the underside of the
fabric.
Stitch density -Stitch density +
Buttonhole slit length (23)
Set the buttonhole slit length by using + to increase
and - to decrease when sewing a buttonhole with
the Sensormatic buttonhole foot.
4:10
23
Page 11

Button stitch repetition (24)
Touch + to increase and - to decrease the number
of stitch repetitions to be sewn, when sewing on a
button.
24
Sequence start position (9)
When sewing a sequence it is possible to start
sewing anywhere in the sequence. Use the arrows
(9) to step through the sequence.
Sewing mode
9
4:11
Page 12

Sewing techniques
These techniques may require some special presser
feet and accessories.
Three-step zigzag stitch
Stich number 1.1.9 can be used to overcast raw
edges. Make sure the needle pierces the fabric on
the left side and overcasts the edge on the right
side.
Stitch number 1.1.9 can also be used as an
elastic stitch to add elastic to pajamas, skirts and
sportswear.
Buttonholes
Buttonholes are found in category 1, subcategory
1.3 in the selection menu. You can also scroll
through the list in sewing mode to fi nd the
buttonhole subcategory.
Note: Buttonholes up to 50 mm can be sewn using
the Sensormatic buttonhole foot. Both sides of the
Sensormatic buttonhole are sewn in the same direction
Sewing mode
for a more even result.
Buttonholes over 50 mm are sewn manually in four
steps with presser foot 5M.
The direction of the stitches being sewn will be
indicated on the screen by an arrow next to the
buttonhole.
To sew a buttonhole, fi rst attach the correct foot,
then select your buttonhole. To ensure a good
result, start with sewing a test sample on the fabric
and stabilizer you will use.
Note: Make sure that the IDT is disengaged.
Attaching the Sensormatic buttonhole foot
1. Snap on the Sensormatic buttonhole foot.
2. Plug the cord into the socket found to the left
underside between the two LED lights (A).
4:12
A
Page 13

Sensormatic buttonhole
When you sew a buttonhole with the Sensormatic
buttonhole foot, adjust the slit length (23) so that
it is slightly larger than the size of the button. You
can measure your button using the button ruler on
the lid.
Set the slit length and make sure that the red arrow
line up with the marking on the foot. Start sewing
by pressing the foot control or start/stop button.
The buttonhole will be completed automatically
and the threads are cut. You can repeat the
buttonhole as many times as you wish.
Manual buttonhole
To sew a manual buttonhole, use presser foot
5M. Sew the fi rst column as long as you want the
buttonhole. Touch the reverse button. The machine
sews the bartack and the second column. When the
columns are aligned, press the reverse button to
sew the second bartack.
Repeat a manual buttonhole (21)
When you have adjusted your buttonhole, use the
repeat buttonhole function (21), to sew identical
copies. As long as that icon is selected, the machine
will repeat the buttonhole over and over again.
Repeat buttonhole is only visible when sewing a
buttonhole manually.
To cancel the function, just deselect the icon.
The repeat function will also be cancelled if any
adjustments are made.
Sewing mode
23
21
4:13
Page 14

Corded buttonhole
Corded buttonholes that are sewn with gimp
threads are more stable, durable and have a
professional appearance. Use pearl cotton or a
regular gimp thread.
1. Place the center of a length of gimp thread over
the metal bar extending from the center back
of the sensormatic buttonhole foot 5A. Pass the
thread ends under the foot and pull up into the
right and left guides on the front of the presser
foot.
2. Snap on the sensormatic buttonhole foot 5A.
Before starting to sew, make sure that the red
arrow lines up with the marking on the foot.
3. After completing the buttonhole, pull the ends
of the gimp thread until the loop of thread is
hidden below the buttonhole bartack.
4. Thread the gimp threads into a needle and pull
them to the wrong side of the garment. Tie the
gimp threads and cut off the excess thread.
Sew on a button
To sew on a button, remove the presser foot and
Sewing mode
select the sew on button program. The feed dogs
will automatically be lowered.
Place the button under the presser foot holder. Use
the mirroring icon to make sure the holes in the
button are aligned with the swing of the needle
and the width is appropriate for the actual button.
If needed change the width between holes with the
width icons.
If needed, increase or decrease the number of
stitches that will fasten the button on the fabric,
using the button stitch repetition icons (24). Start to
sew. The machine will sew the program for you.
Note: Use the multi-purpose tool to create a thread
shank for your button. You can also use a sew on button
foot, available as an optional accessory at your local
authorized PFAFF® dealer.
24
4:14
Page 15

Sewing hems in heavy fabric
When sewing over seams in extra heavy fabric
or a blue jeans hem, the presser foot can tip as
the machine climbs over the seam. Use the multi
purpose tool to balance the height of the presser
foot as you sew.
One side of the tool is thicker than the other. Use
the side that suits the thickness of the seam best.
Handlook quilting
A quilt usually consists of three layers, two layers
of fabric with a layer of batting sandwiched
between.
1. Baste the completed quilt top to the batting and
backing.
2. Thread the needle with an invisible
(monofi lament) thread. Use contrasting or
matching rayon or cotton thread in the bobbin.
3. Snap on the recommended foot shown in the
sewing recommendations view.
4. Engage the IDT.
5. When you sew the stitch you should only see
your bobbin thread. Increase the needle tension
as needed to produce the desired effect.
Sewing mode
Blindhem stitch
The blindhem stitch number 1.1.16 is used to
make invisible hems on skirts, trousers and home
decorating. Use foot number 3 with IDT.
• Finish the edge of the hem.
• Fold and press the hem allowance to the wrong
side.
• Fold the hem back on itself so approximately
3/8” (1 cm) of the fi nished edge extends
beyond the fold. The wrong side of your
project should now be facing up.
• Place the fabric under the presser foot so that
the fold runs along edge guide A.
• When the needle swings into the fold it should
catch a small amount of fabric. If the stitches
are visible on the right side, adjust edge guide
A by turning adjusting screw B until the stitch
that catches the hem just barely shows.
B
A
4:15
Page 16

Elastic blindhem stitch
The elastic blind stitch number 1.1.17 is especially
suitable for stretchy fabrics, because the zigzag in
the stitch lets the stitch stretch. The hem is fi nished
and sewn at the same time. There is no need to
fi nish the raw edge fi rst on most knits.
Sewing in zippers
There are different ways to sew in zippers. Follow
the directions included with your pattern for best
results.
For all types of zippers it is important to sew close
to the teeth of the zipper. The zipper foot 4 can be
snapped to the presser foot bar on the left or right,
depending on how you will insert your zipper.
Then set the stitch position so that it enters close
to the edge of the zipper teeth by using one of the
37 needle positions available for the straight stitch.
If the presser foot is attached on the right side, the
needle must only be moved to the right. If the foot
is attached on the left, the needle must only be
moved to the left.
Sewing mode
Rolled hem
Use the rolled hem foot 7 to fi nish the edges of
blouses, scarves, or ruffl es without having to
iron the edges beforehand. Hemming prevents
the edges from fraying and produces a neat and
durable edge fi nish.
• Double-fold the fabric edge (about 1/8” - 2 mm
- per fold).
• Place the folded fabric edge under the rolled
hem foot and sew a few stitches to secure.
• Turn the handwheel towards you until the
needle is at its lowest point. Raise the presser
foot and slide the fabric into the scroll of the
foot.
• Lower the presser foot and while sewing,
guide the fabric edge evenly into the foot.
When roll-hemming, make sure the raw edge
of the fabric butts against the left edge of the
rolled hem foot opening. Ensure the fabric does
not run underneath the right side of the presser
foot.
Note: A narrow zigzag stitch also makes a nice rolled
hem on lighter stretch fabrics such as lingerie nylon.
4:16
Page 17

Special sewing techniques
The 6th stitch category includes special sewing
technique stitches like candlewicking, pearl
stitches, edge stitches and four direction sewing.
These techniques may require some special presser
feet and accessories. This is indicated by the
optional presser foot icon (A).
Note: Touch Quick help (D) and then touch the presser
foot icon (A) to fi nd out which special presser foot is
required for the selected stitch.
Four direction sewing
Some stitches in category 6 can be sewn in four
directions. Use them for sewing on patches without
having to turn your fabric and for decorative
stitch designs. When selecting a stitch in this
subcategory, the four direction icons will be
shown (
The starting point is marked in the stitch fi eld
(B), and the actual sewing direction is indicated
with an arrow. The selected direction icon is also
showing the actual sewing direction. To change the
direction, use the four direction sewing icons (C).
When the desired length is sewn in one direction,
select the new direction by touching one of the four
direction icons.
C).
A
B
C
D
Sewing mode
4:17
Page 18

Common sewing pop-ups
System busy
When the machine is loading, saving, moving fi les
or anything that takes time, an hour glass is shown.
Bobbin empty
When the bobbin is almost empty, the machine
stops automatically and a pop-up appears on the
screen. Replace the empty bobbin with a full one.
Note: It is possible to sew until the thread has run out.
Just continue sewing without closing the pop-up.
Check needle thread
The machine stops automatically if the needle
thread runs out or breaks. Re-thread the needle
thread, close the pop-up and start sewing again.
Remove Sensormatic buttonhole foot
The Sensormatic buttonhole foot needs to be
removed before doing any of the following:
Sewing mode
• Sewing a stitch that is not a buttonhole.
• Sewing a buttonhole that can not be sewn with
the Sensormatic buttonhole foot.
• Sewing an adjusted buttonhole saved without
the Sensormatic buttonhole foot in your
Personal menu.
4:18
 Loading...