

Page 1
__
0
C,)
C
C)
oR
0
0
Page 2

Do’s
and
Don’ts
1
2.
3.
4.
5.
Always
running.
is
it
When
pulling
not
Do
may
The
maximum
When
machine
the
beware
changing
the
place
burn
using
plug
out.
your
without
the
of
needle,
the
of
out
anything
permissible
sewing
thread
up-an&down
the
socket.
wall
the
foot
the
on
power
machine
for
sewing
for
few
a
movement
foot,
control,
sewing
the
for
the
minutes.
of
the
otherwise
lamp
time,
first
Wipe
the
bobbin
needle
the
bulb
place
away
and
any
or
machine
is
15
piece
a
oil
any
do
other
watts.
which
not
will
of
turn
parts,
start
waste
may
attention
your
always
inadvertently,
under
fabric
appeared.
have
from
disconnect
the
or
the
the
the
control
sewing
machine
machine
or
foot
motor
and
while
by
run
1
Page 3
Contents
4—
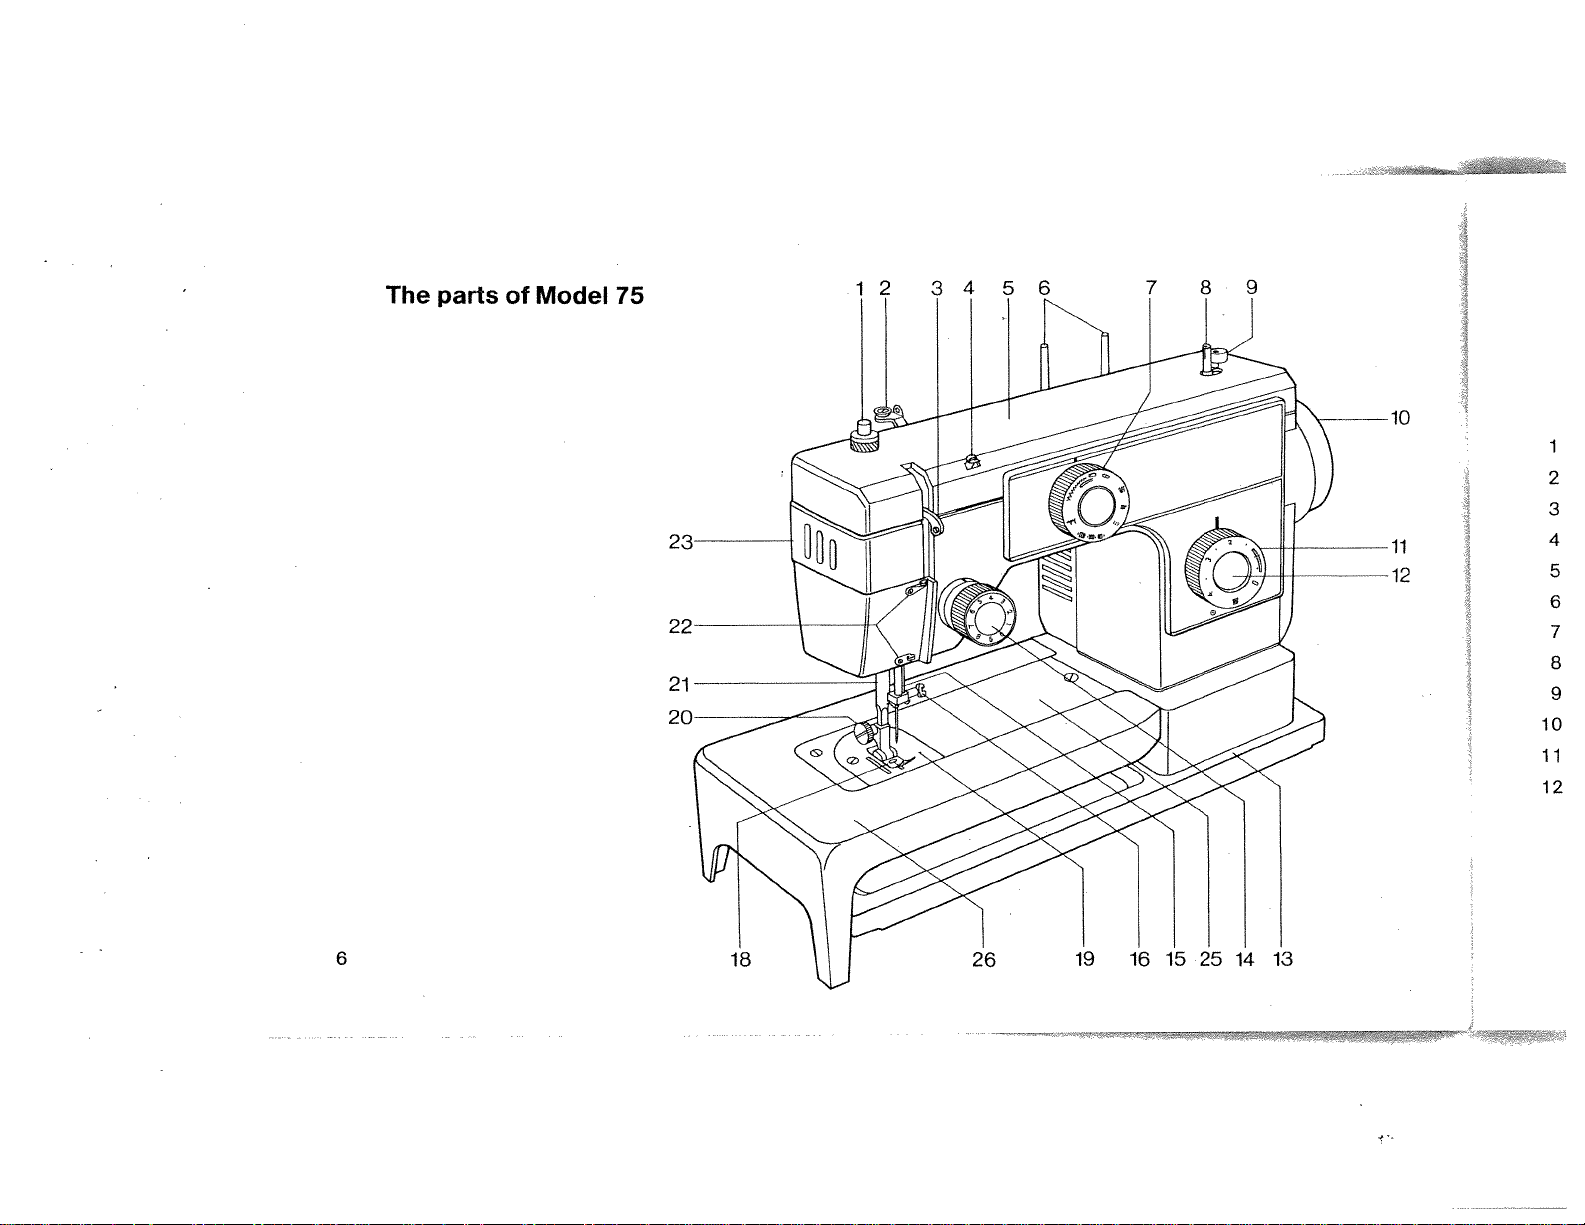
Model
of
parts
The
Model
of
parts
The
Model
parts
usethefoot
sewing
needles,
of
stitch
stitch
stitch
length
to
with
begin
to
turn
to
finish
to
of
workplate,
lamp
the
selector,
selector,
selector,
the
the
the
and
and
the
wind
the
the
the
up
straight
The
Detachable
Howto
The
Table
Inserting
The
The
The
Colourcodeselector
Stitch
Regulating
Regulating
Dropping
Removing
Removing
Winding
How
Threading
Threading
Drawing
Sewing
How
How
2
How
72.
75
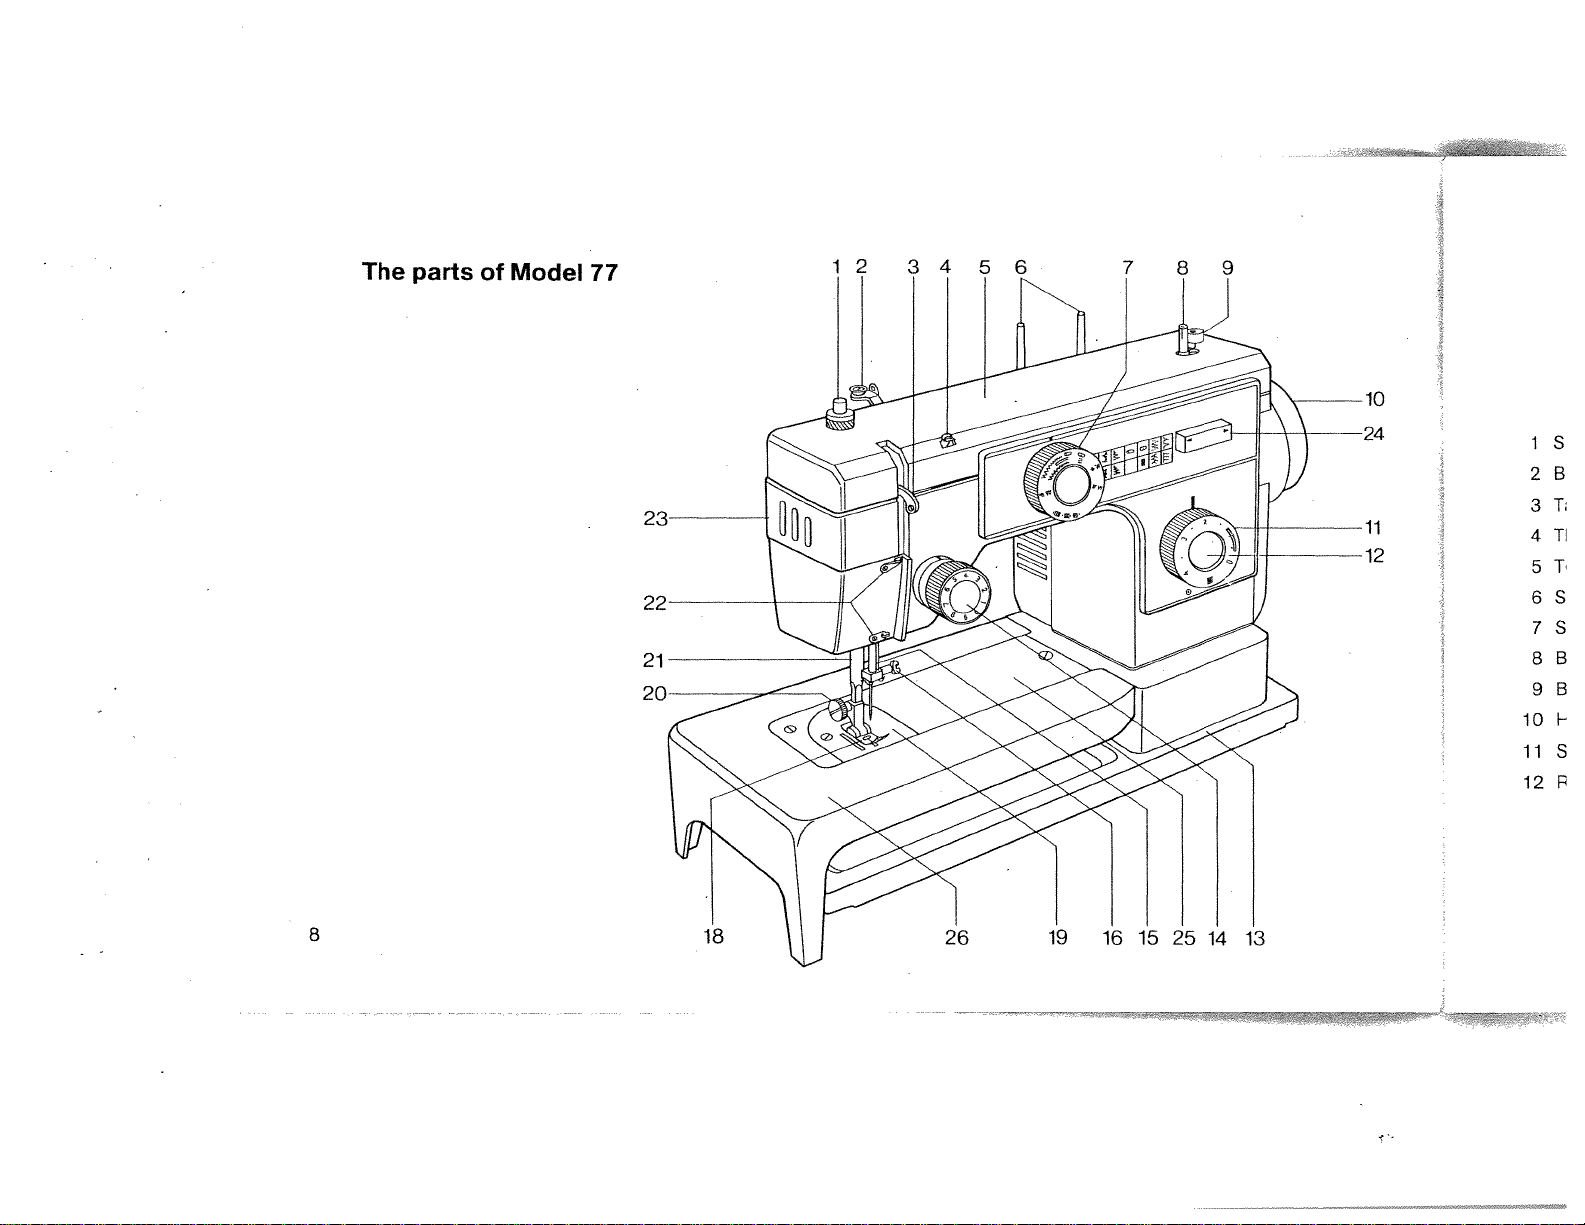
77
control
threads
needle
Model
Model
Model
selector
feed
inserting
bobbin
correctly
bobbin
sewing
corners
sewing
and
threadtensions
sewing
inserting
case
needle
bobbin
stitch
Models
and
72
75
77
reversing
foot
the
the
thread
thread
75
fabrics
pressure
bobbin
bobbin
77
and
button
(Patch-O-Matic)
bobbin,
and
case
and
bobbin,
case
Model
Models
72
75
and
77
6—
8—
10
11
1
12
13
14
14
15
15
5
7
9
1
16
17
18
18
19
20
21
22
23
24
25
26
26
27
27
Page 4
Applications
Sewing
Sewing
Tricot
Triple,
Feather
tubular
with
zigzag
straight
stitch,
Overlock
Sewing
Sewing
Sewing
buttonholes
on
in
Hemming
Sewing
Sewing
blind
blind
Embroidery
Cleaning
Cleaning
to
How
belt
Drive
and
Faults
stitch,
zip
the
the
oil
tension
the
for
—
twin
a
stitch,
stretch
Model
buttons
fasteners
hems,
hems,
shuttle
feed
machine
the
how
free
shaped
needle
Models
Models
Model
Models
dog
remedy
to
arm
articles
stitch,
77
75
race
of
75
and
72
75
them
Models
on
77
and
Models
77
and
75
Models
75
77
and
75
and
77
and
77.
28
77
3
Page 5
CD
-4
C’,
-4
CD
a.
0
0
Page 6
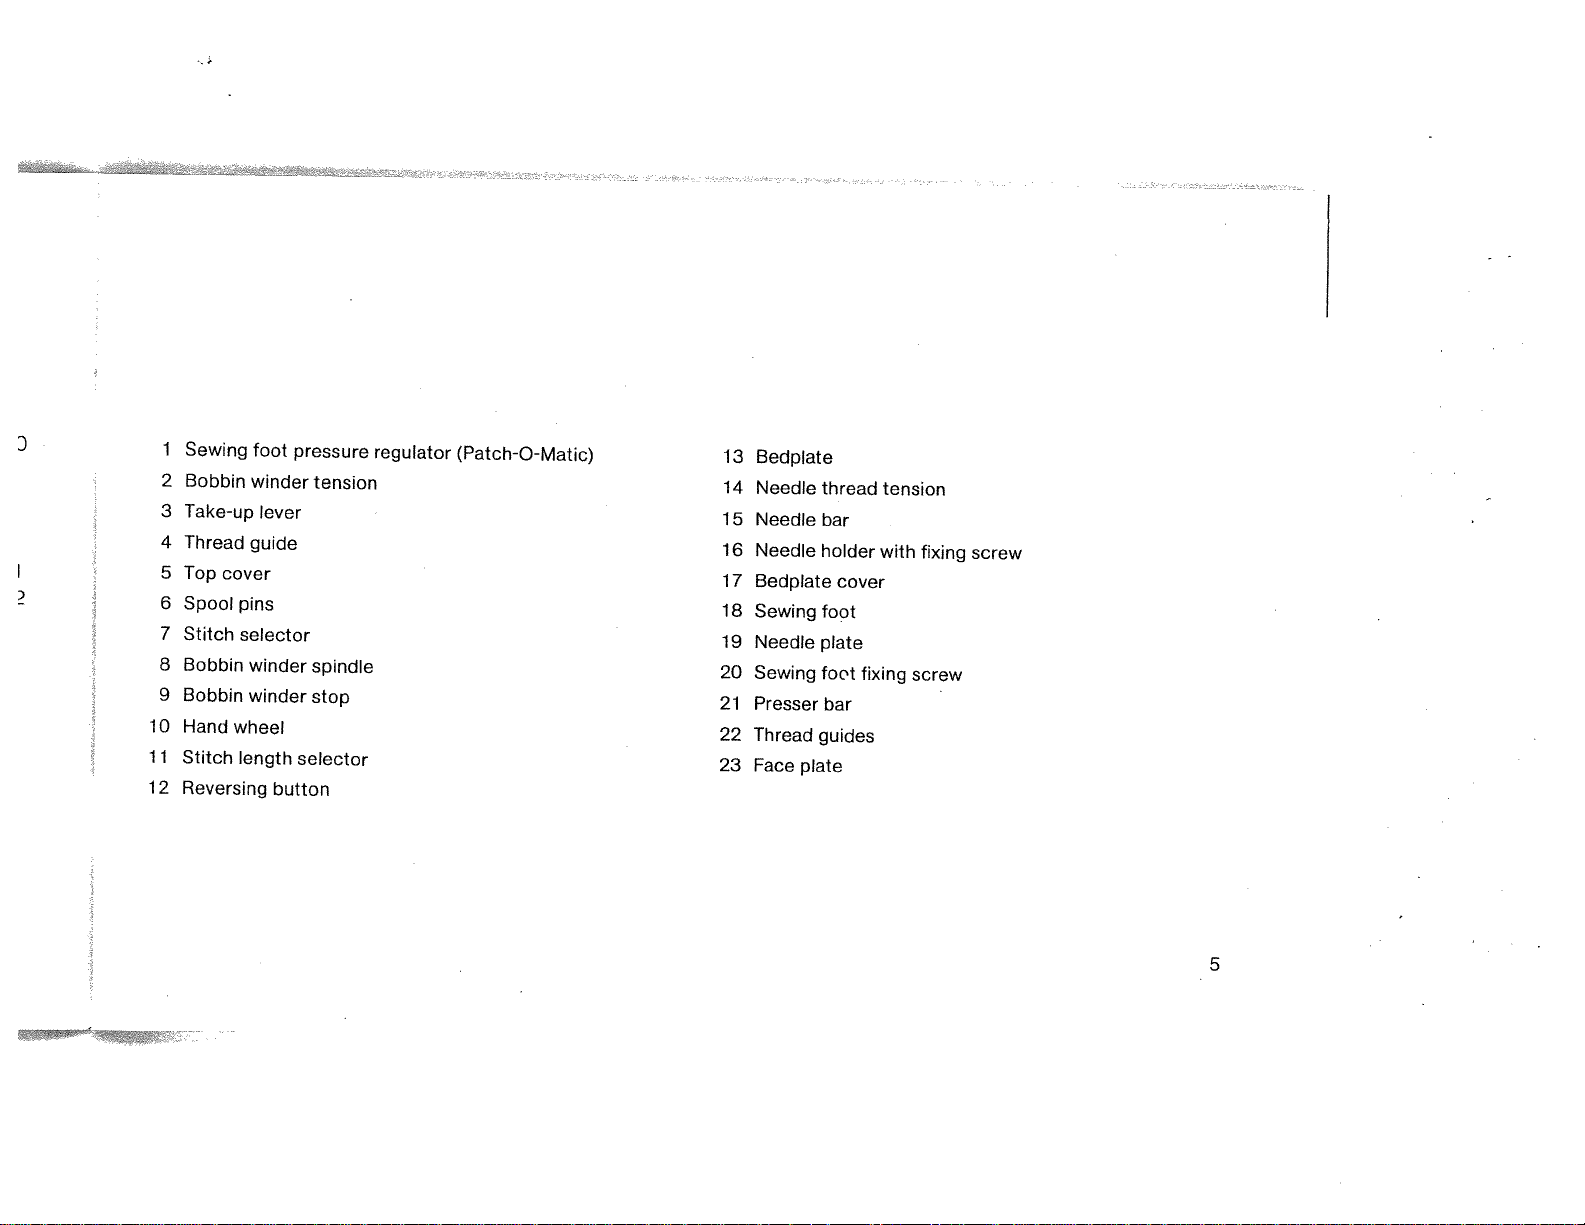
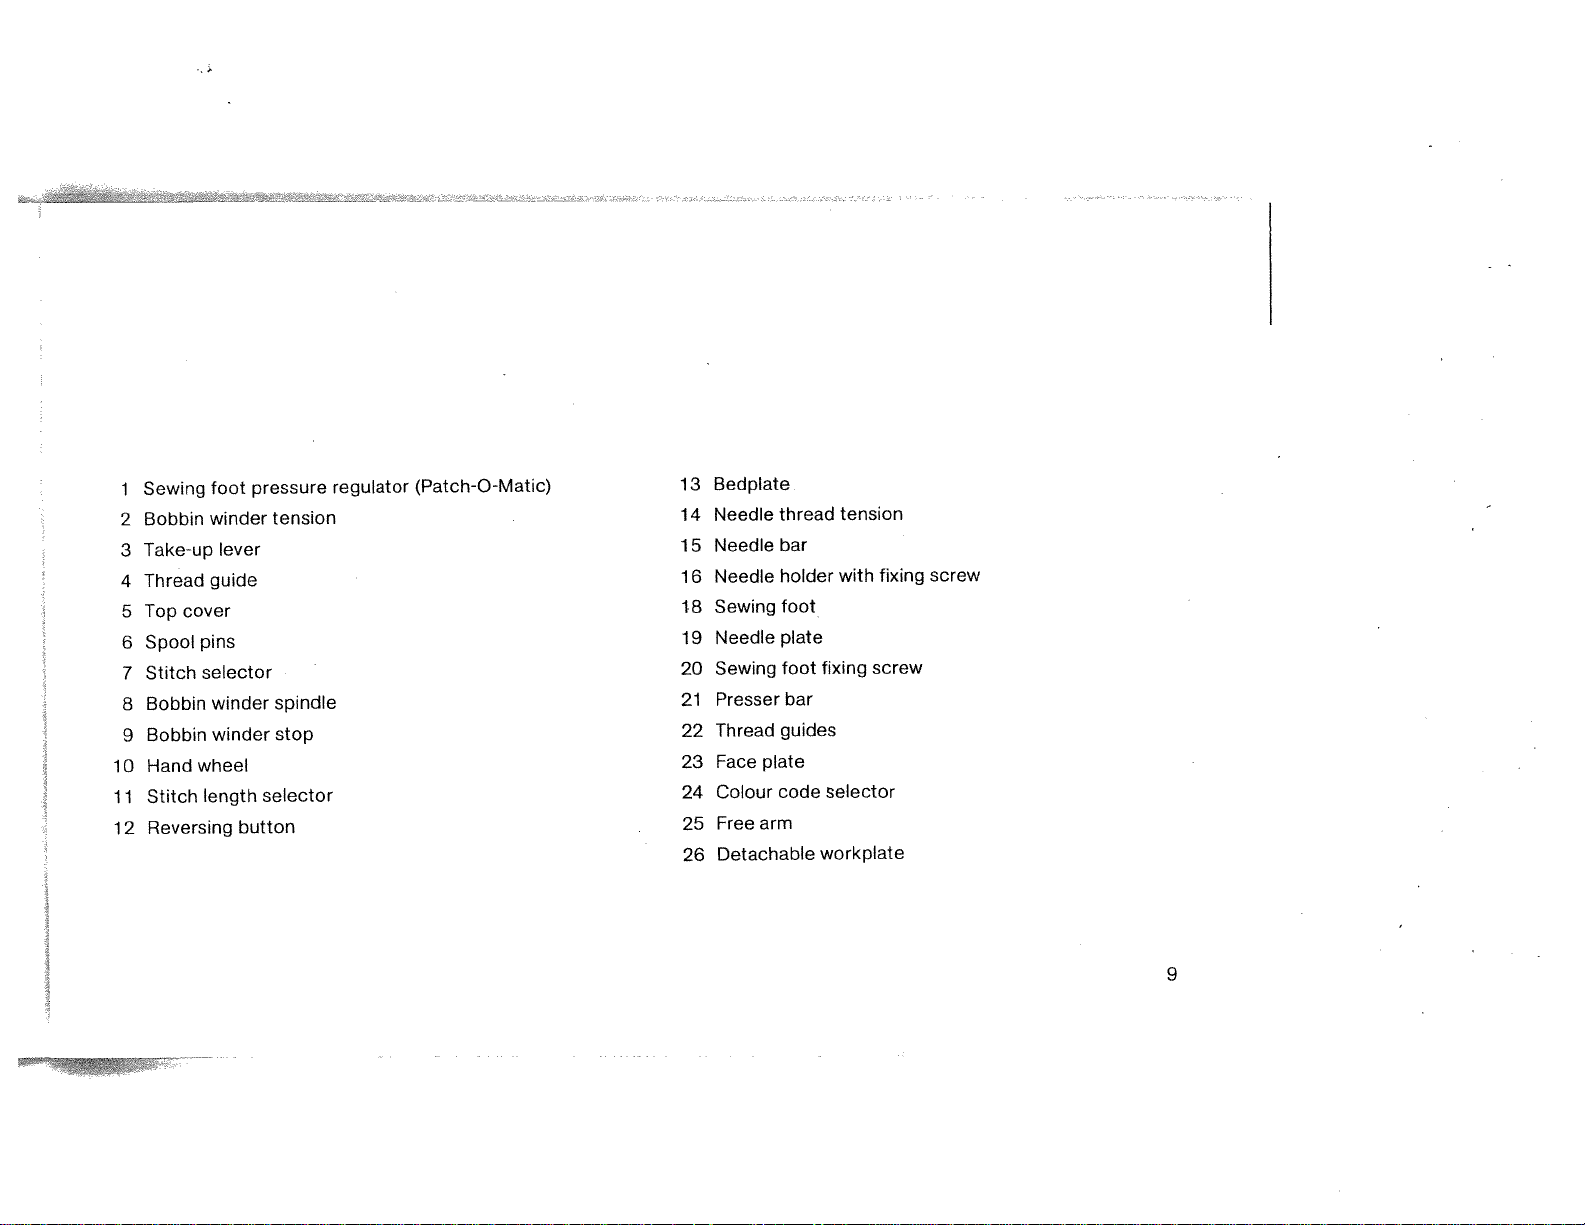
1
2
3
4
5
6
7
8
9
10
11
12
Sewing
Bobbin
Take-up
Thread
Top
cover
Spool
pins
Stitch
selector
Bobbin
Bobbin
Hand
wheel
Stitch
length
Reversing
foot
winder
lever
guide
winder
winder
button
pressure
tension
spindle
stop
selector
regulator
(Patch-O-Matic)
13
14
15
16
17
18
19
20
21
22
23
Bedplate
Needle
Needle
Needle
Bedplate
Sewing
Needle
Sewing
Presser
Thread
Face
plate
thread
bar
holder
cover
toot
plate
foot
bar
guides
tension
with
fixing
fixing
screw
screw
5
Page 7
-l
(D
C’,
0
0a.CD
(Il
-‘
£‘3
()
-
C))
0)
0)
-
C
S
_L
0)
Page 8
1
2
3
4
5
6
7
8
9
10
11
12
Sewing
Bobbin
Take-up
Thread
cover
Top
Spool
Stitch
Bobbin
Bobbin
Hand
Stitch
Reversing
foot
winder
lever
guide
pins
selector
winder
winder
wheel
length
pressure
tension
spindle
stop
selector
button
regulator
(Patch-O-Matic)
13
14
15
16
18
19
20
21
22
23
25
26
Bedplate
Needle
Needle
Needle
Sewing
Needle
Sewing
Presser
Thread
plate
Face
arm
Free
Detachable
thread
bar
holder
foot
plate
foot
bar
guides
tension
fixing
with
screw
fixing
workplate
screw
7
Page 9
-l
m
0
(I,
0
0
0.
m
-.1
Page 10
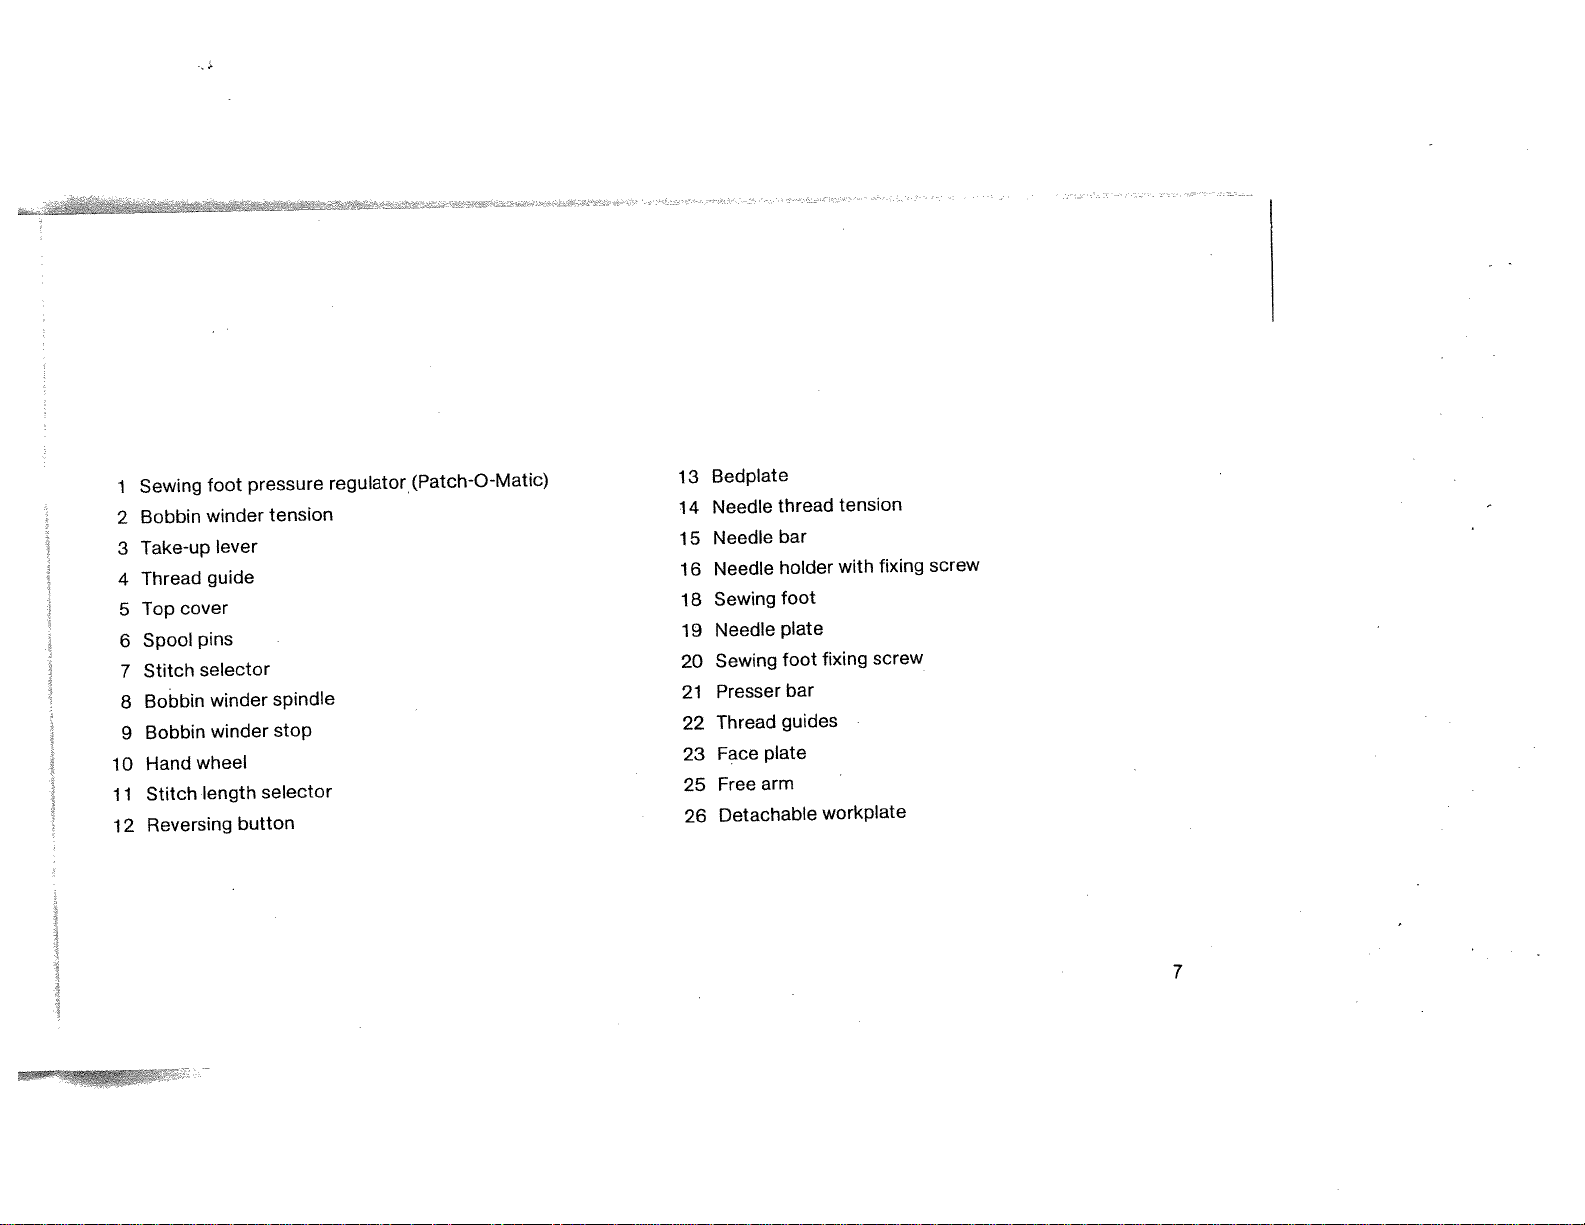
10
11
1
1
2
3
4
5
6
7
8
9
2
Sewing
Bobbin
Take-up
Thread
cover
Top
Spool
Stitch
Bobbin
Bobbin
wheel
Hand
Stitch
Reversing
foot
winder
lever
guide
pins
selector
winder
winder
length
button
pressure
tension
spindle
stop
selector
regulator
(Patch-O-Matic)
13
14
15
16
18
19
20
21
22
23
24
25
26
Bedplate
Needle
Needle
Needle
Sewing
Needle
Sewing
Presser
Thread
plate
Face
Colour
Free
arm
Detachable
thread
bar
holder
foot
plate
foot
bar
guides
code
tension
fixing
with
screw
fixing
selector
workplate
screw
9
Page 11
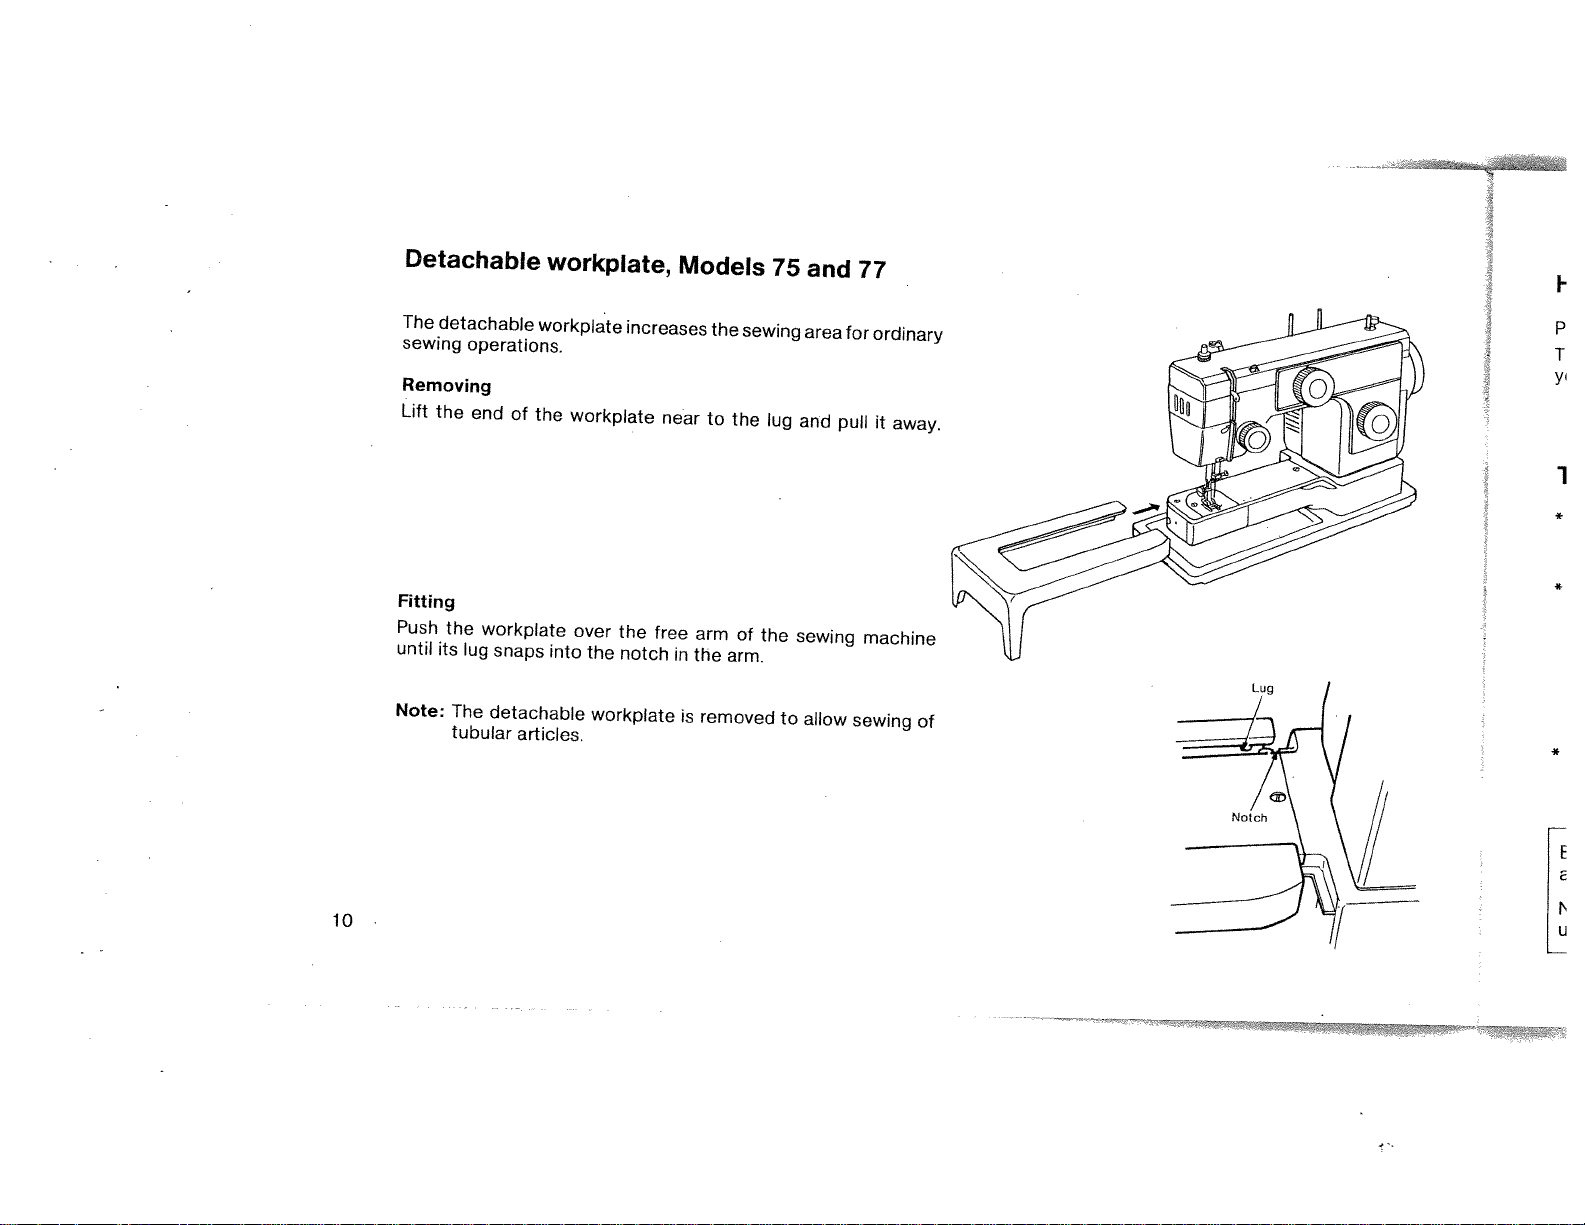
Detachable
The
detachable
sewing
Removing
Lift
operations.
the
end
workplate,
workplate
of
the
V
increases
workplate
Models
near
to
the
sewing
the
75
lug
and
area
and
for
pull
77
ordinary
it
F
P
T
away.
-I
*
10
Fitting
Push
until
Note:
the
its
lug
The
tubular
workplate
snaps
detachable
articles.
into
over
the
workplate
the
notch
free
arm
in
the
is
removed
of
arm.
the
sewing
to
allow
machine
sewing
*
of
*
Page 12
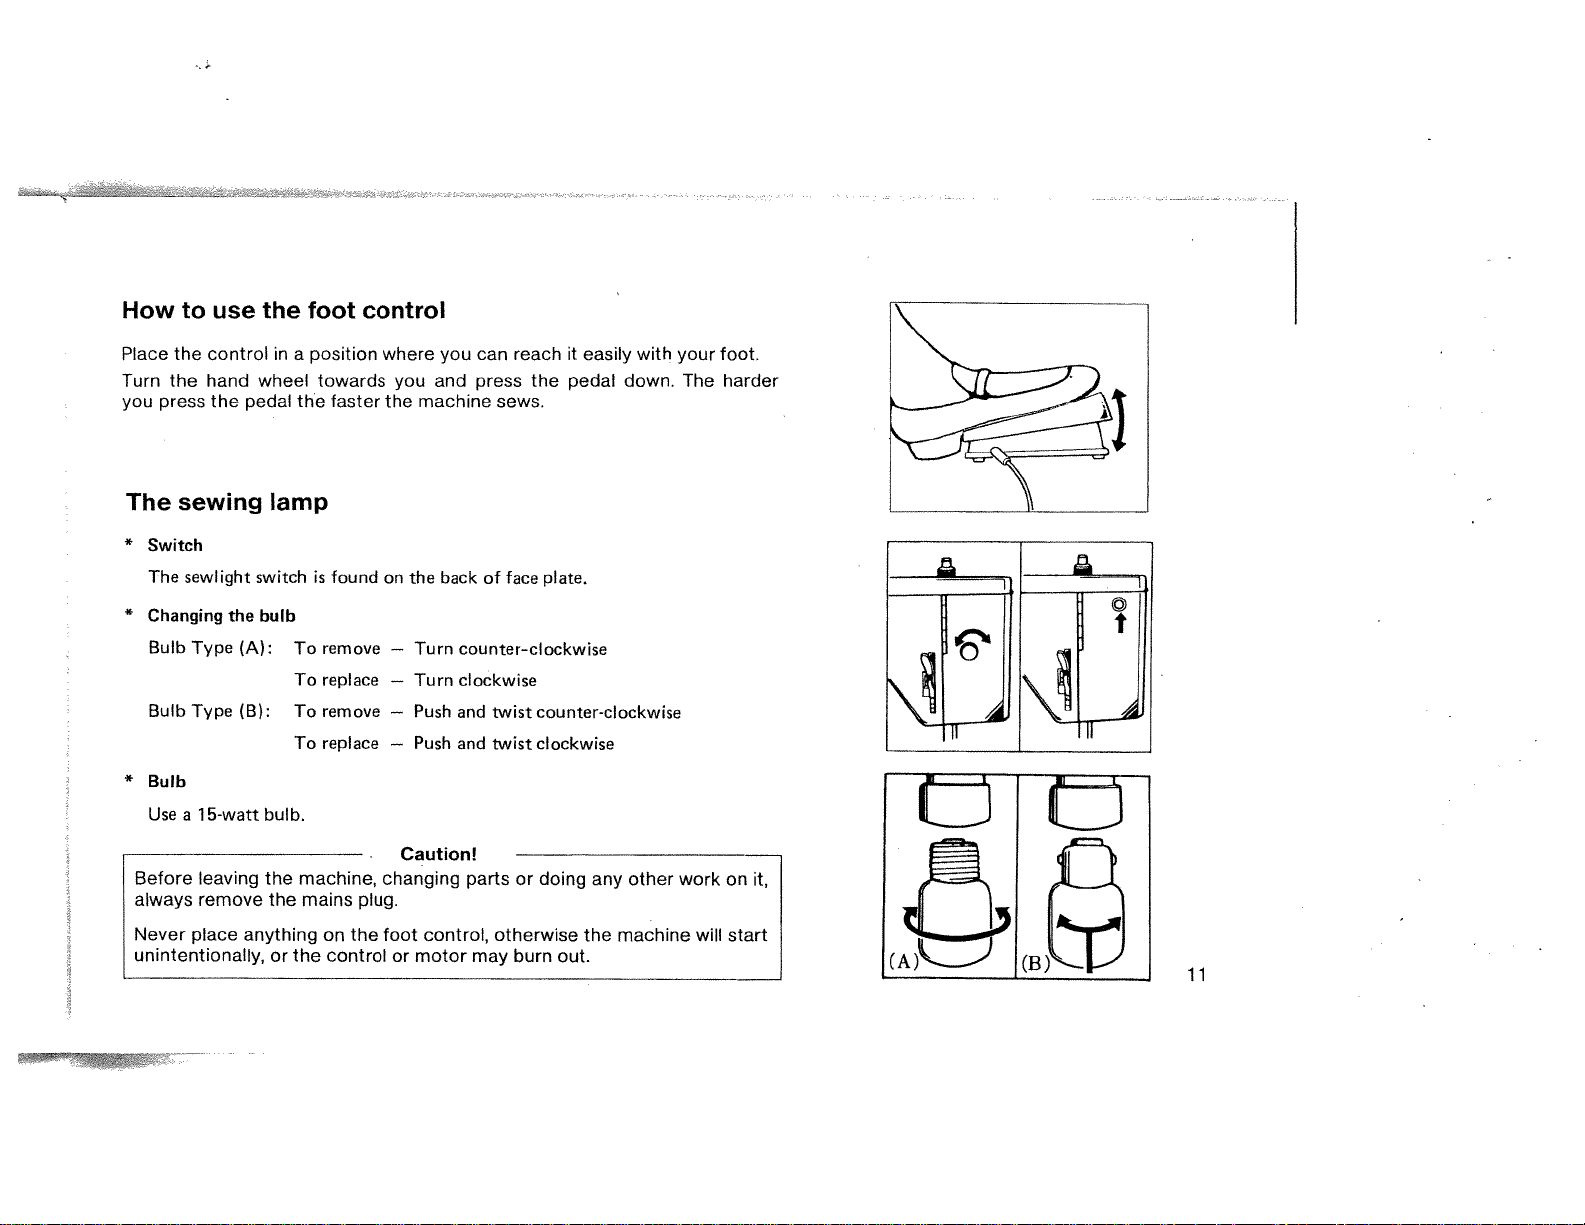
How
to
use
the
foot
control
the
Place
Turn
the
press
you
The
sewing
*
Switch
The
sewlight
*
Changing
Bulb
Type
Bulb
Type
*
Bulb
Use
15-watt
a
Before
always
Never
unintentionally,
leaving
remove
place
control
hand
the
the
(A):
(B):
in
wheel
pedal
lamp
switch
bulb
bulb.
the
the
anything
or
position
a
towards
faster
the
is
found
remove
To
replace
To
To
remove
To replace
machine,
mains
on
the
control
the
where
changing
plug.
foot
you
machine
the
on
the
—
Turn
—
Turn
—
Push
—
Push
Caution!
or
motor
can
you
press
and
control,
sews.
back
of
counter-clockwise
clockwise
and
twist
and
twist
parts
otherwise
may
reach
it
easily
the
pedal
plate.
face
counter-clockwise
clockwise
or doing
burn
any
the
out.
with
down.
other
machine
your
The
work
will
foot.
harder
on
start
[JO
it,
(A)L__-
1
(B)
11
Page 13
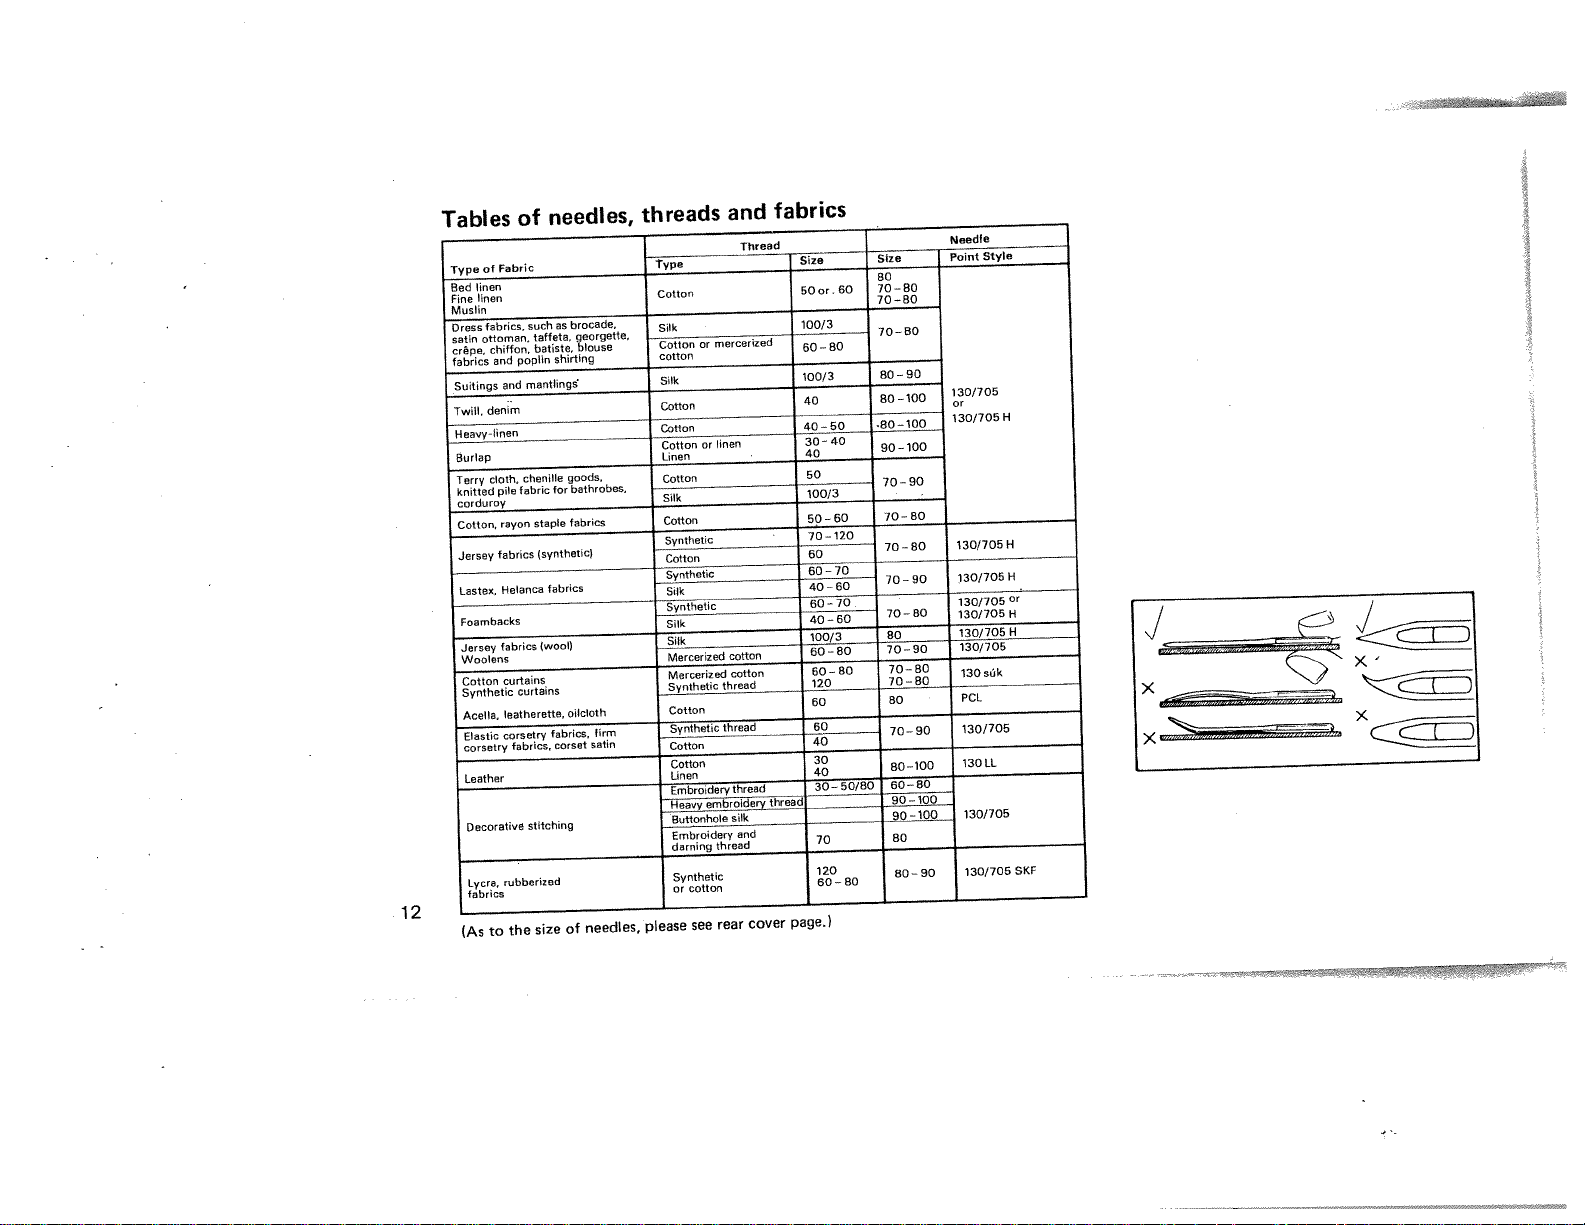
Tables
of
needles,
threads
and
fabrics
xj
12
(As
pagei
cover
rear
see
please
needles
of
size
the
to
Page 14
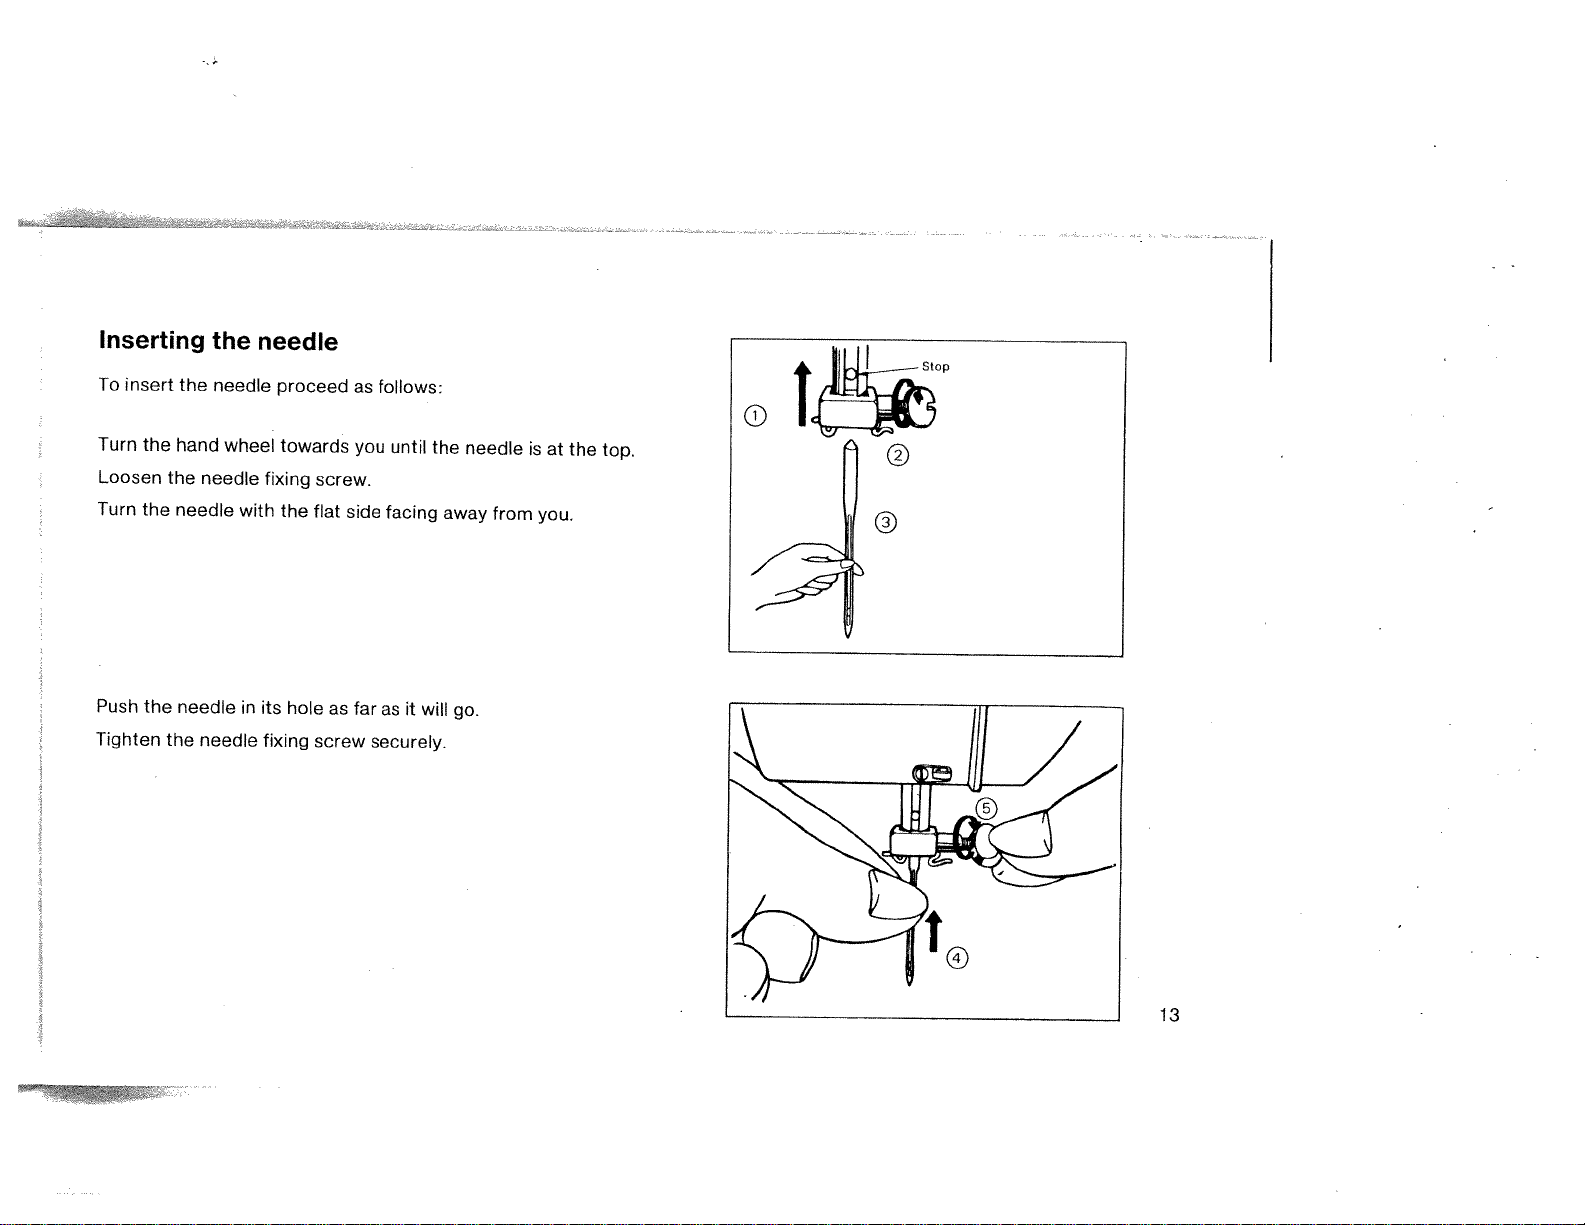
Inserting
To
insert
Turn
the
Loosen
Turn
the
Push
the
Tighten
the
the
hand
the
needle
needle
the
needle
wheel
needle
needle
needle
fixing
with
in
its
fixing
proceed
towards
screw.
the
flat
hole
screw
as
as
you
side
far
securely.
follows:
until
facing
asitwill
the
away
needle
go.
from
is
at
you.
the
o
top.
13
Page 15
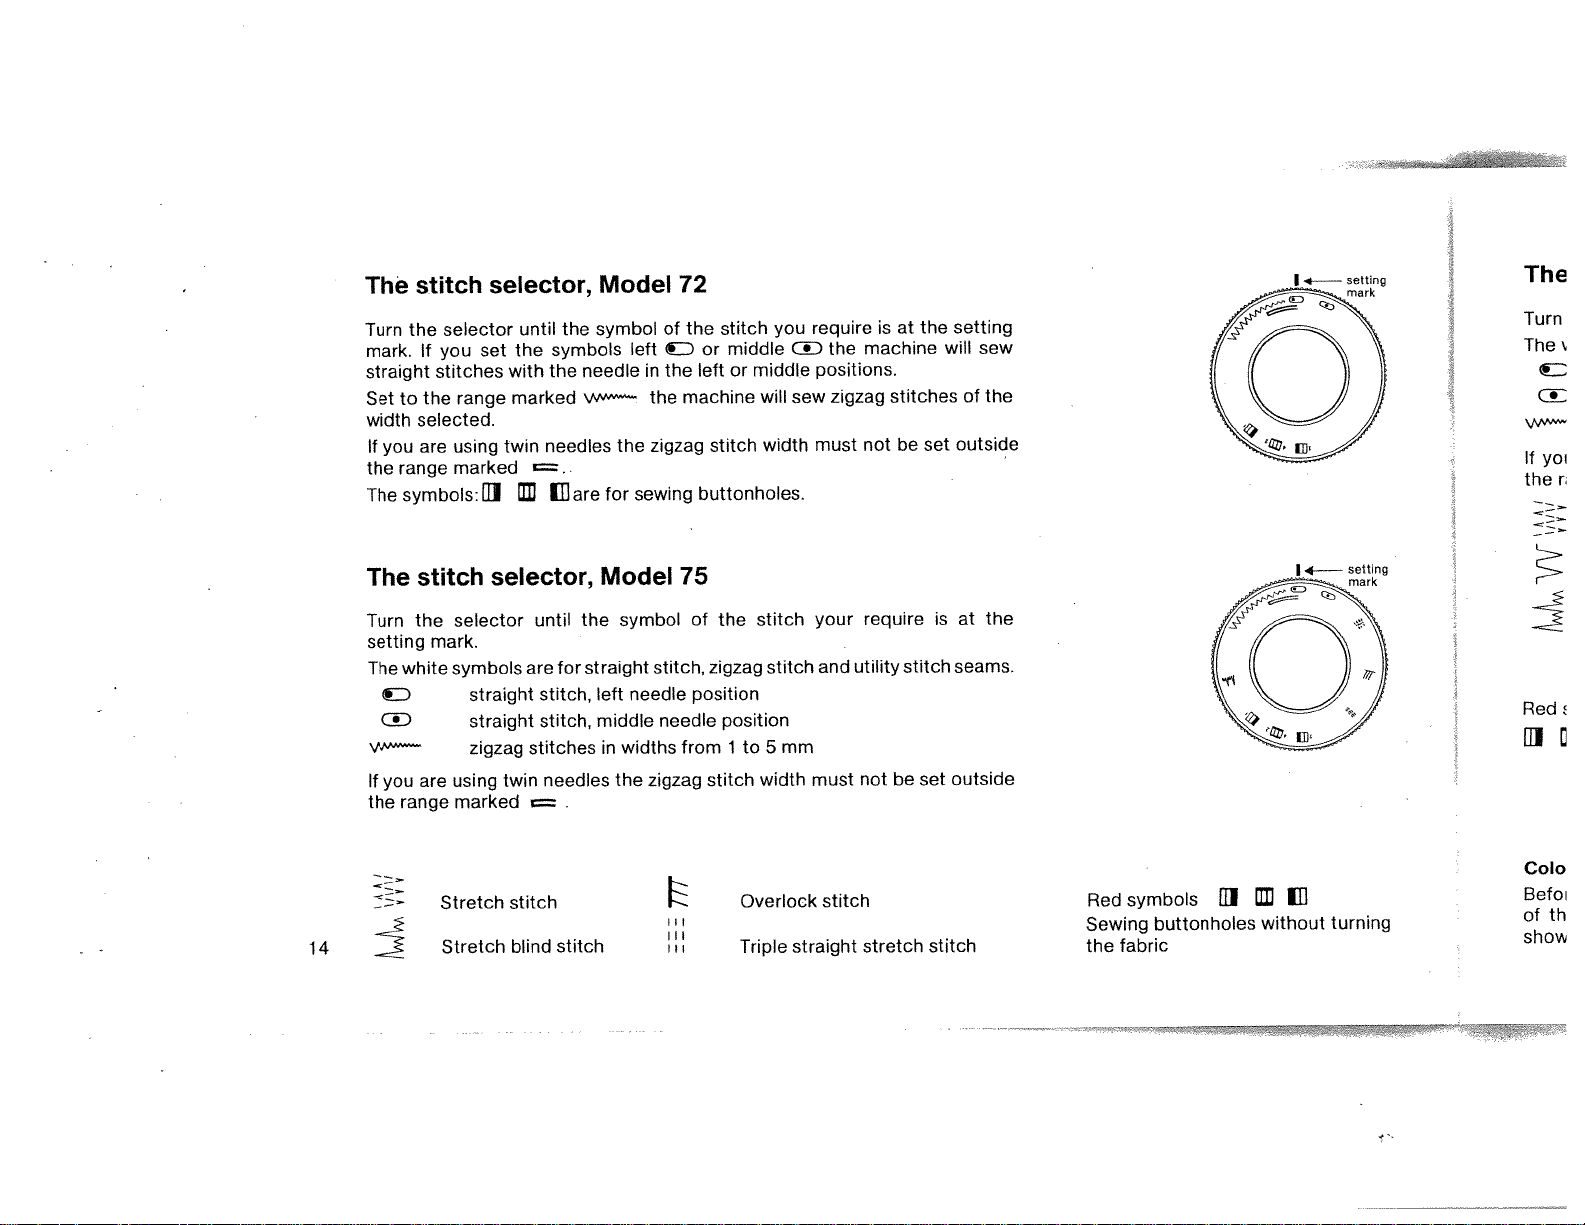
stitch
The
the
Turn
mark.
If
straight
Settothe
selected.
width
are
If
you
range marked
the
The
symbols:
selector
you
stitches
range
using
selector,
until
the
set
with
marked
twin
UI
the
symbols
needle
the
w—
needles
..
are
LU
Model
symbol
left
the
sewing
for
of
D
in
the
the
zigzag
72
stitch
the
middle
or
leftormiddle
machine
stitch
buttonholes.
you
will
width
require
D
positions.
sew
must
the
zigzag
at
the
is
machine
stitches
notbeset
setting
will
of
outside
sew
the
The
Turn
The’.
If
yoi
the
r
14
The
Turn
setting
The
W
you
If
the
stitch
the
white
are
range
selector
mark.
symbols
using
marked
Stretch
Stretch
selector,
straight
straight
zigzag
twin
stitch
blind
until
are
for
stitch,
stitch,
stitches
needles
stitch
Model
the
straight
left
middle
in
the
symbol
stitch,
needle
needle
widths
zigzag
75
of
zigzag
position
from
stitch
the
stitch
position
1
to
width
Overlock
Triple
stitch
mm
5
your
and
must
stitch
straight
require
utility
not
stretch
stitch
be
set
stitch
is
seams.
outside
at
the
Red
Cob
Red
Sewing
the
fabric
symbols
buttonholes
UI
LU
without
turning
Befoi
of
show
th
Page 16

The
Turn
The
W’
If
you
the
stitch
the
white
are
range
selector
symbols
straight
straight
zigzag
using
marked
selector,
untH
the
are
for
stitch,
stitch,
stitches
twin
needles
Model
symbol
straight
left
needle
middle
widths
in
the
77
of
the
stitch,
needle
from
zigzag
stitch
zigzag
position
position
1
stitch
you
require
stitch
to
5
mm
width
and
must
isatthe
utility
not
setting
stitch.
be
set
mark.
outside
Red
111
Colour
Before
of
the
shows
symbols
III
code
you
stitch
the
Stretch
Fancy
Stretch
Sewing
selector
begin
symbol
colour
stitch
stitch
blind
buttonholes
sew,
to
you
range
set.
stitch
set
have
the
selected.
without
lever
turning
of
this
The
the
control
arrow
fabric
to
on
the
the
colour
lever
The
III
\AANv/w
blue
Triple
Triple
Feather
Overlock
Fancy
symbols
straight
zigzag
stretch
White
are
stitch
stitch
and
for
super-utility-stitch
stretch
stretch
stitch
red
range
DcD:
Blue
range
stitch
stitch,
fTh
t
from
seams
1
to
5
mm
15
Page 17

Stitch
To
change
Turn
setting
the
number,
the
length
the
selector
mark
A.
the
length
The
shorter
selector
of
the
so
that
numbers
the
and
stitches
the
number
indicate
stitch.
reversing
proceed
for
the
as
the
stitch
button
follows:
required
lengths
stitch
in
mm.
length
The
is
lower
Re
o
0.5
1
2
3
at
4
16
Sewing
To
sew
the
machine
button
*
Reverse
backwards*:
backwards,
has
the
machine
sewing
made
very
is
push
will
the
sew
useful
the
reversing
number
forwards
as
of
means
a
button
stitches
again:
fully
you
of
strengthening
need.
in
and
When
or
hold
you
securing
it
there
let
go
a
until
of
the
seam.
Stitch
lengths
Corr
tant
thet
res
illust
Rem
u
Page 18

Regulating
the
thread
tensions
increase
needle
tension
or
thread
Correct
tant
the
result.
regulation
for
obtaining
tensions
The
illustrations.
Remarks:*The
the
is
material,
is
not
tensions
correct
fabric
the
needle
tension
of
durable
correct,
are
used.
best
*The
thread
regulated
ly
r’eedle
the
regulated
tension
tension
thread
correct
thread
thread
and
untidy
It
is
tension
by
tension.
tidy
setting
best
on
normal
is
altering
tensions
seams.
seams
as
shown
to
try
a
piece
the
is
impor-
If
will
depends
out
of
one
the
be
in
the
which
waste
of
on
If
the
bobbin
line
on
the
the
needle
loose.
decrease
needle
thread
tension
If
the
needle
material,
the
setatnumber
does,
it
is
tension
as
thread
underside
thread
runs
of
tension
fF
thread
needle
perhaps
shown
4
or
in
runs
thread
lower
necessary
B.
in
the
in
this
a
straight
material,
is
a
straight
tension
fault
to
(A)
too
or
(B)
is
should
increase
If
this
the
sion,
decrease
thread
in
line
set
too
not
you
fault
needle
you
A.
on
the
tight.
normally
the
cannot
by
may
the
tension
top
If
bobbin
remove
increasing
thread
have
bobbin
as
shown
side
of
the
latter
occur.
thread
ten
the
to
is
it
If
17
Page 19

Regulating
the
sewing
foot
pressure
(Patch-O-Matic)
Rer
release the
To
This
causes
The
materialisnow
foot.
For
sewing
littletoprovide
a
you
are
If
farther
the
sewing thick
down
material.
Dropping
Embroidering
disengaged.
drops
the feed
The
length
starts
feed
selectorto“0”orbeyond
foot
free
materials
light
or
normal
pressure,
to
of
sewing
heavy
are
the
function
sewing
the
regulator
thinorlight
the
increase the
to
the
feed
darning
and
Thisisdonebysetting
and
allows
its
pijsh
pressure
push
foot
materials
best
carried
the
again as
it.
to
regulatorBdown
pressure
of
stitch
spring
any
pressure
materialtobe
its
ring
highest
from
push
the
moved
A
downwards.
the
required.
the
sewing
with
out
length
soon
position.
sewing
just
regulai.or
foot
the
feed mechanism
selector
freely
under
you
as
on
at
turn
A
HU
the
the
,which
needle.
stitch
i.
2.
3.
18
Page 20

Removing
and
inserting
the
bobbin
case
and
bobbin,
Model
72
case
open
out
3
with
the
the
bobbin
bobbin
cannot
inside.
drop
Release
out.
the
19
lifting
until
bobbin
As
above
2
long
lever.
the
as
order.
take-up
case
you
latch
hold
leverisat
pull
and
bobbin
the
the
the
top.
bobbin
case
latch
1
fall
Lift
the
the
you
the
out.
1.
2.
3.
Lift
Turn
Open
latch
To
the
the
the
and
insert
sewing
hand
bedplate
the
again
foot
wheel
bobbin
just
raising
by
towards
cover.
will
reverse
Page 21

Removing
1.
Raise
lever
2.
Open
and
sewing
the
isatthe
arm cover.
the
inserting
foot
top.
the
and
bobbin
turn
the
case
hand
and
wheel
bobbin,
towards
Models
you
75
until
and
the
77
take-up
Win
Hold
with
Place
under
Threa
and
Push
stop
Now
away
Tighb
I
y
p
I
20
3.
Lift
the
Release
case
To
insert
bobbin
latch
the
open
again
latch
case
the
just
latch
and
bobbin
reverse
the
and
bobbin
cannot
the
pull
above
the
will
drop
bobbin
out.
fall
out.
order.
case
As
out
long
with
as
you
the
bobbin
hold
the
inside.
bobbin
3
Page 22

Winding
Hold
the
with
your
Place
a
under
the
Thread
and
Push
stop
Now
away
Tighten
the
place
both
fits
let
from
the
hand
right
reel
disc
the
spindle
into
the
the
wheel
of
bobbin
bobbin
the
machine
the
locking
bobbin
hand
thread
winder
of
bobbin.
stop
firmly
(turn
through
and
and
screw
on
tension
on
winder
bobbin
run
cut
with
towards
pin
1.
one
towards
until
the
on
the
your
you).
Pass
2.
of
spindle
the
thread.
hand
left
the
its
3.
the
bobbin
wheel
hand
thread
holes
back
and
from
stops,
again.
undo
through
that
so
then
the
the
the
push
locking
the
inside
bobbin
eyelet
outwards
the
screw
and
winder
spindle
21
Page 23

I
cr-i
0
0D
a-CD
DciøZ-
CQDO_
—
9
D
CDDQ
D0-
CD
0
<D)
—
D
CDCD
C,
0
-I
m
CD
0
cCOD
a
D
,-
0
CD
.
CD0O
D
-.oCJ)
DC)CDcD.g
-
CD
DO
0
D
D
0
0
D
0
f
-
I
CD
oo
CD
—
Cr)
CD
—
cr
0
°CD
—.
D
CO
0
D
a
C)
CD
D
o
00
D)
ZTD
000
*
:r
D0
D
CD
*
—
CD_.D)-Q
*
D
CDD
P-
39.
CD
HD
0
Cl)
DD)
D)C
CD
DD
—
—
D
=
a
3
c
—
ocr
-
0
*0
a-
S
3
—
-
D
a
—
3
0
<
CD
-+CD
D
CD
a
CDO°
0
-
.
D)
O
0
<
CD
4
.4
Page 24

Threading
bobbin
the
Hold
the
Hold
shown
as
filled
the
bobbin
in
bobbin
the
betwen
the
bobbin
case
drawing
inside.
in
the
your
left
and
case
thumb
hand
place
and
forefinger
the
Pull
edge
of
your
of
thread
the
right
bobbin
into
hand
the
case.
and
slot
pull
in
the
off
a
few
Now
spring
inches
pull
and
the
of
into
thread.
thread
the
under
thread
the
eyelet.
tension
Inserting
*
When
(see
the
inserting
page
bobbin
19
and
the
case
bobbin
20).
case
machine
the
in
make
properly
place
into
snaps
latch
the
sure
on
centre
the
pin
23
Page 25

Threading
Move
the
take-up
towards
Lift
the
Pass
your
discs
under
Pass
through
end
Thread
through
you.
the
sewing
machine
the
thread
right
3,
and
the
the
thread
of
the
needle
the
thread
as
hand
then
tension
needle
eye.
the
lever
foot
follows:
through
and
upwards.
guide
from
guides
bar.
from
8
needle
to
raising
by
guides
pass
the
and
right
5
the
its
and
front
thread
top
1
thread
When
thread
to
left
6
and
and
position
the
presser
and
from
you
check
through
through
pull
2.
by
Hold
the
do
spring
about
turning
bar
the
right
so,
the
take-up
guide
six
the
lifter,
reel
between
thread
on
its
7
inches
of
lever
at
hand
and
thread
own.
the
of
wheel
thread
with
tension
passes
4,
then
bottom
thread
Dra
(
(
I
24
Holdtl
your
slowly
moves
take-u
l(
Page 26

Drawing
the
Hold
left
your
slowly
take-up
towards
moves
end
hand.
down
lever
up
of
the
Turn
then
is
the
you
at
bobbin
needle
the
until
up
highest
its
thread
hand
again
the
wheel
needle
and
point.
thread
with
the
the
Pull
bobbin
through
needle
thread
the
needle
thread
will
now
hole
slowly.
come
loop.
in
a
The
up
Pull
under
the
about
the
back.
four
sewing
inches
foot
of
and
each
through
thread
to
25
Page 27

Sewing
Sewing
Stitch
Colour
Stitch
with
foot:.......
selector:.....
code
selector:.
length
selector:.
straight
stitch
zigzag
€D
.
white/red
.
ito
Zigzag
foot
tD
or
(Model
4
77)
Stop
then
Turn
Lowe
foot
Hov
Indicationsinthe
selector
How
Place
Hold
wheel
the
fabric
26
only
to
begin
the
material
thread
the
towards
material to
and
press
different
applytoModel
sewing
under
the
ends
loosely
your
with
you
begin sewing.
the
pedal to
operations
77.
sewing
with
your
right
Let
start
concerning
foot.
left
hand so
the
sewing
machine.
the
hand
that
foot
and
the
the
down
colour
turn
needle
the
onto
code
hand
enters
the
Hoid
At
th
secur
Stop
and
Cut
LeavE
t
Page 28

How
Stop
then
Turn
Lower
the
lift
the
to
the
fabric
the
turn
machine
sewing
about
sewing
corners
the
at
foot.
the
and
foot
corner
needle.
continue
so
that
sewing.
the
needle
is
down
material,
in
the
How
the
At
securing
Stop
pull
and
the
Cut
Leave
to
the
about
finish
end
stitches.
machine
the
thread
the
of
material
using
five
inches
sewing
seam,
that
so
out
the
of
press
the
from
cutter
thread
the
take-up
back.
the
let
hanging
reversing
lever
the
into
is
from
button
at
presser
the
the
in
top.
bar,
needle
order
the
Lift
orapair
eye.
to
presser
of
sew
scissors.
few
a
foot
27
Page 29

Applications
for
the
free
arm
of
Models
75
and
77
Sewin
free
The
such
as
28
Here
are
a
few
examples
/
/
your
machine.
of
arm
free
the
of
help
the
with
do
can
you
work
of
kind
the
of
Page 30

Sewing
tubular-shaped
articles
on
Models
75
and
77
use:
tubular
Place
the
the
begin
the
with
darning
How
or
to
sewing
The
sleeves,
as
such
e
trousers
particularly
is
arm
free
suitable
or
for
socks.
the
free
sewing
sew,
to
material
your
articles
article
arm,
foot
hands.
(
over
lower
and
guiding
lightly
gQ
0
29
Page 31

30
Sewing
Pretty
needles
Sewing
Stitch
Stitch
Colour
the
Set
stitch
Insert
side
(flat
Place
machine
The
thread,
passed
thread
needle
Note:
with
coloured
different-coloured
and
toot
selector
length
code
stitch
selector,
twin
the
away
reels
two
except
between
guides
eyes.
Before
in
ded
corner
the
of
out
twin
The
Needles
left.
used
be
twin
a
patterns
selector:.
selector:
width
not
but
needle
from
thread
of
is
threaded
that
separate
either
at
starting
accessories
the
twin
with
fabric
needle
for
can
.
.
between
higher
exactly
in
you).
on
threads
the
side
sew
to
needles
or
for
with
straight
needle
be
threads.
zigzag
range:
0.5
white!red
.
blue
0
than
the
the
in
discs,
needle
of
place
over
they
this
their
stitch
made
foot
(for
1
to
use
2
and
2
same
the
spool
same
are
separately
the
the
have
you
be
will
machine
shank
at
by
0
stretch
length
normal
stretch
range
in
or
a
pins.
way
divided
bar
two
spool
twisted
in
needle
sewing
2
to
needle
way
as
and
round
take
to
has
the
stitch
“4”)
may
a
as
with
the
at
through
through
pins.
the
broken.
or
shank
its
middle
position
with
on
,
break.
single
a
tension,
the
felts
To
needles
can
two
the
one
single
the
two
provi
turn
the
on
only
middle
+
Tric
This
parts
r
Stil
Co
L
a
Page 32

.4-’
Tricot
This
parts.
Sewing
Stitch
Colour
Stitch
stitch
zigzag
is
foot
selector
code
length
very
selector:.
selector:.
stitch,
suitable
Models
for
zigzag
.
white/red
.
0.3
darning
foot
to
4
75
tears.
and
It
can
77
also
—
Note:
Use
hollow
be
used
the
blue-marked
clearance,
Set
for
reinforcing
the
machine
No.
as
needle
130/705
stretch
described
in
the
H-S.
materials
at
accessories
This
will
the
prevent
and
left
sewing
and
or
stitch
begin
a
needle
on
fabric
to
sew.
with
skipping.
31
Page 33

Triple,
straight
stretch
stitch,
Models
75
and
77
Fe
32
If
you
seams
Triple
Sewing
Stitch
Colour
Stitch
wishtosew
need
that
straight
foot
selector
selector:.
code
selector:.
length
stretch
great
stretch
fabrics,
strength,
stitch
zigzag
blue
.
4
.
thisisthe
crutch
e.g.
foot
right
seams
stitch
or
pocket
to
use
seams.
Note:
Use
needle
prevent
avoid
to
Triple
Sewing
Stitch
Colour
Stitch
the
thread
zigzag
foot
selector
selector:.
code
selector:.
length
blue-marked
hollow
with
skipping.
stitch
breaking.
stretch
stitch
.
.
needle
clearance,
is
It
zigzag
blue
4
in
No.
also
foot
the
1301705
very
suitable
accessories
H-S.
This
for
or
Thi
r
L
a
will
Page 34

I
/-&-
I
f
/j
suitable
for
Feather
stitch
This
Sewing
Stitch
Colour
Stitch
and
stitch,
is
foot-
selector
code
length
sewing
for
suitable
selector:
selector:
Model
for
stretch
fancy
-
.
fabrics.
77
effects
zigzag
blue
4
foot
ccessories
H-S.
O5
This
a
or
will
or
33
Page 35

11111
Iii
1111111!
111111
With
edge
Sewing
Stitch
Colour
Stitch
Place
edge.
Lower
Guide
Sew
this
finish.
selector
length
the
the
the
a
on
Overlock
seam
foot
code
fabric
sewing
material
piece
possible
is
it
selector:.
selector:,
under
foot
lightly
waste
of
the
and
stitch,
to
zigzag
blue
.
4
.
sewing
begin
shown
as
fabric
Models
provide
foot
footsothat
sewing.
right.
check
to
raw
the
75
edges,
the
stitch
77
and
especially
stitches
setting.
are
on
easily
made
fraying
over
the
fabrics,
with
good-looking
a
and
lasting
34
The
fabric
overlock
edge
stitches
when
are
descending
plaäed
on
correctly
right.
the
when
the
needle
just
misses
the
Page 36

ewing
buttonhole
e
iy
turning
buttonholes
mechanism
of
the
material.
fitted
in
this
machine
makes
it
possible
sew
to
buttonholes
inashort
time
without
Sewing
Stitch
Colour
Stitch
xchange
&k
the
find
out
=
for
fabrics
foot
selector
code
length
the
location
the
thick
selector:.
selector:.
ordinary
and
most
sewing
length
suitable
buttonhole
LU’-U1
white/red
O3
to
1
,1
foot
with
of
the
buttonhole
stitch
length
foot
(red
the
-,42
sector)
transparent
on
it
is
best
thin
for
fabrics
the
to
foot
fabric
sew
for
using
sample
a
sewing
pencil
a
buttonhole
buttonholes.
or
tailors
inapieceof
chalk.
buttonhole
waste
foot
fabric.
35
Page 37

Sewing
the
Set
the
Set
the
Set
needle
the
the
Set
To
secure
the
Cut
prominent
Please
buttonholes
selector
stitch
selector
selector
point
at
seledor
seam,
the
buttonhole
buttonholes,
before
note:
B
(continued)
B.
the
the
top.
at
If
you
machine
need
E
with
more
enough,
long
is
seam
the
until
slowly
sew
and
1”
III
“
at
needle
the
“4
“3
2’
111
right
the
until
sew
and
“
at
at
stitches
five
about
sew
and
until
seam
long
is
as
then
point
left
C.
one,
then
stop
at
is
the
as
machine
the
stop
D.
E.
point
is
a
not
few
the
at
stitches.
to
damage
needle
the
must
end
be
tacks.
at
needle
the
at
ripper,
to
until
c
taking
another
and
sew
care
symbol
stitches
five
about
sew
and
2”
“4
at
zigzag
can
a
for
seam
be
moved
set
open
the
the
carefully
use
stitch
stitch
filler
a
selector
selector
using
thread.
36
Page 38

ewing
Sewing
stitch
Stitch
colour
Stitch
the
•
hand
e
five
w
the
t
ease
on
foot
selector
width
code
length
stitch
wheel.
six
or
stitch
note:
buttons
selector:.
selector:.
selector
stitches
selector
move
the
.
a
at
slowly.
at
needle
sewing
button
W’
€D
depending
white/red
width
stitch
and
the
to
sew
top
on
foot
holes
that
three
before
button
in
allows
four
or
setting
the
securing
the
needle
stitch
Exchange
sewing
Place
crosswise
under
Set
slowly
hole.
Lower
enter
to
stitches.
selector
foot.
a
the
the
towards
the
the
button
to
needle.
stitch
button
the
the
to
ordinary
the
selector
you.
right
right
on
sewing
sewing
hole
the
Make
width.
sewing
material
direction
at
sure
foot
in
the
€D”
the
onto
button
foot
so
and
needle
that
and
the
with
the
button.
when
its
turn
enters
the
left
you
holes
the
button
are
hole
hand
the
turn
is
left
button
sewing
foot
37
Page 39

Sewing
Stitch
Colour
Stitch
Move
Loosen
Now
the
Set
right
the
sew
hole.
Sewing
foot
selector
code
length
needle
screw
the
the
on
needle
Tighten
selector:.
selector:.
the
to
on
right
the
at
the
the
half
top
screw
in
top
zip
zip
zip
D
white/red
1to4
.
and
foot
the
of
again,
on
fasteners
foot
or
D
on
screw
set
and
zip.
loosen
the
the
sewing
toot
zip
the
the
zip
foot
screw
foot.
foot.
so
and
Now
that
move
sew
the
on
needle
the
the
can
sewing
left
half
enter
foot
of
the
to
into
the
zip.
the
left
left
so
hole.
that
Tighten
needle
the
the
screw
can
enter
r
[
again.
the
38
Page 40

lemming
old
ake
md
ake
mf
the
over
out
sew
sure
hemmer
the
the
the
workpiece
hem.
that
fabric
edge
During
fabric
the
sufficiently
by
and
draw
sewing,
does
that
so
about
fold
not
the
hemmer
‘Ia”
hem
the
the
move
workpiece
and
fabric
place
into
to
under
the
the
edge
it
hemmer
left
the
runs
under
a
right
little
half
freely
Sewing
Stitch
Colour
Stitch
the
foot
and
foot.
by
allow
the
of
through
selector
length
foot
.
code
selector:
selector:.
Secure
the
pullingonthe
run
to
it
foot.
the
into
The
notch
.
folded
threads.
the
fabric
of
the
hemmer
c.D
.
whitelred
.
2to4
hemmer
must
foot.
edge
with
Lower
be
foot.
fed
the
a
into
few
sewing
stitches.
the
foot
scroll
39
Page 41

Sewing
Stitch
Stitch
Attachment
Place
width
Fold
the
Place
against
Lower
the
guide.
Fold
the
the
(No.
fabric
the
the
the
fabric
Sewing
foot:
selector:
length
fabric
1).
over
workpiece
hemmer
presser
selector:
with
apart.
No.
1
again
guide.
foot
The
the
so
under
and
blind
zigzag
stitch
2
blind
wrong
that
the
sew,
hem
to
the
(No.
hems,
foot
width
4
stitch
side
lowerfold
sewing
making
3)is
Model
3
hemmer
up
foot
sure
now
No.
to
5
and
protrudes
so
the
finished.
2
mm
fold
that
72
the
the
double
by
hem
about
double
folded
over
Turn
needle
Loosen
hem
Tighten
A
5mm
folded
edge
No.3
is
to
(5/32”)
the
guide
in
the
the
C
plate
the
the
required
edge
runs
hand
surface.
sewing
between
sewing
middle
(No.2).
is
along
wheel
of
up
foot
the
foot
the
until
Lower
fixing
screw
fixing
two
the
the
screw
and
screw
prongs
feed
sewing
the
of
dog
in
order
sewing
and
the
is
foot.
foot.
make
sewing
below
to
sure
place
foot.
the
the
guide
I
i
40
B
Page 42

Sewing
blind
hems,
Models
75
and
77
Sewing
Stitch
Colour
Stitch
Attachment
Place
(No.
width
the
Fold
Place
against
Lower
guide.
the
the
Fold
foot
selector
code
length
the
fabric
the
the
the
fabric
selector:.
selector:.
with
fabric
1).
over
workpiece
hemmer
sewing
apart.
No.
1
again
guide.
foot
the
so
under
and
The
zigzag
white!red
to
2
blind
wrong
that
the
sew,
hem
4
stitch
the
sewing
making
(No.
foot
side
lower
3)
hemmer
up
fold
foot
sure
now
is
No.2
and
protrudes
so
the
finished.
the
fold
byabout
the
that
double-folded
Turn
needle
Loosen
hem
Tighten
A
over
hem
5mm
double-folded
edge
No.3
is
to
the
plate
guide
the
in
the
(5/32)
C
hand
the
between
the
middle
required
edge
runs
surface.
sewing
sewing
(No.
is
along
wheel
foot
the
foot
of
2).
up
Lower
the
until
fixing
screw
fixing
two
the
the
screw
and
screw
prongs
feed
sewing
the
of
dog
order
in
sewing
and
the
is
foot.
foot.
make
sewing
to
B
below
place
sure
foot.
the
the
guide
A
hem
gude
41
Page 43

Embroidery
Remove
Stitch
Colour
Stitch
While
(Set
*The
sewing
selector’.....
code
length
are
you
needle
the
required
foot
selector:
selector:.
sewing
the
thread
embroidery
stitch
white/red
.
pattern
tension
pattern
width
move
a
can
the
little
be
to
5
3
embroidery
looser
marked
so
on
that
the
hoop
fabric
Place
selector
hoop
slowly
the
the
firmly
and
bobbin
with
fabric
at”
pencil
a
with
do
not
thread
in
an
Lowerthe
“.
both
allow
is
or
tailor’s
embroidery
sewing
hands.
fingers
your
pulled
not
chalk.
hoop.
foot.
to
through
get
Set
Hold
the
near
to
stitch
the
embroidery
the
to
the
needle.
top
length
side).
42
Page 44

Cleaning
the
shuttle
race
machine
This
means
However,
follows:
as
Move
the
cover
or the
both
Turn
ring.
Carefully
shuttle
replace
To
very
Even
make
will
be
it
should
needle
arm
catches
remove
with
race
the
slight
both.parts
equipped
is
seldom
it
bar
cover
a
parts
damage
unusable.
necesseary
necessary
be
to
and
outwards
shuttle
the
brush.
soft
just
with
top
its
take
reverse
the
to
a
out
and
and
shuttle
clean
to
check
to
position.
bobbin
the
take
clean
above
the
shuttle
race
the
Open
out
the
or
cleaner,
shuttle
the
race,
the
case.
shuttle
the
inside
procedure.
shuttle
which
race.
proceed
bedplate
race
of
race
the
can
shuttle
bobbin
shuttle
bobbin
race
case
ring
43
Page 45

Cleaning
In
order
of
dust
and
Remove
Clean
the
Replace
Note:
After
cleaning,
of
sewing
shown
in
above.
to
make
thread
the
needle
feed
the
needle
machine
the
the
feed
sure
waste
with
dog
apply
oil
illustration
plate
plate.
one
to
dog
there
as
as
a
brush
or
the
on
often
shown
two
holes
the
are
drops
no
as
as
right
in
shown
as
disturbances
possible.
the
illustrations
on
the
in
right.
operation
the
on
left.
of
the
machine
it
is
important
to
clean
the
feed
dog
44
Page 46

How
The
drops
If
the
holes
After
to
oil
holes
of
machine
and
oiling
oil
the
are
a
non-resinous
should
run
the
not
do
machine
marked
not
machine
forget
with
sewing
run
fast
to
sew
arrows
machine
well
with
first
after
all
in
the
being
covers
waste
on
illustrations
oil.
If
the
out
on
fabric
machine
of
use
for
about
in
below.
is
for
a
one
order
Before
in
constant
long
minute.
to
soak
oiling,
period,
Before
up
use,
apply
any
they
this
using
excess
should
should
a
few
the
be
be
drops
machine
oil.
wiped
done
Of
paraffin
clean.
every
again
Apply
two
(kerosine)
oil
it
in
or
the
one
three
usual
two
or
days.
to
the
oil
way.
Model
72,
75,
77
Model
Model
72,
72
75,
77
45
Page 47

Drive
If
the
motor
Todothis:
Unscrew
Loosen
Push
the
then
tighten
belt
and
the
motor
tension
no
longer
take
fixing
bracket
the
off
screw
screw
drives
the
belt
of
the
downwards
again.
properly
cover
motor
or
bracket
to
a
the
drive
(see
position
belt
ill,
in
has
below).
which
just
you
can
been
renewed,
push
the
belt
the
inwards
drive
belt
by
tension
about
c
5mm
has
to
be
(3/16”)
adjusted.
(see
ill.),
46
Caution:
never
adjust
the
belt
too
tight
or
you
may
damage
the
motor
or
the
machine!
Page 48

Faults
and
how
to
remedy
them:
Needle
Thread
Something
Thread
Thread
Needle
Needle
Bobbin
Bobbin
Needle
Needle
Needle
Needle
Needle
Fabric
too
You
are
not
properly
tension
is
is
too
check
not
properly
plate,
thread
thread
not
properly
bent
or
worn
bent
not
properly
heavyortoo
pulling
too
wrong
heavy
spring
shuttle
entangled
not
blunt
on
threaded
tight
with
for
is
inserted
or
under
fitted
fitted
the
the
needle
broken
sewing
tension
hard
fabric
needle
because
on
needle
foot
damaged
of
spring
Cause:
incorrectly
bobbin
on
bar
wound
case
bobbin
Needle
Bobbin
Stitches
Needle
thread
thread
are
breaks
breaks
left
breaks
Thread
Loosen
Replace
Change
Have
Insert
Replace
Wind
Thread
out
Fit
needle
Replace
Replace
Replace
Fit
needle
Use
Do
not
properly
tension
a
new
needle
bobbin
bobbin
needle
pull
needle
properly
properly
of
spring
properly
correctly
correctly
correct
Remedy:
fitted
size
47
Page 49

Faults
Thread
Needle
properly
not
Thread
Thread
Tension
Sewing
NeedleBobbin
Machine
and
Dust
Wrong
Drive
tension
thread
size
check
too
foot
and
thread
oil
belt
and
not
needs
thread
used,
tension
not
not
wound
suited
spring
tight
pressure
bobbin
unevenly
oiling
has
how
properly
properly
thread
shuttle
in
too
not
too
now
fabric
to
working
wound
tight
to
regulated
threaded
strong
of
clogged
remedy
Cause:
and/or
properly
quality
poor
machine
them
bobbin
Machine
thread
Shrinking
does
Thread
or
Irregular
not
forms
puckering
stitches
freely
run
loops
Read
Thread
See
Have
of
Read
Read
Use
Re-wind
and
“Fabrics,
the
makes
Read
Read
Clean
Loosen
instructions
machine
spring
seam
instructions
instructions
quahty
top
bobbin
instructions
instructions
machine
tension
properly
threads,
replaced
threads
noise
a
carefully
of
regulating
for
regulating
for
for
on
on
drive
Remedy:
and/or
thread
regulating
how
to
to
how
and
belt
sizes
oil
clean
re-oil
needle-
wind
and
needle-
sewing
shuttle
with
and
bobbin
needles
and
foot
top
bobbin
thread
bobbin
pressure
race
quality
thread
correctly
thread
oil
tension
tensions
48
Page 50

in
sad
in
ure
oil
thread
correctly
thread
tension
tensions
U.K.
10
11
12
13
14
15
16
17
18
Size
of
needles
Germany
W.
3
4
5
6
7
8
9
40
45
50
55
58/60
62
65
70
75
80
85
90
95
100
105
110/115
—__029
U.S.A.
019
019
022
022
025
027
030
032
034
036
038
040
040
040
U.K.
19
20
21
22
23
24
25
26
27
28
29
30
31
32
33
34
W.
Germany
130/140
150/160
170
1801190
200
230
250
280
300
350
380
400
120
125
—
U.S.A.
046
048
051
054
067
073
080
090
100
—
120
—
140
156
156
172
 Loading...