

Page 1

2170
creative
Owner‘s manual
Page 2

This household sewing machine is designed to comply with IEC/EN 60335-2-28 and UL1594
IMPORTANT SAFETY INSTRUCTIONS
When using an electrical appliance, basic safety precautions should always be followed, including the
following:
Read all instructions before using this household sewing machine.
DANGER - To reduce the risk of electric shock:
• A sewing machine should never be left unattended when plugged in. Always unplug this sewing
machine from the electric outlet immediately after using and before cleaning.
• Always unplug before relamping. Replace bulb with same type rated 5 Watt.
WARNING - To reduce the risk of burns, fi re,
electric shock, or injury to persons:
• Do not allow to be used as a toy. Close attention is necessary when this sewing machine is used by or
near children or infi rm person.
• Use this sewing machine only for its intended use as described in this manual. Use only attachments
recommended by the manufacturer as contained in this manual.
• Never operate this sewing machine if it has a damaged cord or plug, if it is not working properly, if it has
been dropped or damaged, or dropped into water. Return the sewing machine to the nearest authorized
dealer or service center for examination, repair, electrical or mechanical adjustment.
• Never operate the sewing machine with any air openings blocked. Keep ventilation openings of the
Sewing machine and foot controller free from the accumulation of lint, dust, and loose cloth.
• Keep fi ngers away from all moving parts. Special care is required around the sewing machine needle.
• Always use the proper needle plate. The wrong plate can cause the needle to break.
• Do not use bent needles.
• Do not pull or push fabric while stitching. It may defl ect the needle causing it to break.
• Switch the sewing machine off (“0”) when making any adjustment in the needle area, such as threading
needle, changing needle, threading bobbin, or changing presser foot, etc.
• Always unplug the sewing machine from the electrical outlet when removing covers, lubricating, or
when making any other user servicing adjustments mentioned in the instruction manual.
• Never drop or insert any object into any opening.
• Do not use outdoors.
• Do not operate where aerosol (spray) products are being used or where oxygen is being administrated.
• To disconnect, turn all controls to the off (“0”) position, then remove plug from outlet.
• Do not unplug by pulling on cord. To unplug, grasp the plug, not the cord.
• Hold plug when rewinding into cord reel. Do not allow plug to whip when rewinding.
SAVE THESE INSTRUCTIONS
Page 3

Congratulations!
Congratulations on your choice of your Pfaff creative 2170!
As a sewing enthusiast, you have acquired one of the most advanced
and innovative sewing and embroidery machines in the world; it
will enable you to transform all your creative ideas into reality with
unprecedented ease.
If you enjoy sewing to your heart’s content – without any compromises
– this machine will provide the key to exquisite items of clothing,
fashion accessories and home textiles.
Do you enjoy embroidering, or want to create distinctive highlights?
Excellent! Your Pfaff creative 2170 will enable you to experience a
totally new dimension of sewing and embroidery – and it is so easy to
operate.
Switch on the machine and watch it light up. The multi-color touch
screen welcomes you to the world of unlimited, creative possibilities.
Make contact – just a touch is all it takes.
Before you start, please spend some time reading this Owner's Manual.
Ideally, follow the information described directly on your new Pfaff
creative 2170. This is the easiest way to discover its many creative
facets.
But we don’t want to keep you any longer. Give a free rein to your
imagination. Your Pfaff creative 2170 is bound to become a dependable
partner in all your sewing ventures. Our specialist retailers will of
course also be pleased to advise you at any time. Enjoy making your
ideas become reality.
Page 4

Table of Content
1
INTRODUCTION 1:7-1:18
Stitch Chart 1:8-1:10
Decorative stitches creative 2170 1:11-1:13
Machine 1:14
Parts of the embroidery unit 1:15
Parts of the embroidery hoop 1:15
Standard accessories 1:16-1:18
2
PREPARATIONS 2:1-2:24
Operating Instructions 2:2
Voltage Switch 2:2
Electrical connection 2:2
Connecting the foot control 2:2
Changing the presser foot 2:5
The IDT (Integrated Dual Feed) 2:6
Changing the needle 2:7
The feed dogs 2:7
Winding the bobbin from the spool pin 2:8
Threading 2:8
Winding from the second spool pin 2:9
Winding from the third spool pin 2:9
Bobbin winding while embroidering 2:10
Winding a bobbin through the needle 2:10
Setting the bobbin winding speed 2:11
Inserting the bobbin and bobbin case 2:12
Bobbin thread monitor 2:12
Inserting the bobbin 2:12
Inserting the bobbin case 2:12
Correct top tension - How to get it 2:13
Thread tension 2:13
Thread the needle 2:14
Needle threader 2:14
Bobbin thread 2:15
Threading the twin needle 2:15
Presser foot lift 2:16
Electronic knee lift 2:16
General notes 2:17
creative Data Manager 2:18-2:19
How to update your machine 2:20-2:23
3
SEWING 3:1-3:28
Function Buttons 3:2
Sewing mode functions 3:3-3:6
Welcome screen 3:7
Toolbar 3:7-3:10
How to select a stitch 3:11
Altering a utility stitch 3:11
Altering a decorative stitch 3:12
Tie-off 3:12
Needle positions 3:13
Mirroring 3:13
Straight stitch 3:14
Three-step Zigzag – stitch No 4 3:14
Basting program 3:14
Buttonholes 3:15-3:18
Inserting the sensormatic buttonhole guide 3:15
Attaching buttonhole foot – No 5A 3:15
Buttonhole with gimp thread 3:17
Eyelet buttonhole with gimp thread 3:17-3:18
Sewing on buttons 3:19
Eyelets 3:19
Darning 3:20
Darning with the elastic stitch 3:20
Overlock stitches 3:21
Blindhem stitch – No 30 3:22
Elastic blind stitch – No 31 3:22
Bridging stitch - No 11 3:23
Crosshem stitch - No 13 3:23
Sewing in zippers - stitch No 1 3:23
Rolled hem with foot No. 7 3:24
Twin needle sewing 3:24
Sewing Maxi stitches with a twin needle 3:24
Four sewing directions 3:25-3:26
Personal menu 3:27
Demo 3:28
Options for messages 3:28
1:4
Page 5

4
5
DECORATIVE SEWING 4:1-4:28
General notes on decorative sewing 4:2
Selecting decorative stitches 4:2
Alter the stitch settings 4:3
Sewing sequence 4:4-4:10
Create a sewing sequence 4:5
Arrange stitches within a sewing sequence 4:6
Adjust an existing sewing sequence 4:7
Inserting a stitch in the sewing sequence 4:7
Inserting a stitch at the start
of a sewing sequence 4:7
Save a sewing sequence 4:8
Close a sewing sequence without saving 4:9
Delete a sewing sequence 4:9
Select and open a saved sewing sequence 4:9
Open from the machine‘s memory 4:10
Open from a creative memory card 4:10
Stitch Creator 4:11
Placing single stitches 4:13
Combining single parts of patterns 4:14
More options to edit patterns 4:15
Quilting 4:16-4:19
Patchwork 4:16
Piecing the quilt top 4:18
Stitch in the Ditch 4:18
Free-motion Stippling 4:19
Quilt Appliqués 4:19
Tapering 4:20
Nostalgia/Heirloom 4:22
Cross Stitch 4:23
Antique hand embroidery stitches 4:23
Free-motion Sewing 4:24
MAXI Stitches 4:24
Gathering with straight stitch 4:25
Shell edging 4:25
Alphabets 4:26
Editing a word sequence 4:27
Saving a word sequence 4:27
Monogram 4:28
EMBROIDERY 5:1-5:70
The Embroidery window 5:2-5:7
Context menu in embroidery 5:8-5:9
Embroidery accessories 5:10
Attaching the embroidery foot 5:10
Inserting a card 5:10
Lowering the feed dogs 5:11
Disengaging the IDT 5:11
Removing the knee lift 5:11
Connecting the embroidery unit 5:12
Embroidery hoop 5:13
Attach the hoop 5:13
Remove the hoop 5:13
Remove the embroidery unit 5:13
Get started to embroider 5:14
Hooping the fabric 5:15
Embroider single designs from a card 5:16-5:17
Color changing icon 5:18
1:5
Page 6

Multi-color embroidery 5:19
One color embroidery 5:20
Move the design within the hoop 5:20
Embroider 5:21
Enlarged representation 5:22
Positioning of designs in the embroidery hoop 5:22
Precise Positioning a design 5:23-5:25
Jumping over stitches 5:26
Embroider monograms and letters 5:27-5:30
Arcing; embroidery combinations 5:31-5:32
Automatic stitch building 5:33-5:34
Zoom In 5:35
The creative Data manager 5:36
Working with source and destination fi elds
in the creative Data Manager 5:37
Working with a fi eld in
the creative Data Manager 5:38-5:40
File formats 5:40
Using the hoop adapter 5:40
Automatic hoop positioning 5:40
Prepare a creative memory card for saving 5:41
Transferring designs from the PC to
your Pfaff creative 2170 5:41
How to use the embroidery template 5:42
Putting the embroidery in the right place 5:42-5:43
Stabilizers 5:44-5:45
Needles 5:45
Threads 5:46
Appliqué embroidery 5:47
Cutwork embroidery 5:47
BUILT IN DESIGNS 5:49-5:70
6
MAINTENANCE 6:1-6:11
Changing the needle plate 6:2
Cleaning 6:2
Changing the light bulb 6:3
What to do if...? 6:4-6:5
Index 6:6-6:10
Technical Data 6:11
1:6
Page 7

INTRODUCTION
Page 8
Stitch Chart
Utility stitches
1. 2. 3. 4. 5. 6. 7. 8. 9. 10. 11. 12. 13. 14. 15. 16. 17.
Stitch No. Description Application
1 Straight stitch For seaming and topstitching. Many needle positions for edge stitching and
sewing in zippers.
2 Stretch triple straight stitch For reinforced seams such as stitch trouser, under arm seams or decorative
topstitching. With many needle positions.
3 Zigzag stitch For fi nishing seams on fabrics appliqué work and inserting lace.
4 Three-step Zigzag stitch Strong stitch for seam fi nishes, sewing elastic, darning tears, and patches.
5 Straight stitch reverse Program permanent reverse for decorative sequences. Also for bulky projects.
6 Elastic overcast stitch Use to seam and overcast on woven and stretch fabrics.
7 Honeycomb stitch Elastic, decorative stitch for ornamental hem fi nishing on stretch fabric, for
8 Elastic stitch Strong stitch for seam fi nishes, sewing elastic, darning tears and patches.
9 Triple stretch stitch For sewing elastic on sportswear and bathing suits.
Introduction
10 Z-Zigzag stitch For fi nishing seams on fabrics, appliqué, and inserting lace.
11 Bridging stitch For bridging, decorative hemstitching and crazy quilting.
12 Foundation Elastic stitch For joining overlapped seams on bulky fabrics such as leathers and terry cloth.
13 Cross hem stitch Provides a highly elastic, decorative seam for hems on sportswear and Casual
14 Stretch triple zigzag stitch Elastic stitch for decorative hems and topstitching.
15 Quilt stitch For topstitching quilt projects with a hand look stitch.
16 Quilt stitch For topstitching quilt projects with a hand look stitch.
17 Quilt stitch For topstitching quilt projects with a hand look stitch.
decorative elastic application and sewing with elastic thread in the bobbin.
wear.
1:8
Page 9
Utility stitches
18. 19. 20. 21. 22. 23. 24. 25. 26. 27. 28. 29. 30. 31. 32. 47. 48.
Stitch No. Description Application
18 Quilting, appliqué or
pinstitching
19 Closed overlock stitch For joining and overcasting stretch fabrics in one operation. The closed seam
20 Closed overlock stitch For joining and overcasting stretch fabrics in one operation. The closed seam
21 Open overlock stitch For joining and overcasting stretch fabric in one operation.
22 Zigzag stitch, right or left
needle position
23 Standard overlock stitch For joining and overcasting stretch fabrics in one operation
24 Finished Edge overlock stitch For joining and overcasting stretch fabrics in one operation.
25 Light-knit fabric patching
stitch
26 Closed overlock stitch For joining and overcasting stretch fabrics in one operation. The closed seam
27 Stretch knit overlock stitch Join and overcast open knit fabrics and jersey.
28 Overlock stitch For joining and overcasting stretch fabrics in one operation.
29 Reinforced Overlock stitch For joining and overcasting fraying fabrics. The knitted edge reinforces and
30 Blindhem stitch For securing hems invisibly on woven fabrics.
For hand look quilt appliqué or pinstitching.
prevents fabric edges from fraying.
prevents fabric edges from fraying.
For appliqué couching over cords and creating eyelets.
Use to mend light jersey knits. Also for a decorative hem and neckline fi nish.
prevents fabric edges from fraying.
prevents fraying on raw edge.
Introduction
31 Elastic blindhem For securing hems invisibly and fi nishing the edge on stretch fabrics.
32 Basting stitch For basting projects pieces together.
47 Linen buttonhole Buttonholes for blouses, shirts and linen.
48 Standard buttonhole Basic buttonhole for blouses, shirts and jackets. Also for pillow cases.
1:9
Page 10
Utility stitches
49. 50. 51. 52. 53. 54. 55. 56. 57. 58. 59. 60. 61. 62. 63. 64. 65. 66.
Stitch No. Description Application
49 Stretch buttonhole Buttonhole for stretch fabrics.
50 Cross stitch buttonhole Decorative buttonhole for jackets and for embellishing other garments.
51 Rounded buttonhole with
52 Rounded buttonhole with
53 Rounded end buttonhole
54 Eyelet buttonhole with
55 Eyelet buttonhole with
56 Professional eyelet
Introduction
57 Rounded buttonhole Use for lightweight garments or jackets.
58 Decorative Buttonhole with
59 Button sewing program For applying two-hole or four-hole buttons.
60 Bartack For applying belt loops and reinforcing pockets.
61 Denim Bartack Decorative bartack for trouser and skirt pockets
62 Decorative bartack Decorative bartack for trousers and skirts.
pointed bartack
lengthwise tack
with crosswise tack
pointed bartack
lengthwise bartack
buttonhole
triangle tack
Buttonholes for shirts, jackets and trousers.
Buttonholes for shirts, jackets and trousers.
Buttonholes for shirts, jackets and trousers.
Professional tailor's buttonhole, for denim jackets and trousers. Or as a
decorative effect for kitchen and shower curtains. Add rings through the
buttonholes to hang the curtains.
Professional tailor's buttonhole, for denim jackets and trousers. Or as a
decorative effect for kitchen and shower curtains. Add rings through the
buttonholes to hang the curtains.
Professional tailor's buttonhole, for denim jackets and trousers. Or as a
decorative effect for kitchen and shower curtains. Add rings through the
buttonholes to hang the curtains.
Decorative buttonhole for jackets and for embellishing other garments.
1:10
63 Stippling stitch Random darning stitch for mending rips and tears. Also great as a decorative
accent.
64 Programmable Darning
stitch
65 Programmable reinforced
Darning stitch
66 Eyelet Create eyelets for garments and home textiles. Also great for decorating
Programmable length for darning and repeat it for large repairs.
Programmable length for darning and repeat it for large repairs. Reinforced by
horizontal stitches.
nostalgia projects.
Page 11

Decorative stitches creative 2170
Utility stitches
30 33 36 39 42 45
31 34 37 40 43 46
32 35 38 41 44
For the stitches 30, 31 and 32, you fi nd a more detailed
explanation in the Stitch overview on page 1:9.
Scalloped edgings
Satin stitches
89 92 95 98 101 104 107 110 113 116
67 70 73 76 79 82 85 88
68 71 74 77 80 83 86
69 72 75 78 81 84 87
Quilt stitches
15 18 301 304 307 310
Introduction
90 93 96 99 102 105 108 111 114
91 94 97 100 103 106 109 112 115
Cross stitches
117 120 123 126 129 132 135
118 121 124 127 130 133 136
119 122 125 128 131 134
16 299 302 305 308 331
17 300 303 306 309
Hem stitches
137 140 143 146
138 141 144
139 142 145
1:11
Page 12

Decorative stitches creative 2170
Leaves and Flowers
147 150 153 156 159 162 165 332
148 151 154 157 160 163 166
149 152 155 158 161 164 167
Antique Embroidery stitches
311 314 317 320 323 326 329 334
312 315 318 321 324 327 330 335
313 316 319 322 325 328 333
Decorative stitches 1
168 171 174 177 180 183 186 189 192 195 337 340 343
Animal stitches
223 226 229
169 172 175 178 181 184 187 190 193 196 338 341 344
Introduction
170 173 176 179 182 185 188 191 194 336 339 342 345
Decorative stitches 2
197 200 203 206 209 212 215 218 221 347 350
198 201 204 207 210 213 216 219 222 348
199 202 205 208 211 214 217 220 346 349
224 227 230
225 228 351
1:12
Page 13

Decorative stitches creative 2170
MAXI stitches
231 236 241 246 251 256
232 237 242 247 252 257
233 238 243 248 253 258
234 239 244 249 254 259
Introduction
235 240 245 250 255 260
Alphabets
Script Block Outline Comic
Cursive MAXI 1 MAXI 2
1:13
Page 14
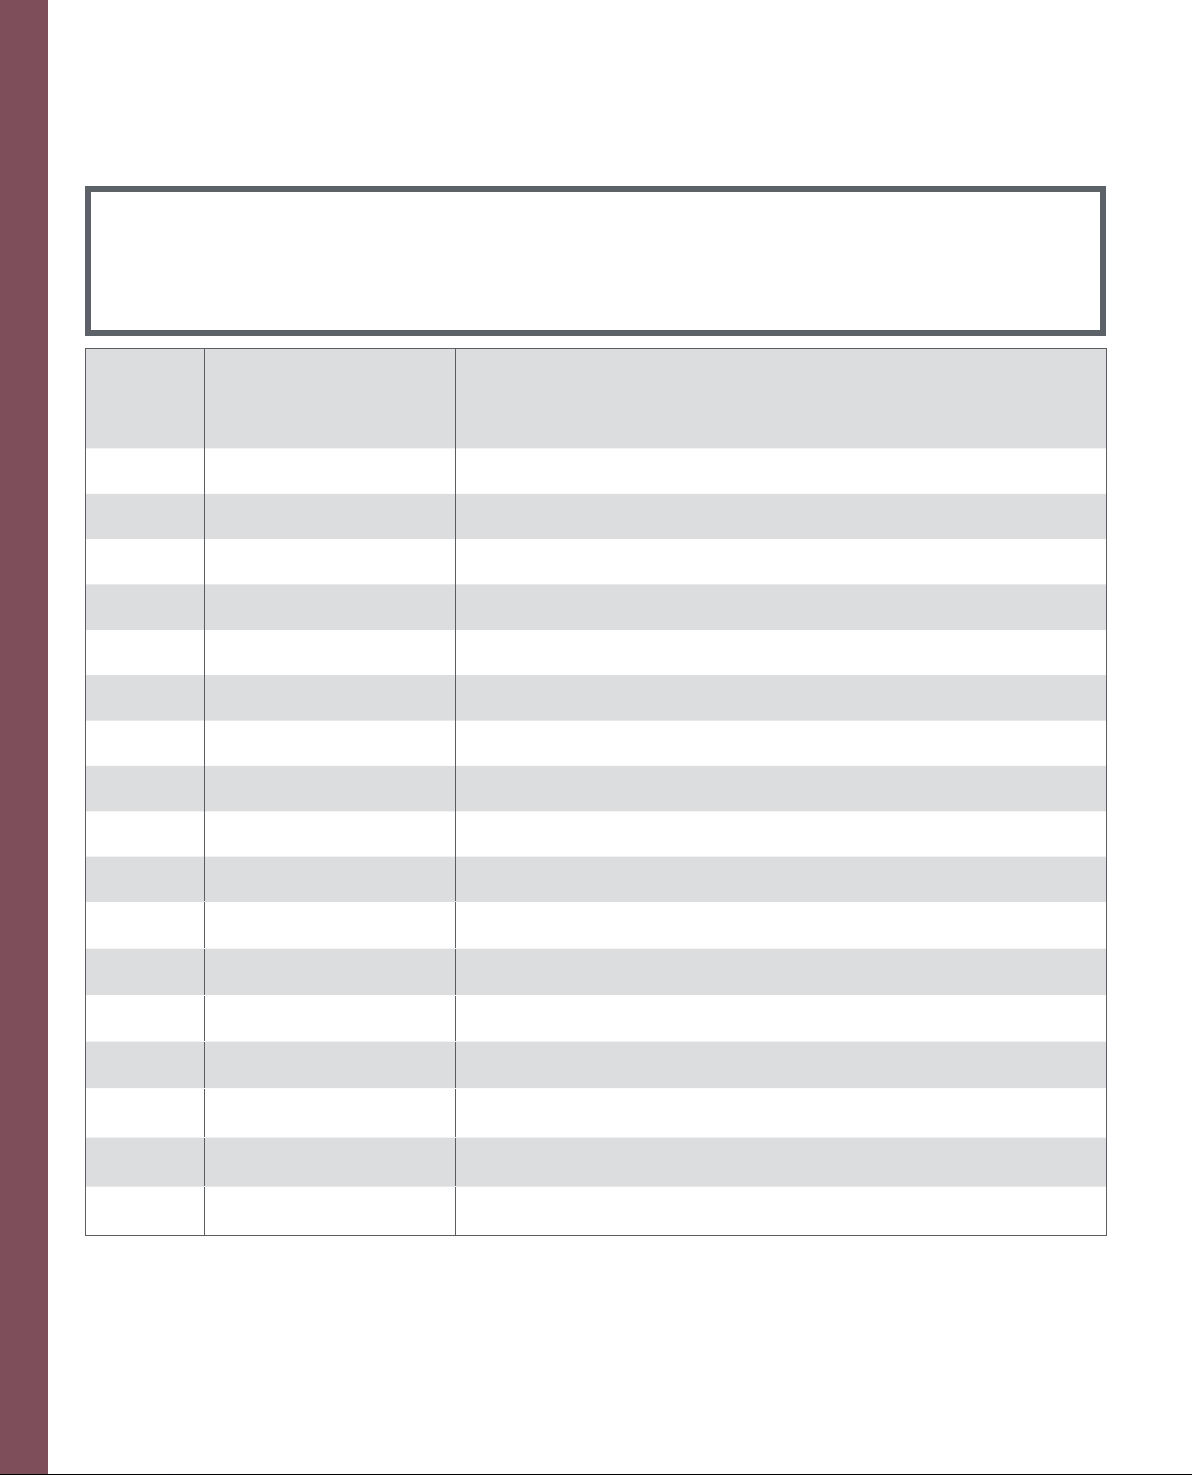
Machine overview
Parts of the creative 2170
1 Top cover with stitch chart
2 Multi-color touch screen
3 Base plate
4 Slide for lowering the feed dogs
5 Connection for knee lift
6 Feed dogs
7 Free arm
8 Presser foot holder with presser foot
9 Needle threader
10 Needle holder with set screw
11 Thread cutter
12 Reverse sewing button
13 Signal lamp bobbin thread monitor
14 Connection socket for embroidery unit
15 Take-up lever
16 Pre-tension device for threading and
bobbin winding
17 Thread guide for threading and bobbin
winding
18 Spool holder with spool cap
19 Second spool holder
20 Hole for third spool holder
21 Bobbin winding control
22 Bobbin winder
23 Handwheel
Introduction
24 Contrast control for the display
25 Front and rear card slots
26 Release buttons for the card slots
27 Voltage switchover
28 Connection socket lead cord
29 Connection socket foot control
30 Main switch
31 Accessory tray
32 Needle plate
33 Thread guides, right and left
34 Sewing bulb (max. 5 W)
35 Threading slot
36 Carrying handle
37 Thread snips button
38 Pattern Start button
39 Sew slow button
40 Needle up/down button
41 Presser foot lifter
42 Integrated Dual feed /IDT
17
16
15
13
8
37
109
38
12
40
39
33
11
7
6
36
35
34
32
31
1918
14
5
41
42
21
20
4
22
30
29
28
1
2
3
23
24
25
26
27
1:14
Page 15
49
48
50
51
52
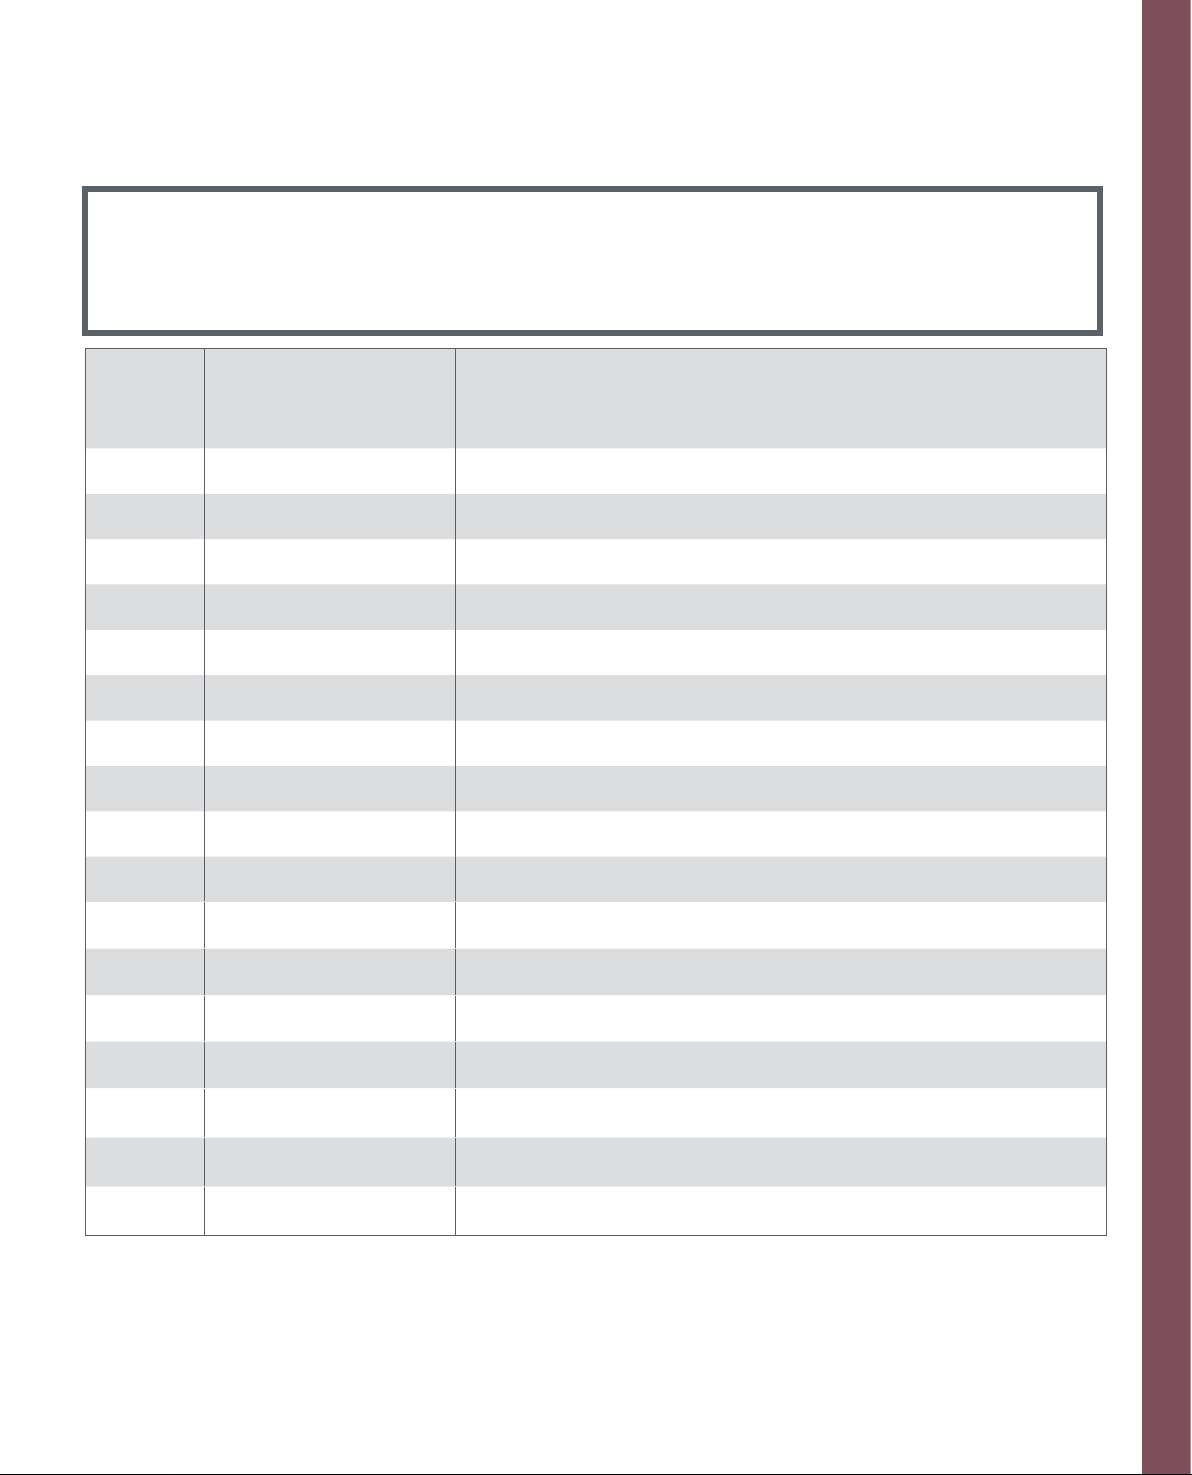
Parts of the embroidery unit
44 Connection plug to the machine
45 Fastener for fi tting to the machine
46 Under arm guide
47 Release button for removing the embroidery unit
48 Pivot for embroidery arm
49 Metal guide for fi tting the embroidery hoop
50 Release lever for removing the embroidery hoop
51 Embroidery arm
52 Recessed grip for raising and rotating the
embroidery arm
47
444546
Introduction
Parts of the embroidery hoop
53 Snap-in pin
53
54
55
56
54 Two guide pins for retaining the hoop
55 Ribs for fi tting the clips
56 Projections for placing the template
57 Retaining screw for the fabric
57
1:15
Page 16
Standard accessories
Standard presser foot
No. 0 A
Order No.: 820 244-096
Fancy stitch foot with
IDT No. 1 A (for IDT)
Order No.: 820 254-096
Fancy stitch foot No. 2 A
(not suitable for IDT)
Order No.: 820 260-096
Zipper foot No. 4
Order No.: 820 248-096
Buttonhole foot No.
5 A
Order No.: 820 299-096
Buttonhole guide No.
10
Order No.: 820 294-096
Introduction
Maxi-stitch Embroidery
foot No. 8 (not suitable
for IDT)
Order No.: 820 259-096
Blindhem foot with IDT
No. 3
Order No.: 820 256-096
Darning foot No. 6
Order No.: 820 243-096
Rolled hem foot No. 7
Order No.: 820 249-096
1:16
Page 17
Creative Fantasy Embroidery foot
Order No: 820 280-096
Edge guide No. 3
Order No.: 820 251-096
Introduction
1. Brush
8
7
Order No.: 93-847-979-91
6
1234 5
2. Extra spool pin
3. Seam ripper
Order No.: 99-053-016-91
4. Bulb remover / Needle plate changer
Order No.: 820 292-096
5. Bobbins
6. Felt pad
7. Spool caps
8. Needles
Stylus
Order No: 412 69 34-01
Stitch Card – Antique Quilt Stitches and Hand
Embroidery Stitches
Order No: 412 74 69-06
1:17
Page 18
Embroidery unit
Embroidery hoops
1. creative HOOP 80
80x80mm, with adapter
Order No: 820 476-096
2. ROUND HOOP 120x115 mm
Order No: 93-039-343-44-000
1. 2.
3. Clips
Order No: 412 65 18-03
4. Hoop Adapter
Order No: 820 477-096
5. Embroidery template
Order No: 412 86 21 01
6. creative HOOP
225x140 mm
Order No: 93-039-340-44-000
Introduction
1. File assistant
File Assistant
Using the File Assistant you can download
embroidery designs directly from the Internet and
transfer them to your creative 2170.
Order No: 412 84 16-96
2. Creative gallery designs
3. USB cable
4. Quick embroidery packet
5. 300 Embroidery card
6. Embroidery threads
Order No: 412 85 90-96
Knee lift
Order No.: 412 70 57 02
4.3.
5. 6.
1
4
2
5
3
6
1:18
Page 19

PREPARATIONS
Page 20
Operating Instructions
Voltage Switch
220 - 240V / 120V
The sewing machine is set to the voltage 220 - 240V. To change the
voltage to 120V (US/Canada), you must set the voltage switch on the
underside of the machine to 120 V.
If you are unsure of the correct voltage for your country, please check
with your authorized Pfaff sewing machine dealer or local electrical
authorities before plugging in your machine.
Electrical connection
Connect the lead cord between the socket of the sewing machine and
the wall outlet.
For the USA and Canada:
This sewing machine has a polarized plug (one blade wider than the
other). To reduce the risk of electric shock, this plug is intended to
fi t in a polarized outlet only one way. If the plug does not fi t fully in
the outlet, reverse the plug. If it still does not fi t, contact a qualifi ed
electrician to install the proper outlet.
DO NOT modify the plug in any way!
Preparations
Connecting the foot control
Pull the retractable cord out of the foot control to a length that is
comfortable for you. The foot control has an automatic cord-rewind
reel for storage. Connect the plug of the foot control to the connection
socket of the sewing machine.
The sewing speed is controlled by pressing the foot control.
The foot control ATK 0080 must be used for this sewing machine.
2:2
Page 21
Main switch
When the main switch is switched on (switch function I) the sewing
lightbulb lights up and the multi-color touch screen lights up.
The sewing machine is now ready to function.
"0" = OFF
"I" = ON
Thread cutter
Pull the thread from the back to the front up over the thread cutter.
Preparations
A
Contrast of the screen
The contrast of the screen is adjustable. The setting can be re-adjusted
with the screen control dial (A).
2:3
Page 22
Carrying case
Place the enclosed lead cord, the foot control and instruction book into
the storage compartment of the carrying case.
Lid
Open the lid upwards.
The stitches of the sewing machine are illustrated on the inside of the
lid.
Preparations
Accessory tray
Open the accessory tray by placing your left index fi nger on the ridged
area on the left of the lid and open the lid up and towards you.
Free arm
In order to sew using the free arm, swing the detachable accessory tray
to the left and lift it up out of the hole. When replacing the accessory
tray, make sure it is fl ush with the free arm of the sewing machine.
Note: Some fabrics have a lot of excess dye which can cause discoloration on other fabric
but also on your sewing machine. This discoloring may be very diffi cult or impossible to
remove.
Fleece and denim fabric (especially in red and blue) often contain a lot of excess dye.
If you suspect that your fabric/ready-to-wear garment contains a lot of excess dye,
always pre-wash it before sewing/embroidering to avoid the discoloring.
2:4
Page 23

Changing the presser foot
Snap off the presser foot
Switch off the main switch.
Press the front part of the presser foot upwards and at the same time
the rear part downwards until it disengages from the presser foot
holder.
Snap on the presser foot
Place the presser foot under the presser foot holder, so that when the
presser foot lift is lowered, the pins of the foot snap onto the presser
foot holder.
Preparations
Check:
Please check that the presser foot is properly attached by raising the
presser foot lift.
Note: If your Presser foot lift is disengaged because of the embroidery or free-motion, step
on the foot control in a sewing stitch or disengage the free-motion icon.
2:5
Page 24
The IDT (Integrated Dual Feed)
For sewing any fabric precisely Pfaff provides the ideal solution: the
Integrated Dual Feed, IDT system. As on industrial machines, the IDT
feeds the fabric from the top and bottom at the same time at the same
stitch length. The fabric is fed precisely. On light fabrics such as silk or
rayon the dual feed prevents puckering of the seam. The even feeding
action also ensures perfect matching of checked and striped fabrics. The
IDT keeps all layers of quilt projects aligned to prevent stretching of the
top layers.
Engaging the IDT
Important: For all work with the Integrated Dual Feed IDT, use presser
feet with the center back cut-out.
Raise the presser foot. Press the IDT down until it engages.
Preparations
Disengaging the IDT
Hold the IDT with two fi ngers at the ribbed ankle. Press the IDT down,
then pull it away from you and release the IDT slowly upward.
2:6
Page 25
Changing the needle
A
A
Switch off the main switch.
To remove: Lower the presser foot and set the
needle to its highest position. Loosen the needle
screw and pull the needle out downwards.
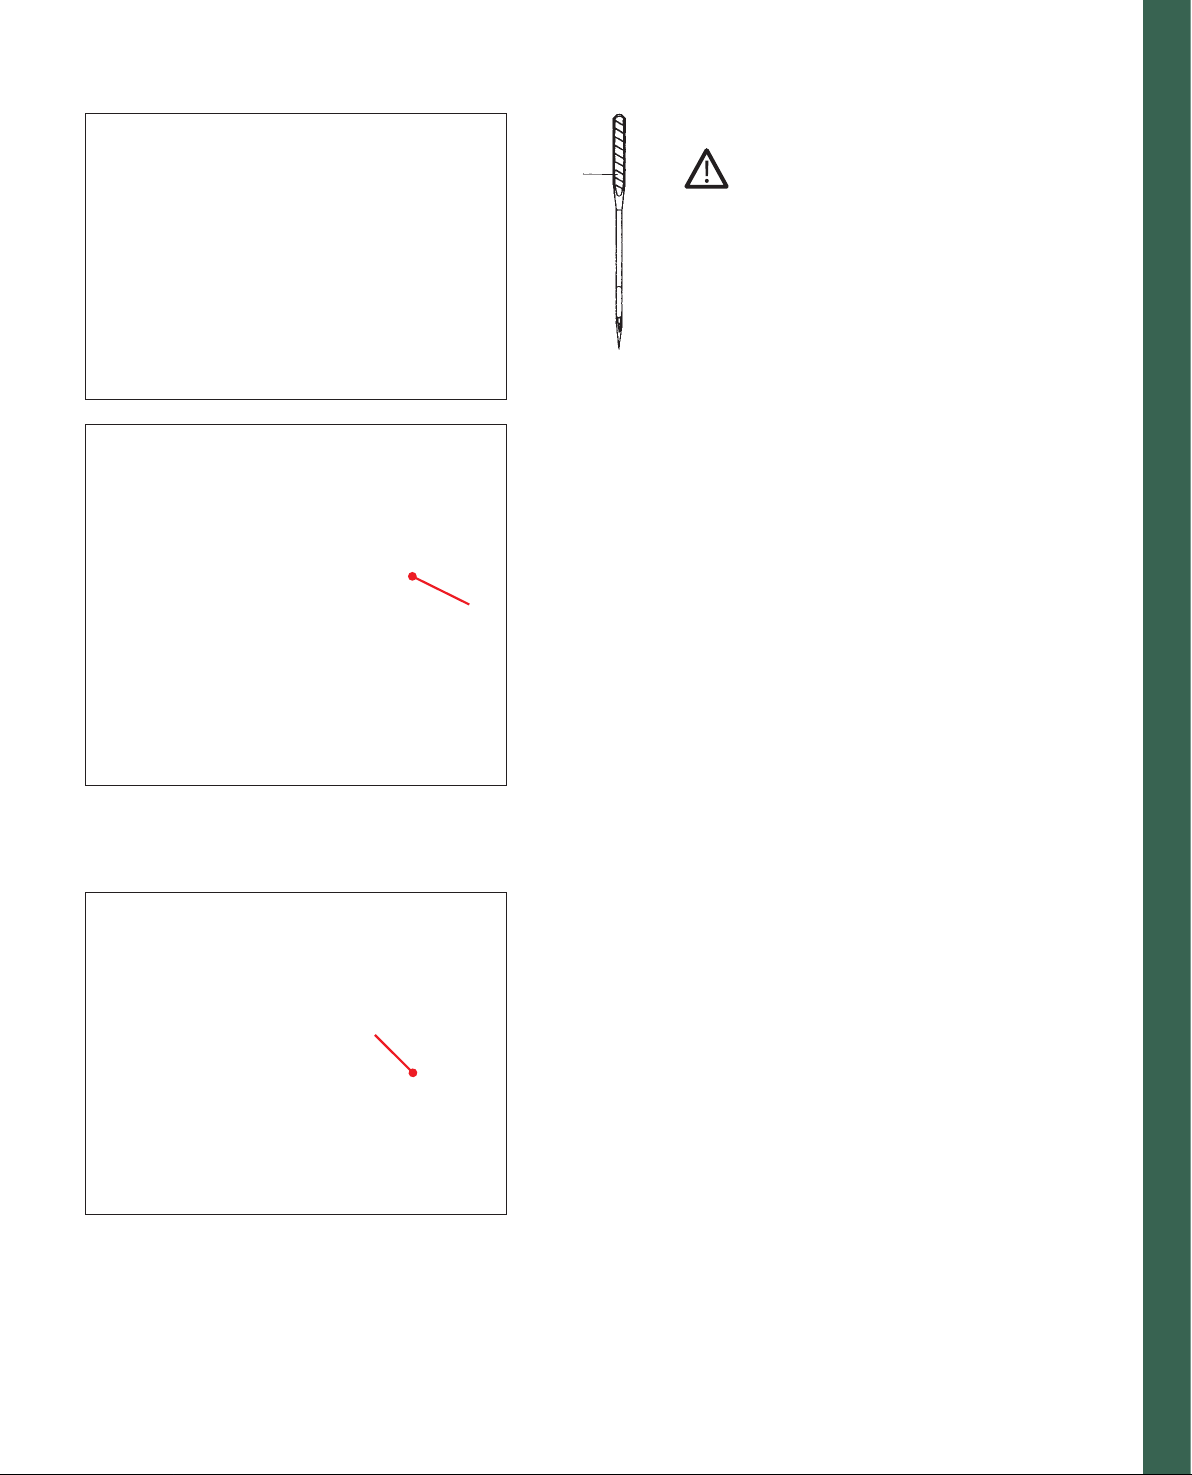
To insert: The fl at side A of the needle must face
to the rear. Lower the presser foot and insert the
needle, pushing it up as far as it will go. Hold the
needle and tighten the needle screw fi rmly.
The feed dogs
For certain sewing work such as free-motion
quilting or darning or when embroidering, the feed
dog must be lowered. On your Pfaff creative 2170
there are two different methods for lowering the
feed dogs, one on the outside of the machine and
one inside the bobbin door.
For either method:
Raise the presser foot before lowering the feed dog.
Push slide A or B to the left.
To bring the feed dogs back up move the slide to the
right.
Preparations
B
2:7
Page 26
Winding the bobbin from the spool pin
Choose a spool cap slightly larger in diameter than the spool. For
example use the large spool cap for larger spools of thread, and the
smallest cap with cone-type spools. Place the sewing thread on the
spool pin. Slide the cap tightly against the spool.
Threading
Place the thread into guide (A) from front to back and pull it counterclockwise ABOVE the bobbin winder thread guide (B).
Wind the start of the thread around the bobbin several times in a
clockwise direction.
Note: When bobbin winding always place the thread ABOVE the bobbin winder thread
guide (B). Place a bobbin on the bobbin winder with the Pfaff logo up. Make sure the
bobbin is secure on the bobbin winder by placing the small pin on the bobbin winder into
Preparations
the slot on the bobbin.
Switch on the main switch.
B
A
Start bobbin winding by pushing the bobbin winding lever to the
right. You may need to adjust the Winding speed on the window in
the multi- color touch screen as explained on page 2:11. As soon as the
bobbin is full, the winding action will be stopped automatically. Cut
the thread and remove the bobbin from the winder.
2:8
Page 27
2.
1.
B
A
Swing the second spool pin up and lock. Place a spool of thread
with an appropriate spool cap on the spool pin.
Preparations
2. Winding from the third spool pin
Insert the third spool pin in the hole provided. Place the appropriate
spool cap and then a spool on the spool pin.
Threading
Place the thread into thread guide (A) from front to back and pull
it counter clockwise above the bobbin winder thread guide (B).
Wind the start of the thread around the bobbin several times in a
clockwise direction.
Start bobbin winding by pushing the bobbin lever to the right.
As soon as the bobbin is full, the winding action will be stopped
automatically. Cut the thread and remove the bobbin from the
winder
1. Winding from the second spool pin
2:9
Page 28
Bobbin winding while embroidering
The creative 2170 has a thread guide for bobbin winding while
embroidering.
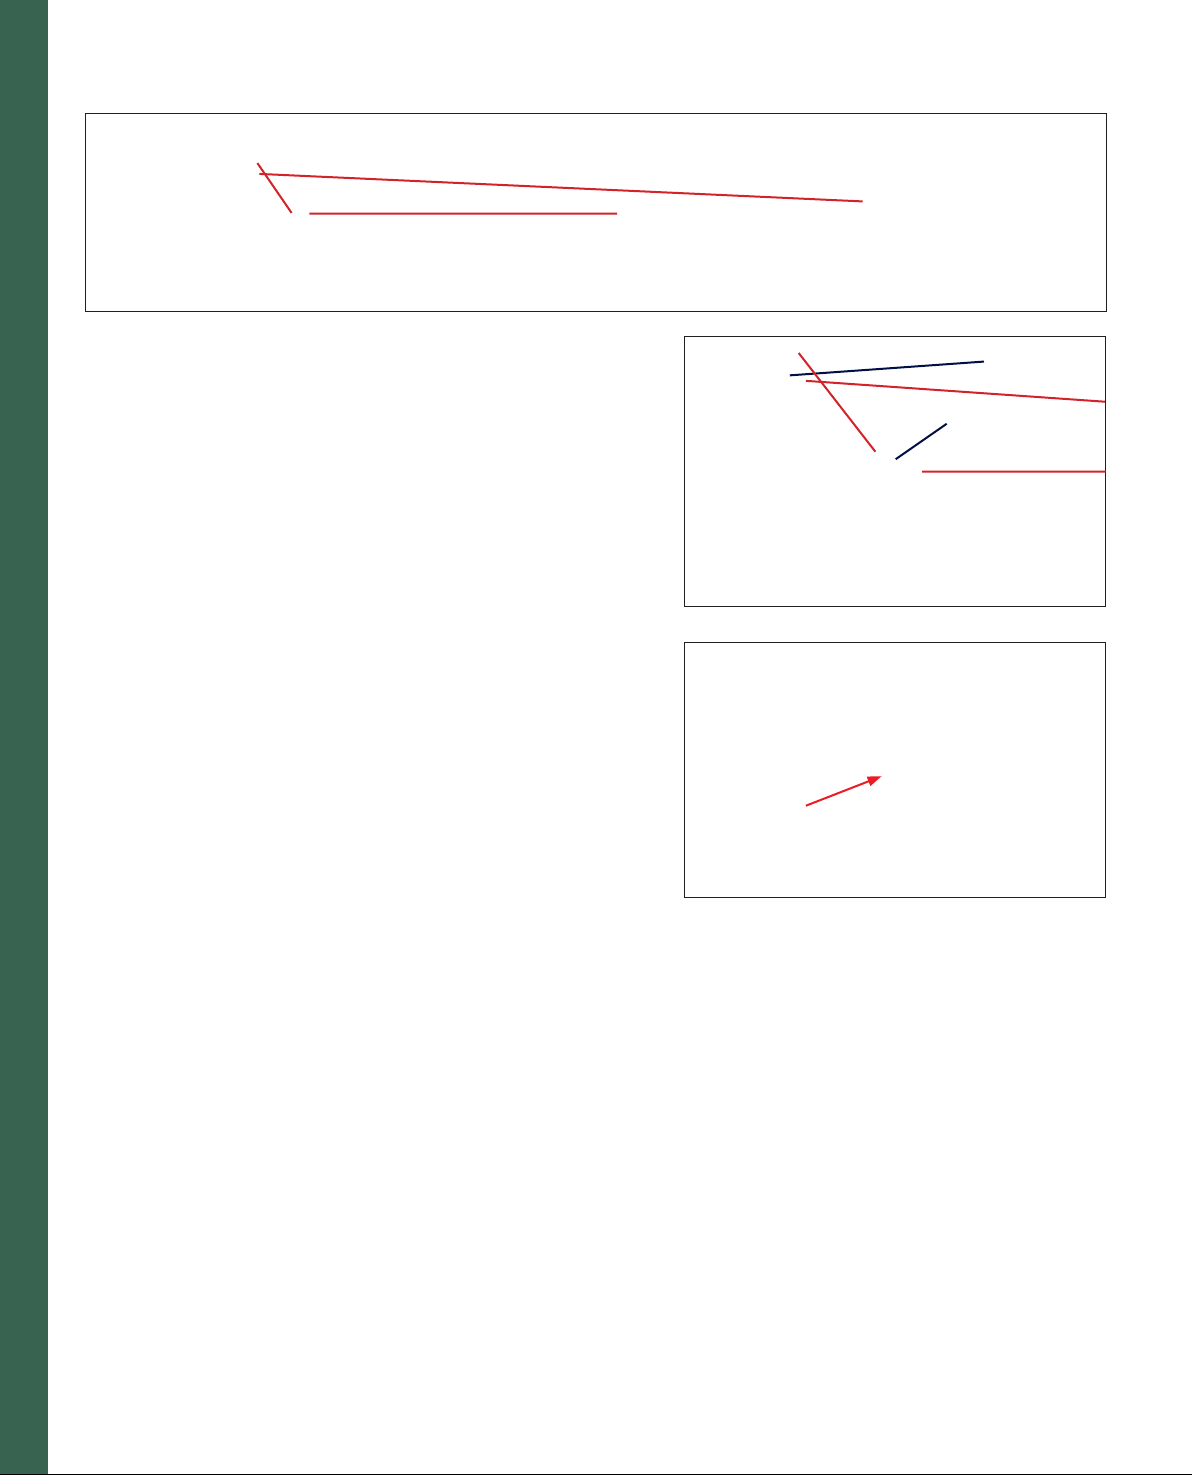
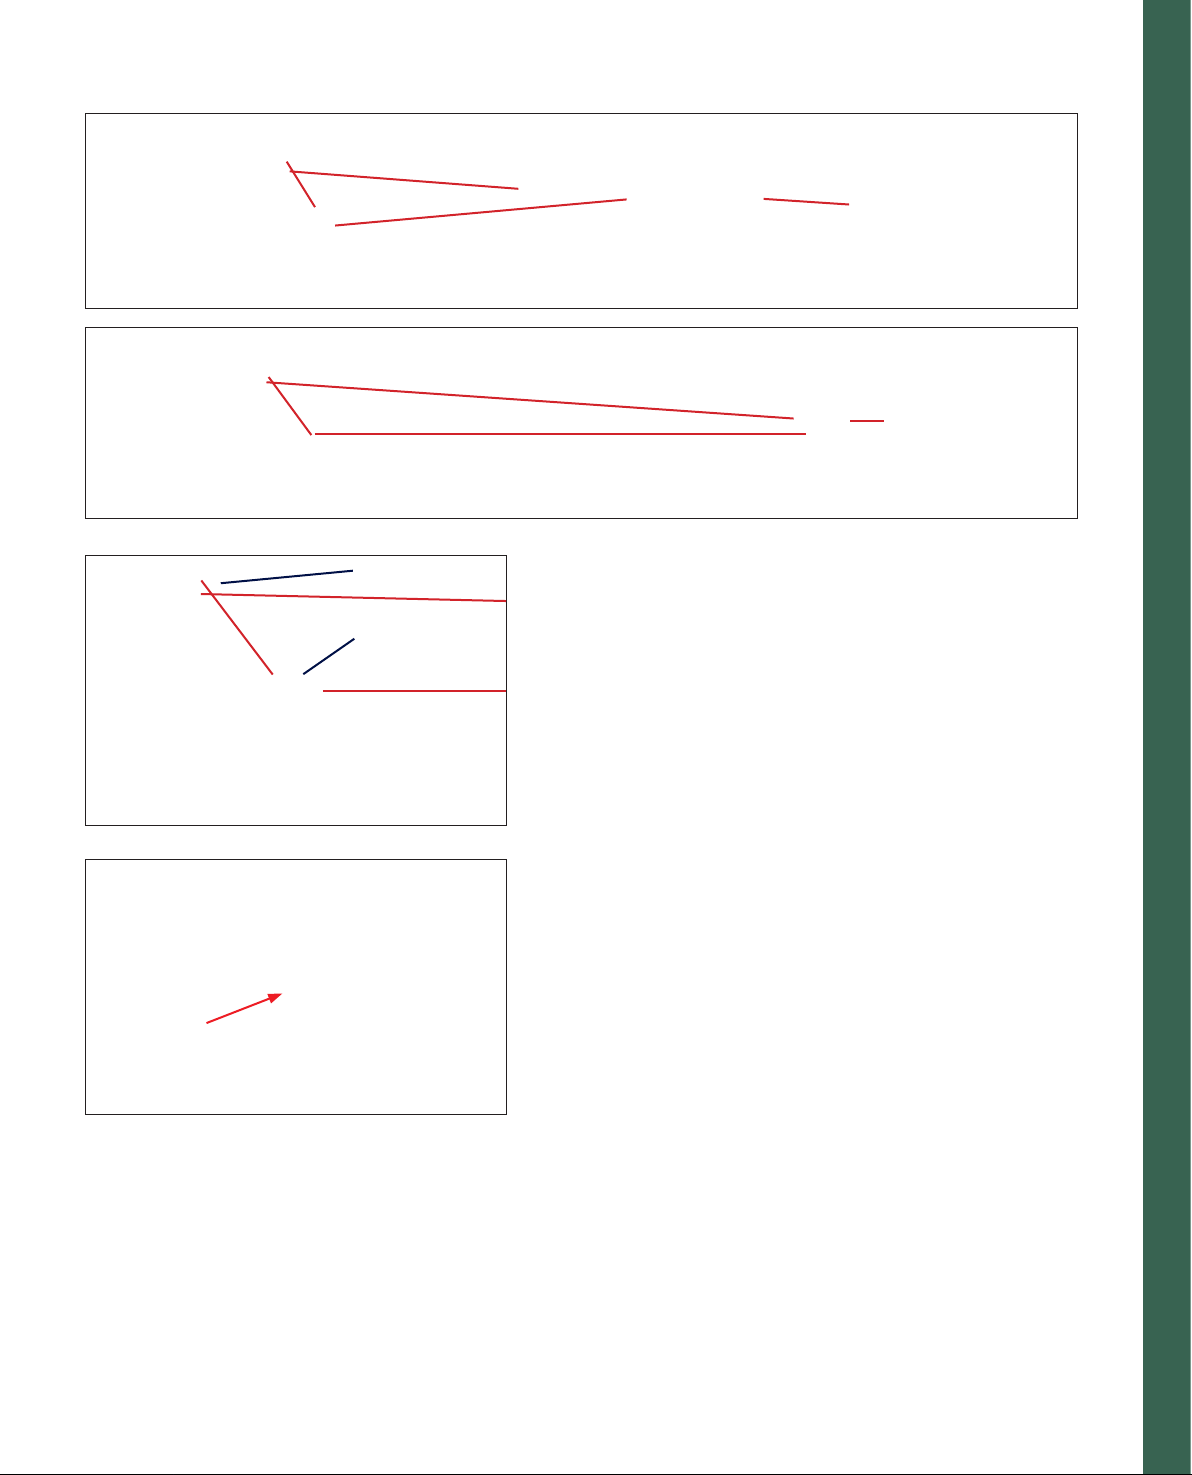
The needle thread (red) is placed into the thread guide (A) and
underneath the bobbin winder thread guide (B). Pull the bobbin thread
(blue) counter clockwise above the bobbin winder thread guide. Wind
the start of the thread around the bobbin several times in a clockwise
direction.
Winding a bobbin through the needle
It is possible to wind bobbins even when the machine is fully threaded
(see page 2:14 for threading instructions).
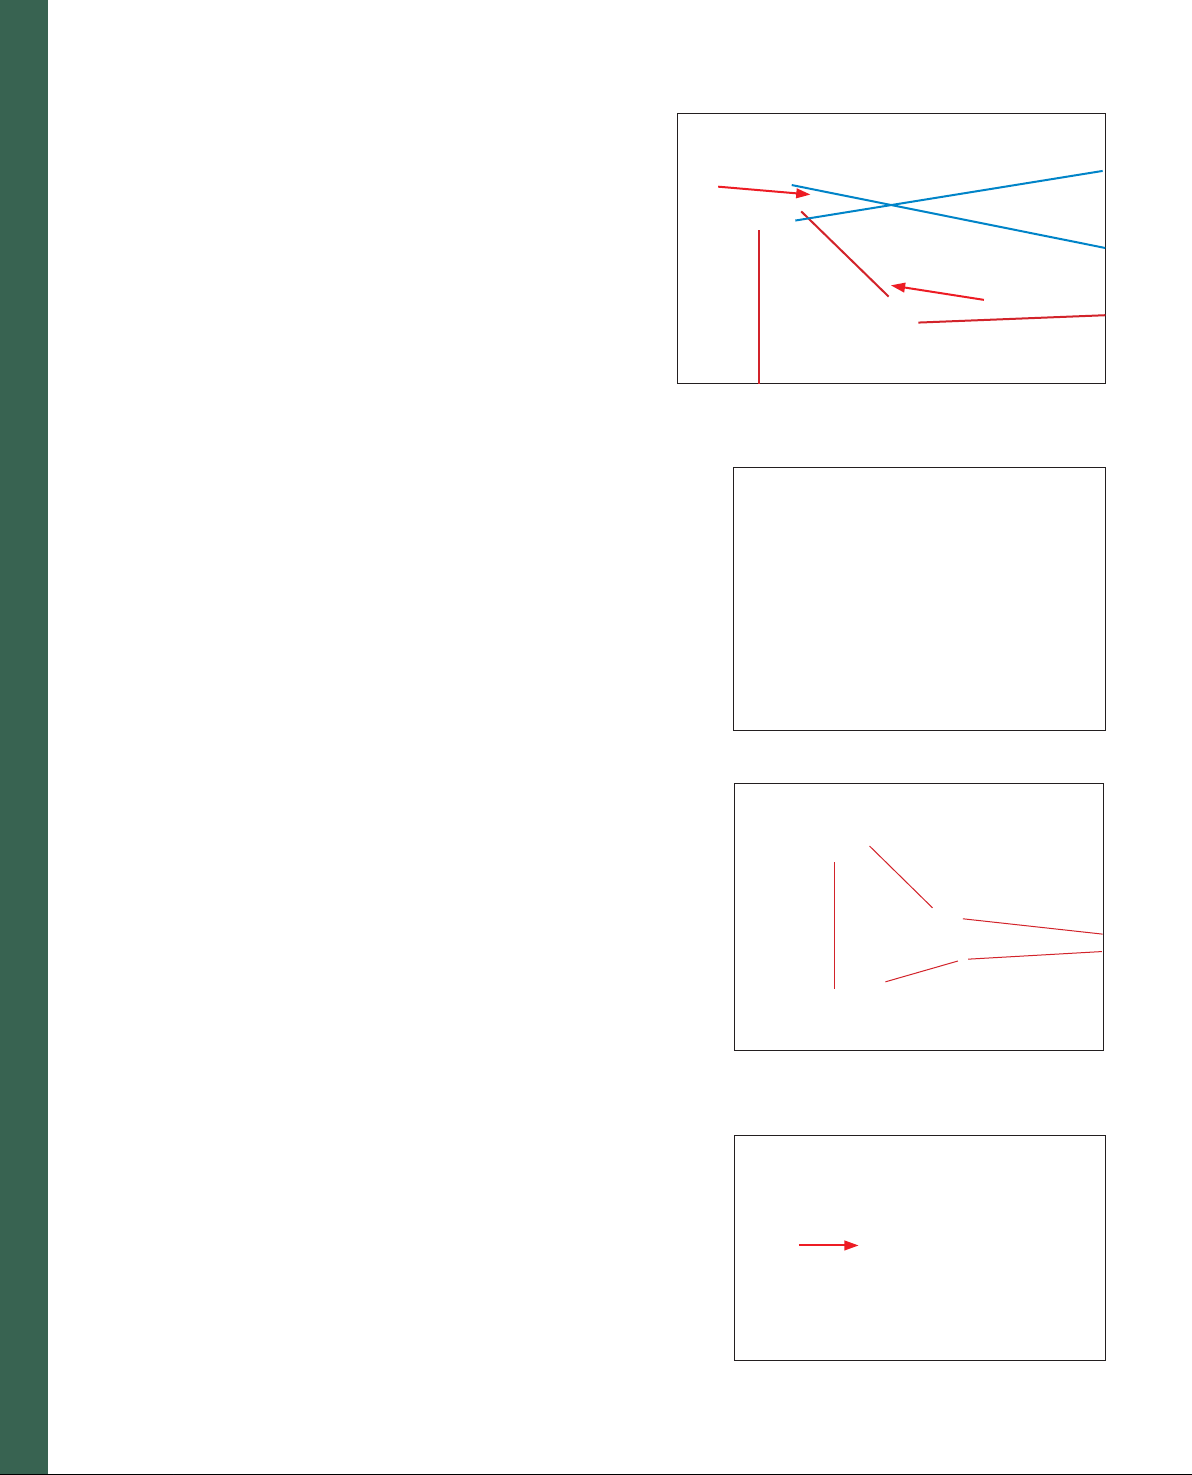
Raise the presser foot. Pull the needle thread underneath the presser
foot and upward through the right-hand threader slot.
B
A
Preparations
Place the thread from left to right through the take-up lever (C).
Note: The take-up lever must be at its highest position.
Guide the thread to the right. Wind the start of the thread around the
bobbin several times in a clockwise direction. Start bobbin winding
by pushing the bobbin lever to the right. As soon as the bobbin is full,
the winding action will be stopped automatically. Cut the thread and
remove the bobbin from the winder.
Note: The thread knife next to the bobbin winder makes it easy to cut the thread after
bobbin winding.
2:10
C
Page 29
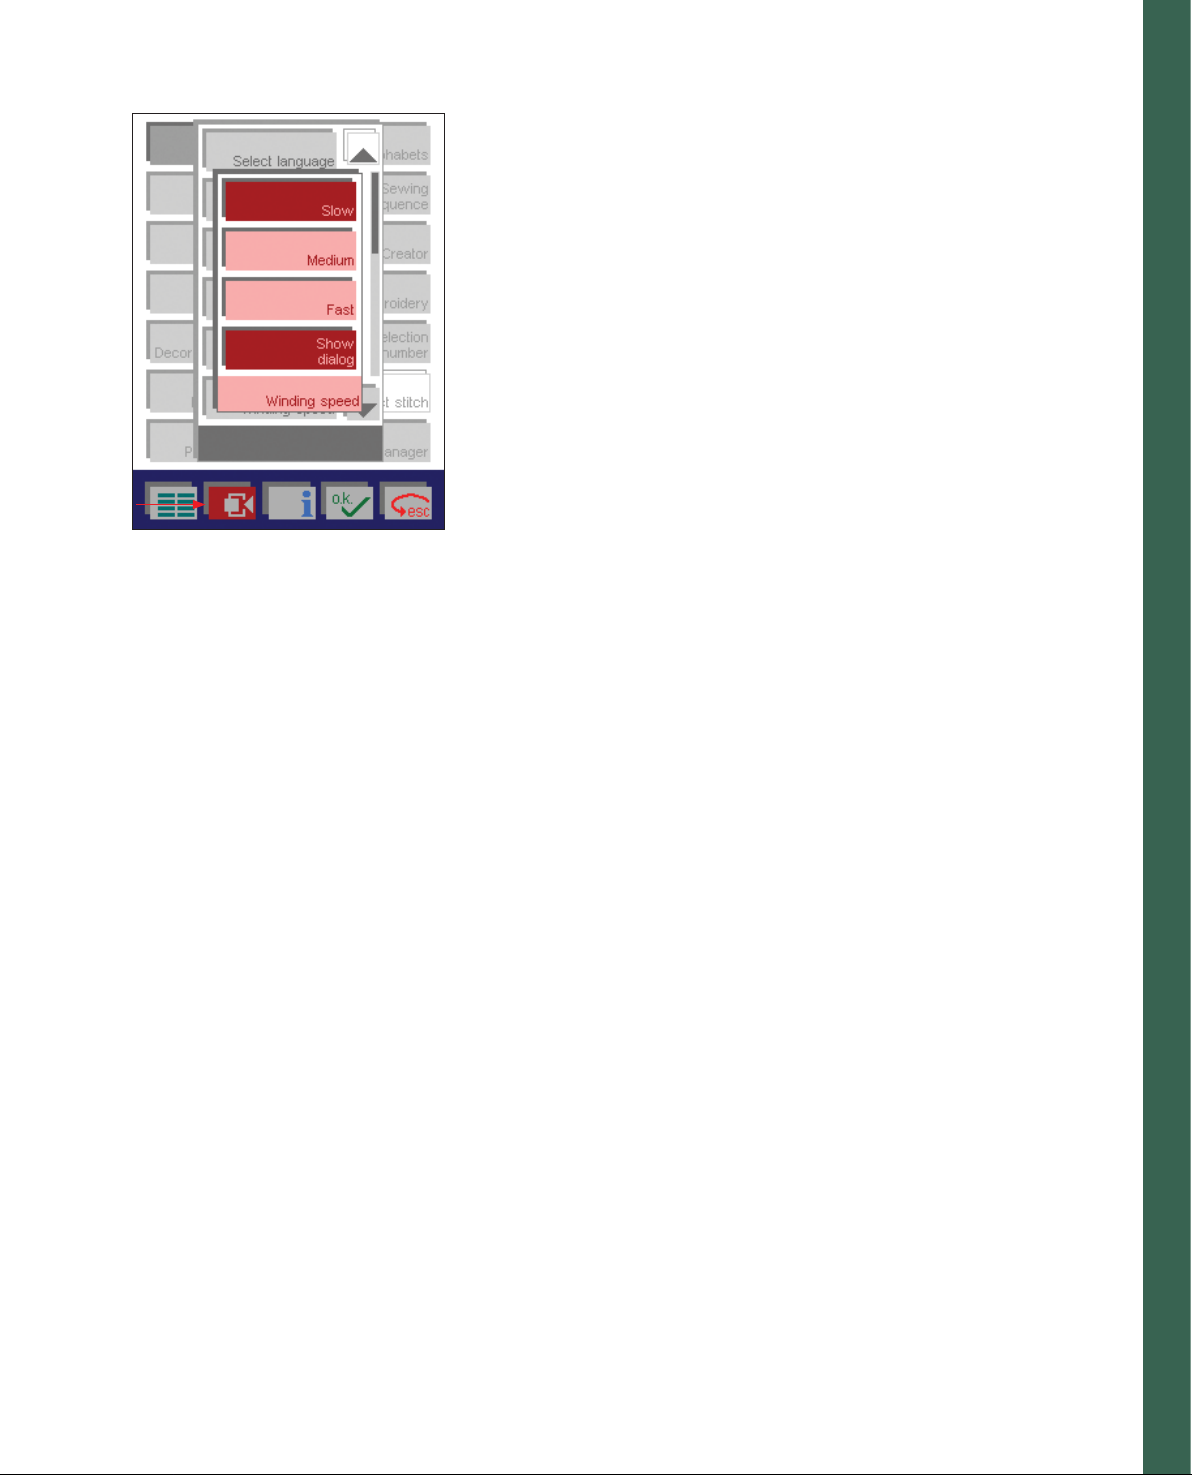
Setting the bobbin winding speed
You can select the speed in which the bobbin winding is wound when
the machine is stopped. In the context menu (A), you will fi nd an icon
called Winding speed. If you touch that icon, a pop-up will appear
where you can choose if you want the winding speed to be Slow,
Medium or High.
If you touch the Show Dialog icon, a window for selecting the speed
opens each time the bobbin winder is switched on.
The speed that you have selected can halved at any time by touching
the half speed button.
Note: If you wind the bobbin while the sewing machine is running, the winding speed is
automatically set to Low.
A
Preparations
2:11
Page 30
Inserting the bobbin and bobbin case
Switch off the main switch.
Open the bobbin door at the left side swinging it open towards the
front.
Lift the latch of the bobbin case and pull the bobbin case out of the
machine. Release the latch and take the empty bobbin out of the bobbin
case.
Bobbin thread monitor
When the bobbin thread is nearing its end the red light next to the
reverse button fl ashes automatically. A warning message will also be
given on your display. This function is only activated when the bobbin
door is closed.
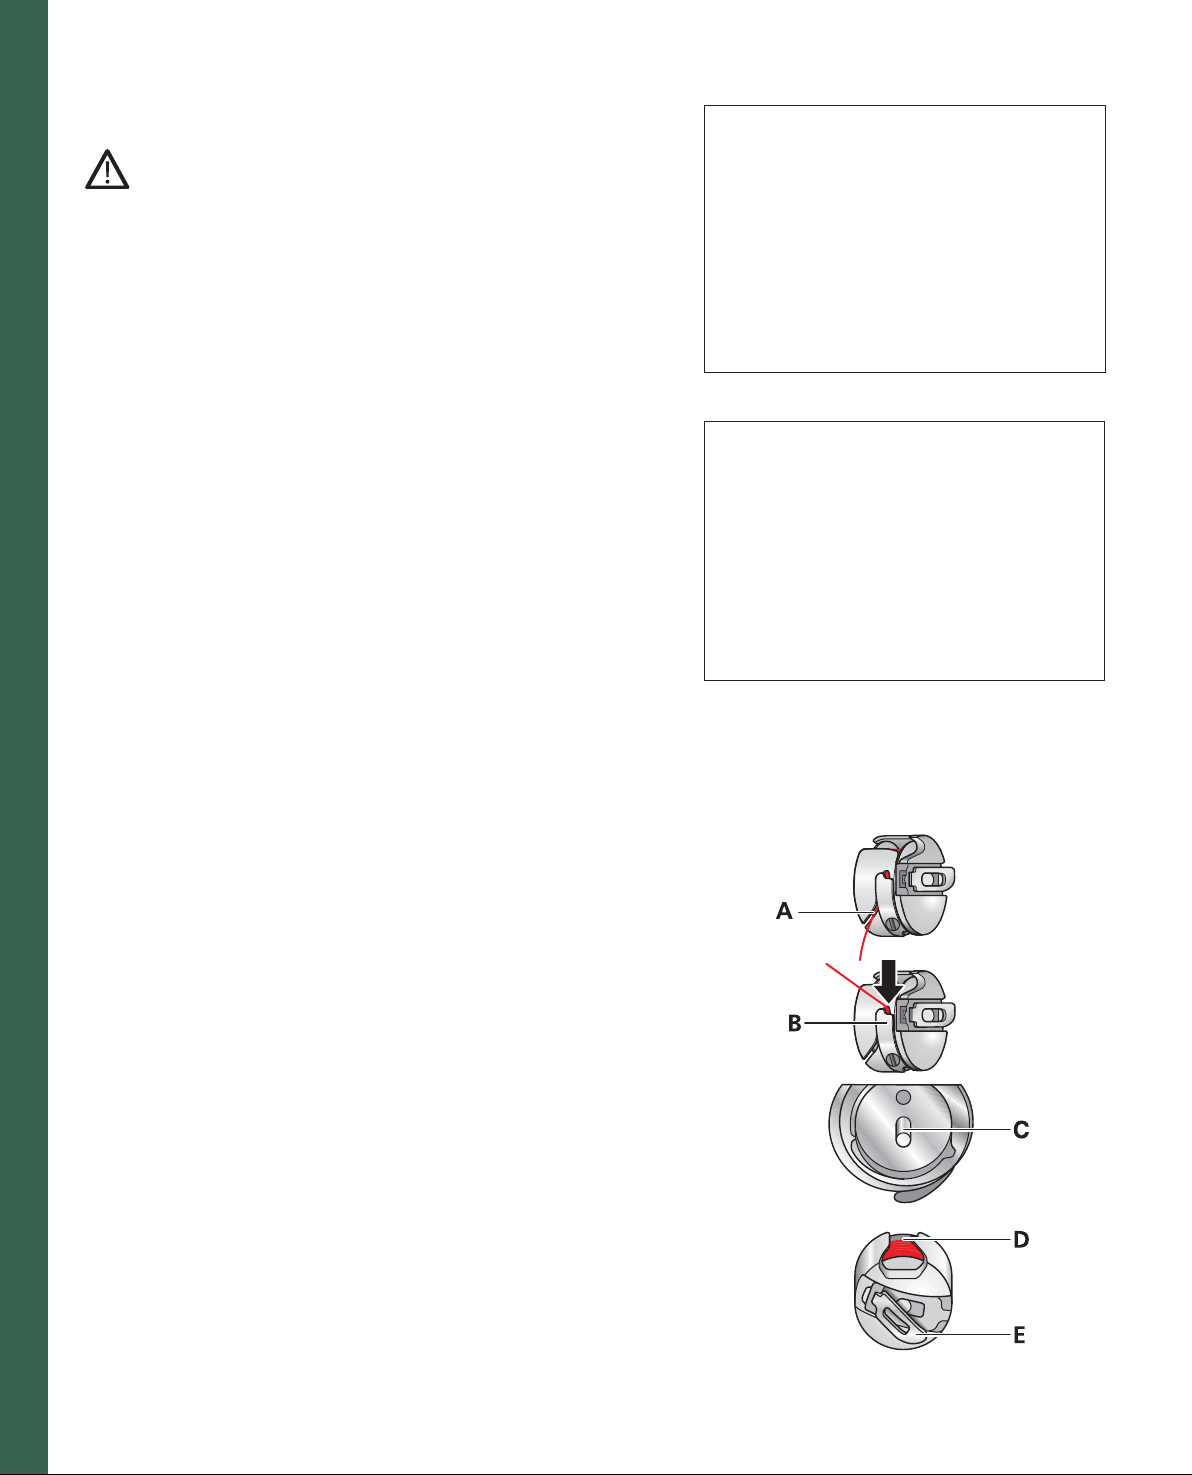
Inserting the bobbin
Insert the full bobbin (with the Pfaff logo facing towards the bobbin
case) in the bobbin case. When doing so, pull the thread through slot
(A), then under tension spring (B) until it rests in the opening (see
arrow).
Preparations
Check: Hold the bobbin case with the bobbin facing towards you. When you pull the
thread, the bobbin must turn clockwise.
Inserting the bobbin case
Lift latch (E) and push the bobbin case fully onto pin (C) of the sewing
hook. Opening (D) of the bobbin case must face upwards.
Check: Pull the bobbin thread sharply. The bobbin case must not fall out of the hook.
2:12
Page 31

Correct top tension - How to get it
This machine will automatically preset the tension for different types of
stitches. Depending on what type of fabric and threads you are using,
manual adjustments might be needed.
If you fi nd that the bobbin thread is visible on the top side of the fabric
or that the top thread is visible on the underside of the fabric, you need
to adjust the thread tension.
Press the thread tension icon (A), + and - to set the required amount
of the needle thread tension. Your adjustments will be reset when you
select a new stitch or design. To save your alterations for the next time
you sew see page 3:12.
A
Thread tension
For the best stitch appearance and durability make sure the needle
thread tension is correctly adjusted, i.e. the threads evenly meet
between the two fabric layers.
The following is valid for general sewing work:
Preparations
Bobbin thread is visible on the top side of the fabric:
The needle thread tension is too tight.
The needle thread tension must be reduced.
Top thread is visible on the underside of the fabric:
The needle thread tension is too loose.
The needle thread tension must be increased.
For decorative stitches and buttonholes the top thread should be visible
on the underside of the fabric.
2:13
Page 32

Threading the needle
Raise the presser foot. Place the thread on the spool pin and fi t a spool
cap of the right size.
Using both hands, pull the thread into the thread guide (A) from front
to back. Place the thread from the right underneath the bobbin winder
thread guide (B).
Now pass it through the left-hand threading slot downwards.
Pull the thread around the stop (C) in the right-hand threading slot and
upwards to the take-up lever (E). The thread must be pulled fully into
the take-up lever from left to right. Pass the thread downwards in the
right-hand threading slot.
Pull the thread from the side behind one of the two thread
guides (D).
To thread the needle, please refer to the next section.
Note: When sewing always place the thread underneath the bobbin winder thread guide
(B).
B
A
E
Preparations
Needle threader
In order to make threading of the needle easier and quicker the Pfaff
needle threader is built-in. The needle threader allows you to thread
the needle automatically.
1. Lower the presser foot. Press the threader down with the handle.
The threader hook (G) swivels through the needle eye.
2. Place the thread from the back, over the hook (F) and under the
thread hook (G) and hold the end of the thread taut. Reduce the
pressure so that the needle threader slowly moves upwards.
3. At the same time, the threader hook swivels out of the needle eye
and pulls the thread through the eye. Slightly release the end of the
thread, so that a thread loop can form behind the needle. Release
the threader and pull the rest of the thread end through the needle
eye.
C
D
1.
2:14
F
2.
G
3.
Page 33

Bobbin thread
Raise the presser foot. Insert the bobbin case and place the thread to the
left (see picture). Close the hook/bobbin door. Place the fabric under
the presser foot and start to sew. The machine will pull the thread up
by itself.
Threading the twin needle
Replace the sewing needle with a twin needle.
A
Swing the second spool holder up and lock. Place a spool of thread
with an appropriate spool cap on it. Make sure that both threads are
placed underneath the bobbin winder thread guide. During threading
in the left threading slot, make sure that you pass one thread to the
left and one thread to the right sides of the tension disk (A). Continue
threading in the usual manner, making sure the threads do not become
twisted together.
Preparations
Pull the right thread into the right thread guide and thread the right
needle. Pull the left thread into the left thread guide and thread the left
needle.
It is not possible to use the automatic needle threader with a twin
needle.
2:15
Page 34

Presser foot lift
The presser foot is raised or lowered with the presser foot lift.
Electronic knee lift
Your Pfaff creative 2170 is provided with an electronic knee lift for
regulating the presser foot height.
1. Push the knee lift fully into the provided hole on the machine.
Note: the fl at side must face upwards.
2. Adjust the rectangular bar on the knee lift until it is positioned at a
comfortable height for you.
If you press the knee lift to the right, the presser foot will raise.
Now you can guide the fabric with both hands.
3. To remove the knee lift, just pull it out of the hole.
Preparations
1. 2.
3.
2:16
Page 35

General notes on how the Pfaff creative 2170
works
In your sewing machine there are two tools to help you while you are
sewing; the creative Assistant and the Machine Assistant.
Creative Assistant
In your Pfaff creative 2170 there is a creative Assistant function (A)
that gives you information on how to use the machine. If you press the
creative Assistant while you are on the Main menu you will get general
information about the machine. If you touch the icon within a stitch,
the direct help function is launched. It provides you with information
about what foot to use etc.
Machine Assistant
When you are in the creative Assistant you can reach the Machine
A
Assistant function by pressing the Machine Assistant icon (B). The
Machine Assistant gives you information on how to use the machine.
You can choose from two menus; Sewing and Embroidery. You can
among other things, fi nd instructions on how to thread the needle,
wind a bobbin, change the presser foot, change the light bulb, and fi t
the embroidery hoop to the machine.
Preparations
When closing the creative Assistant press the (C) icon. The toolbar will
change color and the buttons will change to the normal toolbar.
C
B
2:17
Page 36

creative Data Manager
The creative Data Manager organizes your Pfaff creative 2170’s stitches.
Here you can organize stitches, stitch sequences, personal menus, and
programs as the Patchwork program.
You have access to the following functions:
1. Personalized stitches can be saved and renamed, copied or deleted.
2. Designs can be copied from a card to a creative memory card.
3. Sequences/combinations can be renamed, altered or deleted.
4. Personal menus can be altered, renamed or deleted.
5. New directories and sub-directories can be created in the machine
or on a creative memory card.
6. Data in the memory can be accessed.
7. Individual stitches or designs within a sequence/combination can
be accessed.
8. An entire directory can be accessed. Your Pfaff creative 2170 is
always ready to sew, even when the Creative Data Manager is
open.
In your creative Data manager there are two fi elds available. One
fi eld is the source data. The other fi eld is the destination data. Either
fi eld can be used as source or destination. To open directories, sub-
directories/sequences/combinations, personal menus or data records
there is a selection bar which you can move up or down with the
arrows.
In order to process the data record, it must be selected.
Preparations
2:18
Page 37

creative Data manager
A. Machine memory icon: Use this function to access the stitches or the
A
embroideries in the machine.
B. Front card drive icon, card inserted: use this function to access the
B
front card drive.
C. Rear card drive icon, no card in the machine: Use this function to
G
H
I
J
access the rear card drive.
C
D. Sort criterion icon: use this function to sort your data alphabetically
D
or according to data type.
E
E. Start sewing: If you touch this icon when you have marked
F
a sequence, you can sew it straight away. The corresponding
processing menu for the sewing sequence or embroidery
combination appears on the screen. Read more about sewing
sequence on page 4:4-4:5.
If you touch this icon when a stitch is marked, the processing menu
for the stitch appears and the machine is ready to sew.
If you touch this icon when a Personal menu is marked the personal
menu is displayed and you can select a stitch and sew it. The stitch
appears on the corresponding processing screen.
F. Memory information icon: Use this function to consult the data
records contained in a directory or stitch that you have marked.
G. Activity arrow icon: using these arrows you can browse through
the screen. The dark marker bar indicates the marked area.
H. Delete icon: Use this icon to delete a data record (directory, stitch or
stitch sequence) that you have marked.
I. Copy icon: this is a function for copying renaming, moving
stitches/designs, sequences or combinations.
Preparations
Copying data:
You can duplicate data, such as stitches and stitch sequences, from the
machine or a creative card and save them in a different memory or save
or insert them on a creative card. To do this, mark your destination fi le,
mark the source fi le and touch ’Copy’.
Sequence: 1. Mark destination / 2. Mark source / 3. Copy
Renaming data:
To rename data such as stitches, stitch sequences or personal menus,
touch the Copy icon and Rename. A window for entering a new name
(max. 8 characters) is opened.
Move:
You can move stitches or stitch sequences from the machine or from
a creative card to another memory or onto a creative card. To do this,
mark your source fi le, mark the destination fi le and touch the Copy
icon and Move.
Sequence: 1. Mark destination / 2. Mark source / 3. Move
2:19
Page 38

How to update your machine
Together with your Pfaff creative 2170 you received a special cable with
USB connection on one end and a creative card on the other. Use this
cable when updating your machine or when transferring data between
your Pfaff creative 2170 and the 3D File Assistant on your computer.
1. Enter the Pfaff home page at www.pfaff.com and click on 2170
update.
2. Click to download.
3. Fill out your registration form or enter your e-mail address and
start the search. When the registration is complete, start the
download.
Note: Depending on the Windows version installed on your computer, your screen may
look different than those shown.
4. To run the download program directly from the site, choose Open
this fi le from its current location.
5. If you want to download the program to your hard drive and
update the machine later, choose Save this fi le to disk. See How to
save the update program to your hard drive.
6. Click Yes to continue.
7. When screen (C) appears the update program is activated and you
can close your Internet connection.
Preparations
C
2:20
Page 39

Set your Pfaff creative 2170 in the update mode
1. Connect the cable to a port on your computer then insert the card in
one of the card drives in your sewing machine.
2. Turn the machine on.
3. Touch the Main Menu.
4. Touch Context menu. Touch Firmware update. Choose yes to the
prompting question. A new pop-up with updating instructions
appears.
5. Read the instructions, then touch OK to prepare your Pfaff creative
2170 for updating. Yet another pop-up appears telling you that the
machine is waiting for data.
6. Click on the Update sewing machine icon on the computer
to start the update. The updating process will begin and after
approximately 20 minutes, you can restart the sewing machine
and your Pfaff creative 2170 is ready to use with the new program
version. If you have problems updating your Pfaff creative 2170,
see section Troubleshooting, page 2:23.
Preparations
How to save the update program to your hard drive
Note: Depending on the Windows version installed on your computer, your screen may
look different than those shown.
1. Click on the update link, the following screen appears.
2. Choose Save this fi le to disk by clicking in the white circle in front
of the text (if it has a dot in front of it, it is already selected). Click
OK.
3. The Save As window appears. If you have updated your 2170
previously, browse to the update folder you created and save the
new fi le there. Otherwise create a new folder according to the
instructions below.
2:21
Page 40

Create a folder to save in
4. Left mouse click on the arrow down symbol. Your hard drive is
most often called Local Disk and is followed with a C: as the name
of the drive.
5. Find your hard drive and left mouse click to open it.
6. Click on the new folder icon, (A) to create a new folder on your
hard drive.
Preparations
7. The new folder is selected so you can enter a new name. Name the
folder Update 2170.
8. Double-click on the folder to open it.
9. Left mouse click on the Save icon to save the update fi le in the
folder.
A
2:22
Page 41

10. The saving to the folder begins. The speed of your Internet
connection will determine how long the download will take.
11. The fi le Update 2170 has now been downloaded.
Left mouse click on the Open folder icon, to open the folder where
the update fi le is stored.
(Depending on the settings in your computer the above window might close
automatically. If so, please follow the instructions under Update later).
12. Double-click the left mouse button on the Update 2170 icon. The
update program starts. Follow the instructions on the screen and set
your 2170 in the update mode.
Preparations
Update later
If you want to update your Pfaff creative 2170 at a later time, left mouse
click on the Close icon. If the Download complete screen is closed
automatically, disregard the above.
When you want to update your 2170, left mouse double click on the
My Computer icon on your desktop (the opening screen when you fi rst
turn on your computer). Left mouse double click on the C: drive.
Left mouse double click on the Update 2170 folder to open it.
Double click on the Update 2170 fi le.
The update program starts.
Follow the instructions on the screen and set your 2170 in the update.
Troubleshooting
• The message Unable to open COM-port/USB appears. Check that
the correct COM-port/USB is selected in the serial port selection
list.
• The message Unable to initialize the sewing machine monitor
appears. Check all connections between the computer and the
machine. Switch off your Pfaff creative 2170, restart and set it in the
update mode. Restart the update program.
• If a communication error occurs, check the connection to the
computer, turn the sewing machine off and back on again. When
turning the machine on, the screen will be black. Click the Update
sewing machine icon on the PC. Within a few seconds the updating
process will start again.
2:23
Page 42

SEWING
Page 43

Function Buttons
A. Thread Snips Button
B. Pattern start
C. Sew Slow Button
D. Needle Up/Down Button
E. Bobbin Thread Monitor
F. Reverse Sewing Button
A. Thread Snips Button
When pressing this button the machine automatically cuts the bobbin
and needle thread. If you press the button while sewing, the machine
will fi nish the stitch, make a tie-off and cut the threads.
B. Pattern start
This button has two functions. If you press this button while sewing,
the machine fi nishes the stitch its own and makes a tie-off. If you press
it once you have stopped the machine, it goes back to the beginning of
that stitch.
C. Sew Slow Button
When pressing this button the sewing speed is lowered.
D. Needle Up/Down Button
If you press this button, the needle automatically comes to rest in the
lower position when you stop sewing. When pressing this button the
following dialog window (G) opens on your screen. You can choose
how high you want the presser foot to be lifted when you take your
Sewing
foot off the foot control. When you press the foot control again the
presser foot is automatically lowered again. This makes it easy for you
when turning a corner, quilting etc.
ABCD
E
F
G.
E. Bobbin Thread Monitor
When the bobbin thread is running out the bobbin thread monitor
fl ashes.
Note: The Bobbin Thread Monitor only works if the hook cover is closed.
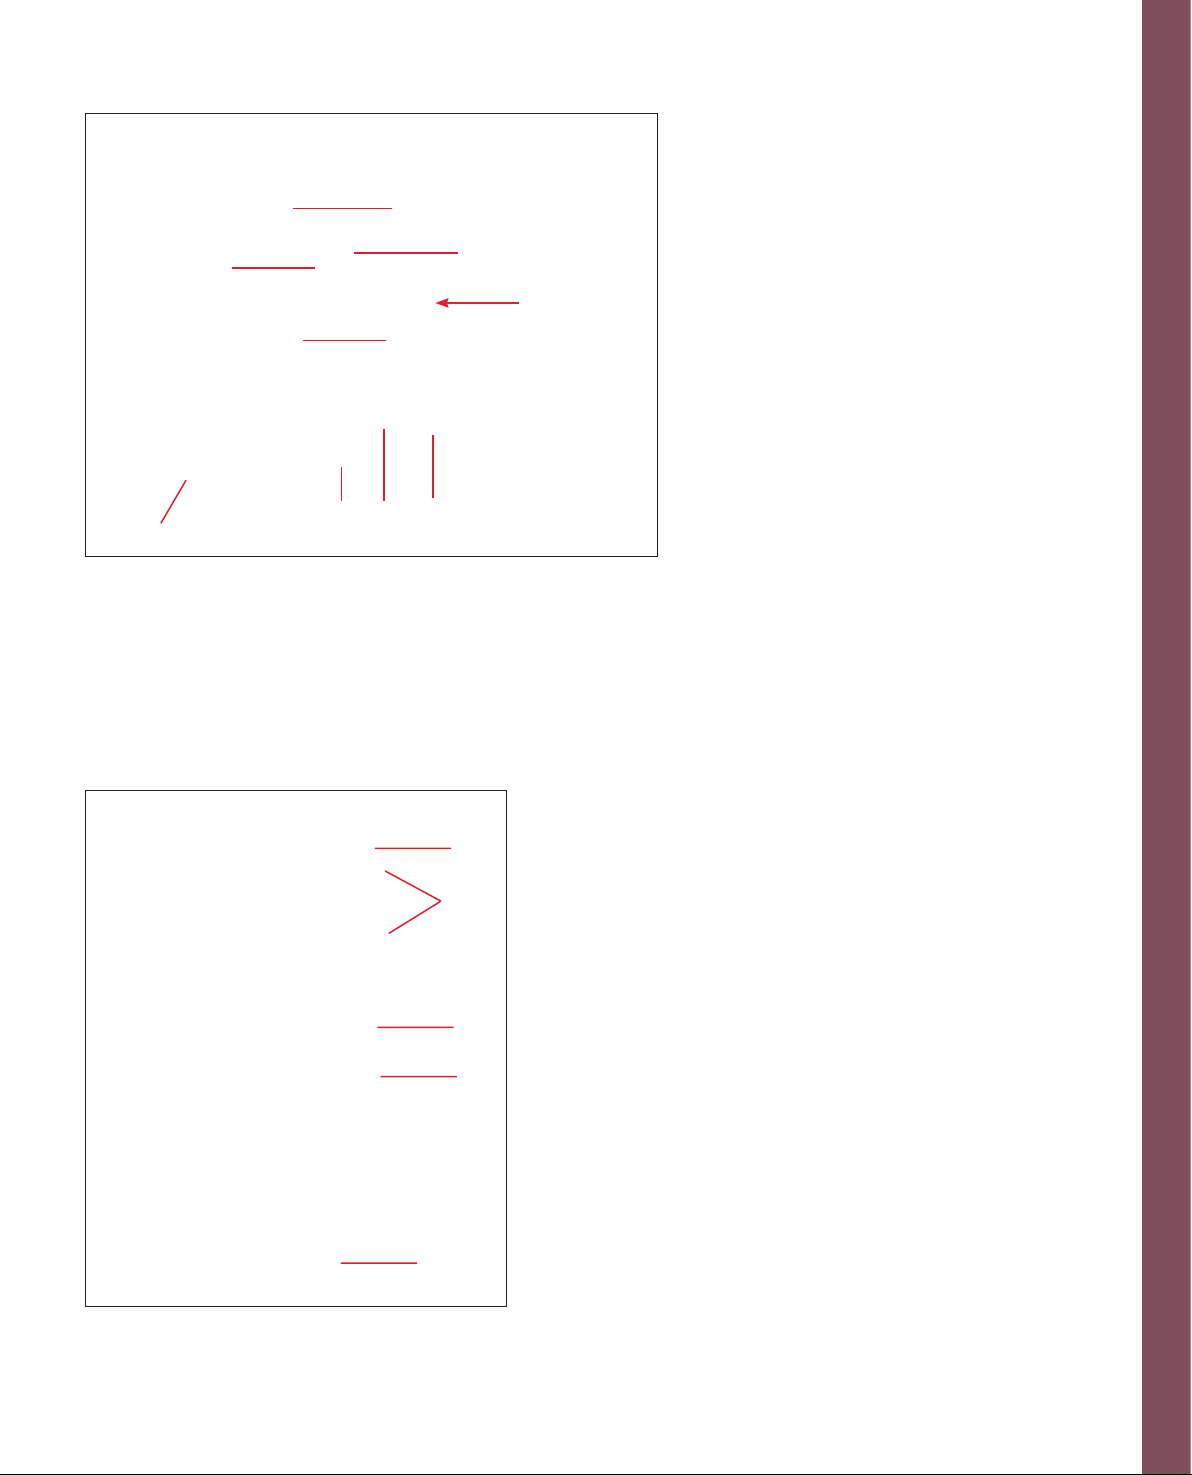
F. Reverse Sewing Button
The Reverse Sewing Button has several different functions in the
sewing mode.
1. If you press the button while sewing, the machine sews in reverse
for as long as you keep the button pressed.
2. If you press this button before starting to sew, the machine sews
in reverse until you press the button again. When the function
is activated, a reverse sewing arrow appears on the Multi Color
Touch Screen (H).
3. If you have activated the Tie-off program, tie-off at the end is
initiated via this button. When the tie-off is selected it is indicated
by that the single stitch icon is activated.
4. In the Patchwork, Tapering, Four sewing directions and Darning
programs, you determine the length of the seams with this button.
5. If you are programming the length of a buttonhole, you determine
the length of the buttonhole seam with this button.
3:2
H
Page 44

A
C
E
G
I
B
D
F
H
J
A. End to end mirroring
B. Side to side mirroring
C. Four directions sewing
D. Single Stitch
E. Immediate tie-off
F. Tie-off program
G. Tapering
H. Balance
I. Free-motion sewing
J. Twin needle
A. End to end Mirroring
When pressing this button, you mirror the stitch end to end. You will
see the change on the screen.
B. Side to side mirroring
This function mirrors your stitch from side to side. You will see the
stitch change on the screen.
Sewing
Sewing mode functions
M
K
L
C. Four directions sewing
With this function, you can program the length and width of a
rectangle and the programmed rectangle can be saved permanently in
the machine. This function can be useful for sewing on patches without
having to turn the fabric.
When pressing the Four directions sewing icon a new window appears.
Touch the Program function (K) before starting to sew, to program and
permanently save a Four directions sewing.
Touch the Manual icon (L) to decide where to end an already
programmed side seam. The machine completes the current stitch and
stops. (Read more about four direction sewing on page 3:25.)
The arrow icons decides the sewing directions. The machine sews in
the direction of the selected arrow.
The Data Manager icon (M) will open a window for opening, saving,
deleting and closing a program.
The four direction sewing is available on stitches 2-4, 7, 10, 11, 18, 23
and 25.
3:3
Page 45

Sewing mode functions
A. End to end mirroring
B. Side to side mirroring
C. Four directions sewing
D. Single Stitch
E. Immediate tie-off
F. Tie-off program
G. Tapering
H. Balance
I. Free-motion sewing
J. Twin needle
D. Single Stitch
Stitches and stitch sequences can be sewn as single stitches. By touching
the single stitch button you can decide how many patterns you want to
sew. When pressing this button a new window appears. Touch the ON
button (N) and you can decide how many pattern repeats you want by
touching + and - .
A
C
E
G
I
B
D
F
H
J
E. Immediate tie-off
Sewing
If you touch the Immediate tie-off icon, either when sewing or when
the machine is stopped, the machine will not fi nish the stitch/sequence
but instead do an immediate tie-off.
Note: If you want to start from the beginning of your sequence again you need to press
pattern start.
After you have done an immediate tie-off the machine will stop and
will not start again until you have released the foot control and press it
down again.
The immediate tie-off icon remains active after being touched and
becomes inactive when the tie-off has been completed.
N
3:4
Page 46

A
C
E
G
I
B
D
F
H
J
A. End to end mirroring
B. Side to side mirroring
C. Four directions sewing
D. Single Stitch
E. Immediate tie-off
F. Tie-off program
G. Tapering
H. Balance
I. Free-motion sewing
J. Twin needle
F. Tie-off program
The icon for the Tie-off program includes four functions; Tie-off
beginning, Tie-off end, Thread Snips and Presser foot lifter. When
touching the icon a new window appears, making it possible for you
to select the different functions. When a function is selected the icon
becomes dark green and only the symbols for the selected functions are
visible on the icon.
If you select one of the these functions it remains active even if you
select another stitch. They will remain active until you switch off the
machine.
Sewing
Sewing mode functions
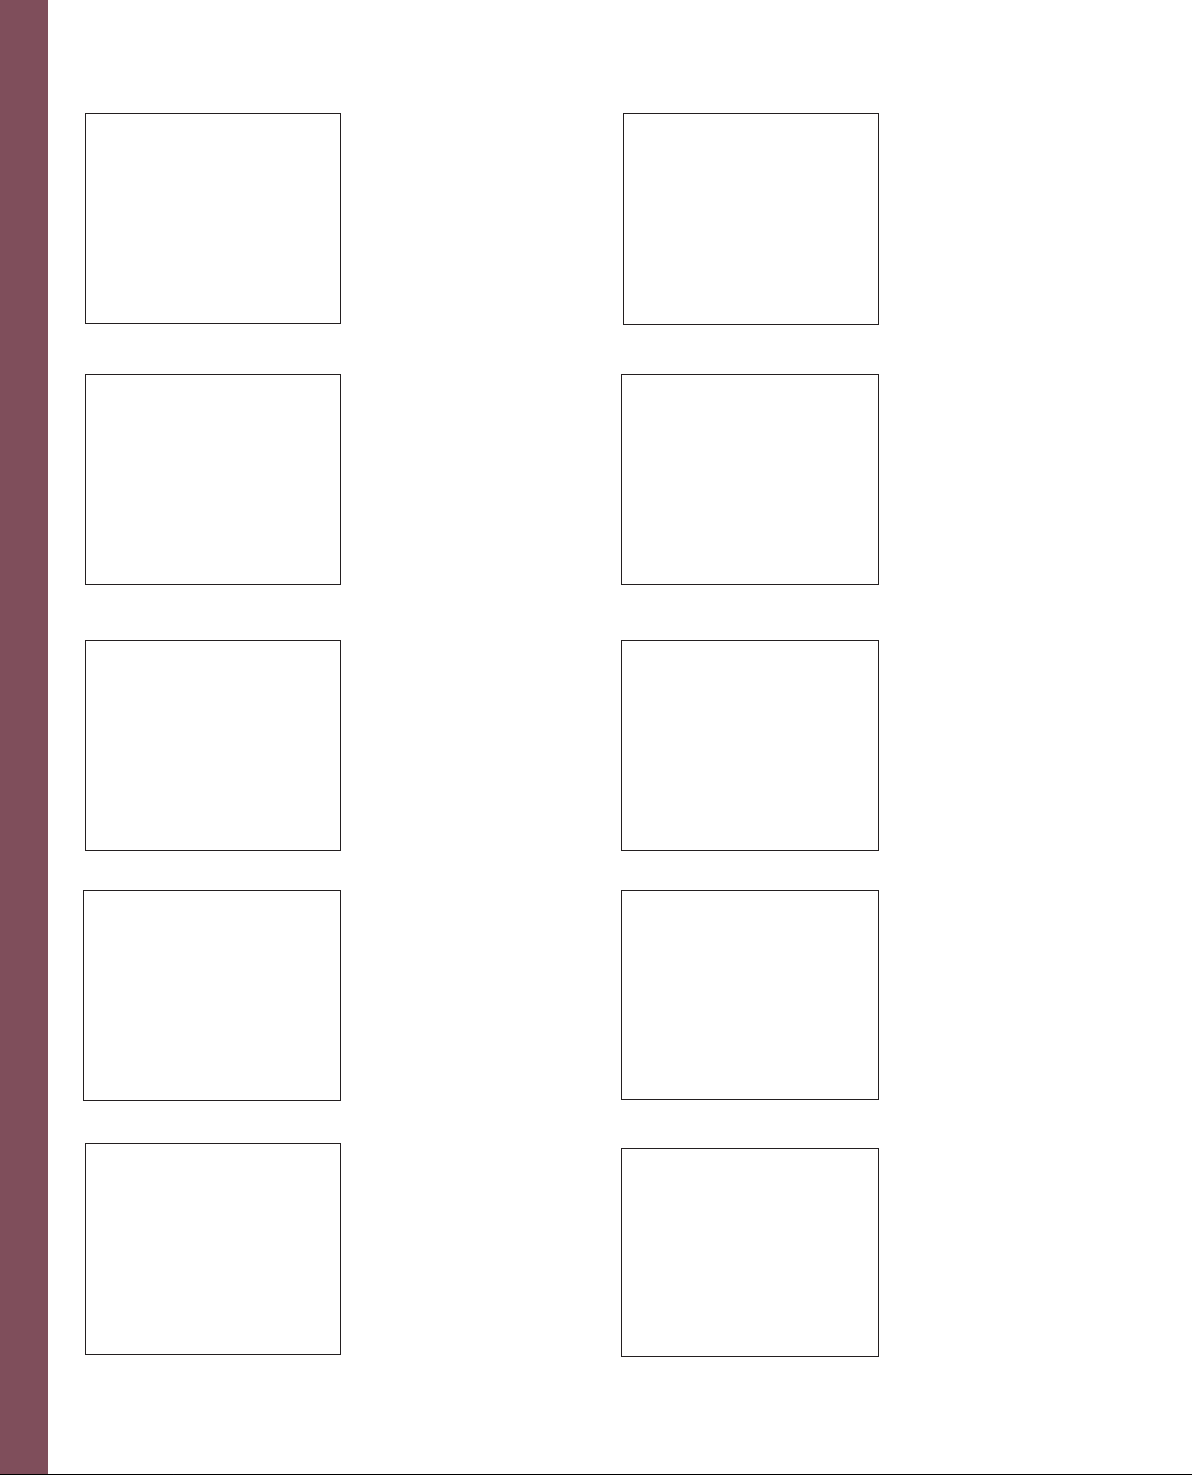
G. Tapering
O
P
When touching the tapering icon a new window appears. If you press
the (O) icon the seams starts at 0mm and becomes wider until the
previously selected stitch width is reached. If you press the reverse key,
the width is automatically reduced to 0mm.
If you press the (P) icon the seam starts at the full width and when
pressing the reverse button it goes down to 0mm width.
The stitch will be reduced according to the angle you have chosen (in
this case 90° or 60°).
3:5
Page 47

H. Balance
When touching this icon, a new window pops up, making it possible
for you to balance your stitch. Start by sewing a seam on a piece of
scrap fabric. When balancing your stitch, then change the seam on your
sewing machine so that it looks like your sewing sample. Use the + and
- buttons to change the balance.
I. Free-motion
This function can be used when you want to make free hand
embroideries or when quilting. When touching the Free-motion icon
the machine prompts you to lower the feed dog. The machine will lift
up the presser foot making it possible for you to sew in free-motion.
J. Twin needle
Press this icon when you are sewing with a twin needle. When
touching this icon, a pop up appears where you can set your twin
needle width. Press ON and use the + and - buttons to set the width.
Sewing
K. Patchwork program
The patchwork program makes it possible for you to program a
particular seam length for joining fabric of equal length and saving
it permanently. When pressing the patchwork program icon a new
window opens.
In the new dialog window, there is an Data Manager icon (where you
can open already saved programs or create a new one) and an ON icon
(to activate the patchwork program).
To make a patchwork program you need to activate the program by
touching ON and OK. Sew your desired length and touch the reverse
button. The reverse button determines the length of the seam. Read
more about how to change the length of the seam and saving the
program on page 4:16-4:17.
3:6
Page 48

Welcome Screen
A. Main menu
B. Last stitch
C. Information
Main Menu
When touching the main menu icon, you enter the main menu. In the main
menu you will fi nd the different categories of stitches, reach the embroidery
mode and the Data Manager.
B
A
C
Information
Use this function to obtain general information on how to operate the machine.
Last stitch
The last stitch function makes it possible for you to go back to the stitch you
where on, before turning off the machine.
On the screen that appears when you start your machine, you can choose a
function called Last stitch. When touching that icon a new menu appears where
you can choose either Last stitch or Current state. Choose last stitch and you
will go to the stitch you where on before turning off the machine. The current
state take you to the last embroidery stitch.
If you have activated the current state function when embroidering you can, via
this button, continue to embroider from where you have stopped before you
turned off the machine.
Sewing
Toolbar
A. Main Menu
B. Context Menu
C. Creative Assistant
D. OK
E. Esc
ABCDE
A. Main Menu
This function allows you to switch back to the main menu, for selection of all
stitches. In this picture you are already on the Main Menu and the icon has then
turned blue.
In the Main Menu, you have different selection menus: Join, Overcast, Utility,
Buttonholes, 9mm Decorative Stitches, MAXI Stitches, Personal Menu,
Alphabets, Sewing Sequence, Stitch Creator, Embroidery, Selection by number,
Last stitch and Data Manager.
3:7
Page 49

B. Context menu
The Context menu always refers specifi cally to the menu you have
selected. When on the Main menu these menus are active:
1. Select language: This icon allows you to change the language in the
machine.
2. Audio signal: You can change button and message sound.
3. Creative Card: You can format a creative memory card or change
the name.
4. Welcome screen off: this function turns the welcoming screen off so
that you will enter the Main menu directly when you turn on your
machine.
5. Back to default setting: resets all the machines settings that you
have previously changed or you can reactivate the information
texts.
6. Winding speed; choose between slow, medium and fast.
Sewing
7. Raise the presser foot: choose between not raising it at all, Low,
Medium and High.
3:8
Page 50

8. Move hoop: You can use this function when you are sewing with
the embroidery unit attached. In order to move the arm as far away
from the sewing area as possible, touch the sew position icon.
In order to move the embroidery arm so that you can remove the
embroidery unit from the machine, touch the Park position icon.
9. Options for messages: Under the options for messages button you
can turn different messages on or off, for instance if you don't want
the machine to stop when the bobbin thread is running out.
10. Code: The code function allows you to lock your Pfaff creative
2170. Your machines Main Menu will not appear until your security
code has been entered accurately. The code must have at least four
digits, and no more than eight. You can delete the code by pressing
the Delete button or if you want to change the code press the Alter
icon.
11. Personal stitches manager: in the personal menu you can save
a selection of stitches. For example you might want to create a
Personal menu for all the stitches you need for sewing garments.
You can create several personal menus (read more about personal
menus on page 3:27).
12. Demo: with the Demo function you can program a demonstration
of the machine into your creative 2170 and replay it permanently.
Also program in a training sequence to remind you of the steps
for a project. To program a demo, touch the Record demo button.
The opening screen appears instantly and you can start making the
demonstration. With the reverse sewing button you fi nish and save
your demo.
Note: this is a great feature to turn on when you are learning a new technique while
taking a class.
13. Version: the current software status of your machine is stored here.
14. Firmware update: press this function button when you want to
install an upgrade for your machine. Read more on how to upgrade
your machine on page 2:20.
Sewing
3:9
Page 51

C. Creative Assistant
There is a Creative Assistant function in your sewing machine to help
you. It can be called up anytime. The toolbar then changes color and
the functions assigned to the icons change. If you touch the icon in the
main menu, the Creative Assistant provides general information on
operating the machine. If you touch the Creative Assistant within a
stitch, the direct help function is launched. Pop-up Direct help provides
information on all sewing functions and icons. Simply touch the fi eld
on which you require more information. Information may run to
several pages, through which you can scroll with the arrows.
D. OK
The OK button is used to confi rm your actions.
E. Esc
This function allows you to switch back from a menu you have selected
to the previous one. When you close a window the settings you have
made will not be retained; you have interrupted the process.
Note: If you change the embroidery hoop positions those changes will remain even if esc
is touched.
ABCDE
Sewing
3:10
Page 52

A
There are three different ways to select a stitch on your Pfaff creative
2170.
Start by opening the Main menu. On the Main menu the stitches are
divided into different categories. You can select a stitch by touching
one of the categories, and then select the stitch by pressing the icon of
the stitch.
The second way to choose a stitch is to go into one of the categories and
scroll between the different menus by touching the scroll bar. You will
then scroll your way across the different categories of stitches.
When you open the Main menu the Join menu is always selected. If you
press the foot control at this point the display switches to the straight
stitch and your Pfaff creative 2170 is ready to sew. Press the foot control
once again and the machine will start to sew stitch number 1; a straight
stitch. You can touch any stitch and the machine will open a screen for
that stitch (A).
The third way to select a stitch is to touch the icon Selection by number
on the Main menu. A pop-up will appear where you can select a stitch
by pressing the stitch number. You can fi nd stitch numbers on the lid
on your Pfaff creative 2170 and stitch cards or in this User's Guide
(page 1:8-1:13).
If you have opened a menu and want to go back to the main menu,
simply press the ESC button (B).
Sewing
How to select a stitch
Altering a utility stitch
When you open a screen the most important settings are visible. To
illustrate this we have chosen a zigzag stitch.
You can modify the settings that are displayed, such as values for
stitch width (this icon changes to needle position for straight stitch)
(C), stitch length (D) and thread tension (E), for the stitch. As soon as
you change a value the numbers will turn red indicating that you have
made a change. Once you have reached the maximum or minimum
value, the function automatically becomes inactive. If you exit the
screen, the stitch settings will go back to the way they were.
C
D
E
Stitch width
Touch the stitch width icon (C) + and - to increase or reduce the width
B
of a stitch.
Stitch length
Touch the stitch length icon (D) + and - to increase or reduce the length
of a stitch.
Thread tension
Touch the thread tension icon (E) + and - to increase or reduce the
thread tension.
3:11
Page 53

Altering a decorative stitch
When selecting a decorative stitch you have an additional icon called
the Pattern elongation (A). This function makes it possible for you
to change the length of a pattern. Use the + and - icons to make the
pattern longer without changing the density.
Save parameter
You can save the settings you have made by going to the context menu,
and touch Save parameter. Once you have saved the stitch it will stay
that way even if you go into another menu or turn off the machine. If
you want to go back to the original setting, go into the context menu
and choose Reset parameter.
Tie-off
On your creative 2170 there are two different ways to do tie-offs. You
can program your machine to do tie-off at the beginning, at the end, cut
the threads and raise the presser foot. We call this the Tie-off program.
Sewing
The second way to do tie-offs is the Immediate tie-off (B). If you press
this icon the tie-off is made instantly.
B
C
A
The tie-off program
If you touch the tie-off program icon (C) a new window appears.
Activate by touching the different icons in the popup; Tie-off
beginning, Tie-off end, Thread Snips and Presser foot lifter. The icon of
the activated function change color to dark green (D). Once you have
activated the function/functions you want, touch OK.
When you have activated something in the tie-off program, the Tie-off
program icon (C) changes color to dark green. It will also show the
settings you have made.
3:12
D
Page 54

Needle positions
On stitches 1, 2, 5, and 15 you can change needle position by touching
the stitch width button (A). These four stitches have 19 different needle
positions. Use the + icon to move the stitches to the right in 0.5 mm
steps. Use the - icon to move the stitches to the left in 0.5 mm steps.
If you look at your lid, the stitches that you can change needle positions
are marked with an arrow.
A
Mirroring
Sewing
There are two ways to mirror a stitch; side to side and end to end.
The side to side mirroring you can mirror a marked stitch or stitch
sequence from side to side. The mirrored stitch appears on the screen
Side to sideEnd to end
for further processing.
The end to end mirroring you can mirror a marked stitch or stitch
sequence from end to end. The mirrored stitch appears on the screen
for further processing.
3:13
Page 55

Straight stitch
Stitch number 1 is the basic straight stitch in center needle position. The
stitch length can be increased up to 6 mm. Change the needle position
of the straight stitch to sew in a zipper or topstitch along the edge of
a collar. Your Pfaff creative 2170 has 19 needle positions that can be
adjusted with the stitch width -/+ buttons.
Tip: Use the needle up/down button to easily pivot at collar points. You can
also just tap on the foot control to set the needle in the down position.
Three-step Zigzag stitch – No 4
Stitch no 4 can be used to overcast raw edges. Make sure the needle
pierces the fabric on the left side and overcasts the edge on the right
side.
Stitch number 4 can also be used as an elastic stitch to add elastic to
pajamas, skirts and sportswear.
Basting program
Sewing
Basting is often used in dressmaking to join fabric layers quickly for
fi tting in order to be able to adjust the garment to the body. For that
purpose you either sew long stitches with 6 mm stitch length or jump
stitches with a length of about 2 cm.
You can also apply markings to materials with long basting stitches
stitched through the material to be used. This is preferable to using
fabric markers in color, especially on light-colored fabrics or materials
with a rough texture.
Your Pfaff creative 2170 includes a basting program which can be
selected with stitch no. 32.
This program can be used in two different ways and is linked to the
engagement and disengagement of the feed dogs.
If the feed dogs are disengaged, the sewing machine will only sew one
stitch at a time. You have to touch the foot control every time you want
the sewing machine to sew one stitch. This allows you to move the
fabric every time so that you can determine the stitch length yourself.
By touching the Presser foot lifter icon you can select to which height
the presser foot should raise automatically when the sewing machine
stops for feeding the fabric further.
If the feed dogs are engaged, the sewing machine sews with a 6 mm
stitch length. 6 mm is the longest stitch length of the Pfaff creative 2170;
it enables you to sew a temporary seam for fi tting.
3:14
Page 56

Buttonholes
There are 12 buttonhole styles available in your Pfaff creative 2170.
Each buttonhole is especially adapted for a particular use and fabric
type. You can read about the different buttonholes in the overview in
chapter 1.
Your Pfaff creative 2170 is equipped with the Sensormatic buttonhole
guide and sensor technology to ensure that every buttonhole is sized
accurately. Beautiful buttonholes can be sewn on even the most
diffi cult fabrics such as velvet, plush, stretch fabrics and heavy knits.
Sewing
Inserting the sensormatic buttonhole guide
1. Push the metal part of the sensormatic buttonhole guide into the
slot under the two arrows at the back of the needle plate. The white
plastic part goes over the needle plate, covering the feed dogs (see
picture).
2. Slide the guide towards you until it lies against the rear of the
free arm. The guide will spring rear slightly. There should be a
small gap between the needle plate and the guide as shown on the
picture.
Inserting the sensormatic buttonhole guide activates the sensor.
Attaching buttonhole foot – No 5A
Attach buttonhole foot No. 5A to sew buttonholes.
Before starting to sew, pull the slide of the foot towards you until the
red arrow matches the second red mark.
3:15
Page 57

How to sew a buttonhole
Choose Buttonholes from the main menu and select the buttonhole
of your choice. For this example we have chosen buttonhole no. 47.
The most important settings are visible on the screen. There are three
different ways of sewing a buttonhole: automatically, programmed or
manually.
Automatic buttonhole
Enter the buttonhole length directly on the screen by touching the +
and - icon on the Stitch elongation icon (A). Enter the length of the slit
of your buttonhole. Start to sew your buttonhole by pressing the foot
control. The buttonhole will be sewn automatically.
Programmed buttonhole
You can program a buttonhole while sewing.
1. Activate the buttonhole program by touching the prog icon (B).
2. Sew until you reach the buttonhole size you want and press the
reverse button. The machine sews in reverse and the second bartack
and cuts the threads.
3. The prog icon changes into this (C) icon. You can repeat the
programmed buttonhole as many times as you want.
4. If you want to clear the size of the buttonhole, touch the prog icon
Sewing
again.
A
C
B
D
E
Manual buttonhole
If you touch the Manual icon (D) you will determine where the last
bartack is sewn.
1. Set the length of the buttonhole by touching the Stitch elongation
icon. The machine will sew the fi rst column, the fi rst bartack and
the second column.
2. After having sewn half of the second column, the machine slows
down. When it is time to do the second bartack, touch the reverse
button and the machine start making the bartack.
Note: The machine will not store the manual buttonhole.
How to balance a buttonhole
Start by sewing a sample of the buttonhole. If you fi nd that one of the
columns are longer than the other you can change the balance of the
buttonhole. Touch the balance icon (E) and a popup appears. Touch the
+ and - buttons (F) to change the buttonhole. You should change the
buttonhole so that it looks like your sewed out sample. The machine
will then correct the buttonhole automatically.
Note: If you would like to sew a buttonhole longer than the 5A foot (50mm) you can sew
without the sensormatic guide but with the 1A foot. To get a perfect result without the
sensormatic guide it might be necessary to balance the buttonhole.
F
3:16
Page 58

Buttonhole with gimp thread
Buttonholes that are sewn with gimp threads are more stable, durable
and has a professional appearing. Use pearl cotton or a regular gimp
thread.
1. Insert the Sensormatic buttonhole guide.
2. Place the center of a length of gimp thread over the metal bar
extending from the center back of the buttonhole foot. Pass the
thread ends under the foot and pull up into the right and left
guides on the front of the presser foot.
3. Attach the buttonhole foot. Before starting to sew, pull it backward
as far as the second red mark.
4. After completing the buttonhole, pull the ends of the gimp thread
until the loop of thread is hidden below the buttonhole bartack.
5. Thread the gimp threads into a needle and pull them to the wrong
side of the garment. Tie the gimp threads and cut off the excess
thread.
Sewing
Eyelet buttonhole with gimp thread
1. Insert the Sensormatic buttonhole guide. Place the center of a length
of gimp thread over the metal bar extending from the center front
of the Buttonhole foot. Pass the thread ends under the foot and pull
up into the right and left guides on the back of the presser foot.
3:17
Page 59

2. Attach the buttonhole foot and pull it backward as far as the second
red mark. Before starting to sew, press the “needle down” button.
3. Sew the right side of the buttonhole.
4. After the machine sews the fi rst few stitches of the curved end pull
the gimp thread down from the clamp with a straight pin.
Note: The presser foot must not be raised from the fabric!
5. Pull the gimp thread on the left towards the rear until the loop is
just in front of the needle. Carefully sew the curve, guiding the
gimp thread under the stitching.
6. After sewing the curve, hold the gimp thread slightly taut and
fi nish sewing the buttonhole.
7. Thread the gimp threads into a needle and pull them to the wrong
side of the garment. Tie the gimp threads and cut off the excess
thread.
The round buttonhole with gimp thread is sewn in the same way.
Sewing
Note: This buttonhole is particularly attractive when sewn with a heavier-weight thread.
Buttonhole tips
Buttonholes that are to be sewn very close to a reinforced edge, may
sometimes not feed optimally with the buttonhole foot because of the
bulk at the edge of the fabric. In this case, use presser foot 1A with the
Integrated Dual Feed engaged.
Fabrics that shift or stretch easily should be reinforced with watersoluble or lightweight stabilizer.
Buttonholes are particularly stable and durable if a gimp cord is
inserted while sewing (see " Buttonholes, with gimp cord").
Linen buttonholes are particularly attractive if you use a heavierweight thread through a topstitch needle.
Buttonholes are normally selected a little larger than the button
diameter. It is important to always sew a test buttonhole on the same
fabric/stabilizer as your project.
Cut open all buttonholes carefully. Open the curve of the keyhole
buttonhole with a belt punch or awl.
3:18
Page 60

Sewing on buttons
With stitch no. 59 you can easily sew on two and four-hole buttons.
1. Remove the presser foot and lower the feed dog.
2. Mark the button position on your fabric. Place the button on the
marked fabric.
3. Turn the handwheel towards you and position the button so the
needle enters the left hole in the button. Lower the presser foot
lifter.
4. The button will be held in place by the shank of the foot. Make sure
the needle also enters the right hole of the button.
5. Continue sewing on the button. The machine will complete the
program for you.
Eyelets
To stitch eyelets on a belt or linen items, select stitch no. 66.
1. Place a small mark wherever you would like to sew an eyelet.
2. Place the fabric under the presser foot, position one of the marks at
the center of the foot.
3. If the Stitch restart is touched during the sewing operation, the
machine will automatically sew one eyelet and tie off the stitch.
4. Cut a hole in the center of the eyelet. You can select from fi ve eyelet
sizes by touching the stitch length.
Stitch no. 66 can also be combined in embroidery stitch combinations
for beautiful embellishment.
Sewing
3:19
Page 61

Darning
To mend a small hole or tear, you can either do automatically by using
the darning stitches on the machine or darn your tear manually using
by doing Free-motion darning.
Automatic darning
The darning stitches no. 64 and no. 65 can be used for strengthening
damaged areas of fabric.
1. Choose stitch no. 64 or no. 65.
2. Change the pattern length to the length of the tear of touching the +
and -.
3. Stitch over the damaged area.
Programmable Darning
1. Choose stitch no. 64 or no. 65.
2. Touch the program icon.
3. Stitch over the damaged area to the required length.
4. Press the reverse button; the machine fi nishes sewing the darning
program and the darning length is saved. The saved darning length
can now be repeated as often as needed.
Stitch no. 64 sews lengthwise only; stitch no. 65 is for darning
lengthwise and crosswise and is more durable.
Note: To give the best strength to the darning stitch it should be slightly out of square.
Sewing
Balancing the darning stitch
Depending on the type of fabric, the darning pattern may shift slightly
out of square. You can balance the program using the adjustment
capability.
Darning with the elastic stitch
Stitch No. 4
The elastic stitch no. 4 is very suitable for repairing small holes and
slightly damaged areas. This is most suitable for light-weight fabrics.
Reduce the stitch length and sew rows of stitches over the damaged
area until it is well covered. Make sure the stitch rows overlap. No
additional backing is needed for these slightly damaged areas.
3:20
Page 62

Overlock stitches
For elastic, knits, woven and stretch fabrics, your creative 2170
provides a selection of overlock stitches. These stitches join multiple
layers of fabric and overcast them in one operation. These stitches can
stretch and are more durable than standard stitches.
Tip: Use blind stitch foot No. 3 when sewing overcast seams. This guides the fabric more
precisely and prevents tunneling of the seam at wider stitch widths. Adjust the stitch
width and guide of the foot to ensure that the right swing of the needle clears the raw
edge of the fabric and the pin of the presser foot.
Closed overlock stitch – No 26
This stitch is suitable for sewing a hem on your garment. Use foot no.
0A or 3.
Fold your fabric 3/8” (1 cm) and stitch the closed overlock on the
right side of the folded fabric. When you have fi nished, cut away the
unnecessary fabric.
Sewing
Open overlock stitch – No 28
The overlock stitch works well when joining or edge-fi nishing fabrics
that do not fray excessively. Use presser foot no. 1A or 3.
Closed overlock stitch with edge thread – No 19
If you wish to sew a fabric that frays easily, select stitch no. 19. With
this stitch an additional edge thread protects the fabric edge against
further fraying. This seam is suitable for woven fabrics.
3:21
Page 63

Blindhem stitch – No 30
The blindhem stitch is used to make invisible hems on skirts, trousers
and home decorating.
• Finish the edge of the hem.
• Fold and press the hem allowance to the wrong side.
• Fold the hem back on itself so approximately 3/8" (1 cm of the
fi nished edge extends beyond the fold. The wrong side of your
project should now be facing up.
• Place the fabric under the presser foot so that the fold runs along
edge guide A.
• When the needle swings into the fold it should catch a small
amount of fabric. If the stitches are visible on the right side, adjust
edge guide A by turning adjusting screw B, until the stitch that
catches the hem just barely shows.
B
A
Sewing
Elastic blind stitch – No 31
The elastic blind stitch is especially suitable for stretchy fabrics, because
the zigzag in the stitch lets the stitch stretch. The hem is fi nished and
sewn at the same time. There is no need to fi nish the raw edge fi rst on
most knits.
Create the blindhem as described above.
3:22
Page 64

Bridging stitch - No 11
The bridging stitch creates a hemstitching effect. It is often used for
connecting two fi nished fabric edges called bridging.
• Finish the fabric edges and press the seam allowance to the wrong
side.
• Place the fabric under the presser foot with the edges
approximately 1/8 inch (3mm) apart.
• Stitch from the right side of the fabric, making sure that the needle
catches the fabric on the right and left sides.
Crosshem stitch - No 13
This highly elastic stitch is very suitable for decorative hems.
• Fold the hem allowance to the reverse side.
• Stitch the hem from the right side of the fabric. Trim any excess
hem fabric up to the stitching.
Sewing
Sewing in zippers - stitch no. 1
There are different ways to sew in zippers. Follow the directions
included with your pattern for best results.
For all types of zippers it is important to sew close to the teeth of the
zipper. The zipper foot can be snapped to the presser foot ankle on the
left or right, depending on how you will insert your zipper. Then set
the needle position so that it enters close to the edge of the zipper teeth
by using one of the 19 needle positions available. If the presser foot is
attached on the right side, the needle must only be moved to the right.
If the foot is attached on the left, the needle must only be moved to the
left.
3:23
Page 65

Rolled hem with foot No. 7
Use the rolled hem foot to fi nish the edges of blouses, scarves, or ruffl es
without having to iron the edges beforehand. Hemming prevents the
edges from fraying and produces a neat and durable edge fi nish.
• Double-fold the fabric edge (about 1/8 inch / 2 mm per fold).
• Place the folded fabric edge under the rolled hem foot and sew a
few stitches to secure.
• Turn the hand wheel towards you until the needle is at its lowest
point. Raise the presser foot and slide the fabric into the scroll of
the foot.
• Lower the presser foot and while sewing, guide the fabric edge
evenly into the foot. When roll-hemming, make sure the raw edge
of the fabric butts against the left edge of the rolled hem foot opening. Ensure the fabric does not run underneath the right side of the
presser foot.
Tip: A narrow zigzag stitch also makes a nice rolled hem on lighter stretch
fabrics such as lingerie nylon.
Twin needle
When you touch the twin needle icon the machine allows you to
specify the width of the twin needle you will use. The stitch width will
automatically be reduced to prevent needle breakage and allow you to
sew decorative stitches with a twin needle.
1. Touch twin needle icon and a popup appears. Touch ON to activate
the function.
Sewing
2. Touch the +/- icon to specify your twin needle width (A). The stitch
is shown as it will sew.
3. Touch OK to close the window and save your settings or ESC, to
continue without saving any settings.
This function must be deactivated when you remove the needle from
the machine. It remains active even after the stitch has been changed,
including after the machine has been turned off and on again.
To deactivate the twin needle function, touch the twin needle icon,
touch ON to deactivate the function. The icon becomes light green
again.
A
Twin needle sewing
You can achieve beautiful effects when embroidering with the twin
needle. These embroideries turn out best with a needle width of
1.6 - 3 mm. Twin-needle embroidery is particularly effective if you
use embroidery threads in matching colors. If you wish to sew with
the twin needle, touch the twin needle icon. The stitch width is
automatically reduced and not displaced to the right or to the left if a
stitch is asymmetrical. In this way the needle is prevented from hitting
the presser foot.
See page 2:15 for threading a twin needle.
Sewing Maxi stitches with a twin needle
If the icon for the twin needle program is active when sewing Maxi
stitches, you can use the twin needle for a decorative effect. However,
you should only use a twin needle with a width of 1.6mm or 1.8mm,
even if a twin needle width up to 6mm can be selected in the program.
3:24
Page 66

A.
Four sewing directions
B
C
You can program the width and length of a rectangle to be sewn, and
save these settings permanently. This is great for sewing on patches
without having to turn the fabric.
The Four directions sewing can be used on stitches no. 2-4, 7, 10, 11, 18,
23 and 25. Once you have touched the Four directions sewing icon the
screen, you will see the following screen (A).
1. Sewing in four directions without saving the program
If one of the direction arrows has turned dark green (B) the function is
active and your Pfaff creative 2170 is ready to sew. With the direction
arrows you can decide the fi rst direction in which the machine sews.
Press the foot control and the machine sews to the right.
When the desired length is sewn, press the reverse button or touch
the next direction icon. Your Pfaff creative 2170 completes the current
stitch, the needle is positioned in the outer corner of the rectangle.
Now, the machine sews forward until you press the reverse button or
the next direction icon. Your Pfaff creative 2170 completes the current
stitch, the needle is positioned in the outer corner of the rectangle.
The length of the other sides are also decided by pressing the reverse
button or touching the direction arrows. The size of the rectangle is not
saved.
Sewing
2. Program the Four directions sewing
Touch Prog icon (C) and the desired sewing direction before starting to
sew. Then save the program to sew it several times.
Use the reverse button to change the sewing direction as described
above. The sewn width and length of the fi rst two sides are shown on
the screen.
Continue sewing until the rectangle is complete. When all four
directions are programmed, the Prog icon changes (D). Now
the program is stored and can be repeated. It can also be saved
permanently in the machine.
Note: If you only want to save one, two or three sides of a rectangle, touch the Prog icon
when you have sewn the sides you want to save. Only the sides you have programmed
will be saved. This is great for patch pockets, that are sewn with three seams.
D
3:25
Page 67

3. Manual ending of a side seam
To repeat a program several times, touch the Prog icon and the desired
sewing direction before starting to sew. If you also touch the man icon
(E), your Pfaff creative 2170 sews one side and then stops. The length of
the sides are determined in the same way as described in section 1. The
machine stops after each side. Press the foot control to continue with
the next side.
E
F
4. Manual ending of a saved rectangle
Even if a rectangle has been programmed and the Prog icon ticked off
is visible on the screen, you can decide the length of the sewn seams by
touching the Man icon (E). The machine slows down at the end of the
third and fourth seam. End the seam by pressing the reverse button,
the machine completes the current stitch, places the needle in the outer
position and continues with the next side.
More functions for four sewing directions
Touch Balance icon (F) to open a screen to balance the rectangle. To
adjust the length of the sides, use a sewn sample as a template.
With the +/- icons (G), you can adjust the rectangle on the screen
until it looks like your sewn sample. The rectangle will be adjusted
automatically the next time you sew.
Touch the Data Manager icon (H) to open, save, delete or close a
program.
A detailed description of the icons is found in the beginning of this
chapter.
Sewing
Touch Esc (I) to return to the selection menu.
Touch the Main menu icon (J) to return to the main menu.
H
J
I
G
3:26
Page 68

Personal menu
On your Pfaff creative 2170 you can have one or several Personal
menus, where you can save your personal settings for the stitches and
create a menu which contain the stitches you use the most.
Create a personal menu by selecting Personal menu (A) in the main
menu.
A
Touch Create new personal menu (B) and OK.
Sewing
B
Select the stitches you want by going into the Mini Main menu (C).
Once you have selected the stitches you want, touch the Data Manager
icon (D). Choose Save As on the pop-up that appears. Rename your
folder and press the OK icon. You have now created a personal menu.
Once you have made a personal menu, you can reach it from the
Personal menu icon. Your personal menu will appear on the pop-up.
Note: If you have altered a stitch and want to save it with those settings to the Personal
menu, you can go to the Context menu and choose Copy to personal stitches. That stitch
will then be saved in the personal menu.
D
C
3:27
Page 69

Demo
You can program a demonstration of the machine into your Pfaff
creative 2170 and replay it.
Programming of a demo
For programming a demo, go into the context menu and touch the
Record demo icon. The screen will change to the welcoming screen,
where you will start making your demo. Operate your Pfaff creative
2170 completely normally and thus compose a demonstration.
Use the reverse sewing button to fi nish and save your demo.
Note: The length of the programmed demo reduces the memory capacity for saving stitch
patterns permanently in the sewing machine.
Playing a demo
To play your demo, touch the Play demo icon (G). Close it with the
reverse button.
G
Options for messages
You can switch off the messages that automatically appear in the
machine. These settings can be determined individually for sewing and
embroidery.
Touch the Sewing/Embroidery icon (A) to decide if the setting should
be valid for sewing or embroidering.
If the function is active the icon has an X in it (B). If you want to switch
it off touch the X. The X in the icon goes out. All functions are active as
Sewing
default.
A
B
3:28
Page 70

DECORATIVE SEWING
Page 71

General notes on decorative sewing
To enhance your own home decorations or garments your Pfaff
creative 2170 offers you a wide variety of fancy and decorative stitches.
Create a greater variety of embellishments by combining different
patterns, colors and sizes. Use specialty decorative threads to enhance
the lovely stitching.
Always use stabilizers under your fabric when sewing decorative
stitches. Properly stabilizing your fabric will help eliminate distortion
of your decorative stitches.
The following recommendations apply to all decorative sewing:
• Rayon embroidery threads give shiny, smooth stitching results and
come in many colors and weights.
• The stitch length and width can be altered as desired.
• Your sewing results will be much prettier if your tension is
properly adjusted.
• Presser foot no. 1A (for IDT) and no. 2A (without IDT) are
recommended for decorative work. We recommend presser foot no.
2A for heavier fabrics.
Selecting decorative stitches on your Pfaff
creative 2170
1. Go to your Main menu.
2. Touch the 9mm Decorative stitches. A new window opens where
the stitches are divided into 11 different categories (A).
3. Touch one of the subcategories. In this example we have chosen the
Scallop edges, and stitch no. 70.
Decorative sewing
4:2
A.
Page 72

Alter the stitch settings
Increase or reduce the width of a stitch with the stitch width icons
plus and minus (A).
Alter the density of the decorative stitch by touching the stitch
length icons plus and minus (B).
You can elongate the pattern with the plus and minus buttons (C).
Elongating the pattern does not change the stitch density.
Thread tension can be changed when using specialty techniques.
The stitch settings will not be saved permanently. The next time the
A
B
C
stitch is open, the stitch will automatically be restored to its original
setting.
D
If you want to save your altered stitch permanently, simply go
into the Context menu (D) and touch the Save parameter icon. The
settings will be saved even when you have turned off the machine.
Decorative sewing
If you have altered a stitch and want to save it with those settings to
the Personal menu, you can go to the Context menu (D) and choose
Copy to personal stitches. That stitch will then be saved in the
personal menu.
4:3
Page 73

Sewing sequence
With your Pfaff creative 2170 you can combine various stitches and
save them permanently in the Sewing sequence menu. You can
combine various 9mm stitches and MAXI stitches from the machine,
creative memory card or creative card and sew them as a continuous
border. In the example below we have taken stitches from the machine.
A. Immediate tie-off icon
B. Data Manager icon
C. Tie-off program icon
D. Mini main menu icon
E. 8 directions sewing
F. Zoom in icon
G. Select stitches icon
H. Zoom out icon
I. Delete icon
J. More options icon
K. Thread tension icon
L. Insert icon
A
N
B
C
D
E
F
G
H
I
J
K
Decorative sewing
L
4:4
Page 74

A
Create a sewing sequence
B
N
1. Touch the sewing sequence icon on your Main menu. The sewing
C
D
E
F
G
H
I
J
K
L
sequence window appears.
2. Touch the Mini main menu (D) to open a menu showing all the
different stitches in the machine. Select the category you want a
stitch from.
Note: You cannot use all the stitches in all the categories. The ones that are grayed out
can not be chosen.
3. After you touch the stitch that you want to include in your sewing
sequence, a menu in which you can modify the stitch is opened (M).
You can mirror the stitch, alter its density and adjust the thread
tension. In this example we have chosen a stitch from the 9mm
M
N
decorative stitches, Leaves and Flowers number 156.
4. Touch OK to confi rm your selection and the stitch appears in
the sewing sequence screen (N). A cursor line shows the end of a
sewing sequence. If you want to continue working with a stitch
move the cursor line over the stitch to select it. The selected stitch
is surrounded by a frame in the sewing sequence. To alter the stitch
open the More options icon (J). Touch OK when you are happy
with the changes you have made.
Note: If you want to repeat the same stitch touch the Insert icon (L).
5. Touch the Mini main menu on the sequence screen to call up each
additional stitch that you wish to include in the sewing sequence.
6. Add stitch no 155 from the machine (N).
Decorative sewing
4:5
Page 75

Arrange stitches within a sewing sequence
To obtain wider borders, you can save connecting stitches in your
sewing sequence. These connecting stitches make it possible to move
stitches in various directions. This results in new shapes and large-area
borders. Connecting stitches are straight stitches with a length of 1 mm.
They can be made in 16 different directions.
More than one stitch will often be needed to render stitches visually
distinct from one another. When using connecting stitches, it is very
important to note where the stitch you are using starts and ends.
The stitches are sewn in the direction chosen from the end of the stitch.
The next stitch starts at the end of the last jump stitch.
1. A stitch is placed in the middle of the working area.
2. When you touch the 8 directions sewing (E), a screen opens where
you can enter the direction (use the arrow icons). Confi rm each
connecting stitch with Confi rm icon (O). In this example we have
put 6 stitches in the direction shown on the screen.
3 Save your input by touching OK, the window is then closed. If you
touch ESC and the window is closed without any changes being
saved.
4.
The cursor line shows the end of the connecting stitches at the point
where the following stitches will be added.
5. Touch the Mini main menu to call up each additional stitch that you
wish to include in the sewing sequence. We have added the fl ower
no. 165, 4 more times but in different angles.
O
More options for adjusting a sewing sequence are accessed by touching
the More options icon (J).
The last stitch in a sequence is always marked and followed by a cursor
line marking the point where next stitch will be added.
Tip: Borders with connecting stitches are neatest if the connecting stitches are covered
by the actual stitch (in this case the fl owers) itself.
Decorative sewing
4:6
Page 76

A
B
C
Adjust an existing sewing sequence
An existing sewing sequence can be adjusted. By selecting an
individual stitch within a sequence or an entire sequence, you can do
adjustments according to your wishes.
1. To select an individual stitch, use the cursor arrows (A) to move
the cursor line in front of the stitch you want to adjust. The selected
stitch is surrounded by a frame.
2. Touch the Select stitches icon (B) to select a sewing sequence. If you
keep the icon depressed, all stitches will be selected.
3. A cursor line appears. Move it with the cursor arrows across the
stitches to select them. The selected stitches are surrounded by a
frame.
4. After selecting one or more stitches, you can modify all their
settings. What settings that can be changed depends on how many
stitches and what kind of stitches that are selected. Touch the More
options icon (C) to adjust the selected stitches or sewing sequences.
You can also delete one or more stitches, or delete the entire sewing
sequence.
5. If you move the cursor line over a previously selected stitch or
sewing sequence, the selection is cancelled. If you would like to
adjust another stitch, select it with the cursor arrows.
6. When you are satisfi ed with your adjustments, cancel the selection
with the select stitches icon (B).
Decorative sewing
Inserting a stitch in the sewing sequence
1. If you would like to insert a stitch in the sewing sequence, use the
cursor arrows to move the cursor line to the insertion point in the
sewing sequence.
2. The cursor must be positioned at the point where you wish to insert
the stitch.
3. Select a new stitch.
4. When the stitch has been inserted, the cursor moves to the end of
the inserted stitch.
Inserting a stitch at the start of a sewing
sequence
If you wish to insert a stitch at the beginning of a sewing sequence,
move the cursor line to the beginning of the sewing sequence and select
a new stitch.
The stitch is automatically placed at the start of the sewing sequence.
4:7
Page 77

Save a sewing sequence
1. Touch the Data Manager icon to save the sewing sequence. The
window for opening, saving, closing or deleting the sewing
sequence opens (A).
2. When you touch Save as, the menu for entering the name opens.
You can give your sewing sequence a name and select a path where
the sequence should be saved.
3. When you open the menu, the machine’s memory is selected
automatically.
A
4. The input fi eld (B) shows a directory where the sewing sequence is
automatically saved. The default folder in which it is saved is the
SEQUENCE-folder. The input fi eld shows the name NEW. You can
delete this name with the Delete icon (C) and enter a name of your
choice. A name may have a maximum of 8 characters.
5. Touch OK to confi rm your input. The sequence is now stored in the
directory SEQUENCE in the machine and can be opened again by
selecting that directory.
If you touch the Arrow down icon (D), another window for selecting a
different directory is opened.
You can save the sewing sequence in a different machine directory, or
on a card.
Save in the machine
1. To save the sewing sequence in the machine, select the directory
Decorative sewing
with the arrows (E) and press OK.
2. Touch the arrow up icon to close the window. The sewing sequence
is saved in the selected directory.
3. Touch ESC to close the window without saving your input.
Save on a creative memory card
If you wish to save the sewing sequence on a card, select the
appropriate card drive (F). If you have created directories on the card,
select the appropriate directory with the cursor arrows.
Touch arrow up icon to close the window. The sewing sequence is
saved in this directory.
Touch ESC to close the window without saving your input.
Confi rm the name you have entered by touching OK, the window is
closed.
B
D
C
E
F
4:8
Page 78

The sewing sequence remains visible on the screen and can be sewn.
If you touch ESC a query appears.
If you confi rm with OK you return to the Sequence menu.
Close a sewing sequence without saving
1. If you touch the Data Manager icon and Close, you exit the menu
without saving the sewing sequence. A window appears with a
query.
If you touch OK, the sequence is closed.
If you touch ESC, the menu is closed.
2. If you touch the Data Manager icon and Open, you exit the menu
without saving the sewing sequence. You then simultaneously open
a sewing sequence that has previously been saved.
A window appears with a query.
If you touch OK, a version of the Data Manager opens (E), where
you can open a saved sewing sequence.
If you touch ESC, the menu Open is closed.
3. Touch the Main menu icon to return to the Main menu.
Decorative sewing
Delete a sewing sequence
If you touch the Data Manager icon and Delete, a window appears with
E
a query.
Touch OK to delete the sewing sequence.
Touch ESC if you do not want to delete the sewing sequence.
Select and open a saved sewing sequence
Touch the Data Manager icon to open a previously saved sewing
sequence from a creative memory card or from the machine’s memory.
Touch Open to open a variant of the creative Data Manager.
4:9
Page 79

Open from the machine‘s memory
Use the cursor arrows (A) to move the selection bar to the directory in
which the sewing sequence is stored.
Confi rm the directory by touching OK, a list of names in that directory
opens. Select the sewing sequence directly with the cursor arrows (A).
The selected sewing sequence appears on the screen when you touch
the Stored stitches icon (C).
Open from a creative memory card
To open a sewing sequence from a card, select the appropriate card
drive (B). If there are directories on the creative memory card, proceed
as described for opening from the machine. If there are no directories
on your creative memory card, select the sewing sequence directly with
the cursor arrows.
The selected sewing sequence appears in the screen when you touch
the Stored stitches icon (C).
All settings for the sewing sequence can now be adjusted for your
specifi c needs.
If you touch the Data Manager icon and Save, the adjusted sewing
sequence is saved under the same name. The sequence previously
saved is automatically erased.
To save the sewing sequence under a new name, touch ”Save as”.
The previously saved sequence is preserved.
A
B
C
Decorative sewing
4:10
Page 80

A
O
Q
S
On the screen you will see how many stitches you
have added, which one/ones you have selected
(marked blue) and actual shows you which stitch the
marker is positioned on (the red square).
P
R
B
C
D
E
F
G
H
I
J
K
L
M
N
Stitch Creator
With Stitch Creator you can customize and create your own stitches.
You can add, erase, move and combine the stitches directly on screen.
Create a stitch pattern of individually designed stitches, or by using the
9 mm stitches, patterns and alphabets.
Note: When sewing a stitch pattern the feed dogs are engaged.
When you open Stitch Creator you have an empty workspace on the
screen.
The workspace is for a 9 mm stitch width. In the middle of the
workspace there is a vertical purple line that indicates the center of the
stitch pattern with 4.5 mm stitch width on each side (R).
For more exact positioning activate the grid in the Context menu (S).
Description of the icons
A. Mirror end to end icon: Mirror the stitch from end to end.
B. Data Manager icon: Use this icon to open a window for opening,
saving or deleting a stitch pattern on the machine or a Creative
Card.
C. Mirror side to side icon: Mirror the stitch from side to side.
D. Mini Main menu icon: Use this function to create a new stitch
pattern. A variant of the main menu is opened. By touching the
desired category and the sorted stitch selection you can select it
directly. If you confi rm the stitch, it appears individually on the
workspace. By touching the icon for selecting stitch menus again,
you can add any further stitch.
E. Confi rm icon: With this icon you place single straight stitches at the
end of a selected stitch. If you have selected more than one stitch
these will be copied and placed right after the selected stitches.
F. Zoom in icon: You enlarge the representation in 3 steps, 150%,
200% and 300%. An additional scroll bar for moving the workspace
horizontally appears on the screen.
G. Select stitches icon: If you touch this icon you can select one stitch
or more. If you depress the icon for a few seconds, all stitches will
be selected. The selected stitches will be marked with blue.
H. Zoom out icon: This icon is only active if you have enlarged the
representation. The function reduces the representation in 3 steps.
I. Triple stitch icon: This function triples the selected stitches.
J. Delete icon: This icon deletes all selected stitches.
K. More options icon: This icon opens a more option menu with
pattern components to combine to get new stitch patterns.
L. Start sewing icon: If you touch this icon you open a menu where
you can see the whole stitch pattern and sew it. It’s only in this
mode that you are able to sew your stitch pattern.
M. This icon shows the horizontal position of the selected stitch. If
you change the position of a single stitch to the left or the right
you automatically change the stitch width. If more than one stitch
is selected you change the position of the selected stitches or the
whole pattern.
Tip: The icon shows the numbers 0-9 , this is not the stitch width but the the xcoordinates of the work space.
Decorative sewing
4:11
Page 81

N. This icon shows the stitch length of a selected stitch. You can
change the stitch length for the selected stitch by touching the + or
the - of the icon. If more than one stitch is selected this icon is not
active.
Tip: If a zigzag stitch is selected this icon does not show the stitch length but the way the
feed dogs are moving. If the number on the icon is negative it means that the feed dogs
move in reverse when you sew.
O. Activity arrow: With this icon you move the selection cursor stitch
by stitch through your stitch pattern. You step stitch by stitch from
the beginning to the end of the stitch pattern and backwards.
P. Scroll bar: The scroll bar between the activity arrows allows you to
scroll faster through the stitch pattern, stitch by stitch.
Q. Scroll bar: The scroll bar is only active if the stitch pattern is longer
than the workspace. Use the scroll bar to view your stitch pattern
while zoomed in.
Create a new stitch pattern by placing single stitches
When you open the Stitch Creator the workspace is empty. A purple
line indicates the middle of the work space.
1. To create a new stitch pattern you must fi rst place the starting
point. This means that you set the position of the fi rst stitch in the
work space.
2. Touch the Confi rm icon (E) to place the starting point and the fi rst
stitch. The position of the fi rst stitch is marked with a red frame.
A
O
Q
S
P
R
B
C
D
E
F
G
H
I
J
K
L
M
N
E
Decorative sewing
4:12
Page 82

Placing single stitches
For each additional stitch you want to place, touch the confi rm icon (E).
To move single stitches
With your stylus or your fi nger you can work with your stitches
V
E
T
U
directly on the work space by dragging and dropping a selected stitch
point. To position a stitch point just touch it on the screen and drag it to
the desired position. When you do this you will change the stitch width
and the stitch length of the selected stitch.
Another way to move the stitch point of a selected stitch and for fi ne
adjustment is to use the stitch length (T) and stitch width icons (U).
The last stitch of the sequence is marked with blue and the last stitch
point is marked with a red frame.
The dotted line, the cursor line (V), at the end of the last stitch shows
where the following stitch will be added (if the x-coordinate of the last
stitch is not the same as the fi rst stitch). This ensures that the fabric is
fed evenly when you sew out your stitch pattern.
If you place the last stitch exactly at the same position (x-coordinate)
as the fi rst one of your stitch pattern the dotted cursor line will not be
sewn.
Touch the Start sewing (E) to open the sewing menu.
Now you can see the whole sequence of your stitch pattern and sew it.
Only when this screen is open you can sew out your stitch pattern.
Touch ESC to return to the Stitch Creator menu, for further editing.
Decorative sewing
4:13
Page 83

Combining single parts of patterns
With the Stitch Creator you can also edit and combine existing stitches.
1. Touch the Mini main menu (W) to open the main menu where you
can call up stitches that you wish to add in your stitch pattern.
2. Touch 9 mm Decorative stitches on the menu.
3. Touch Satin stitches and choose stitch no. 106.
4. Touch OK to confi rm the stitch and return to editing mode. The
whole stitch is automatically selected and marked with blue when
it appears on the workspace.
5. Touch the Select stitches (G) icon to deselect the stitches. Now only
the last stitch of the stitch pattern is selected.
6. Touch the Select stitches icon (G) to activate the multi selection.
7. Touch the arrow up to select the whole circle stitch by stitch. For a
faster selection, use the scroll bar between the arrows. The circle
should be blue.
8. Touch the Delete icon (X) to delete the stitches you have selected.
Now the last stitch of the heart is selected.
9. Touch the arrow up (Y) or the scroll bar (Z) between the arrows to
move forward to the tip of the heart without selecting any further
stitches.
10. Touch Select stitches icon (G) to activate the multi selection.
11. Touch arrow up or the scroll bar to select the next circle to be
deleted.
12. Touch the Delete icon (X) to delete the selected circle. The red frame
is now positioned on the tip of the heart and one stitch is selected.
13. Touch the Start sewing icon (1)to open the the sewing menu to see
the whole stitch pattern.
14. Touch ESC to return to the work space of the Stitch Creator.
W
G
Y
Z
1
X
Decorative sewing
4:14
Page 84

Combining pattern components
A
In the Stitch Creator you have 8 pattern components for creating new
stitch patterns.
1. Touch the More Options icon to open a menu with 8 different
pattern components.
2. Touch an icon (A) and the stitch will be positioned on the work
space.
3. The window remains open and allows you to select further
components.
4. Touch (A) again and the component will be positioned at the end
of the fi rst one you selected. The second component is selected.
5. Touch OK to close the window.
Tip: After selecting a pattern component it’s not possible to close the window with the
ESC icon. If you want to undo an inserted component you close the pop up window with
OK and the delete the component with the eraser.
6. Touch mirror side to side (B) to mirror the selected stitch.
7. Touch the Start sewing (C) to open the sewing menu.
Decorative sewing
More options to edit patterns
Convert single stitches into triple stitches
B
G
D
C
E
F
Touch the Triple stitch icon (D) to convert all selected stitches into
triple stitches.
To view the whole stitch pattern in the sewing menu touch Start
sewing (C).
Changing the position of selected stitches
If more than one stitch is selected, you can change the position of the
stitch pattern horizontally. Touch the - / + on the Stitch width icon (E)
to move the selected stitches of a stitch pattern horizontally.
To view the whole stitch pattern in the sewing menu touch Start
sewing (C).
Inserting more stitches
The last stitch of the wave is selected.
Touch the Select stitches icon (G) and the arrow up or the scroll bar to
select the circle (or the number of stitches you want to insert again).
Touch the Insert icon (F) to copy and paste the selected stitches. The
stitches will be placed at the end of the last stitch.
To view the whole stitch pattern in the sewing menu touch Start
sewing (C).
4:15
Page 85

Quilting
Patchwork
Patchwork and quilting are traditional hand craft techniques to make
use of left-over fabric. Over the years it has developed into a creative
hobby.
Traditionally patchwork was sewn by hand. Today your creative ideas
can be realized in a much shorter time with your Pfaff creative 2170.
A quilt consists of three layers, two layers of fabric with a layer of
batting sandwiched between.
Patchwork program
With this function, you can program and permanently save a desired
seam length. This is ideal when joining pieces of fabric of equal length
as in patchwork quilting.
The following screen shows the window that opens when you have
touched the Patchwork program icon.
You can open a previously saved program or create a new. If you want
to open a previously saved patchwork program simply touch the Data
Manager icon (A).
A
Decorative sewing
4:16
Page 86

Create a new patchwork program
1. To create a new patchwork program, touch the ON icon to activate
the function and press OK. The Patchwork program icon will
change and will say prog pat (B).
2. You determine the length of the seam by test sewing and pressing
D
B
A
C
the Reverse sewing button. The seam is completed without being
tied off. The Prog pat icon will change again and say auto pat (C).
If you want to tie-off a programmed seam at the start and/or at the
end, make sure that the patchwork program is activated and then touch
the Tie-off icon (D) to open the tie-off program. Turn on the functions
you want to activate and press OK.
If you want to adjust the seam of your patchwork program, touch the
Auto pat icon (C). You will then see the length of your patchwork and
a + and - icon. Touch the + icon to increase the length of the seam. The
seam is increased in steps based on the set stitch length. If the stitch
length is set to 2 mm, the programmed seam increases in 2 mm steps.
The stitch length itself will not change.
Touch the - icon to reduce the length of the seam. The stitch length
will not change. The seam is decreased in steps based on the set stitch
length. If the stitch length is set to 2 mm, the programmed seam
decreases in 2 mm steps. The stitch length itself will not change. Touch
the Data Manager icon (A). A window will open allowing you to open,
save, save as or close a program. To turn the function off, touch the
Auto pat icon (C), and then ON. Confi rm with OK.
Decorative sewing
4:17
Page 87

Piecing the quilt top
Cut out the pieces of fabric for your quilt top with a seam allowance
of ¼” (6 mm). Snap on the optional ¼" quilting foot. Sew the pieces
together following the design instructions to piece the quilt top.
The seam allowance of quilts are usually pressed towards the darker
fabric side. Baste the completed quilt top to the batting and backing.
In traditional quilts these three layers of fabric are then sewn together
by hand with small stitches. However, it is quicker and more practical
with your Pfaff creative 2170 e.g. with stitch no. 15 using monofi lament
thread on top and regular or decorative thread in the bobbin.
When the quilting is fi nished simply bind the edges or make it into
cushions, wearable art or other smaller projects.
Stitch-in-the-Ditch
One way to hold the quilt top, batting and backing all together is using
the Stitch-in-the-Ditch method of quilting. Stitching in the ditch means
following the seams in the quilt blocks.
• Set your Pfaff creative 2170 with a straight stitch (no. 1), stitch
length 2.5, center needle position and the IDT engaged.
• Begin by pin basting your quilt through all layers with safety pins
– starting from the middle of your quilt and working out. Place a
pin about every 6 – 8 inches (15 – 20 cm).
• To begin quilting, start sewing from the middle of the quilt and
continue out. Starting from the middle and sewing out will help
keep layers in place. Plan which seams you will actually follow.
This stitching will not only hold the quilt together it will also create
the pattern on the quilt back. You do not need to follow every seam
in the quilt, sew every 3 – 4 inches to keep the quilt in place. Of
Decorative sewing
course you can sew more to create a more decorative pattern for the
back.
Change to a quilting or jeans needle when sewing through thick quilts.
Test sew to make sure your stitching is proper before you start quilting
your piece.
Tip: Use one of the Antique Quilt stitches No. 311-330, 333-335 instead of the straight
stitch to add interest to your quilt, using monofi lament thread on top and colored thread
in the bobbin. This will make your stitch-in-the-ditch look hand sewn.
Tip 2: Use the optional stitch in the ditch foot for optimal guiding.
4:18
Page 88

Free-Motion Stippling
Free-Motion Stippling not only keeps the top, batting and backing
together, but it also adds texture and interest to your quilt.
• Set your Pfaff creative 2170 for stippling with a Straight Stitch
(no. 1). Touch the Free-motion icon. Follow the on-screen
instructions and lower the feed dogs. Attach the or free-motion
quilting foot (extra accessory).
• Pin baste your quilt layers. Prepare your quilt as explained in the
Stitch-in-the-Ditch method.
• Practice stippling on scraps of fabric and batting. When the feed
dogs are lowered, you move the fabric to determine the stitch
length. Sewing with a constant speed will help to keep the stitches
even. Begin near the center of your quilt. Take one stitch and pull
the bobbin thread to the top of the quilt. Take a few stitches right
next to one another to lock the threads. Now move the quilt so that
your stitching creates scrolls and swirls. The stitching should not
cross itself – but travel in swiveling motion all over the quilt.
Tip: You can use the Free-motion Guide Grip to help move your fabric.
Quilt Appliqués
Appliqués add that special touch for your quilt.
There are many different ways of applying appliqués to a quilt. One
way is to add the appliqué to the block before the quilt is put together.
• Set your Pfaff creative 2170 with stitch no. 3, stitch length 0.5, stitch
width 4-6 mm, presser foot no. 2A.
• Adhere the appliqué piece to the quilt block. Place stabilizer behind
the block and appliqué. Sew around the appliqué with the satin
stitch. Make sure the stitch is 80% on the appliqué – just covering
up the appliqué’s raw edge.
Another way to add an appliqué to a quilt is to fi nish the edge of the
appliqué and sew it on with stitch no. 299, using a monofi lament thread
on top and a colored bobbin thread. This will give your quilt a hand
stitched look.
• First prepare the appliqué. Cut the appliqué form out of fabric and
a piece of light weight iron on interfacing.
• Place the right side of the fabric and the rough (iron-on) side of the
interfacing together. Use a straight stitch (no. 1), stitch length 2.0,
center needle position and sew the fabric and interfacing together
using a ¼" seam.
• Trim around the appliqué leaving 1/8" seam allowance and clip
into curves. Slash the interfacing so that the appliqué can be turned
right side out. Finger press the appliqué.
• Place the appliqué on the quilt. When you are satisfi ed with the
position, iron it down.
• Follow around the edge of the appliqué with the straight part of
stitch no. 299. Let the horizontal part of the stitch just catch into the
appliqué. This is the part that will keep the appliqué in place.
Note: Press the needle down function to position the needle in the fabric when you stop
sewing. Program your presser foot lift to the height for the fabric you have chosen. This
makes turning easy with your Pfaff creative 2170.
Decorative sewing
4:19
Page 89

Tapering
Tapering allows you to create stitches with an attractive 3-dimentional
appearance, which are very easy to sew. Tapering increases or
decreases the width of the stitch during sewing to create a symmetric
or asymmetric tapers. On your creative 2170 you can use the tapering
function on 106 stitches.
With the tapering program you can select a particular angle for the
taper. The taper is automatically sewn by the machine. In the example
below we have used the tapering function on stitch no. 3, the zigzag
stitch.
Symmetric taper, Stitch no. 3
Increasing the width
1. Select stitch no. 3.
2. Set the desired stitch width.
3. Touch the Tapering icon (A) and select Increase width icon (B) and
set the desired angle. Touch the OK icon. The zigzag stitch starts
from 0 mm and becomes wider until the selected stitch width is
reached. Stitch the desired seam length.
For symmetrical tapering two angles are available: 90° and 60°. If you
press the reverse key anytime while sewing the machine will sew
"tapering end" pattern.
Decorative sewing
Reducing the width
If you touch the Reduce width icon (C), the taper begins with the preset
stitch width.
1. Select stitch no. 3.
2. Set the desired stitch width.
3. Touch the Tapering icon and select Reduce width icon (C) and set
the desired angle. When you press the reverse button, the width
of the zigzag stitch is reduced to 0 mm. Tap on the foot control or
activate the Needle down icon so that the machine stops with the
needle in the fabric. This makes it easier for you to pivot the fabric
to stitch the corner. Press the foot control again, and the stitch
width increases.
4. Press the reverse button and the width of the zigzag stitch is
reduced to 0mm.
B
C
A
4:20
Page 90

Asymmetric taper, Stitch no. 22
C
To make an asymmetric taper chose a stitch that has a needle position
to the right or left, for instance stitch no. 22. If you use the mirror
function you can reverse the needle position. This stitch is most suitable
for corners and border stipes. For asymmetrical tapering three angles
are available: 90°, 45° and 30°. Select stitch no. 22 and proceed as
described above.
Use the Mirror side to side (C) to reverse the needle position.
Decorative sewing
4:21
Page 91

Nostalgia /Heirloom
Wing Needle
Sewing with a wing needle (a special needle with a wide, wing-like
shaft) creates the look of hemstitching in woven natural fi ber fabrics by
creating holes where the needle goes in and out of the fabric.
• Replace standard needle with a wing needle. Choose any stitch
that goes back and forth into the same holes several times (137-
144). Use the recommended presser foot for that stitch.
• Thread the top and bottom with lightweight thread in color that
matches the fabric you are using. (Remember you want to see the
holes that are created and not the thread.)
• Begin sewing. Use the sew slow button (A) to reduce your speed
while using the wing needle.
Note: For fi ne fabrics, place a lightweight tear-away stabilizer or water soluble stabilizer
under stitching.
Hemstitching
This is a technique everyone recognizes as embroidered by hand. With
your Pfaff creative 2170, you can produce hemstitching much more
quickly and easily. With 10 special hemstitches and by changing the
stitch length and width, you can create a variety of hemstitch effects.
A wing needle is required for hemstitching work. When entering the
Decorative sewing
fabric the wing needle forms holes which are typical for hemstitching.
Hemstitching will be most successful on relatively coarse linen and
cotton fabrics from which single threads can be easily pulled.
If you pull additional threads and sew along the edges close to the
threads you have pulled out, you will achieve even more beautiful
hemstitching effects as the remaining threads are bundled.
A
4:22
Page 92

Twin needle Pintucks
Twin needle Pintucks are created by placing a twin needle in your Pfaff
creative 2170. Mark the fi rst line of stitching with a fade away or wash
away fabric pen. Continue to mark lines or use one of the optional Pfaff
Pintuck feet to easily guide your rows where needed.
• Replace the standard sewing needle with a 2.0 mm twin needle. Set
your creative 2170 for normal Straight Stitch (no. 1), stitch length 2.5
– 3.0, presser foot 2, IDT disengaged.
• Touch the Twin needle icon and set for a 2.0mm twin needle.
• Thread the top and bobbin with thread matching the color of fabric.
Use the extra spool pin for the second top spool. Remember to place
one top thread in one side of the tension disc and the other thread
on the other side of the tension disc.
• Sew along the fi rst line of stitching. Continue until all pintucks are
sewn.
Cross Stitch
No other sewing technique is as closely associated with the term
needlework as cross-stitching. With your Pfaff creative 2170 and the
cross stitches, no. 117-136 this traditional sewing technique can be
created remarkably easily and quickly. The pre-programmed cross
stitches give a hand sewn look and lend a distinctive character to table
linens, towels or clothes.
Tips for cross stitch sewing:
• Always work using the sew slow and needle up/down functions.
• Attach fancy stitch foot no. 2A.
Antique hand embroidery stitches
Your Pfaff creative 2170 has 23 different Antique Hand embroidery
stitches. These stitches has been especially made to look like they have
been stitched by hand. The sewing machine sews these over the stitch 9
times, making it look like you have sewn it with a heavyweight thread.
Decorative sewing
4:23
Page 93

Free-Motion Sewing
With Free-motion sewing you can create the most fantastic work. It is
possible to sew just as you would draw with a pencil, using the various
types of threads that are on the market today and your Pfaff creative
2170. You can also vary the shade of your Free-motion Sewing by
sewing in different directions or patterns.
Top tension 2-3
Presser foot Darning foot, no 6
Feed dog Lowered
Needle size 80-90
Stitch Straight stitch/Zigzag
• Touch the Free-motion sewing icon.
• Thread your machine with a good quality cotton or synthetic
thread. You can use the same thread for bobbin thread, or an
embroidery weight bobbin thread.
• Hoop your fabric tight as a drum into a round embroidery hoop.
You can use a wooden ring hoop wrapped with bias binding for a
better grip.
• Select either the straight stitch or the zigzag. From now on, you
control the stitch length. The movement of the hoop along with
the sewing speed creates the stitch length. Sewing too slowly may
cause small knots to appear on the reverse side of your work.
Important: Never engage the IDT when free-motion sewing.
MAXI Stitches
Your creative 2170 has a selection of 86 MAXI stitches. These stitches
can be up to 60mm wide and can be combined into borders. When
Decorative sewing
sewing a MAXI stitch the machine moves sideways guiding the fabric
by itself.
1. The best way to make sure that the fabric is aligned is to draw two
lines with a fabric marking pen.
2. When you sew your stitch make sure that you presser foot always
remains parallell to those two lines.
4:24
Page 94

Gathering with straight stitch
A straight stitch can be used to gather sleeves, cuffs, skirts or valances.
To obtain neat and even gathers you should sew two or three rows of
gathering stitches.
• Set your stitch length to 6.0 mm. Lower thread tension to 3.
• Mark the fi rst gathering line on the right side of the fabric. Sew
along this line. Leave about 4 - 5 inches (10-13 cm) of thread at the
beginning and end of the seam.
• Sew 1 or 2 more rows of stitching, using the edge of the presser foot
as a guide.
• Gather the fabric by pulling the bobbin (bottom) threads to the
desired fullness.
• Distribute the gathers evenly and knot the thread ends together to
secure the gathering.
Tip: It is important to use a strong thread when gathering to avoid thread breakage when
pulling on the gathering threads.
Decorative sewing
Shell edging
Shell edging is a very effective fi nish for thin, soft fabrics such as silk
and rayon fabrics. It is frequently used as a hem fi nish on lingerie.
• Select blind stitch no. 5 and mirror it with the side to side icon.
• Tighten the thread tension to create a deeper shell tuck.
• Finish the raw edge and press the seam allowance to the left.
• While sewing, make sure the fabric runs under the presser foot at
half of the foot width, and the blind hem swings over the folded
edge.
Tip: Add a colored pearl cotton thread on the folded edge as you sew the shell tuck. This
creates a pretty contrast and strengthens the hem.
4:25
Page 95

Alphabets
You can write an entire sequence of words using the machine’s fonts
and save it permanently in the machine’s memory.
There are three different types of fonts in the machine; fi ve fonts that
you use when sewing, two monograms (Maxi) that can be sewn as
single stitches and two embroidery fonts.
All the alphabets used when sewing should be sewn with the feed dogs
engaged. The Integrated Dual Feed should be disengaged.
1. Touch the Alphabets icon on the Main menu.
2. Select a font.
3. Touch capital or lower-case letters, numbers or symbols to enter the
desired character. For editing a sequence, position the cursor below
the character using the (B) icons. You can alter the font size, delete
characters or insert characters. If you add a character, it will be
inserted to the left of the cursor.
Decorative sewing
4. Confi rm the entry with OK. The sewing sequence is shown on the
screen and you can now sew.
5. Zoom out to see the sequence.
B
4:26
Page 96

Editing a word sequence
In order to process a single character or a word sequence, it must be
previously selected.
To select a single character, just move the red dash to the character
using the cursor icons. The selected character is surrounded by a
colored frame.
C
D
To select a word sequence, touch Select stitches icon (C).
Then move the red dash across the word sequence to be selected, using
the cursor icons. The selected characters are surrounded by a colored
frame.
• After selecting one or more characters, you can alter all settings of
these characters.
• More functions for altering the selected characters or word
sequence and for other processing options can be selected with the
More options icon (D).
• You can delete one or more characters or the entire word sequence.
If you move over a previously selected character or word sequence, the
selection is cancelled again.
If you want to process other characters, just select them using the
cursor icons.
When you have fi nished modifying the characters, cancel the selection
by touching the Select stitches icon (C) again.
The tie-off program is activated automatically.
Decorative sewing
Saving a word sequence
Touch the Data Manager icon to save a word sequence. A window is
opened for opening, saving, closing or deleting an embroidery pattern.
Open
Use this function to access the machine’s memory and select an existing
word sequence.
Save
Use this function to save the sequence under the existing name.
Save as
Use this function to give the sequence a name or rename it.
A name may be a maximum of 8 characters long.
Close
Use this function to close a sequence without saving it (after query).
Delete
Use this function to delete the sequence (after query).
4:27
Page 97

Monogram
There are two monogram fonts available in the sewing machine
(MAXI). These are sewn as single stitches. The feed dogs should be
engaged.
If you select one of the monogram stitches, a screen with the letter A
appears automatically.
Select the letter of your choise by touching the + and - icon with the
letter A above. (D).
As you touch the + and - icons, the letter above them changes as well as
the monogram in the upper left corner of the screen.
The tie-off program (E) is activated automatically.
E
D
Decorative sewing
4:28
Page 98

EMBROIDERY
5:1
Page 99

The Embroidery window
A. Data manager icon
B. Mini Main menu icon
C. Zoom in icon
D. Select stitches icon
E. Zoom out icon
F. Stitch information icon
G. Basting in the hoop
H. Move icon
I. Automatic stitch building icon
J. Delete icon
K. More options icon
A. Data manager icon
This icon opens the memory of the machine or a card. Use this function
for opening, saving, pasting, closing or deleting a program.
When you touch Open, a version of the creative File Manager opens
(L) in order to call up a previously saved program, a stitch or a stitch
sequence, design combination or a stitch on the processing screen
from a creative card or from the machine’s memory. (Stitches, stitch
sequences and programs are referred to as ’programs’ in the following
description.)
The input fi eld shows a directory in which the program is
Embroidery
automatically saved.
With the aid of the Arrow icons (M), move the marker bar onto the
program/stitch that you wish to open. The selected program/stitch
appears on the processing screen when you touch this icon.
A
B
C
D
E
F
G
H
I
J
K
’Save’ icon
If you have called up and modifi ed a program/stitch that had
previously been saved, you can save it again under the same name. The
previous version of the program is automatically replaced.
5:2
M
L
Page 100

’Save as’ icon:
When you touch ”Save as”, the menu for input of the name is opened.
You can give your program a name and select a directory in which
to save it. When you open the menu, the machine’s memory is
automatically selected.
O
N
The input fi eld shows a directory in which the program can be
automatically saved. The input fi eld shows the designation NEW. You
can erase this designation with the Delete icon (N) and enter a name of
your own choice. A name may be a maximum of eight characters long.
Touch the OK icon to confi rm your input.
The stitch is now stored in the machine in this directory and can be
opened again by selecting this directory.
If you touch the Arrow icon (O), a further window for selecting a
different directory is opened.
• You can save the program on the machine in a different directory
• If you wish to save the program on a card, select the appropriate
card drive (front or rear drive) in which you have inserted the card.
To save the program on the machine, select the directory with the
arrows. Touch OK to close the window. The program is saved in this
directory. Touch ESC to close the window without saving your input.
You can create a directory only in the Creative File Manager.
’Close’ icon
If you have saved your settings, the Close icon closes the window. Your
original setting is stored in the machine memory or on a card.
If you have not saved your settings, a window querying
”Do you want to lose the changes?” appears.
If you touch the OK icon, the menu for input of the name appears.
If you touch the ESC icon, the new settings is not saved.
’Delete’ icon:
By touching the Delete icon you erase the current embroidery
combination both from your screen and from the machines memory.
A window opens with the query:
”Delete sequence?”
If you touch the OK icon, the program is deleted.
If you touch the ESC icon, the program is not deleted.
Embroidery
B. Mini Main menu icon
When you touch this icon a variant of the Main menu opens. By
touching the desired category and the sorted stitch or design selection
you can select the design directly. The specifi c setting shown for each
selected design can be modifi ed. If you confi rm the design, it appears
individually on the processing screen. By touching the Mini Main
menu, you can add any further designs.
5:3
 Loading...