

Page 1

Owner's manual
Page 2

This household sewing machine is designed to comply with IEC/EN 60335-2-28 and UL1594.
IMPORTANT SAFETY INSTRUCTIONS
When using an electrical appliance, basic safety precautions should always be followed, including the
following:
Read all instructions before using this household sewing machine.
DANGER – To reduce the risk of electric shock:
• A sewing machine should never be left unattended when plugged in. Always unplug this sewing
machine from the electric outlet immediately after using and before cleaning.
• Always unplug before relamping. Replace bulb with same type rated 5 Watt.
WARNING – To reduce the risk of burns, À re, electric
shock, or injury to person:
• This sewing machine is not intended for use by persons (including children) with reduced physical,
sensory or mental capabilities, or lack of experience and knowledge, unless they have been given
supervision or instruction concerning use of the sewing machine by a person responsible for their safety.
• Children should be supervised to ensure that they do not play with the sewing machine.
• Use this sewing machine only for its intended use as described in this manual. Use only attachments
recommended by the manufacturer as contained in this manual.
• Never operate this sewing machine if it has a damaged cord or plug, if it is not working properly, if
it has been dropped or damaged, or dropped into water. Return the sewing machine to the nearest
authorized dealer or service center for examination, repair, electrical or mechanical adjustment.
• Never operate the sewing machine with any air openings blocked. Keep ventilation openings of the
sewing machine and foot controller free from the accumulation of lint, dust, and loose cloth.
• Keep À ngers away from all moving parts. Special care is required around the sewing machine needle.
• Always use the proper needle plate. The wrong plate can cause the needle to break.
• Do not use bent needles.
• Do not pull or push fabric while stitching. It may deÁ ect the needle causing it to break.
• Wear safety glasses.
• Switch the sewing machine off (“0”) when making any adjustment in the needle area, such as threading
needle, changing needle, threading bobbin, or changing presser foot, etc.
• Always unplug sewing machine from the electrical outlet when removing covers, lubricating, or when
making any other user servicing adjustments mentioned in the instruction manual.
• Never drop or insert any object into any opening.
• Do not use outdoors.
• Do not operate where aerosol (spray) products are being used or where oxygen is being administrated.
• To disconnect, turn all controls to the off (“0”) position, then remove plug from outlet.
• Do not unplug by pulling on cord. To unplug, grasp the plug, not the cord.
• This sewing machine is provided with double insulation. Use only identical replacement parts.
See instructions for Servicing of Double-Insulated Appliances.
SAVE THESE INSTRUCTIONS
SERVICING OF DOUBLE INSULATED PRODUCTS
In a double-insulated product, two systems of insulation are provided instead of grounding. No ground
means is provided on a double-insulated product, nor should a means for grounding be added to the
product. Servicing of a double-insulated product requires extreme care and knowledge of the system and
should be done only by qualiÀ ed service personnel. Replacement parts for a double-insulated product must
be identical to those parts in the product. A double-insulated product is marked with the words ‘DOUBLE
INSULATION’ or ‘DOUBLE INSULATED’.
Page 3
Congratulations!
Congratulations on purchasing your new PFAFF® creative™ 2.0 sewing and embroidery
machine. As a sewing enthusiast, you have acquired a machine that features the very
latest in both design and technology, enabling you to transform all your creative ideas into
reality.
Before you start, please spend some time reading this owner’s manual. You will soon
discover how to maximize the use of your machine. Our authorized PFAFF® dealers will
of course also be pleased to advise you at any time.
Your PFAFF®
experience a totally new dimension of sewing and embroidery.
creative™ 2.0 sewing and embroidery machine will deÀ nitely enable you to
Page 4

Table of contents
4
1
Introduction 1:5
Machine overview ....................................................1:5
Front side ...................................................................... 1:5
Top parts .......................................................................1:5
Rear side .......................................................................1:6
Accessory tray ..............................................................1:6
Parts of the embroidery unit ......................................1:6
Included accessories ....................................................1:7
Presser feet ....................................................................1:8
Stitch overview .........................................................1:9
Alphabets ................................................................1:11
2
Preparations 2:1
Unpacking .................................................................2:1
Connect to the power supply .................................2:1
Pack away after sewing ...........................................2.2
Free arm .....................................................................2:2
Thread cutter.............................................................2:2
Spool pins ..................................................................2:2
Threading the machine............................................2:3
Bobbin winding ........................................................ 2:5
Inserting the bobbin .................................................2:6
IDT (Integrated dual feed) ......................................2:6
Needles ......................................................................2:7
Changing the needle ................................................2:7
Lowering feed dogs .................................................2:8
Changing the presser foot .......................................2.8
USB port ....................................................................2:9
5D™ Embroidery Software ..................................2:10
Buttons .....................................................................2:12
Settings menu .........................................................2:14
3
Sewing 3:1
Sewing mode - overview ............................................3:1
Select a stitch .............................................................3:1
Sewing recommendations .......................................... 3:1
Stitch adjustments .................................................... 3:2
Mirroring ...................................................................3:3
Tie-off options ........................................................... 3:3
Tapering program ....................................................3:4
Speed control ............................................................3:4
Personal stitches ....................................................... 3:5
Sewing techniques ...................................................3:6
Common sewing pop-ups ....................................3:11
Sequencing 4:1
Sequencing - overview................................................4:1
Create a sequence .....................................................4.1
Using the alphabet ...................................................4:2
Manage your sequences .......................................... 4:2
Sewing a sequence ...................................................4:3
5
Embroidery preparations 5:1
Embroidery unit overview .....................................5:1
Embroidery hoop overview .................................... 5:1
Connect the embroidery unit .................................5:2
Remove the embroidery unit .................................. 5:2
To hoop the fabric ....................................................5:3
6
Embroidering 6:1
Embroidery stitch-out view .......................................6:1
Embroidery edit view .................................................6:1
Design information .................................................. 6:1
Embroidery stitch-out .............................................6:2
Load a design ............................................................... 6:2
Load a font ....................................................................6:2
Stitches left in color block ...........................................6:3
Current color ................................................................ 6:3
Orbit to check position................................................6:3
Hoop options................................................................6:4
Basting ...........................................................................6:5
Speed control ................................................................6:5
Thread tension ............................................................. 6:5
Getting started embroidering ....................................6:6
Embroidery edit .......................................................6:7
Design width ................................................................ 6:7
Design height ...............................................................6:7
Rotate ............................................................................6:7
Monochrome ................................................................6:7
Move ..............................................................................6:7
Mirroring ......................................................................6:7
Common embroidery pop-ups ..............................6:8
7
Maintenance 7:1
Changing the light bulbs .........................................7:1
Cleaning the machine ..............................................7:1
Replacing the stitch plate ........................................7:2
Troubleshooting .......................................................7:3
Index ..........................................................................7:5
Page 5
Introduction
Machine overview
1
Introduction
2
3
4
5
6
7
8
9
10
11
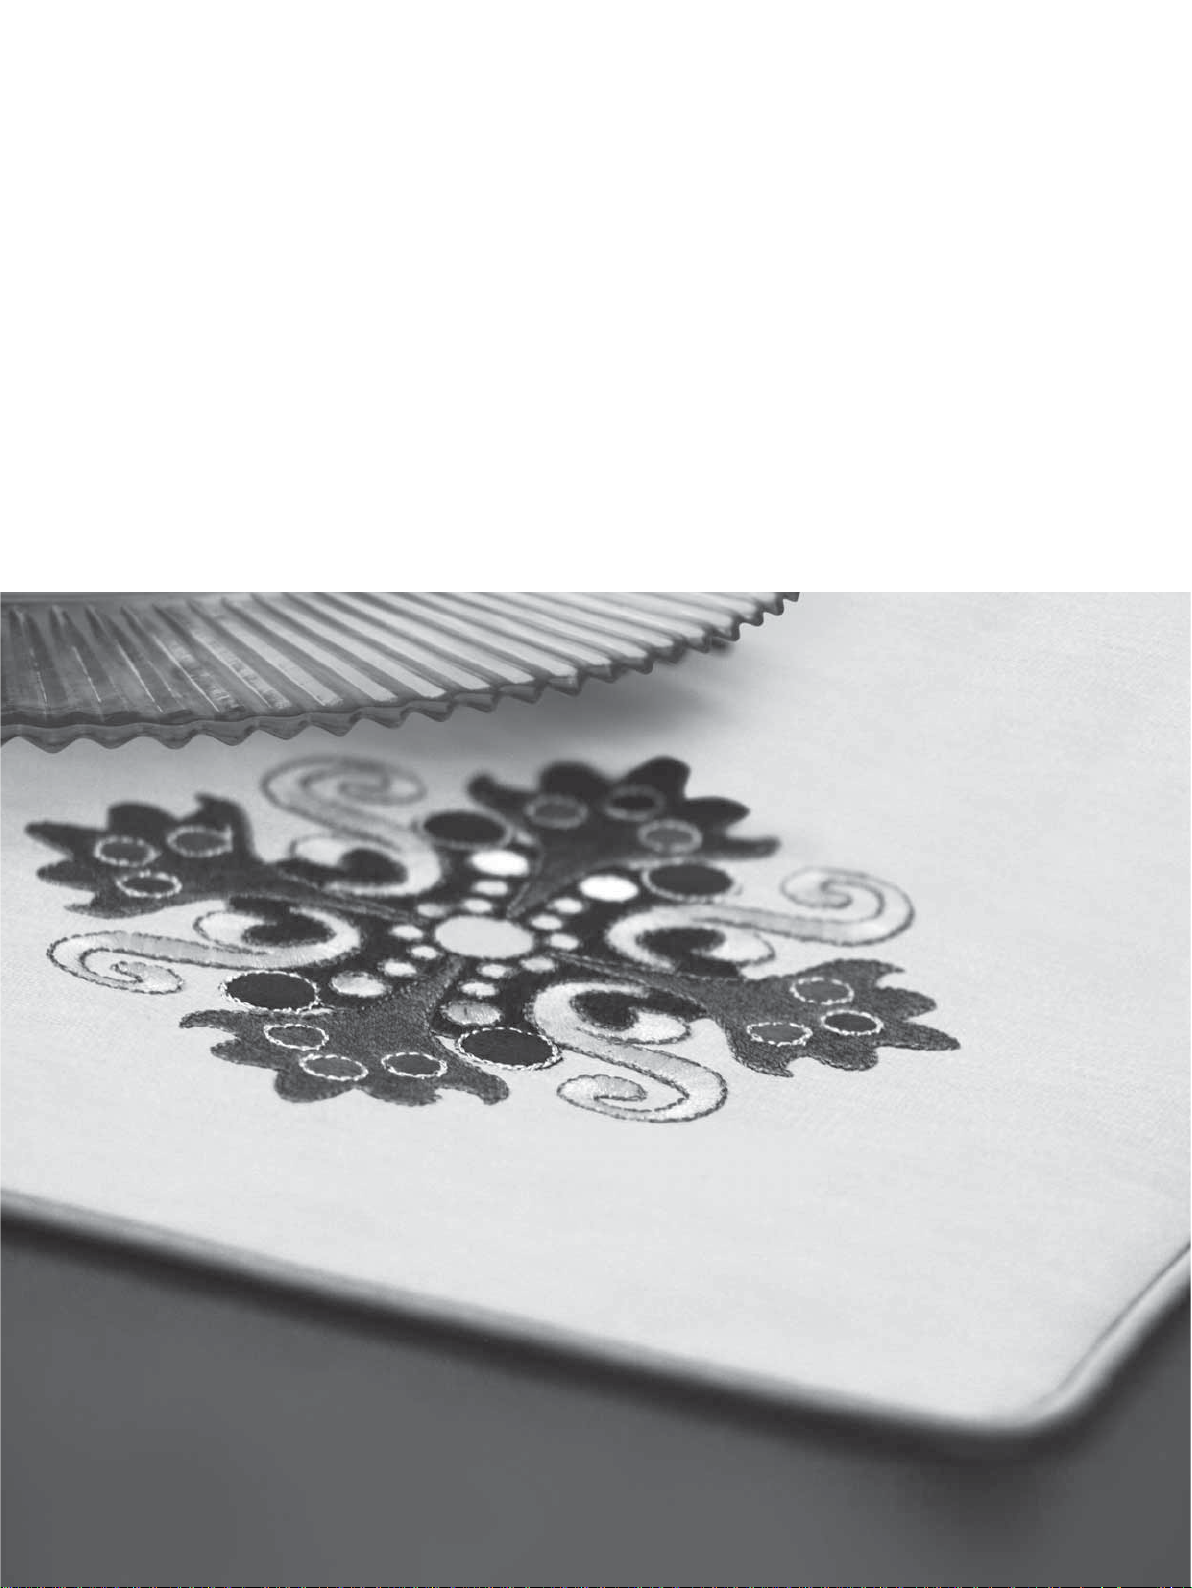
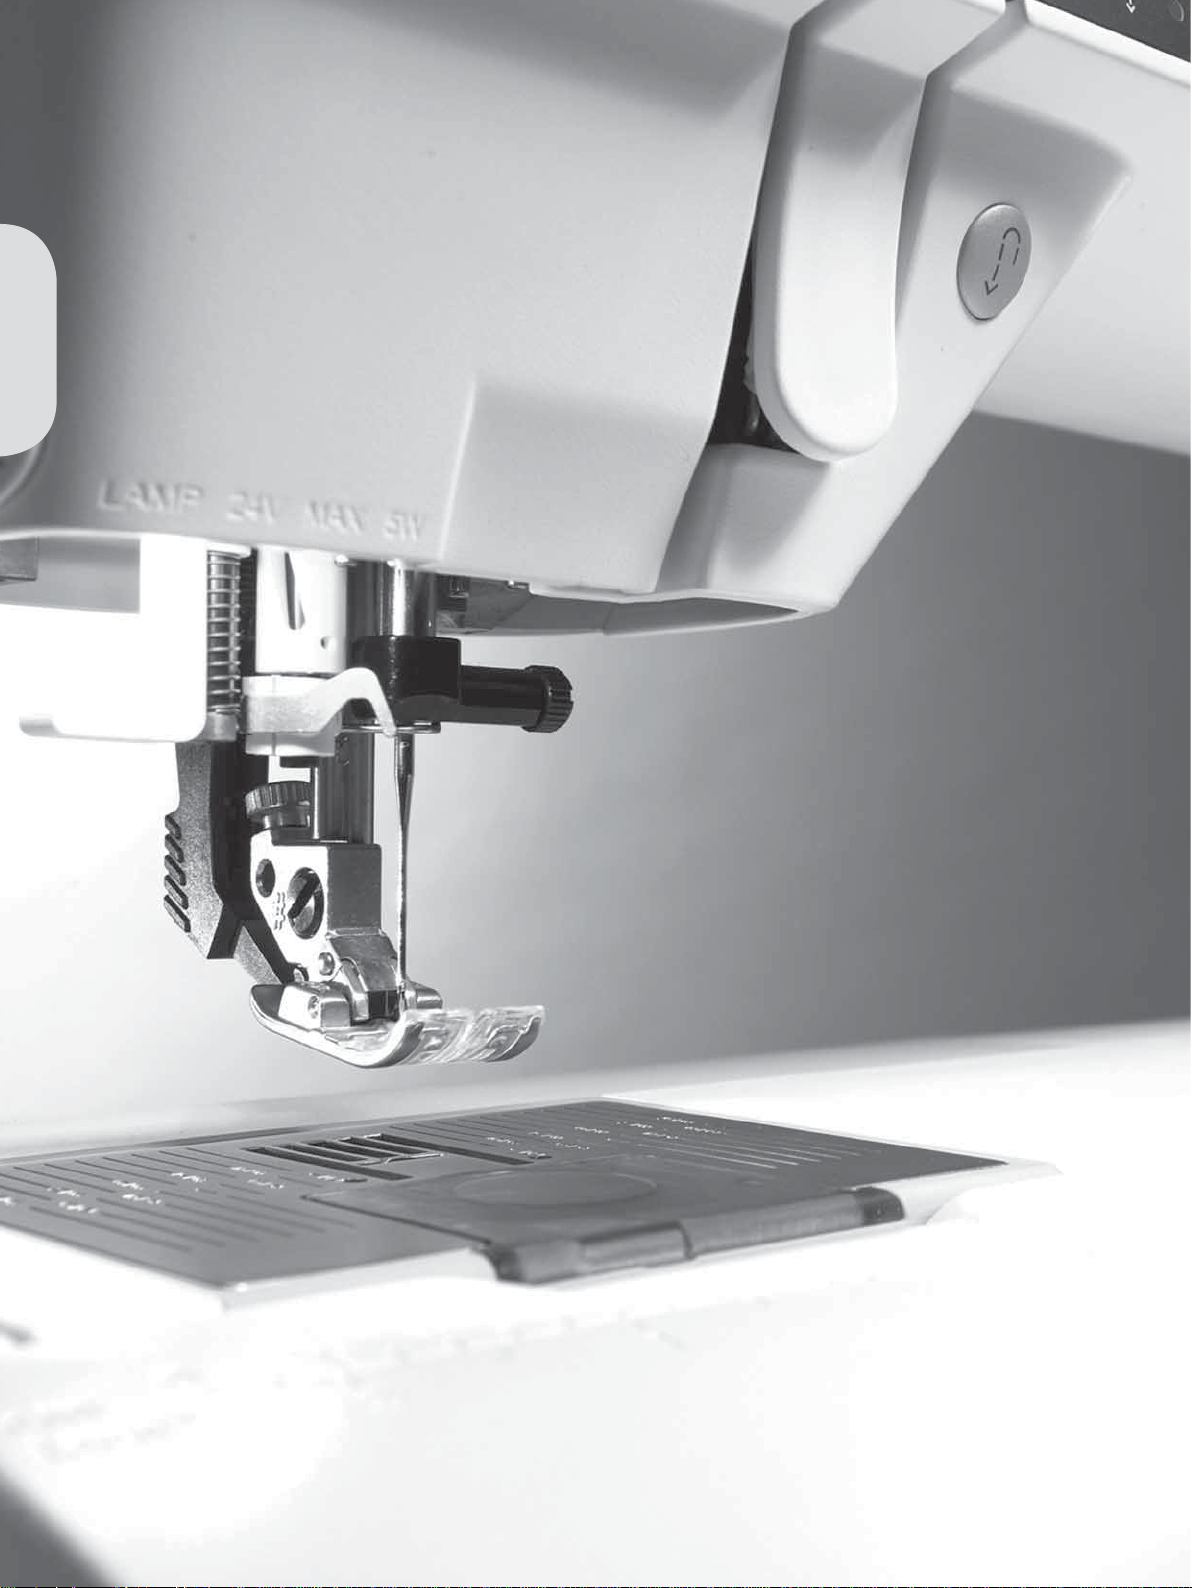
Front side
1. Lid with stitch overview and button ruler
2. Threading slots
3. Thread cutter
4. Sensormatic buttonhole foot socket
5. Light bulbs
6. Built-in needle threader
7. Needle bar
8. Needle thread guide
9. Stitch plate
10. Bobbin cover
11. Free arm
12. Presser foot
13. Presser foot bar and presser foot holder
14. Needle screw
15. Buttons and graphic display
16. Handwheel
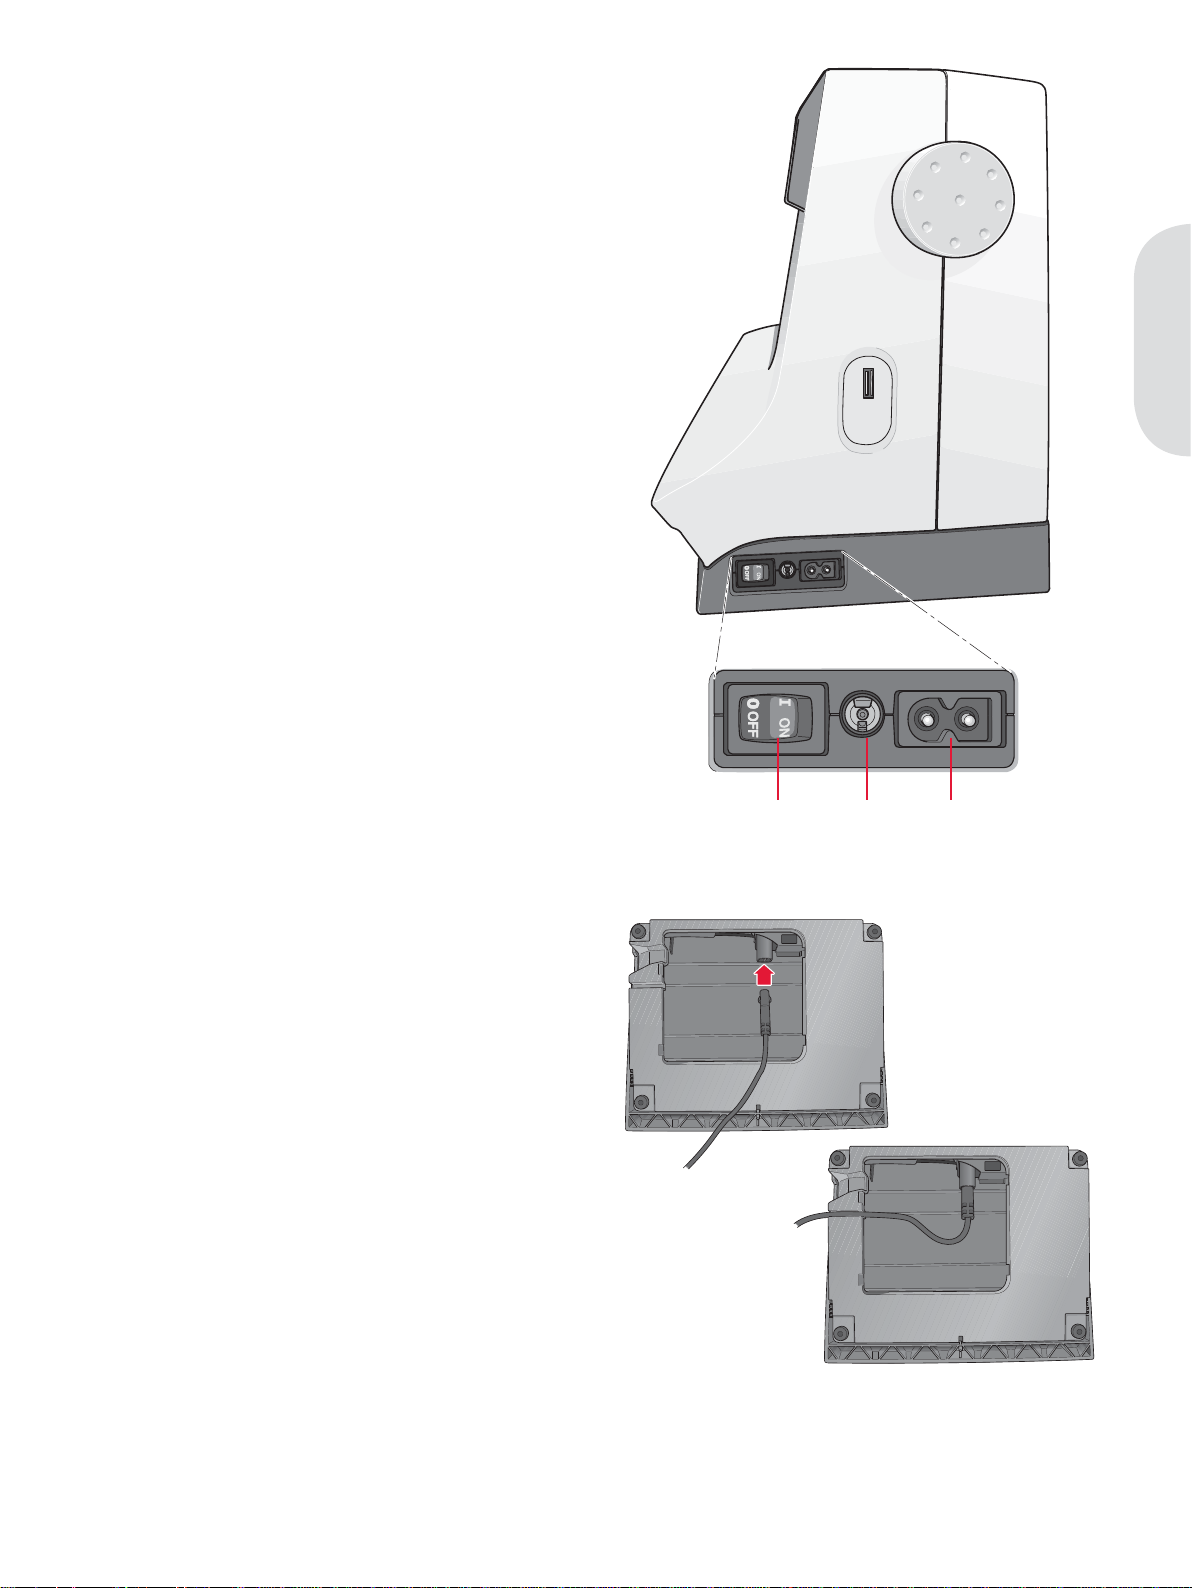
17. Main switch, connectors for power cord and
foot control
18. Slide for lowering the feed dogs
14
13
12
creative 2.0
5
Top parts
19. Pre-tension disk for threading and bobbin
winding
20. Bobbin winder thread guide
21. Thread guide
22. Bobbin thread guides
23. Bobbin thread cutter
24. Bobbin winder lever and bobbin spindle
25. Auxiliary spool pin
26. Spool caps
27. Spool pin
28. Thread tension disk
29. Take-up lever
212019 22 23 24
15
16
17
18
272829
26 25
1:5
Page 6
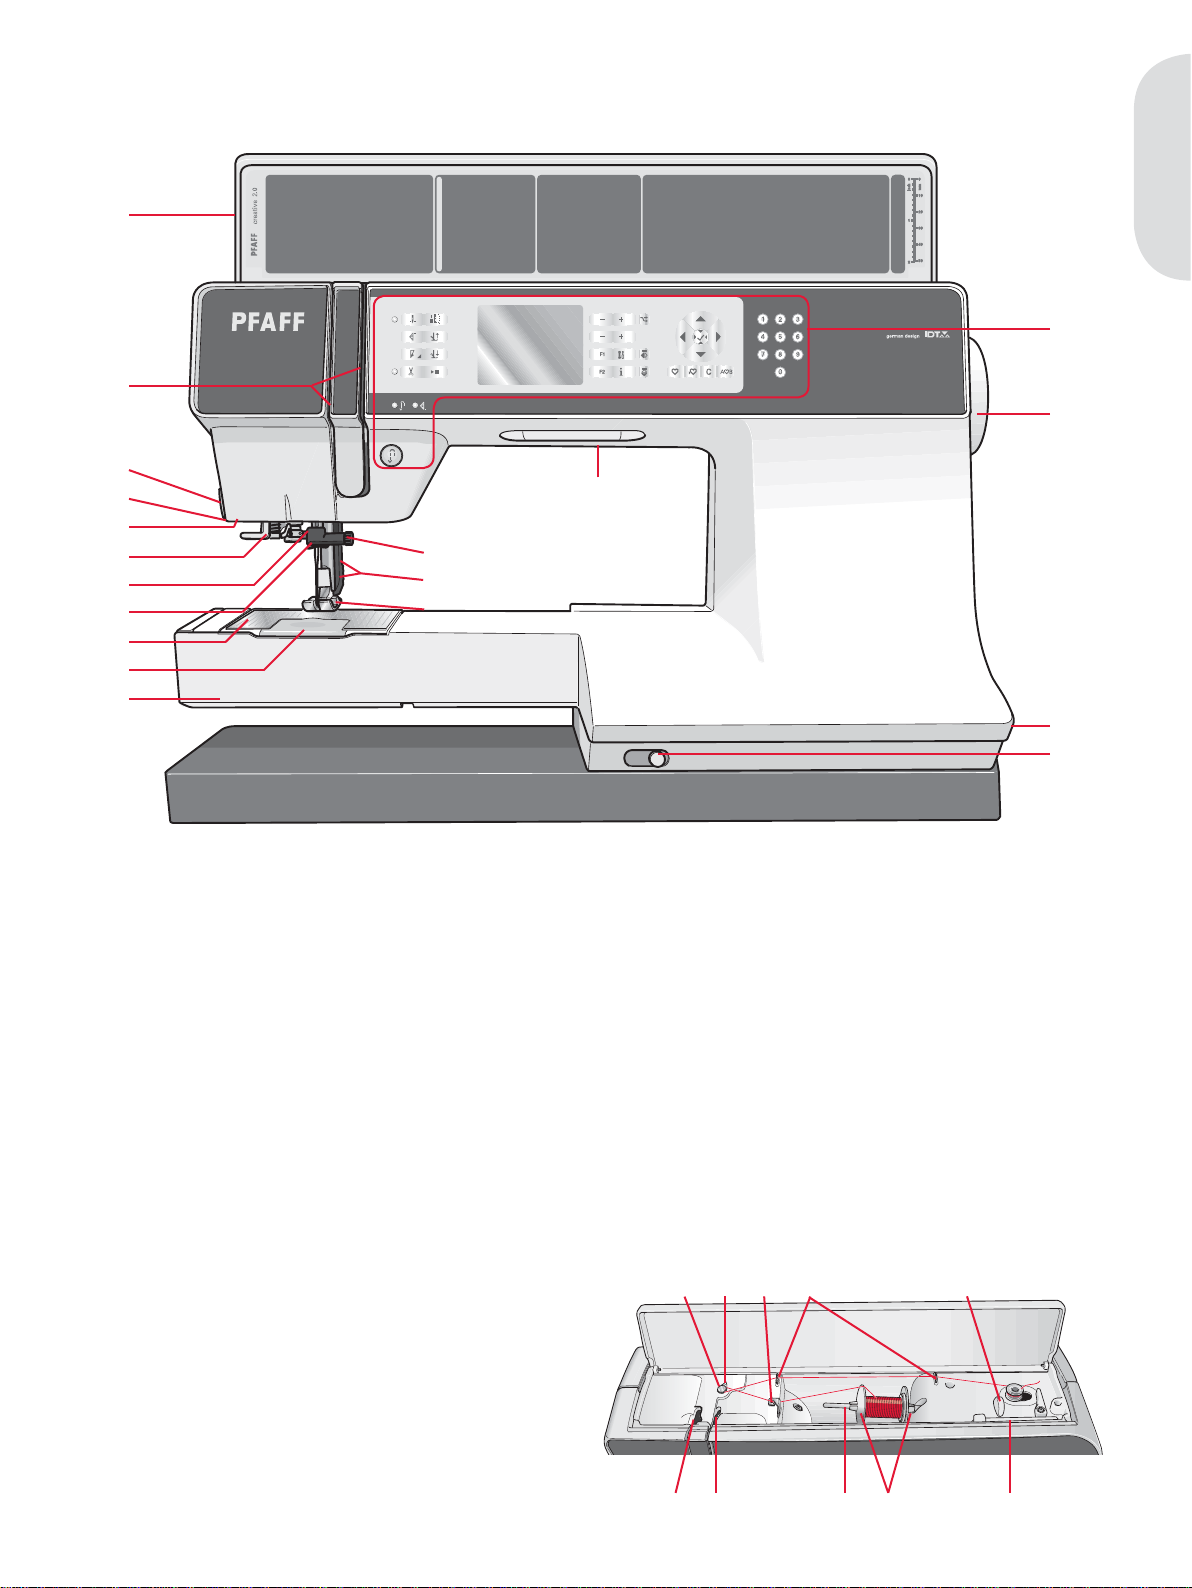
Rear side
30. Handle
31. IDT
32. Embroidery unit connection socket
Introduction
Accessory tray
The accessory tray features special compartments
for presser feet and bobbins, plus space for needles
and other accessories. Store the accessories in the
tray so they are easily accessible.
33. Space for accessories
34. Removable tray for presser feet
35. Removable bobbin holder
30
31
32
33
34
35
Parts of the embroidery unit
(type BE16)
36. Embroidery unit release button
37. Level adjusting feet
38. Embroidery unit socket
39. Embroidery hoop connection assembly
40. Embroidery arm
36
37
40
39
38
1:6
Page 7
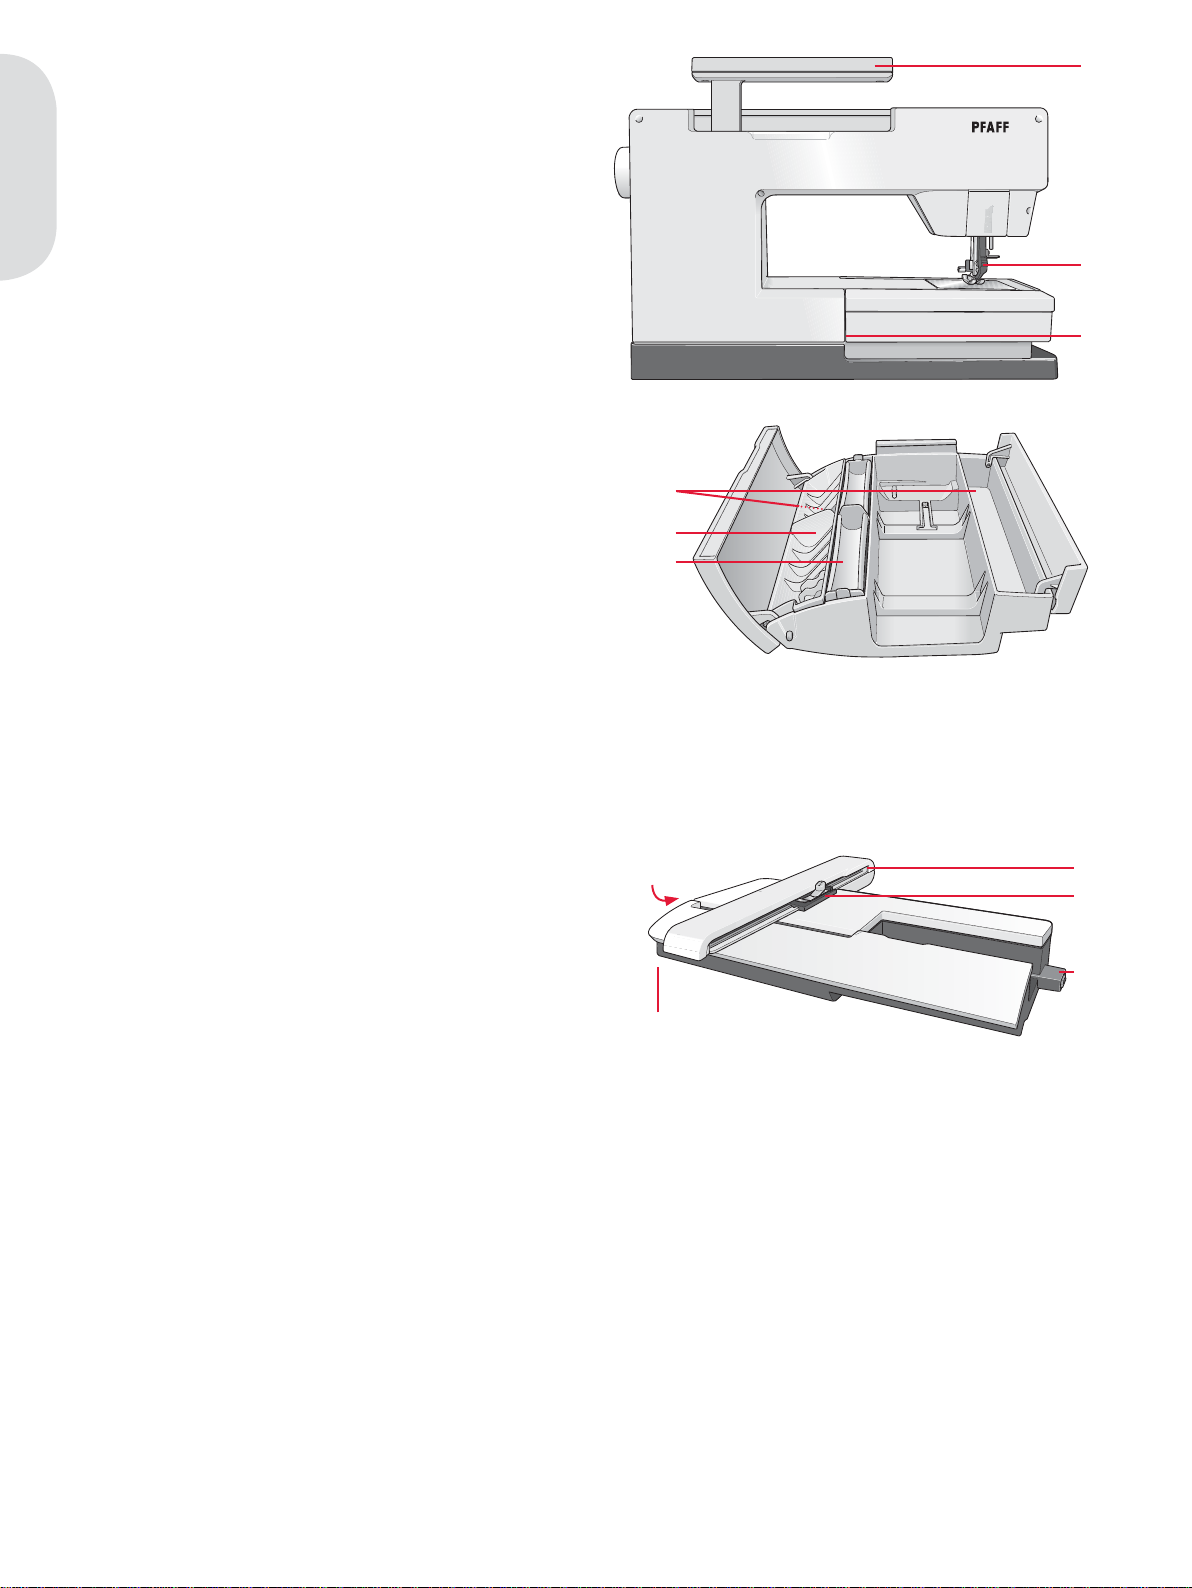
Included accessories
41. Thread net
42. Edge guide
43. Felt pad
44. Light bulb remover
45. Screwdriver
46. Seam ripper
47. Brush
48. Spool cap, large
49. Spool cap, medium
50. Spool cap, small
51. USB embroidery stick
52. Multi-purpose tool
53. Bobbins
54. Hoop clips
44
434241
474645
Introduction
Included hoops
55. creative™ 120 SQUARE HOOP (120x120)
56. creative™ ELITE HOOP (260x200)
51
48
49
55 56
50
545352
Included accessories not in picture
• Foot control
• Power cord
• Needles
• CDs with embroidery designs, communication software etc.
• creative™ 2.0 Embroidery collection
1:7
Page 8
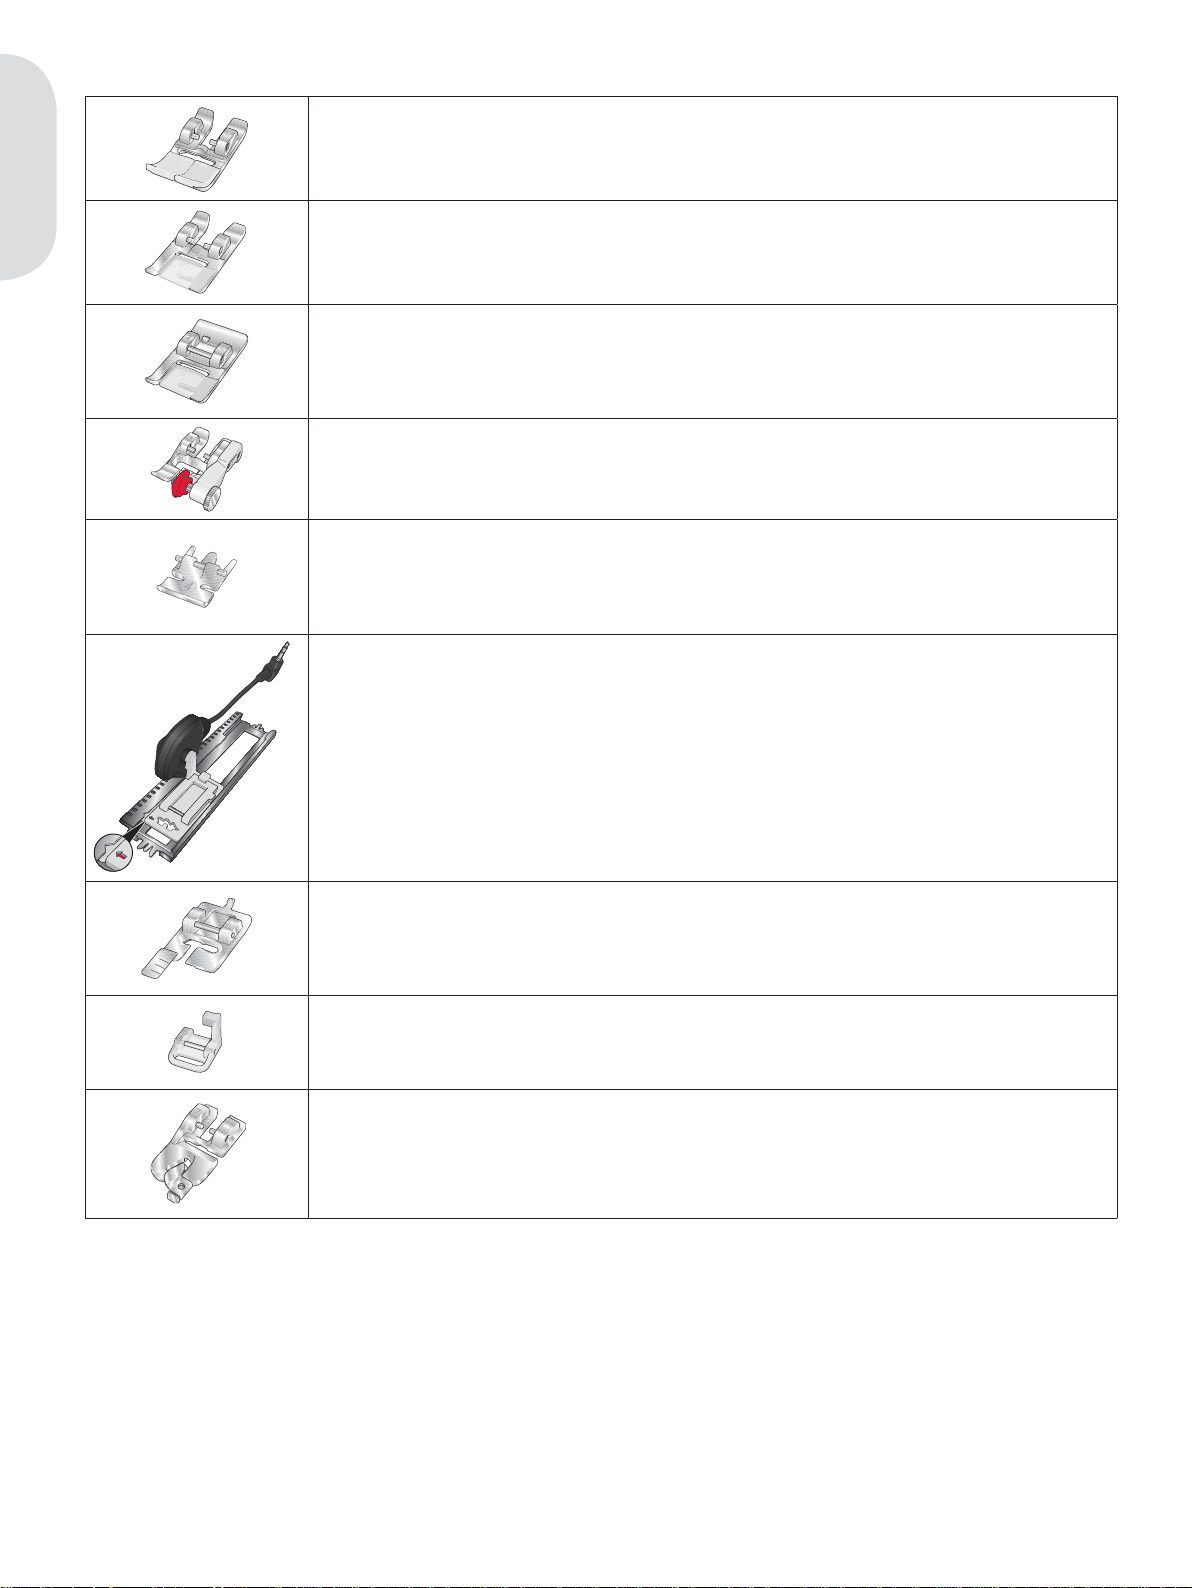
Presser feet
Standard presser foot 0A with IDT (attached on the machine upon delivery)
This foot is used mainly for straight stitching and zigzag stitching with a stitch
length longer than 1.0 mm.
Introduction
Fancy stitch foot 1A with IDT
This foot is used for decorative stitches. The groove on the underside of the foot
is designed to Á ow smoothly over the stitches.
Fancy stitch foot 2A
When sewing decorative stitches or short zigzag stitches and other utility stitches
with less than 1.0mm stitch length, use this foot. The groove on the underside of
the foot is designed to Á ow smoothly over the stitches.
Blindhem foot 3 with IDT
This foot is used for blindhem stitches. The toe on the foot guides the fabric. The
red guide on the foot is designed to ride along the fold of the hem edge.
Zipper foot 4 with IDT
This foot can be snapped on either the right or the left of the needle, making it
easy to sew close to both sides of the zipper teeth. Move the needle position to
the right or left to sew closer to zipper teeth.
Sensormatic buttonhole foot 5A
When connected to the machine, the buttonhole is sewn in a suitable length to
the button size that has been entered into the machine. Used to sew buttonholes
up to 50 mm.
Manual buttonhole foot 5M
This foot is used for sewing manual buttonholes longer than 50 mm. Use the
markings on the foot to position the garment edge. The À nger on the back of the
foot holds cording for corded buttonhole.
Embroidery/Sensormatic free-motion foot 6A
This foot is used for embroidery and sensormatic free-motion sewing. This foot
can also be used for darning.
Rolled hem foot 7 with IDT, 3 mm
This foot is used to sew narrow hems in light to medium weight fabric.
Important: Make sure that the IDT is disengaged when using presser foot 2A, 5A, 5M and 6A.
1:8
Page 9
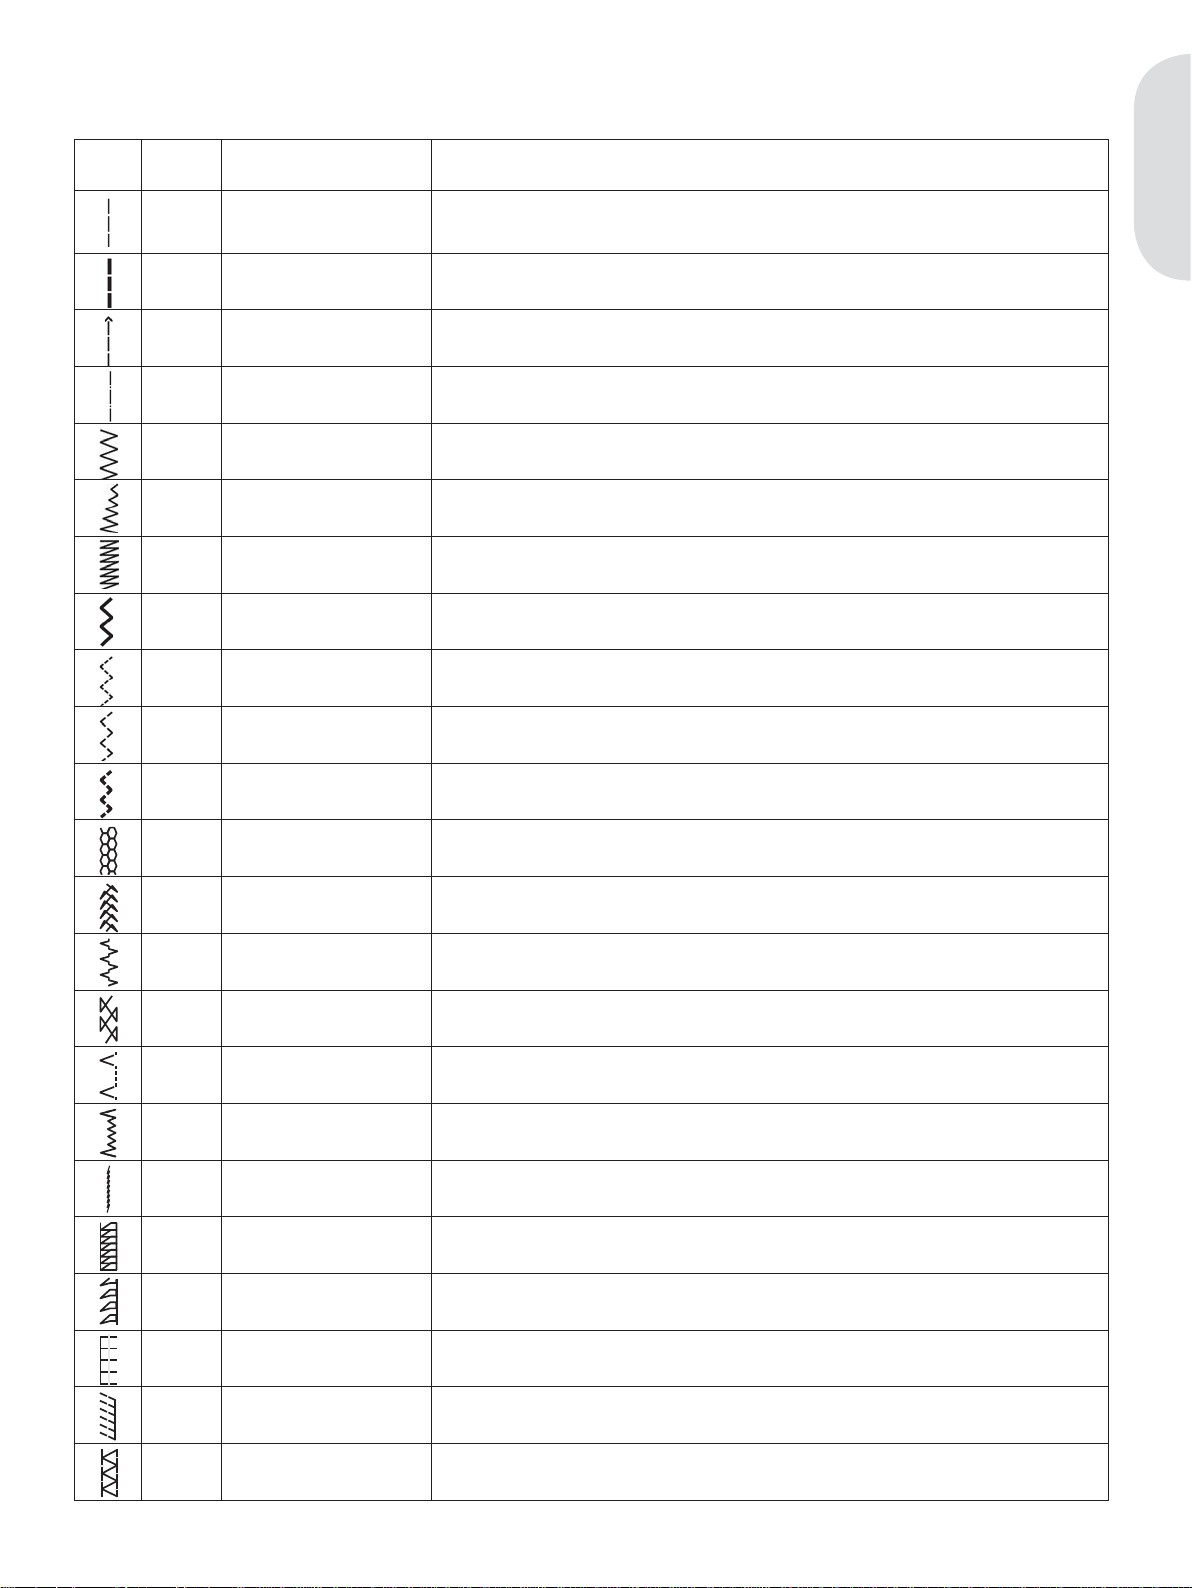
Stitch overview
Utility stitches
Stitch
Stitch
number
Name Description
1 Straight stitch For seaming and topstitching. Select from 37 different needle positions.
2 Stretch triple straight stitch Reinforced seam. Topstitching.
3 Straight stitch reverse Sew continuous reverse.
Introduction
Note: This stitch makes a stronger tie-off than stitch 40.
4 Basting stitch Single stitch used for basting. Touch foot control to sew one stitch. Move fabric manually to desired
5 Zigzag stitch Reinforce seams, clean À nish, stretch sewing, lace insertion.
6 Zigzag stitch Reinforce seams, clean À nish, stretch sewing.
7 Z-zigzag stitch Appliqué, couching, eyelets.
8 Stretch triple zigzag stitch Elastic stitch for decorative hems or topstitching.
9 Three-step zigzag stitch Sewing elastic, darning, patching.
10 Elastic stitch Sewing elastic, darning, patching.
11 Triple stretch stitch Sewing elastic, darning, patching and decorative sewing.
12 Honeycomb stitch Decorative stitch for stretch fabrics and hems. Also used with elastic thread in the bobbin.
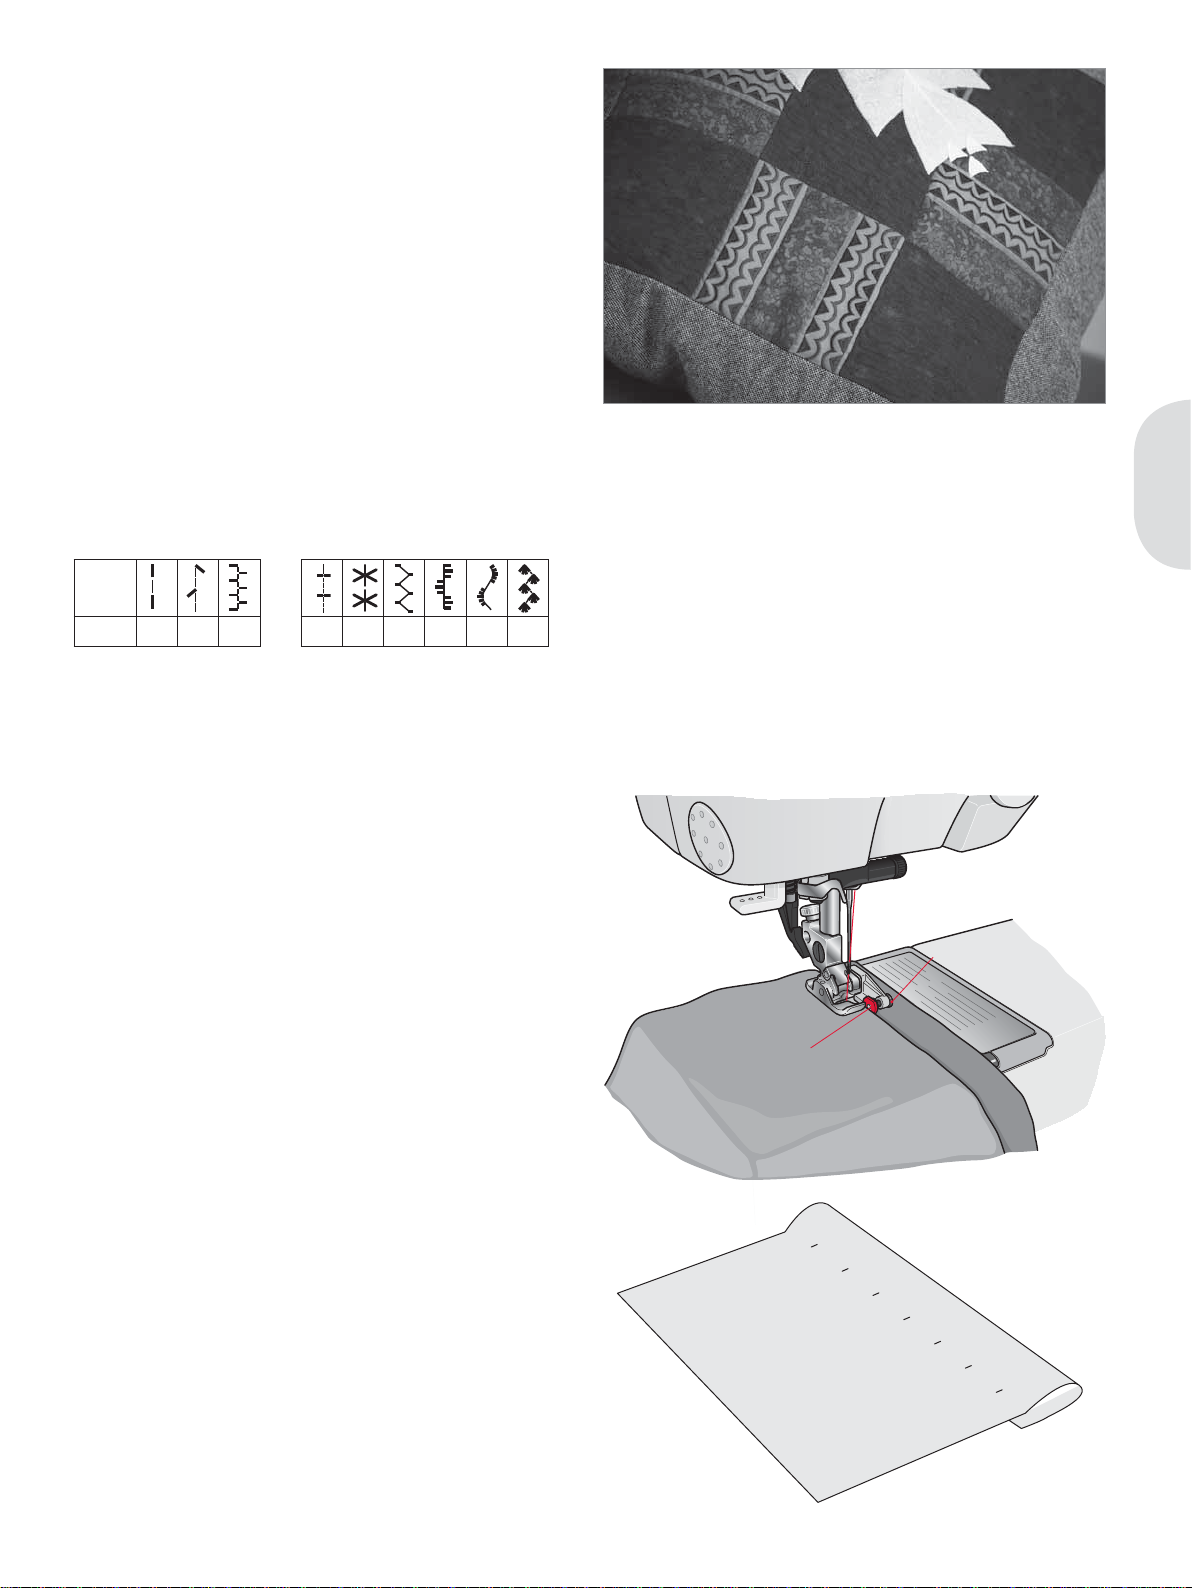
13 Bridging stitch Joining fabrics and quilt batting, decorative stitch for quilting, hemstitching.
14 Foundation elastic stitch Joining stitch for undergarments, terry cloth, leather, bulky fabrics where overlapping the seams.
position and touch foot control again. to sew another stitch.
15 Crosshem stitch Elastic decorative hem for stretch fabrics.
16 Blindhem stitch Sewing blindhems on woven fabrics.
17 Elastic blindhem stitch Sewing blindhems on stretch fabrics.
18 Stretch tricot stitch Sewing seams on stretch fabrics.
19 Closed overlock Seam and overcast stretch fabrics in one step.
20 Closed overlock Seam and overcast in one step with reinforced edge.
21 Elastic overcast Seam and overcast stretch fabrics in one step.
22 Overlock Seam and overcast stretch fabrics in one step.
23 Closed overlock Seam and overcast in one step, patch, hem.
1:9
Page 10
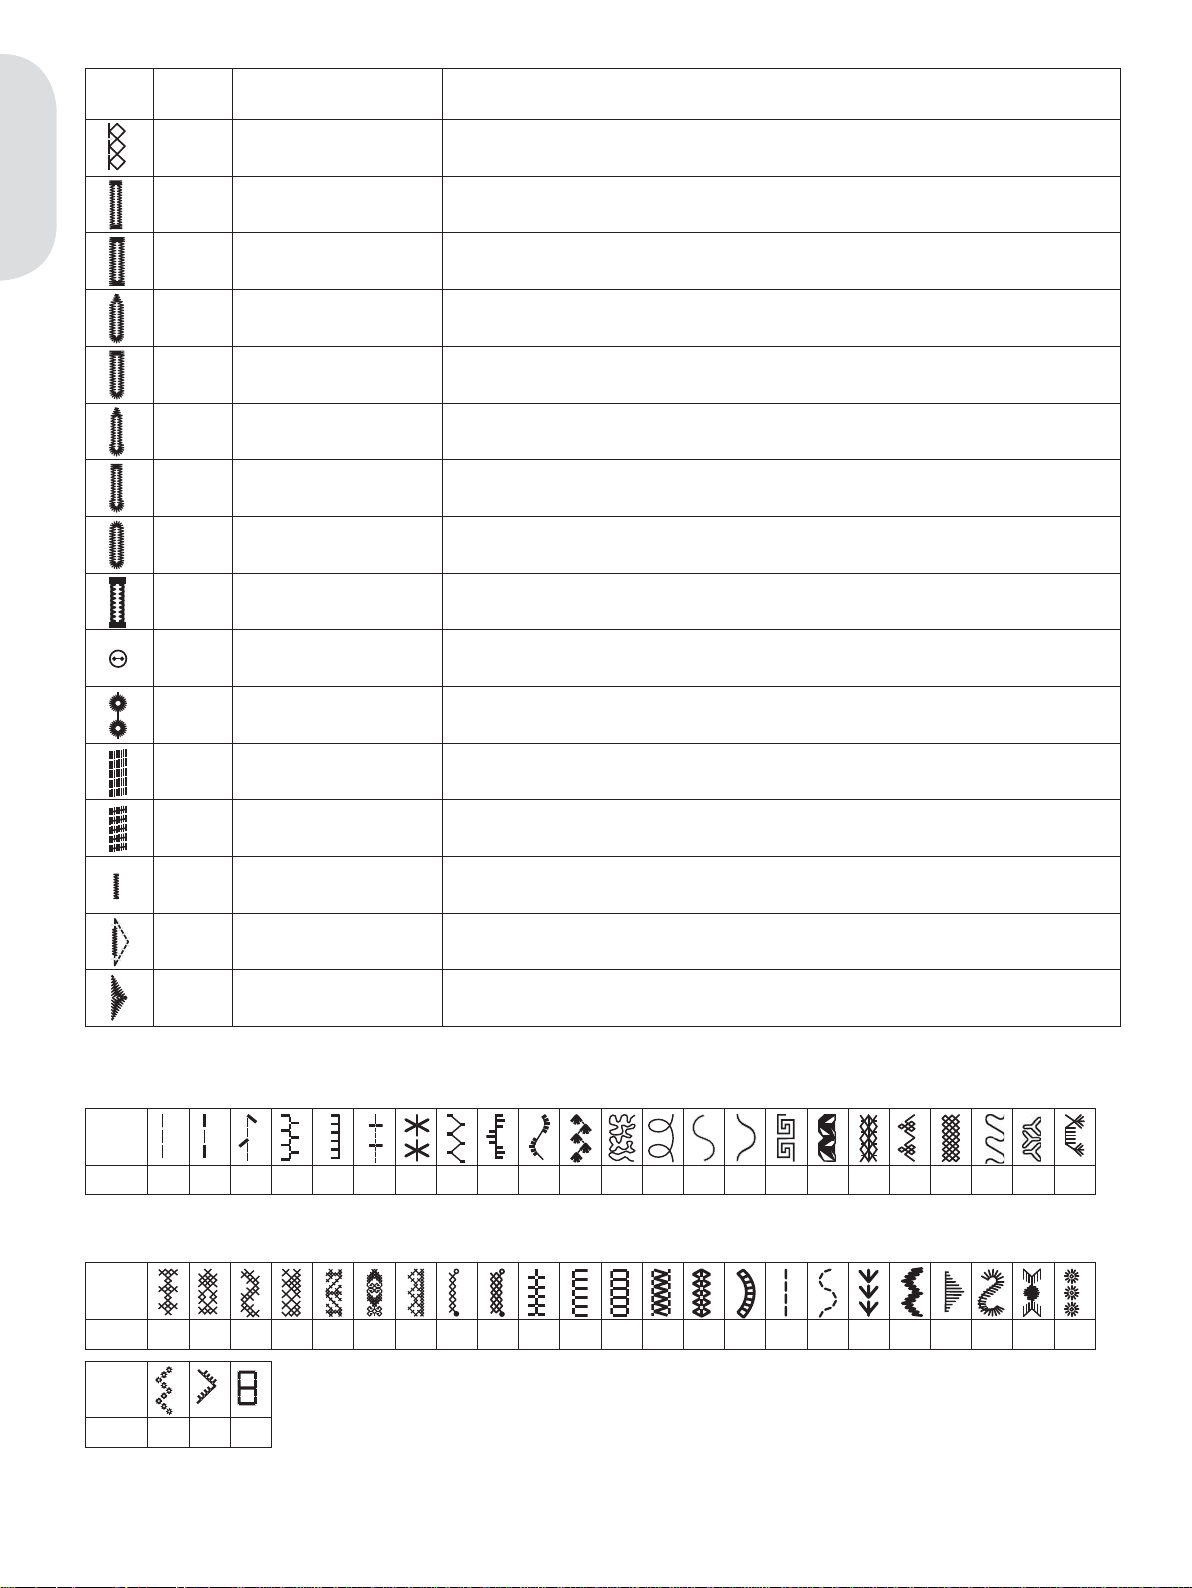
Stitch
Stitch
number
Name Description
24 Stretch knit overlock Seam and overcast stretch fabrics in one step.
25 Linen buttonhole Buttonhole for blouses, shirts and linen.
Introduction
26 Standard buttonhole Basic buttonhole for blouses, shirts and jackets. Also for pillowcases.
27 Rounded buttonhole with
pointed tack
28 Rounded buttonhole with
lengthwise tack
29 Eyelet buttonhole with pointed
tack
30 Eyelet buttonhole with
lengthwise tack
31 Rounded buttonhole Buttonhole for light garments or jackets.
32 Stretch buttonhole Buttonhole for stretch fabrics.
33 Button sewing Sew on buttons or tacking.
34 Eyelet Heirloom sewing decorative trim.
35 Programmable darning stitch Darning holes or damaged fabric.
Buttonhole for garments.
Buttonhole for garments.
Tailors buttonhole or decorative buttonhole.
Tailors buttonhole for jackets and trousers.
36 Programmable reinforced
darning stitch
37 Bartack Automatically reinforce seams and pockets.
38 Denim bartack Automatically reinforce seams and pockets decoratively.
39 Decorative bartack Automatically reinforce seams and pockets decoratively.
Quilt stitches
Stitch
40* 41 42 43 44 45 46 47 48 49 50 51 52 53 54 55 56 57 58 59 60 61 62
Needle art stitches
Stitch
63 64 65 66 67 68 69 70 71 72 73 74 75 76 77 78 79 80 81 82 83 84 85
Stitch
Reinforced darning holes or damaged fabric.
86 87 88
* This stitch makes a more decorative tie-off than stitch 1.
1:10
Page 11
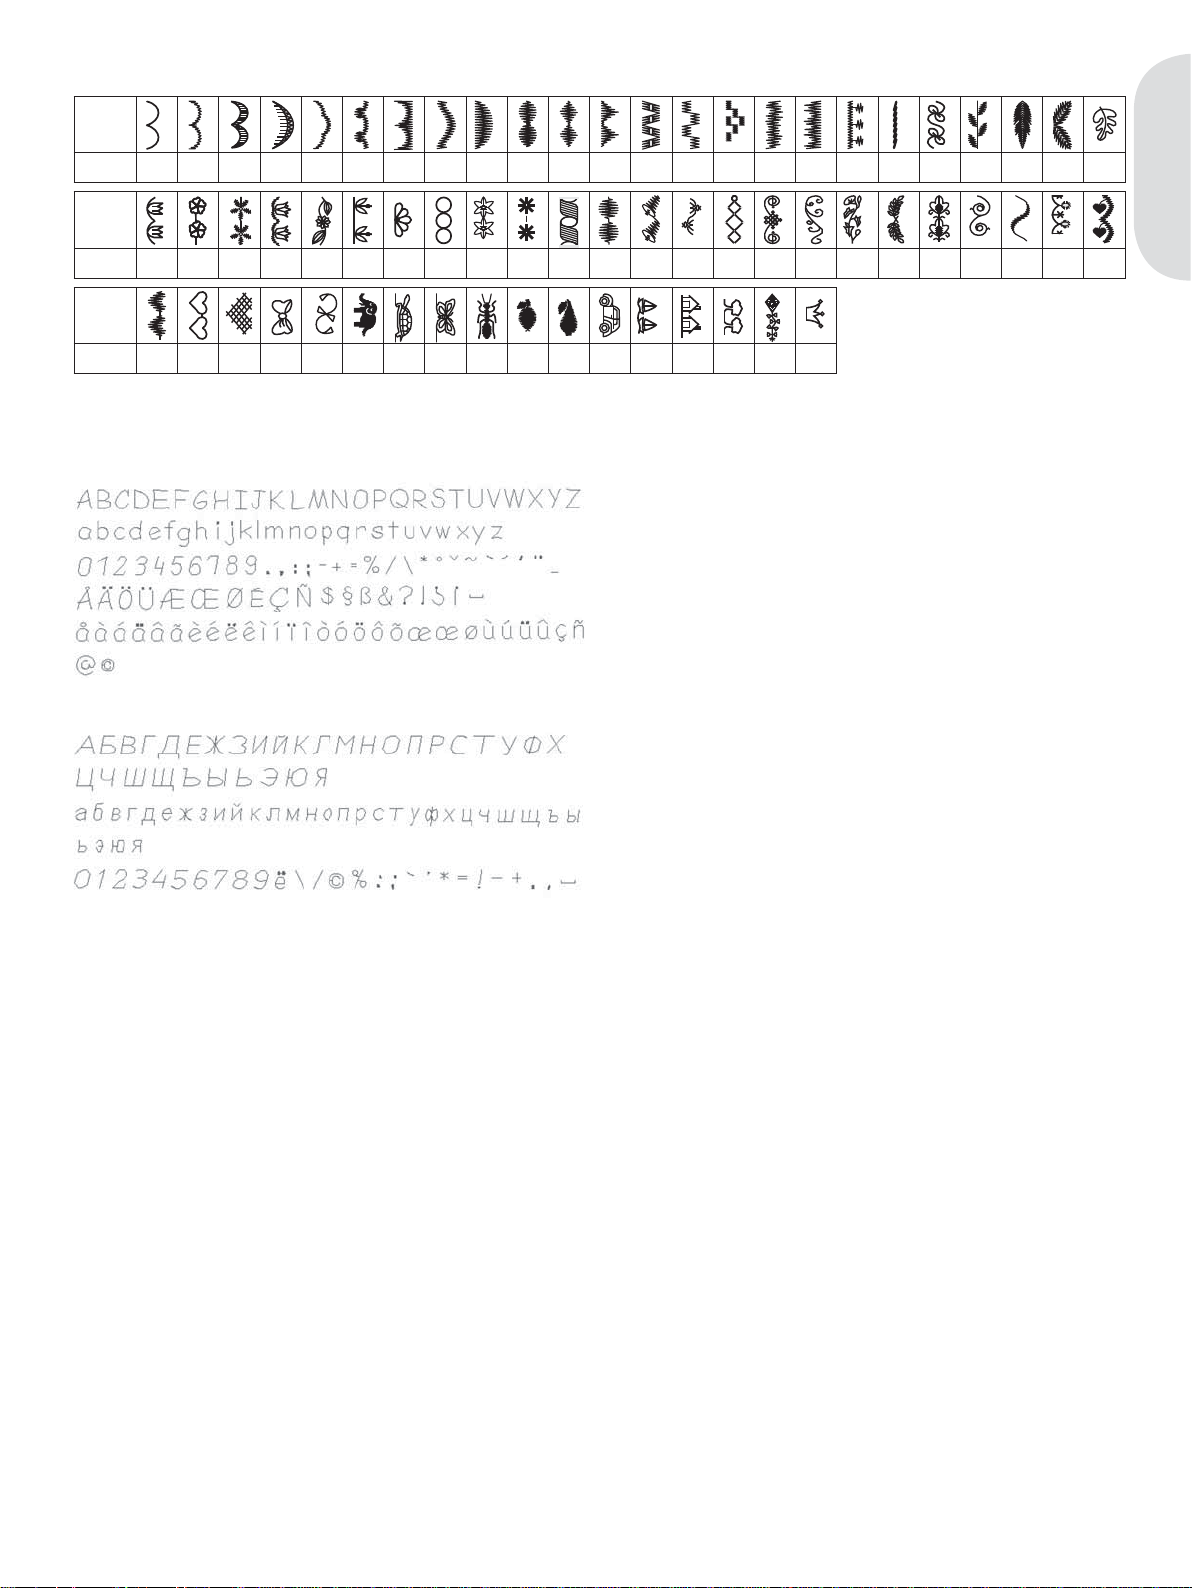
Decorative stitches
Stitch
89 90 91 92 93 94 95 96 97 98 99 100 101 102 103 104 105 106 107 108 109 110 111 112
Stitch
113 114 115 116 117 118 119 120 121 122 123 124 125 126 127 128 129 130 131 132 133 134 135 136
Stitch
137 138 139 140 141 142 143 144 145 146 147 148 149 150 151 152 153
Alphabets
Comic
Introduction
Cyrillic
1:11
Page 12
Preparations
Page 13
Preparations
Unpacking
1. Place the box on a steady, Á at surface. Lift
the machine out of the box, remove the outer
packaging and lift off the machine carrying
case.
2. Remove all outer packing material and the
plastic bag.
3. Slide off the accessory tray and remove the
styrofoam inside.
Note: Styrofoam left in the accessory tray while sewing
may affect stitch quality. The styrofoam is for packing
purposes only and should be removed.
Connect to the power supply
Among the accessories you will À nd the power
cord and the foot control.
Note: Before plugging in the foot control, check to
ensure that it is type ”FR5” (see underside of foot
control).
1. Take out the foot control cord. Turn the foot
control over. Connect the cord to the socket
inside the space of the foot control. Push À rmly
to make sure it is properly connected. Lay the
cord in the slot on the underside of the foot
control.
Note: Connecting the foot control cord to the foot
control is only necessary the very À rst time you are
going to use the machine.
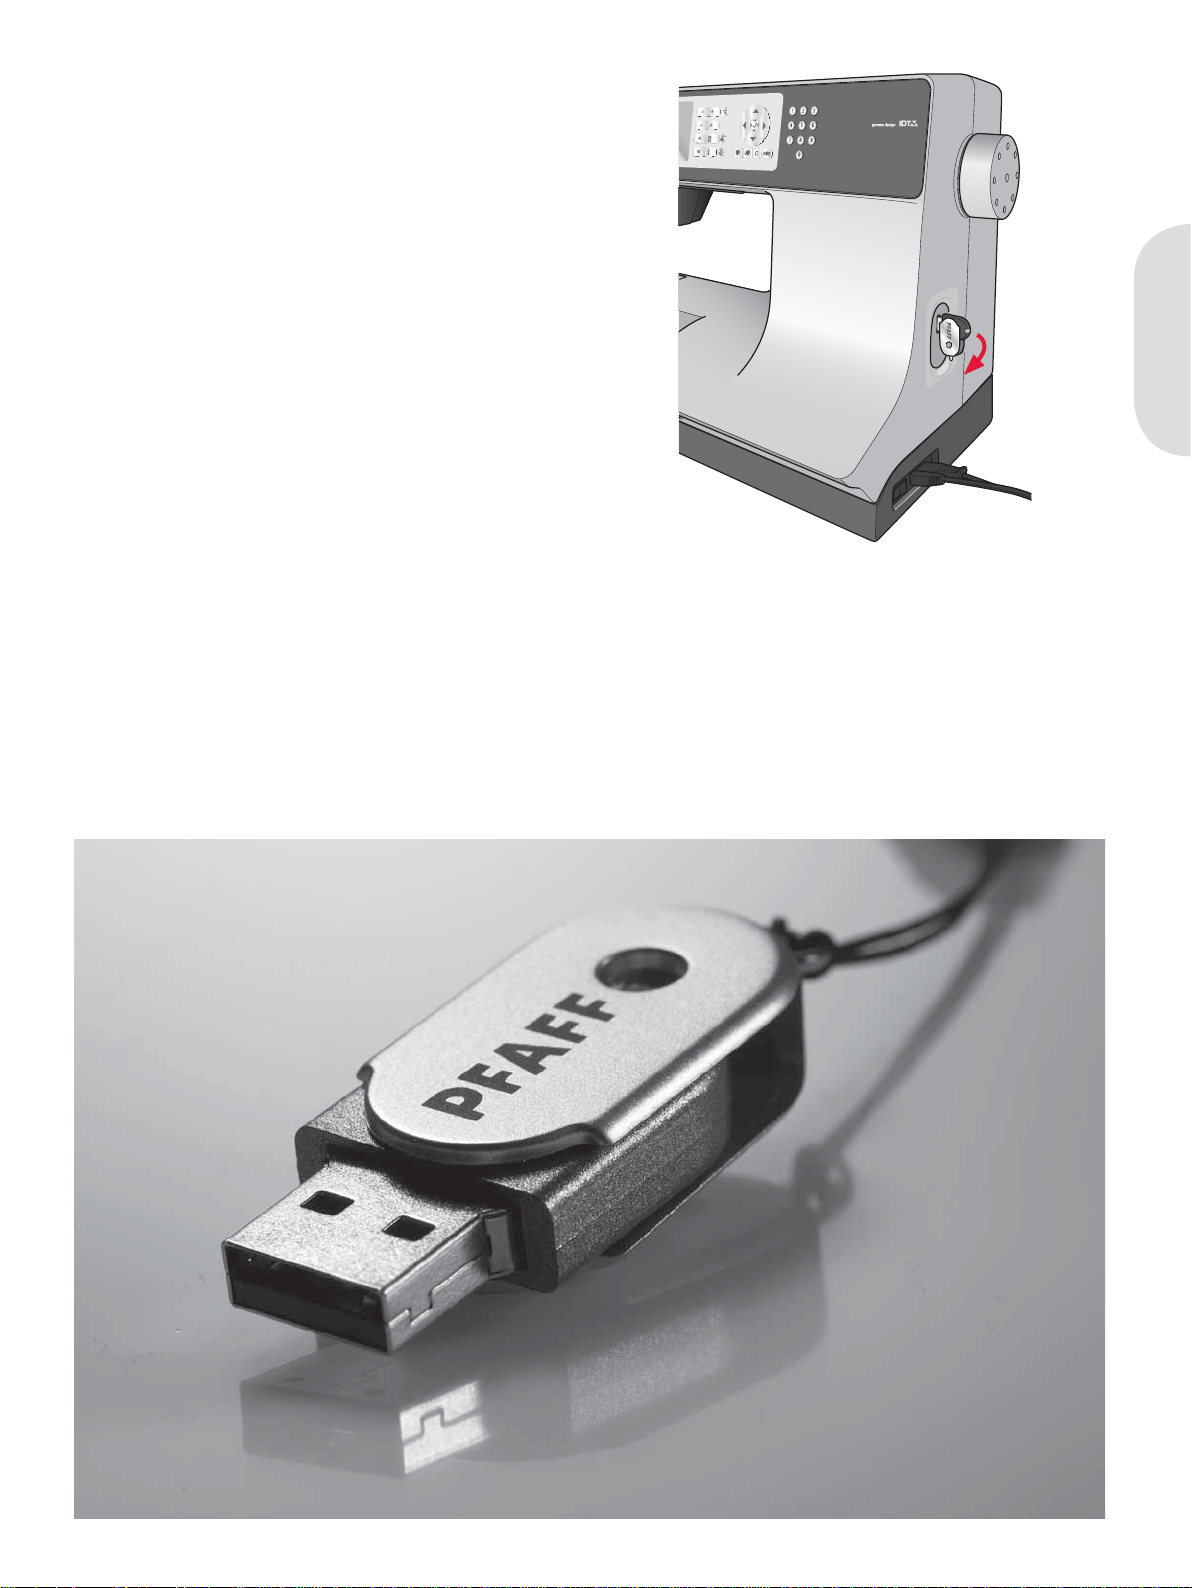
2. Connect the foot control cord to the front
socket on the bottom right side of the machine
(A).
4. Connect the power cord to the rear socket on
the bottom right side of the machine (B). Plug
the cord into the wall socket.
5. Press the ON/OFF switch to ON to turn on
power and light (C).
Preparations
ABC
For the USA and Canada
This sewing machine has a polarized plug (one
blade wider than the other). To reduce the risk
of electric shock, this plug is intended to À t in a
polarized outlet only one way. If the plug does not
À t fully in the outlet, reverse the plug. If it still does
not À t, contact a qualiÀ ed electrician to install the
proper outlet. Do not modify the plug in any way.
2:1
Page 14
Pack away after sewing
1. Switch the main switch off.
2. Unplug the cord from the wall socket and then
from the machine.
3. Unplug the foot control cord from the machine.
Wind the cord around the foot control for easy
storage.
4. Place all accessories in the accessory tray. Slide
the tray on to the machine around the free arm.
5. Place the foot control in the space above the
free arm.
6. Put on the hard cover.
Preparations
Free arm
To use the free arm, slide off the accessory tray.
When attached, a hook keeps the accessory tray
locked to the machine. Remove the tray by sliding
it to the left.
Thread cutter
To use the thread cutter, pull the thread from back
to front as shown (A).
A
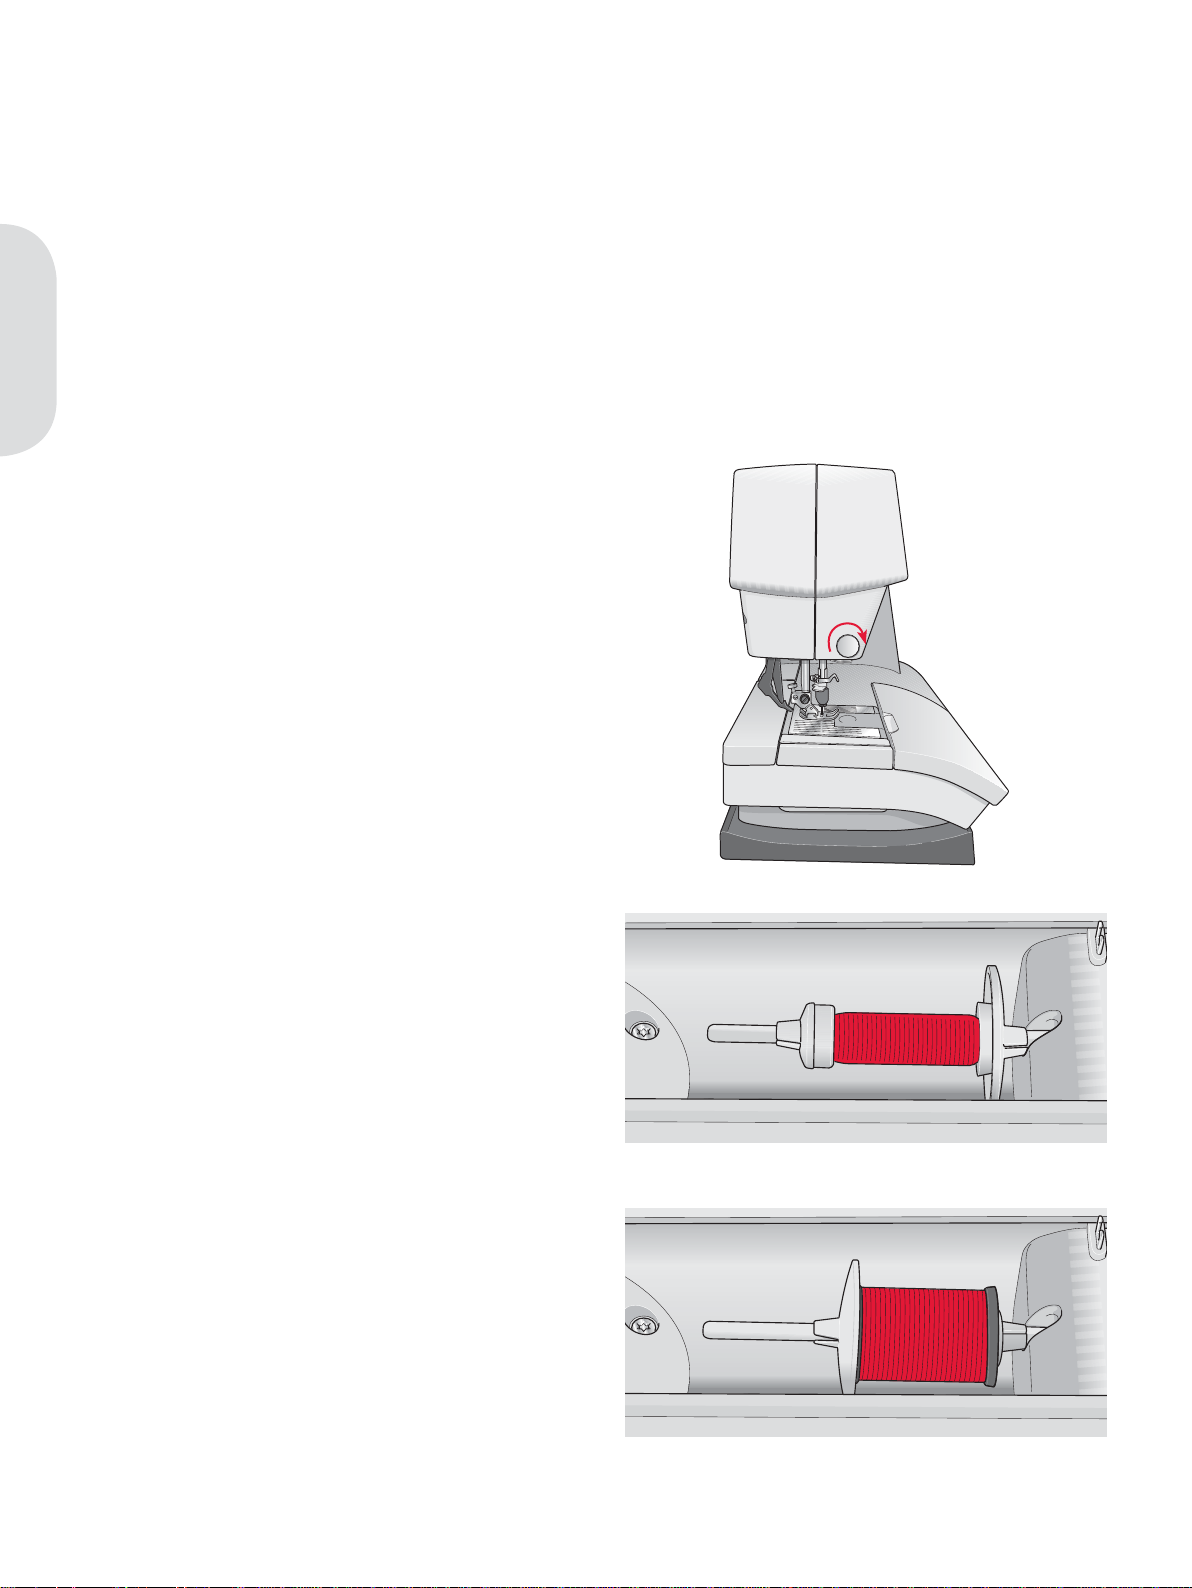
Spool pins
Your machine has two spool pins, a main spool
pin and an auxiliary spool pin. The spool pins
are designed for all types of thread. The main
spool pin is adjustable and can be used both in a
horizontal position (the thread reels off the spool)
and a vertical position (the thread spool rotates).
Use the horizontal position for normal threads and
the vertical position for large spools or specialty
threads.
Horizontal position
Place a spool cap and the thread spool on the spool
pin. Make sure that the thread reels over the top
and slide on a second spool cap.
Use a spool cap slightly larger than the thread
spool. For narrow thread spools, use a smaller
spool cap in front of the spool. For large thread
spools, use a larger spool cap in front of the spool.
The Á at side of the spool cap should be pressed
À rmly against the spool. There should be no space
between the spool cap and the thread spool.
Small spool cap
Large spool cap
2:2
Page 15
A
Vertical position
Raise the spool pin to the vertical position. Slide
on the large spool cap and place a felt pad under
the thread spool. This is to prevent the thread from
reeling off too fast.
Do not place a spool cap on top of the spool pin as
that would prevent the spool from rotating.
Auxiliary spool pin
The auxiliary spool pin is used when winding a
bobbin thread from a second spool of thread or for
a second spool when sewing with a twin needle.
Raise the auxiliary spool pin. Slide on a large spool
cap and place a felt pad under the thread spool.
Preparations
Main spool pin in vertical position
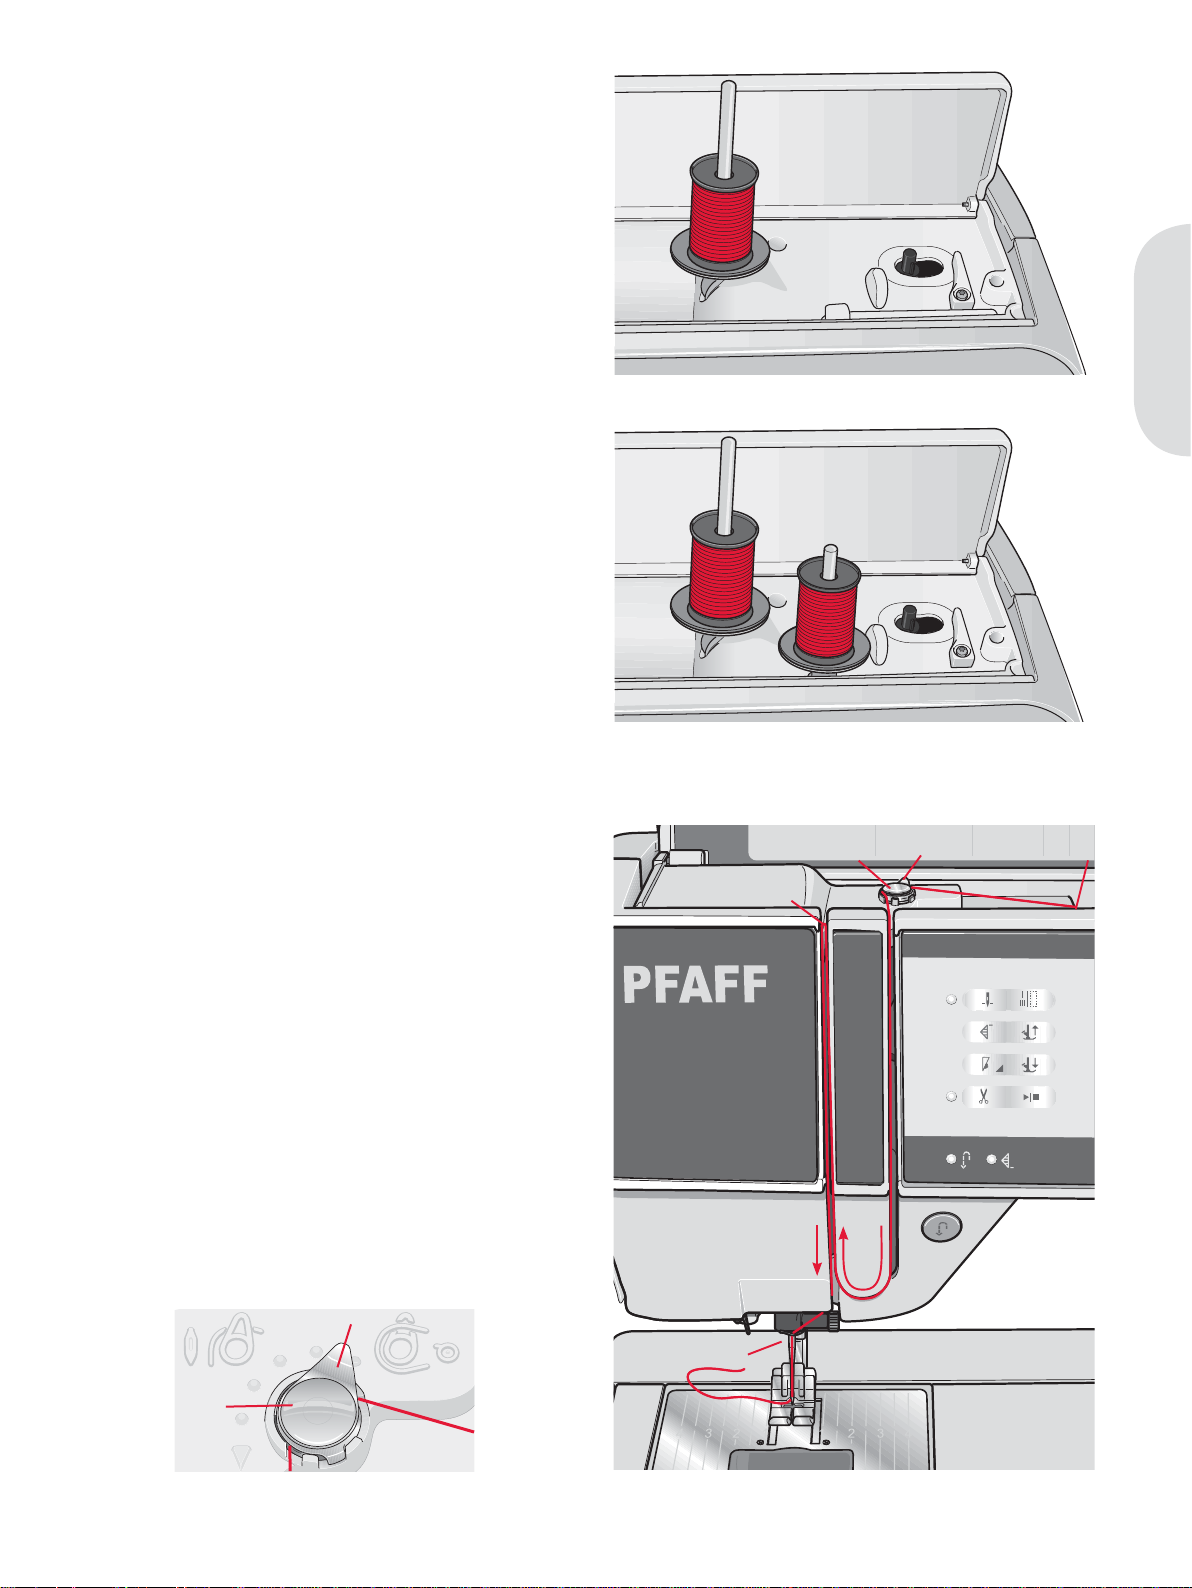
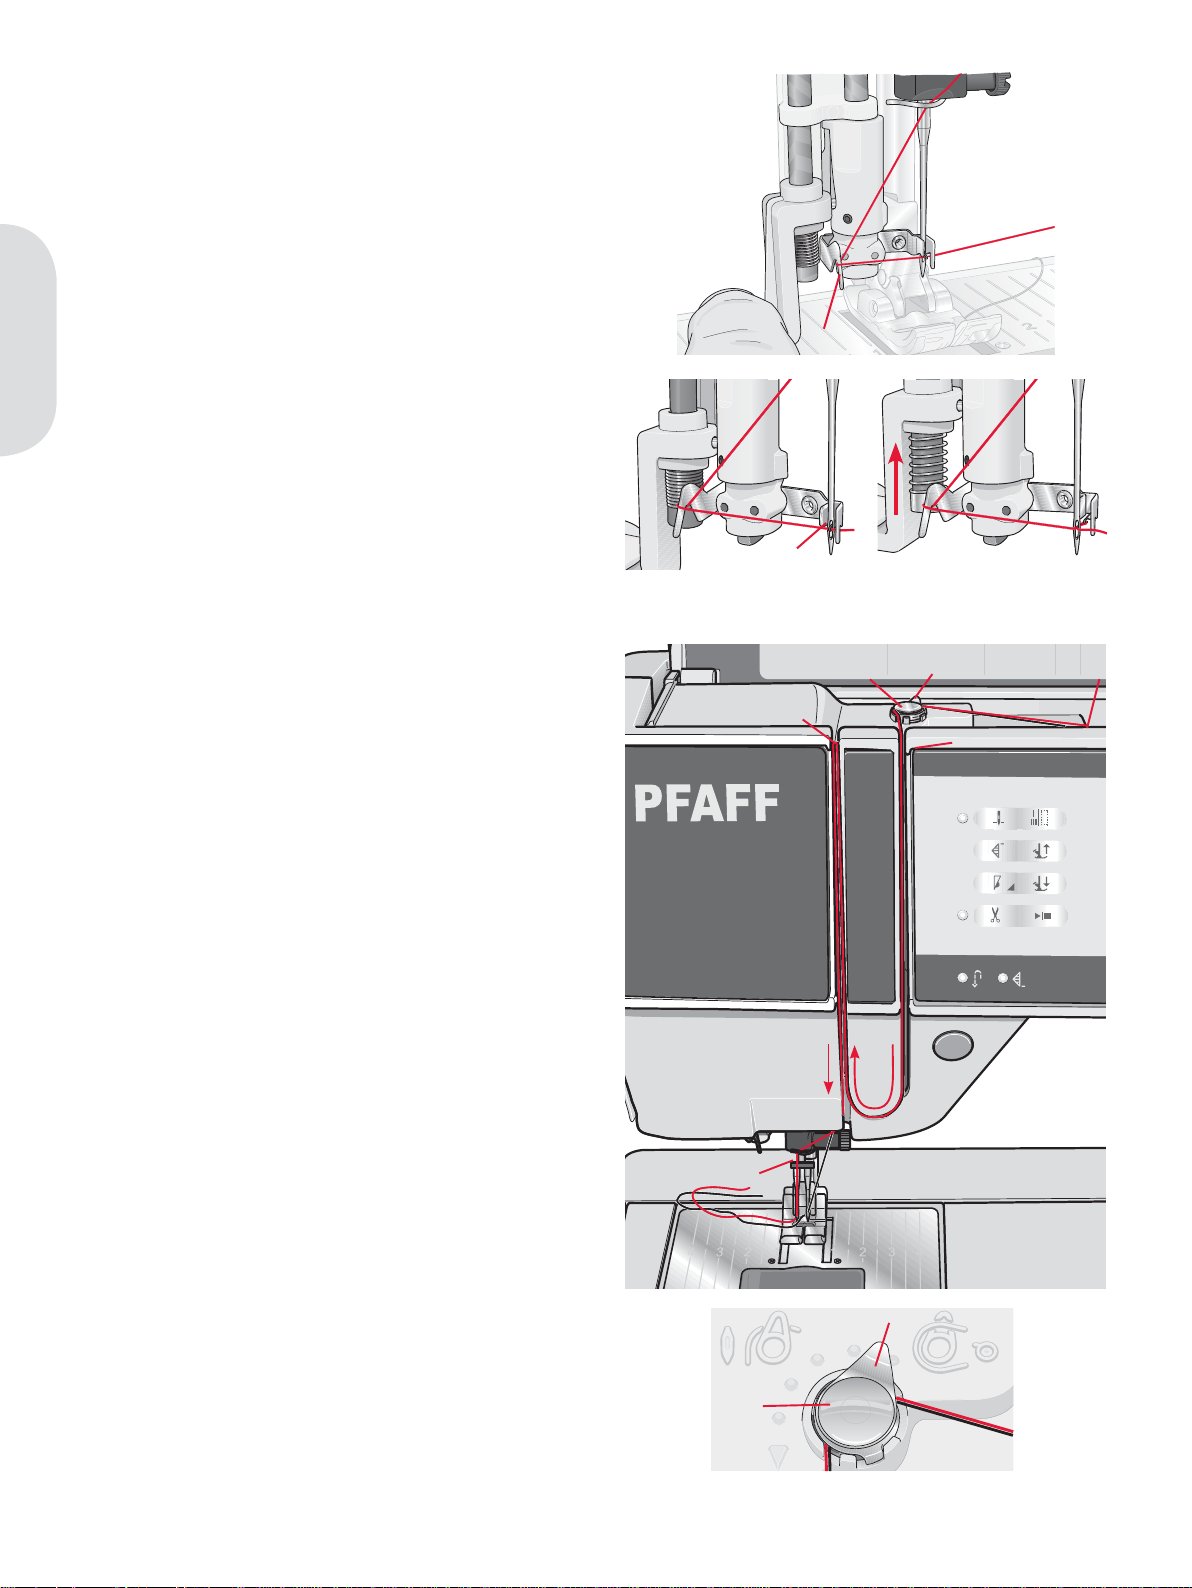
Threading the machine
Make sure that the presser foot is raised and the
needle is in the up position.
1. Place the thread on the spool pin and À t a spool
cap of the right size.
2. Pull the thread into the thread guide (A) from
the front to the back. Pull the thread from the
right underneath the bobbin winder thread
guide (B) on the pre-tension disc (C).
3. Thread down through the right-hand
threading slot and then upwards through the
left-hand threading slot.
4. Bring the thread from the right into the take-up
lever (D) and down in the left-hand threading
slot to the needle thread guide (E).
5. Thread the needle.
Auxiliary spool pin and main spool pin in vertical
position.
PF
D
B
AC
B
E
C
2:3
Page 16
A
Needle threader
The needle threader allows you to thread the
needle automatically. The needle must be in the up
position to use the built-in needle threader. We also
recommend lowering the presser foot.
1. Use the handle to pull the needle threader all
the way down. The threader hook (G) swivels
through the needle eye.
2. Place the thread from the back over the hook
(H) and under the thread hook (G).
3. Let the needle threader gently swing back. The
hook pulls the thread through the needle eye
Preparations
and forms a loop behind the needle. Pull the
thread loop out behind the needle.
Note: The needle threader is designed to be used for size
70-120 needles. You cannot use the needle threader for
size 60 needles or smaller, a wing needle, twin needle or
triple needle. There are also some optional accessories
that require manual threading of the needle.
When threading the needle manually, make sure that the
needle is threaded from front to back. The bobbin cover
can be used as a magnifying glass.
PF
H
G
B
AC
Threading for twin needle
Replace the sewing needle with a twin needle.
Make sure that the presser foot is raised and the
needle is in the up position.
1. Place the thread on the spool pin and À t a
spool cap of the right size. Raise the auxiliary
spool pin. Slide on a large spool cap and a felt
pad. Place the second thread on the spool pin.
2. Pull the threads into the thread guide (A) from
the front to the back. Pull both threads from
the right underneath the bobbin winder thread
guide (B) on the pre-tension disc (C).
3. Thread down through the right-hand
threading slot and then upwards through the
left-hand threading slot. Make sure that you
pass one thread to the left and one thread to
the right sides of the tension disk (D).
4. Bring the threads from the right into the
take-up lever (E) and down in the left-hand
threading slot. Make sure that one thread is
inside the needle thread guide (F) and the
other one outside. Make sure that the threads
do not become twisted together.
5. Thread the needles.
E
D
F
B
2:4
C
Page 17

C C
E
Preparations
Bobbin winding
Winding from horizontal position
1. Place an empty bobbin on the bobbin spindle,
with the logo facing up. Use only the original
PFAFF® bobbins approved for this model.
2. Place the thread spool on the spool pin in
horizontal position. Slide a spool cap tightly
against the spool.
3. Place the thread into the thread guide (A) from
front to back. Pull the thread counter-clockwise
above the bobbin winder thread guide (B) and
then through the bobbin thread guides (C) at
the rear.
Note: Make sure the thread is pulled securely inside
the pre-tension device for correct thread tension.
4. Thread through the hole in the bobbin (D) from
the inside to the outside.
5. Push the bobbin lever to the right to wind. A
pop-up appears on the screen to inform you
that bobbin winding is active. Press the foot
control to start winding the bobbin.
When the bobbin is full, the bobbin winding
will slow down and stop automatically. The
pop-up closes. Remove the bobbin and cut the
thread using the bobbin thread cutter (E).
B
C
A
D
Winding through the needle
Make sure that the presser foot and the needle are
in the up position. Only wind through the needle if
using a metal presser foot.
Bring the thread up from the needle, under
the presser foot, upward through the left-hand
threading slot and through the bobbin thread
guides (C). Then follow step 4 and 5.
B
C
A
2:5
Page 18
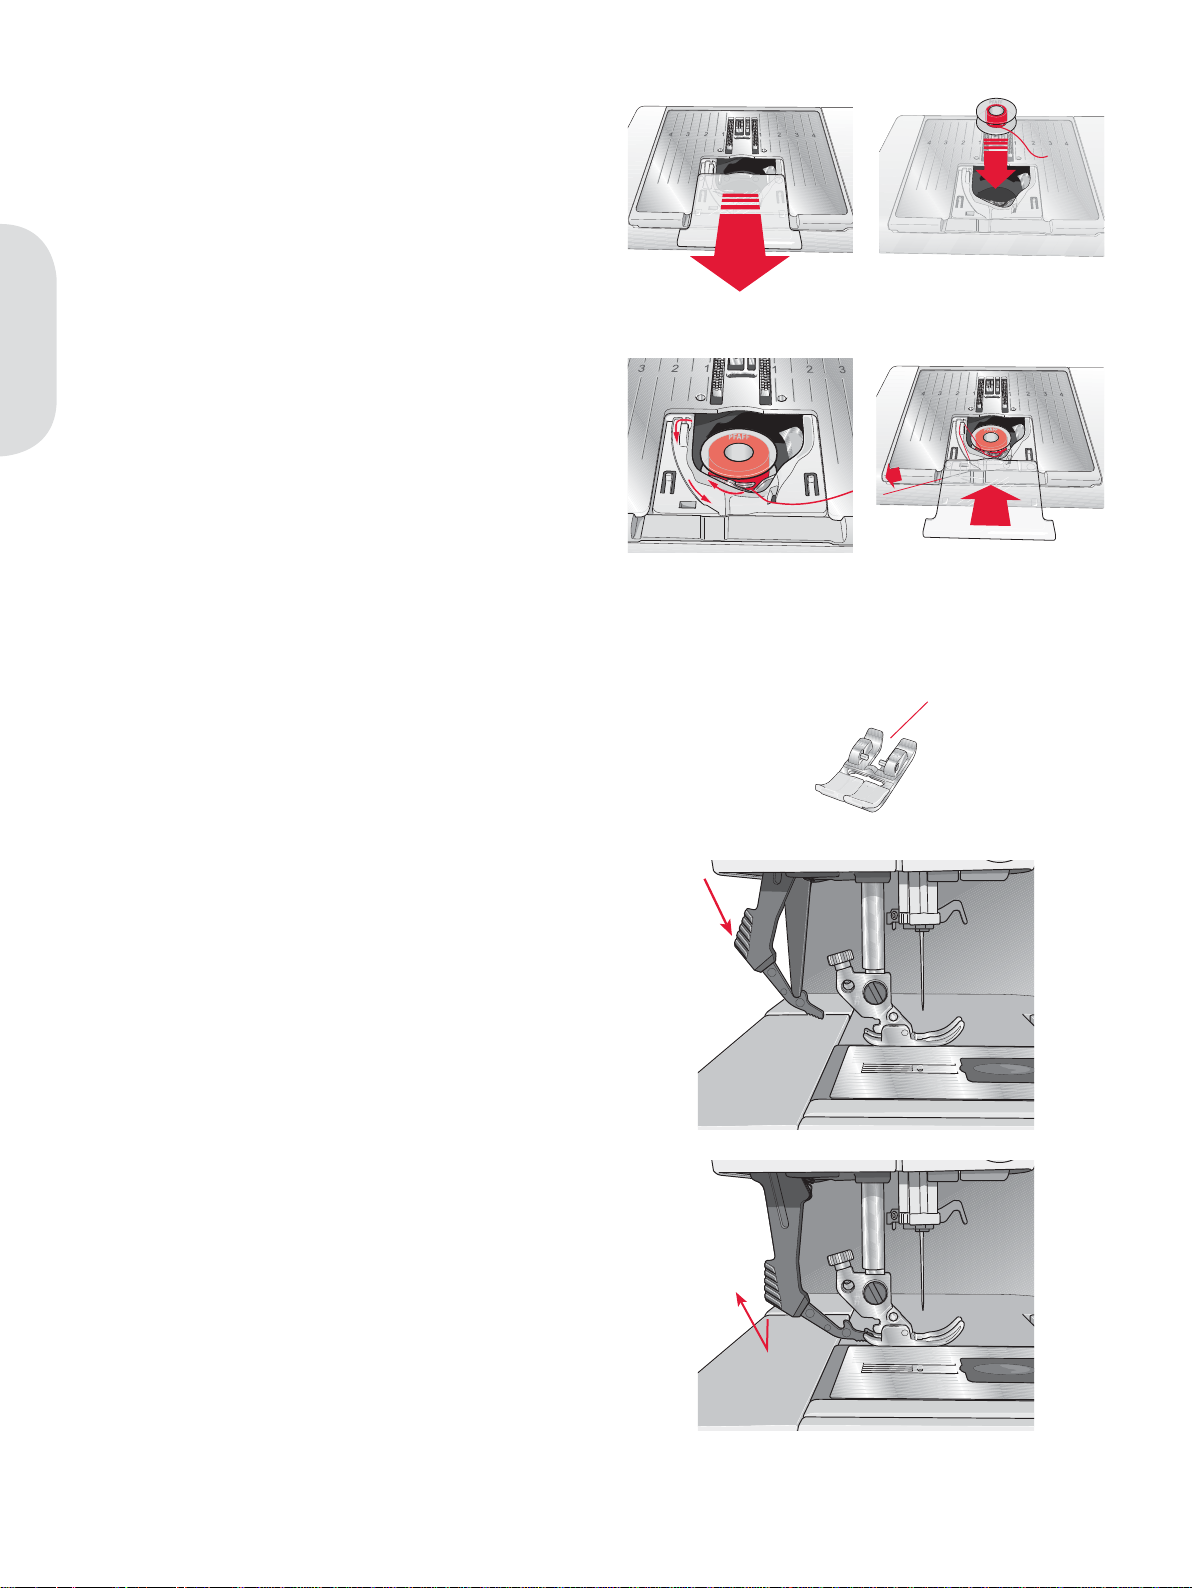
Inserting the bobbin
1. Remove the bobbin cover by sliding it towards
you.
2. Place the bobbin in the bobbin case with the
logo facing up and the thread unreeling from
the left of the bobbin. The bobbin will then
rotate counter-clockwise when you pull out
the thread.
3. Place your À nger on the bobbin to keep it from
turning as you pull the thread À rmly to the
right and then to the left into the tension spring
(A) until it “clicks” into place.
Preparations
4. Continue threading around (B) and to the right
of the thread cutter (C). Replace the cover. Pull
the thread to the left to cut.
IDT (integrated dual feed)
For sewing any fabric precisely, PFAFF® creative™
2.0 sewing and embroidery machine provides
the ideal solution: the integrated dual feed, IDT
system. As on industrial machines, the IDT feeds
the fabric from the top and bottom at the same
time. The material is fed precisely. On light fabrics
such as silk or rayon the dual feed prevents
puckering of the seam. The even feeding action
also ensures perfect matching of checked and
striped fabrics. The IDT keeps all layers of quilt
projects aligned to prevent shifting of the top
layers.
1
B
A
C
2
43
D
Engaging the IDT
Important: For all work with the IDT, use presser feet
with the center back cut-out (D).
Raise the presser foot. Press the IDT down until it
engages.
Disengaging the IDT
Raise the presser foot. Hold the IDT with two
À ngers at the ribbed ankle. Pull the IDT down, then
pull it away from you to release the IDT slowly
upward.
2:6
Page 19
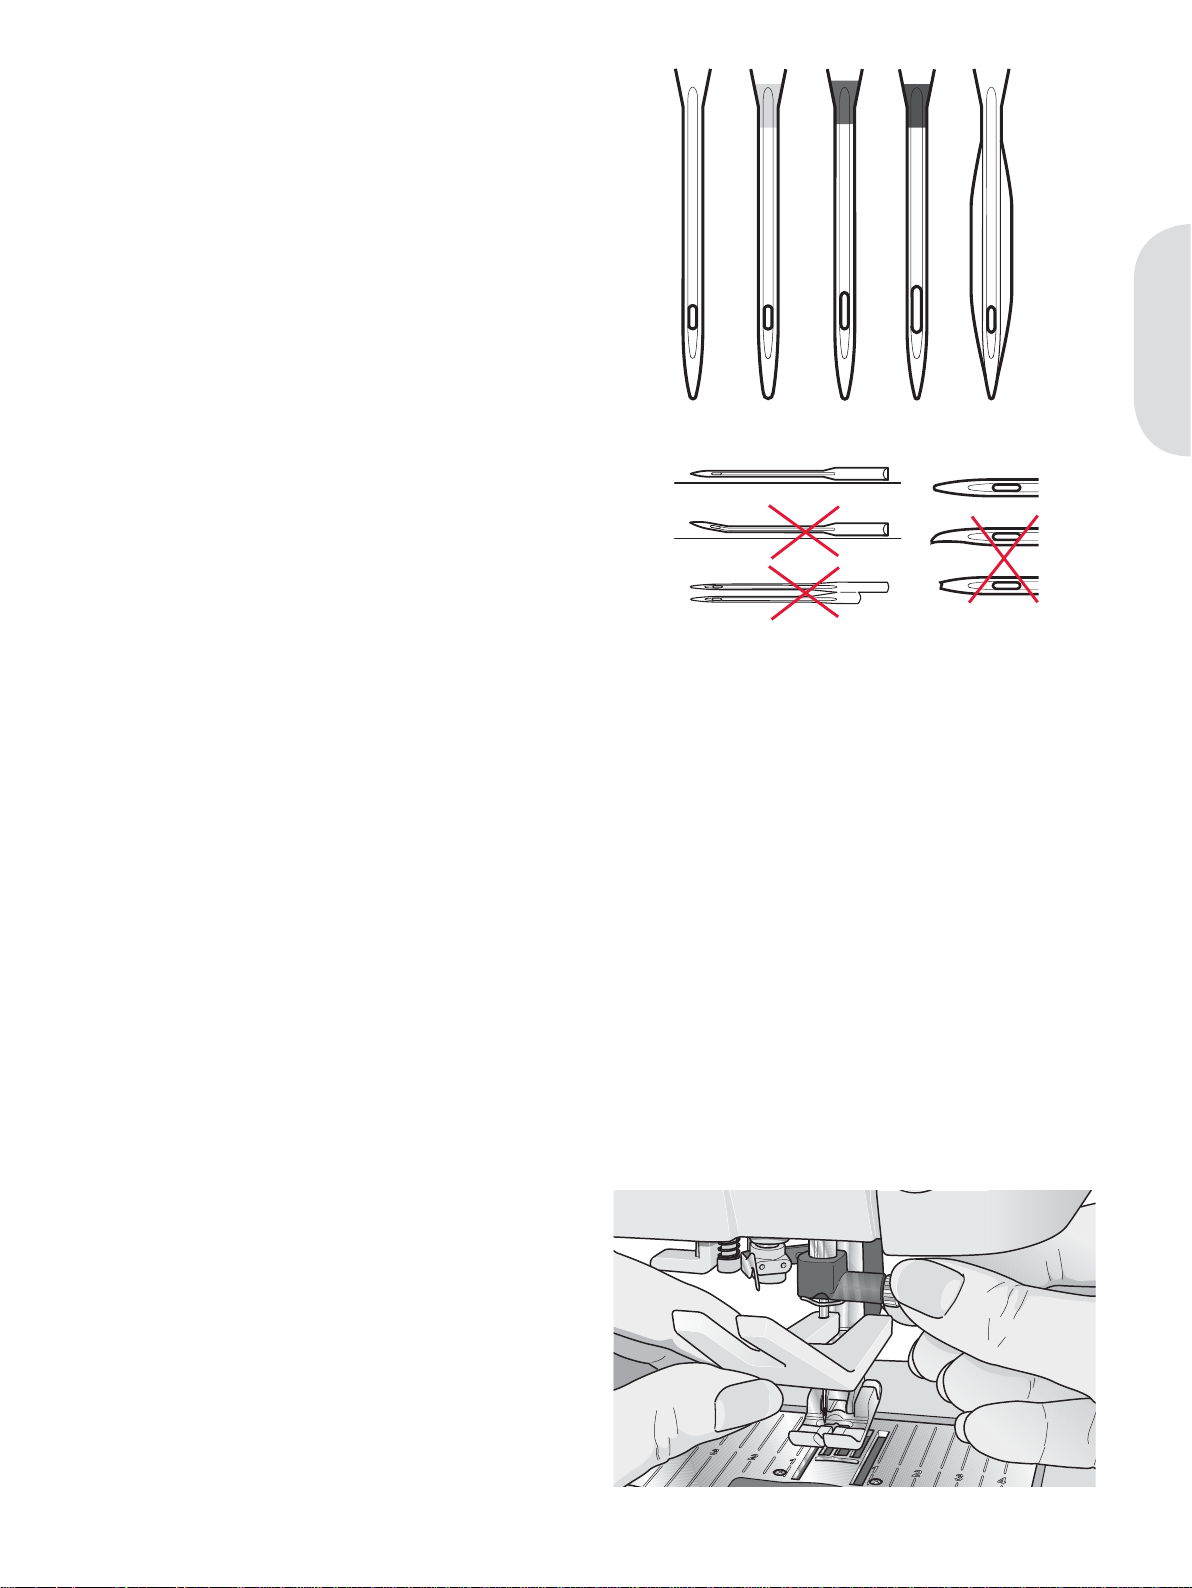
Needles
The sewing machine needle plays an important
role in successful sewing. Use only quality needles.
We recommend needles of system 130/705H.
The needle package included with your machine
contains needles of the most frequently used sizes.
Universal needle (A)
Universal needles have a slightly rounded point
and come in a variety of sizes. For general sewing
in a variety of fabric types and weights.
Stretch needle (B)
Stretch needles have a special scarf to eliminate
skipped stitches when there is a Á ex in the fabric.
For knits, swimwear, Á eece, synthetic suedes and
leathers.
Embroidery needle (C)
Embroidery needles have a special scarf, a slightly
rounded point and a slightly larger eye to avoid
damage to thread and materials. Use with metallic
and other specailty threads for embroidery and
decorative sewing
Denim needle (D)
Denim needles have a sharp point to penetrate
tightly woven fabrics without deÁ ecting the needle.
For canvas, denim, microÀ bers.
Wing needles (E)
The Wing needle has wide wings on the side of
the needle to poke holes in the fabric when sewing
entredeux and other hemstitches on natural À ber
fabrics.
Preparations
ABCDE
F
G
H
Note: Change the needle often. Always use a straight
needle with a sharp point (F).
A damaged needle (G) can cause skipped stitches,
breakage or snapping of the thread. A damaged needle
can also damage the stitch plate.
Do not use asymmetrical twin needles (H), since it may
damage your sewing machine.
Changing the needle
1. Use the hole in the multi-purpose tool to hold
the needle.
2. Loosen the needle screw. Use the screw driver
if necessary.
3. Remove the needle.
4. Insert the new needle, using the multi-purpose
tool. Push the new needle upwards with the
Á at side away from you until it will go no
further.
5. Tighten the needle screw as tight as it will go.
2:7
Page 20
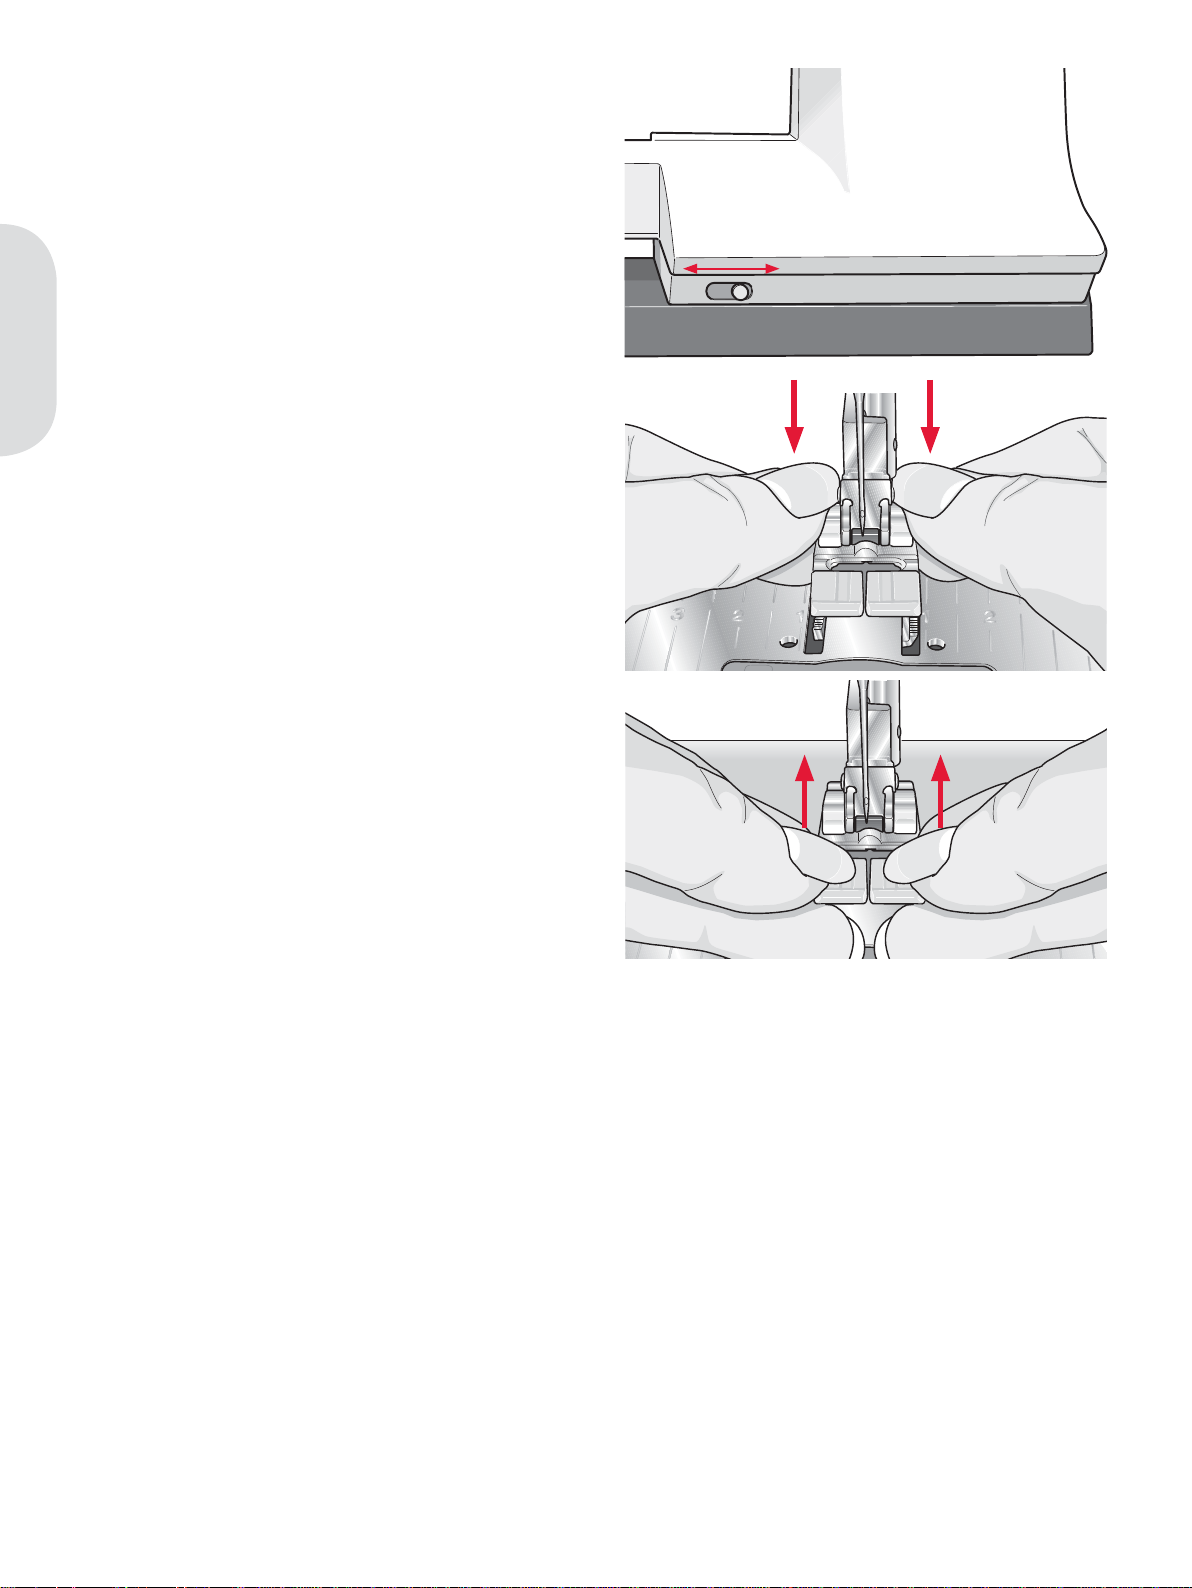
Lowering feed dogs
You can lower the feed dogs by moving the switch
on the front of the sewing machine to the left.
Move the switch to the right if you wish to raise the
feed dogs.
Preparations
Changing the presser foot
Remove presser foot
Press the presser foot downwards until it
disengages from the presser foot holder.
Attach presser foot
Place the presser foot under the presser foot holder,
so that when the presser foot is lowered, the pins of
the foot engage in the presser foot holder.
Note: Check that the presser foot is properly attached by
raising the presser foot lifter.
2:8
Page 21
USB port
Your machine has a USB port to connect your USB
embroidery stick.
USB embroidery stick
Delivered with your machine is a USB embroidery
stick. Use the stick to store designs and embroidery
fonts.
Connect to and remove from USB port
Insert the USB embroidery stick in the port. The
USB plug can only be inserted one way – do not
force it into the port!
To remove, carefully pull the USB embroidery stick
out straight.
Using the USB embroidery stick
A light at the end of the stick indicates that the USB
embroidery stick is plugged in correctly. When
loading from the USB embroidery stick, the light
Á ashes.
Note: Do not remove the USB embroidery stick while
the light is Á ashing, as this can damage the À les on your
USB embroidery stick.
creative 2.0
Preparations
Note: The USB embroidery stick provided
with the machine can be left in the machine
when putting on the hard cover. Make sure
that the cover of the USB stick is turned
downwards.
2:9
Page 22

5D™ Embroidery Software
5D™ QuickFont
Create font À les (.vf3) for your PFAFF® creative™
2.0 embroidery machine from most TrueType® or
OpenType® fonts on your computer.
5D™ Organizer
Find your designs and pictures easily. Browse
them in different sizes and print selected groups
as full worksheets of thumbnail catalogs. Convert
your designs between major embroidery formats,
to pictures or desktop wallpaper for your
Preparations
computer.
Installing your software
If you own other PFAFF® 5D™ Embroidery
System software, you may need to install the 5D™
Embroidery System 9.2 (or higher version) Update
instead of installing the Embroidery Machine
Communication Software. Then add the PFAFF®
creative™ 2.0 from the Machine Manager in 5D™
ConÀ gure, as described in Step 4.
1. Ensure you are logged onto the computer with
a user name that is an administrator on the
computer, then install your software from the
CD provided (attached inside the back cover of
this User’s Guide).
2. Insert your CD. In Windows® 7/Vista, an
AutoPlay message may appear, asking what
you wish to do with the CD. Click the option to
Run Menu.exe. Select your desired language,
and select the ’Install Embroidery Machine
Communication Software’ option from the
menu.
3. Follow the instructions in the Installation
Wizard. When asked to enter your Installation
Code, enter the following number: 8200.
4. In the 5D™ ConÀ gure Wizard under
MyMachines select your machine type:
PFAFF® creative™ 2.0. Under Send 1 or Send 2
select PFAFF® creative™ 2.0, USB Embroidery
Stick.
Note: You can À nd more detailed information about the
installation in the 5D™ Embroidery System Getting
Started Guide, in the folder ’UserGuides’ on the CD.
Your installation CD includes an option to Install
Drivers. However, this is not required for the PFAFF®
creative™ 2.0 embroidery machine.
Register your 5D™ software
After À nishing the software installation, you
can select to register your software by clicking
on Register in the menu. Create an account and
enter your details to receive customized 5D™
newsletters.
Important!
During the registration process you will be given
an option to enter which sewing and embroidery
machine(s) you own. This is NOT a product or
warranty registration. The machine information
entered here is only used to customize 5D™
Software newsletters. For product and warranty
registration, go to the PFAFF® web site at
www.pfaff.com.
To register later, select the Register button in 5D™
ConÀ gure at any time.
How to launch the programs
Shortcuts on the desktop
1. Double-click on the shortcut to the 5D™
Embroidery System program folder. A list of
the programs appears.
2. Double-click on 5D™ Organizer, 5D™
QuickFont or 5D™ ConÀ gure to launch it.
Alternatively use the Start Menu to open modules
under Start, All Programs, 5D™ Embroidery
System.
2:10
Page 23

Viewing and printing PDF Guides
To À nd all the Reference and Sample Guides for
your 5D™ Embroidery System software, go to
Start, All Programs, 5D™ Embroidery System
then choose Reference Guides or Sample Guides.
Choose the relevant folder, then select the desired
PDF Guide. Double-click on the desired name to
launch the relevant .pdf À le if you have Adobe
Acrobat installed on your computer. To install
the Acrobat Reader, insert the 5D™ Embroidery
System CD and select that option from the menu
that appears.
How to update your machine
Be sure to consult the web site at www.pfaff.com
and/or your local authorized PFAFF® dealer
for updates and upgrades for your machine and
Owner’s manual.
Updating instructions
• Go to the PFAFF® web site at www.pfaff.com
and À nd your sewing machine. Here you will
À nd updates available for your machine.
• Download the update software to your USB
embroidery stick, following the instructions on
the web site.
• Make sure that your machine is turned off.
Connect the USB embroidery stick loaded with
the new software version to the USB port on
your machine.
• While pressing and holding the needle up/
down button and the reverse button, turn your
machine on.
• The new software version will install
automatically. When the reverse indicator
starts Á ashing, release the buttons.
• The update procedure can take several
minutes. The graphic display will be blank
while the three indicators are Á ashing in
different combinations.
• When the update is completed the machine
will restart automatically. Check the software
version number in the settings menu.
Note: If the update is not completed successfully the
three indicators will Á ash simultaneously. Turn the
machine off and start the update from the beginning.
If the problem remains contact your authorized
PFAFF® dealer.
Preparations
2:11
Page 24
Preparations
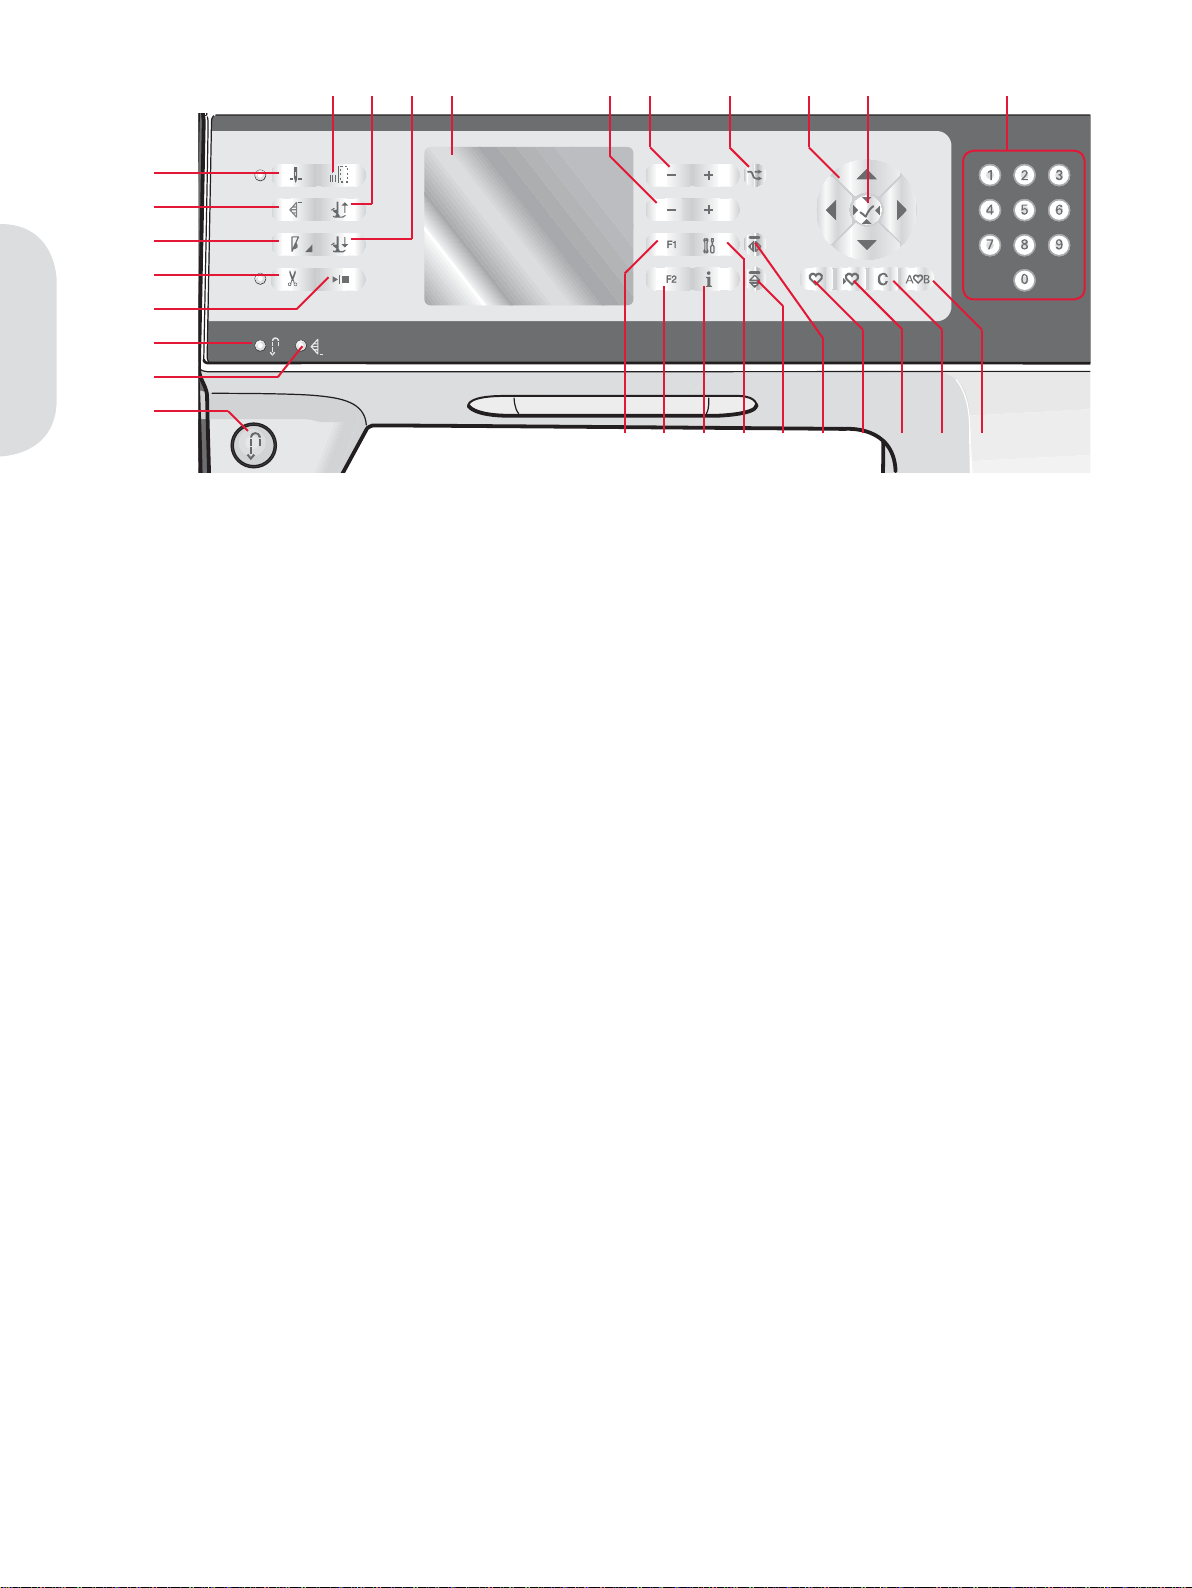
Buttons
10 11 12 14 13 15 16 17 18
1
2
3
4
5
6
7
8
19 20 21 22 23 24 25926 27 28
Needle up/down with indicator (1)
Press this button to move the needle up or down.
The set ting of the needle stop po si tion is changed
at the same time. When needle down is activated,
the indicator is lit, the needle will stop in the down
position and the presser foot will raise to pivot
height.
You can also tap the foot control to raise or lower
the needle.
Stitch restart (2)
When having stopped sewing in the middle of
a stitch, press stitch restart to start sewing at the
beginning of the stitch again without having to
reset any special settings you have made.
If pressing the stitch restart button while sewing,
the stitch will be À nished and the machine will
then stop.
Speed control (3)
Press the speed button to sew at a slower speed.
An icon on the graphic display will indicate how
slow your machine will sew. Long press the speed
button and use the wheel (16) to change the sewing
speed.
Note: You cannot select a higher speed than the default
speed.
Thread snips with indicator (4)
Press the button when you are not sewing and
your sewing machine cuts the top and bobbin
threads and raises the presser foot and the needle.
To cut before the needle moves to the start position
of the next stitch, press the thread snips button
while sewing. The thread snips indicator will be lit.
Start/stop (5)
Press this button to start or stop the machine
without using the foot control. Press the button
once to start and press it again to stop.
Reverse (8) with indicator (6)
For permanent reverse, press the button
before starting to sew. The reverse indicator (6)
will be lit and the machine sews in reverse until
you press the button again to cancel.
If you press the reverse button while sewing, the
machine sews in reverse for as long as you keep the
button pressed. The reverse indicator is lit when
the reverse button is pressed.
Reverse is also used when sewing buttonholes,
programmed tie-off end, darning stitches and
tapering stitches to step between the parts of the
stitch.
Programmed tie-off indicator (7)
The programmed tie-off indicator is lit to indicate
that one or several tie-off options are activated. The
indicator stays lit until the tie-off options are no
longer in use.
Immediate tie-off (9)
Press the tie-off button while sewing and your
machine sews a few tie-off stitches and stops
automatically.
Presser foot up and extra lift toggle (10)
Raises the presser foot and needle to the up
position. Press the button once more and the
presser foot will raise to extra lift.
2:12
Page 25

Presser foot down and pivot toggle (11)
Lower the presser foot completely. Press the button
once more to raise the presser foot to pivot height.
The presser foot is lowered automatically when
you start sewing.
Graphic display (12)
The graphic display lets you view all your
selections and options. Stitches are shown in real
size.
Stitch width or stitch positioning (13)
Increase or decrease the stitch width using the +
and - buttons.
Press the alternatives button (15) to view the stitch
positioning for the selected stitch. Use the + and buttons to change the stitch position.
Stitch length or stitch density (14)
Increase or decrease the stitch length using the +
and - buttons.
Press the alternatives button (15) to view the
density setting for satin stitches. Use the + and
- buttons to change the density for the selected
stitch.
Direct selection (18)
By pressing one of, or a combination of, the 0 to 9
buttons, you select the stitch represented by that
number immediately.
F1 - Function 1 (19)
The F1 button is used to set the tapering program.
It is also used to deactivate repeat for darning
stitches. In sequencing the F1 button is used to
select a character set.
In embroidery mode it is used to check the position
of the design and to rotate the design.
All selections will be shown on the graphic display.
F2 - Function 2 (20)
The F2 button is used to set the tie-off and thread
snips options as well as to deactivate repeat for
buttonholes. In sequencing it is used to select font.
In embroidery mode it is used to select hoop
options and to select monochrome embroidering.
All selections will be shown on the graphic display.
Info button (21)
Press this button to toggle the recommendations
view on and off.
Preparations
Alternatives (15)
When you select a decorative stitch, the width
and length settings will be shown on the graphic
display. By pressing the alternatives button, the
stitch positioning will be shown instead of the
stitch width setting and the density will be shown
instead of the length setting.
In embroidery mode, this button is used to switch
between embroidery edit and embroidery stitchout.
Wheel (16)
Use these buttons to move around the graphic
display. The wheel has up and down arrow
buttons, left and right arrow buttons and the wheel
center icon is a checkmark for OK (17).
The wheel has several functions, for example
stepping between stitches, setting the size of a
buttonhole and moving between options in the
settings menu. In embroidery mode use the wheel
to move the design in the hoop.
OK button (17)
The wheel center icon is a checkmark for OK.
Use the OK button to conÀ rm your selections. In
embroidery mode you can center the design in the
hoop with the OK button.
Settings menu (22)
Press this button to open the menu for machine
settings.
Mirror end to end (23)
For mirroring stitches and sequences end to end.
Mirror side to side (24)
For mirroring stitches and sequences side to side.
Load personal stitch or sequence (25)
Press this button to load a personal stitch or
sequence.
Save personal stitch or sequence (26)
Press this button to save a stitch or sequence to the
machine’s memory.
Clear (27)
For deleting single stitches in a sequence, or
personal stitches and sequences.
Sequencing/Embroidery text editor (28)
Press this button to enter sequencing.
In embroidery mode, press this button to open the
embroidery text editor.
2:13
Page 26
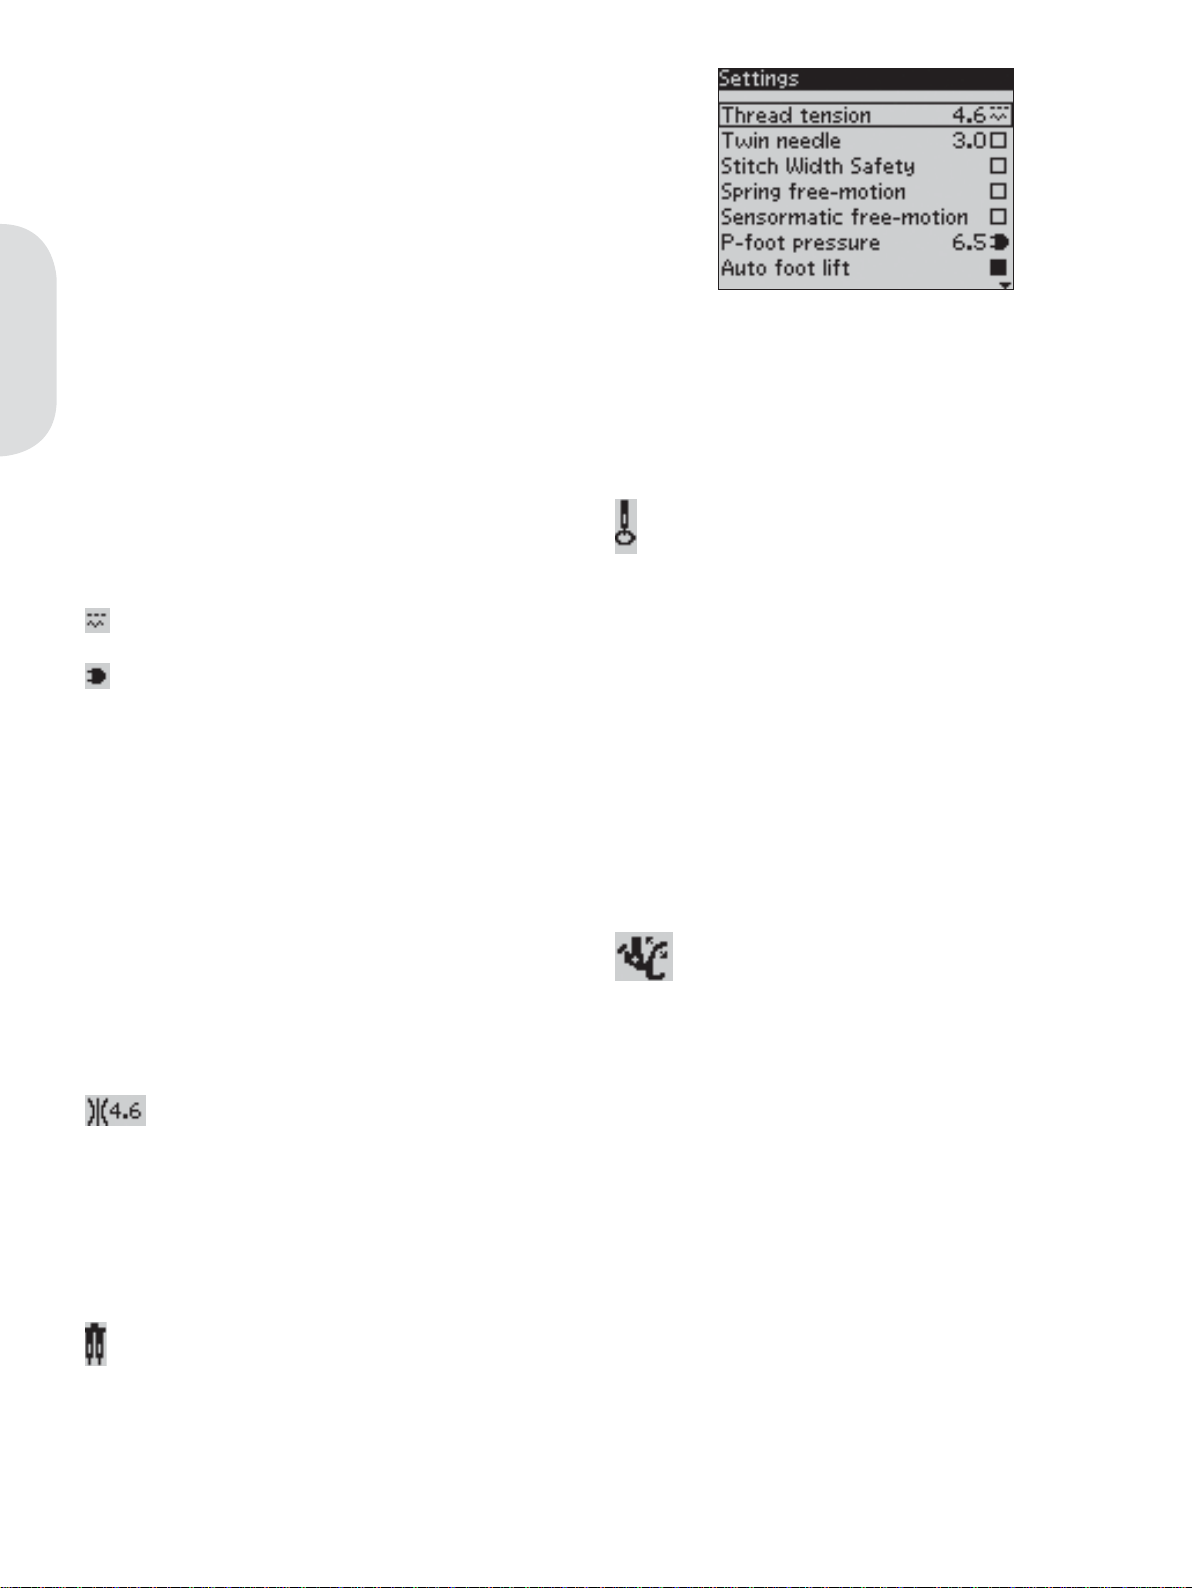
Settings menu
In the settings menu, you can override default
settings and make manual adjustments to the
machine settings, sound settings and screen
settings.
Open the menu by pressing the settings menu
button and select the setting you wish to adjust by
pressing the up and down arrow buttons on the
wheel.
Use the left and right arrow buttons to adjust
the values and activate settings or open a list of
choices by pressing OK. A À lled box means it is
Preparations
activated, an empty box means it is not activated.
Note: If a setting cannot be combined with a previously
selected setting, the outlines of that box will be dashed.
Different settings are available depending on whether
you are in sewing or embroidery mode.
There are two icons which are shown next to some
of the setting alternatives.
This icon shows you that the setting will be
kept until you select another stitch.
This icon shows you that the setting will be
kept until you switch your machine off.
No icon means that this setting is kept until you
deactivate it.
Press the settings menu button again to leave the
settings menu.
Thread tension
Your sewing machine will electronically pre-set a
thread tension for the selected stitch. Depending
on the fabric, batting, thread etc, the tension may
need to be adjusted. Use the left and right arrow
buttons on the wheel to adjust the thread tension.
The changes only affect the selected stitch. The
setting will go back to default when you select
another stitch.
In sewing mode, press the info button to
see the current selected thread tension.
Twin needle
Activate the twin needle program and use the left
and right arrow buttons on the wheel to set the
twin needle width. When a twin needle size is
selected, the width of all stitches is limited for that
needle size to prevent needle breakage.
In sewing mode, press the info button. The twin
needle recommendation icon will be shown.
The setting is kept until you deactivate it.
Note: Twin needle and stitch width safety cannot be
used at the same time.
A warning pop-up will be shown if you select a stitch
that is too wide for the set twin needle size.
Stitch width safety
Select this function when using a straight stitch
needle plate or a straight stitch presser foot to lock
the center needle position for all stitches to prevent
damage to the needle, presser foot or stitch plate.
In sewing mode, press the info button. The
stitch width safety icon will be shown.
The setting is kept until you deactivate it.
Note: When turning on the machine with this setting
activated and for every stitch selection that is not a
straight stitch, a pop-up informs you that it is set to
straight stitch.
Twin needle and stitch width safety cannot be used at
the same time.
Spring foot free-motion
Activate to set the machine in spring foot freemotion mode. Lower the feed dogs. A spring foot
will raise and lower with each stitch to hold the
fabric on the stitch plate while the stitch is being
formed.
In sewing mode, press the info button. The
spring foot free-motion icon will be shown
instead of the presser foot recommendation.
The setting is kept until you deactivate it. A popup will inform you that spring foot free-motion is
active when turning on the machine.
Note: Free-motion feet are optional and can be purchased
at your local authorized PFAFF® dealer. Do not use if
sensormatic free-motion is activated, since the needle
might damage the presser foot.
Any spring foot with light grey plastic housing, can also
be used for free-motion embroidery.
2:14
Page 27

Sensormatic free-motion
Activate to set the machine in sensormatic freemotion mode for presser foot 6A. Lower the feed
dogs.
In sewing mode, press the info button. The
sensormatic free-motion icon will be shown
instead of the presser foot recommendation.
The fabric must be moved manually. When sewing
in free-motion at low speed the presser foot will
raise and lower with each stitch to hold the fabric
on the stitch plate while the stitch is being formed.
At higher speed, the presser foot Á oats over the
fabric while sewing.
When turning on the machine, a pop-up informs
you that the sensormatic free-motion is active.
Presser foot pressure (only for sewing)
In most cases, you do not need to adjust the presser
foot pressure. To improve the result when using
specialty techniques, adjust the pressure.
Use the left and right arrow buttons on the wheel to
adjust the pressure. The higher the number, the more
pressure on the fabric. The value can be adjusted
between 0 and 9 in steps of 0.5. Your manual setting
will be cancelled when you turn off the machine.
Note: If you want to change the presser foot pressure
for a sequence, bring the sequence to sewing mode and
change the setting.
Balance (only for sewing)
When sewing on special fabrics or doing a special
technique, the balance may need to be adjusted.
Start by sewing a stitch on a piece of scrap fabric.
Use the left and right arrow buttons to balance the
stitch between -7 and 7. When you sew again, the
balance will be adjusted.
The changes only affect the selected stitch. The
setting will go back to default when you select
another stitch.
Cut jump stitches (only for embroidering)
Your machine features the automatic function
cut jump stitches. This function saves you time
trimming after the embroidery is completed.
Select cut jump stitches in the settings menu. As
you embroider your machine will trim the top
jump stitch thread and pull the thread end to the
underside of the fabric.
Note: Your machine will also cut the thread after you
have changed to a new color. Hold the thread end when
you start embroidering again, so that you can easily
remove the thread end when cut.
Designs marked ”Cut jump stitch trim command” are
programmed for cut jump stitches. Jump stitch trim
commands can be added to any design using the 5D™
Organizer Software, included with your machine. Go to
”File” and select ”Add Trim Commands”.
Preparations
Pivot height
Adjust the height of the presser foot when
the machine is set for free-motion or when in
embroidery mode.
In Sensormatic free-motion mode: Skipped stitches
can occur if your fabric moves up and down with
the needle as you are stitching. Lowering the pivot
height will reduce the space between the presser foot
and the fabric and eliminate the skipped stitches.
Note: Be careful not to reduce the pivot height too much.
The fabric must still move freely under the presser foot.
In Embroidery stitch-out mode: Some
embroideries may build up under the presser foot.
If there is not enough space between the presser
foot and the embroidery, the top thread will form
loops on the underside of the embroidery. Increase
the pivot height in small steps until the embroidery
moves freely under the presser foot.
Automatic presser foot lift (only for sewing)
When selected, the automatic presser foot lift
is activated. The presser foot will raise to pivot
height when stopping with the needle in the down
position. When deselected, the presser foot will
stay lowered even if the machine stops with the
needle in down position.
Stop for cut (only for embroidering)
When starting to embroider the machine stops after
a few stitches asking you to cut the thread end. Use
the OK button to turn on or off this function in the
settings menu.
Note: Stop for cut and cut jump stitches cannot be used
at the same time. Stop for cut is also disabled if you use
the foot control when embroidering.
Language
Use the left and right arrow buttons to change the
language of all text in your machine.
Audible alarm
Turn all alarm sounds of the machine on or off.
Default setting is on.
Contrast
Adjust the contrast of the graphic display by using
the left and right arrow buttons. The value can be
set between -20 to 20 in steps of 1.
Software version
Check the software version for your sewing
machine.
2:15
Page 28

Sewing
Page 29
Sewing
Sewing mode is the À rst view on the graphic display after you turn on the machine. Your selected stitch
will be shown in real size in the stitch À eld. Here you will À nd all the basic information you need to start
sewing. This is also the menu where you adjust the settings of your stitch. Straight stitch is selected by
default.
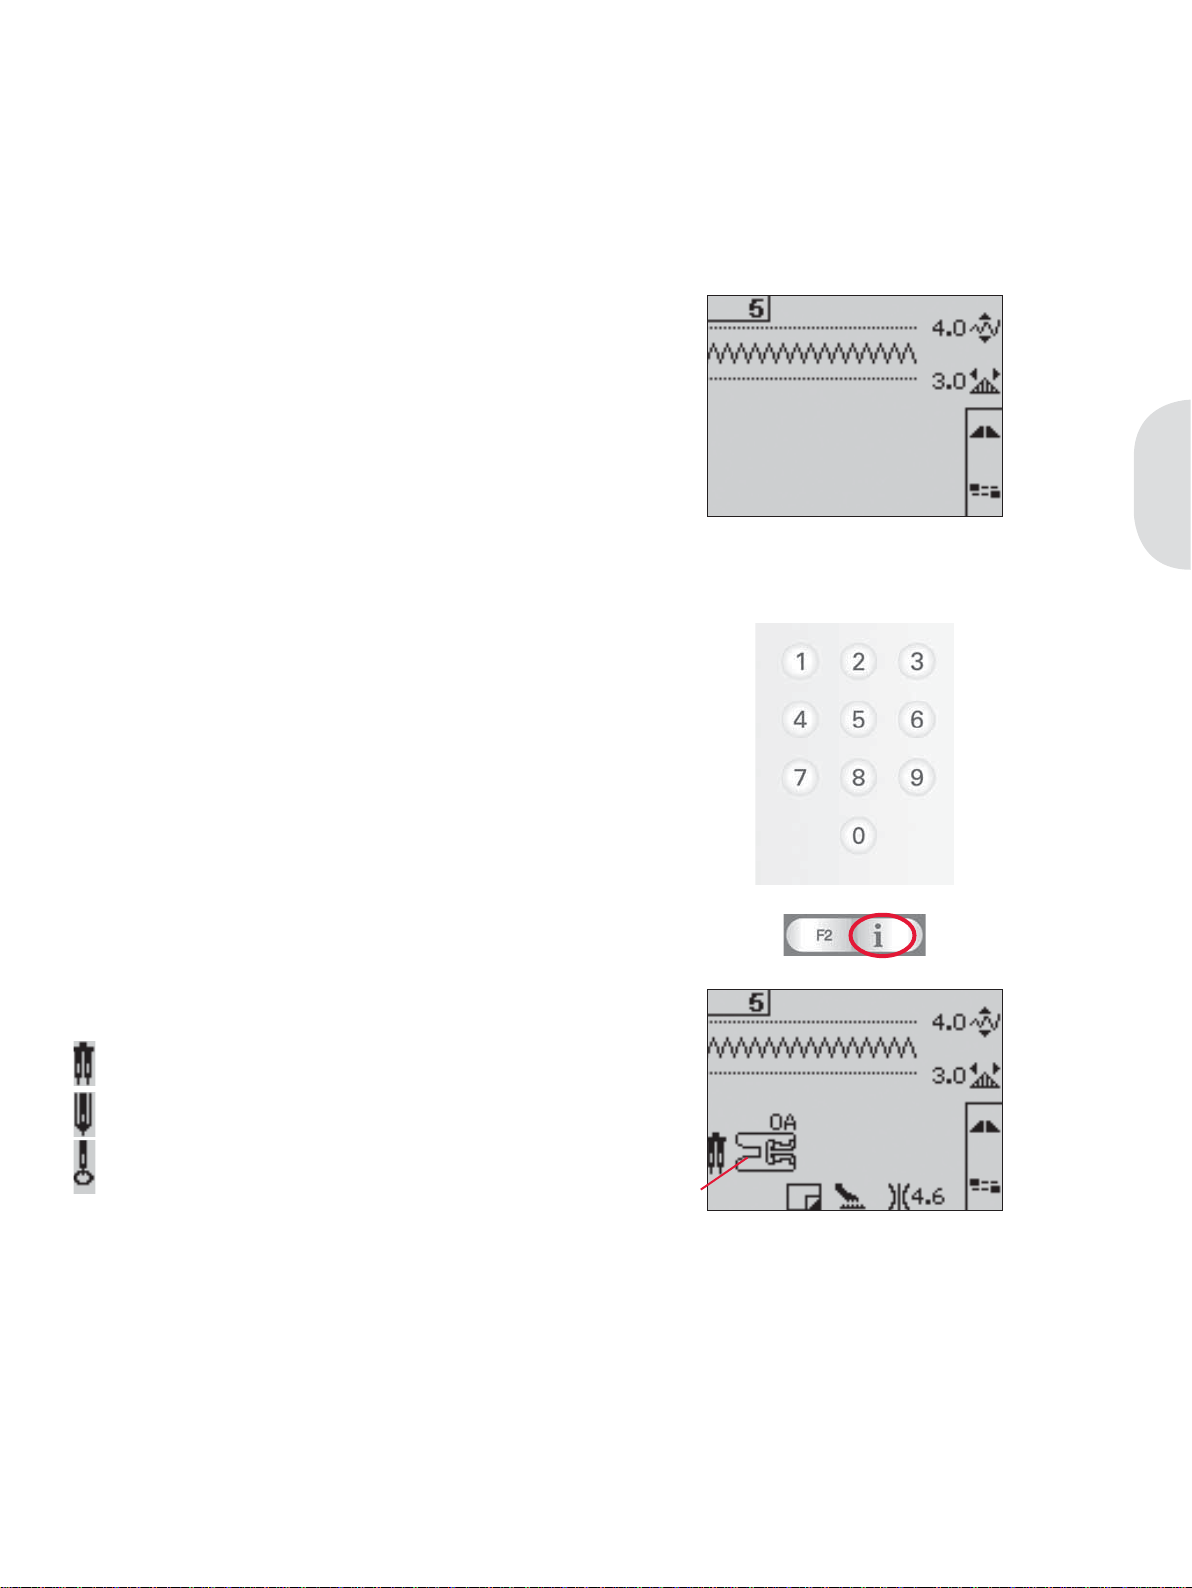
Sewing mode - overview
1. Selected stitch number
2. Stitch À eld
3. Stitch width/stitch positioning
4. Stitch length/density
5. Tapering program
6. Tie-off options
Select a stitch
By pressing one of the direct selection buttons, you
select that stitch number immediately. Press two
or three digits in quick succession to select a stitch
from 10 and up. If the stitch number does not exist,
you will hear a beep and the À rst entered digit will
be selected as a stitch.
Use the up and down arrow buttons on the wheel
to step between stitches.
1
3
2
4
5
6
Sewing
Sewing recommendations
Press the info button to show sewing
recommendations for the current stitch.
Press the button again to hide the information.
7. Needle recommendation/setting
Set for twin needle
Wing needle recommended
Set for stitch width safety
8. Presser foot recommendation
9. Stabilizer recommended
10. Feed dog/IDT recommendation
11. Thread tension value
Note: All symbols and options will not be shown at the
same time.
7
8
10
119
3:1
Page 30

Stitch adjustments
Your machine will set the best settings for
each selected stitch. You can make your own
adjustments on the selected stitch.
The setting changes only affect the selected stitch.
Your changed settings will be reset to default when
selecting another stitch. The changed settings
are not automatically saved when turning your
machine off.
The set stitch width and the stitch length are shown
next to the icons for each adjustment. When trying
to exceed minimum or maximum settings for
width and length, a warning sound will be heard.
Note: The numbers are highlighted when the setting is
changed.
Sewing
Stitch width (1)
Increase or decrease the stitch width using + and -.
Stitch length (2)
Increase or decrease the stitch length using + and
-. If lengthening a zigzag stitch or a decorative
stitch, the entire stitch will be longer. If lengthening
a satin stitch where the density can be adjusted,
the entire stitch will be longer but the density will
remain the same.
Thread tension (5)
For the best stitch appearance and durability, make
sure the needle thread tension is correctly adjusted,
i.e. for general sewing, the threads evenly meet
between the two fabric layers.
Your sewing machine electronically sets a thread
tension for the selected stitch. Depending on the
fabric, batting, thread etc, the tension may need to
be adjusted. See page 2:14 for instructions on how
to change the setting manually.
If the bobbin thread is visible on the top side of
the fabric, the needle thread tension is too tight.
Reduce the needle thread tension.
If top thread is visible on the underside of the
fabric, the needle thread tension is too loose.
Increase the needle thread tension.
For decorative stitches and buttonholes, the top
thread should be visible on the underside of the
fabric.
Stitch positioning (3)
Press the alternatives button to show the stitch
positioning instead of the stitch width. Use the +
and - buttons to move the stitch to the left or right.
Note: This is only possible when using a stitch that is
narrower than 9 mm. You can decrease the stitch width
to make the stitch narrower if necessary.
Stitch density (4)
Press the alternatives button to show the density
setting instead of the stitch length for satin stitches.
Now the stitch length + and - buttons adjust the
density. The stitch density does not affect the
actual length of the entire stitch.
Note: This is often used with specialty threads and when
a less dense satin stitch is desired. If you have selected a
buttonhole, the graphic display will by default show the
density setting instead of the stitch length setting.
1
2
5
Press the alternatives button to view
stitch positioning and density
3
4
3:2
Page 31

Mirroring
To mirror stitches or sequences side to side, press
the mirror side to side button. To mirror end to
end, press the mirror end to end button.
Tie-off options
The tie-off options let you program tie-offs both
at the beginning (A) and the end (B) of the stitch.
Thread snips (C) can also be used.
1. Press the F2 button to open the tie-off options
view.
2. Use the wheel to step between the options and
press OK to select which functions you want
to use.
3. When you have made your selections, close the
view by pressing the F2 button again. Tie-off
mini icons (D) will be shown on the graphic
display, indicating which tie-off functions are
selected. The selections will remain until you
deselect them.
Note: For immediate tie-off, use the tie-off button, found
on the front of the machine.
Sewing
D
ABC
Sewing with tie-off options selected
1. The tie-off beginning (A) will be performed as
soon as you start to sew.
2. Press the reverse button to activate tie-off end
(B). The programmed tie-off indicator will be
lit. The machine will À nish the stitch and do a
tie-off.
When a thread snip (C) is programmed, the
machine will automatically cut the threads
after performing the tie-off end. The needle
and presser foot will raise.
Note: Stop sewing and press the reverse button
twice to activate reverse sewing. The reverse
indicator will be lit. No tie-off will be performed.
Press the reverse button when sewing in reverse to
activate tie-off end. Both the reverse indicator and
the programmed tie-off indicator will be lit.
To go back to sewing forward, stop sewing in
reverse and press the reverse button. No indicators
will be lit and no tie-off will be performed.
3. To deactivate the tie-off options, use the wheel
to step between the options and press OK for
each one to deselect.
3:3
Page 32

Tapering program
Tapering increases or decreases the width of the
stitch during sewing to create symmetrical or
asymmetrical tapers.
1. Open the tapering program view by pressing
the F1 button.
2. Use the left and right arrow buttons on the
wheel to select beginning or end tapering.
Press OK to turn the setting on or off.
3. Long press OK to open a view with different
angle choices for either beginning or end
tapering. Select the angle you want for your
taper by using the arrow buttons, and press
OK to select.
4. Press the F1 button again to close the tapering
program view. There are mini icons (A) on the
Sewing
graphic display that will show you if beginning
or end tapering are activated.
5. When tapering is activated at both the
beginning and at the end and you start to sew,
the stitch width will start at 0 mm. It becomes
wider until the selected stitch width is reached.
Sew your desired length and press the reverse
button. The width is reduced until the width is
0 mm.
Note: Almost all stitches can be tapered. When you
try to open the tapering program view for a stitch
that cannot be tapered, a warning sound will be
heard.
A
Speed control
1. Long press the speed button to open a popup where you can use the left and right arrow
buttons on the wheel to change the sewing
speed.
Note: You cannot select a higher speed than the
default speed.
2. Press the speed button again to close the popup.
3. Press the info button. An icon on the graphic
display will indicate the speed your machine is
set to sew (B).
4. To deactivate the reduced speed, press the
speed button. Press the button again to sew
with the speed you previously selected.
B
3:4
Page 33

Personal stitches
Save personal stitch
1. Save your personal stitches in your machine
by pressing the save button. This will open
the save personal stitch or sequence menu.
Select the personal stitch option with the arrow
buttons on the wheel and conÀ rm by pressing
OK.
2. Select an empty memory by using the arrow
buttons. ConÀ rm your selection by pressing
OK. If the selected memory is not empty, a
pop-up message will appear asking if you wish
to overwrite the previously saved stitch with
the new one. Select yes or no with the arrow
buttons and press OK.
3. Press the save button again to return to sewing
mode.
Note: Some special stitches, such as buttonholes, cannot
be saved. A pop-up will inform you of this when you try
to save such a stitch.
Sewing
Load personal stitch
1. Load your personal stitches by pressing the
load button. This will open the load personal
stitch or sequence menu. Select the personal
stitch option in the pop-up with the arrow
buttons on the wheel. ConÀ rm by pressing OK.
2. Use the arrow buttons to select the stitch you
want to use and press OK. The stitch will
appear in sewing mode ready to be sewn out.
The number of the loaded stitch will be shown
preÀ xed by a heart.
Delete personal stitch
1. Delete your personal stitches from your
machine when you are in load or save mode.
2. Select the stitch you want to delete and press
the clear button. A pop-up will appear asking
you to verify the deletion. Select yes or no with
the arrow buttons on the wheel and press OK.
3:5
Page 34

Sewing techniques
Three-step zigzag stitch
Stich number 9 can be used to overcast raw edges.
Make sure the needle pierces the fabric on the left
side and overcasts the edge on the right side.
Stitch number 9 can also be used as an elastic stitch
to add elastic to pajamas, skirts and sportswear.
Buttonholes
Sewing
To sew a buttonhole, À rst attach the correct foot.
Make sure that the IDT is disengaged.
Note: Buttonholes up to 50 mm are sewn with the
Sensormatic buttonhole foot. Buttonholes over 50 mm
are sewn manually in four steps with presser foot 5M.
Then select your buttonhole. To ensure good
results, start by sewing a test sample on a scrap
piece of the fabric with the stabilizer you will use.
The direction of the stitches being sewn will be
indicated on the screen by an arrow next to the
buttonhole.
A
Sensormatic buttonhole
When you sew a buttonhole with the sensormatic
buttonhole foot, adjust the slit length so that
it is slightly larger than the size of the button.
1. Snap on the sensormatic buttonhole foot 5A.
2. Plug the cord into the socket (A) found to the
left underside behind the light bulb.
3. Use the ruler on the lid to measure your
button. Set the slit length using the left and
right arrow buttons on the wheel.
4. Make sure that the red arrow lines up with the
marking on the foot (B).
5. Start sewing by pressing the foot control.
6. The arrows on the graphic display will show
when each part of the buttonhole is sewn and
in which direction. The columns will be sewn
in the same direction.
7. The buttonhole will be completed
automatically. You can repeat the buttonhole
as many times as you wish by pressing the foot
control.
B
3:6
Page 35

Manual buttonhole
1. To sew a buttonhole longer than 50 mm, use
presser foot 5M. Make sure that the IDT is
disengaged.
2. The À rst column will be sewn backwards.
Sew the À rst column as long as you want the
buttonhole. The graphic display will show the
part and sewing direction of the buttonhole
that is being sewn.
3. Press the reverse button. The machine sews
the bartack and the second column. When the
columns are aligned, press the reverse button
again to sew the second bartack.
The machine will stop automatically when the
buttonhole is complete.
Note: The repeat icon will be highlighted, showing
you that repeat is activated. You can repeat the
buttonhole as many times as you wish by pressing
the foot control.
4. Press the F2 button to deactivate repeat.
Sewing
Corded buttonhole
Corded buttonholes that are sewn with gimp
threads are more stable, durable and have a
professional appearance. Use pearl cotton or a
regular gimp thread.
1. Place the center of a length of gimp thread over
the metal bar extending from the center back
of the sensormatic buttonhole foot 5A. Pass the
thread ends under the foot and pull up into the
right and left guides on the front of the presser
foot.
2. Snap on the sensormatic buttonhole foot 5A.
Before starting to sew, make sure that the red
arrow lines up with the marking on the foot.
3. After completing the buttonhole, pull the ends
of the gimp thread until the loop of thread is
hidden below the buttonhole bartack.
4. Thread the gimp threads into a needle and pull
them to the wrong side of the garment. Tie the
gimp threads and cut off the excess thread.
3:7
Page 36

Sew on a button
1. To sew on a button, remove the presser foot
and select the button sewing stitch.
2. Lower the feed dogs.
3. Place the button under the presser foot holder.
Use the mirroring function to make sure the
holes in the button are aligned with the swing
of the needle and the width is appropriate
for the actual button. If necessary change the
width between holes with the width + and buttons.
4. You can increase or decrease the number of
stitches that will fasten the button on the fabric
in steps of two, using the left and right arrow
buttons on the wheel.
5. Start to sew. The machine will sew the
Sewing
program for you and then tie-off and stop.
Note: Use the multi-purpose tool to create a thread
shank for your button. You can also use a sew-on
button foot, available as an optional accessory.
Darning
Darning a small hole or a tear before it becomes
larger can save a garment. Choose a lightweight
thread in a color as close to your garment as
possible.
1. Place fabric or stabilizer in position under the
hole or tear in your garment.
2. Select a darning stitch.
3. Start sewing above the hole and over it.
4. Once you have sewn across the hole, press the
reverse button to set the length of the stitch.
Your sewing machine will automatically
complete the stitch.
5. By default, the machine will be set to repeat
the same size darning square, just continue
sewing.
Press the F1 button to deactivate repeat.
Note: The repeat icon (A) will be highlighted,
indicating that repeat is activated.
A
Sewing hems in heavy fabric
When sewing over seams in extra heavy fabric or
a blue jeans hem, the foot can tip as the machine
climbs over the seam. Use the multi-purpose tool to
balance the height of the presser foot as you sew.
One side of the multi-purpose tool is thicker than
the other. Use the side that suits the thickness of
the seam best.
3:8
Page 37
Handlook quilting
A quilt usually consists of three layers, two layers
of fabric with a layer of batting sandwiched
between.
1. Baste the completed quilt top to the batting and
backing.
2. Thread the needle with an invisible
(monoÀ lament) thread. Use contrasting or
matching rayon or cotton thread in the bobbin.
3. Snap on the recommended foot shown in the
sewing recommendations view.
4. Engage the IDT.
5. When you sew the stitch you should only see
your bobbin thread. Increase the needle tension
as needed to produce the desired effect.
Recommended stitches for a handlook quilt
Stitch
41 42 43 45 46 47 48 49 50
Sewing
Blindhem stitch
The blindhem stitch number 16 is used to make
invisible hems on skirts, trousers and home
decorating. Use foot number 3 with IDT.
1. Finish the edge of the hem.
2. Fold and press the hem allowance to the wrong
side.
3. Fold the hem back on itself so approximately
3/8” (1 cm) of the À nished edge extends
beyond the fold. The wrong side of your
project should now be facing up.
4. Place the fabric under the presser foot so that
the fold runs along edge guide A.
5. When the needle swings into the fold it should
catch a small amount of fabric. If the stitches
are visible on the right side, adjust edge guide
A by turning adjusting screw B until the stitch
that catches the hem just barely shows.
B
A
3:9
Page 38

Elastic blindhem stitch
The elastic blind stitch number 17 is especially
suitable for stretchy fabrics, because the zigzag in
the stitch lets the stitch stretch. The hem is À nished
and sewn at the same time. There is no need to
À nish the raw edge À rst on most knits.
Sewing in zippers
There are different ways to sew in zippers. Follow
the directions included with your pattern for best
results.
For all types of zippers it is important to sew close
Sewing
to the teeth of the zipper. The zipper foot 4 can be
snapped to the presser foot bar on the left or right,
depending on how you will insert your zipper.
Then set the stitch position so that it enters close
to the edge of the zipper teeth by using one of the
37 needle positions available for the straight stitch.
If the presser foot is attached on the right side, the
needle must only be moved to the right. If the foot
is attached on the left, the needle must only be
moved to the left.
Rolled hem
Use the rolled hem foot 7 to À nish the edges of
blouses, scarves, or rufÁ es without having to
iron the edges beforehand. Hemming prevents
the edges from fraying and produces a neat and
durable edge À nish.
1. Double-fold the fabric edge (about 1/8” - 2 mm
- per fold).
2. Place the folded fabric edge under the rolled
hem foot and sew a few stitches to secure.
3. Turn the handwheel towards you until the
needle is at its lowest point. Raise the presser
foot and slide the fabric into the scroll of the
foot.
4. Lower the presser foot and while sewing,
guide the fabric edge evenly into the foot.
When roll-hemming, make sure the raw edge
of the fabric butts against the left edge of the
rolled hem foot opening. Ensure the fabric does
not run underneath the right side of the presser
foot.
Note: A narrow zigzag stitch also makes a nice rolled
hem on lighter stretch fabrics such as lingerie nylon.
3:10
Page 39

Common sewing pop-ups
Bobbin empty
When the bobbin is almost empty, the machine
stops automatically and a pop-up appears on the
screen. Replace the empty bobbin with a full one
and press OK on the wheel to conÀ rm.
Mainmotor overload
If you are sewing on very heavy fabric or if the
machine is blocked when sewing, the mainmotor
can get overloaded and the machine will stop
sewing. The pop-up message will close when the
mainmotor and power supply are secure.
Remove thread jam
Clean the area under the stitch plate from thread
and lint. Press OK on the wheel to close the popup.
Sewing
3:11
Page 40

Sequencing
Page 41

Sequencing
The sequencing function on your machine makes it possible to combine stitches and letters into
sequences. You can add up to 40 stitches, letters and commands in the same sequence. Save your own
stitches and sequences on your machine and reload and sew them any time you like.
All stitches in your sewing machine can be used for sequencing except for buttonholes, darning, tapering
stitches, button sewing and bartacks.
Sequencing - overview
1. Current stitch number
2. Stitch À eld
3. Sequence commands
4. Alphabet
5. Stitch width/stitch positioning
6. Stitch length/density
7. Character set (upper case/lower case, normal/
special symbols)
8. Font selection
1
2
3
4
5
6
7
8
Sequencing
Create a sequence
1. Press the sequencing button to enter
sequencing.
2. Press the number of the stitch you wish to use.
The stitch will appear in the stitch À eld.
3. Press the number of the next stitch and it will
appear to the right of the previously entered
stitch.
Note: The current position in the stitch À eld is
marked by a cursor. Inserted stitches will be placed
at the cursor position. Move the cursor through the
sequence using the left and right arrow buttons on
the wheel.
Sequence commands
You can insert tie-offs, thread snips and stop
commands into your sequence. Use the arrow
buttons on the wheel to select a command and
press OK to insert it. It will be placed at the cursor
position.
Inserted commands will be included when you
save your sequence and will always be performed
when sewing it.
Note: You can insert up to 3 commands in a row.
4:1
Page 42
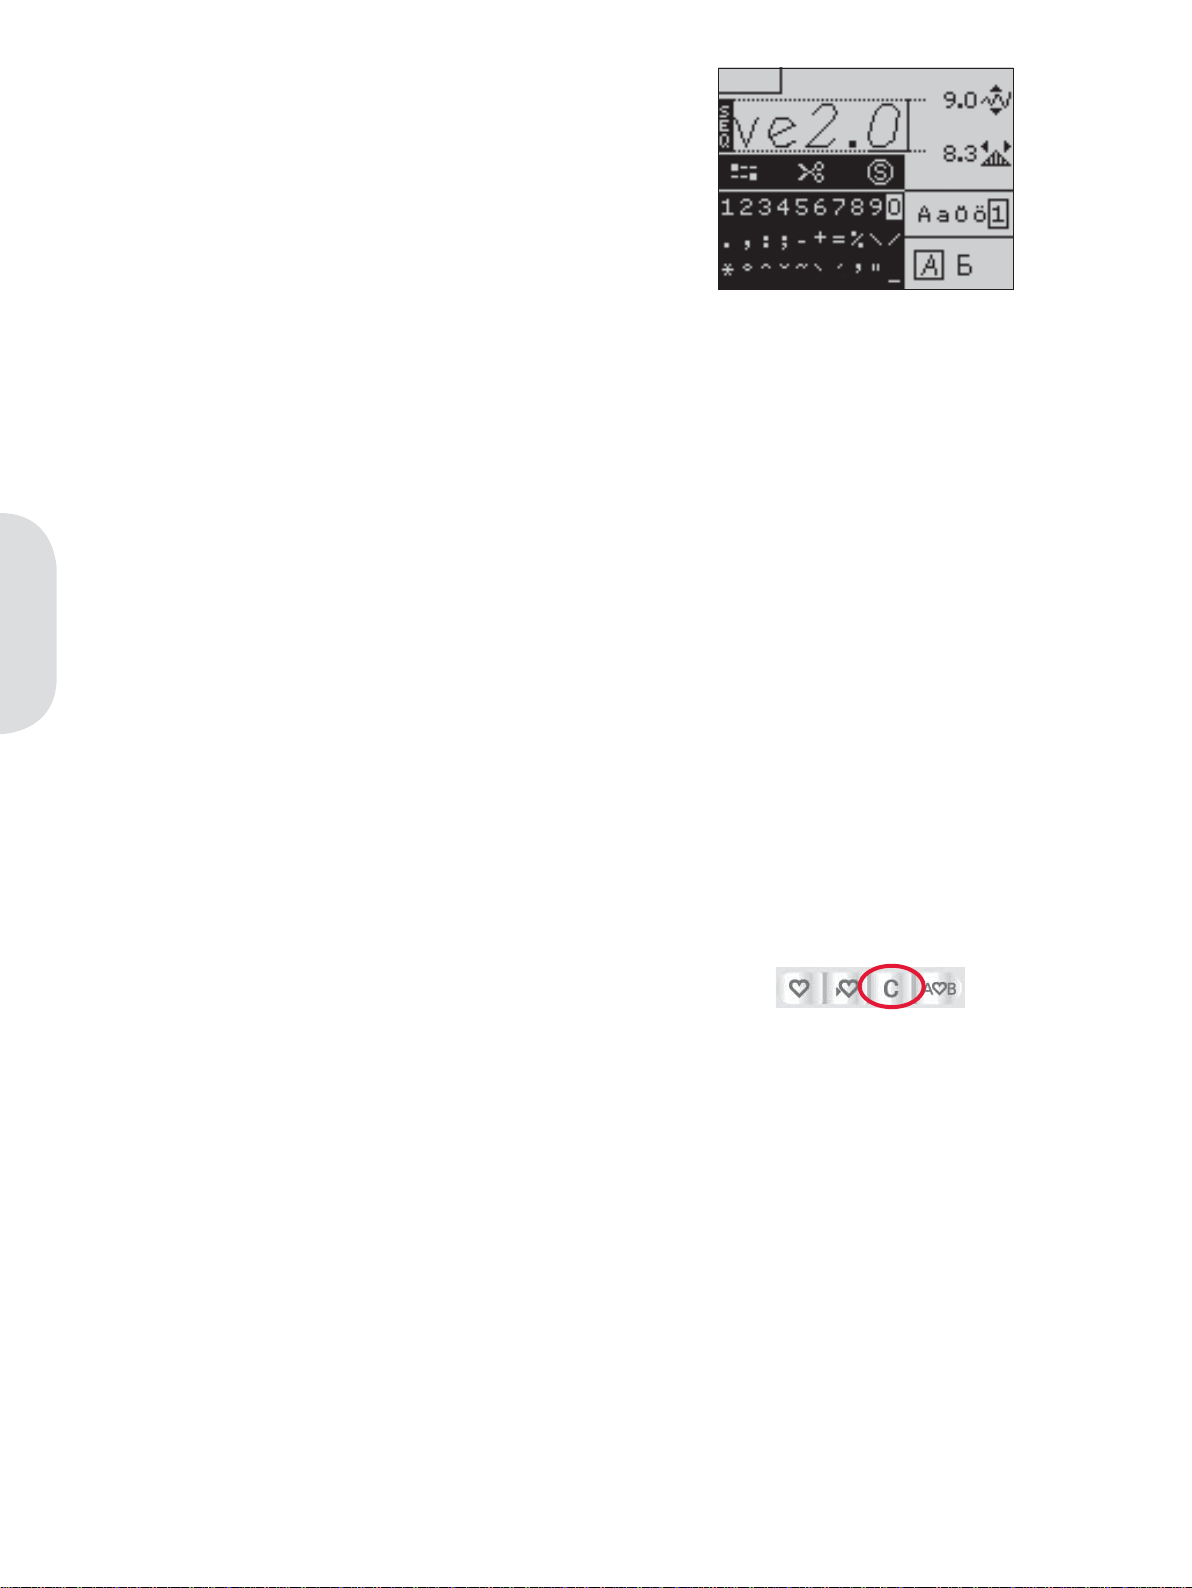
Using the alphabet
1. Move the cursor through the stitch À eld (1)
with the left and right arrow buttons on the
wheel to where you want to add a letter.
2. Use the down arrow button to step through
the sequence commands (2) to the alphabet
(3). Select a letter using the arrow buttons and
press OK to insert it. It will be placed at the
cursor position in the stitch À eld.
Note: The selected letter in the alphabet will be
highlighted.
Select character set and font
Press the F1 button to change character set (6)
between upper or lower case, normal or special
letters and symbols.
Press the F2 button to change fonts (7).
Adjust text and stitches
You can mirror, adjust length (5) and width (4)
or change the density and stitch position of the
Sequencing
selected stitch. The adjustments work just like in
sewing mode. See page 3:2 - 3:4.
When you have changed a value, the digits will be
highlighted on the graphic display to show that the
value is not default.
Note: The adjustments will only affect the stitch at
the cursor position. If you return to sewing mode, all
adjustments made there will affect the entire sequence
and will not be saved.
4
1
2
3
5
6
7
Delete a stitch or letter in a sequence
If you want to delete a stitch, move the cursor to
the stitch you want to delete and press the clear
button.
To delete the entire sequence from the stitch À eld,
long press the clear button.
4:2
Page 43

Manage your sequences
You can save and reload your sequences.
Each sequence memory has a space of 40 stitches.
Save sequence
Saving your sequence works just like in sewing
mode. See page 3:5.
Load sequence
Loading your sequence works just like in sewing
mode. See page 3:5. Select the sequence option in
the load pop-up.
Note: When loading a sequence into sewing mode, the
number of the saved sequence will be shown preÀ xed by
an M.
Delete sequence
Deleting your sequences from the machine works
just like in sewing mode. See page 3:5.
Sewing a sequence
To sew the sequence, return to sewing mode by
pressing the sequencing button or step on the foot
control. Your sequence is ready to be sewn out. The
sequence will be sewn continuously if no stop is
programmed.
Note: Adjustments made in sewing mode will affect the
whole sequence. However, these adjustments will not be
saved if you return to sequencing.
Sequencing
4:3
Page 44
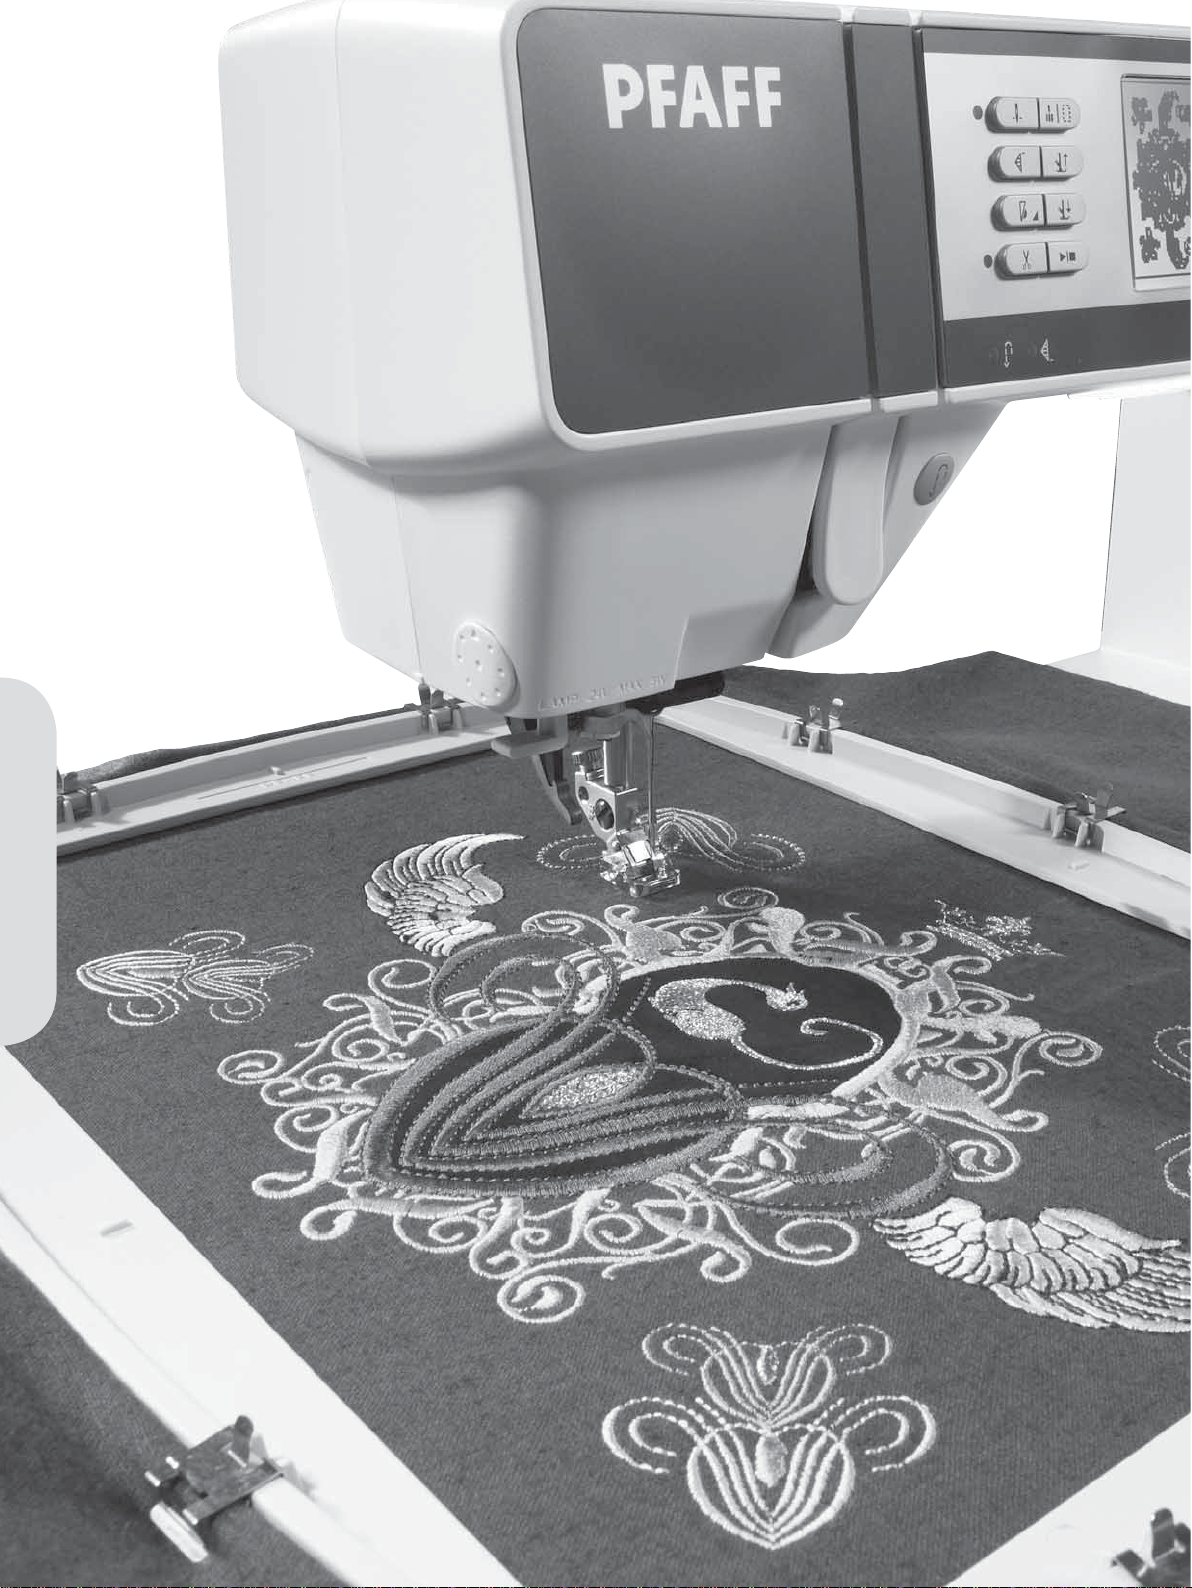
Embroidery preparations
Page 45

Embroidery preparations
E
A
B
Embroidery unit overview
(type BE16)
A Embroidery unit release button
B Level adjusting feet
C Embroidery unit socket
D Embroidery hoop connection assembly
E Embroidery arm
D
C
Embroidery preparations
Embroidery hoop overview
F Embroidery hoop connector
G Outer hoop
H Inner hoop
I Quick release
J Retaining screw
K Ribs for À tting the clips
L Center markings
creative™ 2.0 Embroidery collection
Page through the creative™ 2.0 Embroidery
collection for designs and an embroidery font.
The design number, stitch count (number of
stitches in the design) and the design size are
displayed next to each design. The suggested
thread colors for each color number are shown.
K
L
F
J
H
G
I
5:1
Page 46

Connect the embroidery unit
There is a covered socket behind the free-arm, see
picture. The cover will open automatically when
connecting the embroidery unit.
1. Slide the accessory tray off.
2. Slide the embroidery unit onto the free arm
of the machine until it plugs À rmly into the
socket. If needed, use the level adjusting feet
so that the machine and embroidery unit are
even. If the machine is turned off, turn it on.
3. The machine will automatically restart and
enter embroidery mode.
4. A pop-up tells you to clear the embroidery
area and remove the hoop for positioning.
Press OK. The machine will calibrate and
the embroidery arm will move to the ready
position. This calibration will set your
embroidery functions each time you slide on
the embroidery unit.
Make sure not to calibrate the machine with the
embroidery hoop attached as this can damage the
needle, presser foot, hoop and/or the embroidery
unit. Be sure to clear all materials from around the
machine before calibrating so that the embroidery
arm does not bump into anything while calibrating.
Remove the embroidery unit
1. To store the embroidery unit, move the
embroidery arm to park position by selecting
park position in the hoop settings menu.
2. Press the button at the left, underneath the
embroidery unit (A) and slide the unit to the
Embroidery preparations
left to remove it.
3. The cover of the socket closes automatically.
Note: The machine will automatically restart and
enter sewing mode.
4. Store the embroidery unit in the original
packing material.
A
5:2
Page 47

To hoop the fabric
For the best embroidery results, place a layer
of stabilizer beneath the fabric. When hooping
stabilizer and fabric make sure that they are
smooth and securely hooped.
1. Open the quick release (A) on the outer hoop.
Remove the inner hoop. Place the outer hoop
on a À rm Á at surface with the screw on the
lower right. There is a small arrow in the center
of the lower edge of the hoop which will line
up with a small arrow on the inner hoop.
2. Place stabilizer and the fabric, with the right
sides facing up, on top of the outer hoop. Place
the inner hoop on top of the fabric with the
small arrow at the bottom edge.
3. Push the inner hoop À rmly into the outer hoop.
4. Close the quick release. Adjust the pressure of
the outer hoop by turning the retaining screw
(B). The fabric should be taut in the hoop for
the best results.
Note: When embroidering additional designs on the
same fabric, open the quick release, move the hoop to the
new position on the fabric and close the quick release.
When changing type of fabric, you might need to adjust
the pressure using the retaining screw. Do not force the
quick release.
B
A
Embroidery preparations
Slide on the hoop
Slide the hoop onto the embroidery unit from front
to back until it clicks into place.
To remove the hoop from the embroidery arm,
press the grey button on the hoop connection
assembly and slide the hoop towards you.
5:3
Page 48

Embroidering
Page 49

Embroidering
In embroidery mode you can adjust and stitch out designs. You need to have the embroidery unit
connected to your machine to adjust your designs.
To embroider a design, enter embroidery mode by attaching the embroidery unit. The load menu will
automatically open. After loading a design there are two views available in embroidery mode - stitch-out
and edit.
Embroidery stitch-out view
1. Embroidery À eld
2. Stitches left in color block
(total number of stitches left in design)
3. Current color
(total number of colors)
4. Orbit to check position
5. Hoop options
Embroidery edit view
Press the alternatives button to toggle to
embroidery edit.
6. Design width
7. Design height
8. Rotate
9. Monochrome
Note: Values that have been changed from default
will be highlighted.
The stitch-out view will automatically be shown when
starting to stitch out your design.
1
Stitch-out view
Edit view
2
3
4
5
6
7
8
9
Design information
Press the info button to view information about
the loaded design.
Design name (A)
Design position (B)
Shows how many millimeters the design has been
moved from the center position in the hoop.
Color list (C)
All colors in the loaded design are shown in the
order they will be embroidered. Each listed color
shows order, name and thread type. Use the up
and down arrow buttons to view all of the colors
in the list.
A
B
C
Embroidering
6:1
Page 50

Embroidery stitch-out
Load a design
1. To load a design, press the load button with
the USB embroidery stick and the embroidery
unit connected. Your machine can load .vp3
embroidery À les and .vf3 embroidery font À les.
2. Use the arrow buttons to select a folder and
then press OK to open it. To go back to the
previous folder, press the left arrow button.
3. Select the design you want to load and press
OK to conÀ rm. It will be loaded onto the
embroidery À eld in embroidery stitch-out.
Note: If you have already loaded a design onto the
embroidery À eld, the next design you load will
automatically replace the À rst one.
When saving designs on the USB embroidery stick,
make sure not to create too many levels of subfolders
as this may create a À le path that is too long. Also
make sure to keep the À le name short. When trying
to open such a À le or folder, an alarm sound will be
heard and the À le or folder will not open.
Load a font
Text can be created with embroidery fonts. On
your USB embroidery stick there is one embroidery
font upon delivery.
1. Press the load button with the USB embroidery
stick connected.
2. Select the font À le you want to load and press
OK to conÀ rm. The font will load into the
embroidery text editor.
Note: Font À les are indicated with this symbol.
You can create more font À les using the 5D™
QuickFont software. See page 2:10.
Embroidery text editor view
1. Font À le name
2. Text À eld
3. Alphabet
Embroidering
4. Text length information
5. Text height information
6. Character set (upper case/lower case,
normal/special, symbols)
7. Toggle to embroidery stitch-out
1
2
3
4
5
6
7
6:2
Page 51

Embroidery text editor
An alphabet will be shown automatically when
you have loaded a font. The text editor works just
like sequencing, see page 4:2.
1. Create your embroidery text by selecting letters
using the arrow buttons.
2. ConÀ rm your selections by pressing OK.
3. Press F1 to change character set.
4. When you want to sew your text, press the F2
button to bring the text to embroidery stitchout. The text will now have the appearance of
the loaded font.
5. Use the + and - buttons to adjust the length
and height of the text.
Note: Press the sequencing button to enter the text
editor again. All adjustments made in embroidery mode
will be cancelled if you go back to the text editor. A popup will therefor appear asking if you wish to returm to
embroidery stitch out. If you select yes you will return
to embroidery mode and all your adjustments will be
kept. If you select no the text editor will open and all
your adjustments made in embroidey mode will be
cancelled. Select yes or no with the arrow buttons and
press OK.
Stitches left in color block (1)
This number shows the number of stitches left
in the current color block. In brackets is the total
number of stitches left in the design.
Press the + and - buttons to step forward and
backwards stitch by stitch in the design. Step
backwards a few stitches if the needle thread
breaks or runs out.
Current color (2)
The current color block number will be shown,
next to the total number of color blocks in the
design, shown in brackets. To go to the next color
block, use the + and - buttons.
Orbit to check position (3)
Orbiting can be used to trace the design area. Press
the F1 button to move the hoop so the needle is
placed in the upper left corner of where the design
will be embroidered. Each press of the button will
move the hoop to view all corners of the design.
On the À fth press the hoop will move to the center
position of the design and on the sixth press it will
move back to its original position.
1
2
3
4
Embroidering
6:3
Page 52
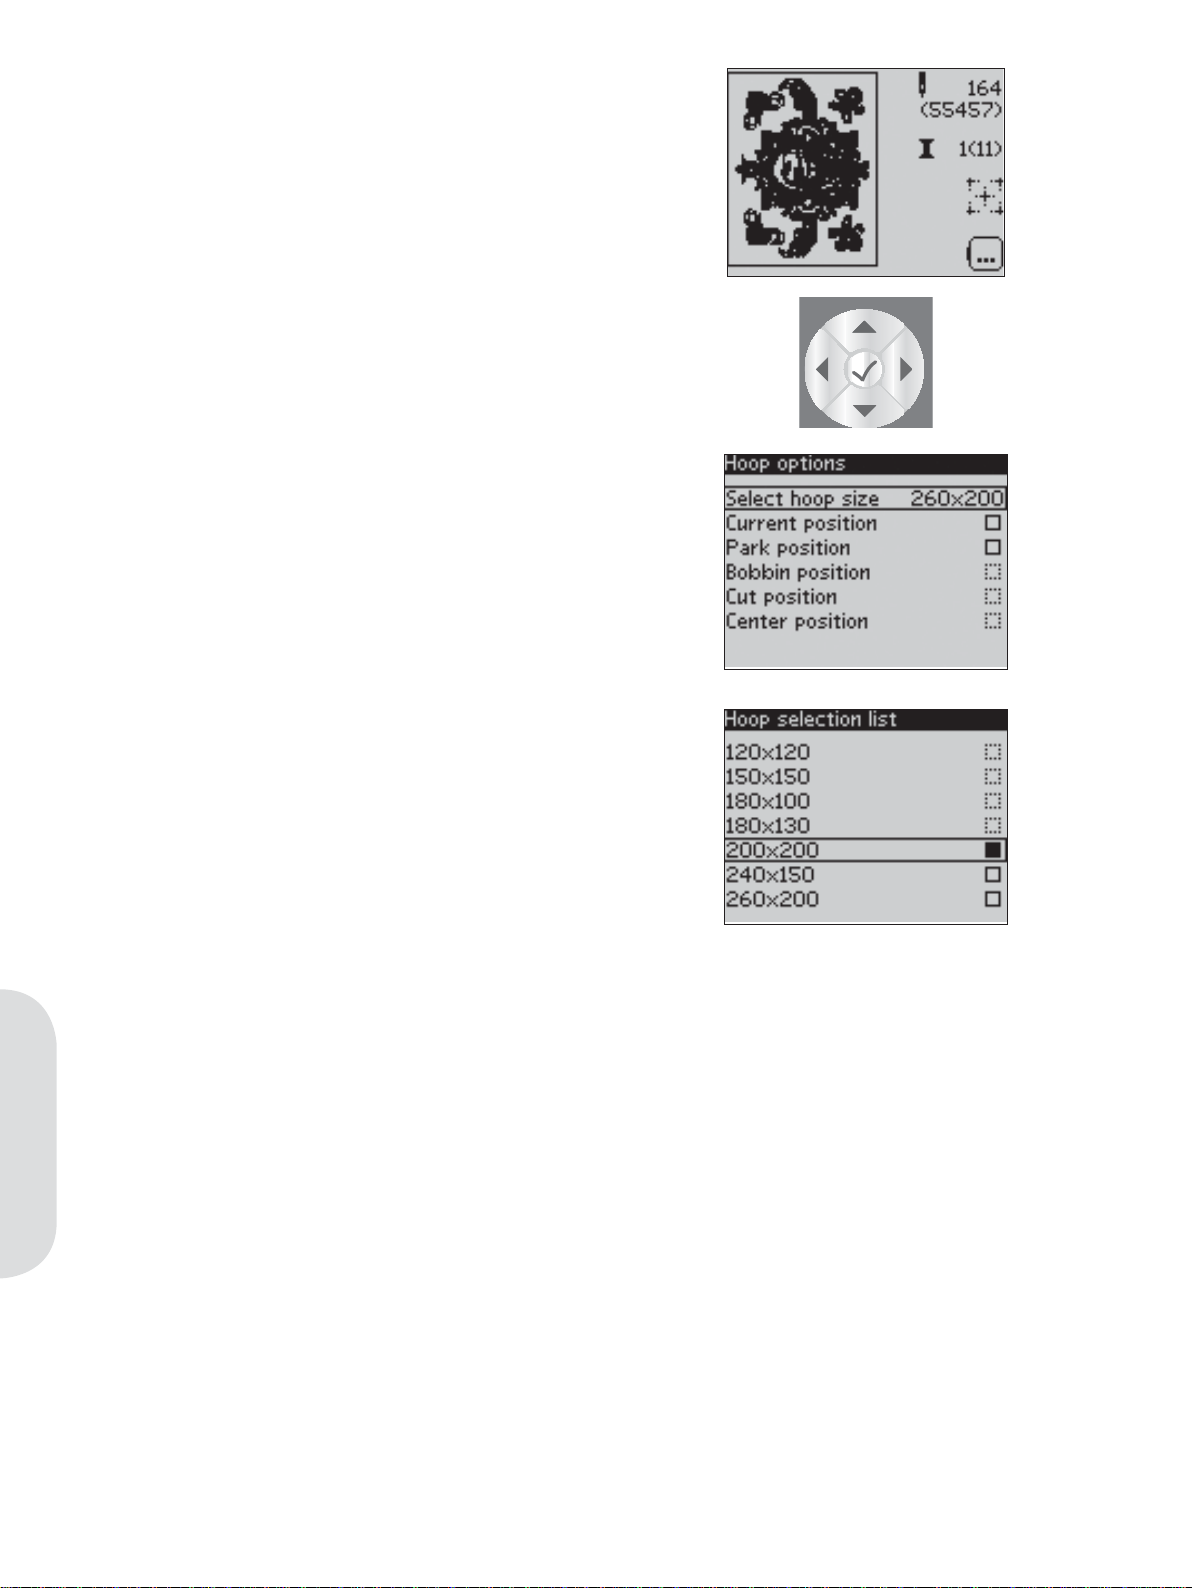
Hoop options (4)
Use the F2 button to open and exit the hoop
options menu. Use the wheel to navigate through
the different options and conÀ rm your selections
with the OK button.
1
2
3
Select hoop size
1. Use the wheel to open and scroll through a list
of available hoop sizes, including hoops that
are available to purchase from your authorized
PFAFF® dealer. A À lled box means that the
hoop is selected. Depending on the size of the
design, some hoops may not be available for
selection. The outlines of the box next to those
hoops will be dashed.
2. Use the wheel to select a hoop and conÀ rm
your selection by pressing OK.
Note: If you try to start sewing and the hoop you have
selected is not the same as the hoop attached to the
embroidery unit, a pop-up will appear to inform you of
this. Attach the correct hoop or select another hoop in
the list.
Current position
When you want to return to the current stitch and
start embroidering again where the embroidery
was interrupted, open the hoop options menu. Use
the wheel to select the current position option and
press OK. You can also press the start/stop button
once to return to the current stitch and start to
embroider.
4
Park position
When you have À nished your embroidery, remove
the hoop and open the hoop options menu. Use
the wheel to select the park position option and
press OK. When selected, the embroidery arm will
be placed in a position that allows for easy storage.
Note: It is very important that the hoop is removed,
otherwise it may be damaged.
Embroidering
Bobbin position
To make it easier to change the bobbin, open the
hoop options menu. Use the wheel to select the
bobbin position option and press OK. The hoop
will move backwards, allowing you to open the
bobbin cover and replace the bobbin.
6:4
Cut position
Cut position will move the hoop towards you,
making it easier to trim fabric when embroidering
an appliqué. Open the hoop options menu. Use
the wheel to select the cut position option and
press OK.
Center position
Use the center position if you want to check where
the center position of the hoop will be placed on
the fabric. Open the hoop options menu. Use the
wheel to select the center position option and
press OK.
Page 53

Basting
Press the immediate tie-off button and the machine
will sew a basting stitch around the design area.
Basting enables you to secure your fabric to a
stabilizer placed beneath it, especially when the
fabric to be embroidered cannot be hooped. Basting
provides support for stretchy fabrics. It also shows
where the design will be placed on the fabric.
Note: During basting the design will not be shown on
the display. Instead the basting will be indicated with a
dashed line. When basting is completed, the design will
automatically be shown on the display again.
Speed control
This function enables you to easily reduce the
maximum embroidery speed. It works just like in
sewing mode, see page 3:4.
Thread tension
When embroidering with specialty thread or
fabric you may need to adjust the thread tension
to achieve the best result. Thread tension can be
adjusted in the settings menu, see page 2:14.
6:5
Embroidering
Page 54

Getting started embroidering
1. Attaching the embroidery unit, the machine
automatically switches to embroidery mode
and opens the load menu.
2. Make sure that the USB embroidery stick
is connected. Select a design from the USB
embroidery stick and press OK to load to
embroidery stitch-out.
3. The design is placed in the center of the hoop.
4. Make sure the IDT is disengaged and snap
on the embroidery foot. Insert a bobbin with
lightweight bobbin thread.
5. Hoop a piece of fabric and stabilizer, and slide
on the hoop.
6. Thread the machine with the À rst color in the
color list.
7. Clear sufÀ cient space to accommodate
movement of the embroidery arm and the
hoop. Hold the needle thread and press the
start/stop button or the foot control. The
machine starts embroidering and jump stitches
will automatically be cut.
Note: Cut jump stitches is activated by default.
Open the settings menu to deactivate this setting.
8. When the À rst color is completed, your
machine stops. A pop-up appears asking you
to change color. Re-thread with the next color
and continue embroidering by pressing start/
stop.
Each color segment is tied off at the end and
the needle thread is cut.
9. When the embroidery is completed, your
machine cuts the needle and bobbin thread
and stops. The needle and presser foot raise
automatically for easy removal of the hoop.
A pop-up informs you that your embroidery is
À nished.
Embroidering
6:6
Page 55

Embroidery edit
Press the alternatives button to toggle to
embroidery edit. In this view you can adjust your
design. When you press the start/stop button, the
machine will automatically toggle to embroidery
stitch-out.
Design width (1)
You can increase or decrease the design width up
to 20%. Use the + and - buttons. The design width
is scaled 5% each time you press a button.
Design height (2)
You can increase or decrease the design height up
to 20%. Use the + and - buttons. The design height
is scaled 5% each time you press a button.
Rotate (3)
You can rotate the design around its center point.
Use the F1 button to rotate. Each time you press the
button, the design will rotate 90 degrees clockwise.
To the left of the rotate icon on the screen you can
see how many degrees the design has rotated from
its original position.
Note: Some designs are too large to fully rotate. Each
press of the button will then rotate the design 180
degrees.
1
2
3
4
Monochrome (4)
Press the F2 button to activate monochrome
embroidery. The machine will not stop for color
block changes.
Press the F2 button again to deactivate
monochrome embroidery.
Move
Use the wheel to move the design anywhere in the
embroidery À eld. In the design information view
you can see how far the design has been moved
from its original position. Press the OK button to
center the design in the hoop.
Mirroring
Use the mirroring buttons to mirror the design end
to end or side to side.
Color blocks / Monochrome
Embroidering
6:7
Page 56

Common embroidery pop-ups
Embroidery unit calibration
When the embroidery unit is attached, a popup asks you to slide off the hoop and clear the
machine area for calibrating the embroidery arm.
Note: It is very important to remove the hoop, otherwise
the hoop or the embroidery unit may be damaged while
calibrating.
Connect a USB stick
When in embroidery mode and pressing the load
button without having a USB stick connected, this
pop-up will appear. Connect a USB stick and press
OK so that you can load or save a design.
The data on the USB stick cannot be read
This pop-up will appear when your sewing
machine cannot access the information on the USB
stick. This can be caused by wrong À le formats on
the USB stick, the USB stick could be damaged
or you might be using a USB stick that is noncompatible with the sewing machine.
Design includes elements that cannot
be opened
Some designs may consist of several designs or
contain other elements that cannot be opened. Use
your 5D™ Organizer to resave the design.
Remove the hoop
This pop-up will appear when a function has been
chosen that forces the embroidery unit to move
outside the limits for the attached hoop. In order
for the embroidery arm to move freely, remove the
hoop and then press OK.
Embroidering
Stop command in design
This pop-up will appear when there is a
programmed stop in the design. The machine will
stop. Press OK to continue embroidering.
6:8
Page 57

Maintenance
Changing the light bulbs
Your sewing machine is equipped with two light
bulbs. One is placed under the sewing head and
one above the free arm. Light bulbs are available at
your authorized PFAFF® dealer. Change the light
bulbs as described below.
1
2
3
creative
4
5
6
7
8
9
0
Turn off the main switch.
1 Place the light bulb remover with the deep
hole, marked OUT, around the bulb. Do not
turn the bulb, just pull it out to remove it.
2 When inserting a new light bulb place the
remover with the shallow hole, marked IN,
around the new bulb. Insert the new bulb by
pushing it up.
Cleaning the machine
To keep your sewing machine operating well, clean
it often. No lubrication (oiling) is needed.
Wipe the exterior surface of your machine with a
soft cloth to remove any dust or lint built up.
Wipe the graphic display with a clean, soft and
damp cloth.
3W
5W
Cleaning the bobbin area
Note: Lower the feed dogs and turn off the
machine.
Remove the presser foot and slide off the bobbin
cover. Place the screwdriver under the stitch
plate as shown on the picture, and gently turn
the screwdriver to pop off the stitch plate. Clean
the feed dogs with the brush found with the
accessories.
Maintenance
7:1
Page 58
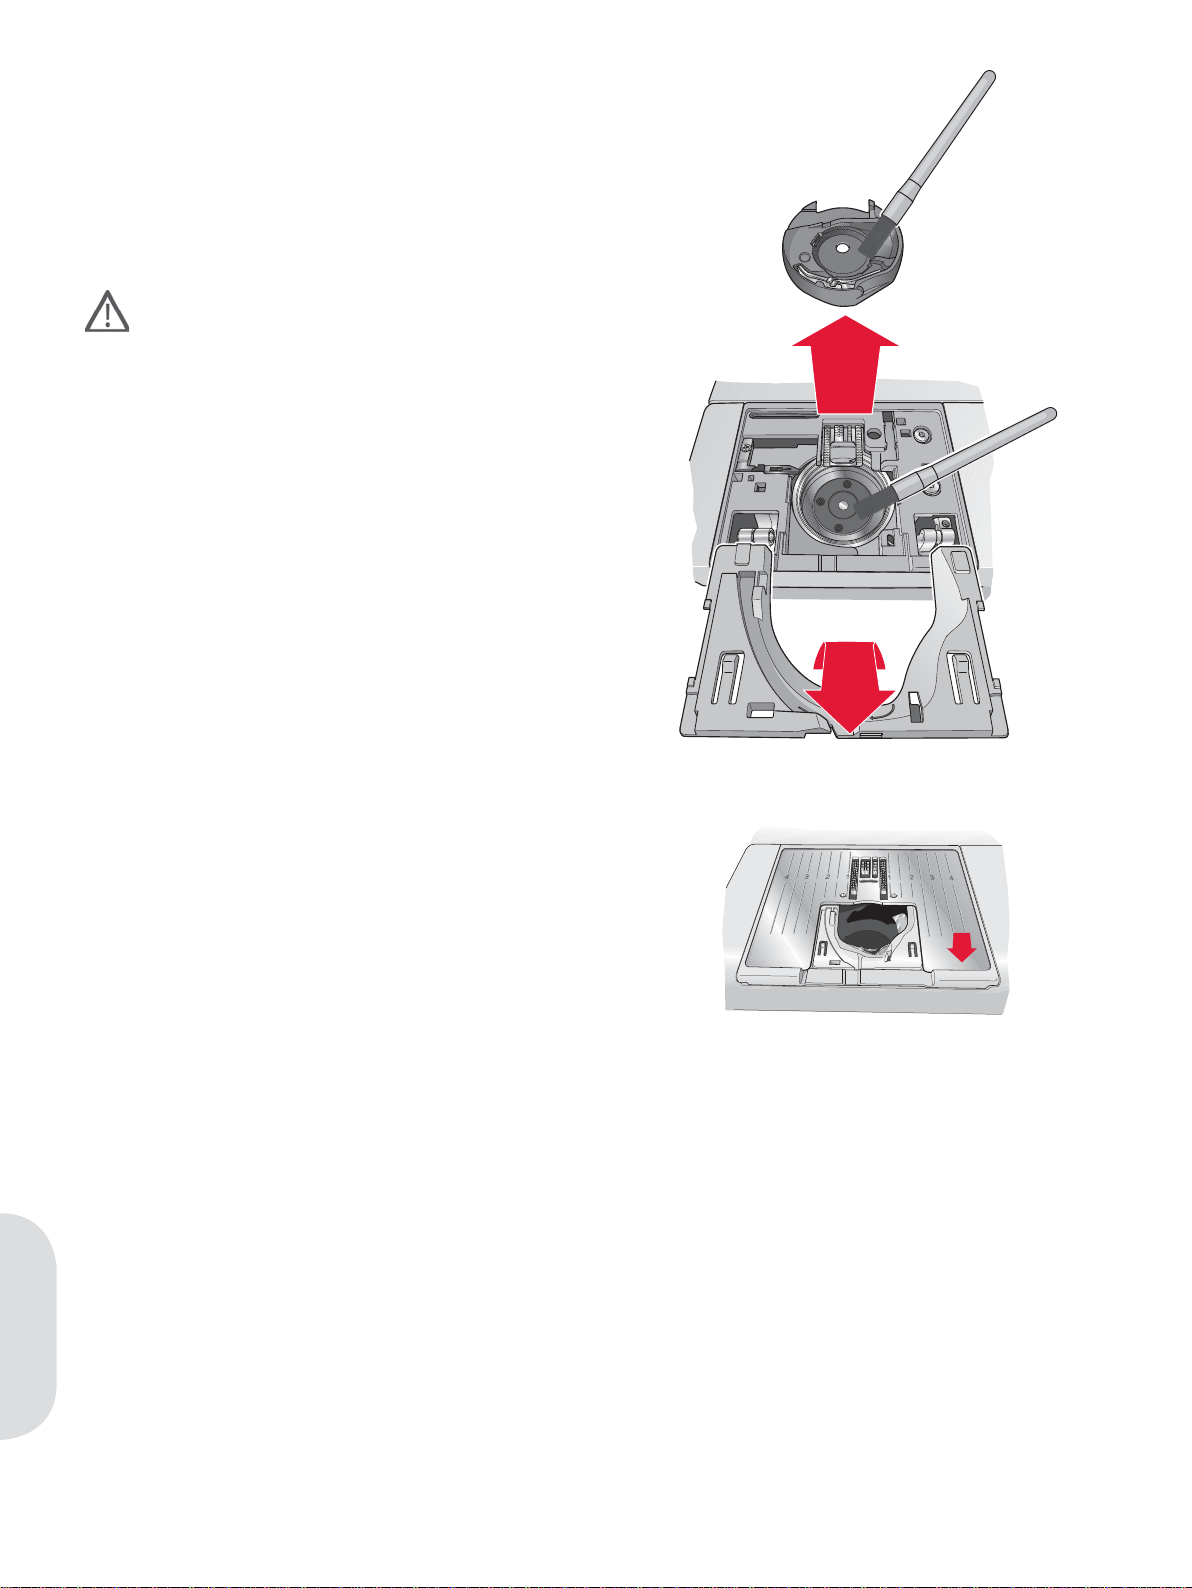
Cleaning under the bobbin area
Clean the area under the bobbin case after
sewing several projects or any time you notice an
accumulation of lint in the bobbin case area.
Remove the bobbin case holder (A), covering
the front part of the bobbin case, by lifting it up.
Remove the bobbin case (B) by lifting it up. Clean
with the brush.
Use caution when cleaning around the
thread snips knife.
Put the bobbin case and the bobbin case holder
back in place.
Note: Do not blow air into the bobbin case area. The
dust and lint will be blown into your machine.
Note: When using the optional accessory PFAFF®
Embroidery Cutwork Needles, it is neccessary to clean
the bobbin area after each embroidered design/project.
B
A
Replacing the stitch plate
With the feed dogs lowered, place the stitch plate
with the knob À tting into the notch at the back (C).
Press the stitch plate down until it clicks into place.
Slide on the bobbin cover.
Maintenance
C
7:2
Page 59
Troubleshooting
In this troubleshooting guide you will À nd solutions to the problems you may have with your machine. For
further information please contact your local authorized PFAFF® dealer who will be happy to help you.
Problem/cause Remedy
General problems
Bobbin alarm does not work? Clean lint from bobbin area and use only the original
PFAFF® bobbins approved for this model.
Thread snips do not cut the thread?
Fabric does not move? Make sure that machine is not set in free-motion mode
Wrong stitch , irregular or narrow stitch? Deactivate twin needle or stitch width safety in the
The needle breaks? Insert needle correctly as described in chapter 2.
The machine will not sew? Check that all plugs are securely plugged into the
The sewing and embroidery machine function
buttons do not respond to touch?
Remove stitch plate and clean lint from bobbin area.
Enable automatic thread snips in the settings menu.
in the settings menu.
Make sure that the feed dogs are not lowered.
settings menu.
Attach correct needle for the fabric.
machine and into the wall socket.
Check that the foot control cord is securely plugged
into the foot control.
Push bobbin winder lever to sewing position.
The sockets and function buttons on the machine can
be sensitive to static electricity. If the buttons do not
respond to touch, turn the machine OFF and then
ON again. If the problem persists, contact your local
authorized PFAFF® dealer.
The machine skips stitches
Did you insert the needle properly? Insert needle correctly as described in chapter 2.
Did you insert a wrong needle?
Is the needle bent or blunt? Insert a new needle.
Did you thread the machine properly? Check how the machine is threaded.
Is the correct presser foot used? Attach correct presser foot.
Is the needle too small for the thread? Make sure the needle is correct for the thread and
Is the fabric moving up and down with the needle
when free-motion sewing or embroidering?
Needle thread breaks
Did you insert the needle properly? Insert needle correctly as described in chapter 2.
Did you insert a wrong needle?
Is the needle bent or blunt? Insert a new needle.
Did you thread the machine properly? Check how the machine is threaded.
Is the needle too small for the thread? Change the needle to the proper size for the thread.
Are you using poor thread with slubs or thread
which has become dry?
Is a correct spool cap used? Attach a spool cap of the right size for the actual
Use needle system 130/750 H.
fabric.
Reduce the presser foot pivot height in the settings
menu.
Use needle system 130/750 H.
Change to a new higher quality thread purchased
from an authorized PFAFF® dealer.
thread spool.
Maintenance
7:3
Page 60

Is the best spool pin position used? Try a different spool pin position (vertical or horizontal).
Is the stitch plate hole damaged? Change the stitch plate.
Bobbin thread breaks
Did you insert the bobbin properly? Check the bobbin thread.
Is the stitch plate hole damaged?
Is the bobbin area clean? Clean lint from bobbin area and use only the original
Is the bobbin wound correctly? Wind a new bobbin.
The seam has uneven stitches
Is the thread tension correct? Check needle thread tension and the threading.
Are you using too thick or slubbed thread?
Is the bobbin thread evenly wound? Check bobbin winding.
Is a correct needle used? Insert a proper needle correctly as described in chapter 2.
The machine does not feed or feeds irregularly
Did you thread the machine properly? Check how the machine is threaded.
Has sewing lint collected between the feed
dogs?
Change the stitch plate.
PFAFF® bobbins approved for this model.
Change the thread.
Remove the stitch plate and clean the feed dogs with a
brush.
The embroidery design is distorted
Is the fabric hooped properly? The fabric must be tightly hooped.
Is the inner embroidery hoop completely
inserted in the outer embroidery hoop?
The embroidery design has puckered
Did you stabilize your fabric sufÀ
Thread loops are forming on the underside of the embroidery design
Has the embroidery built up too much to move
freely under the embroidery foot?
The machine will not embroider
Is the embroidery unit attached? Make sure that the embroidery unit is properly
Is the wrong hoop attached?
Have your sewing machine serviced regularly by your local authorized PFAFF® dealer!
If you have followed this trouble shooting information and still have problems, take your sewing machine
to your dealer. If there is a speciÀ c problem, it is a great help to test sew with your thread on a scrap of
your sewing fabric and bring it to your dealer. A sewing sample will often give much better information
Maintenance
than words.
ciently? Ensure you use the proper stabilizer for your
Hoop the fabric in such a way that the inner hoop
always exactly matches the outer hoop.
technique or fabric type.
Increase the pivot height in the Settings menu in small
steps until problem is solved.
attached into the socket.
Slide on the correct hoop.
Non-original parts and accessories
The warranty does not cover any defect or damage caused by use of non-original accessories or parts.
7:4
Page 61

Index
A
Accessories ................................................................1:6
Accessory tray ..........................................................1:6
Alphabets ................................................................1:11
Alternatives button ................................................ 2:13
Attach the Sensormatic buttonhole foot ...............3:6
Audible alarm .........................................................2:15
Automatic presser foot lift .................................... 2:15
Automatic thread tension ..............................2:14, 3:2
Auxiliary spool pin ..................................................2:3
B
Balance .....................................................................2:15
Basting .......................................................................6:5
Blindhem stitch .........................................................3:9
Bobbin, insert ............................................................ 2:6
Bobbin position ......................................................... 6:4
Bobbin winding ........................................................ 2:5
Winding from horizontal position ............................ 2:5
Winding through the needle ...................................... 2:5
Button, sew on ..........................................................3:8
Buttonholes ...............................................................3:6
Buttonhole with gimp thread .................................... 3:7
Manual buttonhole ......................................................3:7
Sensormatic buttonhole .............................................. 3:6
Buttons .....................................................................2:12
Design height ............................................................6:7
Design width.............................................................6:7
Mirroring ...................................................................6:7
Monochrome .............................................................6:7
Move ..........................................................................6:7
Rotate .........................................................................6:7
Thread tension ..........................................................6:5
Direct selection .......................................................2:13
Disengage IDT .......................................................... 2:6
Display .....................................................................2:13
E
Elastic blindhem stitch ..........................................3:10
Embroidery collection .............................................5:1
Embroidery edit .......................................................6:2
Embroidery À eld ......................................................6:1
Embroidery preparations ........................................5:1
Embroidery stitch-out .............................................6:7
Embroidery text editor ......................................6:2-6:3
Embroidery unit
Connect .........................................................................5:2
Level adjusting feet .....................................................5:1
Overview ......................................................................5:1
Remove .........................................................................5:2
Engage IDT................................................................2:6
C
Calibrate .............................................................5:2, 6:8
Changing the light bulbs .........................................7:1
Changing the needle ................................................2:7
Changing the presser foot ....................................... 2:8
Cleaning .....................................................................7:1
Clear button ............................................................2:13
Color list ....................................................................6:1
Connect the embroidery unit .................................5:2
Connect the foot control .......................................... 2:1
Connect to the power supply .................................2:1
Contrast setting ......................................................2:15
Cover ..........................................................................2:2
Create a sequence ..................................................... 4:1
Current color .............................................................6:3
Cut position ............................................................... 6:4
D
Darning ......................................................................3:8
Decorative stitches .................................................1:11
Delete
Sequencing ............................................................4:2, 4:3
Sewing mode ................................................................ 3:5
Design, load ..............................................................6:2
Design information .................................................. 6:1
Color list ........................................................................ 6:1
Design name ................................................................. 6:1
Design position ............................................................ 6:1
F
F1 ..............................................................................2:13
F2 ..............................................................................2:13
Feed dogs, lower ......................................................2:8
Font, load ...................................................................6:2
Foot control ...............................................................2:1
Free-motion
Sensormatic free-motion...........................................2:15
Spring foot free-motion ............................................2:14
Free arm ..................................................................... 2:2
G
Getting started embroidering ................................. 6:6
Gimp thread buttonhole .........................................3:7
Go to stitch ................................................................6:3
Graphic display ......................................................2:13
H
Hard cover ................................................................2:2
Heavy fabric .............................................................. 3:8
Hoop, overview ........................................................5:1
Hoop, select ...............................................................6:4
Hoop options ............................................................6:4
Hoop the fabric .........................................................5:3
I
IDT ..............................................................................2:6
Disengage .....................................................................2:6
Engage ...........................................................................2:6
Index
7:5
Page 62

Immediate tie-off ....................................................2:12
Info button ...............................................................2:13
Inserting the bobbin ................................................. 2:6
Q
Quilt stitches ...........................................................1:10
Quilting ......................................................................3:9
L
Language .................................................................2:15
Level adjusting feet ..................................................5:1
Light bulbs, change .................................................. 7:1
Load
Design ...........................................................................6:2
Font ................................................................................6:2
Sequencing ...................................................................4:3
Sewing mode ................................................................ 3:5
Lowering feed dogs .................................................2:8
M
Machine overview ....................................................1:5
Accessory tray ..............................................................1:6
Front side ...................................................................... 1:5
Included accessories .................................................... 1:7
Presser feet .................................................................... 1:8
Rear side .......................................................................1:6
Top parts .......................................................................1:5
Maintenance ..............................................................7:1
Manage your sequences .......................................... 4.3
Manual buttonhole...................................................3:7
Mirroring ............................................2:13, 3:3, 4:2, 6:7
Monochrome .............................................................6:7
Move ..........................................................................6:7
N
Needle, changing .....................................................2:7
Needle art stitches .................................................. 1:10
Needles ......................................................................2:7
Needle threader ........................................................ 2:4
Needle up/down ...................................................2:12
O
Orbiting .....................................................................6:3
P
Pack away after sewing ........................................... 2:2
Park position .............................................................6:4
Personal stitches ....................................................... 3:5
Pivot height embroidery .......................................2:15
Pop-ups
Embroidering ...............................................................6:8
Sewing .........................................................................3:11
Power supply ............................................................ 2:1
Presser feet ................................................................1:8
Presser foot, change .................................................2:8
Presser foot, lower .................................................. 2:13
Presser foot pressure..............................................2:15
Presser foot, raise ..........................................2:12, 2:15
Program a sequence .................................................4:1
Programmed tie-off indicator ........................2:12, 3:3
Index
7:6
R
Raise the presser foot .................................... 2:12, 2:15
Remove the embroidery unit .................................. 5:2
Replacing the stitch plate ........................................7:2
Reverse button ........................................................2:12
Reverse indicator ....................................................2:12
Rolled hem ..............................................................3:10
Rotate .........................................................................6:7
S
Safety instructions ....................................................... 2
Save
Sequencing ...................................................................4:3
Sewing mode ................................................................ 3:5
Select a stitch .................................................... 2:13, 3:1
Select hoop ................................................................6:4
Sensormatic buttonhole ...........................................3:6
Sensormatic buttonhole foot ............................1:8, 3:6
Sensormatic free-motion .......................................2:15
Sequence commands ...............................................4:1
Sequencing ................................................................4:1
Settings menu .................................................2:14-2:15
Sewing in zippers ...................................................3:10
Sewing mode ............................................................3:1
Sewing recommendations .......................................3:1
Sewing techniques ...................................................3:6
Handlook quilting ....................................................... 3:9
Darning .........................................................................3:8
Buttonholes ...................................................................3:6
Sew on a button ........................................................3:8
Slide on the hoop ......................................................5:3
Software, 5D™ ........................................................ 2:10
Software version ............................................2:11, 2:15
Speed control ............................................2:12, 3:4, 6:5
Spool cap .............................................................2:2-2:3
Spool pins ............................................................2:2-2:3
Auxiliary spool pin .....................................................2:3
Horizontal position .....................................................2:2
Vertical position ........................................................... 2:3
Spring foot free-motion .........................................2:14
Start/stop ................................................................2:12
Stitch density ...................................................2:13, 3:2
Stitch À eld
Sequencing ...................................................................4:1
Sewing ...........................................................................3:1
Stitch length .....................................................2:13, 3:2
Stitch number
Sequencing ...................................................................4:1
Sewing mode ................................................................ 3:1
Stitch overview .................................................1:9-1:11
Alphabets ....................................................................1:11
Decorative stitches ....................................................1:11
Needle art stitches .....................................................1:10
Page 63

Quilt stitches ..............................................................1:10
Utility stitches ......................................................1:9-1:10
Stitch plate ................................................................. 7:2
Remove .........................................................................7:2
Replace ..........................................................................7:2
Stitch positioning ............................................2:13, 3:2
Stitch restart ............................................................2:12
Stitch adjustments .................................................... 3:2
Stitch width ......................................................2:13, 3:2
Stitch width safety..................................................2:14
Stitches left in color block .......................................6:3
T
Tapering program ....................................................3:4
Thread cutter.............................................................2:2
Threading ............................................................2:3-2:4
Needle threader ...........................................................2:4
Threading for twin needle..........................................2:4
Threading the machine ...............................................2:3
Thread snips............................................................2:12
Thread tension ..........................................2:14, 3:2, 6:5
Three-step zigzag stitch...........................................3:6
Tie-off
Immediate ...................................................................2:12
Options ..........................................................................3:3
Troubleshooting .......................................................7:3
Twin needle
Set for twin needle .............................................. 2:14, 3:1
Threading for twin needle..........................................2:4
U
Unpacking .................................................................2:1
Update machine .....................................................2:11
USB Embroidery stick ......................................2:9, 6:2
USB port ....................................................................2:9
Using the alphabet ...................................................4:2
Utility stitches ...................................................1:9-1:10
V W
Wheel .......................................................................2:13
Winding bobbin ........................................................2:5
Winding from horizontal position ............................ 2:5
Winding through the needle ...................................... 2:5
Z
Zippers .....................................................................3:10
7:7
Index
Page 64

Page 65

Page 66

5D™ Embroidery Machine Communication CD
(For personal computer. See page 2:10)
Page 67

We reserve the right to change the machine equipment and
the ass ort ment of accessories without prior notice, or make
modiÀ cations to the performance or design.
Such modiÀ cations, however, will always be to the beneÀ t of
the user and the product.
Intellectual Property
Patents protecting this product are listed on a label positioned
underneath the Sewing Machine.
PFAFF, CREATIVE, IDT (image) and 5D are trademarks of
KSIN Luxembourg II, S.ar.l.
Please note that on disposal, this product must be safely
recycled in accordance with relevant National legislation
relating to electrical/electronic products. If in doubt please
contact your retailer for guidance.
Page 68

www.pfaff.com
413 29 98-26B • English • InHouse • © 2011 KSIN Luxembourg II, S.ar.l. • All rights reserved • Printed in Sweden on environmentally-friendly paper
 Loading...