

©
Cl)
=0
a-’
C
a
0
03
0
I
0
Fod
out
this
page
Some
a)
b)
c)
d)
safety
Take
fingers
tv’lake
cord
machine
change
parts.
Be
sure
bulb
The
drive
by
anyone
agent.
rules
caretoavoid
by
the
you
or
wanttoclean
mechanical
to
use
the
sewing
belt
must
but
needle
an
sure
whenever
in
injury
unplug
you
have
and
only
lamp.
never
authorized
to
during
the
to
it,
accessory
a 15-watt
be
your
sewing.
power
leave
oil
light
adjusted
Pfaff
the
it
or
Contents
Balancing
Bobbin
winding
Changing
Changing
Changing
Changing
Checking
Checking
Cleaning
Creative
Detachable
Drawing
Dropping
feed
Dual
control
Foot
Important
Inserting
Inserting
Machine
Memorizing
Needle
Operating
Pattern
Pattern
Placing
Presser
Program
Remarks
Repeating
Sewing
pattern
Single
Special
length
Stitch
width
Stitch
Straight-stitch
Thread
Trouble
Twin-needle
threading
Upper
Winding
Winding
Zigzag
the
for
and
out
fuse
the
light
the
needle
the
sewing
the
bobbin
the
needle
the
oiling
and
computer
work
the
up
feed
the
notes
bobbin
the
bobbin
the
connection
and
position
keys
mirroring
setting
start
of
spool
lifter
bar
selection
safety
on
program
feet
accessories
and
setting
cutter
shooting
sewing
from
through
sewing
operating
pattern
preparations
bulb
foot
thread
thread
keyboard
support
bobbin
dog
case
cancelling
straight
for
electronic
of
thread
combinations
setting
pattern
sewing
second
a
needle
the
instructions
length
and
thread
of
pin
on
length
spool
setting
tension
tension
accessories
program
stitch
system
setting
combinations
Page
21,
28,
22,
20,
34,
22
5
4,
32
31
27
30
8
14
31
19
29
12
27
16
14
32
8
9
3
2,
23
26
18
25
24
9
13
20
15
24
29
25
33
21
20
26
15
35
24
10
6
7
26
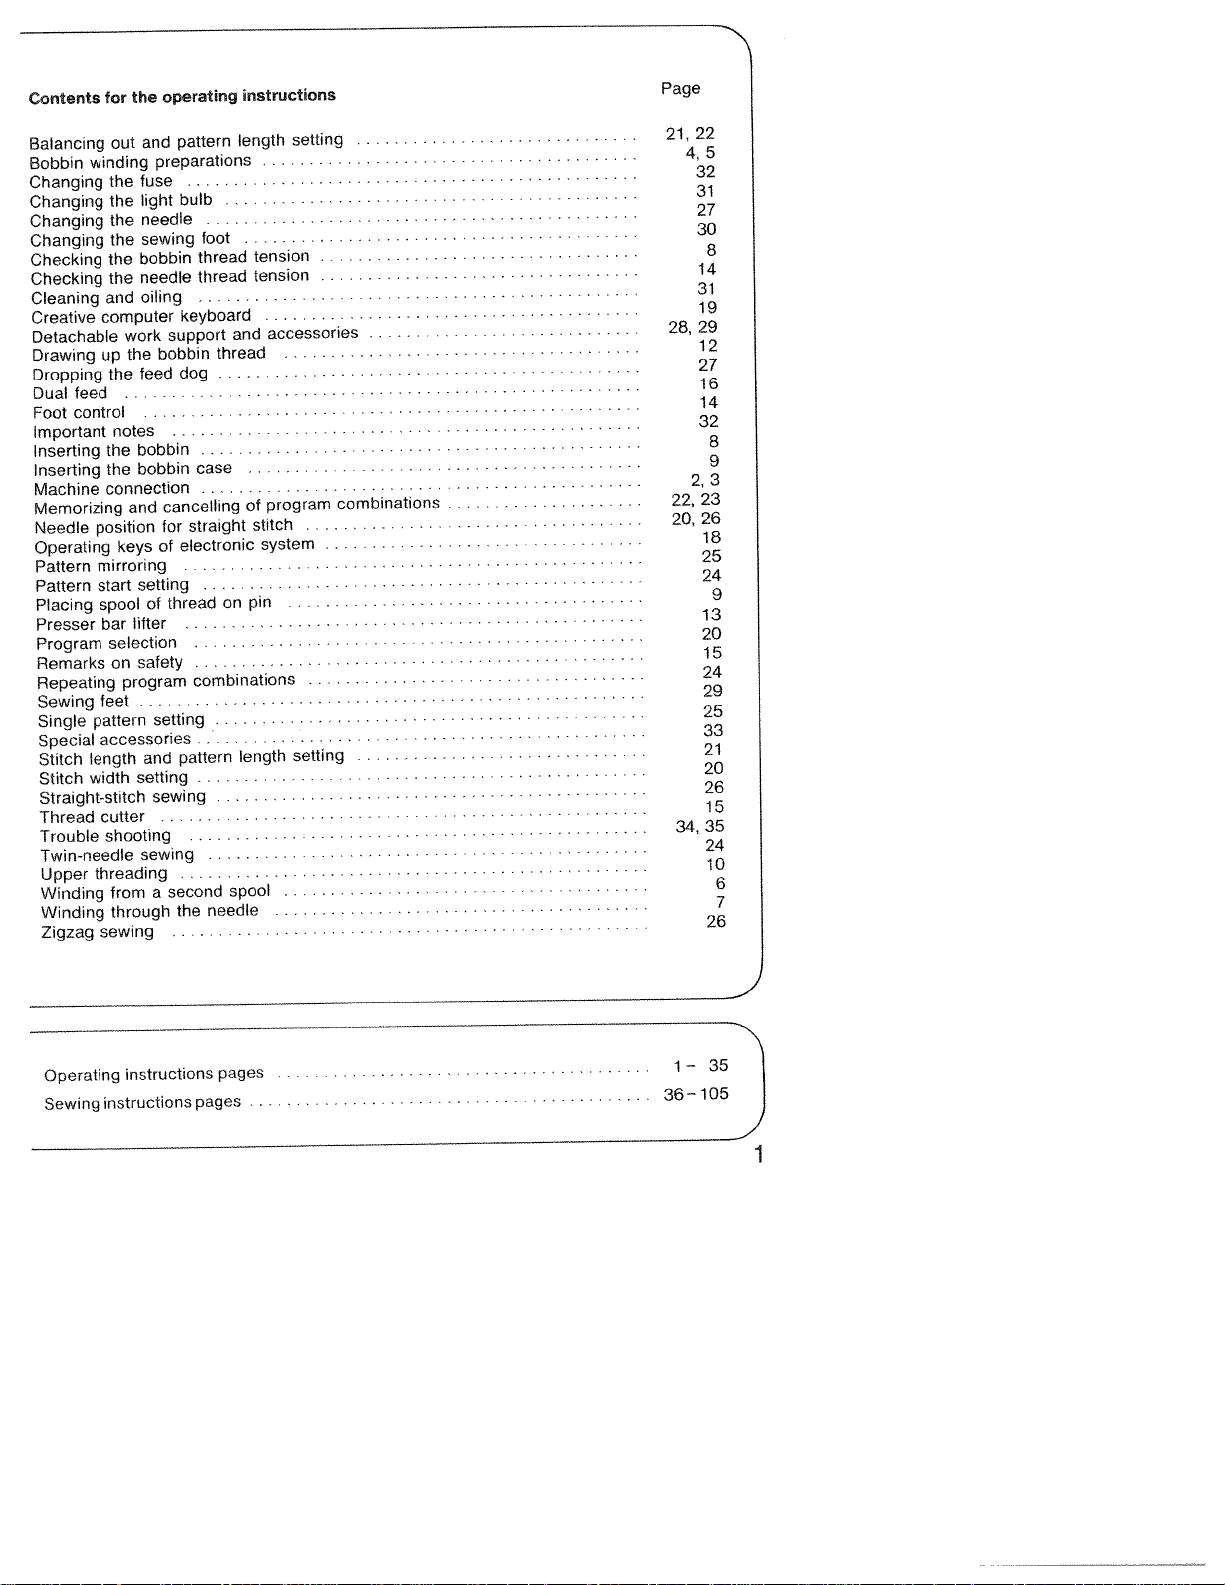
Operating
instructions
Sewinginstructionspages
pages
1
—
36—105
35
/

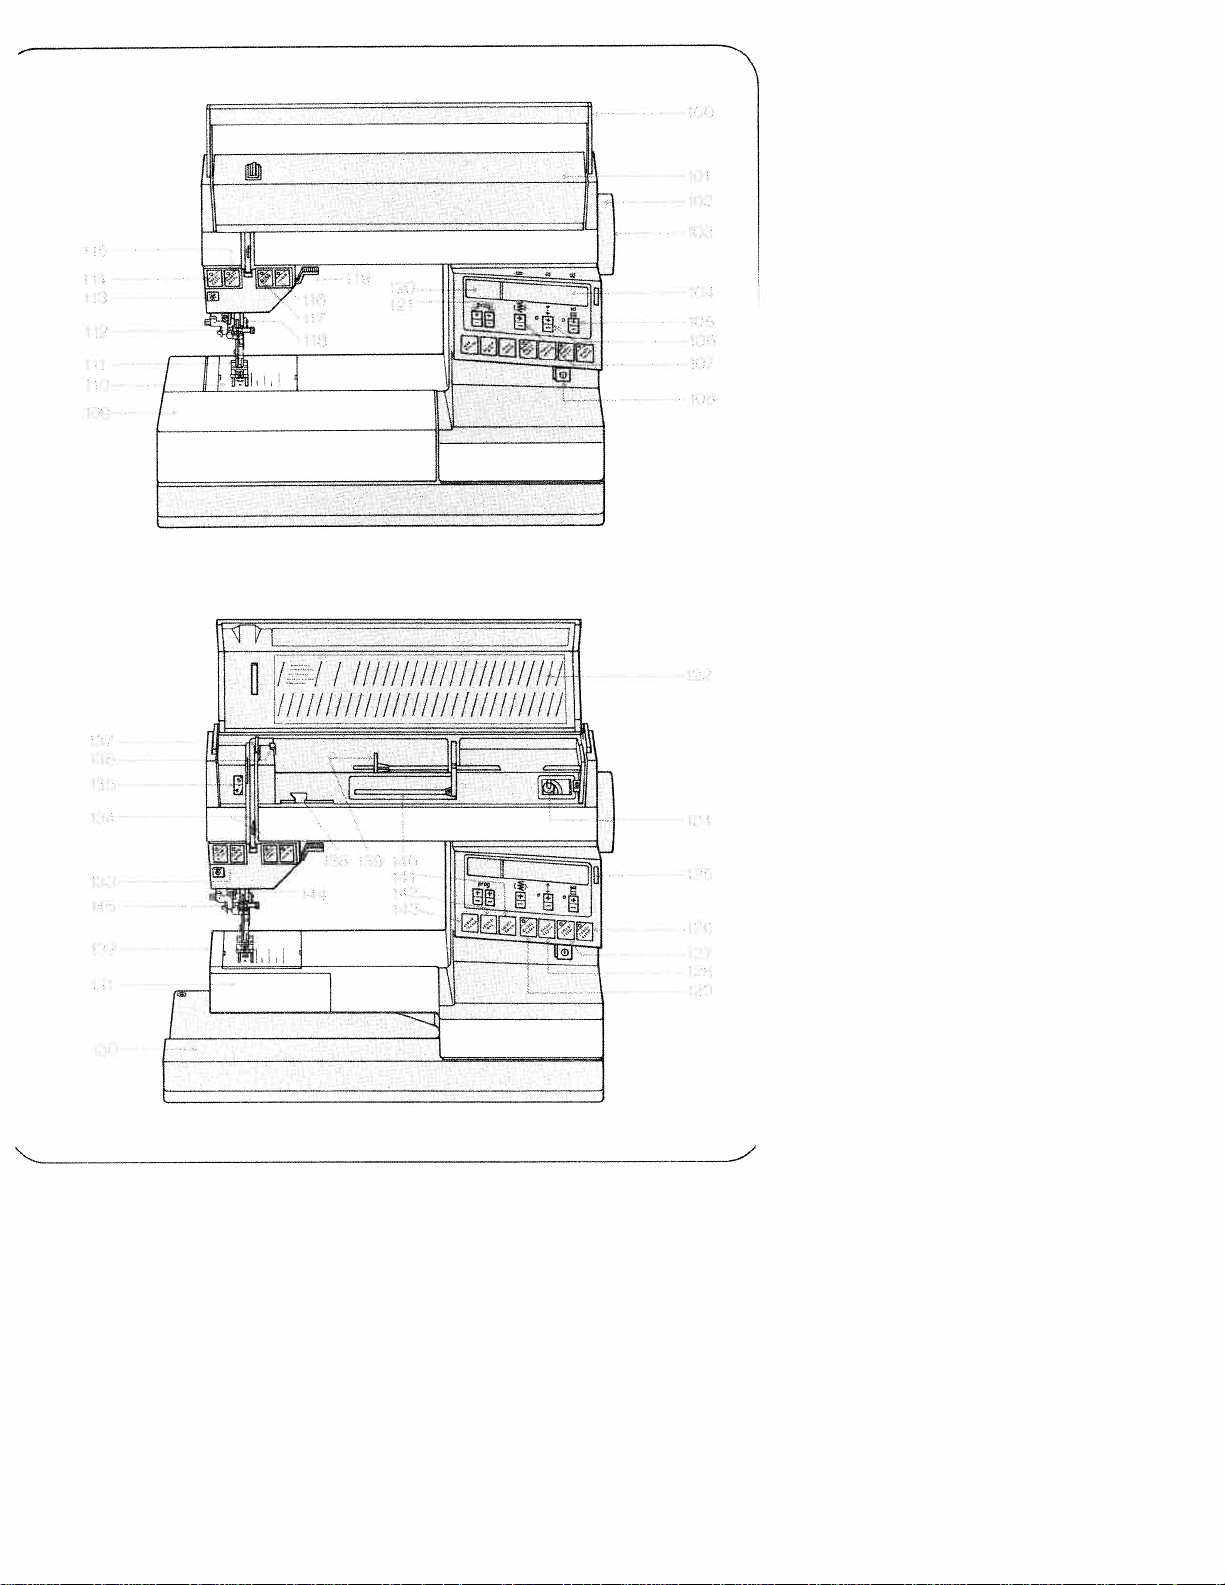
of
Parts
100
101
102
103
104
105
106
107
108
109
110
111
112
113
114
115
116
117
118
119
120
121
122
124
125
126
127
128
129
130
131
132
133
134
135
136
137
138
139
140
141
142
143
144
145
your
Carrying
Hinged
Hand
wheel
motion
Stop
Display
Balancing-out
Stitch length
width key
Stitch
Master
Detachable
accessory
Needle plate
Sewing
Needle
Bobbin
“needle
“sew
slow”
“reverse”
“tie-offIbuttonhole”
Presser
Presser
Program
Programming
Program
Bobbin
Key
for
vertification
“pattern
“single
“pattern
“twin
needle”
plate
Base
arm cover,
Free
hook
Free
arm
Sewing
Threading
Needle
Bobbin winder
Take-up
Bobbin winder
(swing-out)
holder
Spool
Second
“repeat”
“corrector”
“program”
feed
Dual
Threader
sewing
handle
cover
top
knob
switch
work
box
holder
foot
holder
thread
down”
key
key
bar
with
lifter
bar
display
chart
winder
program
mirroring”
pattern”
start”
light
slots
thread
lever
spool
key
key
key
with
&
pattern
&
and
with
monitor
key
keys
(see
key
key
tension
thread
thread
with
holder
thread
machine
pattern
support
compartment
with
set
key
thread
(2)
sewing
cycle
key
key
enclosing
guide
guide
unreeling
(swing-up)
cutter
length
length
with
sewing
screw
light
cutter
key
key
foot
book)
sewing
disc
Dear
are
We
Pfaff
overlooked.
Book:
Page
sorry
Creative
1
8.TE/OFF
consumer:
for
the
inconvenience,
1371
Limited Edition
Please
If
you
117
the
When
light
When
ing,
Then
When
to
(See
make
the
BUTTONHOLE
wishtotie
untilitis
light
will
you
willgoon
you
it willbetied
the
light
sewingabuttonhole
determine
page
oft
lit.
Sew.
also
go
touch
and
sewapattern
off
will
and
100).
following
key
the
go
butinthe
Instruction
a
seamatthe
The
machine
off.
117
during
seam
and
at
the
endofthe
off.
(program
memorize
rushtopublish
then
off
117
pattern.
13),
key
errors
touch
tie off
immediately.
during
117isused
Book,
changesinyour Instruction
beginning,
will
sewingaseam,
will
be
tied
touch
key
the buttonhole
the
were
key
and
the
sew
length.
Page
Page
Page1O2.SEWING
2OSTITCH
Use
3.
needle
32JMPORTANT
The
Pfaff
batteries
Therefore,
If
you
bulk
ofaweltorpiping,
a)
if
the
program
b)ifthe
program01without
Please notethat
willbesewn
piping.
of
WDTK
program01to
positions.
Creative
becauseitdoes
ZPPERS
wishtosew
zipper
zipper
SETTING
This
please
foot
01
with
footisto
programm00can
1/8”
away
sew a
makes
1371
Limited
disregard
closer
use
istothe
pattern
the
lighting
from
straight
topstitching
Edition
not
have
the
second
to
the
coilofthe
program
left
of
mirroring
rightofthe
the
the
coilofthe zipper
stitch
with13possible
very
does
a
constant
paragraph.
01:
the
zipperorwelt,
key
lit
zipperorwelt,
pattern
be
mirroring
used,
easy.
not
require
memory.
zipperorthe
use
use
key.
but
the
stitch
or
bulk

Dear
are
We
Pfaff
overlooked.
Book:
sorry
Creative
Consumer:
for
the inconvenience,
1371
Limited
Please make
Edition
the
Instruction
following
butinthe
changesinyour
rushtopublish
Book,
errors
Instruction
the
were
Page1&JIEIOFF
If
you
untilitis
117
the
light
When
light
will
When
ing,
it
Then
When
to
determine
(See
Page
Page
Page
2O,S1iTCH
Use
3.
needle
32JMPORTANT
The
Pfaff
batteries
Therefore,
1Q2,SEWING
If
you
bulk
of
a)ifthe
program
if
the
b)
program01without
BUTTONHOLE
wishtotie
will
you
goonand
you
will
be
the
light
sewingabuttonhole
page
WIDTH
program
positions.
Creative
because
ZIPPERS
wish
a
weltorpiping,
zipper foot
zipper
offaseamatthe
lit.
Sew.
The
also
touch
sewapattern
tied
100).
please
to
sew
01
off.
go
key
the seam
off
at
will
go
off,
and
memorize
SETTING
01tosewastraight
This
1371
it
does
disregard
closertothe
is
to
with
pattern
footisto
beginning,
machine
117
during
willbetied
and
the endofthe
(program
makes
Limited
not haveaconstant
the
use
program
the
leftofthe
mirroring
the
right
lighting
will
sewingaseam,
touch
the
stitch
topstitching
Edition
second
coilofthe
of
the
the pattern
touch
then
tie
off
immediately.
key
117
during
pattern.
13),
key
117isused
buttonhole
with13possible
very
does
not require
memory.
paragraph.
zipper
01:
zipperorwelt,
key
lit
zipper
or
mirroring
off
length.
easy.
or
welt,
key
and
the
sew
the
use
use
key.
Please note
willbesewn
of
piping.
that
1/8”
programm
from
away
00
the
can
be
coilofthe
used,
but
zipper
the
stitch
or
bulk

I
D
mm
C)
CDC)0
CD
CD
CO
/
/
4
0
CD
0
!
C
CDBCD
CO
D
CD
4
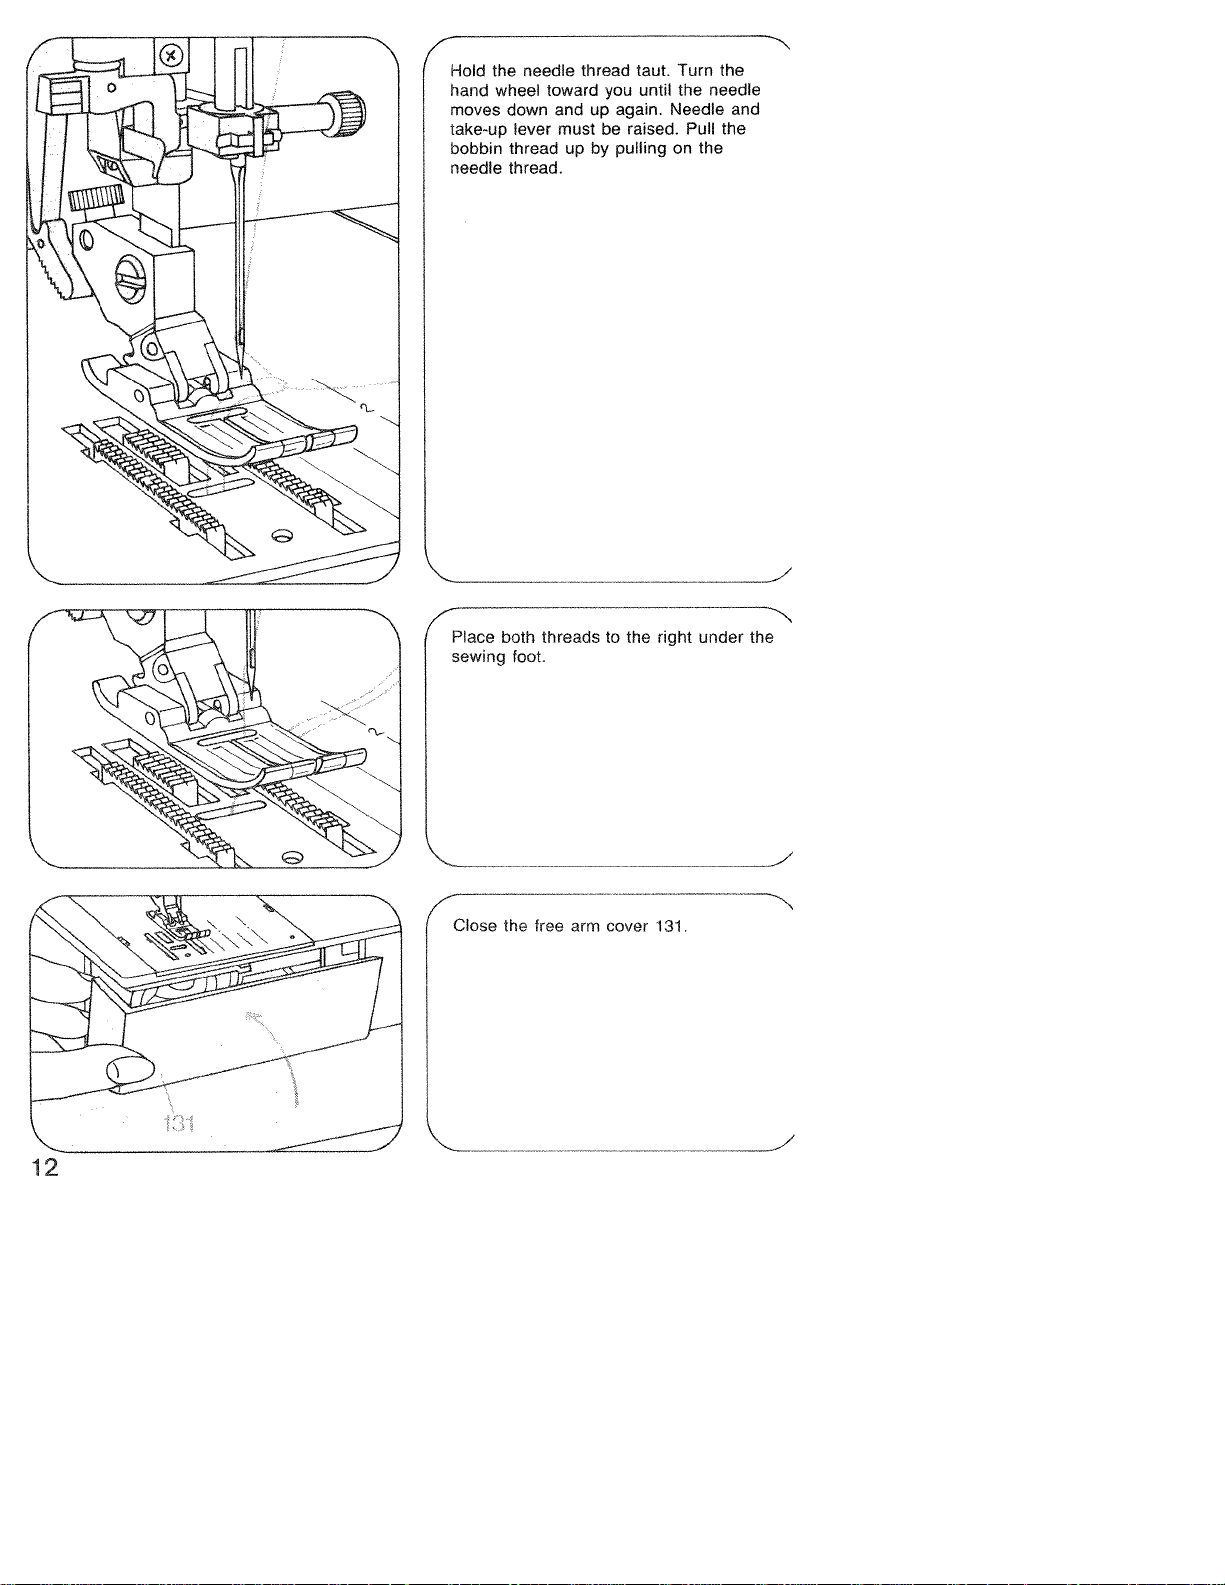
Pull
the
power
cord
out
of
the
foot
N
control.
\\
-
I___________
Plug
the
foot
control
lead
into
machine
control
on
socket
the
and
floor.
place
the
the
foot

N
CD0
0<0
a
C
00
CD
0
ti
cia.
-
<
CC
0
ci
cio
CD
CD
Cl)
C)oC
C
C
(0
4
\
I
0
CD
C
CDCDCl)3C)
-C
XC
Cl)
Cl)CDCl)
C)
0
>
Cl)ciC0C
C.)
CD0CCC)
Cl)
CD
CD
cC)
Cl)
CD
cC)
C)>Cl)
ci
CD
0
CD
0
4
I

4
1
Place
the
in
B.
pin
A
engages
it
until
slot
turn
and
124
winder
on
bobbin
4
—
you.
thread
steady
spool
mechanism:
turn
and
towards
Disengaging
Hold
“nob
cing
the
103
the
hand
towards
second
the
wheel
sewing
thread
onto
and
the
(cush
(N
a
unwinding
disc
C
of
spool
the
holder.
small
5

Winding
Switch
thread
Swing
thread
the
138,
gutde
tension
turns
of
bobbin
the
down
Press
bobbin.
and
left
thread
When
slotonthe
towards
from
on
spring
thread
Push
take
cutter
you
the
a
master
guide
through
placing
towards
the
the
it
8.
place
spindle,
right.
second
switch.
(see
A
on
foot
out,
a
guide
it
the
the
full
cutting
bobbin
spool:
138
between
ill.>
bobbin
right.
control
bobbin
slot
the
forwards.
136,
guide
Wind
and
and
towards
the
with
must
then
a
thread
thread
N
Pull
into
and
few
push
wind
the
in
point
Engaging
the
Hold
towards
forward
wheel
C
wheel
the
the
back,
sewing
firmly,
then
until
mechanism:
turn
turn
snaps
it
disc
the
in.
103
hand

Jinding
witch
rigage
aise
position.
p
4.
raw
ewing
.ee
bobbin
he
right.
be
nd
wind.
he
left
ri
thread
through
master
on
dual
the sewing
Disengage
needle
the
foot,
Wind
ill).
and
Press
Push
and take
cutter
feed.
Place
up
the
and
a
push
down
the
“A”
the
switch.
foot
a
thread
few
full
it
out,
neede:
with
bobbin
sewing
under
through
turns
the
the
bobbin
cutting
needle
the
on
mechanism.
the
guide
thread
of
bobbin
control
foot
spindle
138
towards
towards
thread
the
in
on
its
Engaging
the
Hold
towards
wheel
the
wheel
the
forward
sewing
back,
until
firmly,
then
mechanism:
turn
turn
it
snaps
disc
the
in.
103
hand
D
7

Inserting
that
thread
Draw
(A).
C.
eye
the
unwinds
the
bobbin:
thread
insert
towards
slotBand
into
bobbin
the back
so
into
Checking
Withabrief,
I
your
I
I
downwards.
for
I
weaker
hand the
stronger
tension.
the
sharp
(Turn
tension
bobbin
upward
bobbin
screwDto
thread
movement
must
gradually
andtothe
tension:
right
the
left
of
slip
for
4
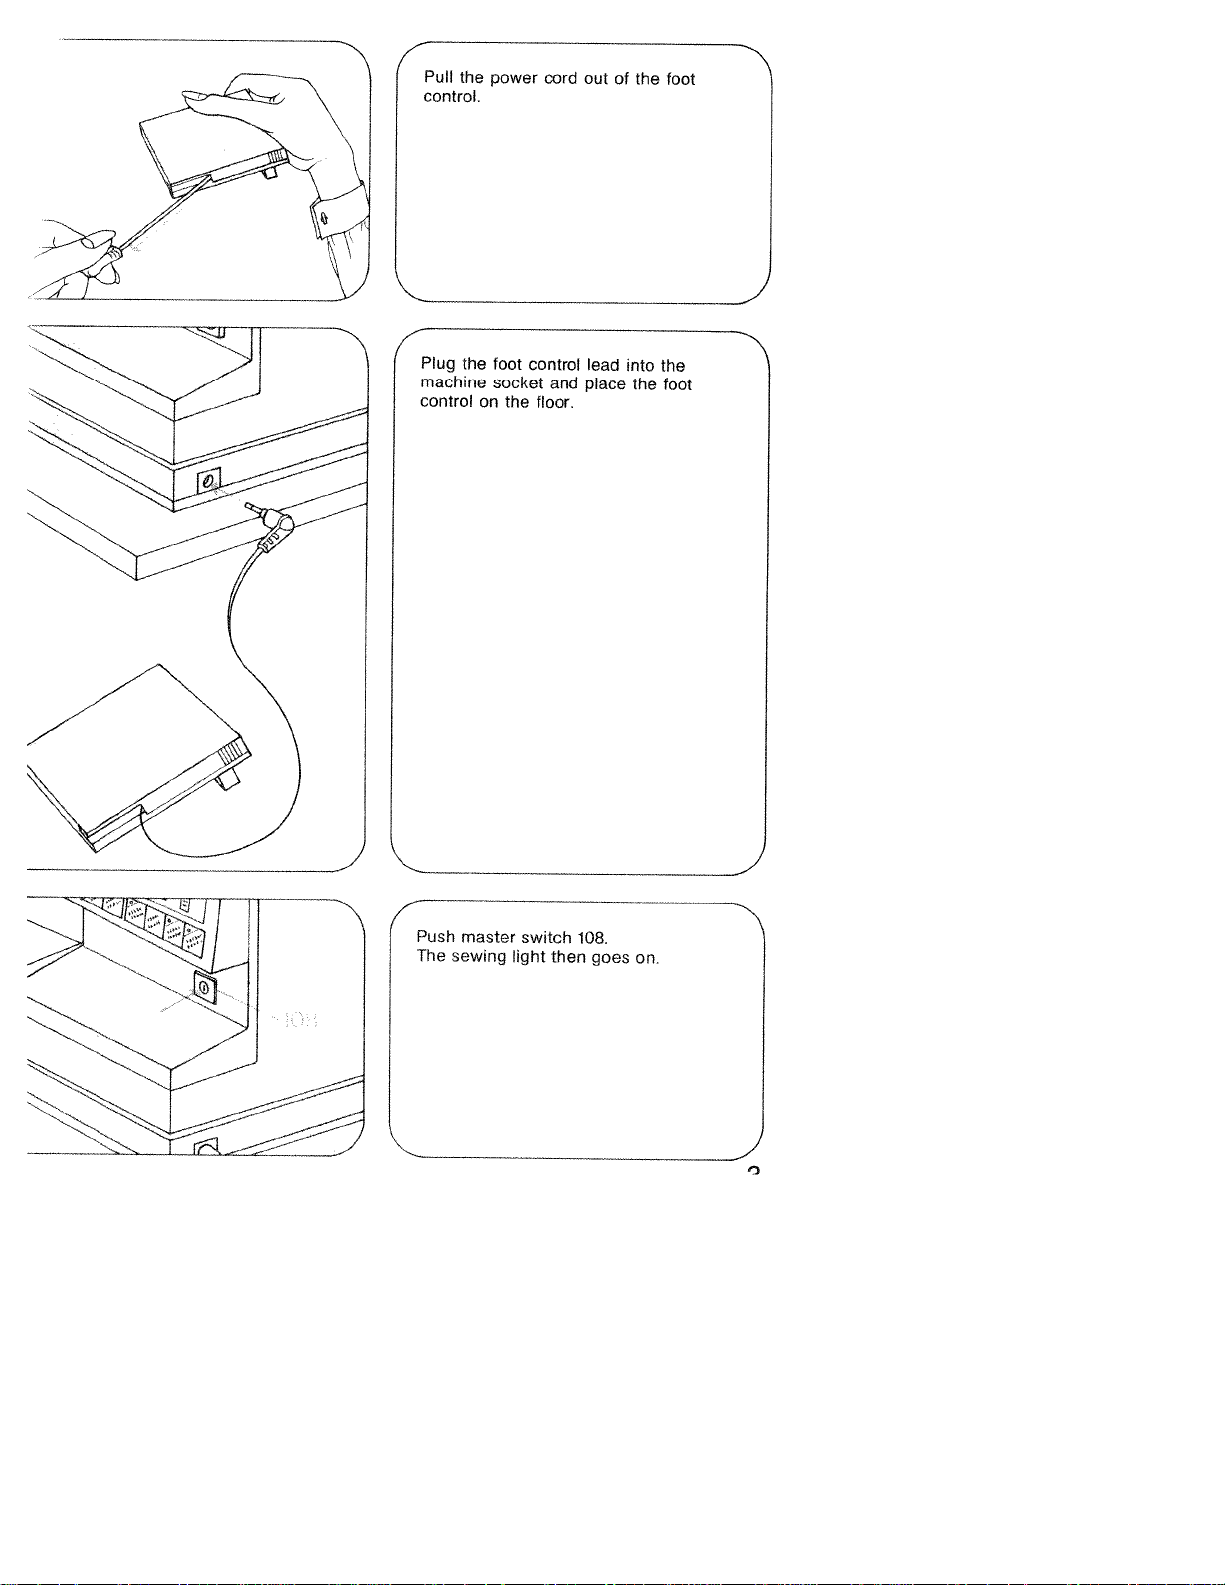
nsertrng
Switch
•
Raise
onto
sure
cutout
latch
stud
the
bobbin
oft
master
and
A
far
B
as
points upwards.
C
push
as
case
switch
the
will
it
108.
bobbin
go,
case
making
Placing
the
disc
large
spool
small
D
in
discEin
of
or
mediumsize
front
of
front
thread
small
of
on
pin:
unwinding
spools, and
large spools.
Place
the
N
-
--
\
9

4
Upper
•
Switch
With
the
slot
lever
slot
the
threading:
the
sewing
from
A.
137
and
B
needle
off
master
needle
foot.
below
(see
into
holder.
in
its
Draw
into
arrows),
the
right
switch
top
the
slot
then
108
position,
thread
thread
B
back
and
into
take-up
into
guide
raise
on
7-
Place
and
downwards.
the
hold
needle
it
there.
thread
Pull
behind
threader
hook
145
D
fully
_
4
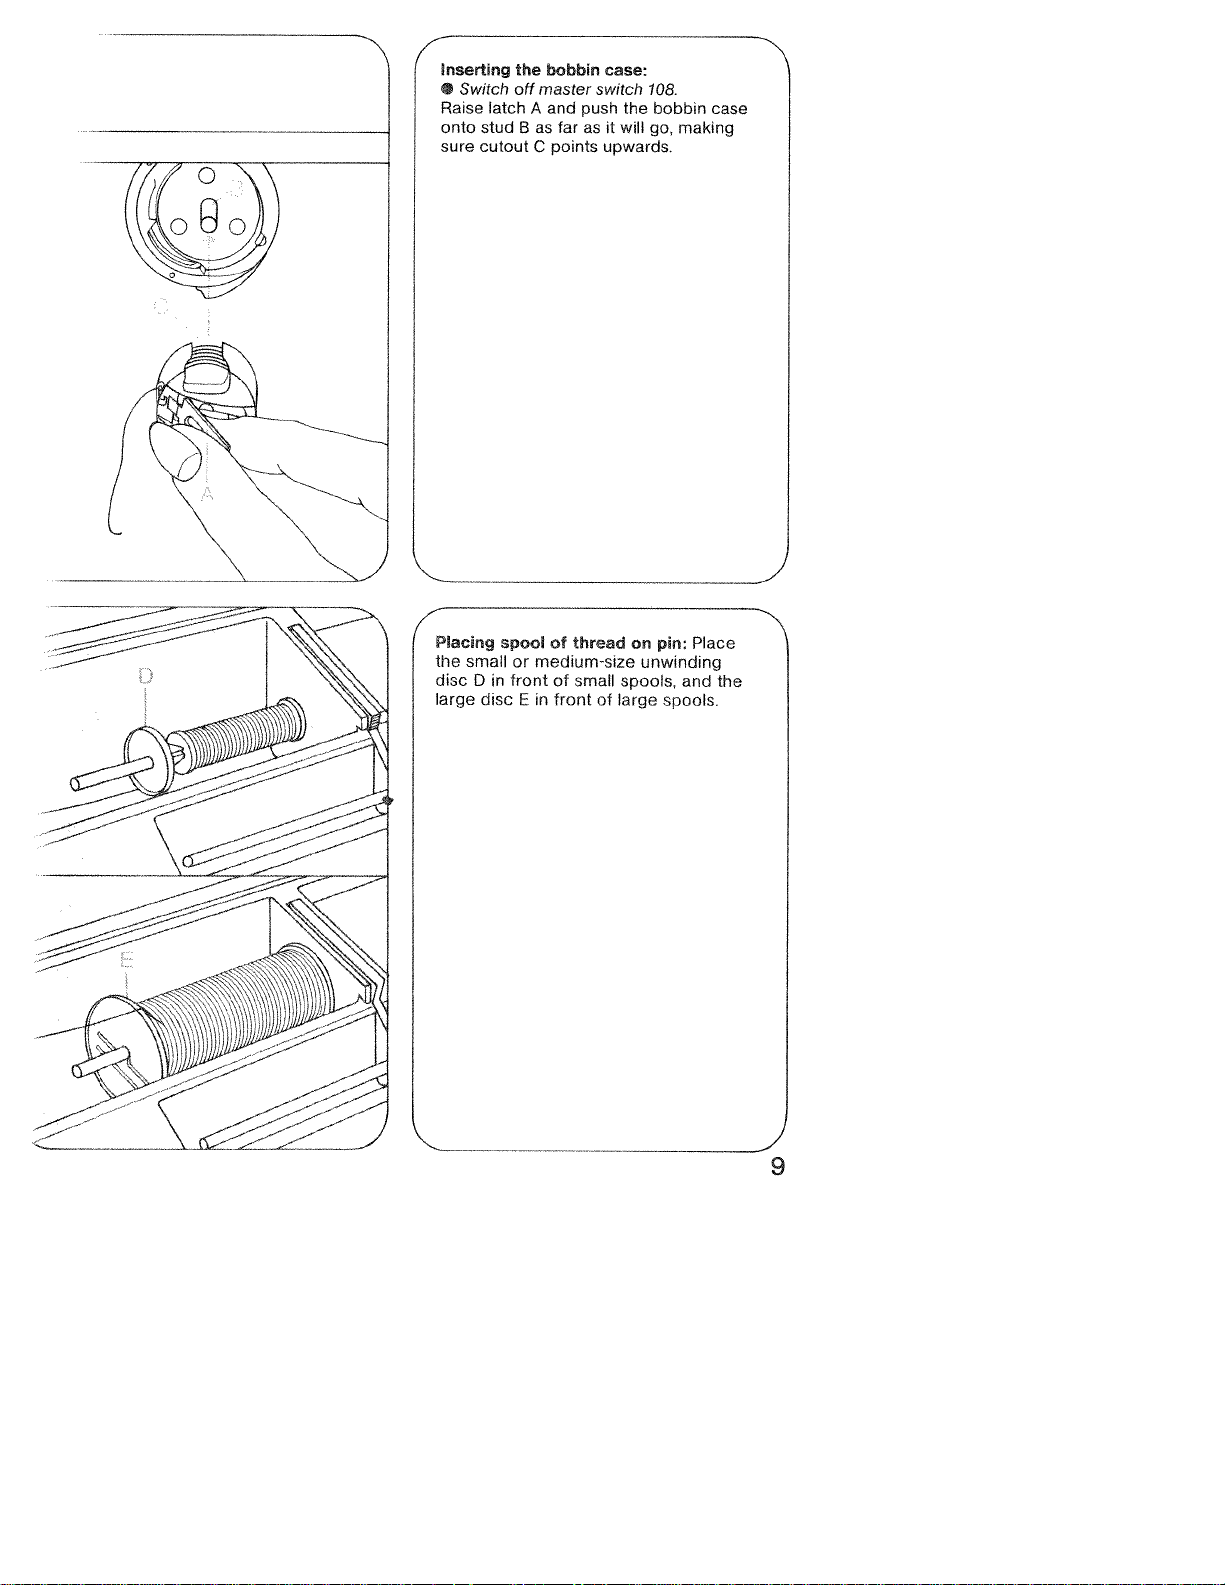
Swing
needle.
Place
threader
thread
forewards
hook
into
against
-_
below.
from
E
I
Swing
thread
move
to
fully
threader
at
upwards,
through
same
backwards,
time
needle
the
and
then
allow
pull
eye.
release
threader
thread
the
11
4
CD
ooa,
1un
I
—
—
00
CD
a
CDCDQCD
CD
Z
a
0
CD
a
CD;
CD
‘<
CD
4
I’
CD
0
CD
CDCDCD
CD3C
0
CD
C)
T.
1
1
Hi
4
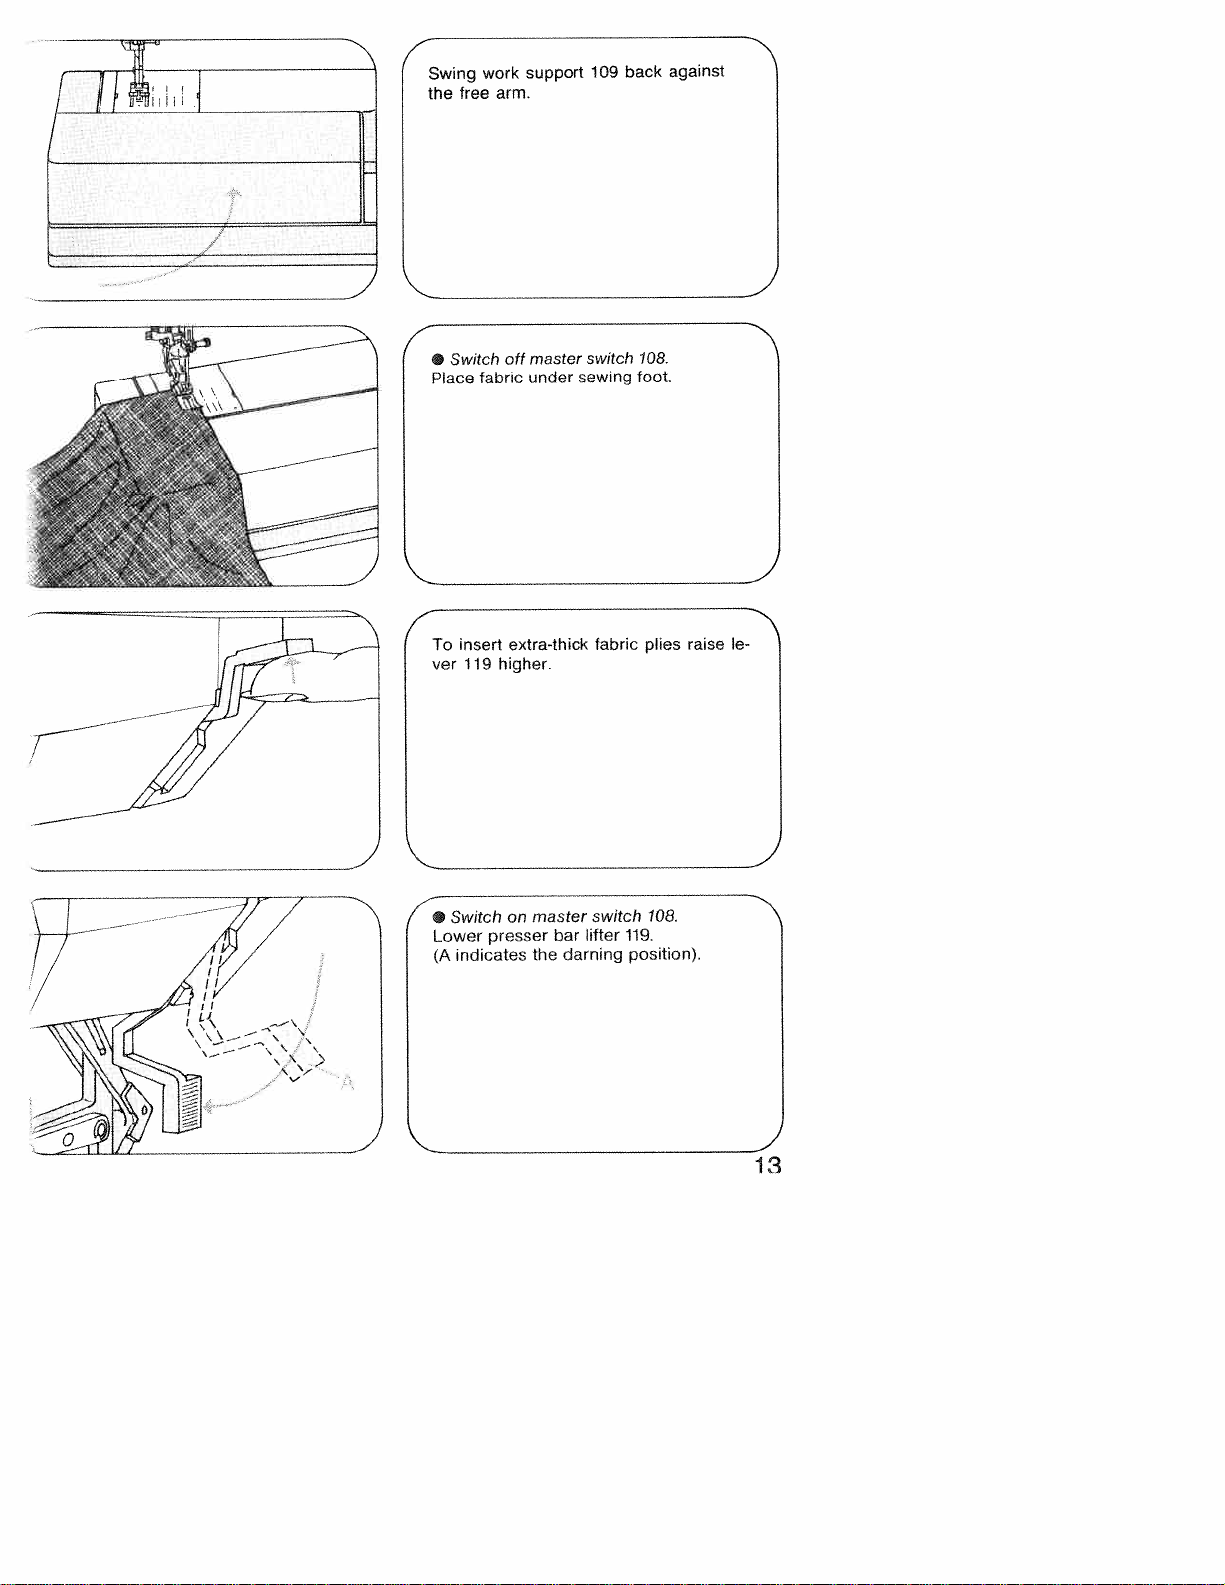
Swing
the
free
work
arm.
support
109
back
N
against
f
off
fabric
higher.
presser
master
under
extra-thick
master
on
bar
the
sewing
darning
Switch
•
Place
To
ver
Switch
•
Lower
indicates
(A
insert
119
switch
fabric
switch
lifter
108.
foot.
plies
108.
119.
position).
raise
N
le
13

4
Operating
you
press
machine
Needle
A
=
Setting
the
the
runs.
thread
foot
pedal
tension
mark.
control:
down,
135
the
The
faster
farther
the
Checking
The
normal
between
ber,
the
tension,
by
entering
Sew
a
interlock
1
the
needle
setting
3
and
tighter
the
set
the
program
short
seam.
in
the
t<E
is
The
5.
tension.
machine
The
middle
thread
in
higher
10
of
the
for
(page
threads
the
tension:
white
the
To
check
zigzag
22).
should
material.
range
num
the
stitch
}
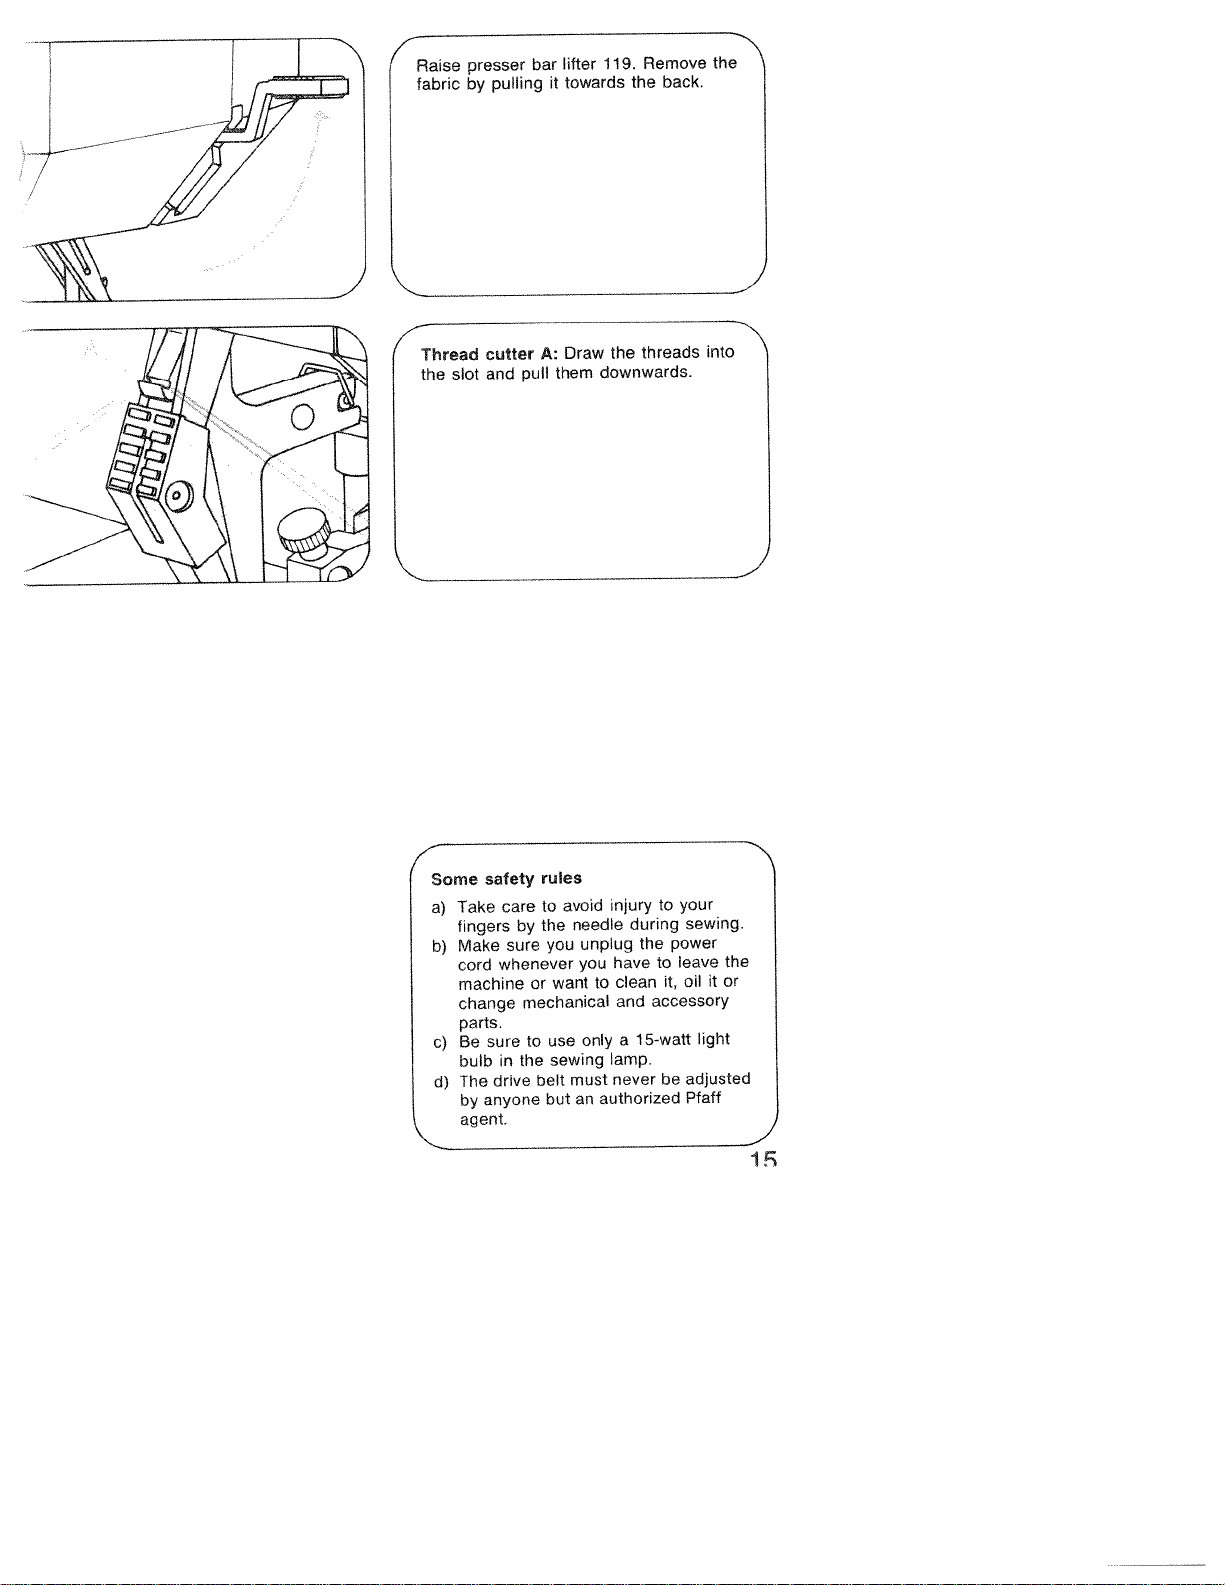
Rase
presser
bar
jj
slot
cutter
and
pull
Thread
fl
I-_
Some
a)
b)
c)
d)
safety
Take
fingers
Make
cord
machine
change
parts.
sure
Be
bulb
drive
The
anyone
by
agent.
care
by
sure
whenever
or
mechanical
to
the
in
A:
rules
to
the
you
want
use
sewing
belt
but
Draw
them
avoid
needle
must
an
the
downwards.
injury
unplug
have
you
clean
to
and
only
a
lamp.
never
authorized
threads
during
the
to
accessory
15-watt
to
it,
be
your
sewing.
power
leave
oil
light
adjusted
Pfaff
into
it
the
or

0’
1F
t
1L
Dual
This
plies
Before
feed
feed
prevents
during
engaging
always
shifting
sewing.
raise
of
or
disengaging
the
sewing
the
material
the
foot.
dual
engage:
/
/
/
/
/
j
/
/
I
To
snapsinplace.
disengage:
To
downwards,
allow
and
it
Lower
push
pull
move
to
dual
dual
t
towards
upwards.
feed
feed
144
the
until
lightly
rear
it

Operating
electronic
These
are
following
keys
system.
described
pages.
of
the
on
the
17
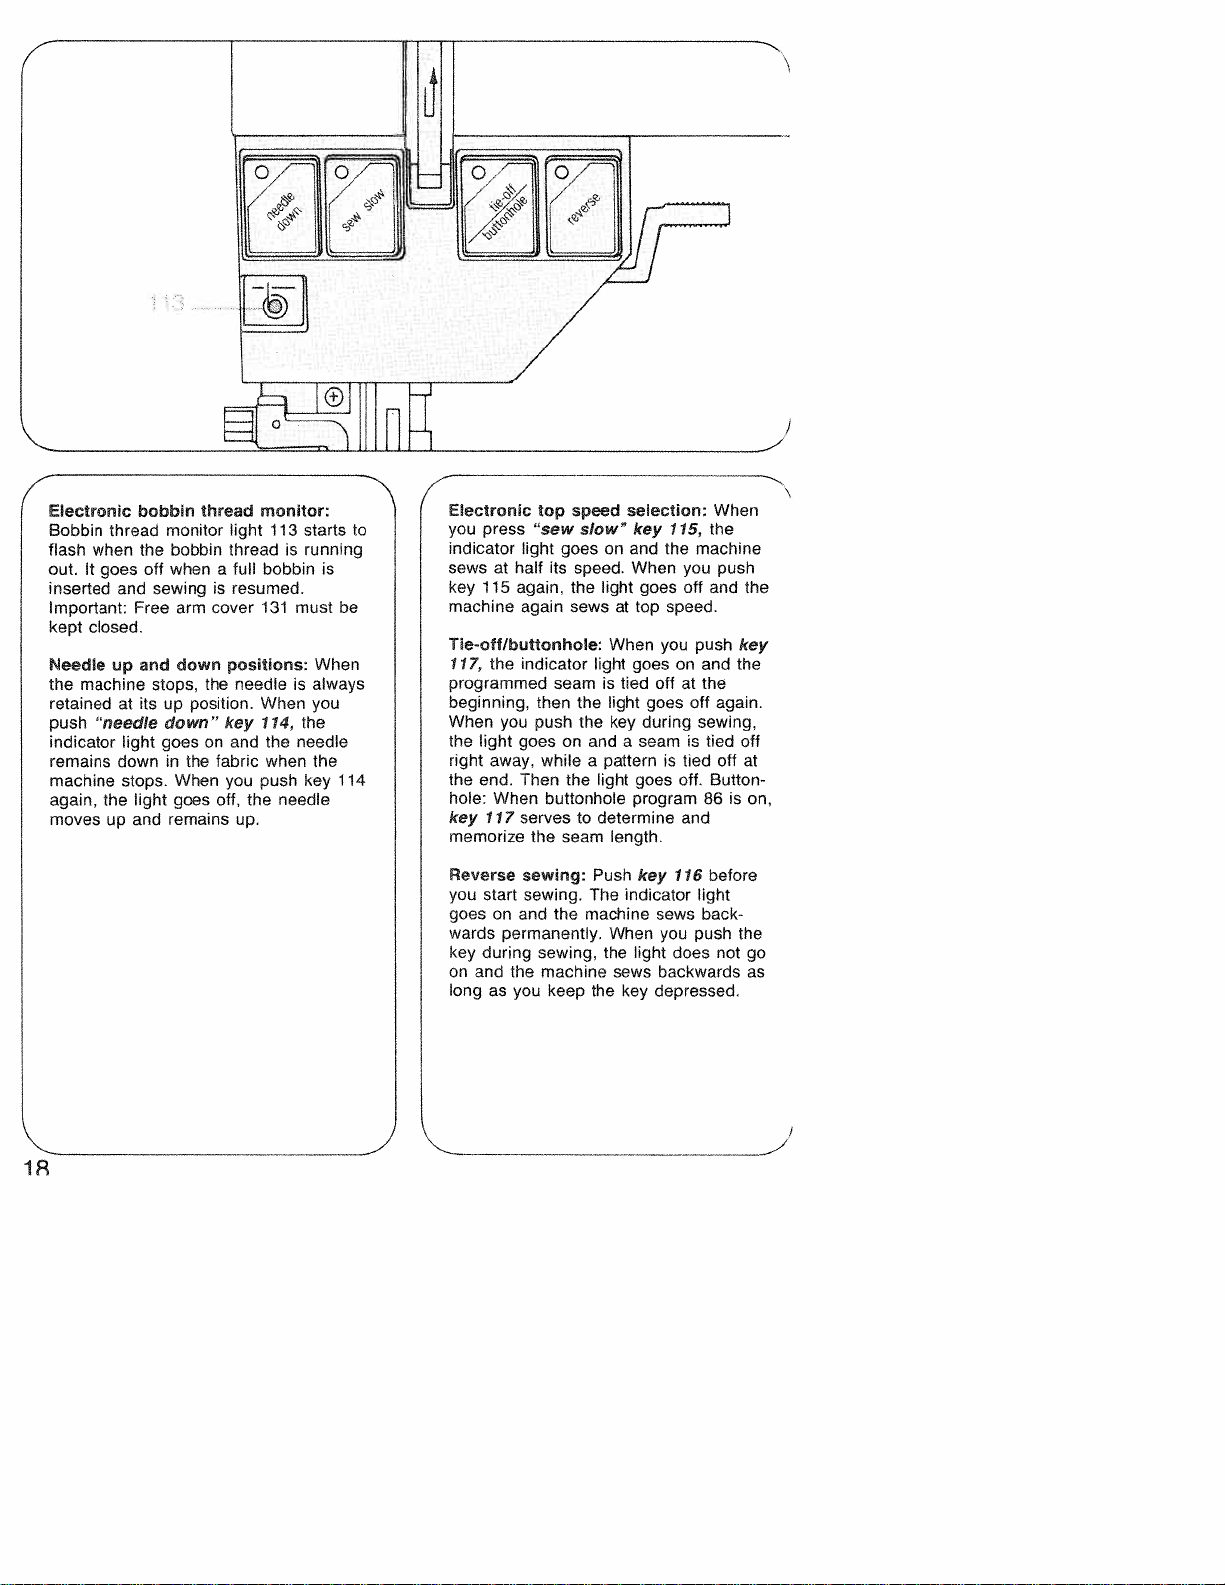
Eectronc
Bobbin
thread
flash
when
out.Itgoes
inserted
Important:
kept
closed.
Neede
the
up
machine
bobbin
the
and
Free
and
thread
off
monitor
when
bobbin
light 113
thread
full
a
sewingisresumed.
cover
arm
positions:
down
the
stops,
retainedatitsupposition.
push
“needle
indicator
remains
macnine stops.
again, the
light
down
light
down”
goes
in
the fabric
When
goes
on
key
and
you
off,
movesupand remains
monitor:
starts
running
is
bobbin
is
131
must
be
When
needleisalways
When
you
114,
the
the
needle
when
the
key
needle
114
push
the
up.
4
E’ectronic
to
you
indicator
sewsathalf
key 115
machine
Tie-oft/buttonhole:
117,
programmed
beginning,
When
the
right
the end.
hole:
key
memorize
top
“sew
light
its
again,
again
indicator
speed
goesonand
speed.
the
sews
press
the
seamistied
then
you
light
away,
When
117
the
push
goesonandaseam
whileapatternistied
Then
the
buttonhole program86is
servestodetermine
the
seam
seecton:
slow” key
When
light
at
top
When
light
goes
light
the
key
light
goes
length.
goes
goes
during
115,
machine
the
you
off
speed.
you
push
on
and
offatthe
off
sewing,
is
tied
off.
and
When
the
push
and
key
the
again.
off
off
Button
the
at
on,
Reverse
you
start
sewing:
sewing.
goesonand
wards
permanently.
key
during
on
and
the
long
as
you
the
sewing,
machine
keep
Push
key
The indicator
machine
When
the
sews
you
light
sews backwards
the
key
depressed.
116
does
before
light
back
push
not
the
go
as
4
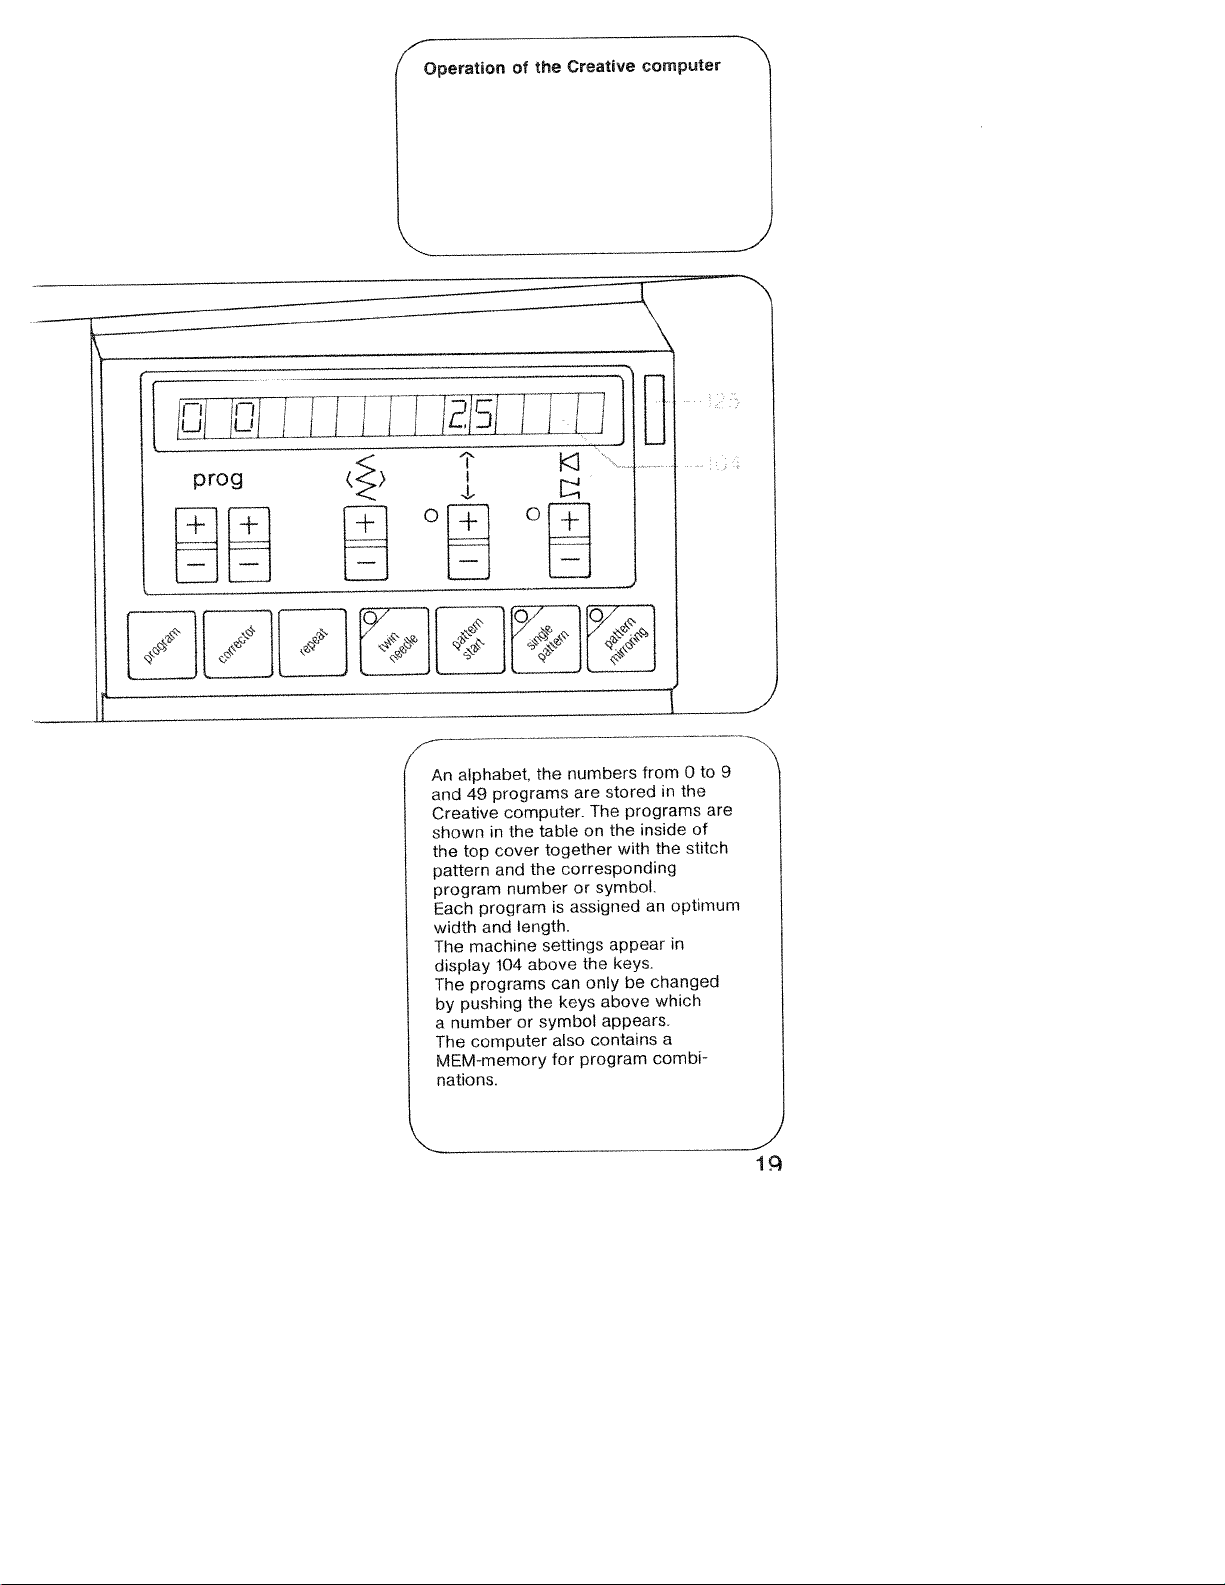
Operation
_i_j
Creative
the
of
computer
prog
DHH
()
to
alphabet,
An
and
programs
49
top
program
and
machine
programs
pushing
number
computer
computer.
in
the
cover
and
number
104
Creative
shown
the
pattern
program
Each
width
The
display
The
by
a
The
MEMmemory
nations.
the
table
together
the
length.
settings
above
the
symbol
or
is
can
also
for
numbers
stored
are
programs
The
the
on
with
corresponding
symbol.
or
assigned
appear
keys.
the
be
only
above
keys
appears
contains
program
from
inside
the
an
changed
which
combi
0
in
the
of
stitch
optimum
in
a
9
are

ju
.‘hn
ik
h:play
121,
The
‘ire
selected
tellers
the
right
Stitch
The
stitch
Key
107
1.
Selection
respective
2.
Selection
numbers.
3.
Slraigh-stitch
programs
ili
00
the
120.
and
width
electiofl:
Creative
appears
required
using
alphabet
numbers
key.
width
has
with
setting:
ranges
functions:
3
of
stitch
program.
the
of
01
and
Ii
switched
Is
in
display
number
programming
and
number
the
left
are
selected
from
width
size
of
needle
position
03
(13
120.
in
key,
Oto6mm.
for
letters
positions).
on,
program
keys
symbols
while
with
the
and
for
pro
oo
T
U
fri
I
LL.J
prog
I
[TT’
I
.L1L
()
I
T
length
display
length
For
length
in
ength
some
length
length
display
is
different
for
A
does
ranges
of
is
for
A
indicated
pro
not
the
limited.
lights
in
ways.
j
<
/\
S
I
-
1
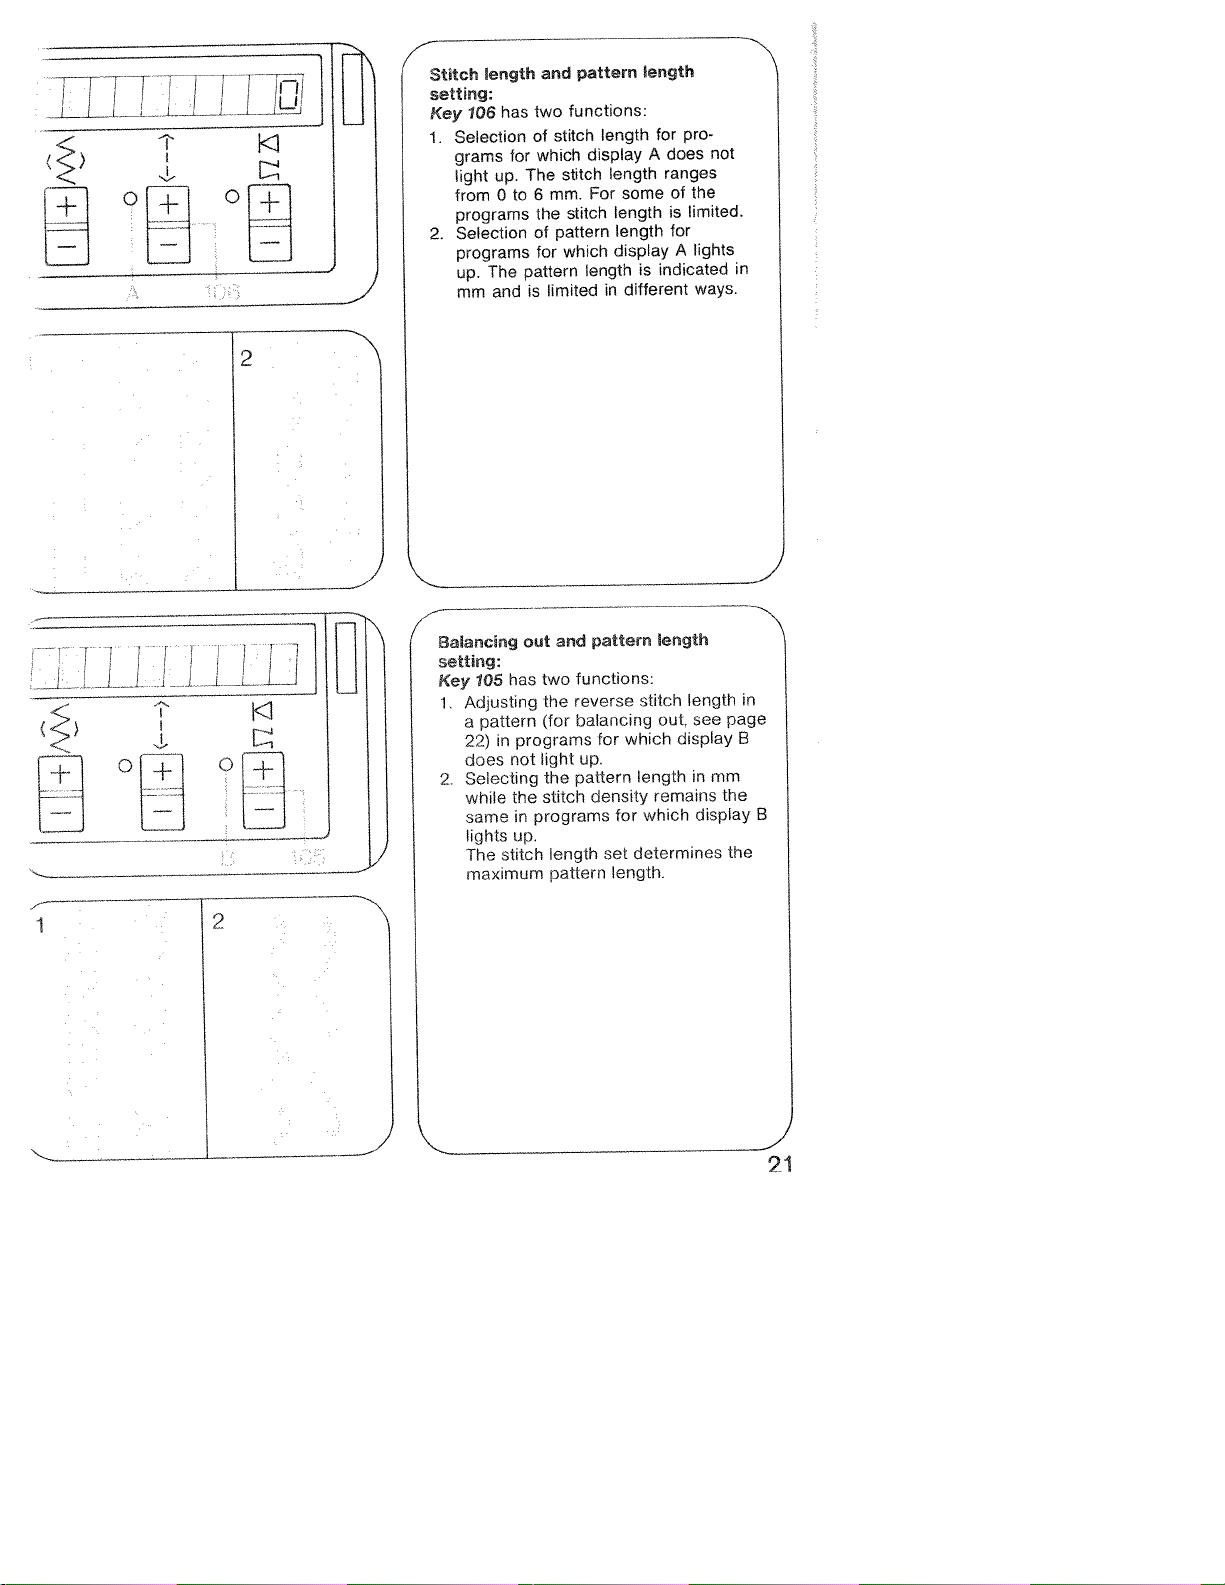
Stitch
setting:
Key
1.
Selection
grams
light
from
programs
Selection
2.
programs
up.
mm
106
up.
0
The
and
has
for
to
pattern
two
of
which
The
6
the
of
for
is
functions:
stitch
stitch
mm.
stitch
pattern
which
limited
pattern
and
length
2
I
K
N
for
for
set
length.
‘ength
stitch
out,
which
length
remains
which
determines
length
see
display
in
display
in
page
B
mm
the
B
the
21
and
has
105
Adjusting
pattern
a
in
22)
not
does
Selecting
the
while
same
up.
lights
stitch
The
maximum
out
programs
in
Balancing
setting:
Key
1.
2.
/
functions:
two
the
reverse
balancing
(for
light
pattern
the
stitch
programs
length
pattern
pattern
up.
density

Balancing
stitch
length
1.
The
baIancingout
adapt
buttonhole
length
With
this key
densityinthe
increases
decreases.
With
this
density
decreases
increases.
The
lengthofthe
canbeadjusted
the
normal
2.
Adjusting
combinations:
Combination
the
of
out
in
or
stitch
seam as
this
and
key
the
and
setting
letter
adjusting
key
density
seam
(program
set
at—the
buttonhole
the
seam
setat+
buttonhole
the
seam
reverse
from
being
and number
.,*
the reverse
is
used
in
the
wellasthe
stitch
seam
length
the
stitch
seam
length
stitches
+7,
—7
to
0.
to
13).
i’
progr:
30
26
26
32
22
22
24
26
26
Adjusted
Rule:
entered
with
appliedtothe
combination.
by
If
the
lastisadjusted
—
or+,this
+3:
patternorprogram
entire
and
adjustment
program
entered
is
22

Memorizing
combinations:
Compiling
programs
numbers.
The
Creative
MEM-memory. Foraprogram
nationupto36letters
can
be
possibletostoreupto
outofthe
MEMmemory.
canbecombined
00to49.
Memorizing:
MEM-memory
MEM-memory
The
number
Then
numbers
and
121
pushing
bers,
display
varied
are
entered.
The
combination
only.
size
entered,Ifthe
further entries,
program
combinations
00to49
computer
stored
consecutively.
series
from
Letters
with
Begin
with
appearsindisplay
select
the
programs, letters
with
singly
them
enter
key
143.
lettersornumbers
104.
length
in
numbers
Their
settingofthe
The
The
programs
and
and
canbesewninone
sizeisdetermined
computer
it
is
out
and
with
has
and
12
00
and
programs
by
selecting
the
left
is
emptyifno
programming
in
the
program
appear
width
letters
last letter
exhausted.
LJ
of
letters
a
combi
numbers
Itisalso
programs
to49in
inaprogram
accepts
numbers
key
104.
memory
num
can
before
by
or
number
the
the
121:
code
or
in
be
they
size
the
no
and
keys
by
Verification ofaprogram
in
the
display
The
programs
verified
play
by
When
you
machine
the
of
pattern
Symbol
number
ning
of
Symbol
number
pattern
a
Cancelling
combination:
“Corrector”
1.
When
program
appears
When
2.
program
combinationiscancelled.
key
pattern
cancelled.
after
one
pushing
depress
switches
the
to
displayed
a
pattern
the
to
displayed
combination.
program
a
key
this
in
key
stored
142
repeatedly
combination
memorized can
the
otherinthe
key
125
the
to
the
combination.
left
of
indicates the
combination.
rightofthe
indicates
142
has
keyispressed
inapattern
the
display.
142
is
pressed
last
combination
repeatedly.
foot
control
beginning
the
code
code
the
two
functions:
combination
a
pattern
of
until
the
has
been
be
dis
the
begin
end
of
LEJ
last
the
again
the
Press
entire
J

N
“p
iO
F
F
I
I
.I
.v
program
1
pmqrams
I
rctions:
ombination
combina
have
to
been
24
Twinneede
Key
129
in.
Display
width
129
to
function.
Pattern
1
Push
pattern
starting
2.
The
appears
3.
Length
is
cancelled.
“twin
A
is
limited
switch
start
“pattern
in
point.
last
programming
sewing:
needle”
lights
to
oIl
setting:
progress
program
in
the
up.
mm.
4
indicator
start”
is
in
display.
must
and
the
Again
light
key
returned
combination
a
in
program
be
and
128.
pushed
stitch
push
to
key
A
the
13

HiZi
prog
()
mmn
27
4
lights
or
off
is
the
and
setting:
pattern”
up.
program
a
beginning
pressed
machine
off
ties
key
The
and
while
completes
the
127.
machine
combination
of
end
sewing
seam.
sews
the
is
the
in
Single
pattern
‘-
“single
Push
Display
a
and
seam.
If
progress,
program
program
ties
the
key
A
N
29
pog
.1.
mmm
zEzzzzzzzzzzzz7’
Frog
23
34
49
-
H
4
Pattern
Press
Display
is
ed
Programs
bination
pressed
nation
Again
function.
and
mirroring:
“pattern
lights
A
mirrored.
can
for
beforehand,
mirrored.
is
push
mirroring”
up.
also
mirroring.
126
key
The
be
entered
When
the
to
program
pattern
switch
key
key
in
off
126.
select
a
141
combi
display
com
is
4
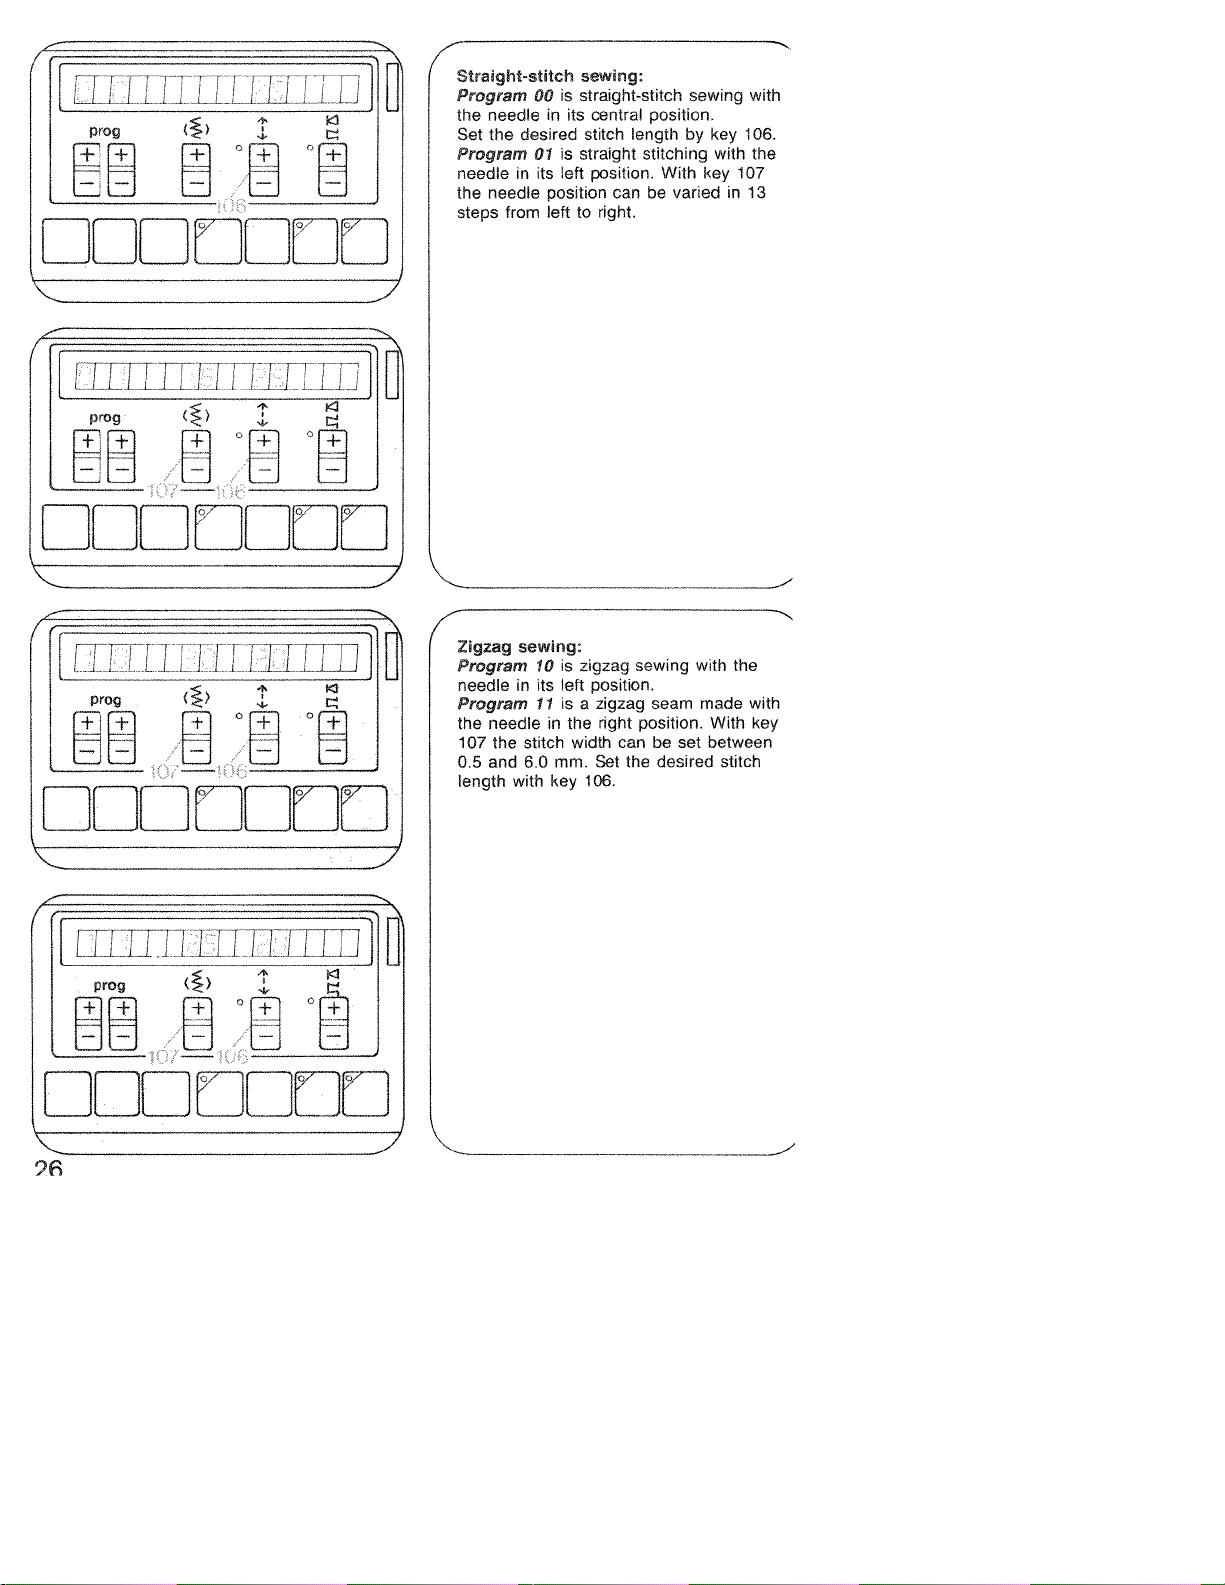
00
01
position
left
is
is
left
to
sewing:
straight-stitch
central position.
stitch
lengthbykey
straight
position.
can
right.
stitching
With
be
sewing
varied
key
with
with
106.
the
107
in
13
.
I
L
T
—
I:3
Straight-stitch
Program
needleinits
the
Set the
Program
needleinits
the
steps
desired
needle
from
Em
A
T
L
iL
prog
rr
f
i—ri
L
—
nmn
T
J
I
1’
rnmm
Lii1L1i1iii1
LEmmEin
r
107
needle
the
and
with
sewing:
10
in
its
11
in
stitch
6,0
is
zigzag sewing
position.
left
isazigzag
right
the
width
mm.
Set
key
106.
seam
position.
canbeset
desired
the
with
made
With
between
stitch
the
with
key
Zigzag
Program
needle
Program
the
0,5
length
rr
L-’-
prog
--:——
I
i,LL.I
L
IL]
LLJ
-
E
EIEIEffiEE
i1
:7
OOcO
0
o
-
D
TCD
DW
-
C)
CD
m
-o
—o
-CD
0(0
Oo
o.
4

qeej
I!
bU!MS
mo
iepun
eqm
pSeMO
NJOM
eqi
poddns
pue
/
4
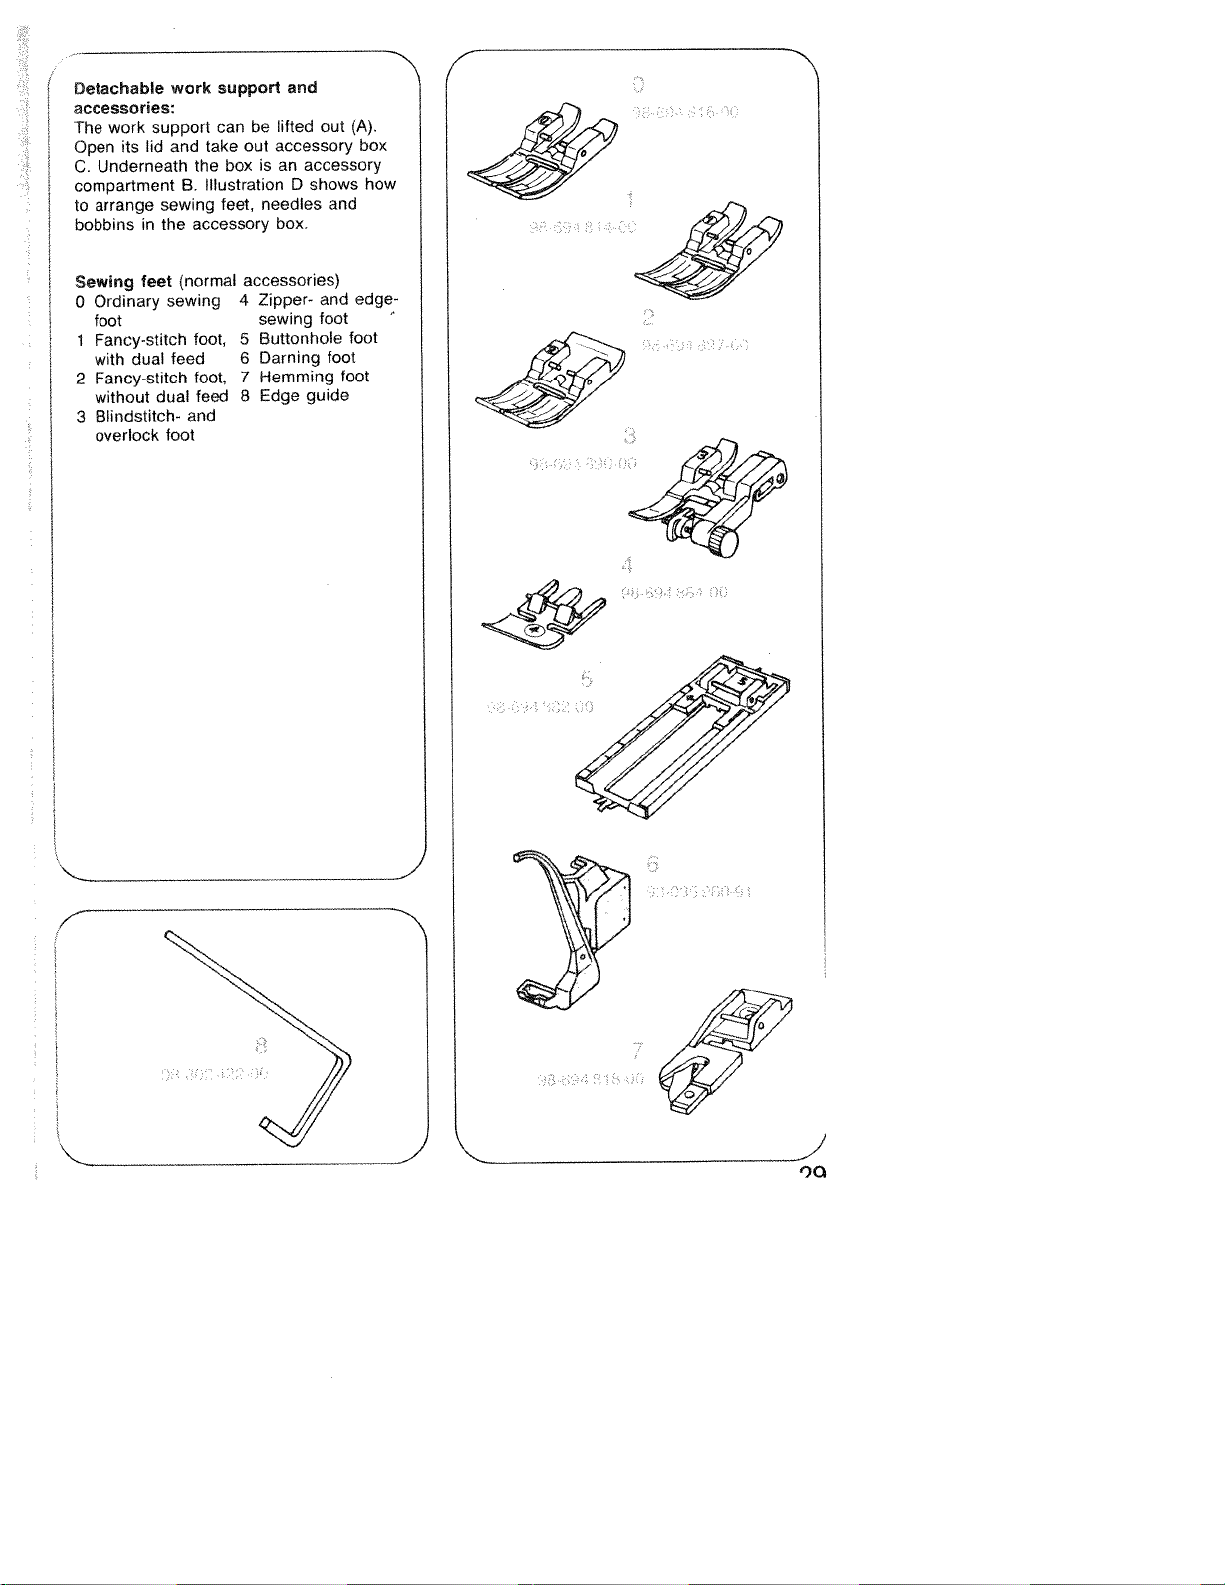
Detachable
accessories:
The
work
its
Open
C.
Underneath
compartment
to
arrange
bobbins
support
lid
sewing
in
the
work
and
the
B.
accessory
support
can
be
out
take
box
is
Illustration
needles
feet,
and
out
lifted
accessory
accessory
an
D
shows
box.
(A).
box
how
and
Sewing
Ordinary
O
foot
1
Fancy-stitch
with
Fancy-stitch
2
without
Blindstitch-
3
overlock
feet
dual
sewing
feed
dual
foot
(normal
foot,
foot,
feed
and
accessories)
Zipper-
4
sewing
Buttonhole
5
Darning
6
Hemming
7
8
Edge
and
foot
foot
guide
edge-
foot
foot
4
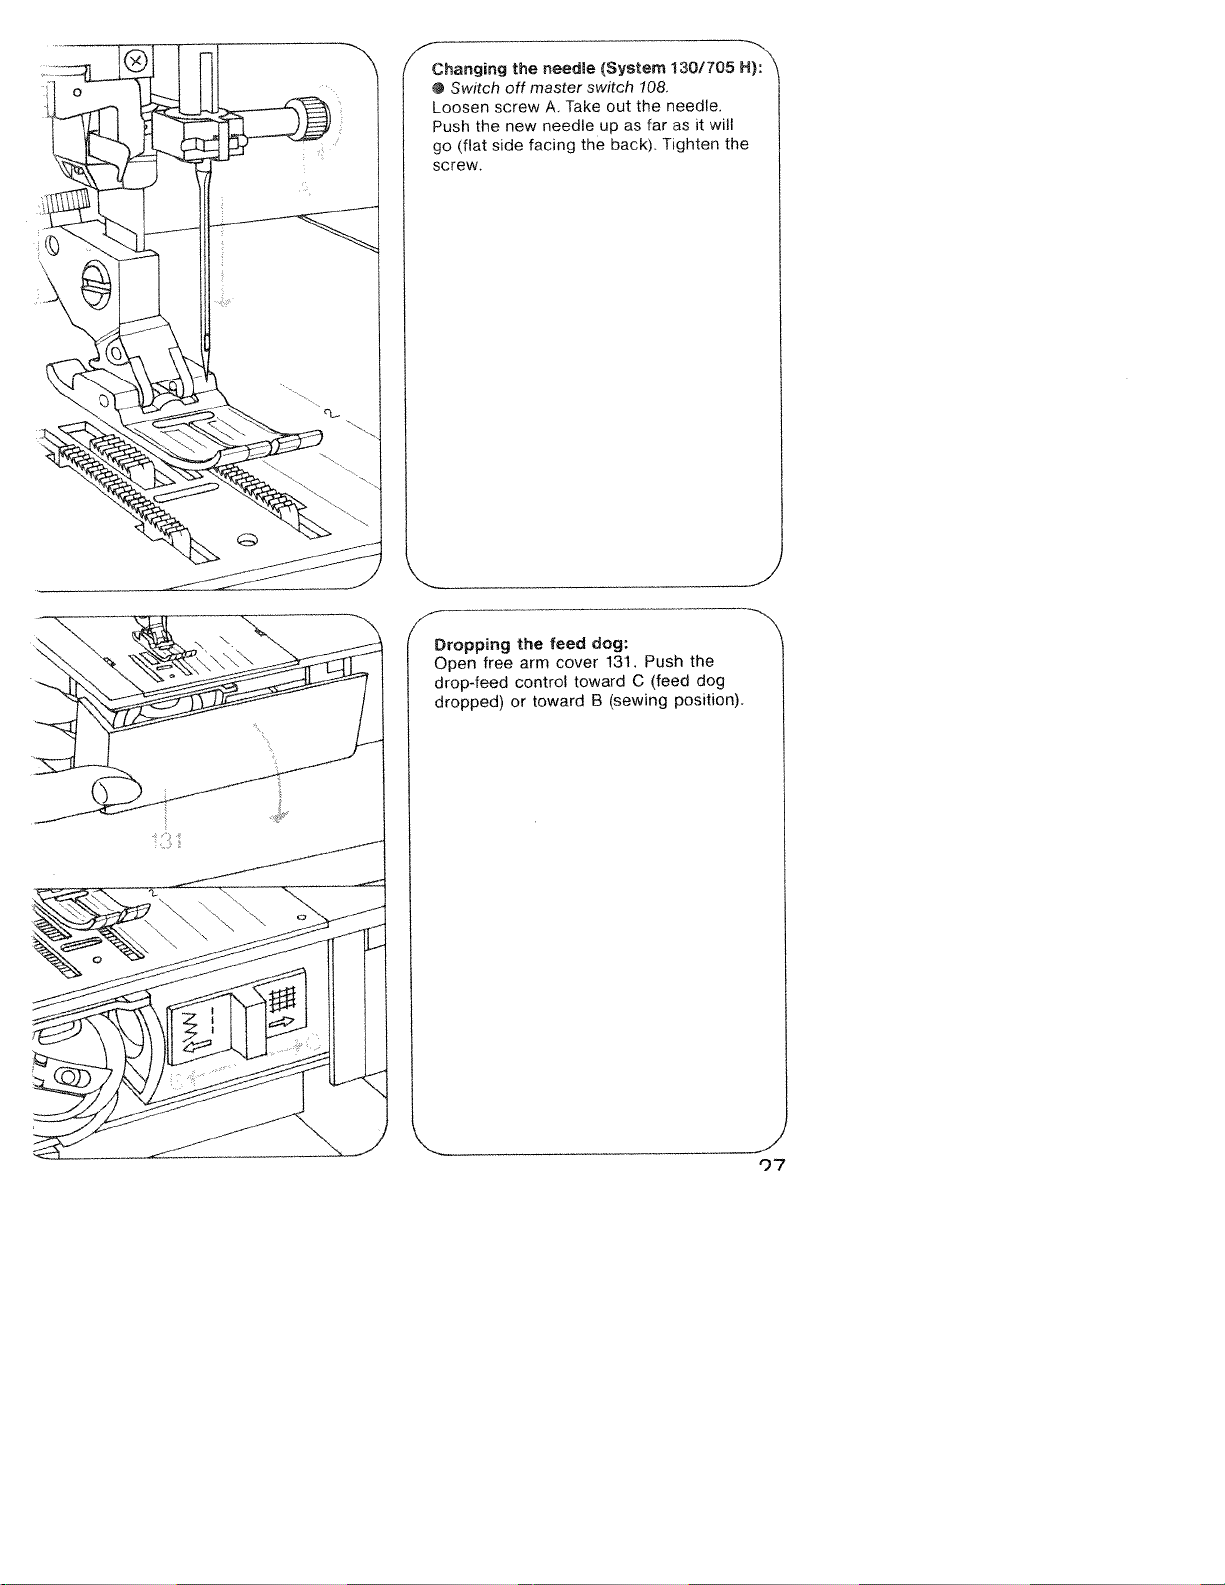
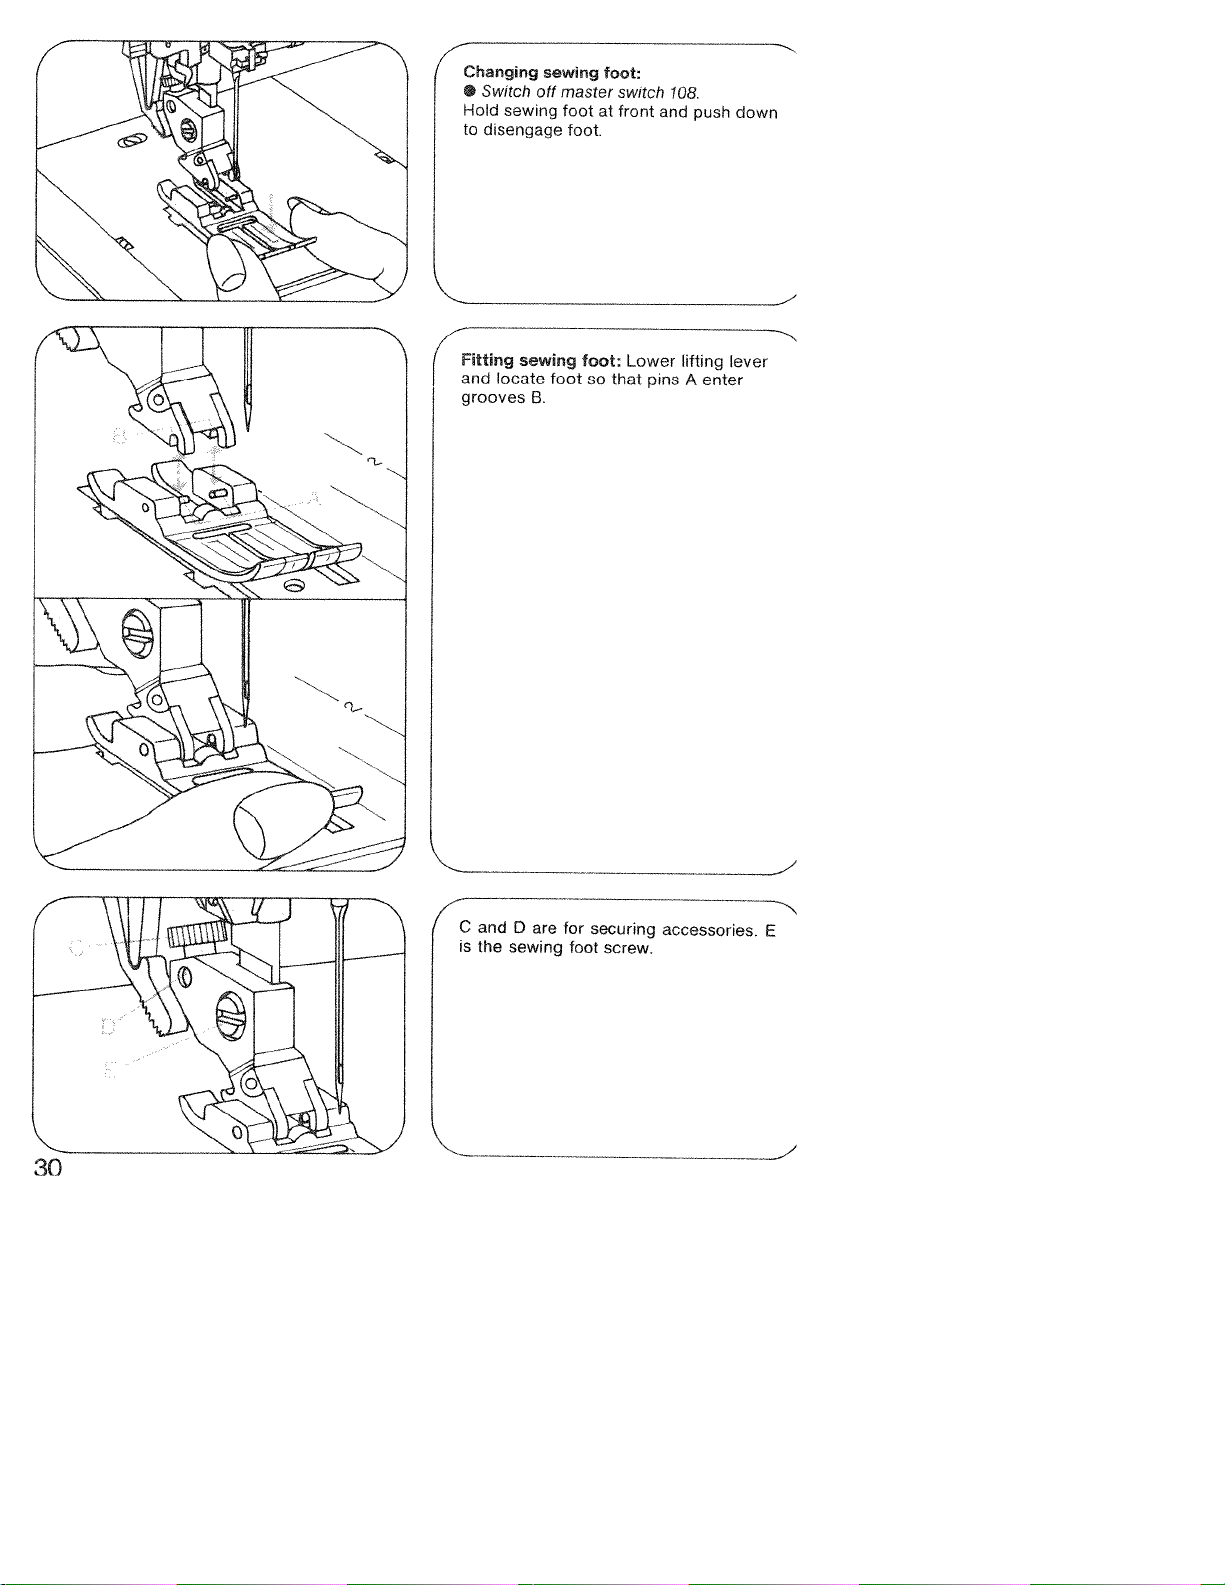
Changing
•
Switch
Hold
to
sewing
disengage
sewing
off
master
foot
foot.
foot:
at
switch
front
and
108.
push
down
--
-
-
o
Fittrng
and
grooves
is
the
sewing
locate
sewing
foot:
Lower
lifting
foot
so
that
pins
A
lever
enter
B.
for
su
ring
foot
accessories.
screw.
E
10
4
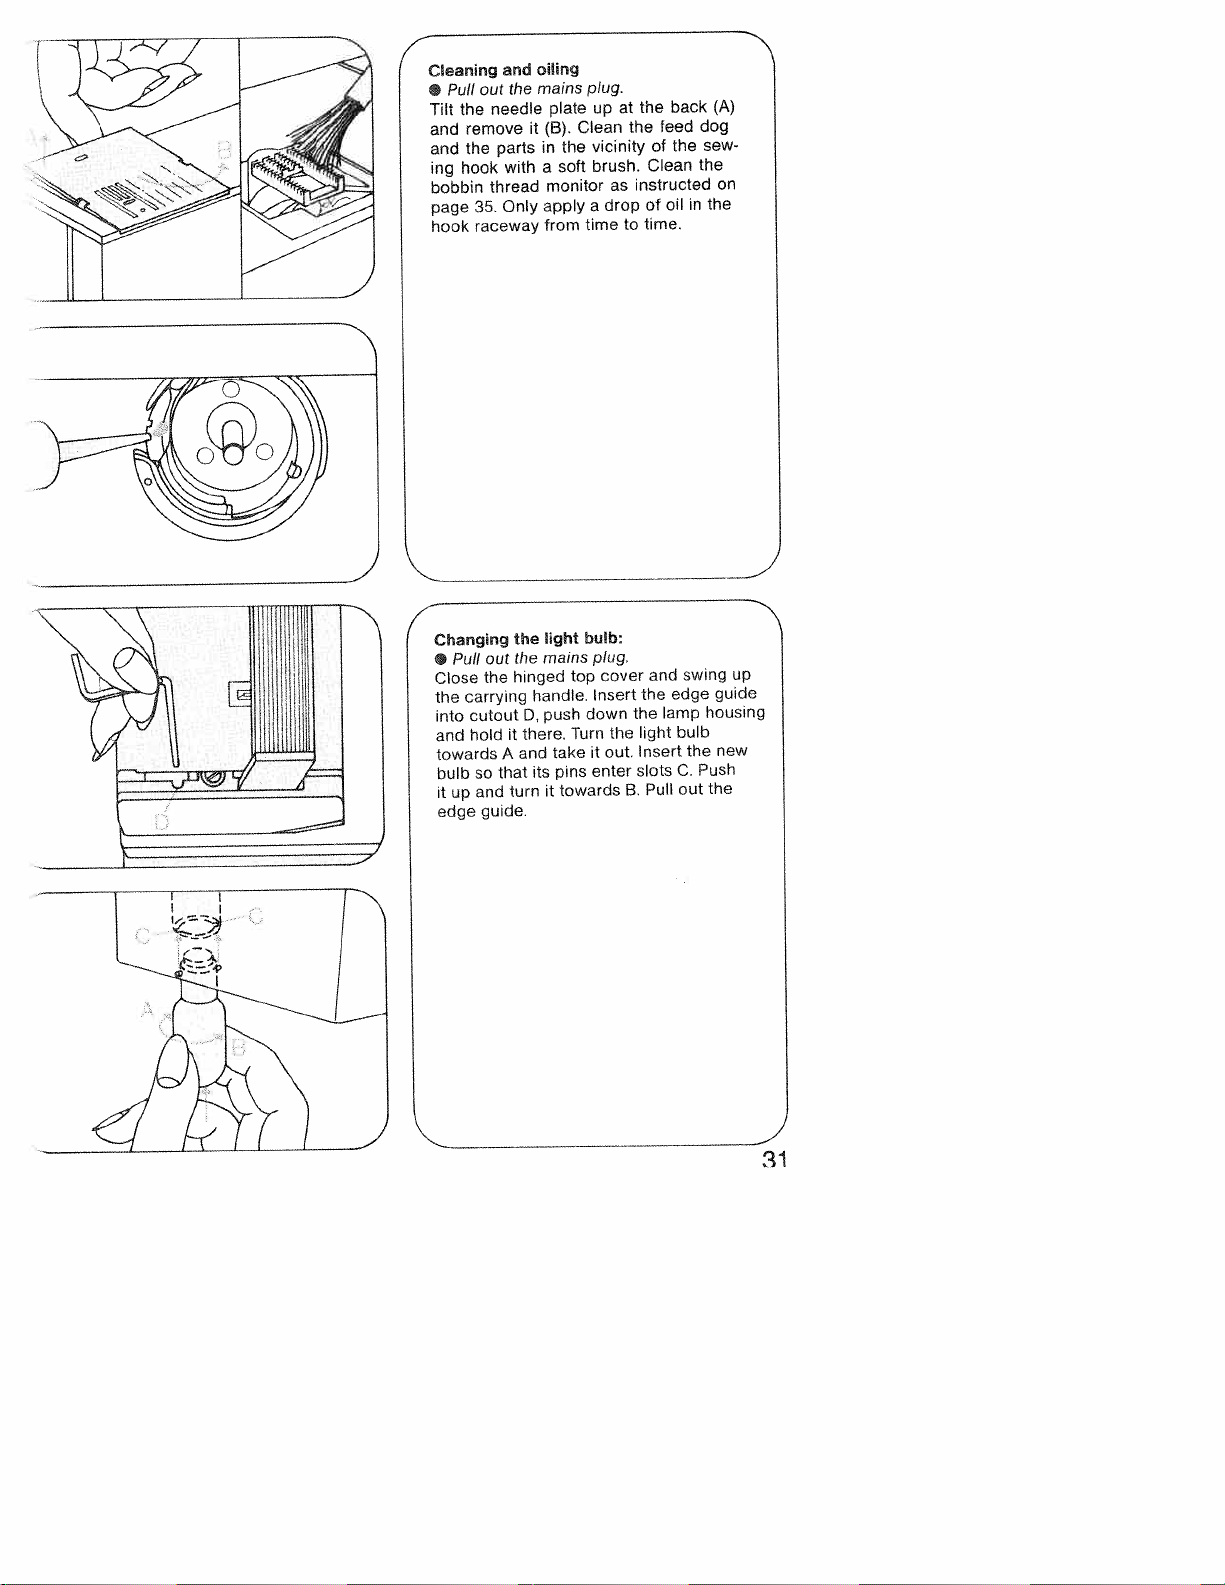
Cleaning
Pull
•
Tilt
the
remove
and
and
the
ing
hook
bobbin
page
hook
and
the
out
needle
parts
with
thread
Only
35.
raceway
oiling
mains
plate
(B).
it
in
a
monitor
apply
from
the
soft
plug.
up
Clean
vicinity
brush.
a
time
at
as
drop
the
the
of
Clean
instructed
of
time.
to
back
feed
the
oil
N
(A)
dog
sew
the
on
the
in
Changing
Pull
•
Close
carrying
the
cutout
into
hold
and
towards
bulb
so
and
t
up
guide.
edge
out
the
it
A
that
turn
the
the
hinged
handle.
D,
there.
and
its
light
mains
push
take
pins
towards
it
bulb
top
down
Turn
plug.
cover
Insert
out.
it
enter
the
B.
the
the
light
Insert
slots
Pull
and
edge
lamp
bulb
C.
out
swing
the
Push
up
guide
housing
new
the
31
4
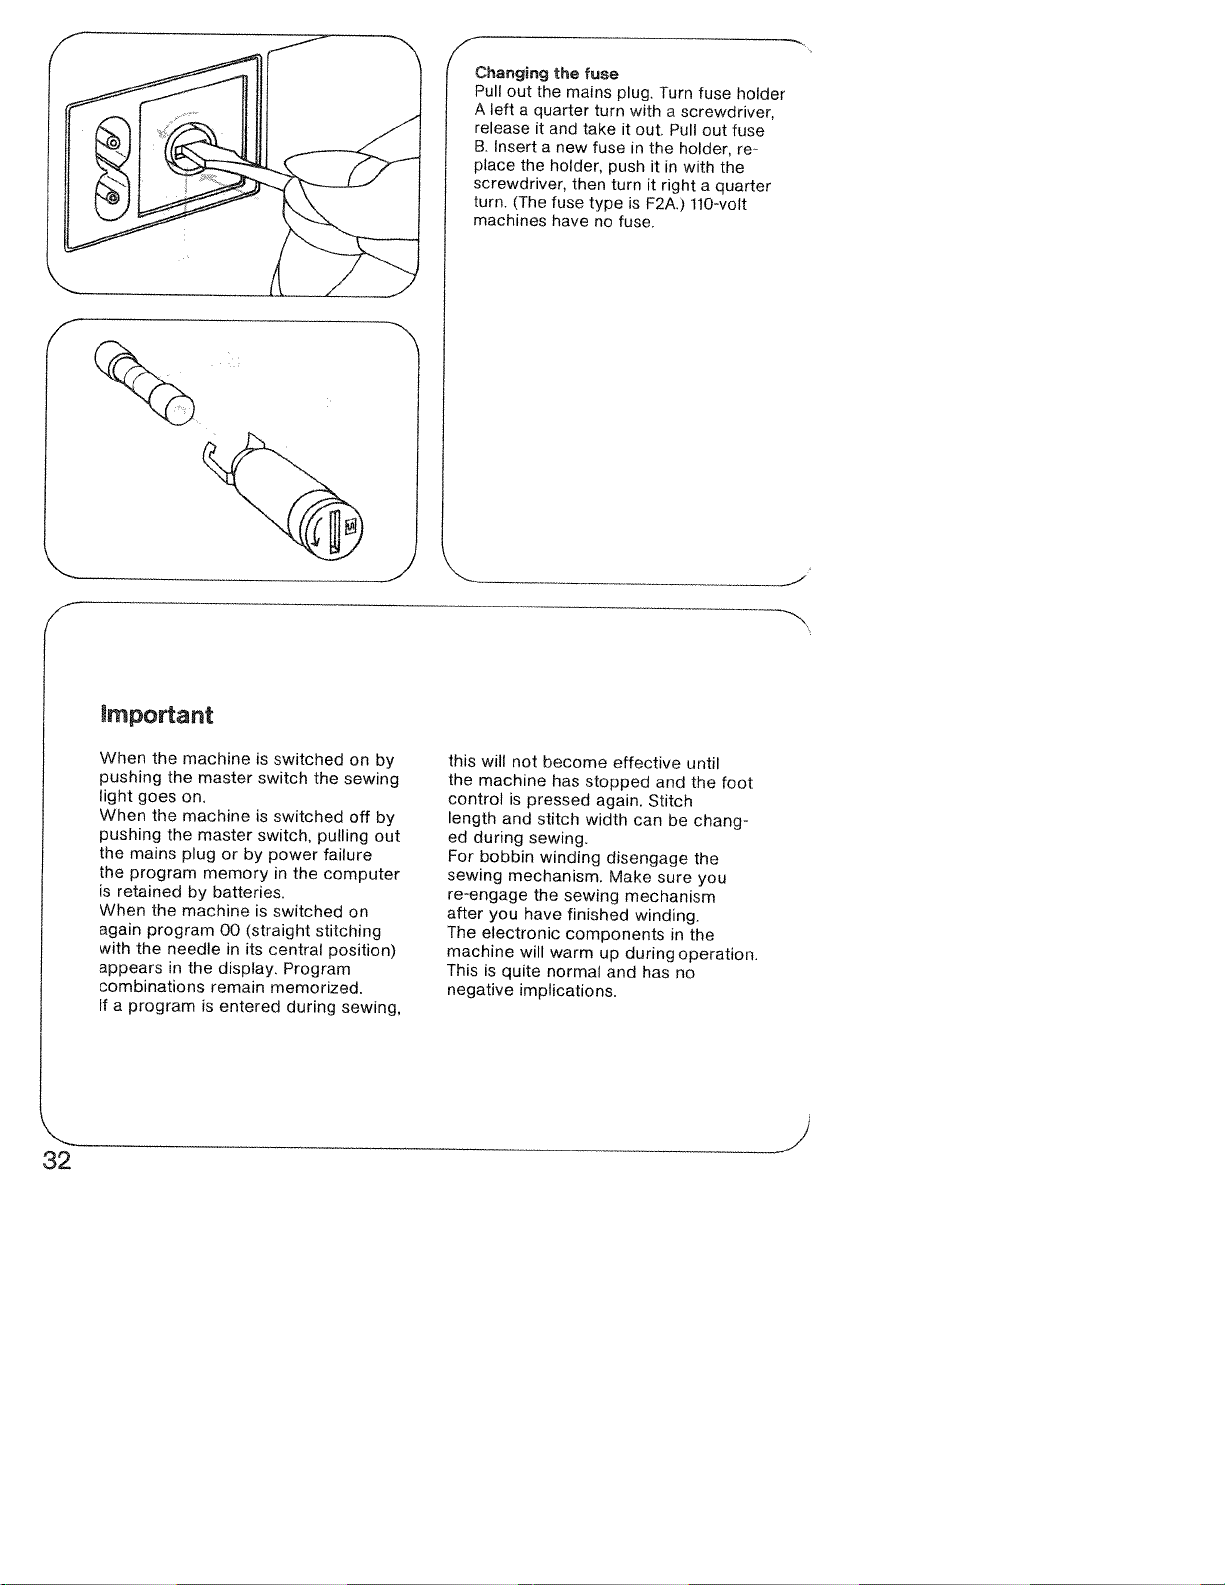
Changing
Pull
left
A
release
B.
place
screwdriver,
turn.
machines
out
Insert
(The
a
quarter
it
the
the
the
and
a
holder,
fuse
have
mains
new
take
then
fuse
turn
fuse
type
no
plug.
it
push
turn
fuse.
with
out.
n
is
Turn
a
Pull
the
it
in
it
right
F2A.)
holder,
fuse
holder
screwdriver,
out
fuse
re
with
the
a
quarter
110-volt
)
32
§mportant
When
pushing
light
When
pushing
the
the
is
retained
When
again
with
appears
combinations
a
If
the
goes
the
mains
program
the
program
the
program
machine
the
on.
machine
the
plug
by
machine
needle
in
the
master
master
or
memory
batteries.
00
in
display.
remain
is
entered
is
switched
switch
is
switched
switch,
by
power
in
is
switched
(straight
its
central
memorized.
the
pulling
failure
the
computer
stitching
Program
during
on
sewing
off
on
position)
sewing,
by
by
out
this
will
the
machine
control
length
during
ed
For
bobbin
sewing
re-engage
after
you
The
electronic
machine
This
is
negative
not
become
has
is
pressed
and
stitch
sewing.
winding
mechanism.
the
have
will
warm
quite
normal
implications.
effective
stopped
again.
width
disengage
Make
sewing
finished
components
up
and
and
Stitch
can
be
sure
mechanism
winding.
in
during
operation.
has
no
until
the
chang
the
you
the
foot
peciaI
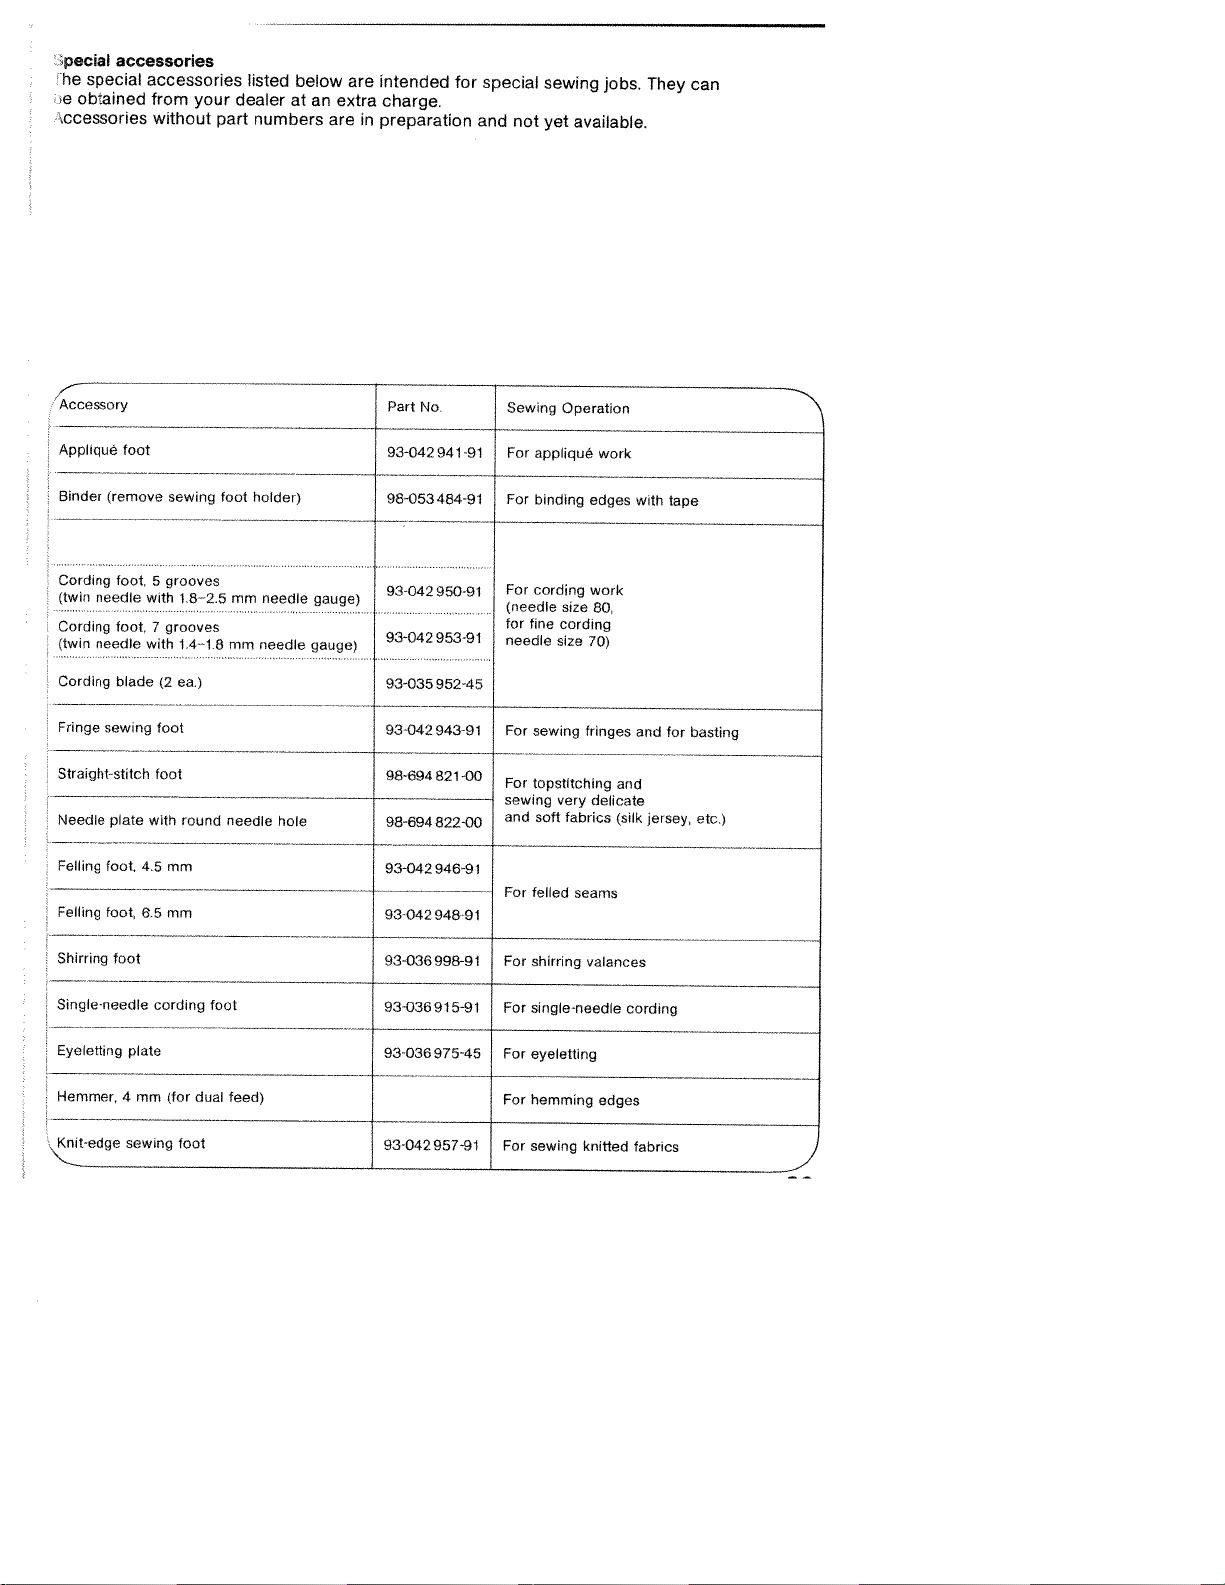
accessories
he
special
obtained
e
\ccessories
accessories
your
from
without
part
listed
dealer
numbers
below
are
at
an
extra
areinpreparation
intended
charge.
for
special
and
not
sewing
yet
available.
jobs.
They
can
Accessory
Appliqué
(remove
Binder
Cording
foot.5grooves
needle
(twin
Cording
foot,
(twin
needle
Cording
blade
Fringe
sewing
Straight-stitch
—---———-——-———-—---——---———-——--—-
Needle
plate
Felling
foot.
Felling
toot,
Shirririg
foot
foot
with
with
4.5
65
7
(2
foot
foot
with
sewing
18—2.5
grooves
14—1.8
ea.)
round
mm
mm
foot
mm
mm
needle
holder)
needle
needle
hole
gauge)
gauge)
Part
No
93-042941-91
98-053484-91
93-042950-91
934295391
93-035952-45
93-042943-91
98-694821-00
—-----——-----
98-694
822-00
93-042946-91
—-——---—-—
93-042948-91
93-036998-91
-
Sewing
For
For
For
(needle
for
needle
For
For
sewing
and
For
For
Operation
appliqué
binding
cording
size
fine
cording
size
sewing
topstitching
very
soft
fabrics
felled
seams
shirring
work
edges
work
80,
70)
fringes
and
delicate
(silk
valances
with
and
Jersey,
tape
for
basting
etc.)
Single-needle
Eyeletting
Hemmer,
Knit-edge
cording
plate
4mm(for
sewing
foot
dual
foot
feed)
93-036915-91
93-036975-45
93-042
957-9
1
For
single-needle
For
eyeletting
For
hemming
For
sewing
edges
knitted
cording
fabrics

I
finding
Fault
Cause:
Machine
1.
Needle
Wrong
needle
Needle
Machine
Needle
too
2.
Needle
For
any
Thread
thread
excessive
3.
Needle
will
Needle
Needle
Needle
because
Bobbin
tension
Poor-quality
that
Needle
not
go.
bent.
too
bent
case
not
bent
threaded
thread
of
the
storage.
breaks
thin
work
skips
inserted
used.
or
blunt.
thin
for
above
too
knotty
or
become
has
pushed
or
strikes
and
is
pushed
improperly
stitches
correctly.
improperly.
thread
breaks
reasons.
strong.
thread
too
up
as
far
thick.
too
needle
or
inserted.
used.
used,
dry
pulled.
Remedy:
Push
needle
flat
shank
Insert
system
Insert
new
Check
threading.
Insert
thicker
par.
See
Regulate
or
by
it
as
plate
Use
Insert
as
Insert
Refer
Let
Only
When
in
as
only
new
it
will
new
to
machine
guide
inserting
far
go.
needle
as
as
up
facing
side
130/705
needle.
needle.
1
above.
thread
tensions.
good-quality
needle
needle.
table.
feed
the
the
material
the
it
will
go.
far
and
bobbin
as
toward
H
thread.
push
work
lightly.
will
it
needle.
it
alone.
case,
the
up
go,
back.
as
push
its
far
it
4.
Seam
Tension
Thread
Bobbin
Kinks
material.
out
too
thread
appear
is
not
of
thick,
uniform
adjustment.
knotty
wound
on
top
or
unevenly.
and
bottom
hard.
Check
Use
first-class
During
thread
bobbin
of
Thread
tensions.
upper
bobbin
in
hand,
tension
machine
and
thread
winding,
but
stud.
properly
lower
pass
tensions.
only.
do
not hold
it
through
and
check
the
both
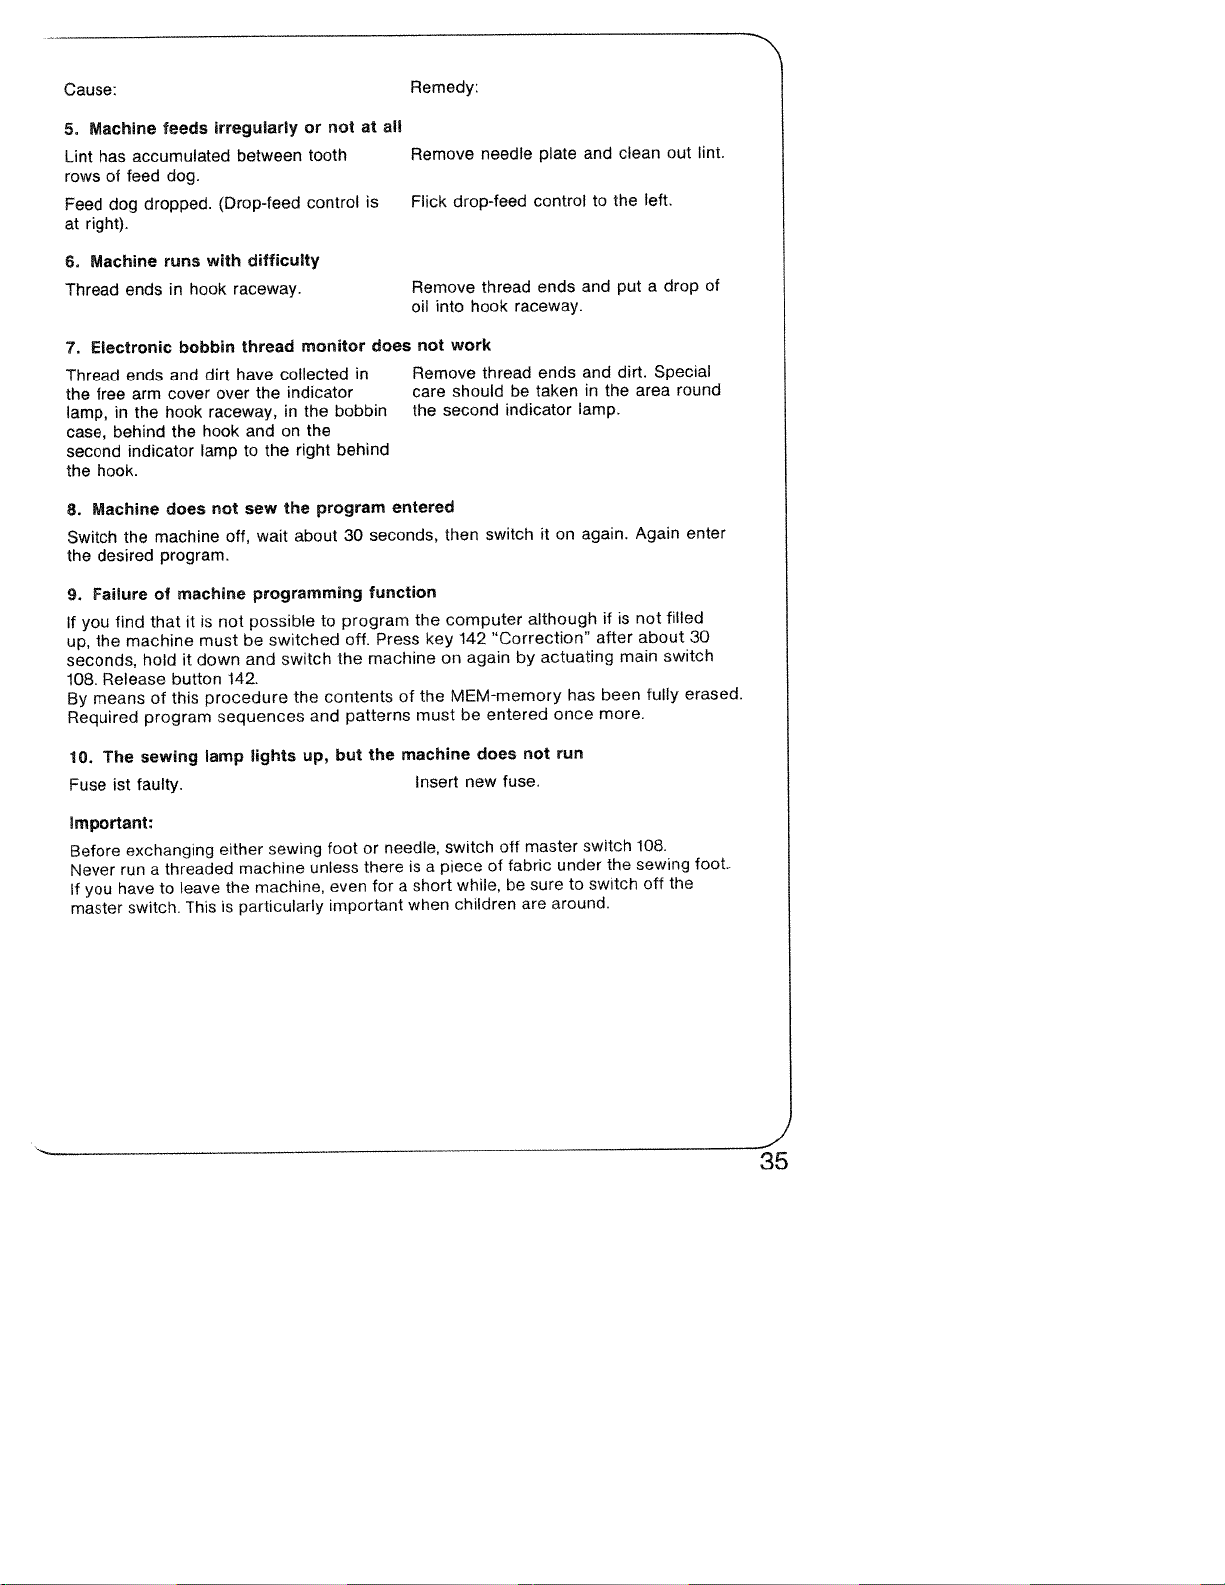
Cause:
Machine
5.
Lint
rows
Feed
right).
at
Machine
6.
Thread
7.
Electronic
Thread
the
lamp,
case,
second
the
has
of
dog
free
in
behind
hook.
feed
ends
ends
feeds
accumulated
dog.
dropped.
runs
hook
in
bobbin
and
cover
arm
hook
the
the
indicator
irregularly
between
(Drop-feed
difficulty
with
raceway.
thread
have
dirt
the
over
raceway,
and
hook
lamptothe
or
tooth
control
monitor
collected
indicator
in
the
the
on
right
not
bobbin
behind
Remedy:
all
at
plate
control
ends
ends
taken
and
to
and
and
in
lamp.
the
the
put
dirt.
area
drop-feed
into
work
should
second
needle
thread
hook
thread
raceway.
be
indicator
Remove
is
Flick
Remove
oil
not
does
Remove
in
care
the
clean
out
left.
drop
a
Special
lint.
of
round
Machine
8.
Switch
desired
the
Failure
9.
find
you
If
the
up,
seconds,
Release
108.
means
By
Required
The
10.
ist
Fuse
Important:
Before
Never
have
If
you
master
does
machine
the
program.
machine
of
that
machine
hold
button
this
of
program
sewing
faulty.
exchanging
threaded
run
a
to
switch.
is
it
must
down
it
procedure
lamp
leave
This
sew
not
wait
off,
programming
possible
not
be
and
142.
sequences
lights
either
machine
machine,
the
particularly
is
the
about
switched
switch
the
and
up,
sewing
unless
program
30
program
to
off.
the
contents
patterns
but
foot
even
important
entered
seconds,
function
Press
machine
of
the
or
needle,
there
for
a
the
key
on
the
must
machine
Insert
piece
is
a
short
when
switch
then
computer
142
again
although
“Correction”
by
MEM-memory
entered
be
not
does
fuse.
new
master
off
switch
of
while,
children
fabric
be
are
sure
again.
on
it
actuating
has
once
run
switch
under
switch
to
around.
if
after
been
more.
the
Again
is
main
filled
not
about
switch
fully
108.
sewing
off
enter
30
erased.
foot.
the
35

ndex
A
Appliqué
Assembly
Attaching
B
Balancing
Balancing
Basting
Binding
Blind
Buttonholes
C
Changing
Changing
Changing
Changing
Closed
Cording
Correcting
Correcting
Correction
Cross
Cutting
D
Darning
Darning
Dashes
Dot
Dots
Dual
E
Edge
Elastic
Elastic
Eyelet
edges
stitch
overlock
stitches
buttonholes
quick
and
feed
binding
stitch
straps
embroidery
36
work
and
lace
the
out
the
the
the
the
program
programs
of
torn
with
selection
dashes
serging
density
letters
needle
buttonhole
stitch length
stitch
width
stitch
entries
the
buttonhole
open
fabrics
straight
with
the
seams
of
buttonhole
and numbers
position
stitch
stored
stitch
and
binder
length
wool
seams
61
89
89
99
72
76
94
95
99—101
77
100
67
67
89—90
58—59
71
65
100
48—50
101
98
96—98
70
69
70
75
94
91
91
52
F
Fabrics
Fagotting
Fringe
seams
G
Gathering
H
Hemstitching
Honeycomb
Hyphens
lnserting
Inserting
L
Lap-seam
Lengthening
stitch
Letters and
Lingerie
Linen
Lycra
M
Making
Multi-colour
N
Narrow
Needle
0
Ornamental
Ornamental
Overlock
lace
patches
density
buttonholes
embroidery
stitch
tailor’s
pleats
chart
stitch
with
stitch
felling
patterns
numbers
embroidery
borders
seams
stitch
for
the
tacks
with
corsetry
shirring
at
the
in
differenz
on
leather
edge-thread
foot
same
sizes
effect
7’
8t
S
8t
S
91—9:
7
S
S
S
6
7
9t
5
8
7
4
5c
10’
42-4’
5t
9(

P
Pattern
and
mirroring
Drogramming
monograms
Programming
Programming
embroidery
Programming
Programming
Q
Quilting
R
Recommended
hemmer
Roll
S
Securing
Selecting
Serging
Serging
Sewing
Sewing
Sewing
Sewing
Sewing
Sewing
Sewing
Sewing
Sewing
stitches
Shell
Shirring
Shirring
Single
Single
Smocking
Spacing
hems
seams
with
dots
fancy
in
letters
monograms
neck
numbers
on
with
edging
with
with
buttonhole
pattern
between
embroidery
letters
names
stitches
possibilities
the
machine
with
MEM-memory
the
zigzag
seams
zippers
openings
buttons
straight,
elastic
straight
elastic
with
and
together
computer
the
stitch
with
utility
thread
stitch
thread
words
stitches
numbers
settings
twin
and
the
and
with
needle
overlock
twin
stretch
needle
68—71
87—89
foot
Straight
66
Stretch
Stretch
68
T
71
Tips
40
Topstitching
Topstitching
Top-stitch
threads
Top-stitch
63
Triple-fancy-stitch
Twin
41
V
93
Verifying
w
92
Writing
64
z
87
Zigzag
69
Zippers
46
102
68
47
89
68
101
73
60
84
83
100
65
86
70
stitch
triple
triple
ambroidering
for
seams
seams
needle
the
texts
stitch
for
straight
zigzag
collar
with
programs
ladies
stitch
points
twin-needle
the
sewn
with
seams
slacks
stitch
sewing
and
with
buttonhole
stored
two
needle
thread
58
+
1(

I
I
4
-
-
A
9E

Ideas
for
embroidering
sewing
Pfaff
Congratulations!
new
Your
one
high-quality
of
machines
sewing
have
you.
lows:
1.
2.
3.
PFAFF
of
world’s
the
outstanding
Embroidery-stitch
Programming
and
Straight-stitch,
programs
machine
do
potentialities
compiled
These are
letters
with
Creative
makes
sewing
finest
possessing
have.
From
offered
ideas
into
program
zigzag-stitch
buttonhole
as
which
by
and
three
stitches,
not
as
various
divided
well
Creative
features
embroidery
the
and
the
1371
the
you
machines.
large
a
other
vast
this
machine
suggestions
groups,
utility-stitch
and
program
owner
It
number
sewing
range
as
numbers
is
of
a
of
we
for
fol
doupt,
No
the
sewing
ity
a
Creative
as
to
contact
He
will
be
you
When
recommend
we
thoroughly.
numerous
the
this
by
enjoyable
work.
needle
you
problems
your
glad
have
This
machine.
and
have
will
fashion
nearest
help
to
studied
that
will
enable
application
We
successful
questions
few
a
encountered
designer.
PFAFF
you.
operating
the
read
you
you
possibilities
wish
you
sewing
Please
dealer
this
to
your
in
at any
instructions
section
make
many
and
regarding
capac
feel
free
time,
just
use
full
afforded
hours
creative
as
of
of
39

programmes
programmi
07
21
programs
programme
programas
08
)
22
23
09
24
10
25
11
_A
26
12
27
13
.
g
//
/
/
.1
00
01
,‘
I
f
02
03
/
j’
4
4
04
05
06
e
14
15
16
17
18
19
20
28
29
30
31
32
33
34
35
36
Programming
Straight-stitch,
•
programs
Embroidery-stitch
•
21
•
Buttonhole
Lingerie
(Program
•
Button
(Program
to
35
and
buttonhole
sewing
from
program
13)
14)
40
37
38
possbWties
zigzag-stitch
00
to
programs
from
39to49
program
20
39
40
and
from
41
42
utility-stitch
43
S
S
•
•
44
45
Cross-stitch
(Program
Hem-stitching
(Programs
Alphabet
Block
letters
Numbers
46
program
36)
programs
37
and
program
from
from
47
48
49
38)
to
A
Z
to
0
9

I(
--I
-
I
I1
I
—
normal
0
seweg
toot]
I
[____
——
Machine
The
box
jobs
illustrated
the
machine
ing
foot
individual
The
prog
‘-
settings
above
every
description
on
the
recommended
for
feed
engaged
feed
disengaged
tension,
foot,
following
the
atand
stitch
e.g.
setting
best
suited
symbols
straight
eg.
Dual
(if
existent)
or
Dual
(if
existent)
Recommended needle
thread
Recommended
sewing
recommended
sewing
of
the
pages
contains
and
respective
for:
e.g.
Ordinary
the
sewing
sewing
sew
job.
3—5
0
41
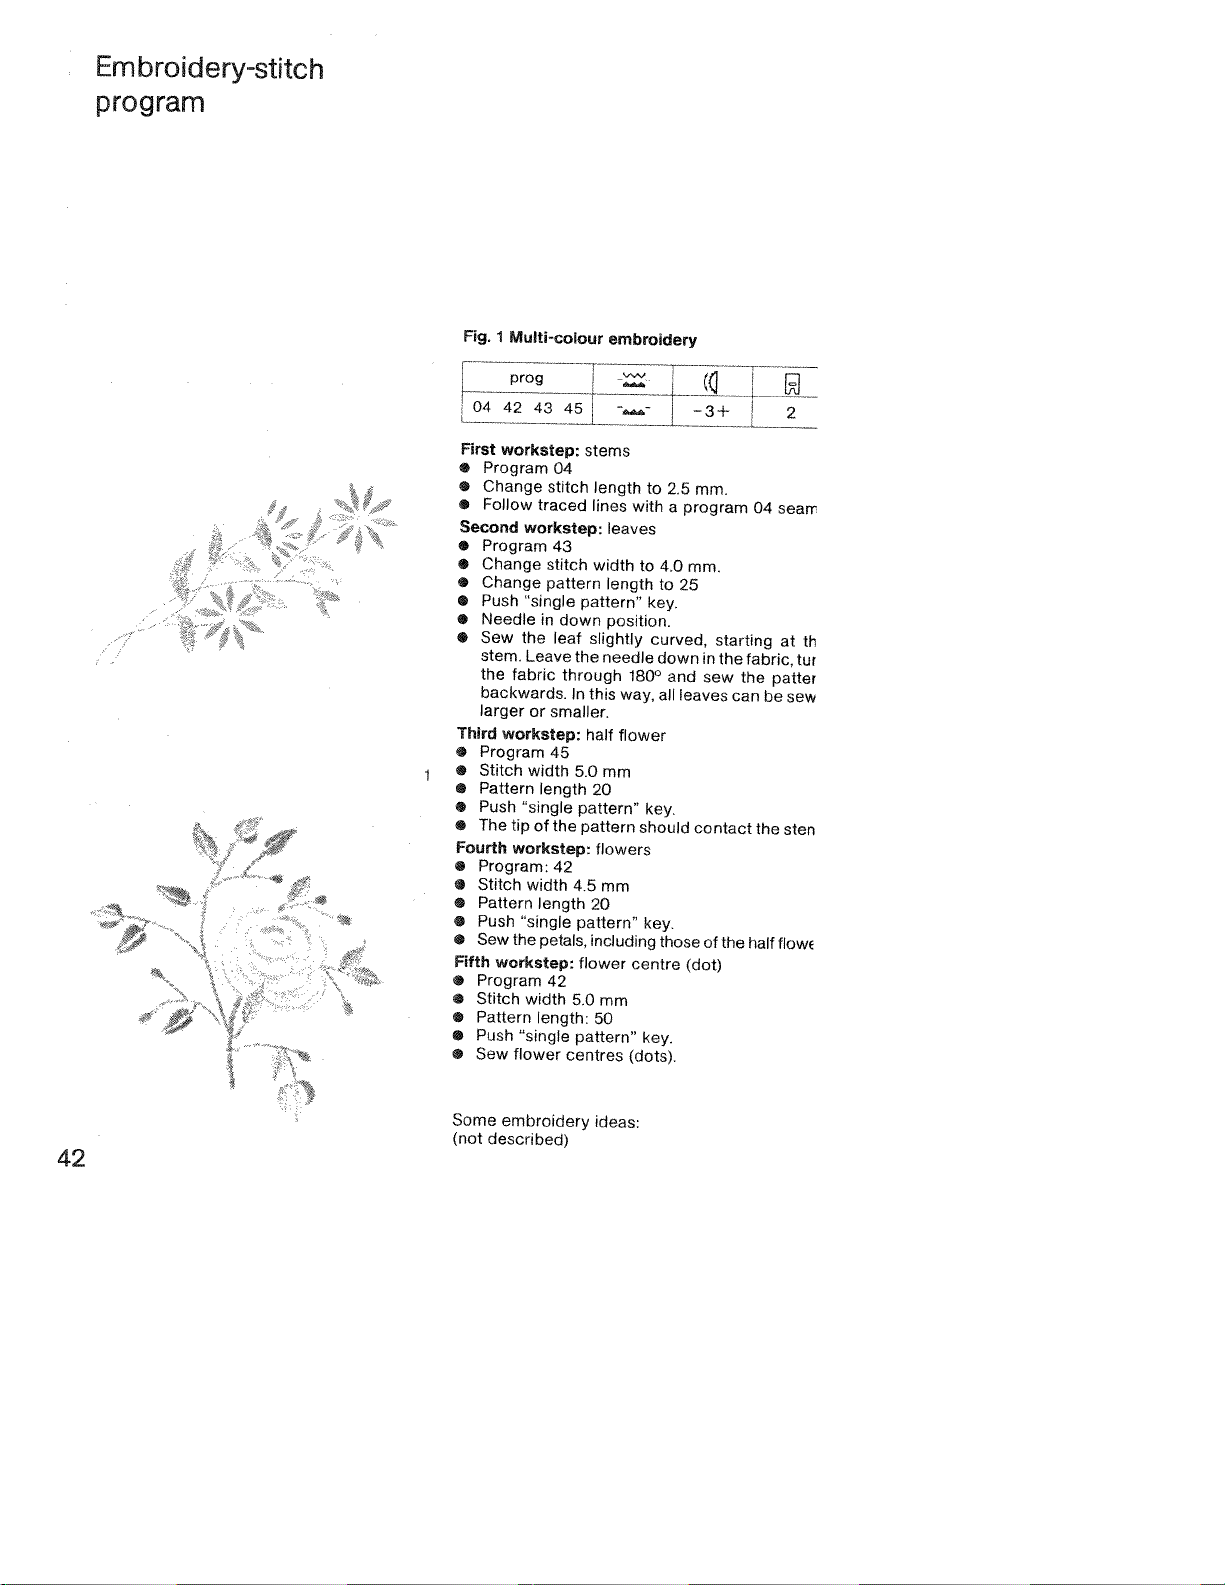
Embroidery-stitch
program
Fig.
prog
04
First
•
Program
•
Change
•
Follow
Second
•
Program
Change
•
•
Change
e
Push
•
Needle
Sew
•
stem.
the
backwards.
larger
Third
•
Program
Stitch
•
Pattern
•
•
Push
•
The
Fourth
•
Program:42
Stitch
•
•
Pattern
•
Push
•
Sew
Fifth
•
Program
•
Stitch
•
Pattern
•
Push
•
Sew
1
Multi-colour
42
43
workstep:
traced
workstep:
stitch
pattern
“single
in
the
Leave
fabric
or
workstep:
width
length
single
tip
of
workstep
width
length
“single
the
petals,
workstep:
42
width
length:
“single
flower
45
04
stitch
43
pattern”
down
leaf
the
through
In
smaller.
45
5.0
pattern”
the
pattern
4.5
pattern”
flower
5.0
pattern”
centres
embroidery
.-
stems
length
lines
leaves
width
length
position.
slightly
needle
this
way,
halt
flower
mm
20
flowers
mm
20
including
mm
50
to
with
to
key.
curved,
180°
key.
should
key.
centre
key.
(dots).
2.5
a
4.0
to
down
and
all
those
—3+
mm.
program
mm.
25
in
sew
leaves
contact
of
(dot)
starting
the
fabric,
the
can
the
04
the
half
patter
be
2
searr
at
tur
sew
sten
flowE
th
42
Some
(not
embroidery
described)
ideas:
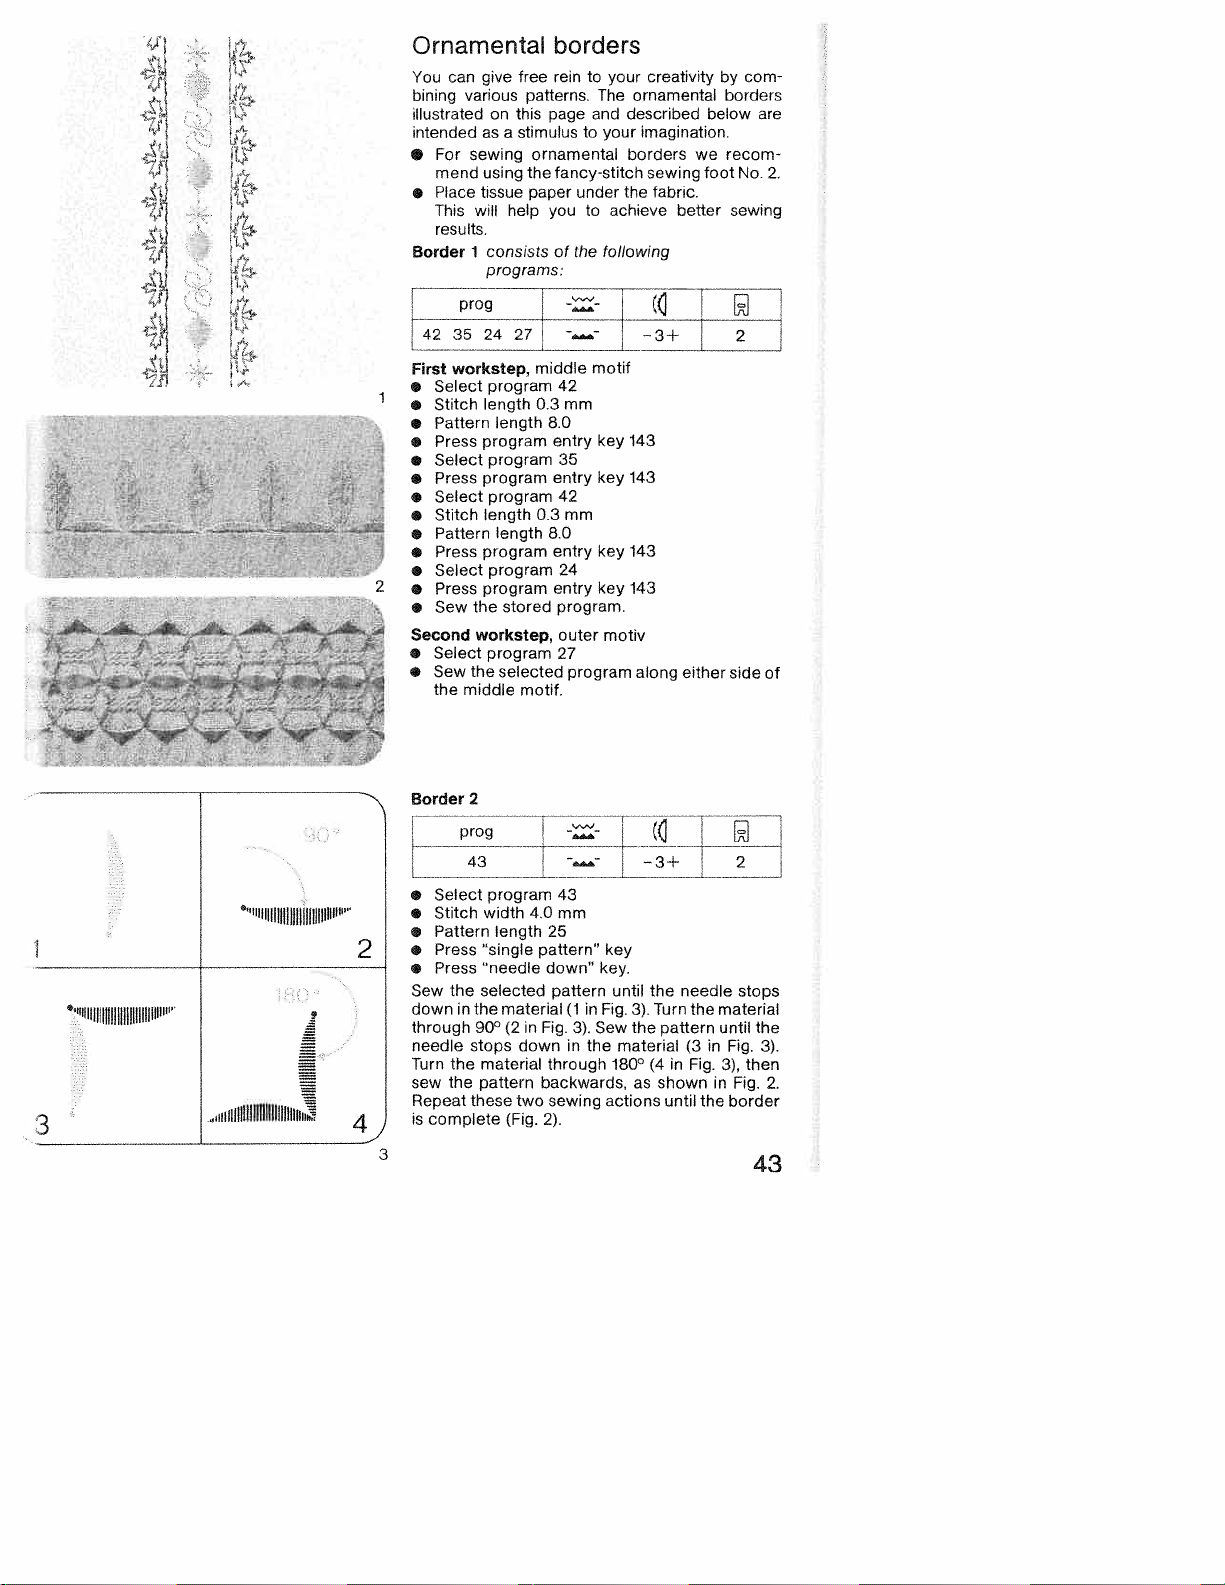
Ornamental
You
can
give
free
various
bining
illustratedonthis
intended
For
•
mend
Place
•
This
results.
Border
stimulustoyour
as
a
sewing
using
tissue
will
help
consists
1
programs:
borders
rein
patterns.
page
ornamental
fancy-stitch
the
under
paper
you to
of
the
to your
The
and
achieve
following
creativitybycom
ornamental
described
imagination.
borders
sewing
the
below
we
foot
fabric.
better
borders
are
recom
No.
sewing
2.
4235
First
•
•
•
•
•
•
•
•-_%
•
•
•
•
2
•
•
Second
•
•
Border
I
workstep,
Select
Stitch
Pattern
Press
Select
Press
Select
Stitch
Pattern
Press
Select
Press
Sew
Select
Sew
the
prog
the
middle
2
24
27
middle
program
length
0.3
length
length
stored
selected
motif.
8.0
0.3
8.0
program
program
program
program
length
program
program
program entry
the
workstep,
program
42
mm
entry
35
entry
42
mm
entry
24
program.
outer
27
program
--
motif
key
key
key
key
motiv
143
143
143
143
along
either
side
of
L
Select
Stitch
Pattern
Press
Press
the
stops
the
the
these
complete
program
width
length
“single
“needle
selected
material(1in
90°(2in
downinthe
material
pattern
two
(Fig.
43
4.0
mm
25
pattern”
down”
pattern
Fig.
3).
through
backwards,
sewing
2).
key
key.
until
the
Fig.
Turn
3).
Sew
the
pattern
material(3in
180° (4inFig.
as
showninFig.
actions
until
needle
the
the
stops
material
until
the
Fig.
then
3),
border
3).
2.
9IIlllIIljlj}IIII}Ilfllllllfl’
itlllIIItIlIITllhIllhIIllNh
•
•
•
•
•
Sew
downinthe
through
needle
Turn
sew
Repeat
is
43
___
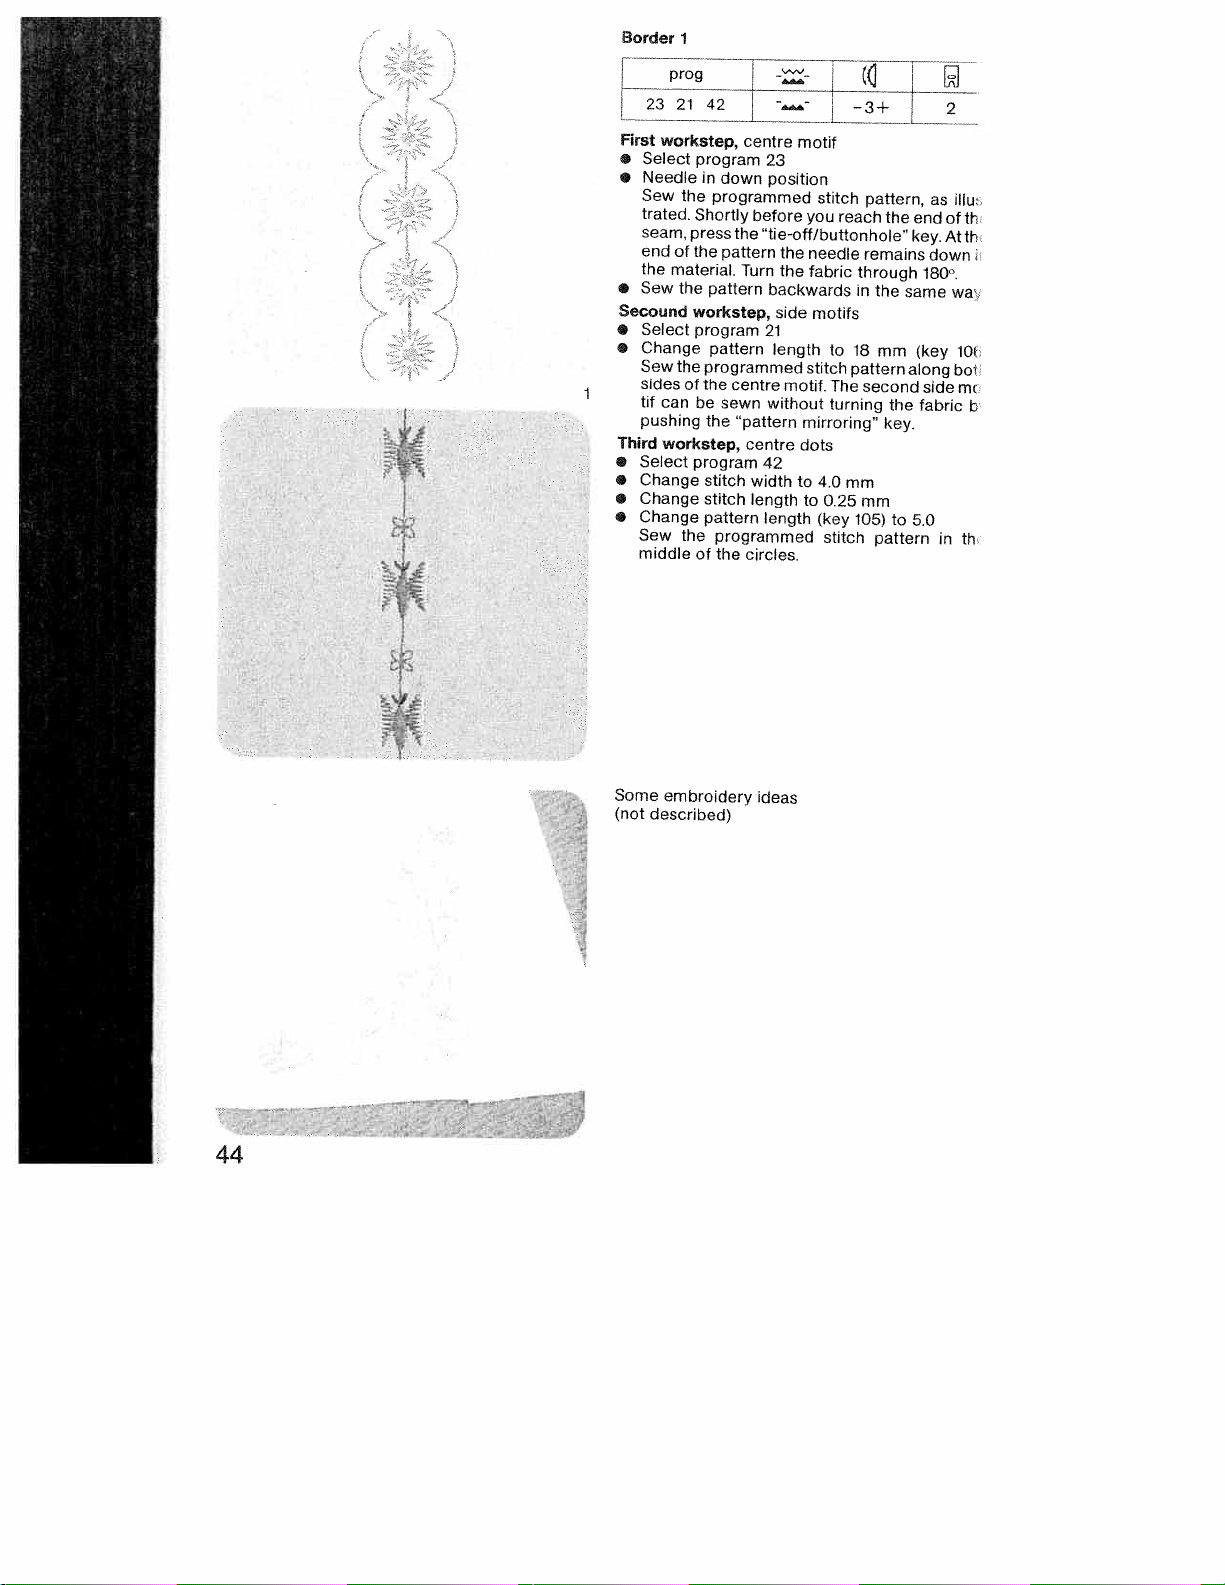
Border
1
-
pwg
232142
First
workstep,
Select
•
Needle
•
Sew
the
trated.
seam,
end
of
the
material.
Sew
•
the
Secound
•
Select
•
Change
Sew
the
sides
of
tif
can
pushing
Third
workstep,
•
‘
•
•
•
Select
Change
Change
Change
Sew
the
middle
program
in
down
programmed
Shortly
press
the
the
pattern
Turn
pattern
workstep,
program
pattern
programmed
the
centre
be
sewn
the
“pattern
program
stitch
stitch
pattern
programmed
the
of
j
centre
23
position
before
“tie-off/buttonhole”
backwards
21
without
centre
42
width
length
length
circles.
motif
the
the
side
length
motif.
to
3+
stitch
you
reach
needle
fabric
motifs
to
stitch
pattern
The
turning
mirroring”
dots
4.0
mm
to
0.25
(key
stitch
pattern,
remains
through
in
the
18
mm
second
mm
105)
pattern
the
the
key.
to
end
key.
same
(key
along
fabric
5.0
as
down:
1800.
side
in
2
illu:
of
Atth
wa
10.
bo’
m
th
h
th
44
Some
(not
embroidery
described)
ideas
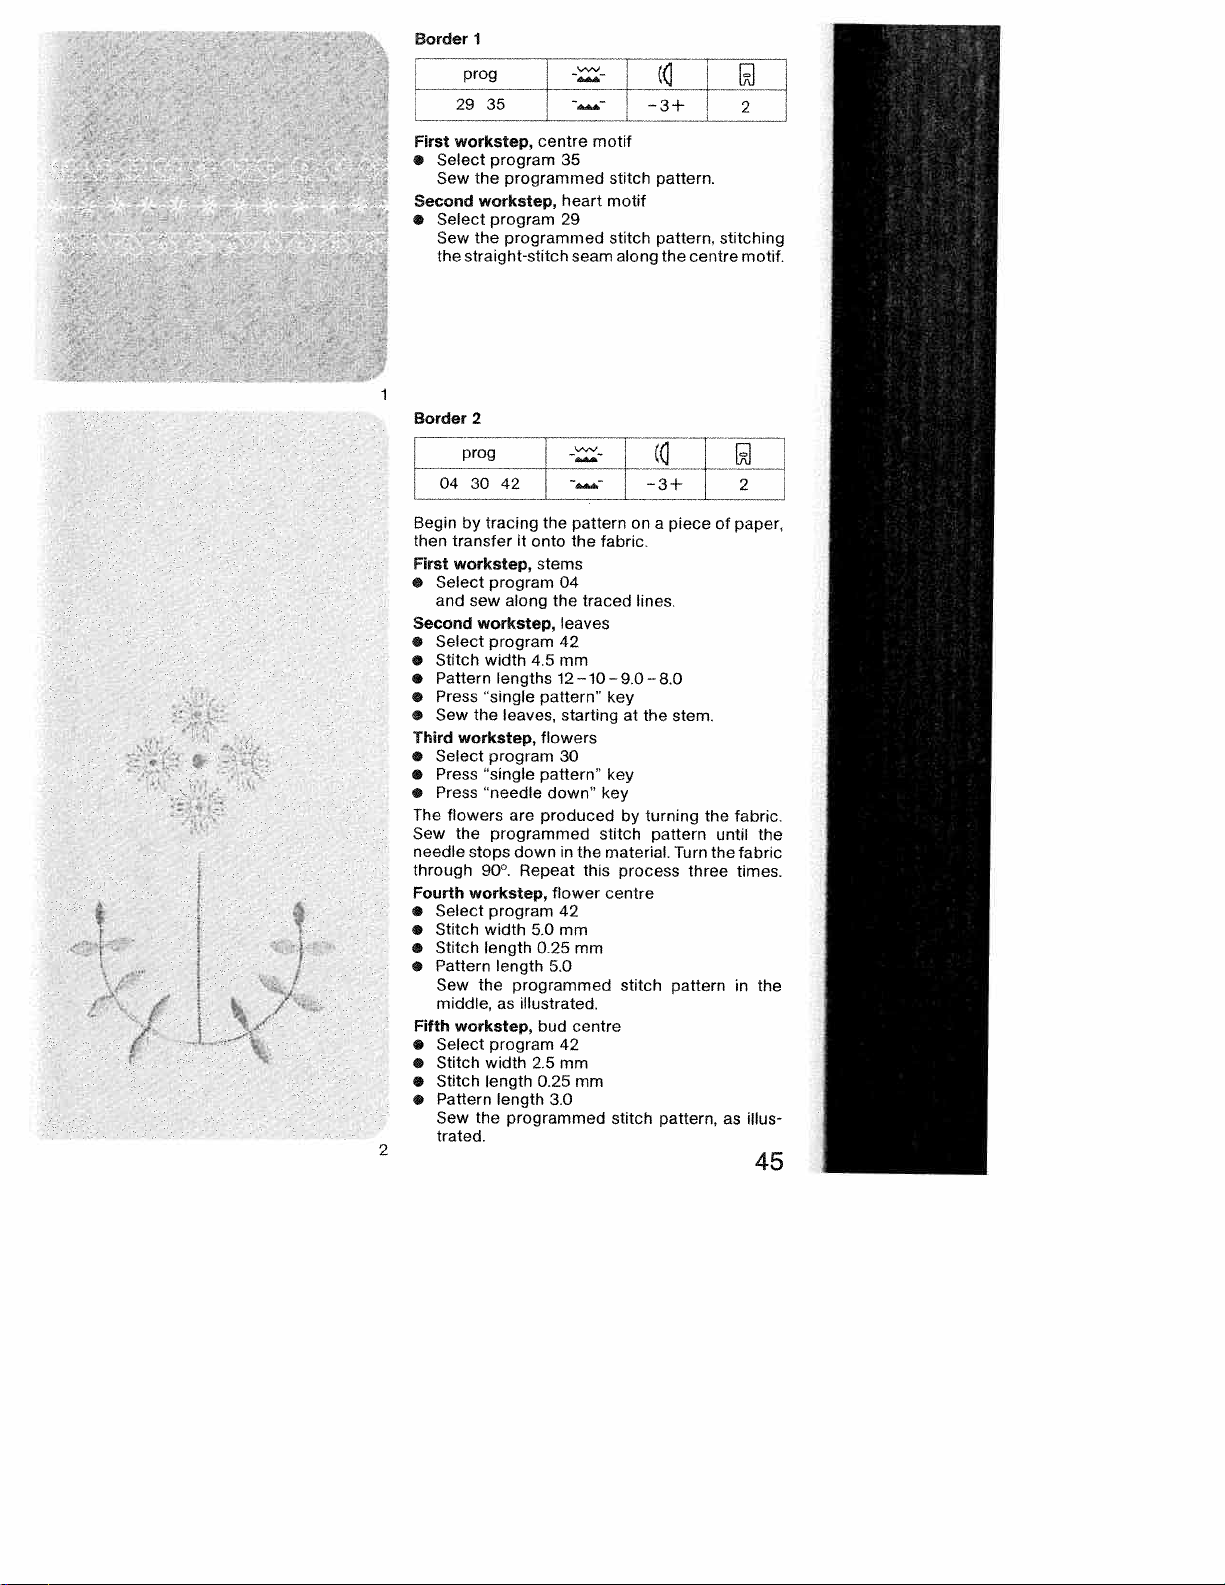
Border
2935
workstep,
First
Select
•
Sew
Second
Select
•
Sew
the
Border
04
Begin
then
transferitonto
First
workstep,
Select
•
and
Second workstep,
•
Select
•
Stitch
•
Pattern
Press
•
•
Sew
Third
•
Select
•
Press
•
Press
The
flowers
Sew
the
needle
through
Fourth
Select
•
•
Stitch
•
Stitch
Pattern
•
Sew
middle,
Fifth
workstep,
•
Select
Stitch
•
Stitch length
•
Pattern
•
Sew
trated.
2
1
prog
centre
program
the programmed
workstep,
program
the
programmed
straight-stitch
2
prog-
30
by
tracing
stems
program
sew
along
program
width
4.5
lengths
‘single
the
workstep,
stops
workstep,
the
the
pattern’
leaves,
program
“single
pattern”
“needle
are
programmed
down
90°.
Repeat
program
width
5.0
length
0.25
length
programmed
as
illustrated.
bud
program
width
2.5
0.25
length
programmed
motif
35
stitch
heart
motif
29
stitch
seam
along
the
pattern
fabric
the
04
the
traced
leaves
42
mm
12—10-9.0—8.0
key
starting
flowers
30
down”
produced
in
flower
42
mm
5.0
42
mm
3.0
the
this
mm
centre
mm
at
key
key
by
stitch
material.
process
centre
stitch
stitch
___
-3+
pattern.
pattern,
the
centre
:izLL.J
onapiece
lines.
the
stem.
turning
the
pattern
Turn
three
pattern
pattern,
2
stitching
motif.
of
paper,
fabric.
until
the
the fabric
times.
in
the
as
illus
45
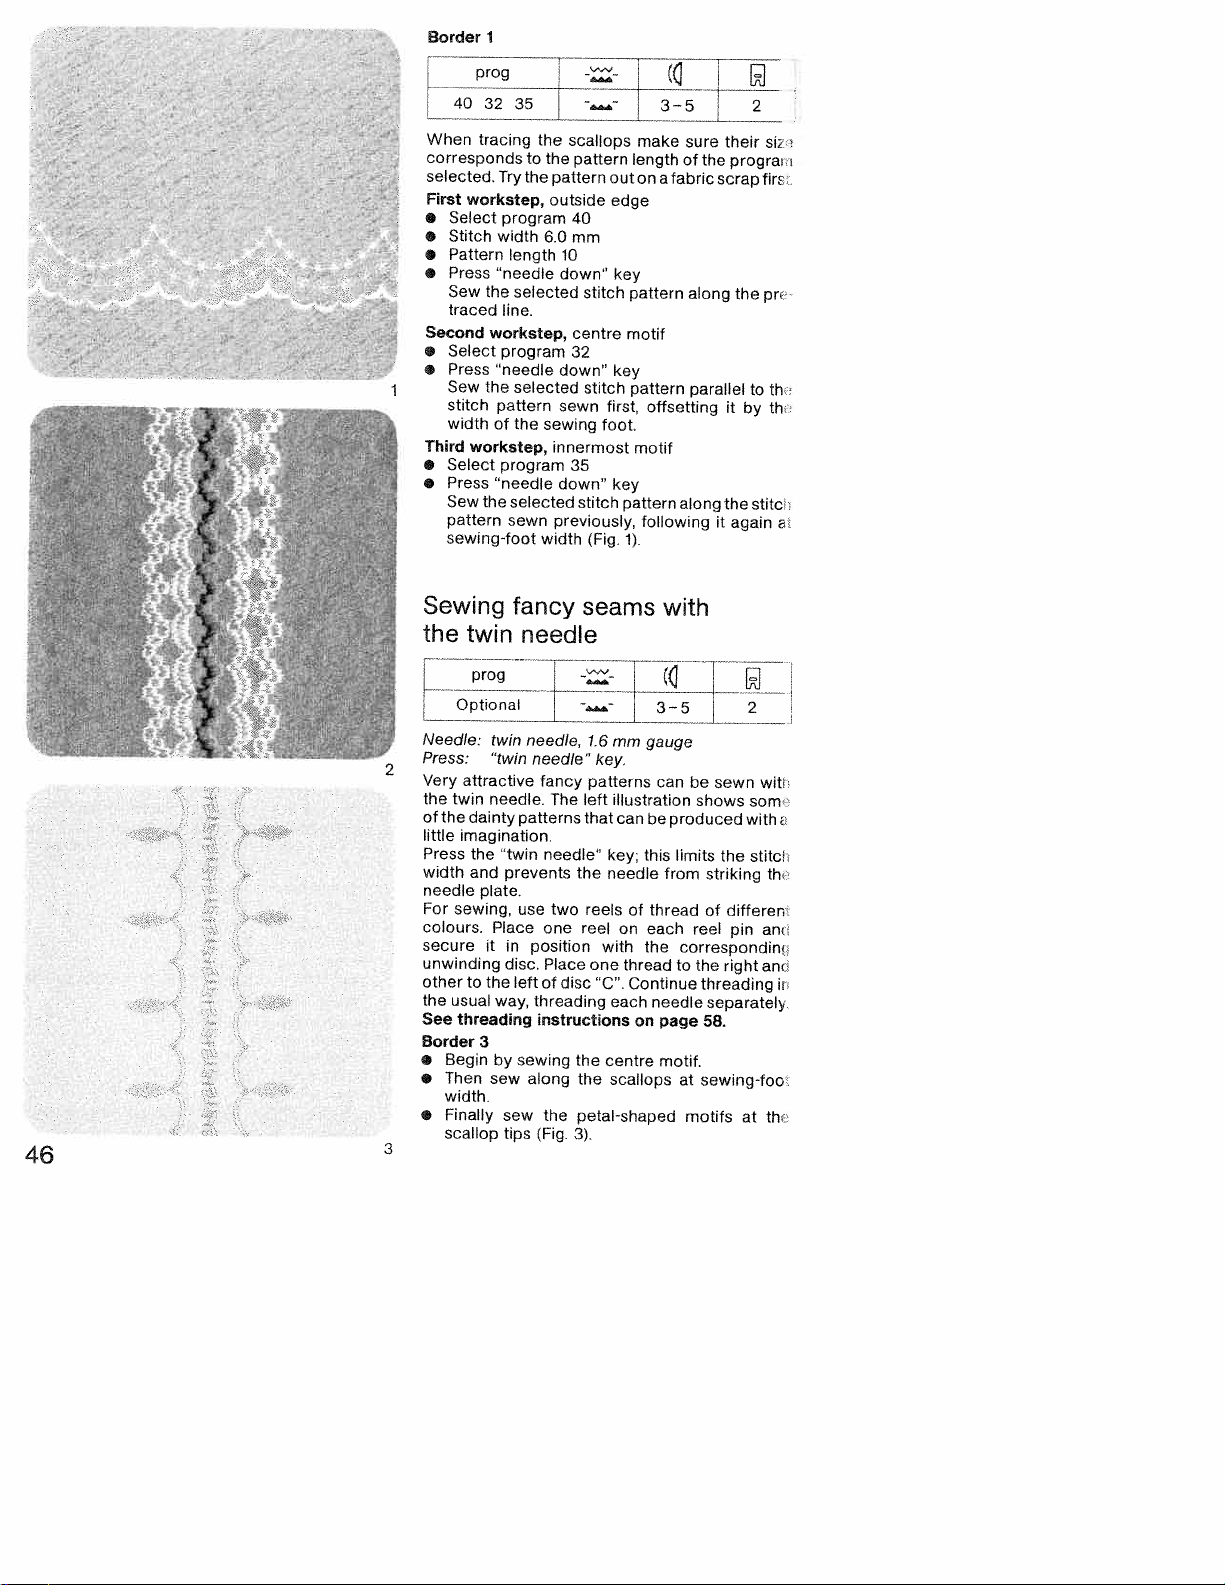
Border
1
46
2
3
__z
L
°
L
2L4-
When
tracing
corresponds
selected.
First
workstep,
•
Select
•
Stitch
•
Pattern
•
Press
Sew
the
traced
Second
•
•
Third
•
•
workstep,
Select
Press
the
Sew
stitch
width
of
workstep,
Select
Press
‘needle
Sew
the
pattern
sewing-foot
Sewing
the
twin
—
-
---
Optional
Needle:
Press:
Very
the
of
little
Press
width
needle
For
colours.
secure
unwinding
other
the
See
Border
•
•
•
twin
“twin
attractive
twin
needle.
the
dainty
imagination.
the
and
plate.
sewing,
Place
it
the
to
usual
way,
threading
3
Beginbysewing
Then
sew
width.
Finally
scallop
to
Try
the
program
width
length
“needle
selected
line.
program
needle
selected
pattern
the
program
selected
sewn
fancy
needle
needle,
patterns
“twin
prevents
use
in
position
disc.
left
along
sew
tips
—
the
scallops
the
pattern
pattern
outside
40
mm
6.0
10
down”
stitch
centre
32
down”
stitch
sewn
sewing
innermost
35
down”
stitch
previously,
width
seams
4—
needle”
fancy
The
left
that
needle”
the
reels
two
one
reel
Place
disc
of
threading
instructions
the
the
the
petal-shaped
(Fig.
3).
out
edge
key
key
first,
foot.
key
pattern
(Fig.
1.6
mm
key.
patterns
illustration
can
key;
needle
on
with
one
thread
“C”.
each
centre
scallops
4-
make
length
on
a
pattern
motif
pattern
offsetting
motif
following
1).
with
4-L
3—5
gauge
can
be
this
from
of
thread
each
the
Continue
needle
on
page
motif.
(1
j
sure
their
the
of
fabric
scrap
along
parallel
along
the
it
sewn
be
shows
produced
limits
the
striking
of
reel
correspondin
the
right
to
threading
separately
58.
at
sewing-too
motifs
2
prograi
the
to
it
by
stitch
again
2
wib
som
with
stitc
differen
pin
at
siz
firr
pr
th•
th
a
th
an
an
i
th
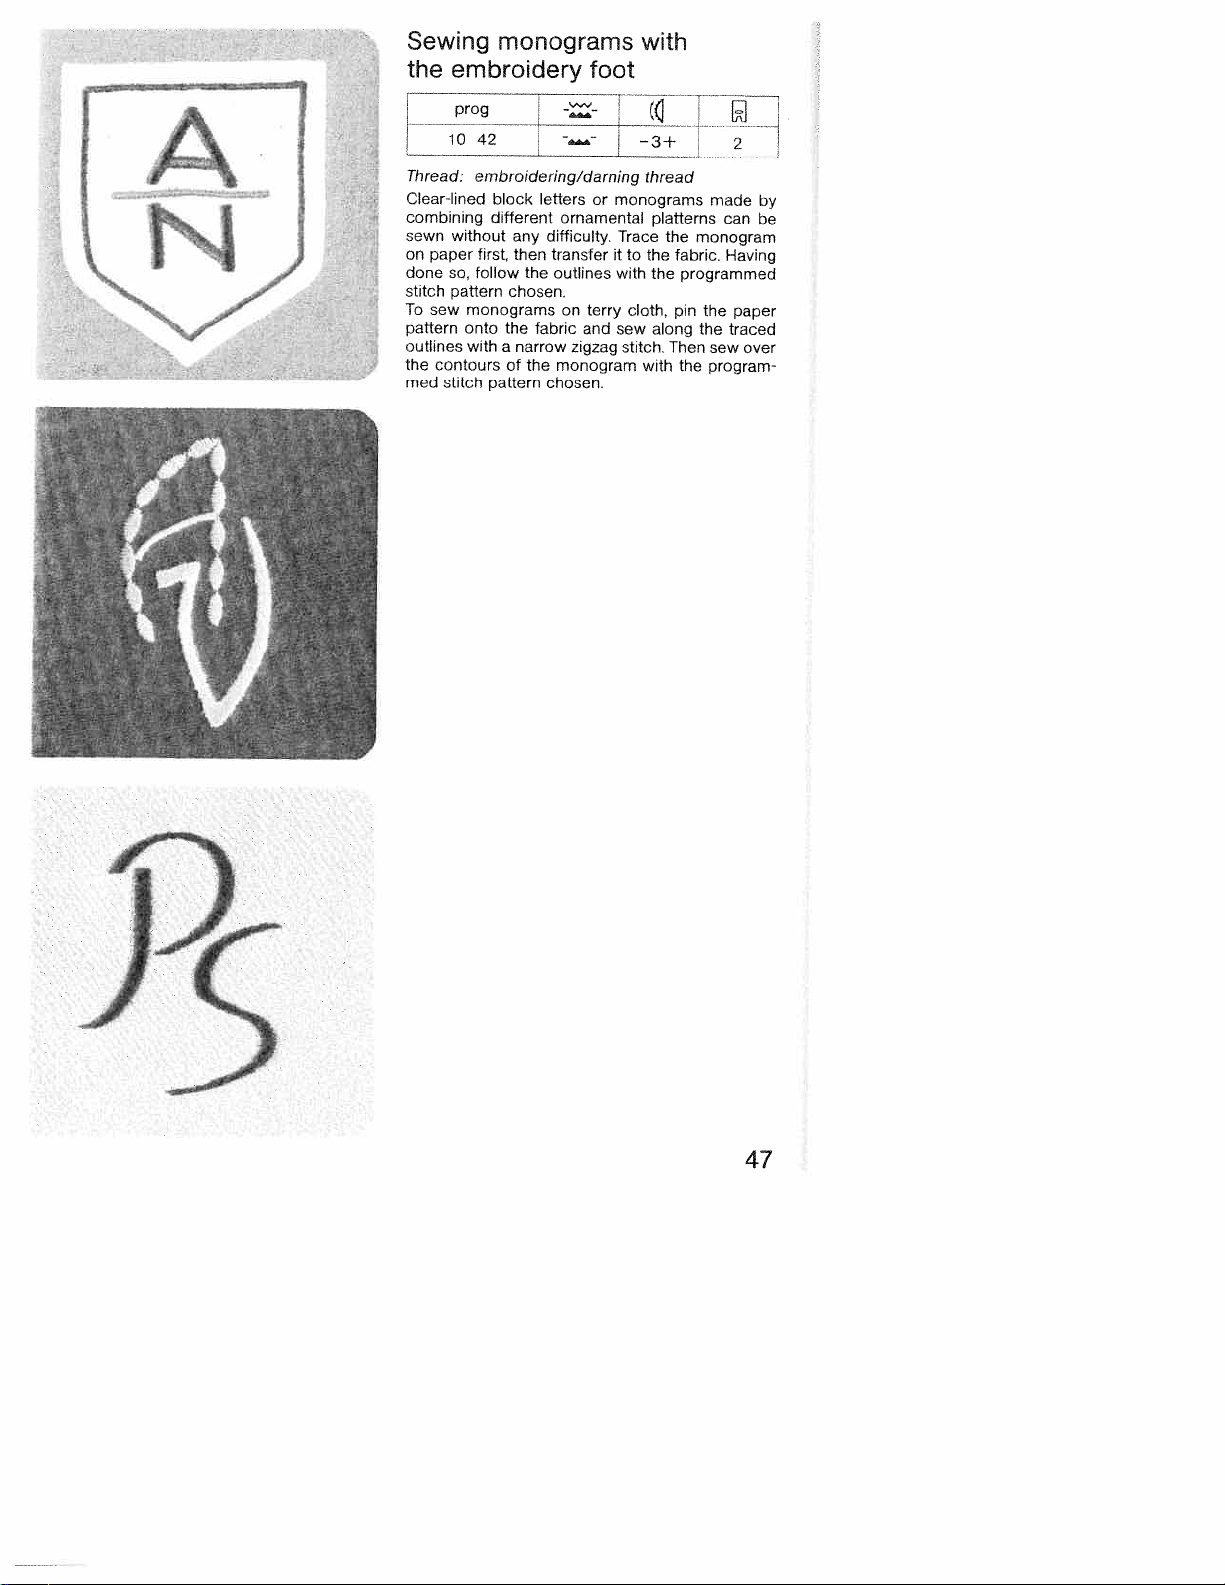
Sewing
embroidery
the
monograms
foot
with
k
I
I
prog
10
Thread:
Clear-lined
combining
without
sewn
paper
on
done
so,
stitch
pattern
To
sew
pattern
outlines
the
contours
med
stitch
-
42
embroidering/darning
block
letters
different
first,
follow
monograms
onto
with
pattern
any
then
the
chosen.
the
a
narrow
of
the
ornamental
difficulty.
transfer
outlines
on
fabric
zigzag
monogram
chosen.
or
monograms
Trace
ittothe
with
terry
and sew
stitch.
—3+
thread
cloth,
with
platterns
the
fabric.
programmed
the
pin
along
Then
the
2
made
can
monogram
Having
paper
the
the
traced
sew
over
program
by
be
47
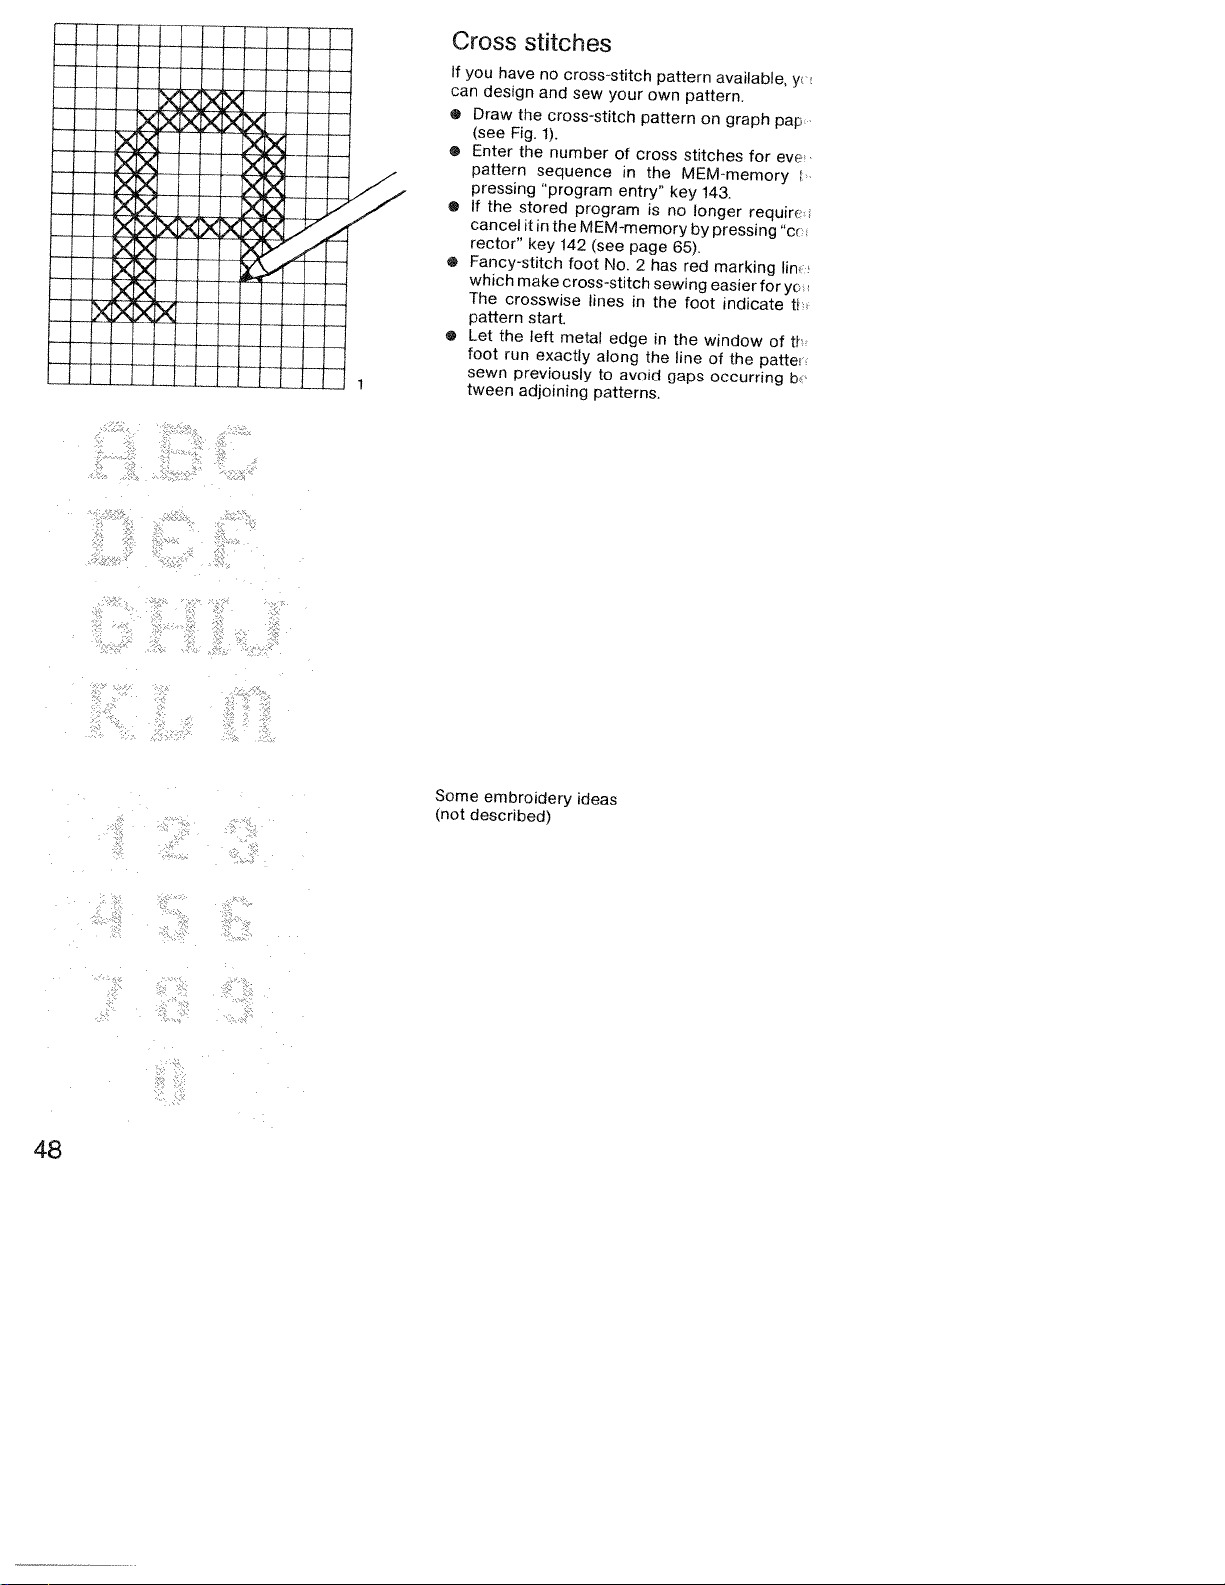
xxx
tx
:--i--
lx
,
)<
><
)<)
x>
)<K
x>(X)(
Cross
If
you
can
•
•
I
—
•
•
•
stitches
have
design
Draw
the
(see
Fig.
Enter
the
pattern
pressing
If
the
stored
cancel
it
rector’
key
Fancy-stitch
which
make
The
crosswise
pattern
start.
Let
the
foot
run
sewn
previously
tween
adjoining
no
cross-stitch
and
sew
cross-stitch
1).
number
sequence
“program
in
the
142
foot
cross-stitch
left
metal
exactly
your
own
pattern
of
cross
in
the
entry”
program
MEM-memory
(see
No.
lines
edge
along
to
avoid
patterns.
page
2
in
the
is
has
sewing
the
in
pattern
available,
pattern.
on
stitches
MEM-memory
key
143.
no
longer
by
pressing
65).
red
marking
easierforyc
foot
the
window
line
of
gaps
occurring
graph
for
requirr
indicate
the
patte
of
y
pap
eve
L
“cc
lin
ti
th
b
48
Some
(not
embroidery
described)
ideas
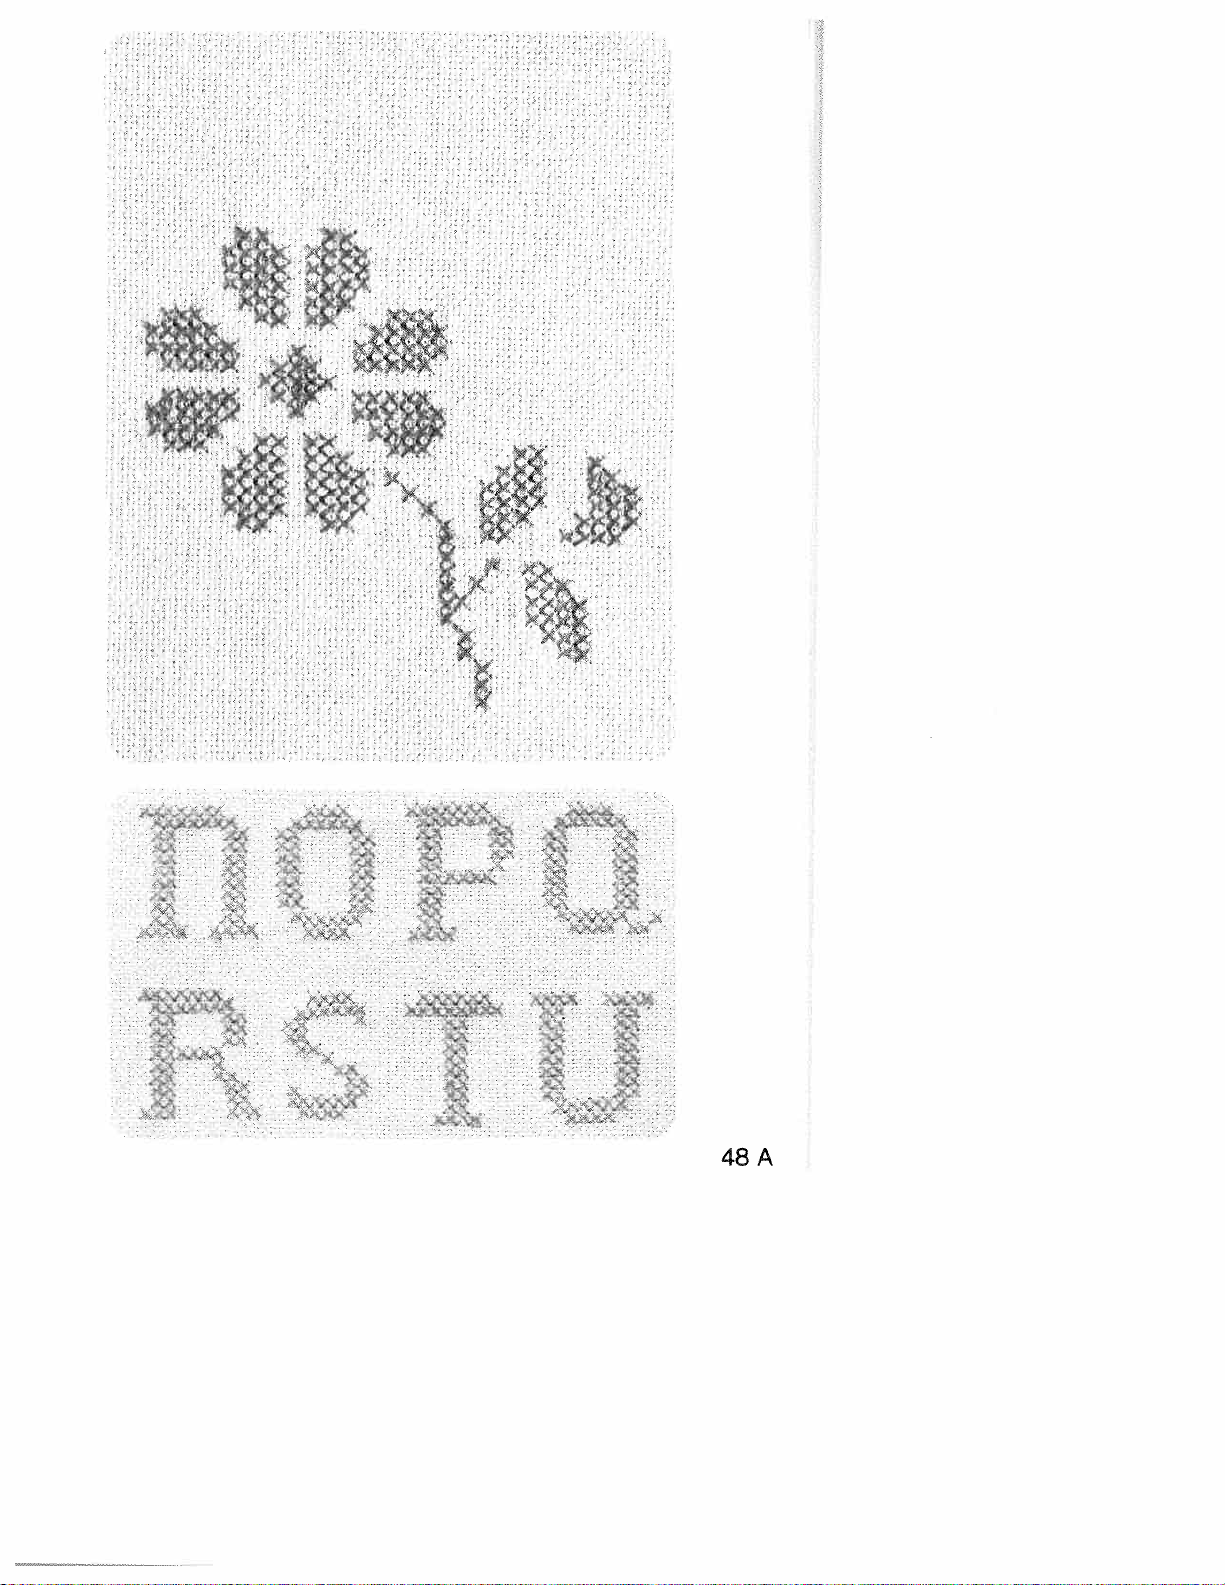
CCK
‘
‘Or
-
‘nfl
r
1’
I-
“7
I
)
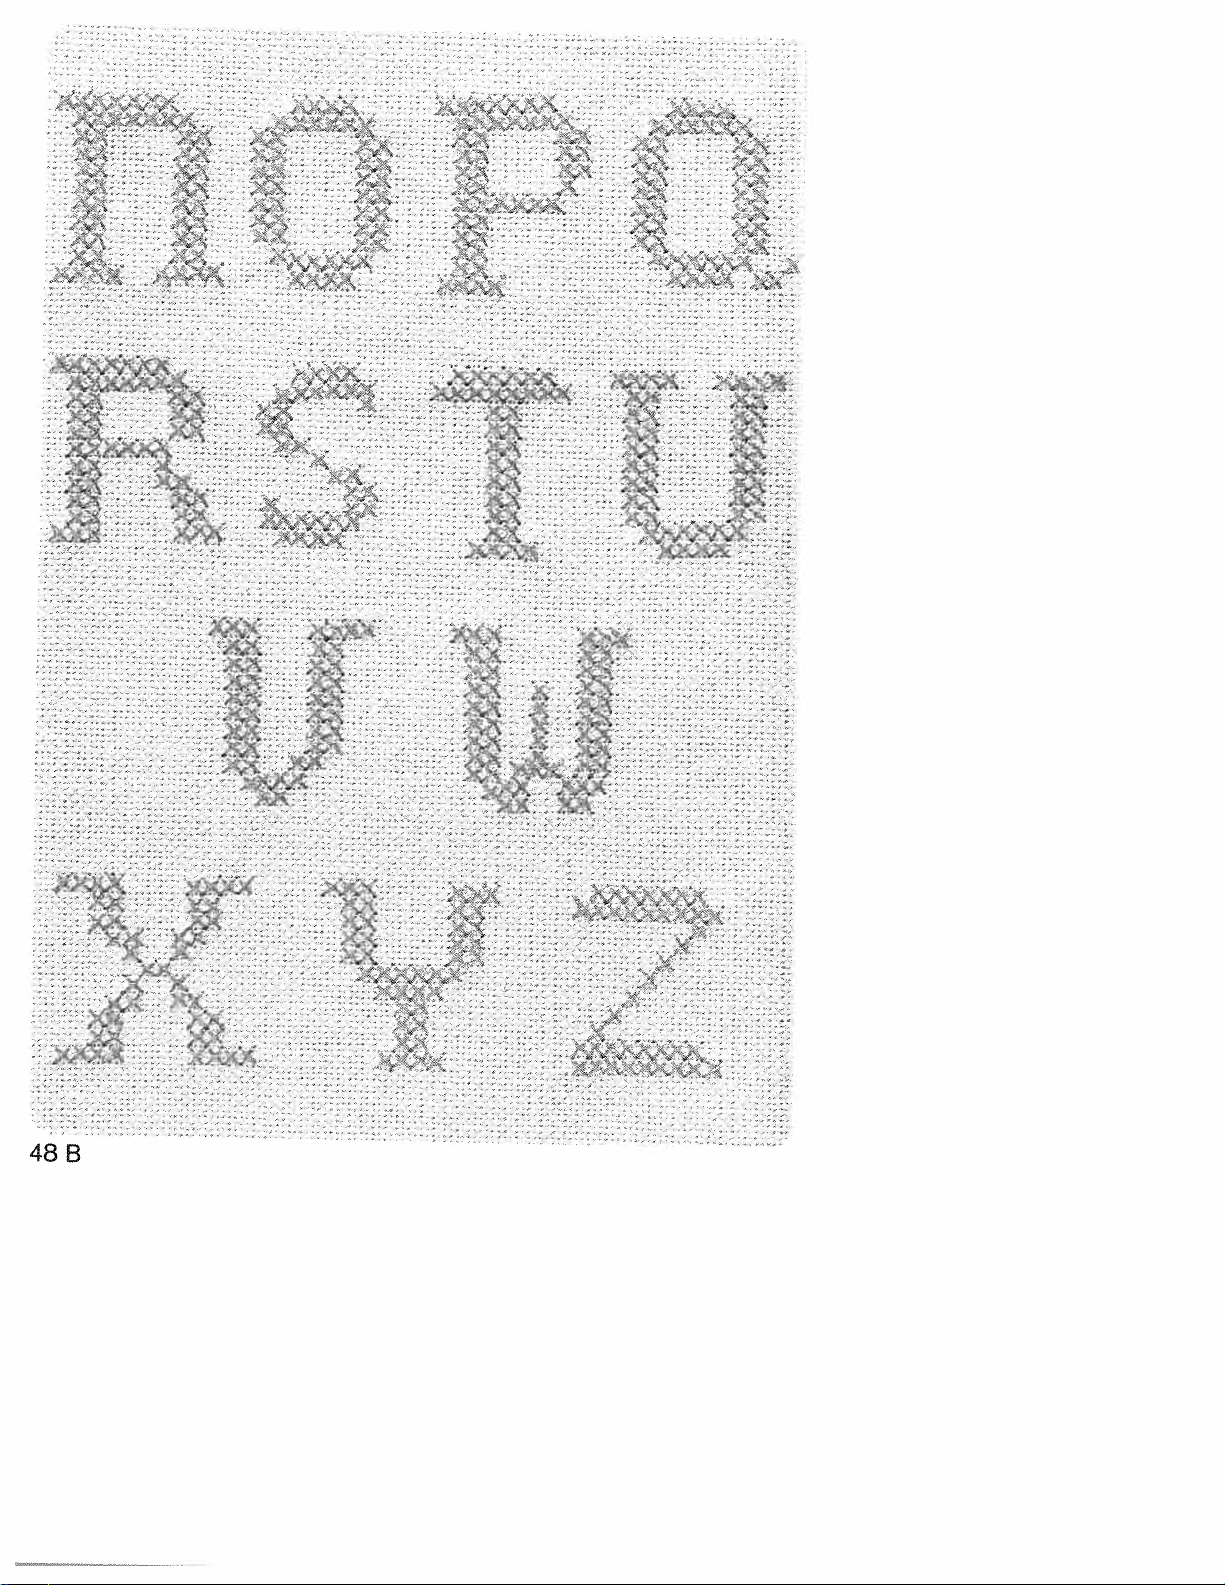
a
U
p.
S
at...
9.
•1’
.iir7Ita
‘•
a.
.
•.
Z
S
9
•
..
.9
•
S
S
‘a.
9.
w
.‘
5...
••t’
.5
•
.
.
asS
a
a
:
..jjR..
:9tt)A.
I
••
e.
13.
.:
•:../•r
bfl
•
‘
•
“
5
a.
559
‘
•
•r..:
I
‘
“‘‘p
S..’
.
an
••.‘
.
a
••a••S
..t%’.’%’
•n:
•..
.,..
9
*
a..’,
•.b.•
.
.:.‘“9”:
a
.
:c;.,;’’i<
.
•
,
.‘:..¾t%t’”.
:L
A.%
.4
a.
:.
:
S
a
,
•9
.
‘
a
•.
fq’
.1ae
r::t..
•
‘
.
?•
.
a
•
s
1
St?ta4tY’o.’.’
•j.
•
.•
a
.
.•
•
as’
a
.
aa,
•
S
—
...
9
•\ss’_.A
.....
‘a
•
‘‘
•
an
._
.•
.
.
.‘‘
•
.
*%1!.31L,Z%4..
0
•
S
.
..
a
•.::
••
•
j’’a:
•
:
.
•!
•
r•
.::..
S
a:.:
‘**$f!..
5
t!s
5
9
a..
•
..:
..
‘
•
v:.
S
:
.
a%,
a
1
b....
‘.
.
hsa
a
a
.;:‘:;.,lF.””
rr:
.3.’:::,:
..
.:::
.
:.:
:..
:
•••
‘;‘‘“:
•

With
beautiful
dery
Border
Enter
pressing
•
4x36
•
1
•
Sew
endofthe
back
terns
Border3
the
motifs.
1
36
the
x
36i
the
cross-stitch
borders,
36i
following
the
“program
pattern
pattern
pattern,
to
the
starting
(Fig.
1).
program
monograms
programsinthe
entry
mirroring
along
the
turn
the
point,
you
can
and
other
key:
traced
material
matching
sew
embroi
computer
line.Atthe
and sew
the
many
ci
2]
by
pat
in
traced
edges
the
—3
key
the
in
-
+
computer
line
the
centre
2
computer
motif
by
on
36i
36
“
First
workstep
1x36
1
Sew
Sew
the
the
36i
x
the
36i
right
following
the
pattern
the
pattern
workstep
following
pattern
the
pattern
and
Enter
pressing
•
•
•
Second
Enter
•4x36
•2x
•
2
centre
program
mirroring
mirroring
left
—
motif
programs
entry
along
outside
programs
alongside
(Fig.
the
3).
AQ
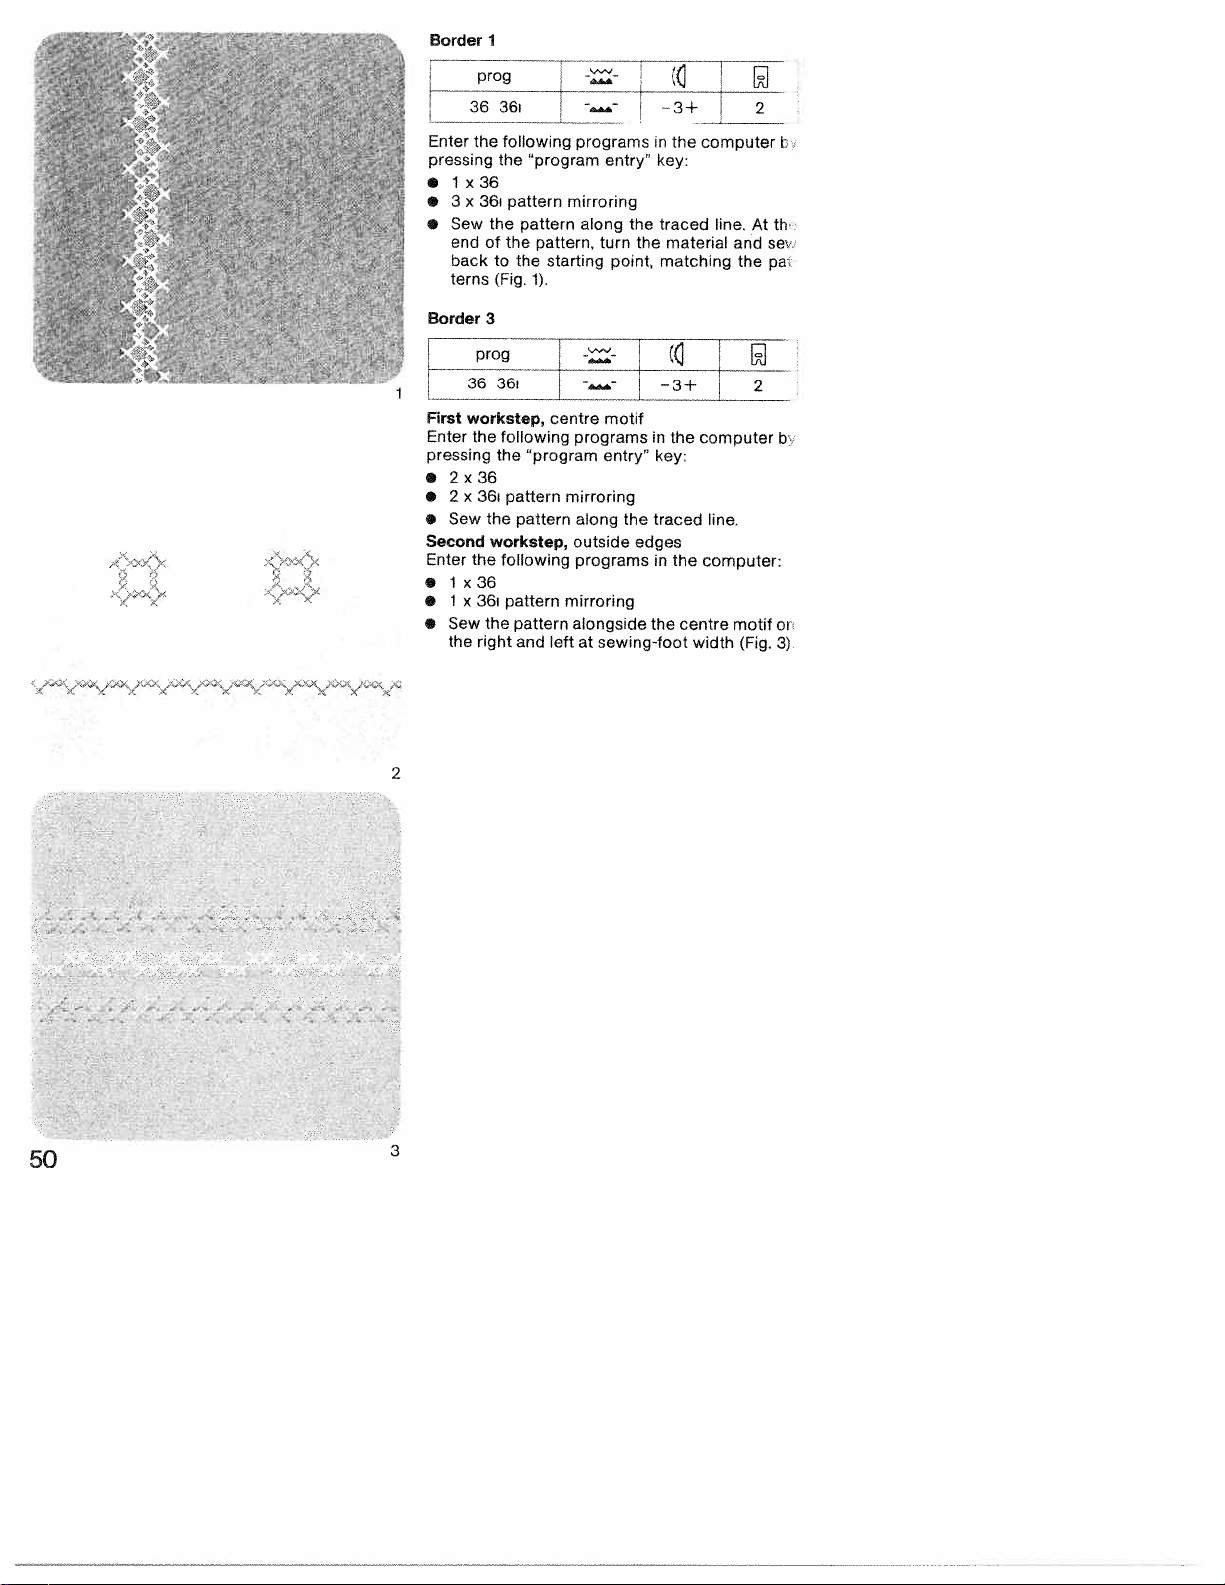
1
Border
1
prog
3636i
Enter
the
1x36
3x36i
Sew
end
back
terns
prog
following
the
pattern
pattern
the
of
the pattern,
to
the
(Fig.
3
pressing
•
•
•
.
..
r
%_:
;4
p’
Border
,
3636
First
workstep,
Enter
the
2x36
2
Sew
1x36
Sew
the
x
36i
the
the
36i
the
right
following
the
pattern
pattern
workstep,
following
pattern
pattern
and
pressing
•
•
•
Second
Enter
•
•1x
•
programsinthe
“program
mirroring
starting
1).
centre
programs
‘program
mirroring
along
outside
programsinthe
mirroring
alongside
left
--
entry”
along
turn
point,
motif
entry”
the
sewing-foot
at
the
the
edges
-3+
key:
traced
material
matching
—3+
the
in
key:
traced
the
centre
computer
line.
:
computer
line.
computer:
width
At
and
the
motif
(Fig.
2
th
se
pa
2
b
oi
3)
50
2
3

C
=0
0
cc
0
©
a
it
I
0
1
L
‘

Linen
embroidery
Plain
popular
made
be
combining
by
Transfer
the
of
tracing
of
Always
fabric
embroidery
ornamentation.
your
on
all
pattern
the
either
fabric
paper.
two
place
embroidering.
during
on
Pfaff
kinds
sheets
linen
The
Creative
of
illustrated
ironing
by
a
is
patterns
stitches.
tissue
of
widely
in
onto
on
it
illustrated
very
a
the
or
paper
known
short
face
with
under
the
and
can
time
side
aid
the
Some
embroidery
described)
(not
ideas:
z
04
Thread:
The
tioned
First
Program
•
Stitch
•
Follow
•
04
Second
Program
•
Stitch
•
Press
•
Sew
•
the
ThWd
Program
•
Embroider
•
Mark
the
izzz
11
embroidering/darning
in
programs.
workstep,
length
the
seam
workstep,
width
‘single
the
stem.
workstep,
the
middle
Fig.
stems
04
pre-traced
39
5.0
leaf
pattern
11
eyelets
position
of
2.5
motifs
motif
:
made
is
1
mm
leaves
mm
pattern”
eyelets
of
flower
the
up
lines
key
slightly
mirroring
page
(see
the
—3+
thread
of
with
curved,
eyelet,
(Fig.
-
above-men
the
a
52)
then
1).
2
program
starting
sew
at
in
it
51

Eyelet
eyeletting
r
embroidery
pate
prog
(special
with
accessory)
the
zzI
pattern
Feed
dog:
Presser
Sewing
Fftting
the
double
row,
position
Place
hoop.
the
fabric
against
and
hold
bar
a
000
0
0
6
0
6
0
a
0
6
0
03
3
0
00
‘3
0
around
slowly
the
stitches
(Fig.
lifter
2).
bar
thread:
the
place
(see
the
Cut
the
it
the
clockwise
lifter:
eyeletting
catch
it
over
Fig.
traced
one
over
pin
for
darning
in
cut
with
or
the
all
the
with
a
engaging
the
1).
fabric
two
round.
first
at
few
mirror
dropped
in
darning
embroidering
thread
plate:
behind
needle
tautly
fibres
pin.
The
Draw
few
stitches
position
zigzag
stitches,
the
same
straight
position
plate
insert
and
the
and
(page
darning
the
middle
snap
inanembroiderin
in
the
fabric
fabric
must
the
bobbin
(placing
beforehand).
turning
time.
Finally,
stitches
at
plate
and
be
thread
pressEi
the
secur
the
96)
tooti
it
pus
tigL
Stitc
hoo
edg
wit
mt
u
52
2
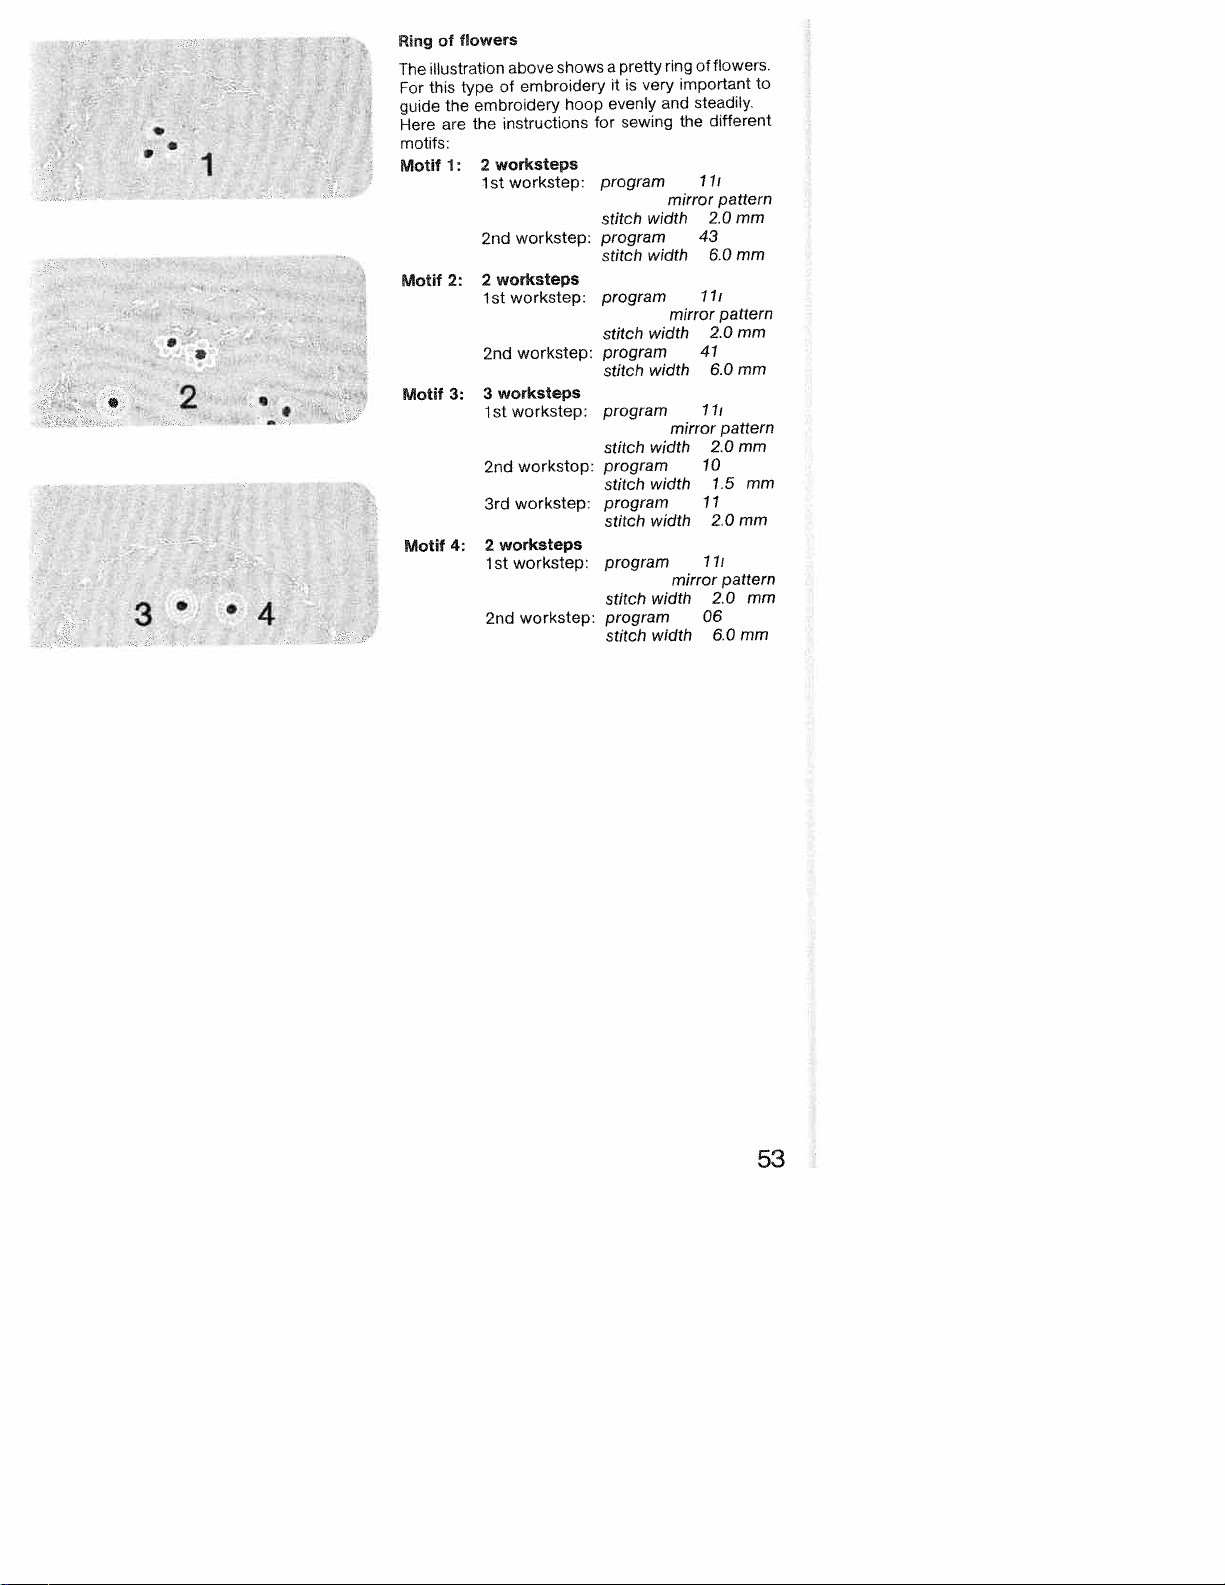
3
flowers
of
Ring
flowers.
ring
very
width
width
width
width
width
width
width
width
width
important
and
the
mirror
mirror
mirror
mirror
of
steadily.
different
11,
pattern
2.0
43
6.0
11,
pattern
2.0
41
6.0
11,
pattern
2.0
10
1.5
11
2,0
lii
pattern
2.0
06
6.0
to
mm
mm
mm
mm
mm
mm
mm
mm
mm
a
hoop
pretty
is
it
evenly
sewing
for
program
stitch
program
stitch
program
stitch
program
stitch
program
stitch
program
stitch
program
stitch
program
stitch
program
stitch
shows
illustration
The
For
this
the
guide
are
Here
S
2
•
motifs:
Motif
Motif
Motif
Motif
1:
2:
above
embroidery
of
type
embroidery
instructions
the
worksteps
2
lstworkstep:
2nd
workstep:
worksteps
2
workstep:
1st
workstep:
2nd
worksteps
3
3:
4:2worksteps
1st
2nd
3rd
1st
2nd
workstep:
workstop:
workstep:
workstep:
workstep:
53

Fringe
Butterfly
Two
worksteps
First
workstep
-_-
prog
10
*
Fringe
Stitch
Stitch
Fringe
First
workstep
First
of
stitch
able.
working
Second
42jj2-3:2
Pattern
Key:
Second
Sew
Third
workstep
Finally
stitches,
a
program
stitch
•
pattern
e
Flower
foot
width:
length:
foot:
sew
scrap
lengths
The
workstep
length:
workstep
the
width
seams
are
(wings)
1.5
0.5
(special
(wings)
fringe
a
material.
wings
from
as
single
body
the
sew
adding
42
4.0
length
mm
mm
until
are
the
required
as
stitch
5.0
required
(body)
(body)
shown
the
mm
I
accessory)
seamasa
During
you
find
best
sewnincircular
outside
pattern
in
antennas
dots
pattern
for this:
-
2-3
trial,
sewing.
the
inwards.
the
illustration
with
attheirtips
(Fig.
using
try
differer
one most
small
bysewinf.
1).
using
*
a
piec.
seam
(Fig,
zigzac
sui
1)
54
3
044243
Mark
out
Sew
the
illustration.
fringe
seam,
wards
(Fig.
the
petals,
Now
2).
-
pattern
stem
fill
working
of
and
in
the
spirally
.
—3+
the
flower
leaves
seed capsule
from
as
on
shown
the
2
the
using
outside
fabric.
in
the
a
in
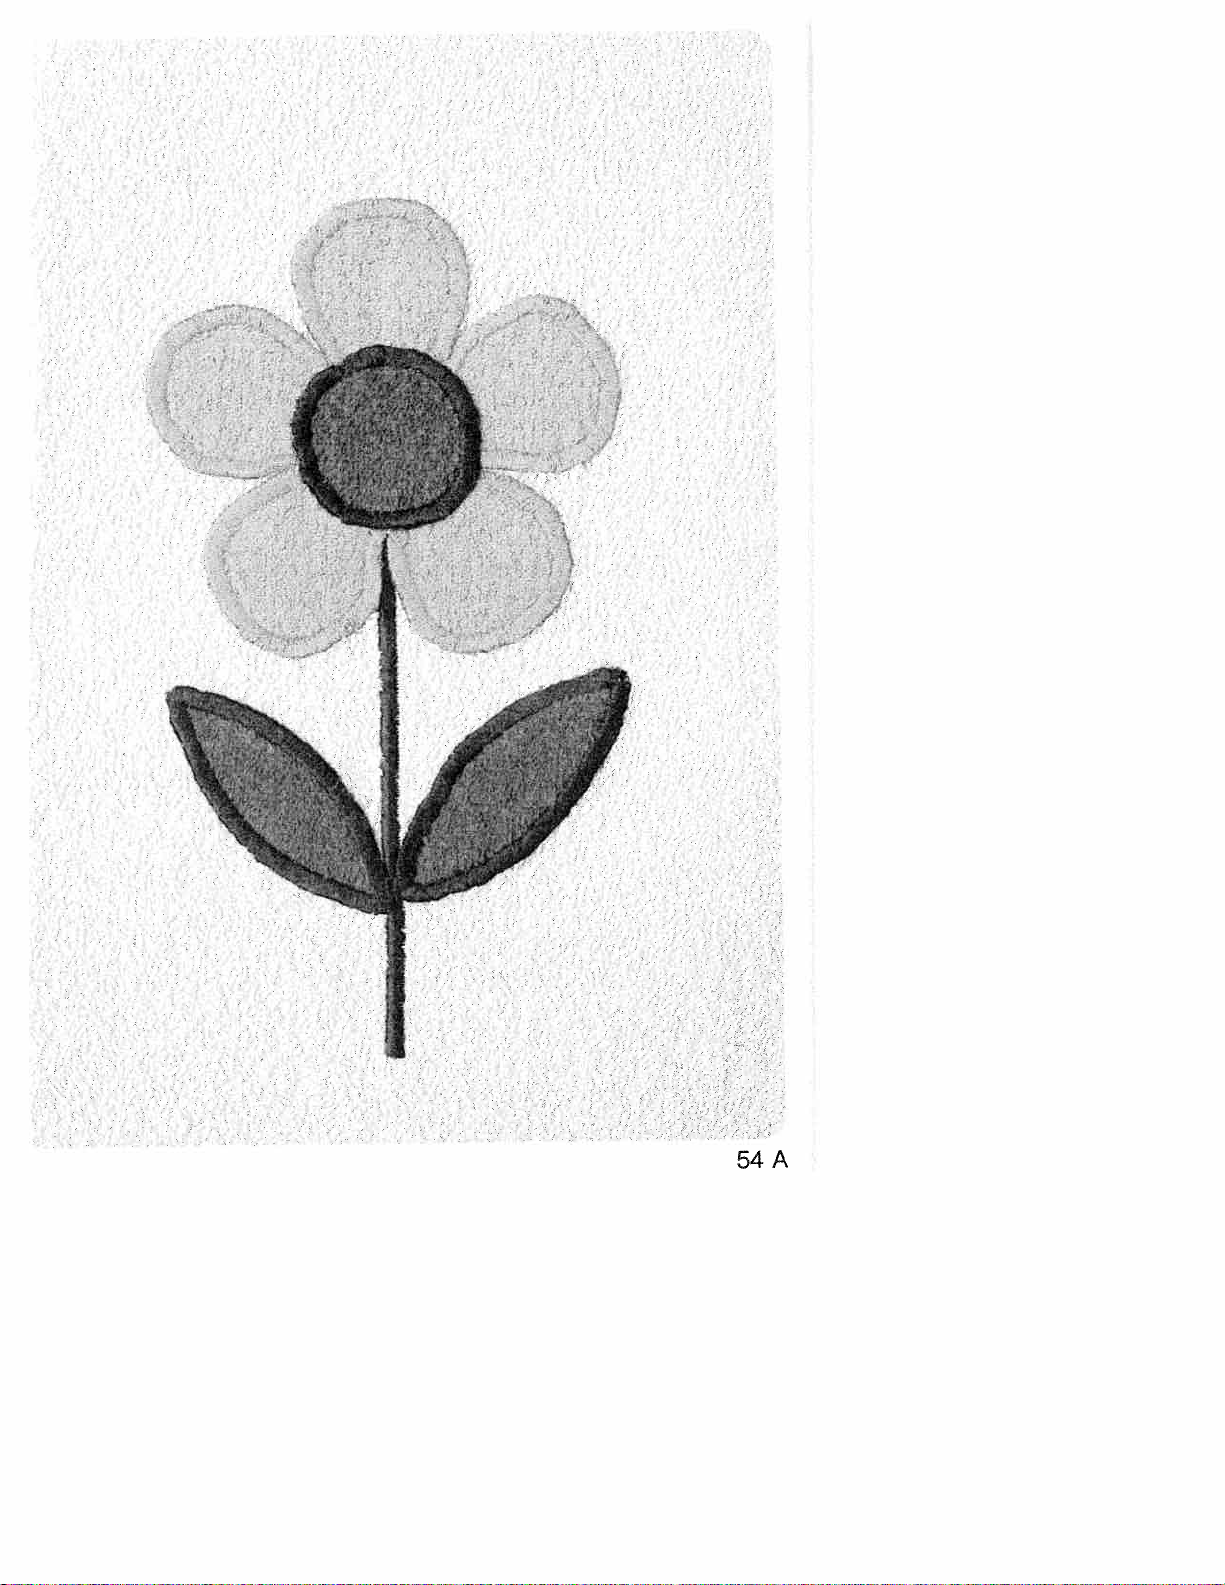
C),
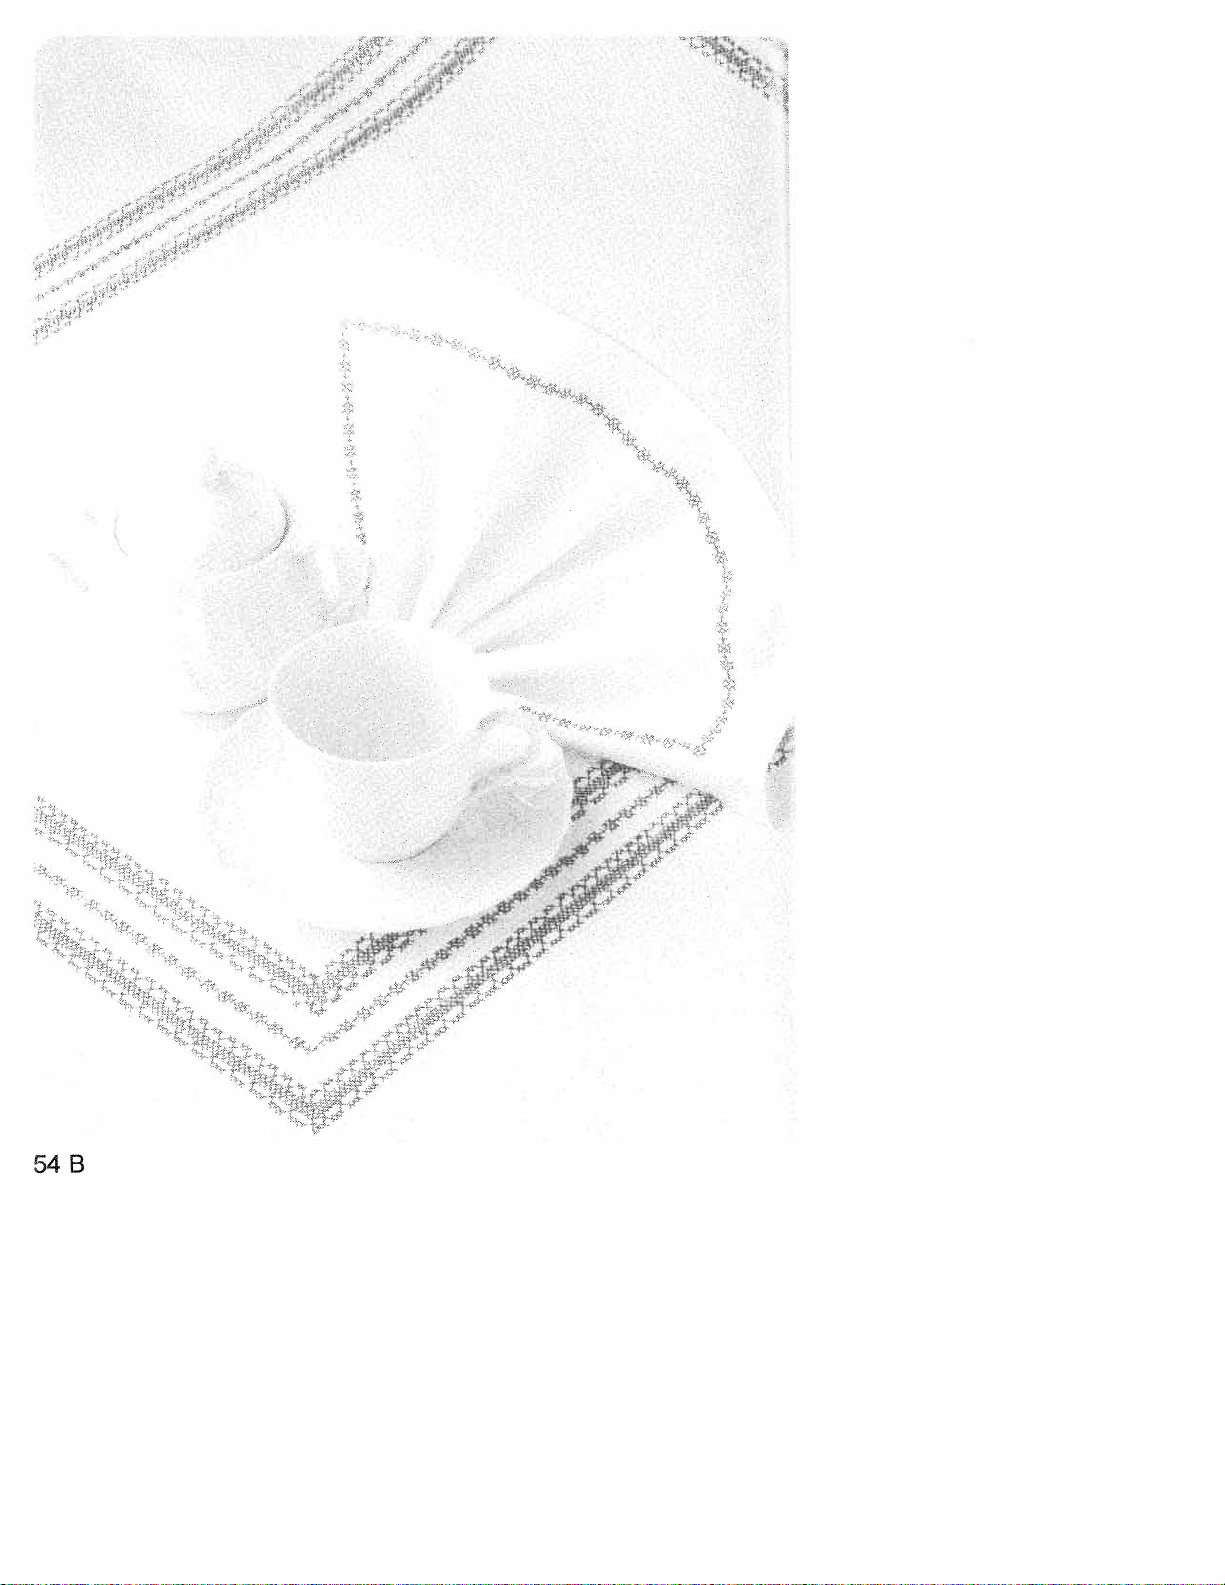
S..
•
*
S
sq
w
L
¼
A
4
.7
.4
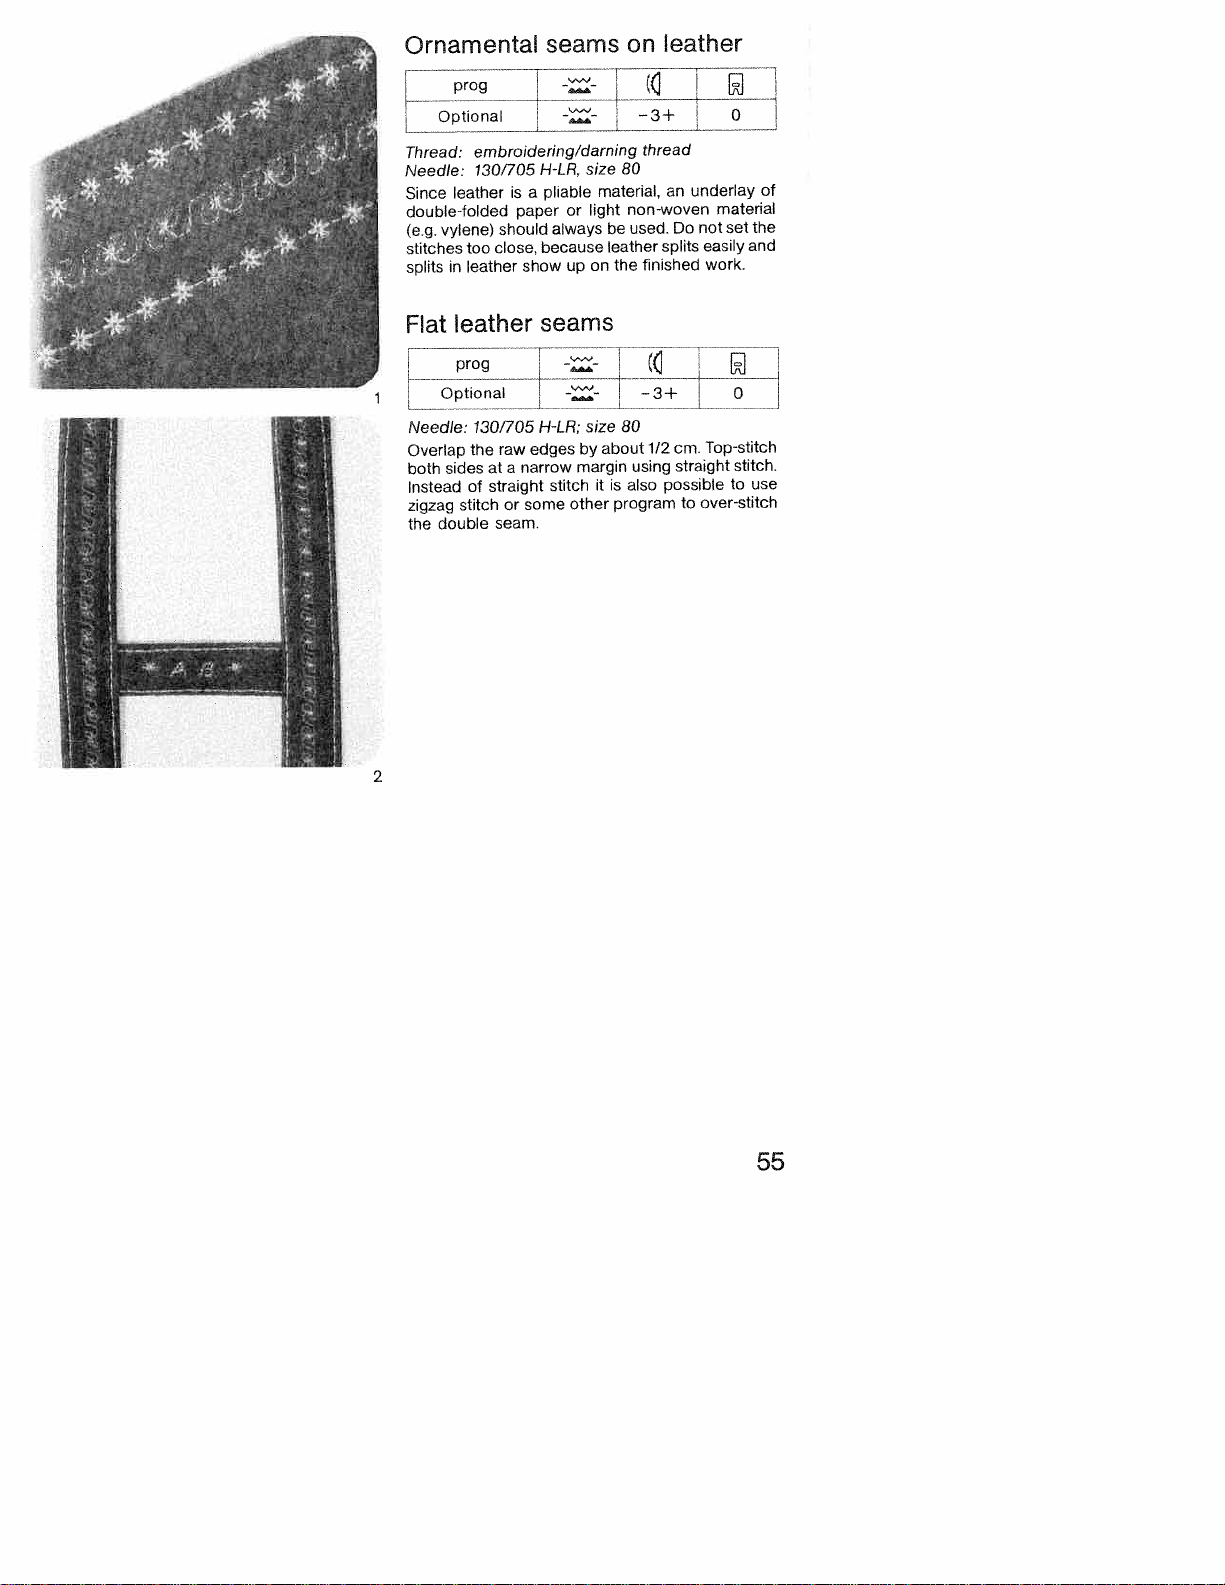
Ornamental
progTZ
Optional
Thread:
Needle:
Since
double-folded
(e.g.
stitches
splits
embroidering/darning
130/705
leather
should
vylene)
close,
too
in
leather
is
paper
show
seams
H-LR,
pliable
a
always
because
--
or
up
r--
size
material,
light
be
leather
the
on
on
leather
—3+
thread
80
an
non-woven
used.
splits
finished
-r
underlay
not
Do
material
set
easily
work.
0
of
the
and
2
Flat
Optional
Needle:
Overlap
both
Instead
zigzag
double
the
leather
130/705
the
at
sides
straight
of
stitch
raw
a
or
seam.
seams
H-LA;
edges
narrow
stitch
some
--
by
margin
other
size
it
80
about
also
is
program
—3+
1/2
using
cm.
straight
possible
over-stitch
to
0
Top-stitch
stitch.
to
use
55
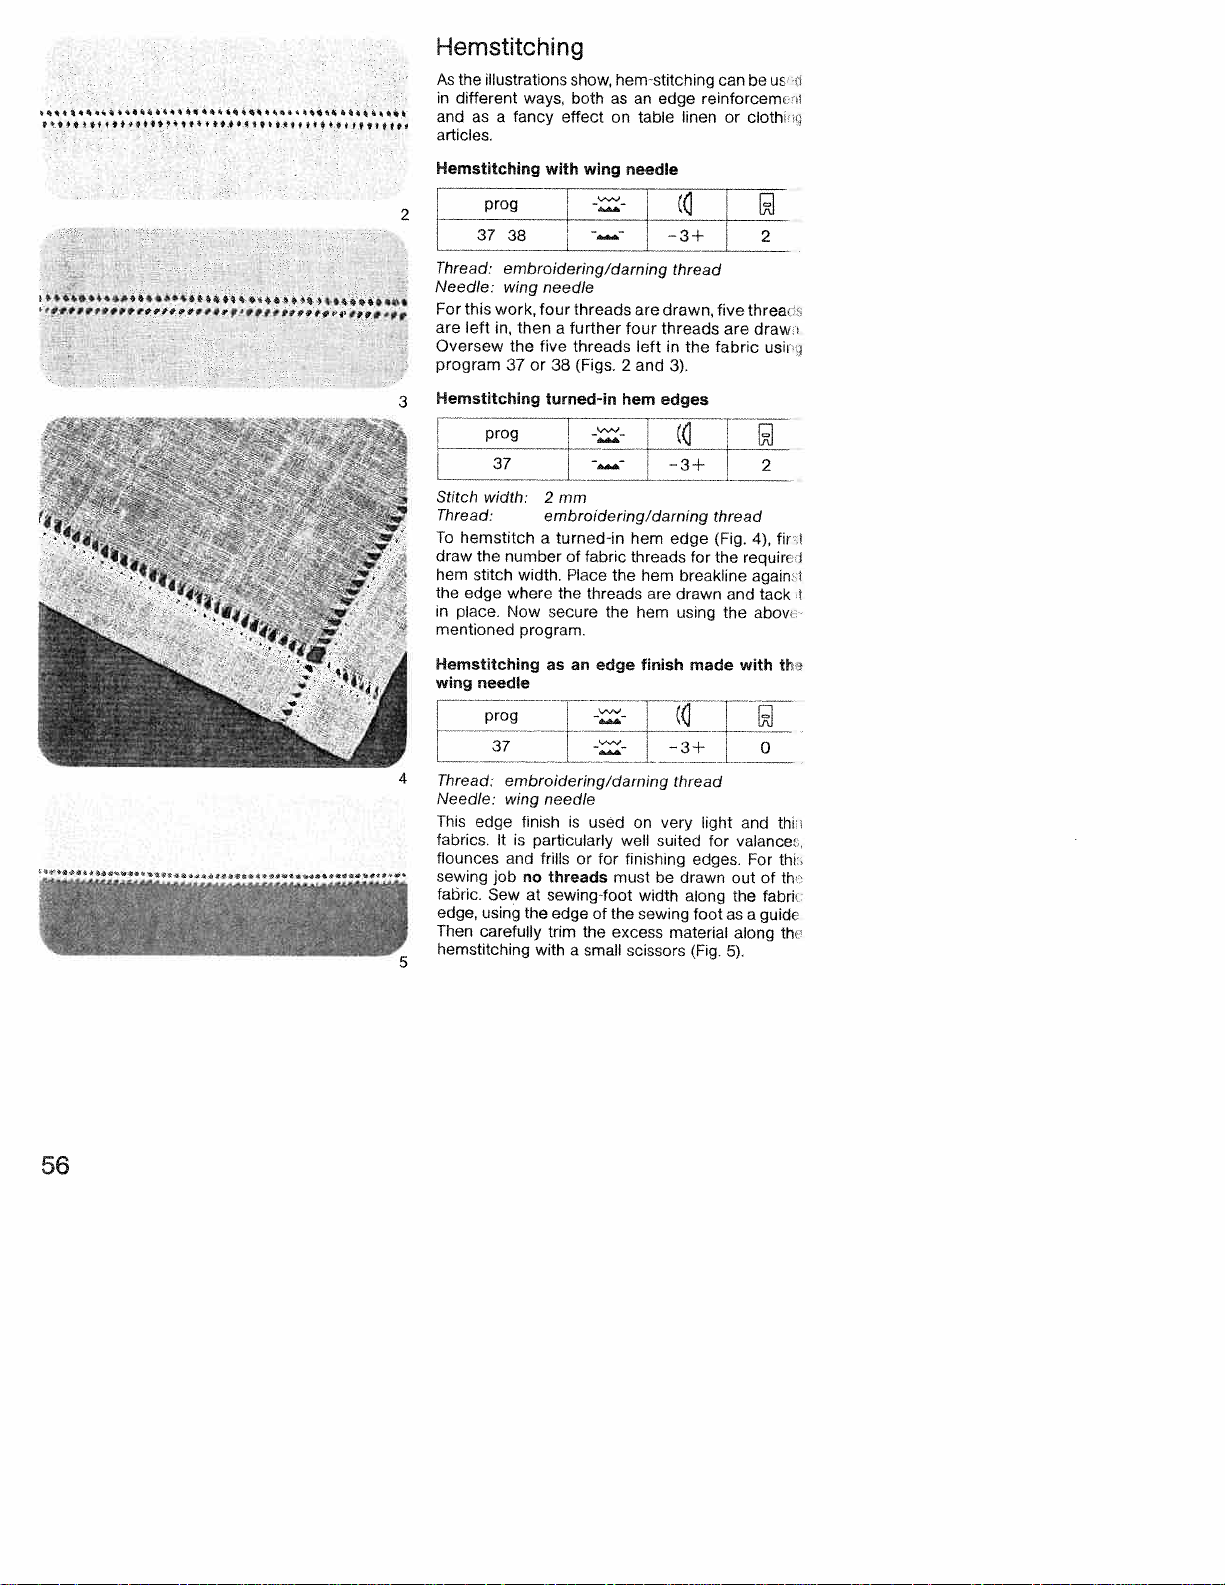
Hemstitching
As
i
the
different
as
ustrations
ways,
a
fancy
in
and
articles.
Hemstitching
with
prog
37
38
Thread:
Needle:
•
ceP?
,..
•
,
For
•
are
Oversew
program
Hemstitching
3
embroidering/darning
wing
needle
this
work,
in,
37
the
four
then
five
or 38
left
turned-in
prog
L
Stitch
width:
Thread:
To
hemstitch
draw
.4
•
44_
•
I
444
,
—.
I_
•
-‘
‘
.II:d
the
hem stitch
the
edge
in
place.
mentioned
Hemstitching
wing
needle
2
embroidering/darning
a
number
width.
where
Now
secure
program.
as
g
show,
both
effect
wing
-
threads are
further
a
threads
(Figs.2and
--
mm
turned-in
of
fabric
Place
the
threads
the
an
edge
zzL
hem-stitching
an
edge
as
table
on
needle
—3+
thread
drawn,
four
threads
left
in
3).
hem
edges
((3
hem
edge
threads
hem
the
are
drawn
hem
using
finish
canbeur
reinforcemi
linen
five
the
fabric
thread
(Fig.
for
the
breakline
made
or
are
and
the
L
cloth:
threa
draw
4),
requin
again
tack
abov
with
2_-
usii
2
:
,
•
4
fir
1
I
th
56
4
5
Thread:
Needle:
This
edge
fabrics,
it
flounces
sewing
job
fabric.
Sewatsewing-foot
edge,
using
Then
carefully
hemstitching
embroidering/darning
wing
needle
finish
is
is
and
no
the
used
particularly
frills
or
threads
edge
trim
the
with
a
small
well
for finishing
must
of
the
excess
scissors
thread
on
very
suited
be drawn
width
along
sewing foot
material
(Fig.
light
for
edges.
and
thi
valance:
For
out
of
the
fabri
asaguidc
along
5).
thi
th
th
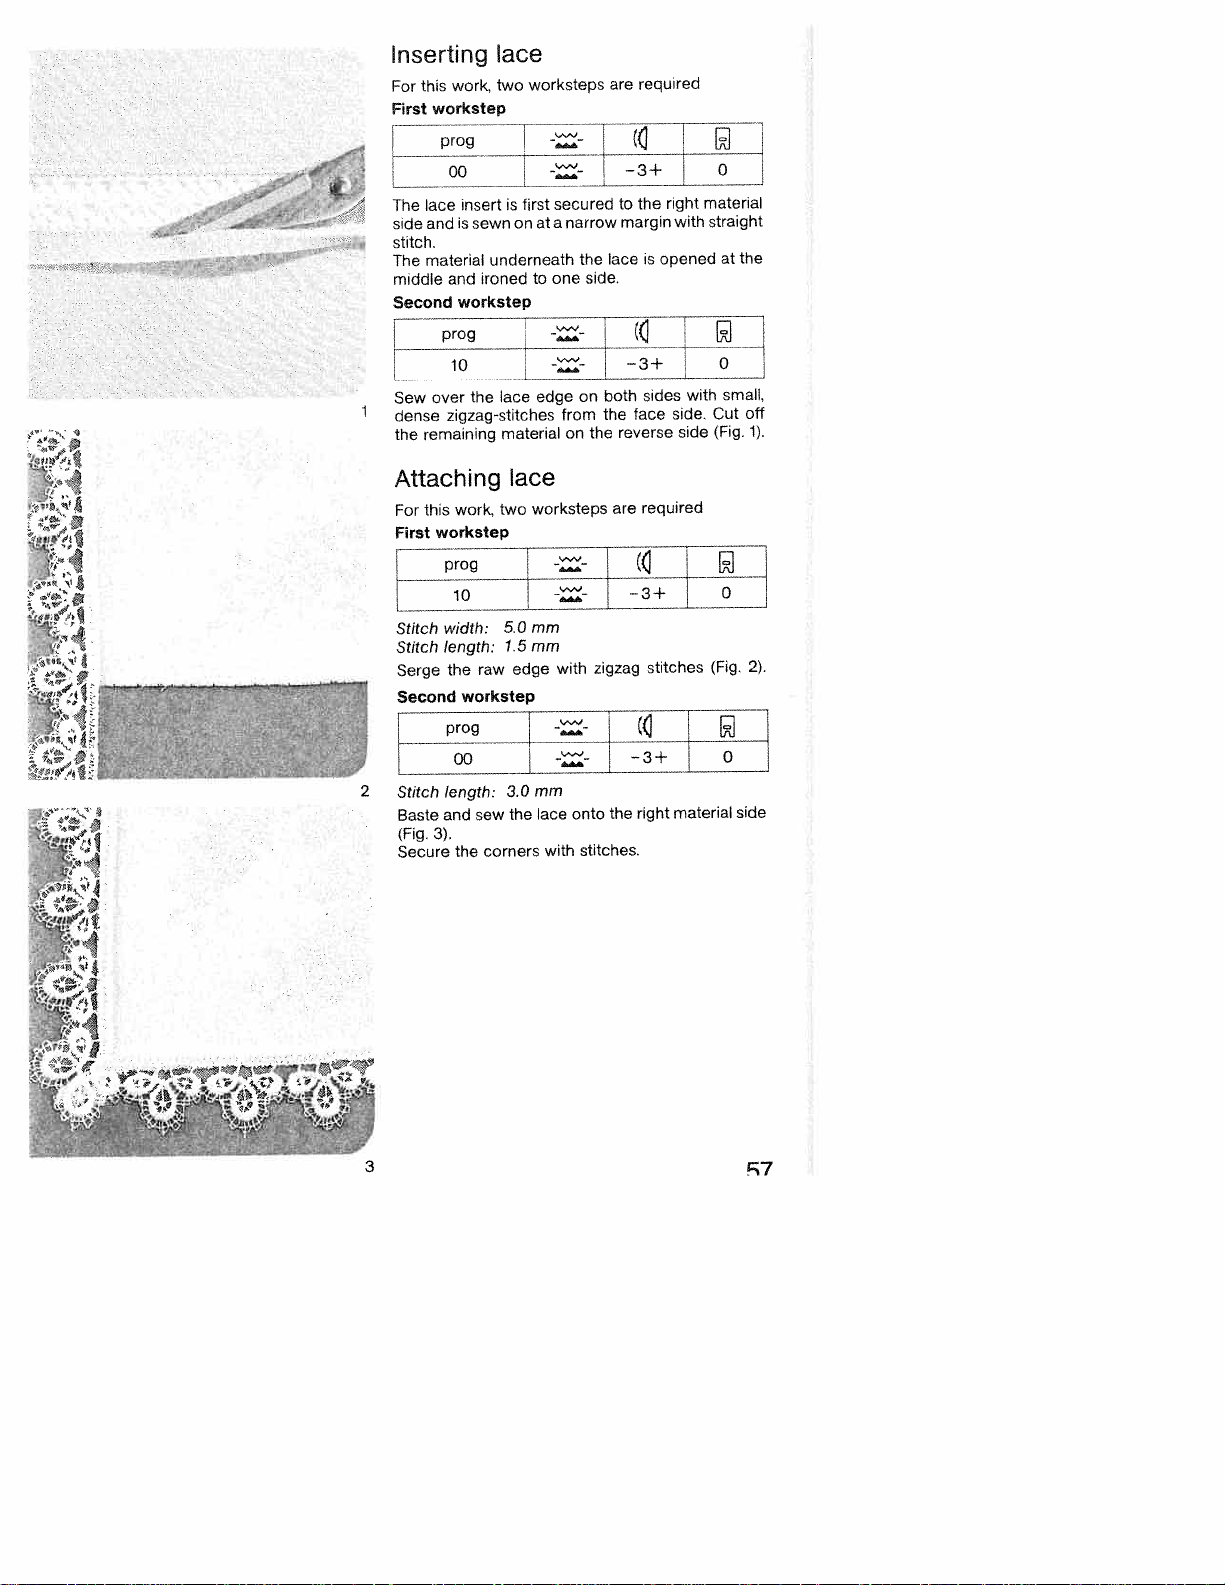
Inserting
For
First
work,
this
workstep
lace
two
worksteps
are
required
narrow
the
side.
on
the
on
zigzag
both
the
-3+
the
to
margin
laceisopened
((
—+
sides
face
reverse
required
are
(
E1z
stitches
:00
insert
lace
/
The
side
stitch.
The
middle
Second
r
-.
Sew
dense
the
andissewn
material
and
ironed
workstep
—
prog
In
-__
the
over
zigzag-stitches
remaining
Attaching
work,
this
For
workstep
First
prog
first
is
at
on
underneath
to
edge
lace
material
lace
worksteps
two
•
-
secured
a
one
--
from
--
ZZT
5.0
raw
1.5
edge
mm
mm
with
Stitch
Stitch
Serge
Second
width:
length:
the
workstep
right
with
side.
side
material
with
0
straight
the
at
0
small,
Cut
(Fig.
(Fig.
off
1).
2).
1_
onto
stitches.
the
-3+
right
00
•:.
:.
•
f
_
2
Stitch
Baste
(Fig.
Secure
length:
and
3).
the
sew
corners
3.0
the
:
mm
lace
with
material
0
side
3

s
•
‘I,
I
‘M
Cording
Cording
——
r
*
Cording
Needle:
Cording
tion
on
underwear,
foot
foot
Double
seams
+
cording
+-
L
needle
are
especially
dresses.
tongue
(Special
___j_
popular
blouses,
as
etc.
accesso
a
decor
y
*
Cording
cording
Cording
Place
cure
it
disc.
to
the
ing
the
threads.
thread
The
thread
fabric
minent
cording
For
thin
the
small
up
to
For
thicker
grooves,
sary
double
If
‘
you
another,
For
greater
edge
is
a
spool
in
position
Place
left
of
machine,
Thread
guides
type.
the
tongue
materials,
2
mm
the
wish
use
guide.
sewn
tongue
always
one
disc
tension
The
cording
cording
are
materials,
large
needle
to
the
distances
of
thread
with
thread
“C”
and
tighter
is
used.
sew
grooves
sewn
the
(Fig.
usual.
as
each
the
should
appears.
engaged.
the
tongue
cording
are
several
with
the
with
on
each
corresponding
to
the
a).
3
Then
Do
thread
needle
be
the
tension,
Fig.
cording
and
the
cording
tongue
used,
cordings
of
the
recommend
we
two
needle
spool
right,
continue
not
separately
eye
(Fig.
adapted
1
shows
foot
with
a
double
and
cording
and
twist
the
foot
beside
foot
threaa
pin
and
unwindir
the
threa
the
throuç
3b).
to
more
how
7
groove
needle
with
the
nec&
(Fig.
using
oth
eve)
pr
eac
s
t
i
-
th
LI
2.
th
I”-,
b
/
3
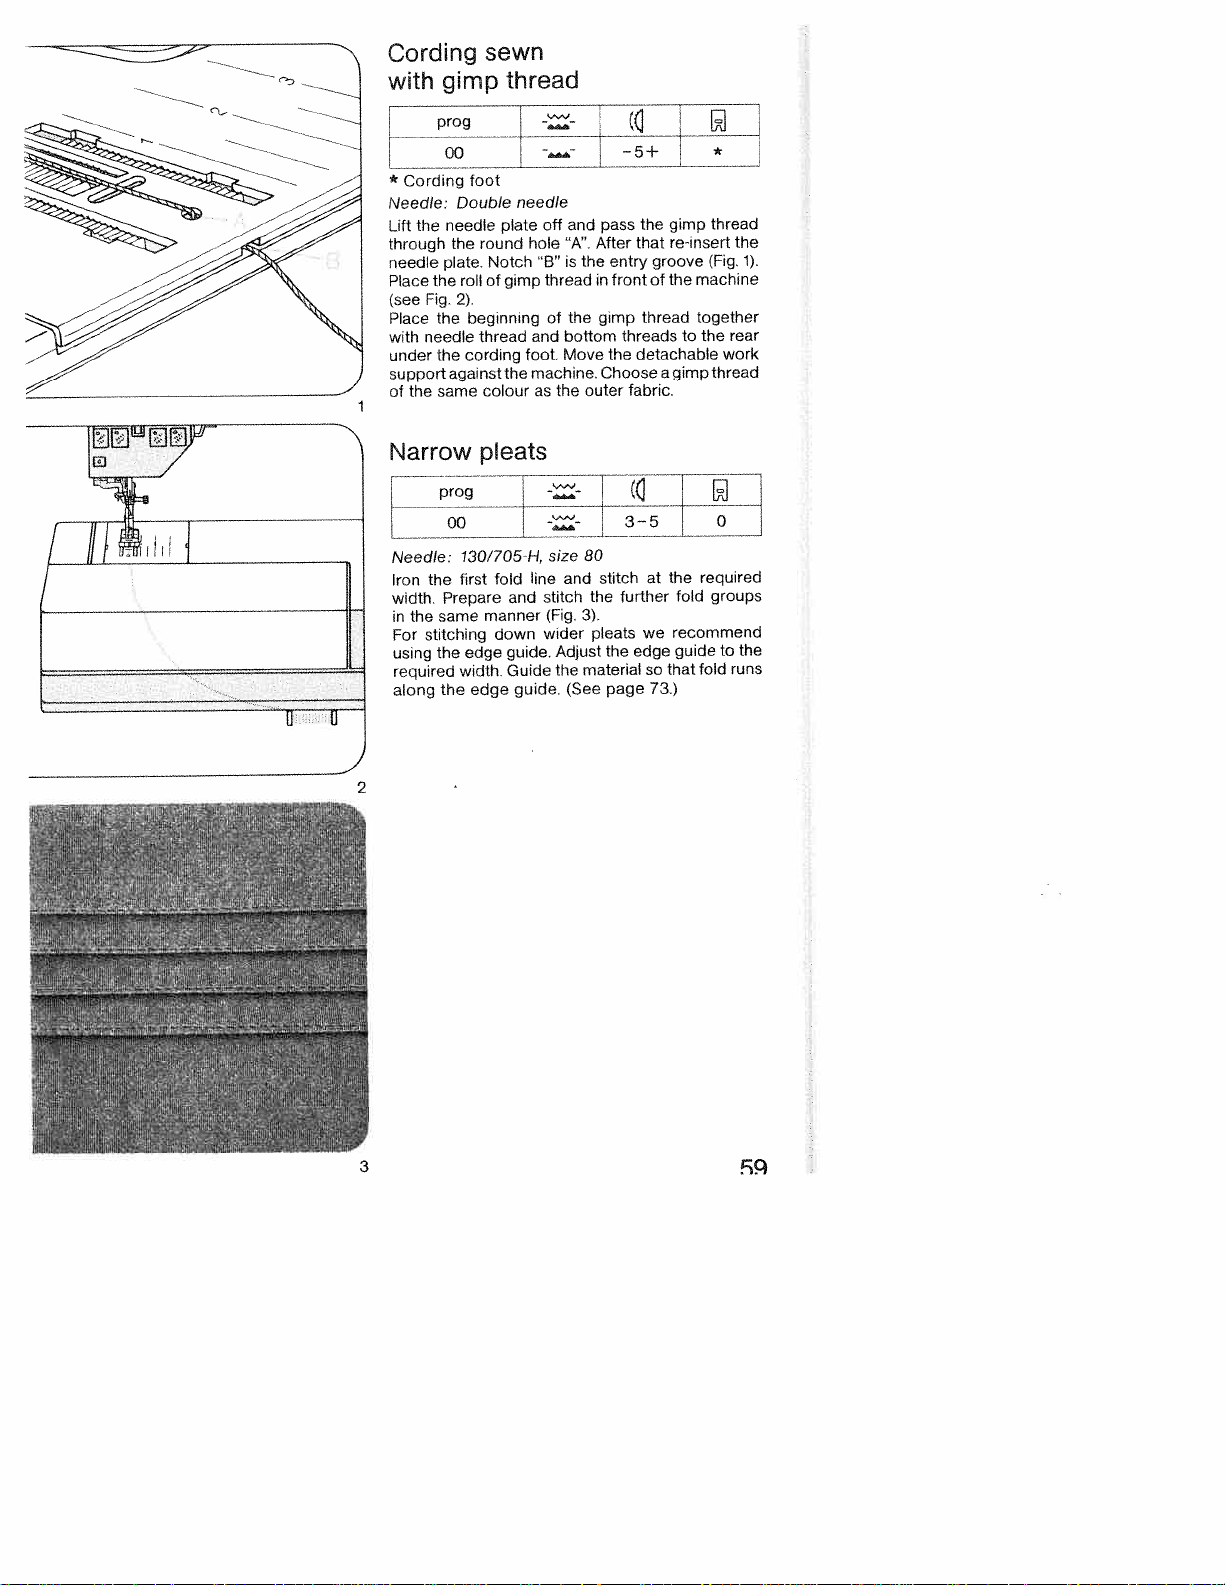
Cording
gimp
with
29__L
*
Cording
Needle:
the
Lift
needle
the
the
plate.
the
Fig.
the
needle
the
against
same
through
needle
Place
(see
Place
with
under
support
of
sewn
toot
Double
round
Notch
of
roll
2).
beginning
thread
cording
colour
thread
needle
plate
hole
“B”
gimp
and
foot.
machine.
the
as
off
thread
of
bottom
Move
the
and
A”.
is
the
5
t_liJ
L
the
pass
that
After
entry
the
front
in
gimp
thread
threadstothe
detachable
the
Chooseagimp
fabric.
outer
gimp
re-insert
groove
of
the
thread
(Fig.
machine
together
rear
work
thread
the
1).
Narrow
p’eats
og
80
fold
and
down
guide.
Guide
line
guide.
size
stitch
(Fig.
wider
Adjust
the
and
(See
stitch
the
3).
pleats
the
material
page
at
further
we
edge
so
the
fold
recommend
guide
that
73.)
required
groups
to
runs
fold
the
Needle:
Iron
width.
the
in
stitching
For
using
required
along
the
Prepare
same
the
the
130/705-H,
first
manner
edge
Width.
edge
2
*Vjfjg
ir
-
VI
V
VV
V
V
I
‘IP
V
V
VVV
1”
V
V
V
I’
V
VVV
V
VjVV
V
3
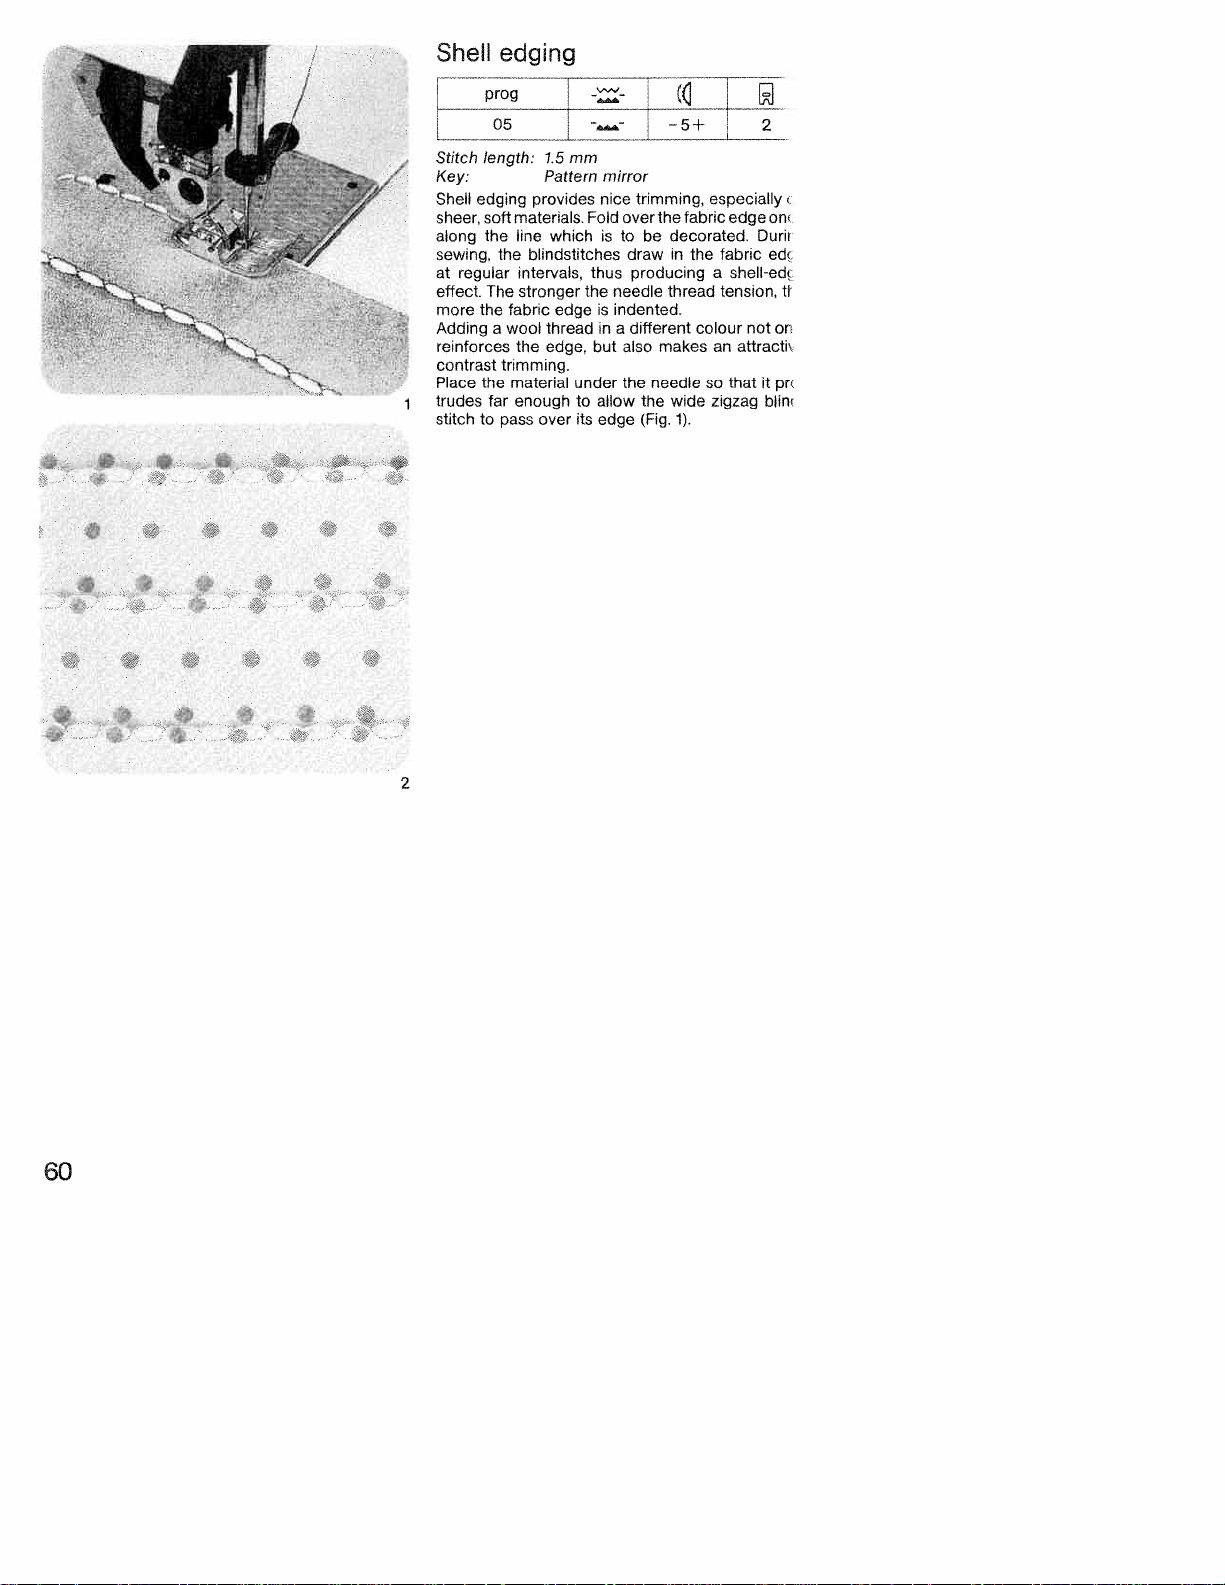
Shell
edging
05
Stitch
length:
Key:
SheA
edging
sheer,
soft
along
the
sewing,
at
effect.
more
Addingawool
reinforces
contrast
‘4
Place
trudes
stitch
regular
The
the
the
far
to
the
fabric
trimming.
pass
mm
1.5
mirror
Pattern
provides
materials.
line
bliridstitches drawinthe
intervals,
stronger the
the
material
enoughtoallow
over
nice
Fold
whichistobedecorated.
thus
is
edge
threadina
but
edge,
under
its
edge
-5+
trimming,
over
producingashell-edt
needle
indented.
different colour not
also
the
the
(Fig.
especially
the
fabric
edge
fabric
thread
tension,
makesanattracti
needlesothatitpr
wide zigzag
1).
2
on
Duri
ed(
ft
or
blin
60
2

a)
C
>
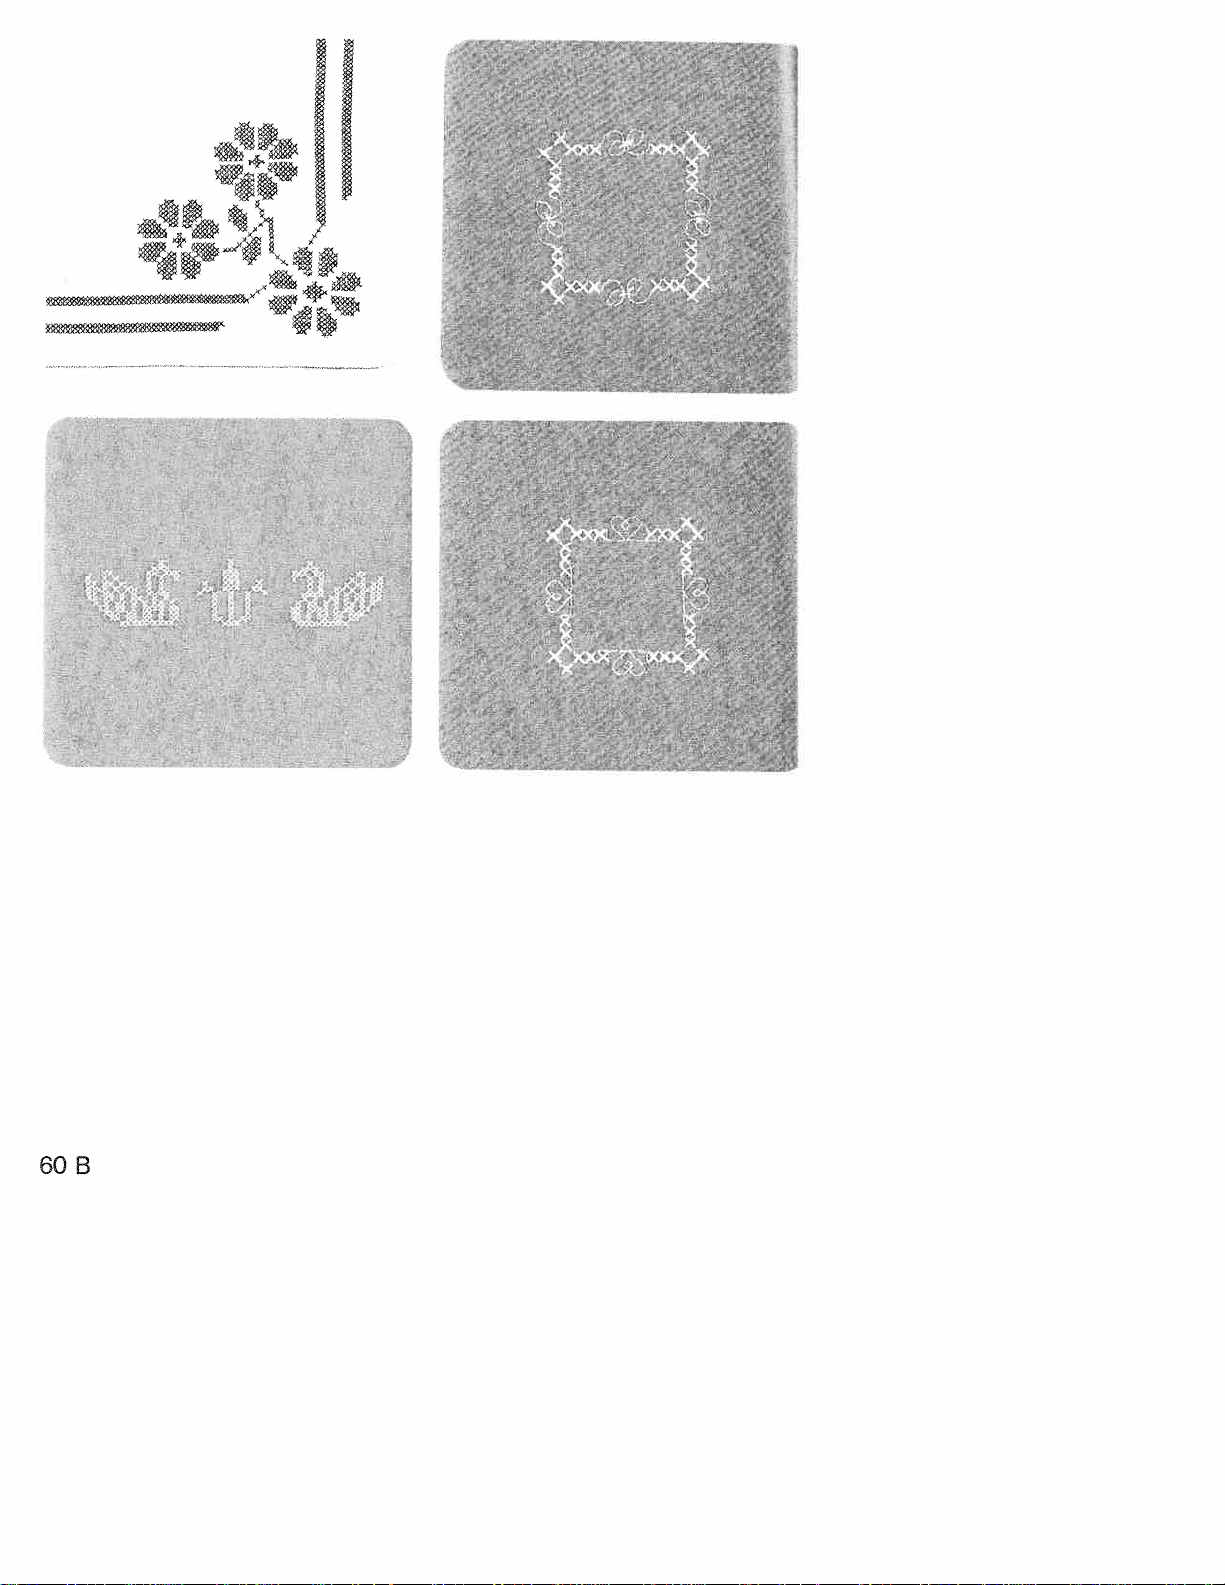
4
-
4
9-
¶9,
/
/4-
.9-
9/
--
r-
4
/
‘9
4
4
>,
I
‘
‘I
:
,/#
-‘,
,j_,
‘I
I
9
-4
7<
I
I-
4
—
-
I
9-
-4
-
-
-
,
<
¶-
9
.
(9
<4’
,-
/
H
-,
4
4
0’
1<
60
B

two
prog
10
width:
workstep
prog
i0
width:
length:
the
appliqué
sure
seam
workstep
the
filler
a
easily.
fusible
it
on
under
design
way,
cording
worksteps
design
it
the
Trim
1).
the
zigzag
edge
cord
fabric
backing.
easier
the
a
accessory)
work
Before
the
are
t—
0.5
1.0
1.5
0.25
to
0.2
the
on
the
on
matches
of
outline
excess
the
(Fig.
2),
edges
raw
(purl)
of
the
the
in
appliqués
you
This
and
cut,
to
with
we
Place
fabric
dense,
recommend
design.
goo&looking
required.
(fOr
reverse
face
fabric
the
the
of
stitches
appliqué
seam.
cut
reinforces
prevents
and
narrow
seam
2—3
2-31
cording)
side
design
material
the
can
out
three
sew
(t
of
side
and
grain.
on
appliqué
(Fig.
more
applied
be
the
fraying.
layers
along
zigzag
produced.
is
the
the
baste
the
close
with
3).
prominent,
design,
material,
the
of
the
stitches.
appliqué
2
2
fabric,
on,
it
wrong
to
nar
much
iron
tissue
edges
foot
the
App’iqué
this,
For
workstep
First
Stitch
Stitchlength:
Second
Stitch
Stitch
Trace
the
lay
making
workstep
First
along
Sew
(Fig.
side
A
contour
Second
over
I
Sew
dense
row,
make
To
insert
Readymade
more
a
on
makes
Baste
paper
the
of
this
ln
For
•
(special
3
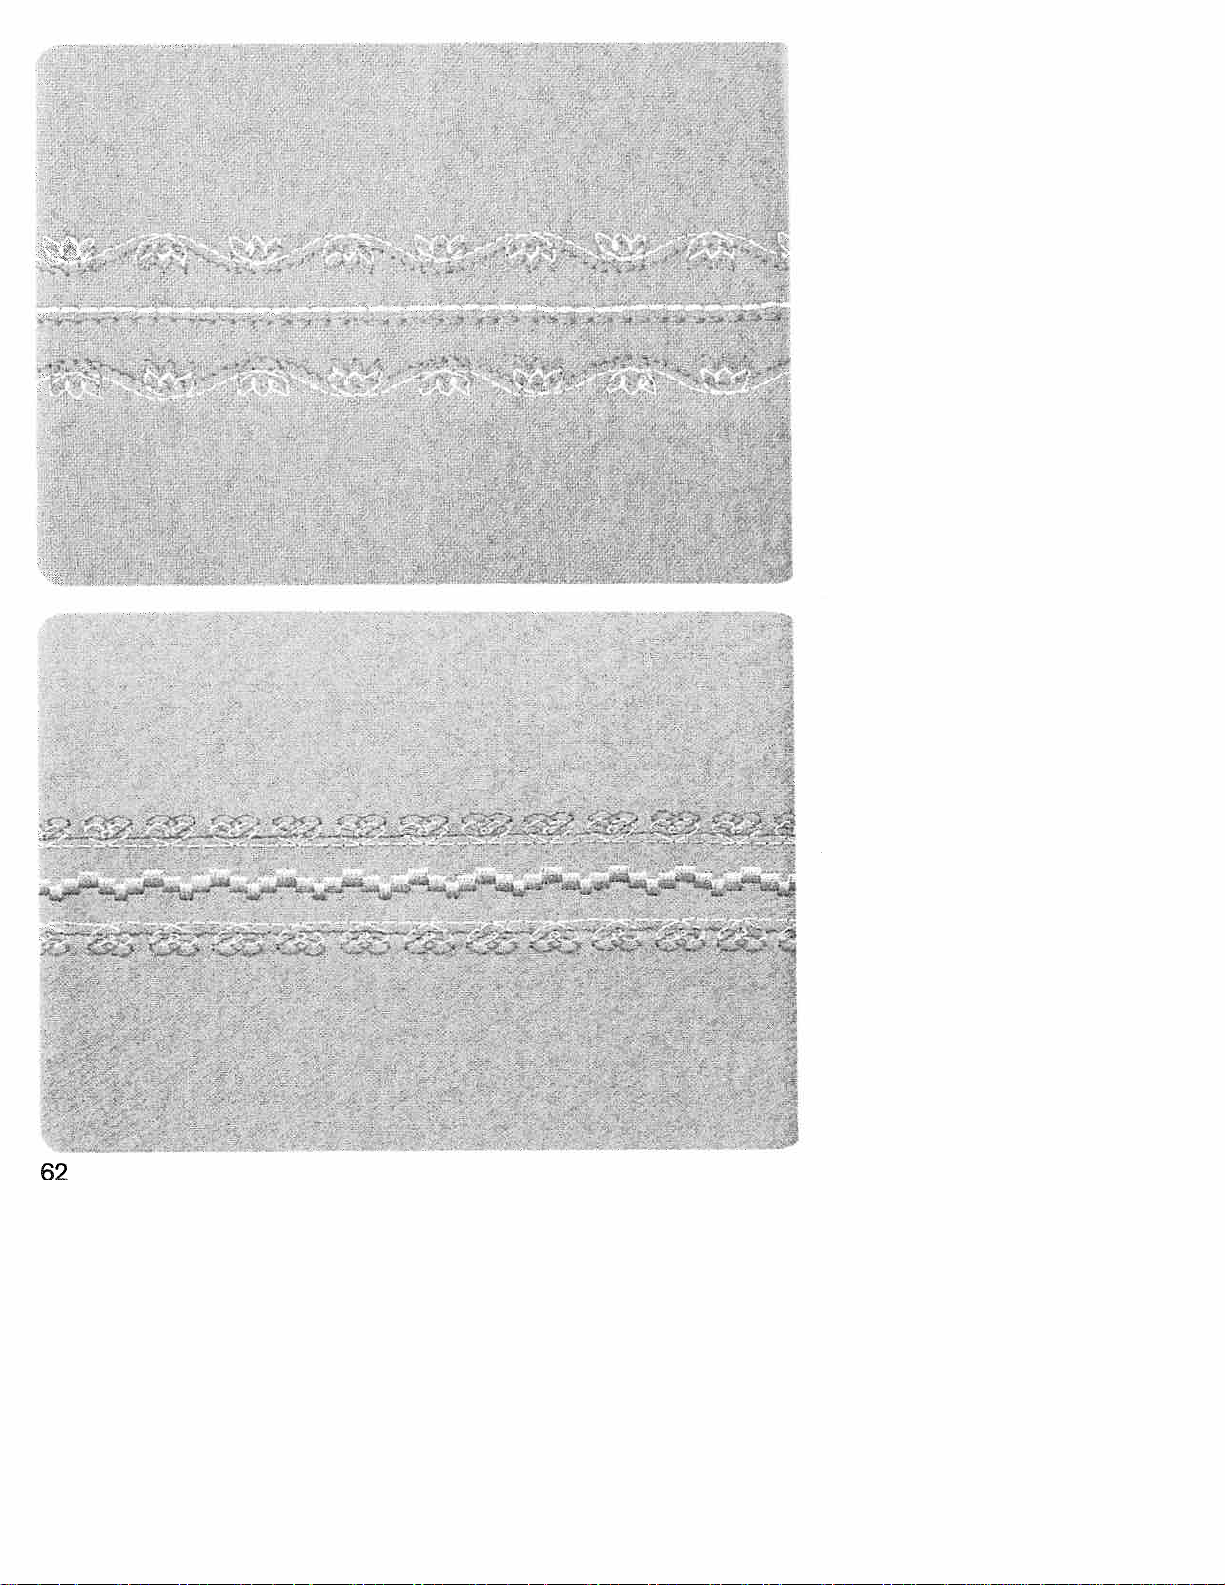
69

Qu!ting
prog
on
padding
soft
purpose,
between
(Fig.
ply
together
over
diamonds
the
of
between
--
articles
3).
plies
with
the
can
material.
00
guide
Edge
•
stitched
Seams
or
effect
flannel
weight
To
,
—Th(
/
I
/
1’
/
—
,
baste
stitches
/
Squares
oronthe
patterns
some
keep
other
For
placed
is
bottom
the
them
spread
and
bias
stitch
this
fabric
them.
spacing
The
adjusting
by
the
Trace
guide
or
edge.
fabric
When
you
work
the
the
along
subsequent
each
the
along
Quilting
terned
Preparation
above.
very
a
between
the
seam
the
have
sideways
first
preceding
can
materials
of
sew
Just
beautiful
quilting
also
guide
line
completed
seam
be
material
the
around
piece
so
seam,
seams
accordingly.
the
for
gauge
that
or
lineofstitching
done
of
(
3—5
with
filled
have
batting,
top
the
padding
the
and
rows
area.
whole
sewn
be
fabrics
On
patterns
the
canbeset
first
seam
along
the
quilting
the
traced
the
guide
advantageously
same
the
is
contours
the
embroidery
a
of
first
the
very
foam
ply
on
the
seam
cotton
prominent
plastic
and
in
long
the
with
or
required
as
on
the
straight-cut
seam
gauge
gauge
(Fig.
1).
described
as
you
and
(Fig.
0
wool
light
a
place,
basting
straight
regular
around
fabric
move
runs
line.
finger
on
have
2).
or
For
pat
2
3

Programming
computer
with
embroidery
and
monograms
prog
the
switches
)
I
Capacity
for
programs
The
•
•
12
programs
the
When
grams
When
•
no
additional
The
•
memory
Before
•
the
Now
Select
•
gramming”
The
•
number
Select
•
gramming”
memory
(Fig,
If
the
•
cancel
I
rector’
of
Creative
MEM-memory
programs
MEM-memory
to
MEM-memory
2).
the
machine
stored
the
capacity
by
a
new
select
the
MEM-memory
key
appears
the
desired
keys
by
program
it
in
the
key
142
computer
(from
are
programs
means
program
pushing
MEM-memory
the
MEM-memory
00
to
has
00
to 49)
after
one
is
switched
cancelled.
of
the
can
121
stored
(Fig.
are
be
cancelled
of
the
sequence
must
the
MEM-memo
(Fig,
is
free
in
display
program
121
and
“program
is
2).
See
“corrector”
be
1).
enter
no
49
one
can
the
memory
accepted.
empty.
with
if
104
by
entry”
longer
by
page
MEM-memc
be
entere
other.
off
the
is
used
in
the
ME
key.
s
enter
the
left
no
progo
(Fig.
1).
pushing
it
in
the
ME
key
need
pushing
65.
p
‘p
‘p
1
“c
iLl
mmm
z*H
prop
LLILI
mmm
J—
64
(
)
ELI
°EL
,j,
R°LlTh

prog
(>
1,
L!LL°1
L
Verifying
want
you
If
“repeat”
push
•
programs
All
•
verified
be
104
play
key
cycle”
Symbol
stands
right
program
a
program
for
the
of
the
verify
to
entered
when
you
as
125
the
to
program
sequence
programs
program
the
141.
key
in
number
their
repeatedly
(Fig,
1).
left
of
(Fig.
start
number
(Fig.
MEM-memory
the
push
the
program
Symbol
1).
stands
2).
stored
stored,
appears
for
in
“program
number
to
end
the
can
dis
the
of
immm
ffffifli
proçj
LF
()
I
°Th
mmm
EL
Correcting
‘Corrector”
(1)
•
(2)
•
Single
\!arious
hers
when
push
•
The
grammed,
matically
2
When
program
display
in
When
gram
stitch
and
sewn
“single
machine
the
142
key
is
it
pushed,
ofaprogram
104.
is
it
pushed
stored
pattern
patterns,
embroidery
single
as
pattern”
ties
(Fig.
programs
hasadual
is
cancelled
motifs,
pattern.
sews
the
off
3)
the
repeatedly
such
key
the
seam
function:
number
sequence
(Fig.
monograms,
as
are
To
do
127.
stitch
and
very
pattern
stored
the
of
appears
last
the
2).
attractive
this,
stops
last
pro
num
pro
auto
65

Lengthening
same
The
med
remains
left
in
sewn
limited
Indicated
pattern
Stitch
in
0.2
0.25
0.3
0.35
0.4
Before
tern
Example:
•
•
•
length
can
of
key
length
with
(Fig.
length
mm
and over
entering
length
Select
Set
pattern
Push
tern
(Fig.
stitch
of
a
be
the same,
105
from
short
1).
below
lengths
by
program
program
with
the
3).
patterns
density
decorative-stitch
lights
pushing
length
varied,
2.0
stitches,
are
for
a
program,
entry’
modified
when
up.
to
90
the
various
42
25
while
the indicator
The
mm.
maximum
Pattern
from
2.0
2.0
2.0
2.0
2.0
key
(with
key
pattern
its
maximum
stitch
you
105.
143
data
at the
pattern
the
When
length
can
key
to
stitch
can
a
and
lengths.
to
50
60
70
80
90
vary
105)
enter
n
the
progrs
den
light
be
patten
length
minimL
in
mm
the
the
memo
to
van
p
p
66
Pattern
if
not
•
•
The
vertical
number
If
terns
gram
•
•
4
mirroring
want
you
‘pattern
“pattern
you
“pattern repeat”
“pattern
only
pattern
want
in
mi
ng:
to
the program
mirroring”
entry”
mirroring
dash
in
the
to
reflex,
mirroring”
pattern
sew
a
key,
key
function
appearing
symbol
display
sewanentire
press
the
key
key
143.
(Fig
following
141
key
in
reflex
but
also
126
and
is
indicated
a1tertheprogra
4).
combination
and
(Fig.
126
keys
4).
(Fig.
2),
after
pus
th
by
of
pa
pr.
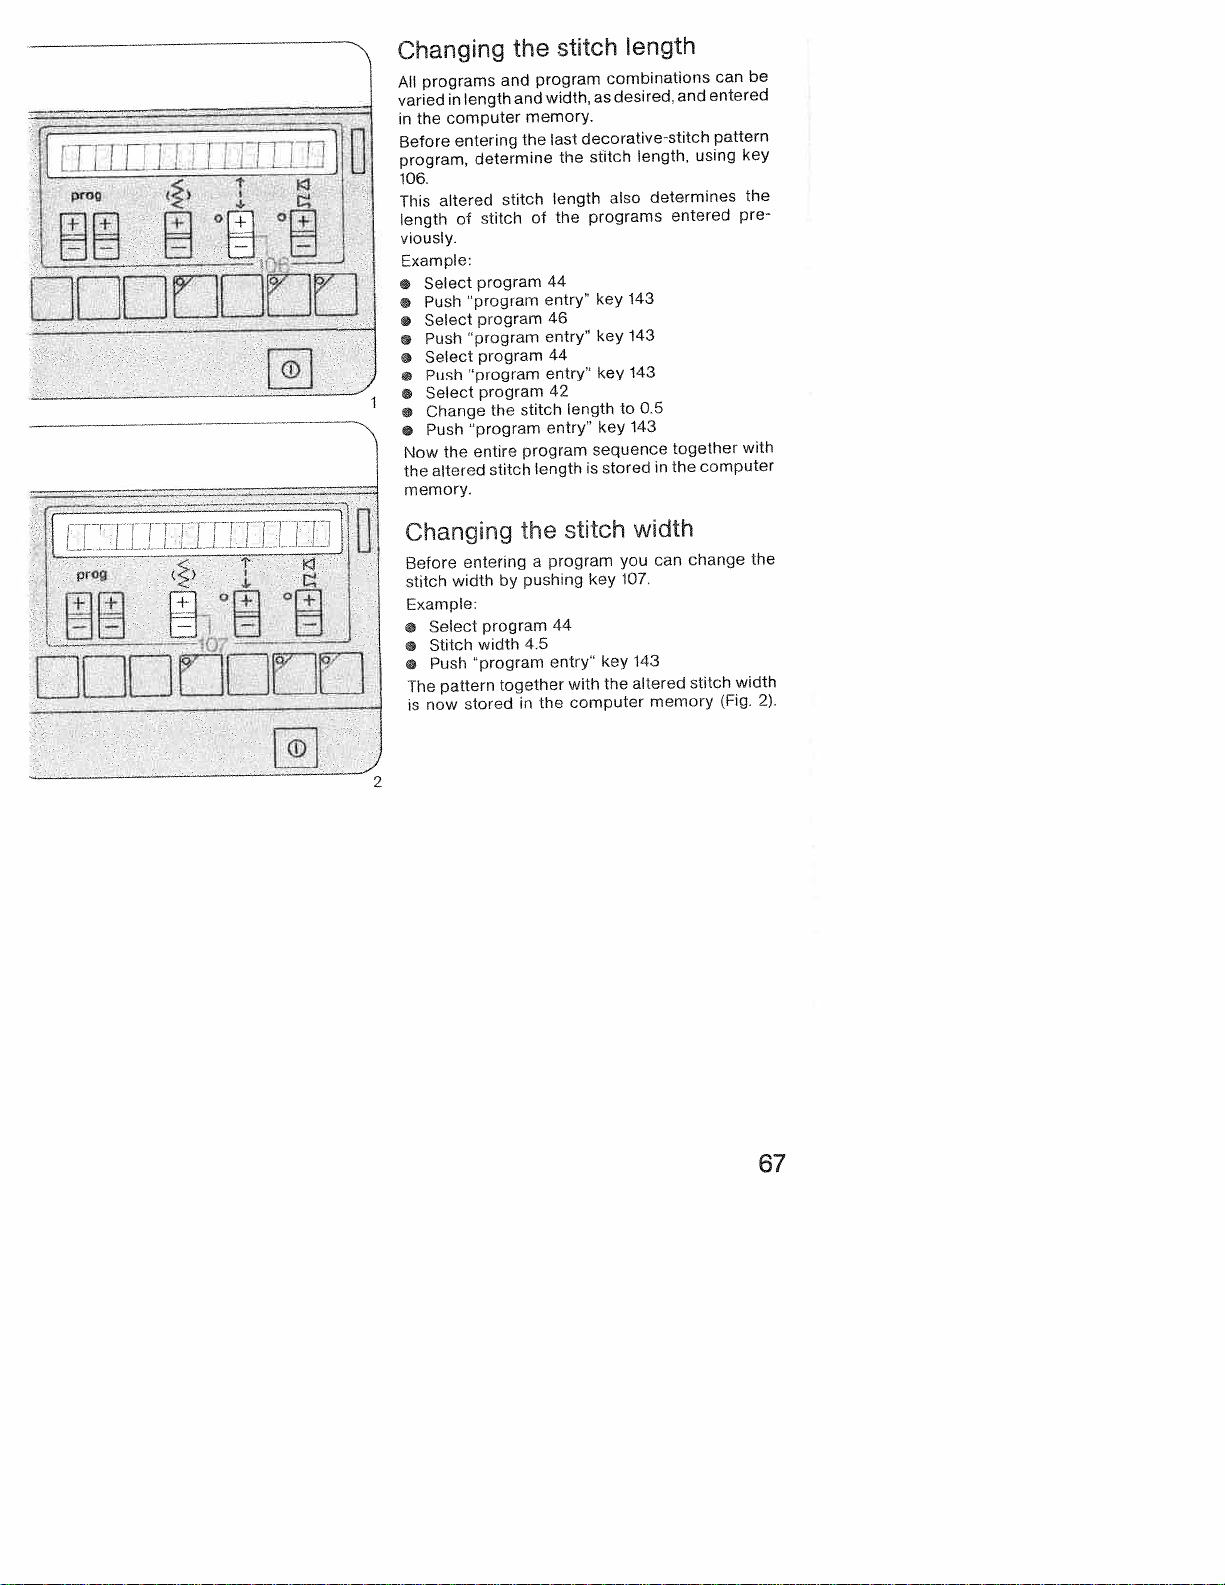
rr’Jr_
I
pi,og
mmm
TT
()
1”
°Th
N
Changing
programs
All
varied
in
Before
program,
106.
t
,
This
length
viously.
Example:
e
•
•
•
•
•
•
the
altered
Select
Push
Select
Push
Select
Push
Select
Change
Push
the
Now
the
altered
memory.
length
in
computer
entering
determine
stitch
of
program
“program
program
“program
program
“program
program
“program
entire
stitch
the
the
and
and
stitch
stitch
program
width,
memory.
the
last
length
the
of
44
entry”
46
entry”
44
entry”
42
stitch
entry”
program
length
the
length
combinations
desired,
as
decorative-stitch
length,
stitch
also
programs
143
key
143
key
143
key
0.5
to
length
key
sequence
stored
is
143
and
using
determines
entered
together
computer
the
in
can
entered
pattern
be
key
the
pre
with
prog
<
Li*
rimmm
1’
LL
Changing
Before
stitch
Example:
•
•
•
The
is
2
Select
Stitch
Push
pattern
now
entering
width
“program
stored
by
program
width
together
the
a
program
pushing
4.5
in
the
stitch
44
entry”
with
computer
key
key
the
width
you
107.
143
altered
can
memory
change
stitch
(Fig,
the
width
2).
67

__
_
LZ_ZfLLO
1
prog
(>
L’
Programming
letters
and
numbers
ni
the
stitch
can
the
enhance
them
you
letters
on
of
garments
You
the
the
can
fabric.
MEM-memory
36
after
the
other.
numbers
and
letters
.A
.
.
—
-3+
“programming”
of
means
1).
(Fig.
letters
key
key
143
key
memorybypre
each
127.
3).
(Fig.
computer
stored
even
121±
time
aiphal
or
—
(Fig.
m
cc
in
2
(rig
I
k
With
from
hers
are
These
goods
linen
texts
pose
Capacity
letters
for
enter
can
You
MEM—memory
Sewing
prog
3
Example:
•
•
I
•
•
•
Select
121—
Select
KLAUS
by
plus)
enter
ing
Press
Sew
A
(left,
means
and
“program
the
0to9
used
and
and
and
letters
—-
—-i,—
KLAUS
A
the
them
“single
program
and
to
outerwear.
write
of
numbers.
to
up
one
by
minus)
following
of
“programming”
in
the
entry”
pattern”
Creative
PFAFF
your
mmmn
-__—
zzz
-
prag
-
()
I
W°W°J
—i
C--——
LW
nfl
uDDHu
löfl
--_C-:”
[1
Sewing
•
Select
Program
letters,
program
program
numbers
the
O
.0
way
t
the
same
n
as
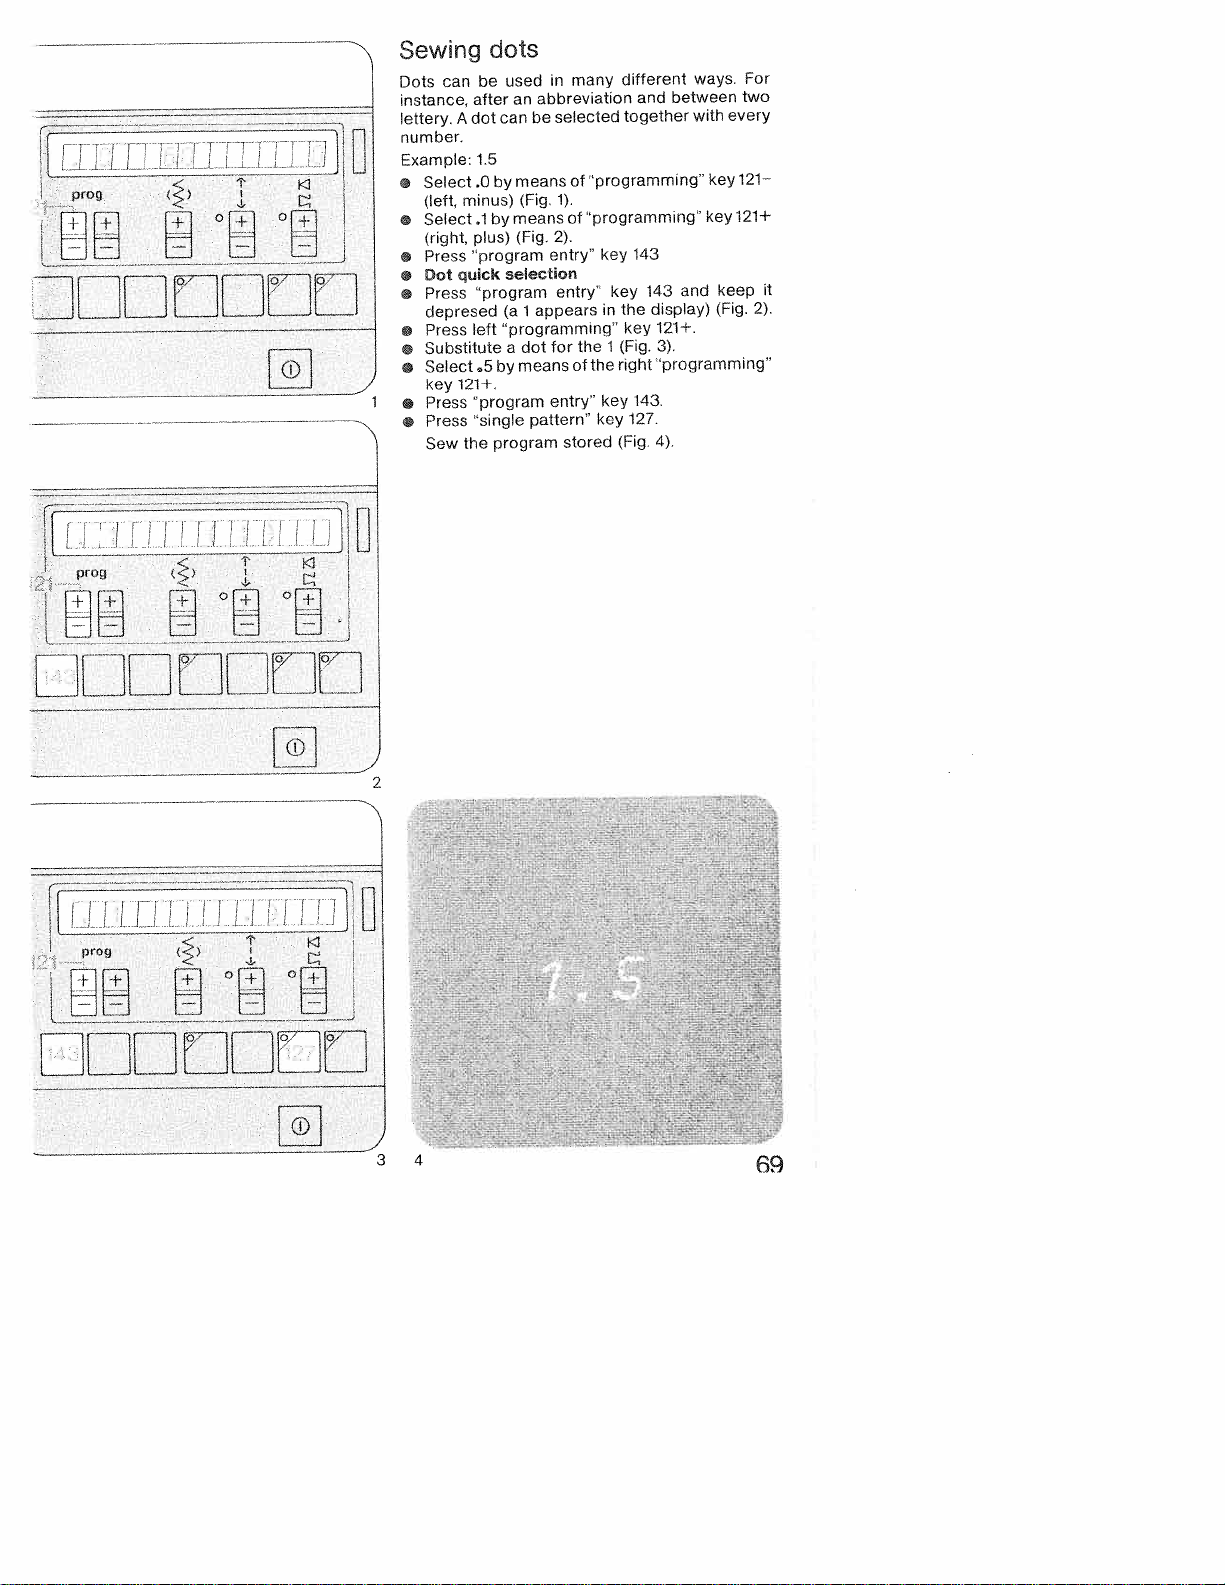
___
-
DZJT.
prog
()
ooj.
rnmm
EiT
prog
J
()
I
JEi
I
can
A
be
after
dot
1.5
O
minus)
plus)
“program
quick
“program
left
5
121+.
“program
“single
the
dots
by
by
program
many
in
used
abbreviation
an
selected
be
can
of
means
(Fig.
1).
(Fig.
2).
entry”
selection
entry”
appears
1
(a
“programming”
for
dot
a
means
pattern”
of
entry”
stored
Sewing
Dots
instance,
lettery.
number.
Example:
Select
•
(left,
•
Select.1bymeansof”programming”
(right,
•
Press
Dot
•
Press
•
depresed
Press
•
Substitute
•
Select
•
key
Press
•
Press
•
Sew
different
and
together
“programming
143
key
143
key
in
the
key
1
(Fig.
the
right
the
143.
key
127.
key
(Fig.
ways.
between
with
every
key
keyl2l+
keep
and
display)
“programming”
4).
(Fig.
121+.
3).
For
two
121—
it
2).
L
mmm
[ji:ZThTT
prog
LELi!
Em
()
.1°EL
EDEE
---__
2
I
4
69

PFAF&J<ARL
SRUHE
Spacing
Example:
Between
gram
a
space.
can
bol
four
space
on
•
much
how
Spacings
with
dot
between
PFAFF_
two
words
programmed
be
symbols
are
quick
itisalways
All
block
space
programmed
selection
KARLSRUHE
letters
with
can
be
is
required
words
necessary
with
a
space.
selected,
(Fig.
the
(see
page
a
same
A
minus
Three
dependi
1).
69).
to
way
p.
sy
PFAFF-CREA
prog
Em
mm
T’
VE
2
/
3
Sewing
Example:
•
Press
hyphen
display
•
Press
•
Enter
Press
•
Dots
At
the
end
(dash)
are
Select
•
gramming”
•
Press
hyphens
PFAFF-CREATIVE
right
“programming”
in
the
desired
(Fig.
2).
“program
the
“single
and
of
programmed,
the
“program
remaining
pattern”
dashes
each
desired
key
121.
entry
entry”
alphabet
(or
length
text.
key
program
key
dashes)
key
127.
a
dot
143.
key
143
by
121—
appears
(Figs.
and
the
a
right
until
in
2+:
hyphc
“pr
if

Writing
Begin
by
fabnc,
After
sewing,
numbers
If
want
you
cycle”
key
play
(see
texts
marking
cut
and
in
to
125.
page
the
the
verify
The
65).
the
spacings
text
begrnning
threads
the
will
between
(Fig.
text,
then
of
the
1).
press
appear
text
letters
program
in
the
on
the
and
dis
AAAH
494
Letters
different
Letters
sizes.
Before
height
width
Correcting
If
you
a
wrong
the
individual
key
142
text
again
Programming
with
•
Select
1
x
1
x
1x35
E
1x35
1x41
1
x
and
2
pressing
Press
•
Sew
and
sizes
and
numbers
The
maximum
the
last
be
107
entry
determined
(Fig.
can
key
program
have
missed
one,
you
entries
and
correct
(see
page
embroidery
the
following
35
41
V
.A
35
enter
them
‘program
‘single
pattern”
program
the
numbers
can
character
of
a
2).
letter
out
a
correct
can
backupto
Then
it.
65).
names
stitches
programs:
in
the
computer
entry”
key
stored
be
letter
by
entries
orfigure
enter
key
127
(Fig.
sewn
the
in
in
height
is
or
number,
means
or
entry,
the
mistake
the
rest
together
memory
143
each
(Fig.
3).
3).
different
6
mm.
of
stitch
entered
Cancel
using
of
time.
its
the
by
3
71
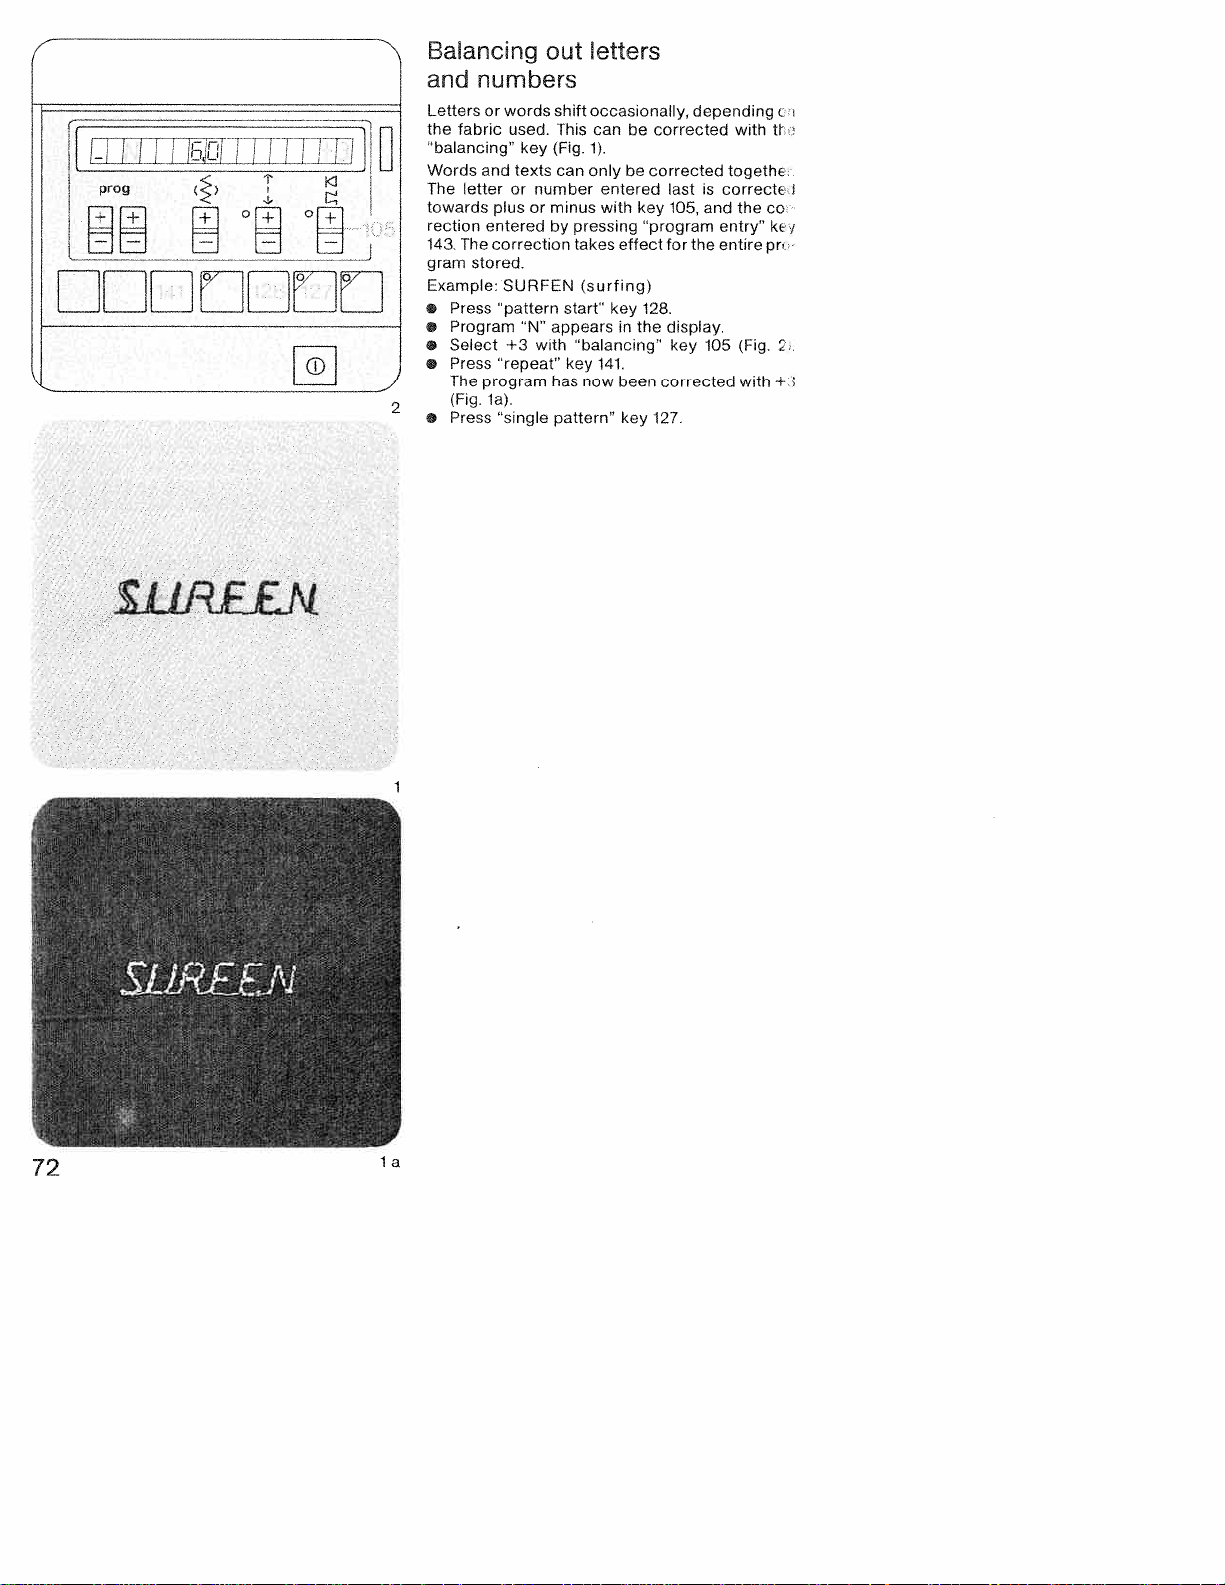
i
prog
L_ZL
Em
I
flEffi
E
Balancing
and
Lettersorwords
the fabric used.
‘0
Words
The
towards
rection
143.
gram
Example SURFEN
•
•
•
•
•
numbers
balancing’
and
letterornumber
plusorminus
enteredbypressing
The
correction
stored.
Press
“pattern
Program
Select +3
Press
“repeat”
The
program
(Fig.
la).
Press
“single
out
shift
This
key
(Fig.
texts
can
start”
“N”
appearsinthe
with
key
has
pattern”
letters
occasionally,
can
be
entered
with
effect
key
141,
been
key
corrected
key
program
128.
corrected
127.
1).
onlybecorrected
takes
(surfing)
“balancing”
now
depending
last
105,
for
the
display.
key
correcte
is
and
entry”
entire
105
with
togethe
the
(Fig.
with
c
tl
co
kej
pr
2
+
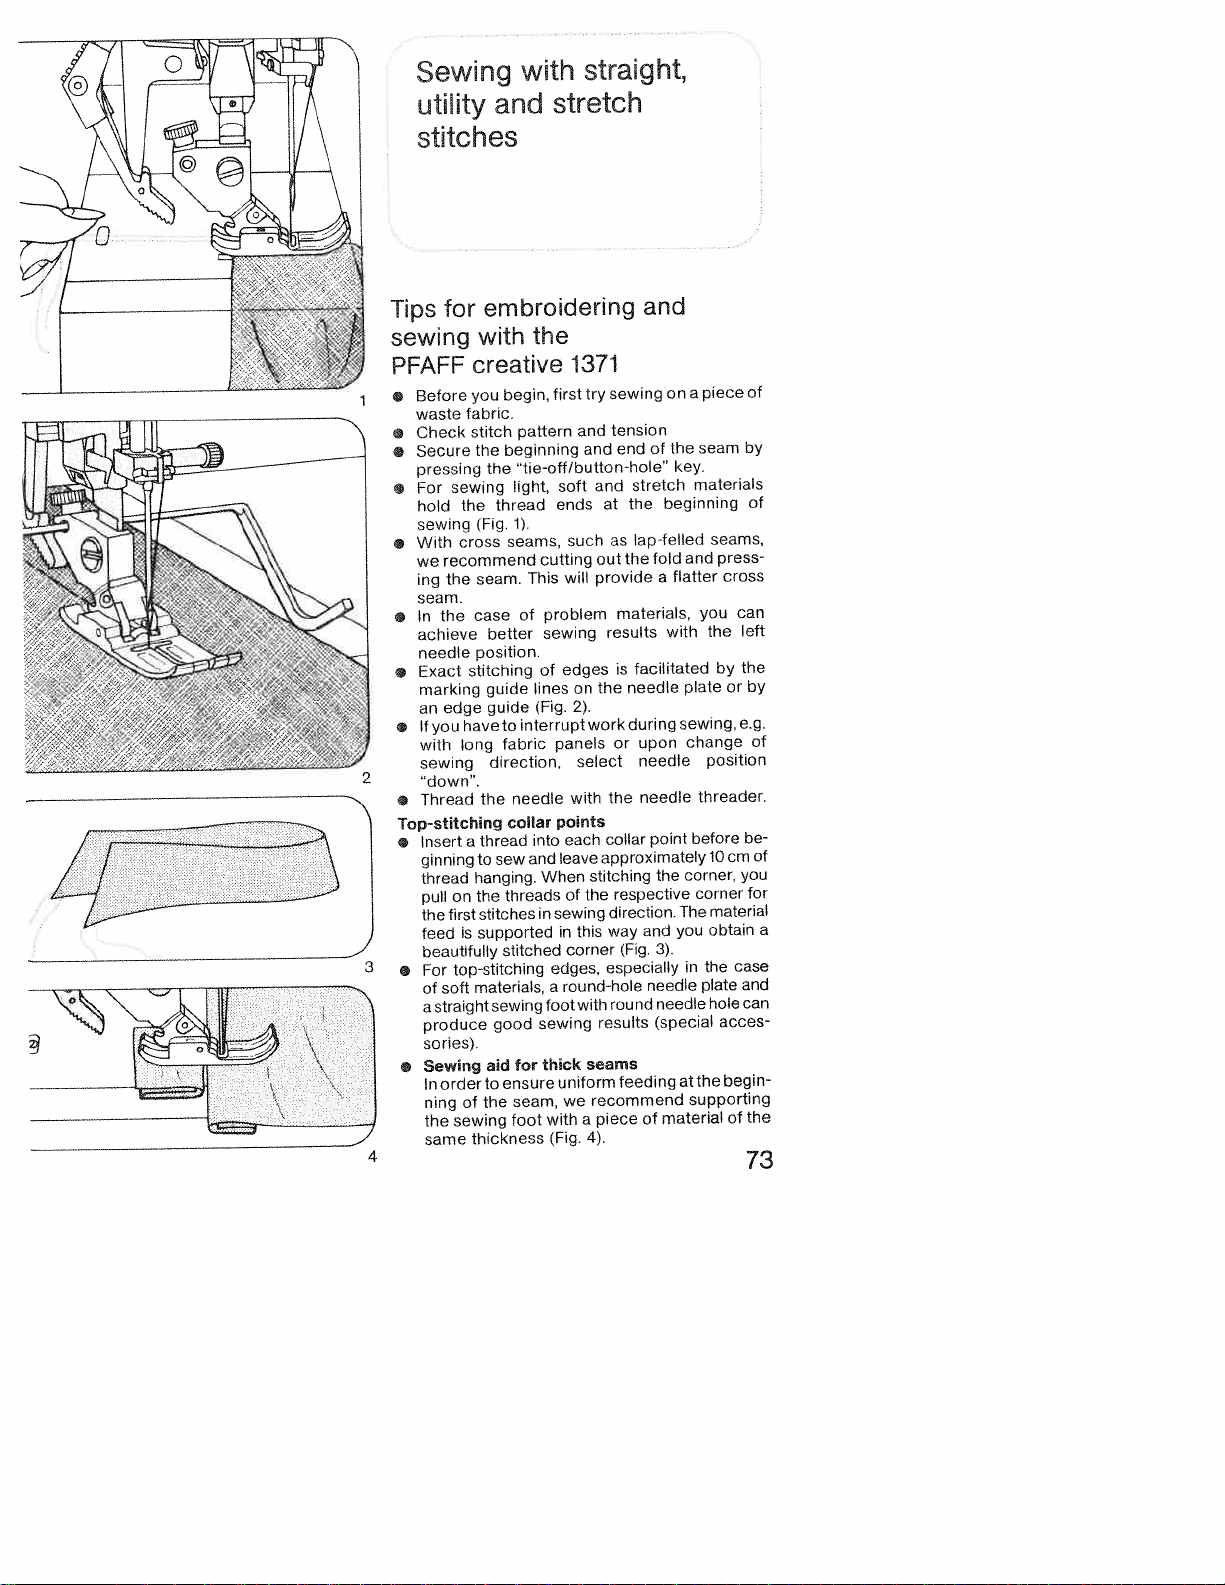
Sewing
utility
stitches
with
and
straight,
stretch
Tips
sewing
PFAFF
o
•
•
•
o
•
•
•
•
Top-stitching
•
•
•
4
for
Before
waste
Check
Secure
pressing
For
sewing
the
hold
sewing
cross
With
recommend
we
the
ing
seam.
the
In
achieve
needle
Exact
marking
edge
an
If
you
with
long
sewing
“down”.
Thread
Insert
ginning
thread
on
pull
first
the
is
feed
beautifully
top-stitching
For
soft
of
straight
a
produce
sories).
Sewing
order
In
ning
sewing
the
same
embroidering
the
with
creative
first
begin,
you
fabric.
pattern
stitch
beginning
the
“tie-off/button-hole”
the
light,
soft
1).
seams,
This
of
interrupt
to
fabric
needle
collar
and
threads
stitched
for
ensure
seam,
foot
ends
cutting
problem
sewing
of
lines
(Fig.
panels
points
into
When
sewing
in
in
edges,
a
foot
sewing
thick
uniform
with
(Fig.
edges
leave
round-hole
thread
(Fig.
seam.
case
better
position.
stitching
guide
guide
have
direction,
the
thread
a
sew
to
hanging.
the
stitches
supported
materials,
sewing
good
aid
to
the
of
thickness
1371
try
and
and
and
such
out
provide
will
the
on
2).
work
select
with
each
approximately
stitching
the
of
this
corner
with
results
seams
recommend
we
piece
a
4),
and
sewing
tension
end
stretch
the
at
lap-felled
as
the
materials,
results
facilitated
is
needle
during
upon
or
needle
needle
the
collar
respective
direction.
and
way
(Fig.
especially
needle
round
feeding
of
on
the
of
key.
beginning
fold
flatter
a
with
sewing,
point
the
The
you
3).
needle
(special
at
material
piece
a
seam
materials
seams,
press
and
cross
you
the
by
or
plate
change
position
threader.
before
10cm
corner,
corner
material
obtain
the
in
plate
hole
acces
begin
the
supporting
of
of
by
of
can
left
the
by
e.g.
of
be
of
you
for
a
case
and
can
the
73
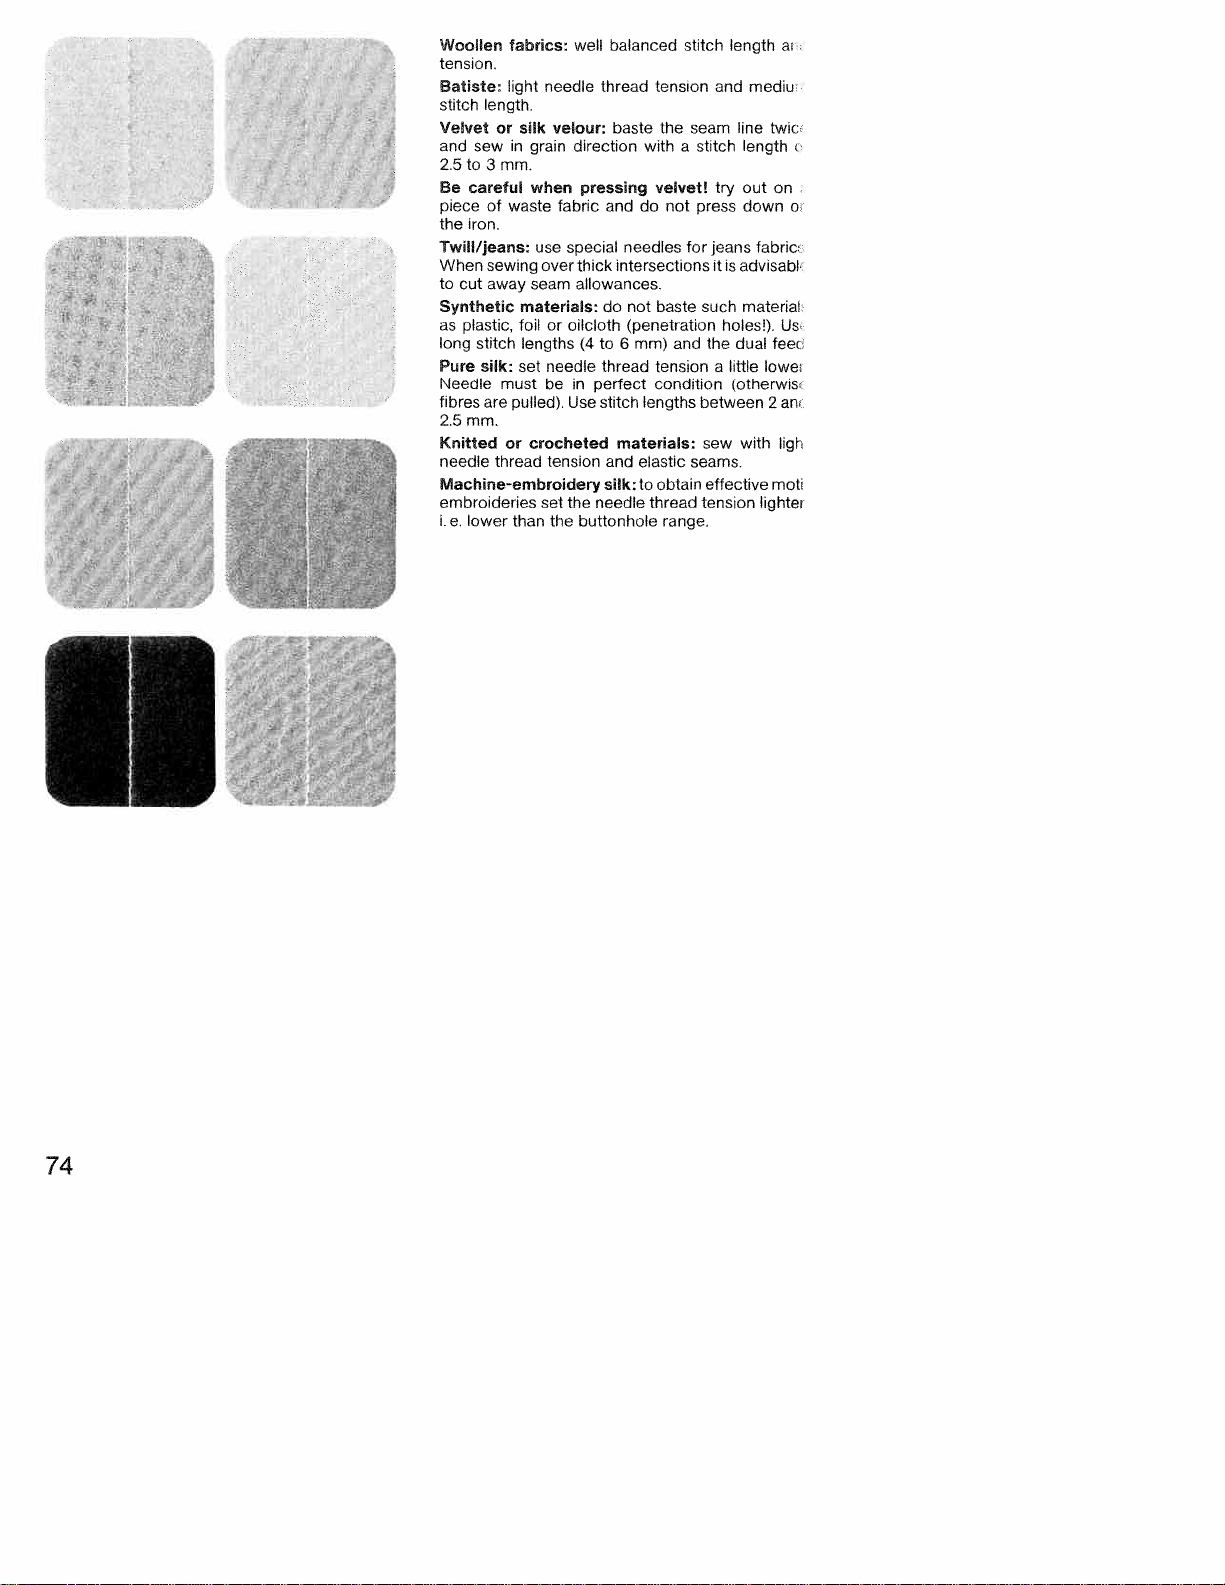
Woollen
tension.
Batiste
stitch
Velvetorsilk
and
2.5to3 mm.
Be
pieceofwaste
the
Twill/jeans;
When
to
fabrics:
light
length.
sewingrain
careful
iron.
sewing
cut
away
needle
when
use
over
seam
well
velour:
direction
pressing
fabric
special
thick
allowances.
Synthetic materials:
as
plastic,
long
Pure
Needle must
fibres
2.5
foiloroilcloth
stitch
lengths(4to6mm)
silk:
set
pulled).
are
mm,
needle
be
Use
in
Knittedorcrocheted
needle
thread
tension
Machine-embroidery
embroideries
i.e.
lower
set
than
the buttonhole
the
balanced
thread
baste
and
do
needles
intersections
do not
(penetration
thread
perfect
stitch
materials:
and
elastic
silk:
to
needle
stitch
tension
withastitch
the
seam
velvet!
not
for
and
try
press
jeans
itisadvisabl
baste
such
holes!).
and the
tensionalittle
condition
lengths
between2an
sew
seams.
obtain
effective
thread
tension
range.
length
ai
mediu
line
twic
length
out
on
down
fabric:
materiai
Us
dual
feei
lowe
(otherwis’
with
ligh
moti
lighter
o
74
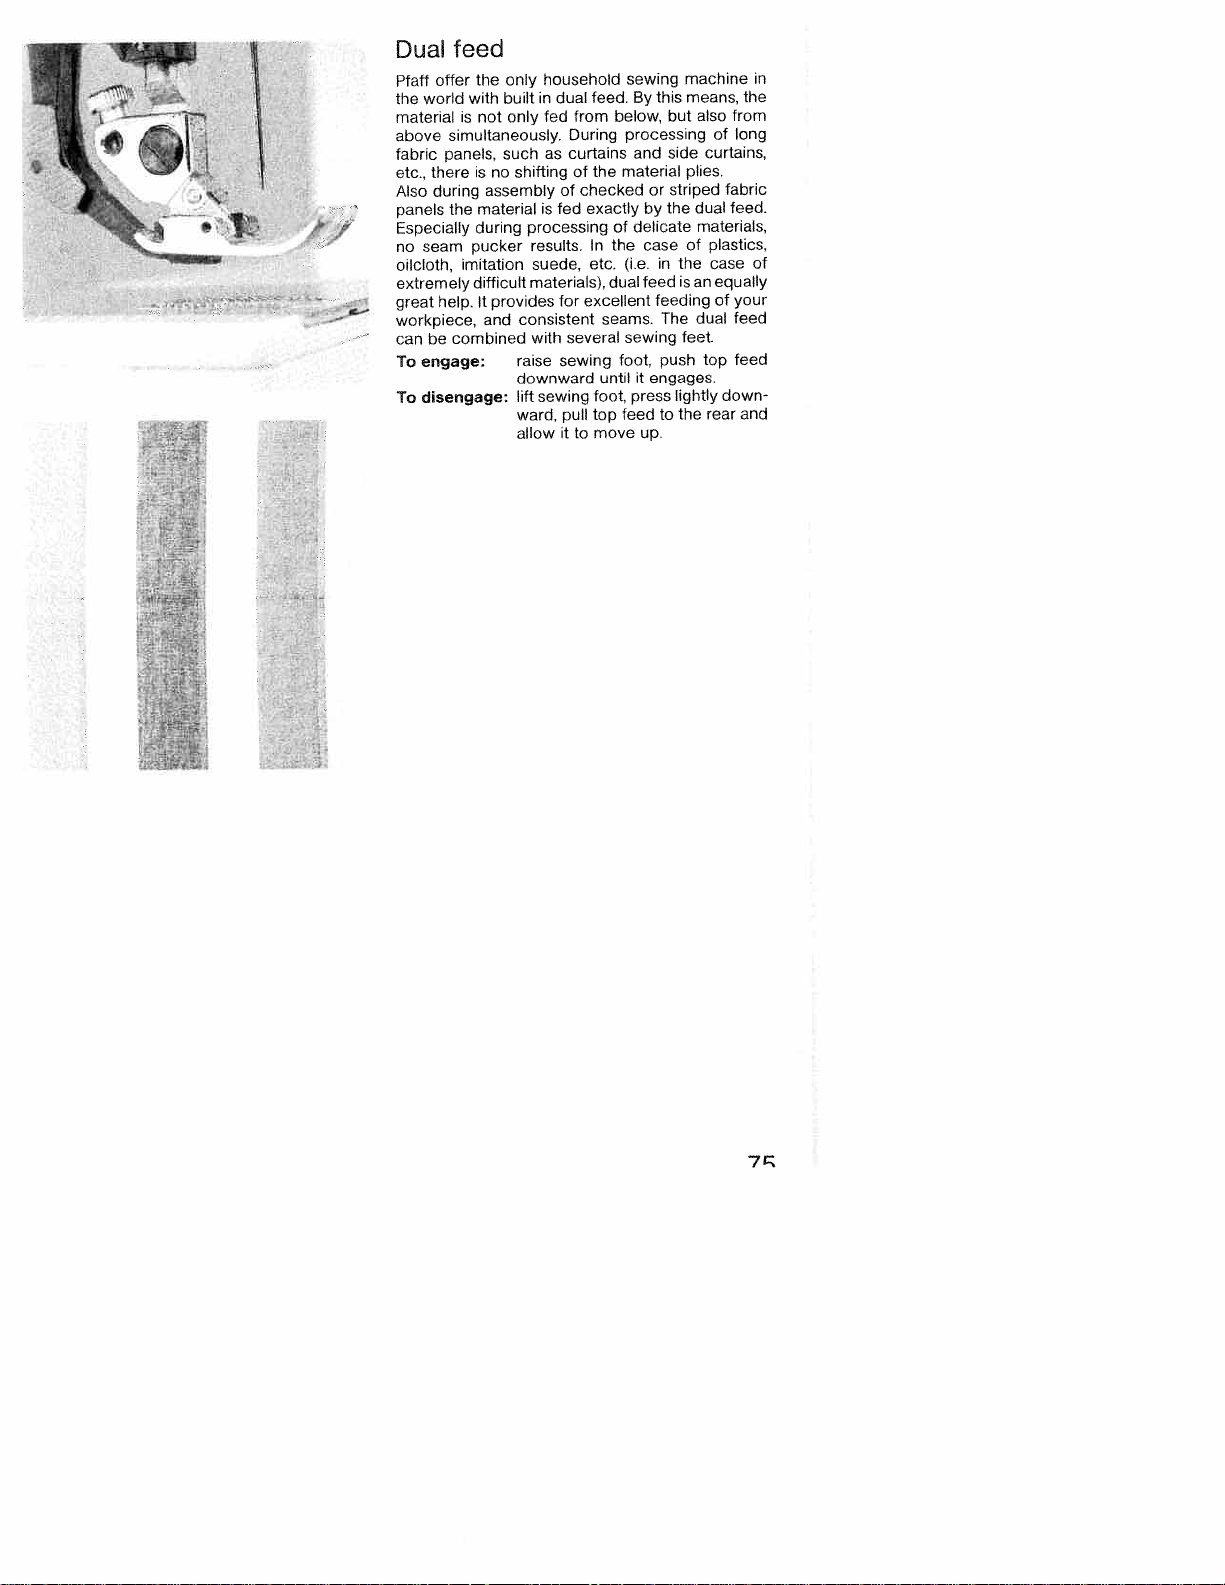
feed
Dual
from
also
long
of
curtains,
fabric
dual
feed.
materials,
plastics,
case
equally
your
of
feed
dual
feed
top
down
rear
in
the
of
and
feed.
from
During
curtains
of
the
checked
exactly
In
etc.
excellent
several
until
foot,
top
move
to
sewing
below,
processing
material
of
the
(i.e.
dual
seams.
sewing
foot.
press
feed
this
By
and
or
by
delicate
case
in
feed
feeding
The
push
engages.
it
to
up.
means,
but
side
plies.
striped
the
of
the
is
feet
lightly
the
an
Pfaff
with
world
the
material
above
fabric
etc.,
Also
panels
F
‘
—
Especially
no
oilcloth,
extremely
great
workpiece,
can
To
To
is
simultaneously.
panels,
is
there
during
the
during
pucker
seam
imitation
difficult
help.
combined
be
engage
disengage:
not
no
assembly
material
provides
It
and
built
in
only
such
shifting
processing
results.
suede,
materials),
consistent
with
raise
downward
lift
sewing
ward,
allow
fed
as
is
dual
of
fed
for
sewing
pull
it
household
only
the
offer
machine

____
foot.
tailor’s
special
Making
Fringe
ZZ4LTZtiZLi
)
10
Fringe
onto
mark
material
foot
thread:
is
along
all
apart
carefully,
*
Stitch-width:
Needle:
Sewing
Basting
lines
First
top
Sew
When
plies
through
Basting
prog
00
____i
dog:
Feed
thread:
Sewing
trying
For
the
parts
workpiece
the
stitch.
After
length
stitch
basting
of
materials,
direction.
avoided.
the
is
material
useful
a
cuttings.
contours
all
ply.
the
have
lines
find
to
on
a
previously
that,
to
completed.
insert
Shifting
;-.-
2
mm
80
Machine
marked
the
to
lowered
normal
garment.
under
the
plies
dress
tacks
accessory
method
been
joining
avoid
:
--
—
with
the
pull
rear.
during
pins
the
of
embroidery
of
tailoring
with
lines
basted,
threads
damage
sewing
we
basting
sewing
the
material
Repeat
order
In
securing
crosswise
material
-3+
transferring
chalk
the
with
pull
the
and
to
cci
—3+
thread
recommend
stitches.
foot,
by
this
procedure
avoid
to
to
pliesisthus
thread
fringe
two
cut
the
the
patternr
of
the
*
s
on
fah
matei
0
securii
Sew
requir
shiftir
bastin’
largel
ft
th
Pla
oi
un
76
Basting
ZprJ
00
length:
Stitch
this
For
the
thread
application
stitch
after
at6mm
mm
6
at
length
sewing.
3
the
Remove
length
feed
the
0
dog.
bastinç
Se
stitch
lower
not
do
mm.
6

_______________________
__
r
cD
-—
prog
the
can
to
when
needle
the
stitch
right
width
always
(Ags.
with
throw.
the
be
width
needle
position
needle
carried
be
stitch
inserting
position.
highest
also
is
needle
for
shown
is
be
(Fig.
mirroring
the
the
If
needle
pressed
by
in
the
the
key
(needle
out
narrow
at
a
position,
position.
shown
number
width
position
different
13
by
number
in
position
the
in
2a)
+
3)
2
zigzag-stitch
needle
zigzag
the
throw,
addition.
in
symbol
display
stitch
at
107
is
at
set
position),
easier.
margin
zippers,
needle
the
the
by
can
positions.
symbol-)
the
display
the
highest
program
positioned
stitch
“pattern
the
appearing
3).
(Fig,
width,
plus
desired
the
For
you
sym
the
in
posi
is
repea
(+)
be
at
to
Pat
or
needle
straight
adjustment
sewing
if
on
as
the
changing
always
needle
needle
the
to
With
from
needle
right
right
1).
zigzag
needle
needle
needle
above
the
can
or
right
at
mirroring
of
press
(—)
width.
of
you
collars
required
position
01
left
key
left
the
of
of
position
position
be
left
left
the
key
the
stitch
until
work
wish
the
be
position
of
107+the
to
position
stitch
needle
stitch
must
11
as
as
11
as
as
pattern
settings
sewn
its
of
of
must
indicated
is
number
decrease
or
the
stitch
of
or
needle
in
the
required
required
required
required
Change
with
Through
certain
example,
such
select
•
For
must
Left
Program:
left
The
bol
Idisplay.
changed
The
the
to
(Fig.
1
Change
with
•
The
tion.
Right
e.g.
Program:
itch-width:
St
Stitch-length:
Left
Program:
Stitch-width:
Stitch-length:
Key:
With
stored
the
a
2
[
begin
mirroring”
tern
ahead
inccrease
To
tedly
minus
stitch
2
:
:
---
--
-
-
.-
-
,
F]
‘--
ir
‘ir
L_JLJL...J
L_iL
J__iL
[-,
3
77
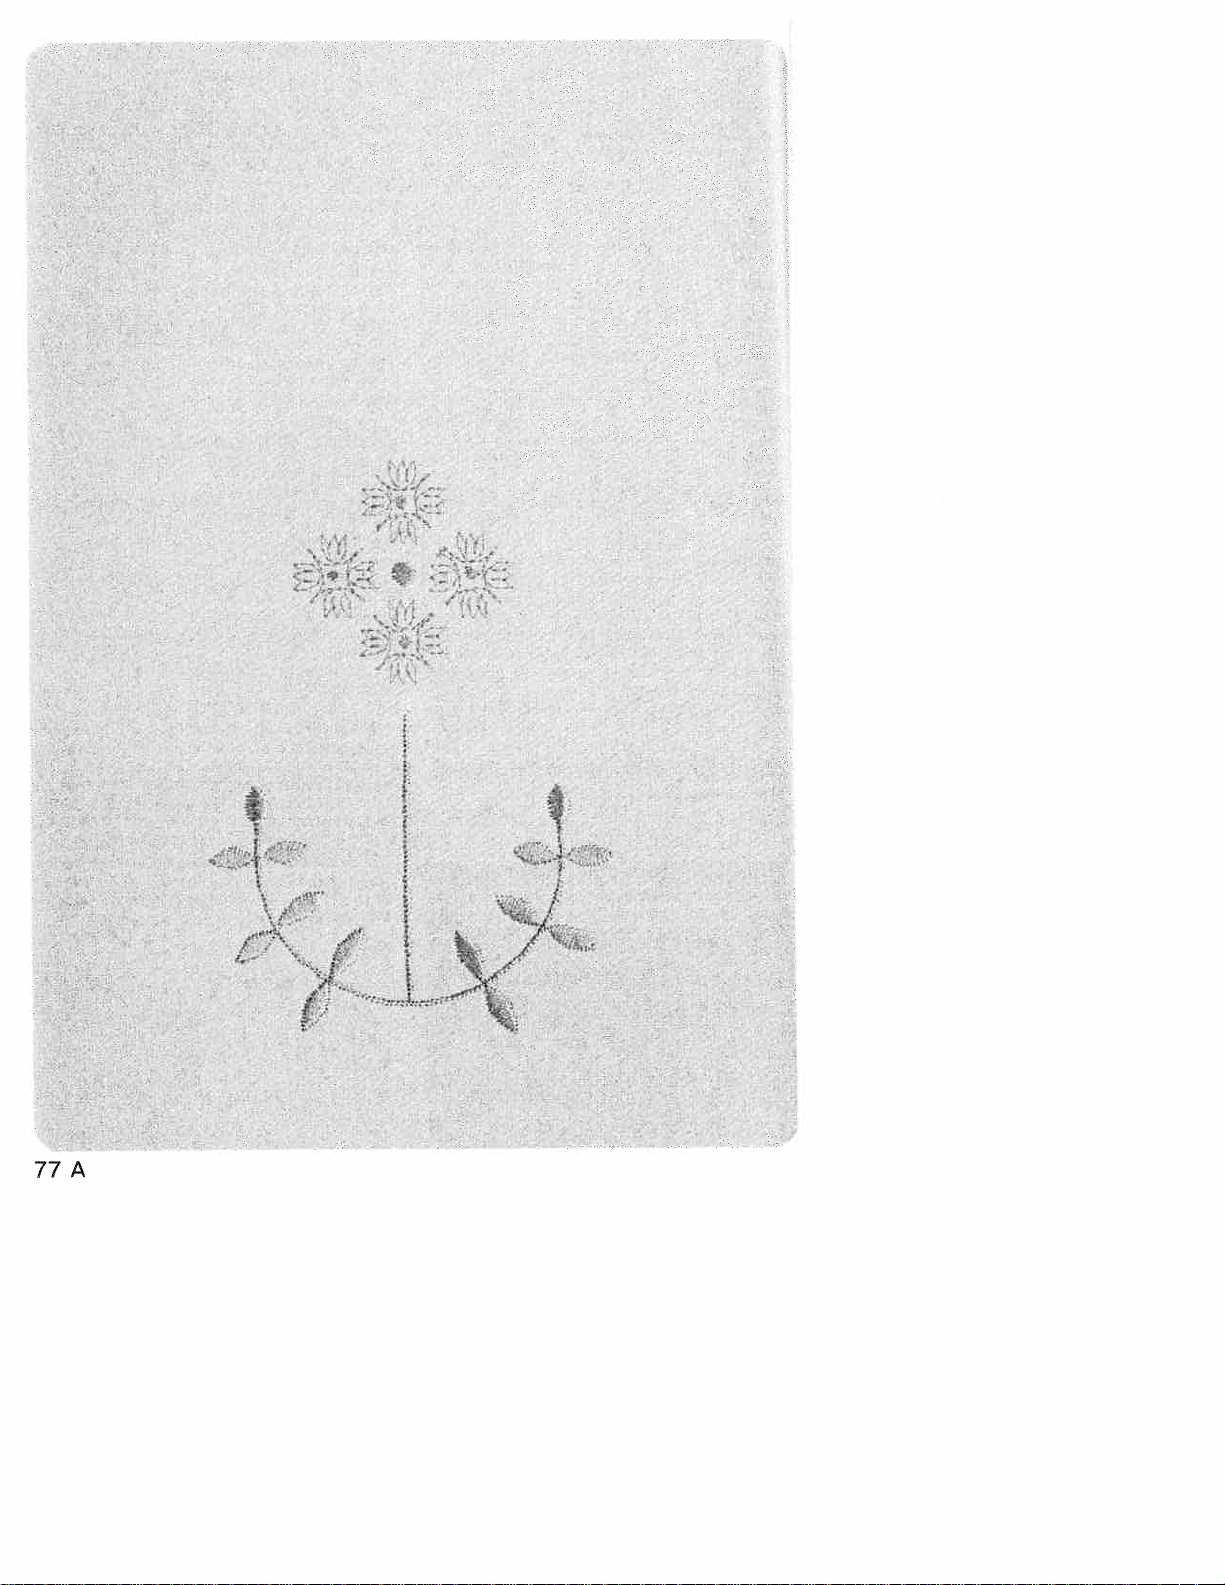
VLL


.NtI.b,.
“!¼
:;f
1%
I
I
;;
i’’
—.
I
2’
‘S
‘
•‘
4’
,
¶1
t
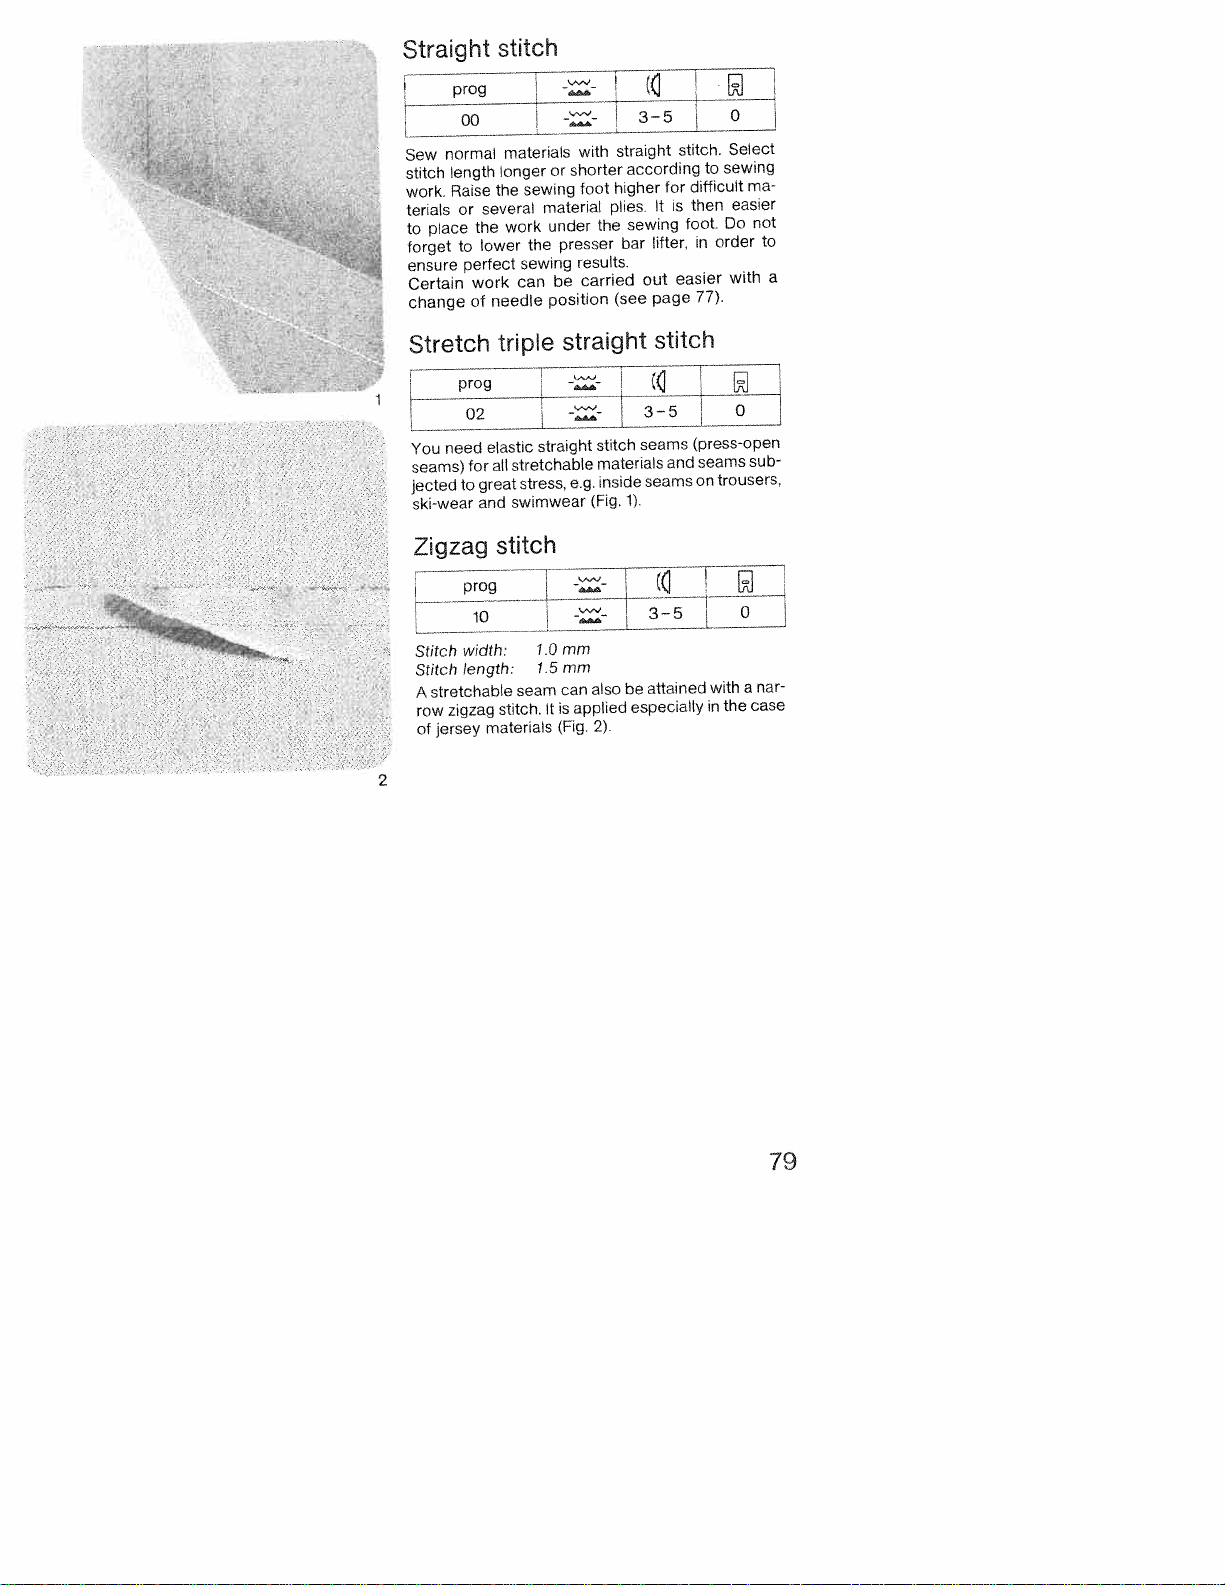
_________
•
Straight
prog
fin
normal
Sew
length
stitch
Raise
work.
or
terials
to
place
to
forget
perfect
ensure
Certain
change
Stretch
prog
need
You
seams)
to
jected
ski-wear
Zigzag
prog
width:
Stitch
Stitchlength:
stretchable
A
zigzag
row
jersey
of
several
the
lower
work
of
02
elastic
for
great
and
materials
stitch
materials
longer
the
work
sewing
can
needle
trip’e
stretchable
all
stress,
swimwear
stitch
seam
stitch.
or
sewing
material
under
the
be
position
straight
1.0mm
1.5mm
It
--
--
with
shorter
foot
plies.
the
presser
results.
carried
straight
--
stitch
materials
inside
e.g.
(Fig.
1E1
also
can
applied
is
(Fig.
2).
straight
according
higher
sewing
bar
out
(see
3—5
seams
seams
1).
be
especially
—
stitch.
for
is
It
lifter,
easier
page
stitch
and
attained
Select
sewing
to
difficult
easier
then
Do
foot.
order
n
with
77).
0
(press-open
seams
trousers,
on
with
in
the
a
ma
not
to
a
sub
nar
case
2
79

Top-stitch
Buttonhole
[prog
00
Needle:
thread: buttonhole
Needle
Bobbin
thread:
length:
Stitch
this,
obtain
seams
selection
particularly
using
Top-stitch
For
To
mend
seams
thread
100/120
sewing
longest
produce
of a
buttonhole
as
needle
thread
stitch
suitable
prominent
thread.
thread
5—6
thread
nice
ornamental
threadisimportan
seams,
we
0
effect:
recorr
Buttonhole
bobbin
2
Buttonhole
and
thread
job
high.
machine
•
•
•
3
thread
prog
rv
thread
used
as
should
the
needle
For
topstitching,
wrong
For
topstitching,
For
difficult
using
the
Before
needleatits
straight-stitch
you
thread
t-
--
-‘‘-
a-
can
bobbin
alsobewound
thread.Inthis
be usedinthe
thread
tension
the
side
up.
a
No.
top-stitch
fit
the
straight-stitch
central
position.
as
needle.
mustbeset
fabric
Select
needle
80
seams
foot
6—7
is
the
we
(special
—-
on
the
case,
this
For
placed
longest
maybe
recommend
accessory).
foot,
-
bobbir
sewinc.
sewinç
relatively
in
thc
stitch
used.
set
the
80
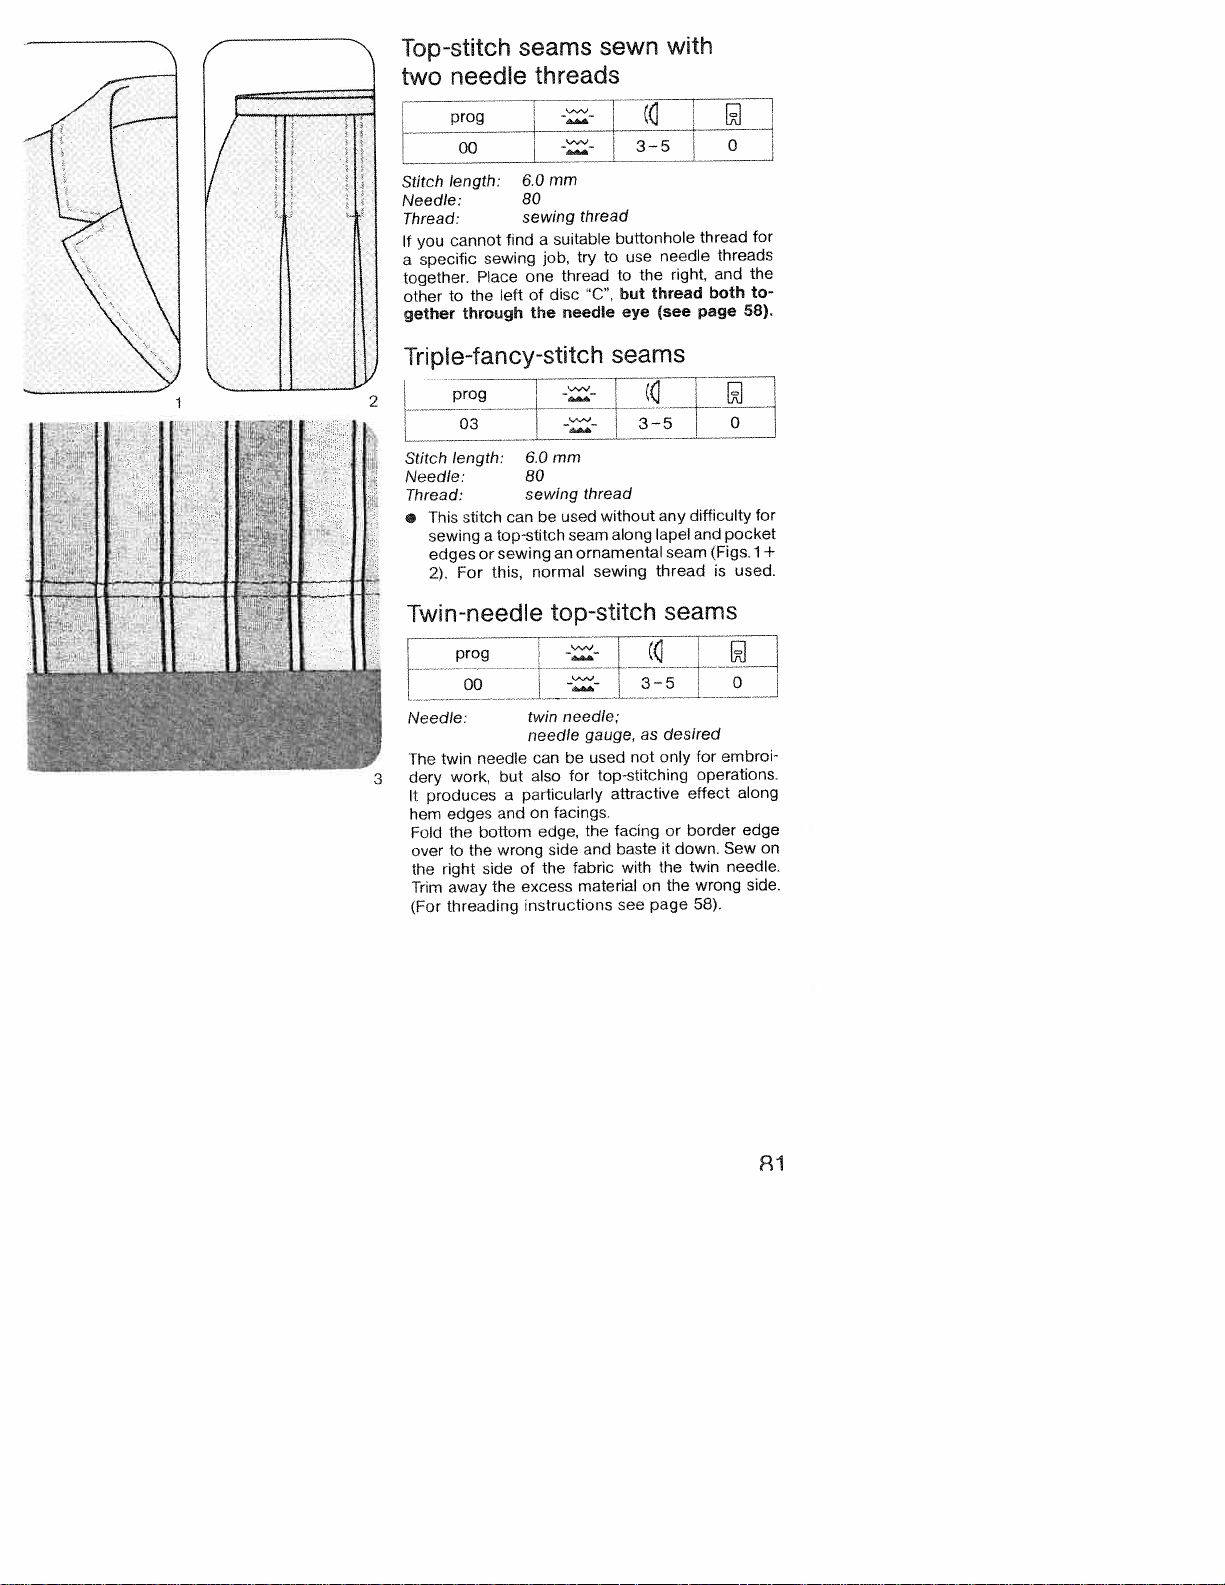
L
ç
V
zi
with
-
I
rzzzzJ
.
Top-stitch
two
I
I
needle
seams
threads
sewn
Ltt:
mm
Place
the
through
left
6.0
80
one
of
the
disc
thread
“C”,
need’e
to
but
eye
the
right,
thread
(see
both
page
and
the
to
58).
length:
\
I!
\
Stitch
Needle:
mrea::sewingthre:d
together.
to
other
gether
\
j_J
1
II
11
seams
mm
thread
without
used
along
seam
ornamental
an
sewing
top-stitch
needle
gauge,
used
be
top-stitching
for
attractive
facings.
facing
the
and
baste
fabric
with
material
see
±
as
not
on
any
lapel
seam
thread
seams
desired
only
or
it
down.
the
the
page
9Z
difficulty
and
pocket
(Figs.
is
embroi
for
operations.
effect
border
Sew
needle.
twin
wrong
58).
for
1+
used.
along
edge
on
side.
can
a
top-stitch
or
sewing
this,
needle
but
a
and
bottom
wrong
side
the
-stftch
6.0
80
sewing
be
normal
twin
needle
can
also
particularly
on
edge,
side
the
of
excess
instructions
Thp)e-fancy
‘2
II
—
-
L
Stitch
Needle:
Thread:
This
•
sewing
edges
2).
Twin-needle
“dt.cdle
The
twin
dery
3
produces
It
edges
hem
Fold
overtothe
the
right
Trim
threading
(For
length:
stitch
For
work,
the
away
Ri
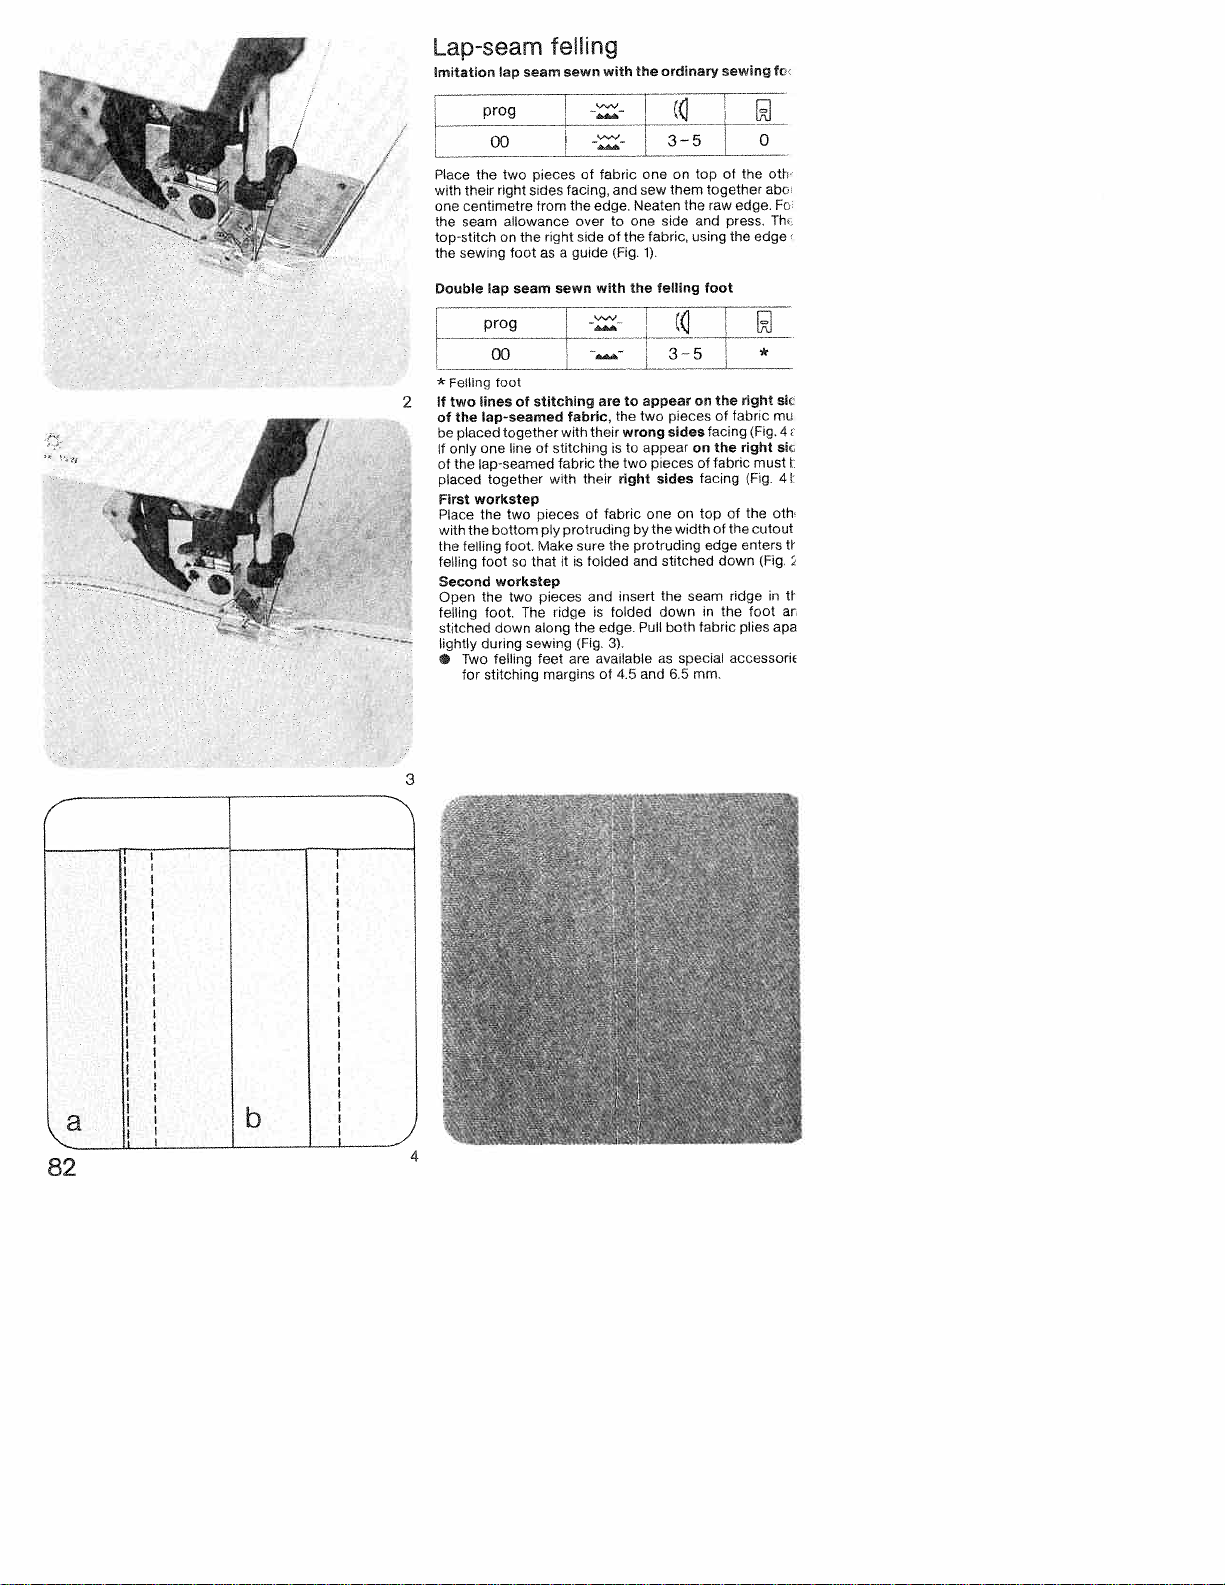
Lap-seam
Imitation
lap
seam
felling
sewn
with
the
ordinary
sewing
fc
prog
I
O35O
of
the
raw
the
of
the
fabric
of
down
the
press,
of
abc
edge.
the
edge
*
right
fabric
(Fig.
right
must
IFig.
the
the
cutout
enters
(Fig.
ridge
foot
plies
accessors
ot,
Fo
Th
sic
mc.
4
sic.
4
0th
t[
t
in
ar
apa
pieces
sides
from
right
as
stitching
of
pieces
ply
Make
that
pieces
The
along
sewing
feet
margins
facing,
the
over
sideofthe
a
guide
sewn
T
fabric,
with
stitching
fabric
with
protruding
sure the
itisfolded
ridge
the
(Fig
are
of
‘
Place
with
their
centimetre
one
seam
the
top-stitch
sewing
the
Double
right
allowance
on
foot
seam
lap
the
two
the
g
*
toot
Felling
lines
placed
one
lap-seamed
workstep
the
the
felling
foot
Two
for
of
lap-seamed
together
iIflC
together
two
bottom
foot.
so
worketep
the
two
foot.
down
during
felling
stifchng
If
two
2
the
of
be
If
only
the
of
placed
First
Place
with
the
felling
Second
Open
felling
stitched
•
fabric
and
edge, Neaten
to
one
(Fig.
with
the
—_-
aretoappear
the
their
wrong
is
to
the
two
right
their
fabric
of
by
protruding
and
insert
and
folded
is
edge.
3)
available
of
4.5
oneontop
them
sew
the
side
fabric,
1)
felling
ZZ
3—5
pieces
two
sides
appear
pieces
sides
on
one
width
the
stitched
the
seam
down
both
Pull
special
as
and
65
and
using
foot
on
on
of
facing
top
edge
in
fabric
mm.
together
facing
82
3
4
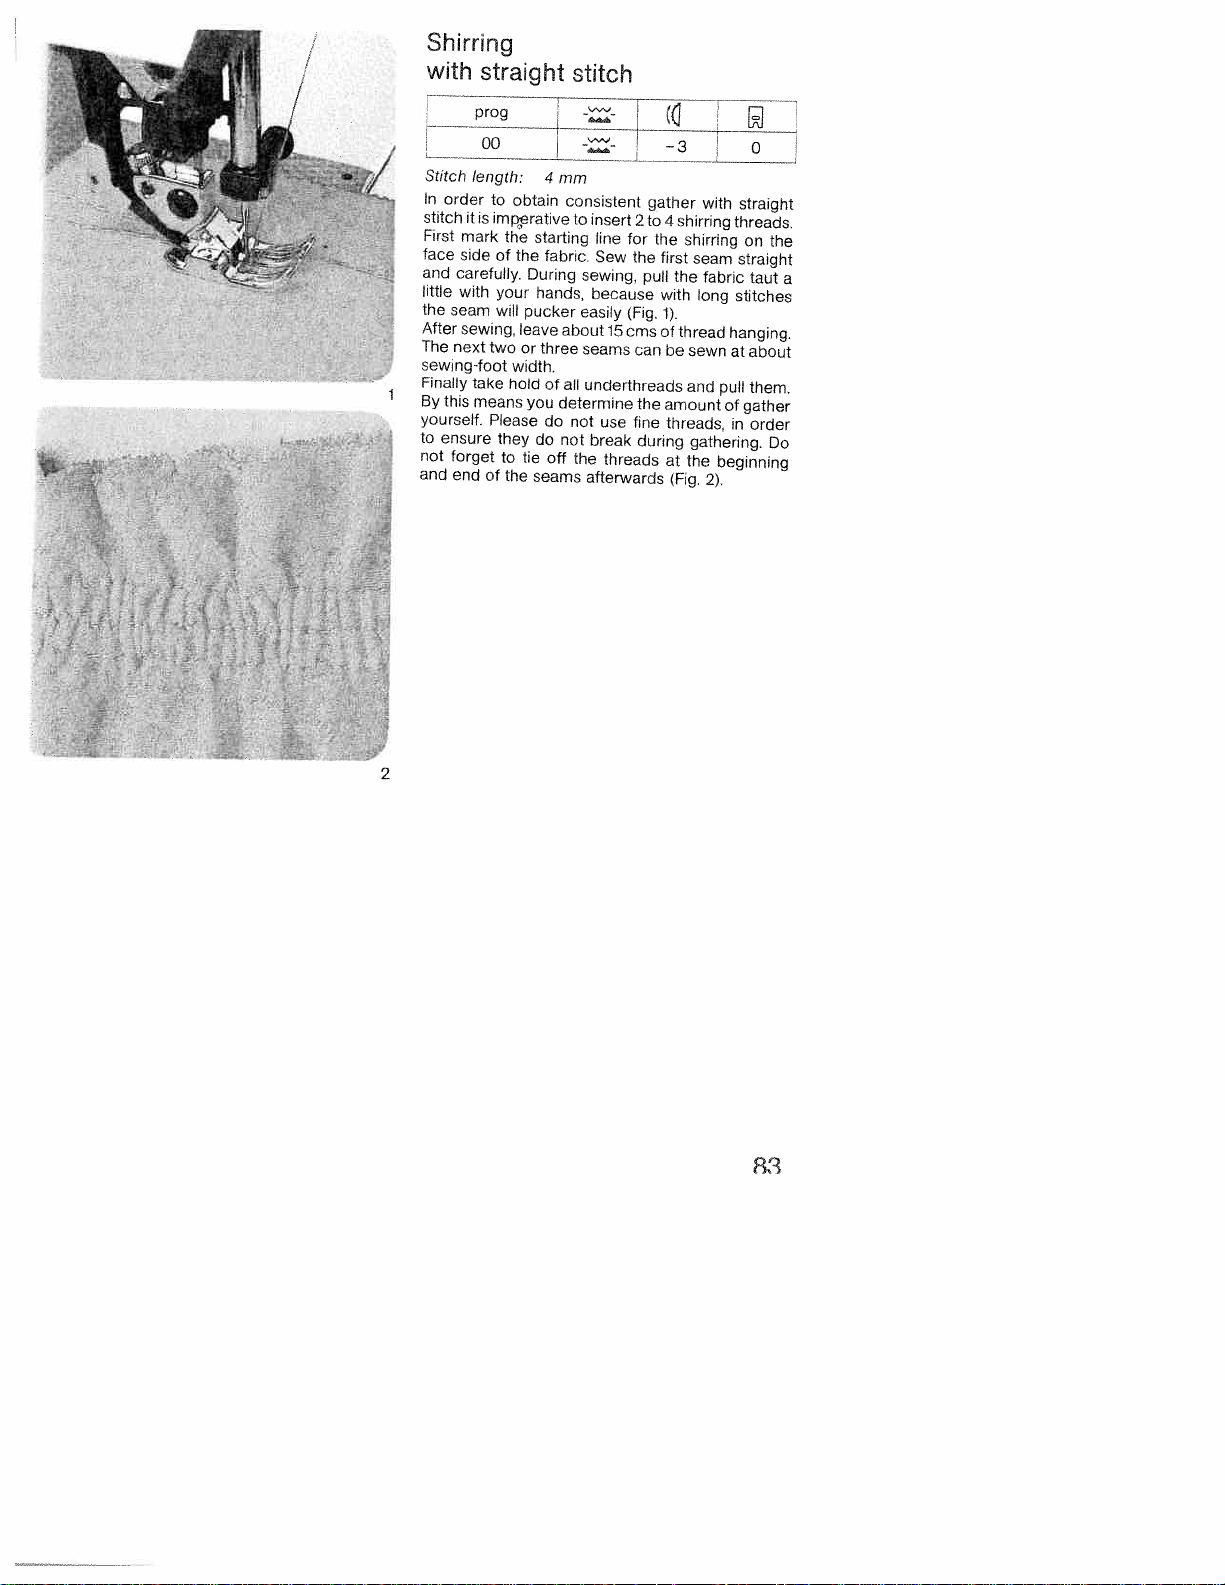
Shirring
with
straight
stitch
for
(Fig.
15
cms
-3
gather
2
to4shirring
the
the
first
pull
the
with
1).
of
thread
can
be
the
amount
fine
threads,
during
at
(Fig.
with
shirring
seam
fabric
long
sewn
and
pull
of
gathering.
the
beginning
2).
0
straight
threads.
on
straight
taut
stitches
hanging.
at
about
them.
gather
in
order
the
a
Do
a-
Stitch
length:
In
order
stitch
it
is
First
fr
.
t..
/
mark
face
side
and
carefully.
little
with
the
seam
After
sewing,
The
next
sewing-foot
Finally
take
this
By
means
yourself.
to
ensure
not
forget
and
end
to
obtain
mprative
the
of
the
your
will
two
width.
hold
Please
they
to
of
the
starting
During
hands,
pucker
leave
three
or
you
do
tie
seams
4
mm
consistent
to
fabric.
about
of
all
determine
do
not
not
off
the
insert
line
Sew
sewing,
because
easily
seams
underthreads
use
break
threads
afterwards
2
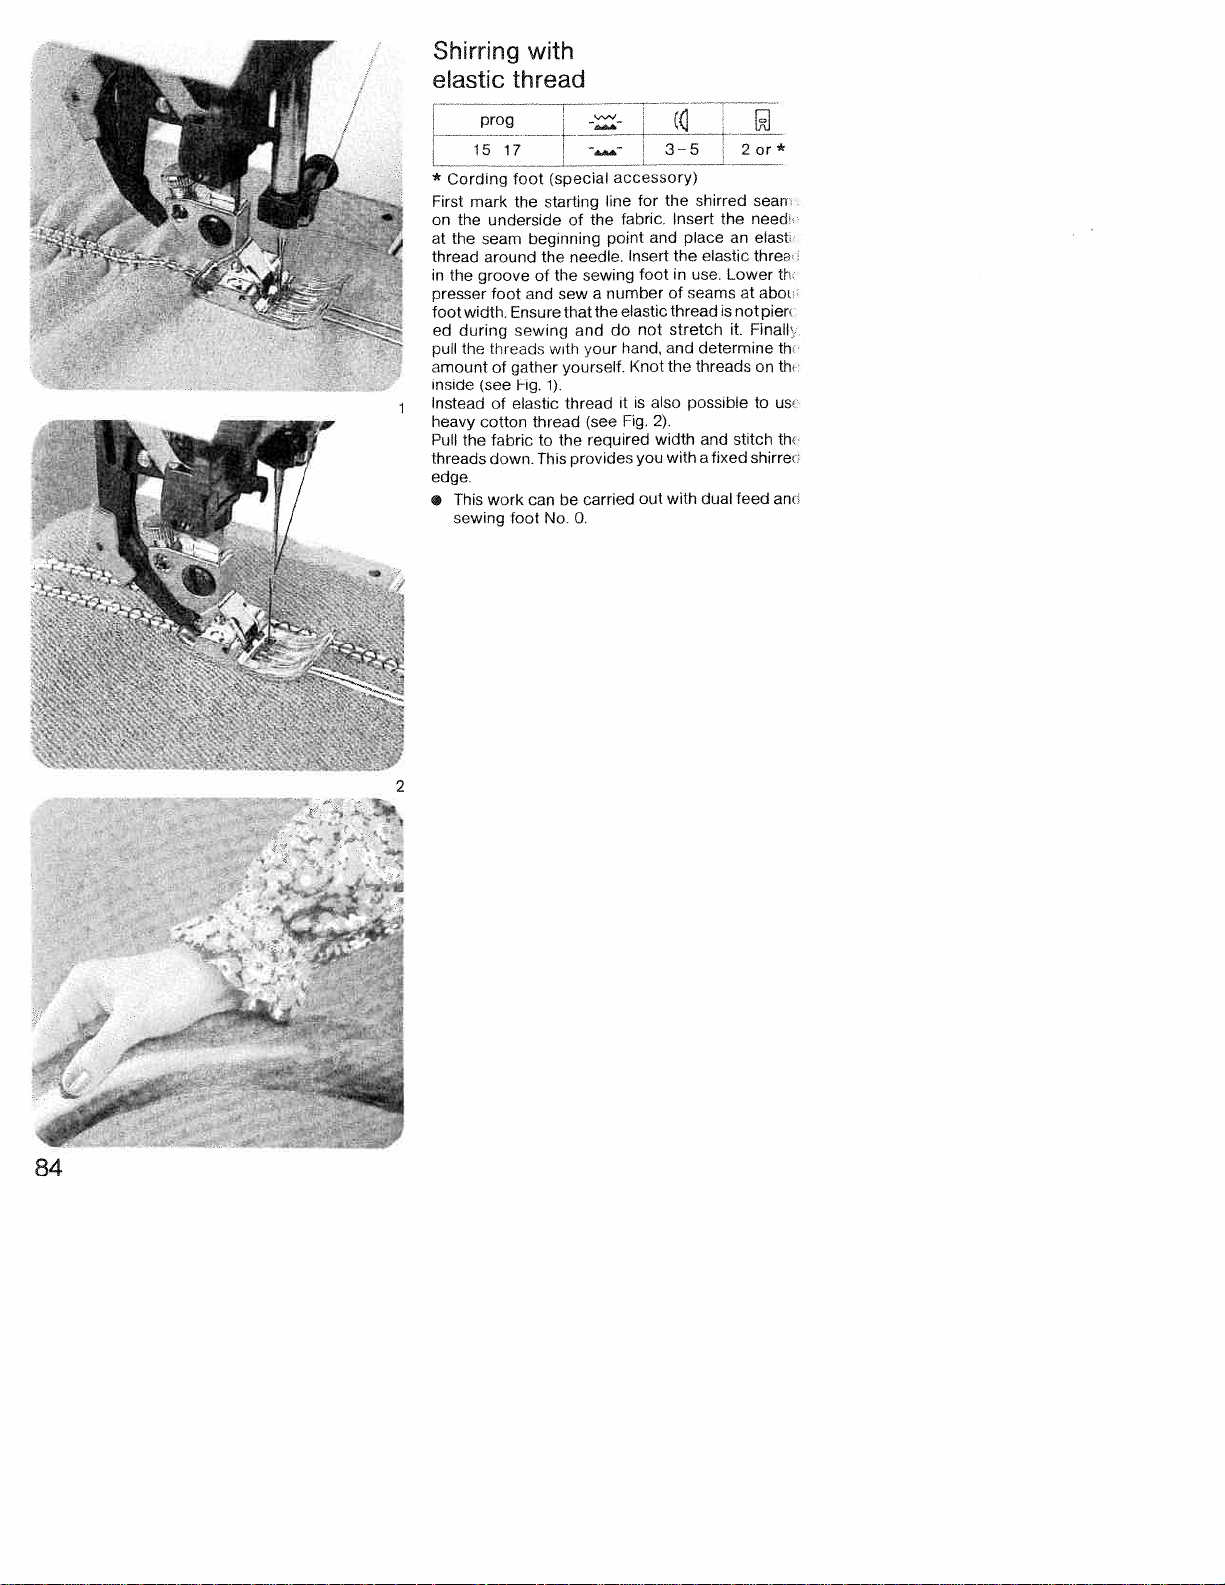
Shirring
e’astic
with
thread
(special
starting
the
the
of
with
1).
thread
to
This
No
-..
the
of
needle.
sewing
a
the
that
and
your
yourself.
thread
(see
required
the
provides
carried
be
0,
.
accessory)
line
for
fabric.
point
Insert
foot
number
elastic
not
do
hand,
Knot
is
it
Fig.
you
out
35
shirred
the
Insert
place
and
the
in
use.
seams
of
threadisnot
stretch
determine
and
threads
the
also
possible
2).
width
with
a
with
2or
sean
the
need
elast
an
elastic three
Lower
at
abot
pier
it.
Finall
on
to
and
stitch
shirre
fixed
dual
feed
t1
th
th
us
th
am
prog
15 17
*
Cording
First
on
at
the
thread
in
the
presser
foot
ed
pull
amount
inside
Instead
heavy
Pull
threads
edge.
e
F
F
foot
the
mark
the
underside
seam
around
groove
foot
width.
Ensure
sewing
during
the
threads
of
gather
Fig.
(see
elastic
of
cotton
the
fabric
down.
This
work
sewing foot
beginning
and sew
can
84
2
I
4w

Gathering
(special
accessory)
prog
with
shirring
1(1
foot
n
*
Shirring
Stitch
How
Insert
and
snaps
How
Both
sewn
step.
under
foot
during
degree
How
Raise
foot
remove
length:
to
the
push
in
to
outer
together
Ensure
the
cutout
sewing;
to
the
Press
foot
insert
shirring
the
(Fig.
2).
gather
fabric
that
foot
(Fig.
of
gathering.
disengage
presser
up
the
sewing
3—4
the
shoe
with
and
by
and
foot
and
the
1).
bar
mm
shirring
with
upwards
the
the
gathered
the
smooth
Lightly
this
means
the
lifter.
hold
foot
toot
its
material
shirring
stretch
toot:
Disengage
the
to
the
rear
so
foot
material
outer
you
presser
rear.
-Z
pin
that
to
the
determine
in
front
be
in
always
fabric
outer
bar
groove
shirred
one
the
lifter
pin
work-
goes
in
fabric
sewing
and
A’
“8”
are
the
the
1
ft
 Loading...